
GB Job Site Radio Instruction manual
F Radio de chantier Manuel d’instructions
D Baustellenradio Betriebsanleitung
I Radio per luoghi di lavoro Istruzioni per l’uso
NL Bouwradio Gebruiksaanwijzing
E Radio de Trabajo Manual de instrucciones
P Rádio a Bateria Manual de instruções
DK Byggepladsradio Brugsanvisning
GR ȇĮįȚȩijȦȞȠ İȡȖȠIJĮȟȓȠȣ ȅįȘȖȓİȢ ȤȡȒıȘȢ
PL Akum. Odbiornik Radiowy Instrukcja obsáugi
DMR106

2
1
14
2345
6
11
12
13
15
9
10
16
17
18
18
18
18
7
8
1
(21) (22)
(19)
(20)
(23) (24)
F
D
C
B
A
H
I
G
E
2
3
4
5
6

3
23
45
67
14
16
25
26
25
26
25
25

4
89
10
27
28
13
1
9
10

5
ENGLISH (Original instructions)
Symbols
The following show the symbols used for the equipment.
Be sure that you understand their meaning before use.
IMPORTANT SAFETY
INSTRUCTIONS
WARNING:
When using electric tools, basic safety precautions should
always be followed to reduce the risk of fire, electric
shock, and personal injury, including the following:
1. Read this instruction manual and the charger
instruction manual carefully before use.
2. Clean only with dry cloth.
3. Do not install near any heat sources such as radiators,
heat registers, stoves, or other apparatus (including
amplifiers) that produce heat.
4. Only use attachments/accessories specified by the
manufacturer.
5. Unplug this apparatus during lighting storms or when
unused for long periods of time.
6. A battery operated radio with integral batteries or a
separate battery pack must be recharged only with the
specified charger for the battery. A charger that may
be suitable for one type of battery may create a risk of
fire when used with another battery.
7. Use battery operated radio only with specifically
designated battery packs. Use of any other batteries
may create a risk of fire.
8. When battery pack is not in use, keep it away from
other metal objects like: paper clips, coins, keys, nails,
screws, or other small metal objects that can make a
connection from one terminal to another. Shorting the
battery terminals together may cause sparks, burns,
or a fire.
9. Avoid body contact with grounded surfaces such as
pipes, radiators, ranges and refrigerators. There is an
increased risk of electric shock if your body is
grounded.
10. Under abusive conditions, liquid may be ejected from
the battery; avoid contact. If contact accidentally
occurs, flush with water. If liquid contacts eyes,
additionally seek medical help. Liquid ejected from the
battery may cause irritation or burns.
SAVE THESE INSTRUCTIONS.
SPECIFIC SAFETY RULES
FOR BATTERY CARTRIDGE
1. Before using battery cartridge, read all
instructions and cautionary markings on (1)
battery charger, (2) battery, and (3) product using
battery.
2. Do not disassemble battery cartridge.
3. If operating time has become excessively shorter,
stop operating immediately. It may result in a risk
of overheating, possible burns and even an
explosion.
4. If electrolyte gets into your eyes, rinse them out
with clear water and seek medical attention right
away. It may result in loss of your eyesight.
5. Do not short the battery cartridge:
(1) Do not touch the terminals with any
conductive material.
(2) Avoid storing battery cartridge in a container
with other metal objects such as nails, coins,
etc.
(3) Do not expose battery cartridge to water or
rain.
A battery short can cause a large current flow,
overheating, possible burns and even a
breakdown.
6. Do not store the tool and battery cartridge in
locations where the temperature may reach or
exceed 50°C (122°F).
7. Do not incinerate the battery cartridge even if it is
severely damaged or is completely worn out. The
battery cartridge can explode in a fire.
8. Be careful not to drop or strike battery.
9. Do not use a damaged battery.
10. The contained lithium-ion-batteries are subject to
the Dangerous Goods Legislation requirements.
For commercial transports e.g. by third parties,
forwarding agents, special requirement on packaging
and labeling must be observed.
For preparation of the item being shipped, consulting
an expert for hazardous material is required. Please
also observe possibly more detailed national
regulations.
Tape or mask off open contacts and pack up the
battery in such a manner that it cannot move around in
the packaging.
11. Follow your local regulations relating to disposal
of battery.
12. To avoid risk, the manual of replaceable the battery
should be read before use.
And the max discharging current of the battery should
be greater than or equal to 8A.
CAUTION:
• Danger of explosion if battery is incorrectly replaced.
• Replace only with the same or equivalent type.
Read instruction manual.
Only for EU countries
Do not dispose of electric equipment or
battery pack together with household waste
material!
In observance of the European Directives, on
Waste Electric and Electronic Equipment and
Batteries and Accumulators and Waste
Batteries and Accumulators and their
implementation in accordance with national
laws, electric equipment and batteries and
battery pack(s) that have reached the end of
their life must be collected separately and
returned to an environmentally compatible
recycling facility.
Cd
Ni-MH
Li-ion

6
SAVE THESE INSTRUCTIONS.
CAUTION: Only use genuine Makita batteries.
Use of non-genuine Makita batteries, or batteries that
have been altered, may result in the battery bursting
causing fires, personal injury and damage. It will also void
the Makita warranty for the Makita tool and charger.
Tips for maintaining maximum battery life
1. Charge the battery cartridge before completely
discharged.
Always stop tool operation and charge the battery
cartridge when you notice less tool power.
2. Never recharge a fully charged battery cartridge.
Overcharging shortens the battery service life.
3. Charge the battery cartridge with room
temperature at 10°C - 40°C (50°F - 104°F). Let a hot
battery cartridge cool down before charging it.
4. Charge the battery cartridge if you do not use it for
a long period (more than six months).
Explanation of general view
(Fig. 1)
1. USB power supply port
2. Power/Sleep timer
3. Source button
4. Radio alarm
5. Buzzer alarm
6. Preset stations/Preset 1 button as Bluetooth
®
pair
button
7. Menu/Info button
8. Volume/Tuning control/Select knob
9. DC IN socket
10. AUX IN 1
11. LCD display
12. Handle
13. Soft bended rod antenna
14. Battery compartment locker
15. Speaker
16. Battery cover
17. Input terminal (AUX IN 2)
18. Battery compartment (covering main battery pack and
back up batteries)
19. Up
20. Left
21. Front
22. Right
23. Back; Battery cover closed
24. Back; Battery cover opened
25. Battery cartridge
26. Button
27. Indicator lamps
28. Check button
LCD display:
A. Radio alarm
B. Buzzer alarm
C. Stereo symbol
D. Low battery indicator
E. Clock
F. Frequency
G. RDS (Radio data system)
H. Sleep status
I. AM/PM for clock
Battery Installation
Note:
Keeping back up batteries inside the compartment
prevent stored data in preset memories from being lost.
1. Pull out the battery compartment locker to release
battery compartment. There are main battery pack
compartment and back up battery compartment.
(Fig. 2)
2. Remove back up battery compartment cover and
insert 2 fresh UM-3 (AA sizes). Make sure the
batteries are with correct polarity as shown inside the
compartment. Replace the battery cover. (Fig. 3)
3. After back up batteries are inserted, insert the main
battery pack to power radio. The suitable battery
packs for this radio listed as the following table.

7
The following table indicates the operating time on a single charge in Radio mode.
: Cluster Battery
: Slide Battery
Note:
Table regarding to the battery operating time above is for reference. The actual operating time may differ with the type of
the battery, charging condition, or usage environment.
Installing or removing Slide battery
cartridge (Fig. 4 & 5)
• To install the battery cartridge, align the tongue on the
battery cartridge with the groove in the housing and slip
it into place. Always insert it all the way until it locks in
place with a little click.
• If you can see the red indicator on the upper side of the
button, it is not locked completely. Install it fully until the
red indicator cannot be seen. If not, it may accidentally
fall out of the tool, causing injury to you or someone
around you.
• Do not use force when inserting the battery cartridge. If
the cartridge does not slide in easily, it is not being
inserted correctly.
• To remove the battery cartridge, withdraw it from the
tool while sliding the button on the front of the cartridge
or pressing the buttons on both sides of the cartridge.
Installing or removing Cluster battery
cartridge (Fig. 6 & 7)
• To insert the battery cartridge, align the tongue on the
battery cartridge with the grove in the housing and slip
it into place.
• To remove the battery cartridge, take the battery out of
the terminal while pressing the buttons on the side of
cartridge.
Return the battery compartment locker to the original
position.
Battery capacity
Battery Cartridge Voltage
AT SPEAKER OUTPUT =
50 mW + 50 mW (unit: Hour)
(Approximately)
7.2 V 10.8 V 14.4 V 18 V In radio or AUX
In Bluetooth
®
with USB
charging
1.0 Ah BL7010 5.5 0.8
1.1 Ah
BL1411G,
L1451
5.5
1.5
BL1811G,
L1851
1.8
1.3 Ah
BL1013
7.5
1.5
BL1415,
BL1413G,
L1453
1.8
BL1815,
BL1813G,
L1853
2.0
1.5 Ah
BL1415N
8.5
2.0
BL1815N 2.5
2.0 Ah
BL1820,
BL1820B
11 3.2
3.0 Ah
BL1430,
BL1430B
16
4.0
BL1830,
BL1830B
5.0
4.0 Ah
BL1440
22
5.5
BL1840,
BL1840B
6.5
5.0 Ah
BL1450
27
6.5
BL1850,
BL1850B
8.0
6.0 Ah
BL1460B
33
7.0
BL1860B 9.5

8
Reduced power, distortion, “stuttering sound” or when
both low battery sign and “POWERFAIL” appear on
the display are all the signs that the main battery pack
needs to replace.
Note:
The battery pack can’t be charged via the supplied AC
power adaptor.
When low battery sign appears and an “EMPTY”
keeps on flashing is the time to replace the back up
batteries.
Indicating the remaining battery capacity
(Only for battery cartridges with “B” at the end of the
model number.) (Fig. 8)
Press the check button on the battery cartridge to indicate
the remaining battery capacity. The indicator lamps light
up for few seconds.
015658
NOTE:
• Depending on the conditions of use and the ambient
temperature, the indication may differ slightly from the
actual capacity.
Using the soft bended rod antenna (Fig. 9)
Straight up the soft bended rod antenna as shown in the
figure.
Using Supplied AC power adaptor
(Fig. 10)
Remove the rubber protector and insert the adaptor plug
into the DC socket on the left side of the radio. Plug the
adaptor into a standard mains socket outlet. Whenever
the adaptor is used, the battery pack is automatically
disconnected. The AC adaptor should be disconnected
from the main supply when not in use.
Note:
When your radio has any interference in AM band by its
adaptor, please move your radio away from its AC adaptor
over 30 cm.
Operating your radio – Scan tuning AM/
FM
1. Press the Power button to switch on your radio.
2. Press the Source button to select AM or FM radio
mode.
3. Press and hold the Tuning control knob to carry out
an auto-tune. Your radio will scan up the AM/FM band
from the currently displayed frequency and will stop
scanning automatically when it finds a station of
sufficient strength.
4. After a few seconds the display will update. The
display will show the frequency of the signal found.
5. To find other station, press and hold the Tuning control
knob as before.
6. When the end of the waveband is reached your radio
will recommence tuning from the opposite end of the
waveband.
7. Rotate the Tuning control knob to adjust the sound
level as required.
Note:
• While adjusting the volume, make sure the FM/AM is
NOT flashing on the screen.
• If AM/FM is flashing on the screen, it allows you to
tune the stations manually (see the section of
“Manual tuning
– AM/ FM” for more detail).
8. To switch off your radio press the Power button .
Manual tuning – AM/FM
1. Press the Power button to switch on your radio.
2. Press the Source button to select AM or FM radio
mode.
3. Press the Tuning control knob and you will see the
FM or AM is flashing on the display.
Note:
• FM/AM will flash approx. 10 seconds. Within this
period, only manual tuning is allowed.
• If volume adjustment is desired while FM/AM is
flashing, press the Tuning control knob to stop the
flash and you can rotate the Tuning control knob to
adjust sound level.
4. Rotate the Tuning control knob to tune to a station.
5. When the end of the waveband is reached your radio
will recommence tuning from the opposite end of the
waveband.
6. Use the Tuning control knob to adjust the sound
level as required.
Indicator lamps
Remaining
capacity
Lighted Off Blinking
75% to 100%
50% to 75%
25% to 50%
0% to 25%
Charge the
battery.
The battery may
have
malfunctioned.

9
Presetting stations in AM/FM mode
There are 5 preset stations each for AM and FM radio.
They are used in the same way for each waveband.
1. Press the Power button to switch on your radio.
2. Press the Source button to select the desired
waveband. Tune to the required radio station as
previously described.
3. Press and hold the required Preset button (1 to 5)
until the display shows “P4” for
example after the frequency. The station will be stored
using the preset number. Repeat this procedure for
the remaining presets as you wish.
4. Preset stations which have already been stored may
be overwritten by following the above procedure if
required.
Display modes – FM
Your radio has a range of display options for FM radio
mode.
1. Repeatedly press the Menu/Info button to view
the RDS information of the station you are listening to.
a. Station name Displays the name if the station being
listened to.
b. Program type Displays the type of station being
listened to such as Pop, Classic,
News, etc.
c. Radio text Displays radio text message such as
new items etc.
d. Year/Day Displays the year and day of the
week according to the date setting of
your radio.
e. Date/Day Displays the date and day of the
week according to the date setting of
your radio.
f. Frequency Displays the frequency of the FM for
the station listened to.
FM stereo (auto)/mono
If the FM radio station being listened to has a weak signal
some hiss may be audible. It is possible to reduce this
hiss by forcing the radio to play the station in mono rather
than stereo.
1. Press the Power button as needed to select the
FM band and tune to the desired FM station as
previously stated.
2. Press and hold Menu/Info button to enter the
menu setting.
3. Rotate the Tuning control knob until the FM Auto/
mono setting shows on the display. If the setting is
Auto press the Tuning control knob to switch to Mono
mode to reduce the hiss. Press the Tuning control
knob to select the option.
Recalling a preset in AM/FM mode
1. Press the Power button to switch on your radio.
2. Press the Source button to select AM or FM radio
mode.
3. Momentarily press the required Preset button
to cause your radio to tune to one of
the stations stored in the preset memory.
Clock and Alarms
Setting the time and date format
The clock display used in stand-by mode and on the
playing mode screens can be set to different format. The
selected format is then also used when setting the alarms.
1. Press and hold the Menu/Info button to enter the
menu setting.
2. Rotate the Tuning control knob until “CLOCK xxH”
appears on the display and press the Tuning control
knob to enter the setting. You will see the time
format begins to flash.
3. Rotate the Tuning control knob to select either 12
or 24 hour format. Press the Tuning control knob to
confirm your choice of clock format.
Note: If the 12 hour clock format is chosen, the radio
will then use the 12 hour clock for the setting.
4. Press and hold the Menu/Info button to enter the
menu setting.
5. Rotate the Tuning control knob until a date (e.g.
THU APR 3) appears on the display and press the
Tuning control knob to enter the setting. You will
see the date format begins to flash.
6. Rotate the Tuning control knob to select the
desired date format. Press the Tuning control knob
to confirm your choice.
Setting the clock time and date
1. Press and hold the Menu/Info button .
2. Rotate the Tuning control knob until “CLOCK ADJ”
appears on the display. Press the Tuning control knob
to enter the setting.
3. The hour setting on the display will begin flashing.
Rotate the Tuning control knob to select the
desired hour, and press the Tuning control knob to
confirm the setting. Then rotate the Tuning control
knob to select the desired minute, and press the
Tuning control knob to confirm the setting.
4. Rotate the Tuning control knob until “DATE ADJ”
appears on the display. Press the Tuning control knob
to enter the setting.
5. Rotate the Tuning control knob to select the
desired year and press the Tuning control knob to
confirm the setting. Then rotate the Tuning control
knob to select the desired month, and press the
Tuning control knob to confirm the setting. Then
rotate the Tuning control knob to select the desired

10
date and press the Tuning control knob to confirm
the setting.
Radio Data System (RDS)
When you set the clock time using the RDS function, your
radio will synchronize its clock time whenever it tunes to a
radio station using RDS with CT signals.
1. When tuning to a station transmitting RDS data, press
and hold the Menu/Info button .
2. Rotate the Tuning control knob until “RDS CT” and
a clock symbol appear on the display. Press the
Tuning control knob to enter the setting.
3. Rotate the Tuning control knob until “RDS CT”
appears on the display. Press the Tuning control knob
to confirm the setting. The clock time of the radio
will set up automatically according to the RDS data
received.
4. When the action is completed, the RDS icon will
appear on the LCD display indicating the radio time is
RDS clock time. The radio clock time will be valid for
5 days each time the radio time is synchronized with
RDS CT.
Setting the alarm clock
Your radio has two alarms which can each be set to wake
you to AM/FM radio or buzzer alarm. The alarms may be
set while the unit is in standby mode or while playing.
a. Setting radio alarm time:
1. The radio can be set either when radio is on or off.
2. Press and hold the radio alarm button , the
radio alarm symbol and the display hour will flash
along with a beep.
3. During radio alarm symbol flashes, rotate
Tuning control knob to select the hour and press
Tuning control knob again to confirm hour setting.
Then rotate the Tuning control knob to select the
minute and press Tuning control knob to confirm
minute setting.
4. Rotate the Tuning control knob and the display will
show the frequency options for the alarm.
The alarm options are as follows:
ONCE – the alarm will sound once
DAILY – the alarm will sound everyday
WEEKDAY – the alarm will sound only on weekdays
WEEKEND – the alarm will sound only at weekends
Press the Tuning control knob to confirm the
setting.
5. During radio alarm symbol is flashing, rotate Tuning
control knob to select desired wake-up band and
station, then press Tuning control knob to confirm the
selection.
6. Rotate Tuning control knob to select the desired
volume and press Tuning control knob to confirm the
volume. Radio alarm setting is now completed.
Note:
If new radio alarm station is not selected, it will select the
last alarm station.
Note:
If the selected AM/FM alarm station is not available when
the alarm is sounding, the buzzer alarm will be used
instead.
b. Setting HWS (Humane Wake System) buzzer alarm:
A beep tone will activate when selecting the HWS buzzer
alarm.
The alarm beep will sound shorter every 15 seconds for
one minute followed by one minute silence before
repeating the cycle.
1. The buzzer alarm can be set either when the radio is
on or off.
2. Press and hold the buzzer alarm button , the
symbol and the display hour will flash along with a
beep.
3. During buzzer alarm symbol flashes, rotate
Tuning control knob to select the hour and press
Tuning control knob again to confirm hour setting.
Then rotate the Tuning control knob to select the
minute and press Tuning control knob to confirm
minute setting.
4. Rotate the Tuning control knob and the display will
show the frequency options for the alarm.
The alarm options are as follows:
ONCE – the alarm will sound once
DAILY – the alarm will sound everyday
WEEKDAY – the alarm will sound only on weekdays
WEEKEND – the alarm will sound only at weekends
Press the Tuning control knob to confirm the
setting.
Note:
There is no volume adjustment for buzzer alarm.
When the alarm sounds
To cancel a sounding alarm, press the Power button
.
Disabling/cancelling alarms
To disable an active alarm, either press the Power button
, or press and hold the corresponding alarm button
to cancel the alarm.
Snooze
1. When the alarm sounds, press any button other than
the Power button will silence the alarm for
5 minutes. “SNOOZE” will appear on the display.

11
2. To adjust the silence time for the snooze timer, press
and hold the Menu/Info button to enter the menu
setting.
3. Rotate the Tuning control knob until “SNOOZE X”
appears on the display, then press the Tuning control
knob to enter the setting. Rotate the Tuning control
knob to adjust the silence time from 5, 10, 15 and
20 minutes for the snooze timer.
4. To cancel the snooze timer while the alarm is
suspended, press the Power button .
Sleep timer
Your radio can be set to turn off automatically after a
preset time has elapsed. The Sleep Timer setting can be
adjusted between 60, 45, 30, 15, 120 and 90 minutes.
1. Press and hold the Power button to enter the
Sleep Timer setting. “SLEEP XX” will show on the
display.
2. Keep holding the Power button and the Sleep
Timer options will start switching on the display. Stop
until the desired Sleep Timer setting appears on the
display. The setting will be saved and the LCD will
return to normal display.
3. Your radio will switch off automatically after the preset
Sleep Timer has elapsed. The Sleep Timer icon
will show on the display indicating an active Sleep
Timer.
4. To cancel the Sleep Timer function before the preset
time has elapsed, simply press the Power button
to turn the unit off manually.
Loudness
You can get compensation on lower and higher frequency
for your radio by adjusting the loudness function.
1. Press and hold the Menu/Info button to enter the
menu setting.
2. Rotate the Tuning control knob until “LOUD ON” or
“LOUD OFF” appears on the display. Press the Tuning
control knob to enter the setting.
3. Rotate the Tuning control knob to choose ON to
turn on the loudness function, then press the Tuning
control knob to confirm the setting.
4. To turn off the loudness function, select OFF and
press the Tuning control knob to confirm the
setting.
Auxiliary input socket
Two 3.5 mm stereo Auxiliary Input sockets are provided.
One is at the front of your radio (AUX IN 1); the other is
located in the battery compartment (AUX IN 2).
1. Connect an external audio source (for example, iPod,
MP3 or CD player) to the Auxiliary Input socket.
2. Repeatedly press and release the Source button
until AUX IN 1or 2 is displayed.
3. Adjust the volume setting on your iPod, MP3 or CD
player to ensure an adequate signal level from the
player, and then use the Tuning control knob on the
radio as needed for comfortable listening.
Listening to Bluetooth
®
music
You need to pair your Bluetooth
®
device with your radio
before you can auto-link to play/stream Bluetooth
®
music
through your radio. Paring creates a permanent “bond” so
two devices can always recognize each other.
Pairing your Bluetooth
®
device
1. Press the Source button to select Bluetooth
®
function. “BT READY” will be shown on the display
and “READY” will flash with every 2 seconds interval.
2. Activate Bluetooth
®
on your device according to the
device’s user manual to allow the paring procedure.
3. Press and release the Pair button , then “BT PAIR”
will be shown on the display and it will flash with
1 second interval. You can start the search of your
radio on your Bluetooth
®
device. Once the name of
your radio is appeared on your Bluetooth
®
device,
press the item in your Bluetooth
®
list.
With some old type mobiles (versions earlier than
BT2.1 Bluetooth
®
device), you may need to input the
pass code “0000”.
4. Your Bluetooth
®
device will be linked with the radio.
5. Once connected, “BLUETOOTH” will remain on the
display and the backlight will be dim-out in
10 seconds.
You can now play the music in your Bluetooth
®
-enabled
device via your radio.
Playing Bluetooth
®
device which has
already paired
1. Press the Source button to select Bluetooth
®
function. “BT READY” will be shown on the display
and “READY” will flash with every 2 seconds interval.
2. Search and link the radio on your Bluetooth
®
device.
Some device may link with the radio automatically.
You can now play the music in your Bluetooth
®
-enabled
device via your radio.
Note:
a) The radio can pair with 8 Bluetooth
®
devices at most.
When you pair Bluetooth
®
devices more than this
number, pairing history will be overwritten from the
oldest pairing history.
b) If there are 2 Bluetooth
®
devices searching for your
radio, it will show its availability on both devices.
c) If your Bluetooth
®
device is temporarily disconnected to
your radio, then you need to manually reconnect your
device again to the radio.
d) If the name of your radio is appeared on your
Bluetooth
®
device list but your device cannot connect

12
with it, please delete the item name of your radio from
your list and pair the device with your radio again
following the steps described previously.
e) The effective operation range between the radio and
the paired device is approximately 10 meters (30 feet).
f) Any obstacle between the radio and the device can
reduce the operational range.
Disconnecting your Bluetooth
®
device
Press and hold the Pair button for 2-3 seconds to
disconnect with your Bluetooth
®
device. “BLUETOOTH”
will disappear from the display indicating deactivation of
Bluetooth
®
.
Charging with USB power supply port
(Fig. 10)
There is the USB port at the front side of the radio. You
can charge USB device trough the USB port.
1. Connect the USB device, such as iPod, MP3, or CD
player, with USB cable available in the market.
2. Press the Power button to switch on your radio.
3. No matter if the radio is AC powered or battery
powered, the radio can charge the USB device when
the radio is switched on and in FM radio mode, or BT
mode, or AUX mode, which is appeared when an
external audio source is connected.
Note:
You cannot charge USB devices during AM mode
because radio signal reception becomes extremely poor
when charging USB device.
• The maximum volume of the output power speaker will
decrease when your USB is charging.
• The USB socket can provide max 1A5V of electrical
current.
Important:
• Before connecting USB device to the charger, always
backup your data of USB device. Otherwise your data
may lose by any possibility.
• The charger may not supply power to some USB
devices.
• When not using or after charging, remove the USB
cable and close the cover.
• Do not connect power source to USB port. Otherwise
there is risk of fire. The USB port is only intended for
charging lower voltage device. Always place the cover
onto the USB port when not charging the lower voltage
device.
• Do not insert a nail, wire, etc. into USB power supply
port. Otherwise a circuit short may cause smoke and
fire.
• Do not connect this USB socket with your PC USB
port, as it is highly possible that it may cause
breakdown of the units.
MAINTENANCE
CAUTION:
• Never use gasoline, benzine, thinner, alcohol or the
like. Discoloration, deformation or cracks may result.
Specifications:
Power Requirements
AC power adaptor DC12 V/1,200 mA, center pin
positive
Battery UM-3 (AA size) x 2 for back up
Cluster battery: 7.2 V - 10.8 V
Slide battery: 14.4 V - 18 V
Frequency coverage FM 87.50 - 108 MHz
(0.05 MHz/step)
AM (MW) 522 - 1,629 kHz
(9 kHz/step)
Bluetooth
®
Bluetooth
®
QD ID 58625
(The Bluetooth
®
word mark and
logos are registered trademarks
owned by Bluetooth SIG, Inc.)
Bluetooth
®
version 4.0
Bluetooth
®
profiles A2DP/SCMS-T
Transmission power Bluetooth
®
specification power
Class 2
Transmission range Max. 10 m (varies according to
usage conditions)
Supported codec SBC
Compatible Bluetooth
®
profile
A2DP
Circuit feature
Loudspeaker 3.5 inches 8 ohm x 2
Output Power 7.2 V: 0.5 W x 2
10.8 V:1.2 W x 2
14.4 V: 2.2 W x 2,
18 V: 3.5 W x 2
Input terminal 3.5 mm dia. (AUX IN1/AUX IN2)
Antenna system FM: soft bended rod antenna
AM: bar antenna
Dimension (W x H x D) in mm
282 x 294 x 163
Weight 4.3 kg (without battery)

13
FRANÇAIS (Instructions d’origine)
Symboles
Les symboles utilisés pour l’appareil sont indiqués ci-
dessous. Assurez-vous d’avoir bien compris leur
signification avant d’utiliser l’appareil.
CONSIGNES DE SÉCURITÉ
IMPORTANTES
AVERTISSEMENT:
Lors de l’utilisation d’outils électriques, vous devez
toujours prendre des précautions élémentaires en matière
de sécurité pour réduire les risques d’incendie, de choc
électrique et de blessure. Ces précautions sont
notamment les suivantes :
1. Avant d’utiliser l’appareil, lisez attentivement son
manuel d’instructions et celui du chargeur.
2. Nettoyez avec un chiffon doux uniquement.
3. N’installez pas l’appareil près de sources de chaleur,
telles que des radiateurs, des bouches de chaleur,
des poêles ou d’autres dispositifs (notamment des
amplificateurs) émetteurs de chaleur.
4. Utilisez uniquement des pièces complémentaires/
accessoires spécifiés par le fabricant.
5. Débranchez cet appareil en cas d’orage ou lorsque
vous ne l’utilisez pas pendant une période prolongée.
6. Les batteries utilisées pour les radios, qu’elles soient
intégrées ou séparées, doivent être rechargées
uniquement à l’aide du chargeur de batterie spécifié.
Un chargeur qui convient à un type de batterie peut
créer un risque d’incendie s’il est utilisé avec une
autre batterie.
7. Les radios fonctionnant à l’aide de batteries doivent
être utilisées uniquement avec les batteries
désignées. L’utilisation d’autres batteries peut créer
un risque d’incendie.
8. Lorsque vous n’utilisez pas la batterie, gardez-la
éloignée de tout objet métallique, comme les
trombones, pièces de monnaie, clés, clous, vis ou
autres petits objets métalliques susceptibles de faire
office de connexion entre deux bornes. Court-circuiter
les bornes de la batterie peut provoquer des
étincelles, des brûlures ou un incendie.
9. Évitez tout contact corporel avec les surfaces mises à
la terre, telles que les tuyaux, radiateurs, cuisinières et
réfrigérateurs. Le risque de choc électrique augmente
si votre corps est mis à la terre.
10. En cas de mauvaise utilisation, du liquide peut fuir de
la batterie ; évitez tout contact ! En cas de contact
accidentel, nettoyez la surface en question à l’eau. Si
du liquide entre en contact avec vos yeux, consultez
un médecin. Le liquide éjecté de la batterie peut
provoquer une irritation ou des brûlures.
CONSERVEZ CES
INSTRUCTIONS.
CONSIGNES DE SÉCURITÉ
PARTICULIÈRES
POUR LA BATTERIE
1. Avant d’utiliser la batterie, veuillez lire toutes les
instructions et tous les avertissements inscrits
sur (1) le chargeur, (2) la batterie et (3) l’appareil
alimenté par la batterie.
2. Ne démontez pas la batterie.
3. Cessez immédiatement d’utiliser l’outil si le temps
de fonctionnement devient excessivement court. Il
y a risque de surchauffe, de brûlures, voire
d’explosion.
4. Si l’électrolyte pénètre dans vos yeux, rincez-les à
l’eau claire et consultez immédiatement un
médecin. Il y a risque de perte de la vue.
5. Évitez de court-circuiter la batterie :
(1) Ne touchez les bornes avec aucun matériau
conducteur.
(2) Évitez de ranger la batterie dans un
contenant où se trouvent d’autres objets
métalliques tels que des clous, pièces de
monnaie, etc.
(3) N’exposez pas la batterie à l’eau ou à la pluie.
Un court-circuit de la batterie risque de provoquer
un fort courant, une surchauffe, parfois des
brûlures et même une panne.
6. Ne rangez pas l’outil ou la batterie dans des
endroits où la température risque d’atteindre ou
de dépasser 50 °C (122 °F).
7. Ne jetez pas la batterie au feu même si elle est
sérieusement endommagée ou complètement
épuisée. La batterie peut exploser au contact du
feu.
8. Veillez à ne pas laisser tomber ou heurter la
batterie.
9. N’utilisez pas de batterie endommagée.
10. Les batteries au lithium-ion contenues dans
l’appareil sont soumises à la législation sur les
marchandises dangereuses.
Pour les transports commerciaux réalisés par des
transitaires tiers par exemple, les conditions spéciales
figurant sur les emballages et les étiquettes doivent
être respectées.
Lors de la préparation de l’article à expédier, il est
obligatoire de consulter un spécialiste en matières
dangereuses. Respectez également les éventuelles
réglementations nationales plus détaillées.
Collez du ruban adhésif sur les contacts ouverts ou
Lire le manuel d’instructions.
Pour les pays européens uniquement
Ne pas jeter les appareils électriques et les
bloc-batteries dans les ordures ménagères !
Conformément aux directives européennes
relatives aux déchets d’équipements
électriques ou électroniques (DEEE) ainsi
qu’aux batteries, aux accumulateurs et aux
batteries et accumulateurs usagés et à leur
transposition dans la législation nationale, les
appareils électriques, les batteries et les bloc-
batteries doivent être collectés à part et être
soumis à un recyclage respectueux de
l’environnement.
Cd
Ni-MH
Li-ion

14
masquez-les et emballez la batterie de sorte qu’elle
ne bouge pas dans le coffret.
11. Respectez les réglementations locales relatives à
la mise au rebut des batteries.
12. Pour éviter tout risque, veuillez lire la section relative
au remplacement de la batterie dans le manuel avant
utilisation.
De plus, le courant de décharge maximum de la
batterie doit être supérieur ou égal à 8 A.
ATTENTION :
• Le remplacement incorrect de la batterie peut entraîner
un risque d’explosion.
• Remplacez toujours la batterie par une batterie de type
identique ou équivalent.
CONSERVEZ CES
INSTRUCTIONS.
ATTENTION : Utilisez uniquement des batteries
Makita d’origine.
L’utilisation de batteries qui ne sont pas Makita d’origine
ou de batteries qui ont été modifiées peut provoquer des
explosions et entraîner des incendies, des blessures
corporelles et des dégâts. Cela peut également invalider
la garantie Makita pour l’outil et le chargeur Makita.
Conseils pour assurer la durée de vie
optimale de la batterie
1. Rechargez la batterie avant qu’elle ne soit
complètement épuisée.
Arrêtez toujours l’outil et rechargez la batterie
quand vous constatez que la puissance de l’outil
diminue.
2. Ne rechargez jamais une batterie complètement
chargée.
La surcharge réduit la durée de service de la
batterie.
3. Chargez la batterie alors que la température de la
pièce se trouve entre 10 °C et 40 °C (50 °F et
104 °F). Si une batterie est chaude, laissez-la
refroidir avant de la charger.
4. Chargez la batterie si vous ne l’avez pas utilisée
pendant une période prolongée (plus de six mois).
Descriptif (Fig. 1)
1. Port USB
2. Bouton d’alimentation/minuterie de veille
3. Bouton Source
4. Alarme de la radio
5. Alarme du vibreur
6. Stations préréglées/bouton de préréglage 1 comme
bouton d’appairage Bluetooth
®
7. Bouton Menu/Info
8. Bouton de volume/commande de syntonisation/
sélection
9. Prise d’entrée secteur
10. AUX IN 1
11. Écran LCD
12. Poignée
13. Antenne tige souple courbée
14. Casier du compartiment des batteries
15. Haut-parleur
16. Couvercle des batteries
17. Borne d’entrée (AUX IN 2)
18. Compartiment des batteries (couvrant le bloc-batterie
principal et les batteries de secours)
19. Haut
20. Gauche
21. Avant
22. Droite
23. Arrière ; couvercle des batteries fermé
24. Arrière ; couvercle des batteries ouvert
25. Batterie
26. Bouton
27. Voyants
28. Bouton de vérification
Écran LCD :
A. Alarme de la radio
B. Alarme du vibreur
C. Symbole de stéréo
D. Indicateur de batterie faible
E. Horloge
F. Fréquence
G. Système radioélectrique de diffusion de données
(RDS)
H. État de veille
I. AM/PM pour l’horloge
Installation de la batterie
Remarque :
Conservez les batteries de secours à l’intérieur du
compartiment pour éviter de perdre les données
enregistrées dans les mémoires préréglées.
1. Tirez sur le casier du compartiment des batteries pour
dégager le compartiment des batteries. La radio
comporte un compartiment de bloc-batterie principal
et un compartiment des batteries de secours. (Fig. 2)
2. Retirez le couvercle du compartiment des batteries de
secours et insérez 2 batteries UM-3 (AA) neuves.
Assurez-vous que la polarité des batteries est
correcte, comme illustré à l’intérieur du compartiment.
Remettez le couvercle des batteries en place. (Fig. 3)
3. Après avoir inséré les batteries de secours, insérez le
bloc-batterie principal pour alimenter la radio. Les
blocs-batterie adaptés à cette radio sont répertoriés
dans le tableau suivant.

15
Le tableau suivant indique la durée de fonctionnement en mode Radio avec une seule charge.
: batterie de type « bloc »
: batterie coulissante
Remarque :
Le tableau ci-dessus répertoriant les durées de fonctionnement des batteries est présenté pour référence. Les durées de
fonctionnement réelles peuvent varier selon le type de batterie, les conditions de chargement ou l’environnement dans
lequel l’appareil est utilisé.
Installation et retrait d’une batterie
coulissante (Fig. 4 et 5)
• Pour installer la batterie, alignez sa languette sur la
rainure qui se trouve à l’intérieur du logement, puis
faites glisser la batterie pour la mettre en place.
Insérez-la toujours bien à fond, jusqu’à ce qu’elle se
verrouille en émettant un léger déclic.
• Si vous voyez le voyant rouge sur la face supérieure du
bouton, la batterie n’est pas parfaitement verrouillée.
Installez-la à fond, jusqu’à ce que le voyant rouge ne
soit plus visible. Sinon, elle risque de tomber
accidentellement de l’outil et de vous blesser ou de
blesser une personne située près de vous.
• N’appliquez pas une force excessive lors de l’insertion
de la batterie. Si la batterie ne glisse pas aisément, elle
n’est pas insérée correctement.
• Pour retirer la batterie, sortez-la de l’outil en faisant
coulisser le bouton à l’avant de la batterie. Vous
pouvez également appuyer sur les boutons situés de
chaque côté de la batterie.
Installation et retrait d’une batterie de
type «bloc» (Fig.6 et 7)
• Pour insérer la batterie, alignez sa languette sur la
rainure qui se trouve à l’intérieur du logement, puis
faites glisser la batterie pour la mettre en place.
Capacité de la
batterie
Tension de la batterie
AU NIVEAU DE LA SORTIE DU HAUT-
PARLEUR
= 50 mW + 50 mW (unité : heure)
(environ)
7,2 V 10,8 V 14,4 V 18 V
En mode Radio ou
AUX
En mode Bluetooth
®
avec chargement
USB
1,0 Ah BL7010 5,5 0,8
1,1 Ah
BL1411G,
L1451
5,5
1,5
BL1811G,
L1851
1,8
1,3 Ah
BL1013
7,5
1,5
BL1415,
BL1413G,
L1453
1,8
BL1815,
BL1813G,
L1853
2,0
1,5 Ah
BL1415N
8,5
2,0
BL1815N 2,5
2,0 Ah
BL1820,
BL1820B
11 3,2
3,0 Ah
BL1430,
BL1430B
16
4,0
BL1830,
BL1830B
5,0
4,0 Ah
BL1440
22
5,5
BL1840,
BL1840B
6,5
5,0 Ah
BL1450
27
6,5
BL1850,
BL1850B
8,0
6,0 Ah
BL1460B
33
7,0
BL1860B 9,5

16
• Pour retirer la batterie, dégagez-la de la borne tout en
appuyant sur les boutons situés de chaque côté de la
batterie.
Remettez le casier du compartiment des batteries en
position d’origine.
Une puissance réduite, une déformation, un « bruit
saccadé » ou l’apparition du signe de batterie faible
et de l’indication « POWERFAIL » (PANNE
D’ALIMENTATION) sur l’affichage indiquent qu’il est
nécessaire de remplacer le bloc-batterie principal.
Remarque :
Le bloc-batterie ne peut pas être rechargé à l’aide de
l’adaptateur secteur fourni.
Lorsque le signe de batterie faible apparaît et que
l’indication « EMPTY » (VIDE) clignote sans
discontinuer, il est temps de remplacer les batteries de
secours.
Indication de l’autonomie restante de la
batterie
(uniquement pour les batteries dont le numéro de modèle
se termine par la lettre « B ».) (Fig. 8)
Appuyez sur le bouton de vérification pour indiquer
l’autonomie restante de la batterie. Les voyants s’allument
alors pendant quelques secondes.
015658
REMARQUE :
• Selon les conditions d’utilisation et la température
ambiante, les indications peuvent différer légèrement
de l’autonomie réelle restante.
Utilisation de l’antenne tige souple
courbée (Fig. 9)
Redressez l’antenne tige souple courbée comme illustré
sur la figure.
Utilisation de l’adaptateur secteur fourni
(Fig. 10)
Retirez le capuchon en caoutchouc et insérez la fiche de
l’adaptateur dans la prise secteur sur le côté gauche de la
radio. Branchez l’adaptateur dans une prise de courant
standard. En cas d’utilisation de l’adaptateur, le bloc-
batterie est automatiquement déconnecté. Débranchez
l’adaptateur secteur de l’alimentation lorsque vous ne
l’utilisez pas.
Remarque :
En cas d’interférences de votre radio avec son adaptateur
en mode AM, éloignez-la de plus de 30 cm de son
adaptateur secteur.
Fonctionnement de votre radio :
syntonisation AM/FM
1. Appuyez sur le bouton d’alimentation pour
allumer votre radio.
2. Appuyez sur le bouton Source pour sélectionner
le mode radio AM ou FM.
3. Appuyez sur le bouton de la commande de
syntonisation et maintenez-le enfoncé pour
procéder à la syntonisation automatique. Votre radio
syntonise la bande AM/FM à partir de la fréquence
affichée et interrompt automatiquement la
syntonisation lorsqu’elle trouve une station
suffisamment puissante.
4. L’affichage se met à jour au bout de quelques
secondes. Il indique la fréquence du signal trouvé.
5. Pour trouver une autre station, appuyez sur le bouton
de la commande de syntonisation et maintenez-le
enfoncé comme précédemment.
6. Une fois que votre radio a atteint la fin de la bande de
longueurs d’ondes, elle reprend la syntonisation à
partir de l’extrémité opposée de la bande de
longueurs d’ondes.
7. Au besoin, tournez le bouton de la commande de
syntonisation pour régler le niveau sonore.
Remarque :
• Pendant le réglage du volume, assurez-vous que
l’indication FM/AM NE clignote PAS à l’écran.
• Si AM/FM clignote à l’écran, vous avez la possibilité
de syntoniser les stations manuellement (pour plus
de détails, reportez-vous à la section
« Syntonisation manuelle : AM/FM »).
8. Pour éteindre votre radio, appuyez sur le bouton
d’alimentation .
Syntonisation manuelle : AM/FM
1. Appuyez sur le bouton d’alimentation pour
allumer votre radio.
2. Appuyez sur le bouton Source pour sélectionner
le mode radio AM ou FM.
Voyants
Autonomie
restante
Allumé Éteint Clignotant
75 % à 100 %
50 % à 75 %
25 % à 50 %
0% à 25%
Recharger la
batterie.
Il est possible que
la batterie ait mal
fonctionné.

17
3. Si vous appuyez sur le bouton de la commande de
syntonisation , FM ou AM clignote sur l’affichage.
Remarque :
• FM/AM clignote pendant 10 secondes environ.
Pendant ce temps, seule la syntonisation manuelle
est autorisée.
• Si vous souhaitez régler le volume alors que FM/
AM clignote, appuyez sur le bouton de la
commande de syntonisation pour que l’affichage
cesse de clignoter et pour pouvoir tourner le bouton
de la commande de syntonisation afin de régler le
niveau sonore.
4. Pour syntoniser une station, tournez le bouton de la
commande de syntonisation .
5. Une fois que votre radio a atteint la fin de la bande de
longueurs d’ondes, elle reprend la syntonisation à
partir de l’extrémité opposée de la bande de
longueurs d’ondes.
6. Au besoin, utilisez le bouton de la commande de
syntonisation pour régler le niveau sonore.
Préréglage de stations en mode AM/FM
5 stations sont préréglées pour chaque radio AM et FM.
Elles sont utilisées de la même manière pour chaque
bande de longueurs d’ondes.
1. Appuyez sur le bouton d’alimentation pour
allumer votre radio.
2. Appuyez sur le bouton Source pour sélectionner
la bande de longueurs d’ondes souhaitée. Syntonisez
la station radio souhaitée comme décrit
précédemment.
3. Appuyez sur le bouton de préréglage souhaité (1 à 5)
et maintenez-le enfoncé jusqu’à ce
que l’affichage indique « P4 », par exemple, après la
fréquence. La station est enregistrée sous le numéro
de préréglage défini. Répétez cette procédure pour
les préréglages restants si vous le souhaitez.
4. Au besoin, vous pouvez écraser les stations
préréglées déjà enregistrées en procédant comme
indiqué ci-dessus.
Modes d’affichage : FM
Votre radio possède plusieurs options d’affichage pour le
mode radio FM.
1. Appuyez plusieurs fois sur le bouton Menu/Info
pour afficher les informations RDS de la station que
vous écoutez.
a. Nom de la station Affiche le nom de la station
écoutée.
b. Type de programme Affiche le type de station
écoutée, par exemple Pop,
Classique, Informations, etc.
c. Texte radio Affiche un message textuel
radio, tel que de nouveaux
éléments, etc.
d. Année/jour Affiche l’année et le jour de la
semaine selon le réglage de la
date de votre radio.
e. Date/jour Affiche la date et le jour de la
semaine selon le réglage de la
date de votre radio.
f. Fréquence Affiche la fréquence de la station
FM écoutée.
FM stéréo (auto)/mono
Si le signal de la station radio FM écoutée est faible, vous
risquez d’entendre un souffle. Il est possible de réduire ce
souffle en forçant la radio à diffuser la station en mode
mono plutôt qu’en mode stéréo.
1. Au besoin, appuyez sur le bouton d’alimentation
pour sélectionner la bande FM et syntoniser la station
FM souhaitée, comme indiqué précédemment.
2. Appuyez sur le bouton Menu/Info et maintenez-
le enfoncé pour accéder aux réglages du menu.
3. Tournez le bouton de la commande de syntonisation
jusqu’à ce que le réglage FM auto/mono s’affiche.
Si le réglage Auto est sélectionné, appuyez sur le
bouton de la commande de syntonisation pour
basculer en mode Mono afin de réduire le souffle.
Pour sélectionner l’option en question, appuyez sur le
bouton de la commande de syntonisation.
Rappel d’un préréglage en mode AM/FM
1. Appuyez sur le bouton d’alimentation pour
allumer votre radio.
2. Appuyez sur le bouton Source pour sélectionner
le mode radio AM ou FM.
3. Appuyez brièvement sur le bouton de préréglage
souhaité pour que votre radio
syntonise l’une des stations enregistrées dans la
mémoire préréglée.
Horloge et alarmes
Réglage du format de l’heure et de la date
L’horloge peut être affichée dans un format différent en
mode veille et sur les écrans en mode de lecture. Le
format sélectionné est alors également utilisé lors du
réglage des alarmes.
1. Appuyez sur le bouton Menu/Info et maintenez-
le enfoncé pour accéder aux réglages du menu.
2. Tournez le bouton de la commande de syntonisation
jusqu’à ce que « CLOCK xxH » (HORLOGE xxH)
apparaisse sur l’affichage et appuyez sur le bouton de
la commande de syntonisation pour accéder aux
réglages. Le format de l’heure commence alors à
clignoter.

18
3. Tournez le bouton de la commande de syntonisation
pour sélectionner le format 12 ou 24 heures.
Appuyez sur le bouton de la commande de
syntonisation pour confirmer le format d’horloge
choisi.
Remarque : si vous choisissez le format d’horloge
12 heures, la radio utilise alors l’horloge 12 heures
comme réglage.
4. Appuyez sur le bouton Menu/Info et maintenez-
le enfoncé pour accéder aux réglages du menu.
5. Tournez le bouton de la commande de syntonisation
jusqu’à ce qu’une date (par exemple, « THU APR 3 »
(JEU 3 AVR)) apparaisse sur l’affichage et appuyez
sur le bouton de la commande de syntonisation
pour accéder aux réglages. Le format de la date
commence alors à clignoter.
6. Tournez le bouton de la commande de syntonisation
pour sélectionner le format de date souhaité.
Appuyez sur le bouton de la commande de
syntonisation pour confirmer votre choix.
Réglage de l’heure et la date de l’horloge
1. Appuyez sur le bouton Menu/Info et maintenez-
le enfoncé.
2. Tournez le bouton de la commande de syntonisation
jusqu’à ce que « CLOCK ADJ » (RGL HORLOGE)
apparaisse sur l’affichage. Appuyez sur le bouton de
la commande de syntonisation pour sélectionner le
réglage.
3. Le réglage de l’heure sur l’affichage commence à
clignoter. Tournez le bouton de la commande de
syntonisation pour sélectionner l’heure souhaitée
et appuyez sur le bouton de la commande de
syntonisation pour confirmer le réglage. Ensuite,
tournez le bouton de la commande de syntonisation
pour sélectionner les minutes et appuyez sur le
bouton de la commande de syntonisation pour
confirmer le réglage.
4. Tournez le bouton de la commande de syntonisation
jusqu’à ce que « DATE ADJ » (RGL DATE)
apparaisse sur l’affichage. Appuyez sur le bouton de
la commande de syntonisation pour sélectionner le
réglage.
5. Tournez le bouton de la commande de syntonisation
pour sélectionner l’année souhaitée et appuyez sur
le bouton de la commande de syntonisation pour
confirmer le réglage. Ensuite, tournez le bouton de la
commande de syntonisation pour sélectionner le
mois souhaité et appuyez sur le bouton de la
commande de syntonisation pour confirmer le
réglage. Ensuite, tournez le bouton de la commande
de syntonisation pour sélectionner la date
souhaitée et appuyez sur le bouton de la commande
de syntonisation pour confirmer le réglage.
Système radioélectrique de diffusion de
données (RDS)
Lorsque vous réglez l’heure de l’horloge à l’aide de la
fonction RDS, votre radio synchronise l’heure de son
horloge lorsqu’elle syntonise une station radio à l’aide du
système RDS et de signaux CT.
1. Lors de la syntonisation d’une station diffusant des
données RDS, appuyez sur le bouton Menu/Info
et maintenez-le enfoncé.
2. Tournez le bouton de la commande de syntonisation
jusqu’à ce que « RDS CT » et un symbole
d’horloge apparaissent sur l’affichage. Appuyez sur le
bouton de la commande de syntonisation pour
sélectionner le réglage.
3. Tournez le bouton de la commande de syntonisation
jusqu’à ce que « RDS CT » apparaisse sur
l’affichage. Appuyez sur le bouton de la commande de
syntonisation pour confirmer le réglage. L’heure de
l’horloge de la radio est réglée automatiquement en
fonction des données RDS reçues.
4. Lorsque l’action est terminée, l’icône RDS apparaît
sur l’écran LCD, indiquant que l’heure de la radio est
l’heure de l’horloge RDS. L’heure de l’horloge de la
radio est valable pendant 5 jours à chaque fois que
l’heure de la radio est synchronisée avec RDS CT.
Réglage de l’horloge de l’alarme
Votre radio possède deux alarmes qui peuvent chacune
être réglées pour vous réveiller avec la radio AM/FM ou
l’alarme du vibreur. Vous pouvez régler les alarmes
lorsque l’appareil est en mode veille ou en cours de
lecture.
a. Réglage de l’heure de l’alarme de la radio :
1. La radio peut être réglée lorsqu’elle est allumée ou
éteinte.
2. Appuyez sur le bouton d’alarme de la radio et
maintenez-le enfoncé. Le symbole d’alarme de la
radio et l’heure d’affichage clignotent et un bip retentit.
3. Lorsque le symbole d’alarme de la radio
clignote, tournez le bouton de la commande de
syntonisation pour sélectionner l’heure et appuyez
à nouveau sur le bouton de la commande de
syntonisation pour confirmer le réglage de l’heure.
Ensuite, tournez le bouton de la commande de
syntonisation pour sélectionner les minutes et
appuyez sur le bouton de la commande de
syntonisation pour confirmer le réglage des
minutes.

19
4. Tournez le bouton de la commande de syntonisation
afin que l’affichage indique les options de fréquence
de l’alarme.
Les options de l’alarme sont les suivantes :
ONCE (UNE FOIS) : l’alarme retentit une fois
DAILY (TOUS LES JOURS) : l’alarme retentit chaque
jour
WEEKDAY (JOUR DE SEMAINE) : l’alarme retentit
uniquement les jours de semaine
WEEKEND (WEEK-END) : l’alarme retentit
uniquement les week-ends
Appuyez sur le bouton de la commande de
syntonisation pour confirmer le réglage.
5. Lorsque le symbole d’alarme de la radio clignote,
tournez le bouton de la commande de syntonisation
pour sélectionner la station et la bande de réveil
souhaitée, puis appuyez sur le bouton de la
commande de syntonisation pour confirmer la
sélection.
6. Tournez le bouton de la commande de syntonisation
pour sélectionner le volume souhaité et appuyez sur
le bouton de la commande de syntonisation pour
confirmer le volume. Le réglage de l’alarme de la radio
est alors terminé.
Remarque :
Si la nouvelle station d’alarme de la radio n’est pas
sélectionnée, la dernière station d’alarme est
sélectionnée.
Remarque :
Si la station de l’alarme AM/FM sélectionnée n’est pas
disponible lorsque l’alarme retentit, l’alarme du vibreur est
utilisée à la place.
b. Réglage de l’alarme du vibreur HWS (Humane Wake
System) :
Un bip retentit lorsque vous sélectionnez l’alarme du
vibreur HWS.
La durée du bip d’alarme diminue toutes les 15 secondes
pendant une minute, suivi par une minute de silence
avant de répéter le cycle.
1. L’alarme du vibreur peut être réglée lorsque la radio
est allumée ou éteinte.
2. Appuyez sur le bouton d’alarme du vibreur et
maintenez-le enfoncé, le symbole et l’heure
d’affichage clignotent et un bip retentit.
3. Lorsque le symbole d’alarme du vibreur clignote,
tournez le bouton de la commande de syntonisation
pour sélectionner l’heure et appuyez à nouveau
sur le bouton de la commande de syntonisation
pour confirmer le réglage de l’heure. Ensuite, tournez
le bouton de la commande de syntonisation pour
sélectionner les minutes, puis appuyez sur le bouton
de la commande de syntonisation pour confirmer le
réglage des minutes.
4. Tournez le bouton de la commande de syntonisation
afin que l’affichage indique les options de fréquence
de l’alarme.
Les options de l’alarme sont les suivantes :
ONCE (UNE FOIS) : l’alarme retentit une fois.
DAILY (TOUS LES JOURS) : l’alarme retentit chaque
jour.
WEEKDAY (JOUR DE SEMAINE) : l’alarme retentit
uniquement les jours de semaine.
WEEKEND (WEEK-END) : l’alarme retentit
uniquement les week-ends.
Appuyez sur le bouton de la commande de
syntonisation pour confirmer le réglage.
Remarque :
Il n’est pas possible de régler le volume de l’alarme du
vibreur.
Lorsque l’alarme retentit
Pour annuler une alarme qui retentit, appuyez sur le
bouton d’alimentation .
Désactivation/annulation d’alarmes
Pour désactiver une alarme active, appuyez sur le bouton
d’alimentation ou appuyez sur le bouton d’alarme
correspondant et maintenez-le enfoncé pour annuler
l’alarme.
Répétition
1. Lorsque l’alarme retentit, appuyez sur n’importe quel
bouton autre que le bouton d’alimentation pour
éteindre l’alarme pendant 5 minutes. « SNOOZE »
(RÉPÉTITION) apparaît sur l’affichage.
2. Pour régler la durée d’interruption de la minuterie de
répétition, appuyez sur le bouton Menu/Info et
maintenez-le enfoncé pour accéder aux réglages du
menu.
3. Tournez le bouton de la commande de syntonisation
jusqu’à ce que « SNOOZE X » (RÉPÉTITION X)
apparaisse sur l’affichage, puis appuyez sur le bouton
de la commande de syntonisation pour accéder
aux réglages. Tournez le bouton de la commande de
syntonisation pour choisir la durée d’interruption de
la minuterie de répétition entre 5, 10, 15 et
20 minutes.
4. Pour annuler la minuterie de répétition alors que
l’alarme est suspendue, appuyez sur le bouton
d’alimentation .
Minuterie de veille
Vous pouvez régler votre radio de sorte qu’elle s’éteigne
automatiquement après une durée prédéfinie. La
minuterie de veille peut être réglée sur 60, 45, 30, 15, 120
et 90 minutes.

20
1. Appuyez sur le bouton d’alimentation et
maintenez-le enfoncé pour accéder aux réglages de la
minuterie de veille. « SLEEP XX » (VEILLE XX)
apparaît sur l’affichage.
2. Si vous maintenez le bouton d’alimentation enfoncé
, les options de la minuterie de veille
commencent à apparaître sur l’affichage. Arrêtez
lorsque le réglage de la minuterie de veille souhaité
s’affiche. Le réglage est enregistré et l’affichage
normal de l’écran LCD est rétabli.
3. Votre radio s’éteint automatiquement lorsque la durée
prédéfinie de la minuterie de veille est écoulée.
L’icône de la minuterie de veille apparaît sur
l’affichage pour indiquer qu’une minuterie de veille est
active.
4. Pour annuler la fonction de la minuterie de veille avant
que la durée prédéfinie soit écoulée, appuyez
simplement sur le bouton d’alimentation afin
d’éteindre l’appareil manuellement.
Volume sonore
Pour corriger la fréquence inférieure et supérieure de
votre radio, réglez le volume sonore.
1. Appuyez sur le bouton Menu/Info et maintenez-
le enfoncé pour accéder aux réglages du menu.
2. Tournez le bouton de la commande de syntonisation
jusqu’à ce que « LOUD ON » (VOLUME ACTIVÉ)
ou « LOUD OFF » (VOLUME DÉSACTIVÉ)
apparaisse sur l’affichage. Appuyez sur le bouton de
la commande de syntonisation pour sélectionner le
réglage.
3. Tournez le bouton de la commande de syntonisation
pour sélectionner ACTIVÉ et ainsi activer la
fonction du volume sonore, puis appuyez sur le
bouton de la commande de syntonisation pour
confirmer le réglage.
4. Pour désactiver la fonction de volume sonore,
sélectionnez DÉSACTIVÉ et appuyez sur le bouton de
la commande de syntonisation pour confirmer le
réglage.
Prise d’entrée auxiliaire
L’appareil est équipé de deux prises d’entrée auxiliaires
stéréo de 3,5 mm. Une prise se trouve sur la façade de
votre radio (AUX IN 1) ; l’autre prise se trouve sur le
compartiment des batteries (AUX IN 2).
1. Raccordez une source audio externe (par exemple, un
iPod, un lecteur MP3 ou un lecteur CD) à la prise
d’entrée auxiliaire.
2. Appuyez plusieurs fois sur le bouton Source et
relâchez-le jusqu’à ce que AUX IN 1 ou 2 s’affiche.
3. Réglez le volume de votre iPod, lecteur MP3 ou
lecteur CD pour garantir un niveau de signal adéquat
à partir du lecteur, puis utilisez au besoin le bouton de
la commande de syntonisation situé sur la radio
pour une écoute confortable.
Écoute de musique en Bluetooth
®
Pour écouter/diffuser de la musique en Bluetooth
®
à partir
de votre radio, vous devez apparier votre appareil
Bluetooth
®
à votre radio afin que les deux soient reliés
automatiquement. L’appairage crée une « liaison »
permanente afin que deux appareils puissent toujours se
reconnaître.
Appairage de votre appareil Bluetooth
®
1. Appuyez sur le bouton Source pour sélectionner
la fonction Bluetooth
®
. « BT READY » (BT PRÊT)
apparaît sur l’affichage et « READY » (PRÊT) clignote
toutes les 2 secondes.
2. Activez la fonction Bluetooth
®
sur votre appareil
conformément au mode d’emploi de cet appareil afin
de procéder à l’appairage.
3. Appuyez sur le bouton d’appairage et relâchez-le.
« BT PAIR » (APPAIRAGE BT) apparaît sur l’affichage
et clignote toutes les secondes. Vous pouvez lancer la
recherche de votre radio sur votre appareil Bluetooth
®
.
Lorsque le nom de votre radio s’affiche sur votre
appareil Bluetooth
®
, appuyez sur l’option dans votre
liste Bluetooth
®
.
Sur d’anciens appareils mobiles (appareils équipés
d’une version Bluetooth
®
antérieure à la version
BT2.1), vous devez saisir le code « 0000 ».
4. Votre appareil Bluetooth
®
va alors être relié à la radio.
5. Lorsque l’appareil est connecté, « BLUETOOTH »
reste affiché et le rétroéclairage s’éteint après
10 secondes.
Vous pouvez maintenant écouter de la musique en
Bluetooth
®
sur votre appareil via votre radio.
Lecture d’un appareil Bluetooth
®
qui a
déjà été apparié
1. Appuyez sur le bouton Source pour sélectionner
la fonction Bluetooth
®
. « BT READY » (BT PRÊT)
apparaît sur l’affichage et « READY » (PRÊT) clignote
toutes les 2 secondes.
2. Lancez la recherche de la radio sur votre appareil
Bluetooth
®
et reliez-la. Certains appareils peuvent être
reliés automatiquement avec la radio.
Vous pouvez maintenant écouter de la musique en
Bluetooth
®
sur votre appareil via votre radio.
Remarque :
a) La radio peut être appariée avec 8 appareils
Bluetooth
®
au maximum. Si vous appariez plus de
8 appareils Bluetooth
®
, l’historique de pairage est
remplacé par l’historique de pairage le plus ancien.
b) Si deux appareils Bluetooth
®
cherchent votre radio, la
disponibilité de celle-ci apparaît sur les deux.

21
c) Si votre appareil Bluetooth
®
est temporairement
déconnecté de votre radio, vous devez reconnecter
manuellement votre appareil à la radio.
d) Si le nom de votre radio apparaît dans la liste de votre
appareil Bluetooth
®
alors que votre appareil ne peut
pas se connecter à celle-ci, supprimez l’option
correspondant au nom de votre radio de votre liste et
appariez à nouveau l’appareil à votre radio en
procédant comme décrit précédemment.
e) La plage de fonctionnement efficace entre la radio et
l’appareil apparié est d’environ 10 mètres (30 pieds).
f) Tout obstacle entre la radio et l’appareil est susceptible
de réduire la plage de fonctionnement.
Déconnexion de votre appareil Bluetooth
®
Appuyez sur le bouton d’appairage et maintenez-le
enfoncé pendant 2 à 3 secondes pour déconnecter votre
appareil Bluetooth
®
. « BLUETOOTH » disparaît de
l’affichage, indiquant la désactivation de la fonction
Bluetooth
®
.
Rechargement à partir du port USB
(Fig. 10)
Le port USB se trouve sur la façade de la radio. Vous
pouvez charger l’appareil USB à partir du port USB.
1. Branchez l’appareil USB, par exemple un iPod, un
lecteur MP3 ou un lecteur CD, à l’aide d’un câble USB
vendu dans le commerce.
2. Appuyez sur le bouton d’alimentation pour
allumer votre radio.
3. Peu importe que la radio soit branchée sur secteur ou
alimentée par batterie, elle est en mesure de charger
l’appareil USB lorsqu’elle est allumée et en mode
radio FM, en mode BT ou en mode AUX, lesquels
apparaissent lorsqu’une source audio externe est
raccordée.
Remarque :
Vous ne pouvez pas charger les appareils USB si le mode
AM est sélectionné car la réception du signal radio
devient extrêmement faible lors du chargement
d’appareils USB.
• Le volume maximum du haut-parleur émettant la
puissance de sortie diminue lors du rechargement à
partir du port USB.
• La prise USB peut fournir un courant électrique
maximum de 1 A ou 5 V.
Important :
• Avant de brancher votre appareil USB au chargeur,
sauvegardez toujours vos données enregistrées sur
l’appareil USB. Dans le cas contraire, vous risquez de
les perdre par accident.
• Il est possible que le chargeur ne puisse pas alimenter
certains appareils USB.
• Retirez le câble USB et fermez le couvercle lorsque
vous ne l’utilisez pas ou lorsque le chargement est
terminé.
• Ne branchez pas une source d’alimentation dans le
port USB. Il y a risque d’incendie. Le port USB est
destiné uniquement au rechargement d’appareils de
faible tension. Placez toujours le couvercle sur le port
USB lorsque vous ne rechargez pas d’appareils de
faible tension.
• N’insérez pas de clou, fil, etc., dans le port USB. Vous
pourriez provoquer un court-circuit et déclencher un
incendie et la formation de fumée.
• Ne branchez pas cette prise USB dans le port USB de
votre PC, au risque de provoquer une panne des
appareils.
ENTRETIEN
ATTENTION :
• N’utilisez jamais d’essence, de benzine, de diluant,
d’alcool ou de produit similaire. Ces produits risquent
de provoquer des décolorations, des déformations ou
des fissures.
Spécifications :
Puissance consommée
Adaptateur secteur 12 V C.C./1 200 mA, broche
centrale positive
Batteries 2 piles UM-3 (AA) de secours
Batterie de type « bloc » : 7,2 V
à 10,8 V
Batterie coulissante : 14,4 V à
18 V
Gamme de fréquences FM 87,50 - 108 MHz
(0,05 MHz/pas)
AM (MW) 522 - 1 629 kHz
(9 kHz/pas)
Bluetooth
®
Bluetooth
®
QD ID 58625
(La marque verbale et les logos
Bluetooth
®
sont des marques
déposées de Bluetooth SIG, Inc.)
Version Bluetooth
®
4.0
Profils Bluetooth
®
A2DP/SCMS-T
Puissance d’émission Spécification Bluetooth
®
,
classe 2
Portée d’émission 10 m au max. (varie selon les
conditions d’utilisation)
Codec pris en charge SBC
Profil Bluetooth
®
compatible
A2DP
Fonction du circuit
Haut-parleur 3,5 pouces 8 ohms x 2
Puissance de sortie 7,2 V : 0,5 W x 2
10,8 V :1,2 W x 2
14,4 V : 2,2 W x 2, 18 V : 3,5 W
x 2
Borne d’entrée diamètre 3,5 mm (AUX IN 1/
AUX IN 2)
Système d’antenne FM : antenne tige souple
courbée
AM : antenne ferrite
Dimensions (L x H x P) en mm
282 x 294 x 163
Poids 4,3 kg (sans la batterie)

22
DEUTSCH (Originalanweisungen)
Symbole
Im Folgenden sind die im Zusammenhang mit diesem
Gerät verwendeten Symbole dargestellt. Machen Sie sich
vor der Benutzung des Geräts unbedingt mit diesen
Symbolen vertraut!
WICHTIGE
SICHERHEITSHINWEISE
WARNUNG:
Bei der Verwendung von Elektrogeräten müssen stets
grundlegende Sicherheitsmaßnahmen befolgt werden, zu
denen auch die im Folgenden genannten gehören, um die
Gefahr von Verletzungen, Stromschlägen und Bränden zu
verringern.
1. Lesen Sie vor der Verwendung des Geräts die
vorliegende Betriebsanleitung sowie die
Betriebsanleitung zum Ladegerät aufmerksam durch.
2. Reinigen Sie dieses Gerät lediglich mit einem
trockenen Tuch.
3. Stellen Sie dieses Gerät nicht in der Nähe von
Wärmequellen wie etwa Radiatoren, Heizregistern,
Öfen oder anderen wärmeerzeugenden Apparaturen
(einschließlich Verstärker) auf.
4. Verwenden Sie ausschließlich vom Hersteller
vorgegebene Anbaugeräte bzw. Zubehörteile.
5. Ziehen Sie bei einem Gewitter, oder wenn Sie das
Gerät für längere Zeit nicht verwenden, den
Netzstecker dieses Geräts.
6. Ein akkubetriebenes Radio mit eingebauten Akkus
oder einem herausnehmbaren Akkupack darf nur mit
dem angegebenen Ladegerät geladen werden. Ein für
einen bestimmten Akkutyp vorgesehenes Ladegerät
kann Feuer verursachen, wenn es für andere Akkus
verwendet wird.
7. Ein akkubetriebenes Radio darf nur mit den dafür
speziell vorgesehenen Akkupacks verwendet werden.
Bei Verwendung anderer Akku besteht Brandgefahr.
8. Wenn sich der Akkupack nicht im Werkzeug befindet,
dann halten Sie ihn fern von metallenen Objekten, wie
etwa: Büroklammern, Münzen, Schlüssel, Nägel,
Schrauben oder anderen kleinen
Metallgegenständen, die eine Verbindung zwischen
den Akkuanschlüssen herstellen können. Ein
Kurzschluss der Akkukontakte kann Funken oder
Verbrennungen verursachen und stellt eine
Brandgefahr dar.
9. Vermeiden Sie Körperkontakt mit geerdeten Flächen
wie Rohren, Radiatoren, Herdplatten und Heiz- und
Kühlelementen. Wenn Ihr Körper geerdet ist, besteht
bei einem elektrischen Schlag eine erhöhte Gefahr.
10. Bei unsachgemäßem Gebrauch kann Flüssigkeit aus
dem Akku austreten; vermeiden Sie in diesem Fall
jeglichen Kontakt mit der Flüssigkeit. Wenn Sie
versehentlich mit Flüssigkeit aus dem Akku in
Berührung geraten, waschen Sie die betroffene Stelle
gründlich mit Wasser ab. Wenn die Flüssigkeit in die
Augen geraten ist, suchen Sie anschließen umgehend
einen Arzt auf. Die aus dem Akku austretende
Flüssigkeit kann Hautreizungen und Verbrennungen
verursachen.
BEWAHREN SIE DIESE
ANLEITUNG SORGFÄLTIG AUF.
SPEZIELLE
SICHERHEITSREGELN
FÜR AKKUBLOCK
1. Lesen Sie vor der Verwendung des Akkublocks
alle Anweisungen und Sicherheitshinweise für das
Akkuladegerät (1), den Akku (2) und das Produkt
(3), für das der Akku verwendet wird, sorgfältig
durch.
2. Der Akkublock darf nicht zerlegt werden.
3. Falls die Betriebsdauer erheblich kürzer wird,
beenden Sie den Betrieb umgehend. Andernfalls
besteht die Gefahr einer Überhitzung sowie das
Risiko möglicher Verbrennungen und sogar einer
Explosion.
4. Wenn Elektrolyt in Ihre Augen gerät, waschen Sie
diese mit klarem Wasser aus und suchen Sie
sofort einen Arzt auf. Andernfalls können Sie Ihre
Sehfähigkeit verlieren.
5. Vermeiden Sie einen Kurzschluss des
Akkublocks:
(1) Die Kontakte dürfen nicht mit leitendem
Material in Berührung kommen.
(2) Der Akkublock darf nicht in einem Behälter
aufbewahrt werden, in dem sich andere
metallische Gegenstände wie beispielsweise
Nägel, Münzen usw. befinden.
(3) Der Akkublock darf weder Feuchtigkeit noch
Regen ausgesetzt werden.
Ein Kurzschluss des Akkus kann zu hohem
Kriechstrom, Überhitzung, möglichen
Verbrennungen und sogar zu einer Zerstörung des
Werkzeugs führen.
6. Werkzeug und Akkublock dürfen nicht an Orten
aufbewahrt werden, an denen Temperaturen von
50°C oder darüber erreicht werden können.
7. Beschädigte oder verbrauchte Akkus dürfen nicht
verbrannt werden. Der Akkublock kann in den
Flammen explodieren.
8. Lassen Sie den Akku nicht fallen und vermeiden
Sie Schläge gegen den Akku.
Lesen Sie die Betriebsanleitung!
Nur für EU-Länder
Entsorgen Sie Elektrowerkzeuge, Batterien
und Akkus nicht über den Hausmüll!
Gemäß der Europäischen Richtlinie über
Elektro- und Elektronik- Altgeräte und über
Batterien und Akkumulatoren sowie
Altbatterien und Altakkumulatoren und ihrer
Umsetzung in nationales Recht müssen
verbrauchte Elektrowerkzeuge sowie
Altbatterien und Altakkumulatoren getrennt
gesammelt und einer umweltgerechten
Wiederverwertung zugeführt werden.
Cd
Ni-MH
Li-ion

23
9. Verwenden Sie niemals einen beschädigten Akku.
10. Die enthaltenen Lithium-Ionen-Akkus unterliegen
den gesetzlichen Bestimmungen über
Gefahrgüter.
Beim kommerziellen Transport durch Dritte, z. B.
Speditionsunternehmen, sind die besonderen
Verpackungs- und Kennzeichnungsvorschriften zu
beachten.
Es ist unbedingt erforderlich, einen Fachmann für
Gefahrstoffe bei der Vorbereitung der Ware für den
Versand zu konsultieren. Bitte beachten Sie auch die
geltenden nationalen Bestimmungen, die
möglicherweise weitere Maßnahmen vorschreiben.
Offene Kontakte müssen abgeklebt oder abgedeckt
werden und der Akku muss so verpackt werden, dass
er in der Verpackung nicht verrutschen kann.
11. Befolgen Sie die in Ihrem Land geltenden
Bestimmungen bzgl. der Entsorgung von Akkus.
12. Lesen Sie die Anleitung zum Austauschen des Akkus
sorgfältig durch, um Gefahren zu vermeiden.
Und der max. Entladestrom des Akkus muss größer
oder gleich 8 A sein.
ACHTUNG:
• Bei unsachgemäßer Verwendung von Ersatzakkus
besteht Explosionsgefahr.
• Als Ersatzteile dürfen nur Akkus des gleichen Typs
verwendet werden.
BEWAHREN SIE DIESE
ANLEITUNG SORGFÄLTIG AUF.
ACHTUNG: Verwenden Sie ausschließlich
Originalakkus von Makita.
Die Verwendung von Akkus anderer Hersteller als Makita
oder von abgeänderten Akkus kann zu einer Explosion
der Akkus und in Konsequenz zu Feuer sowie Personen-
und Sachschäden führen. Darüber hinaus verfällt die für
das Werkzeug und Ladegerät von Makita gültige Makita-
Garantie.
Tipps für eine maximale Nutzungsdauer
von Akkus
1. Laden Sie den Akkublock auf, bevor der Akku
vollständig entladen ist.
Sobald Sie eine verringerte Leistung des
Werkzeugs bemerken, beenden Sie stets den
Betrieb des Werkzeugs und laden Sie den
Akkublock auf.
2. Ein voll aufgeladener Akkublock darf niemals
erneut geladen werden.
Durch Überladungen wird die Lebensdauer des
Akkus verkürzt.
3. Laden Sie den Akkublock bei einer
Zimmertemperatur von 10°C bis 40°C auf. Lassen
Sie einen heißen Akkublock vor dem Aufladen
abkühlen.
4. Laden Sie den Akkublock auf, wenn Sie diesen für
längere Zeit nicht verwenden (mehr als sechs
Monate).
Erläuterung der
Gesamtdarstellung (Abb. 1)
1. USB-Stromversorgungsanschluss
2. Ein/Aus-Taste/Einschlaffunktion
3. Wellenbereichstaste
4. Radiowecker
5. Summeralarm
6. Stationsvorwahltaste/Stationsvorwahltaste 1 dient als
Bluetooth
®
-Pairing-Taste
7. Menü-/Infotaste
8. Lautstärkeregelung/Sendersuchlauf/Auswahlregelung
9. Buchse DC IN
10. Buchse AUX IN 1
11. LCD-Display
12. Griff
13. Flexible Stabantenne
14. Akkufachverriegelung
15. Lautsprecher
16. Akkuabdeckung
17. Eingangsbuchse (AUX IN 2)
18. Batteriefach (für Haupt-Akkupack und Backup-
Batterien)
19. Oberseite
20. Links
21. Vorderseite
22. Rechts
23. Rückseite; mit geschlossener Akkuabdeckung
24. Rückseite; mit geöffneter Akkuabdeckung
25. Akkublock
26. Knopf
27. Anzeigenlampen
28. Akkuprüftaste
LCD-Display:
A. Radiowecker
B. Summeralarm
C. Stereo-Symbol
D. Akkuspannung zu niedrig
E. Uhr
F. Frequenz
G. RDS (Radio Data System)
H. Status der Einschlaffunktion
I. Uhrzeitanzeige AM/PM (vormittags/nachmittags)
Akku einsetzen
Hinweis:
Lassen Sie die Backup-Batterien im Fach, damit keine in
den Senderspeichern gespeicherten Daten verloren
gehen.
1. Ziehen Sie die Akkufachverriegelung heraus, um das
Akkufach zu entriegeln. Das Akkufach enthält ein
Hauptakkufach und ein Backup-Batteriefach. (Abb. 2)
2. Entfernen Sie die Abdeckung des Backup-
Batteriefachs und setzen Sie 2 neue Batterien (UM-3,
Größe AA) ein. Stellen Sie sicher, dass die Batterien
gemäß der in dem Fach abgebildeten Polarität
ausgerichtet sind. Setzen Sie die Akkuabdeckung
wieder ein. (Abb. 3)
3. Setzen Sie nach dem Einsetzen der Backup-Batterien
den Haupt-Akkupack in das Radio ein. Folgende
Tabelle führt die für dieses Radio geeigneten
Akkupacks auf.

24
Die folgende Tabelle zeigt die pro Ladungsvorgang mögliche Betriebsdauer im Radiowiedergabemodus an.
: Aufsteckakku
: Einschubakku
Hinweis:
Obige Tabelle mit den Akku-Betriebszeiten dient lediglich zu Referenzzwecken. Die tatsächliche Betriebsdauer kann je
nach verwendetem Akkutyp und den vorhandenen Lade- und Betriebsbedingungen abweichen.
Einschubakku einsetzen bzw. entfernen
(Abb. 4 und 5)
• Zum Einsetzen des Akkublocks müssen Sie die
Akkublockzunge zur inneren Gehäusenut ausrichten
und den Akkublock in Position schieben. Setzen Sie
den Akkublock unbedingt vollständig ein, bis er mit
einem Klick einrastet.
• Ist weiterhin der oben auf dem Knopf befindliche rote
Bereich sichtbar, dann ist der Akkublock nicht ganz
eingerastet. Setzen Sie den Akkublock vollständig ein,
bis der rote Bereich nicht mehr sichtbar ist. Andernfalls
kann der Akkublock versehentlich aus dem Gerät fallen
und Sie oder umstehende Personen verletzen.
• Wenden Sie keine Gewalt beim Einsetzen des
Akkublocks an. Wenn der Akkublock nicht leicht
hineingleitet, dann haben Sie ihn nicht richtig
ausgerichtet.
• Zum Entfernen des Akkublocks müssen Sie den auf
der Vorderseite des Akkublocks befindlichen Knopf
verschieben und gleichzeitig den Akkublock aus dem
Gerät herausziehen bzw. drücken Sie die zu beiden
Seiten des Blocks befindlichen Knöpfe.
Aufsteckakku einsetzen bzw. entfernen
(Abb. 6 und 7)
• Zum Einsetzen des Akkublocks müssen Sie die
Akkublockzunge an der inneren Gehäusenut
ausrichten und den Akkublock hineinschieben.
• Drücken Sie zum Entfernen des Akkublocks die an der
Akkuseite befindlichen Knöpfe und ziehen Sie den
Akkublock heraus.
Setzen Sie die Akkufachverriegelung wieder auf der
ursprünglichen Position auf.
Eine verminderte Leistung, Klangverzerrungen, eine
stotternde Klangwiedergabe oder die gleichzeitige
Akkuladung
Nennspannung des Akkublocks
BEI LAUTSPRECHERLEISTUNG
= 50 mW + 50 mW (Einheit: Stunde)
(circa)
7,2 V 10,8 V 14,4 V 18 V
Im Radiobetrieb
oder über
AUX-Buchse
Im Bluetooth
®
-
Betrieb mit
USB-Aufladung
1,0 Ah BL7010 5,5 0,8
1,1 Ah
BL1411G,
L1451
5,5
1,5
BL1811G,
L1851
1,8
1,3 Ah
BL1013
7,5
1,5
BL1415,
BL1413G,
L1453
1,8
BL1815,
BL1813G,
L1853
2,0
1,5 Ah
BL1415N
8,5
2,0
BL1815N 2,5
2,0 Ah
BL1820,
BL1820B
11 3,2
3,0 Ah
BL1430,
BL1430B
16
4,0
BL1830,
BL1830B
5,0
4,0 Ah
BL1440
22
5,5
BL1840,
BL1840B
6,5
5,0 Ah
BL1450
27
6,5
BL1850,
BL1850B
8,0
6,0 Ah
BL1460B
33
7,0
BL1860B 9,5

25
Anzeige des Akkusymbols (Akkuspannung zu
niedrig) und der Meldung „POWERFAIL“ auf dem Display
sind Anzeichen dafür, dass das Haupt-Akkupack
getauscht werden muss.
Hinweis:
Der Akkupack kann nicht über den mitgelieferten
Netzadapter geladen werden.
Wenn das Akkusymbol (Akkuspannung zu niedrig)
angezeigt wird und ein „EMPTY“ blinkt, müssen die
Backup-Batterien getauscht werden.
Anzeigen der Restladung des Akkus
(Nur für Akkublöcke mit einem „B“ am Ende der
Modellnummer.) (Abb. 8)
Drücken Sie zum Anzeigen der Restladung des Akkus die
Akkuprüftaste. Die Anzeigenlampen leuchten dann
wenige Sekunden lang auf.
015658
HINWEIS:
• In Abhängigkeit von den Bedingungen bei Gebrauch
und von der Umgebungstemperatur kann der
angezeigte Ladezustand geringfügig vom tatsächlichen
Ladezustand abweichen.
Betrieb mit flexibler Stabantenne (Abb. 9)
Richten Sie die flexible Stabantenne wie in der Abbildung
dargestellt auf.
Betrieb mit mitgeliefertem Netzadapter
(Abb. 10)
Entfernen Sie den Gummischutz und stecken Sie den
Netzadapterstecker in die an der linken Radioseite
befindliche Gleichspannungsbuchse. Stecken Sie den
Netzadapter in eine herkömmliche Netzsteckdose. Bei
einem Radiobetrieb mit Netzadapter wird automatisch der
Akkupack getrennt. Bei nicht betriebenem Radio muss
der Netzadapter aus der Steckdose gezogen werden.
Hinweis:
Wenn der Netzadapter Störungen des Radioempfangs im
AM-Frequenzbereich verursacht, müssen Sie das Radio
in einem Abstand von mindestens 30 cm zum
Netzadapter aufstellen.
Radiobetrieb – AM/FM-Sendersuchlauf
1. Schalten Sie das Radio ein, indem Sie die Ein/Aus-
Taste drücken.
2. Drücken Sie die Wellenbereichstaste , um
zwischen AM- oder FM-Band zu wählen.
3. Drücken Sie für einen Sendersuchlauf dauerhaft die
Sendersuchlauftaste . Das Radio scannt das AM/
FM-Band ab der aktuell angezeigten Frequenz und
stoppt bei einer Radiostation ausreichender Stärke
automatisch den Scanvorgang.
4. Nach einigen Sekunden aktualisiert sich das Display.
Das Display zeigt die Frequenz des gefundenen
Signals an.
5. Um einen anderen Sender zu suchen, müssen Sie
erneut die Sendersuchlauftaste gedrückt halten.
6. Wenn das Ende des Frequenzbereichs erreicht
wurde, beginnt das Radio den Suchlauf wieder am
Anfang des Frequenzbereichs.
7. Drehen Sie die Sendersuchlauftaste , um die
gewünschte Lautstärke einzustellen.
Hinweis:
• Stellen Sie während der Lautstärkeeinstellung
sicher, dass in der Anzeige NICHT das FM/AM-
Symbol leuchtet.
• Wenn das AM/FM-Symbol blinkt, können Sie die
Sender manuell einstellen (siehe Abschnitt
„Manuelle Sendereinstellung
– AM/FM“).
8. Um das Radio auszuschalten, drücken Sie die Ein/
Aus-Taste .
Manuelle Sendereinstellung – AM/FM
1. Schalten Sie das Radio ein, indem Sie die Ein/Aus-
Taste drücken.
2. Drücken Sie die Wellenbereichstaste , um
zwischen AM- oder FM-Band zu wählen.
3. Drücken Sie die Sendersuchlauftaste : Die Symbole
FM bzw. AM blinken.
Hinweis:
• Die Blinkdauer der Symbole FM/AM beträgt ca.
10 Sekunden. Nur innerhalb dieses Zeitraums ist
eine manuelle Sendereinstellung möglich.
• Falls Sie während des Blinkens der FM/AM-
Symbole die Lautstärke einstellen möchten,
müssen Sie die Sendersuchlauftaste drücken, um
das Blinken zu beenden. Anschließend können Sie
durch Drehen der Sendersuchlauftaste die
Lautstärke einstellen.
Anzeigenlampen
Verbleibende
Akkuladung
Leuchtet Aus Blinkt
75% bis 100%
50% bis 75%
25% bis 50%
0% bis 25%
Laden Sie den
Akku auf.
Möglicherweise
liegt ein Defekt
des Akkus vor.

26
4. Drehen Sie die Sendersuchlauftaste , um eine
Radiostation einzustellen.
5. Wenn das Ende des Frequenzbereichs erreicht
wurde, beginnt das Radio den Suchlauf wieder am
Anfang des Frequenzbereichs.
6. Drehen Sie die Sendersuchlauftaste , um die
gewünschte Lautstärke einzustellen.
Radiostation im AM/FM-Modus
voreinstellen
Für das AM- und FM-Band stehen jeweils 5
Stationsspeicher zur Verfügung. Die Funktionsweise ist
für jedes Frequenzband gleich.
1. Schalten Sie das Radio ein, indem Sie die Ein/Aus-
Taste drücken.
2. Drücken Sie die Wellenbereichstaste , um das
gewünschte Frequenzband auszuwählen. Stellen Sie
anhand der oben aufgeführten Schritte die
gewünschte Radiostation ein.
3. Halten Sie die gewünschte Stationsvorwahltaste (1 bis
5) gedrückt, bis das Display nach
dem Frequenzwert beispielsweise „P4“ anzeigt. Die
Station wird nun unter der voreingestellten Nummer
gespeichert. Wiederholen Sie diese Schritte für die
verbleibenden Senderspeicher ganz nach Wunsch.
4. Voreingestellte Stationen, die Sie bereits gespeichert
haben, werden anhand der oben aufgeführten
Vorgehensweise wieder überschrieben.
Displaymodi – FM
Das Radio bietet im FM-Modus eine Vielzahl an
Displayoptionen.
1. Drücken Sie wiederholt die Menü-/Infotaste , um
die RDS-Informationen der aktuell eingestellten
Radiostation anzuzeigen.
a. Sendername Zeigt den Namen der aktuell
eingestellten Radiostation an.
b. Programmart Zeigt den Typ der eingestellten
Radiostation an, beispielsweise Pop,
Classic, News usw.
c. Radiotext Zeigt Radiotextmeldungen an,
beispielsweise News usw.
d. Jahr/Tag Zeigt das Jahr und den Wochentag
gemäß der Datumseinstellung des
Radios an.
e. Datum/Tag Zeigt das Datum und den Wochentag
gemäß der Datumseinstellung des
Radios an.
f. Frequenz Zeigt die FM-Frequenz der aktuell
eingestellten Radiostation an.
FM-Stereo (auto)/Mono
Ist das Empfangssignal der eingestellten FM-Radiostation
zu schwach, ist möglicherweise ein Rauschen hörbar.
Dieses Rauschen kann reduziert werden, indem die
Radiostation im Mono- statt im Stereomodus
wiedergegeben wird.
1. Drücken Sie die Ein/Aus-Taste , um das FM-
Band zu wählen und stellen Sie die gewünschte FM-
Station nach oben beschriebener Anleitung ein.
2. Halten Sie die Menü-/Infotaste gedrückt, um zur
Menüeinstellung zu gelangen.
3. Drehen Sie die Sendersuchlauftaste , bis das
Display die FM Auto/Mono-Einstellung anzeigt.
Drücken Sie bei Auto-Einstellung die
Sendersuchlauftaste, um für eine Rauschminderung
in den Monomodus zu wechseln. Drücken Sie zur
Auswahl der Option die Sendersuchlauftaste.
Voreingestellte Radiostation im AM/FM-
Modus wiederaufrufen
1. Schalten Sie das Radio ein, indem Sie die Ein/Aus-
Taste drücken.
2. Drücken Sie die Wellenbereichstaste , um
zwischen AM- oder FM-Band zu wählen.
3. Drücken Sie kurz die gewünschte
Stationsvorwahltaste , damit das
Radio zu einer der gespeicherten Radiostationen
wechselt.
Uhrzeit und Weckalarm
Format von Uhrzeit und Datum einstellen
Für die im Standby-Modus und im Abspielmodus
angezeigte Uhranzeige kann ein unterschiedliches
Format festgelegt werden. Das ausgewählte Format wird
anschließend auch zum Einstellen der Weckalarme
verwendet.
1. Halten Sie die Menü-/Infotaste gedrückt, um zur
Menüeinstellung zu gelangen.
2. Drehen Sie die Sendersuchlauftaste , bis das
Display „CLOCK xxH“ anzeigt. Drücken Sie zur
Einstellung die Sendersuchlauftaste . Das
Zeitformat beginnt zu blinken.
3. Drehen Sie die Sendersuchlauftaste , um entweder
das 12- oder 24-Stunden-Format auszuwählen.
Drücken Sie die Sendersuchlauftaste , um die
Auswahl des Zeitformats zu bestätigen.
Hinweis: Bei Auswahl des 12-Stunden-Formats
verwendet das Radio die 12-Stunden-Uhr für die
Einstellung.
4. Halten Sie die Menü-/Infotaste gedrückt, um zur
Menüeinstellung zu gelangen.
5. Drehen Sie die Sendersuchlauftaste , bis das
Display ein Datum (z. B. THU APR 3) anzeigt.
Drücken Sie zur Einstellung die Sendersuchlauftaste
. Das Datumsformat beginnt zu blinken.

27
6. Drehen Sie die Sendersuchlauftaste , um das
gewünschte Datumsformat auszuwählen. Drücken Sie
die Sendersuchlauftaste , um Ihre Auswahl zu
bestätigen.
Uhrzeit und Datum einstellen
1. Halten Sie die Menü-/Infotaste gedrückt.
2. Drehen Sie die Sendersuchlauftaste , bis das
Display „CLOCK ADJ“ anzeigt. Drücken Sie für eine
Einstellung die Sendersuchlauftaste .
3. Die Stundenanzeige im Display beginnt zu blinken.
Drehen Sie die Sendersuchlauftaste , um die
gewünschte Stunde auszuwählen, und drücken Sie
die Sendersuchlauftaste , um die Einstellung zu
bestätigen. Drehen Sie anschließend die
Sendersuchlauftaste , um die gewünschte Minute
auszuwählen, und drücken Sie die
Sendersuchlauftaste , um die Einstellung zu
bestätigen.
4. Drehen Sie die Sendersuchlauftaste , bis das
Display „DATE ADJ“ anzeigt. Drücken Sie für eine
Einstellung die Sendersuchlauftaste .
5. Drehen Sie die Sendersuchlauftaste , um das
gewünschte Jahr auszuwählen, und drücken Sie die
Sendersuchlauftaste , um die Einstellung zu
bestätigen. Drehen Sie anschließend die
Sendersuchlauftaste , um den gewünschten Monat
auszuwählen, und drücken Sie die
Sendersuchlauftaste , um die Einstellung zu
bestätigen. Drehen Sie anschließend die
Sendersuchlauftaste , um das gewünschte Datum
auszuwählen, und drücken Sie die
Sendersuchlauftaste , um die Einstellung zu
bestätigen.
RDS – Radio Data System
Wenn Sie die Uhrzeit mit Hilfe der RDS-Funktion
einstellen, synchronisiert das Radio die Uhrzeit bei jedem
Sendersuchlauf über RDS mit CT-Signalen.
1. Halten Sie bei Einstellung einer Radiostation mit RDS-
Datenübertragung dauerhaft die Menü-/Infotaste
gedrückt.
2. Drehen Sie die Sendersuchlauftaste , bis das
Display „RDS CT“ und ein Uhrsymbol anzeigt.
Drücken Sie für eine Einstellung die
Sendersuchlauftaste .
3. Drehen Sie die Sendersuchlauftaste , bis das
Display „RDS CT“ anzeigt. Drücken Sie die
Sendersuchlauftaste , um die Einstellung zu
bestätigen. Die Uhrzeit des Radios wird automatisch
nach dem empfangenen RDS-Signal eingestellt.
4. Nach Abschluss dieser Maßnahme zeigt das im LCD-
Display erscheinende RDS-Symbol an, dass es sich
bei der Radiozeit um die RDS-Uhrzeit handelt. Die
Radiouhrzeit ist 5 Tage nach jeder Synchronisation
der Radiozeit mit RDS CT gültig.
Weckzeit einstellen
Am Radio können zwei Weckalarmzeiten eingestellt
werden, jeweils für AM/FM-Radio oder Summeralarm. Die
Weckalarme können entweder im Standby- oder
Wiedergabemodus des Radios eingestellt werden.
a. Einstellen der Radioweckerzeit:
1. Das Radio kann bei ein- oder ausgeschaltetem Radio
eingestellt werden.
2. Halten Sie die Radioweckertaste gedrückt: Das
Radioweckersymbol und die Stundenanzeige blinken,
begleitet von einem Piepton.
3. Während das Radioweckersymbol blinkt,
drehen Sie, um die Stunde auszuwählen, die
Sendersuchlauftaste . Drücken Sie erneut die
Sendersuchlauftaste , um die Stundeneinstellung
zu bestätigen. Drehen Sie anschließend die
Sendersuchlauftaste , um die gewünschte Minute
auszuwählen, und drücken Sie die
Sendersuchlauftaste , um die Einstellung zu
bestätigen.
4. Drehen Sie die Sendersuchlauftaste, um im Display
die Häufigkeitsoptionen für den Weckalarm
anzuzeigen.
Es stehen folgende Weckalarmoptionen zur
Verfügung:
ONCE: Der Weckalarm ertönt 1 Mal.
DAILY: Der Weckalarm ertönt jeden Tag.
WEEKDAY: Der Weckalarm ertönt nur an
Wochentagen.
WEEKEND: Der Weckalarm ertönt nur an
Wochenenden.
Drücken Sie die Sendersuchlauftaste , um die
Einstellung zu bestätigen.
5. Während das Radioweckersymbol blinkt, drehen Sie
die Sendersuchlauftaste, um den gewünschten
Wecksender auszuwählen; drücken Sie anschließend
die Sendersuchlauftaste, um die Auswahl zu
bestätigen.
6. Drehen Sie die Sendersuchlauftaste, um die
gewünschte Lautstärke auszuwählen, und drücken
Sie die Sendersuchlauftaste, um die Lautstärke zu
bestätigen. Die Einstellung des Radioweckers ist jetzt
abgeschlossen.
Hinweis:
Falls kein neuer Radioweckersender ausgewählt wird,
wird der letzte Sender ausgewählt.

28
Hinweis:
Falls der ausgewählte AM/FM-Wecksender bei Ertönen
des Weckalarms nicht verfügbar ist, wird stattdessen der
Summeralarm verwendet.
b. Einstellen des HWS-Summeralarms (Humane Wake
System, leise beginnender Alarmton):
Ein Piepton wird aktiviert, wenn der HWS-Summeralarm
ausgewählt wird.
Der Alarmton wird eine Minute lang alle 15 Sekunden
kürzer abgespielt, gefolgt von einer Minute Stille, bevor
der Zyklus wiederholt wird.
1. Der Summeralarm kann bei ein- oder
ausgeschaltetem Radio eingestellt werden.
2. Halten Sie die Summeralarmtaste gedrückt: Das
Symbol und die Stundenanzeige blinken, begleitet von
einem Piepton.
3. Während das Summeralarmsymbol blinkt,
drehen Sie, um die Stunde auszuwählen, die
Sendersuchlauftaste . Drücken Sie erneut die
Sendersuchlauftaste , um die Stundeneinstellung
zu bestätigen. Drehen Sie anschließend die
Sendersuchlauftaste , um die gewünschte Minute
auszuwählen, und drücken Sie die
Sendersuchlauftaste , um die Einstellung zu
bestätigen.
4. Drehen Sie die Sendersuchlauftaste und im Display
werden die Häufigkeitsoptionen für den Weckalarm
angezeigt.
Es stehen folgende Weckalarmoptionen zur
Verfügung:
ONCE: Der Weckalarm ertönt 1 Mal.
DAILY: Der Weckalarm ertönt jeden Tag.
WEEKDAY: Der Weckalarm ertönt nur an
Wochentagen.
WEEKEND: Der Weckalarm ertönt nur an
Wochenenden.
Drücken Sie die Sendersuchlauftaste , um die
Einstellung zu bestätigen.
Hinweis:
Für den Summeralarm ist keine Lautstärkeanpassung
möglich.
Wenn der Weckalarm ertönt
Drücken Sie die Ein/Aus-Taste , um einen aktivierten
Weckalarm abzubrechen.
Weckalarm deaktivieren bzw. abbrechen
Zum Deaktivieren eines aktiven Weckalarms drücken Sie
entweder die Ein/Aus-Taste oder halten Sie die
entsprechende Alarmtaste gedrückt, um den Weckalarm
abzubrechen.
Schlummerfunktion
1. Wenn der Weckalarm ertönt, drücken Sie eine
beliebige Taste außer der Ein/Aus-Taste , um
den Weckalarm für 5 Minuten verstummen zu lassen.
Das Display zeigt „SNOOZE“ an.
2. Zum Einstellen der Ruhezeit für die
Schlummerfunktion halten Sie die Menü-/Infotaste
gedrückt, um zur Menüeinstellung zu gelangen.
3. Drehen Sie die Sendersuchlauftaste , bis das
Display „SNOOZE X“ anzeigt. Drücken Sie zur
Einstellung die Sendersuchlauftaste . Drehen Sie
die Sendersuchlauftaste , um die Ruhezeit für die
Schlummerfunktion auf 5, 10, 15 oder 20 Minuten
einzustellen.
4. Drücken Sie die Ein/Aus-Taste , um die
Schlummerfunktion bei einem ausstehenden Alarm
abzubrechen.
Einschlaffunktion
Das Radio schaltet nach Verstreichen einer
voreingestellten Zeit automatisch aus. Die
Einschlaffunktion kann auf 60, 45, 30, 15, 120 und 90
Minuten eingestellt werden.
1. Drücken und halten Sie die Ein/Aus-Taste , um
die Einschlaffunktion aufzurufen. Das Display zeigt
„SLEEP XX“ an.
2. Halten Sie die Ein/Aus-Taste weiterhin gedrückt,
damit das Display die Einschlaffunktionsoptionen
anzeigt. Lassen Sie die Taste los, wenn das Display
die gewünschte Einschlaffunktionseinstellung anzeigt.
Die Einstellung wird gespeichert und das LC-Display
kehrt zur normalen Anzeige zurück.
3. Das Radio schaltet sich automatisch nach
Verstreichen der voreingestellten Zeit aus. Das
Display zeigt das Symbol der Einschlaffunktion
an.
4. Zum Abbrechen der Einschlaffunktion vor
Verstreichen der voreingestellten Zeit drücken Sie
einfach die Ein/Aus-Taste , um das Radio
manuell auszuschalten.
Loudness
Mit Hilfe der Loudness-Funktion können Sie tiefere und
höhere Klangfrequenzen Ihres Radios ausgleichen.
1. Halten Sie die Menü-/Infotaste gedrückt, um zur
Menüeinstellung zu gelangen.
2. Drehen Sie die Sendersuchlauftaste , bis das
Display „LOUD ON“ oder „LOUD OFF“ anzeigt.
Drücken Sie für eine Einstellung die
Sendersuchlauftaste .
3. Drehen Sie die Sendersuchlauftaste , um mit ON
die Loudness-Funktion zu aktivieren. Drücken Sie

29
anschließend die Sendersuchlauftaste , um die
Einstellung zu bestätigen.
4. Wählen Sie zum Ausschalten der Loudness-Funktion
OFF und drücken Sie die Sendersuchlauftaste , um
die Einstellung zu bestätigen.
Zusatzeingangsbuchse
Es stehen zwei 3,5 mm-Stereo-Zusatzeingangsbuchsen
zur Verfügung. Eine dieser Zusatzeingangsbuchsen
befindet sich an der Vorderseite des Radios (AUX IN 1);
die andere im Batteriefach (AUX IN 2).
1. Schließen Sie eine externe Audioquelle
(beispielsweise iPod, MP3- oder CD-Player) an die
Zusatzeingangsbuchse an.
2. Drücken Sie wiederholt die Wellenbereichstaste ,
bis das Display AUX IN 1 oder 2 anzeigt.
3. Stellen Sie die Lautstärke an Ihrem iPod, MP3- oder
CD-Player ein, um einen adäquaten Signalpegel vom
Player zu gewährleisten. Stellen Sie anschließend die
Lautstärke über die Sendersuchlauftaste am Radio
für einen angenehmen Hörgenuss ein.
Audiowiedergabe über Bluetooth
®
Sie müssen Ihr Bluetooth
®
-Gerät zuerst mit Ihrem Radio
koppeln (Pairing), bevor Sie automatisch über Ihr Radio
Audiodateien abspielen/streamen können. Durch das
Pairing entsteht eine permanente Verbindung, durch die
sich zwei Geräte immer gegenseitig identifizieren können.
Pairing-Vorgang (Koppelung) mit Ihrem
Bluetooth
®
-Gerät durchführen
1. Drücken Sie zur Auswahl der Bluetooth
®
-Funktion die
Wellenbereichstaste . Das Display zeigt
„BT READY“ an und es blinkt alle 2 Sekunden die
Meldung „READY“ auf.
2. Aktivieren Sie die Bluetooth
®
-Funktion Ihres
Bluetooth
®
-fähigen Geräts gemäß dem
dazugehörigen Benutzerhandbuch.
3. Halten Sie die Pairing-Taste gedrückt: Das
Display zeigt anschließend im 1-Sekunden-Blinktakt
„BT PAIR“ an. Führen Sie nun auf Ihrem Bluetooth
®
-
Gerät eine Suche nach Ihrem Radio aus. Wenn der
Name Ihres Radios auf Ihrem Bluetooth
®
-Gerät
angezeigt wird, wählen Sie diesen Eintrag auf Ihrer
Bluetooth
®
-Liste an.
Bei älteren Mobilgeräten (d.h. Bluetooth
®
-Geräten
BT2.1 bzw. älter) müssen Sie möglicherweise das
Passwort „0000“ eingeben.
4. Ihr Bluetooth
®
-Gerät wird mit dem Radio verbunden.
5. Nach erfolgreicher Verbindung zeigt das Display
dauerhaft „BLUETOOTH“ an und die
Hintergrundbeleuchtung dimmt nach 10 Sekunden ab.
Sie können nun von Ihrem Bluetooth
®
-Gerät Audiodateien
über Ihr Radio abspielen.
Wiedergabe eines Bluetooth
®
-Geräts, das
bereits über Pairing verbunden ist
1. Drücken Sie zur Auswahl der Bluetooth®-Funktion die
Wellenbereichstaste . Das Display zeigt „BT
READY“ an und es blinkt alle 2 Sekunden die
Meldung „READY“ auf.
2. Suchen Sie Ihr Radio auf Ihrem Bluetooth
®
-Gerät und
stellen Sie eine Verbindung her. Manche Geräte
verbinden sich eventuell automatisch mit dem Radio.
Sie können nun von Ihrem Bluetooth
®
-Gerät Audiodateien
über Ihr Radio abspielen.
Hinweis:
a) Das Radio kann über Pairing mit bis zu 8 Bluetooth
®
-
Geräten gekoppelt werden. Wenn Sie mehr als diese
Anzahl an Bluetooth
®
-Geräten koppeln, wird der
Pairing-Verlauf beginnend mit dem ältesten Pairing
überschrieben.
b) Sollten 2 Bluetooth
®
-Geräte gleichzeitig nach Ihrem
Radio suchen, zeigt es auf beiden Geräten seine
Pairing-Bereitschaft an.
c) Wenn die Verbindung Ihres Bluetooth
®
-Geräts zum
Radio vorübergehend unterbrochen ist, müssen Sie die
Verbindung zwischen dem Gerät und dem Radio
wieder manuell aufbauen.
d) Wenn Ihr Bluetooth
®
-Gerät zwar den Namen Ihres
Radios auflistet, aber keine Verbindung aufbaut,
löschen Sie bitte den Eintrag mit dem Namen Ihres
Radios von der Liste und führen Sie für das Gerät
erneut ein Pairing mit Ihrem Radio aus (siehe oben).
e) Der effektive Betriebsbereich zwischen dem Radio und
dem über Pairing verbundenen Bluetooth
®
-Gerät
beträgt ca. 10 m.
f) Etwaige Hindernisse zwischen dem Radio und dem
Bluetooth
®
-Gerät können allerdings den
Betriebsbereich einschränken.
Verbindung zu Ihrem Bluetooth
®
-Gerät
unterbrechen
Halten Sie 2-3 Sekunden lang die Pairing-Taste
gedrückt, um die Verbindung zu Ihrem Bluetooth
®
-Gerät
zu unterbrechen. Auf dem Display verschwindet wieder
die „BLUETOOTH“-Meldung, wodurch die Deaktivierung
der Bluetooth
®
-Verbindung angezeigt wird.
Ladevorgang über USB-
Stromversorgungsanschluss (Abb. 10)
Der USB-Port befindet sich an der Vorderseite des
Radios. Sie können ein USB-Gerät über den USB-Port
aufladen.
1. Schließen Sie das USB-Gerät, z. B. einen iPod, MP3-
oder CD-Spieler, über ein handelsübliches USB-Kabel
an.
2. Drücken Sie die Ein/Aus-Taste , um Ihr Radio
einzuschalten.

30
3. Das Radio ist sowohl im Netzbetrieb, als auch im
Batteriebetrieb in der Lage, das USB-Gerät
aufzuladen, sofern das Radio eingeschaltet ist und
sich im FM-Modus, BT-Modus oder bei
angeschlossener externer Audio-Quelle im AUX-
Modus befindet.
Hinweis:
Sie können im AM-Modus keine USB-Geräte aufladen, da
der Radioempfang durch das Aufladen des USB-Geräts
äußerst stark beeinträchtigt wird.
• Beim aktiven USB-Ladevorgang steht nur eine
eingeschränkte Lautsprecherleistung zur Verfügung.
• Der USB-Port kann max. 5 V/1 A zur Verfügung stellen.
Wichtig:
• Vor dem Anschluss Ihres USB-Geräts am
Ladeanschluss müssen Sie immer ein Daten-Backup
Ihres USB-Geräts ausführen! Ihre Daten könnten sonst
möglicherweise durch unvorhersehbare Umstände
verloren gehen.
• Der Ladeanschluss kann möglicherweise einige USB-
Geräte nicht mit Elektrizität versorgen.
• Schließen Sie die USB-Abdeckung und ziehen Sie das
USB-Kabel ab, wenn Sie den USB-Port nicht benutzen.
• Schließen Sie am USB-Port keine
Versorgungsspannung an! Es besteht ansonsten
Brandgefahr! Der USB-Port ist ausschließlich zum
Laden von Niederspannungsgeräten geeignet.
Schließen Sie immer die Abdeckung des USB-Ports,
wenn Sie kein Niederspannungsgerät laden.
• Niemals Fremdkörper (Nägel, Draht etc.) in den USB-
Stromversorgungsanschluss einführen! Es könnte ein
Kurzschluss entstehen und einen Brand mit
Rauchentwicklung verursachen.
• Schließen Sie niemals den USB-Port des Radios am
USB-Port eines PCs an, weil dadurch beide Geräte
beschädigt werden können!
WARTUNG
ACHTUNG:
• Verwenden Sie zum Reinigen niemals Kraftstoffe,
Benzin, Verdünner, Alkohol oder ähnliches. Dies kann
zu Verfärbungen, Verformungen oder Rissen führen.
Technische Daten:
Elektrische Daten
Netzadapter Gleichspannung 12 V, 1.200 mA;
mittlerer Stift Pluspol
Akku UM-3 (Größe AA) x 2 für Backup
Aufsteckakku: 7,2 V bis 10,8 V
Einschubakku: 14,4 V bis 18 V
Frequenzbereich FM 87,50 - 108 MHz
(in Schritten zu 0,05 MHz)
AM (MW) 522 - 1.629 kHz
(in Schritten zu 9 kHz)
Bluetooth
®
Bluetooth
®
QD ID 58625
(Die Bluetooth
®
-Wortmarke und
die Bluetooth
®
-Logos sind
eingetragene Marken von
Bluetooth SIG, Inc.)
Bluetooth
®
-Version 4.0
Bluetooth
®
-Profile A2DP/SCMS-T
Übertragungsleistung Bluetooth
®
-Leistungsklasse 2
Übertragungsbereich Max. 10 m (je nach
Betriebsbedingungen)
Unterstützter Bluetooth
®
-Codec
SBC
Kompatibles Bluetooth
®
-Profil
A2DP
Elektrische Daten
Lautsprecher 3,5 Zoll, 8 Ohm x 2
Ausgangsleistung 7,2 V: 0,5 W x 2
10,8 V: 1,2 V x 2
14,4 V: 2,2 W x 2; 18 V:
3,5 W x 2
Eingangsbuchse Durchmesser 3,5 mm (AUX IN1/
AUX IN2)
Antennensystem FM: Flexible Stabantenne
Stabantenne
AM: Stabantenne
Abmessung (B x H x T) in mm
282 x 294 x 163
Gewicht 4,3 kg (ohne Akku)

31
ITALIANO (Istruzioni originali)
Simboli
Di seguito sono riportati i simboli utilizzati per
l’apparecchio. È importante comprenderne il significato
prima dell’uso.
ISTRUZIONI IMPORTANTI PER LA
SICUREZZA
AVVERTENZA:
Durante l’utilizzo di utensili elettrici, è necessario adottare
misure di sicurezza basilari per ridurre il rischio di incendi,
scosse elettriche e lesioni personali, come ad esempio:
1. Leggere attentamente queste istruzioni per l’uso
insieme a quelle del caricabatteria prima dell’utilizzo.
2. Pulire solo con un panno asciutto.
3. Non installare vicino a fonti di calore come radiatori,
termoregolatori, stufe o altri apparecchi (inclusi gli
amplificatori) che producono calore.
4. Utilizzare solo dispositivi opzionali/accessori
specificati dal produttore.
5. Scollegare l’apparecchio durante i temporali o durante
i periodi di inutilizzo prolungato.
6. Le radio con batteria integrata o separata devono
essere ricaricate solo con il caricabatterie specifico
per quel tipo di batteria. Un caricabatterie specifico
per un determinato tipo di batteria potrebbe
comportare il pericolo di incendio se utilizzato con
un’altra batteria.
7. Utilizzare la radio a batteria solo con le batterie
specifiche. L’utilizzo di batterie diverse potrebbe
provocare il pericolo di incendio.
8. Se la batteria non è in uso, tenerla lontana da altri
oggetti in metallo quali graffette, monete, chiavi,
chiodi, viti o altri piccoli oggetti metallici che possano
stabilire un contatto tra un terminale e l’altro. Un
cortocircuito dei terminali della batteria potrebbe
causare scintille, ustioni o incendi.
9. Evitare il contatto con elementi provvisti di
collegamento a terra come tubi, radiatori, frigoriferi e
altri elementi conduttori. Il rischio di scossa elettrica
aumenta se il corpo dell’operatore ha un collegamento
a terra.
10. L’uso improprio può provocare la fuoriuscita del liquido
della batteria; evitare il contatto con tale liquido. In
caso di contatto accidentale sciacquare
abbondantemente con acqua. Se il liquido entra in
contatto con gli occhi, consultare un medico. Il liquido
della batteria può causare irritazioni o ustioni.
CONSERVARE QUESTE
ISTRUZIONI.
NORME SPECIFICHE DI
SICUREZZA
RELATIVE ALLA BATTERIA
1. Prima di utilizzare la batteria, leggere tutte le
istruzioni e gli avvisi di sicurezza relativi a (1)
caricabatteria, (2) batteria e (3) prodotto utilizzato
con la batteria.
2. Non smontare la batteria.
3. Se il tempo di funzionamento è diventato
eccessivamente breve, non utilizzare l’utensile.
Potrebbero verificarsi surriscaldamenti, ustioni o
esplosioni.
4. In caso di contatto dell’elettrolita della batteria con
gli occhi, sciacquare con acqua fresca e rivolgersi
immediatamente a un medico. Potrebbero
verificarsi danni permanenti alla funzionalità
visiva.
5. Non cortocircuitare la batteria:
(1) Non toccare i terminali della batteria con
materiale in grado di condurre elettricità.
(2) Evitare di conservare la batteria a contatto
con oggetti metallici quali chiodi, monete e
così via.
(3) Non esporre le batterie all’acqua o alla
pioggia.
Un cortocircuito può provocare un elevato flusso
di corrente, surriscaldamento, ustioni o rotture.
6. Non conservare l’utensile e la batteria a una
temperatura superiore a 50 °C.
7. Evitare di smaltire le batterie danneggiate o
esaurite bruciandole. Se esposte al fuoco, le
batterie possono esplodere.
8. Evitare di far cadere o di colpire la batteria.
9. Non utilizzare batterie danneggiate.
10. Le batterie agli ioni di litio contenute nel
dispositivo sono soggette ai requisiti di legge
relativi a merci pericolose.
Per il trasporto commerciale, ad esempio da parte di
terzi o di spedizionieri, si devono osservare requisiti
speciali di imballaggio ed etichettatura.
Durante la preparazione dell’articolo da spedire, è
necessario consultare un esperto di materiali
pericolosi. Si prega di osservare anche eventuali,
ulteriori norme nazionali.
Fissare con del nastro adesivo o nascondere i punti di
contatto aperti, e imballare la batteria in modo tale che
non possa muoversi all’interno dell’imballaggio.
11. Attenersi alle normative della propria area
geografica relative allo smaltimento delle batterie.
12. Per evitare qualunque rischio, si consiglia di leggere il
manuale della batteria sostituibile.
La corrente di scarico massima della batteria, inoltre,
deve essere maggiore o uguale a 8A.
Leggere il manuale di istruzioni.
Solo per Paesi UE
Non gettare le apparecchiature elettriche o le
batterie tra i rifiuti domestici.
Secondo le Direttive Europee sui rifiuti di
apparecchiature elettriche ed elettroniche, su
batterie e accumulatori e sui rifiuti di batterie
e di accumulatori, e la sua attuazione in
conformità alle norme nazionali, le
apparecchiature elettriche e le batterie
esauste devono essere raccolte
separatamente, al fine di essere riciclate in
modo eco-compatibile.
Cd
Ni-MH
Li-ion

32
ATTENZIONE:
• Se la batteria non è sostituita correttamente, potrebbe
verificarsi un’esplosione.
• Sostituire la batteria soltanto con una dello stesso tipo
o di tipo equivalente.
CONSERVARE QUESTE
ISTRUZIONI.
ATTENZIONE: Utilizzare esclusivamente batterie
originali Makita.
L’utilizzo di batterie non originali Makita o di batterie
modificate, potrebbe dare luogo all’esplosione della
batteria, provocando incendi, lesioni personali e danni.
Inoltre, tale utilizzo determina l’annullamento della
garanzia Makita per l’utensile e il caricabatterie Makita.
Suggerimenti per il prolungamento della
durata della batteria
1. Caricare le batterie prima di scaricarle
completamente.
Se si nota una diminuzione di potenza
dell’utensile, interrompere il lavoro e ricaricare la
batteria.
2. Non ricaricare una batteria già completamente
carica.
In caso contrario, la durata operativa della batteria
potrebbe ridursi.
3. Caricare la batteria in ambienti con temperatura
compresa tra 10 °C e 40 °C. Prima di caricare una
batteria surriscaldata, lasciarla raffreddare.
4. Caricare la batteria qualora non venga utilizzata
per un lungo periodo (superiore a sei mesi).
Descrizione (Fig. 1)
1. Porta di alimentazione USB
2. Pulsante Power/Timer sveglia
3. Pulsante Source
4. Radiosveglia
5. Allarme acustico
6. Pulsante Preset stations/Preset 1 come pulsante Pair
Bluetooth
®
7. Pulsante Menu/Info
8. Manopola Volume/Tuning control/Select
9. Presa DC IN
10. AUX IN 1
11. Display LCD
12. Impugnatura
13. Antenna morbida
14. Aprivano batteria
15. Altoparlante
16. Coperchio della batteria
17. Terminale d’ingresso (AUX IN 2)
18. Comparto batterie (comprese batterie principali e
batterie di riserva)
19. Alto
20. Sinistra
21. Davanti
22. Destra
23. Dietro; coperchio della batteria chiuso
24. Dietro; coperchio della batteria aperto
25. Batteria
26. Pulsante
27. Spie luminose
28. Pulsante di controllo
Display LCD:
A. Radiosveglia
B. Allarme acustico
C. Simbolo dello stereo
D. Indicatore di batteria scarica
E. Orologio
F. Frequenza
G. RDS (Radio data system)
H. Stato di riposo
I. Indicazione orologio AM/PM
Installazione della batteria
Nota:
Se si conservano le batterie di riserva nell’apposito
scomparto si evita la perdita dei dati memorizzati nelle
memorie preimpostate.
1. Tirare l’aprivano batteria per aprire il comparto delle
batterie principali e il comparto delle batterie di riserva.
(Fig. 2)
2. Rimuovere il coperchio del comparto delle batterie di
riserva e inserire 2 batterie UM-3 (misura AA).
Assicurarsi che le batterie vengano inserite con la
giusta polarità come illustrato. Riposizionare il
coperchio della batteria. (Fig. 3)
3. Una volta inserite le batterie di riserva, inserire le
batterie principali per l’accensione della radio. Di
seguito viene riportato l’elenco delle batterie
compatibili con questa radio.

33
La seguente tabella indica il tempo di funzionamento con una singola carica in modalità Radio.
: Batteria cluster
: Batteria a scorrimento
Nota:
La tabella relativa al tempo di funzionamento della batteria sopra riportata è di puro riferimento. Il tempo di funzionamento
effettivo potrebbe variare in base al tipo di batteria, alle condizioni di caricamento e all’ambiente di utilizzo.
Inserimento o rimozione della batteria a
scorrimento (Fig. 4 e 5)
• Per inserire la batteria, allineare la linguetta sulla
batteria con la scanalatura nell’alloggiamento e farla
scorrere in posizione. Inserire a fondo la batteria fino a
bloccarla in posizione con uno scatto.
• Se è visibile l’indicatore rosso sul lato superiore del
pulsante, significa che la batteria non è completamente
inserita. Inserirla a fondo fino alla scomparsa
dell’indicatore rosso. In caso contrario, potrebbe
fuoriuscire accidentalmente dall’utensile, provocando
danni all’operatore o a eventuali osservatori.
• Non forzare l’inserimento della batteria. Se la batteria
non scorre agevolmente, significa che la manovra di
inserimento non è corretta.
• Per rimuovere la batteria, estrarla dall’utensile facendo
scorrere il pulsante sulla parte anteriore della batteria o
premendo i pulsanti su entrambi i lati della batteria
stessa.
Inserimento o rimozione della batteria
cluster (Fig. 6 e 7)
• Per inserire la batteria, allineare la linguetta sulla
batteria con la scanalatura nell’alloggiamento e farla
scorrere in posizione.
Capacità della
batteria
Tensione della batteria
ALL’USCITA ALTOPARLANTE
= 50 mW + 50 mW (unità: ore)
(circa)
7,2 V 10,8 V 14,4 V 18 V
In modalità radio o
AUX
In modalità
Bluetooth
®
con
ricarica USB
1,0 Ah BL7010 5,5 0,8
1,1 Ah
BL1411G,
L1451
5,5
1,5
BL1811G,
L1851
1,8
1,3 Ah
BL1013
7,5
1,5
BL1415,
BL1413G,
L1453
1,8
BL1815,
BL1813G,
L1853
2,0
1,5 Ah
BL1415N
8,5
2,0
BL1815N 2,5
2,0 Ah
BL1820,
BL1820B
11 3,2
3,0 Ah
BL1430,
BL1430B
16
4,0
BL1830,
BL1830B
5,0
4,0 Ah
BL1440
22
5,5
BL1840,
BL1840B
6,5
5,0 Ah
BL1450
27
6,5
BL1850,
BL1850B
8,0
6,0 Ah
BL1460B
33
7,0
BL1860B 9,5

34
• Per rimuovere la batteria estrarla dal terminale mentre
si tengono premuti i pulsanti sul lato della batteria
stessa.
Riportare l’aprivano batteria alla posizione originale.
In caso di cadute di alimentazione, distorsioni, “suoni
acuti”, o quando sul display appaiono il simbolo di batteria
scarica e “POWERFAIL”, è necessario sostituire le
batterie principali.
Nota:
Non è possibile ricaricare la batteria tramite l’adattatore di
corrente AC in dotazione.
Quando appare il simbolo di batteria scarica e
lampeggia una “EMPTY”, è giunto il momento di sostituire
le batterie di riserva.
Indicazione della capacità residua della
batteria
(Solo per batterie il cui codice modello termina con “B”).
(Fig. 8)
Premere il pulsante di controllo sulla batteria per
visualizzare la capacità residua della batteria. Le spie
luminose si illuminano per qualche secondo.
015658
NOTA:
• Il valore indicato potrebbe variare leggermente dalla
capacità effettiva in base alle condizioni di utilizzo e
alla temperatura ambientale.
Utilizzo dell’antenna morbida (Fig. 9)
Posizionare verticalmente l’antenna morbida come
mostrato nella figura.
Utilizzo dell’adattatore di corrente AC in
dotazione (Fig. 10)
Rimuovere la protezione in gomma e inserire la spina
dell’adattatore nella presa DC sul lato sinistro della radio.
Collegare l’adattatore a una presa di corrente standard.
Durante l’utilizzo dell’adattatore, la batteria viene
scollegata automaticamente. Se non utilizzato,
l’adattatore AC deve essere scollegato dall’alimentazione
principale.
Nota:
Se nella banda AM la radio presenta interferenze a causa
dell’adattatore, allontanare la radio di oltre 30 cm
dall’adattatore AC.
Funzionamento della radio – Scansione
sintonizzazione AM/FM
1. Premere il pulsante Power per accendere la
radio.
2. Premere il pulsante Source per selezionare la
modalità radio AM o FM.
3. Tenere premuta la manopola Tuning control per
eseguire la sintonizzazione automatica. La radio
analizza la banda AM/FM dalla frequenza al momento
visualizzata e interrompe automaticamente la
scansione appena trova una stazione il cui segnale è
sufficientemente forte.
4. Dopo alcuni secondi il display si aggiorna. Il display
mostra la frequenza del segnale trovato.
5. Per trovare altre stazioni, tenere premuta come prima
la manopola Tuning control .
6. Raggiunta la fine della banda di frequenza, la radio
riprende la sintonizzazione partendo dall’estremo
opposto della banda.
7. Ruotare la manopola Tuning control per regolare il
livello dell’audio come desiderato.
Nota:
• Mentre si regola il volume, assicurarsi che FM/AM
NON stia lampeggiando sullo schermo.
• Se AM/FM lampeggia sullo schermo è possibile
sintonizzare le stazioni manualmente (per maggiori
dettagli, vedere la sezione di “Sintonizzazione
manuale – AM/FM”).
8. Per spegnere la radio, premere il pulsante Power
.
Sintonizzazione manuale – AM/FM
1. Premere il pulsante Power per accendere la
radio.
2. Premere il pulsante Source per selezionare la
modalità radio AM o FM.
3. Premere la manopola Tuning control ; in questo
modo sarà possibile vedere FM o AM lampeggiare sul
display.
Nota:
• FM/AM lampeggia per circa 10 secondi. Durante
questo periodo è consentita solo la sintonizzazione
manuale.
Spie luminose
Capacità residua
Accesa Spenta Lampeggiante
Dal 75% al 100%
Dal 50% al 75%
Dal 25% al 50%
Dal 0% al 25%
Caricare la
batteria.
Probabile
malfunzionamento
della batteria.

35
• Se si vuole regolare il volume mentre FM/AM sta
lampeggiando, premere la manopola Tuning
control per arrestare il lampeggiamento. A questo
punto, è possibile ruotare la manopola Tuning
control per regolare il livello dell’audio.
4. Ruotare la manopola Tuning control per
sintonizzarsi su una stazione.
5. Raggiunta la fine della banda di frequenza, la radio
riprende la sintonizzazione partendo dall’estremo
opposto della banda.
6. Utilizzare la manopola Tuning control per regolare
il livello dell’audio come desiderato.
Preimpostazione delle stazioni in
modalità AM/FM
Sono disponibili 5 stazioni preimpostate rispettivamente
per la radio AM e FM. Sono utilizzate allo stesso modo
per ogni banda di frequenza.
1. Premere il pulsante Power per accendere la
radio.
2. Premere il pulsante Source per selezionare la
banda di frequenza desiderata. Sintonizzare la
stazione radio desiderata come descritto sopra.
3. Tenere premuto il pulsante Preset richiesto (da 1 a 5)
finché il display mostra, per esempio,
“P4” dopo la frequenza. La stazione viene
memorizzata utilizzando il numero preimpostato.
Ripetere questa procedura per le restanti preselezioni
in base a quanto desiderato.
4. È possibile sovrascrivere le stazioni preimpostate già
memorizzate seguendo la procedura sopra indicata.
Modalità di visualizzazione – FM
La radio presenta diverse opzioni di visualizzazione per la
modalità radio FM.
1. Premere ripetutamente il pulsante Menu/Info per
visualizzare le informazioni RDS relative alla stazione
che si sta ascoltando.
a. Nome della stazione Visualizza il nome della
stazione che si sta ascoltando.
b. Tipo del programma Visualizza il tipo di stazione che
si sta ascoltando (ad esempio
Pop, Classica, Notizie, ecc.)
c. Testo della radio Visualizza il messaggio di testo
della radio come nuove voci,
ecc.
d. Anno/Giorno Visualizza l’anno e il giorno
della settimana in base
all’impostazione della data della
radio.
e. Data/Giorno Visualizza la data e il giorno
della settimana in base
all’impostazione della data della
radio.
f. Frequenza Visualizza la frequenza FM
della stazione che si sta
ascoltando.
FM stereo (auto)/mono
Se la stazione radio FM che si sta ascoltando ha un
segnale debole si potrebbero udire alcuni fruscii. Per
ridurre il fruscio, riprodurre la stazione in mono anziché in
stereo.
1. Premere il pulsante Power per selezionare la
banda FM e sintonizzarsi sulla stazione FM desiderata
come indicato in precedenza.
2. Tenere premuto il pulsante Menu/Info per
accedere alle impostazioni del menu.
3. Ruotare la manopola Tuning control finché le
impostazioni FM Auto/mono non sono visualizzate sul
display. Se l’impostazione è Auto, premere la
manopola Tuning control per passare alla modalità
Mono e ridurre il fruscio. Premere la manopola Tuning
control per selezionare l’opzione.
Richiamo di una preselezione in modalità
AM/FM
1. Premere il pulsante Power per accendere la
radio.
2. Premere il pulsante Source per selezionare la
modalità radio AM o FM.
3. Premere momentaneamente il pulsante Preset
desiderato per sintonizzare la radio
su una delle stazioni memorizzate nella memoria
preimpostata.
Orologio e Sveglie
Impostare il formato dell’ora e della data
Il display dell’orologio utilizzato in modalità stand-by e
sulle schermate in modalità di riproduzione può essere
impostato su diversi formati. Il formato selezionato viene
utilizzato anche per l’impostazione delle sveglie.
1. Tenere premuto il pulsante Menu/Info per
accedere alle impostazioni del menu.
2. Ruotare la manopola Tuning control finché
“CLOCK xxH” non è visualizzato sul display, quindi
premere la manopola Tuning control per accedere
all’impostazione. Il formato dell’ora inizia a
lampeggiare.
3. Ruotare la manopola Tuning control per
selezionare il formato 12 o 24 ore. Premere la
manopola Tuning control per confermare la scelta
del formato dell’orologio.
Nota: Se è stato scelto il formato 12 ore, per le
impostazioni la radio utilizza l’orologio di 12 ore.
4. Tenere premuto il pulsante Menu/Info per
accedere alle impostazioni del menu.

36
5. Ruotare la manopola Tuning control finché una
data (es. THU APR 3) non è visualizzata sul display,
quindi premere la manopola Tuning control per
accedere all’impostazione. Il formato dell’ora inizia a
lampeggiare.
6. Ruotare la manopola Tuning Control per
selezionare il formato della data desiderato. Premere
la manopola Tuning control per confermare la
scelta.
Impostazione data e ora
1. Tenere premuto il pulsante Menu/Info .
2. Ruotare la manopola Tuning control finché
“CLOCK ADJ” non è visualizzato sul display. Premere
la manopola Tuning control per accedere
all’impostazione.
3. L’impostazione dell’ora sul display inizia a
lampeggiare. Ruotare la manopola Tuning control
per selezionare l’ora desiderata, quindi premere la
manopola Tuning control per confermare
l’impostazione. Ruotare quindi la manopola Tuning
control per selezionare il minuto desiderato, quindi
premere la manopola Tuning control per
confermare l’impostazione.
4. Ruotare la manopola Tuning control finché
“DATE ADJ” non è visualizzato sul display. Premere la
manopola Tuning control per accedere
all’impostazione.
5. Ruotare la manopola Tuning control per
selezionare l’anno desiderato, quindi premere la
manopola Tuning control per confermare
l’impostazione. Ruotare quindi la manopola Tuning
control per selezionare il mese desiderato, quindi
premere la manopola Tuning control per
confermare l’impostazione. Ruotare quindi la
manopola Tuning control per selezionare la data
desiderata, quindi premere la manopola Tuning
control per confermare l’impostazione.
Radio Data System (RDS)
Quando si imposta l’ora utilizzando la funzione RDS, la
radio sincronizza l’orologio ogni volta in cui si sintonizza
su una stazione radio RDS con segnali CT.
1. Quando si sintonizza su una stazione che trasmette
dati RDS, tenere premuto il pulsante Menu/Info .
2. Ruotare la manopola Tuning control finché
“RDS CT” e il simbolo dell’orologio non sono
visualizzati sul display. Premere la manopola Tuning
control per accedere all’impostazione.
3. Ruotare la manopola Tuning control finché
“RDS CT” non è visualizzato sul display. Premere la
manopola Tuning control per confermare
l’impostazione. L’ora della radio viene impostata
automaticamente in base ai dati RDS ricevuti.
4. Quando l’azione è completata, l’icona RDS appare sul
display LCD indicando che l’ora della radio è l’ora
RDS. Ogni volta che viene sincronizzata con RDS CT,
l’ora della radio è valida per 5 giorni .
Regolazione della sveglia
La radio dispone di due allarmi, ognuno dei quali può
essere impostato per la sveglia con radio AM/FM o con
l’allarme acustico. Le sveglie possono essere impostate
mentre l’unità è in modalità standby o durante la
riproduzione.
a. Impostazione ora radiosveglia:
1. La radio può essere attivata sia a radio accesa che a
radio spenta.
2. Tenere premuto il pulsante della radiosveglia ;
in questo modo il simbolo della radiosveglia e l’ora
visualizzata lampeggeranno e si udirà un bip.
3. Mentre il simbolo della radiosveglia lampeggia,
ruotare la manopola Tuning control per selezionare
l’ora, quindi premere di nuovo la manopola Tuning
control per confermare l’impostazione dell’ora.
Ruotare quindi la manopola Tuning control per
selezionare il minuto desiderato, quindi premere la
manopola Tuning control per confermare
l’impostazione.
4. Ruotare la manopola Tuning control; in questo modo il
display mostrerà le opzioni di frequenza per la sveglia.
Le opzioni per la sveglia sono le seguenti:
ONCE - la sveglia suona una volta sola
DAILY - la sveglia suona ogni giorno
WEEKDAY - la sveglia suona solo nei giorni feriali
WEEKEND - la sveglia suona solo nei weekend
Premere la manopola Tuning control per
confermare l’impostazione.
5. Mentre il simbolo della radiosveglia lampeggia,
ruotare la manopola Tuning control per selezionare la
stazione e la banda per la sveglia desiderate, quindi
premere la manopola Tuning control per confermare
la selezione.
6. Ruotare la manopola Tuning control per selezionare il
volume desiderato, quindi premere la manopola
Tuning control per confermare il volume.
L’impostazione della radiosveglia è completata.
Nota:
Se non viene selezionata alcuna stazione radio, verrà
considerata l’ultima registrata.
Nota:
Se la stazione AM/FM selezionata non è disponibile al
momento del suono dell’allarme, si utilizza l’allarme
acustico.

37
b. Impostazione allarme acustico con sistema HWS
(Humane Wake System):
Se si seleziona l’opzione HWS verrà attivato un allarme
acustico.
Il suono del tono di allarme diventa sempre più ravvicinato
ogni 15 secondi per la durata di un minuto, seguito da un
minuto di silenzio prima della ripetizione del ciclo.
1. L’allarme acustico può essere attivato sia a radio
accesa che a radio spenta.
2. Tenere premuto il pulsante dell’allarme acustico ;
in questo modo il simbolo e l’ora visualizzata
lampeggeranno e si udirà un bip.
3. Mentre il simbolo dell’allarme acustico
lampeggia, ruotare la manopola Tuning control per
selezionare l’ora, quindi premere di nuovo la
manopola Tuning control per confermare
l’impostazione dell’ora. Ruotare quindi la manopola
Tuning control per selezionare il minuto desiderato,
quindi premere la manopola Tuning control per
confermare l’impostazione.
4. Ruotare la manopola Tuning control; in questo modo il
display mostrerà le opzioni di frequenza per la sveglia.
Le opzioni per la sveglia sono le seguenti:
ONCE - la sveglia suona una volta sola
DAILY - la sveglia suona ogni giorno
WEEKDAY - la sveglia suona solo nei giorni feriali
WEEKEND - la sveglia suona solo nei weekend
Premere la manopola Tuning control per
confermare l’impostazione.
Nota:
Non c’è la regolazione del volume per l’allarme acustico.
Quando suona la sveglia
Per spegnere la sveglia, premere il pulsante Power .
Disattivazione/cancellazione sveglia
Per disattivare una sveglia attiva, premere il pulsante
Power , oppure tenere premuto il relativo pulsante di
allarme per spegnere la sveglia.
Snooze
1. Quando la sveglia suona, premendo un pulsante
qualsiasi diverso dal pulsante Power la sveglia
si disattiva per 5 minuti. “SNOOZE” è visualizzato sul
display.
2. Per regolare la durata del silenzio per il timer snooze,
tenere premuto il pulsante Menu/Info per
accedere alle impostazioni del menu.
3. Ruotare la manopola Tuning control finché
“SNOOZE X” non è visualizzato sul display, quindi
premere la manopola Tuning control per accedere
all’impostazione. Ruotare la manopola Tuning control
per regolare la durata del silenzio tra 5, 10, 15 e 20
minuti per il timer snooze.
4. Per spegnere il timer snooze quando la sveglia è
sospesa, premere il pulsante Power .
Timer sveglia
La radio può essere impostata affinché si spenga
automaticamente dopo che è trascorso un intervallo di
tempo prestabilito. L’impostazione del timer sveglia può
essere regolata tra 60, 45, 30, 15, 120 e 90 minuti.
1. Tenere premuto il pulsante Power per
configurare le impostazioni del timer sveglia.
“SPLEEP XX” è visualizzato sul display.
2. Tenere premuto il pulsante Power per
visualizzare le varie opzioni del timer sveglia sul
display. Fermarsi quando l’impostazione desiderata
appare sul display. L’impostazione viene salvata e il
display LCD torna alla visualizzazione normale.
3. La radio si spegne automaticamente dopo che è
trascorso il timer sveglia prestabilito. Il simbolo del
timer sveglia visualizzato sul display indica che il
timer sveglia è attivo.
4. Per disattivare la funzione timer sveglia prima che il
tempo prestabilito sia trascorso, è sufficiente premere
il pulsante Power per spegnere manualmente
l’unità.
Loudness
È possibile compensare la frequenza inferiore e superiore
della radio regolando la funzione loudness.
1. Tenere premuto il pulsante Menu/Info per
accedere alle impostazioni del menu.
2. Ruotare la manopola Tuning control finché “LOUD
ON” o “LOUD OFF” non è visualizzato sul display.
Premere la manopola Tuning control per accedere
all’impostazione.
3. Ruotare la manopola Tuning control per scegliere
ON e attivare la funzione loudness, quindi premere la
manopola Tuning control per confermare
l’impostazione.
4. Per disattivare la funzione loudness, selezionare OFF
e premere la manopola Tuning control per
confermare l’impostazione.
Presa di ingresso ausiliario
Sono fornite due prese di ingresso stereo ausiliario da
3,5 mm. Una si trova nella parte anteriore della radio
(AUX IN 1), l’altra si trova nel comparto batterie (AUX IN 2).
1. Collegare una sorgente audio esterna (ad esempio,
un lettore CD, MP3 o iPod) alla presa di ingresso
ausiliario.
2. Premere ripetutamente e rilasciare il pulsante Source
finché AUX IN 1 o 2 non è visualizzato.
3. Regolare l’impostazione del volume sul lettore iPod,
MP3 o CD per garantire un adeguato livello del

38
segnale proveniente dal lettore, quindi utilizzare la
manopola Tuning control sulla radio per migliorare
la qualità dell’ascolto.
Ascolto di musica Bluetooth
®
È necessario effettuare il pairing del dispositivo
Bluetooth
®
con la radio prima di poter effettuare l’auto-link
per riprodurre/effettuare lo streaming della musica
Bluetooth
®
mediante la radio. Il pairing crea un
“collegamento” permanente in modo che i due dispositivi
possano sempre riconoscersi tra loro.
Pairing del dispositivo Bluetooth
®
1. Premere il pulsante Source per selezionare la
funzione Bluetooth
®
. Sul display sarà visualizzato “BT
READY”; l’indicazione “READY” lampeggerà a
intervalli di 2 secondi.
2. Attivare il Bluetooth
®
sul dispositivo seguendo le
istruzioni per l’uso del dispositivo per consentire la
procedura di pairing.
3. Premere e rilasciare il pulsante Pair , quindi sul
display verrà visualizzato “BT PAIR”, lampeggiante a
intervalli di 1 secondo. È possibile iniziare la ricerca
della radio sul dispositivo Bluetooth
®
. Una volta che il
nome della radio è visualizzato sul dispositivo
Bluetooth
®
, premere in corrispondenza della voce
nell’elenco Bluetooth
®
.
Con alcuni cellulari di vecchio tipo (versioni precedenti
a dispositivo Bluetooth
®
BT2.1), potrebbe essere
necessario inserire il pass code “0000”.
4. Il dispositivo Bluetooth
®
verrà collegato alla radio.
5. Una volta stabilita la connessione, “BLUETOOTH”
rimarrà sul display e la retroilluminazione si oscurerà
dopo 10 secondi.
A questo punto è possibile riprodurre la musica sul
dispositivo abilitato Bluetooth
®
tramite la radio.
Riproduzione di un dispositivo
Bluetooth
®
già sottoposto a pairing
1. Premere il pulsante Source per selezionare la
funzione Bluetooth
®
. Sul display sarà visualizzato “BT
READY”; l’indicazione “READY” lampeggerà a
intervalli di 2 secondi.
2. Cercare e collegare la radio sul dispositivo Bluetooth
®
.
Alcuni dispositivi potrebbero collegarsi
automaticamente alla radio.
A questo punto è possibile riprodurre la musica sul
dispositivo abilitato Bluetooth
®
tramite la radio.
Nota:
a) La radio può essere associata mediante pairing a un
massimo di 8 dispositivi Bluetooth
®
. Se si effettua il
pairing con un numero di dispositivi Bluetooth
®
superiore, la cronologia di pairing sarà sovrascritta a
partire dalla voce di pairing meno recente.
b) Se ci sono 2 dispositivi Bluetooth
®
alla ricerca della
radio, la sua disponibilità verrà visualizzata su entrambi
i dispositivi.
c) Se il dispositivo Bluetooth
®
è temporaneamente
scollegato dalla radio, è necessario riconnettere
manualmente il dispositivo alla radio.
d) Se il nome della radio compare nell’elenco del
dispositivo Bluetooth
®
, ma il dispositivo non riesce a
connettersi con essa, eliminare la voce corrispondente
al nome della radio dall’elenco ed effettuare
nuovamente il pairing del dispositivo con la radio
seguendo i passaggi descritti in precedenza.
e) L’effettivo raggio di funzionamento tra la radio e il
dispositivo in pairing è di circa 10 metri.
f) La presenza di eventuali ostacoli tra la radio e il
dispositivo può ridurre il raggio di funzionamento.
Disconnessione del dispositivo
Bluetooth
®
Tenere premuto il pulsante Pair per 2-3 secondi per
disconnettere il dispositivo Bluetooth
®
. “BLUETOOTH”
scomparirà dal display, indicando la disattivazione del
Bluetooth
®
.
Caricamento con la porta di alimentazione
USB (Fig. 10)
Il dispositivo USB può essere ricaricato tramite la porta
USB che si trova nella parte anteriore della radio.
1. Collegare il dispositivo USB (un iPod, un MP3 o un
lettore CD) con un cavo USB disponibile in
commercio.
2. Premere il pulsante Power per accendere la
radio.
3. Che la radio sia alimentata con corrente alternata o a
batteria, la ricarica di un dispositivo USB dalla radio è
possibile quando la radio è accesa e in modalità radio
FM, in modalità BT o in modalità AUX, che compare
quando si collega una sorgente audio esterna.
Nota:
La ricarica di dispositivi USB non è possibile in modalità
AM, poiché durante la ricarica di un dispositivo USB la
ricezione del segnale radio si fa estremamente debole.
• Il volume massimo dell’altoparlante di potenza in uscita
diminuisce durante il caricamento USB.
• La presa USB può fornire un massimo di 1A5V di
corrente elettrica.
Importante:
• Prima di connettere il dispositivo USB al caricabatterie,
effettuare sempre il backup dei propri dati contenuti nel
dispositivo USB. In caso contrario, i dati potrebbero
andare persi.
• Il caricabatterie potrebbe non alimentare alcun
dispositivi USB.
• Quando non è in uso o dopo il caricamento, rimuovere
il cavo USB e chiudere il coperchio.
• Non collegare fonti di alimentazione alla porta USB. In
caso contrario potrebbe scoppiare un incendio. La
porta USB è destinata esclusivamente al caricamento

39
di dispositivi a basso voltaggio. Collocare sempre il
coperchio sulla porta USB quando non si caricano
dispositivi a basso voltaggio.
• Non inserire chiodi, fili, ecc. nella porta di
alimentazione USB. Ciò potrebbe causare un
cortocircuito, con conseguenti fumo e fiamme.
• Non collegare la presa USB alla porta USB di un PC,
onde evitare il rischio elevato di guasto delle unità.
MANUTENZIONE
ATTENZIONE:
• Evitare assolutamente di usare benzina, diluenti,
solventi, alcol o sostanze simili. In caso contrario,
potrebbero verificarsi scoloriture, deformazioni o
incrinature.
Caratteristiche tecniche:
Alimentazione
Adattatore di corrente AC DC12 V/1.200 mA, pin
centrale positivo
Batteria UM-3 (formato AA) x 2 per
riserva
Batteria cluster: 7,2 V - 10,8 V
Batteria a scorrimento:
14,4 V - 18 V
Frequenza radio FM 87,50 - 108 MHz
(0,05 MHz/passo)
AM (MW) 522 - 1.629 kHz
(9 kHz/passo)
Bluetooth
®
ID Bluetooth
®
QD 58625
(Bluetooth
®
e i relativi loghi
sono marchi registrati di
Bluetooth SIG, Inc.)
Versione Bluetooth
®
4.0
Profili Bluetooth
®
A2DP/SCMS-T
Potenza di trasmissione Classe di potenza: Bluetooth
®
Classe 2
Raggio di trasmissione Max. 10 m (variabile in base
alle condizioni di utilizzo)
Codec supportato SBC
Profilo Bluetooth
®
compatibile
A2DP
Circuito
Altoparlante 3,5 pollici 8 ohm x 2
Potenza di uscita 7,2 V: 0,5 W × 2
10,8 V:1,2 W x 2
14,4 V: 2,2 W x 2,
18 V: 3,5 W × 2
Terminale di ingresso 3,5 mm dia.
(AUX IN1/AUX IN2)
Sistema antenna FM: antenna morbida
AM: antenna rigida
Dimensioni (larghezza x altezza x profondità) in mm
282 x 294 x 163
Peso 4,3 kg (senza batteria)

40
NEDERLANDS (Originele instructies)
Symbolen
Hieronder staan de symbolen die voor het gereedschap
worden gebruikt. Zorg ervoor dat u weet wat ze
betekenen alvorens het gereedschap te gebruiken.
BELANGRIJKE
VEILIGHEIDSINSTRUCTIES
WAARSCHUWING:
Tijdens het gebruik van elektrische gereedschappen
dienen altijd de basisveiligheidsvoorzorgen te worden
genomen om het risico van brand, elektrische schokken
en persoonlijk letsel te verkleinen, waaronder de
volgende:
1. Lees deze gebruiksaanwijzing en die van de
acculader voor gebruik aandachtig door.
2. Reinig uitsluitend met een droge doek.
3. Plaats het apparaat niet in de buurt van een
verwarmingsbron, zoals een radiator,
warmeluchtrooster, kookplaat of ander apparaat
(waaronder een versterker) dat warmte produceert.
4. Sluit uitsluitend andere apparaten of accessoires aan
die worden aanbevolen door de fabrikant.
5. Trek de stekker van het apparaat uit het stopcontact in
geval van onweer met bliksem en indien het apparaat
gedurende een lange tijd niet gaat worden gebruikt.
6. Een radio op batterijen met inwendige batterijen of
een losse accu mag alleen worden opgeladen met de
aanbevolen batterij-/acculader. Een acculader die
geschikt is voor een bepaald type accu, kan
brandgevaar opleveren indien gebruikt met een ander
type accu.
7. Gebruik de radio op batterijen uitsluitend met de
specifiek daarvoor bedoelde accu’s. Door een ander
type accu’s te gebruiken, kan brandgevaar ontstaan.
8. Als de accu niet wordt gebruikt, houdt u deze uit de
buurt van metalen voorwerpen, zoals paperclips,
muntgeld, sleutels, spijkers, schroeven en andere
kleine metalen voorwerpen die een kortsluiting kunnen
veroorzaken tussen de accupolen. Kortsluiting tussen
de accupolen kan vonken, brandwonden of brand
veroorzaken.
9. Voorkom lichamelijk contact met geaarde
oppervlakken, zoals pijpen, radiatoren, fornuizen en
koelkasten. De kans op een elektrische schok is
groter wanneer uw lichaam is geaard.
10. Onder zware gebruiksomstandigheden kan vloeistof
uit de accu komen. Voorkom aanraking. Als u deze
vloeistof per ongeluk aanraakt, wast u dit goed af met
water. Als de vloeistof in uw ogen komt, raadpleegt u
tevens een arts. Vloeistof uit de accu kan irritatie en
brandwonden veroorzaken.
BEWAAR DEZE INSTRUCTIES.
AANVULLENDE
VEILIGHEIDSVOORSCHRIFTEN
VOOR ACCU’S
1. Alvorens de accu in gebruik te nemen, leest u
eerst alle instructies en
waarschuwingsopschriften op (1) de acculader, (2)
de accu en (3) het apparaat waarin de accu wordt
aangebracht.
2. Haal de accu niet uit elkaar.
3. Als de gebruikstijd aanzienlijk korter is geworden,
stopt u onmiddellijk met het gebruik. Anders kan
dit leiden tot kans op oververhitting, mogelijke
brandwonden en zelfs een explosie.
4. Als de elektrolyt in uw ogen komt, wast u deze uit
met schoon water en raadpleegt u onmiddellijk
een arts. Dit kan leiden tot verlies van
gezichtsvermogen.
5. Sluit de accu niet kort:
(1) Raak de accupolen niet aan met enig
geleidend materiaal.
(2) Bewaar de accu niet op een plaats waar deze
in aanraking kan komen met andere metalen
voorwerpen, zoals spijkers, munten, enz.
(3) Stel de accu niet bloot aan water of regen.
Kortsluiting van de accu kan leiden tot een hoge
stroomsterkte, oververhitting, mogelijke
brandwonden en zelfs een defect.
6. Bewaar het gereedschap en de accu niet op
plaatsen waar de temperatuur kan oplopen tot
50 °C of hoger.
7. Werp de accu niet in een vuur, zelfs niet als deze al
ernstig beschadigd of helemaal versleten is. De
accu kan in een vuur exploderen.
8. Wees voorzichtig dat u de accu niet laat vallen of
ergens tegenaan stoot.
9. Gebruik nooit een beschadigde accu.
10. De bijgeleverde lithium-ionbatterijen zijn
onderhevig aan de vereisten in de wetgeving
omtrent gevaarlijke stoffen.
Voor commercieel transport en dergelijke door derden
en transporteurs moeten speciale vereisten ten
aanzien van verpakking en etikettering worden
nageleefd.
Als voorbereiding van het artikel dat wordt
getransporteerd is het noodzakelijk een expert op het
gebied van gevaarlijke stoffen te raadplegen. Houd u
tevens aan mogelijk strengere nationale regelgeving.
Blootliggende contactpunten moeten worden afgedekt
Lees de gebruiksaanwijzing.
Alleen voor EU-landen
Geef elektrisch gereedschap en accu’s niet
met het huisvuil mee!
Volgens de Europese richtlijn inzake oude
elektrische en elektronische apparaten, en
inzake batterijen en accu’s en oude batterijen
en accu’s, en de toepassing daarvan binnen
de nationale wetgeving, dienen elektrisch
gereedschap, accu’s en batterijen die het
einde van hun levensduur hebben bereikt,
gescheiden te worden ingezameld en te
worden afgevoerd naar een recyclebedrijf dat
voldoet aan de geldende milieu-eisen.
Cd
Ni-MH
Li-ion

41
met tape en de accu moet zodanig worden verpakt dat
deze niet kan bewegen in de verpakking.
11. Neem de plaatselijke regelgeving met betrekking
tot het weggooien van de accu in acht.
12. Om risico’s te voorkomen, moet de handleiding
omtrent het vervangen van de batterij worden gelezen
vóór gebruik.
De maximale stroomontlading van de batterij moet
groter zijn dan of gelijk zijn aan 8A.
LET OP:
• Ontploffingsgevaar als de batterij niet correct wordt
vervangen.
• Alleen vervangen door hetzelfde of een equivalent
type.
BEWAAR DEZE INSTRUCTIES.
LET OP: Gebruik uitsluitend originele accu’s van
Makita.
Het gebruik van een andere accu dan een originele accu
van Makita, of van een gewijzigde accu, kan ertoe leiden
dat de accu barst en brand, persoonlijk letsel en schade
veroorzaakt. Bovendien vervalt dan de garantie van
Makita op het gereedschap en acculader van Makita.
Tips voor een lange levensduur van de
accu
1. Laad de accu op voordat deze volledig leeg is.
Wanneer u merkt dat het gereedschap minder
vermogen heeft, stopt u met het gebruik ervan en
laadt u eerst de accu op.
2. Laad nooit een volledig opgeladen accu op.
Te lang opladen verkort de levensduur van de
accu.
3. Laad de accu op bij een omgevingstemperatuur
van 10 °C tot 40 °C. Laat een warme accu eerst
afkoelen voordat u deze oplaadt.
4. Als de accu gedurende een lange tijd (meer dan
zes maanden) niet gebruikt, laadt u deze eerst op
alvorens deze te gebruiken.
Overzicht van de belangrijkste
onderdelen (zie afb. 1)
1. USB-voedingspoort
2. Aan-uitknop/slaaptimerknop
3. Bronkeuzeknop
4. Radioalarm
5. Zoemeralarm
6. Voorkeurzenderknoppen/voorkeur 1-knop als
Bluetooth
®
-paringsknop
7. Menuknop/informatieknop
8. Volumeknop/afstemknop/keuzeknop
9. DC IN-gelijkstroomingangsaansluiting
10. AUX IN 1-aansluiting
11. Display
12. Handgreep
13. Flexibele staafantenne
14. Vergrendelhendel van accuvak
15. Luidspreker
16. Accudeksel
17. Ingangsaansluiting (AUX IN 2)
18. Accu-/batterijvak (voor hoofdaccu en back-
upbatterijen)
19. Bovenaanzicht
20. Linkerzijaanzicht
21. Vooraanzicht
22. Rechterzijaanzicht
23. Achteraanzicht met gesloten accudeksel
24. Achteraanzicht met geopend accudeksel
25. Accu
26. Knop
27. Indicatorlampjes
28. Testknop
Display:
A. Radioalarm
B. Zoemeralarm
C. Stereo-indicator
D. Indicator voor lage acculading
E. Klok
F. Frequentie
G. RDS-indicator (Radio Data System)
H. Statusindicator van slaapfunctie
I. AM/PM-indicator van klok
De accu plaatsen
Opmerking:
Door back-upbatterijen in het batterijvak te laten zitten,
voorkomt u dat opgeslagen instellingen in het
voorkeurzendergeheugen verloren gaan.
1. Trek aan de vergrendelhendel van het accu-/
batterijvak om het accu-/batterijvak te ontgrendelen.
Er is een vak voor de hoofdaccu en een voor de back-
upbatterij (zie afb. 2).
2. Verwijder het accudeksel van het back-
upbatterijenvak en plaats 2 nieuwe UM-3 batterijen
(AA-formaat). Breng de batterijen aan met de polen in
de juiste richting, zoals aangegeven aan de
binnenzijde van het vak. Plaats het accudeksel terug
(zie afb. 3).
3. Plaats, nadat u de back-upbatterijen hebt
aangebracht, de hoofdaccu in de radio. In de
onderstaande tabel vindt u de geschikte accu’s voor
deze radio.

42
De onderstaande tabel toont de gebruikstijd van een enkele lading in de Radiofunctie.
: Blokaccu
: Schuifaccu
Opmerking:
De bovenstaande tabel met betrekking tot de gebruikstijd van de accu geldt als richtlijn. De werkelijke gebruikstijd kan
verschillen afhankelijk van het type accu, de laadtoestand en de gebruiksomgeving.
De schuifaccu aanbrengen en
verwijderen (zie afb. 4 en 5)
• Om de accu aan te brengen, lijnt u de lip op de accu uit
met de groef in de behuizing en duwt u de accu op zijn
plaats. Steek de accu zo ver mogelijk in het
gereedschap tot u een klikgeluid hoort.
• Als u het rode deel aan de bovenkant van de knop kunt
zien, is de accu niet goed aangebracht. Breng de accu
zo ver mogelijk aan tot het rode deel niet meer
zichtbaar is. Als u dit niet doet, kan de accu per
ongeluk uit het gereedschap vallen en letsel
veroorzaken bij u of anderen in uw omgeving.
• Oefen geen grote kracht uit bij het aanbrengen van de
accu. Als de accu niet gemakkelijk erin kan worden
geschoven, wordt deze niet goed aangebracht.
• Om de accu te verwijderen, verschuift u de knop aan
de voorkant van de accu of drukt u op de knoppen aan
beide zijden van de accu en trekt u tegelijkertijd de
accu van het gereedschap af.
De blokaccu aanbrengen en verwijderen
(zie afb. 6 en 7)
• Om de accu aan te brengen, lijnt u de lip op de accu uit
met de groef in de behuizing en duwt u de accu op zijn
plaats.
• Om de accu te verwijderen, haalt u de accu uit de
aansluiting terwijl u de knoppen op de zijkant van de
accu ingedrukt houdt.
Zet de vergrendelhendel van het accuvak terug op zijn
oorspronkelijke plaats.
Accucapaciteit
Accuspanning
BIJ LUIDSPREKERUITGANG
= 50 mW + 50 mW (eenheid: uur)
(ongeveer)
7,2 V 10,8 V 14,4 V 18 V In radio of AUX
In Bluetooth
®
met
USB-opladen
1,0 Ah BL7010 5,5 0,8
1,1 Ah
BL1411G,
L1451
5,5
1,5
BL1811G,
L1851
1,8
1,3 Ah
BL1013
7,5
1,5
BL1415,
BL1413G,
L1453
1,8
BL1815,
BL1813G,
L1853
2,0
1,5 Ah
BL1415N
8,5
2,0
BL1815N 2,5
2,0 Ah
BL1820,
BL1820B
11 3,2
3,0 Ah
BL1430,
BL1430B
16
4,0
BL1830,
BL1830B
5,0
4,0 Ah
BL1440
22
5,5
BL1840,
BL1840B
6,5
5,0 Ah
BL1450
27
6,5
BL1850,
BL1850B
8,0
6,0 Ah
BL1460B
33
7,0
BL1860B 9,5

43
Minder vermogen, vervorming, “stotterend geluid” en
wanneer zowel de indicator voor lage acculading als
“POWERFAIL” branden op het display, zijn allemaal
tekenen dat de hoofdaccu moet worden vervangen.
Opmerking:
De accu kan niet worden opgeladen met de bijgeleverde
netspanningsadapter.
Als de indicator voor lage acculading wordt
afgebeeld en een “EMPTY” blijft knipperen, moeten de
back-upbatterijen worden vervangen.
Aanduiding van de resterende acculading
(Alleen voor accu’s met een “B” aan het einde van het
modelnummer.) (zie afb. 8)
Druk op de testknop op de accu om de resterende
accucapaciteit af te lezen. De indicatorlampjes branden
gedurende enkele seconden.
015658
OPMERKING:
• Afhankelijk van de gebruiksomstandigheden en de
omgevingstemperatuur, is het mogelijk dat de
aangegeven acculading verschilt van de werkelijke
acculading.
De flexibele staafantenne aanbrengen (zie
afb. 9)
Trek de flexibele staafantenne uit zoals aangegeven in de
afbeelding.
De bijgeleverde netspanningsadapter
gebruiken (zie afb. 10)
Open de rubberen beschermdop en sluit de stekker van
de netspanningsadapter aan op de
gelijkstroomingangsaansluiting op de linkerkant van de
radio. Steek de netspanningsadapter in een standaard
stopcontact. Bij gebruik van de netspanningsadapter
wordt de accu automatisch losgekoppeld. De
netspanningsadapter moet losgekoppeld zijn van de
netvoeding wanneer u deze niet gebruikt.
Opmerking:
Als de radio op de AM-frequentieband storing ondervindt
van zijn netspanningsadapter, plaatst u de radio meer dan
30 cm uit de buurt van de netspanningsadapter.
De radio bedienen – AM/FM-zenders
scannen
1. Druk op de aan-uitknop om de radio in te
schakelen.
2. Druk op de bronkeuzeknop om de AM- of FM-
frequentieband te selecteren.
3. Houd de afstemknop ingedrukt om automatisch af
te stemmen. Uw radio scant de AM/FM-
frequentieband omhoog vanaf de huidig afgebeelde
frequentie, en stopt automatisch met scannen
wanneer een zender is gevonden met een voldoende
sterk signaal.
4. Na enkele seconden wordt het display bijgewerkt. Het
display toont de frequentie van de gevonden zender.
5. Om een andere zender te vinden, houdt u de
afstemknop nogmaals ingedrukt.
6. Nadat het einde van de frequentieband is bereikt, gaat
de radio verder met scannen vanaf het andere
uiteinde van de frequentieband.
7. Draai de afstemknop om het gewenste
volumeniveau in te stellen.
Opmerking:
• Wanneer u het volumeniveau instelt, mag FM/AM
NIET knipperen op het display.
• Als AM/FM knippert op het display, kunt u handmatig
afstemmen op de zenders (zie het deel “Handmatig
afstemmen
– AM/FM” voor meer informatie).
8. Om de radio uit te schakelen, drukt u op de aan-
uitknop .
Handmatig afstemmen – AM/FM
1. Druk op de aan-uitknop om de radio in te
schakelen.
2. Druk op de bronkeuzeknop om de AM- of FM-
frequentieband te selecteren.
3. Druk op de afstemknop om AM of FM te laten
knipperen op het display.
Opmerking:
• FM/AM knippert gedurende ongeveer 10 seconden.
Gedurende deze tijd is alleen handmatig
afstemmen mogelijk.
• Als u het volumeniveau wilt afstemmen terwijl FM/
AM knippert, drukt u op de afstemknop zodat het
knipperen stopt en u de afstemknop kunt draaien
om het volumeniveau in te stellen.
Indicatorlampjes
Resterende
acculading
Brandt Uit Knippert
75% tot 100%
50% tot 75%
25% tot 50%
0% tot 25%
Laad de accu op.
Er kan een storing
in de accu zijn
opgetreden.

44
4. Draai de afstemknop om op een zender af te
stemmen.
5. Nadat het einde van de frequentieband is bereikt, gaat
de radio verder met scannen vanaf het andere
uiteinde van de frequentieband.
6. Draai de afstemknop om het gewenste
volumeniveau in te stellen.
Een AM/FM-voorkeurzender opslaan
Er kunnen 5 voorkeurzenders op zowel de AM- als de
FM-frequentieband worden opgeslagen. Ze worden voor
elke frequentieband op dezelfde manier gebruikt.
1. Druk op de aan-uitknop om de radio in te
schakelen.
2. Druk op de bronkeuzeknop om de gewenste
frequentieband te selecteren. Stem af op de gewenste
zender zoals hiervoor is beschreven.
3. Houd de gewenste voorkeurzenderknop (1 t/m 5)
ingedrukt tot op het display achter de
frequentie, bijvoorbeeld, “P4” wordt afgebeeld. De
zender wordt opgeslagen onder de ingedrukte
voorkeurzenderknop. Herhaal deze procedure voor de
overige voorkeurzenderknoppen.
4. Voorkeurzenders die reeds zijn opgeslagen kunnen
worden overschreven door zo nodig de bovenstaande
procedure te volgen.
Displayweergave – FM
Uw radio heeft meerdere displayweergavemogelijkheden
voor FM-zenders.
1. Druk herhaaldelijk op de menuknop/informatieknop
om de RDS-informatie te bekijken van de zender
waarnaar u luistert.
a. Zendernaam Beeldt de naam af van de zender
waarnaar u luistert.
b. Programmatype Beeldt het type zender af waarnaar
u luistert, bijvoorbeeld Pop,
Klassiek, Nieuws, enz.
c. Radiotekst Beeldt een radiotekstbericht af,
zoals nieuwsberichten, enz.
d. Jaar/Dag Beeldt het jaar en de dag van de
week af overeenkomstig de
datuminstelling van de radio.
e. Datum/Dag Beeldt de datum en de dag van de
week af overeenkomstig de
datuminstelling van de radio.
f. Frequentie Beeldt de frequentie af van de FM-
zender waarnaar u luistert.
FM-stereo (auto)/mono
Als het signaal van de FM-zender waarnaar u luistert
zwak is, kunnen sis-geluiden hoorbaar zijn. Het is
mogelijk dergelijke sis-geluiden te verminderen door de
radio te dwingen de zender in mono weer te geven in
plaats van in stereo.
1. Druk indien gewenst op de aan-uitknop om de
FM-frequentieband te selecteren en af te stemmen op
de gewenste FM-zender, zoals hiervoor is
beschreven.
2. Houd de menuknop/informatieknop ingedrukt
om het instelmenu op te roepen.
3. Draai de afstemknop tot de instelling FM Auto/
Mono wordt afgebeeld op het display. Als de instelling
Auto is, drukt u op de afstemknop om de instelling te
veranderen naar Mono en de sis-geluiden te
verminderen. Druk op de afstemknop om de instelling
te bevestigen.
Een AM/FM-voorkeurzender oproepen
1. Druk op de aan-uitknop om de radio in te
schakelen.
2. Druk op de bronkeuzeknop om de AM- of FM-
frequentieband te selecteren.
3. Druk kort op de gewenste voorkeurzenderknop
om de radio te laten afstemmen op
de voorkeurzender die is opgeslagen onder die knop.
Klok en alarmen
De datum- en tijdsindeling instellen
De klokweergave in de standby-stand en op de
afspeelschermen kan worden ingesteld op een andere
indeling. De geselecteerde tijdsindeling wordt tevens
gebruikt voor het instellen van de alarmen.
1. Houd de menuknop/informatieknop ingedrukt
om het instelmenu op te roepen.
2. Draai de afstemknop tot “CLOCK xxH” op het
display wordt afgebeeld en druk op de afstemknop
om de instelling op te roepen. U ziet dat de
tijdsindeling begint te knipperen.
3. Draai de afstemknop om de 12-uurs of 24-uurs
tijdsindeling in te stellen. Druk op de afstemknop
om de geselecteerde tijdsindeling te bevestigen.
Opmerking: Als de 12-uurs tijdsindeling is
geselecteerd, zal de radio de 12-uurs klok gebruiken
voor het instellen van de tijd.
4. Houd de menuknop/informatieknop ingedrukt
om het instelmenu op te roepen.
5. Draai de afstemknop tot een datum (bijv. THU
APR 3) op het display wordt afgebeeld en druk op de
afstemknop om de instelling op te roepen. U ziet
dat de datumindeling begint te knipperen.
6. Draai de afstemknop om het gewenste
datumindeling te selecteren. Druk op de afstemknop
om uw keuze te bevestigen.
De kloktijd en datum instellen
1. Houd de menuknop/informatieknop ingedrukt .

45
2. Draai de afstemknop tot “CLOCK ADJ” wordt
afgebeeld op het display. Druk op de afstemknop
om de instelling op te roepen.
3. De uur-instelling op het display begint te knipperen.
Draai de afstemknop om het gewenste uur in te
stellen, en druk op de afstemknop om de instelling
te bevestigen. Draai daarna de afstemknop om de
gewenste minuten in te stellen, en druk op de
afstemknop om de instelling te bevestigen.
4. Draai de afstemknop tot “DATE ADJ” wordt
afgebeeld op het display. Druk op de afstemknop
om de instelling op te roepen.
5. Draai de afstemknop om het gewenste jaar in te
stellen, en druk op de afstemknop om de instelling
te bevestigen. Draai daarna de afstemknop om de
gewenste maand in te stellen, en druk op de
afstemknop om de instelling te bevestigen. Draai
daarna de afstemknop om de gewenste datum in
te stellen, en druk op de afstemknop om de
instelling te bevestigen.
Radio Data System (RDS)
Wanneer u de kloktijd instelt met behulp van de RDS-
functie, zal de radio zijn kloktijd synchroniseren iedere
keer wanneer u afstemt op een zender die gebruikmaakt
van RDS met CT-signalen.
1. Wanneer u afstemt op een zender die RDS-signalen
zendt, houdt u de menuknop/informatieknop
ingedrukt.
2. Draai de afstemknop tot “RDS CT” en een
klokindicator worden afgebeeld op het display. Druk
op de afstemknop om de instelling op te roepen.
3. Draai de afstemknop tot “RDS CT” wordt afgebeeld
op het display. Druk op de afstemknop om de
instelling te bevestigen. De kloktijd van de radio wordt
automatisch ingesteld met behulp van het ontvangen
RDS-signaal.
4. Nadat de bedieningen voltooid zijn, wordt het RDS-
pictogram afgebeeld op het display, waarmee wordt
aangegeven dat de kloktijd van de radio wordt
ingesteld door het RDS CT-signaal. De kloktijd van de
radio blijft 5 dagen geldig nadat deze is
gesynchroniseerd met het RDS CT-signaal.
Het alarm instellen
De radio heeft twee alarmen die beide kunnen worden
ingesteld om u te wekken met het geluid van de AM/FM-
radio of met het zoemeralarm. De alarmen kunnen
worden ingesteld terwijl het apparaat in de standby-stand
staat of tijdens het afspelen.
a. De tijd voor het radioalarm instellen:
1. De radio kan worden ingesteld met de radio in- of
uitgeschakeld.
2. Houd de radioalarmknop ingedrukt, het
symbool van het radioalarm en het cijfer voor het uur
op het display knipperen en een pieptoon klinkt.
3. Terwijl het symbool voor het radioalarm
knippert, draait u de afstemknop om het uur in te
stellen, en drukt u nogmaals op de afstemknop om
de instelling van het uur te bevestigen. Draai daarna
de afstemknop om de minuten in te stellen, en druk
op de afstemknop om de instelling van de minuten
te bevestigen.
4. Draai de afstemknop, waarna de mogelijke
alarmschema’s worden afgebeeld op het display.
De mogelijke alarmschema’s zijn als volgt:
ONCE – het alarm gaat eenmaal af
DAILY – het alarm gaat iedere dag af
WEEKDAY – het alarm gaat alleen op werkdagen af
WEEKEND – het alarm gaat alleen in het weekend af
Druk op de afstemknop om de instelling te
bevestigen.
5. Terwijl het symbool voor het radioalarm knippert,
draait u de afstemknop om de gewenste
frequentieband en zender in te stellen, en drukt u op
de afstemknop op de instellingen te bevestigen.
6. Draai de afstemknop om het gewenste volumeniveau
in te stellen, en druk op de afstemknop om de
instelling van het volumeniveau te bevestigen. Het
instellen van het radioalarm is nu voltooid.
Opmerking:
Als geen nieuwe zender voor het radioalarm wordt
ingesteld, wordt de laatst ingestelde zender gebruikt voor
het radioalarm.
Opmerking:
Als de ingestelde AM/FM-zender voor het radioalarm niet
beschikbaar is wanneer het alarm moet afgaan, wordt in
plaats daarvan het zoemeralarm gebruikt.
b. Het HWS-zoemeralarm (Humane Wake System)
instellen:
Als u het HWS-zoemeralarm selecteert, brengt de radio
een pieptoon voort.
Deze pieptoon wordt steeds korter elke 15 seconden
voortgebracht gedurende 1 minuut, gevolgd door 1 minuut
stilte. Daarna wordt de cyclus herhaald.
1. Het zoemeralarm kan worden ingesteld met de radio
in- of uitgeschakeld.
2. Houd de zoemeralarmknop ingedrukt, het
symbool en het cijfer voor het uur op het display
knipperen en een pieptoon klinkt.
3. Terwijl het symbool voor het zoemeralarm
knippert, draait u de afstemknop om het uur in te
stellen, en drukt u nogmaals op de afstemknop om
de instelling van het uur te bevestigen. Draai daarna
de afstemknop om de minuten in te stellen, en druk

46
op de afstemknop om de instelling van de minuten
te bevestigen.
4. Draai de afstemknop, waarna de mogelijke
alarmschema’s worden afgebeeld op het display.
De mogelijke alarmschema’s zijn als volgt:
ONCE – het alarm gaat eenmaal af
DAILY – het alarm gaat iedere dag af
WEEKDAY – het alarm gaat alleen op werkdagen af
WEEKEND – het alarm gaat alleen in het weekend af
Druk op de afstemknop om de instelling te
bevestigen.
Opmerking:
Het volumeniveau van het zoemeralarm kan niet worden
ingesteld.
Als het alarm afgaat
Om het alarm dat afgaat uit te schakelen, drukt u op de
aan-uitknop .
Het alarm uitschakelen/annuleren
Om een ingesteld alarm uit te schakelen, drukt u op de
aan-uitknop of houdt u de betreffende alarmknop
ingedrukt om het alarm te annuleren.
Sluimeren
1. Wanneer het alarm afgaat, drukt u op een andere
knop dan de aan-uitknop om het alarm
gedurende 5 minuten te onderbreken. “SNOOZE”
(sluimeren) wordt afgebeeld op het display.
2. Om de onderbrekingstijd van het sluimeren in te
stellen, drukt u op de menuknop/informatieknop
om het instelmenu op te roepen.
3. Draai de afstemknop tot “SNOOZE X” (sluimertijd)
op het display wordt afgebeeld en druk op de
afstemknop om de instelling op te roepen. Draai de
afstemknop om de onderbrekingstijd van het
sluimeren in te stellen op 5, 10, 15 of 20 minuten.
4. Om het sluimeren te annuleren tijdens het
onderbreken van een alarm dat afgaat, drukt u op de
aan-uitknop .
Slaaptimer
U kunt de radio instellen op automatisch uitschakelen
nadat een vooraf ingestelde tijdsduur is verstreken. De
slaaptimer kan worden ingesteld tussen 60, 45, 30, 15,
120 en 90 minuten.
1. Houd de aan-uitknop ingedrukt om de instelling
van de slaaptimer op te roepen. “SLEEP XX”
(slaaptijd) wordt afgebeeld op het display.
2. Houd de aan-uitknop ingedrukt om de mogelijke
instellingen van de slaaptimer beurtelings af te
beelden op het display. Stop met drukken wanneer de
gewenste instelling van de slaaptimer wordt afgebeeld
op het display. De instelling wordt opgeslagen en het
display keert terug naar de normale weergave.
3. De radio wordt automatisch uitgeschakeld nadat de
vooraf ingestelde slaaptimer is verstreken. Wanneer
de slaaptimer is ingesteld, wordt het
slaaptimerpictogram afgebeeld op het display.
4. Om de slaaptimer te annuleren voordat de vooraf
ingestelde tijdsduur is verstreken, drukt u op de aan-
uitknop om het apparaat handmatig uit te
schakelen.
Loudness
Op de radio kunt u de lage en hoge frequenties
compenseren door de loudness-functie in te stellen.
1. Houd de menuknop/informatieknop ingedrukt
om het instelmenu op te roepen.
2. Draai de afstemknop tot “LOUD ON” of
“LOUD OFF” wordt afgebeeld op het display. Druk op
de afstemknop om de instelling op te roepen.
3. Draai de afstemknop om ON te selecteren om de
loudness-functie in te schakelen, en druk daarna op
de afstemknop om de instelling te bevestigen.
4. Om de loudness-functie uit te schakelen, stelt u OFF
in en drukt u op de afstemknop om de instelling te
bevestigen.
Extra ingangsaansluiting
De radio is voorzien van twee extra stereo-
ingangsaansluitingen van 3,5 mm. Eén bevindt zich op de
voorkant van de radio (AUX IN 1); en de andere bevindt
zich in het accu-/batterijvak (AUX IN 2).
1. Sluit een externe geluidsbron (bijvoorbeeld een iPod,
mp3-speler of cd-speler) aan op de extra
ingangsaansluiting.
2. Druk herhaaldelijk op de bronkeuzeknop totdat
AUX IN 1 of 2 wordt afgebeeld op het display.
3. Stel het volumeniveau in op de externe geluidsbron
(iPod, mp3-speler of cd-speler) om zeker te zijn van
een voldoende sterk signaal, en gebruik vervolgens
de afstemknop van de radio om zo nodig het
gewenste volumeniveau in te stellen.
Naar Bluetooth
®
-muziek luisteren
U moet uw Bluetooth
®
-apparaat paren aan uw radio
voordat u ze automatisch kunt koppelen om Bluetooth
®
-
muziek via uw radio af te spelen of te streamen. Door ze
te paren ontstaat een permanente “verbinding” zodat de
twee apparaten elkaar altijd herkennen.
Uw Bluetooth
®
-apparaat paren
1. Druk op de bronkeuzeknop om de Bluetooth
®
-
functie te selecteren. “BT READY” wordt afgebeeld op

47
het display en “READY” knippert met een interval van
2 seconden.
2. Activeer Bluetooth
®
op uw apparaat volgens de
gebruiksaanwijzing van het apparaat om de
paringsprocedure mogelijk te maken.
3. Druk op de paringsknop en laat hem los, waarna
“BT PAIR” wordt afgebeeld op het display en knippert
met een interval van 1 seconde. U kunt starten met
het zoeken naar uw radio op uw Bluetooth
®
-apparaat.
Nadat de naam van uw radio wordt afgebeeld op het
Bluetooth
®
-apparaat, selecteert u het item in de
Bluetooth
®
-lijst.
Op sommige oude mobiele telefoons (Bluetooth
®
-
apparaat met oudere versie dan BT2.1), moet u
mogelijk het wachtwoord “0000” invoeren.
4. Uw Bluetooth
®
-apparaat wordt gekoppeld aan de
radio.
5. Eenmaal verbonden blijft “BLUETOOTH” afgebeeld
op het display en wordt de achtergrondverlichting
gedimd na 10 seconden.
U kunt nu de muziek op uw Bluetooth
®
-compatibele
apparaat afspelen via uw radio.
Een Bluetooth
®
-apparaat dat al is gepaard
weergeven
1. Druk op de bronkeuzeknop om de Bluetooth
®
-
functie te selecteren. “BT READY” wordt
weergegeven op het display en “READY” knippert met
een interval van 2 seconden.
2. Zoek naar de radio op uw Bluetooth
®
-apparaat en
koppel deze. Sommige apparaten kunnen
automatisch worden gekoppeld aan de radio.
U kunt nu de muziek op uw Bluetooth
®
-compatibele
apparaat afspelen via uw radio.
Opmerking:
a) De radio kan worden gepaard aan maximaal 8
Bluetooth
®
-apparaten. Wanneer u meer Bluetooth
®
-
apparaten dan dit aantal paart, worden de gepaarde
apparaten overschreven, beginnende met het oudste
gepaarde apparaat.
b) Als er 2 Bluetooth
®
-apparaten zoeken naar uw radio,
wordt zijn beschikbaarheid afgebeeld op beide
apparaten.
c) Als uw Bluetooth
®
-apparaat tijdelijk is losgekoppeld
van uw radio, moet u handmatig uw apparaat opnieuw
verbinden met de radio.
d) Als de naam van uw radio wordt afgebeeld op uw
Bluetooth
®
-apparaatlijst maar uw apparaat niet kan
worden verbonden, wist u de item met de naam van uw
radio vanaf uw lijst en paart u opnieuw uw radio aan de
hand van de stappen die hiervoor zijn beschreven.
e) Het effectieve werkingsbereik tussen de radio en het
gepaarde apparaat is ongeveer 10 meter.
f) Elk obstakel tussen de radio en het apparaat kan het
werkingsbereik verkleinen.
Uw Bluetooth
®
-apparaat los koppelen
Houd de paringsknop ingedrukt gedurende 2 tot 3
seconden om uw Bluetooth
®
-apparaat los te koppelen.
“BLUETOOTH” gaat uit op het display om aan te geven
dat Bluetooth
®
is uitgeschakeld.
Opladen met de USB-voedingspoort (zie
afb. 10)
Er zit een USB-poort op de voorkant van de radio. Met de
USB-poort kunt u een USB-apparaat opladen.
1. Sluit het USB-apparaat, zoals een iPod, MP3-speler of
CD-speler, aan met behulp van een in de winkel
verkrijgbare USB-kabel.
2. Druk op de aan-uitknop om de radio in te
schakelen.
3. Ongeacht of de radio wordt gevoed met netstroom of
door batterijen, de radio kan het USB-apparaat
opladen wanneer de radio is ingeschakeld en is
afgestemd op de FM-frequentieband, of in de BT-
modus of AUX-modus staat, welke wordt afgebeeld
wanneer de externe audiobron is aangesloten.
Opmerking:
U kunt een USB-apparaat niet opladen terwijl de radio is
afgestemd op de AM-frequentieband omdat de
radiosignaalontvangst erg slecht wordt tijdens het
opladen van een USB-apparaat.
• Het maximumvolumeniveau van de luidspreker wordt
lager wanneer uw USB-apparaat wordt opgeladen.
• De USB-poort kan een stroom van maximaal 1 A en 5
V leveren.
Belangrijk:
• Alvorens een USB-apparaat aan te sluiten op de
voedingsaansluiting, maakt u altijd eerst een
reservekopie van de gegevens op het USB-apparaat.
Als u dat niet doet, kunnen uw gegevens per ongeluk
verloren gaan.
• Mogelijk levert de voedingspoort geen stroom aan
sommige USB-apparaten.
• Als u de voedingspoort niet gebruikt en nadat het
opladen klaar is, trekt u de USB-kabel eruit en sluit u
de afdekking.
• Sluit geen stroombron aan op de USB-poort. Als u dat
toch doet, bestaat de kans op brand. De USB-poort is
alleen bedoeld voor het opladen van een
laagspanningsapparaat. Plaats altijd de afdekking
terug op de USB-poort wanneer geen
laagspanningsapparaat wordt opgeladen.
• Steek geen spijker, draad, enz. in de USB-
voedingspoort. Als u dat toch doet, kan kortsluiting
leiden tot rookontwikkeling en brand.
• Sluit deze USB-poort niet aan op de USB-poort van
een computer aangezien het zeer waarschijnlijk is dat
hierdoor de apparaten defect raken.

48
ONDERHOUD
LET OP:
• Gebruik nooit benzine, wasbenzine, thinner, alcohol,
enz. Dit kan leiden tot verkleuren, vervormen of
barsten.
Technische gegevens:
Voedingsvereisten
Netspanningsadapter 12 V DC, 1.200 mA, middenpen
positief
Batterij UM-3 (AA-formaat) x 2 voor back-
up
Blokaccu: 7,2 V - 10,8 V
Schuifaccu: 14,4 V - 18 V
Frequentiebereik FM 87,50 - 108 MHz
(0,05 MHz/stap)
AM (MW) 522 - 1.629 kHz
(9 kHz/stap)
Bluetooth
®
Bluetooth
®
QD-ID 58625
(Het Bluetooth
®
-woordmerk en
-logo’s zijn gedeponeerde
handelsmerken in eigendom van
Bluetooth SIG, Inc.)
Bluetooth
®
-versie 4.0
Bluetooth
®
-profielen A2DP/SCMS-T
Zendvermogen Gespecificeerd Bluetooth
®
-
vermogen Klasse 2
Zendbereik Max. 10 m (varieert met de
gebruiksomstandigheden)
Ondersteunde codec SBC
Compatibel Bluetooth
®
-profiel
A2DP
Circuitfunctie
Luidspreker 3,5 inch, 8 ohm x 2
Uitgangsvermogen 7,2 V: 0,5 W x 2
10,8 V: 1,2 W x 2
14,4 V: 2,2 W x 2, 18 V: 3,5 W x 2
Ingangsaansluiting diameter 3,5 mm (AUX IN1/
AUX IN2)
Antennesysteem FM: flexibele staafantenne
AM: vaste antenne
Afmetingen (b x h x d) in mm
282 x 294 x 163
Gewicht 4,3 kg (zonder accu/batterijen)

49
ESPAÑOL (Instrucciones originales)
Símbolos
Se utilizan los siguientes símbolos para el equipo.
Asegúrese de que comprende su significado antes del
uso.
INSTRUCCIONES IMPORTANTES
DE SEGURIDAD
ADVERTENCIA:
Cuando se utilicen herramientas eléctricas siempre deben
tomarse precauciones de seguridad para reducir el riesgo
de incendio, descargas eléctricas y lesiones personales,
incluyendo las siguientes:
1. Lea con atención este manual de instrucciones y el
manual de instrucciones del cargador antes de su
uso.
2. Limpie solamente con un paño seco.
3. No realice la instalación cerca de fuentes de calor
como radiadores, rejillas de aire caliente, estufas u
otros aparatos (incluyendo amplificadores) que
generen calor.
4. Utilice únicamente los complementos y accesorios
especificados por el fabricante.
5. Desenchufe este aparato durante tormentas eléctricas
o cuando no se utilice durante períodos de tiempo
prolongados.
6. Una radio a batería con baterías integrales o un
paquete de baterías independiente se debe recargar
solamente con el cargador especificado para la
batería. Un cargador que puede ser adecuado para
un tipo de batería puede crear un riesgo de incendio
cuando se usa con otra batería.
7. Utilice la radio a batería únicamente con los paquetes
de batería designados específicamente. El uso de
cualquier otra batería puede crear un riesgo de
incendio.
8. Cuando no se utilice el paquete de batería,
manténgalo alejado de otros objetos metálicos, como
clips de papel, monedas, llaves, clavos, tornillos u
otros objetos metálicos pequeños que puedan
establecer una conexión entre los terminales. El
cortocircuito de los terminales de la batería puede
provocar chispas, quemaduras o un incendio.
9. Evite el contacto corporal con superficies con
conexión a tierra (a masa), tales como tuberías,
radiadores, fogones de cocina y frigoríficos. Se corre
más riesgo de sufrir una descarga eléctrica si su
cuerpo tiene conexión a tierra (a masa).
10. Si no se utiliza correctamente, la batería puede
expulsar líquido; evite cualquier contacto con dicho
líquido. Si se produce un contacto accidental,
enjuague con agua. Si el líquido entra en contacto con
los ojos, solicite ayuda médica. El líquido expulsado
de la batería puede provocar irritaciones o
quemaduras.
GUARDE ESTAS
INSTRUCCIONES.
NORMAS DE SEGURIDAD
ESPECÍFICAS
PARA EL CARTUCHO DE LA
BATERÍA
1. Antes de utilizar el cartucho de la batería, lea
todas las instrucciones y referencias de
precaución que se encuentran en (1) el cargador
de baterías, (2) la batería y (3) el producto que
utiliza la batería.
2. No desmonte el cartucho de la batería.
3. Si el tiempo de funcionamiento es excesivamente
corto, deje de utilizar la herramienta de inmediato.
De lo contrario, existe el riesgo de
sobrecalentamiento, quemaduras e incluso
explosión.
4. Si se produce contacto ocular con electrolito,
enjuáguese los ojos con agua limpia y acuda de
urgencia al médico. Corre el riesgo de perder la
visión.
5. No cortocircuite el cartucho de la batería:
(1) No toque los terminales con material
conductor.
(2) Evite guardar el cartucho de la batería en un
recipiente con otros objetos metálicos, como
clavos, monedas, etc.
(3) No exponga el cartucho de la batería al agua
o a la lluvia.
Un cortocircuito puede provocar un elevado flujo
de corriente, sobrecalentamiento, quemaduras o
incluso una avería.
6. No almacene la herramienta ni el cartucho de la
batería en lugares donde la temperatura supere
los 50 °C (122 ° F).
7. No queme el cartucho de la batería aunque esté
gravemente dañado o completamente gastado. El
cartucho de la batería puede explotar si entra en
contacto con fuego.
8. Procure que la batería no sufra golpes ni caídas.
9. No utilice una batería dañada.
10. Las baterías de litio-ión están sujetas a los
requisitos de la legislación sobre mercancías
peligrosas.
Para transportes comerciales, p. ej., terceros,
transportistas, se deben respetar los requisitos
Lea el manual de instrucciones.
Sólo para países de la Unión Europea
¡No deseche el aparato eléctrico o la batería
junto con los residuos domésticos!
De conformidad con la Directiva Europea
sobre residuos de aparatos eléctricos y
electrónicos, y sobre baterías y
acumuladores y el desecho de baterías y
acumuladores y su aplicación de acuerdo con
la legislación nacional, la herramienta
eléctrica y las baterías y paquetes de
baterías cuya vida útil haya llegado a su fin
se deberán recoger por separado y trasladar
a una planta de reciclaje que cumpla con las
exigencias ecológicas.
Cd
Ni-MH
Li-ion

50
especiales sobre embalajes y etiquetado.
Para preparar el elemento para su transporte, debe
consultarse con un experto en materiales peligrosos.
Respete también cualquier posible normativa
nacional.
Tape o cubra con cinta adhesiva los contactos
abiertos y empaquete la batería de forma que no se
pueda mover dentro del embalaje.
11. Siga las normativas locales relativas al desecho
de la batería.
12. Para evitar riesgos, debe leerse el manual para
sustituir la batería antes del uso.
La tensión de descarga máx. de la batería debe ser
igual o superior a 8 A.
PRECAUCIÓN:
• Peligro de explosión si la batería se sustituye de forma
incorrecta.
• Sustitúyala solo con una del mismo tipo o un tipo
equivalente.
GUARDE ESTAS
INSTRUCCIONES.
PRECAUCIÓN: Utilice solo baterías genuinas de
Makita.
El uso de baterías no genuinas de Makita o baterías que
se han modificado puede provocar una explosión de la
batería y un incendio, lesiones personales y daños.
También se invalidará la garantía de Makita para la
herramienta y el cargador de Makita.
Consejos para conseguir una mayor
duración de la batería
1. Cargue la batería antes de que se descargue por
completo.
Cuando observe que la herramienta tiene menos
potencia, deje de utilizarla y cargue el cartucho de
la batería.
2. No recargue nunca un cartucho de batería
completamente cargado.
La sobrecarga acorta la vida útil de la batería.
3. Cargue el cartucho de la batería a una temperatura
ambiente que oscile entre 10 °C y 40 °C (50 °F -
104 °F). Antes de cargar un cartucho de batería
caliente, deje que se enfríe.
4. Cargue el cartucho de la batería si no lo ha
utilizado durante un período prolongado (más de
seis meses).
Explicación de la vista general
(Fig. 1)
1. Puerto de suministro de alimentación USB
2. Botón de encendido/temporizador de apagado
3. Botón de fuente
4. Alarma de radio
5. Alarma de zumbador
6. Emisoras presintonizadas/Botón 1 de presintonía
funciona como botón de emparejamiento Bluetooth
®
7. Botón Menú/Info.
8. Mando de volumen/control de sintonía/selección
9. Enchufe de entrada de CC
10. AUX IN 1
11. Pantalla LCD
12. Asidero
13. Antena de varilla flexible
14. Cierre del compartimento de las baterías
15. Altavoz
16. Cubierta de la batería
17. Terminal de entrada (ENTRADA AUX 2)
18. Compartimento para las baterías (cubre el paquete de
baterías principal y las baterías de respaldo)
19. Arriba
20. Izquierda
21. Delante
22. Derecha
23. Detrás; Cubierta de la batería cerrada
24. Detrás; Cubierta de la batería abierta
25. Cartucho de la batería
26. Botón
27. Luces indicadoras
28. Botón de comprobación
Pantalla LCD:
A. Alarma de radio
B. Alarma de zumbador
C. Símbolo de estéreo
D. Indicador de batería baja
E. Reloj
F. Frecuencia
G. RDS (Sistema de datos por radio)
H. Estado de temporizador de apagado
I. AM/PM para el reloj
Instalación de la batería
Nota:
Mantener baterías de respaldo en el compartimiento evita
que se pierdan los datos de las memorias
preseleccionadas.
1. Estire hacia fuera el cierre del compartimento de las
baterías para liberar el compartimento de las baterías.
Existe un compartimento para el paquete de baterías
principal y un compartimento para la batería de
respaldo. (Fig. 2)
2. Retire la cubierta del compartimento de la batería de
respaldo e inserte dos baterías UM-3 nuevas
(tamaños AA). Asegúrese de colocar las baterías con
la polaridad correcta dentro del compartimento, tal y
como se muestra. Vuelva a colocar la cubierta de la
batería. (Fig. 3)
3. Tras insertar las baterías de respaldo, inserte el
paquete de baterías principal para alimentar la radio.
Los paquetes de baterías adecuados para esta radio
se muestran en la tabla siguiente.

51
En la siguiente tabla se indica el tiempo de funcionamiento con una sola carga en el modo de radio.
: Batería de clúster
: Batería deslizante
Nota:
La tabla relativa al tiempo de funcionamiento con la batería que se muestra más arriba es para referencia. El tiempo de
funcionamiento real puede diferir según el tipo de batería y el entorno de uso.
Instalación o extracción del cartucho de
la batería deslizante (Fig. 4 y 5)
• Para instalar el cartucho de la batería, alinee la
lengüeta situada en el cartucho de la batería con la
ranura del chasis e insértelo. Insértelo completamente
hasta que quede firmemente encajado con un clic.
• Si puede ver el indicador rojo de la zona superior del
botón, significa que el cartucho no está encajado
completamente. Instálelo completamente hasta que el
indicador rojo no esté visible. De lo contrario, el
cartucho puede desprenderse accidentalmente de la
herramienta y causar lesiones al operario o a alguna
persona que se encuentre cerca.
• No haga fuerza al insertar el cartucho de la batería. Si
el cartucho no entra con suavidad, significa que no lo
está instalando correctamente.
• Para quitar el cartucho de la batería, mantenga
pulsado el botón de la parte frontal del cartucho y
retírelo o pulse los botones de ambos lados del
cartucho.
Instalación o extracción del cartucho de
la batería de clúster (Fig. 6 y 7)
• Para insertar el cartucho de la batería, alinee la
lengüeta situada en el cartucho de la batería con la
ranura del alojamiento e insértela.
• Para quitar el cartucho de la batería, extraiga la batería
del terminal mientras presiona los botones del lateral
del cartucho.
Vuelva a colocar el cierre del compartimento de las
baterías en la posición original.
La reducción de potencia, la distorsión, un “sonido
entrecortado” o la aparición del símbolo de batería baja
Capacidad de la
batería
Tensión del cartucho de batería
EN LA SALIDA DEL ALTAVOZ
= 50 mW + 50 mW (unidad: Hora)
(Aproximadamente)
7,2 V 10,8 V 14,4 V 18 V En radio o AUX
En Bluetooth
®
con
carga USB
1,0 Ah BL7010 5,5 0,8
1,1 Ah
BL1411G,
L1451
5,5
1,5
BL1811G,
L1851
1,8
1,3 Ah
BL1013
7,5
1,5
BL1415,
BL1413G,
L1453
1,8
BL1815,
BL1813G,
L1853
2,0
1,5 Ah
BL1415N
8,5
2,0
BL1815N 2,5
2,0 Ah
BL1820,
BL1820B
11 3,2
3,0 Ah
BL1430,
BL1430B
16
4,0
BL1830,
BL1830B
5,0
4,0 Ah
BL1440
22
5,5
BL1840,
BL1840B
6,5
5,0 Ah
BL1450
27
6,5
BL1850,
BL1850B
8,0
6,0 Ah
BL1460B
33
7,0
BL1860B 9,5

52
y “POWERFAIL” (FALLO DE ALIMENTACIÓN) en la
pantalla son indicadores de que el paquete de baterías
principal debe sustituirse.
Nota:
El paquete de baterías no se puede cargar mediante el
adaptador de alimentación CA suministrado.
Cuando aparece el símbolo de batería baja y
“EMPTY” (VACÍA) parpadea continuamente, ha llegado el
momento de sustituir las baterías de respaldo.
Indicación de la capacidad restante de la
batería
(Solo para cartuchos de la batería con “B” al final del
número de modelo.) (Fig. 8)
Pulse el botón de comprobación del cartucho de la
batería para indicar la capacidad restante de la batería.
Las luces indicadoras se encienden durante unos
segundos.
015658
NOTA:
• En función de las condiciones de uso y de la
temperatura ambiente, la indicación puede diferir
ligeramente de la capacidad real.
Uso de la antena de varilla flexible (Fig. 9)
Ponga la antena de varilla flexible en posición vertical tal y
como se muestra en la figura.
Uso del adaptador de alimentación CA
suministrado (Fig. 10)
Retire el protector de goma e inserte el enchufe
adaptador en el conector de CC de la parte izquierda de
la radio. Enchufe el adaptador en una toma de corriente
estándar de la red de alimentación. Siempre que se utilice
el adaptador, el paquete de baterías se desconectará
automáticamente. El adaptador de CA se debe
desconectar de la red eléctrica cuando no se utilice.
Nota:
Si la radio sufre interferencias en la banda AM
provocadas por el adaptador, separe la radio unos 30 cm
del adaptador CA.
Utilización de la radio – Sintonización
automática AM/FM
1. Pulse el botón de encendido para encender la
radio.
2. Pulse el botón de fuente para seleccionar el
modo de radio AM o FM.
3. Pulse y mantenga pulsado el mando de control de
sintonización para realizar una sintonización
automática. La radio explorará la banda AM/FM desde
la frecuencia que se muestra en ese momento y
detendrá la exploración automáticamente cuando
encuentre una emisora de suficiente potencia.
4. Tras unos segundos, la pantalla se actualizará. La
pantalla mostrará la frecuencia de la señal
encontrada.
5. Para buscar otra emisora, mantenga pulsado el
mando de control de sintonización como antes.
6. Cuando se alcance el final de la banda, la radio
reiniciará la sintonización desde el extremo opuesto
de la banda.
7. Gire el mando de control de sintonización para
ajustar el nivel de sonido según sea necesario.
Nota:
• Mientras ajusta el volumen, asegúrese de que FM/
AM NO parpadee en la pantalla.
• Si AM/FM parpadea en la pantalla, se puede
sintonizar las emisoras manualmente (consulte el
apartado “Sintonización manual – AM/FM” para
obtener información más detallada).
8. Para apagar la radio, pulse el botón de encendido
.
Sintonización manual – AM/FM
1. Pulse el botón de encendido para encender la
radio.
2. Pulse el botón de fuente para seleccionar el
modo de radio AM o FM.
3. Pulse el mando de control de sintonización y verá
FM o AM parpadeando en la pantalla.
Nota:
• FM/AM parpadeará durante 10 segundos aprox.
Durante ese período, solamente se permite la
sintonización manual.
• Si se desea ajustar el volumen mientras FM/AM
parpadea, se debe pulsar el mando de control de
sintonización para detener el parpadeo y se puede
girar el mando de control de sintonización para
ajustar el nivel de sonido.
Luces indicadoras
Capacidad
restante
Iluminada Apagado Parpadea
75% a 100%
50% a 75%
25% a 50%
0% a 25%
Cargue la batería.
Es posible que la
batería se haya
averiado.

53
4. Gire el mando de control de sintonización para
sintonizar una emisora.
5. Cuando se alcance el final de la banda, la radio
reiniciará la sintonización desde el extremo opuesto
de la banda.
6. Utilice el mando de control de sintonización para
ajustar el nivel de sonido según sea necesario.
Presintonía de emisoras en el modo AM/
FM
Hay 5 presintonías para cada radio AM y FM. Se utilizan
de la misma forma para cada banda.
1. Pulse el botón de encendido para encender la
radio.
2. Pulse el botón de fuente parta seleccionar la
banda que desee. Sintonice la emisora de radio que
desee, tal y como se ha descrito anteriormente.
3. Pulse y mantenga pulsado el botón de presintonía
que desee (1 a 5) hasta que se
muestre “P4”, por ejemplo, después de la frecuencia.
La emisora se almacenará usando el número de
presintonía. Repita este procedimiento para las
presintonías restantes según desee.
4. Las presintonías que ya se han almacenado se
pueden sobrescribir siguiendo el procedimiento
anterior si es necesario.
Modos de visualización – FM
La radio tiene diferentes opciones de visualización para el
modo de radio FM.
1. Pulse repetidamente el botón Menú/Info para
ver la información RDS de la emisora que está
escuchando.
a. Station name (Nombre de la emisora)
Muestra el nombre si se está
escuchando la emisora.
b. Program type (Tipo de programa)
Muestra el tipo de emisora que se
está escuchando, por ejemplo, Pop,
Classic, News (Pop, Clásica,
Noticias), etc.
c. Radio text (Texto de radio)
Muestra un mensaje de texto de
radio, como nuevos elementos, etc.
d. Year/Day (Año/Día)
Muestra el año y el día de la semana
de acuerdo con el ajuste de fecha de
la radio.
e. Date/Day (Fecha/Día)
Muestra la fecha y el día de la
semana de acuerdo con el ajuste de
fecha de la radio.
f. Frequency (Frecuencia)
Muestra la frecuencia de FM para la
emisora que se escucha.
FM estéreo (auto)/mono
Si la emisora de radio FM que se está escuchando tiene
una señal débil, se puede oír algún siseo. Se puede
reducir el siseo forzando la reproducción de la emisora en
mono, en lugar de estéreo, en la radio.
1. Pulse el botón de encendido según sea
necesario para seleccionar la banda FM y sintonizar
la emisora FM que desee tal y como se indicó
anteriormente.
2. Pulse y mantenga pulsado el botón Menú/Info
para entrar en el ajuste de menú.
3. Gire el mando de control de sintonización hasta
que el ajuste de FM Auto/mono se muestre en la
pantalla. Si el ajuste es Auto pulse el mando de
control de sintonización para cambiar al modo Mono y
reducir el siseo. Pulse el mando de control de
sintonización para seleccionar la opción.
Recuperación de una presintonía en el
modo AM/FM
1. Pulse el botón de encendido para encender la
radio.
2. Pulse el botón de fuente para seleccionar el
modo de radio AM o FM.
3. Pulse momentáneamente el botón de presintonía que
desee para que la radio sintonice una
de las emisoras almacenadas en la memoria de
presintonías.
Reloj y alarmas
Ajuste del formato de fecha y hora
El reloj, que se utiliza en el modo de reposo y en las
pantallas de modo de reproducción, se puede ajustar en
un formato diferente. El formato seleccionado también se
utiliza para ajustar las alarmas.
1. Pulse y mantenga pulsado el botón Menú/Info
para entrar en el ajuste de menú.
2. Gire el mando de control de sintonización hasta
que aparezca “CLOCK xxH” (RELOJ xxH) en la
pantalla y pulse el mando de control de sintonización
para entrar en el ajuste. Verá que el formato de
hora empieza a parpadear.
3. Gire el mando de control de sintonización para
seleccionar el formato de 12 o 24 horas. Pulse el
mando de control de sintonización para confirmar
su elección de formato de reloj.
Nota: Si se elige el formato de reloj de 12 horas, la
radio utilizará el reloj de 12 horas para el ajuste.
4. Pulse y mantenga pulsado el botón Menú/Info
para entrar en el ajuste de menú.
5. Gire el mando de control de sintonización hasta
que aparezca una fecha (por ejemplo THU APR 3

54
(JUE, 3 de ABRIL)) en la pantalla y pulse el mando de
control de sintonización para entrar en el ajuste.
Verá que el formato de fecha empieza a parpadear.
6. Gire el mando de control de sintonización para
seleccionar el formato de fecha que desee. Pulse el
mando de control de sintonización para confirmar
su elección.
Ajuste de la hora y la fecha del reloj
1. Pulse y mantenga pulsado el botón Menú/Info .
2. Gire el mando de control de sintonización hasta
que aparezca “CLOCK ADJ” (AJUSTE DE RELOJ) en
la pantalla. Pulse el mando de control de sintonización
para entrar en el ajuste.
3. El ajuste de hora de la pantalla empezará a
parpadear. Gire el mando de control de sintonización
para seleccionar la hora que desee y pulse el
mando de control de sintonización para confirmar
el ajuste. A continuación, gire el mando de control de
sintonización para seleccionar los minutos que
desee y pulse el mando de control de sintonización
para confirmar el ajuste.
4. Gire el mando de control de sintonización hasta
que aparezca “DATE ADJ” (AJUSTE DE FECHA) en
la pantalla. Pulse el mando de control de sintonización
para entrar en el ajuste.
5. Gire el mando de control de sintonización para
seleccionar el año que desee y pulse el mando de
control de sintonización para confirmar el ajuste. A
continuación, gire el mando de control de
sintonización para seleccionar el mes que desee y
pulse el mando de control de sintonización para
confirmar el ajuste. A continuación, gire el mando de
control de sintonización para seleccionar el día que
desee y pulse el mando de control de sintonización
para confirmar el ajuste.
RDS (Sistema de datos por radio)
Cuando ajuste la hora del reloj utilizando la función RDS,
la radio sincronizará la hora del reloj cuando sintonice una
emisora de radio que utilice RDS con señales CT.
1. Cuando sintonice una emisora que transmita datos
RDS, pulse y mantenga pulsado el botón Menú/Info
.
2. Gire el mando de control de sintonización hasta
que aparezca “RDS CT” y un símbolo de reloj en la
pantalla. Pulse el mando de control de sintonización
para entrar en el ajuste.
3. Gire el mando de control de sintonización hasta
que aparezca “RDS CT” en la pantalla. Pulse el
mando de control de sintonización para confirmar
el ajuste. La hora del reloj de la radio se configurará
automáticamente de acuerdo con los datos RDS
recibidos.
4. Cuando se complete la acción, aparecerá el icono
RDS en la pantalla LCD para indicar que la hora de la
radio es la hora del reloj RDS. La hora del reloj de la
radio será válida durante 5 días cada vez que la radio
se sincronice con RDS CT.
Ajuste del despertador
La radio tiene dos alarmas que se pueden configurar
independientemente para que le despierten con radio AM/
FM o alarma de zumbador. Las alarmas se pueden
ajustar mientras la unidad está en modo de reposo o
durante la reproducción.
a. Ajuste de la hora de la alarma de radio:
1. La radio se puede ajustar cuando está encendida o
apagada.
2. Pulse y mantenga pulsado el botón de alarma de
radio ; el símbolo de alarma de radio y la hora
de la pantalla parpadearán junto con un pitido.
3. Mientras parpadee el símbolo de alarma de radio
, gire el mando de control de sintonización
para seleccionar la hora y pulse el mando de control
de sintonización de nuevo para confirmar el ajuste
de la hora. A continuación, gire el mando de control
de sintonización para seleccionar los minutos y
pulse el mando de control de sintonización para
confirmar el ajuste de los minutos.
4. Gire el mando de control de sintonización y en la
pantalla se mostrarán las opciones de frecuencia para
la alarma.
Las opciones de la alarma son las siguientes:
ONCE (UNA VEZ) – la alarma sonará una vez
DAILY (DIARIAMENTE) – la alarma sonará todos los
días
WEEKDAY (DÍA DE LA SEMANA) – la alarma sonará
solamente los días de la semana
WEEKEND (FIN DE SEMANA) – la alarma sonará
solamente los fines de semana
Pulse el mando de control de sintonización para
confirmar el ajuste.
5. Mientras parpadee el símbolo de alarma de radio, gire
el mando de control de sintonización para seleccionar
la banda y la emisora para el despertador que desee
y, a continuación, gire el mando de control de
sintonización para confirmar la selección.
6. Gire el mando de control de sintonización para
seleccionar el volumen que desee y púlselo para
confirmar el volumen. Se ha completado el ajuste de
la alarma de radio.
Nota:
Si no se selecciona una nueva emisora de alarma de
radio, se seleccionará la última emisora de alarma.

55
Nota:
Si la emisora de alarma AM/FM seleccionada no está
disponible mientras suena la alarma, se utilizará la alarma
de zumbador en su lugar.
b. Ajuste de la alarma de zumbador HWS (siglas en
inglés de Humane Wake System):
Si se selecciona la alarma de zumbador HWS, al
activarse la alarma sonará un pitido.
El pitido de la alarma será cada vez más corto cada
15 segundos durante un minuto; transcurrido ese tiempo,
habrá un minuto de silencio y se volverá a repetir el ciclo.
1. La alarma de zumbador se puede ajustar cuando la
radio está encendida o apagada.
2. Pulse y mantenga pulsado el botón de alarma de
zumbador , el símbolo y la hora de la pantalla
parpadearán junto con un pitido.
3. Mientras el símbolo de alarma de zumbador
parpadea, gire el mando de control de sintonización
para seleccionar la hora y pulse el mando de
control de sintonización de nuevo para confirmar el
ajuste de la hora. A continuación, gire el mando de
control de sintonización para seleccionar los
minutos y pulse el mando de control de sintonización
para confirmar el ajuste de los minutos.
4. Gire el mando de control de sintonización y la pantalla
mostrará las opciones de frecuencia para la alarma.
Las opciones de la alarma son las siguientes:
ONCE (UNA VEZ) – la alarma sonará una vez
DAILY (DIARIAMENTE) – la alarma sonará todos los
días
WEEKDAY (DÍA DE LA SEMANA) – la alarma sonará
solamente los días de la semana
WEEKEND (FIN DE SEMANA) – la alarma sonará
solamente los fines de semana
Pulse el mando de control de sintonización para
confirmar el ajuste.
Nota:
No hay ningún ajuste de volumen para la alarma de
zumbador.
Cuando la alarma suena
Para cancelar una alarma que suena, pulse el botón de
encendido .
Desactivación/Cancelación de alarmas
Para desactivar una alarma activa, pulse el botón de
encendido o pulse y mantenga pulsado el botón de
alarma correspondiente para cancelar la alarma.
Modo recordatorio
1. Cuando suene la alarma, al pulsar cualquier botón
que no sea el botón de encendido la alarma se
silenciará durante 5 minutos. “SNOOZE”
(RECORDATORIO) se mostrará en la pantalla.
2. Para ajustar el tiempo de silencio para el temporizador
de recordatorio, pulse y mantenga pulsado el botón
Menú/Info para entrar en el ajuste de menú.
3. Gire el mando de control de sintonización hasta
que aparezca “SNOOZE X” (RECORDATORIO X) en
la pantalla y pulse el mando de control de
sintonización para entrar en el ajuste. Gire el
mando de control de sintonización para ajustar el
tiempo de silencio de 5, 10, 15 y 20 minutos para el
temporizador de recordatorio.
4. Para cancelar el temporizador de recordatorio
mientras la alarma está suspendida, pulse el botón de
encendido .
Temporizador de apagado
La radio se puede configurar para que se apague
automáticamente una vez transcurrido un período de
tiempo preestablecido. El temporizador de apagado se
puede ajustar entre 60, 45, 30, 15, 120 y 90 minutos.
1. Pulse y mantenga pulsado el botón de encendido
para entrar en el ajuste del temporizador de
apagado. “SLEEP XX” (APAGADO XX) se mostrará
en la pantalla.
2. Siga pulsando el botón de encendido y las
opciones del temporizador de apagado empezarán a
cambiar en la pantalla. Pare hasta que aparezca en
pantalla el temporizador de apagado que desee. El
ajuste se guardará y el LCD volverá a la pantalla
normal.
3. La radio se apagará automáticamente una vez
transcurrido el tiempo del temporizador de apagado
preestablecido. El icono del temporizador de apagado
se mostrará en la pantalla para indicar que hay
un temporizador de apagado activo.
4. Para cancelar la función de temporizador de apagado
antes de que transcurra el tiempo preestablecido,
solamente tiene que pulsar el botón de encendido
para apagar la unidad manualmente.
Sonoridad
Puede obtener una compensación de frecuencias
inferiores y superiores para la radio ajustando la función
de sonoridad.
1. Pulse y mantenga pulsado el botón Menú/Info
para entrar en el ajuste de menú.
2. Gire el mando de control de sintonización hasta
que aparezca “LOUD ON” (ALTO ACTIVADO) o
“LOUD OFF” (ALTO APAGADO) en la pantalla. Pulse
el mando de control de sintonización para entrar
en el ajuste.
3. Gire el mando de control de sintonización para
elegir ON (ACTIVADO) y activar la función de

56
sonoridad y después pulse el mando de control de
sintonización para confirmar el ajuste.
4. Para apagar la función de sonoridad, seleccione OFF
(APAGADO) y pulse el mando de control de
sintonización para confirmar el ajuste.
Toma de entrada auxiliar
Se proporcionan dos tomas de entrada auxiliar estéreo de
3,5 mm. Una se encuentra en la parte frontal de la radio
(AUX IN 1); la otra se encuentra en el compartimento de
las baterías (AUX IN 2).
1. Conecte una fuente de audio externa (por ejemplo,
iPod, MP3 o un reproductor de CD) a la toma de
entrada auxiliar.
2. Pulse y suelte repetidamente el botón de fuente
hasta que se muestre AUX IN 1 o 2.
3. Ajuste la configuración del volumen en el iPod, MP3 o
reproductor de CD para garantizar un nivel de señal
adecuado y después utilice el mando de control de
sintonización de la radio según sea necesario para
una escucha cómoda.
Cómo escuchar música a través de
Bluetooth
®
Para reproducir/transmitir música a través de Bluetooth
®
mediante la radio, es preciso emparejar el dispositivo
Bluetooth
®
con la radio para realizar la vinculación
automática. El emparejamiento crea un vínculo
permanente para que dos dispositivos siempre puedan
reconocerse entre sí.
Emparejamiento con el dispositivo
Bluetooth
®
1. Pulse el botón de fuente para seleccionar la
función Bluetooth
®
. “BT READY” (BT PREPARADO)
se mostrará en la pantalla y “READY” (LISTO)
parpadeará a intervalos de 2 segundos.
2. Para permitir el procedimiento de emparejamiento,
active la función Bluetooth
®
en el dispositivo de
acuerdo con las indicaciones del manual de usuario
del dispositivo.
3. Cuando pulse y suelte el botón de emparejamiento
, “BT PAIR” (EMPAREJAMIENTO BT) se mostrará
en la pantalla y parpadeará a intervalos de 1 segundo.
Puede comenzar la búsqueda de su radio en el
dispositivo Bluetooth
®
. Cuando aparezca el nombre
de su radio en el dispositivo Bluetooth
®
, pulse el
elemento de la lista Bluetooth
®
.
Con algunos tipos de móvil antiguos (dispositivos con
versiones de Bluetooth
®
anteriores a BT2.1), puede
que deba introducir el código “0000”.
4. Su dispositivo Bluetooth
®
se enlazará con la radio.
5. Una vez conectados, “BLUETOOTH” permanecerá
encendido en la pantalla y la retroiluminación se
atenuará al cabo de 10 segundos.
Ahora puede reproducir la música del dispositivo
habilitado para Bluetooth
®
a través de la radio.
Reproducción desde el dispositivo
Bluetooth
®
que ya se ha emparejado
1. Pulse el botón de fuente para seleccionar la
función Bluetooth®. “BT READY” (BT PREPARADO)
se mostrará en la pantalla y “READY” (LISTO)
parpadeará a intervalos de 2 segundos.
2. Busque y enlace la radio en su dispositivo Bluetooth
®
.
Algunos dispositivos pueden enlazarse con la radio
automáticamente.
Ahora puede reproducir la música del dispositivo
habilitado para Bluetooth
®
a través de la radio.
Nota:
a) La radio puede emparejarse con 8 dispositivos
Bluetooth
®
como máximo. Cuando se empareja un
número superior de dispositivos Bluetooth
®
, el historial
de emparejamiento se sobrescribe desde el historial de
emparejamiento más antiguo.
b) Si hay 2 dispositivos Bluetooth
®
buscando su radio, se
mostrará su disponibilidad en ambos dispositivos.
c) Si su dispositivo Bluetooth
®
se desconecta
temporalmente de la radio, debe volver a conectar
manualmente el dispositivo con la radio.
d) Si el nombre de su radio aparece en la lista de
dispositivos Bluetooth
®
pero el dispositivo no puede
conectarse a ella, elimine el nombre del elemento de la
radio de la lista y vuelva a emparejar el dispositivo con
la radio siguiendo los pasos descritos anteriormente.
e) El alcance operativo efectivo entre la radio y el
dispositivo emparejado es aproximadamente de
10 metros.
f) La presencia de obstáculos entre la radio y el
dispositivo puede reducir el alcance operativo.
Desconexión del dispositivo Bluetooth
®
Para desconectar el dispositivo de la conexión
Bluetooth
®
, mantenga pulsado el botón de
emparejamiento entre 2 y 3 segundos.
“BLUETOOTH” desaparecerá de la pantalla, lo que
significa que la conexión Bluetooth
®
se ha desactivado.
Carga mediante el puerto de suministro
de alimentación USB (Fig. 10)
Existe un puerto USB en la parte frontal de la radio.
Puede cargar el dispositivo USB mediante el puerto USB.
1. Conecte el dispositivo USB, por ejemplo un iPod, MP3
o reproductor de CD, con un cable USB disponible en
el mercado.
2. Pulse el botón de encendido para encender la
radio.
3. Independientemente de si la radio recibe alimentación
de corriente alterna o de baterías, la radio puede
cargar el dispositivo USB cuando está encendida y en

57
el modo de radio FM, el modo BT o el modo AUX, que
aparece cuando se conecta una fuente de audio
externa.
Nota:
No puede cargar dispositivos USB en el modo AM porque
la recepción de la señal de radio pierde mucha calidad
cuando se carga un dispositivo USB.
• Durante la carga USB, el volumen máximo del altavoz
de salida se reducirá.
• La ranura USB puede suministrar una corriente
eléctrica máxima de 1A5V.
Importante:
• Antes de conectar el dispositivo USB al cargador,
realice siempre una copia de seguridad de los datos
del dispositivo USB. De lo contrario, puede que los
datos del dispositivo se pierdan.
• Puede que el cargador no suministre alimentación a
algunos dispositivos USB.
• Cuando no lo utilice, o bien después de una carga,
retire el cable USB y cierre la cubierta.
• No conecte una fuente de alimentación al puerto USB.
Existe riesgo de que se produzca un incendio. El
puerto USB está diseñado únicamente para cargar
dispositivos de bajo voltaje. Cuando no cargue un
dispositivo de bajo voltaje, coloque siempre la cubierta
en el puerto USB.
• No inserte un clavo, un cable, etc. en el interior del
puerto de suministro de alimentación USB. Existe el
riesgo de que se produzca un cortocircuito que
provoque humo o incluso un incendio.
• No conecte esta ranura USB con el puerto USB de un
ordenador, ya que es muy posible que las dos
unidades se averíen.
MANTENIMIENTO
PRECAUCIÓN:
• Nunca utilice gasolina, benceno, disolvente, alcohol o
un producto similar. Se puede provocar una
decoloración, una deformación o grietas.
Especificaciones:
Requisitos de alimentación
Adaptador de alimentación CA
DC12 V/1.200 mA, clavija central
positiva
Batería UM-3 (tamaño AA) x 2 para
respaldo
Batería de clúster: 7,2 V - 10,8 V
Batería deslizante: 14,4 V - 18 V
Cobertura de frecuencias
FM 87,50 - 108 MHz
(0,05 MHz/paso)
AM (MW) 522 - 1.629 kHz
(9 kHz/paso)
Bluetooth
®
Bluetooth
®
QD ID 58625
(La palabra Bluetooth
®
y los
logotipos son marcas comerciales
registradas propiedad de
Bluetooth SIG, Inc.)
Versión de Bluetooth
®
4.0
Perfiles Bluetooth
®
A2DP/SCMS-T
Alimentación de transmisión
Alimentación de especificación
Bluetooth
®
de Clase 2
Alcance de transmisión
Máx. 10 m (varía según las
condiciones de uso)
Códec admitido SBC
Perfil Bluetooth
®
compatible
A2DP
Característica del circuito
Altavoz 3,5 pulgadas 8 ohms x 2
Alimentación de salida
7,2 V: 0,5 W x 2
10,8 V:1,2 W x 2
14,4 V: 2,2 W x 2, 18 V: 3,5 W x 2
Terminal de entrada 3,5 mm diámetro (AUX IN1/
AUX IN2)
Sistema de antena FM: antena de varilla flexible
AM: antena de barra
Dimensiones (Ancho x Alto x Largo) en mm
282 x 294 x 163
Peso 4,3 kg (sin batería)

58
PORTUGUÊS (Instruções de origem)
Símbolos
Descrição dos símbolos utilizados no equipamento.
Certifique-se de que compreende os seus significados,
antes da utilização.
INSTRUÇÕES DE SEGURANÇA
IMPORTANTES
AVISO:
Ao utilizar ferramentas eléctricas, devem ser sempre
cumpridas as precauções de segurança básicas, de
forma a reduzir o risco de incêndios, choques eléctricos e
ferimentos, incluindo as que se seguem:
1. Leia atentamente este manual de instruções e o
manual de instruções do carregador antes da
utilização.
2. Limpe apenas com um pano seco.
3. Não instale próximo de fontes de calor como
radiadores, bocas de ar quente, fornos ou outros
aparelhos (incluindo amplificadores) que produzem
calor.
4. Utilize apenas acessórios especificados pelo
fabricante.
5. Desligue este aparelho durante trovoadas ou quando
não o utilizar durante longos períodos de tempo.
6. Um rádio a bateria com bateria integrada ou uma
bateria separada tem de ser recarregado apenas com
o carregador especificado para a bateria. Um
carregador que pode ser adequado para um tipo de
bateria pode criar um risco de incêndio quando
utilizado com outra bateria.
7. Utilize o rádio a bateria apenas com baterias
especificamente concebidas. A utilização de qualquer
outra bateria pode criar um risco de incêndio.
8. Quando a bateria não estiver a ser utilizada,
mantenha-a afastada de objectos metálicos como, por
exemplo, clipes, moedas, chaves, pregos, parafusos
ou outros pequenos objectos metálicos que possam
fazer a ligação entre terminais. Provocar um curto-
circuito nos terminais da bateria pode causar faíscas,
queimaduras ou um incêndio.
9. Evite contacto corporal com superfícies ligadas à
terra, tais como tubos, radiadores, aquecedores e
frigoríficos. Existe um risco acrescido de choques
eléctricos caso o seu corpo esteja ligado à terra.
10. Sob condições abusivas, poderá ser ejectado líquido
da bateria; evite o contacto. Se ocorrer
acidentalmente um contacto, lave com água. Se o
líquido entrar em contacto com os olhos, consulte um
médico. O líquido ejectado da bateria pode causar
irritação ou queimaduras.
GUARDE ESTAS INSTRUÇÕES.
REGRAS DE SEGURANÇA
ESPECÍFICAS
RELATIVAS À BATERIA
1. Antes de utilizar a bateria, leias as instruções e
chamadas de atenção sobre: (1) o carregador da
bateria, (2) a bateria e (3) o produto que utiliza a
bateria.
2. Não desmonte a bateria.
3. Se o tempo de utilização com a bateria se tornar
demasiado curto, deve parar imediatamente. Se
continuar, pode causar sobreaquecimento,
incêndio e mesmo explosão.
4. Se o electrólito entrar em contacto com os olhos,
enxagúe-os com água limpa e consulte
imediatamente um médico. Os riscos incluem
perda de visão.
5. Não provoque um curto-circuito na bateria:
(1) Não deixe que quaisquer materiais
condutores entrem em contacto com os
terminais da bateria.
(2) Evite guardar a bateria juntamente com
outros objectos de metal como pregos,
moedas, etc.
(3) Não exponha a bateria a água ou chuva.
Um curto-circuito na bateria pode criar uma
grande carga eléctrica, sobreaquecimento,
possiveis queimaduras e mesmo uma avaria.
6. Não guarde a ferramenta e a bateria em locais
onde a temperatura possa atingir ou exceder 50°C
(122°F).
7. Não incinere a bateria, nem mesmo se esta estiver
irremediavelmente danificada ou completamente
gasta. Pode explodir num incêndio.
8. Não a deixe cair e evite o choque com outros
objectos.
9. Não utilize uma bateria danificada.
10. As baterias de iões de lítio estão sujeitas aos
requisitos da legislação para mercadorias
perigosas.
Para transportes comerciais, por exemplo, por
terceiros ou despachantes, é necessário cumprir
requisitos especiais na embalagem e etiquetagem.
Para a preparação do item a enviar, é necessário
consultar um especialista em materiais perigosos.
Cumpra também os regulamentos nacionais mais
detalhados.
Proteja os contactos abertos e embale a bateria de
forma que não se possa mover dentro da embalagem.
11. Siga os regulamentos locais relacionados com a
eliminação da bateria.
Leia o manual de instruções.
Apenas para países da UE
Não deite equipamentos eléctricos ou a
bateria no lixo doméstico!
De acordo com as directivas europeias sobre
ferramentas eléctricas e electrónicas usadas
e baterias, acumuladores e baterias usadas e
a sua aplicação em conformidade com as leis
nacionais, as ferramentas eléctricas, as
baterias e conjuntos usados devem ser
recolhidos em separado e encaminhados
para uma instalação de reciclagem dos
materiais ecológicos.
Cd
Ni-MH
Li-ion

59
12. Para evitar riscos, deve ler o manual da bateria
substituível antes da utilização.
E a corrente máxima de descarga deve ser superior
ou igual a 8A.
PRECAUÇÃO:
• Perigo de explosão se a bateria for substituída
incorretamente.
• Substitua apenas por uma bateria igual ou equivalente.
GUARDE ESTAS INSTRUÇÕES.
PRECAUÇÃO: Utilize apenas baterias genuínas
da Makita.
A utilização de baterias não genuínas da Makita ou
baterias que foram alteradas, pode resultar no
rebentamento da bateria causando incêndios, ferimentos
pessoais e danos. Também vai anular a garantia da
Makita para a ferramenta e carregador da Makita.
Sugestões para o máximo de tempo de
vida da bateria
1. Não espere que a bateria se gaste completamente
para voltar a carregá-la.
Pare a ferramenta e carregue a bateria sempre que
detectar um baixo nível de energia.
2. Nunca volte a carregar uma bateria já
completamente carregada.
O carregamento excessivo diminui o tempo de
vida das baterias.
3. Carregue a bateria em locais onde a temperatura
se situe entre 10°C e 40°C (50°F - 104°F). Se a
bateria estiver quente, deixe-a arrefecer antes de
iniciar o carregamento.
4. Carregue a bateria em caso de inatividade durante
um longo período de tempo (mais de seis meses).
Explicação da vista geral (Fig. 1)
1. Porta da fonte de alimentação USB
2. Botão Alimentação/Temporizador
3. Botão Fonte
4. Alarme rádio
5. Alarme despertador
6. Estações memorizadas/Botão Memorização 1 como
botão Emparelhar Bluetooth
®
7. Botão Menu/Info
8. Volume/Comando Sintonização/Selector
9. Tomada de entrada de CC
10. AUX IN 1
11. Visor LCD
12. Pega
13. Antena flexível de haste regulável
14. Bloqueio do compartimento das baterias
15. Altifalante
16. Tampa da bateria
17. Terminal de entrada (AUX IN 2)
18. Compartimento das baterias (abrange a bateria
principal e as pilhas de reserva)
19. Cima
20. Esquerda
21. Frente
22. Direita
23. Traseira; Tampa da bateria fechada
24. Traseira; Tampa da bateria aberta
25. Bateria
26. Botão
27. Lâmpadas indicadoras
28. Botão de verificação
Visor LCD:
A. Alarme rádio
B. Alarme despertador
C. Símbolo estéreo
D. Indicador de bateria fraca
E. Relógio
F. Frequência
G. RDS (Radio data system)
H. Estado de suspensão
I. AM/PM para o relógio
Instalação da bateria
Nota:
Guarde pilhas de reserva dentro do respectivo
compartimento para evitar que os dados memorizados
sejam perdidos.
1. Retire o bloqueio do compartimento das baterias para
libertar o compartimento das baterias. Há o
compartimento da bateria principal e o compartimento
das pilhas de reserva. (Fig. 2)
2. Retire a tampa do compartimento das pilhas de
reserva e introduza duas pilhas UM-3 (tamanho AA)
novas. Certifique-se de que as pilhas são colocadas
com a polaridade correcta, conforme indicado no
interior do compartimento. Instale novamente a tampa
da bateria. (Fig. 3)
3. Depois de terem sido colocadas as pilhas de reserva,
introduza a bateria principal para alimentar o rádio. As
baterias adequadas para este rádio estão listadas na
tabela seguinte.

60
A tabela seguinte indica o tempo de funcionamento numa única carga no modo Rádio.
: Bateria de grupo
: Bateria de deslize
Nota:
A tabela acima relativa ao tempo de funcionamento da bateria serve de referência. O tempo de funcionamento real pode
variar consoante o tipo de bateria, estado de carregamento ou ambiente de utilização.
Instalar ou retirar a bateria de deslize
(Fig. 4 & 5)
• Para colocar a bateria, alinhe a respectiva saliência
com a calha do compartimento e encaixe-a
suavemente. Insira-a completamente até fixar em
posição com um clique.
• Se ainda estiver visível o indicador vermelho na parte
superior do botão, não estará bem encaixado.
Coloque-a completamente, até deixar de ver o
indicador vermelho. Caso contrário, pode cair da
ferramenta e causar ferimentos em si, ou em alguém
que esteja perto de si.
• Não exerça força ao introduzir a bateria. Se não
encaixar facilmente é porque não está correctamente
posicionada.
• Para retirar a bateria, retire-a da ferramenta ao mesmo
tempo que desliza o botão na parte frontal do cartucho
ou ao mesmo tempo que prime os botões em ambos
os lados do cartucho.
Instalar ou retirar a bateria de grupo
(Fig. 6 & 7)
• Para colocar a bateria, alinhe a respectiva saliência
com a calha do compartimento e encaixe-a
suavemente.
• Para retirar a bateria, retire-a do terminal e, ao mesmo
tempo, prima os botões na parte lateral da mesma.
Coloque o bloqueio do compartimento das baterias na
posição original.
Capacidade da
bateria
Tensão da bateria
NA SAÍDA DO ALTIFALANTE
= 50 mW + 50 mW (unidade: Hora)
(Aproximadamente)
7,2 V 10,8 V 14,4 V 18 V Em rádio ou AUX
Em Bluetooth
®
com
carregamento USB
1,0 Ah BL7010 5,5 0,8
1,1 Ah
BL1411G,
L1451
5,5
1,5
BL1811G,
L1851
1,8
1,3 Ah
BL1013
7,5
1,5
BL1415,
BL1413G,
L1453
1,8
BL1815,
BL1813G,
L1853
2,0
1,5 Ah
BL1415N
8,5
2,0
BL1815N 2,5
2,0 Ah
BL1820,
BL1820B
11 3,2
3,0 Ah
BL1430,
BL1430B
16
4,0
BL1830,
BL1830B
5,0
4,0 Ah
BL1440
22
5,5
BL1840,
BL1840B
6,5
5,0 Ah
BL1450
27
6,5
BL1850,
BL1850B
8,0
6,0 Ah
BL1460B
33
7,0
BL1860B 9,5

61
A potência reduzida, a distorção, o “som interrompido” ou
quando o sinal de bateria fraca e “POWERFAIL”
aparecem no visor são os sinais de que a bateria principal
necessita de ser substituída.
Nota:
A bateria não pode ser carregada com o adaptador de
alimentação CA.
Quando o sinal de bateria fraca aparece e um
“EMPTY” continua a piscar é necessário substituir as
pilhas de reserva.
Indicar a carga restante da bateria
(Apenas para baterias com “B” no final do número de
modelo.) (Fig. 8)
Prima o botão de verificação na bateria para indicar a
carga restante da bateria. As lâmpadas indicadoras
acendem-se durante alguns segundos.
015658
NOTA:
• Consoante as condições de utilização e a temperatura
ambiente, a indicação pode ser ligeiramente diferente
da carga real.
Utilizar a antena flexível de haste
regulável (Fig. 9)
Endireite a antena flexível de haste regulável, conforme
indicado na figura.
Utilizar o adaptador de alimentação CA
fornecido (Fig. 10)
Remova o protector de borracha e coloque a ficha do
adaptador na tomada CC que se encontra na parte
esquerda do rádio. Ligue o adaptador a uma tomada de
alimentação normal. Sempre que o adaptador é usado, a
bateria é automaticamente desligada. O adaptador CA
deve ser desligado da fonte de alimentação quando não
estiver a ser utilizado.
Nota:
Quando o rádio tem qualquer interferência numa banda
AM devido ao adaptador, mova o rádio para longe do
adaptador CA em mais de 30 cm.
Utilizar o seu rádio – Pesquisa automática
de estações AM/FM
1. Prima o botão Alimentação para ligar o rádio.
2. Prima o botão Fonte para seleccionar o modo de
rádio AM ou FM.
3. Prima continuamente o comando Sintonização
para efectuar uma sintonização automática. O rádio
irá pesquisar a banda AM/FM a partir da frequência
actualmente apresentada e irá parar automaticamente
a pesquisa quando encontrar uma estação com força
de sinal suficiente.
4. Após alguns segundos o visor irá actualizar. O visor
irá mostrar a frequência do sinal encontrado.
5. Para encontrar outra estação, prima continuamente o
comando Sintonização conforme anteriormente.
6. Quando é atingido o fim da banda de frequência, o
rádio irá reiniciar a sintonização a partir do fim oposto
da banda de frequência.
7. Rode o comando Sintonização para ajustar o nível
de som, conforme necessário.
Nota:
• Ao ajustar o volume, certifique-se de que FM/AM
NÃO está a piscar no ecrã.
• Se AM/FM estiver a piscar no ecrã, permite
sintonizar as estações manualmente (consulte a
secção “Sintonização manual – AM/FM” para mais
informações).
8. Para desligar o rádio, prima o botão Alimentação
.
Sintonização manual – AM/FM
1. Prima o botão Alimentação para ligar o rádio.
2. Prima o botão Fonte para seleccionar o modo de
rádio AM ou FM.
3. Prima o comando Sintonização e verá FM ou AM a
piscar no visor.
Nota:
• FM/AM irá piscar aprox. 10 segundos. Neste
período, apenas é permitida a sintonização
manual.
• Se pretender ajustar o volume enquanto FM/AM
está a piscar, prima o comando Sintonização para
parar a intermitência e pode rodar o comando
Sintonização para ajustar o nível de som.
4. Rode o comando Sintonização para sintonizar uma
estação.
Lâmpadas indicadoras
Carga restante
Acesa Apagada Intermitente
75% a 100%
50% a 75%
25% a 50%
0% a 25%
Carregue a
bateria.
A bateria pode ter
avariado.

62
5. Quando é atingido o fim da banda de frequência, o
rádio irá reiniciar a sintonização a partir do fim oposto
da banda de frequência.
6. Utilize o comando Sintonização para ajustar o nível
de som, conforme necessário.
Predefinir estações no modo AM/FM
Existem 5 estações predefinidas para rádio AM e FM.
São utilizadas da mesma forma para cada banda de
frequência.
1. Prima o botão Alimentação para ligar o rádio.
2. Prima o botão Fonte para seleccionar a banda de
frequência pretendida. Sintonize a estação de rádio
pretendida, conforme descrito previamente.
3. Prima continuamente o botão de estação memorizada
(1 a 5) pretendido até o visor
apresentar “P4”, por exemplo, após a frequência. A
estação será armazenada com o número pretendido.
Repita este procedimento para as estações
memorizadas restantes, conforme pretender.
4. As estações memorizadas que já foram armazenadas
podem ser substituídas ao seguir o procedimento
acima, se necessário.
Modos de apresentação – FM
O rádio tem uma gama de opções de apresentação para
o modo de rádio FM.
1. Prima repetidamente o botão Menu/Info para
visualizar as informações RDS da estação que está a
ouvir.
a. Station name Apresenta o nome da estação que
está a ouvir.
b. Program type Apresenta o tipo de estação que está
a ouvir tal como Pop, Classic, News,
etc.
c. Radio text Apresenta mensagens de texto de
rádio tal como novos itens etc.
d. Year/Day Apresenta o ano e o dia da semana
de acordo com a definição da data do
rádio.
e. Date/Day Apresenta a data e o dia da semana
de acordo com a definição da data do
rádio.
f. Frequency Apresenta a frequência de FM para a
estação que está a ouvir.
FM estéreo (automático)/mono
Se a estação de rádio FM que está a ouvir tiver um sinal
fraco, pode ouvir-se algum ruído. É possível reduzir este
ruído ao forçar o rádio a reproduzir a estação em mono
em vez de estéreo.
1. Prima o botão Alimentação , conforme
necessário, para seleccionar a banda FM e sintonizar
a estação FM pretendida, conforme mencionado
previamente.
2. Prima continuamente o botão Menu/Info parar
introduzir a definição de menu.
3. Rode o comando Sintonização até a definição FM
Auto/mono aparecer no visor. Se a definição for Auto,
prima o comando Sintonização para mudar para o
modo Mono de modo a reduzir o ruído. Prima o
comando Sintonização para seleccionar a opção.
Aceder a uma estação memorizada no
modo AM/FM
1. Prima o botão Alimentação para ligar o rádio.
2. Prima o botão Fonte para seleccionar o modo de
rádio AM ou FM.
3. Prima momentaneamente o botão de estação
memorizada pretendido para fazer
com que o rádio comute para uma das estações
guardadas na memória.
Relógio e alarmes
Definir o formato da hora e da data
A apresentação do relógio utilizada no ecrã do modo de
espera e do modo de reprodução pode ser definida num
formato diferente. O formato seleccionado é, depois,
utilizado ao definir os alarmes.
1. Prima continuamente o botão Menu/Info parar
introduzir a definição de menu.
2. Rode o comando Sintonização até “CLOCK xxH”
aparecer no ecrã e prima o comando Sintonização
para introduzir a definição. O formato da hora irá
começar a piscar.
3. Rode o comando Sintonização para seleccionar o
formato de 12 ou 24 horas. Prima o comando
Sintonização para confirmar a sua escolha do
formato de relógio.
Nota: Se escolher o formato de relógio de 12 horas, o
rádio irá utilizar o relógio de 12 horas para a definição.
4. Prima continuamente o botão Menu/Info parar
introduzir a definição de menu.
5. Rode o comando Sintonização até (por exemplo,
THU APR 3) aparecer no ecrã e prima o comando
Sintonização para introduzir a definição. O formato
da data irá começar a piscar.
6. Rode o comando Sintonização para seleccionar o
formato de data pretendido. Prima o comando
Sintonização para confirmar a sua escolha.
Definir a hora e a data do relógio
1. Prima continuamente o botão Menu/Info .
2. Rode o comando Sintonização até “CLOCK ADJ”
aparecer no visor. Prima o comando Sintonização
para seleccionar a opção.
3. A definição de hora no visor irá começar a piscar.
Rode o comando Sintonização para seleccionar a

63
hora pretendida e prima o comando Sintonização
para confirmar a definição. De seguida, rode o
comando Sintonização para seleccionar o minuto
pretendido e prima o comando Sintonização para
confirmar a definição.
4. Rode o comando Sintonização até “DATE ADJ”
aparecer no visor. Prima o comando Sintonização
para seleccionar a opção.
5. Rode o comando Sintonização para seleccionar o
ano pretendido e prima o comando Sintonização
para confirmar a definição. De seguida, rode o
comando Sintonização para seleccionar o mês
pretendido e prima o comando Sintonização para
confirmar a definição. De seguida, rode o comando
Sintonização para seleccionar a data pretendida e
prima o comando Sintonização para confirmar a
definição.
Radio Data System (RDS)
Quando define a hora do relógio através da função RDS,
o rádio irá sincronizar a hora do relógio sempre que
sintoniza uma estação de rádio através de RDS com
sinais CT.
1. Ao mudar para uma estação que transmite dados
RDS, prima continuamente o botão Menu/Info .
2. Rode o comando Sintonização até “RDS CT” e um
símbolo de relógio aparecerem no visor. Prima o
comando Sintonização para seleccionar a opção.
3. Rode o comando Sintonização até “RDS CT”
aparecer no visor. Prima o comando Sintonização
para confirmar a definição. A hora do relógio do rádio
será automaticamente configurada de acordo com os
dados RDS recebidos.
4. Quando a acção está concluída, o ícone RDS irá
aparecer no visor LCD indicando que a hora do rádio
é a hora do relógio RDS. A hora do relógio do rádio
será válida durante 5 dias sempre que a hora do rádio
é sincronizada com RDS CT.
Definir o alarme
O seu rádio possui dois alarmes que podem ser definidos
para acordá-lo ao som de rádio AM/FM ou alarme
despertador. Os alarmes podem ser definidos enquanto a
unidade está no modo de espera ou em reprodução.
a. Definição da hora de alarme rádio:
1. O rádio pode ser definido quando o rádio está ligado
ou desligado.
2. Prima continuamente o botão de alarme rádio ,
o símbolo de alarme rádio e a hora irão piscar
juntamente com um sinal sonoro.
3. Durante as intermitências do símbolo de alarme rádio
, rode o comando Sintonização para
seleccionar a hora e prima novamente o comando
Sintonização para confirmar a definição da hora.
De seguida, rode o comando Sintonização para
seleccionar o minuto e prima o comando Sintonização
para confirmar a definição do minuto.
4. Rode o comando Sintonização e o visor irá mostrar as
opções de frequência para o alarme.
As opções de alarme são as seguintes:
ONCE – o alarme irá soar uma vez
DAILY – o alarme irá soar todos os dias
WEEKDAY – o alarme irá soar apenas nos dias da
semana
WEEKEND – o alarme irá soar apenas nos fim-de-
semana
Prima o comando Sintonização para confirmar a
definição.
5. Enquanto o símbolo do alarme rádio está a piscar,
rode o comando Sintonização para seleccionar a
banda e estação de despertar pretendidas, de
seguida, prima o comando Sintonização para
confirmar a selecção.
6. Rode o comando Sintonização para seleccionar o
volume pretendido e prima o comando Sintonização
para confirmar o volume. A definição do alarme rádio
está concluída.
Nota:
Se a nova emissora de alarme rádio não for
seleccionada, o rádio seleccionará a última emissora de
alarme.
Nota:
Se a emissora de alarme AM/FM seleccionada não
estiver disponível quando o alarme está a soar, será
utilizado o alarme despertador.
b. Definição do alarme despertador HWS (Sistema de
despertar humano):
Activar-se-á um tom de aviso sonoro ao seleccionar o
alarme de besouro HWS.
O aviso sonoro de alarme soa cada vez mais curto a cada
15 segundos durante um minuto, seguido de um minuto
de silêncio antes de repetir o ciclo.
1. O alarme despertador pode ser definido quando o
rádio está ligado ou desligado.
2. Prima continuamente o botão de alarme despertador
, o símbolo e a hora irão piscar juntamente com
um sinal sonoro.
3. Durante as intermitências do símbolo de alarme
despertador , rode o comando Sintonização
para seleccionar a hora e prima novamente o
comando Sintonização para confirmar a definição
da hora. De seguida, rode o comando Sintonização
para seleccionar o minuto e prima o comando
Sintonização para confirmar a definição do minuto.
4. Rode o comando Sintonização e o visor irá mostrar as
opções de frequência para o alarme.

64
As opções de alarme são as seguintes:
ONCE – o alarme irá soar uma vez
DAILY – o alarme irá soar todos os dias
WEEKDAY – o alarme irá soar apenas nos dias da
semana
WEEKEND – o alarme irá soar apenas nos fim-de-
semana
Prima o comando Sintonização para confirmar a
definição.
Nota:
Não existe ajuste de volume para o alarme despertador.
Quando o alarme soa
Para cancelar um alarme a soar, prima o botão
Alimentação .
Desactivar/cancelar alarmes
Para cancelar um alarme activo, prima o botão
Alimentação ou prima continuamente o respectivo
botão de alarme para cancelar o alarme.
Snooze
1. Quando o alarme soa, premir qualquer botão que não
o botão Alimentação irá silenciar o alarme
durante 5 minutos. “SNOOZE” irá aparecer no visor.
2. Para ajustar o tempo de silêncio para o temporizador
snooze, prima continuamente o botão Menu/Info
para introduzir a definição de menu.
3. Rode o comando Sintonização até “SNOOZE X”
aparecer no ecrã, de seguida, prima o comando
Sintonização para introduzir a definição. Rode o
comando Sintonização para ajustar o tempo de
silêncio entre 5, 10, 15 e 20 minutos para o
temporizador snooze.
4. Para cancelar o temporizador snooze enquanto o
alarme está suspenso, prima o botão Alimentação
.
Temporizador
O rádio pode ser definido para se desligar
automaticamente após o decorrer de um tempo
predefinido. A definição Temporizador pode ser ajustada
entre 60, 45, 30, 15, 120 e 90 minutos.
1. Prima continuamente o botão Alimentação parar
introduzir a definição Temporizador. “SLEEP XX” irá
aparecer no visor.
2. Continue a premir o botão Alimentação e as
opções Temporizador irão começar a comutar no
visor. Pare quando a definição Temporizador
pretendida aparecer no visor. A definição será
guardada e o LCD irá retomar a apresentação normal.
3. O rádio irá desligar-se automaticamente após o
decorrer do tempo Temporizador predefinido. O ícone
Temporizador irá aparecer no visor indicando um
Temporizador activo.
4. Para cancelar a função Temporizador antes do
decorrer do tempo predefinido, prima o botão
Alimentação para desligar a unidade
manualmente.
Intensidade sonora
Pode obter compensação na frequência inferior e
superior para o rádio ao ajustar a função de intensidade
sonora.
1. Prima continuamente o botão Menu/Info parar
introduzir a definição de menu.
2. Rode o comando Sintonização até “LOUD ON” ou
“LOUD OFF” aparecer no visor. Prima o comando
Sintonização para seleccionar a opção.
3. Rode o comando Sintonização para escolher ON
para ligar a função de intensidade sonora, de seguida,
prima o comando Sintonização para confirmar a
definição.
4. Para desligar a função de intensidade sonora,
seleccione OFF e prima o comando Sintonização
para confirmar a definição.
Tomada de entrada auxiliar
São fornecidas duas tomadas de entrada auxiliar estéreo
de 3,5 mm. Uma na parte frontal do rádio (AUX IN 1); a
outra está situada no compartimento das baterias
(AUX IN 2).
1. Ligue uma fonte de áudio externa (por exemplo, iPod,
MP3 ou leitor de CD) à tomada de entrada auxiliar.
2. Prima repetidamente e solte o botão Fonte até
AUX IN 2 ser apresentado.
3. Ajuste a definição de volume no seu iPod, MP3 ou
leitor CD para garantir uma nível de sinal adequado a
partir do leitor e, de seguida, utilize o comando
Sintonização no rádio, conforme necessário, para
uma escuta confortável.
Ouvir música por Bluetooth
®
Necessita de emparelhar o dispositivo Bluetooth
®
com o
rádio antes de poder ligar automaticamente para
reproduzir/transmitir música por Bluetooth
®
através do
rádio. O emparelhamento cria uma “união” permanente
para que dois dispositivos consigam sempre detectar-se.
Emparelhar o seu dispositivo Bluetooth
®
1. Prima o botão Fonte para seleccionar a função
Bluetooth
®
. “BT READY” será apresentado no visor e
“READY” irá piscar em intervalos de 2 segundos.
2. Active o Bluetooth
®
no seu dispositivo de acordo com
o manual de utilizador do dispositivo para permitir o
procedimento de emparelhamento.

65
3. Prima e solte o botão Emparelhar , de seguida,
“BT PAIR” será apresentado no visor e irá piscar em
intervalos de 1 segundo. Pode iniciar a pesquisa do
seu rádio no dispositivo Bluetooth
®
. Assim que o
nome do rádio aparecer no dispositivo Bluetooth
®
,
prima o item na lista Bluetooth
®
.
Com alguns telemóveis antigos (versões anteriores a
dispositivos Bluetooth
®
BT2.1), pode ser necessário
introduzir o código de acesso “0000”.
4. O dispositivo Bluetooth
®
vai ligar-se ao rádio.
5. Após a ligação, “BLUETOOTH” vai permanecer no
visor e a retroiluminação será apagada no espaço de
10 segundos.
Agora, pode reproduzir a música no seu dispositivo
compatível com Bluetooth
®
através do rádio.
Reproduzir o dispositivo Bluetooth
®
já
emparelhado
1. Prima o botão Fonte para seleccionar a função
Bluetooth
®
. “BT READY” será apresentado no visor e
“READY” irá piscar em intervalos de 2 segundos.
2. Pesquise e ligue o rádio ao seu dispositivo
Bluetooth
®
. Alguns dispositivos podem ligar-se
automaticamente ao rádio.
Agora, pode reproduzir a música no seu dispositivo
compatível com Bluetooth
®
através do rádio.
Nota:
a) O rádio pode ser emparelhado, no máximo, com 8
dispositivos Bluetooth
®
. Quando emparelha mais do
que 8 dispositivos Bluetooth
®
, o histórico de
emparelhamento será substituído a começar pelo
histórico de emparelhamento mais antigo.
b) Se houver 2 dispositivos Bluetooth
®
a pesquisar pelo
rádio, vai mostrar a disponibilidade em ambos os
dispositivos.
c) Se o dispositivo Bluetooth
®
for temporariamente
desligado do rádio, então, necessita de voltar a ligar
manualmente o dispositivo ao rádio.
d) Se o nome do rádio aparecer na lista de dispositivos
Bluetooth
®
mas o dispositivo não consegue efectuar a
ligação, elimine o nome do seu rádio da lista e
emparelhe novamente com o rádio efectuando os
passos descritos acima.
e) O intervalo de funcionamento efectivo entre o rádio e o
dispositivo emparelhado é aproximadamente
10 metros.
f) Qualquer obstáculo entre o rádio e o dispositivo pode
reduzir o intervalo de funcionamento.
Desligar o seu dispositivo Bluetooth
®
Prima continuamente o botão Emparelhar durante
2-3 segundos para desligar do dispositivo Bluetooth
®
.
“BLUETOOTH” vai desaparecer do visor indicando a
desactivação do Bluetooth
®
.
Carregamento através da porta da fonte
de alimentação USB (Fig. 10)
Existe uma porta USB na parte frontal do rádio. Pode
carregar o dispositivo USB através da porta USB.
1. Ligue o dispositivo USB, como iPod, MP3 ou leitor de
CD, com um cabo USB disponível comercialmente.
2. Prima o botão Alimentação para ligar o rádio.
3. Independentemente de o rádio ser alimentado por CA
ou bateria, o rádio pode carregar o dispositivo USB
quando o rádio é ligado e no modo de rádio FM, modo
BT ou modo AUX, que aparece quando é ligada uma
fonte de áudio externa.
Nota:
Não pode carregar dispositivos USB durante o modo AM
porque a receção do sinal de rádio fica extremamente
fraca ao carregar o dispositivo USB.
• O volume máximo do altifalante vai diminuir quando o
USB está a carregar.
• A tomada USB pode proporcionar, no máximo, 1A5V
de corrente eléctrica.
Importante:
• Antes de ligar o dispositivo USB ao carregador, efectue
sempre cópias de segurança dos dados do dispositivo
USB. Caso contrário, os dados podem ser perdidos.
• O carregador pode não fornecer alimentação a alguns
dispositivos USB.
• Quando não está em utilização ou após o
carregamento, retire o cabo USB e feche a tampa.
• Não ligue a fonte de alimentação à porta USB. Caso
contrário, existe um risco de incêndio. A porta USB só
se destina a carregar dispositivos de tensão inferior.
Coloque sempre a tampa na porta USB quando não
estiver a carregar um dispositivo de tensão inferior.
• Não introduza um prego, arame, etc, na porta da fonte
de alimentação USB. Caso contrário, um curto-circuito
pode causar fumo e incêndios.
• Não ligue esta tomada USB à porta USB do
computador, uma vez que é altamente possível que
cause a avaria das unidades.
MANUTENÇÃO
PRECAUÇÃO:
• Nunca utilize gasolina, benzina, diluente, álcool ou
semelhante. Podem formar-se descolorações,
deformações ou fissuras.
Especificações:
Requisitos de alimentação
Adaptador de alimentação CA
CC12 V/1.200 mA, pino central
positivo
Pilhas UM-3 (tamanho AA size) x 2 de
reserva
Bateria de grupo: 7,2 V - 10,8 V
Bateria de deslize: 14,4 V - 18 V

66
Cobertura de frequências
FM 87,50 - 108 MHz
(0,05 MHz/incremento)
AM (MW) 522 - 1.629 kHz
(9 kHz/incremento)
Bluetooth
®
ID QD Bluetooth
®
58625
(A marca e o logótipo Bluetooth
®
são marcas comerciais registadas
da Bluetooth SIG, Inc.)
Versão de Bluetooth
®
4.0
Perfis de Bluetooth
®
A2DP/SCMS-T
Potência de transmissão
Potência de especificação
Bluetooth
®
, classe 2
Intervalo de transmissão
Máx. 10 m (varia de acordo com as
condições de utilização)
Codec suportado SBC
Perfil Bluetooth
®
compatível
A2DP
Característica de circuito
Altifalante 3,5 polegadas 8 ohm x 2
Potência de saída 7,2 V: 0,5 W x 2
10,8 V:1,2 W x 2
14,4 V: 2,2 W x 2, 18 V: 3,5 W x 2
Terminal de entrada 3,5 mm diâ. (AUX IN1/AUX IN2)
Sistema de antena FM: antena flexível de haste
regulável
AM: antena de barra
Dimensões (L x A x P) em mm
282 x 294 x 163
Peso 4,3 kg (sem bateria)

67
DANSK (Originalvejledning)
Symboler
Her vises de symboler, der benyttes til udstyret. Vær
sikker på, at du forstår deres betydning, før du bruger
udstyret.
VIGTIGE
SIKKERHEDSINSTRUKTIONER
ADVARSEL:
Ved brug af elektriske maskiner skal de grundlæggende
sikkerhedsforholdsregler altid overholdes for at reducere
risikoen for brand, elektrisk stød og personskade,
inklusive de følgende:
1. Læs denne brugsanvisning og brugsanvisningen til
opladeren omhyggeligt igennem inden brug.
2. Foretag kun rengøring med en ren klud.
3. Installer ikke udstyret i nærheden af varmekilder som
f.eks. radiatorer, indblæsningsriste, kakkelovne eller
andre apparater (inklusive forstærkere) der
producerer varme.
4. Brug kun ekstraudstyr/tilbehør som er specificeret af
producenten.
5. Tag stikket til dette apparat ud under tordenvejr, eller
når det ikke skal anvendes i længere tidsperioder.
6. En batteridrevet radio med indbygget batteri eller en
separat batteripakke må kun oplades med den
specificerede oplader til batteriet. En oplader, der
muligvis passer til én type batteri, kan medføre risiko
for brand, hvis den anvendes med et andet batteri.
7. Anvend kun batteridrevne radioer sammen med
særligt designerede batteripakker. Brug af andre
batterier kan muligvis medføre en risiko brand.
8. Når batteripakken ikke er i brug, skal den holdes væk
fra andre metalgenstande som f.eks.: papirclips,
mønter, søm, nøgler, skruer eller andre små
metalgenstande, som kan forbinde den ene terminal
med den anden. Kortslutning af batteriterminalerne
kan medføre gnister, forbrændinger eller brand.
9. Undgå kropskontakt med jordforbundne overflader
som rør, radiatorer, overflader og køleskabe. Hvis
kroppen er jordforbundet, forøges risikoen for elektrisk
stød.
10. Ved forkert behandling kan der sive væske ud fra
batteriet; undgå kontakt. Hvis der opstår utilsigtet
kontakt, skal du skylle med vand. Hvis du får væske i
øjnene, skal du desuden søge lægehjælp. Væske fra
batteriet kan forårsage irritation eller forbrændinger.
GEM DISSE INSTRUKTIONER.
SPECIFIKKE
SIKKERHEDSREGLER
FOR BATTERIPAKKEN
1. Før brugen af batteripakken skal du læse alle
instruktioner og advarsler på (1) batteriopladeren,
(2) batteriet og (3) det produkt, som batteriet
anvendes i.
2. Skil ikke batteripakken ad.
3. Hvis driftstiden bliver betydeligt kortere, skal du
straks ophøre med brugen. Brug kan medføre
risiko for overophedning, risiko for forbrændinger
eller endog eksplosion.
4. Hvis du får elektrolyt i øjnene, skal du med det
samme rense øjnene med rent vand og søge læge.
Dette kan medføre tab af synet.
5. Kortslut ikke batteripakken:
(1) Undgå at røre ved terminalerne med ledende
materiale.
(2) Undgå at opbevare batteripakken i en
beholder med andre metalgenstande som
f.eks. søm, mønter osv.
(3) Udsæt ikke batteripakken for vand eller regn.
Hvis batteriet kortsluttes, kan det medføre
voldsom strøm, overophedning, mulige
forbrændinger og endog nedbrud.
6. Undgå at opbevare værktøjet og batteripakken på
steder, hvor temperaturen kan komme op på eller
overstige 50°C.
7. Sæt ikke ild til batteripakken, selvom den er
alvorligt beskadiget eller helt udtjent.
Batteripakken kan eksplodere ved brand.
8. Undgå at tabe eller slå på batteriet.
9. Undlad brug af et beskadiget batteri.
10. De indeholdte lithium-ion-batterier er underlagt
betingelserne i lovgivningen vedrørende farligt
gods.
For kommercielle transporter fx af tredjeparter,
speditører, skal særlige krav om indpakning og
mærkning overholdes.
Det er nødvendigt ved forberedelsen af forsendelsen
af emnet at konsultere en ekspert i farlige stoffer. Vær
desuden også opmærksom på muligvis mere
detaljerede nationale bestemmelser.
Tape eller tildæk åbne kontakter og pak batteriet ind
på en sådan måde, at det ikke kan bevæge sig rundt
inde indpakningen.
11. Følg de lokale bestemmelser med hensyn til
bortskaffelse af batteri.
12. For at undgå risici bør vejledningen til det udskiftelige
batteri læses inden brug.
Den maksimale afladestrøm for batteriet bør desuden
være større end eller lig med 8A.
Læs brugsanvisningen.
Kun for EU-lande
Elektrisk udstyr eller batteripakke må ikke
bortskaffes sammen med almindeligt affald!
I henhold til det europæiske direktiv om
bortskaffelse af elektriske og elektroniske
produkter og om batterier og akkumulatorer
og bortskaffelse af batterier og akkumulatorer
og deres implementering under gældende
national lovgivning skal brugt elektrisk udstyr,
batterier og batteripakke(r), der har udtjent
deres levetid, indsamles separat og
returneres til miljøgodkendt genindvinding.
Cd
Ni-MH
Li-ion

68
FORSIGTIG:
• Fare for eksplosion hvis batteriet udskiftes på forkert
vis.
• Udskift kun med den samme eller tilsvarende type.
GEM DISSE INSTRUKTIONER.
FORSIGTIG: Brug kun originale Makita-batterier.
Brug af uoriginale Makita-batterier, eller batterier som er
blevet ændret, kan muligvis medføre eksplosion af batteri
med brand, personskade og beskadigelse til følge. Det vil
også ugyldiggøre Makita-garantien for Makita-maskinen
og -opladeren.
Tips til, hvordan du forlænger batteriets
levetid
1. Oplad batteripakken, før den bliver helt afladet.
Ophør med at bruge værktøjet, og udskift
batteripakken, hvis strømmen til værktøjet aftager.
2. Oplad aldrig en fuldt opladet batteripakke.
Overopladning forkorter batteriets levetid.
3. Oplad batteripakken ved stuetemperatur på 10°C -
40°C. Lad batteripakken køle ned før den oplades,
hvis den er varm.
4. Oplad batteripakken, hvis du ikke skal anvende
den i en længere periode (mere end seks
måneder).
Forklaring af generel oversigt
(Fig. 1)
1. USB-strømforsyningsport
2. Tænd/sluk-knap og sluktimer
3. Kildeknap
4. Radioalarm
5. Bipperalarm
6. Forhåndsindstillede stationer/
forhåndsindstillingsknap 1 som Bluetooth
®
-
parringsknap
7. Menu-/Info-knap
8. Lydstyrke-/kanalsøgnings-/valgknap
9. DC IN-stik
10. AUX IN 1
11. LCD-display
12. Håndtag
13. Blød bøjet stavantenne
14. Lås til batterirum
15. Højttaler
16. Batteridæksel
17. Indgangsterminal (AUX IN 2)
18. Batterirum (til hovedbatteripakken og backup-
batterier)
19. Op
20. Venstre
21. Forside
22. Højre
23. Bagside, batteridæksel lukket
24. Bagside, batteridæksel åbnet
25. Batteripakke
26. Knap
27. Indikatorlamper
28. Kontrolknap
LCD-display:
A. Radioalarm
B. Bipperalarm
C. Stereosymbol
D. Indikator for lavt batteri
E. Ur
F. Frekvens
G. RDS (Radiodatasystem)
H. Dvalestatus
I. AM/PM for ur
Isætning af batteri
Bemærk:
Du kan forebygge tab af gemte data i den
forhåndsindstillede hukommelse ved at sætte backup-
batterier ind i batterirummet.
1. Træk låsen til batterirummet ud for at frigøre låget til
batterirummet. Der er et hovedbatterirum og et
batterirum til backup-batterier. (Fig. 2)
2. Fjern låget til batterirummet til backup-batterier og
isæt 2 nye UM-3 (størrelse AA). Kontroller, at
batterierne vender korrekt som vist inde i rummet. Sæt
batteridækslet på igen. (Fig. 3)
3. Efter backup-batterierne er sat i, skal du sætte
hovedbatteripakken i for at drive radioen. De typer
batteripakker, der passer til radioen, er vist på den
følgende tabel.

69
Den følgende tabel angiver driftstiden på en enkelt opladning i radio-indstilling.
: Klyngebatteri
: Skydebatteri
Bemærk:
Tabellen ovenfor angående batteriets driftstid er til reference. Den aktuelle driftstid kan muligvis variere afhængigt af
batteritype, opladeforhold eller anvendelsesmiljø.
Montering eller fjernelse af
skydebatteripakken (Fig. 4 og 5)
• Ved montering af batteripakken justeres tungen på
batteripakken med rillen i huset, hvorefter pakken
skubbes ind på plads. Sæt den altid hele vejen ind,
indtil den låses på plads med et lille klik.
• Hvis den røde indikator øverst på knappen er synlig, er
batteripakken ikke låst helt fast. Sæt den helt ind, indtil
den røde indikator ikke er synlig. Ellers kan den falde
ud af maskinen og skade dig eller andre personer i
nærheden.
• Brug ikke magt ved isætning af batteripakken. Hvis den
ikke glider let ind, er den ikke indsat korrekt.
• Afmonter batteripakken ved at holde ned på knappen
foran på batteripakken og skubbe den af maskinen,
eller ved at trykke på knapperne på begge sider af
pakken.
Montering eller fjernelse af
klyngebatteripakken (Fig. 6 og 7)
• Ved indsætning af batteripakken justeres tungen på
batteripakken med rillen i huset, hvorefter pakken
skubbes på plads.
• Fjern batteripakken ved at tage batteriet ud af
terminalen, mens du trykker på knapperne på siden af
pakken.
Sæt låsen til batterirummet tilbage på dens oprindelige
position.
Reduceret kraft, forvrængning, hakkende lyd, eller når
både symbolet for lavt batteri og “POWERFAIL”
Batterikapacitet
Batteripakkespænding
VED HØJTTALERUDGANG
= 50 mW + 50 mW (enhed: Time)
(Cirka)
7,2 V 10,8 V 14,4 V 18 V I radio eller AUX
I Bluetooth
®
med USB-
opladning
1,0 Ah BL7010 5,5 0,8
1,1 Ah
BL1411G,
L1451
5,5
1,5
BL1811G,
L1851
1,8
1,3 Ah
BL1013
7,5
1,5
BL1415,
BL1413G,
L1453
1,8
BL1815,
BL1813G,
L1853
2,0
1,5 Ah
BL1415N
8,5
2,0
BL1815N 2,5
2,0 Ah
BL1820,
BL1820B
11 3,2
3,0 Ah
BL1430,
BL1430B
16
4,0
BL1830,
BL1830B
5,0
4,0 Ah
BL1440
22
5,5
BL1840,
BL1840B
6,5
5,0 Ah
BL1450
27
6,5
BL1850,
BL1850B
8,0
6,0 Ah
BL1460B
33
7,0
BL1860B 9,5

70
vises på displayet, er alle tegn på, at hovedbatteripakken
skal skiftes.
Bemærk:
Batteripakken kan ikke oplades med den medfølgende
vekselstrømsadapter.
Når symbolet for lavt batteri vises, og et “EMPTY”
bliver ved med at blinke, er det tid til at skifte backup-
batterierne.
Angivelse af den resterende
batterikapacitet
(Kun for batteripakker med “B” til sidst i modelnummeret.)
(Fig. 8)
Tryk på kontrolknappen på batteripakken for at få angivet
den resterende batterikapacitet. Indikatorlamperne lyser i
nogle få sekunder.
015658
BEMÆRK:
• Afhængigt af anvendelsesforholdene og den
omgivende temperatur, kan angivelsen muligvis afvige
en smule fra den egentlige kapacitet.
Brug af den bløde bøjede stavantenne
(Fig. 9)
Ret den bløde bøjede stavantenne lige op som vist på
figuren.
Brug af den medfølgende
vekselstrømsadapter (Fig. 10)
Fjern gummiproppen og sæt adapterstikket ind i
jævnstrømsstikket på den venstre side af radioen. Tilslut
adapteren til en almindelig stikkontakt. Når adapteren
bruges, slås batteripakningen automatisk fra.
Vekselstrømsadapteren bør trækkes ud af stikkontakten,
når den ikke er i brug.
Bemærk:
Når radioen opfanger interferens på AM-båndet fra dens
adapter, skal du flytte radioen mere end 30 cm væk fra
vekselstrømsadapteren.
Anvendelse af din radio – Automatisk
søgning på AM/FM
1. Tryk på tænd/sluk-knappen for at tænde for
radioen.
2. Tryk på kildeknappen for at vælge AM- eller FM-
indstilling.
3. Tryk og hold på kanalsøgningsknappen for at
foretage en automatisk kanalsøgning. Radioen søger
opad på AM/FM-båndet fra den aktuelt viste frekvens
og stopper automatisk søgningen, når den finder en
station med en tilstrækkelig styrke.
4. Efter nogle få sekunder opdateres displayet. Displayet
viser frekvensen for det fundne signal.
5. For at finde en anden station skal du trykke og holde
på kanalsøgningsknappen som før.
6. Når enden på frekvensbåndet nås, fortsætter radioen
kanalsøgningen fra den modsatte ende af
frekvensbåndet.
7. Drej på kanalsøgningsknappen for at justere
lydstyrken efter behov.
Bemærk:
• Sikr dig, at FM/AM IKKE blinker på skærmen, når du
justerer lydstyrken.
• Hvis AM/FM blinker på skærmen, kan du søge
manuelt efter stationer (se afsnittet “Manuel
kanalsøgning
– AM/FM” angående yderligere
oplysninger).
8. For at slukke for radioen skal du trykke på tænd/sluk-
knappen .
Manuel kanalsøgning – AM/FM
1. Tryk på tænd/sluk-knappen for at tænde for
radioen.
2. Tryk på kildeknappen for at vælge AM- eller FM-
indstilling.
3. Tryk på kanalsøgningsknappen og du vil se FM
eller AM blinke på displayet.
Bemærk:
• FM/AM blinker i ca. 10 sekunder. Inden for denne
periode er det kun muligt at foretage manuel
kanalsøgning.
• Hvis du ønsker at justere lydstyrken, mens FM/AM
blinker, skal du trykke på kanalsøgningsknappen,
så det stopper med blinke, hvorefter du kan dreje
på kanalsøgningsknappen for at justere
lydstyrkeniveauet.
4. Drej på kanalsøgningsknappen for at stille ind på
en station.
Indikatorlamper
Resterende
kapacitet
Tændt Slukket Blinker
75% til 100%
50% til 75%
25% til 50%
0% til 25%
Oplad batteriet.
Der opstod
muligvis
funktionsfejl på
batteriet.

71
5. Når enden på frekvensbåndet nås, fortsætter radioen
kanalsøgningen fra den modsatte ende af
frekvensbåndet.
6. Brug kanalsøgningsknappen til at justere
lydstyrken efter behov.
Forhåndsindstilling af stationer i AM/FM-
indstilling
Der er 5 forhåndsindstillingsstationer til både AM- og FM-
radio. De anvendes på samme måde på begge
frekvensbånd.
1. Tryk på tænd/sluk-knappen for at tænde for
radioen.
2. Tryk på kildeknappen for at vælge det ønskede
frekvensbånd. Stil ind på den ønskede radiostation
som tidligere beskrevet.
3. Tryk og hold på den ønskede forhåndsindstillingsknap
(1 til 5) indtil displayet viser f.eks.
“P4” efter frekvensen. Stationen vil være gemt under
forhåndsindstillingsnummeret. Gentag denne
procedure for de resterende forhåndsindstillinger efter
behov.
4. Tidligere gemte forhåndsindstillede stationer
overskrives muligvis som følge af proceduren ovenfor,
hvis det er nødvendigt.
Displayindstillinger – FM
Radioen har en række displayfunktioner i FM-
radioindstillingen.
1. Tryk flere gange på Menu/Info-knappen for at få
vist RDS-informationen for den station, du lytter til.
a. Navn på station Viser navnet, hvis der lyttes til
stationen.
b. Programtype Viser den type station der lyttes til
som f.eks. pop, klassisk, nyheder
osv.
c. Radiotekst Viser radiotekstmeddelelser som
f.eks. nyheder osv.
d. År/dag Viser året og ugedagen i henhold til
radioens datoindstilling.
e. Dato/dag Viser datoen og ugedagen i henhold
til radioens datoindstilling.
f. Frekvens Viser FM-frekvensen for den station,
der lyttes til.
FM-stereo (auto)/mono
Hvis den FM-radiostation der lyttes til har et svagt signal,
kan der muligvis høres noget støj. Det er muligt at
reducere denne støj ved at få radioen til at afspille
stationen i mono i stedet for i stereo.
1. Tryk på tænd/sluk-knappen som nødvendigt for
at vælge FM-båndet og stille ind på den ønskede FM-
station som beskrevet tidligere.
2. Tryk og hold på Menu/Info-knappen for at
komme ind i menuindstillingen.
3. Drej på kanalsøgningsknappen indtil FM auto/
mono-indstillingen vises på displayet. Hvis
indstillingen er Auto, skal du trykke på
kanalsøgningsknappen for at skifte til Mono-
indstillingen, så støjen reduceres. Tryk på
kanalsøgningsknappen for at vælge indstillingen.
Genkaldelse af en forhåndsindstilling i
AM/FM-indstilling
1. Tryk på tænd/sluk-knappen for at tænde for
radioen.
2. Tryk på kildeknappen for at vælge AM- eller FM-
indstilling.
3. Tryk midlertidigt på den ønskede
forhåndsindstillingsknap så radioen
stiller ind på én af de stationer, der er gemt i
forhåndsindstillingshukommelsen.
Ur og alarmer
Indstilling af tids/og datoformatet
Urvisningen som anvendes på skærmene i
standbyindstilling og afspilningsindstilling kan indstilles til
forskelligt format. Det valgte format anvendes derefter
også ved indstilling af alarmer.
1. Tryk og hold på Menu/Info-knappen for at
komme ind i menuindstillingen.
2. Drej på kanalsøgningsknappen indtil “CLOCK xxH”
vises på displayet, og tryk på kanalsøgningsknappen
for at komme ind i indstillingen. Du vil se, at
tidsformatet begynder at blinke.
3. Drej på kanalsøgningsknappen for at vælge enten
12 eller 24 timers format. Tryk på
kanalsøgningsknappen for at bekræfte dit valg af
urformat.
Bemærk: Hvis du vælger 12 timers urformatet,
anvender radioen derefter 12 timers uret til
indstillingen.
4. Tryk og hold på Menu/Info-knappen for at
komme ind i menuindstillingen.
5. Drej på kanalsøgningsknappen indtil der vises en
dato (f.eks. THU APR 3) på displayet, og tryk på
kanalsøgningsknappen for at komme ind i
indstillingen. Du vil se, at datoformatet begynder at
blinke.
6. Drej på kanalsøgningsknappen for at vælge det
ønskede datoformat. Tryk på kanalsøgningsknappen
for at bekræfte dit valg.
Indstilling af urets tid og dato
1. Tryk og hold på Menu/Info-knappen .
2. Drej på kanalsøgningsknappen indtil der vises
“CLOCK ADJ” på displayet. Tryk på

72
kanalsøgningsknappen for at komme ind i
indstillingen.
3. Timeindstillingen på displayet begynder at blinke. Drej
på kanalsøgningsknappen for at vælge den
ønskede time, og tryk på kanalsøgningsknappen
for at bekræfte indstillingen. Drej derefter på
kanalsøgningsknappen for at vælge det ønskede
minut, og tryk på kanalsøgningsknappen for at
bekræfte indstillingen.
4. Drej på kanalsøgningsknappen indtil der vises
“DATE ADJ” på displayet. Tryk på
kanalsøgningsknappen for at komme ind i
indstillingen.
5. Drej på kanalsøgningsknappen for at vælge det
ønskede år, og tryk på kanalsøgningsknappen for
at bekræfte indstillingen. Drej derefter på
kanalsøgningsknappen for at vælge den ønskede
måned, og tryk på kanalsøgningsknappen for at
bekræfte indstillingen. Drej derefter på
kanalsøgningsknappen for at vælge den ønskede
dato, og tryk på kanalsøgningsknappen for at
bekræfte indstillingen.
Radiodatasystem (RDS)
Når du indstiller uret med RDS-funktionen, synkroniserer
radioen uret, når den stiller ind på en radiostation med
RDS med CT-signaler.
1. Når du stiller ind på en station, som udsender RDS-
data, skal du trykke og holde på Menu/Info-knappen
.
2. Drej på kanalsøgningsknappen indtil der vises
“RDS CT” og et ursymbol på displayet. Tryk på
kanalsøgningsknappen for at komme ind i
indstillingen.
3. Drej på kanalsøgningsknappen indtil der vises
“RDS CT” på displayet. Tryk på
kanalsøgningsknappen for at bekræfte
indstillingen. Tiden på radioens ur indstilles
automatisk i henhold til de RDS-data, der modtages.
4. Når handlingen er fuldført, vises RDS-ikonet på LCD-
displayet, hvilket angiver, at radioens tid er RDS-urtid.
Tiden på radioens ur vil gælde i 5 dage for hver gang
radioens tid synkroniseres med RDS CT.
Indstilling af vækkeuret
Din radio er udstyret med to alarmer, som begge kan
indstilles til at vække dig med AM/FM-radio eller en
bipperalarm. Alarmerne kan indstilles, mens enheden er i
standbyindstilling eller afspiller.
a. Indstilling af radioalarmtidspunkt:
1. Radioen kan indstilles enten, når radioen er tændt
eller slukket.
2. Tryk og hold på radioalarmknappen og
radioalarmsymbolet og displaytimen begynder at
blinke sammen med et bip.
3. Mens radioalarmsymbolet blinker, skal du dreje
på kanalsøgningsknappen for at vælge timen og
trykke på kanalsøgningsknappen igen for at
bekræfte timeindstillingen. Drej derefter på
kanalsøgningsknappen for at vælge minuttet, og
tryk på kanalsøgningsknappen for at bekræfte
minutindstillingen.
4. Drej på kanalsøgningsknappen og displayet viser
frekvensfunktionerne for alarmen.
Alarmfunktionerne er som følger:
ONCE – alarmen aktiveres én gang
DAILY – alarmen aktiveres dagligt
WEEKDAY – alarmen aktiveres kun på hverdage
WEEKEND – alarmen aktiveres kun i weekender
Tryk på kanalsøgningsknappen for at bekræfte
indstillingen.
5. Mens radioalarmsymbolet blinker, skal du dreje på
kanalsøgningsknappen for at vælge det ønskede
vækningsbånd og stationen, og derefter trykke på
kanalsøgningsknappen for at bekræfte valget.
6. Drej på kanalsøgningsknappen for at vælge den
ønskede lydstyrke og tryk på kanalsøgningsknappen
for at bekræfte lydstyrken. Radioalarmindstillingen er
nu gennemført.
Bemærk:
Hvis der ikke vælges en ny radioalarmstation, benyttes
den sidst valgte alarmstation.
Bemærk:
Hvis den valgte AM/FM-alarmstation ikke er til rådighed,
når alarmen udløses, anvendes bipperalarmen i stedet.
b. Indstilling af HVS (Humant vækningssystem)-
bipperalarmen:
Der lyder et bip, når HVS-bipperalarmen vælges.
Alarmbippet lyder kortere for hvert 15. sekund i et minut,
efterfulgt af et minuts stilhed, hvorefter cyklussen
gentages.
1. Bipperalarmen kan indstilles enten, når radioen er
tændt eller slukket.
2. Tryk og hold på bipperalarmknappen og
symbolet og displaytimen begynder at blinke sammen
med et bip.
3. Mens bipperalarmsymbolet blinker, skal du dreje
på kanalsøgningsknappen for at vælge timen og
trykke på kanalsøgningsknappen igen for at
bekræfte timeindstillingen. Drej derefter på
kanalsøgningsknappen for at vælge minuttet, og
tryk på kanalsøgningsknappen for at bekræfte
minutindstillingen.
4. Drej på kanalsøgningsknappen og displayet viser
frekvensfunktionerne for alarmen.

73
Alarmfunktionerne er som følger:
ONCE – alarmen aktiveres én gang
DAILY – alarmen aktiveres dagligt
WEEKDAY – alarmen aktiveres kun på hverdage
WEEKEND – alarmen aktiveres kun i weekender
Tryk på kanalsøgningsknappen for at bekræfte
indstillingen.
Bemærk:
Der er ingen lydjustering for bipperalarmen.
Når alarmen lyder
Tryk på tænd/sluk-knappen for at annullere en
udløst alarm.
Deaktivering/annullering af alarmer
For at deaktivere en udløst alarm skal du enten trykke på
tænd/sluk-knappen eller trykke og holde på den
modsvarende alarmknap for at annullere alarmen.
Snooze
1. Når alarmen lyder, vil tryk på en hvilken som helst
anden knap end tænd/sluk-knappen afbryde
alarmens lyd i 5 minutter. “SNOOZE” vises i displayet.
2. For at justere tiden for snooze-timeren uden lyd skal
du trykke og holde på Menu/Info-knappen ,
hvorved du kommer ind i menuindstillingen.
3. Drej på kanalsøgningsknappen indtil “SNOOZE X”
vises på displayet, og tryk derefter på
kanalsøgningsknappen for at komme ind i
indstillingen. Drej på kanalsøgningsknappen for at
justere snooze-timerens tid uden lyd til 5, 10, 15 eller
20 minutter.
4. For at annullere snooze-timeren mens alarmen er
midlertidigt afbrudt, skal du trykke på tænd/sluk-
knappen .
Sluktimer
Radioen kan indstilles til at slukke automatisk, efter der er
forløbet en forudindstillet tidsperiode. Indstillingen af
sluktimeren kan indstilles til 60, 45, 30, 15, 120 og
90 minutter.
1. Tryk og hold på tænd/sluk-knappen for at
komme ind i sluktimerindstillingen. Der vises
“SLEEP XX” på displayet.
2. Fortsæt med at holde på tænd/sluk-knappen og
sluktimerens indstillinger begynder at skifte på
displayet. Stop, når den ønskede sluktimerindstilling
vises på displayet. Indstillingen vil blive gemt, og
LCD’et vender tilbage til normal visning.
3. Radioen slukker automatisk, når den forudindstillede
sluktimertid er forløbet. Sluktimerikonet vises på
displayet og angiver en aktiv sluktimer.
4. For at annullere sluktimerfunktionen inden den
forudindstillede tid er forløbet, skal du blot trykke på
tænd/sluk-knappen for at slukke for enheden
manuelt.
Lydintensitet
Du kan kompensere for lave og høje frekvenser på
radioen ved at justere lydintensitetsfunktionen.
1. Tryk og hold på Menu/Info-knappen for at
komme ind i menuindstillingen.
2. Drej på kanalsøgningsknappen indtil der vises
“LOUD ON” eller “LOUD OFF” på displayet. Tryk på
kanalsøgningsknappen for at komme ind i
indstillingen.
3. Drej på kanalsøgningsknappen for at vælge ON
(til) og aktivere lydintensitetsfunktionen, og tryk
derefter på kanalsøgningsknappen for at bekræfte
indstillingen.
4. For at slå lydintensitetsfunktionen fra skal du vælge
OFF (fra) og trykke på kanalsøgningsknappen for
at bekræfte indstillingen.
Ekstra indgangsstik
Radioen er udstyret med to ekstra 3,5 mm
stereoindgangsstik. Det ene er placeret foran på radioen
(AUX IN 1), og det andet er placeret i batterirummet
(AUX IN 2).
1. Tilslut en ekstern lydkilde (for eksempel en iPod, MP3-
eller CD-afspiller) til det ekstra indgangsstik.
2. Tryk flere gange og slip kildeknappen indtil der
vises AUX IN 1 eller 2.
3. Juster lydstyrkeindstillingen på din iPod, MP3- eller
CD-afspiller for at sikre et tilstrækkeligt signalniveau
fra afspilleren, og brug derefter
kanalsøgningsknappen på radioen efter behov, så
der opnås en behagelig lytning.
Lytning til Bluetooth
®
-musik
Du er nødt til at parre din Bluetooth
®
-enhed med din radio,
før du kan foretage automatisk sammenkobling for
afspilning/streaming af Bluetooth
®
-musik gennem din
radio. Parring opretter en permanent “forbindelse”, så de
to enheder altid kan genkende hinanden.
Parring af din Bluetooth
®
-enhed
1. Tryk på kildeknappen for at vælge Bluetooth
®
-
funktion. “BT READY” vises på displayet, og “READY”
blinker med et interval på hvert 2. sekund.
2. Aktiver Bluetooth
®
på din enhed i henhold til enhedens
brugervejledning for at tillade parringsproceduren.
3. Tryk og slip parringsknappen , hvorefter “BT PAIR”
vises på displayet, og det blinker med et interval på
1 sekund. Du kan starte søgningen efter din radio på

74
din Bluetooth
®
-enhed. Når først navnet på din radio
vises på din Bluetooth
®
-enhed, skal du trykke på
punktet i din Bluetooth
®
-liste.
Du er muligvis nødt til at indtaste adgangskoden
“0000” på visse ældre typer mobiltelefoner (versioner
tidligere end BT2.1 Bluetooth
®
-enhed).
4. Din Bluetooth
®
-enhed vil blive lænket med radioen.
5. Når først der er oprettet forbindelse, forbliver
“BLUETOOTH” på displayet, og
baggrundsbelysningen dæmpes helt ned i løbet af
10 sekunder.
Du kan nu afspille musikken på din Bluetooth
®
-aktiverede
enhed via din radio.
Afspilning af Bluetooth
®
-enhed, som
allerede er parret
1. Tryk på kildeknappen for at vælge Bluetooth
®
-
funktion. “BT READY” vil blive vist på displayet, og
“READY” vil blinke med et interval på hvert 2. sekund.
2. Søg og lænk din radio på din Bluetooth
®
-enhed. Visse
enheder lænker automatisk med radioen.
Du kan nu afspille musikken på din Bluetooth
®
-aktiverede
enhed via din radio.
Bemærk:
a) Radioen kan parre med maksimalt 8 Bluetooth
®
-
enheder. Når du parrer flere Bluetooth
®
-enheder end
dette antal, vil parringshistorikken blive overskrevet fra
den ældste parringshistorik.
b) Hvis der er 2 Bluetooth
®
-enheder som søger efter din
radio, vises den som tilgængelig på begge enheder.
c) Hvis din Bluetooth
®
-enhed afbrydes midlertidigt fra
radioen, så er du nødt til manuelt at genoprette din
enheds forbindelse med radioen.
d) Hvis navnet på din radio vises på din Bluetooth
®
-
enhedsliste, men din enhed ikke kan forbinde med den,
skal du slette punktnavnet på din radio fra din liste og
parre enheden med din radio igen ved at følge de
tidligere beskrevne trin.
e) Den effektive driftsrækkevidde mellem radioen og den
parrede enhed er ca. 10 meter.
f) Enhver forhindring mellem radioen og enheden kan
reducere driftsrækkevidden.
Afbrydelse af din Bluetooth
®
-enhed
Tryk og hold på parringsknappen i 2-3 sekunder for at
afbryde forbindelsen med din Bluetooth
®
-enhed.
“BLUETOOTH” forsvinder fra displayet, hvilket angiver
deaktivering af Bluetooth
®
.
Opladning med USB-strømforsyningsport
(Fig. 10)
Der er en USB-port foran på radioen. Du kan oplade en
USB-enhed via USB-porten.
1. Tilslut en USB-enhed, som f.eks. en iPod, MP3- eller
CD-afspiller, med et USB-kabel, der fås i handlen.
2. Tryk på tænd/sluk-knappen for at tænde for din
radio.
3. Uanset om radioen strømforsynes med vekselstrøm
eller er batteridrevet, kan radioen oplade USB-
enheden, når radioen er tændt og i FM-indstilling eller
BT-indstilling, eller AUX-indstillingen der fremkommer,
når der er tilsluttet en eksterm lydkilde.
Bemærk:
Du kan ikke oplade USB-enheder i AM-indstilling, da
radiosignalmodtagelsen bliver enormt dårlig, når der
oplades en USB-enhed.
• Den maksimale lydstyrke for højttalerens
udgangseffekt reduceres, når din USB oplader.
• USB-stikket kan maksimalt levere en elektrisk strøm på
1A 5V.
Vigtigt:
• Inden du tilslutter USB-enheden til opladeren, skal du
altid sikkerhedskopiere dataene på USB-enheden.
Ellers er der mulighed for, at du kan miste dine data.
• Opladeren forsyner muligvis ikke strøm til visse USB-
enheder.
• Når den ikke anvendes eller efter opladning, skal du
fjerne USB-kablet og lukke dækslet.
• Tilslut ikke nogen strømkilde til USB-porten. Ellers er
der risiko for brand. USB-porten er kun beregnet til
opladning af lavspændingsenhed. Placer altid dækslet
på USB-porten, når lavspændingsenheden ikke
oplades.
• Stik ikke søm, wire e.l. ind i USB-
strømforsyningsporten. Ellers kan en kortslutning
medføre røgudvikling og brand.
• Forbind ikke dette USB-stik med USB-porten på din
computer, da det højst sandsynligt vil medføre
sammenbrud på begge enheder.
VEDLIGEHOLDELSE
FORSIGTIG:
• Brug aldrig benzin, benzen, fortynder, alkohol eller
lignende. Det kan muligvis medføre misfarvning,
deformation eller revner.
Specifikationer:
Strømkrav
Vekselstrømsadapter DC12 V/1.200 mA, centerben
positivt
Batteri UM-3 (AA-størrelse) x 2 til backup
Klyngebatteri: 7,2 V - 10,8 V
Skydebatteri: 14,4 V - 18 V
Frekvensdækning FM 87,50 - 108 MHz
(0,05 MHz/trin)
AM (MW) 522 - 1.629 kHz
(9 kHz/trin)
Bluetooth
®
Bluetooth
®
QD ID 58625
(Bluetooth
®
-ordmærket og
logoerne er registrerede
varemærker ejet af Bluetooth SIG,
Inc.)
Bluetooth
®
-version 4.0
Bluetooth
®
-profiler A2DP/SCMS-T

75
Sendekraft Kraftspecifikation for Bluetooth
®
Klasse 2
Senderækkevidde Maks. 10 m (varierer afhængigt af
anvendelsesforhold)
Understøttet codec SBC
Kompatibel Bluetooth
®
-profil
A2DP
Kredsløbsfunktion
Højttaler 3,5 tommer 8 ohm x 2
Udgangseffekt 7,2 V: 0,5 W x 2
10,8 V:1,2 W x 2
14,4 V: 2,2 W x 2; 18 V: 3,5 W x 2
Indgangsterminal 3,5 mm dia. (AUX IN1/AUX IN2)
Antennesystem FM: blød bøjet stangantenne
AM: intern antenne
Mål (B x H x D) i mm 282 x 294 x 163
Vægt 4,3 kg (uden batteri)

76
ǼȁȁǾȃǿȀǹ (ȆȡȦIJȠȖİȞİȓȢ ȠįȘȖȓİȢ)
ȈȪȝȕȠȜĮ
ȉĮ ʌĮȡĮțȐIJȦ ʌĮȡȠȣıȚȐȗȠȣȞ IJĮ ıȪȝȕȠȜĮ ʌȠȣ
ȤȡȘıȚȝȠʌȠȚȠȪȞIJĮȚ ȖȚĮ IJȘ ıȣıțİȣȒ. ǺİȕĮȚȦșİȓIJİ ȩIJȚ
țĮIJĮȞȠİȓIJİ IJȘ ıȘȝĮıȓĮ IJȠȣȢ ʌȡȚȞ Įʌȩ IJȘ ȤȡȒıȘ.
ȈǾȂǹȃȉǿȀǼȈ ȅǻǾīǿǼȈ
ǹȈĭǹȁǼǿǹȈ
ȆȇȅǼǿǻȅȆȅǿǾȈǾ:
ǵIJĮȞ ȤȡȘıȚȝȠʌȠȚİȓIJİ ȘȜİțIJȡȚțȐ İȡȖĮȜİȓĮ, ʌȡȑʌİȚ ʌȐȞIJȠIJİ
ȞĮ ĮțȠȜȠȣșİȓIJİ ȩȜİȢ IJȚȢ ȕĮıȚțȑȢ ʌȡȠijȣȜȐȟİȚȢ ĮıijĮȜİȓĮȢ,
ȖȚĮ ȞĮ ȝİȚȫıİIJİ IJȠȞ țȓȞįȣȞȠ ʌȣȡțĮȖȚȐȢ, ȘȜİțIJȡȠʌȜȘȟȓĮȢ Ȓ
ĮIJȠȝȚțȠȪ IJȡĮȣȝĮIJȚıȝȠȪ, ʌİȡȚȜĮȝȕĮȞȠȝȑȞȦȞ ĮȣIJȫȞ ʌȠȣ
ʌİȡȚȖȡȐijȠȞIJĮȚ ıIJȘ ıȣȞȑȤİȚĮ:
1. ǻȚĮȕȐıIJİ ʌȡȠıİțIJȚțȐ ĮȣIJȩ IJȠ İȖȤİȚȡȓįȚȠ ȠįȘȖȚȫȞ țĮȚ
IJȠ İȖȤİȚȡȓįȚȠ ȠįȘȖȚȫȞ IJȠȣ ijȠȡIJȚıIJȒ ʌȡȚȞ Įʌȩ IJȘ
ȤȡȒıȘ.
2. ȀĮșĮȡȓıIJİ ȝȩȞȠ ȝİ
ıIJİȖȞȩ ʌĮȞȓ.
3. ȂȘȞ İȖțĮIJĮıIJȒıİIJİ țȠȞIJȐ ıİ ʌȘȖȑȢ șİȡȝȩIJȘIJĮȢ ȩʌȦȢ
țĮȜȠȡȚijȑȡ, ĮȞȠȓȖȝĮIJĮ İțȡȠȒȢ șİȡȝȠȪ ĮȑȡĮ, ıȩȝʌİȢ Ȓ
ȐȜȜİȢ ıȣıțİȣȑȢ (ıȣȝʌİȡȚȜĮȝȕĮȞȠȝȑȞȦȞ İȞȚıȤȣIJȫȞ)
ʌȠȣ ʌĮȡȐȖȠȣȞ șİȡȝȩIJȘIJĮ.
4. ȋȡȘıȚȝȠʌȠȚİȓIJİ ȝȩȞȠ İȟĮȡIJȒȝĮIJĮ/ĮȟİıȠȣȐȡ ʌȠȣ
țĮșȠȡȓȗȠȞIJĮȚ Įʌȩ IJȠȞ țĮIJĮıțİȣĮıIJȒ.
5. ǹʌȠıȣȞįȑİIJİ IJȘ ıȣıțİȣȒ țĮIJȐ IJȘ įȚȐȡțİȚĮ țĮIJĮȚȖȓįȦȞ
ȝİ țİȡĮȣȞȠȪȢ Ȓ ȩIJĮȞ įİȞ ʌȡȩțİȚIJĮȚ ȞĮ IJȘ
ȤȡȘıȚȝȠʌȠȚȒıİIJİ ȖȚĮ
ȝİȖȐȜȠ ȤȡȠȞȚțȩ įȚȐıIJȘȝĮ.
6. DzȞĮ ȡĮįȚȩijȦȞȠ ʌȠȣ ȜİȚIJȠȣȡȖİȓ ȝİ İȞıȦȝĮIJȦȝȑȞİȢ
ȝʌĮIJĮȡȓİȢ Ȓ ȝİ ȟİȤȦȡȚıIJȒ țĮıȑIJĮ ȝʌĮIJĮȡȓĮȢ, ʌȡȑʌİȚ
ȞĮ İʌĮȞĮijȠȡIJȓȗİIJĮȚ ȝȩȞȠ ȝİ IJȠȞ țĮșȠȡȚıȝȑȞȠ
ijȠȡIJȚıIJȒ ȖȚĮ IJȘȞ ȝʌĮIJĮȡȓĮ. DzȞĮȢ ijȠȡIJȚıIJȒȢ ʌȠȣ İȓȞĮȚ
țĮIJȐȜȜȘȜȠȢ ȖȚĮ ȑȞĮ IJȪʌȠ ȝʌĮIJĮȡȓĮȢ ȝʌȠȡİȓ ȞĮ
ʌȡȠțĮȜȑıİȚ IJȠȞ țȓȞįȣȞȠ ʌȣȡțĮȖȚȐȢ İȐȞ
ȤȡȘıȚȝȠʌȠȚȘșİȓ ıİ ȑȞĮ ȐȜȜȠ IJȪʌȠ ȝʌĮIJĮȡȓĮȢ.
7. ǵIJĮȞ IJȠ
ȡĮįȚȩijȦȞȠ ȜİȚIJȠȣȡȖİȓ ȝİ ȝʌĮIJĮȡȓİȢ
ȤȡȘıȚȝȠʌȠȚȒıIJİ ȝȩȞȠ IJȚȢ İȚįȚțȐ țĮșȠȡȚıȝȑȞİȢ țĮıȑIJİȢ
ȝʌĮIJĮȡȚȫȞ. Ǿ ȤȡȒıȘ ȠʌȠȚȠȞįȒʌȠIJİ ȐȜȜȦȞ ȝʌĮIJĮȡȚȫȞ
ȝʌȠȡİȓ ȞĮ įȘȝȚȠȣȡȖȒıİȚ IJȠȞ țȓȞįȣȞȠ ʌȣȡțĮȖȚȐȢ.
8. ǵIJĮȞ Ș țĮıȑIJĮ ȝʌĮIJĮȡȓĮȢ įİȞ ȤȡȘıȚȝȠʌȠȚİȓIJĮȚ,
ijȣȜȐȟIJİ IJȘ ȝĮțȡȚȐ Įʌȩ ȐȜȜĮ ȝİIJĮȜȜȚțȐ ĮȞIJȚțİȓȝİȞĮ,
ȩʌȦȢ ıȣȞįİIJȒȡİȢ, ȞȠȝȓıȝĮIJĮ, țȜİȚįȚȐ, țĮȡijȚȐ, ȕȓįİȢ Ȓ
ȐȜȜĮ ȝȚțȡȐ ȝİIJĮȜȜȚțȐ ĮȞIJȚțİȓȝİȞĮ, IJĮ ȠʌȠȓĮ ȝʌȠȡȠȪȞ
ȞĮ
įȘȝȚȠȣȡȖȒıȠȣȞ ıȪȞįİıȘ Įʌȩ IJȠȞ ȑȞĮ ʌȩȜȠ ıIJȠȞ
ȐȜȜȠ. ȉȠ ȕȡĮȤȣțȪțȜȦȝĮ IJȦȞ ĮțȡȠįİțIJȫȞ IJȘȢ
ȝʌĮIJĮȡȓĮȢ ȝʌȠȡİȓ ȞĮ ʌȡȠțĮȜȑıİȚ İȖțĮȪȝĮIJĮ Ȓ
ʌȣȡțĮȖȚȐ.
9. ǹʌȠijİȪȖİIJİ IJȘȞ İʌĮijȒ IJȠȣ ıȫȝĮIJȠȢ ȝİ ȖİȚȦȝȑȞİȢ
İʌȚijȐȞİȚİȢ, ȩʌȦȢ ıȦȜȒȞİȢ, țĮȜȠȡȚijȑȡ, ijȠȪȡȞȠȣȢ țĮȚ
ȥȣȖİȓĮ. ȊʌȐȡȤİȚ ĮȣȟȘȝȑȞȠȢ țȓȞįȣȞȠȢ ȖȚĮ ʌȡȩțȜȘıȘ
ȘȜİțIJȡȠʌȜȘȟȓĮȢ İȐȞ IJȠ ıȫȝĮ ıĮȢ İȓȞĮȚ ȖİȚȦȝȑȞȠ.
10. Ȉİ ĮțȡĮȓİȢ ıȣȞșȒțİȢ
ȝʌȠȡİȓ ȞĮ ʌİIJĮȤIJİȓ ȑȟȦ IJȠ ȣȖȡȩ
IJȘȢ ȝʌĮIJĮȡȓĮȢ, ĮʌȠijȪȖİIJİ IJȘȞ İʌĮijȒ ȝĮȗȓ IJȠȣ. ǼȐȞ
ıȣȝȕİȓ IJȣȤĮȓĮ İʌĮijȒ, ȟİʌȜȪȞİIJİ ȝİ Ȟİȡȩ. ǹȞ IJȠ ȣȖȡȩ
ȑȡșİȚ ıİ İʌĮijȒ ȝİ IJĮ ȝȐIJȚĮ, İʌȚʌȜȑȠȞ ȗȘIJȒıIJİ ȚĮIJȡȚțȒ
ȕȠȒșİȚĮ. ȉȠ ȣȖȡȩ ʌȠȣ İțIJȠȟİȪİIJĮȚ Įʌȩ IJȘȞ ȝʌĮIJĮȡȓĮ
ȝʌȠȡİȓ ȞĮ ʌȡȠțĮȜȑıİȚ İȡİșȚıȝȩ Ȓ İȖțĮȪȝĮIJĮ.
ĭȊȁǹȄȉǼ ǹȊȉǼȈ ȉǿȈ ȅǻǾīǿǼȈ.
ǼǿǻǿȀȅǿ ȀǹȃȅȃǼȈ ǹȈĭǹȁǼǿǹȈ
īǿǹ ȉǾȃ ȂȆǹȉǹȇǿǹ
1. ȆȡȚȞ ȤȡȘıȚȝȠʌȠȚȒıİIJİ IJȘȞ ȝʌĮIJĮȡȓĮ, įȚĮȕȐıIJİ
ȩȜİȢ IJȚȢ ȠįȘȖȓİȢ țĮȚ IJȚȢ İȞįİȓȟİȚȢ ʌȡȠijȪȜĮȟȘȢ ıIJȠ
(1) ijȠȡIJȚıIJȒ ȝʌĮIJĮȡȓĮȢ, (2) IJȘȞ ȝʌĮIJĮȡȓĮ țĮȚ (3) IJȠ
ʌȡȠȧȩȞ ıIJȠ ȠʌȠȓȠ ȤȡȘıȚȝȠʌȠȚİȓIJĮȚ Ș ȝʌĮIJĮȡȓĮ.
2. ȂȘȞ ĮʌȠıȣȞĮȡȝȠȜȠȖİȓIJİ IJȘȞ ȝʌĮIJĮȡȓĮ.
3. ǹȞ Ƞ ȤȡȩȞȠȢ ȜİȚIJȠȣȡȖȓĮȢ IJȘȢ ȝʌĮIJĮȡȓĮȢ İȓȞĮȚ
ȣʌİȡȕȠȜȚțȐ ıȪȞIJȠȝȠȢ, įȚĮțȩȥIJİ ĮȝȑıȦȢ IJȘ
ȜİȚIJȠȣȡȖȓĮ. ǹȞ ıȣȞİȤȓıİIJİ, ȝʌȠȡİȓ ȞĮ ȑȤİȚ ȦȢ
ĮʌȠIJȑȜİıȝĮ
IJȠȞ țȓȞįȣȞȠ ȣʌİȡșȑȡȝĮȞıȘȢ,
ʌȚșĮȞȫȞ İȖțĮȣȝȐIJȦȞ țĮȚ ĮțȩȝȘ ȑțȡȘȟȘȢ.
4. ǹȞ ȝʌİȚ ıIJĮ ȝȐIJȚĮ ıĮȢ ȘȜİțIJȡȠȜȪIJȘȢ, ȟİʌȜȪȞİIJİ ȝİ
țĮșĮȡȩ Ȟİȡȩ țĮȚ ĮȞĮȗȘIJȒıIJİ ĮȝȑıȦȢ ȚĮIJȡȚțȒ
ȕȠȒșİȚĮ. ȂʌȠȡİȓ ȞĮ ȤȐıİIJİ IJȘȞ ȩȡĮıȒ ıĮȢ.
5. ȂȘ ȕȡĮȤȣțȣțȜȫȞİIJİ IJȘȞ ȝʌĮIJĮȡȓĮ:
(1) ȂȘȞ ĮȖȖȓȗİIJİ IJȠȣȢ ĮțȡȠįȑțIJİȢ ȝİ ĮȖȫȖȚȝȠ
ȣȜȚțȩ.
(2) ȂȘȞ ĮʌȠșȘțİȪİIJİ IJȘȞ ȝʌĮIJĮȡȓĮ ıİ įȠȤİȓȠ ȝİ
ȐȜȜĮ
ȝİIJĮȜȜȚțȐ ĮȞIJȚțİȓȝİȞĮ, ȩʌȦȢ țĮȡijȚȐ,
ȞȠȝȓıȝĮIJĮ, țIJȜ.
(3) ȂȘȞ İțșȑIJİIJİ IJȘȞ ȝʌĮIJĮȡȓĮ ıİ Ȟİȡȩ Ȓ ȕȡȠȤȒ.
ǹȞ ȕȡĮȤȣțȣțȜȦșİȓ Ș ȝʌĮIJĮȡȓĮ, ȝʌȠȡİȓ ȞĮ
ʌȡȠțȜȘșİȓ ȝİȖȐȜȘ ȡȠȒ ȘȜİțIJȡȚțȠȪ ȡİȪȝĮIJȠȢ,
ȣʌİȡșȑȡȝĮȞıȘ, ʌȚșĮȞȐ İȖțĮȪȝĮIJĮ țĮȚ ĮțȩȝȘ țĮȚ
țĮIJĮıIJȡȠijȒ IJȘȢ ȝʌĮIJĮȡȓĮȢ.
6. ȂȘȞ ĮʌȠșȘțİȪİIJİ IJȠ İȡȖĮȜİȓȠ țĮȚ IJȘȞ ȝʌĮIJĮȡȓĮ ıİ
ȝȑȡȘ ȩʌȠȣ Ș șİȡȝȠțȡĮıȓĮ ȝʌȠȡİȓ ȞĮ ijIJȐıİȚ Ȓ
ȞĮ
ȟİʌİȡȐıİȚ IJȠȣȢ 50°C (122°F).
7. ȂȘȞ ĮʌȠIJİijȡȫȞİIJİ IJȘȞ ȝʌĮIJĮȡȓĮ ĮțȩȝȘ țȚ ĮȞ
ʌĮȡȠȣıȚȐȗİȚ ıȠȕĮȡȒ ȗȘȝȚȐ Ȓ İȓȞĮȚ İȞIJİȜȫȢ
ijșĮȡȝȑȞȘ. Ǿ ȝʌĮIJĮȡȓĮ ȝʌȠȡİȓ ȞĮ İțȡĮȖİȓ ıİ
ijȦIJȚȐ.
8. ȃĮ ʌȡȠıȑȤİIJİ ȞĮ ȝȘ ıĮȢ ʌȑıİȚ Ș ȝʌĮIJĮȡȓĮ țĮȚ ȞĮ
ȝȘ ıȣȖțȡȠȣıIJİȓ ȝİ țȐʌȠȚȠ ĮȞIJȚțİȓȝİȞȠ.
9. ȂȘ ȤȡȘıȚȝȠʌȠȚİȓIJİ ȝȚĮ ȝʌĮIJĮȡȓĮ ʌȠȣ ȑȤİȚ ȣʌȠıIJİȓ
ȕȜȐȕȘ.
10. ȅȚ
ʌİȡȚİȤȩȝİȞİȢ ȝʌĮIJĮȡȓİȢ ȚȩȞIJȦȞ ȜȚșȓȠȣ,
ȣʌȩțİȚȞIJĮȚ ıIJȚȢ ĮʌĮȚIJȒıİȚȢ IJȘȢ ȞȠȝȠșİıȓĮȢ ʌİȡȓ
İʌȚțȓȞįȣȞȦȞ İȝʌȠȡİȣȝȐIJȦȞ.
īȚĮ IJȚȢ İȝʌȠȡȚțȑȢ ȝİIJĮijȠȡȑȢ, ʌ.Ȥ. Įʌȩ IJȡȓIJȠȣȢ,
ȝİIJĮijȠȡȚțȑȢ İIJĮȚȡȓİȢ, șĮ ʌȡȑʌİȚ ȞĮ IJȘȡȠȪȞIJĮȚ ȠȚ
İȚįȚțȑȢ ĮʌĮȚIJȒıİȚȢ ȖȚĮ IJȘ ıȣıțİȣĮıȓĮ țĮȚ IJȘȞ
ǻȚĮȕȐıIJİ IJȠ İȖȤİȚȡȓįȚȠ ȠįȘȖȚȫȞ.
ȂȩȞȠ ȖȚĮ IJȚȢ ȤȫȡİȢ IJȘȢ ǼǼ
ȂȘȞ ĮʌȠȡȡȓʌIJİIJİ IJȠȞ ȘȜİțIJȡȚțȩ İȟȠʌȜȚıȝȩ Ȓ
IJȘȞ
ȝʌĮIJĮȡȓĮ ȝĮȗȓ ȝİ IJĮ ȠȚțȚĮțȐ
ĮʌȠȡȡȓȝȝĮIJĮ!
ȈȪȝijȦȞĮ ȝİ IJȘȞ ǼȣȡȦʌĮȧțȒ ȅįȘȖȓĮ ʌİȡȓ
ĮʌȠȡȡȚȝȝȐIJȦȞ ȘȜİțIJȡȚțȫȞ, ȘȜİțIJȡȠȞȚțȫȞ
ıȣıțİȣȫȞ, ȝʌĮIJĮȡȚȫȞ țĮȚ ıȣııȦȡİȣIJȫȞ țĮȚ
IJȦȞ ĮʌȠȡȡȚȝȝȐIJȦȞ ȝʌĮIJĮȡȚȫȞ țĮȚ
ıȣııȦȡİȣIJȫȞ țĮȚ IJȘȞ İȞıȦȝȐIJȦıȒ IJȠȣȢ
ıIJȘȞ İșȞȚțȒ ȞȠȝȠșİıȓĮ, ȠȚ ȘȜİțIJȡȚțȑȢ
ıȣıțİȣȑȢ, ȠȚ ȝʌĮIJĮȡȓİȢ țĮȚ ȠȚ țĮıȑIJİȢ
ȝʌĮIJĮȡȚȫȞ, IJȦȞ ȠʌȠȓȦȞ ȑȤİȚ ʌĮȡȑȜșİȚ Ƞ
ȤȡȩȞȠȢ ȦijȑȜȚȝȘȢ ȗȦȒȢ IJȠȣȢ, ʌȡȑʌİȚ
ȞĮ
ıȣȜȜȑȖȠȞIJĮȚ ȟİȤȦȡȚıIJȐ țĮȚ ȞĮ İʌȚıIJȡȑijȠȞIJĮȚ
ıİ İȖțĮIJĮıIJȐıİȚȢ ʌİȡȚȕĮȜȜȠȞIJȚțȒȢ
ĮȞĮțȪțȜȦıȘȢ.
Cd
Ni-MH
Li-ion

77
İʌȚıȒȝĮȞıȘ.
ǹʌĮȚIJİȓIJĮȚ Ș įȚĮȕȠȪȜİȣıȘ ȝİ ȑȞĮȞ İȝʌİȚȡȠȖȞȫȝȠȞĮ
ȖȚĮ İʌȚțȓȞįȣȞĮ ȣȜȚțȐ ȖȚĮ IJȘȞ ʌȡȠİIJȠȚȝĮıȓĮ IJȠȣ
ĮʌȠıIJİȜȜȩȝİȞȠȣ ȣȜȚțȠȪ. ȆĮȡĮțĮȜİȓıșİ İʌȓıȘȢ ȞĮ
IJȘȡȒıİIJİ IJȠȣȢ İȞįİȤȠȝȑȞȦȢ ʌȚȠ ȜİʌIJȠȝİȡİȓȢ İșȞȚțȠȪȢ
țĮȞȠȞȚıȝȠȪȢ.
ȀĮȜȪȥIJİ ȝİ IJĮȚȞȓĮ Ȓ ȐȜȜȠ țȐȜȣȝȝĮ IJȚȢ ĮȞȠȚțIJȑȢ İʌĮijȑȢ
țĮȚ ıȣıțİȣȐıIJİ IJȘ ȝʌĮIJĮȡȓĮ țĮIJȐ IJȑIJȠȚȠȞ IJȡȩʌȠ ȫıIJİ
ȞĮ ȝȘȞ ȝʌȠȡİȓ ȞĮ ȝİIJĮțȚȞȘșİȓ ȝȑıĮ ıIJȘ
ıȣıțİȣĮıȓĮ.
11. ǹțȠȜȠȣșȒıIJİ IJȠȣȢ IJȠʌȚțȠȪȢ țĮȞȠȞȚıȝȠȪȢ ıȤİIJȚțȐ
ȝİ IJȘȞ ĮʌȩȡȡȚȥȘ IJȘȢ ȝʌĮIJĮȡȓĮȢ.
12. īȚĮ ȞĮ ĮʌȠijȪȖİIJİ IJȠȞ țȓȞįȣȞȠ, șĮ ʌȡȑʌİȚ ȞĮ
įȚĮȕȐıİIJİ IJȠ İȖȤİȚȡȓįȚȠ IJȘȢ ĮȞIJȚțĮșȚıIJȫȝİȞȘȢ
ȝʌĮIJĮȡȓĮȢ ʌȡȚȞ Įʌȩ IJȘ ȤȡȒıȘ.
ȀĮȚ IJȠ ȝȑȖȚıIJȠ ȡİȪȝĮ İțijȩȡIJȦıȘȢ IJȘȢ ȝʌĮIJĮȡȓĮȢ șĮ
ʌȡȑʌİȚ ȞĮ İȓȞĮȚ ȝİȖĮȜȪIJİȡȠ Ȓ ȓıȠ ȝİ 8ǹ.
ȆȇȅȈȅȋǾ:
• ȀȓȞįȣȞȠȢ ȑțȡȘȟȘȢ ıİ
ʌİȡȓʌIJȦıȘ İıijĮȜȝȑȞȘȢ
ĮȞIJȚțĮIJȐıIJĮıȘȢ IJȘȢ ȝʌĮIJĮȡȓĮȢ.
• ǹȞIJȚțĮIJĮıIJȒıIJİ ȝȩȞȠ ȝİ ȓįȚȠȣ Ȓ ȚıȠįȪȞĮȝȠȣ IJȪʌȠȣ.
ĭȊȁǹȄȉǼ ǹȊȉǼȈ ȉǿȈ ȅǻǾīǿǼȈ.
ȆȇȅȈȅȋǾ: ȋȡȘıȚȝȠʌȠȚȒıIJİ ȝȩȞȠ ĮȣșİȞIJȚțȑȢ
ȝʌĮIJĮȡȓİȢ IJȘȢ Makita.
Ǿ ȤȡȒıȘ ȝȘ ĮȣșİȞIJȚțȫȞ ȝʌĮIJĮȡȚȫȞ IJȘȢ Makita Ȓ
ȝʌĮIJĮȡȚȫȞ ʌȠȣ ȑȤȠȣȞ IJȡȠʌȠʌȠȚȘșİȓ, ȝʌȠȡİȓ ȞĮ ȠįȘȖȒıİȚ
ıIJȘȞ ȑțȡȘȟȘ IJȘȢ ȝʌĮIJĮȡȓĮȢ ʌȡȠțĮȜȫȞIJĮȢ ʌȣȡțĮȖȚȑȢ,
ıȦȝĮIJȚțȒ ȕȜȐȕȘ țĮȚ ȗȘȝȚȐ. ĬĮ ĮțȣȡȫıİȚ İʌȓıȘȢ IJȘȞ
İȖȖȪȘıȘ IJȘȢ Makita ȖȚĮ IJȠ İȡȖĮȜİȓȠ țĮȚ IJȠȞ ijȠȡIJȚıIJȒ IJȘȢ
Makita.
ȈȣȝȕȠȣȜȑȢ ȖȚĮ IJȘ įȚĮIJȒȡȘıȘ IJȘȢ ȝȑȖȚıIJȘȢ
ȗȦȒȢ IJȘȢ ȝʌĮIJĮȡȓĮȢ
1. ȃĮ ijȠȡIJȓȗİIJİ IJȘȞ ȝʌĮIJĮȡȓĮ ʌȡȚȞ ĮʌȠijȠȡIJȚıIJİȓ
İȞIJİȜȫȢ.
ȆȐȞIJȠIJİ ȞĮ įȚĮțȩʌIJİIJİ IJȘ ȜİȚIJȠȣȡȖȓĮ IJȠȣ
İȡȖĮȜİȓȠȣ țĮȚ ȞĮ ijȠȡIJȓȗİIJİ IJȘȞ ȝʌĮIJĮȡȓĮ ȩIJĮȞ
ʌĮȡĮIJȘȡİȓIJĮȚ ȝİȚȦȝȑȞȘ ȚıȤȪ IJȠȣ İȡȖĮȜİȓȠȣ.
2. ȆȠIJȑ ȝȘȞ İʌĮȞĮijȠȡIJȓȗİIJİ ȝȚĮ ʌȜȒȡȦȢ ijȠȡIJȚıȝȑȞȘ
ȝʌĮIJĮȡȓĮ.
ǹȞ ȣʌİȡijȠȡIJȓıİIJİ IJȘȞ ȝʌĮIJĮȡȓĮ, ȝİȚȫȞİIJĮȚ Ș
ȦijȑȜȚȝȘ įȚȐȡțİȚĮ ȗȦȒȢ IJȘȢ.
3. ȃĮ ijȠȡIJȓȗİIJİ IJȘȞ ȝʌĮIJĮȡȓĮ ıİ șİȡȝȠțȡĮıȓĮ
įȦȝĮIJȓȠȣ,
įȘȜĮįȒ ıIJȠȣȢ 10°C ȑȦȢ 40°C (50°F ȑȦȢ
104°F). ǹȞ Ș ȝʌĮIJĮȡȓĮ İȓȞĮȚ șİȡȝȒ, ĮijȒıIJİ IJȘȞ ȞĮ
ȥȣȤșİȓ ʌȡȚȞ IJȘ ijȠȡIJȓıİIJİ.
4. ĭȠȡIJȓıIJİ IJȘȞ țĮıȑIJĮ ȝʌĮIJĮȡȓĮȢ İȐȞ įİȞ ʌȡȩțİȚIJĮȚ
ȞĮ IJȘȞ ȤȡȘıȚȝȠʌȠȚȒıİIJİ ȖȚĮ ȝİȖȐȜȘ ȤȡȠȞȚțȒ
ʌİȡȓȠįȠ (ʌİȡȚııȩIJİȡȠȣȢ Įʌȩ ȑȟȚ ȝȒȞİȢ).
ǼʌİȟȒȖȘıȘ IJȘȢ ȖİȞȚțȒȢ ȩȥȘȢ
(ǼȚț.1)
1. ĬȪȡĮ IJȡȠijȠįȠıȓĮȢ USB
2. ȀȠȣȝʌȓ IJȡȠijȠįȠıȓĮȢ/įȚĮțȠʌȒȢ ȜİȚIJȠȣȡȖȓĮȢ
3. ȀȠȣȝʌȓ ʌȘȖȒȢ
4. ǹijȪʌȞȚıȘ ȡĮįȚȠijȫȞȠȣ
5. ǺȩȝȕȠȢ ĮijȪʌȞȚıȘȢ
6. ȆȡȠİʌȚȜİȖȝȑȞȠȚ ıIJĮșȝȠȓ/ȀȠȣȝʌȓ ʌȡȠİʌȚȜȠȖȒȢ 1 ȖȚĮ
ıȪȗİȣȟȘ ȝİ Bluetooth
®
7. ȀȠȣȝʌȓ ȝİȞȠȪ/ʌȜȘȡȠijȠȡȚȫȞ
8. ȀȠȣȝʌȓ DzȞIJĮıȘȢ/ǼȜȑȖȤȠȣ ıȣȖȤȡȠȞȚıȝȠȪ/ǼʌȚȜȠȖȒȢ
9. ȊʌȠįȠȤȒ İȚıȩįȠȣ DC
10. AUX IN 1
11. ȅșȩȞȘ LCD
12. ȋİȡȠȪȜȚ
13. ȂĮȜĮțȒ ȜȣȖȚıȝȑȞȘ ȡȐȕįȠȢ țİȡĮȓĮȢ
14. ǹıijȐȜİȚĮ șȒțȘȢ ȝʌĮIJĮȡȓĮȢ
15. ǾȤİȓȠ
16. ȀȐȜȣȝȝĮ ȝʌĮIJĮȡȓĮȢ
17. ȉİȡȝĮ IJȚțȩ İȚıȩįȠȣ (AUX IN 2)
18. ĬȒțȘ ȝʌĮIJĮȡȚȫȞ (ʌİȡȚȜĮȝȕȐȞİȚ IJȘȞ țȪȡȚĮ țĮıȑIJĮ
ȝʌĮIJĮȡȓĮȢ țĮȚ IJȚȢ İijİįȡȚțȑȢ ȝʌĮIJĮȡȓİȢ)
19. ǼʌȐȞȦ
20. ǹȡȚıIJİȡȐ
21. ȆȡȩıȠȥȘ
22. ǻİȟȚȐ
23. ȆȓıȦ- ȀȜİȚıIJȩ țȐȜȣȝȝĮ ȝʌĮIJĮȡȓĮȢ
24. ȆȓıȦ- ǹȞȠȚțIJȩ țȐȜȣȝȝĮ ȝʌĮIJĮȡȓĮȢ
25. ȀĮıȑIJĮ
ȝʌĮIJĮȡȓĮȢ
26. ȀȠȣȝʌȓ
27. ǼȞįİȚțIJȚțȑȢ ȜȣȤȞȓİȢ
28. ȀȠȣȝʌȓ İȜȑȖȤȠȣ
ȅșȩȞȘ LCD:
ǹ. ǺȩȝȕȠȢ ĮijȪʌȞȚıȘȢ
Ǻ. ǹijȪʌȞȚıȘ ȕȩȝȕȠȣ
C. ȈȪȝȕȠȜȠ ıIJİȡİȠijȦȞȚțȠȪ
D. DzȞįİȚȟȘ ȤĮȝȘȜȒȢ ȝʌĮIJĮȡȓĮȢ
E. ȇȠȜȩȚ
F. ȈȣȤȞȩIJȘIJĮ
G. RDS (ȈȪıIJȘȝĮ ȡĮįȚȠijȦȞȚțȫȞ įİįȠȝȑȞȦȞ)
H. ȀĮIJȐıIJĮıȘ įȚĮțȠʌȒȢ ȜİȚIJȠȣȡȖȓĮȢ
I. AM/PM ȖȚĮ IJȠ ȡȠȜȩȚ
ȉȠʌȠșȑIJȘıȘ ȝʌĮIJĮȡȓĮȢ
ȈȘȝİȓȦıȘ:
Ǿ įȚĮIJȒȡȘıȘ IJȦȞ İijİįȡȚțȫȞ ȝʌĮIJĮȡȚȫȞ ȝȑıĮ ıIJȘ șȒțȘ
ĮʌȠIJȡȑʌİȚ IJȘȞ ĮʌȫȜİȚĮ IJȦȞ įİįȠȝȑȞȦȞ ʌȠȣ İȓȞĮȚ
ĮʌȠșȘțİȣȝȑȞĮ ıIJȚȢ ʌȡȠİʌȚȜİȖȝȑȞİȢ ȝȞȒȝİȢ.
1. ǺȖȐȜIJİ ʌȡȠȢ IJĮ ȑȟȦ IJȘȞ ĮıijȐȜİȚĮ IJȘȢ șȒțȘȢ IJȦȞ
ȝʌĮIJĮȡȚȫȞ ȖȚĮ ȞĮ İȜİȣșİȡȫıİIJİ IJȘȞ șȒțȘ IJȦȞ
ȝʌĮIJĮȡȚȫȞ. ȊʌȐȡȤȠȣȞ Ș șȒțȘ IJȘȢ țȪȡȚĮȢ țĮıȑIJĮȢ
ȝʌĮIJĮȡȓĮȢ țĮȚ Ș șȒțȘ IJȦȞ İijİįȡȚțȫȞ ȝʌĮIJĮȡȚȫȞ.
(ǼȚț. 2)
2. ǹijĮȚȡȑıIJİ IJȠ țȐȜȣȝȝĮ IJȘȢ șȒțȘȢ IJȦȞ İijİįȡȚțȫȞ
ȝʌĮIJĮȡȚȫȞ țĮȚ IJȠʌȠșİIJȒıIJİ 2 ȞȑİȢ UM-3 (ȝİȖȑșȠȣȢ
ǹǹ). ǺİȕĮȚȦșİȓIJİ ȩIJȚ ȠȚ ȝʌĮIJĮȡȓİȢ ȑȤȠȣȞ IJȘ ıȦıIJȒ
ʌȠȜȚțȩIJȘIJĮ, ȩʌȦȢ ijĮȓȞİIJĮȚ ȝȑıĮ ıIJȘ șȒțȘ.
ǼʌĮȞĮIJȠʌȠșİIJȒıIJİ IJȠ țȐȜȣȝȝĮ IJȦȞ ȝʌĮIJĮȡȚȫȞ.
(ǼȚț.3)
3. ǹijȠȪ İȚıĮȖȐȖİIJİ IJȚȢ İijİįȡȚțȑȢ ȝʌĮIJĮȡȓİȢ, İȚıĮȖȐȖİIJİ
IJȘȞ țȪȡȚĮ țĮıȑIJĮ ȝʌĮIJĮȡȓĮȢ ȖȚĮ ȞĮ IJȡȠijȠįȠIJȘșİȓ ȝİ
ȡİȪȝĮ IJȠ
ȡĮįȚȩijȦȞȠ. ȅȚ țĮIJȐȜȜȘȜİȢ țĮıȑIJİȢ
ȝʌĮIJĮȡȚȫȞ ȖȚĮ ĮȣIJȩ IJȠ ȡĮįȚȩijȦȞȠ ĮȞĮijȑȡȠȞIJĮȚ ıIJȠȞ
ĮțȩȜȠȣșȠ ʌȓȞĮțĮ.

78
ȅ ʌĮȡĮțȐIJȦ ʌȓȞĮțĮȢ İȝijĮȞȓȗİȚ IJȠ ȤȡȩȞȠ ȜİȚIJȠȣȡȖȓĮȢ ȝİ ȝȓĮ ȝȩȞȠ ijȩȡIJȚıȘ ıIJȘ ȜİȚIJȠȣȡȖȓĮ IJȠȣ ȡĮįȚȠijȫȞȠȣ.
: ȈȣıIJȠȚȤȓĮ ȝʌĮIJĮȡȓĮȢ
: ȈȣȡȩȝİȞȘ ȝʌĮIJĮȡȓĮ
ȈȘȝİȓȦıȘ:
ȅ ʌȓȞĮțĮȢ ʌȠȣ ĮijȠȡȐ IJȠ ȤȡȩȞȠ ȜİȚIJȠȣȡȖȓĮȢ IJȦȞ ȝʌĮIJĮȡȚȫȞ İȓȞĮȚ İȞįİȚțIJȚțȩȢ. ȅ ʌȡĮȖȝĮIJȚțȩȢ ȤȡȩȞȠȢ ȜİȚIJȠȣȡȖȓĮȢ ȝʌȠȡİȓ
ȞĮ įȚĮijȑȡİȚ ĮȞȐȜȠȖĮ ȝİ IJȠȞ IJȪʌȠ IJȘȢ ȝʌĮIJĮȡȓĮȢ, IJȘȞ țĮIJȐıIJĮıȘ ijȩȡIJȚıȘȢ Ȓ IJȠ ʌİȡȚȕȐȜȜȠȞ
ȤȡȒıȘȢ.
ȉȠʌȠșȑIJȘıȘ Ȓ ĮijĮȓȡİıȘ IJȘȢ ıȣȡȩȝİȞȘȢ
țĮıȑIJĮȢ ȝʌĮIJĮȡȓĮȢ (ǼȚț. 4 țĮȚ 5)
• īȚĮ ȞĮ IJȠʌȠșİIJȒıİIJİ IJȘȞ țĮıȑIJĮ ȝʌĮIJĮȡȓĮȢ,
İȣșȣȖȡĮȝȝȓıIJİ IJȘ ȖȜȦIJIJȓįĮ IJȘȢ țĮıȑIJĮȢ ȝʌĮIJĮȡȓĮȢ ȝİ
IJȘȞ İȖțȠʌȒ ıIJȠ ʌİȡȓȕȜȘȝĮ țĮȚ ıȪȡIJİ IJȘ ıIJȘ șȑıȘ IJȘȢ.
ȆȐȞIJȠIJİ ȞĮ IJȘȞ IJȠʌȠșİIJİȓIJİ ȑȦȢ IJȠ IJȑȡȝĮ ȑȦȢ ȩIJȠȣ
ĮıijĮȜȓȗİȚ ıIJȘ șȑıȘ IJȘȢ țĮȚ ĮțȠȣıIJİȓ ȑȞĮȢ ĮʌȜȩȢ ȒȤȠȢ
“țȜȚț”.
• ǹȞ ȝʌȠȡİȓIJİ ȞĮ įİȓIJİ IJȘȞ țȩțțȚȞȘ ȑȞįİȚȟȘ
ıIJȘȞ ʌȐȞȦ
ʌȜİȣȡȐ IJȠȣ țȠȣȝʌȚȠȪ, Ș ȝʌĮIJĮȡȓĮ įİȞ İȓȞĮȚ ʌȜȒȡȦȢ
ĮıijĮȜȚıȝȑȞȘ. ȉȠʌȠșİIJȒıIJİ IJȘȞ ʌȜȒȡȦȢ ȑȦȢ ȩIJȠȣ ȞĮ
ȝȘ ijĮȓȞİIJĮȚ Ș țȩțțȚȞȘ ȑȞįİȚȟȘ. Ȉİ ĮȞIJȓșİIJȘ ʌİȡȓʌIJȦıȘ,
ȝʌȠȡİȓ ȞĮ ʌȑıİȚ țĮIJȐ ȜȐșȠȢ Įʌȩ IJȠ İȡȖĮȜİȓȠ țĮȚ ȞĮ
IJȡĮȣȝĮIJȓıİȚ İıȐȢ Ȓ țȐʌȠȚȠȞ ʌĮȡİȣȡȚıțȩȝİȞȠ.
• ȃĮ ȝȘ ȤȡȘıȚȝȠʌȠȚİȓIJİ įȪȞĮȝȘ ȩIJĮȞ İȚıĮȖȐȖİIJİ IJȘȞ
țĮıȑIJĮ ȝʌĮIJĮȡȓĮȢ. ǹȞ
Ș țĮıȑIJĮ įİȞ ȠȜȚıșĮȓȞİȚ ȝİ
İȣțȠȜȓĮ ĮȣIJȩ ıȘȝĮȓȞİȚ ȩIJȚ įİȞ IJȘȞ İȚıĮȖȐȖĮIJİ ıȦıIJȐ.
• īȚĮ ȞĮ ĮijĮȚȡȑıİIJİ IJȘȞ țĮıȑIJĮ ȝʌĮIJĮȡȓĮȢ, ȕȖȐȜIJİ IJȘȞ
Įʌȩ IJȠ İȡȖĮȜİȓȠ ȠȜȚıșĮȓȞȠȞIJĮȢ IJȠ țȠȣȝʌȓ ıIJȠ
ȝʌȡȠıIJȚȞȩ ȝȑȡȠȢ IJȘȢ țĮıȑIJĮȢ Ȓ ʌȚȑȗȠȞIJĮȢ IJĮ țȠȣȝʌȚȐ
țĮȚ ıIJȚȢ įȣȠ ʌȜİȣȡȑȢ IJȘȢ țĮıȑIJĮȢ.
ȉȠʌȠșȑIJȘıȘ Ȓ ĮijĮȓȡİıȘ IJȘȢ țĮıȑIJĮȢ
ıȣıIJȠȚȤȓĮȢ ȝʌĮIJĮȡȓĮȢ (ǼȚț. 6 țĮȚ 7)
• īȚĮ ȞĮ İȚıĮȖȐȖİIJİ IJȘȞ țĮıȑIJĮ ȝʌĮIJĮȡȓĮȢ,
İȣșȣȖȡĮȝȝȓıIJİ IJȘ ȖȜȦIJIJȓįĮ IJȘȢ țĮıȑIJĮȢ ȝʌĮIJĮȡȓĮȢ ȝİ
IJȘȞ İȖțȠʌȒ ıIJȠ ʌİȡȓȕȜȘȝĮ țĮȚ ıȪȡIJİ IJȘ ıIJȘ șȑıȘ IJȘȢ.
• īȚĮ ȞĮ ĮijĮȚȡȑıİIJİ IJȘȞ țĮıȑIJĮ ȝʌĮIJĮȡȓĮȢ, ȕȖȐȜIJİ IJȘȞ
ȝʌĮIJĮȡȓĮ ȑȟȦ Įʌȩ IJȠ IJİȡȝĮIJȚțȩ ʌĮIJȫȞIJĮȢ IJĮȣIJȩȤȡȠȞĮ
IJĮ țȠȣȝʌȚȐ ıIJȠ ʌȜȐȚ IJȘȢ țĮıȑIJĮȢ.
ǼʌĮȞĮijȑȡİIJİ IJȘȞ ĮıijȐȜİȚĮ IJȘȢ șȒțȘȢ IJȦȞ
ȝʌĮIJĮȡȚȫȞ
ıIJȘȞ ĮȡȤȚțȒ IJȘȢ șȑıȘ.
Ǿ ȝİȚȦȝȑȞȘ ȚıȤȪȢ, Ș ʌĮȡĮȝȩȡijȦıȘ, ȑȞĮȢ “ȒȤȠȢ ıĮȞ
IJȡĮȪȜȚıȝĮ” Ȓ Ș ȤĮȝȘȜȒ ȑȞįİȚȟȘ ȝʌĮIJĮȡȓĮȢ ʌȠȣ
İȝijĮȞȓȗİIJĮȚ ıIJȘȞ ȠșȩȞȘ ȝĮȗȓ ȝİ IJȠ “POWERFAIL” İȓȞĮȚ
ȩȜİȢ ȠȚ İȞįİȓȟİȚȢ ʌȠȣ įȘȜȫȞȠȣȞ ȩIJȚ Ș țȪȡȚĮ țĮıȑIJĮ
ȝʌĮIJĮȡȓĮȢ ʌȡȑʌİȚ ȞĮ ĮȞIJȚțĮIJĮıIJĮșİȓ.
ȋȦȡȘIJȚțȩIJȘIJĮ
ȝʌĮIJĮȡȓĮȢ
ȉȐıȘ țĮıȑIJĮȢ ȝʌĮIJĮȡȓĮȢ
ȈȉǾȃ ǼȄȅǻȅ ǾȋǼǿȅȊ
= 50 mW + 50 mW (ȝȠȞȐįĮ: ǷȡĮ)
(
ȀĮIJȐ ʌȡȠıȑȖȖȚıȘ)
7,2 V 10,8 V 14,4 V 18 V
ȈIJȠ ȡĮįȚȩijȦȞȠ Ȓ ıIJȠ
AUX
ȈIJȠ Bluetooth
®
ȝİ IJȠ USB
ȞĮ ijȠȡIJȓȗİȚ
1,0 Ah BL7010 5,5 0,8
1,1 Ah
BL1411G,
L1451
5,5
1,5
BL1811G,
L1851
1,8
1,3 Ah
BL1013
7,5
1,5
BL1415,
BL1413G,
L1453
1,8
BL1815,
BL1813G,
L1853
2,0
1,5 Ah
BL1415N
8,5
2,0
BL1815N 2,5
2,0 Ah
BL1820,
BL1820B
11 3,2
3,0 Ah
BL1430,
BL1430B
16
4,0
BL1830,
BL1830B
5,0
4,0 Ah
BL1440
22
5,5
BL1840,
BL1840B
6,5
5,0 Ah
BL1450
27
6,5
BL1850,
BL1850B
8,0
6,0 Ah
BL1460B
33
7,0
BL1860B 9,5

79
ȈȘȝİȓȦıȘ:
Ǿ țĮıȑIJĮ ȝʌĮIJĮȡȓĮȢ įİȞ ȝʌȠȡİȓ ȞĮ ijȠȡIJȚıIJİȓ ȝȑıȦ IJȠȣ
ʌĮȡİȤȩȝİȞȠȣ ȝİIJĮıȤȘȝĮIJȚıIJȒ ȡİȪȝĮIJȠȢ AC.
ǵIJĮȞ İȝijĮȞȚıIJİȓ Ș ȤĮȝȘȜȒ ȑȞįİȚȟȘ ȝʌĮIJĮȡȓĮȢ țĮȚ
ıȣȞİȤȓȗİȚ ȞĮ ĮȞĮȕȠıȕȒȞİȚ ȑȞĮ “ǼMPTY”, IJȩIJİ İȓȞĮȚ Ș ȫȡĮ
ȞĮ IJȠʌȠșİIJȒıİIJİ IJȚȢ İijİįȡȚțȑȢ ȝʌĮIJĮȡȓİȢ.
DzȞįİȚȟȘ IJȘȢ İȞĮʌȠȝȑȞȠȣıĮȢ
ȤȦȡȘIJȚțȩIJȘIJĮȢ IJȘȢ ȝʌĮIJĮȡȓĮȢ
(ȂȩȞȠ ȖȚĮ IJȚȢ țĮıȑIJİȢ ȝʌĮIJĮȡȓĮ ȝİ “Ǻ” ıIJȠ IJȑȜȠȢ IJȠȣ
ĮȡȚșȝȠȪ ȝȠȞIJȑȜȠȣ.) (ǼȚț.8)
ȆĮIJȒıIJİ IJȠ țȠȣȝʌȓ İȜȑȖȤȠȣ ıIJȘȞ țĮıȑIJĮ ȝʌĮIJĮȡȓĮȢ ȖȚĮ ȞĮ
İȝijĮȞȚıIJİȓ Ș ȣʌȠȜİȚʌȩȝİȞȘ ȤȦȡȘIJȚțȩIJȘIJĮ IJȘȢ ȝʌĮIJĮȡȓĮȢ.
ȅȚ İȞįİȚțIJȚțȑȢ ȜȣȤȞȓİȢ șĮ ĮȞȐȥȠȣȞ ȖȚĮ ȝİȡȚțȐ
įİȣIJİȡȩȜİʌIJĮ.
015658
ȈǾȂǼǿȍȈǾ:
• ǹȞȐȜȠȖĮ ȝİ IJȚȢ ıȣȞșȒțİȢ ȤȡȒıȘȢ țĮȚ IJȘ șİȡȝȠțȡĮıȓĮ
ʌİȡȚȕȐȜȜȠȞIJȠȢ, Ș ȑȞįİȚȟȘ ȝʌȠȡİȓ ȞĮ įȚĮijȑȡİȚ İȜĮijȡȫȢ
Įʌȩ IJȘȞ ʌȡĮȖȝĮIJȚțȒ ȤȦȡȘIJȚțȩIJȘIJĮ.
ǼȖțĮIJȐıIJĮıȘ IJȘȢ ȝĮȜĮțȒȢ ȜȣȖȚıȝȑȞȘȢ
ȡȐȕįȠȣ țİȡĮȓĮȢ (ǼȚț. 9)
ǼȖțĮIJĮıIJȒıIJİ IJȘ ȝĮȜĮțȒ ȜȣȖȚıȝȑȞȘ ȡȐȕįȠ țİȡĮȓĮȢ ȩʌȦȢ
ijĮȓȞİIJĮȚ ıIJȘȞ İȚțȩȞĮ.
ȋȡȒıȘ IJȠȣ ʌĮȡİȤȩȝİȞȠȣ ȝİIJĮıȤȘȝĮIJȚıIJȒ
ȡİȪȝĮIJȠȢ AC (ǼȚț. 10)
ǹijĮȚȡȑıIJİ IJȠ İȜĮıIJȚțȩ ʌȡȠıIJĮIJİȣIJȚțȩ țĮȚ IJȠʌȠșİIJȒıIJİ IJȠ
ȕȪıȝĮ IJȠȣ ȝİIJĮıȤȘȝĮIJȚıIJȒ ıIJȘȞ ȣʌȠįȠȤȒ DC ıIJȘȞ
ĮȡȚıIJİȡȒ ʌȜİȣȡȐ IJȠȣ ȡĮįȚȠijȫȞȠȣ. ȈȣȞįȑıIJİ IJȠȞ
ȝİIJĮıȤȘȝĮIJȚıIJȒ ıİ ȝȚĮ IJȣʌȚțȒ ʌȡȓȗĮ. ȀȐșİ ijȠȡȐ ʌȠȣ Ƞ
ȝİIJĮıȤȘȝĮIJȚıIJȒȢ ȤȡȘıȚȝȠʌȠȚİȓIJĮȚ, Ș țĮıȑIJĮ ȝʌĮIJĮȡȓĮȢ
ĮʌȠıȣȞįȑİIJĮȚ ĮȣIJȩȝĮIJĮ. ȅ ȝİIJĮıȤȘȝĮIJȚıIJȒȢ AC șĮ
ʌȡȑʌİȚ ȞĮ ĮʌȠıȣȞįİșİȓ Įʌȩ IJȘȞ țȪȡȚĮ ʌĮȡȠȤȒ, ȩIJĮȞ įİȞ
ȤȡȘıȚȝȠʌȠȚİȓIJĮȚ.
ȈȘȝİȓȦıȘ:
ǵIJĮȞ IJȠ
ȡĮįȚȩijȦȞȩ ıĮȢ ȑȤİȚ ȠʌȠȚĮįȒʌȠIJİ ʌĮȡİȝȕȠȜȒ
ıIJȘȞ ȝʌȐȞIJĮ ǹȂ Įʌȩ IJȠ ȝİIJĮıȤȘȝĮIJȚıIJȒ IJȠȣ,
ʌĮȡĮțĮȜȠȪȝİ ĮʌȠȝĮțȡȪȞİIJİ IJȠ ȡĮįȚȩijȦȞȩ ıĮȢ Įʌȩ IJȠȞ
ȝİIJĮıȤȘȝĮIJȚıIJȒ AC IJȠȣ ʌİȡȚııȩIJİȡȠ Įʌȩ 30 cm.
ȁİȚIJȠȣȡȖȓĮ IJȠȣ ȡĮįȚȠijȫȞȠȣ ıĮȢ –
ȈȣȞIJȠȞȚıȝȩȢ ıȐȡȦıȘȢ AM/FM
1. ȆĮIJȒıIJİ IJȠ țȠȣȝʌȓ IJȡȠijȠįȠıȓĮȢ ȖȚĮ ȞĮ
İȞİȡȖȠʌȠȚȒıİIJİ IJȠ ȡĮįȚȩijȦȞȠ ıĮȢ.
2. ȆĮIJȒıIJİ IJȠ țȠȣȝʌȓ ʌȘȖȒȢ ȖȚĮ ȞĮ İʌȚȜȑȟİIJİ IJȘȞ
ȝʌȐȞIJĮ ȡĮįȚȠijȫȞȠȣ AM Ȓ FM.
3. ȆĮIJȒıIJİ țĮȚ țȡĮIJȒıIJİ ʌĮIJȘȝȑȞȠ IJȠ țȠȣȝʌȓ İȜȑȖȤȠȣ
ıȣȞIJȠȞȚıȝȠȪ ȖȚĮ ȞĮ İțIJİȜİıIJİȓ Ƞ ĮȣIJȩȝĮIJȠȢ
ıȣȞIJȠȞȚıȝȩȢ. ȉȠ ȡĮįȚȩijȦȞȩ ıĮȢ șĮ ıĮȡȫıİȚ IJȘȞ
ȝʌȐȞIJĮ AM/FM Įʌȩ IJȘȞ IJȡȑȤȠȣıĮ İȝijĮȞȚȗȩȝİȞȘ
ıȣȤȞȩIJȘIJĮ țĮȚ Ș
ıȐȡȦıȘ șĮ ıIJĮȝĮIJȒıİȚ ĮȣIJȩȝĮIJĮ
ȩIJĮȞ ȕȡİșİȓ ȑȞĮȢ ıIJĮșȝȩȢ ȝİ İʌĮȡțȒ ȚıȤȪ.
4. ȂİIJȐ Įʌȩ ȜȓȖĮ įİȣIJİȡȩȜİʌIJĮ Ș ȠșȩȞȘ șĮ İȞȘȝİȡȦșİȓ.
Ǿ ȠșȩȞȘ șĮ įİȓȟİȚ IJȘȞ ıȣȤȞȩIJȘIJĮ IJȠȣ ıȒȝĮIJȠȢ ʌȠȣ
ȕȡȑșȘțİ.
5. īȚĮ ȞĮ ȕȡİȓIJİ ȑȞĮ ȐȜȜȠ ıIJĮșȝȩ, ʌĮIJȒıIJİ țĮȚ țȡĮIJȒıIJİ
ʌĮIJȘȝȑȞȠ IJȠ țȠȣȝʌȓ İȜȑȖȤȠȣ ıȣȞIJȠȞȚıȝȠȪ ȩʌȦȢ
țĮȚ ʌȡȚȞ.
6. ǵIJĮȞ ijIJȐıİȚ IJȠ
IJȑȜȠȢ IJȘȢ ȝʌȐȞIJĮȢ ıȣȤȞȠIJȒIJȦȞ, IJȠ
ȡĮįȚȩijȦȞȩ ıĮȢ șĮ ĮȡȤȓıİȚ İț ȞȑȠȣ IJȠȞ ıȣȞIJȠȞȚıȝȩ
Įʌȩ IJȠ ĮȞIJȓșİIJȠ ȐțȡȠ IJȘȢ ȝʌȐȞIJĮȢ ıȣȤȞȠIJȒIJȦȞ.
7. ȆİȡȚıIJȡȑȥIJİ IJȠ țȠȣȝʌȓ İȜȑȖȤȠȣ ıȣȞIJȠȞȚıȝȠȪ ȖȚĮ
ȞĮ ȡȣșȝȓıİIJİ IJȠ İʌȓʌİįȠ IJȠȣ ȒȤȠȣ, ȩʌȦȢ ĮʌĮȚIJİȓIJĮȚ.
ȈȘȝİȓȦıȘ:
• ȀĮIJȐ IJȘ ȡȪșȝȚıȘ IJȘȢ ȑȞIJĮıȘȢ, ȕİȕĮȚȦșİȓIJİ ȩIJȚ IJȠ FM/
AM ǻǼȃ ĮȞĮȕȠıȕȒȞİȚ ıIJȘȞ ȠșȩȞȘ.
• ǹȞ IJȠ
AM/FM ĮȞĮȕȠıȕȒȞİȚ ıIJȘȞ ȠșȩȞȘ, ıĮȢ
İʌȚIJȡȑʌİIJĮȚ ȞĮ ıȣȞIJȠȞȓıİIJİ IJȠȣȢ ıIJĮșȝȠȪȢ
ȤİȚȡȠțȓȞȘIJĮ (įİȓIJİ IJȘȞ İȞȩIJȘIJĮ “ȋİȚȡȠțȓȞȘIJȠȢ
ıȣȞIJȠȞȚıȝȩȢ – AM/FM” ȖȚĮ ʌİȡȚııȩIJİȡİȢ
ȜİʌIJȠȝȑȡİȚİȢ).
8. īȚĮ ȞĮ ĮʌİȞİȡȖȠʌȠȚȒıİIJİ IJȠ ȡĮįȚȩijȦȞȩ ıĮȢ ʌĮIJȒıIJİ
IJȠ țȠȣȝʌȓ IJȡȠijȠįȠıȓĮȢ .
ȋİȚȡȠțȓȞȘIJȠȢ ıȣȞIJȠȞȚıȝȩȢ – AM/FM
1. ȆĮIJȒıIJİ IJȠ țȠȣȝʌȓ IJȡȠijȠįȠıȓĮȢ ȖȚĮ ȞĮ
İȞİȡȖȠʌȠȚȒıİIJİ IJȠ ȡĮįȚȩijȦȞȠ ıĮȢ.
2. ȆĮIJȒıIJİ IJȠ țȠȣȝʌȓ ʌȘȖȒȢ ȖȚĮ ȞĮ İʌȚȜȑȟİIJİ IJȘȞ
ȝʌȐȞIJĮ ȡĮįȚȠijȫȞȠȣ AM Ȓ FM.
3. ȆȚȑıIJİ IJȠ țȠȣȝʌȓ İȜȑȖȤȠȣ ıȣȞIJȠȞȚıȝȠȪ țĮȚ șĮ įİȓIJİ
IJȠ FM Ȓ AM ȞĮ ĮȞĮȕȠıȕȒȞİȚ ıIJȘȞ ȠșȩȞȘ.
ȈȘȝİȓȦıȘ:
• ȉȠ FM/AM șĮ ĮȞĮȕȠıȕȒȞİȚ ȖȚĮ ʌİȡȓʌȠȣ
10 įİȣIJİȡȩȜİʌIJĮ. ȂȑıĮ ıİ ĮȣIJȩ IJȠ įȚȐıIJȘȝĮ,
İʌȚIJȡȑʌİIJĮȚ
ȝȩȞȠ Ƞ ȤİȚȡȠțȓȞȘIJȠȢ ıȣȞIJȠȞȚıȝȩȢ.
• ǼȐȞ İȓȞĮȚ İʌȚșȣȝȘIJȒ Ș ȡȪșȝȚıȘ IJȘȢ ȑȞIJĮıȘȢ, țĮșȫȢ
ĮȞĮȕȠıȕȒȞİȚ IJȠ FM/AM, ʌȚȑıIJİ IJȠ țȠȣȝʌȓ İȜȑȖȤȠȣ
ǼȞįİȚțIJȚțȑȢ ȜȣȤȞȓİȢ
ǼȞĮʌȠȝȑȞȠȣıĮ
ȤȦȡȘIJȚțȩIJȘIJĮ
ǹȞĮȝȝȑȞİȢ ȈȕȘıIJȑȢ ǹȞĮȕȠıȕȒȞȠȣȞ
75% ȑȦȢ 100%
50% ȑȦȢ 75%
25% ȑȦȢ 50%
0% ȑȦȢ 25%
ĭȠȡIJȓıIJİ IJȘ
ȝʌĮIJĮȡȓĮ.
Ǿ ȝʌĮIJĮȡȓĮ
ȝʌȠȡİȓ ȞĮ
įȣıȜİȚIJȠȣȡȖİȓ.

80
ıȣȞIJȠȞȚıȝȠȪ ȖȚĮ ȞĮ ıIJĮȝĮIJȒıİȚ ȞĮ ĮȞĮȕȠıȕȒȞİȚ țĮȚ
IJȩIJİ ȝʌȠȡİȓIJİ ȞĮ ʌİȡȚıIJȡȑȥİIJİ IJȠ țȠȣȝʌȓ İȜȑȖȤȠȣ
ıȣȞIJȠȞȚıȝȠȪ ȖȚĮ ȞĮ ȡȣșȝȓıİIJİ IJȠ İʌȓʌİįȠ IJȠȣ ȒȤȠȣ.
4. ȆİȡȚıIJȡȑȥIJİ IJȠ țȠȣȝʌȓ İȜȑȖȤȠȣ ıȣȞIJȠȞȚıȝȠȪ ȖȚĮ
ıȣȞIJȠȞȚıȝȩ ıİ ȑȞĮ ıIJĮșȝȩ.
5. ǵIJĮȞ ijIJȐıİȚ IJȠ IJȑȜȠȢ IJȘȢ ȝʌȐȞIJĮȢ ıȣȤȞȠIJȒIJȦȞ, IJȠ
ȡĮįȚȩijȦȞȩ ıĮȢ șĮ ĮȡȤȓıİȚ İț ȞȑȠȣ IJȠȞ ıȣȞIJȠȞȚıȝȩ
Įʌȩ
IJȠ ĮȞIJȓșİIJȠ ȐțȡȠ IJȘȢ ȝʌȐȞIJĮȢ ıȣȤȞȠIJȒIJȦȞ.
6. ȋȡȘıȚȝȠʌȠȚȒıIJİ IJȠ țȠȣȝʌȓ İȜȑȖȤȠȣ ıȣȞIJȠȞȚıȝȠȪ
ȖȚĮ ȞĮ ȡȣșȝȓıİIJİ IJȠ İʌȓʌİįȠ ȒȤȠȣ, ȩʌȦȢ ĮʌĮȚIJİȓIJĮȚ.
ȆȡȠİʌȚȜȠȖȒ ıIJĮșȝȫȞ ıIJȘ ȜİȚIJȠȣȡȖȓĮ AM/
FM
ȊʌȐȡȤȠȣȞ 5 ʌȡȠİʌȚȜİȖȝȑȞȠȚ ıIJĮșȝȠȓ ȖȚĮ țȐșİ ȡĮįȚȩijȦȞȠ
AM țĮȚ FM. ȋȡȘıȚȝȠʌȠȚȠȪȞIJĮȚ ȝİ IJȠȞ ȓįȚȠ IJȡȩʌȠ ȖȚĮ țȐșİ
ȝʌȐȞIJĮ ıȣȤȞȠIJȒIJȦȞ.
1. ȆĮIJȒıIJİ IJȠ țȠȣȝʌȓ IJȡȠijȠįȠıȓĮȢ ȖȚĮ ȞĮ
İȞİȡȖȠʌȠȚȒıİIJİ IJȠ ȡĮįȚȩijȦȞȠ ıĮȢ.
2. ȆĮIJȒıIJİ IJȠ țȠȣȝʌȓ ʌȘȖȒȢ ȖȚĮ ȞĮ İʌȚȜȑȟİIJİ IJȘȞ
İʌȚșȣȝȘIJȒ ȗȫȞȘ ıȣȤȞȠIJȒIJȦȞ. ȈȣȞIJȠȞȚıIJİȓIJİ ȝİ IJȠȞ
ĮʌĮȚIJȠȪȝİȞȠ ȡĮįȚȠijȦȞȚțȩ ıIJĮșȝȩ, ȩʌȦȢ
ʌİȡȚȖȡȐijȘțİ ʌȡȠȘȖȠȣȝȑȞȦȢ.
3. ȆĮIJȒıIJİ țĮȚ țȡĮIJȒıIJİ
ʌĮIJȘȝȑȞȠ IJȠ ĮʌĮȚIJȠȪȝİȞȠ
țȠȣȝʌȓ ʌȡȠİʌȚȜȠȖȒȢ (1 ȑȦȢ 5) ȝȑȤȡȚ
ȞĮ İȝijĮȞȚıIJİȓ IJȠ “P4”, ȖȚĮ ʌĮȡȐįİȚȖȝĮ ȝİIJȐ Įʌȩ IJȘ
ıȣȤȞȩIJȘIJĮ. ȅ ıIJĮșȝȩȢ șĮ ĮʌȠșȘțİȣIJİȓ
ȤȡȘıȚȝȠʌȠȚȫȞIJĮȢ IJȠȞ ʌȡȠțĮșȠȡȚıȝȑȞȠ ĮȡȚșȝȩ.
ǼʌĮȞĮȜȐȕİIJİ ĮȣIJȒ IJȘ įȚĮįȚțĮıȓĮ ȖȚĮ IJȚȢ
İȞĮʌȠȝȑȞȠȣıİȢ ʌȡȠİʌȚȜȠȖȑȢ ȩʌȦȢ İʌȚșȣȝİȓIJİ.
4. ȅȚ ʌȡȠİʌȚȜİȖȝȑȞȠȚ ıIJĮșȝȠȓ ʌȠȣ ȑȤȠȣȞ ȒįȘ
ĮʌȠșȘțİȣIJİȓ ȝʌȠȡȠȪȞ ȞĮ ĮȞIJȚțĮIJĮıIJĮșȠȪȞ
ĮțȠȜȠȣșȫȞIJĮȢ IJȘȞ ʌĮȡĮʌȐȞȦ įȚĮįȚțĮıȓĮ ĮȞ
ȤȡİȚĮıIJİȓ
.
ȁİȚIJȠȣȡȖȓİȢ İȞįİȓȟȦȞ – FM
ȉȠ ȡĮįȚȩijȦȞȩ ıĮȢ ȑȤİȚ ȝȚĮ ıİȚȡȐ Įʌȩ İʌȚȜȠȖȑȢ İȞįİȓȟİȦȞ
ȖȚĮ IJȘ ȜİȚIJȠȣȡȖȓĮ ȡĮįȚȠijȫȞȠȣ FM.
1. ȆĮIJȒıIJİ İʌĮȞİȚȜȘȝȝȑȞĮ IJȠ țȠȣȝʌȓ ȝİȞȠȪ/
ʌȜȘȡȠijȠȡȚȫȞ ȖȚĮ ȞĮ įİȓIJİ IJȚȢ ʌȜȘȡȠijȠȡȓİȢ RDS
IJȠȣ ıIJĮșȝȠȪ ʌȠȣ ĮțȠȪIJİ.
a. ǵȞȠȝĮ ıIJĮșȝȠȪ ǼȝijĮȞȓȗİȚ IJȠ ȩȞȠȝĮ, İȐȞ
ĮțȠȪȖİIJĮȚ Ƞ ıIJĮșȝȩȢ.
b. ȉȪʌȠȢ ʌȡȠȖȡȐȝȝĮIJȠȢ ǼȝijĮȞȓȗİȚ IJȠ İȓįȠȢ IJȠȣ
ıIJĮșȝȠȪ ʌȠȣ ĮțȠȪȖİIJĮȚ,
ȩʌȦȢ ʌȠʌ, țȜĮıȚțȩȢ,
İȚįȒıİȚȢ, ț.
Į.
c. ȇĮįȚȠijȦȞȚțȩ țİȓȝİȞȠ ǼȝijĮȞȓȗİȚ ȡĮįȚȠijȦȞȚțȩ
ȝȒȞȣȝĮ țİȚȝȑȞȠȣ, ȩʌȦȢ ȞȑĮ
ıIJȠȚȤİȓĮ țȜʌ.
d. DzIJȠȢ/ǾȝȑȡĮ ǼȝijĮȞȓȗİȚ IJȠ ȑIJȠȢ țĮȚ IJȘȞ
ȘȝȑȡĮ IJȘȢ İȕįȠȝȐįĮȢ,
ıȪȝijȦȞĮ ȝİ IJȘ ȡȪșȝȚıȘ IJȘȢ
ȘȝİȡȠȝȘȞȓĮȢ IJȠȣ ȡĮįȚȠijȫȞȠȣ
ıĮȢ.
e. ǾȝİȡȠȝȘȞȓĮ/ǾȝȑȡĮ ǼȝijĮȞȓȗİȚ IJȘȞ ȘȝİȡȠȝȘȞȓĮ țĮȚ
IJȘȞ ȘȝȑȡĮ IJȘȢ İȕįȠȝȐįĮȢ,
ıȪȝijȦȞĮ ȝİ IJȘ ȡȪșȝȚıȘ IJȘȢ
ȘȝİȡȠȝȘȞȓĮȢ IJȠȣ ȡĮįȚȠijȫȞȠȣ
ıĮȢ.
f. ȈȣȤȞȩIJȘIJĮ ǼȝijĮȞȓȗİȚ IJȘ ıȣȤȞȩIJȘIJĮ
IJȦȞ
FM ȖȚĮ IJȠ ıIJĮșȝȩ ʌȠȣ
ĮțȠȪȖİIJĮȚ.
FM ıIJİȡİȠijȦȞȚțȩ (ĮȣIJȩȝĮIJȠ)/
ȝȠȞȠijȦȞȚțȩ
ǹȞ Ƞ ȡĮįȚȠijȦȞȚțȩȢ ıIJĮșȝȩȢ FM ʌȠȣ ĮțȠȪȖİIJĮȚ ȑȤİȚ ȑȞĮ
ĮįȪȞĮȝȠ ıȒȝĮ, ȝʌȠȡİȓ ȞĮ ĮțȠȪȖİIJĮȚ țȐʌȠȚȠ ıijȪȡȚȖȝĮ.
ǼȓȞĮȚ įȣȞĮIJȩ ȞĮ ȝİȚȦșİȓ ĮȣIJȩ IJȠ ıijȪȡȚȖȝĮ, İʌȚȜȑȖȠȞIJĮȢ IJȠ
ȡĮįȚȩijȦȞȠ ȞĮ ʌĮȓȗİȚ IJȠ ıIJĮșȝȩ ıİ ȝȠȞȠijȦȞȚțȩ țĮȚ ȩȤȚ ıİ
ıIJİȡİȠijȦȞȚțȩ ȒȤȠ.
1. ȆĮIJȒıIJİ IJȠ țȠȣȝʌȓ IJȡȠijȠįȠıȓĮȢ ȩʌȦȢ
ĮʌĮȚIJİȓIJĮȚ ȖȚĮ ȞĮ İʌȚȜȑȟİIJİ IJȘȞ ȝʌȐȞIJĮ FM țĮȚ
ıȣȞIJȠȞȚıIJİȓIJİ ıIJȠȞ
İʌȚșȣȝȘIJȩ ıIJĮșȝȩ FM, ȩʌȦȢ
ĮȞĮijȑȡșȘțİ ʌȡȠȘȖȠȣȝȑȞȦȢ.
2. ȆĮIJȒıIJİ țĮȚ țȡĮIJȒıIJİ ʌĮIJȘȝȑȞȠ IJȠ țȠȣȝʌȓ ȝİȞȠȪ/
ʌȜȘȡȠijȠȡȚȫȞ ȖȚĮ ȞĮ ȝʌİȓIJİ ıIJȠ ȝİȞȠȪ
ȡȣșȝȓıİȦȞ.
3. ȆİȡȚıIJȡȑȥIJİ IJȠ țȠȣȝʌȓ İȜȑȖȤȠȣ ıȣȞIJȠȞȚıȝȠȪ ȝȑȤȡȚ
ȞĮ İȝijĮȞȚıIJİȓ ıIJȘȞ ȠșȩȞȘ Ș ȡȪșȝȚıȘ FM ĮȣIJȩȝĮIJȠ/
ȝȠȞȠijȦȞȚțȩ. ǹȞ Ș ȡȪșȝȚıȘ İȓȞĮȚ ĮȣIJȩȝĮIJȠ ʌĮIJȒıIJİ IJȠ
țȠȣȝʌȓ İȜȑȖȤȠȣ ıȣȞIJȠȞȚıȝȠȪ ȖȚĮ ȞĮ ȝİIJĮȕİȓIJİ ıIJȘ
ȝȠȞȠijȦȞȚțȒ ȜİȚIJȠȣȡȖȓĮ ȖȚĮ
IJȘ ȝİȓȦıȘ IJȠȣ
ıijȣȡȓȖȝĮIJȠȢ. ȆĮIJȒıIJİ IJȠ țȠȣȝʌȓ İȜȑȖȤȠȣ
ıȣȞIJȠȞȚıȝȠȪ ȖȚĮ ȞĮ İʌȚȜȑȟİIJİ IJȘȞ İʌȚȜȠȖȒ.
ǹȞȐțIJȘıȘ İȞȩȢ İʌȚȜİȖȝȑȞȠȣ ıIJĮșȝȠȪ ıIJȘ
ȜİȚIJȠȣȡȖȓĮ AM/FM
1. ȆĮIJȒıIJİ IJȠ țȠȣȝʌȓ IJȡȠijȠįȠıȓĮȢ ȖȚĮ ȞĮ
İȞİȡȖȠʌȠȚȒıİIJİ IJȠ ȡĮįȚȩijȦȞȠ ıĮȢ.
2. ȆĮIJȒıIJİ IJȠ țȠȣȝʌȓ ʌȘȖȒȢ ȖȚĮ ȞĮ İʌȚȜȑȟİIJİ IJȘȞ
ȝʌȐȞIJĮ ȡĮįȚȠijȫȞȠȣ AM Ȓ FM.
3. ȆĮIJȒıIJİ ıIJȚȖȝȚĮȓĮ IJȠ ĮʌĮȚIJȠȪȝİȞȠ țȠȣȝʌȓ
ʌȡȠİʌȚȜȠȖȒȢ ȖȚĮ ȞĮ ȠįȘȖȒıİIJİ IJȠ
ȡĮįȚȩijȦȞȩ ıĮȢ ıIJȠ ıȣȞIJȠȞȚıȝȩ ȝİ ȑȞĮȞ Įʌȩ IJȠȣȢ
ıIJĮșȝȠȪȢ ʌȠȣ İȓȞĮȚ ĮʌȠșȘțİȣȝȑȞȠȚ ȦȢ ʌȡȠİʌȚȜȠȖȒ
ıIJȘ ȝȞȒȝȘ.
ȇȠȜȩȚ țĮȚ ȟȣʌȞȘIJȒȡȚĮ
ȇȪșȝȚıȘ ȝȠȡijȒȢ ȫȡĮȢ țĮȚ ȘȝİȡȠȝȘȞȓĮȢ
Ǿ ȑȞįİȚȟȘ IJȠȣ ȡȠȜȠȖȚȠȪ ʌȠȣ ȤȡȘıȚȝȠʌȠȚİȓIJĮȚ ıIJȘȞ
țĮIJȐıIJĮıȘ ĮȞĮȝȠȞȒȢ țĮȚ ıIJȚȢ ȠșȩȞİȢ IJȘȢ ȜİȚIJȠȣȡȖȓĮȢ
ĮȞĮʌĮȡĮȖȦȖȒȢ ȝʌȠȡİȓ ȞĮ ȡȣșȝȚıIJİȓ ıİ įȚĮijȠȡİIJȚțȒ
ȝȠȡijȒ. Ǿ İʌȚȜİȖȝȑȞȘ ȝȠȡijȒ ıIJȘ ıȣȞȑȤİȚĮ ȤȡȘıȚȝȠʌȠȚİȓIJĮȚ
İʌȓıȘȢ țĮIJȐ IJȠȞ ȠȡȚıȝȩ IJȦȞ ĮijȣʌȞȓıİȦȞ.
1. ȆĮIJȒıIJİ țĮȚ țȡĮIJȒıIJİ ʌĮIJȘȝȑȞȠ IJȠ țȠȣȝʌȓ ȝİȞȠȪ/
ʌȜȘȡȠijȠȡȚȫȞ ȖȚĮ ȞĮ ȝʌİȓIJİ ıIJȠ
ȝİȞȠȪ
ȡȣșȝȓıİȦȞ.

81
2. ȆİȡȚıIJȡȑȥIJİ IJȠ țȠȣȝʌȓ İȜȑȖȤȠȣ ıȣȞIJȠȞȚıȝȠȪ ȝȑȤȡȚ
ȞĮ İȝijĮȞȚıIJİȓ IJȠ “CLOCK xxH” ıIJȘȞ ȠșȩȞȘ țĮȚ
ʌĮIJȒıIJİ IJȠ țȠȣȝʌȓ İȜȑȖȤȠȣ ıȣȞIJȠȞȚıȝȠȪ ȖȚĮ ȞĮ
İȚıȐȖİIJİ IJȘ ȡȪșȝȚıȘ. ĬĮ įİȓIJİ ȩIJȚ Ș ȝȠȡijȒ IJȘȢ ȫȡĮȢ
ĮȡȤȓȗİȚ ȞĮ ĮȞĮȕȠıȕȒȞİȚ.
3. ȆİȡȚıIJȡȑȥIJİ IJȠ țȠȣȝʌȓ İȜȑȖȤȠȣ ıȣȞIJȠȞȚıȝȠȪ ȖȚĮ
ȞĮ İʌȚȜȑȟİIJİ IJȘ 12-ȦȡȘ Ȓ IJȘȞ 24-ȦȡȘ ȝȠȡijȒ IJȘȢ
ȫȡĮȢ. ȆĮIJȒıIJİ
IJȠ țȠȣȝʌȓ İȜȑȖȤȠȣ ıȣȞIJȠȞȚıȝȠȪ ȖȚĮ
ȞĮ İʌȚȕİȕĮȚȫıİIJİ IJȘȞ İʌȚȜȠȖȒ ıĮȢ IJȘȢ ȝȠȡijȒȢ
ȡȠȜȠȖȚȠȪ.
ȈȘȝİȓȦıȘ: ǼȐȞ İʌȚȜİȖİȓ Ș 12-ȦȡȘ ȝȠȡijȒ, IJȠ
ȡĮįȚȩijȦȞȠ șĮ ȤȡȘıȚȝȠʌȠȚȒıİȚ ıIJȘ ıȣȞȑȤİȚĮ IJȘ
12-ȦȡȘ ȝȠȡijȒ ȡȠȜȠȖȚȠȪ ȖȚĮ IJȘ ȡȪșȝȚıȘ.
4. ȆĮIJȒıIJİ țĮȚ țȡĮIJȒıIJİ ʌĮIJȘȝȑȞȠ IJȠ țȠȣȝʌȓ ȝİȞȠȪ/
ʌȜȘȡȠijȠȡȚȫȞ ȖȚĮ ȞĮ ȝʌİȓIJİ ıIJȠ ȝİȞȠȪ
ȡȣșȝȓıİȦȞ.
5. ȆİȡȚıIJȡȑȥIJİ IJȠ țȠȣȝʌȓ
İȜȑȖȤȠȣ ıȣȞIJȠȞȚıȝȠȪ ȝȑȤȡȚ
ȞĮ İȝijĮȞȚıIJİȓ ȝȚĮ ȘȝİȡȠȝȘȞȓĮ (ʌ.Ȥ. THU APR 3) ıIJȘȞ
ȠșȩȞȘ țĮȚ ʌĮIJȒıIJİ IJȠ țȠȣȝʌȓ İȜȑȖȤȠȣ ıȣȞIJȠȞȚıȝȠȪ
ȖȚĮ ȞĮ İȚıĮȖȐȖİIJİ IJȘ ȡȪșȝȚıȘ. ĬĮ įİȓIJİ ȩIJȚ Ș ȝȠȡijȒ
IJȘȢ ȫȡĮȢ ĮȡȤȓȗİȚ ȞĮ ĮȞĮȕȠıȕȒȞİȚ.
6. ȈIJȘ ıȣȞȑȤİȚĮ, ʌİȡȚıIJȡȑȥIJİ IJȠ țȠȣȝʌȓ İȜȑȖȤȠȣ
ıȣȞIJȠȞȚıȝȠȪ ȖȚĮ ȞĮ İʌȚȜȑȟİIJİ IJȘȞ İʌȚșȣȝȘIJȒ ȝȠȡijȒ
IJȘȢ ȘȝİȡȠȝȘȞȓĮȢ. ȆĮIJȒıIJİ IJȠ țȠȣȝʌȓ
İȜȑȖȤȠȣ
ıȣȞIJȠȞȚıȝȠȪ ȖȚĮ ȞĮ İʌȚȕİȕĮȚȫıİIJİ IJȘȞ İʌȚȜȠȖȒ
ıĮȢ.
ȇȪșȝȚıȘ IJȘȢ ȫȡĮȢ țĮȚ IJȘȢ ȘȝİȡȠȝȘȞȓĮȢ IJȠȣ ȡȠȜȠȖȚȠȪ
1. ȆȚȑıIJİ țĮȚ țȡĮIJȒıIJİ ʌĮIJȘȝȑȞȠ IJȠ țȠȣȝʌȓ ȝİȞȠȪ/
ʌȜȘȡȠijȠȡȚȫȞ .
2. ȆİȡȚıIJȡȑȥIJİ IJȠ țȠȣȝʌȓ İȜȑȖȤȠȣ ıȣȞIJȠȞȚıȝȠȪ ȑȦȢ
ȩIJȠȣ ȞĮ İȝijĮȞȚıIJİȓ ıIJȘȞ ȠșȩȞȘ IJȠ “CLOCK ADJ”.
ȆĮIJȒıIJİ IJȠ țȠȣȝʌȓ İȜȑȖȤȠȣ ıȣȞIJȠȞȚıȝȠȪ ȖȚĮ ȞĮ
İȚıĮȖȐȖİIJİ IJȘ ȡȪșȝȚıȘ.
3. Ǿ ȡȪșȝȚıȘ IJȘȢ
ȫȡĮȢ ıIJȘȞ ȠșȩȞȘ șĮ ĮȡȤȓıİȚ ȞĮ
ĮȞĮȕȠıȕȒȞİȚ. ȆİȡȚıIJȡȑȥIJİ țȠȣȝʌȓ İȜȑȖȤȠȣ
ıȣȞIJȠȞȚıȝȠȪ ȖȚĮ ȞĮ İʌȚȜȑȟİIJİ IJȘȞ İʌȚșȣȝȘIJȒ ȫȡĮ
țĮȚ ʌĮIJȒıIJİ IJȠ țȠȣȝʌȓ İȜȑȖȤȠȣ ıȣȞIJȠȞȚıȝȠȪ ȖȚĮ ȞĮ
İʌȚȕİȕĮȚȫıİIJİ IJȘ ȡȪșȝȚıȘ. ȈIJȘ ıȣȞȑȤİȚĮ, ʌİȡȚıIJȡȑȥIJİ
IJȠ țȠȣȝʌȓ İȜȑȖȤȠȣ ıȣȞIJȠȞȚıȝȠȪ ȖȚĮ ȞĮ İʌȚȜȑȟİIJİ IJȠ
İʌȚșȣȝȘIJȩ ȜİʌIJȩ, țĮȚ ʌĮIJȒıIJİ IJȠ țȠȣȝʌȓ İȜȑȖȤȠȣ
ıȣȞIJȠȞȚıȝȠȪ ȖȚĮ ȞĮ İʌȚȕİȕĮȚȫıİIJİ IJȘ
ȡȪșȝȚıȘ.
4. ȆİȡȚıIJȡȑȥIJİ IJȠ țȠȣȝʌȓ İȜȑȖȤȠȣ ıȣȞIJȠȞȚıȝȠȪ ȑȦȢ
ȩIJȠȣ ȞĮ İȝijĮȞȚıIJİȓ ıIJȘȞ ȠșȩȞȘ IJȠ “DATE ADJ”.
ȆĮIJȒıIJİ IJȠ țȠȣȝʌȓ İȜȑȖȤȠȣ ıȣȞIJȠȞȚıȝȠȪ ȖȚĮ ȞĮ
İȚıĮȖȐȖİIJİ IJȘ ȡȪșȝȚıȘ.
5. ȆİȡȚıIJȡȑȥIJİ IJȠ țȠȣȝʌȓ İȜȑȖȤȠȣ ıȣȞIJȠȞȚıȝȠȪ ȖȚĮ
ȞĮ İʌȚȜȑȟİIJİ IJȠ İʌȚșȣȝȘIJȩ ȑIJȠȢ țĮȚ ʌĮIJȒıIJİ IJȠ țȠȣȝʌȓ
İȜȑȖȤȠȣ ıȣȞIJȠȞȚıȝȠȪ ȖȚĮ ȞĮ İʌȚȕİȕĮȚȫıİIJİ IJȘ
ȡȪșȝȚıȘ. ȈIJȘ ıȣȞȑȤİȚĮ, ʌİȡȚıIJȡȑȥIJİ IJȠ
țȠȣȝʌȓ
İȜȑȖȤȠȣ ıȣȞIJȠȞȚıȝȠȪ ȖȚĮ ȞĮ İʌȚȜȑȟİIJİ IJȠȞ
İʌȚșȣȝȘIJȩ ȝȒȞĮ țĮȚ ʌĮIJȒıIJİ IJȠ țȠȣȝʌȓ İȜȑȖȤȠȣ
ıȣȞIJȠȞȚıȝȠȪ ȖȚĮ ȞĮ İʌȚȕİȕĮȚȫıİIJİ IJȘ ȡȪșȝȚıȘ. ȈIJȘ
ıȣȞȑȤİȚĮ, ʌİȡȚıIJȡȑȥIJİ IJȠ țȠȣȝʌȓ İȜȑȖȤȠȣ
ıȣȞIJȠȞȚıȝȠȪ ȖȚĮ ȞĮ İʌȚȜȑȟİIJİ IJȘȞ İʌȚșȣȝȘIJȒ
ȘȝİȡȠȝȘȞȓĮ țĮȚ ʌĮIJȒıIJİ IJȠ țȠȣȝʌȓ İȜȑȖȤȠȣ
ıȣȞIJȠȞȚıȝȠȪ ȖȚĮ ȞĮ İʌȚȕİȕĮȚȫıİIJİ IJȘ ȡȪșȝȚıȘ.
ȈȪıIJȘȝĮ ȡĮįȚȠijȦȞȚțȫȞ įİįȠȝȑȞȦȞ
(RDS)
ǵIJĮȞ ȡȣșȝȓıİIJİ IJȘȞ ȫȡĮ IJȠȣ ȡȠȜȠȖȚȠȪ ȤȡȘıȚȝȠʌȠȚȫȞIJĮȢ
IJȘ ȜİȚIJȠȣȡȖȓĮ RDS, IJȠ ȡĮįȚȩijȦȞȠ ıĮȢ șĮ ıȣȖȤȡȠȞȓıİȚ IJȘȞ
ȫȡĮ IJȠȣ ȡȠȜȠȖȚȠȪ IJȠȣ, ȩʌȠIJİ ıȣȞIJȠȞȓȗİIJĮȚ ȝİ ȑȞĮ
ȡĮįȚȠijȦȞȚțȩ ıIJĮșȝȩ ȝİ IJĮ ıȒȝĮIJĮ CT (ȫȡĮ ȡȠȜȠȖȚȠȪ)
ȤȡȘıȚȝȠʌȠȚȫȞIJĮȢ IJȠ RDS.
1. ǵIJĮȞ ıȣȞIJȠȞȓȗİıIJİ ıİ ȑȞĮ ıIJĮșȝȩ ʌȠȣ ȝİIJĮįȓįİȚ
įİįȠȝȑȞĮ RDS, ʌĮIJȒıIJİ țĮȚ țȡĮIJȒıIJİ ʌĮIJȘȝȑȞȠ IJȠ
țȠȣȝʌȓ ȝİȞȠȪ/ʌȜȘȡȠijȠȡȚȫȞ .
2. ȆİȡȚıIJȡȑȥIJİ IJȠ
țȠȣȝʌȓ İȜȑȖȤȠȣ ıȣȞIJȠȞȚıȝȠȪ ȝȑȤȡȚ
IJȠ “RDS CT” țĮȚ IJȠ ıȪȝȕȠȜȠ IJȠȣ ȡȠȜȠȖȚȠȪ ȞĮ
İȝijĮȞȚıIJȠȪȞ ıIJȘȞ ȠșȩȞȘ. ȆĮIJȒıIJİ IJȠ țȠȣȝʌȓ İȜȑȖȤȠȣ
ıȣȞIJȠȞȚıȝȠȪ ȖȚĮ ȞĮ İȚıĮȖȐȖİIJİ IJȘ ȡȪșȝȚıȘ.
3. ȆİȡȚıIJȡȑȥIJİ IJȠ țȠȣȝʌȓ İȜȑȖȤȠȣ ıȣȞIJȠȞȚıȝȠȪ ȝȑȤȡȚ
ȞĮ İȝijĮȞȚıIJİȓ IJȠ “RDS CT” ıIJȘȞ ȠșȩȞȘ. ȆĮIJȒıIJİ IJȠ
țȠȣȝʌȓ İȜȑȖȤȠȣ ıȣȞIJȠȞȚıȝȠȪ ȖȚĮ ȞĮ İʌȚȕİȕĮȚȫıİIJİ
IJȘ ȡȪșȝȚıȘ. Ǿ ȫȡĮ IJȠȣ ȡȠȜȠȖȚȠȪ IJȠȣ
ȡĮįȚȠijȫȞȠȣ șĮ
ȡȣșȝȚıIJİȓ ĮȣIJȩȝĮIJĮ ıȪȝijȦȞĮ ȝİ IJĮ ȜĮȝȕĮȞȩȝİȞĮ
įİįȠȝȑȞĮ RDS.
4. ǵIJĮȞ ȠȜȠțȜȘȡȦșİȓ Ș İȞȑȡȖİȚĮ, IJȠ İȚțȠȞȓįȚȠ RDS șĮ
İȝijĮȞȚıIJİȓ ıIJȘȞ ȠșȩȞȘ LCD įİȓȤȞȠȞIJĮȢ ȩIJȚ Ș ȫȡĮ IJȠȣ
ȡĮįȚȠijȫȞȠȣ İȓȞĮȚ Ș ȫȡĮ IJȠȣ ȡȠȜȠȖȚȠȪ RDS. Ǿ ȫȡĮ
ȡȠȜȠȖȚȠȪ IJȠȣ ȡĮįȚȠijȫȞȠȣ șĮ ȚıȤȪİȚ ȖȚĮ 5 ȘȝȑȡİȢ țȐșİ
ijȠȡȐ ʌȠȣ Ș ȫȡĮ IJȠȣ ȡĮįȚȠijȫȞȠȣ ıȣȖȤȡȠȞȓȗİIJĮȚ ȝİ IJȠ
RDS CT.
ȇȪșȝȚıȘ IJȠȣ ȟȣʌȞȘIJȘȡȚȠȪ
ȉȠ ȡĮįȚȩijȦȞȩ ıĮȢ ȑȤİȚ įȪȠ ĮijȣʌȞȓıİȚȢ, ʌȠȣ ȝʌȠȡİȓ Ș
țĮșİȝȚȐ ȞĮ ȡȣșȝȚıIJİȓ ȫıIJİ ȞĮ ıĮȢ ȟȣʌȞȒıİȚ ȝİ IJȠ
ȡĮįȚȩijȦȞȠ AM/FM Ȓ ȝİ IJȠ ȕȩȝȕȠ ĮijȪʌȞȚıȘȢ. ȅȚ
ĮijȣʌȞȓıİȚȢ ȝʌȠȡȠȪȞ ȞĮ ȡȣșȝȚıIJȠȪȞ ȩIJĮȞ Ș ıȣıțİȣȒ
ȕȡȓıțİIJĮȚ ıIJȘ țĮIJȐıIJĮıȘ ĮȞĮȝȠȞȒȢ Ȓ ȩIJĮȞ ȜİȚIJȠȣȡȖİȓ.
a. ȇȪșȝȚıȘ ȫȡĮȢ ĮijȪʌȞȚıȘȢ ȡĮįȚȠijȫȞȠȣ:
1. Ǿ ĮijȪʌȞȚıȘ IJȠȣ ȡĮįȚȠijȫȞȠȣ ȝʌȠȡİȓ ȞĮ ȡȣșȝȚıIJİȓ
İȓIJİ
ȩIJĮȞ IJȠ ȡĮįȚȩijȦȞȠ ȕȡȓıțİIJĮȚ ıİ ȜİȚIJȠȣȡȖȓĮ İȓIJİ ȩIJĮȞ
ȕȡȓıțİIJĮȚ İțIJȩȢ ȜİȚIJȠȣȡȖȓĮȢ.
2. ȆĮIJȒıIJİ țĮȚ țȡĮIJȒıIJİ ʌĮIJȘȝȑȞȠ IJȠ ʌȜȒțIJȡȠ
ĮijȪʌȞȚıȘȢ ȡĮįȚȠijȫȞȠȣ , IJȠ ıȪȝȕȠȜȠ
ĮijȪʌȞȚıȘȢ ȡĮįȚȠijȫȞȠȣ țĮȚ Ș İȝijĮȞȚȗȩȝİȞȘ ȫȡĮ șĮ
ĮȞĮȕȠıȕȒȞȠȣȞ ȝĮȗȓ ȝİ ȑȞĮ ȘȤȘIJȚțȩ ıȒȝĮ.
3. ȀĮIJȐ IJȘ įȚȐȡțİȚĮ ʌȠȣ ĮȞĮȕȠıȕȒȞİȚ IJȠ ıȪȝȕȠȜȠ
ĮijȪʌȞȚıȘȢ ȡĮįȚȠijȫȞȠȣ ʌİȡȚıIJȡȑȥIJİ IJȠ
țȠȣȝʌȓ İȜȑȖȤȠȣ ıȣȞIJȠȞȚıȝȠȪ
ȖȚĮ ȞĮ İʌȚȜȑȟİIJİ IJȘȞ
ȫȡĮ țĮȚ ʌĮIJȒıIJİ IJȠ țȠȣȝʌȓ İȜȑȖȤȠȣ ıȣȞIJȠȞȚıȝȠȪ
ȟĮȞȐ ȖȚĮ ȞĮ İʌȚȕİȕĮȚȫıİIJİ IJȘ ȡȪșȝȚıȘ IJȘȢ ȫȡĮȢ. ȈIJȘ
ıȣȞȑȤİȚĮ, ʌİȡȚıIJȡȑȥIJİ IJȠ țȠȣȝʌȓ İȜȑȖȤȠȣ
ıȣȞIJȠȞȚıȝȠȪ ȖȚĮ ȞĮ İʌȚȜȑȟİIJİ IJȠ ȜİʌIJȩ țĮȚ ʌĮIJȒıIJİ

82
IJȠ țȠȣȝʌȓ İȜȑȖȤȠȣ ıȣȞIJȠȞȚıȝȠȪ ȖȚĮ ȞĮ
İʌȚȕİȕĮȚȫıİIJİ IJȘ ȡȪșȝȚıȘ IJȠȣ ȜİʌIJȠȪ.
4. ȆİȡȚıIJȡȑȥIJİ IJȠ țȠȣȝʌȓ İȜȑȖȤȠȣ ıȣȞIJȠȞȚıȝȠȪ țĮȚ Ș
ȠșȩȞȘ șĮ İȝijĮȞȓıİȚ IJȚȢ İʌȚȜȠȖȑȢ ȖȚĮ IJȘ ıȣȤȞȩIJȘIJĮ IJȘȢ
ĮijȪʌȞȚıȘȢ.
ȅȚ İʌȚȜȠȖȑȢ ĮijȪʌȞȚıȘȢ İȓȞĮȚ ȠȚ İȟȒȢ:
ONCE - Ș ĮijȪʌȞȚıȘ șĮ ȘȤȒıİȚ ȝȚĮ ijȠȡȐ
DAILY - Ș ĮijȪʌȞȚıȘ șĮ ȘȤİȓ țȐșİ ȝȑȡĮ
WEEKDAY - Ș ĮijȪʌȞȚıȘ șĮ
ȘȤİȓ ȝȩȞȠ țĮIJȐ IJȚȢ
İȡȖȐıȚȝİȢ ȘȝȑȡİȢ
WEEKEND - Ș ĮijȪʌȞȚıȘ șĮ ȘȤİȓ ȝȩȞȠ IJĮ
ıĮȕȕĮIJȠțȪȡȚĮțĮ
ȆĮIJȒıIJİ IJȠ țȠȣȝʌȓ İȜȑȖȤȠȣ ıȣȞIJȠȞȚıȝȠȪ ȖȚĮ ȞĮ
İʌȚȕİȕĮȚȫıİIJİ IJȘ ȡȪșȝȚıȘ.
5. ȀĮIJȐ IJȘ įȚȐȡțİȚĮ ıIJȘȞ ȠʌȠȓĮ ĮȞĮȕȠıȕȒȞİȚ IJȠ ıȪȝȕȠȜȠ
ĮijȪʌȞȚıȘȢ IJȠȣ ȡĮįȚȠijȫȞȠȣ, ʌİȡȚıIJȡȑȥIJİ IJȠ țȠȣȝʌȓ
İȜȑȖȤȠȣ ıȣȞIJȠȞȚıȝȠȪ ȖȚĮ ȞĮ İʌȚȜȑȟİIJİ IJȘȞ İʌȚșȣȝȘIJȒ
ȝʌȐȞIJĮ țĮȚ IJȠ ıIJĮșȝȩ ĮijȪʌȞȚıȘȢ țĮȚ ıIJȘ
ıȣȞȑȤİȚĮ,
ʌĮIJȒıIJİ IJȠ țȠȣȝʌȓ İȜȑȖȤȠȣ ıȣȞIJȠȞȚıȝȠȪ ȖȚĮ ȞĮ
İʌȚȕİȕĮȚȫıİIJİ IJȘȞ İʌȚȜȠȖȒ.
6. ȆİȡȚıIJȡȑȥIJİ IJȠ țȠȣȝʌȓ İȜȑȖȤȠȣ ıȣȞIJȠȞȚıȝȠȪ ȖȚĮ ȞĮ
İʌȚȜȑȟİIJİ IJȘȞ İʌȚșȣȝȘIJȒ ȑȞIJĮıȘ țĮȚ ʌĮIJȒıIJİ IJȠ țȠȣȝʌȓ
İȜȑȖȤȠȣ ıȣȞIJȠȞȚıȝȠȪ ȖȚĮ ȞĮ İʌȚȕİȕĮȚȫıİIJİ IJȘȞ
ȑȞIJĮıȘ. ȅȚ ȡȣșȝȓıİȚȢ IJȘȢ ĮijȪʌȞȚıȘȢ IJȠȣ ȡĮįȚȠijȫȞȠȣ
ȑȤȠȣȞ IJȫȡĮ ȠȜȠțȜȘȡȦșİȓ.
ȈȘȝİȓȦıȘ:
ǹȞ įİȞ ȑȤİȚ İʌȚȜİȖİȓ ȞȑȠȢ ıIJĮșȝȩȢ ĮijȪʌȞȚıȘȢ
ȡĮįȚȠijȫȞȠȣ, șĮ İʌȚȜİȖİȓ Ƞ IJİȜİȣIJĮȓȠȢ ıIJĮșȝȩȢ
ĮijȪʌȞȚıȘȢ.
ȈȘȝİȓȦıȘ:
ǹȞ Ƞ İʌȚȜİȖȝȑȞȠȢ ıIJĮșȝȩȢ ĮijȪʌȞȚıȘȢ AM/FM įİȞ İȓȞĮȚ
įȚĮșȑıȚȝȠȢ IJȩIJİ șĮ ȤȡȘıȚȝȠʌȠȚȘșİȓ ĮȞIJȓ ȖȚĮ ĮȣIJȩȞ Ș ǎ
ȕȩȝȕȠȢ ĮijȪʌȞȚıȘȢ ȩIJĮȞ ȘȤȒıİȚ Ș ĮijȪʌȞȚıȘ.
b. ȇȪșȝȚıȘ IJȠȣ ȕȩȝȕȠȣ ĮijȪʌȞȚıȘȢ HWS (ǹȞșȡȫʌȚȞȠ
ıȪıIJȘȝĮ ĮijȪʌȞȚıȘȢ):
DzȞĮ ȘȤȘIJȚțȩ ıȒȝĮ ȝʌȚʌ șĮ İȞİȡȖȠʌȠȚȘșİȓ țĮIJȐ IJȘȞ
İʌȚȜȠȖȒ IJȠȣ ȕȩȝȕȠȣ ĮijȪʌȞȚıȘȢ HWS.
ȉȠ
ȝʌȚʌ ĮijȪʌȞȚıȘȢ, șĮ ĮțȠȪȖİIJĮȚ ıȣȞIJȠȝȩIJİȡĮ țȐșİ
15 įİȣIJİȡȩȜİʌIJĮ ȖȚĮ ȑȞĮ ȜİʌIJȩ ĮțȠȜȠȣșȠȪȝİȞȠ Įʌȩ ȑȞĮ
ȜİʌIJȩ ıȓȖȘıȘȢ ʌȡȚȞ Įʌȩ IJȘȞ İʌĮȞȐȜȘȥȘ IJȠȣ țȪțȜȠȣ.
1. ȅ ȕȩȝȕȠȢ ĮijȪʌȞȚıȘȢ ȝʌȠȡİȓ ȞĮ ȡȣșȝȚıIJİȓ ȩIJĮȞ IJȠ
ȡĮįȚȩijȦȞȠ ȕȡȓıțİIJĮȚ İȞIJȩȢ Ȓ İțIJȩȢ ȜİȚIJȠȣȡȖȓĮȢ.
2. ȆĮIJȒıIJİ țĮȚ țȡĮIJȒıIJİ ʌĮIJȘȝȑȞȠ IJȠ țȠȣȝʌȓ ȕȩȝȕȠȣ
ĮijȪʌȞȚıȘȢ , IJȠ ıȪȝȕȠȜȠ țĮȚ Ș İȝijĮȞȚȗȩȝİȞȘ ȫȡĮ
șĮ ĮȞĮȕȠıȕȒȞȠȣȞ ȝĮȗȓ ȝİ ȑȞĮ ȘȤȘIJȚțȩ ıȒȝĮ.
3. ȀĮIJȐ IJȘ įȚȐȡțİȚĮ ʌȠȣ ĮȞĮȕȠıȕȒȞİȚ IJȠ ıȪȝȕȠȜȠ
ȕȩȝȕȠȣ ĮijȪʌȞȚıȘȢ , ʌİȡȚıIJȡȑȥIJİ IJȠ țȠȣȝʌȓ
İȜȑȖȤȠȣ ıȣȞIJȠȞȚıȝȠȪ ȖȚĮ ȞĮ İʌȚȜȑȟİIJİ IJȘȞ ȫȡĮ țĮȚ
ʌĮIJȒıIJİ IJȠ țȠȣȝʌȓ İȜȑȖȤȠȣ ıȣȞIJȠȞȚıȝȠȪ ȟĮȞȐ ȖȚĮ
ȞĮ İʌȚȕİȕĮȚȫıİIJİ IJȘ ȡȪșȝȚıȘ IJȘȢ ȫȡĮȢ. ȈIJȘ ıȣȞȑȤİȚĮ,
ʌİȡȚıIJȡȑȥIJİ IJȠ țȠȣȝʌȓ İȜȑȖȤȠȣ ıȣȞIJȠȞȚıȝȠȪ ȖȚĮ ȞĮ
İʌȚȜȑȟİIJİ
IJȠ ȜİʌIJȩ, țĮȚ ʌĮIJȒıIJİ IJȠ țȠȣȝʌȓ İȜȑȖȤȠȣ
ıȣȞIJȠȞȚıȝȠȪ ȖȚĮ ȞĮ İʌȚȕİȕĮȚȫıİIJİ IJȘ ȡȪșȝȚıȘ IJȠȣ
ȜİʌIJȠȪ.
4. ȆİȡȚıIJȡȑȥIJİ IJȠ țȠȣȝʌȓ İȜȑȖȤȠȣ ıȣȞIJȠȞȚıȝȠȪ țĮȚ Ș
ȠșȩȞȘ șĮ İȝijĮȞȓıİȚ IJȚȢ İʌȚȜȠȖȑȢ ȖȚĮ IJȘ ıȣȤȞȩIJȘIJĮ IJȠȣ
ıȣȞĮȖİȡȝȠȪ.
ȅȚ İʌȚȜȠȖȑȢ ĮijȪʌȞȚıȘȢ İȓȞĮȚ ȠȚ İȟȒȢ:
ONCE - Ș ĮijȪʌȞȚıȘ șĮ ȘȤȒıİȚ ȝȚĮ ijȠȡȐ
DAILY - Ș ĮijȪʌȞȚıȘ șĮ ȘȤİȓ țȐșİ ȝȑȡĮ
WEEKDAY - Ș ĮijȪʌȞȚıȘ șĮ ȘȤİȓ ȝȩȞȠ țĮIJȐ IJȚȢ
İȡȖȐıȚȝİȢ ȘȝȑȡİȢ
WEEKEND - Ș ĮijȪʌȞȚıȘ șĮ ȘȤİȓ ȝȩȞȠ IJĮ
ıĮȕȕĮIJȠțȪȡȚĮțĮ
ȆĮIJȒıIJİ IJȠ țȠȣȝʌȓ İȜȑȖȤȠȣ ıȣȞIJȠȞȚıȝȠȪ ȖȚĮ ȞĮ
İʌȚȕİȕĮȚȫıİIJİ IJȘ ȡȪșȝȚıȘ.
ȈȘȝİȓȦıȘ:
ǻİȞ ȣʌȐȡȤİȚ țĮȝȓĮ ȡȪșȝȚıȘ ȑȞIJĮıȘȢ ȖȚĮ IJȠ ȕȩȝȕȠ
ĮijȪʌȞȚıȘȢ.
ǵIJĮȞ ȘȤȒıİȚ Ș ĮijȪʌȞȚıȘ
īȚĮ ȞĮ ĮțȣȡȫıİIJİ IJȘȞ ĮijȪʌȞȚıȘ ȩIJĮȞ ȘȤİȓ, ʌĮIJȒıIJİ IJȠ
țȠȣȝʌȓ IJȡȠijȠįȠıȓĮȢ .
ǹʌİȞİȡȖȠʌȠȓȘıȘ/ĮțȪȡȦıȘ ĮijȪʌȞȚıȘȢ
īȚĮ ȞĮ ĮʌİȞİȡȖȠʌȠȚȒıİIJİ ȝȚĮ İȞİȡȖȒ ĮijȪʌȞȚıȘ, ʌĮIJȒıIJİ
İȓIJİ IJȠ țȠȣȝʌȓ IJȡȠijȠįȠıȓĮȢ Ȓ ʌĮIJȒıIJİ țĮȚ țȡĮIJȒıIJİ
ʌĮIJȘȝȑȞȠ IJȠ ĮȞIJȓıIJȠȚȤȠ țȠȣȝʌȓ ĮijȪʌȞȚıȘȢ ȖȚĮ ȞĮ
ĮțȣȡȫıİIJİ IJȘȞ ĮijȪʌȞȚıȘ.
ȈȓȖȘıȘ
1. ǵIJĮȞ ȘȤȒıİȚ Ș ĮijȪʌȞȚıȘ, ʌȚȑıIJİ ȠʌȠȚȠįȒʌȠIJİ țȠȣȝʌȓ
İțIJȩȢ Įʌȩ IJȠ țȠȣȝʌȓ IJȡȠijȠįȠıȓĮȢ țĮȚ șĮ ıȚȖȒıİȚ
Ș ĮijȪʌȞȚıȘ ȖȚĮ 5 ȜİʌIJȐ. ȉȠ “SNOOZE” șĮ İȝijĮȞȚıIJİȓ
ıIJȘȞ ȠșȩȞȘ.
2. īȚĮ ȞĮ ȡȣșȝȓıİIJİ IJȠ ȤȡȩȞȠ ıȚȦʌȒȢ ȖȚĮ IJȠ ȤȡȠȞȩȝİIJȡȠ
ıȓȖȘıȘȢ, ʌĮIJȒıIJİ țĮȚ țȡĮIJȒıIJİ ʌĮIJȘȝȑȞȠ IJȠ țȠȣȝʌȓ
ȝİȞȠȪ/ʌȜȘȡȠijȠȡȚȫȞ ȖȚĮ ȞĮ ȝʌİȓIJİ ıIJȠ ȝİȞȠȪ
ȡȣșȝȓıİȦȞ.
3. ȆİȡȚıIJȡȑȥIJİ
IJȠ țȠȣȝʌȓ İȜȑȖȤȠȣ ıȣȞIJȠȞȚıȝȠȪ ȝȑȤȡȚ
ȞĮ İȝijĮȞȚıIJİȓ ıIJȘȞ ȠșȩȞȘ IJȠ “SNOOZE X”, ıIJȘ
ıȣȞȑȤİȚĮ ʌĮIJȒıIJİ IJȠ țȠȣȝʌȓ İȜȑȖȤȠȣ ıȣȞIJȠȞȚıȝȠȪ
ȖȚĮ ȞĮ İȚıĮȖȐȖİIJİ IJȘ ȡȪșȝȚıȘ. ȆİȡȚıIJȡȑȥIJİ IJȠ țȠȣȝʌȓ
İȜȑȖȤȠȣ ıȣȞIJȠȞȚıȝȠȪ ȖȚĮ ȞĮ ȡȣșȝȓıİIJİ IJȠ ȤȡȩȞȠ
ıȚȦʌȒȢ țĮIJȐ 5, 10, 15 țĮȚ 20 ȜİʌIJȐ ȖȚĮ IJȠ ȤȡȠȞȩȝİIJȡȠ
ıȓȖȘıȘȢ.
4. īȚĮ ȞĮ ĮțȣȡȫıİIJİ IJȠ ȤȡȠȞȩȝİIJȡȠ ıȓȖȘıȘȢ, ȩIJĮȞ ȑȤİȚ
ĮȞĮıIJĮȜİȓ Ș
ĮijȪʌȞȚıȘ, ʌĮIJȒıIJİ IJȠ țȠȣȝʌȓ
IJȡȠijȠįȠıȓĮȢ .
ȋȡȠȞȠįȚĮțȩʌIJȘȢ įȚĮțȠʌȒȢ ȜİȚIJȠȣȡȖȓĮȢ
ȉȠ ȡĮįȚȩijȦȞȩ ıĮȢ ȝʌȠȡİȓ ȞĮ ȡȣșȝȚıIJİȓ ȫıIJİ ȞĮ
ĮʌİȞİȡȖȠʌȠȚİȓIJĮȚ ĮȣIJȩȝĮIJĮ ȝİIJȐ Įʌȩ IJȠ ʌȑȡĮıȝĮ
ʌȡȠțĮșȠȡȚıȝȑȞȠȣ ȤȡȠȞȚțȠȪ įȚĮıIJȒȝĮIJȠȢ. Ǿ ȡȪșȝȚıȘ IJȠȣ

83
ȤȡȠȞȠįȚĮțȩʌIJȘ įȚĮțȠʌȒȢ ȜİȚIJȠȣȡȖȓĮȢ ȝʌȠȡİȓ ȞĮ ȖȓȞİȚ
ȝİIJĮȟȪ 60, 45, 30, 15, 120 țĮȚ 90 ȜİʌIJȫȞ.
1. ȆĮIJȒıIJİ țĮȚ țȡĮIJȒıIJİ ʌĮIJȘȝȑȞȠ IJȠ țȠȣȝʌȓ
IJȡȠijȠįȠıȓĮȢ ȖȚĮ ȞĮ İȚıĮȖȐȖİIJİ IJȘ ȡȪșȝȚıȘ IJȠȣ
ȤȡȠȞȠįȚĮțȩʌIJȘ įȚĮțȠʌȒȢ ȜİȚIJȠȣȡȖȓĮȢ. ȉȠ “SLEEP XX”
șĮ İȝijĮȞȚıIJİȓ ıIJȘȞ ȠșȩȞȘ.
2. ȈȣȞİȤȓıIJİ ȞĮ ʌĮIJȐIJİ IJȠ țȠȣȝʌȓ IJȡȠijȠįȠıȓĮȢ țĮȚ
ȠȚ İʌȚȜȠȖȑȢ IJȠȣ ȤȡȠȞȠįȚĮțȩʌIJȘ įȚĮțȠʌȒȢ ȜİȚIJȠȣȡȖȓĮȢ
șĮ ĮȡȤȓıȠȣȞ ȞĮ İȞĮȜȜȐııȠȞIJĮȚ ıIJȘȞ ȠșȩȞȘ.
ȈIJĮȝĮIJȒıIJİ ȩIJĮȞ Ș İʌȚșȣȝȘIJȒ ȡȪșȝȚıȘ IJȠȣ
ȤȡȠȞȠįȚĮțȩʌIJȘ įȚĮțȠʌȒȢ ȜİȚIJȠȣȡȖȓĮȢ İȝijĮȞȚıIJİȓ ıIJȘȞ
ȠșȩȞȘ. Ǿ ȡȪșȝȚıȘ șĮ ĮʌȠșȘțİȣIJİȓ țĮȚ Ș LCD șĮ
İʌȚıIJȡȑȥİȚ ıIJȘȞ țĮȞȠȞȚțȒ ȑȞįİȚȟȘ.
3. ȉȠ ȡĮįȚȩijȦȞȩ ıĮȢ șĮ ĮʌİȞİȡȖȠʌȠȚȘșİȓ ĮȣIJȩȝĮIJĮ
ȩIJĮȞ İʌȑȜșİȚ Ƞ ȤȡȩȞȠȢ IJȠȣ ʌȡȠțĮșȠȡȚıȝȑȞȠȣ
ȤȡȠȞȠįȚĮțȩʌIJȘ įȚĮțȠʌȒȢ ȜİȚIJȠȣȡȖȓĮȢ. ȉȠ İȚțȠȞȓįȚȠ IJȠȣ
ȤȡȠȞȠįȚĮțȩʌIJȘ įȚĮțȠʌȒȢ ȜİȚIJȠȣȡȖȓĮȢ șĮ
İȝijĮȞȚıIJİȓ ıIJȘȞ ȠșȩȞȘ įİȓȤȞȠȞIJĮȢ ȩIJȚ
İȓȞĮȚ İȞİȡȖȩȢ Ƞ
ȤȡȠȞȠįȚĮțȩʌIJȘȢ įȚĮțȠʌȒȢ ȜİȚIJȠȣȡȖȓĮȢ.
4. īȚĮ ȞĮ ĮțȣȡȫıİIJİ IJȘ ȜİȚIJȠȣȡȖȓĮ IJȠȣ ȤȡȠȞȠįȚĮțȩʌIJȘ
įȚĮțȠʌȒȢ ȜİȚIJȠȣȡȖȓĮȢ ʌȡȚȞ Įʌȩ IJȠ ʌȑȡĮȢ IJȘȢ
ʌȡȠțĮșȠȡȚıȝȑȞȘȢ ȫȡĮȢ, ĮʌȜȐ ʌĮIJȒıIJİ IJȠ țȠȣȝʌȓ
IJȡȠijȠįȠıȓĮȢ ȖȚĮ ȞĮ ĮʌİȞİȡȖȠʌȠȚȒıİIJİ IJȘ
ȝȠȞȐįĮ ȤİȚȡȠțȓȞȘIJĮ.
ǾȤȘȡȩIJȘIJĮ
ȂʌȠȡİȓIJİ ȞĮ ĮȞIJȚıIJĮșȝȓıİIJİ IJȘȞ ȤĮȝȘȜȩIJİȡȘ țĮȚ
ȣȥȘȜȩIJİȡȘ ıȣȤȞȩIJȘIJĮ IJȠȣ ȡĮįȚȠijȫȞȠȣ ıĮȢ,
ʌȡȠıĮȡȝȩȗȠȞIJĮȢ IJȘ ȜİȚIJȠȣȡȖȓĮ ȘȤȘȡȩIJȘIJĮȢ.
1. ȆĮIJȒıIJİ țĮȚ țȡĮIJȒıIJİ ʌĮIJȘȝȑȞȠ IJȠ țȠȣȝʌȓ ȝİȞȠȪ/
ʌȜȘȡȠijȠȡȚȫȞ ȖȚĮ ȞĮ ȝʌİȓIJİ ıIJȠ ȝİȞȠȪ
ȡȣșȝȓıİȦȞ.
2. ȆİȡȚıIJȡȑȥIJİ IJȠ țȠȣȝʌȓ İȜȑȖȤȠȣ ıȣȞIJȠȞȚıȝȠȪ ȝȑȤȡȚ
ȞĮ İȝijĮȞȚıIJİȓ ıIJȘȞ ȠșȩȞȘ IJȠ “LOUD ON” Ȓ
“LOUD OFF”. ȆĮIJȒıIJİ IJȠ țȠȣȝʌȓ İȜȑȖȤȠȣ
ıȣȞIJȠȞȚıȝȠȪ ȖȚĮ ȞĮ İȚıĮȖȐȖİIJİ
IJȘ ȡȪșȝȚıȘ.
3. ȆİȡȚıIJȡȑȥIJİ IJȠ țȠȣȝʌȓ İȜȑȖȤȠȣ ıȣȞIJȠȞȚıȝȠȪ ȖȚĮ
ȞĮ İʌȚȜȑȟİIJİ IJȠ ON ȖȚĮ ȞĮ İȞİȡȖȠʌȠȚȒıİIJİ IJȘ
ȜİȚIJȠȣȡȖȓĮ ȘȤȘȡȩIJȘIJĮȢ, ıIJȘ ıȣȞȑȤİȚĮ ʌȚȑıIJİ IJȠ țȠȣȝʌȓ
İȜȑȖȤȠȣ ıȣȞIJȠȞȚıȝȠȪ ȖȚĮ ȞĮ İʌȚȕİȕĮȚȫıİIJİ IJȘ
ȡȪșȝȚıȘ.
4. īȚĮ ȞĮ ĮʌİȞİȡȖȠʌȠȚȒıİIJİ IJȘ ȜİȚIJȠȣȡȖȓĮ ȘȤȘȡȩIJȘIJĮȢ,
İʌȚȜȑȟIJİ IJȠ OFF țĮȚ ʌĮIJȒıIJİ IJȠ țȠȣȝʌȓ İȜȑȖȤȠȣ
ıȣȞIJȠȞȚıȝȠȪ ȖȚĮ ȞĮ İʌȚȕİȕĮȚȫıİIJİ IJȘ ȡȪșȝȚıȘ.
ǺȠȘșȘIJȚțȒ ȣʌȠįȠȤȒ İȚıȩįȠȣ
ȆĮȡȑȤȠȞIJĮȚ įȪȠ ıIJİȡİȠijȦȞȚțȑȢ ȕȠȘșȘIJȚțȑȢ ȣʌȠįȠȤȑȢ
İȚıȩįȠȣ IJȦȞ 3,5 mm. Ǿ ȝȚĮ ȕȡȓıțİIJĮȚ ıIJȠ ȝʌȡȠıIJȚȞȩ
ȝȑȡȠȢ IJȠȣ ȡĮįȚȠijȫȞȠȣ ıĮȢ (AUX IN 1), Ș ȐȜȜȘ ȕȡȓıțİIJĮȚ
ıIJȘ șȒțȘ IJȦȞ ȝʌĮIJĮȡȚȫȞ (AUX IN 2).
1. ȈȣȞįȑıIJİ ȝȚĮ İȟȦIJİȡȚțȒ ʌȘȖȒ ȒȤȠȣ (ȖȚĮ ʌĮȡȐįİȚȖȝĮ,
iPod, MP3 Ȓ CD player) ıIJȘ ȕȠȘșȘIJȚțȒ ȣʌȠįȠȤȒ
İȚıȩįȠȣ.
2. ȆĮIJȒıIJİ İʌĮȞİȚȜȘȝȝȑȞĮ țĮȚ ĮijȒıIJİ IJȠ țȠȣȝʌȓ ʌȘȖȒȢ
ȝȑȤȡȚ ȞĮ İȝijĮȞȚıIJİȓ IJȠ AUX IN 2.
3. ȆȡȠıĮȡȝȩıIJİ IJȘ
ȡȪșȝȚıȘ IJȘȢ ȑȞIJĮıȘȢ IJȠȣ ȒȤȠȣ ıIJȠ
iPod ıĮȢ, MP3 Ȓ CD player ȖȚĮ ȞĮ İȟĮıijĮȜȚıIJİȓ ȑȞĮ
ȚțĮȞȠʌȠȚȘIJȚțȩ İʌȓʌİįȠ ıȒȝĮIJȠȢ Įʌȩ IJȘ ıȣıțİȣȒ
ĮȞĮʌĮȡĮȖȦȖȒȢ țĮȚ ıIJȘ ıȣȞȑȤİȚĮ ȤȡȘıȚȝȠʌȠȚȒıİIJİ IJȠ
țȠȣȝʌȓ İȜȑȖȤȠȣ ıȣȞIJȠȞȚıȝȠȪ ıIJȠ ȡĮįȚȩijȦȞȠ,
ȩʌȦȢ ĮʌĮȚIJİȓIJĮȚ ȖȚĮ ȐȞİIJȘ ĮțȡȩĮıȘ.
ǹțȡȩĮıȘ ȝȠȣıȚțȒȢ ȝȑıȦ Bluetooth
®
ĬĮ ȤȡİȚĮıIJİȓ ȞĮ ʌȡĮȖȝĮIJȠʌȠȚȒıİIJİ ıȪȗİȣȟȘ IJȘȢ
ıȣıțİȣȒȢ Bluetooth
®
ȝİ IJȠ ȡĮįȚȩijȦȞȩ ıĮȢ ȖȚĮ ȞĮ
ȝʌȠȡȑıİIJİ ȞĮ ıȣȞįİșİȓIJİ ĮȣIJȩȝĮIJĮ ȖȚĮ ĮȞĮʌĮȡĮȖȦȖȒ/
ȡȠȒ ȝȠȣıȚțȒȢ ȝȑıȦ Bluetooth
®
Įʌȩ IJȠ ȡĮįȚȩijȦȞȩ ıĮȢ. Ǿ
ıȪȗİȣȟȘ įȘȝȚȠȣȡȖİȓ ȑȞĮ ȝȩȞȚȝȠ “ıȪȞįİıȝȠ” ȑIJıȚ įȪȠ
ıȣıțİȣȑȢ ȝʌȠȡȠȪȞ ʌȐȞIJȠIJİ ȞĮ ĮȞĮȖȞȦȡȓȗȠȣȞ Ș ȝȚĮ IJȘȞ
ȐȜȜȘ.
īȚĮ IJȘ įȘȝȚȠȣȡȖȓĮ IJȘȢ ıȪȗİȣȟȘȢ IJȘȢ
ıȣıțİȣȒȢ Bluetooth
®
1. ȆĮIJȒıIJİ IJȠ țȠȣȝʌȓ ʌȘȖȒȢ ȖȚĮ ȞĮ İʌȚȜȑȟİIJİ IJȘȞ
İʌȚșȣȝȘIJȒ ȜİȚIJȠȣȡȖȓĮ Bluetooth
®
. To “BT READY” șĮ
İȝijĮȞȚıIJİȓ ıIJȘȞ ȠșȩȞȘ țĮȚ IJo “READY” șĮ
ĮȞĮȕȠıȕȒȞİȚ țĮIJȐ įȚĮıIJȒȝĮIJĮ IJȦȞ 2 įİȣIJİȡȠȜȑʌIJȦȞ.
2. ǼȞİȡȖȠʌȠȚȒıIJİ IJȠ Bluetooth
®
ıIJȘ ıȣıțİȣȒ ıĮȢ
ıȪȝijȦȞĮ ȝİ İȖȤİȚȡȓįȚȠ ȤȡȒıȘȢ IJȘȢ ıȣıțİȣȒȢ ȖȚĮ ȞĮ
İʌȚIJȡĮʌİȓ Ș įȚĮįȚțĮıȓĮ ıȪȗİȣȟȘȢ.
3. ȆĮIJȒıIJİ țĮȚ İȜİȣșİȡȫıIJİ IJȠ țȠȣȝʌȓ ıȪȗİȣȟȘȢ ,
IJȩIJİ IJȠ “BT PAIR” șĮ İȝijĮȞȚıIJİȓ ıIJȘȞ ȠșȩȞȘ țĮȚ șĮ
ĮȞĮȕȠıȕȒȞİȚ țĮIJȐ ȑȞĮ įȚȐıIJȘȝĮ IJȠȣ 1 įİȣIJİȡȠȜȑʌIJȠȣ.
ʌȠȡİȓIJİ ȞĮ ȟİțȚȞȒıİIJİ IJȘȞ ĮȞĮȗȒIJȘıȘ ıIJȠ ȡĮįȚȩijȦȞȩ
ıĮȢ Įʌȩ IJȘ ıȣıțİȣȒ Bluetooth
®
. ȂȩȜȚȢ İȝijĮȞȚıIJİȓ IJȠ
ȩȞȠȝĮ IJȠȣ ȡĮįȚȠijȫȞȠȣ ıĮȢ ıIJȘ ıȣıțİȣȒ Bluetooth
®
,
ʌĮIJȒıIJİ IJȠ ıIJȠȚȤİȓȠ ıIJȘ ȜȓıIJĮ ıĮȢ Bluetooth
®
.
Ȉİ țȐʌȠȚĮ ʌĮȜȚȐ țȚȞȘIJȐ (İțįȩıİȚȢ ıȣıțİȣȒȢ
Bluetooth
®
ʌȡȠȖİȞȑıIJİȡȘȢ IJȘȢ BT2.1), ȝʌȠȡİȓ ȞĮ
ȤȡİȚĮıIJİȓ ȞĮ İȚıĮȖȐȖİIJİ IJȠȞ țȦįȚțȩ “0000”.
4. Ǿ ıȣıțİȣȒ ıĮȢ Bluetooth
®
șĮ ıȣȗİȣȤșİȓ ȝİ IJȠ
ȡĮįȚȩijȦȞȠ.
5. ȂİIJȐ IJȘ ıȪȞįİıȘ, IJȠ “BLUETOOTH” șĮ ʌĮȡĮȝİȓȞİȚ
ıIJȘȞ ȠșȩȞȘ țĮȚ Ƞ ȠʌȓıșȚȠȢ ijȦIJȚıȝȩȢ șĮ ıțȠIJİȚȞȚȐıİȚ
ıȕȒȞȠȞIJĮȢ ıIJĮ 10 įİȣIJİȡȩȜİʌIJĮ.
ȉȫȡĮ ȝʌȠȡİȓIJİ ȞĮ ĮȞĮʌĮȡȐȖİIJİ IJȘ ȝȠȣıȚțȒ ıIJȘ ıȣıțİȣȒ
ıĮȢ ȝİ įȣȞĮIJȩIJȘIJĮ Bluetooth
®
ȝȑıȦ IJȠȣ ȡĮįȚȠijȫȞȠȣ.
ǹȞĮʌĮȡĮȖȦȖȒ ȝİ IJȘ ıȣıțİȣȒ Bluetooth
®
,
Ș ȠʌȠȓĮ ȑȤİȚ ȒįȘ ıȣȗİȣȤșİȓ
1. ȆĮIJȒıIJİ IJȠ țȠȣȝʌȓ ʌȘȖȒȢ ȖȚĮ ȞĮ İʌȚȜȑȟİIJİ IJȘȞ
İʌȚșȣȝȘIJȒ ȜİȚIJȠȣȡȖȓĮ Bluetooth
®
. To “BT READY” șĮ
İȝijĮȞȚıIJİȓ ıIJȘȞ ȠșȩȞȘ țĮȚ IJo “READY” șĮ
ĮȞĮȕȠıȕȒȞİȚ țĮIJȐ įȚĮıIJȒȝĮIJĮ IJȦȞ 2 įİȣIJİȡȠȜȑʌIJȦȞ.
2. ǼțIJİȜȑıIJİ ĮȞĮȗȒIJȘıȘ țĮȚ ıȣȗİȪȟIJİ IJȠ ȡĮįȚȩijȦȞȠ ȝİ
IJȘ ıȣıțİȣȒ ıĮȢ Bluetooth
®
. ȅȡȚıȝȑȞİȢ ıȣıțİȣȑȢ
ȝʌȠȡȠȪȞ ȞĮ ıȣȗİȣȤșȠȪȞ ȝİ IJȠ ȡĮįȚȩijȦȞȠ ĮȣIJȩȝĮIJĮ.

84
ȉȫȡĮ ȝʌȠȡİȓIJİ ȞĮ ĮȞĮʌĮȡȐȖİIJİ IJȘ ȝȠȣıȚțȒ ıIJȘ ıȣıțİȣȒ
ıĮȢ ȝİ įȣȞĮIJȩIJȘIJĮ Bluetooth
®
ȝȑıȦ IJȠȣ ȡĮįȚȠijȫȞȠȣ.
ȈȘȝİȓȦıȘ:
a) ȉȠ ȡĮįȚȩijȦȞȠ ȝʌȠȡİȓ ȞĮ ıȣȗİȣȤșİȓ ȝİ 8 ıȣıțİȣȑȢ
Bluetooth
®
IJȠ ĮȞȫIJİȡȠ. ǵIJĮȞ ıȣȗİȣȤșİȓIJİ ȝİ
ʌİȡȚııȩIJİȡİȢ Įʌȩ ĮȣIJȩȞ IJȠȞ ĮȡȚșȝȩ ıȣıțİȣȑȢ
Bluetooth
®
, IJȠ ȚıIJȠȡȚțȩ ıȪȞįİıȘȢ șĮ ĮȞIJȚțĮIJĮıIJĮșİȓ
Įʌȩ IJȠ ʌĮȜĮȚȩIJİȡȠ ȚıIJȠȡȚțȩ ıȪȗİȣȟȘȢ.
b) ǹȞ ȣʌȐȡȤȠȣȞ 2 ıȣıțİȣȑȢ Bluetooth
®
ʌȠȣ İțIJİȜȠȪȞ
ĮȞĮȗȒIJȘıȘ ıIJȠ ȡĮįȚȩijȦȞȩ ıĮȢ, șĮ İȝijĮȞȚıIJİȓ Ș
įȚĮșİıȚȝȩIJȘIJȐ IJȠȣ țĮȚ ıIJȚȢ įȣȠ ıȣıțİȣȑȢ.
c) ǹȞ Ș ıȣıțİȣȒ ıĮȢ Bluetooth
®
ĮʌȠıȣȞįİșİȓ ʌȡȠıȦȡȚȞȐ
Įʌȩ IJȠ ȡĮįȚȩijȦȞȩ ıĮȢ, IJȩIJİ șĮ ʌȡȑʌİȚ ȞĮ
İʌĮȞĮıȣȞįȑıİIJİ ȟĮȞȐ ȤİȚȡȠțȓȞȘIJĮ IJȘ ıȣıțİȣȒ ıĮȢ ȝİ
IJȠ ȡĮįȚȩijȦȞȠ.
d) ǹȞ IJȠ ȩȞȠȝĮ IJȠȣ ȡĮįȚȠijȫȞȠȣ ıĮȢ İȝijĮȞȚıIJİȓ ıIJȘ ȜȓıIJĮ
IJȘȢ ıȣıțİȣȒ ıĮȢ Bluetooth
®
ĮȜȜȐ įİȞ ȝʌȠȡİȓIJİ ȞĮ
ıȣȞįİșİȓIJİ ȝİ ĮȣIJȩ, ʌĮȡĮțĮȜȠȪȝİ įȚĮȖȡȐȥIJİ IJȠ ȩȞȠȝĮ
IJȠȣ ıIJȠȚȤİȓȠȣ IJȠȣ ȡĮįȚȠijȫȞȠȣ ıĮȢ Įʌȩ IJȘ ȜȓıIJĮ ıĮȢ
țĮȚ ıȣȗİȪȟIJİ ȟĮȞȐ IJȘ ıȣıțİȣȒ ȝİ IJȠ ȡĮįȚȩijȦȞȩ ıĮȢ
ĮțȠȜȠȣșȫȞIJĮȢ IJĮ ȕȒȝĮIJĮ ʌȠȣ ʌİȡȚİȖȡȐijȘțĮȞ
ʌȡȠȘȖȠȣȝȑȞȦȢ.
e) ȉȠ ĮʌȠIJİȜİıȝĮIJȚțȩ İȪȡȠȢ ȜİȚIJȠȣȡȖȓĮȢ ȝİIJĮȟȪ IJȠȣ
ȡĮįȚȠijȫȞȠȣ țĮȚ IJȘȢ ıȣȗİȣȖȝȑȞȘȢ ıȣıțİȣȒȢ İȓȞĮȚ
ʌİȡȓʌȠȣ 10 ȝȑIJȡĮ (30 ʌȩįȚĮ
).
f) ȀȐșİ İȝʌȩįȚȠ ȝİIJĮȟȪ IJȠȣ ȡĮįȚȠijȫȞȠȣ țĮȚ IJȘȢ
ıȣıțİȣȒȢ ȝʌȠȡİȓ ȞĮ ȝİȚȫıİȚ IJȘȞ İȝȕȑȜİȚĮ ȜİȚIJȠȣȡȖȓĮȢ.
ǹʌȠıȪȞįİıȘ IJȘȢ ıȣıțİȣȒȢ Bluetooth
®
ȆĮIJȒıIJİ țĮȚ țȡĮIJȒıIJİ ʌĮIJȘȝȑȞȠ IJȠ țȠȣȝʌȓ ıȪȗİȣȟȘȢ
ȖȚĮ 2-3 įİȣIJİȡȩȜİʌIJĮ ȖȚĮ ȞĮ ĮʌȠıȣȞįȑıİIJİ IJȘ ıȣıțİȣȒ
Bluetooth
®
. ȉȠ “BLUETOOTH” șĮ İȟĮijĮȞȚıIJİȓ Įʌȩ IJȘȞ
ȠșȩȞȘ İȞįİȓȟİȦȞ, ȣʌȠįİȚțȞȪȠȞIJĮȢ IJȘȞ ĮʌİȞİȡȖȠʌȠȓȘıȘ
IJȘȢ ȜİȚIJȠȣȡȖȓĮȢ Bluetooth
®
.
ĭȩȡIJȚıȘ ȝİ IJȘ șȪȡĮ IJȡȠijȠįȠıȓĮȢ USB
(ǼȚț. 10)
Ǿ șȪȡĮ USB ȣʌȐȡȤİȚ ıIJȘȞ ȝʌȡȠıIJȚȞȒ ʌȜİȣȡȐ IJȠȣ
ȡĮįȚȠijȫȞȠȣ. ȂʌȠȡİȓIJİ ȞĮ ijȠȡIJȓıİIJİ ȝȚĮ ıȣıțİȣȒ USB
ȝȑıȦ IJȘȢ șȪȡĮȢ USB.
1. ȈȣȞįȑıIJİ IJȘ ıȣıțİȣȒ USB, ȩʌȦȢ iPod, MP3 Ȓ CD
player, ȝİ ȑȞĮ įȚĮșȑıȚȝȠ ıIJȘȞ ĮȖȠȡȐ țĮȜȫįȚȠ USB.
2. ȆĮIJȒıIJİ IJȠ țȠȣȝʌȓ IJȡȠijȠįȠıȓĮȢ ȖȚĮ ȞĮ
İȞİȡȖȠʌȠȚȒıİIJİ IJȠ ȡĮįȚȩijȦȞȩ ıĮȢ.
3. ǹȞİȟĮȡIJȒIJȦȢ Įʌȩ IJȠ ĮȞ IJȠ ȡĮįȚȩijȦȞȩ ıĮȢ
IJȡȠijȠįȠIJİȓIJĮȚ Įʌȩ ʌȘȖȒ İȞĮȜȜĮııȩȝİȞȠȣ
ȡİȪȝĮIJȠȢ Ȓ
Įʌȩ ȝʌĮIJĮȡȓĮ, IJȠ ȡĮįȚȩijȦȞȠ ȝʌȠȡİȓ ȞĮ ijȠȡIJȓıİȚ IJȘ
ıȣıțİȣȒ USB ȩIJĮȞ İȞİȡȖȠʌȠȚȘșİȓ IJȠ ȡĮįȚȩijȦȞȠ țĮȚ
ȕȡİșİȓ ıIJȘ ȝʌȐȞIJĮ ȡĮįȚȠijȫȞȠȣ FM Ȓ ıIJȘ ȝʌȐȞIJĮ BT
Ȓ ıIJȘ ȝʌȐȞIJĮ AUX, Ș ȠʌȠȓĮ İȝijĮȞȓȗİIJĮȚ ȩIJĮȞ ȑȤİȚ
ıȣȞįİșİȓ ȝȚĮ İȟȦIJİȡȚțȒ ʌȘȖȒ ȒȤȠȣ.
ȈȘȝİȓȦıȘ:
ǻİȞ ȝʌȠȡİȓIJİ ȞĮ ijȠȡIJȓıİIJİ ıȣıțİȣȑȢ USB ıIJȘ ȝʌȐȞIJĮ AM
İʌİȚįȒ Ș ȣʌȠįȠȤȒ IJȠȣ ȡĮįȚȠijȦȞȚțȠȪ ıȒȝĮIJȠȢ
ȖȓȞİIJĮȚ
İȟĮȚȡİIJȚțȐ ijIJȦȤȒ țĮIJȐ IJȘ įȚȐȡțİȚĮ IJȘȢ ijȩȡIJȚıȘȢ ȝİ
ıȣıțİȣȒ USB.
• Ǿ ȝȑȖȚıIJȘ ȑȞIJĮıȘ ȒȤȠȣ Įʌȩ IJȠ ȘȤİȓȠ İȟȩįȠȣ șĮ ȝİȚȦșİȓ
ȩIJĮȞ ijȠȡIJȓȗİȚ IJȠ USB.
• Ǿ ȣʌȠįȠȤȒ USB ȝʌȠȡİȓ ȞĮ ʌĮȡȐıȤİȚ IJȠ ȝȑȖȚıIJȠ
ȘȜİțIJȡȚțȩ ȡİȪȝĮ IJȠȣ 1A5V.
ȈȘȝĮȞIJȚțȩ:
• ȆȡȚȞ Įʌȩ IJȘ ıȪȞįİıȘ IJȘȢ ıȣıțİȣȒȢ USB ıIJȠ ijȠȡIJȚıIJȒ,
ʌȐȞIJȠIJİ ȞĮ țȡĮIJȐIJİ ĮȞIJȓȖȡĮijĮ ĮıijĮȜİȓĮȢ IJȦȞ
įİįȠȝȑȞȦȞ
ıĮȢ IJȘȢ ıȣıțİȣȒȢ USB. ǻȚĮijȠȡİIJȚțȐ IJĮ
įİįȠȝȑȞĮ ıĮȢ ȝʌȠȡİȓ ȤĮșȠȪȞ ȜȩȖȦ ȠʌȠȚĮıįȒʌȠIJİ
ʌİȡȓʌIJȦıȘȢ.
• ȅ ijȠȡIJȚıIJȒȢ ȝʌȠȡİȓ ȞĮ ȝȘȞ ʌĮȡȐıȤİȚ ȡİȪȝĮ ıİ
ȠȡȚıȝȑȞİȢ ıȣıțİȣȑȢ USB.
• ǹʌȠıȣȞįȑıIJİ IJȠ țĮȜȫįȚȠ USB țĮȚ țȜİȓıIJİ IJȠ țȐȜȣȝȝĮ
ȩIJĮȞ įİȞ IJȠ ȤȡȘıȚȝȠʌȠȚİȓIJİ Ȓ ȝİIJȐ IJȘ ijȩȡIJȚıȘ.
• ȂȘȞ ıȣȞįȑİIJİ ʌȘȖȒ ȡİȪȝĮIJȠȢ ıIJȘ șȪȡĮ USB.
ǻȚĮijȠȡİIJȚțȐ ȣʌȐȡȤİȚ țȓȞįȣȞȠȢ ʌȣȡțĮȖȚȐȢ. Ǿ șȪȡĮ
USB
ʌȡȠȠȡȓȗİIJĮȚ ȝȩȞȠ ȖȚĮ ijȩȡIJȚıȘ ıȣıțİȣȫȞ ȤĮȝȘȜȒȢ
IJȐıȘȢ. ȃĮ IJȠʌȠșİIJİȓIJİ ʌȐȞIJȠIJİ IJȠ țȐȜȣȝȝĮ ʌȐȞȦ ıIJȘ
șȪȡĮ USB ȩIJĮȞ įİȞ İțIJİȜİȓIJİ ijȩȡIJȚıȘ ıȣıțİȣȒȢ
ȤĮȝȘȜȒȢ IJȐıȘȢ.
• ȂȘȞ İȚıĮȖȐȖİIJİ țȐʌȠȚȠ țĮȡijȓ, ıȪȡȝĮ ț.Ȝʌ. ȝȑıĮ ıIJȘ
șȪȡĮ IJȡȠijȠįȠıȓĮȢ USB. ǻȚĮijȠȡİIJȚțȐ ȑȞĮ
ȕȡĮȤȣțȪțȜȦȝĮ ȝʌȠȡİȓ ȞĮ ʌȡȠțĮȜȑıİȚ țĮʌȞȩ țĮȚ
ijȦIJȚȐ.
• ȂȘȞ ıȣȞįȑİIJİ ʌȠIJȑ ĮȣIJȒ Ș ȣʌȠįȠȤȒ USB ȝİ
IJȘ șȪȡĮ
USB IJȠȣ ȣʌȠȜȠȖȚıIJȒ ıĮȢ, țĮșȫȢ İȓȞĮȚ ʌȠȜȪ ʌȚșĮȞȩ ȞĮ
ʌȡȠțĮȜȑıİȚ ȕȜȐȕȘ IJȦȞ ȝȠȞȐįȦȞ.
ȈȊȃȉǾȇǾȈǾ
ȆȇȅȈȅȋǾ:
• ȂȘȞ ȤȡȘıȚȝȠʌȠȚȒıİIJİ ȕİȞȗȓȞȘ, ȕİȞȗȩȜȘ, įȚĮȜȣIJȚțȩ,
ĮȜțȠȩȜȘ Ȓ țȐIJȚ ʌĮȡȩȝȠȚȠ. ȂʌȠȡİȓ ȞĮ ʌȡȠțȜȘșİȓ
ĮʌȠȤȡȦȝĮIJȚıȝȩȢ, ʌĮȡĮȝȩȡijȦıȘ Ȓ ȡȦȖȝȑȢ.
ȆȡȠįȚĮȖȡĮijȑȢ:
ǹʌĮȚIJȒıİȚȢ ȘȜİțIJȡȚțȠȪ ȡİȪȝĮIJȠȢ
ȂİIJĮıȤȘȝĮIJȚıIJȒȢ ȡİȪȝĮIJȠȢ AC
DC12 V/1.200 mA, șİIJȚțȩȢ ʌȩȜȠȢ
Ș țİȞIJȡȚțȒ ĮțȓįĮ
ȂʌĮIJĮȡȓĮ UM-3 (ȝİȖȑșȠȣȢ ǹǹ) x 2 ȖȚĮ
İijİįȡİȓĮ
ȈȣıIJȠȚȤȓĮ ȝʌĮIJĮȡȓĮȢ: 7,2 V -
10,8 V
ȈȣȡȩȝİȞȘ ȝʌĮIJĮȡȓĮ: 14,4 V -
18 V
ȈȣȤȞȩIJȘIJĮȢ țȐȜȣȥȘȢ FM 87,50 ȑȦȢ 108 MHz
(0,05 MHz/ȕȒȝĮ)
AM (MW) 522 - 1.629 kHz
(9 kHz/ȕȒȝĮ)
Bluetooth
®
Bluetooth
®
QD ID 58625
(ȉȠ ȜİțIJȚțȩ ıȒȝĮ Bluetooth
®
țĮȚ IJĮ
ȜȠȖȩIJȣʌĮ ĮʌȠIJİȜȠȪȞ İȝʌȠȡȚțȐ
ıȒȝĮIJĮ IJȘȢ Bluetooth SIG, Inc.)
DzțįȠıȘ Bluetooth
®
4,0
ȆȡȠijȓȜ Bluetooth
®
A2DP/SCMS-T
ǿıȤȪȢ ȝİIJȐįȠıȘȢ ʌȡȠįȚĮȖȡĮijȒ ȚıȤȪȠȢ Bluetooth
®
2
ǼȪȡȠȢ ȝİIJȐįȠıȘȢ ȂȑȖ. 10 M (ʌȠȚțȓȜȜİȚ ĮȞȐȜȠȖĮ ȝİ
IJȚȢ ıȣȞșȒțİȢ ȤȡȒıȘȢ)
ȊʌȠıIJȘȡȚȗȩȝİȞȘ țȦįȚțȠʌȠȓȘıȘ
SBC

85
ȈȣȝȕĮIJȩ ʌȡȠijȓȜ Bluetooth
®
A2DP
ȋĮȡĮțIJȘȡȚıIJȚțȩ țȣțȜȫȝĮIJȠȢ
ȂİȖȐijȦȞȠ 3,5 ȚȞIJıȫȞ 8 ohm x 2
ǿıȤȪȢ İȟȩįȠȣ 7,2 V: 0,5 W x 2
10,8 V:1,2 W x 2
14,4 V: 2,2 W x 2, 18 V: 3,5 W x 2
ȉİȡȝĮIJȚțȩ İȚıȩįȠȣ ǻȚĮȝ. 3,5 mm (AUX IN1/AUX IN2)
ȈȪıIJȘȝĮ țİȡĮȓĮȢ FM: ȂĮȜĮțȒ ȜȣȖȚıȝȑȞȘ ȡȐȕįȠȢ
țİȡĮȓĮȢ
AM: ȡȐȕįȠȢ țİȡĮȓĮȢ
ǻȚĮıIJȐıİȚȢ (Ȇ x Ȋ x Ǻ) ıİ mm
282 x 294 x 163
ǺȐȡȠȢ 4,3 kg (ȤȦȡȓȢ ȝʌĮIJĮȡȓĮ)

86
POLSKI (oryginalna instrukcja)
Symbole
PoniĪej przedstawiono symbole stosowane w przypadku
omawianego urządzenia. Przed rozpoczĊciem jego
uĪytkowania naleĪy upewniü siĊ, Īe są one zrozumiaáe.
WAĩNE ZASADY
BEZPIECZEēSTWA
OSTRZEĩENIE:
UĪywając elektronarzĊdzi, naleĪy zawsze przestrzegaü
podstawowych Ğrodków ostroĪnoĞci w celu zmniejszenia
ryzyka wystąpienia poĪaru, poraĪenia prądem oraz
uszkodzenia ciaáa, wáączając poniĪsze:
1. Przed korzystaniem z urządzenia naleĪy dokáadnie
zapoznaü siĊ z niniejszą instrukcją obsáugi oraz
instrukcją obsáugi áadowarki.
2. CzyĞciü wyáącznie suchą szmatką.
3. Nie montowaü przy jakimkolwiek Ĩródle ciepáa, takim
jak grzejniki, kratki wylotowe ciepáego powietrza, piece
lub inne urządzenia (równieĪ wzmacniacze)
wytwarzające ciepáo.
4. Stosowaü wyáącznie przyrzą
dy/akcesoria zalecane
przez producenta.
5. Wyáączyü niniejsze urządzenie podczas burzy oraz w
przypadku nieuĪywania przez dáuĪszy czas.
6. Akumulatorowy odbiornik radiowy z akumulatorem
wbudowanym lub oddzielnym musi byü áadowany
wyáącznie za pomocą okreĞlonej áadowarki do
akumulatora. àadowarka przeznaczona do jednego
typu akumulatora moĪe stwarzaü zagroĪenie
wystąpienia poĪaru w przypadku stosowania jej do
áadowania innego akumulatora.
7. Do zasilania akumulatorowego odbiornika radiowego
naleĪy uĪywaü tylko przeznaczonych do niego
akumulatorów. UĪywanie innych akumulatorów moĪe
stwarzaü ryzyko wystąpienia poĪaru.
8. Gdy akumulator nie jest uĪywany, naleĪy
zabezpieczyü go przed kontaktem z innymi
metalowymi przedmiotami, takimi jak spinacze,
monety, klucze, gwoĨdzie, wkrĊty bądĨ inne maáe
przedmioty metalowe, które mogą powodowaü
zwarcie styków akumulatora. Zwarcie styków
akumulatora grozi pojawieniem siĊ iskier,
poparzeniami lub poĪarem.
9. Nale
Īy unikaü kontaktu ciaáa z przedmiotami
uziemionymi, takimi jak rury, grzejniki, kuchenki czy
lodówki. Gdy ciaáo czáowieka jest uziemione, wzrasta
ryzyko poraĪenia prądem elektrycznym.
10. W razie niewáaĞciwych warunków uĪytkowania moĪe
dojĞü do wycieku elektrolitu z akumulatora. Unikaü
kontaktu. W razie przypadkowego kontaktu, naleĪy
przemyü skaĪoną skórĊ wodą. W przypadku kontaktu
elektrolitu z oczami naleĪy dodatkowo zasiĊgnąü
porady lekarza. Páyn z akumulatora moĪe powodowaü
podraĪnienia lub poparzenia.
ZACHOWAû INSTRUKCJĉ
OBSàUGI.
SZCZEGÓàOWE ZASADY
BEZPIECZEēSTWA
DOTYCZY AKUMULATORA
1. Przed uĪyciem akumulatora naleĪy zapoznaü siĊ
ze wszystkimi zaleceniami i znakami
ostrzegawczymi na (1) áadowarce do akumulatora,
(2) akumulatorze i (3) produkcie, w którym bĊdzie
uĪywany akumulator.
2. Nie demontowaü akumulatora.
3. JeĞli czas pracy ulegá znacznemu skróceniu,
naleĪy natychmiast przerwaü pracĊ. MoĪe bowiem
dojĞü do przegrzania, wystąpienia ewentualnych
poparzeĔ, a nawet eksplozji.
4. W przypadku dostania siĊ elektrolitu do oczu
naleĪy je przemyü wodą i niezwáocznie zasiĊgnąü
porady lekarza. Przedostanie siĊ elektrolitu do
oczu moĪe spowodowaü utratĊ wzroku.
5. Nie zwieraü styków akumulatora:
(1) Nie dotykaü styków przedmiotami
przewodzącymi prąd.
(2) Nie przechowywaü akumulatora w pojemniku
z innymi metalowymi przedmiotami, takimi
jak gwoĨdzie, monety itp.
(3) Akumulator naleĪy chroniü przed wod
ą lub
deszczem.
Zwarcie powoduje przepáyw prądu elektrycznego
o duĪym natĊĪeniu i przegrzanie akumulatora, co
w konsekwencji moĪe groziü poparzeniami, a
nawet uszkodzeniem produktu.
6. Nie przechowywaü urządzenia i akumulatora w
miejscach, w których temperatura osiąga lub
przekracza 50°C.
7. Nie wrzucaü akumulatorów do ognia, nawet tych
powaĪnie uszkodzonych lub caákowicie zuĪytych.
Akumulator wrzucony do ognia moĪe
eksplodowaü.
8. Akumulator naleĪy chroniü przed upadkiem i
uderzeniami.
9. Nie uĪywaü uszkodzonych akumulatorów.
10. Doáączone do opakowania akumulatory litowo-
jonowe podlegają wymaganiom ustawy o
przewozie towarów niebezpiecznych.
W przypadku transportu towarowego, np. przez stronĊ
trzecią, firmy spedycyjne, naleĪy przestrzegaü
specjalnych wymaganiach dotyczących pakowania i
Przeczytaü instrukcjĊ obsáugi.
Dotyczy tylko paĔstw UE
Nie wyrzucaj urządzeĔ elektrycznych lub
akumulatorów wraz z odpadami z
gospodarstwa domowego!
Zgodnie z Europejską Dyrektywą
w sprawie
zuĪytego sprzĊtu elektrycznego i
elektronicznego oraz dotyczącą
akumulatorów i baterii oraz zuĪytych
akumulatorów i baterii, a takĪe
dostosowaniem ich do prawa krajowego,
zuĪyte urządzenia elektryczne, baterie i
akumulatory, naleĪy skáadowaü osobno i
przekazywaü do zakáadu recyklingu
dziaáającego zgodnie z przepisami
dotyczącymi ochrony Ğrodowiska.
Cd
Ni-MH
Li-ion

87
etykietowania.
W celu przygotowania towaru do wysyáki naleĪy
skonsultowaü siĊ ze specjalistą ds. materiaáów
niebezpiecznych. NaleĪy równieĪ przestrzegaü
prawdopodobnie bardziej szczegóáowych przepisów
krajowych.
Zakleiü taĞmą lub zabezpieczyü otwarte styki, a
nastĊpnie zapakowaü akumulator w sposób
uniemoĪliwiający jego ruch w opakowaniu.
11. PostĊpowaü zgodnie z przepisami lokalnymi
dotyczącymi utylizacji akumulatora.
12. Aby uniknąü niebezpieczeĔstwa, naleĪy w pierwszej
kolejnoĞci przeczytaü instrukcjĊ wymiany
akumulatora.
Maksymalny prąd wyáadowczy akumulatora powinien
byü wiĊkszy lub równy 8 A.
UWAGA:
• NiebezpieczeĔstwo wybuchu w przypadku
nieprawidáowej wymiany akumulatora.
• Akumulator naleĪy wymieniü na akumulator tego
samego typu lub zamiennik.
ZACHOWAû NINIEJSZĄ
INSTRUKCJĉ OBSàUGI.
UWAGA: NaleĪy stosowaü wyáącznie oryginalne
akumulatory firmy Makita.
Stosowanie nieoryginalnych akumulatorów innych niĪ
firmy Makita lub akumulatorów, które zostaáy
zmodyfikowane, moĪe przyczyniü siĊ do wybuchu
akumulatora, powodując poĪar, obraĪenia ciaáa i
uszkodzenia. Spowoduje to równieĪ uniewaĪnienie
gwarancji Makita na narzĊdzie i áadowarkĊ Makita.
Wskazówki dotyczące zachowania
maksymalnej ĪywotnoĞci akumulatora
1. Akumulator naleĪy naáadowaü zanim ulegnie
caákowitemu rozáadowaniu.
W przypadku stwierdzenia spadku mocy
urządzenia naleĪy przerwaü pracĊ i naáadowaü
akumulator.
2. Nigdy nie áadowaü w peáni naáadowanego
akumulatora.
Zbyt dáugie áadowanie skraca ĪywotnoĞü
akumulatora.
3. Akumulator naleĪy áadowaü w temperaturze
pokojowej 10-40°C. Przed naáadowaniem
akumulatora naleĪy odczekaü, aĪ ostygnie.
4. JeĪeli planowany okres wyáączenia z eksploatacji
jest dáuĪszy (przekracza szeĞü miesiĊcy),
akumulator naleĪy naáadowaü.
ObjaĞnienia do widoku ogólnego
(Rys. 1)
1. Port zasilający USB
2. Power (zasilanie)/Sleep timer (zegar wyáączania)
3. Przycisk Source (Ĩródáo)
4. Alarm radiowy
5. Alarm brzĊczyka
6. Zaprogramowane stacje/przycisk Preset 1
(programowalny) jako przycisk parowania Bluetooth
®
7. Przycisk Menu/Info
8. PokrĊtáo gáoĞnoĞci/strojenia/wyboru
9. Gniazdo wejĞcia prądu staáego
10. WejĞcie AUX 1
11. WyĞwietlacz LCD
12. Uchwyt
13. GiĊtka antena
14. Pokrywa przedziaáu na akumulatory
15. GáoĞnik
16. Pokrywa akumulatora
17. Gniazdo wejĞcia (wejĞcie AUX 2)
18. Przedziaá na akumulatory (na zestaw gáówny i
zapasowy)
19. Do góry
20. Lewy
21. Przedni
22. Prawy
23. Tyá, zamkniĊta pokrywa akumulatora
24. Tyá, otwarta pokrywa akumulatora
25. Akumulator
26. Przycisk
27. Kontrolki
28. Przycisk Check (SprawdĨ)
WyĞwietlacz LCD:
A. Alarm radiowy
B. Alarm brzĊczyka
C. Symbol stereo
D. WskaĨnik niskiego poziomu naáadowania baterii
E. Zegar
F. CzĊstotliwoĞü
G. RDS (Radio data system)
H. Status wyáączenia
I. WskaĨnik zegara – czas AM/PM (przed poáudniem/po
poáudniu)
MontaĪ akumulatora
Uwaga:
Przechowywaü akumulatory zapasowe wewnątrz
przedziaáu w celu niedopuszczenia do utraty danych
zapisanych w pamiĊciach przycisków programowalnych.
1. Zdjąü pokrywĊ przedziaáu na akumulatory w celu
uzyskania dostĊpu do przedziaáu na akumulatory.
Wewnątrz znajduje siĊ komora na akumulator gáówny
oraz komora na akumulatory zapasowe. (Rys. 2)
2. Zdjąü pokrywĊ komory na akumulatory zapasowe i
wáoĪyü 2 nowe akumulatory UM-3 (wielkoĞci AA).
Upewniü siĊ, Īe akumulatory zostaáy wáoĪone zgodnie
z oznaczeniami biegunowoĞci wewnątrz komory.
Ponownie zaáoĪyü pokrywĊ akumulatora. (Rys. 3)
3. Po zamontowaniu akumulatorów zapasowych naleĪy
wáoĪyü akumulator gáówny zasilający odbiornik
radiowy. W poniĪszej tabeli zostaáy wymienione
akumulatory odpowiednie do zasilania odbiornika
radiowego.

88
PoniĪsza tabela wskazuje czasy pracy na pojedynczym áadowaniu akumulatorów w trybie Radio.
: Zespóá akumulatorów
: Akumulator wsuwany
Uwaga:
Dane zawarte w powyĪszej tabeli dotyczące czasów pracy akumulatorów stanowią dane referencyjne. Rzeczywisty czas
pracy moĪe róĪniü siĊ w zaleĪnoĞci od typu akumulatora, warunków áadowania lub Ğrodowiska pracy.
MontaĪ lub demontaĪ akumulatora
wsuwanego (Rys. 4 i 5)
• Aby zamontowaü akumulator, naleĪy wyrównaü wystĊp
na akumulatorze z rowkiem w obudowie i wsunąü go
na swoje miejsce. Akumulator naleĪy zawsze wsunąü
do oporu, do momentu jego zablokowania na miejscu,
co jest sygnalizowane delikatnym klikniĊciem.
•JeĞli czerwony wskaĨnik w górnej czĊĞci przycisku jest
nadal widoczny, oznacza to, Īe nie zostaá on caákowicie
zablokowany. NaleĪy go zamontowaü caákowicie, tak
aby czerwony wskaĨnik nie byá widoczny. W
przeciwnym razie akumulator moĪe przypadkowo
wysunąü siĊ z urządzenia, raniąc operatora lub osoby
postronne.
• Podczas montaĪu akumulatora nie uĪywaü nadmiernej
siáy. JeĞli nie moĪna go swobodnie wsunąü,
prawdopodobnie zostaá on nieprawidáowo wáoĪony.
•Aby wyjąü akumulator, naleĪy wyjąü go z urządzenia
poprzez przesuniĊcie przycisku znajdującego siĊ
w
przedniej jego czĊĞci lub nacisnąü jednoczeĞnie
przyciski znajdujące siĊ po obu jego bokach.
MontaĪ lub demontaĪ zespoáu
akumulatorów (Rys. 6 i 7)
• Aby zamontowaü akumulator, wystarczy wyrównaü
wystĊp na akumulatorze z rowkiem w obudowie i
wsunąü go na miejsce.
• Aby zdemontowaü akumulator, naleĪy wysunąü go,
naciskając przyciski znajdujące siĊ z boków
akumulatora.
Ponownie zamocowaü pokrywĊ przedziaáu na
akumulatory w odpowiednim poáoĪeniu.
Zredukowane napiĊcie zasilania, szumy, „przerywany
dĨwiĊk” lub pojawienie siĊ na wyĞwietlaczu zarówno
symbolu niskiego poziomu naáadowania baterii , jak i
komunikatu „POWERFAIL” (usterka zasilania) Ğwiadczą o
Poziom
naáadowania
akumulatora
NapiĊcie akumulatora
NA WYJĝCIU GàOĝNIKA
= 50 mW + 50 mW (jednostka: godzina)
(wartoĞü przybliĪona)
7,2 V 10,8 V 14,4 V 18 V W trybie Radio lub AUX
W trybie Bluetooth
®
przy
áadowaniu przez USB
1,0 Ah BL7010 5,5 0,8
1,1 Ah
BL1411G,
L1451
5,5
1,5
BL1811G,
L1851
1,8
1,3 Ah
BL1013
7,5
1,5
BL1415,
BL1413G,
L1453
1,8
BL1815,
BL1813G,
L1853
2,0
1,5 Ah
BL1415N
8,5
2,0
BL1815N 2,5
2,0 Ah
BL1820,
BL1820B
11 3,2
3,0 Ah
BL1430,
BL1430B
16
4,0
BL1830,
BL1830B
5,0
4,0 Ah
BL1440
22
5,5
BL1840,
BL1840B
6,5
5,0 Ah
BL1450
27
6,5
BL1850,
BL1850B
8,0
6,0 Ah
BL1460B
33
7,0
BL1860B 9,5

89
koniecznoĞci wymiany zestawu gáównego akumulatorów
na nowy.
Uwaga:
Akumulator nie moĪe byü áadowany za pomocą
dostarczonego zasilacza prądu zmiennego.
WyĞwietlenie na ekranie symbolu niskiego poziomu
naáadowania baterii oraz migającego symbolu
„EMPTY” (rozáadowany) oznacza koniecznoĞü wymiany
akumulatorów zapasowych na nowe.
Wskazuje stan naáadowania akumulatora
(Dotyczy wyáącznie akumulatorów z literą „B” na koĔcu
numeru modelu). (Rys. 8)
Nacisnąü przycisk Check (SprawdĨ) na akumulatorze,
aby sprawdziü stan naáadowania akumulatora. Na kilka
sekund zaĞwiecą siĊ kontrolki.
015658
UWAGA:
•ZaleĪnie od warunków uĪytkowania i temperatury
otoczenia wskazywany poziom moĪe nieznacznie siĊ
róĪniü od rzeczywistego poziomu naáadowania
akumulatora.
MontaĪ giĊtkiej anteny (Rys. 9)
Wyprostowaü giĊtką antenĊ zgodnie z rysunkiem.
Korzystanie z dostarczonego zasilacza
prądu zmiennego (Rys. 10)
Usunąü gumowe zabezpieczenie, a nastĊpnie wsunąü
wtyczkĊ zasilacza do wejĞcia prądu staáego, znajdującego
siĊ po lewej stronie odbiornika radiowego. Podáączyü
zasilacz do standardowego gniazdka elektrycznego. W
przypadku kaĪdorazowego uĪycia zasilacza, akumulator
jest automatycznie odáączany. Zasilacz prądu zmiennego
powinien byü odáączony od zasilania, jeĪeli nie jest
uĪywany.
Uwaga:
W przypadku zakáóceĔ w paĞmie AM pochodzących od
zasilacza naleĪy odsunąü odbiornik radiowy od zasilacza
prądu zmiennego na odlegáoĞü wiĊkszą niĪ 30 cm.
Obsáuga odbiornika radiowego – strojenie
AM/FM
1. Wáączyü odbiornik radiowy, naciskając przycisk Power
(zasilanie).
2. Nacisnąü przycisk Source (Ĩródáo) w celu
dokonania wyboru trybu AM lub FM.
3. Nacisnąü i przytrzymaü pokrĊtáo strojenia w celu
przeprowadzenia automatycznego strojenia.
Odbiornik radiowy bĊdzie skanowaá pasmo AM/FM od
aktualnie wyĞwietlonej czĊstotliwoĞci i automatycznie
zatrzyma skanowanie po wyszukaniu stacji o
odpowiedniej sile nadawania.
4. Po kilku sekundach wyĞwietlacz zostanie
zaktualizowany. Na wyĞwietlaczu zostanie
wyĞwietlona czĊstotliwoĞü wyszukanego sygnaáu.
5. W celu znalezienia innej stacji naleĪy nacisnąü i
przytrzymaü pokrĊtáo strojenia , jak opisano
powyĪej.
6. Po osiągniĊciu koĔca pasma czĊstotliwoĞci odbiornik
radiowy ponownie rozpocznie strojenie od
przeciwnego koĔca pasma czĊstotliwoĞci.
7. Obróciü pokrĊtáo strojenia w celu ustawienia
poziomu gáoĞnoĞci zgodnie z wáasnymi preferencjami.
Uwaga:
• Po wyregulowaniu gáoĞnoĞci naleĪy upewniü siĊ, Īe
symbol FM/AM NIE miga na wyĞwietlaczu.
•JeĪeli symbol AM/FM miga na wyĞwietlaczu,
moĪliwe jest przeprowadzenie rĊcznego strojenia
stacji (wiĊcej informacji patrz punkt „RĊczne
strojenie – AM/FM”).
8. Aby wyáączyü odbiornik radiowy, naleĪy nacisnąü
przycisk Power (zasilanie).
RĊczne strojenie – AM/FM
1. Wáączyü odbiornik radiowy, naciskając przycisk Power
(zasilanie).
2. Nacisnąü przycisk Source (Ĩródáo) w celu
dokonania wyboru trybu AM lub FM.
3. Nacisnąü pokrĊtáo strojenia . Na wyĞwietlaczu
pojawi siĊ migający symbol FM lub AM.
Uwaga:
• Symbol FM/AM bĊdzie migaá przez okoáo 10
sekund. Tylko w tym czasie moĪliwe jest
przeprowadzenie rĊcznego strojenia.
•JeĪeli poziom gáoĞnoĞci jest odpowiednio
ustawiony podczas migania symbolu FM/AM,
nacisnąü pokrĊtáo strojenia w celu zatrzymania
migania. Wówczas istnieje moĪliwoĞü obrócenia
Kontrolki
Stan naáadowania
ZaĞwiecone
Wyáączone Migające
75% do 100%
50% do 75%
25% do 50%
0% do 25%
Naáaduj
akumulator.
Akumulator
prawdopodobnie
zostaá
uszkodzony.

90
pokrĊtáa strojenia w celu dopasowania poziomu
gáoĞnoĞci.
4. Obróciü pokrĊtáo strojenia w celu ustawienia stacji.
5. Po osiągniĊciu koĔca pasma czĊstotliwoĞci odbiornik
radiowy ponownie rozpocznie strojenie od
przeciwnego koĔca pasma czĊstotliwoĞci.
6. UĪyü pokrĊtáa strojenia w celu ustawienia poziomu
gáoĞnoĞci zgodnie z wáasnymi preferencjami.
Programowanie stacji w trybie AM/FM
Istnieje moĪliwoĞü zaprogramowania do 5 stacji dla
czĊstotliwoĞci fal radiowych AM i FM. Są one uĪywane w
taki sam sposób dla kaĪdego pasma czĊstotliwoĞci.
1. Wáączyü odbiornik radiowy, naciskając przycisk Power
(zasilanie).
2. Nacisnąü przycisk Source (Ĩródáo) w celu
dokonania wyboru wymaganego pasma
czĊstotliwoĞci. Ustawiü wymaganą stacjĊ radiową
zgodnie z powyĪszym opisem.
3. Nacisnąü i przytrzymaü wymagany przycisk Preset
(programowalny) (1 do 5) do
momentu wyĞwietlenia przykáadowo symbolu „P4”
obok czĊstotliwoĞci. Stacja zostanie zapisana za
pomocą wybranego numeru przycisku
programowalnego. Zgodnie z indywidualnymi
wymaganiami, powtórzyü powyĪszą procedurĊ dla
pozostaáych przycisków programowalnych.
4. Zaprogramowane stacje, które zostaáy juĪ zapisane,
mogą zostaü nadpisane poprzez ponowne
przeprowadzenie wyĪej opisanej procedury.
Tryby wyĞwietlania – FM
Niniejszy odbiornik radiowy posiada kilka opcji
wyĞwietlania dla trybu FM.
1. Nacisnąü kilkakrotnie przycisk Menu/Info w celu
wyĞwietlenia informacji RDS aktualnie sáuchanej
stacji.
a. Station name (nazwa stacji)
WyĞwietla nazwĊ aktualnie sáuchanej
stacji.
b. Program type (rodzaj programu)
WyĞwietla rodzaj aktualnie sáuchanej
stacji, np. Pop, Classic, New itp.
c. Radio text (komunikaty radiowe)
WyĞwietla radiowe komunikaty
tekstowe, np. nowe pozycje itp.
d. Year/Day (rok/dzieĔ)
WyĞwietla rok oraz dzieĔ tygodnia
zgodnie z ustawioną datą na
odbiorniku radiowym.
e. Date/Day (data/dzieĔ)
WyĞwietla datĊ oraz dzieĔ tygodnia
zgodnie z ustawioną datą na
odbiorniku radiowym.
f. Frequency (czĊstotliwoĞü)
WyĞwietla czĊstotliwoĞü FM aktualnie
sáuchanej stacji.
FM stereo (auto)/mono
W przypadku sáuchania stacji radiowej FM o sáabym
sygnale mogą byü sáyszalne pewne szumy. Istnieje
moĪliwoĞü zredukowania ich poprzez ustawienie
odbiornika radiowego w tryb mono zamiast stereo.
1. Nacisnąü przycisk Power (zasilanie), zgodnie z
potrzebą, aby wybraü pasmo FM, a nastĊpnie ustawiü
wymaganą stacjĊ FM, jak opisano powyĪej.
2. Nacisnąü i przytrzymaü przycisk Menu/Info w
celu wprowadzenia ustawienia menu.
3. Obracaü pokrĊtáem strojenia do momentu
wyĞwietlenia na wyĞwietlaczu ustawienia FM Auto/
mono. JeĪeli ustawiona jest opcja Auto, naleĪy
nacisnąü pokrĊtáo strojenia w celu przeáączenia na
tryb Mono i zredukowania szumów. Nacisnąü pokrĊtáo
strojenia w celu wybrania danej opcji.
Przywoáywanie stacji w trybie AM/FM
1. Wáączyü odbiornik radiowy, naciskając przycisk Power
(zasilanie).
2. Nacisnąü przycisk Source (Ĩródáo) w celu
dokonania wyboru trybu AM lub FM.
3. Niezwáocznie nacisnąü wymagany przycisk Preset
(programowalny) w celu ustawienia
na odbiorniku radiowym jednej z zapisanych stacji w
pamiĊci przycisków programowalnych.
Zegar i alarmy
Ustawianie formatu daty i godziny
Zegar uĪywany w trybie czuwania oraz na ekranach w
trybie odtwarzania moĪe byü ustawiony w róĪnym
formacie. Wybrany format jest równieĪ uĪywany podczas
ustawiania alarmów.
1. Nacisnąü i przytrzymaü przycisk Menu/Info w
celu wprowadzenia ustawienia menu.
2. Obracaü pokrĊtáem strojenia do momentu
wyĞwietlenia symbolu „CLOCK xxH” (zegar xxH) na
wyĞwietlaczu, a nastĊpnie nacisnąü pokrĊtáo strojenia
w celu wprowadzenia ustawienia. Na wyĞwietlaczu
pojawi siĊ migający format godziny.
3. Obróciü pokrĊtáo strojenia w celu wybrania formatu
12-godzinnego lub 24-godzinnego. Nacisnąü pokrĊtáo
strojenia w celu potwierdzenia wyboru formatu
godziny.
Uwaga: W przypadku wybrania formatu 12-
godzinnego odbiornik radiowy bĊdzie uĪywaá tego
formatu podczas ustawieĔ.
4. Nacisnąü i przytrzymaü przycisk Menu/Info w
celu wprowadzenia ustawienia menu.

91
5. Obracaü pokrĊtáem strojenia do momentu
wyĞwietlenia daty (np. THU APR 3) na wyĞwietlaczu,
a nastĊpnie nacisnąü pokrĊtáo strojenia w celu
wprowadzenia ustawienia. Na wyĞwietlaczu pojawi siĊ
migający format daty.
6. Obróciü pokrĊtáo strojenia w celu wybrania formatu
daty. Nacisnąü pokrĊtáo strojenia w celu
potwierdzenia wyboru.
Ustawianie daty i godziny zegara
1. Nacisnąü i przytrzymaü przycisk Menu/Info .
2. Obracaü pokrĊtáem strojenia do momentu
wyĞwietlenia na wyĞwietlaczu opcji „CLOCK ADJ”
(ustawienie zegara). Nacisnąü pokrĊtáo strojenia w
celu wprowadzenia ustawienia.
3. Na wyĞwietlaczu zacznie migaü ustawienie godziny.
Obracaü pokrĊtáem strojenia w celu wybrania
wymaganej godziny, a nastĊpnie nacisnąü pokrĊtáo
strojenia w celu potwierdzenia ustawienia. Obracaü
pokr
Ċtáem strojenia w celu wybrania wymaganej
wartoĞci minut, a nastĊpnie nacisnąü pokrĊtáo
strojenia w celu potwierdzenia ustawienia.
4. Obracaü pokrĊtáem strojenia do momentu
wyĞwietlenia na wyĞwietlaczu opcji „DATE ADJ”
(ustawienie daty). Nacisnąü pokrĊtáo strojenia w
celu wprowadzenia ustawienia.
5. Obracaü pokrĊtáem strojenia w celu wybrania
wymaganego roku, a nastĊpnie nacisnąü pokrĊtáo
strojenia w celu potwierdzenia ustawienia. Obracaü
pokrĊtáem strojenia w celu wybrania wymaganego
miesiąca, a nastĊpnie nacisnąü pokrĊtáo strojenia
w celu potwierdzenia ustawienia. Obracaü pokrĊtáem
strojenia w celu wybrania wymaganej daty, a
nastĊpnie nacisnąü pokrĊtáo strojenia w celu
potwierdzenia ustawienia.
RDS (Radio data system)
W przypadku ustawienia godziny za pomocą funkcji RDS
odbiornik radiowy zsynchronizuje swój zegar niezaleĪnie
od tego, czy nadaje stacjĊ radiową przy uĪyciu RDS z
sygnaáami CT.
1. W przypadku wáączenia stacji nadającej dane RDS
nacisnąü i przytrzymaü przycisk Menu/Info .
2. Obracaü pokrĊtáem strojenia do momentu
wyĞwietlenia na wyĞwietlaczu opcji „RDS CT” oraz
symbolu zegara. Nacisnąü pokrĊtáo strojenia w
celu wprowadzenia ustawienia.
3. Obracaü pokrĊtáem strojenia do momentu
wyĞwietlenia na wyĞwietlaczu opcji „RDS CT”.
Nacisnąü pokrĊtáo strojenia w celu potwierdzenia
ustawienia. Zegar odbiornika radiowego zostanie
automatycznie ustawiony zgodnie z otrzymanymi
danymi RDS.
4. Po zakoĔczeniu tej czynnoĞci ikona RDS zostanie
wyĞwietlona na wyĞwietlaczu LCD, potwierdzając tym
samym, Īe godzina na odbiorniku radiowym jest taka
sama jak godzina RDS. Godzina na odbiorniku
radiowym bĊdzie obowiązywaáa przez 5 dni, do
momentu jej kolejnej synchronizacji z RDS CT.
Ustawianie godziny alarmu
Niniejszy odbiornik radiowy posiada dwa alarmy, które
moĪna ustawiü odpowiednio na budzenie radiem AM/FM
lub brzĊczykiem. Alarmy moĪna ustawiü zarówno w trybie
czuwania urządzenia, jak i odtwarzania.
a. Ustawianie czasu alarmu radiowego:
1. Odbiornik radiowy moĪna ustawiü niezaleĪnie od tego
czy jest on wáączony.
2. Nacisnąü i przytrzymaü przycisk alarmu radiowego
. Na ekranie pojawi siĊ migający symbol alarmu
radiowego i godziny, któremu bĊdzie towarzyszyü
alarm dĨwiĊkowy.
3. Gdy symbol alarmu radiowego bĊdzie migaü,
obróciü pokrĊtáo strojenia w celu wybrania godziny,
a nastĊpnie nacisnąü ponownie pokrĊtáo strojenia ,
aby potwierdziü ustawienie godziny. Obracaü
pokrĊtáem strojenia w celu wybrania wymaganej
wartoĞci minut, a nastĊpnie nacisnąü pokrĊtáo
strojenia w celu potwierdzenia ustawienia minut.
4. Obracaü pokrĊtáem strojenia – na wy
Ğ
wietlaczu
zostaną wyĞwietlone opcje czĊstoĞci wáączania
alarmu.
DostĊpne są nastĊpujące opcje alarmu:
ONCE (jednokrotny) – alarm zostanie wáączony tylko
raz;
DAILY (codzienny) – alarm bĊdzie wáączany
codziennie;
WEEKDAY (dni robocze) – alarm bĊdzie wáączany
tylko w dni robocze;
WEEKEND (sobota i niedziela) – alarm bĊdzie
wáączany tylko w weekendy.
Nacisnąü pokrĊtáo strojenia w celu potwierdzenia
ustawienia.
5. Gdy symbol alarmu radiowego bĊdzie migaü, obróciü
pokrĊtáo strojenia w celu wybrania wymaganego
pasma czĊstotliwoĞci i stacji radiowej budzenia, a
nastĊpnie nacisnąü ponownie pokrĊtáo strojenia, aby
potwierdziü wybór.
6. Obracaü pokrĊtáem strojenia w celu wybrania
wymaganego poziomu gáoĞnoĞci, a nastĊpnie
nacisnąü pokrĊt
áo strojenia w celu potwierdzenia
ustawienia poziomu gáoĞnoĞci. Ustawienie alarmu
radiowego zostaáo zakoĔczone.

92
Uwaga:
W przypadku braku wyboru nowej stacji alarmu
radiowego wybrana zostanie ostatnio ustawiona stacja
alarmu.
Uwaga:
W przypadku gdy wybrana stacja AM/FM alarmu nie
bĊdzie dostĊpna podczas wáączenia alarmu, zostanie
wáączony alarm brzĊczyka.
b. Ustawienie alarmu HWS brzĊczyka (system
budzenia):
Po wybraniu alarmu HWS brzĊczyka zostanie
aktywowany alarm.
Alarm brzĊczyka bĊdzie skracaá siĊ co 15 sekund na
kaĪdą jedną minutĊ poprzedzoną minutą ciszy zanim cykl
zostanie powtórzony.
1. Alarm brzĊczyka moĪna ustawiü niezaleĪnie od tego
czy odbiornik radiowy jest wáączony.
2. Nacisnąü i przytrzymaü przycisk alarmu brzĊczyka
. Na wyĞwietlaczu pojawi siĊ migający symbol
alarmu i godziny, któremu bĊdzie towarzyszyü alarm
dĨwiĊkowy.
3. Gdy symbol alarmu brzĊczyka bĊdzie migaü,
obróciü pokrĊtá
o strojenia w celu wybrania godziny,
a nast
Ċpnie nacisnąü ponownie pokrĊtáo strojenia ,
aby potwierdziü ustawienie godziny. Obracaü
pokrĊtáem strojenia w celu wybrania wymaganej
wartoĞci minut, a nastĊpnie nacisnąü pokrĊtáo
strojenia w celu potwierdzenia ustawienia minut.
4. Obracaü pokrĊtáem strojenia – na wyĞwietlaczu
zostaną wyĞwietlone opcje czĊstoĞci wáączania
alarmu.
DostĊpne są nastĊpujące opcje alarmu:
ONCE (jednokrotny) – alarm zostanie wáączony tylko
raz;
DAILY (codzienny) – alarm bĊdzie wáączany
codziennie;
WEEKDAY (dni robocze) – alarm bĊdzie wáączany
tylko w dni robocze;
WEEKEND (sobota i niedziela) – alarm bĊdzie
wáączany tylko w weekendy.
Nacisnąü pokrĊtáo strojenia w celu potwierdzenia
ustawienia.
Uwaga:
Nie ma moĪliwoĞü ustawienia poziomu gáoĞno
Ğci alarmu
brz
Ċczyka.
Wáączenie dĨwiĊku alarmu
Aby wyáączyü alarm, naleĪy nacisnąü przycisk Power
(zasilanie).
Wyáączanie/anulowania alarmów
W celu wyáączenia aktywnego alarmu naleĪy nacisnąü
przycisk Power (zasilanie) lub nacisnąü i
przytrzymaü odpowiedni przycisk alarmu w celu jego
anulowania.
Funkcja drzemki
1. Podczas wáączonego alarmu nacisnąü dowolny
przycisk poza przyciskiem Power (zasilanie) w
celu aktywowania funkcji drzemki na 5 minut. Na
wyĞwietlaczu pojawi siĊ napis „SNOOZE” (drzemka).
2. W celu ustawienia czasu drzemki naleĪy nacisnąü i
przytrzymaü przycisk Menu/Info , aby
wprowadziü ustawienie menu.
3. Obracaü pokrĊtáem strojenia do momentu
wyĞwietlenia symbolu „SNOOZE X” (drzemka X) na
wyĞwietlaczu, a nastĊpnie nacisnąü pokrĊtáo strojenia
w celu wprowadzenia ustawienia. Obracaü
pokrĊtáem strojenia w celu stawienia czasu drzemki
na 5, 10, 15 lub 20 minut.
4. W celu anulowania drzemki, w momencie gdy alarm
jest wstrzymany, naleĪy nacisnąü przycisk Power
(zasilanie).
Zegar wyáączania
W niniejszym odbiorniku radiowym istnieje moĪliwoĞü
ustawienia funkcji automatycznego wyáączania po
upáyniĊciu ustawionego czasu. Ustawienie zegara
wyáączania moĪna zmieniaü w zakresie 60, 45, 30, 15,
120 i 90 minut.
1. Nacisnąü i przytrzymaü przycisk Power
(zasilanie) w celu wprowadzenia ustawienia zegara
wyáączania. Na wyĞwietlaczu pojawi siĊ napis
„SLEEP XX” (wyáączenie XX).
2. Nacisnąü i przytrzymaü przycisk Power
(zasilanie). Na wyĞwietlaczu bĊdą wyĞwietlane
naprzemiennie opcje zegara wyáączania. Zatrzymaü w
momencie wyĞwietlenia na wyĞwietlaczu
wymaganego ustawienia zegara wyáączania.
Ustawienie zostanie zapisane, a wyĞwietlacz LCD
powróci do standardowego trybu wyĞwietlania.
3. Odbiornik radiowy wyáączy siĊ automatycznie po
upáyniĊciu ustawionego czasu zegara wyáączania. Na
wyĞwietlaczu bĊdzie wyĞwietlana ikona zegara
wyáączania , potwierdzająca wáączenie funkcji
zegara wyáączania.
4.
W przypadku anulowania funkcji zegara wyáączania
przed upáyniĊciem ustawionego czasu naleĪy po
prostu nacisnąü przycisk Power (zasilanie) w
celu rĊcznego wyáączenia urządzenia.
GáoĞnoĞü
Istnieje moĪliwoĞü ustawienia kompensacji niĪszej i
wyĪszej czĊstotliwoĞci odbiornika radiowego poprzez
ustawienie funkcji gáoĞnoĞci.

93
1. Nacisnąü i przytrzymaü przycisk Menu/Info w
celu wprowadzenia ustawienia menu.
2. Obracaü pokrĊtáem strojenia do momentu
wyĞwietlenia na wyĞwietlaczu opcji „LOUD ON”
(gáoĞnoĞü wá.) lub „LOUD OFF” (gáoĞnoĞü wyá.).
Nacisnąü pokrĊtáo strojenia w celu wprowadzenia
ustawienia.
3. Obracaü pokrĊtáem strojenia w celu wybrania opcji
ON (wá.) funkcji gáoĞnoĞci, a nastĊpnie nacisnąü
pokrĊtáo strojenia w celu potwierdzenia ustawienia.
4. Aby wyáączyü funkcjĊ gáoĞnoĞci, naleĪy wybraü opcjĊ
OFF (wyá.) i nacisnąü pokrĊtáo strojenia w celu
potwierdzenia ustawienia.
Gniazdo wejĞciowe AUX
W odbiorniku radiowym dostĊpne są dwa 3,5 mm gniazda
wejĞciowe AUX stereo. Jedno znajduje siĊ na przednim
panelu odbiornika radiowego (wejĞcie AUX 1). Drugie
gniazdo znajduje siĊ w przedziale na akumulatory
(wejĞcie AUX 2).
1. Podáączyü zewnĊtrze urządzenie audio (na przykáad
iPod, MP3 lub odtwarzacz CD) do gniazda
wejĞciowego AUX.
2. Kilkakrotnie nacisnąü i zwolniü przycisk Source
(Ĩródáo) do momentu wyĞwietlenia opcji AUX IN 1 lub
2 (wejĞcie AUX 1 lub 2).
3. Ustawiü poziom gáoĞnoĞci na urządzeniu iPod, MP3
lub odtwarzaczu CD w celu zapewnienia
odpowiedniego poziomu sygnaáu urządzenia
odtwarzającego, a nastĊpnie uĪyü pokrĊtáa strojenia
odbiornika radiowego w celu ustawienia
komfortowego poziomu gáoĞnoĞci sáuchania.
Sáuchanie muzyki za pomocą funkcji
Bluetooth
®
W pierwszej kolejnoĞci naleĪy sparowaü urządzenie z
funkcją Bluetooth
®
z odbiornikiem radiowym w celu
ustanowienia automatycznego poáączenia
umoĪliwiającego odtwarzanie/strumieniowanie muzyki za
pomocą funkcji Bluetooth
®
i za poĞrednictwem odbiornika
radiowego. Funkcja parowania zapewnia „staáe
poáączenie”, które umoĪliwia staáe wzajemne
rozpoznawanie siĊ urządzeĔ.
Parowanie urządzenia z funkcją
Bluetooth
®
1. Nacisnąü przycisk Source (Ĩródáo) w celu
wybrania funkcji Bluetooth
®
. Na wyĞwietlaczu zostanie
wyĞwietlony symbol „BT READY” (Bluetooth
®
gotowe), przy czym symbol „READY” (gotowe) bĊdzie
migaá z czĊstoĞcią co kaĪde 2 sekundy.
2. Wáączyü funkcjĊ Bluetooth
®
na swoim urządzeniu
zgodnie z instrukcją uĪytkownika urządzenia w celu
umoĪliwienia przeprowadzenia procedury parowania.
3. Nacisnąü i zwolniü przycisk Pair (parowanie). Na
wyĞwietlaczu zostanie wyĞwietlony symbol „BT PAIR”
(parowanie Bluetooth
®
) i bĊdzie migaá z czĊstoĞcią co
1 sekundĊ. Istnieje moĪliwoĞü rozpoczĊcia
wyszukiwania swojego odbiornika radiowego na
urządzeniu z funkcją Bluetooth
®
. Po wyĞwietleniu
nazwy swojego odbiornika radiowego na ekranie
urządzenia z funkcją Bluetooth
®
naleĪy nacisnąü tĊ
pozycjĊ na liĞcie Bluetooth
®
.
W przypadku niektórych starszych modeli telefonów
komórkowych (wersje starsze niĪ urządzenia z funkcją
Bluetooth
®
BT2.1) moĪe zaistnieü koniecznoĞü
wprowadzenia kodu dostĊpu „0000”.
4. Urządzenie z funkcją Bluetooth
®
zostanie poáączone z
odbiornikiem radiowym.
5. Po poáączeniu na wyĞwietlaczu zostanie wyĞwietlony
symbol „BLUETOOTH”, a podĞwietlenie zostanie
przyciemnione na 10 sekund.
Teraz istnieje moĪliwoĞü odtwarzania muzyki z
podáączonego urządzenia z funkcją Bluetooth
®
za
poĞrednictwem odbiornika radiowego.
Odtwarzanie muzyki z urządzenia z
funkcją Bluetooth
®
, które zostaáo wáaĞnie
sparowane
1. Nacisnąü przycisk Source (Ĩródáo) w celu wybrania
funkcji Bluetooth
®
. Na wyĞwietlaczu zostanie
wyĞwietlony symbol „BT READY” (Bluetooth
®
gotowe), przy czym symbol „READY” (gotowe) bĊdzie
migaá z czĊstoĞcią co kaĪde 2 sekundy.
2. Wyszukaü i poáączyü odbiornik radiowy na ekranie
urządzenia z funkcją Bluetooth
®
. Niektóre urządzenia
mogą same automatycznie áączyü siĊ z odbiornikiem
radiowym.
Teraz istnieje moĪliwoĞü odtwarzania muzyki z
podáączonego urządzenia z funkcją Bluetooth
®
za
poĞrednictwem odbiornika radiowego.
Uwaga:
a) Odbiornik radiowy moĪe siĊ poáączyü maksymalnie z 8
urządzeniami z funkcją Bluetooth
®
. W przypadku
áączenia siĊ z wiĊkszą liczbą urządzeĔ z funkcją
Bluetooth
®
, niĪ wyĪej podana, historia parowania
zostanie nadpisana w kolejnoĞci od najstarszej historii
parowania.
b) W przypadku wyszukiwania swojego odbiornika
radiowego przez 2 urządzenia z funkcją Bluetooth
®
na
obu tych urządzeniach bĊdzie on wyĞwietlany jako
dostĊpny.
c) JeĞli urządzenie z funkcją Bluetooth
®
jest tymczasowo
odáączone od odbiornika radiowego, wówczas
konieczne bĊdzie ponowne rĊczne ustanowienie
poáączenia urządzenia z odbiornikiem radiowym.
d) W przypadku wyĞwietlenia siĊ nazwy swojego
odbiornika radiowego na liĞcie urządzenia z funkcją
Bluetooth
®
i braku moĪliwoĞci poáączenia siĊ z tym
urządzeniem naleĪy usunąü pozycjĊ z nazwą swojego
odbiornika radiowego z listy i ponownie sparowaü

94
urządzenie z odbiornikiem radiowym, postĊpując
zgodnie z procedurą opisaną powyĪej.
e) Efektywny zasiĊg dziaáania pomiĊdzy odbiornikiem
radiowym a sparowanym urządzeniem wynosi okoáo
10 metrów.
f) Wszelkie przeszkody znajdujące siĊ pomiĊdzy
odbiornikiem radiowym a urządzeniem mogą
powodowaü zmniejszenie zasiĊgu dziaáania.
Odáączanie urządzenia z funkcją
Bluetooth
®
Nacisnąü i przytrzymaü przez 2-3 sekundy przycisk Pair
(parowanie) w celu odáączenia urządzenia z funkcją
Bluetooth
®
. Symbol „BLUETOOTH” nie bĊdzie juĪ dáuĪej
wyĞwietlany na ekranie, co oznacza wyáączenie funkcji
Bluetooth
®
.
àadowanie za pomocą portu zasilającego
USB (Rys. 10)
Z przodu odbiornika radiowego znajduje siĊ port USB.
Poprzez port USB istnieje moĪliwoĞü áadowania
urządzenia USB.
1. Podáączyü urządzenie USB, takie jak iPod, MP3 lub
odtwarzacz CD przy uĪyciu przewodu USB
dostĊpnego na runku.
2. Aby wáączyü odbiornik radiowy, naleĪy nacisnąü
przycisk Power (zasilanie).
3. Nie ma znaczenia, czy odbiornik radiowy jest zasilany
prądem AC, czy na baterie, odbiornik radiowy moĪe
áadowaü urządzenie USB, gdy jest on wáączony oraz
jest w trybie FM, BT lub AUX, co jest wskazywane,
gdy zewnĊtrzne Ĩródáo audio jest podáączone.
Uwaga:
Nie moĪna áadowaü urządzeĔ USB w trybie AM, poniewaĪ
odbiór sygnaáu odbiornika radiowego staje siĊ bardzo
sáaby podczas áadowania urządzenia USB.
• Maksymalna gáoĞnoĞü gáoĞnika zostanie zmniejszona
w przypadku
áadowania za pomocą USB.
•WejĞcie USB moĪe zapewniü maksymalne zasilanie o
natĊĪeniu prądu 1 A i napiĊciu 5 V.
WaĪne:
• Przed podáączeniem urządzenia USB do áadowarki
naleĪy zawsze utworzyü kopiĊ zapasową danych
znajdujących siĊ na urządzeniu USB. W przeciwnym
wypadku istnieje ryzyko utraty danych z jakichkolwiek
przyczyn.
• àadowarka moĪe nie doprowadzaü zasilania do
niektórych urządzeĔ USB.
• W przypadku nieuĪywania lub po áadowaniu naleĪy
wyjąü przewód USB i zamknąü osáonĊ.
•Nie podáączaü Ĩródáa zasilania do portu USB. W
przeciwnym wypadku istnieje ryzyko poĪaru. Port USB
przeznaczony jest wyáącznie do áadowania urządzeĔ
niskonapiĊciowych. Zawsze umieszczaü osáon
Ċ na
porcie USB w przypadku braku áadowania urządzenia
niskonapiĊciowego.
•Nie wsuwaü Īadnych gwoĨdzi, przewodów itp. do portu
zasilającego USB. W przeciwnym wypadku zwarcia
elektryczne moĪe spowodowaü wydostawanie siĊ
dymu lub poĪar.
•Nie podáączaü wejĞcia USB do portu USB komputera,
poniewaĪ istnieje duĪe prawdopodobieĔstwo
uszkodzenia urządzeĔ.
KONSERWACJA
UWAGA:
• Nie wolno uĪywaü benzyny, benzenu, rozpuszczalnika,
alkoholu itp. Substancje takie mogą spowodowaü
odbarwienia, odksztaácenia lub pĊkniĊcia.
Dane techniczne:
Dane dotyczące zasilania
Zasilacz prądu zmiennego
12 V DC/1 200 mA, Ğrodkowy
wtyk dodatni
Akumulator UM-3 (wielkoĞci AA) x 2 jako
akumulator zapasowy
Zespóá akumulatorów:
7,2 V - 10,8 V
Akumulator wsuwany:
14,4 V - 18 V
Zakres czĊstotliwoĞci FM 87,50-108 MHz
(0,05 MHz/krok)
AM (MW) 522-1 629 kHz
(9 kHz/krok)
Bluetooth
®
Nr identyfikacyjny QD Bluetooth
®
58625
(Znak sáowny i logo Bluetooth
®
są
zarejestrowanymi znakami
towarowymi naleĪącymi do
Bluetooth SIG, Inc.)
Wersja Bluetooth
®
4.0
Profile Bluetooth
®
A2DP/SCMS-T
Moc transmisji moc wg specyfikacji Bluetooth
®
,
klasa 2
Zakres transmisji Maks. 10 m (róĪni siĊ w
zaleĪnoĞci od warunków
korzystania)
Obsáugiwany kodek SBC
Kompatybilny profil Bluetooth
®
A2DP
Charakterystyka obwodu
GáoĞnik 3,5 cala, 8 omów x 2
Moc wyjĞciowa 7,2 V: 0,5 W x 2
10,8 V: 1,2 W x 2
14,4 V: 2,2 W x 2, 18 V: 3,5 W x 2
Gniazdo wejĞcia ĝred. 3,5 mm (wejĞcie AUX 1/
AUX 2)
System antenowy FM: giĊtka antena
AM: antena prĊtowa
Wymiary (S x W x G) w mm
282 x 294 x 163
Masa 4,3 kg (bez akumulatora)

95

www.makita.com
Makita Europe N.V.
Makita Corporation
3-11-8, Sumiyoshi-cho,
Anjo, Aichi 446-8502 Japan
Jan-Baptist Vinkstraat 2,
3070 Kortenberg, Belgium
ALA
DMR106-9L-PL-0216
-
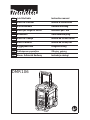 1
1
-
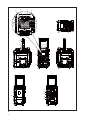 2
2
-
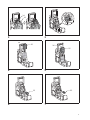 3
3
-
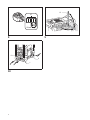 4
4
-
 5
5
-
 6
6
-
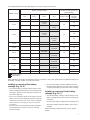 7
7
-
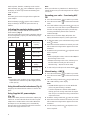 8
8
-
 9
9
-
 10
10
-
 11
11
-
 12
12
-
 13
13
-
 14
14
-
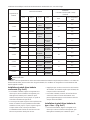 15
15
-
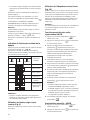 16
16
-
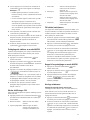 17
17
-
 18
18
-
 19
19
-
 20
20
-
 21
21
-
 22
22
-
 23
23
-
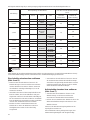 24
24
-
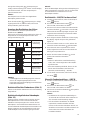 25
25
-
 26
26
-
 27
27
-
 28
28
-
 29
29
-
 30
30
-
 31
31
-
 32
32
-
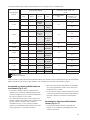 33
33
-
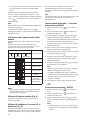 34
34
-
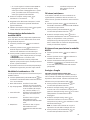 35
35
-
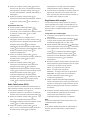 36
36
-
 37
37
-
 38
38
-
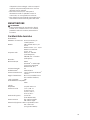 39
39
-
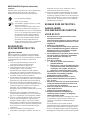 40
40
-
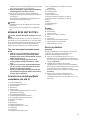 41
41
-
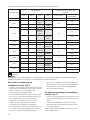 42
42
-
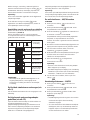 43
43
-
 44
44
-
 45
45
-
 46
46
-
 47
47
-
 48
48
-
 49
49
-
 50
50
-
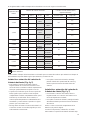 51
51
-
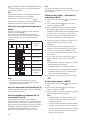 52
52
-
 53
53
-
 54
54
-
 55
55
-
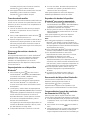 56
56
-
 57
57
-
 58
58
-
 59
59
-
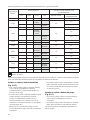 60
60
-
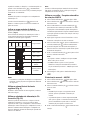 61
61
-
 62
62
-
 63
63
-
 64
64
-
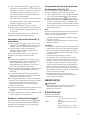 65
65
-
 66
66
-
 67
67
-
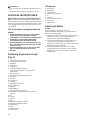 68
68
-
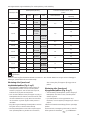 69
69
-
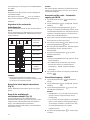 70
70
-
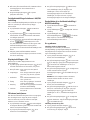 71
71
-
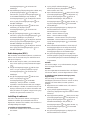 72
72
-
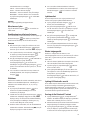 73
73
-
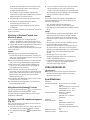 74
74
-
 75
75
-
 76
76
-
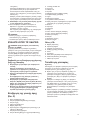 77
77
-
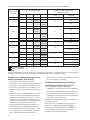 78
78
-
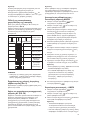 79
79
-
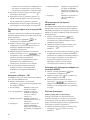 80
80
-
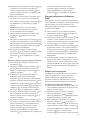 81
81
-
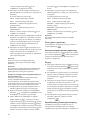 82
82
-
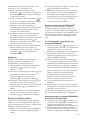 83
83
-
 84
84
-
 85
85
-
 86
86
-
 87
87
-
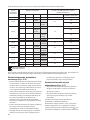 88
88
-
 89
89
-
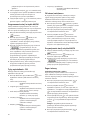 90
90
-
 91
91
-
 92
92
-
 93
93
-
 94
94
-
 95
95
-
 96
96


en otros idiomas
- français: Makita DMR106 Manuel utilisateur
- italiano: Makita DMR106 Manuale utente
- Deutsch: Makita DMR106 Benutzerhandbuch
- Nederlands: Makita DMR106 Handleiding
- português: Makita DMR106 Manual do usuário
- dansk: Makita DMR106 Brugermanual
- polski: Makita DMR106 Instrukcja obsługi
- Türkçe: Makita DMR106 Kullanım kılavuzu
- română: Makita DMR106 Manual de utilizare
Artículos relacionados
-
Makita XT705PT Manual de usuario
-
-
-
-
-
-
-
Makita BMR100 Manual de usuario
-
-
Otros documentos
-
Sangean DCR-200 Instrucciones de operación
-
 Sangean Electronics Sangean RCR-10 Manual de usuario
-
Sangean PR-D4BT Manual de usuario
-
Sangean MMR-99 Manual de usuario
-
Metabo RC 14.4 - 18 El manual del propietario
-
Panasonic EY37A2 El manual del propietario
-
-
basicXL BXL-HDR10 Especificación
-
Pulsar DNV Battery Packs El manual del propietario
-
Milwaukee M18 RC Original Instructions Manual
