
Double 30" Upper
Convection Self-Cleaning
Built-in Wall Oven
Horno El_ctrico
de Autolimpieza
Models, Modelos 91 1.41885, 41889
r I"l ir,rl II
Z
I
ZI
O
p,,
229c4020P271
(SR-10467)
Sears, Roebuck and Co.,
Hoffman Estates, IL 60179 U.S.A. www.sears.com

SELF-CLEANING
UPPERCONVECTIONOVEN
TABLEOFCONTENTS
Oven Safety ..................................3-4
Features of Your Oven ............. 5
Removal of Packaging Tape 1, 5
Oven Control, Clock, Timer ....... 6
Control Display .......................... 7
Clock ........................................... 8
Kitchen Timer ................................ 8
Tones ............................................ 9
F Code ...................................... 9
Convection Baking Tips ........ 10
Convection Roasting Tips ........11
Oven Cooking Tips ......... 12-14
Setting Convection Bake
and Roasting ............................. 15
Setting Bake ............................ 16
Broiling .................................... 17
Setting Special Features ,, 18-19
Self-Cleaning Cycle ............ 20-21
Control Panel ............................ 22
Broiler Pan and Grid .............. 22
Removable Floor ..................... 22
Oven Light Bulb .......................... 23
Oven Racks ........................... 24
Oven Door ................................ 24
Before Calling for
Service .................................... 25=26
Temperature Adjustment ....... 27
Warranty .................................... 28
Consumer Service Numbers 56
For your convenience and future reference, please write down your model
and serial numbers in the space provided. They are located on the front
frame behind the oven door.
MODEL NUMBER:
SERIAL NUMBER:
© Sears, Roebuck and Co,
2

IMPORTANTSAFETYINSTRUCTIONS
SAVE THESE INSTRUCTIONS
Read all instructions before using this appliance. When using gas or
electrical appliances, basic safety precautions should be followed,
including the following:
IMPORTANT: To insure safety for
yourself, family and home, please
read your Owner's Manual carefully.
Keep it handy for reference Pay
close attention to Safety Sections BE
SURE your appliance is installed and
grounded by a qualified technician
• DO NOT leave children alone or
unattended near an appliance in
use
o TEACH CHILDREN not to play
with controls or any part of the
appliance, and not to sit, climb or
stand on the door, or any part of
the appliance,
• CAUTION: NEVER STORE items
of interest to children in cabinets
above the appliance Children
climbing on an appliance could be
seriously injured.
o KEEP THIS book for later use
o NEVER TRY to repair or replace
any part of the appliance unless
instructions are given in this
manual, AII other work should be
done by a qualified technician,
• NEVER USE your appliance for
warming or heating the room
• ALWAYS KEEP combustible wall
coverings, curtains, dishcloths,
towels, potholders and other linens
a safe distance from the appliance
• NEVER USE a towel or other bulky
cloth as a potholder Make sure the
potholder is dry Moist potholders
could cause steam burns DO NOT
let potholders touch hot surfaces
o ALWAYS KEEP the oven area free
from things that will burn Food,
wooden utensils, grease buildup,
gasoline and other flammable
vapors or liquids could catch fire,,
Plastic utensils could melt, and
canned foods could explode Your
appliance should never be used as
a storage area.,
• ALWAYS KEEP your appliance
clear of things that wilt burn
(gasoline and other flammable
vapors or liquids)
° NEVER HEAT unopened food
containers Pressure buildup can
cause the container to burst and
cause injury
o NEVER LEAVE containers of fat or
drippings in your oven
• NEVER TRY to clean a hot surface
Some cleaners produce noxious
fumes, and wet cloths or sponges
could cause steam burns,
* NEVER WEAR Ioose4itting clothing
when using your appliance,
o BE SURE the oven is securely
installed in a cabinet that is firmly
attached to the house structure
3

IMPORTANTSAFETY
INSTRUCTIONS
• DO NOT touch heating elements,
surfaces near them, or interior oven
surfaces These may be hot enough to
cause burns even though they are
dark in color During and after use, do
not touch or let clothing or flammable
material contact the elements or hot
surfaces until they have had time to
cool Other surfaces near the oven
vent openings, oven door and
window may also be hot enough
to cause burns
o PLACE OVEN RACKS in the desired
position while the oven is coot If racks
must be moved while oven is hot, do
not let potholder contact the hot oven
element.
• AFTER BROILING, always take the
broiler pan and grid out of the oven
and clean them Leftover grease in the
broiler pan could catch fire the next
time you use your oven
• ALWAYS USE care when opening the
oven door Let hot air and steam
escape before moving foods
• NEVER USE aluminum foil to line the
oven bottom Improper use of foil
could start a fire, or electrical shock
could result
• NEVER BLOCK the oven vent opening
• CLEAN ONLY the parts listed in this
manual. Follow all cleaning instructions
• NEVER RUB, move, clean or damage
the door gasket on self-cleaning ovens
It is essential for a good seal
• NEVER TRY to clean utensils,
cookware, removable parts or broiler
pan and grid in the self-clean cycle.
• DO NOT USE oven cleaners - No
commercial oven cleaner or protective
coating of any kind should be used in
or around any part of the oven
• IF THE SELF-CLEANING mode
malfunctions, turn the oven off and
disconnect the power supply. Have it
serviced by a qualified technician
IMPORTANT SAFETY
NOTICE!
The California Safe Drinking Water
and Toxic Enforcement Act requires
the governor of California to publish
a list of substances known to the
state to cause birth defects or other
reproductive harm and requires
businesses to warn their customers
of potential exposure to such
substances. The fiberglass
insulation in a self-cleaning oven
will give off a very small amount
of carbon monoxide during the
cleaning cycle. Exposure can be
minimized by venting with an open
door or window or using a
ventilation fan or hood.
IMPORTANT: The health of some
birds is extremely sensitive to the
fumes given off during the self-
cleaning cycle of any oven. Move
birds to another well-ventilated
room.
READ AND UNDERSTAND
THIS INFORMATION NOW!
Be sure everyone in your home
knows what to do in case of fire.
Never use water on a grease fire;
it will only spread the flames.
OVEN FIRE:
Do not try to move the pan!
1. Close the oven door and turn
controls off
.
If fire continues, carefully open the
door, throw baking soda on the fire,
or use a dry chemical, foam
or halon type extinguisher
4

OPERATION
Self-Clean
Automatic
Door Late
(both
Broil Element
(both ovens)
Broiler Pan
and Grk
Convection Fan
& Heating
Element
Location
Model & Serial
Number Location,
(behind upper
door)
Oven Vent
Location
(behind grille
both ovens)
FEATURESOF YOUROVEN
Oven Control
\
Oven Light
(both
ovens)
Oven Rack Guides
(both ovens)
Removable
"Oven Door
(both ovens)
Self-Cleaning
Oven Interior
(both ovens)
Hidden Bake Removable Oven
Elemc Racks (both
(both ovens) ovens)
Self-Cleaning
Door Gasket
(both ovens)
To remove the adhesive left from packaging tape, use household dishwashing
liquid, mineral oil or cooking oil With a soft cloth rub into the area and allow to
soak, Rinse and dry well, Repeat procedure using an appliance polish to insure
no damage is done This should be done before the oven is turned on for
the first time. The tape cannot be removed once the oven has heated.
Packaging tape may be found in the following areas: door handle, control panel
area, door trim and oven area

OPERATION
OvenControl, Clock and Timer
Your new touch pad oven control will allow you to set various functions with ease
Below are the different types of functions and a description of each
BAKE -- Cooks foods in the traditional
oven with a temperature range of I70°F
to 550°F.
BROIL -- Cooks foods at 550°F HI broil
or 450 ° LO broil from the direct heat of
the upper element. Broiling should be
done with the door opened to the broil
stop position
CLEAN -- Cleans the inside area of the
oven for you. When the cycle is finished,
the oven will turn off automatically.
NOTE: The oven door will
automatically latch and wilt only
unlatch once the oven has cooled
down
will turn on automatically at the time you
have set, When DELAY START TIME
is used with OVEN COOKING TIME,
the oven will also turn off automatically,
at the end of the cooking time.
HOUR MIN
@@
@
TEMP
The HOUR/MIN LIP and
DOWN arrow pads set the
time of day, length of
cooking time, length of
cleaning time, the delayed
start time and the time set on
the Kitchen Timer
The TEMP UP and DOWN
arrow pads set the
temperature used for
cooking
CONVECTION BAKE -- Cooks food
with hot air circulated over and around
foods by a convection fan, located at the
back of the oven
CONVECTION ROAST -- Seals juices
inside the meat while creating a golden
brown exterior
Set the amount of time you
want foods to cook or the oven
to clean. The oven turns off
automatically at the end of this
time
Set the time of day you want
the oven to turn on, The oven
The START pad must be
pressed to activate any oven
function
The CLEARIOFF pad is
used to cancel any oven
function and the end of cycle
tone It will not cancel the
Clock or Kitchen Timer,
The KITCHEN TIMER pad is
used to turn the Kitchen
Timer on or off it will not
control any of the other oven
functions,
The CLOCK pad is used to
set the time of day,
Turns oven light on or off.
6

OPERATION
ControlDisplay
Oven Temperature
_ Indicators "_=
101.o° 1 1 fs l.ol,olo tf.olc _ 7 "i
I I I
Timed Function Indicators Timed Functions Timed Function
Indicators
The Control Display is an easy
reference for using your oven control,
Below are descriptions of how the
Control Display works
OVEN TEMPERATURE
INDICATOR -- This indicator has a
multiple purpose
- Displays the temperature
o Displays error code "ERR" --
If the oven temperature indicator
flashes "ERR", then you have set
an invalid time or temperature
° Displays Oven Problems i
If your control flashes "F" and
a number or letter, you have
experienced an oven problem
Please read the section on
F-CODES in your manual.
"ON" INDICATOR -- Will light when
the oven turns on
SET INDICATORS -- The set
indicator will flash in combination
with an oven function or timed
function to let you know you need to
set a time or temperature Example:
"SET" and "BAKE" will flash to
let you know you need to set the
bake temperature.
TIMED INDICATOR -- Displays the
time of day, cooking time, delay start
time, cleaning time or the time set on
the kitchen timer.
° Displays reminder code "PUSH
START"-- If the time indicator
flashes the word "PUSH START",
then you need to press the START
pad to activate your setting
OVEN FUNCTION INDICATORS--
Displays which oven function has
been set, when the oven door locks,
and if the function is delayed,

OPERATION
Clockand Timer
The clock must be set for the correct
time of day before a delayed oven
function can work properly The time
of day cannot be changed during a
timed oven function, but can be
changed during a bake or broil
function.
HOW TO SET THE CLOCK
@@
1. Press the CLOCK pad
2. Press the HOUPJMIN UP and/or
DOWN arrow pads to set the time
3. Press the START pad,
RECALL THE CLOCK
While using your oven for cooking,
press the CLOCK pad if you wish to
check the time of day The current
time of day wil! show in the display
POWER FAILURE
If you have experienced a power
failure, the time will flash in the display
and wilt be incorrect Reset your
clock
Any oven cooking function that was in
process will need to be reset,
The Kitchen Timer is used to time
cooking processes or other
household activities. It does not
control the oven. It can be set for up
to 9 hours and 59 minutes, It will
count down in minutes until the LAST
60 SECONDS is reached, then the
control will beep once When the
countdown reaches ZERO, the
control will beep 3 times followed by
one beep every 6 seconds until the
KITCHEN TIMER pad is pressed The
6 second beep can be removed for
future cycles if desired For directions
on removing this continuous beep,
see Tones on the following page
HOW TO SET THE TIMER
1. Press the KITCHEN TIMER pad.
2. Press the HOUPJMIN UP and/or
DOWN arrow pads to set time
3. Press the START pad
4. When the countdown has reached
zero, press the KITCHEN TIMER
pad to turn off the beepr
To cancel the timer during the
countdown, press the KITCHEN
TIMER pad TWICE
8

OPERATION
OvenControl,ClockandTimer
Your new control has a series of tones
that will sound at different times
These tones may sound while you set
the control for an oven function, or at
the end of the oven function It will also
alert you that there may be a problem
with the functions° Below are the types
of tones and a brief description of
each
TONES WHILE SETTING THE
CONTROL - When you press a touch
pad you wilt hear a beep, This beep
wilt let you know you have placed
enough pressure on the pad to activate
it (The arrow pads do not beep )
END OF TIMED CYCLE TONE - At
the end of a timed cooking function,
you will hear 3 short beeps followed by
1 beep every 6 seconds, This 6 second
beep wilt continue to sound until the
CLEAR/OFF pad is pressed or you
may select the speciai feature to cancel
this 6 second beep from sounding at
the end of future cycles
TO CANCEL THE 6 SECOND BEEP
1. Press and hold the BAKE and
BROIL pads, at the same time for
3 seconds, until the display shows
"SF."
2. Press the KITCHEN TIMER pad
The display will show "CON
BEEP" (continuous beep)
3. Press the KITCHEN TIMER pad
again, The display will show
"BEEP" (beep canceled)
4. Press the START pad to cancel the
6 second beep and leave the
special feature mode
If you would like to return the 6 second
beep, repeat steps above until the
display shows your choice and press
the START pad
ATTENTION TONE - This tone will
sound if you make an error or an
oversight is made while setting an
oven function
Examples would be:
a. Setting a clean cycle and the oven
door is not properly closed
b. Setting function and not pressing the
START pad
c. Pressing an additional function pad
without first setting a temperature or
time
Any of these can be quickly identified
by watching the display
PREHEAT TONE - When you set
an oven temperature, the oven
automatically starts to heat When the
temperature inside the oven reaches
the temperature you have set, a tone
will sound to let you know the oven is
ready for baking
If the control beeps while the display
is showing "F" and a number or letter
such as "F-4" or "Fr' there may be
a problem with the control or oven
Simply press the CLEAR/OFF pad
and wait about an hour. Try setting the
function again If the code repeats,
write down the flashing code and call
for service Tell the technician what
code was flashing
9

OPERATION
ConvectionBakingTips
Convection Baking uses heated air
that is circulated over and around
foods by the convection fan located
in the back of the oven. When
convection baking, cooking
temperatures used in recipes
should be reduced 25 ° E.
METAL OR GLASS
Any type cookware will work in
the convection oven. However,
metal pans heat faster and are
recommended. Glass pans cook
more slowly.
PAPER OR PLASTIC
Heat-resistant paper and plastic that
is recommended for regular ovens
may be used in your convection oven.
Because heated air is circulated
evenly throughout the oven, foods
can be baked with excellent results
on 2 or 3 racks at a time When using
mufti-rack baking, the cooking time
may be longer and foods may not be
as evenly browned as using only
one rack
During any oven operation you may
hear a fan noise. This is the internal
cooling fan that keeps all electrical
parts from overheating It is not
uncommon for this fan to keep
running even after the oven is
turned off.
A convection fan will run while
convection cooking The fan will turn
off when the door is opened
When Convection Baking or Roasting,
as the number of rack positions used
increase, steam may be noticeable as
it escapes from the oven vent located
just above the oven doo_
When baking on 3 rack positions,
place the first rack on position 1, the
second rack on position 3, and the
third rack on position 5
• For cooking foods on 3 rack
positions.
° For large quantities of cooking
° Great for cooking biscuits,
brownies, angel food cake
and bread
10

OPERATION
ConvectionRoastingTips
During Convection Roasting, heat
comes from the top element. The
convection fan circulates the heat
evenly around the food,
Meats cooked in a convection oven are
dark brown on the outside and tender
and juicy on the inside, In most cases
cooking time will be less when using
the Convection Roast feature,
Use the recommended roasting
temperature, Preheating is not
necessary Check foods at the end of
suggested time You may choose to
cook longer.
When you are Convection Roasting,
you should use the broiler pan and
grid that came with your new oven
The pan is used to catch grease
spills and the grid is used to prevent
grease splatters,
To use the Pan and Grid
a. Place the rack in the lowest rack
position
b. Place the meat on the broiler pan
and grid
CONVECTION ROASTING GUIDE
Meats MinJIb,
Beef
Pork
Ham
Poultr_
Rib, Boneless rib, Top Sirloin
(3 to 5 Ibs.) Medium
Welt
Roast (3 to 5 Ibs)
Canned, Butt, Shank
(3 to 5 Ibs. fully cooked)
Whole Chicken
(2 112to 3 1/2 Ibs.)
Turkey, whole*
(18 to 24 ibs,.)
Unstuffed
(10 to 16 ibs)
Turkey Breast (4 to 6 lbSo)
24-28
28_32
23-27
14-18
24-26
8-11
7-10
16-19
Temp. (°F)
325 °
325 °
325 °
325 °
325 =
325 °
325 °
325°
Shield legs and breast
with foil to prevent
over-browning and
drying of skin,
The U,S, Department
of Agriculture
recommends to cook
meat and poultry
thoroughly--meat to
at least an INTERNAL
temperature of 160°F
and poultry to at least
an INTERNAL
temperature of t80°F.
Cooking to these
temperatures usua!]y
protects against food-
borne illness
*Stuffed birds generally require 30-45 minutes additional roasting time

OPERATION
OvenCookingTips
It is normal to have some odor when
using your oven for the first time. To
help eliminate this odor, ventilate the
room by opening a window or using
a vent hood
IMPORTANT: Never cover the oven
bottom or oven rack with aluminum foil.
Improper use can cause poor heat
flow, poor baking results, and may
damage the oven finish To prevent
staining from spiNovers, you may
place a piece of aluminum foil or a
cookie sheet below foods which may
spill over.
Opening the door often to check foods
wilt cause heat loss and poor baking
results..
Preheating is bringing the oven
temperature up to the temperature you
will be using during baking. Let the
oven preheat thoroughly when recipes
call for preheating
To prolong the life of your oven
light bulb, follow this helpful tip:
Always turn the light off when the
oven is not in use or during a clean
cycle. If your oven light is left on for
an extended period of time, the oven
will be warm when the door is opened
due to the heat generated from the
oven light bulb
The oven vent is Iocated just above the
door This area could become hot
during oven use. It is normal for steam
to come out of the vent and/or collect
moisture underneath when oven is in
use The vent is important for proper
air circulation Never block this vent.
Oven Vent
Location
In the back of the oven you will notice
a small tube. This is a heat sensor that
maintains the temperature of the oven
Never move or bend this tube.
Oven '_
Temperatu_._
Sensor
The low temperature zone of your oven
(between 170 ° and 200°F) is available
to keep hot cooked foods warm.
However, foods should not be kept
at these temperatures longer than
2 hours.
12

OPERATION
OvenCooking Tips
When using your convenient Delay
Start operation, foods such as dairy
products, fish, poultry, etc., should
never sit more than 1 hour before
cooking Room temperatures and the
heat from the oven light promote
bacterial growth
Baking results will be better if baking pans
are centered in the oven as much as pos-
sible. If baking with more than one pan,
place the pans so each has at least 1 to
1 1/2°of air space around it. Place pans
so one is not directly above the other
x
Most recipes for baking have been
developed using high-fat products
such as butter or margarine (80% fat
by weightithe federal requirement
for products labeled "margarine").
You will get poor results if cakes, pies,
pastries, cookies or candies are made
with low-fat spreads. Low-fat spreads
contain less fat and more water The
high moisture content of these
spreads affects the texture and flavor
of favorite baked recipes. The lower
the fat content of a spread product,
the more noticeable these differences
become. To ensure best results, use
margarine, butter or stick spreads
containing at least 70% vegetable oil
The Oven Temperature Sensor at the
back of the oven continuously senses
and controls the temperature inside
the oven To keep a constant set
temperature, the elements will cycle
(turn on and off during cooking)
FLAT COOKIE SHEETS, without
sides, allow air to circulate all around
the cookies for even browning
SHINY PANS reflect heat, and are
perfect for cakes and quick breads
that need a light brown crust
GLASS, DARK NON-STICK OR
DARKENED BY AGE BAKEWARE
absorbs heat, and can be used for yeast
breads, pie crust or foods that need a
brown crust. When these pans are
used, the oven temperature should be
reduced by 25°F.
/3

OPERATION
OvenCooking Tips
The oven racks are designed with
stops, a convenience as well as a safety
precaution The guides have a bump to
prevent the racks from tilting when
racks are pufled out of the oven This
design allows the racks to be inserted
in only one way
Bump in
Rack "_
Guzde
Your oven has seven (7) rack positions
The top position is only a guide.. It
cannot be used as a rack position
Guide
_7
_6
_5
_4
_3
_2
Always place oven racks in the
proper position while oven is cool.
CAUTION: When you are using the
rack in the lowest position (1), you will
need to use caution when pulling the
rack out. We recommend that you putl
the rack out several inches and then,
using two potholders, pull the rack out
by holding the sides of it The rack is
low and you could be burned if you
place your hand in the middle of the
rack and pull all the way out Be very
careful not to burn your hand on the
door when using a rack in the lowest
position (1)
You may feel that your new oven
cooks differently than the oven it
replaced We recommend that you
use your new oven a few weeks to
become more familiar with it, following
the times given in your recipes as a
guide If you feel your oven is too hot
or too cool for your cooking
preference, see Do It Yourself
Temperature Adjustment in the back
of this manual to make the adjustment.
14

OPERATION
ConvectionBakingandRoasting
• You may set Bake in both ovens at the
same time
° You may set a Timed Bake and
Traditional Bake at the same time
° You may set Timed Bake in both ovens
at the same time.
° You may set a Timed and Delay Bake
at the same time.
• You may set Delay Bake in both ovens
at the same time
CONVECTION
COOKING
@
TEMP
@
Press the Convection
Cooking BAKE or
ROAST pad.
2. Press the TEMP UP
and/or DOWN arrow
pads to set the oven
temperature you prefer
to use.
3. Press the START pad.
To set the oven to cook for a specific
time and turn off automatically
CONVECTION1. Press the Convection
COOKING
TEMP
@
1
Cooking BAKE or
ROAST pad
Press the TEMP UP
andlor DOWN arrow
pads to set the oven
temperature you prefer
to use
HOUR MIN
@@
Press the OVEN
COOKING TIME pad
Press the HOUR/MIN
UP and/or DOWN
arrow pads to set the
amount of time you
prefer your foods to
cook
Press the START pad
To set the Oven to turn on at a later time
of day, cook for a specific amount of
time and turn off automatically
CONVECTION 1,
COOKING
@
TEMP
@
Press the Convection
Cooking BAKE or
ROAST pad
Press the TEMP UP
and/or DOWN arrow
pads to set the oven
temperature you prefer
to use
HOUR MIN
@@
3. Press the OVEN
COOKING TIME pad
4. Press the HOURtMIN
UP and/or DOWN
arrow pads to set the
amount of time you
prefer your foods to
cook
5. Press the DELAY
START TIME pad
HOUR MIN
@@
Press the HOURIMIN
UP and/or DOWN
arrow pads to set the
time of day you prefer
the oven to turn on
Press the START pad
15

OPERATION
Baking
1. Press the BAKE pad
(_ 2. Press the TEMP UPand/or DOWN arrow
TEMP pads to set the oven
temperature you
prefer to use
3. Press the START
pad
To set the oven to cook for a specific
time and turn off automatically
TEMP
@
Press the BAKE pad
Press the TEMP UP
and/or DOWN arrow
pads to set the oven
temperature you prefer
to use
3. Press the OVEN
COOKING TIME
pad
HOUR MIN
Press the HOURIMIN
UP and/or DOWN
arrow pads to set the
amount of time you
prefer your foods to
cook
5. Press the START pad
To set the oven to turn on at a later
time of day, cook for a specific amount
of time and turn off automatically
(_) 1, Press the BAKE pad,
@
TEMP
@
2_
Press the TEMP UP
and/or DOWN arrow
pads to set the oven
temperature you
prefer to use
3. Press the OVEN
COOKING TIME
pad
HOUR MIN
@@
HOUR MIN
Press the HOUR/MIN
UP and/or DOWN
arrow pads to set the
amount of time you
prefer your foods to
cook
Press the DELAY
START TIME pad
Press the HOURIMIN
UP and/or DOWN
arrow pads to set the
time of day you
prefer the oven to
turn on
7. Press the START
pad
These oven operations may be used
when roasting. The oven will cut off
at the end of the cooking time unless
the cook and HOLD feature has been
activated.
16

OPERATION
Broiling
Broiling is cooking by direct heat from
the upper element The oven door
should remain open to the broil stop
position during broiling
it is not necessary to preheat the oven
when broiling. Use the broiler pan and
grid that came with your oven Both
are designed for proper drainage of
fat and liquids
r
lf foil is used it must be
molded tightly to the grid
and slits cut into the foil
to match those of the
grid. This allows fats and liquids
to drain into the broiler pan,
preventing fire and excessive
smoke.
Always remove the
pan and grid from
the oven. Storing or
forgetting a soiled
broiler pan in the oven is a
potential smoke or fire hazard.
The US Department of Agriculture
recommends to cook meat and pouItry
thoroughly--meat to at least an
INTERNAL temperature of 160°F and
poultry to at least an INTERNAL
temperature of 180°F Cooking to these
temperatures usually protects against
food-borne illness
The closer you place foods to the broil
element, the faster foods brown on
the outside yet remain red to pink in
the center
Moving meats away from the element
will allow the meat to cook to the center
while browning on the outside. Cook
side 1 at least 2 minutes longer than
side 2 If your oven is connected to 208
volts, you may want to use a higher
rack position and/or broil foods longer
The size, weight, thickness, starting
temperature and your preference of the
doneness of the meat will affect
broiling This chart is based on meats
at refrigerator temperature.
FOOD
Steak 1" thick
Ground beef
patties
1" thick
Pork Chops -
1/2" thick
,,Fish Ifillets)
Chicken (pieces)
RACK TOTAL
POSITION TIME (M!N.)
3 9-11
3 16-18
3 27-29
3 i t1-13
2 45-55
la. Press the BROIL pad (This will
automatically set HI Broil),
lb. While the set indicator is flashing
in the display, press the BROIL
pad again if you prefer to use Lo
Broil Use Lo Broil to cook foods
such as poultry or thick cuts of
meat thoroughly without over-
browning them
2. Press the START pad
3. When broiling is finished, press the
CLEARIOFF pad,
17

OPERATION
Setting Special Features
Your new touch pad control has addi-
tional features that you may choose to
use After making your selection, if you
want to change the setting, follow the
steps until the display shows your choice
The control is automatically set to turn off
the oven after 12 hours baking or 3 hours
broiling should you forget and leave the
oven on If you want to remove this feature:
1. Press and hold, at the same time, the
BAKE and BROIL pads for 3 seconds,
until the display shows "SF."
2. Press the DELAY START TIME pad.
The display shows "12Shdn" (12 hour
shut-off)
Press the DELAY START TIME pad
again, The display will show "no
Shdn" (no shut-off)
3, Press the START pad
Your control is set to use the 12 hour
clock. If you prefer to use the 24 hour
Military Time clock or black out the
display:
1. Press and hold, at the same time,
the BAKE and BROIL pads for 3
seconds, until the display shows
"SF."
2. (a) Press the CLOCK pad. The
display shows "12hro" tf this is your
choice press the START pad.
or
(b) Press the CLOCK pad
again The display will show"24hr."
Example: 5:00 on the 12 hour clock
will show 17:00 hours on the military
clock tf this is your choice press the
START pad.
or
(c) Press the CLOCK pad again.
The display will show "OFF" If this
is your choice press the START pad
The display will not show time. (The
Delay Start Time feature will not
operate )
Your oven control is set for the Fahrenheit
temperature selections. Most recipes are
given using the Fahrenheit scale You can
change this to use the Celsius selection
1. Press and hold, at the same time, the
BAKE and BROIL pads for 3 sec-
onds, until the display shows "SF."
2. (a) Press the BROIL pad° The
control display will show the degrees
sign and "F°. ''
(b) Press the BROIL pad again.
This will change F° (Fahrenheit) to
C° (Celsius)
3. Press the START pad
o You can set both ovens for self-clean
at the same time, but the second oven
will automatically delay the start time to
begin at the end of the first oven's
clean cycle.
° You can set delay start in both ovens
at the same time, but the second oven
will automatically delay the start time to
begin at the end of the first oven's
clean cycle
. You can set one oven to begin its clean
cycle now and set delay start in the
second oven for a later time
18

OPERATION
SettingSpecialFeatures
Your control will allow you to lock the
touch pads so they cannot be activated
when pressed If you're worried about
leaving the oven unsupervised, activate
this feature
1. Press and hold, at the same time,
the BAKE and BROIL pads for 3
seconds, until the display shows
"SF."
2. (a) Press the CLEAN pad
The display shows "LOC OFF"
(lockout off)
(b) Press the CLEAN pad again
The display will show "LOC ON"
(lockout on)
3. Press the START pad
This feature can only be set when the
oven is not in use,
When this feature is on, the display will
show "LOC", if a touch pad is pressed
(This feature will not affect the Clock,
Timer or Oven Light pads )
This feature wilt automatically convert
the temperature you set for traditional
baking to convection cooking
1. Press and hold the CONVECTION
BAKE pad for 4 to 5 seconds
2. Press the TEMP UP or DOWN
ARROW pads to set the temperature
3. Press the START pad You will see
the converted temperature inthe dis-
play For example, if you entered
375° the display wil! show 350° This
conversion will need to be set each
time you use Convection Bake
Your new control has a cook and hold
feature for timed cooking only that will
keep hot cooked foods warm up to 3
hours after the timed cooking is finished
To activate this feature:
1. Press and hold, at the same time,
the BAKE and BROIL pads for
3 seconds, until the display shows
"SF."
2. (a) Press the OVEN COOKING TIME
pad The display will show "HLd
OFF."
,
(b) Press the OVEN COOKING TIME
pad again to activate the feature. The
display will show "HLd ON."
Press the START pad
This special feature will allow you to
change the speed; #1 means speed of
change is slow up to #5 which means
speed of change is fast, To set the
speed you prefer, follow these steps:
1. Press and hold, at the same time,
the BAKE and BROIL pads for 3
seconds, until the display shows
"SF."
2. Press the UP arrow pad The
display will show the current set
speed
3. Press the UP arrow to increase the
speed up to the number 5
or
Press the DOWN arrow pad to
decrease the speed down to the
number 1
4. Press the START pad
19

CAREANDCLEANING
Self-CleaningCycle
1,
.
Remove the broiler pan and grid.
oven racks, utensils and any foil
that may be in the oven
Soil on the front frame, and
outside the gasket on the door
liner will need to be cleaned
by hand,
Front Frame
_--_ Door Liner
Clean these areas with hot water,
soap-filled steel wool pads or
cleansers such as Soft Scrub ®to
remove any soil Rinse well with clean
water and dry
3. Wipe up any heavy spillovers on
the oven bottom
.
Do not clean the door gasket
The fiberglass material of the oven
door gasket cannot withstand
abrasion It is essential for the
gasket to remain intact If you
notice it becoming worn or
frayed, it should be replaced
The door gasket is designed to have
a 5"-6" gap at the bottom of the door
This allows for proper air circulation,
Door Panel Gasket
Door Liner _
It is normal for your oven door to give
the appearance of not having a good
seal against the oven, This is due to
the gasket The location of the gasket
on the door maintains a good seal and
prevents any heat loss,
i ,111i1,11111
r
_ tensils should never
be left in the oven
during a clean cycle.
The oven racks may
be cleaned during the self-clean
cycle, but will lose their luster
and become hard to slide. If you
choose to leave them in during
the cycle, wiping them with
vegetable oil after the cycle will
help them slide easier.
For the first clean cycle, vent
the room with an opened
window or hood vent. This will
reduce the odor when heating
new parts.
2O

CAREANDCLEANING
Self-Cleaning Cycle
The Clean Cycle, including cooldown
time, is automatically set for 4 hours,
but you may change this from 3 hours
if oven is lightly soiled, up to 5 hours if
oven is heavily soiled
1. Press the CLEAN
pad 4 hours will
show in the display
HOUR MIN "
@@
If you want to
change the length of
clean time press the
NOUP,JMIN UP and/
or DOWN arrow
pads
3. Press the START
pad,,
Simply press the CLEAR/OFF pad
You will need to wait for the oven
temperature to drop below the lock
temperature (approx 1 hour) before
attempting to open the door
After the cycle, you may notice some
white ash in the oven, Just wipe it up
with a damp cloth or sponge
If white spots remain, scrub them
with a soap-filled steel wool pad Be
sure to rinse thoroughly These are
usually deposits of salt that cannot
be removed during the cycle,
If for any reason you are not
satisfied with the cleaning results,
just repeat the cycle.
1. Press the CLEAN
pad
HOUR MIN
3.
HOUR MIN
@@
If you want to
change the length
of clean time press
the HOUPJMIN UP
and/or DOWN arrow
pads
Press the DELAY
START TIME pad
Press the HOURI
MIN UP and/or
DOWN arrow pads
to set the time you
prefer the clean
cycle to start.
Press the START
pad
21

CAREANDCLEANING
RemovableParts
CLEANING MATERIALS
• Dishwashing detergent
° Warm water
• Soft cloth
Do not use abrasive cleaners,
industrial cleaners or bleach.
CLEANING MATERIALS
° Dishwashing detergent
° Warm water
° Soap-filled scouring pad
° Commercial oven cleaner
TO CLEAN
Allow the pan to soak Sprinkle the
grid with dishwashing detergent and
cover with a damp cloth or paper
towel. Rinse and dry well. Scour as
needed You may also place both the
pan and grid in the dishwasher.
.
3.
When the oven is completely cooled
follow the steps below to remove and
replace the removable oven floor.
1. Remove oven door (see
procedures in "Removable
Oven Door" section)
Press down and pull out as shown
above.
When reinstalling the removable
floor, slide it al! the way to the
back.
I ' ii, iiuiiil,i
The oven is designed to have the
removable floor installed at all
times during cooking. Cooking
performance will be different if
the removable floor is removed.
Clean only as touch-up between
clean cycles Use dishwashing liquid,
warm water or a soap-filled steel
wool pad Rinse wetl after cleaning
and dry
NEVER USE OVEN CLEANERS IN
OR AROUND ANY PART OF THE
OVEN.
When cleaning, be sure not to bend
or displace the temperature sensor
located on the back wall of the oven.
22

CAREANDCLEANING
RemovableParts
r@ CAUTION: Disconnect
electrical power to the
oven at the main circuit
breaker or fuse box before
attempting to replace the oven
light bulb. Do not touch a hot
light bulb with wet hands or a
wet cloth. Wait until the bulb has
cooled and use a dry cloth.
Retainer
Bulb--. _ ._ Live Collar
t
Glass Cover _
TO REPLACE COVER
1. Place the tabs of the glass cover
into the grooves of the glass
retainer.
2. Turn the glass cover 1/4 turn in the
clockwise direction
3. Reconnect the electrical power to
the oven
For improved lighting inside the oven,
clean the glass cover frequently using
a wet cloth Caution: This should
only be done when the oven is
completely cool.
TO REMOVE THE COVER
1. Disconnect electrical power to the
oven at the main circuit breaker or
fuse box
2_
Grasp the glass cover and turn
1/4 turn counterclockwise until the
tabs of the glass cover clear the
grooves of the glass retainer
REPLACE THE LIGHT BULB
Unscrew the light bulb and replace it
with a 40-watt appliance bulb
23

CAREANDCLEANING
RemovableParts
CLEANING MATERIALS
° Dishwashing detergent
• Warm water
• Scouring pad or soap-fifled steed
wool pad
Burnp in Rackl_ _
Guide I_
Raised Back __
o,thoRaok
TO REMOVE
1. Pull the racks out to the stop lock
position
2. Pull up the front of the rack and
slide under the bump of the rack
guide
TO CLEAN
Clean with warm water and
detergent. For hard to remove stains,
gently scrub with a scouring pad or a
soap-filled steel woo! pad, Rinse
well
TO REPLACE
1. Place the raised back of the rack
onto the rack guides
2. Lift the front of the rack until the
raised back slides under the
bump of the rack guides
3. Slide the rack all the way back_
Broil Stop
Position
Hinge
TO REMOVE
1. Open the door to the broil stop
position,
2. Grasp the door at each side and
lift up and off the hinges DO NOT
LIFT DOOR BY THE HANDLE.
r
_ AUTION: When the
door is removed and
the hinge arms are at
the broil stop position,
as a precaution, cover the
hinge arms with toweling or an
empty paper towel roll. Do not
bump or try to move the hinge
arms while working in the oven
area. They could snap back
causing injury to the hands or
damage the porcelain finish of
the front frame.
TO REPLACE
1. Make sure the hinge arms are in the
broil stop position,
2. Lift the door by the sides
3. Line up the slots at the bottom edge
of the door with the hinge arms.
4. Slide the door down onto the hinge
arms as far as it wilt go
5. Close the door,
24

BEFORECALLINGFORSERVICE
To save you time and money, before making a service call check the list below
for any problem you may feet you have with the performance of your oven If
the problem is something you cannot fix, use the Consumer Service Numbers
located at the back of this guide When making any calls, have the Model
No., Serial No., Repair Parts list, Use and Care Guide and the Date of
Purchase available.
Oven malfunction
PROBLEM POSSIBLE CAUSE
i ,i, ,i ,, ,i ,, ,IIIMII,III !1,11,111111,11
The display of your
control is flashing "F"
followed by a number
or letter.
POSSIBLE SOLUTION
Press the CLEAR/OFF
pad Let the oven cool for
t hour and enter an oven
or cleaning operation If
code repeats, call for
service
Oven and oven
control will not work.
No power to oven.
Check the circuit breaker
or fuse Make sure the
power cord is plugged in
Oven temperature
seems inaccurate.
Oven will not
unlock.
Oven light will
not work.
The clock is in the
black-out mode
Oven control calibration
Clean cycle is not
finished
a. Light switch in off
position
See the "Setting Special
Features" section of this
guide.
See the temperature
adjustment instructions
following this section
Oven temperature must
drop below the lock
temperature before the
door will unlock
a=
b. Oven light bulb b.
loose or burned out
Oven did not clean
or results were poor.
a. Controls were not set a.
properly.
b. Oven was soiled b.
heavily
Check oven light
switch on the control
panel
Check the oven light
bulb
Check the self-cleaning
section of this manual
Heavy spillovers
should be removed
before the cycle is set
You can also repeat
the cycle after oven
has cooled
c. Clean cycle was
interrupted
c. The normal clean cycle
should last 4 hours
25

BEFORECALLINGFORSERVICE
PROBLEM
Oven smokes.
POSSIBLE CAUSE
a. Dirty oven
a_
b. Improper use of b.
aluminum foil.
c. Broiler pan containing c.
grease left in the oven,
POSSIBLE SOLUTION
............ ,, ,,, ,,,,,,,,,,,,,,,
Check for heavy
spiilover
Use of foil not
recommended
Clean pan and grid
after each use.
1,1,1
Foods do not bake
properly.
a_
Oven was not
preheated
b. Improper rack or pan
placement.
C.
Oven vent blocked or
covered
a. Be sure to preheat until
the tone sounds, when
the recipe calls for it
b. Maintain uniform air
space around pans and
utensils See cooking
tips section
c. Keep vent clear
Improper use of foil d.
d=
e. Improper temperature e.
setting for utensil
used
f. Oven temperature f.
needs adjustment
g. Oven and oven rack g.
not level
h. Oven controls h.
improperly set
i. Oven floor not in place i.
Racks should not be
covered during baking
Reduce temperature
25 degrees for glass or
dullldarkened pans
Check oven temperature
adjustment section
Check the installation
instructions for leveling
See the baking section
Replace the floor
i , !!_l '_ ' i'1 i1,11,11,,111111_
Foods do not broil a. Improper rack
properly, position
b. Oven preheated
c. Improper use of foil
d. Oven door closed
during broiling
e. Low voltage (208
Volts)
f. Improper broiling
time.
g. Oven controls
improperly set
i i
a. Check broil pan
placement; see broiling
section
b. Do not preheat when
broiling
c. Check broiling section
d. Open door to broil stop
e. Use higher rack
position and/or longer
cooking time
f. Check broiling chart in
broiling section
g. See the broiling section
26

"DOIT YOURSELF"
TEMPERATURE
ADJUSTMENT
You may feel that your new oven
cooks differently than the oven it
replaced We recommend that you
use your new oven a few weeks to
become more familiar with it,
following the times given in your
recipes as a guide
tf you think your new oven is too hot
(burning foods) or not hot enough
(foods are undercooked), you can
adjust the temperature yourself
The appearance and texture of foods
is a better indicator of oven accuracy
than oven thermometers, These
thermometers can vary by 20-40
degrees from the true temperature
of the oven In addition, the oven
door must be opened to read these
thermometers Opening the door will
change the temperature of the oven,
To decide how much to change
the temperature, set the oven
temperature 25 degrees higher
(if foods are undercooked) or
25 degrees lower (if foods are
burning) than the temperature in your
recipe, then bake The results of this
"test" should give you an idea of how
much the temperature should be
changed
+
1. Press and hold down
both the BAKE and
BROIL pads for 3
seconds, until the
display shows "SF."
3a.
TEMP
@
3b.
Press the BAKE
pad for the oven to
adjust A factory set
2 digit number will
show in the display,
usually "00."
if you think the oven
is not hot enough,
Press the TEMP UP
arrow pad to increase
(+) the temperature up
to +35°F
If you think the oven
is too hot,
Press the TEMP
DOWN arrow pad to
decrease (-) the
temperature down to
-35°F
4. Press the
START pad,
This increased or decreased
temperature setting will remain in
memory until the above steps are
repeated, A power failure will not
affect this setting
The broil, convection and self-clean
temperatures will not be affected.
Each oven will need to be adjusted
separately
27

BUILT-IN
WALLOVENWARRANTY
ULL ONE YEAR WARRANTY ON ALL PARTS
If, within one year from the date of installation, any part fails to function
properly due to a defect in material or workmanship, Sears will repair or
replace it, at our option, free of charge°
tf this product is subjected to other than private family use, the above warranty
is effective for only 90 days.
WARRANTY SERVICE IS AVAILABLE BY CONTACTING THE NEAREST
SEARS SERVICE CENTER IN THE UNITED STATES
This warranty gives you specific legal rights, and you may also have other
rights which vary from state to staten
Sears Roebuck and Coo Dept. 817 WA Hoffman Estates, IL 60179
To further add to the value of your Oven,
Buy a Sears Maintenance Agreement,
I Years of Ownership Coverage
1. Replacement of Defective Parts
2. Annual Preventive Maintenance
Check at your request
1st Year
W
MA
W -Warranty
2nd Year
MA
MA
3rd Year
MA - Maintenance Agreement
Kenmore Wall Ovens are designed, manufactured and tested for years of
dependable operation. Yet, any appliance may require service from time to
time. The Sears Maintenance Agreement offers you an outstanding service
program for your product..
The table above shows the additional benefits a Sears Maintenance
Agreement offers compared to a Sears Warranty.
Contact your Sears Sales Associate or local Sears Service Center to purchase
a Sears Maintenance Agreement°
28

HORNOA CONVECCiON
SUPERIORCONAUTOLIMPIEZA
Indice
Seguridad en el uso
de1 homo .................................... 30-31
Caracteristicas de su homo ...........32
C6mo sacar la cinta
de empaque .................................... 32
Control de homo, reloj,
cron6metro .................................. 33
Dial de control ............................... 34
Reloj ............................................... 35
CronOmetro de la cocina ............ 35
Tonos ......................................... 36
COdigo F ....................................... 36
Consejos para hornear
a convecci6n .......................................37
Consejos para asar a
convecciOn ..................................... 38
Consejos para cocinar
en et homo ........................... 39-41
COmo programar para hornear
y asar a convecci6n ...................... 42
C6mo hornear ............................. 43
CSmo asar a la parrilla .................... 44
Programas especiates .......... 45-46
Ciclo de autolimpieza ........... 47-48
Panel de control .............................. 49
Cacerota y parrilla para asar a la
parrilla ............................................... 49
Fondo removible ........................... 49
Foco de la iuz det homo .......... 50
Parrillas det homo ...................... 51
Puerta del homo ............................. 51
Antes de Ifamar para
un servicio .............................. 52-53
Ajustes a la temperatura ............... 54
Garantia ...................................... 55
N0meros de servicio para el
consumidor .............................. 56
Para su conveniencia y referencia futura, por favor escriba el n_mero de
modeio y serie en el espacio que se provee. Est_n ubicados en el marco
frontal detr_s de la puerta.
NUMERO DE MODELO: NUMERO DE SERIE:
© Sears,Roebuckand Co
29

INSTRUCCIONES
DESEGURIDADIMPORTANTES
GUARDE ESTAS INSTRUCCIONES
Lea todas las instrucciones antes de usar este aparato, Cuando use
aparatos a gas o el_ctricos, se deberian seguir precauciones de seguridad,
incluyendo io siguiente:
tMPORTANTE: Para garantizar su
seguridad, la de su familia y la de su
hogar, por favor lea su Manual def
Consumidor cuidadosamente Mant6ngalo
a la mano para referencias Ponga mucha
atenci6n alas secciones de seguridad
ASEGORESE que su estufa sea instalada
por un tecnico especializado y que haga
tierra adecuadamente
• NO DEJE a los nifios sin vigilancia cerca
de una estufa que se este usando.
• ENSEI_iE A LOS NIl;lOS A no jugar con
los controles o cualquier parte del
homo, no sentarse, subirse o pararse
sobre la puerta de! homo.
° PRECAUClON: NUNCA GUARDE
articutos que sean de interns para los
nifios en el panel trasero o en los
gabinetes sobre el homo Los niSos que
se suban sobre el homo podrian
resultar gravemente heridos
,, GUARDE ESTE iibro para un uso
futuro.
• NUNCA TRATE de reparar o
reemptazar una parte del homo a
menos que las instrucciones se den en
este manual. Todo otro trabajo deberia
ser hecho por un t6cnico especializado
• NUNCA USE su homo para entibiar o
calentar una habitaci6n
• S1EMPRE MANTENGA los
revestimientos combustibles de las
paredes, cortinas y otros patios a una
distancia prudente del homo
O
°
NUNCA USE una toalta u otro patio
abultado como agarradera Asegurese
que la agarradera est6 seca Las
agarraderas humedas podrian causar
quemaduras pot vapor. NO PERMITA
que los agarraderas toquen los
superficies para cocinar calientes
SIEMPRE MANTENGA el _rea del
homo despejada de cosas que se
podrian quemar Los alimentos, los
utensilios de madera, ta acumulaci6n
de grasa, la gasolina y otros vapores o
liquidos inftamabtes se podrian
incendiar. Los utensitios de plAstico se
podrfan derretir y tas comidas en
conservas podrian explotar, Su homo
nunca de deberia usar para almacenar
cosas
SIEMPRE MANTENGA el homo
despejada de cosas que se podrian
quemar (gasolina y otros vapores o
liquidos inflamables)
• NUNCA CALIENTE contenedores de
alimentos cerradoso El aumento de la
presi6n puede causar que e!
contenedor exptote y cause heridas
• NUNCA DEJE contenedores con grasa
o goteaduras dentro o cerca det homo
• NUNCA TRATE de limpiar una cubierta
caliente Algunos limpiadores producen
vapores tOxicos, y los patios o espenjas
mojadas poddan causar quemaduras
por vapor
NUNCA USE ropa suelta cuando use el
homo
ASEGURESE que el homo est_
instalado firmemente en un gabinete que
est_ bien pegado a fa pared.
30

INSTRUCCIONES
DESEGURIDAD
IMPORTANTES
,, NO TOQUE lassuperficies para calentar, fas
superficies cerca deelias o tas superficies
interiores,Estaspodrian estar suficientemente
calientespara quemar aunque se veande
coloroscuro Durantey despues del uso, no
toqueo permita que la ropa o materiales
inflamableshagan contacto con lassuperfi-
cies calientes hastaque hayan tenido tiempo
de enfriarse Lasotras superficies cerca de
lasventaniltasde ventitaciOndel homo,
puertasventanasy tambien podrfan estar
suficientemente catientes para causar
quemaduras
• COLOQUELAS PARRILLASDEL HORNO
en la posici6ndeseada mientras ethomo est_
frio Si lasparriltas se deben movermientras
el homo estacaliente, no permita que fa
agarradera haga contacto con el quemador
caliente del homo
• DESPUESDE ASARA LA PARRILLA,
siempresaque tacacerola y la parrillapara
asar del homo y timpielas Lossobrados de
grasaen la cacerola para asar podrian
incendiarse la pr6xima vez que usted use
el homo
,, SIEMPRETENGA CUIDADO cuando abra la
puerla del homo Dejeque e!aire catientey el
vapor escapen antes de mover los alimen!os
- NUNCA USEpapel de aluminiopara forrare!
rondo del homo El uso inadecuado del papel
de aluminiopodria resultaren un golpe de
corriente oen un incendio,
,, NUNCA OBSTRUYAta abertura de la
venlilaci6n del homo
• LIMPIE SOLAMENTE Ias partes que se
listan enesle manual Siga todaslas
instrucciones para la limpieza
• NUNCA FRIEGUE, mueva, limpie o dane el
selto de Ia puerta en los hornoscon
autolimpieza
. NUNCA TRATE de timpiarlos utensilios,
ollas, partesremovibleso facacerola y ta
parrilla paraasar en el ciclo de autolimpieza
,, NO USElimpiadores para homos - No se
deberia usar ningunaclase de timpiador para
homos dentroo airededor de cualquier parte
del homo
• St LA FUNCION DE AUTOLIMPIEZA
fatla, apague el homo y desconecte la
electricidad Hbgale un servicio por un
tecnico calificado
|ADVERTENCIA DE
SEGURIDAD IMPORTANTE!
California Safe Drinking Water and Toxic
Enforcement Act requiere que el
gobernador de California publique una
lista de substancias que el estado sepa
que producen defectos de nacimiento u
otros daSos reproductivos y requiere que
los hombres de negoclos adviertan a sus
clientes del contacto potencial a tales
substancias. El aislante de libra de vidrio
en el homo con autolimpieza emitir_ una
muy pequeSa cantidad de mon6xido de
carbono durante el ciclo de autolimpieza.
El contacto se puede minimizar ventilando
con una puerta o ventana abierta o
usando un ventilador o una campana de
ventilaci6n.
IMPORTANTE: La salud de algunos
p,_jaroses extremadamente sensitiva a
los vapores producidos por el ciclo de
autolimpieza de cualquier homo. Ponga
los p_jaros en otra habitaci6n que est_
bien ventilada.
;LEA Y COMPRENDA IESTA
INFORMACION AHORA!
Asegt_rese que todos en su hogar sepan
qu_ hacer en caso de incendio. Nunca use
agua sobre un incendio de grasa, esto
solamente extender,_ las llamas.
FUEGO EN EL HORNO:
iNo trate de mover la cacerola!
1. Cierre ta puerta del homo y apague los
controles
2o Si el incendio contin6a, cuidadosamente
abra ta puerta, arroje soda para cocinar
sobre el fuego, o use un extintor de
quimico seco, espuma o "halon"
31

OPERACION
Cerrojo
autom_tico para
autolim "
Elemento para
asar a la
(ambos hornos)
Cacerola y parrilta
para asar a la
parrilla
Ubicaci6n de
elemento
calentador y
ventilador
para
Ubicaci6n del
ndmero de
modelo y
Ventilaci6n del
horno (detrds de
la rejilla ambos
hornos)
Etemento para
hornear oct
(ambos hornos)
Sello de la puerta
para autolimpieza
(ambos hornos)
CARACTERISTICASDESUHORNO
Control de| horno
Ubicaci6n de la
luz del homo
(ambos hornos)
Guias para
del homo
(ambos hornos)
Puerta removible
homo (ambos
hornos)
Interior del horno
autolimpieza
(ambos hornos)
Parriilas del homo
removible (ambos
hornos)
Para sacar el residuo del adhesivo de la cinta de empaque, use detergente
liquido para platos, aceite mineral o aceite para cocinar Con un patio suave
frOtelos sobre e[ area y permita que se remoje Enjuague y seque bien, Repita el
procedimiento usando un pulidor para estufas para asegurarse que el homo no se dane
Esto se deberia hacer antes de encender al horno por primera vez. La cinta
no se puede sacar una vez que el homo se haya calentado. La cinta de
empaque se puede encontrar en las siguientes areas: manilla de la puerta, area
del panel de control, moldura de la puerta, y area del horno
32

OPERACION
ControlDelHomo,Relojy CronSmetro
I @ @@ @
® @ ®® @®
Su nuevo conlro! de homo a botones le permitir#,programar las funciones varias con facilidad
Mas abajo est_n los diferentes tipos de funciones y la descripci6n de cada uno
HORNEAR - Cocina los alimentos en el homo
tradicional a una temperatura que varfa de
170°F a550°F,
ASAR A LA PARRILLA - Asa los alimentos
en ALTO a 550°F o en BAJO a 450°F a calor
directo del elemento superior Etasado a la
parrilla se debe hacer con la puerta abierta
en la posici6n de tope para asar a la parrilta
LIMPIEZA - Limpia el area interior del homo
por usted Cuando el cicto termina, el homo
se apagar_ automaticamenle
NOTA: La puerta del homo se cerrar,_ con
cerrojo autom,_ticamente y el cerrojo se
abrira s61ocuando el homo se haya
enfriado
HORNEAR A CONVEOClON - Hornear con
aire caliente que es circulado sobre y
atrededor de los alimentos pot el ventilador
de convecci6n ubicado en [a parte lrasera
de! homo
ASAR A CONVECClON - Sella los jugos
dentro de la came mientras crea un exterior
care dorado
_ rograma la cantidad de tiempo
en que usted desea cocinar los
alimentos o en que el homo se
limpie El homo se apaga
automaticamente al final de esta
cantidad de tiempo
_ Programa la hora del dfa en la
cuat usted desea que el homo se
@@
HOUR MtN
@@
@
TEMP
encienda El homo se encender,_
automalicamente a la hora que
usted haya seleccionado, Cuando
se use el COMIENZO DEMORADO
(DELAY START) con TIEMPO
PARA COCINAR, et homo se
apagara automaticamente at
t_rmino del ciclo para cocinar
Los botones con las flechas para
SUBIR y/o BAJAR las HORASI
MINUTOS programan ta hora del
dia, la cantidad de tiempo para
cocinar, la cantidad de tiempo
para limpiar, ta hora para un
comienzo demorado, Ja
temperatura det homo y la hora
det cron6metro de la cocina
Empuje los botches con las
flechas para SUBIR y BAJAR
para seleccionar la temperatura
que desea usar
El bot6n START debe empujarse
para activar cualquier funci6n det
homo
El bot6n CLEAR/OFF se usa para
cancelar cualquier funci6n del
homo y el tono de fin de ciclo
No cancelar_ el Reloj o et
Cron6metro de la Cocina.
El bot6n KITCHEN TIMER
(ENCENDIDO/APAGADO) se usa
para encender o apagar et
Cron6metro de la Cocina No
controtara ninguna otra funci6n
del homo
El bot6n del RELOJ se usa para
poner la hora del dia
Enciende y apaga la luzdel
homo
33

OPERACION
Dial DeControl
Indicador de
funci6n autom&tica
indicador de
_ temperatura
de! horno
r-c /ce 1
UPPERfSTAR;CLOCEiCLEAN]
;it Mut tocK .tOWeR sroPlrIM .RI
Funciones automdticas
O rlOONV BA EZ
MUL"LOOXEDIPROB ! i! L
Indicador de
funci6n automdtica
El Dial de Control es una referencia f_cil
para utitizar et control det homo M_,s
abajo est&n las descripciones para indicar
c(_mo funciona el Dial de Control
INDICADOR DE LA TEMPERATURA
DEL HORNO - Este indicador tiene un
prop6sito m_ltiple,
° Muestra la temperatura
, Muestra un cf_ligo de error "ERR" - 3i
el indicador de temperatura del homo
pestaNea "ERR", entonces usted ha
programado un tiempo o una
temperatura incorrecta
• Muestra problemas el horno- Si et
control pesta_ea "F" y un n0mero o
letra, usted est_ experimentando un
prob]ema del homo Pot favor lea la
secci6n CODIGOS-F en su manual
INDICADOR DE ENCENDIDO - Se
encender,_ cuando se programe una
funci6n del homo
INDICADORES DE PROGRAMA - El
indicador de programa pestafiear_ en
combinaciOn con una funci6n del horno o
una funci6n autom&tica para avisarle que
necesita programar un tiempo o una
temperatura Ejemplo: "SET" y "BAKE"
pestafieardn para avisarle que necesita
programar la temperatura del horno
INOICADOR DE LA HORA- Muestra la
hora del dia, la cantidad de tiempo para
cocinar, la hora para comenzar una
funci6n demorada para cocinar, limpiar o
la hora programada en el cron6metro de la
cocina,
• Muestra tm c6digo para recordar
"PUSH START" - Si el indicador de la
hora det homo pestaRea las palabras
"PUSH START", entonces usted tiene
que empujar e] bot6n START para
activar su programa
INDtCADORES DE LAS FUNCIONES
DEL HORNO - Muestran qu_ funci6n ha
sido programada, cuando ta puerta det
homo est,. enganchada, y si la funci6n es
demorada.
34

OPERACION
Relojy CronSmetro
El reloj debe ponerse a la correcta hora
del dfa antes que una funci6n demorada
det homo funcione correctamente La hora
de! dia no se puede cambiar durante una
funci6n automatica del homo, pero se
puede cambiar durante una funci6n para
hornear o para asar a la parrilla,
COMO PONER EL RELOJ
HOUR MIN
@@
1o Empuje el bot6n CLOCK,
2. Empuje los botones con las flechas
SUBIR o BAJAR para poner la hora
correcta del dia
3. Empuje el bot6n START
PARAVOLVER ALRELOJ
Mientras est6 usando el homo para
cocinar, empuje el bot6n CLOCK, si
desea vet la hora del dia La hora
presente del dfa se ver_ en el dial
CORTE DE CORRIENTE
Si ha ocurrido un corte de corriente, la
hora pestaSeara en el dial y estara
incorrecta, Ponga nuevamente el reloj
a la hora,
Cualquier funci6n para cocinar del homo
que estaba en proceso tendra que ser
reprogramada,
El cron6metro de la cocina se usa para
medir el tiempo de los procesos para
cocinar u otras actividades del hogar, No
controla el homo Se puede programar
hasta 9 horas y 59 minutos ContarA hacia
atr_s en minutos hasta que Ilegue a los
ULTIMOS 60 SEGUNDOS, entonces el
control sonara una vez Cuando la cuenta
tlegue a CERO, el control sonarA 3 veces
seguido de un sonido cada 6 segundos
hasta que el bot6n KITCHEN TIMER se
empuje El sonido de cada 6 segundos se
puede eliminar para ciclos futuros sl se
desea Para las instrucciones de c6mo
eliminar estos sonidos continuos, vea
Tonos en la p_gina siguiente
COMO PROGRAMAR EL CRONOMETRO
HOUR
1. Empuje el bot6n KITCHEN TIMER.
2. Empuje los botones con las flechas
SUBIR o BAJAR para poner la hora
3. Empuje et bot6n START
4o Cuando la cuenta llegue a cero,
empuje el bot6n KITCHEN TIMER.
Para cancelar el cron6metro durante la
cuenta, empuje el bot6n KITCHEN TIMER
DOS VECES,
35

OPERACiON
ControlDelHomo,Relojy
CronSmetro
El nuevo controf tiene una serie de tonos
que sonar&n a tiempos diferentes Estos
tonos pueden sonar mientras usted
programa una funci6n del homo, o al final
de una funci6n del homo Tambien fe
avisara si existe un probtema con una de
las funciones M&s abajo est#,n los tipos
de tonos y una breve descripci6n de cada
URO,
TONOS MIENTRAS PROGRAMA EL
CONTROL - Cuando empuje un bot6n
usted escuchar& un tono. Este tono ie harA
saber que aplic6 suficiente presi6n sobre
el bot6n para activartQ (Los botones con
tas flechas no suenan )
TONO AL FINAL DE UN CiCLO
AUTOMATICO - Despu_s de una funci6n
para cocinar autom_tica, usted escuchar#`
tres tonos cortos seguidos por un tono
cada 6 segundos El tono de cada 6
segundos seguirA.sonando hasta que
empuje el bot6n CLEAR/OFF ousted
decida seleccionar e! programa especial
para cancefar y evitar que el tono de 6
segundos suene al final de un ciclo futuro
COMO CANCELAR EL TONO DE 6
SEGUNDOS
1.
Empuje y sujete los botones BAKE y
BROIL, a la misma vez por 3
segundos, hasta que el dial muestre
"SF".
2. Empuje et bot6n KITCHEN TIMER
ONIOFF, El dial mostrar#` "CON
BEEP" (tono continuo),
3. Empuje e! bot6n KITCHEN TIMER
ON/OFF nuevamente El dial mostrar_t
"BEEP" (tono cancelado)
4. Empuje el bot6n START, para
cancelar el tono y salir de este m6dulo
especial
Si desea regresar a los tonos de 6
segundos, repita los pasos de arriba hasta
que el dial muestre su selecci6n y empuje
el bot6n para el comienzo (START)
TONO DE ATENCION - Este tono sonar&
si hace un error u omite algo mientras
programa una funci6n del homo
Unos ejemplos sedan:
a, Programar un ciclo de limpieza y la
puerta del homo no est,_ bien cerrada
b. Programar una funci6n y no empujar el
bot6n START.
c. Empujar un bot6n para una funci6n
adicional sin programar primero la
temperatura o el tiempo
Cualquiera de estos se puede identificar
rapidamente con mirar el dial.
TONO DE PRECALENTAMIENTO -
Cuando programa una temperatura en el
homo, el homo empieza a catentarse
autom#`ticamente CtJando la temperatura
dentro del homo llega a tatemperatura
que usted program6, sonar#, un tono para
avisarle que el homo est#` listo para
hornear.,
Si el control suena mientras el dial hace
mostrar una "F" y un numero o tetra tal
como "F-4" o "FI", es posible que exista
un probtema con et control o con el homo
Simplemente empuje el bot6n CLEAR/
OFF y espere una hora Trate de
programar esa funci6n nuevamente Si el
cOdigo se repite, escriba el c6digo que
pestaF_eay tlame para un servicio Digale
al t_cnico qu6 c6digo estaba
pestaSeando
36

OPERACION
ConsejosParaHornear
a Convecci6n
Homear con aire caliente que es
circulado sobre y atrededor de los
alimentos por el ventilador de convecci6n
ubicado en la parte trasera del homo.
Cuando se hornea a convecciSn, las
temperaturas para cocinar se deberian
reducir en 25°F
Debido a que el aire caliente es circulado
parejamente a tray,s del homo, los
alimentos se pueden hornear con
resuttados excetentes sobre 2 o 3
parrillas a ta vez Cuando cocine con
parri!las mQItiples, la cantidad de tiempo
para cocinar podria ser mAs larga y los
alimentos no podrian quedar dorados en
forma pareja como cuando usa una
parrilla
_7
m6
_5
_4
_3
_2
Cuando homee sobre 3 posiciones de
parrillas, coloque la primera parrilla en la
posiciOn 1, la segunda parrilla en ia
posiciOn 3, y la tercera parrilla en la
posici6n 5
METAL O VIDRIO
Cualquier tipo de utensilios funcionar_ en
el homo a convecciOn Sin embargo, los
utensilios de metal se calientan mAs
r&pidamente y son recomendados Los
utensilios de vidrio cocinan mas
lentamente.
PAPEL Y PLASTICO
Papel y Pl_stico resistente al cator que se
recomienda para hornos regufares se
puede usar en su homo de convecci6n
Durante cualquier operaci6n del homo
usted podria oir un ruido de ventilador
Esto es el ventilador interno para enfriar y
prevenir que todas las partes el_ctricas se
recalienten. No es poco comun que el
ventilador siga corriendo incluso despu6s
que el homo se haya apagado
Un ventitador para convecci6n funcionarA
mientras se cocina a convecci6n.. El
ventitador se apagarA cuando se abra ta
puerta.
Cuando hornee convecciOn o ase, a
medida que el n0mero de posiciones de
parrillas aumenta, se puede notar que el
vapor escapa a trav6s de Ia ventitaciOn del
homo ubicada sobre la puerta del homo
• Para cocinar alimentos en tres posiciones
de parrilla
• Para grandes cantidades de comida
• Excelente para hornear panecillos,
"brownies", queques de angel y pan
37

OPERACION
ConsejosPara Asar
a ConvecciGn
Durante el asado a conveccbn, el calor
viene del elemento superior y el ventilador
de convecci6n hace circular el calor
parejamente alrededor de tos alimentos,
seliando los jugos dentro de ta came
mientras crea un exterior caf_ dorado
Las carnes que se cocinan en un homo a
convecciOn quedan de un color care
obscuro por afuera y blandas y jugosas por
dentro En la mayoria de los casos la
cantidad de tiempo para cocinar ser_ menor
cuando ase a convecci6n
Use }as temperaturas para asar
recomendadas No es necesario
precalentar, Revise los alimentos al final del
tiempo sugerido Usted podria decidir
cocinar pot m_s tiempo
Cuando ase a convecci6n, usted deberia
usar la caceroia y la parrilia para asar que
vienen con su nuevo homo La cacerola se
usar para recibir los derrames de grasa y la
parrilia se usa para prevenir saipicaduras
de grasa
C6me usar la Cacerola y la Parrilla:
ao Coloque ia parrilla en la posici6n de m_s
abajo
b. Coloque la came sobre la parritla
para asar
Carnes
Res
Cerdo
Jam6n
Ave
GUIA PARA ASAR A CONVECCION
Costilla, Costilla sin hueso,
Solomillo (3 a 5 lbs,) Medo I
Bien asado
Asado (3 to 5 Ibs.)
Enlatado, Asiento, "Shank"
(3 to 5 ibso bten coctdo)
Polio entero
(2 112 a 3 1/2 Ibs_)
Pavo, entero* (18 a 24 lbs.)
No retleno
(10 a 16 Ibs.)
Pechuga de pavo (4 a 6 lbs.)
(18 a 24 |bs.)
MinJIb.
24_28
28-32
23-27
14-18
24-26
8-11
7-10
16-19
Temp. (°F)
325 °
325 °
325 °
325 °
325 °
325 °
325 _
325 °
Proteja ta piernas y ta
pechuga con papei
aiuminio para prevenir
que ia piel se dote
demasiado y se seque
El Departamento de
Agricuitura de los
Estados Unidos
recomienda cocinar ta
came y las aves
compietamente--la came
a un calor INTERNO de
por fomenos t60°F y las
ayes a un calor INTERNO
de por Io menos 180°F
El cocinar a estas
temperaturas
generalmente protege
contra enfermedades
causadas por los
alimentos
*Las eves reifenas generalmente requieren 30-40 minutos adicionales de tiempo para asar
38

OPERACION
ConsejosParaCocinar
enel Homo
Es normal sentir un poco de olor cuando use
su homo por primera vez Para ayudar a
eiiminar este olor, ventile la habitaci6n
abriendo una ventana o usando una
campana de ventilaci6n.
IMPORTANTE: Nunca cubra etfondo del
homo o la parrilla del homo con papel de
aluminio El uso inadecuado puede causar
una mala circulaci6n del calor, pobres
resultados al hornear, y podria da_ar el
acabado del homo Para prevenir manchas
debido a derrames, usted podria colocar un
pedazo de papet de aluminio o una bandeja
para galletas sobre la parrilta debajo de ta
comida que se podria derramar
- r, , , _ ,'_-
La ventilaci6n del homo esta ubicada
inmediatamente sobre ta puerta Esta Area
se podria calentar mucho durante el uso del
homo Es normal que salga vapor de la
ventilaci6n y/o que se produzca humedad
debajo cuando e! homo no este en uso La
ventilaci6n es importante para la correcta
circulaci6n del aire Nunca obstruya la
ventilaci6n, Ventilaci6n
del homo
Etprecalentamiento es subir la temperatura
a la temperatura que va a usar cuando
homee Permita que el homo se precaliente
bien cuando las recetas requieren
precalentamiento
Para prolongar la vida del foco de las
luces del homo, siga estos consejos:
Siempre apague las luces cuando e! homo
no este en uso 6 durante un ciclo de
Nmpieza Si su homo no tiene una ventana
en la puerta, usted tendr,_ que abrir la
puerta para estar seguro que las luce estA
apagad& Si la luz del homo se deja
encendida por un largo periodo de
tiempo, el homo estarb, tibio cuando abra
la puerta debido al calor generado por el
foco de las luces del homo
En la parte trasera del homo usted notar& un
pequeSo tubo Esto es un sensor de ca!or
que mantiene la temperatura def homo
Nunca mueva o doble este tubo
temperatura _._._o_
del horno
La zona de temperatura baja de su homo
(entre 170° y 200°F) esta disponible para
mantener los alimentos tibios Sin embargo,
los alimentos no se deberian mantener
a estas bajas temperaturas por mas de
2 horas
Si abre la puerta frecuentemente para mirar
los alimentos, causar#, una perdida de calor
y malos resultados cuando hornee
39

OPERACION
ConsejosParaCocinar
EnElHomo
Cuando use su conveniente operaci6n de
Comienzo Demorado, los alimentos tales
como productos l_cteos, pescado, ayes,
etc, nunca se deberian dejar expuestos por
m&s de una hora antes de ser cocinados La
temperatura ambiente y el calor de la luz del
homo promueven el crecimiento de
bacterias
Los resultados del horneado ser_ mejor si
fas cacerolas para hornear estan centradas
en el homo lo m_.sposible Siesta homeando
con mAs de un utensilio, colOquelos de
manera que cada uno tenga por Io menos
de !' a 1 112"de espacio de aire a su
alrededor. Coloque los utensilios de manera
que ninguno quede directamente encima
de otto
La mayoria de las recetas para hornear han
sido desarrolladas utilizando produetos con
un alto contenido de manteca tales como
mantequilla y margarina (80% de manteca
por peso--el requerimiento federal para los
productos marcados"margarina') Usted
obtendra ma!os resuftados si los queques,
pastetes, tortas, galfetas o dulces sen
hechos con mantequilta con bajo contenido
de manteca Las mantequitlas y margarinas
con bajo contenido de aceite contienen
menos manteca y m&s agua Etalto
contenido de agua de la mantequilla o
margarina afecta ta textura y el sabor de sus
recetas para hornear favoritas Mientras m_s
bajo sea el contenido de manteca de la
mantequilla o margarina, masse notar,_n
estas diferencias Para asegurar los mejores
resultados, use margarina, mantequilla u
otras barras de estos productos que
contengan per to menos 70% de aceite
vegetal,
LAS BANDEJAS BAJAS, sin fados,
para galletas permiten que el aire circule
alrededor de las galletas para que se doren
en forma pareja
LOS UTENSILIOS BRIM.ANTES son
perfectos para que los queques y panes
r_pidos tengan una corteza cafe dorada
UTENSILIOS DE VIDRIO, OSOUROS
CONTRA PEGADURAS U OPACOS POR
LA EDAD son perfectos para panes con
levadura, cortezas para pasteJes o
alimentos que tengan una corteza cafe
La temperatura del homo se debeda
reducir en 25°F
El Sensor de Temperatura del Homo en la
parte trasera del homo mide y controla
continuamente la temperatura dentro del
homo Para mantener una temperatura
programada constante, los etementos harb,n
un cicto de encendido y apagado mientras
el homo cocina
4O

OPERACION
ConsejosParaCocinar
EnE!Homo
Las parrillas del homo est_n disefiadas con
topes, una conveniencia y tambien una
precauci6n de seguridad Las guias tienen
un tope para prevenir que las parrillas se
den vuelta cuando se sacan del homo Este
dise5o permite que las parrillas puedan
ser insertadas de s6to una manera
Tope en tas I_ ltl
guias para_ lt_
Su homo tiene siete (7) posiciones de las
parriltas La posiciOn de mas arriba es
solamente una guia No puede ser usada
como posici6n para una parrilla
Gufa
Usted podria pensar que su homo nuevo
cocina diferentemente al homo que
reemplaz6 Le recomendamos que use su
homo nuevo por varias semanas para que
se familiarice m_s con 61,siguiendo los
tiempos que se dan en ta receta como una
guia, Si cree que su homo esta funcionando
demasiado caliente o frio para su
preferenceia, yea Ajustes-H#,galos Usted
Mismo en la parte de atr#,sde este manual
para hacer los ajustes
Siempre coloque las parrillas del homo
en la posici6n correcta cuando el horno
est6 frio.
PRECAUCION" Cuando usted este usando
la parri!la en fa posici6n mas baja (1),
necesitara tener cuidado cuando saque la
parrilla Recomendamos que tire la parrilta
varias putgadas hacia afuera y entonces,
usando dos agarraderas, tire la parrilla hacia
afuera sujetandola de los lados La parrilla
esta baja y usted se podria quemar si coloca
la mano en el medio de la parrilla y lasaca
completamente hacia afuera Tenga cuidado
de no quemarse ia mane en la puerta
cuando use una parrilta en la posici6n m_s
baja (1)
41

OPERACION
ParaHornearAsary
Convecci6n
• Usted puede programar para homear en
ambos homos a la misma vez
• Usted puede programar un homeado
automatico o tradicional a la mlsma vez
• Usted puede programar un horneado
autom&tico en ambos hornos a la misma
vez
• Usted puede programar un homeado
autom&tico y demorado a la misma vez
• Usted puede programar un horneado
demorado en ambos hornos a ta misma
vez
CONVECTION
COOKING
@
TEMP
@
1. Empuje el bol6n
Convection Cooking
BAKE o ROAST
2, Empuje los botches con
]as flechas para SUBIR
y!e BAJAR la
temperatura, para
programar la
temperatura del homo
que desea usar
3o Empuje et bot6n START
Para programar queet homo cocine pot un
tiempo determinado y se apague
autom_ticamente;
@
TEMP
2_
Empuje el bot6n Convection
Cooking BAKE o ROAST
Empuje el bot6n con las
flechas para SUBIR y!o
BAJAR la temperatura para
seleccfonar la temperatura
del homo que usted desea
usar
3, Empuje el bot6n OVEN
COOKING TIME
HOUR MIN
@@
Empuje el bot6n con las
ffechas para SUBIR y/o
BAJAR las HORAS/
MINUTOS para seleccionar
la cantidad de tiempo en
que desea que los
alimentos se cocinen
5, Empuje e! bot6n START
Para programar que el homo se encienda a
una hora posterior del dia, cocine por una
cantidad de tiempo especifica y se apague
automAticamente
CONVECTION
COOKING
@
TEMP
@
HOUR MIN
_ 5.
HOUR MIN
1, Empuje el bot6n Convection
Cooking BAKE o ROAST
Empuje el bot6n con las
flechas para SUBIR y/o
BAJAR la temperatura para
seleccionar ]a temperatura
del homo que prefiere usar
Empuje el boron OVEN
COOKING TIME
Empuje el bot6n con las
flechas para SUBIR y/o
BAJAR las HORASI
MINUTOS para seleccionar
la cantidad de tiempo en
que desea cocinar los
alimentos,
Empuje el bot6n DELAY
START TIME,
Empuje el bot6n con las
flechas para SUBIR y/o
BAJAR las HORAS/
MINUTOS para seleccionar
la hora del dfa en que
prefiere que el homo se
encienda
Empuje el bot6n START
42

OPERACiON
CSmoHornear
TEMP
@
1. Empuje el bot6n BAKE
2. Empuje los botones con las
flechas para SUBIR y/o
BAJAR ta temperatura,
para programar ta
temperatura del homo que
desea usar
Empuje er bot6n START
Para programar que el homo cocine
por un tiempo determinado y se apague
autom_ticamente:
TEMP
@
1. Empuje el bot6n BAKE
2_
Empuje el bot6n con las
flechas para SUBIR y/o
BAJAR la temperatura
para seteccionar la
temperatura del homo
que usted desea usar
HOUR MIN
@@
Empuje el bot6n OVEN
COOKING TIME,.
Empuje el bot6n con las
flechas para SUBIR y/o
BAJAR las HORASI
MINUTOS para
seleccionar la cantidad
de tiempo en que desea
que los alimentos se
cocinen
Empuje elbot6nSTART
Para programar que el homo se encienda a
una hora posterior det dia, cocine por una
canlidad de tiempo especifica y se apague
automs,ticamente
@
TEMP
@
Empuje el bot6n BAKE
Empuje el bot6n con las
flechas para SUBIR y!o
BAJAR fatemperatura
para seleccionar la
temperalura del homo
que prefiere usar.,
3.
HOUR MIN
@@
Empuje el bot6n OVEN
COOKING TIME,
Empuje el bot6n con las
flechas para SUBIR y/o
BAJAR las HORAS/
MINUTOS para
seleccionar la cantidad
de tiempo en que desea
cocinar los alimentos
HOUR MIN
@@
Empuje el bot6n DELAY
START TIME
Empuje et boron con las
flechas para SUBIR y/o
BAJAR las HORAS!
MINUTOS para
seleccionar la hora del
dia en que prefiere que
el homo se encienda
7. Empuje el bot6n
START
Estas operaciones del homo pueden
usarse al asar comidas, El homo parar_
al final del tiempo de cocinado, a menos
que la funci6n de cocinado y HOLD
(Sostener) hayan sido activadas.
43

OPERACION
CGmoAsar ALa Parrilla
Asar es cocinar al calor directo del
elemento superior,, La puerta det homo
deberfa permanecer abierta en la posici6n
de tope para asar cuando ase a la parritla..
No es necesario precalentar el homo
cuando ase a la parrilla. Use la cacerofa y
la parrilla para asar que viene con su
homo. Ambas est_n diseCtadas para
drenar adecuadamente la grasa y los
liquidos.
i, ii , i ................
/_\ Cuando Use papel de
I _ n l aluminio, el papel de
k _r./aluminio debe estar
moldeado firmemente a
la parrilla y los cortes en el papel
deben coincidir con los cortes de
la parrilla. Esto permite que la
grasa y los iiquidos caigan a la
cacerola, evitando que se
produzca un incendio y humo
excesivo.
Siempre saque la ,_._
cacerola y la parrilla _, {t,t-_
._.._--_,__ i-
dol horno. Guardar y ._._..
olvidar una cacerola '_j:;:-
para asar sucia en el
horno es un peligro para producir
un incendio o humo.
ii i n in in iiiiiiii,I , _1_
El Departamento de Agricultura de los
Estados Unidos recomienda cocinar la
came y las aves completamente---la came
a un calor INTERNO de pot 1omenos I60°F
y ias ayes a un calor INTERNQ de pot to
menos 180°F El cocinar a estas
temperaturas generalmente protege
contra enfermedades causadas por los
alimentos.
Mientras m_,s cerca coloque los alimentos
def elemento para asar, m_s r_pido se
dorar&n por afuera, pero quedando rojo o
rosado en el centro
Colocando las carnes lejos det efemento
permitir_ que las carnes se cocinen en el
centro mientras se doran por afuera
Usando estas posiciones, cocine el lado 1
por Io menos 2 minutos m&s que el lado 2.
Si su homo est_ conectado a 208 voltios,
usted podria usar una posici6n de parrilla
m&s atta y/o cocinar los alimentos por m,_s
tiempo.
E1tamaRo, peso, grosor, temperatura
inicial y su preferencia personal afectar_ el
asado a la parrilla Esta tabta estb. basada
en carnes a la temperatura dot
refrigerador.
ALIMENTO
H/
Bistec 1" de grueso
Tortas de came
rnollda -
1= de gtueso
Chuletas de cerdo -
1/2 = de g rueso
Pescado (filetes)
Polio (presas)
POSICION
DE
PARR!L_,
3
3
3
,H,,m i
3
2
TIEMPO TOTAL
(minutos)
i
9-11
16-18
27-29
11_13
45-55
la. Empuje el bot6n BROIL (Esto
autom_ticamente programa ASADO
en HI-ALTO)
lb. Mientras el indicador de programa
pestaRea en el dial, empuje
nuevamente el bot6n BROIL si
prefiere asar en bajo (LO). Ase en
bajo para cocinar bien alimentos tales
como aves o cortes de came gruesos
sin que se doren demasiado
2. Empuie el bot6n START
3. Cuando termine de asar, empuje el
botOn CLEAR/OFF
44

OPERACION
CSmoSeleccionar
ProgramasEspeciales
Su nuevo control a botones tiene
caracteristicas adicionales que usted podria
usar Despu6s de hacer su selecci6n, si
usted desea cambiar et programa, siga los
pasos hasta que el dial muestre su
sefecci6n
El control se programa autom#,ticamente
para apagarse despues de hornear por 12
horas o despues de asar a la pardlIa por 3
horas en caso que se le olvide y deje el
homo encendido Si desea eliminar este
programa:
1. Empuje y sujete, al mismo tiempo, el
bot6n BAKE y BROIL por 3 segundos,
hasta que el dial muestre "SF"
2. Empuje el bot6n DELAY START TIME
El dial muestra "12Shdn" (apagado en
12 horas)
Empuje el bot6n DELAY START TIME
nuevamente El dial mostrar_ "no Shdn"
(no apagado)
3. Empuje el bot6n START
El control de! homo esta programado para
la selecci6n de ternperaturas en Fahrenheit
La mayoria de las recetas se dan usando
la escala Fahrenheit Usted puede cambiar
esto y usar una setecci6n en Centigrados
1. Empuje y sujete, al mismo tiempo,
los botches BAKE y BROIL por 3
segundos, hasta que e! dial muestre
"SF"
2o (a) Empuje el bot6n BROIL El dial det
control mostrara el signo para grado y
iI Fep_
(b) Empuje el boron BROIL nuevamente
Esto cambiara F° (Fahrenheit) a C°
(Centigrado).
3. Empuje el bot6n START
Su control est_ programado para usar et re!oj
en 12 horas, Si usted prefiere usar Hora
Militar de 24 horas o poner el dial en blanco,
se hace asi:
1. Empuje y sujete, a la misma vez, el
botOn BAKE y BROIL por 3 segundos,
hasta que el dial muestre "SF"
2. (a) Empuje el bot6n CLOCK El dial
mostrar_ "12hr". Siesta es su
selecci6n, empuje et bot6n START
O
(b) Empuje el bot6n CLOCK
nuevamente El dial mostrarb."24hr"
Ejemplo: 5:00 en el relojde 12 horas
leera !7:00 en el reloj de 24 horas
Empuje el bot6n START
O
(c) Empuje el bot6n CLOCK
nuevamente El dial ahora mostrarb,
"OFF" Si esta es su selecci6n,
empuje el bot6n START La hora no
se mostrar_ en el dial (La funci6n
delay start no funcionar,€ )
• Usted puede programar ambos hornos
para autolimpieza al misrno tiempo, pero
el segundo homo demorarb.
autom_.ticamente la hora de comienzo
para empezar a! final del ciclo de limpieza
del primer homo
• Usted puede programar un comienzo
demorado en ambos homos al mismo
tiempo, pero el segundo homo demorarA
autom_Iicamente la hora de comienzo
para empezar al final del ciclo de limpieza
del primer homo
• Usted puede programar un homo para
que empiece su ciclo de limpieza ahora y
programar un comienzo demorado en el
segundo homo para una hora posterior
45

OPERACION
C6moSeleccionar
ProgramasEspeciales
El control le permitir_ cerrar los botones de
manera que no se puedan activar cuando
los empuje Si se preocupa de dejar el homo
sin supervisf6n, active este programa
1. Empuje y sujete, a la misma vez per 3
segundos, los botones BAKE y BROIL,
hasta que el dial muestre "SF."
2. (a) Empuje el bot6n CLEAN El dial
muestra "LOC OFF" (cierre inactive)
(b) Empuje el bot6n CLEAN
nuevamente El dia! mostrara "LOC
ON" (cierre activado)
3. Empuje el bot6n START
Este programa se puede seleccionar
solamente cuando el homo no est_
en uso,
Cuando este programa este activado, el
control sonar_ y el dia! mostrara."LOC" si se
empuja un bot6n, Los botches Clock, Timer
o Oven Light no son afectados
Esta funci6n convertir& autom&ticamente
la temperatura que usted selecciona para
hornear tradicionalmente a la temperatura
para cocinar a convecciOn
1. Ernpuje y sujete el bot6n
CONVECTION BAKE per 4 o 5
segund0s
2. Empuje los botches con las fiechas
para SUBIR o BAJAR la
TEMPERATURA para programar la
temperatura
3. Empuje el bot6n START Usted ver,_la
temperatura convertida en el dial Per
ejempto, si usted entre 375 grades, el
dial mostrara 350 grades Ser_
necesario hacer esta conversi6n cada
vez que usted cocine a convecci6n
Su nuevo control tiene una funciOn para
cocinar y mantener fa temperatura para
cocinar autom_ticamente solamente que
mantendrA los alimentos tibios hasta 3 horas
despues que el cocinado autom,:'itico haya
terminado Para activar esta funcid_n:
1. Empuje y sujete, a la misma vez, los
botones BAKE y BROIL per 3
segundos, hasta que el dial muestre
"SF'.
2. (a) Empuje el botOn OVEN COOKING
TIME El dial mostrar_ "HLd OFF"=
(b) Empuje el botSn OVEN COOKING
TIME nuevamente para activar este
programa E1dial mostrar_ "HLd ON".
3. Empuje el bot6n START
Este Programa Especial le permifir_ cambiar
la velocidad; #1 significa que el cambio de
velocidad; es lento hasta #5 que significa
que el carnbio de velocidad es rApido Para
seleccionar la velocidad que preflere, siga
estos pasos:
1o Empuje y sujete, a la misma vez,
los botones BAKE y BROIL per 3
segundos, hasta que et dial muestre
"SF".
2, Empuje el botSn con fa flecha SUBIR
El dial le mostrar_ una posiciSn de
velocidad entre 1 y 5
3. Empuje la flecha SUBIR para aumentar
la velocidad hasta el n0mero 5
,
O
Empuje el botOn con la flecha BAJAR
para disminuir la velocidad hasta el
nrJmero 1
Empuje el botOn START
46

CUIDADOYLIMPIEZA
El Ciclo De Autolimpieza
1. Saque la cacerola y la parrilla para
asar, la parrilla del homo, utensilios y
cuatquier papel de aluminio que
podria quedar en el homo
2. La suciedad en el frente def marco y
alrededor del sello det revestimiento
de la puerta del homo tendrb, que ser
limpiada a mano,,
Marcofrontal
_'_--"'_ Revestimientodela puerta
Limpie estas &reas con agua caliente,
lanillas con jabon o limpiadores como Soft
Scrub ®para sacar cualquier suciedad
Enjuague bien con agua limpia y seque
3. Limpie cualquier derrame pesado del
rondo del homo
4,
No limpie el sello de la puerta del
homo El material de fibra de vidrio de
fa puerta del homo no soporta la
abrasi6n Es esencial que el setlo
permanezca intacto Si nora que se
est_ gastando o trizando, deberia ser
reemplazado
El selio de la puerta estA diseSado para
que tenga un espacio de 5"-6" en el fondo
del homo, Esto permite la circutaci6n
adecuada det aire
Panel de la puerta Sello
f
Revestimientode la puerta
Es normal que su homo d6 ia apariencia
de no tenet un buen sello sobre el homo
Esto se debe al sello La ubicaciOn del
selto sobre la puerta mantiene la puerta
sellada y previene cualquier p6rdida de
calor,
,==
r /,_-_,. Los utensilios nunca _
se deberian dejar
dentro del horno
durante un ciclo de
limpieza.
Las parrillas del horno se
podr[an limpiar durante el ciclo
de autolimpieza, pero perderdn
su brillo y se pondr_n dificiles
de deslizar. Si decide dejarlas
dentro durante el ciclo de
limpieza, pdseles aceite vegetal
para que se deslicen mds
f_cilmente.
Durante el primer cicio de
limpieza, ventile ia habitaci6n
con una ventana abierta o una
campana de ventilaci6n.
.J
47

CUIDADOYLIIVIPIEZA
Ciclo de Autolimpieza
El Ciclo de Limpieza, incluyendo el tiempo
de enfriamiento, est,. programado
automAticamente por 4 horas, pero usted
puede cambiar esto de 3 horas si el homo
est,, levemente sucio a 5 horas si el homo
est_ muy sucio.
1. Empuje el botOn
CLEAN. Mostrar_. 4
horas en el dial.
HOUR MIN
@@
Empuje los bot6nes
con las flechas para
SUBIR y/0 BAJAR las
HORAS/MINUTOS para
seleccionar la cantidad
de tiempo que usted
desee que dure el
ciclo.
3. Empuje el bot6n
START,
Simplemente empuje el bot6n CLEAR/
OFF. Usted necesitar_ esperar a que la
temperatura del homo baje masque la
temperatura de enganche (aprox. 1 hora)
antes de tratar de abrir la puerta
Despu6s del ciclo, usted podria notar
un poco de cenizas blancas en el horno.
Simplemente limpielas con un pa5o o
esponja ht_meda
Si algunas manchas blancas persisten,
fri_guelas con una lanilla de acero con
jab6n Asegerese de enjuagar bien Estas
son generatmente depOsitos de sal que no
se pueden sacar durante el ciclo.
Si por alguna raz6n usted no queda
satisfecho con los resultados de la
limpieza, simplemente repita el ciclo.
1o
HOUR MIN
@@
HOUR MIN
Empuje el bot6n
CLEAN
Si usted desea
cambiar la cantidad
de tiempo para
fimpiar, empuje los
botones con [as
flechas para SUBIR y/o
BAJAR ias HORAS!
MINUTOS
Empuje el bot6n
DELAY START TIME,,
Empuje los botones
con las flechas para
SUB1R y/o BAJAR las
HORAS/MINUTOS
para seleccionar la
hora dei dia en que
prefiere que el ciclo de
timpieza empiece
Empuje el bot6n
START
48

CUIDADOYLIMPIEZA
PartesRemovibles
MATERIALES DE LIMPIEZA
• Detergente Ifquido para platos
• Agua tibia
° PaSo suave
No use iimpadores abrasivos,
limpiadores industriales o
blanquedores (cloro)_
MATERIALES DE LIMPIEZA
• Detergente fiquido para platos
• Agua tibia
= Lanitlas de acero con jabOn
,, Limpiador comercial para hornos
COMO LIMPIAR
Permita que la cacerota se remoje Ponga
detergente para platos sobre la parrilla y
cubra con un pa5o o una toalla h0meda
pot un rato. Enjuague y seque bien.
Ffiegue a medida que sea necesario.
Usted tambien podria poner la cacerola
y la parrilta en la lavadora de platos
+
3,
Cuando el homo este completamente if{o,
siga los pasos de mAs abajo para sacar y
poner nuevamente el fondo det homo.
1o Saque la puerta del homo (yea los
procedimientos en secci6n "Puerta
Removible det Homo")
Empuje hacia abajo y tire hacia afuera
como se muestra arriba
Cuando instale el rondo removible
nuevamente, deslicelo completamente
hacia art&s.
El homo estd disefiado para que
tenga el fondo removible instalado
en todo momento cuando est_
cocinando, El resultado de c6mo se
cocine la comida ser_ diferente si el
fondo removible ha sido sacado.
%, d
Limpie solamente como un toque entre
ciclos de limpieza Use detergente Ifquido,
agua tibia o lanilla de acero con jabOn
Enjuague bien despues de limpiar y
seque.
NUNCA USE LIMPIADORES DE
HORNOS DENTRO O ALREDEDOR DE
CUALQU1ER PARTE DEL HORNO.
Cuando limpie, asegurese de no doblar
o despiazar el sensor de temperatura
ubicado en la pared trasera del homo
49

CUIDADOYLIMPIEZA
PartesRemovibles
.......... _,,,,..:..:.................
PRECAUCION: Desconecte -_
el poder et_ctrico hacia el
homo en la caja del
circuito principal o en la
caja de los fusibles antes
de tratar de reemplazar el foco de ta
luz del horno_ No toque un foco de la
luz caiiente con tas manos mojadas
o con un patio htJmedo. Espere a que
el foco se enfrie y use un patio seco.
, j I1 II ,, _4
Sujetador del
vidrio
Collar con
electricidad
Foco
Cubie_ade
vidrio ........
o
COMO SACAR LA CUBIERTA
1.
.
Desconecte el paso de la electricidad
al homo en el interruptor del circuito
principal o en la caja de los fusibles,
Tome la cubierta de vidrio y h,_gala
girar 1/4 de vuelta contra el retoj hasta
que las aletilfas de la cubierta de vidrio
pasen pot sobre las ranuras del
sujetador del vidrio
COMO REEMPLAZAR EL FOCO
DE LA LUZ
Desatornille el foco de ]a iuz y reempl_celo
con un foco para aparator el_ctricos de
casa de 40 watts
PARA REEMPLAZAR LA CUBIERTA
1, Coloque las atetitlas de la cubierta
de vidrio en ta ranura del sujetador
del vidrio,
2. Haga girar Jacubierta de vidrio t/4 de
vuelta en direcci6n del reloj.
3. Reconecte fa electricidad al homo
Para mejorar la luz dentro del horno, limpie
fa cubierta de vidrio frecuentemente con
un paso mojado. Precauci6n: Esto se
deberia hacer solamente cuando el
homo estd completamente frio.
50

CUIDADOYLIMPIEZA
Partes Removibles
MATERIALES DE L|MPIEZA
• Detergente para ptatos
• Agua tibia
• Lanas para fregar o lanitla de acero con
jab6n
Tope en !_
Parte trasera la guia-..[_ -''_"
levantada de I___._
la parrilla_
COMO SACAN
1o Tire las parriflas hasta ta posici6n de
tope
2. Levante el frente de la parrilta y
deslicela bajo et tope de ta gufa para
las parrillas
PARA LIMPIAR
Limpie con agua tibia y detergente Para
sacar manchas duras, friegue levemente
con lana para fregar o con una lanilla de
acero con jabSn, Enjuague bien
PARA COLOCAR NUEVAMENTE
1. Coloque la parte levantada de arras
de la parriila sobre tas guias
2. Levante el frente de ia parrilla hasta
que la parle fevantada de arras se
deslice por debajo del tope de las
gufas
3. Deslice la parrilia hasta atr_is
Posici6n de tope para asar a l&parrilla
_t[[ Bisagra
PARA SACAR
1_ Abra la puerta hasta ta posici6n para
asar a la parrill&
2. Tome la puerta de cada lado, levantela
y s_quela de las bisagras NO
LEVANTE LA PUERTA DE LA
MANILLA.
PRECAUCION: Cuando
la puerta se saca y los
brazos de ias bisagras
est_n en la posici6n de
tope para asar a la parriita
como precauci_n, cubra !os brazos
de las bisagras con toallas o con un
rollo de toallas vacio. No pase a
llevar o trate de mover los brazes
de las bisagras mientras est_
trabajando en el _rea del homo° Se
podrian devolver violentamente y
causarle heridas en las manos o
dafiar el acabado de porcelana en
el frente del marco.
PARA COLOCARLA NUEVAMENTE
1. Asegurese que los brazos de las
bisagras estAn en la posici6n de tope
para asar a la parrilla
2. Levante la puerta de ambos lados
3. Coloque en IFnealas ranuras en la orilla
del fondo del homo con los brazos de
las bisagras
4. Deslice la puerta hacia abajo sobre los
brazos de las bisagras Io mas posible
5. Cierre la puerta
51

ANTESDELLAMARPARAUNSERVICIO
Para ahorrar tiempo y dinero, antes de tfamar para un servicio, revise la lista de m,_s abajo
para cualquier problema que usted crea que tiene con el funcionamiento de su homo Si
el probtema es algo que usted no puede reparar, use los Numeros de Servicio para el
Consumidor que se encuentran al final de este manual. Ouando haga un Ilamado, tenga
disponible el nlimero de modelo, ndmero de serie, lista de partes para reparaciones,
manual de uso y cuidado y la fecha de compra.
PROBLEMA POSIBLE CAUSA POSIBLE SOLUCION
=1 ii =i1[1!1,1.I =H I ..................... ipf / i HIIII I
El dial del control pestafiea Mal funcionamiento del
una "F" seguida por un homo,
n_3meroo tetra.
I _JJ....
El horno y los controles No pasa
del homo no funcionan, electricidad a el
homo
La temperatura
del horno
parece estar
inexacta.
El reloj est,. en
la funci6n en
blanco
i iiiiiii , i1,11
Empuje el bot6n CLEAR/
OFF, Permita que el horno se
enfrie por una hora y ponga
nuevamente el homo en
funcionamiento Si el
problema se repite, flame
para un servicio
, HI ' HiPiii
Revise la caja del circuito o
los fusibles Aseg_Jrese que el
cord6n de la corriente este
enchufado.
Vea la secci6n de "C6mo
Programmar Funciones
Especiates" en este manual.
iii iiiq i
Calibraci6n del control
del homo
Yea las instrucciones de los
ajustes de temperatura que
siguen esta secci6n
La puerta del
homo no se
desengancha.
La luz del homo
no funciona.
ii
El horno no se
limpi6 o los
resultados
fueron malos.
El ciclo de limpieza no ha
terminado.
ii i ii
a. lnterruptor de la luz
en posici6n de
apagado
b. Foco de la luz est&
flojo o quemadoo
i ...... tH H"t?" i .......................
a. Los controtes no se
pusieron bien.
b. El homo estaba
demasiado sucio
' J!l ii,
La temperatura det homo
debe bajar a menos de la
temperatura de enganche
antes que la puerta pueda
abrirse
a. Revise la posici6n del
interruptor de la luz del
homo
b. Revise el foco de ta luz
del homo.
' II 1! II IIII
a. Lea la secci6n de
autoiimpieza de este
manual
b. Los derrames grandes se
deberian limpiar antes de
programar un cicto. Usted
tambien podria repetir el
cicfo despues el homo
est& fresco,
c. El ciclo de limpieza
fue interrumpido.
c. El ciclo de limpieza normal
deberia ser de 4 horas.
52

ANTESDELLAMARPARAUNSERVICIO
PROBLEMA
Homo humea.
a_
POSIBLE CAUSA POStBLE SOLUCION
iiif,ffl,,i i i !1!1,111,11,1,,1111 i,i, i I , , ii I I
Homo sucio a, Vea que no hayan
derrames
Los alimentos
no se hornean
adecuadamente.
_lU,,lU,,, ,I i
Los alimentos
no se asan
adecuadamente,
bo Mal use de papel de
aluminio
c. Cacerola para asar
con grasa se dej6 en
el homo,
a. El homo se
precatent6,
bo Posici6n incorrecta
de la parri!la o la
cacerota
c° La ventilaci6n def
homo est_ obstruida
o cubierta
d, Usoincorrecto del
papel de aluminio
e. Temperatura
incorrecta para el
utensilio usado
f. Temperatura del
homo necesite ajuste
go E1homo o la parrilta
del homo no est__n
niveladas
h. Controles det homo
mal puestos
L El rondo del homo ha
sido sacado.
a, Posici6n incorrecta de
la parrilla
b. El homo se
precalent6
c. Mal use de papel de
aluminio
d. La puerta de! homo se
cerr6 durante el
asado a ta parritla
e, Bajo voltage (208
Voltios)
f, Cantidad de tiempo
incorrecta para asar
g. Controles det homo
real puesto
b. No se recomienda et uso
del papel de aluminio
c, Limpie la cacerola y la
parrilla despu6s de cada
use
a. Aseg0rese de precalentar
hasta que suene el tono
b. Mantenga un espacio de
aire uniforme alrededor de
las ollas y utensilios. Vea
la secci6n para cocinar en
el Homo
c. Mantenga la ventilaci6n
despejada
d. No cubra las parrillas
cuando hornee
e, Reduzca la temperatura
en 25 grados para
utensilios de vidrio.
osouros u opacos
f, Revise la secciOn de
ajustes a la temperatura
del homo,
g. Vea las instrucciones de
instalaciOn para la
nivelaciOn
h, Vea la secci6n para
hornear
i, Instale el rondo
a. Revise la posicion de las
cacerolas; vea la secci6n
para asar a ta parrilla
bo No precaiiente cuando ase
a la parrilla,
e. Lea la secciOn para asar a
la parri!ta
d. Abra la puerta a la posiciOn
de tope para asar
e. Use una posici0n de
parrilla m_s alta y/o ase
pot m_s tiempo
f. Vea la tabla para asar en la
secci6n de c6mo asar a Ia
parrilla
g. Vea la secciOn del cOmo
asar a la parrilla
53

AJUSTESDE TEMPERATURA-
"HAGALOSlISTEDMISMO"
Usted podria pensar que su nuevo homo
cocina diferentemente at homo que
reemplaz6 Recomendamos que use su
homo nuevo unas pocas semanas para
que se familiarice con 61,siguiendo los
tiempos que se dan en las recetas como
una gui&
Si cree que su nuevo homo est_
funcionando demasiado caliente (quema
la comida) o no calienta 1osuficiente (la
comida no queda bien cocida) usted
mismo puede ajustar la temperatura, La
apariencia y la textura de los alimentos
son mejores indicadores de la exactitud
de un homo que term6metros para homos
para controlar fa posici6n de ta
temperatura de su nuevo homo,
Estos term6metros pueden variar entre
20-40 grados de la verdadera temperatura
del homo Adem_s, la puerta se tiene que
abrir para leer estos term6metros Abrir ta
puerta cambiara la temperatura del homo,
Para decidir en cub,nto cambiar la
temperatura, suba la temperatura de!
homo en 25 grados (si los atimentos no
quedan bien cocidos) o baje la
temperatura en 25 grados (si fa comida se
quema) de ta temperalura de la receta,
fuego hornee Los resultados de esta
"prueba" fe deberian dar una idea de
cu,_nto se deberia cambiar ta temperatur&
+
Empuje y sujete los botones
BAKE y BROIL por 3
segundos, hasta que et diaF
muestre SF
2.
@
TEMP
@
Para ajustar el homo,
empuje el bot6n BAKE
Un nt3mero puesto en
f_brica de dos digitos
aparecerA en el dial.
generalmente "00."
Si piensa que el homo
no est_ suficientemente
caliente,
3a. Empuje el bot6n con la
flecha para SUBIR TEMP
para aumentar (+) la
temperatura hasta +35°F.
Si piensa que el horno
est& demasiado caliente,
3b°
Empuje el bot6n con
la ftecha para BAJAR
TEMP para bajar (-) la
temperatura hasta -35°F.
Empuje el bot6n START
Este aumento o disminuciOn en la posici6n
de ta temperatura permanecer& en la
memoria basra que los pasos de arriba
sean repetidos, Un corte de corriente no
afectar_ esta posici6n,
Las temperaturas para asar a la parrilla,
para la convecci6n o para la autolimpieza
no ser_n afectadas
Cada cual de los hornos se deberian
ajustar por separado
54

GARANTIADELHORNODE
PAREDEMPOTRADO
UN Ai_IO COMPLETO DE GARANTIA PARA TODAS LAS PARTES
Si, dentro de un a_o de la fec.ha de instalaciSn, cualquier parte deja de
funcionar adecuadamente debido a un defecto en el material o la obra de
mano, Sears la reparar& o reemptazar&, a nuestra opci6n, sin costo_
Si este producto es sometido a un uso que no sea e! familiar privado, la
garant[a de arriba es efectiva por solamente 90 dfas.
EL SERViCIO DE GARANTIA ESTA DISPONIBLE PONIENDOSE EN
CONTACTO CON EL CENTRO O DEPARTAMENTO DE SERVtCIO SEARS
MAS CERCANO EN LOS ESTADOS UNIDOS.
Esta garanfia le brinda derechos legales especfficos, y usted tambi_n podr{a
tener otros derechos que varian de estado a estado..
Sears Roebuck and Co.. Dept. 817 WA Hoffman Estates, IL 60179
llll ii i
Para ampliar el valor de su homo,
compre un contrato de mantenimiento Sears=
ASos de cobertura de propiedad ler aSo 2do aSo 3er aSo
1. Reemplazo de las partes defectuosas _ CM CM
CM CM
2. RevisiSn de mantenimiento preventivo
anual a solicitud de usted
CM
G - Garantfa CM - Contrato de Mantenimiento
.J
Los hornos Kenrnore est_n diseSadas, fabricadas y probadas para a_os de
funcionamiento de confianza. Sin embargo, cualquier aparato moderno podr[a
requerir un servicio de vez en cuando. El Contrato de Mantenimiento Sears le
ofrece un excelente programa de servicio para su producto.
La tabla de arriba muestra los beneficios adicionales que un Contrato de
Mantenimiento Sears ofrece cornparado a una Garantia Sears.
P6ngase en contacto con su Servicio de Ventas de Sears o con un Centro de
Servicio Sears para comprar un Contrato de Mantenimiento Sears.
55

iiii_ii?i
•_i_: _:_i
no matter who made it, no matter who sold it!
1-800-4-MY-HOM EsMAnytime, day or night
(1-800-469-4663)
www.sears.com
To bring in products such as vacuums,
lawn equipment and electronics for repair, call for
the location of your nearest Sears Parts & Repair Cenler.
1-800-488-1222 Anytime, day or night
www.sears,com
For the replacement parts, accessories and owner's manuals
that you need to do-it-yourself, call Sears PartsDirect sM!
1-800-366-PART 6a.m.-11p.m.CST, .......
(1-800-366-7278) 7 days a week ::
wwwosears.comtpartsdirect
To purchase or inquire about a Sears Service Agreement:
1-800-827-6655
7 &m - 5 p.m CST, Mon. - Sat.,
Para pedir servicio de reparacidn a domicil[o, Au Canada pour service en franqais:
y pard ordenar piezas con entrega adomicilio: 1.877-LE.FOYER s_
1-888-SU-HOGAR sM (1-877_533-6937)
: (1.888-784-6427)r_._ _ :;i
.........I........
[_Ho --- ''meCentraf= J
229C4020P271
© Sears, Roebuck and Co
® Regislered Trademark / _M Trademark of Sears. Roebuck and Co.
@March Registrada / _r_,March de Ffibrica de Sears, Roebuck and Co
56
-
 1
1
-
 2
2
-
 3
3
-
 4
4
-
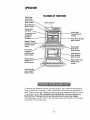 5
5
-
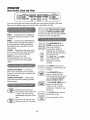 6
6
-
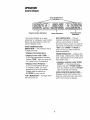 7
7
-
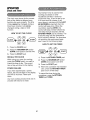 8
8
-
 9
9
-
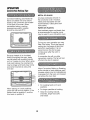 10
10
-
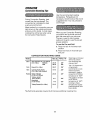 11
11
-
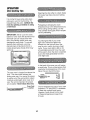 12
12
-
 13
13
-
 14
14
-
 15
15
-
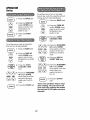 16
16
-
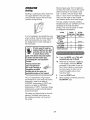 17
17
-
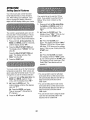 18
18
-
 19
19
-
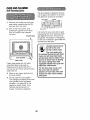 20
20
-
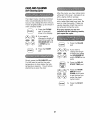 21
21
-
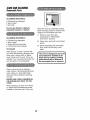 22
22
-
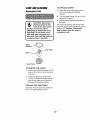 23
23
-
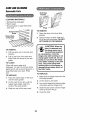 24
24
-
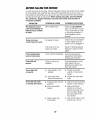 25
25
-
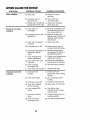 26
26
-
 27
27
-
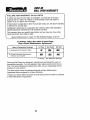 28
28
-
 29
29
-
 30
30
-
 31
31
-
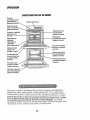 32
32
-
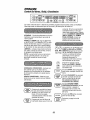 33
33
-
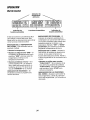 34
34
-
 35
35
-
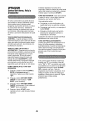 36
36
-
 37
37
-
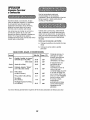 38
38
-
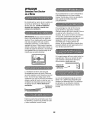 39
39
-
 40
40
-
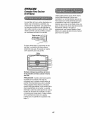 41
41
-
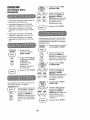 42
42
-
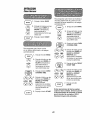 43
43
-
 44
44
-
 45
45
-
 46
46
-
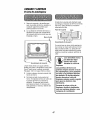 47
47
-
 48
48
-
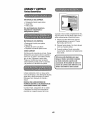 49
49
-
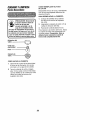 50
50
-
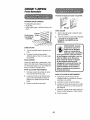 51
51
-
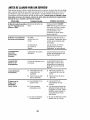 52
52
-
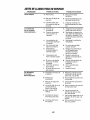 53
53
-
 54
54
-
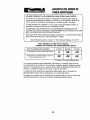 55
55
-
 56
56


Kenmore 911.41885 Series El manual del propietario
- Tipo
- El manual del propietario
- Este manual también es adecuado para
En otros idiomas
Documentos relacionados
-
Kenmore 91147084100 El manual del propietario
-
-
-
-
-
-
-
Kenmore 911.47466 Manual de usuario
-
-
Otros documentos
-
Kenmore Elite 91149003991 El manual del propietario
-
 Kenmore Elite 91149014991 El manual del propietario
-
GE JTP7030 Manual de usuario
-
-
-
-
