
OWNER'S MANUAL .. ....
'S|NGLE30, ELECTRIC MODELNO. e_ i
cONvECTION SELF. 9tl. 41779 -t
911. 41779 "7 ?0
CLEANING _BUILT-IN
WALL OVEN ., ,,,-
:i!:r
CAUTION:
Before using this range, • Safety Instructions
read this manual and • Operation
follow all its Safety Rules • Care and Cleaning
and Operating .i. • . : : i i _ Problem Solving :
Instructions, ' _ r .... .... :,-
Sears, Roebuck and Co., Hoffman Estates, IL 60179 U.S.A.
229C4020P155 (SR-10361)

Table of Contents
Oven Safety !-..i............ :.......... 3-4
Removal of Packaging Tape .... 5
Features of Your Oven .............. 5
Oven Control, Clock_ Timer....:. 6.
Control Display ..-....................... 7.
Control Panei:::..;iL.i.,:.i........;.,..::_2i
Broiler Pan and Grid ............... 21
Oven Light B_ibv_!.i:!"..!:.:;...:...;L21
Oven .Racks ............................ 22
Oven Door .............................. 22
Clock ......... :,.,:..,...8 . . ...... ..... :: '
Kitchen Timer ........................... 8:
Tones ........................................ 9
F Codes ................. "........... :....... 9 :,
Convection Baking Tips :.:.Jii..i0
Convection Roasting Tips ;.....11
Oven Cooking Tips .......::.....12_13
Setting Convection Bake ahcl ::-
Roasting ................................. 14
Setting Bake ........................... 15
Broiling ............................ .. 16
Special Features ............. ... 17,18
• Bef0re-Calling for Service ...........
,:..._:-................ :.L.................. 23-24
Temperature Adjustment ....... 25
..............................................
Consumer Service Numbers .. 28
For your :convenience •and future reference' please writed0wn ::,' ,
your model and serialnumbers in the space provided. They are :i
located on the front frame behind the oven door. .............
,,,,,,,,,,,,,,,,,,,,,,,,,,,,,,,,, ,,
SERIAL NUMBER: ...... •,i, ..... ii::
III I IIIII III I I I
2

IMPORTANT
SAFETYINSTRUCTIONS
SAVE THESE INSTRUCTIONS
Read all instructions before using this appliance. When using
gas or electrical appliances, basic safety precautions should
be followed, including the following:
To insure safety for yourself, family
and home, please read your Owner's
Manual carefully. Keep it handy for
reference. Pay ctose attention to
Safety Sections. BE SURE your
appliance is installed and grounded _:.
by a qualified technician.
• DO NOT leave children alone or
Unattended near an appliance in
use.
_-TEACH CHILDREN not to play
with Controls or any part Of the
appliance, and not to sit, Climbor
stand on the door, or any part Ofthe
appliance.
• CAUTION: NEVER STORE
items of interest to children in .
cabinets above the appliance.
Children climbing on an appliance
could be seriously injured.
• KEEP THIS book for later use.
• NEVER TRY to repair or replace
any part of the appliance unless . _
instructions are given in this ......
•manual. All other work should be
done by a qualified technician. _
• NEVER USE your appliance for
warming or heating the room.
' ALWAYS KEEP combustible wall
coverings, curtains, dishcloths,
towels, potholders, and other linens
a safe distance from the appliance.
• NEVER USE a t0wel Or other
bulky cloth as a potholder and
make sure the potholder is dry.
Moist potholders could cause
steam burns. DO NOT let
potholders touch hot surfaces.
• ALWAYS KEEP the oven area
free from things that will burn. Food,
wooden utensils, grease buildup,
gasoline and other flammable
.vapors or liquids could catch fire..
- Piasticute;hsils_could meit, ancl'_........
canned foods could explode. Your
appliance should never be used as
a storage area.
- ALWAYS KEEP your appliance
clear of things that will burn
(gasoline and other flamm able
vapors or liquids).
• NEVER NEAT unopened food
containers. Pressure buildup can
cause the container to burst and
cause injury.
• NEVER LEAVE jars or cans of fat
or drippings in your oven.
• NEVER TRY to clean a hot
surface. Some cleaners produce
noxious fumes, and wet cloths or
sponges could cause steam burns.
• NEVER WEAR loose fitting
clothing when using your .....
appliance. .
• BE SURE the 0ven is securely •
installed in a cabinet that is firmly
attached to the house structure.
3

IMPORTANTSAFETY
INSTRUCTIONS
• DO NOT touch heatingelements,
surfaces near them, or interior oven"
surfaces. These may be hot enough to
cause burns even though they are
dark in color. During and after use, do
not touch or let clothing or flammable
material contact the elements or hot
surfaces until they have had time to
cool. Other surfaces near the oven
vent openings, oven door, Orwindow
may also be hot enough to cause
burns.
* PLACE OVEN RACKS in the
desired position while the oven is
cool. If racks must be moved while
oven is hot, do not let potholder
contact the hot oven element.
• AFTER BROILING, atways take the
broiler pan and grid out of the oven
and clean them. Leftover grease inthe
broiler pan could catch fire the next
time you use your oven.
- ALWAYS USE care when opening
the oven door. Let hot air and steam
escape before moving foods.
• NEVER USE aluminum foil to.linethe
oven bottom. Improper use of foil
could start a fire.
- NEVER BLOCK the oven vent '
opening, r ": : _ '"
' r
• CLEAN ONLY the parts listed inthis
manual. Foltow all cleaning '
instructions.
'• NEVER RUB, move or damage the
door gasket on self-cleaning ranges.
4
• NEVER TRY to-clean utensils, ::,"::ir:
cookware, removable parts or broiler:
pan and grid in the self-clean cycle: ,.:::;,
• DO NOT USE oven _leaners - No
commercial oven cleaner should be
used in or around any part of the
. oven.
IMPORTANT SAFETY
NOTICE!
The California Safe Drinking
Water and Toxic Enforcement
Act requires the governor Of
California to publish a list of
substances known to the state:
to cause birth defects or other
reproductive harm and
requires businesses to warn
their customers of potential
exposure, to :such substances. _
The fiberglass insulation ina
self-cleaning oven will give off
a very small amount of carbon
monoxide during the cleaning
cycle. Exposure can be
minimized by venting with an
open door or window or using
a ventilation fan or hood.
READ AND UNDERSTAND
THIS INFORMATION
NOW!
Be sure everyone in your home
knows what to do in case of
fire. Never use water on a
grease fire; it will only spread:
the flames. ......
OVEN FIRE:
Do not try to move the pan!
1. ClOse the oven door and turn i
controls off. " '
2. If fire continues carefully openthe
door, throw baking soda on the
fire, or use a dry chemical, foam,
or halon type extinguisher.

OPERATION
FEATURESOF YOURRANGE
Self-Clean
Automatic
Door Latch
Oven Vent
Oven •
Temperatur_
Sensor
Convection Fan
Self.Cleaning
Oven Interior
Range Control
Clock Pad
Oven Light
Switch
Element "
_lht
Oven Rack
Guides
Model & Serial Removable
Number Location Oven Rack
Bake Element Removable Ore
Door
Broiler Pan & Self-Cleaning
Grid Oven Door
Gasket
!
To remove the adhesive left from packaging tape, use household dishwashing
liquid, mineral oil or cooking oil. With a soft cloth rub into the area and allow to
soak. Rinse and dry well. Repeat procedure using an appliance polish to-inSUre __
no damage is done. This should be done beforethe oven is turned on
for the first time. The tape cannot be removed once the oven has-
heated. Packaging tape may be found in the following areas: Door handle,
control F3ane!area, door trim and oven area.
5

I
OPERATION :
Clock,TimerandOvenConttoi::::!I
Your new touch pad oven control will ...... _ Set the time of day you want_the.,
allow you to set oven [unctions with [_ oven to turn on. The ovenwilf ::
ease. Below are the different types of turn on automatically at the time
functions and a description of each. ..... , :you have set: .... :.._;,i _:_=:::;
_The HOUR/MIN UP ,_nd _
BAKE -- Cooks foods in the traditional DOWN arrow pads set the
oven with a temperature range of.170°F HOUR MtN time of day_ length of,Cooking.-
to 550"F. _ _('_ time, length of cleaning time,
BROIL -- Cooks foods at 550°F Hi _ "v..zJ the delayed start time, and
broil or 450° LO broil from the dire.ct the time set on the Kitchen
heat of the upper elemen L Broiling Timer.
should be done with the door opened to . _._ _ TheTEMP arrow pads set
the broil stop position, _ the temperature used for
CLEAN -.- Cteans the inside area of _TEMP cooking.
the oven for you. When the cycle is 1'_./_
finished, the oven will turn off
automatically. _ The START pad must be
pressed to activate any oven
function,
CONVECTION BAKE -- Cooks food
with hot air circulated over and around
foods by a convection fan, located at
the back of the oven.
CONVECTION ROAST-- Seals
juices inside the meat while creating a
golden brown exterior,
set the amount of time you
want foods to cook or the
oven to clean. The oven turns
off automatically at the end of
this time.
The CLEAR/OFF pad is
used to cancel any oven
function and the end of cycle
tone. It will not cancel
the Clock or Kitchen
Timer.- _
Kitchen
Timer
The KITCHEN TIMER
ON/OFF pad is used to turn
the Kitchen Timer on or off. It
will not control any of the
.other oven functions. - .
The CLOCK pad is used to
set the time of day.

OPERATION
ControlDisplay
indicator to let you
indicator
Flashingindicato,to f' ! 2t_"_ : lz I_o_?t Lf
..... T_ @ x_'_ time of day clock,kltchen
timer, delay
alert you to set , , ..... v ,
a temperature :: _Y _NVB_ _ CLOCK_, start time, oven
moeFR oc_l_OO0_ sl_ cooking_ or:cleaning
ora time • " _L_ _l/
time
" _" OvenFuitcti0h Oven Function
Indicator Indicator
The Control Display is an easy
reference for using your oven control..
BeloWare descriptions Of how the
Control Dis play works.
OVENTEMPERATURE :"_'': "
INDICATOR This indicator has a
multiple purpose..
• Displays_the temperature
• DisplaYs an error €ode
"ERR" - If the oven tern perature
indicator41ashes"ERR",.then you
have set an invalid tim eor_
temperature, r : u _
• Displays,Oven Problems r- If
your control flashes "F',, arid a
number or letter, youhave
experienced ari oven problem. "
Please read the section on :
F;CODES in your manual.- r: " " :-'
"ON" INDICATOR Will light
when the oven turns on: .... : :-
SET INDICATORS--The set
indicator Wil! flash in combination with
an oven function or timed function to
let you Know you need to set a timeor
temperature: E_mpl_i,'SET": arid
"BAKE" will Flash L. let you know
you need to set the bake
temperature. -....... .
TIMED INDICATOR _-_Displays
the time of day_ cooking time, delay
start time, cleaning time or the time
set on the kitchen timer.
• Displays a reminder code --
"PUSH START"qf the time
indicator flashes the words "PUSH
STAR1P'_ thenyou need-to press :_
the START:pad toactivate your : "
setting .... ,. . .. -
OVEN FUNCTION,iNDICATORS
--_ Displays which oven function has
been set, when the Oven door locks,
and if the :functionis delayed.
:

The KitchefiTime¢ :_s_ _tO_:i_ime-
,,, = cooking processes or other
household activities. It does not
.., ,,.: :_, :., controt the oven. It can be set for up
.:::,ito 9 hours_and 59minutesL: It will
:coUnt down in minutes Untitthe LAST
The cl_k_rnustbe 'set for the correct ,60 SECONDS is reached, then the !:
timei0f, day bef0readelayed ovenr:__: :: :contro!::will beepi!0nc e. When the._<,,::
fudcii0n ¢an'w0rkpr0perly._Thetime: " :countdown [cannes ZERO, the-::,-,-,:
of day cannot-be chancie(J: durina_a;.........control Will beep3 times:followedby :'
timed'oven function, butcan be ._...... one beepevery 6 seconds unti[the':
changed during a bake or broil ,: ,_;,,:,:- KITCHENTIMER ONIOFF pad is
function. ,,, ,::::',:_ pressed;.-The 6second beep can be
removed for future cycles if desired ....
HOW TO ;_ For directions on i'emoving this
: . ....... : :, ..... : : : contifiqus beep -see::T0fle_0n!the ' :::_:i!:
following page. - " ............ .....
OPERATION
Clockand Timer
1. Press the CLOCK pad.,: ;_:: ....
2. Press the HOUR/MiNUP and!0r :_
DOWN arrow pads to'Set the
time,:. _• : : : ;::
3. Press the START:_ad. : '::: •.:::
RECALL THE CLOCK 'r'_ ::.__
Whiteusing your-oven for:cookingi: ,
press the CLOCK padif you WDh tO
check the time of day: Thecurrent :
time of day wilt show in the display::
POWER: FAILURE ..... " !::
If you have exprerienced a p_wei
failure, the time....will flash in the display.
and will be incorrect. Reset your
clock.
Any oven cooking function that was in
process will need to be reset.
1. PresstheKITCHEN TIMER: :
ON/OFFpad: : :;: : ::: :_:: :::.:,
2. Press HOUR/MIN UP and/or
DOWN arrow pads to:set:,time:;J:,:_.....
3. Press START pad, : ii
4. When thelcountdown'_as reached
zero, press the KITCHEN _.
TIMER ON/OFF pad to turn oft,,
the beep.
, , , . : : ") :
To cancel the timer during the :_ ,-
countdown, press the KITCHEN
TIMER ONIOFF pad TWICE.
•

OPERATION
OvenControl, Clock and Timer
Your new control has a series of tones
that will sound at different times. These
tones may sound while you set the
control for an oven function, Oi"at the
end of the oven function. It will also alert
you there may be a problem with the::::_i:'
functions. Below are the types of tones
and a brief description of each.
TONES WHILE SETTING THE
CONTROL--When you press a touch
pad you willhear a beep. This beep will
let you know you have placed enough
pressure on the pad to activate.it. (The
arrow pads do not beep.)
END OF TIMED CYCLE TONE--At
the end of a timed cooking function,
you will hear 3 short beeps followe d by
1 beep every 6 seconds. Thisbeep will
continue to sound every 6 seconds,
until the CLEAR/OFF pad is pressed
or you may select the special feature to
cancel this 6 second beep from
sounding at the end of future CYCles.
TO CANCEL THE 6 SECOND
BEEP
1. Press and hold the BAKE and:
BROIL pads, at the same time
for 3 seconds, until the display
shows "SP.
2. Press the KITCHEN TIMER
0N/OFF pad. The display will show
"@ON BEE_' (continous beep).
3. Press the KITCHEN TIMER
ONtOFF pad again. The display will
show "BEEI_' (beep canceled).
4, Press the START pad to cancel the
6 second beep and leave the
special feature mode.
Ifyou would like to return the 6 Second:
beep, repeat steps above until the:
display shows yourch0ice and p:ress
Start.
ATTENTION TONE--This tone will
sound if you make an error or an
.oversight is'made while setting an oven
function;
Exampies would be:
a, Setting aclean cycle and the oven
door is not.properly closed.
b. Setting function and not pressing
Start.
c. Pressing an additional functiOn pad
without first setting a temperature or
time.
d. ERR will flash if you set an invalid
temperature. Press the CLEAR/OFF
pad.to clear the Co'ntrol and reset
your oven function:
Any of these can be quickly identified
by watching the display.
PREHEAT TONE--When you Set: an
oven temperature, Lheoven
automatically starts to heat. When the
temperature insidethe oven reaches
the temperature you have set, a-lone -
will sound to let youknow the oven is
ready for bak!ng.
Ifyou set.an oven function and the
control beeps while the display ss
flashing "F,' an'd a number or letter-:
Such as "F-4" or "Fr' there may be a
problem with the control or oven.
Simply press the CLEAR/OFF pad and
wait about an hour. Try setting the
function again, Ifthe code repeats, write
down the flashing code and call for
service. Tell the technician what code
was flashing.
9

Convection Baking uses heated air that
is circulated over and around foods by
the convection fan located in the back
of the oven. When convection baking,
cooking temperatures used in reci Des
should be reduced 25° F.
Because heated air is circulated evenly
throughout the oven, foods can be baked
with excellent results on 2 or3 racks at a
time. When using multi-rack baking, the
cocking time may be longer and foods
may not be as evenly browned as using
0nly one rack,
METAL OR GLASS __ '_:.....
Any type cookware will work in-the .....
convecti0noven. HOwever, metal pans
heat faster and are recommended: ::i
iGIa_sspanscook more slowly. :i ::.:.
PAPER OR PLASTIC
Heat-resistant paper and plastic that is
recommended for regUlar ovens may be
used in your convection oven.
During any oven operation you may
hear a_fannoise. This is the inteinal
cooling fan that keeps all electrical
parts from overheating, ]t is not
uncommon for this fan to keep running
even after the o_/enisturned off.
A convection fan will run while
convection cooking. The fan wii! turn off
when the door is opened.
When Convection Baking or Roasting,
as the number of rack positions used
increase steam may be noticeable as it
escapes from the oven vent located just
above the oven. door_
• For browning foods on 3 racks
positions.
• For large quanties cooking.
• Great for cooking biscuits, brownies,
angel food cakes and breads.
When baking on 3 rack positions, place
the first rack on position 1.the second
rack on position 3, and the third rack on
position 6.
1•0

OPERATION
Convection Roasting Tips
During Convection Roasting, heat
comes from the top element. The
convection fan circulates the heat
evenly around the food.
Meats cooked in a convection oven are
dark brown or1the outside and tender
arid juicy on the inside. In most cases
cooking time wilt be less when using the
Convection Roast feature.
Use the recommended roasting
temperature. Preheating is not necessary.
Check foods atthe minimum suggested
timerecomrriended on the chart below_
¥0Li'i'naychoose to Cook longer, = -.
When you are Convection Roasting,you
should use the broiler pan and grid that
came with yournew Oven. The pan iS:
Used tocatch grease spills and the grid
is used to prevent grease splatters:
To use the Pan and Grid
and grid,
CONVECTION ROASTING GUIDE
Meats
Beef
Pc_rk
Ham
Poultr
Rib, Boneless rib, Top Sirloin
(3 tO 5 Ibs.) Medium
Well
Roast (3 tO 5 Ibs.)
Canned, Butt, Shank
(3 to 5 Ibs. fully cooked)
Whole Chicken
(2 i/2 to 3 1/2 Ibs.)
Turkey, whole* (18-24 lba.)
Unstuffed (10 to 16 Ibs,)
Turkey Breast (4 to 6 Ibs.)
a. Place the rack in the lowest rack
position.
b, Place the meat on the broiler pan
MinJIb. Temp. (°F)
24-28 325 =
28-32 325 °
123.27 325 °
14-! 8 325 °
24-26 325 °
8-11 325 °
7-10 325 °
16-19 325 °
:i
Shield legs and breast
with foil to prevent
over-browning and
drying of skin.
The U.S. Department
of Agriculture says
"Rare beef is popular,
but you Should know
thatcooking meats to
only 140°F (rare)
means that some
poisoning organisms
may survive." (Source:
Safe Food Book-Your
Kitchen Guide. USDA
Rev. June 1985)
*Stuffed birds generally require 30-45 minutes additional
roasting time.
11

OPERATION....
Oven Cooking Tips
it is normal to have some odor when
using your oven for the first time;To,i,
Preheating is bringing the {empefature
up to the temperature you wi[!.be :USing_:
during baking. ,, .;. :+ :':::'::_::!:::.::
ihelp eliminate this odOr, ventilate::
the room by opening a windoW
- or using a vent hood.
IMPORTANT: Never Cover the oveil
bottom or oven rack with aluminum foil.
Improper use can cause poor heat flow,
poor baking results, and may damage
the oven finish. To prevent staining from
spillovers, you may place a piece of
aluminum foil or a cookie sheet below
foods which may spill over.
The oven vent is located under the
control panel. This area could become
hot during oven use. The vent is
important for proper air circulation.
Never block this vent.
Oven Vent
Location
Opening the door often to check foods
will cause heat loss and poor baking
results.
in the back of the oven you will notice, a
small tube. This is a heat sensor that
maintains the temperature of the oven.
Never move or bend this tube.
Oven "_=__ "_
Temperature Sensor
The low temperature zone of your oven
(between 170° and 200°F)is available
-to keep hot cooked foods warm.
However, foods should not be kept at- +
these temperatures longer-than 2 hours.
When using your convenient Delay Start
operation, foods such as dairy
products, fish, poultry, etc., should
never sit more than I hour before
cooking. Room temperatures and the
heat from the oven light promote
bacterial growth.
The Oven Temperature Sensor at the
back of the oven continuously senses :
and controls the temperature inside the
oven. To keep a constant set
temperature, the elements wilt cycle or
turn on and off during cooking,
12

oPERATION
OvenCookingTips
If baking with more than one pan; place
the pans so each has at least 1to 1 1/2"
ofair Space around iL Place pans soone
is not directly_above the other.
FLAT COOKIE SHEETS, without sid'es,
The oven racks are designed with stop
locks a convenience as well as a safe_
precaution, The guides have a bump to
prevent the_racks from tilting when
racks are pulled out of the oven.
Your oven has seven (7) rack positions.
Above the top guide cannot be used for
a rack position.
guide
allow air to circulate all around the cookies_
for even brown!ng.
SHINY PANSreftect heat, and are
perfect for cakes and quick breads that
need a light brown crust.
GLASS, DARK NON.STICK OR
DARKENED BY AGE BAKE-WARE,
absorb heat, and can be used foryeast
breads, pie crust or foods that need a
brown crust. When using these pans, the
oven temperature should be reduced by
25°F.
Always place oven racks in the
proper position while oven is cool,
You may;feel that your new oven cooks
differently than the oven it replaced. We
recommend that you use your new oven
a few weeks to become more familiar
with it, following the times given in your
recipes as a guide. See Do ttYOurself
Temperature Adjustment in the back of
this manual to make the adjustment if
you feel your oven is too hot or too cool,
for your cooking preference.

OPERATION,
Convection Baking and
Roasting " "
CONVeC_ON_1. Press the Convection
To set the oven to turn Onata later time
of day, cookfor a specificamop0t of
timeand turnoffautomatically:.... _
COOKING
Cooking BAKE or
ROAST pad.
2. Press the TEMP UPand/or DOWN arrow
TEMP pads to set the oven
temperature you
prefer to use.
3. Press the START
pad. " "
To set the oven tocook for a specific
time and turn off automatically.
2, Pressthe:TEMP UP
and!or DOWN arrow
TEMP : pads toset the oven
temperature you
prefer to use:
3. Press the OVEN
COOKING TIME
. pad .....
CO.VEC'nON1. Press the Convection
COOKING Cooking BAKE or
ROAST pad. _---::
2. Press the TEMP UP;:
and!orDOWN arrow
TEMP pads to set the :oven
temperature you
prefer to use.
3. Press the OVEN
COOKING TIME
pad.
@ @ 4, Press the
HOUR/MIN UP
HOUR MIN and/or DOWN arrow
@ @ padstosetthe
. amount of time you
prefer your foods to
cook.
5. Press the START
pad.
preferyour foods to
cook.
4 ¸
5. Press the DELAY
START TIME pad.
@@ 6. Press the _
HOUR/MIN UP
HOUR MIN and/or DOWN arrow
@ @ pads to Setthe tinie of
day you:prefer:the:
oven to turn On.
:i 7, Press the START
pad.

OPERATION
Baking
t, Press the BAKE pad.
•
TEMP
@
=,Press the TEMP UP
and/or DOWN arrow
pads to set the oven
temperature you
-prefer:t0 use.
3. Press the START
Dad:
To set the oven to cook for a specific
time and turn off automatically.
. %.PresstheBAKE.. pad.
.2, Press the TEMp UP
: !and!or DOWN arrow
TEMP pads to set the o_,e_
temperature you
_-,
_ prefer to use.
3, Press the OVEN
COOKING TIME
pad.
@ 4. Press the
HOUR/MIN UP
HOUR MIN and/'or DOWN arrow
pads to set the
amount of time you
prefer your foods to
cook.
5. Press the START
pad.
To set the oven to turn on ata later time
of day, cook for aspecific amount:of
time and turn off automatically.
1. Press the BAKE pad.
2. Press the TEMP UP
and/or DOWN
arrow
TEMP pads to set the oven
temperature you
prefer t0 Use.
3, Press the OVEN
COOKING TIME
pad,
HOUR/MIN UP
HOUR MIN and/or DOWN arrow
@ @ padstosetthe
a_00r_t of time you
prefer your foods to
co0k:
- 5; Press theDELAY
START TIME pad.
@(_ 6. Press the
HOUR/MIN UP
HOUR MIN. • and/or DOWN arrow
@ @ pads to set the time of
day you prefer the
oven to turn on.
7. PreSstlie START
pad;
15•

OPERATION
Broiling
Broiling iscooking by direct heat from
the uppei"_element:The oven doQr_ "
should remain open to the broil stop
position during broiling.
It is not necessary to preheat the oven
when broiling. Use the broiler pan and
grid that camewithyour range: Bothare
designed for p(oper drainage of fat and
liquids.
if foil is used it must
be molded tightly to
the grid and slits cut
into the foil to match
those of thegrid; This
allows fats and liquids to
drain into the broiler pan,
preventing fire and
excessive smoke.
Always remove the pan and
grid from the oven.
Storing or forgetting
a soiled broiler pan _-_
in the oven is a potential
smoke or fire hazard.
The U.S, Department of Agriculture
notes that meat cooked rare is popular,
but meat cooked to only 140°F(rare)
means that some food poisoning
organisms may survive.
The closer you place foods to:the br0il;r
element the faster foOdSbro,_,hOn the
outside yet rernain red-to pink in the
center.
Moving meats away from the element ....
will al]ow the meat to cook to the center
while browning on the outside:: Cook
side I at least 2 rhinutes f0ngerthan
side 2. If:your oven is connected to 208
volts, you may want to use a'higher rack
positioa and/or broil foods longer.
The size, weight, thickness, starting
temperature and your preference:of the
doneness ofthe meat will affect
broiling. This chart is based on meats at
refrigerator temperature.
FOOD RACK
Steak1" thick
Ground beef.
patties
1" thick
Pork Chops-I/2"
thick
Fish (fi,!!e_s)
Chicken (pieces)
POSITION
3: "
3' •
3
3
2
TOTAL
TIME (MIN,)
_.,!:. 9-11
1648
- 27-29
1143
45-55
t8.
lb,
Press the BROIL pad. (This will
automatically Set HI Broil).
While the set indicator is flashing 'n
the display, press the BROIL pad
again if youprefer to use Lo Broil._
Use Lo Broil to cook foods such as
poultry or thick cuts of meat
thoroughly:without over-brown ng
them.
2.- Press theSTART _ad.
3. When broiling is finished, press the
CLEAR/OFF _ad.
16

OPERATION
Setting Special Features
Your new touchpad controthas additional
features that you may choose to use. After
making yourselection_if you want to
change the setting, follow the steps until
the display shows your choice.
The control is automatically set to turn off
the oven after 12hours baking or 3 hours
broiling should you forget and leave the
ovenon. Ifyou want to removethis feature:
1, Pressand hold, at the same time,
the BAKE and BROIL pads for3
seconds, until the display shows SF.
2' Pressthe DELAY START TIME
pad. The display shows t2shdn (12
hour shut-off).
PresstheDELAY START TIME pad
again. The display will show no shdn
(no shut-off).
8, Press the START pad.
Yourcontrolissettousethe12hour
clock,lfyouprefertousethe24 hour
MilitaryTime clock or black out the
display: :. .....
1.
21
Press and hold, at the same time,
the BAKE and BROIL pads for 3
seconds, untilthe display showsSF.
(a) Pressthe CLOCK pad. The
display shows 12hr. Ifthis is your :
choice press theSTART pad.
or
(b) PresstheCLOCK pad again:
The display will show 24hr. Example:
5:00 on the 12 hour Clockwil! show
17:00 hourson the.military clock. If'
this isyour choice press the START
pad.
Or • -• ' -
(c) Pressthe CLOCK pad again.
The display will show OFF. Ifthis is
your choice press START. The
display will not show time. (The Delay
Start Time feature Willnot operate.)
Your ovencontrol is set for the Fahrenheit
temperature selections. Mostrecipes are
given using the Fahrenheit scale. You can
change thisto use the Celsius selection.
1, Pressand hold, at the same time,
the BAKE and BROIL pads for 3
seconds, until the display shows SF.
2. (a) Pressthe BROIL pad. The
control display will show the degrees
signand F.
(b) Press the BROIL pad again
This will change F (Fahrenheit) to C
(Celsius).
3, Pressthe START pad.
17-

OPERATION
Setting Special Features
Your control will allow you to lock the
touch pads so they cannot be activa.ted
when pressed. If you're worried about
leaving the oven unsupervised, activate
this feature.
1. Press and hold, at the same
time, the BAKE and BROIL pads
for3 seconds, until the display
shows SF.
2. (a) Press the CLEAN pad. The
display shows LOC OFF (lockout
off).
(b) Press the CLEAN pad again.
The display will show LOC ON ' ::
(lockout on).
3, Pressthe START pad.
This feature can only be set
when the oven is not in use_ r
When this feature is on, the display will
show LOC, if a touch pad is pressed.
(This feature will not affect the clock,
timer, or oven light pads.)
This feature will automatically convert
the temperature you set for traditional
baking to convection cooking.
1, Press and hold the CONVECTION
BAKE pad for 4 to 5 seconds.
2. Press the TEMP UP or DOWN
ARROW pads to set the
temperature.
3. Press the START pad. Youwill see
the converted temperature in the
display. For example, if you entered
375° the display will show 350°. This
conversion will need to be set each
time you use Convection Bake.
Your new control has a cook and hold
feature for timed cooking only that Will: _
keep hot cooked foods warm up to 3
hours after the timed cooking is
finished. To activate this feature:
1. Press and hold, at the same
time, the BAKE and BROIL pads
for 3 seconds, until the display
shows SF. -
2. [a) Press the OVEN COOKING "
TIME pad. The display will show:
HLd OFF.
[b) Press the OVEN COOKING
TIME pad again toactivate the
feature. The display will show HLd
ON.
3. Press the START pad.
This special feature will a
Self-CleaningrCycle
CAREAND.CLEANING
I. Remove the broiler pan and g_'id;
oven racks, utensils and any foil that
may,be in.the oven .....
2. Soil on the.frOnt framell _inside:the
oven, and outside the door gasket
-- •w
- k_..b_
Door Liner
Clean these areas with hot water,
soap-filled steel wool pads or cleansers
such a.sSoft Scrub® to remove any
soil. Rinse weft with clean water and
dry.
3. Wipe up any heavy spillovers on the
oven bottom.
4. Donot clean the door gasket. The
• fiberglass material of the oven door
gasket cannot withstand abrasion, tt
is essential for the gasket to remain
intact. Ifyou notice it becoming
worn, frayed, or displaced on the
door, it should be replaced.
T6edoor gaske{is_desigr_edto,have::a_
5-6"gapat the b0ttomofthe door.This
allowsfor proper air circulation.
Door Panel Gasket
Door Liner -)
Itis normal for your oven door to give
the appearance of not having a good
seal against the range. Thisi_; Ciueto -
the gasket: The:location of the gasket
on,the oven door maintains agood seal
and prevents any heat loss.
i
_ utensils should .
never be left in the
The oven racks maybe _
cleaned during the self-clean
cycle, but will lose their
luster and become hard to
slide, If you choose to leave
them in during the cycle,
wiping them with vegetable
oil after the cycle will help
them slide easier.
For the first clean cycle, vent
the room with an opened
window or hood vent. This
will reduce the odor when
heating new parts.
19

CAREANDCLEANING white ashin thebven_JustWi#e:ifup ::_
Serf-CleaningCycle<,,: :
The CleanCycle including cool down
time, is automafical y Set for 4 hours,
but you may change this fr0m 3 hours if
oven is lightly soiled up to 5 hours if
oven is heavily soiled.
t;: Press the GLEAN
Dad.4 hours Will
show in the display.
@ @2. IfyouWanttochange
the length of clean
HOUR" MIN time pressthe _-
HOUR MINUP
- and/or DOWN arrow :
pad,
3. Pressthe START
pad.- --- ,:_;_"_
SimP!y`preS_ tSeCLEAI_OFF pad,
You W IIneedto Wat for the o,_en'
temperature to drop betow {helock
temperatu[e (approx.' 1 houO before-
attempting tOopen the dOOr.
with adamp,€[Oth_o.r,sponge,,... :...:..
lii-i_:hitespots remain,:is_rb5 the_ _ith:iai:
s0ap_filied,st ee!:wool pad._Besulre_tO:ili_:::
rinSetfiOi,6uglily;.Theseare=lJSually "
deposits of salt that cannot be removed
during the.cycle.
If for any reason you are not
satisfied with the cleaning ::
results, just repeat the cycle.
........1.Press theCLEAN
@ 2.'lf_'ou wantto
change the length
HOUR MIN of cieari time press
:_ :,i:_ the HOUR/MIN
vY..L_.../• - UP arid/or DOWN
arrow pads. _--
31 Press the DELAY
:_ START TIME
pad,
4,. Press the "
HOUR/MIN UP or
HOUR MIN. DOWN.arrow pads
@.@ to set the time you
prefer the clean
- cycle.to start.
Press the START
5,
pad.
0

CARE CLEANING
CLEANING MATERIALS ="
• Dishwashing detergent
• Warm water . +:. +-.
• Soft cloth
Don0t use" abrasive c|eaners,
industrial cleaners or bleach.
CLEANING MATERIALS!
• Dishwashing detergent
• Wa[m water-
• Soap-filled scouring pad
• Commercial oven:cleaner, ;:"+
TO CLEAN
AIIow,th; pan t0"sbak: Sprinkle:the
grid Witt_d[shWashing detergeflt ahd
cover with =adamp _¢!othor-paper
towel; Riffle a_rd_drylweli: 5co_€ as;
neede& Y6_ may also place both the
pan add grlid in the disl_wash_r.
_11 II
CAUTION: Be sure +:
the ov+n:+iight +witch +
with wet hands or a wet cloth+ _
Wait until the bulb has cooled
and use a dry cloth_ Never
touch the live collar of the
bulb. If you are replacing a
broken light bulb makeSure
the power supply is off.
Ill i
Glass Retainer
Bull
,+
i
Glass Cover
1'O REMOVE THE COVER
1. Disconnect electrical power tothe
oven at the main circuit breaker or
fuse box.
2. Unscrew the glass cover and
remove,
REPLACE THE LIGHT BULB
Unscrew the light bulb and replace it
with a 40-watt home appliance bulb.
1.O REPLACE COVER
1. Screw down the glass cover:
21

CLEANING MATERIALS
• Dishwashing detergent . ....
• Warm water
• Sco_jri,qg parlor soap-filled steel.
wool pad ..... : :-i: i
Raised Back
Broil Stop Position
Hinge , :::::;:::; ,:;_
TO REMOVE
1. Open,the d0or tothebroil stop
.......Positi£n. :_ :::::
TO REMOVE
1. Pull the racks outto the Stop lock
position,
2. Pullup the front of the rack and
stide under the bum p off,the rack
guide. " ...... .....
TO CLEAN
Clean with .warm water and
detergent. For hard to remove stains,
gently scrub with a Scouring pad or a
soap-filled steel wool pad. Rinse
welt.
TO REPLACE
1. Place the raised back of the rack
onto the rack guides.
2. Lift the front of the rack until the
raised back slides under the
bump of the rack guides.
3, Slide the rack a!l the way back,
/_\ CAUTION: When_i_ :
_ ,,] the" door is removed
k,._r/) and :the hinge armS;
"" are at the broil::stop
causing injury to the hands
or damage the porcelain
Lfinish Of the front frame. .
TO REPLACE
1. Make sure the hinge arms are in
the broil stop position.
2. Lift the door by the sides,
3. Line up the slots at the bottom
edge of the door with the hinge
arms.
4. Slide the door down onto the hinge
arms as far as it will go.
5. Close the door.
22

Tosave you4ime and money_-before makinga.seryice callcheck the list belowlfor any
problem you may feel.you,havewith theperformance of,your range_Ifthe problem-is -
something you cannot fix use the Consumer Service Numbers located atthe-back of this
manuaf. When making any calls have the Model No., Repair Parts list,
Use and Care Manual and the Date of Purchase available.
PROBLEM POSSIBLE CAUSE
The displayofyour Range malfuncti0n.
control is flashing ......
"F" follO_vedby a
number or letter:
• • •ii ii • ii
Oven and oven No power to range,
control will not
work.
POSSIBLE SOLUTION
Press the CLEAR/OFF
pad. Let the oven cool for
I hour and enter an oven
or cleaning operation. If
code repeats, call for
service.
Check the circuit breaker
or fuse. Make sure the
power cord is plugged in.
ii i i i
Oven temperature, Thermostat Calibration.
seems inaccurate.
ii i
See the adjustments
described following this
section.
iiii i
Oven will not Clean cycle is not
unlock, finished.
Oven temperature must
drop below the lock
temperature before the
door will unlock.
Oven light will not- a, Light switch in off a. Check oven light
work, position, switch on the control
panel.
b. Oven rlightbulb b. Check the oven light
burned out, buib. .
Oven did not
clean or results
were poor.
i
a. Controls were not set
properly.
b. Clean cycle was
interrupted.
c. Oven was soiled
heavily,
a. Check the self-cleaning
section of this manual
b. The normal clean cycle
should last 4 hours.
c. Heavy spillovers
should be removed
before the cycle is set.
You can also repeat
the cycle.
3"

•PROBLEM
: L¸
BEFORECALLINGFORSERVICE
POSSIBLE CAUSE POSSIBLE SOLUTION
Oven smokes;
a;, Dirty oven.
b. Improper use of
aluminum foil. _:::::
c. Broiler pan cOntaining
grease left in the oven.
Foods do not bake a.
properly.
b.
Cl
a, Check for heavy
spiflover.
b. Use of foil not
recommended.
c, Clean pan ancl grid aftei:_.
each Use. " "
Oven is not preheated, a. Be sure to preheat until.,
rnproper rack or pan
placement.
Oven vent blocked or
covered.
the tone sounds.
b, Maintain uniform air
space around pans
and utensils. See oven
cooking section;
c, Keepvent clear:
41
: eg
f.
g.
h.
Foods do not broil
properly.
a.
improper use of foil.
Improper temperature
setting for utensil used.
Recipe not followed.
Improper oven control
calibration.
Range and oven rack
not level.
Jl,l, JJi i
Improper rack position.
b, Oven preheated:
c, fmproperuse of foil.
d, Oven door closed
during broiling.
e, Low voltage. (208
Volts).
fo Improper broiling time.
d, Racks-should nO[be
covered during'baking.
e, Reduce temperature
25 degrees for glass or
doll/darkened pans.
f, Check recipe and
measurement.
g, Check the temperature
adjustment following
this section. "
h, Check the installation
instructions for
leveling.
a, Check broil pan
placement; see broiling
section.
b, Do not preheat when
broiling.
c, Check broiling section_
d, Open door to broil stop.
e. Use higher rack position
and/or longer cooking
time.
f, Check broiling chart in
broiling section.
24

"DOIT YOURSELF"
TEMPERATURE
1. Press and hold down
both the BAKE and
BROIL pads for 3
seconds, untiethe
display shows SF.
ADJUSTMENT
You may feel that your new oven cooks
• differently than the oven it replaced. We
recommend that you use your new oven
afew weeks to become more familiar
with it, following the times given in your
recipes as a guide.
Ifyou think your new oven is too hot
(burning foods) or not hot enough
(foods are undercooked) you can
adjust the temperature yourself. The
appearance and texture of foods is a
better indicator of oven accuracy than
oven thermometers; These
thermometers can vary by 20-40
degrees. In addition, the oven door
must be opened to read these
thermometers. Opening the door will
change the temperature of the oven.
To decide how much to change the
temperature, set the oven temperature
25 degrees higher (if foods are
undercooked) or 25 degrees lower (if
foods are burning) than the temperature
in your recipe, then bake. The results of
this "test" should give you an idea of
• how much the temperature should be
changed.
..I-
1
Press the BAKE pad.
A factory set 2 digit
number will show in
the display, usually
00.
TEMP
@
If you think the
oven is not hot
enough,
3a. Press the TEMP UP
arrow pad to
increase (+) the
temperature up to
+35°F.
3b. Press the TEMP
DOWN arrow pad to
decrease (-) the
temperature down to
.35°F,
4. Press the START
pad,
This increased or decreased
temperature setting will remain in
memory until the above steps are
repeated. A power failure witl not "
affect this setting.
The broil and self-clean temperatures,
will not be affected.
25

_iNOTES
26

: - ,::: :_.:/: !_:..-: ilk;/) _¸¸i i:/¸ ¸¸_,
RANGEWARRANTY:
tFFULLONEYEARWARRANTYONTHEFUNCTIONINGOFALLPARTSEXCEPTGLASS.
PARTS _ ,_",:"_-':. :
If'withinoneyeaifromthedateofinstallation,anypart,otherthanaglas_part;faiis:to:fuhction
properlyduetoadefectinmaterialorworkmanshipSearswillrepairor replaceit,freeofCharge."
FULL30-DAYWARRANTYONGLASSPARTSANDFINISHOFPORCELAINENAMEL,
PAINTEDORBRIGHTMETALFINISHEDPARTS
If,.:within30-daysfromthedateofinstallation,anyglasspartorthefinishonanyporcelainenamel,
paintedorbrightmetalpartisdefectiveinmateriatorworkmanship,Searswiltreptacethepart,free
ofcharge. .........
FULL9B-DAYWARRANTYONMECHANICALADJUSTMENTS ' ',: '! ::-
For90daYsfromthedateofinstallation,Searswil!provide,freeofcharge,anymechanical
adjustmentsnecessaryforproperoperatonoftherangeexceptfornormatmaintenance_
Iftherangeissubjectedtootherthanprivatefamilyuse,theabovewarrantycovetageiseffectivefor
Onty90days. _ . ,
WARRANTYSERVICEISAVAILABLEBYCONTACTINGTHENEARESTSEARSSERVCECENTER.!
DEPARTMENTINTHEUNITEDSTATES'
ThiswarrantyappliesonlywhilethisproductisinuseintheUnitedStates,Thiswarrantygivesyou
;pecifictegalrights,andyoumayalsohaveotherrightswhichvaryfromstatetostate:
SearsRoebuckandCo.Dept.817 WAHoffmanEstates,tL60179
J
To further add to the value of your Range,
Buy a Sears Maintenance Agreement.
Years of Ownership Coverage 1st Year 2nd Year 3rcl Year
Replacement of D_fective
Po,_ot_r_,..Po,oo_a,, W MA MA
' or Glass
2 M_,a.i0alA,_.a_..t W MA MA
30 DAYS
3 P,,,_e'.l.andGlassPacrts W" MA MA
Annual Preventive Malnten-
4 a._*c,_k_tyo.,,_.o.t MA MA MA
W _ Warramy MA - Maintenance Agreement
KenmoreRangesaredesigned,manufacturedandtestedforyearsofdependableoperation.Yet,any
modernappliancemayrequireservicefromtimetotime.TheSearsWarrantyp_ustheSears
MaintenanceAgreementprovidesprotectionfromunexpectedrepairbillsandassuresyouofenjoying
maximumrangeefficiency.
ThechartabovecomparesthewarrantyandMaintenanceAgreementandshowsyouthebenefitsofa
SearsRangeMaintenanceAgreement.
ContactyourSearsSalesAssociateorLocalSearsServiceCentertodayandpurchaseaSears
MaintenanceAgreement.
27

For therepair or replacement parts you need
delivered directly toyour home
Call 7 am - 7 prn, 7 days a week
1-800-366-PART
(1-800-366-7278)
Forin-home major brand repair service
Call 24 hours a day, 7 days a week j!/'_ 8_et_qS 1
1,800-4-REPAIR
i. " (1-800-473-7247) '
For the Iocation of a
Searsparts and Repair Center in your area
Call 24 hours a day, 7 days aweek _
1-800.488-1222
Forinformation on purchasing a Sears
Maintenance Agreement or to inquire
about an existing Agreement
Call9am- 5prn,Monday-Saturday
1-800-827-6655
America's Repair Specialists
28

MANUAL DEL CONSUMIDOR
._:+,+ . _ _
++ Hi PARED
EMPOTRADO A
:_-+CONVECClON DE 30"
CON AUTOLIMPIBZA
MODELO NO,
911.41775
911.41779 ....
PRECAUClON:
Lea y siga todas las
reg|as y las instrucciones
para el funcionamiento ...._
antes de usar este _ ....
producto por primera vez.
• Instrucciones de
Seguridad
• Funcionamiento ........._:,_
• Cuidado yLimpieza
• C6mo Resolver : , _
Problemas
r _
Sears, Roebuck and Co., Hoffman Estates, IL 60179 U.S.A.
229C4020P155 (SR- 10361)

indice
C6mo sacar la cinta de empaque.. 5
Caracter[sticas de su homo ........... 5
i:HORNOEMPOTRADOA,i, :i: i
E c c o de autolimpieza ,_:.:,::;:: 19_20:: :::!i
Panel de control ,...L.__,,;',;I,..:..::,:,,, 21' '
Caceroayparr a:jSara_a_a[:a a :?:; _ ",
ParriIlas del homo ......................... 22
Puerta del homo .......:................... 22
Control dei homo. retoj, ....
cron6metro -. - :...6 "_.
Panel de control .................. ;._....;... 7
Reloj ........................... '......:............ f. 8
CronSmetro de Facocina ....;..{_.._._._8:- ...::A.._ ................ i..................... 23-24
Tonos 9 : "- Ajustesa la temp_ratUra .............. -25
C6dig6s F ....................................... 9 ..... Ga[a ntia ......... ......................... 27
consejos para hornear Nfimeros para servicio del
a convecci6n ..................... :..::.L... ,.I0.. consumidor ................................... 28
Conse|os para asar a " " "
conveccibn ................................... 11
Consejos para cocinar en el
homo ........................................ 12-13
C6mo programar para homear
y asar a convecciSn ..................... 14.
Cbmo hornear ............................... 15
C6mo asar .................. ;................. 16 "
Funciones especiales ........ _...,. 17-18
..Antes de:llamar para un servicio .....
k-
Para su convenienciay referencia futura, pot favor-escr|ba el- .....
n,_mero de modelo y ser|e en el espac;o que se provee. Est_n
ubicados en el marco frontal detr=_s de la puerta del horno......
Ntimero de modelo: NGmero de serie:
I III
2

INSTRUCCIONES
DESEGURIDADIMPORTANTES
' GUARDE ESTASINSTRUCCIONES
Lea todas ias instmcciones antes de usar este aparato. Cuando _/_
use aparatos a gas o eiGctricos, se deberian seguir precauciones
de seguridad, ineluyendo iosiguiente:
IMPORTANTE Para garantrzar su
seguridad, la de su familia y la de slu _
hogar, pot favor lea su Manual dei
Consumidor cuidadosamente. Mant_ngalo
a Ia mano para referenCias. Ponga mucha
atenciSn alas secciones de seguridad.
ASEGt)RESE quesu homo sea
instalado por un tecnico especializado y
que haga tierra adecuadamente.
• NO DEJE'a los niSos sin vigilancia
cerca de un homo que se est_ usando.
• ENSEi_E A LOS HII_IOS A no jugar
con los controles o cualqu!er parte de]
homo, no sentarse, subirse 0 pararse
sobre la puerta del homo.
• PRECAUCION: NUNCA GUARDE
articulos q ue sear de interns para los
nifios an el panel trasero o enrlOS
gabinetes sobre el homo. Los ni_os que
se suban sobre el homo podrfan
resuttar gravemente heridos:
• GUARDE ESTE Iibro para un uso
futuro.
• NUNCA TRATE de reparar o
reemplazar una parte del homo a
menos que las instrucciones se den en
este manual. Todo otto trabajo deberfa
ser hecho pot un tecnico especializado:
• MUNCA USE su homo para entibiar o
calentar una habitaci6n.
• SIEMPRE MANTENGA los
revestimientos combustibles de las
paredes, cortinas y otros paSos auna
distancia prudente del homo.
- NUNCA USE una toaila u otro pano
abultado como agarradera y asegt3rese
que la agarradera est_ seca. Las
agarraderas ht3medas podrian causar.
quemaduras por vapor. NO PERMITA
que tas agarraderas toquen las
superficies para cocinar calientes.
• SIEMPRE MANTENGA el _rea del
homo despejada de cosas que se
podrfan quemar. Los alimentos, los
utensilios de madera, la acumulacidn
de grasa, la gasotina y otros vapores o :
liquidos inflamables se podr[an :! ....... ..:i
incendiar; Los utensilios, de pl&stico se
podrfan derretir y las comidas en
conservas podrianexplotar. Su homo
nunca de deber[a usar para almacenar
oosas.
• SIEMPRE MANTENGA el homo
despejado de cosas que se podr{an
quemar (gasotina y otros vapores o
I¿quidos inflamables)o
• NUNCA CALIENTE contenedores de
alimentos cerrados. El aumento de la
presi6n puede causar que el
contenedor explote y cause heridas...
° NUNiI_A DEJE fiascos o latas con
grasa o goteaduras dentro o cerca del
homo.
• NUNCA TRATE de ]impiar una
cubierta caliente. Algunos limpiadores
producer vapores t6xicos y los paflos
o esponjas mojadas podrian causal
quemaduras por vapor.
• NUNCA USE ropa suelta cuando use
el horno.
• ASEGI;IRESE que el horno est_
insta[ado ffrmemente en un gabinete que
este bien pegado a la pared.
3

INSTRUCCiONES
DESEGURIDAD
IMPORTANTES
• NO TOQUE las superficies para calentar, las
superficies ce_ca de elias o Jassuperficies."
intefiores. Estas podflan estar suficientemente
calientes para quemar aunque se vean de
color oscuro. Durante y despu&s detuso, no
toque o permita que la ropa omateriales
inflamableshagan contacto con Ias
superficies calientes hasta quehayan tenido:
tiempo de enfriarse. Las otras suprficies cerca
de las ventanillas de ventilaci6n del homo,
puertas, ventanas tambien podrian estar
suficientemente calientes para causar
quemaduras.
• COLOQUE LAS PARRILLAS DEL
HORNO en ta posici6n deseada mientrasel
homo estZafrb. Silas pard,as se deben mover
mientras el homo est_ caliente, no permita
que la agarradera haga contactocon el
quemador caliente del homo.
• DESPUES DE ASAR A LA PARRILLA,
siempre saque !acacerola y ta parritla para
asardel homo y Ii'mpielas.Los sobrados de
grasa en la cacerola para asar podrfan
incendiarse la pr6xima vez que usted use el
homo.
• SIEMPRE TENGA CUIDADO cuando
abra la puerta det homo. Deje que el aire
catiente y el vapor escapen antes de mover
losalimentos.
,, NUNCA USE papeI de aluminio para forrar
el fondo del homo. Eluso inadecuado del
papel de atuminio podrfa resultar en ungolpe
de corriente o en un incendio.
• NUNCA OBSTRUYA la ventilaci6n det
homo.
• NUNCA TP.ATE de timpiar!os Utensilios,
ollas, partes'removibles o la ¢acerofa y la ..
parrilla para asaren el ciclo de autolitnpieza:._-
*NO USE limpiadores para hornos - Nose
hdeberiausar ninguna clase de limpiador para
ornos dentro o alrededor de cualquier pa,'te
de] homo.
%-
..... ;ADVERTENCIA DE
SEGURIDAD IMPORTANTE!
OaUfomla Safe Drinking Water and
Toxic Enforcement Act requiere que'
el gobernador de California publique
una !ista de substancias que el
estadosepa que produ¢en dafecto_
de nacimlanto u, otros daHos'
reproducUvos y requiere que los
hombres de negocios adviertana
sus clientes del contacto potenclal
a tales substancias. El aislante de
libra de vldr|o en el homo con
autolimpieza emitir& una mw
pequeHa cantidad de mon6xido de
carhono durante el ciclo de
autoUmpieza.. E! contacto se puede-._,;
minimizar ventUando con una puerta
o ventana abierta o usando un
ventilador o una campana de
ventilacien. -
;LEA Y COMPRENDA ESTA _
INFORMA@ION AHORA!
Asegerese que todos en su hogar
sepan qu6 hacer en caso de
incendio.'Nunca use agua sobre un
incendio de grasa_ esto solamente
extender=_ las llamas.
FUEGO ENELHORNO:
;No trate de mover la cacemla!
1. Cierre la puerta de1homo yapague los
controle&
Si el incendio contint3a, cuidadosamente
abra ta puerta, arroje soda para cocinar
sobre el fuego, o use un extintor de
qufmico seco, espuma o "halon".
• LIMPIE SOLAMENTE taspartes que se
Iistan eneste manual. Siga todas las
instrucciones para la limpieza.
• NUNCA FRIEGUE, mueva, o dafie e!sello
de Ia puerta en las estufas con autolimpieza.

OPERACION
CARACTERISTICASDESUHORNO
Cerrojo
autom_tico
para
Ventila#i6n
del homo
Sensor de
de/homo
Ventila¢tm
para
conveccidn
Interior de,
homo con
Control de ia
estufa
Ubicacidn
del ndmero
de modelo y
serie Cacerola y parrilla
para asar Sello de puerta
Elemento para del homo'con
hornear autolimpieza
interruptor de la
Luz del homo
parrillas dei _
homo
Parrillas de
homo _:
.removibles
Puerta ......
removible del - •
homo
Para sacar el residuo del adhesivo de la cJnta de:empaque; use detergente lfqQidO para i/:
F3[atos,a.ceite mineral o aceite para cocinar, Con un pafiosuave fr6teios sobre e[ Area y
permita que se remoje. Enjuague y seque bien, E_o se deber|a hacer antes de
encender la estufa pot primera vet. La cinta no se puede sa©ar una vez-
que el homo se haya calentado. La cinta de empaque se puede enContrar en [as
siguientes Area: manifla de la,puerta, _rea del panel de control, moldura de la puerta y
Area del homo.

' ' ..... OPERAClON ,:>
Control Del Homo, Reloj Y CronGmetro
Su nuevo control de homo a botones le permitir_, prograrnar :las funciones de] homo con
facitidad. M&s abaio est_n los diferentes tipos de funciones y la descripci6n de cada uno_'_......."::
Programa la hora del dfa en ]a
cual usted desea queeI hornc_ '"
se encienda. El horn0se .........
encender_, autom_ticamente a
HORNEAR -- Cocina los alimentos en el
homo traditional a una temperatura la hora.que usted ha
........... programadoy cuando la __: :::
varia de170_'F a 550°F. .... ..:. funci6n termine, el homo se.
ASARALAPARRILLA--Asalos'
alime_tosen_ALTO a 550_Fo en BAJO a, _ '! " " ..............
450°F a:#a[or directo del elemento super[oK :::_
El asado a la parrifta se debe hacer Conla
pueaaabiertaenlaposici6ndetopepara. -_ . '........'o botonescon as" h ..............
asarala pardll& , _, _, H_U--IN UP _1_1_1 s _:'":'
• - I_M y
LIMPiEZA -- Limpia el &rea interior del _ I/_. ,_r,_,r_man la hora de) dl'a 'la:::_'_:
homo pot usted, Cuando el ciclo termina, el HOUR MIN _clad de t emno r_ara ' .
homo se apagar_ aUtom_ticamente... _t'_/'_ _('_"_ i coc nar_ acant ct_d _e tiem _.,i
...... _.:_: : :: P ..:
" ' ' " " ............... k_ '_ para fimpiar, lahora para pn : ._:
: comienzo demorado, la ...........
temperatura del homo y:!a hora..::.
HORNEAR A GONVE¢ClON -- Hornear _ de1crondmetro de ta cocin #. . ::.
con aire caliente que es circulado sobre y _ Los botones TEMP con las ::.::
alrededor de los alimentos pot el VentiJador TEMP : 'flechas seleccionar la :,
de convecci6n ubicado en ia parte trasera _t'_'_'_ :
del homo,
ASAR A ¢ONVECCION -- Sella los jugos
dentro de ]a came mientras crea un exterior _'T^=T'_
caf_ dorado. ........ !1_ :
;.I_rograma Iacantidad :deiiempo
i en que usted desea cocinar los
aIimentos 0 en que el h0rno se
Iimpie. EIhomo se apaga l_chen
:'_ aLJtom_ticamente al final de esta Timer
cantidad de tiempo. _'n_n_
temperatura para cocinar.
El bot6n START debe
empujarse para activar
cualquier funci6n del homo.
El bot6n OIEAR/OFF se usa
para cancelar cualquier funci6n
del homo y el tono definde ' " '
ciclo, No ¢ancelalT_: el Reloj :
o el Cron6metro de la: ....
Cocina. :: : - ": :
El bot6nKIfCHEN TIMER i :'
ONIOFF se usa.pa,ra encender :.
o apagar e! Cron6metro de Ia ' _
Cocina. No controlar_ ninguna
otra funci6n del homo.
Ef bot6n del RELOJ se usa
para poner la hora del dfa,

CION
PANELOECONTROL
-. Indicador de .
temperatura del
Luz interm|tente
para avisarle
programe una; _:-
temperatura o un
tiempo Ihdi_ad0r.de
funci6ndel horno-.
indicador para
avisar|e que el
homo se ha.
Indicador de
funciones
autom_ticas-
Ubicaci6n para la
hora,del dia en el
cron6metrode
la cocina, hora de
comienz0 demorado,
cocci6n en el homo
o tiemp0de
limpieza. "
• El Dial de Control es una referencia f_cil para utilizar el control deJ homo. M&s abajo est&n
fas descripciones para indicar c_mo funciona el Dialde Control,
|NDICADOR DE LA TEMPERATURA
DEL HORNO -- Este indicador tier_e un.,
prop6sitQm ltiple. .,-
* Muestra la temperatura
. Muestra un c6digo de error
"ERR'_._ Si el indicador de temperatura
delhSrm5 pes[a_ea "ERR", er_l:onces :
usted ha programado un tiempo o una
temperatu'ra inc0rtecta_ : "
- Muestra prol_lemas el homo --Sf
el control pesta_ea_ ,F', yun n_mero o
letra, usted est_ expedmentando un
problema del homo: Por favor lea la
secci6n CODIGOS-F ensu manual.
. INDICADOR DE ENCENDID0 Se
encender_ Cuando se programe una
funci6n del homo .........
INDICADORES DE PROGRAM A _ El
indicador de programa pesta_ear_, en
combinaci6n con uria furlci6n del homo o
una funciSn autom&tica para avisa_'le,que
necesita programar un tiemp o o una
temperatura. Ejemplo: ,'SE_' y "BAKE"
pestaHear_n para av{sarJeque qecesita
programar laternperatura de[ horn_., r
INDICADOR DE LA HORA -- Muestra
la hora det dia. la'cantidad de tiemp.o para
cocinar, la hora para comenzar una;
funciSn demorada para cocinar,.JimPiar, o.
la hora programada en el cronSmetro de la
cocina.
Muestra unc6digo para recordar --
"PUSH START" - Si el indicador, de la
hora del homo pestaSea las palabras
"PUSH START", entonces usted tiene
que empujar el bot6n START para activa(
su programa.
INDICADORES DE LAB FUN_IONE$
DEL HORNO -- Muestran qu_ fun¢i6n
ha sido programada, cuando la puerta del
homo est_ enganchada, y si la fUnCi6n es
demorada.

OPERAClON
Reloj Y CronGmetro
medir el :tiemPo de los procesos para
cocinar b otras actividades del hogar. No
controla el homo. Se puede programar
: :_:': _: hasta9'horas y 59 minutos'iC0ntar& hacia
_a_r_s e_ minutos basra que Ilegue a los
LILTIMOS 60 SEGUNDOS, entonces el
El reloj debe i_onerse a la correcta:h0ta
deldfaantes que una funci6n dernorada_
de] homo funcione c0rrectamente. Laihora
del diaNO SE PUEDE cambiardurante
una funciSn autom_tica deI homo, pero
$E PUEDE cambiar..durante una funciOn
para hornear o para asar a la pardllaL '
COMO PONER EL RELOJ :....
1. Empujeel botSnCLOCK:
2. Empuje.!os b0toneg con Jasflechas
HORAS/MIHUTOS SUBIR o
' BAJAR para poner la hora correcta
de] dfa.
3. Empuje rel botOh START. :
PARA VOLVER AL RELOJ
Mientras est_ usand0 eI h0rno para
cocinar, empuje el bot6n CLOCK; si
desea vet la hora del d[a. La hora
presente del dfa se ver_. en el dial.: -
.¢ontr0LSonar_, una vez. Cuando la cuenta
IlegOe.a:CERO ekc0ntrol s0nard3 veces ::
seguiclo deun '_0nidb cacta:6:_egondds
hast_iqUe eI:b6fbhKITCHEN, TIMER ._
ON/OFF se empuje. El sonido de ea:da 6
segundos se puede eliminar para ciclos-
futuros si se deseX.: Para las instrucciones
de c6mo elimifiar" estos: s0nidos continuos,
vea TONOS en la p_.gina siguiente.
-COMO PROGRAMAR EL
.. " .:",CRONOMETRO
1. Empujeel bot6n KITCHEN TIMER
ONOFFI ' ":':........
2. Emp£je' i0s #0tones.c0n las flechas
HORAS/MINUTOS SUBIR o
BAJAR_para poner la, hora. _
3. Empuje elbbt6n START,
4. Cuando Eacuenta Ilegue a :Cero,
empuje el boron KITCHEN TIMER
CORTE DE CORRIENTE "
cuenta, empuje:e] b0t6n KITCHEN
Si ha ocurrido un corte de c0rriente, la TIMER ON/OFF DOS VECES: " • '
hora pestaSear_ erl el dial y estar_.
inc0rrecta: Ponga nuevamente el re]oj a la
hora.
Cual_ _ier funci6n para cocinar del homo
que estaba en proceso tendr_, que set
reprogramada.
8

OPERACION
ControlDel Homo, Reloj Y
CronGmetro "
El nuevo control tiene una serie de tonosque
sonar_n a tiempos diferentes. Estos ton0s
pueden sonar mientras usted programa una
funciOn de[ homo, o al final de una funciOn
det homo. Tambi_n ]e avisar&Si existe un ,_
prob]ema con una de Ias funciones. M_s _
abaj0 est&n los tipos de tonos y una bre_,e
description de cada uno. -
TONOS MiENTRAS PROGRAMA EL
CONTROL--Cuanddempuje un boron
usted escuchar& un tono, Este tono [e har_
saber que aplic6 suficiente presiOn sobre el.
boron para activado. (Los botones con las
f[echas no suenan.)
TONO AL FINAL DE UN CICLO
AUTOMATICO--DespuOs de una funciOn
para cocinar autom_tica, usted escuchar_.,
tres tonos c_rtos seguidos por un tono cada
6 segundos. Este tono de cada6 segLlndos
seguir& sonando-hasta que empuje ellboron
CLI_I_OFF o usted decJda seleccionar el
programa especial para cancelar y evitar
que et tono de 6 segundos suene al final de
un ciclo futuro.
COMO CANCELAR EL TONO DE 6
SEGUNDOS
t, Empuje y sujete los botones BAKE y
BROIL, a ia misma vez pot 3
segundos, hasta que el dial rnuestre
"SF".
2. Empuje el bot6n KITCHEN TIMER
ON/OFF. El dial mostrar_ "CON
BEEP" (tono contJnuo}.
3, Empu]e el botOn KITCHEN TIMER
ON/OFF nuevamente. El dial mostrar&
"BEEI_ (tono cancelado).
4, Empuie el botOn START, para cancelar
el tono y salir de este modulo especial.
Si desea reg[esar alc_stonosde 6 -_
segundos, repita los pasos de arriba hasta; ::-..
que e] dial mUestre su selection yempuje:el :
bot6n para el comienzo (start).
TONO DE ATENCION--Este tono sonata _
si hace un error u omite alg0mientras
programa una funciOn de] homo.
Unos ejemp]os serfan:
a. Pr_gramai :un:€ic]o de timpieza y la
puerta de[ homo no est,. bien'cerrada.
b. Programar una funciOn y no empujar el
boron START.
e. Empujar un botOn para una funciOn
adicional sin programar pdmero la
ternperatura o el tiernpo.
d. ERR pestanear_ si usted programa una
temperatUra inv&lida;_Empuje e] boron
CLFJ, I_OFF para porter el dial en
blanco y reprogramar lafunckOn del
homo.
Cualquiera de estosse puede identificar
r_pidamente con mirar:eldial.
TONO DE PRECALENTAMIENTO--
Cuando programa una temperatur&en el
homo, el homo empieza a calentarse
autom_4ioamente. Cuar, do:l_ temperatura
dentro del homo Ilega ala temperatura que
usted progi'amO>sonar& un tono para
avisar]e que e] homo est& listo para homear_
Si usted programa una funcibn del homo y el
control suena mientras e] dial hace
pestaffear una -!_- yun r_t_meroo letra tal
como "F,4" 0 "F,I', es posible que exista
un problema con el contro{ o con el homo.
Simplemente empuje elbotOn CLE_#'OFIF
y espere una hot& Trate de programar esa
funciOn nuevamente. Si el cOdigo se repite,
escriba el cOdigo que Peslar3ea y.llarne para
un servicio. Digale al t_cnico que cOdigo
estaba pestaffeando.
r

OPERACION
Consejos Para Hornear
A ConvecciGn
Homear con aire catiente que es c]rculado
sobre y atrededor de los alimentos por el
ventilador de convecci0n ubicado en [a
parte trasera dei homo. Cuando se homea a
convecci6n, fas temperaturas para cocinar
se deberian reducir en 25"F.
Debido a que el aire caliente es circulad0: '. _
parejamente a traves del homo, los _, :_
alimentos se pueden hornear conlresultadbs il
excelentes'sobre 2 o 3 parritlas a la vez:; :_.....
Cuando cocine con parrilfas m_ltiples, la :
cantidad de tiempo para cocinar podr_ia ,_ :
set m_s larga y los alimentos no podrian .: .
quedar dorados en forma pareja como .... :..
cuando usa una parrilla.
LLLS"F
"r3,
--2
.....1
Cuando homee sobre 3 posiciones de
parrillas, coloque la primera parriila en la
posici6n 1, ]a segunda parriNa en la posicJSn
3, y la tercera parrilla en la posici6n 6.
METAL 0 VIDRIO
Cualquiertipo de utensiliosfunCiOnargten el
homo aconvecciSn.Sinembargo,los
utensiliosde metalse calientanm_,s
r&pidamentey son recomendados;Los
utensi]iosde vidriococinan maslentamente,
PAPEL Y PLASTICO
Papely Pl4stiooresistenteal calorque se
recomiendaparahomos regulatesse puede.
usaren su homode c0nvec_i6n.
Dvrante cualquier operaci6n delhomo ested
#odria ofr un ruido deventilador;Esto es eh
ventiiador intemo par8_enfria[ y prevenir que.
todas las partes electricas serecalienten. NO
es poco comt_n que el ventifador siga
cordendoincluso despu6s que el homo se
haya apagado.
Un ventilador para conveccR_n funcionar_ .......
mientras se c0cina a Conveccidn'. El
ventilador se apagar_t cuando se abra la - _
puerta.
Cuando hornee:c0nvecci6n o ase;a'med'ida !'
qua el niJmero de posiciones de parrillas:.
aumenta, se puede notar que el vapor .
escapa _ tray,s de la ventilaci6n del homo •
ubicada sob[e la puerta de1homo; ; %: _ 7
• Para dorar alimento_ en 3 po_ioiioties de
parrillas,
• Para cantidades de €omidas grandes.
• Excelente para homear paneci[los;
"brownies", queques livianos (angel ' -
cakes), y panes. ....
10

OPERACION
ConsejosParaAsarA
ConvecciGn
/
Durante el asado a c0nvecciSn el ca.tor viene
del elemento superior,j el ventilador de
conveccbn hace circular el calor
parejamente a]rededor de los alimentos,
Las cames que se €ocinan en un homo a
convecci6n quedan de un color caf6
obscuro porafue(a y blandas yjugosas pot
dentro, En la rtia.yorfa de los casos la
cantidad de tiempo para cocinar ser& menor
cuat{do asea convecciSn.
Use las temperaturas para asar
recomendadas. No es necasario
precatentar. Revise los alirnentos al final det
tiempo sugerido. Revise los alimentos al
tiernpo sugefido mfnimo recomendado en la_
tabla de m_sabajo.
Cuando ase a convecciSn, usted deber_a
usar ia cacerola y ta parrilla para asar que
vienen con su nuevo homo. La cacerola se
usa para recibir los derrames de grasa y la
parilla se usa para prevenir salpicaduras de
g[asa,
C6m0 usar la Cacerola y la Parrilla:
a, Coloque la parrilla especial enla posici6h
de m_s abajo.
b, Coloque lacame sobre la parrilla para
asar,
GUIA PARA ASAR A CONVECCION
Carnes
Cerdo
Jam6n
Av_
Topsirloin (3a5ibs,)Medium
Well : _ "
Asado (3 to 5 lbs.)
Enlatado, Asiento, Shank
(3 to 5 Ibs. bien co¢id0)
PolIo entero
(2 1/2 a 3 1/2 Ibs.)
Pavo, entero* (18-24 Ibs.)
No relteno (10 a 16 lbs.)
Pechuga de pavo (4 a 6 Ibs.)
(°F)
28-32
23-37 325°
14-18 325°
24-26 325 °
8-11 325°
r 7 "10 325 _
16-19 325°
"Las ayes rellenas generalmente requieren 30-40 minutos adicionales
de tiempo para asar.
Proteja la piernas y la
pechuga con pape]
aluminio para prevenir
que la pie! se dore
demasiado,y se seque.
El Departamento de
Agricultura de los ,
Estados Unidos dice
que.
%8 came de res cruda
es popular, pero usted
debe saber que si
cocina las carnes a
menos de t40°F
significa que algunos
organismos venenosos
podrfan sobrevivir,
*(Fuente: Safe Food
Book-Your Kitchen
Guide. USDA Rev,
_June 1985)-.
11

OPERACION
ConsejosPara Cocinar
En E1Homo
Es normal sentir un pocode obr
su homo por primera vez: Esto escausado ':_
pot el calentamiento de las partes nuevas y
de! aislante. Para ayudar a elimlnar este obr.
ventile la habitaci6n abriendo una
ventana o usando una ©ampana de
ventilaci6n,
IMPORTANTE: Nunca cubra el fondo de1
homo o la pardlla del homo con papel de.
El precalentamiento es Subir la temperatura
a la temperatura que va a usar cuando "
hornee.
Enla partetrasera del h0rno usted notar_ un
pequeSo tubs. Esto es un sensor de calor .
que mantiene ]atemperatura del homo.
Nunca mueva o doble este tubs,
__ Sensor de
lJJ .._ temperatura del
orno
La zona de temperatura baja de su homo
aluminio. El uso inadecuado puede ca,4sar ,_
una mala circulacl6n del cafor, pobres . {entre 170° y 200°F) est,, disponible para
resuRados al homear, y podda dafiar el mantener los al]mentos tibios. Sin embargo,
acabado deI homo. los alimentos no se debedan mantener a
. : estasbajastemperaturas porm_sde2;
' horas. " ".............................
:r
La ventilaci6n del homo est& ubbada debaj0
del panel de control. Esta &tea se podria
calentar mucho durante el uso del horns. La
ventilaci6n es importante para la correcta
circulaci6n del aire. Nunea obstmya la
ventilaci6n.
Cuando use su conveniente operacidn de
' Comienzo Demorado, los alimentos tales _:-;:
corns product0s ]_-cteos, pescado, ave& ::
etc., nunca se deberian dejar expuestos pot
m_s de una I-iora antes de set cocinados. La
.,temperatura arnbiente y,el calor de la luz del
homo promueven ef c[ecimiento de
bacteria&
Ventilaci6n E[ Sensor de Temperatura del Homo en ta
del homo parte trasera de! homo mide y controta
continuamente la temperatura dentro del
.... homo. Para mantener una temperatura . ::; '
programada constant& los elementoe har_ln. ',
un ciclo de encendido y apagado mientras
el homo cocina.
Si abe la puerta frecuentemente para mirar
los alimentos, causar_ una p_rdida de cator
y malos resultados cuando hornee.
12

OPERACION
ConsejosPara CocinarEn
Homo
Las parrillas del homo est_n _ised_adas co'i-
topes, una conveniencia y tambi6n una
precauci6n de seguridad cu_ndo las_ -
pard,as est&n cofocadas correctamente en
el homo, las guias tienen un tope para
preveni[ que las parfi, as se den VUelta
cuando se sacan del homo.
Si est_ homeando con m_s de un utensilio,
co(SqueIos de manera que cada uno tenga
pot Io menos de 1" a 1 112' de espacio de
aire a su alrededor. Co(oque los utensilios de
manera que ninguno quede dJrectamente
encima de tro.
7_&....J _._.b -
Las bandejas bajas, sin lados, para
galietaS permiten que e_aire circule
alrededor de (as galletas para que se doien
en forma pareja.
_para
parrillas
=
Su homo t(ene siete (7) posiciones. La
posiciSn de m&s arriba es $olamente una
guia. La gu[a de m4e ardba no se puede
usar como una posici6n para la parrilla.
Gu_S
$iempre coloque |as parrillasdel
homo en la posici6n correcta
cuando el homo est6 frio.
i
Los utensilios briUantes ref(ejan eI
cator, y son perfectas para los queques y
panecillos r&pidos que deben quedar con
una corteza de color caf_ claro.
UTENSILIOS DE VIDRIO, OSCUROS
CONTRA PEGADURAS, U OPA¢OS
POR LA EDAD abso_en el calory pueden
set usados para panes con (evadura,
cortezas para pasteles o alimentos que
tengan una corteza cafe. La temperatura de(
homo se deberia reducir en 25°F.
Usted podr_a pansar que su homo nuevo
coeina dife[entemente alhomo que
reemplaz5. Le recomendamos que use su
homo nuevo _)orvarias semanas para que
se familiarice m_s con _), siguiendo los
tiempos que se dan en lar¢ceta como una
guia. Vea Ajustes-H_gatos Usted Mismo en
la parte de atr&s de este manual para hater.
los ajustes si cree que su horno est&
funcionando demasiado caliente o frfo para .
su preferencia.
13

OPERACION
Para Hornear y Asar a
ConvecciGn
Para programar que e homo se encien_a: a
cierta_hora m_.starde del d[a cocine por una.
cantidad detiemp0 especifica yse apague "
autom&ticamente: , .,::
c_vee, tion 1. Empuie el bot6n
Cooking " Convection Cooking
. " BAKE o ROAST.
i " 2. Empuie los botones con
las flechas TEMP " -
SUBIR ylo BAJAR,
TEMP para programar ta
. ,r temperatura deJ homo
• que desea usar
.iii,3. Empuje el bot6n
.: " START.
Para programar que el homo homee por una,,
cantjdad de tJempo determinada y se
apague automAticamente
Convectioit 11 Empuje el botSn
Cooking Convection Cooking
BAKE.
2. Empuje tos botones con
' tas flechas TEMP
SUBIR y!o BAJAR,
para programar la
temperatura del homo
que desea usar.
8. Empuje e! bot6n
OVEN COOKING
TIME.
4. Empuje el bot6n con
@@ ias f,echas HCRAS y
MINUTOS SUBIR
y/o BAJAR. pare
HOUR MfN programar la
@@ cantidad de t,empo
en que desea que los
alimentos se cocinen.
5. Empuje el bot6n
START.
TEMP seleccioaar la
temperatui'a det homo
que prefiere.
3. Empuje elbotdnOVEN
COOKING TIME.
@ ,"_'_-, _.4. Empuje el bot6n €on la
_,1%) _ flebSa HORAS y
MINUTOS SUBIR y/o
HOUR ...... BAJAR para seleccionar
Jacantidad de tiempo en
€lue_prefiere cocinar ta :",
eomida. " '
5. Empuje'el' bot6n DELAY
START TIME.I
_ __ :: 6, Empuje el botdn con la
flecha HORAS y/o
HOUR MIN MINUTOS SUBIR o
@@- BAJAR para _e,ecc[onar
la h0radet dia en que
desea 9ue ei homo se
encienda_
7. Empuje el bot6n START.
!4

OPERACION
CGmoHornear
_ I, Empuje el botdn BAKE.
2. Empuje los botones con
las flecha TEMP SUBIR
TEMP y BAJAR, para
• programar la temperatura
del homo que desea
usar.
3, Empuje el bot6n
START.
Para programar que el homo cocine pot
un tiempodeterminado y se apague
autom&ticamente:
1. Empuje el bot6ri BAKE.
2. Empuje ei bot6n con las .-
flechas TEMPSUBIR
y/o BAJAR para
TEMP seleccionar (a
. _ temperatura del homo
vk _J
que usted desea usar.
3. Empuje e] bot6n OVEN
COOKING TIME.
@ 4, Empuje el bot6n con las
flechas
HORAS/MINUTOS
HOUR MIH SUBIR y/o BAJAR
@ @ para seleccionar la
cantidad de tiempo en
que desea que los
alirnentos se cocinen.
5, Empuje el bot6n
START.
Para programar que el homo se encienda a
una hora posterior del dia, cocifie por.una '
cantidad de tiempo esPecifica y se apague
autom&ticamente.
1, Empuje el bot6n
BAKE.
2. Empuje el bot6n con
Jasflechas SUBIR yio
BAJAR para
TEMP seleocionar ]a
temperatura del homo
que prefiere usar.
,tl, Empuje el bot6n OVEN
COOKING TIME.
@ 4. Empuje el bot6n con
..... las flechas :
HORAS/MIHUTOS
HOUR MIH SUBIR yio BAJAR
@ @ para seleccionar la
i cantidad de tiempo en
quedese,€ docinar los
alimentos.
Empuje el bot6r_:
DELAY START
TIME. - -
6, Empuje el bot6n con
'@@ ' las'fl_has ..
. HORAS/MiNUTOS
FLOUR MIN SUBIR y/o BAJAR
para seleccionar la
hora del dia den que
prefiere que el homo se
encienda:
15 '

OPERACION
CGmoAsarALaParrilla
Asar es cocinar al cator directo deI efemento
superior. La puerta del homo deberla
permanecer abierta en la posiciSn de tope
para asar cuando ase a la parri!la.
No es necesario precalentar el homo cuando
ase a Japarrilia. Use la cacerola y la parrilla
para asar qua viene con su estufa. :Ambas
est_n diseCiadas para drenar
adecuadamente la grasa y los ltquidos.
Cuando use papel de
aluminio, el papel de
aluminio (lobe estar
moldeado firmemente a
la parrilla y los cortes en el
papel deben coincidir con 10s
cortes de la parr|ihl. Esto
permite que lagrasa y los ,
lfquidos caigan a la cacerola,
evitando que se produzca un
incendio y humo excesivo.
Siempre saque |a ¢acerola y la
homo.
El Departamento de Agricultura de los
Estados Unidos nora qua lascarnes
cocinadas crudas son populates, pero
que lacarne qua secocina hastasdlo
140°F,(cruda) significa que algunos
organismosvenenosos poddan sobrevivir.
Mientras m_s cerca coloquelos alimantos
def elemento para asar, m_s r_pid0 se
dorar_n por afuera, pero quedando rojoo "
rosado en el centro.
Colocando las carnes lejos del elemento
permitir& qua las cames' se ¢ocinen en el
centro mientras se doran pot afuera.
Usando estas pos!cione s, €ocineelilad0_ !
pot Io menos 2 minutos rn_isque e[lado 2.
si su homo est_ conectado a 208:voftios,
usted podr[a usar una posicidn de parrilla
m#,s alta yio cocinar los alimentos por m_s
tiempo.
E1tarnario, peso, grosor, temperatura iniciaf
y su preferencia personal afectar_ elasado
a la parrilla. Esta tabla est& basada en
cames a la temperatura del refrigerador:
ALIMENTO
Bistec 1" de grueso
Tott_ de came
molida-l" de gtuss0
Chtiletas de cerdo-
1/2" de grueso
PosP-.ado (fi lete_)
Potlo {presas)
POSICION ] TIEMPOTOTAL
DE (minutos)
PARRILLA !
: :S _ | 9-11
3 1 27-29
3 , | ,,,1,,1-13
2 ' ! 45.55
la. Empuje el bot6n BROIL (Esto
autom_ticamente programa _
ASADO on HI-ALTO).
lb, Mientras el inclicad0r de prograrna.
pesta_iea en el dial;:empuje nuevamente
el botbn BROIL si prefiere asar en •
BAJO (LO), Ase en LO (BAJO) pal a
• cocinar bien alimentos tales come ayes.
o cortes de came gruesos sii_que se
doren demasiado
2,
3.
Ernpuje el botSn START,
Cuando terrnine de asar, empuje el i:
bot6n OLEAPJOFF:
16

OPERACION
CGmoSeleccionar
Programas Especiales
Su nuevo control a botones tiene funciones
adicionales que usted l_odfia decidir utifizar.
Despu_s de hacer su selecci6n, si desea
carnbiar el programs, siga los pasts haste que
el diat muestre se selecci6n.
FI control se programs autom&ticamente para
apagarse despu_s de hernear per 12 h(_[as0:-:_.
despu_ de asara Ja-parrillaper 3 horas:en....
case que se le olvide y deje el homo
encendido. Si desea eliminar este pregrama: :::
t, Empuje y sufete, ai mismo tiempo, el
bot6n BAKE y BROIL per 3 segundos,
hasta queel dial muestre SF.
2. Empuje el bot6n DELAY START TIME.
El dial muestra 12shdn (apagado en 12
betas).
Ernpuje el bot6n DELAY START TIME
nuevamente. Eldial mostrar_, no shdn
(no apagado).
3, Empuje el bot6n START.
Su control est_ programado para usar el reloj
en 12 horas. SJusted prefiere usar Hera Mi]itar
de 24 horas o porter el dial en btanco, se hace :-
as[:
1. Empuje y sujete; a la mismavez, el
botS_qBAKEy BROIL pot 3 segundos
hasta que el dial muestre SF.
2, |a)Empuje el botSnCLOCK. El dia!
mostrar_,t 2hr. $i _sta es su
selecciSn, empuje el botSn START.
o..
{b} Empujeel botSn'CLOCK nueva:mente.
El dial mostrar_.24hr. Ejemplo: 5:00
en el retojde 12 horas feer_17:00 en
el reloj de 24 h0ras_Empuje el botSn
START.
(c| Empuje el bot(SnCLOCK nue_'amente.
EJdial ahora mostrar_ OFF. Si _sta:es
su seJecci6n, ernpuje el botSn START: -
La hera nose mestrar_ enel dial. (La
funciSn delay start no funcionar_.)
EJcontrol det homo est_ programad0 Para ta .
selecci6n de temperaturasen Fahrenheit. La
mayoria de las recetas ee dan usando la "
escala Fahrenheit. Usted puede cambiar estoy
user una setecci6n en Cent{grades.
1. Empuje y sujete,al mismo tiempo, los;
botones BAKE y BROIL per 3 segundos,
hasta que el dial muestre SF.
2. (a) Empuje el botSn BROIL. El dial del
controf mostrar_ el signo para grade y F.
|b) Empuje el bot6n BROIL nuevamente.
Esto cambiar_ F (Fahrenheit) a C
(Centigrade).
3, Empuje el bot6n START.

OPERACION
CGunoSeleccionar
ProgramasEspeciales
El control le permitir_l cerrar los botones de
manera que no se puedan activar cuando ;
los ernpuje. Si se preocupade dejar elhomo
sin supewisi6n, active este prograrna.
1. Ernpuje y sujete, ala mlsma vez pot 3
segundos,el bot6n BAKE y BROIl.,
haste que el dial muestre SF.
2. (a) Empuje el bot6n CLEAN. El dial
rnuestra LOC OFF (cierre inactivo).
(b) Empuje el bot6n CLEAN
nuevamente. E1dia! mostrar_ LOC
ON (cierre activado).
3, rEmpuie et bot6n START.
Este programa se puede sele©clonar
solamente cuando el homo no est_
en uso,
Cuando este programa est_ aotivado, el
control sonarS,y el dial rnostrar_ LOC, si se
ernpuja un bot6n. (Los botCheS clock, timer,
o oven light no sen afectados.)
Esta funci6n convertir_ autom&ticamente la
ternperatura que usted selecciona pare
homear tradicionalmente a la ternperatura
para cocinar a convecci6n,
1. Empuje y sujete el bot6n
CONVECTION BAKE por 4 o 5
segundos.
2. Ernpuje los botones con las flechas
para SUBIR o BAJAR la
TEMPERATURA para programar la
temperature.
3. Empuje el bot6n START. Usted ver_ la
ternperatura convertida en el dial. Por
ejemplo, si usted entr6 375 grados, el
dial mostrar& 350 grados. Ser_
necesario hacer esta conversi6n cada
vez que usted cocine a convecci6n.
Su nuevo control tiene una funci6n pare
cooinar y rnantener la temperature para
cocinar autorn_ticarnente solarnente que ,: :
rnantendr& los alirnentos tibios haste 3 horas ....
despues que el cocinado autom_tico haya _
terminado. Pare activar esta funci6n:
1. Ernpuje y sujete, ala misma vez. los
botches BAKE y BROIL por 3
segundos, haste que el dial muestre
SFJ
2. [a) Ernpuje el bot6n OVEN COOKING
TIME: El dial rnestrar& HLd OFF.
:,i(b) Empuje el:bot6n OVEN COOKING
TIME nuevamente, pare actiVar este
programs. El dial:mostrar_ HLd ON.
3. Ernpuje el b0tSnSTART.
Este Programa Especial le perrnitir_ cambiar
la velocidad; #1 significa que et oarnbio de
veiocidad es lento haste #5 qua significa
queet cambio de velocidad es r_pido. Pare
seleccionar la velocidad que prefiere, siga
estospasos:
1. Ernpuje y sujete, ala mlsma vez, los
botones BAKE y BROIL por 3
segundos, hasta que el dial muestre
SF.
2. £rnpuje el bot6n con la flecha:SUBIR. ,_
El dial le rn6Strar_ uria bosici(m de
-velocidad entre 1y 5J
3.' Ernpuje la flecha SUBIR pare aumentar
la velocidad haste el m3mero 5.
4e
O
Empuje el bot6n con la flecha BAJAR
pare disminuir la velocidad haste el
n0rnero 1.
Ernpuje el bot6n START.
18

•_ ."_. _ +.• _i,'_ !i_:::?:_!
• CUIDADOYLIMPIEZA
...r:'CicloDeAM Io"mlpieza i _ : .........,
disef_adbI£1SeltO de tapuerta:est& para;:qua::
tenga un espacio de 5-6' en el fondo del .....
homo. . :
Panel de la puerta $ello
Revestimento de la puerta
Esto permite la Circulaci6n adecuada def
aire. Es normal que su homo de la
apariencia de no tenet un buen sello sobre
el homo. Esto se debe a] se[lo. La ubieaci6rt
del setlo sobre la puerta del homo mantiene •
la puerla smllada y previene oualquier
p_rdida de calor.
..... ,Sel'c
Revestimento de
" la puerta
Limpie estas _reas:oOn agua caliente, -
lan l as con jab6n'o mp adores como Soft
Scrub para sacar cuatquier suciedad.
Enjuague; bien con agua limp a y seque.
3, Lirnpiecuatquier derrame pesado de]
rondo del homo:
4. No timpie el sello_d_:ta puerta del:homo+
El material de libra de vidrio dela puerta
del homo no soporta ]a abrasion. Es
esencial que el sello permanezca
intacto+ Bi nota que se est_ gastando,
trizando, o saliendo de la puerta, deberia
set reemplazado+
+. limpieza,
Las pa_illas del homo se
podrJan limpiar durante el ciclo
de autolimpieza, pero perder_n
su brillo y se pondr_n dificiles
de deslizar. Si decide dejarlas
dentro durante el ciclo de
limpieza, p_Zseles aeeite vegetal
para clue se deslicen m_s
f_ciimente,
Durante el primer ciclo de
limpieza, ventile la habitaci6n
con una ventana ab[erta o una
campana de ventilaci6n. Esto
reducir_ el clot cuando caliente
las partes nuevas.
k_ ......
19 ¸

poco de cenizas biancas en el homo ...... ..
CUIDADOYLIMPIEZA S mp ementeJfmpielasoonuopano:o:,
es_onja h_meda ........ ..... ............
s0n genera]rSe6tea_pesitos de sal qdeh6
El Ciclo de Limpieza, incluyendo el tiempo se pueden saCa_-:duranteel Ci#!b. '-...... ,i
de enfriamiento, est& programado ;; Si pot algunaraz6n u$ted no qumJl_
autom_ticamente por 4 horas, pero usted . satisfeChO cbn los resultados de la
puede cambi'ar esto de 3 h0raspi el hoi'tlo .... liapiea, simplemente repita el
est_ levemente sucio a 5 horas si el homo ¢iclo.. :_: : : : :' : " :
est_ muySuci0: ..... :- " :: ;::::::._:,:...... .:: .' _. :! :. ' ',::'
: :;i1.: Empuje el-13otdn:
: CLEAN: Mqstra:r& 4
....{floras en e d a..
" ..... ?_.: .... :'_':i. Empuje el bot_n
. .CLEAN. ......
@ _ 2. S[ desea oambial_-[a............d0racisn del iiempo de i
__ limpieza, empuje el .i ii -
...... i bot_n para SUSiR yl01-:
iBAJAR I_ HOR_IN_;
L i :
......!':: START: ..... ...............
Simplemente empuje el botch CLEAR/OFF.
Usted necesitar& esperar a que la
tempei'atura deI homo baje m&s.que la
temperatura de enganche (aprox. 1 hora)
antes de tratar de abrir la puerta.
@ (_"_ si usted dese:_icambiar
.la'cantidad de {iempo
HOUR MIN para limpiar, empuje los
@ /E-C'_ b0tones con.las flechas
_VVJ-..... SUBIR yio BAJAR.
" 3. Empuje el botSa
I _'_A"R{ [ D=LAY START
.....-_ _ 4,: Empuje los botones con
(_ _(_ _' la_sflechas para SUBIR
_ . ,,y!o BAJAR la
HOUR MIN HORA/MIN
@@ seleccionar la hora de,
dia en que prefiere que
el cicIo de timpieza
empiece.
5. el botch
Empuje
STARlr.

CUIDADOYLIMPIEZA ...........
PartesRemovibles ::i:
MATERIALES DIE LIMPIEZA
• Detergente Iiquid0,'para pFatos
. Agua tibia
• Patio suave
No us_ limpiadores abrasivos,
Iimpiadores industriales, o
blanquedores [cloro).
MATERIALESDE: L!MP-I_
Detergente I_quido:para platos
Agua_tibia ....... .
Lanillas de:acero con jab6n
Limpiador comerciat para hornos
COMOLIMPIAR '
Permita_qu_ I_'cac_'oia' se remoje. Ponga
detergente p_ra-platos sobre la parrilla.y
cubra con un paso o una toalla hSmedapor
un rat0_iFitieg_Jea medida que seaL
necesafiS_Lave, enjiJague y Se¢lue bien. .
Usted tambi_n' p0dri'a,p0ner, ia cacerola y Ia
pardlla en Ia Iavad0r_acJeplatos,
.ete.eDo.
DEL VIDRIO
--..LI.
J
j COLLAR CON
VlDRIO
COMO SACAR LA CUBIERTA
1. Desconecte la electricidad hacia el
homo en el circuito principa]:,o en la caja
de fusib]es,
2. Desatornilte la cubierta de vidrio y:
s&quela,
REEMPACE EL FOCO DE LA LUZ
Desatomil]e el fooo y reempl_celo conun foco
de hornos residenciales de 40 watts.
PARA RECOLOCAR LA CUBIERTA
1. Atornilie la cubierta de vidrio.
1¸¸¸

MATERIALES DELIMPIEZA
" Detergente pafap[atos.' . -
• Agua tibia_ -
- Lanas parafrega_ O:lanilla de aeero con
]ab6n
Parte trasera ___m_,
levantada de ........__]_
la parrilla Tope en .......
COMO SACAR
t. Tire las parrillas hasta la posici6n de
tope.
2, Levante el frente de la parrilla y
desltceta bajo el tope de ta gufa para
las parrilla&
PARA LIMPIAR
Umpie con agua tibia y detergente. Para
sacar manchas duras friegue levemente
con lana para fregar o con una lanilla de.
acero con jab6n. Enjuagu e bien.
PARA COLOCAR NUEVAMENTE
4 _ k r J ....
1. Co 0que a parte evantada de arras de
fa pardlla sobre las gu[as.., r ....
2. Levante el fre'r_te de lapar_:iila hasta .....
que la parte levantadade atr&s se
deslice pot debajo del tope de tas
guias.
3, Deslice ta parrilia hasta atr&s.
Posi©i6n de tope para asar a:la
parrilla
PARA SACAR
1. Abra la pue[ta hasta la posioi6n para
asar a la parrilla.
Tome la puerta delcada lade, lev_tefa y _:
s&quela de las bieagras. NO
LEVANTE LA PUERTA DE
MANILLA,
PREOAUCIONI Cua'ndo
la puerta se saca ylos
brazes de las bisagras
est_n en la posici6n de :
tope para asara la parrilla, ©omo
precauci6n cubra los brazes de v
las bisagras con toallas o con un
brazes de las bisagras mientras
est6 trabajando en el Area del
homo. Se podrian devolver
vio|entamente y causarle
heridas en las manes o daHar el
acabado de porcelana en el
frente del marco.
PARA ¢OLOCARLA NUEVAMENTE
1. AsegOrese que los brazes de las
bisagras est_n en Japosici6n de tope
para asar a la parfilla.
2, Levante la puerta de ambos lades.
3, Coloque en Iinea las ranuras en Ia orilla
def fondo del homo con los brazes de las
bisagras.
4, Desiice Ia puerta hacia abajo sobre los
brazes de las bisagras Iom&s posible.
5. Cierre la puerta.
2, •

..... ANTESDELLAMARPARAUN
SERVICIO "
Para ahorrar tiempo y diner0, antes de ilamarpara un servicio, revise la lista de m_s abaio
para cualquier preblema qua usted crea que tiena con eLfuncionamiento de su estufa, Si
el probtema es algo qua usted no puede reparar, use los N0meros de Servic]o para el
Consumidor qua se encuentfan al final de este manual. Cuando haga un Ilamado,
tenga disponible el n_mero de modelo, lista de partes para reparaciones,
manual de uso y culdad0 y la fecha de compra,
PROBLEMA POSIBLE CAUSA POSlBLE SOLUCION
IN H I I II I
El dial del control
pestaiea una "IF"
seguida pot un niimero
o letra,
j lll ll
Mal funcionamiento del Empuje el bot6n CLEARIOFF.
borne. Perm_a qua la estufa se '
ehfrfe pot una hora y ponga
nuevamente el homo en
funcionamiento. Siel
problema se repite, tlame
para un servicio.
El homo y los No pasa
controles dei homo no electricidad al
funclonan, horno.
Revise la caja det ci[c_ito o
los fusibles. Asegerese que el
cord6n de la corriente est6
La
temperatura
de! homo
parece estar
inexacta.
i i
La puerta del
homo no se
desengancha.
m
La luz del
homo no
funclona.
Calibraci6n del
termostato.
enchufado.
i
Vea los ajustes descritos qua
siguen esta secci6n.
Et ciclo de limpieza no ha
terminado.
La temperatura del homo
debe bajar a menos de la
temperatura de enganche
antes que la puerta pueda
abrirse.
i
a.
b.
lnterruptor de la luz
en posici6n de
apagado.
Foco de la Iuz estA.
quemado.
i ii
a. Revise la posiOi6n del
interruptor de ]a luz del
horno.
b. Revise el foco de la luz
dei homo.
El homo no
se I|mpi6 o
los
resultados
fueron
malos.
a. Los controles no se
pusieron bien.
b.. El ciclo de limDieza
fue ;nterrum pido.
c. El homo estaba
demasiado sucio.
23
a. Lea la secci6n de
autolimDieza de este
manual.
b. El cicio de timpieza normal
deberia set de 4 horas.
c. Los derrames grandes se
debefian timpiar antes de
programar un ciclo. Usted
tambi6n podrfa repetir el
ciclo.

PROBLEMA
i
El homo humea..
ANTESDELLAMARPARA
SERVICIO "
POS|BLE CAUSA
POSIBLE SOLUCION
t .
a. :Homo sucio. a. Vea que'no hayan
derrames.
b. Mal us0 de pape de"
aluminio.
c. Cacercola para asar
. con grasa se dej5 er_. "
el homo.
b. Nose recomienda el
_ papel de aluminio. .-.
c, Urnpie la cacerola y fa
parri!la despu6s de cada
USO.
Los alimentos no r
se hornean
adecuadamente.
ii
a. E1homo no se a.
precalent6.
b. Posici6n incorrecta b.
de la pardlla o la
cacerola.
¢. La ventilaci6n del €_'
" homo est_ obstruida
o cubierta.
d. Uso incorrecto del d.
papel de aluminio..
e, Temperature e,
incorrecta F3arael
utensilio usado.
f. No se sigui6 la f.
receta
g. Male catibraci6n del g;
control del homo.
h. La estufa o la parri!la
del homo no est_.n
niveladas.
h=
i
Asegt3rese de p[ecatentar
haste que suene elton0. ,_
Mantenga un espacio de
aire uniforme alrededor de
las ollas y utensilios. Vea
la secci6n pare cocinar en
el Horno.
Mantenga la ventilaci6n
despejad_.- ............
No cubra las parrillas
cuando hornee.
Reduzca la temperature
en 25 grados pare
utensilios de vidrio.
oscuros U opacos.
&Es la receta confiable y "
probada?
Revise la secci6n de
ajustes ala temperature
que sigue esta secci6n,
Vea las instrucciones de
instalaciSn para la
nivelaci6n.
i i i ii.
Los alimentos a. Posici6n incorrecta de
no se asan, - [a parrilla.
adecuadamente.
b. El homo se
precalent6.
c. Mal uso de papel de
aluminio.
d. La _3uertadel hot,no se
cerr6 durante el
asado a ]a parrilla.
,-e..Bajo voltage (208
Voltios).
f. Cantidad de tiempo
incorrecta pare asar.
2,4
a, Revise la posici6n de laSr-
cacerolas: yea la secci6n
pare asar a la parrilla.
b. No precaliente cuando ase
ala parrilla.
¢, Lea la secci6n para asara la-
parrilla.
d. Abra {a puerta ala posicl6n
de tope pare asar.
e. Use una posici6n de parrifla
m_.s atta yio ase por m_.s
tiempo,
f. Vea la table para asar en la
secci6n de c6mo asar ala
parritla.

AJUSTESBETEMPERATURA-
"HAGALOSlISTEDMISMO"
Usted podrfa pensar que su nuevo homo
cocina diferentemente al homo que
reemplaz6. Recomendamos que use su
homo nuevo unas pocas semanas para
que se famitiadce con _1,siguiendo los
tiempos que se dan en las recetas como
una guia.
Si cree que su nuevo homo est&
funcionando demasiado caliente (quema
la comida) o no calienta lo suficFente (la
comida no queda bien cocida) usted
mismo puede ajustar ta temperatura. La
apariencia y la textura de los alimentos
son mejores indicadores de la exactitud
de un homo que un term6metro para
hornos. Estos term6metros pueden vadar
entre 20-40 grados. Adem&s, la puerta se
tiene que abrir para leer estos
term6metros. Abdr la puerta cambiar& ]a
temperatura del homo.
Para decidir en cu_nto cambiar la
temperatura, suba la temperatura del
homo en 25 grados (si los alimentos no
quedan bien cocidos) o baje Ja
temperatura en 25 grados (si la comida se
quema) de ta temperatura de la receta,
tuego hornee. Los resultados de esta
"prueba" le debedan dar una idea de
cu_nto se deberia cambiar la temperatura.
1, mpuje y sujete tos botones
BAKE y BROIL por 3
segundos, basra que el dial
"/" muestre SF.
@
2, mpuje e] botSn BAKE.
Un n_mero puesto en
f_brica de dos d_gitos
aparecer& en el dial,
generalmente oo.
Si piensa que el homo
no est_
suficientemente
caiiente,
3a.Empuje el bot6n con ta
flecha UP TEMP para
aumentar (+) la temperatura
hasta +35_F.
TEMP 3b.Empuje el botSn con la ::i
para
flecha DOWN
TEMP
bajar (-) la temperatura
hasta -35QF.
_4. Empuje el bot6n START.
Este aumento o disminuci6n en la posiciSn
de la temperatura permanecerA en la
memoda hasta que los pasos de ardba
sean repetidos. Un corte de cordente no
afectar_ esta posici6n.
Las temperaturas para asar a la parrilla o
para la autolimpieza no ser_n afectadas.

_'NOTAS
26 _

i iiiii i
_TODOUN AI_IO DE GARANTIA COMPLETA PARA LAS FUNCIONES DE
TODAS LAS PARTES EXGEPTO LAS DE VIDRIO .... _,-:::
Si, dentro del lapso de un a_o a partir defa fecha de insta;acJ6n ,¢ualquier parte qde
no sea de vidrio funciona mat debido a un defecto en el material o en la _iano de :
obra _Sears [a reparar_ o la reemp]azar_ sin Costo alguno, ::: ...... : .....
GARANTIA TOTAL DE 30 DIAS PARA LAS PARTES DE VIDRIOY EL"
ACABADO DE ESMALTE PORCELANIZADO, PARTES DE METAL
PINTADO O BRILLANTE " ...... ' .......... _......... ......
Si, dentro_:ae 10s treinta dfas posteriores a la insialaCiSn, cuafquier p"ar_eae!:Vidrib o el
acab_dede.cualquier esmafte porcetanizado-o parte de metat pinta_do 0;bril]ante
tiene defectos en el material o mano de obra, Sears reemplazarA la parte sin costo
aFguno.
GARANTIA TOTAL DE 90 DIAS EN AJUSTES MECANICOS
Durante 90 dfas a partir de la fecha de instalaci6n, Sears proporcionar& sin costo
alguno, cualquier ajuste mec_nico necesar o para a correcta operac!6n de ,a_estufa,-_
exceptuando el mantenimiento normal. ::_: :, :, ::
Si la est_fa est& sujeta a otro use que no sea el privado familiar, la cobertura de la
garantia:r_enciOnada arriba ser_ efectiva s61o durante 90 dias. -. :::.. i .
EL SERVICIO DE GARANTIA ESTADISPONtBLE CON SOLO PONERSE EN "
CONTACTO CON EL CENTRO O DEPARTAMENTO DE SERVIC10 SEARS MAS
CERCANO.EN LOS ESTADOS UNIDOS ..... .......................'.
Esta garant[a se aplica s6io cuando este producto se use en t0s Est_d0s :Ur_iaos;
Esta garantta le brinda derechos tegales especfficos, y tambien puede toner otros
derechos que vadan de un estado a otro.
Sears, Roebuck and Co., Dept. 817 WA, Hoffman Estates, IL 60179
! •
Para Ampliar El Valor De Su Estufa, .... .:, :
¢ompre Un Contrato De Mantenimiento Sears.
1or aho 2" _ 3er =_o
1 "'P_=°='p"'='t'="°'' G AM AM
que no surJ de por_lana • 'ddde
DAYS
=0 DAYS
3 P_e._d_,p_me_amtyv_dr_o, G AM AM
_1 R_v_"16n anus! d_ mant_)m_en_
_t
G -Garan=a N¢ * C¢._tra_ dl* Ma_m_'T, kmto
[,as estufas Kenmore est&n diseSadas, fabricadas y probadas para brindarle aSos de
operaciSn confiable, Sin embargo, cuaiquieraparat0 moderno puede requedr de a]g_n
servicio de vez en cuando. La garantfa Sears, adern&s de_contrato de Mantenimiento
Sears, le brinda proteeciSn contra cuentasde reparaciones inesperadas y le asegura que.
disfrute de la m&_ima eficiencia de la estufa,
La tabla de ardba compara el contrato de Garant_a Y:de Manterfimiento y re muestr_ los
beneficios de tener un Contrato de Mantenimiento para su estufa Sears.
P6ngase en contacto con su vendedor de Sears o con el centro de servicio Sears de la
localidad hoy mismo y compre un contrato de Mantenimiento Sears.
27

• 4;: ++ •_ " • • • "
Sears se complace en ofrecer a sus clientes
servicio de reparaci6n deaparatos
eleCtrodom_sticos y electr6nicos de todas las
marcas ....... ".... +
En searsusted puede cOntar conoperadores en •+.
espaRol a los que puede Ilamar sin cargo alguno. .....
.a
! II II I IIIIIII II
Paz;a servicio de+reparaci6n
a domicilio,
Llame24 horas al dfa, 7 dias a Ea
semar18
1 800-676-5811
Para ordenar piezas con entrega + i. i(_ _ _,_
a domicilio,
Llame de 7 am a 7 pm, 7 d_asa la
$emaR8
1 800-659-7084
-
 1
1
-
 2
2
-
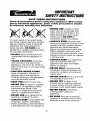 3
3
-
 4
4
-
 5
5
-
 6
6
-
 7
7
-
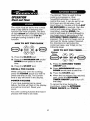 8
8
-
 9
9
-
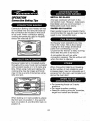 10
10
-
 11
11
-
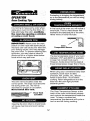 12
12
-
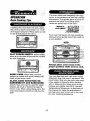 13
13
-
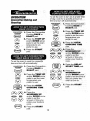 14
14
-
 15
15
-
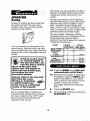 16
16
-
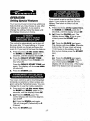 17
17
-
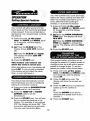 18
18
-
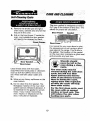 19
19
-
 20
20
-
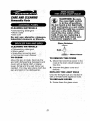 21
21
-
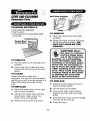 22
22
-
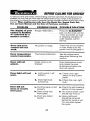 23
23
-
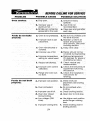 24
24
-
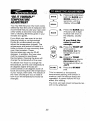 25
25
-
 26
26
-
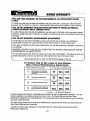 27
27
-
 28
28
-
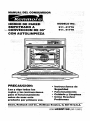 29
29
-
 30
30
-
 31
31
-
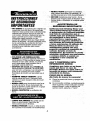 32
32
-
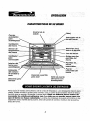 33
33
-
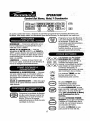 34
34
-
 35
35
-
 36
36
-
 37
37
-
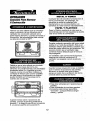 38
38
-
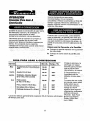 39
39
-
 40
40
-
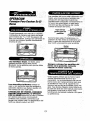 41
41
-
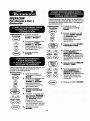 42
42
-
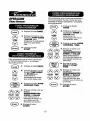 43
43
-
 44
44
-
 45
45
-
 46
46
-
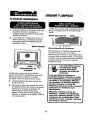 47
47
-
 48
48
-
 49
49
-
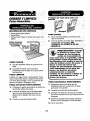 50
50
-
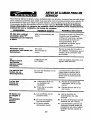 51
51
-
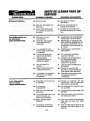 52
52
-
 53
53
-
 54
54
-
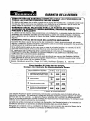 55
55
-
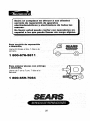 56
56


Kenmore 91141775790 El manual del propietario
- Tipo
- El manual del propietario
- Este manual también es adecuado para
En otros idiomas
- English: Kenmore 91141775790 Owner's manual
Documentos relacionados
-
Kenmore 91147465791 El manual del propietario
-
-
Kenmore 911.41885 Series El manual del propietario
-
-
-
-
Kenmore 91147702201 El manual del propietario
-
-
-
Otros documentos
-
Kenmore Elite 91149003991 El manual del propietario
-
GE JTP7030 Manual de usuario
-
-
-
-
 Kenmore Elite 91149014991 El manual del propietario
-
