Belson HT-338 Use And Care Book
- Categoría
- Cortapelos
- Tipo
- Use And Care Book

OPERATING INSTRUCTIONS
PRODUCT MAY VARY SLIGHTLY FROM ILLUSTRATIONS
Start by trimming sides from the bottom upward. Hold
clipper lightly against hair with teeth pointed up. Slowly
move trimmer up and out, cutting only a small portion of
hair at a time.
CAUTION: Never attempt to clean, oil or replace blades while the
clipper is plugged into the electrical outlet.
Before attempting to clean, oil or replace blades, turn clipper off and
unplug it from the electrical outlet. Other than the recommended
cleaning, oiling or replacing of blades, all maintenance must be
performed by authorized service personnel. Refer service to qualified
service personnel.
TO CLEAN: After each use, manipulate taper control lever back and
forth to dislodge excess hair from clipper blades. Brush away loose
hair with the cleaning brush. Use a soft, dry cloth to wipe appliance
surfaces. Attachments may be cleaned separately with mild soap and
water. Do not allow water or any other liquid to get into the unit. Be
sure attachments have dried completely before using with clipper.
TO OIL: If oiling is necessary, place a drop or two on blades and turn
clipper on, as described in BEFORE USING CLIPPER section above.
Excessive oiling or application of liquids will cause damage if allowed
to seep into the unit. Always store lubricant (oil bottle) in an upright
position.
TO ADJUST POWER SCREW: Use a screwdriver or an appropriate
instrument to turn the power screw clockwise until there is a clacking
sound. Then readjust screw by turning it counterclockwise until
clacking noise stops. Readjustment may again be necessary if
clacking persists or redevelops. Unit has now reached maximum
power setting.
TO ALIGN BLADES: (1) Turn clipper off and unplug. (2) Remove all
excess hair from blades (3) Add two or three drops of oil to blade
assembly. (4) Turn clipper on for a minute or two to let oil disperse,
then turn off and unplug. (5) Slightly loosen the two screws holding
blade assembly in place. (6) Check blade position: The extreme left-
hand tooth of the top blade should either cover or appear on the left
of the first small tooth of the bottom blade. The big tooth on the
bottom blade should be touching the extreme right-hand tooth of the
top blade. (Refer to Fig. 1.)
NOTE: Use care while aligning to avoid getting oil on clothes.
TO REPLACE BLADES: After continued use, the top and bottom blades
may wear out. Replacement blades are available through our service
center. (See warranty for details.) To remove the blades, unplug the
clipper from the electrical outlet. Lay the unit upside down on a flat,
dry surface with blade assembly facing forward. Using a Phillips
screwdriver, remove the two screws located in the bottom blade.
Some pressure may need to be exerted, as the screws holding the
blades are very tightly secured. To replace the blades, position the
new top blade on the drive shaft. Place the new bottom blade over the
top blade so that the screw holes align with the mounting holes on the
clipper. Secure with screws and check blade alignment again. Tighten
screws firmly before operating clipper.
TO STORE: Unplug appliance and clean. Store in its box or in a dry
place. Never store it while it is hot or still plugged in. Never wrap the
cord tightly around the appliance. Never hang unit by the cord -- use
the hanging ring provided. Do not put any stress on the cord where it
enters the unit, as it could cause the cord to fray and break.
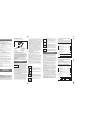
1. Barber Comb
2. Hanging Ring
3. On/Off Switch
4. Scissors
5. Cleaning Brush
6. Lubricant (Oil)
7. 4-in-1 Adjustable
Trimming Guide Attachment
8. Taper Control Lever
9. Protective Cap
10. Trimming Blade
7-PIECE HAIRCUTTING KIT
CONJUNTO DE 7 PIEZAS PARA
CORTAR EL PELO
SAVE THIS USE AND CARE BOOK
CONSERVE ESTE INSTRUCTIVO
IMPORTANT SAFEGUARDS
When using electrical appliances, especially when children are
present, basic safety precautions should always be followed,
including the following:
■ READ ALL INSTRUCTIONS BEFORE USING.
■ KEEP AWAY FROM WATER.
DANGER - As with most electrical appliances, electrical
parts are electrically live even when the switch
is off.
To reduce the risk of electric shock:
■ Do not reach for an appliance that has fallen into water.
Unplug immediately.
■ Do not use while bathing or in a shower.
■ Do not place or store this appliance where it can fall or be
pulled into a tub or sink. Do not place in or drop into water
or other liquid.
■ Always unplug this appliance from the electrical outlet
immediately after using.
■ Unplug this appliance before cleaning.
WARNING - To reduce the risk of burns, electric shock,
or injury to persons:
■ An appliance should never be left unattended when
plugged in.
■ Close supervision is necessary when this appliance is used
by, on, or near children or invalids.
■ Use this appliance for its intended household use as
described in this manual. Do not use attachments not
recommended by the manufacturer.
■ Never operate this appliance if it has a damaged cord or
plug, if it is not working properly, if it has been dropped
or damaged or dropped into water. Return the appliance to
authorized service center for examination and repair.
■ Keep cord away from heated surfaces.
■ Never drop or insert any object into any opening.
■ Do not use outdoors or operate where aerosol (spray)
products are being used or where oxygen is being
administered.
■ Do not use this appliance with a damaged or broken blade,
as injury may occur.
■ To disconnect, turn on/off switch to “off”; then remove plug
from outlet.
■ To prevent possible damage to cord, do not wrap cord
around the unit.
SAVE THESE
INSTRUCTIONS
POLARIZED PLUG:
This appliance has a polarized plug (one blade is wider than the
other). As a safety feature, this plug fits in a polarized outlet only one
way. If the plug does not fit into the outlet, reverse the plug and try
again. If it still does not fit, contact a qualified electrician. Do not
attempt to defeat this safety feature.
LINE CORD SAFETY TIPS
1. Never pull or yank on the cord or the appliance.
2. To insert plug, grasp it firmly and guide it into outlet.
3. To disconnect appliance, grasp plug and remove it from outlet.
4. Before each use, inspect the line cord for cuts and/or abrasion
marks. If any are found, this indicates that the appliance should be
serviced and the line cord replaced. Please return it to our Service
Department or to an authorized service representative.
5. Never wrap the cord tightly around the appliance, as this could
place undue stress on the cord where it enters the appliance and
cause it to fray and break.
DO NOT OPERATE APPLIANCE IF THE LINE CORD SHOWS ANY
DAMAGE, OR IF APPLIANCE WORKS INTERMITTENTLY OR STOPS
WORKING ENTIRELY.
IMPORTANT: During the first few minutes of initial use, you may notice
smoke and a slight odor. This is normal and will quickly disappear.
HOW TO USE
This appliance is for household use and may be plugged into any
120-volt AC electrical outlet (ordinary household current).
BEFORE USING CLIPPER
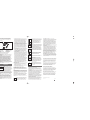
1. Check Blade Alignment -- Clipper blades
have precisely hardened, ground and lapped
teeth which should be handled carefully and
never bumped or used to cut dirty or abrasive
material. Before using clipper for the first time,
and after blade cleaning or replacement, it is strongly recommended
that blades be checked to make sure they are in proper alignment.
Proper blade alignment is necessary to prevent the clipper from
cutting too close or scraping the skin. To determine whether blades
are properly aligned, compare blades, point by point, as shown in Fig.
1. The distance between the end of the top blade teeth and the bottom
blade should be 1/32" to 1/16". If blades are out of alignment, follow
procedure outlined in CARE AND CLEANING.
2. Check to See If Clipper Needs Oil -- Every few haircuts, clipper will
need oiling. Before attempting to oil, be sure clipper is clean and
free of excess hair. Carefully place a few drops of the oil included
with clipper on the blades. Turn clipper on for a minute to permit oil
to be absorbed by blades. CAUTION: Use only oil supplied with unit,
as it has been specially formulated not to evaporate and not to slow
down blade operation. DO NOT OVER-OIL!
3. Examine Trimming Guide Attachment-- To ensure trimming
accuracy, it is recommended to experiment and become familiar
with the 4-in-1 trimming guide attachment before using clipper. The
4-in-1 trimming guide can be adjusted to cut hair to four different
lengths by sliding it backward or forward to change position while it
is attached to clipper blade. Before attaching guide, be sure On/Off
switch is in the Off position. Then check the trimming guide to
confirm that it is in correct position for attachment. If positioning
is correct, a small tab will protrude beyond its lower edge, and the
number "16" will appear in the window between the two leftmost
teeth. Position attachment over blade assembly and snap into
place. To change position of attachment, push attachment up or
FIG.1
down until it snaps into place at desired position. At each location,
the number appearing in the window will change, to indicate length
of trim at that position. To remove attachment, return trimming guide
to its original position, lift tab and gently pull it off.
4. Check the Power Screw -- On the side of most clipper units, near
the blade, there is a power screw which has been factory-adjusted
for peak efficiency. However, if voltage is low where clipper is to be
used, power screw may need to be adjusted. See CARE AND
CLEANING for complete instructions on power screw adjustment.
5. Examine the Taper Control Lever -- The taper control lever, located
on the other side of the unit near the blade, may be adjusted to
change and control the type of cut using only the standard blade.
The standard blade is ideal for tapering, texturizing and thinning
without the need for an attachment. Pulling the lever upward will
give a closer cut -- all the way up will give a very short cut; pushing
it downward will lessen the amount trimmed. Adjust lever slowly
back and forth until desired position is reached.
Using the taper control lever can extend blade life, as a different
cutting edge is used at each setting. Manipulating the lever will
also help to clear packed hair from blades and improve clipper
performance. Keeping clipper on, move lever quickly up and down
a few times. Repeating this action after each use should maintain
clipper blades free of cut hair. If unit fails to operate properly after
excess hair is removed, blades may need replacement. To order
replacement blades for clipper, see coupon.
BEFORE CUTTING HAIR
Check to be sure clipper is in proper working order:
1. If set includes cape, place it around neck and shoulders of person
whose hair is to be cut, tucking it in around collar and tying
it so that hair will not fall inside collar. If cape is not provided,
use a towel.
2. Seat person on chair or stool so that top of head is at eye level.
3. Hold clipper in a comfortable grip.
TO USE: Begin by combing hair as it is naturally worn, and determining
amount to be cut. For best results, hair should be clean, dry and free
from dirt, hair spray, creams, etc. The standard blade is ideal for
tapering, texturizing and thinning. A 4-in-1 trimming guide attachment
is included for precision cutting.
TRIMMING HAIR: Comb hair to remove all tangles. Finish combing in
the style usually worn. We suggest cutting only a small amount until
familiar with the clipper and adjustable attachment. Use the taper
control lever to lengthen or shorten the distance between the blades
and to cut hair at various lengths without attachment. Allow the
clipper to cut its way through the hair. Do not force it through the hair
at a fast rate.
For precision cutting, use the 4-in-1 adjustable trimming guide
attachment. To use, slide the attachment over the trimming blade and
slide back and forth to adjust and set at the desired level. Slide the
attachment back and closest to the blade for the shortest trim length,
or slide it forward and farthest from the blade for the longest trim
length.
CARE AND CLEANING
쐅
For longer hair on top, do not use attachment. Use
either the barber comb or a regular comb and lift hair
with comb. Trim along the top of the comb, or grasp
with fingers and trim along the top of fingers. Repeat
procedure from front to back, gradually cutting hair
shorter by reducing space, between comb or fingers and the head. Be
sure to comb frequently to remove trimmed hair and check for uneven
strands.
For the top, move clipper from front of head to the
back. Again, leave hair long the first few times until
accustomed to the clipper and attachment.
Repeat all the way around sides and back of head. For
shorter hair, push attachment down onto clipper, or
apply more pressure and less outward motion. This
requires practice; therefore, it is always better to leave
hair long the first few times.
Using scissors instead of clipper for top of the head
may be preferred. Follow the same procedures as
above, using scissors.
SHAPING HAIRCUT: Use clipper without attachment for
shaping. Comb hair into natural style and start between
the ear and sideburn. Hold clipper with corner edge of
blade against hairline. Carefully follow the desired
outline of hair over, around and behind the ear.
Hold clipper upside down to shape sideburns and back
of neck. Hold against skin at the desired length and
move down.
MUSTACHES: Comb through the mustache using the
fine-toothed end of the comb. Using the comb, hold the
whiskers and trim hair in an upward motion. To use
attachment, simply slide it over the blades and set to the
desired position. Comb through mustache with smooth,
overlapping strokes.
TRIMMING BEARDS: Using barber comb or any comb;
comb beard in an upward motion; hold hair ends in
place with the comb and trim hair with an upward
motion. If desired slide the trimming guide attachment
over the blades, and push down to the desired position.
Start at each sideburn and trim toward the chin in smooth,
overlapping strokes, as if combing the beard. Once trimming the beard
is completed, comb through to comb out any remaining trimmed hair.
HOW TO ORDER REPLACEMENT PARTS FOR THE
HT-338 CLIPPER KIT
Check your preference(s), complete coupon, clip and mail to:
SERVICE CENTER; 5980 Miami Lakes Drive; Miami Lakes, FL 33014
NOTE: Be sure to enclose check or money order for full amount,
payable to SERVICE CENTER. Allow four weeks for delivery.
PLEASE SEND ME THE FOLLOWING AT PRICE(S) STATED:
Quantity TOTAL
4-IN-1 TRIMMING GUIDE ATTACHMENT(S) @ $1.50 ea
(207-132)
REPLACEMENT BLADE SET (207-133) @ $6.00 ea
SCISSORS (207-135) @ $2.00 ea
BOTTLE(S) OF LUBRICANT (OIL) (207-134) @ $ .50 ea
POSTAGE & HANDLING
MINIMUM ORDER $5.00.
PRICES ARE SUBJECT TO CHANGE
WITHOUT NOTICE.
TOTAL AMOUNT ENCLOSED
Send to (please print clearly)
NAME:
ADDRESS:
CITY: STATE: ZIP CODE:
$1.00
COMO ORDENAR PIEZAS DE RESPUESTO PARA
EL CORTADOR HT-338
Marque su(s) preferencia(s), complete el cupón y envíelo a:
SERVICE CENTER; 5980 Miami Lakes Drive; Miami Lakes, FL 33014
NOTA: Asegúrese de incluir cheque o giro postal por la cantidad
exacta, pagadero a SERVICE CENTER. Demora cuatro semanas para
su entrega.
POR FAVOR ENVIEME EL (LOS) SIGUIENTE(S) PAQUETE(S) DE
RULEROS Y CLIPS AL (LOS) PRECIO(S) ESTABLECIDO(S):
Cantidad TOTAL
GUÍA 4-EN-1 PARA EL CORTE @ $1.50 c/u
(207-132)
JUEGO DE CUCHILLAS (207-133) @ $6.00 c/u
TIJERA (207-135) @ $2.00 c/u
BOTELLA(S) DE LUBRICANTE (ACEITE) @ $ .50 c/u
(207-134)
FRANQUEO Y COSTOS DE MANEJO
PEDIDO MINIMO $5.00.
PRECIOS SUJETOS A CAMBIAR SIN AVISO.
MONTO TOTAL
Enviar a (escribir con claridad)
NOMBRE:
DIRECCION:
CIUDAD: ESTADO: CODIGO POSTAL:
$1.00
FIG. 1
2000_12_14_29_BP 2/15/01 3:11 PM Page 1

3. Examine la guía para el recorte - Para asegurarse de la eficacia
del cortado, es recomendable experimentar y familiarizarse con el
aditamento guía 4-en-1 antes de usar el cortador. La guía 4-en-1
para cortar se puede ajustar para cortar el pelo en cuatro
diferentes tamaños simplemente deslizándola hacia atrás o hacia
adelante para cambiar la posición mientras esté adaptado a la
cuchilla. Antes de colocar la guía, asegúrese que el Interruptor
Encendido/Apagado (On/Off) esté en la posición Apagado (Off).
Luego revise la guía para confirmar que está en la posición
correcta para adaptarla. Si la posición está correcta, una pequeña
lengüeta sobresaldrá en el extremo de abajo y el número “16”
aparecerá en la ventanilla entre los dientes del extremo izquierdo.
Coloque el aditamento sobre el ensamblaje de la cuchilla y
asegúrelo en su lugar. Para cambiar la posición del aditamento,
empújelo hacia arriba o hacia abajo hasta que se asegure en su
lugar a la posición deseada. En cada ubicación, el número que
aparece en la ventanilla cambiará, indicando el largo del corte en
esa posición. Para retirar el aditamento, regrese la guía a su
posición original, levante la lengüeta y suavemente hale hacia
afuera.
4. Revise el tornillo de fuerza - En el costado de la mayoría de las
unidades para cortar el pelo, cerca de la cuchilla, hay un tornillo de
fuerza el cual ha sido ajustado por la fábrica para una máxima
eficiencia. Sin embargo, si el voltaje es más bajo donde va a ser
usado el cortador, el tornillo de fuerza necesitará ser ajustado.
Vea CUIDADO Y LIMPIEZA para instrucciones completas en el
ajuste del tornillo de poder.
5. Examine la palanca del control para ajustar el tamaño - La palanca
del control para ajustar el tamaño, ubicada en el otro lado de la
unidad cerca de la cuchilla, se puede usar para cambiar y controlar
el tipo de corte usando solamente la cuchilla estándar. La cuchilla
estándar es ideal para disminuir, dar textura y para afinar sin la
necesidad de un aditamento. Halando la palanca hacia arriba le
dará un corte corto - y la palanca completamente hacia arriba para
un corte muy cortito; halándola hacia abajo le disminuirá la
cantidad que se cortará. Ajuste la palanca suavemente hacia atrás
y hacia adelante hasta obtener la posición deseada.
Usando la palanca del control para ajustar el tamaño le puede
alargar la vida de la cuchilla, ya que diferente posición se usa para
cada corte. Manipulando la palanca le ayudará también a limpiar
las cuchillas de los pelos acumulados y mejorar el rendimiento del
cortador. Manteniendo el cortador encendido, mueva la palanca
rápidamente hacia arriba y hacia abajo unas cuantas veces.
Repitiendo esta acción después de cada uso le mantendrá las
cuchillas del cortador libre de pelos. Si la unidad no funciona
adecuadamente después de que el exceso de pelos sea removido,
puede ser que las cuchillas necesitan reemplazo. Para ordenar
cuchillas de repuesto para el cortador, vea el cupón.
ANTES DE CORTAR EL PELO
Asegúrese de que el cortador está funcionando en el orden adecuado:
1. Si el conjunto incluye la capa, colóquela alrededor del cuello y de
los hombros de la persona a la cual le va a cortar el pelo y
ajustándola para que el pelo no caiga dentro del cuello. Si no es
provista una capa, use una toalla.
2. Siente a la persona en una silla o en una banqueta de manera que
la cabeza de esta quede al nivel de sus ojos.
3. Sostenga el cortador enpuñándolo cómodamente.
PARA USARLO: Comience peinando su cabello en la forma
acostumbrada y determinando la cantidad a cortarse. Para mejores
resultados, el cabello debe estar limpio, seco y libre de polvo, laca,
cremas, etc. La cuchilla regular es ideal para disminuir, dar textura y
para afinar. Se incluye un aditamento ajustable 4-en-1 para un corte
preciso.
PARA CORTAR EL PELO: Desenrede el cabello. Termine peinándolo en
el estilo acostumbrado. Sugerimos que solamente corte una pequeña
cantidad hasta familiarizarse con el cortador y el aditamento ajustable.
Use la guía ajustable para el largo del cabello para alargar o acortar la
distancia entre las cuchillas para cortar el pelo en varias medidas sin
el aditamento. Deje que el cortador corte en su paso a través del
cabello. No lo fuerce.
Para un corte preciso, use el aditamento ajustable 4-en-1. Para usarlo
deslice el aditamento sobre la cuchilla hacia atrás y hacia adelante
hasta ajustar y llegar al nivel deseado. Deslice el aditamento para
atrás y lo más cerca a la cuchilla para un corte más pequeño o
deslícelo para adelante y lo más alejado de la cuchilla para un corte
más largo.
Printed in/Impreso en Hong Kong
2000/12-14-29E/S HT-338/7 PIECE
FULL ONE-YEAR WARRANTY
Applica warrants this product against any defects that are due
to faulty material or workmanship for a one-year period after
the original date of consumer purchase. This warranty does
not include damage to the product resulting from accident or
misuse. If the product should become defective within the
warranty period, we will repair it or elect to replace it free
of charge.
This warranty gives you specific legal rights and you may also
have other rights which vary from state to state or province
to province. Answers to any questions regarding warranty or
service locations may be obtained by calling Consumer
Assistance and Information: 203-926-3230.
UN AÑO COMPLETO DE GARANTIA
Applica garantiza este producto contra cualquier defecto
originado por fallas en los materiales o en la mano de obra por
un período de un año a partir de la fecha original de compra.
Esta garantía no incluye daños al producto ocasionados por
accidentes o mal uso. Si el producto resulta con defectos
dentro del período de garantía, lo repararemos o
reemplazaremos de ser necesario, sin cargo alguno.
Esta garantía le otorga derechos legales específicos, y usted
podría tener otros derechos que pueden variar de estado a
estado o de provincia a provincia en su país. Si tiene alguna
pregunta acerca de la garantía o de la localidad de las
sucursales de servicio, dirígase al centro de información
y asistencia para el consumidor al número: 203-926-3230.
Este artefacto es para uso doméstico y puede ser enchufado en
cualquier tomacorriente de 120 voltios (corriente ordinaria doméstica).
ANTES DE USAR EL CORTADOR
1. Revise el alineamiento de las cuchillas -
Las cuchillas de la máquina para cortar el
pelo tienen dientes sólidos, afilados y
plegados, por lo tanto deben ser manejadas
con mucho cuidado, no ser usadas para dar
golpes o para cortar materiales sucios o abrasivos. Antes de usar su
cortador por primera vez y después de limpiar o reemplazar las
cuchillas, es altamente recomendable que las cuchillas sean
revisadas para asegurarse que estén debidamente alineadas. El
alineamiento correcto es necesario para prevenir que el cortador
corte mucho o que arañe la piel. Para determinar si las cuchillas están
debidamente alineadas, compárelas punta por punta, como muestra la
Fig. 1. Esta distancia entre la parte de arriba de los dientes y la parte
de abajo de la cuchilla deberá ser 1/32" a 1/16". Si las cuchillas no
están alineadas, siga el procedimiento delineado en CUIDADO Y
LIMPIEZA.
2. Revise el cortador en caso de que necesite aceite - Entre varias
cortadas, el cortador necesitará aceite. Antes de lubricarlo,
asegúrese de que el cortador esté limpio y libre de pelos.
Cuidadosamente coloque unas cuantas gotas del aceite incluido
con el cortador en las cuchillas. Encienda el cortador por unos
minutos para dejar que el aceite sea absorbido por las cuchillas.
PRECAUCION: Use solamente el aceite provisto con la unidad, ya
que ha sido especialmente formulado para no evaporarse y no
retardar el funcionamiento de las cuchillas. ¡NO LO LUBRIQUE
DEMASIADO!
Cuando esté usando aparatos electrodomésticos,
especialmente en presencia de niños, debe seguir siempre
medidas básicas de seguridad, incluyendo las siguientes:
■ LEA TODAS LAS INSTRUCCIONES ANTES DE USARSE.
■ MANTENGALO ALEJADO DEL AGUA.
PELIGRO - Como sucede con la mayoría de los aparatos
eléctricos, las piezas eléctricas se mantienen
eléctricamente vivas aún después de apagar
el interruptor.
Para reducir el riesgo de muerte por electrocución:
■ No toque ningún artefacto que se haya caído dentro del
agua. Desenchúfelo inmediatamente.
■ No lo use mientras se esté bañando o en la ducha.
■ No coloque ni guarde el aparato donde se pueda caer o ser
arrojado en la tina o lavamanos. No lo coloque o tire dentro
de agua u otro líquido.
■ Desenchufe siempre el artefacto inmediatamente después
de usarlo.
■ Desenchufe el artefacto antes de limpiarlo.
ADVERTENCIA - Para reducir el riesgo de quemaduras,
electrocución o lesiones personales:
■ Un artefacto nunca debe ser desatendido mientras está en
uso o enchufado.
■ Cuando este artefacto está siendo usado por, en o cerca
de niños o inválidos, es necesario supervisar
cuidadosamente su manejo.
■ Use este aparato únicamente por los fines descritos en este
manual. No use accesorios no recomendados por el
fabricante.
■ Nunca use este artefacto si tiene dañado el cordón o
enchufe, si no está funcionando debidamente, si se ha caído
o dañado o si ha sido arrojado al agua. Regrese el artefacto
al centro de servicio autorizado para que sea examinado
y reparado.
■ Mantenga el cordón alejado de superficies calientes.
■ Nunca deje caer o introduzca objetos en las aberturas.
■ No lo use al aire libre, ni lo haga funcionar en lugares donde
productos de aerosol están siendo usados o donde se esté
administrando oxígeno.
■ No use este artefacto con una cuchilla dañada o rota, ya
que podría causar heridas.
■ Para desconectarlo, mueva el interruptor encendido/
apagado (on/off) a la posición “apagado” (off) y retire el
enchufe del tomacorriente.
■ Para prevenir posibles daños al cordón, no lo enrolle
alrededor de la unidad.
1. Peine de barbero
2. Aro para colgar
3. Interruptor Encendido/
Apagado (On/Off)
4. Tijera
5. Cepillo para limpieza
6. Lubricante (aceite)
7. Aditamento como guía
ajustable 4-en-1
8. Guía ajustable para el largo
del cabello
9. Tapa protectora
10. Cuchilla del cortador
CONSERVE ESTAS
INSTRUCCIONES
INSTRUCCIONES DE FUNCIONAMIENTO
ESTE PRODUCTO PUEDE VARIAR LIGERAMENTE DE LAS
ILUSTRACIONES
SUGERENCIAS PARA SEGURIDAD CON EL CORDON
1. Nunca hale o tire del cordón o del artefacto.
2. Para introducir el enchufe, sujételo firmemente y guíelo hacia
el tomacorriente.
3. Para desconectar el artefacto, sujete el enchufe y retírelo del
tomacorriente.
4. Antes de cada uso, inspeccione el cordón si tiene cortes y/o
raspaduras. Si algo fuera encontrado, esto indica que el
artefacto deberá ser revisado y el cordón deberá ser
reemplazado. Por favor, devuélvalo a nuestro Departamento
de Servicio o a un representante de servicio autorizado.
5. Nunca enrolle el cordón ajustadamente alrededor del artefacto,
ya que esto podría causar una presión excesiva en el cordón
donde éste entra al artefacto y causar desgaste y rotura.
NO HAGA FUNCIONAR EL ARTEFACTO SI EL CORDON MUESTRA
CUALQUIER DAÑO, O SI EL ARTEFACTO FUNCIONA
INTERMITENTEMENTE O DEJA DE FUNCIONAR COMPLETAMENTE.
IMPORTANTE: Durante los primeros minutos de su uso inicial, podría
notar humo y un ligero olor a quemado. Esto es normal y
desaparecerá rápidamente.
COMO USAR
CUIDADO Y LIMPIEZA
FIG.1
INSTRUCCIONES
DE SEGURIDAD
쐅
Comience cortando los lados de abajo hacia arriba.
Sostenga el cortador suavemente contra el pelo con los
dientes apuntando hacia arriba. Suavemente mueva el
cortador hacia arriba y hacia afuera, cortando
solamente una pequeña cantidad de pelo al mismo
tiempo.
Repita el procedimiento en todos los lados y detrás de
la cabeza. Para pelo más corto, empuje el aditamento
hacia abajo o aplique más presión y menos movimiento
hacia afuera. Esto requiere práctica; por lo tanto, es
mejor dejar el pelo largo las primeras veces.
Para la parte de arriba, mueva el cortador desde la
parte de adelante de la cabeza hacia atrás.
Nuevamente, deje el pelo largo las primeras veces
hasta que se acostumbre al cortador y sus
aditamentos.
Para el pelo más largo en la parte de arriba no use los
aditamentos. Use ya sea el peine de barbero o un peine
regular y levante el pelo con el peine. Corte a lo largo
de la parte de arriba del peine o agárrelo con los dedos
y corte a lo largo en la parte de arriba de los dedos.
Repita el procedimiento de adelante hacia atrás, cortando
gradualmente más corto el pelo reduciendo espacio entre el peine o
los dedos y la cabeza. Asegúrese de peinarse frecuentemente para
remover el pelo ya cortado y para inspeccionar mechones disparejos.
Sostenga el cortador hacia abajo para darle forma
a las patillas y detrás del cuello. Sosténgalo contra la
piel al tamaño deseado y muévalo hacia abajo.
PARA DARLE FORMA AL CORTE: Use el cortador sin el
aditamento para darle forma. Peine el cabello en su
estilo normal y comience entre la oreja y las patillas.
Sostenga el cortador con el filo de la esquina de la
cuchilla contra la línea del cabello. Siga
cuidadosamente la línea alrededor y detrás de la oreja.
Podría preferir usar las tijeras en lugar del cortador
para la parte de arriba de la cabeza. Simplemente siga
los mismos procedimientos de arriba, usando la tijera.
BIGOTES: Péinese el bigote usando el lado de dientes
finos del peine. Usando el peine, sostenga el vello y
recórtelos con movimientos hacia arriba. Para usar el
aditamento, simplemente deslícelo sobre las cuchillas y
colóquelo a la posición deseada. Peine el bigote con
movimientos suaves y extendidos.
RECORTANDO BARBAS: Use el peine de barbero o
cualquier otro peine; peine la barba hacia arriba;
sostenga las puntas del pelo de la barba en su lugar
con el peine y córtelo con movimientos hacia arriba. Si
desea, puede deslizar el aditamento sobre las cuchillas
y bájelos a la posición deseada. Comience por las patillas hacia la
barbilla con movimientos suaves y extendidos, como si peinara la
barba. Una vez que haya terminado de cortársela, péinela para
remover cualquier residuo de pelo cortado.
PRECAUCION: Nunca intente limpiar, lubricar o reemplazar las
cuchillas mientras el cortador esté enchufado.
Antes de limpiarlo, lubricarlo o reemplazar las cuchillas, apague su
cortador y desenchúfelo. Algo más que no sea limpiarlo, lubricarlo o
reemplazar las cuchillas, todo mantenimiento debe ser hecho por
personal de servicio autorizado. Póngase en contacto con personal de
servicio calificado.
PARA LIMPIAR: Después de cada uso, manipule la palanca del control
para ajustar el tamaño, hacia atrás y hacia delante para desprender el
exceso de pelos en las cuchillas del cortador. Limpie los residuos del
pelo con el cepillo. Use un paño suave y seco para limpiar la
superficie del artefacto. Los aditamentos pueden ser limpiados por
separado con agua y un jabón suave. No deje que agua u otro líquido
entre en la unidad. Asegúrese de que los aditamentos estén
completamente secos antes de usarlos con su cortador.
PARA LUBRICAR: Coloque una o dos gotas en las cuchillas y encienda
el cortador, como se describe en la sección ANTES DE USAR SU
CORTADOR. Excesiva lubricación o aplicación de líquidos causará
daño si penetra en la unidad. Guarde siempre el lubricante (botella de
aceite) en una posición hacia arriba.
PARA AJUSTAR EL TORNILLO DE PODER: Un destornillador o un
instrumento apropiado para darle vuelta al tornillo de poder hacia la
derecha hasta que oiga un sonido. Luego reajuste el tornillo dándole
vuelta hacia la izquierda hasta que el sonido pare. El reajuste puede
ser nuevamente necesario si el sonido persiste o vuelve a
producirse.La unidad ya ha alcanzado la máxima posición de poder.
PARA ALINEAR LAS CUCHILLAS: Si las cuchillas necesitan
realineamiento; (1) Apague el cortador y desenchúfelo. (2) Retire todo
exceso de pelo de las cuchillas. (3) Añada dos o tres gotas de aceite
al ensamblaje de la cuchilla. (4) Encienda el cortador por uno o dos
minutos y deje que el aceite se disperse, luego apáguelo y
desenchúfelo. (5) Afloje ligeramente los dos tornillos sosteniendo el
ensamblaje de la cuchilla en su lugar. (6) Examine la posición de la
cuchilla: El diente del extremo izquierdo en la cuchilla de la parte de
arriba deberá cubrir o aparecer a la izquierda del primer diente
pequeño de la cuchilla de abajo. El diente grande de la cuchilla de
abajo deberá estar tocando el extremo derecho del diente de la
cuchilla de arriba. (Remítase a Fig. 1).
NOTA: Tenga cuidado mientras esté alineando para evitar que le caiga
aceite en la ropa.
PARA REEMPLAZAR LAS CUCHILLAS: Después de un prolongado uso,
la parte de arriba y abajo de las cuchillas pueden desgastarse.
Repuesto de las cuchillas están disponibles a través de nuestro centro
de servicio. (Vea la garantía para más detalles). Para retirar las
cuchillas, desenchufe el cortador. Coloque la unidad hacia abajo en
una superficie plana y seca con el ensamblaje de la cuchilla hacia
adelante. Usando un destornillador Phillips, retire los dos tornillos
ubicados en la parte de abajo de la cuchilla. Puede ser necesario algo
de presión para ejecutar la operación, ya que los tornillos que
sostienen las cuchillas están fuertemente asegurados. Para
reemplazar las cuchillas, coloque la cuchilla nueva de arriba en la
barra. Coloque la nueva cuchilla de abajo sobre la cuchilla de arriba
para que los agujeros para los tornillos alineen con los agujeros para
montar en el cortador. Asegure con los tornillos y examine
nuevamente el alineamiento de las cuchillas. Ajuste los tornillos
firmemente antes de hacer funcionar el cortador.
PARA GUARDAR: Desenchufe el artefacto y límpielo. Guárdelo en su
caja o en un lugar seco. Nunca lo guarde mientras esté caliente o
enchufado. Nunca enrolle el cordón ajustado alrededor del artefacto.
Nunca cuelgue la unidad por el cordón. No ponga presión al cordón
donde éste entra a la unidad, ya que esto podría causar el desgaste
del cordón y su posible rotura.
ENCHUFE POLARIZADO:
Este aparato tiene un enchufe polarizado (una hoja es más ancha
que la otra). Como medida de precaución, este enchufe debe ser
usado en un tomacorriente polarizado en un solo sentido. Si el
enchufe no entrara en el tomacorriente, inviértalo. Si aún así no
entrara, busque la ayuda de un electricista calificado. No intente
anular este sistema de seguridad.
FIG. 1
2000_12_14_29_BP 2/15/01 3:11 PM Page 2
-
 1
1
-
 2
2


Belson HT-338 Use And Care Book
- Categoría
- Cortapelos
- Tipo
- Use And Care Book
en otros idiomas
- English: Belson HT-338
Artículos relacionados
Otros documentos
-
Tristar TR-2547 El manual del propietario
-
Conair HCT42 Manual de usuario
-
-
Mellerware 20800A Manual de usuario
-
Conair HCT570GBV Instrucciones de operación
-
Conair THE CHOPPER HCT420CSC Manual de usuario
-
-
Wahl Stainless steel Black Edition El manual del propietario
-
-
Windmere CS23 Guía del usuario