Rane 1010X Guía de inicio rápido
- Categoría
- Micrófonos
- Tipo
- Guía de inicio rápido
Este manual también es adecuado para


2

3
Quickstart Guide (English)
Introduction
The Terminal 1010x is an audio digital signal multi-processor designed to manage all sizes of audio
installations, including retail stores, performance venues, hospitality and corporate facilities. The
1010x is easily programmable with Halogen software and an online wizard provides project
templates for a plug and play performance. This 1 RU model provides native 10-in/10-out, 6 flexible
RAD ports for remote audio expansion and wall-controls, an optional DANTE Card and is incredibly
expandable. Integrate the 1010x for automation via the Universal Logic Ports and/or to a 3
rd
-Party
Control Systems on the network. Rane Commercial products deliver high-quality sound, accurate
audio processing with no latency and wide dynamic range. Take your Install to the next step and get
the best DSP experience with the Terminal 1010x.
Advanced drag-and-drop open architecture with the following:
• 10 universal analog inputs (+20 dBU)
• 10 balanced analog outputs (+20 dBU)
• 2 Universal Logic Ports (Logic IN, Logic OUT and Ratiometric IN)
• 6 high-power RAD+ ports
• Expansion port
• Expansion slot for optional Dante card (32 x 32 with sample rate conversion to support up to
96K sampling rate Dante flows)
• Front panel color display for monitoring system status
• Uses Halogen graphical drag-and-drop software.
• Control remotely from a web browser on a computer, smartphone, or tablet.
• 50+ advanced processing block types with advanced linking, automatic and scheduled events
and integration with 3rd-party control systems
• Optional Accessories: DANTE Card, DRZH, RAD16z, RAD26, DR6 and RPX7 pager remotes
Box Contents
Terminal 1010x
(5) 6-pin 3.8 mm Euroblock input (green, for audio inputs)
(5) 6-pin 3.8 mm Euroblock outputs (orange, for zone outputs)
(1) 6-pin 3.8 mm Euroblock input (black, for logic input)
Power Cable
Quickstart Guide
Safety & Warranty Manual
Important: Visit ranecommercial.com to download the full Halogen User Guide.
Support
For the latest information about this product (documentation, technical specifications, system
requirements, compatibility information, etc.) and product registration, visit ranecommerical.com.
For additional product support, visit ranecommercial.com/support.

4
Setup
Terminal 1010x comes with a default configuration applied and ready to go. For more
templates, visit the Halogen Wizard, download a configuration and apply it to the Terminal
1010x for plug-and-play performance. If you’re a Rane Certified Designer or collaborate with a
Rane Certified Company, please feel free to build your own design with Halogen software.
The default application in Terminal 1010x is: 4 stereo multi-source to 8 mono zones and 1
stereo zone with 2 dynamic microphones for master and local-announcement plus master web
remote for source selection and level control.
To use or test the default configuration, connect all Euroblock connectors with the Terminal
1010x turned off without the power cable. Make sure all cables are properly screwed inside
the Euroblock connectors and a power amplifier is placed in between the chain from the
Terminal 1010x to the speakers.
Follow the specification below for setting up Terminal 1010x with the default configuration.
MUSIC INPUTS
Connect Inputs 1-8 to balanced line level (+20 dBU) stereo audio sources, as follows:
Input 1: Music Source A Left
Input 2: Music Source A Right
Input 3: Music Source B Left
Input 4: Music Source B Right
Input 5: Music Source C Left
Input 6: Music Source C Right
Input 7: Music Source D Left
Input 8: Music Source D Right
MICROPHONE INPUTS
Connect dynamic microphones to Inputs 9 and 10 for local and master announcements,
respectively, as follows:
Input 9: Dynamic Microphone M1 for local announcement (overrides any other audio
input on all mono zone outputs 1–8)
Input 10: Dynamic Microphone M2 for master announcement (overrides any other audio
input—including the local announcement—on all outputs 1–10)
If you are using a microphone with an on/off switch, set the switch to on to begin the
announcement. If your microphone does not have an on/off switch, the dedicated Halogen
block called Voice Detect will detect when the microphone is in use and duck other audio
input. After your message has finished, the audio input will smoothly fade back in over 3
seconds.

5
OUTPUTS
Connect Outputs 1–8 to mono zones, and Outputs 9–10 to a single stereo zone, as follows:
Output 1: Mono Zone 1
Output 2: Mono Zone 2
Output 3: Mono Zone 3
Output 4: Mono Zone 4
Output 5: Mono Zone 5
Output 6: Mono Zone 6
Output 7: Mono Zone 7
Output 8: Mono Zone 8
Output 9: Stereo Zone 9 Left
Output 10: Stereo Zone 9 Right
Connect the outputs to a power amplifier according to your needs, then connect the amplifier
to speakers in each zone. Place the speakers connected to Outputs 9 and 10 in the same
room as a stereo left/right pair for proper audio playback.
All outputs feature a -6 dBFS limiter to protect drivers and avoid saturation.
Once all connections have been made, test or use your system by connecting the power cable
to power on Terminal 1010x.
CONNECT USING HALOGEN
Use the Halogen software to modify the default configuration or apply a template downloaded
from the Halogen Wizard. Connect Terminal 1010x to a router or similar access point
integrated with your LAN Network. You don’t need a static IP; Halogen will find the Terminal
1010x unit using our proprietary RaneLink auto-discovery service.
WEB INTERFACE
You can use the web interface to control sources and levels remotely. Press the Home button
on Terminal 1010x until the Wired Network Settings appear on the display, and then make
note of the DHCP IP address (e.g., 10.10.10.182). Type this address into a web browser to
load the web interface.
The earliest supported operating system is Windows 7 with SP1, 32-bit or 64-bit.
RESTORE PARAMETERS
If power to Terminal 1010x is lost at any time, the system will restore your previous
adjustments including source selection and level control for all zones, ensuring that your
system is always set as you intended.
READY TO GO
Once you have checked your system and set all sources and levels, you can close the web
interface and enjoy your system.
For more system applications and design templates, or to get your own custom configuration
built, please visit ranecommercial.com.

6
Connection Diagram
Items not listed under Introduction > Box Contents are sold separately.
ZONE 2
SOURCE
ZONE 3 ZONE 3
SOURCE STATUS DIMMER
VIDEO
AUX 1
SETUP MICL - AUDIO - R
1 CBL/SAT 3 GAME4 NETWORK
QUICK SELECT
2 Blu-ray
PHONES BACK
ENTER
INFO
SETUP
ZONE 2
SOURCE SELECT
MASTER VOLUME
ON/OFF
AUX 1
HDMI 7 5V/1A
ON/OFF
OPTION
Features
Front Panel
1
2
4
3
5
6
8
7
1. Display: This display shows information about Terminal 1010x current status and options. See
Operation > Display for more information.
2. Home: Press this button to enter the Home screen.
3. Menu: Press this button to enter the Menu screen, where you can select from the available
pages.
4. Select: Press this button to select the highlighted page.
5. Page Left/Right (</>): Press these buttons to select the previous or next page (respectively)
shown in the display.
6. Ethernet Comm: This LED will light to indicate Ethernet communication.
7. Ethernet Link: This light is on when the Computer Ethernet port on the rear panel is
connected to a computer (powered on). You can then use the computer to load a properly
designed system configuration using a Windows PC and Halogen software or control
Terminal 1010x remotely using a web-based interface.
8. Power: This LED will be lit when Terminal 1010x is powered on.
Master Remote
(e.g., Rane DR6)
Zone
Remote
(e.g., Rane
DRZH)
Power
Router
Audio Inputs
(Receiver, DVD Player, etc.)
Powered
Stereo
Speakers
Mono Audio Inputs
(Microphones)
Computer
Zone Amplifier
and Speakers

7
Rear Panel
1
2
4
3
5
6
7
8
1. Inputs (10 Universal Analog): Connect balanced or unbalanced audio sources to these mono
inputs. The inputs can function in 4 modes of operation: Condenser Mic with 48V phantom
power, Dynamic Mic, Balanced +20 dBU Line, and Unbalanced Line+.
Tip: Unbalanced Line+ sums two unbalanced signals (such as left and right RCA lines) when
one is connected to the positive (+) input and one is connected to the negative (-) input.
2. Outputs: (10 Balanced Line): Connect line-level devices to these balanced +20 dBU mono
outputs with EMI filtering and transient on/off muting.
3. Universal High-Power RAD Ports: These 6 ports support any RAD or DR device (no power
supply required). Each port provides up to 15 watts of peak power, and supports up to 2 audio
in and 2 audio out channels plus control.
4. Computer Ethernet Port (Ethernet): Connect this port to a router or similar access point during
setup. After Terminal 1010x is properly configured, you can connect a computer to another port
on the same router or access point, allowing you to use a web browser to access an interface
to control Terminal 1010x.
5. Expansion Bus: This port provides support for legacy expansion devices and future hardware
releases.
6. Universal Logic Ports (Euroblock): Each of these 2 ports allow a system designer to read a
contact closure, drive an indicator or relay, or read a potentiometer.
7. Optional Card Slot: Insert an optional DanteX card or other compatible expansion card into
this slot.
8. Power Input (IEC): Use a standard IEC cable to connect this input to a power outlet.

8
Operation
Important: Visit ranecommercial.com to download the full Halogen User Guide.
Display
Home
To access the Home page, press the Home button at any time. The contents of the Home
page will change depending on the current state of Terminal 1010x. Information that may be
shown here includes booting status, fault status, network status, and more.
Menu
To access the menu, press the Menu button at any time.
To highlight the desired page, press the Page Left and Page Right buttons.
To enter the highlighted page, press the Select button.
The menu always contains the following pages:
• Analog Input: This page shows this selected Input Mode and current Input Level for all
10 Inputs.
• Analog Output: This page shows the Output Level and Mute Status for all 10 Outputs.
• RAD: This page shows the Input Level, Output Level, Device Status, and Expected/
Unexpected Status. If you are locating a device, the square for that device will blink.
• EXP: This page is divided into 32 regions, each representing 1 of 32 possible EXP
positions in the chain. One of the following 4 status icons will appear in regions with
connected devices in the configuration:
o Green: This icon indicates the connection is good.
o Yellow: This icon provides a warning for a missing connection.
o Yellow with Question Mark: This icon provides a warning for an unexpected status.
o Red with Slash: This icon indicates a problem, such as a wrong device connected.
If you are locating a device, the icon will blink.
Blank regions indicate an unused location that is not physically connected or in the
configuration.
With an optional Dante Expansion Card installed, 4 additional pages will be shown in the
menu: 1-16 TX, 17-32 TX, 1-16 RX, and 17-32 RX. These pages indicate if a channel is being
routed and its level.

9
Controlling Terminal 1010x Remotely
You can use a web-based interface on your computer to control Terminal 1010x remotely.
To set up Terminal 1010x for use with its web interface:
1. Use standard Ethernet cables to connect Terminal 1010x’s Computer Ethernet port to a
DHCP (Dynamic Host Configuration Protocol)-enabled router or similar access point, and
then connect your computer to another port on the same router or access point.
2. Once connected to a network, Terminal 1010x will automatically acquire a dynamic IP
address that you can use. This may take a few seconds.
3. Press the Home button on Terminal 1010x until the Wired Network Settings appear on
the display, and then make note of the DHCP IP address (e.g., 10.10.10.182).
To open the Terminal 1010x web interface:
1. Open a web browser on your computer.
2. In the browser, enter the DHCP IP address shown in Terminal 1010x's Wired Network
Settings (e.g., http://10.10.10.182) to load the web interface.
3. Press the Login button, and then enter the password for Full access mode. The default
password is admin.

10
Troubleshooting
If you encounter a problem, try doing these things first:
• Make sure all cables and other connected devices are properly and securely connected.
• Make sure you are using Terminal 1010x as described in this user guide.
• Make sure your other devices or media are working properly.
• If you believe Terminal 1010x is not working properly, check the following table for
your problem and solution.
Problem: Solution:
Power does not turn on.
Make sure Terminal 1010x’s power input is properly
connected to a power outlet using the included power
cable.
Terminal 1010x does not produce
any sound, or the sound is
distorted.
Make sure all cable and device connections are
secure and correct.
Make sure none of the cables are damaged.
Make sure the settings on your Bluetooth device,
loudspeaker, mixer, etc. are correct.
Ethernet Link LED indicators do not
come on after plugging the HAL
into a network switch or
connecting it directly to a
computer.
Make sure the Ethernet cable or crossover cable is
not broken. Try using a different cable.
Try plugging the cable into a different port on the
network switch.
Terminal 1010x does not connect
to the web browser.
Press the Home button on Terminal 1010x until the
Wired Network Settings page appears on the
display. Make note of the DHCP IP address. Type this
address into your web browser to load the web
interface.
After opening Halogen, Terminal
1010x does not appear in the
Connect To Device window.
Make sure that you can connect to the Terminal
1010x web server through a browser.
Make sure that the RaneLink II service is running. If
not, restart it.
Make sure to add the following to your firewall and
virus protection exception lists: Halogen.exe,
RaneLink.exe (port 4994), hal1.pcops.exe, and
python.exe.

11
Guía de inicio rápido (Español)
Introducción
El Terminal 1010x es un multiprocesador de señales digitales de audio diseñado para administrar
instalaciones de audio de todos los tamaños, incluyendo tiendas minoristas, espacios para shows,
salones de recepción y corporativos. El 1010x se programa fácilmente con el software Halogen y un
asistente en línea que le provee las plantillas de proyecto para ofrecer un funcionamiento "plug and
play". Este modelo, que ocupa 1 unidad de rack, ofrece de forma nativa 10 salidas/10 entradas, 6
puertos RAD flexibles para expansión de audio remota y controles de pared, una tarjeta DANTE
opcional y es increíblemente extensible. Integre el 1010x para automatización mediante los puertos
lógicos universales y/o a sistemas de control de otras marcas en la red. Los productos
comerciales de
Rane ofrecen sonido de alta calidad, procesamiento de audio preciso sin latencia y
amplio rango dinámica. Lleve su instalación al siguiente nivel y obtenga la mejor experiencia de DSP
con el Terminal 1010x.
Arquitectura abierta avanzada de "arrastrar y soltar" con:
• 10 entradas analógicas universales (+20 dBU)
• 10 entradas analógicas balanceadas (+20 dBU)
• 2 puertos lógicos universales (entrada lógica, salida lógica y entrada ratiométrica)
• 6 puertos RAD+ de alta potencia
• Puerto de expansión
• Ranura de expansión para una tarjeta Dante opcional (32 x 32 con conversión de tasa de
muestreo compatible con flujos de Dante de tasa muestreo de hasta 96 K)
• Pantalla a color en el panel delantero para monitorear el estado del sistema
• Utiliza el software gráfico de "arrastrar y soltar" Halogen.
• Contrólelo remotamente desde un navegador web en un ordenador, teléfono inteligente
(smartphone) o tableta.
• Más de 50 tipos de bloques de procesamiento avanzados con enlace avanzado, eventos
automáticos y programados e integración con sistemas de control de otras marcas
• Accesorios opcionales: Tarjeta DANTE, DRZH, RAD16z, RAD26, DR6 y controles remotos
RPX7 Pager.
Contenido de la caja
Terminal 1010x
(5) Entrada Euroblock de 3,8 mm de 6 patillas
(verde, para entradas de audio)
(5) Salidas Euroblock de 3,8 mm de 6 patillas
(naranjas, para salidas de zona)
(1) Entrada Euroblock de 3,8 mm de 6 patillas
(negra, para entradas lógicas)
Cable de alimentación
Guía de inicio rápido
Manual sobre la seguridad y garantía
Importante: Visite ranecommercial.com para
descargar la guía del usuario completa de
Halogen.
Soporte
Para obtener la información más reciente acerca de este producto (documentación, especificaciones
técnicas, requisitos de sistema, información de compatibilidad, etc.) y registrarlo, visite
ranecommercial.com.
Para obtener soporte adicional del producto, visite ranecommercial.com/support.

12
Instalación
El Terminal 1010x viene con una configuración predeterminada aplicada y lista para funcionar.
Para obtener más plantillas, visite Halogen Wizard, descargue una configuración y aplíquela
en el Terminal 1010x para tener un funcionamiento "plug-and-play". Si usted es un diseñador
certificado de Rane o colabora con una compañía certificada de Rane, siéntase libre de crear
su propio diseño con el software Halogen.
La aplicación predeterminada del Terminal 1010x es: 4 multifuentes estéreo a 8 zonas mono y
1 zona exterior con 2 micrófonos dinámicos para anuncios principales y locales, más un
control remoto web principal para selección de fuentes y control de nivel.
Para utilizar o probar la configuración predeterminada, conecte todos los conectores
Euroblock al Terminal 1010x apagado y sin el cable de alimentación. Asegúrese de que
todos los cables estén correctamente atornillados dentro de los conectores Euroblock y de
colocar un amplificador de potencia entre la cadena que proviene del Terminal 1010x y los
altavoces.
Siga las especificaciones a continuación para instalar el Terminal 1010x con la configuración
predeterminada.
ENTRADAS DE MÚSICA
Conecte las entradas 1-8 a fuentes de audio estéreo balanceadas de nivel de línea (+20 dBU)
de la siguiente manera:
Entrada 1: Fuente de música A izquierda
Entrada 2: Fuente de música A derecha
Entrada 3: Fuente de música B izquierda
Entrada 4: Fuente de música B derecha
Entrada 5: Fuente de música C izquierda
Entrada 6: Fuente de música C derecha
Entrada 7: Fuente de música D izquierda
Entrada 8: Fuente de música D derecha
ENTRADAS DE MICRÓFONO
Conecte micrófonos dinámicos a las entradas 9 y 10 para realizar anuncios locales y
principales, respectivamente, de la siguiente manera:
Entrada 9: Micrófono dinámico M1 para anuncios locales (anula cualquier otra entrada de
audio en todas las salidas de zona mono 1-8)
Entrada 10: Micrófono dinámico M2 para anuncios principales (anula cualquier otra
entrada de audio—incluyendo los anuncios locales—en todas las salidas 1-10)
Si está utilizando un micrófono con un interruptor de encendido/apagado, coloque el
interruptor en encendido para realizar el anuncio. Si su micrófono no cuenta con un
interruptor de encendido/apagado, el bloque de Halogen dedicado denominado Voice Detect
detectará que el micrófono está en uso y silenciará temporalmente todas las demás entradas
de audio. Una vez que haya finalizado su mensaje, la entrada de audio regresará
paulatinamente a su nivel original en un lapso de 3 segundos.

13
SALIDAS
Conecte las salidas 1-8 a zonas mono y las salidas 9-10 a una zona estéreo individual, de la
siguiente manera:
Salidas 1: Zona mono 1
Salidas 2: Zona mono 2
Salidas 3: Zona mono 3
Salidas 4: Zona mono 4
Salidas 5: Zona mono 5
Salidas 6: Zona mono 6
Salidas 7: Zona mono 7
Salidas 8: Zona mono 8
Salidas 9: Zona estéreo 9 izquierda
Salidas 10: Zona estéreo 9 derecha
Conecte las salidas a un amplificador de potencia según sus necesidades y luego conecte el
amplificador a los altavoces en cada zona. Coloque en la misma sala los altavoces
conectados a las salidas del par estéreo izquierda/derecha para obtener una reproducción de
audio adecuada.
Todas las salidas cuentan con un limitador de -6 dBFS para proteger los drivers y evitar la
saturación.
Una vez realizadas todas las conexiones, pruebe o utilice su sistema conectando el cable de
alimentación a fin de encender el Terminal 1010x.
CONEXIÓN MEDIANTE HALOGEN
Utilice el software Halogen para modificar la configuración predeterminada o aplicar una
plantilla descargada desde el Halogen Wizard. Conecte el Terminal 1010x a un enrutador o
punto de acceso similar integrado con su red LAN. No necesita una dirección IP estática; el
Halogen encontrará la unidad Terminal 1010x utilizando el servicio propietario de exploración
automática de RaneLink.
INTERFAZ WEB
La interfaz web puede utilizarse para controlar las fuentes y niveles de forma remota. Pulse el
botón Home en el Terminal 1010x hasta que aparezcan los ajustes de red con cable en la
pantalla y tome nota de la dirección de DHCP IP (por ej., 10.10.10.182). Ingrese esta dirección
en un navegador web para cargar la interfaz web.
El sistema operativo más antiguo soportado es Windows 7 con SP1, de 32 o 64 bits.
RESTAURACIÓN DE LOS PARÁMETROS
Si en algún momento se cortara el suministro eléctrico al Terminal 1010x, el sistema
recuperará sus ajustes previos incluyendo su selección de fuente y su control de nivel para
todas las zonas, garantizando que su sistema siempre estará configurado como usted lo
desea.
LISTO PARA COMENZAR
Una vez que haya revisado su sistema y ajustado todas las fuentes y niveles, puede cerrar la
interfaz web y disfrutar de su sistema.
Para obtener más aplicaciones del sistema y plantillas de diseño o para hacerse armar su
propia configuración, visite ranecommercial.com.

14
Diagrama de conexión
Los elementos que no se enumeran en Introducción > Contenido de la caja se venden por separado.
ZONE 2
SOURCE
ZONE 3 ZONE 3
SOURCE STATUS DIMMER
VIDEO
AUX 1
SETUP MICL - AUDIO - R
1 CBL/SAT 3 GAME4 NETWORK
QUICK SELECT
2 Blu-ray
PHONES BACK
ENTER
INFO
SETUP
ZONE 2
SOURCE SELECT
MASTER VOLUME
ON/OFF
AUX 1
HDMI 7 5V/1A
ON/OFF
OPTION
Características
Panel frontal
1. Pantalla: Esta pantalla muestra información sobre el estado actual y las opciones del
Terminal 1010x. Consulte Funcionamiento > Pantalla para obtener más información.
2. Home: Pulse este botón para entrar a la pantalla de inicio.
3. Menu: Pulse este botón para entrar a la pantalla del menú en donde podrá seleccionar
una de las páginas disponibles.
4. Select: Pulse este botón para seleccionar la página resaltada.
5. Página anterior/siguiente (</>): Pulse estos botones para seleccionar la opción anterior
o siguiente (respectivamente) que se muestra en la pantalla.
6. Comunicación Ethernet: Este LED se encenderá para indicar la comunicación Ethernet.
7. Enlace Ethernet: Esta luz se enciende cuando el puerto Ethernet del ordenador del
panel trasero está conectado a un ordenador (encendido). Podrá entonces utilizar el
ordenador para cargar una configuración del sistema correctamente diseñada utilizando
un PC con Windows y el software Halogen o controlar el Terminal 1010x remotamente
mediante una interfaz web.
8. Encendido: Este LED se encenderá cuando el Terminal 1010x esté encendido.
Control remoto principal
(por ej., Rane DR6)
Control
remoto de
zona (por ej.,
Rane DRZH)
Alimentacion
Enrutador
Entradas de audio (receptor,
reproductor de DVD, etc.)
Altavoces
estéreo
alimentados
Entradas de audio
mono (micrófonos)
Computadora
Amplificador de
zona y altavoces
1
2
4
3
5
6
8
7

15
Panel trasero
1
2
4
3
5
6
7
8
1. Entradas (10 analógicas universales): Conecte a estas entradas mono fuentes de audio
balanceadas o no balanceadas. Las entradas pueden funcionar en 4 modos de
operación: Micrófono condensador con potencia fantasma de 48 V, micrófono dinámico,
línea balanceada de +20 dBU y línea balanceada+.
Consejo: Línea balanceada+ suma dos señales no balanceadas (tales como las líneas
RCA izquierda y derecha) cuando una de ellas se conecta a la entrada positiva (+) y la
otra se conecta a la entrada negativa (-).
2. Salidas: (10 líneas balanceadas). Conecte dispositivos de nivel de línea a estas salidas
mono balanceadas de +20 dBU con filtros FMI y silenciamiento de encendido/apagado
transitorio.
3. Puertos RAD universales de alta potencia: Estos 6 puertos soportan cualquier
dispositivo RAD o DR (no requieren fuente de energía). Cada puerto provee hasta 15 W
de potencia pico y soportan hasta 2 canales de entrada y 2 canales de salida de audio
más un control.
4. Puerto Ethernet del ordenador (Ethernet): Conecte este puerto a un enrutador o punto
de acceso similar durante la configuración. Una vez que el Terminal 1010x esté
configurado correctamente, podrá conectar un ordenador a otro puerto en el mismo
enrutador o punto de acceso, lo que le permitirá utilizar un navegador web como interfaz
de control para elTerminal 1010x.
5. Bus de expansión: Este puerto provee soporte para dispositivos de expansión
heredados y futuros lanzamientos de hardware.
6. Puertos lógicos universales (Euroblock): Cada uno de estos 2 puertos permiten que el
diseñador del sistema lea un cierre de contacto, accione un indicador o relé, o lea un
potenciómetro.
7. Ranura para tarjeta opcional: Inserte en esta ranura una tarjeta DanteX opcional u otra
tarjeta de expansión compatible.
8. Entrada de alimentación (IEC): Utilice el cable IEC estándar para conectar esta entrada
a una toma de corriente.

16
Funcionamiento
Importante: Visite ranecommercial.com para descargar la guía del usuario completa de
Halogen.
Pantalla
Inicio
Para acceder a la página de inicio, pulse el botón Home en cualquier momento. El
contenido de la página de inicio cambiará en función del estado actual del Terminal 1010x. La
información que puede aparecer aquí incluye el estado de arranque, el estado de falla, el
estado de la red y más.
Menú
Para acceder al menú, pulse el botón Menu en cualquier momento.
Para resaltar la página deseada, pulse los botones Page Left y Page Right.
Para entrar a la página resaltada, pulse el botón Select.
El menú siempre contiene las siguientes páginas:
• Analog Input: Esta página muestra el Input Mode (modo de entrada) seleccionado e
Input Level (nivel de entrada) actual para todas las 10 entradas.
• Analog Output: Esta página muestra el Output Level (nivel de salida) y Mute Status
(estado de silenciamiento) para todas las 10 salidas.
• RAD: Esta página muestra el Input Level, Output Level, Device Status (estado del
dispositivo) y Expected/ Unexpected Status (estado esperado/inesperado). Si está
localizando un dispositivo, el cuadrado de ese dispositivo parpadeará.
• EXP: Esta página está dividida en 32 regiones, cada una representa las 32 posiciones
posibles de EXP en la cadena. Uno de los siguientes 4 iconos de estado aparecerá en las
regiones que poseen dispositivos conectados en la configuración:
o Verde: Este icono indica que la conexión es buena.
o Amarillo: Este icono advierte sobre una conexión faltante.
o Amarillo con signo de interrogación: Este icono advierte sobre un estado
inesperado.
o Rojo con barra: Este icono indica un problema, como por ejemplo un dispositivo
incorrecto conectado.
Si está localizando un dispositivo, icono parpadeará.
Las regiones en blanco indican un lugar en desuso que no está físicamente conectado ni
en la configuración.
Con una tarjeta opcional de expansión Dante instalada, se mostrarán 4 páginas adicionales en
el menú: 1-16 TX, 17-32 TX, 1-16 RX y 17-32 RX. Estas páginas indican si un canal se está
encaminando y su nivel.

17
Control remoto del Terminal 1010x
Puede utilizar una interfaz web desde su ordenador para controlar Terminal 1010x
remotamente.
Cómo configurar el Terminal 1010x para utilizarlo mediante su interfaz web:
1. Utilice cables Ethernet estándar para conectar el puerto Computer Ethernet del
Terminal 1010x a un enrutador compatible con DHCP (Dynamic Host Configuration
Protocol) o punto de acceso similar y luego conecte su ordenador a otro puerto en el
mismo enrutador o punto de acceso.
2. Una vez conectado a una red, el Terminal 1010x adquirirá una dirección IP dinámica de
forma automática que usted podrá utilizar. Esto puede demorar algunos segundos.
3. Pulse el botón Info en el Terminal 1010x hasta que aparezca Wired Network Settings
en la pantalla y tome nota de la dirección DHCP IP (por ej., 10.10.10.182).
Cómo abrir la interfaz web del Terminal 1010x:
1. Abra un navegador en su ordenador.
2. En el navegador, introduzca la dirección DHCP IP que figura en Wired Network Settings
del Terminal 1010x (por ej., http://10.10.10.182) para cargar la interfaz web.
3. Pulse el botón Login y luego introduzca la contraseña del modo de acceso Full. La
contraseña predeterminada es admin.

18
Solución de problemas
Si experimenta problemas, realice lo siguiente:
• Asegúrese de que todos los cables y los otros dispositivos estén conectados firme y
correctamente.
• Asegúrese de estar utilizando Terminal 1010x como describe esta guía del usuario.
• Asegúrese de que todos sus otros dispositivos o medios funcionen correctamente.
• Si cree que Terminal 1010x no está funcionando correctamente, busque su
problema y solución en la siguiente tabla.
Problema: Solución:
La unidad no se enciende.
Asegúrese de que la entrada de corriente del
Terminal 1010x esté conectada correctamente a
una toma de corriente utilizando el cable de
corriente incluido.
El Terminal 1010x no emite ningún
sonido o el sonido está distorsionado.
Asegúrese de que todas las conexiones de cables y
dispositivos estén firmes y correctas.
Asegúrese de que ninguno de los cables esté
dañado.
Asegúrese de que los ajustes en su dispositivo
Bluetooth, altavoz, mezclador, etc. sean correctos.
Los indicadores LED de enlace de
Ethernet no se encienden al conectar
el HAL a un conmutador de red o al
conectarlo directamente a un
ordenador.
Asegúrese de que el cable de Ethernet o el cable
cruzado no esté roto. Pruebe con otro cable.
Pruebe enchufando el cable en otro puerto del
conmutador de red.
El Terminal 1010x no se conecta al
navegador web.
Pulse el botón Home del Terminal 1010x hasta que
aparezca en la pantalla la página de Ajustes de red
con cable. Tome nota de la dirección DHCP IP.
Ingrese esta dirección en un navegador web para
cargar la interfaz web.
Una vez abierto el Halogen, el
Terminal 1010x no aparece en la
ventana de Conectar a dispositivo.
Asegúrese de poder conectarse al servidor web del
Terminal 1010x mediante un navegador.
Asegúrese de que el servicio RaneLink II esté
funcionando. De lo contrario, inícielo.
Asegúrese de añadir los siguientes archivos a la
lista de excepciones de su firewall y programa
antivirus: Halogen.exe, RaneLink.exe (puerto 4994),
hal1.pcops.exe y python.exe.

19
Guide d’utilisation rapide (Français)
Présentation
Le Terminal 1010x est un multiprocesseur de signaux audionumérique (DSP) conçu afin de gérer des
installations audio de toutes tailles, y compris celles des magasins de détail, des salles de
spectacles, des établissements hôteliers et des entreprises. Le 1010x peut être programmé
facilement en utilisant le logiciel Halogen et un assistant en ligne permet également de télécharger
des modèles de configuration de projet afin d’offrir une fonctionnalité autoconfigurable. Ce modèle 1
RU dispose de 10 entrées et 10 sorties natives, 6 ports RAD polyvalents, qui permettent l’ajout de
commandes à distance audio murales, une carte DANTE optionnelle, et il est également
incroyablement extensible. Le 1010x peut s’intégrer à un réseau par l'intermédiaire des ports
logiques universels et/ou des systèmes de commande tiers pour une plus grande automatisation.
Les produits commerciaux Rane fournissent un son de haute qualité, le traitement audio précis sans
latence et une plage dynamique étendue. Faites passer votre système au niveau supérieur et
obtenez la meilleure expérience DSP avec le Terminal 1010x.
Architecture ouverte évoluée utilisant la méthode glisser-déposer avec :
• 10 entrées analogiques universelles (+20 dBU)
• 10 Sorties analogiques symétriques (+20 dBU)
• 2 ports logiques universels (entrée logique, sortie logique et entrée ratiométrique)
• 6 ports RAD+ haute puissance
• Port d'extension
• Logement d’expansion pour carte Dante optionnelle (32 x 32 avec une conversion de fréquence
d'échantillonnage qui prendre en charge jusqu'à 96K)
• Écran couleur sur panneau avant pour contrôler l’état du système
• Utilise le logiciel graphique avec fonction glisser-déposer Halogen.
• Se commande à distance à partir d'un navigateur web sur un ordinateur, un smartphone ou une
tablette.
• Plus de 50 types de blocs de traitement avec fonctions avancées de liaison, de programmation
d’évènements automatiques et d’évènements planifiés et d’intégration avec des systèmes de
contrôle tiers
• Accessoires en option : Carte DANTE, DRZH, RAD16z, RAD26, DR6 et commandes à distance
RPX7.
Contenu de la boîte
Terminal 1010x
5 entrée Euroblock 3,8 mm à 6 broches
(vert, pour entrées audio)
5 sorties Euroblock 3,8 mm à 6 broches
(orange, pour sorties zone)
1 entrée Euroblock 3,8 mm à 6 broches
(noir, pour entrée logique)
Câble d’alimentation
Guide d’utilisation rapide
Consignes de sécurité et informations concernant
la garantie
Important : Veuillez visiter ranecommercial.com
afin de télécharger le guide d’utilisation complet de
Halogen.
Assistance
Pour les toutes dernières informations concernant la documentation, les spécifications techniques, la
configuration requise, la compatibilité et l’enregistrement du produit, veuillez visiter
ranecommercial.com.
Pour de l’assistance supplémentaire, veuillez visiter ranecommercial.com/support.

20
Installation
Le Terminal 1010x est livré avec une configuration par défaut prête à utiliser. Pour obtenir
d’autres modèles de configuration, veuillez utiliser l’assistant en ligne Halogen Wizard afin de
télécharger une configuration et de l’appliquer automatiquement au Terminal 1010x. Si vous
êtes un concepteur Rane certifié ou collaborez avec une entreprise Rane certifiée, vous
pouvez réaliser votre propre configuration avec le logiciel Halogen.
La configuration par défaut du Terminal 1010x est : 4 multisources stéréo vers 8 zones mono
et 1 zone stéréo avec 2 microphones dynamiques pour les annonces principales et locales et
une commande à distance web principale pour la sélection des sources et des niveaux.
Pour utiliser ou tester la configuration par défaut, veillez à relier tous les connecteurs
Euroblock alors que le câble d’alimentation du Terminal 1010x n’est pas branché. Veillez à
ce que tous les câbles soient correctement vissés à l’intérieur des connecteurs Euroblock et
qu’un amplificateur de puissance soit placé dans la chaîne entre le Terminal 1010x et les
enceintes.
Veuillez suivre les spécifications ci-dessous pour installer le Terminal 1010x afin d’utiliser la
configuration par défaut.
ENTRÉES AUDIO
Reliez les entrées 1-8 à des sources audio stéréo de niveau ligne (+20 dBU), comme suit :
Entrée 1 : source audio A gauche
Entrée 2 : source audio A droite
Entrée 3 : source audio B gauche
Entrée 4 : source audio B droite
Entrée 5 : source audio C gauche
Entrée 6 : source audio C droite
Entrée 7 : source audio D gauche
Entrée 8 : source audio D droite
ENTRÉES MICROPHONE
Reliez des microphones dynamiques aux entrées 9 et 10 pour les annonces locales et
principales, respectivement, comme suit :
Entrée 9 : microphone dynamique M1 pour les annonces locales (elle a préséance sur
n'importe quelle autre entrée audio sur toutes les sorties zone mono 1-8)
Entrée 10 : microphone dynamique M2 pour les annonces principales (elle a préséance
sur n'importe quelle autre entrée audio, incluant celle des annonces locales, sur toutes
les sorties zone mono 1-10)
Si vous utilisez un microphone qui dispose d’un interrupteur marche/arrêt, réglez-le sur la
position en marche pour faire une annonce. Si le microphone ne dispose pas d’interrupteur
marche/arrêt, le bloc Halogen dédié appelé Voice Detect détectera lorsque le microphone est
utilisé et mettra en sourdine toutes les autres entrées audio. Une fois l’annonce terminée,
l’intensité du signal des entrées audio augmentera progressivement en un peu plus de 3
secondes.

21
SORTIES
Reliez les sorties 1-8 aux zones mono et les sorties 9-10 à une seule zone stéréo, comme
suit :
Sortie 1 : zone mono 1
Sortie 2 : zone mono 2
Sortie 3 : zone mono 3
Sortie 4 : zone mono 4
Sortie 5 : zone mono 5
Sortie 6 : zone mono 6
Sortie 7 : zone mono 7
Sortie 8 : zone mono 8
Sortie 9 : zone stéréo 9 gauche
Sortie 10 : zone stéréo 9 droite
Reliez les sorties à un amplificateur de puissance selon vos besoins, puis reliez l'amplificateur
aux enceintes de chaque zone. Placez les enceintes reliées aux sorties de la même salle
comme paire stéréo gauche/droite afin d’obtenir une lecture audio appropriée.
Toutes les sorties disposent d’un limiteur de -6 dBFS afin de protéger les haut-parleurs et
d’éviter la saturation.
Une fois les raccordements faits, testez ou utilisez votre système en branchant le câble
d’alimentation du Terminal 1010x.
CONNEXION AVEC HALOGEN
Utilisez le logiciel Halogen pour modifier la configuration par défaut ou appliquer un modèle de
configuration téléchargé à partir de l'assistant Halogen Wizard. Reliez le Terminal 1010x à un
routeur ou autre point d’accès similaire intégré à votre réseau local (LAN). Vous n'avez pas
besoin d'un IP statique ; Halogen trouvera le Terminal 1010x en utilisant notre service de
découverte automatique exclusif RaneLink.
INTERFACE WEB
Vous pouvez utiliser l’interface web afin de commander les sources et les niveaux à distance.
Maintenez la touche Home sur le Terminal 1010x enfoncée jusqu'à ce que Wired Network
Settings s’affiche, puis notez l’adresse IP DHCP (p. ex., 10.10.10.182). Entrez cette adresse
dans un navigateur web pour charger l’interface web.
Prend en charge le système d’exploitation Windows 7 avec SP1, 32 bits ou 64 bits, ou une
version supérieure.
RÉINITIALISATION DES PARAMÈTRES
En cas de perte d'alimentation électrique, le Terminal 1010x restaurera les réglages
précédents, y compris la sélection des sources et des niveaux pour toutes les zones, afin que
les réglages de votre système soient toujours définis comme vous l’avez programmé.
PRÊT À DÉMARRER
Une fois que vous avez vérifié votre système, sélectionné toutes les sources et réglé tous les
niveaux, vous pouvez fermer l’interface web et profiter de votre système.
Pour d’autres applications et modèles de configuration ou pour obtenir une configuration
personnalisée, veuillez visiter le site ranecommercial.com.

22
Schéma de connexion
Les éléments qui ne figurent pas dans Présentation > Contenu de la boîte sont vendus séparément.
ZONE 2
SOURCE
ZONE 3 ZONE 3
SOURCE STATUS DIMMER
VIDEO
AUX 1
SETUP MICL - AUDIO - R
1 CBL/SAT 3 GAME4 NETWORK
QUICK SELECT
2 Blu-ray
PHONES BACK
ENTER
INFO
SETUP
ZONE 2
SOURCE SELECT
MASTER VOLUME
ON/OFF
AUX 1
HDMI 7 5V/1A
ON/OFF
OPTION
Caractéristiques
Panneau avant
1
2
4
3
5
6
8
7
1. Écran : Cet écran affiche des informations sur l'état et les options actuels du Terminal 1010x.
Veuillez consulter la section Fonctionnement > Écran d’affichage afin d’en savoir plus.
2. Home : Cette touche permet de retourner à la fenêtre d’accueil.
3. Menu : Cette touche permet d’accéder au menu et de sélectionner une des pages disponibles.
4. Select : Cette touche permet de sélectionner la page en surbrillance.
5. Page gauche/droite (</>) : Appuyer sur ces touches permet de sélectionner la page
précédente ou suivante, respectivement, à l’écran.
6. Communication Ethernet : Cette DEL s'allume lorsqu’une communication Ethernet est établie.
7. Connexion Ethernet : Cet indicateur s’allume lorsque le port Computer Ethernet sur le
panneau arrière est relié à un ordinateur sous tension. Vous pouvez alors utiliser un ordinateur
pour charger une configuration système correctement conçue en utilisant un ordinateur PC
sous Windows et le logiciel Halogen ou en utilisant une interface web pour commander le
Terminal 1010x à distance.
8. Touche d’alimentation : Cette DEL s’allume lorsque le Terminal 1010x est sous tension.
Commande à distance
principale (p. ex., Rane DR6)
Commande à
distance
(p. ex., Rane
DRZH)
Alimentation
Routeur
Entrées audio (récepteur,
lecteur DVD, etc.)
Enceintes
stéréo
amplifiées
Entrées audio mono
(microphones)
Ordinateur
Amplificateur et
enceintes de zone

23
Panneau arrière
1
2
4
3
5
6
7
8
1. Entrées (10 entrées analogiques universelles) : Ces entrées mono permettent de relier
des sources audio symétriques et asymétriques. Ces entrées ont 4 modes de
fonctionnement : microphone à condensateur avec alimentation fantôme 48 V,
microphone dynamique, niveau ligne symétrique +20 dBU et niveau ligne+ asymétrique.
Astuce : L’option niveau ligne+ asymétrique permet d’additionner deux signaux
asymétriques (tels que les canaux RCA gauche et droit) lorsqu’un est relié à l'entrée
positive (+) et l’autre est relié à l’entrée négative (-).
2. Sorties (10 sorties symétriques à niveau ligne) : Ces sorties mono symétriques +20 dBU
à niveau ligne avec filtrage des interférences et mise en sourdine transitoire commutable
permettent de relier des appareils à niveau ligne.
3. Ports RAD haute puissance universels : Ces 6 ports prennent en charge n'importe
quelle commande RAD ou DR (aucune alimentation requise). Chaque port fournit jusqu'à
15 watts de puissance de crête et prend en charge jusqu'à 2 canaux d'entrée audio et 2
canaux de sortie audio en plus de la commande.
4. Port Ethernet pour ordinateur (Ethernet) : Ce port permet de relier le routeur ou autre
point d’accès similaire lors de l’installation. Une fois le Terminal 1010x correctement
configuré, vous pouvez relier un ordinateur à un autre port sur le même routeur ou point
d'accès, et utiliser un navigateur web afin d’accéder à une interface pour commander le
Terminal 1010x.
5. Bus d'expansion : Ce port assure la prise en charge de l’expansion d’appareils existants
et de nouveaux matériels.
6. Ports logiques universels (Euroblock) : Chacun de ces 2 ports permet à un concepteur
de systèmes de contrôler une fermeture de contact, d’alimenter un indicateur ou un
relais, ou de contrôler un potentiomètre.
7. Logement d’expansion pour carte optionnelle : Ce logement permet d’insérer une
carte DanteX optionnelle ou toute autre carte d'expansion compatible.
8. Entrée d'alimentation (CÉI) : Utilisez un câble CÉI standard afin de brancher cette
entrée à une prise secteur.

24
Fonctionnement
Important : Veuillez visiter ranecommercial.com afin de télécharger le guide d’utilisation
complet de Halogen.
Écran d’affichage
Accueil
Pour accéder à la page d’accueil à tout moment, appuyez sur la touche Home. Le contenu
de la page d’accueil change selon l’état du Terminal 1010x. Les informations qui peuvent se
retrouver sur la page d’accueil incluent l’état du démarrage, l’état de défaillance, l’état du
réseau et bien plus encore.
Menu
Pour accéder menu à tout moment, appuyez sur la touche Menu.
Pour mettre en surbrillance la page désirée, appuyez sur les touches Page Left et Page
Right.
Pour accéder à la page en surbrillance, appuyez sur la touche Select.
Le menu contient toujours les pages suivantes :
• Analog Input : Cette page affiche que le mode d’entrée sélectionné est analogique
(Input Mode) et le niveau d'entrée (Input Level) pour chacune des 10 entrées.
• Analog Output : Cette page affiche le niveau de sortie (Output Level) et l’état de mise en
sourdine (Mute Status) pour chacune des 10 sorties.
• RAD : Cette page affiche le niveau d'entrée (Input Level), le niveau de sortie (Output
Level), l’état de l’appareil (Device Status) et l’état prévu/imprévu (Expected/
Unexpected Status). Lorsque vous tentez de localiser un appareil, le carré de cet
appareil clignote.
• EXP : Cette page est divisée en 32 sections, chacune représentant 1 des 32 positions
EXP possibles dans la chaîne. L'une des 4 icônes d'état suivantes apparaît dans les
sections avec des appareils connectés dans la configuration :
o Vert : Cette icône indique que la connexion est bonne.
o Jaune : Cette icône indique qu’une connexion est manquante.
o Jaune avec point d'interrogation : Cette icône indique un état imprévu.
o Rouge avec barre oblique : Cette icône indique un problème, tel que lorsqu’un
appareil est branché au mauvais connecteur.
Lorsque vous tentez de localiser un appareil, l’icône clignote.
Les sections vides indiquent un emplacement non utilisé qui n’est pas physiquement
connecté ou dans la configuration.
Avec une carte d'extension Dante optionnelle installée, 4 pages supplémentaires seront
affichées dans le menu : 1-16 TX, 17-32 TX, 1-16 RX et 17-32 RX. Ces pages indiquent si le
signal d’un canal est transmis et son niveau.

25
Commander le Terminal 1010x à distance
Vous pouvez accéder à une interface web par le biais d'un ordinateur afin de commander le
Terminal 1010x à distance.
Pour configurer le Terminal 1010x pour l’interface web :
1. Utilisez des câbles Ethernet standard pour relier le port Computer Ethernet du Terminal
1010x à un routeur DHCP (Dynamic Host Configuration Protocol) ou à un autre point
d'accès semblable, puis reliez votre ordinateur à un autre port sur le même routeur ou
point d'accès.
2. Une fois relié à un réseau, le Terminal 1010x obtiendra automatiquement une adresse IP
dynamique que vous pourrez utiliser. Ceci peut prendre quelques secondes.
3. Maintenez le bouton Info sur le Terminal 1010x enfoncé jusqu'à ce que Wired Network
Settings s’affiche, puis notez l’adresse DHCP IP (p. ex., 10.10.10.182).
Pour ouvrir l'interface web du Terminal 1010x :
1. Lancez un navigateur web sur votre ordinateur.
2. Dans le navigateur, entrez l’adresse DHCP IP affiché dans les paramètres Wired
Network Settings du Terminal 1010x (p. ex., http://10.10.10.182) pour charger
l'interface web.
3. Appuyez sur le bouton Login, puis entrez le mot de passe pour le mode d’accès complet
(Full). Le mot de passe par défaut est admin.

26
Guide de dépannage
En cas de problème, procédez comme suit :
• Assurez-vous que tous les câbles et les autres périphériques sont correctement
raccordés.
• Assurez-vous que vous utilisez Terminal 1010x comme indiqué dans ce guide
d’utilisation.
• Assurez-vous que vos autres appareils ou médias fonctionnent correctement.
• Si vous croyez que Terminal 1010x ne fonctionne pas correctement, vérifiez le
tableau suivant afin de trouver le problème et la solution.
Problème : Solution :
L’appareil ne s’allume pas. Veuillez vous assurer que le câble d’alimentation du
Terminal 1010x est correctement branché à l’entrée
d’alimentation et à la prise secteur.
Le Terminal 1010x ne produit aucun
son, ou le son est déformé.
Assurez-vous que tous les câbles et appareils soient
correctement raccordés.
Assurez-vous que les câbles ne soient pas
endommagés.
Assurez-vous que les paramètres de votre appareil
Bluetooth, enceinte, console de mixage, etc. soient
correctement réglés.
Les indicateurs DEL de la connexion
Ethernet ne s’allument pas après
avoir branché le HAL dans un
commutateur réseau ou en le
connectant directement à un
ordinateur.
Vérifiez que le câble Ethernet ou le câble croisé n’est
pas endommagé. Essayez un autre câble.
Essayez de brancher le câble à un port différent sur
le commutateur de réseau.
Le Terminal 1010x ne se connecte
pas au navigateur Web.
Maintenez la touche Home sur le Terminal 1010x
enfoncée jusqu'à ce que la page Wired Network
Settings s’affiche. Prenez note de l'adresse IP DHCP.
Entrez cette adresse dans un navigateur web pour
charger l’interface web.
Après avoir lancé Halogen, le
Terminal 1010x n'apparaît pas dans
la fenêtre Connect To Device.
Vérifiez que vous pouvez vous connecter au serveur
web du Terminal 1010x via un navigateur.
Vérifiez que le service RaneLink II est en cours
d’exécution. S’il ne l’est pas, relancez-le.
Veillez à ajouter ce qui suit aux listes d’exceptions de
votre pare-feu et antivirus : Halogen.exe,
RaneLink.exe (port 4994), hal1.pcops.exe et
python.exe.

27
Guida rapida (Italiano)
Introduzione
Il Terminal 1010x è un multi-processore di segnale audio digitale indicato per la gestione di impianti
audio di tutte le dimensioni, inclusi impianti di punti vendita, per esibizioni, accoglienza e aziendali. Il
1010x è facilmente programmabile con il software Halogen e una procedura guidata online fornisce
modelli di progetto per prestazioni plug and play. Questo modello da 1 RU fornisce 10 porte di
ingresso / 10 di uscita native, 6 porte RAD flessibili per l’espansione audio remota e i comandi wall,
una scheda DANTE opzionale ed è incredibilmente espandibile. Gli utilizzatori possono integrare il
1010x per l’automazione tramite le porte logiche universali e/o a sistemi di controllo di terzi in rete. I
prodotti commerciali Rane garantiscono un suono di alta qualità, un’elaborazione audio precisa
senza latenza e una vasta gamma dinamica. Porta il tuo impianto a un livello superiore e ottieni la
migliore esperienza DSP grazie al Terminal 1010x.
Architettura aperta avanzata drag-and-drop con:
• 10 ingressi analogici universali (+20 dBU)
• 10 uscite analogiche universali (+20 dBU)
• 2 porte logiche universali (INGRESSO logico, USCITA logica e INGRESSO raziometrico)
• 6 porte RAD+ ad alta potenza
• Porta di espansione
• Slot di espansione per scheda Dante opzionale (32 x 32 con conversione della frequenza di
campionamento a supportare flussi Dante fino a 96K di frequenza di campionamento)
• Display a colori sul pannello anteriore per il monitoraggio dello stato di sistema
• Impiega il software grafico drag-and-drop Halogen.
• Controllo a distanza da un browser Web su un computer, smartphone o tablet.
• 50+ tipi di blocco di elaborazione avanzato con Linking avanzato, eventi automatici e
programmati e integrazione con sistemi di controllo di terzi
• Accessori opzionali: scheda DANTE, telecomandi pager DRZH, RAD16z, RAD26, DR6 e RPX7.
Contenuti della confezione
Terminal 1010x
(5) ingresso Euroblock a 6 perni 3,8 mm
(verde, per ingressi audio)
(5) uscite Euroblock a 6 perni 3,8 mm
(arancione, per uscite di zona)
(1) ingresso Euroblock a 6 perni 3,8 mm
(nero, per ingresso logico)
Cavo di alimentazione
Guida rapida
Istruzioni di sicurezza e garanzia
Importante: recarsi alla pagina ranecommercial.com
per scaricare la guida per l’uso completa di Halogen.
Assistenza
Per le ultime informazioni in merito a questo prodotto (documentazione, specifiche tecniche, requisiti
di sistema, informazioni sulla compatibilità, ecc.) e per effettuarne la registrazione, recarsi alla pagina
ranecommercial.com.
Per ulteriore assistenza sul prodotto, recarsi alla pagina ranecommercial.com/support.

28
Configurazione
Il Terminal 1010x è dotato di una configurazione predefinita applicata e pronta per l’uso. per
ulteriori modelli, utilizzare l’Halogen Wizard, scaricare una configurazione e applicarla al
Terminal 1010x per prestazioni plug-and-play. Se sei un designer certificato Rane o collabori
con un’azienda certificata da Rane, costruisci il tuo design personalizzato con il software
Halogen.
L’applicazione predefinita nel Terminal 1010x è: Da 4 zone stereo multi-source a 8 zone mono
e 1 zona stereo con 2 microfoni dinamici per annunci master e locali, più telecomando master
Web per la scelta della fonte e il controllo del livello.
Per utilizzare o testare la configurazione predefinita, collegare tutti i connettori Euroblock con
il Terminal 1010x spento senza il cavo di alimentazione. Assicurarsi che tutti i cavi siano
adeguatamente avvitati all’interno dei connettori Euroblock e che l’amplificatore sia collocato
al centro della catena dal Terminal 1010x agli altoparlanti.
Seguire le specifiche indicate qui di seguito per la configurazione del Terminal 1010x con la
configurazione predefinita.
INGRESSI MUSICALI
Collegare gli ingressi 1-8 a fonti audio stereo bilanciate a livello di linea (+20 dBU), come
segue:
Ingresso 1: Fonte musicale A sinistra
Ingresso 2: Fonte musicale A destra
Ingresso 3: Fonte musicale B sinistra
Ingresso 4: Fonte musicale B destra
Ingresso 5: Fonte musicale C sinistra
Ingresso 6: Fonte musicale C destra
Ingresso 7: Fonte musicale D sinistra
Ingresso 8: Fonte musicale D destra
INGRESSI MICROFONO
Collegare i microfoni dinamici agli ingressi 9 e 10 per annunci Local e Master, rispettivamente,
come segue:
Ingresso 9: Microfono dinamico M1 per annunci Local (bypassa qualsiasi altro ingresso
audio su tutte le uscite zona mono 1–8)
Ingresso 10: Microfono dinamico M2 per annunci Master (bypassa qualsiasi altro
ingresso audio - incluso l’annuncio locale - su tutte le uscite 1-10)
Se si utilizza un microfono con un interruttore on/off, impostare l’interruttore su on per iniziare
l’annuncio. Se il microfono non dispone di un interruttore on/off, il blocco Halogen dedicato
chiamato Voice Detect individuerà quando il microfono è in uso e abbasserà qualsiasi altro
ingresso audio. Una volta completato il messaggio, l’ingresso audio sfumerà uniformemente in
più di 3 secondi.

29
USCITE
Collegare le uscite 1–8 alle zone mono e le uscite 9–10 a una singola zona stereo, come
segue:
Uscita 1: Mono Zona 1
Uscita 2: Mono Zona 2
Uscita 3: Mono Zona 3
Uscita 4: Mono Zona 4
Uscita 5: Mono Zona 5
Uscita 6: Mono Zona 6
Uscita 7: Mono Zona 7
Uscita 8: Mono Zona 8
Uscita 9: Zona stereo 9 sinistra
Uscita 10: Zona stereo 9 destra
Collegare le uscite a un amplificatore in base alle proprie esigenze, quindi collegare
l’amplificatore agli altoparlanti in ciascuna zona. Collocare gli altoparlanti collegati alle uscite
nella stanza di una coppia stereo sinistra/destra per una riproduzione audio corretta.
Tutte le uscite presentano un limitatore da -6 dBFS per proteggere i driver ed evitare la
saturazione.
Una volta effettuate tutte le connessioni, testare o utilizzare il sistema collegando il cavo di
alimentazione per accendere il Terminal 1010x.
COLLEGAMENTO UTILIZZANDO HALOGEN
Utilizzare il software Halogen per modificare la configurazione predefinita o applicare un
modello scaricato dall’Halogen Wizard. Collegare il Terminal 1010x a un router o a un punto di
accesso simile integrato con la propria rete LAN. Non occorre un IP statico; lHalogen troverà
l’unità Terminal 1010x utilizzando il nostro servizio proprietario di scoperta automatica,
RaneLink.
INTERFACCIA WEB
Si può utilizzare l’interfaccia web per controllare fonti e livelli a distanza. Premere il tasto
Home sul Terminal 1010x fino a quando a display non compaiono le Wired Network Settings,
quindi prendere nota dell’indirizzo DHCP IP (ad es., 10.10.10.182). Digitare tale indirizzo in un
browser per caricare l’interfaccia Web.
Il sistema operativo più recente supportato è Windows 7 con SP1, a 32 o 64 bit.
RIPRISTINA PARAMETRI
Se in qualsiasi momento viene persa l’alimentazione al Terminal 1010x, il sistema ripristina le
regolazioni precedenti, inclusi la scelta della fonte e il controllo di livello per tutte le zone,
assicurando che il sistema sia sempre impostato come desiderato.
PRONTI A PARTIRE
Una volta verificato il sistema e impostato tutte le fonti e i livelli, è possibile chiudere
l’interfaccia Web e godersi l’impianto.
Per ulteriori applicazioni di sistema e modelli di design o per ottenere la propria configurazione
personalizzata, recarsi su ranecommercial.com.

30
Schema dei collegamenti
Elementi non elencati sotto Introduzione > Contenuti della confezione sono venduti separatamente.
ZONE 2
SOURCE
ZONE 3 ZONE 3
SOURCE STATUS DIMMER
VIDEO
AUX 1
SETUP MICL - AUDIO - R
1 CBL/SAT 3 GAME4 NETWORK
QUICK SELECT
2 Blu-ray
PHONES BACK
ENTER
INFO
SETUP
ZONE 2
SOURCE SELECT
MASTER VOLUME
ON/OFF
AUX 1
HDMI 7 5V/1A
ON/OFF
OPTION
Caratteristiche
Pannello anteriore
1
2
4
3
5
6
8
7
1. Display: questo display mostra informazioni sullo stato corrente del Terminal 1010x e sulle
relative opzioni. Per maggiori informazioni, si veda Operazione > Display.
2. Home: premere questo tasto per aprire la schermata principale (Home).
3. Menu: premere questo tasto per entrare nella schermata Menu, dove è possibile selezionare le
pagine disponibili.
4. Select: premere questo tasto per selezionare la pagina evidenziata.
5. Page Left/Right (</>) (pagina sx/dx): premere questi tasti per selezionare la pagina precedente
o successiva (rispettivamente) illustrata a display.
6. Comunicazione Ethernet: questo LED si accende per indicare la comunicazione Ethernet
7. Link Ethernet: questa spia è accesa quando la porta Computer Ethernet sul pannello
posteriore è collegata a un computer (acceso). Quindi, per caricare una configurazione di
sistema progettata adeguatamente, è possibile utilizzare un computer Windows e il software
Halogen oppure controllare il Terminal 1010x a distanza servendosi di un’interfaccia basata su
Web.
8. Power: questo LED si illumina quando il Terminal 1010x è acceso.
Telecomando Master
(ad es., Rane DR6)
Telecomando
di zona (ad
es., Rane
DRZH)
Alimentazione
Router
Ingressi audio (ricevitore,
lettore DVD, ecc.)
Altoparlanti
stereo
Ingressi audio mono
(microfoni)
Computer
Amplificatore di
zona e altoparlanti

31
Pannello posteriore
1
2
4
3
5
6
7
8
1. Ingressi (10 analogici universali): collegare fonti audio bilanciate o non bilanciate a questi
ingressi mono. Gli ingressi hanno 4 modalità di funzionamento: Microfono a
condensatore con alimentazione phantom da 38V, microfono dinamico, Line +20 dBU
bilanciata e Line+ non bilanciata.
Suggerimento: Unbalanced Line+ somma due segnali non bilanciati (quali le linee RCA
destra e sinistra) quando uno è collegato all’ingresso positivo (+) e uno è collegato
all’ingresso negativo (-).
2. Uscite: (10 Balanced Line): collegare dispositivi a livello di linea a queste uscite mono
bilanciate da +20 dBU con filtro EMI e silenziamento transiente on/off.
3. Porte RAD universali ad alta potenza: queste 6 porte supportano qualsiasi dispositivo
RAD o DR (non richiede alimentazione). Ciascuna porta fornisce fino a 15 watt di
alimentazione di picco e supporta fino a 2 canali di ingresso audio e 2 canali di uscita
audio più comandi.
4. Porta Ethernet del computer (Ethernet): collegare questa porta a un router o a un punto
di accesso simile durante il setup. Una volta configurato adeguatamente il Terminal
1010xv, è possibile collegare un computer a un’altra porta sullo stesso router o punto di
accesso, potendo così utilizzare un browser Web per accedere a un’interfaccia che
consenta il controllo del Terminal 1010x.
5. Bus di espansione: Questa porta garantisce il supporto per dispositivi di espansione di
quello esistente e per future uscite hardware.
6. Porte logiche universali (Euroblock): ciascuna di queste 2 porte consente a un designer
di sistema di leggere una chiusura di contatto, guidare un indicatore o relè o leggere un
potenziometro.
7. Slot scheda opzionale: inserire una scheda DanteX opzionale o altre schede di
espansione compatibili in questa slot.
8. Ingresso di alimentazione (IEC): servirsi di un cavo standard IEC per collegare questo
ingresso a una presa di alimentazione.

32
Operazione
Importante: recarsi alla pagina ranecommercial.com per scaricare la guida per l’uso
completa di Halogen.
Display
Home
Per accedere alla pagina Home, premere il tasto Home in qualsiasi momento. I contenuti
della pagina principale (Home) cambiano a seconda dello stato corrente del Terminal 1010x.
Le informazioni che possono essere illustrate qui comprendono lo stato di avviamento, lo stato
di errore, lo stato di rete e molto altro.
Menu
per accedere al menu, premere il tasto Home in qualsiasi momento.
Per evidenziare la pagina desiderata, premere i tasti Page Left e Page Right.
Per entrare nella pagina evidenziata, premere il tasto Select.
Il menu contiene sempre le pagine seguenti:
• Analog Input: questa pagina mostra questa Input Mode selezionata e l’Input Level
corrente per tutti e 10 gli ingressi.
• Analog Output: questa pagina mostra l’Output Level e il Mute Status di tutte e 10 le
uscite.
• RAD: questa pagina mostra Input Level, Output Level, Device Status e Expected/
Unexpected Status. Se si sta individuando un dispositivo, il quadratino di tale
dispositivo lampeggerà.
• EXP: questa pagina è divisa in 32 regioni, ciascuna delle quali rappresenta 1 di 32
possibili posizioni EXP nella catena. Una delle 4 seguenti icone comparirà in regioni con
dispositivi collegati nella configurazione:
o Verde: questa icona indica che il collegamento è buono.
o Giallo: questa icona avvisa di un collegamento mancante.
o Giallo con punto interrogativo: questa icona avvisa di uno stato inatteso.
o Rosso con barra: questa icona indica un problema quale un dispositivo errato
collegato.
Se si sta individuando un dispositivo, l’icona lampeggerà.
Le regioni vuote indicano una sede inutilizzata che non è fisicamente connessa o
presente nella configurazione.
Con l’installazione di una scheda di espansione Dante, nel menu verranno mostrate 4 pagine
aggiuntive: 1-16 TX, 17-32 TX, 1-16 RX e 17-32 RX. Queste pagine indicano se un canale
viene convogliato e il relativo livello.

33
Controllare Terminal 1010x a distanza
Per controllare Terminal 1010x a distanza, è possibile utilizzare un’interfaccia basata su Web.
Per configurare Terminal 1010x per l’uso con la sua interfaccia Web:
1. Servirsi di cavi Ethernet standard per collegare la porta Computer Ethernet di Terminal
1010x a un router DHCP (Dynamic Host Configuration Protocol) o a un punto di accesso
simile, quindi collegare il computer a un’altra porta dello stesso router o punto di
accesso.
2. Una volta collegato a una rete, Terminal 1010x acquisirà automaticamente un indirizzo IP
dinamico da utilizzare. Questo può richiedere alcuni secondi.
3. Premere il tasto Info sullo Terminal 1010x fino a quando a display non compare Wired
Network Settings, quindi prendere nota dell’indirizzo DHCP IP (ad es., 10.10.10.182).
Per aprire l’interfaccia Web Terminal 1010x:
1. Aprire un browser sul computer.
2. Nel browser, inserire l’indirizzo DHCP IP illustrato nelle impostazioni di rete Wired
Network Settings di Terminal 1010x (ad es. http://10.10.10.182) per caricare l’interfaccia
Web.
3. Premere il tasto Login, quindi inserire la password per la modalità di accesso Full. Quella
predefinita è admin.

34
Risoluzione di problemi
In caso di problemi, procedere come segue:
• Assicurarsi che tutti i cavi e i dispositivi siano collegati in maniera corretta e ben salda.
• Assicurarsi di utilizzare Terminal 1010x come descritto nel presente guia per l'uso.
• Assicurarsi che gli altri dispositivi o media funzionino correttamente.
• Se si ritiene che Terminal 1010x non funzioni come si deve, verificare nella seguente
tabella il problema riscontrato e la relativa soluzione.
Problema: Soluzione:
Non si accende.
Assicurarsi che l'ingresso di alimentazione del
Terminal 1010x sia collegato a una presa di
alimentazione utilizzando le cavo in dotazione.
Il Terminal 1010x non produce
alcun suono o il suono è distorto.
Assicurarsi che tutti i cavi e i collegamenti ai
dispositivi siano sicuri e corretti.
Assicurarsi che non vi siano cavi danneggiati.
Assicurarsi che le impostazioni sul dispositivo
Bluetooth, altoparlante, mixer, ecc. siano corrette.
Gli indicatori LED di collegamento
Ethernet non si accendono dopo
aver collegato l’HAL in un
interruttore di rete o collegandolo
direttamente a un computer.
Assicurarsi che il cavo Ethernet o il cavo di crossover
non siano interrotti. Provare a utilizzare un cavo
diverso.
Provare a collegare il cavo in una porta diversa
sull’interruttore di rete.
Il Terminal 1010x non si collega al
browser Web.
Premere il tasto Home sul Terminal 1010x fino a
quando la pagina Wired Network Settings non
compare a display. Prendere nota dell’indirizzo IP
DHCP. Digitare tale indirizzo nel browser per caricare
l’interfaccia Web.
Dopo aver aperto Halogen, il
Terminal 1010x non compare nella
finestra Connect To Device.
Assicurarsi di potersi collegare al server Web del
Terminal 1010x tramite un browser.
Assicurarsi che il servizio RaneLink II sia in funzione.
In caso contrario, riavviarlo.
Assicurarsi di aggiungere quanto segue all’elenco
delle eccezioni del proprio firewall e antivirus:
Halogen.exe, RaneLink.exe (porta 4994),
hal1.pcops.exe e python.exe.

35
Schnellstart-Anleitung (Deutsch)
Einführung
Das Terminal 1010x ist ein Audio-Digitalsignal-Multiprozessor, der für die Verwaltung von
Audioinstallationen jeglicher Größe, einschließlich Einzelhandelsgeschäften, Veranstaltungsorten,
Gastronomiebetrieben und Unternehmenseinrichtungen entwickelt wurde. Der 1010x ist mit der
Halogen-Software leicht zu programmieren. Ein Online-Assistent bietet Projektvorlagen für eine Plug-
and-Play-Performance. Dieses 1-RU-Modell bietet native 10-In/10-Out, 6 flexible RAD-Ports für
Remote-Audio-Erweiterung und Wandbedienelemente, eine optionale DANTE-Karte und ist mit fast
grenzenlos erweiterbar. Integrieren Sie das 1010x für die Automatisierung über die
Universal Logic Ports und/oder Steuerungssysteme eines Drittanbieters im Netzwerk. Rane Produkte
für den kommerziellen Gebrauch bieten qualitativ hochwertigen Sound, präzise Audioverarbeitung
ohne Latenz und einen großen Dynamikbereich. Bringen Sie Ihre Installation auf den nächsten Level
und erzielen Sie mit dem Terminal 1010x ideale DSP-Ergebnisse.
Erweiterte Drag-and-Drop-Architektur mit den folgenden Funktionen:
• 10 Universal-Analog-Eingänge (+20 dBU)
• 10 symmetrische Analogausgänge (+20 dBU)
• 2 Universal-Logic-Ports (Logic IN, Logic OUT und Ratiometrischer IN)
• 6 leistungsstarke RAD+ Ports
• Erweiterungsport
• Erweiterungssteckplatz für optionale Dante-Karte (32 x 32 mit Abtastratenkonvertierung zur
Unterstützung von einer Abtastrate von 96K für Dante-Kanäle)
• Farbanzeige an der Vorderseite zur Überwachung des Systemstatus
• Verwendet die grafische Drag-and-Drop-Software von Halogen.
• Steuern Sie das Gerät über einen Webbrowser auf einem Computer, Smartphone oder Tablet
fern.
• 50+ erweiterte Verarbeitungsblocktypen mit erweitertem Linking, automatischen und geplanten
Ereignissen sowie der Integration von Steuerungssystemen von Drittanbietern
• Optionales Zubehör: DANTE Karte, DRZH, RAD16z, RAD26, DR6 und RPX7 Pager-
Fernbedienungen.
Lieferumfang
Terminal 1010x
(5) 6-pin 3,8 mm Euroblock-Eingang
(Grün, für Audio Eingänge)
(5) 6-pin 3,8 mm Euroblock-Ausgänge
(Orange, für Zonenausgänge)
(1) 6-pin 3,8 mm Euroblock-Eingang
(Schwarz, für Logic-Eingang)
Netzkabel
Schnellstart-Anleitung
Sicherheitshinweise und Garantieinformationen
Wichtig: Besuchen Sie ranecommercial.com,
um das komplette Halogen Benutzerhandbuch
herunterzuladen.
Kundendienst
Für die neuesten Informationen zu diesem Produkt (Dokumentation, technische Daten,
Systemanforderungen, Informationen zur Kompatibilität etc.) und zur Produktregistrierung besuchen
Sie bitte: ranecommercial.com.
Für zusätzlichen Produkt-Support besuchen Sie ranecommercial.com/support.

36
Setup
Terminal 1010x wird mit einer Standardkonfiguration ausgeliefert und kann sofort gestartet
werden. Weitere Vorlagen finden Sie im Halogen Wizard, laden Sie eine Konfiguration herunter
und wenden Sie sie für die Plug-and-Play-Performance des Terminal 1010x an. Wenn Sie ein
Rane-zertifizierter Designer sind oder mit einem Rane-zertifizierten Unternehmen
zusammenarbeiten, können Sie Ihr eigenes Design mit der Halogen-Software erstellen.
Die Standardanwendung des Terminal 1010x ist: 4 Stereo-Multi-Quellen bis 8 Mono-Zonen
und 1 Stereo-Zone mit 2 dynamischen Mikrofonen für die Master- und lokale Ansage plus
Master-Web-Fernbedienung für die Quellenauswahl und Lautstärkeregelung.
Um die Standardkonfiguration zu verwenden oder zu testen, schließen Sie alle Euroblock-
Steckverbinder ohne Stromkabel an das Terminal 1010x an. Stellen Sie sicher, dass alle
Kabel ordnungsgemäß mit den Euroblock-Steckern verbunden sind und dass sich ein
Leistungsverstärker zwischen dem Terminal 1010x und den Lautsprechern befindet.
Befolgen Sie die nachstehenden Anweisungen, um das Terminal 1010x mit der
Standardkonfiguration einzurichten.
MUSIKEINGÄNGE
Verbinden Sie die Eingänge 1-8 mit symmetrischen Stereo-Audioquellen (+20 dBU) wie folgt:
Eingang 1: Musikquelle A links
Eingang 2: Musikquelle B rechts
Eingang 3: Musikquelle B links
Eingang 4: Musikquelle B rechts
Eingang 5: Musikquelle C links
Eingang 6: Musikquelle C rechts
Eingang 7: Musikquelle D links
Eingang 8: Musikquelle D rechts
MIKROFONEINGÄNGE
Schließen Sie dynamische Mikrofone an die Eingänge 9 und 10 für lokale und Master-Ansagen
wie folgt an:
Eingang 9: Dynamisches Mikrofon M1 für lokale Ansage (setzt alle anderen
Audioeingänge in allen Mono-Zonenausgängen 1-8 außer Kraft)
Eingang 10: Dynamisches Mikrofon M2 für die Master-Ansage (setzt alle anderen
Audioeingänge - einschließlich der lokalen Ansage - auf allen Ausgängen 1-10 außer
Kraft)
Wenn Sie ein Mikrofon mit einem Ein/Aus-Schalter verwenden, schalten Sie den Schalter ein,
um mit der Ansage zu beginnen. Wenn Ihr Mikrofon keinen Ein-/Ausschalter hat, erkennt der
dedizierte Halogen-Block namens Voice Detect, wenn das Mikrofon verwendet wird und
reduziert den Pegel der anderen Audioeingänge. Nachdem Ihre Ansage beendet wurde, wird
der Audioeingang innerhalb von 3 Sekunden sanft wieder eingeblendet.

37
AUSGÄNGE
Verbinden Sie die Ausgänge 1-8 mit Mono-Zonen und die Ausgänge 9-10 mit einer einzelnen
Stereo-Zone wie folgt:
Ausgang 1: Mono-Zone 1
Ausgang 2: Mono-Zone 2
Ausgang 3: Mono-Zone 3
Ausgang 4: Mono-Zone 4
Ausgang 5: Mono-Zone 5
Ausgang 6: Mono-Zone 6
Ausgang 7: Mono-Zone 7
Ausgang 8: Mono-Zone 8
Ausgang 9: Stereo Zone 9 links
Ausgang 10: Stereo Zone 9 rechts
Verbinden Sie die Ausgänge nach Ihren Bedürfnissen mit einem Leistungsverstärker und
verbinden Sie dann den Verstärker mit den Lautsprechern in jeder Zone. Platzieren Sie die
Lautsprecher, die an die Ausgänge angeschlossen sind, im selben Raum wie ein Stereo-
Links/Rechts Lautsprecherpaar, um eine korrekte Audiowiedergabe zu gewährleisten.
Alle Ausgänge verfügen über einen -6 dBFS-Limiter, um Treiber zu schützen und Sättigung zu
vermeiden.
Sobald alle Verbindungen hergestellt sind, testen oder benutzen Sie Ihr System, indem Sie das
Netzkabel an das Terminal 1010x anstecken.
VERBINDEN MIT HALOGEN
Verwenden Sie die Halogen-Software, um die Standardkonfiguration zu ändern oder eine vom
Halogen-Assistenten heruntergeladene Vorlage anzuwenden. Verbinden Sie das Terminal
1010x mit einem Router oder einem ähnlichen Access Point, der in Ihr LAN-Netzwerk integriert
ist. Sie benötigen keine statische IP-Adresse. Halogen wird die Terminal 1010x-Einheit mit
unserem proprietären, automatischen RaneLink-Suchdienst finden.
WEB-SCHNITTSTELLE
Sie können die Webschnittstelle verwenden, um Quellen und Pegel fernzusteuern. Drücken Sie
die Home-Taste am Terminal 1010x, bis die Einstellungen für das verkabelte Netzwerk auf
dem Display angezeigt werden und notieren Sie sich dann die DHCP-IP-Adresse (z. B.
10.10.10.182). Geben Sie diese Adresse in einen Webbrowser ein, um die Web-Schnittstelle
zu laden.
Das früheste unterstützte Betriebssystem ist Windows 7 mit SP1, 32-Bit oder 64-Bit.
PARAMETER WIEDERHERSTELLEN
Wenn die Stromversorgung zu Terminal 1010x zu irgendeinem Zeitpunkt unterbrochen wird,
stellt das System die vorherigen Einstellungen wieder her, einschließlich Quellenauswahl und
Pegelsteuerung für alle Zonen, um sicherzustellen, dass Ihr System immer wie von Ihnen
vorgesehen eingestellt ist.
SOFORT EINSATZBEREIT
Sobald Sie Ihr System überprüft und alle Quellen und Pegel festgelegt haben, können Sie die
Weboberfläche schließen und Ihr System genießen.
Für weitere Systemanwendungen und Designvorlagen oder um Ihre eigene benutzerdefinierte
Konfiguration zu erstellen, besuchen Sie bitte ranecommercial.com.

38
Anschlussdiagramm
Teile, die nicht unter Einführung > Lieferumfang angegeben sind, sind separat erhältlich.
ZONE 2
SOURCE
ZONE 3 ZONE 3
SOURCE STATUS DIMMER
VIDEO
AUX 1
SETUP MICL - AUDIO - R
1 CBL/SAT 3 GAME4 NETWORK
QUICK SELECT
2 Blu-ray
PHONES BACK
ENTER
INFO
SETUP
ZONE 2
SOURCE SELECT
MASTER VOLUME
ON/OFF
AUX 1
HDMI 7 5V/1A
ON/OFF
OPTION
Funktionen
Vorderseite
1
2
4
3
5
6
8
7
1. Display: Dieses Display zeigt Informationen über den aktuellen Status und die Optionen des
Terminal 1010x an. Siehe Betrieb > Display für weitere Informationen.
2. Home: Drücken Sie diese Taste, um den Home-Bildschirm zu öffnen.
3. Menu: Drücken Sie diese Taste, um den Menübildschirm aufzurufen, in dem Sie aus den
verfügbaren Seiten auswählen können.
4. Select: Drücken Sie diese Taste, um die markierte Seite auszuwählen.
5. Seite Links/Rechts (</>): Drücken Sie diese Tasten, um die jeweils vorherige oder nächste
Seite auszuwählen, die auf dem Display angezeigt wird.
6. Ethernet Kommunikation: Diese LED leuchtet auf, um die Ethernet-Kommunikation
anzuzeigen.
7. Ethernet-Link: Diese LED leuchtet, wenn der Computer-Ethernet-Anschluss an der
Rückseite mit einem (eingeschalteten) Computer verbunden ist. Sie können dann den
Computer verwenden, um eine ordnungsgemäß gestaltete Systemkonfiguration mithilfe eines
Windows-PC und der Halogen-Software zu laden bzw. das Terminal 1010x über eine
webbasierte Schnittstelle fernsteuern.
8. Power: Diese LED leuchtet, wenn das Terminal 1010x eingeschaltet ist.
Master-Fernbedienung
(z. B. Rane DR6)
Zonen-
Fernbedienun
g (z. B. Rane
DRZH)
Steckdose
Router
Audioeingänge (Receiver,
DVD-Player usw.)
Stereo-
Aktivlautsprecher
Mono-Audio-
Eingänge (Mikrofone)
Computer
Zonenverstärker
und Lautsprecher

39
Rückseite
1
2
4
3
5
6
7
8
1. Eingänge (10 Universal-Analog): Schließen Sie symmetrische oder unsymmetrische
Audioquellen an diese Mono-Eingänge an. Die Eingänge können in 4 Betriebsmodi
betrieben werden: Kondensatormikrofon mit 48-V-Phantomspeisung, Dynamisches
Mikrofon, symmetrische +20 dBU-Line und unsymmetrische Line+.
Tipp: Die unsymmetrische Line+ summiert zwei unsymmetrische Signale (wie linke und
rechte RCA-Leitungen), wenn eine an den positiven (+) Eingang und eine an den
negativen (-) Eingang angeschlossen ist.
2. Ausgänge: (10 Symmetrische Line): Verbinden Sie Line-Level-Geräte mit diesen
symmetrischen +20 dBU Mono-Ausgängen mit EMI-Filterung und Ein/Aus-Schalter zum
Stummschalten von transienten Signalen.
3. Universelle Hochleistungs-RAD-Ports: Diese 6 Ports unterstützen jedes RAD- oder
DR-Gerät (keine Stromversorgung erforderlich). Jeder Port bietet bis zu 15 Watt
Spitzenleistung und unterstützt bis zu 2 Audio-Eingangs- und 2 Audio-Ausgangskanäle
plus Steuerung.
4. Computer Ethernet-Port (Ethernet): Verbinden Sie diesen Port während der Installation
mit einem Router oder einem ähnlichen Zugriffspunkt. Nachdem Terminal 1010x
ordnungsgemäß konfiguriert wurde, können Sie einen Computer mit einem anderen Port
desselben Routers oder Zugriffspunkts verbinden.
5. Erweiterungsbus: Dieser Port bietet Unterstützung für Legacy-Erweiterungsgeräte und
zukünftige Hardware-Versionen.
6. Universal Logic-Ports (Euroblock): Jeder dieser 2 Ports ermöglicht einem
Systementwickler, eine Kontaktschließung zu lesen, eine Anzeige oder ein Relais zu
steuern oder ein Potenziometer zu lesen.
7. Optionaler Kartensteckplatz: Setzen Sie eine optionale DanteX-Karte oder eine andere
kompatible Erweiterungskarte in diesen Steckplatz ein.
8. Netzeingang (IEC): Verwenden Sie ein handelsübliches IEC-Kabel, um diesen Eingang
mit einer Steckdose zu verbinden.

40
Betrieb
Wichtig: Besuchen Sie ranecommercial.com, um das komplette Halogen Benutzerhandbuch
herunterzuladen.
Display
Start
Um auf die Startseite zuzuspringen, drücken Sie jederzeit die Home-Taste. Der Inhalt der
Startseite ändert sich je nach dem aktuellen Status des Terminal 1010x. Informationen, die hier
angezeigt werden können, umfassen den Boot-Status, den Fehlerstatus, den Netzwerkstatus
und vieles mehr.
Menü
Um auf das Menü zuzugreifen, drücken Sie die jederzeit die Taste Menu.
Um die gewünschte Seite zu markieren, drücken Sie die Tasten Page Left und Page Right.
Um auf die markierte Seite zu springen, drücken Sie die Taste Select.
Das Menü enthält immer die folgenden Seiten:
• Analog Input: Diese Seite zeigt diesen ausgewählten Input Mode und den aktuellen
Input Level für alle 10 Eingänge an.
• Analog Output: Diese Seite zeigt den Output Level und den Mute Status für alle 10
Ausgänge.
• RAD: Diese Seite zeigt Input Level, Output Level, Device Status und Expected/
Unexpected Status. Wenn Sie ein Gerät suchen, blinkt das Quadrat für dieses Gerät.
• EXP: Diese Seite ist in 32 Regionen unterteilt, die jeweils 1 von 32 möglichen EXP-
Positionen in der Kette repräsentieren. Eines der folgenden 4 Statussymbole wird in
Regionen mit verbundenen Geräten in der Konfiguration angezeigt:
o Grün: Dieses Symbol zeigt an, dass die Verbindung gut ist.
o Gelb: Dieses Symbol zeigt eine Warnung für eine fehlende Verbindung an.
o Gelb mit Fragezeichen: Dieses Symbol zeigt eine Warnung für einen unerwarteten
Status an.
o Rot mit Schrägstrich: Dieses Symbol zeigt ein Problem an, z. B. den Anschluss
eines inkorrekten Geräts.
Wenn Sie ein Gerät suchen, blinkt das Symbol.
Leere Bereiche zeigen einen nicht verwendeten Standort an, der nicht physisch
verbunden ist oder nicht konfiguriert ist.
Wenn eine optionale Dante-Erweiterungskarte installiert ist, werden 4 zusätzliche Seiten im
Menü angezeigt: 1-16 TX, 17-32 TX, 1-16 RX und 17-32 RX. Diese Seiten zeigen an, wenn ein
Kanal geroutet wird sowie den Pegel des Kanals.

41
Terminal 1010x per Fernbedienung steuern
Sie können eine Web-basierte Verknüpfung auf Ihrem Computer benutzen, um Terminal 1010x
per Fernbedienung zu steuern.
Um Terminal 1010x für den Gebrauch mit seiner Web-Verknüpfung einzurichten:
1. Benutzen Sie ein standardmäßiges Ethernet-Kabel, um Terminal 1010x’s Computer
Ethernet-Anschluss mit einem DHCP- (Dynamic Host Configuration Protocol)
kompatiblen Router oder ähnlichem Zugriffspunkt zu verbinden, dann verbinden Sie Ihren
Computer mit einem anderen Anschluss am selben Router oder Zugriffspunkt.
2. Einmal mit einem Netzwerk verbunden, wird Terminal 1010x automatisch eine
dynamische IP-Adresse bekommen, die Sie benutzen können. Das kann ein paar
Sekunden dauern.
3. Drücken Sie den Info-Regler auf Terminal 1010x bis Wired Network Settings im
Display erscheint, dann notieren Sie sich die DHCP IP Adresse (e.g., 10.10.10.182).
Um die Terminal 1010x Web-Verknüpfung zu öffnen:
1. Öffnen Sie den Web Browser auf Ihrem Computer.
2. Im Browser geben Sie die DHCP IP Adresse ein, die in Terminal 1010x's Wired Network
Settings (z.B. http://10.10.10.182) angezeigt wird, um die Web-Verknüpfung zu laden.
3. Drücken Sie den Login-Knopf, und geben dann das Password für den Full Access-
Modus ein. Das voreingestellte Passwort ist admin.

42
Fehlerbehebung
Wenn Sie ein Problem haben, gehen Sie wie folgt vor:
• Sorgen Sie dafür, dass alle Kabel und Geräte Medien richtig und fest angeschlossen
sind.
• Achten Sie darauf, dass Terminal 1010x laut vorliegendem Benutzerhandbuch
verwendet wird.
• Achten Sie darauf, dass Ihre anderen Geräte oder Medien ordnungsgemäß funktionieren.
• Wenn Sie glauben, dass Terminal 1010x nicht ordnungsgemäß funktioniert, überprüfen
Sie die folgende Tabelle auf Lösungen für das Problem.
Problem: Lösung:
Das Gerät lässt sich nicht
einschalten.
Vergewissern Sie sich, dass der Netzeingang des
Terminal 1010x ordnungsgemäß mit dem mitgelieferten
Netzkabel an eine Steckdose angeschlossen ist.
Das Terminal 1010x gibt keinen
Ton aus bzw. der Ton klingt
verzerrt.
Stellen Sie sicher, dass alle Kabel- und
Geräteanschlüsse sicher und korrekt sind.
Achten Sie darauf, dass keine Kabel beschädigt sind.
Vergewissern Sie sich, dass die Einstellungen auf Ihrem
Bluetooth-Gerät, Lautsprecher, Mixer usw. korrekt sind.
Die Ethernet Link-LED-Anzeigen
leuchten nicht auf, nachdem Sie
HAL an einen Netzwerkschalter
angeschlossen oder direkt an
einen Computer angeschlossen
haben.
Stellen Sie sicher, dass das Ethernet- und das
Crossover-Kabel nicht beschädigt sind. Verwenden Sie
ein anderes Kabel.
Versuchen Sie, das Kabel an einen anderen Anschluss
des Netzwerkschalters anzuschließen.
Terminal 1010x stellt keine
Verbindung zum Webbrowser her.
Drücken Sie die Home-Taste an Terminal 1010x, bis die
Seite "Wired Network Settings" auf dem Display
angezeigt wird. Notieren Sie sich die DHCP-IP-Adresse.
Geben Sie diese Adresse in einen Webbrowser ein, um
die Web-Schnittstelle zu laden.
Nach dem Öffnen von Halogen
wird das Terminal 1010x nicht im
Fenster Mit Gerät verbinden
angezeigt.
Stellen Sie sicher, dass Sie über einen Browser eine
Verbindung zum Terminal 1010x-Webserver herstellen
können.
Stellen Sie sicher, dass der RaneLink II-Dienst
ausgeführt wird. Wenn nicht, starten Sie ihn neu.
Achten Sie darauf Ihren Firewall- und
Virenschutzausnahmelisten Folgendes hinzuzufügen:
Halogen.exe, RaneLink.exe (port 4994), hal1.pcops.exe
und python.exe.

43

44
Appendix (English)
Technical Specifications
Analog I/O Type
10 in x 10 out
ADC
High definition audio 24-bit, 48 kHz, DR 116 dB A-
weighted
DAC
High definition audio 24-bit, 48 kHz, DR 116 dB A-
weighted
Frequency Response
20 Hz – 20 kHz, + 0.1 dB
Inputs Connection
(5) Euroblock connectors, 6 pins each, 3.81 mm pitch,
green. Ships with strain relief plugs.
Condenser
Mic Mode
Type
Active balanced, microphone input mode with 48 V
phantom power
Phantom Power
+ 48 V
Maximum Input
1 Vrms
Input Impedance
2.5 kΩ
Each leg
Dynamic
Mic Mode
Type
Active balanced, microphone input mode without
phantom power
Maximum Input
250 mVrms
Input Impedance
2.5 kΩ
Each leg
Line Mode Type
Active balanced, line-level
Maximum Input
8 Vrms
Input Impedance
5 kΩ
Each leg
Line+ Mode
Type
Active, left [+] & right [–] signals summed to mono
Maximum Input
8 Vrms
Input Impedance
5 kΩ
Each leg
Outputs
Connection
(5) Euroblock connectors, 6 pins each, 3.81 mm pitch,
orange. Ships with strain relief plugs.
Type
Active balanced, line output mode with active output
transient muting
Maximum Output
8 Vrms
Impedance
300 Ω
Each leg
Frequency Response
20 Hz
–
20 kHz, + 0.1 dB
DSP Processing Power
>10,000 MIPS
Word Length
32-/64-bit Floating Point
Delay Memory
Min. 160 sec total
Computer
Interface
Type
Ethernet 1000
base-T
Zeroconf service discovery protocol
for easy setup
Connection
RJ-45 Shielded Cat 5e cable or better
Length
300 ft. / 100 m Standard Ethernet cable length limit

45
RAD+ Ports Connection
(6) RJ-45 Shielded Cat 5e cable or better
Audio Channels
2 in, 2 out Each port, control channel, 24-bit, 48
kHz
Voltage
27
V
DC Each port
Power
12 W (peak) / 6
W (average)
Each port
Length
DR devices: 984
ft. / 300 m
RAD devices: 325 ft. / 100 m
Universal Logic
I/O
Connection
(1) mini-Euroblock connector, 6 pins, 3.81 mm pitch,
black
Logic In Internal Pull-Up
5 mA Protected to +24 V, reverse-polarity-
protected
Vin High
> 2.2 V Normal state
Vin Low
< 1.0 V
Logic Out Open Collector
Output
Source 5 mA,
Sink 200 mA
Protected to +24 V, reverse-polarity-
protected
Vout High
> 2.2 V
Vout Low
< 0.2 V
Ratiometric
Input
Input
0
–
5 V
V+
40 mA
Resolution
8-bit at 2 kHz
sample rate
Expansion Port
Types
Rane Expansion
Bus
Port supports legacy expansion
devices and future hardware releases.
Dante card
(optional)
32 x 32 with sample-rate conversion,
allowing 96 kHz sample rate Dante
flows
Connection
RJ-45 Shielded Cat 5e cable or better
Maximum Length
300 ft. / 100 meters
Power Connection
IEC
Voltage
90
–
260 VAC, 50/60 Hz
Consumption
70 W
Output
28 V

46
Unit Wiring
Class 2 Rear-panel terminals
Operating
Temperature
32–104°F, 0–40°C
Fan
10 CFM, low noise (<20 dBa), long life (60k hours at
45°C)
Dimensions
18.98” x 8.38” x 1.74”
48.2 x 21.3 x 4.4 cm
Width x depth x height
Weight
6.9 lbs., 3.14 kg
Specifications are subject to change without notice.
Trademarks & Licenses
Rane is a trademark of inMusic Brands, Inc., registered in the U.S. and other countries.
All other product names, company names, trademarks, or trade names are those of their respective owners.

47

-
 1
1
-
 2
2
-
 3
3
-
 4
4
-
 5
5
-
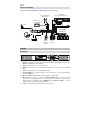 6
6
-
 7
7
-
 8
8
-
 9
9
-
 10
10
-
 11
11
-
 12
12
-
 13
13
-
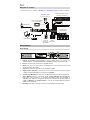 14
14
-
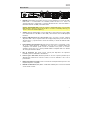 15
15
-
 16
16
-
 17
17
-
 18
18
-
 19
19
-
 20
20
-
 21
21
-
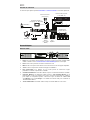 22
22
-
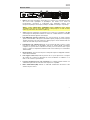 23
23
-
 24
24
-
 25
25
-
 26
26
-
 27
27
-
 28
28
-
 29
29
-
 30
30
-
 31
31
-
 32
32
-
 33
33
-
 34
34
-
 35
35
-
 36
36
-
 37
37
-
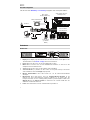 38
38
-
 39
39
-
 40
40
-
 41
41
-
 42
42
-
 43
43
-
 44
44
-
 45
45
-
 46
46
-
 47
47
-
 48
48


Rane 1010X Guía de inicio rápido
- Categoría
- Micrófonos
- Tipo
- Guía de inicio rápido
- Este manual también es adecuado para
en otros idiomas
- français: Rane 1010X Guide de démarrage rapide
- italiano: Rane 1010X Guida Rapida
- Deutsch: Rane 1010X Schnellstartanleitung
Artículos relacionados
Otros documentos
-
ATEN VE66DTH Guía de inicio rápido
-
Casio fx-3650P II El manual del propietario
-
Master SM40 10inch E21 El manual del propietario
-
Master SUPER Manual de usuario
-
Casio fx-50F PLUS El manual del propietario
-
Jamo JDA-500 Manual de usuario
-
 Denon Professional DN-470A El manual del propietario
-
Klipsch KDA-1000 El manual del propietario
-
KlarkTeknik DM8000 Guía de inicio rápido
-
