Yamaha BD-S671 El manual del propietario
- Categoría
- Reproductores de Blu-Ray
- Tipo
- El manual del propietario

© 2011 Yamaha Corporation
Printed in China BD-S671_P
USB
BLU-RAY DISC PLAYER
BD-S671
OWNER’S MANUAL
MANUAL DE INSTRUCCIONES
P
LASER SAFETY
This unit employs a laser. Due to possible eye injury, only
a qualified service person should remove the cover or
attempt to service this device.
DANGER
This unit emits visible laser radiation when open. Avoid
direct eye exposure to beam. When this unit is plugged
into the wall outlet, do not place your eyes close to the
opening of the disc tray and other openings to look into
inside.
SEGURIDAD CONTRA LA RADIACIÓN LÁSER
Este aparato utiliza rayos láser. Debido a la posibilidad de
que se produzcan daños en los ojos, la extracción de la
cubierta del aparato o las reparaciones solamente deberán ser
realizadas por un técnico cualificado.
PELIGRO
Este aparato emite radiación láser visible cuando se abre.
Evite la exposición directa a los rayos láser. Cuando se
conecte este aparato a una toma de corriente no acerque sus
ojos a la abertura de la bandeja del disco ni a otras aberturas
para mirar al interior.
CAUTION
Use of controls or adjustments or performance of
procedures other than those specified herein may result
in hazardous radiation exposure.
PRECAUCIÓN
El uso de los controles, los ajustes o los procedimientos
que no se especifican enste manual pueden causar una
exposición peligrosa a la radiación.
LASER Specification:
Class 1 LASER Product
Wave length: 790 nm (CDs)/658 nm (DVDs)/405 nm (BDs)
Laser output: max. 1 mW
Especificaciones LÁSER:
Producto LÁSER de Clase 1
Longitud de onda: 790 nm (CD)/658 nm (DVD)/405 nm (BD)
Salida de láser: máxima de 1 mW
CAUTION:
INVISIBLE LASER RADIATION WHEN OPEN.
DO NOT STARE INTO BEAM.
INVISIBLE LASER RADIATION WHEN OPEN.
AVOID DIRECT EXPOSURE TO THE BEAM.
DANGER:
00_BD-S671_P_cv.fm Page 1 Wednesday, March 23, 2011 1:47 PM

Caution-i En
1 To assure the finest performance, please read this manual
carefully. Keep it in a safe place for future reference.
2 Install this sound system in a well ventilated, cool, dry, clean
place-away from direct sunlight, heat sources, vibration, dust,
moisture, and/or cold. For proper ventilation, allow the
following minimum clearances.
Top : 10 cm (4 in)
Rear: 10 cm (4 in)
Side: 10 cm (4 in)
3 Locate this unit away from other electrical appliances,
motors, or transformers to avoid humming sounds.
4 Do not expose this unit to sudden temperature changes from
cold to hot, and do not locate this unit in an environment with
high humidity (i.e. a room with a humidifier) to prevent
condensation inside this unit, which may cause an electrical
shock, fire, damage to this unit, and/or personal injury.
5 Avoid installing this unit where foreign object may fall onto
this unit and/or this unit may be exposed to liquid dripping or
splashing. On the top of this unit, do not place:
– Other components, as they may cause damage and/or
discoloration on the surface of this unit.
– Burning objects (i.e. candles), as they may cause fire,
damage to this unit, and/or personal injury.
– Containers with liquid in them, as they may fall and
liquid may cause electrical shock to the user and/or
damage to this unit.
6 Do not cover this unit with a newspaper, tablecloth, curtain,
etc. in order not to obstruct heat radiation. If the temperature
inside this unit rises, it may cause fire, damage to this unit,
and/or personal injury.
7 Do not plug in this unit to a wall outlet until all connections
are complete.
8 Do not operate this unit upside-down. It may overheat,
possibly causing damage.
9 Do not use force on switches, knobs and/or cords.
10 When disconnecting the power cable from the wall outlet,
grasp the plug; do not pull the cable.
11 Do not clean this unit with chemical solvents; this might
damage the finish. Use a clean, dry cloth.
12 Only voltage specified on this unit must be used. Using this
unit with a higher voltage than specified is dangerous and
may cause fire, damage to this unit, and/or personal injury.
Yamaha will not be held responsible for any damage resulting
from use of this unit with a voltage other than specified.
13 To prevent damage by lightning, keep the power cable
disconnected from a wall outlet or this unit during a lightning
storm.
14 Do not attempt to modify or fix this unit. Contact qualified
Yamaha service personnel when any service is needed. The
cabinet should never be opened for any reasons.
15 When not planning to use this unit for long periods of time
(i.e. vacation), disconnect the AC power plug from the wall
outlet.
16 Be sure to read the “TROUBLESHOOTING” section on
common operating errors before concluding that this unit is
faulty.
17 Before moving this unit, press p to set this unit to the
standby mode, and disconnect the AC power plug from the
wall outlet.
18 Condensation will form when the surrounding temperature
changes suddenly. Disconnect the power cable from the
outlet, then leave this unit alone.
19 When using this unit for a long time, this unit may become
warm. Turn the power off, then leave this unit alone for
cooling.
20 Install this unit near the AC outlet and where the AC power
plug can be reached easily.
21 The batteries shall not be exposed to excessive heat such as
sunshine, fire or the like.
CAUTION: READ THIS BEFORE OPERATING YOUR UNIT.
This unit is not disconnected from the AC power source
as long as it is connected to the wall outlet, even if this
unit itself is turned off by p. This state is called the
standby mode. In this state, this unit is designed to
consume a very small quantity of power.
WARNING
TO REDUCE THE RISK OF FIRE OR ELECTRIC
SHOCK, DO NOT EXPOSE THIS UNIT TO RAIN OR
MOISTURE.
The laser component in this product is capable of
emitting radiation exceeding the limit for Class 1.

1 En
1
2
3
4
5
English
WHAT YOU CAN DO WITH THIS PLAYER........ 2
SUPPLIED PARTS .............................................. 2
ABOUT DISCS AND FILES................................. 3
Types of discs/files that can be used with this player..... 3
Loading a disc................................................................. 4
Disc precautions ............................................................. 4
Notice for watching 3D video images ............................ 4
CONTROLS AND FUNCTIONS .......................... 5
Front panel...................................................................... 5
Remote control ............................................................... 6
INTRODUCTION TO CONNECTIONS .............. 10
Rear panel ..................................................................... 10
HDMI CONNECTION......................................... 12
Connecting to the HDMI terminal................................ 12
Connection for the playback of Blu-ray 3D discs ........ 12
VIDEO CONNECTIONS .................................... 13
Connecting to the component/video jack ..................... 13
AUDIO CONNECTIONS .................................... 14
Connecting to the digital audio jack/terminal............... 14
Connecting to the audio jacks....................................... 15
NETWORK AND USB CONNECTION .............. 16
Connecting to the NETWORK terminal and
USB port .................................................................. 16
OTHER CONNECTIONS ................................... 17
Connecting to the REMOTE CONTROL jacks ........... 17
Connecting the power cable ......................................... 17
INITIAL WIZARD/EASY SETUP........................ 18
Setting with the Initial Wizard/Easy Setup................... 18
HOME/MEDIA MENU ........................................ 19
Playing back photo/music/video................................... 19
Using network content.................................................. 21
USING NETWORK SERVICES ......................... 22
PLAYING VIDEOS FROM YouTube™ ............. 22
ADVANCED PLAYBACK OPERATION............ 23
On Screen menu............................................................ 23
Status menu................................................................... 24
Using Bookmark........................................................... 25
Program play................................................................. 25
Using search ................................................................ 25
Enjoying BONUSVIEW™ and BD-Live™................. 26
Using Picture in Picture function
(secondary audio/video playback) ........................... 26
Using the feature of BD-Live™ ................................... 26
SETUP MENU.................................................... 27
Example of SETUP menu operation............................. 29
General Setting.............................................................. 30
Display Setting.............................................................. 32
Audio Setting ................................................................ 34
System Information....................................................... 34
About the audio output formats .................................... 35
About the video output formats .................................... 36
SOFTWARE UPGRADE .................................... 37
Upgrading the software................................................. 37
TROUBLESHOOTING....................................... 38
Power ............................................................................ 38
Basic operation.............................................................. 38
Disc playback................................................................ 38
Picture ........................................................................... 39
Sound ............................................................................ 39
Network......................................................................... 40
Messages on the screen ................................................. 40
GLOSSARY ....................................................... 41
SPECIFICATIONS ............................................. 42
General.......................................................................... 42
Input/output................................................................... 42
Copyright ...................................................................... 43
(at the end of this manual)
■ About this manual
– This manual describes how to operate this Player
using a remote control except when it is not
available. Some of these operations are also
available using the front panel buttons.
– Notes contain important information about safety
and operating instructions. Hint(s) indicates a tip for
your operation.
– This manual is printed prior to production. Design
and specifications are subject to change in part as a
result of improvements, etc. In case of differences
between the manual and the product, the product has
priority.
The icons used in this manual
Icons are used to indicate available buttons/functions for a
particular format.
: BD-Video
: DVD-Video, DVD-VR, DVD+VR
: Audio CD
: AVCHD, WMV, DivX
: MP3, WMA, WAV
: JPEG
CONTENTS
1. INTRODUCTION
2. CONNECTION
3. PLAYBACK
4. SETTINGS
5. ADDITIONAL INFORMATION
Information about software ....................................i
BD
DVD
CD
VIDEO
MUSIC
PHOTO

2 En
INTRODUCTION
* For details on playable disc and format, see page 3.
** Network setting is needed to use this function.
Make sure the following accessories are provided with the product.
WHAT YOU CAN DO WITH THIS PLAYER
Easy setting for language, resolution, screen aspect ratio \ p. 18
You can perform language and TV settings.
Play back commercially-released Blu-ray™/DVD/CD discs
*
\ p. 23
In addition to Blu-ray Discs™ (BD discs), this Player also supports playback of a variety of
other discs.
Play back BONUSVIEW™, BD-Live™, etc.
*
\ p. 26
You can enjoy additional movies on the latest BD discs.
Play back Video, Music, Photo files on a disc
*
\ p. 19
This Player can play back discs you recorded.
Play back Video, Music, Photo files on a disc/USB memory device
*
\ p. 19
Files recorded on discs/USB memory devices can be played back with this Player.
Play back Video, Music, Photo files on a Home Network Server
*
**
\ p. 21
PC contents can be played back with TV or AV receiver by connecting this Player to a network
server.
Operation with the remote control of TV, AV receiver, etc. \ p. 30
Connecting devices with an HDMI cable, you can control devices with a single remote control
using the HDMI Control function.
Streaming Playback contents on the Network Services
**
\ p. 22
You can instantly enjoy videos over the internet with this Player.
SUPPLIED PARTS
Batteries (×2)
(AAA, R03, UM-4)
Remote control Audio/Video cable Power cable

3 En
English
INTRODUCTION
1
■ Types of discs/files that can be
used with this player
– 12 cm (5”) and 8 cm (3”) discs can be played back in
this Player. Do not use an 8 cm (3”) to 12 cm (5”)
adapter.
– Use discs that conform to compatible standards as
indicated by the presence of official logos on the
disc label. Playback of discs not complying with
these standards is not guaranteed. In addition, the
image quality or sound quality is not guaranteed
even if the discs can be played back.
– BD/DVD video players and discs have region codes,
which dictate the regions in which a disc can be
played.
– BD/DVD Video operations and functions may be
different from the explanations in this manual and
some operations may be prohibited due to disc
manufacturer’s settings.
– If a menu screen or operating instructions are
displayed during playback of a disc, follow the
operating procedure displayed.
– Playback for some of the discs in the left side
column tables may not be possible depending on the
disc.
– Finalize all recording media that is played back in
this player.
– “Finalize” refers to a recorder processing a recorded
disc so that it will play in other players/recorders as
well as this Player. Only finalized discs will play
back in this Player. (This Player does not have a
function to finalize discs.)
– Playback of all files on the disc, USB memory
device and network is not guaranteed.
– A copyright protected file cannot be played back via
USB memory device and network.
MP3/WMA audio file requirement
– Sampling frequency: within 32 - 48 kHz (MP3/
WMA), LPCM 44.1 kHz/16 bit/Stereo (WAV)
– Bitrate: within 8 - 320 kbps (MP3), 32 - 192 kbps
(WMA)
WMV file requirement
– WMV9, maximum resolution is 1,920 × 1,080.
ABOUT DISCS AND FILES
Disc Type
Recording
Format
Data Format
BD-ROM/BD-R/
BD-RE
BD-Video --
DVD-ROM DVD-Video --
DVD-R/DVD-R DL/
DVD-RW
DVD-Video/DVD-
VR/AVCHD/Data
Disc
DivX/WMV/MP3/
WAV/WMA/JPEG
DVD+R/DVD+R
DL/DVD+RW
DVD-Video/
DVD+VR/AVCHD/
Data Disc
DivX/WMV/MP3/
WAV/WMA/JPEG
CD-ROM CDDA/HDCD --
CD-R/CD-RW CDDA/Data Disc DivX/WMV/MP3/
WAV/WMA/JPEG
USB -- DivX/WMV/MP3/
WAV/WMA/JPEG
Network -- WMV/MP3/WMA/
WAV/JPEG
Region management information
Destination BD-Video DVD-Video
U.S.A. and Canada Region code “A” or
“ALL”
Region number “1”
or “ALL”
Asia Region code “A” or
“ALL”
Region number “3”
or “ALL”
Central and South
America
Region code “A” or
“ALL”
Region number “4”
or “ALL”
Europe Region code “B” or
“ALL”
Region number “2”
or “ALL”
1
ALL
3
ALL
4
ALL
2
ALL
Australia Region code “B” or
“ALL”
Region number “4”
or “ALL”
Russia Region code “C” or
“ALL”
Region number “5”
or “ALL”
China Region code “C” or
“ALL”
Region number “6”
or “ALL”
Notes
Region management information
Destination BD-Video DVD-Video
4
ALL
5
ALL
ALL

4 En
ABOUT DISCS AND FILES
■ Loading a disc
– Insert the disc with the label face up.
– In case of the disc recorded on both sides, face down
the side to play back.
– Playback may begin automatically, depending on the
disc and setting of this Player.
– The menu may be displayed first, depending on the
disc.
– The disc load time may vary depending on the disc.
■ Disc precautions
Be careful of scratches and dust
– BD, DVD and CD discs are sensitive to dust,
fingerprints and especially scratches. A scratched
disc may not be able to be played back. Handle discs
with care and store them in a safe place.
Proper disc storage
Handling precautions
Cleaning the pick up lens
– Never use commercially available cleaning discs.
The use of these discs can damage the lens.
– Request the nearest service center approved by
Yamaha to clean the lens.
■ Notice for watching 3D video
images
– Some people may experience discomfort (such as
eye strain, fatigue, or nausea) while watching 3D
video images. We recommend that all viewers take
regular breaks while watching 3D video images.
– If you experience any discomfort, stop watching the
3D video images until the discomfort subsides.
Consult a doctor if you experience severe
discomfort.
– Read the owner’s manuals (Blu-ray disc and TV)
and/or the caution messages that appear on the TV
carefully.
– The vision of young children (especially those under
six years old) is still under development. Consult
your doctor (such as a pediatrician or eye doctor)
before allowing young children to watch 3D video
images.
– Adults should supervise young children to ensure
they follow the recommendations described above.
Notes
Place the disc in the center of the disc case
and store the case and disc upright.
Avoid storing discs in locations subject to
direct sunlight, close to heating appliances
or in locations of high humidity.
Do not drop discs or subject them to
strong vibrations or impacts.
Avoid storing discs in locations where
there are large amounts of dust or
moisture.
– If the surface is soiled, wipe gently with a
soft, damp (water only) cloth. When
wiping discs, always move the cloth from
the center hole toward the outer edge.
– Do not use record cleaning sprays,
benzene, thinner, static electricity
prevention liquids or any other solvent.
– Do not touch the surface.
– Do not stick paper or adhesive labels to the disc.
– If the playing surface of a disc is soiled or scratched,
the Player may decide that the disc is incompatible
and eject the disc tray, or it may fail to play the disc
correctly. Wipe any dirt off the playing surface with
a soft cloth.

5 En
English
INTRODUCTION
1
■ Front panel
1 p (On/Standby)
2 USB port (p. 16)
3 Front panel display
4 Disc tray (p. 4)
5 (Eject) (p. 4)
6 (Search backward/Skip backward):
Press to skip backward, and press and hold to search
backward.
7 (Search forward/Skip forward):
Press to skip forward, and press and hold to search
forward.
8 (Play)
9 (Pause)
0 (Stop)
CONTROLS AND FUNCTIONS
USB
2 4 51 3 6 7 8 9 0

6 En
CONTROLS AND FUNCTIONS
■ Remote control
– will appear on the top left corner of the screen
when the pressed button is not available.
1 Infrared signal transmitter: Outputs infrared
signal. Aim this window to the remote control sensor
(p. 9).
2 MARKER : Sets Bookmark (p. 25) at
a specified point of a movie. After Bookmark is set, to
select the set point you want to jump to, press
DIGEST. You can set up to 12 Bookmarks.
3 : Opens/closes the disc tray.
4 PROGRAM : Sets the order of playback
(p. 25). You can set up to 15 tracks (for an audio disc)
or titles/chapters (DVD-Video).
5 Number buttons: Enters numbers, or during
playback, jumps to the track/chapter corresponding to
the number you input. These buttons may not be
available depending on the disc type and playback
condition.
6 CLEAR: Clears entered number/set item.
7 PIP : Turns on/off the Picture in Picture (p. 26).
PIP Mark ( ) is displayed on the screen when this
function is available. You can also select this item from
On Screen menu (p. 23).
– PIP Mark is displayed only when the PIP Mark is set
to on (p. 31).
8 SETUP: Displays SETUP menu screen (p. 27).
9 2ND AUDIO : Selects the secondary audio of the
Picture in Picture (p. 26) or audio commentaries. The
Secondary Audio Mark ( ) is displayed on the
screen when this function is available (p. 34). You can
also select this item from On Screen menu (p. 23).
– Secondary Audio Mark is displayed only when
Secondary Audio Mark is set to on (p. 31).
0 HOME: Displays the HOME menu screen (p. 19).
A DIGEST : Shows 12 photo thumbnails.
When thumbnails are displayed, you can proceed to
the next/previous page with / .
: Displays Bookmark select bar
(p. 25).
B p: Turns this Player on or sets it to the standby mode.
C ZOOM : Zooms in/out.
The size of the screen will change each time you press
the button (zoom in/out: 3 steps each).
D Color buttons : Use these buttons according to
on-screen instructions.
E STATUS: Displays the playback information (p. 24).
Note
PROGRAM MARKER DIGEST ZOOM
STATUS
SUBTITLE
ANGLE
AUDIOSEARCHCLEAR
REPEAT
SETUPPIP
HOME
2ND
AUDIO
ENTER
TOP MENU
RETURN ON SCREEN
POP-UP MENU
A B
J
I
H
F
K
G
A
C
0
7
6
5
4
3
8
9
2
1
E
D
B
Note
Note
DVD
VIDEO
DVD CD
BD
BD
PHOTO
DVD VIDEO
DVD VIDEO PHOTO
BD

7 En
CONTROLS AND FUNCTIONS
English
INTRODUCTION
1
F SUBTITLE : Changes subtitle
languages (p. 42) if available . You can also select this
item from On Screen menu (p. 23).
G ANGLE : Changes the camera angle if
video is recorded with multiple angles. The Angle
Mark ( ) is displayed on the screen when this
function is available. You can also select this item
from On Screen menu (p. 23).
– Angle Mark is displayed only when the Angle Mark
is set to on (p. 31).
H SEARCH :
Jumps to a specified point during playback. For details
on this function, refer to “Using search” (p. 25). You
can also select this item from status menu (p. 24).
I AUDIO : Changes the audio language or
format. You can also select this item from On Screen
menu (p. 23).
J REPEAT
: Changes repeat mode. Repeat mode shown
below will change each time you press the button.
: Repeats the title being played back.
: Repeats the chapter being played back.
: Repeats the folder being played back.
: Repeats all tracks/files on the disc.
: Repeats the track/file being played back.
Shuffle All: Plays back all the tracks/files on the disc
randomly.
K A/B : Plays back
a specific part you want to repeat.
1 Press A/B at the scene where you want to set the
start point. “A-” is displayed on the screen.
2 Press A/B again at the scene where you want to set
the end point. “A-B” is displayed on the screen.
Repeat playback starts.
3 To cancel the repeat playback, press A/B. “A-B”
disappears and the repeat playback is finished.
– This function cannot be performed depending on the
specifications of the disc.
Note
Note
BD DVD VIDEO
BD DVD
BD DVD CD VIDEO MUSIC
BD DVD
BD DVD CD VIDEO MUSIC
PHOTO
BD DVD CD VIDEO MUSIC
Continued to the next page.
\

8 En
CONTROLS AND FUNCTIONS
L TOP MENU : Displays the top menu
screen (p. 42) if the disc contains a menu. Select the
desired item using 5/a /2/3 and ENTER.
– Specific operations may be different depending on
the disc. Follow the instructions of each menu
screen.
M Cursor buttons (5 /a /2/3 ): Moves the focus in
the menu screen.
ENTER: Selects the focused menu/item.
N RETURN: Returns to the previous menu or screen,
etc.
O Control buttons
: Stops playback. To stop playback completely,
press this button twice.
: Pauses playback.
: Plays back contents.
()/ ()
: Performs slow backward/forward. Slow
playback speed will change each time you press the
button (slow backward/forward: 4 steps each).
These buttons also perform frame advance/reverse
playback during pause.
Press to resume normal playback.
/
:
Searches backward/forward. The search speed will
change each time you press the button (search
backward/forward: 5 steps each). Press to resume
normal playback.
: Changes the speed of a slide show (slower/
faster: 3 steps).
/ :
Press for instant search/replay. Instant search skips the
content 30 seconds. Instant replay replays the content
from 10 seconds before.
/: Skips backward/forward.
– Some BD/DVD discs are not compatible with frame
advance/reverse playback.
– Depending on the disc, this Player resumes playback
from the point that where the Player was previously
stopped. To play back from the beginning, press
twice and then .
PROGRAM MARKER DIGEST ZOOM
STATUS
SUBTITLE
ANGLE
AUDIOSEARCHCLEAR
REPEAT
SETUPPIP
HOME
2ND
AUDIO
ENTER
TOP MENU
RETURN ON SCREEN
POP-UP MENU
A B
Q
P
L
N
M
O
Note
Notes
BD DVD
BD DVD CD VIDEO MUSIC PHOTO
BD DVD
BD DVD CD VIDEO MUSIC
PHOTO
BD DVD CD VIDEO MUSIC

9 En
CONTROLS AND FUNCTIONS
English
INTRODUCTION
1
P POP-UP/MENU : Displays pop-up
menu. The menu contents displayed vary depending
on the disc. For details on how to see and operate the
pop-up menu, refer to the manual for the disc.
The top menu screen may be displayed by pressing
POP-UP/MENU depending on the DVD.
Q ON SCREEN: Displays On Screen menu (p. 23).
ID function
You can change the remote control ID to prevent
unwanted operation of the other Yamaha player such as
DVD player. If you have changed the remote control ID,
make sure that you select the same ID for the main unit.
The default setting is ID1.
1 Remote control setting
To change the ID from ID1 to ID2, press and hold
the red color button and 2 of number button
simultaneously for 7 seconds. To change the ID
from ID2 to ID1, press and hold the red color button
and 1 of number button simultaneously for 7
seconds.
2 Main unit setting
Press and hold and on the
front panel simultaneously for 2 seconds to display
current ID when:
– No disc is inserted in this Player.
– The disc tray is closed.
– Playback is stopped.
– “NO DISC” is displayed on the front panel
display.
Keep pressing and holding the keys for another 2
seconds to change the ID between ID1 and ID2.
– If the remote control is without batteries for a few
minutes or if exhausted batteries remain in the
remote control, the remote control ID is
automatically set to ID1. If you want to use the
remote control in ID2 setting, install new batteries
and set the remote control ID again.
Loading the batteries in the remote
control
– Do not subject the remote control unit to shock,
water or excessive humidity.
– The remote control unit may not function if the
Player’s remote sensor is in direct sunlight or any
other strong light.
– Incorrect use of batteries may cause them to leak or
burst. Read the battery warnings and use the
batteries properly.
– Do not mix old and new batteries, or mix different
brands.
– Remove the batteries if you will not use the remote
control unit for an extended period of time.
– Dispose of batteries according to your regional
regulations.
Approximate operating range of
remote control
Note
BD DVD
Notes
1
3
2
2
USB
30˚30˚
Remote control sensor
6 m (20 ft)

10 En
CONNECTION
Find the corresponding connection method on your video/audio equipment. We recommend that you use the HDMI
terminal which provides high quality digital audio and video on a single connection. If you use the other terminals/jacks,
connect the video first. Then connect the audio.
■ Rear panel
INTRODUCTION TO CONNECTIONS
Yes
No
Use AV receiver?
HDMI terminal on
AV receiver? *
HDMI terminal on TV?
HDMI terminal on TV?
HDMI terminal on TV?
Connect video and audio to TV with HDMI cable.
Connect video to TV.
Connect video to TV with HDMI cable.
Connect video to AV receiver.
Connect video and audio to AV
receiver with HDMI cable.
Refer to owner’s manual
of AV receiver.
START
* When you connect to an AV receiver that cannot output the sound,
input via its HDMI terminal, refer to the owner’s manual of your AV
receiver.
REMOTE CONTROL
OUT IN
R
L
COAXIAL
COMPONENT
PB Y
VIDEO
OPTICAL
P
R
DIGITAL OUT AUDIO OUT
VIDEO OUT
NETWORK
USB
HDMI
67
09
3214 85

11 En
English
CONNECTION
2
1 OPTICAL (p. 14)
2 USB (p. 16)
3 HDMI (p. 12)
4 COMPONENT (p. 13)
5 VIDEO (p. 13)
6 AUDIO OUT (L/R) (p. 15)
7 REMOTE CONTROL (OUT/IN) (p. 17)
8 AC IN (p. 17)
9 NETWORK (p. 16)
0 COAXIAL (p. 14)
Video connection
Connect audio to AV
receiver.
Video connection to TV
Connect audio to TV.
HDMI (p. 12)
A
Video and audio connection to
AV receiver
Audio connection to AV receiver
Video and audio connection to TV
Audio connection to TV
HDMI (p. 12)
A’
COMPONENT (p. 13)
B
VIDEO (p. 13)
C
to TV
to AV receiver
or
COMPONENT (p. 13)
B’
VIDEO (p. 13)
C’
or
COAXIAL (p. 14)
D
OPTICAL (p. 14)
E
or
L/R (p. 15)
F
or
COAXIAL (p. 14)
D’
OPTICAL (p. 14)
E’
or
L/R (p. 15)
F’
or
HDMI (p. 12)
A’

12 En
■ Connecting to the HDMI terminal
– You can enjoy high quality digital picture and sound through the HDMI terminal.
– Firmly connect an HDMI cable (commercially available) to the HDMI terminals.
– See page 35 for information on the audio/video output formats.
– Use HIGH SPEED HDMI cables that have the HDMI logo (as shown on the back cover).
Caution!
Do not connect the power cable of this Player until all connections are completed.
HDMI CONNECTION
– When you use the HDMI Control function,
refer to the “HDMI Control” (p. 30).
– For information on the output mode of HDMI
terminal, refer to the “HDMI” (p. 34).
– When no picture is displayed, refer to
“TROUBLESHOOTING” (p. 39).
■ Connection for the playback
of Blu-ray 3D discs
To enjoy Blu-ray 3D discs on this Player, you need
the following equipments and connections:
– You need a TV and an AV Receiver (if you
need) that have 3D functionality.
– All the components must be connected with
HDMI cables.
– Blu-ray disc should contain 3D images.
Hints
COAXIAL
COMPONENT
PB Y
VIDEO
OPTICAL
P
R
DIGITAL OUT AUDIO OUT
VIDEO OUT
NETWORK
USB
HDMI
R
L
HDMI IN
This Player
To HDMI terminal
HDMI cable
(commercially available)
AV receiver
TV
A A’
To HDMI input terminal

13 En
English
CONNECTION
2
■ Connecting to the component/video jack
– You can enjoy accurate color reproduction and high quality images through the component jacks.
– Firmly connect a component video cable (commercially available) or a video pin cable to the COMPONENT jacks/
VIDEO jack.
– See page 36 for information on the video output formats.
Caution!
Do not connect the power cable of this Player until all connections are completed.
– If you play back the image via VCR, the image may deteriorate due to the copy guard function.
– To enjoy BD-3D discs on this Player, you need to connect an AV receiver, a TV, and this Player using HDMI
cables. Refer to the previous page.
VIDEO CONNECTIONS
COAXIAL
COMPONENT
PB Y
VIDEO
OPTICAL
P
R
DIGITAL OUT AUDIO OUT
VIDEO OUT
NETWORK
USB
HDMI
R
L
COMPONENT IN
Y
PB
PR
This Player
Component video cable
(commercially available)
AV receiver
TV
(Blue)
(Red)
(Green)
(Green)
(Blue)
(Red)
To COMPONENT
jacks
To component
input jacks
B B’
(Green)
(Blue)
(Red)
(Green)
(Blue)
(Red)
COAXIAL
COMPONENT
PB Y
VIDEO
OPTICAL
P
R
DIGITAL OUT AUDIO OUT
VIDEO OUT
NETWORK
USB
HDMI
R
L
VIDEO
AV INPUT
This Player
Audio/Video cable
(supplied)
AV receiver TV
(Yellow)
(Yellow)
(Yellow)
To VIDEO
jack
To video
input jack
(Yellow)
C C’
Notes

14 En
■ Connecting to the digital audio jack/terminal
– You can connect audio equipment or the TV to the COAXIAL jack/OPTICAL terminal.
– Firmly connect a Coaxial digital audio cable (commercially available) or optical cable (commercially available) to
the coaxial digital audio jack or optical digital audio terminal.
– See page 35 for information on the audio output formats.
Caution!
Do not connect the power cable of this Player until all connections are completed.
– For information on the output mode of COAXIAL jack/OPTICAL terminal, refer to the “Coaxial/Optical” (p. 34).
AUDIO CONNECTIONS
Hint
COAXIAL
COMPONENT
PB Y
VIDEO
OPTICAL
P
R
DIGITAL OUT AUDIO OUT
VIDEO OUT
NETWORK
USB
HDMI
R
L
AV INPUT
COAXIAL
COAXIAL
COMPONENT
PB Y
VIDEO
OPTICAL
P
R
DIGITAL OUT AUDIO OUT
VIDEO OUT
NETWORK
USB
HDMI
R
L
DIGITAL AUDIO IN
OPTICAL
This Player
To OPTICAL
terminal
TVAV receiver
Optical cable
(commercially available)
Coaxial digital audio cable
(commercially available)
This Player
AV receiver
D D’
To COAXIAL
jack
To coaxial
input jack
To optical
input terminal
TV
D’ E E’

AUDIO CONNECTIONS
15 En
English
CONNECTION
2
■ Connecting to the audio jacks
– You can connect audio equipment or the TV to the AUDIO OUT L/R jacks.
– Firmly connect an Audio/Video cable (supplied) to the AUDIO OUT L/R jack.
– See page 35 for information on the audio output formats.
Caution!
Do not connect the power cable of this Player until all connections are completed.
COAXIAL
COMPONENT
PB Y
VIDEO
OPTICAL
P
R
DIGITAL OUT AUDIO OUT
VIDEO OUT
NETWORK
USB
HDMI
R
L
AUDIO
AUDIO IN
LR
To AUDIO OUT
L/R jack
Audio/Video cable
(supplied)
(White)
(Red)
(White) (Red)
TVAV receiver
This Player
To audio L/R
input jack
F F’
(White)
(Red)
(White)
(Red)

16 En
■ Connecting to the NETWORK terminal and USB port
– PC contents can be played back by connecting this Player to the network.
– You can enjoy a variety of contents with interactive functions by connecting to the internet when playing BD-Live
compatible discs. Refer to page 26 regarding further information on BD-Live functions.
– You can connect a USB memory device (2 GB or greater and formatted with FAT 32/16) for BD Local Storage to
the USB port on the rear panel (or front panel) of the player to save the BD-Live data or to upgrade the software of
this Player.
– Firmly connect a network cable (commercially available) and a USB memory device (commercially available) to
the NETWORK terminal and USB port.
– Use only an STP (shielded twisted pair) network cable.
– When using the internet, a broadband internet connection as shown below is required.
– Connect the other connector of the network cable to the hub/broadband router.
Before using the USB memory device
After connecting
– When you set the Network setting manually, refer to “Network” (p. 32).
– To play back the PC contents on your network, refer to “Using network content” (p. 21).
NETWORK AND USB CONNECTION
– When using a broadband internet
connection, a contract with an internet
service provider is required. For more
details, contact your nearest internet service
provider.
– Refer to the operation manual of the
equipment you have as the connected
equipment and connection method may
differ depending on your internet
environment.
– Use a network cable/router supporting
10BASE-T/100BASE-TX.
CAUTION:
– Do not remove the USB memory device
or unplug the power cable while the
operations for BD-Live (p. 26) or
software upgrade are being performed.
– Do not use a USB extension cable when
connecting a USB memory device to the
USB port of the Player. Using a USB
extension cable may prevent the Player
from performing correctly.
– Yamaha cannot guarantee that all brands’
USB memory devices will operate with
this Player.
Notes
Note
COAXIAL
COMPONENT
PB Y
VIDEO
OPTICAL
P
R
DIGITAL OUT AUDIO OUT
VIDEO OUT
NETWORK
USB
HDMI
R
L
LAN
This Player
To NETWORK
terminal
Internet
Modem
Network cable
(commercially available)
Hub or
broadband router
PC
To USB
Terminal
USB memory device
(commercially available)
To LAN
terminal
– To save BD-Live data on
the USB memory device
on the front panel, set
Local Storage to Front
USB (p. 30).
Hint

17 En
English
CONNECTION
2
■ Connecting to the REMOTE
CONTROL jacks
– You can transmit and receive the remote control
signals by connecting to the REMOTE CONTROL
(OUT/IN) jacks.
– Firmly connect monaural 3.5 mm mini plug cables
(commercially available) to the REMOTE
CONTROL (OUT/IN) jacks.
– If your AV receiver is a Yamaha product and has the
capability to transmit SCENE control signals, you
can control the Player with the SCENE function.
Caution!
Do not connect the power cable of this
Player until all connections are completed.
– For details about the SCENE function, refer to the
owner’s manual supplied with your Yamaha AV
receiver.
– You can connect a Yamaha component (such as CD
player) supports the SCENE function to the
REMOTE CONTROL (OUT) jack of this Player.
■ Connecting the power cable
– After all connections are completed, plug the
supplied power cable into the AC IN on the rear of
the Player. Then plug into AC outlet.
– TO PREVENT RISK OF ELECTRIC SHOCK, DO
NOT TOUCH THE UN-INSULATED PARTS OF
ANY CABLES WHILE THE POWER CABLE IS
CONNECTED.
OTHER CONNECTIONS
REMOTE CONTROL
OUT IN
E
O
AUDIO OUT
R
L
REMOTE CONTROL IN
REMOTE CONTROL OUT
This Player
To REMOTE
CONTROL (IN)
jack
Monaural 3.5 mm mini
plug cable
(commercially available)
To remote
control out
jack
Yamaha component
To remote
control in
jack
Monaural 3.5 mm
mini plug cable
(commercially
available)
Infrared signal receiver
or Yamaha component
(such as AV receiver)
To REMOTE
CONTROL
(OUT) jack
Hints
Note
To AC outlet
To AC inlet

18 En
PLAYBACK
■ Setting with the Initial Wizard/
Easy Setup
Initial Wizard/Easy Setup allows you to set language,
resolution, and screen aspect ratio easily. Initial Wizard
screen is displayed when you turn this Player on for the
first time after purchase or upgrade. Same setting can be
performed from SETUP menu = System = Easy Setup.
1 When Easy Setup screen is displayed, Press ENTER to
start Easy Setup.
2 Press 5/a to select the language you want to display
on the screen, then press ENTER.
3 Press 5 /a to select the resolution, then press ENTER.
For details on setting items, see “Resolution” (p. 33).
4 Press 5/a to select the screen aspect ratio, then press
ENTER. For details on setting items, see “TV Screen”
(p. 32).
Easy Setup is completed.
5 Press ENTER to exit Easy Setup.
– When no picture is displayed after Initial Wizard/
Easy Setup is completed, refer to
“TROUBLESHOOTING” (p. 39).
– A warning message concerning 3D video playback
appears when this Player is turned on. Press ENTER
to dismiss the message or CLEAR to disable it (p.
30).
INITIAL WIZARD/EASY SETUP
Notes
ENTER
FinishPrevious
Setting
Page: 5/5
Easy Setup
The set-up wizard is finished!
Now press the Finish button to go to SETUP. Please
enjoy!

19 En
English
PLAYBACK
3
HOME and MEDIA menus allow you to browse and play
multi-media files on data discs, USB memory devices and
your network.
– For details on playable disc and format, see page 3.
■ Playing back photo/music/video
Basic operation
5/a : Moves the focus.
2: Returns to the parent folder.
3: Checks/unchecks single folder/file.
HOME: Moves to/exits HOME menu screen.
ENTER: Confirms the folder/file.
Icons on the top of MEDIA menu
: Plays back the disc on the tray, or displays contents
in the data disc.
: Displays contents in the USB memory device
connected to the USB port.
: Searches for a DLNA (p. 21) server on the network.
: Displays contents on the connected DLNA server.
Common operations for playing back
files in a selected folder
Example: Selecting a movie file on a USB memory
device
– Stop the playback of the video before you move to
MEDIA menu screen.
1 Press HOME to move to HOME menu screen.
Press 2/3 to select MEDIA, then press ENTER.
2 MEDIA screen appears.
3 Select the item which contains the file you want to play
back, then press ENTER.
HOME/MEDIA MENU
Note
REPEAT
SETUPPIP
2ND
AUDIO
ENTER
TOP MENU
RETURN ON SCREEN
POP-UP MENU
A BHOME
Note

HOME/MEDIA MENU
20 En
4 Select the Photo, Music, Video or AVCHD folder you
want to play back, then press ENTER.
To return to the parent folder, press 2 or select .
– Note that the only the file type selected on this step
will be displayed in the following step. For example,
if you selected Photo folder in this step, only photo
files are displayed after this step. When you play
back other than photo, return to this hierarchy and
select file type again.
5 Select the folder(s) containing the file you want to play
back.
6 Select the file you want to play back, then press
ENTER.
When a video file is selected, playback starts.
When a music file is selected, status screen is displayed
and playback starts.
When a photo file is selected, slide show starts.
– To enjoy slide show with music, press HOME to
return to the HOME menu screen while music is
played back, and select photo file.
– The displayed file may not be played back
depending on the content.
Operations for viewing photos
While viewing photos, the buttons on the remote control
work as shown below.
: Stops slide show and returns to the file browser.
: Pauses a slide show.
: Plays a slide show.
: Moves to a next photo.
: Moves to a previous photo.
: Makes a slide show faster in 3 steps.
: Makes a slide show slower in 3 steps.
5: Inverts a photo.
a : Reflects a photo.
2: Rotates a photo counterclockwise.
3: Rotates a photo clockwise.
ZOOM: Zooms in/out a photo (zoom in/out: 3 steps each).
5/a /2 /3: Pan in zoom mode when a photo is larger
than the screen.
DIGEST: Switches to thumbnail mode (p. 6). When
thumbnails are displayed, you can proceed to the next/
previous page with / .
Note
Hint
Note

HOME/MEDIA MENU
21 En
PLAYBACK
3
English
■ Using network content
This Player is a DLNA certified digital media player. You
can manage photo, music and video contents stored on
DLNA servers on your home network.
About DLNA
DLNA (Digital Living Network Alliance) provides easy
sharing of digital media through network in the home, and
you can enjoy digital contents stored on your DLNA-
server-software-installed PC or other DLNA compatible
device with your TV via this Player. To connect this
Player to your DLNA servers, some settings for the
DLNA server or device are required. For details, refer to
your DLNA server software or DLNA device.
Playing back shared contents
1 To play back files on your PC, install a DLNA server
software, such as Windows Media Player 12, and share
files you want to play back.
2 Turn on the PC with DLNA server software installed or
the DLNA device connected to your home network.
3 Press HOME to display HOME menu screen. Then
select MEDIA to move to MEDIA menu. The DLNA
servers connected to the network are listed on the
screen.
– If your DLNA server is not listed, select DLNA
Search to find it.
– Depending on the DLNA server, this Player may
need to be permitted from the server.
– To play the file on the DLNA server, this Player and
the server must be connected to the same access
point.
– The file requirements may not always be compatible.
There may be some restrictions depending on file
features and DLNA sever capability.
4 Select the file you want to play back.
– The playback and operating quality may be affected
by your home network condition.
– The files from removable media such as USB
memory devices or DVD-drive on your media
server, may not be shared properly.
Notes
Notes

22 En
You can instantly watch the videos that the following network services provide.
– YouTube
– Access to content provided by third parties requires a high speed internet connection and may also require account
registration and a paid subscription.
– Third party content services may be changed, suspended, interrupted, or discontinued at any time without notice,
and Yamaha disclaims any liability in connection with such occurrences.
– Some content may only be available for specific countries and may be presented in specific languages.
– Yamaha does not represent or warrant that content services will continue to be provided or available for a particular
period of time, and any such warranty, express or implied, is disclaimed.
You can watch movies from YouTube over the internet
using this Player.
The services may be changed without notice.
1 Press HOME to display HOME menu screen.
– The HOME menu screen may differ depending on
the model.
2 Press 5/a /2/3 to select YouTube, then press
ENTER.
– To return to the HOME menu screen, press
RETURN.
USING NETWORK SERVICES
Note
PLAYING VIDEOS FROM YouTube™
Hint
Hint

23 En
English
PLAYBACK
3
This chapter explains playback of commercially available
BD and DVD discs, CDs, and recorded DVD-RW/R discs.
– For the basic playback operation, see page 6.
■ On Screen menu
To display On Screen menu, press ON SCREEN. After
that, press 5/a /2/3 to select an item, then press
ENTER to operate the desired function.
On Screen menu contains following items.
Title : Shows the title number being
played back. You can skip to the desired title by selecting
it from this item.
Chapter : Shows the chapter
number being played back. You can skip to the desired
chapter by selecting it from this item.
Track/File : Shows
track/file number being played back. You can skip to the
desired track/file by selecting it from this item.
Time : Shows the
playback time. Select display type from the following:
– Elapsed playback time of the title, chapter, disc,
track or file
– Remaining playback time of the title, chapter, disc,
track or file
Mode/Play Mode
: Shows current
playback mode. You can select playback mode from the
following:
– Normal: Normal playback.
– Shuffle: Random playback without repetition.
– Random: Random playback with repetition.
– Normal
– Shuffle CH (chapter)
– Shuffle TT (title)
– Shuffle All
– Random CH (chapter)
– Random TT (title)
– Random All
– Normal
– Shuffle F (folder)
– Shuffle All
– Random F (folder)
– Random All
Audio : Shows audio language/
signal of BD/DVD disc currently selected. You can select
the desired type of audio.
Angle : Shows the currently-selected angle
number. If the video is recorded with multiple angles, you
can change the angle.
Subtitle : Shows the currently-
selected subtitle language when the subtitle is provided.
Subtitle Style : Shows the currently-selected
subtitle style. This function is available only for Video-file
external subtitle. You can select the desired text style of
subtitle.
Bitrate : Shows
bitrate of the audio/video signal.
Second Video : Turns the PIP on/off (p. 6).
Second Audio : Turns the secondary audio on/off
(p. 6).
Ins Search
: Skips 30 seconds.
Ins Replay
: Replays the content
from 10 seconds before.
Slide Show :
Shows slide show speed. You can select the slide show
speed fr
om Slow/Medium/Fast.
Transition : Shows how photo appears on the
screen. You can select the transition type.
Code Page : Selects character code of subtitle
you added to DivX video (p. 41).
ADVANCED PLAYBACK OPERATION
Note
BD DVD VIDEO
BD DVD VIDEO
CD VIDEO MUSIC PHOTO
BD DVD CD VIDEO MUSIC
DVD CD VIDEO MUSIC PHOTO
CD
DVD
VIDEO MUSIC PHOTO
BD DVD VIDEO
BD DVD
BD DVD VIDEO
BD
BD DVD CD VIDEO MUSIC
BD
BD
BD DVD CD VIDEO MUSIC
BD DVD CD VIDEO MUSIC
PHOTO
PHOTO
VIDEO

ADVANCED PLAYBACK OPERATION
24 En
■ Status menu
This shows various settings, such as subtitles, angle
settings and the title/chapter/track number currently
played back. To display status menu, press STATUS.
Status menu contains following menus.
Example: Icons when playing BD
1 (Playback status)
2 (Disc type/video file icon)
3 (Title number being played): You can jump to
specified title with SEARCH button (p. 7).
4 (Chapter number being played): You can
jump to specified chapter with SEARCH button (p. 7).
5 (Elapsed playback time): You can jump to
specified point with SEARCH button (p. 7).
6 (Subtitle currently selected): You can change
the subtitle language with SUBTITLE button.
7 (Audio currently selected): You can change the
audio language or format with AUDIO button.
8
(Repeat mode):
Shows current repeat mode (p. 7).
Example: Icons when playing music file
1 (Playback status)
2
(Repeat mode):
Shows current repeat mode (p. 7).
3 (Disc type/music file icon)
4 (Artwork) : Displays artwork if the file
contains it.
5 (Track/file number being played): You can
jump to specified track with SEARCH button (p. 7).
6 (Information) : Displays music information
if the file contains them.
7 (Elapsed playback time): You can jump to
specified point with SEARCH button (p. 7).
8 (Progress bar) : Shows progress status of
current song.
9 (Audio level meter): displays current volume level.
1 (Playback status)
2 (Photo file icon)
3 (File number being displayed)
4
(Repeat mode):
Shows current repeat mode (p. 7).
5 (Slide show speed)
BD DVD VIDEO
13
78
245
6
CD MUSIC
MUSIC
MUSIC
MUSIC
PHOTO

ADVANCED PLAYBACK OPERATION
25 En
PLAYBACK
3
English
■ Using Bookmark
This allows you to set Bookmark at the specified point of
the video. After Bookmark is set, you can move to the
point you set using this function. You can set up to 12
Bookmarks.
1 Press MARKER during playing back the movie to set
Bookmark. Bookmark number, and the status are
displayed.
2 After Bookmark is set, press DIGEST to display
Bookmark select bar.
3 Press 2/3 to select the Bookmark you want to play
back, then press ENTER.
Press CLEAR to delete the selected Bookmark.
– When playback is finished (e.g., ejecting the disc,
pressing twice), Bookmarks are automatically
deleted.
■ Program play
This allows you to program playback order of audio disc
tracks or DVD chapters.
Press PROGRAM during playback to display the
PROGRAM window to program playback order.
You can program up to 15 tracks/chapters.
Example: Programming the playback order of CD tracks
1 Press PROGRAM during playback.
2 Press ENTER to program playback order.
For audio disc, press 5/a to select a desired track then
press ENTER.
For DVD-Video disc, select a desired title (shown as
TT) and chapter (shown as CH) instead of a track.
To clear a set track, select the track you want to clear,
then press CLEAR.
Press RETURN to cancel the Program play.
3 After programming is finished, press to set and
start program playback.
4 To cancel program play, stop playback completely by
pressing twice.
■ Using search
This allows you to jump to the specified point during
playback.
1 Press SEARCH during playback. Status bar appears.
2 Press 5/a /2/3 to select one of the item below, then
press ENTER.
:
– Title number (shown as )
– Chapter number (shown as )
– Elapsed title time (shown as )
– Elapsed chapter time (shown as )
:
– Track number (shown as )
– Elapsed track time (shown as )
– Elapsed disc time (shown as )
:
– File number (shown as )
– Elapsed file time (shown as )
3 Press 5/a or number buttons to set/adjust the value of
the focused item, and press ENTER to jump to the
specified point.
4 To close the status bar, press STATUS.
Note
DVD VIDEO
DVD CD
BD DVD CD VIDEO MUSIC
BD DVD
CD
VIDEO MUSIC

ADVANCED PLAYBACK OPERATION
26 En
■ Enjoying BONUSVIEW™ and BD-
Live™
This player supports BONUSVIEW (p. 41) (BD-ROM
Profile 1 Version 1.1) and BD-Live (p. 41) (BD-ROM
Profile 2) playback functions.
– Functions and playback method vary depending on
the disc. See the guidance on the disc or the supplied
user’s manual.
■ Using Picture in Picture function
(secondary audio/video playback)
BD-Video that includes secondary audio and video
compatible with Picture in Picture can be played back
with secondary audio and video simultaneously as a small
video in the corner.
While PIP Mark ( ) or Secondary
Audio Mark ( ) is displayed, press
PIP to turn the Picture in Picture
function on/off.
– To listen to secondary audio, make sure that the
Audio Output setting (Coaxial/Optical or HDMI) is
set to PCM or Reencode (p. 34).
– Depending on the disc, to listen to secondary audio,
you may need to set secondary audio to on on the top
menu of the disc (p. 8).
– The secondary audio and video for Picture in Picture
may automatically play back and be removed
depending on the content. Also, playable areas may
be restricted.
■ Using the feature of BD-Live™
1. Set the Network setting (p. 32).
2. Connect the USB memory device
to this Player (p. 16).
BD-Live data is saved in a USB memory device
connected to this Player. To enjoy these functions,
connect a USB memory device (2 GB or greater and
formatted with FAT 32/16) supporting USB 2.0
High Speed (480 Mbit/s) to the USB port that you
select on Local Storage (p. 30). The default setting is
the USB port on the rear panel.
– BUDA folder is created automatically in the USB
memory device when necessary.
– If there is insufficient storage space, the data will not
be copied/downloaded. Delete unneeded data or use
a new USB memory device.
– Some time may be required for the data to load
(read/write).
– Yamaha cannot guarantee that all brands’ USB
memory devices will operate with this Player.
– Do not use a USB extension cable when connecting
a USB memory device to the USB port of the player.
Using a USB extension cable may prevent the player
from performing correctly.
3. Play back the disc.
4. Run BD-Live according to the
instructions on the disc.
– Regarding playback method of BD-Live contents,
etc., perform the operations in accordance with the
instructions in the BD disc manual.
– To enjoy BD-Live functions, perform the network
connection (p. 16) and Network settings (p. 32).
– Refer to “BD-Live Connection” (p. 32) regarding the
setup to restrict access to BD-Live contents.
– The time required to download the provided
programs into the USB memory device connected to
this Player varies depending on the internet
connection speeds and the data volume of the
programs.
– BD-Live programs provided through the internet
may not be able to display the connection depending
on the status (upgrading) of the provider. In such
cases, take out the disc and try again.
– If the BD-Live screen does not appear for a while
after you select the BD-Live function in the BD disc
menu, the USB memory device may not have
enough free space. In such cases, eject the disc from
the player, and then erase the data in the USB
memory device using the “Format” menu in the
“Local Storage” (p. 30).
Note
Notes
Primary video Secondary video
Notes
Notes

27 En
English
SETTINGS
4
SETTINGS
The SETUP menu enables various audio/visual settings and adjustments for functions using the remote control unit.
SETUP MENU
Menu/Submenu Item Function Page
General Setting
System Screen Saver Sets screen saver on/off. 30
Disc Auto Playback Sets this Player to start disc playback automatically. 30
HDMI Control Sets this Player to receive control signal from the remote
control of your TV/AV receiver.
30
Network Control Sets the control via Ethernet to on/off. 30
Load Default Resets all settings to the default setting except Security
setting.
30
Upgrade Performs upgrade of this Player. 30
Easy Setup Sets language, resolution, screen aspect ratio. 30
Local Storage Displays status of Local Storage (p. 30), formats Local
Storage and selects the front/rear USB port for Local Storage.
30
3D Playback
Message
Displays a warning message concerning 3D video playback
when this Player is turned on.
30
Language OSD Selects the language for On Screen Display. 31
Menu Prioritizes the language for disc menu. 31
Audio Prioritizes the language for audio. 31
Subtitle Prioritizes the language for subtitle. 31
Playback Closed Caption Sets the closed caption to on/off. 31
Angle Mark Sets to display the Angle Mark when BD/DVD with multiple
angles is played back.
31
PIP Mark Sets to display the PIP Mark when BD/DVD with Picture in
Picture is played back.
31
Secondary Audio
Mark
Sets to display the Secondary Audio Mark when BD/DVD
with secondary audio is played back.
31
Last Memory Sets this Player to remember the last playback position of a
disc when it is set to the standby mode or the disc tray is
opened.
31
DivX(R) VOD
DRM
Displays registration code for DivX(R) video.
31
Security Change Password Changes password for Parental Control and Country Code. 31
Parental Control Sets the Parental Control depending on the disc content. 31
Country Code Sets your Country Code. 31
Network Internet Connection Sets the internet connection to Enable/Disable. 32
Information Displays network information screen. 32
Connection Test Performs the network connection test. 32
IP Setting Sets the IP setting to Auto/Manual. 32
BD-Live
Connection
Sets the BD-Live connection to Permitted/Partial Permitted/
Prohibited.
32
DLNA Sets the DLNA to Enable/Disable. 32
Proxy Setting Sets the proxy setting. 32

SETUP MENU
28 En
Display Setting
TV 3D Output Selects 3D or 2D videos. 32
TV Screen Sets the screen aspect ratio of the connected TV, and adjust
the video output.
32
Resolution Selects the resolution of output video. 33
TV System Selects the TV System from NTSC/PAL/Multi. 33
Color Space Selects Color Space from YCbCr 4:4:4/YCbCr 4:2:2/ Full
RGB/RGB.
33
HDMI Deep Color Selects HDMI Deep Color from 30 bits/36 bits/Off. 33
HDMI 1080p 24Hz Sets HDMI 1080p 24Hz to auto/off. 33
Lip Sync Adjusts the lag between video and audio, such as when the
mouth movement is out of sync with the voice.
33
Video Process Video Mode Adjusts the visual image. 33
Color Adjust Adjusts Brightness/Saturation/Hue for each color. 33
Auto Contrast Adjusts contrast to optimize the played back image. 33
Noise Reduction Sets the level of Noise Reduction. 33
De-interlacing
Mode
Sets how to detect the video signal.
33
Audio Setting
Audio Output Coaxial/Optical Selects the output mode of COAXIAL jack/OPTICAL
terminal from Bitstream/PCM/Reencode/Off.
34
HDMI Selects the output mode of HDMI terminal from Bitstream/
PCM/Reencode/Off.
34
Downsampling Selects the digital audio signal down sampling frequency
from 48k/96k/192k.
34
DRC Sets the DRC (Dynamic Range Compression). 34
Speaker Setting 2ch Downmix Sets the audio output from AUDIO OUT L/R jack. 34
Post Process Up Mix Multi-channelizes the 2-channel audio signal. 34
System
Information
Displays software version and MAC address (p. 42).
34
Menu/Submenu Item Function Page

SETUP MENU
29 En
SETTINGS
4
English
■ Example of SETUP menu
operation
You need to call up the SETUP menu screen to perform
settings for this Player. The following is the explanation
for basic operations of the SETUP menu.
Example: Setting Parental Control
– Some items cannot be set during playback. In this
case, press twice to stop playback completely
before setting.
1. Display the SETUP menu screen.
Press SETUP to display the SETUP menu screen.
Press 2/3 to select General Setting, then press
ENTER or a .
2. Select a Submenu.
Press 5/a to select Security, then press ENTER or
cursor 3.
3. Select a menu item.
Press 5/a to select Parental Control, then press
ENTER or cursor 3.
4. Enter password.
Enter your password with number buttons.
– The default password is 0000.
– You cannot move to the next setting screen until
you have input the correct password.
– To change the password, refer to “Change
Password” (p. 31).
5. Select a next item.
Press 5/a to select the Parental Control Level for
BD/DVD, then press ENTER.
6. Exit the menu screen.
Press 2 to return to the previous menu.
Note
ENTER
TOP MENU
RETURN ON SCREEN
POP-UP MENU
STATUS
SUBTITLE
ANGLE
AUDIOSEARCHCLEAR
REPEAT
SETUPPIP
2ND
ABHOME

SETUP MENU
30 En
■ General Setting
The default settings are marked with “
*
”.
System
Screen Saver
You can set the screen saver to on/off.
When set to on, this Player will switch to screen saver
mode if there is no operation for 5 minutes. After that, this
Player will turn to standby mode when there is no
operation for 20 minutes.
On
*
, Off
Disc Auto Playback
You can set Disc Auto Playback to on/off. When set to on,
a disc will play back automatically after loading.
On
*
, Off
HDMI Control
You can set the Player to receive control signal from a
TV/AV receiver compatible with the HDMI Control
function via an HDMI cable (p. 12).
On, Off
*
Network Control
You can set control via Ethernet to on/off. This player
employs Yamaha Network Control protocol (YNC).
On, Off
*
– When set to on, power consumption during standby
mode increases due to network control function.
– When set to on, the system startup time is decreased.
Load Default
You can reset all settings of this Player to default setting
except Security setting (p. 31). For details on default
settings, see pages 27-34.
Upgrade
You can upgrade the software manually from Disc, USB
Storage or Network. For details on software upgrade, refer
to “SOFTWARE UPGRADE” (p. 37).
Easy Setup
You can perform Easy Setup (p. 18).
Local Storage
You can display Local Storage information, format Local
Storage, and select Front USB/Rear USB to save the BD-
Live data.
To format (empty) the “BUDA” folder in the USB
memory device, select Information and press ENTER
when “Format” is focused on the screen.
Front USB, Rear USB
*
– Local Storage is used as an auxiliary memory when
Blu-ray Disc is played back.
3D Playback Message
You can turn on or off a warning message concerning 3D
video playback that appears on the TV when this Player is
turned on.
On
*
, Off
Using HDMI Control function
Using the HDMI Control function, you can interactively
operate this Player with your TV (HDMI Control
function supported).
When you connect this Player to the TV compatible with
the HDMI Control function using an HDMI cable and
set HDMI Control in the SETUP menu to on (p. 30), you
can perform the function listed below.
• Automatic input select function
When you start playback of this Player, the input
selector of the TV (and an AV receiver if this Player is
connected to the TV via the AV receiver) is switched
to this Player automatically. TV Power is turned on
automatically depending on the TV.
• Automatic power off function
When you turn off the TV while this Player is in stop
mode and the SETUP menu screen is not displayed,
the power of this Player is also turned off
automatically.
– HDMI Control function may not work properly
depending on the TV.
– Functions other than ones shown above may work
depending on the TV or AV receiver.
– In order to make the HDMI Control function
available, set up settings for the HDMI Control
function on ALL components (this Player, TV,
and AV receiver). Certain operation may also be
required.
– Each function may be set independently to
activate/deactivate depending on the TV.
– Refer to the operation manuals supplied with the
TV and/or AV receiver for details regarding setup.
– When set to on, power consumption during
standby mode increases due to HDMI control
function.
Notes
Notes
Hint

SETUP MENU
31 En
SETTINGS
4
English
Language
OSD
You can select the language for On Screen Display which
is the messages or menu displayed on the screen such as
SETUP menu.
English
*
, , , , ,
, , ,
Menu
You can prioritize the language for disc menu.
English
*
, , , , , ,
, Portuguese, Danish, , Finnish,
Norwegian, , Korean, Japanese, More
Audio
You can prioritize the audio language for BD/DVD
playback. For details on setting items, see “Menu” (p. 31).
Subtitle
You can prioritize the language for Subtitle.
English, , , , , ,
, Portuguese, Danish, , Finnish,
Norwegian, , Korean, Japanese, More, Off
*
Playback
Closed Caption
You can set to display the closed caption (p. 41) when BD/
DVD with closed caption is played back.
On
*
, Off
Angle Mark
You can set to display the Angle Mark ( ) when BD/
DVD with multiple angles is played back.
On
*
, Off
PIP Mark
You can set to display the PIP Mark ( ) when BD with
picture in picture (p. 26) is played back.
On
*
, Off
Secondary Audio Mark
You can set to display the Secondary Audio Mark ( )
when BD with secondary audio is played back.
On
*
, Off
Last Memory
You can set whether this Player remembers the last
playback position of a disc when it is set to the standby
mode or the disc tray is opened.
On
*
, Off
– Some discs are not compatible with this function.
DivX(R) VOD DRM
You can display registration code for DivX(R) video.
Security
Change Password
You can set the password for changing the Parental
Control Level and Country Code. Refer to “Parental
Control” (p. 31) and “Country Code” (p. 31).
– The default password is 0000.
– If you forget the password, refer to
“TROUBLESHOOTING” (p. 38) and set all the
Security settings to their default settings.
Parental Control
In some BD/DVD discs, a control level for disc viewing is
set depending on the age of the viewer. You can set the
Parental Control shown on the screen depending on the
disc content.
The password (see “Change Password” on p. 31) needs to
be entered before the Parental Control Levels is set.
After you set the Parental Control, when you play back a
disc with level higher than current Parental Control Level,
or you want to change the Parental Control Level, a dialog
box will pop up to ask you to enter the password.
Off*, 1 to 8
Country Code
You can set the Country Code you live in. The password
(see “Change Password” on p. 31) needs to be entered
before the Country Code is set. This setting may be used
for rating of Parental Control and disc playback.
Note
Fran
ç
ais Español Deutsch Italiano
Svenska Nederlandse
Fran
ç
ais Español Deutsch Italiano
Nederlandse Svenska
Fran
ç
ais Español Deutsch Italiano
Nederlandse Svenska
Notes

SETUP MENU
32 En
Network
Internet Connection
Set this item to Enable when you use BD-Live (p. 26), DLNA
(p. 21) and software upgrade from the network (p. 37).
Enable
*
, Disable
Information
You can display network information screen. On this
screen, you can view the information of Interface
(Ethernet), Address Type, IP Address, Subnet Mask,
Default Gateway, and DNS.
Connection Test
You can perform an internet connection test. If the test is
failed, please check “IP Setting” (p. 32) and perform the
test again.
IP Setting
You can configure the network settings.
– Numeric keys Enters characters.
– 2/3 Moves the highlight.
– CLEAR Deletes a character.
– ENTER Saves the settings and exits from
the menu.
BD-Live Connection
You can set access restriction to BD-Live contents.
DLNA
You can set the DLNA (p. 21) to Enable/Disable. When
you do not use the DLNA function, set to Disable.
Enable
*
, Disable
Proxy Setting
You can set Proxy Setting. Set to Disable for normal use.
Set to Enable to set the proxy setting.
■ Display Setting
The default settings are marked with “
*
”.
TV
3D Output
You can select 3D or 2D video output from this Player.
– Even if you set “3D Output” to “Auto” and play
back a Blu-ray 3D disc, this Player selects 2D
images depending on the connection and the setting
of TV, etc (p. 12).
TV Screen
You can set the screen aspect ratio of the connected TV,
and adjust the video output.
If you switch your TV (i.e. because you have bought a
new one) and the screen aspect ratio of the connected TV
changes, you will have to change the TV Screen setting.
Auto* Select to automatically configure the network
settings of this Player with the DHCP server.
Manual Select to configure the network settings (IP Address,
Subnet Mask, Default Gateway, and DNS) manually.
Hints
Permitted
Allows all BD-Live discs to connect the network.
Partial
Permitted
*
Allows only discs with owner certification.
Prohibited Prohibits all BD-Live discs to connect the network.
Enable Enables proxy host and proxy port setting.
Disable
*
Sets proxy server to disable. Select this item when
proxy server is not used.
Proxy Host Sets proxy host.
Proxy Port Sets proxy port.
Auto* This Player automatically selects 3D or 2D videos.
Off This Player always selects 2D videos.
Note
16:9 Full Select this when this Player is connected to a TV
with a 16:9 screen. When a 4:3 aspect ratio video is
played back, the video is displayed as shown below.
16:9 Normal
*
Select this when this Player is connected to a TV
with a 16:9 screen. When a 4:3 aspect ratio video is
played back, the video is displayed as shown below.
4:3 Pan Scan Select this when this Player is connected to a TV
with a 4:3 screen. When a 16:9 aspect ratio video is
played back, the video is displayed as shown below.
4:3 Letterbox Select this when this Player is connected to a TV
with a 4:3 screen. When a 16:9 aspect ratio video is
played back, the video is displayed as shown below.
Original
image size
On 16:9 (wide screen) TV
16:9 Full 16:9 Normal
4:3
Original
image size
On 4:3 TV
4:3 Pan Scan 4:3 Letterbox
16:9

SETUP MENU
33 En
SETTINGS
4
English
Resolution
You can select the video output resolution from Auto,
480i/576i, 480p/576p, 720p, 1080i, and 1080p. When set
to Auto, resolution is set to the maximum resolution
according to the connected TV. For more details on output
formats, refer to “About the video output formats” (p. 36).
Auto
*
, 480i/576i, 480p/576p, 720p, 1080i, 1080p
– To output HD audio (such as Dolby TrueHD or
DTS-HD Master Audio) from HDMI terminal, set
Resolution to Auto or more than 720p.
TV System
You can select TV System from PAL, NTSC and Multi.
Set the same TV System as your TV set. For more details
on output formats, refer to “About the video output
formats” (p. 36).
Color Space
You can select the Color Space (p. 41) output from
HDMI. This function is available when this Player is
connected with an HDMI cable.
– This function is only available on TVs that support
this function.
HDMI Deep Color
When your TV and/or AV receiver is compatible with
Deep Color (p. 41), set this item according to your TV/AV
receiver. This function is available when this Player is
connected with an HDMI cable.
30 bits, 36 bits, Off
*
HDMI 1080p 24Hz
This outputs the BD-Video encoded in 24Hz frame rate in
HDMI 1080p 24Hz. Smoother video playback may be
available with this function. This function is available
when your TV/AV receiver support this function, and this
Player is connected with an HDMI cable. For more details
on output formats, refer to “About the video output
formats” (p. 36).
Auto
*
, Off
– This setting is disabled when output resolution is
other than 1080p.
Lip Sync
You can set/adjust the Lip Sync (p. 42) function.
Video Process
Video Mode
You can select Video Mode below.
Color Adjust
You can adjust Brightness/Saturation/Hue for each color
(Red/Green/Blue/Yellow/Cyan/Magenta). To use this
function, set Video Mode to Custom. For details on the
setting items, see “Video Mode” (p. 33).
The default settings are 0.
Auto Contrast
Adjusts contrast to optimize the played back image.
To use this function, set Video Mode to Custom.
Off
*
, On
Noise Reduction
You can set the Noise Reduction to a level of 0 to 3. 0 is
off, and 3 is the maximum level.
0
*
, 1, 2, 3
De-interlacing Mode
You can select how to detect the video signal. Set to Auto
for normal use. When horizontal stripping noise appears
on the screen, set this to Film/Video to remove the noise.
Auto
*
, Film, Video
Note
NTSC, PAL
*
, Multi
(Australia, Asia, China, U.K., Europe and
Russia models)
NTSC
*
, PAL, Multi
(U.S.A., Canada, Central and South America
models)
YCbCr 4:4:4
*
Sets Color Space to YCbCr 4:4:4.
YCbCr 4:2:2 Sets Color Space to YCbCr 4:2:2.
Full RGB When RGB is set and white and black on the screen
are too faint, select this item. This setting is effective
when a connected component supports RGB 0-255
range.
RGB Outputs video signal at normal signal range.
Note
Note
Auto* This Player adjusts the Lip Sync function
automatically.
Manual You can adjust the Lip Sync function manually. You
can set the delay of the audio for 2D and 3D contents
independently.
2D
3D
Off This Player does not adjust the Lip Sync function.
Standard* The image is most natural and well-balanced. This
mode suits for normal use.
Vivid The image is more vivid and sharp.
Cinema The image suits for watching movie in dark room.
Custom You can adjust the visual image manually. Press 5/
a to select the parameter, then press 2/3 to adjust
the figure.
Brightness
Adjusts the overall brightness of the image.
Saturation
Adjusts the richness of the color in the projected
image.
Hue
Adjusts the tint of the projected image.
Contrast
Adjusts the bright areas (white levels) in the image.
Sharpness
Adjusts the sharpness of objects in the video.
CTI
Smoothes out the edges of color images. Color
images are rendered more distinct.
The default settings are 0.

SETUP MENU
34 En
■ Audio Setting
The default settings are marked with “
*
”.
Audio Output
Coaxial/Optical
You can select the output mode of COAXIAL jack and
OPTICAL terminal. For more details on output formats,
refer to “About the audio output formats” (p. 35).
HDMI
You can select the output mode of HDMI terminal. For
details on setting items, see “Coaxial/Optical” (p. 34). For
more details on output formats, refer to “About the audio
output formats” (p. 35).
Bitstream
*
, PCM, Reencode, Off
– To output HD audio (such as Dolby TrueHD or
DTS-HD Master Audio) from HDMI terminal, set
Resolution to Auto or more than 720p (p. 33).
Downsampling
You can select digital audio signal down-sample
frequency. This function is effective for the audio signal
output from the COAXIAL jack/OPTICAL terminal.
DRC
You can set the DRC (Dynamic Range Compression)
(p. 41) to on/off/Auto. When set to Auto, DRC is
automatically turned on for a source with DRC
information in Dolby TrueHD format. DRC makes the
strong sound such as plosive sound lower, and
conversations more audible. It is useful when you watch
movies in the night.
Off, On, Auto
*
Speaker Setting
2ch Downmix
You can select down mix method to analog 2-ch from
Stereo or Lt/Rt.
Post Process
Up Mix
You can multi-channelize the 2-channel audio signal. To
multi-channelize, select NEO6, then select Cinema or
Music mode.
Off
*
, NEO6
■ System Information
Software version and MAC address (p. 42) are displayed.
Bitstream
Outputs digital signal without any processing.
Secondary Audio is not output.
PCM Outputs 2-channel PCM.
Reencode
*
Outputs Bitstream with Secondary Audio.
Off Mutes sound.
Note
48k
*
The highest sampling rate of digital PCM output is
48 kHz.
96k The highest sampling rate of digital PCM output is
96 kHz.
192k The highest sampling rate of digital PCM output is
192 kHz.
Lt/Rt Select this item if this unit is connected to a Dolby
Pro Logic decoder. Sound from rear speakers is
mixed to the 2-ch stereo sound.
Stereo
*
Changes channel output to stereo, which only
delivers sound from the two front speakers.

SETUP MENU
35 En
SETTINGS
4
English
■ About the audio output formats
* “SA” is a Secondary Audio.
** “BCS” is a button click sound, the sound effect for pop-up menus, etc.
– When Coaxial/Optical or HDMI is set to Bitstream, secondary audio is not output. (p. 34)
– To output HD audio (such as Dolby TrueHD or DTS-HD Master Audio) from HDMI terminal, set Resolution to
Auto or more than 720p (p. 33).
HDMI COAXIAL/OPTICAL
MIXED 2CH
Source format Bitstream PCM Reencode Bitstream PCM Reencode
PCM 2ch PCM 2ch PCM 2ch 2ch
PCM 5.1ch PCM 5.1ch PCM 2ch 2ch
PCM 7.1ch PCM 7.1ch PCM 2ch 2ch
Dolby Digital Dolby Digital
PCM up to
5.1ch
Dolby Digital Dolby Digital PCM 2ch Dolby Digital 2ch
with SA
*
or
BCS
**
Dolby Digital
Plus
Dolby Digital
Plus
PCM up to
7.1ch
Dolby Digital
Plus
Dolby Digital PCM 2ch Dolby Digital
2ch
with SA
*
or
BCS
**
Dolby Digital
Dolby
TrueHD
Dolby
TrueHD
PCM up to
7.1ch
Dolby
TrueHD
Dolby Digital PCM 2ch Dolby Digital
with SA
*
or
BCS
**
Dolby Digital
DTS DTS
PCM up to
5.1ch
DTS DTS PCM 2ch DTS 2ch
with SA
*
or
BCS
**
DTS HD High
Resolution
DTS HD High
Resolution
PCM up to
7.1ch
DTS HD High
Resolution
DTS PCM 2ch DTS
2ch
with SA
*
or
BCS
**
DTS
DTS-HD
Master Audio
DTS-HD
Master Audio
PCM up to
7.1ch
DTS-HD
Master Audio
DTS PCM 2ch DTS
with SA
*
or
BCS
**
DTS
Notes

SETUP MENU
36 En
■ About the video output formats
When TV System is set to NTSC
* Depending on the disc or contents, this Player outputs 480p video signal.
When TV System is set to PAL
* Depending on the disc or contents, this Player outputs 576p video signal.
When TV System is set to Multi
When TV System is set to Multi, video signal is output at the same frequency as the source. Refer to the tables above for
details on the frequency setting of the TV and resolution of the output video signal.
While a menu screen such as SETUP menu is displayed, video signal is output at the same frequency as the source.
– “Max” in the table means that resolution is set to the maximum resolution supported by the connected TV.
– HDMI 1080p 24Hz setting is disabled when output resolution is other than 1080p.
– When this Player outputs the 1080p 24 Hz video signal from HDMI, no signals are output from the
COMPONENT and VIDEO jacks.
– When commercially-released DVD is played back with component output, maximum resolution is 480p/576p.
– When TV System is set to NTSC and video source is not 60 Hz, the video output signal is converted to 60 Hz.
– When TV System is set to PAL and video source is not 50 Hz, the video output signal is converted to 50 Hz.
Resolution Auto 480i/576i 480p/576p 720p 1080i
1080p
24Hz Others
HDMI
Playback BD
Max Max Max 720p 60 Hz 1080i 60 Hz
1080p 24 Hz
1080p 60 Hz
others 1080p 60 Hz
COMPONENT
Playback
commercially-
released DVD
480i 480i
480p 480p 480p 480p
Playback BD 480i 480i 480i off 480i
others 480p 720p 60 Hz * 1080i 60 Hz * 1080i 60 Hz *
VIDEO
Playback BD
480i 480i 480i 480i 480i
off
480i
others 480i
Resolution Auto 480i/576i 480p/576p 720p 1080i
1080p
24Hz Others
HDMI
Playback BD
Max Max Max 720p 50 Hz 1080i 50 Hz
1080p 24 Hz
1080p 50 Hz
others 1080p 50 Hz
COMPONENT
Playback
commercially-
released DVD
576i 576i
576p 576p 576p 576p
Playback BD 576i 576i 576i off 576i
others 576p 720p 50 Hz * 1080i 50 Hz * 1080i 50 Hz *
VIDEO
Playback BD
576i 576i 576i 576i 576i
off
576i
others 576i
Notes

37 En
SETTINGS
4
English
Some of the newly released BD discs cannot be played
back unless you upgrade this Player software to the latest
version. We recommend upgrading the software of this
Player with software upgrade so that this Player is
operated based on the latest software.
To check for the availability of a software upgrade, visit
http://download.yamaha.com/downloads/service/top/
?site=europe.yamaha.com&language=en
– Software upgrade is automatically started after
loading the disc which contains upgrade file
package.
– Do not remove the disc/USB memory device, set this
Player to standby mode or unplug the power cable/
LAN cable while the software upgrade is being
performed.
■ Upgrading the software
1. Prepare for the software upgrade.
When you upgrade the software from Disc/USB
Storage:
1 Save the upgrade file package to the appropriate
folder on the disc/USB memory device. For more
details, refer to the procedure document attached
with the upgrade file package.
2 Load the disc or connect the USB memory
device.
When the disc is loaded, software upgrade is
started automatically. Skip step 2.
When you upgrade the software from Network:
Confirm that this Player is connected to the
network.
2. Select the upgrade method and
start upgrade from SETUP menu.
1 Press SETUP to display SETUP menu screen.
2 Select General Setting = System = Upgrade.
3 Select the item which contains the upgrade file
package from Disc/USB Storage/Network.
3. The system will search for
upgrade file package.
4. Press ENTER to start upgrade.
5. Upgrade is completed. The system
will restart.
SOFTWARE UPGRADE
Hint
Note

38 En
ADDITIONAL INFORMATION
Refer to the table below when this Player does not function properly. If the problem you are experiencing is not listed
below or if the instruction below does not help, turn off this Player, disconnect the power cable, and contact the nearest
authorized Yamaha dealer or service center.
■ Power
■ Basic operation
■ Disc playback
TROUBLESHOOTING
Problem Possible causes and solutions
No power. – Connect the AC power cable properly.
– Press p on the front panel to turn on the power.
The Player power is turned off. – The power will be automatically turned off after 25 continuous minutes of inactivity (no
playback).
Problem Possible causes and solutions
The remote control does not work. – Use the remote control within its operating range. (p. 9)
– Replace the batteries. (p. 9)
– Check the ID settings for the main unit and the remote control. (p. 9)
Buttons do not work. – Press and hold p on the front panel for around 5 seconds to restart this Player.
– To completely reset this Player, unplug the power cable from the AC outlet for 10
seconds or more, plug the power cable to the AC outlet again, and then turn on this
Player.
Password is forgotten.
– Press and hold and on the front panel simultaneously when no disc is inserted
and playback is stopped to set all the Security settings (p. 31) of this Player to their
default settings. After the power is turned off automatically, press p to turn on the
power again.
Problem Possible causes and solutions
The Player cannot play a disc. – Take out the disc and clean it. (p. 4)
– Make sure that the disc is loaded properly (aligned in disc tray and label-side up). (p. 4)
– Use a disc supported by the Player. (p. 3)
– Remove the disc and then check whether the Player supports the disc or not. (p. 3)
– Check the region code. (p. 3)
– Check whether the disc is defective by trying another disc.
– The CD-R/RW, DVD+R/RW/R DL, and DVD-R/RW/R DL must be finalized. (p. 3)
Video stops. – The Player will stop if it senses shock or vibration.
The Player makes a snapping sound
when starting playback or loading a
disc.
– These sounds are not malfunctions of the Player but are normal operating conditions.

TROUBLESHOOTING
39 En
ADDITIONAL INFORMATION
5
English
■ Picture
■ Sound
Problem Possible causes and solutions
No picture. – Make sure that the cables are connected correctly. (p. 10)
– Make sure that the connected TV or the AV receiver is set to the correct input. (p. 10)
– Connect this Player to the TV with VIDEO jack (p. 13) using the supplied video pin
cable.
– If picture is still not displayed with the unit connected to the VIDEO jack, press and
hold on the front panel for around 5 seconds when no disc is inserted and
playback is stopped to switch NTSC/PAL and then set Resolution properly. (p. 33).
– TV System is set to the incorrect setting. Press and hold and on the front panel
simultaneously when no disc is inserted and playback is stopped to reset the TV System
and Resolution settings to their default settings.
Screen freezes and operation buttons
do not work.
– Press , then restart playback.
– Turn off the power and turn on the power again.
– Press and hold p on the front panel for around 5 seconds to restart this Player.
Video is not output with the desired
resolution.
– Set to the desired resolution. (p. 33)
Widescreen video appears vertically
stretched, or black bands appear at the
top and bottom of the screen. Or 4:3
video appears horizontally stretched.
– Change the aspect ratio of your TV. (p. 32)
Square noise (mosaic) appears on the
screen.
– Blocks in images may be visible in scenes with rapid movement due to the
characteristics of digital image compression technology.
The playback screen will be disturbed if
DVD video is recorded to a VCR, or
played back through a VCR.
– This Player complies with analog copy protection. Some discs contain a copy
prohibiting signal. If you try to play back such discs through a VCR, or record to a VCR
and play back the signal, the copy protection will prevent normal playback.
Audio is not output, or images are not
played back properly.
– The audio may not be output or the images may not be played back properly for some
discs in which copyright-protected contents are recorded.
Problem Possible causes and solutions
No sound, or sound is distorted. – Check that the audio cable is connected correctly. (p. 10)
– Turn the volume of TV or AV receiver up.
– There is no sound during still mode, slow motion playback, fast forward and fast
reverse. (p. 8)
– Audio may not be output depending on the audio recording status, such as when audio
other than an audio signal or non-standard audio is recorded for the audio content. (p. 3)
Left and right channels of audio are
reversed, or sound comes out of only
one side.
– Check the audio connection. (p. 10)
Audio is not output, or images are not
played back properly.
– The audio may not be output or the images may not be played back properly for some
discs in which copyright-protected contents are recorded.
Cannot hear the desired audio type and/
or number of channels.
– Refer to Audio Output setting and “About the audio output formats”. (p. 34, 35)
Cannot hear the sound of PIP
(secondary audio).
– Set Coaxial/Optical or HDMI to PCM/Reencode. (p. 34)
– To hear secondary audio, press 2ND AUDIO. (p. 6)
– Depending on the disc, you may need to set secondary audio on the top menu of the
disc. (p. 8)

TROUBLESHOOTING
40 En
■ Network
■ Messages on the screen
– The following messages appear on the TV screen in case the disc you tried to play back is not appropriate or the
operation is not correct.
Problem Possible causes and solutions
Cannot connect to the Internet. – Connect the Network cable properly.
– Turn on the connected equipment, such as broadband router or modem.
– Connect the broadband router and/or modem properly.
– Set the proper value(s) in the network setting. Check “Network”. (p. 32)
Cannot download BD-Live contents. – Connect the Network cable properly. (p. 16)
– Connect USB memory device properly. Check that the USB memory device is
connected to the USB port of this Player. (p. 16)
– Check if the BD disc supports BD-Live.
– Check the setting for “Internet Connection”. (p. 32)
– Connect the USB memory device formatted in FAT16 or FAT32.
– It is recommended to connect the USB memory device with at least 2 GB of free space.
If there is not enough free space, format the USB memory device. (p. 30)
– Refer to the supplied user's manual of the disc or consult the disc manufacturer.
Cannot detect the DLNA server. – Connect the network cable properly.
– Turn on the connected equipment, such as broadband router or the server.
– Confirm the Player and the server are connected to the same access point.
– Set the proper value(s) in the network setting. Check “Network”. (p. 32)
– Depending on the DLNA server, the Player may need to be permitted from the server.
Cannot a play the file on the home
network server.
– Make sure the file is playable. (p. 3)
– Check your DLNA server’s setting.
– The playback and operating quality may be affected by your home network condition.
Error message Possible causes and solutions
Not Support This File! – The file is not supported with this Player. See “Types of discs/files that can be used with this player”
(p. 3).
Wrong region code! – The disc is an incompatible region code. See “Region management information” (p. 3).
Network has FAILED. – This Player cannot be connected to the network. Check connection (p. 16) and Network setting (p. 32).
Network is OK, proxy has
FAILED.
– This Player cannot be connected to the proxy server. See “Proxy Setting” (p. 32).
The Setting is prohibited,
please setup again.
– BD-Live connection is prohibited. See “BD-Live Connection” (p. 32).
No valid upgrade file is
found!
– Check if the upgrade file is in the appropriate folder.
Upgrade has failed for some
reason!
– Upgrade is failed. Check if the upgrade file is corrupted or unreadable.

41 En
ADDITIONAL INFORMATION
5
English
AVCHD
AVCHD is a new format (standard) for high definition
video cameras that can be used to record and play high-
resolution HD images.
BD-Live™
BD-Live is a BD standard that utilizes a network
connection, enabling this Player to go online to
download promotional videos and other data.
BDMV
BDMV (Blu-ray Disc Movie, BD-MV) refers to one of
the application formats used for BD-ROM which is one
of the Blu-ray Disc specifications. BDMV is a recording
format equivalent to DVD-Video of the DVD
specification.
Blu-ray 3D™
Blu-ray 3D enables you to view full high definition 3D
images.
BONUSVIEW™
BONUSVIEW compatible discs let you simultaneously
enjoy video sub-channel for two screens, audio sub-
channel and sub-titles. A small screen appears within
the main screen during playback (Picture in Picture).
Closed caption
Closed captions are kind of subtitle, and the difference
between subtitles and captions is that subtitles are
intended for hearing persons and captions are for the
hearing impaired. Subtitles rarely show all of the audio.
For example, captions show sound effects (e.g., “phone
ringing” and “footsteps”), while subtitles do not. Before
you select this setting, please ensure that the disc
contains closed caption information.
Color Space
Color Space is a color range that can be represented.
RGB is a color space based on the RGB color model
(red, green and blue) and is typically used for PC
monitors. YCbCr is a color space based on a luminance
signal (Y) and two color difference signals (Cb and Cr).
Deep Color
Deep Color refers to the use of various color depths in
displays, up from the 24-bit depths in previous versions
of the HDMI specification. This extra bit depth allows
HDTVs and other displays go from millions of colors to
billions of colors and eliminate on-screen color banding
for smooth tonal transitions and subtle gradations
between colors. The increased contrast ratio can
represent many times more shades of gray between
black and white. Also Deep Color increases the number
of available colors within the boundaries defined by the
RGB or YCbCr color space.
DivX®
DivX® is a popular media technology created by DivX,
Inc. DivX® media files contain highly compressed
video with high visual quality that maintains a relatively
small file size. DivX® files can also include advanced
media features like menus, subtitles, and alternate audio
tracks. Many DivX® media files are available for
download online, and you can create your own using
your personal content and easy-to-use tools from
DivX.com.
Dolby Digital
A sound system developed by Dolby Laboratories Inc.
that gives movie theater ambience to audio output when
the product is connected to a Dolby Digital processor or
amplifier.
Dolby Digital Plus
A sound system developed as an extension to Dolby
Digital. This audio coding technology supports 7.1
multi-channel surround sound.
Dolby TrueHD
Dolby TrueHD is a lossless coding technology that
supports up to 8 channels of multi-channel surround
sound for the next generation optical discs. The
reproduced sound is true to the original source bit-for-
bit.
DRC (Dynamic Range Control)
DRC lets you adjust the range between the loudest and
softest sounds (dynamic range) for playback at average
volume. Use this when it is hard to hear dialog, or
during times when playback may disturb neighbors.
DTS
This is a digital sound system developed by DTS, Inc.
for use in cinemas.
DTS-HD High Resolution Audio
DTS-HD High Resolution Audio is a new technology
developed for the next generation high definition optical
disc format.
DTS-HD Master Audio
DTS-HD Master Audio is a lossless audio compression
technology developed for the next generation high
definition optical disc format.
HDMI
HDMI (High-Definition Multimedia Interface) is an
interface that supports both video and audio on a single
digital connection. The HDMI connection carries
standard to high definition video signals and multi-
channel audio signals to AV components such as HDMI
equipped TVs, in digital form without degradation.
Letterbox (LB 4:3)
A screen size with black bars on the top and bottom of
the image to allow viewing of wide-screen (16:9)
material on a connected 4:3 TV.
GLOSSARY

SPECIFICATIONS
42 En
Linear PCM Sound
Linear PCM is a signal recording format used for Audio
CDs and on some DVD and Blu-ray discs. The sound on
Audio CDs is recorded at 44.1 kHz with 16 bits. (Sound
is recorded between 48 kHz with 16 bits and 96 kHz
with 24 bits on DVD discs and between 48 kHz with 16
bits and 192 kHz with 24 bits on BD discs.)
Lip Sync
Lip Sync, an abbreviation for lip synchronization, is a
technical term that involves both a problem and a
capability of maintaining audio and video signals
synchronized during post-production and transmission.
Whereas the audio and video latency requires complex
end-user adjustments, HDMI version 1.3 incorporates
an automatic audio and video syncing capability that
allows devices to perform this synchronization
automatically and accurately without user interaction.
Mac address
The Mac address is a unique value assigned to a network
device for identification purposes.
Pan Scan (PS 4:3)
A screen size that cuts off the sides of the image to allow
viewing of wide-screen (16:9) material on a connected
4:3 TV.
Subtitles
These are the lines of text appearing at the bottom of the
screen which translate or transcribe the dialog. They are
recorded on many DVD and BD discs.
Top menu
In a BD-Video/DVD-Video, this is the menu for
selecting things like the chapter to be played back and
the subtitle language. In some DVD-Videos, the top
menu may be called the “Title Menu”.
x.v.Color
x.v.Color reproduces a greater range of color than
before, showing almost all of the colors that the human
eye can detect.
■ General
Power supply
[U.S.A. and Canada models]...................................AC 110-240 V, 60 Hz
[Central and South America model] ..................AC 110-240 V, 50/60 Hz
[Australia model] ....................................................AC 110-240 V, 50 Hz
[U.K., Europe and Russia model] ...........................AC 110-240 V, 50 Hz
[China model] .........................................................AC 110-240 V, 50 Hz
[Asia model].......................................................AC 110-240 V, 50/60 Hz
Power consumption (Normal) .............................................................. 23 W
Power consumption (Standby) ................................................. 0.5 W or less
Dimensions (W × H × D) ............................................. 435 × 86 × 257 mm
(17-1/8 × 3-3/8 × 10-1/8 in)
Weight ..................................................................................3.0 kg (6.6 lbs.)
■ Input/output
HDMI output.............................................................. Type A connector × 1
480i/576i/480p/576p/720p/1080i/1080p/1080p@24Hz,
Deep Color, x.v. Color support
Component video output..............................................Y: 1 Vp-p (75 ohms)
P
B, PR: 0.7 Vp-p (75 ohms)
Video output......................................................................1 Vp-p (75 ohms)
Digital output ..........................................................Optical × 1, Coaxial × 1
Analog audio output..............................................................Mixed 2 ch × 1
2 ± 0.3 V (1 kHz, 0 dB)
USB............................................................................ Type A connector × 2
Other equipments ......................................................... Remote IN/OUT × 1
Ethernet × 1
Specifications are subject to change without notice.
SPECIFICATIONS

SPECIFICATIONS
43 En
ADDITIONAL INFORMATION
5
English
■ Copyright
– Audio-visual material may consist of copyrighted
works which must not be recorded without the
authority of the owner of the copyright. Refer to
relevant laws in your country.
– This item incorporates copy protection technology
that is protected by U.S. patents and other
intellectual property rights of Rovi Corporation.
Reverse engineering and disassembly are prohibited.
– Manufactured under license from Dolby
Laboratories. Dolby and the double-D symbol are
trademarks of Dolby Laboratories.
– Manufactured under license under U.S. Patent #’s:
5,451,942; 5,956,674; 5,974,380; 5,978,762;
6,226,616; 6,487,535; 7,212,872; 7,333,929;
7,392,195; 7,272,567 & other U.S. and worldwide
patents issued & pending. DTS and the Symbol are
registered trademarks, & DTS-HD, DTS-HD Master
Audio, and the DTS logos are trademarks of DTS,
Inc. Product includes software. © DTS, Inc. All
Rights Reserved.
– “Blu-ray Disc
TM
”, “Blu-ray
TM
”, “Blu-ray 3D
TM
”,
“BD-Live
TM
”, “BONUSVIEW
TM
”, and the logos
are trademarks of the Blu-ray Disc Association.
– is a trademark of DVD Format/Logo
Licensing Corporation.
– HDMI, the HDMI logo and High-Definition
Multimedia Interface are trademarks or registered
trademarks of HDMI Licensing LLC.
– “x.v.Color” and “x.v.Color” logo are trademarks.
– “AVCHD” and the “AVCHD” logo are trademarks
of Panasonic Corporation and Sony Corporation.
– Java and all Java-based trademarks and logos are
trademarks or registered trademarks of Sun
Microsystems, Inc. in the United States and/or other
countries.
– This product is licensed under the AVC patent
portfolio license and VC-1 patent portfolio license
for the personal and non-commercial use of a
consumer to (i) encode video in compliance with the
AVC Standard and VC-1 Standard (“AVC/VC-1
Video”) and/or (ii) decode AVC/VC-1 Video that
was encoded by a consumer engaged in a personal
and non-commercial activity and/or was obtained
from a video provider licensed to provide AVC/VC-
1 Video. No license is granted or shall be implied for
any other use. Additional information may be
obtained from MPEG LA, LLC.
See http://www.mpegla.com.
– Windows Media Player is a registered trademark or
trademark of Microsoft corporation in the United
States and/or other countries.
– YouTube and the YouTube logo are trademarks of
Google. Inc.
– DLNA and DLNA CERTIFIED are trademarks and/
or service marks of Digital Living Network Alliance.
– “DivX®, DivX Certified®, DivX Plus™ HD and
associated logos are registered trademarks of DivX,
Inc. and are used under license.”
– “DivX Certified® to play DivX® and DivX Plus™
HD (H.264/.MKV) video up to 1080p HD and
premium content.”
ABOUT DIVX VIDEO: DivX® is a digital video format created by
DivX, Inc. This is an official DivX Certified® device that plays DivX
video. Visit divx.com for more information and software tools to
convert your files into DivX video.
ABOUT DIVX VIDEO-ON-DEMAND: This DivX Certified® device
must be registered in order to play purchased DivX Video-on-Demand
(VOD) movies. To obtain your registration code, locate the DivX VOD
section in your device setup menu. Go to vod.divx.com for more
information on how to complete your registration.

Precaución-i Es
1 Para asegurar el mejor rendimiento de este aparato, lea
atentamente este manual. Y luego guárdelo en un lugar
seguro para poder consultarlo en el futuro en caso de ser
necesario.
2 Instale esta unidad en un lugar bien ventilado, fresco, seco y
limpio, alejado de la luz directa del sol, fuentes de calor,
vibración, polvo, humedad y/o frío. Para una adecuada
ventilación, permita que el equipo tenga el siguiente espacio
libre mínimo:
Superior: 10 cm
Posterior: 10 cm
Laterales: 10 cm
3 Coloque este aparato lejos de otros aparatos eléctricos,
motores o transformadores, para evitar así los ruidos de
zumbido.
4 No exponga este aparato a cambios bruscos de temperaturas,
del frío al calor, ni lo coloque en lugares muy húmedos (una
habitación con deshumidificador, por ejemplo), para impedir
así que se forme condensación en su interior, lo que podría
causar una descarga eléctrica, un incendio, daños en el
aparato y/o lesiones a las personas.
5 Evite instalar este aparato en un lugar donde puedan caerle
encima objetos extraños y/o donde quede expuesto al goteo o
a la salpicadura de líquidos. Encima de este aparato no ponga:
– Otros componentes, porque pueden causar daños y/o
decoloración en la superficie de este aparato.
– Objetos con fuego (velas, por ejemplo), porque
pueden causar un incendio, daños en el aparato y/o
lesiones a las personas.
– Recipientes con líquidos, porque pueden caerse y
derramar el líquido, causando descargas eléctricas al
usuario y/o dañando el aparato.
6 No tape este aparato con un periódico, mantel, cortina, etc.
para no impedir el escape del calor. Si aumenta la
temperatura en el interior del aparato, esto puede causar un
incendio, daños en el aparato y/o lesiones a las personas.
7 No enchufe este aparato a una toma de corriente hasta
después de haber terminado todas las conexiones.
8 No ponga el aparato al revés. Podría recalentarse y
posiblemente causar daños.
9 No utilice una fuerza excesiva con los conmutadores, los
controles y/o los cables.
10 Cuando desconecte el cable de alimentación de la toma de
corriente, sujete la clavija y tire de ella; no tire del propio
cable.
11 No limpie este aparato con disolventes químicos porque
podría estropear el acabado. Utilice un paño limpio y seco
para limpiar el aparato.
12 Utilice solamente la tensión especificada en este aparato.
Utilizar el aparato con una tensión superior a la especificada
resulta peligroso y puede producir un incendio, daños en el
aparato y/o lesiones a las personas. Yamaha no se hará
responsable de ningún daño debido al uso de este aparato con
una tensión diferente de la especificada.
13 Para impedir daños debidos a relámpagos, desconecte el
cable de alimentación de la toma de corriente durante una
tormenta eléctrica.
14 No intente modificar ni arreglar este aparato. Póngase en
contacto con el personal de servicio Yamaha cualificado
cuando necesite realizar alguna reparación. La caja no deberá
abrirse nunca por ninguna razón.
15 Cuando no piense utilizar este aparato durante mucho tiempo
(cuando se ausente de casa por vacaciones, por ejemplo)
desconecte el cable de alimentación de la toma de corriente.
16 Asegúrese de leer la sección “RESOLUCIÓN DE
PROBLEMAS” antes de dar por concluido que su aparato
está averiado.
17 Antes de trasladar este aparato, pulse p para ponerlo en el
modo de espera, y luego desconecte el cable de alimentación
de CA de la toma de corriente.
18 La condensación se formará cuando cambie de repente la
temperatura ambiental. Desconecte en este caso el cable de
alimentación de la toma de corriente y no utilice el aparato.
19 El aparato se calentará cuando la utilice durante mucho
tiempo. Desconecte en este caso la alimentación y luego no
utilice el aparato para permitir que se enfríe.
20 Instale este aparato cerca de la toma de CA y donde se pueda
alcanzar fácilmente la clavija de alimentación.
21 Las baterías no deberán exponerse a un calor excesivo como,
por ejemplo, el que producen los rayos del sol, el fuego y
similares.
PRECAUCIÓN: LEA LAS INDICACIONES SIGUIENTES ANTES DE
UTILIZAR ESTE APARATO
Este aparato no se desconecta de la fuente de
alimentación de CA si está conectada a una toma de
corriente, aunque la propia aparato esté apagada con p.
A este estado se le llama modo de espera. En este
estado, este aparato ha sido diseñada para que consuma
un cantidad de corriente muy pequeña.
ADVERTENCIA
PARA REDUCIR EL RIESGO DE INCENDIO O
DESCARGA ELÉCTRICA, NO EXPONGA ESTE
APARATO A LA LLUVIA NI A LA HUMEDAD.
El componente láser de este producto es capaz de emitir
radiación que sobrepasa el límite establecido para la
clase 1.

1 Es
1
2
3
4
5
Español
QUÉ PUEDE HACER CON ESTE
REPRODUCTOR ............................................. 2
PIEZAS INCLUIDAS............................................ 2
INFORMACIÓN SOBRE DISCOS Y ARCHIVOS 3
Tipos de discos/archivos que se pueden utilizar con este
reproductor ................................................................. 3
Para cargar un disco........................................................ 4
Precauciones con los discos............................................ 4
Aviso para ver imágenes de vídeo en 3D ....................... 4
CONTROLES Y FUNCIONES ............................. 5
Panel delantero ............................................................... 5
Mando a distancia........................................................... 6
INTRODUCCIÓN A LAS CONEXIONES........... 10
Panel trasero ................................................................. 10
HDMI CONEXIÓN.............................................. 12
Conexión con el terminal HDMI.................................. 12
Conexión para la reproducción de discos 3D
de Blu-ray................................................................. 12
CONEXIONES DE VÍDEO ................................. 13
Conexión a la toma de vídeo componente.................... 13
CONEXIONES DE AUDIO................................. 14
Conexión con el terminal/toma de audio digital........... 14
Conexión con las tomas de audio ................................. 15
CONEXIÓN DE RED Y USB.............................. 16
Conexión con el terminal NETWORK y
el puerto USB........................................................... 16
OTRAS CONEXIONES...................................... 17
Conexión a las tomas REMOTE CONTROL............... 17
Conexión del cable de alimentación............................. 17
ASISTENTE INICIAL/CONFIGURACIÓN
SENCILLA ..................................................... 18
Configuración con el Asistente inicial/Configuración
Sencilla..................................................................... 18
MENÚ HOME/MEDIA ........................................ 19
Reproducción de Foto/Música/Vídeo........................... 19
Uso del contenido de red .............................................. 21
USO DE SERVICIOS DE RED .......................... 22
REPRODUCCIÓN DE VÍDEOS DESDE
YouTube™ .................................................... 22
FUNCIONAMIENTO DE REPRODUCCIÓN
AVANZADO ................................................... 23
Menú en pantalla .......................................................... 23
Menú de estado............................................................. 24
Uso de Marcador .......................................................... 25
Reproducción de programa........................................... 25
Uso de la búsqueda ...................................................... 25
Disfrute de BONUSVIEW™ y BD-Live™ ................. 26
Utilización de la función Imagen en Imagen
(reproducción de audio/vídeo secundario) ............... 26
Utilización de la función de BD-Live™....................... 26
MENÚ SETUP.................................................... 27
Ejemplo de funcionamiento del menú SETUP ............. 29
Configuración General.................................................. 30
Configuración de pantalla ............................................. 32
Configuración de audio................................................. 34
Sistema de Información ................................................ 34
Formatos de salida de audio.......................................... 35
Acerca de los formatos de salida de vídeo.................... 36
ACTUALIZACIÓN DE SOFTWARE .................. 37
Actualización del software............................................ 37
RESOLUCIÓN DE PROBLEMAS...................... 38
Alimentación................................................................. 38
Funcionamiento básico ................................................. 38
Reproducción de disco.................................................. 38
Imagen........................................................................... 39
Sonido ........................................................................... 39
Red ................................................................................ 40
Mensajes en pantalla ..................................................... 40
GLOSARIO ........................................................ 41
ESPECIFICACIONES ........................................ 42
Generalidades................................................................ 42
Entrada/salida................................................................ 42
Propiedad intelectual..................................................... 43
(al final de este manual)
■ Acerca de este manual
– Este manual describe cómo utilizar este reproductor
con un mando a distancia, excepto cuando no esté
disponible. También se puede acceder a algunas de
estas operaciones mediante los botones del panel
delantero.
– Las notas contienen información importante sobre
seguridad e instrucciones de funcionamiento. Las
indicaciones señalan consejos de funcionamiento.
– Este manual se ha impreso antes de la fabricación. El
diseño y las especificaciones están sujetos a cambios
en parte como resultado de mejoras, etc. En caso de
diferencias entre el manual y el producto, este último
tiene prioridad.
Iconos utilizados en este manual
Los iconos se utilizan para indicar botones/funciones
disponibles para un formato particular.
: Vídeo BD
: Vídeo DVD, DVD-VR, DVD+VR
: CD de audio
: AVCHD, WMV, DivX
: MP3, WMA, WAV
: JPEG
CONTENIDO
1. INTRODUCCIÓN
2. CONEXIONES
3. REPRODUCCIÓN
4. AJUSTES
5. INFORMACIÓN ADICIONAL
Information about software ....................................i
BD
DVD
CD
VIDEO
MUSIC
PHOTO

2 Es
INTRODUCCIÓN
* Para conocer los detalles sobre los discos y formatos que se pueden reproducir, consulte la página 3.
** Para utilizar esta función es necesaria la configuración de red.
Asegúrese de que con el producto se han suministrado los siguientes accesorios.
QUÉ PUEDE HACER CON ESTE REPRODUCTOR
Configuración sencilla de idioma, resolución, relación de aspecto
de la pantalla
\ pág. 18
Puede ajustar la configuración de idioma y TV.
Reproducción de discos Blu-ray™/DVD/CD lanzados
comercialmente
*
\ pág. 23
Además de Blu-ray Discs™ (discos BD), este reproductor también admite la reproducción de
otros discos diversos.
Reproducción de BONUSVIEW™, BD-Live™, etc.
*
\ pág. 26
Puede disfrutar de películas adicionales en los discos BD más recientes.
Reproducción de archivos de Vídeo, Música, Foto de un disco
*
\ pág. 19
Este reproductor puede reproducir los discos que usted grabe.
Reproducción de archivos de Vídeo, Música, Foto de un disco/
dispositivos de memoria USB
*
\ pág. 19
Con este reproductor se pueden reproducir archivos grabados en discos/dispositivos de memoria
USB.
Reproducción de archivos de Vídeo, Música, Foto de un servidor
doméstico de red
*
**
\ pág. 21
El contenido del PC se puede reproducir en el televisor o el receptor de A/V conectando este
reproductor a un servidor de red.
Funcionamiento con el mando a distancia del televisor, receptor
de A/V, etc.
\ pág. 30
Puede conectar dispositivos con un cable HDMI y controlarlos con un único mando a distancia
utilizando la función Control HDMI.
Transferencia de contenidos de reproducción en los servicios de
red
**
\ pág. 22
Puede disfrutar instantáneamente de vídeos a través de Internet con este reproductor.
PIEZAS INCLUIDAS
Pilas (×2)
(AAA, R03, UM-4)
Mando a distancia Cable de audio/vídeo Cable de alimentación

3 Es
Español
INTRODUCCIÓN
1
■
Tipos de discos/archivos que se
pueden utilizar con este reproductor
– En este reproductor se pueden reproducir discos de 12
cm y 8 cm. No utilice un adaptador de 8 cm a 12 cm.
– Utilice discos que sean compatibles con los
estándares que se indican con la presencia de
logotipos oficiales marcados en la etiqueta del disco.
La reproducción de discos que no cumplan con estos
estándares no está garantizada. Además, la calidad
de imagen o sonido no está garantizada incluso si
tales discos se pueden reproducir.
– Los discos y los reproductores de vídeo BD/DVD
tienen códigos de región que dictan las regiones en
las que se puede reproducir un disco.
– Las operaciones y funciones de vídeo BD/DVD
pueden ser diferentes de las explicaciones que
aparecen en este manual y algunas operaciones
pueden estar prohibidas debido a las configuraciones
del fabricante del disco.
– Si se visualiza una pantalla de menú o instrucciones
de funcionamiento durante la reproducción de un
disco, siga el procedimiento de funcionamiento
visualizado.
– Según el disco, puede que no sea posible la
reproducción de algunos de los discos de las tablas
de la columna izquierda.
– Finalice todos los medios de reproducción que se
reproduzcan en este reproductor.
– “Finalizar” hace referencia a un procesamiento del
grabador sobre un disco grabado para que se pueda
reproducir en otros reproductores/grabadores, así
como en este reproductor. Sólo se podrán reproducir
en el reproductor los discos que se hayan finalizado.
(Este reproductor no dispone de función para
finalizar discos.)
– No se garantiza la reproducción de todos los archivos
del disco, dispositivo de memoria USB y red.
– Un archivo con propiedad intelectual protegida no se
puede reproducir a través de un dispositivo de
memoria USB o red.
Requisitos de archivos de audio MP3/WMA
– Frecuencia de muestreo: entre 32 - 48 kHz (MP3/
WMA), LPCM 44,1 kHz/16 bits/estéreo (WAV)
– Bitrate: entre 8 - 320 kbps (MP3), 32 - 192 kbps
(WMA)
Requisitos de archivo WMV
– WMV9, la resolución máxima es 1.920 × 1.080.
INFORMACIÓN SOBRE DISCOS Y ARCHIVOS
Tipo de disco
Formato de
grabación
Formato de
datos
BD-ROM/BD-R/
BD-RE
Vídeo BD --
DVD-ROM Vídeo DVD --
DVD-R/DVD-R DL/
DVD-RW
Vídeo DVD/DVD-
VR/AVCHD/disco
de datos
DivX/WMV/MP3/
WAV/WMA/JPEG
DVD+R/DVD+R
DL/DVD+RW
Vídeo DVD/
DVD+VR/AVCHD/
disco de datos
DivX/WMV/MP3/
WAV/WMA/JPEG
CD-ROM CDDA/HDCD --
CD-R/CD-RW CDDA/disco de
datos
DivX/WMV/MP3/
WAV/WMA/JPEG
USB -- DivX/WMV/MP3/
WAV/WMA/JPEG
Red -- WMV/MP3/WMA/
WAV/JPEG
Información de gestión de la región
Destino Vídeo BD Vídeo DVD
EE.UU. y Canadá Código de región
“A” o “ALL”
Número de región
“1” o “ALL”
Asia Código de región
“A” o “ALL”
Número de región
“3” o “ALL”
América Central y
del Sur
Código de región
“A” o “ALL”
Número de región
“4” o “ALL”
Europa Código de región
“B” o “ALL”
Número de región
“2” o “ALL”
1
ALL
3
ALL
4
ALL
2
ALL
Australia Código de región
“B” o “ALL”
Número de región
“4” o “ALL”
Rusia Código de región
“C” o “ALL”
Número de región
“5” o “ALL”
China Código de región
“C” o “ALL”
Número de región
“6” o “ALL”
Notas
Información de gestión de la región
Destino Vídeo BD Vídeo DVD
4
ALL
5
ALL
ALL

4 Es
INFORMACIÓN SOBRE DISCOS Y ARCHIVOS
■ Para cargar un disco
– Inserte el disco con la etiqueta hacia arriba.
– En el caso de un disco grabado por ambos lados,
ponga boca abajo el lado que va a reproducir.
– La reproducción podría iniciarse automáticamente,
dependiendo del disco y la configuración del
reproductor.
– El menú podrá visualizarse primero, según el disco.
– El tiempo para cargar el disco puede variar
dependiendo del disco.
■ Precauciones con los discos
Tenga cuidado con los arañazos y el polvo
– Los discos BD, DVD y CD son sensibles al polvo, a
las huellas dactilares y especialmente, a los arañazos.
Es posible que no se pueda reproducir un disco con
arañazos. Maneje los discos con cuidado y
almacénelos en un lugar seguro.
Almacenamiento apropiado de los discos
Precauciones para el manejo
Limpieza de la lente lectora
– No utilice nunca discos de limpieza de venta en el
comercio. La utilización de esos discos podría dañar
la lente.
– Solicite la limpieza de la lente en el centro de
atención al cliente aprobado por Yamaha más
cercano.
■ Aviso para ver imágenes de vídeo
en 3D
– Algunas personas pueden sufrir molestias (como
vista cansada, fatiga o náuseas) al ver imágenes de
vídeo en 3D. Se recomienda a todos los espectadores
realizar pausas periódicas durante la visualización de
imágenes de vídeo en 3D.
– Si sufre alguna molestia, deje de ver las imágenes de
vídeo en 3D hasta que ésta desaparezca. Consulte
con un médico si sufre molestias agudas.
– Lea atentamente los manuales de instrucciones
(televisor y disco Blu-ray) y los mensajes de
precaución que aparecen en el televisor.
– La visión de niños pequeños (especialmente de
menos de seis años) todavía está en proceso de
desarrollo. Consulte con su médico (como un
pediatra o un oftalmólogo) antes de permitir a niños
pequeños ver imágenes de vídeo en 3D.
– Los niños pequeños deben estar bajo la supervisión
de un adulto para garantizar que siguen las
recomendaciones descritas anteriormente.
Notas
Ponga el disco en el centro de la caja y
almacene la caja y el disco en posición
vertical.
Evite guardar los discos en lugares con luz
solar directa, cerca de dispositivos de
calefacción o en lugares con alta humedad.
No deje caer los discos ni los someta a
vibraciones o impactos fuertes.
Evite almacenar los discos en lugares
donde haya mucha cantidad de polvo o
humedad
– Si la superficie tiene manchas, límpiela
suavemente con un paño suave
humedecido (con agua solamente).
Cuando limpie los discos, mueva siempre
el paño desde el orificio central hacia el
borde exterior.
– No utilice pulverizadores de limpieza de
discos de vinilo, bencina, diluyente,
líquidos para prevención de electricidad
estática u otros disolventes.
– No toque la superficie.
– No adhiera papel ni etiquetas adhesivas en el disco.
– Si la superficie de reproducción de un disco está
manchada o raspada, el reproductor podrá decidir
que el disco es incompatible y expulsar la bandeja
portadiscos, o podría no reproducir el disco
correctamente. Limpie cualquier mancha de la
superficie de reproducción con un paño suave.

5 Es
Español
INTRODUCCIÓN
1
■ Panel delantero
1 p (Encendido/En espera)
2 Puerto USB (pág. 16)
3 Visor del panel delantero
4 Bandeja portadiscos (pág. 4)
5 (Expulsar) (pág. 4)
6 (Búsqueda hacia atrás/Salto hacia
atrás): Pulse para saltar hacia atrás y mantenga
pulsado para buscar hacia atrás.
7 (Búsqueda hacia adelante/Salto
hacia adelante):
Pulse para saltar hacia adelante y mantenga pulsado
para buscar hacia adelante.
8 (Reproducción)
9 (Pausa)
0 (Detener)
CONTROLES Y FUNCIONES
USB
2 4 51 3 6 7 8 9 0

6 Es
CONTROLES Y FUNCIONES
■ Mando a distancia
– En la esquina superior izquierda de la pantalla
aparecerá cuando la tecla pulsada no esté
disponible.
1 Transmisor de señales infrarrojas: Emite la
señal infrarroja. Oriente esta ventana al sensor del
mando a distancia (pág. 9).
2 MARKER : Establece un Marcador
(pág. 25) en un punto especificado de una película.
Tras definir un Marcador, para seleccionar el punto de
ajuste al que desea saltar, pulse DIGEST. Puede definir
hasta 12 marcadores.
3 : Abre/cierra la bandeja portadiscos.
4 PROGRAM : Establece el orden de
reproducción (pág. 25). Puede configurar hasta 15
pistas (para discos de audio) o títulos/capítulos (Vídeo
DVD).
5 Teclas numéricas: Permiten introducir números, o
durante la reproducción, saltar a la pista/capítulo
correspondiente al número introducido. Es posible que
estos botones no estén disponibles en función del tipo
de disco y la situación de reproducción.
6 CLEAR: Borra el número introducido o elemento
establecido.
7 PIP : Permite encender/apagar la función Imagen
en imagen (pág. 26). Marca PIP ( ) se muestra en
pantalla cuando esta función está disponible. También
puede seleccionar este elemento desde el menú en
pantalla (pág. 23).
– Marca PIP se muestra sólo cuando la Marca PIP está
encendida (pág. 31).
8 SETUP: Muestra la pantalla de menú SETUP
(pág. 27).
9 2ND AUDIO : selecciona el audio secundario de
la función Imagen en imagen (pág. 26) o los
comentarios de audio. Cuando esta función está
disponible se muestra en pantalla Marca Audio
Secundario ( ) (pág. 34). También puede
seleccionar este elemento desde el menú en pantalla
(pág. 23).
– Marca Audio Secundario se muestra sólo cuando la
Marca Audio Secundario está encendida (pág. 31).
0 HOME: Muestra la pantalla de menú HOME
(pág. 19).
A DIGEST : Muestra 12 fotografías en
miniatura. Cuando se muestran las miniaturas, puede
continuar a la página siguiente o anterior con /
.
: Muestra la barra de selección
Marcador
(pág. 25).
Nota
PROGRAM MARKER DIGEST ZOOM
STATUS
SUBTITLE
ANGLE
AUDIOSEARCHCLEAR
REPEAT
SETUPPIP
HOME
2ND
AUDIO
ENTER
TOP MENU
RETURN ON SCREEN
POP-UP MENU
A B
J
I
H
F
K
G
A
C
0
7
6
5
4
3
8
9
2
1
E
D
B
Nota
Nota
DVD
VIDEO
DVD CD
BD
BD
PHOTO
DVD VIDEO

7 Es
CONTROLES Y FUNCIONES
Español
INTRODUCCIÓN
1
B p: Enciende el reproductor o lo pone en modo de
espera.
C ZOOM : Ampliar/reducir
zoom. El tamaño de la pantalla cambiará cada vez que
pulse la tecla (ampliar/reducir zoom: 3 pasos cada
uno).
D Teclas de colores : Utilice estas teclas según
las instrucciones en pantalla.
E STATUS: Muestra la información de reproducción
(pág. 24).
F SUBTITLE : Permite cambiar
el idioma de los subtítulos (pág. 42) si está disponible.
También puede seleccionar este elemento desde el
menú en pantalla (pág. 23).
G ANGLE : Permite cambiar el ángulo de
la cámara si el vídeo se ha grabado con varios ángulos.
Cuando esta función está disponible se muestra en
pantalla Marca de Angulo ( ). También puede
seleccionar este elemento desde el menú en pantalla
(pág. 23).
– Marca de Angulo se muestra sólo cuando la Marca
de Angulo está encendida (pág. 31).
H SEARCH :
Permite saltar a un punto especificado durante la
reproducción. Para conocer los detalles sobre esta
función, consulte “Uso de la búsqueda” (pág. 25).
También puede seleccionar este elemento desde el
menú de estado (pág. 24).
I AUDIO : Permite cambiar el idioma o
formato de audio. También puede seleccionar este
elemento desde el menú en pantalla (pág. 23).
J REPEAT
: Permite cambiar el modo de repetición. El
modo de repetición mostrado a continuación cambiará
cada vez que se pulse el botón.
: Permite repetir el título que se está
reproduciendo.
: Permite repetir el capítulo que se está
reproduciendo.
: Permite repetir la carpeta que se está
reproduciendo.
: Permite repetir todas las pistas o los archivos del
disco.
: Permite repetir la pista o el archivo que se está
reproduciendo.
Shuffle All: Permite reproducir todas las pistas o los
archivos del disco aleatoriamente.
K A/B : Permite
reproducir una parte específica que desee repetir.
1 Pulse A/B en la escena donde desee establecer el
punto inicial. En la pantalla se muestra “A-”.
2 Vuelva a pulsar A/B en la escena donde desee
establecer el punto final. En la
pantalla se muestra
“A-B”. Se inicia la reproducción de repetición.
3 Para cancelar la reproducción de repetición, pulse
A/B. “A-B” desaparece y finaliza la reproducción
de repetición.
– Es posible que esta función no se pueda realizar
dependiendo de las especificaciones del disco.
Nota
DVD VIDEO PHOTO
BD
BD DVD VIDEO
BD DVD
BD DVD CD VIDEO MUSIC
BD DVD
BD DVD CD VIDEO MUSIC
PHOTO
Nota
BD DVD CD VIDEO MUSIC
Continúa en la página siguiente.
\

8 Es
CONTROLES Y FUNCIONES
L TOP MENU : Muestra la pantalla de
menú principal (pág. 42) si el disco contiene un menú.
Seleccione el elemento deseado mediante 5 /a /2/3
y ENTER.
– Las operaciones concretas pueden diferir
dependiendo del disco. Siga las instrucciones de
cada pantalla de menú,
M Teclas de cursor (5/a /2/3): Permiten mover la
selección en la pantalla de menú.
ENTER: Elige el menú/elemento seleccionado.
N RETURN: Permite volver al menú o pantalla anterior,
etc.
O Teclas de control
: Detiene la reproducción. Para detener la
reproducción completamente, pulse este botón dos
veces.
: Pausa la reproducción.
: Reproduce el contenido.
()/ ()
: Realiza una ejecución lenta hacia atrás/
hacia adelante. La velocidad de reproducción lenta
cambiará cada vez que pulse la tecla (reproducción
lenta hacia atrás/adelante: 4 pasos cada una).
Estos botones también permiten la reproducción de
avance/retroceso de fotograma durante la pausa.
Pulse para reanudar la reproducción normal.
/
:
Permite buscar hacia atrás/hacia adelante. La
velocidad de búsqueda cambiará cada vez que pulse la
techa (buscar hacia atrás/adelante: 5 pasos cada una).
Pulse para reanudar la reproducción normal.
: Permite cambiar la velocidad de un pase de
diapositivas (más lento/más rápido: 3 pasos).
/ :
Púlselo para realizar una búsqueda o una repetición
instantánea. La búsqueda instantánea salta 30
segundos en el contenido. La repetición instantánea
reproduce el contenido desde 10 segundos antes.
/: Permite saltar hacia atrás/hacia adelante.
– Algunos discos BD/DVD no son compatibles con la
reproducción de avance/retroceso de fotograma.
– En función del disco, el reproductor reanuda la
reproducción desde el punto en el que se paró
anteriormente el reproductor. Par
a reproducir desde
el principio, pulse dos veces y después .
PROGRAM MARKER DIGEST ZOOM
STATUS
SUBTITLE
ANGLE
AUDIOSEARCHCLEAR
REPEAT
SETUPPIP
HOME
2ND
AUDIO
ENTER
TOP MENU
RETURN ON SCREEN
POP-UP MENU
A B
Q
P
L
N
M
O
Nota
Notas
BD DVD
BD DVD CD VIDEO MUSIC PHOTO
BD DVD
BD DVD CD VIDEO MUSIC
PHOTO
BD DVD CD VIDEO MUSIC

9 Es
CONTROLES Y FUNCIONES
Español
INTRODUCCIÓN
1
P POP-UP/MENU : Muestra el menú
emergente. Los contenidos del menú que se visualiza
varían en función del disco. Consulte los detalles
sobre cómo ver y operar el menú emergente en el
manual del disco.
La pantalla del menú principal se puede mostrar
pulsando POP-UP/MENU, dependiendo del DVD.
Q ON SCREEN: Muestra el menú en pantalla
(pág. 23).
Función ID
Puede modificar el ID del mando a distancia para evitar
una utilización no deseada de otro reproductor Yamaha,
como un reproductor de DVD. Si modifica el ID del
mando a distancia, seleccione el mismo ID para la unidad
principal. La configuración predeterminada es ID1.
1 Configuración del mando a distancia
Para modificar el ID de ID1 a ID2, mantenga
pulsado el botón de color rojo y el botón 2 de los
botones numéricos simultáneamente durante 7
segundos. Para modificar el ID de ID2 a ID1,
mantenga pulsado el botón de color rojo y el botón
1 de los botones numéricos simultáneamente
durante 7 segundos.
2 Configuración de la unidad principal
Mantenga pulsado y en el
panel delantero simultáneamente durante 2
segundos para mostrar el ID actual si:
– No hay ningún disco en el reproductor.
– La bandeja portadiscos está cerrada.
– Se detiene la reproducción.
– “NO DISC” aparece en el visor del panel
delantero.
Mantenga pulsadas las teclas durante 2 segundos
más para cambiar el ID de ID1 a ID2.
– Si el mando a distancia está sin pilas durante unos
minutos o si se dejan pilas agotadas en el mando a
distancia, el ID del mando a distancia se ajusta
automáticamente en ID1. Si desea utilizar el mando
a distancia con el ajuste ID2, coloque pilas nuevas y
vuelva a configurar el ID del mando a distancia.
Instalación de las pilas en el mando a
distancia
– No someta al mando a distancia a golpes, agua ni
humedad excesiva.
– El mando a distancia podría no funcionar si el sensor
del reproductor está expuesto a la luz solar directa o
cualquier otra luz fuerte.
– El uso incorrecto de las pilas puede provocar que
revienten o tengan fugas. Lea las advertencias para
las pilas y utilícelas correctamente.
– No mezcle pilas viejas y nuevas, ni mezcle
diferentes marcas.
– Extraiga las pilas si no va a utilizar el mando a
distancia durante un periodo de tiempo prolongado.
– Deshágase de las pilas según la normativa de su
región.
Alcance aproximado de
funcionamiento del mando a distancia
Nota
BD DVD
Notas
1
3
2
2
USB
30˚30˚
Sensor del mando a distancia
6 m

10 Es
CONEXIONES
Encuentre el método de conexión que corresponde a su equipo de vídeo/audio. Le recomendamos que utilice el terminal
HDMI que ofrece audio y vídeo digital de alta calidad en una única conexión. Si utiliza los demás terminales/conectores,
conecte el vídeo en primer lugar. A continuación, conecte el audio.
■ Panel trasero
INTRODUCCIÓN A LAS CONEXIONES
Sí
No
¿Utilizar receptor de A/V?
¿Terminal HDMI en el
receptor de A/V? *
¿Terminal HDMI en el
televisor?
¿Terminal HDMI en el
televisor?
¿Terminal HDMI en el
televisor?
Conecte el vídeo y el audio al televisor mediante cable HDMI.
Conecte el vídeo al televisor.
Conecte el vídeo al televisor mediante
cable HDMI.
Conecte el vídeo al receptor de AV.
Conecte el vídeo y audio al receptor
de A/V mediante cable HDMI.
Consulte el manual de
instrucciones del receptor
de A/V.
INICIO
* Cuando conecte a un receptor de A/V que no pueda dar salida a la
entrada de sonido a través de su terminal HDMI, consulte el manual de
instrucciones del receptor de A/V.
REMOTE CONTROL
OUT IN
R
L
COAXIAL
COMPONENT
PB Y
VIDEO
OPTICAL
P
R
DIGITAL OUT AUDIO OUT
VIDEO OUT
NETWORK
USB
HDMI
67
09
3214 85

11 Es
Español
CONEXIONES
2
1 OPTICAL (pág. 14)
2 USB (pág. 16)
3 HDMI (pág. 12)
4 COMPONENT (pág. 13)
5 VIDEO (pág. 13)
6 AUDIO OUT (L/R) (pág. 15)
7 REMOTE CONTROL (OUT/IN) (pág. 17)
8 AC IN (pág. 17)
9 NETWORK (pág. 16)
0 COAXIAL (pág. 14)
Conexiones para vídeo
Conecte el audio al
receptor de AV.
Conexiones de vídeo al televisor
Conecte el audio al
televisor.
HDMI (pág. 12)
A
Conexión de audio y vídeo al
receptor de A/V
Conexiones de audio para
el receptor de A/V
Conexiones de vídeo y audio al televisor
Conexiones de audio al televisor
HDMI (pág. 12)
A’
COMPONENT (pág. 13)
B
VIDEO (pág. 13)
C
al televisor
al receptor de A/V
o
COMPONENT (pág. 13)
B’
VIDEO (pág. 13)
C’
o
COAXIAL (pág. 14)
D
OPTICAL (pág. 14)
E
o
L/R (pág. 15)
F
o
COAXIAL (pág. 14)
D’
OPTICAL (pág. 14)
E’
o
L/R (pág. 15)
F’
o
HDMI (pág. 12)
A’

12 Es
■ Conexión con el terminal HDMI
– Puede disfrutar de imagen y sonido digital de alta calidad a través del terminal HDMI.
– Conecte con firmeza un cable HDMI (de venta en el comercio) a los terminales HDMI.
– Consulte la página 35 para obtener información sobre los formatos de salida de audio/vídeo.
– Utilice cables HIGH SPEED HDMI que dispongan del logotipo HDMI (tal como se muestra en la cubierta trasera).
¡Precaución!
No conecte el cable de alimentación del reproductor hasta haber finalizado todas las
conexiones.
HDMI CONEXIÓN
– Cuando utilice la función Control HDMI,
consulte “Control HDMI” (pág. 30).
– Para más información sobre el modo de salida
del terminal HDMI, consulte “HDMI”
(pág. 34).
– Si no se muestra la imagen, consulte
“RESOLUCIÓN DE PROBLEMAS”
(pág. 39).
■ Conexión para la
reproducción de discos 3D
de Blu-ray
Para disfrutar de discos 3D de Blu-ray en este
reproductor, necesita los equipos y conexiones
siguientes:
– Necesita un televisor y un receptor de A/V (en
caso necesario) con funcionalidad 3D.
– Todos los componentes deben estar
conectados con cables HDMI.
– El disco Blu-ray debe contener imágenes 3D.
Consejos
COAXIAL
COMPONENT
PB Y
VIDEO
OPTICAL
P
R
DIGITAL OUT AUDIO OUT
VIDEO OUT
NETWORK
USB
HDMI
R
L
HDMI IN
Este reproductor
Al terminal HDMI
Cable HDMI
(de venta en el comercio)
Receptor de A/V
Televisor
A A’
Al terminal de entrada
HDMI

13 Es
Español
CONEXIONES
2
■ Conexión a la toma de vídeo componente
– Puede disfrutar de una reproducción de color precisa y de imágenes de alta calidad a través de las tomas de
componente.
– Conecte con firmeza un cable de vídeo componente (vendido en comercios) o un cable de clavijas de vídeo a la
toma COMPONENT/toma de VIDEO.
– Consulte la página 36 para obtener información sobre los formatos de salida de vídeo.
¡Precaución!
No conecte el cable de alimentación del reproductor hasta haber finalizado todas las
conexiones.
– Si reproduce la imagen mediante una videograbadora, la imagen puede deteriorarse debido a la función de
protección contra la copia.
– Para disfrutar de discos BD-3D en este reproductor, necesita conectar un receptor de A/V, un televisor y este
reproductor con cables HDMI. Consulte la página anterior.
CONEXIONES DE VÍDEO
COAXIAL
COMPONENT
PB Y
VIDEO
OPTICAL
P
R
DIGITAL OUT AUDIO OUT
VIDEO OUT
NETWORK
USB
HDMI
R
L
COMPONENT IN
Y
PB
PR
Este reproductor
Cable de vídeo componente
(de venta en el comercio)
Receptor de A/V
Televisor
(Azul)
(Rojo)
(Verde)
(Verde)
(Azul)
(Rojo)
A la toma
COMPONENT
A las tomas de entrada
de componente
B B’
(Verde)
(Azul)
(Rojo)
(Verde)
(Azul)
(Rojo)
COAXIAL
COMPONENT
PB Y
VIDEO
OPTICAL
P
R
DIGITAL OUT AUDIO OUT
VIDEO OUT
NETWORK
USB
HDMI
R
L
VIDEO
AV INPUT
Este reproductor
Cable de audio/vídeo
(suministrado)
Receptor de A/V Televisor
(Amarillo)
(Amarillo)
(Amarillo)
A la toma
VIDEO
A la toma de entrada
de vídeo
(Amarillo)
C C’
Notas

14 Es
■ Conexión con el terminal/toma de audio digital
– Puede conectar el equipo de audio o el televisor en la toma COAXIAL o el terminal OPTICAL.
– Conecte con firmeza un cable de audio digital coaxial (de venta en el comercio) o un cable óptico (de venta en el
comercio) a la toma de audio digital coaxial o al terminal de audio digital óptico.
– Consulte la información sobre los formatos de salida de audio en la página 35.
¡Precaución!
No conecte el cable de alimentación del reproductor hasta haber finalizado todas las
conexiones.
– Para más información sobre el modo de salida de la toma COAXIAL o terminal OPTICAL, consulte “Coaxial/
Óptica” (pág. 34).
CONEXIONES DE AUDIO
Consejo
COAXIAL
COMPONENT
PB Y
VIDEO
OPTICAL
P
R
DIGITAL OUT AUDIO OUT
VIDEO OUT
NETWORK
USB
HDMI
R
L
AV INPUT
COAXIAL
COAXIAL
COMPONENT
PB Y
VIDEO
OPTICAL
P
R
DIGITAL OUT AUDIO OUT
VIDEO OUT
NETWORK
USB
HDMI
R
L
DIGITAL AUDIO IN
OPTICAL
Este reproductor
Al terminal
OPTICAL
TelevisorReceptor de A/V
Cable óptico
(de venta en el comercio)
Cable de audio digital coaxial
(de venta en el comercio)
Este reproductor
Receptor de A/V
D D’
A la toma
COAXIAL
A la toma de
entrada coaxial
Al terminal de
entrada óptica
Televisor
D’ E E’

CONEXIONES DE AUDIO
15 Es
Español
CONEXIONES
2
■ Conexión con las tomas de audio
– Puede conectar el equipo de audio o el televisor en las tomas AUDIO OUT L/R.
– Conecte con firmeza un cable de audio/vídeo (suministrado) al terminal AUDIO OUT L/R.
– Consulte la información sobre los formatos de salida de audio en la página 35.
¡Precaución!
No conecte el cable de alimentación del reproductor hasta haber finalizado todas las
conexiones.
COAXIAL
COMPONENT
PB Y
VIDEO
OPTICAL
P
R
DIGITAL OUT AUDIO OUT
VIDEO OUT
NETWORK
USB
HDMI
R
L
AUDIO
AUDIO IN
LR
A la toma AUDIO
OUT L/R
Cable de audio/vídeo
(suministrado)
(Blanco)
(Rojo)
(Blanco) (Rojo)
TelevisorReceptor de A/V
Este reproductor
A la toma de entrada
de audio L/R
F F’
(Blanco)
(Rojo)
(Blanco)
(Rojo)

16 Es
■ Conexión con el terminal NETWORK y el puerto USB
– El contenido del PC se puede reproducir conectando este reproductor a la red.
– Puede disfrutar de una variedad de contenido con funciones interactivas gracias a la conexión a Internet cuando
reproduzca discos compatibles BD-Live. Consulte la página 26 para obtener información adicional sobre las
funciones de BD-Live.
– Puede conectar un dispositivo de memoria USB (2 GB o superior y formateado con FAT 32/16) para BD
Almacenamiento Local al puerto USB del panel posterior (o delantero) del reproductor para guardar los datos BD-
Live o para actualizar el software de este reproductor.
– Conecte con firmeza un cable de red (vendido en comercios) y un dispositivo de memoria USB (vendido en
comercios) al terminal NETWORK y al puerto USB.
– Utilice sólo un cable de red STP (par trenzado blindado).
– Cuando se emplee Internet, se necesita una conexión a Internet de banda ancha como se muestra más abajo.
– Conecte el otro conector del cable de red al nodo/enrutador de banda ancha.
Antes de utilizar el dispositivo de memoria USB
Después de la conexión
– Para establecer el parámetro de Red manualmente, consulte “Red” (pág. 32).
– Para reproducir el contenido del PC en su red, consulte “Uso del contenido de red” (pág. 21).
CONEXIÓN DE RED Y USB
– Cuando utilice una conexión a Internet de
banda ancha, es necesario un contrato con
un proveedor de servicios de Internet. Para
más información, póngase en contacto con
su proveedor de servicios de Internet más
cercano.
– Consulte el manual de manejo de su equipo
ya que el equipo conectado y el método de
conexión pueden variar dependiendo de su
entorno de Internet.
– Emplee un cable de red/enrutador
compatible con 10BASE-T/100BASE-TX.
PRECAUCIÓN:
– No desconecte el dispositivo de memoria
USB ni desenchufe el cable de
alimentación mientras se estén
realizando las operaciones de BD-Live
(pág. 26) o se esté llevando a cabo la
actualización del software.
– No utilice un cable de extensión USB
cuando conecte un dispositivo de
memoria USB al puerto USB del
reproductor. El uso de un cable de
extensión USB podría impedir que el
reproductor funcione correctamente.
– Yamaha no puede garantizar que todas
las marcas de dispositivos de memoria
USB funcionen con este reproductor.
Notas
Nota
COAXIAL
COMPONENT
PB Y
VIDEO
OPTICAL
P
R
DIGITAL OUT AUDIO OUT
VIDEO OUT
NETWORK
USB
HDMI
R
L
LAN
Este reproductor
Al terminal
NETWORK
Internet
Módem
Cable de red
(de venta en el comercio)
Nodo o enrutador
de banda ancha
PC
Al puerto
USB
Dispositivo de memoria USB
(de venta en el comercio)
Al terminal
LAN
– Para guardar los datos
de BD-Live en el
dispositivo de
memoria USB del
panel frontal,
establezca
Almacenamiento
Local en USB Frontal
(pág. 30).
Consejo

17 Es
Español
CONEXIONES
2
■ Conexión a las tomas REMOTE
CONTROL
– Puede transmitir y recibir las señales del mando a
distancia conectando a las tomas REMOTE
CONTROL (OUT/IN).
– Conecte con firmeza cables con mini clavija mono
de 3,5 mm (de venta en el comercio) en las tomas
REMOTE CONTROL (OUT/IN).
– Si su receptor de AV es un producto Yamaha y tiene
la capacidad de transmitir señales de control
SCENE, puede controlar el reproductor con la
función SCENE.
¡Precaución!
No conecte el cable de alimentación del
reproductor hasta haber finalizado todas
las conexiones.
– Para más detalles sobre la función SCENE, consulte
el manual de instrucciones de su receptor de A/V
Yamaha.
– Puede conectar un componente Yamaha (como, por
ejemplo, un reproductor de CD) que sea compatible
con la función SCENE a la toma REMOTE
CONTROL (OUT) de este reproductor.
■ Conexión del cable de
alimentación
– Después de realizar todas las conexiones, enchufe el
cable de alimentación suministrado a la AC IN de la
parte trasera del reproductor. A continuación
enchúfelo en una toma de CA.
– PARA PREVENIR EL RIESGO DE DESCARGAS
ELÉCTRICAS, NO TOQUE LAS PARTES SIN
AISLAMIENTO DE NINGÚN CABLE CUANDO
EL CABLE DE ALIMENTACIÓN ESTÉ
CONECTADO.
OTRAS CONEXIONES
REMOTE CONTROL
OUT IN
E
O
AUDIO OUT
R
L
REMOTE CONTROL IN
REMOTE CONTROL OUT
Este reproductor
A la toma
REMOTE
CONTROL (IN)
Cable con mini clavija
mono de 3,5 mm
(de venta en el comercio)
A la toma de
entrada del
mando a
distancia
Componente Yamaha
A la toma
de salida
del mando a
distancia
Cable con mini
clavija mono de
3,5 mm
(de venta en el
comercio)
Receptor de señales infrarrojas
o componente Yamaha (por
ejemplo, un receptor A/V)
A la toma
REMOTE
CONTROL
(OUT)
Consejos
Nota
A la toma de CA
A la entrada de CA

18 Es
REPRODUCCIÓN
■ Configuración con el Asistente
inicial/Configuración Sencilla
Asistente inicial/Configuración Sencilla le permite
establecer con facilidad el idioma, la resolución y la
relación de aspecto de pantalla. La pantalla Asistente
inicial se muestra cuando enciende el reproductor por
primera vez después de la compra o actualización. El
mismo ajuste se puede realizar desde el menú SETUP =
Sistema = Configuración Sencilla.
1 Cuando se muestre la pantalla Configuración Sencilla,
pulse ENTER para iniciar Configuración Sencilla.
2 Pulse 5/a para seleccionar el idioma que desea ver en
la pantalla y, después, pulse ENTER.
3 Pulse 5/a para seleccionar la resolución, a
continuación pulse ENTER. Para obtener detalles
sobre la configuración de elementos, consulte
“Resolución” (pág. 33).
4 Pulse 5/a para seleccionar la relación de aspecto de
pantalla, a continuación pulse ENTER. Para más
detalles sobre la configuración de elementos, consulte
“Pantalla de TV” (pág. 32).
La Configuración Sencilla se ha completado.
5 Pulse ENTER para salir de Configuración Sencilla.
– Si no se muestra la imagen tras completar Asistente
inicial/Configuración Sencilla, consulte
“RESOLUCIÓN DE PROBLEMAS” (pág. 39).
– Aparecerá un mensaje de advertencia acerca de la
reproducción de vídeo en 3D cuando este
reproductor esté encendido. Pulse ENTER para
descartar el mensaje o CLEAR para desactivarlo
(pág. 30).
ASISTENTE INICIAL/CONFIGURACIÓN SENCILLA
Notas
ENTER
FinalizarAnterior
Configuración
Página: 5/5
Configuración Sencilla
¡ se va a finalizar el asistente !
Ahora presione el botón Finalizar para ir al Menú
Inicio. Por favor, disfrútelo.

19 Es
Español
REPRODUCCIÓN
3
Los menús HOME y MEDIA le permiten examinar y
reproducir archivos multimedia en discos de datos,
dispositivos de memoria USB y su red.
– Para conocer los detalles sobre los discos y formatos
que se pueden reproducir, consulte la página 3.
■ Reproducción de Foto/Música/
Vídeo
Funcionamiento básico
5/a : Mueve la selección.
2: Vuelve a la carpeta principal.
3: Activa/desactiva el archivo/carpeta simple.
HOME: Permite entrar/salir de la pantalla de menú
HOME.
ENTER: Confirma la carpeta/archivo.
Iconos sobre el menú MEDIA
: Reproduce el disco que hay en la bandeja o muestra
el contenido del disco de datos.
: Muestra el contenido del dispositivo de memoria
USB conectado al puerto USB.
: Busca un servidor DLNA (pág. 21) en la red.
: Muestra el contenido del servidor DLNA conectado.
Operaciones comunes para la
reproducción de archivos en una
carpeta seleccionada
Ejemplo: Selección de un archivo de película en un
dispositivo de memoria USB
– Detenga la reproducción del vídeo antes de
desplazarse a la pantalla de menú MEDIA.
1 Pulse HOME para pasar a la pantalla del menú HOME.
Pulse 2/3 para seleccionar MEDIA y pulse ENTER.
2 Aparece la pantalla MEDIA.
3 Seleccione el elemento que contiene el archivo que
desea reproducir, a continuación pulse ENTER.
MENÚ HOME/MEDIA
Nota
REPEAT
SETUPPIP
2ND
AUDIO
ENTER
TOP MENU
RETURN ON SCREEN
POP-UP MENU
A BHOME
Nota

MENÚ HOME/MEDIA
20 Es
4 Seleccione la carpeta Foto, Música, Vídeo o AVCHD
que desea reproducir, a continuación pulse ENTER.
Para volver a la carpeta principal, pulse 2 o seleccione
.
– Tenga en cuenta que en el siguiente paso sólo se
mostrarán los archivos del tipo que seleccione en
este paso. Por ejemplo, si selecciona la carpeta Foto
en este paso, sólo se mostrarán archivos de fotos
después de este paso. Cuando desee reproducir un
tipo de archivo distinto a foto, vuelva a esta jerarquía
y seleccione de nuevo el tipo de archivo.
5 Seleccione las carpetas que contienen el archivo que
desea reproducir.
6 Seleccione el archivo que desea reproducir, a
continuación pulse ENTER.
Cuando se selecciona un archivo de vídeo se inicia la
reproducción.
Cuando se selecciona un archivo de música, se muestra
la pantalla de estado y se inicia la reproducción.
Cuando se selecciona un archivo de fotografía se inicia
el pase de diapositivas.
– Para disfrutar del pase de diapositivas con música,
pulse HOME para volver a la pantalla de menú
HOME mientras se reproduce la música y seleccione
archivo de fotos.
– Es posible que el archivo mostrado no se reproduzca
dependiendo del contenido.
Operaciones para visualización de
fotos
Mientras se ven fotos los botones del mando a distancia
funcionan como se indica a continuación.
: Detiene el pase de diapositivas y vuelve al explorador
de archivos.
: Establece una pausa en un pase de diapositivas.
: Reproduce un pase de diapositivas.
: Pasa a la fotografía siguiente.
: Pasa a la fotografía anterior.
: Acelera un pase de diapositivas en 3 pasos.
: Ralentiza un pase de diapositivas en 3 pasos.
5: Invierte una foto.
a : Muestra la foto reflejada.
2: Gira una foto en sentido contrario a las agujas del
reloj.
3: Gira una foto en el sentido de las agujas del reloj.
ZOOM: Amplía/reduce una foto (ampliar/reducir zoom: 3
pasos cada uno).
5/a /2 /3: Permite desplazarse en modo de zoom
cuando la foto es mayor que la pantalla.
DIGEST: Cambia a modo de miniaturas (pág. 6). Cuando
se muestran las miniaturas, puede continuar a la página
siguiente o anterior con / .
Nota
Consejo
Nota

MENÚ HOME/MEDIA
21 Es
REPRODUCCIÓN
3
Español
■ Uso del contenido de red
Este reproductor es un reproductor multimedia digital
certificado para DLNA. Puede administrar contenido de
fotos, música y vídeo almacenado en servidores DLNA en
su red doméstica.
Acerca de DLNA
DLNA (Digital Living Network Alliance) permite
compartir de forma sencilla medios digitales a través de
una red doméstica y puede disfrutar del contenido digital
almacenado en su software, PC instalado, servidor DLNA
u otro dispositivo compatible con DLNA con su TV a
través de este reproductor. Para conectar este reproductor
a sus servidores DLNA se requieren algunos ajustes del
dispositivo o del servidor DLNA. Para más detalles,
consulte el software del servidor DLNA o el dispositivo
DLNA.
Reproducción de contenido
compartido
1 Para reproducir archivos en el PC, instale un software
de servidor DLNA como, por ejemplo Windows Media
Player 12 y comparta los archivos que desee
reproducir.
2 Encienda el PC con el software de servidor DLNA
instalado o el dispositivo DLNA conectado a su red
doméstica.
3 Pulse HOME para mostrar la pantalla de menú HOME.
Seleccione MEDIA para pasar al menú MEDIA. Los
servidores DLNA conectados a la red aparecen en
pantalla.
– Si su servidor DLNA no aparece en la lista,
seleccione Buscar DLNA para buscarlo.
– Dependiendo del servidor DLNA, es posible que sea
necesario autorizar al reproductor desde el servidor.
– Para reproducir el archivo en el servidor DLNA, el
reproductor y el servidor deben estar conectados al
mismo punto de acceso.
– Es posible que los requisitos de archivo no siempre
sean compatibles. Podría haber algunas restricciones
dependiendo de las características de los archivos y
de la capacidad del servidor DLNA.
4 Seleccione el archivo que desee reproducir.
– La calidad de funcionamiento y reproducción podría
verse afectada por las condiciones de la red
doméstica.
– Es posible que los archivos de medios extraíbles
tales como dispositivos de memoria USB o unidades
de DVD del servidor de medios no se compartan
correctamente.
Notas
Notas

22 Es
Puede ver instantáneamente los vídeos que proporcionan los servicios de red siguientes.
– YouTube
– El acceso a contenido suministrado por terceros requiere una conexión de Internet de alta velocidad y también un
registro de cuenta y una suscripción de pago.
– Los servicios de contenido de terceros pueden modificarse, suspenderse, interrumpirse o dejar de proporcionarse en
cualquier momento sin previo aviso, y Yamaha no asume ninguna responsabilidad en relación con dichos sucesos.
– Es posible que parte del contenido sólo esté disponible para países específicos y que se presente en idiomas
específicos.
– Yamaha no representa ni garantiza que los servicios de contenido se seguirán proporcionando o estarán disponibles
durante un periodo de tiempo concreto, y se rechaza cualquier garantía de este tipo, ya sea expresa o implícita.
Puede ver películas desde YouTube a través de Internet
mediante este reproductor.
Los servicios pueden modificarse sin previo aviso.
1 Pulse HOME para mostrar la pantalla de menú HOME.
– La pantalla de menú HOME puede variar en función
del modelo.
2 Pulse 5/a /2/3 para seleccionar YouTube, a
continuación pulse ENTER.
– Para volver a la pantalla de menú HOME, pulse
RETURN.
USO DE SERVICIOS DE RED
Nota
REPRODUCCIÓN DE VÍDEOS DESDE YouTube™
Consejo
Consejo
EnterSeleccione

23 Es
Español
REPRODUCCIÓN
3
En este capítulo se explica la reproducción de discos BD y
DVD de venta en el comercio, CD y discos DVD-RW/R
grabados.
– Para conocer el funcionamiento básico de
reproducción, consulte la página 6.
■ Menú en pantalla
Para mostrar el menú en pantalla, pulse ON SCREEN. A
continuación, pulse 5/a /2/3 para seleccionar un
elemento, después pulse ENTER para utilizar la función
deseada.
El menú en pantalla consta de los siguientes elementos.
Título : Muestra el número del
título que se está reproduciendo. Puede saltar al título
deseado seleccionándolo desde este elemento.
Capítulo : Muestra el número del
capítulo que se está reproduciendo. Puede saltar al
capítulo deseado seleccionándolo desde este elemento.
Pista/Archivo :
Muestra el número de la pista o archivo que se está
reproduciendo. Puede saltar a la pista o al archivo deseado
seleccionándolo desde este elemento.
Hora : Muestra el
tiempo de reproducción. Seleccione el tipo de
visualización entre los siguientes:
– Tiempo de reproducción transcurrido del título,
capítulo, disco, pista o archivo
– Tiempo de reproducción restante del título, capítulo,
disco, pista o archivo
Modo/Modo de reproducción
: Muestra el
modo de reproducción actual. Puede seleccionar uno de
los modos de reproducción siguientes:
– Normal: Reproducción normal.
– Shuffle: Reproducción aleatoria sin repetición.
– Aleatorio: Reproducción aleatoria con repetición.
– Normal
– Shuffle CH (capítulo)
– Shuffle TT (título)
– Shuffle All
– Aleatorio CH (capítulo)
– Aleatorio TT (título)
– Aleatorio All
– Normal
– Shuffle F (carpeta)
– Shuffle All
– Aleatorio F (carpeta)
– Aleatorio All
Audio : Muestra el idioma/señal de
audio del disco BD/DVD seleccionado actualmente.
Puede seleccionar el tipo de audio deseado.
Ángulo : Muestra el número del ángulo
seleccionado actualmente. Si el vídeo se ha grabado con
varios ángulos, puede cambiar el ángulo.
Subtítulo : Muestra el idioma de
los subtítulos seleccionados actualmente si hay subtítulos.
Estilo subtítulos : Muestra el estilo de los
subtítulos seleccionados actualmente. Esta función sólo
está disponible para subtítulos externos de archivo de
vídeo. Puede seleccionar el estilo de texto deseado de los
subtítulos.
Bitrate : Muestra el
bitrate de la señal de audio/vídeo.
Video secundario : Ac
tiva o desactiva PIP
(pág. 6).
Audio Secundario : Activa o desactiva el audio
secundario (pág. 6).
Búsqueda Ins
: Salta 30 segundos.
Repetición Ins
: Reproduce el
contenido desde 10 segundos antes.
Pase de diapositivas :
Muestra la velocidad del pase de diapositivas. Puede
seleccionar la velocidad del pase de diapositivas entre
Lento/Medio/Rápido.
Transición : Muestra cómo aparece la foto en
la pantalla. Puede seleccionar el tipo de transición.
Code Page : Permite seleccionar el código de
caracteres de los subtítulos que ha agregado al vídeo DivX
(pág. 41).
FUNCIONAMIENTO DE REPRODUCCIÓN AVANZADO
Nota
BD DVD VIDEO
BD DVD VIDEO
CD VIDEO MUSIC PHOTO
BD DVD CD VIDEO MUSIC
DVD CD VIDEO MUSIC PHOTO
CD
DVD
VIDEO MUSIC PHOTO
BD DVD VIDEO
BD DVD
BD DVD VIDEO
BD
BD DVD CD VIDEO MUSIC
BD
BD
BD DVD CD VIDEO MUSIC
BD DVD CD VIDEO MUSIC
PHOTO
PHOTO
VIDEO

FUNCIONAMIENTO DE REPRODUCCIÓN AVANZADO
24 Es
■ Menú de estado
Muestra varios ajustes, cómo los subtítulos, el ángulo y el
número de título/capítulo/pista reproducido actualmente.
Para mostrar el menú de estado, pulse STATUS. El menú
de estado consta de los siguientes menús.
Ejemplo: Iconos cuando se reproduce BD
1 (Estado de reproducción)
2 (Icono de tipo de disco/archivo de vídeo)
3 (Número de título que se reproduce): Puede
saltar al título especificado con la tecla SEARCH
(pág. 7).
4 (Número de capítulo que se reproduce):
Puede saltar al capítulo especificado con la tecla
SEARCH (pág. 7).
5 (Tiempo de reproducción transcurrido):
Puede saltar al punto especificado con la tecla
SEARCH (pág. 7).
6 (Subtítulos seleccionados actualmente):
Puede cambiar el idioma de los subtítulos con la tecla
SUBTITLE.
7 (Audio seleccionado actualmente): Puede
cambiar el formato o idioma de audio con la tecla
AUDIO.
8
(Modo repetición):
Muestra el modo repetición
actual (pág. 7).
Ejemplo: Iconos cuando se reproduce un archivo de
música
1 (Estado de reproducción)
2
(Modo repetición):
Muestra el modo repetición
actual (pág. 7).
3 (Icono de tipo de disco/archivo de música)
4 (Gráficos) : Muestra gráficos si están
contenidos en el archivo.
5 (Número de pista/archivo que se
reproduce): Puede saltar a la pista especificada con
la tecla SEARCH (pág. 7).
6 (Información) : Muestra información
musical si está contenida en el archivo.
7 (Tiempo de reproducción transcurrido):
Puede saltar al punto especificado con la tecla
SEARCH (pág. 7).
8 (Barra de progreso) : Muestra el estado de
progreso de la canción actual.
9 (Medidor de nivel de audio): muestra el nivel de
volumen actual.
1 (Estado de reproducción)
2 (Icono de archivo de fotos)
3 (Número de archivo que se muestra)
4
(Modo repetición):
Muestra el modo repetición
actual (pág. 7).
5 (Velocidad de pase de diapositivas)
BD DVD VIDEO
13
678
245
CD MUSIC
14327
89
65
MUSIC
MUSIC
MUSIC
PHOTO

FUNCIONAMIENTO DE REPRODUCCIÓN AVANZADO
25 Es
REPRODUCCIÓN
3
Español
■ Uso de Marcador
Le permite establecer un Marcador en un punto
especificado del vídeo. Después de establecer el
Marcador, puede saltar al punto utilizando esta función.
Puede definir hasta 12 marcadores.
1 Pulse MARKER durante la reproducción de la película
para definir el Marcador. Se muestran el número de
Marcador y el estado.
2 Después de establecer el Marcador, pulse DIGEST
para mostrar la barra de selección de Marcador.
3 Pulse 2/3 para seleccionar el Marcador que desee
reproducir, a continuación pulse ENTER.
Pulse CLEAR para eliminar el Marcador seleccionado.
– Cuando finaliza la reproducción (por ejemplo, al
expulsar el disco o al presionar dos veces), los
marcadores se eliminan automáticamente.
■ Reproducción de
programa
Esta opción le permite programar el orden de
reproducción de las pistas de un disco de audio o de los
capítulos de DVD.
Pulse PROGRAM durante la reproducción para mostrar
la ventana PROGRAMA para programar el orden de
reproducción.
Puede programar hasta 15 pistas/capítulos.
Ejemplo: Programación del orden de reproducción de
pistas de CD
1 Pulse PROGRAM durante la reproducción.
2 Pulse ENTER para programar el orden de
reproducción.
Para un disco de audio, pulse 5/a para seleccionar
una pista deseada y, a continuación, pulse ENTER.
Para un disco DVD-Vídeo, seleccione un título
deseado (mostrado como TT) y capítulo (mostrado
como CH) en lugar de una pista.
Para borrar una pista establecida, seleccione la pista
que desea borrar y, a continuación, pulse CLEAR.
Pulse RETURN para cancelar la reproducción del
programa.
3 Una vez finalizada la programación, pulse para
definir e iniciar la reproducción del programa.
4 Para cancelar la reproducción del programa, detenga la
reproducción por completo pulsando dos veces.
■ Uso de la búsqueda
Esta opción le permite saltar a un punto específico durante
la reproducción.
1 Pulse SEARCH durante la reproducción. Aparece la
barra de estado.
2 Pulse 5/a /2/3 para seleccionar uno de los
elementos siguientes, a continuación pulse ENTER.
:
– Número de título (mostrado como )
– Número de capítulo (mostrado como )
– Tiempo de título transcurrido (mostrado como )
– Tiempo de capítulo transcurrido (mostrado como )
:
– Número de pista (mostrado como )
– Tiempo de pista transcurrido (mostrado como )
– Tiempo de disco transcurrido (mostrado como )
:
– Número de archivo (mostrado como )
– Tiempo de archivo transcurrido (mostrado como
)
3 Pulse 5 /a o las teclas de número para definir o ajustar
el valor del elemento seleccionado y pulse ENTER
para saltar al punto especificado.
4 Para cerrar la barra de estado, pulse STATUS.
Nota
DVD VIDEO
DVD CD
BD DVD CD VIDEO MUSIC
BD DVD
CD
VIDEO MUSIC

FUNCIONAMIENTO DE REPRODUCCIÓN AVANZADO
26 Es
■ Disfrute de BONUSVIEW™ y BD-
Live™
Este reproductor admite las funciones de reproducción de
BONUSVIEW (pág. 41) (BD-ROM Perfil 1 Versión 1.1)
y BD-Live (pág. 41) (BD-ROM Perfil 2).
– Las funciones y el método de reproducción varían
según el disco. Siga las indicaciones del disco o del
manual de usuario suministrado.
■ Utilización de la función Imagen
en Imagen
(reproducción de audio/vídeo
secundario)
El Vídeo BD que incluye audio y vídeo secundario
compatible con Imagen en Imagen se puede reproducir
con audio y vídeo secundario simultáneamente como un
vídeo pequeño en la esquina.
Mientras se muestra Marca PIP ( ) o
Marca Audio Secundario ( ), pulse
PIP para activar o desactivar la
función Imagen en imagen.
– Para escuchar audio secundario, asegúrese de que el
ajuste Salida de audio (Coaxial/Óptica o HDMI) se
ha definido en PCM o Recodificar (pág. 34).
– Dependiendo del disco, para escuchar audio
secundario, es posible que tenga que activar el audio
secundario en el menú principal del disco (pág. 8).
– Dependiendo del contenido, el audio y el vídeo
secundario para Imagen en Imagen pudiera
reproducirse y desaparecer automáticamente.
Además, pudiera haber restricción respecto a las
áreas que pueden visualizarse.
■
Utilización de la función de BD-Live™
1. Ajuste de la configuración de red
(pág. 32).
2. Conecte el dispositivo de memoria
USB al reproductor (pág. 16).
Los datos de BD-Live se guardan en un dispositivo de
memoria USB conectado a este reproductor. Para
disfrutar de estas funciones, conecte un dispositivo de
memoria USB (2 GB o superior y formateado con
FAT 32/16) compatible con USB 2.0 de alta velocidad
(480 Mbit/s) al puerto USB seleccionado en
Almacenamiento Local (pág. 30). La configuración
predeterminada es el puerto USB del panel trasero.
– La carpeta BUDA se crea automáticamente en el
dispositivo de memoria USB cuando es necesario.
– Si el espacio de almacenamiento es insuficiente, los
datos no se copiarán/descargarán. Elimine datos
innecesarios o utilice un nuevo dispositivo de
memoria USB.
– Puede requerirse algún tiempo para que se carguen
(lectura/escritura) los datos.
– Yamaha no puede garantizar que todas las marcas de
dispositivos de memoria USB funcionen con este
reproductor.
– No utilice un cable de extensión USB cuando
conecte un dispositivo de memoria USB al puerto
USB del reproductor. El uso de un cable de
extensión USB podría impedir que el reproductor
funcione correctamente.
3. Reproducción del disco.
4. Ejecute BD-Live siguiendo las
instrucciones del disco.
– En relación con el método de reproducción de
contenidos BD-Live, etc., lleve a cabo las
operaciones de acuerdo con las instrucciones del
manual del disco BD.
– Para disfrutar de las funciones de BD-Live, realice la
conexión de red (pág. 16) y los ajustes de Red (pág. 32).
– Consulte la “Conexión BD-Live” (pág. 32) en
relación con la configuración para restringir el
acceso a contenidos BD-Live.
– El tiempo que se necesita para descargar los
programas que se ofrecen al dispositivo de memoria
USB conectado en este reproductor depende de las
velocidades de conexión a Internet y del volumen de
datos de los programas.
– Los programas BD-Live suministrados a través de
Internet podrían no ser capaces de mostrar la conexión
dependiendo del estado (actualización) del proveedor.
En tal caso, extraiga el disco y vuelva a intentarlo.
– Si la pantalla BD-Live no aparece durante un rato
después de seleccionar la función BD-Live en el
menú del disco BD, es posible que el dispositivo de
memoria USB no tenga suficiente espacio libre. En
tal caso, expulse el disco del reproductor y, a
continuación, borre los datos del dispositivo de
memoria USB utilizando el menú “Formato” de
“Almacenamiento Local” (pág. 30).
Nota
Notas
Vídeo principal Vídeo secundario
Notas
Notas

27 Es
Español
AJUSTES
4
AJUSTES
El Menú SETUP permite realizar diversos ajustes y configuraciones audio/visuales en las funciones utilizando el mando
a distancia.
MENÚ SETUP
Menú/Submenú Elemento Función Página
Configuración
General
Sistema Protector de pantalla Activa/desactiva el protector de pantalla. 30
Reproducción
Automática Disco
Ajusta el reproductor para que inicie automáticamente la
reproducción del disco.
30
Control HDMI Configura el reproductor para que reciba la señal de control
desde el mando a distancia de su receptor de TV/AV.
30
Control de Red Activa o desactiva el control a través de Ethernet. 30
Cargar
configuración por
defecto
Restablece todos los ajustes a los valores predeterminados,
excepto el ajuste Seguridad. 30
Actualizar Realiza la actualización del reproductor. 30
Configuración
Sencilla
Ajusta el idioma, la resolución y la relación de aspecto de la
pantalla.
30
Almacenamiento
Local
Muestra el estado de Almacenamiento Local (pág. 30),
formatea Almacenamiento Local y selecciona el puerto USB
delantero o posterior de Almacenamiento Local.
30
Mensaje
Reproducción 3D
Muestra un mensaje de advertencia acerca de la reproducción
de vídeo en 3D cuando este reproductor esté encendido.
30
Idioma OSD Selecciona el idioma del menú en pantalla. 31
Menú Permite dar prioridad al idioma del menú del disco. 31
Audio Permite dar prioridad al idioma del audio. 31
Subtítulo Permite dar prioridad al idioma de los subtítulos. 31
Reproducción Subtítulos Activa o desactiva los subtítulos. 31
Marca de Angulo Ajuste para mostrar la Marca de Angulo cuando se
reproducen BD/DVD con ángulos múltiples.
31
Marca PIP Ajuste para mostrar la Marca PIP cuando se reproducen BD/
DVD con Imagen en imagen.
31
Marca Audio
Secundario
Ajuste para mostrar la Marca Audio Secundario cuando se
reproducen BD/DVD con audio secundario.
31
Memoria última Configura este reproductor para que recuerde la posición de
la última reproducción de un disco cuando se pone en modo
de espera o si la bandeja portadiscos está abierta.
31
DivX(R) VOD
DRM
Muestra el código de registro del vídeo DivX(R).
31
Seguridad Cambiar Contraseña Permite cambiar la contraseña de Control Paterno y Código
de país.
31
Control Paterno Establece el Control Paterno en función del contenido del
disco.
31
Código de país Establece el Código de país. 31
Red Conexión a Internet Permite definir la conexión a Internet en Permitir/Desactivar. 32
Información Muestra la pantalla de información de red. 32
Prueba de conexión Realiza la prueba de conexión de red. 32
Configuración IP Permite definir la configuración IP en Auto/Manual. 32
Conexión BD-Live Permite definir la conexión a BD-Live en Autorizada/
Permitida Parcialmente/Prohibido.
32
DLNA Permite definir la conexión a DLNA en Permitir/Desactivar. 32
Configuración
Proxy
Permite definir la configuración proxy.
32

MENÚ SETUP
28 Es
Configuración de
pantalla
TV Salida 3D Selecciona vídeos en 3D o 2D. 32
Pantalla de TV Ajusta la relación de aspecto de la pantalla del televisor
conectado, y ajusta la salida de vídeo.
32
Resolución Selecciona la resolución del vídeo de salida. 33
Sistema de TV Permite seleccionar el Sistema de TV entre NTSC/PAL/
Multi.
33
Color Space Permite seleccionar Color Space entre YCbCr 4:4:4/YCbCr
4:2:2/Full RGB/RGB.
33
HDMI Deep Color Permite seleccionar HDMI Deep Color entre 30 bits/36 bits/
Desactivar.
33
HDMI 1080p 24Hz Activa o desactiva HDMI 1080p 24Hz. 33
Sincronismo de
labios
Ajusta el retardo entre vídeo y audio, como por ejemplo
cuando el movimiento de la boca no se corresponde con la
voz.
33
Procesamiento
de Video
Modo de Vídeo Ajusta la imagen visual. 33
Ajuste de color Ajusta Brillo/Saturación/Tonalidad para cada color. 33
Contraste
automático
Ajusta el contraste para optimizar la imagen reproducida.
33
Reducción de ruido Ajusta el nivel de Reducción de ruido. 33
Modo
desentrelazado
Ajusta cómo detectar la señal de vídeo.
33
Configuración de
audio
Salida de audio Coaxial/Óptica Permite seleccionar el modo de salida de la toma COAXIAL/
terminal OPTICAL entre Bitstream/PCM/Recodificar/
Desactivar.
34
HDMI Permite seleccionar el modo de salida del terminal HDMI
entre Bitstream/PCM/Recodificar/Desactivar.
34
Downsampling Permite seleccionar la frecuencia de submuestreo de la señal
de audio digital entre 48k/96k/192k.
34
DRC Define el DRC (Control de gama dinámica). 34
Ajuste de altavoz Mezcla descendente
2 Canales
Establece la salida de audio de la toma AUDIO OUT L/R.
34
Post-
procesamiento
Mezcla ascendente Convierte la señal de audio de 2 canales en multicanal.
34
Sistema de
Información
Muestra la versión de software y la dirección MAC (pág. 42).
34
Menú/Submenú Elemento Función Página

MENÚ SETUP
29 Es
AJUSTES
4
Español
■ Ejemplo de funcionamiento del
menú SETUP
Debe llamar a la pantalla de menú SETUP para realizar
los ajustes en el reproductor. A continuación se explican
las operaciones básicas del menú SETUP.
Ejemplo: Ajuste de Control Paterno
– Algunos elementos no se pueden ajustar durante la
reproducción. En este caso, pulse dos veces para
detener la reproducción completamente antes de
realizar el ajuste.
1. Muestre la pantalla de menú SETUP.
Pulse SETUP para mostrar la pantalla de menú
SETUP.
Pulse 2/3 para seleccionar Configuración General,
a continuación pulse ENTER o a .
2. Seleccione un submenú.
Pulse 5/a para seleccionar Seguridad, a
continuación pulse ENTER o el cursor 3.
3. Seleccione un elemento del menú.
Pulse 5 /a para seleccionar Control Paterno, a
continuación pulse ENTER o el cursor 3.
4. Introduzca la contraseña.
Introduzca la contraseña con las teclas numéricas.
– La contraseña predeterminada es 0000.
– No puede ir a la siguiente pantalla de
configuración hasta que no haya introducido la
contraseña correcta.
– Para cambiar la contraseña, consulte “Cambiar
Contraseña” (pág. 31).
5. Seleccione un elemento siguiente.
Pulse 5 /a para seleccionar el nivel de Control
Paterno para BD/DVD, a continuación pulse
ENTER.
6. Salga de la pantalla del menú
Pulse 2 para volver al menú anterior.
Nota
ENTER
TOP MENU
RETURN ON SCREEN
POP-UP MENU
STATUS
SUBTITLE
ANGLE
AUDIOSEARCHCLEAR
REPEAT
SETUPPIP
2ND
ABHOME

MENÚ SETUP
30 Es
■ Configuración General
Los ajustes predeterminados están marcados con “
*
”.
Sistema
Protector de pantalla
Puede definir el protector de pantalla en activado o
desactivado.
Cuando se activa, el reproductor pasará a modo de
protector de pantalla si no se utiliza durante 5 minutos.
Posteriormente, el reproductor pasará a modo de espera
cuando no se utilice durante 20 minutos.
Activar
*
, Desactivar
Reproducción Automática Disco
Puede activar o desactivar la Reproducción Automática
Disco. Cuando se activa, el disco se reproducirá
automáticamente después de cargarlo.
Activar
*
, Desactivar
Control HDMI
Puede ajustar el reproductor para que reciba una señal de
control desde un receptor de TV/AV compatible con la
función Control HDMI a través de un cable HDMI (pág. 12).
Activar, Desactivar
*
Control de Red
Puede activar el control a través de Ethernet. Este
reproductor utiliza el protocolo Yamaha Network Control
(YNC).
Activar, Desactivar
*
– Cuando está activado, el consumo de energía durante
el modo de espera aumenta por la función de control
de red.
– Cuando está activado, se reduce el tiempo de inicio
del sistema.
Cargar configuración por defecto
Puede restablecer todos los ajustes de este reproductor al
ajuste predefinido, excepto el ajuste Seguridad (pág. 31).
Para conocer detalles sobre los ajustes predeterminados,
consulte las páginas 27-34.
Actualizar
Puede actualizar el software manualmente desde Disc,
USB Storage o Network. Para conocer detalles sobre la
actualización de software, consulte “ACTUALIZACIÓN
DE SOFTWARE” (pág. 37).
Configuración Sencilla
Puede realizar la Configuración Sencilla (pág. 18).
Almacenamiento Local
Puede mostrar información de Almacenamiento Local,
formatear Almacenamiento Local y seleccionar USB
Frontal/USB Trasera para guardar los datos de BD-Live.
Para formatear (vaciar) la carpeta “BUDA” en el
dispositivo de memoria USB, seleccione Información y
pulse ENTER mientras “Formato” está seleccionado en la
pantalla.
USB Frontal, USB Trasera
*
– Almacenamiento Local se utiliza como memoria
auxiliar cuando se reproduce el disco Blu-ray.
Mensaje Reproducción 3D
Puede activar o desactivar un mensaje de advertencia
acerca de la reproducción de vídeo en 3D que aparezca en
el televisor cuando este reproductor está activado.
Activar
*
, Desactivar
Utilización de la función Control HDMI
Con la función de Control HDMI, puede operar
interactivamente este reproductor con su televisor (si
soporta la función de Control HDMI).
Cuando se conecta el reproductor al televisor compatible
con la función de Control HDMI mediante un cable
HDMI y se activa el Control HDMI en el menú SETUP
(pág. 30), puede realizar las funciones indicadas a
continuación.
• Función de selección de entrada automática
Cuando inicie la reproducción en este reproductor, el
selector de entrada del televisor (y de un receptor A/V
si este reproductor esta conectado con el televisor
mediante un receptor A/V) cambia automáticamente a
este reproductor. La alimentación del televisor se
enciende automáticamente dependiendo del televisor.
• Función de apagado automático
Si apaga el televisor cuando este reproductor está en
modo de parada y no se visualiza menú SETUP, este
reproductor también se apagará automáticamente.
– Es posible que la función de Control HDMI no
funcione correctamente dependiendo del televisor.
– Otras funciones, aparte de las que se han
mencionado anteriormente, pueden funcionar
según el televisor o receptor A/V.
– Para hacer que la función de Control HDMI esté
disponible, configure los ajustes de la función de
Control HDMI en TODOS los componentes (este
reproductor, el televisor y el receptor de A/V). Es
posible que también sean necesarias determinadas
operaciones.
– Cada función se puede configurar de forma
independiente para activar o desactivar según el
televisor.
– Consulte los detalles relacionados con la
configuración en los manuales de funcionamiento
que se proporcionan con el televisor y/o el
receptor A/V.
– Cuando está activado, el consumo de energía
durante el modo de espera aumenta por la función
de control de HDMI.
Notas
Notas
Consejo

MENÚ SETUP
31 Es
AJUSTES
4
Español
Idioma
OSD
Puede seleccionar el idioma de pantalla, es decir, el menú
o los mensajes mostrados en pantalla como, por ejemplo,
el menú SETUP.
English
*
, , , , , ,
, ,
Menú
Puede dar prioridad al idioma del menú del disco.
English
*
, , , , , ,
, Portugués, Danés, , Finlandés,
Noruega, , Corea, Japonés, Más
Audio
Puede dar prioridad al idioma del audio para la
reproducción de BD/DVD. Para obtener detalles sobre la
configuración de elementos, consulte “Menú” (pág. 31).
Subtítulo
Puede dar prioridad al idioma de los Subtítulo.
English, , , , , ,
, Portugués, Danés, , Finlandés,
Noruega, , Corea, Japonés, Más, Desactivar
*
Reproducción
Subtítulos
Puede ajustar que se visualicen los subtítulos (pág. 41)
cuando se reproducen BD/DVD con subtítulos.
Activar
*
, Desactivar
Marca de Angulo
Puede ajustar la visualización de Marca de Angulo ( )
cuando se reproducen BD/DVD con ángulos múltiples.
Activar
*
, Desactivar
Marca PIP
Puede ajustar la visualización de Marca PIP ( ) cuando
se reproducen BD (pág. 26) con Imagen en imagen.
Activar
*
, Desactivar
Marca Audio Secundario
Puede ajustar la visualización de Marca Audio Secundario
( ) cuando se reproducen BD con audio secundario.
Activar
*
, Desactivar
Memoria última
Puede establecer si este reproductor recuerda la posición
de la última reproducción de un disco cuando se pone en
modo de espera o si la bandeja portadiscos está abierta.
Activar
*
, Desactivar
– Algunos discos no son compatibles con esta función.
DivX(R) VOD DRM
Puede mostrar el código de registro del vídeo DivX(R).
Seguridad
Cambiar Contraseña
Puede ajustar la contraseña para cambiar el nivel de
Control Paterno y Código de país. Consulte “Control
Paterno” (pág. 31) y “Código de país” (pág. 31).
– La contraseña predeterminada es 0000.
– Si olvida la contraseña, consulte “RESOLUCIÓN
DE PROBLEMAS” (pág. 38) y configure todos los
ajustes de Seguridad en sus valores predeterminados.
Control Paterno
En algunos discos de BD/DVD, existe un nivel de control
para la visualización del disco en función de la edad del
espectador. Puede ajustar el Control Paterno mostrado en
pantalla en función del contenido del disco.
Es necesario introducir la contraseña (consulte “Cambiar
Contraseña” en pág. 31) antes de ajustar los niveles de
Control Paterno.
Después de ajustar el Control Paterno, si reproduce un
disco con un nivel más alto del nivel de Control Paterno
actual o si desea cambiar el nivel de Control Paterno,
aparecerá un cuadro de diálogo solicitando que introduzca
la contraseña.
Desactivar*, 1 a 8
Código de país
Puede ajustar el Código de país en el que vive. Es
necesario introducir la contraseña (consulte “Cambiar
Contraseña” en pág. 31) antes de ajustar el Código de país.
Este parámetro podría utilizarse para la calificación de
Control Paterno y reproducción de discos.
Nota
Fran
ç
ais Español Deutsch Italiano Svenska
Nederlandse
Fran
ç
ais Español Deutsch Italiano
Nederlandse Svenska
Fran
ç
ais Español Deutsch Italiano
Nederlandse Svenska
Notas

MENÚ SETUP
32 Es
Red
Conexión a Internet
Defina este elemento en Permitir cuando utilice BD-Live
(pág. 26), DLNA (pág. 21) y actualice el software desde la red
(pág. 37).
Permitir
*
, Desactivar
Información
Puede mostrar la pantalla de información de red. En esta
pantalla puede ver información de Interfaz (Ethernet),
Tipo de dirección, Dirección IP, Máscara de subred,
Default Gateway y DNS.
Prueba de conexión
Puede realizar una prueba de conexión a Internet. Si la
prueba falla, compruebe la “Configuración IP” (pág. 32) y
vuelva a realizar la prueba.
Configuración IP
Puede configurar los ajustes de red.
–
Teclas numéricas
Permiten introducir caracteres.
– 2/3 Permiten desplazar el elemento
resaltado.
– CLEAR Permite eliminar un carácter.
– ENTER Permite guardar los valores y
salir del menú.
Conexión BD-Live
Puede definir la restricción de acceso al contenido de BD-
Live.
DLNA
Puede definir la función DLNA (pág. 21) en Permitir/
Desactivar. Cuando no utilice la función DLNA, defínala
en Desactivar.
Permitir
*
, Desactivar
Configuración Proxy
Puede definir Configuración Proxy. Defínalo en
Desactivar para uso normal. Seleccione Permitir para
definir la configuración del proxy.
■ Configuración de pantalla
Los ajustes predeterminados están marcados con “
*
”.
TV
Salida 3D
Puede seleccionar salida de vídeo en 3D o 2D desde este
reproductor.
– Aunque establezca “Salida 3D” en “Auto” y
reproduzca un disco 3D de Blu-ray, este reproductor
selecciona imágenes en 2D en función de la
conexión y del ajuste del televisor, etc. (pág. 12).
Pantalla de TV
Puede ajustar la relación de aspecto de la pantalla del
televisor conectado, y ajustar la salida de vídeo.
Si cambia de televisor, por ejemplo, porque ha adquirido
uno nuevo, y la relación de aspecto de la pantalla del
televisor conectado cambia, también tendrá que cambiar el
ajuste Pantalla de TV.
Auto* Seleccione este valor para configurar
automáticamente los ajustes de red de este
reproductor con el servidor DHCP.
Manual Seleccione este valor para configurar los ajustes de
red (Dirección IP, Máscara de subred, Default
Gateway y DNS) manualmente.
Consejos
Autorizada Permite que todos los discos de BD-Live se conecten
a la red.
Permitida
Parcialmente
*
Permite únicamente los discos con certificación de
propietario.
Prohibido Prohíbe que todos los discos de BD-Live se conecten
a la red.
Permitir Activa los ajustes del host y el puerto proxy.
Desactivar
*
Desactiva el servidor proxy. Seleccione esta opción
cuando no utilice el servidor proxy.
Host Proxy Define el host proxy.
Puerto proxy Define el puerto proxy.
Auto* Este reproductor selecciona automáticamente vídeos
en 3D o 2D.
Desactivar Este reproductor siempre selecciona vídeos en 2D.
Nota
16:9 Lleno Selecciónelo cuando conecte el reproductor a un
televisor con pantalla 16:9. Cuando se reproduce
vídeo con una relación de aspecto 4:3, el vídeo se
muestra como aparece en la ilustración.
16:9 Normal
*
Selecciónelo cuando conecte el reproductor a un
televisor con pantalla 16:9. Cuando se reproduce
vídeo con una relación de aspecto 4:3, el vídeo se
muestra como aparece en la ilustración.
4:3
Panorámico
Selecciónelo cuando conecte el reproductor a un
televisor con pantalla 4:3. Cuando se reproduce
vídeo con una relación de aspecto 16:9, el vídeo se
muestra como aparece en la ilustración.
4:3 Buzón Selecciónelo cuando conecte el reproductor a un
televisor con pantalla 4:3. Cuando se reproduce
vídeo con una relación de aspecto 16:9, el vídeo se
muestra como aparece en la ilustración.
Tamaño de
imagen
original
En televisor 16:9 (pantalla
panorámica)
16:9 Lleno 16:9 Normal
4:3
Tamaño de
imagen
original
En televisor 4:3
4:3 Panorámico 4:3 Buzón
16:9

MENÚ SETUP
33 Es
AJUSTES
4
Español
Resolución
Puede seleccionar la resolución de salida de vídeo entre
Auto, 480i/576i, 480p/576p, 720p, 1080i y 1080p. Cuando
se define en Auto, la resolución se ajusta a la resolución
máxima según el televisor conectado. Para obtener
detalles adicionales sobre los formatos de salida, consulte
“Acerca de los formatos de salida de vídeo” (pág. 36).
Auto
*
, 480i/576i, 480p/576p, 720p, 1080i, 1080p
– Para emitir audio HD (como Dolby TrueHD o DTS-
HD Master Audio) desde un terminal HDMI,
configure Resolución como Auto o un ajuste
superior a 720p.
Sistema de TV
Puede seleccionar el valor de Sistema de TV entre PAL,
NTSC y Multi. Ajuste el mismo valor de Sistema de TV
que su televisor. Para obtener detalles adicionales sobre
los formatos de salida, consulte “Acerca de los formatos
de salida de vídeo” (pág. 36).
Color Space
Puede seleccionar la salida Color Space (pág. 41) desde
HDMI. Esta función está disponible cuando el reproductor
se conecta con un cable HDMI.
– Esta función sólo está disponible en televisores que
admitan dicha función.
HDMI Deep Color
Si su televisor y/o receptor de A/V es compatible con
Deep Color (pág. 41), ajuste este elemento según su
televisor o receptor de AV. Esta función está disponible
cuando el reproductor se conecta con un cable HDMI.
30 bits, 36 bits, Desactivar
*
HDMI 1080p 24Hz
Permite la salida del Vídeo BD codificado con una
velocidad de fotogramas de 24 Hz en HDMI 1080p 24Hz.
Con esta función es posible que disponga de una
reproducción de vídeo más suave. Esta función está
disponible si el receptor de A/V o el televisor admiten esta
función y el reproductor está conectado con un cable
HDMI. Para obtener detalles adicionales sobre los
formatos de salida, consulte “Acerca de los formatos de
salida de vídeo” (pág. 36).
Auto
*
, Desactivar
– Este parámetro está desactivado cuando la
resolución de salida es diferente de 1080p.
Sincronismo de labios
Puede definir o ajustar la función Sincronismo de labios
(pág. 42).
Procesamiento de Video
Modo de Vídeo
Puede seleccionar Modo de Vídeo más abajo.
Ajuste de color
Ajusta Brillo/Saturación/Tonalidad para cada color (Rojo/
Verde/Azul/Amarillo/Cian/Magenta). Para utilizar esta
función, configure Modo de Vídeo como Particularizado.
Para obtener detalles sobre la configuración de elementos,
consulte “Modo de Vídeo” (pág. 33).
Los valores predeterminados son 0.
Contraste automático
Ajusta el contraste para optimizar la imagen reproducida.
Para utilizar esta función, configure Modo de vídeo como
Particularizado.
Desactivar
*
, Activar
Reducción de ruido
Puede configurar la Reducción de ruido a un nivel entre 0
y 3. 0 equivale a desactivado y 3 es el nivel máximo.
0
*
, 1, 2, 3
Modo desentrelazado
Puede seleccionar cómo detectar la señal de vídeo.
Defínalo en Auto para uso normal. Cuando aparece en la
pantalla un ruido de desgarro horizontal, configure esta
opción en Película/Vídeo para eliminar el ruido.
Auto
*
, Película, Vídeo
Nota
NTSC, PAL
*
, Multi
(Modelos de Australia, Asia, China, Reino
Unido, Europa y Rusia)
NTSC
*
, PAL, Multi
(Modelos de EE. UU., Canadá, América
Central y del Sur)
YCbCr 4:4:4
*
Permite definir Color Space en YCbCr 4:4:4.
YCbCr 4:2:2 Permite definir Color Space en YCbCr 4:2:2.
Full RGB Si se ha configurado RGB y el blanco y negro de la
pantalla está demasiado difuminado, seleccione este
elemento. Esta opción se aplica si un componente
conectado admite el intervalo RGB 0-255.
RGB Permite la salida de la señal de vídeo con el rango
normal de señal.
Nota
Nota
Auto* Este reproductor ajusta la función Sincronismo de
labios automáticamente.
Manual Puede ajustar la función Sincronismo de labios
manualmente. Puede establecer el retraso del audio
para contenido 2D y 3D de forma independiente.
2D
3D
Desactivar Este reproductor no ajusta la función Sincronismo de
labios.
Estándar* La imagen es más natural y equilibrada. Este modo
es adecuado para usos normales.
Rico La imagen es más viva e intensa.
Cine La imagen es adecuada para ver películas en una
habitación a oscuras.
Particularizado
Puede ajustar la imagen visual manualmente. Pulse
5/a para seleccionar el parámetro, a continuación
pulse 2 /3 para ajustar la figura.
Brillo
Ajusta el brillo global de la imagen.
Saturación
Ajusta la riqueza de color de la imagen proyectada.
Tonalidad
Ajusta el tono de la imagen proyectada.
Contraste
Ajusta las áreas claras (niveles blancos) de la imagen.
Nitidez
Ajusta la nitidez de los elementos del vídeo.
CTI
Suaviza los bordes de las imágenes en color. De este
modo, las imágenes en color se distinguen más.
Los valores predeterminados son 0.

MENÚ SETUP
34 Es
■ Configuración de audio
Los ajustes predeterminados están marcados con “
*
”.
Salida de audio
Coaxial/Óptica
Puede seleccionar el modo de salida de la toma
COAXIAL y del terminal OPTICAL. Para obtener
detalles adicionales sobre los formatos de salida, consulte
“Formatos de salida de audio” (pág. 35).
HDMI
Puede seleccionar el modo de salida del terminal HDMI.
Para obtener detalles sobre la configuración de elementos,
consulte “Coaxial/Óptica” (pág. 34). Para obtener detalles
adicionales sobre los formatos de salida, consulte “Formatos
de salida de audio” (pág. 35).
Bitstream
*
, PCM, Recodificar, Desactivar
– Para emitir audio HD (como Dolby TrueHD o DTS-
HD Master Audio) desde un terminal HDMI,
configure Resolución como Auto o un ajuste
superior a 720p (pág. 33).
Downsampling
Puede seleccionar la frecuencia de submuestreo de la
señal de audio digital. Esta función está activa para la
salida de señal de audio desde la toma COAXIAL/
terminal OPTICAL.
DRC
Puede activar, desactivar o poner en modo Auto el DRC
(Control de gama dinámica)
(pág. 41). Cuando se define en Auto, DRC se enciende
automáticamente para una fuente con información DRC
en formatoDolby TrueHD. DRC hace que los sonidos
fuertes como oclusivos suenen más bajo y que las
conversaciones sean más audibles. Resulta útil cuando se
ven películas de noche.
Desactivar, Activar, Auto
*
Ajuste de altavoz
Mezcla descendente 2 Canales
Puede seleccionar 2 canales analógico como método de
mezcla descendente desde Estéreo o It/Dt.
Post-procesamiento
Mezcla ascendente
Permite convertir la señal de audio de 2 canales en
multicanal. Para realizar esta conversión, seleccione
NEO6, y seleccione el modo Cinema o Music.
Desactivar
*
, NEO6
■ Sistema de Información
Se muestran la versión de software y la dirección MAC
(pág. 42).
Bitstream Permite la salida de la señal digital sin ningún
procesamiento. No se produce la salida del audio
secundario.
PCM Permite la salida de PCM de 2 canales.
Recodificar
*
Permite la salida de Bitstream con audio secundario.
Desactivar Silencia el sonido.
Nota
48k
*
La tasa de muestreo más alta de la salida PCM
digital es 48 kHz.
96k La tasa de muestreo más alta de la salida PCM
digital es 96 kHz.
192k La tasa de muestreo más alta de la salida PCM
digital es 192 kHz.
It/Dt Seleccione este elemento si la unidad está conectada
a un descodificador Dolby Pro Logic. El sonido de
los altavoces posteriores se mezcla con el sonido
estéreo de 2 canales.
Estéreo
*
Cambia la salida del canal a estéreo, con lo que
solamente se emite sonido desde los dos altavoces
frontales.

MENÚ SETUP
35 Es
AJUSTES
4
Español
■ Formatos de salida de audio
* “AS” es audio secundario.
** “SCB” es el sonido clic del botón, el efecto de sonido de los menús emergentes, etc.
– Si Coaxial/Óptica o HDMI se define en Bitstream, no se produce la salida de audio secundario. (pág. 34)
– Para emitir audio HD (como Dolby TrueHD o DTS-HD Master Audio) desde un terminal HDMI, configure
Resolución como Auto o un ajuste superior a 720p (pág. 33).
HDMI COAXIAL/OPTICAL
MIXED 2CH
Formato de origen Bitstream PCM Recodificar Bitstream PCM Recodificar
PCM 2 canales PCM 2 canales PCM 2 canales 2 canales
PCM 5.1 canales PCM 5.1 canales PCM 2 canales 2 canales
PCM 7.1 canales PCM 7.1 canales PCM 2 canales 2 canales
Dolby Digital Dolby Digital
PCM hasta 5.1
canales
Dolby Digital Dolby Digital
PCM 2
canales
Dolby Digital 2 canales
con AS
*
o
SCB
**
Dolby Digital
Plus
Dolby Digital
Plus
PCM hasta 7.1
canales
Dolby Digital
Plus
Dolby Digital
PCM 2
canales
Dolby Digital
2 canales
con AS
*
o
SCB
**
Dolby Digital
Dolby
TrueHD
Dolby
TrueHD
PCM hasta 7.1
canales
Dolby
TrueHD
Dolby Digital
PCM 2
canales
Dolby Digital
con AS
*
o
SCB
**
Dolby Digital
DTS DTS
PCM hasta 5.1
canales
DTS DTS
PCM 2
canales
DTS 2 canales
con AS
*
o
SCB
**
DTS HD High
Resolution
DTS HD High
Resolution
PCM hasta 7.1
canales
DTS HD High
Resolution
DTS
PCM 2
canales
DTS
2 canales
con AS
*
o
SCB
**
DTS
DTS-HD
Master Audio
DTS-HD
Master Audio
PCM hasta 7.1
canales
DTS-HD
Master Audio
DTS
PCM 2
canales
DTS
con AS
*
o
SCB
**
DTS
Notas

MENÚ SETUP
36 Es
■ Acerca de los formatos de salida de vídeo
Si Sistema de TV se define en NTSC
* En función del disco o del contenido, este reproductor permite la salida de señal de vídeo de 480p.
Si Sistema de TV se define en PAL
* En función del disco o del contenido, este reproductor permite la salida de señal de vídeo de 576p.
Si Sistema de TV se define en Multi
Si Sistema de TV está configurado como Multi, la salida de la señal de vídeo tiene la misma frecuencia que la fuente.
Consulte las tablas anteriores para obtener información sobre la configuración de frecuencia del televisor y la resolución
de la señal de vídeo de salida.
Si se muestra una pantalla de menú como, por ejemplo, SETUP la salida de la señal de vídeo tiene la misma frecuencia
que el origen.
– “Máx.” en la tabla significa que la resolución se ha definido en la resolución máxima admitida por el televisor
conectado.
– El parámetro HDMI 1080p 24Hz está desactivado cuando la resolución de salida es diferente de 1080p.
– Cuando este reproductor permite la salida de vídeo de 1080p 24 Hz desde HDMI, no se emiten señales desde las
tomas COMPONENT y VIDEO.
– Cuando se reproduce un DVD comercial con salida de componente, la resolución máxima es 480p/576p.
– Cuando Sistema de TV se define en NTSC y el origen de vídeo no es 60 Hz, la salida de vídeo se convierte a 60
Hz.
– Cuando Sistema de TV se define en PAL y el origen de vídeo no es 50 Hz, la salida de vídeo se convierte a 50 Hz.
Resolución Auto 480i/576i 480p/576p 720p 1080i
1080p
24 Hz Otros
HDMI
Reproducción
de BD
Máx. Máx. Máx. 720p 60 Hz 1080i 60 Hz
1080p 24 Hz
1080p 60 Hz
otros 1080p 60 Hz
COMPONENT
Reproducción
de DVD
comercial
480i 480i
480p 480p 480p 480p
Reproducción
de BD
480i 480i 480i desactivado 480i
otros 480p 720p 60 Hz * 1080i 60 Hz * 1080i 60 Hz *
VIDEO
Reproducción
de BD
480i 480i 480i 480i 480i
desactivado
480i
otros 480i
Resolución Auto 480i/576i 480p/576p 720p 1080i
1080p
24 Hz Otros
HDMI
Reproducción
de BD
Máx. Máx. Máx. 720p 50 Hz 1080i 50 Hz
1080p 24 Hz
1080p 50 Hz
otros 1080p 50 Hz
COMPONENT
Reproducción
de DVD
comercial
576i 576i
576p 576p 576p 576p
Reproducción
de BD
576i 576i 576i desactivado 576i
otros 576p 720p 50 Hz * 1080i 50 Hz * 1080i 50 Hz *
VIDEO
Reproducción
de BD
576i 576i 576i 576i 576i
desactivado
576i
otros 576i
Notas

37 Es
AJUSTES
4
Español
Algunos de los discos BD recién lanzados no se pueden
reproducir a menos que actualice el software del
reproductor a la versión más reciente. Le recomendamos
la actualización para que el reproductor funcione con el
software más actual.
Para comprobar la disponibilidad de una actualización de
software, visite
http://download.yamaha.com/downloads/service/top/
?site=europe.yamaha.com&language=en
– La actualización del software se inicia
automáticamente tras cargar el disco que contiene el
paquete de actualización.
– No saque el disco/dispositivo de memoria USB, no
ponga el reproductor en modo de espera ni
desenchufe el cable de alimentación o el cable LAN
mientras se lleva a cabo la actualización de software.
■ Actualización del software
1. Prepare la actualización de
software.
Si actualiza el software desde Disc/USB Storage:
1 Guarde el paquete de archivos de actualización en
la carpeta correspondiente en el disco/dispositivo
de memoria USB. Para más información,
consulte el documento de procedimientos adjunto
con el paquete de archivos de actualización.
2 Cargue el disco o conecte el dispositivo de
memoria USB.
Al cargar el disco, la actualización de software se
inicia automáticamente. Omita el paso 2.
Si actualiza el software desde Network:
Confirme que el reproductor está conectado a la
red.
2. Seleccione el método de
actualización e inicie la
actualización desde el menú
SETUP.
1 Pulse SETUP para mostrar la pantalla de menú
SETUP.
2 Seleccione Configuración General = Sistema =
Actualizar.
3 Seleccione el elemento que contiene el paquete
de archivos de actualización desde Disc/USB
Storage/Network.
3. El sistema buscará el paquete de
archivos de actualización.
4. Pulse ENTER para iniciar la
actualización.
5. La actualización se ha
completado. El sistema se
reiniciará.
ACTUALIZACIÓN DE SOFTWARE
Consejo
Nota
¡ buscando archivo de actualización !
Por favor, espere. . .
Actualizar

38 Es
INFORMACIÓN ADICIONAL
Consulte la tabla inferior cuando el equipo no funcione correctamente. Si el problema que usted tiene no aparece en la
lista inferior o las instrucciones no le sirven de ayuda, apague este reproductor, desenchufe el cable de alimentación y
póngase en contacto con un centro de servicio o concesionario Yamaha autorizado.
■ Alimentación
■ Funcionamiento básico
■ Reproducción de disco
RESOLUCIÓN DE PROBLEMAS
Problema Causas posibles y soluciones
No hay alimentación. – Conecte correctamente el cable de alimentación de CA.
–Pulse p en el panel delantero para encender la alimentación.
La alimentación del reproductor está
apagada.
– La alimentación se desconectará automáticamente pasados 25 minutos continuos de
inactividad (sin reproducción).
Problema Causas posibles y soluciones
El mando a distancia no funciona. – Utilice el mando a distancia dentro de su alcance operativo. (pág. 9)
– Cambie las pilas. (pág. 9)
– Compruebe la configuración de ID de la unidad principal y el mando a distancia. (pág.
9)
Las teclas no funcionan. – Mantenga pulsado p en el panel delantero durante unos 5 segundos para reiniciar el
reproductor.
– Para reiniciar completamente el reproductor, desenchufe el cable de alimentación de la
toma de CA durante 10 segundos o más, vuelva a enchufarlo y, a continuación, encienda
el reproductor.
He olvidado la contraseña.
– Mantenga pulsado y en el panel frontal simultáneamente sin ningún disco
insertado y con la reproducción parada para configurar todos los ajustes de Seguridad
(pág. 31) de este reproductor en sus valores predeterminados. Una vez que la
alimentación se desconecte automáticamente, pulse p para volver a conectarla.
Problema Causas posibles y soluciones
El reproductor no puede reproducir un
disco.
– Extraiga el disco y límpielo. (pág. 4)
– Asegúrese de que se ha cargado correctamente el disco (alineado en la bandeja
portadiscos y con la cara de la etiqueta hacia arriba). (pág. 4)
– Utilice un disco admitido por el reproductor. (pág. 3)
– Extraiga el disco y compruebe si es un disco admitido por el reproductor o no. (pág. 3)
– Compruebe el código de región. (pág. 3)
– Compruebe si el disco está defectuoso probando con otro disco.
– Los discos CD-R/RW, DVD+R/RW/R DL y DVD-R/RW/R DL deben estar finalizados.
(pág. 3)
El vídeo se para. – El reproductor se parará si detecta golpes o vibraciones.
El reproductor hace un sonido de
chasquido cuando comienza la
reproducción o al cargar un disco.
– Estos sonidos no son averías sino condiciones normales de funcionamiento del
reproductor.

RESOLUCIÓN DE PROBLEMAS
39 Es
INFORMACIÓN ADICIONAL
5
Español
■ Imagen
■ Sonido
Problema Causas posibles y soluciones
No hay imagen. – Asegúrese de que los cables están correctamente conectados. (pág. 10)
– Asegúrese de que el televisor o receptor de A/V conectado está ajustado a la entrada
correcta. (pág. 10)
– Conecte este reproductor al televisor con la toma VIDEO (pág. 13) mediante el cable de
clavijas de vídeo suministrado.
– Si la imagen sigue sin mostrarse con la unidad conectada al terminal VIDEO,
mantenga pulsado en el panel frontal unos 5 segundos sin ningún disco insertado
y con la reproducción parada para cambiar NTSC/PAL y, a continuación, establezca
Resolución correctamente. (pág. 33).
– Sistema de TV se ha configurado con el ajuste incorrecto. Mantenga pulsado y
en el panel frontal simultáneamente sin ningún disco insertado y con la reproducción
parada para restablecer los ajustes de Sistema de TV y Resolución a sus valores
predeterminados.
La pantalla se congela y las teclas de
operación no responden.
– Pulse y, después, reinicie la reproducción.
– Desconecte la alimentación y conéctela de nuevo.
– Mantenga pulsado p en el panel delantero durante unos 5 segundos para reiniciar el
reproductor.
La salida de vídeo no tiene la resolución
deseada.
– Ajuste la resolución deseada. (pág. 33)
El vídeo de ancho horizontal aparece
estirado verticalmente, o aparecen
bandas negras en las partes superior e
inferior de la pantalla. O el vídeo 4:3
aparece estirado horizontalmente.
– Cambie la relación de aspecto del televisor. (pág. 32)
Aparece ruido cuadrado (mosaicos) en
la pantalla.
– Se podrían ver bloques en las imágenes en escenas que contengan movimientos rápidos
debido a las características de la tecnología de compresión de imagen digital.
La pantalla de reproducción se
perturbará si se graba vídeo DVD en una
videograbadora, o se reproduce a través
de una videograbadora.
– Este reproductor cumple con la protección contra copias analógicas. Algunos discos
contienen una señal de prohibición de copia. Si intenta reproducir tales discos a través
de una videograbadora, o grabar a una videograbadora y reproducir la señal, la
protección contra copia impedirá la reproducción normal.
No hay salida de audio o las imágenes
no se reproducen adecuadamente.
– En algunos discos en los que se ha grabado contenido protegido por derechos de autor
es posible que no haya salida de audio o que las imágenes no se reproduzcan
adecuadamente.
Problema Causas posibles y soluciones
No hay sonido o está distorsionado. – Compruebe que el cable de audio está correctamente conectado. (pág. 10)
– Suba el volumen del televisor o del receptor de A/V.
– No hay sonido durante el modo de reproducción fija, cámara lenta, avance rápido y
retroceso rápido. (pág. 8)
– El audio puede no salir dependiendo del estado de grabación del audio, por ejemplo,
cuando se haya grabado como contenido de audio, audio que no sea una señal de audio
o audio no estándar. (pág. 3)
Los canales de audio izquierdo y
derecho están invertidos o el sonido
sólo sale por uno de ellos.
– Compruebe la conexión de audio. (pág. 10)
No hay salida de audio o las imágenes
no se reproducen adecuadamente.
– En algunos discos en los que se ha grabado contenido protegido por derechos de autor
es posible que no haya salida de audio o que las imágenes no se reproduzcan
adecuadamente.
No se puede escuchar el tipo de audio
que se desea y/o el número de canales.
– Consulte el ajuste Salida de audio y “Formatos de salida de audio”. (pág. 34, 35)
No se escucha el sonido de PIP (audio
secundario).
– Ajuste Coaxial/Óptica o HDMI en PCM/Recodificar. (pág. 34)
– Para escuchar el audio secundario, pulse 2ND AUDIO. (pág. 6)
– Dependiendo del disco, es posible que tenga que activar el audio secundario en el menú
principal del disco (pág. 8).

RESOLUCIÓN DE PROBLEMAS
40 Es
■ Red
■ Mensajes en pantalla
– Los mensajes siguientes aparecerán en la pantalla del televisor si el disco que intenta reproducir no es apropiado o
la operación no es correcta.
Problema Causas posibles y soluciones
No se puede conectar a Internet. – Conecte correctamente el cable de red.
– Encienda el equipo conectado como, por ejemplo, un módem o enrutador de banda
ancha.
– Conecte correctamente el módem y/o el enrutador de banda ancha.
– Configure correctamente el valor o valores de la red. Compruebe “Red”. (pág. 32)
No se pueden descargar contenidos BD-
Live.
– Conecte correctamente el cable de red. (pág. 16)
– Conecte el dispositivo de memoria USB correctamente. Compruebe que el dispositivo
de memoria USB está conectado al puerto USB del reproductor. (pág. 16)
– Compruebe si el disco BD admite BD-Live.
– Compruebe el ajuste de “Conexión a Internet”. (pág. 32)
– Conecte el dispositivo de memoria USB formateado en FAT16 o FAT32.
– Se recomienda conectar el dispositivo de memoria USB con al menos 2 GB de espacio
libre. Si no hay suficiente espacio libre, formatee el dispositivo de memoria USB. (pág.
30)
– Consulte el manual del usuario suministrado del disco o póngase en contacto con el
fabricante del disco.
No se puede detectar el servidor DLNA. – Conecte correctamente el cable de red.
– Encienda el equipo conectado como, por ejemplo un enrutador de banda ancha o el
servidor.
– Asegúrese de que el reproductor y el servidor están conectados al mismo punto de
acceso.
– Configure correctamente el valor o valores de la red. Compruebe “Red”. (pág. 32)
– Dependiendo del servidor DLNA, es posible que sea necesario autorizar al reproductor
desde el servidor.
No se puede reproducir el archivo en el
servidor doméstico de red.
– Asegúrese de que el archivo se puede reproducir. (pág. 3)
– Compruebe la configuración del servidor DLNA.
– La calidad de funcionamiento y reproducción podría verse afectada por las condiciones
de la red doméstica.
Mensaje de error Causas posibles y soluciones
Not Support This File! – El reproductor no admite el archivo. Consulte “Tipos de discos/archivos que se pueden utilizar con
este reproductor” (pág. 3).
¡Código de región erróneo! – El disco tiene un código de región incompatible. Consulte “Información de gestión de la región”
(pág. 3).
La red ha fallado. – El reproductor no se puede conectar a la red. Compruebe la conexión (pág. 16) y los valores de la red
(pág. 32).
Red está bien, proxy ha
fallado.
– El reproductor no se puede conectar al servidor proxy. Consulte “Configuración Proxy” (pág. 32).
The Setting is prohibited,
please setup again.
– La conexión de BD-Live está prohibida. Consulte “Conexión BD-Live” (pág. 32).
¡No se encuentra un fichero
válido para actualización!
– Compruebe si el archivo de actualización está en la carpeta apropiada.
¡La actualización ha fallado
por alguna razón!
– La actualización ha fallado. Compruebe si el archivo de actualización está dañado o es ilegible.

41 Es
INFORMACIÓN ADICIONAL
5
Español
AVCHD
AVCHD es un nuevo formato (estándar) para cámaras
de vídeo de alta definición que se puede utilizar para
grabar y reproducir imágenes de alta definición (HD).
BD-Live™
BD-Live es un estándar de BD que utiliza una conexión
de red y permite al reproductor conectarse a la red para
descargar vídeos promocionales y otros datos.
BDMV
BDMV (Blu-ray Disc Movie, BD-MV=Películas en
disco Blu-ray BD-MV) se refiere a uno de los formatos
de aplicación utilizados para BD-ROM que constituye
una de las especificaciones de los discos Blu-ray.
BDMV es un formato de grabación equivalente al Vídeo
DVD de la especificación DVD.
Blu-ray 3D™
Blu-ray 3D le permite ver imágenes 3D de alta
definición completa.
BONUSVIEW™
Los discos compatibles con BONUSVIEW le permiten
disfrutar simultáneamente de subcanal de vídeo para dos
pantallas, subcanal de audio y subtítulos. Aparece una
pequeña pantalla dentro de la pantalla principal durante
la reproducción (Imagen en imagen).
Subtítulos
La audiodescripción es un tipo de subtítulos, la
diferencia entre los subtítulos y la audiodescripción es
que los primeros están diseñados para personas sin
problemas auditivos, mientras que los segundos lo están
para personas que no oyen. Los subtítulos no suelen
mostrar todo el audio. La audiodescripción muestra
efectos de sonido (por ejemplo, un “suena el teléfono” y
“ruido de pasos”), mientras que los subtítulos no lo
hacen. Antes de seleccionar este ajuste, asegúrese de
que el disco contiene información de audiodescripción.
Color Space
El Color Space es una gama de colores que se puede
representar. RGB es un espacio de color basado en el
modelo de color RGB (rojo, verde y azul) y se utiliza
normalmente para monitores de PC. YCbCr es un
espacio de color basado en una señal de luminancia (Y)
y dos señales de diferencia de color (Cb y Cr).
Deep Color
Deep Color se refiere al uso de diversas profundidades
de color en pantallas, a partir de las profundidades de 24
bits de versiones anteriores de la especificación HDMI.
Esta profundidad de bits adicional permite que las
pantallas HDTV y otros tipos de pantallas pasen de
millones a miles de millones de colores y eliminan la
aparición de bandas de color en pantallas permitiendo
unas transiciones tonales suaves y una gradación ligera
entre colores. La mayor relación de contraste permite
representar muchos más tonos de gris entre blanco y
negro. Además Deep Color aumenta el número de
colores disponibles dentro de los límites definidos por el
espacio de color RGB o YCbCr.
DivX®
DivX® es una tecnología multimedia popular creada
por DivX, Inc. Los archivos multimedia DivX®
contienen vídeo muy comprimido con una alta calidad
visual que mantiene un tamaño de archivo relativamente
pequeño. Los archivos DivX® también pueden incluir
características multimedia avanzadas como menús,
subtítulos y pistas de audio alternativas. Muchos
archivos multimedia DivX® están disponibles para
descarga en línea y puede crear sus propios archivos
utilizando su propio contenido y herramientas fáciles de
utilizar de DivX.com.
Dolby Digital
Un sistema de sonido desarrollado por Dolby
Laboratories Inc. que da un ambiente de sala de cine a la
salida de audio cuando el producto está conectado con
un amplificador o procesador Dolby Digital.
Dolby Digital Plus
Un sistema de sonido desarrollado como una extensión
de Dolby Digital. Esta tecnología de codificación de
audio soporta sonido envolvente de 7.1 multicanales.
Dolby TrueHD
Dolby TrueHD es una tecnología de codificación sin
pérdidas que soporta hasta 8 canales de sonido
envolvente multicanal para los discos ópticos de
próxima generación. El sonido reproducido conserva
fielmente, bit a bit, la fuente original.
DRC (Control de gama dinámica)
DRC le permite ajustar la gama entre los sonidos más
alto y más bajo (gama dinámica) para reproducir a un
volumen intermedio. Utilícela cuando sea difícil
escuchar los diálogos o durante las horas en que la
reproducción pueda molestar a los vecinos.
DTS
Un sistema de sonido digital desarrollado por DTS, Inc.
para su uso en salas de cine.
DTS-HD High Resolution Audio
DTS-HD High Resolution Audio es una nueva
tecnología desarrollada para el formato de disco óptico
de alta definición de próxima generación.
DTS-HD Master Audio
DTS-HD Master Audio es una tecnología de
compresión de audio sin pérdidas desarrollada para el
formato de disco óptico de alta definición de próxima
generación.
HDMI
HDMI (High-Definition Multimedia Interface, Interfaz
Multimedia de Alta Definición) es una interfaz que
soporta vídeo y audio en una sola conexión digital. La
conexión HDMI lleva señales de vídeo, lo mismo
estándar que de alta definición, y señales de audio en
multicanal a componentes A/V, por ejemplo, televisores
equipados con HDMI en forma digital y sin
degradación.
GLOSARIO

ESPECIFICACIONES
42 Es
Buzón (LB 4:3)
Un tamaño de pantalla con barras negras en las partes
superior e inferior de la imagen para permitir la
visualización de material en pantalla ancha (16:9) en un
televisor 4:3 conectado.
Sonido PCM lineal
PCM lineal es un formato de grabación de señales
utilizado para CD de audio y en algunos discos DVD y
Blu-ray. El sonido de CD de audio se graba a 44,1 kHz
con 16 bits. (El sonido se graba entre 48 kHz con 16 bits
y 96 kHz con 24 bits en discos DVD y entre 48 kHz con
16 bits y 192 kHz con 24 bits en discos BD.)
Sincronismo de labios
Sincronismo de labios, una abreviatura de “lip
synchronization”, o sincronización de labios, es un
término que hace referencia tanto a un problema
habitual como a la posibilidad de mantener
sincronizadas las señales de audio y vídeo durante la
posproducción y la transmisión. La latencia de audio y
vídeo requiere complejos ajustes por parte del usuario,
pero la versión 1.3 de HDMI incorpora una función de
sincronización automática de audio y vídeo que permite
a los dispositivos sincronizarse de forma automática y
precisa y sin la intervención del usuario.
Dirección MAC
La dirección MAC es un valor único asignado a un
dispositivo de red para fines identificativos.
Panorámico (PS 4:3)
Un tamaño de pantalla que recorta los costados de la
imagen para permitir la visualización de material de
pantalla ancha (16:9) en un televisor 4:3 conectado.
Subtítulos
Son las líneas de texto que aparecen en la parte inferior
de la pantalla y que traducen o transcriben el diálogo.
Están grabadas en muchos discos de vídeo DVD y BD.
Menú principal
En un Vídeo BD/Vídeo DVD es el menú para
seleccionar elementos tales como el capítulo que se va a
reproducir y el idioma de los subtítulos. En algunos
vídeos DVD, al menú principal también se le denomina
“Menú de títulos”.
x.v.Color
x.v.Color reproduce una gama de colores más amplia
que antes, mostrando casi todos los colores que puede
detectar el ojo humano.
■ Generalidades
Alimentación
[Modelos de EE. UU. y Canadá].............................110-240 V CA, 60 Hz
[Modelo para América Central y del Sur]..........110-240 V CA, 50/60 Hz
[Modelo para Australia] ..........................................110-240 V CA, 50 Hz
[Modelo para Reino Unido, Europa y Rusia] .........110-240 V CA, 50 Hz
[Modelo para China] ...............................................110-240 V CA, 50 Hz
[Modelo para Asia] ............................................110-240 V CA, 50/60 Hz
Consumo de energía (normal) .............................................................. 23 W
Consumo (en espera).............................................................0,5 W o menos
Dimensiones (Ancho × Alto × Largo) .......................... 435 × 86 × 257 mm
Peso ..................................................................................................... 3,0 kg
■ Entrada/salida
Salida HDMI ................................................................. Conector tipo A × 1
480i/576i/480p/576p/720p/1080i/1080p/1080p@24Hz,
Soporte Deep Color, x.v. Color
Salida de vídeo componente......................................Y: 1 Vp-p (75 ohmios)
P
B, PR: 0,7 Vp-p (75 ohmios)
Salida de vídeo ...............................................................1 Vp-p (75 ohmios)
Salida digital.............................................................Óptica × 1, Coaxial × 1
Salida de audio analógica..............................................Mixed 2 canales × 1
2 ± 0,3 V (1 kHz, 0 dB)
Conectores USB ...........................................................................Tipo A × 2
Otros equipos ............................................................... Remote IN/OUT × 1
Ethernet × 1
Las especificaciones están sujetas a cambio sin previo aviso.
ESPECIFICACIONES

ESPECIFICACIONES
43 Es
INFORMACIÓN ADICIONAL
5
Español
■ Propiedad intelectual
– El material audio-visual puede consistir de productos
con propiedad intelectual que no se deben grabar sin
la autorización del poseedor de dicha propiedad
intelectual. Remítase a las leyes aplicables en su
país.
– Este producto contiene tecnología de protección de
copia que está protegida por patentes de los EE. UU.
y otros derechos de propiedad intelectual de Rovi
Corporation. Se prohíbe la ingeniería inversa o el
desarmado de la unidad.
– Fabricado bajo licencia de Dolby Laboratories.
Dolby y el símbolo de la doble D son marcas
comerciales de Dolby Laboratories.
– Fabricado con licencia bajo las patentes de EE. UU.
número: 5,451,942; 5,956,674; 5,974,380;
5,978,762; 6,226,616; 6,487,535; 7,212,872;
7,333,929; 7,392,195; 7,272,567 y otras patentes de
los EE. UU. e internacionales emitidas o pendientes.
DTS y el símbolo son marcas registradas y los
logotipos DTS-HD, DTS-HD Master Audio y DTS
son marcas comerciales de DTS, Inc.. El producto
comprende también el software. © DTS, Inc. Todos
los derechos reservados.
– “Blu-ray Disc
™
”, “Blu-ray
™
”, “Blu-ray 3D
™
”,
“BD-Live
™
”, “BONUSVIEW
™
” y los logotipos son
marcas comerciales de Blu-ray Disc Association.
– es una marca comercial de DVD Format/Logo
Licensing Corporation.
– HDMI, el logotipo HDMI y High-Definition
Multimedia Interface son marcas comerciales o
marcas registradas de HDMI Licensing LLC.
– “x.v.Color” y el logotipo “x.v.Color” son marcas
comerciales.
– “AVCHD” y el logotipo “AVCHD” son marcas
comerciales de Panasonic Corporation y Sony
Corporation.
– Java y todas las marcas comerciales y logotipos
basados en Java son marcas comerciales o marcas
registradas de Sun Microsystems, Inc. en los Estados
Unidos y/o otros países.
– Este producto se otorga con licencia bajo la licencia
de cartera de patentes AVC y la licencia de cartera
de patentes VC-1 para su uso personal y no
comercial por parte de un consumidor para (i)
codificar vídeo que cumpla con las normas AVC y
VC-1 (“AVC/VC-1 Video”) y/o (ii) descodificar
vídeo AVC/VC-1 codificado por un consumidor
dedicado a una actividad personal y no comercial y/o
que se obtuvo de un proveedor de vídeo con licencia
para proporcionar vídeo AVC/VC-1. No se otorga o
se da por supuesta licencia alguna para cualquier
otro uso. Se puede obtener información adicional de
MPEG LA, LLC.
Consulte http://www.mpegla.com.
– Windows Media Player es una marca comercial o
una marca comercial registrada de Microsoft
Corporation en Estados Unidos y/o en otros países.
– YouTube y el logotipo YouTube son marcas
comerciales de Google. Inc.
– DLNA y DLNA CERTIFIED son marcas
comerciales y/o marcas de servicio de Digital Living
Network Alliance.
– “DivX®, DivX Certified®, DivX Plus™ HD y los
logotipos asociados son marcas comerciales
registradas de DivX, Inc. y se utilizan con licencia.”
– “DivX Certified® para reproducir vídeo DivX® y
DivX Plus™ HD (H.264/.MKV) hasta 1080p HD y
contenido de calidad.”
ACERCA DE DIVX VIDEO: DivX® es un formato de vídeo digital
creado por DivX, Inc. Éste es un dispositivo oficial DivX Certified®
que reproduce vídeo DivX. Visite divx.com para obtener más
información y herramientas de software para convertir sus archivos en
vídeo DivX.
ABOUT DIVX VIDEO-ON-DEMAND: Este dispositivo DivX
Certified® debe registrarse para reproducir películas DivX Video-on-
Demand (VOD) adquiridas. Para obtener su código de registro,
localice la sección DivX VOD en el menú de configuración de su
dispositivo. Acceda a vod.divx.com para obtener más información
sobre cómo realizar el registro.

i
Information about software
This product uses the following software.
For information (copyright, etc) about each software, read the original sentences stated below.
■ About Linux, Busybox, SquashFS, LIRC, U-boot
GNU GENERAL PUBLIC LICENSE
Version 2, June 1991
Copyright (C) 1989, 1991 Free Software Foundation, Inc.
51 Franklin St, Fifth Floor, Boston, MA 02110-1301 USA
Everyone is permitted to copy and distribute verbatim copies of this license document,
but changing it is not allowed.
Preamble
The licenses for most software are designed to take away your freedom to share and
change it. By contrast, the GNU General Public License is intended to guarantee your
freedom to share and change free software--to make sure the software is free for all its
users. This General Public License applies to most of the Free Software Foundation’s
software and to any other program whose authors commit to using it. (Some other Free
Software Foundation software is covered by the GNU Library General Public License
instead.) You can apply it to your programs, too.
When we speak of free software, we are referring to freedom, not price. Our General
Public Licenses are designed to make sure that you have the freedom to distribute
copies of free software (and charge for this service if you wish), that you receive source
code or can get it if you want it, that you can change the software or use pieces of it in
new free programs; and that you know you can do these things.
To protect your rights, we need to make restrictions that forbid anyone to deny you
these rights or to ask you to surrender the rights. These restrictions translate to certain
responsibilities for you if you distribute copies of the software, or if you modify it.
For example, if you distribute copies of such a program, whether gratis or for a fee, you
must give the recipients all the rights that you have. You must make sure that they, too,
receive or can get the source code. And you must show them these terms so they know
their rights.
We protect your rights with two steps: (1) copyright the software, and (2) offer you this
license which gives you legal permission to copy, distribute and/or modify the software.
Also, for each author’s protection and ours, we want to make certain that everyone
understands that there is no warranty for this free software. If the software is modified
by someone else and passed on, we want its recipients to know that what they have is
not the original, so that any problems introduced by others will not reflect on the
original authors’ reputations.
Finally, any free program is threatened constantly by software patents. We wish to
avoid the danger that redistributors of a free program will individually obtain patent
licenses, in effect making the program proprietary. To prevent this, we have made it
clear that any patent must be licensed for everyone’s free use or not licensed at all.
The precise terms and conditions for copying, distribution and modification follow.
GNU GENERAL PUBLIC LICENSE
TERMS AND CONDITIONS FOR COPYING, DISTRIBUTION AND
MODIFICATION
0. This License applies to any program or other work which contains a notice placed
by the copyright holder saying it may be distributed under the terms of this General
Public License. The “Program”, below, refers to any such program or work, and a
“work based on the Program” means either the Program or any derivative work
under copyright law: that is to say, a work containing the Program or a portion of it,
either verbatim or with modifications and/or translated into another language.
(Hereinafter, translation is included without limitation in the term “modification”.)
Each licensee is addressed as “you”.
Activities other than copying, distribution and modification are not covered by this
License; they are outside its scope. The act of running the Program is not restricted,
and the output from the Program is covered only if its contents constitute a work
based on the Program (independent of having been made by running the Program).
Whether that is true depends on what the Program does.
1. You may copy and distribute verbatim copies of the Program’s source code as you
receive it, in any medium, provided that you conspicuously and appropriately
publish on each copy an appropriate copyright notice and disclaimer of warranty;
keep intact all the notices that refer to this License and to the absence of any
warranty; and give any other recipients of the Program a copy of this License along
with the Program.
You may charge a fee for the physical act of transferring a copy, and you may at
your option offer warranty protection in exchange for a fee.
2. You may modify your copy or copies of the Program or any portion of it, thus
forming a work based on the Program, and copy and distribute such modifications
or work under the terms of Section 1 above, provided that you also meet all of these
conditions:
a) You must cause the modified files to carry prominent notices stating that you
changed the files and the date of any change.
b) You must cause any work that you distribute or publish, that in whole or in part
contains or is derived from the Program or any part thereof, to be licensed as a
whole at no charge to all third parties under the terms of this License.
c) If the modified program normally reads commands interactively when run, you
must cause it, when started running for such interactive use in the most
ordinary way, to print or display an announcement including an appropriate
copyright notice and a notice that there is no warranty (or else, saying that you
provide a warranty) and that users may redistribute the program under these
conditions, and telling the user how to view a copy of this License. (Exception:
if the Program itself is interactive but does not normally print such an
announcement, your work based on the Program is not required to print an
announcement.)
These requirements apply to the modified work as a whole. If identifiable sections of
that work are not derived from the Program, and can be reasonably considered
independent and separate works in themselves, then this License, and its terms, do not
apply to those sections when you distribute them as separate works. But when you
distribute the same sections as part of a whole which is a work based on the Program,
the distribution of the whole must be on the terms of this License, whose permissions
for other licensees extend to the entire whole, and thus to each and every part regardless
of who wrote it.
Thus, it is not the intent of this section to claim rights or contest your rights to work
written entirely by you; rather, the intent is to exercise the right to control the
distribution of derivative or collective works based on the Program.
In addition, mere aggregation of another work not based on the Program with the
Program (or with a work based on the Program) on a volume of a storage or distribution
medium does not bring the other work under the scope of this License.
3. You may copy and distribute the Program (or a work based on it, under Section 2)
in object code or executable form under the terms of Sections 1 and 2 above
provided that you also do one of the following:
a) Accompany it with the complete corresponding machine-readable source code,
which must be distributed under the terms of Sections 1 and 2 above on a
medium customarily used for software interchange; or,
b) Accompany it with a written offer, valid for at least three years, to give any
third party, for a charge no more than your cost of physically performing source
distribution, a complete machine-readable copy of the corresponding source
code, to be distributed under the terms of Sections 1 and 2 above on a medium
customarily used for software interchange; or,
c) Accompany it with the information you received as to the offer to distribute
corresponding source code. (This alternative is allowed only for
noncommercial distribution and only if you received the program in object
code or executable form with such an offer, in accord with Subsection b
above.)
The source code for a work means the preferred form of the work for making
modifications to it. For an executable work, complete source code means all the source
code for all modules it contains, plus any associated interface definition files, plus the
scripts used to control compilation and installation of the executable. However, as a
special exception, the source code distributed need not include anything that is
normally distributed (in either source or binary form) with the major components
(compiler, kernel, and so on) of the operating system on which the executable runs,
unless that component itself accompanies the executable.
If distribution of executable or object code is made by offering access to copy from a
designated place, then offering equivalent access to copy the source code from the same
place counts as distribution of the source code, even though third parties are not
compelled to copy the source along with the object code.
4. You may not copy, modify, sublicense, or distribute the Program except as
expressly provided under this License. Any attempt otherwise to copy, modify,
sublicense or distribute the Program is void, and will automatically terminate your
rights under this License. However, parties who have received copies, or rights,
from you under this License will not have their licenses terminated so long as such
parties remain in full compliance.
5. You are not required to accept this License, since you have not signed it. However,
nothing else grants you permission to modify or distribute the Program or its
derivative works. These actions are prohibited by law if you do not accept this
License. Therefore, by modifying or distributing the Program (or any work based
on the Program), you indicate your acceptance of this License to do so, and all its
terms and conditions for copying, distributing or modifying the Program or works
based on it.
6. Each time you redistribute the Program (or any work based on the Program), the
recipient automatically receives a license from the original licensor to copy,
distribute or modify the Program subject to these terms and conditions. You may
not impose any further restrictions on the recipients’ exercise of the rights granted
herein. You are not responsible for enforcing compliance by third parties to this
License.
7. If, as a consequence of a court judgment or allegation of patent infringement or for
any other reason (not limited to patent issues), conditions are imposed on you
(whether by court order, agreement or otherwise) that contradict the conditions of
this License, they do not excuse you from the conditions of this License. If you
cannot distribute so as to satisfy simultaneously your obligations under this License
and any other pertinent obligations, then as a consequence you may not distribute
the Program at all. For example, if a patent license would not permit royalty-free
redistribution of the Program by all those who receive copies directly or indirectly
through you, then the only way you could satisfy both it and this License would be
to refrain entirely from distribution of the Program.
If any portion of this section is held invalid or unenforceable under any particular
circumstance, the balance of the section is intended to apply and the section as a whole
is intended to apply in other circumstances.
It is not the purpose of this section to induce you to infringe any patents or other
property right claims or to contest validity of any such claims; this section has the sole
purpose of protecting the integrity of the free software distribution system, which is
implemented by public license practices. Many people have made generous
contributions to the wide range of software distributed through that system in reliance
on consistent application of that system; it is up to the author/donor to decide if he or
she is willing to distribute software through any other system and a licensee cannot
impose that choice.

ii
This section is intended to make thoroughly clear what is believed to be a consequence
of the rest of this License.
8. If the distribution and/or use of the Program is restricted in certain countries either
by patents or by copyrighted interfaces, the original copyright holder who places
the Program under this License may add an explicit geographical distribution
limitation excluding those countries, so that distribution is permitted only in or
among countries not thus excluded. In such case, this License incorporates the
limitation as if written in the body of this License.
9. The Free Software Foundation may publish revised and/or new versions of the
General Public License from time to time. Such new versions will be similar in
spirit to the present version, but may differ in detail to address new problems or
concerns.
Each version is given a distinguishing version number. If the Program specifies a
version number of this License which applies to it and “any later version”, you have the
option of following the terms and conditions either of that version or of any later
version published by the Free Software Foundation. If the Program does not specify a
version number of this License, you may choose any version ever published by the Free
Software Foundation.
10. If you wish to incorporate parts of the Program into other free programs whose
distribution conditions are different, write to the author to ask for permission. For
software which is copyrighted by the Free Software Foundation, write to the Free
Software Foundation; we sometimes make exceptions for this. Our decision will be
guided by the two goals of preserving the free status of all derivatives of our free
software and of promoting the sharing and reuse of software generally.
NO WARRANTY
11. BECAUSE THE PROGRAM IS LICENSED FREE OF CHARGE, THERE IS NO
WARRANTY FOR THE PROGRAM, TO THE EXTENT PERMITTED BY
APPLICABLE LAW. EXCEPT WHEN OTHERWISE STATED IN WRITING
THE COPYRIGHT HOLDERS AND/OR OTHER PARTIES PROVIDE THE
PROGRAM “AS IS” WITHOUT WARRANTY OF ANY KIND, EITHER
EXPRESSED OR IMPLIED, INCLUDING, BUT NOT LIMITED TO, THE
IMPLIED WARRANTIES OF MERCHANTABILITY AND FITNESS FOR A
PARTICULAR PURPOSE. THE ENTIRE RISK AS TO THE QUALITY AND
PERFORMANCE OF THE PROGRAM IS WITH YOU. SHOULD THE
PROGRAM PROVE DEFECTIVE, YOU ASSUME THE COST OF ALL
NECESSARY SERVICING, REPAIR OR CORRECTION.
12. IN NO EVENT UNLESS REQUIRED BY APPLICABLE LAW OR AGREED
TO IN WRITING WILL ANY COPYRIGHT HOLDER, OR ANY OTHER
PARTY WHO MAY MODIFY AND/OR REDISTRIBUTE THE PROGRAM AS
PERMITTED ABOVE, BE LIABLE TO YOU FOR DAMAGES, INCLUDING
ANY GENERAL, SPECIAL, INCIDENTAL OR CONSEQUENTIAL
DAMAGES ARISING OUT OF THE USE OR INABILITY TO USE THE
PROGRAM (INCLUDING BUT NOT LIMITED TO LOSS OF DATA OR DATA
BEING RENDERED INACCURATE OR LOSSES SUSTAINED BY YOU OR
THIRD PARTIES OR A FAILURE OF THE PROGRAM TO OPERATE WITH
ANY OTHER PROGRAMS), EVEN IF SUCH HOLDER OR OTHER PARTY
HAS BEEN ADVISED OF THE POSSIBILITY OF SUCH DAMAGES.
END OF TERMS AND CONDITIONS
How to Apply These Terms to Your New Programs
If you develop a new program, and you want it to be of the greatest possible use to the
public, the best way to achieve this is to make it free software which everyone can
redistribute and change under these terms.
To do so, attach the following notices to the program. It is safest to attach them to the
start of each source file to most effectively convey the exclusion of warranty; and each
file should have at least the “copyright” line and a pointer to where the full notice is
found.
<one line to give the program’s name and a brief idea of what it does.>
Copyright (C) <year> <name of author>
This program is free software; you can redistribute it and/or modify it under the
terms of the GNU General Public License as published by the Free Software
Foundation; either version 2 of the License, or (at your option) any later version.
This program is distributed in the hope that it will be useful, but WITHOUT ANY
WARRANTY; without even the implied warranty of MERCHANTABILITY or
FITNESS FOR A PARTICULAR PURPOSE. See the GNU General Public
License for more details.
You should have received a copy of the GNU General Public License along with
this program; if not, write to the Free Software Foundation, Inc., 51 Franklin St,
Fifth Floor, Boston, MA 02110-1301 USA
Also add information on how to contact you by electronic and paper mail.
If the program is interactive, make it output a short notice like this
when it starts in an interactive mode:
Gnomovision version 69, Copyright (C) year name of author Gnomovision comes
with ABSOLUTELY NO WARRANTY; for details type ‘show w’. This is free
software, and you are welcome to redistribute it under certain conditions; type
‘show c’ for details.
The hypothetical commands ‘show w’ and ‘show c’ should show the appropriate parts
of the General Public License. Of course, the commands you use may be called
something other than ‘show w’ and ‘show c’; they could even be mouse-clicks or menu
items--whatever suits your program.
You should also get your employer (if you work as a programmer) or your school, if
any, to sign a “copyright disclaimer” for the program, if necessary. Here is a sample;
alter the names:
Yoyodyne, Inc., hereby disclaims all copyright interest in the program
‘Gnomovision’ (which makes passes at compilers) written by James Hacker.
<signature of Ty Coon>, 1 April 1989
Ty Coon, President of Vice
This General Public License does not permit incorporating your program into
proprietary programs. If your program is a subroutine library, you may consider it more
useful to permit linking proprietary applications with the library. If this is what you
want to do, use the GNU Library General
Public License instead of this License..
■ About glibc, libmtp, libusb, libusb-compat, DirectFB
GNU LESSER GENERAL PUBLIC LICENSE
Version 2.1, February 1999
Copyright (C) 1991, 1999 Free Software Foundation, Inc.
59 Temple Place, Suite 330, Boston, MA 02111-1307 USA
Everyone is permitted to copy and distribute verbatim copies of this license document,
but changing it is not allowed.
[This is the first released version of the Lesser GPL. It also counts as the successor of
the GNU Library Public License, version 2, hence the version number 2.1.]
Preamble
The licenses for most software are designed to take away your freedom to share and
change it. By contrast, the GNU General Public Licenses are intended to guarantee
your freedom to share and change free software--to make sure the software is free for
all its users.
This license, the Lesser General Public License, applies to some specially designated
software packages--typically libraries--of the Free Software Foundation and other
authors who decide to use it. You can use it too, but we suggest you first think carefully
about whether this license or the ordinary General Public License is the better strategy
to use in any particular case, based on the explanations below.
When we speak of free software, we are referring to freedom of use, not price. Our
General Public Licenses are designed to make sure that you have the freedom to
distribute copies of free software (and charge for this service if you wish); that you
receive source code or can get it if you want it; that you can change the software and
use pieces of it in new free programs; and that you are informed that you can do these
things.
To protect your rights, we need to make restrictions that forbid distributors to deny you
these rights or to ask you to surrender these rights. These restrictions translate to
certain responsibilities for you if you distribute copies of the library or if you modify it.
For example, if you distribute copies of the library, whether gratis or for a fee, you must
give the recipients all the rights that we gave you. You must make sure that they, too,
receive or can get the source code. If you link other code with the library, you must
provide complete object files to the recipients, so that they can relink them with the
library after making changes to the library and recompiling it. And you must show
them these terms so they know their rights.
We protect your rights with a two-step method: (1) we copyright the library, and (2) we
offer you this license, which gives you legal permission to copy, distribute and/or
modify the library.
To protect each distributor, we want to make it very clear that there is no warranty for
the free library. Also, if the library is modified by someone else and passed on, the
recipients should know that what they have is not the original version, so that the
original author’s reputation will not be affected by problems that might be introduced
by others.
Finally, software patents pose a constant threat to the existence of any free program.
We wish to make sure that a company cannot effectively restrict the users of a free
program by obtaining a restrictive license from a patent holder. Therefore, we insist
that any patent license obtained for a version of the library must be consistent with the
full freedom of use specified in this license.
Most GNU software, including some libraries, is covered by the ordinary GNU General
Public License. This license, the GNU Lesser General Public License, applies to
certain designated libraries, and is quite different from the ordinary General Public
License. We use this license for certain libraries in order to permit linking those
libraries into non-free programs.
When a program is linked with a library, whether statically or using a shared library, the
combination of the two is legally speaking a combined work, a derivative of the original
library. The ordinary General Public License therefore permits such linking only if the
entire combination fits its criteria of freedom. The Lesser General Public License
permits more lax criteria for linking other code with the library.
We call this license the “Lesser” General Public License because it does Less to protect
the user’s freedom than the ordinary General Public License. It also provides other free
software developers Less of an advantage over competing non-free programs. These
disadvantages are the reason we use the ordinary General Public License for many
libraries. However, the Lesser license provides advantages in certain special
circumstances.
For example, on rare occasions, there may be a special need to encourage the widest
possible use of a certain library, so that it becomes a de-facto standard. To achieve this,
non-free programs must be allowed to use the library. A more frequent case is that a
free library does the same job as widely used non-free libraries. In this case, there is
little to gain by limiting the free library to free software only, so we use the Lesser
General Public License.
In other cases, permission to use a particular library in non-free programs enables a
greater number of people to use a large body of free software. For example, permission
to use the GNU C Library in non-free programs enables many more people to use the
whole GNU operating system, as well as its variant, the GNU/Linux operating system.
Although the Lesser General Public License is Less protective of the users’ freedom, it
does ensure that the user of a program that is linked with the Library has the freedom
and the wherewithal to run that program using a modified version of the Library.
The precise terms and conditions for copying, distribution and modification follow.
Pay close attention to the difference between a “work based on the library” and a “work
that uses the library”. The former contains code derived from the library, whereas the
latter must be combined with the library in order to run.

iii
GNU LESSER GENERAL PUBLIC LICENSE
TERMS AND CONDITIONS FOR COPYING, DISTRIBUTION AND
MODIFICATION
0. This License Agreement applies to any software library or other program which
contains a notice placed by the copyright holder or other authorized party saying it
may be distributed under the terms of this Lesser General Public License (also
called “this License”). Each licensee is addressed as “you”.
A “library” means a collection of software functions and/or data prepared so as to be
conveniently linked with application programs (which use some of those functions and
data) to form executables.
The “Library”, below, refers to any such software library or work which has been
distributed under these terms. A “work based on the Library” means either the Library
or any derivative work under copyright law: that is to say, a work containing the
Library or a portion of it, either verbatim or with modifications and/or translated
straightforwardly into another language. (Hereinafter, translation is included without
limitation in the term “modification”.)
“Source code” for a work means the preferred form of the work for making
modifications to it. For a library, complete source code means all the source code for
all modules it contains, plus any associated interface definition files, plus the scripts
used to control compilation and installation of the library.
Activities other than copying, distribution and modification are not covered by this
License; they are outside its scope. The act of running a program using the Library is
not restricted, and output from such a program is covered only if its contents constitute
a work based on the Library (independent of the use of the Library in a tool for writing
it). Whether that is true depends on what the Library does and what the program that
uses the Library does.
1. You may copy and distribute verbatim copies of the Library’s complete source
code as you receive it, in any medium, provided that you conspicuously and
appropriately publish on each copy an appropriate copyright notice and disclaimer
of warranty; keep intact all the notices that refer to this License and to the absence
of any warranty; and distribute a copy of this License along with the Library.
You may charge a fee for the physical act of transferring a copy, and you may at your
option offer warranty protection in exchange for a fee.
2. You may modify your copy or copies of the Library or any portion of it, thus
forming a work based on the Library, and copy and distribute such modifications or
work under the terms of Section 1 above, provided that you also meet all of these
conditions:
a) The modified work must itself be a software library.
b) You must cause the files modified to carry prominent notices stating that you
changed the files and the date of any change.
c) You must cause the whole of the work to be licensed at no charge to all third
parties under the terms of this License.
d) If a facility in the modified Library refers to a function or a table of data to be
supplied by an application program that uses the facility, other than as an
argument passed when the facility is invoked, then you must make a good faith
effort to ensure that, in the event an application does not supply such function
or table, the facility still operates, and performs whatever part of its purpose
remains meaningful.
(For example, a function in a library to compute square roots has a purpose that is
entirely well-defined independent of the application. Therefore, Subsection 2d
requires that any application-supplied function or table used by this function must
be optional: if the application does not supply it, the square root function must still
compute square roots.)
These requirements apply to the modified work as a whole. If identifiable sections of
that work are not derived from the Library, and can be reasonably considered
independent and separate works in themselves, then this License, and its terms, do not
apply to those sections when you distribute them as separate works. But when you
distribute the same sections as part of a whole which is a work based on the Library, the
distribution of the whole must be on the terms of this License, whose permissions for
other licensees extend to the entire whole, and thus to each and every part regardless of
who wrote it.
Thus, it is not the intent of this section to claim rights or contest your rights to work
written entirely by you; rather, the intent is to exercise the right to control the
distribution of derivative or collective works based on the Library.
In addition, mere aggregation of another work not based on the Library with the Library
(or with a work based on the Library) on a volume of a storage or distribution medium
does not bring the other work under the scope of this License.
3. You may opt to apply the terms of the ordinary GNU General Public License
instead of this License to a given copy of the Library. To do this, you must alter all
the notices that refer to this License, so that they refer to the ordinary GNU General
Public License, version 2, instead of to this License. (If a newer version than
version 2 of the ordinary GNU General Public License has appeared, then you can
specify that version instead if you wish.) Do not make any other change in these
notices.
Once this change is made in a given copy, it is irreversible for that copy, so the ordinary
GNU General Public License applies to all subsequent copies and derivative works
made from that copy.
This option is useful when you wish to copy part of the code of the Library into a
program that is not a library.
4. You may copy and distribute the Library (or a portion or derivative of it, under
Section 2) in object code or executable form under the terms of Sections 1 and 2
above provided that you accompany it with the complete corresponding machine-
readable source code, which must be distributed under the terms of Sections 1 and 2
above on a medium customarily used for software interchange.
If distribution of object code is made by offering access to copy from a designated
place, then offering equivalent access to copy the source code from the same place
satisfies the requirement to distribute the source code, even though third parties are not
compelled to copy the source along with the object code.
5. A program that contains no derivative of any portion of the Library, but is designed
to work with the Library by being compiled or linked with it, is called a “work that
uses the Library”. Such a work, in isolation, is not a derivative work of the Library,
and therefore falls outside the scope of this License.
However, linking a “work that uses the Library” with the Library creates an executable
that is a derivative of the Library (because it contains portions of the Library), rather
than a “work that uses the library”. The executable is therefore covered by this License.
Section 6 states terms for distribution of such executables.
When a “work that uses the Library” uses material from a header file that is part of the
Library, the object code for the work may be a derivative work of the Library even
though the source code is not. Whether this is true is especially significant if the work
can be linked without the Library, or if the work is itself a library. The threshold for
this to be true is not precisely defined by law.
If such an object file uses only numerical parameters, data structure layouts and
accessors, and small macros and small inline functions (ten lines or less in length), then
the use of the object file is unrestricted, regardless of whether it is legally a derivative
work. (Executables containing this object code plus portions of the Library will still
fall under Section 6.)
Otherwise, if the work is a derivative of the Library, you may distribute the object code
for the work under the terms of Section 6. Any executables containing that work also
fall under Section 6, whether or not they are linked directly with the Library itself.
6. As an exception to the Sections above, you may also combine or link a ‘work that
uses the Library” with the Library to produce a work containing portions of the
Library, and distribute that work under terms of your choice, provided that the
terms permit modification of the work for the customer’s own use and reverse
engineering for debugging such modifications.
You must give prominent notice with each copy of the work that the Library is used in
it and that the Library and its use are covered by this License. You must supply a copy
of this License. If the work during execution displays copyright notices, you must
include the copyright notice for the Library among them, as well as a reference
directing the user to the copy of this License. Also, you must do one of these things:
a) Accompany the work with the complete corresponding machine-readable
source code for the Library including whatever changes were used in the work
(which must be distributed under Sections 1 and 2 above); and, if the work is an
executable linked with the Library, with the complete machine-readable “work
that uses the Library”, as object code and/or source code, so that the user can
modify the Library and then relink to produce a modified executable containing
the modified Library. (It is understood that the user who changes the contents
of definitions files in the Library will not necessarily be able to recompile the
application to use the modified definitions.)
b) Use a suitable shared library mechanism for linking with the Library. A
suitable mechanism is one that (1) uses at run time a copy of the library already
present on the user’s computer system, rather than copying library functions
into the executable, and (2) will operate properly with a modified version of the
library, if the user installs one, as long as the modified version is interface-
compatible with the version that the work was made with.
c) Accompany the work with a written offer, valid for at least three years, to give
the same user the materials specified in Subsection 6a, above, for a charge no
more than the cost of performing this distribution.
d) If distribution of the work is made by offering access to copy from a designated
place, offer equivalent access to copy the above specified materials from the
same place.
e) Verify that the user has already received a copy of these materials or that you
have already sent this user a copy.
For an executable, the required form of the “work that uses the Library” must include
any data and utility programs needed for reproducing the executable from it. However,
as a special exception, the materials to be distributed need not include anything that is
normally distributed (in either source or binary form) with the major components
(compiler, kernel, and so on) of the operating system on which the executable runs,
unless that component itself accompanies the executable.
It may happen that this requirement contradicts the license restrictions of other
proprietary libraries that do not normally accompany the operating system. Such a
contradiction means you cannot use both them and the Library together in an executable
that you distribute.
7. You may place library facilities that are a work based on the Library side-by-side in
a single library together with other library facilities not covered by this License,
and distribute such a combined library, provided that the separate distribution of the
work based on the Library and of the other library facilities is otherwise permitted,
and provided that you do these two things:
a) Accompany the combined library with a copy of the same work based on the
Library, uncombined with any other library facilities. This must be distributed
under the terms of the Sections above.
b) Give prominent notice with the combined library of the fact that part of it is a
work based on the Library, and explaining where to find the accompanying
uncombined form of the same work.
8. You may not copy, modify, sublicense, link with, or distribute the Library except as
expressly provided under this License. Any attempt otherwise to copy, modify,
sublicense, link with, or distribute the Library is void, and will automatically
terminate your rights under this License. However, parties who have received
copies, or rights, from you under this License will not have their licenses
terminated so long as such parties remain in full compliance.

iv
9. You are not required to accept this License, since you have not signed it. However,
nothing else grants you permission to modify or distribute the Library or its
derivative works. These actions are prohibited by law if you do not accept this
License. Therefore, by modifying or distributing the Library (or any work based on
the Library), you indicate your acceptance of this License to do so, and all its terms
and conditions for copying, distributing or modifying the Library or works based
on it.
10. Each time you redistribute the Library (or any work based on the Library), the
recipient automatically receives a license from the original licensor to copy,
distribute, link with or modify the Library subject to these terms and conditions.
You may not impose any further restrictions on the recipients’ exercise of the rights
granted herein. You are not responsible for enforcing compliance by third parties
with this License.
11. If, as a consequence of a court judgment or allegation of patent infringement or for
any other reason (not limited to patent issues), conditions are imposed on you
(whether by court order, agreement or otherwise) that contradict the conditions of
this License, they do not excuse you from the conditions of this License. If you
cannot distribute so as to satisfy simultaneously your obligations under this License
and any other pertinent obligations, then as a consequence you may not distribute
the Library at all. For example, if a patent license would not permit royalty-free
redistribution of the Library by all those who receive copies directly or indirectly
through you, then the only way you could satisfy both it and this License would be
to refrain entirely from distribution of the Library.
If any portion of this section is held invalid or unenforceable under any particular
circumstance, the balance of the section is intended to apply, and the section as a whole
is intended to apply in other circumstances.
It is not the purpose of this section to induce you to infringe any patents or other
property right claims or to contest validity of any such claims; this section has the sole
purpose of protecting the integrity of the free software distribution system which is
implemented by public license practices. Many people have made generous
contributions to the wide range of software distributed through that system in reliance
on consistent application of that system; it is up to the author/donor to decide if he or
she is willing to distribute software through any other system and a licensee cannot
impose that choice.
This section is intended to make thoroughly clear what is believed to be a consequence
of the rest of this License.
12. If the distribution and/or use of the Library is restricted in certain countries either
by patents or by copyrighted interfaces, the original copyright holder who places
the Library under this License may add an explicit geographical distribution
limitation excluding those countries, so that distribution is permitted only in or
among countries not thus excluded. In such case, this License incorporates the
limitation as if written in the body of this License.
13. The Free Software Foundation may publish revised and/or new versions of the
Lesser General Public License from time to time. Such new versions will be similar
in spirit to the present version, but may differ in detail to address new problems or
concerns.
Each version is given a distinguishing version number. If the Library specifies a
version number of this License which applies to it and “any later version”, you have the
option of following the terms and conditions either of that version or of any later
version published by the Free Software Foundation. If the Library does not specify a
license version number, you may choose any version ever published by the Free
Software Foundation.
14. If you wish to incorporate parts of the Library into other free programs whose
distribution conditions are incompatible with these, write to the author to ask for
permission. For software which is copyrighted by the Free Software Foundation,
write to the Free Software Foundation; we sometimes make exceptions for this.
Our decision will be guided by the two goals of preserving the free status of all
derivatives of our free software and of promoting the sharing and reuse of software
generally.
NO WARRANTY
15. BECAUSE THE LIBRARY IS LICENSED FREE OF CHARGE, THERE IS NO
WARRANTY FOR THE LIBRARY, TO THE EXTENT PERMITTED BY
APPLICABLE LAW. EXCEPT WHEN OTHERWISE STATED IN WRITING
THE COPYRIGHT HOLDERS AND/OR OTHER PARTIES PROVIDE THE
LIBRARY “AS IS” WITHOUT WARRANTY OF ANY KIND, EITHER
EXPRESSED OR IMPLIED, INCLUDING, BUT NOT LIMITED TO, THE
IMPLIED WARRANTIES OF MERCHANTABILITY AND FITNESS FOR A
PARTICULAR PURPOSE. THE ENTIRE RISK AS TO THE QUALITY AND
PERFORMANCE OF THE LIBRARY IS WITH YOU. SHOULD THE
LIBRARY PROVE DEFECTIVE, YOU ASSUME THE COST OF ALL
NECESSARY SERVICING, REPAIR OR CORRECTION.
16. IN NO EVENT UNLESS REQUIRED BY APPLICABLE LAW OR AGREED
TO IN WRITING WILL ANY COPYRIGHT HOLDER, OR ANY OTHER
PARTY WHO MAY MODIFY AND/OR REDISTRIBUTE THE LIBRARY AS
PERMITTED ABOVE, BE LIABLE TO YOU FOR DAMAGES, INCLUDING
ANY GENERAL, SPECIAL, INCIDENTAL OR CONSEQUENTIAL
DAMAGES ARISING OUT OF THE USE OR INABILITY TO USE THE
LIBRARY (INCLUDING BUT NOT LIMITED TO LOSS OF DATA OR DATA
BEING RENDERED INACCURATE OR LOSSES SUSTAINED BY YOU OR
THIRD PARTIES OR A FAILURE OF THE LIBRARY TO OPERATE WITH
ANY OTHER SOFTWARE), EVEN IF SUCH HOLDER OR OTHER PARTY
HAS BEEN ADVISED OF THE POSSIBILITY OF SUCH DAMAGES.
END OF TERMS AND CONDITIONS
How to Apply These Terms to Your New Libraries
If you develop a new library, and you want it to be of the greatest possible use to the
public, we recommend making it free software that everyone can redistribute and
change. You can do so by permitting redistribution under these terms (or, alternatively,
under the terms of the ordinary General Public License).
To apply these terms, attach the following notices to the library. It is safest to attach
them to the start of each source file to most effectively convey the exclusion of
warranty; and each file should have at least the “copyright” line and a pointer to where
the full notice is found.
<one line to give the library’s name and a brief idea of what it does.> Copyright (C)
<year> <name of author>
This library is free software; you can redistribute it and/or modify it under the terms
of the GNU Lesser General Public License as published by the Free Software
Foundation; either version 2 of the License, or (at your option) any later version.
This library is distributed in the hope that it will be useful, but WITHOUT ANY
WARRANTY; without even the implied warranty of MERCHANTABILITY or
FITNESS FOR A PARTICULAR PURPOSE. See the GNU Lesser General Public
License for more details.
You should have received a copy of the GNU Lesser General Public License along
with this library; if not, write to the Free Software Foundation, Inc., 59 Temple
Place, Suite 330, Boston, MA 02111-1307 USA
Also add information on how to contact you by electronic and paper mail.
You should also get your employer (if you work as a programmer) or your school, if
any, to sign a “copyright disclaimer” for the library, if necessary. Here is a sample;
alter the names:
Yoyodyne, Inc., hereby disclaims all copyright interest in the library ‘Frob’ (a
library for tweaking knobs) written by James Random Hacker.
<signature of Ty Coon>, 1 April 1990 Ty Coon, President of Vice
That’s all there is to it!
■ About Fusion
DirectFB Fusion kernel module: introduction and API
by Niels Roest
Copyright (C) 2009 Niels Roest
This documentation is free software; you can redistribute it and/or modify it under the
terms of the GNU General Public License as published by
the Free Software Foundation; either version 2 of the License, or (at your option) any
later version.
This program is distributed in the hope that it will be useful, but WITHOUT ANY
WARRANTY; without even the implied warranty of
MERCHANTABILITY or FITNESS FOR A PARTICULAR PURPOSE. See the GNU
General Public License for more details.
You should have received a copy of the GNU General Public License along with this
program; if not, write to the Free Software Foundation, Inc.,
59 Temple Place, Suite 330, Boston, MA 02111-1307 USA
For more details see the ?le COPYING in the source distribution of Linux.
■ About openssl
Copyright (C) 1998-2008 The OpenSSL Project. All rights reserved.
Redistribution and use in source and binary forms, with or without modification, are
permitted provided that the following conditions are met:
1. Redistributions of source code must retain the above copyright notice, this list of
conditions and the following disclaimer.
2. 2. Redistributions in binary form must reproduce the above copyright notice, this
list of conditions and the following disclaimer in the documentation and/or other
materials provided with the distribution.
3. All advertising materials mentioning features or use of this software must display
the following acknowledgment:
“This product includes software developed by the OpenSSL Project for use in the
OpenSSL Toolkit. (http://www.openssl.org/)”
4. The names “OpenSSL Toolkit” and “OpenSSL Project” must not be used to
endorse or promote products derived from this software without prior written
permission. For written permission, please contact [email protected].
5. Products derived from this software may not be called “OpenSSL” nor may
“OpenSSL” appear in their names without prior written permission of the OpenSSL
Project.
6. Redistributions of any form whatsoever must retain the following
acknowledgment:
‘This product includes software developed by the OpenSSL Project for use in the
OpenSSL Toolkit (http://www.openssl.org/)”
THIS SOFTWARE IS PROVIDED BY THE OpenSSL PROJECT “AS IS” AND ANY
EXPRESSED OR IMPLIED WARRANTIES, INCLUDING, BUT NOT LIMITED
TO, THE IMPLIED WARRANTIES OF MERCHANTABILITY AND FITNESS FOR
A PARTICULAR PURPOSE ARE DISCLAIMED. IN NO EVENT SHALL THE
OpenSSL PROJECT OR ITS CONTRIBUTORS BE LIABLE FOR ANY DIRECT,
INDIRECT, INCIDENTAL, SPECIAL, EXEMPLARY, OR CONSEQUENTIAL
DAMAGES (INCLUDING, BUT NOT LIMITED TO, PROCUREMENT OF
SUBSTITUTE GOODS OR SERVICES; LOSS OF USE, DATA, OR PROFITS; OR
BUSINESS INTERRUPTION) HOWEVER CAUSED AND ON ANY THEORY OF
LIABILITY, WHETHER IN CONTRACT, STRICT LIABILITY, OR TORT
(INCLUDING NEGLIGENCE OR OTHERWISE) ARISING IN ANY WAY OUT OF
THE USE OF THIS SOFTWARE, EVEN IF ADVISEDOF THE POSSIBILITY OF
SUCH DAMAGE.
This product includes cryptographic software written by Eric Young
([email protected]). This product includes software written by Tim Hudson

v
Original SSLeay License
Copyright (C) 1995-1998 Eric Young (eay@cryptsoft.com) All rights reserved.
This package is an SSL implementation written by Eric Young ([email protected]).
The implementation was written so as to conform with Netscapes SSL.
This library is free for commercial and non-commercial use as long as the following
conditions are aheared to. The following conditions apply to all code found in this
distribution, be it the RC4, RSA, lhash, DES, etc., code; not just the SSL code. The
SSL documentation included with this distribution is covered by the same copyright
terms except that the holder is Tim Hudson ([email protected]).
Copyright remains Eric Young’s, and as such any Copyright notices in the code are not
to be removed. If this package is used in a product, Eric Young should be given
attribution as the author of the parts of the library used. This can be in the form of a
textual message at program startup or in documentation (online or textual) provided
with the package.
Redistribution and use in source and binary forms, with or without modification, are
permitted provided that the following conditions are met:
1. Redistributions of source code must retain the copyright notice, this list of
conditions and the following disclaimer.
2. Redistributions in binary form must reproduce the above copyright notice, this list
of conditions and the following disclaimer in the documentation and/or other
materials provided with the distribution.
3. All advertising materials mentioning features or use of this software must display
the following acknowledgement:
“This product includes cryptographic software written by Eric Young
([email protected])” The word ‘cryptographic’ can be left out if the rouines from
the library being used are not cryptographic related :-).
4. If you include any Windows specific code (or a derivative thereof) from the apps
directory (application code) you must include an acknowledgement:
“This product includes software written by Tim Hudson ([email protected])”
THIS SOFTWARE IS PROVIDED BY ERIC YOUNG “AS IS” AND ANY EXPRESS
OR IMPLIED WARRANTIES, INCLUDING, BUT NOT LIMITED TO, THE
IMPLIED WARRANTIES OF MERCHANTABILITY AND FITNESS FOR A
PARTICULAR PURPOSE ARE DISCLAIMED. IN NO EVENT SHALL THE
AUTHOR OR CONTRIBUTORS BE LIABLE FOR ANY DIRECT, INDIRECT,
INCIDENTAL, SPECIAL, EXEMPLARY, OR CONSEQUENTIAL DAMAGES
(INCLUDING, BUT NOT LIMITED TO, PROCUREMENT OF SUBSTITUTE
GOODS OR SERVICES; LOSS OF USE, DATA, OR PROFITS; OR BUSINESS
INTERRUPTION) HOWEVER CAUSED AND ON ANY THEORY OF LIABILITY,
WHETHER IN CONTRACT, STRICT LIABILITY, OR TORT (INCLUDING
NEGLIGENCE OR OTHERWISE) ARISING IN ANY WAY OUT OF THE USE OF
THIS SOFTWARE, EVEN IF ADVISED OF THE POSSIBILITY OF SUCH
DAMAGE.
The licence and distribution terms for any publically available version or derivative of
this code cannot be changed. i.e. this code cannot simply be copied and put under
another distribution licence [including the GNU Public Licence.]
■ About zlib
Copyright notice:
(C) 1995-2004 Jean-loup Gailly and Mark Adler
This software is provided ‘as-is’, without any express or implied warranty. In no event
will the authors be held liable for any damages arising from the use of this software.
Permission is granted to anyone to use this software for any purpose, including
commercial applications, and to alter it and redistribute it freely, subject to the
following restrictions:
1. The origin of this software must not be misrepresented; you must not claim that you
wrote the original software. If you use this software in a product, an
acknowledgment in the product documentation would be appreciated but is not
required.
2. Altered source versions must be plainly marked as such, and must not be
misrepresented as being the original software.
3. This notice may not be removed or altered from any source distribution.
Jean-loup Gailly Mark Adler
If you use the zlib library in a product, we would appreciate *not* receiving lengthy
legal documents to sign. The sources are provided for free but without warranty of any
kind. The library has been entirely written by Jean-loup Gailly and Mark Adler; it does
not include third-party code.
If you redistribute modified sources, we would appreciate that you include in the file
ChangeLog history information documenting your changes. Please read the FAQ for
more information on the distribution of modified source versions.
■ About FreeType
The FreeType Project LICENSE
2006-Jan-27
Copyright 1996-2002, 2006 by
David Turner, Robert Wilhelm, and Werner Lemberg
Introduction
The FreeType Project is distributed in several archive packages; some of them may
contain, in addition to the FreeType font engine, various tools and contributions which
rely on, or relate to, the FreeType Project.
This license applies to all files found in such packages, and which do not fall under their
own explicit license. The license affects thus the FreeType font engine, the test
programs, documentation and makefiles, at the very least.
This license was inspired by the BSD, Artistic, and IJG (Independent JPEG Group)
licenses, which all encourage inclusion and use of free software in commercial and
freeware products alike. As a consequence, its main points are that:
o We don’t promise that this software works. However, we will be interested in any
kind of bug reports. (‘as is’ distribution)
o You can use this software for whatever you want, in parts or full form, without
having to pay us. (‘royalty-free’ usage)
o You may not pretend that you wrote this software. If you use it, or only parts of it, in
a program, you must acknowledge somewhere in your documentation that you have
used the FreeType code. (‘credits’)
We specifically permit and encourage the inclusion of this software, with or without
modifications, in commercial products. We disclaim all warranties covering The
FreeType Project and assume no liability related to The FreeType Project.
Finally, many people asked us for a preferred form for a credit/disclaimer to use in
compliance with this license. We thus encourage you to use the following text:
Portions of this software are copyright (C) <year> The FreeType Project
(www.freetype.org). All rights reserved.
Please replace <year> with the value from the FreeType version you actually use.
Legal Terms
0. Definitions
Throughout this license, the terms ‘package’, ‘FreeType Project’, and ‘FreeType
archive’ refer to the set of files originally distributed by the authors (David Turner,
Robert Wilhelm, and Werner Lemberg) as the ‘FreeType Project’, be they named as
alpha, beta or final release.
‘You’ refers to the licensee, or person using the project, where ‘using’ is a generic term
including compiling the project’s source code as well as linking it to form a ‘program’
or ‘executable’. This program is referred to as ‘a program using the FreeType engine’.
This license applies to all files distributed in the original FreeType Project, including
all source code, binaries and documentation, unless otherwise stated in the file in its
original, unmodified form as distributed in the original archive. If you are unsure
whether or not a particular file is covered by this license, you must contact us to verify
this.
The FreeType Project is copyright (C) 1996-2000 by David Turner, Robert Wilhelm,
and Werner Lemberg. All rights reserved except as specified below.
1. No Warranty
THE FREETYPE PROJECT IS PROVIDED ‘AS IS’ WITHOUT WARRANTY OF
ANY KIND, EITHER EXPRESS OR IMPLIED, INCLUDING, BUT NOT LIMITED
TO, WARRANTIES OF MERCHANTABILITY AND FITNESS FOR A
PARTICULAR PURPOSE. IN NO EVENT WILL ANY OF THE AUTHORS OR
COPYRIGHT HOLDERS BE LIABLE FOR ANY DAMAGES CAUSED BY THE
USE OR THE INABILITY TO USE, OF THE FREETYPE PROJECT.
2. Redistribution
This license grants a worldwide, royalty-free, perpetual and irrevocable right and
license to use, execute, perform, compile, display, copy, create derivative works of,
distribute and sublicense the FreeType Project (in both source and object code forms)
and derivative works thereof for any purpose; and to authorize others to exercise some
or all of the rights granted herein, subject to the following conditions:
o Redistribution of source code must retain this license file (‘FTL.TXT’) unaltered;
any additions, deletions or changes to the original files must be clearly indicated in
accompanying documentation. The copyright notices of the unaltered, original files
must be preserved in all copies of source files.
o Redistribution in binary form must provide a disclaimer that states that the software
is based in part of the work of the FreeType Team, in the distribution documentation.
We also encourage you to put an URL to the FreeType web page in your
documentation, though this isn’t mandatory.
These conditions apply to any software derived from or based on the FreeType Project,
not just the unmodified files. If you use our work, you must acknowledge us. However,
no fee need be paid to us.
3. Advertising
Neither the FreeType authors and contributors nor you shall use the name of the other
for commercial, advertising, or promotional purposes without specific prior written
permission.
We suggest, but do not require, that you use one or more of the following phrases to
refer to this software in your documentation or advertising materials: ‘FreeType
Project’, ‘FreeType Engine’, ‘FreeType library’, or ‘FreeType Distribution’.
As you have not signed this license, you are not required to accept it. However, as the
FreeType Project is copyrighted material, only this license, or another one contracted
with the authors, grants you the right to use, distribute, and modify it. Therefore, by
using, distributing, or modifying the FreeType Project, you indicate that you understand
and accept all the terms of this license.
4. Contacts
There are two mailing lists related to FreeType:
Discusses general use and applications of FreeType, as well as future and wanted
additions to the library and distribution. If you are looking for support, start in this list if
you haven’t found anything to help you in the documentation.
Discusses bugs, as well as engine internals, design issues, specific licenses, porting, etc.
Our home page can be found at
http://www.freetype.org

vi
■ About Expat
Copyright (C) 1998, 1999, 2000 Thai Open Source Software Center Ltd
and Clark Cooper
Copyright (C) 2001, 2002, 2003, 2004, 2005, 2006 Expat maintainers.
Permission is hereby granted, free of charge, to any person obtaining a copy of this
software and associated documentation files (the “Software”), to deal in the Software
without restriction, including without limitation the rights to use, copy, modify, merge,
publish, distribute, sublicense, and/or sell copies of the Software, and to permit persons
to whom the Software is furnished to do so, subject to the following conditions:
The above copyright notice and this permission notice shall be included in all copies or
substantial portions of the Software.
THE SOFTWARE IS PROVIDED “AS IS”, WITHOUT WARRANTY OF ANY
KIND, EXPRESS OR IMPLIED, INCLUDING BUT NOT LIMITED TO THE
WARRANTIES OF MERCHANTABILITY, FITNESS FOR A PARTICULAR
PURPOSE AND NONINFRINGEMENT. IN NO EVENT SHALL THE AUTHORS
OR COPYRIGHT HOLDERS BE LIABLE FOR ANY CLAIM, DAMAGES OR
OTHER LIABILITY, WHETHER IN AN ACTION OF CONTRACT, TORT OR
OTHERWISE, ARISING FROM, OUT OF OR IN CONNECTION WITH THE
SOFTWARE OR THE USE OR OTHER DEALINGS IN THE SOFTWARE.
■ About cURL
COPYRIGHT AND PERMISSION NOTICE
Copyright (C) 1996 - 2009, Daniel Stenberg, <[email protected]>.
All rights reserved.
Permission to use, copy, modify, and distribute this software for any purpose with or
without fee is hereby granted, provided that the above copyright notice and this
permission notice appear in all copies.
THE SOFTWARE IS PROVIDED “AS IS”, WITHOUT WARRANTY OF ANY
KIND, EXPRESS OR IMPLIED, INCLUDING BUT NOT LIMITED TO THE
WARRANTIES OF MERCHANTABILITY, FITNESS FOR A PARTICULAR
PURPOSE AND NONINFRINGEMENT OF THIRD PARTY RIGHTS. IN NO
EVENT SHALL THE AUTHORS OR COPYRIGHT HOLDERS BE LIABLE FOR
ANY CLAIM, DAMAGES OR OTHER LIABILITY, WHETHER IN AN ACTION
OF CONTRACT, TORT OR OTHERWISE, ARISING FROM, OUT OF OR IN
CONNECTION WITH THE SOFTWARE OR THE USE OR OTHER DEALINGS IN
THE SOFTWARE.
Except as contained in this notice, the name of a copyright holder shall not be used in
advertising or otherwise to promote the sale, use or other dealings in this Software
without prior written authorization of the copyright holder.
■ About Independent JPEG group
The Independent JPEG Group’s JPEG software
README for release 7 of 27-Jun-2009
This distribution contains the seventh public release of the Independent JPEG Group’s
free JPEG software. You are welcome to redistribute this software and to use it for any
purpose, subject to the conditions under LEGAL ISSUES, below.
This software is the work of Tom Lane, Guido Vollbeding, Philip Gladstone, Bill
Allombert, Jim Boucher, Lee Crocker, Bob Friesenhahn, Ben Jackson, Julian
Minguillon, Luis Ortiz, George Phillips, Davide Rossi, Ge’ Weijers, and other members
of the Independent JPEG Group.
IJG is not affiliated with the official ISO JPEG standards committee.
DOCUMENTATION ROADMAP
This file contains the following sections:
OVERVIEW General description of JPEG and the IJG software.
LEGAL ISSUES Copyright, lack of warranty, terms of distribution.
REFERENCES Where to learn more about JPEG.
ARCHIVE LOCATIONS Where to find newer versions of this software.
ACKNOWLEDGMENTS Special thanks.
FILE FORMAT WARS Software *not* to get.
TO DO Plans for future IJG releases.
Other documentation files in the distribution are:
User documentation:
install.txt How to configure and install the IJG software.
usage.txt Usage instructions for cjpeg, djpeg, jpegtran, rdjpgcom, and
wrjpgcom.
*.1 Unix-style man pages for programs (same info as usage.txt).
wizard.txt Advanced usage instructions for JPEG wizards only.
change.log Version-to-version change highlights.
Programmer and internal documentation:
libjpeg.txt How to use the JPEG library in your own programs.
example.c Sample code for calling the JPEG library.
structure.txt Overview of the JPEG library’s internal structure.
filelist.txt Road map of IJG files.
coderules.txt Coding style rules --- please read if you contribute code.
Please read at least the files install.txt and usage.txt. Some information can also be
found in the JPEG FAQ (Frequently Asked Questions) article. See ARCHIVE
LOCATIONS below to find out where to obtain the FAQ article.
If you want to understand how the JPEG code works, we suggest reading one or more
of the REFERENCES, then looking at the documentation files (in roughly the order
listed) before diving into the code.
OVERVIEW
This package contains C software to implement JPEG image encoding, decoding, and
transcoding. JPEG (pronounced “jay-peg”) is a standardized compression method for
full-color and gray-scale images.
This software implements JPEG baseline, extended-sequential, and progressive
compression processes. Provision is made for supporting all variants of these processes,
although some uncommon parameter settings aren’t implemented yet. We have made
no provision for supporting the hierarchical or lossless processes defined in the
standard.
We provide a set of library routines for reading and writing JPEG image files, plus two
sample applications “cjpeg” and “djpeg”, which use the library to perform conversion
between JPEG and some other popular image file formats. The library is intended to be
reused in other applications.
In order to support file conversion and viewing software, we have included
considerable functionality beyond the bare JPEG coding/decoding capability; for
example, the color quantization modules are not strictly part of JPEG decoding, but
they are essential for output to colormapped file formats or colormapped displays.
These extra functions can be compiled out of the library if not required for a particular
application.
We have also included “jpegtran”, a utility for lossless transcoding between different
JPEG processes, and “rdjpgcom” and “wrjpgcom”, two simple applications for
inserting and extracting textual comments in JFIF files.
The emphasis in designing this software has been on achieving portability and
flexibility, while also making it fast enough to be useful. In particular, the software is
not intended to be read as a tutorial on JPEG. (See the REFERENCES section for
introductory material.) Rather, it is intended to be reliable, portable, industrial-strength
code. We do not claim to have achieved that goal in every aspect of the software, but
we strive for it.
We welcome the use of this software as a component of commercial products. No
royalty is required, but we do ask for an acknowledgement in product documentation,
as described under LEGAL ISSUES.
LEGAL ISSUES
In plain English:
1. We don’t promise that this software works. (But if you find any bugs, please let us
know!)
2. You can use this software for whatever you want. You don’t have to pay us.
3. You may not pretend that you wrote this software. If you use it in a program, you
must acknowledge somewhere in your documentation that you’ve used the IJG code.
In legalese:
The authors make NO WARRANTY or representation, either express or implied, with
respect to this software, its quality, accuracy, merchantability, or fitness for a particular
purpose. This software is provided “AS IS”, and you, its user, assume the entire risk as
to its quality and accuracy.
This software is copyright (C) 1991-2009, Thomas G. Lane, Guido Vollbeding.
All Rights Reserved except as specified below.
Permission is hereby granted to use, copy, modify, and distribute this software (or
portions thereof) for any purpose, without fee, subject to these conditions:
(1) If any part of the source code for this software is distributed, then this README file
must be included, with this copyright and no-warranty notice unaltered; and any
additions, deletions, or changes to the original files must be clearly indicated in
accompanying documentation.
(2) If only executable code is distributed, then the accompanying documentation must
state that “this software is based in part on the work of the Independent JPEG Group”.
(3) Permission for use of this software is granted only if the user accepts full
responsibility for any undesirable consequences; the authors accept NO LIABILITY for
damages of any kind.
These conditions apply to any software derived from or based on the IJG code, not just
to the unmodified library. If you use our work, you ought to acknowledge us.
Permission is NOT granted for the use of any IJG author’s name or company name in
advertising or publicity relating to this software or products derived from it. This
software may be referred to only as “the Independent JPEG Group’s software”.
We specifically permit and encourage the use of this software as the basis of
commercial products, provided that all warranty or liability claims are assumed by the
product vendor.
ansi2knr.c is included in this distribution by permission of L. Peter Deutsch, sole
proprietor of its copyright holder, Aladdin Enterprises of Menlo Park, CA. ansi2knr.c is
NOT covered by the above copyright and conditions, but instead by the usual
distribution terms of the Free Software Foundation; principally, that you must include
source code if you redistribute it. (See the file ansi2knr.c for full details.) However,
since ansi2knr.c is not needed as part of any program generated from the IJG code, this
does not limit you more than the foregoing paragraphs do.
The Unix configuration script “configure” was produced with GNU Autoconf. It is
copyright by the Free Software Foundation but is freely distributable. The same holds
for its supporting scripts (config.guess, config.sub, ltmain.sh). Another support script,
install-sh, is copyright by X Consortium but is also freely distributable.
The IJG distribution formerly included code to read and write GIF files. To avoid
entanglement with the Unisys LZW patent, GIF reading support has been removed
altogether, and the GIF writer has been simplified to produce “uncompressed GIFs”.
This technique does not use the LZW algorithm; the resulting GIF files are larger than
usual, but are readable by all standard GIF decoders.
We are required to state that
“The Graphics Interchange Format(c) is the Copyright property of
CompuServe Incorporated. GIF(sm) is a Service Mark property of
CompuServe Incorporated.”
REFERENCES
We recommend reading one or more of these references before trying to understand the
innards of the JPEG software.
The best short technical introduction to the JPEG compression algorithm is
Wallace, Gregory K. “The JPEG Still Picture Compression Standard”,

vii
Communications of the ACM, April 1991 (vol. 34 no. 4), pp. 30-44.
(Adjacent articles in that issue discuss MPEG motion picture compression, applications
of JPEG, and related topics.) If you don’t have the CACM issue handy, a PostScript file
containing a revised version of Wallace’s article is available at http://www.ijg.org/files/
wallace.ps.gz. The file (actually a preprint for an article that appeared in IEEE Trans.
Consumer Electronics) omits the sample images that appeared in CACM, but it
includes corrections and some added material. Note: the Wallace article is copyright
ACM and IEEE, and it may not be used for commercial purposes.
A somewhat less technical, more leisurely introduction to JPEG can be found in “The
Data Compression Book” by Mark Nelson and Jean-loup Gailly, published by M&T
Books (New York), 2nd ed. 1996, ISBN 1-55851-434-1. This book provides good
explanations and example C code for a multitude of compression methods including
JPEG. It is an excellent source if you are comfortable reading C code but don’t know
much about data compression in general. The book’s JPEG sample code is far from
industrial-strength, but when you are ready to look at a full implementation, you’ve got
one here...
The best currently available description of JPEG is the textbook “JPEG Still Image
Data Compression Standard” by William B. Pennebaker and Joan L. Mitchell,
published by Van Nostrand Reinhold, 1993, ISBN 0-442-01272-1. Price US$59.95,
638 pp. The book includes the complete text of the ISO JPEG standards (DIS 10918-1
and draft DIS 10918-2).
Although this is by far the most detailed and comprehensive exposition of JPEG
publicly available, we point out that it is still missing an explanation of the most
essential properties and algorithms of the underlying DCT technology.
If you think that you know about DCT-based JPEG after reading this book, then you are
in delusion. The real fundamentals and corresponding potential of DCT-based JPEG are
not publicly known so far, and that is the reason for all the mistaken developments
taking place in the image coding domain.
The original JPEG standard is divided into two parts, Part 1 being the actual
specification, while Part 2 covers compliance testing methods. Part 1 is titled “Digital
Compression and Coding of Continuous-tone Still Images, Part 1: Requirements and
guidelines” and has document numbers ISO/IEC IS 10918-1, ITU-T T.81. Part 2 is
titled “Digital Compression and Coding of Continuous-tone Still Images, Part 2:
Compliance testing” and has document numbers ISO/IEC IS 10918-2, ITU-T T.83.
The JPEG standard does not specify all details of an interchangeable file format. For the
omitted details we follow the “JFIF” conventions, revision 1.02. A copy of the JFIF
spec is available from:
Literature Department
C-Cube Microsystems, Inc.
1778 McCarthy Blvd.
Milpitas, CA 95035
phone (408) 944-6300, fax (408) 944-6314
A PostScript version of this document is available at http://www.ijg.org/files/jfif.ps.gz.
There is also a plain text version at http://www.ijg.org/files/jfif.txt.gz, but it is missing
the figures.
The TIFF 6.0 file format specification can be obtained by FTP from ftp://ftp.sgi.com/
graphics/tiff/TIFF6.ps.gz. The JPEG incorporation scheme found in the TIFF 6.0 spec
of 3-June-92 has a number of serious problems. IJG does not recommend use of the
TIFF 6.0 design (TIFF Compression tag 6). Instead, we recommend the JPEG design
proposed by TIFF Technical Note #2 (Compression tag 7). Copies of this Note can be
obtained from http://www.ijg.org/files/. It is expected that the next revision of the TIFF
spec will replace the 6.0 JPEG design with the Note’s design. Although IJG’s own code
does not support TIFF/JPEG, the free libtiff library uses our library to implement TIFF/
JPEG per the Note.
ARCHIVE LOCATIONS
The “official” archive site for this software is www.ijg.org. The most recent released
version can always be found there in directory “files”. This particular version will be
archived as http://www.ijg.org/files/jpegsrc.v7.tar.gz, and in Windows-compatible
“zip” archive format as http://www.ijg.org/files/jpegsr7.zip.
The JPEG FAQ (Frequently Asked Questions) article is a source of some general
information about JPEG. It is available on the World Wide Web at http://www.faqs.org/
faqs/jpeg-faq/ and other news.answers archive sites, including the official
news.answers archive at rtfm.mit.edu: ftp://rtfm.mit.edu/pub/usenet/news.answers/
jpeg-faq/. If you don’t have Web or FTP access, send e-mail to mail-
[email protected] with body
send usenet/news.answers/jpeg-faq/part1
send usenet/news.answers/jpeg-faq/part2
ACKNOWLEDGMENTS
Thank to Juergen Bruder of the Georg-Cantor-Organization at the Martin-Luther-
University Halle for providing me with a copy of the common DCT algorithm article,
only to find out that I had come to the same result in a more direct and comprehensible
way with a more generative approach.
Thank to Istvan Sebestyen and Joan L. Mitchell for inviting me to the ITU JPEG (Study
Group 16) meeting in Geneva, Switzerland.
Thank to Thomas Wiegand and Gary Sullivan for inviting me to the Joint Video Team
(MPEG & ITU) meeting in Geneva, Switzerland.
Thank to John Korejwa and Massimo Ballerini for inviting me to fruitful consultations
in Boston, MA and Milan, Italy.
Thank to Hendrik Elstner, Roland Fassauer, and Simone Zuck for corresponding
business development.
Thank to Nico Zschach and Dirk Stelling of the technical support team at the Digital
Images company in Halle for providing me with extra equipment for configuration
tests.
Thank to Richard F. Lyon (then of Foveon Inc.) for fruitful communication about JPEG
configuration in Sigma Photo Pro software.
Last but not least special thank to Thomas G. Lane for the original design and
development of this singular software package.
FILE FORMAT WARS
The ISO JPEG standards committee actually promotes different formats like JPEG-
2000 or JPEG-XR which are incompatible with original DCT-based JPEG and which
are based on faulty technologies. IJG therefore does not and will not support such
momentary mistakes (see REFERENCES). We have little or no sympathy for the
promotion of these formats. Indeed, one of the original reasons for developing this free
software was to help force convergence on common, interoperable format standards for
JPEG files. Don’t use an incompatible file format! (In any case, our decoder will remain
capable of reading existing JPEG image files indefinitely.)
TO DO
v7 is basically just a necessary interim release, paving the way for a major breakthrough
in image coding technology with the next v8 package which is scheduled for release in
the year 2010.
Please send bug reports, offers of help, etc. to [email protected].
■ About International Components for Unicode
ICU License - ICU 1.8.1 and later
COPYRIGHT AND PERMISSION NOTICE
Copyright (C) 1995-2003 International Business Machines Corporation and others
All rights reserved.
Permission is hereby granted, free of charge, to any person obtaining a copy of this
software and associated documentation files (the “Software”), to deal in the Software
without restriction, including without limitation the rights to use, copy, modify, merge,
publish, distribute, and/or sell copies of the Software, and to permit persons to whom
the Software is furnished to do so, provided that the above copyright notice(s) and this
permission notice appear in all copies of the Software and that both the above copyright
notice(s) and this permission notice appear in supporting documentation.
THE SOFTWARE IS PROVIDED “AS IS”, WITHOUT WARRANTY OF ANY
KIND, EXPRESS OR IMPLIED, INCLUDING BUT NOT LIMITED TO THE
WARRANTIES OF MERCHANTABILITY, FITNESS FOR A PARTICULAR
PURPOSE AND NONINFRINGEMENT OF THIRD PARTY RIGHTS. IN NO
EVENT SHALL THE COPYRIGHT HOLDER OR HOLDERS INCLUDED IN THIS
NOTICE BE LIABLE FOR ANY CLAIM, OR ANY SPECIAL INDIRECT OR
CONSEQUENTIAL DAMAGES, OR ANY DAMAGES WHATSOEVER
RESULTING FROM LOSS OF USE, DATA OR PROFITS, WHETHER IN AN
ACTION OF CONTRACT, NEGLIGENCE OR OTHER TORTIOUS ACTION,
ARISING OUT OF OR IN CONNECTION WITH THE USE OR PERFORMANCE
OF THIS SOFTWARE.
Except as contained in this notice, the name of a copyright holder shall not be used in
advertising or otherwise to promote the sale, use or other dealings in this Software
without prior written authorization of the copyright holder.
All trademarks and registered trademarks mentioned herein are the property of their
respective owners.
■ About libpng
This copy of the libpng notices is provided for your convenience. In case of any
discrepancy between this copy and the notices in the file png.h that is included in the
libpng distribution, the latter shall prevail.
COPYRIGHT NOTICE, DISCLAIMER, and LICENSE:
If you modify libpng you may insert additional notices immediately following this
sentence.
libpng versions 1.2.6, August 15, 2004, through 1.2.35, February 14, 2009, are
Copyright (C) 2004, 2006-2008 Glenn Randers-Pehrson, and are distributed according
to the same disclaimer and license as libpng-1.2.5 with the following individual added
to the list of Contributing Authors
Cosmin Truta
libpng versions 1.0.7, July 1, 2000, through 1.2.5 - October 3, 2002, are Copyright
(C) 2000-2002 Glenn Randers-Pehrson, and are distributed according to the same
disclaimer and license as libpng-1.0.6 with the following individuals added to the
list of Contributing Authors
Simon-Pierre Cadieux
Eric S. Raymond
Gilles Vollant
and with the following additions to the disclaimer:
There is no warranty against interference with your enjoyment of the library or
against infringement. There is no warranty that our efforts or the library will fulfill
any of your particular purposes or needs. This library is provided with all faults,
and the entire risk of satisfactory quality, performance, accuracy, and effort is with
the user.
libpng versions 0.97, January 1998, through 1.0.6, March 20, 2000, are Copyright (C)
1998, 1999 Glenn Randers-Pehrson, and are distributed according to the same
disclaimer and license as libpng-0.96, with the following individuals added to the list of
Contributing Authors:
Tom Lane
Glenn Randers-Pehrson
Willem van Schaik
libpng versions 0.89, June 1996, through 0.96, May 1997, are Copyright (C) 1996, 1997
Andreas Dilger Distributed according to the same disclaimer and license as libpng-0.88,
with the following individuals added to the list of Contributing Authors:
John Bowler
Kevin Bracey
Sam Bushell
Magnus Holmgren

viii
Greg Roelofs
Tom Tanner
libpng versions 0.5, May 1995, through 0.88, January 1996, are Copyright (C) 1995,
1996 Guy Eric Schalnat, Group 42, Inc.
For the purposes of this copyright and license, “Contributing Authors” is defined as the
following set of individuals:
Andreas Dilger
Dave Martindale
Guy Eric Schalnat
Paul Schmidt
Tim Wegner
The PNG Reference Library is supplied “AS IS”. The Contributing Authors and Group
42, Inc. disclaim all warranties, expressed or implied, including, without limitation, the
warranties of merchantability and of fitness for any purpose. The Contributing Authors
and Group 42, Inc. assume no liability for direct, indirect, incidental, special,
exemplary, or consequential damages, which may result from the use of the PNG
Reference Library, even if advised of the possibility of such damage.
Permission is hereby granted to use, copy, modify, and distribute this source code, or
portions hereof, for any purpose, without fee, subject to the following restrictions:
1. The origin of this source code must not be misrepresented.
2. Altered versions must be plainly marked as such and must not be misrepresented
as being the original source.
3. This Copyright notice may not be removed or altered from any source or altered
source distribution.
The Contributing Authors and Group 42, Inc. specifically permit, without fee, and
encourage the use of this source code as a component to supporting the PNG file format
in commercial products. If you use this source code in a product, acknowledgment is
not required but would be appreciated.
A “png_get_copyright” function is available, for convenient use in “about” boxes and
the like:
printf(“%s”,png_get_copyright(NULL));
Also, the PNG logo (in PNG format, of course) is supplied in the files “pngbar.png” and
“pngbar.jpg (88x31) and “pngnow.png” (98x31).
Libpng is OSI Certified Open Source Software. OSI Certified Open Source is a
certification mark of the Open Source Initiative.
Glenn Randers-Pehrson
glennrp at users.sourceforge.net
February 14, 2009
■ About tinyxml
www.sourceforge.net/projects/tinyxml
Original code (2.0 and earlier )copyright (C) 2000-2006 Lee Thomason
(www.grinninglizard.com)
This software is provided ‘as-is’, without any express or implied warranty. In no event
will the authors be held liable for any damages arising from the use of this software.
Permission is granted to anyone to use this software for any purpose, including
commercial applications, and to alter it and redistribute it freely, subject to the
following restrictions:
1. The origin of this software must not be misrepresented; you must not claim that you
wrote the original software. If you use this software in a product, an acknowledgment in
the product documentation would be appreciated but is not required.
2. Altered source versions must be plainly marked as such, and must not be
misrepresented as being the original software.
3. This notice may not be removed or altered from any source distribution.
■ About dtoa and strtod
The author of this software is David M. Gay.
Copyright (C) 1991, 2000, 2001 by Lucent Technologies.
Permission to use, copy, modify, and distribute this software for any purpose without
fee is hereby granted, provided that this entire notice is included in all copies of any
software which is or includes a copy or modification of this software and in all copies
of the supporting documentation for such software.
THIS SOFTWARE IS BEING PROVIDED “AS IS”, WITHOUT ANY EXPRESS OR
IMPLIED WARRANTY. IN PARTICULAR, NEITHER THE AUTHOR NOR
LUCENT MAKES ANY REPRESENTATION OR WARRANTY OF ANY KIND
CONCERNING THE MERCHANTABILITY OF THIS SOFTWARE OR ITS
FITNESS FOR ANY PARTICULAR PURPOSE.
■ About gSOAP
gSOAP Public License
Version 1.3b
The gSOAP public license is derived from the Mozilla Public License (MPL1.1). The
sections that were deleted
from the original MPL1.1 text are 1.0.1, 2.1.(c),(d), 2.2.(c),(d), 8.2.(b), 10, and 11.
Section 3.8 was added. The
modified sections are 2.1.(b), 2.2.(b), 3.2 (simplified), 3.5 (deleted the last sentence),
and 3.6 (simplified).
This license applies to the gSOAP software package, with the exception of the wsdl2h
source code located in
gsoap/wsdl, all code generated by wsdl2h, the UDDI source code gsoap/uddi2, and the
Web server sample
source code samples/webserver. To use all of the software commercially, a commercial
license has to be obtained
from www.genivia.com.
1 DEFINITIONS.
1.0.1.
1.1. “Contributor” means each entity that creates or contributes to the creation of
Modifications.
1.2. “Contributor Version” means the combination of the Original Code, prior
Modifications used by a Contributor, and the Modifications made by that particular
Contributor.
1.3. “Covered Code” means the Original Code, or Modifications or the combination of
the Original Code, and Modifications, in each case including portions thereof.
1.4. “Electronic Distribution Mechanism” means a mechanism generally accepted in
the software development community for the electronic transfer of data.
1.5. “Executable” means Covered Code in any form other than Source Code.
1.6. “Initial Developer” means the individual or entity identified as the Initial
Developer in the Source Code notice required by Exhibit A.
1.7. “Larger Work” means a work which combines Covered Code or portions thereof
with code not governed by the terms of this License.
1.8. “License” means this document.
1.8.1. “Licensable” means having the right to grant, to the maximum extent possible,
whether at the time of the initial grant or subsequently acquired, any and all of the rights
conveyed herein.
1.9. “Modifications” means any addition to or deletion from the substance or structure
of either the Original Code or any previous Modifications. When Covered Code is
released as a series of files, a Modification is: A.
Any addition to or deletion from the contents of a file containing Original Code or
previous Modifications. B.
Any new file that contains any part of the Original Code, or previous Modifications.
1.10. “Original Code” means Source Code of computer software code which is
described in the Source Code notice required by Exhibit A as Original Code, and which,
at the time of its release under this License is not already Covered Code governed by
this License.
1.10.1. “Patent Claims” means any patent claim(s), now owned or hereafter acquired,
including without limitation, method, process, and apparatus claims, in any patent
Licensable by grantor.
http://www.cs.fsu.edu/~engelen/license.html
1.11. “Source Code” means the preferred form of the Covered Code for making
modifications to it, including all modules it contains, plus any associated interface
definition files, scripts used to control compilation and installation of an Executable, or
source code differential comparisons against either the Original Code or another well
known, available Covered Code of the Contributor’s choice. The Source Code can be in
a compressed or archival form, provided the appropriate decompression or de-archiving
software is widely available for no charge.
1.12. “You” (or “Your”) means an individual or a legal entity exercising rights under,
and complying with all of the terms of, this License or a future version of this License
issued under Section 6.1. For legal entities, “You” includes any entity which controls, is
controlled by, or is under common control with You. For purposes of this definition,
“control” means (a) the power, direct or indirect, to cause the direction or management
of such entity, whether by contract or otherwise, or (b) ownership of more than fifty
percent (50%) of the outstanding shares or beneficial ownership of such entity.
2 SOURCE CODE LICENSE.
2.1. The Initial Developer Grant. The Initial Developer hereby grants You a world-
wide, royalty-free, non-exclusive license, subject to third party intellectual property
claims:
(a)
under intellectual property rights (other than patent or trademark) Licensable by Initial
Developer to use, reproduce, modify, display, perform, sublicense and distribute the
Original Code (or portions thereof) with or without Modifications, and/or as part of a
Larger Work; and
(b)
under patents now or hereafter owned or controlled by Initial Developer, to make, have
made, use and sell (“offer to sell and import”) the Original Code, Modifications, or
portions thereof, but solely to the extent that any such patent is reasonably necessary to
enable You to utilize, alone or in combination with other software, the Original Code,
Modifications, or any combination or portions thereof.
(c)
(d)
2.2. Contributor Grant.
Subject to third party intellectual property claims, each Contributor hereby grants You a
world-wide, royalty-free, non-exclusive license
(a)
under intellectual property rights (other than patent or trademark) Licensable by
Contributor, to use, reproduce, modify, display, perform, sublicense and distribute the
Modifications created by such Contributor (or portions thereof) either on an unmodified
basis, with other Modifications, as Covered Code and/or as part of a Larger Work; and
(b)
under patents now or hereafter owned or controlled by Contributor, to make, have
made, use and sell (“offer to sell and import”) the Contributor Version (or portions
thereof), but solely to the extent that any such patent is reasonably necessary to enable
You to utilize, alone or in combination with other software, the Contributor Version (or
portions thereof).
(c)
(d)
3 DISTRIBUTION OBLIGATIONS.
3.1. Application of License.
The Modifications which You create or to which You contribute are governed by the
terms of this License, including without limitation Section 2.2. The Source Code
version of Covered Code may be distributed only under the terms of this License or a
future version of this License released under Section 6.1, and You must include a copy
of this License with every copy of the Source Code You distribute. You may not offer
or impose any terms on any Source Code version that alters or restricts the applicable
version of this License or the recipients’ rights hereunder. However, You may include
an additional document offering the additional rights described in Section 3.5.
3.2. Availability of Source Code.

ix
Any Modification created by You will be provided to the Initial Developer in Source
Code form and are subject to the terms of the License.
3.3. Description of Modifications.
You must cause all Covered Code to which You contribute to contain a file
documenting the changes You made to create that Covered Code and the date of any
change. You must include a prominent statement that the Modification is derived,
directly or indirectly, from Original Code provided by the Initial Developer and
including the name of the Initial Developer in (a) the Source Code, and (b) in any notice
in an Executable version or related documentation in which You describe the origin or
ownership of the Covered Code.
3.4. Intellectual Property Matters.
(a) Third Party Claims.
If Contributor has knowledge that a license under a third party’s intellectual property
rights is required to exercise the rights granted by such Contributor under Sections 2.1
or 2.2, Contributor must include a text file with the Source Code distribution titled
“LEGAL” which describes the claim and the party making the claim in sufficient detail
that a recipient will know whom to contact. If Contributor obtains such knowledge after
the Modification is made available as described in Section 3.2, Contributor shall
promptly modify the LEGAL file in all copies Contributor makes available thereafter
and shall take other steps (such as notifying appropriate mailing lists or newsgroups)
reasonably calculated to inform those who received the Covered Code that new
knowledge has been obtained.
(b) Contributor APIs.
If Contributor’s Modifications include an application programming interface and
Contributor has knowledge of patent licenses which are reasonably necessary to
implement that API, Contributor must also include this information in the LEGAL file.
(c) Representations.
Contributor represents that, except as disclosed pursuant to Section 3.4(a) above,
Contributor believes that Contributor’s Modifications are Contributor’s original
creation(s) and/or Contributor has sufficient rights to grant the rights conveyed by this
License.
3.5. Required Notices.
You must duplicate the notice in Exhibit A in each file of the Source Code. If it is not
possible to put such notice in a particular Source Code file due to its structure, then You
must include such notice in a location (such as a relevant directory) where a user would
be likely to look for such a notice. If You created one or more Modification(s) You may
add your name as a Contributor to the notice described in Exhibit A. You must also
duplicate this License in any documentation for the Source Code where You describe
recipients’ rights or ownership rights relating to Covered Code. You may choose to
offer, and to charge a fee for, warranty, support, indemnity or liability obligations to
one or more recipients of Covered Code. However, You may do so only on Your own
behalf, and not on behalf of the Initial Developer or any Contributor.
3.6. Distribution of Executable Versions.
You may distribute Covered Code in Executable form only if the requirements of
Section 3.1-3.5 have been met for that Covered Code. You may distribute the
Executable version of Covered Code or ownership rights under a license of Your
choice, which may contain terms different from this License, provided that You are in
compliance with the terms of this License and that the license for the Executable
version does not attempt to limit or alter the recipient’s rights in the Source Code
version from the rights set forth in this License. If You distribute the Executable version
under a different license You must make it absolutely clear that any terms which differ
from this License are offered by You alone, not by the Initial Developer or any
Contributor. If you distribute executable versions containing Covered Code as part of a
product, you must reproduce the notice in Exhibit B in the documentation and/or other
materials provided with the product.
3.7. Larger Works.
You may create a Larger Work by combining Covered Code with other code not
governed by the terms of this License and distribute the Larger Work as a single
product. In such a case, You must make sure the requirements of this License are
fulfilled for the Covered Code.
3.8. Restrictions.
You may not remove any product identification, copyright, proprietary notices or labels
from gSOAP.
4 INABILITY TO COMPLY DUE TO STATUTE OR REGULATION.
If it is impossible for You to comply with any of the terms of this License with respect
to some or all of the Covered Code due to statute, judicial order, or regulation then You
must: (a) comply with the terms of this License to the maximum extent possible; and
(b) describe the limitations and the code they affect. Such description must be included
in the LEGAL file described in Section 3.4 and must be included with all distributions
of the Source Code. Except to the extent prohibited by statute or regulation, such
description must be sufficiently detailed for a recipient of ordinary skill to be able to
understand it.
5 APPLICATION OF THIS LICENSE.
This License applies to code to which the Initial Developer has attached the notice in
Exhibit A and to related Covered Code.
6 VERSIONS OF THE LICENSE.
6.1. New Versions.
Grantor may publish revised and/or new versions of the License from time to time.
Each version will be given a distinguishing version number.
6.2. Effect of New Versions.
Once Covered Code has been published under a particular version of the License, You
may always continue to use it under the terms of that version. You may also choose to
use such Covered Code under the terms of any subsequent version of the License.
6.3. Derivative Works.
If You create or use a modified version of this License (which you may only do in order
to apply it to code which is not already Covered Code governed by this License), You
must (a) rename Your license so that the phrase “gSOAP” or any confusingly similar
phrase do not appear in your license (except to note that your license differs from this
License) and (b) otherwise make it clear that Your version of the license contains terms
which differ from the gSOAP Public License. (Filling in the name of the Initial
Developer, Original Code or Contributor in the notice described in Exhibit A shall not
of themselves be deemed to be modifications of this License.)
7 DISCLAIMER OF WARRANTY.
COVERED CODE IS PROVIDED UNDER THIS LICENSE ON AN “AS IS” BASIS,
WITHOUT WARRANTY OF ANY KIND, WHETHER EXPRESS, IMPLIED OR
STATUTORY, INCLUDING, WITHOUT LIMITATION, THE IMPLIED
WARRANTIES OF MERCHANTABILITY, OF FITNESS FOR A PARTICULAR
PURPOSE, NONINFRINGEMENT OF THIRD PARTY INTELLECTUAL
PROPERTY RIGHTS, AND ANY WARRANTY THAT MAY ARISE BY REASON
OF TRADE USAGE, CUSTOM, OR COURSE OF DEALING. WITHOUT
LIMITING THE FOREGOING, YOU ACKNOWLEDGE THAT THE SOFTWARE
IS PROVIDED “AS IS” AND THAT THE AUTHORS DO NOT WARRANT THE
SOFTWARE WILL RUN UNINTERRUPTED OR ERROR FREE. LIMITED
LIABILITY THE ENTIRE RISK AS TO RESULTS AND PERFORMANCE OF THE
SOFTWARE IS ASSUMED BY YOU. UNDER NO CIRCUMSTANCES WILL THE
AUTHORS BE LIABLE FOR ANY SPECIAL, INDIRECT, INCIDENTAL,
EXEMPLARY OR CONSEQUENTIAL DAMAGES OF ANY KIND OR NATURE
WHATSOEVER, WHETHER BASED ON CONTRACT, WARRANTY, TORT
(INCLUDING NEGLIGENCE), STRICT LIABILITY OR OTHERWISE, ARISING
OUT OF OR IN ANY WAY RELATED TO THE SOFTWARE, EVEN IF THE
AUTHORS HAVE BEEN ADVISED ON THE POSSIBILITY OF SUCH DAMAGE
OR IF SUCH DAMAGE COULD HAVE BEEN REASONABLY FORESEEN, AND
NOTWITHSTANDING ANY FAILURE OF ESSENTIAL PURPOSE OF ANY
EXCLUSIVE REMEDY PROVIDED. SUCH LIMITATION ON DAMAGES
INCLUDES, BUT IS NOT LIMITED TO, DAMAGES FOR LOSS OF GOODWILL,
LOST PROFITS, LOSS OF DATA OR SOFTWARE, WORK STOPPAGE,
COMPUTER FAILURE OR MALFUNCTION OR IMPAIRMENT OF OTHER
GOODS. IN NO EVENT WILL THE AUTHORS BE LIABLE FOR THE COSTS OF
PROCUREMENT OF SUBSTITUTE SOFTWARE OR SERVICES. YOU
ACKNOWLEDGE THAT THIS SOFTWARE IS NOT DESIGNED FOR USE IN ON-
LINE EQUIPMENT IN HAZARDOUS ENVIRONMENTS SUCH AS OPERATION
OF NUCLEAR FACILITIES, AIRCRAFT NAVIGATION OR CONTROL, OR LIFE-
CRITICAL APPLICATIONS. THE AUTHORS EXPRESSLY DISCLAIM ANY
LIABILITY RESULTING FROM USE OF THE SOFTWARE IN ANY SUCH ON-
LINE EQUIPMENT IN HAZARDOUS ENVIRONMENTS AND ACCEPTS NO
LIABILITY IN RESPECT OF ANY ACTIONS OR CLAIMS BASED ON THE USE
OF THE SOFTWARE IN ANY SUCH ON-LINE EQUIPMENT IN HAZARDOUS
ENVIRONMENTS BY YOU. FOR PURPOSES OF THIS PARAGRAPH, THE
TERM “LIFE- CRITICAL APPLICATION” MEANS AN APPLICATION IN
WHICH THE FUNCTIONING OR MALFUNCTIONING OF THE SOFTWARE
MAY RESULT DIRECTLY OR INDIRECTLY IN PHYSICAL INJURY OR LOSS
OF HUMAN LIFE. THIS DISCLAIMER OF WARRANTY CONSTITUTES AN
ESSENTIAL PART OF THIS LICENSE. NO USE OF ANY COVERED CODE IS
AUTHORIZED HEREUNDER EXCEPT UNDER THIS DISCLAIMER.
8 TERMINATION.
8.1.
This License and the rights granted hereunder will terminate automatically if You fail to
comply with terms herein and fail to cure such breach within 30 days of becoming
aware of the breach. All sublicenses to the Covered Code which are properly granted
shall survive any termination of this License. Provisions which, by their nature, must
remain in effect beyond the termination of this License shall survive.
8.2.
8.3.
If You assert a patent infringement claim against Participant alleging that such
Participant’s Contributor Version directly or indirectly infringes any patent where such
claim is resolved (such as by license or settlement) prior to the initiation of patent
infringement litigation, then the reasonable value of the licenses granted by such
Participant under Sections 2.1 or 2.2 shall be taken into account in determining the
amount or value of any payment or license.
8.4.
In the event of termination under Sections 8.1 or 8.2 above, all end user license
agreements (excluding distributors and resellers) which have been validly granted by
You or any distributor hereunder prior to termination shall survive termination.
9 LIMITATION OF LIABILITY.
UNDER NO CIRCUMSTANCES AND UNDER NO LEGAL THEORY, WHETHER
TORT (INCLUDING NEGLIGENCE), CONTRACT, OR OTHERWISE, SHALL
YOU, THE INITIAL DEVELOPER, ANY OTHER CONTRIBUTOR, OR ANY
DISTRIBUTOR OF COVERED CODE, OR ANY SUPPLIER OF ANY OF SUCH
PARTIES, BE LIABLE TO ANY PERSON FOR ANY INDIRECT, SPECIAL,
INCIDENTAL, OR CONSEQUENTIAL DAMAGES OF ANY CHARACTER
INCLUDING, WITHOUT LIMITATION, DAMAGES FOR LOSS OF GOODWILL,
WORK STOPPAGE, COMPUTER FAILURE OR MALFUNCTION, OR ANY AND
ALL OTHER COMMERCIAL DAMAGES OR LOSSES, EVEN IF SUCH PARTY
SHALL HAVE BEEN INFORMED OF THE POSSIBILITY OF SUCH DAMAGES.
THIS LIMITATION OF LIABILITY SHALL NOT APPLY TO LIABILITY FOR
DEATH OR PERSONAL INJURY RESULTING FROM SUCH PARTY’S
NEGLIGENCE TO THE EXTENT APPLICABLE LAW PROHIBITS SUCH
LIMITATION. SOME JURISDICTIONS DO NOT ALLOW THE EXCLUSION OR
LIMITATION OF INCIDENTAL OR CONSEQUENTIAL DAMAGES, SO THIS
EXCLUSION AND LIMITATION MAY NOT APPLY TO YOU.
10 U.S. GOVERNMENT END USERS.
11 MISCELLANEOUS.
12 RESPONSIBILITY FOR CLAIMS.
As between Initial Developer and the Contributors, each party is responsible for claims
and damages arising, directly or indirectly, out of its utilization of rights under this
License and You agree to work with Initial Developer and Contributors to distribute
such responsibility on an equitable basis. Nothing herein is intended or shall be deemed
to constitute any admission of liability.
EXHIBIT A.
“The contents of this file are subject to the gSOAP Public License Version 1.3 (the
“License”); you may not use this
file except in compliance with the License. You may obtain a copy of the License
athttp://www.cs.fsu.edu/ engelen/soaplicense.html

x
Software distributed under the License is distributed on an “AS IS” basis, WITHOUT
WARRANTY OF ANY KIND, either express or implied. See the License for the
specific language governing rights and limitations under the License.
The Original Code of the gSOAP Software is: stdsoap.h, stdsoap2.h, stdsoap.c,
stdsoap2.c, stdsoap.cpp,
stdsoap2.cpp, soapcpp2.h, soapcpp2.c, soapcpp2_lex.l, soapcpp2_yacc.y, error2.h,
error2.c, symbol2.c, init2.c,
soapdoc2.html, and soapdoc2.pdf, httpget.h, httpget.c, stl.h, stldeque.h, stllist.h,
stlvector.h, stlset.h.
The Initial Developer of the Original Code is Robert A. van Engelen. Portions created
by Robert A. van Engelen are
Copyright (C) 2001-2004 Robert A. van Engelen, Genivia inc. All Rights Reserved.
Contributor(s):
“________________________.”
[Note: The text of this Exhibit A may differ slightly form the text of the notices in the
Source Code files of the Original code. You should use the text of this Exhibit A rather
than the text found in the Original Code Source Codefor Your Modifications.]
EXHIBIT B.
“Part of the software embedded in this product is gSOAP software.
Portions created by gSOAP are Copyright (C) 2001-2009 Robert A. van Engelen,
Genivia inc. All Rights Reserved. THE SOFTWARE IN THIS PRODUCT WAS IN
PART PROVIDED BY GENIVIA INC AND ANY EXPRESS OR IMPLIED
WARRANTIES, INCLUDING, BUT NOT LIMITED TO, THE IMPLIED
WARRANTIES OF MERCHANTABILITY AND FITNESS FOR A PARTICULAR
PURPOSE ARE DISCLAIMED. IN NO EVENT SHALL THE AUTHOR BE
LIABLE FOR ANY DIRECT, INDIRECT, INCIDENTAL, SPECIAL,
EXEMPLARY, OR CONSEQUENTIAL DAMAGES (INCLUDING, BUT NOT
LIMITED TO, PROCUREMENT OF SUBSTITUTE GOODS OR SERVICES; LOSS
OF USE, DATA, OR PROFITS; OR BUSINESS INTERRUPTION) HOWEVER
CAUSED AND ON ANY THEORY OF LIABILITY, WHETHER IN CONTRACT,
STRICT LIABILITY, OR TORT (INCLUDING NEGLIGENCE OR OTHERWISE)
ARISING IN ANY WAY OUT OF THE USE OF THIS SOFTWARE, EVEN IF
ADVISED OF THE POSSIBILITY OF SUCH DAMAGE.”
http://www.cs.fsu.edu/~engelen/license.html
■ About fonts
Fonts are (c) Bitstream (see below). DejaVu changes are in public domain.
Glyphs imported from Arev fonts are (c) Tavmjong Bah (see below)
Bitstream Vera Fonts Copyright
------------------------------
Copyright (c) 2003 by Bitstream, Inc. All Rights Reserved. Bitstream Vera is a
trademark of Bitstream, Inc.
Permission is hereby granted, free of charge, to any person obtaining a copy of the fonts
accompanying this license (“Fonts”) and associated documentation files (the “Font
Software”), to reproduce and distribute the Font Software, including without limitation
the rights to use, copy, merge, publish, distribute, and/or sell copies of the Font
Software, and to permit persons to whom the Font Software is furnished to do so,
subject to the following conditions:
The above copyright and trademark notices and this permission notice shall be included
in all copies of one or more of the Font Software typefaces.
The Font Software may be modified, altered, or added to, and in particular the designs
of glyphs or characters in the Fonts may be modified and additional glyphs or
characters may be added to the Fonts, only if the fonts are renamed to names not
containing either the words “Bitstream” or the word “Vera”.
This License becomes null and void to the extent applicable to Fonts or Font Software
that has been modified and is distributed under the “Bitstream Vera” names.
The Font Software may be sold as part of a larger software package but no copy of one
or more of the Font Software typefaces may be sold by itself.
THE FONT SOFTWARE IS PROVIDED “AS IS”, WITHOUT WARRANTY OF
ANY KIND, EXPRESS OR IMPLIED, INCLUDING BUT NOT LIMITED TO ANY
WARRANTIES OF MERCHANTABILITY, FITNESS FOR A PARTICULAR
PURPOSE AND NONINFRINGEMENT OF COPYRIGHT, PATENT,
TRADEMARK, OR OTHER RIGHT. IN NO EVENT SHALL BITSTREAM OR THE
GNOME FOUNDATION BE LIABLE FOR ANY CLAIM, DAMAGES OR OTHER
LIABILITY, INCLUDING ANY GENERAL, SPECIAL, INDIRECT, INCIDENTAL,
OR CONSEQUENTIAL DAMAGES, WHETHER IN AN ACTION OF CONTRACT,
TORT OR OTHERWISE, ARISING FROM, OUT OF THE USE OR INABILITY TO
USE THE FONT SOFTWARE OR FROM OTHER DEALINGS IN THE FONT
SOFTWARE.
Except as contained in this notice, the names of Gnome, the Gnome Foundation, and
Bitstream Inc., shall not be used in advertising or otherwise to promote the sale, use or
other dealings in this Font Software without prior written authorization from the Gnome
Foundation or Bitstream Inc., respectively. For further information, contact: fonts at
gnome dot org.
Arev Fonts Copyright
------------------------------
Copyright (c) 2006 by Tavmjong Bah. All Rights Reserved.
Permission is hereby granted, free of charge, to any person obtaining a copy of the fonts
accompanying this license (“Fonts”) and associated documentation files (the “Font
Software”), to reproduce and distribute the modifications to the Bitstream Vera Font
Software, including without limitation the rights to use, copy, merge, publish,
distribute, and/or sell copies of the Font Software, and to permit persons to whom the
Font Software is furnished to do so, subject to the following conditions:
The above copyright and trademark notices and this permission notice shall be included
in all copies of one or more of the Font Software typefaces.
The Font Software may be modified, altered, or added to, and in particular the designs
of glyphs or characters in the Fonts may be modified and additional glyphs or
characters may be added to the Fonts, only if the fonts are renamed to names not
containing either the words “Tavmjong Bah” or the word “Arev”.
This License becomes null and void to the extent applicable to Fonts or Font Software
that has been modified and is distributed under the “Tavmjong Bah Arev” names.
The Font Software may be sold as part of a larger software package but no copy of one
or more of the Font Software typefaces may be sold by itself.
THE FONT SOFTWARE IS PROVIDED “AS IS”, WITHOUT WARRANTY OF
ANY KIND, EXPRESS OR IMPLIED, INCLUDING BUT NOT LIMITED TO ANY
WARRANTIES OF MERCHANTABILITY, FITNESS FOR A PARTICULAR
PURPOSE AND NONINFRINGEMENT OF COPYRIGHT, PATENT,
TRADEMARK, OR OTHER RIGHT. IN NO EVENT SHALL TAVMJONG BAH BE
LIABLE FOR ANY CLAIM, DAMAGES OR OTHER LIABILITY, INCLUDING
ANY GENERAL, SPECIAL, INDIRECT, INCIDENTAL, OR CONSEQUENTIAL
DAMAGES, WHETHER IN AN ACTION OF CONTRACT, TORT OR
OTHERWISE, ARISING FROM, OUT OF THE USE OR INABILITY TO USE THE
FONT SOFTWARE OR FROM OTHER DEALINGS IN THE FONT SOFTWARE.
Except as contained in this notice, the name of Tavmjong Bah shall not be used in
advertising or otherwise to promote the sale, use or other dealings in this Font Software
without prior written authorization from Tavmjong Bah. For further information,
contact: tavmjong @ free. fr.

© 2011 Yamaha Corporation
Printed in China BD-S671_P
USB
BLU-RAY DISC PLAYER
BD-S671
OWNER’S MANUAL
MANUAL DE INSTRUCCIONES
P
LASER SAFETY
This unit employs a laser. Due to possible eye injury, only
a qualified service person should remove the cover or
attempt to service this device.
DANGER
This unit emits visible laser radiation when open. Avoid
direct eye exposure to beam. When this unit is plugged
into the wall outlet, do not place your eyes close to the
opening of the disc tray and other openings to look into
inside.
SEGURIDAD CONTRA LA RADIACIÓN LÁSER
Este aparato utiliza rayos láser. Debido a la posibilidad de
que se produzcan daños en los ojos, la extracción de la
cubierta del aparato o las reparaciones solamente deberán ser
realizadas por un técnico cualificado.
PELIGRO
Este aparato emite radiación láser visible cuando se abre.
Evite la exposición directa a los rayos láser. Cuando se
conecte este aparato a una toma de corriente no acerque sus
ojos a la abertura de la bandeja del disco ni a otras aberturas
para mirar al interior.
CAUTION
Use of controls or adjustments or performance of
procedures other than those specified herein may result
in hazardous radiation exposure.
PRECAUCIÓN
El uso de los controles, los ajustes o los procedimientos
que no se especifican enste manual pueden causar una
exposición peligrosa a la radiación.
LASER Specification:
Class 1 LASER Product
Wave length: 790 nm (CDs)/658 nm (DVDs)/405 nm (BDs)
Laser output: max. 1 mW
Especificaciones LÁSER:
Producto LÁSER de Clase 1
Longitud de onda: 790 nm (CD)/658 nm (DVD)/405 nm (BD)
Salida de láser: máxima de 1 mW
CAUTION:
INVISIBLE LASER RADIATION WHEN OPEN.
DO NOT STARE INTO BEAM.
INVISIBLE LASER RADIATION WHEN OPEN.
AVOID DIRECT EXPOSURE TO THE BEAM.
DANGER:
00_BD-S671_P_cv.fm Page 1 Wednesday, March 23, 2011 1:47 PM
-
 1
1
-
 2
2
-
 3
3
-
 4
4
-
 5
5
-
 6
6
-
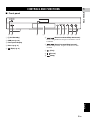 7
7
-
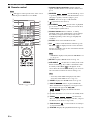 8
8
-
 9
9
-
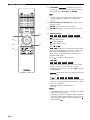 10
10
-
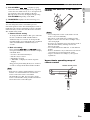 11
11
-
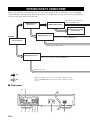 12
12
-
 13
13
-
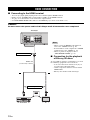 14
14
-
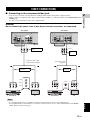 15
15
-
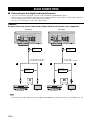 16
16
-
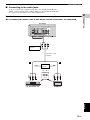 17
17
-
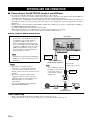 18
18
-
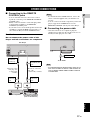 19
19
-
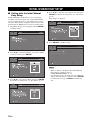 20
20
-
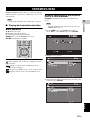 21
21
-
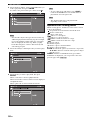 22
22
-
 23
23
-
 24
24
-
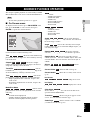 25
25
-
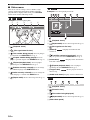 26
26
-
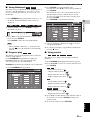 27
27
-
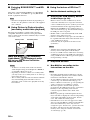 28
28
-
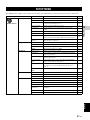 29
29
-
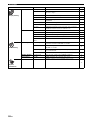 30
30
-
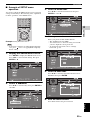 31
31
-
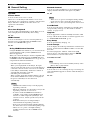 32
32
-
 33
33
-
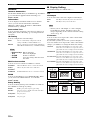 34
34
-
 35
35
-
 36
36
-
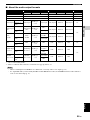 37
37
-
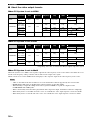 38
38
-
 39
39
-
 40
40
-
 41
41
-
 42
42
-
 43
43
-
 44
44
-
 45
45
-
 46
46
-
 47
47
-
 48
48
-
 49
49
-
 50
50
-
 51
51
-
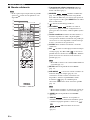 52
52
-
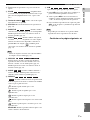 53
53
-
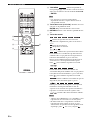 54
54
-
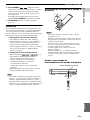 55
55
-
 56
56
-
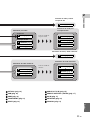 57
57
-
 58
58
-
 59
59
-
 60
60
-
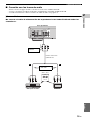 61
61
-
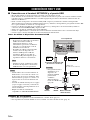 62
62
-
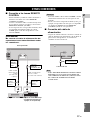 63
63
-
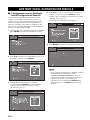 64
64
-
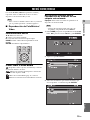 65
65
-
 66
66
-
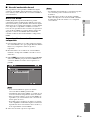 67
67
-
 68
68
-
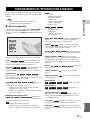 69
69
-
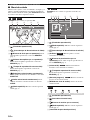 70
70
-
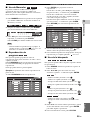 71
71
-
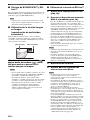 72
72
-
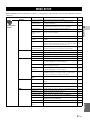 73
73
-
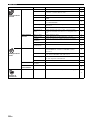 74
74
-
 75
75
-
 76
76
-
 77
77
-
 78
78
-
 79
79
-
 80
80
-
 81
81
-
 82
82
-
 83
83
-
 84
84
-
 85
85
-
 86
86
-
 87
87
-
 88
88
-
 89
89
-
 90
90
-
 91
91
-
 92
92
-
 93
93
-
 94
94
-
 95
95
-
 96
96
-
 97
97
-
 98
98
-
 99
99
-
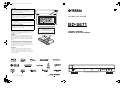 100
100


Yamaha BD-S671 El manual del propietario
- Categoría
- Reproductores de Blu-Ray
- Tipo
- El manual del propietario
En otros idiomas
- English: Yamaha BD-S671 Owner's manual
Documentos relacionados
-
Yamaha BD-S1900 El manual del propietario
-
-
-
-
-
-
-
-
Yamaha DVD-S661 El manual del propietario
-