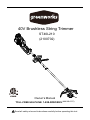
Greenworks 2100702 Instrucciones de operación
- Categoría
- Podadoras de césped
- Tipo
- Instrucciones de operación

Owner’s Manual
TOLL-FREE HELPLINE: 1-888-90WORKS
(888.909.6757)
40V Brushless String Trimmer
Read all safety rules and instructions carefully before operating this tool.
(2100702)
ST40L210

2
Know your string trimmer ....................................................................................................... 8
Assembly ........................................................................................................................ 9-11
Operation .......................................................................................................................12-17
Maintenance .......................................................................................................................18
Troubleshooting ................................................................................................................. 19
Warranty. ........................................................................................................................... 20
Exploded view and Part list ........................................................................................... 21-22
SPECIFICATIONS
40V brushless string trimmer
Weight ........................................................................................................15 lbs(6.8kg)
CONTENTS
Type....................................................................................... Cordless, battery-powered
Motor ........................................................................................................................40 V
Introduction .......................................................................................................................... 2
Important Safety Instructions...............................................................................3-5
Symbols ............................................................................................................................ 6 -7
String Cutting Width........................................................................................................... 14 in.
String Diameter........................................................................................
Nylon / 0.080 in. max.
4
YEAR/AÑO
TOOL WARRANTY
GARANTÍA DE
INSTRUMENTO
2
YEAR/AÑO
BATTERY WARRANTY
GARANTÍA DE
BATERÍA
MOTOR WARRANTY
GARANTÍA DE
MOTOR
10
YEAR/AÑO

3
IMPORTANT SAFETY INSTRUCTIONS
W A R N I N G
Read and understand all instructions before using this product. Failure to follow all
•
liquids, gases, or dust. Power tools create sparks which may ignite the dust or fumes.
• Do not allow children or untrained individuals to use this unit.
• Don’t expose power tools to rain or wet conditions. Water entering a power tool will increase
the risk of electric shock.
• Do not handle plug or tool with wet hands.
• Never allow children to operate the equipment. Never allow adults to operate the equipment
without proper instruction.
• Always wear safety glasses with side
shields. Everyday gl
asses have only impact resistant
lenses. They are NOT safety glasses. Following this rule will reduce the risk of eye injury. Use
face mask if operation is dusty.
• Wear eye protection when operating this product.Secure long hair above shoulder level to
prevent entanglement in moving parts.
• Use extra care when cleaning on stairs.
• Do not expose to rain, store indoors.
• Do not operate in poor lighting.
• Keep all parts of your body away from any movin
g part.
•
• Wear heavy long pants, boots, and gloves. Avoid loose garments or jewelry that could get
caught in moving parts of the machine or its motor.
• Do not force tool. Use the correct tool for your application. The correct tool will do the job
better and safer at the rate for which it is designed.
• Do not operate the equipment while barefoot or when wearing sandals or similar lightweight
footwear. Wear protective footwear that will protect your feet and improve your footing on
slipper
y surfaces.
• S
ecure long hair so it is above shoulder level to prevent entanglement in any moving parts.
•
• Do not allow to be used as a toy. Close attention is necessary when used by or near children.
• Do not use tool if switch does not turn it on or off. Any tool that cannot be controlled with the
switch is dangerous and must be repaired.
• Keep all bystanders, children, and pets at least 50 ft. away.
•
medication.
• Do not operate in poor lighting.

4
• Keep all parts of your body away from any moving parts and all hot surfaces of the unit.
• Do not put any object into openings. Do not use with any opening blocked; keep openings free
• Check the work area before each use. Remove all objects such as rocks, broken glass, nails,
wire, or string which can be thrown or become entangled in the machine.
• Use only identical manufacturer’s replacement parts and accessories. Use of any other parts
may create a hazard or cause product damage.
• Do not charge battery tool in rain, or damp or wet location. Following this rule will reduce the
risk of electric shock.
• For household use only.
• Battery tools do not have to be plugge
d into an ele
ctrical outlet; therefore, they are always in
operating condition. Be aware of possible hazards when not using your battery tool or when
personal injury.
• Remove or disconnect battery before servicing, cleaning or removing material from the
gardening appliance.
• Use only Greenworks batteries.
• Store idle appliances - When not in use, string trimmer should be stored indoors in a dry,
locked place out of the reach of children.
•
possible special disposal instructions.
• Do not open or mutilate the batteries. Released electrolyte is corrosive and may cause
damage to the eyes or skin. It may be toxic if swallowed.
•
explosion and possibly injury.
• Batteries can explode in the presence of a source of ignition, such as a pilot light. To reduce
the risk of serious personal injury, never use any cordless product in the presence of open
immediately.
• Do not crush, drop or damage battery pack. Do not use a battery pack or charger that has
been dropped or received a sharp blow. A damaged battery is subject to explosion. Properly
dispose of a dropped or damaged battery immediately.
• Exercise care in handling batteries in order not to short the battery with conducting materials
such as rings, bracelets, and keys. The battery or conductor may overheat and cause burns.
Do not open or mutilate the batteries. Released ele
ctrolyte is corrosive an
d may cause
damage to the eyes or skin. It may be toxic if swallowed.
• For best results, your battery tool should be charged in a location where the temperature is
more than 50°F but less than 100°F. To reduce the risk of serious personal injury, do not store
outside or in vehicles.
• Under extreme usage or temperature conditions, battery leakage may occur. If liquid comes in
contact with your skin, wash immediately with soap and water, then neutralize with lemon juice
then seek immediate medical attention. following this rule will reduce the risk of serious
personal injury.
IMPORTANT SAFETY INSTRUCTIONS

5
• If the power supply cord is damaged, it must be replaced only by the manufacturer or by an
authorized service center to avoid risk.
• Do not point the string trimmer in the direction of people or pets.
• When not in use, string trimmer should be stored indoors in a dry, locked up place—out of the
reach of children.
• Maintain tool with care. Keep fan area clean for best and safest performance. follow
unplugging it.
• To reduce the risk of electrical shock, do not expose to rain, do not use on wet surfaces. Store
indoors.
• Save these instructions. Refer to them frequently and use them to instruct others who may
use this power tool. If you loan someone this power tool, loan them these instructions also.
W A R N I N G
(PROPOSITION 65)
Some dust created by power sanding, sawing, grinding, drilling, and other construction activities
contains chemicals known to cause cancer, birth defects or other reproductive harm. Some
examples of these chemicals are:
• Lead from lead-based paints
• Crystalline silica from bricks and cement and other masonry products, and
• Arsenic and chromium from chemically treated lumber.
Your risk of exposure to these chemicals varies dependi
ng on how often you do this type of
work. To reduce your exposure to these chemicals, work in a well-ventilated area, and work with
particles.
CHILD SAFETY
Tragic accidents can occur if the operator is not aware of the presence of children.
• Keep children out of the working area and under the watchful care of a responsible adult.
• Do not allow children under the age of 14 to operate this trimmer. Children who are 14
years of age and older must read and understand the operating instructions and safety
rules in this manual and must be trained and supervised by a parent.
• Stay alert, and turn the trimmer off if a child or any other person enters the working area.
• Look behind and down for small children before and while cutting backwards.
• Use extreme care when approaching blind corners, doorways, shrubs, trees, or other
objects that may obscure your view of a child who may run into the path of the trimmer.
IMPORTANT SAFETY INSTRUCTIONS
• Do not open or mutilate the battery(ies). Released electrolyte is corrosive and may cause
damage to the eyes or skin. It may be toxic if swallowed.
• Do not dispose of the battery(ies) in a fire. The cell may explode. Check with local codes for
possible special disposal instructions.
• For use only with 29462 / 29472 battery. For use only with 29482 charger.
• Exercise care in handling batteries in order not to short the battery with conducting materials
such as rings, bracelets, and keys. The battery or conductor may overheat and cause burns.
• Don’t Overreach – Keep proper footing and balance at all times.

6
SYMBOLS
SYMBOL NAME DESIGNATION/EXPLANATION
V Volts Voltage
A Amperes Current
Hz Hertz Frequency (cycles per second)
W Watts Power
min Minutes Time
Alternating Current Type of current
Direct Current Type or a characteristic of current
No Blade
Do not install or use any type of blade on a
product or displaying this symbol.
/min Per Minute Revolutions, strokes, surface speed, orbits etc.,
per minute
Wet Conditions Alert Do not expose to rain or use in damp locations
Read The Operator’s Manual To reduce the risk of injury user must read and
understand operator’s manual before using this
product.
Eye Protection Wear eye protection when operating
this equipment.
Safety Alert Precautions that involve your safety.
Long Hair Failure to keep long hair away from the air inlet
could result in personal injury.
Loose Clothing Failure to keep loose clothing from being drawn
into air intake could result in personal injury.
Keep Bystanders Away Keep all bystanders at least 50 ft. away.
Some of the following symbols may be used on this product. Please study them and learn their
meaning. Proper interpretation of these symbols will allow you to operate the product better and safer.

The following signal words and meanings are intended to explain the levels of risk associated
with this product.
SERVICE
service technician. For service we suggest you return the product to your nearest AUTHORIZED
SERVICE CENTER for repair. When servicing, use only identical replacement parts.
W ARN I N G
To avoid serious personal injury, do not attempt to use this product until you have read this Owner's
Manual thoroughly and understand it completely. If you do not understand the warnings and
instructions in this Owner's Manual, do not use this product. Call the Toll-free Helpline (1-888-909-
6757) for assistance. The operation of any power tool can result in foreign objects being thrown
into your eyes, which can result in severe eye damage. Before operating a power tool, always wear
safety goggles, safety glasses with side shields, or a full face shield when needed. We recommend
a Wide Vision Safety Mask for use over eyeglasses or s
tandard safety glasses with side shields.
Always use eye protection that is marked to comply with ANSI Z87.1.
W ARN I N G
The operation of any power tool can result in foreign objects being thrown into your eyes,
which can result in severe eye damage. Before beginning power tool operation, always
wear safety goggles or safety glasses with side shields and, when needed, a full face
shield. We recommend Wide Vision Safety Mask for use over eyeglasses or standard
safety glasses with side shields. Always use eye protection which is marked to comply
with ANSI Z87.1.
SYMBOL SIGNAL MEANING
DANGER Indicates an imminently hazardous situation, which, if not
avoided, will result in death or serious injury.
WARNING Indicates a potentially hazardous situation, which, if not avoided,
could result in death or serious injury.
CAUTION Indicates a potentially hazardous situation, which, if not avoided,
may result in minor or moderate injury.
CAUTION (Without Safety Alert Symbol) Indicates a situation that may
result in property damage.
SYMBOLS
SAVE THESE INSTRUCTIONS
7

8
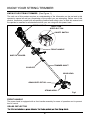
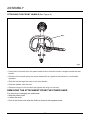
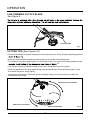
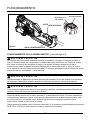
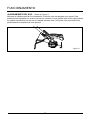
KNOW YOUR STRING TRIMMER
KNOW YOUR STRING TRIMMER (See Figure 1.)
The safe use of this product requires an understanding of the information on the tool and in this
operator’s manual as well as a knowledge of the project you are attempting. Before use of this
product, familiarize yourself with all operating features and safety rules, in both this manual and
the operator’s manuals for all attachments that your are using with this power head.
FRONT HANDLE
The power head is equipped with a front handle assembly for ease of operation and to prevent
loss of control.
Fig.1
COUPLER
FRONT HANDLE
SWITCH TRIGGER
REAR HANDLE
GRASS DEFLECTOR
TRIMMER SHAFT
GRASS DEFLECTOR
GEAR HEAD
STRING HEAD
ON/OFF SWITCH
HIGH / LOW
SPEED BUTTON

9
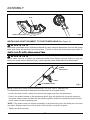
ASSEMBLY
UNPACKING
This product requires assembly.
• Carefully remove the product and any accessories from the box. Make sure that all items listed
in the packing list are included.
• Inspect the product carefully to make sure no breakage or damage occurred during shipping.
• Do not discard the packing material until you have carefully inspected and satisfactorily
operated the product.
• If any parts are damaged or missing, please call1-888-90WORKS for assistance.
W A R N I N G
Do not use this product if any parts on the packing list are already assembled to your product
when you unpack it. Parts on this list are not assembled to the product by the manufacturer and
require customer installation. Use of a product that may have been improperly assembled could
result in serious personal injury.
W A R N I N G
If any parts are damaged or missing do not operate this product until the parts are replaced. Use
of this product with damaged or missing parts could result in serious personal injury.
W A R N I N G
Do not attempt to modify this product or create accessories not recommended for use with this
leading to possible serious personal injury.
W A R N I N G
Do not connect to power supply until assembly is complete. Failure to comply could result in
accidental starting and possible serious personal injury.
• Power Head
• Front Handle with Hardware
•
•
•
Operator’s Manual
PACKING LIST
Straight Shaft Trimmer Attachment
ATTACHING THE GRASS DEFLECTOR (See Figure 2.)
•
•
•
•
• Tighten the screw securely.

10
ASSEMBLY
INSTALLING AN ATTACHMENT TO THE POWER HEAD(See Figure 3.)
W A R N I N G
Read and understand entire Operator’s Manual for each optional attachment used on this power
head and follow all warnings and instructions. Failure to follow all instructions may result in
W A R N I N G
Never install, remove, or adjust any attachment while power head is running. Failure to stop the
motor can cause serious personal injury. Never operate power head without an attachment.
NOTE: When using string trimmer attachments, use only .080 in. diameter line.
The attachment connects to the power head by means of a coupler device.
• Loosen the knob on the coupler and remove the hanger cap from the attachment.
• Push in the button located on the attachment shaft. Align the button with the guide recess on
the power head coupler and slide the two shafts together. Rotate the attachment shaft until the
button locks into the positioning hole.
NOTE: If the button does not release completely in the positioning hole, the shafts are not locked
into place. Slightly rotate from side to side until the button is locked into place.
• Tighten the knob securely.
Fig.3
Fig.2
SLOT
GRASS DEFLECTOR
POWER
HEAD SHAFT
KNOB
ATTACHMENT SHAFT

11
ASSEMBLY
ATTACHING THE FRONT HANDLE(See Figure 4.)
Fig.4
BOLT
• Press the front handle onto the power head shaft so that the handle is angled toward the rear
handle.
• Place the front handle along the power head shaft to a position that allows for comfortable
operation.
• Slide the bolt through the holes in the front handle.
• Slide the washer onto the bolt.
• Place the wing nut onto the bolt and tighten the wing nut securely.
REMOVING THE ATTACHMENT FROM THE POWER HAED
For removing or changing the attachment:
• Stop the power head.
• Loosen the knob.
• Push in the button and twist the shafts to remove and separate ends.

12
OPERATION
W A R N I N G
Read and understand entire Operator’s Manual for each optional attachment used on this power
head and follow all warnings and instructions. Failure to follow all instructions may result in
W A R N I N G
Do not allow familiarity with product to make you careless. Remember that a careless fraction of
W A R N I N G
Do not use any attachments or accessories not recommended by the manufacturer of this
product. The use of attachments or accessories not recommended can result in serious personal
injury.
W A R N I N G
Always wear eye protection with side shields marked to comply with ANSI Z87.1. Hearing and/
or head protection may also be required depending on the type of attachment used and as
prescribed in the attachment’s Operator’s Manual. Failure to do so could result in objects being
thrown into your eyes and other possible serious injuries.
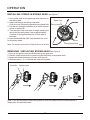
LOCK-OUT BUTTON(See Figure 5.)
The lock-out button reduces the possibility of accidental starting. The lock-out button is located
on the handle above the switch trigger. The lock-out button must be depressed before you pull
the switch trigger. The lock resets each time the trigger is released.
STARTING AND STOPPING THE TRIMMER (See Figure 5.)
To start the power head:
• Press the power button
• Press high speed button to increase speed depending upon grass condition
• Depress the lock-out button and squeeze the switch trigger
To stop the power head:
• Release the switch trigger
• The unit will power itself down after being idle for 1 minute

13
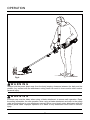
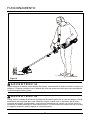
OPERATION
Hold the power head with your right hand on the rear handle and your left hand on the front
comfortable position with the rear handle about hip height.
Always operate power head at full throttle. If debris becomes wrapped around the attachment,
RELEASE THE SWITCH TRIGGER, and remove the debris.
OPERATING THE TRIMMER (See Figures 6)
W A R N I N G
Motor housing may become hot during operation. Do not rest or place your arm, hand, or any
13 (depending on attachment used) during trimmer operation with all body parts clear of motor
housing (or as shown in the applicable attachment Operator’s Manual). Extended contact with
the motor housing may result in burns or other injuries.
W A R N I N G
Always position the unit on the operator’s right side. The use of the unit on the operator’s left side
will expose the user to hot surfaces and can result in possible burn injury.
W A R N I N G
To avoid burns from hot surfaces, never operate unit with the bottom of the motor above waist
level.
Fig.5
SWITCH TRIGGER
LOCK-OUT BUTTON
HIGH SPEED BUTTON
POWER BUTTON

14
OPERATION
W A R N I N G
Always hold the power head away from the body keeping clearance between the body and the
product. Any contact with the attachment cutting head can result in burns and/or other serious
personal injury.
W A R N I N G
Extreme care must be taken when using a blade attachment to ensure safe operation. Read
the safety information for safe operation when using a blade attachment and refer to the safety
rules and instructions in your attachment manual. Never use a brush cutter attachment with this
electric power head. Improper operation of a blade or any attachment could result in serious
injury.
Fig.6

15
OPERATION
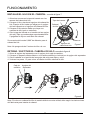
INSTALLING STRING IN STRING HEAD
REMOVING / REPLACING STRING HEAD
See Figure 8
Fig.7
Fig.8
See Figure 7
1. Line up the spacer hole up with the hole in the gear box.
2. Place a small screw driver or metal rod (Not included) in the spacer hole.
3. Rotate the head clockwise to loosen and remove.
4. Reverse steps 1.-3. to reinstall the same string head.
Note: If you put a different model string head on this unit please follow the manufacturer’s
instructions to install that head.
1. Line up the slots on the spool cap with the slots on
the string head.
2. Insert line through the string head hole.
Push line until it exits the opposite string head hole.
3. Pull the line through until there is an equal amount
of line on each side.
4. Turn the spool cap clock-wise to begin winding the
string into the string head. Leave approximately
5 inches of string protruding out of each side of
the head.
It is recommended that .080” line Diameter be used
for this string head.
Note: Do not put more than 15 feet of line in at a time.
Spool Cap
String Head
String Head Hole
Slots
Spacer Hole
Gear Box

16
OPERATION
LINE TRIMMING CUT-OFF BLADE
See Figure 9.
CUTTING TIPS (See Figures 10)
Fig.10
DANGEROUS CUTTING AREA
DIRECTION OF ROTATION
BEST CUTTING AREA
CUT-OFF BLADE
Fig.9
• Avoid hot surfaces by always keeping the tool away from your body. (Proper operating position
• Keep the trimmer tilted toward the area being cut; this is the best cutting area.
6
• The trimmer cuts when passing the unit from right to left. This will avoid throwing debris at the
• Use the tip of string to do the cutting; do not force string head into uncut grass.
• Wire and picket fences cause extra string wear and breakage. Stone and brick walls, curbs,
and wood may wear string rapidly.
• Avoid trees and shrubs. Tree bark, wood moldings, siding, and fence posts can easily be
damaged by the string.
10.

17
OPERATION
LENGTHENING THE LINE See Figure 11.
Fig.11
While the string trimmer is operating, the cutting line gets worn down and becomes shorter. This
trimmer is equipped with bump feed line advancement, which advances additional line once the
head is bumped on the ground while rotating. The cutting blade will cut the line to keep an
accurate cutting swath.

18
MAINTENANCE
W A R N I N G
etc., come in contact with plastic parts. Chemicals can damage, weaken or destroy plastic which
may result in serious personal injury.
GENERAL MAINTENANCE
Avoid using solvents when cleaning plastic parts. Most plastics are susceptible to damage from
various types of commercial solvents and may be damaged by their use. Use clean cloths to
remove dirt, dust, lubricant, grease, etc.
you can often make adjustments and repairs described here. For other repairs, have the power
head serviced by an authorized service dealer.
CLEANING THE POWER HEAD
• Stop the motor and disconnect from power supply.
• Clean dirt and debris from the power head using a damp cloth with a mild detergent.
W A R N I N G
When servicing, use only identical replacement parts. Use of any other parts may create a
hazard or cause product damage.
W A R N I N G
Always wear eye protection with side shields marked to comply with ANSI Z87.1, along with
hearing protection. Head protection may also be required depending on the type of attachment
used and as prescribed in the attachment’s Operator’s Manual. Failure to do so could result in
objects being thrown into your eyes and other possible serious injuries.
W A R N I N G
Before inspecting, cleaning, or servicing the machine, shut off motor, wait for all moving parts
to stop, and disconnect extension cord. Failure to follow these instructions can result in serious
personal injury or property damage.

19
MAINTENANCE
NOTE: Do not use any strong detergents on the plastic housing or the handle. They can be damaged by
certain aromatic oils such as pine and lemon, and by solvents such as kerosene.
STORING THE POWER HEAD
• Clean all foreign material from the product.
• Store it in a well-ventilated place that is inaccessible to children.
• Keep away from corrosive agents such as garden chemicals and de-icing salts.
TROUBLE SHOOTING
PROBLEM CAUSE SOLUTION
Motor fails to start when switch
trigger is depressed.
C h e c k b a t t e r y charger Recharge
Check power button Push button

20
GREENWORKS™ hereby warranties this product, to the original purchaser with proof of
purchase, for a period of four (4) years against defects in materials, parts or workmanship.
GREENWORKS™, at its own discretion will repair or replace any and all parts found to be
defective, through normal use, free of charge to the customer. This warranty is valid only for
units which have been used for personal use that h
ave not been hired or rented for industrial/
commercial use, and that have been maintained in accordance with the instructions in the
owners’ manual supplied with the product from new.
Battery carries a two (2) year warranty against defects in workmanship and materials. Batteries
must be charged in accordance with the operator’s manuals directions and regulations in order
to be valid.
ITEMS NOT COVERED BY WARRANTY:
1. Any part that has become inoperative due to misuse, commercial use, abuse, neglect,
accident, improper maintenance, or alteration; or
2. The unit, if it has not been operated and/or maintained in accordance with the owner's
manual; or
3. Normal wear, except as noted below;
4. Routine maintenance items such as lubricants, blade sharpening;
5.
GREENWORKS HELPLINE (1 888 90WORKS):
Warranty service is available by calling our toll-free helpline, 9 a.m. to 5 p.m. EST. Monday –
Friday at 1 888 909 6757 (1 888 90WORKS).
TRANSPORTATION CHARGES:
Transportation charges for the movement of any power equipment unit or attachment are the
responsibility of the purchaser. It is the purchaser’s responsibility to pay transportation charges
for any part submitted for replacement under this warranty unless such return is requested in
writing by GREENWORKS.
LIMITED FOUR-YEAR WARRANTY
Brushless Motor: Lifetime to original purchaser
4
YEAR/AÑO
TOOL WARRANTY
GARANTÍA DE
INSTRUMENTO
2
YEAR/AÑO
BATTERY WARRANTY
GARANTÍA DE
BATERÍA
MOTOR WARRANTY
GARANTÍA DE
MOTOR
10
YEAR/AÑO

21
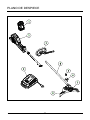
EXPLODED VIEW

22
PART LIST
ITEM NO. PART NO. DESCRIPTION
QTY
1 31103976(BK)
311232836
31121836
31112836
34107511-3
33307825
31110836
31114836
31102998
Battery
Upper shaft
Front handle
Lower shaft
Knob
Guard connecter
Trimmer head
Guard
Charger
1
2
1
3
1
4
1
5
2
6
1
7
8
9
1
1
1

Printed in China on 100% Recycled PaperRev:
TOLL-FREE HELPLINE: 1-888-90WORKS
(888.909.6757)
Greenworks Tools
P.O. Box 3130
Mooresville, North Carolina 28117
00 (11-26-15)

LÍNEA TELEFÓNICA GRATUITA: 1-888-90WORKS
(888.909.6757)
Lea atentamente las normas de seguridad e instrucciones antes de utilizar
esta herramienta.
40V Contemporizador de Cuerda de Brushless
Manual Del Propietario
(2100702)
ST40L210

2
Introducción .......................................................................................................................... 2
Reglas generales de seguridad...............................................................................3-5
7-6............................................................................................................................ solobmíS
8Sepa su producto
Armado ........................................................................................................................... 9-12
61-31................................................................................................................ oeimanoicnuF
91 otneiminetnaM
20....................................................................................................Resolución de problemas
21............................................................................................................................. .aítnaraG
32-22......................................................................................... tsil traP dna weiv dedolpxE
ESPECIFICACIONES
CONTENTS
40V Brushless ensartan al contemporizador
Tipo ........................................................................... Inalámbrica, activada por baterías
V 04..................................................................................................................... rotoM
Peso de unidad ..................................................................................................
15 lbs (6.8 kg)
Cuerda que Corta Anchura .............................................................................................. 14 in.
Diámetro de Cuerda...............................................................................
4
YEAR/AÑO
TOOL WARRANTY
GARANTÍA DE
INSTRUMENTO
2
YEAR/AÑO
BATTERY WARRANTY
GARANTÍA DE
BATERÍA
MOTOR WARRANTY
GARANTÍA DE
MOTOR
10
YEAR/AÑO
Nylon / 0.080 in. max.
..................................................................................................................
....................................................................................................................

3
REGLAS GENERALES DE SEGURIDAD
A D V E R T E N C I A
Lea y comprenda todas las instrucciones antes de usar este producto. No obedecer
todas las instrucciones que se listan a continuación podría resultar en choques
eléctricos, incendios o lesiones personales graves.
• No opere herramientas eléctricas en entornos explosivos, por ejemplo ante la presencia de
podrían incendiar el aserrín o los vapores.
• No exponga las herramientas eléctricas a la lluvia ni a las condiciones húmedas. El agua
dentro de una herramienta eléctrica aumenta el riesgo de choques eléctricos.
• No toque el enchufe ni la herramienta con las manos mojadas.
• Nunca permita que los niños operen el equipo. Nunca permita que personas adultas hagan
funcionar el equipo sin la debida capacitación.
• Use siempre gafas de seguridad con protecciones laterales. Las gaf
as para uso diario tienen
lentes solamente resistentes a impactos. NO son gafas de seguridad. Observar esta regla
reduce el riesgo de lesiones en los ojos. Utilice una careta si la operación produce polvo.
• Al operar este producto utilice protección para los ojos.
• Tenga cuidado extremo al limpiar gradas.
• No lo exponga a la lluvia, almacénelo bajo techo.
• Úselo solamente según se indica en este manual. Utilice solamente los accesorios
recomendados por el fabricante.
•
Mantenga el cabello, la ropa suelta, los dedos y todas las demás partes de su cuerpo
alejados de los respiraderos y de las piezas móviles.
• Use pantalones gruesos y largos, botas y guantes. Evite usar ropa suelta y joyas que
pudieran enredarse en las piezas móviles de la máquina o el motor.
• No violente la herramienta. Use la herramienta correcta para su aplicación. Las herramientas
correctas hacen un mejor trabajo y con mayor seguridad a la velocidad para la que fueron
diseñadas.
•
No haga funcionar el equipo estando descalzo ni al usar sandalias o calzado ligero similar.
• Asegure el cabello largo para mantenerlo arriba de sus hombros para evitar que se enrede en
las piezas móviles.
•
alcance natural. Hacerlo podría resultar en la pérdida del equilibrio.
• No permita que se le use como un juguete. Es necesario poner mucha atención al usarla y al
encontrarse cerca de niños.
• No use la herramienta si el interruptor no la enciende o apaga. Cualquier herramienta que no
puede ser controlada con su interruptor es peligrosa y se le debe reparar.
• Mantenga a los espectadores, niños y mascotas alejados por lo menos 15 metros (50 pies).
•
medicamentos.
• No la opere en lugares con poca iluminación.
• Mantenga todas las partes de su cuerpo alejadas de todos los elementos móviles y
• No introduzca ningún objeto en los respiraderos. No la use si algún respiradero está
bloqueado; mantenga los respiraderos libres de polvo, pelusa, cabello y de cualquier cosa

4
REGLAS GENERALES DE SEGURIDAD
• Revise el área de trabajo cada vez antes del uso. Quite todo objeto inadecuado tal como
rocas, fragmentos de vidrio, clavos, alambre o cuerdas que pudieran saltar o enrollarse en la
máquina.
• Utilice sólo repuestos y accesorios idénticos a los del fabricante. Usar cualquier otro repuesto
podría provocar peligros o crear daños al producto.
• Para uso en el hogar solamente.
• Las herramientas que funcionan a baterías no necesitan ser enchufadas en to
macorrientes;
por lo tanto, están siempre listas para operar. Tome conciencia de los posibles riesgos
existentes aun cuando no se está usando las herramientas de baterías y al cambiar
accesorios. Observar esta regla reduce el riesgo de choques eléctricos, incendios y lesiones
personales graves.
• No cargue las herramientas a baterías bajo la lluvia o condiciones húmedas o mojadas.
Observar esta regla reduce el riesgo de choques eléctricos.
• No use bajo la lluvia aparatos q
ue funcionan a baterías.
• Antes de darle servicio a la herramienta y de limpiar o quitar materiales, quite o desconecte
la batería de la herramienta para el jardín.
• Use solamente el tipo y tamaño indicado de baterías.
• Almacene los aparatos inactivos. Al no usar el recortador se le debe almacenar bajo techo en
un lugar seco, con llave, fuera del alcance de los niños.
•
códigos locales para averiguar si hay instrucciones especiales para su desecho.
• No abra las baterías ni las corte. El electrolito suelto es corrosivo y podría causar lesiones en
los ojos o la piel. Podría ser tóxico si se le ingiere.
• No coloque las herramientas a baterías o sus baterías cerca del fuego o el calor. Con ello se
reduce el riesgo de explosiones y posibles lesiones.
• Las baterías podrían explotar si existen fuentes de ignición, tales como luces piloto. Para
reducir el ries
go de lesiones personales graves, nunca use productos inalámbricos al existir
llamas. Las baterías al explotar podrían impulsar escombros y productos químicos. En caso
de contacto, enjuague inmediatamente con agua las áreas expuestas.
• No aplaste, deje caer ni dañe el paquete de baterías. No use los paquetes de baterías
ni cargadores que se han caído o recibido golpes severos. Las baterías dañadas están
propensas a explotar. Deseche inmediata y apropiadamente las baterías
que se han caído o
dañado.
• Tenga mucho cuidado al manejar baterías para no poner en corto la batería mediante
materiales conductores tales como anillos, brazaletes y llaves. La batería o el material
conductor se podría sobrecalentar y provocar quemaduras.
• Para obtener los mejores resultados, se debe cargar la herramienta a baterías en un lugar
en que la temperatura sea entre 10°C y 38°C (entre 50°F y 100°F). Para reducir el riesgo de
lesiones personales graves, no la almacene en exte
riores ni en vehículos.
• La batería podría desarrollar fugas si se le usa excesivamente o si hay temperaturas
extremas. Si el líquido entra en contacto con su piel, lávela inmediatamente con jabón y
agua, luego neutralícela con jugo de limón o con vinagre. Si el líquido entra en sus ojos,
enjuáguelos con agua limpia durante 10 minutos como mínimo, luego obtenga atención
médica inmediatamente. Observar esta regla reduce el riesgo de lesiones personales graves.
• Para evitar riesgos, si el cord
ón de alimentación se ha dañado, sólo el fabricante o un centro
de servicio autorizado pueden reemplazarlo.
• No apunte el recortador en la dirección de personas o mascotas.
• Nunca haga funcionar la unidad sin contar con los accesorios apropiados.
• Al no usar el recortador se le debe almacenar bajo techo en un lugar seco, con llave, fuera
del alcance de los niños.

5
REGLAS GENERALES DE SEGURIDAD
• Proporcione mantenimiento cuidadoso a la herramienta. Mantenga limpia el área del
ventilador para que proporcione el mejor desempeño con la mayor seguridad. Siga las
instrucciones para dar mantenimiento apropiado. No trate de liberar obstrucciones de la
herramienta sin desactivarla primero.
•
húmedas. Almacénela en interiores.
• Guarde estas instrucciones. Léalas frecuentemente y utilícelas para instruir a otros que
pudieran hacer uso de esta herramienta. Si presta esta herramienta eléctrica, entregue estas
instrucciones también.
A D V E R T E N C I A
( P R O P O S I C I Ó N 6 5 )
El polvo creado por la arena a chorro, el aserrado, esmerilado, taladrado y o tras actividades de
la construcción podría
contener productos químicos que se sabe provocan cáncer, defectos de
nacimiento y otras lesiones reproductivas. Algunos ejemplos de estos productos químicos son:
SEGURIDAD DE NIÑOS
Si el operador no se percata de la presencia de niños, se pueden generar accidentes trágicos.
• Mantenga a los niños alejados del área de trabajo y bajo el cuidado atento de un adulto
responsable.
• No deje que niños menores de 14 años operen este recortador. Los niños de 14 años
o más deben leer y comprender las instrucciones de funcionamiento y las reglas de
seguridad de este manual y uno de sus padres les debe capacitar y supervisar.
• Manténgase alerta, y apague el recortador si un niño o cualquier otra persona ingresa al
área de trabajo.
• Antes y al soplar hacia atrás, mire hacia atrás y hacia abajo para asegurarse de que no
hay niños pequeños.
Tenga extremo cuidado al acercarse a esquinas ciegas, entradas, arbustos, árboles u otros
objetos que le pudieran obstruir la visión de niños, los cuales pudieran correr hacia el área
de trabajo del recortador.
• Plomo en pintura a base de plomo
• Sílice cristalino en ladrillos, cemento y otros productos de mampostería, y
• Arsénico y cromo de madera con tratamiento químico.
Su riesgo de exposición a estos productos químicos depende de la frecuencia en que efectúe
este tipo de trabajo. Para reducir su exposición a estos productos químicos, trabaje en áreas
bien ventiladas y use equipo de seguridad aprobado, tal como máscaras contra el polvo
• No abra las baterías ni las corte. El electrolito suelto es corrosivo y podría causar lesiones en
los ojos o la piel. Podría ser tóxico si se le ingiere.
• No deseche las baterías tirándolas al fuego. Las celdas podrían explotar. Verifique los códigos
locales para averiguar si hay instrucciones especiales para su desecho.
• Utilizar solo con baterías 29462 / 29472. Utilizar solo con el cargador 29482.
• Tenga mucho cuidado al manejar baterías para no poner en corto la batería mediante materiales
conductores tales como anillos, brazaletes y llaves. La batería o el material conductor se podría
sobrecalentar y provocar quemaduras.
• No realice sobreesfuerzos. Mantenga un equilibro adecuado en todo momento.
•

6
S ÍMBOLO NOMBRE DESIGNACIÓN/EXPLICACIÓN
V Voltios
Voltaje
Corriente
Frecuencia (ciclos por segundo)
Potencia eléctrica
Tiempo
Tipo de corriente
Tipo o característica de la corriente
No instale ni utilice ningún tipo de hoja de
corte en ningún producto con este símbolo.
Revoluciones, carreras, velocidad superficial,
órbitas, etc. por minuto
No la exponga a la lluvia ni la use en lugares
húmedos o mojados
Para reducir el riesgo de lesiones el usuario
debe leer y comprender el manual del operador
antes de usar el producto
Al operar este equipo utilice protección para
los ojos.
Precauciones que involucran su seguridad.
Si no se mantiene alejado el cabello largo de la
entrada de aire se podrían provocar lesiones
personales.
Si no se evita que la ropa suelta sea succionada
hacia la entrada de aire se podrían provocar
lesiones personales.
A Amperios
Hz Hertz
W Vatios
Minutosin M
Corriente alterna
Corriente directa
No instale hoja de corte
/min Por minuto
Alerta de condiciones
húmedas
Lea el manual del operador
Protección para los ojos
Alerta de seguridad
Abello largo
Ropa suelta
Mantenga alejados a
los espectadores
Mantenga a todos los espectadores a 15 m.
(50 pies) de distancia por lo menos.
Este producto podría contener algunos de los siguientes símbolos. Sírvase estudiarlos y aprender su
una forma más segura.
SÍMBOLOS

7
este producto.
SERVICIO
Para dar servicio es necesario tener extremo cuidado y conocimiento, el servicio debe ser
al producto lo regrese a su CENTRO DE SERVICIO AUTORIZADO más cercano para que los
reparen. Al dar servicio, use solamente repuestos idénticos.
ADVERTENCIA
Para evitar lesiones personales graves, no trate de usar este producto antes de haber leído
completamente el presente Manual del Propietario y haberlo comprendido en su totalidad.
Si no comprende las advertencias y las instrucciones que aparecen en el presente Manual
del Propietario, no use el producto. Llame gratis al 1-888-909- 6757 pa
ra recibir ayuda. Toda
herramienta eléctrica al funcionar puede lanzar objetos extraños hacia sus ojos, lo que podría
provocarles lesiones graves. Antes de operar una herramienta eléctrica, use siempre gafas de
seguridad, gafas de seguridad con protecciones laterales o una careta completa si es necesario.
Recomendamos usar una careta de seguridad con rango visual ancho encima de gafas de
seguridad estándar, o usar gafas de seguridad estándar con protecciones laterales. Use siempre
protección para los ojos con viñetas que indiquen q
ue cumplen ANSI Z87.1.
A D V E R T E N C I A
Toda herramienta eléctrica al funcionar puede lanzar objetos extraños hacia sus ojos, lo que podría provocarles
lesiones graves. Antes de comenzar el funcionamiento de una herramienta eléctrica, use siempre gafas de seguridad
o gafas de seguridad con protecciones laterales y, si es necesario, una careta completa. Recomendamos usar caretas
de seguridad con rango visual ancho encima de gafas de seguridad estándar, o usar gafas de seguridad estánda
r
con protecciones laterales. Use siempre protección para los ojos con viñetas que indiquen que cumplen ANSI
Z87.1.which can result in severe eye damage. Before beginning power tool operation, always wear safety goggles or
safety glasses with side shields and, when needed, a full face shield. We recommend Wide Vision Safety Mask for use
over eyeglasses or standard safety glasses with side shields. Always use eye protection whi
ch is marked to comply
with ANSI Z87.1.
SÍMBOLOS
GUARDE ESTAS INSTRUCCIONES
SÍMBOLO AVISO SIGNIFICADO
PELIGRO Indica situaciones inminentemente peligrosas que, si no se
evitan, resultan en la muerte o en lesiones serias.
ADVERTENCIA Indica situaciones potencialmente peligrosas que, si no se evitan,
podrían resultar en la muerte o en lesiones serias
PRECAUCIÓN Indica situaciones potencialmente peligrosas que, si no se evitan,
podrían resultar en lesiones entre mínimas y moderadas.
PRECAUCIÓN (Sin el símbolo de alerta por seguridad) indica una situación que
podría resultar en daños a la propiedad.

8
SEPA SU PRODUCTO
EMPUÑADURA DELANTERA
La cabeza motriz está equipada con un conjunto de mango frontal para facilitar el uso y para evitar
la pérdida de control.
ANILLO DE ACOPLE
EMPUÑADURA DELANTERA
GATILLO-INTERRUPTOR
EMPUÑADURA TRASERA
CONOZCA SU PRODUCTO (consultar figura 1).
El uso seguro de este producto requiere la comprensión de la información de la herramienta y del
manual de usuario, así como el conocimiento de la tarea que intenta realizar. Antes de usar este
producto, familiarícese con todas las características de funcionamiento y normas de seguridad,
tanto en este manual como en los manuales de usuario de todos los accesorios que utilice con
esta cabeza motriz.
Figura.1
RECORTADORA DE EJE
DEFLECTOR DE HIERBA
CABEZAL DE
ENGRANAJE
CABEZA PARA HILO
DE
CORTE
tegerse de los restos que salen
volando
.
DEFLECTOR DE HIERBA
INTERRUPTOR
ALTO / BOTÓN DE
VELOCIDAD BAJO

9
ARMADO
A D V E R T E N C I A
Si falta alguna pieza o alguna está dañada, no utilice el producto hasta que haya sustituido las
piezas. Usar este producto si falta alguna pieza o si alguna está dañada podría provocar graves
daños personales.
.
A D V E R T E N C I A
No intente modificar este producto o crear accesorios no recomendados para ser usados con él.
Cualquier alteración o modificación es un uso incorrecto del producto y podría provocar situaciones
peligrosas que conlleven graves daños personales.
A D V E R T E N C I A
No conecte la unidad al suministro de energía hasta que esté completamente montada. Si la
máquina está mal montada, podría arrancar accidentalmente y provocar graves daños personales.
• Cabeza motriz
• Mango delantero con accesorios
• Accesorio de contemporizador de eje directo
• Hierba deflector
• Manual de instrucciones
LISTA DE PIEZAS
DESEMBALAJE
Es necesario montar este producto.
• Retire con cuidado el producto y los accesorios de la caja. Asegúrese de que están incluidos todos
los elementos que figuran en la lista del paquete de embalaje.
• Revise el producto con atención para asegurarse de que no se produjeron daños o roturas durante
el transporte.
• No tire el material de embalaje hasta que haya revisado con atención y haya utilizado el producto
de manera satisfactoria.
• Si falta alguna parte dañada o se encuentra dañada, llame al 1-888-90WORKS para que le
proporcionen asistencia
A D V E R T E N C I A
No utilice este producto si ya está montado en el producto algún elemento de la lista del paquete
de embalaje cuando lo desembale. El fabricante no ha montado los elementos de esta lista en el
producto y requieren de la instalación del cliente. Usar un producto que puede haber sido mal
montado podría provocar graves daños personales.

10
ARMADO
COLOCAR EL DEFLECTOR DE HIERBA
Véase la Figura 2.
de hierba.
• Apriete bien los tornillos de montaje.
DEFLECTOR DE HIERBA
RANURA
Figura 2.

11
ARMADO
NOTA:
Al utilizar accesorios de la cortadora, utilice sólo un cable de 0,2 cm de diámetro. El
accesorio se conecta al bloque motor mediante un anillo de acople.
• Afloje la perilla del acoplador y retire la tapa de suspensión del accesorio.
• Presione el botón situado en el eje del accesorio. Alinee el botón con la guía de receso del
acoplador del bloque motor y deslice los dos ejes hasta que se unan. Gire el eje del accesorio
hasta que el botón se bloquee en al agujero de posición.
NOTA: Si el botón no se libera por completo en el agujero de posición significa que los ejes no
están bien colocados. Gire ligeramente de un lado a otro hasta que el botón se ajuste en su
lugar.
• Apriete la llave firmemente.
INSTALACIÓN DE UN ACCESORIO A LA CABEZA MOTRIZ (See Figura 3.)
Figura 3.
A D V E R T E N C I A
Lea y comprenda el manual de usuario en su totalidad para cada accesorio opcional utilizado en
esta cabeza motriz y siga todas las advertencias e instrucciones. Si no sigue todas las instrucciones,
podrían producirse descargas eléctricas, incendios y/o daños personales graves.
A D V E R T E N C I A
Nunca instale, retire o ajuste ningún accesorio mientras sigue funcionando el bloque motor. Un fallo
en la parada del motor puede causar lesiones personales graves. No haga funcionar la cabeza
motriz sin accesorios.
EJE DEL BLOQUE MOTOR
LLAVE
EJE PARA ACCESORIOS

12
• Presione el mango delantero en el eje de la cabeza motriz de manera que el mango está inclinado
hacia el mango trasero.
• Sitúe la empuñadura a lo largo del eje de la cabeza motriz en una posición que permita un
funcionamiento cómodo.
• Deslice el perno a través de los agujeros del mango delantero.
• Deslice la arandela en el perno.
• Coloque la tuerca de mariposa en el perno y apriétela de forma segura.
FIJACIÓN DEL MANGO DELANTERO (consultar figura 4).
Figura.4
PERNO
ARMADO
• Detenga la cabeza motriz.
• Pulse el botón y gire los ejes para quitar y separar los extremos.
QUITAR EL ACCESORIO DE LA CABEZA MOTRIZ
Para quitar o cambiar el accesorio:

13
FUNCIONAMIENTO
A D V E R T E N C I A
Lea y comprenda el manual de usuario en su totalidad para cada accesorio opcional utilizado en
esta cabeza motriz y siga todas las advertencias e instrucciones. Si no sigue todas las instrucciones,
podrían producirse descargas eléctricas, incendios y/o daños personales graves.
A D V E R T E N C I A
Preste especial atención aunque esté familiarizado con el producto. Recuerde que un despiste de
una sola fracción de segundo es suficiente para causar daños graves.
A D V E R T E N C I A
No utilice conexiones ni accesorios que no estén recomendados por el fabricante de este
producto. El uso de conexiones o accesorios no recomendados podría causar graves daños
personales.
A D V E R T E N C I A
Use siempre gafas de protección con protección lateral que cumplan la normas ANSI Z87.1.
También puede ser necesaria protección para la cabeza o auditiva en función del tipo de accesorio
utilizado y como se indica en el manual de usuario del accesorio. Si no sigue estas recomendaciones,
podrían entrar objetos extraños en los ojos y podría sufrir otras lesiones graves.
BOTÓN DE BLOQUEO (consultar figura 5).
El botón de bloqueo reduce la posibilidad de un arranque accidental. El botón de bloqueo está
situado en el mango por encima del gatillo-interruptor. El botón de bloqueo debe estar presionado
antes de apretar el gatillo-interruptor. El bloqueo se restablece cada vez que suelte el
gatillo-interruptor.
Comenzar la cabeza de poder:
• Presionan el botón de poder
• Botón de alta velocidad de Prensa para aumentar velocidad según condición de hierba
• Deprimen el botón de bloqueo y aprietan el gatillo de interruptor
Parar la cabeza de poder:
• Liberan el gatillo de interruptor
• La unidad se impulsará abajo siendo ocioso durante 1 minuto
ARRANCAR Y DETENER LA CABEZA MOTRIZ (consultar figura 5).

14
FUNCIONAMIENTO
Sujete la cabeza motriz con la mano derecha en la empuñadura trasera y la mano izquierda en
la empuñadura delantera. Agarre la herramienta firmemente con ambas manos mientras esté
en funcionamiento. La cabeza motriz debería sujetarse en una posición cómoda con la
empuñadura trasera a la altura de la cadera.
Utilice siempre la cabeza motriz a máxima velocidad. Si el accesorio queda rodeado por residuos,
SUELTE EL G
ATILLO, desconecte la unidad y elimine los escombros.
FUNCIONAMIENTO DE LA CABEZA MOTRIZ (consultar figura 6)
A D V E R T E N C I A
La cubierta del motor puede calentarse durante la operación. No apoye ni coloque el brazo, la
mano o cualquier parte del cuerpo sobre la cubierta del motor durante su uso. Sujete la unidad
sólo como se muestra en las figuras 5 (según el accesorio utilizado) durante el uso de la
cortadora con todas las partes del cuerpo alejadas de la cubierta del motor (o como se indica
en el manual de usuario del accesorio aplicable). El contacto prolongado con la cubierta del motor
puede resultar en quemaduras u otras lesiones.
A D V E R T E N C I A
Coloque siempre el aparato en el lateral derecho del operador. El uso del aparato a la izquierda
del operador expondrá al usuario a superficies calientes que pueden causar quemaduras.
Para evitar las quemaduras debido a las superficies calientes, no trabaje situando el aparato con
la parte inferior del motor por encima de la cintura.
.
A D V E R T E N C I A
Figura.5
GATILLO-INTERRUPTOR
BOTÓN DE BLOQUEO
BOTÓN DE ALTA
VELOCIDAD
BOTÓN DE PODER

15
FUNCIONAMIENTO
A D V E R T E N C I A
Sujete siempre la cabeza motriz alejada del cuerpo, manteniendo la distancia entre el cuerpo y el
producto. Cualquier contacto con el cabezal de corte del accesorio podría provocar quemaduras
y/o lesiones personales graves.
A D V E R T E N C I A
Tenga mucho cuidado al utilizar las cuchillas del accesorio para que su uso sea seguro. Lea la
información de seguridad para una utilización segura cuando use un accesorio de la hoja y
consulte las normas de seguridad e instrucciones del manual de usuario. No utilice nunca un
accesorio de desbrozadora con esta cabeza motriz. El funcionamiento inadecuado de una hoja
o cualquier accesorio podría resultar en l
esiones graves.
Figura.6

16
consulte la figura 7
consulte la figura 8
Figura.7
Figura.8
FUNCIONAMIENTO
INSTALAR EL HILO EN EL CABEZAL
RETIRAR / SUSTITUIR EL CABEZAL DE HILO
1. Alinee el agujero del separador con el agujero de la caja de cambios.
2. Coloque un pequeño destornillador o una varilla metálica (no incluida) en el agujero del separador.
3. Gire el cabezal en el sentido de las agujas del reloj para alojar y retire.
4. Vuelva a los pasos 1-3 para volver a instalar el mismo cabezal de hilo.
Nota: Si coloca un cabezal de hilo de modelo distinto en esta unidad, debe seguir las instrucciones
del fabricante para instalar el cabezal.
1. Alinee las ranuras en la tapa del carrete con las
ranuras del cabezal de hilo.
2. Coloque el hilo a través del agujero del cabezal de
hilo. Empuje el hilo hasta que salga por el agujero
del lado opuesto en el agujero del cabezal de hilo.
3. Coloque el hilo adentro hasta que haya una
cantidad de hilo igual en cada lado.
4. Gire la tapa del carrete en el sentido de las agujas
del reloj. Deje que sobresalgan aproximadamente.
5 pulgadas de hijo en cada lado del cabezal.
Se recomienda línea de 0,080" de diámetro para el
cabezal de hilo
Nota: No ponga más de 5 metros de hilo a la vez.
Tapa del carrete
Cabezal
de hilo
Agujero del
cabezal de hilo
Caja de
cambios
Agujero del
separador
Ranuras

17
CUCHILLA CORTA CABOS DE RECORTADORA
Véase la Figura 9.
r rendimiento.
Figura. 10
FUNCIONAMIENTO
CORTAR PUNTAS
Véase la Figura 10.
posición correcta de funcionamiento se muestra en la figura 6.)
• Mantenga la recortadora inclinada hacia la zona a cortar; esta es la mejor área de corte.
• La recortadora corta al pasar el aparato de derecha a izquierda. Esto evitará que se arrojen
• Utilice la punta del hilo para cortar; no fuerce la cabeza para hilo de corte en la hierba no cor-
tada.
• Las vallas de madera o alambre provocan un desgaste excesivo del hilo y rotura. Las paredes
de piedra y ladrillo, los bordillos y la madera pueden desgastar rápidamente el hilo.
• Evite los árboles y arbustos. La corteza de árbol, las molduras de madera, los frisos y las esta-
cas de las vallas pueden ser dañados fácilmente por el hilo.
10.
MEJOR ZONA DE CORTE
ZONA DE CORTE PELIGROSA
DIRECCIÓN DE GIRO
CUCHILLA DE CORTE
Figura. 9

18
ALARGAMIENTO DEL HILO
Véase la Figura 11.
FUNCIONAMIENTO
Figura. 11
Mientras la orilladora está en funcionamiento, el hilo de corte se desgasta y se acorta. Esta
podadora está equipada con avance de hilo por contacto, lo que permite que el hilo salga cuando
se golpea suavemente el suelo con el cabezal mientras rota. La hoja de corte recortará el hilo
para mantener la amplitud de corte precisa.

19
MANTENIMIENTO
A D V E R T E N C I A
Utilice solo piezas de recambio idénticas cuando esté realizando labores de mantenimiento
de la máquina. El uso de otras piezas puede ocasionar riesgos o daños en el producto.
A D V E R T E N C I A
Use siempre gafas de protección con protección lateral que cumplan la normas ANSI Z87.1,
junto con protección auditiva. También puede ser necesaria protección para la cabeza en función
del tipo de accesorio utilizado y como se indica en el manual de usuario del accesorio. Si no
sigue estas recomendaciones, podrían entrar objetos extraños en los ojos y podría sufrir otras
lesiones graves.
A D V E R T E N C I A
A D V E R T E N C I A
Antes de inspeccionar, limpiar o reparar la máquina, detenga el motor, espere a que todas las
piezas móviles se detengan y desconecte del cable extensible. El incumplimiento de estas
instrucciones puede resultar en lesiones corporales graves o daños a la propiedad.
MANTENIMIENTO GENERAL
Evite el uso de disolventes para limpiar las piezas de plástico. La mayoría de los plásticos son
susceptibles a diversos tipos de disolventes comerciales y pueden dañarse por su uso. Utilice paños
limpios para eliminar la suciedad, el polvo, los restos de lubricante y grasa, etc.
No permita en ningún momento que las piezas de plástico entren en contacto con líquido de frenos,
gasolina, productos derivados del petróleo, lubricantes penetrantes, etc
. Los productos químicos pueden
dañar, destruir o debilitar el plástico, lo que puede ocasionar graves daños personales.
En ciertas ocasiones podrá realizar ajustes y reparaciones que se describen aquí. Para realizar otras
reparaciones, deberá llevar la cabeza motriz a un distribuidor autorizado.
LIMPIEZA DE LA CABEZA MOTRIZ
• Detenga el motor y desconéctelo de la fuente de alimentación.
• Limpie la suciedad y los desechos de la cabeza motriz utilizando un paño húmedo con un
detergente suave.
NOTA: No use detergentes fuertes en el mango o en la carcasa de plástico. Podrían dañarse si utiliza aceites
aromáticos, como de pino y de limón, y solventes como el queroseno.
ALMACENAJE DE LA CABEZA MOTRIZ
• Limpie todo el material extraño que pueda permanecer en el producto.
• Guárdela en un lugar bien ventilado que sea inaccesible para los niños.
• Almacénelo lejos de agentes corrosivos como sales de deshielo y productos químicos de jardín.

20
RESOLUCIÓN DE PROBLEMAS
PROBLEMA CAUSA SOLUCIÓN
El motor no arranca cuando
está pulsado el gatillo-
interruptor.
Compruebe el cargador de baterías Recargar
Compruebe el botón de poder Empuje botón

21
GARANTÍA LIMITADA DE 4 AÑOS
Por este medio y por un período de cuatro años GREENWORKS™ garantiza este producto
contra defectos en materiales, piezas o mano de obra al comprador original que cuente con
una prueba de compra. GREENWORKS™, a su sola discreción reparará o reemplazará, sin
costo alguno para el cliente, cualquier pieza defectuosa, siempre y cuando se haya hecho uso
normal de ella. Esta garantía es válida solamente para unidades utilizadas de manera personal
y que no hayan sido utilizadas o alquiladas para uso industrial o comercial, y que hayan recibido
mantenimiento de acuerdo a las instrucciones que aparecen en el manual del propietario que se
suministró con el producto nuevo.
La batería tiene una garantía de un año co
ntra defectos en materiales o mano de obra. Para
mantener su validez, se debe cargar las baterías siguiendo las instrucciones y regulaciones que
aparecen en el manual del operador.
ARTÍCULOS QUE NO CUBRE LA GARANTÍA:
1. Cualquier pieza que se haya vuelto inoperante debido a mal uso, uso comercial, abuso,
descuido, accidente, mantenimiento inapropiado o alteración; o
2. La unidad, si no ha sido operada o si no se le ha dado mantenimiento de acuerdo al
manual del propietario; o
3. Desgaste normal, excepto según se indica a conti
nuación;
4.
5. Deterioro normal del acabado exterior debido al uso y la exposición al entorno.
LÍNEA TELEFÓNICA PARA AYUDA DE GREENWORKS (1 888 90WORKS):
Se puede obtener servicio relacionado con la garantía llamando de lunes a viernes entre las 9
a.m. y las 5 p.m. a nuestra línea gratis para ayuda, el
1 888 909 6757 (1 888 90WORKS).
CARGOS DE TRANSPORTE:
Los cargos de transporte por el traslado de cualquier unidad de equipo o accesorio eléctrico son
responsabilidad del comprador. El comprador es responsable de pagar los cargos de transporte
de cualquier pieza presentada para reemplazo de acuerdo a esta garantía a menos que
GREENWORKS solicite por escrito tal retorno.
4
YEAR/AÑO
TOOL WARRANTY
GARANTÍA DE
INSTRUMENTO
2
YEAR/AÑO
BATTERY WARRANTY
GARANTÍA DE
BATERÍA
MOTOR WARRANTY
GARANTÍA DE
MOTOR
10
YEAR/AÑO

22
PLANO DE DESPIECE

23
LISTA DE PIEZAS
Batería
1 31103976(BK)
311232836
31121836
31112836
34107511-3
33307825
31110836
31114836
31102998
Eje superior/
Mango delantero
Eje inferior/
Perilla
Guardia connecter
Cabeza de contemporizador
Protección
Cargador
1
2
1
3
1
4
1
5
2
6
1
7
8
9
1
1
1
Artículo # ERP# Descripción Qty

Rev: 00 (11-26-15)
LÍNEA DE AYUDA GRATUITA: 1-888-90WORKS
(888.909.6757)
Impreso en China en papel reciclado de 100%
Greenworks Tools
P.O. Box 3130
Mooresville, North Carolina 28117
-
 1
1
-
 2
2
-
 3
3
-
 4
4
-
 5
5
-
 6
6
-
 7
7
-
 8
8
-
 9
9
-
 10
10
-
 11
11
-
 12
12
-
 13
13
-
 14
14
-
 15
15
-
 16
16
-
 17
17
-
 18
18
-
 19
19
-
 20
20
-
 21
21
-
 22
22
-
 23
23
-
 24
24
-
 25
25
-
 26
26
-
 27
27
-
 28
28
-
 29
29
-
 30
30
-
 31
31
-
 32
32
-
 33
33
-
 34
34
-
 35
35
-
 36
36
-
 37
37
-
 38
38
-
 39
39
-
 40
40
-
 41
41
-
 42
42
-
 43
43
-
 44
44
-
 45
45
-
 46
46
-
 47
47


Greenworks 2100702 Instrucciones de operación
- Categoría
- Podadoras de césped
- Tipo
- Instrucciones de operación
En otros idiomas
Documentos relacionados
-
Greenworks ST48B2210 Instrucciones de operación
-
-
-
-
-
-
-
-
-
Otros documentos
-
EGO STA1600 String Trimmer Attachment Manual de usuario
-
Greenworks Pro ST80L210 Instrucciones de operación
-
-
-
Simplicity SB60V Manual de usuario
-
Ryobi RY40220 Manual de usuario
-