Greenworks STF310 String Trimmer Manual de usuario
- Categoría
- Podadoras de césped
- Tipo
- Manual de usuario

STF310
EN OPERATOR MANUAL
ES MANUAL DEL OPERADOR
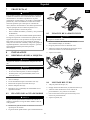
STRING TRIMMER
DESBROZADORA
www.greenworkstools.com


1 Description.........................................4
1.1 Purpose.............................................................. 4
1.2 Overview........................................................... 4
2 Important safety instructions...........4
3 Symbols on the machine................... 5
4 Risk levels...........................................5
5 Service................................................ 6
6 Environmentally safe battery
disposal...............................................6
7 Proposition 65....................................6
8 Installation......................................... 6
8.1 Unpack the machine.......................................... 6
8.2 Attach the edge guide........................................ 7
8.3 Attach the guard.................................................7
8.4 Assemble the shaft.............................................7
8.5 Attach the auxiliary handle................................7
8.6 Install the battery pack.......................................8
8.7 Remove the battery pack................................... 8
9 Operation........................................... 8
9.1 Start the machine............................................... 8
9.2 Stop the machine............................................... 8
9.3 Operation tips.................................................... 8
9.4 Cutting tips........................................................ 9
9.5 Adjust the length of the cutting line.................. 9
9.6 Adjust the cutting diameter................................9
10 Maintenance.......................................9
10.1 General information.........................................10
10.2 Clean the machine........................................... 10
10.3 Replace the spool.............................................10
10.4 Replace the spool.............................................10
10.5 Replace the cutting line....................................11
10.6 Replace the bump knob....................................11
11 Transportation and storage............ 11
11.1 Move the machine............................................11
11.2 Store the machine.............................................11
12 Troubleshooting...............................12
13 Technical data..................................13
14 Limited warranty............................ 13
15 Exploded view..................................14
3
English EN

1 DESCRIPTION
1.1 PURPOSE
This machine is used to cut grass, light weeds, and other
similar vegetation at or around ground level. The cutting
plane must be approximately parallel to the ground surface.
You cannot use the machine to cut or chop hedges, shrubs,
bushes, flowers and compost.
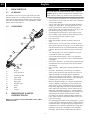
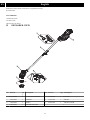
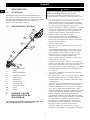
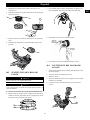
1.2 OVERVIEW
1Rear handle
2Trigger
3Lock-out button
4Auxiliary handle
5Upper shaft
6Lower shaft
7Edge guide
8Trimmer head
9Guard
10 Knob
11 Coupler
2 IMPORTANT SAFETY
INSTRUCTIONS
READ ALL INSTRUCTIONS BEFORE USING (THIS
POWER TOOL)
WARNING
Read and understand all instructions before using this
product. Failure to follow all instructions listed below may
result in electric shock, fire, and/or serious personal injury.
• Use only identical manufacturer’s replacement parts and
accessories. Use of any other parts may create a hazard or
cause product damage.
• Always wear safety glasses with side shields marked to
comply with ANSI Z87.1. Everyday glasses have only
impact resistant lenses. They are NOT safety glasses.
Following this rule will reduce the risk of eye injury. Use
face mask if operating in dusty work spaces.
• Avoid Dangerous Environment – Don’t expose power
tools to damp or wet conditions. Water entering a power
tool will increase the risk of electric shock.
• Don’t use in rain.
• Keep all bystanders, children, and pets at least 50 ft.
away.
• Dress Properly – Do not wear loose clothing or jewelry.
They can be caught in moving parts. Use of rubber gloves
and substantial footwear is recommended when working
outdoors. Wear protective hair covering to contain long
hair.
• Use right Appliance. Do not use appliance for any job
except that for which it is intended.
• Avoid Unintentional Starting – Don’t carry appliance
with finger on switch. Be sure switch is off when battery
is plugged in.
• Don’t Force Appliance – It will do the job better and with
less likelihood of a risk of injury at the rate for which it
was designed.
• Don’t overreach – Keep proper footing and balance at all
times.
• Stay alert – Watch what you are doing. Use common
sense. Do not operate this unit when you are tired, ill or
under the influence of alcohol, drugs or medication.
• Always store idle power tools indoors – When not in use,
power tools should be stored indoors in a dry and high or
locked-up place, out of reach of children.
• Maintain Appliance With Care – Replace string head if
cracked, chipped, or damaged in any way. Be sure the
string head is properly installed and securely fastened.
Keep cutting edge sharp and clean for best performance
and to reduce the risk of injury. Follow instructions for
lubricating and changing accessories. Inspect appliance
cord periodically, and if damaged, have it repaired by an
authorized service facility. Inspect extension cords
periodically and replace if damaged. Keep handles dry,
clean, and free from oil and grease. Failure to do so can
cause serious injury.
• Check damaged parts before using the appliance, a guard
or other part that is damaged should be carefully checked
to determine that it will operate properly and perform its
intended function. Check for alignment of moving parts,
binding of moving parts, breakage of parts, damaged
mountings, and any other condition that may affect its
4
English
EN

operation. A guard or other part that is damaged should
be properly repaired or replaced by an authorized service
center unless indicated elsewhere in this manual.
• Remove or disconnect battery before servicing, cleaning
or removing material from the gardening appliance.
• Do not modify or attempt to repair the appliance or the
battery pack (as applicable) except as indicated in the
instructions for use and care. Use appliances only with
specifically designated battery packs. Use of any other
battery packs may create a risk of injury and fire. Use
only Greenworks BAF721 battery or other BAF series.
• Recharge only with the charger specified by the
manufacturer. A charger that is suitable for one type of
battery pack may create a risk of fire when used with
another battery pack. Use only Greenworks 29482
charger or other CAF series.
• When battery pack is not in use, keep it away from other
metal objects, like paper clips, coins, keys, nails, screws
or other small metal objects, that can make a connection
from one terminal to another. Shorting the battery
terminals together may cause a fire.
• Under abusive conditions, liquid may be ejected from the
battery; avoid contact. If contact accidentally occurs,
flush with water. If liquid contacts eyes, additionally seek
medical help. Liquid ejected from the battery may cause
irritation or burns.
• Do not use a battery pack or appliance that is damaged or
modified. Damaged or modified batteries may exhibit
unpredictable behavior resulting in fire, explosion or risk
of injury.
• Do not expose a battery pack or appliance to fire or
excessive temperature. Exposure to fire or temperature
above 265 °F (130 °C) may cause an explosion.
• Do not dispose of the batteries in a fire. The cells may
explode. Check with local codes for possible special
disposal instructions.
• Do not open or mutilate the batteries. Released electrolyte
is corrosive and may cause damage to the eyes or skin. It
may be toxic if swallowed.
• Exercise care in handling batteries in order not to short
the battery with conducting materials such as rings,
bracelets, and keys. The battery or conductor may
overheat and cause burns.
• Follow all charging instructions and do not charge the
battery pack or appliance outside of the temperature range
specified in the instructions. Charging improperly or at
temperatures outside of the specified range may damage
the battery and increase the risk of fire.
• Have servicing performed by a qualified repair person
using only identical replacement parts. This will ensure
that the safety of the product is maintained.
• Keep guards in place and in working order.
• Keep hands and feet away from cutting area.
• Disconnect the battery pack from the appliance before
making any adjustments, changing accessories, or storing
appliance. Such preventive safety measures reduce the
risk of starting the appliance accidentally.
• Use only with the nylon cutting line of 0.08 " (2 mm)
diameter. Do not use heavier lines than recommended by
the manufacturer and line materials of other types – for
example, metal wire, rope, and the like.
SAVE THESE INSTRUCTIONS
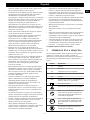
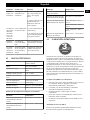
3 SYMBOLS ON THE MACHINE
Some of the following symbols can be used on this machine.
Please study them and learn their definition. Proper
interpretation of these symbols will let you operate the tool
better and safer.
Symbol Explanation
V Voltage
A Current
Hz Frequency (cycles per second)
W Power
min Time
/min Revolutions, strokes, surface speed, or-
bits etc., per minute
Direct current
Precautions that involve your safety.
Read and understand all instructions be-
fore you operate the machine, and follow
all warnings and safety instructions.
Always wear safety glasses with side
shields marked to comply with ANSI
Z87.1 when you operate this machine.
Do not expose the machine to rain or
moist conditions.
Keep all bystanders at least 15m away.
Do not install or use any type of blade on
the machine or displaying this symbol.
Thrown objects can ricochet and result in
personal injury or property damage.
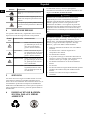
4 RISK LEVELS
The following signal words and meanings are intended to
explain the levels of risk associated with this product.
5
English EN

SYM-
BOL
SIGNAL MEANING
DANGER Indicates an imminently haz-
ardous situation,which, if not
avoided, will result in death
or serious injury.
WARNING Indicates a potentially hazard-
ous situation,which, if not
avoided, could result in death
or serious injury.
CAUTION Indicates a potentially hazard-
ous situation, which, if not
avoided, may result in minor
or moderate injury.
CAUTION (Without Safety Alert Sym-
bol) Indicates a situation that
may result in property dam-
age.
5 SERVICE
Servicing requires extreme care and knowledge and must be
performed only by a qualified service technician. For service
we suggest you return the machine to your nearest
AUTHORIZED SERVICE CENTER for repair. Use only
identical manufacturer’s replacement parts and accessories.
6 ENVIRONMENTALLY SAFE
BATTERY DISPOSAL
The toxic and corrosive materials below are in the batteries
used in this machine: Lithium-Ion, a toxic material.
WARNING
Discard all toxic materials in a specified manner to prevent
contamination of the environment. Before discarding
damaged or worn out Li-ion battery, contact your local
waste disposal agency, or the local Environmental
Protection Agency for information and specific instructions.
Take the batteries to a local recycling and/or disposal center,
certified for lithium-ion disposal.
WARNING
If the battery pack cracks or breaks, with or without leaks,
do not recharge it and do not use. Discard it and replace
with a new battery pack. DO NOT TRY TO REPAIR IT! To
prevent injury and risk of fire, explosion, or electric shock,
and to avoid damage to the environment:
• Cover the terminals of the battery with heavy-duty
adhesive tape.
• DO NOT try to remove or destroy any of the battery
pack components.
• DO NOT try to open the battery pack.
• If a leak develops, the released electrolytes are
corrosive and toxic. DO NOT get the solution in the
eyes or on skin, and do not swallow it.
• DO NOT put these batteries in your regular household
trash.
• DO NOT incinerate.
• DO NOT put them where they will become part of any
waste landfill or municipal solid waste stream.
• Take them to a certified recycling or disposal center.
7 PROPOSITION 65
WARNING
This product contains a chemical known to the state of
California to cause cancer, birth defects or other
reproductive harm. Some dust created by power sanding,
sawing, grinding, drilling, and other construction activities
contains chemicals known to cause cancer, birth defects or
other reproductive harm. Some examples of these chemicals
are:
• Lead from lead-based paints;
• Crystalline silica from bricks and cement and other
masonry products;
• Arsenic and chromium from chemically treated lumber.
Your risk of exposure to these chemicals varies depending
on how often you do this type of work. To reduce your
exposure to these chemicals, work in a well-ventilated area,
and work with approved safety equipment, such as dust
masks that are specially designed to filter out microscopic
particles.
8 INSTALLATION
8.1 UNPACK THE MACHINE
WARNING
Make sure that you correctly assemble the machine before
use.
6
English
EN

WARNING
• If the parts are damaged, do not use the machine.
• If you do not have all the parts, do not operate the
machine.
• If the parts are damaged or missing, speak to the service
center.
1. Open the package.
2. Read the documentation in the box.
3. Remove all the unassembled parts from the box.
4. Remove the machine from the box.
5. Discard the box and package in compliance with local
regulations.
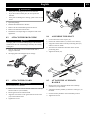
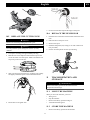
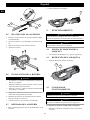
8.2 ATTACH THE EDGE GUIDE
NOTE
The edge guide can limit the cutting range of the machine
and decrease the risk of the damage caused by the rotating
cutting line.
1. Push the edge guide onto the trimmer head until it
engages in the slots.
2. The edge guide can be flipped up for storage.
8.3 ATTACH THE GUARD
WARNING
Do not touch the cut-off blade.
1. Remove the screws from the trimmer head with a Phillips
head screwdriver (not included).
2. Put the guard onto the trimmer head.
3. Align the screw holes on the guard with the screw holes
(12) on the trimmer head.
4. Tighten the screws.
8.4 ASSEMBLE THE SHAFT
1. Loosen the knob on the coupler (11).
2. Push in the release button (13) on the lower shaft (6).
3. Align the release button with the positioning hole (14)
and move the two shafts.
4. Turn the lower shaft until the button locks into the
positioning hole.
5. Tighten the knob (10).
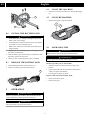
8.5 ATTACH THE AUXILIARY
HANDLE
1. Remove the screws from the handle with a Phillips
screwdriver (not provided).
2. Attach the auxiliary handle (4) and lower clamp (15) on
the shaft.
3. Set the auxiliary handle in the comfortable position.
4. Tighten the screws.
7
English EN

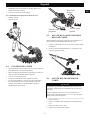
8.6 INSTALL THE BATTERY PACK
WARNING
• If the battery pack or charger is damaged, replace the
battery pack or the charger.
• Stop the machine and wait until the motor stops before
you install or remove the battery pack.
• Read, know, and do the instructions in the battery and
charger manual.
1. Align the lift ribs on the battery pack with the grooves in
the battery compartment.
2. Push the battery pack into the battery compartment until
the battery pack locks into place.
3. When you hear a click, the battery pack is installed.
8.7 REMOVE THE BATTERY PACK
1. Push and hold the battery release button (16).
2. Remove the battery pack from the machine.
9 OPERATION
IMPORTANT
Before you operate the machine, read and understand the
safety regulations and the operation instructions.
WARNING
Be careful when you operate the machine.
9.1 START THE MACHINE
1. Pull back on the lock-out button (3) and pull the trigger
(2).
9.2 STOP THE MACHINE
1. Release the trigger to stop the machine.
9.3 OPERATION TIPS
WARNING
Keep clearance between the body and the machine.
WARNING
Do not operate the machine without guard in place.
Do these tips when you use the machine
• Keep the machine connected to the correctly worn
harness.
• Keep a firm hold with the two hands on the machine
while you operate the machine.
• Cut tall grass from the top down.
If grass winds around the trimmer head:
• Remove the battery pack.
• Remove the grass.
8
English
EN

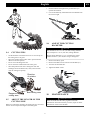
9.4 CUTTING TIPS
• Tilt the machine toward the area to be cut. Use the tip of
the cutting line to cut grass.
• Move the machine from right to left to prevent thrown
debris toward the operator.
• Do not cut in the dangerous area.
• Do not force the trimmer head into uncut grass.
• Wire and picket fences cause cutting line wear and
breakage. Stone and brick walls, curbs, and wood can
wear the cutting line quickly.
'DQJHURXV
FXWWLQJDUHD
%HVWFXWWLQJDUHD
'LUHFWLRQ
RIURWDWLRQ
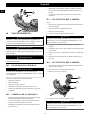
9.5 ADJUST THE LENGTH OF THE
CUTTING LINE
While you operate the machine, the cutting line gets worn and
shorter. You can adjust the length of the cutting line.
1. Hit the trimmer head against the ground while you
operate the machine.
2. Line is automatically released and the cut-off blade cuts
the excess length.
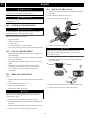
9.6 ADJUST THE CUTTING
DIAMETER
NOTE
The machine is set at a 13 in. (330 mm) cutting diameter.
You can adjust to a 15 in. (381 mm) cutting diameter.
Set the cutting diameter to 13 in. (330 mm) for greater
runtime and 15 in. (381 mm)for a larger cutting area.
1. Remove the battery pack.
2. Remove the blade screws from the cut-off blade (17).
3. Turn the cut-off blade 180°.
4. Tighten the blade screws.
r
10 MAINTENANCE
IMPORTANT
Read and understand the safety regulations and the
maintenance instructions before you clean, repair or do the
maintenance work on the machine.
9
English EN

IMPORTANT
Make sure that all nuts, bolts and screws are tight. Examine
regularly that you install the handles tightly.
IMPORTANT
Use only the replacement parts and accessories of the initial
manufacturer.
10.1 GENERAL INFORMATION
IMPORTANT
Only your dealer or approved service center can do the
maintenance that is not given in this manual.
Before the maintenance operations:
• Stop the machine.
• Remove the battery pack.
• Cool the motor.
• Store the machine in cool and dry place.
• Use correct clothing, protective gloves and safety glasses.
10.2 CLEAN THE MACHINE
• Clean the machine after use with a moist cloth dipped in
neutral detergent.
• Do not use aggressive detergents or solvents to clean the
plastic parts or handles.
• Keep the trimmer head free of grass, leaves, or excessive
grease.
• Keep the air vents clean and free of debris to avoid
overheating and damage to the motor or the battery.
• Do not spray water onto the motor and electrical
components.
10.3 REPLACE THE SPOOL
Figure
1. Push the tabs on the sides of the trimmer head at the same
time.
2. Pull and remove the spool cover.
3. Remove the remaining spool.
4. Put the spool in the spool cover.
NOTE
Make sure that the cutting line is in the slot on the new
spool, and is extended approximately 15 cm before you
install the new spool.
5. Put the ends of the cutting lines through the holes.
6. Extend the cutting line to release it from the guide slot in
the spool.
7. Install the spool and spool cover onto the trimmer head.
8. Push the spool cover until it clicks into position.
10.4 REPLACE THE SPOOL
1. Push the tabs (20) on the sides of the trimmer head at the
same time.
2. Pull and remove the spool cover (18).
3. Remove the remaining spool (19).
4. Put the spool in the spool cover.
NOTE
Make sure that the cutting line is in the slot on the new
spool, and is extended approximately 15 cm before you
install the new spool.
5. Put the ends of the cutting lines through the holes (21).
6. Extend the cutting line to release it from the guide slot
(22) in the spool.
7. Install the spool and spool cover onto the trimmer head.
8. Push the spool cover until it clicks into position.
10
English
EN

10.5 REPLACE THE CUTTING LINE
NOTE
Remove the remaining cutting line on the spool.
NOTE
Use only with the nylon cutting line of 0.08 " (2 mm)
diameter.
1. Cut a piece of cutting line approximately 3m long.
2. Bend the line at the midpoint and hook the loop into the
slot in the center rim of the spool. Make sure that the line
snaps into position in the slot.
3. With your finger between the lines, wind the lines equally
and tightly around the spool in the indicated direction.
4. Put the lines in the guide slots.
5. Do not wind the lines beyond the edge of the spool.
10.6 REPLACE THE BUMP KNOB
1. Push the tabs on the sides of the trimmer head at the same
time.
2. Pull and remove the spool cover.
3. Remove the spool.
4. Hold the bump knob (23) and pry it out with a metal rod
(not provided).
5. Put the new bump knob into the spool housing.
11 TRANSPORTATION AND
STORAGE
WARNING
Remove the battery pack from the machine before
tranportation and storage.
11.1 MOVE THE MACHINE
When you move the machine, you must:
• Wear gloves.
• Stop the machine.
• Remove the battery pack and charge it.
• Assemble the blade guard.
11.2 STORE THE MACHINE
• Remove the battery pack from the machine.
11
English EN

• Make sure that children cannot come near the machine.
• Keep the machine away from corrosive agents such as
garden chemicals and de-icing salts.
• Secure the machine during transportion to prevent
damage or injury. Clean and examine the machine for any
damage.
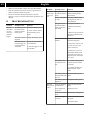
12 TROUBLESHOOTING
Problem Possible Cause Solution
The ma-
chine does
not start
when you
push the
trigger.
No electrical con-
tact between the
machine and the
battery pack.
1. Remove battery pack.
2. Check contact and in-
stall the battery pack
again.
The battery pack is
depleted.
Charge the battery pack.
The lock-out but-
ton and trigger are
not pushed at the
same time.
1. Pull the lock-out but-
ton and hold it.
2. Pull the trigger to start
the machine.
Problem Possible Cause Solution
The ma-
chine stops
when you
cut.
The guard is not
attached to the ma-
chine.
Remove the battery pack
and attach the guard to
the machine.
Heavy cutting line
is used.
Use only with the nylon
cutting line of 0.08 " (2
mm) diameter.
The grass winds
around the motor
shaft or the trim-
mer head.
1. Stop the machine.
2. Remove the battery
pack.
3. Remove the grass from
the motor shaft and trim-
mer head.
The motor is over-
loaded.
1. Remove the trimmer
head from the grass.
2. The motor will recover
to work as soon as the
load is removed.
3. When you cut, move
the trimmer head in and
out of the grass to be cut
and remove no more than
8" in pass.
The battery pack
or machine is too
hot.
1. Cool the battery pack
until its function returns
to normal.
2. Cool the machine for
approximately 10 mi-
nutes.
The battery pack is
disconnected from
the tool.
Install the battery pack
again.
The battery pack is
depleted.
Charge the battery pack.
The line
does not ad-
vance.
Lines are welded
to themselves.
Lubricate with silicone
spray.
Not enough line
on spool.
Install more line.
Lines are worn too
short.
Advance the cutting line.
Lines are tangled
on spool.
1. Remove the lines from
the spool.
2. Wind the lines.
12
English
EN

Problem Possible Cause Solution
The line
keeps
breaking.
The machine is
used incorrectly.
1. Cut with the tip of the
line, avoid stones, walls
and other hard objects.
2. Advance the cutting
line regularly to keep full
cutting width.
The grass
winds
around the
trimmer
head and
motor hous-
ing.
Cut tall grass at
ground level.
1. Cut tall grass from the
top down.
2. Remove no more than
8" in each pass to prevent
wrapping.
The line
does not cut
well.
The cut-off blade
becomes dull.
Sharpen the cut-off blade
with a file or replace it.
Vibration
increases
obviously.
The line is worn
down at one side
and not advanced
in time.
Make sure that the line on
both sides is normal. Ad-
vance the line.
13 TECHNICAL DATA
Type Cordless, battery powered
Motor 40V Brushed
No load speed 6000/5600 ± 10% RPM
RPM
Cutting line diameter 0.08 " (2 mm)
Cutting path diameter 13/15 in. (330/381 mm)
Feed Type Bump Feed
Weight (without battery
pack)
6.6 lbs (3 kg)
Battery model BAF721 and other BAF ser-
ies
Charger model 29482 and other CAF series
The recommended ambient temperature range:
Item Temperature
String trimmer storage tem-
perature range
-4°F (-20°C) - 158°F (70°C)
String trimmer operation
temperature range
6.8°F (-14°C) - 104°F (40°C)
Battery charging temperature
range
39°F (4°C) - 104°F (40°C)
Charger operation tempera-
ture range
39°F (4°C) - 113°F (45°C)
Item Temperature
Battery storage temperature
range
1 year: 32°F (0°C) - 73°F
(23°C)
3 month: 32°F (0°C) - 113°F
(45°C)
1 month: 32°F (0°C) - 140°F
(60°C)
Battery discharging tempera-
ture range
6.8°F (-14°C) - 113°F (45°C)
14 LIMITED WARRANTY
YEAR
AÑOS
LIMITED WARRANTY
GARANTÍA
LIMITADA
3
Greenworks hereby warranties this product, to the original
purchaser with proof of purchase, for a period of three (3)
years against defects in materials, parts or workmanship.
Greenworks, at its own discretion will repair or replace any
and all parts found to be defective, through normal use, free
of charge to the customer. This warranty is valid only for
units which have been used for personal use that have not
been hired or rented for industrial/commercial use, and that
have been maintained in accordance with the instructions in
the owners’ manual supplied with the product from new.
ITEMS NOT COVERED BY WARRANTY:
1. Any part that has become inoperative due to misuse,
commercial use, abuse, neglect, accident, improper
maintenance, or alteration; or
2. The unit, if it has not been operated and/or maintained in
accordance with the owner's manual; or
3. Normal wear, except as noted below;
4. Routine maintenance items such as lubricants, blade
sharpening;
5. Normal deterioration of the exterior finish due to use or
exposure.
HELPLINE:
Warranty service is available by calling our toll-free helpline,
at 1-888-909-6757.
TRANSPORTATION CHARGES:
Transportation charges for the movement of any power
equipment unit or attachment are the responsibility of the
purchaser. It is the purchaser’s responsibility to pay
transportation charges for any part submitted for replacement
13
English EN

under this warranty unless such return is requested in writing
by Greenworks.
USA ADDRESS:
Greenworks Tools
P.O. Box 1238
Mooresville, NC 28115
15 EXPLODED VIEW
No. Part No. Qt
y
Description No. Part No. Qty Description
1 311262460 1 AUXILIARY HANDLE 5 311062493 1 GUARD
2 311032493 1 HANDLE 6 311101429 1 SPOOL
3 311042493 1 SHAFT 7 341031429 1 SPOOL COVER
4 311052493 1 MOTOR HOUSING
14
English
EN

1 Descripción.......................................16
1.1 Finalidad.......................................................... 16
1.2 Descripción general......................................... 16
2 Instrucciones importantes de
seguridad..........................................16
3 Símbolos en la máquina..................17
4 Niveles de riesgo.............................. 18
5 Servicio.............................................18
6 Eliminación de batería segura
para el medio ambiente...................18
7 Propuesta 65.....................................19
8 Instalación........................................19
8.1 Desembalaje de la máquina............................. 19
8.2 Fijación de la guía de borde.............................19
8.3 Fijación de la protección..................................19
8.4 Montaje del tubo .............................................19
8.5 Fijación del asa auxiliar...................................20
8.6 Instalación de la batería................................... 20
8.7 Retirada de la batería....................................... 20
9 Funcionamiento...............................20
9.1 Puesta en marcha de la máquina......................20
9.2 Detención de la máquina................................. 20
9.3 Consejos de funcionamiento............................20
9.4 Consejos de corte.............................................21
9.5 Ajuste de la longitud del hilo de corte.............21
9.6 Ajuste del diámetro de corte............................21
10 Mantenimiento.................................22
10.1 Información general.........................................22
10.2 Limpieza de la máquina...................................22
10.3 Sustitución del carrete..................................... 22
10.4 Sustitución del carrete..................................... 22
10.5 Sustitución del hilo de corte............................ 23
10.6 Sustitución del mando de avance.....................23
11 Transporte y almacenamiento........24
11.1 Traslado de la máquina....................................24
11.2 Almacenamiento de la máquina...................... 24
12 Solución de problemas.................... 24
13 Datos técnicos.................................. 25
14 Garantía limitada............................25
15 PLANO DE DESPIECE................. 26
15
Español
ES

1 DESCRIPCIÓN
1.1 FINALIDAD
Esta máquina se utiliza para cortar hierba, maleza ligera y
otra vegetación similar a nivel del suelo. El plano de corte
debe estar aproximadamente paralelo a la superficie del suelo.
No puede utilizar la máquina para cortar o podar setos,
arbustos, matorrales, flores y compost.
1.2 DESCRIPCIÓN GENERAL
1Empuñadura trasera
2Gatillo
3Botón de desbloqueo
4Empuñadura auxiliar
5Tubo superior
6Tubo inferior
7Guía de bordes
8Cabezal de corte
9Cubierta protectora
10 Perilla
11 Acople
2 INSTRUCCIONES
IMPORTANTES DE
SEGURIDAD
LEA TODAS LAS INSTRUCCIONES ANTES DEL USO
(DE ESTA HERRAMIENTA ELÉCTRICA)
AVISO
Debe leer y entender todas las instrucciones antes de
utilizar este producto. El incumplimiento de las
instrucciones indicadas a continuación puede provocar
descargas eléctricas, incendios o lesiones personales graves.
• Utilice únicamente accesorios y piezas de repuesto
idénticos del fabricante. El uso de cualquier otra pieza
puede generar un riesgo o producir daños en el producto.
• Lleve siempre gafas de seguridad con protectores
laterales marcadas para cumplir la ANSI Z87.1. Las gafas
normales solo tienen lentes resistentes a impactos. NO
son gafas de seguridad. Si sigue esta regla reducirá el
riesgo de lesiones oculares. Utilice máscara facial si
trabaja en espacios de trabajo con polvo.
• Evite los entornos peligrosos – No exponga las
herramientas eléctricas a condiciones de humedad. Si
penetra agua en una herramienta eléctrica, aumentará el
riesgo de descarga eléctrica.
• No utilice bajo la lluvia.
• Mantenga a todos los transeúntes, niños y mascotas al
menos a 15 m.
• Lleve indumentaria adecuada – No lleve ropa o joyas
sueltas. Pueden quedar atrapadas en las piezas móviles.
Se recomienda el uso de guantes de goma y calzado
resistente cuando se trabaje en el exterior. Lleve una
protección capilar para sujetar el cabello largo.
• Utilice el aparato adecuado. No utilice el aparato para
trabajos distintos del previsto.
• Evite la puesta en marcha accidental – No transporte el
aparato con el dedo sobre el interruptor. Asegúrese de que
el interruptor esté desactivado al conectar la batería.
• No fuerce el aparato – Hará el trabajo mejor y con menos
probabilidades de sufrir lesiones a la velocidad para la
que se diseñó.
• No se estire – Mantenga en todo momento una postura
adecuada y el equilibrio.
• Permanezca alerta – Observe lo que está haciendo. Utilice
el sentido común. No utilice esta unidad cuando esté
cansado, enfermo o bajo la influencia de alcohol, drogas
o medicamentos.
• Almacene siempre las herramientas eléctricas inactivas en
interiores – Cuando no estén en uso, las herramientas
eléctricas deben almacenarse en interiores, en un lugar
seco y alto o cerrado, fuera del alcance de los niños.
• Cuide el mantenimiento del aparato – Sustituya el cabezal
de hilo si está agrietado, astillado o dañado de alguna
manera. Asegúrese de que el cabezal de hilo esté
correctamente instalado y bien fijado. Mantenga el filo
afilado y limpio para un mejor rendimiento y para reducir
el riesgo de lesiones. Siga las instrucciones para la
lubricación y el cambio de accesorios. Inspeccione
periódicamente el cable del aparato, y si está dañado,
haga que lo repare un centro de servicio técnico
autorizado. Inspeccione periódicamente los cables
alargadores y sustitúyalos si están dañados. Mantenga las
16
Español
ES

asas secas, limpias y sin restos de aceite y grasa. De no
hacerlo podrían producirse lesiones graves.
• Compruebe las piezas dañadas antes de utilizar el aparato,
una protección u otra pieza dañada debe comprobarse
detenidamente para determinar si funcionará
correctamente y cumplirá su función prevista. Compruebe
la alineación de las piezas móviles, la unión de las partes
móviles, la rotura de piezas, los montajes dañados y
cualquier otra condición que pueda afectar a su
funcionamiento. Una protección u otra pieza que esté
dañada debe ser reparada o sustituida debidamente por un
centro de servicio autorizado, a menos que se indique lo
contrario en este manual.
• Retire o desconecte la batería antes de reparar, limpiar o
retirar material del aparato de jardinería.
• No modifique ni intente reparar el aparato o la batería
(según corresponda), excepto lo indicado en las
instrucciones de uso y cuidado. Utilice los aparatos
únicamente con las baterías designadas específicamente.
El uso de cualquier otra batería puede dar lugar a un
riesgo de lesiones e incendio. Utilice únicamente la
batería Greenworks BAF721 u otra serie BAF.
• Recargue solo con el cargador especificado por el
fabricante. Un cargador adecuado para un tipo de batería
puede dar lugar a un riesgo de incendio cuando se usa con
otra batería. Utilice únicamente el cargador Greenworks
29482 u otra serie CAF.
• Cuando la batería no esté en uso, manténgala alejada de
otros objetos metálicos como clips, monedas, llaves,
clavos, tornillos u otros objetos metálicos pequeños que
puedan hacer una conexión entre los terminales. El
cortocircuito de los terminales de la batería puede
provocar un incendio.
• Bajo condiciones abusivas, es posible que salga líquido
despedido de la batería; evite el contacto. Si se produce
un contacto accidental, aclare con agua. Si el líquido
entra en contacto con los ojos, acuda también al médico.
El líquido despedido de la batería puede provocar
irritación o quemaduras.
• No utilice una batería o un aparato que haya sufrido
daños o modificaciones. Las baterías dañadas o
modificadas pueden exhibir un comportamiento
impredecible que puede dar lugar a un incendio, una
explosión o un riesgo de lesiones.
• No exponga una batería o un aparato al fuego ni a
temperaturas excesivas. La exposición al fuego o a una
temperatura superior a 265 °F (130 °C) puede provocar
una explosión.
• No deseche las baterías en el fuego. Las celdas pueden
explotar. Compruebe los códigos locales para conocer las
posibles instrucciones especiales de eliminación.
• No abra ni desguace las baterías. El electrolito liberado es
corrosivo y puede producir daños a los ojos o la piel.
Puede ser tóxico en caso de ingestión.
• Tenga cuidado al manipular las baterías para no
cortocircuitarlas con materiales conductores como anillos,
pulseras y llaves. La batería o el conductor puede
sobrecalentarse y producir quemaduras.
• Siga todas las instrucciones de carga y no cargue la
batería o el aparato fuera del intervalo de temperatura
especificado en las instrucciones. La carga incorrecta o a
temperaturas fuera del intervalo especificado puede dañar
la batería y aumentar el riesgo de incendio.
• Solicite a un técnico de reparación cualificado que realice
las tareas de servicio utilizando únicamente piezas de
repuesto idénticas. Esto garantizará el mantenimiento de
la seguridad del producto.
• Mantenga las protecciones en su posición y en estado de
funcionamiento.
• Mantenga las manos y los pies alejados de la zona de
corte.
• Desconecte la batería del aparato antes de realizar ajustes,
cambiar accesorios o almacenarlo. Estas medidas de
seguridad preventivas reducen el riesgo de que el aparato
se ponga en marcha accidentalmente.
• Utilice únicamente con el hilo de corte de nylon de 0.08
" (2 mm) de diámetro. No utilice hilos más fuertes de lo
recomendado por el fabricante ni materiales de hilo de
otros tipos – por ejemplo, alambre, cuerda y similar.
CONSERVE ESTAS INSTRUCCIONES
3 SÍMBOLOS EN LA MÁQUINA
En esta máquina pueden utilizarse algunos de los siguientes
símbolos. Le rogamos que los estudie y aprenda sus
definiciones. La interpretación correcta de estos símbolos le
permitirá manejar la herramienta mejor y de manera más
segura.
Símbolo Explicación
V Tensión
A Corriente
Hz Frecuencia (ciclos por segundo)
W Potencia
min Tiempo
/min Revoluciones, carreras, velocidad de su-
perficie, órbitas, etc., por minuto
Corriente continua
Precauciones que afectan a su seguridad.
Debe leer y entender todas las instruc-
ciones antes de manejar la máquina, así
como seguir todas las advertencias e in-
strucciones de seguridad.
Lleve siempre gafas de seguridad con
protectores laterales marcada para cum-
plir la ANSI Z87.1 cuando utilice esta
máquina.
No exponga la máquina a la lluvia o a
condiciones de humedad.
17
Español
ES

Símbolo Explicación
Mantenga a los transeúntes al menos a
15 m.
No instale ni utilice ningún tipo de cu-
chilla en la máquina o que muestre este
símbolo.
Los objetos proyectados pueden rebotar y
provocar lesiones personales o daños ma-
teriales.
4 NIVELES DE RIESGO
Las siguientes indicaciones y significados tienen como fin
explicar los niveles de riesgo asociados a este producto.
SÍMBO-
LO
INDICACIÓN SIGNIFICADO
PELIGRO Indica una situación de peli-
gro inminente que, de no evi-
tarse, provocará lesiones
graves o incluso la muerte.
ADVERTEN-
CIA
Indica una situación de peli-
gro potencial que, de no evita-
rse, podría provocar lesiones
graves o incluso la muerte.
PRECAUCIÓN Indica una situación de peli-
gro potencial que, de no evita-
rse, puede provocar lesiones
leves o moderadas.
PRECAUCIÓN (Sin símbolo de alerta sobre
seguridad) Indica una situa-
ción que puede provocar da-
ños materiales.
5 SERVICIO
Las tareas de servicio exigen un cuidado extremo así como
conocimientos y deben ser realizadas únicamente por un
técnico de servicio cualificado. Para cuestiones de servicio, le
recomendamos que devuelva la máquina al CENTRO DE
SERVICIO AUTORIZADO más cercano para su reparación.
Utilice únicamente accesorios y piezas de repuesto idénticos
del fabricante.
6 ELIMINACIÓN DE BATERÍA
SEGURA PARA EL MEDIO
AMBIENTE
Los materiales tóxicos y corrosivos que figuran a
continuación se encuentran en las baterías utilizadas en esta
máquina: Ion de litio, un material tóxico.
AVISO
Deseche todos los materiales tóxicos de una manera
especificada para evitar la contaminación del medio
ambiente. Antes de desechar una batería de ion de litio
dañada o agotada, contacte con la agencia local de
eliminación de residuos o con la agencia de protección
ambiental local para obtener información e instrucciones
específicas. Lleve las baterías a un centro de reciclaje o
eliminación local, certificado para la eliminación de ion de
litio.
AVISO
Si la batería se agrieta o se rompe, con o sin fugas, no la
recargue ni la utilice. Deséchela y sustitúyala por una
batería nueva. ¡NO INTENTE REPARARLA! Para evitar
lesiones y riesgos de incendio, explosión o descarga
eléctrica, y para evitar daños al medio ambiente:
• Cubra los terminales de la batería con cinta adhesiva
resistente.
• NO intente retirar o destruir ninguno de los
componentes de la batería.
• NO intente abrir la batería.
• Si se produce una fuga, los electrolitos liberados son
corrosivos y tóxicos. NO deje que la solución entre en
contacto con los ojos o la piel, y no la ingiera.
• NO deseche estas baterías con la basura doméstica
normal.
• NO incinere.
• NO lleve las baterías a lugares donde formarán parte de
vertederos de residuos o flujos de residuos sólidos
urbanos.
• Llévelas a un centro de reciclaje o eliminación
certificado.
18
Español
ES

7 PROPUESTA 65
AVISO
Este producto contiene una sustancia química conocida en
el estado de California como causante de cáncer, defectos
de nacimiento u otros daños reproductivos. El polvo
generado por el lijado eléctrico, el serrado, el esmerilado, la
perforación y otras actividades de construcción contiene
sustancias químicas que se sabe que son causantes de
cáncer, defectos de nacimiento u otros daños reproductivos.
Algunos ejemplos de estas sustancias químicas son:
• Plomo de pinturas con base de plomo;
• Sílice cristalina de ladrillos y cemento y otros productos
de albañilería;
• Arsénico y cromo de la madera tratada químicamente.
El riesgo de exposición a estas sustancias químicas varía
según la frecuencia con la que realice este tipo de trabajo.
Para reducir su exposición a estas sustancias químicas,
trabaje en una zona bien ventilada y trabaje con equipos de
seguridad aprobados, como máscaras antipolvo, que estén
especialmente diseñadas para filtrar partículas
microscópicas.
8 INSTALACIÓN
8.1 DESEMBALAJE DE LA MÁQUINA
AVISO
Asegúrese de montar correctamente la máquina antes del
uso.
AVISO
• Si las piezas presentan daños, no utilice la máquina.
• Si no tiene todas las piezas, no utilice la máquina.
• Si faltan piezas o hay piezas dañadas, hable con el
centro de servicio.
1. Abra el embalaje.
2. Lea la documentación que se encuentra en la caja.
3. Retire todas las piezas sin montar de la caja.
4. Retire la máquina de la caja.
5. Deseche la caja y el embalaje de conformidad con los
reglamentos locales.
8.2 FIJACIÓN DE LA GUÍA DE BORDE
NOTA
La guía de borde puede limitar el alcance de corte de la
máquina y disminuir el riesgo de daños debidos al hilo de
corte giratorio.
1. Introduzca la guía de borde en el cabezal de corte hasta
que encaje en las ranuras.
2. La guía de borde puede abatirse para su almacenamiento.
8.3 FIJACIÓN DE LA PROTECCIÓN
AVISO
No toque la cuchilla de corte.
1. Retire los tornillos del cabezal de corte con un
destornillador Phillips (no incluido).
2. Ponga la protección sobre el cabezal de corte.
3. Alinee los orificios de tornillo de la protección con los
orificios de tornillo (12) del cabezal de corte.
4. Apriete los tornillos.
8.4 MONTAJE DEL TUBO
1. Afloje la perilla del acople (11). .
2. Empuje el botón de liberación (13) del tubo inferior (6).
3. Alinee el botón de liberación con el orificio de
posicionamiento (14) y mueva los dos tubos.
4. Gire el tubo inferior hasta que el botón encaje en el
orificio de posicionamiento.
5. Apriete la perilla (10).
19
Español
ES

8.5 FIJACIÓN DEL ASA AUXILIAR
1. Retire los tornillos del asa con un destornillador Phillips
(no suministrado).
2. Fije el asa auxiliar (4) y la abrazadera (15) inferior en el
eje.
3. Sitúe el asa auxiliar en una posición cómoda.
4. Apriete los tornillos.
8.6 INSTALACIÓN DE LA BATERÍA
AVISO
• Si la batería o el cargador ha sufrido daños, sustituya la
batería o el cargador.
• Detenga la máquina y espere hasta que el motor se pare
antes de instalar o retirar la batería.
• Debe leer, conocer y seguir las instrucciones del manual
de la batería y el cargador.
1. Alinee las nervaduras de elevación de la batería con las
ranuras del compartimento de la batería.
2. Introduzca la batería en el compartimento de la batería
hasta que encaje en su posición.
3. Cuando escuche un clic, la batería está instalada.
8.7 RETIRADA DE LA BATERÍA
1. Pulse y mantenga pulsado el botón de desbloqueo (16) de
la batería.
2. Retire la batería de la máquina.
9 FUNCIONAMIENTO
IMPORTANTE
Antes de utilizar la máquina, debe leer y entender las
normas de seguridad y las instrucciones de funcionamiento.
AVISO
Tenga cuidado cuando utilice la máquina.
9.1 PUESTA EN MARCHA DE LA
MÁQUINA
1. Tire del botón de desbloqueo (3) y apriete el gatillo (2).
9.2 DETENCIÓN DE LA MÁQUINA
1. Suelte el gatillo para detener la máquina.
9.3 CONSEJOS DE
FUNCIONAMIENTO
AVISO
Mantenga un espacio entre el cuerpo y la máquina.
AVISO
No utilice la máquina sin la protección en su posición.
Le sugerimos lo siguiente cuando utilice la máquina
• Mantenga la máquina conectada al arnés correctamente
colocado.
20
Español
ES

• Mantenga una posición firme con las dos manos en la
máquina mientras la utiliza.
• Corte la hierba alta de arriba a abajo.
Si se enrolla hierba alrededor del cabezal de corte:
• Retire la batería.
• Quite la hierba.
9.4 CONSEJOS DE CORTE
• Incline la máquina hacia la zona que va a cortar. Utilice la
punta del hilo de corte para cortar hierba.
• Mueva la máquina de derecha a izquierda para evitar que
salgan residuos despedidos hacia el operario.
• No corte en la zona peligrosa.
• No fuerce el cabezal de corte en hierba sin cortar.
• Las cercas de alambres y estacas provocan el desgaste y
la rotura del hilo de corte. Las paredes de piedra y de
ladrillo, los bordillos y la madera pueden desgastar
rápidamente el hilo de corte.
Dirección
de giro
Área de corte
óptima
Área de corte
peligrosa
9.5 AJUSTE DE LA LONGITUD DEL
HILO DE CORTE
Mientras utiliza la máquina, el hilo de corte se desgasta y se
acorta. Puede ajustar la longitud del hilo de corte.
1. Golpee el cabezal de corte contra el suelo mientras utiliza
la máquina.
2. El hilo se libera automáticamente y la cuchilla de corte
corta la longitud sobrante.
9.6 AJUSTE DEL DIÁMETRO DE
CORTE
NOTA
La máquina está ajustada a un diámetro de corte de 13 in.
(330 mm). Puede ajustarla a un diámetro de corte de 15 in.
(381 mm).
Ajuste el diámetro de corte a 13 in. (330 mm) para un
tiempo de funcionamiento mayor y a 15 in. (381 mm) para
una zona de corte más extensa.
1. Retire la batería.
2. Retire los tornillos de la cuchilla de la cuchilla de corte
(17).
3. Gire la cuchilla de corte 180°.
4. Apriete los tornillos de la cuchilla.
21
Español
ES

r
10 MANTENIMIENTO
IMPORTANTE
Debe leer y entender los reglamentos de seguridad y las
instrucciones de mantenimiento antes de limpiar, reparar o
realizar tareas de mantenimiento en la máquina.
IMPORTANTE
Asegúrese de que todas las tuercas, los pernos y los tornillos
estén apretados. Examine periódicamente que las asas estén
bien instaladas.
IMPORTANTE
Utilice únicamente las piezas de repuesto y los accesorios
del fabricante original.
10.1 INFORMACIÓN GENERAL
IMPORTANTE
Únicamente un distribuidor o un centro de servicio
autorizado puede realizar el mantenimiento que no se indica
en este manual.
Antes de las operaciones de mantenimiento:
• Detenga la máquina.
• Retire la batería.
• Deje que se enfríe el motor.
• Almacene la máquina en un lugar fresco y seco.
• Utilice ropa adecuada, guantes protectores y gafas de
seguridad.
10.2 LIMPIEZA DE LA MÁQUINA
• Limpie la máquina después de utilizarla con un paño
húmedo humedecido en detergente neutro.
• No utilice detergentes o disolventes agresivos para
limpiar las piezas de plástico o las asas.
• Mantenga el cabezal de corte libre de hierba, hojas o
grasa excesiva.
• Mantenga los respiraderos limpios y libres de residuos
para evitar el sobrecalentamiento y daños al motor o la
batería.
• No pulverice agua sobre el motor ni los componentes
eléctricos.
10.3 SUSTITUCIÓN DEL CARRETE
Figura
1. Presione las pestañas de los laterales del cabezal de corte
al mismo tiempo.
2. Tire para retirar la cubierta del carrete.
3. Retire el carrete restante.
4. Ponga el carrete en la cubierta del carrete.
NOTA
Asegúrese de que el hilo de corte esté en la ranura sobre el
carrete nuevo y que se extienda aproximadamente 15 cm
antes de instalar el carrete nuevo.
5. Introduzca los extremos de los hilos de corte por los
orificios.
6. Extienda el hilo de corte para soltarlo de la ranura de guía
en el carrete.
7. Instale el carrete y la cubierta del carrete en el cabezal de
corte.
8. Introduzca la cubierta del carrete hasta que encaje en su
posición.
10.4 SUSTITUCIÓN DEL CARRETE
1. Presione las pestañas (20) de los laterales del cabezal de
corte al mismo tiempo.
2. Tire para retirar la cubierta del carrete (18).
3. Retire el carrete (19) restante.
4. Ponga el carrete en la cubierta del carrete.
NOTA
Asegúrese de que el hilo de corte esté en la ranura sobre el
carrete nuevo y que se extienda aproximadamente 15 cm
antes de instalar el carrete nuevo.
22
Español
ES

5. Introduzca los extremos de los hilos de corte por los
orificios (21).
6. Extienda el hilo de corte para soltarlo de la ranura de guía
(22) en el carrete.
7. Instale el carrete y la cubierta del carrete en el cabezal de
corte.
8. Introduzca la cubierta del carrete hasta que encaje en su
posición.
10.5 SUSTITUCIÓN DEL HILO DE
CORTE
NOTA
Retire el hilo de corte restante del carrete.
NOTA
Utilice únicamente con el hilo de corte de nylon de 0.08 " (2
mm) de diámetro.
1. Corte un trozo de hilo de corte de aproximadamente 3m.
2. Doble el hilo en el punto medio y enganche el bucle en la
ranura en el borde central del carrete. Asegúrese de que el
hilo encaje en su posición en la ranura.
3. Con el dedo entre los hilos, enrolle estos por igual y con
fuerza alrededor del carrete en la dirección indicada.
4. Introduzca los hilos en las ranuras de guía.
Ranura
de guía
Ranura
de guía
5. No enrolle los hilos más allá del borde del carrete.
10.6 SUSTITUCIÓN DEL MANDO DE
AVANCE
1. Presione las pestañas de los laterales del cabezal de corte
al mismo tiempo.
2. Tire para retirar la cubierta del carrete.
3. Retire el carrete.
4. Sujete el mando de avance (23) y sáquelo con una varilla
metálica (no incluida).
5. Coloque el nuevo mando de avance en la carcasa del
carrete.
23
Español
ES

11 TRANSPORTE Y
ALMACENAMIENTO
AVISO
Retire la batería de la máquina antes del transporte y el
almacenamiento.
11.1 TRASLADO DE LA MÁQUINA
Cuando mueva la máquina debe:
• Llevar guantes.
• Detener la máquina.
• Retirar la batería y cargarla.
• Montar la protección de la cuchilla.
11.2 ALMACENAMIENTO DE LA
MÁQUINA
• Retire la batería de la máquina.
• Asegúrese de que los niños no puedan acercarse a la
máquina.
• Mantenga la máquina alejada de agentes corrosivos,
como sustancias químicas para jardín y sales para
descongelación.
• Fije la máquina durante el transporte para evitar daños o
lesiones. Limpie y examine si hay daños en la máquina.
12 SOLUCIÓN DE PROBLEMAS
Problema Posible causa Solución
La máquina
no se pone
en marcha
cuando
aprieta el
gatillo.
No hay contacto
eléctrico entre la
máquina y la bate-
ría.
1. Retire la batería.
2. Compruebe el contacto
e instale de nuevo la bate-
ría.
La batería se ha
agotado.
Cargue la batería.
El botón de des-
bloqueo y el gatil-
lo no se presionan
al mismo tiempo.
1. Apriete el botón de
desbloqueo y sujételo.
2. Apriete el gatillo para
poner en marcha la má-
quina.
Problema Posible causa Solución
La máquina
se detiene
cuando cor-
ta.
La protección no
está fijada a la má-
quina.
Retire la batería y fije la
protección a la máquina.
Se utiliza un hilo
de corte pesado.
Utilice únicamente con el
hilo de corte de nylon de
0.08 " (2 mm) de diáme-
tro.
La hierba se enrol-
la alrededor del eje
del motor o del ca-
bezal de corte.
1. Detenga la máquina.
2. Retire la batería.
3. Retire la hierba del eje
del motor y del cabezal
de corte.
El motor se ha so-
brecargado.
1. Retire el cabezal de
corte de la hierba.
2. El motor se recuperará
para funcionar en cuanto
se retire la carga.
3. Cuando corte, mueva
el cabezal de corte hacia
dentro y fuera de la hier-
ba que va a cortar y quite
no más de 8" (20 cm) en
cada pasada.
La batería o la má-
quina está dema-
siado caliente.
1. Deje enfriar la batería
hasta que el funciona-
miento vuelva a la nor-
malidad.
2. Deje enfriar la máqui-
na durante aproximada-
mente 10 minutos.
La batería se ha
desconectado de la
herramienta.
Instale de nuevo la bate-
ría.
La batería se ha
agotado.
Cargue la batería.
El hilo no
avanza.
Los hilos se han
quedado soldados.
Lubrique con espray de
silicona.
No ha suficiente
hilo en el carrete.
Instale más hilo.
Los hilos se desga-
stan y son dema-
siado cortos.
Avance el hilo de corte.
Los hilos están en-
redados en el car-
rete.
1. Retire los hilos del car-
rete.
2. Enrolle los hilos.
24
Español
ES

Problema Posible causa Solución
El hilo se
rompe con-
tinuamente.
La máquina se está
utilizando incor-
rectamente.
1. Corte con la punta del
hilo, evite piedras, par-
edes y otros objetos
duros.
2. Avance el hilo de corte
periódicamente para
mantener el ancho de
corte completo.
La hierba se
enrolla alre-
dedor del
cabezal de
corte y de
la carcasa
del motor.
Corte la hierba alta
al nivel del suelo.
1. Corte la hierba alta de
arriba a abajo.
2. No quite más de 8" (20
cm) en cada pasada para
evitar que se enrolle.
El hilo no
corta bien.
La cuchilla de
corte se ha desafi-
lado.
Afile la cuchilla de corte
con una lima o sustitúya-
la.
Las vibra-
ciones au-
mentan no-
tablemente.
El hilo está gasta-
do en un lado y no
se ha avanzado a
tiempo.
Asegúrese de que el hilo
a ambos lados esté nor-
mal. Avance el hilo.
13 DATOS TÉCNICOS
Tipo Inalámbrico, con funciona-
miento a batería
Motor 40V con escobillas
Velocidad sin carga 6000/5600 ± 10% RPM
RPM
Diámetro de hilo de corte 0.08 " (2 mm)
Diámetro de recorrido de
corte
13/15 in. (330/381 mm)
Tipo de alimentación Avance por sacudida
Peso (sin batería) 6.6 lbs (3 kg)
Modelo de batería BAF721 y otras series BAF
Modelo de cargador 29482 y otras series CAF
El intervalo de temperatura ambiente recomendado:
Elemento Temperatura
Intervalo de temperatura de
almacenamiento del corta-
bordes
-4°F (-20°C) - 158°F (70°C)
Intervalo de temperatura de
funcionamiento del corta-
bordes
6,8°F (-14°C) - 104°F (40°C)
Elemento Temperatura
Intervalo de temperatura de
carga de la batería
39°F (4°C) - 104°F (40°C)
Intervalo de temperatura de
funcionamiento del cargador
39°F (4°C) - 113°F (45°C)
Intervalo de temperatura de
almacenamiento de la batería
1 año: 32°F (0°C) - 73°F
(23°C)
3 mes: 32°F (0°C) - 113°F
(45°C)
1 mes: 32°F (0°C) - 140°F
(60°C)
Intervalo de temperatura de
descarga de la batería
6,8°F (-14°C) - 113°F (45°C)
14 GARANTÍA LIMITADA
YEAR
AÑOS
LIMITED WARRANTY
GARANTÍA
LIMITADA
3
Greenworks Por la presente, se garantiza este producto al
comprador original en posesión de la prueba de compra por
un periodo de tres (3) años contra defectos de material, piezas
o mano de obra. Greenworks, a su propia discreción, reparará
o reemplazará todas y cada una de las piezas que se
encuentren defectuosas, en base a un uso normal, sin costo
alguno para el cliente. Esta garantía es válida para aparatos de
los que se ha realizado un uso personal y no han sido
alquilados para aplicaciones comerciales/industriales, y que
han sido sometidos a un mantenimiento tal y como se indica
en las instrucciones del manual del usuario suministrado con
el producto nuevo.
LO QUE NO CUBRE LA GARANTÍA:
1. Cualquier pieza que no funcione debido al uso incorrecto,
uso comercial, abusivo, negligencia, accidente,
mantenimiento inadecuado, o alteración; o
2. La unidad, si no ha sido utilizada y/o mantenida
siguiendo el manual del propietario; o
3. El desgaste normal, excepto según se indica a
continuación.
4. Piezas que requieren un mantenimiento rutinario como
lubricantes, afilar la cuchilla;
5. El deterioro normal del acabado exterior debido al uso o
exposición.
ASISTENCIA AL USUARIO:
El servicio de garantía está disponible llamando a nuestra
línea de asistencia gratuita al 1-888-909-6757.
25
Español
ES

GASTOS DE TRANSPORTE:
Los gastos de transporte del traslado de cualquier herramienta
eléctrica o accesorio será responsabilidad del comprado. Es
responsabilidad del comprador pagar los gastos de transporte
de cualquier pieza enviada para su reemplazo bajo esta
garantía, salvo que dicha devolución sea solicitada por escrito
por Greenworks.
DIRECCIÓN EN EE.UU.:
Greenworks Tools
P.O. Box 1238
Mooresville, NC 28115
26
Español
ES

3 311042493 1 TUBO 7 341031429 1 CUBIERTA DEL CARRETE
4 311052493 1 CARCASA DEL MOTOR
27
Español
ES
15 PLANO DE DESPIECE
N.° N.° de pieza Cta
d.
Descripción N.° N.° de pieza Cta
d.
Descripción
1 311262460 1 EMPUÑADURA AUXILIAR 5 311062493 1 CUBIERTA PROTECTORA
2 311032493 1 EMPUÑADURA 6 311101429 1 CARRETE

-
 1
1
-
 2
2
-
 3
3
-
 4
4
-
 5
5
-
 6
6
-
 7
7
-
 8
8
-
 9
9
-
 10
10
-
 11
11
-
 12
12
-
 13
13
-
 14
14
-
 15
15
-
 16
16
-
 17
17
-
 18
18
-
 19
19
-
 20
20
-
 21
21
-
 22
22
-
 23
23
-
 24
24
-
 25
25
-
 26
26
-
 27
27
-
 28
28


Greenworks STF310 String Trimmer Manual de usuario
- Categoría
- Podadoras de césped
- Tipo
- Manual de usuario
En otros idiomas
Documentos relacionados
Otros documentos
-
Greenworks Pro ST60L00 Instrucciones de operación
-
-
-
Simplicity 1696956-00 Manual de usuario
-
Craftsman undefined El manual del propietario
-
PowerSmith PGT140 Manual de usuario
-
Worx WG167 Ficha de datos