Electrolux EXM18HV1WE Manual de usuario
- Tipo
- Manual de usuario

EXM18HV1W
EXM24HV1W
SPLIT TYPE ROOM AIR
CONDITIONER
CONDIZIONATORE
SPLIT PER AMBIENTI
ACONDICIONADOR
DE AIRE TIPO SPLIT
SPLIT TIPI ODA KLIMASI
USER MANUAL
MANUALE PER L’UTENTE
MANUAL DE
INSTRUCCIONES
KULLANIM KILAVUZU
2
22
42
62
EN
IT
ES
TR

2
Table of Contents
Congratulations ...................................................................3
Safety Precautions ..............................................................4
Product´s Description ..........................................................6
Indoor Unit Display ..............................................................7
Remote Control ....................................................................7
Remote Control Description ................................................8
Remote Control Display Indicators ......................................9
First Use ..............................................................................10
How to use the Remote Control ...........................................10
How to use the Indoor Unit ..................................................15
Emergency Operation ..........................................................16
Optimal Operation .................................................... ...........16
Cleaning and Maintenance .................................................. 17
Operation Tips .....................................................................19
Troubleshooting ...................................................................20
• Keeptheremotecontrolwhereitssignalcanreachthe
receiveroftheindoorunit.
• Whenoperatetheairconditioner,makesuretheremote
controlispointingtothesignalreceiveroftheindoor
unit.
• Whentheremotecontrolsendsoutasignal,thesymbol
willblinkforabout1secondonthedisplayofthe
remotecontrol.
• Theindoorunitwillacknowledgethesignalwithabeep
whenitreceivesthesignalfromtheremotecontrol.
• Pleasepressthebuttonoftheremotecontroland
resendthesignalifyoudidnothearabeepfromthe
indoorunit.
Important Reminder

3
Congratulations
• The air conditioner is not intended for use by
youngchildrenorinrmedpersonswithout
supervision.
• Young children should be supervised to ensure
that they do not play with the air conditioner.
• Contact an authorised installer for installation
of this air conditioner.
• Contact an authorised service technician for
repair or maintenance of this unit.
• If the power cord is to be replaced,
replacement work shall be performed by
authorised personnel only.
• Installation work must be performed in
accordance with the national wiring Standards
by authorised personnel only.
Congratulations and thank you for choosing
Electrolux split-type air conditioner. We are sure
youwillndyournewairconditionerapleasureto
use.
Before you use the air conditioner, we recommend
that you read through the entire user manual, which
provides the description of the air conditioner and
its functions.
To avoid the risks that are always present when
you use an electrical appliance, it is important that
the air conditioner is installed correctly and that
you read the safety instructions carefully to avoid
misuse and hazards.
We recommend that you keep this instruction
booklet for future reference and pass it on to any
future owners.
After unpacking the air conditioner please check
it is not damaged. If in doubt, do not use the
air conditioner but contact your local Electrolux
authrised service centre.
Conditionsofuse
This appliance is intended to be used in
household and similar applications such as:
• Staffkitchenareasinshops,ofcesandother
working environments.
• Farm houses.
• By clients in hotels, motels, and other
residential type environments.
• Bed and breakfast type environments.
Important notes
Contact an authorised installer for installation of
this unit.
Contact an authorised service technician for
repair or maintenance of this unit.
• The socket outlet required to supply power
must be connected and commissioned by a
licenced contractor.
• This appliance is not intended for use by
children and persons with reduced physical,
sensory or mental capabilities, or lack of
experience and knowledge, unless they
have been given supervision or instruction
concerning use of the appliance by a person
responsible for their safety.
• Young children should be supervised to
ensure that they do not play with the air
conditioner.
• If the power cord is to be replaced,
replacement work shall be performed by
authorised personnel only.
• Installation work must be performed
in accordance with the national wiring
standards and the electricity suppliers service
rules by authorised personnel only.
• If the unit is to be moved to another location
ordisposedof,onlyasuitablyqualied
person is permitted to undertake such work.
• Takecarenottocatchngersonthefan
blade when adjusting vertical louvers.
• This air conditioner uses R410a refrigerant.
Information on disposal for users
• Most of the packing materials are recyclable.
• Please dispose of those materials through
your local recycling depot or by placing them in
appropriate collection containers.
• If you wish to discard this air conditioner, please
contact your local authorities and ask for the
correct method of disposal.
caution
environmental tip

4
If you notice an unusal situation, such
as a burning smell, please switch off
the power to the air conditioner and
contact an Electrolux service agent. If
this abnormal status continues the air
conditioner may be damaged or even
causeelectricshockorre.
Do not operate the air conditioner with
wet hands. This may cause electric
shock.
Do not damage or cut off the power cord
or other wires. If this occurs, please have
it repaired or replaced by an accredited
technician
Do not connect this air conditioner to a
multi outlet powerboard.
Please switch off the power supply to
the air conditioner if it is not to be used
for an extended period. Otherwise, it will
accumulatedustandmaycauseare.
Before cleaning the air conditioner,
please disconnect the power supply in
order to eliminate the possibility of electric
shock.
The power supply should be matched
with the air conditioner according to
the installation manual. Air conditioners
provided with a supply cord should be
connected directly to a power outlet with
a suitable safety switch. Air conditioners
that are hard wired must be connected to
a suitable safety circuit breaker according
to the installation manual.
Please ensure that the power supply to
the air conditioner is stable and meets the
requirements set out in the installation
manual.
Always ensure the product is installed
with appropriate earthing.
For safety, be sure to turn off the
circuit breaker before performing any
maintenance or cleaning or when the
product is not used for an extended
period of time. Accumulated dust may
causereorelectricshock.
Safetyprecautions
Insidethismanualyouwillndmanyhelpfulhints
on how to use and maintain your air conditioner
properly. Just a little preventive care on your part
can save you a great deal of time and money over
thelifeofyourairconditioner.You’llndmany
answers to common problems in the chart of
troubleshooting tips on page 20-21. If you review the
chartoftroubleshootingtipsrst,youmaynotneed
to call for service.
Meanings of symbols used in this manual are shown
below:
This indicates information concerning your personal
safetyand how to avoid damaging the appliance.
This symbol indicates tips and information about use
of the appliance.
This symbol indicates tips and information about
economical and ecological use of the appliance.
This symbol indicates never to do this.
Always do this.
Importantnotes:
1 Do not operate unit with horizontal louvre inclosed
position.
2 Donotoperateunitwithouttheairlter.
caution
warning
environmental tip
tips and information

5
Safetyprecautions
Usage
Exposuretodirectairowfromtheair
conditioner for an extended period of time could
be hazardous to your health.
Do not expose people, pets or plants to the
directairowforanextendedperiod.
Cleaningandmaintenance
1 Whencleaningtheunit,rstmakesurethat
the power and circuit breaker are turned off.
2 Do not touch the metal parts of the unit
whenremovingthelters.Injuriescanoccur
when handling sharp metal edges.
3 Do not use water to clean inside the air
conditioner. Exposure to water may lead to
possible electric shock.
Service
For repair and maintenance, contact your
authorised service dealer.
PriortoOperation
1 Contactaqualiedinstaller.
2 Plug in the power plug properly.
3 Do not use a damaged or non-standard
power cord.
4 Do not share the same outlet with other
appliances.
5 Do not use an extension cord.
6 Do not start/stop operation by plugging /
unplugging the power cord.
caution
Select the most appropriate temperature.
It can save electricity.
Do not keep windows and doors open for
a long time during operation. It will result
ininsufcientperformance.
Do not block the air inlet or outlet.
Itwillresultininsufcientperformance
and cause malfunctions.
Keep combustible materials away from
theunitsatleast1m.Itmaycausere.
Do not step on the top of the outdoor unit
or place heavy things on it.
It may cause damage or injury.
Do not attempt to repair the air
conditioner by yourself. Incorrect repairs
maycauseelectricshockorre.Please
contact your local authorised service
centre.
Do not insert your hands or objects into
the air inlet or outlet. It may cause injury.
Do not expose animals or plants directly
totheairow.
Do not use the unit for any other purpose,
such as preserving food or drying clothes.
Do not splash water on the air
conditioner. It may cause electric shock
or malfunction.

6
1
3
2
5
6
8
10
11
12
14
15
7
4
ProductDescription
Air inlet
IndoorUnit
Air Outlet
OutdoorUnit
Air inlet (rear)
Air inlet
(side)
Air Outlet
The above drawings are for explanation purpose only.
Your air conditioner may be slightly different.
The actual shape shall prevail.
Note:
Front panel
Digital display
Healthyairlter(behindthedustlter)
Pre-dustlter
Horizontal air louvers
Vertical air louvers
Cold plasma generator (if applicable)
Manual control button
Remote control
Remote control holder
Refrigerant pipe (if applicable)
Drain hose (if applicable)
Power cable (if applicable)
Mounting plate
Connecting cable (if applicable)
6
Light
Turbo
Timer-On
Temp
Timer-Off
Swing
I feel
Eco
Fan
Clock
Mode
1
3
2
5
6
8
9
10
11
12
13
14
15
7
4
ProductDescription
Air inlet
IndoorUnit
Air Outlet
OutdoorUnit
Air inlet (rear)
Air inlet
(side)
Air Outlet
The above drawings are for explanation purpose only.
Your air conditioner may be slightly different.
The actual shape shall prevail.
Note:
Front panel
Digital display
Healthyairlter(behindthedustlter)
Pre-dustlter
Horizontal air louvers
Vertical air louvers
Cold plasma generator (if applicable)
Manual control button
Remote control
Remote control holder
Refrigerant pipe (if applicable)
Drain hose (if applicable)
Power cable (if applicable)
Mounting plate
Connecting cable (if applicable)
13

7
RemoteControl
tips and information
• When changing batteries, do not use old or
varied ones, otherwise, it may cause problems
with the remote control.
• If the remote control is not used for a long time,
remove the batteries as old batteries may leak
or corrode and damage the remote control.
• The battery life during normal use is about six
months.
• If the remote control does not operate normally,
pleaseremoveandretthebatteries.If
abnormal operation continues, replace with new
batteries.
8m
• The air conditioner will not operate if curtains,
doors or other materials block the signals from
the remote control to the indoor unit.
• Prevent any liquid from falling into the remote
control. Do not expose the remote control to
direct sunlight or heat.
• If the infrared signal receiver on the indoor
unit is exposed to direct sunlight, the air
conditioner may not function properly. Use
curtains to prevent the sunlight from falling on
the receiver.
• If other electrical appliances react to the
remote control, either move these appliances
or consult your local dealer.
IndoorUnitDisplay
• Keep the remote control where its signal can reach
the receiver of the indoor unit (a maximum distance
of 8m is allowed).
• When you select the timer operation, the remote
control automatically transmits a signal to the
indoorunitatthespeciedtime.
• If you keep the remote control in a position that
hinders proper signal transmission, a time lag of up
to 15 minutes may occur.
• When the remote control sends out a signal, the
symbol
will blink for about 1 second on the
display. The indoor unit will acknowledge the signal
with a beep when it receives an effective signal.
HeatingModeindicator
It lights when the heating function is activated
CoolingModeindicator
It lights when the cooling function is activated
PowerON/OFFindicator
It lights when the appliance is running or at
standby mode
Dehumidifyindicator
Itlightswhenthedehumidicationfunctionis
activated
Temperatureindicator
Displays the temperature setting when the Air
Conditioner is in operation
Signalreceiver
caution
HowtousetheRemoteControl
• Point the remote control to the signal receiver of
indoor unit.
• Make sure there is no obstacle that may interfere
with the signal.
Locationoftheremotecontrol
Batteryinstallation/replacement
• Slide the battery compartment cover off and
insert two new alkaline dry batteries
(2x AAA1.5Volt). Make sure that the polarity of
(+) or (-) is installed correctly.
• Slide the battery compartment cover back on
7
RemoteControl
tips and information
• When changing batteries, do not use old
or varied ones, otherwise, it may cause
problems with the remote control.
• If the remote control is not used for a long
time, remove the batteries as old batteries
may leak or corrode and damage the remote
control.
• The battery life during normal use is about six
months.
• If the remote control does not operate
normally,pleaseremoveandretthe
batteries. If abnormal operation continues,
replace with new batteries.
8m
• Keep the remote control where its signal
can reach the receiver of the indoor unit (a
maximum distance of 8m is allowed).
• When you select the timer operation, the
remote control automatically transmits a signal
totheindoorunitatthespeciedtime.
• The air conditioner will not operate if curtains,
doors or other materials block the signals from
the remote control to the indoor unit.
• Prevent any liquid from falling into the remote
control. Do not expose the remote control to
direct sunlight or heat.
• If the infrared signal receiver on the indoor
unit is exposed to direct sunlight, the air
conditioner may not function properly. Use
curtains to prevent the sunlight from falling on
the receiver.
• If other electrical appliances react to the
remote control, either move these appliances
or consult your local dealer.
IndoorUnitDisplay
Signal
receiver
• If you keep the remote control in a position that
hinders proper signal transmission, a time lag of
up to 15 minutes may occur.
• When the remote control sends out a signal, the
symbol
will blink for about 1 second on the
display. The indoor unit will acknowledge the
signal with a beep when it receives an effective
signal.
IFeelindicator
It lights when I Feel function is activated.
Turboindicator
Illuminates during Turbo operation.
Eco(Economy)indicator
Illuminates when ECO function is in operation.
Temperatureindicator
Displays the temperature settings when the air
conditioner is in operation.
Timerindicator
The indicator illuminates when Timer is set ON
and/or OFF.
Swingindicator
It lights when the Swing function is activated.
caution
HowtousetheRemoteControl
• Point the remote control to the signal receiver of
indoor unit.
• Make sure there is no obstacle that may interfere
with the signal.
Locationoftheremotecontrol
Batteryinstallation/replacement
• Slide the battery compartment cover off and
insert two new alkaline dry batteries
(2x AAA1.5Volt). Make sure that the polarity of
(+) or (-) is installed correctly.
• Slide the battery compartment cover back on
Light
Turbo
Timer-On
Temp
Timer-Off
Swing
I feel
Eco
Fan
Clock
Mode

8
RemoteControlDescription
TurboButton
Press this button in COOL or HEAT mode to put
the fan into the high speed Turbo mode and the air
conditoner will work at maximum power.
Press again to cancel this function.
X-FanButton
InCoolingandDehumidicationmode,pressthe
X-Fan button to active the Self-Cleaning. After
the unit is turned off, the indoor fan will continue
operation for 10 minutes to dry the indoor unit and
prevent bacteria and mildew from growing.
TimerOnButton
Press this button to set the start time.
TimerOffButton
Press this button to set the stop time.
SwingButton:
Press this button, the louver will swing up and
down automatically. Press again to cancel it and
the louver will stay at its last position.
IFeelButton:
Press this button, the remote control will send the
temperature information to the indoor unit every
2 minutes. The unit will operate to reach the set
temperature at the location of remote control.
Presss again to cancel this function.
ControlButton:
Forward Backward
Press the button to increase the temperature
setting.
Press the button to decrease the temperature
setting.
In Timer On/Off or Clock functions, use these
buttons to set the clock or timer adjustment.
ClockButton:
Press this button and the Clock symbol
will
blink. You can press Control buttons
and to
set the time you want.
Temp(Temperature)Button
Press this button to change the remote control
display of the set temperature to the room
temperature.
Eco(Economy)Button
Press this button to start the Eco operation.
This is ideal for the users to use while sleeping.
Press again to cancel the function.
Note:
Under heating mode, press Temp and Clock
buttons to turn on the function of heating the
indoor room temperature to 8°C.
AUTO DEHUMIDIFY FAN COOL HEAT
ON/OFFButton
Press this button to turn the air conditioner
ON or OFF.
ModeButton
By pressing this button, AUTO, DEHUMIDIFY,
FAN, COOL, and HEAT (COOL only model
has no HEAT feature) mode can be selected
progressively.
AUTO mode is default while power on.
Under AUTO mode, the initial value would not be
displayed, and it will run in the desirable Temp.;
Under HEAT mode, the initial value is 28°C;
Under other modes, the initial value is 25°C.
LightButton
Press this button to switch the indicating lights
of the indoor unit ON or OFF.
The normal condition at start up is ON.
FanButton
By pressing this button, Auto, Low, Medium and
High speed can be progressively selected.
When the unit is turned on, Auto fan speed is
the default.
InDEHUMIDIFYmode,thefanspeedisxedat
Low speed.

9
RemoteControlDisplay
Indicator
TransmissionIndicator:
Displays when the remote control transmits
signals to the indoor unit.
TurboDisplay
Displays when Turbo function is selected.
IFeelDisplay
Displays when I Feel function is activated.
EcoDisplay
Displays when Eco function is selected.
HealthyDisplay
Displayed by pressing the Healthy button.
Press the Healthy button again to remove.
NOTE: there is no such indicator for the
models without Cold-Plasma function.
RoomTemperatureDisplay
Displays when the temperature shown on the
LCD screen is room temperature. It can be
switched on/off by pressing the Temp button.
ProgrammedTemperatureDisplay
Lights when the remote control displays the
set temperature. It can be switched on/off by
pressing the Temp button.
TimerOn/OffDisplay
Displays when the Timer On/Off function is
activated.
FanSpeedDisplay
Displays the selected fan speed in the following
sequence:
“
” (Low), “ ” (Medium), “ ” (High) and
Auto.
In Auto speed, only “ ” symbol displays.
SwingDisplay
Displays when the Swing function is selected.
X-FanDisplay
Displays when the X-Fan function is activated by
pressing Turbo and Healthy buttons at the same
time (for models with Cold-plasma function) or by
pressing X-Fan button (for models without Cold-
plasma function)
TemperatureDisplay
Displays the room or set temperature in °C or °F.
No display in Fan mode.
TimeDisplay
Displays the Clock time (must be set) and/or the
on/off time of the timer.
ModeDisplay
Displays the current operation mode, including
Auto (
), Dehumidify ( ), Fan ( ), Cool ( )
and Heat ( ).
NOTE: The Cool model does not offer a Heating
option.

10
FirstUse
AutomaticOperation
HowtoUsetheRemoteControl
WhentheAUTOoperatingmodeis
selected,thefanspeedandtemperature
willbeautomaticallycontrolledandcannot
beset.
Fan
Fan
Cooling
Cooling
Time
Programmed temp.
DehumidifyingOperation
1 Ensure the unit is plugged in and power is
available.
2 Be sure the batteries are inserted correctly in the
remote control (the lights on the remote control
will be on).
3 SetthetimebyControlbuttonsandconrmby
pressing the Clock button.
4 Point the remote control to the indoor unit and
press ON/OFF button to turn the unit on.
The default operating mode is AUTO. Once you
select the operating mode with remote control,
the operating conditions will be saved in the
indoor unit’s microcomputer memory. The next
time the air conditioner will start operating under
the same conditions when you simply push the
ON/OFF button of the remote control.
IftheAUTOmodeisuncomfortable,you
canselectthedesiredconditionsmanually.
When the AUTO mode is selected, the air
conditioner will automatically select COOL, HEAT
(if applicable), or FAN only operation, depending on
the programmed and/or the room temperature.
Start
1 ON/OFF Button
Press this button to turn the air conditioner on.
The temperature indicator on the indoor unit
display lights on.
2 Press the Mode button to select AUTO.
3 The air conditioner starts functioning after approx
3 minutes.
Stop
1 ON/OFF Button
Press this button again to turn the air conditioner
off. The horizontal louver returns back to the
position upon shut down.
The DEHUMIDIFY mode works based on the
difference between the set temperature and the
actual room temperature.
The temperature is regulated while dehumidifying
through repeatedly turning on/off of the COOLING
operation or FAN only operation.
tips and information
DehumidifyingOperation

11
InDEHUMIDIFYmodethefanspeedisxed
at Low, and Turbo function can’t be used.
FanOperation
• No fan speed indication displays on the
remote control if Auto fan speed is selected.
CoolingandHeatingOperation
Start
1 ON/OFF Button
Press this button to turn the air conditioner on.
The temperature indicator on the indoor unit
display lights on.
2 Mode Button
Press to select DEHUMIDIFY.
3 Control Buttons
Set the desired temperature.
Normally, set between 21ºC to 28ºC.
2 Mode Button
Press to select FAN.
3 Fan Button
Press to select the desired fan speed at: Auto,
Low, Medium and High.
The default fan speed is Auto.
Stop
1 ON/OFF Button
Press this button again to turn the air
conditioner off. The horizontal louver returns
back to the position upon shut down.
Stop
1 ON/OFF Button
Press this button again to turn the air
conditioner off. The horizontal louver returns
back to the position upon shut down.
Start
1 ON/OFF Button
Press this button to turn the air conditioner on.
The temperature indicator on the indoor unit
display lights on.
2 Mode Button
Press to select COOL or HEAT (if applicable)
mode.
When you select the FAN operating mode the air
conditioner will just vent the indoor air.
1 ON/OFF Button
Press this button to turn the air conditioner on.
The temperature indicator on the indoor unit
display lights on.
tips and information
tips and information

12
No fan speed indication displays on the
remote control if Auto fan speed is selected.
TimerSettings
• The working time of the timer function set by
the remote control depends on the Clock time.
Check that the Clock on the remote control is
set correctly in order to prevent malfunctioning.
• The effective operation time set by the remote
control is limited in 24 hours.
3 Control Buttons
Set the desired temperature.
Normally, set between 21ºC to 28ºC.
4 Fan Button
Press to select the desired fan speed at: Auto,
Low, Medium and High.
The defaul fan speed is Auto.
3 Pointtheremotecontroltotheindoorunit,conrm
the set time by pressing the Timer-On button.
symbol will stay on the remote control’s display.
Check that the Timer indicator on the display panel
of indoor unit is illuminated.
CancelingtheSettings
Point the remote control to the indoor unit and press
again the Timer-On button. Make sure the symbol
on the remote control is turned off.
TimerOffOperation
1 Press the Timer-Off button,
willashonthedisplayoftheremote
controlincaseoftherstuseofTimer-Off
operation.Otherwise,thelastsettimewillash.
2 Set the desired time by pressing the Control
buttons: Forward Backward
Each time you press the buttons, the time will
moves forward or backward by 1 minute.
Holding the button down will scroll more rapidly
through the time display.
3 Pointtheremotecontroltotheindoorunit,conrm
the set time by pressing the Timer-Off button.
symbol will stay on the remote control’s display.
Check that the Timer indicator on the display panel
of indoor unit is illuminated.
CancelingtheSettings
Point the remote control to the indoor unit and press
again the Timer-Off button. Make sure the symbol
on the remote control is turned off.
Stop
1 ON/OFF Button
Press this button again to turn the air
conditioner off. The horizontal louver returns
back to the position upon shut down.
TimerOnOperation
1 Press the Timer-On button,
willashonthedisplayoftheremote
controlincaseoftherstuseofTimer-On
operation. Otherwise, the last set time will
ash.
2 Set the desired time by pressing the Control
buttons:
Forward Backward
Each time you press the buttons, the time will
moves forward or backward by 1 minute.
Holding the button down will scroll more
rapidly through the time display.
ExamplesofTimerSettings
TimerOnOperation(TimerStartOperation)
This function is recommended when you want the
unit to be turned on automatically before returning
home. The air conditioner will automatically start
operating at the set time.
Example: It is 8:00 AM and you want the air
conditioner to start working at 6:00 PM.
tips and information
tips and information

13
1 Press the Timer-On button.
2 Set the desired time by pressing repeatedly or
holding down the Control buttons until 18:00
shows in the display of the remote control.
3 Conrmthesettimebypointingtheremote
control to the indoor unit and pressing again
the Timer-On button.
symbol will stay on the remote control’s
display.
The Timer indicator on the display panel of
indoor unit is illuminated.
TimerOffOperation(TimerStopOperation)
This function is recommended when you want
the unit to be turned off automatically for bed
time.
The air conditioner will automatically stop
operating at the set time.
Example: It is 6:00 PM and you want the Air
Conditioner to turn off at 11:55 PM.
1 Press the Timer-Off button.
2 Set the desired time by pressing repeatedly or
holding down the Control buttons until 23:55
shows in the display of the remote control.
3 Conrmthesettimebypointingtheremote
control to the indoor unit and pressing again
the Timer-Off button.
symbol will stay on the remote control’s
display.
The Timer indicator on the display panel of
indoor unit is illuminated.
CombinedTimer
TimerOn TimerOff
(Off-Start-Stop operation)
This function is recommended when you want to
turn the air conditioner on before waking up and
turn it off after leaving the house.
Example: It is 10:00 PM and you want to start
the air conditioner at 6:30 AM and stop it at
9:30 AM.
1 Press the Timer On button.
2 Set the desired time by pressing repeatedly or
holding down the Control buttons until 06:30
shows in the display of the remote control.
3 Conrmthesettimebypointingtheremote
control to the indoor unit and pressing again the
Timer-On button.
4 Press the Timer-Off button.
5 Set the desired time by pressing repeatedly or
holding down the Control buttons until 09:30
shows in the display of the remote control.
6 6Conrmthesettimebypointingtheremote
control to the indoor unit and pressing again the
Timer-Off button.
symbol is displayed on the remote control and
the function is activated.
TimerOff TimerOn
(On-Stop-Start operation)
This function is recommended when you want to
turn the air conditioner off after going to bed and
start it again before waking up in the morning or
returning back home.
Example:It is 8:00 AM and you want to stop the
air conditioner at 9:30AM and restart at 6:00PM
1 Press the Timer-Off button.
2 Set the desired time by pressing repeatedly or
holding down the Control buttons until 09:30
shows in the display of the remote control.
3 Conrmthesettimebypointingtheremote
control to the indoor unit and pressing again the
Timer-Off button.
4 Press the Timer-On button.
5 Set the desired time by pressing repeatedly or
holding down the Control buttons until 18:00
shows in the display of the remote control.
6 Conrmthesettimebypointingtheremote
control to the indoor unit and pressing again the
Timer-On button.
symbol is displayed on the remote control and
the function is activated.

14
• The clock timer uses a 24 hour clock mode.
• The default time for remote control is
12:00PM and it will revert to this when the
batteries are changed.
Economy(Eco)Operation
IFeelOperation
SettingtheClock
1
Set
Temperature
1
1hour
1hour
Cooling
Set
Temperature
1
1
1hour 1hour
Press Eco button in COOL or HEAT (if applicable)
mode, the air conditioner will automatically increase
(in COOL mode) or decrease (in HEAT mode) 1 °C per
hour over a 2 hour period. The set temperature will be
steady for the next 5 hours then the unit will stop.
This function permits more comfort and saves energy.
This operation is recommended for bed time.
Before you start operating the air conditioner,
set the clock of the remote control using the
procedure given in this section. The clock panel
on the remote control will display the time
regardless of whether the air conditioner is in
operation or not.
After batteries are inserted in the remote control,
willdisplayandbegintoash.
1 Control Buttons
Press the Control buttons to set the desired
time.
Forward Backward
Each time you press the buttons the time will
moves forward or backward by 1 minute.
Holding the button down will scroll more rapidly
through the time display.
2 Clock Button
When the desired time is achieved, press the
Clock button again or after 5 seconds with no
operation,theclocktimestopsashingandthe
clock is set.
3 Re-set the Clock
Press the Clock button and the clock display
willstarttoash.
Follow step 1 and 2 to set the new time.
Heating
The remote control works as a remote thermostat,
providing an accurate temperature control and
maximum comfort.
Point the remote control to the indoor unit and press I
Feelbutton,abeepfromtheindoorunitistoconrm
that this function is activated.
The I Feel symbol will stay on the display of the
remote control until I Feel button is pressed again.
The air conditioner will operate to reach the set
temperature at the location of the remote control.
The remote control sends the temperature information
at its location to the indoor unit every 10 minutes.
The air conditioner will quit I Feel operation if no
temperature information is received from the remote
control for successive 11 minutes.
tips and information

15
HowtoUsetheIndoorUnit
AdditionalOptions
AirowDirectionControl
Range
Upanddownairow
Vertical
louver
• The Swing button will be disabled when the
air conditioner is not in operation (even if the
Timer On is set).
• Do not operate the air conditioner for long
timewiththeairowdirectionsetdownward
in COOL or DEHUMIDIFY mode. Otherwise,
condensate may occur on the surface of the
horizontallouveranddropontotheooror
furnishings.
• When the louver moves to the desired direction,
press the Swing button again and the louver will
stay at where it is.
• Press the Swing button again and the louver will
start swing up and down automatically.
1 SmartRestartFunction
The air conditioner resumes automatically with
the previous settings after a possible power
failure.
2 SelfDiagnoseandAutoProtection
This air conditioner can detect the malfunctions,
showing the diagnosis on the display of the
indoor unit by means of an error code.
The air conditioner will change operation
automatically for self-protection.
Toadjustthehorizontal(left/right)airow
directionmanually
• Adjust the vertical louvers manually by means of
the Left/Right lever of the vertical louver arm.
• Perform these adjustments before you start the
unit because once it has been started, there is a
riskofyourngersgettingcaughtonthefan.
• Adjusttheairowdirectionproperly,otherwise,
it might cause discomfort or uneven room
temperatures.
• Adjust the horizontal louvers with the remote
control.
• Adjust the vertical louvers manually.
Range
Left/andrightairow
Tosetthevertical(up/down)airowdirection
automatically
• Perform this function while the unit is in
operation.
• Press the Swing button on the remote control,
the horizontal louver will swing up and down
automatically.
caution

16
• Do not move the horizontal louver
manually. Always use the Swing button.
Moving the louver manually may
cause malfunction during operation.
If the louver malfunctions, stop the air
conditioner and restart it.
• Open angle of the horizontal louver
should not be set too small, as cooling
or heating performance may be impaired
duetotoorestrictedairowarea.
• Do not operate the air conditioner with
horizontal louver in closed position.
• When the air conditioner is connected to
power (initial operation), the horizontal
louver may generate a sound for
10 seconds, this is a normal operation.
EmergencyOperation
Manualcontrol
button
Manualcontrolbutton
OperatingTemperature
OptimalOperation
• Press the Manual Control button again to turn the
air conditioner off.
The operation mode is seen in the following table.
If the air conditioner is used outside of the above
conditions, certain safety protection features may
come into operation and cause the unit to function
abnormally.
When the remote control is lost or fails to operate,
please use the manual switch on the indoor unit.
The air conditioner will operate in AUTO mode and
the temperature setting or fan speed can not be
changed.
To achieve optimal performance, please note:
• Adjusttheairowdirectioncorrectlysothatitis
not directed on people.
• Adjust the temperature to achieve the highest
comfort level. Do not adjust the unit to excessive
temperature levels.
• Close doors and windows in the operation
of COOL or HEAT mode, otherwise, product
performance will be impaired.
• Use the Timer On and Timer Off buttons on the
remote control to select the desired time for
startup and shut-down.
• Do not place any object close to the air inlets
oroutlets,astheproductefciencymaybe
reduced and the air conditioner may stop
running.
• Cleantheairltersfrequently,otherwisecooling
or heating performance may be reduced.
• Press the Manual Control button to enter
AUTO mode. The air conditioner will select the
mode of COOL, HEAT (heat pump model only)
and FAN automatically according to the room
temperature for reaching the best comfort.
Mode Model Temperature setting Airow
AUTO COOLING 25°C (COOL, FAN) AUTO
AUTO HEAT PUMP 25°C (COOL, FAN) AUTO
AUTO HEAT PUMP 20°C (HEAT) AUTO
Operating temperature ranges
Indoor Side
DB (°C)
Outdoor Side
DB (°C)
Maximum Cooling 32 43
Maximum Heating 27 24

17
CleaningandMaintenance
Maintenance
IndoorUnitandRemote
ControlCleaning
CleaningtheFilters
Panel
bracket
Dustlterhandle
The following maintenance operations must be performed regularly.
*
Theoperationmustbeperformedbyqualiedpersonnelonly.
• Stop the air conditioner and disconnect the
power supply before cleaning.
• Use a dry cloth to wipe the indoor unit and
remote control.
• A cloth dampened with cold water may be used
on the indoor unit if it is too dirty.
• The front panel of the indoor unit cant be
removed and cleaned with water. Then wipe
with a dry cloth.
• Do not use brushes, emery paper or burnishes
to clean the unit because it may cause
damages.
• Do not use a chemically treated cloth or duster
to clean the unit.
• Do not use benzine, thinner, polishing powder
or similar solvents for cleaning. These may
cause the plastic surface to crack or deform.
• Never use warm water over 40 C to clean
the front panel, it may cause deformation or
discoloration.
1 Lift the indoor unit front panel up to an angle until
it stops with a full support from the bracket.
2 Holdthedustlterhandleandliftitupslightlyto
takeitoutfromthelterholder.
Note: Supply power must be disconnected before
cleaning.
Acloggeddustlterreducesthecooling/heating
efciencyofthisunit.Pleasecleanthelterevery
month or more often if necessary.
3 Thenpullthedustlterdownwardsoutofthe
indoor unit.
warning
Items
Maintenance
operations
Recommended frequency
Dustlter Clean Every month or more often if necessary
Healthyairlters Replace/clean Every 3 months or more often if necessary
Unit casing Clean Every month or more often if necessary
Water tray and
evacuation piping
Clean and check for
obstructions
Each season before start up*
Indoor and outdoor
coils
Clean Each season before start up*

18
General maintenance
Dustlter
Donottouchortrytocleanthecold
plasmagenerator(ifapplicable).It
maycauseanelectricshock.
• Do not touch the metal parts of the unit when
removingthelter.Injuriescanoccurwhen
handling sharp metal edges.
• Do not use water to clean inside the air
conditioner. Exposure to water can destroy
the insulation, leading to possible electric
shock.
• Whencleaningtheunit,rstmakesurethat
the power and circuit breaker are turned off.
Dustlter
Healthylter
CleantheDustlterwithavacuumcleaneror
water, then dry it up in cool place.
If the air conditioner is not going to be used for a
long period of time:
• Operate in FAN only mode for 3~4 hours to allow
the unit to completely dry out.
• Switch off the unit and pull out the power plug.
Remove the batteries from the remote control.
• The outdoor unit requires periodic maintenance
and cleaning. Do not attempt to do this yourself.
Contact your dealer or service technician.
Checksbeforeoperation
• Check that the wiring is not broken or
disconnected
• Checkthatthedustlterisinstalled.
• Check if the air outlet or inlet is blocked if the air
conditioner has not been used for a long time.
4 Thehealthyairfresheninglters(ifapplicable)
likeActivecarbonlter/BIOlter/VitaminClter
/Silverionlterarexedonthedustlter.
Removethehealthyltersfromthesupportframe
ofthedustlter.
Cleanthehealthyltersatleasteverythree(3)
months and replace every 6 months.
Clean with vacuum cleaner if possible.
5 Installthehealthyairfresheningltersback
in position.
6 Installtheupperportionofdustltersback
into the unit, taking care that the left and right
edgeslineupcorrectlyandplacedustlters
into position.
warning
warning

19
OperationTips
environment that has a high relative humidity.
• A white mist may generate due to moisture
generated from defrosting process when the air
conditioner restarts in HEAT mode operation after
defrosting.
4.Lownoiseoftheairconditioner
• You may hear a low hissing sound when the
compressor is running or has just stop running.
Thisisthesoundoftherefrigerantowingor
coming to a stop.
• You also may hear a low “squeak” sound when
the compressor is running or just stopped
running. This is caused by heat expansion and
cold contraction of the plastic parts in the unit
when the temperature is changing.
• A noise may be heard due to louver restoring to
its original position when power is furst turned on.
5.Dustisblownoutfromtheindoorunit
This is a normal condition when the air conditioner
hasnotbeenusedforalongtimeorduringrstuse
of the unit.
6.Apeculiarsmellcomesoutfromtheindoorunit
This is caused by the indoor unit giving off smells
permeated from building material, furniture or
smoke.
7.TheairconditionerturnestoFANonlymode
fromCOOLorHEATmode
When the indoor temperature reaches the setting
value, the compressor will stop automatically, and
the air conditioner turns to FAN mode.
The compressor will start again when the indoor
temperature rises in COOL mode or falls in HEAT
mode to the set point.
8.Condensation
Condensate water is likely to form at the air outlet
if cooling or drying for a long time when the relative
humidity is more than 80% (with doors and windows
open).
Set the vertical louver to its maximum angle (to
theoor)andHighfanspeed.Closethedoorsand
windows.
9.Lighting or a car wireless telephone operating
nearby may cause the unit to malfunction.
Disconnect the unit with power and then re-connect
the unit with power again. Push ON/OFF button on
the remote control to restart operation.
10.X-Fanfunction
The indoor unit may keep running after you switch
off the unit by pressing ON/OFF button.
Please check whether the X-Fan function is
switched off.
The following events may occur during normal
operation:
1.Protectionoftheairconditioner.
• Compressorprotection
The compressor can’t restart for 3 minutes
after it stops
• Anti-freezing
If the unit is operating in COOL mode and
in low ambient temperature, frost may be
formed on the heat exchanger. When indoor
heat exchanger temperature decreases below
0 °C, the compressor will stop operation to
protect the unit.
• Defrosting
Frost may form on the outdoor unit in heating
operation when the outdoor temperature
is low but humidity is high, resulting in low
heatingefciency.
During this condition the air conditioner will
stop heating operation and start defrosting
automatically. The time to defrost may vary
from 3 to 12 minutes.
During defrosting, the fan motors of indoor
unit and outdoor unit will stop, the indoor
indicatorashes“H1”andtheoutdoorunit
may emit vapor. This is not malfunction. After
defrostingisnished,theheatingoperation
will recover automatically.
• Anti-coldair
In HEAT mode, the indoor fan will not operate
in order to prevent cold air being blown into
the room (within 2 minutes), if the indoor
heat exchanger does not reach a minimum
temperature under the following states:
(1) Heating operation just start.
(2)Afterautodefrostingisjustnished.
(3) Heating at low temperature.
2.Gentlebreeze
The indoor unit may blow gentle breeze and the
louver rotate to a certain position in the following
situation:
(1) In HEAT mode, the unit is turned on, the
compressor does not reach the starting
condition.
(2) In HEAT mode, the temperature reaches the
set value and the compressor stops running
for about 1 minute.
3.Awhitemistcomingoutfromtheindoorunit
• A white mist may generate due to a large
temperature difference between air inlet
and air outlet in COOL mode in an indoor

20
TroubleShooting
• If error code (except H1) appears on the
display of indoor unit.
• Powerindicatororotherindicatorashrapidly
andthisashingcannotbestoppedby
disconnecting the power and then connecting
it again.
• Fuse blows frequently or circuit breaker often
trips.
• Water or other liquid is splashed into the unit.
• Water is leaking from the unit.
• There is a harsh sound during operation.
• Strong odours are emmited during operation.
• Power cord and power plug are overheating.
• Other abnormal situations.
Theairconditionerisnotuserserviceable.Incorrectrepairmaycauseelectricshockorre.
Please contact an authorised service center for professional repair.
If one of the following situations occur, immediately stop the air conditioner,
disconnect the power, and contact the authorised service center.
The pressure in the refrigeration system is low and could result in the unit breaking down.
Askacertiedinstallertocontrolit.
warning
Malfunctions Cause What should be done
The unit does not
start
Power cut Wait for power to be restored.
The unit may have become unplugged. Check that plug is securely in wall
receptacle.
Fuse may have blown. Replace the fuse.
Voltage is too high or too low. Test the voltage by professionals.
Batteries in remote control may have
been exhausted.
Replace the batteries.
The time you have set with timer is
incorrect.
Wait or cancel timer setting.
The unit does not
cool or heat (if
applicable) the room
very well while air
owsoutfromtheair
conditioner
Inappropriate temperature setting. Set the temperature correctly.
For details please refer to “Using
Remote Control” section
Airlterisblocked. Cleantheairlter.
Doors or windows are open. Close the doors or windows.
Air inlet or outlet of indoor or outdoor
unit has been blocked.
Cleartheobstructionsawayrst,
then restart the unit.
Compressor 3 minutes protection has
been activated.
Wait for 3 minutes.
If the trouble has not been corrected, please contact a local dealer or the nearest customer service
center. Be sure to inform them of the detailed malfunctions and unit model.

21
The following checks prior to contact may save you time and money.
Malfunctions Cause
Water leakage
of indoor unit
•The humidity is high.
•Condensingwateroverows.
•Drain hose is loose or
obstructed.
Water leakage
of outdoor unit
•During cooling operation, water
condensates around the pipes
and connection joints.
•During defrosting operation,
thawedwaterowsout.
•During heating operation, water
on the heat exchanger drips out.
Noise from
indoor unit
•The noise emmited when the fan
or compressor relay is switched
on or off.
•When the defrosting operation
is started or stopped, there is a
soundofrefrigerantowingin
the reverse direction.
Indoor unit can
not blow air
•In HEAT mode, when the
temperature of indoor heat
exchangerisverylow,airowis
stopped in order to prevent cold
air. (within 2 minutes)
•In HEAT mode, when the
outdoor temperature is low or
humidity is high, frost will be
formed on the outdoor heat
exchanger. The unit will defrost
automatically and indoor unit
will stop blowing air for several
mintues.
•During defrosting operation,
water or vapour may be
emmited.
•In DEHUMIDIFY mode, the
indoor fan will stop blowing air
for 3-12 minutes in order to
avoid condensing water being
vaporised again.
Moisture on air
outlet
If the unit operates at high
humidity for a long time, moisture
may be generated on air outlet
grill and then drip off.
H1 error code:
defrosting
It is normal. The unit is in
defrosting operation and heating
will recommence soon.
Malfunctions Cause
The unit does
not operate
The unit does not operate if it is
turned on immediately after it is
turned off. This is to protect the
unit. Please wait about 3 minutes.
Odours are
emitted
•Some odours may be emmited
from the indoor unit. This is the
result of room smells (such as
furniture, tobacco, etc.) which
have been taken into the unit.
•Consult authorised service
center for cleaning if the odours
persist.
“Waterowing”
noise
The swishing noise like water
owingistherefrigerantowing
inside the unit.
Mist is
emmited in
COOL mode
During cooling operation, a thin
mist may be seen emmited from
the indoor unit due to high room
temperature and humidity.
After a period of time, the mist
will disappear as the decrease of
room temperature and humidity.
Cracking noise
This is the sound of friction
caused by expansion and/or
contraction of panel or other
parts due to the change of
temperature.
The unit can
not be started
up
•Is the power cut off?
•Is the power plug loose?
(if applicable)
•Is the circuit protection device
tripped off?
•Is voltage higher or lower?
(tested by professionals)
•Is the TIMER correctly used?
•Are the batteries exhausted?
Cooling
/Heating effect
is poor
•Is the temperature setting
appropriate?
•Is the air inlet/outlet blocked?
•Isthelterdirty?
•Is the door or window open?
•Is low fan speed set?
•Are there heat sources in the
room?
Do not dispose this product as unsorted municipal waste.
Collection of such waste separately for special treatment
is necessary.
21
The following checks prior to contact may save you time and money.
Malfunctions Cause
Water leakage
of indoor unit
•The humidity is high.
•Condensingwateroverows.
•Drain hose is loose or
obstructed.
Water leakage
of outdoor unit
•During cooling operation, water
condensates around the pipes
and connection joints.
•During defrosting operation,
thawedwaterowsout.
•During heating operation, water
on the heat exchanger drips out.
Noise from
indoor unit
•The noise emmited when the fan
or compressor relay is switched
on or off.
•When the defrosting operation
is started or stopped, there is a
soundofrefrigerantowingin
the reverse direction.
Indoor unit can
not blow air
•In HEAT mode, when the
temperature of indoor heat
exchangerisverylow,airowis
stopped in order to prevent cold
air. (within 2 minutes)
•In HEAT mode, when the
outdoor temperature is low or
humidity is high, frost will be
formed on the outdoor heat
exchanger. The unit will defrost
automatically and indoor unit will
stop blowing air for 2-3 mintues.
•During defrosting operation,
water or vapour may be
emmited.
•In DEHUMIDIFY mode, the
indoor fan will stop blowing air
for 3-12 minutes in order to
avoid condensing water being
vaporised again.
Moisture on air
outlet
If the unit operates at high
humidity for a long time, moisture
may be generated on air outlet
grill and then drip off.
H1 error code:
defrosting
It is normal. The unit is in
defrosting operation and heating
will recommence soon.
Malfunctions Cause
The unit does
not operate
The unit does not operate if it is
turned on immediately after it is
turned off. This is to protect the
unit. Please wait about 3 minutes.
Odours are
emitted
•Some odours may be emmited
from the indoor unit. This is the
result of room smells (such as
furniture, tobacco, etc.) which
have been taken into the unit.
•Consult authorised service
center for cleaning if the odours
persist.
“Waterowing”
noise
The swishing noise like water
owingistherefrigerantowing
inside the unit.
Mist is
emmited in
COOL mode
During cooling operation, a thin
mist may be seen emmited from
the indoor unit due to high room
temperature and humidity.
After a period of time, the mist
will disappear as the decrease of
room temperature and humidity.
Cracking noise
This is the sound of friction
caused by expansion and/or
contraction of panel or other
parts due to the change of
temperature.
The unit can
not be started
up
•Is the power cut off?
•Is the power plug loose?
(if applicable)
•Is the circuit protection device
tripped off?
•Is voltage higher or lower?
(tested by professionals)
•Is the TIMER correctly used?
•Are the batteries exhausted?
Cooling
/Heating effect
is poor
•Is the temperature setting
appropriate?
•Is the air inlet/outlet blocked?
•Isthelterdirty?
•Is the door or window open?
•Is low fan speed set?
•Are there heat sources in the
room?
Do not dispose this product as unsorted municipal waste.
Collection of such waste separately for special treatment
is necessary.

22
Indice
Congratulazioni ....................................................................23
Norme di sicurezza .............................................................. 24
Descrizione del prodotto ...................................................... 26
Display unità interna ............................................................27
Telecomando ........................................................................27
Descrizione del telecomando ..............................................28
Indicatori del display del telecomando .................................29
Primo utilizzo .......................................................................30
Come usare il telecomando .................................................. 30
Come usare l'unità interna ................................................... 35
Funzionamento di emergenza .............................................36
Funzionamento ottimale .................................................... ..36
Pulizia e manutenzione .......................................................37
Suggerimenti per il funzionamento ......................................39
Risoluzione dei problemi .....................................................40
• Tenereiltelecomandoinunpuntodacuiilsegnale
possaraggiungereilricevitoredell'unitàinterna.
• Quandosiusailcondizionatore,vericarecheil
telecomandostiapuntandoalricevitoredisegnale
dell'unitàinterna.
• Quandoiltelecomandolanciaunsegnale,ilsimbolo
lampeggiapercirca1secondosuldisplaydel
telecomando.
• L'unitàinternariconosceràilsegnaleconunbipquando
riceveilsegnaledaltelecomando.
• Premereiltastodeltelecomandoeinviarenuovamenteil
segnalenelcasoincuinonsisiasentitoilbipdall'unità
interna.
Promemoria importante

23
Congratulazioni
• Il condizionatore non deve essere utilizzato
da bambini o da persone inferme senza la
supervisione di una persona responsabile.
• È consigliabile controllare che i bambini non
giochino con il condizionatore.
• Contattare un installatore autorizzato per
installare questo condizionatore.
• Contattare un tecnico autorizzato per riparare
o eseguire la manutenzione di questa
apparecchiatura.
• Se il cavo di alimentazione è danneggiato,
può essere sostituito solo dal personale
autorizzato.
• I lavori di installazione possono essere eseguiti
conformemente agli standard nazionali vigenti
dal personale autorizzato.
Complimenti e grazie per aver scelto un
condizionatore split Electrolux. È un condizionatore
di qualità studiato per un uso pratico e semplice.
Prima di iniziare a usare il condizionatore, leggere
attentamente il libretto di istruzioni, contenente
la descrizione dell’apparecchiatura e delle sue
funzioni.
Come per tutte le apparecchiature elettriche, è
importante eseguire l’installazione correttamente
e leggere attentamente le avvertenze per la
sicurezza, per evitare usi impropri e condizioni di
pericolo.
Conservare questo manuale di istruzioni per
riferimenti futuri e consegnarlo al nuovo proprietario
in caso di cessione dell’apparecchiatura.
Dopo avere estratto il condizionatore
dall’imballaggio, controllare che non sia
danneggiato. In caso di dubbi, non utilizzare il
condizionatore e contattare un centro assistenza
autorizzato Electrolux.
Condizionid'uso
L'apparecchiatura è destinata all'uso domestico e
applicazioni simili, tra cui:
• Cucinedinegozi,ufciealtriambientidi
lavoro.
• Fattorie.
• Clienti di hotel, motel e altri ambienti
residenziali.
• Nei bed and breakfast.
Note importanti
Contattare un installatore autorizzato per
installare questa apparecchiatura.
Contattare un tecnico autorizzato per riparare
o eseguire la manutenzione di questa
apparecchiatura.
• La presa di corrente deve essere collegata
da un ente autorizzato.
• Questa apparecchiatura non è destinata
all'uso da parte di bambini o adulti con
limitatecapacitàsiche,sensorialiomentali
o con scarsa esperienza o conoscenza
sull'uso dell'apparecchiatura stessa, a meno
che non siano sorvegliati o istruiti da una
persona responsabile della loro sicurezza.
• È consigliabile controllare che i bambini non
giochino con il condizionatore.
• Se il cavo di alimentazione è danneggiato,
può essere sostituito solo dal personale
autorizzato.
• I lavori di installazione possono essere
eseguiti conformemente agli standard
nazionali vigenti e alle regole dei fornitori
di corrente elettrica esclusivamente da
personale autorizzato.
• Prima di spostare l’unità in un altro luogo o
smaltirla, contattare il personale autorizzato.
• Prestare attenzione a non incastrare le dita
nella ventola durante la regolazione dei
deettoriverticali.
• Questo condizionatore può utilizzare gas
refrigeranti R410a.
Informazioni sullo smaltimento
• La maggior parte dei materiali di imballaggio
è riciclabile.
• Consegnare questi materiali al centro di
smaltimento e riciclaggio più vicino o usare
i contenitori di raccolta appropriati.
• Al termine della durata utile del condizionatore,
rivolgersiall’ufciodicompetenzalocaleper
informazioni sul metodo di smaltimento corretto.
attenzione
protezione dell’ambiente

24
Nel caso in cui si riscontri una situazione
anomala, ad esempio odore di
bruciato, scollegare l'alimentazione al
condizionatore e contattare un agente
di servizio Electrolux. Nel caso in cui
questo stato anomalo si protragga,
il condizionatore potrebbe essere
danneggiato o produrre scosse elettriche
o fuoco.
Non utilizzare il condizionatore con le
mani bagnate. Può essere causa di
scosse elettriche.
Non danneggiare o tagliare il cavo di
alimentazione o altri cavi. Nel caso in cui
ciòsiverichi,chiederelariparazioneo
la sostituzione dello stesso da parte di un
tecnico accreditato
Non collegare questo condizionatore a
una ciabatta di corrente.
Scollegare l'alimentazione al
condizionatore nel caso in cui si preveda
di non usarlo a lungo. In caso contrario
l'apparecchiatura accumulerà sporco e
potrebbe provocare un incendio.
Prima di pulire il condizionatore,
scollegarel'alimentazionealne
di eliminare la possibilità di scosse
elettriche.
L'alimentazione dovrebbe corrispondere
a quella del condizionatore, come
da manuale di installazione. I
condizionatori forniti con un cavo di
alimentazione dovrebbero essere
collegati direttamente a una presa di
corrente con un interruttore di sicurezza
adatto. I condizionatori cablati devono
essere collegati a un interruttore di
sicurezza adeguato come da manuale di
installazione.
Vericarechel'alimentazioneal
condizionatoresiastabileesoddis
i requisiti delineati nel manuale di
installazione.
Vericaresemprecheilprodotto
disponga di una messa a terra adeguata.
Per motivi di sicurezza invitiamo a
spegnere l'interruttore del circuito
prima di eseguire eventuali interventi
di manutenzione o pulizia o quando
si prevede di non usare il prodotto a
lungo. La polvere accumulata potrebbe
provocare incendi o scosse elettriche.
Normedisicurezza
All’interno del manuale sono riportati molti consigli
utili per il corretto utilizzo e la manutenzione del
condizionatore. Con pochi accorgimenti preventivi
è possibile risparmiare tempo e denaro per l’intera
durata del condizionatore. Troverete molte risposte
a problemi comuni nella tabella dei suggerimenti
per la risoluzione dei problemi di pagina 80 - 81.
Analizzando prima questa tabella, potrebbe non
essere necessario richiedere l'intervento di un
tecnico.
Altri simboli usati in questo libretto:
Suggerimenti e informazioni legate alla sicurezza
personale e alle modalità per evitare di danneggiare
l'apparecchiatura.
Questo simbolo indica la disponibilità di
suggerimenti e informazioni sull’utilizzo
dell'apparecchiatura.
Questo simbolo indica la disponibilità di
suggerimenti e informazioni sull’utilizzo economico
ed ecologico dell'apparecchiatura.
Questo simbolo indica le operazioni da evitare.
Cosa fare.
Noteimportanti:
1 Nonazionarel’unitàconideettoriorizzontali
nella posizione chiusa.
2 Nonazionarel’unitàsenzailltroperl'aria.
attenzione
avvertenza
protezione dell’ambiente
suggerimenti e informazioni

25
Normedisicurezza
Uso
Esporsialussodirettodalcondizionatorea
lungo potrebbe provocare rischi per la salute.
Non esporre persone, animali od oggetti al
ussodirettoalungo.
Puliziaemanutenzione
1 Quando si pulisce l’apparecchiatura,
vericarechel’alimentazioneeildisgiuntore
siano scollegati.
2 Quandosiestraeilltrodell’aria,non
toccare le parti metalliche dell’unità.
Attenzione a non ferirsi toccando le
partimetallicheaflate.
3 Non pulire la parte interna del
condizionatore con acqua. L'esposizione
all'acqua potrebbe portare a scosse
elettriche.
AssistenzaTecnica
Per le operazioni di riparazione e manutenzione
rivolgersi a un centro di assistenza autorizzato.
Primadell'uso
1 Rivolgersiauninstallatorequalicato.
2 Inserire correttamente la spina nella
presa.
3 Non utilizzare un cavo di alimentazione
danneggiato o non idoneo.
4 Non utilizzare prese multiple.
5 Non utilizzare una prolunga.
6 Non accendere/spegnere
l’apparecchiatura inserendo/estraendo
la spina dalla presa di corrente.
attenzione
Selezionare la temperatura più adeguata.
Ciò consente di risparmiare elettricità.
Nontenerenestreeporteapertealungo
in fase di funzionamento. Le prestazioni
non risulterebbero soddisfacenti.
Non bloccare l'ingresso o l'uscita dell'aria.
Le prestazioni non risulterebbero
soddisfacenti con anomalie di
funzionamento.
Tenere i materiali combustibili lontani
dalle unità di almeno 1 m. Potrebbe
provocare incendi.
Non salire sopra all'unità esterna e non
appoggiare oggetti pesanti sulla stessa.
Ciò potrebbe provocare danni o lesioni.
Non cercare di riparare il condizionatore
da soli. Una riparazione sbagliata
può essere causa di scosse elettriche
o incendio. Contattare il centro di
assistenza locale autorizzato.
Non inserire mani od oggetti all'interno
dell'entrata o dell'uscita dell'aria.
Potrebbe provocare lesioni.
Non esporre animali o piante
direttamentealussod'aria.
Non usare l'unità per altri scopi, ad
esempio conservare alimenti o asciugare
indumenti.
Non spruzzare acqua sul condizionatore.
Ciò può causare scosse elettriche o
anomalie di funzionamento.

26
6
Light
Turbo
Timer-On
Temp
Timer-Off
Swing
I feel
Eco
Fan
Clock
Mode
1
3
2
5
6
8
9
10
11
12
13
14
15
7
4
ProductDescription
Air inlet
IndoorUnit
Air Outlet
OutdoorUnit
Air inlet (rear)
Air inlet
(side)
Air Outlet
The above drawings are for explanation purpose only.
Your air conditioner may be slightly different.
The actual shape shall prevail.
Note:
Front panel
Digital display
Healthyairlter(behindthedustlter)
Pre-dustlter
Horizontal air louvers
Vertical air louvers
Cold plasma generator (if applicable)
Manual control button
Remote control
Remote control holder
Refrigerant pipe (if applicable)
Drain hose (if applicable)
Power cable (if applicable)
Mounting plate
Connecting cable (if applicable)
13
1
3
2
5
6
8
10
11
12
14
15
7
4
Descrizionedelprodotto
Entrata aria
Unitàinterna
Uscita aria
Unitàesterna
Entrata aria (posteriore)
Entrata aria
(laterale)
Uscita aria
I disegni precedenti hanno unicamente uno scopo esemplicativo.
Il vostro condizionatore potrebbe essere leggermente diverso.
Sarà la forma del condizionatore che si possiede ad avere la priorità.
Nota:
Pannello anteriore
Display digitale
Filtroariasana(dietroalltrodellapolvere)
Filtro pre-polvere
Deettoridell'ariaorizzontali
Deettoridell'ariaverticali
Generatore di plasma freddo (se disponibile)
Tasto controllo manuale
Telecomando
Supporto telecomando
Tubo del refrigerante (se disponibile)
Tuboessibilediscarico(sedisponibile)
Cavo di alimentazione (se disponibile)
Piastradissaggio
Cavo di collegamento (se disponibile)

27
Telecomando
suggerimenti e informazioni
• In fase di sostituzione delle batterie, non
usarne di vecchie e non mescolare batterie
di tipo diverso. Ciò potrebbe provocare dei
problemi di funzionamento al telecomando.
• Nel caso in cui il telecomando non venga
usato a lungo, estrarre le batterie, dato
che quelle vecchie potrebbero perdere o
corrodersi danneggiando il telecomando.
• La normale durata delle batterie con impiego
normale è di circa sei mesi.
• Nel caso in cui il telecomando non funzioni
normalmente, estrarre e inserire nuovamente
le batterie. Nel caso in cui il comportamento
anomalo continui, sostituire con batterie
nuove.
8m
• Mantenere il telecomando a una distanza tale
da potere raggiungere il ricevitore sull’unità
interna (distanza massima 8 m).
• Se si seleziona il funzionamento con il timer,
il telecomando trasmette automaticamente
all'unitàinternailsegnaleall’oraspecicata.
• Il condizionatore non funziona se tende, porte
o altri oggetti ostruiscono la ricezione dei
segnali del telecomando da parte dell’unità
interna.
• Evitare di versare liquidi sul telecomando. Non
esporre il telecomando alla luce diretta del sole
o a fonti di calore.
• Se il ricevitore dei segnali infrarossi sull’unità
interna è esposto alla luce diretta del
sole, il condizionatore può non funzionare
correttamente. Usare delle tende per evitare
che la luce solare diretta colpisca il ricevitore.
• Se altre apparecchiature elettriche rispondono
al telecomando, spostarle oppure consultare il
rivenditore locale.
Displayunitàinterna
• Se si tiene il telecomando in una posizione che
impedisce la corretta trasmissione del segnale,
possono passare anche 15 minuti prima che il
segnale sia ricevuto.
• Quando il telecomando lancia un segnale, il
simbolo
lampeggia per circa 1 secondo sul
display. L'unità interna conferma la ricezione del
segnale con un bip quando riceve un segnale.
attenzione
Comeusareiltelecomando
• Puntare il telecomando sul ricevitore del segnale
dell'unità interna.
• Vericarechenonvisianoostacoliche
potrebbero interferire col segnale.
Posizionedeltelecomando
Installazione/sostituzionedellabatteria
• Togliere il coperchio dell'alloggiamento delle
batterie e inserire due nuove batterie alcaline
secche(2xAAA1,5volt).Vericarechela
polarità (+) o (-) sia stata rispettata.
• Riposizionare il coperchio
IndicatoreModalitàRiscaldamento
Si accende quando è attivata la funzione
riscaldamento
IndicatoreModalitàRaffreddamento
Si accende quando è attivata la funzione
raffreddamento
IndicatoreAlimentazioneON/OFF
Si accende quando l’apparecchiatura è in
funzione o in modalità standby
IndicatoreDeumidicazione
Si accende quando è attivata la funzione
deumidicazione
Indicatoredellatemperatura
Visualizza la temperatura impostata quando il
condizionatore è in funzione
Ricevitoredisegnale
7
RemoteControl
tips and information
• When changing batteries, do not use old
or varied ones, otherwise, it may cause
problems with the remote control.
• If the remote control is not used for a long
time, remove the batteries as old batteries
may leak or corrode and damage the remote
control.
• The battery life during normal use is about six
months.
• If the remote control does not operate
normally,pleaseremoveandretthe
batteries. If abnormal operation continues,
replace with new batteries.
8m
• Keep the remote control where its signal
can reach the receiver of the indoor unit (a
maximum distance of 8m is allowed).
• When you select the timer operation, the
remote control automatically transmits a signal
totheindoorunitatthespeciedtime.
• The air conditioner will not operate if curtains,
doors or other materials block the signals from
the remote control to the indoor unit.
• Prevent any liquid from falling into the remote
control. Do not expose the remote control to
direct sunlight or heat.
• If the infrared signal receiver on the indoor
unit is exposed to direct sunlight, the air
conditioner may not function properly. Use
curtains to prevent the sunlight from falling on
the receiver.
• If other electrical appliances react to the
remote control, either move these appliances
or consult your local dealer.
IndoorUnitDisplay
Signal
receiver
• If you keep the remote control in a position that
hinders proper signal transmission, a time lag of
up to 15 minutes may occur.
• When the remote control sends out a signal, the
symbol
will blink for about 1 second on the
display. The indoor unit will acknowledge the
signal with a beep when it receives an effective
signal.
IFeelindicator
It lights when I Feel function is activated.
Turboindicator
Illuminates during Turbo operation.
Eco(Economy)indicator
Illuminates when ECO function is in operation.
Temperatureindicator
Displays the temperature settings when the air
conditioner is in operation.
Timerindicator
The indicator illuminates when Timer is set ON
and/or OFF.
Swingindicator
It lights when the Swing function is activated.
caution
HowtousetheRemoteControl
• Point the remote control to the signal receiver of
indoor unit.
• Make sure there is no obstacle that may interfere
with the signal.
Locationoftheremotecontrol
Batteryinstallation/replacement
• Slide the battery compartment cover off and
insert two new alkaline dry batteries
(2x AAA1.5Volt). Make sure that the polarity of
(+) or (-) is installed correctly.
• Slide the battery compartment cover back on
Light
Turbo
Timer-On
Temp
Timer-Off
Swing
I feel
Eco
Fan
Clock
Mode

28
Descrizionedeltelecomando
TastoTurbo
Premere questo tasto in modalità COOL o HEAT per
mettere la ventola in modalità Turbo ad alta velocità e il
condizionatore funzionerà alla potenza massima.
Premere nuovamente per annullare questa funzione.
TastodellaventolaX(X-Fan)
InmodalitàRaffreddamentoeDeumidicazione,premere
il tasto X-Fan per attivare la pulizia automatica. Dopo aver
spento l’apparecchiatura, la ventola interna continuerà a
funzionare per 10 minuti per asciugare l’unità interna ed
impedire la proliferazione di batteri e muffe.
Tastodiavvioconiltimer(TimerOn)
Premere questo tasto per impostare l’orario di
accensione.
Tastodiarrestoconiltimer(TimerOff)
Premere questo tasto per impostare l’orario di
spegnimento.
Tastodirotazione(Swing):
Premendo questo tasto, l’aletta verrà inclinata e
sollevata automaticamente. Premere di nuovo per
annullare il comando: l’aletta manterrà l’ultima
posizione assunta.
Tastotemperaturapercepita(IFeel):
Premendo questo tasto, il telecomando invierà le
informazioni sulla temperatura all’unità interna ogni
10 minuti. L’unità funzionerà per raggiungere la
temperatura impostata rispetto alla posizione del
telecomando. Premere di nuovo per annullare questa
funzione.
Tastodicontrollo(Control):
Avanti Indietro
Premere questo tasto
per aumentare la temperatura
impostata.
Premere questo tasto
per ridurre la temperatura
impostata.
Nelle funzioni On/Off o Clock, utilizzare questi tasti per
impostare l’orologio o il timer.
Tastodell’orologio(Clock):
Premendo questo tasto, il simbolo dell’orologio inizierà
a
lampeggia. Premere il tasto Control e per
impostare l’orario desiderato.
Tastodellatemperatura(Temp)
Premere questo tasto per sostituire il contenuto
visualizzato dall’unità interna relativo alla temperatura
impostata con la temperatura ambiente.
TastoEco(Economy)
Premere questo tasto per attivare la modalità di
Risparmio di energia. Questa funzione è perfetta per
utilizzare la temperatura quando si dorme.
Premere di nuovo per annullare questa funzione.
Nota
In modalità riscaldamento, premere i tasti Temp e
Orologio per attivare la funzione di riscaldamento della
temperatura interna a 8°C.
AUTO DEUMIDIFICAZIONE VENTOLA RAFFRESCAMENTO RISCALDAMENTO
TastoON/OFF
Premere questo tasto per ACCENDERE o
SPEGNERE il condizionatore.
Tastomodalità
Premendo questo tasto sarà possibile scegliere,
in sequenza, una delle seguenti modalità:
AUTO, DEHUMIDIFY, FAN, COOL, e HEAT
(solo il modello COOL non ha la funzione
HEAT).
La modalità AUTO viene impostata in
automatico all'accensione dell'apparecchiatura.
Nella modalità AUTOMATICA, il valore iniziale
non verrà visualizzato e l’apparecchiatura
funzionerà secondo la temperatura desiderata.
In modalità HEAT, il valore iniziale è 28°C;
Nelle altre modalità il valore iniziale è 25°C.
TastoLuce
Premere questo tasto per accendere le spie
che indicano se l'unità interna è su ON od OFF.
La condizione normale, l'avvio, è ON.
TastoFAN
Premendo questo tasto, sarà possibile
selezionare, in successione, la velocità Auto,
Basso, Medio e Alto.
Quando l'unità viene accesa, la velocità della
ventolaautoèimpostatainmodopredenito.
In modalità DEHUMIDIFY, la velocità della
ventola è impostata a bassa velocità.
7LPHU2Q
7LPHU2II
6ZLQJ
,)HHO
(FR
)DQ
/LJKW
7XUER
;)DQ
7HPS
&ORFN
0RGH

29
Indicatoredeldisplaydel
telecomando
Indicatoreditrasmissione:
Visualizza quando il telecomando trasmette
segnali verso l'unità interna.
DisplayTurbo
Compare quando è selezionata la funzione
Turbo.
DisplayIFeel
Si accende quando è attivata la funzione I
Feel.
DisplayEco
Compare quando è selezionata la funzione
Eco.
DisplayHealthy
Viene visualizzata quando si preme il tasto
Healthy. Premere nuovamente il tasto
Healthy per toglierla.
N.B. questo indicatore non è previsto nei
modelli senza funzione Plasma Freddo.
DisplayTemperaturadellastanza
Visualizza quando la temperatura indicata
sullo schermo LCD è la temperatura della
stanza. Può essere accesa/spenta premendo
il tasto Temp.
DisplayTemperaturaProgrammata
Si accende quando il telecomando visualizza
la temperatura impostata. Può essere
accesa/spenta premendo il tasto Temp.
Displaytimeracceso/spento
Visualizza quando la funzione Timer On/Off è
attivata.
Displaydellavelocitàdellaventola
Visualizza la velocità della ventola selezionata
nella seguente sequenza:
“
” (Low - Bassa), “ ” (Medium - Media), “
” (High - Alta) e Auto.
In velocità Auto, compare solo il simbolo " ".
Displayoscillazione
Visualizza quando viene selezionata la funzione
Swing (Oscillazione).
DisplayX-Fan
Visualizza quando è attivata la funzione X-Fan
premendo contemporaneamente i tasti Turbo
e Healthy (per i modelli con funzione Plasma
Freddo) oppure premendo il tasto X-Fan (per i
modelli senza funzione Plasma Freddo).
Displaydellatemperatura
Visualizza la temperatura della stanza o la
temperatura impostata in °C o °F.
Nessuna visualizzazione in modalità Fan.
Displayora
Visualizza l'ora dell'orologio (deve essere
impostata) e/o l'ora on/off del timer.
Displaymodalità
Visualizza la modalità operativa corrente,
compresa Auto (
), Dehumidify ( ), Fan ( ),
Cool ( ) e Heat ( ).
N.B. Il modello Cool non offre l'opzione
Riscaldamento.

30
Primoutilizzo
Funzionamentoautomatico
Comeusareiltelecomando
QuandosiimpostalamodalitàAUTO,la
velocitàdellaventolaelatemperatura
verrannocontrollateautomaticamente
enonpotrannoessereimpostate.
Ventola
Ventola
Raffreddamento
Raffreddamento
Tempo
Temp. programmata
Funzionamentodideumidicazione
1 Vericarechelaspinadell’unitàsiainseritae
che vi sia corrente.
2 Vericarechelebatteriesianostateinserite
correttamente nel telecomando (le spie sul
telecomando sono accese).
3 Impostare l'ora con i tasti di Controllo e
confermare premendo il tasto Clock.
4 Puntare il telecomando verso l'unità interna e
premere il tasto ON/OFF per accendere l'unità.
Lamodalitàdifunzionamentopredenitaè
AUTO. Dopo avere selezionato la modalità
operativa col telecomando, le condizioni di
funzionamento sono memorizzate nella memoria
del microcomputer dell’unità interna. Pertanto
il condizionatore incomincia a funzionare alle
stesse condizioni semplicemente premendo il
tasto ON/OFF sul telecomando.
SenonsigradiscelamodalitàAUTO,
selezionaremanualmentelecondizioni
desiderate.
Quando viene selezionata la modalità AUTO,
il condizionatore imposta automaticamente il
funzionamento COOL, HEAT (ove presente), o solo
FAN, a seconda della temperatura programmata e/o
della temperatura ambiente.
Inizio
1 Tasto ON/OFF
Premere questo tasto per accendere il
condizionatore.
L'indicatore della temperatura sul display
dell'unità interna si accende.
2 Premere il tasto Modalità per selezionare AUTO.
3 Il condizionatore inizia a funzionare dopo circa
3 minuti.
Arresto
1 Tasto ON/OFF
Premere nuovamente questo tasto per spegnere
ilcondizionatore.Ildeettoreorizzontaletorna
alla posizione di spegnimento.
La modalità DEHUMIDIFY funziona sulla base
della differenza fra la temperatura impostata e la
temperatura reale della stanza.
La temperatura viene regolata durante la
deumidicazionemediantesuccessivaattivazione/
disattivazione della funzione COOLING o solo
FAN.
suggerimenti e informazioni
Funzionamentodi
deumidicazione

31
In modalità DEHUMIDIFY la velocità della
ventola è impostata su Low (Bassa), e non è
possibile usare la funzione Turbo.
Funzionamentodellaventola
• Nessuna indicazione della velocità della
ventola compare sul telecomando se la
velocità della ventola è impostata su Auto.
Funzionediraffreddamento
eriscaldamento
Inizio
1 Tasto ON/OFF
Premere questo tasto per accendere il
condizionatore.
L'indicatore della temperatura sul display
dell'unità interna si accende.
2 Tasto Modalità
Premere e selezionare DEHUMIDIFY.
3 Tasti di controllo
Impostare la temperatura desiderata.
Di norma, impostare fra 21°C e 28°C.
2 Tasto Modalità
Premere e selezionare FAN.
3 Tasto FAN
Premere per selezionare la velocità della
ventola desiderata: Auto, Bassa, Media e Alta.
LavelocitàpredenitadellaventolaèAuto.
Arresto
1 Tasto ON/OFF
Premere nuovamente questo tasto per
spegnereilcondizionatore.Ildeettore
orizzontale torna alla posizione di
spegnimento.
Arresto
1 Tasto ON/OFF
Premere nuovamente questo tasto per
spegnereilcondizionatore.Ildeettore
orizzontale torna alla posizione di
spegnimento.
Inizio
1 Tasto ON/OFF
Premere questo tasto per accendere il
condizionatore.
L'indicatore della temperatura sul display
dell'unità interna si accende.
2 Tasto Modalità
Premere per selezionare la modalità COOL o
HEAT (ove presente).
Quando viene selezionata la modalità di
funzionamento FAN il condizionatore muove
semplicemente l'aria interna.
1 Tasto ON/OFF
Premere questo tasto per accendere il
condizionatore.
L'indicatore della temperatura sul display
dell'unità interna si accende.
suggerimenti e informazioni
suggerimenti e informazioni

32
Nessuna indicazione della velocità della
ventola compare sul telecomando se la
velocità della ventola è impostata su Auto.
Impostazionetimer
• L'orario di funzionamento della funzione timer
impostato dal telecomando dipende dall'ora
dell'Orologio.Vericarechel'Orologiosul
telecomando sia impostato correttamente per
evitare malfunzionamenti.
• L’orario effettivo di funzionamento impostato
mediante il telecomando è limitato a 24 ore.
3 Tasti di controllo
Impostare la temperatura desiderata.
Di norma, impostare fra 21°C e 28°C.
4 Tasto FAN
Premere per selezionare la velocità della
ventola desiderata: Auto, Bassa, Media e Alta.
LavelocitàpredenitadellaventolaèAuto.
3 Puntare il telecomando all'unità interna, confermare
l'ora impostata premendo il tasto Timer-On.
resterà presente sul display del telecomando.
Vericarechel'indicatoredeltimersulpannellodel
display dell'unità interna sia illuminato.
Annullamentodelleimpostazioni
Puntare il telecomando all'unità interna e premere
nuovamente il tasto Timer-On. Accertarsi che il
simbolo
sul telecomando sia spento.
FunzionamentoTimerOff
1 Premere il tasto Timer-Off,
lampeggia sul display del telecomando
nel caso in cui si tratti del primo uso della funzione
Timer-Off. In caso contrario, lampeggerà l'ultimo
orario impostato.
2 Impostare l'orario desiderato premendo i tasti di
controllo: Avanti Indietro
Ogni volta che vengono premuti questi tasti, l'ora si
sposta avanti o indietro di 1 minuto.
Tenendo premuto il tasto ci si sposterà più
rapidamente all'interno della visualizzazione
dell'ora.
3 Puntare il telecomando all'unità interna, confermare
l'ora impostata premendo il tasto Timer-Off.
resterà presente sul display del telecomando.
Vericarechel'indicatoredeltimersulpannellodel
display dell'unità interna sia illuminato.
Annullamentodelleimpostazioni
Puntare il telecomando verso l'unità interna e premere
nuovamente il tasto Timer-Off. Accertarsi che il
simbolo
sul telecomando sia spento.
Arresto
1 Tasto ON/OFF
Premere nuovamente questo tasto per
spegnereilcondizionatore.Ildeettore
orizzontale torna alla posizione di
spegnimento.
FunzionamentoTimerOn
1 Premere il tasto Timer-On,
lampeggia sul display del
telecomando nel caso in cui si tratti del
primo uso della funzione Timer-On. In
caso contrario, lampeggerà l'ultimo orario
impostato.
2 Impostare l'orario desiderato premendo i tasti
di controllo:
Avanti Indietro
Ogni volta che vengono premuti questi tasti,
l'ora si sposta avanti o indietro di 1 minuto.
Tenendo premuto il tasto ci si sposterà più
rapidamente all'interno della visualizzazione
dell'ora.
Esempiodiimpostazionedeltimer
FunzionamentoTimerOn(Funzionamento
TimerStart)
Questa funzione è consigliata quando si vuole
che l'unità venga accesa in automatico prima
di tornare a casa. Il condizionatore si accende
automaticamente all’ora impostata.
Esempio: Sono le 8 di mattina e si vuole che il
condizionatore inizi a funzionare alle ore 18:00.
suggerimenti e informazioni
suggerimenti e informazioni

33
1 Premere il tasto Timer-On.
2 Impostare l'ora desiderata premendo
ripetutamente o tenendo premuti i tasti di
controllonoachesuldisplaydeltelecomando
non compare 18:00.
3 Confermare l'ora impostata puntando il
telecomando verso l'unità interna e premendo
nuovamente il tasto Timer-On.
resterà presente sul display del telecomando.
L'indicatore del timer sul pannello del display
dell'unità interna è illuminato.
FunzionamentoTimerOff(Funzionamento
TimerStop)
Questa funzione è consigliata quando si vuole che
l'unità venga spenta in automatico prima di andare
a letto.
Il condizionatore si ferma automaticamente all’ora
impostata.
Esempio: Sono le 18 e si vuole che il
condizionatore si spenga alle 23:55.
1 Premere il tasto Timer-Off.
2 Impostare l'ora desiderata premendo
ripetutamente o tenendo premuti i tasti di
controllonoachesuldisplaydeltelecomando
non compare 23:55.
3 Confermare l'ora impostata puntando il
telecomando verso l'unità interna e premendo
nuovamente il tasto Timer-Off.
resterà presente sul display del telecomando.
L'indicatore del timer sul pannello del display
dell'unità interna è illuminato.
Timercombinato
TimerOn TimerOff
(spento – avvio – arresto funzionamento)
Questa funzione è consigliata quando si vuole
accendere il condizionatore prima di svegliarsi e
spegnerlo dopo essere usciti di casa.
Esempio: Sono le 22:00 e si vuole far partire
il condizionatore alle 6:30 e farlo fermare alle
9:30.
1 Premere il tasto Timer On.
2 Impostare l'ora desiderata premendo
ripetutamente o tenendo premuti i tasti di
controllonoachesuldisplaydeltelecomando
non compare 06:30.
3 Confermare l'ora impostata puntando il
telecomando verso l'unità interna e premendo
nuovamente il tasto Timer-On.
4 Premere il tasto Timer-Off.
5 Impostare l'ora desiderata premendo
ripetutamente o tenendo premuti i tasti di
controllonoachesuldisplaydeltelecomando
non compare 09:30.
6 6 Confermare l'ora impostata puntando il
telecomando verso l'unità interna e premendo
nuovamente il tasto Timer-Off.
questo simbolo compare sul telecomando è la
funzione è attivata.
TimerOff TimerOn
(acceso – spento – avvio funzionamento)
Questa funzione è consigliata quando si vuole
spegnere il condizionatore dopo essere andati e
letto e riavviarlo prima di svegliarsi alla mattina o
prima di tornare a casa la sera.
Ad esempio: sono le 8:00 e si vuole fermare il
condizionatore alle 9:30 per riavviarlo alle 18:00
1 Premere il tasto Timer-Off.
2 Impostare l'ora desiderata premendo
ripetutamente o tenendo premuti i tasti di
controllonoachesuldisplaydeltelecomando
non compare 09:30.
3 Confermare l'ora impostata puntando il
telecomando verso l'unità interna e premendo
nuovamente il tasto Timer-Off.
4 Premere il tasto Timer-On.
5 Impostare l'ora desiderata premendo
ripetutamente o tenendo premuti i tasti di
controllonoachesuldisplaydeltelecomando
non compare 18:00.
6 Confermare l'ora impostata puntando il
telecomando verso l'unità interna e premendo
nuovamente il tasto Timer-On.
questo simbolo compare sul telecomando è la
funzione è attivata.

34
• Il timer dell'orologio usa un orologio in
modalità 24 ore.
• L'orapredenitaperiltelecomandosonole
12:00 e tornerà a questa impostazione ogni
volta che vengono sostituite le batterie.
FunzionamentoEconomy(Eco)
FunzionamentoIFeel
Impostazionedell'orologio
1
Imposta
temperatura
1
1ora
1ora
Raffreddamento
Imposta
temperatura
1
1
1ora 1ora
Premere il tasto Eco in modalità COOL o HEAT (ove
presente), il condizionatore aumenterà la temperatura
(in modalità COOL) o la diminuirà (in modalità HEAT)
di 1 °C all'ora per un periodo di 2 ore. La temperatura
impostatarimarràssaperle5oresuccessive;quindi
l'unità si interromperà.
Questa funzione consente una maggiore comodità e
consente di risparmiare energia. Il funzionamento è
consigliato per quando si va a letto la sera.
Prima di azionare il condizionatore, impostare
l’orologio del telecomando seguendo la
procedura indicata in questa sezione Il pannello
dell’orologio sul telecomando visualizza l’ora
indipendentemente che il condizionatore sia in
funzione o meno.
Dopo che le batterie vengono inserite all'interno
del telecomando,
si illumina e inizia a
lampeggiare.
1 Tasti di controllo
Premere i tasti di controllo per impostare l'ora
desiderata.
Avanti Indietro
Ogni volta che vengono premuti questi tasti,
l'ora si sposta avanti o indietro di 1 minuto.
Tenendo premuto il tasto ci si sposterà più
rapidamente all'interno della visualizzazione
dell'ora.
2 Tasto Clock
Quando viene raggiunto il tempo desiderato,
premere nuovamente il tasto Clock per
5 secondi senza funzionamento; l'ora
dell'orologio smette di lampeggiare e
l'orologio sarà stato impostato.
3 Reimpostare l'orologio
Premere il tasto Orologio e il display orologio
inizierà a lampeggiare.
Seguire i passaggi 1 e 2 per impostare
nuovamente l'ora.
Riscaldamento
Il telecomando funziona come termostato remoto, e
fornisce un accurato controllo della temperatura oltre
che una comodità ottimale.
Puntare il telecomando verso l'unità interna e premere
il tasto I Feel; un bip dall'unità interna conferma che la
funzione è stata attivata.
Il simbolo I Feel rimane sul display del telecomando
noacheiltastoIFeelnonvienenuovamente
premuto.
Il condizionatore funzionerà per raggiungere
la temperatura impostata nella posizione del
telecomando.
Il telecomando invia le informazioni della temperatura
nella sua posizione all'unità interna ogni 10 minuti.
Il condizionatore uscirà dalla funzione I Feel nel
caso in cui non vengano ricevute informazioni
sulla temperatura dal telecomando per i 11 minuti
successivi.
suggerimenti e informazioni

35
Comeusarel'unitàinterna
Opzioniaggiuntive
Controllodelladirezionedel
ussodiaria
Portata
Flusso dell'aria verso l'alto
e verso il basso
Deettore
verticale
• Il tasto di Oscillazione verrà disattivato quando il
condizionatore non è in funzione (anche quando
è impostata la funzione Timer On).
• Non azionare il condizionatore per lunghi periodi
conladirezionedelussod’ariarivoltaverso
il basso nelle modalità COOL o DEHUMIDIFY.
In caso contrario si potrebbe formare della
condensasullasuperciedeldeettore
orizzontale che a sua volta potrebbe far cadere
delle gocce sul pavimento o sugli arredi.
• Quandoildeettoresiportanelladirezione
desiderata, premere nuovamente il tasto Swing e
ildeettorerimarrànellaposizioneincuisitrova.
• Premendo nuovamente il tasto Swing, il
deettoreinizieràadoscillareinaltoeinbasso
automaticamente.
1 FunzionediRiavvioRapido
Il condizionatore riprende automaticamente con
le impostazioni precedenti dopo un possibile
guasto di corrente.
2 Autodiagnosieautoprotezione
Questo condizionatore è in grado di rilevare
anomalie di funzionamento mostrando la
diagnosi sul display dell'unità interna tramite un
codice errore.
Il condizionatore cambia automaticamente
modalità di funzionamento come forma di
auto-protezione.
Perregolareladirezionedelussodell'aria
orizzontale(sinistra/destra)manualmente
• Regolareideettoriverticalitramitelaleva
Sinistra/Destra del braccio verticale del
deettore.
• Eseguire queste regolazioni prima di accendere
l’apparecchiatura perché, se accesa, le dita
potrebbero rimanere intrappolate nella ventola.
• Regolareladirezionedelussod’ariacorrettamente,
per evitare di creare situazioni sgradevoli o creare
differenze di temperatura in un locale.
• Regolareideettoriorizzontalicoltelecomando.
• Regolareideettoriverticalimanualmente.
Portata
Flusso dell'aria verso sinistra e verso destra
Perimpostareladirezionedelussodell'aria
verticale(su/giù)inmodoautomatico
• Eseguire questa funzione mentre l’unità è in
funzione.
• Premere il tasto Swing sul telecomando per
muovereildeettoreorizzontaleversol’alto
e il basso automaticamente.
attenzione

36
• Nonspostaremanualmenteideettori
orizzontali. Utilizzare sempre il tasto Swing.
Unospostamentomanualedeldeettorepuò
provocare anomalie in fase di funzionamento.
Qualoraideettorinonfunzionino
correttamente, spegnere immediatamente e
riavviare il condizionatore.
• Non si dovrebbe impostare un angolo di
aperturadeldeettoreorizzontaletroppo
piccolo, poiché sia il raffreddamento che il
riscaldamento potrebbero non funzionare
adeguatamenteacausadiunasupercieper
ilussod’ariatroppolimitata.
• Non azionare il condizionatore con il
deettoreorizzontalenellaposizionechiusa.
• Quando il condizionatore viene collegato
all’alimentazione (funzionamento iniziale), il
deettoreorizzontalepuòemettereunsuono
per circa 10 secondi: tutto ciò è normale.
Funzionamentodiemergenza
Tastocontrollo
manuale
Tastocontrollo
manuale
Temperaturadifunzionamento
Funzionamentoottimale
• Premere nuovamente il tasto di Controllo Manuale per
spegnere il condizionatore.
La modalità di funzionamento viene vista nella seguente
tabella.
Se il condizionatore viene impiegato in condizioni
diverse da quelle precedenti, alcune funzioni di
protezione possono essere attivate e causare un
funzionamento anomalo dell'apparecchiatura.
Quando il telecomando va smarrito o non funziona,
servirsi dell'interruttore manuale sull'unità interna.
Il condizionatore funziona in modalità AUTO e
l'impostazione della temperatura o la velocità della
ventolanonpotrannoesseremodicate.
Per raggiungere le prestazioni ottimali, si noti
quanto segue:
• Indirizzareladirezionedelussod'ariainmodo
che non investa direttamente le persone.
• Regolare la temperatura per raggiungere il più
alto livello di comfort. Non regolare l'unità a livelli
eccessivi di temperatura.
• Chiudereporteenestrequando
l'apparecchiatura funziona in modalità COOL
o HEAT; in caso contrario, le prestazioni
dell'apparecchiatura potrebbero risentirne.
• Servirsi dei tasti Timer On e Timer Off sul
telecomando per impostare l'ora desiderata di
avvio e spegnimento.
• Non posizionare alcun oggetto vicino alle
presedientrataouscita,datochel'efcacia
dell'apparecchiatura potrebbe essere ridotta e il
condizionatore potrebbe smettere di funzionare.
• Pulirefrequentementeilltrodell’ariaper
non ridurre la capacità di raffreddamento/
riscaldamento dell’apparecchiatura.
• Premere il tasto di Controllo manuale per
accedere alla Modalità AUTO. Il condizionatore
selezionerà la modalità COOL, HEAT (solo
modello con pompa di calore) e FAN in
automatico conformemente alla temperatura
della stanza per raggiungere un ottimo livello
di comodità.
Modalità Modello
Impostazione
temperatura
Flusso
dell'aria
AUTO HEAT PUMP 25°C COOL/FAN
AUTO HEAT PUMP 20°C HEAT/FAN
Intervalli di temperature di funzionamento
Lato interno
DB (
°C)
Lato esterno
DB (°C)
Raffreddamento massimo 32 43
Riscaldamento massimo 27 24

37
Puliziaemanutenzione
Manutenzione
Puliziadell'unitàinternaedel
telecomando
Puliziadeiltri
Staffa
pannello
Manigliadelltroantipolveri
Occorre eseguire con regolarità le seguenti operazioni di manutenzione.
*
Questaoperazionedeveessereeseguitaesclusivamentedapersonalequalicato.
• Spegnere il condizionatore e scollegare
l'alimentazione prima di procedere alla pulizia.
• Utilizzare un panno asciutto per pulire l’unità
interna e il telecomando.
• Se l’unità interna dovesse essere
eccessivamente sporca, si può utilizzare un
panno bagnato con acqua fredda.
• Il pannello anteriore dell’unità interna può
essere smontato e pulito con acqua. Asciugare
poi con un panno asciutto.
• Non usare spazzole, carta smerigliata o
strumenti di lucidatura per pulire l'unità, in
quanto si potrebbe danneggiare.
• Per pulire l’unità non utilizzare panni o piumini
imbevuti di sostanze chimiche.
• Non usare benzene, solvente, polveri per la
lucidatura o solventi simili per le operazioni
di pulizia. Ciò potrebbe provocare crepe o
deformazionisullasupercieinplastica.
• Non usare mai acqua tiepida al di sopra dei
40°C per pulire il pannello anteriore. Potrebbe
provocare deformazioni o scolorimenti.
1 Afferrare e sollevare il pannello anteriore dell’unità
internanoachenonsisentecheèsaldamente
bloccato dalla staffa.
2 Tenerelamanigliadelltroantipolverie
sollevarlo leggermente per estrarlo dal supporto
ltro.
Nota: Prima di eseguire qualsiasi operazione di
pulizia occorre disattivare l’alimentazione elettrica.
Seilltroantipolverièintasato,l’efcienza
di raffreddamento/riscaldamento dell’unità è
limitata.Pulireilltroognimeseopiùspesso,se
necessario.
3 Quindi,estrarreilltroantipolveridalbasso
dell'unità interna.
avvertenza
Voci
Operazioni di
manutenzione
Frequenza consigliata
Filtro antipolveri Pulire Ogni mese o più spesso, se necessario
Filtri aria sana Sostituire/pulire Ogni 3 mesi o più spesso, se necessario
Unità interna Pulire Ogni mese o più spesso, se necessario
Vaschetta dell’acqua
e tubazione di
evacuazione
Pulire ed eliminare
eventuali intasamenti
Ogni stagione prima di avviare l’apparecchiatura*
Bobine interne ed
esterne
Pulire Ogni stagione prima di avviare l’apparecchiatura*

38
Manutenzione generale
Filtro antipolveri
Nontoccareocercaredipulireil
generatorediplasmafreddo(se
disponibile).Puòesserecausadi
scosseelettriche.
• Quandosiestraeilltrodell’aria,nontoccare
le parti metalliche dell’unità. Attenzione a non
ferirsitoccandolepartimetallicheaflate.
• Non pulire la parte interna del condizionatore
con acqua. La penetrazione di acqua
all’interno può danneggiare l’isolamento e
portare a scosse elettriche.
• Quando si pulisce l’apparecchiatura,
vericarechel’alimentazioneeildisgiuntore
siano scollegati.
Filtro antipolveri
Filtro sanitario
Pulireilltroantipolvericonunaspirapolvereo
con acqua, poi asciugarlo in un luogo fresco.
Se non si prevede di utilizzare il condizionatore per
lunghi periodi di tempo:
• Azionare l’apparecchiatura nella modalità solo
FAN per 3~4 ore per asciugare completamente
l’unità
• Spegnere l’apparecchiatura e togliere la spina.
Estrarre le batterie dal telecomando.
• L’unità esterna richiede operazioni di
manutenzione e pulizia periodiche. Non cercare
di eseguire tali operazioni personalmente.
Contattare il rivenditore o il centro di assistenza
locale.
Controllidaeseguireprimadellamessain
funzione
• Controllare che i cavi non siano rotti o scollegati
• Controllarecheilltroperlapolveresiainstallato.
• Controllare che l’entrata e l'uscita dell’aria non
siano ostruite se il condizionatore è rimasto
inoperativo per un lungo periodo di tempo.
4 Illtririnfrescantiperavereun'ariasana(se
disponibili),comeadesempioilltroacarboni
attivi/ltroBIO/ltrovitaminaC/ltroagliioni
d'argentosonossatisulltroantipolveri.
Rimuovereiltrisanitaridaltelaiodisupportodel
ltroantipolveri.
Pulireiltrisanitarialmenoognitre(3)mesie
sostituirli ogni 6 mesi.
Pulire con un aspirapolvere, ove possibile.
5 Reinstallareiltriperrinfrescarel'ariain
posizione.
6 Inserirelapartesuperioredelltroantipolveri
nell’unità, prestando attenzione che i bordi
sinistro e destro siano correttamente installati
erimontareilltro.
avvertenza
avvertenza

39
Suggerimentiperilfunzionamento
3.Unanebbiabiancaescedall’unitàinterna.
• Si potrebbe generare una nebbia bianca a causa
di una grande differenza di temperatura fra
l'ingresso e l'uscita dell' aria in modalità COOL
in un ambiente chiuso con un'elevata umidità
relativa.
• L’umidità derivante dal processo di sbrinamento
può determinare la formazione di una nebbia
bianca quando il condizionatore viene riacceso
in modalità HEAT dopo lo sbrinamento.
4.Leggerorumoredelcondizionatore
• Quando il compressore funziona o ha appena
smesso di funzionare si può sentire un leggero
suono sibilante. Si tratta dello scorrere o del
fermarsi del refrigerante.
• Quando il compressore funziona o ha appena
smesso di funzionare si può sentire anche un
basso “cigolio". Si tratta dell’espansione dovuta al
calore e della contrazione dovuta al freddo delle
parti in plastica nell'unità quando la temperatura
cambia.
• Un rumore può inoltre essere dovuto al ritorno
allaposizioneoriginaledeideettoriallaprima
accensione.
5.Dall’unitàinternaescedellapolvere
Si tratta di un fenomeno normale quando il
condizionatore non è stato utilizzato per un lungo
periodo o al primo impiego dell’apparecchiatura.
6.Dall’unitàinternaesceunodoreparticolare
Ciò è causato dal fatto che l’unità interna rilascia
odori permeati da materiali di costruzione, mobili o
fumo.
7.IlcondizionatorepassaallamodalitàFANsolo
dallemodalitàCOOLoHEAT
Quando la temperatura interna raggiunge il
valore dell'impostazione, il compressore si ferma
automaticamente e il condizionatore passa in
modalità FAN.
Il compressore si avvia nuovamente quando la
temperatura interna si alza o si abbassa rispetto
a quella impostata, rispettivamente nella modalità
COOL o HEAT.
8.Condensa
L'acqua di condensa si potrebbe formare all'uscita
dell'aria se l'apparecchiatura ha raffreddato o
asciugato a lungo con una temperatura relativa
superioreall'80%(conporteenestrechiuse).
Impostareildeettoreverticaleallasuaangolazione
massima (verso il pavimento) e la velocità della
ventolasuHigh.Chiudereporteenestre.
9.Ilampiolavicinanzaditelefonisenzalipossono
determinare il cattivo funzionamento dell’unità.
Scollegare e successivamente ricollegare
l'alimentazione all’unità. Per riprendere il
funzionamento, premere il tasto ON/OFF sul
telecomando.
10.FunzioneX-Fan
L'unità interna potrebbe continuare a funzionare
anche dopo aver spento l'unità premendo il tasto
ON/OFF.
VericarechelafunzioneX-Fansiadisattivata.
Quantoseguepuòvericarsiduranteilnormale
funzionamento:
1.Protezionedelcondizionatore.
• Protezionedelcompressore
Dopo un’interruzione il compressore deve
attendere 3 minuti prima di potere essere
riacceso.
• Anti-congelamento
Nel caso in cui l'unità stia funzionando in
modalità COOL e con una temperatura
ambiente bassa, si potrebbe formare del
gelo sullo scambiatore di calore. Quando
la temperatura dello scambiatore di
calore interno scende al di sotto dei 0°C,
il compressore smette di funzionare per
proteggere l'unità.
• Sbrinamento
Si potrebbe formare del gelo sull'unità
esterna durante l'operazione di riscaldamento
quando la temperatura esterna è bassa ma
l'umidità è alta. Il che porta a una scarsa
efcaciaalivellodiriscaldamento.
In tali casi, il condizionatore interrompe il
riscaldamento e avvia automaticamente lo
sbrinamento. Il tempo di sbrinamento può
variare dai 3 ai 12 minuti.
In fase di sbrinamento, i motori delle
ventole dell'unità interna e dell'unità esterna
si interrompono; sull'indicatore interno
lampeggia la dicitura "H1" e dall'unità esterna
potrebbero fuoriuscire dei vapori. Non si
tratta di un'anomalia di funzionamento. Al
termine dello sbrinamento, l'operazione di
riscaldamento ripartirà in modo automatico.
• Dispositivoantiariafredda
In modalità HEAT la ventola interna non
funzionaperevitarechevengasofata
dell'aria fredda all'interno della stanza (entro
2 minuti), nel caso in cui lo scambiatore di
calore interno non raggiunga una temperatura
minima nelle seguenti condizioni:
(1) L'opzione di riscaldamento si è appena
attivata.
(2) Al termine dell'opzione di sbrinamento
automatico.
(3) Riscaldamento a bassa temperatura.
2.Venticellodelicato
L'unità interna può emettere un venticello
delicatoefarruotareildeettoreinuna
determinata posizione nella seguente
situazione:
(1) In modalità HEAT, l'unità viene accesa, il
compressore non raggiunge la condizione di
avvio.
(2) In modalità HEAT, la temperatura raggiunge
il valore impostato e il compressore smette di
funzionare per circa 1 minuto.

40
Risoluzionedeiproblemi
• Nel caso in cui compaia un errore (ad
eccezione di H1) sul display dell’unità interna.
• L'indicatore di potenza o un altro indicatore
lampeggia rapidamente; non sarà possibile
interrompere questo lampeggiamento
scollegando l'alimentazione e ricollegandola
nuovamente.
• Il fusibile salta spesso o l'interruttore scatta
frequentemente.
• Acqua o altri liquidi vengono spruzzati nell'unità.
• C'è una perdita di acqua dall'unità.
• Si sente un suono brusco durante il funzionamento.
• Durante il funzionamento vengono emessi dei forti
odori.
• Il cavo di alimentazione e la presa si stanno
surriscaldando.
• Altre situazioni anomale.
Il condizionatore non può essere riparato dall'utente. Una riparazione sbagliata può essere
causa di scosse elettriche o incendio. Rivolgersi a un centro di assistenza autorizzato per una
riparazione di livello professionale.
Nelcasoincuisiverichiunadelleseguentisituazioni,fermaresubitoilcondizionatore,
scollegare l'alimentazione e contattare il centro di assistenza autorizzato.
La pressione nel sistema refrigerante è bassa e potrebbe comportare una rottura dell'unità.
Chiedereauninstallatorecerticatodieseguireuncontrollo.
avvertenza
Difetti Causa Intervento
L'unità non si avvia Interruzione alimentazione Attendere il ripristino della
corrente.
L'unità può essere scollegata. Controllare che la spina sia
correttamente inserita nella presa.
Il fusibile potrebbe essere saltato. Sostituire il fusibile.
La tensione è troppo alta o troppo
bassa.
Richiedere il controllo della
tensione da parte di professionisti.
Le batteria del telecomando possono
essere scariche.
Sostituire le batterie.
L’ora impostata con il timer può non
essere corretta.
Attendere o annullare le
impostazioni.
L'unità non raffredda
o non scalda (ove
possibile) la stanza
molto bene quando
l'aria fuoriesce dal
condizionatore
Impostazione sbagliata della
temperatura.
Impostare la temperatura in modo
corretto. Per ulteriori dettagli
rimandiamo alla sezione "Utilizzo
del telecomando"
Illtrodell’ariaèbloccato. Pulireilltrodell’aria.
Leporteolenestresonoaperte. Chiudereporteonestre.
L’entrata o l’uscita dell’aria sull’unità
interna o esterna sono ostruite.
Eliminare le ostruzioni, poi avviare
nuovamente l’unità.
La protezione del compressore di
3 minuti è stata attivata.
Attendere 3 minuti.
Se non è possibile risolvere il problema, contattare il rivenditore locale o il più vicino centro di
assistenza. Informare il personale contattato dei problemi riscontrati e del modello dell’unità.

41
Invitiamoaeseguireiseguenticontrolliprimadicontattarequalsiasiinstallatorealnedirisparmiaretempoe
soldi.
Difetti Causa
Perdite di acqua
dell'unità interna
•L'umidità è elevata.
•L'acqua di condensa fuoriesce.
•Iltuboessibilediscaricoèallentato
od ostruito.
Perdite di acqua
dell'unità esterna
•Durante l'operazione di
raffreddamento, l'acqua si condensa
intorno ai tubi e ai giunti di
collegamento.
•Durante l'operazione di sbrinamento,
l'acqua sbrinata fuoriesce.
•Durante l'operazione di
riscaldamento, gocciola dell'acqua
dallo scambiatore di calore.
Rumore
dall'unità interna
•Il rumore emesso quando la ventola
o il relè del compressore vengono
accesi o spenti.
•Quando lo sbrinamento viene
avviato o interrotto, si sente
un rumore: si tratta del liquido
refrigerante che scorre in direzione
opposta.
L'unità interna
non emette aria
•In modalità HEAT, quando la
temperatura dello scambiatore di
calore interno è molto bassa, il
ussodell'ariavieneinterrottoper
evitare l'emissione di aria fredda.
(per 2 minuti)
•In modalità HEAT, quando la
temperatura esterna è bassa o
l'umidità è alta, si forma del gelo
sullo scambiatore di calore esterno.
L'unità si sbrina in modo automatico
e l'unità interna smette di emettere
aria per alcuni minuti.
•Durante l'operazione di sbrinamento
potrebbe fuoriuscire dell'acqua
o potrebbero essere emessi dei
vapori.
•In modalità DEHUMIDIFY, la ventola
interna smette di emettere aria per
3 - 12 minuti per evitare che l'acqua
di condensa venga nuovamente
vaporizzata.
Umidità
sull'uscita
dell'aria
Nel caso in cui l'unità funzioni
con un'umidità elevata a lungo, si
potrebbe generare dell'umidità sulla
griglia di uscita aria che potrebbe poi
portare a dei gocciolamenti.
Codice di errore
H1: sbrinamento
È normale. L'unità si trova in modalità
di sbrinamento e il riscaldamento
riprenderà a breve.
Difetti Causa
L'apparecchiatura
non funziona
L'apparecchiatura non funziona se
viene accesa subito dopo essere
spenta. Ciò serve per proteggere
l'unità. Attendere circa 3 minuti.
Vengono emessi
degli odori
•L'unità interna potrebbe emettere
degli odori. Si tratta del risultato
degli odori della stanza (ad esempio
mobili, tabacco, ecc.) che sono stati
assorbiti dall'unità.
•Rivolgersi a un centro di assistenza
autorizzato per l'esecuzione della
pulizia nel caso in cui gli odori
persistano.
Rumore di
"acqua che
scorre"
Il sibilo simile all'acqua che scorre è
causato dal refrigerante che scorre
all'interno dell'unità.
In modalità
COOL viene
emessa della
nebbia
Durante l'opzione di raffreddamento,
l'unità interna potrebbe emettere
dellanebbianeacausadell'elevata
temperatura della stanza e
dell'umidità.
Dopo un po' di tempo la nebbia
sparisce, mano a mano che la
temperatura della stanza e l'umidità
diminuiscono.
Rumore simile a
crepitio
Questo è il rumore dell'attrito
causato dall'espansione e/o dalla
contrazione del pannello di altre
componenti a causa della variazione
di temperatura.
Non è possibile
avviare l'unità
•È stata tolta la corrente?
•La spina è allentata?
(ove prevista)
•È saltato il salvavita dell'impianto?
•La tensione è più alta o più bassa?
(testata da professionisti)
•Il TIMER è stato usato in modo
corretto?
•Le batterie sono scariche?
L'effetto di
raffreddamento/
riscaldamento è
scadente
•L'impostazione della temperatura è
adeguata?
•L'entrata/uscita dell'aria sono
bloccate?
•Illtroèsporco?
•Laportaolanestrasonoaperte?
•È stata impostata la velocità bassa
della ventola?
•Vi sono fonti di calore nella stanza?
Nonsmaltirequestoprodottocomeriutocomunalenon
classicato.Sarànecessariosmaltirequestodispositivo
separatamente, in quanto viene trattato in modo speciale.
21
The following checks prior to contact may save you time and money.
Malfunctions Cause
Water leakage
of indoor unit
•The humidity is high.
•Condensingwateroverows.
•Drain hose is loose or
obstructed.
Water leakage
of outdoor unit
•During cooling operation, water
condensates around the pipes
and connection joints.
•During defrosting operation,
thawedwaterowsout.
•During heating operation, water
on the heat exchanger drips out.
Noise from
indoor unit
•The noise emmited when the fan
or compressor relay is switched
on or off.
•When the defrosting operation
is started or stopped, there is a
soundofrefrigerantowingin
the reverse direction.
Indoor unit can
not blow air
•In HEAT mode, when the
temperature of indoor heat
exchangerisverylow,airowis
stopped in order to prevent cold
air. (within 2 minutes)
•In HEAT mode, when the
outdoor temperature is low or
humidity is high, frost will be
formed on the outdoor heat
exchanger. The unit will defrost
automatically and indoor unit will
stop blowing air for 2-3 mintues.
•During defrosting operation,
water or vapour may be
emmited.
•In DEHUMIDIFY mode, the
indoor fan will stop blowing air
for 3-12 minutes in order to
avoid condensing water being
vaporised again.
Moisture on air
outlet
If the unit operates at high
humidity for a long time, moisture
may be generated on air outlet
grill and then drip off.
H1 error code:
defrosting
It is normal. The unit is in
defrosting operation and heating
will recommence soon.
Malfunctions Cause
The unit does
not operate
The unit does not operate if it is
turned on immediately after it is
turned off. This is to protect the
unit. Please wait about 3 minutes.
Odours are
emitted
•Some odours may be emmited
from the indoor unit. This is the
result of room smells (such as
furniture, tobacco, etc.) which
have been taken into the unit.
•Consult authorised service
center for cleaning if the odours
persist.
“Waterowing”
noise
The swishing noise like water
owingistherefrigerantowing
inside the unit.
Mist is
emmited in
COOL mode
During cooling operation, a thin
mist may be seen emmited from
the indoor unit due to high room
temperature and humidity.
After a period of time, the mist
will disappear as the decrease of
room temperature and humidity.
Cracking noise
This is the sound of friction
caused by expansion and/or
contraction of panel or other
parts due to the change of
temperature.
The unit can
not be started
up
•Is the power cut off?
•Is the power plug loose?
(if applicable)
•Is the circuit protection device
tripped off?
•Is voltage higher or lower?
(tested by professionals)
•Is the TIMER correctly used?
•Are the batteries exhausted?
Cooling
/Heating effect
is poor
•Is the temperature setting
appropriate?
•Is the air inlet/outlet blocked?
•Isthelterdirty?
•Is the door or window open?
•Is low fan speed set?
•Are there heat sources in the
room?
Do not dispose this product as unsorted municipal waste.
Collection of such waste separately for special treatment
is necessary.

42
Índice
Enhorabuena .......................................................................43
Precauciones de seguridad .................................................44
Descripción del producto .....................................................46
Pantalla de la unidad interior ...............................................47
Mando a distancia ................................................................47
Descripción del mando a distancia ...................................... 48
Indicadores de la pantalla del mando a distancia ...............49
Primer uso ...........................................................................50
Uso del mando a distancia ...................................................50
Uso de la unidad interior ......................................................55
Funcionamiento de emergencia ..........................................56
Funcionamiento óptimo.................................................... ....56
Limpieza y mantenimiento ................................................... 57
Consejos de funcionamiento ...............................................59
Solución de problemas ........................................................60
• Guardeelmandoadistanciadondesuseñalpueda
llegaralreceptordelaunidadinterior.
• Cuandoutiliceelacondicionadordeaire,asegúresede
queelmandoadistanciaapuntaalreceptordeseñales
delaunidadinterior.
• Cuandoelmandoadistanciaenvíaunaseñal,elsímbolo
parpadeadurante1segundoenlapantalladel
mandoadistancia.
• Launidadinteriorreconocelaseñalconunpitido
cuandolarecibedelmandoadistancia.
• Pulselatecladelmandoadistanciayvuelvaaenviarla
señalsinooyeelpitidodelaunidad.
Recordatorio importante

43
Enhorabuena
• El acondicionador de aire no debe ser utilizado
por niños o personas discapacitadas sin
supervisión.
• Es necesario vigilar a los niños pequeños para
que no jueguen con el acondicionador de aire.
• Póngase en contacto con el instalador para
instalar este acondicionador de aire.
• Póngase en contacto con el servicio
autorizado para las reparaciones o tareas de
mantenimiento de la unidad.
• Si fuera necesario cambiar el cable de
alimentación, la sustitución solo debe llevarla
a cabo personal autorizado.
• El trabajo de instalación debe realizarse de
acuerdo con las normativas nacionales de
cableado y solo por personal autorizado.
Le damos la enhorabuena y las gracias por
elegir un acondicionador de aire de tipo split de
Electrolux. Estamos seguros de que le resultará un
placer usar su nuevo acondicionador de aire.
Antes de utilizarlo, le recomendamos que lea
atentamente todo el manual del usuario, en el que
se ofrece la descripción del acondicionador de aire
y sus funciones.
Para evitar riesgos que siempre están presentes
al usar un aparato eléctrico, es importante que el
acondicionador de aire se instale correctamente y
que lea atentamente las instrucciones de seguridad
para evitar peligros y usos indebidos.
Se recomienda guardar este folleto de
instrucciones para consultas posteriores y, si fuera
el caso, proporcionárselo a los futuros propietarios.
Una vez desembalado el acondicionador de aire,
asegúrese de que no está dañado. En caso de
duda, no lo use y póngase en contacto con el
centro local de servicio técnico de Electrolux.
Condicionesdeuso
Este aparato está concebido para utilizarse en
aplicaciones domésticas y similares, tales como:
• Cocinasdelpersonalentiendas,ocinasy
otros entornos de trabajo.
• Granjas.
• Por clientes en hoteles, moteles y otros
entornos de tipo residencial.
• Entornos tipo hostales o pensiones.
Notas importantes
Póngase en contacto con el instalador para
instalar esta unidad.
Póngase en contacto con el servicio autorizado
para las reparaciones o tareas de mantenimiento
de la unidad.
• La toma de red necesaria para su suministro
eléctrico debe conectarla y ponerla en
servicio un contratista debidamente
certicado.
• Este aparato no está diseñado para que lo
usen personas o niños con discapacidad
física, sensorial o mental, o con experiencia
yconocimientoinsucientes,amenosque
una persona responsable de su seguridad
les supervise o instruya en el uso del
electrodoméstico.
• Es necesario vigilar a los niños pequeños
para que no jueguen con el acondicionador
de aire.
• Si fuera necesario cambiar el cable de
alimentación, la sustitución solo debe llevarla
a cabo personal autorizado.
• Las tareas de instalación las ejecutarán
sola y exclusivamente personal autorizado,
de conformidad con las normas nacionales
de cableado y los reglamentos de servicio
y mantenimiento de los proveedores de
electricidad.
• Si la unidad va a trasladarse a otra
posición o va a ser desechada, las tareas
correspondientes solo podrá ejecutarlas una
persona debidamente titulada.
• Tenga cuidado de no pillarse los dedos en
las aspas del ventilador cuando ajuste las
láminas verticales.
• Este acondicionador de aire usa refrigerante
R410a.
Información sobre desechos para el usuario
• La mayoría de los materiales de embalaje son
reciclables.
• Deséchelos en el lugar de reciclaje local o
colóquelos en los contenedores adecuados.
• Si desea desechar este acondicionador de aire,
póngase en contacto con las autoridades locales
para consultar la forma correcta de hacerlo.
precaución
consejo ecológico

44
Si observa una situación anómala,
como olor a quemado, apague la
alimentación del acondicionador de aire
y póngase en contacto con un agente
de servicio de Electrolux. Si la situación
anómala continúa, es posible que el
acondicionador de aire esté dañado
o que cause descargas eléctricas o
incendios.
No utilice el acondicionador de aire con
las manos húmedas. Puede causar
descargas eléctricas.
No corte ni dañe el cable de alimentación
ni otros hilos. En caso contrario,
deberá repararlo o sustituirlo un técnico
cualicado.
No conecte el acondicionador de aire
a una placa de alimentación de varias
tomas.
Apague el suministro eléctrico del
acondicionador de aire si no va a
utilizarlo durante un período de tiempo
prolongado. De lo contrario, acumulará
polvo y podrá causar incendios.
Antes de limpiar el acondicionador
de aire, desconecte la alimentación
para eliminar el riesgo de descargas
eléctricas.
El suministro eléctrico debe
corresponderse con el acondicionador
de aire de acuerdo con el manual de
instalación. Los acondicionadores de aire
provistos de cable de alimentación deben
conectarse directamente a una toma de
corriente con interruptor de seguridad
adecuado. Los acondicionadores de
aire conectados permanentemente
deben conectarse a un disyuntor de
seguridad adecuado según el manual de
instalación.
Asegúrese de que el suministro eléctrico
al acondicionador de aire es estable y
cumple los requisitos establecidos en el
manual de instalación.
Asegúrese siempre de que el producto se
instala con la conexión a tierra adecuada.
Por motivos de seguridad, asegúrese
de apagar el disyuntor antes de realizar
ninguna tarea de mantenimiento o
limpieza o cuando el producto no se
utilice durante un largo período de
tiempo. La acumulación de polvo puede
causar descargas eléctricas o incendios.
Precaucionesdeseguridad
En su interior encontrará muchas sugerencias válidas
sobre cómo utilizar y mantener debidamente su
acondicionador de aire. Si se molesta en observar
un mínimo de cuidados preventivos se ahorrará gran
cantidad de tiempo y dinero a lo largo de la vida
útil de su acondicionador de aire. En el cuadro de
recomendaciones para la solución de problemas de
las páginas 100-101 encontrará muchas respuestas
a los problemas más comunes. Si examina
primeramente el cuadro Solución de problemas
puede que no le haga falta llamar al servicio técnico.
Elsignicadodelossímbolosutilizadoseneste
manual se indican a continuación:
Indica información relativa a su seguridad personal
y la forma de evitar daños en el aparato.
Este símbolo indica consejos e información sobre la
utilización del aparato.
Este símbolo indica consejos e información sobre la
utilización ecológica y económica del aparato.
Este símbolo indica que nunca se debe hacer eso.
Proceda siempre de esta forma.
Notasimportantes:
1 No utilice la unidad con las láminas horizontales
en posición cerrada.
2 Noutilicelaunidadsinelltrodeaire.
precaución
advertencia
consejo ecológico
consejos e información

45
Precaucionesdeseguridad
Uso
Laexposiciónalujodeairedirectodel
acondicionador de aire durante largos períodos
de tiempo puede resultar peligroso para su
salud.
No exponga a las personas, los animales ni las
plantasalujodeairedirectodurantelargos
períodos de tiempo.
Mantenimientoylimpieza
1 Al limpiar el aparato asegúrese primero de
que el suministro eléctrico y el disyuntor
están apagados.
2 No toque las partes metálicas de la unidad
alsacarlosltros.Puedenproducirse
lesiones al manipular bordes de metal
alados.
3 No utilice agua para limpiar el interior del
acondicionador de aire. La exposición al
agua puede causar descargas eléctricas.
Asistencia
Para las tareas de reparación y mantenimiento,
póngase en contacto con el centro de servicio
autorizado.
Antesdelfuncionamiento
1 Llameauninstaladorcualicado.
2 Conecte el enchufe debidamente.
3 No utilice un cable de suministro
eléctrico dañado o atípico.
4 No comparta la misma toma de
suministro eléctrico con otros aparatos.
5 No conecte un alargador.
6 No ponga el aparato en funcionamiento
ni lo apague enchufando y
desenchufando.
precaución
Seleccione la temperatura más
adecuada.
Puede ahorrarle electricidad.
No deje las puertas y ventanas abiertas
durante mucho tiempo durante el
funcionamiento. Puede tener como
resultado un bajo rendimiento.
No bloquee la entrada ni salida de aire.
Puede tener como resultado un bajo
rendimiento y provocar averías.
Mantenga los materiales combustibles
alejados a 1 m como mínimo de las
unidades. Pueden causar incendios.
No se suba encima de la unidad exterior
ni coloque objetos pesados sobre la
misma.
Puede causar daños o lesiones.
No intente reparar el acondicionador
de aire usted mismo. Las reparaciones
incorrectas pueden causar incendios
o descargas eléctricas. Póngase en
contacto con el centro de servicio técnico.
No introduzca las manos ni objetos en la
entrada ni la salida de aire. Puede causar
lesiones.
No exponga los animales ni las plantas
directamentealujodeaire.
Noutilicelaunidadparaningúnotron,
como conservar alimentos o secar ropa.
No salpique agua en el acondicionador
de aire. Puede causar descargas
eléctricas o averías.

46
6
Light
Turbo
Timer-On
Temp
Timer-Off
Swing
I feel
Eco
Fan
Clock
Mode
1
3
2
5
6
8
9
10
11
12
13
14
15
7
4
ProductDescription
Air inlet
IndoorUnit
Air Outlet
OutdoorUnit
Air inlet (rear)
Air inlet
(side)
Air Outlet
The above drawings are for explanation purpose only.
Your air conditioner may be slightly different.
The actual shape shall prevail.
Note:
Front panel
Digital display
Healthyairlter(behindthedustlter)
Pre-dustlter
Horizontal air louvers
Vertical air louvers
Cold plasma generator (if applicable)
Manual control button
Remote control
Remote control holder
Refrigerant pipe (if applicable)
Drain hose (if applicable)
Power cable (if applicable)
Mounting plate
Connecting cable (if applicable)
1
3
2
5
6
8
10
11
12
14
15
7
4
Descripcióndelproducto
Entrada de
aire
Unidadinterior
Salida de
aire
Unidadexterior
Entrada de aire
(trasera)
Entrada
de aire
(lateral)
Salida de
aire
Las ilustraciones anteriores son solo a título ilustrativo.
Es posible que su acondicionador de aire sea ligeramente diferente.
La forma actual prevalece.
Nota:
Panel frontal
Pantalla digital
Filtroambientador(detrásdelltrodepolvo)
Preltrodepolvo
Láminas horizontales
Láminas verticales
Generador de frío de plasma (en su caso)
Tecla de control manual
Mando a distancia
Soporte del mando a distancia
Tubo de refrigerante (en su caso)
Manguera de desagüe (en su caso)
Cable de suministro eléctrico (en su caso)
Placa de montaje
Cable de conexión (en su caso)
13

47
Mandoadistancia
consejos e información
• Al cambiar las pilas, no utilice otras viejas o
dediferenteespecicación,delocontrario
puede que el mando a distancia no funcione
bien.
• Si no va a utilizar el mando a distancia
durante un tiempo, saque las pilas, ya que las
antiguas pueden sulfatarse y dañar el mando.
• Un uso normal de las pilas proporciona una
vida útil media de aproximadamente seis
meses.
• Si el mando a distancia no funciona con
normalidad, quite las pilas y vuelva a
colocarlas. Si persiste el funcionamiento
anómalo, cámbielas por otras nuevas.
8m
• Mantenga el mando a distancia en una
posición en la que su señal pueda llegar
al receptor de la unidad interior (distancia
máxima de 8 m).
• Al poner el temporizador en funcionamiento, el
mando a distancia transmite automáticamente
una señal a la unidad interior a la hora
seleccionada.
• El acondicionador de aire no funcionará si
hay cortinas, puertas u otros materiales que
bloqueen las señales que el mando a distancia
envía a la unidad interior.
• Impida que caigan líquidos en el mando a
distancia. No someta el mando a distancia al
calor ni a la luz directa del sol.
• Si el receptor de señales de infrarrojos
de la unidad interior está expuesto a la
luz directa del sol cabe la posibilidad de
que el acondicionador de aire no funcione
debidamente. Utilice cortinas para proteger el
receptor de la luz directa del sol.
• Si hay otros aparatos eléctricos que
reaccionan a las señales del mando
a distancia, muévalos o consulte a su
distribuidor local.
Pantalladelaunidadinterior
• Si se mantiene el mando a distancia en una
posición que imposibilite la transmisión correcta
de la señal, puede que se produzca un retardo
de hasta 15 minutos.
• Cuando el mando a distancia envía una señal,
el símbolo
parpadea durante 1 segundo en la
pantalla. La unidad interior reconoce la señal con
un pitido cuando la recibe.
precaución
Usodelmandoadistancia
• Apunte el mando a distancia hacia el receptor de
señales de la unidad interior.
• Asegúrese de que no hay obstáculos que
puedan interferir con la señal.
Posicióndelmandoadistancia
Instalación/cambiodelaspilas
• Deslice hacia afuera la tapa del compartimento
de las pilas e inserte dos pilas alcalinas nuevas
secas (2 x AAA 1,5 voltios). Compruebe que la
polaridad (+) o (-) es correcta.
• Vuelva a cerrar la tapa del compartimento de la
pila, deslizándola en sentido contrario.
Indicadordemododecalefacción
Se enciende cuando la función de calefacción
está activada.
Indicadordemododerefrigeración
Se enciende cuando la función de refrigeración
está activada.
Indicadordeencendido/apagadoON/OFF
Se enciende cuando el aparato está
funcionando o en el modo de espera
Indicadordedeshumidicación
Se enciende cuando la función de
deshumidicaciónestáactivada.
Indicadordetemperatura
Muestra el ajuste de temperatura cuando el
acondicionador de aire está operativo.
Receptordeseñales
7
RemoteControl
tips and information
• When changing batteries, do not use old
or varied ones, otherwise, it may cause
problems with the remote control.
• If the remote control is not used for a long
time, remove the batteries as old batteries
may leak or corrode and damage the remote
control.
• The battery life during normal use is about six
months.
• If the remote control does not operate
normally,pleaseremoveandretthe
batteries. If abnormal operation continues,
replace with new batteries.
8m
• Keep the remote control where its signal
can reach the receiver of the indoor unit (a
maximum distance of 8m is allowed).
• When you select the timer operation, the
remote control automatically transmits a signal
totheindoorunitatthespeciedtime.
• The air conditioner will not operate if curtains,
doors or other materials block the signals from
the remote control to the indoor unit.
• Prevent any liquid from falling into the remote
control. Do not expose the remote control to
direct sunlight or heat.
• If the infrared signal receiver on the indoor
unit is exposed to direct sunlight, the air
conditioner may not function properly. Use
curtains to prevent the sunlight from falling on
the receiver.
• If other electrical appliances react to the
remote control, either move these appliances
or consult your local dealer.
IndoorUnitDisplay
Signal
receiver
• If you keep the remote control in a position that
hinders proper signal transmission, a time lag of
up to 15 minutes may occur.
• When the remote control sends out a signal, the
symbol
will blink for about 1 second on the
display. The indoor unit will acknowledge the
signal with a beep when it receives an effective
signal.
IFeelindicator
It lights when I Feel function is activated.
Turboindicator
Illuminates during Turbo operation.
Eco(Economy)indicator
Illuminates when ECO function is in operation.
Temperatureindicator
Displays the temperature settings when the air
conditioner is in operation.
Timerindicator
The indicator illuminates when Timer is set ON
and/or OFF.
Swingindicator
It lights when the Swing function is activated.
caution
HowtousetheRemoteControl
• Point the remote control to the signal receiver of
indoor unit.
• Make sure there is no obstacle that may interfere
with the signal.
Locationoftheremotecontrol
Batteryinstallation/replacement
• Slide the battery compartment cover off and
insert two new alkaline dry batteries
(2x AAA1.5Volt). Make sure that the polarity of
(+) or (-) is installed correctly.
• Slide the battery compartment cover back on
Light
Turbo
Timer-On
Temp
Timer-Off
Swing
I feel
Eco
Fan
Clock
Mode

48
Descripcióndelmando
adistancia
TeclaTurbo
Pulse esta tecla en el modo COOL o HEAT para
que el ventilador pase al modo Turbo de alta
velocidad y el acondicionador de aire funcione a la
máxima potencia.
Púlsela de nuevo si desea cancelar esta función.
TeclaX-Fan
Enlosmodosderefrigeraciónydeshumidicación,
pulse el botón X-Fan para activar la autolimpieza.
Después de apagar la unidad, el ventilador interior
sigue funcionando durante
10 minutos para secar la unidad interior y evitar
el crecimiento de moho y bacterias.
TeclaTimerOn
Pulse esta tecla para ajustar la hora de inicio.
TeclaTimerOff
Pulseestateclaparaajustarlahoraden.
TeclaSwing:
Pulse esta tecla para que la lámina oscile hacia
arriba y hacia abajo automáticamente. Púlsela de
nuevo para cancelarla: las láminas permanecen
en la última posición.
TeclaIFeel:
Al pulsar esta tecla, el mando a distancia envía
la información de temperatura a la unidad interior
cada 10 minutos. La unidad funciona para
alcanzar la temperatura ajustada en la ubicación
del mando a distancia. Púlsela de nuevo si desea
cancelar esta función.
TeclaControl:
Adelante Hacia atrás
Pulse la tecla de para aumentar la temperatura.
Pulse la tecla de para reducir la temperatura.
Con las funciones Timer On/Off o Clock, use estas
teclas para ajustar el temporizador o el reloj.
TeclaClock:
Pulse esta tecla y el símbolo Clock
parpadeará.
Puede pulsar las teclas Control y para
seleccionar la hora que desee.
TeclaTemp(Temperatura)
Pulse esta tecla para que la pantalla de la unidad
interior cambie de la temperatura programada a la
temperatura ambiente.
TeclaEco(Economía)
Pulse esta tecla para iniciar el modo Eco. Es
la opción es perfecta para el usuario mientras
duerme.
Púlsela de nuevo si desea cancelar esta función.
Nota:
En modo de calefacción, pulse las teclas Temp
y Clock para activar la función de calentar la
temperatura de la unidad interior a 8ºC.
AUTO DEHUMIDIFY FAN COOL HEAT
TeclaON/OFF(encendido/apagado)
Pulse esta tecla para encender o apagar el
acondicionador de aire.
TeclaMode
Al pulsar esta tecla, se pueden seleccionar por
orden AUTO, DEHUMIDIFY, FAN, COOL y HEAT
(el modelo de solo COOL no tiene función HEAT).
El modo AUTO es el predeterminado cuando el
aparato está encendido.
En modo AUTO el valor inicial no se muestra y
funciona con la temperatura deseada.
Con el modo HEAT, el valor inicial es de 28ºC.
Con los demás modos, el valor inicial es de 25ºC.
TeclaLight
Pulse esta tecla para encender o apagar los
pilotos indicadores de la unidad interior.
El caso normal al arrancar es ON (encendido).
TeclaFan
Al pulsar esta tecla, se puede seleccionar por
orden las velocidades de ventilador Auto, Low,
Medium y High.
Cuando la unidad está encendida, la velocidad
Auto es el valor predeterminado.
En el modo DEHUMIDIFY, la velocidad del
ventiladorsejaenLow(baja).
7LPHU2Q
7LPHU2II
6ZLQJ
,)HHO
(FR
)DQ
/LJKW
7XUER
;)DQ
7HPS
&ORFN
0RGH

49
Indicadordelapantalladel
mandoadistancia
Indicadordetransmisión:
Muestra cuándo el mando a distancia
transmite señales a la unidad interior.
PantallaTurbo
Muestra cuándo la función Turbo está
seleccionada.
PantallaIFeel
Muestra cuando la función I Feel está
activada.
PantallaEco
Muestra cuándo la función Eco está
seleccionada.
PantallaHealthy
Se enciende pulsando la tecla Healthy.
Púlsela de nuevo para apagarla.
NOTA: este indicador no existe en los
modelos sin función Cold-Plasma.
PantallaRoomTemperature(temperatura
ambiente)
Muestra cuándo la temperatura indicada en
la pantalla LCD es la temperatura ambiente.
Se puede encender o apagar pulsando la
tecla Temp.
PantallaProgrammedTemperature
(temperaturaprogramada)
Se enciende cuando el mando a distancia
muestra la temperatura ajustada. Se puede
encender o apagar pulsando la tecla Temp.
PantallaTimerOn/Off
Muestra cuándo la función Timer On/Off está
activada.
PantallaFanSpeed(velocidaddelventilador)
Muestra la velocidad seleccionada para el
ventilador en el orden siguiente:
“
” (Low), “ ” (Medium), “ ” (High) y
Auto.
En la velocidad Auto, solo aparece el símbolo “ ".
PantallaSwing
Muestra cuándo la función Swing está
seleccionada.
PantallaX-Fan
Muestra cuándo la función X-Fan está activada
pulsando las teclas Turbo y Healthy al mismo
tiempo (para los modelos con función Cold-
plasma) o pulsando la tecla X-Fan (para los
modelos sin función Cold-plasma)
PantallaTemperature
Muestra la temperatura ambiente o programada en
°C o °F.
No hay indicación en el modo Fan.
PantallaTime
Muestra la hora del reloj (se debe ajustar) y/o la
hora de encendido/apagado del temporizador.
PantallaMode
Presenta el modo de funcionamiento actual,
incluido Auto (
), Dehumidify ( ), Fan ( ),
Cool ( ) y Heat ( ).
NOTA: El modo Cool no ofrece la opción de
calefacción (Heating).

50
Primeruso
Funcionamientoautomático
Usodelmandoadistancia
CuandoestáseleccionadoelmodoAUTO,
lavelocidaddelventiladorylatemperatura
secontrolanautomáticamenteynose
puedenajustar.
Ventilador
Ventilador
Refrigeración
Refrigeración
Tiempo
Temp. programada
Mododedeshumidicación
1 Cerciórese de que el aparato está enchufado a
la red y que le llega corriente.
2 Asegúrese de que las pilas se han introducido
correctamente en el mando a distancia (los
pilotos del mando están encendidos).
3 Ajuste la hora con las teclas de Control y
conrmepulsandolateclaClock(reloj).
4 Apunte con el mando a distancia a la unidad
interior y pulse la tecla ON/OFF para encender
la unidad.
El modo de funcionamiento predeterminado
es AUTO. Tras seleccionar el modo de
funcionamiento con el mando a distancia,
las condiciones de trabajo se guardan en la
memoria del microordenador de la unidad.
La próxima vez, el acondicionador de aire
comenzará a funcionar en el mismo modo
cuando pulse la tecla ON/OFF del mando a
distancia.
SielmodoAUTOnoproducelatemperatura
ambientequesedesea,puedeseleccionar
manualmentelascondicionesquepreera.
Cuando está seleccionado el modo AUTO, el
acondicionador de aire selecciona automáticamente
COOL, HEAT (en su caso) o FAN solo, en función
de la temperatura ambiente o programada.
Inicio
1 Tecla ON/OFF (encendido/apagado)
Pulse esta tecla para encender el acondicionador
de aire.
El indicador de temperatura de la pantalla de la
unidad interior se enciende.
2 Pulse la tecla Mode para seleccionar AUTO.
3 El acondicionador de aire empieza a funcionar
después de aprox. 3 minutos.
Parada
1 Tecla ON/OFF (encendido/apagado)
Pulse de nuevo esta tecla para apagar el
acondicionador de aire. La lámina horizontal
vuelve a la posición de apagado.
ElmodoDEHUMIDIFY(deshumidicación)
funciona según la diferencia entre la temperatura
ajustada y la actual.
La temperatura se regula al tiempo que tiene lugar
ladeshumidicación,activandoydesactivando
el modo de enfriamiento (COOLING) o de solo
ventilador (FAN only).
consejos e información
Mododedeshumidicación

51
En el modo DEHUMIDIFY, la velocidad del
ventilador se establece en Low (baja); la
función Turbo no se puede utilizar.
Funcionamientodelventilador
• No aparece ninguna indicación de velocidad
del ventilador en el mando a distancia si se
ha seleccionado la velocidad Auto.
Funcionamientodeenfriamiento
ycalefacción
Inicio
1 Tecla ON/OFF (encendido/apagado)
Pulse esta tecla para encender el
acondicionador de aire.
El indicador de temperatura de la pantalla de la
unidad interior se enciende.
2 Tecla Mode
Púlsela para seleccionar DEHUMIDIFY.
3 Teclas Control
Programe la temperatura que desee.
Normalmente ajustado entre 21ºC y 28ºC.
2 Tecla Mode
Púlsela para seleccionar FAN (ventilador).
3 Tecla Fan
Pulse para seleccionar la velocidad deseada
del ventilador entre: Auto, Low (baja), Medium
(media) y High (alta).
La velocidad predeterminada es Auto.
Parada
1 Tecla ON/OFF (encendido/apagado)
Pulse de nuevo esta tecla para apagar el
acondicionador de aire. La lámina horizontal
vuelve a la posición de apagado.
Parada
1 Tecla ON/OFF (encendido/apagado)
Pulse de nuevo esta tecla para apagar el
acondicionador de aire. La lámina horizontal
vuelve a la posición de apagado.
Inicio
1 Tecla ON/OFF (encendido/apagado)
Pulse esta tecla para encender el
acondicionador de aire.
El indicador de temperatura de la pantalla de la
unidad interior se enciende.
2 Tecla Mode
Pulse para seleccionar los modos COOL o
HEAT (en su caso).
Cuando se selecciona el modo FAN el
acondicionador de aire solo ventila el aire interior.
1 Tecla ON/OFF (encendido/apagado)
Pulse esta tecla para encender el
acondicionador de aire.
El indicador de temperatura de la pantalla de la
unidad interior se enciende.
consejos e información
consejos e información

52
No aparece ninguna indicación de velocidad
del ventilador en el mando a distancia si se
ha seleccionado la velocidad Auto.
Ajustesdeltemporizador
• La duración de la función del temporizador
ajustada con el mando a distancia depende de
la hora del reloj. Asegúrese de que el reloj del
mando a distancia está correctamente ajustado
para evitar errores de funcionamiento.
• Eltiempodefuncionamientoecazajustadocon
el mando a distancia se limita a 24 horas.
3 Teclas Control
Programe la temperatura que desee.
Normalmente ajustado entre 21ºC y 28ºC.
4 Tecla Fan
Pulse para seleccionar la velocidad deseada
del ventilador entre: Auto, Low (baja), Medium
(media) y High (alta).
La velocidad predeterminada es Auto.
3 Apunte con el mando a distancia a la unidad
interioryconrmelahoraajustadapulsandola
tecla Timer-On.
permanece en la pantalla del mando a distancia.
Asegúrese de que el indicador del temporizador
(Timer) en panel de la pantalla de la unidad interior
está encendido.
Cancelarlosajustes
Apunte con el mando a distancia a la unidad interior y
pulse de nuevo la tecla Timer-On. Asegúrese de que
el símbolo
del mando a distancia está apagado.
FuncionamientodeTimerOff
1 Pulse la tecla Timer-Off,
parpadea en la pantalla del mando a
distancia en el primer uso del Timer-Off. De lo
contrario, parpadea la última hora ajustada.
2 Ajuste la hora pulsando las teclas Control:
Adelante Hacia atrás
Cada vez que se pulsan las teclas, la hora se
incrementa o decrementa 1 minuto.
Al mantener pulsada la tecla, se desplaza más
rápidamente por la hora.
3 Apunte con el mando a distancia a la unidad
interioryconrmelahoraajustadapulsandola
tecla Timer-Off.
permanece en la pantalla del mando a distancia.
Asegúrese de que el indicador del temporizador
(Timer) en panel de la pantalla de la unidad interior
está encendido.
Cancelarlosajustes
Apunte con el mando a distancia a la unidad interior y
pulse de nuevo la tecla Timer-Off. Asegúrese de que
el símbolo
del mando a distancia está apagado.
Parada
1 Tecla ON/OFF (encendido/apagado)
Pulse de nuevo esta tecla para apagar el
acondicionador de aire. La lámina horizontal
vuelve a la posición de apagado.
FuncionamientodeTimerOn
1 Pulse la tecla Timer-On,
parpadea en la pantalla del mando a
distancia en el primer uso del Timer-On. De lo
contrario, parpadea la última hora ajustada.
2 Ajuste la hora pulsando las teclas Control:
Adelante Hacia atrás
Cada vez que se pulsan las teclas, la hora se
incrementa o decrementa 1 minuto.
Al mantener pulsada la tecla, se desplaza
más rápidamente por la hora.
Ejemplosdeajustesdeltemporizador
FuncionamientodeTimerOn(iniciodel
temporizador)
Se recomienda usar esta función cuando se desea
que la unidad se encienda automáticamente antes
de volver a casa. El acondicionador de aire comienza
automáticamente a funcionar a la hora seleccionada.
Ejemplo: Son las 8:00 y desea que el
acondicionador de aire empiece a funcionar
a las 18:00.
consejos e información
consejos e información

53
1 Pulse la tecla Timer-On.
2 Ajuste la hora que desee pulsando
repetidamente o manteniendo pulsadas las
teclas Control hasta que 18:00 aparezca en la
pantalla del mando a distancia.
3 Conrmelahoraapuntandoconelmandoa
distancia a la unidad interior y pulsando de
nuevo la tecla Timer-On.
permanece en la pantalla del mando a
distancia.
El indicador Timer en el panel de la pantalla
de la unidad interior se enciende.
FuncionamientodeTimerOff(ndel
temporizador)
Se recomienda usar esta función cuando
se desea que la unidad se apague
automáticamente para ir a dormir.
El acondicionador de aire se detiene
automáticamente a la hora seleccionada.
Ejemplo: Son las 18:00 y desea que el
acondicionador de aire empiece a funcionar a
las 23:55.
1 Pulse la tecla Timer-Off.
2 Ajuste la hora que desee pulsando
repetidamente o manteniendo pulsadas las
teclas Control hasta que 23:55 aparezca en la
pantalla del mando a distancia.
3 Conrmelahoraapuntandoconelmandoa
distancia a la unidad interior y pulsando de
nuevo la tecla Timer-Off.
permanece en la pantalla del mando a
distancia.
El indicador Timer en el panel de la pantalla
de la unidad interior se enciende.
Temporizadorcombinado
TimerOn TimerOff
(Funcionamiento en la secuencia Desactivación -
Inicio - Parada)
Se recomienda usar esta función cuando desee
encender el acondicionador de aire antes de
despertarse y apagarlo después de salir de
casa.
Ejemplo: Son las 22:00 y desea que el
acondicionador de aire se encienda a las 6:30
y se pare a las 9:30.
1 Pulse la tecla Timer-On.
2 Ajuste la hora que desee pulsando
repetidamente o manteniendo pulsadas las
teclas Control hasta que 06:30 aparezca en la
pantalla del mando a distancia.
3 Conrmelahoraapuntandoconelmandoa
distancia a la unidad interior y pulsando de
nuevo la tecla Timer-On.
4 Pulse la tecla Timer-Off.
5 Ajuste la hora que desee pulsando
repetidamente o manteniendo pulsadas las
teclas Control hasta que 09:30 aparezca en la
pantalla del mando a distancia.
6 6Conrmelahoraapuntandoconelmando
a distancia a la unidad interior y pulsando de
nuevo la tecla Timer-Off.
aparece en el mando a distancia y la función
se activa.
TimerOff TimerOn
(Funcionamiento en la secuencia Activación -
Parada - Inicio)
Se recomienda usar esta función cuando desee
apagar el acondicionador de aire después de
irse a la cama y encenderlo de nuevo antes de
despertarse por la mañana o al volver a casa.
Ejemplo: Son las 08:00 y desea que el
acondicionador de aire se apague a las 09:30 y
se vuelva a poner en marcha a las 18:00.
1 Pulse la tecla Timer-Off.
2 Ajuste la hora que desee pulsando
repetidamente o manteniendo pulsadas las
teclas Control hasta que 09:30 aparezca en la
pantalla del mando a distancia.
3 Conrmelahoraapuntandoconelmandoa
distancia a la unidad interior y pulsando de
nuevo la tecla Timer-Off.
4 Pulse la tecla Timer-On.
5 Ajuste la hora que desee pulsando
repetidamente o manteniendo pulsadas las
teclas Control hasta que 18:00 aparezca en la
pantalla del mando a distancia.
6 Conrmelahoraapuntandoconelmandoa
distancia a la unidad interior y pulsando de
nuevo la tecla Timer-On.
aparece en el mando a distancia y la función
se activa.

54
• El temporizador del reloj utiliza el modo
horario de 24 horas.
• La hora predeterminada del mando a
distancia son las 24:00 y vuelve a esta
hora cuando se cambian las pilas.
Funcionamientodeahorro(Eco)
FuncionamientodeIFeel
Ajustedelreloj
1
Temperatura
ajustada
1
1hora
1hora
Refrigeración
Temperatura
ajustada
1
1
1hora 1hora
Pulse la tecla Eco en el modo COOL o HEAT (en su
caso); el acondicionador de aire aumenta (en modo
COOL) o disminuye (en modo HEAT) automáticamente
1ºC por hora en un período de 2 horas. La temperatura
ajustadaquedajadurantelaspróximas5horasy
después la unidad se para.
Esta función ofrece más comodidad y ahorra energía.
Se recomienda para dormir.
Antes de poner el acondicionador de aire en
funcionamiento programe el reloj del mando
a distancia siguiendo los procedimientos que
se recogen en esta sección. El panel del
reloj del mando a distancia presenta la hora,
independientemente de que el acondicionador de
aire esté o no funcionando.
Una vez introducidas las pilas en el mando a
distancia,
aparece y empieza a parpadear.
1 Teclas Control
Pulse las teclas de control para ajustar la hora.
Adelante Hacia atrás
Cada vez que se pulsan las teclas, la hora se
incrementa o decrementa 1 minuto.
Al mantener pulsada la tecla, se desplaza más
rápidamente por la hora.
2 Tecla Clock
Cuando alcance la hora deseada, pulse
la tecla Clock de nuevo o después de
5 segundos sin funcionar; la hora del reloj
deja de parpadear y el reloj se ajusta.
3 Poner en hora el reloj
Pulse la tecla Clock para que la pantalla del
reloj empiece a parpadear.
Siga los pasos 1 y 2 para ajustar la nueva
hora.
Calefacción
El mando a distancia funciona como un termostato
remoto que ofrece un control preciso de la temperatura
y la máxima comodidad.
Apunte con el mando a distancia a la unidad interior y
pulse la tecla I Feel; la unidad interior emite un pitido
paraconrmarquelafunciónestáactivada.
El símbolo I Feel permanece en la pantalla del
mando a distancia hasta que se vuelve a pulsar la
tecla I Feel.
El acondicionador de aire funciona para alcanzar la
temperatura ajustada en la ubicación del mando a
distancia.
El mando a distancia envía la información sobre la
temperatura en su ubicación a la unidad interior cada
10 minutos. El acondicionador de aire abandona
el modo I Feel si no se recibe información sobre la
temperatura del mando a distancia durante 11 minutos
consecutivos.
consejos e información

55
Usodelaunidadinterior
Opcionesadicionales
Controldedireccióndelujodeaire
Rango
Flujo de aire arriba y abajo
Lámina
vertical
• La tecla Swing (oscilación) se desactiva
cuando el acondicionador de aire no está
funcionando (incluso cuando se haya
seleccionado Timer On).
• No tenga el acondicionador de aire
funcionando durante mucho tiempo con
elujodeaireorientadohaciaabajoen
el modo COOL o DEHUMIDIFY. De lo
contrario, puede producirse condensación
enlasuperciedelaláminahorizontaly
provocar que caiga humedad sobre el suelo
o los muebles.
• Cuando la lámina se mueva en la dirección
deseada, pulse de nuevo la tecla Swing para que
la lámina permanezca donde se encuentra.
• Pulse la tecla Swing de nuevo para que la lámina
empiece a oscilar hacia arriba y hacia abajo
automáticamente.
1 Funciónderearranqueinteligente
El acondicionador de aire se reanuda
automáticamente con los ajustes anteriores tras
un eventual corte de corriente.
2 Protecciónydiagnósticoautomáticos
Este acondicionador de aire puede detectar
averías y mostrar el diagnóstico en la pantalla de
la unidad interior por medio de un código de error.
El acondicionador de aire cambia el
funcionamiento automáticamente para la
protección automática.
Paraajustarmanualmenteladireccióndelujo
deairehorizontal(izquierda/derecha)
• Ajuste manualmente las láminas verticales por
medio de la palanca izquierda/derecha del brazo
vertical.
• Realice estos ajustes antes de poner el aparato
en funcionamiento, puesto que una vez que
lo haga cabe la posibilidad de que se pille los
dedos con el ventilador.
• Ajusteladireccióndelujodeaire
correctamente para evitar situaciones poco
agradables o cambios de temperatura en la
habitación.
• Ajuste las láminas horizontales con el mando a
distancia.
• Ajuste las láminas verticales manualmente.
Rango
Flujo de aire izquierda y derecha
Paraajustarautomáticamenteladireccióndel
ujodeairevertical(arriba/abajo)
• Ejecute esta función con el aparato
funcionando.
• Pulse la tecla Swing (oscilación) del mando
a distancia: la lámina horizontal oscila hacia
arriba y hacia abajo automáticamente.
precaución

56
• No mueva la lámina horizontal
manualmente. Utilice siempre la
tecla Swing. Si se mueve la lámina
manualmente, puede provocar averías
durante el funcionamiento. Si la lámina
funciona mal, detenga el acondicionador
de aire y arránquelo de nuevo.
• El ángulo de abertura de la lámina
horizontal no debe establecerse
demasiado pequeño, dado que puede
menoscabar el rendimiento de enfriamiento
o calefacción debido a lo restringido de la
zonaparaelujodeaire.
• No utilice el acondicionador de aire con las
láminas horizontales en posición cerrada.
• Si el acondicionador de aire está
conectado al suministro eléctrico
(funcionamiento inicial), la lámina
horizontal puede emitir un sonido por
espacio de 10 segundos, lo que puede
considerarse normal.
Funcionamientodeemergencia
Tecladecontrol
manual
Tecladecontrol
manual
Temperaturadefuncionamiento
Funcionamientoóptimo
• Pulse de nuevo la tecla Manual Control para
apagar el acondicionador de aire.
El modo de funcionamiento se observa en la
siguiente tabla.
Si el acondicionador de aire se usa sin tener
en cuenta las condiciones anteriores, cabe la
posibilidad de que ciertas características de
seguridad, cuya función es la de proteger, se
activen y fuercen al aparato a funcionar mal.
Cuando el mando a distancia se ha perdido o no
funciona, use el interruptor manual de la unidad
interior. El acondicionador de aire funcionará
en modo AUTO y el ajuste de temperatura o la
velocidad del ventilador no podrán cambiarse.
Si desea alcanzar un rendimiento óptimo deberá
observar lo siguiente:
• Ajustecorrectamenteelsentidodeujodelaire
de forma que no quede dirigido a las personas.
• Ajuste la temperatura para alcanzar el mayor
grado de comodidad posible. No ajuste el aparato
a temperaturas demasiado elevadas.
• Cierre las puertas y las ventanas cuando esté en
los modos COOL o HEAT, ya que de lo contrario
el rendimiento puede verse afectado.
• Use las teclas Timer On y Timer Off del mando
a distancia para seleccionar la hora deseada de
encendido y apagado.
• No coloque ningún objeto junto a la entrada o
salidadeaire,dadoquelaecaciadelaparato
puede verse reducida y puede incluso dejar de
funcionar.
• Limpieconfrecuencialosltrosdeaire,yaquede
lo contrario el rendimiento del enfriamiento o de la
calefacción puede verse reducido.
• Pulse la tecla Manual Control para pasar
al modo AUTO. El acondicionador de aire
selecciona automáticamente los modos COOL,
HEAT (solo modelos con bomba de calor) y
FAN en función de la temperatura ambiente
para lograr el mayor confort.
Modo Modelo
Ajuste de la
temperatura
Flujo de aire
AUTO HEAT PUMP 25°C COOL/FAN
AUTO HEAT PUMP 20°C HEAT/FAN
Rangos de temperatura de funcionamiento
Lado interior
DB (°C)
Lado exterior
DB (°C)
Enfriamiento máximo 32 43
Calor máximo 27 24

57
Limpiezaymantenimiento
Mantenimiento
Limpiezadelaunidadinterior
yelmandoadistancia
Limpiezadelosltros
Abrazadera
del panel
Asadelltrodepolvo
Se deben realizar periódicamente las siguientes operaciones de mantenimiento.
*
Estaoperacióndebellevarlaacaboúnicamentepersonalcualicado.
• Apague el acondicionador de aire y
desconecte el suministro eléctrico antes de
proceder a la limpieza.
• Utilice un paño seco para limpiar la unidad
interior y el mando a distancia.
• Puede utilizar un paño humedecido con agua
fría para limpiar la unidad interior si está muy
sucia.
• El panel frontal de la unidad interior puede
quitarse y limpiarse con agua. Después pase
un paño seco.
• No utilice cepillos, papel de lija ni elementos
de pulido para limpiar la unidad, ya que puede
causar daños.
• No utilice un paño tratado químicamente ni un
paño de quitar el polvo para limpiar el aparato.
• No utilice disolventes, diluyentes, polvo para
pulir ni disolventes similares para la limpieza.
Pueden causar roturas o deformaciones en la
superciedeplástico.
• Nunca utilice agua caliente a más de 40ºC
para limpiar el panel frontal, ya puede causar
deformaciones o decoloraciones.
1 Levante el panel frontal de la unidad interior hasta
un ángulo en el que se pare con soporte total de
la abrazadera.
2 Sujeteelasadelltrodepolvoylevántelo
ligeramenteparasacarlodelportaltros.
Nota: Hay que desconectar el suministro eléctrico
antes de proceder a la limpieza.
Unltrocontraelpolvoqueestéatascado
reducelaecaciadeenfriamientoocalefacción
delaparato.Limpieelltromensualmenteocon
mayor frecuencia si fuera necesario.
3 Tiredespuésdelltrohaciaabajoparaextraerlo
de la unidad interior.
advertencia
Artículos
Operaciones de
mantenimiento
Frecuencia recomendada
Filtro de polvo Limpieza
Mensualmente o con mayor frecuencia si fuera
necesario
Filtros ambientadores Cambio / limpieza
Cada 3 meses o con mayor frecuencia si fuera
necesario
Carcasa del aparato Limpieza
Mensualmente o con mayor frecuencia si fuera
necesario
Bandeja de recogida de agua y
tuberías de evacuación
Limpiaryvericarsi
hay obstrucciones
Al principio de cada estación antes de ponerlo en
funcionamiento*
Bobinas interior y exterior Limpieza
Al principio de cada estación antes de ponerlo en
funcionamiento*

58
Mantenimiento general
Filtro de polvo
Notoqueniintentelimpiarel
generadordefríodeplasma(en
sucaso).Puedecausardescargas
eléctricas.
• No toque las partes metálicas de la unidad al
sacarelltro.Puedenproducirselesionesal
manipularbordesdemetalalados.
• No utilice agua para limpiar el interior del
acondicionador de aire. El contacto con el
agua puede destruir el aislamiento y acarrear
posibles descargas eléctricas.
• Al limpiar el aparato asegúrese primero de
que el suministro eléctrico y el disyuntor
están apagados.
Filtro de polvo
Filtro
ambientador
Limpieelltrodepolvoconunaaspiradorao
agua y, seguidamente, séquelo en un lugar
fresco.
Si el acondicionador de aire no va a usarse durante
un largo período de tiempo:
• Póngalo en funcionamiento en el modo de solo
ventilador (FAN) durante aproximadamente
3 ó 4 horas para que la unidad se seque
completamente.
• Apague el aparato y tire del enchufe. Saque las
baterías del mando a distancia.
• La unidad exterior requiere limpieza y
mantenimiento periódicos. No intente hacerlo
usted mismo. Diríjase a su distribuidor o técnico
de servicio.
Comprobacionesantesdelapuestaen
funcionamiento
• Asegúrese de que el cableado no está roto ni
desconectado.
• Asegúresedequeelltrodepolvoestáinstalado.
• Asegúrese de que la entrada o salida de aire no
están bloqueadas si el aparato no se ha usado
durante mucho tiempo.
4 Losltrosambientadores(ensucaso)como
elltrodecarbónactivo,elbioltro,elltrode
vitaminaCoelltrodeplataiónicaestánjados
alltrodepolvo.
Retirelosltrosambientadoresdelmarcodel
soportedelltro.
Limpielosltrosambientadorescomomínimo
cada tres (3) meses y cámbielos cada 6 meses.
Límpielos con una aspiradora en la medida de lo
posible.
5 Vuelvaacolocarlosltrosambientadoresen
su sitio.
6 Vuelvaacolocarlapartesuperiordelltro
de polvo en la unidad, teniendo cuidado para
que los bordes izquierdo y derecho queden
debidamente alineados y coloque en su sitio
losltrosdepolvo.
advertencia
advertencia

59
Consejosdefuncionamiento
3.Delaunidadinteriorsaleunaneblinablanca.
• Puede generarse una neblina blanca debido a la
gran diferencia de temperatura entre la entrada y
la salida de aire en el modo COOL en un entorno
interior que tenga una elevada humedad relativa.
• Esta neblina blanca puede generarse por
la humedad generada en el proceso de
descongelación cuando el acondicionador
arranca en el modo HEAT tras la descongelación.
4.Elacondicionadordeaireemiteunligeroruido
• Puede oírse un ligero silbido cuando el
compresor funciona o deja de hacerlo. Este
sonidoeseldelrefrigerantealuirodetenerse.
• Puede oírse un ligero "chirrido" al funcionar el
compresor o al dejar de hacerlo. Ello se debe a la
dilatación por el calor y a la contracción por el frío
de las partes de plástico del aparato cuando la
temperatura cambia.
• Puede que se oiga un ruido ocasionado por la
lámina al volver a su posición original al encender
el suministro eléctrico.
5.Launidadinteriorexpulsapolvo.
Esto es normal cuando el acondicionador de aire no
se ha usado desde hace tiempo o cuando se pone
en funcionamiento por primera vez.
6.Delaunidadinteriorsaleunolorpeculiar.
Ello se debe a que la unidad interior emite olores
ocasionados por los materiales de construcción,
muebles o humos.
7.ElacondicionadordeairepasadelmodoCOOL
oHEATaldesoloFAN(ventilador).
Al llegar la temperatura interior al valor ajustado,
el compresor se para automáticamente y el
acondicionador de aire cambia al modo de
ventilador (FAN).
El compresor volverá a funcionar cuando la
temperatura interior suba en el modo COOL o baje
en el de HEAT hasta alcanzar el punto de ajuste
seleccionado.
8.Condensación
Es probable que se forme agua de condensación en
la salida de aire si se enfría o seca durante mucho
tiempo cuando la humedad relativa es de más del
80% (con las puertas y ventanas abiertas).
Ajuste la lámina vertical al ángulo máximo (respecto
al suelo) y seleccione el modo de velocidad del
ventilador High (alta). Cierre puertas y ventanas.
9.La iluminación o el teléfono inalámbrico de un
vehículo funcionando en las cercanías puede
ocasionar un funcionamiento incorrecto del aparato.
Desconecte la unidad del suministro eléctrico y,
seguidamente, vuelva a conectarla. Pulse la tecla
ON/OFF del mando a distancia para reiniciar el
funcionamiento.
10.FuncióndelventiladorX-Fan
La unidad interior puede seguir funcionando
después de apagarla pulsando la tecla ON/OFF.
Compruebe si se ha apagado la función X-Fan.
Cabe la posibilidad de que durante un
funcionamiento normal se produzcan los
siguientes sucesos:
1.Proteccióndelacondicionadordeaire.
• Proteccióndelcompresor
El compresor no puede volver a arrancar
antes de que transcurran 3 minutos después
de pararse.
• Anticongelación
Si la unidad funciona en el modo COOL y a
baja temperatura ambiente, puede formarse
escarcha en el condensador. Cuando la
temperatura del condensador baja por debajo
de los 0ºC, el compresor se detiene para
proteger la unidad.
• Descongelación
En la unidad exterior puede formarse hielo
durante el ciclo de calefacción, cuando la
temperatura exterior es baja y cuando la
humedad es elevada, lo que conlleva una
reduccióndelaecaciacalefactora.
En estos casos el acondicionador de aire
dejará de calentar y comenzará a deshelar
automáticamente. El periodo necesario para
la descongelación puede variar entre 3 y 12
minutos.
Durante la descongelación, los motores de
ventilación de la unidad interior y exterior se
paran, el indicador interior parpadea “H1” y la
unidad exterior puede emitir vapores. No se
trata de ninguna avería. Una vez terminada
la descongelación, el modo de calefacción se
recupera automáticamente.
• Proteccióncontraelairefrío
En el modo HEAT, el ventilador interior no
funciona para evitar que se introduzca aire
frío en la habitación (durante 2 minutos),
si el condensador interior no alcanza una
temperatura mínima en los siguientes casos:
(1) El modo de calefacción acaba de
empezar.
(2) Exactamente después de que la
descongelación automática termine.
(3) Calefacción a baja temperatura.
2.Suavebrisa
Es posible que la unidad interior genere una
suave brisa y las láminas giren a una posición
determinada en los siguientes casos:
(1) En el modo HEAT, la unidad está encendida,
el compresor no alcanza la condición de
arranque.
(2) En el modo HEAT, la temperatura alcanza
el valor programado y el compresor deja de
funcionar durante 1 minuto.

60
Solucióndeproblemas
• Si aparece un código de error (excepto H1) en
la pantalla de la unidad interior.
• El indicador de corriente u otros indicadores
parpadean rápidamente y no se puede
detener desconectando la alimentación y
volviendo a encenderla.
• El fusible se funde o el disyuntor salta con
frecuencia.
• Se ha salpicado agua u otros líquidos a la unidad.
• La unidad pierde agua.
• Se produce un sonido brusco durante el
funcionamiento.
• Se emiten olores fuertes durante el
funcionamiento.
• El cable de alimentación y el enchufe están
sobrecalentados.
• Otras situaciones anómalas.
El acondicionador de aire no lo puede reparar el usuario. Las reparaciones incorrectas
pueden causar incendios o descargas eléctricas. Póngase en contacto con un centro de
servicio autorizado para obtener una reparación profesional.
Si se produce alguna de las siguientes situaciones, pare inmediatamente el acondicionador de
aire, desconecte la alimentación y póngase en contacto con el centro de servicio técnico.
La presión del sistema de refrigeración es baja y puede provocar roturas en la unidad.
Soliciteauninstaladorcualicadoquelosupervise.
advertencia
Anomalías Causa ¿Qué se debe hacer?
La unidad no se
inicia
Corte eléctrico Espere a que se restablezca el
servicio.
Puede que la unidad se haya
desenchufado.
Asegúrese de que está
correctamente enchufada.
Puede que el fusible se haya fundido. Cambie el fusible.
La tensión es demasiado alta o
demasiado baja.
Solicite que un profesional pruebe
la tensión.
Puede que las pilas del mando a
distancia se hayan agotado.
Cambie las pilas.
La hora que ha seleccionado para el
temporizador no es correcta.
Espere o cancele el ajuste del
temporizador.
La unidad no enfría
o no calienta bien
la habitación (en
su caso), al tiempo
que sale aire del
acondicionador.
El ajuste de la temperatura no es
apropiado.
Denacorrectamentela
temperatura. Para obtener más
información, consulte el apartado
“Uso del mando a distancia”.
Elltrodeaireestábloqueado. Limpieelltro.
Las puertas o ventanas están abiertas. Cierre puertas y ventanas.
La entrada o salida de aire de la
unidad interior o exterior están
bloqueadas.
Quite las obstrucciones antes de
volver a arrancar el aparato.
Se ha activado la protección de
3 minutos del compresor.
Espere 3 minutos.
Si el problema no se ha solucionado, póngase en contacto con un distribuidor local o con el centro
de servicio al cliente más cercano. Cerciórese de que les informa detalladamente de las averías y del
modelo de unidad.

61
Las siguientes comprobaciones antes de ponerse en contacto pueden ahorrarle tiempo y dinero.
Anomalías Causa
Fuga de agua de
la unidad interior
•La humedad es alta.
•Desbordamiento del agua de
condensación.
•Lamangueradedesagüeestáoja
u obstruida.
Fuga de agua
de la unidad
exterior
•Durante el modo de enfriamiento, el
agua se condensa alrededor de los
tubos y juntas de conexión.
•Durante el modo de descongelación,
elaguadescongeladauyehacia
afuera.
•Durante el modo de calefacción, el
agua del condensador gotea hacia
afuera.
Ruido de la
unidad interior
•Ruido emitido cuando el relé
del compresor o el ventilador se
encienden o apagan.
•Cuando se inicia o detiene el modo
de descongelación, se produce un
sonidodeujoderefrigeranteenla
dirección opuesta.
La unidad
interior no puede
expulsar aire.
•En el modo HEAT, cuando la
temperatura del condensador
interioresmuybaja,elujodeaire
se detiene para evitar el aire frío (en
2 minutos).
•En el modo HEAT, cuando la
temperatura exterior es baja o la
humedad es alta, se forma hielo en
el condensador exterior. La unidad
se descongela automáticamente y la
unidad interior para el aire durante
unos minutos.
•Durante la descongelación, pueden
emitirse vapores o agua.
•En el modo DEHUMIDIFY, el
ventilador interior para el aire
durante unos 3-12 minutos para
evitar que el agua de condensación
se evapore de nuevo.
Humedad en la
salida de aire
Si la unidad funciona con humedad
elevada durante mucho tiempo, se
puede generar humedad en la rejilla
de salida del aire y después gotear.
Código de
error H1:
descongelación
Esto es correcto. La unidad
se encuentra en el modo de
descongelación y la calefacción se
reanuda pronto.
Anomalías Causa
La unidad no
funciona.
La unidad no funciona si se enciende
inmediatamente después de
apagarse. Esto sirve para proteger la
unidad. Espere unos 3 minutos.
Se producen
olores.
•Es posible que la unidad interior
desprenda olores. Es el resultado
de los olores de la habitación (como
muebles, tabaco, etc.) que ha
absorbido la unidad.
•Póngase en contacto con el centro
de servicio técnico para la limpieza
si persisten los olores.
Ruido de “agua
uyendo”
El ruido de siseo como agua
corriendoeselrefrigerantequeuye
en el interior de la unidad.
Se genera
neblina en el
modo COOL.
Durante el modo de enfriamiento,
es posible que se genere una suave
neblina de la unidad interior debido
a la alta temperatura ambiente y a la
humedad.
Después de un lapso de tiempo, la
neblina desaparece a medida que se
reduce la temperatura y la humedad.
Crujido
Es el sonido de la fricción causada
por la expansión o contracción del
panel u otras partes por el cambio
de temperatura.
La unidad no se
puede encender.
•¿Está cortado el suministro
eléctrico?
•¿Está suelto el enchufe?
(en su caso)
•¿Se ha disparado el dispositivo de
protección del circuito?
•¿Es la tensión más alta o más baja?
(prueba por parte de técnicos)
•¿Se ha utilizado correctamente el
temporizador (TIMER)?
•¿Se han agotado las pilas?
El efecto de
refrigeración
/ calefacción es
de baja calidad.
•¿Es adecuado el ajuste de
temperatura?
•¿Están bloqueadas la entrada o
salida de aire?
•¿Estásucioelltro?
•¿Están abiertas las puertas o
ventanas?
•¿Se ha ajustado la velocidad baja
del ventilador?
•¿Hay fuentes de calor en la
habitación?
No se deshaga de este producto en los vertederos como si fuera
unresiduosinclasicar.Esnecesarioclasicarlosdesechospor
separado para que reciban el tratamiento adecuado.
21
The following checks prior to contact may save you time and money.
Malfunctions Cause
Water leakage
of indoor unit
•The humidity is high.
•Condensingwateroverows.
•Drain hose is loose or
obstructed.
Water leakage
of outdoor unit
•During cooling operation, water
condensates around the pipes
and connection joints.
•During defrosting operation,
thawedwaterowsout.
•During heating operation, water
on the heat exchanger drips out.
Noise from
indoor unit
•The noise emmited when the fan
or compressor relay is switched
on or off.
•When the defrosting operation
is started or stopped, there is a
soundofrefrigerantowingin
the reverse direction.
Indoor unit can
not blow air
•In HEAT mode, when the
temperature of indoor heat
exchangerisverylow,airowis
stopped in order to prevent cold
air. (within 2 minutes)
•In HEAT mode, when the
outdoor temperature is low or
humidity is high, frost will be
formed on the outdoor heat
exchanger. The unit will defrost
automatically and indoor unit will
stop blowing air for 2-3 mintues.
•During defrosting operation,
water or vapour may be
emmited.
•In DEHUMIDIFY mode, the
indoor fan will stop blowing air
for 3-12 minutes in order to
avoid condensing water being
vaporised again.
Moisture on air
outlet
If the unit operates at high
humidity for a long time, moisture
may be generated on air outlet
grill and then drip off.
H1 error code:
defrosting
It is normal. The unit is in
defrosting operation and heating
will recommence soon.
Malfunctions Cause
The unit does
not operate
The unit does not operate if it is
turned on immediately after it is
turned off. This is to protect the
unit. Please wait about 3 minutes.
Odours are
emitted
•Some odours may be emmited
from the indoor unit. This is the
result of room smells (such as
furniture, tobacco, etc.) which
have been taken into the unit.
•Consult authorised service
center for cleaning if the odours
persist.
“Waterowing”
noise
The swishing noise like water
owingistherefrigerantowing
inside the unit.
Mist is
emmited in
COOL mode
During cooling operation, a thin
mist may be seen emmited from
the indoor unit due to high room
temperature and humidity.
After a period of time, the mist
will disappear as the decrease of
room temperature and humidity.
Cracking noise
This is the sound of friction
caused by expansion and/or
contraction of panel or other
parts due to the change of
temperature.
The unit can
not be started
up
•Is the power cut off?
•Is the power plug loose?
(if applicable)
•Is the circuit protection device
tripped off?
•Is voltage higher or lower?
(tested by professionals)
•Is the TIMER correctly used?
•Are the batteries exhausted?
Cooling
/Heating effect
is poor
•Is the temperature setting
appropriate?
•Is the air inlet/outlet blocked?
•Isthelterdirty?
•Is the door or window open?
•Is low fan speed set?
•Are there heat sources in the
room?
Do not dispose this product as unsorted municipal waste.
Collection of such waste separately for special treatment
is necessary.

62
İçindekiler
Tebrikler ...............................................................................63
Güvenlik Önlemleri ..............................................................64
ÜrünTanımı .........................................................................66
İçMekanÜnitesiEkranı.......................................................67
Uzaktan Kumanda ................................................................67
UzaktanKumandaAçıklaması.............................................68
UzaktanKumandaEkranıGöstergeleri ...............................69
İlkkullanım...........................................................................70
UzaktanKumandanınKullanımı ...........................................70
İçMekanÜnitesiNasılKullanılır .......................................... 75
AcilDurumÇalışması ..........................................................76
İdealÇalıştırma.................................................... ...............76
TemizlikveBakım ................................................................77
Çalıştırmaİpuçları ...............................................................79
Sorun giderme .....................................................................80
• Uzaktankumandayı,sinyalininiçmekanünitesine
erişebileceğibiryerdetutun.
• Klimayıkullanırken,uzaktankumandanıniçmekan
ünitesininsinyalalıcısınıgösterdiğindeneminolun.
• Uzaktankumandabirsinyalgönderdiğinde,sembol
yaklaşık
1saniyesüreyleuzaktankumanda
ekranındayanıpsönecektir.
• İçmekanünitesisinyaliuzaktankumandadanaldığında
sinyalibirbipsesiilekabuledecektir.
• Uzaktankumandatuşunabasınveiçmekanünitesinden
birbipsesigelmezseyenidensinyalgönderin.
ÖnemliHatırlatma

63
Tebrikler
• Klima,küçükçocuklarveyaçokyaşlıkişiler
tarafındandenetimsizbirşekildekullanılmak
üzeretasarlanmamıştır.
• Küçükçocukların,klimaileoynamadıklarından
eminolunmalıveçocuklargözetimaltında
tutulmalıdır.
• Buklimanınmontajıiçinyetkilibirmontaj
personelinebaşvurun.
• Bucihazınonarımıyadabakımıiçinyetkilibir
servisteknisyeninebaşvurun.
• Güçkablosudeğiştirilecekse,değişimişleminin
sadeceyetkilipersoneltarafındanyapılması
gerekir.
• Montajişlerinin,sadeceyetkilipersonel
tarafındanonaylanmışulusalkablo
Standartlarıileuyumluşekildeyapılması
gerekir.
Electroluxsplittipiklimaseçtiğiniziçintebrikve
teşekkürederiz.Yeniklimanızıkullanmanınbirzevk
olduğunuhissedeceğinizdeneminiz.
Klimayıkullanmadanönce,klimave
fonksiyonlarınınaçıklandığıkullanmakılavuzunun
tümünüokumanızıöneririz.
Birelektriklicihazkullanırkendaimamevcutolan
risklerdenkaçınmakiçin,klimadoğruşekilde
kurulmuşolmalıdırveyanlışkullanımıvetehlikeleri
önlemekiçingüvenliktalimatlarınıdikkatlice
okumanızgerekmektedir.
Bukitapçığıileridekullanmakveyagelecekteki
sahibinevermeküzeresaklayın.
Klimayıambalajındançıkardıktansonralütfen
hasarlıolupolmadığınıkontroledin.Eğerşüpheniz
varsa,klimayıkullanmayınveyerelElectroluxyetkili
servis merkezinizle temas kurun.
Kullanımşartları
Bucihazaşağıdakigibievvebenzerialanlarda
kullanılmaküzeretasarlanmıştır:
• Mağaza,osvediğerçalışmaortamlarındaki
mutfakbölümleri.
• Çiftlik evleri.
• Otel,motelvediğerkonaklamatarzıyerlerdeki
müşterilertarafından.
• Pansiyon tipi ortamlar.
Önemlinotlar
Buüniteninmontajıiçinyetkilibirmontaj
personelinebaşvurun.
Bucihazınonarımıyadabakımıiçinyetkilibir
servisteknisyeninebaşvurun.
• Güçvermekiçingerekliolansoketçıkışı,
lisanslıbiryüklenicitarafındanbağlanmalı
vekullanımasunulmalıdır.
• Bucihaz,ziksel,duyumsalveyazihinsel
kapasitesidüşükkişiler(çocuklardahil)veya
yeterlibilgivedeneyimesahipolmayankişiler
tarafından,güvenliklerindensorumlubirkişi
tarafındanbilgilendirilmedenveyabukişinin
gözetimialtındaolmadıkçakullanılmamalıdır.
• Küçükçocukların,klimaile
oynamadıklarındaneminolunmalıve
çocuklargözetimaltındatutulmalıdır.
• Güçkablosudeğiştirilecekse,değişim
işlemininsadeceyetkilipersoneltarafından
yapılmasıgerekir.
• Montajişlerinin,sadeceyetkilipersonel
tarafındanonaylanmışulusalkablo
standartlarıveelektriktedarikçileriservis
kurallarıileuyumluolarakyapılmasıgerekir.
• Üniteninbaşkayeretaşınmasıveya
sökülmesigerekirse,buişlemancakkaliye
birkişitarafındangerçekleştirilmelidir.
• Dikeyhavalandırmakapaklarınıayarlarken
fanınpervanesineparmaklarınızı
kaptırmamayadikkatedin.
• BuklimadaR410Asoğutucuakışkan
kullanılır.
Kullanıcılariçinimhaetmeileilgilibilgiler
• Ambalajmalzemelerininbüyükbirkısmıgeri
dönüşümlüdür.
• Lütfenbumalzemeleriyerelgeridönüşüm
depolarınakoyarakveyauyguntoplama
kutularınaatarakimhaedin.
• Buklimayıatmakistemenizhalinde,lütfenyerel
idarenizle temas kurarak uygun imha etme
yönteminiöğrenin.
dikkat
çevrekorumasınailişkinipucu

64
Yanıkkokusugibianormalbirdurum
tespitederseniz,klimayıkapatınve
Electroluxservisiiletemasageçin.
Anormal durum devam ederse, klima
hasargörebilirvehattaelektrikçarpması
yadayangınanedenolabilir.
Klimayııslakellerleçalıştırmayın.Bu
durumelektrikçarpmasınanedenolabilir.
Elektrikkablosuyadadiğerkablolara
zarar vermeyin ya da kesmeyin.
Budurumortayaçıkarsa,yetkilibir
teknisyeningereklionarımıyapmasını
yadakabloyudeğiştirmesinisağlayın
Buklimayıçokluprizebağlamayın.
Uzunsürekullanılmayacaksaklimaya
gelen gücü kesin. Aksi takdirde, toz
birikecekvebudayangınaneden
olabilecektir.
Klimayıtemizlemedenönce,elektrik
çarpmasıolasılığınıortadankaldırmak
içingüçkaynağınıkesin.
Güçkaynağımontajkılavuzunagöre
klimaileuyumluolmalıdır.Elektrik
kablosu ile sunulan klimalar, uygun bir
güvenlikşalteriyleprizebağlanmalıdır.
Tesisatlıklimalar,montajkılavuzuna
göreuygunbirgüvenlikdevrekesicisine
bağlanmalıdır.
Klimayagelengücünstabilolduğundan
vemontajkılavuzundakigereksinimleri
karşıladığındaneminolun.
Ürünün uygun topraklama ile monte
edildiğindeneminolun.
Güvenlikiçin,herhangibirbakımya
datemizliktenönceveyaürünuzun
sürekullanılmadığındadevrekesiciyi
kapattığınızdaneminolun.Birikentoz
yangınayadaelektrikçarpmasınaneden
olabilir.
Güvenlikönlemleri
Bukılavuziçinde,klimanızınkullanımıvebakımı
hakkındasizeyardımcıolabilecekyararlıipuçları
bulacaksınız.Yapacağınızküçükbirönleyicibakım,
klimanızınömrüsüresincesizeciddişekildezaman
veparatasarrufusağlayabilir.Sayfa20-21'dekiarıza
bulmaipuçlarıtablosundagenelsorunlarailişkin
pekçokyanıtbulacaksınız.Önceliklesorungiderme
ipuçlarıtablosunagözatarsanız,servisiaramanıza
gerek kalmayabilir.
Bukullanımkılavuzundakullanılansembollerin
anlamlarıaşağıdagösterilmektedir:
Bu,kişiselgüvenliğinizlevecihazınzarargörmesinin
nasılönleneceğiileilgiliönemlibilgilereişareteder.
Busembol,cihazınkullanımıhakkındaipuçlarıve
bilgileri belirtir.
Busembol,cihazınekonomikveekolojikkullanımı
hakkındaipuçlarınıvebilgileribelirtir.
Busembol,'aslayapmayın'anlamınagelir.
Bunudaimayapın.
Önemli notlar:
1 Yatayvekapalıkonumdaüniteyiçalıştırmayın.
2 Üniteyi,havaltresiolmadankullanmayın.
dikkat
uyarı
çevrekorumasınailişkinipucu
ipuçlarıvebilgiler

65
Güvenlikönlemleri
Kullanım
Uzunbirsüreklimadangelenhavaakışına
maruzkalmaksağlığınızaçısındantehlikeli
olabilir.
İnsanları,evcilhayvanlarıveyabitkileriuzun
süredoğrudanhavaakışınamaruzbırakmayın.
Temizlikvebakım
1 Üniteyitemizlerken,önceliklegüçvedevre
kesicininkapatıldığındaneminolun.
2 Filtreleriçıkarırkenüniteninmetal
kısımlarınadokunmayın.Keskinmetal
kenarlar yaralanmalara neden olabilir.
3 Klimanıniçinitemizlemekiçinsu
kullanmayın.Suyamaruzbırakmakelektrik
çarpmasınanedenolabilir.
Servis
Onarımvebakımiçinyetkiliservistemsilciniz
ileiletişimegeçin.
ÇalıştırmaÖncesi
1 Kaliyebirmontajpersoneliçağırın.
2 Güçşinidoğrubirşekildetakın.
3 Hasarlıyadastandartolmayangüç
kablosukullanmayın.
4 Diğercihazlarileaynıçıkışı
paylaşmayın.
5 Uzatmakablosukullanmayın.
6 Güçkablosunutakarak/çıkararakişlemi
başlatmayın/durdurmayın.
dikkat
Enuygunsıcaklığıseçin.
Elektriktasarrufusağlayabilir.
Çalışmasırasındapencerevekapıları
uzunsüreaçıkbırakmayın.Yetersiz
performansanedenolacaktır.
Havagirişiyadaçıkışınıtıkamayın.
Yetersizperformansavearızalaraneden
olacaktır.
Yanıcımaddeleriünitelerdenenaz
1metreuzaktatutun.Yangınaneden
olabilir.
Dışüniteüstüneçıkmayınyadaüzerine
ağırşeylerkoymayın.
Hasara ya da yaralanmaya neden olabilir.
Klimayıkendinizonarmayaçalışmayın.
Yanlışonarımlarelektrikçarpmasınaya
dayangınanedenolabilir.Lütfenyerel
yetkiliservisinizileirtibatageçin.
Elleriniziyadacisimlerihavagirişiyada
çıkışınasokmayın.Yaralanmayaneden
olabilir.
Hayvanlarıyadabitkileridoğrudanhava
akışınamaruzbırakmayın.
Yiyecek saklama ya da giysi kurutma gibi
başkaamaçlarlaüniteyikullanmayın.
Klimayasusıçratmayın.Budurum
elektrikçarpmasıyadaarızayaneden
olabilir.

66
1
3
2
5
6
8
10
11
12
14
15
7
4
ÜrünTanımı
Havagirişi
İçMekanÜnitesi
HavaÇıkışı
DışÜnite
Havagirişi(arka)
Havagirişi
(yan)
Hava
Çıkışı
Yukarıdaki çizimler sadece bilgi amaçlıdır.
Klimanız biraz farklı olabilir.
Asıl şekil geçerli olacaktır.
Not:
Ön panel
Dijitalgösterge
Sağlıklıhavaltresi(tozltresininarkasında)
Öntozltresi
Yatayhavapancurları
Dikeyhavapancurları
Soğukplazmaüreteci(varsa)
Manuelkontroltuşu
Uzaktan kumanda
Uzaktan kumanda tutucu
Soğutucuakışkanborusu(varsa)
Tahliye hortumu (varsa)
Güçkablosu(varsa)
Montajplakası
Bağlantıkablosu(varsa)
6
Light
Turbo
Timer-On
Temp
Timer-Off
Swing
I feel
Eco
Fan
Clock
Mode
1
3
2
5
6
8
9
10
11
12
13
14
15
7
4
ProductDescription
Air inlet
IndoorUnit
Air Outlet
OutdoorUnit
Air inlet (rear)
Air inlet
(side)
Air Outlet
The above drawings are for explanation purpose only.
Your air conditioner may be slightly different.
The actual shape shall prevail.
Note:
Front panel
Digital display
Healthyairlter(behindthedustlter)
Pre-dustlter
Horizontal air louvers
Vertical air louvers
Cold plasma generator (if applicable)
Manual control button
Remote control
Remote control holder
Refrigerant pipe (if applicable)
Drain hose (if applicable)
Power cable (if applicable)
Mounting plate
Connecting cable (if applicable)
13

67
Uzaktan Kumanda
ipuçlarıvebilgiler
• Pillerideğiştirirken,eskiveyadeğişmiş
olanlarıkullanmayın,aksitaktirdebudurum
uzaktan kumanda da sorunlara neden olabilir.
• Uzaktankumandauzunsürekullanılmazsa,
eskipillerkaçakyadakorozyonyaparak
uzaktankumandayazararverebileceğinden
pilleriçıkarın.
• Normalkullanımdapilinömrüyaklaşıkaltı
aydır.
• Uzaktankumandadüzgünçalışmazsa,pilleri
çıkarınveyenidentakın.Anormalçalışma
devamederse,yenipilleriledeğiştirin.
• Uzaktankumandayı,sinyaliniçmekan
ünitesineerişebileceğibiryerdetutun
(maksimum 8 m'lik mesafeye izin verilir).
• Zamanlayıcıyıçalıştırmayıseçtiğinizde,
uzaktan kumanda otomatik olarak belirlenen
zamandaiçmekanünitesinebirsinyal
gönderir.
• Perdeler,kapılaryadadiğermalzemeler
uzaktankumandadaniçmekanünitesinegelen
sinyallerikesiyorsaklimaçalışmayacaktır.
• Uzaktankumandayasıvıgirmemesinedikkat
edin.Uzaktankumandayıdoğrudangüneş
ışığıyadaısıyamaruzbırakmayın.
• İçmekanünitesindekikızılötesisinyalalıcısı
doğrudangüneşışığınamaruzkalırsa,klima
düzgünçalışmayabilir.Güneşışığınınalıcıya
gelmesiniönlemekiçinperdekullanın.
• Diğerelektriklicihazlaruzaktankumandaya
tepkiveriyorsa,bucihazlarıhareketettirinya
dayerelbayinizedanışın.
İçMekanÜnitesiEkranı
• Uzaktankumandayıuygunsinyalalımını
engelleyenbirkonumdatutarsanız,15dakikaya
kadar bir gecikme olabilir.
• Uzaktankumandabirsinyalgönderdiğinde,
sembolyaklaşık
1 saniye süreyle uzaktan
kumandaekranındayanıpsönecektir.İçmekan
ünitesi,uzaktankumandadansinyalaldığında
bunu bir bip sesi ile kabul edecektir.
IsıModugöstergesi
Isıtmafonksiyonuetkinleştiğindeyanar
SoğutmaModugöstergesi
Soğutmafonksiyonuetkinleştiğindeyanar
GüçAÇIK/KAPALIgöstergesi
Cihazçalışıyorkenyadabekleme
modundayken yanar
Nemgidermegöstergesi
Nemgidermefonksiyonuetkinleştiğindeyanar
Sıcaklıkgöstergesi
Klimakullanılırkensıcaklıkayarınıgösterir
Sinyalalıcı
dikkat
UzaktanKumandanınKullanımı
• Uzaktankumandayıiçmekanünitesininsinyal
alıcısınadoğrultun.
• Sinyalileçakışabilecekbirengelolmadığından
emin olun.
Uzaktankumandanınkonumu
Pilintakılması/değişimi
• Pilbölmesikapağınıkaydırıpçıkarınveikiyeni
alkalipili(2xAAA1,5Volt)takın.(+)yada(-)
kutuplarındoğruolduğundaneminolun.
• Pilbölmesikapağınıgeritakın
8m
7
RemoteControl
tips and information
• When changing batteries, do not use old
or varied ones, otherwise, it may cause
problems with the remote control.
• If the remote control is not used for a long
time, remove the batteries as old batteries
may leak or corrode and damage the remote
control.
• The battery life during normal use is about six
months.
• If the remote control does not operate
normally,pleaseremoveandretthe
batteries. If abnormal operation continues,
replace with new batteries.
8m
• Keep the remote control where its signal
can reach the receiver of the indoor unit (a
maximum distance of 8m is allowed).
• When you select the timer operation, the
remote control automatically transmits a signal
totheindoorunitatthespeciedtime.
• The air conditioner will not operate if curtains,
doors or other materials block the signals from
the remote control to the indoor unit.
• Prevent any liquid from falling into the remote
control. Do not expose the remote control to
direct sunlight or heat.
• If the infrared signal receiver on the indoor
unit is exposed to direct sunlight, the air
conditioner may not function properly. Use
curtains to prevent the sunlight from falling on
the receiver.
• If other electrical appliances react to the
remote control, either move these appliances
or consult your local dealer.
IndoorUnitDisplay
Signal
receiver
• If you keep the remote control in a position that
hinders proper signal transmission, a time lag of
up to 15 minutes may occur.
• When the remote control sends out a signal, the
symbol
will blink for about 1 second on the
display. The indoor unit will acknowledge the
signal with a beep when it receives an effective
signal.
IFeelindicator
It lights when I Feel function is activated.
Turboindicator
Illuminates during Turbo operation.
Eco(Economy)indicator
Illuminates when ECO function is in operation.
Temperatureindicator
Displays the temperature settings when the air
conditioner is in operation.
Timerindicator
The indicator illuminates when Timer is set ON
and/or OFF.
Swingindicator
It lights when the Swing function is activated.
caution
HowtousetheRemoteControl
• Point the remote control to the signal receiver of
indoor unit.
• Make sure there is no obstacle that may interfere
with the signal.
Locationoftheremotecontrol
Batteryinstallation/replacement
• Slide the battery compartment cover off and
insert two new alkaline dry batteries
(2x AAA1.5Volt). Make sure that the polarity of
(+) or (-) is installed correctly.
• Slide the battery compartment cover back on
Light
Turbo
Timer-On
Temp
Timer-Off
Swing
I feel
Eco
Fan
Clock
Mode

68
UzaktanKumandaAçıklaması
TurboTuşu
FanıyüksekhızlıTurbomodunaalmakiçin
SOĞUTMAyadaISITMAmodundaykenbu
tuşabasın.Böylece,klimamaksimumgüçte
çalışacaktır.
Bufonksiyonuiptaletmekiçinyenidenbasın.
X-FanDüğmesi
SoğutmaveNemgidermemodunda,Otomatik
TemizlemeyietkinleştirmekiçinX-Fantuşuna
basın.Ünitekapatıldıktansonra,bakteriveküf
oluşumunuönlemekamacıylaiçmekanünitesini
kurutmakiçiniçmekanfanı
10dakikaçalışmayısürdürecektir.
TimerOn(ZamanlayıcıileAçma)Tuşu
Başlangıçzamanınıayarlamakiçinbutuşabasın.
TimerOff(ZamanlayıcıileKapama)Tuşu
Duruşzamanınıayarlamakiçinbutuşabasın.
Swing(Salınım)Tuşu:
Butuşabastığınızda,pancuryukarıveaşağı
otomatiksalınacaktır.İptaletmekiçinbunatekrar
bastığınızdapancurensonkonumundakalacaktır.
IFeel(Hissediyorum)Tuşu:
Butuşabasıldığında,uzaktankumanda
sıcaklıkbilgisiniher10dakikadabiriçmekan
ünitesinegönderecektir.Ünite,uzaktankumanda
konumundakiayarlısıcaklığaerişmekiçin
çalışacaktır.Bufonksiyonuiptaletmekiçin
yenidenbasın.
KontrolTuşu:
İleri Geri
Isıayarını artırmakiçinbutuşabasın.
Isıayarını azaltmakiçinbutuşabasın.
ZamanlayıcıileAçma/KapamayadaSaat
fonksiyonlarında,saatyadazamanlayıcıayarını
yapmakiçinbutuşlarıkullanın.
Clock(Saat)Tuşu:
ButuşabastığınızdaSaatsembolü
yanıp
sönecektir.Control(Kontrol)tuşlarına ve
basarakistediğinizzamanıayarlayın.
Temp(Sıcaklık)Tuşu
Uzaktankumandadaayarlısıcaklıkgösterimini
odasıcaklığınadeğiştirmekiçinbutuşabasın.
Eco(Eko)(Ekonomi)Düğmesi
Ekoişleminibaşlatmakiçinbutuşabasın.
Bu,uykusırasındakullanımiçinidealdir.
Fonksiyonuiptaletmekiçinyenidenbasın.
Not:
Odasıcaklığını8°C'yeısıtmafonksiyonunu
etkinleştirmekiçin,ısıtmamodundaykenSıcaklık
veSaattuşlarınabasın.
OTOMATİK NEMALMA FAN SOĞUTMA ISITMA
ON/OFF(AÇMA/KAPAMA)Tuşu
KlimayıAÇMAKyadaKAPAMAKiçinbutuşa
basın.
Mode(Mod)Tuşu
ButuşabasılarakOTOMATİK,NEMALMA,
FAN,SOĞUTMAveISITMA(sadece
SOĞUTMAmodelindeISITMAözelliğiyoktur)
modusıraylaseçilebilir.
GüçaçıkkenOTOMATİKmoduvarsayılandır.
OTOMATİKmodundabaşlangıçdeğeri
gösterilmezveklimaistenensıcaklıkta
çalışacaktır.
ISITMAmodunda,başlangıçdeğeri28°C'dir;
Diğermodlaraltında,başlangıçdeğeri25°C'dir.
Light(Işık)Tuşu
İçmekanünitesiningöstergeışıklarınıAÇMAK
yadaKAPAMAKiçinbutuşabasın.
BaşlangıçtanormaldurumAÇIK'tır.
FanTuşu
Butuşabasılarak,Otomatik,Düşük,Ortave
Yüksekhızsıraylaseçilebilir.
Üniteaçıldığında,Otomatikfanhızı
varsayılandır.
NEMALMAmodunda,fanhızıDüşükhızolarak
sabitlenir.
7LPHU2Q
7LPHU2II
6ZLQJ
,)HHO
(FR
)DQ
/LJKW
7XUER
;)DQ
7HPS
&ORFN
0RGH

69
UzaktanKumandaEkranı
Göstergesi
İletimGöstergesi:
Uzaktankumandaiçmekanünitesinesinyal
gönderdiğindegösterilir.
TurboGöstergesi
Turbofonksiyonuseçildiğindegösterilir.
HissediyorumEkranı
Hissediyorumfonksiyonuetkinleştiğinde
gösterilir.
EkoEkranı
Ekofonksiyonuseçildiğindegösterilir.
SağlıklıEkranı
Healthy(Sağlıklı)tuşunabasıldığında
gösterilir.KaldırmakiçinHealthy(Sağlıklı)
tuşunayenidenbasın.
NOT: Soğuk-Plazma fonksiyonsuz
modellerde bu tip bir gösterge yoktur.
OdaSıcaklığıGöstergesi
LCDekrandagösterilensıcaklıkoda
sıcaklığıykengösterilir.Temp(Sıcaklık)
tuşunabasılarakaçılabilir/kapanabilir.
ProgramlanmışSıcaklıkGöstergesi
Uzaktankumandaayarlısıcaklığı
gösterdiğindeyanar.Temp(Sıcaklık)tuşuna
basılarakaçılabilir/kapanabilir.
ZamanlayıcıileAçma/KapamaEkranı
ZamanlayıcıileAçma/Kapamafonksiyonu
etkinleştirildiğindegösterilir.
FanHızıEkranı
Seçilenfanhızınıaşağıdakisıraylagösterir:
“
”(Düşük),“ ” (Orta), “ ” (Yüksek) ve
Otomatik.
Sadece,Otomatikhızda“ ”sembolügösterilir.
SalınımEkranı
Salınımfonksiyonuseçildiğindegösterilir.
X-FanEkranı
TurboveHealthy(Sağlıklı)tuşlarınaaynı
andabasıldığında(Soğuk-plazmafonksiyonlu
modellerde)yadaX-Fantuşuna(Soğuk-plazma
fonksiyonsuzmodellerde)basıldığındaX-Fan
fonksiyonuetkinleştiğindegösterilir.
SıcaklıkEkranı
Odasıcaklığınıyadaayarlısıcaklığı,°Cyada°F
olarakgösterir.
Fanmodundagösterimyok.
SaatEkranı
Saati(ayarlanmalıdır)ve/veyazamanlayıcının
açma/kapamazamanınıgösterir.
ModEkranı
Geçerliçalışmamodunugösterir,şunlarda
dahildir: Otomatik (
), Nem Alma ( ),
Fan ( ),Soğutma( )veIsıtma( ).
NOT: Soğutucu model Isıtma seçeneği sunmaz.

70
İlkkullanım
OtomatikÇalıştırma
UzaktanKumandanınKullanımı
OTOMATİKçalıştırmamoduseçildiğinde,fan
hızıvesıcaklıkotomatikolarakkontroledilir
veayarlanamaz.
Fan
Fan
Soğutma
Soğutma
Süre
Programlanmışsıc.
NemAlıcıÇalıştırma
1 Fişintakılıolduğundanveelektrikgeldiğinden
emin olun.
2 Pillerin,uzaktankumandayadoğru
yerleştirildiğindeneminolun(uzaktan
kumandadakiışıklaraçıkolur).
3 Control(Kontrol)tuşlarıilezamanıayarlayınve
Clock(Saat)düğmesinebasarakonaylayın.
4 Uzaktankumandayıiçmekanünitesinetutunve
üniteyiaçmakiçinON/OFF(AÇMA/KAPAMA)
tuşunabasın.
VarsayılançalıştırmamoduOTOMATİK'tir.
Uzaktankumandaileçalıştırmamodu
seçtiğinizde,çalışmakoşullarıiçmekan
ünitesindekimikroişlemcininbelleğinekaydedilir.
Uzaktan kumandadaki ON/OFF (AÇMA/
KAPAMA)tuşunabirsonrakibasışınızda,
klimaotomatikolarakaynıayarlardaçalışmaya
başlayacaktır.
OTOMATİKmoduygungelmiyorsa,
istediğinizayarımanuelolarak
yapabilirsiniz.
OTOMATİKmodseçildiğinde,klima,programlanan
sıcaklıkve/veyaodasıcaklığınagöreotomatik
olarakSOĞUTMA,ISITMA(varsa)veyayalnızca
FANmodunageçecektir.
Başlangıç
1 ON/OFF(AÇMA/KAPAMA)Tuşu
Klimayıaçmakiçinbutuşabasın.
İçmekanünitesininekranındayeralansıcaklık
göstergesiyanar.
2 OTOMATİKöğesiniseçmekiçinModtuşuna
basın.
3 Klimayaklaşık3dakikasonraçalışmayabaşlar.
Durdurma
1 ON/OFF(AÇMA/KAPAMA)Tuşu
Klimayıkapamakiçinbutuşayenidenbasın.
Klimakapandığında,yataypancuryerinegeri
döner.
NEMALMAmodu,ayarlanmışsıcaklıkvegerçek
odasıcaklığıarasındakisıcaklıkfarkınıtemel
alarakçalışır.
Nemalınırken,sıcaklık,SOĞUTMAveyalnızca
FANmodunutekrartekraraçma/kapamasuretiyle
düzenlenir.
ipuçlarıvebilgiler
NemAlıcıÇalıştırma

71
NEMALMAmodundafanhızıDüşük'e
sabitlenirveTurbofonksiyonukullanılamaz.
FanÇalıştırma
• Otomatikfanhızıseçilirse,uzaktan
kumandadahiçbirfanhızıbilgisi
görüntülenmez.
SoğutmaveIsıtmaİşlemleri
Başlangıç
1 ON/OFF(AÇMA/KAPAMA)Tuşu
Klimayıaçmakiçinbutuşabasın.
İçmekanünitesininekranındayeralansıcaklık
göstergesiyanar.
2 Mode(Mod)Tuşu
NEMALMAmodunuseçmekiçinbasın.
3 Control(Kontrol)Tuşları
İstenilensıcaklığıayarlayın.
Normalde21ºCile28ºCarasınaayarlanır.
2 Mode(Mod)Tuşu
FANmodunuseçmekiçinbasın.
3 FanTuşu
İstediğinizfanhızınıseçmekiçinbasın:
Otomatik,Düşük,OrtaveYüksek.
VarsayılanfanhızıOtomatik'tir.
Durdurma
1 ON/OFF(AÇMA/KAPAMA)Tuşu
Klimayıkapamakiçinbutuşayenidenbasın.
Klimakapandığında,yataypancuryerinegeri
döner.
Durdurma
1 ON/OFF(AÇMA/KAPAMA)Tuşu
Klimayıkapamakiçinbutuşayenidenbasın.
Klimakapandığında,yataypancuryerinegeri
döner.
Başlangıç
1 ON/OFF(AÇMA/KAPAMA)Tuşu
Klimayıaçmakiçinbutuşabasın.
İçmekanünitesininekranındayeralansıcaklık
göstergesiyanar.
2 Mode(Mod)Tuşu
SOĞUTMAveyaISITMA(varsa)modunu
seçmekiçinbasın.
FANçalıştırmamodunuseçtiğinizde,klima
yalnızcaiçerdekihavayıüer.
1 ON/OFF(AÇMA/KAPAMA)Tuşu
Klimayıaçmakiçinbutuşabasın.
İçmekanünitesininekranındayeralansıcaklık
göstergesiyanar.
ipuçlarıvebilgiler
ipuçlarıvebilgiler

72
Otomatikfanhızıseçilirse,uzaktan
kumandadahiçbirfanhızıbilgisi
görüntülenmez.
ZamanlayıcıAyarları
• Uzaktankumandaileayarlananzamanlayıcı
fonksiyonununçalışmasüresiSaat'ingösterdiği
zamanabağlıdır.İşlevbozukluğunuönlemek
içinkumandadakiSaatindoğruolupolmadığını
kontrol edin.
• Uzaktankumandaileayarlananetkinçalışma
süresi24saatilesınırlıdır.
3 Control(Kontrol)Tuşları
İstenilensıcaklığıayarlayın.
Normalde21ºCile28ºCarasınaayarlanır.
4 FanTuşu
İstediğinizfanhızınıseçmekiçinbasın:
Otomatik,Düşük,OrtaveYüksek.
VarsayılanfanhızıOtomatik'tir.
3 Uzaktankumandayıiçmekanünitesinedoğrultun,
Timer-On(ZamanlayıcıileAçma)düğmesine
basarakayarlananzamanıonaylayın.
sembolüuzaktankumandanınekranındakalır.
İçmekanünitesiningöstergepanelindeki
Zamanlayıcıgöstergesininyanıpyanmadığını
kontrol edin.
Ayarlarınİptali
Uzaktankumandayıiçmekanünitesinetutunve
tekrarTimer-On(ZamanlayıcıileAçma)tuşunabasın.
Uzaktankumandanınekranından,
sembolünün
kalktığındaneminolun.
ZamanlayıcıileKapama
1 Timer-Off(ZamanlayıcıileKapama)düğmesine
basın, ışığı,ZamanlayıcıileKapama
fonksiyonuilkdefakullanıldığındauzaktan
kumandanınüzerindeyanıpsönecektir.Aksi
takdirde,sonayarlananzamanyanıpsöner.
2 Control(Kontrol)tuşlarınabasarakistediğiniz
süreyiayarlayın:
İleri Geri
Tuşlaraherbasışınızda,süre1dakikaileriveya
geri gidecektir.
Tuşabasılıtutmaksüregöstergesindedahahızlı
kaydırmayapmanızısağlar.
3 Uzaktankumandayıiçmekanünitesinedoğrultun,
Timer-Off(ZamanlayıcıileKapama)tuşuna
basarakayarlananzamanıonaylayın.
sembolüuzaktankumandanınekranındakalır.
İçmekanünitesiningöstergepanelindeki
Zamanlayıcıgöstergesininyanıpyanmadığını
kontrol edin.
Ayarlarınİptali
Uzaktankumandayıiçmekanünitesinetutunve
tekrarTimer-Off(ZamanlayıcıileKapama)tuşuna
basın.Uzaktankumandanınekranından,
sembolününkalktığındaneminolun.
Durdurma
1 ON/OFF(AÇMA/KAPAMA)Tuşu
Klimayıkapamakiçinbutuşayenidenbasın.
Klimakapandığında,yataypancuryerine
geridöner.
ZamanlayıcıileÇalıştırma
1 Timer-On(ZamanlayıcıileAçma)tuşuna
basın, ışığı,zamanlayıcıaçık
kullanımilkdefagerçekleştiğindeuzaktan
kumandanınüzerindeyanıpsönecektir.Aksi
takdirde,sonayarlananzamanyanıpsöner.
2 Control(Kontrol)tuşlarınabasarakistediğiniz
süreyiayarlayın:
İleri Geri
Tuşlaraherbasışınızda,süre1dakikaileri
veya geri gidecektir.
Tuşabasılıtutmaksüregöstergesindedaha
hızlıkaydırmayapmanızısağlar.
ZamanlayıcıAyarıÖrnekleri
TimerOnileAçma(ZamanlayıcıileÇalıştırma)
Evedönmedenönceklimanınotomatikolarak
çalışmasınıistediğinizde,bufonksiyonu
kullanmanızıtavsiyeederiz.Klima,ayarlanan
zamandaotomatikolarakçalışmayabaşlayacaktır.
Örnek: Saat 8:00 ve siz klimanın 18:00'da
çalışmaya başlamasını istiyorsunuz.
ipuçlarıvebilgiler
ipuçlarıvebilgiler

73
1 Timer-On(ZamanlayıcıileAçma)tuşunabasın.
2 İstenilenzamanıayarlamakiçin,uzaktan
kumandanınekranındasaat18:00görününceye
kadarControl(Kontrol)tuşlarınatekrartekrarbasın
veyabasılıtutun.
3 Uzaktankumandayıiçmekanünitesinedoğrultarak
vetekrarTimer-On(ZamanlayıcıileAçma)tuşuna
basarakayarlananzamanıonaylayın.
sembolüuzaktankumandanınekranındakalır.
İçmekanünitesiningöstergepanelindeki
Zamanlayıcıgöstergesiaydınlatılır.
TimerOffileKapama(ZamanlayıcıileDurdurma)
Sizuyurkenklimanınotomatikolarakkapanmasını
istiyorsanız,bufonksiyonukullanmanızıtavsiye
ederiz.
Klima,ayarlananzamandaotomatikolarakçalışmayı
durduracaktır.
Örnek: Saat 18:00 ve Klimanın saat 23:55'te
kapanmasını istiyorsunuz.
1 Timer-Off(ZamanlayıcıileKapama)tuşunabasın.
2 İstenilenzamanıayarlamakiçin,uzaktan
kumandanınekranındasaat23:55görününceye
kadarControl(Kontrol)tuşlarınatekrartekrarbasın
veyabasılıtutun.
3 Uzaktankumandayıiçmekanünitesinedoğrultarak
vetekrarTimer-Off(ZamanlayıcıileKapama)
tuşunabasarakayarlananzamanıonaylayın.
sembolüuzaktankumandanınekranındakalır.
İçmekanünitesiningöstergepanelindeki
Zamanlayıcıgöstergesiaydınlatılır.
KarmaZamanlayıcı
ZamanlayıcıileAçma
ZamanlayıcıileKapama
(Kapat-Başlat-Durdurişlemi)
Klimanın,sizuyanmadanönceaçılmasınıveevden
çıktığınızdakapanmasınıistediğinizdebufonksiyonu
kullanmanızıtavsiyeederiz.
Örnek: Saat 22:00 ve klimanın 6:30'da çalışmaya
başlayıp 9:30'da durmasını istiyorsunuz.
1 TimerOn(ZamanlayıcıileAçma)düğmesinebasın.
2 İstenilenzamanıayarlamakiçin,uzaktan
kumandanınekranındasaat06:30görününceye
kadarControl(Kontrol)tuşlarınatekrartekrarbasın
veyabasılıtutun.
3 Uzaktankumandayıiçmekanünitesinedoğrultarak
vetekrarTimer-On(ZamanlayıcıileAçma)tuşuna
basarakayarlananzamanıonaylayın.
4 Timer-Off(ZamanlayıcıileKapama)tuşunabasın.
5 İstenilenzamanıayarlamakiçin,uzaktankumandanın
ekranındasaat09:30görününceyekadarControl
(Kontrol)tuşlarınatekrartekrarbasınveyabasılı
tutun.
6 Uzaktankumandayıiçmekanünitesinedoğrultarakve
tekrarTimer-Off(ZamanlayıcıileKapatma)düğmesine
basarakayarlananzamanıonaylayın.
sembolüuzaktankumandadagörüntülenirve
fonksiyon etkin hale gelir.
ZamanlayıcıileKapama
ZamanlayıcıileAçma
(Aç-Başlat-Durdurişlemi)
Klimanın,sizuyurkenkapanmasınıveuyanmadan
veyaevedönmedenönceaçılmasınıistediğinizdebu
fonksiyonukullanmanızıtavsiyeederiz.
Örnek: Saat 8:00 ve klimanın 9:30'da durmasını ve
18:00'da tekrar çalışmaya başlamasını istiyorsunuz
1 Timer-Off(ZamanlayıcıileKapama)tuşunabasın.
2 İstenilenzamanıayarlamakiçin,uzaktankumandanın
ekranındasaat09:30görününceyekadarControl
(Kontrol)tuşlarınatekrartekrarbasınveyabasılı
tutun.
3 Uzaktankumandayıiçmekanünitesinedoğrultarak
vetekrarTimer-Off(ZamanlayıcıileKapama)tuşuna
basarakayarlananzamanıonaylayın.
4 Timer-On(ZamanlayıcıileAçma)tuşunabasın.
5 İstenilenzamanıayarlamakiçin,uzaktankumandanın
ekranındasaat18:00görününceyekadarControl
(Kontrol)tuşlarınatekrartekrarbasınveyabasılı
tutun.
6 Uzaktankumandayıiçmekanünitesinedoğrultarak
vetekrarTimer-On(ZamanlayıcıileAçma)tuşuna
basarakayarlananzamanıonaylayın.
sembolüuzaktankumandadagörüntülenirve
fonksiyon etkin hale gelir.

74
• Zamanlayıcı,24'lüksaatmodukullanır.
• Uzaktankumandanınvarsayılansaati
12:00'dırvepillerdeğiştirilinceyinebu
ayaradönecektir.
Ekonomik(Eko)Çalıştırma
HissediyorumKullanımı
SaatinAyarlanması
1
Ayarlı
Sıcaklık
1
1saat
1saat
Soğutma
Ayarlı
Sıcaklık
1
1
1saat 1saat
SOĞUTMAveyaISITMA(varsa)modundaEco(Eko)
tuşunabasın;klimaotomatikolarak2saatlikbir
periyodunüzerindesaatte1°Cyükselir(SOĞUTMA
modunda)veyadüşer(ISITMAmodunda).Ayarlanan
sıcaklık5saatboyuncakalırvedahasonraünitedurur.
Bu fonksiyon daha fazla konfor ve enerji tasarrufu
sağlar.Bufonksiyonunyatarkenkullanılmasıönerilir.
Klimayıkullanmayabaşlamadanöncebu
bölümdeanlatılanyöntemiizleyerekuzaktan
kumandanınsaatinikurun.Uzaktankumandanın
saatpaneli,klimaçalışıyorolsadaolmasada
saatigösterir.
Uzaktankumandayapillertakıldıktansonra,
simgesigörüntülenirveyanıpsönmeyebaşlar.
1 Control(Kontrol)Tuşları
İstediğinizsaatiayarlamakiçinControl
(Kontrol)tuşlarınabasın.
İleri Geri
Düğmeyeherbasışınızda,süre1dakikaileri
veya geri gidecektir.
Tuşabasılıtutmaksüregöstergesindedaha
hızlıkaydırmayapmanızısağlar.
2 Clock(Saat)Tuşu
İstenilenzamanayarlandıktansonraClock
(Saat)tuşunatekrarbasıldığındaveya
5saniyeherhangibirişlemyapılmadığında
saatyanıpsönmeyibırakırveayarlanmışolur.
3 SaatiSıfırlama
Clock(Saat)tuşunabasın,saatyanıp
sönmeyebaşlayacaktır.
Yenizamanayarıyapmakiçin1.ve2.adımları
izleyin.
Isıtma
Uzaktankumandauzakbirtermostatgibiçalışır;kesin
birsıcaklıkkontrolüvesondereceyüksekkonfor
sunar.
İçmekanünitesineuzaktankumandayıtutunveI
Feel(Hissediyorum)tuşunabasın;bufonksiyonun
etkinleştirildiğinionaylamakiçiniçmekanünitesinden
bir bip sesi gelecek.
Hissediyorum Sembolü ışığı,IFeel(Hissediyorum)
tuşunatekrarbasılıncayakadaruzaktankumandanın
ekranındayanar.
Klima,uzaktankumandailebelirlenmişsıcaklığa
ulaşmakiçinçalışacaktır.
Uzaktankumanda,bulunduğukonumunsıcaklık
bilgisiniher10dakikadabiriçmekanünitesine
gönderir.Sonraki11dakikaiçerisindeuzaktan
kumandasıcaklıkbilgisigöndermezise,klima
Hissediyorummodundançıkar.
ipuçlarıvebilgiler

75
İçMekanÜnitesininKullanılması
EkSeçenekler
HavaAkışYönüKontrolü
Aralık
Yukarıveaşağıhavaakışı
Dikey
Pancur
• KlimakullanımdadeğilkenSwing(Salınım)
tuşudevredışıkalır(ZamanlayıcıileAçma
ayarlanmışolsabile).
• Klimayı,SOĞUTMAveyaNEMALMA
modundaveaşağıyönlühavaakışına
ayarlıikenuzunsüreliolarakkullanmayın.
Aksi takdirde, dikey pancurun yüzeyinde
yoğuşmaoluşulabilirvezemineyada
mobilyalara su damlayabilir.
• Pancuristenenyönegeldiğinde,Swing(Salınım)
tuşunatekrarbasın;pancurmevcutkonumunda
kalacaktır.
• Swing(Salınım)tuşunatekrarbasın;pancur
otomatikolarakaşağıyukarıhareketetmeye
başlayacaktır.
1 AkıllıYenidenBaşlatmaFonksiyonu
Olasıbirelektrikkesintisisonrasıklimaotomatik
olaraköncekiayarlarlayenidençalışmayabaşlar.
2 KendiKendineTeşhisveOtomatikKoruma
Klima,içmekanünitesininekranınateşhisleri
birerhatakoduolarakgetirerekişlev
bozukluklarınısaptayabilir.
Klimakendinikorumaamacıylaçalışmasını
otomatikolarakdeğiştirecektir.
Yatay(sol/sağ)havayönününelleayarlanması
• DikeypancurkulbununSol/Sağkolunu
kullanarakdikeypancuruelleayarlayın.
• Üniteçalışmayabaşladıktansonraparmaklarınızı
fanakaptırmariskisözkonusuolduğundanbu
ayarlarıüniteçalışmayabaşlamadanönceyapın.
• Havaakışyönünüuygunşekildeayarlayın,aksi
durumdarahatsızlıkverebilirveyadengesizoda
sıcaklığınayolaçabilir.
• Yataypancurlarıuzaktankumandaileayarlayın.
• Dikeypancurlarıelleayarlayın.
Aralık
Solvesağhavaakışı
Dikey(yukarı/aşağı)havaakışyönünü
otomatikolarakayarlamakiçin
• Bufonksiyonuüniteçalışırkengerçekleştirin.
• UzaktankumandadakiSwing(Salınım)tuşuna
basın;yataypancuryukarıveaşağıdoğru
hareket edecektir.
dikkat

76
• Yatay pancuru elle hareket ettirmeyin.
DaimaSwing(Salınım)tuşunukullanın.
Pancurun elle hareket ettirilmesi,
çalıştırmasırasındaişlevbozukluğuna
nedenolabilir.Pancurişlevbozukluğu
gösterirse,klimayıdurdurunveyeniden
başlatın.
• Yataypancurunaçıkağzıçokkısık
olmamalıdır,çünküfazlakısılmışhava
çıkışındandolayısoğutmaveyaısıtma
performansıdüşebilir.
• Yataypancurkapalıkonumdayken
klimayıçalıştırmayın.
• Klimaelektriğebağlandığında(ilkişlem),
yatay pancur 10 saniye boyunca bir ses
çıkarabilir;bunormalbirçalışmaşeklidir.
AcilDurumÇalışması
Manuelkontrol
tuşu
Manuelkontroltuşu
ÇalıştırmaSıcaklığı
İdealÇalıştırma
• KlimayıkapamakiçinManualControl(Manuel
Kontrol)tuşunayenidenbasın.
Çalıştırmamoduaşağıdakitablodakigibidir.
Klimaşayetyukarıdabelirtilenkoşullarındışında
kullanılırsa,bazıgüvenlikkorumaözellikleridevreye
girereküniteninanormalçalışmasınanedenolabilir.
Uzaktan kumanda kaybolursa veya bozulursa,
lütfeniçmekanünitesiüzerindekimanuelanahtarı
kullanın.KlimaOTOMATİKmoddaçalışacakve
sıcaklıkayarıveyafanhızıdeğiştirilemeyecektir.
İdealperformansaulaşmakiçin,şunlarıgöz
önündebulundurun:
• Havaakışyönünüinsanlaragelmeyecekşekilde
ayarlayın.
• Sıcaklığı,enyüksekkonforseviyesini
sağlayacakşekildeayarlayın.Üniteyiaşırı
yükseksıcaklıklaraayarlamayın.
• ÜniteSOĞUTMAveyaISITMAmodunda
çalışırkenkapılarıvepencerelerikapayın,aksi
takdirde,ürününperformansıdüşecektir.
• İstenilençalışmavekapanmazamanlarını
seçmekiçinuzaktankumandadakiTimer
On(ZamanlayıcıileAçma)veTimerOff
(ZamanlayıcıileKapama)tuşlarınıkullanın.
• Havagirişveçıkışlarınahiçbirnesne
yerleştirmeyin,budurumürününverimliliğinin
azalmasınaveklimanınçalışmayıdurdurmasına
neden olabilir.
• Havaltrelerinisıksıktemizleyin,aksitakdirde
soğutmaveyaısıtmaperformansıdüşebilir.
• OTOMATİKmodagirmekiçinManualControl
(Manuel Kontrol) tuşunabasın.Klimaen
yüksekkonforusunmakiçinodasıcaklığına
göreSOĞUTMA,ISITMA(sıcakpompalı
model)veFANmodlarındanbiriniotomatik
olarakseçer.
Mod Model İçMekanSıcaklığı Fonksiyon
OTOMATİK
SICAKLIK
POMPASI
25ºC
SOĞUTMA/
FAN
OTOMATİK
SICAKLIK
POMPASI
20ºC ISITMA/FAN
Çalıştırmasıcaklığıaralıkları
İçMekanTarafı
DB (
°C)
DışMekanTarafı
DB (°C)
EnYüksekSoğutma 32 43
EnYüksekIsıtma 27 24

77
TemizlikveBakım
Bakım
İçMekanÜnitesininveUzaktan
KumandanınTemizliği
FiltrelerinTemizliği
Panel
braketi
Tozltresikolu
Aşağıdakibakımişlemleridüzenlişekildeyapılmalıdır.
*
İşlem,sadecekaliyepersoneltarafındanyapılmalıdır.
• Temizlemeişlemindenönceklimayıdurdurun
vegüçkaynağındanayırın.
• İçmekanünitesiveuzaktankumandayısilmek
içinkurubirbezkullanın.
• İçmekanünitesiçokkirliyse,temizlikiçin
soğuksuylaıslatılmışbirbezkullanılabilir.
• İçmekanünitesininönpaneliçıkarılamazve
suylatemizlenemez.Ardındankurubirbezle
silin.
• Hasarverebileceğindenötürüfırça,zımpara
kağıdıyadacilalamamalzemesikullanmayın.
• Üniteyitemizlemekiçinkimyasalolarak
işlenmişbezyadatozbezikullanmayın.
• Temizlemeiçinbenzin,tiner,cilatozuyada
benzersolventlerikullanmayın.Bunlar,plastik
yüzeyinçatlamasınayadadeformeolmasına
neden olabilir.
• Deformasyonveyarenksolmasınayol
açabileceğinden,önpanelitemizlemek
için40°Cüstündesıcaksukullanmayın.
1 Brakettentamdestekalarakduranadekiçmekan
ünitesiönpaneliniaçılışekildekaldırın.
2 Filtretutucudançıkarmakiçintozltresikolunu
tutunvehafçeyukarıkaldırın.
Not: Temizleme öncesinde besleme gücü
bağlantısı kesilmelidir.
Tıkalıbirtozltresibuüniteninsoğutma/ısıtma
etkinliğiniazaltır.Filtreyiherayveyagerekli
olduğundadahasıktemizleyin.
3 Ardından,tozltresiniaşağıdoğruçekipiç
mekanünitesindençıkarın.
uyarı
Öğeler Bakımişlemleri Önerilensıklık
Tozltresi Temizlik Herayyadagerekirsedahasık
Sağlıklıhava
ltreleri
Değiştir/temizle 3aydabiryadagerekirsedahasık
Ünitemuhafazası Temizlik Herayyadagerekirsedahasık
Sutablasıve
boşaltmaborusu
Temizleyin ve
tıkanıklıklarıkontrol
edin
Hermevsim,kullanımabaşlamadanönce*
İçvedışserpantin Temizlik Hermevsim,kullanımabaşlamadanönce*

78
Genelbakım
Tozltresi
Soğukplazmaüretecine(varsa)
dokunmayınyadatemizlemeye
çalışmayın.Elektrikçarpmasına
nedenolabilir.
• Filtreyiçıkarırkenüniteninmetalkısımlarına
dokunmayın.Keskinmetalkenarlar
yaralanmalara neden olabilir.
• Klimanıniçinitemizlemekiçinsukullanmayın.
Suyamaruzbırakılmasıyalıtımazarar
vererekelektrikçarpmasınanedenolabilir.
• Üniteyitemizlerken,önceliklegüçvedevre
kesicininkapatıldığındaneminolun.
Tozltresi
Sağlıklıltre
Toz Filtresini elektrikli süpürge ya da su ile
temizleyin,ardındanserinbiryerdekurutun.
Klimauzunsürekullanılmayacaksa:
• ÜnitenintamamenkurumasıiçinsadeceFAN
modunda3~4saatçalıştırın.
• Üniteyikapatınveşiniprizdençekin.Pilleri
uzaktankumandadançıkarın.
• Dışüniteperiyodikbakımvetemizlikgerektirir.
Bunukendinizyapmayaçalışmayın.Bayinizeya
daservisteknisyeninizebaşvurun.
Çalıştırmaöncesikontroller
• Kablolarınbozukolmadığınıyadaçıkmadıklarını
kontrol edin
• Tozltresinintakılıolduğunukontroledin.
• Klimauzunsürekullanılmadıysahavaçıkışıyada
girişinintıkalıolmadığınıkontroledin.
4 Aktifkarbonltresi/BIOltresi/VitaminC
ltresi/Gümüşiyonltresigibisağlıklıhava
temizleyiciltreler(varsa)tozltresinesabitlenir.
Sağlıklıltreleritozltresinindestek
gövdesindençıkarın.
Sağlıklıltreleriherüç(3)aydabirtemizleyinve
6aydabirdeğiştirin.
Mümkünse elektrikli süpürge ile temizleyin.
5 Sağlıklıhavatemizleyiciltreleriyeniden
yerlerinetakın.
6 Tozltrelerininüstkısmınısolvesağkenarlar
düzgünsıralanacakşekildeüniteyegeritakın
vetozltreleriniyerineyerleştirin.
uyarı
uyarı

79
Çalıştırmaİpuçları
• BuzçözmeninardındanklimaISITMAmodunda
yenidençalıştığındabuzçözmeninürettiği
nemdenötürübeyazbirdumanoluşabilir.
4.Klimanındüşükgürültüsü
• Kompresörçalışırkenyadaçalışmayı
durdurduğundadüşükbirıslıksesiduyabilirsiniz.
Bu,soğutucuakışkanınakışsesiyadadurma
sesidir.
• Kompresörçalışırkenyadaçalışmayı
durdurduğundadüşükbir“ciyaklama”sesi
duyabilirsiniz.Bununnedenisıcaklıkdeğiştiğinde
üniteiçindekiplastikparçalarıngenleşmesiyada
büzüşmesidir.
• Güçaçıldığındapancureskikonumunadönerken
bir ses duyulabilir.
5.Toz,içmekanünitesindendışarıüenir
Klimauzunsürekullanılmadığındayadaüniteilk
kezkullanıldığındabudurumnormaldir.
6.İçmekanünitesindengaripbirkokuyayılıyor
Bununnedeni,içmekanünitesinininşaat
malzemeleri,mobilyalaryadasigaradanalınan
kokularıvermesidir.
7.Klima,SOĞUTMAyadaISITMAmodundan
sadeceFANmodunageçişyapar
İçmekansıcaklığıayardeğerineulaştığında,
kompresörotomatikolarakduracakveklimaFAN
modunadönecektir.
SOĞUTMAmodundaiçmekansıcaklığıarttığında
yadaISITMAmodundaayarnoktasınadüştüğünde
kompresöryenidenbaşlayacaktır.
8.Yoğuşma
Bağılnem%80'inüzerindeykenuzunsürelisoğutma
yadakurutmasırasındahavaçıkışındayoğuşma
suyuoluşmaihtimaliyüksektir(kapılarvepencereler
açıkken).
Dikeypancurumaksimumaçısına(zemine)ve
Yüksekfanhızınaayarlayın.Kapılarıvepencereleri
kapatın.
9.Şimşekyadayakındaçalışanbiraraçtelefonu
üniteninarızalanmasınanedenolabilir.
Üniteyegelengücükesinveardındanüniteyetekrar
güçverin.ÇalışmayıyenidenbaşlatmakiçinON/
OFF(AÇMA/KAPAMA)tuşunayenidenbasın.
10.X-Fanfonksiyonu
ÜniteyiON/OFF(AÇMA/KAPAMA)tuşunabasarak
kapattıktansonraiçmekanünitesiçalışmayı
sürdürebilir.
X-Fanfonksiyonununkapatıldığınıkontroledin.
Normalçalıştırmasırasındaaşağıdakiolaylar
meydana gelebilir:
1.Klimanınkoruması.
• Kompresörkoruması
Durduktansonrakompresör3dakikasüreyle
yenidenbaşlatılamaz
• Donmaönleyici
ÜniteSOĞUTMAmodundavedüşükortam
sıcaklığındaçalışıyorsa,ısıeşanjörüüzerinde
karlanmaoluşabilir.İçmekanısıeşanjörü
sıcaklığı0ºCaltınadüştüğünde,kompresör
üniteyikorumakiçinçalışmayıdurduracaktır.
• Buzçözme
Dışünitesıcaklığıdüşükfakatnem
yüksekkenısıtmasırasındadışünitede
karlanmaolabilirvebudurumdüşükısıtma
etkinliğinenedenolur.
Budurumda,klimaısıtmaişleminidurduracak
veotomatikbuzçözmeişleminibaşlatacaktır.
Buzçözmesüresi3ila12dakikaarasında
değişebilir.
Buzçözmesırasında,içvedışüniteninfan
motorlarıduracak,içmekangöstergesinde
“H1”yanıpsönecekvedışünitebuhar
yayabilecektir. Bu normal bir durumdur. Buz
çözmeninardından,ısıtmaişlemineotomatik
olarakdönülecektir.
• Soğukönleyicihava
İçmekanünitesiısıeşanjörüaşağıdaki
koşullaraltındaasgaribirsıcaklığa
ulaşamazsa(2dakikaiçinde),ISITMA
modundaodayasoğukhavanınverilmesini
önlemekiçiniçmekanfanıçalışmayacaktır:
(1)Isıtmaişlemiyenibaşlamıştır.
(2)Otomatikbuzçözmeyenibitmiştir.
(3)Düşüksıcaklıktaısıtma.
2.Hafesinti
Aşağıdakidurumdaiçmekanünitesihaf
bir esinti verebilir ve pancur belli bir konuma
dönebilir:
(1) ISITMAmodunda,üniteaçıldığında
kompresörbaşlangıçkonumunaulaşmaz.
(2) ISITMAmodunda,sıcaklıkayarlanmış
değereulaşırvekompresöryaklaşık1
dakikaçalışmayıkeser.
3.İçmekanünitesindenbeyazbirduman
çıkıyor
• Yüksekbağılnemesahipkapalıbirortamda
SOĞUTMAmodundaykenhavagirişive
havaçıkışıarasındakibüyüksıcaklıkfarkı
sebebiylebeyazbirdumançıkıyor.

80
Sorun Giderme
• İçmekanünitesininekranındahatakodu(H1
hariç)görünürse.
• Güçgöstergesiyadadiğergöstergeler
hızlıcayanıpsönervebudurumgücünkesilip
yenidentakılmasıyladurdurulamaz.
• Sigortasıkatıyoryadadevrekesicisıkdevre
giriyor.
• Üniteyesuveyabaşkasıvılargiriyor.
• Ünitedensusızıyor.
• Çalışmasırasındakababirsesvar.
• Çalışmasırasındagüçlükokularyayılıyor.
• Elektrikkablosuveşiaşırıısınıyor.
• Diğeranormaldurumlar.
Klimayakullanıcıbakımyapamaz.Yanlışonarımelektrikçarpmasınayadayangınaneden
olabilir.Profesyonelonarımiçinyetkilibirservismerkezinebaşvurun.
Aşağıdakilerdenbiriortayaçıkarsa,klimayıhemendurdurun,gücükesinve
yetkiliservismerkezinebaşvurun.
Soğutmasistemindekibasınçdüşükveüniteninarızalanmasınanedenolabilir.Yetkilibir
montaj personelinin bunu kontrol etmesini isteyin.
uyarı
Arızalar Sebep Neyapılmalıdır
Üniteçalışmıyor Elektrik kesintisi Gücün geri gelmesini bekleyin.
Üniteninşiçıkmışolabilir. Fişin,prizesağlamşekilde
takıldığınıkontroledin.
Sigortaatmışolabilir. Sigortayıdeğiştirin.
Voltajçokyüksekyadaçokdüşük. Voltajıkaliyepersoneletest
ettirin.
Uzaktankumandadakipillerbitmiş
olabilir.
Pillerideğiştirin.
Zamanlayıcıileayarladığınızzaman
yanlış.
Zamanlayıcıayarınıbekleyinya
da iptal edin.
Klimadan hava
çıkarken,üniteodayı
çokiyisoğutmuyor
yadaısıtmıyor
(varsa)
Uygunolmayansıcaklıkayarı. Sıcaklığıdoğruşekilde
ayarlayın.Detaylariçin,“Uzaktan
KumandanınKullanımı”bölümüne
bakın
Havaltresitıkalı. Havaltresinitemizleyin.
Kapılaryadapencereleraçık. Kapılarıyadapencereleri
kapatın.
İçyadadışünitedekihavagirişiveya
çıkışıtıkalı.
Öncetıkanmalarıaçınve
ardındanüniteyiyenidenbaşlatın.
Kompresör3dakikakoruması
etkinleştirildi.
3 dakika bekleyin.
Sorundüzelmediyse,yerelbirbayiyadaenyakınmüşteriservisiileiletişimegeçin.Detaylıarızalarve
ünitemodelihakkındaonlarımutlakabilgilendirin.

81
Buürünü,sınıandırılmamışkentselatıkolarakimhaetmeyin.
Butüratıklarınözelolarakarıtılmasıiçinayrıayrıtoplanması
gereklidir.
Başvurudanönceaşağıdakikontrolleriyapmaksizezamanveparatasarrufusağlayabilir.
Arızalar Sebep
İçmekan
ünitesinde su
sızıntısı
•Nem yüksek.
•Yoğuşmasuyutaşması.
•Tahliyehortumugevşekyada
tıkalı.
Dışünitedesu
kaçağı
•Soğutmaişlemisırasında,
borularınvebağlantı
mafsallarınınçevresindesu
yoğuşmayapar.
•Buzçözmesırasında,eriyensu
dışarıakar.
•Isıtmasırasında,ısı
eşanjöründekisudışarıdamlar.
İçmekan
ünitesinden
gelen gürültü
•Fanyadakompresörrölesi
açıldığındayadakapatıldığında
gelen gürültü.
•Buzçözmebaşlatıldığındaya
dadurdurulduğunda,soğutucu
akışkanıntersyöndeakışsesi
gelir.
İçmekan
ünitesi hava
üeyemiyor
•ISITMAmodunda,içmekan
ısıeşanjörününsıcaklığı
çokdüşükken,soğukhavayı
önlemekiçinhavaakışıkesilir.
(2dakikaiçinde)
•ISITMAmodunda,dışsıcaklık
düşükyadanemyüksekken
dışısıeşanjöründebuzlanma
olacaktır.Üniteotomatikolarak
buzuçözecekveiçmekan
ünitesibirkaçdakikasüreyle
havaüemeyikesecektir.
•Buzçözmesırasında,suveya
buharçıkabilir.
•NEMALMAmodunda,yoğuşan
suyunyenidenbuharlaşmasını
önlemekiçiniçmekanfanı
3-12dakikaarasıhavaüemeyi
kesecektir.
Hava
çıkışındaki
nem
Ünite uzun süreyle yüksek
nemdeçalışırsa,havaçıkış
ızgarasındanemoluşabilirve
ardındandamlayabilir.
H1 hata kodu:
buzçözme
Bu normal bir durumdur. Ünite
buzçözüyorveısıtmabirazdan
yenidenbaşlayacak.
Arızalar Sebep
Ünite
çalışmıyor
Kapatıldıktanhemensonra
açılırsaüniteçalışmaz.Bunun
amacıüniteyikorumaktır.
Yaklaşık3dakikabekleyin.
Kokular geliyor
•İçmekanünitesindenbazı
kokulargelebilir.Bu,üniteiçine
çekilenodakokularının(mobilya,
tütün, vb. gibi) sonucunda
meydana gelir.
•Kokular devam ederse
temizlemeiçinyetkiliservis
merkezinebaşvurun.
“Suakış”
gürültüsü
Suakışınabenzerbirakışsesinin
nedeniüniteiçindedolaşan
soğutucuakışkandır.
SOĞUTMA
modunda
duman geliyor
Soğutmaişlemisırasında,yüksek
odasıcaklığıvenemdenötürüiç
mekanünitesindenyayılanince
birdumangörülebilir.
Belli bir süre sonra, oda
sıcaklığınınveneminazalmasıile
dumandağılacaktır.
Çatlama sesi
Bu,sıcaklıkdeğişimindenötürü
panelveyadiğerparçalardaki
genişlemeve/veyabüzüşmenin
bir sonucudur.
Ünite
başlatılamıyor
•Cihazınelektriğikesikmi?
•Elektrikşigevşemişmi?
(varsa)
•Devrekorumacihazıtetiklendi
mi?
•Voltaj daha yüksek ya da daha
düşükmü?(profesyoneller
tarafındantestedilmiş)
•ZAMANLAYICI düzgün
kullanılıyormu?
•Piller bitik mi?
Soğutma/
Isıtmaetkisi
zayıf
•Sıcaklıkayarıuygunmu?
•Havagirişi/çıkışıtıkalımı?
•Filtre kirli mi?
•Kapıyadapencereaçıkmı?
•Düşükfanhızıayarlıdurumda
mı?
•Odadaısıkaynaklarıvarmı?
21
The following checks prior to contact may save you time and money.
Malfunctions Cause
Water leakage
of indoor unit
•The humidity is high.
•Condensingwateroverows.
•Drain hose is loose or
obstructed.
Water leakage
of outdoor unit
•During cooling operation, water
condensates around the pipes
and connection joints.
•During defrosting operation,
thawedwaterowsout.
•During heating operation, water
on the heat exchanger drips out.
Noise from
indoor unit
•The noise emmited when the fan
or compressor relay is switched
on or off.
•When the defrosting operation
is started or stopped, there is a
soundofrefrigerantowingin
the reverse direction.
Indoor unit can
not blow air
•In HEAT mode, when the
temperature of indoor heat
exchangerisverylow,airowis
stopped in order to prevent cold
air. (within 2 minutes)
•In HEAT mode, when the
outdoor temperature is low or
humidity is high, frost will be
formed on the outdoor heat
exchanger. The unit will defrost
automatically and indoor unit will
stop blowing air for 2-3 mintues.
•During defrosting operation,
water or vapour may be
emmited.
•In DEHUMIDIFY mode, the
indoor fan will stop blowing air
for 3-12 minutes in order to
avoid condensing water being
vaporised again.
Moisture on air
outlet
If the unit operates at high
humidity for a long time, moisture
may be generated on air outlet
grill and then drip off.
H1 error code:
defrosting
It is normal. The unit is in
defrosting operation and heating
will recommence soon.
Malfunctions Cause
The unit does
not operate
The unit does not operate if it is
turned on immediately after it is
turned off. This is to protect the
unit. Please wait about 3 minutes.
Odours are
emitted
•Some odours may be emmited
from the indoor unit. This is the
result of room smells (such as
furniture, tobacco, etc.) which
have been taken into the unit.
•Consult authorised service
center for cleaning if the odours
persist.
“Waterowing”
noise
The swishing noise like water
owingistherefrigerantowing
inside the unit.
Mist is
emmited in
COOL mode
During cooling operation, a thin
mist may be seen emmited from
the indoor unit due to high room
temperature and humidity.
After a period of time, the mist
will disappear as the decrease of
room temperature and humidity.
Cracking noise
This is the sound of friction
caused by expansion and/or
contraction of panel or other
parts due to the change of
temperature.
The unit can
not be started
up
•Is the power cut off?
•Is the power plug loose?
(if applicable)
•Is the circuit protection device
tripped off?
•Is voltage higher or lower?
(tested by professionals)
•Is the TIMER correctly used?
•Are the batteries exhausted?
Cooling
/Heating effect
is poor
•Is the temperature setting
appropriate?
•Is the air inlet/outlet blocked?
•Isthelterdirty?
•Is the door or window open?
•Is low fan speed set?
•Are there heat sources in the
room?
Do not dispose this product as unsorted municipal waste.
Collection of such waste separately for special treatment
is necessary.

www.electrolux.com/shop
-
 1
1
-
 2
2
-
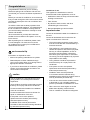 3
3
-
 4
4
-
 5
5
-
 6
6
-
 7
7
-
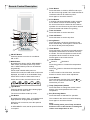 8
8
-
 9
9
-
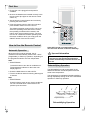 10
10
-
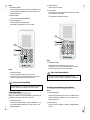 11
11
-
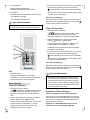 12
12
-
 13
13
-
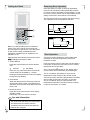 14
14
-
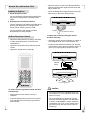 15
15
-
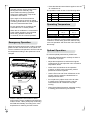 16
16
-
 17
17
-
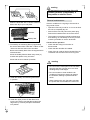 18
18
-
 19
19
-
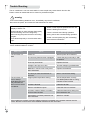 20
20
-
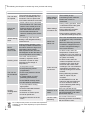 21
21
-
 22
22
-
 23
23
-
 24
24
-
 25
25
-
 26
26
-
 27
27
-
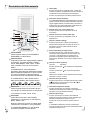 28
28
-
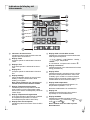 29
29
-
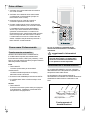 30
30
-
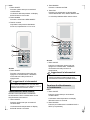 31
31
-
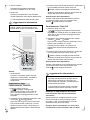 32
32
-
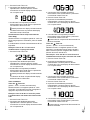 33
33
-
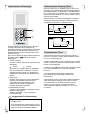 34
34
-
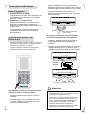 35
35
-
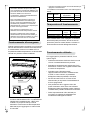 36
36
-
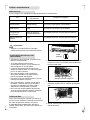 37
37
-
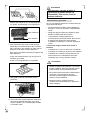 38
38
-
 39
39
-
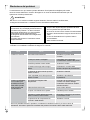 40
40
-
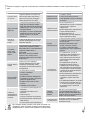 41
41
-
 42
42
-
 43
43
-
 44
44
-
 45
45
-
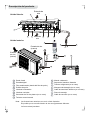 46
46
-
 47
47
-
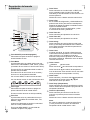 48
48
-
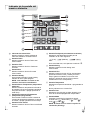 49
49
-
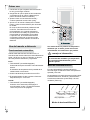 50
50
-
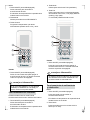 51
51
-
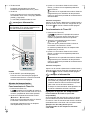 52
52
-
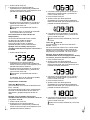 53
53
-
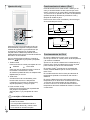 54
54
-
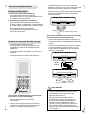 55
55
-
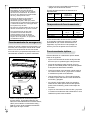 56
56
-
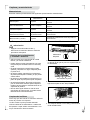 57
57
-
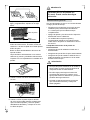 58
58
-
 59
59
-
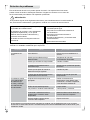 60
60
-
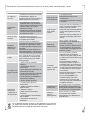 61
61
-
 62
62
-
 63
63
-
 64
64
-
 65
65
-
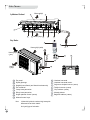 66
66
-
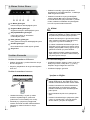 67
67
-
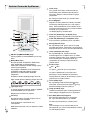 68
68
-
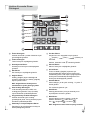 69
69
-
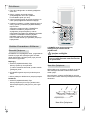 70
70
-
 71
71
-
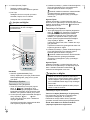 72
72
-
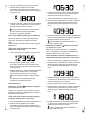 73
73
-
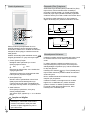 74
74
-
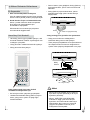 75
75
-
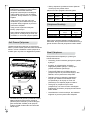 76
76
-
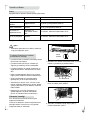 77
77
-
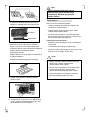 78
78
-
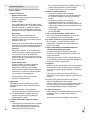 79
79
-
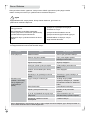 80
80
-
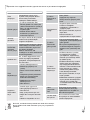 81
81
-
 82
82


Electrolux EXM18HV1WE Manual de usuario
- Tipo
- Manual de usuario
en otros idiomas
- italiano: Electrolux EXM18HV1WE Manuale utente
- English: Electrolux EXM18HV1WE User manual
- Türkçe: Electrolux EXM18HV1WE Kullanım kılavuzu
Artículos relacionados
-
Electrolux EXM18HV1WE Manual de usuario
-
Electrolux EPI24LEIWE Manual de usuario
-
-
-
-
-
-
-
-
Electrolux EXI12HD1WI Manual de usuario
Otros documentos
-
LG SX122CL3 Manual de usuario
-
Precision PIAW12169A/70B Manual de usuario
-
Becken AR CONDICIONADO INVERTER I 12BTU El manual del propietario
-
Daitsu DSM-9UIDN Manual de usuario
-
PREMIUM PIAW18180B Manual de usuario
-
 Olimpia Splendid Nexya S4 E Duct Inverter Commercial Guía de instalación
-
Vemer Klima 3 Manual de usuario
-
LAMBORGHINI CALORECLIMA BREEZE INVERTER series Instrucciones de operación
