
www.lg.com
AIR CONDITIONER
TYPE: WALL MOUNTED
Read this owner's manual thoroughly before operating the
appliance and keep it handy for reference at all times.
OWNER’S MANUAL
EN ENGLISH SP ESPAÑOL
Rev.00 Copyright © 2023 LG Electronics Inc. All Rights Reserved

TABLE OF CONTENTS This manual may contain images or content
different from the model you purchased.
This manual is subject to revision by the
manufacturer.
SAFETY INSTRUCTIONS ..............................................................3
IMPORTANT SAFETY INSTRUCTIONS ..........................................................3
NAMES OF PARTS ....................................................................... 11
Indoor Unit.......................................................................................................11
Outdoor Unit ....................................................................................................11
INDOOR UNIT DISPLAY ...............................................................12
EMERGENCY FUNCTION ............................................................ 13
Emergency Function .......................................................................................13
REMOTE CONTROLLER .............................................................14
Using Wireless Remote Control ......................................................................14
Replacement of Batteries ................................................................................ 15
OPERATING INSTRUCTIONS .....................................................16
Cooling Mode ..................................................................................................16
Dry Mode .........................................................................................................16
Fan Mode (Not Fan Button) ............................................................................17
Heating Mode .................................................................................................. 17
Auto Mode ....................................................................................................... 18
Turbo Function ................................................................................................18
Swing Control .................................................................................................. 19
ECO Function..................................................................................................20
Display Function (Indoor Display) ...................................................................20
Sleep Function ................................................................................................21
I FEEL Function ..............................................................................................21
Timer Function ................................................................................................22
Mildew Function ..............................................................................................23
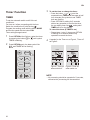
PROTECTION ............................................................................... 24
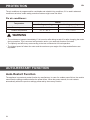
AUTO-RESTART FUNCTION ....................................................... 24
Auto-Restart Function .....................................................................................24
MAINTENANCE ............................................................................ 25
Antidust Filters ................................................................................................25
Cleaning the Heat Exchanger .........................................................................25
End of Season Maintenance ...........................................................................26
Replacing the Batteries ...................................................................................26
TROUBLESHOOTING .................................................................. 27

3
EN
SAFETY INSTRUCTIONS
The following safety guidelines are intended to prevent unforeseen risks
or damage from unsafe or incorrect operation of the appliance.
The guidelines are separated into ‘WARNING’ and ‘CAUTION’ as
described below.
This symbol is displayed to indicate matters and operations
that can cause risk. Read the part with this symbol carefully
and follow the instructions in order to avoid risk.
WARNING
This indicates that the failure to follow the instructions can cause
serious injury or death.
CAUTION
This indicates that the failure to follow the instructions can cause the
minor injury or damage to the product.
IMPORTANT SAFETY INSTRUCTIONS
WARNING
To reduce the risk of explosion, fire, death, electric shock,
injury or scalding to persons when using this product, follow
basic precautions, including the following:
• Before accessing the terminals, all power circuits must be
disconnected.
• Fixed installations will incorporate disconnect means in
accordance with installation rules.
• This device will not be accessible to public.
• The appliance must be installed in accordance with national
regulations for electrical installations.

4
EN
Children in the Household
This appliance is not intended for use by persons (including children)
with reduced physical, sensory or mental capabilities, or lack of
experience and knowledge, unless they have been given supervision or
instruction concerning use of the appliance by a person responsible for
their safety. Children should be supervised to ensure that they do not
play with the appliance.
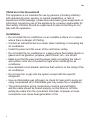
Installation
• Do not install the air conditioner on an unstable surface or in a place
where there is danger of it falling.
• Contact an authorized service center when installing or relocating the
air conditioner.
• Install the panel and the cover of the control box safely.
• Do not install the air conditioner in a place where flammable liquids or
gases such as gasoline, propane, paint thinner, etc., are stored.
• Make sure that the pipe and the power cable connecting the indoor
and outdoor units are not pulled too tight when installing the air
conditioner.
• Use standard circuit breaker and fuse that conform to the rating of the
air conditioner.
• Do not input air or gas into the system except with the specific
refrigerant.
• Use non-flammable gas (nitrogen) to check for leak and to purge air;
using compressed air or flammable gas may cause fire or explosion.
• The indoor/outdoor wiring connections must be secured tightly,
and the cable should be routed properly so that there is no force
pulling the cable from the connection terminals. Improper or loose
connections can cause heat generation or fire.

5
EN
• Install dedicated electric outlet and circuit breaker before using the air
conditioner.
• Do not connect the ground wire to a gas pipe, a lightning rod, or a
telephone ground wire.
• Means for disconnection must be incorporated in the fixed wiring in
accordance with the wiring rules.
• Do not install the unit in potentially explosive atmospheres.
Operation
• Be sure to use only those parts listed in the service parts list. Never
attempt to modify the equipment.
• Make sure that children do not climb on or hit the outdoor unit.
• Dispose of the batteries in a place where there is no danger of fire.
• Use only the refrigerant specified on the air conditioner label.
• Cut off the power supply if there is any noise, smell, or smoke coming
from the air conditioner.
• Do not leave flammable substances such as gasoline, benzene, or
thinner near the air conditioner.
• Contact an authorized service center when the air conditioner is
submerged by flood waters.
• Do not use the air conditioner for an extended period of time in a
small place without proper ventilation.
• In the event of a gas leak (such as Freon, propane gas, LP gas, etc.)
ventilate sufficiently before using the air conditioner again.
• Be sure to ventilate sufficiently when the air conditioner and a heating
appliance such as a heater are used simultaneously.

6
EN
• Do not block the inlet or outlet of air flow.
• Do not insert hands or other objects through the air inlet or outlet
while the air conditioner is operating.
• Make sure that the power cable is neither dirty, loose, nor broken.
• Never touch, operate, or repair the air conditioner with wet hands.
• Do not place any objects on the power cable.
• Do not place a heater or other heating appliances near the power
cable.
• Do not modify or extend the power cable. Scratches or peeling
insulation on the power cables may result in fire or electric shock, and
should be replaced.
• Cut off the power supply immediately in the event of a blackout or a
thunderstorm.
• Take care to ensure that power cable could not be pulled out or
damaged during operation.
• Do not touch refrigerant pipe, water pipe and any internal parts while
the unit is operating or immediately after operation.
Maintenance
• Do not clean the appliance by spraying water directly onto the
product.
• Before cleaning or performing maintenance, disconnect the power
supply and wait until the fan stops.
Technical Safety
• Installation or repairs made by unauthorized persons can pose
hazards to you and others.

7
EN
• The information contained in the manual is intended for use by a
qualified service technician who is familiar with the safety procedures
and equipped with the proper tools and test instruments.
• Failure to read and follow all instructions in this manual can result
in equipment malfunction, property damage, personal injury and/or
death.
• The appliance shall be installed in accordance with national wiring
regulations.
• When the power cord is to be replaced, the replacement work
shall be performed by authorized personnel using only genuine
replacement parts.
• This appliance must be properly grounded to minimize risk of electric
shock.
• Do not cut or remove the grounding prong from the power plug.
• Attaching the earth wire to the power outlet cover screw does not
ground the appliance unless the cover screw is metal, uninsulated,
and the power outlet is grounded through house wiring.
• If you have any doubt whether the air conditioner is properly
grounded, have the power outlet and circuit checked by a qualified
electrician.
• The refrigerant and insulation blowing gas used in the appliance
require special disposal procedures. Consult a service agent or a
similarly qualified person before disposing of them.
• If the supply cord is damaged, it must be replaced by the
manufacturer, its service agent or similarly qualified person in order to
avoid a hazard.

8
EN
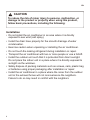
CAUTION
To reduce the risk of minor injury to persons, malfunction, or
damage to the product or property when using this product,
follow basic precautions, including the following:
Installation
• Do not install the air conditioner in an area where it is directly
exposed to sea wind (salt spray).
• Install the drain hose properly for the smooth drainage of water
condensation.
• Exercise caution when unpacking or installing the air conditioner.
• Do not touch the leaking refrigerant during installation or repair.
• Transport the air conditioner with two or more people or use a forklift.
• Install the outdoor unit such that it is protected from direct sunlight.
Do not place the indoor unit in a place where it is directly exposed to
sunlight via the windows.
• Safely dispose of packing materials such as screws, nails, plastic bag
or batteries using proper packaging after installation or repair.
• Install the air conditioner in a place where the noise from the outdoor
unit or the exhaust fumes will not inconvenience the neighbors.
Failure to do so may result in conflict with the neighbors.

9
EN
Operation
• Remove the batteries if the remote control is not to be used for an
extended period of time.
• Make sure that the filter is installed before operating the air
conditioner.
• Be sure to check if there is a refrigerant leak after installing or
repairing the air conditioner.
• Do not place any object on the air conditioner.
• Never mix different types of batteries, or old and new batteries for the
remote control.
• Do not let the air conditioner run for a long time when humidity is very
high or when a door or a window has been left open.
• Stop using the remote control if there is a fluid leak in the battery. If
your clothes or skin are exposed to the leaking battery fluid, wash off
with clean water.
• Do not expose people, animals, or plants to the cold or hot wind from
the air conditioner for extended periods of time.
• If the leaking battery fluid has been swallowed, rinse the inside of the
mouth thoroughly and consult a doctor.
• Do not drink the water drained from the air conditioner.
• Do not use the product for special purposes, such as preserving
foods, works of art, and etc. It is an air conditioner for consumer
purposes, not a precision refrigeration system. There is risk of
damage or loss of property.
• Do not recharge or disassemble the batteries.
• This appliance can be used by children aged from 8 years and above
and persons with reduced physical, sensory or mental capabilities
or lack of experience and knowledge if they have been given
supervision or instruction concerning use of the appliance in a safe
way and understand the hazards involved. Children shall not play
with the appliance. Cleaning and user maintenance shall not be made
by children without supervision.

10
EN
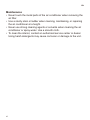
Maintenance
• Never touch the metal parts of the air conditioner when removing the
air filter.
• Use a sturdy stool or ladder when cleaning, maintaining, or repairing
the air conditioner at a height.
• Never use strong cleaning agents or solvents when cleaning the air
conditioner or spray water. Use a smooth cloth.
• To clean the interior, contact an authorized service center or dealer.
Using harsh detergents may cause corrosion or damage to the unit.

11
EN
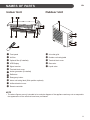
NAMES OF PARTS
Indoor Unit Outdoor Unit
a a Front panelFront panel m m Air outlet grilleAir outlet grille
b b Air filterAir filter n n Outdoor unit rating labelOutdoor unit rating label
c c Optional filter (if installed)Optional filter (if installed) o o Terminal block coverTerminal block cover
d d LED DisplayLED Display p p Gas valveGas valve
e e Signal receiverSignal receiver q q Liquid valveLiquid valve
f f Terminal block coverTerminal block cover
g g Ionizer generator (if installed)Ionizer generator (if installed)
h h DeflectorsDeflectors
i i Emergency buttonEmergency button
j j Indoor unit rating label (Stick position optional)Indoor unit rating label (Stick position optional)
k k Airflow direction louverAirflow direction louver
l l Remote controllerRemote controller
NOTE
• The above figures are only intended to be a simple diagram of the appliance and may not correspond to
the appearance of the units that have been purchased.

12
EN
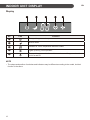
INDOOR UNIT DISPLAY
Display
No. LED Function
a
The symbol appears when power on.
b
SLEEP mode.
c
Indicator for Timer, temperature and Error codes.
d
Lights up during Timer operation.
e
The symbol appears when the unit is turned on, and disappear when the
unit is turned off.
NOTE
• The shape and position of switches and indicators may be different according to the model, but their
function is the same.

13
EN
EMERGENCY FUNCTION
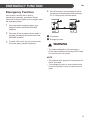
Emergency Function
If the remote controller fails to work or
maintenance necessary, proceed as follows:
Open and lift the front panel up to an angleto reach
the emergency button.
1 One press of the emergency button (one
beep) will lead to the forced COOLING
operation.
2 Two press of the emergency button within 3
seconds (two beeps) will lead to the forced
HEATING operation.
3 To switch off the unit, you just need to press
the button again (a single long beep).
4 After 30 minutes in forced operation, the air
conditioner will automatically start working in
23 °C cooling mode, auto fan speed.
a a Front panelFront panel
b b Emergency buttonEmergency button
WARNING
• The shape and position of the emergency
button may be different according to the model,
but their function is the same.
NOTE
• The external static pressure of heat pumps is 0
Pa for all models.
• The emergency button in some models could
be on the right part of the unit under the front
panel.

14
EN
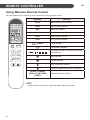
Using Wireless Remote Control
You can operate the air conditioner more conveniently with the remote control.
ECO
OPTION
TURBO
MODE FAN
A
FA
UT
N
OC
H
O
E
O
AT
L
E
D
C
R
O
Y
R
L
M
A
EN
IL
Y
I
D
M
F
8
E
E
C
W
E
S
H
L
E
E
E
A
E
A
D
L
P
N
F
TH
T
R
DIS
E
IM
E
E
P
G
L
CL
IN
W
OD
H
E
Symbols Meaning
AUTO
Mode Auto function indicator
COOL
Mode Cooling indicator
DRY
Mode Dry indicator
FAN
Mode Fan indicator
HEAT
Mode Heating indicator
ECO
ECO function indicator
[TIMER]
Timer indicator
Temperature indicator
Flashing
Fan speed indicator: Auto/low/low-mid/mid/
mid-high/high
Mute indicator
TURBO indicator
Flap swing angle indicator
Deflector swing angle indicator (Optional)
[SLEEP] [TIMER]
[DISPLAY] [MILDEW]
[I FEEL]
Optional functions indicator
NOTE
• Some functions may not be supported, depending on the model.
REMOTE CONTROLLER

15
EN
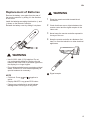
Replacement of Batteries
Remove the battery cover plate from the rear of
the remote controller, by sliding it in the direction
of the arrow.
Install the batteries according the direction (+ and
-) shown on the Remote Controller.
Reinstall the battery cover by sliding it into place.
WARNING
• Use 2 LRO 3 AAA (1.5V) batteries. Do not
use rechargeable batteries. Replace the old
batteries with new ones of the same type when
the display is no longer legible.
• Do not dispose batteries as unsorted municipal
waste. Collection of such waste separately for
special treatment is necessary.
NOTE
• Child-lock: Press and together to
active.
• Display ON/OFF: Long press ECO button.
• Please remove batteries to avoid leakage
damage when not using for a long time.
WARNING
1 Direct the remote controller toward the air
conditioner.
2 Check that there are no objects between the
remote control and the signal receptor in the
indoor unit.
3 Never leave the remote controller exposed to
the rays of the sun.
4 Keep the remote controller at a distance of at
least 1 m from the television or other electrical
appliances.
ECO
OPTION
TURBO
MODE FAN
A
FA
UT
N
OC
H
O
E
O
AT
L
E
D
C
R
O
Y
R
L
M
A
EN
IL
Y
I
D
M
F
8
E
E
C
W
E
S
H
L
E
E
E
A
E
A
D
L
P
N
F
TH
T
R
DIS
E
IM
E
E
P
G
L
CL
IN
W
OD
H
E
a a Signal receptorSignal receptor

16
EN
OPERATING INSTRUCTIONS
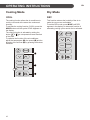
Cooling Mode
COOL
The cooling function allows the air conditioner to
cool the room and at the same time reduces air
humidity.
To activate the cooling function (COOL), press the
MODE button until the symbol COOL appears on
the display.
The cooling function is activated by setting the
button or at a temperature lower than that
of the room.
To optimize the function of the air conditioner,
adjust the temperature (a), the speed (b) and the
direction of the air flow (c) by pressing the buttons
indicated.
OPTION
ECO TURBO
MODE FAN
Dry Mode
DRY
This function reduces the humidity of the air to
make the room more comfortable.
To set the DRY mode, press MODE until DRY
appears in the display. An automatic function of
alternating cooling cycles and air fan is activated.
OPTION
ECO TURBO
MODE FAN

17
EN
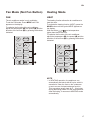
Fan Mode (Not Fan Button)
FAN
The air conditioner works in only ventilation.
To set the FAN mode, Press MODE until FAN
appears on the display.
To optimize the function of the air conditioner,
adjust the temperature (a), the speed (b) and the
direction of the air flow (c) by pressing the buttons
indicated.
OPTION
ECO TURBO
MODE FAN
Heating Mode
HEAT
The heating function allows the air conditioner to
heat the room.
To activate the heating function (HEAT), press the
MODE button until the symbol HEAT appears on
the display.
With the button or set a temperature
higher than that of the room.
To optimize the function of the air conditioner,
adjust the temperature (a), the speed (b) and the
direction of the air flow (c) by pressing the buttons
indicated.
OPTION
ECO TURBO
MODE FAN
NOTE
• In HEATING operation, the appliance can
automatically activate a defrost cycle, which is
essential to clean the frost on the condenser
so as to recover its heat exchange function.
This procedure usually lasts for 2 - 10 minutes
during defrosting,indoor unit fan stop operation.
After defrosting, it resumes to HEATING mode
automatically.

18
EN
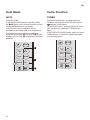
Auto Mode
AUTO
Automatic mode.
To activate the AUTO mode of operation, press
the MODE button on the remote controller until the
symbol AUTO appears on the display.
In AUTO mode, the air conditioner will run
automatically according to the room temperature.
To optimize the function of the air conditioner,
adjust the temperature (a), the speed (b) and the
direction of the air flow (c) by pressing the buttons
indicated.
OPTION
ECO TURBO
MODE FAN
Turbo Function
TURBO
To activate turbo function, pressing the button
TURBO or pressing the button FAN until symbol
appears on the display.
To cancel this function, pressing the FAN to switch
other fan speed or pressing the TURBO button
again.
In AUTO/HEAT/COOL/FAN mode, when you select
TURBO feature, it will use the highest fan setting
to blow strong airflow.
OPTION
ECO TURBO
MODE FAN

19
EN
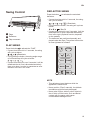
Swing Control
a a FlapsFlaps
b b DeflectorsDeflectors
c c Flap movementFlap movement
FLAP SWING
Press the button to activate the “FLAP”.
• If press time interval is in 2 seconds, the swing
will cycle as below:
Deactivate
• If long press the button, the swing angle range
of horizontal flap will cycle as below:
• If press time interval is over 2 seconds, it will be
deactivate the air flow is directed alternatively
from up to down. In order to guarantee an even
diffusion of the air in the room.
DEFLECTOR SWING
Press the button to activates the motorized
deflectors.
• If press time interval is in 2 seconds, the swing
will cycle as below:
Flashing
Deactivate
• If long press the button, the swing will cycle as
below:
• If press time interval is over 2 seconds, it will be
deactivate the air flow is directed alternatively
from left to right. (Optional function, depends
on the models)
• The deflectors are positioned manually and
placed under the flaps. They allow to direct the
air flow rightward or leftward.
OPTION
ECO TURBO
MODE FAN
NOTE
• This adjustment must be done while the
appliance is switched off.
• Never position “Flaps” manually, the delicate
mechanism might seriously damaged!
• Never poke fingers, sticks or other objects in
the air inlet or outlet vents. Such accidental
contact with live pants might cause
unforeseeable damage or hurt.

20
EN
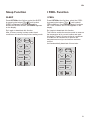
ECO Function
ECO
In this mode the appliance automatically sets the
operation to achieve energy savings.
1 Press the “ON/OFF” button to turn on appliance
and select a COOLING/HEATING mode.
2 Press the “ECO” button, the appliance will run
in ECO mode.
3 Pressing the “ECO” button again will cancel the
mode, “ECO” will no longer be shown on the
LCD screen.
OPTION
ECO TURBO
MODE FAN
NOTE
• The ECO function is available in COOLING and
HEATING modes.
Display Function (Indoor
Display)
DISPLAY
Switch on/off the LED display on panel.
Press OPTION at the fist time, select the DISPLAY
by pressing the button or until symbol
DISPLAY is flashing; Press OPTION again to switch
off the LED display on the panel, and DISPLAY
appears on the remote controller display.
Do it again to switch on the LED display.
OPTION
ECO TURBO
MODE FAN

21
EN
Sleep Function
SLEEP
Press OPTION at the fist time, select the SLEEP
by pressing the button or until symbol
SLEEP is flashing; Press OPTION again to
activate the SLEEP function, and SLEEP appears
on the display.
Do it again to deactivate this function.
After 10 hours running in sleep mode, the air
conditioner will return to the previous setting mode.
OPTION
ECO TURBO
MODE FAN
I FEEL Function
I FEEL
Press OPTION at the first time, select the I FEEL
by pressing the button or until symbol I
FEEL is flashing; Press OPTION again to activate
the I FEEL function, and I FEEL appears on the
display.
Do it again to deactivate this function.
This function enable the remote control to measure
the temperature at its current location and send
this signal 7 times in 2 hours to the air conditioner
to enable the air conditioner to optimize the
temperature around you and ensure maximum
comfort.
It will automatically deactivate 2 hours later.
OPTION
ECO TURBO
MODE FAN

22
EN
Timer Function
TIMER
To set the automatic switch-on/off of the air
conditioner.
For timer on, before proceeding with the time:
Switch the conditioner off (with the key ).
Program the working mode with the button MODE
and the fan speed with the button FAN.
Timer setting/change/cancel:
1 Press OPTION at the fist time, select the timer
by pressing the button or until symbol
TIMER is flashing;
2 Press OPTION again, the data symbol like
and TIMER will be flashing;
OPTION
ECO TURBO
MODE FAN
3 To set the timer or change the timer:
• Press the button or to set the
expected timer (Increase or decrease at half-
hour intervals) the symbols h and TIMER
both are flashing.
• Press OPTION or waiting for 5 seconds
without any operation to confirm the timer,
the pre-setting timer like and symbol
TIMER will be on the display.
To cancel the timer (if TIMER is on)
• Repeat step 1, step 2, then press OPTION
or waiting for 5 seconds without any
operation to cancel the timer.
4 A sample for the Timer-on as Figure1, Timer-off
as Figure2.
AUTO COOL DRY
FANECO
HEALTH MILDEW
CLEAN
AUTO COOL DRY
ECO
REMITREMIT
NAELCNAELC YYALPSIDALPSID
PEELSPEELS REMITREMIT LEEF
IL
EEF I
DISPLAY 8 CH
HEAT
HEAT
Figure1, Timer-on
when switch off
Figure2, Timer-off
when switch on
NOTE
• All processing should be operated in 5 seconds,
otherwise the processing will be cancelled.

23
EN
Mildew Function
MILDEW
Press OPTION at the first time, select the MILDEW
by pressing the button or until symbol
MILDEW is flashing; Press OPTION again to
activate the MILDEW function, and MILDEW
appears on the display.
Do it again to deactivate this function.
This function enable the air conditioner still blow
airflow about 15 minutes to dry the indoor inner
parts to avoid mildew, when the air conditioner is
off.
OPTION
ECO TURBO
MODE FAN
NOTE
• MILDEW function only available in DRY/
COOLING mode.

24
EN
The air conditioner is programmed for comfortable and suitable living conditions, if it is used in abnormal
conditioner as below, certain safety protection features might come into effect.
Fix air conditioner:
Temperature MODE
Cooling operating Heating operating
Room temperature 16
°C ~ 31 °C
16
°C ~ 31 °C
Outdoor temperature 21
°C ~ 48 °C
-7
°C ~ 24 °C
WARNING
• The unit does not operate immediately if it is turned on after being turned off or after changing the mode
during operation. This is a normal self-protection action, you need wait for about 3 minutes.
• The capacity and efficiency are according to the test conducted at full-load operation.
• The highest speed of indoor fan motor and the maximum open angle of the flaps and deflectors are
requested.
Auto-Restart Function
The appliance is preset auto-restart function by manufacturer. In case of a sudden power failure, the module
memorizes the setting conditions before the power failure. When the power restores, the unit restarts
automatically with all the previous settings preserved by the memory function.
PROTECTION
AUTO-RESTART FUNCTION

25
EN
MAINTENANCE
Periodic maintenance is essential for keeping your
air conditioner efficient.
Before carrying out any maintenance, disconnect
the power supply by taking the plug out from the
socket.
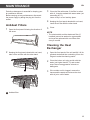
Antidust Filters
1 Open the front panel following the direction of
the arrow.
2 Keeping the front panel raised with one hand,
take out the air filter with the other hand.
a a Antidust filterAntidust filter
3 Clean the filter with water; if the filter is soiled
with oil, it can be washed with warm water (not
exceeding 45 °C).
Leave to dry in a cool and dry place.
4 Keeping the front panel raised with one hand,
insert the air filter with the other hand.
5 Close.
NOTE
• The electrostatic and the deodorant filter (if
installed) cannot be washed or regenerated
and must be replaced with new filters after
every 6 months.
Cleaning the Heat
Exchanger
1 Open the front panel of the unit and life it till its
greatest stroke and then unhooking it from the
hinges to make the cleaning easier.
2 Clean the indoor unit using a cloth with the
water (not higher than 40 °C) and neutral
soap. Never use aggressive solvents or
detergents.
3 If the outdoor unit is clogged, remove the
leaves and the waste and remove the dust
with air jet or a bit of water.

26
EN
End of Season Maintenance
1 Disconnect the automatic switch or the plug.
2 Clean and replace the filters.
3 On a sunny day let the conditioner work in
ventilation for some hours, so that the inside of
the unit can dry completely.
Replacing the Batteries
When: There is no confirmation beep heard from
the indoor unit. The LCD doesn’t act.
How: Take off the cover at back. Place the new
batteries respecting the symbols + and -.
NOTE
• Use only new batteries. Remove the batteries
from the remote controller when the conditioner
is not in operation.
WARNING
• Do not throw batteries into common rubbish,
they should be disposed of in the special
containers situated in the collection points.

27
EN
TROUBLESHOOTING
Malfunction
Possible Causes
The appliance does not
operate.
Power failure/plug pulled out.
Damaged indoor/outdoor unit fan motor.
Faulty compressor thermomagnetic circuit breaker.
Faulty protective device or fuses.
Loose connections or plug pulled out.
It sometimes stops operating to protect the appliance.
Voltage higher or lower than the voltage range.
Active TIMER-ON function.
Damaged electronic control board.
Strange odour. Air filter dirty.
Noise of running water. Back flow of liquid in the refrigerant circulation.
A fine mist comes from
the air outlet.
This occurs when the air in the room becomes very cold, for example in the
“COOLING” or “DEHUMIDIFYING/DRY” modes.
A strange noise can be
heard.
This noise is made by the expansion or contraction of the front panel due to
variations in temperature and does not indicate a problem.
Insufficient airflow,
either hot or cold.
Inappropriate temperature setting.
Air inlet or outlet of indoor or outdoor unit has been blocked.
Air filter is blocked.
Fan speed set at minimum.
Other sources of heat in the room.
No refrigerant.
The appliance does not
respond to commands.
Remote control is not near enough to indoor unit.
Battery in remote controller may have been exhausted.
Obstacles between remote control and signal receiver in indoor unit.
The display is off. Active LED function.
Power failure.
WARNING
• Switch off the air conditioner immediately and cut off the power supply in the event of:
−Strange noises during operation.
−Faulty electronic control board.
−Faulty fuses or switches.
−Spraying water or objects inside the appliance.
−Overheated cables or plugs.
−Very strong smells coming from the appliance.

28
EN
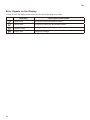
Error Signals on the Display
In case of error, the display on the indoor unit shown the following error codes:
RUN lamp Description of the trouble
Flashes once The fault of indoor temperature sensor.
Flashes twice The fault of indoor pipe temperature sensor.
Flashes 6 times Malfunction of indoor fan motor.
Display code Refrigerant leakage.

www.lg.com
AIRE ACONDICIONADO
Copyright © 2023 LG Electronics Inc. Todos los derechos reservados.
TIPO: DE MONTAJE EN PARED
Lea este manual del propietario detenidamente antes de
operar el aparato y consérvelo a su alcance para consultarlo en
cualquier momento.
MANUAL DEL PROPIETARIO

ÍNDICE
NOMBRES DE LAS PARTES ....................................................... 11
Unidad interior .................................................................................................11
Unidad exterior ................................................................................................11
PANTALLA DE LA UNIDAD INTERIOR ....................................... 12
FUNCIÓN DE EMERGENCIA ....................................................... 13
Función de emergencia...................................................................................13
CONTROL REMOTO ....................................................................14
Uso del control remoto inalámbrico.................................................................14
Reemplazo de las baterías .............................................................................15
INSTRUCCIONES DE FUNCIONAMIENTO ................................. 16
Modo de refrigeración .....................................................................................16
Modo Seco ......................................................................................................16
Modo Ventilador (No botón FAN) ....................................................................17
Modo Calefacción ...........................................................................................17
Modo Automático ............................................................................................18
Función Turbo .................................................................................................18
Control de oscilación ....................................................................................... 19
Función ECO...................................................................................................20
Función de pantalla (Pantalla interior) ............................................................20
Función Dormir ................................................................................................21
Función YO SIENTO .......................................................................................21
Función Temporizador ..................................................................................... 22
Función Moho .................................................................................................23
PROTECCIÓN ...............................................................................24
FUNCIÓN DE REINICIO AUTOMÁTICO ...................................... 24
Función de reinicio automático .......................................................................24
MANTENIMIENTO ........................................................................25
Filtros antipolvo ...............................................................................................25
Limpieza del intercambiador de calor .............................................................25
Mantenimiento de fin de temporada................................................................26
Reemplazo de las baterías .............................................................................26
SOLUCIÓN DE PROBLEMAS ......................................................27
Este manual puede contener imagenes o
contenido diferente al del modelo que ha
comprado.
Este manual está sujeto a revisiones por
parte del fabricante.

3
SP
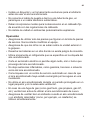
INSTRUCCIONES DE SEGURIDAD
Las siguientes pautas de seguridad sirven para evitar daños o riesgos
imprevistos generados por una operación incorrecta del producto.
Las directrices se dividen entre “ADVERTENCIA” y “PRECAUCIÓN”, tal
como se describe a continuación.
Este símbolo se muestra para indicar cuestiones y
funcionamientos que pueden resultar riesgosos. Lea la
sección con este símbolo atentamente y siga las instrucciones
para evitar riesgos.
ADVERTENCIA
Esto indica que el incumplimiento de las instrucciones puede
provocar lesiones graves o la muerte.
PRECAUCIÓN
Esto indica que el incumplimiento de las instrucciones puede
provocar lesiones leves o daño al producto.
INSTRUCCIONES IMPORTANTES DE SEGURIDAD
ADVERTENCIA
Para reducir el riesgo de explosión, incendio, muerte,
descargas eléctricas, lesiones o quemaduras a las personas al
utilizar este producto, siga las precauciones básicas, incluidas
las siguientes:
• Antes de acceder a las terminales, todos los circuitos de
alimentación deben desconectarse.
• Deben incorporarse medios de desconexión a la instalación fija
de acuerdo con las reglas de instalación.
• Este aparato no es accesible al público en general.
• El aparato debe instalarse de acuerdo a las regulaciones
nacionales para electricidad.

4
SP
Niños en el hogar
Este aparato no está diseñado para ser utilizado por personas
(incluidos niños) con capacidades físicas, sensoriales o mentales
disminuidas o con falta de experiencia y conocimiento, a menos que
una persona responsable de su seguridad los supervise o los instruya
acerca del uso del mismo. Se debe supervisar a los niños para
asegurar que no jueguen con el artefacto.
Instalación
• No instale el aparato de aire acondicionado en una superficie
inestable o en un lugar donde exista peligro de que se caiga.
• Comuníquese con un centro de servicio autorizado cuando instale o
desee reubicar el aire acondicionado.
• Instale el panel y la cubierta de la caja de control de manera segura.
• No instale el aire acondicionado en un lugar donde se almacenen
líquidos o gases inflamables tales como gasolina, propano, diluyente
de pintura, etc.
• Asegúrese de que el tubo y el cable de alimentación que conecta
las unidades del interior y el exterior no estén demasiado tensos al
instalar el aire acondicionado.
• Utilice un fusible y un disyuntor estándar que correspondan a la
calificación del aire acondicionado.
• No introduzca aire o gas al sistema, salvo que este tenga el
refrigerante específico.
• Utilice gas no inflamable (nitrógeno) para comprobar si hay fugas
y para purgar el aire; usar aire comprimido o gas inflamable puede
provocar incendios o explosiones.
• Las conexiones del cableado interior/exterior deben estar firmemente
aseguradas y el cable debe conducirse correctamente de manera
que ninguna fuerza jale el cable de los terminales de conexión. Las
conexiones sueltas o mal realizadas pueden generar calor o provocar
incendios.

5
SP
• Instale un disyuntor y un tomacorriente exclusivos para el artefacto
antes de usar el aire acondicionado.
• No conecte el cable de puesta a tierra a una tubería de gas, un
pararrayos o un cable telefónico subterráneo.
• Deben incorporarse medios para la desconexión en el cableado fijo
de acuerdo con las regulaciones de cableado.
• No instale la unidad en ambientes potencialmente explosivos.
Operación
• Asegúrese de utilizar solo las piezas que figuran en la lista de piezas
de servicio. Nunca intente modificar el equipo.
• Asegúrese de que los niños no se suban sobre la unidad exterior ni
la golpeen.
• Deseche las baterías en un sitio donde no exista peligro de incendio.
• Utilice únicamente el refrigerante que se especifica en la etiqueta del
aire acondicionado.
• Corte el suministro eléctrico si percibe algún ruido, olor o humo que
provenga del aire acondicionado.
• No deje sustancias inflamables, como gasolina, benceno o solvente
cerca del aire acondicionado.
• Comuníquese con un centro de servicio autorizado en caso de que
el aire acondicionado haya estado sumergido por las aguas en una
inundación.
• No utilice el aire acondicionado durante un período prolongado en un
lugar pequeño y sin la adecuada ventilación.
• En caso de una fuga de gas (como gas freón, gas propano, gas LP,
etc.) ventile bien antes de utilizar el aire acondicionado de nuevo.
• Asegúrese de ventilar bien el ambiente cuando el aire acondicionado
y un artefacto calentador (como, por ejemplo, un calefactor) se
utilicen simultáneamente.

6
SP
• No bloquee la entrada ni la salida del flujo de aire.
• No introduzca las manos u otros objetos a través de la entrada
o salida de aire mientras el aire acondicionado se encuentra
funcionando.
• Asegúrese de que el cable de alimentación no esté sucio, flojo o roto.
• Nunca toque, opere o repare el artefacto de aire acondicionado con
las manos húmedas.
• No coloque ningún objeto sobre el cable de alimentación.
• No coloque un calefactor u otros artefactos calentadores cerca del
cable de alimentación.
• No modifique ni prolongue el cable de alimentación. Los cables
eléctricos con rasguños o a los que se les haya salido el material
aislante podrían ocasionar incendios o descargas eléctricas y deben
reemplazarse.
• Interrumpa el suministro de electricidad inmediatamente en caso de
corte de energía o tormenta eléctrica.
• Asegúrese de que el cable no pueda desenchufarse de un tirón ni
resultar dañado durante el funcionamiento.
• No toque el tubo de refrigerante o el tubo del agua o cualquier parte
interna con la unidad en operación o inmediatamente después de su
parada.
Mantenimiento
• No limpie el artefacto rociando agua directamente sobre el mismo.
• Antes de limpiar o realizar el mantenimiento, desconecte el
suministro de electricidad y espere que el ventilador se detenga.
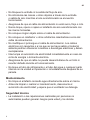
Seguridad técnica
• La instalación o las reparaciones realizadas por personas no
autorizadas pueden generar riesgos para usted y los demás.

7
SP
• La información contenida en este manual está destinada a
ser utilizada por un técnico calificado, familiarizado con los
procedimientos de seguridad y equipado con las herramientas y los
instrumentos de prueba adecuados.
• Si no se leen y siguen todas las instrucciones de este manual, es
posible que se produzcan daños a la propiedad, mal funcionamiento
del equipo, lesiones personales o la muerte.
• El aparato deberá ser instalado de acuerdo con las normas
nacionales de cableado.
• Cuando se deba reemplazar el cable de alimentación, el trabajo de
sustitución deberá ser realizado por personal autorizado y utilizando
solo piezas de repuesto originales.
• Este aparato debe estar correctamente conectado a tierra para
minimizar el riesgo de descarga eléctrica.
• No corte ni extraiga la clavija de conexión a tierra del enchufe de
alimentación.
• Conectar el terminal de tierra del adaptador al tornillo de la tapa de
la toma de la pared no conecta el aparato a tierra a menos que el
tornillo de la tapa sea metálico, no esté aislado, y la toma de la pared
esté conectada a tierra a través del cableado de la casa.
• Si tiene alguna duda sobre si el aire acondicionado está
correctamente conectado a tierra, haga que un electricista calificado
revise el circuito y la toma de la pared.
• El gas de soplado aislante y el refrigerante utilizados en el aparato
requieren procedimientos especiales de eliminación. Consulte a
un representante de servicio o a una persona calificada antes de
deshacerse de ellos.
• Si el cable de alimentación está dañado, debe ser reemplazado
por el fabricante, un representante de servicio o por una persona
igualmente calificada a fin de evitar riesgos.

8
SP
PRECAUCIÓN
Para reducir el riesgo de lesiones personales leves, mal
funcionamiento o daños al producto o la propiedad al usar
este artefacto, siga las precauciones básicas de seguridad,
incluidas las siguientes:
Instalación
• No instale el aparato de aire acondicionado en una zona en la que se
encuentre expuesto directamente a la brisa marina (rocío salino).
• Instale la manguera de desagüe de forma adecuada para que el
agua de la condensación drene suavemente.
• Tenga cuidado al desembalar e instalar el aire acondicionado.
• No toque el refrigerante que se filtre durante la instalación o la
reparación del artefacto.
• Transporte el aire acondicionado con la ayuda de dos o más
personas o utilice un montacargas.
• Instale la unidad exterior de modo que quede protegida de la luz
solar directa. No coloque la unidad interior en un lugar donde quede
expuesta directamente a la luz solar a través de las ventanas.
• Después de la instalación o reparación del artefacto, deseche los
materiales de embalaje, tales como tornillos, clavos, bolsas de
plástico o baterías utilizando los embalajes adecuados.
• Instale el aire acondicionado en un lugar donde el ruido proveniente
de la unidad exterior o los gases de escape no incomoden a los
vecinos. Si no lo hace, puede tener conflictos con sus vecinos.

9
SP
Operación
• Retire las pilas del control remoto si no lo va a utilizar durante un
período prolongado.
• Asegúrese de que el filtro esté instalado antes de utilizar el aire
acondicionado.
• Asegúrese de verificar si hay una fuga de refrigerante después de
instalar o reparar el aire acondicionado.
• No coloque ningún objeto sobre el aire acondicionado.
• Nunca mezcle diferentes tipos de baterías o baterías viejas y nuevas
en el control remoto.
• No haga funcionar el aire acondicionado durante mucho tiempo
cuando la humedad sea muy alta o cuando se haya dejado abierta
una puerta o una ventana.
• Deje de usar el control remoto si existe una pérdida de líquido de
las baterías. Si su ropa o su piel entran en contacto con el líquido
proveniente de la batería, lave con agua limpia.
• No exponga a personas, animales o plantas a la corriente fría o
caliente del aire acondicionado durante períodos prolongados.
• Ante la ingesta de líquido proveniente de una batería que gotea, lave
el interior de la boca a fondo y consulte a un médico.
• No beba el agua del desagüe del aire acondicionado.
• No utilice este producto para fines especiales, como la conservación
de alimentos, obras de arte, etc. Este es un aire acondicionado para
fines de consumo, no un sistema de refrigeración de precisión. Existe
riesgo de daño o pérdida de bienes.
• No recargue ni desarme las baterías.
• Este aparato puede ser usado por niños de 8 años en adelante y
personas con capacidad física, sensorial o mental reducida, ó sin
experiencia o conocimiento, siempre y cuando hayan sido instruidas
o supervisadas en lo concerniente al uso seguro del aparato, y
entiendan los riesgos que esto conlleva. Niños no deben jugar con
el aparato. La limpieza y el mantenimiento no deben ser llevados a
cabo por niños sin supervisión.

10
SP
Mantenimiento
• Nunca toque las partes metálicas del aire acondicionado cuando
retire el filtro de aire.
• Utilice un banco resistente o una escalera para limpiar, mantener o
reparar el aire acondicionado ubicado en lo alto.
• Nunca utilice solventes o productos de limpieza fuertes para limpiar
el aire acondicionado ni lo rocíe con agua. Utilice un paño suave.
• Para limpiar el interior, comuníquese con un distribuidor o centro
de servicio autorizado. El uso de detergentes fuertes puede causar
corrosión o daños en la unidad.

11
SP
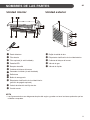
NOMBRES DE LAS PARTES
Unidad interior Unidad exterior
a a Panel delanteroPanel delantero m m Rejilla de salida de aireRejilla de salida de aire
b b Filtro de aireFiltro de aire n n Etiqueta de clasificación de la unidad exteriorEtiqueta de clasificación de la unidad exterior
c c Filtro opcional (si está instalado)Filtro opcional (si está instalado) o o Cubierta del bloque de bornesCubierta del bloque de bornes
d d Pantalla LEDPantalla LED p p Válvula de gasVálvula de gas
e e Receptor de señalReceptor de señal q q Válvula de líquidoVálvula de líquido
f f Cubierta del bloque de bornesCubierta del bloque de bornes
g g Generador ionizador (si está instalado)Generador ionizador (si está instalado)
h h DeflectoresDeflectores
i i Botón de emergenciaBotón de emergencia
j j Etiqueta de clasificación de la unidad interior Etiqueta de clasificación de la unidad interior
(posición de pegado opcional)(posición de pegado opcional)
k k Celosía de dirección del flujo de aireCelosía de dirección del flujo de aire
l l Control remotoControl remoto
NOTA
• Las figuras anteriores son diagramas simples del equipo y pueden no tener la misma apariencia que las
unidades compradas.

12
SP
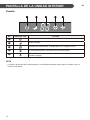
PANTALLA DE LA UNIDAD INTERIOR
Pantalla
No. Indicador LED Función
a
Este símbolo aparece cuando está encendido.
b
Modo DORMIR.
c
Indicador del temporizador, la temperatura y los códigos de error.
d
Se enciende durante el funcionamiento del temporizador.
e
Este símbolo aparece cuando la unidad está encendida, y desaparece
cuando se apaga.
NOTA
• La forma y la posición de los interruptores y los indicadores pueden variar según el modelo, pero su
función es la misma.

13
SP
FUNCIÓN DE EMERGENCIA
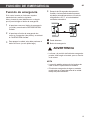
Función de emergencia
Si el control remoto no funciona o requiere
mantenimiento, realice lo siguiente:
Abra y levante el panel delantero en un ángulo
que le permita llegar el botón de emergencia.
1 Al presionar una vez el botón de emergencia
(un pitido), se activará la REFRIGERACIÓN
forzada.
2 Al presionar el botón de emergencia dos
veces en 3 segundos (dos pitidos), se activará
la CALEFACCIÓN forzada.
3 Para apagar la unidad, solo debe presionar el
botón de nuevo (un solo pitido largo).
4 Después de 30 segundos de operación
forzada, el aire acondicionado empezará
a trabajar automáticamente en el modo de
refrigeración a 23 °C, a la velocidad del
ventilador automática.
a a Panel delanteroPanel delantero
b b Botón de emergenciaBotón de emergencia
ADVERTENCIA
• La forma y la posición del botón de emergencia
pueden variar según el modelo, pero su función
es la misma.
NOTA
• La presión estática externa de las bombas de
calor es de 0 Pa para todos los modelos.
• El botón de emergencia de algunos modelos
puede estar en la parte derecha de la unidad
debajo del panel delantero.

14
SP
Uso del control remoto inalámbrico
Usted puede operar el aire acondicionado más cómodamente con el control remoto.
ECO
OPTION
TURBO
MODE FAN
A
FA
UT
N
OC
H
O
E
O
AT
L
E
D
C
R
O
Y
R
L
M
A
EN
IL
Y
I
D
M
F
8
E
E
C
W
E
S
H
L
E
E
E
A
E
A
D
L
P
N
F
TH
T
R
DIS
E
IM
E
E
P
G
L
CL
IN
W
OD
H
E
Símbolos Significado
AUTO
Indicador de la función de modo
Automático
COOL
Indicador del modo Refrigeración
DRY
Indicador del modo Seco
FAN
Indicador del modo Ventilador
HEAT
Indicador del modo Calefacción
ECO
Indicador de función ECO (Ecológica)
[TIMER]
Indicador del temporizador
Indicador de temperatura
Flashing
Indicador de la velocidad del ventilador:
Automático/bajo/bajo medio/medio/medio
alto/alto
Indicador de Silencio
Indicador de TURBO
Indicador del ángulo de oscilación de la
aleta
Indicador del ángulo de oscilación del
deflector (Opcional)
[SLEEP] [TIMER]
[DISPLAY] [MILDEW]
[I FEEL]
Indicador de funciones opcionales
NOTA
• Algunas funciones pueden no estar incluidas según el modelo.
CONTROL REMOTO

15
SP
Reemplazo de las baterías
Retire la cubierta de las baterías de la parte
posterior del control remoto deslizándola en la
dirección que indica la flecha.
Instale las baterías según la dirección (+ y -) que
se muestra en el control remoto.
Vuelva a colocar la cubierta de las baterías
deslizándola en su lugar.
ADVERTENCIA
• Use 2 baterías LRO 3 AAA (1.5 V) No utilice
baterías recargables. Reemplace las baterías
viejas por otras del mismo tipo cuando la
pantalla ya no sea legible.
• No deseche las baterías como residuo
municipal sin clasificar. Es necesario recolectar
este residuo por separado para que reciba un
tratamiento especial.
NOTA
• Bloqueo para niños: Presione y juntos
para activarlo.
• Pantalla ENCENDIDA/APAGADA: Presione de
forma prolongada el botón ECO.
• Extraiga las baterías para evitar daños por
fugas si no se utiliza el equipo durante un largo
tiempo.
ADVERTENCIA
1 Dirija el control remoto hacia el aire
acondicionado.
2 Verifique que no haya objetos entre el control
remoto y el receptor de señal de la unidad
interior.
3 No deje el control remoto expuesto al rayo
del sol.
4 Mantenga el control remoto a, por lo menos,
1 m de distancia del televisor u otros aparatos
eléctricos.
ECO
OPTION
TURBO
MODE FAN
A
FA
UT
N
OC
H
O
E
O
AT
L
E
D
C
R
O
Y
R
L
M
A
EN
IL
Y
I
D
M
F
8
E
E
C
W
E
S
H
L
E
E
E
A
E
A
D
L
P
N
F
TH
T
R
DIS
E
IM
E
E
P
G
L
CL
IN
W
OD
H
E
a a Receptor de señalReceptor de señal

16
SP
INSTRUCCIONES DE FUNCIONAMIENTO
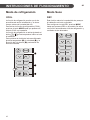
Modo de refrigeración
COOL
La función de refrigeración permite que el aire
acondicionado enfríe la habitación y, al mismo
tiempo, reduzca la humedad del aire.
Para activar la función de refrigeración (COOL),
presione el botón MODE hasta que aparezca el
símbolo COOL en la pantalla.
La función de refrigeración se activa ajustando el
botón o a una temperatura inferior a la de
la habitación.
Para optimizar la función del aire acondicionado,
ajuste la temperatura (a), la velocidad (b) y la
dirección del flujo de aire (c) presionando los
botones indicados.
OPTION
ECO TURBO
MODE FAN
Modo Seco
DRY
Esta función reduce la humedad del aire para que
la habitación esté más confortable.
Para configurar el modo DRY, presione MODE
hasta que aparezca DRY en la pantalla. Se activa
una función automática de ciclos de refrigeración y
ventilador de aire alternados.
OPTION
ECO TURBO
MODE FAN

17
SP
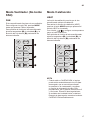
Modo Ventilador (No botón
FAN)
FAN
El aire acondicionado funciona solo en ventilación.
Para configurar el modo FAN, presione MODE
hasta que aparezca FAN en la pantalla.
Para optimizar la función del aire acondicionado,
ajuste la temperatura (a), la velocidad (b) y la
dirección del flujo de aire (c) presionando los
botones indicados.
OPTION
ECO TURBO
MODE FAN
Modo Calefacción
HEAT
La función de calefacción permite que el aire
acondicionado caliente la habitación.
Para activar la función de calefacción (HEAT),
presione el botón MODE hasta que aparezca el
símbolo HEAT en la pantalla.
Con el botón o , configure una temperatura
mayor a la de la habitación.
Para optimizar la función del aire acondicionado,
ajuste la temperatura (a), la velocidad (b) y la
dirección del flujo de aire (c) presionando los
botones indicados.
OPTION
ECO TURBO
MODE FAN
NOTA
• Cuando está en CALEFACCIÓN, el equipo
puede activar automáticamente un ciclo para
descongelar, que es esencial para limpiar
la escarcha en el condensador y recuperar
su función de intercambio de calor. Este
procedimiento, por lo general, demora entre 2
y 10 minutos. Durante el descongelamiento,
el ventilador de la unidad interior se detiene.
Después de descongelar, reanuda el modo de
CALEFACCIÓN automáticamente.

18
SP
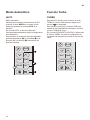
Modo Automático
AUTO
Modo Automático.
Para activar el modo de funcionamiento AUTO,
presione el botón MODE en el control remoto
hasta que aparezca el símbolo AUTO en la
pantalla.
En el modo AUTO, el aire acondicionado
funcionará automáticamente según la temperatura
de la habitación.
Para optimizar la función del aire acondicionado,
ajuste la temperatura (a), la velocidad (b) y la
dirección del flujo de aire (c) presionando los
botones indicados.
OPTION
ECO TURBO
MODE FAN
Función Turbo
TURBO
Para activar la función turbo, presione el botón
TURBO o el botón FAN hasta que aparezca el
símbolo en la pantalla.
Para cancelar esta función, presione FAN para
cambiar a otra velocidad del ventilador o presione
el botón TURBO de nuevo.
En el modo AUTO/HEAT/COOL/FAN, si selecciona
la función TURBO, se usará la configuración de
ventilador más alta para que emita un flujo de aire
fuerte.
OPTION
ECO TURBO
MODE FAN

19
SP
Control de oscilación
a a AletasAletas
b b DeflectoresDeflectores
c c Movimiento de la aletaMovimiento de la aleta
OSCILACIÓN DE LA ALETA
Presione el botón para activar la “ALETA”.
• Si el intervalo de tiempo es de menos de 2
segundos, la oscilación hará este ciclo:
Desactivar
• Si presiona más tiempo el botón, el ángulo de
oscilación de la aleta horizontal hará este ciclo:
• Si el intervalo de tiempo es mayor a 2
segundos, se desactivará y el flujo de aire se
dirigirá alternadamente hacia arriba y hacia
abajo para garantizar una difusión de aire
pareja en toda la habitación.
OSCILACIÓN DEL DEFLECTOR
Presione el botón para activar los deflectores
motorizados.
• Si el intervalo de tiempo es de menos de 2
segundos, la oscilación hará este ciclo:
Flashing
Desactivar
• Si presiona más tiempo el botón, la oscilación
hará este ciclo:
• Si el intervalo de tiempo es mayor a 2
segundos, se desactivará y el flujo de aire se
dirigirá alternadamente de izquierda a derecha.
(Función opcional según el modelo)
• Los deflectores se posicionan manualmente
y se colocan debajo de las aletas. Permiten
dirigir el flujo de aire hacia la derecha o hacia la
izquierda.
OPTION
ECO TURBO
MODE FAN
NOTA
• El ajuste se debe realizar con el equipo
apagado.
• ¡No posicione las aletas manualmente porque
podría causar daños graves en el delicado
mecanismo!
• No meta los dedos, varillas ni otros objetos en
la entrada de aire ni en las ventilaciones de
salida. El contacto accidental con piezas con
electricidad podría causar daños o lesiones
imprevistas.

20
SP
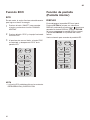
Función ECO
ECO
En este modo, el equipo funciona automáticamente
para lograr un ahorro de energía.
1 Presione el botón “ON/OFF” para encender
el equipo y seleccione el modo COOLING/
HEATING.
2 Presione el botón “ECO” y el equipo funcionará
en modo ECO.
3 Al presionar de nuevo el botón, el modo “ECO”
se cancelará, y desaparecerá “ECO” de la
pantalla LCD.
OPTION
ECO TURBO
MODE FAN
NOTA
• La función ECO está disponible en los modos de
REFRIGERACIÓN y CALEFACCIÓN.
Función de pantalla
(Pantalla interior)
DISPLAY
Encienda/apague la pantalla LED en el panel.
Presione OPTION la primera vez, seleccione
DISPLAY presionando el botón o hasta que
parpadee el símbolo DISPLAY; presione OPTION
de nuevo para apagar la pantalla LED en el panel,
y aparecerá DISPLAY en la pantalla del control
remoto.
Vuelva a hacerlo para encender la pantalla LED.
OPTION
ECO TURBO
MODE FAN

21
SP
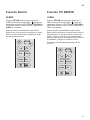
Función Dormir
SLEEP
Presione OPTION la primera vez, seleccione
SLEEP presionando el botón o hasta que
parpadee el símbolo SLEEP; presione OPTION de
nuevo para activar la función SLEEP, y aparecerá
SLEEP en la pantalla.
Vuelva a hacerlo para desactivar esta función.
Después de 10 horas de funcionamiento en modo
Dormir, el aire acondicionado regresará al modo
de configuración anterior.
OPTION
ECO TURBO
MODE FAN
Función YO SIENTO
I FEEL
Presione OPTION la primera vez, seleccione I
FEEL presionando el botón o hasta que
parpadee el símbolo I FEEL; presione OPTION de
nuevo para activar la función I FEEL y aparecerá I
FEEL en la pantalla.
Vuelva a hacerlo para desactivar esta función.
Esta función permite que el control remoto mida la
temperatura en su ubicación actual y envíe esta
señal 7 veces en 2 horas al aire acondicionado
para que este optimice la temperatura que siente a
su alrededor y asegure un máximo confort.
Se desactivará automáticamente después de
2 horas.
OPTION
ECO TURBO
MODE FAN

22
SP
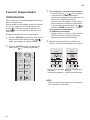
Función Temporizador
TEMPORIZADOR
Para configurar el encendido/apagado automático
del aire acondicionado.
Para encender el temporizador, antes de continuar
con la hora: Apague el aire acondicionado (con
la tecla ). Programe el modo de trabajo con el
botón MODE y la velocidad del ventilador con el
botón FAN.
Configurar/cambiar/cancelar el temporizador:
1 Presione OPTION la primera vez, seleccione el
temporizador presionando el botón o
hasta que parpadee el símbolo TIMER;
2 Presione OPTION de nuevo, el símbolo de
datos como y TIMER parpadearán;
OPTION
ECO TURBO
MODE FAN
3 Para configurar o cambiar el temporizador:
• Presione el botón o para configurar
el temporizador esperado (aumente o
disminuya con intervalos de media hora); los
símbolos h y TIMER parpadearán.
• Presione OPTION o espere 5 segundos sin
hacer nada para confirmar el temporizador;
el temporizador preconfigurado como y
el símbolo TIMER aparecerán en pantalla.
Para cancelar el temporizador
(si TIMER está encendido)
• Repita el paso 1 y el paso 2, luego presione
OPTION o espere 5 segundos sin hacer
nada para cancelar el temporizador.
4 Muestra del temporizador encendido en la
Figura 1, temporizador apagado en la Figura 2.
AUTO COOL DRY
FANECO
HEALTH MILDEW
CLEAN
AUTO COOL DRY
ECO
REMITREMIT
NAELCNAELC YYALPSIDALPSID
PEELSPEELS REMITREMIT LEEF
IL
EEF I
DISPLAY 8 CH
HEAT
HEAT
Figura 1, Temporizador
encendido
cuando está apagado
Figura 2, Temporizador
apagado
cuando está encendido
NOTA
• Todo el proceso debe realizarse en 5 segundos,
de lo contrario se cancelará.

23
SP
Función Moho
MILDEW
Presione OPTION la primera vez, seleccione
MILDEW presionando el botón o hasta que
parpadee el símbolo MILDEW; presione OPTION
de nuevo para activar la función MILDEW, y
aparecerá MILDEW en la pantalla.
Vuelva a hacerlo para desactivar esta función.
Esta función permite que el aire acondicionado siga
tirando aire durante unos 15 minutos para secar
las partes internas del equipo interior y evitar la
formación de moho, cuando el aire acondicionado
está apagado.
OPTION
ECO TURBO
MODE FAN
NOTA
• La función MILDEW solo está disponible en el
modo DRY/COOLING.

24
SP
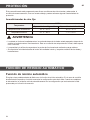
El aire acondicionado está programado para ofrecer condiciones de vida cómodas y adecuadas, si
se utiliza de manera anormal, como se muestra debajo, pueden activarse algunas características de
protección.
Acondicionador de aire fijo:
Temperatura MODO
Operación de refrigeración Operación de calefacción
Temperatura de la habitación 16
°C ~ 31 °C
16
°C ~ 31 °C
Temperatura exterior 21
°C ~ 48 °C
-7
°C ~ 24 °C
ADVERTENCIA
• La unidad no funciona inmediatamente si se enciende después de haber estado apagada o después de
cambiar el modo durante el funcionamiento. Esta es una acción de autoprotección normal, debe esperar
unos 3 minutos.
• La capacidad y la eficiencia responden a la prueba de funcionamiento realizada a carga máxima.
• Se necesita la velocidad más alta del motor del ventilador interior y la apertura máxima de las aletas y
los deflectores.
Función de reinicio automático
El equipo viene predeterminado de fábrica con la función de reinicio automático. En el caso de una falla
de alimentación repentina, el módulo memoriza la configuración antes de la falla. Cuando se restablece
la alimentación, la unidad se reinicia automáticamente con la configuración que tenía antes de la falla
preservada por la función de memoria.
PROTECCIÓN
FUNCIÓN DE REINICIO AUTOMÁTICO

25
SP
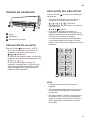
MANTENIMIENTO
El mantenimiento periódico es fundamental para
mantener la eficiencia de su aire acondicionado.
Antes de realizar el mantenimiento, desconecte
el suministro de energía al sacar el enchufe de
alimentación del tomacorriente.
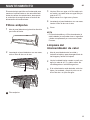
Filtros antipolvo
1 Abra el panel delantero siguiendo la dirección
que indica la flecha.
2 Levantando el panel delantero con una mano,
retire el filtro de aire con la otra.
a a Filtro antipolvoFiltro antipolvo
3 Limpie el filtro con agua; si el filtro está sucio
con aceite, se puede lavar con agua tibia (no
más de 45 °C).
Déjelo secar en un lugar seco y fresco.
4 Levantando el panel delantero con una mano,
inserte el filtro de aire con la otra.
5 Cierre.
NOTA
• El filtro electrostático y el filtro desodorante (si
está instalado) no se pueden lavar ni regenerar
y deben reemplazarse por unos nuevos cada
6 meses.
Limpieza del
intercambiador de calor
1 Abra el panel delantero de la unidad y
levántelo al máximo para desengancharlo de
las bisagras y facilitar la limpieza.
2 Limpie la unidad interior usando un paño con
agua (no más de 40 °C) y jabón neutro. No
use detergentes ni solventes agresivos.
3 Si la unidad exterior está obstruida, retire las
hojas y la suciedad, y limpie el polvo con un
chorro de aire o un poco de agua.

26
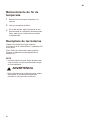
SP
Mantenimiento de fin de
temporada
1 Desconecte el interruptor automático o el
enchufe.
2 Limpie y reemplace los filtros.
3 En un día soleado, deje funcionando el aire
acondicionado en ventilación durante algunas
horas, para que la unidad interior se seque
completamente.
Reemplazo de las baterías
Cuando: No se escucha ningún pitido de
confirmación de la unidad interior. La pantalla LCD
no se activa.
Cómo: Retire la cubierta de la parte posterior.
Coloque las baterías nuevas respetando los
símbolos + y -.
NOTA
• Use solo baterías nuevas. Retire la batería del
control remoto si el aire acondicionado no está
en funcionamiento.
ADVERTENCIA
• No tire las baterías en la basura común, deben
desecharse en contenedores especiales
ubicados en los puntos de recolección.

27
SP
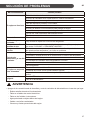
SOLUCIÓN DE PROBLEMAS
Mal funcionamiento
Causas posibles
El equipo no funciona.
Falla eléctrica/el enchufe esta desconectado.
El motor del ventilador de la unidad interior o exterior está dañado.
Falla del disyuntor termomagnético del compresor.
Falla del dispositivo protector o los fusibles.
Conexiones sueltas o enchufe desconectado.
A veces, se detiene el funcionamiento para proteger el equipo.
La tensión es mayor o menor que el rango de tensión.
Función de TEMPORIZADOR ENCENDIDO activa.
El tablero de control electrónico está dañado.
Olor extraño. Filtro de aire sucio.
Sonido de agua
corriendo. Flujo inverso de líquido en el circuito del refrigerante.
Sale una bruma fina de
la salida de aire.
Esto ocurre cuando el aire en la habitación se vuelve muy frío, por ejemplo, en
los modos “COOLING” o “DEHUMIDIFYING/DRY”.
Se oye un ruido
extraño.
Este ruido se produce por la expansión o la contracción del panel delantero por
las variaciones de temperatura y no indica un problema.
Flujo de aire
insuficiente, ya sea frío
o caliente.
Configuración de temperatura inapropiada.
La entrada o la salida de aire de la unidad interior o exterior está bloqueada.
El filtro de aire está bloqueado.
La velocidad del ventilador está configurada en el mínimo.
Hay otras fuentes de calor en la habitación.
Falta refrigerante.
El equipo no responde
a los comandos.
El control remoto no está lo suficientemente cerca de la unidad interior.
La batería del control remoto puede haberse agotado.
Hay obstáculos entre el control remoto y el receptor de señal en la unidad
interior.
La pantalla está
apagada.
Función LED activa.
Falla en la alimentación.
ADVERTENCIA
• Apague el aire acondicionado de inmediato y corte el suministro de alimentación en el caso de que haya:
−Ruidos extraños durante el funcionamiento
−Fallas en el tablero de control electrónico.
−Fallas en los fusibles o interruptores.
−Agua pulverizada u objetos dentro del equipo.
−Cables o enchufes recalentados.
−Olores muy fuertes provenientes del equipo.

-
 1
1
-
 2
2
-
 3
3
-
 4
4
-
 5
5
-
 6
6
-
 7
7
-
 8
8
-
 9
9
-
 10
10
-
 11
11
-
 12
12
-
 13
13
-
 14
14
-
 15
15
-
 16
16
-
 17
17
-
 18
18
-
 19
19
-
 20
20
-
 21
21
-
 22
22
-
 23
23
-
 24
24
-
 25
25
-
 26
26
-
 27
27
-
 28
28
-
 29
29
-
 30
30
-
 31
31
-
 32
32
-
 33
33
-
 34
34
-
 35
35
-
 36
36
-
 37
37
-
 38
38
-
 39
39
-
 40
40
-
 41
41
-
 42
42
-
 43
43
-
 44
44
-
 45
45
-
 46
46
-
 47
47
-
 48
48
-
 49
49
-
 50
50
-
 51
51
-
 52
52
-
 53
53
-
 54
54
-
 55
55
-
 56
56


LG SX122CL3 Manual de usuario
- Tipo
- Manual de usuario
- Este manual también es adecuado para
En otros idiomas
- English: LG SX122CL3 User manual
Otros documentos
-
Aspes AAC3000 El manual del propietario
-
Precision PIAW12169A/70B Manual de usuario
-
PREMIUM PIAW18180B Manual de usuario
-
Electrolux EXM18HV1WE Manual de usuario
-
Electrolux EXM18HV1WE Manual de usuario
-
-
Castorama S 4225 Manual de usuario
-
Airwell RC 08C Manual de usuario
-
-
Toyotomi TRG-856ZR Manual de usuario