Somfy Tilt only 50 WF RTS Manual de usuario
- Tipo
- Manual de usuario

TILT ONLY 50 WF ZIGBEE
EN Instructions
FR Notice
ES Instrucciones

EN TILT ONLY 50 WF ZIGBEE
2Copyright© 2023 SOMFY ACTIVITES SA. All rights reserved.
ORIGINAL INSTRUCTIONS
These instructions apply to all TILT ONLY 50 WF ZIGBEE drives, the different versions of which are available in the current
catalogue.
CONTENTS
1.
Prior information..........................................................................................................................................................
3
1.1.
Field of application..........................................................................................................................................
3
1.2.
Liability .............................................................................................................................................................
3
2.
Installation.....................................................................................................................................................................
3
2.1.
Assembly ..........................................................................................................................................................
4
2.2.
Wiring ...............................................................................................................................................................
4
2.3.
Commissioning of a Zigbee drive ..................................................................................................................
5
2.4.
Commissioning with TaHoma pro application (recommended)................................................................
5
2.5.
Commissioning with a control point only (without TaHoma pro application)........................................
6
2.6.
Tips and advice on installation.......................................................................................................................
11
3.
Use and maintenance ...................................................................................................................................................
12
3.1.
Use with TaHoma switch solution ................................................................................................................
12
3.2.
Use with TaHoma ready solution..................................................................................................................
13
3.3.
Tips and advice on operation.........................................................................................................................
14
4.
Technical data ...............................................................................................................................................................
14
GENERAL INFORMATION
Safety instructions
DANGER
Indicates a danger which may result in immediate death or serious injury.
WARNING
Indicates a danger which may result in death or serious injury.
PRECAUTION
Indicates a danger which may result in minor or moderate injury.
CAUTION
Indicates a danger which may result in damage to or destruction of the product.

TILT ONLY 50 WF ZIGBEE EN
Copyright© 2023 SOMFY ACTIVITES SA. All rights reserved. 3
1.PRIOR INFORMATION
1.1.Field of application
The TO 50 drives are designed to motorise all types of:
▪
Tiltable venetian blinds which bottom lath can be lifted at least by 4cm when an upward force of 150N is applied to
the bottom lath positioned at 16cm from the fully extended position.
1.2.Liability
Before installing and using the drive, please read these instructions carefully.
In addition to the instructions provided in this guide, please also comply with the instructions provided in the attached Safety
instructions document.
The drive must be installed by a home motorisation and automation professional, in accordance with Somfy’s
instructions and the applicable regulations in the country of installation.
Any operation of the drive outside the field of application described above is prohibited. Such use, and any failure to comply
with the instructions given in this guide and in the attached Safety instructions document, absolves Somfy of any liability and
invalidates the warranty.
After installing the drive, the installer must inform his customers of the operating and maintenance conditions for the drive
and must provide them with the operating and maintenance instructions, and the attached Safety instructions document.
Any After-Sales Service operation on the drive must be performed by a home motorisation and automation professional.
Never begin installing without first checking the compatibility of this product with the associated equipment and
accessories. If in doubt when installing this product and/or to obtain additional information, contact a Somfy representative
or visit the website www.somfy.com.
Using this drive with any products which are not listed in the attached «Compatibility matrix» document shall also
render invalid any Somfy warranty and release Somfy from any liability.
2.INSTALLATION
WARNING
•
These instructions are mandatory for the home motorisation and automation professional installing the drive.
•
Comply with current standards and legislation in the country of installation.
CAUTION
•
Never drop, knock or puncture the drive or immerse it in liquid.
•
Install an individual control point for each drive.
NOTICE
Make sure that LED, programming button and input connection remain visible and easily accessible after installation.

EN TILT ONLY 50 WF ZIGBEE
4Copyright© 2023 SOMFY ACTIVITES SA. All rights reserved.
2.1.Assembly
2.1.1.Preparing the drive
1] Cut the shaft to the length required.
2] Position the headrail and shaft adapters on the drive.
1]
2]
2.1.2.Fitting the drive inside the headrail
1] Insert the drive in the headrail.
CAUTION
Take care not to cut the power supply cable on the edges of the headrail when
introducing the drive.
2] Slide the shafts to the end stops of the drive’s shaft adaptors.
NOTICE
For optimal radio reception, the drive antenna should be kept straight and
should be positioned outside of headrail (if used).
NOTICE
It can be installed in a central or lateral position.
1]
2]
2.2.Wiring
WARNING
•
To ensure electrical safety, this Class III drive must be powered by a «SELV» voltage source (Safety Extra Low
Voltage).
•
For the purposes of recharging the battery, only use the detachable supply unit provided with this appliance.
•
Improper using battery pack may cause overheat, fire, explosion, resulting in serious injury or death.
•
Do not expose the drive or battery to excessive temperatures.
•
There is a risk if terminals of the battery-operated drive or battery being short circuited by metal objects.
•
Ensure battery is fully charged prior to installation on site.
Connect the battery or power supply to the drive’s power supply cable.

TILT ONLY 50 WF ZIGBEE EN
Copyright© 2023 SOMFY ACTIVITES SA. All rights reserved. 5
PRECAUTION
•
Cables which pass through a metal wall must be protected and isolated using a sheath or sleeve.
•
Attach cables to prevent any contact with moving parts.
•
Drive cable cannot be removed. If it is damaged, return the drive to the After-Sales department.
CAUTION
•
Do not unplug the battery when the motor works.
•
Leave the drive power supply cable accessible: the product must be easily replaceable.
•
Using this drive with any products which are not listed in the attached «Compatibility matrix» document shall also
render invalid any Somfy warranty and release Somfy from any liability.
2.3.Commissioning of a Zigbee drive
In an installation with Zigbee drives, 2 solutions are available to the user: TaHoma switch solution and TaHoma ready
solution.
TaHoma switch solution is the solution in connected mode, with a TaHoma switch in the installation that allows the user to
control all his Zigbee products through the TaHoma application.
The other solution, without TaHoma switch, is called TaHoma ready. It allows the user to control his Zigbee drives only
with control points. But this installation can be switched to connected mode afterwards by adding a TaHoma switch later.
Regarding the commissioning of a Zigbee drive, it can be done in 2 different ways :
▪
Either commissioning with TaHoma pro application, which is recommended because it is easier and more complete.
▪
Either commissioning with a control point.
Please refer to the corresponding section according to the selected commissioning mode.
2.4.Commissioning with TaHoma pro application (recommended)
Commissioning with TaHoma pro application is possible and recommended for both TaHoma ready solution
and TaHoma switch solution.
2.4.1.Starting-up
A Somfypro account is required but TaHoma switch is not mandatory.
To set the drive, you need to access and use TaHoma pro application, you must have a compatible phone or mobile device
and access to the internet.
The application is downloadable for free from Apple Store platforms and Google Play Store on Apple or Android™
compatible mobile devices. This compatibility is the one indicated in the description of the application on the corresponding
Store.
The software version of the TaHoma pro application may be updated from time to time to add new features and services.
2.4.2.Setting the drive
CAUTION
•
Download TaHoma pro application if it is not yet installed on the smartphone.
•
Launch the TaHoma pro application before performing this step.

EN TILT ONLY 50 WF ZIGBEE
6Copyright© 2023 SOMFY ACTIVITES SA. All rights reserved.
1] Plug in the power supply of the drive.
g
If the drive is not set or paired, once plugged in, it goes into programming
mode during 3min, and its LED blinks orange.
2] Open the TaHoma pro application and follow the steps to scan the drive QR
code.
3] Follow the instructions on the TaHoma pro application.
1]
2]
3]
NOTICE
This drive can be set with TaHoma pro and used without TaHoma switch (TaHoma switch can be added later).
2.4.3.Network management
To pair a control point to the drive, to add a new control point or a new drive in the installation, follow the instructions on
the TaHoma pro application.
2.4.4.Advanced settings
The TaHoma pro application is the recommended tool to easily set the drive and perform re-settings such as modifying the
direction of rotation of the drive, or readjusting the end limits.
On the other hand, some advanced settings such as adjusting the speed or the tilting travel can only be made via the
TaHoma pro application.
Follow the instructions in the TaHoma pro application to perform these settings or re-settings.
2.5.Commissioning with a control point only (without TaHoma pro
application)
This chapter describes the commissioning of the drive with a control point only, without using TaHoma pro
application, in the case of TaHoma ready solution.
2.5.1.Link creation between a drive and a control point
The following steps describe how to program a drive that is not set or paired, with an unpaired control point.
CAUTION
Settings are not possible if the control point batteries are too low.

TILT ONLY 50 WF ZIGBEE EN
Copyright© 2023 SOMFY ACTIVITES SA. All rights reserved. 7
1] Plug in the power supply of the drive.
g
If the drive is not set or paired, once plugged in, it goes into programming
mode during 3min, and its LED blinks orange.
NOTICE
If the drive has left the programming mode, its LED is not blinking:
•
Press and hold the PROG button on the drive until the motorised product
moves up and down briefly and its LED blinks orange : the drive is in
programming mode during 3min.
2] Bring the control point close to the drive then briefly press simultaneously
the Up and Down buttons on the control point: the control point looks for
the closest drive in programming mode.
g
When found, the feedback LED on the control point blinks in green, the
drive LED flashes in green, and the motorised product moves up and
down briefly.
g
Then the feedback LED on the control point blinks in orange slowly as
long as it is in setting mode.
1]
2]
NOTICE
If the control point does not find a drive nearby, the feedback LED of the control point blinks red after a few seconds,
and the motorised product of the drive does not move: repeat the above procedure. (If the drive is still in
programming mode, repeat only step 2).
NOTICE
If the control point does not find the right drive, please refer to chapter Scanning mode.
2.5.2.Scanning mode
If several drives are in programming mode, it is possible to be in setting mode with an
undesired drive.
1] Make sure the drive to be paired is still in programming mode. Otherwise,
restart from the beginning of commissioning steps.
2] If the drive to be paired is still in programming mode, bring the control point
close to the drive then briefly press the Up and Down buttons on the
control point simultaneously to exit the setting mode with the previous drive
and scan another close Zigbee drive.
g
The motorised product of the new found drive moves up and down
briefly, the drive is in setting mode.
A
A
A B C
B
B C …

EN TILT ONLY 50 WF ZIGBEE
8Copyright© 2023 SOMFY ACTIVITES SA. All rights reserved.
2.5.3.Checking the direction of rotation
Press the Up button on the control point:
a] If the slats tilt in the desired direction, the direction of rotation is correct: move
onto section Setting the end limits and pairing the control point.
b] Otherwise: move onto the next step.
b1] Press the my button on the control point until the slats move up and down: The
direction of rotation has been modified.
b2] Press the Up button on the control point to check the direction of rotation of
slats.
a]
b]
b1] b2]
2.5.4.Setting the end limits and pairing the control point
NOTICE
The end limits can be set in any order.
CAUTION
Do not set an end limit in a position that could lift the motorised product as this could result in long-term damage to
the motorised product and/or the drive.
1] Press and hold the Up button to tilt the slats to the desired up position. If
necessary, adjust the up position using the Up or Down buttons.
2] Press the my and Down buttons simultaneously until the slats briefly move up
and down.
ð
The upper end limit is memorised.
3] Press and hold the Down button to tilt the slats to the desired lower position.
If necessary, adjust the lower position using the Up or Down buttons.
4] Press the my and Up buttons simultaneously until the slats briefly move up
and down.
ð
The lower end limit is memorised.
▪
To confirm and exit the setting and pair the control point: briefly press the
PROG button of the control point:
◦
→ The slats briefly move up and down: the drive is now set and can be
controlled using the control point.
▪
To confirm and exit the setting without pairing the control point: press and
hold the Up and Down buttons on the control point simultaneously, until the
feedback LED on the control point stops flashing.
◦
→ The drive is now set and no control point is paired. (To pair the first control
point with an already set drive, refer to the following section).
1] 2]
3] 4]
2.5.5.Pairing the first control point to an already set drive
CAUTION
This procedure cannot be performed on multiple drives at the same time.
NOTICE
Keep the control point close to the drive during the whole procedure.

TILT ONLY 50 WF ZIGBEE EN
Copyright© 2023 SOMFY ACTIVITES SA. All rights reserved. 9
1] Press and hold the PROG button on the drive until the slats move up and
down briefly and its LED blinks orange: the drive is in programming mode
during 3 min.
2] Briefly press the PROG button on the control point: the slats move up and
down briefly.
g
The drive can now be controlled using the control point.
1]
2]
2.5.6.Creating a network with TaHoma ready: add control points and drives in
the installation
▪
To add a new single-channel or multichannel control point to the drive or to delete one of its paired control points:
refer to the control point instruction guide.
▪
To pair additional drives: follow the same procedure of commissioning with a new control point for each drive and
refer to the control point instruction guide to have them share the same network.
2.5.7.Modifying the direction of rotation with a control point
CAUTION
•
This procedure cannot be performed on multiple drives at the same time.
•
The drive must be set and paired to the control point.
NOTICE
Keep the control point close to the drive during the whole procedure.
1] Press and hold the PROG button on the control point until the slats move up
and down.
2] Briefly press the Up and Down buttons simultaneously on the control point :
ð
The slats move up and down after a few seconds.
3] Press the my button on the control point until the slats move up and down:
ð
The direction of rotation has been modified.
4] To confirm and exit the setting, press and hold the Up and Down buttons on
the control point simultaneously, until the feedback LED on the control point
stops flashing.
5] Press the Up button on the control point to check the direction of rotation.
1]
2] 3]
4] 5]
2.5.8.Readjusting the end limits with a control point
CAUTION
•
This procedure cannot be performed on multiple drives at the same time.
•
The drive must be set and paired to the control point.
NOTICE
Both end limits can be readjusted: either only one of them, or both at the same time.
2.5.8.1. Readjusting the upper end limit
NOTICE
Keep the control point close to the drive during the whole procedure.

EN TILT ONLY 50 WF ZIGBEE
10 Copyright© 2023 SOMFY ACTIVITES SA. All rights reserved.
1] Press and hold the PROG button on the control point until the slats briefly
move up and down.
2] Briefly press the Up and Down buttons simultaneously on the control point :
ð
The slats briefly move up and down after a few seconds.
3] Press and hold the Up or Down button on the control point to tilt the slats to
the new desired position.
4] Briefly press the my and Down buttons simultaneously on the control point :
ð
The slats move up and down.
5] To confirm and exit the setting, press and hold the Up and Down buttons on
the control point simultaneously, until the feedback LED on the control point
stops flashing.
2]
3] 4]
5]
1]
2.5.8.2. Readjusting the lower end limit
NOTICE
Keep the control point close to the drive during the whole procedure.
1] Press and hold the PROG button on the control point until the slats briefly
move up and down.
2] Briefly press the Up and Down buttons simultaneously on the control point :
ð
The slats briefly move up and down after a few seconds.
3] Press and hold the Up or Down button on the control point to tilt the slats to
the new desired position.
4] Briefly press the Up and my buttons simultaneously on the control point :
ð
The slats move up and down.
5] To confirm and exit the setting, press and hold the Up and Down buttons on
the control point simultaneously, until the feedback LED on the control point
stops flashing.
2]
3] 4]
5]
1]
2.5.8.3. Readjusting the two end limits
NOTICE
Keep the control point close to the drive during the whole procedure.

TILT ONLY 50 WF ZIGBEE EN
Copyright© 2023 SOMFY ACTIVITES SA. All rights reserved. 11
1] Press and hold the PROG button on the control point until the slats briefly
move up and down.
2] Briefly press the Up and Down buttons simultaneously on the control point :
ð
The slats briefly move up and down after a few seconds.
3] Press and hold the Up or Down button on the control point to tilt the slats to
the new desired upper position.
4] Briefly press the my and Down buttons simultaneously on the control point :
ð
The slats move up and down.
ð
The upper end limit is readjusted.
5] Press and hold the Up or Down button on the control point to tilt the slats to
the new desired lower position.
6] Briefly press the Up and my buttons simultaneously on the control point :
ð
The slats move up and down.
ð
The lower end limit is readjusted.
7] To confirm and exit the setting, press and hold the Up and Down buttons on
the control point simultaneously, until the feedback LED on the control point
stops flashing.
1] 2]
3] 4]
5] 6]
7]
2.5.9.Advanced settings
Some advanced settings such as adjusting the speed or the tilting travel cannot be made with a control point.
These advanced settings can only be made via the TaHoma pro application, please refer to chapter Commissionning with
TaHoma pro application (recommended).
2.6.Tips and advice on installation
2.6.1.Questions about the product?
Observations Possible causes Solutions
The motorised product does not work. The drive is neither set nor paired. Proceed to Commissioning of a
Zigbee drive.
The drive is paired but not set. Proceed to Commissioning of a
Zigbee drive.
The drive is set but not paired Proceed to Commissioning of a
Zigbee drive.
An obstacle hinders the movement of
the slats.
Remove the obstacle.
There may be some radio interference. Disconnect the power supply cable,
then reconnect the battery to the drive.
The drive battery is low and requires
charge.
Plug in the charger.
The control point battery is low. Check the battery power level and
replace if necessary.
The control point is not compatible or
not programmed
Check the compatibility or pair the
control point as required referring to
Commissioning of a Zigbee drive.

EN TILT ONLY 50 WF ZIGBEE
12 Copyright© 2023 SOMFY ACTIVITES SA. All rights reserved.
2.6.2.Upgrading a TaHoma ready installation into a TaHoma switch installation
To add TaHoma switch into a TaHoma ready installation, and then upgrade the installation into a TaHoma switch
installation, follow the instructions on the TaHoma pro application.
2.6.3.Erasing the memory of the drive (reset to original configuration)
NOTICE
This reset deletes all paired control points, end limit settings, advanced settings and resets the drive’s favourite
position (my).
Press and hold the PROG button on the drive until its LED blinks orange and the slats
briefly move up and down 3times.
➔ All the settings are erased. The drive is reset to its original configuration.
➔ The drive is in programming mode during 3min, and its LED blinks orange.
Resume the commissioning procedure (Refer to Commissioning).
3.USE AND MAINTENANCE
NOTICE
This drive does not require any maintenance operations.
The way to control a Zigbee motorised product is different depending on the solution present in the installation: TaHoma
switch solution or TaHoma ready solution.
Please refer to the corresponding section according to the solution.
3.1.Use with TaHoma switch solution
3.1.1.Use with TaHoma application
To control the motorised product in connected mode, you need to access and use TaHoma application, you must have a
compatible phone or mobile device and access to the internet.
The application is downloadable for free from Apple Store platforms and Google Play Store on Apple or Android™
compatible mobile devices. This compatibility is the one indicated in the description of the application on the corresponding
Store.
The software version of the TaHoma application may be updated from time to time to add new features and services.
1] Download TaHoma application if it is not yet installed on the smartphone.
2] Launch the application and follow the instructions to control the motorised
product.
1] 2]
3.1.2.Use with a control point
3.1.2.1. Up and Down buttons
▪
Briefly press the Up or Down button on the control point to tilt the slats to
the up or lower position of tilting.
▪
Press and hold the Up or Down button on the control point until the slats
reach the desired position of tilting. The movement stops when the button is
released.

TILT ONLY 50 WF ZIGBEE EN
Copyright© 2023 SOMFY ACTIVITES SA. All rights reserved. 13
Stop function
▪
Briefly press the my button on the control point to stop the tilting of the slats.
Favourite position (my)
NOTICE
An intermediate stop, which is called the “favourite position (my)”, is different from the upper and lower positions.
Programming or modifying the favourite position (my)
NOTICE
Only one favourite position (my) is permitted.
1] Move the slats to the desired favourite position using the Up or Down
button.
2] Briefly press the my button to stop the slats.
3] Press and hold the my button until the slats briefly move up and down:
g
The desired favourite position (my) is programmed and green LED blinks
5times.
1]
2] 3]
Using the favourite position (my)
▪
If a favourite position (my) is programmed, briefly press the my button on the
control point twice in succession: the slats first move to the lower end limit
and then to the favourite position (my).
x 2 =
3.2.Use with TaHoma ready solution
3.2.1.Up and Down buttons
▪
Briefly press the Up or Down button on the control point to tilt the slats to
the up or lower position of tilting.
▪
Press and hold the Up or Down button on the control point until the slats
reach the desired position of tilting. The movement stops when the button is
released.
Stop function
▪
Briefly press the my button on the control point to stop the tilting of the slats.
Favourite position (my)
NOTICE
An intermediate stop, which is called the “favourite position (my)”, is different from the upper and lower positions.

EN TILT ONLY 50 WF ZIGBEE
14 Copyright© 2023 SOMFY ACTIVITES SA. All rights reserved.
Programming or modifying the favourite position (my)
NOTICE
Only one favourite position (my) is permitted.
1] Move the slats to the desired favourite position using the Up or Down
button.
2] Briefly press the my button to stop the slats.
3] Press and hold the my button until the slats briefly move up and down:
g
The desired favourite position (my) is programmed and green LED blinks
5times.
1]
2] 3]
Using the favourite position (my)
▪
If a favourite position (my) is programmed, briefly press the my button on the
control point twice in succession: the slats first move to the lower end limit
and then to the favourite position (my).
x 2 =
3.3.Tips and advice on operation
3.3.1.Questions about the product?
Observations Possible causes Solutions
The motorised product does not work. The drive battery is low and requires
charge.
Plug in the charger.
The control point battery is low. Check the battery and replace if
necessary.
NOTICE
If the motorised product still does not work, contact a drive and home automation professional.
4.TECHNICAL DATA
Frequency bands and maximum power used 2.4 GHz - 2.4835 GHz e.r.p <63mW [USA, Australia, Canada]
Power supply 12 Vdc SELV
Operating temperature 0°C - 60°C
Index protection rating IP30 (For indoor use only)
Safety level Class III
Torque 1 N·m
Speed 5-15 rpm
Minimum distance between two end limits 1/8 turn
Maximum distance between two end limits 5 turns
Maximum number of associated controls 12
NOTICE
For additional information on the technical data for this drive contact your Somfy representative.
Please separate storage cells and batteries from other types of waste and recycle them via the local collection
facility.

TILT ONLY 50 WF ZIGBEE EN
Copyright© 2023 SOMFY ACTIVITES SA. All rights reserved. 15
We care about our environment. Do not dispose of the appliance with usual household waste. Give it to an
approved collection point for recycling.
The Bluetooth® word mark and logos are registered trademarks owned by the Bluetooth SIG, Inc. and any use of
such marks by SOMFY ACTIVITIES SA is under license. Other trademarks and trade names are those of their
respective owners.
Reference Designation
1241782 TILT ONLY 50 WF ZIGBEE
1241783 TILT ONLY 50 WF ZIGBEE
This device complies with Industry Canada’s licence-exempt RSSs. Operation is subject to the following two conditions:
(1) This device may not cause interference; and (2) This device must accept any interference, including interference that may
cause undesired operation of the device.
FCC warning statement:
- This device complies with Part 15 of the FCC Rules.
Operation is subject to the following two conditions:
(1) This device may not cause harmful interference, and (2) This device must accept any interference received, including
interference that may cause undesired operation.
- This equipment complies with FCC radiation exposure limits set forth for an uncontrolled environment. End users must
follow the specific operating instructions for satisfying RF exposure compliance. This transmitter must not be co-located
or operating in conjunction with any other antenna or transmitter.
- Changes or modifications not expressly approved by the party responsible for compliance could void the user’s authority
to operate the equipment.
FCC RF RADIATION EXPOSURE STATEMENT: This equipment complies with FCC radiation exposure limits set forth for an
uncontrolled environment. This equipment should be installed and operated with a minimum distance of 20cm between
the radiator and any part of your body.
ISED WARNING STATEMENTS: This equipment complies with IC RSS-102 radiation exposure limits set forth for an
uncontrolled environment. This equipment should be installed and operated with a minimum distance of 20cm between
the radiator and any part of your body.
Apple and Apple logos are trademarks of Apple, Inc., registered in the U.S. and other countries.
iPad® and iPhone® are registered trademarks of Apple, Inc. App Store is a service mark of Apple Inc.
Android is a trademark of Google LLC.
https://developer.android.com/distribute/marketing-tools/brand-guidelines

FR TILT ONLY 50 WF ZIGBEE
16 Copyright© 2023 SOMFY ACTIVITES SA. All rights reserved.
NOTICE TRADUITE
Cette notice s'applique à toutes les motorisations TILT ONLY 50 WF ZIGBEE dont les déclinaisons sont disponibles au
catalogue en vigueur.
SOMMAIRE
1.
Informations préalables...............................................................................................................................................
17
1.1.
Domaine d’application....................................................................................................................................
17
1.2.
Responsabilité..................................................................................................................................................
17
2.
Installation.....................................................................................................................................................................
17
2.1.
Assemblage ......................................................................................................................................................
18
2.2.
Câblage .............................................................................................................................................................
18
2.3.
Mise en service d'une motorisation Zigbee .................................................................................................
19
2.4.
Mise en service avec l'application TaHoma pro (recommandé) ................................................................
19
2.5.
Mise en service avec un point de commande uniquement (sans l'application TaHoma pro).................
20
2.6.
Astuces et conseils d’installation...................................................................................................................
26
3.
Utilisation et maintenance...........................................................................................................................................
26
3.1.
Utilisation avec la solution TaHoma switch.................................................................................................
27
3.2.
Utilisation avec la solution TaHoma ready...................................................................................................
28
3.3.
Astuces et conseils d’utilisation.....................................................................................................................
29
4.
Caractéristiques techniques ........................................................................................................................................
29
GÉNÉRALITÉS
Consignes de sécurité
DANGER
Signale un danger entraînant immédiatement la mort ou des blessures graves.
AVERTISSEMENT
Signale un danger susceptible d’entraîner la mort ou des blessures graves.
PRÉCAUTION
Signale un danger susceptible d’entraîner des blessures légères ou moyennement
graves.
ATTENTION
Signale un danger susceptible d’endommager ou de détruire le produit.

TILT ONLY 50 WF ZIGBEE FR
Copyright© 2023 SOMFY ACTIVITES SA. All rights reserved. 17
1.INFORMATIONS PRÉALABLES
1.1.Domaine d’application
Les motorisations TO 50 sont conçues pour motoriser tous types de :
▪
Brise-soleil orientables dont la dernière lame peut être remontée de 4 cm au moins lorsqu’une force de 150 N est
appliquée sur cette dernière lame placée à 16 cm de sa position totalement déployée.
1.2.Responsabilité
Avant d’installer et d’utiliser la motorisation, lire attentivement cette notice.
Outre les consignes de cette notice, respecter également les consignes détaillées dans le document joint Consignes de
sécurité.
La motorisation doit être installée par un professionnel de la motorisation et de l’automatisation de l’habitat,
conformément aux consignes de Somfy et à la réglementation applicable dans le pays de mise en service.
Toute utilisation de la motorisation hors du domaine d’application décrit ci-dessus est interdite. Elle exclurait, comme tout
irrespect des consignes figurant dans cette notice et dans le document joint Consignes de sécurité, toute responsabilité et
garantie de Somfy.
Après l’installation de la motorisation, l’installateur doit informer ses clients des conditions d’utilisation et de maintenance de
la motorisation et doit leur transmettre les consignes d’utilisation et de maintenance, ainsi que le document joint Consignes
de sécurité. Toute opération de Service Après-Vente sur la motorisation nécessite l’intervention d’un professionnel de la
motorisation et de l’automatisation de l’habitat.
Avant toute installation, vérifier la compatibilité de ce produit avec les équipements et accessoires associés. Si un doute
apparaît lors de l’installation de ce produit et / ou pour obtenir des informations complémentaires, consulter un
interlocuteur Somfy ou aller sur le site www.somfy.com.
L’utilisation de cette motorisation avec des produits non listés dans le document joint Matrice de compatibilité
exclurait également toute responsabilité et garantie de Somfy.
2.INSTALLATION
AVERTISSEMENT
•
Consignes à suivre impérativement par le professionnel de la motorisation et de l’automatisation de l’habitat
réalisant l’installation de la motorisation.
•
Se conformer aux normes et à la législation en vigueur dans le pays d’installation.
ATTENTION
•
Ne jamais laisser tomber, choquer, percer, immerger la motorisation.
•
Installer un point de commande individuel pour chaque motorisation.
INFORMATION
S’assurer que la LED, le bouton deprogrammation et l’entrée du câble du chargeur restent visibles et facilement accessibles
après l’installation.

FR TILT ONLY 50 WF ZIGBEE
18 Copyright© 2023 SOMFY ACTIVITES SA. All rights reserved.
2.1.Assemblage
2.1.1.Préparation de la motorisation
1] Couper l’axe du caisson à la longueur désirée.
2] Placer les adaptateurs de caisson et d'arbre sur la motorisation.
1]
2]
2.1.2.Intégration de la motorisation à l’intérieur du caisson
1] Insérer la motorisation dans le caisson.
ATTENTION
Veiller à ne pas couper le câble d’alimentation sur les bords du caisson au
moment d’introduire la motorisation dans le caisson.
2] Faire glisser les axes en butée sur les adaptateurs d’axe de la motorisation.
INFORMATION
Pour que la réception radio soit optimale, l’antenne de la motorisation doit être
tenue rectiligne et doit être placée à l’extérieur du caisson (le cas échéant).
INFORMATION
Le montage est possible en position centrale ou latérale.
1]
2]
2.2.Câblage
AVERTISSEMENT
•
Pour garantir la sécurité électrique, cette motorisation de classe III doit obligatoirement être alimentée par une
source de tension « TBTS » (Très Basse Tension de Sécurité).
•
Pour recharger la batterie, utiliser uniquement l’alimentation détachable fournie avec l’appareil.
•
Le pack batterie, s’il n’est pas correctement utilisé, peut provoquer une surchauffe, un incendie ou une explosion et
entraîner des blessures graves, voire mortelles.
•
Ne pas exposer la motorisation ou la batterie à des températures excessives.
•
Il existe un risque de court-circuit avec des objets métalliques entre les bornes de la motorisation alimentée par
batterie ou celles de la batterie.
•
S’assurer que la batterie est entièrement rechargée avant l’installation sur site.

TILT ONLY 50 WF ZIGBEE FR
Copyright© 2023 SOMFY ACTIVITES SA. All rights reserved. 19
Relier la batterie ou l’alimentation au câble d’alimentation de la motorisation.
PRÉCAUTION
•
Les câbles traversant une paroi métallique doivent être protégés et isolés par un manchon ou un fourreau.
•
Attacher les câbles pour éviter tout contact avec une partie en mouvement.
•
Le câble de la motorisation n’est pas démontable. S’il est endommagé, retourner la motorisation au SAV.
ATTENTION
•
Ne jamais débrancher la batterie lorsque la motorisation est en marche.
•
Laisser le câble d’alimentation de la motorisation accessible : le produit doit pouvoir être remplacé facilement.
•
L’utilisation de cette motorisation avec des produits non listés dans le document joint « Matrice de compatibilité »
exclurait également toute responsabilité et garantie de Somfy.
2.3.Mise en service d'une motorisation Zigbee
Deux solutions s'offrent à l'utilisateur pour installer une motorisation Zigbee : la solution TaHoma switch et la solution
TaHoma ready.
TaHoma switch est la solution en mode connecté avec un TaHoma switch dans l'installation permettant à l'utilisateur de
piloter tous ses produits Zigbee depuis l'application TaHoma.
L'autre solution, sans TaHoma switch, est appelée TaHoma ready. Elle permet à l'utilisateur de piloter ses motorisations
Zigbee depuis des points de commande uniquement. Il est toutefois possible de basculer cette installation en mode
connecté en ajoutant TaHoma switch par la suite.
Concernant la mise en service d'une motorisation Zigbee, deux méthodes sont possibles :
▪
soit la mise en service avec l'application TaHoma pro, méthode recommandée car elle est plus facile et plus
complète,
▪
soit la mise en service avec un point de commande.
Veuillez vous reporter à la section correspondante selon le mode choisi.
2.4.Mise en service avec l'application TaHoma pro (recommandé)
La mise en service avec l'application TaHoma pro est possible et recommandée pour les solutions TaHoma
ready et TaHoma switch.
2.4.1.Mise en route
Un compte Somfypro est nécessaire, mais TaHoma switch n'est pas obligatoire.
Pour mettre la motorisation en service, utiliser l’application TaHoma pro. Un téléphone ou un appareil mobile compatible et
une connexion internet sont nécessaires.
L’application est téléchargeable gratuitement depuis l'Apple Store et le Google Play Store sur les appareils mobiles
compatibles Apple ou Android™. Cette compatibilité est celle indiquée dans la description de l’application sur le Store
correspondant.
La version logicielle de l’application TaHoma pro doit être mise à jour de temps en temps pour ajouter de nouvelles
fonctionnalités et de nouveaux services.

FR TILT ONLY 50 WF ZIGBEE
20 Copyright© 2023 SOMFY ACTIVITES SA. All rights reserved.
2.4.2.Réglage de la motorisation
ATTENTION
•
Télécharger l’application TaHoma pro si elle n’est pas encore installée sur le smartphone.
•
Lancer l'application TaHoma pro avant de procéder à cette étape.
1] Brancher l'alimentation de la motorisation au secteur.
g
Si la motorisation n'est ni réglée ni appairée, elle passe en mode
programmation pendant 3 min après avoir été branchée, et sa LED
clignote en orange.
2] Ouvrir l'application TaHoma pro et suivre les étapes pour scanner le QR code
de la motorisation.
3] Suivre les consignes sur l’application TaHoma pro.
1]
2]
3]
INFORMATION
Cette motorisation peut être réglée avec TaHoma pro et utilisée sans TaHoma switch (TaHoma switch peut être
ajouté ultérieurement).
2.4.3.Gestion de réseau
Pour appairer un point de commande à la motorisation, pour ajouter un nouveau point de commande ou une nouvelle
motorisation à l'installation, suivre les consignes sur l’application TaHoma pro.
2.4.4.Réglages avancés
L'application TaHoma pro est l'outil recommandé pour régler la motorisation et effectuer des reréglages facilement tels que
la modification du sens de rotation ou le réajustement des fins de course.
En revanche, certains réglages avancés, tels que l'ajustement de la vitesse ou de la course d'inclinaison, ne peuvent être
effectués que par l'intermédiaire de l'application TaHoma pro.
Suivre les consignes sur l'application TaHoma pro pour effectuer ces réglages ou réajustements.
2.5.Mise en service avec un point de commande uniquement (sans
l'application TaHoma pro)
Ce chapitre décrit la mise en service de la motorisation avec un point de commande uniquement, sans utiliser
l'application TaHoma pro, dans le cas d'une solution TaHoma ready.
2.5.1.Création du lien entre la motorisation et le point de commande
Les étapes suivantes décrivent comment programmer une motorisation qui n'est pas encore réglée ou appairée, avec un
point de commande non appairé.
ATTENTION
Les réglages sont impossibles si les piles du point de commande sont trop faibles.

TILT ONLY 50 WF ZIGBEE FR
Copyright© 2023 SOMFY ACTIVITES SA. All rights reserved. 21
1] Brancher l'alimentation de la motorisation au secteur.
g
Si la motorisation n'est ni réglée ni appairée, elle passe en mode
programmation pendant 3 min après avoir été branchée, et sa LED
clignote en orange.
INFORMATION
Si la motorisation a quitté le mode programmation, sa LED ne clignote pas :
•
Faire un appui long sur le bouton PROG de la motorisation jusqu'au bref va-
et-vient du produit motorisé et que sa LED clignote en orange : la
motorisation est en mode programmation pendant 3 min.
2] Approcher le point de commande de la motorisation, puis faire un appui bref
et simultané sur les touches Montée et Descente du point de commande : Le
point de commande recherche alors la motorisation en mode
programmation la plus proche.
g
Lorsqu'il l'a détectée, la LED de feedback du point de commande clignote
en vert, ainsi que la LED de la motorisation, et le produit motorisé effectue
un bref va-et-vient.
g
Ensuite, la LED de feedback du point de commande clignote en orange
lentement tant qu'il se trouve en mode réglage.
1]
2]
INFORMATION
Si le point de commande ne trouve pas de motorisation à proximité, sa LED de feedback clignote en rouge après
quelques secondes et le produit motorisé ne bouge pas : répéter la procédure ci-dessus. (Si la motorisation est
toujours en mode programmation, répéter uniquement l'étape 2.)
INFORMATION
Si le point de commande ne détecte pas la motorisation souhaitée, voir le chapitre Mode de recherche.
2.5.2.Mode de recherche
Si plusieurs motorisations sont en mode programmation, il est possible que le point
de commande détecte une motorisation non désirée et la mette en mode réglage.
1] Vérifier que la motorisation à appairer est toujours en mode programmation.
Dans le cas contraire, reprendre les étapes de mise en service au début.
2] Si la motorisation à appairer se trouve toujours en mode programmation,
approcher le point de commande de la motorisation, faire un appui bref et
simultané sur les touches Montée et Descente du point de commande pour
quitter le mode réglage de la motorisation précédente et rechercher une
autre motorisation Zigbee à proximité.
g
Le produit motorisé de la nouvelle motorisation détectée effectue un bref
va-et-vient, la motorisation passe en mode réglage.
A
A
A B C
B
B C …

FR TILT ONLY 50 WF ZIGBEE
22 Copyright© 2023 SOMFY ACTIVITES SA. All rights reserved.
2.5.3.Contrôle du sens de rotation
Appuyer sur la touche Montée du point de commande :
a] Si les lames du store s’orientent dans le sens attendu, le sens de rotation est
correct : passer à Réglage des fins de course et appairage du point de
commande.
b] Sinon : passer à l’étape suivante.
b1] Appuyer sur la touche my du point de commande jusqu’au va-et-vient des lames :
le sens de rotation est modifié.
b2] Appuyer sur la touche Montée du point de commande pour vérifier le sens de
rotation des lames.
a]
b]
b1] b2]
2.5.4.Réglage des fins de course et appairage du point de commande
INFORMATION
Les fins de course peuvent être réglées dans n’importe quel ordre.
ATTENTION
Ne pas régler une fin de course dans une position qui pourrait soulever le produit motorisé, car cela pourrait finir par
endommager le produit motorisé et/ou la motorisation.
1] Faire un appui long sur la touche Montée pour orienter les lames à la position
haute désirée. Au besoin, ajuster la position haute à l’aide des touches
Montée et Descente.
2] Appuyer en même temps sur les touches my et Descente jusqu’au bref va-
et-vient des lames.
ð
La fin de course haute est mémorisée.
3] Faire un appui long sur la touche Descente pour orienter les lames à la
position basse désirée. Au besoin, ajuster la position basse à l’aide des touches
Montée et Descente.
4] Appuyer en même temps sur les touches my et Montée jusqu’au bref va-et-
vient des lames.
ð
La fin de course basse est mémorisée.
▪
Pour confirmer, quitter le réglage et appairer le point de commande : faire un
appui bref sur le bouton PROG du point de commande :
◦
→ Les lames effectuent un bref va-et-vient : la motorisation est maintenant
réglée et peut être pilotée à l’aide du point de commande.
▪
Pour confirmer et quitter le réglage sans appairer le point de commande : faire
un appui long et simultané sur les touches Montée et Descente du point de
commande jusqu’à ce que sa LED de feedback cesse de clignoter.
◦
→ La motorisation est maintenant réglée, mais non appairée au point de
commande. (Pour appairer le premier point de commande avec une
motorisation déjà réglée, voir la section suivante.)
1] 2]
3] 4]
2.5.5.Appairage du premier point de commande avec une motorisation déjà
réglée
ATTENTION
Cette procédure ne peut pas être effectuée sur plusieurs motorisations en même temps.
INFORMATION
Maintenir le point de commande à proximité de la motorisation pendant toute la procédure.

TILT ONLY 50 WF ZIGBEE FR
Copyright© 2023 SOMFY ACTIVITES SA. All rights reserved. 23
1] Faire un appui long sur le bouton PROG de la motorisation jusqu’au bref va-
et-vient des lames et que sa LED clignote en orange : la motorisation est en
mode programmation pendant 3 min.
2] Faire un appui bref sur le bouton PROG du point de commande : les lames
effectuent un bref va-et-vient.
g
La motorisation peut maintenant être pilotée à l’aide du point de
commande.
1]
2]
2.5.6.Création d'un réseau avec TaHoma ready : ajout de points de commande
et de motorisations à l'installation
▪
Pour ajouter un nouveau point de commande à canal unique ou multicanal à la motorisation ou pour supprimer l'un
de ses points de commande appairés : se référer à la notice du point de commande.
▪
Pour appairer d'autres motorisations : suivre la procédure de mise en service avec un nouveau point de commande
pour chaque motorisation et se référer à la notice du point de commande pour les mettre en réseau.
2.5.7.Modification du sens de rotation à l’aide d’un point de commande
ATTENTION
•
Cette procédure ne peut pas être effectuée sur plusieurs motorisations en même temps.
•
La motorisation doit être réglée et appairée au point de commande.
INFORMATION
Maintenir le point de commande à proximité de la motorisation pendant toute la procédure.
1] Faire un appui long sur le bouton PROG du point de commande jusqu’au va-
et-vient des lames.
2] Faire un appui bref et simultané sur les touches Montée et Descente du point
de commande :
ð
les lames effectuent un va-et-vient après quelques secondes.
3] Appuyer sur la touche my du point de commande jusqu’au va-et-vient des
lames :
ð
Le sens de rotation est modifié.
4] Pour confirmer le réglage et quitter, faire un appui long et simultané sur les
touches Montée et Descente du point de commande jusqu’à ce que sa LED
de feedback cesse de clignoter.
5] Appuyer sur la touche Montée du point de commande pour contrôler le sens
de rotation.
1]
2] 3]
4] 5]
2.5.8.Réajustement des fins de course avec un point de commande
ATTENTION
•
Cette procédure ne peut pas être effectuée sur plusieurs motorisations en même temps.
•
La motorisation doit être réglée et appairée au point de commande.
INFORMATION
Il est possible de réajuster les deux fins de course : soit une seule, soit les deux à la fois.

FR TILT ONLY 50 WF ZIGBEE
24 Copyright© 2023 SOMFY ACTIVITES SA. All rights reserved.
2.5.8.1. Réajustement de la fin de course haute
INFORMATION
Maintenir le point de commande à proximité de la motorisation pendant toute la procédure.
1] Faire un appui long sur le bouton PROG du point de commande jusqu’au bref
va-et-vient des lames.
2] Faire un appui bref et simultané sur les touches Montée et Descente du point
de commande :
ð
les lames effectuent un bref va-et-vient après quelques secondes.
3] Faire un appui long sur la touche Montée ou Descente du point de
commande pour orienter les lames dans la nouvelle position désirée.
4] Faire un appui bref et simultané sur les touches my et Descente du point de
commande :
ð
les lames effectuent un va-et-vient.
5] Pour confirmer le réglage et quitter, faire un appui long et simultané sur les
touches Montée et Descente du point de commande jusqu’à ce que sa LED
de feedback cesse de clignoter.
2]
3] 4]
5]
1]
2.5.8.2. Réajustement de la fin de course basse
INFORMATION
Maintenir le point de commande à proximité de la motorisation pendant toute la procédure.
1] Faire un appui long sur le bouton PROG du point de commande jusqu’au bref
va-et-vient des lames.
2] Faire un appui bref et simultané sur les touches Montée et Descente du point
de commande :
ð
les lames effectuent un bref va-et-vient après quelques secondes.
3] Faire un appui long sur la touche Montée ou Descente du point de
commande pour orienter les lames dans la nouvelle position désirée.
4] Faire un appui bref et simultané sur les touches my et Montée du point de
commande :
ð
les lames effectuent un va-et-vient.
5] Pour confirmer le réglage et quitter, faire un appui long et simultané sur les
touches Montée et Descente du point de commande jusqu’à ce que sa LED
de feedback cesse de clignoter.
2]
3] 4]
5]
1]
2.5.8.3. Réajustement des deux fins de course
INFORMATION
Maintenir le point de commande à proximité de la motorisation pendant toute la procédure.

TILT ONLY 50 WF ZIGBEE FR
Copyright© 2023 SOMFY ACTIVITES SA. All rights reserved. 25
1] Faire un appui long sur le bouton PROG du point de commande jusqu’au bref
va-et-vient des lames.
2] Faire un appui bref et simultané sur les touches Montée et Descente du point
de commande :
ð
les lames effectuent un bref va-et-vient après quelques secondes.
3] Faire un appui long sur la touche Montée ou Descente du point de
commande pour orienter les lames dans la nouvelle position haute désirée.
4] Faire un appui bref et simultané sur les touches my et Descente du point de
commande :
ð
les lames effectuent un va-et-vient.
ð
La fin de course haute est réajustée.
5] Faire un appui long sur la touche Montée ou Descente du point de
commande pour orienter les lames dans la nouvelle position basse désirée.
6] Faire un appui bref et simultané sur les touches my et Montée du point de
commande :
ð
les lames effectuent un va-et-vient.
ð
La fin de course basse est réajustée.
7] Pour confirmer le réglage et quitter, faire un appui long et simultané sur les
touches Montée et Descente du point de commande jusqu’à ce que sa LED
de feedback cesse de clignoter.
1] 2]
3] 4]
5] 6]
7]
2.5.9.Réglages avancés
Certains réglages avancés, tels que le réglage de la vitesse ou de la course d'inclinaison, ne peuvent pas être effectués à l'aide
d'un point de commande.
Ces réglages avancés nécessitent l'application TaHoma pro, voir le chapitre Mise en service avec l'application TaHoma
pro (recommandé).

FR TILT ONLY 50 WF ZIGBEE
26 Copyright© 2023 SOMFY ACTIVITES SA. All rights reserved.
2.6.Astuces et conseils d’installation
2.6.1.Questions sur le produit ?
Constats Causes possibles Solutions
Le produit motorisé ne fonctionne pas. La motorisation n’est ni réglée, ni
appairée.
Procéder à la Mise en service d’une
motorisation Zigbee.
La motorisation est appairée mais non
réglée.
Procéder à la Mise en service d’une
motorisation Zigbee.
La motorisation est réglée mais non
appairée.
Procéder à la Mise en service d’une
motorisation Zigbee.
Un obstacle empêche le mouvement
des lames.
Éliminer l’obstacle.
Présence possible d’interférences radio. Débrancher le câble d’alimentation, puis
rebrancher la batterie à la motorisation.
La batterie de la motorisation est faible
et nécessite une recharge.
Recharger la batterie.
La pile du point de commande est faible. Contrôler si la pile est faible et la
remplacer si besoin.
Le point de commande n’est pas
compatible ou n’est pas enregistré.
Vérifier la compatibilité ou appairer le
point de commande conformément à la
procédure Mise en service d’une
motorisation Zigbee.
2.6.2.Mise à niveau d'une installation TaHoma ready vers TaHoma switch
Pour ajouter TaHoma switch à une installation TaHoma ready, puis mettre à niveau vers une installation TaHoma switch,
suivre les consignes sur l’application TaHoma pro.
2.6.3.Effacement de la mémoire de la motorisation (réinitialisation à la
configuration d’origine)
INFORMATION
Cette réinitialisation supprime tous les points de commande appairés, tous les réglages de fin de course, tous les
réglages avancés, ainsi que la position favorite (my) de la motorisation.
Faire un appui long sur le bouton PROG de la motorisation jusqu’à ce que la LED
clignote en orange et que les lames effectuent 3 brefs va-et-vient.
➔ Tous les réglages sont effacés. La motorisation est réinitialisée à la configuration
d’origine.
➔ La motorisation est en mode programmation pendant 3 min et sa LED clignote en
orange.
Reprendre la mise en service (voir chapitre Mise en service).
3.UTILISATION ET MAINTENANCE
INFORMATION
Cette motorisation ne nécessite pas d’opération de maintenance.
Un produit motorisé Zigbee se pilote différemment selon la solution utilisée au sein de l'installation : solution TaHoma
switch ou TaHoma ready.
Voir la section de la solution qui vous intéresse.

TILT ONLY 50 WF ZIGBEE FR
Copyright© 2023 SOMFY ACTIVITES SA. All rights reserved. 27
3.1.Utilisation avec la solution TaHoma switch
3.1.1.Utilisation avec l'application TaHoma
Pour piloter le produit motorisé en mode connecté, utiliser l’application TaHoma. Un téléphone ou un appareil mobile
compatible et une connexion internet sont nécessaires.
L’application est téléchargeable gratuitement depuis l'Apple Store et le Google Play Store sur les appareils mobiles
compatibles Apple ou Android™. Cette compatibilité est celle indiquée dans la description de l’application sur le Store
correspondant.
La version logicielle de l’application TaHoma doit être mise à jour de temps en temps pour ajouter de nouvelles
fonctionnalités et de nouveaux services.
1] Télécharger l’application TaHoma si elle n’est pas encore installée sur le
smartphone.
2] Lancer l'application et suivre les consignes pour piloter le produit motorisé.
1] 2]
3.1.2.Utilisation avec un point de commande
3.1.2.1. Touches Montée et Descente
▪
Appuyer brièvement sur la touche Montée ou Descente du point de
commande pour orienter les lames en position haute ou basse.
▪
Faire un appui long sur la touche Montée ou Descente du point de
commande jusqu’à ce que les lames atteignent l'orientation souhaitée. Dès que
la touche est relâchée, le mouvement s’arrête.
Fonction Stop
▪
Appuyer brièvement sur la touche my du point de commande pour arrêter le
pivotement des lames.
Position favorite (my)
INFORMATION
Il existe une position intermédiaire appelée « position favorite (my) » autre que les positions basse et haute.
Enregistrement ou modification de la position favorite (my)
INFORMATION
Une seule position favorite (my) est admise.
1] Appuyer sur la touche Montée ou Descente pour amener les lames à la
position favorite.
2] Appuyer brièvement sur la touche my pour arrêter le mouvement des lames.
3] Faire un appui long sur la touche my jusqu’au va-et-vient des lames :
g
La position favorite (my) souhaitée est enregistrée et la LED verte clignote
5 fois.
1]
2] 3]

FR TILT ONLY 50 WF ZIGBEE
28 Copyright© 2023 SOMFY ACTIVITES SA. All rights reserved.
Utilisation de la position favorite (my)
▪
Si une position favorite (my) est enregistrée, faire deux appuis brefs et
consécutifs sur la touche my du point de commande : les lames se déplacent
d’abord jusqu’à la fin de course basse, puis jusqu’à la position favorite (my).
x 2 =
3.2.Utilisation avec la solution TaHoma ready
3.2.1.Touches Montée et Descente
▪
Appuyer brièvement sur la touche Montée ou Descente du point de
commande pour orienter les lames en position haute ou basse.
▪
Faire un appui long sur la touche Montée ou Descente du point de
commande jusqu’à ce que les lames atteignent l'orientation souhaitée. Dès que
la touche est relâchée, le mouvement s’arrête.
Fonction Stop
▪
Appuyer brièvement sur la touche my du point de commande pour arrêter le
pivotement des lames.
Position favorite (my)
INFORMATION
Il existe une position intermédiaire appelée « position favorite (my) » autre que les positions basse et haute.
Enregistrement ou modification de la position favorite (my)
INFORMATION
Une seule position favorite (my) est admise.
1] Appuyer sur la touche Montée ou Descente pour amener les lames à la
position favorite.
2] Appuyer brièvement sur la touche my pour arrêter le mouvement des lames.
3] Faire un appui long sur la touche my jusqu’au va-et-vient des lames :
g
La position favorite (my) souhaitée est enregistrée et la LED verte clignote
5 fois.
1]
2] 3]
Utilisation de la position favorite (my)
▪
Si une position favorite (my) est enregistrée, faire deux appuis brefs et
consécutifs sur la touche my du point de commande : les lames se déplacent
d’abord jusqu’à la fin de course basse, puis jusqu’à la position favorite (my).
x 2 =

TILT ONLY 50 WF ZIGBEE FR
Copyright© 2023 SOMFY ACTIVITES SA. All rights reserved. 29
3.3.Astuces et conseils d’utilisation
3.3.1.Questions sur le produit ?
Constats Causes possibles Solutions
Le produit motorisé ne fonctionne pas. La batterie de la motorisation est faible
et nécessite une recharge.
Recharger la batterie.
La pile du point de commande est faible. Contrôler si la pile est faible et la
remplacer si besoin.
INFORMATION
Si le produit motorisé ne fonctionne toujours pas, consulter un professionnel de la motorisation et de
l’automatisation de l’habitat.
4.CARACTÉRISTIQUES TECHNIQUES
Bandes de fréquence et puissance maximale
utilisées
2.4 GHz - 2.4835 GHz e.r.p <63mW [USA, Australia, Canada]
Alimentation 12 Vcc TBTS
Température d’utilisation 0°C- 60°C
Indice de protection IP30 (Utilisation en intérieur uniquement)
Niveau de sécurité Classe III
Couple 1 N·m
Vitesse 5-15 tr/min
Distance minimum entre deux fins de course 1/8 tour
Distance maximum entre deux fins de course 5 tours
Nombre maximal de points de commande
associés
12
INFORMATION
Pour tout complément d’information sur les caractéristiques techniques de cette motorisation, consulter votre
interlocuteur Somfy.
Veiller à séparer les piles et batteries des autres types de déchets et à les recycler via votre système local de
collecte.
Nous nous soucions de notre environnement. Ne pas jeter l’appareil avec les déchets ménagers habituels. Le
déposer dans un point de collecte agréé pour son recyclage.
La marque et les logos Bluetooth® sont des marques déposées appartenant à Bluetooth SIG, Inc. et toute
utilisation de ces marques par SOMFY ACTIVITES SA se fait sous licence. Les autres marques et noms
commerciaux sont la propriété de leurs détenteurs respectifs.
Référence Désignation
1241782 TILT ONLY 50 WF ZIGBEE
1241783 TILT ONLY 50 WF ZIGBEE
Cet appareil est conforme aux normes d’exemption de licence RSS d’Industry Canada. Son fonctionnement est soumis aux
deux conditions suivantes :

FR TILT ONLY 50 WF ZIGBEE
30 Copyright© 2023 SOMFY ACTIVITES SA. All rights reserved.
(1) Cet appareil ne doit pas causer d’interférence ; et (2) cet appareil doit accepter toute interférence, y compris les
interférences pouvant entraîner un fonctionnement indésirable de celui-ci.
Déclaration de la FCC :
- Cet appareil est conforme à la partie 15 des règles de la FCC.
Son fonctionnement est soumis aux deux conditions suivantes :
(1) cet appareil ne doit pas causer d’interférences nuisibles ; et (2) cet appareil doit accepter toute interférence reçue, y
compris les interférences pouvant entraîner un fonctionnement indésirable.
- Cet équipement est conforme aux limitations prévues par la FCC pour l’exposition aux radiations dans le cadre d’un
environnement d’accès libre. Les utilisateurs finaux doivent suivre les instructions d’utilisation spécifiques pour garantir la
conformité aux limites d’exposition RF. Cet émetteur ne doit pas être situé au même endroit ou utilisé conjointement avec
une autre antenne ou un autre émetteur.
- Les changements ou modifications non expressément approuvés par la partie responsable de la conformité pourraient
annuler l’autorité de l’utilisateur à utiliser l’équipement.
Apple et les logos Apple sont des marques déposées appartenant à Apple, Inc., société inscrite au répertoire des entreprises
aux États-Unis et dans d'autres pays.
iPad® et iPhone® sont des marques déposées d'Apple, Inc. L'App Store est une marque de service d'Apple Inc.
Android est une marque déposée de Google LLC.
https://developer.android.com/distribute/marketing-tools/brand-guidelines

TILT ONLY 50 WF ZIGBEE ES
Copyright© 2023 SOMFY ACTIVITES SA. All rights reserved. 31
MANUAL TRADUCIDO
Este manual es aplicable a todas las motorizaciones TILT ONLY 50 WF ZIGBEE, cuyas versiones se encuentran disponibles
en el catálogo actual.
ÍNDICE
1.
Información previa .......................................................................................................................................................
32
1.1.
Ámbito de aplicación.......................................................................................................................................
32
1.2.
Responsabilidad...............................................................................................................................................
32
2.
Instalación .....................................................................................................................................................................
32
2.1.
Montaje ............................................................................................................................................................
33
2.2.
Cableado...........................................................................................................................................................
33
2.3.
Puesta en marcha de un motor Zigbee.........................................................................................................
34
2.4.
Puesta en marcha con la aplicación TaHoma Pro (recomendado) ............................................................
34
2.5.
Puesta en marcha con solo un punto de mando (sin la aplicación Tahoma Pro).....................................
35
2.6.
Trucos y consejos de instalación ...................................................................................................................
41
3.
Uso y mantenimiento...................................................................................................................................................
41
3.1.
Uso con la solución TaHoma Switch.............................................................................................................
42
3.2.
Uso con la solución TaHoma Ready..............................................................................................................
43
3.3.
Trucos y consejos de uso................................................................................................................................
44
4.
Características técnicas................................................................................................................................................
44
INFORMACIÓN GENERAL
Normas de seguridad
PELIGRO
Señala un peligro que provoca inmediatamente la muerte o lesiones graves.
ADVERTENCIA
Señala un peligro susceptible de provocar la muerte o lesiones graves.
PRECAUCIÓN
Señala un peligro susceptible de provocar lesiones leves o moderadamente graves.
ATENCIÓN
Señala un peligro susceptible de dañar o destruir el producto.

ES TILT ONLY 50 WF ZIGBEE
32 Copyright© 2023 SOMFY ACTIVITES SA. All rights reserved.
1.INFORMACIÓN PREVIA
1.1.Ámbito de aplicación
Las motorizaciones TO 50 están diseñadas para motorizar todo tipo de:
▪
Persianas venecianas inclinables cuyo listón inferior pueda elevarse al menos 4 cm cuando se aplica una fuerza
ascendente de 150 N al listón inferior, situado a 16 cm de la posición totalmente extendida.
1.2.Responsabilidad
Antes de instalar y utilizar la motorización, lea detenidamente estas instrucciones.
Además de las instrucciones que figuran en esta guía, siga también las instrucciones que figuran en el documento adjunto
Normas de seguridad.
La motorización debe instalarla un profesional de la motorización y automatización de la vivienda de acuerdo con
las instrucciones de Somfy y la normativa vigente aplicable en el país de instalación.
Queda prohibido utilizar el motor fuera de cualquier campo aplicación arriba descrito. Ello conllevaría, como todo
incumplimiento de las instrucciones que figuran en este manual y en el documento adjunto Normas de seguridad, la
exclusión de toda responsabilidad por parte de Somfy y la anulación de la garantía.
Tras la instalación del motor, el instalador deberá informar a sus clientes de las condiciones de uso y de mantenimiento y
hacerles entrega de las instrucciones de uso y mantenimiento, así como del documento adjunto Normas de seguridad.
Cualquier operación del Servicio posventa en la motorización requerirá la intervención de un profesional de la motorización
y la automatización de la vivienda.
Antes de su instalación, compruebe la compatibilidad de este producto con los equipos y accesorios asociados. Para
resolver cualquier duda que pudiera surgir durante la instalación de este producto o para obtener información adicional,
póngase en contacto con uno de los agentes de Somfy o visite la página web www.somfy.com.
El uso de este motor con productos no incluidos en el documento adjunto «Matriz de compatibilidad» conllevaría
la exclusión de cualquier responsabilidad por parte de Somfy y la anulación de la garantía.
2.INSTALACIÓN
ADVERTENCIA
•
Instrucciones que debe seguir obligatoriamente el profesional de la motorización y la automatización de la
vivienda que efectúe la instalación de la motorización.
•
Se deben seguir las normas y la legislación vigentes en el país de instalación.
ATENCIÓN
•
Nunca deje caer, golpee, perfore ni sumerja en líquido la motorización.
•
Instale un punto de mando individual para cada motorización.
AVISO
Después de la instalación, debe asegurarse de que el LED, el botón de programación y la conexión de entrada sean visibles y
fácilmente accesibles.

TILT ONLY 50 WF ZIGBEE ES
Copyright© 2023 SOMFY ACTIVITES SA. All rights reserved. 33
2.1.Montaje
2.1.1.Preparación de la motorización
1] Corte el eje a la longitud deseada.
2] Coloque el cabezal y los adaptadores de los ejes en el motor.
1]
2]
2.1.2.Integración del motor en el cabezal
1] Introduzca el motor en el cabezal.
ATENCIÓN
Tenga cuidado de no cortar el cable de alimentación en los bordes del cabezal al
introducir el motor.
2] Arrastre los ejes hasta el tope por los adaptadores de eje del motor.
AVISO
Para una recepción óptima de la radio, la antena del motor debe estar recta y
situada fuera del cabezal (si se utiliza).
AVISO
Puede llevarse a cabo el montaje en posición central o lateral.
1]
2]
2.2.Cableado
ADVERTENCIA
•
Para garantizar la seguridad eléctrica, este motor de clase III debe accionarse mediante una fuente de tensión
«SELV» (tensión extra-baja de seguridad).
•
Para cargar la batería, utilice únicamente la unidad de alimentación desmontable que se entrega con este aparato.
•
Un uso inadecuado del tubo de las baterías puede ocasionar sobrecalentamiento, un incendio o una explosión y,
como consecuencia de ello, lesiones graves o incluso mortales.
•
No exponga la motorización o la batería a temperaturas extremas.
•
Existe riesgo de cortocircuito si los terminales de la batería o la motorización que funciona con baterías entran en
contacto con objetos metálicos.
•
Asegúrese de que la batería esté totalmente cargada antes de su instalación.

ES TILT ONLY 50 WF ZIGBEE
34 Copyright© 2023 SOMFY ACTIVITES SA. All rights reserved.
Conecte la batería o la alimentación al cable de alimentación del motor.
PRECAUCIÓN
•
En caso de que los cables deban atravesar una pared metálica, deben protegerse y aislarse con un tubo corrugado
o un pasamuros.
•
Fije los cables para evitar cualquier contacto con un componente en movimiento.
•
El cable del motor no es desmontable. Si está dañado, debe devolver el motor al Servicio Posventa (SPV).
ATENCIÓN
•
No desenchufe la batería con el motor en funcionamiento.
•
Deje accesible el cable de alimentación de la motorización: el producto debe sustituirse fácilmente.
•
El uso de este motor con productos no incluidos en el documento adjunto «Matriz de compatibilidad» conllevaría
la exclusión de cualquier responsabilidad por parte de Somfy y la anulación de la garantía.
2.3.Puesta en marcha de un motor Zigbee
En una instalación con motores Zigbee, el usuario dispone de 2 soluciones: solución TaHoma switch y solución TaHoma
ready.
La solución TaHoma switch es la que está en modo conectado, con un TaHoma switch en la instalación que permite al
usuario controlar todos sus productos Zigbee a través de la aplicación TaHoma.
La otra solución, sin TaHoma switch, se llama TaHoma ready. Permite al usuario controlar sus motores Zigbee solo con los
puntos de mando. No obstante, esta instalación se puede cambiar posteriormente al modo conectado añadiendo un
TaHoma switch más tarde.
En cuanto a la puesta en marcha de un motor Zigbee, puede hacerse de dos formas distintas:
▪
realizar la puesta en marcha con la aplicación TaHoma pro, lo que es recomendable porque es más fácil y completa; o
también
▪
realizar la puesta en marcha con un punto de mando.
Consulte la sección correspondiente según el modo de puesta en marcha seleccionado.
2.4.Puesta en marcha con la aplicación TaHoma Pro (recomendado)
La puesta en marcha con la aplicación TaHoma pro es posible y se recomienda tanto para la solución
TaHoma ready como para la solución TaHoma switch.
2.4.1.Inicio
Se requiere una cuenta Somfypro, pero el TaHoma switch no es obligatorio.
Para configurar el motor, debe acceder y utilizar la aplicación TaHoma pro para ello, debe disponer de un teléfono o
dispositivo móvil compatible y conectarse a Internet.
Puede descargar la aplicación de forma gratuita desde las plataformas de Apple Store y Google Play Store en dispositivos
móviles compatibles con Apple o Android™. Esta compatibilidad es la indicada en la descripción de la aplicación en la Store
correspondiente.
La versión de software de la aplicación TaHoma pro puede actualizarse en cualquier momento para añadir nuevas funciones
y servicios.

TILT ONLY 50 WF ZIGBEE ES
Copyright© 2023 SOMFY ACTIVITES SA. All rights reserved. 35
2.4.2.Ajuste del motor
ATENCIÓN
•
Descargue la aplicación TaHoma pro si no la tiene instalada en su teléfono móvil.
•
Inicie la aplicación TaHoma pro antes de realizar este paso.
1] Conecte la alimentación eléctrica del motor.
g
Si el motor no está configurado o emparejado, una vez conectado, entra
en modo de programación durante 3 min y el LED parpadea en naranja.
2] Abra la aplicación TaHoma pro y siga los pasos para escanear el código QR del
motor.
3] Siga las instrucciones de la aplicación TaHoma pro.
1]
2]
3]
AVISO
El motor se puede ajustar con el TaHoma pro y utilizar sin el TaHoma switch (el TaHoma switch se puede añadir más
tarde).
2.4.3.Gestión de redes
Para emparejar un punto de mando con el motor, añadir un punto de mando nuevo o un motor en la instalación, siga las
instrucciones de la aplicación TaHoma pro.
2.4.4.Ajustes avanzados
La aplicación TaHoma pro es la herramienta recomendada para configurar el motor fácilmente y realizar reajustes, como
modificar el sentido de giro del mismo, o reajustar el final de carrera.
Por otro lado, algunos ajustes avanzados, como la velocidad o el desplazamiento de inclinación, solo pueden realizarse a
través de la aplicación TaHoma pro.
Siga las instrucciones de la aplicación TaHoma pro para realizar estos ajustes o reajustes.
2.5.Puesta en marcha con solo un punto de mando (sin la aplicación
Tahoma Pro)
Este capítulo describe la puesta en marcha del motor solo con un punto de mando, sin utilizar la aplicación
TaHoma pro, en el caso de la solución TaHoma ready.
2.5.1.Creación de enlaces entre un motor y un punto de mando
Los siguientes pasos describen cómo programar un motor que no está configurado o emparejado, con un punto de mando
sin emparejar.
ATENCIÓN
Los ajustes no son posibles si las baterías del punto de mando están demasiado bajas.

ES TILT ONLY 50 WF ZIGBEE
36 Copyright© 2023 SOMFY ACTIVITES SA. All rights reserved.
1] Conecte la alimentación eléctrica del motor.
g
Si el motor no está configurado o emparejado, una vez conectado, entra
en modo de programación durante 3 min y el LED parpadea en naranja.
AVISO
Si el motor ha salido del modo de programación, el LED no parpadea:
•
Mantenga pulsado el botón PROG en el motor hasta que el producto
automatizado realice un movimiento breve de subida y bajada y el LED
parpadee en naranja: el motor permanece en modo de programación durante
3 min.
2] Acerque el punto de mando al motor y, a continuación, pulse brevemente y
de forma simultánea los botones subida y bajada del punto de mando: el
punto de mando busca el motor más cercano en el modo de programación.
g
Cuando lo detecta, el LED de respuesta del punto de mando parpadea en
verde, el LED del motor parpadea en verde y el producto automatizado
sube y baja brevemente.
g
A continuación, el LED de respuesta del punto de mando parpadea en
naranja lentamente mientras esté en modo de ajuste.
1]
2]
AVISO
Si el punto de mando no encuentra un motor cerca, el LED de respuesta del punto de mando parpadea en rojo al cabo
de unos segundos y el producto automatizado del motor no se mueve: repita el procedimiento descrito
anteriormente. (Si el motor sigue en modo de programación, repita solo el paso 2).
AVISO
Si el punto de mando no encuentra el motor correcto, consulte el capítulo Modo de escaneo.
2.5.2.Modo de escaneo
Si hay varios motores en modo de programación, es posible que un motor no
deseado se encuentre en modo de ajuste.
1] Asegúrese de que el motor que va a emparejar está aún en modo de
programación. En caso contrario, reinicie desde el principio de los pasos de
puesta en marcha.
2] Si el motor que se va a emparejar está aún en modo de programación,
acerque el punto de mando al motor y, a continuación, pulse brevemente
los botones de subida y bajada simultáneamente en el punto de mando para
salir del modo de ajuste con el motor anterior y escanear otro motor Zigbee
cercano.
g
El producto automatizado del motor nuevo se mueve levemente hacia
arriba y hacia abajo, el motor está en modo de ajuste.
A
A
A B C
B
B C …

TILT ONLY 50 WF ZIGBEE ES
Copyright© 2023 SOMFY ACTIVITES SA. All rights reserved. 37
2.5.3.Comprobación del sentido de rotación
Pulse el botón de Subida del punto de mando:
a] Si las lamas de la persiana se orientan en el sentido esperado, el sentido de rotación
es correcto: vaya a la sección Ajuste de los finales de carrera y emparejamiento
del punto de mando.
b] Si no es así: vaya al siguiente apartado.
b1] Pulse el botón my en el punto de mando hasta que las lamas realicen un
movimiento de subida y bajada: el sentido de giro queda modificado.
b2] Pulse el botón de subida en el punto de mando para comprobar el sentido de giro
de las lamas.
a]
b]
b1] b2]
2.5.4.Ajuste de los finales de carrera y emparejamiento del punto de mando
AVISO
Los finales de carrera pueden ajustarse en cualquier orden.
ATENCIÓN
No ajuste un final de carrera en una posición que pueda levantar el producto automatizado, ya que esto podría dañar
el producto automatizado o el motor a largo plazo.
1] Mantenga pulsado el botón de subida para orientar las lamas hacia la posición
de subida deseada. Si es necesario, ajuste la posición superior utilizando los
botones de subida o bajada.
2] Pulse de forma simultánea los botones my y de bajada hasta que las lamas
realicen un leve movimiento de subida y bajada.
ð
Se ha memorizado el final de carrera superior.
3] Mantenga pulsado el botón de bajada para orientar las lamas hacia la posición
de bajada deseada. Si es necesario, ajuste la posición inferior utilizando los
botones de subida o bajada .
4] Pulse de forma simultánea los botones my y de subida hasta que las lamas
realicen un leve movimiento de subida y bajada.
ð
Se ha memorizado el final de carrera inferior.
▪
Para confirmar y salir de los ajustes y emparejar el punto de mando: pulse
brevemente el botón PROG del punto de mando:
◦
→ Las lamas realizan un leve movimiento de subida y bajada: ahora el motor
está configurado y puede ser controlado con el punto de mando.
▪
Para confirmar y salir de los ajustes sin emparejar el punto de mando:
mantenga pulsados los botones de subida y bajada simultáneamente en el
punto de mando, hasta que el LED de respuesta del punto de mando deje de
parpadear.
◦
→ El motor ya está configurado y no hay ningún punto de mando
emparejado. (Para emparejar el primer punto de mando con un motor ya
configurado, consulte la siguiente sección).
1] 2]
3] 4]
2.5.5.Emparejamiento del primer punto de mando a un motor ya configurado
ATENCIÓN
Esta operación no puede realizarse en varios motores a la vez.
AVISO
Mantenga el punto de mando cerca del motor durante todo el procedimiento.

ES TILT ONLY 50 WF ZIGBEE
38 Copyright© 2023 SOMFY ACTIVITES SA. All rights reserved.
1] Mantenga pulsado el botón PROG en el motor hasta que las lamas realicen
un leve movimiento de subida y bajada y el LED parpadea en naranja: el motor
permanece en modo de programación durante 3 min.
2] Pulse brevemente el botón PROG del punto de mando: las lamas realizan un
leve movimiento de subida y bajada.
g
Ahora el motor puede ser controlado manualmente con el punto de
mando.
1]
2]
2.5.6.Creación de una red con TaHoma Ready: añadir puntos de mando y
motores en la instalación
▪
Para añadir un nuevo punto de mando monocanal o multicanal al motor o para suprimir uno de sus puntos de
mando emparejados: consulte la guía del manual del punto de mando.
▪
Para emparejar motores adicionales: siga el mismo procedimiento de puesta en marcha con un nuevo punto de
mando para cada motor y consulte la guía de instrucciones del punto de mando para que compartan la misma red.
2.5.7.Modificación del sentido de giro con un punto de mando
ATENCIÓN
•
Esta operación no puede realizarse en varios motores a la vez.
•
El motor tiene que estar configurado y emparejado con el punto de mando.
AVISO
Mantenga el punto de mando cerca del motor durante todo el procedimiento.
1] Mantenga pulsado el botón PROG en el punto de mando hasta que las lamas
realicen un movimiento de subida y bajada.
2] Pulse brevemente y de forma simultánea los botones de Subida y Bajada en
el punto de mando:
ð
Las lamas realizan un movimiento de subida y bajada tras unos segundos.
3] Pulse el botón my en el punto de mando hasta que las lamas realicen un
movimiento de subida y bajada:
ð
el sentido de giro queda modificado.
4] Para confirmar y salir del ajuste, mantenga pulsados simultáneamente los
botones de subida y bajada del punto de mando, hasta que el LED de
respuesta del punto de mando deje de parpadear.
5] Pulse el botón de subida del punto de mando para comprobar el sentido de
giro.
1]
2] 3]
4] 5]
2.5.8.Reajuste del final de carrera con un punto de mando
ATENCIÓN
•
Esta operación no puede realizarse en varios motores a la vez.
•
El motor tiene que estar configurado y emparejado con el punto de mando.
AVISO
Pueden reajustarse ambos finales de carrera: o bien solo uno de ellos, o los dos a la vez.

TILT ONLY 50 WF ZIGBEE ES
Copyright© 2023 SOMFY ACTIVITES SA. All rights reserved. 39
2.5.8.1. Reajuste del final de carrera superior
AVISO
Mantenga el punto de mando cerca del motor durante todo el procedimiento.
1] Mantenga pulsado el botón PROG en el punto de mando hasta que las lamas
realicen un leve movimiento de subida y bajada.
2] Pulse brevemente y de forma simultánea los botones de Subida y Bajada en
el punto de mando:
ð
Las lamas realizan un leve movimiento de subida y bajada tras unos
segundos.
3] Mantenga pulsado el botón de subida o bajada en el punto de mando para
orientar las lamas hacia la nueva posición deseada.
4] Pulse brevemente y de forma simultánea los botones de my y bajada en el
punto de mando:
ð
Las lamas realizan un movimiento de subida y bajada.
5] Para confirmar y salir del ajuste, mantenga pulsados simultáneamente los
botones de subida y bajada del punto de mando, hasta que el LED de
respuesta del punto de mando deje de parpadear.
2]
3] 4]
5]
1]
2.5.8.2. Reajuste del final de carrera inferior
AVISO
Mantenga el punto de mando cerca del motor durante todo el procedimiento.
1] Mantenga pulsado el botón PROG en el punto de mando hasta que las lamas
realicen un leve movimiento de subida y bajada.
2] Pulse brevemente y de forma simultánea los botones de Subida y Bajada en
el punto de mando:
ð
Las lamas realizan un leve movimiento de subida y bajada tras unos
segundos.
3] Mantenga pulsado el botón de subida o bajada en el punto de mando para
orientar las lamas hacia la nueva posición deseada.
4] Pulse brevemente y de forma simultánea los botones de subida y my en el
punto de mando:
ð
Las lamas realizan un movimiento de subida y bajada.
5] Para confirmar y salir del ajuste, mantenga pulsados simultáneamente los
botones de subida y bajada del punto de mando, hasta que el LED de
respuesta del punto de mando deje de parpadear.
2]
3] 4]
5]
1]
2.5.8.3. Reajuste de los dos finales de carrera
AVISO
Mantenga el punto de mando cerca del motor durante todo el procedimiento.

ES TILT ONLY 50 WF ZIGBEE
40 Copyright© 2023 SOMFY ACTIVITES SA. All rights reserved.
1] Mantenga pulsado el botón PROG en el punto de mando hasta que las lamas
realicen un leve movimiento de subida y bajada.
2] Pulse brevemente y de forma simultánea los botones de Subida y Bajada en
el punto de mando:
ð
Las lamas realizan un leve movimiento de subida y bajada tras unos
segundos.
3] Mantenga pulsado el botón de subida o bajada en el punto de mando para
orientar las lamas hacia la nueva posición de subida deseada.
4] Pulse brevemente y de forma simultánea los botones de my y bajada en el
punto de mando:
ð
Las lamas realizan un movimiento de subida y bajada.
ð
Se ha reajustado el final de carrera superior.
5] Mantenga pulsado el botón de subida o bajada en el punto de mando para
orientar las lamas hacia la nueva posición de bajada deseada.
6] Pulse brevemente y de forma simultánea los botones de subida y my en el
punto de mando:
ð
Las lamas realizan un movimiento de subida y bajada.
ð
Se ha reajustado el final de carrera inferior.
7] Para confirmar y salir del ajuste, mantenga pulsados simultáneamente los
botones de subida y bajada del punto de mando, hasta que el LED de
respuesta del punto de mando deje de parpadear.
1] 2]
3] 4]
5] 6]
7]
2.5.9.Ajustes avanzados
Algunos ajustes avanzados, como la velocidad o el desplazamiento de inclinación, no pueden realizarse con un punto de
mando.
Estos ajustes avanzados solo se pueden realizar a través de la aplicación TaHoma pro, consulte el capítulo Puesta en
marcha con la aplicación TaHoma Pro (recomendado).

TILT ONLY 50 WF ZIGBEE ES
Copyright© 2023 SOMFY ACTIVITES SA. All rights reserved. 41
2.6.Trucos y consejos de instalación
2.6.1.¿Preguntas sobre el producto?
Problemas Posibles causas Soluciones
El producto automatizado no funciona. El motor no está configurado ni
emparejado.
Pase a la sección Puesta en marcha de
un motor Zigbee.
El motor está emparejado, pero no
ajustado.
Pase a la sección Puesta en marcha de
un motor Zigbee.
El motor está ajustado, pero no
emparejado
Pase a la sección Puesta en marcha de
un motor Zigbee.
Un obstáculo impide el movimiento de
las lamas.
Retire el obstáculo.
Puede que existan interferencias de
radio.
Desconecte el cable de alimentación y
vuelva a conectar la batería al motor.
El nivel de batería del motor es bajo, por
lo que es necesario cargarla.
Cargue la batería.
La pila del punto de mando está
agotada.
Compruebe si el nivel de carga de la pila
es bajo y sustitúyala en caso necesario.
El punto de mando no es compatible o
no está programado
Compruebe la compatibilidad o
empareje el punto de mando como se
describe en Puesta en marcha de un
motor Zigbee.
2.6.2.Actualización de una instalación TaHoma Ready a una instalación TaHoma
Switch
Para añadir TaHoma switch en una instalación TaHoma ready y, a continuación, actualizar la instalación a una TaHoma
switch, siga las instrucciones de la aplicación TaHoma pro.
2.6.3.Borrado de la memoria del motor (reinicio a la configuración original)
AVISO
Esta operación de reinicio elimina todos los puntos de mando, sensores, ajustes de final de carrera y ajustes
avanzados emparejados y restablece la posición favorita (my) del motor.
Mantenga pulsado el botón PROG en el motor hasta que el LED parpadee en naranja
y las lamas realicen un movimiento breve de subida y bajada 3 veces.
➔ Todos los ajustes quedan borrados. El motor se reinicia en la configuración
original.
➔ El motor permanece en modo de programación durante 3 min y el LED parpadea
en naranja.
Reanude el procedimiento de puesta en marcha (consulte Puesta en marcha).
3.USO Y MANTENIMIENTO
AVISO
Esta motorización no precisa ninguna operación de mantenimiento.
La forma de controlar un producto automatizado Zigbee es diferente en función de la solución presente en la instalación:
solución TaHoma switch o solución TaHoma ready.
Consulte la sección correspondiente según la solución.

ES TILT ONLY 50 WF ZIGBEE
42 Copyright© 2023 SOMFY ACTIVITES SA. All rights reserved.
3.1.Uso con la solución TaHoma Switch
3.1.1.Uso con la aplicación TaHoma
Para controlar el producto automatizado en modo conectado, debe acceder y utilizar la aplicación TaHoma para ello, debe
disponer de un teléfono o dispositivo móvil compatible y conectarse a Internet.
Puede descargar la aplicación de forma gratuita desde las plataformas de Apple Store y Google Play Store en dispositivos
móviles compatibles con Apple o Android™. Esta compatibilidad es la indicada en la descripción de la aplicación en la Store
correspondiente.
La versión de software de la aplicación TaHoma puede actualizarse en cualquier momento para añadir nuevas funciones y
servicios.
1] Descargue la aplicación TaHoma si no la tiene instalada en su teléfono móvil.
2] Inicie la aplicación y siga las instrucciones para controlar el producto
automatizado.
1] 2]
3.1.2.Uso con un punto de mando
3.1.2.1. Botones de subida y bajada
▪
Pulse brevemente el botón de subida o bajada en el punto de mando para
orientar las lamas hacia la posición de inclinación de subida o bajada.
▪
Mantenga pulsado el botón de subida o bajada en el punto de mando hasta
que las lamas alcancen la posición de inclinación deseada. El movimiento se
detiene al soltar el botón.
Función de detención
▪
Pulse brevemente el botón my en el punto de mando para detener la
inclinación de las lamas.
Posición favorita (my)
AVISO
Una parada intermedia, denominada «posición favorita (my)», es diferente de las posiciones superior e inferior.
Programación o modificación de la posición favorita (my)
AVISO
Solo se permite una posición favorita (My).
1] Desplace las lamas hasta la posición favorita deseada utilizando los botones de
subida o bajada.
2] Pulse brevemente el botón my para detener las lamas.
3] Mantenga pulsado el botón my hasta que las lamas realicen un leve
movimiento de subida y bajada:
g
Se ha programado la posición favorita deseada (my) y el LED verde
parpadea 5 veces.
1]
2] 3]

TILT ONLY 50 WF ZIGBEE ES
Copyright© 2023 SOMFY ACTIVITES SA. All rights reserved. 43
Uso de la posición favorita (my)
▪
Si se ha programado una posición favorita (my), pulse brevemente el botón
my en el punto de mando dos veces, de forma sucesiva: las lamas primero se
desplazan al fin de carrera inferior y luego a la posición favorita (my).
x 2 =
3.2.Uso con la solución TaHoma Ready
3.2.1.Botones de subida y bajada
▪
Pulse brevemente el botón de subida o bajada en el punto de mando para
orientar las lamas hacia la posición de inclinación de subida o bajada.
▪
Mantenga pulsado el botón de subida o bajada en el punto de mando hasta
que las lamas alcancen la posición de inclinación deseada. El movimiento se
detiene al soltar el botón.
Función de detención
▪
Pulse brevemente el botón my en el punto de mando para detener la
inclinación de las lamas.
Posición favorita (my)
AVISO
Una parada intermedia, denominada «posición favorita (my)», es diferente de las posiciones superior e inferior.
Programación o modificación de la posición favorita (my)
AVISO
Solo se permite una posición favorita (My).
1] Desplace las lamas hasta la posición favorita deseada utilizando los botones de
subida o bajada.
2] Pulse brevemente el botón my para detener las lamas.
3] Mantenga pulsado el botón my hasta que las lamas realicen un leve
movimiento de subida y bajada:
g
Se ha programado la posición favorita deseada (my) y el LED verde
parpadea 5 veces.
1]
2] 3]
Uso de la posición favorita (my)
▪
Si se ha programado una posición favorita (my), pulse brevemente el botón
my en el punto de mando dos veces, de forma sucesiva: las lamas primero se
desplazan al fin de carrera inferior y luego a la posición favorita (my).
x 2 =

ES TILT ONLY 50 WF ZIGBEE
44 Copyright© 2023 SOMFY ACTIVITES SA. All rights reserved.
3.3.Trucos y consejos de uso
3.3.1.¿Preguntas sobre el producto?
Problemas Posibles causas Soluciones
El producto automatizado no funciona. El nivel de batería del motor es bajo, por
lo que es necesario cargarla.
Cargue la batería.
La pila del punto de mando está
agotada.
Compruebe la pila y sustitúyala en caso
necesario.
AVISO
Si el producto sigue sin funcionar, póngase en contacto con un profesional de la motorización y la automatización de
la vivienda.
4.CARACTERÍSTICAS TÉCNICAS
Bandas de frecuencia y potencia máxima
utilizadas
2.4 GHz - 2.4835 GHz e.r.p <63mW [USA, Australia, Canada]
Alimentación eléctrica 12 Vdc SELV
Temperatura de funcionamiento 0°C- 60°C
Índice de protección IP30 (Uso en interior únicamente)
Nivel de seguridad Clase III
Par 1 N·m
Velocidad 5-15 rpm
Distancia mínima entre dos finales de carrera 1/8 giro
Distancia máxima entre dos finales de carrera 5 giros
Número máximo de controles asociados 12
AVISO
Para obtener más información sobre las características técnicas de la motorización, consulte con su agente de Somfy.
Recuerde separar las baterías y las pilas del resto de desechos y reciclarlas en el centro de recogida de residuos de
su localidad.
Nos preocupa el medio ambiente. No tire el aparato junto con los desechos domésticos habituales. Llévelo a un
punto de recogida aprobado para su reciclaje.
La marca con la palabra y los logotipos de Bluetooth® son marcas comerciales registradas propiedad de Bluetooth
SIG, Inc. y cualquier uso de las mismas por parte de SOMFY ACTIVITIES SA se realiza bajo licencia. Las demás
marcas y denominaciones comerciales pertenecen a sus respectivos propietarios.
Referencia Denominación
1241782 TILT ONLY 50 WF ZIGBEE
1241783 TILT ONLY 50 WF ZIGBEE
Este dispositivo cumple las RSS exentas de licencia de Industry Canada. El funcionamiento está sujeto a estas dos
condiciones:
(1) El dispositivo no puede provocar interferencias; y (2) debe aceptar cualquier interferencia, incluidas las que puedan
provocar un funcionamiento no deseado del mismo.

TILT ONLY 50 WF ZIGBEE ES
Copyright© 2023 SOMFY ACTIVITES SA. All rights reserved. 45
Advertencia de la FCC:
- Este dispositivo cumple la Parte 15 de las normas de la FCC.
El funcionamiento está sujeto a estas dos condiciones:
(1) El dispositivo no puede provocar interferencias dañinas; y (2) debe aceptar cualquier interferencia recibida, incluidas las
que puedan provocar un funcionamiento no deseado.
- Este equipo cumple los límites de exposición a la radiación de la FCC para entornos no controlados. Los usuarios finales
deben seguir las instrucciones de uso específicas para cumplir la normativa de exposición a radiofrecuencias. Este
transmisor no debe instalarse ni funcionar junto con ninguna otra antena o transmisor.
- Los cambios o modificaciones que no hayan sido expresamente aprobados por la parte responsable del cumplimiento
podrían anular la autorización del usuario para utilizar el equipo.
Apple y los logotipos de Apple son marcas de Apple Inc., registradas en EE. UU. y otros países.
iPad® y iPhone® son marcas registradas de Apple, Inc. App Store es una marca de servicio de Apple Inc.
Android es una marca de Google LLC.
https://developer.android.com/distribute/marketing-tools/brand-guidelines

SOMFY ACTIVITES SA
50 avenue du Nouveau Monde
74300 CLUSES FRANCE
www.somfy.com
5169982A
SOMFY ACTIVITES SA, Société Anonyme, capital 35.000.000 Euros, RCS Annecy, 303.970.230 - 06/2023 - Images not contractually binding
100% recycled paper
-
 1
1
-
 2
2
-
 3
3
-
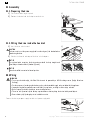 4
4
-
 5
5
-
 6
6
-
 7
7
-
 8
8
-
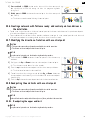 9
9
-
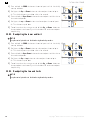 10
10
-
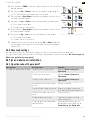 11
11
-
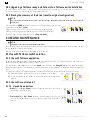 12
12
-
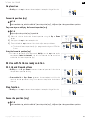 13
13
-
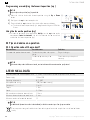 14
14
-
 15
15
-
 16
16
-
 17
17
-
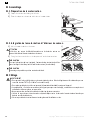 18
18
-
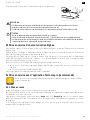 19
19
-
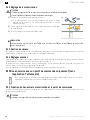 20
20
-
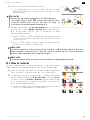 21
21
-
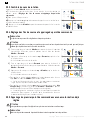 22
22
-
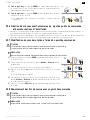 23
23
-
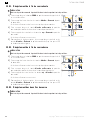 24
24
-
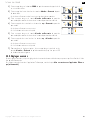 25
25
-
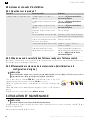 26
26
-
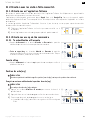 27
27
-
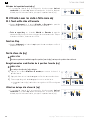 28
28
-
 29
29
-
 30
30
-
 31
31
-
 32
32
-
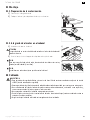 33
33
-
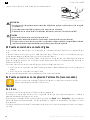 34
34
-
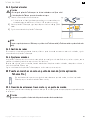 35
35
-
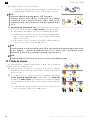 36
36
-
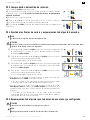 37
37
-
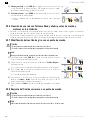 38
38
-
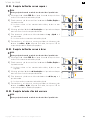 39
39
-
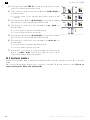 40
40
-
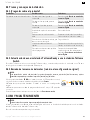 41
41
-
 42
42
-
 43
43
-
 44
44
-
 45
45
-
 46
46


Somfy Tilt only 50 WF RTS Manual de usuario
- Tipo
- Manual de usuario
en otros idiomas
Artículos relacionados
-
Somfy TILT and Instrucciones de operación
-
Somfy Sonesse ULTRA 30 WF Instrucciones de operación
-
Somfy ROLL UP 28 WIREFREE Instrucciones de operación
-
Somfy Sonesse 28 Instrucciones de operación
-
Somfy 5168359A Manual de usuario
-
Somfy Pergola io Instrucciones de operación
-
-
Somfy sonesse 40 Instrucciones de operación
-
Somfy 1870359 Instrucciones de operación
-

