Pioneer DDJ-1000SRT Guía de inicio rápido
- Categoría
- Controladores de DJ
- Tipo
- Guía de inicio rápido

DJ Controller / Controlador DJ
pioneerdj.com/support/
http://serato.com/
For FAQs and other support information for this product, visit the above websites.
Para consultar las preguntas frecuentes y otra información de soporte de este producto, visite el sitio de arriba.
Operating Instructions (Quick Start Guide)
Manual de instrucciones (Guía de inicio rápido)
DDJ-1000SRT
English Español

2
En
CAUTION
TO PREVENT THE RISK OF ELECTRIC SHOCK, DO NOT
REMOVE COVER (OR BACK). NO USER-SERVICEABLE
PARTS INSIDE. REFER SERVICING TO QUALIFIED
SERVICE PERSONNEL.
D3-4-2-1-1_B1_En
WARNING
This equipment is not waterproof. To prevent a fire or
shock hazard, do not place any container filled with
liquid near this equipment (such as a vase or flower
pot) or expose it to dripping, splashing, rain or
moisture.
D3-4-2-1-3_A1_En
WARNING
To prevent a fire hazard, do not place any naked flame
sources (such as a lighted candle) on the equipment.
D3-4-2-1-7a_A1_En
Operating Environment
Operating environment temperature and humidity:
+5 °C to +35 °C (+41 °F to +95 °F); less than 85 %RH
(cooling vents not blocked)
Do not install this unit in a poorly ventilated area, or in
locations exposed to high humidity or direct sunlight (or
strong artificial light).
D3-4-2-1-7c*_A2_En
CAUTION
The switch on this unit will not completely shut off
all power from the AC outlet. Since the power cord
serves as the main disconnect device for the unit,
you will need to unplug it from the AC outlet to shut
down all power. Therefore, make sure the unit has
been installed so that the power cord can be easily
unplugged from the AC outlet in case of an accident.
To avoid fire hazard, the power cord should also be
unplugged from the AC outlet when left unused for a
long period of time (for example, when on vacation).
D3-4-2-2-2a*_A1_En
When using this product, confirm the safety
information shown on the bottom of the unit.
D3-4-2-2-4_B1_En
WARNING
Store small parts out of the reach of children and
infants. If accidentally swallowed, contact a doctor
immediately.
D41-6-4_A1_En
CAUTION
This product is evaluated in moderate and tropical
climate condition.
D3-8-2-1-7a_A1_En
VENTILATION CAUTION
When installing this unit, make sure to leave space
around the unit for ventilation to improve heat radiation
(at least 5 cm at rear and 5 cm at each side).
D3-4-2-1-7d*_A1_En
The graphical symbol placed on the product
means alternating current.
The graphical symbol placed on the product
means direct current.
The graphical symbol placed on the product
means Class II equipment.
D3-8-2-4_A1_En
POWER-CORD CAUTION
Handle the power cord by the plug. Do not pull out the
plug by tugging the cord and never touch the power
cord when your hands are wet as this could cause a
short circuit or electric shock. Do not place the unit, a
piece of furniture, etc., on the power cord, or pinch the
cord. Never make a knot in the cord or tie it with other
cords. The power cords should be routed such that they
are not likely to be stepped on. A damaged power cord
can cause a fire or give you an electrical shock. Check
the power cord once in a while. When you find it
damaged, ask your nearest service center or your
dealer for a replacement.
S002*_A1_En

English
En
3
Contents
How to read this manual
Thank you for choosing this Pioneer DJ product.
! This manual briefly explains procedures from connecting the unit to
your PC/Mac, through to outputting sound. For more details on how
to use the unit, refer to the “Operating Instructions” on the Pioneer
DJ website.
! Please note that the screens and specifications of the software, as
well as the external appearance and specifications of the hardware,
were still under development at the time this manual was created
and may differ from the final specifications.
! Please note that, depending on the operating system version, web
browser settings etc., operation may differ from the ways shown in
this manual.
! Please note that the language on the screens of the software
described in this manual may differ from the language on your
screen.
This manual provides brief descriptions regarding the names of parts
on the unit and the connections between the unit and peripherals.
For more detailed instructions on using the unit, see its “Operating
Instructions.”
! For details on how to find “Operating Instructions” for the unit, see
“Viewing the Operating Instructions” (page 4).
Before you start ........................................................ 4
Features ............................................................................................. 4
What’s in the box ............................................................................... 4
Acquiring the manual ....................................................................... 4
Installing the software ...................................................................... 4
Part names ................................................................ 7
Browser section ................................................................................ 7
Deck section ...................................................................................... 8
Mixer section ..................................................................................... 9
Rear panel ........................................................................................ 10
Front panel ....................................................................................... 10
Operation ................................................................. 11
Connection examples ..................................................................... 11
Connecting the unit ................................................ 13
Launching the system ............................................ 14
Changing the settings .................................................................... 16
Quitting the system ......................................................................... 16
Additional information ........................................... 17
Troubleshooting .............................................................................. 17
About trademarks and registered trademarks ............................. 17
Cautions on copyrights .................................................................. 17
Specifications .................................................................................. 17

4
En
Before you start
Features
This unit is an all-in-one DJ controller designed specifically for use with
Serato Limited’s DJ software, Serato DJ Pro.
Controls such as ‘BIG JOG’, ‘PERFORMANCE PADS’ and
‘4-CHANNEL MIXER’ are arranged in a way to enable comfortable
control of functions in Serato DJ Pro.
The unit also has multiple input/output terminals suitable for various
setups and styles of DJ performance, and it’s designed with the quality
needed for use at clubs and house parties.
What’s in the box
! AC adapter
! Power plug
! USB cable
1
! Operating Instructions (Quick Start Guide) – this manual
! Serato DJ Pro Expansion Pack Voucher
2
1
Only one USB cable is supplied with the unit. If you want to use two,
use a cable that supports USB 2.0.
2
Please note that the Serato DJ Pro Expansion Pack Voucher can’t
be reissued. You’ll need to use the voucher code to activate the
expansion pack. Be sure to store it in a safe place.
Acquiring the manual
Various instruction manuals are provided as PDF files.
You need to have Adobe
®
Reader
®
installed to view PDF files.
Viewing the Operating Instructions
1 Launch a web browser on your PC/Mac and visit the
Pioneer DJ website.
pioneerdj.com
! To select your language, click the flag icon in the top-right
corner of the screen.
2 Hover the cursor over [Support].
3 Click [Tutorials, manuals & documentation].
4 Click [DDJ-1000SRT] under [DJ CONTROLLER].
5 Select the language you need.
Download the manual if you want to.
Downloading the Serato DJ Pro software
manual
1 Visit the Serato website.
http://serato.com/
2 Click [Serato DJ Pro] in the [Products] menu.
3 Click [Download].
4 Click [Manuals and downloads].
5 Click the Serato DJ Pro software manual in the language
you need.
Installing the software
Before you install the software
The Serato DJ Pro software and driver software are not included with
the unit.
Access and download the software from the Pioneer DJ support
page.
pioneerdj.com/support/
! You are responsible for preparing your PC/Mac, network devices,
and other elements needed to connect to the internet.
Downloading the driver software
1 Launch a web browser on your PC/Mac and visit the
Pioneer DJ website.
pioneerdj.com
! To select your language, click the flag icon in the top-right
corner of the screen.
2 Hover the cursor over [Support].
3 Click [Software & firmware updates].
4 Click [DDJ-1000SRT] under [DJ CONTROLLER].
5 Click [Drivers].
6 Click [Download link], then save the file.
About the Serato DJ Pro software
Serato DJ Pro is a DJ software application made by Serato Limited.
DJ performances are enabled by connecting the unit to your PC/Mac
with the software installed.
Minimum computer requirements
Supported operating systems CPU and memory required
Mac: macOS Mojave 10.14/macOS
High Sierra 10.13/macOS Sierra 10.12
(latest update)
Intel
®
processor Core™ i3, i5, i7 and i9
1.07 GHz or better
4 GB or more of RAM
Windows
®
10 / Windows
®
8.1 /
Windows
®
7 (latest service pack)
Intel
®
processor Core™ i3, i5, i7 and i9
1.07 GHz or better
4 GB or more of RAM
! 32-bit operating systems not supported.
Others
USB port
Your PC/Mac must have a USB 2.0 port to connect
with the unit.
Display resolution Resolution of 1280 × 720 or greater
Internet connection
You’ll need an internet connection to register your
user account at Serato.com and to download the
software.
! For information on the latest system requirements, compatibility, and supported
operating systems of Serato DJ Pro, see the site below.
https://serato.com/dj/pro/downloads
! Be sure to use the latest version and latest service pack for your operating
system.
! Operation is not guaranteed on all PC/Mac models, even if the system
requirements are met.

English
En
5
! Depending on power-saving settings and other conditions of the PC/Mac, the
CPU and hard disk may not provide sufficient processing capabilities. For
laptops in particular, make sure the PC/Mac is in the best condition to provide
constant high-level performance when using Serato DJ Pro (e.g. by keeping
the AC power connected).
! To use the internet, you need a separate contract with an internet service
provider, which you may have to pay for.
Downloading the Serato DJ Pro software
1 Visit the Serato website.
http://serato.com/
2 Click [Serato DJ Pro] under [Products].
The Serato DJ Pro download page is displayed.
! The download page is subject to change.
3 Click [DOWNLOAD v*.*].
4 Create a Serato.com user account.
! If you’ve already registered an account, skip to step 6.
! If you haven’t finished registering your account, follow the steps
below.
— Following the instructions on the screen, enter your email
address and create a password, then select the region
where you live.
— If you check [Go backstage with Serato], you’ll receive
newsletters with the latest information on Serato Limited
products.
— Once you’ve finished registering your user account, you’ll
receive an email. Check the contents of the email.
! Be careful not to forget the email address and password you
used to register. You’ll need them to update the software in
future.
! The personal information you entered when registering your
user account may be collected, processed, and used based on
the privacy policy on the Serato Limited website.
5 Click the link in the email you received from Serato.com.
This takes you to the Serato DJ Pro download page.
6 Log in.
Enter the email address and password you registered to log in to
Serato.com.
7 Select [A laptop with a supported controller, mixer or
interface] on the download page, and click [DOWNLOAD
SERATO DJ PRO] to download the software.
Installation procedure (Mac)
Do not connect the unit to your Mac until installation is complete.
! Quit any other programs that are running on your Mac.
1 Unzip the downloaded driver software
(DDJ1000SRTXXXdmg.zip).
2 Double-click [DDJ-1000SRT_M_X.X.X.dmg].
3 Double-click [DDJ-1000SRT_AudioDriver.pkg].
4 Follow the on-screen instructions to install.
5 Unzip the downloaded Serato DJ Pro software file.
6 Double-click the unzipped software file to launch the
installer.
7 Read the terms of the license agreement carefully, and if
you agree, click [Agree].
! If you don’t agree to the contents of the license agreement, click
[Disagree] to cancel installation.
8 Click [Install].
9 Follow the on-screen instructions to install.
10 Click [Close] to quit the installer.
Installation procedure (Windows)
Do not connect the unit to your PC until installation is complete.
! Log in to the administrator account on your PC before starting
installation.
! Quit any other programs that are running.
1 Unzip the downloaded driver software
(DDJ1000SRTXXXXexe.zip).
2 Double-click [DDJ-1000SRT_X.XXX.exe].
3 Follow the on-screen instructions to install.
If [Windows Security] appears on the screen during installation,
click [Install this driver software anyway] and continue with the
installation.
When the installation program is finished, a completion message
appears.
After installing the driver software, install the Serato DJ Pro software.
4 Unzip the downloaded Serato DJ Pro software file.
5 Double-click the unzipped software file to launch the
installer.
6 Read the terms of the license agreement carefully, and
if you agree, select [I agree to the license terms and
conditions], then click [Install].
! If you don’t agree to the contents of the license agreement, click
[Close] to cancel installation.
A message indicating successful installation appears when installation
is complete.
7 Click [Close] to quit the Serato DJ Pro installer.

6
En
Installing the driver software on macOS
Mojave 10.14 / macOS High Sierra 10.13
A new security feature has been added to macOS Mojave 10.14 /
macOS High Sierra 10.13.
When installing Pioneer DJ driver software on these versions of
macOS, driver software authentication is required.
If you’re installing the driver software for the first time and you’re
using macOS Mojave 10.14 / macOS High Sierra 10.13, you need to
follow the steps below. If the driver software was installed on macOS
or OS X before you updated to macOS Mojave 10.14 / macOS High
Sierra 10.13, you don’t need to follow these steps.
When installing Pioneer DJ driver software on macOS Mojave 10.14 /
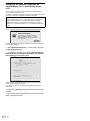
macOS High Sierra 10.13, the following screen is displayed.
Click [OK] to allow the driver software installation.
The installation will finish.
1 Open [System Preferences], then click [Security &
Privacy].
2 Check that [System software from developer “Pioneer
DJ Corporation” was blocked from loading.] is displayed
at the bottom of the screen.
This is shown for 30 minutes after starting the driver software
installation.
If it isn’t shown, repeat the driver software installation procedure.
3 Click [Allow] in the bottom-right corner of the screen.
4 If the unit is connected to your Mac, disconnect the USB
cable and connect it again.

English
En
7
Part names
For further details on each button and knob, refer to the “Part names and functions” section in the “Operating Instructions.”
1 Browser section
2 Deck section
3 Mixer section
Browser section
1 Rotary selector
2 BACK button
3 LOAD PREPARE button

8
En
Deck section
You can control four decks with the unit. There are knobs and buttons on the left side to control decks 1 and 3, and on the right side to control decks
2 and 4.
1 On Jog Display
2 Jog wheel
3 QUANTIZE button
4 SLIP button
5 JOG ADJUST knob
6 SYNC button
7 KEY LOCK button
8 TEMPO slider
9 HOT CUE mode button
a ROLL mode button
b SLICER mode button
c SAMPLER mode button
d PARAMETER , buttons
e KEY SYNC button
f KEY RESET button
g Performance Pads
h PLAY/PAUSE button
i CUE button
j BEAT JUMP
, buttons
k SHIFT button
l GRID button
m DECK SELECT button
n CENSOR button
o LOOP IN button
p LOOP OUT button
q 4 BEAT LOOP button

English
En
9
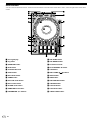
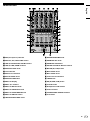
Mixer section
1 MIC (microphone) indicator
2 MIC OFF, ON, TALK OVER switch
3 USB A, PHONO/LINE, USB B switches
4 USB A, LINE, USB B switches
5 MASTER LEVEL knob
6 CLIP indicator
7 Master level indicator
8 BOOTH LEVEL knob
9 MASTER CUE button
a BEAT FX display
b BEAT , buttons
c BEAT FX SELECT knob
d BEAT FX CH SELECT knob
e BEAT FX LEVEL/DEPTH knob
f BEAT FX ON/OFF button
g HEADPHONES LEVEL knob
h HEADPHONES MIX knob
i SAMPLER VOL knob
j SAMPLER CUE button
k SOUND COLOR FX SELECT buttons
l MIC EQ (HI, LOW) knobs
m MIC2 LEVEL knob
n MIC1 LEVEL knob
o Channel level indicators
p TRIM knobs
q EQ (HI, MID, LOW) knobs
r COLOR knobs
s Headphones CUE buttons
t Channel faders
u CROSSFADER ASSIGN switches
v Crossfader

10
En
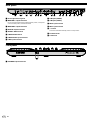
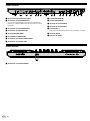
Rear panel
1 Kensington Security Slot
2 MASTER 1 output terminals
Do not connect a device that provides phantom power, or the power
cord of another product, to these terminals.
3 MASTER 2 output terminals
4 BOOTH output terminals
5 SIGNAL GND terminal
6 LINE/PHONO switch
7 LINE/PHONO input terminals
8 LINE input terminals
9 USB port (USB B)
a USB port (USB A)
b MIC2 input terminal
c MIC1 input terminal
d switch
This switch is between standby and on for this product.
e DC IN terminal
f Cord hook
Front panel
1 PHONES output terminals

English
En
11
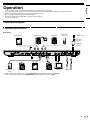
Operation
! Only connect the power cord to a power outlet after you’ve made all other connections.
Turn off the unit and disconnect the power cord from the outlet before connecting different devices or changing connections.
Refer to the operating instructions for any devices you want to connect.
! Be sure to use the supplied power cord and AC adapter.
! Be sure to use the supplied USB cable or one that supports USB 2.0.
! Do not use a USB hub.
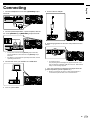
Connection examples
Connecting input terminals
Rear panel
Portable audio
device
Multi player Analog player*
1
Multi player*
2
MicrophonePC/Mac
Analog player*
1
Multi player*
2
Multi player
Portable audio
device
To power outlet
Power cord
(supplied)
AC adapter
(supplied)
*1 When connecting an analog player, set the [LINE/PHONO] switch beside the terminals to [PHONO].
*2 When connecting a DJ player, set the [LINE/PHONO] switch beside the terminals to [LINE].

12
En
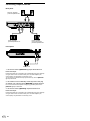
Connecting output terminals
Rear panel
Devices, amplifier,
powered speakers etc.
Power amplifier,
powered speakers etc.
Power amplifier
(for booth monitor),
powered speakers etc.
Front panel
Headphones
1 Be sure to use the [MASTER 1] output terminals for a
balanced output.
If these terminals are connected to an unbalanced input (such as RCA)
using an XLR to RCA converter cable (or a converter adapter) etc.,
sound quality may decrease or noise may occur.
To connect to an unbalanced input (such as RCA), use the [MASTER
2] output terminals.
2 Be careful not to accidentally insert the power cord plug
of another unit or device into a [MASTER 1] output terminal.
Do not connect devices capable of supplying phantom power to the
[MASTER 1] output terminals.
3 Be sure to use the [BOOTH] output terminals for a
balanced output.
If these terminals are connected to an unbalanced input (such as RCA)
using an XLR to RCA converter cable (or a converter adapter) etc.,
sound quality may decrease or noise may occur.

English
En
13
Connecting
1 Connect headphones to one of the [PHONES] output
terminals.
2 Connect powered speakers, a power amplifier, devices
etc. to the [MASTER 1] or [MASTER 2] output terminals.
! To output the sound from the [BOOTH] output terminals,
connect speakers or other devices to the [BOOTH] output
terminals.
! For details on connecting the input/output terminals, see the
“Operating Instructions.”
3 Connect the unit to your PC/Mac via a USB cable.
4 Turn on your PC/Mac.
5 Connect the AC adapter.
6 Press the [] switch on this unit’s rear panel to turn the
unit on.
! For Windows users
The preparing device message may appear when this unit is
first connected to a different USB port on the PC. Wait until the
ready-to-use message appears.
7 Turn on the devices connected to the output terminals
(powered speakers, power amplifier etc.).
! When a microphone, DJ player or other external device is
connected to input terminals, turn on that device too.

14
En
Launching the system
Launching Serato DJ Pro
This manual mainly focuses on explaining the hardware functions of the unit. For detailed instructions on using the Serato DJ Pro software, see the
Serato DJ Pro software manual.
For Mac
In Finder, open the [Applications] folder, then click the [Serato DJ Pro] icon.
For Windows 10
From the [Start] menu, click [Serato] > [Serato DJ Pro] icon.
For Windows 8.1
From [Apps view], click the [Serato DJ Pro] icon.
For Windows 7
In the Windows [Start] menu, click the [Serato DJ Pro] icon under [All Programs] > [Serato].
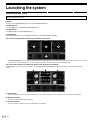
The screen directly after the Serato DJ Pro software is launched
! The [BUY/ACTIVATE] icon may appear on the right side of the screen when you launch Serato DJ Pro for the first time. However, you don’t need
a license to use the DDJ-1000SRT. You can buy expansion packs such as DVS and use them as additional options.
The screen when tracks are loaded onto decks in the Serato DJ Pro software
Click [Library] in the top-left corner of the screen, then select [Vertical] or [Horizontal] from the pull-down menu to change the Serato DJ Pro
screen.
A Deck section
The track information (track name, artist name, BPM etc.), the overall waveform and other information of the loaded track are displayed.
B Waveform display
The waveform of the loaded track is displayed.
C Browser section
Tracks in the library, or crates containing multiple tracks, are displayed.

English
En
15
Importing music files (tracks)
! There are various ways to import tracks into Serato DJ Pro. For
details, see the Serato DJ Pro manual.
! If you’re already using Serato Limited’s DJ software (e.g., Scratch
Live, ITCH, Serato DJ Intro, or Serato DJ Lite) and you’ve already
created track libraries, you can use these libraries.
! If you’re using Serato DJ Lite and you’ve already created track
libraries, you may need to reanalyze tracks.
The typical way to import music files (tracks) is as follows.
1 Click the [Files] key in the Serato DJ Pro screen to open
the [Files] panel.
The contents of your PC/Mac or the hard drive/device connected to the
PC/Mac are displayed in the [Files] panel.
2 Click the folder containing the tracks you want to add to
your library.
3 Drag and drop the selected folder to the crates panel.
A crate is created and the tracks are added to your library.
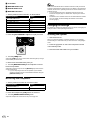
a
b
a [Files] panel
b Crates panel
Loading a track onto a deck
The following explains how to load a track onto deck [1] as an example.
1 Rotary selector
2 BACK button
1 Press the [BACK] button on this unit, move the cursor to
the crates panel, then turn the rotary selector to select the
crate etc.
2 Press the rotary selector, move the cursor to the library,
then turn the rotary selector to select the track you want to
load.
a
b
a Library
b Crates panel
3 Press the rotary selector.
The track loads onto deck 1.
Playing tracks
The following describes how to play the track on deck 1 (left) as an
example.
1 USB A, LINE, USB B switch
2 TRIM knob
3 EQ (HI, MID, LOW) knobs
4 COLOR knob
5 Headphones CUE button
6 Channel fader
7 HEADPHONES MIX knob
8 HEADPHONES LEVEL knob
9 CROSSFADER ASSIGN switch

16
En
a Crossfader
b MASTER LEVEL knob
c BOOTH LEVEL knob
d MASTER CUE button
1 Set the positions of the knobs etc. as shown below.
Names of knobs etc. Position
USB A, LINE, USB B switch USB A
TRIM knob Turned fully counterclockwise
EQ (HI, MID, LOW) knobs Center
COLOR knob Center
Channel fader Bottom position
MASTER LEVEL knob Turned fully counterclockwise
Crossfader Center
CROSSFADER ASSIGN switch THRU
2 Press the [PLAY/PAUSE ] button to play the track.
3 Turn the [TRIM] knob.
Adjust the [TRIM] knob so the channel level indicator lights up orange
at the loudest part of the track.
4 Move the channel fader away from you.
5 Turn the [MASTER LEVEL] knob to adjust the volume
level of the speakers.
Adjust the sound level output from the [MASTER] output terminals to
an appropriate level.
! If you’re outputting sound from the speaker of your PC/Mac,
adjust the speaker volume on the PC/Mac instead of using the
[MASTER LEVEL] knob.
Monitoring with headphones
1 Set the positions of knobs etc. as shown below.
Names of knob etc. Position
HEADPHONES MIX knob Center
HEADPHONES LEVEL knob Turned fully counterclockwise
2 Press the headphones [CUE] button for channel 1.
3 Turn the [HEADPHONES LEVEL] knob.
Adjust the headphones volume to a level you’re happy with.
Note
This unit and the Serato DJ Pro software include a variety of features
enabling characteristic DJ performances. For details on the respective
features, see the unit’s “Operating Instructions” and the Serato DJ Pro
software manual.
! You can download the unit’s “Operating Instructions” from the
Pioneer DJ support page. For details, see “Acquiring the manual”
(page 4).
!
The Serato DJ Pro software manual can be downloaded from Serato.
com. For details, see “Downloading the Serato DJ Pro software
manual” (page 4).
Changing the settings
For details on changing the settings of this unit, see the “Changing the
settings” section in the “Operating Instructions.”
Quitting the system
1 Quit Serato DJ Pro.
When you close the software, a question appears on your PC/Mac
screen asking for confirmation that you want to close it. Click [Yes] to
close.
2 Press the [] switch on this unit’s rear panel to set the
unit to standby mode.
3 Disconnect the USB cable from your PC/Mac.

English
En
17
Additional information
Troubleshooting
! If you think something is wrong with the unit, refer to the
“Troubleshooting” section of the unit’s “Operating Instructions” and
the [FAQ] for the [DDJ-1000SRT] on the Pioneer DJ support page.
pioneerdj.com/support/
Also, check any connected devices. If you can’t solve the problem,
ask your nearest Pioneer authorized service center or your dealer
to carry out repair work.
! The unit may not work properly if it’s subjected to static electricity or
other external influences. In this case, you may be able to restore
proper operation by turning off the power, waiting 1 minute, then
turning the power back on.
About trademarks and registered
trademarks
! Pioneer DJ is a trademark of PIONEER CORPORATION and is
used under license.
! Mac, macOS, OS X and Finder are trademarks of Apple Inc.,
registered in the U.S. and other countries.
! Windows is a registered trademark of Microsoft Corporation in the
United States and other countries.
! Intel and Intel Core are trademarks of Intel Corporation in the U.S.
and/or other countries.
! Adobe and Reader are trademarks of Adobe Systems Incorporated
in the U.S. and other countries.
! Serato DJ Pro is a registered trademark of Serato Limited.
The names of companies and products mentioned herein are the
trademarks of their respective owners.
Cautions on copyrights
Recordings you have made are for your personal enjoyment and
according to copyright laws may not be used without the consent of the
copyright holder.
! Music recorded from CDs etc., is protected by the copyright laws
of individual countries and by international treaties. It is the full
responsibility of the person who has recorded the music to ensure
that it is used legally.
! When handling music downloaded from the Internet etc., it is the
full responsibility of the person who has downloaded the music to
ensure that it is used in accordance with the contract concluded
with the download site.
Specifications
AC adapter
Power .................................................. AC 100 V to 240 V, 50 Hz/60 Hz
Rated current ..................................................................................0.9 A
Rated output ...................................................................... DC 12 V, 3 A
General – Main Unit
Power consumption .................................................. DC 12V, 2 000 mA
Main unit weight ............................................................................ 6.0 kg
Max. external dimensions (W × H × D)
........................................................ 708 mm × 73.4 mm × 361.4 mm
Tolerable operating temperature .................................... +5 °C to +35 °C
Tolerable operating humidity ...................5 % to 85 % (no condensation)
Audio Section
Sampling rate ............................................................................44.1 kHz
Frequency characteristic
USB, LINE, MIC1, MIC2 ..........................................20 Hz to 20 kHz
S/N ratio (rated output, A-WEIGHTED)
USB .......................................................................................110 dB
LINE .........................................................................................96 dB
PHONO ....................................................................................85 dB
MIC1 ........................................................................................80 dB
MIC2 ........................................................................................80 dB
Total harmonic distortion (20 Hz to 20 kHzBW)
USB .....................................................................................0.002 %
LINE ..................................................................................... 0.007 %
Standard input level / Input impedance
LINE .......................................................................... –12 dBu/47 kW
PHONO ..................................................................... –52 dBu/47 kW
MIC1 ........................................................................ –57 dBu/3.3 kW
MIC2 ........................................................................ –57 dBu/3.3 kW
Standard output level / Load impedance / Output impedance
MASTER 1 ............................................ +6 dBu/10 kW/330 W or less
MASTER 2 ............................................ +2 dBu/10 kW/680 W or less
BOOTH ................................................. +6 dBu/10 kW/330 W or less
PHONES ................................................... +8 dBu/32 W/10 W or less
Rated output level / Load impedance
MASTER 1 .................................................................. 25 dBu/10 kW
MASTER 2 .................................................................. 21 dBu/10 kW
BOOTH ....................................................................... 25 dBu/10 kW
Crosstalk
LINE .........................................................................................82 dB
Channel equalizer characteristic
HI .............................................................. –26 dB to +6 dB (20 kHz)
MID ............................................................. –26 dB to +6 dB (1 kHz)
LOW............................................................ –26 dB to +6 dB (20 Hz)
Microphone equalizer characteristic
HI ............................................................ –12 dB to +12 dB (10 kHz)
LOW........................................................ –12 dB to +12 dB (100 Hz)
Input / Output terminals
LINE input terminals
RCA pin jack ........................................................................... 2 sets
LINE/PHONO input terminals
RCA pin jack ........................................................................... 2 sets
MIC input terminals
XLR connector & 1/4” TRS jack ................................................. 1 set
1/4” TRS jack ............................................................................ 1 set
MASTER output terminals
XLR connector .......................................................................... 1 set
RCA pin jacks ............................................................................ 1 set
BOOTH output terminals
1/4” TRS jack ............................................................................ 1 set
PHONES output terminals
1/4” stereo jack .......................................................................... 1 set
3.5 mm stereo mini jack............................................................. 1 set
USB ports
B type ...................................................................................... 2 sets
! For improvement purposes, specifications and design of this unit
and the included software are subject to change without notice.

Es
2
PRECAUCIÓN
PARA PREVENIR EL PELIGRO DE CHOQUE ELÉCTRICO
NO REMOVER LA TAPA NI LAS PARTES DENTRO NO
UTILIZADAS, LLAMAR UNA PERSONA CUALIFICADA.
D3-4-2-1-1_B2_Es
ADVERTENCIA
Este aparato no es impermeable. Para evitar el riesgo
de incendio y de descargas eléctricas, no ponga ningún
recipiente lleno de líquido (como pueda ser un vaso o
un florero) cerca del aparato ni lo exponga a goteo,
salpicaduras, lluvia o humedad.
D3-4-2-1-3_A1_Es
ADVERTENCIA
Para evitar el peligro de incendio, no ponga nada con
fuego encendido (como pueda ser una vela) encima del
aparato. D3-4-2-1-7a_A1_Es
ADVERTENCIA
Guarde las piezas pequeñas fuera del alcance de los
niños. Si las ingirieran accidentalmente, póngase de
inmediato en contacto con un médico.
D41-6-4_A1_Es
PRECAUCIÓN
El interruptor de la alimentación de este aparato
no corta por completo toda la alimentación de la
toma de corriente de CA. Puesto que el cable de
alimentación hace las funciones de dispositivo de
desconexión de la corriente para el aparato, para
desconectar toda la alimentación del aparato deberá
desenchufar el cable de la toma de corriente de CA.
Por lo tanto, asegúrese de instalar el aparato de
modo que el cable de alimentación pueda
desenchufarse con facilidad de la toma de corriente
de CA en caso de un accidente. Para evitar correr el
peligro de incendio, el cable de alimentación también
deberá desenchufarse de la toma de corriente de CA
cuando no se tenga la intención de utilizarlo durante
mucho tiempo seguido (por ejemplo, antes de irse de
vacaciones).
D3-4-2-2-2a*_A1_Es
Entorno de funcionamiento
Temperatura y humedad del entorno de funcionamiento
+5 °C a +35 °C; menos del 85 % de humedad relativa
(rejillas de refrigeración no obstruidas)
No instale este aparato en un lugar mal ventilado, ni en
lugares expuestos a alta humedad o a la luz directa del
sol (o de otra luz artificial potente).
D3-4-2-1-7c*_A1_Es
Cuando utilice este producto, confirme la
información de seguridad mostrada en la parte
inferior de la unidad.
D3-4-2-2-4_B1_Es
PRECAUCIÓN PARA LA VENTILACIÓN
Cuando instale este aparato, asegúrese de dejar
espacio en torno al mismo para la ventilación con el fin
de mejorar la disipación de calor (por lo menos 5 cm
detrás y 5 cm en cada lado).
D3-4-2-1-7d*_A1_Es
PRECAUCIÓN
Este producto se evalúa en un entorno climático
tropical y moderado.
D3-8-2-1-7a_A1_Es
El símbolo gráfico colocado en el producto
significa corriente alterna.
El símbolo gráfico colocado en el producto
significa corriente continua.
El símbolo gráfico colocado en el producto
significa equipo de Clase II.
D3-8-2-4_A1_Es
PRECAUCIONES CONCERNIENTES A LA
MANIPULACIÓN DEL CABLE DE
ALIMENTACIÓN
Tome el cable de alimentación por la clavija. No
extraiga la clavija tirando del cable. Nunca toque el
cable de alimentación cuando sus manos estén
mojadas, ya que esto podría causar cortocircuitos o
descargas eléctricas. No coloque la unidad, algún
mueble, etc., sobre el cable de alimentación.
Asegúrese de no hacer nudos en el cable ni de unirlo a
otros cables. Los cables de alimentación deberán ser
dispuestos de tal forma que la probabilidad de que
sean pisados sea mínima. Una cable de alimentación
dañado podrá causar incendios o descargas eléctricas.
Revise el cable de alimentación está dañado, solicite el
reemplazo del mismo al centro de servicio más
cercano, o a su distribuidor.
S002*_A1_Es

Español
Es
3
Contenido
Cómo leer este manual
Gracias por haber escogido este producto de Pioneer DJ.
! Este manual explica brevemente los procedimientos de conexión
de esta unidad a un PC/Mac a través de la salida de sonido. Para
obtener más detalles sobre cómo usar la unidad, consulte el
“Manual de instrucciones” en el sitio web de Pioneer DJ.
! Tenga en cuenta que las pantallas y especificaciones de software,
así como la apariencia exterior y las especificaciones del hardware,
se encontraban en desarrollo durante la creación de este manual y
podrían ser distintas de las especificaciones finales.
! Tenga en cuenta que, en función de la versión del sistema
operativo, la configuración del navegador web, etc., el
funcionamiento puede variar del indicado en este manual.
! Tenga en cuenta que el idioma de las pantallas del software
descrito en este manual puede variar del idioma de su pantalla.
Este manual proporciona descripciones breves de los nombres de
las partes de esta unidad y de las conexiones entre la unidad y los
periféricos.
Para obtener instrucciones más detalladas sobre el uso de la unidad,
consulte su “Manual de instrucciones”.
! Para obtener más información sobre cómo encontrar el “Manual de
instrucciones” de la unidad, consulte “Visualización del Manual de
instrucciones” (página 4).
Antes de empezar a usar la unidad ......................... 4
Características .................................................................................. 4
Contenido de la caja ......................................................................... 4
Adquisición del manual .................................................................... 4
Instalación del software ................................................................... 4
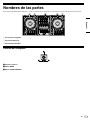
Nombres de las partes ............................................. 7
Sección del navegador ..................................................................... 7
Sección del deck ............................................................................... 8
Sección de mezclador ...................................................................... 9
Panel trasero.................................................................................... 10
Panel frontal ..................................................................................... 10
Operación ................................................................ 11
Ejemplos de conexión .....................................................................11
Conexión ................................................................. 13
Inicio del sistema .................................................... 14
Cambio de los ajustes .................................................................... 16
Cierre del sistema ........................................................................... 16
Información adicional ............................................ 17
Solución de problemas ................................................................... 17
Acerca de marcas comerciales y marcas comerciales
registradas ....................................................................................... 17
Precauciones relativas a los derechos de autor .......................... 17
Especificaciones ............................................................................. 17

Es
4
Antes de empezar a usar la unidad
Características
Esta unidad es un controlador DJ todo en uno diseñada
específicamente para el uso con el software DJ de Serato Limited,
Serato DJ Pro.
Los controles, como “BIG JOG”, “PERFORMANCE PADS” o
“4-CHANNEL MIXER”, están dispuestos cómodamente para controlar
las funciones de Serato DJ Pro.
La unidad está equipada con varios terminales de entrada y salida
aptos para distintas configuraciones y estilos de DJ, y está diseñada
con la calidad necesaria para su uso en clubs nocturnos o fiestas
particulares.
Contenido de la caja
! Adaptador de CA
! Clavija de alimentación
! Cable USB
1
! Manual de instrucciones (Guía de inicio rápido), este documento
! Serato DJ Pro Expansion Pack Voucher
2
1
Solo se suministra un cable USB con la unidad. Si quiere utilizar dos
cables, use un cable compatible con USB 2.0.
2
Tenga en cuenta que el Serato DJ Pro Expansion Pack Voucher
no puede volver a emitirse. Deberá utilizar el código de cupón para
activar el paquete de expansión. Guárdelo en un lugar seguro.
Adquisición del manual
Algunos manuales de instrucciones se proporcionan como archivos
en PDF.
Para verlos, se necesita tener instalado Adobe
®
Reader
®
.
Visualización del Manual de instrucciones
1 Inicie un navegador web en su PC/Mac y visite el sitio
web de Pioneer DJ.
pioneerdj.com
! Para seleccionar su idioma, haga clic en el icono de bandera
que aparece en la esquina superior derecha de la pantalla.
2 Coloque el cursor en [Soporte].
3 Haga clic en [Tutoriales, manuales y documentación].
4 Haga clic en [DDJ-1000SRT] en [CONTROLADORES
DJ].
5 Seleccione el idioma que necesite.
Descargue el manual si lo desea.
Descarga del manual del software Serato DJ
Pro
1 Visite el sitio web de Serato.
http://serato.com/
2 Haga clic en [Serato DJ Pro] en el menú [Products].
3 Haga clic en [Download].
4 Haga clic en [Manuals and downloads].
5 Haga clic en el manual del software Serato DJ Pro del
idioma que necesite.
Instalación del software
Antes de instalar el software
El software Serato DJ Pro y el software del controlador no están
incluidos con la unidad.
Acceda a la página de soporte de Pioneer DJ y descargue el
software.
pioneerdj.com/support/
! Usted es responsable de preparar el PC/Mac, los dispositivos de
red y otros elementos necesarios para conectarse a Internet.
Descarga del software controlador
1 Inicie un navegador web en su PC/Mac y visite el sitio
web de Pioneer DJ.
pioneerdj.com
! Para seleccionar su idioma, haga clic en el icono de bandera
que aparece en la esquina superior derecha de la pantalla.
2 Coloque el cursor en [Soporte].
3 Haga clic en [Actualización de Software y firmware].
4 Haga clic en [DDJ-1000SRT] en [CONTROLADORES
DJ].
5 Haga clic en [Drivers].
6 Haga clic en [Link de descarga] y, a continuación,
guarde el archivo.
Acerca del software Serato DJ Pro
Serato DJ Pro es una aplicación de software DJ creada por Serato
Limited.
Es posible realizar actuaciones de DJ conectando la unidad al PC/Mac
en el que se instale este software.
Requisitos mínimos del equipo
Sistemas operativos
compatibles
CPU y memoria necesaria
Mac: macOS Mojave 10.14/macOS
High Sierra 10.13/macOS Sierra 10.12
(actualización más reciente)
Procesador Intel
®
Core™ i3, i5, i7 y i9
1,07 GHz o superior
RAM de 4 GB o más
Windows
®
10 / Windows
®
8.1 /
Windows
®
7 (Service Pack más
reciente)
Procesador Intel
®
Core™ i3, i5, i7 y i9
1,07 GHz o superior
RAM de 4 GB o más
! Las versiones del sistema operativo de 32 bits no son compatibles.

Español
Es
5
Otros
Puerto USB
El PC/Mac debe tener un puerto USB 2.0 para
conectar la unidad.
Resolución de la
pantalla
Resolución de 1 280 × 720 o superior
Conexión a Internet
Necesitará una conexión a Internet para registrar
su cuenta de usuario en Serato.com y descargar el
software.
! Para obtener información sobre los requisitos más actuales del sistema,
la compatibilidad y los sistemas operativos compatibles de Serato DJ Pro,
consulte el siguiente sitio.
https://serato.com/dj/pro/downloads
! Asegúrese de usar la última versión y el Service Pack más reciente para su
sistema operativo.
! La operación no se garantiza en todos los PC/Mac, aunque se cumplan todas
las condiciones.
! En función de la configuración de ahorro de energía y otras condiciones
del PC/Mac, es posible que la CPU y el disco duro no tengan la suficiente
capacidad de procesamiento. En el caso concreto de portátiles, asegúrese de
que el PC/Mac se encuentra en las mejores condiciones para proporcionar
un alto rendimiento constante (por ejemplo, manteniendo conectada la
alimentación de CA) al usar Serato DJ Pro.
! Para usar Internet se necesita un contrato independiente con un proveedor de
servicios de Internet, así como pagar sus tarifas.
Descarga del software Serato DJ Pro
1 Visite el sitio web de Serato.
http://serato.com/
2 Haga clic en [Serato DJ Pro] en [Products].
Se visualiza la página de descarga de Serato DJ Pro.
! La página de descarga está sujeta a cambios.
3 Haga clic en [DOWNLOAD v*.*].
4 Cree una nueva cuenta de usuario de Serato.com.
! Si ya ha registrado una cuenta, vaya al paso 6.
! Si no ha terminado de registrar su cuenta, siga los pasos
siguientes.
— Siga las instrucciones de la pantalla, introduzca su dirección
de correo electrónico y cree una contraseña. A continuación,
seleccione la región en la que vive.
— Si selecciona la casilla [Go backstage with Serato],
recibirá boletines de noticias con la información más
reciente de los productos de Serato Limited.
— Cuando haya terminado de registrar su cuenta de usuario,
recibirá un correo electrónico. Compruebe el contenido del
correo electrónico.
! No olvide la dirección de correo electrónico y la contraseña que
usó cuando realizó el registro. Las necesitará para actualizar el
software en el futuro.
! La información personal que introduce al registrar una cuenta
de usuario nueva puede recopilarse, procesarse y usarse
basándose en la política de privacidad del sitio web de Serato
Limited.
5 Haga clic en el vínculo en el mensaje de correo
electrónico recibido desde Serato.com.
Le llevará a la página de descarga de Serato DJ Pro.
6 Inicie la sesión.
Introduzca la dirección de correo electrónico y la contraseña que ha
registrado para iniciar la sesión en Serato.com.
7 Seleccione [A laptop with a supported controller,
mixer or interface] en la página de descarga y haga clic
en [DOWNLOAD SERATO DJ PRO] para descargar el
software.
Procedimiento de instalación (Mac)
No conecte la unidad al Mac hasta completar la instalación.
! Cierre los otros programas que se estén ejecutando en el Mac.
1 Descomprima el software del controlador descargado
(DDJ1000SRTXXXdmg.zip).
2 Haga doble clic sobre [DDJ-1000SRT_M_X.X.X.dmg].
3 Haga doble clic sobre [DDJ-1000SRT_AudioDriver.
pkg].
4 Siga las instrucciones de instalación que aparecen en la
pantalla.
5 Descomprima el archivo de software Serato DJ Pro
descargado.
6 Haga doble clic en el archivo de software descomprimido
para iniciar el instalador.
7 Lea atentamente los términos del acuerdo de licencia y,
si los acepta, seleccione [Acepto].
! Si no acepta el contenido del acuerdo de licencia, haga clic en
[No acepto] para cancelar la instalación.
8 Haga clic en [Instalar].
9 Siga las instrucciones de instalación que aparecen en la
pantalla.
10 Haga clic en [Cerrar] para cerrar el instalador.
Procedimiento de instalación (Windows)
No conecte la unidad al PC hasta completar la instalación.
! Inicie sesión en la cuenta de administrador de su PC antes de
comenzar la instalación.
! Cierre los otros programas que se estén ejecutando.
1 Descomprima el software del controlador descargado
(DDJ1000SRTXXXXexe.zip).
2 Haga doble clic sobre [DDJ-1000SRT_X.XXX.exe].
3 Siga las instrucciones de instalación que aparecen en la
pantalla.
Si aparece en la pantalla [Seguridad de Windows] mientras la
instalación está en curso, haga clic en [Instalar este software de
controlador de todas formas] y siga con la instalación.
Cuando se complete la instalación del programa se mostrará un
mensaje que confirma la finalización de la instalación.
Tras instalar el software controlador, realice la instalación del software
Serato DJ Pro.
4 Descomprima el archivo de software Serato DJ Pro
descargado.
5 Haga doble clic en el archivo de software descomprimido
para iniciar el instalador.
6 Lea atentamente los términos del acuerdo de licencia y,
si los acepta, seleccione [I agree to the license terms and
conditions] y, a continuación, haga clic en [Install].
! Si no acepta el contenido del acuerdo de licencia, haga clic en
[Close] para cancelar la instalación.
Aparece un mensaje de instalación correcta al completar la instalación.
7 Haga clic en [Close] para salir del instalador de Serato
DJ Pro.

Es
6
Instalación del software controlador en
macOS Mojave 10.14 / macOS High Sierra
10.13
Se ha añadido una nueva función de seguridad a macOS Mojave
10.14 / macOS High Sierra 10.13.
Al instalar el software controlador de Pioneer DJ en estas versiones de
macOS, se necesitará autentificar el software controlador.
Si está instalando el software controlador por primera vez y está
usando macOS Mojave 10.14 / macOS High Sierra 10.13, deberá
seguir los pasos siguientes. Si el software controlador estaba
instalado en macOS u OS X antes de la actualización a macOS
Mojave 10.14 / macOS High Sierra 10.13, no necesitará seguir estos
pasos.
Al instalar el software controlador de Pioneer DJ en macOS Mojave
10.14 / macOS High Sierra 10.13, aparecerá la siguiente pantalla.
Haga clic en [OK] para permitir la instalación del software controlador.
La instalación finalizará.
1 Abra [System Preferences] y, a continuación, haga clic
en [Security & Privacy].
2 Compruebe que aparece el mensaje [System software
from developer “Pioneer DJ Corporation” was blocked
from loading.] en la pantalla inferior.
Este mensaje se mostrará durante 30 minutos tras el inicio de la
instalación del software controlador.
Si no aparece, repita el procedimiento de instalación del software
controlador.
3 Haga clic en [Allow] en la esquina inferior derecha de la
pantalla.
4 Si la unidad está conectada al Mac, desconecte el cable
USB y conéctelo de nuevo.

Español
Es
7
Nombres de las partes
Para obtener más detalles sobre cada botón y mando, consulte la sección “Nombres y funciones de los controles” del “Manual de instrucciones”.
1 Sección del navegador
2 Secciones del deck
3 Sección de mezclador
Sección del navegador
1 Selector giratorio
2 Botón BACK
3 Botón LOAD PREPARE

Es
8
Sección del deck
Puede controlar cuatro decks con la unidad. Los mandos y botones del lado izquierdo afectan a los decks 1 y 3, y los del lado derecho afectan a los
decks 2 y 4.
1 Pantalla del dial Jog
2 Dial Jog
3 Botón QUANTIZE
4 Botón SLIP
5 Mando JOG ADJUST
6 Botón SYNC
7 Botón KEY LOCK
8 Barra deslizante TEMPO
9 Botón de modo HOT CUE
a Botón de modo ROLL
b Botón de modo SLICER
c Botón de modo SAMPLER
d Botones PARAMETER ,
e Botón KEY SYNC
f Botón KEY RESET
g Pads de actuación
h Botón PLAY/PAUSE
i Botón CUE
j Botones BEAT JUMP
,
k Botón SHIFT
l Botón GRID
m Botón DECK SELECT
n Botón CENSOR
o Botón LOOP IN
p Botón LOOP OUT
q Botón 4 BEAT LOOP

Español
Es
9
Sección de mezclador
1 Indicador MIC (micrófono)
2 Conmutador MIC OFF, ON, TALK OVER
3 Conmutadores USB A, PHONO/LINE, USB B
4 Conmutadores USB A, LINE, USB B
5 Mando MASTER LEVEL
6 Indicador CLIP
7 Indicador de nivel maestro
8 Mando BOOTH LEVEL
9 Botón MASTER CUE
a Pantalla BEAT FX
b Botones BEAT ,
c Mando BEAT FX SELECT
d Mando BEAT FX CH SELECT
e Mando BEAT FX LEVEL/DEPTH
f Botón BEAT FX ON/OFF
g Mando HEADPHONES LEVEL
h Mando HEADPHONES MIX
i Mando SAMPLER VOL
j Botón SAMPLER CUE
k Botones SOUND COLOR FX SELECT
l Mandos MIC EQ (HI, LOW)
m Mando MIC2 LEVEL
n Mando MIC1 LEVEL
o Indicadores de nivel de canal
p Mandos TRIM
q Mandos EQ (HI, MID, LOW)
r Mandos COLOR
s Botones CUE de auriculares
t Faders del canal
u Conmutadores CROSSFADER ASSIGN
v Crossfader

Es
10
Panel trasero
1 Ranura de seguridad Kensington
2 Terminales de salida MASTER 1
No conecte ningún dispositivo que proporcione alimentación
phantom, o un cable de alimentación de otro producto, a estos
terminales.
3 Terminales de salida MASTER 2
4 Terminales de salida BOOTH
5 Terminal SIGNAL GND
6 Conmutador LINE/PHONO
7 Terminales de entrada LINE/PHONO
8 Terminales de entrada LINE
9 Puerto USB (USB B)
a Puerto USB (USB A)
b Terminal de entrada MIC2
c Terminal de entrada MIC1
d Conmutador
Este conmutador alterna el producto entre conectado y en espera.
e Terminal DC IN
f Gancho de cables
Panel frontal
1 Terminales de salida PHONES

Español
Es
11
Operación
! Conecte el cable de alimentación a la toma de corriente únicamente después de realizar el resto de conexiones.
Apague la unidad y desenchufe el cable de alimentación antes de conectar los distintos dispositivos o cambiar las conexiones.
Consulte el manual de instrucciones de los dispositivos que se van a conectar.
! Asegúrese de usar el cable de alimentación y el adaptador de CA suministrados.
! Asegúrese de usar el cable USB suministrado o uno compatible con USB 2.0.
! No utilice un concentrador USB.
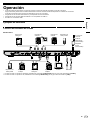
Ejemplos de conexión
Conexión de terminales de entrada
Panel trasero
Dispositivo de
audio portátil
Reproductor
múltiple
Reproductor
analógico*
1
Reproductor
múltiple*
2
MicrófonoPC/Mac
Reproductor
analógico*
1
Reproductor
múltiple*
2
Reproductor
múltiple
Dispositivo de
audio portátil
A la toma de
corriente
Cable de
alimentación
(suministrado)
Adaptador
de CA
(suministrado)
*1 Cuando conecte un reproductor analógico, establezca el conmutador [LINE/PHONO] que hay junto a los terminales en [PHONO].
*2 Cuando conecte un reproductor DJ, establezca el conmutador [LINE/PHONO] que hay junto a los terminales en [LINE].

Es
12
Conexión de terminales de salida
Panel trasero
Dispositivos, amplificador,
altavoces activos, etc.
Amplificador de potencia,
altavoces activos, etc.
Amplificador de potencia
(para el monitor de cabina),
altavoces activos, etc.
Panel frontal
Auriculares
1 Asegúrese de usar los terminales de salida [MASTER 1]
para lograr una salida equilibrada.
Si estos terminales se conectan a una entrada desequilibrada (como
una RCA), mediante un cable de conversión (o adaptador convertidor)
de XLR a RCA, la calidad del sonido puede verse reducida o se puede
producir ruido.
Para conectar una entrada no equilibrada (como una RCA), use los
terminales de salida [MASTER 2].
2 Tenga cuidado de no insertar accidentalmente el enchufe
del cable de alimentación de otra unidad o dispositivo en el
terminal de salida [MASTER 1].
No conecte dispositivos que puedan proporcionar alimentación
phantom a los terminales de salida [MASTER 1].
3 Asegúrese de usar los terminales de salida [BOOTH]
para lograr una salida equilibrada.
Si estos terminales se conectan a una entrada no equilibrada (como
una RCA), mediante un cable de conversión (o adaptador convertidor)
de XLR a RCA, la calidad del sonido puede verse reducida o se puede
producir ruido.

Español
Es
13
Conexión
1 Conecte los auriculares a uno de los terminales de salida
[PHONES].
2 Conecte altavoces activos, un amplificador de potencia,
componentes, etc., a los terminales de salida [MASTER 1] o
[MASTER 2].
! Para emitir sonido desde los terminales de salida [BOOTH],
conecte altavoces u otros dispositivos a los terminales de salida
[BOOTH].
! Consulte el “Manual de instrucciones” para los detalles de la
conexión de los terminales de entrada/salida.
3 Conecte la unidad a su PC/Mac mediante un cable USB.
4 Encienda el PC/Mac.
5 Conecte el adaptador de CA.
6 Pulse el conmutador [] en el panel trasero de esta
unidad para encenderla.
! Para usuarios de Windows
El mensaje de preparación del dispositivo puede aparecer
cuando esta unidad se conecta por primera vez a un puerto
USB diferente en el PC. Espere a que aparezca el mensaje que
indique que ya se puede usar.
7 Conecte la alimentación de los aparatos conectados a
los terminales de salida (altavoces activos, amplificador de
potencia, etc.).
! Cuando conecte un micrófono, reproductor DJ u otro dispositivo
externo a los terminales de entrada, encienda también ese
dispositivo.

Es
14
Inicio del sistema
Inicio de Serato DJ Pro
Este manual se centra principalmente en explicar las funciones de esta unidad como hardware. Para obtener instrucciones detalladas sobre el
uso del software Serato DJ Pro, consulte el manual del software Serato DJ Pro.
Para Mac
En Finder, abra la carpeta [Aplicación] y haga clic en el icono de [Serato DJ Pro].
Para Windows 10
Desde el menú [Iniciar], haga clic en [Serato] > icono de [Serato DJ Pro].
Para Windows 8.1
Desde la [vista Aplicaciones], haga clic en el icono [Serato DJ Pro].
Para Windows 7
Desde el menú [Iniciar] de Windows, haga clic en el icono [Serato DJ Pro] en [Todos los programas] > [Serato].
Aparece la pantalla justo después de iniciar el software Serato DJ Pro
! Puede que aparezca el icono [BUY/ACTIVATE] en el lado derecho de la pantalla cuando inicie Serato DJ Pro por primera vez. Sin embargo,
no necesita ninguna licencia para usar el DDJ-1000SRT. Puede comprar paquetes de expansión como DVS y usarlos a modo de opciones
adicionales.
La pantalla cuando las pistas se cargan en los decks en el software Serato DJ Pro
Haga clic en [Library] en la parte superior izquierda de la pantalla y seleccione [Vertical] u [Horizontal] del menú desplegable para cambiar la
pantalla de Serato DJ Pro.
A Sección del deck
Muestra la información de la pista (el nombre de la pista, el nombre del artista, BPM, etc.), la forma de onda general y otra información.
B Display de forma de onda
Muestra la forma de onda de la pista cargada.
C Sección del navegador
Muestra las pistas en la biblioteca o las cajas que contienen varias pistas.

Español
Es
15
Importación de archivos de música (pistas)
! Hay varios modos de importar pistas a Serato DJ Pro. Para obtener
más detalles, consulte el manual de Serato DJ Pro.
! Si ya utiliza software DJ de Serato Limited (p. ej., Scratch Live,
ITCH, Serato DJ Intro o Serato DJ Lite) y ya tiene bibliotecas de
pistas creadas, podrá usar dichas bibliotecas de pistas.
! Si está usando Serato DJ Lite y ya ha creado bibliotecas de pistas,
es posible que tenga que volver a analizar las pistas.
El modo típico de importar archivos de música (pistas) es el siguiente:
1 Haga clic en la tecla [Files] de la pantalla de Serato DJ
Pro para abrir el panel [Files].
El contenido de su PC/Mac o del disco duro / los periféricos
conectados al PC/Mac se muestra en el panel [Files].
2 Haga clic en la carpeta que contiene las pistas que desea
añadir a la biblioteca.
3 Arrastre y suelte la carpeta seleccionada en el panel de
cajas.
Se crea una caja y las pistas se añaden a la librería.
a
b
a Panel [Files]
b Panel de cajas
Carga de una pista en un deck
A continuación se explica cómo cargar una pista en el deck [1] a modo
de ejemplo.
1 Selector giratorio
2 Botón BACK
1 Pulse el botón [BACK] de esta unidad, mueva el
cursor al panel de las cajas y gire el selector giratorio para
seleccionar la caja, etc.
2 Pulse el selector giratorio, desplace el cursor a la
biblioteca y, a continuación, gire el selector giratorio para
seleccionar la pista que quiere cargar.
a
b
a Library
b Panel de cajas
3 Pulse el selector giratorio.
La pista se carga en el deck 1.
Reproducción de pistas
A continuación se describe cómo reproducir una pista en el deck 1
(izquierdo) a modo de ejemplo.
1 Conmutador USB A, LINE, USB B
2 Mando TRIM
3 Mandos EQ (HI, MID, LOW)
4 Mando COLOR
5 Botón CUE de auriculares
6 Fader de canal
7 Mando HEADPHONES MIX
8 Mando HEADPHONES LEVEL
9 Conmutador CROSSFADER ASSIGN

Es
16
a Crossfader
b Mando MASTER LEVEL
c Mando BOOTH LEVEL
d Botón MASTER CUE
1 Ajuste las posiciones de los mandos, etc. tal y como se
muestra más abajo.
Nombre de los mandos, etc. Posición
Conmutador USB A, LINE, USB B USB A
Mando TRIM Girado completamente hacia
la derecha
Mandos EQ (HI, MID, LOW) Centro
Mando COLOR Centro
Fader de canal Posición inferior
Mando MASTER LEVEL Girado completamente hacia
la derecha
Crossfader Centro
Conmutador CROSSFADER ASSIGN THRU
2 Pulse el botón [PLAY/PAUSE ] para reproducir la
pista.
3 Gire el mando [TRIM].
Ajuste el mando [TRIM] de modo que el indicador de nivel del canal se
ilumine en naranja en la parte con más volumen de la pista.
4 Mueva el fader de canal lejos de usted.
5 Gire el control [MASTER LEVEL] para ajustar el nivel de
volumen de los altavoces.
Ajuste la salida de nivel de sonido de los terminales de salida
[MASTER] en un nivel apropiado.
! Si está emitiendo sonido desde el altavoz del PC/Mac, ajuste
el volumen del altavoz en el PC/Mac en lugar de usar el mando
[MASTER LEVEL].
Monitoreo con auriculares
1 Ajuste las posiciones de los mandos, etc. tal y como se
muestra más abajo.
Nombre del mando, etc. Posición
Mando HEADPHONES MIX Centro
Mando HEADPHONES LEVEL
Girado completamente hacia
la derecha
2 Pulse el botón [CUE] de los altavoces para el canal 1.
3 Gire el control [HEADPHONES LEVEL].
Ajuste el volumen de los altavoces a un nivel que le parezca adecuado.
Nota
Esta unidad y el software Serato DJ Pro incluyen una serie de
características que permiten realizar actuaciones de DJ con su propio
sello. Para obtener detalles de las características respectivas, consulte
el “Manual de instrucciones” y el manual del software Serato DJ Pro.
! Puede descargar el “Manual de instrucciones” de la unidad desde
la página de soporte de Pioneer DJ. Para obtener más información,
consulte “Adquisición del manual” (página 4).
!
El manual del software Serato DJ Pro puede descargarse desde
Serato.com. Para obtener más detalles, consulte “Descarga del
manual del software Serato DJ Pro” (página 4).
Cambio de los ajustes
Para obtener detalles sobre cómo cambiar los ajustes en esta
unidad, consulte la sección “Cambio de los ajustes” en el “Manual de
instrucciones”.
Cierre del sistema
1 Cierre Serato DJ Pro.
Cuando cierra el software, aparece en la pantalla del PC/Mac una
pregunta en la que se le pide que confirme que quiere cerrarlo. Haga
clic en [Yes] para cerrarlo.
2 Pulse el conmutador [] del panel trasero de esta unidad
para poner la unidad en espera.
3 Desconecte el cable USB de su PC/Mac.

Español
Es
17
Información adicional
Solución de problemas
! Si piensa que algo no funciona bien en la unidad, consulte la
sección “Solución de problemas” del “Manual de instrucciones” de
esta unidad y las [FAQ] de [DDJ-1000SRT] en la página de soporte
de Pioneer DJ.
pioneerdj.com/support/
Asimismo, compruebe los dispositivos conectados. Si el problema
no se soluciona, solicite una reparación al centro de servicio
autorizado o al distribuidor Pioneer.
! Es posible que esta unidad no funcione correctamente a causa de
la electricidad estática o de otras influencias externas. En tal caso,
desconecte el cable de alimentación, espere aproximadamente
un minuto y vuelva a conectarlo para restaurar el funcionamiento
normal.
Acerca de marcas comerciales y
marcas comerciales registradas
! Pioneer DJ es una marca comercial de PIONEER CORPORATION,
usada bajo licencia.
! Mac, macOS, OS X y Finder son marcas comerciales de Apple Inc.
en los Estados Unidos y en otros países.
! Windows es una marca registrada de Microsoft Corporation en los
Estados Unidos y en otros países.
! Intel e Intel Core son marcas registradas de Intel Corporation en los
Estados Unidos y/o en otros países.
! Adobe y Reader son marcas comerciales de Adobe Systems
Incorporated en los Estados Unidos y en otros países.
! Serato DJ Pro es una marca comercial registrada de Serato
Limited.
Los nombres de compañías y productos mencionados aquí son marcas
comerciales de sus respectivos propietarios.
Precauciones relativas a los derechos
de autor
Las grabaciones que usted ha hecho son para su uso personal y,
según las leyes de los derechos de autor, no se pueden usar sin el
consentimiento del propietario de tales derechos.
! La música grabada de CD, etc., está protegida por las leyes de los
derechos de autor de países individuales, y también por tratados
internacionales. La persona que ha grabado la música es la
responsable de asegurar que ésta se use legalmente.
! Cuando maneje música descargada de Internet, etc., la persona
que la haya descargado será la responsable de asegurar que ésta
se use según el contrato concluido con el sitio de la descarga.
Especificaciones
Adaptador de CA
Alimentación ..........................................CA 100 V a 240 V, 50 Hz/60 Hz
Corriente nominal ...........................................................................0,9 A
Salida nominal .................................................................... CC 12 V, 3 A
General – Unidad principal
Consumo energético ................................................. 12 V CC, 2 000 mA
Peso de la unidad principal ........................................................... 6,0 kg
Dimensiones externas máx. (An × Al × Pr)
........................................................ 708 mm × 73,4 mm × 361,4 mm
Temperatura de funcionamiento tolerable ....................... +5 °C a +35 °C
Humedad de funcionamiento tolerable... 5 % a 85 % (sin condensación)
Sección de audio
Frecuencia de muestreo ...........................................................44,1 kHz
Características de frecuencia
USB, LINE, MIC1, MIC2 ...........................................20 Hz a 20 kHz
Relación señal/ruido (salida nominal, A-WEIGHTED)
USB .......................................................................................110 dB
LINE .........................................................................................96 dB
PHONO ....................................................................................85 dB
MIC1 ........................................................................................80 dB
MIC2 ........................................................................................80 dB
Distorsión armónica total (20 Hz a 20 kHzBW)
USB .....................................................................................0,002 %
LINE ..................................................................................... 0,007 %
Nivel de entrada / Impedancia de entrada estándar
LINE .......................................................................... –12 dBu/47 kW
PHONO ..................................................................... –52 dBu/47 kW
MIC1 ........................................................................ –57 dBu/3,3 kW
MIC2 ........................................................................ –57 dBu/3,3 kW
Nivel de salida / Impedancia de carga / Impedancia de salida estándar
MASTER 1 ......................................... +6 dBu/10 kW/330 W o menos
MASTER 2 ......................................... +2 dBu/10 kW/680 W o menos
BOOTH .............................................. +6 dBu/10 kW/330 W o menos
PHONES ................................................ +8 dBu/32 W/10 W o menos
Nivel de salida nominal / Impedancia de carga
MASTER 1 .................................................................. 25 dBu/10 kW
MASTER 2 .................................................................. 21 dBu/10 kW
BOOTH ....................................................................... 25 dBu/10 kW
Diafonía
LINE .........................................................................................82 dB
Características del ecualizador de canales
HI ............................................................... –26 dB a +6 dB (20 kHz)
MID .............................................................. –26 dB a +6 dB (1 kHz)
LOW............................................................. –26 dB a +6 dB (20 Hz)
Características del ecualizador del micrófono
HI ............................................................. –12 dB a +12 dB (10 kHz)
LOW......................................................... –12 dB a +12 dB (100 Hz)
Terminales entrada / salida
Terminales de entrada LINE
Conector de contacto RCA .................................................. 2 juegos
Terminales de entrada LINE/PHONO
Conector de contacto RCA .................................................. 2 juegos
Terminales de entrada MIC
Conector XLR y conector TRS 1/4” ....................................... 1 juego
Conector TRS 1/4” ................................................................ 1 juego
Terminales de salida MASTER
Conector XLR........................................................................ 1 juego
Conectores de contactos RCA .............................................. 1 juego
Terminales de salida BOOTH
Conector TRS 1/4” ................................................................ 1 juego
Terminales de salida PHONES
Conector fonográfico estéreo 1/4” ......................................... 1 juego
Conector fonográfico estéreo de 3,5 mm .............................. 1 juego
Puertos USB
Tipo B .................................................................................. 2 juegos
! Por motivos de mejoras, las especificaciones y diseño de esta
unidad y del software incluido están sujetos a cambios sin previo
aviso.


<DRH1638-A>Printed in Malaysia
© 2019 Pioneer DJ Corporation. All rights reserved.
-
 1
1
-
 2
2
-
 3
3
-
 4
4
-
 5
5
-
 6
6
-
 7
7
-
 8
8
-
 9
9
-
 10
10
-
 11
11
-
 12
12
-
 13
13
-
 14
14
-
 15
15
-
 16
16
-
 17
17
-
 18
18
-
 19
19
-
 20
20
-
 21
21
-
 22
22
-
 23
23
-
 24
24
-
 25
25
-
 26
26
-
 27
27
-
 28
28
-
 29
29
-
 30
30
-
 31
31
-
 32
32
-
 33
33
-
 34
34
-
 35
35
-
 36
36


Pioneer DDJ-1000SRT Guía de inicio rápido
- Categoría
- Controladores de DJ
- Tipo
- Guía de inicio rápido
en otros idiomas
Artículos relacionados
-
Pioneer DDJ-1000SRT Guía de inicio rápido
-
Pioneer DJ DDJ-SR2 Guía de inicio rápido
-
Pioneer DDJ-SX-W Guía de inicio rápido
-
Pioneer DDJ-SZ-N El manual del propietario
-
Pioneer PLX-CRSS12 Guía de inicio rápido
-
Pioneer DDJ-SX2 Guía de inicio rápido
-
Pioneer DJ DDJSB3 Manual de usuario
-
-
Pioneer DDJ-S1 Manual de usuario
-
Pioneer DDJ-REV7 El manual del propietario