
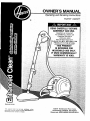
®
OWNEES MANUAL
Operatingand ServicingInstructions
Espa_ol- p,_ginaE1 i::
i i: i
READCAREFULLYBEFORE ....
ASSEMBLY AND USE. ::
Questions or concerns?
For assistance, please call
Customer Service at
1-800-944-9200
Mon-Fri 8am-7pm EST.
PLEASE DO NOT RETURN THIS
PRODUCT TO THE STORE.
THIS PRODUCT
IS INTENDEDFOR
HOUSEHOLDUSEONLY.
IF USED COMMERCIALLY
WARRANTY IS V01D. :i
hoover.c0m
"Or, sealed hard non=porous surfaces, wherl
usecl with Hoover _ MuJti-Purpose Disinfectan_ in
8ccordatlce with owner's mar_ua!,
@201t Techtronic Floor Care
Technology Limited. All Rights
Reserved, #961145003 IDI02314-R1

Thankyou for choosinga HOOVEFPproduct.
PIease enter the complete model and Manufacturing
Code in thespaces provided.
MODEL
MFG, CODE
Hint: Attach your sales receipt to this owner's manual.
Verification of date of purchase may be required for
,warranty service of your HOOVER ®product,
Be sure to register your product online at Hoover.corn
or call t-800-944-9200 to register by phone
Visit Hoover.com for additional video instructions for
assembly and maintenance.
(_ lease visit Hoover.corn
for video instructions
for this cleaner,
MANUFACTURINGCODE
(Labe| located on bottom of canister)
Important Safety Instructions .................................................................................... 3
Carton Contents ......................................................................................................... 5
Steamer Description ................................................................................................... 5
Steamer Assembly ..................................................................................................... 6
How To Use: Steamer ................................................................................................. 6
Filling Clean Water Tank.......................................................................................... 6
Filling Solution Tank................................................................................................. 7
Operating Cleaner ................................................................................................... 7
Refilling Water During Operation ............................................................................. 8
Acess To Built-In Accessories .................................................................................. 8
HOWTo Use: Accessories .......................................................................................... 9
Attaching Accessories ............................................................................................. 9
Accessory Chart ...................................................... _............................................... 11
Maintenance ................................................................................................................ 12
Cleaning Microfiber Cleaning Pads ......................................................................... 12
Storage ........................................................................................................................ 12
Troubleshooting ......................................................................................................... 13
Service ......................................................................................................................... 13
Warranty ...................................................................................................................... 14
if you need assistance:
Visit our website at hoover.com. Follow the authorized dealer locater link to find the HooveP authorized
dealer nearest you or call 1-800-944-9200 for an automated referral of Hoover • authorized dealer
locations (U.S. only) or to speak with a customer service representative; Men- Fn 8am- 7pm EST.
PLEASE DO NOT RETURN THIS PRODUCT TO THE STORE.
2

IMPORTANTSAFETYINSTRUCTIONS
SAVETHESEINSTRUCTIONS
When using an electrical appliance, basic precautions should always be
followed, includingthe foflowing:
READALLINSTRUCTIONSBEFOREUSINGTHISAPPLIANCE.
WARNING:TOREDUCETHERISKOFFIRE,
ELECTRICSHOCKORINJURY:
• Fullyassemblebeforeoperating.
• Operateapplianceonlyatvoltagespecifiedondatalabelon bottomof product.
° Donotleaveappliancewhenpluggedin.Unplugfromoutletwhennotinuseandbefore
cleaningorservicingproduct.
° Notforspaceheatingpurposes.
° Donotuseorstoreoutdoors.
° Donotallowto be usedasa toy.Notintendedfor usebychildrenage12 andunder.
Closesupervisionis necessarywhenusednearchildren.Toavoidinjuryor damage,
keepchildrenawayfrom produc%anddo notallowchildrento placefingersor other
objectsintoanyopenings.
° Use only as described in this manual. Use only manufacturer'srecommended
attachmentsandproducts.
° Donotusewith damagedcordor plug.If applianceis notworkingasit should,has
beendropped,damaged,leftoutdoors,ordroppedintowater,takeitto a servicecenter
priortocontinuinguse.
° Donotpull or carrybycord,usecordasa handle,closea dooron cord,or pullcord
aroundsharpedgesor corners.Donotplaceproducton cord.Donot run appliance
overcord.Keepcordawayfrom heatedsurfaces.
• Donotunplugbypullingoncord.Tounplug,grasptheplug,notthecord.
° Donothandleplugorappliancewithwet hands.
° Donotputanyobjectintoopenings.Donotusewithanyopeningblocked.
,* Keephair,looseclothing,fingers,and all parts of bodyaway from openingsand
movingparts.
o Turnoff allcontrolsbeforeunplugging.
° Useextracarewhencleaningonstairs.Whennotin usedonotplaceproductonstairs
orfumibJre,asit mayresultin injuryordamage.
• Donot usein areaswhereflammable or combustible liquids, such as gasoline
may bepresent.
• Connecttoa properlygroundedoutletonly.SeeGroundingInstructions.
• Donotcleanoverfloorelectricaloutlets.
• Onlyusewaterto refillthe cleanwatertank. Donot useanytype of chemicalsor
additivesinthecleanwatertank.
° Donotopenthewaterfill safetycapwhenusingtheappliance.
° Whenin use,neverturntheapplianceoveror usewhileon itsside.
° Allowappliancesufficienttimeto coolpdorto removingthemicrofiberpad.
•AppIiance shouldonlybeusedincontainersor tubsthatarenotfilledwith liquid.
Donotoperatesteamcanisterwithoutwaterin cleanwatertank. Donotoverfill the
tank.Usethemeasuringcupsuppliedwith unit.
• Donotusewithoutmicrofibercleaningpadproperlyattachedto mophead.
3

• Beforecleaningthe appliance,unplugthe powercordfrom electricaloutletand
cleanunitwith adry'ordampcloth.Donotpourwateror usealcohol,benzeneor
paintthinnerontheunit.
• Makesurewaterfill safetycapistightlyclosed,asdescribedintheinstructions.
• Donotadd descaling,aromatic,alcoholicsolutions,cleaningsolutions,scented
perfumes,oilsor anyotherchemicalstothe waterusedin thisapplianceasthis
maydamagetheunitor makeitunsafeforuse.Whilethisapplianceisdesignedfor
tapwater,toincreaseeffectivenessofthesteamandtoavoidbuildupof minerals,
youmayusedistilledwatertofl]l cleanwatertank.
• Thehousingwill heatupduringuse- this isnormal.
• Alwayscarryappliancebyhandle.
• Donottouchanyoftheappliancehotparts.
• Toavoidburnor injury,donotapplysteamdirectlyto anypersonor animal.
• Itisnormalforwaterto dripoccasionallyfromthenozzle.Thisissimplysteamthat
hasrecondensedintowaterinthenozzle.
• Donotuseapplianceon leather,waxpolishedfurnitureorfloors,syntheticfabdcs,
velvetor otherdelicate,steamorwatersensitivematerials.
• WARNING:ThisproductcontainschemicalsknowntotheStateofCaliforniatocause
cancer,birthdefectsor reproductiveharm.WASHHANDSAFTERHANDLING.
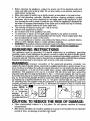
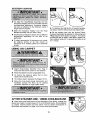
GROUNDINGINSTRUCTIONS
This appliancemust be grounded.If it shouldmalfunctionor breakdown,grounding
providesa pathof leastresistancefor electdccurrentto reducetheriskofelectricshock.
Thisapplianceisequippedwitha cordhavinganequipment-groundingconductor(C)and
groundingplug(A).Theplugmustbeinsertedintoanappropriateoutlet(13)thatisproperly
installedandgroundedin accordancewith all localcodesandordinances.
WARNING:Improperconnectionof the equipment-groundingconductorcan
resultintheriskofelectricshock.Checkwithaqualifiedelectdcianorservicepersonifyou
areindoubtastowhethertheoutletisproperlygrounded.Donotmodifytheplugprovided
with theappliance- if it willnotfit theoutJet,havea properoutletinstalledbya qualified
electrician.Thisapplianceisfor useon a nominal120-voltcircuitand hasa grounding
plugthat looksliketheplug(A)illustratedin Fig.1.Atemporaryadapter(D)maybeused
toconnectthisplugto a2-polereceptacle(E)ifa properlygroundedoutletisnotavailable
(Fig.2).Thetemporaryadaptershouldbeusedonlyuntilapropedygroundedoutlet(B)can
be installedby a qualifiedelectrician(Fig.1).Thegreencoloreddgidear,lug,orthelike
(F)extendingfrom theadaptermustbe connectedto a permanentground(G)suchasa
properlygroundedoutletboxcover(Fig.2).Whenevertheadapterisused,itmustbehel,
in placebya metal
screw. NOTE: In
Canada, the use
of a temporary
adapter is not
permitted by the
CanadianElectrical
Code.
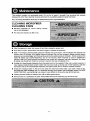
CAUTION:TOREDUCETHERISKOFDAMAGE:
• Storeappropriatelyindoors in a dry place. Do not expose machine to freezing
temperatures.
• Withsteamactivated,donotallowappliancetosprayinonelocationfor anextended
periodoftime, as damageto surfacecanresult.
4

/
!
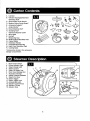
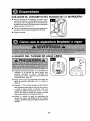
A, Canister
B. Window Squeegee/Garment
Steaming Tool*
C. Small Nylon Scrub Brush*
D. Medium Nylon Scrub Brush"
E. Accassory Adaptor"
E Ang]e Nozzle*
G. Grout Cleaning Tool*
H. Scraping Tool*
]. Garment Steamer Cloth*
J. Mop Head
K. Funnel*
L. Measuring Cup
M. Multi-Surface Microfiber Pad
N. Carpet Glider
O. Extension Wands
P, HoseiHandte Assembly
Q. Hard Floor Microfiber Pad
R. Cooling Base
*Accessories stored in the accessory
storage compartment.
@
_%_,,
I J
e N
J
1. Main Power Switch
2. Power Indicator Light
3, Steam Ready Light
4. Steam Control
5. Water Fill Safety Cap
6, Floor Head Storage Slot
7. Accessonj Storage
8, Safety Pressure Indicator
9. Steam Port Door
10. Steam Trigger
1I. Steam Trigger Lock
12, Accessories Latch
13. Solution Control Knob
14. So]ution Fill Cap
15. Solution Tank
4
9 j
2 3

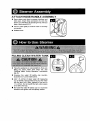
ATTACH HOSE/HANDLE ASSEMBLY
• Open steam port door to expose interface and
hold open, Insert hose connector (A) onto the
steam port interface (B) pressing firmly until you
hear a click sound (3.1).
• Pull on hose lightly to ensure hose is securely
connected.
I Release door.
FILLING CLEAN WATER TANK
i Place the appliance on a level platform. If you are
tilling the clean water tank when hot, see
"Refilling Water During Operation" instructions
(pg. 8).
• Unscrew the water fill safety cap counter-
clockwise (4.1), and insert funnel.
• Add 1.1L (37oz) of dean water (fill measuring
cup to 550ml (18.50z) twice) and pour the water
into the tank (4,2). (Max. capacity of the tank is
1.1L (37oz). Do not overfill the tank, allow space
to be left at the top).
| Re-install the water t_l]safety cap in a clockwise
direction and tighten until completely sealed.

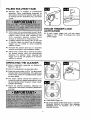
FILLING SOLUTION TANK
• Solution tank is located in hoselhandle
assembly. Place Hose!Handle Assembly on
flat surface. Unscrew the solution tank cap (A)
by turning counter- clockwise (4,3), and insert
funnel,
• Fill the tank with recommended HooveP Multi-
Purpose Disinfectant or HooveP Multi-Purpose
Cleaner using funnel and measuring cup
(4.4), maximum solution volume 200ml
(6.5oz) as indicated on measuring cup,
• If refilling solution tank during use, do not hold
or depress tdgger, as steam may be released.
Trigger can be locked to avoid accidental
release of steam.
Re-install the solution tank cap in a clockwise
direction and tighten until completely sealed.
Adjust clean control dial by turning the dial to
the desired setting, which will automaticaBy
dispense the solution when pressing the
trigger. Turn to the "off' position if no Hoover _
solution is desired
STEAM TRIGGER LOCK
ACTIVATION
• If used, steam trigger ]ock will lock steam
trigger in %ff = mode, To activate lock, slide
toward tdgger.
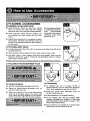
OPERATING THE CLEANER
• Attach hose/handle assembly as directed in
F{gure 3.1 (pg. 6).
• Plug {n the appliance to a grounded outlet.
• Press the power button (4,5,D). The blue power
indicator light should {lluminate. If the light does
not illuminate, check the "troubteshoeting" section
for more details.
• The steam cleaner should take between 3"5
minutes to heat up to steam temperatures, which
will be indicated when the green "steam ready"
indicator illuminates.
• Attach the desired acoessoP/, following the
instructions inthe section"AccessoryAttachment
and Use,"
• Press steam tdgger (F).
= By tuming steam control knob (G) in a counter-
clockwise direction, the steam flow released
decre_;ses (4.7). To increase, turn it in the
oppos;te direction.

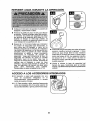
REFILLING WATER DURING OPERATION
• Turn paver switch off and unplug the power cord.
• Press down steam tdgger (4.8,A) to release
pressure. When tank is under pressure, the
safety pressure indicator will rise above the
surface of the cap (4.9,B). When the tank is not
under pressure the safety pressure indicator wi!l
be flush or below the su#ace (4.9,C).
= Wait 7-t0 minutes until the safety pressure
indicator has gone down, which indicates the
steamer has cooled, After 10 minutes, if the
safety pressure indicator has net fully dropped,
release residual steam pressure by pressing
trigger and then gently pushing the safety
pressure indicator. Slowly unscrew the water fill
safety cap counter-clockwise, but do not
remove. Allow machine to ¢0ol an additional 5
minutes. After you have ensured the steamer
has cooled and pressure has been released,
the water fill safety cap should turn freely for
removal. Unscrew the water fill safety cap
completely (4.10).
• Remove any remaining water to avoid overfilling,
insert funnel and add 1.1L (37oz) o_ clean water
(fill measuring cup to 550m1 (t8.50z) twice) and
pour the water into the tank (4.10). (Max, capacity
of the tank is 1.1L (37oz). Do not overfill the tank,
allow space to be left at the top).
• Re-install the water f_lisafety cap in a clockwise
direction and tighten until completely sealed.
ACCESS TO BUILT-IN ACCESSORIES
II The steamer is fitted with a series of built
in accessories in the accessory holder
compartments on both sides of the main body_
II 4,1I To access these, press lightly on tabs (D)
on the top of side doors and swing doors down.

ATTACHING ACCESSORIES
EXTENSION WAND SECTIONS
• Align Extension Wand (A) with hose handle
(B) (5._,). Connect the wand with the rotating
cord hook first to the hose and handle assembly.
• Press Extension Wand with the rotating cord
hook against the hose handle until you hear
a click.
• Repeat this p_ocedure if it is necessary to attach
more wands. The fixed hook extension wand will
be last to be attached (closest to the accessory
or mop head).
• Use ExtensionWands
to increase the distance
from HoselHandle
Assembly to the chosen
accessory (mop head,
grout tool, etc.)
ATTACHING MOP HEAD
• 5.2 Align Extension Wand (C) with the opening on the Mop Head (D), at the
corresponding end,
• Press Extension 'Wand against the Mop Head until you hear a click.
=' Use Mop Head to clean sealed hard floors and carpets. Pad must be
attached. Reference section "Attaching the Microflber Pads" to ensure
correct pad is being used.
I Mop head can also be connected directly to the hoselhandle assembly.
ATTACHING THE MICROFIBER PADS
ForGeneralCleaning
ii Use the "Multi-Surface Microfiber Pad" (5.3).
II Place the "Multi-Surface Microfiber Pad" on
the floor (white side up).
i Place the product on top of the pad making
sure the mop head covers the entire pad
(5.3). Hook and loop feature on the bottom
of the mop head will hold the pad in place.
ForDisinfecting
• To disinfect and kill or remove 99.9% of
harmful bacteria, use the "Hard Floor Microfiber
Pad", which contains the cut outs in it (5.4).
• Place the "Hard Floor Microflber Pad" on
the floor (white side up).
• Follow directions For General Cleaning.
• Fill the solution tank with the HooveP Multi-
Purpose Disinfectant as directed in "Removing
and Filling Solution Tank" section on page 7. Turn
Clean Control dial to HIGH,
• Run a minimum of 4 strokes at a medium pace
across same area and allow to air dry.

ACCESSORYADAPTOR
• 5.6 Align the H0seJHandle Assembly (G) with
Accessopj Adaptor (H) on the end fitted with the
corresponding attachment, Accessory adaptor
can also be attached to the extension wand if
longer reach is needed.
• Slide the Accessory Adaptor over the Hose
Handle Assembly until you hear a click.
• UseAccessory Adaptor to attach various different
accessories depending on the task to be
performed.
• To attach accessories, fit accessory over nozzle
tip, aligning arrows on tip with arrows on
accessory (5.7). Rotate quarter turn clockwise
to lock,
• To disinfect and kill 99.9% of harmful bacteria,
use steam cleaner without tools and attachments,
• Fill the solution tank with the Hoover _ Multi-
Purpose Disinfectant as directed in "Removing and
Filling Solution Tank" section on page 7, Turn Clean
Control(qM) dial to HIGH. Hold steam nozzle 6-8"
from surface, Spray for 10 seconds and allow to sit
for 1 minute.
USING ON CARPET
• Attach Multi-Surfaca Micmfiber Pad. Plug in
and press the power button on the steamer.
• Place the steamer into the carpet glider (5,8),
• To recline the steamer place foot on floor
head and tilt handle (5,9).
• To produce steam squeeze the trigger (5.t0),
• Move the mop head slowly backwards and
forwards across the floor (5,1t) paying
particular attention to high traffic areas.
AFTER STEAMER USE / USING COOLING BASE
• After using mop head and to avoid damage to your floors, unplug and
place mop head in cooling base (5.12) until product cools, Once steamer
is cooled, remove steam pad and follow =how to clean" instructions in
Microfiber pad section on page 12 to avoid mold and mildew,
10

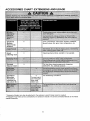
ACCESSORIES CHART: EXTENSIONS AND USAGE
Small and
Medium
Nylon Scrub
Brushes
Grout
Cleaning Tool
Hard Floor
Microfiber
Pad (which
contains the
x
Connect wand
and Tdangular
Mop Head
Oven, microwaves, stove tops, showers, bathtubs,
faucet fixtures, tile, grout,toys. refrigerators, etc.
Cleaning all grout lines, sanded or non-sanded.
For disinfecting hard floors.
* Accessory Adaptor can also be attached to the extension wand if longer reach is needed.
*'Triangular mop head can be connected to the extension wands or it can be connected directly to the Hose/
Handle Assembly.
11

This product contains no serviceable parts. Do not try to repair it yourself. Any servicing that requires
disassembly other than cleaning must be performed by a qualified appliance repair technician.
ALL servicing should be done by an authorized service representative.
CLEANING MICROFIBER
CLEANING PADS
= Machine washable on "warm ° setting, Always
use a mild detergent.
i For best care results, lay fiat to dryr
• After the steamer is used, turn power off and then unplug the power cord.
• Over sink or drain, press down the steam trigger to release all pressure.
• Wait 7-10 minutes until the safety pressure indicator has gone down, which indicates the steamer has
cooled. After 10 minutes, if the safety pressure indicator has not fully dropped, release residual steam
pressure by pressing trigger and then gently pushing the safety pressure indicator. Slowly unscrew the
water fill safety cap counter-clockwise, but do not remove. Allow machine to cool an additional 5
minutes. After you have ensured the steamer has cooled and pressure has been released, the water
fill safety cap should turn freely for removal. Unscrewthe cap completely (3.5).
• Unplug the Hose/Handle Assembly f_m the steam port on the canister. If the unit is under pressure, it
may release residual steam and/or water that may have built up during use. If this happens, grab the
connector end of the Hose/Handle Assembly and place inside sink or towel to release contents.
• Empty the residual water in the tank and clean the external surface with a dry cloth. Allow to dry.
Re-install the water fill safety cap in a cloc,,_vise direction and tighten until completely sealed. DO NOT
OVER TIGHTEN, over tightening may make it more difficult to remove the cap at the next use.
• Leaving unused solution in solution tank wll[ not affect performance.
• Stare product in a protected, dry area. Keep water funnel and measuring cup for future use.

USETROUBLESHOOTING GUIDE AS A FIRST STEP TO RESOLVE ANY PROBLEMS YOU MAY BE
EXPERIENCING.
All servicing should be done by an authorized service representative,
PROBLEM
Reduced steam or
no steam
Appliance worked
intermittently and
then stopped
Unit will not turn on
POSSIBLEREASON
4. Steam Nozzle may be blocked.
6, Trigger is locked,
3. Power button isnot on.
POSSIBLESOLUTION
2. Make sure unit is plugged in and/or tom
power button on or check fuse or breaker
in home,
4. With Unit unplugged and all steam
discharged, Unplug HosetHand]eAssembly
and dean any visible debds from outlet of
steam nozzle using a paper dip.
6. To un[ock trigger, see Steam Trigger
Lock Activation section, page 7.
3. Press power button and make sure the
blue light is illuminated
To obtain approved Hoover _ service and genuine Hoover _ parts, locate the nearest Authorized Hoove_
Warranty Service Dealer (Depot) by:
• Checking the Yellow Pages under "Vacuum Cleaners" or "Household".
• Visit our website at hoover.corn (U.S. Customers) or hoover, ca (Canadian customers),
Follow the service center Iink to find the service outlet nearest you.
• For an automated referral of authorized service outlet locations call 1-800-944-9200.
Do not send your product to Hoover _, Inc. in GlenwiUow for service. This will only result in delay.
If you need further assistance:
To speak with a customer service representative call 1-800-944-9200; Mon-Fri 8am-7pm EST. Always
identify your steamer by the oomplete model number when requesting information or ordering parts. (The
model number appears on the bottom of the steamer,)
PLEASE DO NOT RETURN THIS PRODUCTTO THE STORE.
13

LIMITEDTWOYEARWARRANTY
(Domestic Use)
WHAT THIS WARRANTY COVERS
When used and maintained in normal household
use in accordance with the Owner's Manual,
your HOOVER ® appliance and hose assemb]y
is warranted against odgina[ defects in material
and workmanship for a full two years from date
of purchase (the "Warranty Pedod"). Dudng the
W'arranty Pedod, Hoover _ will provide tabor and
_arts, at no cost to you, to correct any such
defect in appliances purchased in the United
States, U.S. Military Exchanges and Canada.
HOW TO MAKE A WARRANTY CLAIM
If this appliance is not as warranted, take or send
the appliance to either a Hoover _ Authorized
Warranty Service Dealer along with proof of
_urchase. Foran automated referral to authorized
service outlets in the U.S.A., phone: 1-800-944-
9200 OR visit Hoover _ online at www.hoover.
com. For additional assistance or information
concerning this Warranty or the availability of
warranty Service outlets, phone the Hoover _
Consumer Response Center, Phone 1.-800-944-
9200, Mon-Fri 8am-7pm EST.
WHAT THIS WARRANTY DOES NOT COVER
This Warranty does not cover, use of the appliance
in a commercial operation (such as maid,
janitorial and equipment rental services), pads,
accessory tools and attachments, improper
maintenance of the appliance, damage due to
misuse, acts of God, nature, vandalism or
other acts beyond the control of Hoover _,
owner's acts or omissions, use outside the
country in which the appliance was initially
purchased and resales of the appliance by the
original owner. This warranty does not cover
pick up, defivery, transportation or house calls.
However, if you mail your appliance to a
Hoover _ Authorized Warranty Service Dealer,
cost of shipping will be paid one way.
This warranty does not apply to appliances
purchased outside the United States, including its
territories and possessions, outside a U.S. Military
Exchange and outside of Canada. This warranty
does not cover appliances purchased from a
party that is not an authorized retailer, dealer, or
distributor of Hoover _ appliances.
OTHER IMPORTANT TERMS
This Warranty isnot transferable and may not be
assigned. This Warranty shall be governed and
constnaad under the laws of the state of Ohio. The
Warranty Period will not be extended by any
replacement or repair performed under this
Warranty.
THIS WARRANT( IS THE EXCLUSIVE
WARRANTY AND REMEDY PROVIDED BY
HOOVER ®. ALL OTHER WARRANTIES,
EXPRESSED OR IMPLIED, INCLUDING
WARRANTIES OF MERCHANTABILITY OR
FITNESS FOR PARTICULAR PURPOSE, ARE
DISCLAIMED. IN NO EVENT WILL HOOVER
BE LIABLE FOR ANY SPECIAL, INDIRECT,
INCIDENTAL OR CONSEQUENTIAL DAMAGES
OF ANY KIND OR NATURE TO OWNER OR
ANY PARTY CLAIMING THROUGH OWNER,
WHETHER BASED IN CONTRACT,
NEGLIGENCE,.TORT OR STRICTAPPLIANCES
LIABILITY OR ARISING FROM ANY CAUSE
WHATSOEVER. Some states do not allow the
exclusion of consequential damages, so the
above exclusion may not apply to you. This
warranty gives you specific rights; you may also
have others that vary from state to state.
14

®
MANUAL
DEL PROPIETARIO
InstruccionesdeFuncionamientoy Servicio
LEA MENTAMENTE ANTES
DE ENSAMBLARY USAR.
_,Tiene alguna pregunta 0 inqui-
etud? Para obtener asistencia,
Itame al Servicio de atenciSn al
cliente al 1-800 944 9200, de
funes a viemes, de 8 a.m. a 7
p.m., hera del ESTE.
PeR FAVOR, NO DEVUELVA
ESTE PRODUCTO A LA TIENDA.
ESTA ASPIRADORA
PARAALFOMBRAS ESTA
DISEI_ADAPARA USO
DOMf:STICO.
ELUSOCOMERCIALDE
ESTEPRODUCTO
ANULA LA GARANTIA,
hoover.com
"En superficies dufas seilada$ r_oporo_;as, ut_|izando el
des_nfectan_e multiusos Multi-Purpose de Hoover =
sigu_encloIas instrucciones de! manual del propiatado,
El
©2011 Techtronic Floor Care
Technology Limited. Todos los derechos
reservados. #961145003 ID102314-R1

Graciaspar haberelegidounproductoHOOVER_.
Anote los n0meros completos de C6digo de fabricaci6n
en los espacias provistos,
MODELO
CODtGO DE FABRICACION
Consejo: Adjunte su recibo de compra a este Manual del
propietario. Para obtener el servicio de garantia de su
producto HOOVER _ puede requerirse la vedficaci6n de la
fecha de compra,
inscdba su producto en linea en Hoover.cam, o Ilame a[
1-800-9A4-9200 si prefiere hacedo par teI_fono, Visite
Hoover, cam para obtener instrucciones adicionales en
video para el armada y el mantenimiento.
C(JDIGODEFABRICACION
(Etiqueta ubicada en la parte inferior de
la unidad.)
Por favor visite Hoover.com para
obtener instrucciones en video
para este limpiador.
Salvaguarclias importantes .................................................................................... E3
Contenido de la caja ......................................................................................... E5
Descripci6n del limplador a vapor ............................................................................ E5
Ensamblado ................................................................................................................ E5
C6mo usar |a aspiradora: limpiador a vapor ........................................................ E6
Llenado de1tanque de agua limpia ......................................................................... E6
Llenado deI tanque de so[uci6n............................................................................... E7
Funcionamiento del limpiador .................................................................................. E7
Reponer agua durante ]a operaci6n ........................................................................ E8
Aoceso a los accesorios integrados ..................................... :.................................. E8
C6mo usar la aspiradora: accesorios .................................................................. E9
Colocacibn de accesorios ........................................................................................ E9
Cuadro de accesorios.............................................................................................. Ell
Manten|miento .......................................................................................................... Et2
Limpieza de Ias almohadillas papa curia y varila ..................................................... E12
Almacenaje ................................................................................................................ E12
So|ucibn de problemas ........................................................................................... E13
Servicio ........... ,.......................................................................................................... El3
Garantia ...................................................................................................................... Et4
Si neces_ta ayuda:
Visite nuestro sitio web en www.hoover.com. Haga clic en el entace que permite IocaIizar los vende-
dares autodzados hoover para encontrar el vendedor m_s cem.,ano, o marque el 1-800-944-9200 pare
escuchar un mensaje indicando 12 direcci6n de los vendedores autorizados Hoover_ (s6io en ee. Uu.)
O para hablar con un representante de atenci6n al cliente (de 8 am a 7 pro, hora estdndar del este, de
lunes a viemes),
POR FAVOR, NO DE'VUELVA ESTE PRODUQTO A LA TIENDA.
E2

iSALVAGUARDIASIMPORTANTES!
iGUARDEESTASINSTRUCCIONES!
O
O
Ill
l
AIusar un aparatoel_ctrico,observesiemprelas precaucionesb_sicas,incluyendo
lassiguientes:
LEATODASLASINSTRUCCIOHESANTESDEUSARESTEAPARATO
ADVERTENCIA:PARAREDUCIRELRIESGODE
!NCENDIOS,CHOQUESELECTRICOS0 LESIONES:
Ensamblecompletamenteel productoantesdehacerlofuncionar.
• Hagafuncionarel electi'odom_stico_nicamenteconlatensi6nqueseespecificaenla
etiquetadedatosenla parteinferiordela aspiradora.
• NodejeelaparatosinsupervN6ncuandoest_enchufado.Desench_felodelatomade
corrientecuandonoIoest_usandoy antesdelimpiarloo darlemantenimiento.
• Nouseeste aparatoen lugaresal aire fibre ni en superficiesh_medas,
• Nousep.aracalentarespacios.
• Noperm_queestam_quinaseusecomounjuguete.Noest_disefiadaparaqueIoutilicen
nifiosde 12 afiosy menos.Sedebeprestarespecialatenci6ncuandoes_ productoes
usa.docercadelosnifios.Paraevitar,lesioneso dafios,manlBngaa losnifioslejosdelpro-
auc_oy nopermitaqueiosniSoscoEoquenlOSdedosu o_'osoDje_(_senn[ngunaabertur_
• Useel productos61ocomosedescribeenestemanual.Uses61olosaccesoriosy pro-
ductosrecomendadosporelfabricante.
• Nouseesteaparatoconuncord6no enchufedafiados.Siel aparatonoest_funcio-
nandoadecuadamente,sedej6caer,se daft6,sedej6a la intempedeo sedej6caer
dentrodelagua,116veloa un Centrodeservicioantesdecontinuarus_dolo.
• Notire delcord6nni trasladeel aparatojalandodel cord6n,nitampocoIousecome
manija;nocierrela puertacuandoel cord6nest_atravesadonitirede estealrededor
debordeso esquinasfllosos.Nocoloqueel productosobreel cord6n.Nohagafuncio-
narel aparatoencimadelcord6n.Mantengael cord6nlejosdesuperficiescalientes.
NoIodesenchufetirandode]cord6n.Paradesenchufado,sujeteel enchufe,noelcord6n.
Mantengaelcabel]o,lasropassueltas,losdedosytodaslaspartesdelcuerpoalejadas
de lasaberturas.
Nointroduzcaobjetosenlasaberturas.Nousesialgunadelasabe_ras est_bloqueada.
Mantengaelcabel]o,lasropassueltas,losdedosytodaslaspartesdelcuerpoalejadas
de lasaberturas.
_oApaguetodosloscontrolesantesdedesenchufarelaparato.
Tengaespecialcuidadoal limpiarescaleras.Cuandono est6 en usono coloqueel
limpladorsobreescaleraso muebles,ya_lueestopuedecausar!esioneso dafios.
Nouseen areasdondepuedahaber|fqutaosinnamableso combustibles,_es como
gasolina.
• Conecteel aparatoOnicamentea unatoma de corrientecon una€onexi6na tierra
adecuada.Vea"lnstruccionesde conexi6natierra".
• Nolimpiesobretomacorrientesel6ctricosdepiso.
• Onlyusewater to refillthe cleanwatertank. Donot useanytype of chemicalsor
additivesin thecleanwatertank.
• UtiliceOnicamenteaguaparaIlenareltanquedeagualimpia.Noulilicening0nlJpode
productoqufmicoo _ilivo eneltanquedeagualimpia.
° No abra/a tapa de seguridaddel llenado de agua mientras est6 utilizando e!
limpiadora vapor.
• Mientrasest_ en uso, nuncainviertael aparatoni Ioutilice sobresucostado.
° Permitaqueel electrodom6sticoseenfrfeduranteuntiemposuficienteantesdequitar
la a]mohadillade microfibra.
E3

• Elelectrodom6sticos61osedebeutilizaren contenedoreso cubasquenoest6nIlenosde
liquido.Nohagafuncionareltrineoavaporsinaguaeneltanquedeagua!impia.NoIleneel
tanqueenexceso.U'dlicelatazamedidoraquesesuminisiraconlauniaaa.
• No utilicesin la alrnohadillade limpiezade microfibracolocadacorrectamenteen el
cabezaldelafregona.
i ntesdelimpiarelelectrodom_stico,desenchufeelcabledealimentaci6ndeltomacorfiente
el6ctricoy lirnpielaunidadconunpatiosecooh_medo.Noviertaaguani u'dlicealcohol,
bencenoosolventedepinl]Jrasobrelaunidad.
Aseg_resede que la tapade segufldaddel Ilenadode aguaest_ajustada,comose
describeenlasinstrucciones.
• Noagreguesolucionesdesincrustani_s,aromaticas,alcoh61icas,solucioneslimpiadoras,
per_ames,aceitesni ning_nottoproductoquimicoalaguaqueseutilizaenesteaparato,
ya que estopuededanarla unidado hacerque su usosea peligroso.Si bieneste
electrodorn6s_coesl_disefiadoparaaguadelgrifo,paraaumentarlaeficaciadelvapory
evitarlaacumulaci6nderninerales,sepuede_lizar aguadestiladaparaIlenareltanque
deagualimpia.
• Lacarcasasecalentar_duranteeluso;estoesnormal.
o Siempretransporteelelectrodom_l_c.otom._ndolodelmango.
° Notoqueningunaaeiaspiezascalientesaeie[ecirooom6stico.
° Paraevitarquernaduraso lesiones,noapliquevapordirectamentesobrepersonasoani-
males.
• Esnormalqueocasionalmentegoteeaguadelaboquilla.Estoessimplementevaporque
sehacondensadonuevamentetransforma.ndoseenaguadentrodelaboquilla.
No utiliceel electrodom6sBcocobrecuero,muebleso pisospulidosconcera,telas
sint6ticas,terciopelouotrosmatedalesdelicadesysensiblesalvaporoalagua.
ADVERTENCIA:Esteproductocontienesustanciasquimicasreconocidasporelesta_ode
Californiacomocausa.ntesde c_ncer,defectoscong_nitoso dafioreproductivo.LA!/ESE
LASMANOSDESPUESDEUSARFi PRODUCTO, .
INSTRUCCIONESDECONEXIONA TIERRA
Esteaparatodebeestarconectadoatierra. Encasodedesperfectoo falla, laconexi6n
a tierra ofrece un circuito de menorresistenciapara la corrientee]6ctricaa fin de
reducirel riesgode choqueel6ctrico.Esteaparatotieneun cord6ncon un conductor
de conexi6na tierra delequipo (C)y un enchufede conexi6na tierra (A).El enchufe
debeestarenchufado,en unatoma decorriente(B)adecuadacorrectamenteinstalada
y conectadaazierraae acueraocontoaos_oscoa_gosy ordenanzaslocales.
PELIGRO:Laconexi6nioadec.aeadetconductordeconexi6oatierraeelequipo
puedeocasionarunriesgodechequeel6ctrico.Consultea un electricistacalificadoo al
personaldernantenimientosino est_segurodecluelatomadecorrienteest,.conectada
a tierraen formaadecuada.Nomodifiqueel enchufesuministradoconel aparato;sino
calzaen la tarnade cordente hagaque un electdcistacalificadoinstaleunatomade
cordenteadecuada.Esteap,aratoesaptaparausoenuncircuitonominalde120voltiosy
tieneunenchufede conext6natierrasimilaral enchufe(A)quaseilustraenel diagmma.
Sinosedisponede unatornadecorrienteconunacanexiSnatierraadecuada,sepuede
usarun adaptadortemporal(D)paraconectaresteenchufea un recept_culode2,palos
(E).Eladaptadortemporaldebeutilizarset_nicamentehastaqueunelectdcistacaliT_caao
puedainstalarunatoma de corrienteconunaconexi6na tierraadecuada(B).Laoreja,
patillaodispositivosimilarrigidodecolorverde(F)quesaledeladaptadordebeconectarse
a unaconexi6na tierrapermanente(6),comolatapadelacajadeunatomadecorriente
can una conexi6na tierra adecuada.Cuandose use el adaotador,deb,_mantenerse
en su luaar con un tomillo del_ B I Ira,-, I
metaI.NOl A:EnCanad&efC6digolI( I . I
El_ctrico Canadiense (Canadianl\"--_ 11_'Jr I IZ _"F D--_--,I
ElectricalCode)no permiteel usol Y'_ll '.(_'11 I_ G ,'_'
deadaptadorestemporales,I " 11 "':"'J
E4

ADVERTENCIA:PARAREDUCIREL RIESGO
DEDANOS:
• Eviteaspirar0bjetosdurosyfilos0sconesteproduct0,yaquapuedencausardafi0s.
• Guardela m_,quinaenun lugarseco,Nolaexpongaatemperaturasdec0ngelamiento,
A. Aspiradora
B. UmpiacristaleslAccesorio para
Iimpieza a vapor de prendas
de vestir*
C. Cepil[o de fregar pequefzo
de nylon"
D. Cepiflo de fregar mediano
de nylon*
E. Adaptador para accesorios*
F. Boquilla angular*
G. Accesorio limpiador de juntas
de baldosas*
H. Accesorio raspador*
L Pa5o para limpieza a
vapor de prendas de vestir
J. Cabeza[ de ]a fregona
K. Embudo de pl,Sstico duro*
L Taza medidora
M. Almohadilla de microfibra para
superficies m01tiples
N. Deslizador para alfombras
O. Tubos de extensi6n
! J
M N
P. Mango de la manguera
Q. Almohadilla de microfibra
para pisos duros
R. Base de enfdamiento
J
*Accesotios guardados en el
compartimiento para accesorios.
1. Interruptor de alimentaci6n
pdncipaI
2. Luz indicadora de
alimentad6n el_ctdca
3. Luz de vapor listo
4. Control de vapor
5. Tapa de seguridad del Ilenado
de agua
6. Ranura para el guardado del
cabezal de piso
7. Lugar para guardado de
accesodos
8. Indicador de presi6n de
seguridad
9. Puerta de la abertura
de vapor
10. GaUllo de vapor
tl. Bloqueo deI gatillo de vapor
12. Pestil{o de los accesorios
13. Peritla de control de soluci6n
14. Tapa de Ilenado de soluciSn
15. Tanque de soluciSn
iY
J
E5

COLOQUE EL CONJUNTO DEL MANGO DE LA MANGUERA
• Abra Ea pueda de la abedura de vapor para
exporter la interfaz, y mant&ngala abierta. Inserte
et conector de la manguera (A) en _ainterfaz de
]a abertura de vapor (B) presionando firmemente
hasta escuchar un clic (3.1).
• Tire de la manguera levemente para asegurarse
de que Ia misma est6 conectada f_rmemente,
• Suelte la puert&
LLENADO DEL TANQUE DE AGUA LIMPIA
= Coloque el electrodom6stico en una plataforma
nivelada, Si ef tanque de agua limpia est_
caliente mientras Io Ilena, consutte las
instrucciones sobre "Reporter agua durante el
funcionamiento ° (p_g. 8).
ml Haga girar la tapa de seguridad del Ilenado de
agua en sentido antihorario (4.1), e inserte el
embudo.
• Agregue 1.1 Iitros (37oz) de agua limpia (t[ene la
taza medidora basra 550 ml (t 8.5oz) dos veces),
y vierta el agua dentro el tanque (4.2). (La
capacidad m_txima del tanque es de 1.1 litros
(37oz). No llene el tanque en exceso, permita
que quede espado en la parte superior.)
m Vuelva a colocar Ia tapa de seguridad del
Ilenado de agua, haci_ndola girar en sentido
horario y apdetela hasta que est_ completamente
sellada.
E6

LLENADO DEL TANQUE DE
SOLUCION
• El tanque de soluciSn se ubica en el
ensambla)e manguera/mango, Coloque e]
ensamblaje mangueralmango an una
superficie plana. Desenrosque la tapa del
tanque de so]ucibn (A), girando en sentido
antihorario (4.3), e inserte el embudo.
dispensar& la solucibn al presionar el gatillo.
Co[oqua en la posiciSn "off" (apagado) si no
se desea utilizar soluc(Gn HooveP.
• Llene eI tanque con el desinfectante multiusos
Multi-Purpose de HooveP o el timp)ador
multiusos Multi-Purpose de Hoover ®
recomendado, usando un embudo y una taza
de medi_ (4.4). El volumen m6ximo de soluci6n
(200 ml) (6,5oz) se indica en la taza de medi_
• Si debe relIenar el tanque de soluci6n durante
el uso, no sujete ni presione el gatillo, ya qua
podr(a liberarse vapor. El gat{l[o se puede trabar
para evitar Ia liberaci6n accidental de vapor.
I VueIva a colocar Iatapa del tanque de solud6n,
haci_ndola girar en sentido horado y apd6tela
hasta qua est_ completamente seIlada.
• Ajuste el dial de control de limpieza
haci_ndolo girar hasia la configuraci6n
que se desea, Io cual aulom&ticamente
FUNCIONAMIENTO DEL LIMPIADOR
• Fije el ensamblaje manguera/mango tal como Io
indica la Figura 3.1 (p. 6),
• Enchufe el electrodom6stico a un lomacorriente
conec_ado a tierre.
• Presione el bot6n de encendido (4.5,D). Usted
debar& ver Ia luz azuI, qua es el indicador de
encendido iluminado. Si Ia luz no se enciende,
verffique [a secci6n de "DetecciSn y resoluci6n
de problemas" para obtener rnas detalles.
• Le tomar'& al limpiador a vapor de 3 a 6 minutos calentarse hasta alcanz_r
las temperaturas para producir vapor, Ioque se indicar_ cuando se encienda
la luz verde de "vapor Iisto",
I Conecte eI accesorio qua desee, siguiendo Ias instrucciones de Ia secci6n
"Colocaci6n y uso de los accesodos".
• Presione el gatiIIo de vapor (F),
li Girando la perilla de control de vapor (G) en sentido aniihorario, el flujo de
vapor qua se Iibera disminuye (4.7). Pare increment.ado, h&gaIo girar en
]a direcci6n opuesta.
ACTIVACIC)N DEL BLOQUEO
DEL GATILLO DE VAPOR
• Si sele utiliza, el bloqueo del gat{llo de vapor
bloqueara el gatillo de vapor an e[ modo .off,
(apagado). Para activar el bloqueo, deslicelo
hacia el gatillo.
E7

REPONER AGUA DURANTE LA OPERACI(_N
• Coloque eI interruptor det aparato en posiciSn de
apagado y desenchufe el cable,
• Presione el gatillo de vapor (4.8.A) pars liberar
Ia presi6n. Cuando el tanque est_ bajo presi6n,
el indicador de presibn de seguddad se eleva
par encima de Is superfi¢ie de la tapa (4.9, B),
Cuando e] tanque no est_ bajo presibn, el
indicador de presi6n de seguddsd esters a nivel
o par debsjo de ta supe_cie (4.9, C).
• Esperede7a 10minutoshastaqueeI{ndicador
de presibn de seguridad haya descendido, Io
que indica qua el limpiador a vapor se ha
enfrisdo. Despu_s de 10 minutos, s{el indicador
de presi6n de seguddad no ha descend{do por
completo, libere la presiSn de vapor residual
presionando el gatillo y ]uego empujando
suavemente el indicador de presi6n de
seguridsd. Hags girar lentamente la tapa de
seguddad deI Ilenado de agua en sen|ido
antihorario, pero no la retire, Deje qua la
m_quina se enfrie otros 5 minutos. Despu6s de
verificar que el ]impiador a vapor se hsya
enfriado y que se haya liberado la presiSn, Is
tapa de seguridad del Ilensdo de ague debe
poder girar Iibremente pars qu{tarla.
Desenrosque Ia taps completamente (4.10),
• Quite toda el ague sobrante para evitar el Ilenado
excesivo, inserte el embudo y agregue I.'_ litros
(37oz) de ague limpia (llene la taza medidora
hasta 550 m[ (i8.5oz) dos veces) y vierta el agua
dentro del tanque (4,10). (La capacidad m&xima
del tanque es de 1.1 titros (37oz). No Ilene el
tanque en exceso, permits qua quede espacio en
Ia parte superior.)
• Vuelva a colocar Ia taps de segur_dad del
Ilenado de ague, haciendola girer en sentido
horario, yapdete[a hast_ que est_ completamenta
selIada.
ACCESO A LOS ACCESORIOS INTEGRADOS
II El limpiador a vapor est& equipado con una
serie de acoesorios integrados en el
comportamiento porta-accesorios a ambos
lados det cuerpo principal.
11 4.11 Pars acceder a elias, presiane ligeramente
sabre las !engOetas (D) en la parte supedor de
[as puertas laterales y gire la puerta hada abajo,
E8

COLOCACI(_N DE ACCESORIOS
SECCIONES ACERCA DEL TUBe DE EXTENSI(3N
• Alinee el tube de extensi6n (A) con el mango de Ia manguera (B) (5.1),
Conecte primero el tubo con el gancho rotativo del cable al ensamblaje de
la manguera con el mango.
• Presione el tube de extensi6n con el gancho relative del cable conVa el
mango de ]a manguera haste que oiga un CfiC.
• Repita este procedimiento si es necesado pare conectar m&s tubes. Et tube
de extensi6n con e] gancho fijo se coloca at final (to m_s cerca de] accesorio
odel cabezal de la fregona).
• Utilice los tubes de extensiSn pare incrementar la distancia desde el conjunto deI mango de Ia manguera
haste el accesodo elegido (Cabezal de fregona, acoesedo pare hendiduras, etc.).
PARA CONECTAR EL CABEZAL DE LA FREGONA
• 5>2Alinee el tube de extensi6n (C) con la abertura del cabezaI de [afregona
(D), en el extreme correspondiente.
• Presione el tube de extensi6n centre el cabezal de la fregona haste que
escuche un clic.
• Utilice el cabezal de la fregona pare limpiar pisos duroS sellados y moquetas.
La almohadilla debe estar colocada. Refierase ala secciOn _Colocar lea
almehadillas de microfibra" pare asegurarse de que usa la almohadilla correcta,
• El cabezaI de la fregona tambien se puede conectar directamente al ensamblaie
mangueraimango.
COLOCACION DE LA ALMOHADILLA DE
MMPIEZA DE MICROFIBRA
Paralimpieza general
• Utilice la "Atmohaditla de microfibra pare
superficies mQItiples" (5.3).
• Coloque la °Almohadilla de microfibra para
superficies mt_ltiples" on el piso (lade blanco
hacia art;be).
• Coloque et producto sobre ta almohadilta,
verificando que el cabezal det trapeador
cubra toda la almohadilla (5.3), El gancho y
bucle en ta parle inferior del cabeza] del
trapeador su)etar'& la atmohadilla en su tugar.
Paradesinfectar
• Pare desinfectar y mater o eliminar el 99% de Ias
bacterias nocivas,use la almohadilla de mictofibra
pare suelos duros, que ya viene perforada (5.4).
• Coloque Ia "Almohadilla de microfibra pare pisos
duros" en el piso (lade blanco hacia arriba).
• Siga Ias instrucciones generales de limpieza,
• L[ene el tanque de soluci6n con el desinfectante
multiprop6sito de Hoover _ Multi-Purpose, come
se indite en Ia secci6n "Pare quitar y Ilenar el
tanque de selud6ff, en la pdgina 6. Coloque ]a
configuraci6n de control de limpieza en HIGH
(Alto).
• Pase al menos 4 veces per la misma zone a
veloddad media, y deje secar al aire.
E9

ADAPTADORPARAACCESORIOS
• 5.6AIinee el conjunto deI mango de Ia manguera
(G) con el adaptador para accesorios (H) en el
extremo que est_ equipado con el accesorio
correspondiente.
m Presione el adaptador para accesories contra el
conjunto del mango de Ia manguera hasta que
escuche un clic.
• Utilice el adaptador para accesorios para
conectar ratios acr...esodos diferentes seg_n Ia
tarea que se realizara.
• Para fijar un accesorio, coI6quelo en el exOremo
de la boquilla, alineando las flechas de ia punta
con Ias t]echas del accesorio (5.7). Haga gira_-
un cuado de vuetta en sent•do horatio para
bloquear.
• Para desinfectar y matar el 99.9% de las
bacterias nocivas, use el limpiador a vapor sin
boquilIa ni accesorio.
I Uene el tanque de solu¢i6n con el desinfectante
multiusos Multi-Purpose de HooveP, siguiendo
Ias instruct•ones "Para quitar y t[enar el tanque
de soluci6n" de Ia p&gina 7. Gire el dial selector
de control de limpieza hasta la posici6n alta
(HIGH). Sujete Ia boquilIa de vapor a 6-8 pulg.
de Ia superficie. Vaporice durante !0 segundos
y deje actuar 1 minuto.
USO EN ALFOMBRAS
• Verifique que Ia almohadilIa de microfibra para
superficies m01tiplesa est_ colocada. Enchufe el
artefacto y pros•one el bot6n de encendido deI
Iimpiador a vapor.
.1 En aproximadamente 30 segundos, la
unidad estar,-_ lista para producir vapor. Una
vez que eat6 lista para producir vapor, el
indYcador verde de "vapor listo"se iluminar_,.
• CoIoqLle el Iimpiador a vapor en el deslizador
para alYombras (53).
• Para reclinar el limpiador a vapor coIoque el pie
en e[ ¢.abezal de piso e incline el mango (5.9).
• ParaproducirvaporapdeteelgatilIo(5.10).
• Mueva el cabezaI de la fregona lentamente hacia
atria y adelante pot el suelo (5.11), prestando
especial atenci6n alas _reas de alto tr,tnsito.
DESPUieS DE USAR EL LIMPIADOR A VAPOR / USO DE LA
BASE DE ENFRIAMIENTO
• Despuds de usar el cabezaI de la fregona y para evitar daSar los
suelos, desconecte el aparato y coloque el cabeza[ de [a fregona en la
base de enfriamiento (5.12) hasta que el produoto se enfrie. Una vez et
{impiador a vapor enfriado_ _emueva la almohadilla de vapor y siga las
instrucciones °C6mo limpiar" en la secci6n dedicada alas almohadillas
de microfibra en Ia pagina 11, para evitar {os hongos y el moho.
El0

CUADRO DE ACCESORIOS: EXTENSIONES Y USO
Accasorio
limpiador
dejuntas de
baldosas
Paho para
timpieza a vapor
de prendas de
vestir
Limpieza de todas las juntasde baldosas,
lijadas o r_o.
Para ut]Iizar cuando se aptica vapor a prendas,
cortinas, manteles, etc. (sin usar soluciSn).
Almohadilla de X Para desi,qfectar pisos duma.
microfibra para Conecte el tubo
pisos duros y el cabezal
triangular de la
fregona antes
de utilizar.
*E_adaptador para accesodos tambi6n se puede colocar aItubo de extensi6n en caso de qua un mayor alcance
sea necesario.
**El cabeza] triangular de la fregona sa puede conactar a los tubes de e_ensi6n, o se puede conectar
directamente al Conjunto del Mango de ta Manguera.
Ell

No contiene piezas que el usuario pueda reparar. No intente reparaflo por su cuenta. Cualquier sen.,icio de
mantenimiento que requiera desarmar el ar[efacto, que no sea ta limpieza, debe set ejecutado pot un
tgcnico calificado en reparaci6n de electrodom6sticos.
Toda tarea de servicio debe ser realizada per un representante de servicio autodzado.
LIMPIEZA DE LAS
ALMOHADILLAS PARA
CUNA Y VARILLA
• Lavaram_quinaenagua°CALIENTE ". Siempre
•use detergente.
• Para mejoresresultados, deje secar sobre una
superficie plana.
I Despues de usar el Umpiador a vapor, apague eI artefacto y desenchufe el cable.
I Encima deI fregadero o del desag0e, presione eI gatillo de vapor para liberar la presi6n.
• Espere de 7 a 10 minutos hasta que el indicador de presi6n de seguridad haya descendido, Io que
indica que el limpiador a vapor se ha enfdado, Despu_s de 10 minutos, si el indicador de prest6n de
seguridad no ha descendido pot compieto, libere Ia presi6n de vapor residual presionando el gatiIIo y
luego empujando suavemente el indicador de presi6n de seguridad. Haga girar lentamente la iapa de
seguridad deI IIenado de agua en sent_do antihorado, pero no la retire. Deje que la m&quina se enfrie
otros 5 minutos. Despu_s de verificar que el limpiador a vapor se haya enfdado y que se haya liberado
la presi6n, Ia tapa de seguridad del Ilenado de agua debe poder girar libremente para quitarIa.
Desenrosque la tapa por completo (3,5),
• Desenchufe el ensamblaje deI mango con la manguera de la entrada de vapor en el cuerpo deI aparato.
Si el aparato esta bajo presi6n, puede que Iibere vapor residual ylo agua acumulados durante el
funcionamiento. En caso de que esto ocurra, coloque en el fregadero o encima de una toalla eI extremo
con el conector del ensamblaje deI mango con la manguera para que se Ubere el contenido.
I Vacie el agua que quede en el tanque y Iimpie la superficie exterior con un trapo seco. Vuelva a
colocar la tapa de seguddad del llenado de agua, haciendola girar en sentido horario y apri6te]a
hasta que est6 completamente sellada. NO APRIETE DEMASIADO FUERTE, ya que podr[a ser
dificil reiirar el tap6n la pr6xima vez que se use.
• Guarde el producto en un [ugar seco y resguardado, Guarde el embudo de agua y la taza medidora
pare su uso futuro.
Et2

SI ocurre un problema manor, generatmente puede resolverse con bastante facilidad cuando se halla la
causa, usando esta lista de verificaci6n,
Cualquier otra tarea de mantenimiento debe set rea|izada par un representante de mantenimiento
autorizado.
PROBLEMA
Vapor no
produce
vapor
El aparato
funcion6 de
tnarlera
intermitente, y
luego se
detuvo.
La unidad no
se enciende
CAUSAPOSIBLE SOLUCI'()NPOSIBLE
2. No Ilega potencia a Ia unidad. 2. Presione elbot6n de encendido y aseg0rese
de quela I_ azul est6 iluminada.
4. [] inyectorde vapor puedeser bloqueado. 4. Con la unidad desenchufada y todo el
vapor descargado, limpie redo residue visible
de [asalida de la boquilla de vapor utilizando
un clip para papal.
6, El gatiI[oesl_,bloqueado. 6, Para desbloquear el gatillo,yea lasecoi6n
Bloqueo del gatilIode vapor en ta p_gina 7.
1. Fusible quemado o se disper6 el disyuntor. 1. Reemplace el fusibleo restablezca el
disyuntor en Ia casa.
3. El baton de encendido no est&en la 3. Presione el bot6n de encendido y aseg_rese
posici6n"On" (encendido). de que la luz azul est6 iluminada.
¢
i
Para obtener un servicio aprobado de HooveP y piezas genuinas de Hoover_, encuenlre el Concesionario autor-
izado de sewicio de garantia de Hoover_(depositario) mas cercano:
• Consultando las P_,ginas amarilIas en la secci6n °Aspiradoras - usa" dom_,stico.
• V]site nues_ro sitioweb en hoover.cam (clientes
estadounidenses) o hoover,ca (clientes canadienses), Siga el enlace del centre de servimo para
encontrar el centrede servicio m,_scercano.
• Para que le informen de manera automStJca Ia ubicaci6n de los centros a_torizados de servicio, flame
al 1-800-944-9200,
No envie su productoa Hoover®,Inc., en GlenwiUow para su mantenimiento, Esto s61ocausar_ demoras.
Si neceslt_ recibir m_s ayuda:
Para hablarcon un represenlante de atenci6n al ciiente, Ilame aI 1-800-944-92Q0; de funes a viernes, de 8 a.m. a
7 p,m., hera del Este. Siempre identifique su aspiradara par el _,3merode madelo complete al solicitar informaci6n
o realizar pedidosde piezas, (Opera el limpiader a vapor _nicamente con la tensi6n qua se especifica en Ia eti-
quota de dates en la parte infedor de la unidad.)
NO DEVUELVA ESTE PRODUCTO A LA TIENDA,
E13

GARANTIALliVilTADADE DOSANOS
(Para uso dom_stico)
QUE CUBRE ESTA GARANTJA
Si se utiliza y mantiene conforme al usa normal
en una casa de famUia segL3n Ias instrucciones
del Manual del P_.propietario, su aparato
HOOVER® y con junto de manguera estan garan-
tizados contra defectos or_ginales en mater_ales y
mano de obra durante dos afos completos a
_artir de Ia fecha de compra (el "Per_odo de
garantia"). Durante e] Periodo de Garantfa,
Hoover e le proporcJonar&gratuitamente, como se
describe en esta garant_a, la mano de obra y Ias
)iezas necesadas para corregir cualquier defecto
en los productos comprados an los Es_ados
Unidos, en Una tienda situada en una base militar
de los EE UU. yen Canad&
COMO HACER UN RECLAMO EN VIRTUD DE
LA GAI_ANT[A
Si este producto no se ajusta a tas condiciones
garantizadas, 116veloa un Concesionario autor-
izado de servicio de garantia de Hoover _ junto
con el comprobante de compra. Para que le infer-
men de manera autom&tica la ubicaci6n de los
centros autorizados de servicio, Ilame al: t-800-
944-9200 o visite Hoover e en Intemet, en hoover.
com. (dientes estadounidenses) o hoover.ca (c[i-
entes canadienses). Si necesita asistencia adi-
cionaI o informaciSn sobre esta Garantia 0 Ia
disponibilidact de los centros de servicio de
garant{a, Ilame al 1-800-944-9200, de lunes a
viemes, de 8 a.m. a 7 p:m., hora de[ Este.
QUF- NO CUBRE ESTA GARANTiA
Esta garantia no cubre: el uso del producto con
cualquier fin comercJal (como servicios de limp-
ieza, mantenimiento y de alquiler de equipos), et
man_enimiento inadecuado del producto, los
daSos provocados por el uso indebido, caso for-
tuito, hechos de la naturaleza, vandalismo u otros
actoa que excedan del contro[ de Hoover _,
acciones u omisiones del propietario, uso fuera
del pals en que el producto fue comprado inicial-
mente y reventa del producto por parte del propi-
etar_o odginaL Esta garantia no cubre el retiro del
3roducto, la entrega, el transporte ni las visitas a
domicilio,
Esta garant[a no se aplica a los productos com-
prados fuera de 10S Estados Unidos, incluides
sus terdtorios y posesiones, fuera de una tienda
siluada en una base militar de los EE. UU. ni
fuera de Canada. Esta garant[a no cubre los
productos comprados a una parte que no sea un
minodsta, concasionario o distdbuidor autodza-
dos de los productos de HooveP.
OTRO$ TI_RMINOS |MPORTANTES
Esta Garant[a no es transferible ni puede ceder-
se. Esta Garantia se regir& e interpretara de
conformidad con Ias leyes del estado de Ohio. El
Perfodo de Garantia no se prorroga_ en funciSn
de ningOn reempiazo o reparaciSn realizados en
vidud de esta Garantla.
ESTA GARANTJA ES LA 0 NICA GARANTJA Y EL
UNICO RECURSO QUE HOOVER ®
PROPORC[ONA. TODAS LAS DEMAS
GAR.ANTiAS, EXPRESAS O IMPLICITAS,
INCLUIDAS LAS GARANTiAS DE
COMERCIABILIDAD O APTITUD PARA UN FIN
PARTICULAR, QUEDAN EXCLUIDAS. HOOVER
NO SERA RESPONSABLE EN NINGUN CASO
POR NINGON DAi_O ESPECIAL, tNDIRECTO,
INCIDENTAL O MEDIATO DE NINGON TIPO O
NATURALEZA CON RESPECTO AL
PROPIETARIO O A CUALQUlER PARTE QUE
REALICE UN RECLAMO A TRAVt_S DEL
PROPIETARIO, YA SEA QUE SE BASE EN
RESPONSABIUDAD CONTRACTUAL,
NEGLIGENCIA, RESPONSABILIDAD
EXTRACONTRACTUAL O RESPONSABILIDAD
ClVtL OBJETtVA POR LOS PRODUCTOS, O
EMERGENTE DE CUALQUIER OTRA CAUSA.
A[gunos estados no permiten la e×c[usi6n de los
daSos mediatos, per Io cual es posible que la
exclusi6n mencionada no se ap]ique en su caso.
Esta garantia Ie otorga derechos especificos; es
posible que, adem_s, tenga otros derechos que
vadan de un estado a otto.
E14
-
 1
1
-
 2
2
-
 3
3
-
 4
4
-
 5
5
-
 6
6
-
 7
7
-
 8
8
-
 9
9
-
 10
10
-
 11
11
-
 12
12
-
 13
13
-
 14
14
-
 15
15
-
 16
16
-
 17
17
-
 18
18
-
 19
19
-
 20
20
-
 21
21
-
 22
22
-
 23
23
-
 24
24
-
 25
25
-
 26
26
-
 27
27
-
 28
28


en otros idiomas
- English: Hoover WH20300 Owner's manual
Artículos relacionados
-
Hoover WH01100 Manual de usuario
-
-
-
-
-
-
-
-
-