
ENGLISH | ESPAÑOL
JP6NEO.FR
OWNER’S MANUAL
MANUAL DEL USUARIO
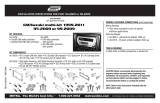
6.5" NEODYMIUM LOUDSPEAKER
WITH PLUG & PLAY ENCLOSURE
FOR JEEP JL/JLU/JT DASHBOARD.
ALTAVOZ DE NEODIMIO DE 6.5" CON CAJA PLUG
& PLAY PARA SALPICADERO DE JEEP JL/JLU/JT.
SPECIALLY MADE FOR:
HECHO ESPECIALMENTE PARA:

1
JP6NEO.FR
TOOLS REQUIRED
• Panel removal tool
• Phillips screwdriver
• 8mm, 10mm, socket wrench
**ATTENTION**
Let the vehicle rest with the key out of the
ignition for a few minutes before
removing the factory radio. When testing
the aftermarket equipment, ensure that
all factory equipment is connected before
cycling the key to ignition.
Installation of mobile audio and video
components requires experience with a
variety of mechanical and electrical
procedures. Although this manual
provides general installation and
operation instructions, it does not show
the exact installation methods for your
vehicle. If you do not have the required
knowledge and experience to successfully
complete the installation, consult an
authorized dealer about professional
installation service.
Please visit DS18.tools for a full
installation video.
HERRAMIENTAS NECESARIAS
• Herramienta de extracción de paneles
• Destornillador Phillips
• Llave de tubo de 8 mm, 10 mm
**ATENCIÓN**
Deje que el vehículo descanse con la llave
fuera del encendido durante unos minutos
antes de quitar la radio de fábrica. Al probar
el equipo del mercado de accesorios,
asegúrese de que todo el equipo de fábrica
esté conectado antes de encender y apagar.
La instalación de componentes móviles de
audio y video requiere experiencia con una
variedad de procedimientos mecánicos y
eléctricos. Aunque este manual proporciona
instrucciones generales de instalación y
funcionamiento, no muestra los métodos
de instalación exactos para su vehículo. Si
no tiene los conocimientos y la experiencia
necesarios para completar con éxito la
instalación, consulte a un distribuidor
autorizado sobre el servicio de instalación
profesional.
Visite DS18.tools para ver un video de
instalación completo.
6.5" NEODYMIUM LOUDSPEAKER WITH PLUG & PLAY
ENCLOSURE FOR JEEP JL/JLU/JT DASHBOARD
ALTAVOZ DE NEODIMIO DE 6.5" CON CAJA PLUG & PLAY PARA
SALPICADERO DE JEEP JL/JLU/JT.
SPECIALLY MADE FOR:
HECHO ESPECIALMENTE PARA:

2
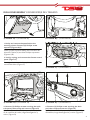
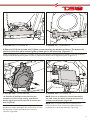
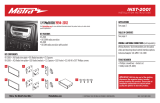
3. Remove (2) Phillips screws securing the radio
trim panel, then unclip and remove. (Figure D)
Quite los (2) tornillos Phillips que sujetan el panel
de la moldura del radio, luego desenganche y
retire. (Figura D)
4. Remove (1) Phillips screw securing the dash
pad, then unclip and remove. (Figure E)
Quite (1) tornillo Phillips que sujeta la almohadilla
del tablero, luego desenganche y retire. (Figura E)
(FIGURE A) (FIGURE B)
(FIGURE C)
(FIGURE E) (FIGURE D)
DASH DISASSEMBLY /
1.Unclip and remove the panel below the
steering column. Remove (2) Phillips screw
exposed. (Figures A,B)
Soltar y quitar el panel debajo de la columna de
dirección. Retire (2) tornillos Phillips expuestos.
2. Unclip, unplug, and remove the climate control
panel. (Figure C)
Desengancha, desenchufa y quita el panel de
control del clima. (Figure C)

3
JP6NEO.FR
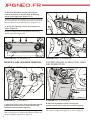
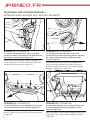
(FIGURE F)
(FIGURE H) (FIGURE G)
(FIGURE J)
(FIGURE I)
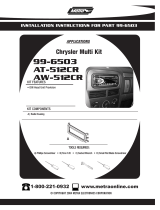
DRIVER’S SIDE SPEAKER REMOVAL
5. Remove (8) Phillips screws securing the
instrument panel on the left side, and airbag
panel on the right side. (Figure F, G)
Quite los (8) tornillos Phillips que sujetan el panel
de instrumentos en el lado izquierdo y el panel de
la bolsa de aire en el lado derecho. (Figura F, G)
6. Unclip the steering column shroud then set
aside. (Figure H)
Suelte la cubierta de la columna de dirección y
déjela a un lado. (Figura H)
7. Open the driver’s door, then unclip and remove
the panel on the side of the dash. Remove (5)
Phillips screws exposed. (Figure I)
Abra la puerta del conductor, luego desenganche y
retire el panel en el costado del tablero. Retire (5)
tornillos Phillips expuestos. (Figure I)
8. Remove (5) Phillips screws securing the
speaker panel, then unclip and remove. (Figure J)
Quite los (5) tornillos Phillips que sujetan el panel
del altavoz, luego desenganche y retire. (Figure J)
EXTRACCIÓN DEL ALTAVOZ DEL LADO
DEL CONDUCTOR

4
(FIGURE K) (FIGURE L)
(FIGURE M) (FIGURE N)
NOTE: There is an electronic module attached to
the back of the pod which must be removed and
reused in Kit Assembly. (Figure N)
NOTA: Hay un módulo electrónico adjunto a la
parte posterior de la cápsula que debe quitarse y
9.Remove (4) 10mm screws and (1) 8mm screw securing the dashboard brace. The brace only
needs loosened to aid in removing the speaker pod in the next step. (Figure K, L)
Quite (4) tornillos de 10 mm y (1) tornillo de 8 mm que sujetan la abrazadera del tablero. Solo es necesario
10. Remove (3) Phillips screws securing the
speaker pod, then unclip, unplug, and remove.
Gentle aggression will be required to remove the
pod. (Figure M)
Quite los (3) tornillos Phillips que sujetan el soporte
del altavoz, luego desenganche, desenchufe y retire.
Se requerirá un poco de fuerza para quitar la
cápsula. (Figure M)

5
JP6NEO.FR
(FIGURE O) (FIGURE P)
(FIGURE Q) (FIGURE R)
11. Open the passenger door, then unclip and
remove the panel on the side of the dash. Remove
(5) Phillips screws exposed. (Figure O)
Abra la puerta del pasajero, luego desenganche y
retire el panel en el costado del tablero. Retire (5)
tornillos Phillips expuestos. (Figura O)
13. Unclip and remove the airbag trim panel, then
remove (2) Phillips screws exposed. (Figure Q)
Desenganche y retire el marco del tablero de la bolsa
de aire, luego retire (2) tornillos Phillips expuestos.
(Figura Q)
14. Open the glovebox, then unclip the hinge and
drop the glovebox. Remove (3) Phillips screws
exposed. (Figure R)
Abra la guantera, luego suelte la bisagra y deje caer
la guantera. Retire (3) tornillos Phillips expuestos.
(Figura R)
12. Starting from the right side, unclip and
remove the trim panel from the grab-bar. Remove
(2) 10mm screws securing the grab-bar, then
remove. (Figure P)
Empezando por el lado derecho, desenganche y
retire el marco del tablero de la barra de apoyo.
Retire (2) tornillos de 10 mm que sujetan la barra
de agarre, luego retire. (Figura P)
PASSENGER SIDE SPEAKER REMOVAL /
EXTRACCIÓN DEL ALTAVOZ DEL LADO DEL PASAJERO

6
(FIGURE S) (FIGURE T)
(FIGURE U) (FIGURE V)
15. Looking in the glovebox cavity up high, remove
(2) 13mm screws securing the back of the
passenger side airbag. (Figure S)
Mirando hacia arriba en la cavidad de la guantera,
retire (2) tornillos de 13 mm que sujetan la parte
posterior de la bolsa de aire del lado del pasajero.
(Figura S)
17. Carefully unclip and pull out on the dashboard
panel just enough to expose the speaker pod.
Remove (3) Phillips screws securing the pod, then
unclip, unplug and remove. (Figure V)
Desenganche con cuidado y tire del panel del tablero lo
suficiente para exponer el compartimento del altavoz.
Retire (3) tornillos Phillips que sujetan la cápsula, luego
desenganche, desenchufe y retire. (Figure V)
16. Unclip and slightly release the airbag panel,
just enough to expose (3) Phillips screws securing
the passenger side dash panel. Remove the (3)
screws. (Figures T, U)
Desenganche y suelte ligeramente el panel de la
bolsa de aire, lo suficiente para exponer los (3)
tornillos Phillips que sujetan el panel del tablero del
lado del pasajero. Retire los (3) tornillos. (Figuras T, U)
Continue to Kit Assembly

7
JP6NEO.FR
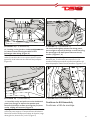
(FIGURE A)
INSTALLING THE PODS / INSTALACIÓN DE LAS CÁPSULAS
1.Install the new DS18 pods with the
speaker included connecting the
supplied speaker connector to the
factory speaker harness. (Figure A)
Instale las nuevas cápsulas DS18 con el
altavoz incluido conectando el conector
de altavoz suministrado al arnés de
altavoz de fábrica. (Figura A)
2.Reassemble the dash in reverse order
of disassembly. Ensure that the factory
electronic module removed in Dash
Disassembly, step 10, is connected back
to the vehicle.
Vuelva a instalar el tablero en orden
inverso al desmontaje. Asegúrese de que
el módulo electrónico de fábrica que se
quitó en Desmontaje del tablero, paso 10,
esté conectado nuevamente al vehículo.
Enjoy your new JP6 Dash Enclosure Upgrade with 6.5” Neodymium Mid-Range included.
Disfrute de su nueva Mejora Del Gabinete De Altavoz Del Tablero JP6 con Altavoz de 6.5"
de Rango Medio con magneto de Neodimio" incluido.
PASSENGER SIDE SPEAKER REMOVAL /
EXTRACCIÓN DEL ALTAVOZ DEL LADO DEL PASAJERO

8
GENERAL SPECIFICATIONS:
Nominal Speaker Diamete . . . . . . . . . . . . . . . . . . . . . . . . . . . . . . . . . . . . . . . . . . . . . . 6.5" / 165mm
Nominal Impedance . . . . . . . . . . . . . . . . . . . . . . . . . . . . . . . . . . . . . . . . . . . . . . . . . . . . . . . . . . 4 Ohms
RMS Power Handling . . . . . . . . . . . . . . . . . . . . . . . . . . . . . . . . . . . . . . . . . . . . . . . . . . . . . . . . . 225W
MAX Power Handling. . . . . . . . . . . . . . . . . . . . . . . . . . . . . . . . . . . . . . . . . . . . . . . . . . . . . . . . . . 450W
Sensitivity (1w/1m) . . . . . . . . . . . . . . . . . . . . . . . . . . . . . . . . . . . . . . . . . . . . . . . . . . . . . . . . . . . . 97dB
Frequency Response . . . . . . . . . . . . . . . . . . . . . . . . . . . . . . . . . . . . . . . . . . . . . . . . . . . 100Hz-16KHz
Recommended Hi Pass Crossover . . . . . . . . . . . . . . . . . . . . . . . . . . . . . . . . . . . . . . . . . . . . . . 160Hz
Pair or Single . . . . . . . . . . . . . . . . . . . . . . . . . . . . . . . . . . . . . . . . . . . . . . . . . . . . . . Pair (Left & Right)
BODY FEATURES
Enclosure Material . . . . . . . . . . . . . . . . . . . . . . . . . . . . . . . . . . . . . . . . . . . . . . . ABS Injected Plastic
Wiring / Connections . . . . . . . . . . . . . . . . . . . . . . . . . . . . . . . . . . . . . . . . . . . . . OEM Plug Connector
Clamps. . . . . . . . . . . . . . . . . . . . . . . . . . . . . . . . . . . . . . . . . . . . . . . . . . . . . . . . . ABS Factory Location
Finish . . . . . . . . . . . . . . . . . . . . . . . . . . . . . . . . . . . . . . . . . . . . . . . . . . . . . . . . . . . . . . . . . . . . Satin Black
WOOFER SPECIFICATIONS:
Voice Coil Diameter. . . . . . . . . . . . . . . . . . . . . . . . . . . . . . . . . . . . . . . . . . . . . . . . . . . . 1.5" / 38.6mm
Voice Coil Former Material . . . . . . . . . . . . . . . . . . . . . . . . . . . . . . . . . . . . . . . . . . . . . . . . . . . . Kapton
Winding Material . . . . . . . . . . . . . . . . . . . . . . . . . . . . . . . . . . . . . . . . . . . . . . . . . . . . . . . . . . . . . CCAW
Cone Material. . . . . . . . . . . . . . . . . . . . . . . . . . . . . . . . . . . . . . . . . . . . . . . . . . . . . Non-Pressed Paper
Bullet Material / Color . . . . . . . . . . . . . . . . . . . . . . . . . . . . . . . . . . . . . . . . . . . . . . . . Silver Aluminum
Surround Material. . . . . . . . . . . . . . . . . . . . . . . . . . . . . . . . . . . . . . . . . . . . . . . . . . . . . . . . . . . . . . Cloth
Basket Material. . . . . . . . . . . . . . . . . . . . . . . . . . . . . . . . . . . . . . . . . . . . . . . . . . . . . . . . . . . Aluminum
Magnet Material . . . . . . . . . . . . . . . . . . . . . . . . . . . . . . . . . . . . . . . . . . . . . . . . . . . . . . . . . Neodymium
Magnet Size . . . . . . . . . . . . . . . . . . . . . . . . . . . . . . . . . . . . . . . . . . . . . . . . . . . . . . . 90x6mm / 7.67 Oz
THIELE & SMALL PARAMETERS:
Equivalent Volume . . . . . . . . . . . . . . . . . . . . . . . .Vas . . . . . . . . . . . . . . . . . . . . . . . 2.11L / 0.074ft3
Excursion (one way) . . . . . . . . . . . . . . . . . . . . . . . Xmax . . . . . . . . . . . . . . . . . . . . . . . . . . . . . 6.8mm
Free Air Resonance . . . . . . . . . . . . . . . . . . . . . . . . Fs . . . . . . . . . . . . . . . . . . . . . . . . . . . . . . . . . 166Hz
Mechanical Factor . . . . . . . . . . . . . . . . . . . . . . . . Qms . . . . . . . . . . . . . . . . . . . . . . . . . . . . . . . 3.173
Electrical Factor . . . . . . . . . . . . . . . . . . . . . . . . . . Qes . . . . . . . . . . . . . . . . . . . . . . . . . . . . . . . . 0.409
Total Factor . . . . . . . . . . . . . . . . . . . . . . . . . . . . . . .Qts . . . . . . . . . . . . . . . . . . . . . . . . . . . . . . . . 0.362
Mechanical Mass . . . . . . . . . . . . . . . . . . . . . . . . . Mms . . . . . . . . . . . . . . . . . . . . . . . . . . . . . . 11.31g
Mechanical Compliance . . . . . . . . . . . . . . . . . . . .Cms. . . . . . . . . . . . . . . . . . . . . . . . . . . . 0.08mm/H
BL Factor . . . . . . . . . . . . . . . . . . . . . . . . . . . . . . . . .BL . . . . . . . . . . . . . . . . . . . . . . . . . . . . . . . . . . . 9.79
Voice Coil Inductance . . . . . . . . . . . . . . . . . . . . . .Le. . . . . . . . . . . . . . . . . . . . . . . . . . . . . . . 0.472mH
Cone Area . . . . . . . . . . . . . . . . . . . . . . . . . . . . . . . Sd. . . . . . . . . . . . . . . . . . . . . . . . . . . . . 136.85cm2
DC Resistance . . . . . . . . . . . . . . . . . . . . . . . . . . . . Re . . . . . . . . . . . . . . . . . . . . . . . . . . . . . . . 3.3 ohm
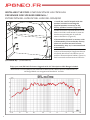
MEASUREMENTS:
Overall Length (Left). . . . . . . . . . . . . . . . . . . . . . . . . . . . . . . . . . . . . . . . . . . . . . . . . . . . 7.5" / 190mm
Overall Depth (Left) . . . . . . . . . . . . . . . . . . . . . . . . . . . . . . . . . . . . . . . . . . . . . . . . . . . 7.38" / 187mm
Overall Height (Left). . . . . . . . . . . . . . . . . . . . . . . . . . . . . . . . . . . . . . . . . . . . . . . . . 10.47" / 265mm
Overall Length (Right) . . . . . . . . . . . . . . . . . . . . . . . . . . . . . . . . . . . . . . . . . . . . . . . . . 8.18" / 207mm
Overall Depth (Right) . . . . . . . . . . . . . . . . . . . . . . . . . . . . . . . . . . . . . . . . . . . . . . . . . . 8.14" / 206mm
Overall Height (Right). . . . . . . . . . . . . . . . . . . . . . . . . . . . . . . . . . . . . . . . . . . . . . . . . . 9.96" / 252mm

9
JP6NEO.FR
ESPECIFICACIONES GENERALES:
Diámetro nominal del bocina . . . . . . . . . . . . . . . . . . . . . . . . . . . . . . . . . . . . . . . . . . . . . . . 6.5" / 165mm
Impedancia Nominal. . . . . . . . . . . . . . . . . . . . . . . . . . . . . . . . . . . . . . . . . . . . . . . . . . . . . . . . . . . . . 4 Ohms
Manejo de Potencia RMS . . . . . . . . . . . . . . . . . . . . . . . . . . . . . . . . . . . . . . . . . . . . . . . . . . . . . . . . . 225W
Manejo de Potencia MAX . . . . . . . . . . . . . . . . . . . . . . . . . . . . . . . . . . . . . . . . . . . . . . . . . . . . . . . . . 450W
Crosover Paso alto Recomendado . . . . . . . . . . . . . . . . . . . . . . . . . . . . . . . . . . . . . . . . . . . . . . . . . 160Hz
Par o Unidad . . . . . . . . . . . . . . . . . . . . . . . . . . . . . . . . . . . . . . . . . . . . . . . . . . . . Par (izquierda y derecha)
CARACTERISTICAS DEL GABINETE
Cableado / Conexiones. . . . . . . . . . . . . . . . . . . . . . . . . . . . . . . . . . . . . . . . . Conector de enchufe OEM
Finalizar . . . . . . . . . . . . . . . . . . . . . . . . . . . . . . . . . . . . . . . . . . . . . . . . . . . . . . . . . . . . . . . . Negro Satinado
ESPECIFICACIONES DEL WOOFER:
Material del Cono. . . . . . . . . . . . . . . . . . . . . . . . . . . . . . . . . . . . . . . . . . . . . . . . . . . . . Papel no prensado
Material de la bala/color . . . . . . . . . . . . . . . . . . . . . . . . . . . . . . . . . . . . . . . . . . . . . . Aluminio plateado
Material de la Suspension. . . . . . . . . . . . . . . . . . . . . . . . . . . . . . . . . . . . . . . . . . . . . . . . . . . . . . . . . . . Tela
Material de la Canasta . . . . . . . . . . . . . . . . . . . . . . . . . . . . . . . . . . . . . . . . . . . . . . . . . . . . . . . . . . Aluminio
Material del Imán. . . . . . . . . . . . . . . . . . . . . . . . . . . . . . . . . . . . . . . . . . . . . . . . . . . . . . . . . . . . . . Neodimio
Tamaño del imán . . . . . . . . . . . . . . . . . . . . . . . . . . . . . . . . . . . . . . . . . . . . . . . . . . . . . 90x6mm / 7.67 Oz
PARÁMETROS T/S:
Volumen Equivalente. . . . . . . . . . . . . . . . . . . . . . . . . . . . Vas. . . . . . . . . . . . . . . . . . . . 2.11L / 0.074ft3
Excursion (una via). . . . . . . . . . . . . . . . . . . . . . . . . . . . . . .Xmax . . . . . . . . . . . . . . . . . . . . . . . . . . 6.8mm
Resonancia al Aire Libre . . . . . . . . . . . . . . . . . . . . . . . . . Fs . . . . . . . . . . . . . . . . . . . . . . . . . . . . . . 166Hz
Factor Mecánico. . . . . . . . . . . . . . . . . . . . . . . . . . . . . . . . .Qms . . . . . . . . . . . . . . . . . . . . . . . . . . . . . 3.173
Factor Eléctrico. . . . . . . . . . . . . . . . . . . . . . . . . . . . . . . . . .Qes . . . . . . . . . . . . . . . . . . . . . . . . . . . . . . 0.409
Factor Total. . . . . . . . . . . . . . . . . . . . . . . . . . . . . . . . . . . . . Qts. . . . . . . . . . . . . . . . . . . . . . . . . . . . . . . 0.362
Factor Mecánico. . . . . . . . . . . . . . . . . . . . . . . . . . . . . . . . .Mms . . . . . . . . . . . . . . . . . . . . . . . . . . . 11.31g
Cumplimiento Mecánico. . . . . . . . . . . . . . . . . . . . . . . . . Cms . . . . . . . . . . . . . . . . . . . . . . . . . 0.08mm/H
Area del cono. . . . . . . . . . . . . . . . . . . . . . . . . . . . . . . . . . . Sd . . . . . . . . . . . . . . . . . . . . . . . . . . 136.85cm2
Resistencia DC. . . . . . . . . . . . . . . . . . . . . . . . . . . . . . . . . .Re . . . . . . . . . . . . . . . . . . . . . . . . . . . . . 3.3 ohm
MEDIDAS:
Longitud total (izquierda). . . . . . . . . . . . . . . . . . . . . . . . . . . . . . . . . . . . . . . . . . . . . . . . . . . 7.5" / 190mm
Profundidad total (izquierda) . . . . . . . . . . . . . . . . . . . . . . . . . . . . . . . . . . . . . . . . . . . . . 7.38" / 187mm
Altura total (izquierda) . . . . . . . . . . . . . . . . . . . . . . . . . . . . . . . . . . . . . . . . . . . . . . . . . . 10.47" / 265mm
Longitud total (derecha). . . . . . . . . . . . . . . . . . . . . . . . . . . . . . . . . . . . . . . . . . . . . . . . . . 8.18" / 207mm
Profundidad total (derecha) . . . . . . . . . . . . . . . . . . . . . . . . . . . . . . . . . . . . . . . . . . . . . . 8.14" / 206mm
Altura total (derecha) . . . . . . . . . . . . . . . . . . . . . . . . . . . . . . . . . . . . . . . . . . . . . . . . . . . . 9.96" / 252mm

10
Please visit our website DS18.com for more information
on our warranty policy.
We reserve the right to change products and specifications
at any time without notice.
Images may or may not include optional equipment.
Visita nuestra página web DS18.com para obtener más
información sobre nuestra garantía.
Nos reservamos el derecho de cambiar productos y
especificaciones en cualquier momento sin previo aviso. Las
imágenes pueden incluir o no equipo opcional.
WARRANTY
GARANTÍA
WARNING:
Cancer and Reproductive Harm.
www.P65Warning.ca.gov
ADVERTENCIA:
Cáncer y Daño Reproductivo.
www.P65Warning.ca.gov
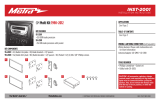
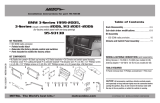
MEASUREMENTS /
MEDIDAS
8.14” / 206mm
DERECHA
RIGHT
0.26”/6.50mm
0.24”/6mm
8.18” / 207mm
9.96” / 252mm
3.50mm
DERECHA
RIGHT
0.23”/5.94mm
7.50” / 190mm
10.47” / 265mm
3.50mm
3-
LEFT
IZQUIERDA
LEFT
IZQUIERDA
7.38” / 187mm

V1
FOR MORE INFORMATION
PLEASE VISIT
DS18.COM
-
 1
1
-
 2
2
-
 3
3
-
 4
4
-
 5
5
-
 6
6
-
 7
7
-
 8
8
-
 9
9
-
 10
10
-
 11
11
-
 12
12


en otros idiomas
- English: DS18 JP6NEO.FR Owner's manual
Artículos relacionados


Otros documentos
-
Axxess AXPIO-JL1 Manual de usuario
-
Metra WM-GMK01 Manual de usuario
-
 Metra Electronics 95-2009 Instrucciones de operación
-
 Metra Electronics 95-2001 Double DIN Instrucciones de operación
-
 Metra Electronics AT-512CR Manual de usuario
-
 Metra Electronics 952001 Instrucciones de operación
-
 Metra Electronics 95-9313B Installation Instructions Manual
-
Metra 99-6520B Manual de usuario
-
-


