DS18 SLG-SP6 El manual del propietario
- Categoría
- Altavoces de coche
- Tipo
- El manual del propietario

ENGLISH | ESPAÑOL
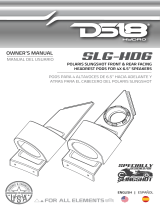
OWNER’S MANUAL
MANUAL DEL USUARIO
DESIGNED FOR
SPECIALLY
SLINGSHOT
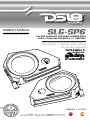
POLARIS SLINGSHOT SIDE PANEL SPEAKER PODS
FOR 6.5” SHALLOW SPEAKERS & 1.7” TWEETERS
PODS PARA ALTAVOCES DELGADOS DE 6.5” Y
TWEETERS DE 1.7” PARA EL PANEL LATERAL
DEL POLARIS SLINGSHOT

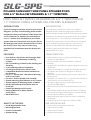
FEATURES
WHAT’S IN THE BOX
INTRODUCTION
If you're looking to maximize sound in your Polaris
Slingshot, you may consider adding these durable
Polyethylene side panel Pods by DS18. These Pods
can fit a shallow 6.5" Speaker (not included) and
one 1.7” Tweeter (not included) that your stereo
system deserves. These Pods come in pairs (Driver
& Passenger) with a black textured finish to match
the factory’s look. Very easy to Install using
supplied bolts and brackets that fits directly into
place.
• Left & Right Speaker Pods
• Mounting Brackets.
• Screws and washers.
• Speaker Wiring.
• Pods de altavoz izquierdo y derecho
• Soportes de montaje.
• Tornillos y arandelas.
• Cableado de altavoces.
• Pods Sold as a Set 9Driver and Passenger Side).
• Easy to install - All Hardware and Wiring
Included.
• OFC Tinned Wiring for More Power Handling and
Durability.
• 2 core 0.6M Input Wires for Speakers.
• Fits Slingshot Models from 2015 or later
• Coated Metal Bracket for Better Resistance to
the Elements.
• Fits a 1.7” tweeter with 1.93”/49mm Mounting
Hole (not included).
• Fits a 6.5” Shallow Speaker (not included).
• Speaker Mounting Hole Diameter: 5.59”/142mm.
• Speaker Maximum Mounting Depth: 2”/58mm.
• Durable (PE) Waterproof Enclosure with UV
Protection.
• Sealed Type Waterproof Enclosure.
• Damping Material for Better Speaker
Performance.
• Black OEM Finish
• Pods vendidos como un juego para los lados del
conductor y del pasajero.
• Fácil de instalar con todo el hardware y cableado
incluidos.
• Cableado OFC estañado para mayor manejo de potencia y
durabilidad.
• Cables de entrada de 2 núcleos de 0,6 M para altavoces.
• Se adapta a los modelos de Slingshot de 2015 en
adelante.
• Soporte de metal revestido para una mejor resistencia a
los elementos.
• Se adapta a un tweeter de 1,7” con orificio de montaje de
1,93”/49 mm (se recomienda ZXI-T1).
• Se adapta a altavoces poco profundos de 6,5” (se
recomienda PRO-SM6.2).
• Diámetro del orificio de montaje del altavoz: 5,59”/142
mm.
• Profundidad máxima de montaje del altavoz: 2”/58 mm.
• Caja resistente al agua (PE) duradera con protección UV.
• Recinto impermeable de tipo sellado.
• Material de amortiguación para un mayor rendimiento
del altavoz.
• Acabados de textura negra como plásticos OEM
INTRODUCCIÓN
CARACTERÍSTICAS
QUÉ HAY EN LA CAJA
Si está buscando maximizar el sonido en su Polaris
Slingshot, puede considerar agregar estos duraderos
paneles laterales de polietileno de DS18. Estos pods pueden
adaptarse a un parlante poco profundo de 6.5" (no incluido)
y un tweeter de 1.7" (no incluido) que su sistema estéreo
merece. Estos pods vienen en pares (conductor y pasajero)
con un acabado texturizado negro para coincida con el
aspecto de fábrica Muy fácil de instalar utilizando los
tornillos y soportes suministrados que encajan
directamente en su lugar.
POLARIS SLINGSHOT SIDE PANEL SPEAKER PODS
FOR 6.5” SHALLOW SPEAKERS & 1.7” TWEETERS
PODS PARA ALTAVOCES DELGADOS DE 6.5” Y TWEETERS DE
1.7” PARA EL PANEL LATERAL DEL POLARIS SLINGSHOT

INSTALLATION INSTALACIÓN
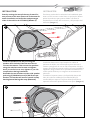
Start by moving the seat all the way forward for
easy access to this area. (Removal of the seats for
easier installation on both driver and passenger
sides of the vehicles is OPTIONAL) (Picture 1)
Install the speakers into the pod using the
speaker wires included. Use the same line to
connect the tweeter. Then secure the speakers
using the stainless steel screws and tighten
them, be careful not to over-tighten or you risk
complications during installation.
Assemble the rear bracket to driver side speaker
pod using (2) M6 Washer and (2) M6 Screw per
bracket. The bracket will need to remain loosely
hand tightened during this step. (Picture 2)
Comience moviendo los asientos hacia adelante para
tener un fácil acceso a esta área, es opcional si desea
quitar los asientos para pasar cables o facilitar la
instalación en el lado del conductor y del pasajero del
vehículo.
(Imagen 1)
Instale los altavoces en el pod usando los cables de
parlantes incluidos, use la misma línea para conectar el
tweeter y asegúrese de usar un filtro bloqueador de bajos,
asegure los parlantes usando tornillos de acero inoxidable y
apriételos, tenga cuidado de no apretarlos demasiado o el
orificio puede dañarse y no asegurar correctamente los
altavoces.
Ensamble el soporte trasero a la cápsula del altavoz del
lado del conductor utilizando (2) arandelas M6 y (2)
tornillos M6 por soporte. El soporte deberá permanecer
apretado a mano sin apretar durante este paso. (Imagen 2)
1
2

INSTALLATION INSTALACIÓN
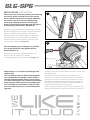
Secure the front side of the speaker pod removing
the factory plastic clip that secures the vehicle
factory plastic side panel to a bracket welded to
the chassis tube, then use the supplied long
screw with a washer and bolt it on using the
factory hole through the speaker pod and tight it
by hand using a screwdriver. (Picture 3)
Once the speaker pod is resting on its position,
you can go ahead and fully tighten the rear
bracket. (Picture 4)
Repeat steps 2-4 to install the passenger side
speaker pod.
This kit needs to have an aftermarket amplifier
pre-installed that can handle 2 ohms load per
channel with the speaker wires in this location,
only after this step you can connect the speakers
pods using the aftermarket amp's speaker wire.
This concludes the installation of the SLG-SP6
and it is ready to enjoy your new sound system
upgrade!
Asegure el lado frontal del pod quitando el clip de
plástico de fábrica que asegura el panel lateral de
plástico de fábrica del vehículo a el soporte
soldado al tubo del chasis, luego use el tornillo
largo provisto con una arandela y atorníllelo a
traves del orificio hacia el pod y apriete a mano
con un destornillador. (Imagen 3)
Una vez que el pod esté descansando en su
posición, puede continuar y apretar
completamente el soporte trasero. (Imagen 4)
Repita los pasos 2 a 4 para instalar el módulo de altavoz del
lado del pasajero.
Este kit debe tener preinstalado un amplificador del
mercado de accesorios que pueda manejar una carga de 2
ohmios por canal con los cables de los altavoces en esta
ubicación, solo después de este paso puede conectar los
módulos de los altavoces usando el cable del altavoz del
amplificador del mercado de accesorios.
¡Esto concluye la instalación del SLG-SP6 y está listo para
disfrutar de su nueva actualización del sistema de sonido!
4
3

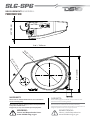
MEASUREMENTS / MEDIDAS:
DRIVER SIDE
4.25" / 108mm
12.8" / 325mm
8.9" / 226mm
Ø1.93” / 49mm
Ø5.59” / 142mm

Please visit our website DS18.com for more information
on our warranty policy.
We reserve the right to change products and specifications
at any time without notice.
Images may or may not included optional equipment.
Visita nuestra página web DS18.com para obtener más
información sobre nuestra garantía.
Nos reservamos el derecho de cambiar productos y
especificaciones en cualquier momento sin previo aviso. Las
imágenes pueden incluir o no equipo opcional.
WARRANTY GARANTÍA
WARNING:
Cancer and Reproductive Harm.
www.P65Warning.ca.gov
ADVERTENCIA:
Cáncer y Daño Reproductivo.
www.P65Warning.ca.gov
MEASUREMENTS / MEDIDAS:
PASSENGER SIDE
4.25" / 108mm
12.8" / 325mm
8.9" / 226mm
Ø1.93” / 49mm
Ø5.59” / 142mm

V1
FOR MORE INFORMATION
PLEASE VISIT
DS18.COM
-
 1
1
-
 2
2
-
 3
3
-
 4
4
-
 5
5
-
 6
6
-
 7
7


DS18 SLG-SP6 El manual del propietario
- Categoría
- Altavoces de coche
- Tipo
- El manual del propietario
En otros idiomas
- English: DS18 SLG-SP6 Owner's manual
Documentos relacionados
-
 DS18 SLG-FKP6 El manual del propietario
-
 DS18 SLG-AR6 El manual del propietario
-
DS18 SLG-AR6LD El manual del propietario
-
 DS18 SLG-HD6 El manual del propietario
-
DS18 SLG-RSUB10 El manual del propietario
-
DS18 SLG-RSUB10LD El manual del propietario
-
DS18 SLG-WFCC8LD El manual del propietario
-
 DS18 JP6NEO.FR El manual del propietario
-
DS18 EN8PLD El manual del propietario


