DS18 SLG-RSUB10LD El manual del propietario
- Tipo
- El manual del propietario

ENGLISH | ESPAÑOL
OWNER’S MANUAL
MANUAL DEL USUARIO
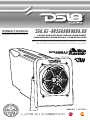
SLG-RSUB10LD
POLARIS SLINGSHOT REAR STORAGE COMPARTMENT
SUBWOOFER ENCLOSURE WITH NXL-10SUB/BK INCLUDED
CAJA DE SUBWOOFER PARA EL COMPARTIMIENTO TRASERO
DEL POLARIS SLINGSHOT CON NXL-10SUB/BK INCLUIDO
DESIGNED FOR
SPECIALLY

FEATURES
WHAT’S IN THE BOX
INTRODUCTION
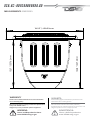
If you're looking to maximize sound in your Polaris
Slingshot, you may consider adding this durable
Polyethylene 10" Subwoofer Enclosure by DS18.
This enclosure allows you to mount one 10"
subwoofer using the rear storage compartment to
give you the bass that your stereo system deserves.
This enclosure comes with one NXL-10SUB/BK
Subwoofer with RGB LED Lights in black textured
finish to match the factory’s look. Easy to Install
using supplied bolts and brackets directly into place.
• Subwoofer Enclosure with One
NXL-10SUB/BK included.
• Face Plate
• Mounting Brackets
• 6 x M6x16mm Screws and Washers
• 4 x M6x40mm Screws and Washers
• 6 x M6 Clip-On Nut
• Speaker Wiring
• Caja de subwoofer con un NXL-10SUB/BK incluido.
• Marco frontal
• Soportes de montaje
• 6 x Tornillos y Arandelas M6x16mm
• 4 x Tornillos y Arandelas M6x40mm
• 6 x Tuerca con Clip M6
• Cableado de altavoces
• One NXL-10SUB/BK subwoofers included
• 300w rms /600w max power handling
• 4 ohm total load impedance
• Easy to install - all hardware and wiring
included
• OFC tinned 12GA wiring for more power
handling and durability
• 6 core 3.2 ft / 1m input wires for rgb lighting
and speaker
• Fits slingshot models from 2015 or later
• Works for both driver and/or passenger side
storage compartment
• Coated metal bracket for better resistance to
the elements
• Black OEM finish
• Durable (PE) waterproof enclosure with uv
protection
• 0.75ft3 / 21l ported / vented enclosure type.
• Damping material for better subwoofer
performance.
• Manejo de potencia de 300 Wrms/600 W máx.
• Un subwoofer NXL-10SUB/BK incluido.
• Impedancia de carga total de 4 ohmios.
• Fácil de instalar con todo el hardware y cableado
incluidos.
• Cableado OFC estañado 12Ga para mayor manejo de
potencia y durabilidad.
• Cables de entrada de 6 núcleos de 1 m/3,2 pies para
iluminación RGB y altavoz.
• Se adapta a todos los Slingshots de 2015 en adelante.
• Funciona tanto para el compartimento de
almacenamiento del lado del conductor como del
pasajero.
• Soporte de metal revestido para una mejor resistencia a
los elementos.
• Acabado OEM negro.
• Caja resistente al agua (PE) duradera con protección UV.
• Tipo de caja con puerto / ventilado de 0.75ft3 / 21L.
• Material de amortiguación para un mayor rendimiento de
los subwoofers.
INTRODUCCIÓN
CARACTERÍSTICAS
QUÉ HAY EN LA CAJA
Si está buscando maximizar el sonido en su Polaris
Slingshot, puede considerar agregar esta caja para
Subwoofer de polietileno duradero de 10 "de DS18. Esta
caja le permite montar un subwoofer de 10" usando el
compartimiento de almacenamiento trasero para brindarle
el bajo que su sistema estereo merece. Esta caja viene con
un subwoofer NXL-10SUB/BK con luces LED RGB en
acabado negro texturizado para combinar con el aspecto de
fábrica. Fácil de instalar utilizando los pernos y soportes
suministrados directamente en su lugar.
SLG-RSUB10LD
POLARIS SLINGSHOT REAR STORAGE COMPARTMENT
SUBWOOFER ENCLOSURE WITH NXL-10SUB/BK INCLUDED
CAJA DE SUBWOOFER PARA EL COMPARTIMIENTO TRASERO
DEL POLARIS SLINGSHOT CON NXL-10SUB/BK INCLUIDO

INSTALLATION INSTALACIÓN
1
2
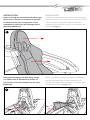
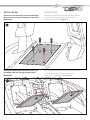
Starts by moving the seats all away forward to get
easy access to this area, it is optional if you want
to remove the seats for running wires or easy
installation on both driver and passenger side of
the vehicle. (Picture 1)
Comience moviendo todos los asientos hacia adelante
para tener fácil acceso a esta área, es opcional si desea
quitar los asientos para pasar cables o facilitar la
instalación en el lado del conductor y del pasajero del
vehículo. (Imagen 1)
Remove the Passenger rear deck hump using a
T25 TORX socket to extract the (2) screws on
front bottom of the piece and pull it to the front,
(Picture 2)
Retire la joroba de la plataforma trasera del Pasajero
usando una punta TORX T25 para extraer los (2)
tornillos en la parte inferior delantera de la pieza y tire
de ella hacia el frente, (Imagen 2)

INSTALLATION INSTALACIÓN
4
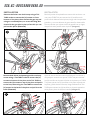
3
SLG-RSUB10LD
Retire la joroba de la plataforma trasera del conductor con
una punta TORX T25 para extraer los (2) tornillos en la
parte inferior delantera de la pieza, luego retire la tapa de la
gasolina y, con unos alicates de gran tamaño, desatornille
la tuerca anular que sujeta el tubo de gasolina en su lugar,
después de esto puedes sacar la pieza. (Imagen 3)
Quite el acento del aro trasero del lado del conductor y
del pasajero usando una punta TORX T40 para extraer
los (2) tornillos en la parte inferior de la pieza y un TORX
T25 para extraer los (2) tornillos en la parte superior de
la pieza y jálelo hacia la fuente, luego utilizando el T40
TORX para extraer los (2) tornillos en la parte posterior
de la pieza y tirar de ella hacia atrás. (Imagen 4)
Remove the Driver rear deck hump using a T25
TORX socket to extract the (2) screws on front
bottom of the piece, then remove the gas cap and
using an oversized pliers, un-screw the Ring-Nut
that holds the gas tube in place, after this you can
pull out the piece. (Picture 3)
Remove both driver and passenger side rear hoop
accent using a T40 TORX socket to extract the (2)
screws on bottom of the piece and a T25 TORX to
extract the (2) screws on top of the piece and pull it
to the font, then using the T40 TORX to extract the
(2) screws in the back of the piece and pull it to the
back. (Picture 4)

INSTALLATION INSTALACIÓN
5
Retire los tornillos que estaban ubicados debajo
de las cubiertas de la cabeza una vez que se
quitaron las jorobas. (Imagen 5)
Retire las puertas que cubren el compartimiento
de almacenamiento trasero del lado del
conductor y del pasajero. (Imagen 6)
Remove screws that were located underneath
the head covers once the humps are removed.
(Picture 5)
Remove the doors that cover both driver and
passenger side rear storage compartment.
(Picture 6)
6

INSTALLATION INSTALACIÓN
SLG-RSUB10LD
Retire todos los tornillos TORX T40 y los (2) clips de presión
que se encuentran en el panel posterior. (Imagen 7)
Para los modelos de 2017 en
adelante, use las seis (6)
tuercas con clip suministradas
en el lado izquierdo y derecho
para montar el gabinete.
(Imagen 8)
Remove all T40 TORX screws and (2) push
clips that are located on back panel. (Picture 7)
For 2017 and newer models, use the six (6)
supplied clip nuts on the left and right side
to mount the cabinet. (Picture 8)
7
8

INSTALLATION INSTALACIÓN
Si la caja aún no tiene los soportes instalados,
continúe, colóquelo en su lugar y asegúrelo con los
pernos y arandelas suministrados.
(Imagen 10)
Este kit necesita un amplificador del mercado de
accesorios preinstalado con los cables de los altavoces en
esta ubicación, solo después de este paso puede conectar
los altavoces usando el cable del altavoz del amplificador
del mercado de accesorios y los cables LED RGB (opcional)
del módulo LED (LED -BTC no incluido) . (Imagen 9)
This kit needs an aftermarket amp pre-installed
with the speaker wires in this location, only after
this step can you connect the speakers using the
aftermarket amp's speaker wire and RGB LED
wires (optional) of the LED module (LED -BTC not
included). (Picture 9)
If the enclosure does not have the brackets
installed already, go ahead, and put it in place and
secure it using the supplied bolts and washers.
(Picture 10)
9
10
BATTERY
BATERÍA
LED-BTC
RGB LED CONTROL

INSTALLATION INSTALACIÓN
SLG-RSUB10LD
Tome la parte superior e inferior del gabinete y
deslice la caja de subwoofer en su lugar en el
compartimiento trasero. (Imagen 11)
Fije el marco frontal con los tornillosM6x40
suministrados. (Imagen 14)
Una vez que haya terminado, vuelva a instalar
el panel posterior e instale los tornillos TORX
T40 de fábrica para asegurar la caja
SLG-RSUB10LD. (Imagen12) (Imagen13)
Vuelva a instalar todo en orden desde la
joroba trasera y el acento del aro de la misma
manera que lo sacó.
¡Esto concluye la instalación del
SLG-RSUB10LD y está listo para disfrutar de
su nueva actualización del sistema de sonido!
Grab the top and bottom of the enclosure and slide
the subwoofer box into place in the rear
compartment. (Picture 11)
Once finished, re-install the rear panel, and
install the factory T40 TORX screws back to
secure SLG-RSUB10LD enclosure.
(Picture 12) (Picture 13)
Attach the face plate using the supplied
M6x40mm screws. (Picture 14)
Re-install everything back in order from the
rear hump and hoop accent in the same way
that was pulled out.
This concludes the installation of the
SLG-RSUB10LD and it is ready to enjoy your
new sound system upgrade!
12 13
14
11

CONNECTION OPTIONS /
OPCIONES DE CONEXIÓN
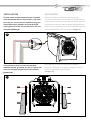
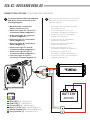
If you have an LED Control Module (LED-BTC),
Connect as Shown in the Following Diagram:
Si tiene un módulo de control LED (LED-BTC),
conéctelo como se muestra en el siguiente diagrama:
Blue LED (-) / LED Azul (-)
Red LED (-) / LED Rojo (-)
Green LED (-) / LED Verde (-)
Black 12V DC (+) / 12V DC Negro (+)
White Speaker (+) / Altavoz Blanco (+)
Grey Speaker (-) / Altavoz Gris (-)
BATTERY
BATERÍA
LED-BTC
RGB LED CONTROL
1 1

SLG-RSUB10LD
CONNECTION OPTIONS /
OPCIONES DE CONEXIÓN
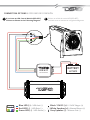
BATTERY
BATERÍA
To connect without LED Control Module
(LED-BTC), Connect as Shown in the
Following Diagram:
• Black wire"BK" connected to
battery Positive (+) 12V
• White Color Light "R"; "B" and "G"
connected to battery Negative (-)
• Green Color Light "G" connected
to battery Negative (-)
• Red Color Light "R" connected to
battery Negative (-)
• Blue Color Light "B" connected to
battery Negative (-)
• Purple Color Light "R" and "B"
connected to battery Negative (-)
• Yellow Color Light"R" and "G"
connected to battery Negative (-)
• Cyan Color Light "B" and "G"
connected to battery Negative (-)
Para conectarse sin el módulo de control LED
(LED-BTC), conecte como se muestra en el
siguiente diagrama:
• Cable negro "BK" conectado al positivo
de la batería (+) 12V
• Luz de color blanco "R"; "B" y "G"
conectados al negativo de la batería (-)
• Luz de color verde "G" conectada al
negativo de la batería (-)
• Luz de color roja "R" conectada al
negativo de la batería (-)
• Luz de color azul "B" conectada al
negativo de la batería (-)
• Luz de color púrpura "R" y "B"
conectada al negativo de la batería (-)
• Luz de color amarillo "R" y "G"
conectada al negativo de la batería (-)
• Luz de color cian "B" y "G" conectada al
negativo de la batería (-)
Blue LED (-) / LED Azul (-)
Red LED (-) / LED Rojo (-)
Green LED (-) / LED Verde (-)
Black 12V DC (+) / 12V DC Negro (+)
White Speaker (+) / Altavoz Blanco (+)
Grey Speaker (-) / Altavoz Gris (-)
2 2

GENERAL / GENERAL:
Speaker Size / Tamaño de Altavoz..................................................................................................10" / 254mm
Total Impedance / Impedancia Total ......................................................................................................... 4 Ohms
Total RMS Power Handling / Manejo de Potencia RMS ........................................................................300W
Total MAX Power Handling / Manejo de Potencia MAX ........................................................................600W
Sensitivity (1w/1m) / Sensibilidad (1w/1m) ...............................................................................................89dB
Frequency Response / Respuesta de Frecuencia............................................................................ 35-250Hz
Recommended Lo Pass Crossover / Crossover Paso Bajo Recomendado ......................................100Hz
SPEAKER SPECIFICATIONS / ESPECIFICACIONES DE LOS ALTAVOCES:
Voice Coil Diameter / Diámetro de la Bobina de Voz ..................................................................2" / 50.8mm
Voice Coil Former Material / Material Interior de Bobina Móvil .................................................Glass fiber
Winding Material / Material de Bobinado................................................................................................... CCAW
Cone Material ....................................................................Injection Molded Polypropylene + UV Compliant
Material del Cono Polipropileno Moldeado por Inyección + Compatible con UV
Dust Cap Material / Material de la Tapa Antipolvo........................................................................................ PPI
Surround Material / Material de la Suspensión......................................... Butyl (Rubber) / Butilo (Caucho)
Basket Material ................ High Temp Injection Molded Composite (ASA) with UV Protection coating
Material de la canasta
Compuesto moldeado por inyección de alta temperatura (ASA) con recubrimiento de protección UV
Magnet Material / Material del Imán...........................................................................................Ferrite/ Ferrita
Magnet Weight / Peso del Imán....................................................................................................................... 72oz
BOX SPECIFICATIONS / ESPECIFICACIONES DE LA CAJA:
Internal Volume / Volumen Interno................................................................................................0.75 ft3 / 21L
Load Configuration / Cargar Configuración.............................................................................. Single / Sencillo
Box Type / Tipo de Caja ......................................................................Ported / Vented / Porteado / Ventilado
Port Tuned (Fb) / Puerto Sintonizado (Fb).....................................................................................................40Hz
Box Material / Material de la Caja.......................................................... Polyethylene (PE) / Polietileno (PE)
Finish Material / Material de Acabado...........................................................................................Black / Negro
-3Db Dropping Point (F3) / -Punto de Caída 3Db (F3) ..............................................................................45Hz
UV Protection / Protección UV......................................................................................................................Yes / Si
Waterproof Rating ......................................................................................................IP65 (With Ports Covered)
Clasificación Impermeable IP65 (Con el Puerto Cubierto)
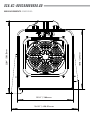
MEASUREMENT / ESPECIFICACIONES DE LA CAJA:
Overall Height / Altura Total....................................................................................................... 18.78" / 477mm
Overall Width / Ancho Total........................................................................................................ 15.25" / 388mm
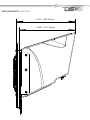
Overall Depth / Profundidad Total ........................................................................................14.31" / 363.3mm

MEASUREMENTS / MEDIDAS:
SLG-RSUB10LD
22.84” / 580.15mm
18.78” / 477mm
15.25” / 388mm
18.05” / 458.50mm

MEASUREMENTS / MEDIDAS:
14.31” / 363.35mm
13.68” / 347.35mm

Please visit our website DS18.com for more information
on our warranty policy.
We reserve the right to change products and specifications
at any time without notice.
Images may or may not include optional equipment.
Visita nuestra página web DS18.com para obtener más
información sobre nuestra garantía.
Nos reservamos el derecho de cambiar productos y
especificaciones en cualquier momento sin previo aviso. Las
imágenes pueden incluir o no equipo opcional.
WARRANTY GARANTÍA
WARNING:
Cancer and Reproductive Harm.
www.P65Warning.ca.gov
ADVERTENCIA:
Cáncer y Daño Reproductivo.
www.P65Warning.ca.gov
MEASUREMENTS / MEDIDAS:
SLG-RSUB10LD
13.27” / 337.02mm
13.28” / 337.21mm
18.05” / 458.50mm

V1
FOR MORE INFORMATION
PLEASE VISIT
DS18.COM
SLG-RSUB10LD
-
 1
1
-
 2
2
-
 3
3
-
 4
4
-
 5
5
-
 6
6
-
 7
7
-
 8
8
-
 9
9
-
 10
10
-
 11
11
-
 12
12
-
 13
13
-
 14
14
-
 15
15


DS18 SLG-RSUB10LD El manual del propietario
- Tipo
- El manual del propietario
En otros idiomas
- English: DS18 SLG-RSUB10LD Owner's manual
Documentos relacionados
-
DS18 SLG-RSUB10 El manual del propietario
-
 DS18 SLG-HD6 El manual del propietario
-
DS18 SLG-WFCC8LD El manual del propietario
-
DS18 CA-X3DS6LD El manual del propietario
-
 DS18 PRO-X6.4BMRGB El manual del propietario
-
 DS18 SLG-FKP6 El manual del propietario
-
 DS18 SLG-SP6 El manual del propietario
-
DS18 SLG-AR6LD El manual del propietario
-
DS18 EN8PLD El manual del propietario
-
 DS18 SLG-AR6 El manual del propietario


