DS18 SLG-RSUB10 El manual del propietario
- Categoría
- Subwoofers
- Tipo
- El manual del propietario
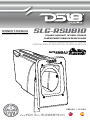
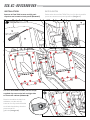
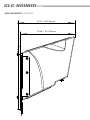
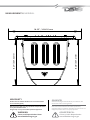
El DS18 SLG-RSUB10 es una caja para subwoofer de 10 pulgadas diseñada específicamente para el compartimento de almacenamiento trasero del Polaris Slingshot, y su propósito es mejorar la calidad del sonido del sistema de audio del vehículo. Esta caja acústica permite montar un subwoofer de 10 pulgadas para brindar los graves que tu sistema estéreo merece. Viene en un acabado texturizado negro que combina con el aspecto de fábrica del Slingshot y es fácil de instalar utilizando los pernos y soportes suministrados.
El DS18 SLG-RSUB10 es una caja para subwoofer de 10 pulgadas diseñada específicamente para el compartimento de almacenamiento trasero del Polaris Slingshot, y su propósito es mejorar la calidad del sonido del sistema de audio del vehículo. Esta caja acústica permite montar un subwoofer de 10 pulgadas para brindar los graves que tu sistema estéreo merece. Viene en un acabado texturizado negro que combina con el aspecto de fábrica del Slingshot y es fácil de instalar utilizando los pernos y soportes suministrados.


-
 1
1
-
 2
2
-
 3
3
-
 4
4
-
 5
5
-
 6
6
-
 7
7
-
 8
8
-
 9
9
-
 10
10
-
 11
11
-
 12
12


DS18 SLG-RSUB10 El manual del propietario
- Categoría
- Subwoofers
- Tipo
- El manual del propietario
El DS18 SLG-RSUB10 es una caja para subwoofer de 10 pulgadas diseñada específicamente para el compartimento de almacenamiento trasero del Polaris Slingshot, y su propósito es mejorar la calidad del sonido del sistema de audio del vehículo. Esta caja acústica permite montar un subwoofer de 10 pulgadas para brindar los graves que tu sistema estéreo merece. Viene en un acabado texturizado negro que combina con el aspecto de fábrica del Slingshot y es fácil de instalar utilizando los pernos y soportes suministrados.
En otros idiomas
- English: DS18 SLG-RSUB10 Owner's manual
Documentos relacionados
-
DS18 SLG-RSUB10LD El manual del propietario
-
 DS18 SLG-HD6 El manual del propietario
-
 DS18 SLG-FKP6 El manual del propietario
-
DS18 SLG-WFCC8LD El manual del propietario
-
 DS18 SLG-SP6 El manual del propietario
-
DS18 CA-X3DS6LD El manual del propietario
-
 DS18 SLG-AR6 El manual del propietario
-
DS18 SLG-AR6LD El manual del propietario
-
 DS18 DDX10.5AD El manual del propietario
-
DS18 JK-SUB12-LR El manual del propietario


