
ENGLISH | ESPAÑOL
OWNER’S MANUAL
DDX10.5AD 10.5" SINGLE-DIN FLOATING DISPLAY MULTIMEDIA RECEIVER
WITH ANDROID 10 OPERATING SYSTEM / MIRROR-LINK FOR IOS &
ANDROID / DSP / BT / AUX / USB / SD / AM / FM & ALL YOUR FAVORITE APPS
MANUAL DE USUARIO
RECEPTOR MULTIMEDIA CON PANTALLA FLOTANTE DIN SIMPLE DE 10.5"
CON SISTEMA OPERATIVO ANDROID 10 / MIRROR-LINK PARA IOS Y
ANDROID / DSP/ BT / AUX / USB / SD / AM / FM /
Y TODAS TUS APLICACIONES FAVORITAS

Thank you for purchasing the DS18 Multimedia
Receiver! Please read this operation manual carefully
before using the product for instructions on proper
handling of the equipment.
This unit is designed specifically for a DC 12V negative
ground operation system. Verify your vehicle is
connected to a DC 12V negative ground electrical
system. Once the power source is established, connect
the speaker (-) leads to the speaker (-) terminal. DO
NOT connect the left and right channel speaker wires
together or to the vehicle body.
IMPORTANT NOTICE
& PRECAUTIONS
¡Gracias por utilizar nuestro reproductor multimedia DS18!
Para operar la unidad correctamente, lea atentamente el
manual de operación antes de usarla. Conserve este
manual de funcionamiento para futuras consultas.
La unidad está diseñada solo para el sistema de operación
de tierra negativa DC 12V. Asegúrese de que su vehículo
esté conectado al sistema eléctrico de tierra negativa DC
12V. Asegúrese de conectar los cables del altavoz (-) al
terminal del altavoz (-). Nunca conecte los cables de los
altavoces de los canales izquierdo y derecho juntos ni a la
carrocería del vehículo.
AVISO IMPORTANTE
Y PRECAUCIONES
CONTENT / CONTENIDO
DDX10.5AD
The DS18 Multimedia Receiver operates best when
used in temperatures between -20 and 60 degree
Celsius. Please refrain from using the receiver in
extreme high or low temperatures. Do not block any
vents or radiator panels on the unit; blocking these
outlets will cause heat to build up inside the unit and
may cause damage or fire.
La temperatura normal de funcionamiento es de entre -20
y 60 grados Celsius. No trabaje en temperaturas
extremadamente altas o bajas NI bloquee las rejillas de
ventilación o los paneles del radiador de la unidad,
bloquearlos hará que se acumule calor dentro de la unidad
y puede causar daños o incendios.
DDX10.5AD
1
FEATURES / CARACTREÍSTICAS . . . . . . . . . . . . . . . . . . . . . . . . . . . . . . . . . . . . . . . . . . . . . . . . . . . . . . . . . . . . . . . . . . 2-3
INSTALLATION / INSTALACIÓN . . . . . . . . . . . . . . . . . . . . . . . . . . . . . . . . . . . . . . . . . . . . . . . . . . . . . . . . . . . . . . . . . . . . . 4
MAIN UNIT OPERATIONS / OPERACIONES DE LA UNIDAD PRINCIPAL . . . . . . . . . . . . . . . . . . . . . . . . . . . . . . . . 10
CONTROL PANEL OPERATIONS / OPERACIONES DEL PANEL DE CONTROL. . . . . . . . . . . . . . . . . . . . . . . . . . . . 11
WIRING CONNECTIONS / CONEXIONES DE CABLEADO. . . . . . . . . . . . . . . . . . . . . . . . . . . . . . . . . . . . . . . . . . . . . . 12
MAIN INTERFACE / INTERFAZ PRINCIPAL . . . . . . . . . . . . . . . . . . . . . . . . . . . . . . . . . . . . . . . . . . . . . . . . . . . . . . . . . 13
VIDEO PLAYER FUNCTION / FUNCIÓN DE REPRODUCTOR DE VIDEO . . . . . . . . . . . . . . . . . . . . . . . . . . . . . . . . . . . . 13
BT PHONE FEATURES / CARACTERÍSTICAS DEL TELEFONO BT . . . . . . . . . . . . . . . . . . . . . . . . . . . . . . . . . . . . . . . . . 15
RADIO OPERATION / OPERACIÓN DEL RADIO . . . . . . . . . . . . . . . . . . . . . . . . . . . . . . . . . . . . . . . . . . . . . . . . . . . . . . . . . . 18
BT MUSIC FUNCTION / FUNCIÓN DE MÚSICA BT. . . . . . . . . . . . . . . . . . . . . . . . . . . . . . . . . . . . . . . . . . . . . . . . . . . . . . . 19
MUSIC PLAYER FUNCTION / FUNCIÓN DE REPRODUCTOR DE MÚSICA . . . . . . . . . . . . . . . . . . . . . . . . . . . . . . . . . . 20
PHOTO VIEWER FUNCTION / FUNCIÓN DE VISOR DE FOTOS. . . . . . . . . . . . . . . . . . . . . . . . . . . . . . . . . . . . . . . . . . . . 21
GENERAL SETTINGS / AJUSTES GENERALES . . . . . . . . . . . . . . . . . . . . . . . . . . . . . . . . . . . . . . . . . . . . . . . . . . . . . . . . . . . 22
OPTIONAL FETURES OPERATION / FUNCIONES DE CARACTERÍSTICAS OPCIONALES. . . . . . . . . . . . . . . . . . . . . 23
NAVIGATION OPERATIONS / OPERACIONES DE NAVEGACIÓN . . . . . . . . . . . . . . . . . . . . . . . . . . . . . . . . . . . . . . . . . . 29
AUXILIARY AND VIDEO INPUT / ENTRADA AUXILIAR DE AUDIO Y VÍDEO. . . . . . . . . . . . . . . . . . . . . . . . . . . . . . . . . 30
SPLIT SCREEN AN SCREEN PROJECTION / PANTALLA DIVIDIDA Y PROYECCIÓN DE PANTALLA. . . . . . . . . . . . 31
DVR / DVR . . . . . . . . . . . . . . . . . . . . . . . . . . . . . . . . . . . . . . . . . . . . . . . . . . . . . . . . . . . . . . . . . . . . . . . . . . . . . . . . . . . . . . . . . . . 32
DSP SETTING / AJUSTE DEL DSP . . . . . . . . . . . . . . . . . . . . . . . . . . . . . . . . . . . . . . . . . . . . . . . . . . . . . . . . . . . . . . . . . . . . . . 35
SPECIFICATIONS / ESPECIFICACIONES . . . . . . . . . . . . . . . . . . . . . . . . . . . . . . . . . . . . . . . . . . . . . . . . . . . . . . . . . 39-40
TROUBLESHOOTING / SOLUCIÓN DE PROBLEMAS . . . . . . . . . . . . . . . . . . . . . . . . . . . . . . . . . . . . . . . . . . . . . . . . . 41

Thank you for purchasing the DS18 Multimedia
Receiver! Please read this operation manual carefully
before using the product for instructions on proper
handling of the equipment.
This unit is designed specifically for a DC 12V negative
ground operation system. Verify your vehicle is
connected to a DC 12V negative ground electrical
system. Once the power source is established, connect
the speaker (-) leads to the speaker (-) terminal. DO
NOT connect the left and right channel speaker wires
together or to the vehicle body.
¡Gracias por utilizar nuestro reproductor multimedia DS18!
Para operar la unidad correctamente, lea atentamente el
manual de operación antes de usarla. Conserve este
manual de funcionamiento para futuras consultas.
La unidad está diseñada solo para el sistema de operación
de tierra negativa DC 12V. Asegúrese de que su vehículo
esté conectado al sistema eléctrico de tierra negativa DC
12V. Asegúrese de conectar los cables del altavoz (-) al
terminal del altavoz (-). Nunca conecte los cables de los
altavoces de los canales izquierdo y derecho juntos ni a la
carrocería del vehículo.
GENERAL:
• 10.5” Floating Display Multimedia Receiver
• Single DIN in Dash (Perfect Fit) Modular Mounting
• Rotatable 180° Screen with adjustable angle, tilt,
and height position
• BT 5.0v for more range and sound quality
• Professional 8 Channels DSP with 6 Volts
Pre-Output
• Latest Android 10 System with 2+32 Gb capacity
• Quad Core A53 1.5GHz Processor for
faster operation
• AM/FM Radio with 12 Presets and
30 Favorite Stations
• RDS to display the information of the radio station
• DVR using Front and Rear HD cameras like
a Dashcam
• USB and SD Media Files Supported: RMVB,
MPG4, DivX, AVI, MP3, WMA, JPEG.
DISPLAY:
• Full HD 10.5” IPS Display (1280X720) Resolution
• Capacitive Touch Screen
• Support 1080P Video Display"
• Dynamic Multi-Color LED Backlight
FEATURES
AUDIO:
• 54W x 4 Max Power Speaker Output
• 14 Bands Parametric Equalizer
• 5.1 / 2-Way / 3-Way Pre-Output mode
• Time Delay up to 12ms or 400.8cm
• Crossover totally Adjustable from 6 to 48 dB/Oct
• 8 Channels Hi-Volt RCA Pre-Output
CONNECTIVITY:
• Mirror-Link for iOS and Android Phones
• BT Audio Streaming and Hands Free
for Cell Phones
• Wi-Fi and GPS built-in
• HDMI Video Output for Full HD Monitors
• Dual Video Output selectable
• Wired Remote Input for Steering Wheel
Control Interface
• Front USB port with 1.5 Amp Charger
and Dual rear USB
• Front Audio Jack Input
• Video and Audio Input (RCA)
• Rear and Front Camera Input
• Support for CCD or AHD 1080P Cameras
• External Mic and GPS Antenna is Included
The DS18 Multimedia Receiver operates best when
used in temperatures between -20 and 60 degree
Celsius. Please refrain from using the receiver in
extreme high or low temperatures. Do not block any
vents or radiator panels on the unit; blocking these
outlets will cause heat to build up inside the unit and
may cause damage or fire.
La temperatura normal de funcionamiento es de entre -20
y 60 grados Celsius. No trabaje en temperaturas
extremadamente altas o bajas NI bloquee las rejillas de
ventilación o los paneles del radiador de la unidad,
bloquearlos hará que se acumule calor dentro de la unidad
y puede causar daños o incendios.
2

ADVERTENCIA
Para garantizar la seguridad de su automóvil y de
quienes lo rodean, asegúrese de seguir estos requisitos
básicos. Lea atentamente todas las instrucciones antes
de utilizar este receptor.
1. ) Para evitar infringir las normas de tráfico, no mire
ningún contenido multimedia en el receptor mientras
conduce.
2.) Para evitar cortocircuitos, no permita que la unidad
entre en contacto con agua ni que la penetren objetos
metálicos.
3.) SI su receptor no funciona correctamente, llame a una
estación de reparación profesional para mantenimiento.
4.) No utilice su receptor con el motor apagado durante
largos períodos de tiempo. Si lo hace, la energía de la
batería de su automóvil se agotará.
5.) No inserte objetos en las ranuras de ventilación ni en
ninguna otra salida del dispositivo.
6.) No permita que objetos afilados entren en contacto
con la pantalla del receptor.
Este manual utiliza ilustraciones para guiar a los usuarios
a través de la instalación e informar a los usuarios sobre
las precauciones que se deben tomar durante la
instalación. Las fotos de este manual se deben usar solo
como referencia y pueden diferir ligeramente en aparien-
cia del producto real.
La etiqueta de exclamación significa tomar
precauciones. La información que sigue a esta etiqueta
debe leerse detenidamente para evitar daños al receptor
y al usuario.
La etiqueta de burbuja de texto se utiliza para
llamar la atención sobre instrucciones especiales que el
usuario debe seguir.
GENERAL:
• Receptor Multimedia de Pantalla Flotante
de 10.5”
• Montaje modular DIN sencillo en tablero
(Ajuste perfecto)
• Pantalla giratoria con ángulo de 180°,
inclinación y posición de altura ajustables
• BT 5.0v para mayor alcance y calidad de sonido
• DSP profesional de 8 canales con presalida de
6 voltios
• Resiente sistema Android 10 con capacidad
de 2+32 Gb
• Procesador Quad Core A53 de 1.5 GHz para un
funcionamiento más rápido
• Radio AM/FM con 12 preajustes y
30 estaciones favoritas
• RDS para mostrar la información de la estación
de radio
• DVR que utiliza cámaras HD delanteras y
traseras como una cámara de tablero.
• Archivos multimedia USB y SD compatibles:
RMVB, MPG4, DivX, AVI, MP3, WMA, JPEG
MONITOR:
• Resolución de pantalla IPS Full HD de 10.5”
(1280X720)
• Pantalla táctil capacitiva
• Soporta pantalla de video 1080P
• Retroiluminación LED multicolor dinámica
CARACTERÍSTICAS
This manual uses illustrations to guide users through
installation and inform users to precautions that should
be taken during installation. The photos in this manual
are to be used for reference only and may slightly differ
in appearance to the actual product.
The exclamation label means take precautions.
The information that follows this label should be read
carefully to prevent damage to the receiver and
the user.
The text bubble label is used to bring attention
to special instructions the user must follow.
AUDIO:
• Salida de potencia máxima de 54W x 4
• Ecualizador paramétrico de 14 bandas
• Modo de salida previa 5.1 / 2 vías / 3 vías
• Retardo de tiempo de hasta 12 ms o 400.8 cm
• Crossover totalmente Ajustable de 6 a 48
dB/Oct
• Presalida RCA de alto voltaje de 8 canales
CONECTIVIDAD:
• Mirror-Link para teléfonos iOS y Android
• Transmisión de audio BT y manos libres para
teléfonos celulares
• Wifi y GPS integrados
• Salida de video HDMI para monitores
Full-HD
• Salida de video doble seleccionable
• Entrada remota con cable para la interfaz
de control del volante
• Puerto USB frontal con cargador de 1.5
amperios y USB posterior doble
• Entrada de conector de audio frontal
• Entrada de video y audio (RCA)
• Entrada de cámara trasera y delantera
• Micrófono externo y antena GPS incluidos
DDX10.5ADDDX10.5AD
3

WARNING
To ensure the safety of your car and those around you,
please be sure to follow these basic requirements.
Please read all instructions carefully before using this
receiver.
1. ) To avoid violation of traffic regulations, do not
watch any multimedia content on the receiver while
driving.
2.) To avoid short circuiting, do not let the unit come into
contact with water or be penetrated by any metallic
objects.
3.) IF your receiver does not work properly, please call a
professional repair station for maintenance.
4.) Do not use your receiver with the engine off for
extended periods of time. Doing so will cause your cars
battery power to be depleted.
5.) Do not insert objects into the ventilation slots or any
other outlet of the device.
6.) Do not allow sharp objects to come into contact with
the receiver’s screen.
ADVERTENCIA
Para garantizar la seguridad de su automóvil y de
quienes lo rodean, asegúrese de seguir estos requisitos
básicos. Lea atentamente todas las instrucciones antes
de utilizar este receptor.
1. ) Para evitar infringir las normas de tráfico, no mire
ningún contenido multimedia en el receptor mientras
conduce.
2.) Para evitar cortocircuitos, no permita que la unidad
entre en contacto con agua ni que la penetren objetos
metálicos.
3.) SI su receptor no funciona correctamente, llame a una
estación de reparación profesional para mantenimiento.
4.) No utilice su receptor con el motor apagado durante
largos períodos de tiempo. Si lo hace, la energía de la
batería de su automóvil se agotará.
5.) No inserte objetos en las ranuras de ventilación ni en
ninguna otra salida del dispositivo.
6.) No permita que objetos afilados entren en contacto
con la pantalla del receptor.
Este manual utiliza ilustraciones para guiar a los usuarios
a través de la instalación e informar a los usuarios sobre
las precauciones que se deben tomar durante la
instalación. Las fotos de este manual se deben usar solo
como referencia y pueden diferir ligeramente en aparien-
cia del producto real.
La etiqueta de exclamación significa tomar
precauciones. La información que sigue a esta etiqueta
debe leerse detenidamente para evitar daños al receptor
y al usuario.
La etiqueta de burbuja de texto se utiliza para
llamar la atención sobre instrucciones especiales que el
usuario debe seguir.
4
INSTALLATION NOTES:
• Choose a mounting location where the unit will not
interfere with the normal driving functions.
• Before finally installing the unit, connect the wiring
temporarily and make sure it is all connected properly
and the unit and the system work properly.
• Use only the parts included with the unit to ensure
proper installation. The use of unauthorized parts can
cause malfunction.
• Consult with your nearest dealer if installation
requires the drilling of holes or other modifications in
the vehicle.
• Install the unit where it does not get in the driver’s
way and cannot injure the passenger if there is a sudden
stop, like an emergency stop.
• If the installation angle exceeds 30° from horizontal,
the unit might not function optimally.
NOTAS DE INSTALACIÓN:
• Elija una ubicación de montaje donde la unidad no
interfiera con las funciones normales de conducción.
• Antes de instalar finalmente la unidad, conecte el
cableado temporalmente y asegúrese de que todo esté
conectado correctamente y de que la unidad y el sistema
funcionen correctamente.
• Utilice sólo las piezas incluidas con la unidad para
garantizar una instalación adecuada. El uso de piezas no
autorizadas puede provocar averías.
• Consulte con su distribuidor más cercano si la
instalación requiere la perforación de orificios u otras
modificaciones en el vehículo.
• Instale la unidad donde no se interponga en el camino
del conductor y no pueda lastimar al pasajero si hay una
parada repentina, como una parada de emergencia.
• Si el ángulo de instalación supera los 30° con respecto
a la horizontal, es posible que la unidad no funcione de
manera óptima.
30º

DDX10.5AD
5
• Evite instalar la unidad donde pueda estar sujeta a
altas temperaturas, como la luz solar directa o aire
caliente, proveniente del calentador, o donde esté sujeta
a polvo, suciedad o vibraciones excesivas.
• Avoid installing the unit where it would be subject to
high temperature, such as from direct sunlight, or hot
air, from the heater, or where it would be subject to
dust, dirt or excessive vibration.
ATTENTION
Installation of mobile audio components require
experience with a variety of mechanical and electrical
procedures. Although this manual provides general
installation and operation instructions, it does not
show the exact installation methods for your vehicle. If
you do not have the required knowledge and experience
to successfully complete the installation, consult an
authorized dealer about professional installation
service.
ATENCIÓN
La instalación de componentes de audio móviles
requiere experiencia con una variedad de
procedimientos mecánicos y eléctricos. Aunque este
manual proporciona instrucciones generales de
instalación y operación, no muestra los métodos de
instalación exactos para su vehículo. Si no tiene los
conocimientos y la experiencia necesarios para
completar con éxito la instalación, consulte a un
distribuidor autorizado sobre el servicio de instalación
profesional.
MONTAJE DIN FRONTAL /
TRASERO
Esta unidad se puede instalar correctamente desde
adelante (montaje frontal DIN convencional) o posterior
(instalación de montaje trasero DIN, utilizando orificios
para tornillos roscados en los lados del chasis de la
unidad). Para obtener más información, consulte los
siguientes métodos de instalación ilustrados.
MONTAJE FRONTAL DIN
(MÉTODO A) APERTURA DE
INSTALACIÓN
Esta unidad se puede instalar en cualquier tablero que
tenga una abertura como se muestra a continuación:
DIN FRONT / REAR-MOUNT
This unit can be properly installed either from “Front”
(conventional DIN Front-mount) or “Rear” (DIN
Rear-mount installation, utilizing threaded screw holes
at the sides of the unit chassis). For details, refer to the
following illustrated installation methods.
DIN FRONT-MOUNT
(METHOD A) INSTALLATION
OPENING
This unit can be installed in any dashboard having an
opening as shown below:
7.16” / 182mm
2.08” / 53mm

6
1. Cage
2. Key
3. Frame Trim
1. Canasta
2. Key
3. Moldura del Marco
Be sure you test all connections first, and then follow
these steps to install the unit.
1. Make sure the ignition is turned off, and then
disconnect the cable from the (-) negative terminal of
the vehicle’s battery.
If an existing radio is installed, than remove it before
install this new one, refer to the old radio
manufacturer's manual for more info.
2. Disconnect the wire harness and the antenna.
3. Lift the top of the outer trim ring then pull it out to
remove it.
4. Mount the cage by inserting the cage into the opening
of the dashboard and bend open the tabs located
around the cage with a screwdriver. Not all tabs will be
able to make contact, so examine which ones will be
most effective. Bend open the appropriate tabs behind
the dashboard to secure the cage in place.
Asegúrese de probar todas las conexiones primero y
luego siga estos pasos para instalar la unidad.
1. Asegúrese de que el encendido esté apagado y luego
desconecte el cable del terminal negativo (-) de la batería
del vehículo. Si hay una radio existente instalada, retírela
antes de instalar esta nueva, consulte el manual del
fabricante de la radio anterior para obtener más
información.
2. Desconecte el mazo de cables y la antena.
3. Levante la parte superior del anillo de moldura exterior
y luego tire de él para quitarlo.
4. Monte la canasta insertándolo en la abertura del
tablero y abra las pestañas ubicadas alrededor de la
canasta con un destornillador. No todas las pestañas
podrán hacer contacto, así que examine cuáles serán
más efectivas. Doble para abrir las pestañas
correspondientes detrás del tablero para asegurar la
canasta en su lugar.
123
5. Reconnect the wire harness and the antenna and be
careful not to pinch any wires or cables.
6. Slide the unit into the cage until it locks into place.
DASHBOARD
SCREWDRIVER
CAGE
CANASTA
TABLERO
DESTORNILLADOR
RADIO
5. Vuelva a conectar los cables del “harness” y la antena,
tenga cuidado de no pellizcar ningún cable.
6. Deslice la unidad en la canasta hasta que encaje en
su lugar.
PARTS YOU WILL NEED (INCLUDED) PARTES QUE VAS A NECESITAR (INCLUÍDO)

8. Reconnect the cable to the vehicle battery’s negative
(-) terminal. And this completes the installation of your
new radio.
8. Vuelva a conectar el cable al terminal negativo (-) de la
batería del vehículo. Y con esto termina la instalacion de
tu nuevo radio.
DDX10.5AD
7
7. Install the frame on the unit lining up on the edges
and pressing until you hear a click, then secure the
display after installation by sliding the screen bracket
into the radio bracket, make sure the locking pins are in
place when you hear them click.
WARNING:
The screen is not designed for use as a detachable
faceplate, disconnect or connect the screen ONLY for
installation purposes.
7. Instale el marco en la unidad alineándolo con los
bordes y presionando hasta que escuche un clic,
despues asegure la pantalla después de la instalación
deslizando el soporte de la pantalla en el soporte del
radio, asegúrese de que los pines de seguro estén
puestos al escuchar el clic.
ADVERTENCIA:
La pantalla no está diseñada para usarse como una placa
frontal desmontable, desconecte o conecte la pantalla
SOLAMENTE para propósitos de instalación.

WE LIKE IT LOUD
REMOVING THE UNIT
1. Make sure the ignition is turned off, then disconnect
the cable from the vehicle battery’s negative (-)
terminal.
2. Remove the metal strap attached the back of the unit
(if attached).
3. Press the release button to remove the front panel.
REMOVIENDO LA UNIDAD
1. Asegúrese de que el equipo esté apagado, luego
desconecte el cable del terminal negativo (-) de la batería
del vehículo.
2. Retire la correa de metal que se encuentra en la parte
posterior de la unidad (si está colocada).
3. Presione el botón de liberación para quitar el panel
frontal.
4. Levante la parte superior del anillo de moldura exterior
y luego tire de él para quitarlo.
5. Inserte las dos llaves suministradas en las ranuras en
los lados medio izquierdo y derecho de la unidad, luego
extraiga la unidad del tablero (no se aplica a todos los
modelos).
4. Lift the top of the outer trim ring then pull it out to
remove it.
5. Insert both of the supplied keys into the slots at the
middle left and right sides of the unit, then pull the unit
out of the dashboard (Not applicable for all models).
8

DIN REAR-MOUNT
(METHOD B)
Fastening the unit to the factory radio mounting bracket:
1. Consult your vehicle's service manual to remove the
factory dashboard or radio frame to access the bracket of the
factory radio and remove it. This procedure requires
experience to avoid damage to the parts of the dashboard.
on certain vehicles may require an installation kit that
includes a standard single DIN radio frame and wiring
adapter.
2. Select a position where the screw holes of the bracket and
the screw holes of the main unit become aligned, and tighten
the screws at 2 places on each side. Use either truss screws
(5 x 5mm) or flush surface screws (4 x 5mm).
3. After doing the electrical installation you can put
everything back the same way everything was removed.
then secure the display after installation by sliding the screen
bracket into the radio bracket, make sure the locking pins are
in place when you hear them click.
MONTAJE TRASERO DIN
(MÉTODO B)
Fijación de la unidad al soporte de montaje del radio
de fábrica:
1. Consulte el manual de servicio de su vehículo para quitar el
tablero o el marco de la radio de fábrica para acceder al
soporte de la radio de fábrica y quitarlo. Este procedimiento
requiere experiencia para evitar daños en las partes del
tablero.en ciertos vehículos puede requerir un kit de
instalación que incluye un marco de radio DIN sencillo
estándar y un adaptador de cableado.
2. Seleccione una posición en la que los orificios para
tornillos del soporte y los orificios para tornillos de la unidad
principal queden alineados y apriete los tornillos en 2 lugares
a cada lado. Utilice tornillos de cabeza redonda (5 x 5 mm) o
tornillos de superficie al ras (4 x 5 mm).
3. despues de hacer la instalacion electrica puede poner todo
de vuelta de la misma manera en que se removio todo.
despues asegure la pantalla después de la instalación
deslizando el soporte de la pantalla en el soporte del radio,
asegúrese de que los pines de seguro estén puestos al
escuchar el clic.
1.
2.
3.
DDX10.5AD
9
NOT REQUIRED
NO REQUERIDO

MAIN UNIT OPERATIONS /
OPERACIONES DE LA UNIDAD PRINCIPAL
function OPERATIONS & CONTROLS / OPERACIONES Y CONTROLES
NO.
HOME: Press to shift between MAIN MENU or current operatIon mode.
HOGAR: Presione para cambiar entre el MENÚ PRINCIPAL o el modo de operación actual.
Remote control sensor for signal reception from remote handset.
Sensor de mando a dist. para la recepción de señales desde el mando a distancia.
For voice reception under BT operation.
Para recepción de voz en funcionamiento BT.
BACKWARD / FORWARD:
Radio Mode: Press repeatedly to fine tune the radio frequency upward or downward.
Press & hold shortly to tune the radio frequency to the upward or downward station for
broadcasting.
USB / SD / Bt Mode: Press repeatedly to shift track upward or downward for playback.
Each time press & hold shortly to activate various fast forward/rewind speeds for playback.
(Note: Fast forward or fast rewind is not available at BT mode & picture playback mode)
HACIA ATRÁS HACIA DELANTE::
Modo Radio: Presione repetidamente para sintonizar la frecuencia de radio hacia arriba o hacia abajo.
Mantenga pulsado brevemente para sintonizar la frecuencia de radio hacia arriba o hacia abajo.
USB / SD / Modo BT: Presione repetidamente para cambiar la pista o presione arriba o abajo para la
reproducción.
Presione y mantenga presionado brevemente para activar varias velocidades de avance / retroceso
para la reproducción. (Nota: el avance rápido o el rebobinado rápido no están disponibles en el modo
BT ni en el modo de reproducción de imágenes)
función
IPS SCREEN: It shows the status of operation on the unit. This screen is also a touch-screen display
- tap the screen softly for different operations of unit (Refer to other parts of this manual for
operation details).
BACK: press to go back to previous mode.
VOLVER: presione para volver al modo anterior
PANTALLA IPS: Muestra el estado de funcionamiento de la unidad. Esta pantalla también es una
pantalla táctil: toque suavemente la pantalla para diferentes operaciones de la unidad (consulte otras
partes de este manual para conocer los detalles de la operación).
NAVIGATION: Press to enter the navigation interface.
NAVEGACION: Presione para seleccionar el modo de operación deseado.
1
6
4
2
38
9
7
5
1
2
3
4
5
6
7
10

DDX10.5AD
RESET: Press with a pointed object (such as a ball point) to reset the unit to its initial setting by
the factory (default stage).
REINICIAR: Presione con un objeto puntiagudo (como un bolígrafo) para resetear la unidad a su
posición inicial. Configuración de fábrica (etapa predeterminada).
FRONT USB PORT: Insert USB device to this slot for digital files playback
PUERTO USB FRONTAL: Inserte el dispositivo USB en esta ranura para la reproducción de
archivos digitales
VOL/POWER: Gire para ajustar el nivel de salida de sonido. Cuando la unidad está apagada,
presiona para encender la unidad. Cuando la unidad esté encendida, mantenga presionado
brevemente para apagar la unidad.
MAIN UNIT OPERATIONS / OPERACIONES DE LA UNIDAD PRINCIPAL
CONTROL PANEL OPERATIONS (BODY) /
OPERACIONES DE LA UNIDAD PRINCIPAL (UNIDAD)
4
function OPERATIONS & CONTROLS / OPERACIONES Y CONTROLES
NO. función
AUXILIAR: Inserte un dispositivo externo en este conector para tener salida de sonido de ese
dispositivo a través de la unidad.
AUX: Insert an external device to this jack in order to have sound output of that external device
through the unit.
RANURA PARA TARJETAS SD: Inserte una tarjeta micro SD en este puerto para la reproducción de
archivos digitales.
SD CARD SLOT: Insert micro SD card to this port for digital files playback
VOL/POWER: Rotate to adjust sound output level. When the unit is turned off, press to
turn on the unit. When the unit is turned on, press & hold shortly to turn off unit.
PHONE CALL: Press to enter to BT phone call mode. When a call is incoming press this to
answer, During the call, press again to hang up.
LLAMADA TELEFÓNICA: presione para ingresar al modo de llamada telefónica BT. Cuando entre
una llamada, presione esto para responder. Durante la llamada, presione nuevamente
para colgar.
function OPERATIONS & CONTROLS / OPERACIONES Y CONTROLES
NO.
función
MEDIA
RST
SCREEN BRACKET/HOLDER: For easy installation the screen is removable, Secure the screen after installation
sliding the screen’s bracket into this holder, make sure the pin lockers are secured by hearing the click. Warning:
the screen is not designed for use as a detachable faceplate, disconnect or connect the screen ONLY for
installation purposes.
SOPORTE DE LA PANTALLA: Para facilitar la instalación, la pantalla es removible. Asegure la pantalla después de
la instalación deslizando el soporte de la pantalla en este soporte, asegúrese de que los pasadores estén
asegurados al escuchar el clic. Advertencia: la pantalla no está diseñada para usarse como una placa frontal
desmontable, desconecte o conecte la pantalla ÚNICAMENTE para fines de instalación.
8
9
3
5
4
1
1
2
3
4
5
2
11

White / Blanco
Red / Rojo
Blue /Azul
Brown / Marrón
Grey / Gris
Green / Verde
10
HDMI
G
ANT
FL- RL- RR+BATT KEY1
GND BACK FR-
FL+ RL+ RR-ILL ANTACC KEY2 FR+
1
2
3
4
5
6
7
8
9
10
11
12
13
14
15
16
White / Blanco
White / Blanco
White / Blanco
White / Blanco
White / Blanco
Red / Rojo
Red / Rojo
Red / Rojo
Red / Rojo
Red / Rojo
Blue / Azul
Sub R out: Sub-woofer Right output
5.1 CENT R 3 WAY FR LOW
3 WAY FL LOW
5.1 CENT L
5.1 RR 2 WAY FR 3 WAY FR MID
Sub L out: Subwoofer Left output
Salida izquierda del subwoofer
Salida derecha del subwoofer
5.1 Centro R 3 vias FR bajo
5.1 Centro L
2 vias FR 3 vias FR medio
5.1 RL 2 WAY FL 3 WAY FL MID
2 vias FL 3 vias FL medio
5.1 FR 2 WAY FR HIGH 3 WAY FR HIGH
2 vias FR alto 3 vias FR alto
5.1 FL 2 WAY FL HIGH 3 WAY FL HIGH
2 vias FL alto 3 vias FL alto
3 vias FL bajo
Aux in R: Auxiliary right speaker input
Aux in L: Auxiliary left speaker input
Entrada de altavoz izquierdo auxiliar
Entrada de altavoz derecho auxiliar
AMP Amplifier control: (B+)
Control de amplificador: (B+)
No Function
No Funciona
USB
TV L IN
TV R IN
POWER - 12V
IR
CAN TX
CAN RX
Rear Camera in (AHD) / Entrada Camara trasera
Entrada Camara frontal
Front Camera in (AHD) /
TV-video in / Entrada video - TV
Entrada video AUX
Entrada trasera CCD
Salida de potencia de la cámara trasera
Yellow / Amarillo
Yellow / Amarillo
Yellow / Amarillo
Yellow / Amarillo
Pink / Rosa
Black / Negro
Rear CCD in /
Aux Video in /
CCD: Rear camera power output
Video output / Salida de Video
Brake detect / Detección de Freno
WiFi antenna / Antena Wifi
Bluetooth antenna / Antena Bluetooth
MIC IN: Extremal Microphone input jack
Yellow / Amarillo
Brown / Marrón
Grey / Gris
White / Blanco
Ground / Tierra
MAIN UNIT OPERATIONS / OPERACIONES DE LA UNIDAD PRINCIPAL WIRING CONNECTIONS / CONEXIÓN DE CABLEADO
CONTROL PANEL OPERATIONS (BODY) /
OPERACIONES DE LA UNIDAD PRINCIPAL (UNIDAD)
REMARKS:
Due to the law of some countries, video
playback is not allowed during driving. To
allow video playback during driving the
brown wire (brake) should be connected to
ground (B-) of the car battery.
SOCKET A / ENCHUFE A
G: GPS ANTENNA / ANTENA GPS
ANT: RADIO ANTENNA / ANTENA RADIO
HDMI VIDEO OUTPUT / SALIDA DE VIDEO HDMI
SOCKET B / ENCHUFE B
SOCKET C / ENCHUFE C
SOCKET F / ENCHUFE F
SOCKET D /
ENCHUFE D
SOCKET E /
ENCHUFE E
MAIN UNIT REAR PANEL /
OBSERVACIONES:
Debido a la ley de algunos países, no se
permite la reproducción de videos mientras
vayas conduciendo. Para permitir la
reproducción de video mientras conduces, el
cable marrón (freno) debe conectarse a tierra
(B-) de la batería del automóvil.
PANEL TRASERO DE LA UNIDAD PRINCIPAL
ENTRADA MIC: Conector de entrada de
micrófono extremo
Black / Negro
12

DDX10.5AD
1. INTERFAZ PRINCIPAL
En el modo de arranque, el sistema por defecto va
a Modo de Radio. Toque el ícono de inicio para
ingresar al menú principal:
1. ) Deslice los dedos suavemente por la pantalla para
llegar a la página de aplicaciones, mantenga presionados
los íconos para mover sus posiciones.
2.) Toque el icono atrás para volver a la pantalla
anterior.
3.) Toque el icono de inicio para volver a la pantalla
del menú principal.
4.) Toque el icono de cascada para ver cualquier
operación que se esté ejecutando en segundo plano.
5.) En la interfaz principal toque el icono para entrar
a la página de [todas las aplicaciones].
6.) Abra el menú de configuración presionando el icono
en la esquina superior derecha de la interfaz
7.) Toque el icono [pantalla off] para apagar la pantalla,
toca la pantalla de nuevo para volver a encenderla
1. MAIN INTERFACE
In boot mode, the system by default goes to
Radio mode,touch the home icon to enter the main
menu:
1. ) Slide your fingers gently across the screen to get to
the applications page, press and hold icons to move
their positions.
2. ) Touch the back icon to return to the screen you
were at previously.
3. ) Touch the home icon to return to the main menu.
4. ) Touch the cascade icon to see any operations
running in the background.
5. ) In the main interface touch the icon to enter
[all applications] page.
6. ) Open the settings menu by pressing the icon in the
upper right corner of the interface
7. ) Touch the [off-screen] icon to turn off the screen,
touch the screen again to turn it back on
2. VIDEO PLAYER FUNCTION 2. FUNCIÓN DE REPRODUCTOR
DE VÍDEO
Esta función permite reproducir videos desde una unidad
USB o archivos grabados en el disco duro de la unidad.
1.) El producto soporta formatos de archivo de video
incluyendo MPEG, MPG, MP4, 3GP, MKV, AVI, FLV, etc.
This function can play video from USB drive or files
recorded on the unit's hard drive.
1.) Product Support video file formats including MPEG,
MPG, MP4,3GP, MKV, AVI, FLV and so on.
13

4.) Toque el ícono de la lista para ingresar al
directorio y buscar los videos disponibles para ver en su
dispositivo.
3.) Presione el ícono de Imagen en Imagen para ver
el video mientras busca en otras páginas.
2.) En el menú principal, toque el ícono de video para
abrir la pantalla de reproducción de video como se
muestra a continuación:
Durante la reproducción
de video, deslice hacia
arriba y hacia abajo en el
lado izquierdo de la
pantalla para ajustar el
brillo. Deslice hacia
arriba y hacia abajo en el
lado derecho de la
pantalla para ajustar el
volumen.
2. ) In the main menu, touch the video icon to open the
video playback screen as shown below:
During video playback,
slide up and down on
the left hand side of the
screen to adjust the
screen’s brightness.
Slide up and down on
the right hand side of
the screen to adjust the
volume.
3. ) Press the picture in picture icon in order to
watch video while searching other pages.
4. ) Touch the list icon to enter the directory page
and search through the available videos to watch on
your device.
14

DDX10.5AD
• EMPAREJAR Y CONECTAR
1.) Cuando el teléfono está emparejado con el host por
primera vez, deberá seguir los siguientes pasos: Abra la
configuración de BT en su teléfono.
2.) Buscar por la configuración BT del teléfono o buscar
dispositivos BT a través del host y conéctese.
3.) Se mostrará en la pantalla del teléfono un mensaje,
ingrese la contraseña (1234) en su teléfono, luego
presione (ENT).
4.) Después del emparejamiento, ingrese a la siguiente
interfaz: después de volver a energizarse, el sistema
BT buscara conectarse automáticamente al último
teléfono desconectado. Después del emparejamiento
exitoso, el icono de estado de conexión en la esquina
superior derecha será blanco, de lo contrario, deberá
activar la detección de dispositivos cercanos en la
configuración de BT de su teléfono, y poder buscar
hosts en dispositivos móviles. Historial de llamadas
Agenda Marcar Configuración de BT .
3. CARACTERÍSTICAS DEL
TELÉFONO BT
1.) Abra la configuración de BT.
2.) Busque dispositivos
BTa través del host y
conéctese a su teléfono.
3.) Se mostrará un
mensaje con una
contraseña de 4 dígitos
en su pantalla, ingréselo
en el receptor, y luego
presione ingresar.
4.) Una vez emparejado con un dispositivo, el receptor
multimedia se conectará al último dispositivo con el que
estuvo emparejado. De lo contrario, el dispositivo
buscará dispositivos BT para conectarse.
3. BT PHONE FEATURES
1. ) Open the BT features.
2. ) Search for BT
devices through the
host and connect to
your phone
3. ) A message with a 4
digit password will be
displayed on your
screen, input it into the
receiver, then press
enter
4.) Once paired with a device, the multimedia receiver
will connect to the device it was paired to last.
Otherwise, the device will be looking for BT devices to
connect to.
• PAIR AND CONNECT
1. ) When the phone is paired with the host for the first
time, shall look at the steps: Open the phone BT
features.
2. ) Search by mobile BT device or search for BT devices
through the host, and connect.
3. ) Is displayed on the phone screen a message, enter
the password (1234) on your phone, then press (ENT).
4. ) After pairing, enter the following interface: BT
system after re-energized, it will automatically connect
to the last phone disconnected. After successful pairing,
the connection state upper right corner icon is white,
otherwise, the connection status must open the
phone let all nearby BT devices to detect feature, you
can search for hosts to mobile devices. Call History
Phonebook Dial BT settings .
15

Durante una llamada, las instrucciones de operación son
las siguientes:
1.) Toque el ícono del teclado para ingresar al
teclado numérico.
2.) Toque el icono de colgar para colgar el teléfono.
3.) Toque los íconos del receptor o el ícono del
teléfono para cambiar entre la unidad estéreo y
la auricular respectivamente.
4.) Toque el ícono del micrófono / para
cambiar entre modo silencioso y activo.
También puedes colgar directamente desde
tu teléfono�.
• EMPAREJAR Y CONECTAR
1.) Cuando el teléfono está emparejado con el host por
primera vez, deberá seguir los siguientes pasos: Abra la
configuración de BT en su teléfono.
2.) Buscar por la configuración BT del teléfono o buscar
dispositivos BT a través del host y conéctese.
3.) Se mostrará en la pantalla del teléfono un mensaje,
ingrese la contraseña (1234) en su teléfono, luego
presione (ENT).
4.) Después del emparejamiento, ingrese a la siguiente
interfaz: después de volver a energizarse, el sistema
BT buscara conectarse automáticamente al último
teléfono desconectado. Después del emparejamiento
exitoso, el icono de estado de conexión en la esquina
superior derecha será blanco, de lo contrario, deberá
activar la detección de dispositivos cercanos en la
configuración de BT de su teléfono, y poder buscar
hosts en dispositivos móviles. Historial de llamadas
Agenda Marcar Configuración de BT .
During a call the operation instructions are as follows:
1. ) Touch the keypad icon to enter the numeric
keypad
2. ) Touch the hang up icon to hang up the phone
3.) Touch the receiver icons or the phone icon
to switch between the stereo unit and the
handset respectively
4.) Touch the microphone icon / to
switch between silent and active mode.
You can also hang up directly from your phone.
When the phone is connected to the host is successful,
enter the phone number via the keypad on the touch
screen, then touch [ ] icon to make a call. In the
dial-up process, if input wrong number, touch the
icon deletes by single digits, press the icon to
delete all. The following interface:
Cuando el teléfono está conectado al host exitosamente,
ingrese el número de teléfono a través del teclado en la
pantalla táctil, luego toque el icono [ ] para hacer una
llamada. En el proceso de marcado de número, si ingresa
un número incorrecto, toque el ícono para eliminar
por dígitos individuales, o presione el ícono para
eliminar todos. La siguiente interfaz:
16
WE LIKE IT LOUD

Busque números de teléfono en su directorio telefónico
a través de la barra de búsqueda. Toque el icono de
sincronización para sincronizar con los contactos
de tu teléfono
DDX10.5AD
• HISTORIAL DE LLAMADAS
Toque el ícono de la interfaz BT para ingresar a la
siguiente interfaz:
• DIRECTORIO
TELEFÓNICO
Toque el ícono de la
interfaz BT para ingresar a
la agenda de la siguiente
manera:
• PHONEBOOK
Touch BT interface icon
to enter the phone book as
follows:
Search for Phone numbers in your phone book through
the search bar. Touch the sync icon to sync the
contacts on your phone
1. ) Touch the bottom right corner icon to switch to the
recent calls display interface.
Note: After the connection is successful, the phone
sends a request message (DDX10.5AD wishes to access
your contacts and call history you want to grant
access?) And press [ Enter ] on your phone, enter the
phone book download, the download is successful,
the phone call records and phone book will be
displayed in real-time to the host call records and
phone book.
• CALL HISTORY
Touch BT interface icon to enter the following
interface
1.) Toque el icono en la esquina inferior derecha para
cambiar a la interfaz de llamadas recientes.
Nota: Después de que la conexión sea exitosa, el teléfono
enviara un mensaje de solicitud (DDX10.5AD desea
acceder a tus contactos y al historial de llamadas, quieres
conceder acceso?). Presione [Enter] en su teléfono. El
dispositivo procederá a descargar la agenda telefónica, y
luego de que la descarga se haya realizado
correctamente, los registros de llamadas telefónicas y
agenda telefónica se mostraran en tiempo real en los
registros de llamadas del host y directorio telefónico.
17
Etti
Alex
DS18 Headquarters
Alberto
Sasha
Raquel

• CAMBIO DE BANDA
Toque el icono de BANDA para cambiar entre FM y AM.
• BÚSQUEDA DE AJUSTE FINO
Pulse los iconos de avance y retroceso / para
buscar a través de las estaciones una por una. Mantenga
presionado los botones para buscar manualmente y
cuando se encuentra una señal la radio se detendrá
automáticamente.
4. OPERACIÓN DEL RADIO
En el menú principal, toque el ícono de radio para
ingresar al interfaz de radio.
2. ) Toque [PIN del nombre del dispositivo] para que
aparezca el teclado numérico, el cual se puede utilizar
para modificar el código PIN del nombre del dispositivo.
3.) Toque el ícono del
interruptor para confi-
gurar la función de
aceptación automática.
2. ) Touch [Device Name PIN] to bring up the numeric
keypad, this will be used to modify the device name
PIN Code.
3. ) Touch the switch icon
to set the Automatic
Auto Accept function.
In the Main Menu touch the radio icon to enter the
radio interface.
Touch the BAND icon to switch between FM – AM.
Press the forward and backward icons / to
search through the stations one by one, long press the
buttons to search manually and when a signal is found
the radio will automatically stop.
4. RADIO OPERATION
• BAND SWITCHING
• FINE-TUNE SEARCH
18

DDX10.5AD
1.) La lista local tendrá estaciones que ya ha buscado
2.) Toque el ícono Me gusta / para marcar
las emisoras de radio que te gustan.
3.) Buscar, buscar de nuevo después de que la búsqueda
se detenga automáticamente
1. ) The Local List will have stations that you’ve already
searched.
2. ) Touch the like icon / to bookmark the
radio stations you like.
3. ) Search, search again after the search will stop
automaically.
• LISTA DE
RADIOS
Presione el ícono de
lista para ingresar a la
siguiente interfaz
• ALMACENAMIENTO DE
BÚSQUEDA AUTOMÁTICA DE
ESTACIONES DE RADIO
Mantenga presionado el ícono de búsqueda para
buscar entre estaciones que ya han sido almacenadas
automáticamente. Presione el icono de búsqueda
de nuevo para cancelar la búsqueda.
5. FUNCIÓN DE MÚSICA BT
Use la función de música
BT para reproducir
archivos de música
inalámbricos desde tu
teléfono. Cuando esté en el
menú principal, toque el
Ícono de BTMusic para
ingresar a la siguiente
interfaz:
Debido a diferentes modelos de teléfono, en
algunos casos deberá empezar a reproducirse archivos
de audio a través de teclado del teléfono.
Long press the search icon to search through
stations that have been automatically stored. Press the
search icon again to cancel the search.
Press the list icon to
enter the following
interface
• AUTOMATIC SEARCH STORAGE
RADIO STATIONS
• RADIO LIST
5. BT MUSIC FUNCTION
Use the BT Music
Function to play wireless
music files in your phone.
When in the main menu
touch the BT Music icon
to enter the following
interface:
Because of different phone models and in some
cases should start to play audio files through the
phone keypad.
19

6. FUNCIÓN DE REPRODUCTOR
DE MÚSICA
1.) La función del reproductor de música puede
reproducir música desde USB u otros dispositivos
conectados que tengan sus propios discos duro
integrados con archivos de audio.
2.) Este producto admite formatos de archivos de música
incluyendo MP3, M4A, WAV, AMR, WMA, OGG, AAC, MID
y similares.
3.) Si ingresa sus archivos y no se pueden reproducir, se
le puede pedir que formatee su disco. Es posible que la
música que haya elegido simplemente no es compatible
con el dispositivo.
4.) En el menú principal toque el icono de música para
entrar en la siguiente interfaz.
5.) Toque el icono de adelante y el icono de retroceso
/ para pasar de una canción a otra en
tu dispositivo.
6.) Toque el icono de pausa para pausar y reproducir
tu música.
7.) Toque el icono de repetir para cambiar entre
repetición abierta, repetición única o repetición aleatoria.
6. MUSIC PLAYER FUNCTION
1. ) The Music Player Function can play music from
USB’s, or other connected devices that have their own
built in hard-disk with audio files.
2. ) This product supports music file formats including
MP3, M4A, WAV, AMR, WMA, OGG, AAC, MID and so on.
3. ) If you input your files and they cannot be played, you
may be prompted to format your disk, it’s highly
possible that the music you chose is just not compatible
with the device.
4. ) In the Main Menu touch the music icon to enter the
following interface.
5. ) Touch the forward and backward icon / to
go from song to song on your device.
6. ) Touch the pause icon to pause and play
your music.
7. ) Touch the loop icon to switch between open
loop, single repeat, or repeat all random.
20

DDX10.5AD
7. FUNCIÓN DE VISOR DE FOTOS
Esta función se puede realizar en USB u otros
dispositivos con un disco duro interno que están
conectados a tu receptor.
1.) Este producto soporta formatos de archivo de imagen
incluyendo JPG, PNG, BMP, JPEG y similares.
2.) Si el archivo que intenta abrir da un mensaje de
archivo no compatible, el
formato de su imagen no
es compatible.
3.) En la interfaz Todas las
aplicaciones, toque el icono
de imagen para entrar en la
interfaz de lista de
cuadrícula.
4.) Toca cualquiera de las
imágenes en la lista de
cuadrícula para ingresar a la interfaz de vista previa de
imagen.
5.) Toque el icono de reenviar para ir a la siguiente
imagen, y toca el icono anterior para ir la imagen
anterior.
6.) Toca el ícono de rotación para girar la imagen a la
izquierda.
7.) Toca el ícono de Reproducir para que todas sus
fotos se muestren en una presentación de diapositivas
con un intervalo de 5 segundos.
7. PHOTOS VIEWER FUNCTION
This function can be performed on USB’s or other
devices with an internal hard disk that are connected to
your receiver.
1. ) This product supports image file formats including
JPG, PNG, BMP, JPEG, and the like.
2. ) If the file you try to open gives an unsupported
image format player
message, the format
your picture was saved
in is not supported.
3. ) In the All applica-
tions interface touch
the image icon to enter
the Grid List interface.
4. ) Touch any of the
pictures in the Grid list
to enter the picture preview interface.
5. ) Touch the forward icon to go to the next picture,
and touch the previous icon to go to the previous
picture.
6. ) Touch the rotation icon to Rotate the picture left.
7. ) Touch the Play icon to have all of your pictures
displayed in a slideshow at an interval of 5 seconds.
21

Luego toque el botón de interruptor para encender
la conexión WLAN. La lista a continuación debe llenarse
con redes a conectar.
La figura de arriba es para
buscar el nombre de la
fuente (en el enrutador, este
nombre se conoce como el
SSID. Se puede cambiar, pero
generalmente no es
recomendado que este en
chino). Detrás de cada
nombre hay un icono de un
abanico que indica la
intensidad de la señal WLAN. Si el abanico al lado del
gráfico tiene un pequeño candado significa que la señal
está encriptada, y necesitara ingresar una contraseña
para poder conectarse.
• CONFIGURACIÓN DE RED
E INTERNET
Abrir y Cerrar WLAN.
Toque el icono de Red e
Internet para ingresar al
siguiente interfaz:
8. AJUSTES GENERALES
En la interfaz de Todas las
aplicaciones toque el icono
de Configuración para entrar
a la siguiente interfaz.
• NETWORK & INTERNET SETTINGS
8. GENERAL SETTINGS
In the All Applications
interface touch the Settings
icon to enter the following
interface.
Opening and closing WLAN.
Touch the Network &
Internet icon to enter the
following interface:
Then touch the switch button to turn on WLAN
connection. The list below should populate with
networks to be connected to.
The figure above, to search
for the source name ( on the
router, this name is called
the SSID, they can be set, is
generally not recommended
set to Chinese) small print
below plus wireless WLAN
Tight manner, each name
behind the fan icon indicates
the WLAN signal strength, if
the fan next to the graphic added a small lock indicating
signal is encrypted, you need to enter a password before
they can connect.
22

Toque el icono de punto
de acceso y de conexión
para ingresar a la
siguiente interfaz:
Para modificar el nombre
y contraseña del punto
de acceso, toque el
botón del interruptor
para abrir un punto de
acceso WiFi.
DDX10.5AD
• MORE SETTINGS
• SYSTEM
• CONNECTIVITY WIRELESS WLAN
Search to wireless WLAN if not encrypted, it will
automatically connect after open WLAN.
If there is encryption, click on the wireless WLAN name,
a password will automatically pop up a window,
generally only need to enter your password and click on
the bottom right of the Connect button to connect. Check
the lower-left comer of the Show advanced options
later, there will be more detailed settings, when
connecting this function can be selected according to
their needs:
Proxy: Default None (no access to general, will not be
here, say so).
IP settings: The default is DHCP, automatically obtain
IP address. When elected as static, you can manually
enter the IP address. Data usage can query traffic usage
and other functions.
Touch the Hotspot &
Tethering icon to enter the
following interface:
To modify the Hotspot
name and password,
touch the switch button
to open a Wi-Fi
hotspot.
Touch the [System]
icon to enter the
following interface:
• CONECTIVIDAD WLAN
INALÁMBRICA
Al buscar WLAN inalámbrica, si no está encriptada se
conectará automáticamente después de abrir WLAN.
Si hay encriptación, haga clic en el nombre de la WLAN
inalámbrica, y automáticamente aparecerá una ventana
para ingresar la contraseña. Necesitará ingresar su
contraseña y hacer clic en la parte inferior derecha del
botón Conectar para conectarse.
Si necesita ver opciones avanzadas haga clic en la
esquina inferior izquierda en el botón de mostrar
opciones avanzadas, habrá ajustes más detallados. Al
conectarse a una red, esta función se puede modificar
según sus necesidades:
Proxy: Predeterminado Ninguno (sin acceso a general).
Configuración de IP: el valor predeterminado es DHCP,
automáticamente obtiene la dirección IP. Cuando se
elige estático, puede ingresar manualmente el Dirección
IP. El uso de datos puede consultar el uso del tráfico y
otras funciones.
• SISTEMA
Toque el icono [Sistema]
para ingresar a la
siguiente interfaz:
23
• MÁS AJUSTES

• AJUSTES DE FECHA Y HORA
Toque el icono de [Fecha y hora] para entrar en la
siguiente interfaz:
Esta interfaz se utiliza para establecer la fecha, hora y
zona horaria
• ENTRADA DE IDIOMA
Toque el icono [Idioma] para entrar en la siguiente
interfaz:
Aquí puede elegir el
idioma que quiere que
su receptor muestre
normalmente.
• DATE AND TIME SETTINGS
• LANGUAGE INPUT
• VERSION NUMBER
INFORMATION
Touch the [Date & Time] icon to enter the following
interface:
This interface is used to set the date, time, and time
zone.
Touch the [Language] icon to enter the following
interface:
This is where you
choose the language
you want your
receiver to display
normally.
Touch the [About System] icon in the System page to
get the Android version revision number.
• INFORMACIÓN DEL NÚMERO
DE VERSIÓN
Toque el icono [Acerca del sistema] en la página del
sistema para obtener el número de revisión de la versión
de Android.
24

• AJUSTES DE PANTALLA
1.) Toque el icono de [Pantalla] para entrar en la
siguiente interfaz:
2.) Arrastre el botón
bajo [Nivel de brillo]
para ajustar la fuerza de
la luz de fondo.
3.) Toque el Icono
[Modelo de brillo] para
entrar en el menú de
configuración del
modelo de brillo. En este
menú, elija uno de los
tres modelos de brillo
Valores predeterminados: Automático, Día y Noche. En el
modo automático, el brillo de su pantalla sigue los
cambios del faro o interruptor de encendido. El modo Día
ajusta el brillo en su ajuste más alto. El modo Noche
ajusta el brillo a su configuración más baja.
4.) Toque el botón de [icono de Poder] para ingresar a sus
ajustes. En este menú puede elegir entre el uso de
energía dinámica y energía estática.
• AJUSTES DEL COCHE
En la [interfaz de
configuraciones]
toque el icono
[Ajustes del coche]
para introduzca la
siguiente interfaz:
Desde aquí puedes
elegir entrar en las
siguientes interfaces:
Pantalla, Sonido,
Configuración de
Reversa, Navegación, Configuración, Aprendizaje del
Volante y Configuración de Reinicio.
• CAR SETTINGS
• DISPLAY SETTINGS
In the [Setting
Interface] touch the
[Car Settings] icon to
enter the following
interface:
From here you can
choose to enter the
following interfaces:
Display, Sound, Tuner
region, Backcar Set,
Navigation, Settings,
Steering Wheel learning, and Reset settings.
1) Touch the [Display] icon to enter the following
interface:
2. ) Drag the button under
[Brightness Level] to
adjust the strength of the
backlight.
3.) Touch the [Brightness
Model] icon to enter the
Brightness Model setting
menu. At this menu,
choose one of the three
Brightness Model
Defaults: Auto, Day, and Night. In Auto mode, the
brightness of your display follows the changes of the
headlight or power switch. Day mode adjusts the
brightness at its highest setting. Night mode adjusts
the brightness to its lowest setting.
4. ) Touch the [Power Logo] icon to enter Power Logo
settings. In this menu you can choose between use of
the dynamic power logo and the static power logo.
DDX10.5AD
25

1. ) From this menu
you can adjust
the volume of
every function your
receiver uses by
dragging the corre-
sponding button
icon . [Default Volume} adjusts the volume for when
the device is turned on; [BT Volume] adjusts the volume
for incoming calls and calls you are currently having;
[Navi Volume] adjusts the volume of the navigation
broadcast sound, and the Mixing Ratio refers to the
ratio of the output size of other sounds when navigation
sounds are broadcasted
2. ) [Beep] and [Mute Backcar] functions can be set by
touching the corresponding switch button icon .
[Beep] refers to the button sound switch. The [Mute
Backcar] function is used to mute the car when it is
backing up, if the reverse mute is turned off, you can
adjust the level of sound attenuation through [Backcar
Volume Reduction].
If the current volume is adjusted to be lower than
the default volume, the volume will remain at the
volume set last time and reset after shut off.
1.) Desde este
menú puede ajustar
el volumen de todas
las funciones que
utiliza su receptor
arrastrando el icono
del botón
correspondiente. [Volumen predeterminado] ajusta el
volumen para cuando el dispositivo está encendido;
[Volumen BT] ajusta el volumen de las llamadas
entrantes y las que está teniendo actualmente;
[Volumen de navegación] ajusta el volumen de la
navegación y la Proporción de Mezcla se refiere a la
proporción del volumen de salida de otros sonidos
cuando se transmiten sonidos de navegación
2.) Las funciones [Beep] y [Silenciar Reversa] se pueden
configurar tocando el icono del botón del interruptor
correspondiente. [Beep] se refiere al interruptor de
sonido del botón. El [Silenciar Reversa] se utiliza para
silenciar el coche cuando está retrocediendo. Si Silenciar
Reversa está desactivado, puede ajustar el nivel de
atenuación del sonido a través de [Reducción de
Volumen de Reversa].
Si el volumen actual se ajusta para que sea inferior
al volumen predeterminado, el volumen permanecerá en
el volumen establecido la última vez y será reiniciado
después de apagar.
• AJUSTES DE SONIDO DEL
SISTEMA
Toque el icono de
[Sonido] en
[Ajustes del coche]
para acceder a la
siguiente interfaz
• AJUSTES DE PANTALLA
1.) Toque el icono de [Pantalla] para entrar en la
siguiente interfaz:
2.) Arrastre el botón
bajo [Nivel de brillo]
para ajustar la fuerza de
la luz de fondo.
3.) Toque el Icono
[Modelo de brillo] para
entrar en el menú de
configuración del
modelo de brillo. En este
menú, elija uno de los
tres modelos de brillo
Valores predeterminados: Automático, Día y Noche. En el
modo automático, el brillo de su pantalla sigue los
cambios del faro o interruptor de encendido. El modo Día
ajusta el brillo en su ajuste más alto. El modo Noche
ajusta el brillo a su configuración más baja.
4.) Toque el botón de [icono de Poder] para ingresar a sus
ajustes. En este menú puede elegir entre el uso de
energía dinámica y energía estática.
• SYSTEM SOUND SETTINGS
• NAVIGATION SETTINGS
Touch the [Sound]
icon in [Car
Settings] to enter
the following
interface:
Navigation path has been set up at the factory, please
do not interfere with the navigation interface. It is free
to change the path. Otherwise, it may cause abnormal
programming.
• AJUSTES DE NAVEGACIÓN
La ruta de navegación se configuró en la fábrica, por
favor no interfiera con la interfaz de navegación. Está
libre de cambiar el camino. De lo contrario, puede causar
programación anormal.
26

• CÁMARA DE REVERSA
1.) Toque el icono del botón de interruptor en
[Espejo Reversa] para configurar el cambio de espejo
inverso.
2.) Toque el icono del botón de interruptor en
[Pista Reversa] para establecer si la trayectoria de
reversa se muestra.
3.) Toque el icono del botón de interruptor en [Línea
de Asistencia de Reversa] para mostrar la línea de
estacionamiento en la pantalla al retroceder.
4.) Toque el icono del botón de interruptor en la
[Advertencia de Video durante la Conducción] para
permitir la reproducción de video mientras conduce.
Para su seguridad al conducir, no lo configure para
que sea capaz de ver el video.
• APRENDIZAJE DEL VOLANTE
Este dispositivo también se puede controlar usando el
volante de su vehículo.
El control del volante se
logra conectando un
elec- trodo negativo
con el electrodo
positivo de la máquina,
y un electrodo positivo
en el electrodo negativo
de la máquina. Uno a
uno presione las teclas
en su volante, el
dispositivo registra el
orden en que está presionado, haga clic en la función
corres- pondiente para guardar la configuración.
• TUNER REGION
Choose your radio area.
•
REVERSE CAMERA
1.) Touch the switch button icon in the [Backcar
Mirror] column to set the switch of reverse mirroring.
2.) Touch the switch button icon in the [Backcar
track] column to set whether the reversing trajectory is
displayed.
3.) Touch the switch button icon in the [Packassist
line] column to display the parking line on screen when
backing up.
4.) Touch the switch button icon in the [Driving
Video Warning] column to allow video playback while
driving.
• STEERING WHEEL LEARNING
This device can also be controlled using your
vehicles steering wheel. Steering Wheel Control
is achieved by
connecting a negative
electrode in the positive
electrode of the
machine, and a positive
electrode in the negative
electrode of the
machine. One by one
press the keys on your
steering wheel, the
device records the order
in which they are
pressed, click the corresponding function
settings to save the settings.
For your driving safety, please do not set it to be
able to watch the video.
• REGIÓN DEL SINTONIZADOR
Elige tu zona de radio.
DDX10.5AD
27

In the [Car settings] screen, touch [Reset] icon, to
prompt the [Determine the factory reset] dialog. If you
touch the [ OK] icon to restore the system to factory
settings then the system will automatically restart.
After the system is restored to factory settings and all
third-party programs are cleared and installed, all
user data will be lost.
• FACTORY RESET
9. 0PTIONAL FEATURE
OPERATION
• FILE BROWSER FUNCTION
OPERATION
In the [All Applications} menu, touch the [File Explorer]
icon to enter the file browser interface.
Local: This is the root directory of the storage device
in use.
The USB file manager offers a variety of file operations,
multi-select multiple file view options, a search
function and more powerful clipboard functions.
Library: Insert your USB or disk drive and you can view
pictures, music, video playback and other functions.
• USER'S MANUAL APPLICATION
In the [All Applications] menu, touch the [Manual] icon
to enter the manual operation interface, then click the
icon corresponding to the function to input your own
description of what the function does.
• RESTABLECIMIENTO DE FÁBRICA
En la pantalla [Ajustes del coche], toque el icono
[Restablecer] para hacer aparecer el cuadro de diálogo
[Determinar el restablecimiento de fábrica]. Si usted toca
el icono [OK] para restaurar el sistema a la configuración
de fábrica, el sistema se reiniciará automáticamente.
Después de restaurar el sistema a la configuración de
fábrica todos los programas de terceros se borran e
instalan, y se perderán todos los datos del usuario.
9. FUNCIONAMIENTO DE
CARACTERÍSTICAS OPCIONALES
• OPERACIÓN DE LA FUNCIÓN DEL
NAVEGADOR DE ARCHIVOS
En el menú [Todas las aplicaciones}, toque el icono de
[Explorador de Archivos] para entrar en la interfaz del
explorador de archivos.
Local: este es el directorio raíz del dispositivo de
almacenamiento en uso.
El administrador de archivos USB ofrece una variedad de
operaciones de archivo: selección múltiple de múltiples
opciones de visualización de archivos, una función de
búsqueda y funciones de portapapeles más potentes.
Biblioteca: Inserte su USB o unidad de disco y podrá ver
imágenes, música, reproducción de video y otras
funciones.
• APLICACIÓN DEL MANUAL
DEL USUARIO
En el menú [Todas las Aplicaciones], toque el icono
[Manual] para ingresar a la interfaz del manual de
operaciones luego haga clic en el icono correspondiente
a la función para mostrar la descripción de lo que hace la
función.
28

10. OPERACIONES DE
NAVEGACIÓN
En el [Menú principal] toque el icono de
[Navegación] para entrar en la interfaz de navegación.
Presione el botón de inicio para salir de la pantalla
de navegación y cambiar a la pantalla principal. Una vez
que haya salido de la pantalla de navegación, cualquier
operación allí iniciada continuará ejecutándose en el
fondo.
In the [Main Menu] touch the [Navigation] icon to enter
the navigation interface. Press the home panel to
exit the navigation screen and switch to the main menu.
Once you have exited the navigation screen, any
operations started there will continue in the
background.
• BEFORE THE NAVIGATION
INSTRUCTIONS
1. ) Make sure the host and satellite antenna is
connected correctly, if you’ve had your antenna for
some time it may need to be switched. If this is your first
time using your antenna you might have to wait for your
antenna to receive any updated information from the
satellite signal.
2. ) Make sure your vehicle is in a position to receive the
signal being broadcast from the satellite. (Avoid
tunnels , bridges , and tall buildings)
3. ) Preset your navigation destination before you begin
to drive, do not operate the navigation system while you
are moving.
• NAVIGATION MAP DESCRIPTION
Because of urban constructions and the rapid develop-
ment of road transport, the company will continue to
update the navigation map, please keep updated
navigation map information available if the map is not
updated. The navigation map may guide you towards a
route with actual road conditions or traffic control
situations, please follow the specified traffic rules.
10. NAVIGATION OPERATIONS
• INSTRUCCIONES ANTES
DE NAVEGAR
1.) Asegúrese de que la antena del receptor y del satélite
esté conectado correctamente, si ha tenido su antena
por algún momento puede ser necesario cambiarlo. si
este es tu la primera vez que usa su antena, es posible
que tenga que esperar para que la antena reciba
cualquier información actualizada de la señal del satélite.
2.) Asegúrese de que su vehículo esté en condiciones de
recibir la señal que se transmite desde el satélite. (Evitar
túneles, puentes y edificios altos)
3.) Preestablezca su destino de navegación antes de
comenzar para conducir, no opere el sistema de
navegación mientras está en movimiento.
• DESCRIPCION DE EL MAPA
DE NAVEGACIÓN
Debido a las construcciones urbanas y al rápido
desarrollo del transporte por carretera, la compañía
continuará actualizando el mapa de navegación. Por
favor mantenga información del mapa de navegación
actualizada si el mapa no está actualizado. El mapa de
navegación puede guiarlo hacia una ruta con condiciones
reales de carretera o situaciones de control de tráfico,
siga las reglas de tráfico especificadas
DDX10.5AD
29

11. AUXILIARY AUDIO AND
VIDEO INPUT
• ERROR
1. ) Use the search function in the Navigation menu in
order to set the destination of your journey.
2. ) In an area you are familiar with, you may be more
comfortable driving without the use of the navigation
software
It’s normal to have satellite signal reception errors. This
product automatically reconnects itself to the signal
every 7 meters travelled.
NOTE:
The navigation system environment is complex, a large
external electromagnetic interface can be the cause of
your navigation not working properly. If this is the case,
restart your GPS to enter normal operation.
Touch the [AUX] icon from the Applications menu to
reach the following interface:
1.) Utilice la función de búsqueda en el menú de
navegación para fijar el destino de su viaje.
2. ) En un área con la que está familiarizado, puede estar
más cómodo conduciendo sin el uso de la navegación
por software.
• ERROR
Es normal tener errores en la recepción de la señal del
satélite. Este producto se vuelve a conectar
automáticamente a la señal cada 7 metros recorridos.
NOTA:
El entorno del sistema de navegación es complejo, y una
gran interferencia electromagnética externa puede
causar que su navegación no funcione correctamente. Si
este es el caso, reinicie su GPS para entrar en
funcionamiento normal.
11. ENTRADA AUXILIAR DE
AUDIO Y VÍDEO
Toque el icono [AUX] del menú Aplicaciones para llegar a
la siguiente interfaz:
30

1.) Toque el icono
de división de pantalla
para entrar modo
de pantalla dividida,
toque de nuevo
para salir de esta
modalidad.
2.) Toca el icono
de escala para tirar
hacia la izquierda y a
la derecha y cambiar
el tamaño de las
ventanas.
12. SPLIT SCREEN AND
SCREEN PROJECTION
• SPLIT SCREEN
1. ) If there is no equipment connected to the radio, the
screen will look similar to the picture above.
2. ) Use the 3.5mm auxiliary audio input which is located
on the front of the radio or you can also use the RCA
audio and video input which is located on the rear of the
radio.
When using the front auxiliary audio input it blocks the
rear audio input, so you can only use one at a time.
On the radio screen it will only show video coming from
the auxiliary composite video RCA input and the Radio
only controls the volume of the sound coming from the
audio auxiliary RCA input.
1. ) Touch the split
screen icon to
enter split screen
mode, touch it again to
exit this display.
2. ) Touch the scaling
icon to pull left and
right and change the
size of the windows.
1. ) Si no hay ningún equipo conectado a la radio, la
pantalla se verá similar a la imagen de arriba.
2. ) Utilice la entrada de audio auxiliar de 3,5 mm ubicada
en la parte frontal de la radio o también puede usar la
entrada de audio y video RCA que se encuentra en la
parte trasera de la radio.
Al usar la entrada de audio auxiliar frontal se bloquea
automáticamente la entrada de audio trasera, por lo que
solo se puede usar uno a la vez.
En la pantalla de la radio solo se mostrará video
proveniente de la entrada auxiliar de video compuesto
RCA y el radio solo controla el volumen del sonido
proveniente de la entrada auxiliar de audio RCA.
12. PANTALLA DIVIDIDA Y
PROYECCIÓN DE PANTALLA
DDX10.5AD
• PANTALLA DIVIDIDA
31

PROYECCIÓN DE PANTALLA
1.) Toque el icono de proyección para poner la
aplicación de pantalla principal en la pantalla secundaria
y haga clic en el icono de proyección de nuevo para tirar
la aplicación de pantalla secundaria de vuelta a la
pantalla principal.
2.) La proyección HDMI emite sonido a la pantalla
secundaria, El sonido CVBS todavía se emite en la
pantalla del host.
• SCREEN PROJECTION
13. DVR
1.) Touch the projection icon to put the main
screen application into the secondary screen, and click
the projection icon again to pull the sub screen applica-
tion back to the main screen.
2. ) HDMI Projection outputs sound to the sub screen,
CVBS sound is still output on the host screen.
This device is equipped with a High Definition double
recording streaming media function.
1. ) On the home or application screen, click the [DVR]
icon to access the double record screen
2. ) The first entry into the dual-record interface is a
front and rear-view screen display, this is presented on
the top and bottom half of the screen simultaneously.
The picture is shown compressed , with the front-view
being displayed on the top half and the rear view being
displayed on the bottom half.
3. ) To switch to a single screen display double click
either the front view or the rear view to maximize it’s
respective window on the screen.
13. DVR
Este dispositivo está equipado con una función de doble
Grabación de Alta Definición de transmisión de medios.
1.) En la pantalla de inicio o de la aplicación, haga clic en
el icono [DVR] para acceder a la pantalla de doble
grabación.
2.) La primera entrada en la interfaz de doble grabación
es una visualización de la pantalla de visión delantera y
trasera, esto se presenta en la mitad superior e inferior
de la pantalla simultáneamente. La imagen se muestra
comprimida, con la vista frontal mostrándose en la mitad
superior y la vista trasera en la mitad inferior.
3.) Para cambiar a una visualización de pantalla única,
haga doble clic ya sea en la vista frontal o la vista trasera
para maximizar su respectiva ventana en la pantalla�
WE LIKE IT LOUD
32

4. ) CONTROL DE VIDEO: En la interfaz de vista previa de
pantalla única, el botón de control de video se hace
visible lo que le permite acceder a una serie de
interruptores que podrían ser útil para usted mientras
usa este producto:
INTERRUPTOR DE GRABACIÓN: Inserte un dispositivo
de almacenamiento y puede usar el interruptor de
grabación para grabar las imágenes que obtiene de sus
cámaras de visión delantera o trasera.
INTERRUPTOR DE BLOQUEO: La función del interruptor
de bloqueo le permite bloquear ciertos videos creados
por el software. Esto hace que si te quedas sin espacio
en su dispositivo de almacenamiento, los videos
seleccionados no sean eliminados para hacer espacio.
INTERRUPTOR DE FOTO: El interruptor de foto le
permite guardar videos como imágenes.
CAMBIO DE CÁMARA: Usando el cambio de cámara
puede ver la vista delantera y trasera de un cambio de
foto
5.) AJUSTES DE GRABACIÓN DOBLE: en la pantalla de
doble Pantalla ingrese al menú de configuración
presionando el botón de configuración. Haga clic en el
icono de reproducción para abrir la pantalla de
reproducción. En el lado derecho de esta pantalla se
mostrarán una variedad de categorías:
VIDEO FRONTAL: Este botón muestra el video grabado
desde la cámara frontal
VIDEO TRASERO: Este botón muestra el video grabado
desde la cámara trasera
FOTO: Esto muestra una lista de archivos
de fotos
4. ) VIDEO CONTROL: In the single screen preview
interface, the video control button becomes visible
allowing you access to a number of switches that could
be useful to you while using this product:
RECORDING SWITCH: Insert a storage device and you
can use the record switch to record the footage you get
from your front or rear view cameras.
LOCK SWITCH: The lock switch function allows you to
lock certain videos created by the software. This makes
it so that if you happen to run out of space on your
storage device the selected videos will not be deleted to
make room.
PHOTO SWITCH: The Photo Switch allows you to save
videos as pictures.
CAMERA SWITCHING: Using Camera switching you can
see the front and rear view of a photo switch
5.) DOUBLE RECORDING SETTINGS: In the Dual Display
Screen enter the settings menu by pressing the settings
icon. Click the playback icon to open the playback
screen. On the right side of this screen there will be a
variety of categories displayed:
FORWARD VIDEO: This button displays the recorded
video from the front facing camera
BACKWARD VIDEO: This button displays the recorded
video from the rear facing camera
PHOTO: This displays a photo file list
DDX10.5AD
33

• RECORDING SETTINGS
VIDEO STORAGE LOCATION: This will display the
location where the video files you are recording will be
saved. This setting only displays videos made and saved
by the device, this will not display the contents of your
storage device.
SINGLE RECORDING TIME: This function allows you to
select a time sequence for recording a single video.
AUTOMATIC VIDEO SWITCH: When this function is
turned on, recording will start as soon as the vehicle is
turned on. If this function is not on, the last recording
state will be remembered.
FORMAT: This function allows you to format the
storage device you’re using to save your video.
• DISPLAY SETTING
START-UP DISPLAY STREAMING MEDIA TIME: With this
function selected the device will automatically display
the double record screen on boot up.
BACKWARD DISPLAY FOREARD TIME: With this
function selected the device will automatically display
the front camera when the car backs up.
• AJUSTES DE GRABACIÓN
UBICACIÓN DE ALMACENAMIENTO DE VIDEO: Esto
mostrará la ubicación donde estarán los archivos de
video que está grabando. Esta configuración solo
muestra videos hechos y grabados por el dispositivo,
esto no mostrará el contenido de su dispositivo de
almacenamiento.
TIEMPO DE GRABACIÓN ÚNICO: Esta función le permite
seleccione una secuencia de tiempo para grabar un único
video.
CAMBIO AUTOMÁTICO DE VIDEO: Cuando esta función
está encendida, la grabación comenzará tan pronto
como el vehículo esté encendido. Si esta función no está
activada, se recordará el último estado de grabación.
FORMATEO: Esta función le permite formatear el
dispositivo de almacenamiento que está utilizando para
guardar su video.
• CONFIGURACIÓN DE PANTALLA
TIEMPO DE INICIO DE TRANSMISION DE MEDIOS A LA
PANTALLA: Con esta función seleccionada el dispositivo
automáticamente mostrara la pantalla de grabación
doble al arrancar.
CAMARA TRASERA TIEMPO HACIA ADELANTE: Con esta
función seleccionada, el dispositivo mostrará
automáticamente la cámara frontal cuando el auto
retrocede.
WE LIKE IT LOUD
34

14. AJUSTES DEL DSP
En la interfaz de aplicaciones, toque el icono [DSP] para
ingresar a la interfaz de configuración de DSP. La
configuración de DSP contiene EQ, posición de escuchar,
salida y división de frecuencia. La interfaz se muestra de
la siguiente manera:
Para evitar que el equipo de altavoces se dañe, la
configuración relacionada con DSP se realiza mejor bajo
la guía de profesionales.
• ECUALIZACIÓN
Puede ajustar EQ, valor Q, frecuencias, la interfaz de EQ
y guardado de modo de usuario.
• Toque [Flecha izquierda] o [Flecha derecha] para
seleccionar un tipo de ecualizador (EQ) (Figura 1).
• Toque [U1, U2, U3] para seleccionar el ecualizador
para usuarios separados.
• Toque y mantenga presionado [U1, U2, U3] para
salvar los ajustes realizados para cada usuario
• Arrastre la barra de ganancia hacia la preferencia
definida por el usuario.
• Toque FC por cada banda del ecualizador para ajustar
la frecuencia (Figura 2).
• Toque el botón Q por banda para ajustar el valor Q
(Figura 3)
14. DSP SETTING
• EQUALIZATION
In the Applications interface, touch the [DSP] Icon to
enter the DSP settings interface. DSP settings contain
EQ, listening position, out put and frequency division.
The interface is displayed as follows:
In order to prevent the speaker equipment from
being damaged, DSP related settings are best carried
out under the guidance of professionals.
You can adjust EQ, Q value, frequencies, the EQ
interface, and user mode saving.
• Touch [Left Arrow] or [Right Arrow] to select an EQ
type(Figure 1).
• Touch [U1, U2, U3] to select EQ type’s for separate
users. Touch and Hold [U1, U2, U3] to save the
adjustments made for each user.
• Drag the gain bar into user defined preference.
• Touch FC per band EQ to adjust the frequency
(Figure 2).
• Touch the Q button per band to adjust Q value
(Figure 3).
WE LIKE IT LOUD
DDX10.5AD
35

FIGURE 1 / FIGURA 1
FIGURE 2 / FIGURA 2
FIGURE 3 / FIGURA 3
36

POSICIÓN DE ESCUCHA /
RETARDO DE TIEMPO
Este dispositivo contiene dos modos de posiciones de
escuchar: modo automático y modo manual
• Toque [ms] o [cm] para seleccionar el modo que desea
ajustar. La posición de escuchar cambia a medida que
arrastra el centro de referencia de posición.
Cada vez que toque el botón en pantalla el modo de
corrección cambia. La posición de escuchar cambia a
medida que arrastra el centro de referencia de posición.
• Toque [+] o [-] para cada altavoz para ajustar el tiempo y
la distancia en modo manual.�
This device contains two listening position modes: auto
mode and manual mode
• Touch [ms] or [cm] to select the mode you hope to
adjust. Listening position changes as you drag the
reference center position.
Each time you touch the on screen button and correction
mode changes. Listening position changes as you drag
the reference center position.
• Touch [+] or [-] for each speaker to adjust the time and
distance in manual mode.
• LISTENING POSITION /
TIME DELAY
DDX10.5AD
37

La división de frecuencia admite 5.1, división de dos
frecuencias y tres frecuencias para líneas de altavoces
RCA. La función del botón de reinicio se utiliza para
restablecer parámetros para parámetros ajustados.
• Toque [paso alto] [pendiente] para seleccionar HPF FC
y pendiente; Actualmente, la pendiente admite 0dB/oct,
12dB/oct, 24dB/oct, 36dB/oct y 48dB/oct.
• Toque [paso bajo] [pendiente] para seleccionar LPF FC
y pendiente; Actualmente, la pendiente admite 0dB/oct,
12dB/oct, 24dB/oct, 36dB/oct y 48dB/oct.
Al configurar el tweeter, la frecuencia central no se
puede establecer demasiado baja, de lo contrario el
tweeter del equipo puede resultar dañado.
Frequency division supports 5.1, two frequency division
and three frequency division for RCA speaker lines. The
function of the reset button is used to reset parameters
for adjusted parameters.
• Touch [high pass] [slope] to select HPF FC and slope;
At present, slope supports 0dB/oct,12dB/oct,
24dB/oct, 36dB/oct and 48dB/oct.
• Touch [high pass] [slope] to select LPF FC and slope;
At present, slope supports 0dB/oct,12dB/oct,
24dB/oct, 36dB/oct and 48dB/oct.
When setting the tweeter, the center frequency
cannot be set too low, otherwise the tweeter
equipment may be damaged.
• VOLUMEN DE LAS SALIDAS
Arrastre la barra
de ganancia para
cada altavoz para
ajustar sus
respectivos valores
de ganancia.
• Toque [Invertir] para
cada altavoz para
invertir la fase.
• Toque [Silencio] para
cada altavoz para
silenciarlo
• OUTPUT VOLUME
• FREQUENCY CROSSOVER
• Drag the gain bar for
each speaker to adjust
their respective gain
values.
• Touch [Invert] for
each speaker to phase
invert.
• Touch [Mute] for
each speaker to
silence them.
• CRUCE DE FRECUENCIAS
38

SPECIFICATIONS
GENERAL:
Rated power source: 14.4V DC (10.8V to 15V operation)
Maximum Current Consumption: 10 Amp
Dimensions (W x H x D):Chassis: 178mm x 50mm x 115mm
Bezel frame: 170mm x 46mm x 5mm
Screen Frame: 266mm x 180mm
Weight: 4.5Lb
DISPLAY:
Screen Size / Aspect Ratio: 10.5 inch / Wide 16:9
Pixels: 1280 x 720
Display Type: IPS / Full HD / Capacitive Touch Screen
Temperature Operation: -20°C to +60°C (14°F to 140°F)
AUDIO:
Maximum Power Output: 54W X 4 Ch / 4 ohm
Continuous Power Output: 18W x 4 Ch / 4 ohm @ 14.4V
Pre-output Level: 6 Volts @ 14.4V
Equalizer: 14 bands totally adjustable from 20Hz to 20KHz on each band
Factor Q: Adjustable from 0.4 to 12
Gain: +/- 15dB
Presets: Standard / Popular / Rock / Classical / Jazz
Custom: 3 User Memories
Crossover: High Pass: Adjustable 20Hz to 20KHz
Low Pass: Adjustable 20Hz to 20KHz
Slope: Adjustable 6, 12, 24, 36, 48 dB/Oct
Audio Control: Volume / Balance / Fader / Gain / Delay
TUNER:
Frequency Range: FM: 87.5 ~ 107.9 KHz
AM: 530 ~ 1710 KHz
Presets Memory: 30 Favorite Stations and 12 Presets (6 FM/6 AM)
Región: Selectable (Europe, USA, China, Japan, Eastern Europe,
Latin América, Taiwan, Australia, South América, Iran,
Middle East)
Sensitivity Adjustment: LOC (On/Off) / ST (On/Off)
USB / SD PLAYER:
Type / Class: V1.1 / V2.0 / MSC / MTP / FAT16 / FAT32 / NTFS
Format Files Supported: RMVB, MPG4, AVI, MP3, WMA, JPEG, DivX
Resolution Supported: 1080P Video
Memory Size Reader: up to 64 Gb
Max Current Supply: 1.5 Amp (USB)
Number of USB Ports: 3 (1 x Front, 2 x Rear)
CONNECTIVITY:
BTVersion / Services: V5.0 / Audio Streaming / Hands Free calls
Camera Input: RCA Analog Video up to HD 1080p (Front/Rear)
Video Output: RCA (1 Volt/75 ohm) / HDMI Selectable
A/V Aux Input: Rear RCA Audio and Video / Front 3.5mm Jack Stereo Audio
Microphone: 3.5mm Jack external MIC Input
Remote Control: Wired (3.5mm jack) Input
Internet: Wi-Fi wireless connection
DDX10.5AD
39

GENERAL:
Fuente de alimentación nominal: 14.4 V DC (funcionamiento de 10.8 V a 15 V)
Consumo máximo de corriente: 10 Amp
Dimensiones (An. x Al. x Pr.): Chasis: 178 mm x 50 mm x 115 mm
Marco del bisel: 170 mm x 46 mm x 5 mm
Marco de pantalla: 266 mm x 180 mm
Peso: 4.5 libras
MONITOR:
Tamaño de pantalla/Relación de aspecto: 10.5 pulgadas/Ancho 16:9
Píxeles: 1280 x 720
Tipo de pantalla: IPS / Full HD / Pantalla táctil capacitiva
Temperatura Operación: -20°C a +60°C (14°F a 140°F)
AUDIO:
Salida de potencia máxima: 54W X 4 Ch / 4 ohm
Potencia de salida continua: 18 W x 4 canales / 4 ohmios a 14,4 V
Nivel de salida previa: 6 voltios a 14,4 V
Ecualizador: 14 bandas totalmente ajustables de 20Hz a 20KHz
en cada banda
Factor Q: Ajustable de 0.4 a 12
Ganancia: +/- 15dB
Preestablecidos: Estándar / Popular / Rock / Clásica / Jazz
Personalizado: Memoria de 3 usuarios
Cruce: Paso alto: Ajustable de 20 Hz a 20 KHz
Paso bajo: Ajustable de 20 Hz a 20 KHz
Pendiente: Ajustable 6, 12, 24, 36, 48 dB/Oct
Control de audio: Volumen/Balance/Atenuación/Ganancia/Retardo
SINTONIZADOR:
Rango de frecuencia: FM: 87,5 ~ 107,9 KHz
AM: 530 ~ 1710 KHz
Memoria de presintonías: 30 estaciones favoritas y 12 presintonías (6 FM/6 AM)
Región: Seleccionable (Europa, EE. UU., China, Japón, Europa del Este,
América Latina, Taiwán, Australia, América del Sur,
Irán, Medio Oriente)
Ajuste de sensibilidad: LOC (encendido/apagado) / ST (encendido/apagado)
REPRODUCTOR USB/SD:
Tipo / Clase: V1.1 / V2.0 / MSC / MTP / FAT16 / FAT32 / NTFS
Formato de archivos compatibles: RMVB, MPG4, AVI, MP3, WMA, JPEG, DivX
Resolución admitida: Video 1080P
Lector de tamaño de memoria: Hasta 64 Gb
Suministro de corriente máxima: 1.5 amperios (USB)
Número de puertos USB: 3 (1 frontal, 2 traseros)
CONECTIVIDAD:
Versión de BT/ Servicios: V5.0 / Transmisión de audio / Llamadas manos libres
Entrada de cámara: Video analógico RCA hasta HD 1080p (delantero/trasero)
Salida de video: RCA (1 volt/75 ohm) / HDMI seleccionable
Entrada auxiliar A/V: Audio y video RCA trasero/audio estéreo con conector frontal
de 3.5 mm
Micrófono: Entrada de micrófono externo jack de 3.5 mm
Mando a distancia: Entrada con cable (conector de 3.5 mm)
Internet: Connexión inalámbrica Wi-Fi
ESPECIFICACIONES
40

LIMPIEZA DEL DISPOSITIVO
Si la superficie del dispositivo tiene una mancha, utilice
un paño limpio y suave para quitar las manchas. Si el
panel está muy sucio, límpielo con detergente suave,
luego use un paño limpio y suave para quitar el
limpiador.
El spray de limpieza de piezas mecánicas puede
afectar el dispositivo directamente. Si utiliza un paño
duro o un líquido volátil (como diluyente o alcohol) para
limpiar la superficie puede rayar la superficie o borrar
caracteres del dispositivo.
COMMON TROUBLESHOOTING GUIDE
FAULT 1 : You can not boot
CAUSE: The power supply fuse burned
SOLUTION: Replace the same type fuse
FAULT 2: can not boot
REASON: Other factors contributing to
the microprocessor is not working
WORKAROUND: After IOS, host restarts
FAULT 3: After the ignition switch is turned off, the
settings are lost
REASON: replace the battery or fuse.
SOLUTION: Re-setting information and save the.
FAULT 4: poor income units.
REASON: The radio signal is weak.
Solution: The car is moved to another location
search again.
FAULT 5: No image
REASON: Other factors contributing to the
microprocessor is not working.
WORKAROUND: After 1O seconds, host restarts .
FAULT 6: driving the process can not view the image .
CAUSE: driving the process is not allowed to
view images .
SOLUTION: Plug the car to a safe location, the car stalls
placed in the Prange, pull handbrake .
TROUBLESHOOTING
FUNCTIONAL
DEVICE CLEANING
If the surface of the device has a stain, use a clean soft
cloth to remove spots. If the panel is very dirty, wipe
with mild detergent dirt, then use a clean soft cloth to
wipe off the cleaner.
Mechanical parts cleaning spray may affect the
device directly. Hard cloth or using a volatile liquid
(such as thinner or alcohol) to wipe the surface may
scratch the surface or erase character.
RESOLUCIÓN DE PROBLEMAS
GUÍA DE SOLUCIÓN DE PROBLEMAS COMUNES
FALLA 1: No puede arrancar
CAUSA: Fusible de la fuente de alimentación quemado
SOLUCIÓN: Reemplazar el fusible con uno del mismo tipo
FALLO 2: No puede arrancar
MOTIVO: Otros factores que contribuyen a que
el microprocesador no funcione
SOLUCIÓN ALTERNATIVA: después de IOS, el host se reinicia
FALLA 3: Después de apagar el interruptor de encendido,
la configuración se pierde
MOTIVO: reemplace la batería o el fusible.
SOLUCIÓN: Reingrese la información y guarde nuevamente.
FALLA 4: Unidades con baja señal.
MOTIVO: La señal de radio es débil.
Solución: Mueva el automóvil a otra ubicación y busque
de nuevo.
FALLO 5: No hay imagen
MOTIVO: Otros factores que contribuyen a que
el microprocesador no funcione.
SOLUCIÓN ALTERNATIVA: después de 10 segundos,
el host se reinicia.
FALLO 6: al conducir el automóvil no se puede visualizar
la imagen.
CAUSA: conducir el automóvil no tiene permitido
ver imágenes
SOLUCIÓN: Estacione el automóvil en un lugar seguro,
tire del freno de mano.
DDX10.5AD
41

GENERAL:
Fuente de alimentación nominal: 14.4 V DC (funcionamiento de 10.8 V a 15 V)
Consumo máximo de corriente: 10 Amp
Dimensiones (An. x Al. x Pr.): Chasis: 178 mm x 50 mm x 115 mm
Marco del bisel: 170 mm x 46 mm x 5 mm
Marco de pantalla: 266 mm x 180 mm
Peso: 4.5 libras
MONITOR:
Tamaño de pantalla/Relación de aspecto: 10.5 pulgadas/Ancho 16:9
Píxeles: 1280 x 720
Tipo de pantalla: IPS / Full HD / Pantalla táctil capacitiva
Temperatura Operación: -20°C a +60°C (14°F a 140°F)
AUDIO:
Salida de potencia máxima: 54W X 4 Ch / 4 ohm
Potencia de salida continua: 18 W x 4 canales / 4 ohmios a 14,4 V
Nivel de salida previa: 6 voltios a 14,4 V
Ecualizador: 14 bandas totalmente ajustables de 20Hz a 20KHz
en cada banda
Factor Q: Ajustable de 0.4 a 12
Ganancia: +/- 15dB
Preestablecidos: Estándar / Popular / Rock / Clásica / Jazz
Personalizado: Memoria de 3 usuarios
Cruce: Paso alto: Ajustable de 20 Hz a 20 KHz
Paso bajo: Ajustable de 20 Hz a 20 KHz
Pendiente: Ajustable 6, 12, 24, 36, 48 dB/Oct
Control de audio: Volumen/Balance/Atenuación/Ganancia/Retardo
SINTONIZADOR:
Rango de frecuencia: FM: 87,5 ~ 107,9 KHz
AM: 530 ~ 1710 KHz
Memoria de presintonías: 30 estaciones favoritas y 12 presintonías (6 FM/6 AM)
Región: Seleccionable (Europa, EE. UU., China, Japón, Europa del Este,
América Latina, Taiwán, Australia, América del Sur,
Irán, Medio Oriente)
Ajuste de sensibilidad: LOC (encendido/apagado) / ST (encendido/apagado)
REPRODUCTOR USB/SD:
Tipo / Clase: V1.1 / V2.0 / MSC / MTP / FAT16 / FAT32 / NTFS
Formato de archivos compatibles: RMVB, MPG4, AVI, MP3, WMA, JPEG, DivX
Resolución admitida: Video 1080P
Lector de tamaño de memoria: Hasta 64 Gb
Suministro de corriente máxima: 1.5 amperios (USB)
Número de puertos USB: 3 (1 frontal, 2 traseros)
CONECTIVIDAD:
Versión de BT/ Servicios: V5.0 / Transmisión de audio / Llamadas manos libres
Entrada de cámara: Video analógico RCA hasta HD 1080p (delantero/trasero)
Salida de video: RCA (1 volt/75 ohm) / HDMI seleccionable
Entrada auxiliar A/V: Audio y video RCA trasero/audio estéreo con conector frontal
de 3.5 mm
Micrófono: Entrada de micrófono externo jack de 3.5 mm
Mando a distancia: Entrada con cable (conector de 3.5 mm)
Internet: Connexión inalámbrica Wi-Fi
WARNING:
Cancer and Reproductive Harm.
www.P65Warning.ca.gov
ADVERTENCIA:
Cáncer y Daño Reproductivo.
www.P65Warning.ca.gov
WARRANTY
Please visit our website DS18.com for more
information on our warranty policy.
We reserve the right to change products and
specifications at any time without notice.
Images may or may not included optional
equipment.
GARANTÍA
Visita nuestra página web DS18.com para obtener
más información sobre nuestra garantía
Nos reservamos el derecho de cambiar
productos y especificaciones en cualquier
momento sin previo aviso. Las imágenes pueden
incluir o no equipo opcional.
FCC ID: 2AYOQ-DDX9AD
This device complies with part 15 of the FCC Rules. Operation is subject to the following two conditions: (1) this device may not cause harmful interference,
and (2) this device must accept any interference received, including interference that may cause undesired operation.
Note:This equipment has been tested and found to comply with the limits for a class B digital device,pursuant to Part 15 of the FCC Rules.These equipment
generates uses and can radiate radio frequency energy and if not installed and used in accordance with the instructions, may cause harmful interference to
radio communications.However, there is no guarantee that interference will not occur in a particular installation. If this equipment does cause interference
to radio of television reception,which can be determined by turning the equipment off and then on, the user is encouraged to try to correct the interference
by one or more of the following.
Declaración de conformidad con la FCC: FCC ID: 2AYOQ-DDX9AD
Este dispositivo cumple con la Parte 15 de las Reglas de la FCC. La operación está sujeta a las siguientes dos condiciones: (1) Este dispositivo no debe causar
interferencias perjudiciales y (2) Este dispositivo debe aceptar cualquier interferencia recibida, incluidas las interferencias que puedan causar un funcionamiento
no deseado.
Nota: Este equipo ha sido probado y se ha determinado que cumple con los límites para un dispositivo digital de clase B, de acuerdo con la Parte 15 de las Reglas
de la FCC. Este equipo genera, utiliza y puede irradiar energía de radiofrecuencia y si no se instala y no se utiliza de acuerdo a las instrucciones, puede causar
interferencia dañina a las comunicaciones de radio. Sin embargo, no hay garantía de que no ocurrirá interferencia en una instalación en particular. Si este equipo
causa interferencia a la recepción de radio o televisión, lo cual se puede determinar apagando el equipo y luego encendiéndolo , se recomienda al usuario que
intente corregir la interferencia mediante las siguientes.

V1
FOR MORE INFORMATION PLEASE VISIT
DS18.COM
-
 1
1
-
 2
2
-
 3
3
-
 4
4
-
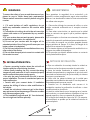 5
5
-
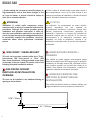 6
6
-
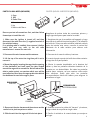 7
7
-
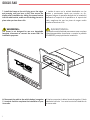 8
8
-
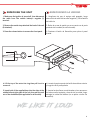 9
9
-
 10
10
-
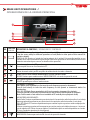 11
11
-
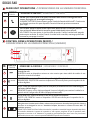 12
12
-
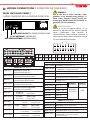 13
13
-
 14
14
-
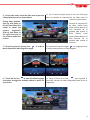 15
15
-
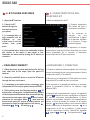 16
16
-
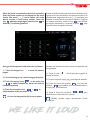 17
17
-
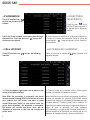 18
18
-
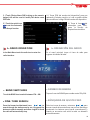 19
19
-
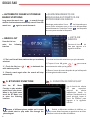 20
20
-
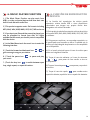 21
21
-
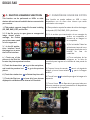 22
22
-
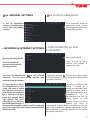 23
23
-
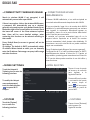 24
24
-
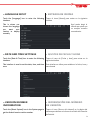 25
25
-
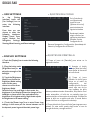 26
26
-
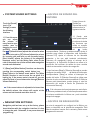 27
27
-
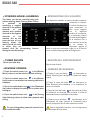 28
28
-
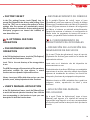 29
29
-
 30
30
-
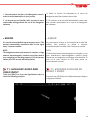 31
31
-
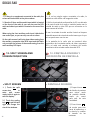 32
32
-
 33
33
-
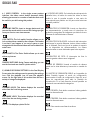 34
34
-
 35
35
-
 36
36
-
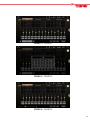 37
37
-
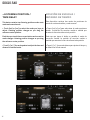 38
38
-
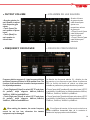 39
39
-
 40
40
-
 41
41
-
 42
42
-
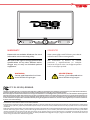 43
43
-
 44
44


