Ega Master 51254 El manual del propietario
- Categoría
- Medir, probar
- Tipo
- El manual del propietario
Este manual también es adecuado para

MULTÍMETRO DIGITAL
DIGITAL MULTIMETER
COD. 51253 COD. 51254
MANUAL DE INSTRUCCIONES
OPERATING INSTRUCTIONS
ESPAÑOL ............................... 2
ENGLISH .............................. 34
GARANTIA / GUARANTEE ... 65

2
TABLA DE CONTENIDOS
1. Antes de empezar ............................................................................................. 3
Información general .............................................................................................. 3
Desembalaje ........................................................................................................ 4
Información de seguridad ...................................................................................... 4
Reglas para un funcionamiento seguro .................................................................. 5
Símbolos eléctricos internacionales ....................................................................... 6
2. Familiarización (Primeros pasos) ....................................................................... 6
Encendido del medidor ......................................................................................... 6
Consideraciones sobre la batería ........................................................................... 6
Apagado Automático ............................................................................................. 6
Apagado de retroiluminación automático .............................................................. 6
Indicador de batería baja ....................................................................................... 7
La estructura del medidor ...................................................................................... 7
Selector giratorio ................................................................................................... 7
Función de los botones.......................................................................................... 8
Funciones del medidor Vs Pantallas .................................................................... 11
Selección del rango ............................................................................................. 12
Descripción de la pantalla ................................................................................... 12
Grácodebarrasanalógico ................................................................................. 14
Utilización de MAX/MIN ..................................................................................... 14
3. Mediciones ..................................................................................................... 14
Introducción ....................................................................................................... 14
A. Medición de tensión .................................................................................... 14
B. Medición de corriente .................................................................................. 15
C. Medición de resistencia ............................................................................... 16
D. Prueba de continuidad ................................................................................ 17
E. Prueba de diodos ......................................................................................... 18
F. Medidor de capacidad .................................................................................. 19
G. Medidor de frecuencia / Ciclo de trabajo ...................................................... 20
H. Medidor de temperatura ......................................................................... 20
I. 4~20mA Bucle de corriente % lectura ......................................................... 20
4. Memorización, Recuperación y Envío ............................................................. 21
Introducción ....................................................................................................... 21
Memorización y borrado de lecturas ................................................................... 21
ESPAÑOL

3
Recuperación de lecturas guardadas .................................................................... 22
5.Cambiodelaconguraciónpordefecto ......................................................... 22
Introducción ....................................................................................................... 22
Seleccióndelasopcionesdeconguración ......................................................... 22
6. Mantenimiento ............................................................................................... 24
A. Servicios generales ...................................................................................... 24
B. Sustitución de los fusibles ............................................................................ 24
C. Sustitución de la batería ............................................................................... 25
7.Especicaciones .............................................................................................. 25
Seguridad y conformidades ................................................................................. 26
Especicacionesfísicas ........................................................................................ 26
Especicacionesgenerales ................................................................................... 26
Resumen de características .................................................................................. 27
Especicacionesbásicas ...................................................................................... 27
Especicacionesdetalladasdeprecisión .............................................................. 27
A. Voltaje DC.................................................................................................... 28
B. Voltaje AC .................................................................................................... 28
C. Corriente DC ................................................................................................ 29
D. Corriente AC ................................................................................................ 29
E. Resistencia ................................................................................................... 30
F. Prueba de continuidad ................................................................................. 30
G. Prueba de diodo ........................................................................................... 30
H. Capacidad .................................................................................................... 31
I. Frecuencia ................................................................................................... 31
J. Temperatura .................................................................................................. 31
Grados Celsius ................................................................................................ 31
Fahrenheit ....................................................................................................... 32
K. 4~20mA bucle de corriente ....................................................................... 32
1. ANTES DE EMPEZAR
Informacióngeneral
Este manual de instrucciones contiene información a cerca de la seguridad.
Por favor, lea la información relevante con atención y observe todos los avisos y advertencias
escritas.
¡Advertencia!
Para evitar descargas eléctricas o lesiones personales, lea con atención la
“Información de seguridad” y “Reglas para la Operación Segura” antes de usar
el medidor.
Medidor digital COD. 51253/51254 (en lo sucesivo, “Medidor”) es un instrumento de
operaciones estables con pantalla de 20.000, con dígitos de 4 1/2”, estructura moderna y con
opción de selección de rango automátco. No sólo es capaz de medir tensión y corriente AC,
tensión y corriente DC, resistencia, diodos, frecuencia, modos relativos y continuidad si no que
también posee AC True RMS , AC+DC, indicador de batería baja, retroiluminación, retención de
datos, apagado automático y protección completa de sobrecarga.

4
Desembalaje
Abra la caja y saque el medidor. Compruebe los elementos mostrados en la Tabla 1.1 con
atención para comprobar si han sido facilitados todos o si tienen alguna parte dañada:
Tabla 1-1. Desembalaje
Artículo Descripción Cantidad
1 Manual de instrucciones en
castellano
1 und.
2Cable de prueba 2 unds.
3 Tipo-K (cromo níquel ~ silicio
níquel)
Sonda de temperatura
(que sólo es adecuado para
medir la temperatura por
debajo de 230 ºC
(sólo COD. 51254)
1 und.
4Clip pinza 1 und.
5Clip de testeo 1 und.
6Cable USB 1 und.
7 CD-ROM (Guía de instalación
y programa interfaz)
1 und.
8Bolsa de transporte 1 und.
9 Batería 9V (NEDA 1604, 6F22,
006P)
1 und.
En el caso de encontrar alguna falta o daño, por favor, póngase en contacto con su distribuidor
inmediatamente.
Informacióndeseguridad
Este medidor cumple con el requisito de las normas de seguridad IEC61010: en el grado de
contaminación 2, categoría de sobretensión (CAT. III 1000V, CAT.IV 600V) y doble aislamiento.
CAT.III:Niveldedistribución,instalaciónja,conmenoressobretensionestransitoriasqueCAT.IV
CAT.IV: Nivel de suministro primario, líneas aéreas, sistemas de cables, etc.
Useelmedidorsólocomoseespecicaenestemanualdeinstrucciones,delocontrariola
protección provista por el instrumento podría verse afectada.
Enestemanual,unaAdvertenciaidenticacondicionesyaccionesquepuedenrepresentar
riesgos para el usuario, o puede causar daños al medidor o al equipo bajo prueba.
Unanotaidenticalainformacióndondeelusuariodebeprestaratención.
Los símbolos eléctricos internacionales utilizados en el multímetro y en este manual de
funcionamiento se explican en la página 6.

5
Reglasparaunfuncionamientoseguro
¡Advertencia!
Para evitar posibles descargas eléctricas o lesiones personales, y para evitar posibles
daños al medidor o al equipo bajo prueba, adhiérase a las suguientes reglas:
-
Antes del uso del medidor inspeccione la carcasa. No use el medidor si
ésta está dañada o la carcasa (o parte de ella) está retirada. Busque roturas o
posibles faltas de plástico.
- Preste atención al aislamiento alrededor de los conectores.
- Inspeccione los cables de prueba por posibles daños en el aislante o
partesmetálicasexpuestas.Veriquelacontinuidaddeloscablesdeprueba.
Remplace los cables dañados por unos de idéntico número de modelo o
especicacioneseléctricasantesdelusodelmedidor.
- No aplique más del ratio de tensión marcado en el medidor, entre los
terminales o entre cualquier terminal y la toma de tierra.
- El Selector giratorio debe ser colocado en la posición correcta y no
realizar ningún cambio de rango durante la medición evitando posibles daños
al Medidor
- Si el valor a ser medido es desconocido, use la posición de máxima
medida y reduzca el rango poco a poco hasta que la lectura obtenida sea
satisfactoria.
-CuandoelMedidortrabajeconunatensiónecazporencimade60V en
DC o 30V rms en AC, se deberá tomar especial cuidado al peligro de posibles
descargas eléctricas.
- Utilice los terminales, funciones y rangos apropiados para sus mediciones.
-No utilice o almacene el Medidor en un ambiente de alta temperatura,
humedad, explosivo, inamable y fuertes campos magnéticos. La capacidad
del Medidor puede deteriorarse después de humedecerse.
-Cuando utilice los cables de prueba, mantenga sus dedos tras el protector.
-Desconecte la energía del circuito y descargue todos los condensadores de
alta tensión antes de testear la resistencia, continuidad y diodo.
- Antes de medir corriente, compruebe los fusibles del Medidor y desconecte la
energía del circuito antes de conectar el Medidor al circuito.
- Reemplace la batería tan pronto como el indicador de batería aparezca.
Con una batería baja, el Medidor puede producir falsas lecturas que pueden
conducir a descargas eléctricas o daños personales.
- Al reparar el Medidor, use solamente el mismo número de modelo o
repuestosdeidénticasespecicacioneseléctricas.
-El circuito interno del Medidor no debe ser alterado para evitar posibles
daños al Medidor y cualquier accidente.
-LasuperciedelMedidordebeserlimpiadaconuntraposuaveyun
detergente suave. No deben usarse disolventes ni abrasivos para prevenir la
corrosióndelasupercie,dañooaccidente.

6
Símbolos eléctricos internacionales
Los símbolos utilizados en el medidor y en este manual se explican en la Tabla 1-2.
Tabla 1-2. Símbolos eléctricos internacionales
Medición de AC o DC
Medición DC
Medición AC
Toma de tierra
Aislamiento doble
Advertencia. Consulte el manual de instrucciones
Decienciadelabatería
Conforme a las normas de la Unión Europea
2. FAMILIARIZACIÓN
Encendido del multímetro
Para encender el multímetro, gire el selector giratorio de OFF a cualquier otra posición.
Consideraciones sobre las baterías
El equipo utiliza una batería de 9V (NEDA 1604, 6F22, 006P). En los párrafos siguientes se
describen varias técnicas utilizables para ahorrar batería.
Apagadoautomático
La pantalla se mostrará en blanco y el medidor entrará en modo “sleep” si no ha cambiado la
posición del Selector giratorio o pulsado un botón durante un periodo determinado. Mientras que
está en modo de reposo, al pulsar el botón azul o girar el selector giratorio podría encender el
medidor. El medidor vuelve a la pantalla de la función seleccionada con el selector giratorio; todas
las funciones activadas previamente serán descartadas.
Elapagadoautomáticoestáprogramadopara10minutos.EnelmenúConguración(véase
elcapítulo5),puedeespecicareltiempo(10minutos,20minutos,30minutosuOFF).Sise
establece en OFF, el medidor mantiene activo hasta que gire el selector giratorio en OFF.
Apagadoderetroiluminaciónautomático
Pulse el botón LIGHT para encender la retroiluminación y presione LIGHT otra vez para
apagarlo. Pulse EXIT para salir de la función.
Pulse LIGHTparaseleccionarelniveldeiluminación(altaobaja).Enelmenúdeconguración
(vercapítulo5),sepuedeespecicarunahoraparaapagarautomáticamentelailuminaciónde
fondo (10 segundos, 20 segundos, 30 segundos u OFF). Si el periodo se establece en OFF, la
función de luz de fondo se desactiva.

7
Indicador de batería baja
Un icono de la batería constante en la esquina superior izquierda de la pantalla indica que la
batería está baja y deben ser reemplazada.
¡Advertencia!
Para evitar falsas lecturas, que podrían tener como consecuencia descargas
eléctricas o daños personales, reemplace la batería tan pronto como el icono de la
batería se lo indique.
La estructura del medidor
La Figura 2-1 muestra la estructura del medidor.
1. Pantalla LCD
2. Botones
3. Selector giratorio
4. Terminales de entrada
Figura 2-1. Estructura del medidor
Selectorgiratorio
El multímetro se enciende al seleccionar cualquier función de medición. El multímetro presenta
una pantalla estándar para esa función.
Lapantallatambiénpuedeestarinuenciadaporalgunasdelasdecisionestomadasenla
conguración.
Utilice el botón azul para seleccionar cualquier función alternativa de cada posición del selector
giratorio.
Cuando mueva el Selector giratorio de una función a otra, aparecerá una nueva pantalla para la
nueva función.
La Tabla 2-1 describe cada posición del selector giratorio.
Tabla 2-1. Selección del Selector giratorio
PosicióndelSelectorgiratorio FuncióndeSelectorgiratorio Función de la tecla azul
OFF Apaga el medidor Ninguna
Medición de la tensión DC Ninguna
Medición de la tensión AC Ninguna
(sólo COD. 51253) Medición de alto voltaje DC Ninguna
(sólo COD.
51254) Medición de alto voltaje DC
Medición de frecuencia
- Medición de la señal de
frecuencia del ciclo de trabajo
Medición de la resistencia -Prueba de diodos
- Prueba de continuidad

8
Medición de capacidad Ninguna
Medición de Frecuencia Medición de la señal de
frecuencia de ciclo de trabajo
(sólo COD. 51254) Medición de la temperatura en
centígrados
Medida de la temperatura en
Fahrenheit
Medición de corriente DC
(200µA, 2000µA)
Alternar entre corriente AC o
DC
(sólo COD. 51253) Medición de corriente DC (20
mA, 200 mA)
Alternar entre corriente AC o
DC
(sólo COD. 51254)
Medición de corriente DC (20
mA, 200 mA)
Alternar entre corriente AC o
DC
4 ~ 20mA bucle de corriente
como lectura %
Medición de corriente AC o
DC (10A)
Alternar entre AC o corriente
DC
Función de los botones
Los botones activan características que incrementan la función seleccionada con el Selector
giratorio. Los botones se muestran en la Tabla 2.2.
Pulse el botón una vez para acceder a la función principal (por ejemplo, almacenamiento).
Para acceder a la primera función adicional del botón (por ejemplo, retirada), presione y
mantenga presionado el botón durante más de 1 segundo. Ésta característica adicional aparece
justo encima a la derecha o en el lado izquierdo de la tecla correspondiente.
Para acceder a la segunda característica adicional del botón (p.ej. ), pulse una vez el botón
de nuevo, mientras que el medidor ya ha entrado en la primera característica adicional (p.ej.
recuperación). La segunda característica adicional aparece en el lado derecho por encima de las teclas
correspondientes
.
RANGE y EXIT tiene una sola característica adicional.
Tabla 2-2. Función de los botones
Botón Descripción Método de acceso
Programas:
AUTO salida y entrada a escala manual. En MANUAL,
seleccione el
rango de entrada. EXIT para regresar a AUTO. AUTO
es el predeterminado.
Pulse el botón una vez
Prueba de resistencia de la señal de calibración:
Cuando se prueba la resistencia de la señal de
calibración, es necesario
presionar este botón para cambiar la visualización de
máxima a 4000
, pero la precisión se mantiene sin cambios.
Presione y mantenga
presionado el botón
mientras enciende el
medidor.
Conguracióndeprograma:
Accesoalasseleccionesdeconguración,lapantalla
mostrará “SET”.
Enelmododeconguración,cadavezquepulseel
botón SETUP pasará a la siguiente selección.
Presione y mantenga
presionado el botón durante
más de 1 segundo.

9
(sólo
COD. 51253)
Pulse para enviar los datos, el modo auto
Apagado. La pantalla principal muestra “ENVIAR”.
Pulse EXIT para salir.
Pulse el botón una vez.
(sólo
COD. 51253)
Conguracióndeprograma:
Enlaconguración,pulseOFFparaseleccionar
HIGH y LOW.
Pulse una vez el botón;
después de entrar en el
mododeconguración.
(sólo
COD. 51254)
Características de almacenamiento:
Almacena el valor de medición actual. Pulse EXIT
para salir de
la función de almacenamiento.
Pulse el botón una vez.
Característica de recuperación:
Recupera el valor almacenado. Pulse EXIT para
salir de la Memoria de almacenamiento.
Presione y mantenga
presionado el botón durante
más de un segundo.
Conguracióndeprograma:
Enlaconguración,pulseOFFparaseleccionar
HIGH y LOW.
Pulse el botón
una vez después de
entrar en el modo de
conguración.
Función de retención:
Presione HOLD para congelar el valor mostrado.
Pulse EXIT para
liberar la pantalla.
Pulse el botón una vez.
Función de retención de pico:
Pulse para acceder a la función de retención de
pico, la pantalla principal
muestra los picos retenidos. Pulse EXIT para salir.
Presione y mantenga
presionado el botón durante
más de un segundo.
-Enconguración,cadavezquepresione
selecciona el dígito que desea editar.
- En recuperación, presione para activar la función
SEND (COD. 51254 solamente)
- En almacén, pulse para borrar todos los datos
almacenados de la lectura.
Pulse el botón una vez
después de entrar en
conguracióno
recuperación o
almacenamiento.
Pulse el botón para salir de ciertas funciones
yelmedidorvolveráalaconguración
predeterminada de fábrica.
Pulse una botón una vez.
Pulse para encender la retroiluminación. Es
posible alternar entre el
primer y segundo nivel de retroiluminación y salir
de la función pulsando
este botón. Después de salir de la función de la
luz, es necesario
presionar y mantener presionado el botón durante
más de 1 segundo para encender la
luz de fondo de nuevo.
Pulse el botón durante más
de un segundo.

10
(sólo
COD. 51253)
Pulse para mostrar max, min y los valores medios.
Pulse EXIT para parar y volver al modo de
medición.
Pulse el botón una vez.
Enconguración,cadavezquepulsedecrementa
una opción.
Pulse el botón una vez
después de entrar en modo
de envío.
(sólo
COD. 51254)
Pulse para mostrar max, min y los valores medios.
Pulse EXIT para parar y volver al modo de
medición.
Pulse el botón una vez.
Pulse para enviar los datos, el modo auto apagado.
La pantalla principal muestra “SEND”.
Pulse EXIT para salir.
Presione y mantenga
presionado
el botón durante más de 1
segundo.
Cadavezquepulseenconguración
Cada vez que pulse
en recuperación
Cada vez que pulse
en almacenamiento, intervalo.
Pulse EXIT para salir.
Pulse el botón una vez
después de entrar en
modo envío.
Pulse para entrar en modo relativo.
La pantalla secundaria izquierda muestra la
medición del valor actual. La pantalla secundaria
derecha muestra el valor almacenado.
La pantalla principal muestra el valor de medición
actual menos el valor almacenado.
Pulse EXIT para salir del modo relativo.
Pulse el botón una vez.
Enconguración,cadavezquepresione
incrementa una opción.
En recuperación, cada vez que pulse recupera la
siguiente lectura almacenada.
En almacenamiento, cada vez que pulse aumenta
un segundo el intervalo de memorización.
Presione y mantenga
presionado el botón durante
más de 1 segundo.
Botón amarillo
Cuando está en modo de medición AC, presione
botón amarillo para mostrar AC + DC valor True
RMS en la pantalla principal y
la pantalla secundaria izquierda “AC + DC”.
Pulse el botón una vez.
Botón azul
Utilice el botón azul para seleccionar otras
funciones alternativas (etiquetada, en letras azules)
Pulse el botón una vez.
Presione y mantenga presionado el botón mientras
enciende el medidor para cambiar a 2000 para
todas las funciones.
Es más rápido cuando el medidor está en modo
medición de 4000.
Después de que el medidor ha reanudado desde
el apagado automático o encender y apagar de
nuevo, el medidor volverá al modo normal de
medición (20.000).

11
LasfuncionesdelmedidorVsPantalla
La Tabla 2-3 muestra la relación de la función y la pantalla:
Tabla 2-3 Funciones Vs Pantalla
Función Pantalla principal Pantalla secundaria
derecha
Pantalla secundaria
izquierda
DCV El valor de la tensión
DC a prueba No hay imagen Rango completo: 2,
20, 200, 1000
ACV El valor de la tensión
AC a prueba
Valor de la frecuencia
de prueba : 45.00Hz~
100.0kHz
Rango completo: 2,
20, 200, 750
Rango completo: 200
DCmV La prueba de valor
DCmV No hay imagen
Valor de la prueba de
resistencia No hay imagen Rango completo: 200,
2, 20, 200, 2, 20
Valor de la prueba de
resistencia No hay imagen Valor del rango
completo: 200
Valor de la prueba de
resistencia No hay imagen Rango completo 2
Hz Valor de la prueba de
frecuencia No hay imagen
Rango completo: 20,
200, 2, 20, 200, 2,
20, 200
Valor de la prueba de
la capacidad No hay imagen Rango completo: 20,
200, 2, 20, 200, 2, 20
ºC
(sólo COD. 51254) Valor probado ºC No hay imagen 1000
ºF
(sólo COD. 51254) Valor probado ºF No hay imagen 1832
Valor de la tensión
probada DCµA No hay imagen Rango completo 200,
2000
Valor de la tensión
probada ACµA
Valor de la frecuencia:
45.00Hz~10.00kHz
Rango completo 200,
2000
DCmA Valor de la tensión
probada DCmA No hay imagen Rango completo: 20,
200
ACmA Valor de la tensión
probada ACmA
Valor de la frecuencia:
45.00Hz~ 10.00kHz
Rango completo: 200,
2000
DCA Valor probado de la
corriente DC No hay imagen Rango completo: 10
ACA Valor probado de la
corriente AC
Valor de la frecuencia:
45.00Hz~ 10.00kHz Rango completo: 10
STO
(sólo COD. 51254)
Valor de medición
actual
Valor correspondiente
a cada número.
Aumentar en uno
el número del
índice. Número de
clasicación:nº0001
~ nº 0100
RCL
(sólo COD. 51254) El valor a recuperar Número total de
valores almacenador
Número de índice-, nº
0001 ~ nº 0100

12
MAX MIN Capítulo 2 Familiarización – Utilizando MAX MIN
El valor presente
menos el valor
almacenado
Valor almacenado El valor presente.
Seleccionarelrango
Pulse RANGEparaseleccionarunrangojoolafuncióndeajusteautomático.
Rango automático (AUTO iluminado en la pantalla) siempre aparece incialmente cuando se
selecciona una nueva función. En rango automático, el medidor selecciona el rango de entrada más
bajo posible, asegurando que la lectura aparece con la mayor resolución disponible.
Si ya está en AUTO, pulse RANGE para entrar a escala manual en el rango actual. A
continuación, puede seleccionar el rango manual siguiente cada vez que pulse RANGE.
Regrese a escala automática pulsando EXIT.
Tenga en cuenta que no existe rango manual en la función REL.
Descripción de la pantalla
Las características de la pantalla se muestran en la Figura 2-2 y se describen en la Tabla 4.2.
Figura 2-2. Características de la pantalla
Tabla 2-4. Características de la pantalla
Nº. Símbolo Signicado
1MAX Máxima lectura
MIN Mínima lectura
2Nº Secuencia de la lectura
3ºC, ºF (sólo COD. 51254) Grados Celsius (por defecto) o Fahrenheit
4Indica lectura negativa
5
La batería está baja.
Advertencia:Paraevitarlecturasfalsasque
podríanconduciraunaposibledescargaeléctrica
o lesiones personales, reemplace la batería tan
pronto como el indicador de la batería se lo
indique.
6 SET Funcióndeconguraciónencendida.
7 TrueRMS Indicador de valor True RMS
8 AC+DC Para las funciones DCV y DCA, la lectura representa
las mediciones True RMS total de AC y DC.

13
9
, K , M
: Ohmio. Unidad de resistencia.
k : Kilohmio. 1x10³ ó 1000 ohmios
M: Megaohmio. 1x10⁶ ó 1,000,000 ohmios
Hz, kHz, mHz
Hz : Hertz. La unidad de frecuencia en ciclos/
segundo
kHz: kilohercio. 1x10³ ó 1000 hertz
MHz: Megahercio, 1x10⁶ ó 1,000,000 hercio
mV, V V: Voltio. Unidad de la tensión
mV: Millivolt. 1x10⁻³ ó 0.001 volts
µA, mA, A
A: Amperios. Unidad de corriente
mA: Miliamperio, 1x10⁻³ ó 0.001 amperios
µA:Microamp.1x10-6 ó 0.000001 amperios
nF,µF, mF
Farad. Unidad de capacidad
nF: nano Faradio. 1x10⁻⁹ ó 0.000000001 faradios
µF:Microfarad.1x10-6 or 0.000001 faradios
mF: Millifarad. 1x10⁻³ ó 0.001 faradios
10 Función automática de apagado activada
11 Prueba de continuidad
12 STO (sólo COD. 51254) Almacén de datos activo
RCL (sólo COD. 51254) Recuperación de datos activo
13 Modo relativo activo mostrando el valor actual
menos el valor almacenado
14 LOW El indicador para el límite mínimo de la
conguración
HIGH Elindicadorparaellímitemáximodeconguración
15 AUTO
El medidor está en modo selección automática en
la que el medidor selecciona automáticamente el
rango con la mejor resolución.
16 SEND El envió de datos está en marcha
17 Retroiluminación activada
18 HOLD El modo de retención de datos está activado.
19 PEAK HOLD El modo Peak Hold está activado
20 Prueba de diodo
21 % Señal de frecuencia del ciclo de trabajo
4 ~ 20mA bucle de corriente con % de lectura
22 OL El valor de entrada es demasiado grande para el
rango seleccionado
23 Grácodebarrasanalógico Proporciona una indicación analógica de la entrada
actual, respuesta rápida

14
Grácodebarrasanalógico
Elgrácodebarrasproporcionaunaindicaciónanalógicadelamedidadeentrada.Parala
mayoríadelasfuncionesdemedición,elgrácodebarrasseactualiza10vecesporsegundo.
Utilización de MAX MIN
El modo MAX MIN almacena los valores de entrada máximo y mínimo. Cuando la entrada está
por debajo del valor mínimo almacenado o por encima del valor máximo almacenado, el medidor
suena y almacena el nuevo valor.
Presione MAX MIN para activar el modo MAX MIN. El tiempo de muestreo es cada 2 segundos.
La lectura máxima (MAX) se muestran en la pantalla secundaria izquierda. La lectura mínima
(MIN) se muestran en la pantalla secundaria derecha. La pantalla principal muestra la lectura de la
medición actual.
Presione MAX MIN por segunda vez. La lectura de la medición actual se muestra en la pantalla
secundaria izquierda. La lectura mínima o MIN se muestran en la pantalla secundaria derecha. La
pantalla principal muestra el valor máximo.
Presione MAX MIN por tercera vez. La lectura de la medición actual se muestra en la pantalla
secundaria izquierda. La lectura máxima o MAX se muestra en la pantalla secundaria derecha. La
pantalla principal muestra el valor mínimo.
Cada vez que se pulse MAX MIN pasará a través de los modos indicados arriba.
Para salir del modo MIN MAX, pulse EXIT.
Pulse HOLD para detener la actualización de la lectura del medidor.
El modo MIN MAX sólo se puede utilizar en el modo de rango manual.
3. MEDICIONES
Introducción
En el capítulo 3 se explica cómo realizar las mediciones. La mayoría de las funciones de
medición pueden ser seleccionadas con el selector giratorio.
Mientrasquelasletrasosímbolosidenticanlasfuncionesprincipales;lasletrasazuleso
símbolosazulesidenticanlasfuncionesalternativas.Pulseelbotónazulparaaccederaestas
funciones alternativas.
A. Medición de tensión
¡Advertencia!
Para evitar posibles daños personales o daños al medidor provocados por
descargas eléctricas, no intente medir tensiones superiores a 1000 V, aunque
se puedan obtener.
Figura 3-1. Medida de tensión
Rojo Negro

15
Para medir tensión, ajuste el medidor como en la Figura 3-1 y haga lo siguiente:
1. Inserte el cable rojo de prueba en el terminal V y el cable negro en el terminal COM.
2. COD. 51253: Seleccione o o o COD. 51254: Seleccione o o .
3. Conecte los cables de prueba con el objeto a medir.
4. El valor medido se muestra en la pantalla.
La medida AC muestra el valor True RMS.
La medida DC muestra el valor efectivo de la onda senoidal (respuesta del valor).
Cuando una función de ACV se ha seleccionado, puede pulsar el botón amarillo para ver el
valor AC + DC True RMS real en la pantalla principal. Para salir, pulse EXIT.
El botón azul está entre la frecuencia y el ciclo de trabajo .
Nota
- Cuando se mide la tensión, el medidor actúa en torno a una impedancia de 10M ( y ) o
2.5G ( ) en paralelo con el circuito. Este efecto de carga puede causar errores de medición
encircuitosdealtaimpedancia.Enlamayoríadeloscasos,elerroresinsignicante(0,1%o
menos) si la impedancia del circuito es de 10k o menos.
- Se debe tener un especial cuidado en la medición de alta tensión.
-Cuando la medición de tensión se haya completado, desconecte la conexión entre las puntas
de prueba y el circuito bajo prueba y retire los cables de los terminales de entrada del medidor.
B. Medición de corriente
¡Advertencia!
Si el fusible se funde durante la medición, el medidor se podría dañar o el propio
operador podría resultar lastimado.
Para evitar posibles daños en el medidor o en el equipo bajo prueba, compruebe los
fusibles antes de medir la corriente. Utilice los terminales, función y el rango de la
medición adecuados. Nunca coloque las puntas de prueba en paralelo con un circuito o
componente cuando los conductores están conectados a los terminales de corriente.
Para medir la corriente AC o DC, ajuste el medidor como en la Figura 3-2 y haga lo siguiente:
1. Apague la alimentación del circuito. Descargue todos los condensadores de alta tensión.
2. Inserte el cable rojo de prueba en el terminal mAµA o A y el cable negro de prueba en el
terminal COM
3. Si usted está utilizando el terminal A, ajuste el selector giratorio a .Si usted está
utilizando el terminal mAµA, fíjelo a µA 20000µA , o mA (COD. 51253) o %
(COD. 51254) para la corriente por encima de 20000µA.
Figura 3-2. Medición de corriente
Rojo Negro

16
4. Medición DC viene por defecto, pulse el botón azul para seleccionar la medición AC.
5. Abra el circuito a probar. Sitúe el cable de prueba rojo en la parte más positiva de la ruptura;
lleve el cable de prueba negro al lado más negativo de la ruptura. Invertir los cables producirá una
lectura negativa, pero no dañará el Medidor.
6. Encienda el circuito y luego lea la pantalla.
La medición AC muestra el valor True RMS.
7. La medición DC muestra el valor efectivo de la onda sinusoidal (respuesta del valor)
Apague la alimentación del circuito y descargue todos los condensadores de alta tensión. Retire
el medidor y restablezca el circuito para conseguir un funcionamiento normal.
Cuando una función ACA se ha seleccionado, puede pulsar el botón amarillo para ver el valor
AC + DC True RMS en la pantalla principal. Para salir, pulse EXIT.
Nota
- Si el valor a medir es desconocido, use la posición de medición máxima y reduzca el rango
poco a poco hasta que se consiga una lectura satisfactoria.
- Cuando la corriente medida sea de 5A, la medición continua será permitida.
- Cuando la corriente medida sea de entre 5 A-10A, la medición continua es de 10 segundos y el
intervalo mayor que 15 minutos.
- Cuando las pruebas de medición de corriente se hayan completado, desconecte la conexión
entre los cables de prueba y el circuito bajo prueba y retire los cables de los terminales de entrada
del medidor.
C. Medición de resistencia
¡Advertencia!
Para evitar posibles daños personales, por favor, no trabaje con voltajes de
entrada superiores a 60V DC o 30V AC rms.
Para evitar posibles daños al medidor o en los dispositivos bajo prueba,
desconecte la alimentación del circuito y descargue todos los condensadores
de alta tensión antes de medir la resistencia.
Para medir la resistencia, ajuste el medidor como se muestra en la Figura 3-3 y siga el siguiente
procedimiento
:
1. Inserte el cable rojo de prueba en el terminal y el cable negro en el terminal COM.
2. Fije el selector giratorio a ; pulse el botón azul para seleccionar el modo de medición
.
3. Conecte los cables de prueba al objeto a medir.
El valor medido se muestra en la pantalla.
El botón AZUL cicla entre resistencia, continuidad y diodo.
Figura 3-3. Medición de la resistencia
Rojo Negro

17
Nota
- Cuando se mide baja resistencia, los cables de prueba pueden agregar de 0.1 a 0.2 de error
en la medición.
Para probar los cables de prueba, junte sus puntas y lea la resisrencia de los mismos.Si es
necesario, puede pulsar REL para restar automáticamente este valor.
- Para la medición de alta resistencia (>1M ), lo normal es tomar varios segundos para obtener
una lectura estable.
Conelndeobtenerlecturasdeprecisión,utilicelapuntadepruebalomáscortaposible.
- Si la pantalla LCD muestra OL ello indica circuito abierto o que el valor de la resistencia a
prueba es mayor que el alcance máximo del medidor.
- Cuando se prueba la resistencia de la señal del calibrador, es necesario mantener pulsado el
botón ESCALA mientras enciende el medidor para cambiar la pantalla máxima de 2000, pero la
precisión no cambia.
- Cuando la medición de resistencia se haya completado, desconecte la conexión entre los
cables de prueba y el circuito bajo prueba y retirelos de los terminales de entrada.
D. Prueba de continuidad
¡Advertencia!
Para evitar posibles daños personales, por favor, no trabaje con voltajes de
entrada superiores a 60V DC o 30V AC rms.
Para evitar posibles daños al medidor o en los dispositivos bajo prueba,
desconecte la alimentación del circuito y descargue todos los condensadores de
alta tensión antes de medir la continuidad.
Para probar la continuidad, ajuste el medidor como en la Figura 3-4 y haga lo siguiente:
1. Inserte el cable rojo de prueba en el terminal y el negro en el terminal COM.
2. Fije el selector giratorio a ; pulse el botón azul para seleccionar y conecte los
cables de prueba con el objeto de ser probado.
3. El medidor emite un sonido de forma continua en condición abierto, que es prueba de
resistencia≤50 .
El botón AZUL cicla entre la resistencia, continuidad y diodos.
Figura 3-4. Prueba de continuidad
Nota
Tensión del circuito abierto en torno a-1.2V y el rango de medición 400.
Cuando la prueba de continuidad haya sido completada, desconecte la conexión entre los
cables de prueba y el circuito bajo prueba y retire los cables de los terminales de entrada.
Rojo Negro

18
E. Prueba de diodos
¡Advertencia!
Para evitar posibles daños personales, por favor, no trabaje con tensiones de
entrada superiores a 60V DC o 30V AC rms.
Para evitar daños al medidor o en los dispositivos bajo prueba, desconecte la
alimentación del circuito y descargue todos los condensadores de alta tensión
antes de la prueba de diodos.
Use la prueba de diodos para comprobar los diodos, transistores y otros dispositivos
semiconductores. La prueba de diodos envía una corriente a través de la unión semiconductora,
mediendo la caída de tensión a través de la unión. Una buena unión de silicio cae entre 0,5 V y
0.8V.
Para probar el diodo fuera de un circuito, ajuste el medidor como en la Figura 3-5 y haga lo
siguiente:
1.InserteelcablerojodepruebaenelterminalΩyelcablenegroenelterminalCOM.
2. Fije el selector giratorio a ; y pulse el botón azul para seleccionar modo de
medición.
Figura 3-5. Prueba de diodos
3. Para las lecturas de caída de tensión en cualquiera de los componentes semiconductores,
coloque el cable rojo de prueba en el ánodo del componente y coloque el cable de prueba negro
en el cátodo del componente. La polaridad del cable rojo es “+”, mientras que la polaridad del
cable de prueba negro es “-”.
El valor medido se muestra en la pantalla.
El botón AZUL cicla entre la resistencia, continuidad y diodos.
Nota
- En un circuito, un diodo en buen estado debe producir una lectura de caída de tensión de 0,5V
a 0,8V.
- Conecte los cables a los terminales apropiados como se indica arriba para evitar que el
medidor muestre error.
- La pantalla LCD mostrará OL indicando ya sea circuito abierto o una conexión errónea de
polaridad.
-
La unidad de diodo es voltios (V), que muestra el valor de la conexión positiva de caída de tensión.
- Tensión de circuito abierto aproximadamente 2.8V.
Rojo Negro

19
- Cuando la prueba de diodo haya sido completada, desconecte la conexión entre los cables de
prueba y el circuito bajo prueba y retire los cables de los terminales de entrada.
F. Medición de capacidad
¡Advertencia!
Para asegurar la precisión, el interior del medidor es descargado contra
el condensador probado. “DIS.C” se mostrará en la pantalla cuando esté
descargandose, este proceso será bastante lento.
Para evitar daños al medidor o al equipo bajo prueba, desconecte la
alimentación del circuito y descargue todos los condensadores de alta tensión
antes de medir la capacidad.
UtilicelafuncióndetensiónDCparaconrmarqueelcondensadorestádescargado.
Para medir la capacidad, ajuste el medidor como se muestra en la Figura 3-6 y haga lo siguiente:
1. Inserte el cable rojo de prueba en el terminal y el negro en el terminal COM.
2. Fije el selector giratorio a .
Para mejorar la precisión de la medición de los condensadores de pequeño valor (menos de
10nF), presione REL con las puntas de prueba abiertos para extraer la capacidad residual del
medidor y los cables.
3. Se recomienda el uso del clip de testeo para llevar a cabo la medición, para reducir los
efectos del condensador interno de distribución.
Nota
- La pantalla LCD muestra OL. indicando que el condensador no llega o sobrepasa los rangos
mínimos y máximos.
-Condensadoresdemásde400¦ÌFtardanmástiempo.Elgrácodebarrasanalógicomuestrael
tiempo que queda antes de terminar la medición.
- Cuando la medición de capacidad haya sido completada, desconecte la conexión entre los
cables de prueba y el circuito bajo prueba y quite los cables de los terminales de entrada del
medidor.
Figura 3-6. Medición de capacidad
Rojo Negro

20
G.Medicióndelafrecuencia/Ciclodetrabajo
¡Advertencia!
Para evitar posibles daños personales, por favor, no trate de voltaje de entrada
superior a 30 V rms.
Para medir la frecuencia y ciclo de trabajo, conecte el medidor como en la Figura 3-7 y haga lo
siguiente:
1. Inserte el cable rojo de prueba en el terminal Hz y el cable negro en el terminal COM.
2. Fije el selector giratorio en (COD. 51253) o (COD. 51254) y pulse el botón azul
para seleccionar el modo de medición para medir la frecuencia Hz o % para la medición del ciclo
de trabajo.
El botón azul cicla entre , la frecuencia y ciclo de trabajo.
3. Conecte los cables de prueba al objeto a medir.
El valor medido se muestra en la pantalla principal.
Figura 3-7. Frecuencia / Ciclo de medición
Nota
El requisito de la amplitud de entrada “a” es el siguiente:
Cuando 10Hz~40MHz: 200 mV a 30Vrms;
>40MHz:Noespecicada
Cuando la medición Hz ha sido completada, desconecte la conexión entre las puntas de prueba
y el circuito bajo prueba y quite los cables de los terminales de entrada.
H. Medición de la temperatura (sólo COD. 51254)
¡Advertencia!
Para evitar posibles daños personales, por favor, no trate de tensiones de entrada
superiores a 60V DC o 30V AC rms.
Para medir la temperatura, ajuste el medidor como se muestra en la Figura 3-8 y siga los
siguientes pasos:
Fije el selector giratorio a ºC ºF, en la pantalla se mostrará OL. Una los extremos de los
cables de prueba para mostrar la temperatura ambiente. El medidor, mide por defecto en grados
centígrados pudiendo cambiar de unidades pulsando el botón azul una vez que haya seleccionado
Rojo Negro

21
la función de la temperatura.
1.Insertelasondadetemperaturaenelmedidorcomoenlagura8.
2. Coloque la sonda de temperatura en objeto a medir.
3. El valor medido se muestra en la pantalla después de varios segundos.
Figura 3-8. Medición de la Temperatura
Nota
Coloque el medidor en un ambiente de entre 18 ºC y 23 ºC. En caso contrario, puede ser
obtenida una lectura falsa, especialmente midiendo bajas temperaturas.
La sonda de temperatura incluida, sólo se puede utilizar con temperaturas por debajo de 230 ºC.
Cuando la medición de temperatura haya sido completada, retire la sonda de temperatura de la
toma de usos múltiples.
4 ~ 20 mA de corriente como% de lectura de salida (sólo COD. 51254
Se muestra el valor medido mA o nivel de salida en %, en una escala de 4 a 20 mA.
Para utilizar la función de 4 ~ 20mA, conectar el medidor de la siguiente manera:
1. Fije el selector giratorio a , y pulse el botón azul para seleccionar (4~20mA) %.
2. Para proseguir con el procedimiento siga: B. Medición de la corriente: Medición de corriente
DC(Figura 3-2).
Cuando las lecturas obtenidas sean las siguientes
:
<4 mA, la pantalla principal muestra LO 4 mA, la pantalla principal muestra 0%. ....
20 mA, la pantalla principal muestra 100%> 20 mA, la pantalla principal muestra HI
4.MEMORIZACION,RECUPERACIONYENVIO
Introducción
En el capítulo 4 se explica cómo utilizar las características de almacenamiento, recuperación
y comunicación disponibles en el medidor. Tenga en cuenta que las características de
almacenamiento y recuperación de datos sólo están disponibles en el modelo COD. 51254.
Memorización y borrado de lecturas
Para almacenar las lecturas, haga lo siguiente:

22
- Pulse STOREunavez,STOy“no.xxxx”apareceparaconrmarlaoperaciónylapantalla
secundaria izquierda mostrará la lectura de la medición actual. Pulse para alternar entre
eliminación de las lecturas almacenadas y empezar desde la primera lectura, o empezar desde la
última lectura almacenada. La pantalla secundaria derecha muestra el número de registros.
- Pulse STORE por segunda vez, y aparecerá STO. La pantalla secundaria izquierda muestra el
intervalo de tiempo de almacenamiento en segundos, que está programado a cero. Para cambiar el
intervalo pulsa + o -. El intervalo puede ser de hasta 255 segundos o tan bajo como 0 segundos.
- Mantenga pulsado STOREparaaccederalaconguraciónrápida.
- Pulse STORE por tercera vez, STO ya no aparece.
La pantalla secundaria izquierda muestra el aumento del número de índice. La pantalla
secundaria derecha muestra el valor del número de índice correspondiente, la pantalla principal
muestra la lectura de la medición actual.
- Si no hay un tiempo establecido para guardar la lectura, pulse STORE para guardar una lectura.
- Para salir, pulse EXIT.
- El apagado automático se desactivará después de entrar en este modo.
Recuperacióndelecturasguardadas
Utilice el siguiente procedimiento para recuperar la lectura almacenada:
- Pulse RECALLpararecuperarelvaloralmacenadoyRCLapareceráparaconrmarla
operación.
- La pantalla secundaria izquierda muestra el número de índice “no.xxxx”.
- La pantalla principal muestra los datos correspondientes.
- La pantalla secundaria derecha muestra el número total de datos almacenados.
- Pulse el botón para activar la función de envío para exportar los datos al ordenador vía
USB. El software muestra el tiempo de almacenamiento de datos y también el valor de los datos.
Después de que la transferencia de datos haya sido completada, la función de envío se
desactivará automáticamente.
- Pulse + o - para ver la lectura adicional almacenada.
- Presione y sostenga RECALL para acceder a recuperación rápida.
- Pulse EXIT para salir de recuperación.
5. CAMBIO DE LA CONFIGURACION POR DEFECTO
Introducción
Elmedidorlepermitecambiarlaconguraciónquetienepordefecto,cambiandolasopciones
deconguraciónrealizadosenlafábrica.
Estosajustesestánalmacenadosypuedensercambiadosenelmodoconguraciónmedianteel
procedimiento descrito en este capítulo.
Seleccióndelasopcionesdeconguración
Paraentrarenelmododeconguración,enciendaelmedidorymantengapresionadoelbotón
SETUPdurantemásde1segundo.Serecomiendacambiarlaconguraciónpredeterminadasólo
cuando el medidor esté en modo de medición de DCV.
Enelmododeconguración,cadavezquepulseelbotónSETUPpasaráalasiguienteselección.
Cada vez que pulse + o - se decrementará o aumentará una opción.

23
Cadaseleccióndeconguraciónyopciónapareceenlapantallaprincipalenlasecuenciaquese
muestra en la Tabla 5.1.
Table 5-1. Selección de conguración
Selección Opción
Predet.
de
fábrica
Descripción
HIGH
Max. 20000; Pulse para
seleccionar OFF
Pulse para seleccionar el
dígito que desea editar
OFF En los límites superiores, no suena
continuamente
LOW
Max. 20000; Pulse para
seleccionar OFF
Pulse para seleccionar el
dígito que desea editar
OFF En los límites más bajos, no suena
continuamente
10
10 min
Apagado en 10 min
20 Apagado en 20 min
30 Apagado en 30 min
OFF Función de apagado desactivada
11
Emite un pitido continuo y se ilumina el
icono de encendido
OFF No hay sonido, el icono parpadea
10
10
La luz de fondo se apagará en 10
segundos
20 La luz de fondo se apagará en 20
segundos
30 La luz de fondo se apagará en 30
segundos
OFF Desactivar la función de retroiluminación
Barra
gráco
analógico
El 0 está en el lado izquierdo
El 0 está
en el
centro
El 0 está en el centro Sólo puede aplicarse a funciones DCV,
DCI y °C/°F
Guardandolasopcionesdeconguración
Encadaopcióndeconguración,guardesuelecciónysalgadelaconguraciónpulsandoEXIT
o avance a la siguiente opción pulsando +.
Parasalirdelmododeconguraciónsinguardarlaopciónactual,pulseSETUP.

24
6. MANTENIMIENTO
Este capítulo proporciona información básica; incluyendo mantenimiento de la batería de e
instrucciones para la sustitución del fusible.
¡Advertencia!
Nointenterepararodarservicioalmedidoramenosqueestécalicadopara
hacerlo y tenga la calibración correspondiente, pruebas de rendimiento e
información de servicio.
A. Servicios Generales
- Limpie periódicamente la carcasa con un paño húmedo y detergente. No utilice productos
abrasivos o disolventes.
- Para limpiar los terminales utilice una barra de algodón con detergente, ya que la suciedad o la
humedad en los terminales puede afectar a las lecturas.
- Apague el medidor en la posición OFF cuando no esté en uso.
- Saque la batería cuando no se utilice durante un periodo largo de tiempo.
- No utilice ni guarde el medidor en un ambientes húmedos, de temperaturas elevadas,
inamables,explosivosofuertescamposmagnéticos.
B.Sustitucióndelosfusibles
¡Advertencia!
Para evitar descargas eléctricas o lesiones personales o daños al medidor,
utilicelosfusiblesespecicadossólodeacuerdoconelsiguiente
procedimiento.
Siga la Figura 6-1 y haga lo siguiente para reemplazar el fusible del medidor:
- Gire el selector giratorio hasta la posición OFF y retire todas las conexiones de los terminales.
- Quite los 5 tornillos de la parte inferior de la carcasa.
-Retireelfusible,aojándolosuavementeysáquelodesusoporte.
-Instaleunfusibledelmismotipoyasegúresedequesejarmementeenelsoporte.
Fusible 1: 0,5 A, 250V fusible, tipo rápido, Ø5 x 20 mm
Fusible 2: 10 A, 250, fusible tipo rápido, Ø5 x 20 mm
- Vuelva a unir la parte inferior y superior de la caja, e instale los 5 tornillos.

25
La sustitución de los fusibles rara vez es necesaria. La quema de un fusible siempre es el
resultado de un funcionamiento incorrecto.
Figura 6-1. Sustitución de los fusibles
C. Sustitución de la batería
¡Advertencia!
Paraevitarasaslecturasquepodríanconduciraposiblesdescargaseléctricas
o lesiones personales, reemplace la batería tan pronto como el indicador de
batería aparezca “ ”.
Asegúrese de que los cables de prueba están desconectados del circuito antes de abrir la base de
la carcasa.
Siga la Figura 6-2 y haga lo siguiente para reemplazar la batería:
- Gire el selector giratorio hasta la posición OFF y retire todas las conexiones de los terminales.
- Retire el tornillo del compartimiento de baterías, y separe el compartimento de la batería de la
carcasa posterior.
- Reemplacela por una nueva batería de 9V 6F22.
- Vuelva a unir la base de la carcasa y el compartimiento de las pilas, y vuelva a colocar el
tornillo.
Figura 6-2. Reemplazo de la batería
7. ESPECIFICACIONES
Fusible
Batería

26
Seguridadyconformidades
Tensión máxima entre cualquier terminal
y toma a tierra Referente a la protección de la tensión de entrada.
Certicación
Conformidades IEC 61010 CAT.III1000V, CAT.IV 600V y doble
aislamiento de sobretensión
Protección con fusibles para el
terminal de entrada µAmA:0.5A, fusible de 250V, tipo rápido, Ø5 x 20 mm
Protección de fusible para una
terminal de entrada A: 10 A, 250, fusibles tipo rápido, Ø5 x 20 mm
Especicacionesfísicas
Pantalla (LCD)
Digital: 20.000 en la pantalla principal,
actualizaciones 2-3 veces / segundo.
2000 con dos pantallas secundarias.
Analógico: 40 segmentos, actualizaciones de 10
veces / segundo
Temperatura de funcionamiento 0ºC~40ºC (32ºF~104ºF)
Temperatura de almacenamiento -10ºC~50ºC (14ºF~122ºF)
Humedad relativa ≤75%@0ºCa30ºCpordebajo;
50%@30ºCy40ºC:
Tipo de la batería 9V NEDA 1604 ó 6F22 ó 006P
Compatibilidad electromagnética
- En un radio por debajo de 1 V / m :
Precisióntotal=exactitudespecicada+5%del
rango
- En un radio sobre 1 V / m :
Noseespecicalaprecisiónasignada
Dimensiones (H x W x L) 177 x 85 x 40mm
Peso Aprox. 340g (incluyendo la batería)
Especicacionesgenerales
Rango Auto
Polaridad Auto
Sobrecarga Pantalla OL
Excepto en 4 ~ 20mA el rango muestran HI o LO
Decienciadelabatería Muestra
“ ”

27
Resumen de características
Pantalla Tri digital
Grácodebarrasanalógico
Primaria: cuenta con 20.000
Secundaria izquierda: 2000
Secundaria derecha: 2000
Grácodebarras:40segmentos,actualizaciones10
veces / segundo
Luz de fondo con 2 niveles de brillo Retroiluminación para lecturas claras en áreas mal
iluminadas
Ajuste automático El medidor selecciona automáticamente el mejor
rango.
AC+DC True RMS, AC RMS Opciones de sólo AC o AC + DC.
Retención de datos Retención de lecturas en la pantalla.
Continuidad Se emite un sonido para lecturas de resistencia por
debajo del umbral.
Grácodebarras 40 segmentos
Ciclo de trabajo Medida de la señal encendida o apagada tiempo en%
Modo MIN MAX Registro máximo y mínimo
Puerta de acceso a la batería Batería reemplazable
Especicacionesbásicas
Función Rangos/Descripción
DC Voltaje 0 a 1000V
Voltaje AC, RMS De 0 a 1000V, 100 kHz de ancho de banda
Precisión básica Tensión DC: COD. 51253: 0.1 %, COD. 51254: 0.005%
Tensión AC: COD. 51253: 0.8 %, COD. 51254: 0.6 %
Corriente DC de 0 a 10 A (5 ~ 10A por 10 seg, intervalo de 15 min)
Corriente AC, True RMS 0 a 10 A (5 ~ 10A por 10 seg, intervalo de 15 min)
Resistencia 0 a 20M
Capacidad 0 a 20mF
Frecuencia 0~200MHz
Temperatura -40ºC~1000ºC (-40ºF~1832ºF)
Almacenar lecturas
Hasta 100 lecturas pueden ser guardadas por el usuario en una
memoria para COD. 51254. Estas lecturas se pueden ver utilizando
la función de recuperación.
Especicacionesdetalladasdeprecisión
Precisión:([%delectura]+[númerodedígitosmenossignicativos),garantíade1año.
Temperatura de servicio: 18 ºC ~ 28 ºC
Humedad relativa: 75% de HR

28
A.VoltajeDC
Rango Resolución Precisión Protección de
sobrecarga
Impedancia de
entrada
COD. 51253 COD. 51254
200mV 0.01mV
±(0.1%+8)
±(0.05%+5)
1000V
Alrededor de
2.5G
2V 0.0001V
±(0.08%+5) Alrededor de
10M
20V 0.001V
200V 0.01V
1000V 0.1V ±(0.15%+8) ±(0.1%+8)
B.VoltajeAC(AC+DCmediciónAC+DCdisponible)
Rango Resolución Ancho de banda Precisión Impedancia de
entrada
COD. 51253 COD. 51254
2V 0.0001V
45Hz~1kHz ±(0.8%+40) ±(0.6%+40)
Aprox 10M
1kHz~10kHz ±(1.8%+40) ±(1.6%+40)
10kHz~100kHz ±(7%+40) ±(7%+40)
20V 0.001V
45Hz~1kHz ±(0.8%+40) ±(0.6%+40)
1kHz~10kHz ±(2%+40) ±(1.8%+40)
10kHz~100kHz ±(7%+40) ±(7%+40)
200V 0.01V
45Hz~1kHz ±(0.8%+40) ±(0.6%+40)
1kHz~10kHz ±(5%+40) ±(5%+40)
10kHz~100kHz NoEspecicado NoEspecicado
1000V 0.1V
45Hz~1kHz ±(1.5%+40) ±(1.2%+40)
1kHz~5kHz ±(6%+40)
5kHz~10kHz ±(10%+40)
Observaciones:
- Protección de sobrecarga: 1000V.
- Pantalla:
a) True rms son válidos desde 10% hasta el 100% del rango.
b) El factor de cresta AC puede ser de hasta 3,0 excepto 1000V donde es de 1,5.
c) Una lectura residual de 80 dígitos con los cables de prueba en cortocircuito, no afectará a la
exactitud indicada.
d) Cuando la frecuencia es inferior a 100 kHz, la garantía de exactitud del rango es del 10% -100%
.
e) Al hacer la medición CA + CC, la exactitud necesita añadir (1% + 35 dígitos) de la lectura
basada en la tabla anterior.

29
C. Corriente DC
Rango Resolución Precisión Protección de sobrecarga
COD. 51253 COD. 51254
200µA 0.01µA
±(0.2%+20) ±(0.15%+20)
0.5A, 250V, fusible tipo
rápido,
Ø5 x 20 mm
2000µA 0.1µA
20mA 0.001mA
200mA 0.01mA
10A 0.001A ±(0.8%+30) ±(0.7%+30) 10A, 250V, fusible tipo rápido,
Ø5 x 20 mm
Observaciones:
Enelrangode10A:
- Cuando la corriente medida es 5A, la medición continua es permitida.
- Cuando la corriente medida es de entre 5 A-10A, la medición continua < 10 segundos y el
intervalo es de más de 15 minutos.
D.CorrienteAC(mediciónAC+DCestádisponible)
Rango Resolución Ancho de banda Precisión Protección de
sobrecarga
COD. 51253 COD. 51254
200µA 0.01µA
45Hz~1kHz
1kHz~10kHz
±(1%+15)
±(2%+40)
±(0.8%+15)
±(1.5%+40)
0.5A, 250V, fusible
tipo rápido,
Ø5 x 20 mm
2000µA 0.1µA
20mA 0.001mA
200mA 0.01mA
10A 0.001A
45Hz~1kHz ±(2%+20) ±(2%+20) 10 A, 250, fusible
tipo rápido, Ø5 x 20
mm
1kHz~10kHz ±(6%+40) ±(6%+40)
Observaciones:
Pantalla:
a) True rms es válido desde el 10% hasta el 100% del rango
b) El factor de cresta AC puede ser de hasta 3.0.
c) Una lectura residual de 80 dígitos con los cables de prueba en cortocircuito, no afectará a la
exactitud indicada.
d) Cuando la frecuencia es inferior a 100 kHz, la garantía de exactitud es de10% -100%.
e) Al hacer la medición CA + CC, la exactitud necesita añadir (1% + 35 dígitos) de la lectura
basada en la tabla anterior.
Enelrangode10A:
a) Cuando la corriente medida es 5A, la medición continua es permitida.
b) Cuando la corriente medida es de entre 5 A-10A, la medición continua es de 10 segundos y el
intervalo de más de 15 minutos.

30
E. Resistencia
Rango Resolución Precisión Protección de sobrecarga
COD. 51253 COD. 51254
200 0.01
± (0,5% 20)
+
valor de
los cables
de prueba
circuito
abierto
± (0,4% 20)
+
valor de
los cables
de prueba
circuito
abierto 1000V
2k 0.0001k ±(0.5%+20) ±(0.4%+20)
20k 0.001k
200k 0.01k ±(1%+20) ±(0.8%+20)
2M 0.0001M ±(1%+40) ±(1%+40)
20M 0.001M ±(1.5%+40) ±(1.5%+40)
F. Prueba de continuidad
Rango Resolución Protección de sobrecarga
0.01 1000V
Observaciones:
- Tensión aproximada del circuito abierto -1.2V.
- El medidor no suena cuando la prueba de resistencia es >60 .
- La señal sonora se enciende de forma continua durante las condiciones abiertas, que es la
pruebaderesistenciade≤40 .
G. Prueba de diodo
Rango Resolución Protección de sobrecarga
0.0001V 1000V
Observaciones:
- Tensión aproximada de circuito abierto 2.8V.
- Una buena unión de silicio está entre 0,5 V y 0.8V.

31
H. Capacidad
Rango Resolución Precisión Protección de sobrecarga
COD. 51253 COD. 51254
20nF 0.001nF
± (1,5% 20)
+
valor de la
capacidad
de los cables
de prueba
circuito
abierto
± (1,2% 20)
+
valor de la
capacidad
de los cables
de prueba
circuito
abierto 1000V
200nF 0.01nF ±(1.5%+20) ±(1.2%+20)
2µF 0.0001µF
20µF 0.001µF ±(1.5%+40) ±(1.2%+40)
200µF 0.01µF ±(1.5%+40)
2mF 0.0001mF ±(5%+40) ±(5%+40)
20mF 0.001 mF Sinespecicar Sinespecicar
I. Frecuencia
Rango Resolución Precisión Protección de sobrecarga
20Hz 0.001Hz
±(0.1%+15) 1000V
200Hz 0.01Hz
2kHz 0.0001kHz
20kHz 0.001kHz
200kHz 0.01kHz
2MHz 0.0001MHz
20MHz 0.001MHz
200MHz 0.01MHz Sinespecicar
Observaciones:
- Amplitud de entrada “a” de la siguiente manera; (DC nivel eléctrico cero)
Cuando 10Hz~40 MHz: 200mV un 30Vrms;
Cuando>40MHz:Noespecicado
J. Temperatura (sólo COD. 51254)
Grados Celsius
Rango Resolución Precisión Protección de
sobrecarga
-40ºC~40ºC
0.1ºC
±(3%+30)
1000V40ºC~400ºC ±(1%+30)
400ºC~1000ºC ±2.5%

32
Fahrenheit
Rango Resolución Precisión Protección de
sobrecarga
-40ºF~32ºF
0.1ºF
±(4%+50)
1000V32ºF~752ºF ±(1.5%+50)
752ºF~1832ºF ±3%
Observaciones:
- Se incluye una sonda de temperatura de contacto tipo K (cromo-níquel ~ silicio níquel) que
sólo puede medir temperaturas por debajo de 230 ºC. Si desea medir una temperatura superior a
230 ºC, debe utilizar la varilla de contacto.
K. 4~20 mA corriente del circuito (sólo COD. 51254)
Rango Resolución Precisión Protección de
sobrecarga
(4~20mA)% 0.01% ±(1%+50)
0,5 A, 250 V, fusible
tipo rápido, Ø5 x 20
mm
Observaciones:
Cuandolaslecturasobtenidassonlassiguientes:
- <4 mA, la pantalla principal muestra LO
- 4 mA, la pantalla principal muestra 0% ....
20 mA, la pantalla principal muestra 100%
->20 mA, la pantalla principal muestra HI

33
NOTAS
¡IMPORTANTE!
El fabricante no se responsabiliza de los daños o mal funcionamiento del aparato en caso de un
uso incorrecto o se haya utilizado para trabajos para los que no está diseñado .
Según la directiva sobre residuos eléctricos de aparatos eléctricos y electrónicos
(RAEE), éstos deberán recogerse y tratarse por separado. Si en el futuro tiene que deshacerse de
este producto, no se deshaga de él junto con la basura doméstica. Póngase en contacto con su
distribuidor para proceder a su reciclaje de manera gratuita cuando sea posible.
GARANTÍA
El fabricante garantiza al comprador de este aparato la garantía total durante 12 meses de las
piezas con defectos de fabricación.
Esta garantía no cubre aquellas piezas que por su uso normal tienen un desgaste.
Nota:paraobtenerlavalidezdelagarantía,esabsolutamenteimprescindiblequecompletey
remitaalfabricanteeldocumentode“CERTIFICADODEGARANTIA”,dentrodelossietediasa
partirdelafechadecompra.

34
TABLE OF CONTENTS
1.BeforeYouStart ................................................................................................. 35
Overview ....................................................................................................... 35
Unpacking Inspection .......................................................................................... 36
Safety Information ............................................................................................... 36
Rules For Safe Operation ..................................................................................... 37
International Electrical Symbols ........................................................................... 38
2.GettingAcquainted ............................................................................................. 38
Turning the Meter On .......................................................................................... 38
Battery Considerations ......................................................................................... 38
Automatic Power Off ........................................................................................... 38
Automatic Backlight Off ...................................................................................... 38
Low Battery Indication ......................................................................................... 38
The Meter Structure ............................................................................................. 39
Rotary Switch ...................................................................................................... 39
Functional Buttons ............................................................................................... 40
The Meter Functions Vs Displays ......................................................................... 43
Selecting the Range ............................................................................................. 44
Understanding the Display .................................................................................. 44
Analogue Bar Graph ............................................................................................ 46
Using MAX MIN .................................................................................................. 46
3.MakingMeasurements ..................................................................................... 46
Introduction ....................................................................................................... 46
A. Measuring Voltages ..................................................................................... 46
B. Measuring Currents ...................................................................................... 47
C. Measuring Resistance .................................................................................. 48
D. Testing for Continuity .................................................................................. 49
E. Testing Diodes ............................................................................................. 50
F. Measuring Capacitance ................................................................................ 51
G. Measuring Frequency / Duty Cycle ............................................................... 51
H. Measuring Temperature ................................................................................ 52
I. 4~20mA loop current as % readout ............................................................. 52
4.UsingStores,RecallandSendFeatures ............................................................ 53
Introduction ....................................................................................................... 53
Storing and Clearing Readings ............................................................................. 53
ENGLISH

35
Recalling Stored Readings ................................................................................... 54
5.ChangingtheDefaultSetting ........................................................................... 54
Introduction ....................................................................................................... 54
Selecting Setup Options....................................................................................... 54
6. Maintenance .................................................................................................... 55
A. General Service ........................................................................................... 55
B. Replacing the Fuses ..................................................................................... 56
C. Replacing the Battery ................................................................................... 56
7.Specications ................................................................................................... 57
Safety and Compliances....................................................................................... 57
PhysicalSpecications ......................................................................................... 57
GeneralSpecications ......................................................................................... 58
Feature Summary ................................................................................................. 58
BasicSpecications ............................................................................................. 58
DetailedAccuracySpecications ......................................................................... 59
A. DC Voltage ................................................................................................... 59
B. AC Voltage ................................................................................................... 59
C. DC Current ................................................................................................... 60
D. AC Current ................................................................................................... 60
E. Resistance .................................................................................................... 61
F. Continuity Test ............................................................................................. 61
G. Diode Test ................................................................................................... 61
H. Capacitance ................................................................................................. 61
I. Frequency .................................................................................................... 62
J. Temperature.................................................................................................. 62
Degrees Celsius ............................................................................................... 62
Fahrenheit ....................................................................................................... 62
K. 4~20mA loop current ................................................................................. 62
1. BEFORE YOU START
Overview
This Operating Manual covers information on safety and cautions. Please read the relevant
information carefully and observe all the Warnings and Notes strictly.
Warning!
To avoid electric shock or personal injury, read the “Safety Information” and
“Rules for Safe Operation” carefully
before using the Meter.
Digital Multimeter COD. 51253/51254 (hereafter referred to as “the Meter”) is a 20000 counts
and 4 1/2 digits with steady operations, fashionable structure and auto ranging instrument. They all
not only can measure AC voltage and current, DC voltage and current, Resistance, Capacitance,
Frequency, Diodes, Continuity, Relative Mode but also has AC
True RMS, AC+DC, Low Battery Display, Double Display Backlight, Data Hold, Automatic
Power Off and full overload protection.
COD. 51254 has extra Temperature, 4~20mA Loop, Data Store and Data Recall feature.

36
UnpackingInspection
Open the package case and take out the Meter. Check the items shown on Table 1-1 carefully to
see any missing or damaged part:
Table 1-1. Unpacking Inspection
Item Description Qty
1 English Operating Manual 1 piece
2 Test Lead 1 pair
3 K-Type (nickel chromium ~
nickel silicon) Point Contact
Temperature Probe (It is
only suitable for measuring
temperature under 230ºC
(COD. 51254 only)
1 piece
4 Alligator Clip 1 piece
5 Test Clip 1 pair
6 USB interface cable 1 piece
7 CD-ROM (Installation Guide &
Computer Interface Software)
1 piece
8 Carrying Bag 1 piece
9 9V Battery (NEDA 1604, 6F22,
006P)
1 piece
Intheeventyoundanymissingordamage,pleasecontactyourdealerimmediately.
SafetyInformation
This Meter complies with the standards IEC61010 safety measurement requirement: in pollution
degree 2, overvoltage category (CAT. III 1000V, CAT.IV 600V) and double insulation.
CAT.III:Distributionlevel,xedinstallation,withsmallertransientovervoltagethanCAT.IV
CAT.IV: Primary supply level, overhead lines, cable systems etc.
UsetheMeteronlyasspeciedinthisoperatingmanual,otherwisetheprotectionprovidedby
the Meter may be impaired.
Inthismanual,aWarningidentiesconditionsandactionsthatmayposehazardstotheuser,or
may damage the Meter or the equipment under test.
ANoteidentiestheinformationthatusershouldpayattentionto.
International electrical symbols used on the Meter and in this Operating Manual are explained
on page 36.

37
RulesForSafeOperation
Warning!
To avoid possible electric shock or personal injury, and to avoid possible damage
to the Meter or to the equipment under test, adhere to the following rules:
• Before using the Meter inspect the case. Do not use the Meter if it is
damaged or the case (or part of the case) is removed. Look for cracks or
missing plastic. Pay attention to the insulation around the connectors.
• Inspect the test leads for damaged insulation or exposed metal. Check the
test leads for continuity. Replace damaged test leads with identical model
numberorelectricalspecicationsbeforeusingtheMeter.
• Do not apply more than the rated voltage, as marked on the Meter, between
the terminals or between any terminal and grounding.
• The rotary switch should be placed in the right position and no any
changeover of range shall be made during measurement is conducted to
prevent damage of the Meter.
• When the Meter working at an effective voltage over 60V in DC or 30V rms
in AC, special care should be taken for there is danger of electric shock.
• Use the proper terminals, function, and range for your measurements.
•
If the value to be measured is unknown, use the maximum measurement position
.
• Do not use or store the Meter in an environment of high temperature,
humidity,explosive,inammableandstrongmagneticeld.Theperformance
of the Meter may deteriorate after dampened.
•Whenusingthetestleads,keepyourngersbehindthengerguards.
• Disconnect circuit power and discharge all highvoltage capacitors before
testing resistance, continuity, diodes.
• Before measuring current, check the Meter’s fuses and turn off power to the
circuit before connecting the Meter to the circuit.
• Replace the battery as soon as the battery indicator appears. With a low
battery, the Meter might produce false readings that can lead to electric
shock and personal injury.
• When servicing the Meter, use only the same model number or identical
electricalspecicationsreplacementparts.
• The internal circuit of the Meter shall not be altered at will to avoid damage
of the Meter and any accident.
• Soft cloth and mild detergent should be used to clean the surface of the
Meter when servicing. No abrasive and solvent should be used to prevent the
surface of the Meter from corrosion, damage and accident.
• The Meter is suitable for indoor use.
• Turn the Meter off when it is not in use and take out the battery when not
using for a long time.
• Constantly check the battery as it may leak when it has been using for some
time, replace the battery as soon as leaking appears. A leaking battery will
damage the Meter.

38
International Electrical Symbols
Symbols used on the Meter and in this manual are explained in Table1-2.
Table 1-2. International Electrical Symbols
AC or DC Measurement
DC Measurement
AC Measurement
Grounding
Double Insulated
Warning. Refer to the Operating Manual
DeciencyofBuilt-InBattery
Conforms to Standards of European Union
2. GETTING ACQUAINTED
TurningtheMeterOn
To turn the Meter on, turn the rotary switch from OFF to any switch setting.
Battery Considerations
The Meter uses one 9V Battery (NEDA 1604, 6F22, 006P). The following paragraphs describe
several techniques used to conserve battery power.
AutomaticPowerOff
The display blanks and the Meter goes into a “sleep” mode if you have not changed the rotary
switch position or pressed a button for a set period. While in Sleep mode, pressing the blue button
or turning the rotary switch could turn the Meter on. The Meter then returns to the display for the
function selected with the rotary switch; all previously activated button features are discarded.
The automatic power off is preset to 10 minutes. From the Setup menu (see Chapter 5), you
could specify a time (10 minutes, 20 minutes, 30 minutes or OFF). If you set to OFF, the Meter
retains on until you turn the rotary switch to OFF or the battery becomes too weak.
AutomaticBacklightOff
Press LIGHT button to turn the backlight on and press LIGHT again to turn it off. Press EXIT to
exit the feature.
Press LIGHT to select the backlight level (low or high). In Setup menu (see Chapter 5), you could
specify a time to automatically turn off the backlight (10 seconds, 20 seconds, 30 seconds or OFF).
If the period is set to OFF, the backlight feature is disabled.
Low Battery Indication
A constant battery icon intheupperleftcornerofthedisplaynotiesyouthatthebatteries
are low and should be replaced.
Warning!
To avoid false readings, which could lead to possible electric shock or personal
injury, replace the battery as soon as the battery icon appears.

39
The Meter Structure
The Figure 2-1 shows the Meter structure.
1. LCD Display
2. Functional Buttons
3. Rotary Switch
4. Input Terminals
Figure 2-1. Meter Structure
Rotary Switch
Turn the Meter on by selecting any measurement function. The Meter presents a standard display
for that function.
ThedisplaymayalsobeinuencedbysomeofthechoicesmadeinSetup.
Use the blue button to select any rotary switch alternate function (labeled in blue letters).
When you turn the rotary switch from one function to another, a display for the new function
appears. Button choices made in one function do not carry over into another function.
The Table 2-1 described each rotary switch position.
Table 2-1. Rotary Switch Selections
Rotary
Switch Position Rotary Switch Function Blue Key Function
OFF Turn the Meter off None
DC voltage measurement None
AC voltage measurement None
(COD. 51253 only) DC millivoltage measurement None
(COD. 51254
only) DC millivoltage measurement
- Frequency measurement
- Frequency signal duty cycle
measurement
Resistance measurement - Diode test
- Continuity test
Capacitance measurement None
Frequency measurement Frequency signal duty cycle
measurement
(COD. 51254 only) Centigrade temperature
measurement
Fahrenheit temperature
measurement
DC current measurement
(200µA , 2000µA)
Toggle between AC or DC
current
(COD. 51253 only) DC current measurement
(20mA , 200mA)
Toggle between AC or DC
current

40
(COD. 51254 only)
DC current measurement
(20mA , 200mA)
Toggle between AC or DC
current
4~20mA loop current as %
reading
AC or DC current measurement
(10A)
Toggle between AC or DC
current
Functional Buttons
The buttons activate features that augment the function selected with the rotary switch. The
buttons are shown in Table 2-2.
Press the button once to access the main feature (e.g. STORE).
Toaccesstherstadditionalfeatureofthebutton(e.g.RECALL),pressandholdthebuttonfor
over 1 second to access this additional feature. This additional feature appears right above or on the
left hand side of the appropriate keys.
To access the second additional feature of the button (e.g. ), press once the button again while
theMeterhasalreadyenteredtherstadditionalfeature(e.g.RECALL).Thesecondadditional
feature appears on the right hand side above the appropriate keys.
The RANGE and EXIT buttons has only one additional feature.
Table 2-2. Functional Buttons
Button Description Access Method
Range feature:
Exit AUTO and enter MANUAL ranging.
In MANUAL, select
next input range. EXIT to return to AUTO.
AUTO is default.
Press the button once.
Testing resistance signal from calibrator:
When testing resistance signal from
calibrator, it is necessary
to press this button to change the
maximum display to 4000
counts but the accuracy remains
unchanged.
Press and hold the button
while turning on the Meter.
Setup feature:
Access Setup selections, the display shows
“SET”.
In the Setup mode, each press of SETUP
button steps to
the next Selection.
Press and hold the button for
more than 1 second.
(COD. 51253 only)
Press to output the data, AUTO mode
switch off. The primary
display shows “SEND”.
Press EXIT to exit.
Press the button once.

41
(COD. 51253 only)
Setup feature:
In Setup, press to select OFF at the
selection of HIGH and LOW.
Press the button
once after entering Setup
mode.
(COD. 51254 only)
Store feature:
Store the current measurement value.
Press EXIT to exit
the Store feature.
Press the button
once.
Recall feature:
Recall the stored value. Press EXIT to exit
the Recall feature.
Press and hold the button for
over 1second.
Setup feature:
In Setup, press to select OFF at the
selection of HIGH and LOW.
Press the button
once after entering Setup
mode.
Hold feature:
Press HOLD to freeze the displayed value.
Press EXIT to
release the display.
Press the button once.
Peak Hold feature:
Press to access Peak Hold feature, the
primary display
shows PEAK HOLD. Press EXIT to exit.
Press and hold the button for
over 1second.
- In Setup, each press to select the digit
you want to edit.
- In Recall, press to enable SEND feature
(COD. 51254 only)
- In Store, press to toggle between clearing
all the stored
reading or start storing reading from the
current index
number. (COD. 51254 only)
Press the button once after
entering
Setup or Recall or Store mode.
Press to exit certain button functions and
the Meter will return to the factory default
setting.
Press the button once.
Press to turn the backlight on. It is possible
to toggle between
1st and the 2nd backlight level and Exit
the feature by pressing
this button. After exiting the light feature,
it is necessary to
press and hold the button for over 1
second to turn the
backlight on again.
Press and hold the button for
over 1 second.
(COD. 51253 only)
Press to display max, min and average
values.
Press EXIT to stop and return to current
measurement mode.
Press the button once.
In Setup, each press to decrement an
Option.
Press the button once after
entering SEND mode.

42
(COD. 51254 only)
Press to display max, min and average
values.
Press EXIT to stop and return to current
measurement mode.
Press the button once.
Press to output the data, AUTO mode
switch off. The primary display shows
“SEND”.
Press EXIT to exit.
Press and hold
the button for over 1 second.
In Setup, each press
In Recall, each press
In Store, each press
interval.
Press EXIT to exit
Press the button once after
entering
SEND mode.
Press to enter relative mode, the primary
display shows .
The left secondary display shows the
present measurement
value. The right secondary display shows
the stored value.
The primary display shows the present
measurement value
minus the stored value.
Press EXIT to exit relative mode.
Press the button once.
In Setup, each press to increment an
Option.
In Recall, each press to recall the next
stored reading.
In Store, each press to increase a second
on the storing interval.
Press and hold the button for
over 1 second.
Yellow Button
When it is at AC measurement mode,
press the button to
display AC+DC True RMS value in the
primary display and
the left secondary display “AC+DC”.
Press the button once.
Blue Button
Use the blue button to select any rotary
switch alternate
function (labeled in blue letters).
Press the button once
Press and hold the Button while turning
on the Meter to
toggle to 2000 counts for all functions.
It is faster when the Meter is at 4000
counts measurement
mode.
After the Meter is resuming from
Automatic Power Off or
turn on and off again, the Meter will back
to normal measurement mode (20000
counts).

43
TheMeterFunctionsVsDisplays
Table 2-3 shows the cross reference of function and display:
Table 2-3 Functions Vs Displays
Function Primary Display RightSecondary
Display
LeftSecondary
Display
DCV The tested DC voltage
value No display Full range: 2, 20, 200,
1000
ACV The tested AC voltage
value
The tested frequency
value:
45.00Hz~ 100.0kHz
Full range: 2, 20, 200,
750
Full range: 200
DCmV The tested DCmV
value No display
The tested resistance
value No display Full range: 200, 2, 20,
200, 2, 20
The tested resistance
value No display Full range value: 200
The tested resistance
value No display Full range: 2
Hz The tested frequency
value No display Full range: 20, 200, 2,
20, 200, 2, 20, 200
The tested capacitance
value No display Full range: 20, 200, 2,
20, 200, 2, 20
ºC
(COD. 51254 only) The tested ºC value No display 1000
ºF
(COD. 51254 only) The tested ºF value No display 1832
The tested DCµA value No display Full range: 200, 2000
The tested ACµA value
The tested frequency
value:
45.00Hz~10.00kHz
Full range: 200, 2000
DCmA The tested DCmA
value No display Full range: 20, 200
ACmA The tested ACmA
value
The tested frequency
value:
45.00Hz~10.00kHz
Full range: 200, 2000
DCA The tested DC current
value No display Full range: 10
ACA The tested AC current
value
The tested frequency
value:
45.00Hz~10.00kHz
Full range: 10
STO
(COD. 51254 only)
The current
measurement
reading
The value of the
corresponding
index number
Index number increase
one.
Index number:
nº.0001~nº.0100
RCL
(COD. 51254 only) The recalled val The total number of
stored value.
Index number:
nº.0001~nº.0100

44
MAX MIN Chapter 2 Getting Acquainted – Using MAX MIN
The present
measurement value
minus the stored value
The stored value The present
measurement value.
SelectingtheRange
PressRANGEtoselecteitheraxedrangeortheautorangefeature.
Autoranging (AUTO lighted in the display) always comes on initially when you select a new
function. In autorange, the Meter selects the lowest input range possible, ensuring that the reading
appears with the highest available resolution.
If AUTO is already on, press RANGE to enter MANUAL ranging in the present range. You can
then select the next manual range each time you press RANGE.
Return to autoranging by press EXIT.
Note that there is no MANUAL ranging on REL feature.
UnderstandingtheDisplay
Display features are shown in Figure 2-2 and described in Table 2-4.
Figure 2-2. Display Features
Table 2-4. Display Features
Nº. Symbol Meaning
1MAX Maximum reading displayed.
MIN Minimum reading displayed
2Nº The sequence of the reading.
3ºC, ºF (COD. 51254 only) Degrees Celsius (default) or Fahrenheit.
4Indicates negative reading
5
The battery is low.
Warning:Toavoidfalsereadings,
which could lead to possible electric
shock
or personal injury, replace the battery as
soon as the battery indicator appears.
6 SET Setup feature is on.
7 TrueRMS Indicator for True RMS value
8 AC+DC
For DCV and DCA functions, reading
represents the True RMS total of AC and
DC measurements

45
9
, K , M
: Ohm. The unit of resistance.
k : Kilohm. 1x10³ or 1000 ohms
M: Megaohm. 1x10⁶ or 1,000,000 ohms
Hz, kHz, mHz
Hz : Hertz. The unit of frequency in cycles/
second
kHz: Kilohertz. 1x10³ or 1000 hertz
MHz: Megahertz, 1x10⁶ or 1,000,000
hertz
mV, V V: Volts. The unit of voltage
mV: Millivolt. 1x10⁻³ or 0.001 volts
µA, mA, A
A: Amperes (amps). The unit of current
mA: Milliamp, 1x10⁻³ or 0.001 amperes
µA:Microamp.1x10-6 or 0.000001 amperes
nF,µF, mF
Farad. The unit of capacitance
nF: Nanofarad. 1x10⁻⁹ or 0.000000001
farads
µF:Microfarad.1x10-6 or 0.000001 farads
mF: Millifarad. 1x10⁻³ or 0.001 farads
10 Automatic power off feature is on
11 Continuity test
12 STO (COD. 51254 only) Data store is on
RCL (COD. 51254 only) Data recall is on
13 The relative mode is on to display the
present value minus the stored value
14 LOW The indicator for the lowest setup limit
HIGH The indicator for the highest setup limit
15 AUTO
The Meter is in the auto range mode in
which the Meter automatically selects the
range with the best resolution.
16 SEND Data output is in progress
17 Backlight feature is on
18 HOLD Data hold mode is active
19 PEAK HOLD Peak hold mode is active
20 Diode test
21 % Frequency signal duty cycle
4~20mA loop current as % reading
22 OL The input value is too large for the selected
range
23 Analogue Bar Graph Provides an analog indication of the
present input, quick response

46
AnalogueBarGraph
The bar graph provides an analogue indication of the measured input. For most measurement
functions, the bar graph updates 10 times per second.
UsingMAXMIN
The MAX MIN mode stores minimum (MIN) and maximum (MAX) input values. When the input
goes below the stored minimum value or above the stored maximum value, the Meter beeps and
stores the new value.
Press MAX MIN to enter MAX MIN mode. The sampling time is every 2 seconds. The maximum
reading and MAX are shown on the left secondary display. The minimum reading and MIN are
shown on the right secondary display. The primary display shows the current measurement reading.
Press MAX MIN the second time, the current measurement reading is shown on the left
secondary display. The minimum reading and MIN are shown on the right secondary display. The
primary display shows the maximum value.
Press MAX MIN the third time, the current measurement reading is shown on the left secondary
display. The maximum reading and MAX are shown on the right secondary display. The primary
display shows the minimum value.
Each subsequent press of MAX MIN steps through the above three modes.
To exit MAX MIN mode, press EXIT.
Press HOLD to stop the Meter updating reading.
MAX MIN mode can only be used under MANUAL ranging mode.
3. MAKING MEASUREMENT
Introduction
Chapter 3 explains how to make measurements. Most measurement functions can be selected by
using the rotary switch.
While letters or symbols identify primary functions; blue letters or symbols identify alternative
functions. Press the BLUE button to access these alternate functions.
A.MeasuringVoltages
Warning!
To avoid harms to you or damages to the Meter from electric shock, please do not
attempt to measure voltages higher than 1000V, although readings may
be obtained.
Figure 3-1. Voltages Measurement

47
To measure voltages, set up the Meter as Figure 3-1 and do the following:
1. Insert the red test lead into the V terminal and the black test lead into the COM terminal.
2. COD. 51253: Set the rotary switch to or or COD. 51254: Set the rotary switch
to or or .
3. Connect the test leads across with the object being measured.
4. The measured value shows on the display.
AC measurement displays the True RMS value.
DC measurement displays the effective value of sine wave (mean value response).
When a ACV function is selected, you can press the Yellow Button to view the AC + DC True
RMS value in the primary display. To exit, please EXIT button.
The BLUE button cycles among , frequency and duty cycle.
Note
- When measuring voltage, the Meter acts around a 10M ( and ) or 2.5G (
) impedance in parallel with the circuit. This loading effect can cause measurement errors in high
impedance circuits. In most cases, the error is negligible (0.1% or less) if the circuit impedance is
10k or less.
- Special care should be taken when measuring high voltage.
-
When voltage measurement has been completed, disconnect the connection between the testing
leads and the circuit under test and remove testing leads away from the input terminals of the Meter.
B.MeasuringCurrents
Warning!
If the fuse burns out during measurement, the Meter may be damaged or the
operator himself may be hurt.
To avoid possible damage to the Meter or to the equipment under test, check the
Meter’s fuses before measuring current. Use proper terminals, function, and range
for the measurement. Never place the testing leads in parallel with any circuit or
component when the leads are plugged into the current terminals.
To measure AC or DC current, set up the Meter as Figure 3-2 and proceed as follows:
1. Turn off power to the circuit. Discharge all highvoltage capacitors.
2. Insert the red test lead into the mAµA or A terminal and black test lead into the COM terminal.
3. If you are using the A terminal, set the rotary switch to .If you are using mAµA
terminal, set the rotary switch to µA for currents below 20000µA , or mA (COD. 51253) or
%(COD. 51254) for current above 20000µA.
Figure 3-2. Currents Measurement

48
4. DC measurement is default, press blue button to select AC measurement.
5. Open the circuit path to be tested. Touch the red testing leads to the more positive side of
the break; touch the black probe to the more negative side of the bread. Reversing the leads will
produce a negative reading, but will not damage the Meter.
6. Turn on power to the circuit; then read the display.
AC measurement displays the True RMS value.
7. DC measurement displays the effective value of sine wave (mean value response)
Turn off power to the circuit and discharge all highvoltage capacitors. Remove the Meter and
restore the circuit to normal operation.
When a ACA function is selected, you can press the Yellow Button to view the AC + DC True
RMS value in the primary display. To exit, please EXIT button.
Note
- If the value to be measured is unknown, use the maximum measurement position and reduce
the range step by step until a satisfactory reading is obtained.
- When the measured current is 5A, continuous measurement is allowed.
- When the measured current is between 5A-10A, continuous measurement 10 seconds and
interval more than 15 minutes.
- When current measurement has been completed, disconnect the connection between the
testing leads and the circuit under test and remove testing leads away from the input terminals of
the Meter.
C.MeasuringResistance
Warning!
To avoid harms to you, please do not attempt to input voltage higher than 60V DC
or 30V rms AC.
To avoid possible damages to the Meter or to the devices under test, disconnect
circuit power and discharge all the high-voltage capacitors before
measuring resistance.
To measure resistance, set up the Meter as shown in Figure 3-3 and follow the following procedure
:
1. Insert the red test lead into the terminal and the black test lead into the COM terminal.
2. Set the rotary switch to ; press BLUE button to select measurement mode.
3. Connect the test leads across with the object being measured.
The measured value shows on the display.
The BLUE button cycles among resistance, continuity, and diode.
Figure 3-3. Resistance Measurement

49
Note
- When measuring low resistance, the test leads can add 0.1 to 0.2 of error to resistance
measurement.
To test the leads, touch the probe tips together and read the resistance of the leads. If necessary,
you can press REL to automatically subtract this value.
- For high-resistance measurement (>1M ), it is normal taking several seconds to obtain a stable
reading.
In order to obtain precision readings, use the test lead as short as possible.
- The LCD displays OL indicating open-circuit or the tested resistor value is higher than the
maximum range of the Meter.
- When testing the resistance signal from the calibrator, it is necessary to press and hold the
RANGE while turning on the Meter to change the maximum display to 2000 counts but the
accuracy remains unchanged.
- When resistance measurement has been completed, disconnect the connection between the
testing leads and the circuit under test and remove testing leads away from the input terminals.
D.TestingforContinuity
Warning!
To avoid harms to you, please do not attempt to input voltage higher than 60V DC
or 30V rms AC.
To avoid possible damages to the Meter or to the devices under test, disconnect
circuit power and discharge all the high-voltage capacitors before measuring
continuity.
To test for continuity, set up the Meter as Figure 3-4 and do the following:
1. Insert the red test lead into the terminal and the black test lead into the COM terminal.
2. Set the rotary switch to ; press BLUE button to select measurement mode and
connet the test leads across with the object being tested.
3.Thebeepercomesoncontinuouslyforopenconditions,thatistestresistance≤50 .
The BLUE button cycles among resistance, continuity, and diode.
Figure 3-4. Continuity Test
Note
Open circuit voltage around –1.2V and range is 400 measurement range.
When continuity testing has been completed, disconnect the connection between the testing
leads and the circuit under test and remove the test leads away from the input terminals.

50
E.TestingDiodes
Warning!
To avoid harms to you, please do not attempt to input voltages higher than 60V
DC or 30V rms AC.
To avoid damages to the Meter or to the devices under test, disconnect circuit
power and discharge all the high-voltage capacitors before testing diodes.
Use the diode test to check diodes, transistors, and other semiconductor devices. The diode
test sends a current through the semicondutor junction, then measure the voltage drop across the
junction. A good silicon junction drops between 0.5V and 0.8V.
To test the diode out of a circuit, set up the Meter as Figure 3-5 and proceed as follows:
1. Insert the red test lead into the terminal and the black test lead into the COM terminal.
2. Set the rotary switch to ; and press BLUE button to select measurement mode.
Figure 3-5. Diode Test
3. For forward voltage drop readings on any semiconductor component, place the red test lead
on the component’s anode and place the black test lead on the component’s cathode. The red test
lead polarity is “+” while the black test lead polarity is “- “.
The measured value shows on the display.
The BLUE button cycles among resistance, continuity, and diode.
Note
- In a circuit, a good diode should still produce a forward voltage drop reading of 0.5V to 0.8V;
however, the reverse voltage drop reading can vary depending on the resistance of other pathways
between the probe tips.
- Connect the test leads to the proper terminals as said above to avoid error display.
- The LCD will display OL indicating either open circuit or wrong polarity connection.
- The unit of diode is volt (V), displaying the positiveconnection voltage-drop value.
- Open circuit voltage approximate 2.8V.
- When diode testing has been completed, disconnect the connection between the testing leads
and the circuit under test and remove the test leads away from the input terminals.

51
F.MeasuringCapacitance
Warning!
To ensure accuracy, the Meter inside is discharged against the tested capacitor.
“DIS.C” will be shown on the display when it is under discharging, this
process will be quite slow.
To avoid damage to the Meter or to the equipment under test, disconnect circuit
power and discharge all high-voltage capacitors before measuring
capacitance.
UsetheDCVoltagefunctiontoconrmthatthecapacitorisdischarged.
To measure capacitance, set up the Meter as shown in Figure 3-6 and proceed as follows:
1. Insert the red test lead into the terminal and the black test lead into the COM terminal.
2. Set the rotary switch to measurementmode,theMetermaydisplayaxedreadingwhich
is a internal distributed capacitor value. For testing less than 10nF capacitor, the tested value must
subtract the internal distributed capacitor value to maintain the accuracy.
To improve the measurement accuracy of small value capacitors (less than 10nF), press REL
with the test leads open to subtract the residual capacitance of the Meter and leads.
3. It is recommended to use test clip to carry out measurement to reduce the effect of internal
distributed capacitor.
Note
- The LCD displays OL indicating the tested capacitor is shorted or it exceeds the maximum
range.
- Capacitors larger than 400¦ÌF take longer time. The analogue bar graph shows the time left
beforenishingthemeasurement.
- When capacitance measurement has been completed, disconnect the connection between the
testing leads and the circuit under test and remove the test leads away from the input terminals of
the Meter.
Figure 3-6. Capacitance Measurement
G.MeasuringFrequency/DutyCycle
Warning!
To avoid harms to you, please do not attempt to input voltage higher than 30V rms
.
To measure frequency and duty cycle, connect the Meter as Figure 3-7 and do the following:
1. Insert the red test lead into the Hz terminal and the black test lead into the COM terminal.

52
2. Set the rotary switch to (COD. 51253) or (COD. 51254) and press BLUE button to
select the Hz measurement mode for frequency measurement or % for duty cycle measurement.
The BLUE button cycles among , frequency and duty cycle.
3. Connect the test leads across with the object being measured.
The measured value shows on the primary display.
Figure 3-7. Frequency / Duty Cycle Measurement
Note
The requirement of Input amplitude “a” is as follows:
When 10Hz~40MHz: 200 mV a 30Vrms;
>40MHz:Un-specied
When Hz measurement has been completed, disconnect the connection between the testing
leads and the circuit under test and remove the test leads away from the input terminals.
H.MeasuringTemperature(COD.51254only)
Warning!
To avoid harms to you, please do not attempt to input voltages higher than 60V DC
or 30V rms AC.
To measure temperature, set up the Meter as shown in Figure 3-8 and proceed the following.
Set the rotary switch to ºC ºF, the display shows OL. Short circuit the test leads to show the room
temperature. The Meter is default to Celsius ºC degree unit, you can change units by press the
BLUE button once you have selected the temperature function.
1.InsertthepointcontacttemperatureprobeintotheMeterasgure10.
2. Place the temperature probe to the object being measured.
3. The measured value shows on the display after several seconds.

53
Figure 3-8. Temperature Measurement
Note
Place the Meter in an environment of 18ºC~23ºC otherwise false reading may be obtained
especially in testing low temperature.
The included point contact temperature probe can only be used with temperature 230ºC below.
When temperature measurement has been completed, remove the temperature probe away from
the multi-purpose socket, and remove the multipurpose socket away from the Meter.
4~20 mA loop current as % readout (COD. 51254 only)
It shows the mA measured value or output level in %, in a 4-20mA scale.
To use 4~20mA Loop feature, connect the Meter as follows:
1. Set the rotary switch to , and press BLUE button to select (4~20mA)% feature.
2. The rest procedure, please follow B. Measuring Current: DC current measurement (Figure 3-2).
When the readings obtained is:
< 4mA, the primary display shows LO 4mA, the primary display shows 0%. ….
20mA, the primary display shows 100% > 20mA, the primary display shows HI
4. USING STORE, RECALL & SEND FEATURES
Introduction
Chapter 4 shows you how to use stores, recall and communication features available on the
Meter. Please note that Data stores and recall features are available only on the COD. 51254.
StoringandClearingReadings
To store readings, proceed as follows:
-PressSTOREonce,STOand“no.xxxx”appearstoconrmtheoperationandtheleftsecondary
display shows the current measurement reading. Press to toggle between clearing the stored
readingsandstartfromtherstreadingsorstartfromthelaststoredreading.Rightsecondary
display shows the original number of records.
- Press STORE the second time, STO appears. The left secondary display shows the storing time
interval in second, it is preset to zero. To change the interval in second by pressing + or - button.
The interval can be as high as 255 seconds or as low as 0 second.

54
- Press and hold STORE to access the quick setting.
- Press STORE the third time, STO and no appears.
The left secondary display shows the index number increase one. The right secondary display
shows the value of the corresponding index number, the primary display shows the current
measurement reading.
- If there is not set time to store the reading, each press of STORE to store one reading. An index
number increase one.
- To exit, press EXIT.
- Automatic power off feature will be disabled after entering this mode.
RecallingStoredReadings
Use the following procedure to recall the stored reading:
- Press RECALLtorecallthestoredvalueandRCLappearstoconrmtheoperation.
- The left secondary display shows the index number “no.xxxx”.
- The primary display shows the corresponding recalled data.
- The right secondary display shows the total number of the stored data.
- Press button to enable the SEND feature to export the data to the computer via USB. The
software shows the data storing time and also the data value.
After the data transferring is completed, the SEND feature will be disabled automatically.
- Press + or - button to view additional stored reading.
- Press and hold RECALL to access quick recalling.
- Press EXIT to exit recalling.
5. CHANGING THE DEFAULT SETTING
Introduction
TheMeterallowsyoutochangethedefaultoperatingcongurationoftheMeterbychanging
setup options made at the factory.
These settings are stored and can be changed in the Setup mode using the procedure described
in this chapter.
SelectingSetupOptions
To enter the Setup mode, turn the Meter on and press and hold SETUP button for over 1 second.
It is recommended to change the default setting only when the Meter is at DCV measurement
mode.
In the Setup mode, each press of SETUP button steps to the next Selection. Each press of – or +
button decrement or increment an Option.
Each Setup Selection and Option appears in the primary display in the sequence shown in Table 5-1.

55
Table 5-1. Setup Selections
Selection Option Factory
Default
Description
HIGH
Max. 20000; Press to select
OFF
Press to select the digit you
want to edit
OFF Over the upper limits, beeps not
continuously
LOW
Max. 20000; Press to select
OFF
Press to select the digit you
want to edit
OFF Over the lower limits, beeps not
continuously
10
10 mins
10 mins power off
20 20 mins power off
30 30 mins power off
OFF Power off feature is disabled
11Beeps continuously and icon lights on
OFF Nobeep,iconashes
10
10
Backlight turn off in 10 seconds
20 Backlight turn off in 20 seconds
30 Backlight turn off in 30 seconds
OFF Disable backlight feature
Analogue
Bar
Graph
Zero is in the left hand side
Zero is in
the
center
Zero is in the center It can only apply to DCV, DCI and °C/°F
functions
SavingSetupOptions
At each setup Option, store your choice and exit setup by press EXIT, advance to the next
Option by press +.
To exit the Setup mode without saving the present Option, press Setup.
6. MAINTENANCE
This chapter provides basic maintenance information including battery and fuse replacement
instruction.
Warning!
DonotattempttorepairorserviceyourMeterunlessyouarequaliedtodosoand
have the relevant calibration, performance test, and service information
A. General Service
- Periodically wipe the case with a damp cloth and mild detergent. Do not use abrasives or
solvents.
- To clean the terminals with cotton bar with detergent, as dirt or moisture in the terminals can
affect readings.
- Turn the Meter to OFF when it is not in use.

56
- Take out the battery when it is not using for a long time.
-DonotuseorstoretheMeterinaplaceofhumidity,hightemperature,explosive,inammable
andstrongmagneticeld.
B.ReplacingtheFuses
Warning!
To avoid electrical shock or arc blast, or personal injury or damage to the Meter, use
speciedfusesONLYinaccordancewiththefollowingprocedure
Follow Figure 6-1 and proceed as follows to replace the Meter’s fuse:
- Turn the rotary switch to OFF and remove all connections from the terminals.
- Remove the 5 screws from the case bottom.
- Remove the fuse by gently prying one end loose, then take out the fuse from its bracket.
-InstallONLYreplacementfuseswiththeidenticaltypeandspecicationasfollowsandmake
surethefuseisxedrmlyinthebracket.
Fuse 1: 0.5A, 250V, fast type fuse, Ø5×20mm
Fuse 2: 10A, 250V, fast type fuse, Ø5×20mm
- Rejoin the case bottom and case top, and install the 5 screws.
Replacement of the fuses is seldom required. Burning of a fuse always results from improper
operation.
Figure 6-1. Fuse Replacement
C.ReplacingtheBattery
Warning!
To avoid false readings, which could lead to possible
electric shock or personal injury, replace the battery
as soon as the battery indicator “ ” appears.

57
Make sure the test leads are disconnected from the circuit being tested before opening the case
bottom.
Follow Figure 6-2 and proceed as follows to replace the battery:
- Turn the rotary switch to OFF and remove all connections from the terminals.
- Remove the screw from the battery compartment, and separate the battery compartment from
the case bottom.
- Replace with a new 6F22 9V battery.
- Rejoin the case bottom and battery compartment, and reinstall the screw.
Figure 6-2. Battery Replacement
7. SPECIFICATIONS
SafetyandCompliances
Maximum Voltage between any Terminal
and Grounding Refer to different range input protection voltage
Certication
Compliances IEC 61010 CAT.III1000V, CAT.IV 600V overvoltage
and double insulation standard
Fused Protection for µAmA input
terminal: 0.5A, 250V, fast type fuse, Ø5×20mm
Fused Protection for A input terminal: 10A , 250V,fast type fuse, Ø5×20mm
PhysicalSpecications
Display (LCD)
Digital: 20000 counts on primary display; updates
2-3 times / second.
2000 counts on two secondary displays.
Analog: 40 segments; updates 10 times / second
Operating Temperature 0ºC~40ºC (32ºF~104ºF)
Storage Temperature -10ºC~50ºC (14ºF~122ºF)
Relative Humidity ≤75%@0ºC~30ºCbelow;
≤50%@30ºC~40ºC:
Battery Type 9V NEDA 1604 or 6F22 or 006P

58
Electromagnetic Compatibility
-Inaradioeldof1V/mbelow:
OverallAccuracy=SpeciedAccuracy+5%of
Range
-Inaradioeldof1V/mabove:
Noassignedaccuracyisspecied
Dimensions (H x W x L) 177 x 85 x 40mm
Weight Approx.340g (including battery)
GeneralSpecications
Range Auto
Polarity Auto
Overloading
Display OL
(For COD. 51254 only: except at 4~20mA Loop
range which display HI or LO)
BatteryDeciency Display
“ ”
Feature Summary
Tri Digital Displays
Analogue Bar Graph
Primary: 20,000 counts
Left Secondary: 2000 counts
Right Secondary: 2000 counts
Bar Graph: 40 segments, updates 10 times / second
Backlight with 2 brightness levels Bright backlight for clear readings in poorly lighted
areas
Autorange The Meter automatically selects best range
AC+DC True RMS, AC RMS Choices for AC only or AC+DC readings
Data Hold Holds readings on display
Continuity Beeper sounds for resistance readings below
threshold
Bar Graph 40 segments
Duty Cycle Measure signal on or off time in %
MAX MIN Mode Record maximum and minimum
Battery Access Door Battery replaceable
BasicSpecications
Function Ranges/Description
DC Voltage 0 to 1000V
AC Voltage, True RMS 0 to 1000V, 100kHz bandwidth
Basic Accuracy DC Voltage: COD. 51253: 0.1%, COD. 51254: 0.05%
AC Voltage: COD. 51253: 0.8%, COD. 51254: 0.6%
DC Current 0 to 10A (5~10A for 10 seconds, interval 15 minutes)
AC Current, True RMS 0 to 10A (5~10A for 10 seconds, interval 15 minutes)
Resistance 0 to 20M
Capacitance 0 to 20mF
Frequency 0~200MHz
Temperature -40ºC~1000ºC (-40ºF~1832ºF)

59
STORE Readings
Up to 100 readings for COD. 51254 may be saved by
the user in a memory. These readings may be viewed by
using Recall feature.
DetailedAccuracySpecications
Accuracy:([%ofreading]+[numberofleastsignicantdigits),guaranteefor1year.
Operating temperature: 18ºC~28ºC
Relative humidity: 75%RH
A.DCVoltage
Range Resolution Accuracy Overload
Protection
Input
Impedance
COD. 51253 COD. 51254
200mV 0.01mV
±(0.1%+8)
±(0.05%+5)
1000V
Around 2.5G
2V 0.0001V
±(0.08%+5) Around 10M
20V 0.001V
200V 0.01V
1000V 0.1V ±(0.15%+8) ±(0.1%+8)
B.ACVoltage(AC+DCmeasurementisavailable)
Range Resolution Bandwidth Accuracy Input
Impedance
COD. 51253 COD. 51254
2V 0.0001V
45Hz~1kHz ±(0.8%+40) ±(0.6%+40)
Approx 10M
1kHz~10kHz ±(1.8%+40) ±(1.6%+40)
10kHz~100kHz ±(7%+40) ±(7%+40)
20V 0.001V
45Hz~1kHz ±(0.8%+40) ±(0.6%+40)
1kHz~10kHz ±(2%+40) ±(1.8%+40)
10kHz~100kHz ±(7%+40) ±(7%+40)
200V 0.01V
45Hz~1kHz ±(0.8%+40) ±(0.6%+40)
1kHz~10kHz ±(5%+40) ±(5%+40)
10kHz~100kHz NotSpecied NotSpecied
1000V 0.1V
45Hz~1kHz ±(1.5%+40) ±(1.2%+40)
1kHz~5kHz ±(6%+40)
5kHz~10kHz ±(10%+40)
Remarks:
- Overload Protection: 1000V.
- Display:
a) True rms are valid from 10% of range to 100% of range
b) AC crest factor can be up to 3.0 except 1000V where it is 1.5.
c) A residual reading of 80 digits with test leads shorted, will not affect stated accuracy.
d) When frequency is lower than 100kHz, the accuracy guarantee range 10%-100%.
e) When making AC+DC measurment, the accuray need to add (1%+ 35 digits) of reading
based on the above table.

60
C. DC Current
Range Resolution Accuracy Overload Protection
COD. 51253 COD. 51254
200µA 0.01µA
±(0.2%+20) ±(0.15%+20) 0.5A, 250V, fast type fuse,
Ø5×20mm
2000µA 0.1µA
20mA 0.001mA
200mA 0.01mA
10A 0.001A ±(0.8%+30) ±(0.7%+30) 10A, 250V, fast type fuse,
Ø5×20mm
Remarks:
At10Arange:
-Whenthemeasuredcurrentis≤5A,continuousmeasurementisallowed.
-Whenthemeasuredcurrentisbetween5A-10A,continuousmeasurement≤10secondsand
interval more than 15 minutes.
D.ACCurrent(AC+DCmeasurementisavailable)
Range Resolution Bandwidth Accuracy Overload Protection
COD. 51253 COD. 51254
200µA 0.01µA
45Hz~1kHz
1kHz~10kHz
±(1%+15)
±(2%+40)
±(0.8%+15)
±(1.5%+40)
0.5A, 250V, fast type
fuse,
Ø5×20mm
2000µA 0.1µA
20mA 0.001mA
200mA 0.01mA
10A 0.001A 45Hz~1kHz ±(2%+20) ±(2%+20) 10A, 250V, fast type
fuse, Ø5×20mm
1kHz~10kHz ±(6%+40) ±(6%+40)
Remarks:
Display:
a) True rms are valid from 10% of range to 100% of range
b) AC crest factor can be up to 3.0.
c) A residual reading of 80 digits with test leads shorted, will not affect stated accuracy.
d) When frequency is lower than 100kHz, the accuracy guarantee range 10%-100%.
e) When making AC+DC measurment, the accuray need to add (1%+ 35 digits) of reading
based on the above table.
At10Arange:
a)Whenthemeasuredcurrentis≤5A,continuousmeasurementisallowed.
b)Whenthemeasuredcurrentisbetween5A-10A,continuousmeasurement≤10secondsand
interval more than 15 minutes.

61
E. Resistance
Range Resolution Accuracy Overload Protection
COD. 51253 COD. 51254
200 0.01
±
(0.5%+20)
+
test leads open
circuit value
±
(0.4%+20)
+
test leads open
circuit value
1000V
2k 0.0001k ±(0.5%+20) ±(0.4%+20)
20k 0.001k
200k 0.01k ±(1%+20) ±(0.8%+20)
2M 0.0001M ±(1%+40) ±(1%+40)
20M 0.001M ±(1.5%+40) ±(1.5%+40)
F. Continuity Test
Range Resolution Overload Protection
0.01 1000V
Remarks:
- Open circuit voltage approximate -1.2V.
- The buzzer does not sound when the test resistance is >60 .
-Thebeepercomesoncontinuouslyforopenconditions,thatistestresistanceis≤40 .
G. Diode Test
Range Resolution Overload Protection
0.0001V 1000V
Remarks:
- Open circuit voltage approximate 2.8V.
- A good silicon junction drops between 0.5V and 0.8V.
H. Capacitance
Range Resolution Accuracy Overload Protection
COD. 51253 COD. 51254
20nF 0.001nF
±
(1.5%+20)
+
capacitance
value of open
circuit test
leads
±
(1.2%+20)
+
capacitance
value of open
circuit test
leads
1000V
200nF 0.01nF ±(1.5%+20) ±(1.2%+20)
2µF 0.0001µF
20µF 0.001µF ±(1.5%+40) ±(1.2%+40)
200µF 0.01µF ±(1.5%+40)
2mF 0.0001mF ±(5%+40) ±(5%+40)
20mF 0.001 mF Notspecied Notspecied

62
I. Frequency
Range Resolution Accuracy Overload Protection
20Hz 0.001Hz
±(0.1%+15) 1000V
200Hz 0.01Hz
2kHz 0.0001kHz
20kHz 0.001kHz
200kHz 0.01kHz
2MHz 0.0001MHz
20MHz 0.001MHz
200MHz 0.01MHz NotSpecied
Remarks:
- Input amplitude “a” as follows; (DC electric level is zero)
When10Hz~40MHz:200mV≤a≤30Vrms;
When>40MHz:Notspecied
J. Temperature (COD. 51254 only)
DegreesCelsius
Range Resolution Accuracy Overload Protection
-40ºC~40ºC
0.1ºC
±(3%+30)
1000V40ºC~400ºC ±(1%+30)
400ºC~1000ºC ±2.5%
Fahrenheit
Range Resolution Accuracy Overload Protection
-40ºF~32ºF
0.1ºF
±(4%+50)
1000V32ºF~752ºF ±(1.5%+50)
752ºF~1832ºF ±3%
Remarks:
- Included is a K-Type (nickel chromium ~ nickel silicon) point contact temperature probe
which could only measure temperature below 230ºC. If you want to measure temperature higher
than 230ºC, you must use the rod contact temperature probe.
K. 4~20 mA loop current (COD. 51254 only)
Range Resolution Accuracy Overload Protection
(4~20mA)% 0.01% ±(1%+50) 0.5A, 250V, fast type
fuse, Ø5×20mm
Remarks:
Whenthereadingsobtainedis:
-< 4mA, the primary display shows LO
- 4mA, the primary display shows 0% ….
20mA, the primary display shows 100%
-> 20mA, the primary display shows HI

63
NOTES
IMPORTANT!
The maker will not take responsibility for damage or malfunction as a result of the device being
incorrectly used or, applied for a purpose for whith it was not intended.
According to Waste Electrical and Electronic Equipment directive (WEEE), these ones must
be collected and arranged separately. If you have to throw them out, please, do not use the usual
rubbish. Please, contact your distributor for free recycling.
GUARANTEE
The maker guarantees to the device owner 12 months against any manufacture defect.
This guarantee do not cover the parts wich are consumables.
Note:toapplytheguaranteeitsnecesarytosendthe“GUARANTEECERTIFICATE”dulylled
withinoneweekafterpurchasedthemachinetothemaker.

64


-
 1
1
-
 2
2
-
 3
3
-
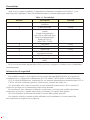 4
4
-
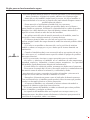 5
5
-
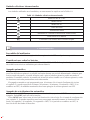 6
6
-
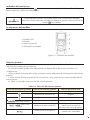 7
7
-
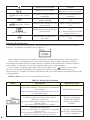 8
8
-
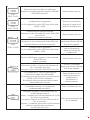 9
9
-
 10
10
-
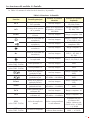 11
11
-
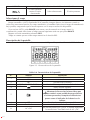 12
12
-
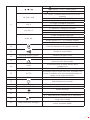 13
13
-
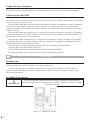 14
14
-
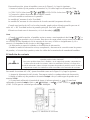 15
15
-
 16
16
-
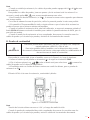 17
17
-
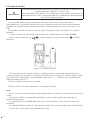 18
18
-
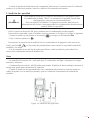 19
19
-
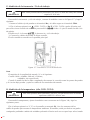 20
20
-
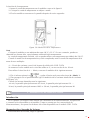 21
21
-
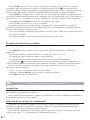 22
22
-
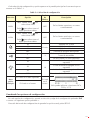 23
23
-
 24
24
-
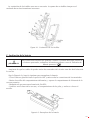 25
25
-
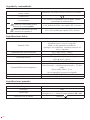 26
26
-
 27
27
-
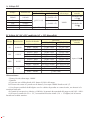 28
28
-
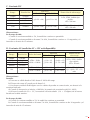 29
29
-
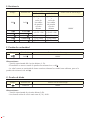 30
30
-
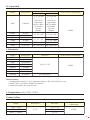 31
31
-
 32
32
-
 33
33
-
 34
34
-
 35
35
-
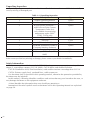 36
36
-
 37
37
-
 38
38
-
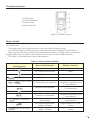 39
39
-
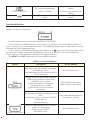 40
40
-
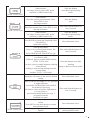 41
41
-
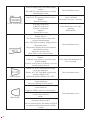 42
42
-
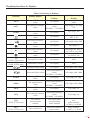 43
43
-
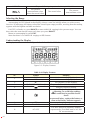 44
44
-
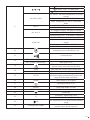 45
45
-
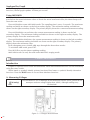 46
46
-
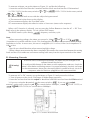 47
47
-
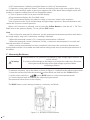 48
48
-
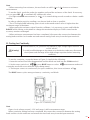 49
49
-
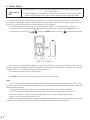 50
50
-
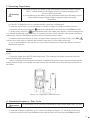 51
51
-
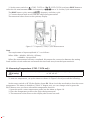 52
52
-
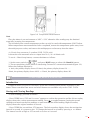 53
53
-
 54
54
-
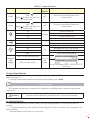 55
55
-
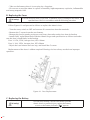 56
56
-
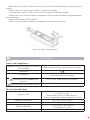 57
57
-
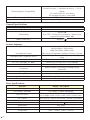 58
58
-
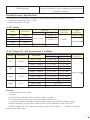 59
59
-
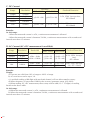 60
60
-
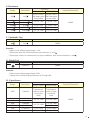 61
61
-
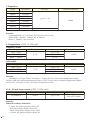 62
62
-
 63
63
-
 64
64
-
 65
65
-
 66
66
-
 67
67
-
 68
68


Ega Master 51254 El manual del propietario
- Categoría
- Medir, probar
- Tipo
- El manual del propietario
- Este manual también es adecuado para
en otros idiomas
- English: Ega Master 51254 Owner's manual
Artículos relacionados
Otros documentos
-
KNOVA KN 8058 El manual del propietario
-
KPS MT480 El manual del propietario
-
-
KPS DMM3000 El manual del propietario
-
-
Amprobe AM-560 & AM-570 Mutimeter Manual de usuario
-
Extech Instruments MG300 Manual de usuario
-
-
-