Sage COFFEE GRINDER (SCG820BSS4EEU1) El manual del propietario
- Categoría
- Cafeteras
- Tipo
- El manual del propietario
Este manual también es adecuado para

the Smart Grinder
™
Pro
BCG820/SCG820
EN
QUICK GUIDE
DE
KURZANLEITUNG
FR
GUIDE RAPIDE
NL
SNELSTARTGIDS
ES
GUÍA RÁPIDA
IT
GUIDA RAPIDA
PT
MANUAL RÁPIDO

2
CONTENTS
SAGE
®
RECOMMENDS
SAFETY FIRST
At Sage
®
we are very safety
conscious. We design and
manufacture appliances with
your safety foremost in mind.
In addition, we ask that you
exercise a degree of care
when using any electrical
appliance and adhere to the
following precautions.
IMPORTANT
SAFEGUARDS
READ ALL INSTRUCTIONS
BEFORE USE AND SAVE
FOR FUTURE REFERENCE
• A downloadable version of this
document is also available at
sageappliances.com
• Before using the rst time
ensure your electricity supply
is the same as shown on
the label on the underside of
the appliance.
• Remove and safely discard
any packaging materials
before rst use.
• To eliminate a choking hazard
for young children, safely
discard the protective cover
tted to the power plug.
• This appliance is for household
use only. Do not use the
appliance for anything other
than its intended use. Do not
use in moving vehicles or boats.
Do not use outdoors. Misuse
may cause injury.
• Fully unwind the power cord
before operating.
• Position the appliance on a
stable, heat resistant, level, dry
surface away from the edge and
do not operate on or near a heat
source such as a hot plate, oven
or gas hob.
• Do not let the power cord hang
over the edge of a bench or
table, touch hot surfaces or
become knotted.
• Do not leave the appliance
unattended when in use.
• Always ensure the appliance
is turned OFF, unplugged at
the power outlet and has been
2 Sage
®
Recommend Safety First
5 Getting To Know Your New Appliance
6 Operating Your New Appliance
11 Care, Cleaning & Storage
12 Troubleshooting
13 Guarantee

3
EN
allowed to cool before cleaning,
attempting to move or storing.
• Always turn the appliance to
the OFF position, switch o at
the power outlet and unplug
at the power outlet when the
appliance is not in use.
• Do not use the appliance if the
power cord, plug, or appliance
becomes damaged in any way.
If damaged and maintenance
other than cleaning is
required please contact Sage
Customer Service or go to
sageappliances.com
• Any maintenance other than
cleaning should be performed
by an authorised Sage
®
service centre.
• Children should not play with
the appliance.
• Cleaning of the appliance
should not be carried out by
children unless they are 8 years
or older and supervised.
• The appliance and its cord
should be kept out of reach
of children aged 8 years
and younger.
• The installation of a residual
current safety switch is
recommended to provide
additional safety when using
all electrical appliances.
Safety switches with a rated
operating current not more
than 30mA are recommended.
Consult an electrician for
professional advice.
• Do not use attachments
other than those provided
with the appliances.
• Do not attempt to operate
the appliance by any method
other than those described
in this booklet.
• Do not move the appliance
whilst in operation.
• Do not touch hot surfaces.
Allow the appliance to cool
down before moving or
cleaning any parts.
• This appliance shall not be
used by children. Keep the
appliance and its cord out
of reach of children.
• This appliance can be used by
persons with reduced physical,
sensory or mental capabilities
or a lack of experience and
knowledge, only if they have
been given supervision or
instruction concerning use
of the appliance in a safe
way and understand the
hazards involved.
• Do not operate the grinder
without the hopper lid in
position. Keep ngers,
hands, hair, clothing and
utensils away from the
hopper during operation.
WE RECOMMEND SAFETY FIRST

4
WE RECOMMEND SAFETY FIRST
The symbol shown
indicates that this appliance
should not be disposed of
in normal household waste.
It should be taken to a local
authority waste collection centre
designated for this purpose or to
a dealer providing this service.
For more information, please
contact your local council oce.
To protect against electric
shock, do not immerse the
power plug, cord or appliance in
water or any liquid.
FOR HOUSEHOLD USE ONLY
SAVE THESE INSTRUCTIONS

5
EN
C
B
D
E
F
G
H
M
L
O
N
A
K
J
I
Oi
Oii
GETTING TO KNOW YOUR NEW APPLIANCE
A. Bean Hopper Lid
B. Bean Hopper
C. Hardened Stainless Steel Conical Burrs
D. Backlit LCD Screen
E. GRIND AMOUNT / PROGRAM Dial
F. SHOTS / CUPS Button
G. Grind Outlet
H. Grind Tray
I. Grind Size Dial
J. START / PAUSE / CANCEL Button
K. Portalter Activation Switch
ACCESSORIES
L. Portalter Cradle 50–54mm
M. Portalter Cradle 58mm
N. Conical Burr Cleaning Brush
O. Grinds Container
Oi - Container Cap
Oii - Container Lid
Rating Information
220–240V ~ 50-60Hz 165W

6
BEFORE FIRST USE
Remove and safely discard all promotional
labels and packing materials attached to
your Sage
®
product.
Wash hopper, cradles, grind container, container
lid and cleaning brush in warm soapy water and
dry thoroughly. Wipe exterior of grinder with a
soft damp cloth and dry thoroughly. Place grinder
on at level surface and plug power cord into
220–240V outlet and switch Power ‘ON’.
ENERGY SAVING FEATURE
The grinder will automatically switch o if not
used after 5 minutes.
ASSEMBLING YOUR SAGE SMART
GRINDER
™
PRO
Bean Hopper
Align tabs on the base of the bean hopper
and insert hopper into position. Turn the
bean hopper dial 90° to lock into position.
Fill with fresh coee beans and secure lid
on top of bean hopper.
GRINDING FOR ESPRESSO
COFFEE
Use single wall lter baskets when grinding fresh
coee beans. Use the ner 1–30 settings in the
ESPRESSO range.
STEP 1:
Insert the appropriate portalter cradle size. Insert
your portalter into the cradle.
PUSH
50-54mm
58mm
CRADLES
NOTE
Maximum number of shots with the cradle
inserted is 2.
PLUNGER
1 UP TO 12 CUPS
BREW METHOD
GRIND SETTING
GRIND SIZE
AMOUNT
FINE
1-30
1 UP TO 8 SHOTS
ESPRESSO DRIP FILTER
MEDIUM COARSE
46-54
COARSE
55-60
1 UP TO 12 CUPS
PERCOLATOR
31-45
1 UP TO 12 CUPS
MEDIUM
COFFEE CHART
OPERATING YOUR NEW APPLIANCE

7
EN
STEP 2:
Selecting your SHOTS / CUPS
Select the desired amount of ground coee
required by pressing the SHOTS / CUPS button.
START PAUSE
GRIND AMOUNT SHOTS CUPS
CANCELPROGRAM
Rotate the Grind Amount Dial to adjust the grinding
time to achieve the correct amount of coee.
START PAUSE
GRIND AMOUNT SHOTS CUPS
CANCELPROGRAM
STEP 3:
Select your grind size
For espresso, we recommend selecting Grind Size
setting 12 as a starting point and moving the Grind
Size dial Coarser or Finer to adjust the ow of
espresso as required.
START PAUSE
GRIND AMOUNT SHOTS CUPS
CANCELPROGRAM
NOTE
If the Grind Size Dial is tight, run the grinder
by pressing the START / PAUSE / CANCEL
button while turning the Grind Size Dial. This
will release coee grounds caught between
the burrs.
GRINDING INTO GRINDS
CONTAINER OR COFFEE FILTER
STEP 1:
Remove cradle by sliding out from under the
grind outlet.
PULL
Slide in grinds container with cap open or coee
lter directly under grind outlet.
OPERATING YOUR NEW APPLIANCE

8
NOTE
Programming a custom grind amount/time
only sets it for that particular brew method.
This will not change the other Shots or
Cups settings.
Pause Function
You can pause the grinder during operation
allowing you to collapse or settle the coee
in the portalter.
• Press and release the
START / PAUSE / CANCEL button to start the
grinding operation.
• During grinding, press the
START / PAUSE / CANCEL button again
to pause the operation for 10 seconds.
• Press again within this time to resume grinding
the remaining dose.
START PAUSE
GRIND AMOUNT SHOTS CUPS
CANCELPROGRAM
OPERATING YOUR NEW APPLIANCE
• Select the required amount of ground coee
by pressing the SHOTS / CUPS button.
• Press the START / PAUSE / CANCEL button
to start grinding operation.
START PAUSE
SHOTS CUPS
CANCEL
START PAUSE
SHOTS CUPS
CANCEL
FEATURES OF YOUR SAGE
SMART GRINDER™ PRO
Automatic Grinding
Grinding automatically allows you to grind
hands-free.
• Press and release either the
START / PAUSE / CANCEL button or push
the handle of your portalter once. This will
activate the PORTAFILTER SWITCH.
• Grinding will automatically stop when the
preset amount is dispensed.
START PAUSE PORTAFILTER SWITCH
PRESS & RELEASE
OR
PUSH

9
EN
ADJUSTING YOUR GRIND AMOUNT
Increasing the Grind Amount
To increase the grind amount selected, turn the
GRIND AMOUNT dial to the right.
START PAUSE
GRIND AMOUNT SHOTS CUPS
CANCELPROGRAM
Decreasing the Grind Amount
To decrease grind amount selected, turn the
Grind Amount Dial to the left.
NOTE
To RESET the grind amount/time to the default
settings, press and hold the SHOTS / CUPS
button until a long beep sounds.
Program Function
Once you have set your required dose,
you can program this time into the number
of shot(s) currently displayed on the LCD.
Press and hold the PROGRAM button,
grinder will beep twice to conrm. Only
the shot displayed will be programmed,
all other shots will remain unchanged.
START PAUSE
GRIND AMOUNT SHOTS CUPS
CANCELPROGRAM
PRESS & HOLD
Manual Grinding
Grinding manually allows you to have complete
control over how much coee is dispensed.
• Press and hold either the START / PAUSE /
CANCEL button or push the handle of your
portalter to activate the PORTAFILTER
SWITCH for as long as you require.
• Release START / PAUSE / CANCEL button or
PORTAFILTER SWITCH and grinding will stop.
START PAUSE PORTAFILTER SWITCH
PRESS, HOLD & RELEASE
OR
PUSH
OPERATING YOUR NEW APPLIANCE

10
OPERATING YOUR NEW APPLIANCE
ADJUSTING CONICAL BURRS
Some types of coee may require a wider grind range to achieve an ideal extraction or brew.
A feature of your Smart Grinder™ Pro is the ability to extend this range with an adjustable upper burr.
We recommend making only one adjustment at a time.
13
Hold hopper over container & turn
dial to release beans into container
Align hopper
into position
Run grinder
until empty
Remove hopperUnlock hopper
1 2 3 4 5
Move adjustable
top burr, 1 number,
coarser or finer
Remove wire
handle from both
sides of the burr
Align the number
with the handle
opening
Remove upper
burr
6
8877 9
Insert wire
handle from both
sides of the burr
10
Push upper burr
firmly into
position
11
Lock upper burr
12
Align hopper
into position
AIR TIGHT
CONTAINER
14
Lock hopper
15
Check your
extraction
F
I
N
E
C
O
A
R
S
E
F
I
N
E
C
O
A
R
S
E
4
5
6
7
8
F
I
N
E
C
O
A
R
S
E
F
I
N
E
C
O
A
R
S
E

11
EN
CARE, CLEANING & STORAGE
CARE, CLEANING & STORAGE
1. Empty beans from the hopper
and grind out any excess beans
(see below).
2. Unplug power cord from power outlet
before cleaning.
3. Wash the grind container and lid, bean
hopper and lid in warm soapy water, rinse
and dry thoroughly.
4. Wipe and polish exterior of appliance with
a soft damp cloth.
CLEANING CONICAL BURRS
Regular cleaning helps the burrs achieve consistent grinding results which is especially important when
grinding for espresso coee.
13
Hold hopper over container & turn
dial to release beans into container
Align hopper
into position
Run grinder
until empty
Remove hopper
Un
lock hopper
1 2 3 4 5
Clean lower
burr with
cleaning brush
Clea
n upper
burr
with
c
leaning brush
Clean grind
outlet with
brush
Remove upper
burr
6
8877 9
Push upper
burr firmly into
position
10
Lock upper burr
11
Align hopper
into position
12
Lock hopper
AIR TIGHT
CONTAINER
NOTE
Do not use alkaline or abrasive cleaning
agents, steel wool or scouring pads, as
these can damage the surface.
NOTE
Please do not clean any grinder parts or
accessories in the dishwasher.

12
TROUBLESHOOTING
PROBLEM POSSIBLE CAUSE WHAT TO DO
Grinder does
not start after
pressing START /
PAUSE / CANCEL
button
• Grinder not plugged in.
• Grinder has overheated.
• Bean hopper not attached
correctly. ‘PLEASE LOCK
HOPPER’ will be displayed
on LCD screen.
• Plug power cord into power outlet.
• Remove power plug from power outlet.
Leave for 20 minutes to cool down
before using again.
• Lock bean hopper into position.
Motor starts but
coming from
grind outlet
• Incorrect button pressed.
• No coee beans in bean
hopper.
• Grinder/bean hopper
is blocked.
• Press START / PAUSE / CANCEL
or PORTAFILTER SWITCH
to activate.
• Fill bean hopper with fresh
coee beans.
• Remove bean hopper. Inspect bean
hopper and burrs for blockage.
Replace parts and try again.
Motor starts but
operates with a
loud ‘racket’ noise
• Grinder is blocked with
foreign item or chute
is blocked.
• Moisture clogging grinder.
• Remove bean hopper, inspect burrs
and remove any foreign body.
• Clean burrs and chute (refer to Care
& Cleaning on page page 11).
• Leave burrs to dry thoroughly before
re-assembling. You can use a hair dryer
to blow air into grinder inlet (lower burr)
to dry.
Unable to lock
bean hopper into
position
• Coee beans obstructing bean
hopper locking device.
• Remove bean hopper. Clear coee
beans from top of burrs. Re-lock hopper
into position & try again.
Not enough/
too much
• Grind amount requires
adjustment.
• Press SHOTS / CUPS button to change
grind amount.
• Use Grind Amount Dial to ne tune
the amount ‘more’ or ‘less’.
• It is normal for the correct amount
of coee to appear overlled in
your portalter. Untamped coee
has approximately three times
the volume of tamped coee.
Emergency stop?
• Press START / PAUSE / CANCEL
button to stop operation.
• Unplug power cord from power outlet.

13
EN
GUARANTEE
2 YEAR LIMITED GUARANTEE
Sage Appliances guarantees this product for
domestic use in specied territories for 2 years
from the date of purchase against defects caused
by faulty workmanship and materials. During
this guarantee period Sage Appliances will repair,
replace, or refund any defective product
(at the sole discretion of Sage Appliances).
All legal warranty rights under applicable national
legislation will be respected and will not be
impaired by our guarantee. For full terms and
conditions on the guarantee, as well as instructions
on how to make a claim, please visit
www.sageappliances.com.

14
INHALTE
• Dieses Informationsbuch
steht zum Download unter
www.sageappliances.com zur
Verfügung.
• Vor dem ersten Gebrauch
prüfen, dass Ihre Netzspannung
mit der auf dem Etikett an
der Unterseite des Geräts
übereinstimmt.
• Vor dem ersten Gebrauch
alle Verpackungsmaterialien
abnehmen und sicher
entsorgen.
• Schutzhülle am Netzstecker
sicher entsorgen, da
sie für Kleinkinder eine
Erstickungsgefahr
darstellen könnte.
• Dieses Gerät ist nur für den
Haushaltsgebrauch bestimmt.
Gerät nur bestimmungsgemäß
verwenden. Nicht in fahrenden
Fahrzeugen oder Booten
verwenden. Nicht im Freien
verwenden. Missbrauch kann
Verletzungen nach sich ziehen.
• Netzkabel vor dem Gebrauch
vollständig entrollen.
• Gerät in sicherem Abstand
von Kanten auf eine stabile,
hitzebeständige, ebene und
trockene Fläche stellen.
WICHTIGE
VORSICHTSMASS
NAHMEN
BITTE ALLE ANWEISUNGEN
VOR DEM GEBRAUCH
LESEN UND ZUR
SPÄTEREN BEZUGNAHME
AUFBEWAHREN.
14 Wir empfehlen: Sicherheit geht vor
17 Lernen Sie Ihr neues Gerät kennen
18 Bedienung Ihres Neuen Geräts
23 Reinigung und Pege
24 Problembeseitigung
25 Garantie
SAGE
®
EMPFIEHLT:
SICHERHEIT
GEHT VOR
Wir bei Sage
®
sind sehr
sicherheitsbewusst.
Beim Design und bei der
Herstellung unserer Geräte
denken wir zu allererst
an Ihre Sicherheit. Darüber
hinaus bitten wir Sie, bei
der Verwendung jedes
Elektrogeräts angemessene
Sorgfalt anzuwenden und
sich an die folgenden
Vorsichtsmaßnahmen
zu halten.

15
DE
WIR EMPFEHLEN: SICHERHEIT GEHT VOR
Nicht auf oder neben einer
Wärmequelle wie einem
Gas- oder Elektroherd oder
einem heißen Ofen betreiben.
• Netzkabel nicht über
Arbeitsplatten oder Tischkanten
hängen lassen, von heißen
Oberächen fern halten,
Kabelgewirr vermeiden.
• Gerät während des Betriebs
nicht unbeaufsichtigt lassen.
• Gerät immer ausschalten,
Netzstecker ziehen und
abkühlen lassen, ehe Sie es
bewegen, reinigen oder lagern.
• Gerät immer ausschalten,
sofern möglich auch an der
Steckdose, und Netzstecker
ziehen, wenn es nicht in
Gebrauch ist.
• Gerät nicht verwenden,
wenn das Netzkabel,
der Netzstecker oder das
Gerät selbst in irgendeiner
Weise beschädigt ist. Wenden
Sie sich bei Schäden und zur
Wartung (außer Reinigung) bitte
an den Sage-Kundendienst
oder besuchen Sie
sageappliances.com
• Alle Wartungsarbeiten außer
Reinigung nur von autorisierten
Sage
®
-Kundendienststellen
vornehmen lassen.
• Kinder nicht mit dem Gerät
spielen lassen.
• Reinigung des Geräts nicht
von Kindern unter 8 Jahren
und nur unter Aufsicht
vornehmen lassen.
• Gerät und Netzkabel für
Kinder bis zu 8 Jahren
unzugänglich aufbewahren.
• Die Installation eines Schutz-
oder Sicherheitsschalters
wird bei der Verwendung
von Elektrogeräten als
zusätzliche Schutzmaßnahme
empfohlen. Es wird ein
Sicherheitsschalter mit maximal
30 mA Nennleistung empfohlen.
Fachgerechte Beratung erhalten
Sie von Ihrem Elektriker.
• Nur die mit Ihrem Gerät
mitgelieferten Einsätze
verwenden.
• Ihr Gerät nicht anders betreiben
als in dieser Broschüre
beschrieben.

16
NUR FÜR DEN HAUSHALTSGEBRAUCH
DIESE ANLEITUNG AUFBEWAHREN
WIR EMPFEHLEN: SICHERHEIT GEHT VOR
• Gerät während des Betriebs
immer an Ort und Stelle lassen.
• Keine heißen Oberächen
berühren. Gerät vor dem
Transport oder der Reinigung
abkühlen lassen.
• Gerät nicht von Kindern
bedienen lassen. Gerät und
Kabel für Kinder unzugänglich
aufbewahren.
• Dieses Gerät kann von
Personen mit eingeschränkten
körperlichen, sensorischen
oder geistigen Fähigkeiten oder
mit mangelnder Erfahrung und
fehlenden Kenntnissen genutzt
werden, sofern sie beaufsichtigt
werden oder in den sicheren
Gebrauch des Geräts
eingewiesen wurden und sich
der entsprechenden Risiken
bewusst sind.
• Mahlwerk nur mit auf den
Bohnenbehälter aufgesetztem
Deckel verwenden. Finger,
Hände, Haare, Bekleidung
und Utensilien während der
Verwendung des Mahlwerks
vom Bohnenbehälter fernhalten.
Dieses Symbol zeigt,
dass das Gerät nicht im
normalen Hausmüll
entsorgt werden sollte.
Es sollte stattdessen bei einem
entsprechenden kommunalen
Wertstohof oder Fachhändler
zur Entsorgung abgegeben
werden. Weitere Einzelheiten
erfahren Sie von Ihrer
Kommunalbehörde.
Zum Schutz gegen
Stromschlag Netzstecker,
Netzkabel oder Gerät nicht
in Wasser oder sonstige
Flüssigkeiten tauchen.

17
DE
C
B
D
E
F
G
H
M
L
O
N
A
K
J
I
Oi
Oii
LERNEN SIE IHR NEUES GERÄT KENNEN
A. Bohnenbehälter-Deckel
B. Bohnenbehälter
C. Kegelmahlwerk aus gehärtetem Edelstahl
D. Hintergrundbeleuchtetes LCD-Display
E. Drehwähler MAHLMENGE / PROGRAMM
F. Taste SHOTS / TASSEN
G. Mahlwerkausgabe
H. Auangschale
I. Drehwähler Mahlgrad
J. Taste START / PAUSE / ABBRUCH
K. Schalter zur Siebträger-Aktivierung
ZUBEHÖR
L. Siebträger-Halter 50–54 mm
M. Siebträger-Halter 58 mm
N. Reinigungsbürste für Kegelmahlwerk
O. Mahlbehälter
Oi – Mahlbehälter-Kappe
Oii – Mahlbehälter-Deckel
Leistungsangaben
220–240 V ~50 Hz 165W

18
VOR DEM ERSTEN GEBRAUCH
Alle Werbeaufkleber und Verpackungsmaterialien
an Ihrem Sage
®
-Produkt entfernen und sicher
entsorgen.
Bohnenbehälter, Halter, Mahlbehälter,
Behälterdeckel und Reinigungsbürste in warmem
Spülwasser waschen und sorgfältig trocknen.
Mühle außen mit einem weichen, feuchten Tuch
abwischen und sorgfältig trocknen. Mühle auf
eine ebene Fläche stellen, Netzkabel in eine
230–240-V-Steckdose einstecken und Gerät
EINschalten.
ENERGIESPARFUNKTION
Die Mühle schaltet sich bei Nichtgebrauch
nach 5 Minuten automatisch aus.
ZUSAMMENSETZEN IHRER SAGE
SMART GRINDER
™
PRO
Bohnenbehälter
Markierungen am Fuß des Bohnenbehälters
ausrichten und Behälter einsetzen. Drehscheibe
am Bohnenbehälter zum Einrasten um 90 ° drehen.
Mit frischen Kaeebohnen füllen und Deckel auf
den Bohnenbehälter aufsetzen.
Zum Mahlen frischer Kaeebohnen einwandige
Filtersiebe verwenden. Für ESPRESSO die
feineren Einstellungen von 1–30 verwenden.
SCHRITT 1:
Siebträger-Halter der richtigen Größe einsetzen.
Siebträger in den Halter einsetzen.
DRÜCKEN
HALTER
HINWEIS
Mit eingesetztem Halter können maximal 2
Espresso-Shots gemahlen werden.
FRENCH PRESS
1 BIS 12 TASSEN
BRÜHMETHODE
MAHLEINSTELLUNG
MAHLGRAD
MENGE
FEIN
1-30
1 BIS 8 ESPRESSO
-SHOTS
ESPRESSO FILTERKAFFEE
MITTELGROB
46-54
GROB
55-60
1 BIS 12 TASSEN
KAFFEEMASCHINE
31-45
1 BIS 12 TASSEN
MITTEL
BEDIENUNG IHRES NEUEN GERÄTS

19
DE
SCHRITT 2:
Auswahl Ihrer SHOTS / TASSEN
Gewünschte Mahlmenge durch Betätigung der
Taste SHOTS / TASSEN einstellen.
START PAUSE
GRIND AMOUNT SHOTS CUPS
CANCELPROGRAM
Drehwähler MAHLMENGE drehen, um die
Mahldauer für die gewünschte Menge an
Kaeemehl einzustellen.
START PAUSE
GRIND AMOUNT SHOTS CUPS
CANCELPROGRAM
SCHRITT 3:
Einstellung des Mahlgrads
Für Espresso empfehlen wir, mit der Einstellung
12 zu beginnen und den Drehwähler für die
Mahlgradeinstellung dann gröber oder feiner
zu stellen, um die Espressoausgabe nach
Wunsch anzupassen.
START PAUSE
GRIND AMOUNT SHOTS CUPS
CANCELPROGRAM
BEDIENUNG IHRES NEUEN GERÄTS
HINWEIS
Bei schwer drehbarer Mahlgradeinstellung
die Taste START / PAUSE / ABBRUCH
drücken, um die Mühle zu starten, und
dann den Drehwähler Mahlgrad drehen.
Dies entfernt etwaige Bohnenrückstände
zwischen den Kegeln.
MAHLEN IN EINEN
SCHRITT 1:
Halter von der Unterseite der Mahlwerkausgabe
herausziehen.
ZIEHEN
Oenen Kaeebehälter oder Kaeelter direkt unter
die Mahlwerkausgabe stellen.

20
HINWEIS
Die Programmierung einer personalisierten
Mahlmenge/Mahldauer stellt sie nur für die
jeweilige Brühmethode ein. Sie hat keine
Auswirkung auf andere Einstellungen für
Espresso-Shots oder Tassen.
Pause-Funktion
Sie können den Betrieb der Kaeemühle
unterbrechen, z. B. um Kaee im Siebträger
geradezustreichen.
• Taste START / PAUSE / ABBRUCH kurz drücken,
um das Mahlwerk zu starten.
• Während des Mahlvorgangs Taste START /
PAUSE / ABBRUCH erneut drücken, um den
Mahlvorgang 10 Sekunden lang zu pausieren.
• Taste während dieser Zeit erneut drücken,
um die restliche Menge zu mahlen.
KURZ DRÜCKEN
BEDIENUNG IHRES NEUEN GERÄTS
• Gewünschte Mahlmenge durch Betätigung
der Taste SHOTS / TASSEN einstellen.
• Taste START / PAUSE / ABBRUCH drücken,
um das Mahlwerk zu starten.
START PAUSE
SHOTS CUPS
CANCEL
START PAUSE
SHOTS CUPS
CANCEL
FUNKTIONEN IHRER SAGE SMART
GRINDER
™
PRO
Automatisches Mahlen
Automatisches Mahlen lässt Sie die Mühle
freihändig bedienen.
• Taste START / PAUSE / ABBRUCH kurz
drücken oder den Gri Ihres Siebträgers
ein Mal andrücken. Dies aktiviert den
SIEBTRÄGER-SCHALTER.
• Der Mahlvorgang endet automatisch,
wenn die voreingestellte Menge Kaee
ausgegeben wurde.
START PAUSE SIEBTRÄGER-SCHALTER
KURZ DRÜCKEN
ODER
DRÜCKEN

21
DE
EINSTELLUNG DER MAHLMENGE
Erhöhung der Mahlmenge
Zur Erhöhung der gewählten Mahlmenge den
Drehwähler MAHLMENGE nach rechts drehen.
START PAUSE
GRIND AMOUNT SHOTS CUPS
CANCELPROGRAM
Verringerung der Mahlmenge
Zur Verringerung der gewählten Mahlmenge den
Drehwähler MAHLMENGE nach links drehen.
Programm-Funktion
Nach dem Einstellen der gewünschten Menge
können Sie für die auf dem LCD-Display aktuell
angezeigte Anzahl Espresso-Shots die Mahldauer
einstellen. PROGRAMM-Taste gedrückt halten.
Die Mühle piepst zur Bestätigung zwei Mal. Nur
der angezeigte Espresso-Shot wird programmiert;
alle anderen Espresso-Shots bleiben unverändert.
START PAUSE
GRIND AMOUNT SHOTS CUPS
CANCELPROGRAM
DRÜCKEN & HALTEN
Manuelles Mahlen
Manuelles Mahlen gibt Ihnen vollständige
Kontrolle über die abgegebene Menge
Kaeemehl.
• Taste START / PAUSE / ABBRUCH gedrückt
halten oder den Gri Ihres Siebträgers drücken,
um den SIEBTRÄGER-SCHALTER für die
gewünschte Dauer zu aktivieren.
• Taste START / PAUSE / ABBRUCH oder
SIEBTRÄGER-SCHALTER freigeben,
um den Mahlvorgang zu beenden.
START PAUSE
DRÜCKEN, HALTEN & FREIGEBEN
ODER
DRÜCKEN
BEDIENUNG IHRES NEUEN GERÄTS
HINWEIS
Zum ZURÜCKSETZEN der Mahlmenge/-
dauer auf die Standardeinstellungen die Taste
SHOTS/TASSEN gedrückt halten, bis ein
langer Piepston ertönt.

22
BEDIENUNG IHRES NEUEN GERÄTS
EINSTELLUNG DER MAHLKEGEL
Manche Arten Kaee brauchen für ideale Extraktion oder Brühung ein größeres Spektrum des Mahlgrads.
Ihre Smart Grinder
™
Pro bietet die Möglichkeit, dieses Spektrum anhand des verstellbaren oberen Kegels
zu erweitern. Wir empfehlen, jeweils nur eine Einstellung zu ändern.
Behälter über eine Dose halten; Bohnen
durch Drehen des Drehwähler in die
Dose leeren
Behälter richtig
positionieren
Mahlwerk leer
laufen lassen
Bohnenbehälter
entnehmen
Bohnenbehälter
entriegeln
Verstellbaren
oberen Kegel,
um 1 Nummer,
gröber oder feiner
verschieben
Drahtgriff von
beiden Seiten
des Kegels
abnehmen
Zahl an der
Öffnung für
den Drahtgriff
ausrichten
Oberen Kegel
abnehmen
Drahtgriff an beiden
Seiten des Kegels
einsetzen
Oberen Kegel fest
einschieben
Oberen Kegel
einrasten lassen
Behälter richtig
positionieren
Bohnenbehälter
einrasten lassen
Extraktion prüfen

23
DE
REINIGUNG UND PFLEGE
PFLEGE, REINIGUNG UND
AUFBEWAHRUNG
1. Bohnenbehälter leeren und nicht
entfernbare Bohnen mahlen
(siehe unten).
2. Netzstecker vor der Reinigung aus der
Steckdose ziehen.
3. Bohnenbehälter und Deckel in
warmem Spülwasser waschen, spülen
und sorgfältig trocknen.
4. Gerät außen mit einem weichen,
feuchten Tuch abwischen und polieren.
HINWEIS
Keine basischen oder scheuernden
Putzmittel oder Stahlwolle verwenden,
da diese die Oberäche beschädigen
können.
HINWEIS
Mühlenteile oder Zubehörteile bitte nicht
in der Spülmaschine waschen.
REINIGUNG DER MAHLKEGEL
Regelmäßig gereinigte Mahlkegel erzielen gleichmäßigere Mahlergebnisse, die vor allem
für Espressokaee wichtig sind.
Behälter über eine Dose halten;
Bohnen durch Drehen des
Drehwähler in die Dose leeren
Behälter richtig
positionieren
Mahlwerk leer
laufen lassen
Bohnenbehälter
entnehmen
Bohnenbehälter
entriegeln
Unteren Kegel
mit der
Reinigungsbürste
reinigen
Oberen Kegel mit der
Reinigungsbürste
reinigen
Mahlwerkausgabe
mit einem Bürstchen
reinigen
Oberen Kegel
abnehmen
Oberen Kegel fest
einschieben
Oberen Kegel
einrasten lassen
Behälter richtig
positionieren
Bohnenbehälter
einrasten lassen

24
PROBLEMBESEITIGUNG
PROBLEM MÖGLICHE URSACHE LÖSUNG
Mühle startet
nach Betätigung
der Taste
START / PAUSE /
ABBRUCH nicht
• Netzstecker nicht eingesteckt.
• Mühle überhitzt.
• Bohnenbehälter nicht richtig
eingesetzt. Das LCD-Display
zeigt „BOHNENBEHÄLTER
EINRASTEN LASSEN“ an.
• Netzkabel an Steckdose anschließen.
• Netzstecker aus der Steckdose
ziehen. Vor der weiteren Verwendung
20 Minuten abkühlen lassen.
• Bohnenbehälter richtig einrasten
lassen.
Motor startet, aber
das Mahlwerk gibt
aus
• Inkorrekte Taste betätigt.
• Keine Bohnen im
Bohnenbehälter.
• Mahlwerk/Bohnenbehälter
ist verstopft.
• Zur Aktivierung Taste START /
PAUSE / ABBRUCH oder
SIEBTRÄGER-SCHALTER betätigen.
• Bohnenbehälter mit frischen
Kaeebohnen füllen.
• Bohnenbehälter abnehmen.
Bohnenbehälter und Kegel auf
Blockaden prüfen. Teile wieder
einsetzen und nochmals versuchen.
Motor startet, aber
verursacht ein
lautes, ratterndes
Geräusch
• Mahlwerk ist durch einen
Fremdkörper blockiert oder
Ausgabe ist verstopft.
• Mahlwerk ist durch
Feuchtigkeit verstopft.
• Bohnenbehälter abnehmen, Mahlkegel
prüfen und Fremdkörper entfernen.
• Kegel und Ausgabe reinigen (siehe
Reinigung und Pege, Seite 23).
• Kegel vor dem Zusammensetzen
völlig trocknen lassen. Sie können
zum Trocknen mit einem Haartrockner
warme Luft in den Mahlwerkseingang
(unterer Kegel) blasen.
Bohnenbehälter
rastet nicht
richtig ein
• Kaeebohnen versperren
die Verriegelung des
Bohnenbehälters.
• Bohnenbehälter abnehmen.
Kaeebohnen oben auf den Kegeln
entfernen. Bohnenbehälter wieder
einsetzen und einrasten lassen;
nochmals versuchen.
Nicht genug/zu
• Mahlmenge muss
nachgestellt werden.
• Taste SHOTS / TASSEN drücken,
um die Mahlmenge zu ändern.
• Mahlmenge über den Drehwähler
MAHLMENGE nach oben oder unten
feineinstellen.
Siebträger zu voll
• Es ist normal, dass die richtige
Kaeemenge im Siebträger nach
zu viel aussieht. Nicht getamperter
Kaee hat etwa das dreifache
Volumen von getampertem Kaee.
Not-Aus?
• Taste START / PAUSE / ABBRUCH
drücken, um den Betrieb zu stoppen.
• Netzstecker aus der Steckdose
ziehen.

25
DE
GARANTIE
2 JAHRE BESCHRÄNKTE GARANTIE
Sage Appliances gibt auf dieses Produkt für den
häuslichen Gebrauch in bestimmten Gebieten eine
Garantie über 2 Jahre ab Kaufdatum für Mängel,
die durch fehlerhafte Verarbeitung und Materialien
verursacht wurden. Während dieser Garantiezeit
wird Sage Appliances jedes fehlerhafte Produkt
reparieren, ersetzen oder das Geld zurückerstatten
(nach eigenem Ermessen von Sage Appliances).
Alle gesetzlichen Gewährleistungsrechte nach
geltendem nationalem Recht werden beachtet
und durch unsere Garantie nicht beeinträchtigt.
Die vollständigen Garantiebestimmungen
und -bedingungen sowie Hinweise zur
Geltendmachung von Ansprüchen nden Sie unter
www.sageappliances.com.

26
NOTIZEN

FR
GUIDE RAPIDE
the Smart Grinder
™
Pro

2
TABLE DES MATIÈRES
SAGE
®
RECOMMANDE
LA SÉCURITÉ
EN PREMIER
Chez Sage
®
, la sécurité est
une priorité. Nous concevons
et fabriquons des appareils
en mettant votre sécurité
au premier plan. Nous vous
demandons également de
faire attention lorsque vous
utilisez un appareil électrique
et de respecter les consignes
suivantes.
MESURES
IMPORTANTES
DE SÉCURITÉ
LISEZ TOUTES LES
INSTRUCTIONS AVANT
LES POUR RÉFÉRENCE
ULTÉRIEURE
• Une version téléchargeable
de ce document est
également disponible sur
sageappliances.com.
• Avant une première utilisation,
assurez-vous que l'alimentation
électrique est identique à celle
illustrée sur l'étiquette sous
l'appareil.
• Retirez tout emballage avant la
première utilisation et éliminez-
le de façon sûre.
• Pour éviter tout risque
d'étouement pour les jeunes
enfants, éliminez de manière
sûre le couvercle de protection
sur la prise d'alimentation.
• Cet appareil est destiné à un
usage domestique uniquement.
N'utilisez pas l'appareil pour
toute autre n que son utilisation
prévue. Ne l'utilisez pas sur un
bateau ou dans des véhicules
en mouvement. Ne l'utilisez
pas en plein air. Une mauvaise
utilisation peut engendrer des
blessures.
• Déroulez entièrement le cordon
d'alimentation avant utilisation.
• Placez l'appareil sur une
surface stable, résistante à la
chaleur, plane et sèche, loin
du bord. Ne l'utilisez pas sur
ou à proximité d'une source
de chaleur (plaque chauante,
four ou cuisinière au gaz).
2 Sage
®
recommande la sécurité
en premier
5 Apprendre à connaître votre nouvel
appareil
6 Utilisation de votre nouvel appareil
11 Entretien, nettoyage et stockage
12 Dépannage
13 Garantie

3
FR
• Ne laissez pas le cordon
d'alimentation suspendu au
bord d'un banc ou d'une table,
toucher des surfaces chaudes
ou se nouer.
• Ne laissez pas l'appareil sans
surveillance lorsqu'il est en
marche.
• Assurez-vous toujours que
l'appareil est hors tension,
débranché de la prise électrique
et qu'il a refroidi avant de le
nettoyer, de le déplacer ou de le
ranger.
• Assurez-vous toujours que
l'appareil est HORS TENSION,
éteint et débranché au niveau
de la prise électrique lorsqu'il
n'est pas utilisé.
• N'utilisez pas l'appareil si le
cordon d'alimentation, la prise
ou l'appareil sont endommagés
de quelque manière que ce soit.
En cas de dommages ou si un
entretien autre que le nettoyage
est nécessaire, contactez le
service client Sage ou consultez
le site sageappliances.com.
• Tout entretien autre que le
nettoyage doit être réalisé par
un centre de services Sage
®
agréé.
• Les enfants ne doivent pas
jouer avec l'appareil.
• Le nettoyage de l'appareil ne
doit pas être eectué par des
enfants à moins qu'ils aient
8 ans ou plus, et ce, sous la
surveillance d'un adulte.
• L'appareil et son cordon doivent
être conservés hors de la
portée des enfants de 8 ans et
moins.
• L'installation d'un commutateur
de sécurité de courant résiduel
est recommandée pour fournir
une sécurité supplémentaire
lors de l'utilisation de tous
les appareils électriques. Les
commutateurs de sécurité avec
un courant de fonctionnement
nominal maximal de 30 mA
sont recommandés. Consultez
un électricien pour obtenir des
conseils professionnels.
• N'utilisez d'autres accessoires
que ceux fournis avec les
appareils.
• N'essayez pas de faire
fonctionner l'appareil par une
méthode autre que celles
décrites dans ce livret.
• Ne déplacez pas l'appareil
en cours de fonctionnement.
• Ne touchez pas les surfaces
chaudes. Laissez l'appareil
refroidir avant de déplacer
ou de nettoyer des pièces.
NOUS RECOMMANDONS LA SÉCURITÉ EN PREMIER

4
NOUS RECOMMANDONS LA SÉCURITÉ EN PREMIER
• Cet appareil ne doit pas être
utilisé par des enfants. Gardez
l'appareil et son cordon hors de
portée des enfants.
• Cet appareil peut être utilisé par
des personnes aux capacités
mentales, sensorielles ou
physiques réduites, ou ayant
peu d'expérience et de
connaissances uniquement
sous supervision ou s'ils
ont reçu des instructions
sur l'utilisation sécuritaire
de l'appareil et qu'elles
comprennent les risques
impliqués.
• N'utilisez pas le moulin si le
couvercle de la trémie n'est pas
en place. Gardez les doigts,
les mains, les cheveux, les
vêtements et les ustensiles
loin de la trémie pendant le
fonctionnement.
Le symbole illustré indique
que cet appareil ne doit pas
être jeté dans les ordures
ménagères. Il doit être
coné à un centre de collecte
de déchets des autorités locales
désigné à cette n ou à un
revendeur proposant ce service.
Pour en savoir plus, veuillez
contacter le bureau de votre
municipalité.
À des ns de protection
contre les décharges
électriques, ne plongez pas
la prise électrique, le cordon ou
l'appareil dans de l'eau ou dans
un liquide.
POUR UN USAGE DOMESTIQUE UNIQUE
MENT CONSERVEZ CES INSTRUCTIONS

5
FR
C
B
D
E
F
G
H
M
L
O
N
A
K
J
I
Oi
Oii
APPRENDRE À CONNAÎTRE VOTRE NOUVEL APPAREIL
A. Couvercle de la trémie à grains
B. Trémie à grains
C. Broyeurs coniques en acier inoxydable trempé
D. Écran LCD rétroéclairé
E. Sélecteur GRIND AMOUNT (Quantité de mouture)/
PROGRAM (Programmer)
F. Bouton SHOTS (Doses)/
CUPS (Tasses)
G. Sortie de mouture
H. Bac de mouture
I. Sélecteur de degré de mouture
J. Bouton START (Démarrer)/
PAUSE (Interrompre)/CANCEL (Annuler)
K. Commutateur d'activation du porte-ltre
ACCESSOIRES
L. Support de porte-ltre 50 à 54 mm
M. Support de porte-ltre 58 mm
N. Brosse de nettoyage des broyeurs coniques
O. Récipient de mouture
Oi - Bouchon du récipient
Oii - Couvercle du récipient
Informations sur la tension nominale
220 à 240 V ~ 50 à 60 Hz 165 W

6
AVANT LA PREMIÈRE UTILISATION
Retirez et jetez en toute sécurité toutes les
étiquettes promotionnelles et les matériaux
d'emballage attachés à votre produit Sage
®
.
Lavez la trémie, les supports, le récipient de
mouture, le couvercle du récipient et la brosse
de nettoyage dans de l'eau chaude savonneuse
et séchez complètement. Essuyez l'extérieur du
moulin avec un chion doux et humide, et séchez
soigneusement. Placez le moulin sur une surface
plane et branchez le cordon d'alimentation sur
une prise de 220 à 240 V, puis mettez-le sous
tension.
FONCTION D'ÉCONOMIE D'ÉNERGIE
Le moulin s'éteint automatiquement s'il
n'est pas utilisé au bout de 5 minutes.
ASSEMBLAGE DE VOTRE
SMART GRINDER
™
PRO DE SAGE
Trémie à grains
Alignez les languettes à la base de la trémie
à grains et insérez la trémie dans la position
adéquate. Tournez le cadran de la trémie à grains
à 90° pour la verrouiller dans la position adéquate.
Remplissez avec des grains de café frais et xez le
couvercle sur le dessus de la trémie à grains.
MOUTURE DE CAFÉ EXPRESSO
Utilisez des paniers à ltre simple paroi pour
moudre les grains de café frais. Utilisez les
réglages plus ns 1 à 30 pour la gamme
EXPRESSO.
ÉTAPE 1 :
Insérez la taille appropriée de support de porte-
ltre. Insérez votre porte-ltre dans le support.
POUSSER
50-54mm
58mm
CRADLES
REMARQUE
Nombre maximum de doses avec
le support inséré : 2.
QUANTITÉ
DEGRÉ DE
MOUTURE
RÉGLAGE
DE MOUTURE
MÉTHODE
D'INFUSION
MOYEN
1 À 12 TASSES
31-45
CAFETIÈRE À
PERCOLATION
1 À 12 TASSES
55-60
GROSSIER
46-54
MOYEN
À GROSSIER
FILTRE
À ÉGOUTTEMENT
EXPRESSO
1 À 8 DOSES
1-30
FIN
1 À 12 TASSES
PLONGEUR
TABLEAU SUR LE CAFÉ
UTILISATION DE VOTRE NOUVEL APPAREIL

7
FR
ÉTAPE 2 :
Sélection de doses/tasses
Sélectionnez la quantité de café moulu souhaitée
en appuyant sur le bouton SHOTS (Doses)/CUPS
(Tasses).
START PAUSE
GRIND AMOUNT SHOTS CUPS
CANCELPROGRAM
Tournez le sélecteur de quantité de mouture
pour régler le temps de mouture an d'obtenir la
quantité de café appropriée.
START PAUSE
GRIND AMOUNT SHOTS CUPS
CANCELPROGRAM
ÉTAPE 3 :
Sélection du degré de mouture
Pour l'expresso, nous vous recommandons de
sélectionner le réglage de degré de mouture 12
comme point de départ et d'ajuster avec le
sélecteur de façon à avoir un degré plus gros ou
plus n pour régler le débit de l'expresso selon vos
besoins.
START PAUSE
GRIND AMOUNT SHOTS CUPS
CANCELPROGRAM
REMARQUE
Si le sélecteur de degré de mouture
coince un peu, faites-le tourner tout en
faisant fonctionner le moulin en appuyant
sur le bouton START (Démarrer)/PAUSE
(Interrompre)/CANCEL (Annuler). Cela
permet de libérer le marc de café pris entre
les broyeurs.
MOUTURE DANS UN RÉCEPTACLE
DE MOUTURE OU FILTRE À CAFÉ
ÉTAPE 1 :
Retirez le support en le faisant glisser sous la sortie
de mouture.
TIREZ
Faites glisser le récipient de mouture avec le
bouchon ouvert ou le ltre à café directement sous
la sortie de mouture.
UTILISATION DE VOTRE NOUVEL APPAREIL

8
REMARQUE
Programmer une quantité/durée de mouture
personnalisée ne la dénit que pour cette
méthode d'infusion particulière. Cela ne
change pas les autres paramètres de doses
ou de tasses.
Fonction de pause
Vous pouvez mettre le moulin en pause pendant le
fonctionnement, ce qui vous permet de réduire ou
de déposer le café dans le porte-ltre.
• Appuyez et relâchez le bouton
START (Démarrer)/PAUSE (Interrompre)/
CANCEL (Annuler) pour lancer l'opération
de mouture.
• Pendant la mouture, appuyez de nouveau
sur le bouton START (Démarrer)/PAUSE
(Interrompre)/CANCEL (Annuler) pour
interrompre l'opération pendant 10 secondes.
• Appuyez à nouveau dans ce délai pour
reprendre la mouture de la dose restante.
START PAUSE
GRIND AMOUNT SHOTS CUPS
CANCELPROGRAM
UTILISATION DE VOTRE NOUVEL APPAREIL
• Sélectionnez la quantité de café moulu
requise en appuyant sur le bouton SHOTS
(Doses)/CUPS (Tasses).
• Appuyez sur le bouton START (Démarrer)/
PAUSE (Interrompre)/CANCEL (Annuler)
pour lancer l'opération de mouture.
START PAUSE
SHOTS CUPS
CANCEL
START PAUSE
SHOTS CUPS
CANCEL
FONCTIONNALITÉS DE VOTRE
SMART GRINDER™ PRO DE SAGE
Mouture automatique
La mouture automatique vous permet d'avoir les
mains libres.
• Appuyez et relâchez le bouton
START (Démarrer)/PAUSE (Interrompre)/
CANCEL (Annuler) ou poussez la poignée
de votre porte-ltre une fois. Cela va activer
le commutateur du porte-ltre.
• La mouture s'arrête automatiquement lorsque
la quantité préréglée est distribuée.
START PAUSE PORTAFILTER SWITCH
POUSSEZ ET RELÂCHEZ
OU
POUSSER

9
FR
RÉGLAGE DE LA QUANTITÉ
DE MOUTURE
Augmentation de la quantité de mouture
Pour augmenter la quantité de mouture
sélectionnée, tournez le sélecteur GRIND
AMOUNT (Quantité de mouture) vers la droite.
START PAUSE
GRIND AMOUNT SHOTS CUPS
CANCELPROGRAM
Réduction de la quantité de mouture
Pour réduire la quantité de mouture sélectionnée,
tournez le sélecteur GRIND AMOUNT (Quantité
de mouture) vers la gauche.
REMARQUE
Pour réinitialiser la quantité/la durée de
mouture aux paramètres par défaut, appuyez
sur le bouton SHOTS (Doses)/CUPS (Tasses)
et maintenez-le enfoncé jusqu'à ce qu'un long
bip retentisse
Fonction de programmation
Une fois que vous avez déni la dose requise,
vous pouvez programmer cette durée en
fonction du nombre de doses achées sur
l'écran LCD. Appuyez sur le bouton PROGRAM
(Programmer) et maintenez-le enfoncé, le
moulin émet deux bips pour conrmer. Seule
la dose achée est programmée, toutes
les autres doses restent inchangées.
START PAUSE
GRIND AMOUNT SHOTS CUPS
CANCELPROGRAM
PRESS ET HOLD
Mouture manuelle
La mouture manuelle vous permet de contrôler
totalement la quantité de café distribuée.
• Appuyez et maintenez enfoncé le bouton
START (Démarrer)/PAUSE (Interrompre)/
CANCEL (Annuler) ou poussez la poignée de
votre porte-ltre pour activer le commutateur
du porte-ltre aussi longtemps que vous en
avez besoin.
• Relâchez le bouton START (Démarrer)/
PAUSE (Interrompre)/CANCEL (Annuler)
ou le commutateur du porte-ltre pour arrêter
la mouture.
START PAUSE POUSSER
POUSSEZ, MAINTENEZ ET RELÂCHEZ
OU
UTILISATION DE VOTRE NOUVEL APPAREIL

10
UTILISATION DE VOTRE NOUVEL APPAREIL
RÉGLAGE DES BROYEURS CONIQUES
Certains types de café peuvent nécessiter une gamme de moutures plus large pour obtenir une extraction
ou une infusion idéale.
Votre Smart Grinder™ Pro ore la possibilité d'étendre cette gamme avec un broyeur supérieur réglable.
Nous vous recommandons de ne faire qu'un seul ajustement à la fois.
14 15
Enlever le broyeur
supérieur
Déverrouiller la
trémie
Retirer la trémieFaire tourner le
moulin jusqu'à ce
qu'il soit vide
Aligner la trémie
dans la position
adéquate
Tenir la trémie au-dessus du
récipient et tourner le cadran pour
libérer les grains dans le récipient
Aligner la trémie
dans la position
adéquate
Verrouiller le
broyeur supérieur
Insérer
fermement le
broyeur supérieur
dans la position
adéquate
Insérer la poignée
en fil métallique
des deux côtés
du broyeur
Aligner le nombre
avec l'ouverture
de la poignée
Retirer la poignée
en fil métallique
des deux côtés
du broyeur
Déplacer le
broyeur supér
ieur
réglable, 1 chiffre,
pour une mouture
plus grossière ou
plus fine
Vérifier votre
extraction
Verrouiller la
trémie
1 2 3 4 5 6
AIR TIGHT
CONTAINER
138877 9 10 11 12
F
I
N
E
C
O
A
R
S
E
F
I
N
E
C
O
A
R
S
E
4
5
6
7
8
F
I
N
E
C
O
A
R
S
E
F
I
N
E
C
O
A
R
S
E

11
FR
ENTRETIEN, NETTOYAGE ET RANGEMENT
ENTRETIEN, NETTOYAGE ET
RANGEMENT
1. Videz les grains de la trémie et
éliminez tout excès de grains (voir
ci-dessous).
2. Débranchez le cordon d'alimentation
de la prise de courant avant le
nettoyage.
3. Lavez le récipient de mouture et
le couvercle, la trémie à grains et
le couvercle dans de l'eau chaude
savonneuse, rincez et séchez
complètement.
4. Essuyez et polissez l'extérieur de
l'appareil avec un chion doux et
humide.
NETTOYAGE DES BROYEURS CONIQUES
Un nettoyage régulier permet d'obtenir des résultats de mouture constants avec les broyeurs, ce qui est
particulièrement important lors de la mouture de café expresso.
13
1 3 4 5 6
8877 9 10 11 12
Verrouiller la trémieAligner la trémie
dans la position
adéquate
Verrouiller le
broyeur supérieur
Insérer fermement
le broyeur supérieur
dans la position
adéquate
Nettoyer la sortie
de mouture avec
une brosse
N
ettoyer le broyeur
sup
érieur avec une
b
rosse de
nettoyage
Nettoyer le broyeur
inférieur avec une
brosse de
nettoyage
Enlever le broyeur
supérieur
Dé
verrouiller la
tr
émie
Retirer la trémieFaire tourner le
moulin jusqu'à ce
qu'il soit vide
Aligner la trémie
dans la position
adéquate
Tenir la trémie au-dessus du récipient et
tourner le cadran pour libérer les grains
dans le récipient
2
AIR TIGHT
CONTAINER
REMARQUE
N'utilisez pas de produits nettoyants
alcalins ou abrasifs, des tampons
à récurer ou de la laine d'acier, car ils
peuvent endommager la surface.
REMARQUE
Veuillez ne pas nettoyer les pièces ou
accessoires du moulin dans le lave-
vaisselle.

12
DÉPANNAGE
PROBLÈME CAUSE POSSIBLE MESURE À PRENDRE
Le moulin ne
démarre pas après
avoir appuyé sur
le bouton START
(Démarrer)/PAUSE
(Interrompre)/
CANCEL (Annuler)
• Le moulin n'est pas branché.
• Le moulin est en surchaue.
• La trémie à grains n'est pas
correctement xée. Le message
« PLEASE LOCK HOPPER »
(Verrouillez la trémie) s'ache
sur l'écran LCD.
• Branchez le cordon d'alimentation
dans la prise de courant.
•
Retirez la che d'alimentation de la prise
de courant. Laissez refroidir 20 minutes
avant de réutiliser.
• Verrouillez la trémie à grains dans la
position adéquate.
Le moteur démarre,
mais pas de café
moulu provenant de
la sortie de mouture
• Le bouton enfoncé n'est pas
le bon.
• Pas de grains de café dans la
trémie à grains.
• Le moulin ou la trémie à grains
est bloqué(e).
• Appuyez sur START (Démarrer)/
PAUSE (Interrompre)/CANCEL
(Annuler) ou sur le commutateur
du porte-ltre pour activer.
• Remplissez la trémie à grains de grains
de café frais.
• Retirez la trémie à grains. Inspectez
la trémie à grains et les broyeurs pour
vous assurer qu'ils ne sont pas obstrués.
Remplacez les pièces et réessayez.
Le moteur démarre,
mais fonctionne
avec un « vacarme »
• Le moulin est bloqué avec un
objet étranger ou le goulot est
bloqué.
• Moulin obstrué par l'humidité.
• Retirez la trémie à grains, inspectez les
broyeurs et retirez tout corps étranger.
• Nettoyez les broyeurs et le goulot
(reportez-vous à la section Entretien
et nettoyage à la page page 11).
• Laissez les broyeurs sécher
complètement avant de les remonter. Vous
pouvez utiliser un sèche-cheveux pour
souer de l'air dans l'entrée du moulin
(broyeur inférieur) pour sécher.
Impossible de
verrouiller la trémie
à grains dans la
position adéquate
• Des grains de café obstruent
le dispositif de verrouillage
de la trémie à grains.
• Retirez la trémie à grains. Enlevez les
grains de café du dessus des broyeurs.
Refermez la trémie dans la position
adéquate et réessayez.
Pas assez/trop de
café moulu
• La quantité de mouture
nécessite un réglage.
• Appuyez sur le bouton SHOTS (Doses)/
CUPS (Tasses) pour modier la quantité
de mouture.
• Utilisez le sélecteur de quantité
de mouture pour aner la quantité
à « plus » ou « moins ».
déborde
• Il est normal que la quantité correcte de
café semble déborder de votre porte-
ltre. Le volume du café non tassé est
environ trois fois celui du café tassé.
Arrêt d'urgence ?
• Appuyez sur le bouton START (Démarrer)/
PAUSE (Interrompre)/CANCEL (Annuler)
pour arrêter l'opération.
• Débranchez le cordon d'alimentation
de la prise de courant.

13
FR
GARANTIE
GARANTIE LIMITÉE 2 ANS
Sage Appliances garantit ce produit pour un usage
domestique sur les territoires spéciés pendant
2 ans à compter de la date d’achat, contre les
défauts de fabrication et de matériaux. Au cours
de cette période de garantie, Sage Appliances
s’engage à réparer, remplacer ou rembourser tout
produit défectueux (à sa seule discrétion).
Tous les droits de garantie légaux en vertu
de la législation nationale applicable seront
respectés et ne seront pas compromis par
notre garantie. Pour connaître les conditions
générales complètes relatives à la garantie ou
pour obtenir des instructions sur la manière de
déposer une réclamation, rendez-vous sur www.
sageappliances.com.

14
REMARQUES

NL
SNELSTARTGIDS
the Smart Grinder
™
Pro

2
INHOUD
SAGE
®
STELT
VEILIGHEID
VOOROP
Bij Sage
®
gaan we
veiligheidsbewust te werk. Bij
het ontwerpen en produceren
van onze apparaten staat uw
veiligheid voorop. Daarnaast
vragen wij u voorzichtig
om te gaan met elektrische
apparaten en de volgende
voorzorgsmaatregelen in
acht te nemen.
BELANGRIJKE
VEILIGHEIDS
MAATREGELEN
LEES ALLE INSTRUCTIES
VÓÓR GEBRUIK EN BEWAAR
DEZE VOOR TOEKOMSTIGE
NASLAG
• Een downloadbare
versie van dit document
is ook beschikbaar op
sageappliances.com
• Controleer vóór het
eerste gebruik of uw
elektriciteitsvoorziening
dezelfde is als die op het label
aan de onderkant van het
apparaat.
• Verwijder voor het
eerste gebruik het
verpakkingsmateriaal en gooi
het op een veilige manier weg.
• Gooi het beschermkapje op de
stekker op een veilige manier
weg om verstikkingsgevaar bij
jonge kinderen te voorkomen.
• Dit apparaat is alleen voor
huishoudelijk gebruik. Gebruik
het apparaat alleen voor het
beoogde gebruik. Gebruik het
niet in bewegende voertuigen
of boten. Gebruik het niet
buitenshuis. Verkeerd gebruik
kan tot letsel leiden.
• Wikkel het netsnoer volledig af
voordat u het apparaat gebruikt.
• Plaats het apparaat op een
stabiele, hittebestendige,
vlakke, droge ondergrond,
weg van de rand, en gebruik
het niet op of in de buurt van
een warmtebron zoals een
kookplaat, oven of gasfornuis.
2 Sage
®
stelt veiligheid voorop
5 Uw nieuwe apparaat leren kennen
6 Uw nieuwe apparaat gebruiken
11 Onderhoud, reiniging en opslag
12 Problemen oplossen
13 Garantie

3
NL
• Zorg dat het netsnoer niet over
de rand van een aanrecht of
tafel hangt, in aanraking komt
met hete oppervlakken of in de
knoop raakt.
• Laat het apparaat niet
onbeheerd achter tijdens
gebruik.
• Zorg er altijd voor dat het
apparaat UIT staat, de stekker
uit het stopcontact is gehaald
en het apparaat is afgekoeld
voordat u het schoonmaakt,
probeert te verplaatsen of
opbergt.
• Zet het apparaat altijd UIT
en trek de stekker uit het
stopcontact wanneer het
apparaat niet in gebruik is.
• Gebruik het apparaat niet als
het netsnoer, de stekker of het
apparaat op enigerlei wijze
beschadigd is. Neem contact op
met de klantenservice van Sage
of ga naar sageappliances.
com als er sprake is van schade
en er ander onderhoud dan
reiniging is vereist.
• Alle onderhoud anders
dan reiniging moet
worden uitgevoerd
door een geautoriseerd
Sage
®
-servicecentrum.
• Kinderen mogen niet met het
apparaat spelen.
• Reiniging van het apparaat
mag niet door kinderen worden
uitgevoerd, tenzij ze ten minste
8 jaar oud zijn en onder toezicht
staan.
• Het apparaat en het snoer
moeten buiten het bereik van
kinderen jonger dan 8 jaar
worden gehouden.
• Het wordt aanbevolen
een aardlekschakelaar
te installeren voor extra
veiligheid bij het gebruik van
alle elektrische apparaten.
Veiligheidsschakelaars met een
nominale bedrijfsstroom van
niet meer dan 30 mA worden
aanbevolen. Raadpleeg een
elektricien voor professioneel
advies.
• Gebruik alleen accessoires
die bij de apparaten zijn
meegeleverd.
• Probeer het apparaat niet op
een andere manier te gebruiken
dan beschreven in deze
handleiding.
• Verplaats het apparaat niet
terwijl het in werking is.
• Laat het niet in aanraking
komen met hete oppervlakken.
Laat het apparaat afkoelen
voordat u onderdelen verplaatst
of schoonmaakt.
WE STELLEN VEILIGHEID VOOROP

4
WE STELLEN VEILIGHEID VOOROP
• Dit apparaat mag niet door
kinderen worden gebruikt.
Houd het apparaat en het snoer
buiten het bereik van kinderen.
• Dit apparaat kan worden
gebruikt door personen met
beperkte fysieke, zintuiglijke
of mentale capaciteiten of een
gebrek aan ervaring en kennis,
alleen als zij worden begeleid
of instructies hebben gekregen
over het veilige gebruik van het
apparaat en de gevaren ervan
begrijpen.
• Gebruik de molen niet
zonder dat het deksel van de
bonencontainer op zijn plaats
zit. Houd vingers, handen, haar,
kleding en keukengerei tijdens
het gebruik uit de buurt van de
bonencontainer.
Het weergegeven symbool
geeft aan dat dit apparaat
niet met het normale
huishoudelijk afval mag
worden weggegooid. Het moet
naar een geschikt plaatselijk
afvalverwerkingscentrum worden
gebracht of naar een provider die
deze service biedt. Neem voor
meer informatie contact op met
uw gemeente.
Dompel de stekker, het
snoer of het apparaat niet
onder in water of een andere
vloeistof om elektrische schok-
ken te voorkomen.
ALLEEN VOOR HUISHOUDELIJK
GEBRUIK BEWAAR DEZE INSTRUCTIES

5
NL
C
B
D
E
F
G
H
M
L
O
N
A
K
J
I
Oi
Oii
UW NIEUWE APPARAAT LEREN KENNEN
A. Deksel van bonencontainer
B. Bonencontainer
C. Kegelvormige maalelementen van gehard
roestvrij staal
D. Verlicht lcd-scherm
E. Draaiknop GRIND AMOUNT/PROGRAM
(hoeveelheid/programma)
F. Knop (SHOTS/CUPS) (shots/kopjes)
G. Maalopening
H. Maallade
I. Draaiknop voor maalgraad
J. Knop START/PAUSE/CANCEL
(starten/pauzeren/annuleren)
K. Activeringsschakelaar portalter
ACCESSOIRES
L. Portalterhouder 50 - 54 mm
M. Portalterhouder 58 mm
N. Reinigingsborstel kegelvormig maalelement
O. Maalbak
Oi - Klepje voor maalbak
Oii - Deksel van maalbak
220 - 240 V ~ 50 - 60 Hz 165 W

6
VOOR HET EERSTE GEBRUIK
Verwijder alle reclamelabels en
verpakkingsmateriaal van uw Sage
®
-product en
gooi ze op een veilige manier weg.
Maak de bonencontainer, houders, maalbak,
het deksel en de reinigingsborstel schoon in
warm zeepsop en droog alles grondig af. Veeg
de buitenkant van de molen af met een zachte,
vochtige doek en droog deze goed af. Plaats de
molen op een vlak oppervlak en sluit het netsnoer
aan op het stopcontact van 220 - 240 V.
ENERGIEBESPARENDE FUNCTIE
De molen wordt automatisch
uitgeschakeld als deze 5 minuten niet
wordt gebruikt.
UW SAGE SMART GRINDER
™
PRO
IN ELKAAR ZETTEN
Bonencontainer
Zorg dat de lipjes op de onderkant van de
bonencontainer zijn uitgelijnd en zet de
bonencontainer op zijn plaats. Draai de
vergrendelknop 90 ° om de bonencontainer
vast te zetten. Vul de bonencontainer met verse
koebonen en plaats het deksel erop.
KOFFIE MALEN VOOR ESPRESSO
Gebruik enkelwandige lterbakjes bij het malen
van verse koebonen. Gebruik de jnere
instellingen 1- 30 in het ESPRESSO-bereik.
STAP 1:
Plaats de portalterhouder van het juiste formaat.
Plaats uw portalter in de houder.
DUWEN
50-54mm
58mm
CRADLES
OPMERKING
U kunt maximaal 2 shots maken als de
houder is geplaatst.
HOEVEELHEID
MAALGRAAD
MAALIN-
STELLING
BEREIDINGS-
METHODE
MEDIUM
1 TOT 12 KOPJES
31 - 45
PERCOLATOR
1 TOT 12 KOPJES
55 - 60
GROF
46 - 54
MIDDELGROF
DRUPPELFILTERESPRESSO
1 TOT 8 SHOTS
1 - 30
FIJN
1 TOT 12 KOPJES
CAFETIÈRE
KOFFIETABEL
UW NIEUWE APPARAAT GEBRUIKEN

7
NL
STAP 2:
Uw shots/kopjes selecteren
Druk op de knop SHOTS/CUPS om de gewenste
hoeveelheid gemalen koe te selecteren.
START PAUSE
GRIND AMOUNT SHOTS CUPS
CANCELPROGRAM
Draai de GRIND AMOUNT-draaiknop om
de maalduur aan te passen en zo de juiste
hoeveelheid gemalen koe te krijgen.
START PAUSE
GRIND AMOUNT SHOTS CUPS
CANCELPROGRAM
STAP 3:
Uw maalgraad selecteren
Voor espresso raden we aan met een
maalgraadinstelling van 12 te beginnen en de
maalgraad met behulp van de draaiknop grover
of jner te maken voor de perfecte espresso-
extractie.
START PAUSE
GRIND AMOUNT SHOTS CUPS
CANCELPROGRAM
OPMERKING
Als de draaiknop voor maalgraad te stroef
is, drukt u op de START/PAUSE/CANCEL-
knop om de molen te laten draaien. Draai
ondertussen met de draaiknop voor
maalgraad. Dit zorgt ervoor dat gemalen
koe die tussen de maalelementen vastzit,
loskomt.
MALEN IN EEN MAALBAK
OF KOFFIEFILTER
STAP 1:
Verwijder de houder door deze van onder
de maalopening weg te schuiven.
TREKKEN
Schuif het koelter of de maalbak (met het klepje
open) direct onder de maalopening.
UW NIEUWE APPARAAT GEBRUIKEN

8
OPMERKING
Als u een aangepaste maalduur of
-hoeveelheid programmeert, wordt deze
alleen ingesteld voor die specieke
bereidingsmethode. Andere instellingen
voor shots/kopjes worden niet gewijzigd.
Pauzefunctie
U kunt de molen tijdens het gebruik pauzeren om
de koe in het portalter samen te drukken of af
te vlakken.
• Druk kort op de START/PAUSE/CANCEL-
knop om het malen te starten.
• Druk tijdens het malen nogmaals op de
START/PAUSE/CANCEL-knop om het malen
10 seconden te pauzeren.
• Druk binnen de 10 seconden nogmaals op de
knop om de resterende koe te malen.
START PAUSE
GRIND AMOUNT SHOTS CUPS
CANCELPROGRAM
UW NIEUWE APPARAAT GEBRUIKEN
• Druk op de knop SHOTS/CUPS om de
vereiste hoeveelheid gemalen koe te
selecteren.
• Druk op de START/PAUSE/CANCEL-knop
om het malen te starten.
START PAUSE
SHOTS CUPS
CANCEL
START PAUSE
SHOTS CUPS
CANCEL
FUNCTIES VAN UW SAGE SMART
GRINDER
™
PRO
Automatisch malen
Als u automatisch malen kiest, kunt u uw handen
vrijhouden.
• Druk kort op de knop
START/PAUSE/CANCEL of druk één keer op
het handvat van uw portalter. Zo wordt de
portalterschakelaar geactiveerd.
• De molen stopt automatisch wanneer de
vooraf ingestelde hoeveelheid is bereikt.
START PAUSE PORTAFILTER SWITCH
PUSH EN RELEASE
OR
DUWEN

9
NL
HOEVEELHEID GEMALEN KOFFIE
AANPASSEN
De hoeveelheid verhogen
Als u de geselecteerde hoeveelheid gemalen
koe wilt verhogen, draait u de GRIND AMOUNT-
draaiknop naar rechts.
START PAUSE
GRIND AMOUNT SHOTS CUPS
CANCELPROGRAM
De hoeveelheid verlagen
Als u de geselecteerde hoeveelheid gemalen
koe wilt verlagen, draait u de GRIND AMOUNT-
draaiknop naar links.
OPMERKING
Als u de standaardinstellingen voor maalduur/-
hoeveelheid wilt herstellen, houdt u de SHOTS/
CUPS-knop ingedrukt tot u een lange pieptoon
hoort.
Programmafunctie
Zodra u de gewenste dosering heeft ingesteld,
kunt u deze duur programmeren als het aantal
shots dat op het lcd-scherm staat. Houd
de PROGRAM-knop ingedrukt. De molen
piept twee keer om te bevestigen. Alleen de
weergegeven shot(s) worden geprogrammeerd.
Alle andere shots blijven ongewijzigd.
START PAUSE
GRIND AMOUNT SHOTS CUPS
CANCELPROGRAM
DRUK OP EN HOUD
Handmatig malen
Door handmatig te malen heeft u de volledige
controle over de hoeveelheid koe.
• Druk kort op de knop START/PAUSE/
CANCEL of druk één keer op het handvat
van uw portalter om de portalterschakelaar
zolang als nodig te activeren.
• Wanneer u de START/PAUSE/CANCEL-
knop of portalterschakelaar loslaat, stopt de
molen.
START PAUSE
DRUK OP, HOLD en laat RELEASE los
OF
DUWEN
UW NIEUWE APPARAAT GEBRUIKEN

10
UW NIEUWE APPARAAT GEBRUIKEN
KEGELVORMIGE MAALELEMENTEN VERSTELLEN
Sommige koesoorten vereisen een breder maalbereik voor de ideale extractie of bereiding.
Met uw Smart Grinder™ Pro kunt u dit bereik uitbreiden via een verstelbaar bovenste maalelement.
Het is raadzaam slechts één aanpassing tegelijk uit te voeren.
14 15
Verwijder het
bovenste
maalelement
Ontgrendel de
container
Haal de container
van de molen
Laat de molen
draaien tot deze
leeg is
Plaats de
container correct
op de molen
Houd de bonencontainer boven een
afvalbakje en draai de knop om de
bonen in het bakje te laten vallen
Plaats de
container correct
op de molen
Vergrendel het
bovenste
maalelement
Duw het bovenste
maalelement
stevig op zijn
plaats
Steek de draad
van de
handgreep aan
beide kanten in
het maalelement
Zorg dat het cijfer
is uitgelijnd met
de handgree-
popening
Verwijder de
draad van de
handgreep aan
weerszijden van
het maalelement
Beweeg het
verstelbare
bovenste
maalelement met
1 cijfer, grover of
fijner
Controleer uw
extractie
Vergrendel de
bonencontainer
1 2 3 4 5 6
AIR TIGHT
CONTAINER
138877 9 10 11 12
F
I
N
E
C
O
A
R
S
E
F
I
N
E
C
O
A
R
S
E
4
5
6
7
8
F
I
N
E
C
O
A
R
S
E
F
I
N
E
C
O
A
R
S
E

11
NL
ONDERHOUD, REINIGING EN OPSLAG
ONDERHOUD, REINIGING
EN OPSLAG
1. Haal alle koebonen uit de
bonencontainer en laat de molen
draaien om overtollige gemalen
bonen te verwijderen (zie hieronder).
2. Haal het netsnoer uit het stopcontact
voordat u begint met reinigen.
3. Was de maalbak, bonencontainer en
deksels in warm zeepsop af. Spoel
en droog alles daarna goed af.
4. Veeg de buitenkant van het apparaat
met een zachte, vochtige doek af en
poets het op.
KEGELVORMIGE MAALELEMENTEN REINIGEN
Door de maalelementen regelmatig te reinigen, blijven ze consistente resultaten leveren, wat uiterst
belangrijk is wanneer u bonen maalt voor espressokoe.
138877 9 10 11 12
Vergrendel de
bonencontainer
Plaats de container
correct op de
molen
Vergrendel het
bovenste
maalelement
Duw het bovenste
maalelement stevig
op zijn plaats
Maak maalopening
schoon met een
borstel
Maak het bovenste
maalelement
schoon met een
borstel
Maak onderste
maalelement
schoon met een
borstel
Verwijder het
bovenste
maalelement
Ontgrendel de
container
Haal de container
van de molen
Laat de molen
draaien tot deze
leeg is
Plaats de container
correct op de
molen
Houd de bonencontainer boven een
afvalbakje en draai de knop om de bonen
in het bakje te laten vallen
1 2 3 4 5 6
AIR TIGHT
CONTAINER
OPMERKING
Gebruik geen alkalische of schurende
schoonmaakmiddelen of schuursponsjes
van staalwol, aangezien deze het
oppervlak kunnen beschadigen.
OPMERKING
Was onderdelen of accessoires van de
molen niet af in de vaatwasser.

12
PROBLEMEN OPLOSSEN
PROBLEEM MOGELIJKE OORZAAK WAT TE DOEN
Molen start niet
nadat op de
START/PAUSE/
CANCEL-knop
is gedrukt
• Molen is niet aangesloten.
• Molen is oververhit.
• Bonencontainer is niet
correct geplaatst. 'PLEASE
LOCK HOPPER' (Vergrendel
de bonencontainer)
wordt op het lcd-scherm
weergegeven.
• Sluit het netsnoer aan op het
stopcontact.
• Trek de stekker uit het stopcontact.
Laat het apparaat 20 minuten afkoelen
voordat u het opnieuw gebruikt.
• Vergrendel de bonencontainer.
Motor start
maar er komt
geen gemalen
maalopening
• Verkeerde knop ingedrukt.
• Er zitten geen koebonen in
de bonencontainer.
• Molen/bonencontainer is
geblokkeerd.
• Druk op START/PAUSE/CANCEL of
op de portalterschakelaar om deze
te activeren.
• Vul de bonencontainer met verse
koebonen.
• Verwijder de bonencontainer.
Controleer de bonencontainer en
maalelementen op verstoppingen.
Plaats de onderdelen en probeer het
opnieuw.
Motor start
maar draait
met een luid
'raketgeluid'
• De molen is verstopt met
een vreemd voorwerp of de
vulklep is geblokkeerd.
• Vocht zorgt voor verstopping
van de molen.
• Haal de bonencontainer van de molen,
controleer de maalelementen en
verwijder vreemde voorwerpen.
• Reinig de maalelementen en vulklep (zie
Onderhoud en reiniging op pagina page
11).
• Laat de maalelementen goed drogen
voordat u ze weer in de molen plaatst.
U kunt een haardroger gebruiken om
lucht in de molenopening te blazen
(onderste maalelement).
Kan de
bonencontainer
niet
vergrendelen
• Koebonen blokkeren het
vergrendelingsmechanisme
van de bonencontainer.
• Verwijder de bonencontainer.
Verwijder koebonen uit de bovenkant
van de maalelementen. Zet de
bonencontainer weer vast en probeer
het opnieuw.
Onvoldoende/
te veel gemalen
• Hoeveelheid gemalen koe
moet worden aangepast.
• Druk op SHOTS/CUPS om de
hoeveelheid te wijzigen.
• Gebruik de GRIND AMOUNT-
draaiknop om nauwkeurig een hogere
of lagere hoeveelheid in te stellen.
te vol
• Het is normaal dat het lijkt alsof er te
veel koe in uw portalter zit. Koe
die niet is aangedrukt, heeft driemaal
het volume van aangedrukte koe.
Noodstop
• Druk op de knop START/PAUSE/
CANCEL om de molen te stoppen.
• Haal het netsnoer uit het stopcontact.

13
NL
GARANTIE
BEPERKTE GARANTIE VAN 2 JAAR
Sage Appliances biedt een garantie op dit product
voor huishoudelijk gebruik in genoemde gebieden
gedurende 2 jaar vanaf de datum van aankoop
tegen defecten veroorzaakt door gebrekkige
afwerking en materialen. Gedurende deze
garantieperiode zal Sage Appliances defecte
producten repareren, vervangen of terugbetalen
(naar eigen goeddunken van Sage Appliances).
Alle wettelijke garantierechten onder de
toepasselijke nationale wetgeving worden
gerespecteerd en onze garantie doet geen afbreuk
aan deze rechten. Voor de algemene voorwaarden
van de garantie, evenals instructies over hoe u
aanspraak maakt op de garantie, gaat u naar
www.sageappliances.com.

14
OPMERKINGEN

IT
GUIDA RAPIDA
the Smart Grinder
™
Pro

2
SOMMARIO
SAGE
®
CONSIGLIA:
LA SICUREZZA
PRIMA DI TUTTO
In Sage
®
abbiamo molto a
cuore la sicurezza. In fase di
progettazione e realizzazione
dei nostri apparecchi
diamo assoluta priorità alla
sicurezza dei clienti. Inoltre,
invitiamo i clienti a prestare
molta attenzione durante
l'utilizzo degli apparecchi
elettrici e a osservare le
seguenti precauzioni.
NORME DI
SICUREZZA
IMPORTANTI
LEGGERE TUTTE LE
ISTRUZIONI PRIMA
DELL'USO E SALVARLE PER
CONSULTARLE IN FUTURO
• Sul sito Web sageappliances.
com è disponibile anche
una versione scaricabile del
presente documento
• Prima di usare l'apparecchio
per la prima volta, verifica che la
tensione della rete corrisponda
a quella indicata sull'etichetta
posta sotto il dispositivo.
• Rimuovere e smaltire in
sicurezza tutti i materiali di
imballaggio prima di utilizzare
l'apparecchio per la prima volta.
• Per eliminare il rischio di
soffocamento per i bambini,
smaltire in sicurezza la
copertura protettiva della spina.
• Il presente apparecchio
è destinato esclusivamente
all'uso domestico. Non utilizzare
per usi diversi da quello
previsto. Non utilizzare su veicoli
in movimento o barche. Non
utilizzare all'aperto. L'uso non
corretto potrebbe provocare
lesioni.
• Svolgere completamente il cavo
prima dell'uso.
• Posizionare l'elettrodomestico
su una superficie stabile,
resistente al calore, piana
e asciutta, lontano dal bordo.
Utilizzare lontano da fonti di
calore quali piastre elettriche,
fornelli a gas o forni.
2 Sage
®
consiglia: la sicurezza prima
di tutto
5 Informazioni sul nuovo apparecchio
6 Utilizzo del nuovo apparecchio
11 Manutenzione, pulizia e conservazione
12 Risoluzione dei problemi
13 Garanzia

IT
3
• Assicurarsi che il cavo di
alimentazione non sporga
oltre il bordo del tavolo o del
banco, non entri a contatto con
superfici calde e non presenti
nodi.
• Non lasciare l'elettrodomestico
incustodito durante il
funzionamento.
• Prima di pulire, spostare
o riporre l'elettrodomestico,
assicurarsi sempre che sia
spento e scollegato dalla
rete e che si sia raffreddato
a sufficienza.
• Quando non in uso, impostare
sempre l'elettrodomestico
su OFF, spegnere l'interruttore
di alimentazione e scollegare
il cavo dalla presa.
• Non utilizzare l'elettrodomestico
se il cavo di alimentazione,
la presa o l'elettrodomestico
stesso presentano danni di
qualsiasi tipo. Se l'elettro-
domestico è danneggiato
o richiede un intervento di
manutenzione diverso dalla
pulizia, contattare il Servizio
clienti Sage o visitare il sito
Web sageappliances.com
• Qualsiasi operazione di
manutenzione diversa dalla
pulizia deve essere eseguita
da un centro assistenza Sage
®
autorizzato.
• Fare attenzione che i bambini
non giochino con l'apparecchio.
• La pulizia dell'elettrodomestico
può essere effettuata da
bambini di età non inferiore
a 8 anni e con la supervisione
di un adulto.
• Tenere l'elettrodomestico e il
cavo fuori dalla portata dei
bambini di età pari o inferiore
agli 8 anni.
• Si consiglia l'installazione di un
interruttore salvavita per una
maggiore sicurezza durante
l'utilizzo di tutti i dispositivi
elettrici. Si consiglia l'uso di
un salvavita con corrente
operativa nominale non
superiore a 30 mA. Rivolgersi
a un elettricista per un parere
professionale.
• Utilizzare esclusivamente
gli accessori forniti con gli
elettrodomestici.
• Attenersi scrupolosamente
alle istruzioni riportate nel
presente libretto per utilizzare
l'elettrodomestico.
• Non spostare l'elettrodomestico
quando è in funzione.
• Evitare il contatto con le
superfici calde. Lasciare
raffreddare l'elettrodomestico
prima di spostarlo o pulire uno
qualsiasi dei suoi componenti.
IL NOSTRO CONSIGLIO: LA SICUREZZA PRIMA DI TUTTO

4
IL NOSTRO CONSIGLIO: LA SICUREZZA PRIMA DI TUTTO
• L'elettrodomestico non deve
essere utilizzato dai bambini.
Tenere l'elettrodomestico e il
cavo fuori dalla portata dei
bambini.
• L'elettrodomestico può essere
utilizzato da persone con
disabilità fisiche o mentali o prive
di esperienza o conoscenza
dell'elettrodomestico stesso,
a condizione che queste ultime
lo utilizzino sotto la supervisione
di qualcuno o secondo
specifiche istruzioni ricevute
in merito all'uso in sicurezza
dell'elettrodomestico e che
comprendano i rischi associati.
• Non utilizzare il macinacaffè
se il coperchio del portachicchi
non è in posizione. Tenere dita,
mani, capelli, vestiti e utensili
lontani dal portachicchi durante
l'utilizzo.
Questo simbolo indica che
l'apparecchio non può
essere smaltito insieme ai
normali rifiuti domestici.
È necessario conferirlo presso
un centro di smaltimento locale
specializzato o presso un
rivenditore che fornisce questo
servizio. Per ulteriori informazioni,
contattare l'ufficio comunale
locale.
Per proteggersi dalle
scariche elettriche, non
immergere la spina, il cavo di
alimentazione o l'elettro-
domestico in acqua o in
qualsiasi altro liquido.
ESCLUSIVAMENTE PER USO DOMESTICO
SALVARE LE ISTRUZIONI

IT
5
C
B
D
E
F
G
H
M
L
O
N
A
K
J
I
Oi
Oii
INFORMAZIONI SUL NUOVO APPARECCHIO
A. Coperchio del portachicchi
B. Portachicchi
C. Macine coniche in acciaio
inossidabile temprato
D. Schermo LCD retroilluminato
E. Manopola GRIND
AMOUNT / PROGRAM
F. Pulsante SHOTS / CUPS
G. Condotto di uscita del caè
macinato
H. Vassoio di raccolta del caè
macinato
I. Manopola di regolazione delle
dimensioni di macinatura
J. Pulsante START / PAUSE / CANCEL
K. Interruttore di attivazione portaltro
ACCESSORI
L. Alloggiamento portaltro
da 50-54 mm
M. Alloggiamento portaltroda 58 mm
N. Spazzola per la pulizia
delle macine coniche
O. Contenitore per caè macinato
Oi - Tappo contenitore
Oii - Coperchio contenitore
Informazioni sui valori nominali
220–240 V ~ 50-60 Hz 165 W

6
PREPARAZIONE AL PRIMO
UTILIZZO
Rimuovere e smaltire in sicurezza tutte le etichette
promozionali e i materiali di imballaggio forniti con il
prodotto Sage
®
.
Lavare il portachicchi, gli alloggiamenti, il
contenitore per caè macinato, il coperchio del
contenitore e la spazzola per la pulizia con acqua
tiepida e sapone e asciugare bene. Stronare
la parte esterna del macinacaè con un panno
morbido inumidito e asciugare bene. Posizionare
il macinacaè su una supercie piana, collegare
il cavo di alimentazione a una presa da 220-240 V
e impostare l'interruttore di alimentazione su "ON".
FUNZIONE DI RISPARMIO
ENERGETICO
Il macinacaè si spegne automaticamente
dopo 5 minuti di inutilizzo.
ASSEMBLAGGIO DI SAGE SMART
GRINDER
™
PRO
Portachicchi
Allineare le tacche alla base del portachicchi
e inserire quest'ultimo in posizione. Girare la
manopola di 90° per bloccarlo. Riempire con
chicchi di caè freschi e ssare il coperchio sul
portachicchi.
MACINATURA PER CAFFÈ
ESPRESSO
Usare i ltri a parete singola per macinare i chicchi
di caè freschi. Usare le impostazioni 1-30 per la
macinatura ne per ESPRESSO.
PASSAGGIO 1:
Inserire l'alloggiamento portaltro della dimensione
corretta. Inserire il portaltro nell'alloggiamento.
SPINGERE
50-54mm
58mm
CRADLES
NOTA
Il numero massimo di erogazioni con
l'alloggiamento inserito è 2.
QUANTITÀ
DIMENSIONI
CAFFÈ MACINATO
TIPO DI
MACINATURA
TIPO DI
ESTRAZIONE
MEDIA
DA 1 A 12 TAZZE
31-45
CAFFETTIERA
DA 1 A 12 TAZZE
55-60
GROSSA
46-54
MEDIO GROSSA
CON FILTROESPRESSO
DA 1 A 8 TAZZINE
1-30
FINE
DA 1 A 12 TAZZE
A STANTUFFO
TABELLA CAFFÈ
UTILIZZO DEL NUOVO APPARECCHIO

IT
7
PASSAGGIO 2:
Selezione del numero di erogazioni
Selezionare la quantità desiderata di caè
macinato premendo il pulsante SHOTS / CUPS.
START PAUSE
GRIND AMOUNT SHOTS CUPS
CANCELPROGRAM
Ruotare la manopola Grind Amount per regolare
il tempo di macinatura in modo da ottenere la
quantità di caè corretta.
START PAUSE
GRIND AMOUNT SHOTS CUPS
CANCELPROGRAM
PASSAGGIO 3:
Selezione delle dimensioni di macinatura
Per l'espresso, si consiglia di impostare la
dimensione di macinatura 12 come punto di
partenza e ruotare la manopola di regolazione
della macinatura su una macinatura più grossa
o più ne per regolare l'estrazione dell'espresso
come desiderato.
START PAUSE
GRIND AMOUNT SHOTS CUPS
CANCELPROGRAM
NOTA
Se la manopola di regolazione della
macinatura è dura, premere il pulsante
START / PAUSE / CANCEL e ruotare
la manopola per mettere in funzione
il macinacaè. Ciò consente di rimuovere
i residui di caè accumulatisi tra le macine.
MACINATURA NEL CONTENITORE
PER CAFFÈ MACINATO O NEL
FILTRO PER CAFFÈ
PASSAGGIO 1:
Rimuovere l'alloggiamento da sotto il condotto
di uscita del caè facendolo scorrere.
TIRARE
Posizionare il contenitore per caè macinato con
il tappo aperto o il ltro per caè direttamente sotto
il condotto di uscita del caè.
UTILIZZO DEL NUOVO APPARECCHIO

8
NOTA
La programmazione di una quantità o di
un tempo di macinatura personalizzati
consente di impostare valori specici solo
per quel particolare metodo di estrazione.
Le altre impostazioni di estrazione non
vengono modicate.
Funzione di pausa
È possibile mettere in pausa il macinacaè durante
il funzionamento per far scendere o sistemare
il caè nel portaltro.
• Premere e rilasciare il pulsante START /
PAUSE / CANCEL per avviare la macinatura.
• Durante la macinatura, premere il pulsante
START / PAUSE / CANCEL per mettere
in pausa l'apparecchio per un massimo
di 10 secondi.
• Premere nuovamente entro l'intervallo
di tempo specicato per continuare
a macinare la dose di caè rimanente.
START PAUSE
GRIND AMOUNT SHOTS CUPS
CANCELPROGRAM
UTILIZZO DEL NUOVO APPARECCHIO
• Selezionare la quantità desiderata di caè
macinato premendo il pulsante SHOTS / CUPS.
• Premere il pulsante
START / PAUSE / CANCEL per avviare la
macinatura.
START PAUSE
SHOTS CUPS
CANCEL
START PAUSE
SHOTS CUPS
CANCEL
FUNZIONALITÀ DI SAGE SMART
GRINDER™ PRO
Macinatura automatica
La macinatura automatica consente di macinare
senza bisogno di eseguire nessuna azione.
• Premere e rilasciare il pulsante START /
PAUSE / CANCEL o premere una volta la
maniglia del portaltro. Questa operazione
consente di attivare l'INTERRUTTORE
DI ATTIVAZIONE DEL PORTAFILTRO.
• La macinatura si arresta automaticamente
una volta completata l'erogazione della
quantità preimpostata.
START PAUSE PORTAFILTER SWITCH
SPINGERE E RILASCIARE
OR
SPINGERE

IT
9
REGOLAZIONE DELLA QUANTITÀ
DI CAFFÈ MACINATO
Per aumentare la quantità di caè macinato
selezionata, ruotare il selettore GRIND AMOUNT
verso destra.
START PAUSE
GRIND AMOUNT SHOTS CUPS
CANCELPROGRAM
Per ridurre la quantità di caè macinato
selezionata, ruotare il selettore GRIND AMOUNT
verso sinistra.
NOTA
Per ripristinare la quantità/il tempo di macinatura
predeniti, tenere premuto il pulsante
SHOTS / CUPS no a quando l'apparecchio
non emette un segnale acustico prolungato.
Funzione Programma
Una volta impostata la dose desiderata,
è possibile programmare il numero di tazzine
attualmente visualizzato sul display LCD.
Tenere premuto il pulsante PROGRAM;
il macinacaè emetterà due segnali acustici di
conferma. Viene programmata solo l'erogazione
visualizzata, tutte le altre rimangono invariate.
START PAUSE
GRIND AMOUNT SHOTS CUPS
CANCELPROGRAM
TIENI PREMUTO
Macinatura manuale
La macinatura manuale ore un controllo totale
sulla quantità di caè macinato.
• Tenere premuto il pulsante START / PAUSE /
CANCEL o premere la maniglia del
portaltro per attivare l'INTERRUTTORE
DI ATTIVAZIONE DEL PORTAFILTRO per il
tempo desiderato.
• Rilasciare il pulsante START / PAUSE /
CANCEL o l'INTERRUTTORE
DI ATTIVAZIONE DEL PORTAFILTRO
per interrompere la macinatura.
START PAUSE
SPINGERE, TENERE PREMUTO E RILASCIARE
O
SPINGERE
UTILIZZO DEL NUOVO APPARECCHIO

10
UTILIZZO DEL NUOVO APPARECCHIO
REGOLAZIONE DELLE MACINE CONICHE
Alcuni tipi di caè potrebbero richiedere una gamma di impostazioni di macinatura più ampia per garantire
un'estrazione ottimale.
Una delle funzionalità oerte da Smart Grinder™ Pro consiste nella possibilità di estendere tale gamma
mediante una macina superiore regolabile.
Si consiglia di eettuare una sola regolazione alla volta.
Rimuovere la
macina superiore
Sbloccare
il portachicchi
Rimuovere
il portachicchi
Lasciare in
funzione il
macinacaffè
finché non
è vuoto
Reinserire
il portachicchi
Posizionare il portachicchi sopra
il contenitore e ruotare la manopola
per versare i chicchi nel contenitore
Reinserire
il portachicchi
Bloccare la
macina superiore
Inserire la macina
superiore
e premere fino
a bloccarla in
posizione
Inserire la
maniglia in
metallo su
entrambi i lati
della macina
Allineare il
numero con
l'apertura per la
maniglia
Rimuovere la
maniglia in
metallo da
entrambi i lati
della macina
Girare la macina
superiore
regolabile,
1 numero,
grossa o fine
Controllare
l'erogazione
Bloccare
il portachicchi
1 2 3 4 5 6
AIR TIGHT
CONTAINER
138877 9 10 11 12
F
I
N
E
C
O
A
R
S
E
F
I
N
E
C
O
A
R
S
E
F
I
N
E
C
O
A
R
S
E
14 15
F
I
N
E
C
O
A
R
S
E
4
5
6
7
8

IT
11
MANUTENZIONE, PULIZIA E CONSERVAZIONE
MANUTENZIONE, PULIZIA
E CONSERVAZIONE
1. Svuotare il portachicchi e macinare
eventuali chicchi rimasti (vedere di
seguito).
2. Scollegare il cavo di alimentazione
dalla presa prima di procedere con
la pulizia.
3. Lavare il contenitore per caè
macinato e il portachicchi e i relativi
coperchi con acqua tiepida e sapone,
sciacquare e asciugare bene.
4. Stronare e lucidare la parte esterna
dell'apparecchio con un panno
morbido inumidito.
PULIZIA DELLE MACINE CONICHE
La pulizia regolare delle macine consente di ottenere una macinatura sempre uniforme, aspetto molto
importante soprattutto per quanto riguarda la macinatura per caè espresso.
Bloccare
il portachicchi
Reinserire
il portachicchi
Bloccare la macina
superiore
Inserire la macina
superiore
e premere fino
a bloccarla in
posizione
Pulire il condotto di
uscita del caffè con
una spazzola
P
ulire la macina
sup
eriore con una
sp
azzola per
l
a pulizia
Pulire la macina
inferiore con una
spazzola per
la pulizia
Rimuovere la
macina superiore
S
bloccare
i
l portachicchi
Rimuovere
il portachicchi
Lasciare in
funzione il
macinacaffè finché
non è vuoto
Reinserire
il portachicchi
Posizionare il portachicchi sopra
il contenitore e ruotare la manopola
per versare i chicchi nel contenitore
1 2 3 4 5 6
AIR TIGHT
CONTAINER
138877 9 10 11 12
NOTA
Non utilizzare prodotti per la pulizia
alcalini o abrasivi o pagliette metalliche
onde evitare di danneggiare la supercie.
NOTA
Non lavare parti o accessori del
macinacaè in lavastoviglie.

12
RISOLUZIONE DEI PROBLEMI
PROBLEMA POSSIBILE CAUSA PROCEDURA
non entra in
funzione dopo
aver premuto
il pulsante
START /
PAUSE /
CANCEL
• Il macinacaè non
è collegato alla corrente.
• Il macinacaè si
è surriscaldato.
• Il portachicchi non è ssato
correttamente. Sullo schermo
LCD verrà visualizzato il
messaggio "PLEASE LOCK
HOPPER" (BLOCCARE
IL PORTACHICCHI).
• Collegare il cavo di alimentazione alla
presa di corrente.
• Scollegare la spina dalla presa di
corrente. Lasciare rareddare per
20 minuti prima di riutilizzarlo.
• Fissare correttamente il portachicchi.
Il motore si
avvia, ma dal
condotto di
• È stato premuto il pulsante
errato.
• Non sono presenti chicchi
di caè nel portachicchi.
• Il macinacaè/portachicchi
è bloccato.
• Premere START / PAUSE / CANCEL
o L'INTERRUTTORE DI ATTIVAZIONE
DEL PORTAFILTRO per attivarlo.
• Riempire il portachicchi con chicchi
di caè freschi.
• Rimuovere il portachicchi. Controllare
che il portachicchi e le macine non
siano ostruiti. Sostituire le parti
e riprovare.
Il motore
si avvia ma
produce
un rumore
fastidioso
durante il
funzionamento
• Il macinacaè è ostruito
da corpi estranei oppure
l'imbuto è ostruito.
• L'umidità ostruisce
il macinacaè.
• Rimuovere il portachicchi, controllare
le macine e rimuovere eventuali corpi
estranei.
• Pulire macine e imbuto (vedere
Manutenzione e pulizia a pagina page
11).
• Lasciare asciugare bene le macine
prima di rimontarle. È possibile
utilizzare un asciugacapelli per soare
aria in corrispondenza della bocca
di ingresso del macinacaè (macina
inferiore) per asciugarlo.
Impossibile
portachicchi
• Presenza di chicchi di caè
che ostruiscono il dispositivo
di blocco del portachicchi.
• Rimuovere il portachicchi. Eliminare
i chicchi di caè presenti sulle macine.
Riposizionare il portachicchi, bloccarlo
e riprovare.
La quantità di
è scarsa/
eccessiva
• È necessario regolare la
quantità di caè che viene
macinato.
• Premere il pulsante SHOTS / CUPS per
modicare la quantità di caè macinato.
• Usare la manopola Grind Amount per
aumentare o ridurre la quantità.
Riempimento
eccessivo del
• È normale che la giusta quantità di
caè sembri eccessiva all'interno
del portaltro. Il volume del caè
non compresso è circa tre volte
quello del caè compresso.
Arresto di
emergenza
• Premere il pulsante
START / PAUSE / CANCEL per
interrompere l'operazione.
• Scollegare il cavo di alimentazione
dalla presa.

IT
13
GARANZIA
GARANZIA LIMITATA DI 2 ANNI
Sage Appliances ore una garanzia per l’utilizzo
domestico di questo prodotto in speciche aree
geograche, per 2 anni dalla data di acquisto. La
garanzia copre eventuali malfunzionamenti causati
da difetti di fabbricazione o dei materiali. Durante il
periodo coperto dalla garanzia, Sage Appliances
sarà tenuta a riparare, sostituire o rimborsare
l’importo corrispondente ai prodotti difettosi (a sola
discrezione di Sage Appliances).
Tutti i diritti di garanzia previsti dalla legislazione
nazionale applicabile verranno rispettati e non
possono essere annullati dalla presente garanzia.
Per i termini e le condizioni complete della garanzia
e per istruzioni su come inviare una richiesta di
risarcimento, visitare il sito
www.sageappliances.com.

14
NOTE

the Smart Grinder
™
Pro
ES
GUÍA RÁPIDA

2
ÍNDICE
SAGE
®
RECOMIENDA
SEGURIDAD
ANTE TODO
En Sage
®
nos preocupa
mucho la seguridad.
Diseñamos y fabricamos
electrodomésticos teniendo
en cuenta tu seguridad.
También te rogamos que
actúes cuidadosamente
al usar cualquier elec tro-
doméstico y que tomes las
precauciones siguientes.
MEDIDAS DE
SEGURIDAD
IMPORTANTES
CIONES ANTES DEL USO
Y GUÁRDALAS PARA
PODER CONSULTARLAS
EN EL FUTURO
• Hay una versión de este
documento disponible en
sageappliances.com para
descargar.
• Antes de usar el producto por
primera vez, asegúrate de que
la potencia eléctrica de la toma
de corriente coincida con la que
gura en la etiqueta en la base
del electrodoméstico.
• Retira y desecha de forma
apropiada los materiales de
embalaje antes del primer uso.
• Para evitar riesgos de asxia
de niños pequeños, desecha
correctamente la cubierta
protectora del enchufe.
• Este electrodoméstico es solo
para uso doméstico. No se debe
utilizar para nes distintos de su
uso previsto. No se debe utilizar
en vehículos o embarcaciones
en movimiento. No se debe
utilizar al aire libre. El uso inapro-
piado podría causar lesiones.
• Desenrolla completamente
el cable de alimentación antes
de usar el electrodoméstico.
• Coloca el electrodoméstico
sobre una supercie estable,
resistente al calor, nivelada
y seca. No lo pongas muy
cerca del borde ni cerca de
una fuente de calor (por ejemplo,
una placa de cocina eléctrica,
un quemador de gas o un horno).
2 Sage® recomienda seguridad
ante todo
5 Conoce tu nuevo
electrodoméstico
6 Manejo de tu nuevo
electrodoméstico
11 Cuidado, limpieza y
almacenamiento
12 Resolución de problemas
13 Garantía

3
ES
• Evita que el cable de
alimentación sobresalga
del borde de una encimera
o una mesa, entre en contacto
con supercies calientes o se
enrede.
• Supervisa el electrodoméstico
en todo momento mientras esté
en funcionamiento.
• Antes de limpiar, mover
o guardar el electrodoméstico,
asegúrate siempre de que esté
APAGADO y desenchufado
de la toma de corriente, y que
se haya enfriado tras el uso.
• Cuando no utilices el electro do -
méstico, debe estar APAGADO
(en la posición OFF) y desen-
chufado de la toma de corriente.
• No lo utilices si el cable de
alimentación, el enchufe o el
electrodoméstico propiamente
dicho están dañados. Ante
cualquier daño y si se requiere
algún tipo de mantenimiento
(que no sea la limpieza), ponte
en contacto con el Servicio
de atención al cliente de Sage
o visita sageappliances.com
• Cualquier tarea de mante ni-
miento que no sea de limpieza
debe realizarla un Centro de
servicio autorizado de Sage
®
.
• No permitas que los niños
jueguen con este electro-
doméstico.
• La limpieza del electro domés-
tico no debe ser realizada por
niños menores de 8 años,
ni por niños mayores sin
la supervisión de un adulto.
• El electrodoméstico y el cable
deben mantenerse fuera del
alcance de los niños menores
de 8 años.
• Se recomienda la instalación
de un interruptor diferencial
para ofrecer seguridad adicional
al usar todos los electrodo-
més ticos. Se recomienda usar
interruptores de seguridad con
una corriente de funciona miento
nominal de no más de 30 mA.
Solicita asesoramiento profesio-
nal a un electricista.
• No utilices accesorios que
no sean los suministrados
con los electrodomésticos.
• No intentes hacer funcionar
el electrodoméstico con un
método que no sea el descrito
en esta publicación.
• No muevas el electrodoméstico
mientras esté en funcionamiento.
• No toques las supercies
calientes. Deja que el electro-
doméstico se enfríe antes de
mover o limpiar cualquier pieza.
• Este electrodoméstico no debe
ser utilizado por niños. Mantén
el electrodoméstico y su cable
fuera del alcance de los niños.
RECOMENDAMOS SEGURIDAD ANTE TODO

4
RECOMENDAMOS SEGURIDAD ANTE TODO
• El electrodoméstico puede ser
utilizado por personas con disca-
pacidades físicas, sensoriales
o mentales, o sin experiencia ni
conocimientos de uso, siempre
y cuando reciban supervisión
o instruc ciones para el uso
seguro del electrodoméstico
y comprendan los riesgos
implicados.
• No hagas funcionar el molinillo
sin la tapa de la tolva colocada.
Mantén los dedos, manos,
cabello, ropa y utensilios
alejados de la tolva durante
la operación.
Este símbolo indica que el
electrodoméstico no debe
desecharse con la basura
doméstica normal. Debe
llevarse a un centro de recogida
de residuos designado por las
autoridades locales para ese n,
o a una empresa que preste ese
servicio. Para obtener más
información, ponte en contacto
con los servicios municipales.
Para evitar descargas
eléctricas, no sumerjas
el enchufe, el cable de alimen-
tación ni el electrodoméstico
en agua ni otros líquidos.
SOLO PARA USO DOMÉSTICO
GUARDA ESTAS INSTRUCCIONES

5
ES
C
B
D
E
F
G
H
M
L
O
N
A
K
J
I
Oi
Oii
CONOCE TU NUEVO ELECTRODOMÉSTICO
A. Tapa de tolva de café
B. Tolva de café
C. Muelas cónicas de acero inoxidable endurecido
D. Pantalla LCD retroiluminada
E. Dial GRIND AMOUNT / PROGRAM
F. Botón SHOTS / CUPS
G. Salida del molido
H. Bandeja de molido
I. Dial de grosor del molido
J. Botón START / PAUSE / CANCEL
K. Interruptor de activación del portaltros
ACCESORIOS
L. Soporte para portaltros 50–54 mm
M. Soporte para portaltros 58 mm
N. Cepillo de limpieza de muelas cónicas
O. Recipiente para café molido
Oi - Cierre del recipiente
Oii - Tapa del recipiente
Datos técnicos
220–240 V ~ 50-60 Hz 165 W

6
ANTES DEL PRIMER USO
Retira y desecha de forma segura todas
las etiquetas promocionales y los materiales
de embalaje adjuntos a tu producto Sage
®
.
Lava la tolva, los soportes, el recipiente
hermético, la tapa del recipiente y el cepillo
de limpieza en agua tibia jabonosa y seca bien.
Limpia el exterior del molinillo con un paño suave
y húmedo y seca bien. Coloca el molinillo
en una supercie plana y conecta el cable
de alimentación a una toma de 220-240 V
y enciende la alimentación (“ON”).
CARACTERÍSTICA DE AHORRO
DE ENERGÍA
El molinillo se apagará automáticamente
si no se usa después de 5 minutos.
MONTAJE DE TU SAGE SMART
GRINDER
™
PRO
Tolva de café
Alinea las pestañas en la base de la tolva de
café y coloca la tolva en su posición. Gira el dial de
la tolva de café 90° para bloquearla en su posición.
Rellena con granos de café frescos y asegura
la tapa en la parte superior de la tolva de café.
MOLIDO PARA CAFÉ EXPRESO
Usa ltros no presurizados al moler granos
de café frescos. Usa los ajustes más nos
1–30 en el rango EXPRESSO.
PASO 1:
Coloca el tamaño apropiado de soporte para
portaltros. Coloca tu portaltros en el soporte.
EMPUJAR
50-54mm
58mm
CRADLES
NOTA
El número máximo de dosis con el soporte
insertado es 2.
CANTIDAD
GROSOR
DEL MOLIDO
AJUSTE
DE MOLIDO
MÉTODO DE
ELABORACIÓN
MEDIO
1 HASTA 12 TAZAS
31-45
PERCOLADOR
1 HASTA 12 TAZAS
55-60
GRUESO
46-54
MEDIO GRUESO
FILTRO DE GOTEOEXPRESO
1 HASTA 8 DOSIS
1-30
FINO
1 HASTA 12 TAZAS
PRENSA
TABLA DE CAFÉ
MANEJO DE TU NUEVO ELECTRODOMÉSTICO

7
ES
PASO 2:
Seleccionar tus DOSIS / TAZAS
Selecciona la cantidad deseada de café molido
requerida pulsando el botón SHOTS / CUPS.
START PAUSE
GRIND AMOUNT SHOTS CUPS
CANCELPROGRAM
Gira el dial GRIND AMOUNT / PROGRAM para
ajustar el tiempo de molido para lograr la cantidad
correcta de café.
START PAUSE
GRIND AMOUNT SHOTS CUPS
CANCELPROGRAM
PASO 3:
Seleccionar tu grosor del molido
Para expreso, recomendamos seleccionar el ajuste
12 de GRIND SIZE como punto de inicio y mover el
dial GRID SIZE a COARSER o FINER para ajustar
el ujo de expreso según sea necesario.
START PAUSE
GRIND AMOUNT SHOTS CUPS
CANCELPROGRAM
NOTA
Si el disco GRIND SIZE está apretado,
pon en marcha el molinillo pulsando el
botón START / CANCEL mientras giras
el dial GRIND SIZE. Esto liberará los
granos de café atrapados entre las muelas.
MOLER EN UN RECIPIENTE
PARA CAFÉ MOLIDO
O UN FILTRO DE CAFÉ
PASO 1:
Retira el soporte deslizándolo por debajo
de la salida del molido.
HALAR
Desliza y coloca el recipiente para café molido
con el cierre abierto o el ltro de café directamente
debajo de la salida del molido.
INSERT UNDER
GRIND OUTLET
OPEN CONTAINER
CAP
MANEJO DE TU NUEVO ELECTRODOMÉSTICO

8
NOTA
Programar una cantidad/tiempo de molido
personalizada solo la establece para
ese método de elaboración en particular.
No cambiará los otros ajustes de dosis o tazas.
Función de pausa
Puedes pausar el molinillo durante la operación,
lo que te permite bajar o asentar el café en el
portaltros.
• Pulsa y suelta el botón START / PAUSE /
CANCEL para iniciar la operación de molido.
• Durante el molido, pulsa de nuevo el botón
START / PAUSE / CANCEL para pausar la
operación durante 10 segundos.
• Pulsa nuevamente dentro de este tiempo
para reanudar el molido de la dosis restante.
START PAUSE
GRIND AMOUNT SHOTS CUPS
CANCELPROGRAM
MANEJO DE TU NUEVO ELECTRODOMÉSTICO
• Selecciona la cantidad requerida de café
molido pulsando el botón SHOTS / CUPS.
• Pulsa el botón START / PAUSE / CANCEL
para iniciar la operación de molido.
START PAUSE
SHOTS CUPS
CANCEL
START PAUSE
SHOTS CUPS
CANCEL
CARACTERÍSTICAS DE TU SAGE
SMART GRINDER™ PRO
Molido automático
El molido automático te permite tener las manos
libres.
• Pulsa y suelta el botón START / PAUSE /
CANCEL o pulsa una vez el asa de tu
portaltros. Esto activará el interruptor
del portaltros.
• El molido se detendrá automáticamente cuando
se dispense la cantidad preestablecida.
START PAUSE PORTAFILTER SWITCH
PRESIONE SOLTAR
OR
EMPUJAR

9
ES
AJUSTE DE LA CANTIDAD
DE MOLIDO
Aumento de la cantidad de molido
Para aumentar la cantidad de molido
seleccionada, gira el dial GRIND AMOUNT a la
derecha.
START PAUSE
GRIND AMOUNT SHOTS CUPS
CANCELPROGRAM
Disminución de la cantidad de molido
Para disminuir la cantidad de molido seleccionada,
gira el dial GRIND AMOUNT hacia la izquierda.
NOTA
Para restablecer la cantidad/el tiempo de
molido a los ajustes predeterminados, mantén
pulsado el botón SHOTS / CUPS hasta que
suene un pitido largo.
Función de programa
Una vez que hayas establecido la dosis requerida,
puedes programar este tiempo en el número de
tomas que se muestran actualmente en la pantalla
LCD. Mantén pulsado el botón PROGRAM,
el molinillo emitirá dos pitidos para conrmar.
Solo se programará la dosis que se muestre,
las demás dosis permanecerán sin cambios.
START PAUSE
GRIND AMOUNT SHOTS CUPS
CANCELPROGRAM
PRESIONE Y MANTENGA
Molido manual
El molido manual te permite tener un control
completo sobre la cantidad de café que se
dispensa.
• Mantén pulsado el botón START / PAUSE /
CANCEL o pulsa el asa de tu portaltros
para activar el interruptor del portaltros
todo el tiempo que necesites.
• Suelta el botón START / PAUSE / CANCEL
o el interruptor del portaltros y el molido se
detendrá.
START PAUSE
EMPUJE, SOSTENGA Y SUELTE
O
EMPUJAR
MANEJO DE TU NUEVO ELECTRODOMÉSTICO

10
MANEJO DE TU NUEVO ELECTRODOMÉSTICO
AJUSTE DE MUELAS CÓNICAS
Algunos tipos de café pueden requerir un rango de molido más amplio para lograr una extracción
o elaboración ideal.
Una característica de tu Smart Grinder™ Pro es la capacidad de extender este rango con una muela
superior ajustable.
Recomendamos hacer solo un ajuste a la vez.
13
1 2 3 4 5 6
88 9 10 11 12
14 15
Retira la muela
superior
Desbloquea
la tolva
Retira la tolvaPon el molinillo
en marcha hasta
que se vacíe
Alinea la tolva
en su posición
Sostén la tolva sobre el recipiente
y gira el dial para que los granos
caigan al recipiente
Alinea la tolva
en su posición
Bloquea la muela
superior
Empuja la muela
superior con
firmeza hasta
su posición
Inserta el asa
de alambre desde
ambos lados de
la muela
Alinea el número
con la abertura
del asa
Retira el asa de
alambre desde
ambos lados
de la muela
Mueve la muela
superior ajustable,
número 1, más
grueso o más fino
Comprueba
la extracción
Bloquea la tolva

11
ES
CUIDADO, LIMPIEZA Y ALMACENAMIENTO
CUIDADO, LIMPIEZA
Y ALMACENAMIENTO
1. Vacía los granos de la tolva y muele
el exceso de granos (ver más abajo).
2. Desenchufa el cable de alimentación
de la toma de corriente antes de
limpiar.
3. Lava el recipiente para café molido
y la tapa, la tolva de café y la tapa
con agua tibia jabonosa, enjuaga
y seca bien.
4. Limpia y pule el exterior del electro do-
més tico con un paño suave y húmedo.
LIMPIEZA DE MUELAS CÓNICAS
La limpieza regular ayuda a que las muelas logren resultados de molido consistentes, lo cual es
especialmente importante cuando se muele para café expreso.
13
1 2 3 4 5 6
8877 9 10 11 12
Bloquea la tolvaAlinea la tolva en s
u posición
Bloquea la muela
superior
Empuja la muela
superior con
firmeza hasta
su posición
Limpia la salida
del molido con
el cepillo
Limpia la muela
superior con el
cepillo de limpieza
Limpia la muela
inferior con el
cepillo de limpieza
Retira la muela
superior
Desbloquea la tolva
Retira la tolvaPon el molinillo
en marcha hasta
que se vacíe
Alinea la tolva
en su posición
Sostén la tolva sobre el recipiente
y gira el dial para que los granos
caigan al recipiente
NOTA
No utilices productos de limpieza abrasi-
vos o alcalinos, ni estropajos de lana de
acero, ya que pueden dañar la supercie.
NOTA
No laves ninguna de las piezas o accesorios
del molinillo en el lavaplatos.

12
RESOLUCIÓN DE PROBLEMAS
PROBLEMA CAUSA POSIBLE QUÉ HACER
El molinillo no se
inicia después de
pulsar el botón
START / PAUSE /
CANCEL
• El molinillo no está enchufado.
• El molinillo se ha sobreca-
lentado.
• La tolva de café no está bien
colocada. “PLEASE LOCK
HOPPER” aparecerá en la
pantalla LCD.
• Enchufa el cable de alimentación
a la toma de corriente.
• Retira el enchufe de la toma
de corriente. Deja enfriar durante
20 minutos antes de volver a utilizar.
• Bloquea la tolva de café en su posición.
El motor arranca
pero no sale café
molido de la
salida del molido
• Se ha pulsado el botón
incorrecto.
• No hay granos de café
en la tolva de café.
• El molinillo / La tolva de café
está bloqueada.
• Pulsa START / PAUSE / CANCEL o el
interruptor del portaltros para activar.
• Llena la tolva con granos de café
frescos.
• Retira la tolva de café. Inspecciona
la tolva de café y las muelas en busca
de obstrucciones. Coloca de nuevo
las piezas y vuelve a intentarlo.
El motor arranca
pero funciona
con un ruido
“de traqueteo”
• El molinillo está bloqueado
con un objeto extraño o el
canal está bloqueado.
• Hay humedad que obstruye
el molinillo.
• Retira la tolva de café, inspecciona
las muelas y retira cualquier cuerpo
extraño.
• Limpia las muelas y el canal (consulta
Cuidado y limpieza en la página 11).
• Deja que las muelas se sequen
com pletamente antes de volver
a montarlas. Puedes usar un secador
de pelo para soplar aire en la entrada
del molinillo (muela inferior) para que
se seque.
No se puede
bloquear la
tolva de café
en su posición
• Hay granos de café que
obstruyen el dispositivo
de bloqueo de la tolva.
• Retira la tolva de café. Retira los granos
de café de la parte superior de las
muelas. Bloquea de nuevo la tolva
en su posición y vuelve a intentarlo.
Hay demasiado
café molido
• La cantidad de molido
requiere ajustes.
• Pulsa el botón SHOTS / CUPS para
cambiar la cantidad de molido.
• Usa el dial GRIND AMOUNT para
ajustar la cantidad a más o a menos.
demasiado lleno
• Es normal que la cantidad correcta
de café aparezca demasiado llena en
tu portaltros. El café no apisonado
tiene aproximadamente tres veces
el volumen del café apisonado.
¿Parada de
emergencia?
• Pulsa el botón START / PAUSE /
CANCEL para detener la operación.
• Desenchufa el cable de alimentación
de la toma de corriente.

13
ES
GARANTÍA
GARANTÍA LIMITADA DE 2 AÑOS
La garantía de Sage Appliances cubre este
producto para uso doméstico en territorios
especícos durante 2 años a partir de la fecha de
compra contra fallos causados por mano de obra
y materiales defectuosos. Durante el plazo de la
garantía, Sage Appliances reparará o sustituirá
productos defectuosos (a criterio de Sage
Appliances).
Todos los derechos de garantía en virtud de la
legislación nacional vigente serán respetados y
no se verán afectados por nuestra garantía. Para
consultar los términos y condiciones completos
de la garantía, así como instrucciones sobre cómo
hacer una reclamación, visite
www.sageappliances.com

14
NOTAS

the Smart Grinder
™
Pro
PT
MANUAL RÁPIDO

2
ÍNDICE
A SAGE
®
RECOMENDA
A SEGURANÇA
COMO MÁXIMA
PRIORIDADE
Na Sage
®
, temos
a máxima preocupação
com a segurança.
Desenhamos e fabricamos
eletrodomésticos com a sua
segurança como máxima
prioridade. Além disso,
pedimos que tenha cuidado
quando utilizar qualquer
aparelho elétrico e que
cumpra as precauções
seguintes.
CUIDADOS
IMPORTANTES
LEIA TODAS AS INSTRUÇÕES
ANTES DE UTILIZAR
CONSULTA FUTURA
• Está disponível uma versão
transferível deste documento
em sageappliances.com
• Antes de utilizar pela primeira
vez, certifique-se de que
a sua fonte de alimentação
corresponde à indicada na
etiqueta na parte inferior
do aparelho.
• Remova e elimine todos
os materiais da embalagem
antes da primeira utilização.
• Para eliminar o risco de asfixia
para as crianças, elimine
de forma segura a cobertura
de proteção instalada na ficha
de alimentação.
• Este aparelho destina-se
apenas a uso doméstico. Não
utilize o aparelho para outra
função diferente da utilização
a que se destina. Não utilize
em veículos em movimento
ou barcos. Não utilize no
exterior. A utilização incorreta
pode causar ferimentos.
• Desenrole completamente
o cabo de alimentação antes
de utilizar.
• Coloque o aparelho numa
superfície plana, estável,
resistente ao calor e seca,
afastado da extremidade e não
utilize próximo de uma fonte de
calor, como uma placa térmica,
forno ou bico de gás.
2 A Sage
®
recomenda a segurança
como máxima prioridade
5 Introdução ao aparelho
6 Funcionamento do aparelho
11 Cuidados, limpeza e armazenamento
12 Resolução de problemas
13 Garantia

3
PT
• Não deixe o cabo de
alimentação pendurado sobre
a extremidade de uma mesa
ou bancada, em contacto
com superfícies quentes
nem permita que o cabo
se enrosque.
• Não deixe o aparelho sem
supervisão durante a utilização.
• Certifique-se sempre de que
o aparelho está desligado,
e que a ficha foi retirada da
tomada elétrica e permitiu
o arrefecimento antes de limpar,
mover ou armazenar.
• DESLIGUE sempre o aparelho,
desligue o cabo da tomada
de alimentação e retire a ficha
da tomada de alimentação
quando o aparelho não estiver
em utilização.
• Não use o aparelho se o cabo
de alimentação, ficha ou
o próprio aparelho estiverem
danificados de qualquer
maneira. Contacte o serviço de
atendimento ao cliente da Sage
ou aceda a sageappliances.com
se o aparelho estiver danificado
ou se for necessária qualquer
tarefa de manutenção que não
a de limpeza
• Qualquer tarefa de manutenção
que não a de limpeza deve
ser realizada por um centro
de assistência autorizado pela
Sage
®
.
• As crianças não devem brincar
com o aparelho.
• As tarefas de limpeza do
aparelho não devem ser
executadas por crianças exceto
caso tenham mais de 8 anos
de idade e tenham supervisão.
• O aparelho e o cabo devem
ser mantidos fora do alcance
das crianças com idade inferior
a 8 anos.
• Recomendamos a instalação
de um comutador de segurança
da corrente residual para
fornecer segurança adicional
ao utilizar todos os aparelhos
elétricos. Recomendamos
o uso de comutadores de
segurança com uma corrente
operacional nominal não
superior a 30 mA. Consulte
um eletricista para obter
aconselhamento profissional.
• Nunca use dispositivos
suplementares que não os
fornecidos com o aparelho.
• Não tente utilizar o aparelho
por outro método para além
do descrito neste manual.
• Não mova o aparelho enquanto
estiver em funcionamento.
• Não toque nas superfícies
quentes. Deve permitir que
o aparelho arrefeça antes
de mover ou limpar quaisquer
partes.
RECOMENDAMOS QUE CONSIDERE A SEGURANÇA
COMO MÁXIMA PRIORIDADE

4
RECOMENDAMOS QUE CONSIDERE A SEGURANÇA
COMO MÁXIMA PRIORIDADE
• Este aparelho não deve ser
utilizado por crianças. Mantenha
o aparelho e o seu cabo fora
do alcance das crianças.
• O aparelho pode ser utilizado
por pessoas com capacidades
físicas ou mentais reduzidas
ou com falta de experiência
e conhecimento, mas apenas
se tiverem recebido supervisão
ou instruções relativas
ao uso seguro do aparelho
e compreenderem os perigos
envolvidos.
• Não utilize o moinho sem
a tampa do depósito colocada.
Mantenha os dedos, mãos,
cabelo, roupa e utensílios
afastados do depósito durante
o funcionamento.
O símbolo apresentado
indica que este aparelho
não deve ser eliminado
juntamente com os resíduos
domésticos normais. Deve ser
encaminhado para um centro
de recolha de resíduos da
autoridade local designado para
este fim ou um revendedor que
forneça este serviço. Contacte
a Câmara Municipal local para
obter mais informações.
Não submerja a cha
elétrica, o cabo
ou o aparelho em água
ou qualquer outro líquido para
proteger contra choques
elétricos.
APENAS PARA USO DOMÉSTICO
GUARDE ESTAS INSTRUÇÕES

5
PT
C
B
D
E
F
G
H
M
L
O
N
A
K
J
I
Oi
Oii
INTRODUÇÃO AO APARELHO
A. Tampa do depósito de grãos
B. Depósito de grãos
C. Trituradores cónicos de aço inoxidável
endurecido
D. Ecrã LCD retroiluminado
E. Botão GRIND AMOUNT/
PROGRAM (TEMPO DE MOAGEM/
PROGRAMAR)
F. Botão SHOTS/CUPS (DOSES/
CHÁVENAS)
G. Saída de moagem
H. Tabuleiro de moagem
I. Botão do grau de moagem
J. Botão START/PAUSE/CANCEL
(INICIAR/PAUSA/CANCELAR)
K. Interruptor de ativação do manípulo
ACESSÓRIOS
L. Base do manípulo de café 50–54 mm
M. Base do manípulo de café 58 mm
N. Pincel de limpeza dos trituradores
cónicos
O. Recipiente de grãos moídos
Oi – Tampão do recipiente
Oii – Tampa do recipiente
220–240 V ~ 50-60Hz 165 W

6
ANTES DA PRIMEIRA UTILIZAÇÃO
Remova e elimine em segurança todas as
etiquetas promocionais e materiais de embalagem
no seu produto Sage
®
.
Lave o depósito de grãos, bases, recipiente
de grãos moídos, tampa do recipiente e pincel
de limpeza em água morna com sabão e deixe
secar completamente. Limpe o exterior do
moinho com um pano suave húmido e deixe
secar completamente. Coloque o moinho numa
superfície plana e nivelada, ligue o cabo de
alimentação numa tomada de 220-240 V e ligue
o botão "ON".
FUNCIONALIDADE DE POUPANÇA
DE ENERGIA
O moinho desliga-se automaticamente
se não for utilizado durante 5 minutos.
MONTAR O SAGE SMART
GRINDER
™
PRO
Depósito de grãos
Alinhe as patilhas na base do depósito de grãos
e introduza o depósito na posição correta. Rode
o botão do depósito de grãos 90º para bloquear
a posição. Encha com grãos de café frescos e xe
a tampa na parte superior do depósito de grãos.
MOER PARA CAFÉ ESPRESSO
Utilize cestos de ltro de parede única quando
moer grãos de café frescos. Utilize as denições
mais nas 1-30 no intervalo ESPRESSO.
PASSO 1:
Introduza o tamanho da base do manípulo de café
adequado. Introduza o manípulo de café na base.
EMPURRE
50-54 mm
58 mm
BASES
NOTA
O número máximo de doses com a base
inserida é 2.
ÊMBOLO
DE 1 ATÉ 8 DOSES
MÉTODO
DE EXTRAÇÃO
DEFINIÇÃO
DE MOAGEM
GRAU DE
MOAGEM
QUANTIDADE
FINA
1-30
DE 1 ATÉ 8 DOSES
ESPRESSO
FILTRO DE
GOTEJAMENTO
GROSSA MÉDIA
46-54
GROSSA
55-60
DE 1 ATÉ 8 DOSES
CAFETEIRA
DE CAFÉ
31-45
DE 1 ATÉ 8 DOSES
MÉDIA
TABELA DE CAFÉ
FUNCIONAMENTO DO APARELHO

7
PT
PASSO 2:
Selecionar DOSES/CHÁVENAS
Selecione a quantidade de grãos moídos
necessária rodando o botão SHOTS/CUPS
(DOSES/CHÁVENAS).
START PAUSE
GRIND AMOUNT SHOTS CUPS
CANCELPROGRAM
Rode o botão Grind Amount (Tempo de moagem)
para ajustar o tempo de moagem e obter
a quantidade de café adequada.
START PAUSE
GRIND AMOUNT SHOTS CUPS
CANCELPROGRAM
PASSO 3:
Selecione o grau de moagem
Para espresso, recomendamos que selecione
a denição 12 do grau de moagem como ponto
de partida e rode o botão Grind Size (Grau de
moagem) para ajustar a saída do espresso, mais
no ou mais grosso.
START PAUSE
GRIND AMOUNT SHOTS CUPS
CANCELPROGRAM
NOTA
Se o botão Grind Size estiver apertado, rode
o moinho premindo o botão START/PAUSE/
CANCEL enquanto roda o botão Grind Size.
Isto liberta os grãos de café presos nos
trituradores.
MOER PARA UM RECIPIENTE DE
MOAGEM OU FILTRO DE CAFÉ
PASSO 1:
Remova a base deslizando-a da saída de moagem.
PUXE
Coloque o recipiente de moagem com o tampão
aberto ou ltro de café diretamente debaixo
da saída de moagem.
FUNCIONAMENTO DO APARELHO

8
NOTA
Se programar uma quantidade/tempo
de moagem personalizada, a denição
apenas será aplicada ao método de extração
especíco. Não altera as outras denições
de Doses ou Chávenas.
Função de pausa
Pode colocar o moinho em pausa durante
o funcionamento, permitindo-lhe assentar o café
no manípulo.
• Prima e liberte o botão
START/PAUSE/CANCEL para iniciar
a operação de moagem.
• Durante a moagem, prima o botão
START/PAUSE/CANCEL novamente para
colocar em pausa o processo de moagem
durante 10 segundos.
• Prima novamente durante este intervalo
de tempo para retomar a moagem da dose
restante.
START PAUSE
GRIND AMOUNT SHOTS CUPS
CANCELPROGRAM
FUNCIONAMENTO DO APARELHO
• Selecione a quantidade de grãos moídos
necessária premindo o botão SHOTS/CUPS
(DOSES/CHÁVENAS).
• Prima o botão START/PAUSE/CANCEL para
iniciar a operação de moagem.
START PAUSE
SHOTS CUPS
CANCEL
START PAUSE
SHOTS CUPS
CANCEL
FUNCIONALIDADES DO SAGE
SMART GRINDER
™
PRO
Moagem automática
A moagem automática permite-lhe efetuar
a moagem sem necessidade de utilizar as mãos.
• Prima e liberte o botão
START/PAUSE/CANCEL ou empurre
o punho do manípulo uma vez. Isto ativa
o INTERRUPTOR DO MANÍPULO DE CAFÉ.
• A moagem para automaticamente quando
atingir a quantidade denida.
INICIAR PAUSA INTERRUPTOR DO MANÍPULO
PRIMA E LIBERTE
OU
EMPURRE

9
PT
AJUSTAR O TEMPO DE MOAGEM
Aumentar o tempo de moagem
Para aumentar o tempo de moagem selecionado,
rode o botão GRIND AMOUNT para a direita.
START PAUSE
GRIND AMOUNT SHOTS CUPS
CANCELPROGRAM
Diminuir o tempo de moagem
Para diminuir o tempo de moagem selecionado,
rode o botão GRIND AMOUNT para a esquerda.
NOTA
Para REPOR a quantidade/tempo de moagem
para as predenições, mantenha premido
o botão SHOTS/CUPS até ouvir um sinal
sonoro longo.
Função de programação
Após denir a dose pretendida, pode programá-
la para o número de doses apresentadas
no ecrã LCD. Mantenha premido o botão
PROGRAM, o moinho emite dois sinais sonoros
para conrmar. Apenas será programada
a dose apresentada no ecrã, todas as
outras doses permanecem inalteradas.
INICIAR PAUSATEMPO DE MOAGEM DOSES CHÁVENAS
CANCELARPROGRAMAR
MANTENHA PREMIDO
Moagem manual
A moagem manual permite-lhe controlar
totalmente a quantidade de café utilizada.
• Mantenha premido o botão START/PAUSE/
CANCEL ou empurre o punho do manípulo
para ativar o INTERRUPTOR DO MANÍPULO
durante o tempo necessário.
• Liberte o botão START/PAUSE/CANCEL
ou o INTERRUPTOR DO MANÍPULO para
parar a moagem.
INICIAR PAUSA INTERRUPTOR DO MANÍPULO
MANTENHA PREMIDO E LIBERTE
OU
EMPURRE
FUNCIONAMENTO DO APARELHO

10
FUNCIONAMENTO DO APARELHO
AJUSTAR OS TRITURADORES CÓNICOS
Alguns tipos de café podem necessitar de um maior intervalo de moagem para obter a extração ideal.
Uma funcionalidade do seu Smart Grinder
™
Pro é a capacidade de ampliar este intervalo com
um triturador superior ajustável. Recomendamos que efetue um ajuste de cada vez.
13
Segure o depósito de grãos sobre
o recipiente e rode o botão para
despejar os grãos no recipiente
Alinhe o depósito
de grãos na
posição correta
Ligue o moinho
até esvaziá-lo
Remova
o depósito
de grãos
Desbloqueie
o depósito
de grãos
1 2 3 4 5
Mova o triturador
superior ajustável
1 número, mais
grosso ou mais
fino
Remova a patilha
metálica de
ambos os lados
do triturador
Alinhe o número
com a abertura
da patilha
Remova
o triturador
superior
6
8877 9
Introduza
a patilha metálica
em ambos
os lados
do triturador
10
Fixe firmemente
o triturador
superior na
posição correta
11
Bloqueie
o triturador
superior
12
Alinhe o depósito
de grãos na
posição correta
RECIPIENTE
HERMÉTICO
14
Bloquear
depósito
15
Verifique a sua
extração
F
I
N
E
C
O
A
R
S
E
F
I
N
E
C
O
A
R
S
E
4
5
6
7
8
F
I
N
E
C
O
A
R
S
E
F
I
N
E
C
O
A
R
S
E

11
PT
CUIDADOS, LIMPEZA E ARMAZENAMENTO
CUIDADOS, LIMPEZA
E ARMAZENAMENTO
1. Limpe os grãos vazios do depósito
e triture os grãos em excesso (veja
abaixo).
2. Desligue o cabo de alimentação
da tomada antes de limpar.
3. Limpe a tampa e o recipiente de grãos
moídos, a tampa do depósito e o depósito
de grãos com água morna com sabão,
lave e deixe secar completamente.
4. Limpe o exterior do aparelho com
um pano suave e húmido.
LIMPAR OS TRITURADORES CÓNICOS
Uma limpeza regular ajuda os trituradores a obterem resultados de moagem consistentes, o que
é especialmente importante quando prepara um espresso.
13
Segure o depósito de grãos sobre
o recipiente e rode o botão para despejar
os grãos no recipiente
Alinhe o depósito
de grãos na
posição correta
Ligue o moinho até
esvaziá-lo
Remova o depósito
de grãos
Desbloqueie
o depósito
de grãos
1 2 3 4 5
Limpe o triturador
inferior com
um pincel
de limpeza
Limpe o triturador
superior com um
pincel de limpeza
Limpe a saída
de moagem com
um pincel
Remova o triturador
superior
6
8877 9
Fixe firmemente
o triturador superior
na posição correta
10
Bloqueie o triturador
superior
11
Alinhe o depósito
de grãos na
posição correta
12
Bloqueie o depósito
RECIPIENTE
HERMÉTICO
NOTA
Não utilize agentes de limpeza alcalinos
ou abrasivos, esfregões de aço ou
abrasivos, porque podem danicar
a superfície.
NOTA
Não limpe quaisquer peças do moinho
ou acessórios na máquina lava-louças.

12
RESOLUÇÃO DE PROBLEMAS
PROBLEMA CAUSA POSSÍVEL O QUE FAZER
O moinho não
se inicia quando
prime o botão
START/PAUSE/
CANCEL
• A cha do moinho não está
ligada.
• O moinho está em
sobreaquecimento.
• O depósito de grãos não
está instalado corretamente.
É apresentada a mensagem
"PLEASE LOCK HOPPER"
(Bloqueie o depósito
de grãos) no ecrã LCD.
• Ligue o cabo de alimentação a uma
tomada.
• Retire a cha de alimentação da
tomada elétrica. Aguarde 20 minutos
para permitir o arrefecimento antes
de utilizar novamente.
• Bloqueie o depósito de grãos
na posição correta.
O motor arranca
mas o café moído
não sai do moinho
• Premiu o botão incorreto.
• Não há grãos de café
no depósito de grãos.
• O moinho/depósito de grãos
está bloqueado.
• Prima START/PAUSE/CANCEL
ou o INTERRUPTOR DO MANÍPULO
para ativar.
• Encha o depósito de grãos com grãos
de café frescos.
• Remova o depósito de grãos.
Inspecione o depósito de grãos
e os trituradores para detetar bloqueios.
Substitua as peças e tente novamente.
O motor arranca,
mas funciona com
um ruído estranho
• O moinho está bloqueado
por algum corpo estranho
ou a abertura está bloqueada.
• Humidade bloqueando
o moinho.
• Retire o depósito de grãos, inspecione
os trituradores e retire qualquer corpo
estranho.
• Limpe os trituradores e a abertura
(consulte Cuidados e limpeza
na página 11).
• Deixe secar completamente
os trituradores antes de instalá-los
novamente. Pode utilizar um secador
para soprar ar na abertura do moinho
(triturador inferior) para secar.
Não é possível
bloquear
o depósito
de grãos na
posição correta
• Existem grãos de café que
estão a obstruir o dispositivo
de bloqueio do depósito
de grãos.
• Remova o depósito de grãos. Limpe
os grãos de café da parte superior
dos trituradores. Bloqueie novamente
o depósito na posição correta e tente
novamente.
Café moído
em excesso/
• A quantidade de café moído
deve ser ajustada.
• Prima o botão SHOTS/CUPS para
alterar o tempo de moagem.
• Utilize o botão Grind Amount para
ajustar o tempo para "mais" ou "menos".
O manípulo
de café
transborda
• É normal que uma quantidade de
café correta pareça transbordar no
manípulo. O café não prensado tem
três vezes o volume do café prensado.
Paragem
de emergência?
• Prima o botão START/PAUSE/CANCEL
para parar o funcionamento.
• Desligue o cabo de alimentação
da tomada.

13
PT
GARANTIA
GARANTIA LIMITADA DE 2 ANOS
A Sage Appliances fornece uma garantia para
este produto para uso doméstico nos territórios
especicados de 2 anos a partir da data de
compra contra avarias provocadas por defeitos
na mão-de-obra e nos materiais. Durante
este período da garantia, a Sage Appliances
irá reparar, substituir ou reembolsar qualquer
produto defeituoso (a exclusivo critério da Sage
Appliances).
Todos os direitos legais da garantia ao abrigo
da legislação nacional aplicável serão respeitados
e não serão afetados pela nossa garantia.
Visite www.sageappliances.com para consultar
os termos e condições completos da garantia,
bem como as instruções sobre como efetuar uma
reivindicação.

www.sageappliances.com
DEU AUT
Sage Appliances GmbH
Campus Fichtenhain 48, 47807 Krefeld, Deutschland
Deutschland: +49 (0)8005053104
Österreich: +43 (0)800 80 2551
BEL
Belgium
+32 (0)800 54 155
LUX
Luxembourg
+352 (0)800 880 72
ESP
Spain
+34 (0)900 838 534
CHE
Switzerland
+41 (0)800 009 933
POR
Portugal
+351 (0)800 180 243
Registered in Germany No. HRB 81309 (AG Düsseldorf).
Registered in England & Wales No. 8223512.
• Due to continued product improvement, the products illustrated or photographed in this document may vary slightly from the actual product.
•Aufgrund kontinuierlicher Produktverbesserungen kann das auf dieser Verpackung dargestellte Produkt leicht vom tatsächlichen Produkt abweichen.
• En raison de son amélioration continue, le produit représenté sur cet emballage peut diérer légèrement du produit réel.
• Vanwege de voortdurende verbetering van de producten kunnen de producten die in dit document
worden geïllustreerd of gefotografeerd enigszins afwijken van het daadwerkelijke product.
• A causa del continuo miglioramento dei prodotti, il prodotto illustrato su questa confezione può variare leggermente rispetto al prodotto reale.
• Perfeccionamos nuestros productos continuamente, por lo que el artículo podría diferir ligeramente de la ilustración o imagen en este documento.
• Devido à melhoria contínua dos produtos, os produtos ilustrados ou fotografados neste documento podem variar ligeiramente do produto real.
Copyright BRG Appliances 2019.
BCG820/SCG820 – A19
-
 1
1
-
 2
2
-
 3
3
-
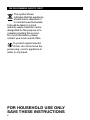 4
4
-
 5
5
-
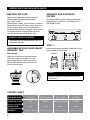 6
6
-
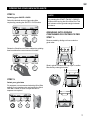 7
7
-
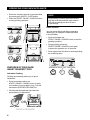 8
8
-
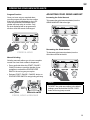 9
9
-
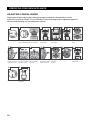 10
10
-
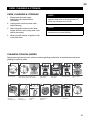 11
11
-
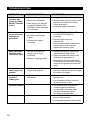 12
12
-
 13
13
-
 14
14
-
 15
15
-
 16
16
-
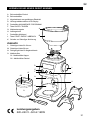 17
17
-
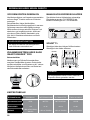 18
18
-
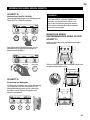 19
19
-
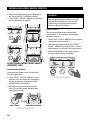 20
20
-
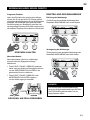 21
21
-
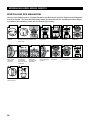 22
22
-
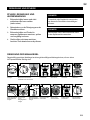 23
23
-
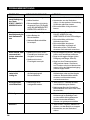 24
24
-
 25
25
-
 26
26
-
 27
27
-
 28
28
-
 29
29
-
 30
30
-
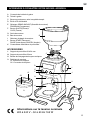 31
31
-
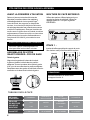 32
32
-
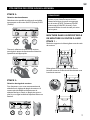 33
33
-
 34
34
-
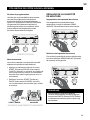 35
35
-
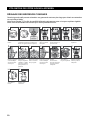 36
36
-
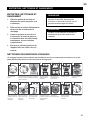 37
37
-
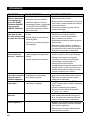 38
38
-
 39
39
-
 40
40
-
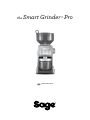 41
41
-
 42
42
-
 43
43
-
 44
44
-
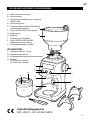 45
45
-
 46
46
-
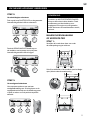 47
47
-
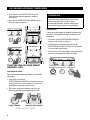 48
48
-
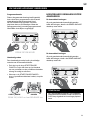 49
49
-
 50
50
-
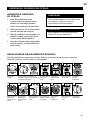 51
51
-
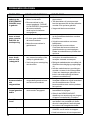 52
52
-
 53
53
-
 54
54
-
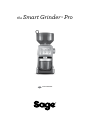 55
55
-
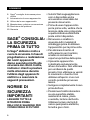 56
56
-
 57
57
-
 58
58
-
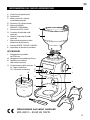 59
59
-
 60
60
-
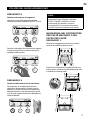 61
61
-
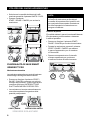 62
62
-
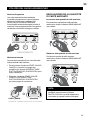 63
63
-
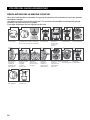 64
64
-
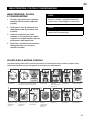 65
65
-
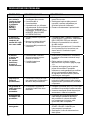 66
66
-
 67
67
-
 68
68
-
 69
69
-
 70
70
-
 71
71
-
 72
72
-
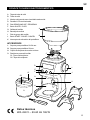 73
73
-
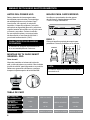 74
74
-
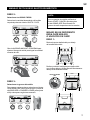 75
75
-
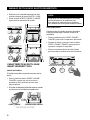 76
76
-
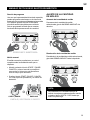 77
77
-
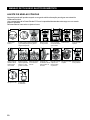 78
78
-
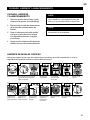 79
79
-
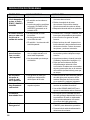 80
80
-
 81
81
-
 82
82
-
 83
83
-
 84
84
-
 85
85
-
 86
86
-
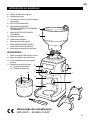 87
87
-
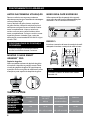 88
88
-
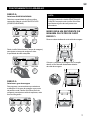 89
89
-
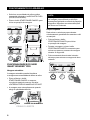 90
90
-
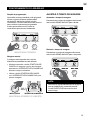 91
91
-
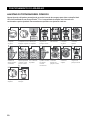 92
92
-
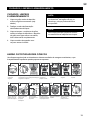 93
93
-
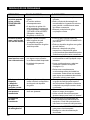 94
94
-
 95
95
-
 96
96


Sage COFFEE GRINDER (SCG820BSS4EEU1) El manual del propietario
- Categoría
- Cafeteras
- Tipo
- El manual del propietario
- Este manual también es adecuado para
en otros idiomas
- français: Sage COFFEE GRINDER (SCG820BSS4EEU1) Le manuel du propriétaire
- italiano: Sage COFFEE GRINDER (SCG820BSS4EEU1) Manuale del proprietario
- English: Sage COFFEE GRINDER (SCG820BSS4EEU1) Owner's manual
- Deutsch: Sage COFFEE GRINDER (SCG820BSS4EEU1) Bedienungsanleitung
- Nederlands: Sage COFFEE GRINDER (SCG820BSS4EEU1) de handleiding
- português: Sage COFFEE GRINDER (SCG820BSS4EEU1) Manual do proprietário
Artículos relacionados
-
Sage BCG820 Guía del usuario
-
Sage BCG600 the Dose Control Pro Guía del usuario
-
-
Sage SCG600 Guía del usuario
-
-
-
-
-
-
Sage THE BARISTA TOUCH BLACK TRUFFLE (SES880BTR4EEU1) El manual del propietario
Otros documentos
-
 Russell Hobbs 18416-80-1 Manual de usuario
-
Breville BCG820 Instrucciones de operación
-
Hamilton Beach 80385 Guía del usuario
-
Gaggia MM Steel Manual de usuario
-
-
Hamilton Beach CM17 Manual de usuario
-
KitchenAid KCG0702ER Guía del usuario
-
-
Smeg Broyeur à café CGF01PBEU Bleu Azur Manual de usuario
-
Smeg CGF01PGEU Manual de usuario
