Masterbuilt BUTTERBALL MB23015018 El manual del propietario
- Categoría
- Pequeños electrodomésticos de cocina
- Tipo
- El manual del propietario
Este manual también es adecuado para

Manual Code: 9801180014 180925-GSB
BUTTERBALL® ELECTRIC FRYER
FREIDORA ELÉCTRICA BUTTERBALL®
Operation Manual and Safety Instructions
Manual de operación e Instrucciones de seguridad
Mfg. Date - Serial Number | Fecha Fabricado - Número de serie
Your model number | Su número de modelo
FOR INDOOR HOUSEHOLD USE ONLY
SOLO PARA USO CASERO INTERNO
MB23015018, MB23015118
These numbers are located on the back of the fryer.
Estos números se ubican en la parte posterior de la freidora.
Downloaded from www.Manualslib.com manuals search engine

2
WARNINGS AND IMPORTANT SAFEGUARDS
READ ALL INSTRUCTIONS
• A short cord is provided to prevent the possibility of entanglement or tripping. Use of an extension cord
increases the risk of entanglement or tripping.
• Use of an extension cord causes loss of energy and appliance may not heat properly.
• Extreme caution must be used when moving an appliance containing hot oil or other hot liquids.
• Never move appliance when oil or water is above 100°F (37°C).
• Do NOT touch hot surfaces. Use handles.
• To protect against electric shock, do NOT immerse cord, plugs, or any part of control panel in water or
other liquids.
• Appliance is HOT while in use. Do NOT move appliance while in use or while HOT.
• This is an ATTENDED appliance. Do NOT leave this appliance unattended during use. Heated liquid
inside cooking pot remains dangerously HOT for a period of time after use.
• Unplug from outlet when not in use and before cleaning. Allow to cool before removing parts for
cleaning and storing.
• Do NOT operate the appliance with a damaged cord, plug, or after appliance malfunctions or has been
damaged in any manner. Contact Masterbuilt Customer Service for assistance at 1-800-489-1581.
• Accessory attachments not supplied by Masterbuilt Manufacturing, LLC are not recommended and may
cause injury.
• Do NOT use outdoors. Appliance is for indoor use only.
• Do NOT let cord hang over edge of table or counter, or touch hot surfaces.
• Do NOT place on or near a HOT gas or electric burner, or in a heated oven.
• ALWAYS attach breakaway power cord to appliance first, then plug cord into outlet.
• To disconnect, turn thermostat control dial to OFF position, then remove plug from outlet.
• Do NOT use appliance for anything other than intended use.
• If oil begins to smoke, IMMEDIATELY turn appliance off.
• NEVER overfill cooking pot. Do NOT exceed MAX fill line.
• Remove lid with caution to prevent being burned by escaping steam.
• Add food slowly to avoid boil over.
• Do NOT use appliance without water or oil in the pot. The appliance can be
severely damaged if heated while empty.
• Place appliance on a level and stable surface to prevent tipping.
• Do NOT mix different types of oil at the same time.
• Never melt fat or lard on the heating element or in basket.
• Risk of fire and electric shock. Replace only with manufacturer’s
cord set, part number 9001180060.
• Close supervision is necessary when any appliance is used by or near children.
All food placed into the appliance should be thoroughly defrosted to 35°- 40°F (1.6°- 4.4°C). Remove any
possibility of remaining ice crystals and then dry thoroughly before immersing in hot oil.
Failure to do so may cause damage to surroundings or personal injury.
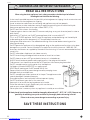
SAVE THESE INSTRUCTIONS
When using electrical appliances, basic safety precautions should always be followed
including but not limited to the following:
STEAM
180718
Downloaded from www.Manualslib.com manuals search engine


4
ADVERTENCIAS Y SALVAGUARDAS IMPORTANTES
LEA TODAS LAS INSTRUCCIONES
•
Se proporciona un cable corto para evitar la posibilidad de enredarse o tropezarse. El uso de un cable
de extensión aumenta el riesgo de enredarse o tropezarse.
• El uso de un cable de extensión provoca pérdida de energía y el artefacto podría no calentarse
adecuadamente.
• Se debe tener mucho cuidado al mover un artefacto que contenga aceite caliente u otros líquidos
calientes.
• Nunca mueva el artefacto cuando el aceite o el agua estén por encima de los 100°F (37°C).
• NO toque las superficies calientes. Use las asas.
• Para protegerse contra una descarga eléctrica, NO sumerja el cable, enchufe o cualquier pieza del
panel de control en agua u otro líquido.
• El artefacto está CALIENTE cuando está en uso. NO mueva el artefacto cuando esté en uso o cuando
esté CALIENTE.
• Este artefacto debe ATENDERSE siempre. NO deje este artefacto desatendido durante el uso. El líquido
calentado dentro de la olla de cocción permanece peligrosamente CALIENTE por un período de tiempo
luego del uso.
• Desenchufe del tomacorrientes cuando no esté en uso y antes de la limpieza. Deje que se enfríe antes
de retirar piezas para limpiarlo y guardarlo.
• NO opere el artefacto con un cable o enchufe dañado, o si el artefacto se malogra o se ha dañado de
alguna manera. Contacte al Servicio de atención al cliente de Masterbuilt al: 1-800-489-1581.
• No se recomienda usar accesorios adicionales no suministrados por Masterbuilt Manufacturing, LLC;
estos podrían causar lesiones.
• NO utilice el aparato en exteriores. El artefacto es sólo para uso en interiores.
• NO deje que el cable cuelgue del borde de la mesa o mostrador, o que toque superficies calientes.
• NO lo coloque encima o cerca a una hornilla eléctrica o de gas CALIENTE, o en un horno calentado.
• SIEMPRE fije el cable de alimentación de retención al artefacto primero, luego enchufe el cable al
tomacorrientes.
• Para desconectar, apague el termostato, luego retire el enchufe del tomacorrientes.
• NO utilice el aparato para un uso distinto del previsto.
• Si el aceite comienza a ahumar, apague INMEDIATAMENTE el artefacto.
• NUNCA llene demasiado la olla de cocción. NO exceda la línea de llenado
máximo.
• Retire la tapa con precaución para evitar quemarse por el vapor que escape.
• Agregue alimentos lentamente para evitar que se desborden.
• NO use el artefacto sin agua o aceite en la olla. El artefacto
puede dañarse seriamente si se calienta vacío.
• Coloque el artefacto sobre una superficie nivelada y estable para evitar que se
vuelque.
• NO mezcle distintos tipos de aceite a la vez.
• Nunca derrita grasa o manteca en el elemento calefactor o en el cesto.
• Riesgo de incendio y descarga eléctrica. Reemplace sólo con el set de cables
del fabricante, número de parte 9001180060.
• Es necesaria una supervisión cercana cuando un niño usa cualquier artefacto o cuando está
cerca a un niño.
Todos los alimentos colocados en el artefacto deben descongelarse exhaustivamente a
35°- 40°F (1.6°- 4.4°C). Retire cualquier resto de cristales de hielo y luego seque bien los alimentos
antes de sumergirlos en el aceite caliente.
Si no lo hace, puede causar daños a sus alrededores o lesiones personales.
GUARDE ESTAS INSTRUCCIONES
Cuando use artefactos eléctricos, siempre se deben seguir las precauciones básicas de seguridad,
incluyendo, entre otras, las siguientes:
VAPOR
Downloaded from www.Manualslib.com manuals search engine

5
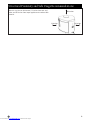
Recomendaciones de proximidad estructural y uso seguro
Mantenga una distancia mínima de 18 pulgadas (45.72
cm) de la parte trasera y lateral, y de 40 pulgadas (101.6
cm) de la parte superior del artefacto con respecto al
material combustible.
40 pulgadas
(45.72 cm)
18 pulgadas
(45.72 cm)
18 pulgadas
(45.72 cm)
Downloaded from www.Manualslib.com manuals search engine

6
DO NOT RETURN TO RETAILER for assembly assistance, missing or damaged parts. Please
contact MASTERBUILT customer service at 1-800-489-1581 or support.masterbuilt.com. Please
have the model number and serial number available. These numbers are located on the silver
rating label on the back of the appliance.
STOP
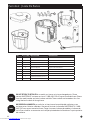
Parts List | Lista De Partes
1
2
5
6
3
4
NO. QT Y./ CANT. DESCRIPTION DESCRIPCIÓN
1 1 Outer Shell Carcasa exterior
2 1 Lid Tapa
3 1 Basket Cesto
4 1 Inner Pot Olla interna
5 4 Inner Pot Supports Soportes de la olla interna
6 1 Control Panel with Element Panel de control con elemento
7 2 Basket Handle Asa del cesto
8 1 Breakaway Power Cord Cable de alimentación de retención
1 Insulated Food Gloves (MB23015118)
Guantes de alimentos aislados
(MB23015118)
1 Pocket thermometer (MB23015118)
Termómetro de bolsillo
(MB23015118)
7
7
8
NO REGRESE AL MINORISTA para solicitar asistencia en el ensamblaje del artefacto, o para
reclamar partes faltantes o dañadas. Contacte al Servicio al cliente de MASTERBUILT al 1-800-
489-1581 o en support.masterbuilt.com. Tenga a la mano el número de modelo y el número de
serie. Estos números se encuentran en la etiqueta plateada de clasificación en la parte posterior
del artefacto.
PARE
Downloaded from www.Manualslib.com manuals search engine

7
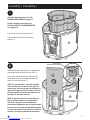
Assembly | Ensamblaje
2
Clean the appliance prior to use. See
CLEANING AND STORAGE on page 13.
Limpie el artefacto antes de su uso.
Consulte LIMPIEZA Y ALMACENAMIENTO
en la página 16.
1
4
1
Insert inner pot (4) into outer shell (1).
Inserte la olla interna (4) en la carcasa
exterior (1).
Slide control panel and element (6) down onto
mounting bracket on front of outer shell (1).
Deslice el panel de control y el elemento (6)
hacia abajo, hasta la abrazadera de montaje
frente a la carcasa exterior (1).
NOTE: The control panel is correctly attached
when the element is inside the inner pot. The
control panel must be correctly attached for the
appliance to operate. A built-in safety switch on
the control panel will prevent the element from
heating if not mounted correctly.
NOTA: El panel de control está correctamente
fijado cuando el elemento está dentro de la
olla interna. El panel de control debe estar
correctamente fijado para que el artefacto pueda
funcionar. Un interruptor de seguridad integrado
en el panel de control evitará que el elemento se
caliente si no está ensamblado correctamente.
6
6
1
MOUNTING BRACKET
SOPORTE DE MONTAJE
SAFETY SWITCH
INTERRUPTOR DE SEGURIDAD
POT MUST BE INSTALLED
EL OLLA DEBE SER INSTALADO
Downloaded from www.Manualslib.com manuals search engine

8
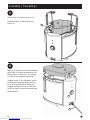
3
4
Place basket (3) inside of inner pot (4).
Coloque el cesto (3) dentro de la olla
interna (4).
Place lid (2) onto fryer and insert breakaway
power cord (8) into the connection on the
control panel (6). Make sure “This Side Up”
is shown on top for proper connection.
Coloque la tapa (2) en la freidora e inserte
el cable de alimentación de retención (8)
en la conexión del panel de control (6).
Asegúrese de que se muestre “Este lado
arriba” en la parte superior para conectarlo
correctamente.
Assembly | Ensamblaje
3
4
2
6
8
Downloaded from www.Manualslib.com manuals search engine

9
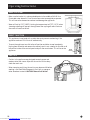
• FOR BEST RESULTS, read the following start-up tips before using this appliance. Remember this is an
ELECTRIC appliance and has different characteristics than a gas appliance.
• FOR SAFETY, the heating element only heats up when properly attached to the mounting bracket. This is a
powerful heating element and may cause a circuit breaker to trip. This can be minimized by operating any
additional appliances on a separate circuit. Tripping a circuit breaker will NOT damage the appliance or
your electrical system.
• PREHEATING oil or water may take up to 25-35 minutes. Take advantage of this time to prepare food for
cooking. For optimal performance, completely preheat appliance to cooking temperature before frying
or boiling food. Keep lid ON during preheating and cooking. This will reduce heating time and keep
temperature more consistent.
• POWER LIGHT (red) will turn ON indicating that the breakaway power cord is plugged into an outlet.
• READY INDICATOR LIGHT (green) will turn ON when set temperature is reached. The indicator light will turn
off if the oil or water temperature falls below the set temperature and will turn on again once the oil or
water returns to the set temperature.
Getting Started
Downloaded from www.Manualslib.com manuals search engine

10
• PARA MEJORES RESULTADOS, lea los siguientes consejos iniciales antes de usar este artefacto. Recuerde
que se trata de una artefacto ELÉCTRICO y que tiene características distintas de un artefacto a gas.
• POR SEGURIDAD, el elemento calefactor sólo se calienta cuando está correctamente fijado a la abrazadera
de montaje. Este es un elemento calefactor potente y puede causar una falla en el interruptor. Esto se
puede minimizar operando los artefactos adicionales en un circuito aparte. Una falla en el interruptor NO
dañará el artefacto o su sistema eléctrico.
• El PRECALENTAMIENTO del aceite o agua puede tomar hasta 25-35 minutos. Aproveche este momento
para preparar los alimentos que va a cocinar. Para un rendimiento óptimo, precaliente completamente el
artefacto a una temperatura de cocción antes de freír o hervir los alimentos. Mantenga la tapa CERRADA
durante el precalentamiento y la cocción. Esto reducirá el tiempo de calentamiento y mantendrá la
temperatura más consistente.
• La LUZ DE ENCENDIDO (rojo) se encenderá indicando que el cable de alimentación de retención está
enchufado a un tomacorrientes.
• La LUZ INDICADORA DE LISTO (verde) se encenderá cuando se alcance la temperatura configurada. La
luz indicadora se apagará si la temperatura del aceite o del agua caen por debajo de la temperatura
configurada y se volverá a encender si el aceite o el agua regresan a la temperatura configurada.
Inicio
Downloaded from www.Manualslib.com manuals search engine

11
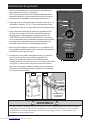
1. Mount the control panel and element onto the bracket on the
outer shell. See step 2 on page 7.
NOTE: The control panel is correctly attached when the heating
element is positioned inside of the inner pot and fully submerged
in oil or water during use.
2. Add water to the MIN 1 gallon (4 qts.) or MAX 1.3 gallons (5.2 qts.)
fill line. If cooking with oil, always fill pot to the middle of MAX fill
line.
3. Attach the breakaway power cord to the control panel. See step
4 on page 8. Plug the breakaway power cord into an outlet (refer
to the “WARNINGS AND IMPORTANT SAFEGUARDS” section of
the manual). The red power light will turn on indicating that the
appliance is plugged in and the element and control panel are
mounted correctly to the mounting bracket.
4. Turn the dial to set the temperature. The green ready light will
turn on when the appliance has reached the set temperature and
is ready for use.
5. When cooking time has elapsed and food is done turn dial to the
off position, then unplug the power cord from the outlet. Carefully
lift the basket with the retractable side handles (see Figure A
below). Allow excess oil or water to drain by hooking the drain
clip on the basket into the drain clip mounting hole (see Figure B
below).
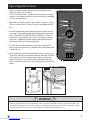
Operating Instructions
• When using the drain clips on the basket, make sure that the basket is firmly in place in the drain clip
mounting hole before releasing the handle. Failure to follow warning may allow the basket to fall back
into hot oil or water which may cause damage to surroundings or personal injury.
WARNING
POWER
LIGHT
READY
LIGHT
TEMPERATURE
DIAL
DRAIN
CLIP
DRAIN CLIP
MOUNTING HOLE
Figure A Figure B
Downloaded from www.Manualslib.com manuals search engine

12
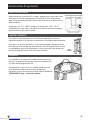
• Make sure the basket is in place and add water to the middle of MAX fill line.
Do not add water above this line. Do not allow water to completely evaporate.
This will cause the element to overheat and damage the appliance.
• Water will boil at 212°F (100°C). Setting the temperature to 375°F (191°C) when
steaming or boiling will prevent the appliance from cycling off and will ensure
the water will continue to boil.
Operating Instructions
HOW TO STEAM
• This appliance is equipped with a safety feature to prevent overheating. If the
appliance overheats it will shut off automatically.
• To reset the appliance turn dial to the off position and allow to cool completely.
Unplug from the outlet and remove the control panel. Insert a toothpick into the small
hole on the inside of the control panel and push the reset button. This will reset the
appliance.
RESET FUNCTION
• Cavities in the appliance are designed to catch grease and
condensation from steam. Wipe out the cavities with a damp
cloth after each use.
• When steaming and frying, the cavities may become full before
cooking is finished. Check frequently. Drain with a sponge or
other absorbent material. CAUTION! Water/oil will be hot.
CAVITIES
MAX
MIN
REAR VIEW OF INNER POT
RESET
BUTTON
CAVITIES
Downloaded from www.Manualslib.com manuals search engine

13
Operating Instructions
CLEANING AND STORAGE
• Clean fryer prior to first use.
• After use, turn appliance off, unplug and let cool for 2 hours if using water or 5 hours if using oil before
cleaning and storing.
• Clean lid, inner pot, and basket/handles with a damp cloth or sponge using a mild detergent. Rinse and dry
thoroughly.
• Clean outer shell, cord, control panel and element with a damp cloth or sponge using a mild detergent. Dry
thoroughly. NEVER put these parts in a dishwasher or submerge in water.
• Do not place control panel under running water. Immersing control panel and cord can cause
electrocution.
WARNING
• Disconnect electric cord from outlet before cleaning, servicing and/or removing heating element.
Electric shock can result in personal injury or death.
• Do not pour used oil in sink. Drain oil back into oil containers. Dispose of used oil according to local
regulations
CAUTION
Downloaded from www.Manualslib.com manuals search engine

14
1. Monte el panel de control y el elemento en la abrazadera en la
carcasa exterior. Ver Paso 2 en la página 7.
NOTA: El panel de control está correctamente fijado cuando el
elemento calefactor está posicionado dentro de la olla interna y
completamente sumergido en aceite o agua durante el uso.
2. Añada agua hasta la línea de llenado mínimo de 1 galón (4 cts.) o
máximo de 1.3 galones (5.2 cts.). Si está cocinando con aceite,
siempre llene la olla hasta el centro de la línea de llenado máximo.
3. Fije el cable de alimentación de retención al panel de control.
Ver Paso 4 en la página 8. Enchufe el cable de alimentación
de retención en un tomacorrientes (consulte la sección de
“ADVERTENCIAS Y SALVAGUARDAS IMPORTANTES” del manual).
La luz de encendido rojo se encenderá indicando que el artefacto
está enchufado y que el elemento y el panel de control están
montados correctamente en la abrazadera de montaje.
4. Gire el dial para configurar la temperatura. La luz verde de LISTO
se encenderá cuando el artefacto haya alcanzado la temperatura
establecida y esté listo para usarse.
5. Cuando haya transcurrido el tiempo de cocción y los alimentos
estén listos, gire el dial a la posición de apagado (OFF) y
desenchufe el cable de alimentación del tomacorrientes.
Cuidadosamente levante el cesto con las asas laterales retráctiles
(ver Figura A, a continuación). Deje que el exceso de aceite o
agua se escurran enganchando el sujetador de escurrimiento en
el cesto en el orificio de montaje del sujetador de escurrimiento
(ver Figura B, a continuación).
Instrucciones de operación
• Cuando utilice los sujetadores de escurrimiento en el cesto, asegúrese que el cesto esté firmemente
colocado en el orificio de montaje del sujetador de escurrimiento antes de soltar el asa. Si no sigue
la advertencia, el cesto puede caer de vuelta en el aceite o agua caliente, causando daños a los
alrededores o lesiones personales.
ADVERTENCIA
LUZ DE
ENCENDIDO
LUZ DE
LISTO
DIAL DE
TEMPERATURA
Figura B
SUJETADOR DE
ESCURRIMIENTO
ORIFICIO DE MONTAJE
DEL SUJETADOR DE
ESCURRIMIENTO
Figura A
Downloaded from www.Manualslib.com manuals search engine

15
• Asegúrese de que la cesta esté en su lugar y agregue agua al centro de la línea
de llenado máximo. No añada agua por encima de esta línea. No deje que el
agua se evapore completamente. Esto hará que el elemento se sobrecaliente y
dañe el artefacto.
• El agua hervirá a 212°F (100°C). Configurar la temperatura a 375°F (191°C)
cuando cocine al vapor o hierva alimentos evitará que el artefacto se apague y
garantizará que el agua siga hirviendo.
Instrucciones de operación
CÓMO COCER AL VAPOR
• Este artefacto viene equipado con una función de seguridad para evitar el
sobrecalentamiento. Si el artefacto se sobrecalienta, se apagará automáticamente.
• Para reiniciar el aparato, gire el dial a la posición de apagado y deje que se enfríe
completamente. Desenchufe del tomacorriente y retire el panel de control. Inserte
un mondadientes en el orificio pequeño en la parte interna del panel de control y
presione el botón de reinicio. Este reiniciará el artefacto.
FUNCIÓN DE REINICIO
• Las cavidades en el artefacto han sido diseñadas para atrapar
la grasa y la condensación del vapor. Limpie las cavidades con
un paño húmedo luego de cada uso.
• Cuando cocine al vapor y fríe, las cavidades pueden llenarse
antes de que la cocción esté terminada. Verifique con
frecuencia. Escurrir con una esponja u otro material absorbente.
¡PRECAUCIÓN! El agua / aceite estará caliente.
CAVIDADES
MÁX
MÍN
VISTA POSTERIOR DE LA OLLA INTERNA
BOTÓN
DE REINICIO
CAVIDADES
Downloaded from www.Manualslib.com manuals search engine

16
Instrucciones de operación
LIMPIEZA Y ALMACENAMIENTO
• Limpie la freidora antes del primer uso.
• Luego del uso, apague el artefacto, desenchúfelo y déjelo enfriar por 2 horas si está usando agua y por 5
horas si está usando aceite antes de limpiar y almacenar.
• Limpie la tapa, la olla interna y el cesto/las asas con un paño o esponja húmedo usando un detergente
suave. Enjuague y seque exhaustivamente.
• Limpie la carcasa exterior, el cable, el panel de control y el elemento con un paño o esponja húmedo
usando un detergente suave. Seque exhaustivamente. NUNCA coloque estas piezas en un lavaplatos ni las
sumerja en agua.
• No coloque el panel de control bajo agua corriente. Si sumerge el panel de control, se puede
electrocutar.
ADVERTENCIA
• Desconecte el cable eléctrico del tomacorriente antes de limpiarlo, de hacerle mantenimiento y/o de
retirar el elemento calefactor. Una descarga eléctrica puede dar como resultado una lesión personal o
la muerte.
• No vierta aceite usado en el fregadero. Escurra el aceite de regreso a los contenedores de aceite.
Deseche el aceite usado conforme a las regulaciones locales.
PRECAUCIÓN
Downloaded from www.Manualslib.com manuals search engine

17
Troubleshooting
SYMPTOM CAUSE POSSIBLE SOLUTION
Power light won’t come on.
If none of these solutions work, reset
appliance. See RESET FUNCTION on
page 12. If appliance still does not work,
contact Masterbuilt at 1-800-489-1581.
Appliance not plugged into outlet. Check outlet connection.
Breakaway power cord is loose or not
connected.
Disconnect and reconnect
breakaway power cord.
Control panel is not attached to outer
shell correctly.
Remove and reinstall. Make sure
control panel is mounted onto
the outer shell bracket to engage
safety switch.
Circuit breaker tripped. Make sure other appliances are not
operating on the same electrical
circuit. Check circuit breakers.
Reset tripped on control panel. See RESET FUNCTION on page 12.
Power light is on but appliance isn’t
heating.
Temperature dial has not been set. Appliance will not begin heating
until temperature is set.
Temperature setpoint already reached. Allow appliance to cool below
setpoint or enter higher setpoint.
Appliance takes excessive amount of
time to heat up (longer than 1 hr, 15
mins.).
Appliance plugged into extension
cord.
Place appliance close to an
outlet so an extension cord is not
needed.
Lid not in place. Close lid on appliance to retain
heat.
Appliance overheats then shuts off. Temperature sensor malfunctioning,
overheat sensor shutting appliance
off.
Contact Masterbuilt at
1-800-489-1581.
No oil or water in pot. Fill pot and reset control panel. See
RESET FUNCTION on page 12.
If symptom is not listed here OR in the Frequently Asked Questions section,
please contact Masterbuilt at 1-800-489-1581.
Downloaded from www.Manualslib.com manuals search engine

18
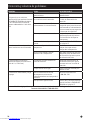
Detección y solución de problemas
PROBLEMA CAUSA SOLUCIÓN POSIBLE
La luz de encendido no se enciende.
Si ninguna de estas soluciones
funciona, reinicie el artefacto. Consulte
la FUNCIÓN DE REINICIO en la página
15. Si el artefacto aún no funciona,
contacte a Masterbuilt al 1-800-489-
1581.
El artefacto no está enchufado al
tomacorrientes.
Verifique la conexión al
tomacorrientes.
El cable de alimentación de retención
está suelto o no está conectado.
Desconecte y vuelva a conectar
el cable de alimentación de
retención.
El panel de control no está fijado
correctamente a la carcasa exterior.
Retírelo y vuélvalo a instalar.
Asegúrese que el panel de control
esté montado en la abrazadera de
la carcasa exterior para enganchar
el interruptor de seguridad.
El interruptor se ha desconectado. Asegúrese que no haya otros
aparatos operando en el mismo
circuito eléctrico Verifique los
interruptores
Reinicio activado en el panel de
control.
Consulte la FUNCIÓN DE REINICIO
en la página 15.
La luz de encendido está prendida
pero el artefacto no está calentando.
No se ha configurado el dial de
temperatura.
El artefacto no comenzará a
calentar hasta que se haya
configurado la temperatura.
Ya se ha alcanzado el punto de
referencia de la temperatura.
Deje que el artefacto se enfríe por
debajo del punto de referencia o
de lo contrario, ingrese un punto
de referencia más alto.
El artefacto toma una excesiva
cantidad de tiempo para calentarse
(más de 1 hr, 15 minutos)
El artefacto se ha enchufado en un
cable de extensión.
Coloque el artefacto cerca de
un tomacorrientes para que no
sea necesario usar un cable de
extensión.
La tapa no está en su lugar. Cierre la tapa del artefacto para
retener el calor.
El artefacto se sobrecaliente y luego
se apaga.
Mal funcionamiento del sensor
de temperatura, el sensor de
sobrecalentamiento está apagando el
artefacto.
Contacte a Masterbuilt en
1-800-489-1581.
No hay aceite o agua en la olla. Llene la olla y reinicie el panel de
control. Consulte la FUNCIÓN DE
REINICIO en la página 15.
Si hubiera algún problema que no esté mencionado aquí O en la sección de Preguntas frecuentes,
contacte a Masterbuilt al 1-800-489-1581.
Downloaded from www.Manualslib.com manuals search engine

19
Frequently Asked Questions
Why won’t my fryer turn on?
The control panel features a “safety switch” that must be mounted properly on the mounting bracket of
the outer shell for the appliance to power on. See step 2 on page 7. The power light will illuminate when the
control panel is mounted properly and the breakaway power cord is properly attached.
How much oil do I need to use?
The fryer will require approximately 1.3 gallons (5.2 qts.) of oil max. The middle of the MAX fill line is the
maximum amount of liquid that can safely be used in this appliance. Filling to the line is more than enough
water or oil to prepare most food.
What type of oil should I use?
Peanut oil is recommended because of the great taste and higher smoke point but any cooking oil may be
used.
How hot will the oil become?
Oil will reach 375°F (191°C) in approximately 25-35 minutes. Oil temperature will decrease when food is
placed in the fryer.
Should I keep the lid on during use?
Yes. The lid helps retain heat and keeps splatter inside of the appliance.
Can an extension cord be used with this appliance?
No. Extension cords will lose electrical current resulting in increased cooking time and decreased
performance. Extension cords can also pose a trip hazard.
I followed the formula and the food did not fully cook. What went wrong?
Cooking conditions may vary. Food may have been cold. Sometimes a cold or frozen spot does not allow
that section to cook properly.
Downloaded from www.Manualslib.com manuals search engine

20
Preguntas frecuentes
¿Por qué no enciende mi freidora?
El panel de control incluye un “interruptor de seguridad” que debe montarse apropiadamente en la
abrazadera de montaje de la carcasa exterior para que el artefacto puede encenderse. Ver Paso 2 en la
página 7. La luz de encendido se iluminará cuando el panel de control esté montado apropiadamente y
cuando el cable de alimentación de retención esté correctamente fijado.
¿Cuánto aceite necesito usar?
La freidora requerirá aproximadamente 1.3 galones (5.2 cts.) de aceite como máximo. La mitad de la línea
de llenado máximo es la cantidad máxima de líquido que puede usarse con seguridad en este artefacto.
Llenar hasta la línea es más que suficiente agua o aceite para preparar la mayoría de alimentos.
¿Qué tipo de aceite debo usar?
Se recomienda usar aceite de cacahuate o maní debido a su excelente sabor y punto de humo más alto,
pero se puede usar cualquier aceite de cocina.
¿Cuán caliente se pondrá el aceite?
El aceite alcanzará los 375°F (191°C) en aproximadamente 25-35 minutos. La temperatura del aceite
disminuirá cuando se coloquen los alimentos en la freidora.
¿Debo mantener la tapa puesta durante el uso?
Sí. La tapa ayuda a retener el calor y mantiene las salpicaduras dentro del artefacto.
¿Se puede usar un cable de extensión con este artefacto?
No. Los cables de extensión perderán corriente eléctrica, lo que dará como resultado un aumento del
tiempo de cocción y una disminución del rendimiento. Los cables de extensión también pueden significar
un peligro de tropiezo.
Seguí la fórmula y los alimentos no se cocinaron completamente. ¿Qué sucedió?
Las condiciones de cocción pueden variar. Los alimentos podían haber estado fríos. A veces, un punto frío
o congelado no permite que esa sección se cocine complemente.
Downloaded from www.Manualslib.com manuals search engine

21
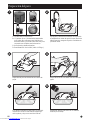
Turkey Preparation
1
A. Butterball® Electric Fryer.
B. 1.5 gallons (6 qts.) of oil. Peanut oil is
recommended because of the great taste and
higher smoke point but any cooking oil may be
used.
C. Your favorite marinade and seasoning.
D. Butterball® 8-10 lb. (3.63-4.54 kgs.) turkey.
PEANUT OIL
A B
C D
3
Pat turkey completely dry on the outside with
paper towels.
5
If desired, inject with marinade (not included).
Inject 4-8 oz. into each side of breast, thigh, leg,
and wing for a total of 8-16 oz.
2
4
6
Rinse thoroughly with warm water or soak in a
warm water bath for no more than 30 minutes to
ensure cavities are free of ice.
Dry inside cavities using a paper towel.
Season inside and outside with your favorite
seasoning (not included).
Downloaded from www.Manualslib.com manuals search engine

22
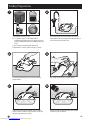
Preparación del pavo
1
A. Freidora eléctrica Butterball®.
B. 1.5 galones (6 cts.) de aceite. Se recomienda
usar aceite de cacahuate o maní debido a su
excelente sabor y punto de humo más alto, pero
se puede usar cualquier aceite de cocina.
C. Su marinada y aderezo favoritos.
D. Pavo Butterball® de 8 a 10 lb. (3.63 a 4.54 kgs.).
ACEITE DE
CACAHUATE
O MANÍ
A B
C D
3
Seque bien el pavo en el exterior con toallas de
papel.
5
Si lo desea, inyéctele una marinada (no incluida).
Inyecte de 4 a 8 oz. a cada lado de la pechuga,
muslo, pierna y ala para un total de 8 a 16 oz.
2
4
6
Enjuague el pavo exhaustivamente con agua tibia
o remójelo en un baño de agua tibia por no más de
30 minutos para asegurarse que las cavidades no
presenten hielo.
Seque dentro de las cavidades con una toalla de
papel.
Sazone por dentro y por fuera con su aderezo
favorito (no incluido).
MARINADA
ADEREZO
Downloaded from www.Manualslib.com manuals search engine

23
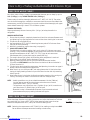
An 8-10 lb. (3.63-4.54 kgs.) turkey is recommended. However, you can deep fry up to a
12 lb. (5.44 kgs.) turkey. DO NOT EXCEED 12 lbs. (5.44 kgs.).
Frozen turkeys should be thoroughly defrosted to 35°- 40°F (1.6°- 4.4°C). The turkey
must be rinsed thoroughly or soaked in a warm water bath for no more than 30 minutes
to remove any possibility of remaining ice crystals and then dried thoroughly with paper
towels before immersing in hot oil. This will reduce splatter.
THAWING THE TURKEY
Allow approximately 24 hours for every 4 lbs. (1.8 kgs.) of turkey thawed in the
refrigerator.
COOKING INSTRUCTIONS
1. Ensure that the turkey is completely thawed and free of ice and water. Remove neck
and giblet bag. Pay special attention to inner cavities when checking for ice or water.
2. Fill pot with oil to the MAX fill line.
3. Set control dial to 375°F (191°C). Preheating time may take 25-35 minutes. Close
the fryer lid while preheating.
4. While oil is preheating, prepare the turkey (see page 21).
5. CALCULATE COOKING TIME
The formula for calculating cooking time is to fry turkey 3.5-4 minutes per pound
(0.45 kg.). Using a meat thermometer, check turkey breast to ensure it has reached the
appropriate temperature of 165°-170°F (74°-77°C). If you do not have a meat
thermometer then fry turkey 4 minutes per pound (0.45 kg.).
6. The ready indicator light (green) will illuminate when temperature is reached.
7. Place turkey in the basket, breast side down (Figure A).
8. Wearing protective gloves or mitts, grasp the retractable basket handles
(Figure B) and VERY SLOWLY lower the basket into the hot oil. Once the basket is
in place, close the lid.
9. Turn dial to the desired cooking temperature. See Operating Instructions on page 11.
Always cook for the complete calculated time.
10. When time is up, turn the fryer to OFF and unplug from outlet. Lift the basket from
the hot oil slowly, hooking the drain clip on the basket into the drain clip mounting
hole (Figure C).
11. Allow turkey to rest in the basket for 10 minutes before removing it for carving and
serving. The turkey can remain in the basket to cool until ready to serve.
NOTE: • Cooking conditions vary. Insert a food thermometer 2 inches (5.08 cm)
into the deepest part of the turkey breast and make sure an internal
temperature of 165°F (74°C) is reached.
• The appliance uses slightly less than 1.5 gallons (6 qts.) of oil, but make sure
you have at least 1.5 gallons (6 qts.) of oil on hand.
• Butterball® turkey is recommended. However, if you have another brand
please remove the pop-up cooking indicator and leg ties.
Figure C
DRAIN
CLIP
DRAIN CLIP
MOUNTING HOLE
How to Fry a Turkey in the Butterball® Electric Fryer
DEEP FRIED WHOLE TURKEY
DEEP FRIED TURKEY BREAST
Follow the above directions and safety precautions and adjust the formula to 7 minutes
per pound (0.45 kg.). Start at 375°F (191°C). After lowering turkey breast into fryer
reduce the temperature to 325°F (163°C) for the entire cooking time.
NOTE: Reducing the temperature to 325°F (163°C) is for cooking a turkey breast ONLY.
Do not reduce the temperature when cooking a whole turkey.
6 lbs.
X 7 min.
42 min.
Total Cooking Time
Figure A
Figure B
Downloaded from www.Manualslib.com manuals search engine

24
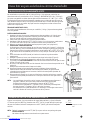
Se recomienda un pavo de 8 a 10 lb. (3.63 a 4.54 kgs.). Sin embargo, puede freír en
abundante aceite un pavo de hasta 12 lb. (5.44 kgs.). NO EXCEDA LAS 12 lbs. (5.44 kgs.).
Los pavos congelados se deben descongelar exhaustivamente a 35°- 40°F (1.6°- 4.4°C).
El pavo debe enjuagarse exhaustivamente o remojarse en un baño de agua tibia por no
más de 30 minutos para retirar cualquier posibilidad de tener cristales de hielo restantes
y debe secarse bien con toallas de papel antes de sumergirlo en aceite caliente. Esto
reducirá las salpicaduras.
DESCONGELAMIENTO DEL PAVO
Se calculan aproximadamente 24 horas por cada 4lbs. (1.8 kgs.) de pavo descongelado
en el refrigerador.
INSTRUCCIONES DE COCCIÓN
1. Asegúrese de que el pavo esté completamente descongelado y sin hielo ni agua.
Retire el pescuezo y la menudencia. Preste particular atención a las cavidades
internas cuando verifique la presencia de hielo o agua.
2. Llene la olla con aceite hasta la línea de llenado máximo.
3. Configure el dial de control a 375°F (191°C). El tiempo de precalentamiento puede tomar
25-35 minutos. Cierre la tapa de la freidora mientras está precalentando.
4. Mientras se esté precalentando el aceite, prepare el pavo (ver la página 22).
5. CÁLCULO DEL TIEMPO DE COCCIÓN
La fórmula para calcular el tiempo de cocción consiste en freír el pavo 3.5 a 4 minutos
por libra (0.45 kg.). Con un termómetro para carnes, verifique la pechuga de pavo para
asegurarse que haya alcanzado la temperatura apropiada de 165° a 170°F (74° a 77°C).
Si no cuenta con un termómetro para carnes, fría un pavo por 4 minutos por libra (0.45
kg.).
6. La luz indicadora de LISTO (verde) se iluminará cuando se haya alcanzado la
temperatura.
7. Coloque el pavo en el cesto, con el lado de la pechuga hacia abajo (Figura A).
8. Usando guantes o mitones de protección, tome las asas retráctiles del cesto
(Figura B) y baje MUY LENTAMENTE el cesto en el aceite caliente. Una vez que el cesto
esté en su lugar, cierre la tapa.
9. Gire el dial a la temperatura de cocción deseada. Ver Instrucciones de operación en la
página 14.
Siempre cocine durante todo el tiempo calculado.
10. Cuando el tiempo se haya terminado, apague la freidora y desenchufe del
tomacorrientes. Eleve el cesto del aceite caliente lentamente, enganchando el
sujetador de escurrimiento en el cesto en el orificio de montaje del sujetador de
escurrimiento (Figura C).
11. Deje que el pavo repose en el cesto por 10 minutos antes de retirarlo para cortarlo
y servirlo. El pavo puede permanecer en el cesto para enfriarse hasta que esté listo
para servirse.
NOTA: • Las condiciones de cocción varían. Inserte un termómetro para alimentos 2
pulgadas (5.08 cm) en la parte más profunda de la pechuga de pavo
asegúrese de alcanzar una temperatura interna de 165°F (74°C).
• El artefacto usa ligeramente 1,5 galones (6 cts.) de aceite, pero asegúrese
de tener al menos 1.5 galones (6 cts.) de aceite a la mano.
• Se recomienda usar pavos Butterball®. Sin embargo, si tiene alguna otra marca
retire el indicador de cocción y los amarres de las piernas.
Figura C
SUJETADOR DE
ESCURRIMIENTO
ORIFICIO DE MONTAJE
DEL SUJETADOR DE
ESCURRIMIENTO
Cómo freír un pavo en la freidora eléctrica Butterball®
PAVO ENTERO FRITO EN ABUNDANTE ACEITE
PECHUGA DE PAVO FRITA EN ABUNDANTE ACEITE
Siga las instrucciones y las precauciones de seguridad anteriores, y ajuste la fórmula
a 7 minutos por libra (0.45 kg.). Comience en 375°F (191°C). Luego de bajar la pechuga
de pavo a la freidora, reduzca la temperatura a 325°F (163°C) por todo el tiempo de
cocción.
NOTA: Reducir la temperatura a 325°F (163°C) es para cocinar una pechuga de pavo
EXCLUSIVAMENTE.
No reduzca la temperatura cuando cocine un pavo entero.
6 lbs.
X 7 min.
42 min.
Tiempo de cocción
total
Figura A
Figura B
Downloaded from www.Manualslib.com manuals search engine

25
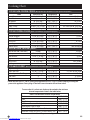
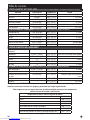
Cooking Chart
FRYING NON-FROZEN FOODS (Oil may take up to 30 minutes to reach desired temperature)
Food Maximum Qty. Temperature Time
French Fries 1 lb. (0.45 kgs.) 375°F (191°C) 10-12 min.
Fried Chicken 3 pieces 350°F (177°C) 14-18 min.
Mushrooms 1 lb. (0.45 kgs.) 325°F (163°C) 10-12 min.
Fish Fillets 1 lb. (0.45 kgs.) 375°F (191°C) 6-8 min.
Whole Turkey
8-10 lbs. (3.6-4.5 kgs.)
375°F (191°C) 3.5-4 min. per lb. (0.45 kg.)
Hot Wings 1 lb. (0.45 kgs.) 375°F (191°C) 10-15 min.
FRYING FROZEN FOODS (Refer to instructions on food packaging first)
Fried Okra 1/2 lb. (0.23 kgs.) 375°F (191°C) 5-7 min.
Chicken Nuggets 1/2 lb. (0.23 kgs.) 375°F (191°C) 7-8 min.
Mushrooms 1 lb. (0.45 kgs.) 375°F (191°C) 8-9 min.
Fish Sticks 1/2 lb. (0.23 kgs.) 375°F (191°C) 6-7 min.
Corn Dogs 4 lbs. (1.8 kgs.) 375°F (191°C) See Packaging
Cheese Sticks 1/2 lb. (0.23 kgs.) 325°F (163°C) See Packaging
BOILING NON-FROZEN FOODS*
Corn on the Cob (short ears) 6 Cobs 375°F (191°C) 5-8 min.
Shrimp 2.5 lbs. (1.13 kgs.) 375°F (191°C) 3-4 min. or Until Pink
Red Potatoes 1.5 lbs. (1.36 kgs.) 375°F (191°C) 25 min.
Eggs 6 375°F (191°C) 10 min.
Pasta Shells 1 lb. (0.45 kgs.) 375°F (191°C) Until Tender
Hot Dogs 12 375°F (191°C) 2-3 min.
STEAMED FOODS* (Refer to instructions on food packaging first)
King Crab Legs 2.5 lbs. (1.13 kgs.) 375°F (191°C) 5-8 min.
Clams/Mussels 2.5 lbs. (1.13 kgs.) 375°F (191°C) 5-7 min. or Until Open
Yellow Squash w/Red Peppers 1 lb. (0.45 kgs.) 375°F (191°C) Steam Until Tender
Blue Crabs 4 375°F (191°C) 6-10 min.
Lobster 1 375°F (191°C) 10-12 min.
* Water will boil at 212°F (100°C). Setting the temperature to 375°F (191°C) when steaming or boiling will
prevent the appliance from cycling off and will ensure the water will continue to boil.
USDA* Safe Minimum Internal Temperatures
Fish 145°F (63°C)
Pork 160°F (71°C)
Egg Dishes 160°F (71°C)
Steaks and Roasts of Beef, Veal or Lamb 145°F (63°C)
Ground Beef, Veal or Lamb 160°F (71°C)
Whole Poultry (Turkey, Chicken, Duck, etc.) 165°F (74°C)
Ground or Pieces of Poultry (Chicken Breast, etc.) 165°F (74°C)
* United States Department of Agriculture
To ensure that it is safe to eat, food must be cooked to the minimum
internal temperatures listed in the table below.
Downloaded from www.Manualslib.com manuals search engine

26
Tabla de cocción
FREÍR ALIMENTOS NO CONGELADOS (El aceite puede tomar hasta 30 minutos en alcanzar la temperatura deseada)
Alimentos Cant. máxima Temperatura Tiempo
Papas fritas 1 lb. (0.45 kgs.) 375°F (191°C) 10-12 min.
Pollo frito 3 piezas 350°F (177°C) 14-18 min.
Hongos 1 lb. (0.45 kgs.) 325°F (163°C) 10-12 min.
Filetes de pescado 1 lb. (0.45 kgs.) 375°F (191°C) 6-8 min.
Pavo entero
8-10 lbs. (3.6-4.5 kgs.)
375°F (191°C) 3.5 a 4 min. por lb. (0.45 kg.)
Alitas picantes 1 lb. (0.45 kgs.) 375°F (191°C) 10-15 min.
FREÍR ALIMENTOS CONGELADOS (Consulte primero las instrucciones en el empaque del alimento)
Quimbombó frito 1/2 lb. (0.23 kgs.) 375°F (191°C) 5-7 min.
Nuggets de pollo 1/2 lb. (0.23 kgs.) 375°F (191°C) 7-8 min.
Hongos 1 lb. (0.45 kgs.) 375°F (191°C) 8-9 min.
Palitos de pescado 1/2 lb. (0.23 kgs.) 375°F (191°C) 6-7 min.
Salchichas empanadas 4 lbs. (1.8 kgs.) 375°F (191°C) Ver empaque
Palitos de queso 1/2 lb. (0.23 kgs.) 325°F (163°C) Ver empaque
HERVIR ALIMENTOS NO CONGELADOS*
Mazorca de maíz (de orejas
pequeñas)
6 mazorcas 375°F (191°C) 5-8 min.
Camarones 2.5 lbs. (1.13 kgs.) 375°F (191°C) 3 a 4 min. o hasta que estén rosados
Papas rojas 1.5 lbs. (1.36 kgs.) 375°F (191°C) 25 min.
Huevos 6 375°F (191°C) 10 min.
Pasta en forma de conchitas 1 lb. (0.45 kgs.) 375°F (191°C) Hasta que estén tiernas
Hot Dogs 12 375°F (191°C) 2-3 min.
ALIMENTOS COCIDOS AL VAPOR (Consulte primero las instrucciones en el empaque del alimento)
Patas de centolla 2.5 lbs. (1.13 kgs.) 375°F (191°C) 5-8 min.
Almejas/Mejillones 2.5 lbs. (1.13 kgs.) 375°F (191°C) 5 a 7 min. o hasta que se abran
Calabaza amarilla con pimien-
tos rojos
1 lb. (0.45 kgs.) 375°F (191°C) Cocinar al vapor hasta que esté
tierna
Cangrejos azules 4 375°F (191°C) 6-10 min.
Langosta 1 375°F (191°C) 10-12 min.
* El agua hervirá a 212°F (100°C). Configurar la temperatura a 375°F (191°C) cuando cocine al vapor o hierva
alimentos evitará que el artefacto se apague y garantizará que el agua siga hirviendo.
Temperaturas mínimas internas seguras del USDA*
Pescado 145°F (63°C)
Cerdo 160°F (71°C)
Platos con huevo 160°F (71°C)
Filetes y asados de carne de res, ternera o cordero 145°F (63°C)
Carne molida de res, ternera o cordero 160°F (71°C)
Aves enteras (pavo, pollo, pato, etc.). 165°F (74°C)
Carne de ave molida o en piezas (pechuga de pollo, etc.) 165°F (74°C)
* Departamento de Agricultura de los Estados Unidos
Para asegurarse que son seguros de comer, los alimentos deben cocinarse a las temperaturas
mínimas internas de la tabla a continuación.
Downloaded from www.Manualslib.com manuals search engine

27
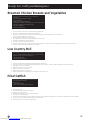
Steamed Chicken Breasts and Vegetables
• 2 (12 oz.) whole chicken breasts, split and boned
• 1 tsp salt
• 1 tsp dried tarragon leaves, crushed
• 1 cup cold water
• 2 large carrots, peeled and sliced
• 6 new potatoes, washed and unpeeled, sliced 1/2 inch thick
• 3 zucchini, washed and unpeeled, sliced
• 1 bay leaf, crumbled
• 2 tbsp chopped parsley
1. Rinse chicken breasts under cold running water and pat dry.
2. On a sheet of waxed paper, combine salt and tarragon.
3. Sprinkle chicken breast halves on both sides using 1/4 tsp of tarragon mixture on each breast half.
Reserve remaining mixture for later use.
4. Layer chicken breasts skin side up in basket.
5. Layer with carrots, potatoes, zucchini and bay leaf in that order.
6. Sprinkle with remaining tarragon mixture.
7. Turn dial to 375°F (191°C) to bring to a boil.
8. Lower the temperature and steam covered for 35-40 minutes or until chicken and vegetables are tender. Remove from heat.
9. Arrange chicken breasts and vegetables on a platter.
Low Country Boil
• 2 lbs. shrimp, 21-25 count (recommend split and deveined)
• 1 lb. pre-cooked smoked sausage (1/2 to 1 inch thick slices)
• 4-6 ears of corn, cut into 2-3 inch pieces
• 1 bag of crab boil mix
• 1 lb. of whole new potatoes
Ready. Set. Craft your Masterpiece.
1. Fill inner pot with water to MAX fill line (approximately 1.5 gallons)
2. Turn dial to 375°F (191°C). Add crab boil mix and bring to a boil. (Note: If using a crab boil bag, place bag inside basket.)
Allow water to boil for 15 minutes.
3. Add potatoes first, boil for 12 minutes.
4. Add corn and boil for 9 minutes.
5. Add sausage and boil for 9 minutes.
6. Add shrimp and boil for an additional 3-5 minutes. Remove and serve.
Fried Catfish
• 4 lbs. fresh or frozen catfish fillets, thinly sliced
• 1/2 cup prepared mustard
• Oil for frying
• 1-1/2 cups cornmeal
• 3 tbsp of your favorite Cajun seasoning
1. Thaw fish if frozen.
2. Rinse fish and pat dry with paper towels.
3. Cut fish into 2 inch pieces.
4. Combine fish and mustard and chill for 15 minutes.
5. Pre-heat oil to 375°F (191°C).
6. Combine cornmeal and your favorite Cajun seasoning. Stir well with a whisk. Evenly coat all sides of catfish with cornmeal mixture.
7. Fry 3 or 4 pieces at a time for 4 to 5 minutes or until golden.
8. Remove from hot oil and drain on paper towels.
Downloaded from www.Manualslib.com manuals search engine

28
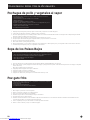
Pechugas de pollo y vegetales al vapor
• 2 pechugas de pollo enteras (12 oz.), cortadas en mitad y con hueso
• 1 cucharadita de sal
• 1 cucharadita de hojas de estragón seco, triturado
• 1 taza de agua fría
• 2 zanahorias grandes peladas y picadas
• 6 papas nuevas lavadas y sin pelar, cortadas con 1/2 pulgadas de grosor
• 3 zapallitos italianos lavados y sin pelar, en rodajas
• 1 hoja de laurel, desmoronada
• 2 cucharadas de perejil picado
1. Enjuague las pechugas de pollo bajo agua corriente fría y séquelas con toallas de papel.
2. Sobre una hoja de papel encerado, combine la sal y el estragón.
3. Rocíe las pechugas de pollo en mitad por ambos lados con 1/4 de cucharadita de mezcla de estragón sobre cada pechuga en mitad.
Reserve la mezcla restante para uso posterior.
4. Coloque capas de pechugas con el lado de la piel hacia arriba en el cesto.
5. Coloque capas de zanahorias, papas, zapallito italiano y hojas de laurel, en ese orden.
6. Rocíe con la mezcla de estragón restante.
7. Gire el dial a 375°F (191°C) para que hierva.
8. Baje la temperatura y cocine al vapor cubierto por 35 a 40 minutos o hasta que el pollo y los vegetales estén tiernos. Retire del calor.
9. Acomode las pechugas de pollo y los vegetales en una fuente.
Sopa de los Países Bajos
• 2 lbs. de camarones, 21 a 25 en total (se recomienda cortarlos por mitad y desvenarlos)
• 1 lb. de salchicha ahumada precocida (rodajas de 1/2 a 1 pulgada de grosor)
• 4 a 6 orejas de maíz, cortadas en pedazos de 2 a 3 pulgadas
• 1 bolsa de mezcla para sopa de cangrejo
• 1 lb. de papas enteras
En sus marcas. Listos. Cree su obra maestra.
1. Llene la olla interna con agua hasta la línea de llenado máximo (aproximadamente 1,5 galones)
2. Gire el dial a 375°F (191°C). Agregue la mezcla de cangrejo y deje que hierva. (Nota: Si usa una bolsa para hervir el cangrejo, colóquela
dentro del cesto).
Deje que el agua hierva por 15 minutos.
3. Agregue primero las papas, hierva por 12 minutos.
4. Agregue el maíz y hierva por 9 minutos.
5. Agregue la salchicha y hierva por 9 minutos.
6. Agregue los camarones y hierva por 3 a 5 minutos más. Retire y sirva.
Pez gato frito
• 4 lbs. de filetes de pez gato frescos o congelados, cortados muy delgados
• 1/2 taza de mostaza preparada
• Aceite para freír
• 1 a 1/2 tazas de harina de maíz
• 3 cucharadas de su sazonador cajún favorito
1. Descongele el pescado si está congelado.
2. Retire el pescado y séquelo con toallas de papel.
3. Corte el pescado en pedazos de 2 pulgadas.
4. Combine el pescado con la mostaza y enfríe por 15 minutos.
5. Precaliente el aceite a 375°F (191°C).
6. Combine la harina de maíz con su sazonador cajún favorito. Mezcle bien con un batidor de manos. Recubra uniformemente todos
los lados del pez gato con la mezcla de harina de maíz.
7. Fría 3 o 4 piezas por vez por 4 a 5 minutos o hasta que estén doradas.
8. Retire el aceite caliente y seque con toallas de papel.
Downloaded from www.Manualslib.com manuals search engine

29
Visit masterbuilt.com or complete form below and return to:
Attn: Warranty Registration
Masterbuilt Manufacturing, LLC
1 Masterbuilt Court | Columbus, GA 31907
Name: ___________________________ Address: __________________________________________
City: ______________________________________________________________________________
State/Province: ________ Postal Code: ________________ Phone Number: _______________________
E-mail Address: ______________________________________________________________________
*Model Number: ______________________________ *Serial Number: __________________________
Purchase Date: _____- ______-_______ Place of Purchase: ___________________________________
*Model Number and Serial Number are located on silver label on back of the appliance.
Masterbuilt 1-Year Limited Warranty
Masterbuilt warrants its products to be free from defects in material and workmanship under
proper assembly, normal use and recommended care for 1 year from the date of original retail
purchase. The Masterbuilt warranty does not cover paint finish as it may burn off during normal
use. The Masterbuilt warranty does not cover rust. Masterbuilt requires proof of purchase for
warranty claim, such as a receipt. Upon the expiration of such warranty, all such liability shall
terminate.
Within the stated warranty period, Masterbuilt, at its discretion, shall replace defective
components free of charge, with the owner being responsible for shipping. Should Masterbuilt
require return of component(s) in question for inspection, Masterbuilt will be responsible for
shipping charges to return requested item. This warranty excludes property damage sustained
due to misuse, abuse, accident, or damage arising out of transportation.
This express warranty is the sole warranty given by Masterbuilt and is in lieu of all other
warranties, expressed or implied including implied warranty, merchantability, or fitness for a
particular purpose. Neither Masterbuilt nor the retail establishment selling this product has
authority to make any warranties or to promise any remedies in addition to or inconsistent with
those stated above. Masterbuilt’s maximum liability, in any event, shall not exceed the purchase
price of the product paid by the original consumer/ purchaser. Some states do not allow the
exclusion or limitation of incidental or consequential damages. In such a case, the above
limitations or exclusions may not be applicable.
California residents only: Not withstanding this limitation of warranty, the following specific
restrictions apply; if service, repair, or replacement of the product is not commercially practical,
the retailer selling the product or Masterbuilt will refund the purchase price paid for the product,
less the amount directly attributable to use by the original buyer prior to the discovery of the
nonconformity. Owner may take the product to the retail establishment selling this product in
order to obtain performance under warranty. This express warranty gives you specific legal rights,
and you may also have other rights which vary from state to state.
Downloaded from www.Manualslib.com manuals search engine

30
Visite masterbuilt.com o llene el formulario a continuación y devuélvalo a:
A la atención de: Registro de garantía
Masterbuilt Manufacturing, LLC
1 Masterbuilt Court | Columbus, GA 31907
Nombre: ___________________________ Dirección: _______________________________________
Ciudad: ___________________________________________________________________________
Estado/Provincia: ________ Código postal: ________________ Teléfono: ________________________
Dirección de e-mail: __________________________________________________________________
*Número del modelo: _____________________ *Número de serie: _____________________________
Fecha de compra: _____- ______-_______ Lugar de compra:: __________________________________
*El número de modelo y número de serie se encuentran en una etiqueta plateada en la parte posterior del artefacto.
Garantía limitada por 1 año de Masterbuilt
Masterbuilt garantiza que sus productos no presentan defectos de fabricación, ni de material ni
de la mano de obra, si se los ensambla correctamente, se los utiliza de forma normal y se los cuida
según las recomendaciones, durante un período de 1 año a partir de la fecha de compra original.
La garantía de Masterbuilt no cubre el acabado de la pintura ya que puede salirse durante el uso
normal. La garantía de Masterbuilt no cubre la oxidación. Masterbuilt requiere el comprobante de
compra para hacer un reclamo de la garantía, como por ejemplo, un recibo. Después de la fecha
de vencimiento de la garantía, finalizarán todas las responsabilidades.
Durante el período de vigencia establecido de la garantía, Masterbuilt, a su criterio, reemplazará
los componentes defectuosos sin costo alguno, debiendo hacerse responsable el propietario de
los gastos de envío. Si Masterbuilt requiere la devolución del o los componentes en cuestión para
su inspección, Masterbuilt será responsable de todos los cargos de envío para devolver el artículo
solicitado. Esta garantía excluye los daños ocasionados a la propiedad por el mal uso, abuso, los
accidentes, o los daños causados por el transporte.
Esta garantía expresa es la única garantía entregada por Masterbuilt y reemplaza a todas las
demás garantías, expresas o implícitas, incluidas las garantías implícitas de comercialización
o idoneidad para cualquier fin en particular. Ni Masterbuilt ni el establecimiento minorista que
ofrece este producto, tienen autoridad alguna para otorgar garantías o prometer otros recursos
que sean adicionales o inconsistentes con los establecidos previamente. La responsabilidad
máxima de Masterbuilt, en todos los casos, no superará el precio de compra del producto que
el cliente o comprador original pagó. Algunos estados no permiten la exclusión o limitación de
daños accidentales o resultantes. En dicho caso, no se aplicarán las exclusiones o limitaciones
anteriores.
Solo para residentes de California: A pesar de esta limitación de garantía, se aplican las
siguientes restricciones específicas; si el mantenimiento, la reparación o el reemplazo del
producto no se puede realizar comercialmente, el establecimiento minorista que ofrece
el producto o Masterbuilt devolverá el monto original de la compra del producto, menos el
monto directamente atribuible al uso por parte del comprador original antes de informar su
disconformidad. El propietario puede llevar el producto al establecimiento minorista que lo ofrece
a fin de obtener la ejecución de cualquier obligación en virtud de esta garantía. Esta garantía
expresa le otorga derechos legales específicos, y es posible que también tenga otros derechos
que varían de un estado a otro.
Downloaded from www.Manualslib.com manuals search engine


Rest assured, we’re here to help.
Tenga por seguro, que estamos aquí para ayudarle.
Customer Service
Servicio de atención al cliente
masterbuilt.com/contact
Masterbuilt Manufacturing, LLC
1 Masterbuilt Court | Columbus, GA | 31907
@masterbuilt
1-800-489-1581
masterbuilt.com
Downloaded from www.Manualslib.com manuals search engine
-
 1
1
-
 2
2
-
 3
3
-
 4
4
-
 5
5
-
 6
6
-
 7
7
-
 8
8
-
 9
9
-
 10
10
-
 11
11
-
 12
12
-
 13
13
-
 14
14
-
 15
15
-
 16
16
-
 17
17
-
 18
18
-
 19
19
-
 20
20
-
 21
21
-
 22
22
-
 23
23
-
 24
24
-
 25
25
-
 26
26
-
 27
27
-
 28
28
-
 29
29
-
 30
30
-
 31
31
-
 32
32


Masterbuilt BUTTERBALL MB23015018 El manual del propietario
- Categoría
- Pequeños electrodomésticos de cocina
- Tipo
- El manual del propietario
- Este manual también es adecuado para
en otros idiomas
Artículos relacionados
-
Masterbuilt MB20010118 Manual de usuario
-
Masterbuilt 20010610 El manual del propietario
-
Masterbuilt MB20020107 El manual del propietario
-
-
-
-
-
-
-
