

Contents
Parts list ..................................................................... 3
Contents ............................................................... 3
General information .................................................. 4
Safety instructions ................................................ 5
User instructions ....................................................... 6
Cooking guide ....................................................... 9
Recipes ............................................................... 10
Helpful hints ....................................................... 14
Cleaning and maintenance ...................................... 15
Other useful information ........................................ 16
Technical specifications ...................................... 16
Storing ................................................................ 16
Downloaded from www.Manualslib.com manuals search engine

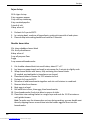
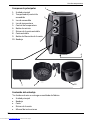
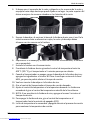
Parts List
3
1
5
4
3
2
6
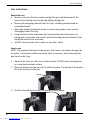
Main parts
1. Main unit
2. Timer/Power knob
3. Power indicator light
4. Temperature indicator light
5. Temperature control knob
6. Reset button
7. Removable basket divider
8. Removable basket
9. Basket release button
10. Pan
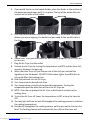
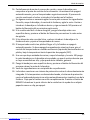
Contents of packaging
*The Air Fryer comes pre-assembled.
Main unit
Pan
Basket
Basket divider
Instruction manual
1
1
1
7
9
8
10
Downloaded from www.Manualslib.com manuals search engine

General information
4
General information
When using the Air Fryer, basic safety precautions should be observed. PLEASE READ AND
SAVE ALL INSTRUCTIONS BEFORE USING THE AIR FRYER.
1. Close supervision is necessary when any appliance is used near children. This Air Fryer
is not intended for use by persons (including children) with reduced physical, sensory,
or mental capabilities, or lack of experience and knowledge, unless they have been
given supervision or instruction concerning the use of the Air Fryer by a person
responsible for their safety.
2. For indoor household use only.
3. Unplug the Air Fryer from the outlet when not in use and before cleaning.
4. To protect against electric shock, do not immerse cord, plugs, or Air Fryer main unit in
water or any other liquid.
5. Do not operate the Air Fryer with a damaged cord or plug, or if the Air Fryer
malfunctions, or has been damaged in any manner. Return the Air Fryer to the
nearest authorized service facility for examination, repair or refund.
6. Keep hands and utensils out of the Air Fryer bowl when in use.
7. Do not use Air Fryer pan without removable basket in place. Never put items directly
into the Air Fryer pan.
8. Do not overfill removable basket to prevent the ingredients from coming into contact
with the heating elements.
9. Never place oil directly into the pan. If oil is necessary for your recipe, use it to lightly
coat your ingredients instead. This is not a deep fryer.
10. If dark smoke is emitting from the unit, unplug it immediately. Wait for the smoke to
clear before you remove the pan from the appliance. Check to make sure the
removable basket is not overfilled and ingredients are not too close to the heating
element before calling customer service.
11. The pan gets VERY hot. Carry the pan by the handle of the removable basket only and
use hot pads if necessary.
12. Never use accessories which are not recommended by the manufacturer. They could
constitute a danger to the user and risk damage to the Air Fryer.
13. Never move the Air Fryer by pulling the cord. DO NOT let the electrical cord hang over
the edge of a table or counter or touch hot surfaces.
14. Place Air Fryer at least 5 inches away from the wall or other appliances as to not block
the vents.
15. Place the Air Fryer on a flat, level, stable, heat resistant surface when using. Do not
place the Air Fryer on a soft surface such as a towel.
16. Do not place the Air Fryer on or near a hot gas or electric burner or in a heated oven.
17. Do not use the Air Fryer with a damaged outlet.
18. Make sure hands are dry when plugging in and unplugging the Air Fryer.
19. Do not use this Air Fryer for other than intended use.
SAVE ALL INSTRUCTIONS
Downloaded from www.Manualslib.com manuals search engine

Safety instructions
5
Safety instructions
WARNING: Read and understand all instructions. Failure to follow all instructions
listed below may result in electric shock, fire or serious personal injury. The warnings,
cautions, and instruction discussed in this instruction manual cannot cover all possible
conditions and situations that may occur. It must be understood by the operator that
common sense and caution are a factor which cannot be built into this product, but
must be supplied by the operator.
CAUTION: A short power supply cord is provided to reduce the risk of personal injury
resulting from becoming entangled in or tripping over a longer cord. We do not
recommend using an extension cord. If an extension cord is required, special care and
caution is necessary. Also the cord must be: (1) marked with an electrical rating of
125V, and at least 13 A., 1625 W., and (2) the cord must be arranged so that it will not
drape over the countertop or tabletop where it can be pulled on by children or
tripped over accidentally.
Polarized plug
NOTE: This Air Fryer has a polarized plug (one blade is wider than the other).
As a safety feature to reduce the risk of electrical shock, this plug is intended to fit
in a polarized outlet only one way.
If the plug does not fit fully in the outlet, reverse the plug.
If the plug still does not fit, contact a qualified electrician. Do not attempt to
defeat this safety feature.
Electric power
If electric circuit is overloaded with other appliances, your appliances may not operate
properly. The Air Fryer should be operated on a separate electrical circuit from other
operating appliances.
Safety warning
Although your Air Fryer is easy to operate, for your safety, the warnings below must
be followed:
1. Do not place the Air Fryer near a heat source.
2. Never leave the Air Fryer unattended while connected to the electrical outlet.
3. Use the Air Fryer on a flat stable work surface away from water.
4. Do not unplug from the wall socket by pulling on the power supply cord.
5. The Air Fryer must be unplugged:
A. After each use.
B. If it appears to be faulty.
C. Before cleaning or maintenance.
THIS PRODUCT IS INTENDED FOR HOUSEHOLD USE ONLY.
SAVE THESE INSTRUCTIONS!
Downloaded from www.Manualslib.com manuals search engine

User instructions
6
User instructions
Before first use
Remove main unit from the carton and pull the pan and basket out of the
main unit by holding onto handle and pulling straight out.
Remove all packaging material from Air Fryer, including material used on
removable basket.
Wash pan, basket and basket divider in warm soapy water, rinse, and dry
thoroughly before first use.
Using a soft dry cloth, wipe down the inside and outside of the main unit
taking care to not come into contact with the heating element located on the
top of the inside of the main unit.
Do NOT immerse main unit in water or any other liquid.
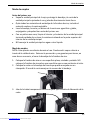
How to use
NOTE: The appliance does get hot during use. Hot steam may release through the
air outlet. Use extreme caution and oven mitts if necessary, when removing the
pan from the Air Fryer.
1. Place the Air Fryer on a flat, level, stable surface. DO NOT place the appliance
on a non-heat-resistant surface.
2. Place the basket into the pan until it clicks into place. The handle of the basket
fits into the notch on the pan.
3. Pull the clear tab back to block the basket release button.
Downloaded from www.Manualslib.com manuals search engine

User instructions
7
4. If you would like to use the basket divider, place the divider in the notches of
the basket and push down until it is in place. The top of the divider fits into
notches on the sides of the basket.
5. Push the pan and basket into the Air Fryer base with the handle. Like with a
drawer you are re-aligning, the basket and pan need to line up with slots in
the fryer.
6. Please note: If the pan and basket are not inserted properly, the Air Fryer will
not turn on.
7. Plug the Air Fryer into the outlet.
8. Preheat the Air Fryer by turning the temperature to 400°F and the timer to 5
minutes, allowing it to warm up.
9. When the timer turns off, pull the pan out of the Air Fryer and add the
ingredients into the basket. DO NOT fill the basket higher than MAX line as
this could affect the cooking time.
10. Slide the pan back into the Air Fryer.
11. Turn timer knob to desired cook time.
12. Turn temperature control knob to desired temperature. Turning the
temperature past the white line will turn the Air Fryer on.
13. NOTE: If you do not preheat the Air Fryer, add at least 5 minutes to the
cooking time.
14. To turn the Air Fryer off, lower the temperature to OFF or turn the timer to
OFF.
15. The heat light will turn on and off throughout the cooking process to maintain
the cooking temperature.
16. Periodically throughout the cooking process, pull the pan out to check on the
food. The heating element will automatically turn off, but the timer will
Downloaded from www.Manualslib.com manuals search engine

User instructions
8
continue counting down. When the pan gets put back into the Fryer, the
cooking will continue.
17. Some recipes require shaking the basket to move the ingredients around. To
do this, pull the pan and basket out of the fryer and shake the basket. Slide
the pan back into the Air Fryer and continue cooking. DO NOT press the
release button on the handle during shaking.
18. However, if it is easier for shaking, rest the pan on the hard surface and press
the release button to remove the basket prior to shaking.
19. If cooking is not complete, put the pan back into the Air Fryer and set the
timer again.
20. When the timer has counted down to 0, the timer will beep and the fryer will
automatically turn off. If you want to turn the fryer off manually during use,
turn the timer knob counterclockwise (left) until you hear a beep and lower
the temperature to OFF.
21. Once cooking is complete, remove the cooking pan and basket. DO NOT turn
the basket upside down with the pan still attached to it, as any excess oils that
have collected in the pan will drip out and could be hot.
22. Rest the pan on a hard flat surface and press the handle release button to
remove the basket from the pan.
23. Empty your ingredients into your desired container.
24. There is also an overheat protection built in. If the inner temperature is too
high, the overheat protection automatically activated and the fryer cannot be
used. Let the fryer cool down completely. Press the RESET button on the
bottom of the unit with a tiny object such as a paperclip.
Downloaded from www.Manualslib.com manuals search engine

Cooking guide
9
Cooking guide
The tables below are to help select the basic settings for ingredients you want to
prepare. For additional times and temperatures needed, please look at your local
library or search online.
Cooking guide from the top of the air fryer:
Food
Temperature
Minutes
Frozen french fries*
400°F
18–22
Homemade french fries*
400°F
20–25
Frozen tater tots*
400°F
18-22
Frozen chicken nuggets*
400°F
15–20
Fresh chicken drumsticks
350°F
30–36
Fresh hamburgers
400°F
15–20
Baked potato
400°F
35–45
Frozen vegetables*
350°F
10–15
Note: Please keep in mind that these settings are only approximate. As
ingredients differ in origin, size, shape as well as brand, we cannot guarantee the
best setting for your ingredients. Cooking could also require more time based on
how full the basket is.
*These items should be shaken several times during cooking.
Additional cooking options:
Time
(min.)
Temperature
(°F)
Shake
Extra Information
Homemade fries,
wedges or cubes
18–30
400°F
Shake
Add ½ tbsp. of oil
and your favorite
seasonings
Steak
12–20
350°F
Porkchops
15–20
350°F
Chicken Breast
20–30
350°F
Check in between
Downloaded from www.Manualslib.com manuals search engine

Recipes
10
Recipes
Sweet potato chips
1 medium sweet potato
1 tsp. olive oil
2 pinches salt
1. Wash the potatoes under running water to clean.
2. Peel the potato.
3. Cut the potato into very thin slices. (A mandoline slicer can be used with caution.)
4. Soak potato slices in salt water for 30 minutes, changing the water several times.
5. Drain water thoroughly and lay potato slices out on a paper towel in a single layer
and pat to dry completely for about 5 minutes.
6. Preheat the Air Fryer to 350°F.
7. In a mixing bowl, toss the potatoes with olive oil.
8. Place potatoes into basket and cook for 30–45 minutes or until slightly crispy.
9. Shake basket frequently to ensure potatoes are cooked evenly.
10. When cooking is complete, put potatoes in serving bowl and salt to taste.
Root vegetable medley
1¼ cup parsnips
1¼ cup celery
2 red onions
1½ cup butternut squash
1 tbsp. fresh thyme needles
1 tbsp. olive oil
Salt & pepper to taste
1. Preheat Air Fryer to 400°F.
2. Peel parsnips and onions.
3. Cut parsnips, onions and celery into small cubes.
4. Halve butternut squash and remove seeds and peel. Cut into cubes.
5. In mixing bowl, mix vegetables with thyme and olive oil.
6. Season to taste.
7. Place vegetables into cooking basket and cook for 20 minutes.
8. Shake basket frequently to ensure vegetables are cooked evenly.
Downloaded from www.Manualslib.com manuals search engine

Recipes
11
Stuffed garlic mushrooms
10-12 whole small button mushrooms
1 cup seasoned breadcrumbs
1 garlic clove, crushed
1 tbsp. parsley, finely chopped
2 tbsp. olive oil.
Pepper to taste
1. Preheat Air Fryer to 400°F.
2. In food processor, mix breadcrumbs, garlic, parsley and pepper to taste.
3. When fully mixed, stir in olive oil until mixture is combined.
4. Cut off mushroom stalks.
5. Fill mushroom caps with breadcrumb mixture.
6. Pat mixture into caps to ensure loose crumbs are cooked.
7. Place stuffed mushrooms into cooking basket and cook for 7-10 minutes or
until they are golden brown.
Pigs in a blanket
1 12 oz. package of cocktail franks
1 8 oz. can of crescent rolls.
1. Remove cocktail franks from the package and drain.
2. Pat dry with paper towels.
3. Cut dough into small triangles, about 1” x 1½”.
4. Roll dough around cocktail franks, leaving ends visible.
5. Place franks into freezer for about 5-10 minutes to firm a bit.
6. Preheat the Air Fryer to 325°F.
7. Remove franks from the freezer and place into cooking basket in a single
layer.
8. Cook for about 10-12 minutes.
9. Change temperature to 400°F and cook for another 5-8 minutes until golden
brown.
Downloaded from www.Manualslib.com manuals search engine

Recipes
12
Cajun shrimp
1¼ lb. tiger shrimp
¼ tsp. cayenne pepper
½ tsp. old bay seasoning
¼ tsp. smoked paprika
1 pinch of salt
1 tbsp. olive oil.
1. Preheat Air Fryer to 400°F.
2. In a mixing bowl, combine all ingredients, coating shrimp with oil and spices.
3. Place shrimp into cooking basket and cook for 5 minutes.
Cheddar bacon bites
1 lb. sharp cheddar cheese block
1 lb. thinly sliced bacon
4 tbsp. olive oil
1 cup all-purpose flour
2 eggs
1 cup seasoned breadcrumbs
1. Cut cheddar cheese block into small cubes, about ½” x ½”.
2. Lay bacon on paper towel and cook in microwave for 1 minute to slightly cook.
3. Wrap cheese blocks with bacon, fully enclosing the cheese blocks.
(If needed, use toothpicks to keep bacon on cheese)
4. Place bacon bites in freezer for 5-10 minutes to firm.
5. Preheat Air Fryer to 400°F.
6. Mix olive oil and breadcrumbs together and stir until mixture is combined.
7. Remove bites from freezer.
8. Beat eggs in a bowl.
9. Roll each bite in flour, then eggs, then breadcrumbs.
10. Press breadcrumbs firmly into bites to ensure it sticks.
11. Place bites into cooking basket in a single layer and cook for 15-20 minutes or
until golden brown.
Hint: To make sure the cheese does not run during cooking, you can double coat
them by dipping them a second time into the beaten egg and then into the
breadcrumbs.
Downloaded from www.Manualslib.com manuals search engine

Recipes
13
Grilled cheese
2 slices of bread
2 slices Muenster cheese
1 slice American cheese
¼ cup butter
1. Preheat Air Fryer to 400°F.
2. Melt butter.
3. Brush butter on both sides of bread slices.
4. Remove cooking basket and place 1 slice of bread into basket.
5. Layer slices of cheese.
6. Place 2nd slice of bread onto cheese.
7. Cook for 10 minutes or until golden brown.
Note: It is recommended to flip the Grilled Cheese after it has been cooking for
about 5 minutes.
Peanut butter/marshmallow fluff turnovers
4 sheets filo pastry, defrosted
4 tbsp. peanut butter
4 tsp. marshmallow fluff
2 oz. butter, melted
1 pinch sea salt
1. Preheat Air Fryer to 375°.
2. Brush 1 sheet of filo with butter.
3. Place 2nd sheet of filo on top of first and brush with butter.
4. Repeat until you have used all 4 sheets of filo.
5. Cut filo rectangles, approximately 3” x 4”.
6. Place 1 tbsp. of peanut butter and 1 tsp. of marshmallow fluff on one corner of
the strip of filo.
7. Fold the tip of the sheet over the filling to form a triangle and fold repeatedly in a
zigzag manner until the filling is fully wrapped.
8. Use a touch of butter to seal the ends of the turnover.
9. Place the turnovers into the cooking basket in a single layer.
10. Cook for 3-5 minutes or until golden brown and puffy.
11. Finish with a touch of sea salt for a sweet and salty combination.
Hint: This also tastes delicious with a piece of chocolate inside.
Downloaded from www.Manualslib.com manuals search engine

Helpful hints
14
Helpful hints
1. Shaking ingredients halfway through the preparation time optimizes the end
result and can help prevent unevenly fried ingredients.
2. For a crispier result on your potatoes, you can add some oil to the potatoes.
3. We do not recommend cooking extremely greasy foods in the Air Fryer as the
amount of grease may drip and cause a fire hazard.
4. Some snacks that can be prepared in an oven can also be prepared in the Air
Fryer.
5. You can also use the Air Fryer to reheat ingredients. To reheat ingredients, set
the temperature to about 300°F for up to 10 minutes or until it reaches
desired temperature.
6. If the Air Fryer overheats, there is a RESET button located on the bottom of
the unit. It must be pushed with something very thin, such as a paperclip.
7. Do not block the air inlet or air outlet vents.
8. NEVER use the pan without the basket in it.
Downloaded from www.Manualslib.com manuals search engine

Cleaning and maintenance
15
Cleaning and maintenance
CAUTION:
Always be sure that the Air Fryer is unplugged and completely cooled before
cleaning or attempting to store the item. NEVER IMMERSE main unit in water or
any other liquid.
It is important to clean your Air Fryer thoroughly after each use to prevent sticky
build ups that are difficult to clean later. Proper cleaning of the Air Fryer can lead
to cleaner, better tasting food.
1. Let the Air Fryer cool at least 30 minutes before cleaning.
2. Remove the pan, basket and basket divider (if necessary) from the main unit.
3. Wash the pan, basket and basket divider in warm soapy water, rinse, and dry
thoroughly before storing.
4. Wipe the inside and outside of the main unit with a damp cloth, sponge, or
paper towel taking care not to touch the heating element.
5. Dry the surfaces with a soft cloth or paper towel before storing.
6. Do not use metal utensils or abrasive cleaners on any part of the Air Fryer as
they may damage the non-stick coating.
7. The pan, basket and basket divider are top shelf dishwasher safe, HOWEVER
we strongly recommend hand washing.
DO NOT USE ANY ABRASIVE MATERIAL TO CLEAN THE SURFACE
DO NOT IMMERSE THE AIR FRYER MAIN UNIT INTO WATER AT ANY TIME
Downloaded from www.Manualslib.com manuals search engine

Other useful information
16
Other useful information
Technical specifications
Model Number TXG-DS13
Rating Voltage 120V – 60Hz
Nominal Power 1230W
Storing
Allow the Air Fryer to cool completely before storing.
Store the Air Fryer in a dry location.
Do not place any heavy items on top of the Air Fryer during storage as this
may result in possible damage.
Service center
If you have any questions in regards to the operation of this Air Fryer please
contact the service center at:
Tel: 1-888-367-7373
Business Hours: Mon-Fri 10:00am – 5:00pm EST
Email: help@myproduct.care
Environmental protection
If the Air Fryer should no longer work at all, please make sure that it is disposed of
in an environmentally friendly way.
Downloaded from www.Manualslib.com manuals search engine

Other useful information
17
Contenido
Lista de componentes ............................................. 18
Contenido ........................................................... 18
Información general ................................................ 19
Instrucciones de seguridad ................................. 21
Modo de empleo ..................................................... 23
Guía de cocción ................................................... 26
Recetas ............................................................... 27
Consejos útiles .................................................... 32
Limpieza y mantenimiento ...................................... 33
Información adicional de utilidad ........................... 34
Especificaciones técnicas .................................... 34
Almacenamiento ................................................. 34
Downloaded from www.Manualslib.com manuals search engine

Lista de componentes
18
4
3
2
1
5
6
Components principales
1. Unidad principal
2. Temporizador/control de
encendido
3. Luz de encendido
4. Luz de temperatura
5. Control de temperatura
6. Botón de reinicio
7. Divisor de la cesta extraíble
8. Cesta extraíble
9. Botón de liberación de la cesta
10. Bandeja
Contenido del embalaje
*La freidora de aire se entrega ensamblada de fábrica.
Unidad principal
Bandeja
Cesta
Divisor de la cesta
Manual de instrucciones
7
8
1
1
1
9
10
Downloaded from www.Manualslib.com manuals search engine

Información general
19
Información general
Al utilizar la freidora de aire, es necesario seguir unas precauciones de seguridad
básicas. POR FAVOR, LEA Y GUARDE TODAS LAS INSTRUCCIONES ANTES DE USAR
LA FREIDORA DE AIRE.
1. Es necesaria una atenta supervisión cuando el aparato se usa cerca de los
niños. Esta freidora de aire no está diseñada para ser utilizada por personas
(incluidos niños) con capacidades físicas, sensoriales o mentales reducidas, o
sin experiencia o conocimiento, a menos que sean supervisados o reciban
instrucciones acerca de su uso por parte de una persona responsable de su
seguridad.
2. Para uso doméstico en interiores solamente.
3. Desconecte la freidora de aire del tomacorriente cuando no esté en uso y
antes de limpiarla.
4. Para protegerse contra las descargas eléctricas, no sumerja el cable, los
enchufes o la unidad principal de la freidora de aire en agua u otro líquido.
5. No utilice la freidora de aire con un cable o enchufe dañado, si ha sufrido una
avería o si se ha dañado de alguna forma. Devuelva la freidora de aire al
centro de servicio técnico autorizado más cercano para su revisión,
reparación o recibir un reembolso.
6. No introduzca las manos o utensilios en la freidora de aire mientras esté en
funcionamiento.
7. No use la freidora de aire sin la cesta extraíble instalada. No ponga ningún
alimento directamente en la freidora de aire.
8. No llene demasiado la cesta extraíble para evitar que los ingredientes entren
en contacto con las resistencias.
9. No ponga nunca aceite directamente en la bandeja. Si necesita aceite para la
receta, aplíquelo ligeramente a la superficie de los ingredientes. Ésta no es
una freidora de inmersión.
10. Si la unidad emite humo negro, desenchúfela inmediatamente. Espere a que
el humo se disipe antes de sacar la bandeja del aparato. Asegúrese de que la
cesta extraíble no esté excesivamente llena y que los ingredientes no estén
demasiado cerca de la resistencia antes de llamar al servicio de atención.
11. La bandeja se calienta MUCHO. Transporte la bandeja por el asa de la cesta
extraíble y use agarradera en caso de ser necesario.
12. Nunca utilice accesorios que el fabricante no haya recomendado. Podrían ser
peligrosos para el usuario y causar daños a la freidora de aire.
Downloaded from www.Manualslib.com manuals search engine

Información general
20
13. No mueva nunca la freidora de aire jalando del cable. No permita que el cable
de alimentación cuelgue del borde de un mostrador o una mesa, ni que toque
superficies calientes.
14. Ubique la freidora de aire a una distancia de al menos 5 pulgadas (12.7 cm) de
la pared o de otros electrodomésticos para no bloquear las ranuras de
ventilación.
15. Coloque la freidora de aire en una superficie resistente al calor, nivelada,
plana y estable al utilizarla. No ponga la freidora de aire sobre una superficie
blanda como una toalla.
16. No coloque la freidora de aire sobre o cerca de una hornilla de gas o eléctrica,
o en un horno caliente.
17. No utilice la freidora de aire con un enchufe dañado.
18. Asegúrese de que sus manos estén secas al enchufar y desenchufar la freidora
de aire.
19. No utilice la freidora de aire para un uso que no sea el previsto.
GUARDE TODAS LAS INSTRUCCIONES
Downloaded from www.Manualslib.com manuals search engine

Instrucciones de seguridad
21
Instrucciones de seguridad
ADVERTENCIA: Lea y comprenda todas las instrucciones. Si no se cumplen todas
las instrucciones indicadas a continuación se pueden producir descargas
eléctricas, incendios o lesiones graves. Las advertencias, precauciones e
instrucciones que se detallan en este manual de instrucciones no cubren todas las
condiciones y situaciones posibles que podrían suceder. El operador debe
entender que el sentido común y la precaución son factores que no se pueden
incluir en el producto, sino que los debe aportar el operador mismo.
PRECAUCIÓN: Se proporciona un cable eléctrico corto para reducir el riesgo de
lesiones personales resultantes de enredarse o tropezar con un cable más largo.
No recomendamos usar un cable de extensión. Si se requiere usar un cable de
extensión, es necesario tener especial cuidado y precaución. Además el cable
debe: (1) tener una clasificación eléctrica de
125 V y al menos 13 A., 1625 W., y (2) el cable debe colocarse de manera que no
cuelgue de un mostrador o una mesa en donde los niños pudieran halarlo o
tropezar con él accidentalmente.
Enchufe polarizado
NOTA: La freidora de aire posee un enchufe polarizado (una clavija es más ancha
que la otra).
Como medida de seguridad para reducir el riesgo de descarga eléctrica, este
enchufe está diseñado para entrar en un tomacorriente polarizado en un solo
sentido.
Si el enchufe no entra completamente en el tomacorriente, gire el enchufe.
Si el enchufe aún no encaja, comuníquese con un electricista calificado. No
intente eliminar esta característica de seguridad.
Alimentación eléctrica
Si el circuito eléctrico está sobrecargado con otros electrodomésticos, estos
podrían no funcionar correctamente. La freidora de aire debe conectarse en un
circuito eléctrico diferente al de otros aparatos en funcionamiento.
Advertencia de seguridad
Si bien la freidora de aire es fácil de utilizar, se deben cumplir las siguientes
advertencias por razones de seguridad:
1. No coloque la freidora de aire cerca de una fuente de calor.
Downloaded from www.Manualslib.com manuals search engine

Instrucciones de seguridad
22
2. No deje la freidora de aire desatendida mientras está conectada a la red
eléctrica.
3. Use la freidora de aire sobre una superficie de trabajo estable alejada del
agua.
4. No la desconecte del tomacorriente jalando del cable de alimentación.
5. La freidora de aire debe desenchufarse:
A. Después de cada uso.
B. Si parece estar defectuosa.
C. Antes de cualquier operación de limpieza o mantenimiento.
ESTE PRODUCTO ESTÁ DESTINADO EXCLUSIVAMENTE PARA USO DOMÉSTICO.
¡GUARDE ESTAS INSTRUCCIONES!
Downloaded from www.Manualslib.com manuals search engine

Modo de empleo
23
Modo de empleo
Antes del primer uso
Saque la unidad principal de la caja y extraiga la bandeja y la cesta de la
unidad principal sujetando el asa y jalando directamente hacia fuera.
Quite todos los materiales de embalaje de la freidora de aire, incluido el
material usado en la cesta extraíble.
Lave la bandeja, la cesta y el divisor de la cesta con agua tibia y jabón,
enjuáguelos y séquelos bien antes del primer uso.
Con un paño suave seco, limpie el interior y el exterior de la unidad principal
teniendo cuidado de no tocar la resistencia situada en la parte superior del
interior de la unidad principal.
NO sumerja la unidad principal en agua u otro líquido.
Modo de empleo
NOTA: Este aparato se calienta durante el uso. Puede emitir vapor caliente a
través de la salida de aire. Extreme la precaución y use guantes para horno, en
caso de ser necesario, al sacar la bandeja de la freidora de aire.
1. Coloque la freidora de aire en una superficie plana, nivelada y estable. NO
coloque la freidora de aire sobre una superficie que no sea resistente al calor.
2. Coloque la cesta en la bandeja de forma que quede encajada con un
chasquido. El asa de la cesta encaja en la muesca de la bandeja.
3. Jale de la traba transparente hacia atrás para fijar el botón de liberación de la
cesta.
Downloaded from www.Manualslib.com manuals search engine

Modo de empleo
24
4. Si desea usar el separador de la cesta, colóquelo en las muescas de la cesta y
empújelo hacia abajo hasta que quede fijado en su lugar. La parte superior del
divisor encaja en las muescas situadas en los laterales de la cesta.
5. Empuje la bandeja y la cesta en la base de la freidora de aire con el asa. De la
misma manera como se alinearía un cajón, la cesta y la bandeja deben
alinearse con las ranuras en la freidora.
6. Importante: Si la bandeja y la cesta no se insertan correctamente, la freidora
no se encenderá.
7. Enchufe la freidora en el tomacorriente.
8. Precaliente la freidora de aire girando el control de temperatura hasta los
400 °F (205 °C) y el temporizador a 5 minutos para que se caliente.
9. Cuando el temporizador se apague, saque la bandeja de la freidora de aire y
agregue los ingredientes a la cesta. NO llene la cesta por encima de la línea
MAX, ya que esto podría afectar el tiempo de cocción.
10. Vuelva a insertar la bandeja en la freidora de aire.
11. Gire el control del temporizador al tiempo de cocción deseado.
12. Ajuste el control de temperatura a la temperatura deseada. La freidora se
encenderá al girar el control de temperatura más allá de la línea blanca.
13. NOTA: Si no precalienta la freidora de aire, agregue al menos 5 minutos al
tiempo de cocción.
14. Para apagar la freidora de aire, gire el control de temperatura o el
temporizador hasta la posición de apagado (OFF).
15. La luz de temperatura se encenderá y apagará durante el proceso de cocción
para mantener la temperatura de cocción.
Downloaded from www.Manualslib.com manuals search engine

Modo de empleo
25
16. Periódicamente durante el proceso de cocción, saque la bandeja para
comprobar el punto de cocción de los alimentos. La resistencia se apagará
automáticamente, pero el temporizador seguirá avanzando. El proceso de
cocción continuará al volver a introducir la bandeja en la freidora.
17. En algunas recetas es necesario agitar la cesta para remover los ingredientes.
Para ello, saque la bandeja y la cesta de la freidora y agite la cesta. Vuelva a
introducir la bandeja en la freidora de aire y siga cocinando. NO presione el
botón de liberación del asa mientras agita cesta.
18. Si le resulta más fácil a la hora de agitar, ponga la bandeja sobre una
superficie dura y presione el botón de liberación para extraer la cesta antes
de agitarla.
19. Si los alimentos aún no están listos, vuelva a introducir la bandeja en la
freidora de aire y ajuste el temporizador de nuevo.
20. El temporizador emitirá un pitido al llegar a 0 y la freidora se apagará
automáticamente. Si desea apagarla manualmente mientras la usa, gire el
control del temporizador en sentido antihorario (izquierda) hasta escuchar un
pitido y baje la temperatura hasta la posición de apagado (OFF).
21. Una vez que haya acabado de cocinar, saque la bandeja y la cesta. NO ponga
la cesta bocabajo con la bandeja aún acoplada, ya que el aceite sobrante que
se haya acumulado en ella, y que puede estar caliente, goteará.
22. Ponga la bandeja en una superficie dura y presione el botón de liberación del
asa para extraer la cesta de la bandeja.
23. Vacíe los ingredientes en un recipiente de su preferencia.
24. La freidora cuenta con un sistema de protección contra el sobrecalentamiento
integrado. Si la temperatura es demasiado elevada, el sistema de protección
contra el sobrecalentamiento se activa automáticamente e impide el uso de la
freidora. Deje que la freidora se enfríe completamente. Presione el botón de
REINICIO situado en la parte inferior de la unidad con la ayuda de un objeto
pequeño como un clip para papel.
Downloaded from www.Manualslib.com manuals search engine

Guía de cocción
26
Guía de cocción
Las tablas siguientes sirven de guía para seleccionar los ajustes básicos apropiados
para los ingredientes que desee preparar. Para ver otros tiempos y temperaturas,
consulte un libro en su biblioteca local o búsquelo en Internet.
Guía de cocción de la parte superior de la freidora de aire:
Alimentos
Temperatura
Minutos
Papas fritas congeladas*
400 °F (205 °C)
18–22
Papas fritas caseras*
400 °F (205 °C)
20–25
Tater tots congelados*
400 °F (205 °C)
18-22
Nuggets de pollo congelados*
400 °F (205 °C)
15–20
Patas de pollo frescas
350 °F (175 °C)
30–36
Hamburguesas frescas
400 °F (205 °C)
15–20
Papa al horno
400 °F (205 °C)
35–45
Verduras congeladas*
350 °F (175 °C)
10–15
Nota: Recuerde que estos ajustes sólo son aproximados. Puesto que los alimentos
tienen distintos orígenes, tamaños formas y marcas, no podemos garantizar el
mejor ajuste para sus ingredientes. También podría ser necesario prolongar el
tiempo de cocción en función de qué tan llena esté la cesta.
*Estos alimentos deben moverse varias veces durante la cocción.
Otras opciones de cocción:
Tiempo
(min.)
Temperatura
(°F [°C])
Agitar
Información
adicional
Papas fritas
caseras,
en cuñas o cubos
18–30
400 °F (205 °C)
Agitar
Agregue ½
cucharadita de
aceite
y sus condimentos
favoritos
Filete
12–20
350 °F (175 °C)
Chuletas de cerdo
15–20
350 °F (175 °C)
Pechuga de pollo
20–30
350 °F (175 °C)
Compruebe a la
mitad
Downloaded from www.Manualslib.com manuals search engine

Recetas
27
Recetas
Batatas fritas
1 batata mediana
1 cucharadita de aceite de oliva
2 pizcas de sal
1. Lave las batatas bajo el agua corriente para limpiarlas.
2. Pele las batatas.
3. Corte las batatas en rebanadas muy finas. (Puede usarse una mandolina con
cuidado.)
4. Deje las rebanadas de batata en agua con sal durante 30 minutos; cambie el
agua varias veces.
5. Quite el agua y ponga las rebanadas de batata sobre una toalla de papel, en
una sola capa, y utilice otra toalla de papel encima para secarlas
completamente durante unos 5 minutos.
6. Precaliente la freidora de aire a 350 °F (175 °C).
7. En un cuenco, mezcle las batatas con aceite de oliva.
8. Ponga las batatas en la cesta y fríalas durante 30–45 minutos o hasta que
estén ligeramente crujientes.
9. Agite la cesta con frecuencia para asegurarse de que las batatas se frían
uniformemente.
10. Cuando estén listas, póngalas en una fuente para servir y agregue sal a su
gusto.
Tubérculos variados
1¼ taza de chirivías (nabos blancos)
1¼ taza de apio
2 cebollas rojas
1½ taza de calabaza moscada
1 cucharada de tomillo fresco
1 cucharada de aceite de oliva
Sal y pimienta al gusto
1. Precaliente la freidora de aire a 400 °F (205 °C).
2. Pele las chirivías y las cebollas.
Downloaded from www.Manualslib.com manuals search engine

Recetas
28
3. Corte las chirivías, las cebollas y el apio en cubos pequeños.
4. Corte la calabaza por la mitad, quite las semillas y pélela. Córtela en cubos.
5. En un cuenco, mezcle las verduras con el tomillo y el aceite de oliva.
6. Sazone a su gusto.
7. Ponga las verduras en la cesta de la freidora y fríalas durante 20 minutos.
8. Agite la cesta con frecuencia para asegurarse de que las verduras se frían
uniformemente.
Champiñones rellenos con ajo
10-12 champiñones pequeños
1 taza de pan molido aderezado
1 diente de ajo machacado
1 cucharada de perejil picado fino
2 cucharadas de aceite de oliva
Pimienta al gusto
1. Precaliente la freidora de aire a 400 °F (205 °C).
2. En una procesadora de alimentos, mezcle el pan molido, el ajo, el perejil y la
pimienta.
3. Una vez que estén bien mezclados, agregue y remueva el aceite de oliva hasta
que quede bien incorporado.
4. Corte los tallos de los champiñones.
5. Llene la cabeza de los champiñones con la mezcla de pan molido.
6. Presione la mezcla en las cabezas para asegurarse de cocinar el pan molido
suelto.
7. Ponga los champiñones rellenos en la cesta de la freidora y cocínelos durante
7-10 minutos o hasta que adquieran un color marrón dorado.
Salchichas empanizadas
1 paquete de 12 onzas de salchichas tipo "frank"
1 lata de 8 onzas (225 g) de cuernitos.
1. Saque las salchichas del paquete y deshágase del líquido.
2. Séquelas con toallas de papel.
3. Corte la masa en pequeños triángulos de aprox. 1” x 1½” (2.5 x 3.8 cm).
Downloaded from www.Manualslib.com manuals search engine

Recetas
29
4. Envuelva las salchichas con la masa de manera que los extremos queden
visibles.
5. Ponga las salchichas en el congelador por unos 5-10 minutos para que se
endurezcan un poco.
6. Precaliente la freidora de aire a 325 °F (162 °C).
7. Saque las salchichas del congelador y póngalas en la cesta de la freidora en
una sola capa.
8. Fríalas durante 10-12 minutos.
9. Cambie la temperatura a 400 °F (205 °C) y cocine otros 5-8 minutos hasta que
adquieran un color dorado.
Langostinos cajún
1¼ libra (0.56 kg) de langostino jumbo
¼ cucharadita de pimienta roja de Cayena
½ cucharadita de condimento "old bay"
¼ cucharadita de pimentón ahumado
1 pizca de sal
1 cucharada de aceite de oliva
1. Precaliente la freidora de aire a 400 °F (205 °C).
2. En un cuenco, mezcle todos los ingredientes y cubra los langostinos con aceite
y las especias.
3. Ponga los langostinos en la cesta de la freidora y fríalos durante 5 minutos.
Bocaditos de cheddar con tocino
1 libra (0.45 kg) de queso cheddar fuerte en bloque
1 libra (0.45 kg) de tocino cortado fino
4 cucharadas de aceite de oliva
1 taza de harina común
2 huevos
1 taza de pan molido aderezado
1. Corte el bloque de queso cheddar en cubos pequeños de ½” x ½” (1.3 x 1.3
cm).
2. Extienda el tocino sobre una toalla de papel y cocínelo en el microondas
durante 1 minuto para que se haga ligeramente.
Downloaded from www.Manualslib.com manuals search engine

Recetas
30
3. Envuelva los trozos de queso con el tocino de manera que queden
completamente encerrados. (En caso de ser necesario, puede utilizarse un
palillo para que el tocino no se abra)
4. Ponga los bocaditos de tocino en el congelador durante 5-10 minutos para
que se endurezcan.
5. Precaliente la freidora de aire a 400 °F (205 °C).
6. Mezcle el aceite de oliva y el pan molido, y remueva hasta que queden bien
mezclados.
7. Saque los bocaditos del congelador.
8. Bata los huevos en un cuenco.
9. Cubra los bocaditos con harina, seguidos de los huevos y finalmente el pan
molido.
10. Presione el pan molido sobre los bocaditos para asegurarse de que se adhiera
bien.
11. Ponga los bocaditos en la cesta de la freidora en una sola capa y fríalos
durante 15-20 minutos o hasta que adquieran un color marrón dorado.
Consejo: Para asegurarse de que el queso no se derrita durante la cocción,
puede empanizarlos dos veces sumergiéndolos una segunda vez en el huevo
batido y a continuación cubrirlos con el pan molido.
Emparedados de queso
2 rebanadas de pan
2 rebanadas de queso Muenster
1 rebanada de queso americano
¼ taza de mantequilla
1. Precaliente la freidora de aire a 400 °F (205 °C).
2. Derrita la mantequilla.
3. Con un pincel, cubra ambos lados de las rebanadas de pan con mantequilla.
4. Saque la cesta de la freidora y ponga una rebanada de pan en ella.
5. Ponga las rebanadas de queso en capas.
6. Ponga la 2.a rebanada de pan encima del queso.
7. Fría durante 10 minutos o hasta que adquiera un color marrón dorado.
Nota: Se recomienda dar la vuelta al emparedado de queso después de unos
5 minutos.
Downloaded from www.Manualslib.com manuals search engine

Recetas
31
Pasteles de mantequilla de cacahuate/crema de malvavisco
4 hojas de hojaldre, descongeladas
4 cucharadas de crema de cacahuate
4 cucharaditas de crema de malvavisco
2 onzas (57 g) de mantequilla derretida
1 pizca de sal marina
1. Precaliente la freidora a 375 °F (190 °C).
2. Con un pincel, cubra 1 hoja de hojaldre con mantequilla.
3. Ponga la 2.a hoja de hojaldre encima de la primera y use el pincel para
cubrirla con mantequilla.
4. Repita el proceso hasta usar las 4 hojas de hojaldre.
5. Corte el hojaldre en rectángulos de aproximadamente 3” x 4” (7.6 x 10.2 cm)
de tamaño.
6. Ponga 1 cucharada de mantequilla de cacahuate y 1 cucharadita de crema de
malvavisco en una esquina de la tira de hojaldre.
7. Pliegue la punta de la hoja por encima del relleno para crear un triángulo y
pliegue repetidamente en zigzag hasta que el relleno quede completamente
envuelto.
8. Use una cantidad mínima de mantequilla para sellar los extremos de los
pasteles.
9. Ponga los pasteles en la cesta de la freidora en una sola capa.
10. Fríalos durante 3-5 minutos o hasta que adquieran una consistencia
esponjosa y un color marrón dorado.
11. Acábelos con una pizca de sal para conseguir un contraste entre dulce y
salado.
Consejo: Los pasteles también son deliciosos con un trozo de chocolate
dentro.
Downloaded from www.Manualslib.com manuals search engine

Consejos útiles
32
Consejos útiles
1. Agitar los ingredientes cuando queda la mitad de tiempo mejora el resultado
final y puede ayudar a evitar que se frían de manera no uniforme.
2. Para unas patatas más crujientes, pruebe a agregarles algo de aceite.
3. No recomendamos preparar alimentos extremadamente grasientos en la
freidora de aire, ya que la grasa puede gotear y crear riesgo de incendio.
4. Algunos alimentos que pueden prepararse en un horno también pueden
prepararse en la freidora de aire.
5. También puede usar la freidora de aire para recalentar los ingredientes. Para
recalentar los ingredientes, ajuste la temperatura a unos 300 °C (149 °C)
durante aproximadamente 10 minutos o hasta que alcancen la temperatura
deseada.
6. Si la freidora de aire se sobrecalienta, hay un botón de REINICIO en la parte
inferior de la unidad. Utilice un clip de papel para presionarlo.
7. No bloquee las ranuras de entrada ni de salida de aire.
8. No use NUNCA la bandeja sin la cesta puesta.
Downloaded from www.Manualslib.com manuals search engine

Limpieza y mantenimiento
33
Limpieza y mantenimiento
PRECAUCIÓN:
Asegúrese siempre de que la freidora de aire esté desenchufada y se haya
enfriado completamente antes de limpiarla o tratar de guardarla. NO SUMERJA
NUNCA la unidad principal en agua ni en ningún otro líquido.
Es importante limpiar la freidora de aire a fondo después de cada uso para evitar
acumulaciones pegajosas que son difíciles de limpiar después. Una limpieza
correcta de la freidora de aire puede mejorar el sabor y la pureza de los
alimentos.
1. Deje que la freidora de aire se enfríe por al menos 30 minutos antes de
limpiarla.
2. Saque la bandeja, la cesta y el divisor de la cesta (en caso de ser necesario) de
la unidad principal.
3. Lave la bandeja, la cesta y el divisor de la cesta con agua tibia y jabón,
enjuáguelos y séquelos antes de guardarlos.
4. Limpie el interior y el exterior de la unidad principal con un paño, una esponja
o una toalla de papel húmedos teniendo cuidado de no tocar la resistencia.
5. Seque las superficies con un paño suave o una toalla de papel antes de
guardar la freidora.
6. No utilice utensilios de metal o limpiadores abrasivos en ninguna superficie de
la freidora de aire, ya que pueden dañar la superficie antiadherente.
7. La bandeja, la cesta y el divisor de la cesta pueden lavarse en la rejilla superior
del lavavajillas; SIN EMBARGO recomendamos encarecidamente lavarlos a
mano.
NO USE MATERIALES ABRASIVOS PARA LIMPIAR LA SUPERFICIE
NO SUMERJA LA UNIDAD PRINCIPAL DE LA FREIDORA DE AIRE EN AGUA EN
NINGÚN MOMENTO
Downloaded from www.Manualslib.com manuals search engine

Información adicional de utilidad
34
Información adicional de utilidad
Especificaciones técnicas
Número de modelo TXG-DS13
Voltaje nominal 120V – 60Hz
Potencia nominal 1230W
Almacenamiento
Deje que la freidora de aire se enfríe completamente antes de usarla.
Guarde la freidora de aire en un lugar seco.
No coloque objetos pesados encima de la freidora de aire durante el
almacenamiento, ya que esto podría dañarla.
Centro de servicio
Si tiene alguna pregunta sobre la operación de la freidora de aire, póngase en
contacto con nuestro centro de servicio en:
Tel.: 1-888-367-7373
Horario de atención: de lunes a viernes, de 10:00 a.m. a 5:00 p.m., hora del Este
Correo electrónico: help@myproduct.care
Protección del medio ambiente
Si la freidora de aire deja de funcionar completamente, asegúrese de desecharla
de forma respetuosa con el medio ambiente.
Downloaded from www.Manualslib.com manuals search engine

Your details:
Name
Address
Email
Date of purchase*
*We recommend you keep the receipt with this warranty card
Location of purchase
Description of malfunction:
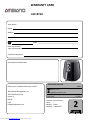
WARRANTY CARD
AIR FRYER
Customer Service Phone
Hours:
Monday – Friday
10:00am – 5:00pm EST
2
Return your completed warranty card to:
Wachsmuth & Krogmann, Inc.
1015 Hawthorn Drive
Itasca, IL
60143
USA
AFTER SALES SUPPORT
49823
888 367 7373
help@myproduct.care
MODEL:
TXG-DS13 11/2016
Downloaded from www.Manualslib.com manuals search engine

ALDI INC. FULL WARRANTY CONDITIONS
Dear Customer:
The ALDI warranty is a fully warranty offering you the following benefits:
Warranty period: 2 years from date of purchase.
6 months for movable parts and consumables under normal
and proper conditions of use (e.g. rechargeable batteries).
Costs: Free repair/exchange or refund.
No transport costs.
ADVICE: Please contact our service hotline by phone, e-mail or fax
before sending in the device. This allows us to provide
support in the event of possible operator errors.
In order to make a claim under the warranty, please send us:
The faulty item with all the component parts, the original receipt and the
warranty card properly completed.
The warranty does not cover damage caused by:
Accident or unanticipated events (e.g. lightning, water, fire).
Improper use or transport.
Failure to follow the safety and maintenance instructions.
Other improper treatment or modification of the product.
After the expiration of the warranty period, you may wish to have your product
repaired at your own expense.
This warranty gives you specific legal rights, and you may also have other rights
which vary from state to state but this warranty is not intended to exceed statutory
minimum requirements beyond what is included above.
This warranty does not limit the statutory obligation of the seller arising from any
implied warranties. The period of warranty can only be extended in accordance with
applicable law.
Neither the service company nor ALDI will assume any liability for data or settings
stored on any returned product.
Downloaded from www.Manualslib.com manuals search engine

Sus datos:
Nombre
Dirección
Correo electrónico
Fecha de la compra*
*Le recomendamos que guarde el recibo con esta tarjeta de garantía
Lugar de la compra
Descripción de la avería:
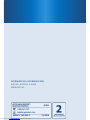
TARJETA DE GARANTÍA
FREIDORA DE AIRE
Horario de Servicio al cliente:
de lunes a viernes de
10:00a.m. – 5:00p.m.
(horario del Este en EE.UU.)
2
Devuelva su tarjeta de garantía completada a:
Wachsmuth & Krogmann, Inc.
1015 Hawthorn Drive
Itasca, IL
60143
USA
SERVICIO POSVENTA
49823
888 367 7373
help@myproduct.care
NO. DEL MODELO:
TXG-DS13 11/2016
Downloaded from www.Manualslib.com manuals search engine

CONDICIONES DE LA GARANTÍA COMPLETA DE ALDI INC.
Estimado cliente:
La Garantía ALDI es una garantía completa que le ofrece los siguientes beneficios:
Período de garantía: 2 años a partir de la fecha de la compra.
6 meses para las piezas de recambio y consumibles en
condiciones normales y adecuadas de uso (por ejemplo,
baterías recargables).
Costos: Reparación/sustitución gratis o reembolso.
No hay costos de transporte.
AVISO: Póngase en contacto con nuestra línea directa de atención
por teléfono, correo electrónico o fax antes de retornar el
producto. Esto nos permite proporcionar ayuda en caso de
posibles errores del operador.
Para hacer una reclamación bajo la garantía, por favor envíenos:
El artículo defectuoso junto con todas las piezas, el recibo de compra original y
la tarjeta de garantía completada de manera apropiada.
La garantía no cubre los daños ocasionados por:
Accidentes o eventos imprevistos (por ejemplo, rayos, agua, fuego)
Uso o transporte inadecuados
Incumplimiento de las instrucciones de seguridad y mantenimiento
Otro tratamiento o modificación inadecuados del producto.
Después del vencimiento del período de garantía, tiene la posibilidad de mandar a
reparar su producto si usted corre con los gastos.
Esta garantía le otorga derechos legales específicos y es posible que también tenga
otros derechos que pueden variar de un estado a otro, pero no tiene como fin
exceder los requisitos legales mínimos que aquí se incluyen.
Esta garantía no limita la obligación legal del vendedor derivada de cualquier
garantía implícita. El período de garantía solo se puede extender hasta donde lo
permita la ley.
Ni la compañía de servicio ni ALDI asumen ninguna responsabilidad por los datos o
configuraciones que puedan haberse almacenado en cualquier producto retornado.
Downloaded from www.Manualslib.com manuals search engine


-
 1
1
-
 2
2
-
 3
3
-
 4
4
-
 5
5
-
 6
6
-
 7
7
-
 8
8
-
 9
9
-
 10
10
-
 11
11
-
 12
12
-
 13
13
-
 14
14
-
 15
15
-
 16
16
-
 17
17
-
 18
18
-
 19
19
-
 20
20
-
 21
21
-
 22
22
-
 23
23
-
 24
24
-
 25
25
-
 26
26
-
 27
27
-
 28
28
-
 29
29
-
 30
30
-
 31
31
-
 32
32
-
 33
33
-
 34
34
-
 35
35
-
 36
36
-
 37
37
-
 38
38
-
 39
39
-
 40
40


en otros idiomas
- English: Ambiano AIR User manual
Otros documentos
-
Masterbuilt 20010610 El manual del propietario
-
Masterbuilt MB23015018 El manual del propietario
-
NuWave 36011 El manual del propietario
-
Bella 5.3 QT Touchscreen Air Convection Fryer El manual del propietario
-
-
-
KALORIK MAXX Pizza Air Fryer Oven Manual de usuario
-
-