Jensen JEP-150 Guía del usuario
- Categoría
- Equipo de música suplementario
- Tipo
- Guía del usuario

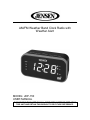
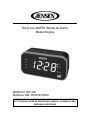
AM/FM Weather Band Clock Radio with
Weather Alert
MODEL: JEP-150
USER MANUAL
PLEASE READ THIS USER MANUAL COMPLETELY BEFORE OPERATING
THIS UNIT AND RETAIN THIS BOOKLET FOR FUTURE REFERENCE.

E-1
WARNING
TO PREVENT FIRE OR SHOCK HAZARD, DO NOT USE THIS PLUG WITH AN
EXTENSION CORD, RECEPTACLE OR OTHER OUTLET UNLESS THE BLADES
CAN BE
FULLY INSERTED TO PREVENT BLADE EXPOSURE. TO PREVENT FIRE
OR SHOCK
HAZARD, DO NOT EXPOSE THIS APPLIANCE TO RAIN OR MOISTURE
.
The Caution Marking is located at the back enclosure of the apparatus.
The Rating plate is located at the bottom enclosure of the apparatus
IMPORTANT SAFETY INSTRUCTIONS
1. Read these instructions.
2. Keep these instructions.
3. Heed all warnings.
4. Follow all instructions.
5. Do not use this apparatus near water.
6. Clean only with dry cloth.
7. Do not block any ventilation openings. Install in accordance with the manufacturer’s
instructions.
8. Do not install near any heat sources such as radiators, heat registers, stoves, or
other apparatus (including amplifiers) that product heat.
9. Do not defeat the safety purpose of the polarized or grounding-type plug. A polarized
plug has two blades with one wider than the other. A grounding type plug has two
blades and a third grounding prong. The wide blade or the third prong is provided for
your safety. If the provided plug does not fit into your outlet, consult an electrician for
replacement of the obsolete outlet.
10. Protect the power cord from being walked on or pinched particularly at plugs,
convenience receptacles, and the point where they exit from the apparatus.
11. Only use attachments/accessories specified by the manufacturer.
12. Use only with a cart, stand, tripod, bracket, or table recommended
by the manufacturer, or sold with the product. When a cart is used,
use caution when moving the cart/apparatus combination to avoid
injury from tip-over.
13. Unplug this apparatus during lightning storms or when unused for
long periods of time.
14. Refer all servicing to qualified service personnel. Servicing is required when the
apparatus has been damaged in any way, such as power-supply cord or plug is
damaged, liquid has been spilled or objects have fallen into the apparatus, the
apparatus has been exposed to rain or moisture, does not operate normally, or has
been dropped.

E-2
15. This appliance shall not be exposed to dripping or splashing water and that no object
filled with liquids such as vases shall be placed on the apparatus.
16. Do not overload wall outlet. Use only power source as indicated.
17. Use replacement part as specified by the manufacturer.
18. Upon completion of any service or repairs to this product, ask the service technician
to perform safety checks.
19. Power Sources - This product should be operated only from the type of power
source indicated on the marking label. If you are not sure of the type of power supply
to your home, consult your product dealer or local power company. For products
intended to operate from battery power, or other sources, refer to the operating
instruction.
20. Object and Liquid Entry - Never push objects of any kind into this product through
openings as they may touch dangerous voltage points or short-out parts that could
result in a fire or electric shock. Never spill liquid of any kind on the product.
21. Damage Requiring Service - Unplug this product from the wall outlet and refer
servicing to qualified service personnel under the following conditions:
a) When the power-supply cord or plug is damaged,
b) If liquid has been spilled, or objects have fallen into the product,
c) If the product has been exposed to rain or water,
d) If the product does not operate normally by following the operating instructions.
Adjust only those controls that are covered by the operating instructions as an
improper adjustment of other controls may result in damage and will often require
extensive work by a qualified technician to restore the product to its normal
operation.
e) If the product has been dropped or damaged in any way, and
f) When the product exhibits a distinct change in performance - this indicates a need
for service.
22. Main plug is used as disconnect device and it should remain readily operable during
intended use. In order to disconnect the apparatus from the mains completely, the
mains plug should be disconnected from the mains socket outlet completely.
23. The battery (battery or batteries or battery pack) shall not be exposed to excessive
heat such as sunshine, fire or the like.
24. Excessive sound pressure from earphones and headphone can cause hearing loss.
This symbol indicates that this product incorporates
doub
le
insulation
between hazardous mains voltage and
user
accessible
p
a
r
ts.
CAUTION:
TO PREVENT ELECTRIC SHOCK, MATCH WIDE
BLADE OF AC PLUG TO WIDE SLOT. FULLY INSERT.
SAVE THESE INSTRUCTIONS

E-3
COMPLIANCE WITH FCC REGULATIONS
This device complies with Part 15 of the FCC Rules. Operation is subject to the following
two conditions:
(1) this device may not cause harmful interference, and
(2) this device must accept any interference received, including interference that
may cause undesired operation.
NOTE: This equipment has been tested and found to comply with the limits for a Class B
digital device, pursuant to Part 15 of the FCC Rules. These limits are designed to
provide reasonable protection against harmful interference in a residential installation.
This equipment generates uses and can radiate radio frequency energy and, if not
installed and used in accordance with the instructions, may cause harmful interference
to radio communications. However, there is no guarantee that interference will not occur
in a particular installation. If this equipment does cause harmful interference to radio or
television reception, which can be determined by turning the equipment off and on, the
user is encouraged to try to correct the interference by one or more of the following
measures:
- Reorient or relocate the receiving antenna.
- Increase the separation between the equipment and receiver.
- Connect the equipment into an outlet on a circuit different from that to which the
receiver is connected.
- Consult the dealer or an experienced radio/TV technician for help.
CAUTION: Changes or modifications not expressly approved by the party
responsible for compliance could void the user’s authority to operate the
equipment.
PROTECT YOUR FURNITURE
This system is equipped with non-skid rubber ‘feet’ to prevent the product from
moving when
you
operate the controls. These ‘feet’ are made from non-migrating
rubber material specially
formulated
to avoid leaving any marks or stains on your
furniture. However certain types of oil based
furniture
polishes, wood preservatives or
cleaning sprays may cause the rubber ‘feet’ to soften, and
leave
marks or a rubber
residue on the
furniture.
To prevent any damage to your furniture we strongly recommend that you purchase
small
self-
adhesive felt pads, available at hardware stores and home improvement
centers everywhere,
and
apply these pads to the bottom of the rubber ‘feet’ before
you place the product on fine
wooden furniture.

E-4
DEAR JENSEN CUSTOMER
Selecting fine audio equipment such as the unit you've just purchased is only the
start of
your
musical enjoyment. Now it's time to consider how you can maximize the
fun and excitement
your
equipment offers. This manufacturer and t h e E le c t r onic
Industries Association's
Consumer
Electronics Group want you to get the most out of
your equipment by playing it at a safe level.
One
that lets the sound come through
loud and clear without annoying blaring or distortion and,
most
importantly, without
affecting your sensitive hearing. Sound can be deceiving. Over time
your
hearing
"comfort level" adapts to higher volumes of sound. So what sounds "normal" can
actually
be loud and harmful to your hearing. Guard against this by setting your
equipment at a safe
level
BEFORE your hearing
adapts.
To
establish
a safe l
e
v
e
l
:
• Start your volume control at a low
setting.
• Slowly increase the sound until you can hear it comfortably and clearly, and without
distortion.
Once you have
established
a
comfortable sound
l
e
v
e
l
:
•
Set the dial and leave it
there.
Taking a minute to do this now will help to prevent hearing damage or loss in the
future.
After
all, we want you listening for a
lifetime.
We Want You
Listening
For a
Li
f
e
t
i
m
e
Used wisely, your new sound equipment will provide a
lifetime
of
fun and enjoyment. Since hearing damage
from loud noise
is
often undetectable until it is too late,
this manufacturer and
the Electronic Industries
Association
'
s
Consumer
Electronics
Group
recommend
you avoid prolonged exposure to excessive
noise.
Customer's
Re
c
o
r
d
:
The serial number of this product is found on its bottom cover. You should note the
serial
number
of this unit in the space provided as a permanent record of your
purchase to aid in identification
in the
event of theft of
loss.
Model Number: JEP-150 Serial Number:

E-5
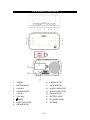
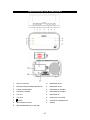
LOCATION OF CONTROLS
1 TIME/M+ 10 FM INDICATOR
2 MIN/DOWN/DIM 11 AM INDICATOR
3 HOUR/UP 12 ALARM 1 INDICATOR
4 SNOOZE/SLEEP 13 ALARM 2 INDICATOR
5 VOL-/AL1 14 PM INDICATOR
6 VOL+/AL2 15 BATTERY DOOR
7
/MODE
16 AC POWER CORD
8 ALERT INDICATOR 17 ANTENNA
9 WB INDICATOR

E-6
POWER SOURCE
AC POWER CONNECTION
This product operates on 120V ~60Hz AC power supply. Plug the AC power cord (#16)
into a household outlet AC source.
INSTALLING THE BACK-UP BATTERY
This unit is equipped with a battery back-up system, it requires
3V
2 x AA (UM-3)
batteries (not included)
to maintain the time settings and radio presets during an AC
power outage.
1. Remove the battery door (#15).
2. Install two pieces AA size batteries into the battery compartment following the
polarity diagram inside. Use only the specified size and type of batteries.
3. Replace the battery door (#15).
Note: The unit will operate without a battery installed but your time & alarm setting will
be lost and will have to be reset in the event of power interruption or failure.
IMPORTANT:
Be sure that the batteries are installed correctly. Wrong polarity may damage the unit
and void the warranty. For best performance and longer operating time, we recommend
the use of good quality alkaline battery.
BATTERY WARNING
1. Be sure that the batteries are installed correctly. Wrong polarity may damage the unit
2. Use only the size and type of batteries specified.
3. If the unit is not to be used for an extended period of time, remove the batteries.
Old or leaking batteries can cause damage to the unit and may void the warranty.
4. Do not try to recharge batteries not intended to be recharged; they can overheat
and rupture. (Follow battery manufacturer’s directions)
5. Do not dispose of batteries in fire, batteries may leak or explode
POWER ON/STANDBY
1. In standby mode, press and hold the /MODE BUTTON (#7) to turn on the unit.
2. Press and hold the /MODE BUTTON (#7) again to return the unit to standby mode.
CLOCK OPERATION
TIME SETTING
1. At Standby mode, press
Time/M+ button (#1), 12 or 24 Hr will flash on the display.
2.
Press MIN/DOWN/DIM (#2) or HOUR/UP BUTTON (#3) repeatedly to select 12 or
24-hour display mode.
3. Press TIME/M+ button (#1) to confirm, the time will flash on the display.
4. Press the HOUR/UP BUTTON (#3) repeatedly to set the hour, press the
MIN/DOWN/DIMBUTTON (#2) repeatedly to set the minute.
Notes:
•
If the PM Indicator (#14) is not showing in 12-hour mode, the time displayed
is AM.
•
It will auto confirm after it flashes 4 times. Once the time stop flashing, you can
repeat step 1 to step 4 to reset the time.

E-7
ALARM SETTING
1. At Standby mode, press the VOL-/AL 1 BUTTON (#5) to enter into the AL1 mode.
The ALARM 1 INDICATOR (#12) will turn on and the time will flash on the display.
2. Press the HOUR/UP BUTTON (#3) to select your desired hour, press the
MIN/DOWN/DIM BUTTON (#2) to select your desired minute.
3. Press the VOL-/AL1 BUTTON (#5) again, the display will show “buZ” or “rAd” or
“OFF” and flash.
4. Press the MIN/DOWN/DIM BUTTON (#2) or HOUR/UP BUTTON (#3) repeatedly
to select wake to buzzer “buZ”
wake to FM radio “rAd”/FM LED light
wake to
AM radio “rAd”/AM LED light
turn off the alarm 1 “OFF”.
5.
To turn off Radio or Buzzer alarm after it sounds by pressing the /MODE BUTTON
(#7)
.
6.
The Alarm or Radio will sound for 30 minutes if the /MODE BUTTON (#7)
was not
pressed. It will stop automatically and wait for same alarm time on next day
7.
Alarm 2 setting is same as Alarm.
Note: You should tune to your desired radio station first before starting to set the alarm
time and choosing the radio alarm mode.
SNOOZE FUNCTION
When the alarm sounds, press the SNOOZE/SLEEP BUTTON (#4) to suspend the
alarm and activate the snooze function, alarm will stop & will sound again 9 minutes
later. If you press SNOOZE/SLEEP BUTTON (#4) again, the alarm will stop momentarily
and sound again in 9 minutes and so on.
NOTES:
• The Snooze interval time is fixed at 9 minutes.
• To turn the Snooze function OFF, press the /MODE BUTTON (#7)
once.
LISTENING TO THE RADIO
1. Press and hold /MODE BUTTON (#7)
to turn on the JEP-150.
2.
Press the
/MODE BUTTON (#7)
to switch to your desired frequency band
(FM/AM/WB).
3.
The selected frequency band indicator will light up.
MANUAL SEARCH FOR RADIO STATIONS
Tap the HOUR/UP BUTTON (#3) or MIN/DOWN/DIM BUTTON (#2) repeatedly to
choose your desired radio station.
AUTOMATIC SEARCH FOR RADIO STATIONS (AM/FM BAND)
To automatically search for stations with strong signals, press and hold the
HOUR/UP
BUTTON (#3) or MIN/DOWN/DIM BUTTON (#2)
until the frequency readout on the
display begins to scan and then release the button. The tuner will stop on the first strong
station it finds.
Press the VOL-/AL1/ VOL+/AL2 BUTTONS (#5/#6) to adjust the volume level.
Notes:
• The automatic search function is not available in Weather mode. One of the 7
available channels must be selected manually.

E-8
• Use manual tuning to select weaker stations that might be skipped during automatic
tuning.
• If the automatic tuning does not stop on the exact frequency of the station, for
example, it stops on 88.9 MHz instead of 88.8 MHz, use the manual tuning method to
“fine tune” to the exact frequency of the desired station.
HINTS FOR BEST RECEPTION:
To insure maximum FM tuner reception, unwrap and fully extend the ANTENNA (#17)
for best FM radio reception.
TO SET THE RADIO PRESETS (AM/FM BAND)
1. Press and hold the /MODE BUTTON (#7) to turn on the JEP-150.
2. Tap the /MODE BUTTON (#7)
to select AM/FM band. The AM/FM INDICATOR
(#11/10) will light up.
3.
Tap the HOUR/UP BUTTON (#3) or MIN/DOWN/DIM BUTTON (#2) repeatedly to
choose your desired radio station
.
4. Press hold the TIME/M+/BUTTON (#1), the preset location will blink on the LED
display.
5. Use
HOUR/UP BUTTON (#3) or MIN/DOWN/DIM BUTTON (#2
) to select the
desired preset number (P01-P30).
6. Press the TIME/M+/BUTTON (#1)) again to confirm the preset.
7. Repeat steps 2 through 6 to preset up to 60 stations (30 AM and 30FM stations).
To recall one of the preset stations
1. Press and hold the
OFF
/MODE BUTTON (#7)
to turn on the JEP-150.
2. Tap the /MODE BUTTON (#7)
to select AM/FM band.
3. Press the TIME/M+/BUTTON (#1), the preset location will light up on the LED display.
4.
Tap the HOUR/UP BUTTON (#3) or MIN/DOWN/DIM BUTTON (#2) repeatedly
until you reach the desired preset number/radio station.
SLEEP TIMER
1.
Press and hold the SNOOZE/SLEEP BUTTON (#4), the display will show 120
minutes. Repeatedly tap the SNOOZE/SLEEP BUTTON (#4) to select the sleep
timer 110, 100, 90, 80, 70, 60, 50, 40, 30, 20, 10, OFF (in minutes).
The unit will
play for the selected length of time then turn off automatically.
2.
Repeat step 1 to change or cancel the sleep timer
3. To turn the unit “Off” before the selected length of time, press the /MODE
BUTTON (#7) at any time.
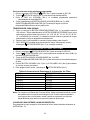
LISTENING TO A WEATHER CHANNEL
1. Press and hold the /MODE BUTTON (#7)
to turn on the JEP-150.
2. Tap the /MODE BUTTON (#7)
to select WB band, WB INDICATOR will turn on
.
3.
Tap the HOUR/UP BUTTON (#3) or MIN/DOWN/DIM BUTTON (#2)
to select the
weather band channel for your area.
4. Press the VOLUME +/AL 2 BUTTON (#6) OR VOLUME -/AL1 BUTTON (#5) to
obtain the desired sound level.
5. To turn the radio off, press and hold the /MODE BUTTON (#7).

E-9
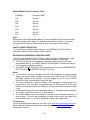
Weather Band Channel Frequency Table
CHANNEL Frequency (MHZ)
Ch1 162.400
Ch2 162.425
Ch3 162.450
CH4 162.475
CH5 162.500
CH6 162.525
CH7 162.550
Note:
With regard to the NOAA Weather Band: You need to identify which channel receives
your local weather report. When you change locations either to another city or state,
you may need to choose a different band to get the local report in that location.
HINTS FOR BEST RECEPTION:
To insure maximum weather band reception, the ANTENNA (#17) should be fully
extended to obtain the best possible station reception.
RECEIVING AN EMERGENCY WEATHER ALERT
In both On and Off modes, the JEP-150 will receive emergency broadcast alerts, and
sound an alarm warning if there is a severe weather emergency in your area.
1. The JEP-150 will turn on automatically, activate the alarm and turn on the pre-
selected WB channel. The ALERT INDICATOR (#8) flashes. The alarm will stay on
for the duration of the alert broadcast.
2. The ALERT INDICATOR (#8) will not stop flashing until you press SNOOZE/SLEEP
BUTTON (#4) or /MODE BUTTON (#7) to turn it off.
Notes:
•
In case there is a power interruption, the JEP-150 will continue to receive weather
alerts if you have a battery installed in the unit (see “INSTALLING THE BACK-UP
BATTERY” section of the manual). The clock display will be off, but the ALERT
INDICATOR (#8) will be flashing if there is an alert.
•
The radio will continue to drain the battery if left unplugged or without power for a
long period of time. It’s highly recommended that you connect the JEP-150 to AC
power to prevent the battery from completely draining and turning the radio off while
in use.
•
NOAA Weather band is a service broadcast of the U.S. Government and available in
all 50 states, Puerto Rico and the U.S. Virgin Islands.
•
The NOAA Weather Service broadcasts a test alert every Wednesday between 11
am and Noon. To receive the broadcasts, the radio must be within the range of the
local broadcast site, 10 - 40 miles, depending on terrain and obstructions.
To learn more:
Or find the weather band channel for your area, go to: http://www.nws.noaa.gov/nwr/ for
NOAA (National Oceanic & Atmospheric Administration) and http://www.ec.gc.ca/ for
Environment Canada.

E-10
DIMMER OPERATION
In standby mode, press the
MIN/DOWN/DIM BUTTON (#2
) repeatedly to select one of
the two brightness settings (high or low).
CARE AND MAINTENANCE
• Children should be supervised when using this appliance.
• Never wrap the AC POWER CORD around any animal or person. Special care
should be taken with long wire.
• Avoid operating your unit under direct sunlight or in hot, humid or dusty places.
• Keep your unit away from heating appliances and sources of electrical noise such as
fluorescent lamps or motors.
• Unplug the unit from the electrical power outlet immediately in case of malfunction.
CLEANING THE UNIT
• To prevent fire or shock hazard, disconnect your unit from the AC power source when
cleaning.
• The finish on the unit may be cleaned with a dust cloth and cared for as other
furniture, use caution when cleaning and wiping the plastic parts.
• If the cabinet becomes dusty wipe it with a soft dry dust cloth. Do not use any wax or
polish sprays on the cabinet.
• If the front panel becomes dirty or smudged with fingerprints it may be cleaned with a
soft cloth slightly dampened with a mild soap and water solution. Never use abrasive
cloths or polishes as these will damage the finish of your unit.
CAUTION:
Never allow any water or other liquids to get inside the unit while cleaning.
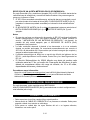
CARE AND MAINTENANCE
If you experience difficulties in the use of this music system, please check the following
or call 1-800-777-5331 for Customer Service.
SYMPTOM POSSIBLE CAUSE POSSIBLE SOLUTION
Power does not come on. AC line cord not plugged in. Insert plug firmly into AC
outlet.
The AC outlet has not
power
Try the unit on another
outlet
Unit is of Turn on the unit. No sound.
VOLUME control at
minimum position.
Increase Volume
Noise or sound distorted
FM
AM
- Station not tuned properly
- Antenna is not extended
- AM reception is weak
- Retune Broadcast station
- Fully extend the antenna
- Relocate the position of
the unit

E-11
RESETTING
If the system does not respond or exhibits erratic or intermittent operation, you may have
experienced an electrostatic discharge (ESD) or a power surge that triggered the internal
microcontroller to shut down automatically. If this occurs, simply disconnect the ac power
cord and remove the system backup battery, wait for at least 3 minutes and then setup
the unit again as if it is a brand-new unit.
SPECIFICATION
Power source: 120V~, 60Hz
Power Consumption: 3W
Back-up source: 3V
2 x AA (UM-3) batteries (not included)
Frequency Range: FM: 87.5-108 MHz
AM: 520-1710 kHz
WB:162.400MHz-162.550MHz;
Speaker Output power: 1×150mW RMS
At Spectra, environmental and social
responsibility is a core value of our business.
We are dedicated to continuous implementation
of responsible initiatives with an aim to
conserve and maintain the environment through
responsible recycling.
Please visit us at
http://www.spectraintl.com/green.htm
for more information on Spectra’s green
initiatives or to find a recycler in your area.
90 DAY LIMITED WARRANTY AND SERVICE
VALID IN THE U.S.A. ONLY
SPECTRA MERCHANDISING INTERNATIONAL, INC. warrants this unit to be
free from defective materials or
factory workmanship for a period of 90 days
from the date of original customer purchase and provided the
product is
utilized within the U.S.A. This warranty is not assignable or transferable. Our
obligation under this
warranty is the repair or replacement of the defective
unit or any part thereof, except batteries, when it is
returned to the SPECTRA
Service Department, accompanied by proof of the date of original consumer
purchase, such as a duplicate copy of a sales receipt.
You must pay all shipping charges required to ship the product to SPECTRA for
warranty service. If the product is repaired or replaced under warranty, the return
charges will be at SPECTRA’s expense. There are no other express warranties
other than those stated herein.

E-12
This warranty is valid only in accordance with the conditions set forth below:
1. The warranty applies to the SPECTRA product only while:
a. It remains in the possession of the original purchaser and proof of
purchase is demonstrated.
b. It has not been subjected to accident, misuse, abuse, improper service,
usage outside the descriptions and warnings covered within the user
manual or non-SPECTRA approved modifications.
c. Claims are made within the warranty period.
2. This warranty does not cover damage or equipment failure caused by
electrical wiring not in compliance with
electrical codes or SPECTRA user
manual specifications, or failure to provide reasonable care and
necessary maintenance as outlined in the user manual.
3.
Warranty of all SPECTRA products applies to residential use only and is void when
products are used in nonresidential environment or installed outside the United
States.
This warranty gives you specific legal rights, and you may also have other rights
which vary from state to state. TO OBTAIN SERVICE please remove all batteries
(if any) and pack the unit carefully and send it freight prepaid to SPECTRA at the
address shown below. IF THE UNIT IS RETURNED WITHIN THE WARRANTY
PERIOD shown above, please include a proof of purchase (dated cash register
receipt) so that we may establish your eligibility for warranty service and repair of
the unit without cost. Also include a note with a description explaining how the
unit is defective. A customer service representative may need to contact you
regarding the status of your repair, so please include your name, address,
phone number and email address to expedite the process.
IF THE UNIT IS OUTSIDE THE WARRANTY PERIOD, please include a check
for $
12.00
to cover the cost of repair, handling and return postage. All out of
warranty returns must be sent prepaid.
It is recommended that you contact SPECTRA first at 1-800-777-5331 or by
email at custserv@spectraintl.com for updated information on the unit requiring
service. In some cases, the model you have may be discontinued, and
SPECTRA reserves the right to offer alternative options for repair or replacement.
SPECTRA MERCHANDISING INTERNATIONAL, INC.
4230 North Normandy Avenue,
Chicago, IL60634, USA. 1-800-777-5331
To register your product, visit the link on the website below to enter your
information.
http://www.spectraintl.com/wform.htm
1117 Printed in China

Reloj con AM/FM, Banda de Alerta
Meteorológica
MODELO: JEP-150
MANUAL DEL PROPIETARIO
POR FAVOR LEA CUIDADOSAMENTE ESTE MANUAL DEL USUARIO EN
SU TOTALIDAD, ANTES DE OPERAR ESTA UNIDAD Y GUÁRDELO PARA
REFERENCIA POSTERIOR

S-1
ADVERTENCIA
PARA PREVENIR EL PELIGRO DE INCENDIO O DESCARGA, NO UTILICE ESTE
ENCHUFE CON UN CABLE DE EXTENSIÓN, RECEPTÁCULO U OTRAS TOMAS A
MENOS QUE LOS CLAVIJAS SE PUEDAN INTRODUCIR COMPLETAMENTE PARA
PREVENIR EXPOSICIÓN. PARA PREVENIR INCENDIOS O DESCARGAS, NO
EXPONGA ESTE APARATO A LLUVIA O HUMEDAD.
La marca de precaución está situada en la tapa trasera del dispositivo.
La placa se encuentra en el recinto de la parte inferior del aparato
INSTRUCCIONES IMPORTANTES DE SEGURIDAD
1. Lea estas instrucciones
2. Guarde estas instrucciones
3. Atienda todas las advertencias.
4. Siga todas las instrucciones.
5. No utilice este aparato cerca del agua.
6. Límpielo solo con un paño seco.
7. No obstruya ninguno de los orificios de ventilación. Instálelo de acuerdo con las
instrucciones del fabricante.
8. No lo instale cerca de fuentes de calor como radiadores, registros de calefacción,
estufas u otros aparatos (incluyendo amplificadores) que producen calor.
9. No anule el propósito de seguridad del enchufe polarizado o del enchufe con
conexión a tierra. Un enchufe polarizado tiene dos espigas, una más ancha que la
otra. Un enchufe con conexión a tierra tiene dos espigas y una tercera clavija para
la descarga a tierra. La espiga más ancha o la tercera clavija son para su
seguridad. Si el enchufe no se adapta a su tomacorriente, consulte a un
electricista para que cambie el tomacorriente obsoleto.
10. Proteja el cable de energía de manera que no se camine sobre él ni quede
prensado, especialmente en los enchufes, receptáculos utilitarios y en el lugar
donde los enchufes salen del aparato.
11. Utilice solamente accesorios/conexiones especificados por el fabricante.
12. Utilice el equipo solamente con mesas móviles, soportes, trípodes,
abrazaderas o mesa especificados por el fabricante, o vendidos junto
con el aparato. Cuando se utiliza una mesa móvil, tenga cuidado de
mover a la vez la mesa móvil y el aparato para evitar lesiones
provocadas por caídas o inclinación. .
13. Desenchufe este aparato durante tormentas eléctricas o cuando no lo vaya a usar
por largos períodos de tiempo

S-2
14. Realice todo el mantenimiento con personal de servicio calificado. Se requiere
mantenimiento cuando el aparato haya sido dañado en cualquier forma, como por
ejemplo cuando haya daños en los enchufes o cable eléctrico, cuando se hayan
derramado líquidos o hayan caído objetos dentro del equipo, cuando el aparato
haya sido expuesto a la lluvia o humedad, cuando no funcione normalmente o
como resultado de una caída
15. No exponga el aparato a goteos o salpicaduras y nunca coloque objetos llenos de
líquido encima del aparato, por ejemplo jarrones.
16. No sobrecargue el tomacorriente de la pared. Use solamente la fuente de energía
eléctrica como se indica.
17. Use solo las piezas de repuesto especificadas por el fabricante.
18. Al finalizar cualquier servicio o reparación en este producto, pídale al técnico que
lleve a cabo revisiones de seguridad.
19. Suministro de energía: solo utilice este producto con el tipo de suministro de energía
indicado en la etiqueta de especificaciones. Si no está seguro/a de qué clase de
suministro de energía tiene en su hogar, consulte con el proveedor o con la empresa
proveedora del servicio eléctrico. Si se trata de productos que funcionan con baterías
u otras fuentes, consulte las instrucciones de operación.
20. Entrada de objetos o líquido: nunca empuje objetos de ninguna clase hacia adentro
de este producto a través de las aberturas ya que podrían hacer contacto con
terminales que tienen voltaje peligroso o piezas energizadas que pueden ocasionar
un incendio o descarga eléctrica. Nunca derrame líquido de ninguna clase sobre el
producto.
21. Daños que requieren servicio: desenchufe el aparato del tomacorriente de la pared y
consulte personal calificado de servicio bajo las condiciones siguientes:
a) Si el cable eléctrico o el enchufe del aparato están dañados.
b) Por la entrada de líquidos u objetos al aparato.
c) Cuando el aparato haya estado expuesto a lluvia o agua.
d) Si el producto no funciona con normalidad después de cumplir con las
instrucciones de operación. Únicamente ajuste los controles indicados en las
instrucciones de operación, ya que cualquier ajuste a otros controles puede
resultar en daños y por lo regular requiere trabajo intensivo a cargo de un
técnico para restaurar el producto a su funcionamiento normal.
e) En caso de que el producto se haya caído o tenga daños de cualquier tipo.
f) Cuando el producto presente un cambio distintivo en su desempeño. Esto
indica que necesita llevarlo a servicio.
22. El enchufe principal se utiliza como dispositivo de desconexión y deberá estar en
buenas condiciones. Para desconectar el aparato completamente de la red de
distribución, debe desenchufar completamente el adaptador del tomacorriente.
23. La batería (o baterías) no se deben exponer al calor excesivo como el sol, el fuego o
similares.
24. La presión excesiva de sonido causada por los audífonos puede causar la pérdida
del sentido de la audición.
Este símbolo indica que este producto incorpora doble aislante entre
la tensión peligrosa y las partes accesibles al usuario.

S-3
PRECAUCIÓN:
PARA PREVENIR DESCARGA ELÉCTRICA,
EMPAREJAR LA LÁMINA ANCHA DEL ENCHUFE
CON LA RANURA ANCHA. INSERTAR
COMPLETAMENTE EL ENCHUFE AL ZÓCALO DE
LA ALIMENTACIÓN PRINCIPAL.
GUARDE ESTAS INSTRUCCIONES
COMUNICACIONES (FCC POR SUS SIGLAS EN INGLÉS)
Este dispositivo se conforma con la parte 15 de las reglas de la FCC. La operación
cumple con las dos condiciones siguientes:
(1) este dispositivo puede no causar interferencia dañosa, y
(2) este dispositivo debe aceptar cualquier interferencia recibida, incluyendo
interferencia que pueda causar la operación indeseada.
NOTA: Este equipo ha sido probado y se ha determinado que satisface los límites para
un dispositivo digital clase B, de acuerdo a lo que dispone la Parte 15 de los
Reglamentos de la FCC, Estos límites tienen el propósito de proporcionar una
protección razonable contra interferencia dañina en una instalación residencial. Este
equipo genera, usa y puede emitir energía de radiofrecuencia, y si no se instala y se usa
de acuerdo con estas instrucciones, puede causar interferencia dañina a las
radiocomunicaciones.
Sin embargo, no hay ninguna garantía de que no vaya a ocurrir interferencia en ninguna
instalación
Determinada. Si este equipo causa interferencia no deseada contra la recepción de
radio o televisión, lo cual se puede determinar encendiendo y apagando el aparato, se
exhorta al usuario a tratar de corregir el problema de la interferencia tomando una o
más de las siguientes medidas:
- Reoriente o reubique la antena de recepción
- Aumente la distancia de separación entre el equipo y el receptor
- Conecte el equipo a un receptáculo en un circuito distinto al que usa el receptor.
- Consulte al concesionario o a un radiotécnico experimentado para que le ayuden.
ADVERTENCIA: Los cambios o modificaciones a esta unidad que no estén
expresamente aprobados por la parte responsable de la conformidad podrían anular la
autoridad del usuario para operar el equipo.

S-4
¡PROTEJA SUS MUEBLES!!
Este sistema está equipado con soportes de goma anti deslizante para prevenir que el
equipo se mueva mientras usted opera los controles. Éstos soportes están realizados
en un material de goma no deslizante especialmente formulado para evitar dejar marcas
o manchas en sus muebles. Sin embargo, cierto tipo de barnices de muebles con base
de aceite, persevantes de la madera, o vaporizadores de limpieza pueden ablandar
dichos soportes, y dejar marcas o un residuo de goma en los muebles. Para prevenir
cualquier tipo de daño a sus muebles, recomendamos que compre pequeñas
almohadillas de fieltro auto-adhesivas, disponibles en ferreterías y todo tipo de centros
de compra del hogar y aplique estas almohadillas en la parte inferior del soporte de
goma antes de colocar el producto sobre el mobiliario de madera fina
.
ESTIMADO CLIENTE DE JENSEN
Seleccionar un equipo de audio fino tal como la unidad que usted acaba de comprar es
solamente el inicio de su gratificación musical. Ahora es el momento de considerar
como puede maximizar la diversión y el entusiasmo que su equipo le ofrece. Este
fabricante y el Grupo de Consumidores de Electrónica de la Asociación de Industrias
Electrónicas desean que usted obtenga lo máximo de su equipo y operándolo en un
nivel seguro. Un nivel que permita que el sonido llegue en forma alta y clara sin
estruendo o distorsión y, más importante, sin afectar la sensibilidad de su audición. El
sonido puede ser engañoso. A lo largo del tiempo su “nivel de confort” auditivo se
adapta a volúmenes de sonido más altos. Por lo tanto lo que suena “normal” puede en
realidad ser alto y causar daño a su audición. Prevenga esto configurando su equipo
en un nivel seguro ANTES de que su oído se adapte.
Para establecer un nivel seguro:
• Inicie su control de volumen en una configuración baja.
• Lentamente aumente el sonido hasta que usted pueda escucharlo en forma
confortable y clara, y sin distorsión.
Una vez que este ha establecido un nivel de sonido confortable:
•
Fije el selector y déjelo así
Tomar un minuto para realizar esto ahora lo ayudará a prevenir daño en la audición o
pérdidas en el futuro. Después de todo, nosotros deseamos que usted escuche para
toda la vida.
Nosotros deseamos que usted escuche toda la vida
Usado conscientemente, su nuevo equipo de sonido
brindará toda una vida de diversión y gratificación. Debido a
que el daño en la audición por ruidos altos es a menudo
indetectable hasta que es demasiado tarde, este fabricante
y el Grupo de Consumidores de Electrónica de la
Asociación de Industrias Electrónicas le recomiendan evitar la exposición prolongada
al ruido excesivo.
Registro del cliente:
El número de serie de este producto se encuentra en la parte inferior de la cubierta.
Usted notará el número de serie de esta unidad en el espacio suministrado con el
registro permanente de su compra para ayudar en la identificación en el caso de robo
o pérdida.
Modelo número: JEP-150 Número de serie: __________________

S-5
UBICACION DE LOS CONTROLES
1
TIME (LA HORA)/M+ 10 INDICADOR DE FM
2
MIN (MINUTOS)/BAJAR/DESVANECEDOR 11 INDICADOR DE AM
3
HORAS (HOURS)/SUBIR 12 INDICADOR DE ALARMA 1
4
DORMITAR / DORMIR 13 INDICADOR DE ALARMA 2
5
VOL-/AL1 14 INDICADOR PM
6
VOL+/AL2 15 PUERTA DE LA BATERÍA
7
/MODO
16 CORDÓN DE CORRIENTE AC
8
INDICADOR DE ALERTA 17 ANTENA
9
INDICADOR BANDA DEL CLIMA (WB)

S-6
FUENTE DE ALIMENTACIÓN
CONEXIÓN CON LA CORRIENTE AC
Este producto opera con corriente 120V~ 60Hz AC. Enchufe el cable AC (de corriente
alterna) No. 16 a un tomacorriente doméstico compatible.
INSTALACIÓN DE LAS BATERÍAS DE RESPALDO
Esta unidad está equipada con un sistema de baterías de respaldo que requiere
2 baterías AA (UM-3) de
3V
(no incluidas)
para mantener la configuración de la
hora y las estaciones de radio programadas, durante una falla en la energía
eléctrica AC.
1. Quite la puerta del compartimiento de las baterías (No. 15).
2. Instale 2 baterías AA en el compartimiento de las baterías siguiendo el diagrama
de polaridad dentro del compartimiento. Use solo el tamaño y tipo de baterías
especificadas.
3. Vuelva a colocar la puerta del compartimiento de las baterías (No. 15).
Nota: La unidad operará sin la batería instalada, pero la hora, la alarma y configuración
fijada para el radio deberán reconfigurarse en caso de falla o interrupción en el
suministro de corriente eléctrica.
IMPORTANTE:
Asegúrese de instalar correctamente las baterías. La polaridad equivocada podría dañar
el control remoto y anular la garantía. Para mejor desempeño y mayor vida útil,
recomendamos usar baterías alcalinas de buena calidad.
ADVERTENCIA CON RESPECTO A LAS BATERÍAS
1. Asegúrese de instalar correctamente las baterías. La polaridad equivocada podría
dañar la unidad y anular la garantía.
2. Use solo el tamaño y tipo de baterías especificadas.
3. Si no va a usar la unidad por un largo período de tiempo, quítele las baterías. Las
baterías viejas o derramadas podrían dañar la unidad y anular la garantía.
4. No intente recargar baterías no recargables; podrían romperse o recalentarse.
Siga las instrucciones del fabricante de baterías.
5. No elimine las baterías en el fuego ya que pueden derramarse o hacer explosión.
ENCENDIDO/EN ESPERA
1. Si está en espera, presione y sostenga el /BOTÓN DE MODO (No. 7) para
encender la unidad.
2. Pulse y sostenga el /BOTÓN DE MODO (No.7) para que la unidad vuelva a
quedar en modo en espera.

S-7
OPERACIÓN DEL RELOJ
CONFIGURAR LA HORA
1. En el modo en Espera pulse el botón
TIME (LA HORA)/M+ (No.1), y en la pantalla
aparecerán parpadeando 12 o 24 hr.
2.
Pulse repetidamente el BOTÓN MIN (MINUTOS)/BAJAR/DESVANECER (No. 2) o
el BOTÓN HORAS (HOURS)/SUBIR (No.3) para seleccionar el modo de pantalla
de 12 o 24 horas.
3. Pulse el botón TIME (LA HORA)/M+ (No.1) para confirmar la hora aparecerá
intermitente en la pantalla.
4. Pulse repetidamente el BOTÓN HORAS (HOURS)/SUBIR (No. 3) para definir las
horas del reloj, pulse el botón MIN (MINUTOS)/BAJAR/DESVANECER (No.2)
Nota:
Si el indicador PM (No.14) no aparece en modo de 12 horas, la
hora en pantalla es "AM".
Confirmará automáticamente después de parpadear 4 veces. Cuando termine
de parpadear la hora, puede repetir del paso 1 al 4 para reconfigurar la hora.
CONFIGURACIÓN DE LA ALARMA
1. En modo en Espera, pulse el BOTÓN VOL-/AL 1 (No. 5) para ingresar al modo
AL1. Se iluminará el INDICADOR DE ALARMA 1 (No. 12) y la hora aparecerá
parpadeando en la pantalla.
2. Pulse repetidamente el BOTÓN HORAS (HOURS)/SUBIR (No. 3) para fijar las
horas, pulse el botón MIN (MINUTOS)/BAJAR/DESVANECER (No.2) para
seleccionar los minutos.
3. Pulse de nuevo el BOTÓN VOL-/AL1 (No. 5), la pantalla mostrará
“
buZ
”
o
“
rAd
”
o
aparecerá
“
OFF
”
intermitente.
4.
Precione el BOTÓN (#2) MIN/DOWN/DIM BUTTON (MINUTOS/BAJAR/DISMINUIR)
ó el BOTÓN (#3) HOUR/UP BUTTON (HORA/AUMENTAR) repetidamente para
seleccionar Timbre de despartador “buZ” à ó despertar con radio FM “rAd” luz
LED FM à despertar con radio AM “rAd” luz LED AM à apagar “OFF’ la alarma 1
.
5.
Para apagar la alarma en Radio o Zumbido después de que suene al presionar
/BOTÓN MODO (No.7)
.
6.
La alarma o el radio sonarán durante 30 minutos si el /BOTÓN MODO (No.7)
no
se oprime. Se detendrá automáticamente y volverá a activarse a la misma hora del
día siguiente.
7.
La alarma 2 se configura igual que la alarma.
Nota: Sintonice su radiodifusora favorita antes de comenzar a configurar la hora de
activación de la alarma y elija el modo de alarma de radio.
FUNCIÓN DE DORMITAR
Cuando suene la alarma, pulse el botón DORMITAR/DORMIR (No.4) para suspender la
alarma y activar la función de dormitar, la alarma se detendrá y volverá a sonar 9
minutos después. Si pulsa el BOTÓN DORMITAR/DORMIR (No.4) una vez más, la
alarma se detendrá por un momento y volverá a sonar a los 9 minutos y así
sucesivamente.
NOTA:
• El intervalo del tiempo de Dormitar está configurado en 9 minutos.
• Para apagar la función Dormitar, pulse el /BOTÓN DE MODO (No.7)
una vez
.

S-8
PARA ESCUCHAR EL RADIO
1. Pulse y sostenga el /BOTÓN DE MODO (No.7)
para encender el JEP-150.
2.
Pulse el
/BOTÓN DE MODO (No.7)
para cambiar a la banda de frecuencia de su
preferencia (FM/AM/WB).
3.
El indicador de banda de frecuencia se encenderá.
BÚSQUEDA AUTOMÁTICA DE RADIODIFUSORAS
Toque repetidamente el BOTÓN HORAS (HOURS)/SUBIR (No.3) o MIN
(MINUTOS)/BAJAR/DESVANECER (No.2) para elegir su emisora favorita.
BÚSQUEDA AUTOMÁTICA DE RADIODIFUSORAS (BANDA AM/FM)
Para buscar automáticamente radiodifusoras con señal fuerte pulse y sostenga el
BOTÓN DE LAS HORAS (HOURS)/SUBIR (No.3) o el BOTÓN MIN
(MINUTOS)/BAJAR/DESVANECER (No.2)
hasta que la lectura de frecuencias en la
pantalla comience a escanear y luego suelte el botón. El sintonizador se detendrá en la
primera radiodifusora de señal fuerte que encuentre.
Pulse los BOTONES VOL-/AL1/ VOL+/AL2 (No.5 y 6) para ajustar el nivel de volumen.
Notas:
• La función de búsqueda automática no está disponible en el modo del Clima. Uno
de los 7 canales disponibles debe seleccionarse manualmente.
• Sintonice manualmente las estaciones más débiles que podrían pasar
desapercibidas durante la sintonización automática.
• Si la sintonización automática no se detiene en la frecuencia exacta de la
radiodifusora, por ejemplo, si se detiene en 88.9 MHz y no en 88.8 MHz, use el
método manual de sintonización para "afinar" la sintonía a la frecuencia exacta de
la radiodifusora.
CONSEJOS PARA OBTENER LA MEJOR RECEPCIÓN
Para garantizar la mejor sintonía FM, desenvuelva y extienda completamente la
ANTENA (No. 17) para escuchar mejor su radio FM.
DETERMINAR LAS ESTACIONES DE RADIO PROGRAMADAS (BANDA AM/FM).
1. Pulse y sostenga el /BOTÓN DE MODO (No.7)
para encender el JEP-150.
2. Toque el /BOTÓN DE MODO (No.7)
para seleccionar banda AM/FM. Se
encenderá el INDICADOR AM/FM (No. 11/10).
3.
Toque repetidamente el BOTÓN HORAS (HOURS)/SUBIR (No.3) o MIN
(MINUTOS)/BAJAR/DESVANECER (No.2) para elegir su emisora favorita
.
4. Pulse el BOTÓN TIME (LA HORA)/M+/ (No.1), la localidad programada aparecerá
parpadeando en la pantalla LED.
5. Use el
BOTÓN HORAS (HOURS)/SUBIR (No.3) o MIN
(MINUTOS)/BAJAR/DESVANECER (No.2
) para seleccionar el número programado
que desee. (P01-P30).
6. Pulse nuevamente el BOTÓN TIME (LA HORA)/M+/ (No.1) para configurar lo
programado
7. Repita los pasos del 2 al 6 para programar hasta 60 radiodifusoras (30 AM y 30 FM).

S-9
Para recordar una de las estaciones programadas.
1. Pulse y sostenga el BOTÓN
OFF
/MODO (No.7)
para encender el JEP-150.
2. Toque el /BOTÓN DE MODO (No.7)
para seleccionar banda AM/FM.
3. Pulse el TIME (LA HORA)/M+ (No.1), la localidad programada aparecerá
parpadeando en la pantalla LED.
4.
Toque repetidamente el BOTÓN HORAS (HOURS)/SUBIR (No.3) o MIN
(MINUTOS)/BAJAR/DESVANECER (No.2) hasta que llegue al número
programado/Radiodifusora de su preferencia.
TEMPORIZADOR PARA DORMIR
1.
Pulse y sostenga el BOTÓN DORMITAR/DORMIR (No. 4), la pantalla mostrará
120 minutos. Toque repetidamente le BOTÓN DORMITAR /DORMIR (No.4) para
seleccionar el temporizador para dormir 110, 100, 90, 80, 70, 60, 50, 40, 30, 20,
10, o APAGADO (en minutos).
La unidad funcionará durante el período de tiempo
seleccionado y luego se apagará automáticamente.
2.
Repita el paso 1 para cambiar o cancelar el temporizador para el sueño.
3. Para "APAGAR" la unidad antes del período de tiempo seleccionado, pulse y
sostenga el /BOTÓN DE MODO (No. 7) en cualquier momento.
PARA ESCUCHAR EL CANAL DEL CLIMA
1. Pulse y sostenga el /BOTÓN DE MODO (No.7) para encender el JEP-150.
2. Toque el /BOTÓN DE MODO (No.7)
para seleccionar banda del clima (WB). Se
encenderá el INDICADOR WB
.
3.
Toque el BOTÓN HORAS (HOURS)/SUBIR (No. 3) o MIN
(MINUTOS)/BAJAR/DESVANECER (No.2)
para seleccionar el canal de banda para
su área.
4. Pulse el BOTÓN VOLUMEN +/AL 2 (No. 6) O VOLUMEN -/AL1 (No.5) para obtener
el nivel de volumen que desee.
5. Para apagar el radio, pulse y sostenga el /BOTÓN DE MODO (No.7).
Tabla de frecuencias de Estaciones de Información del Clima
CANAL
FRECUENCIA (MHz)
CANAL1
162.400
CANAL2
162.425
CANAL3
162.450
CANAL4
162.475
CANAL5
162.500
CANAL6
162.525
CANAL7
162.550
Nota:
Con respecto a la Banda del Clima de NOAA: Usted necesitará identificar cuál de
las bandas recibe su reporte meteorológico local. Cuando usted se traslada a
otro lugar ya sea a otra ciudad o estado, podría ser necesario que elija una
banda diferente para obtener los reportes locales de dicho lugar.
CONSEJOS PARA OBTENER LA MEJOR RECEPCIÓN
Para asegurar la mejor recepción de la banda del clima, deberá extender totalmente la
ANTENA (No. 17).

S-10
RECEPCIÓN DE UN ALERTA METEOROLÓGICO DE EMERGENCIA
En modo Encendido (On) y también en Apagado (Off), el JEP-150 recibirá alertas de las
radiodifusiones de emergencia y sonará una alarma de alerta si hay una emergencia
grave por el clima en su área.
1. El JEP-150 se encenderá automáticamente, activará la alarma y encenderá e canal
pre-seleccionado de la banda del clima (WB). El INDICADOR DE ALERTA (No. 8)
parpadea. La alarma se quedará encendida por la duración de la radiodifusión de
alerta.
2. El INDICADOR DE ALERTA (No.8) no dejará de parpadear hasta que usted pulse el
BOTÓN DORMITAR/DORMIR (No. 4) o el /BOTÓN DE MODO (No.7) para
apagarlo.
Notas:
• En caso de que haya una interrupción de energía, el JEP-150 continuará recibiendo
alertas meteorológicas si tiene una batería instalada en la unidad (consulte la
sección " INSTALACIÓN DE LAS BATERÍAS DE RESPALDO " del manual). La
pantalla del reloj estará apagada, pero el INDICADOR DE ALERTA (No.8)
parpadeará si hay una alerta.
• La radio continuará drenando la batería si se desconecta o si no se enciende
durante un período prolongado. Se recomienda encarecidamente que conecte el
JEP-150 a la alimentación de CA para evitar que la batería se agote por completo y
apague la radio mientras está en uso.
• La banda meteorológica de NOAA es un servicio de difusión del gobierno de los
EE.UU. y está disponible en los 50 estados, Puerto Rico y las Islas Vírgenes de los
EE. UU.
•
El Servicio Meteorológico de NOAA difunde una alerta de prueba cada
miércoles entre las 11 am y el medio día. Para recibir las difusiones, el radio
deberá de encontrarse dentro del rango de difusión, de 10 a 40 millas,
dependiendo del terreno y obstrucciones
.
Para obtener mayor información:
Haga clic en http://www.nws.noaa.gov/nwr/ para la NOAA (Administración Nacional
Oceánica y Atmosférica) y en http://www.ec.gc.ca/ para el Ministerio de Medio
Ambiente de Canadá (Environment Canada).
OPERACIÓN DEL DESVANECEDOR
En modo de espera, pulse repetidamente el
BOTÓN MIN
MINUTOS)/BAJAR/DESVANECER (No.2
) para seleccionar una de la configuraciones
más brillantes (alto o bajo).
CUIDADO Y MANTENIMIENTO
• Debe supervisar a los niños cuando utilicen este dispositivo.
• Nunca enrolle el CABLE DE CORRIENTE AC en personas o animales. Debe poner
especial cuidado si se trata de un cable largo.
• Evite operar su unidad bajo los rayos directos del sol o en lugares calientes,
húmedos o con mucho polvo.

S-11
• Mantenga su unidad alejada de electrodomésticos que emanan calor o son fuentes
de ruido eléctrico como las lámparas fluorescentes o motores.
• Desenchufe la unidad de la corriente eléctrica de inmediato en caso de falla
LIMPIEZA DE LA UNIDAD
• Para prevenir incendios, fuego o descarga eléctrica, desconecte la unidad de la
fuente de energía AC cuando la limpie.
• Las superficies con acabados de la unidad pueden limpiarse con un paño para
sacudir el polvo y darle los cuidados que acostumbra dar a otros muebles. Ponga
especial atención durante la limpieza de las piezas plásticas.
• Si la consola se empolva, sacúdala con un paño seco y suave. No utilice ceras ni
pulidores en aerosol en la consola.
• Si el panel frontal se ensucia o tiene huellas digitales, puede limpiarlo con un paño
suave ligeramente humedecido con una solución de jabón suave y agua. Nunca use
paños abrasivos o pulidores ya que podrían dañar el acabado de su unidad
PRECAUCIÓN:
Nunca permita que caiga agua u otros líquidos adentro de la unidad
mientras la limpia.
SOLUCIONADOR DE PROBLEMAS
Si tiene dificultad al usar este sistema musical, por favor revise lo siguiente o llama al
teléfono 1-800-777-5331 de Servicio al Cliente.
SÍNTOMA CAUSA POSIBLE POSIBLES SOLUCIONES
No regresa la luz. Cable de la línea AC no
está enchufado.
Inserte firmemente el
enchufe a un tomacorriente
AC.
El tomacorriente AC no
tiene corriente.
Pruebe la unidad en otro
tomacorriente.
La Unidad está apagada. Encienda la unidad. No hay sonido.
Control de VOLUMEN en
una posición mínima.
Aumente el volumen
Ruido o sonido
distorsionado FM
AM
- La estación no está bien
sintonizada.
- La antena FM no está
extendida.
Si la recepción AM es débil.
Resintonice la
radiodifusora.
- Extienda completamente
la antena FM
Cambie de posición la
unidad.
RESTABLECIMIENTO DEL SISTEMA
Si el sistema no responde o su operación es intermitente o errática, podría haber
experimentado una descarga electrostática (ESD) o un pico de energía que provocó que
el micro controlador interno se apagara automáticamente. Si esto sucede, simplemente
desconecte el adaptador AC y quite la batería de respaldo del sistema, espere por lo
menos 3 minutos y luego encienda la unidad de nuevo como si fuera complemente
nuevo.

S-12
ESPECIFICACIÓN
FUENTE DE CORRIENTE 120V~, 60Hz
Consumo de energía: 3W
Fuente de respaldo: 3V
2 baterías AA (UM-3) (no incluidas)
Rango de frecuencia FM: 87.5-108 MHz
AM: 520-1710 kHz
WB:162.400MHz-162.550MHz;
Potencia de salida de altavoz: 1×150mW RMS
En Spectra, la responsabilidad ambiental y
social es uno de los valores fundamentales de
nuestra empresa. Nos dedicamos a la
continua implementación de iniciativas
responsables con el objeto de conservar y
mantener el medio ambiente a través del
reciclaje responsable.
Por favor visítenos en
http://www.spectraintl.com/green.htm
para mayor información
sobre las iniciativas de protección del medio ambiente o para encontrar los centros de
reciclaje en su área.
GARANTÍA Y SERVICIOS DE COBERTURA LIMITADA POR 90 DÍAS
VÁLIDA EN LOS ESTADOS UNIDOS SOLAMENTE
SPECTRA MERCHANDISING INTERNATIONAL, INC. garantiza que esta unidad se
encuentra libre de materiales o mano de obra de fábrica defectuosos, por un período de
90 días, desde la fecha de la compra original por parte del cliente, siempre que el
producto sea utilizado dentro de los Estados Unidos. Esta garantía no es asignable o
transferible. Nuestra obligación de acuerdo a esta garantía es reparar o reemplazar la
unidad con defectos o cualquier parte correspondiente, con excepción de las baterías,
cuando es devuelta al Departamento de Servicios de SPECTRA, acompañada de la
prueba de la fecha original de compra por parte de cliente, como por ejemplo una copia
duplicada del recibo de ventas.
Usted debe pagar todos los costos de envío requeridos para entregar el producto a
SPECTRA para el servicio de garantía. Si el producto es reparado o reemplazado de
acuerdo a garantía, los gastos de retorno serán por cuenta de SPECTRA. No existen
otras garantías expresas diferentes de aquellas declaradas en el presente documento.

S-13
Esta garantía es válida solamente en el cumplimiento de las condiciones que se
establecen a continuación:
1. La garantía se aplica solamente al producto de SPECTRA siempre que:
a. Permanezca en posesión del comprador original y se exhiba la prueba de compra.
b. Que no ha sido sometido a accidentes, mal uso, abuso, servicio inapropiado, uso
fuera de las descripciones de advertencia cubiertas dentro del manual del
propietario, o modificaciones no aprobada por SPECTRA.
c. Los reclamos deben ser hechos dentro del período de garantía.
2. Esta garantía no cubre daños o fallas del equipamiento causados por conexiones
eléctricas que no cumplen con los códigos eléctricos, con las especificaciones del
manual del propietario de SPECTRA, o la falta de cuidado razonable y mantenimiento
necesario como se describe en el manual del propietario.
3. La garantía de todos los productos de SPECTRA se aplica solamente al uso
residencial y es anulada cuando los productos son utilizados en un ambiente no
residencial, o instalados fuera de los Estados Unidos.
Esta garantía le da derechos legales específicos, y usted puede tener también otros
derechos que varían de estado a estado. Para OBTENER SERVICIO por favor remueva
todas las baterías (de existir) y embale la unidad con cuidado enviándola por correo
postal asegurado y prepago o UPS a SPECTRA, a la dirección que se menciona abajo.
SI LA UNIDAD ES DEVUELTA DENTRO DEL PERÍODO DE GARANTÍA EXHIBIDO
arriba, por favor incluya una prueba de compra (recibo de caja registradora con fecha),
para que podamos determinar su elegibilidad para el servicio de garantía y reparación
de la unidad sin costo. También incluya una nota con una descripción explicando en qué
forma la unidad es defectuosa. Un representante de atención al cliente tal vez deba
contactarlo en relación al estado de su reparación, por lo tanto incluya su nombre,
dirección, número de teléfono y dirección de correo electrónico para acelerar el proceso.
SI LA GARANTÍA SE ENCUENTRA FUERA DEL PERÍODO DE GARANTÍA, por favor
incluya un cheque por
$12.00
para cubrir el costo de reparación, manejo y correo de
retorno. Todas las devoluciones cubiertas por la garantía deben ser enviadas por correo
prepago.
Se recomienda que primero entre en contacto con SPECTRA llamando al número 1-
800-777-5331 o por correo electrónico enviando un mensaje a
[email protected] para obtener información actualizada sobre la unidad que
requiere servicio. En algunos casos el modelo puede haber sido discontinuado y
SPECTRA se reserva el derecho de ofrecer opciones alternativas de reparación o
reemplazo.
SPECTRA MERCHANDISING INTERNATIONAL, INC.
4230 North Normandy Avenue,
Chicago, IL 60634, USA.
1-800-777-5331
Para registrar su producto, siga el vínculo a continuación en el sitio web para ingresar
su información.
http://www.spectraintl.com/wform.htmI.
1117 Impreso en China
-
 1
1
-
 2
2
-
 3
3
-
 4
4
-
 5
5
-
 6
6
-
 7
7
-
 8
8
-
 9
9
-
 10
10
-
 11
11
-
 12
12
-
 13
13
-
 14
14
-
 15
15
-
 16
16
-
 17
17
-
 18
18
-
 19
19
-
 20
20
-
 21
21
-
 22
22
-
 23
23
-
 24
24
-
 25
25
-
 26
26
-
 27
27


Jensen JEP-150 Guía del usuario
- Categoría
- Equipo de música suplementario
- Tipo
- Guía del usuario
en otros idiomas
- English: Jensen JEP-150 User guide