First Alert SFA2200 Guía del usuario
- Categoría
- Relojes de alarma
- Tipo
- Guía del usuario

INDOOR WEATHER STATION
WITH PROJECTION CLOCK
USER MANUAL
SFA2200
PLEASE READ THIS USER MANUAL COMPLETELY BEFORE
OPERATING THIS UNIT AND RETAIN IT FOR FUTURE REFERENCE

-1-
IMPORTANT SAFETY INSTRUCTIONS
When used in the directed manner, this unit has been designed and manufactured to ensure your personal
safety. However, improper use can result in potential electrical shock or fire hazards. Please read all safety
and operating instructions carefully before installation and use, and keep these instructions handy for
future reference. Take special note of all warnings listed in these instructions and on the unit.
1. Read these instructions – All the safety and operating instructions should be read before the appliance is
operated.
2. Keep these instructions – The safety and operating instructions should be kept for future reference.
3. Heed all warnings – All warnings on the appliance and in the operating instructions should be adhered to.
4. Follow all instructions – All operation and use instructions should be followed.
5. Do not use this apparatus near water – The appliance should not be used near water; for example, near a
bath tub, washbowl, kitchen sink, laundry tub, in a wet basement, or near a swimming pool.
6. Clean only with dry cloth – The appliance should be cleaned only as recommended by the manufacturer.
7. Do not install near any heat sources such as radiators, heat registers, stoves, or other apparatus
(including amplifiers) that produce heat.
8. Only use attachments / accessories specified by the manufacturer.
9. Refer all servicing to qualified service personnel. Servicing is required when the apparatus has been
damaged in any way, such as power-supply cord or plug is damaged, liquid has been spilled or objects
have fallen into the apparatus, the apparatus has been exposed to rain or moisture, does not operate
normally, or has been dropped.
10. This appliance shall not be exposed to dripping or splashing water and that no object filled with liquids
such as vases shall be placed on the apparatus.
11. Power Sources – The appliance should be connected to a power supply only of the type described in the
operating instructions or as marked on the appliance. Do not overload wall outlet.
12. Danger of explosion if battery is incorrectly replaced. Replace only with the same or equivalent type.
13. Do not attempt to dismantle, open or repair this product yourself. If a fault occurs, seek advice from your
local qualified service technician or contact the distributor via the telephone number at the back of this
instruction manual.
14. Caution marking and nameplate are located on back of product.
COMPLIANCE WITH FCC REGULATIONS
This device complies with Part 15 of the FCC Rules. Operation is subject to the following two conditions:
(1) this device may not cause harmful interference, and
(2) this device must accept any interference received, including interference that may cause undesired
operation.
NOTE: This equipment has been tested and found to comply with the limits for a Class B digital device,
pursuant to Part 15 of the FCC Rules. These limits are designed to provide reasonable protection against
harmful interference in a residential installation. This equipment generates, uses and can radiate radio
frequency energy and, if not installed and used in accordance with the instructions, may cause harmful
interference to radio communications. However, there is no guarantee that interference will not occur in a
particular installation. If this equipment does cause harmful interference to radio or television reception,
which can be determined by turning the equipment off and on, the user is encouraged to try to correct the
interference by one or more of the following measures:
- Reorient or relocate the receiving antenna.
- Increase the separation between the equipment and receiver.
- Connect the equipment into an outlet on a circuit different from that to which the receiver is connected.
- Consult the dealer or an experienced radio/TV technician for help.
CAUTION: Changes or modifications not expressly approved by the party responsible for
compliance could void the user’s authority to operate the equipment.
SPECIAL NOTE
This model is equipped with non-skid rubber 'feet' to prevent the product from moving when you operate the
controls. These 'feet' are made from non-migrating rubber material specially formulated to avoid leaving
any marks or stains on your furniture. However certain types of oil based furniture polishes, wood
preservatives, or cleaning sprays may cause the rubber 'feet' to soften, and leave marks or a rubber residue
on the furniture. To prevent any damage to your furniture we strongly recommend that you purchase small
self-adhesive felt pads, available at hardware stores and home improvement centers everywhere, and
apply these pads to the bottom of the rubber 'feet' before you place the product on fine wooden furniture.

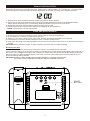
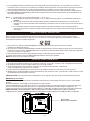
LOCATION OF CONTROLS
-2-
1 2
3
4
5
6
78910
11
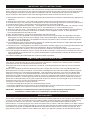
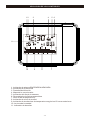
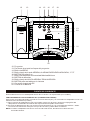
1. Alarm ON/OFF Indicator
2. PM Time Indicator
3. Multi-Function Display
4. Time Zone Map
5. Day of the Week Indicator
6. Special Day Reminder
7. Temperature Reading
8. Comfort Level Indicator
9. Past 12 hour Temperature Trend Indicator
10. Humidity Reading
11. Snooze Indicator

200m
12
13
14
15 16
17
19
20
21
22
18
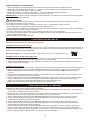
12. Projector
13. Projector Focus Adjust Knob
14. MODE Button
15. Adjust UP; ALARM ON/OFF; °C /°F Button
16. SNOOZE/LIGHT Button
17. Maximum/Minimum Temperature/Humidity Button
18. SNOOZE Button
19. Adjust DOWN/TIME ZONE button
20. RESET Button
21. DC-IN Jack
22. Battery Door
-3-

P M C E
-4-
!
POWER SOURCE
This unit operates using the included AC-DC Adaptor or on 2 X AAA batteries (not included)
AC POWER OPERATION
An AC-DC Adaptor with the output 4.5V DC 200mA (included) is required for operating the main unit in AC
power mode.
1.) To connect the AC-DC Adaptor to the unit, firmly and securely insert the DC plug of the adaptor into the
DC Jack located on the left hand side of the back of the unit.
2.) Plug the AC-DC Adaptor plug into a household AC outlet that supplies 120V AC ~ 60Hz. Connecting this
system to any other power source may cause damage to the system.
NOTE: When the AC-DC adaptor is connected to the DC Jack, the batteries are automatically disconnected.
BATTERY OPERATION
1. Open the Battery Door on the back of the main unit.
2. Following the polarity (+ and -) diagrams shown inside the battery compartment, insert 2 ‘AAA' (UM-4)
batteries (not included).
Note: For optimum performance, alkaline-type batteries are recommended.
3. Replace the Battery Door.
IMPORTANT: Be sure that the batteries are installed correctly. Wrong polarity may damage the unit.
BATTERY NOTE AND CARE
- Danger of explosion if the battery is replaced incorrectly. Replace only with the same or equivalent type.
- Do not mix old and new batteries.
- Do not mix alkaline, standard (carbon-zinc) or rechargeable (nickel-cadmium) batteries.
- If the unit is not to be used for an extended period of time, remove the battery. Any old or leaking battery
can cause damage to the unit and may void the warranty.
- Do not dispose of batteries in fire, batteries may explode or leak.
- Do not try to recharge batteries not intended to be recharged; they can overheat, rupture
and leak(Follow battery manufacturer’s directions).
- Only an adult should replace the batteries
CLOCK SETTING
When the unit is in clock display mode:
Setting the Time Zone
The unit default is Pacific time (P). Tap the TIME ZONE button on the back repeatedly to select another time
zone if necessary. The time zone will change in the following order when you press the TIME ZONE button.
Pacific Time (P)→Mountain Time (M)→Central Time ( C )→Eastern Time (E)
12/24 Hour format
1. The unit default is 12 hour format. Press and hold the MODE button for 3 seconds; 12 hour format (H 12)
will appear on display and flash.
2. Tap the UP/DOWN button to change clock setting display to 24 hour format (H 24) if necessary.
Setting the Clock
3. Tap the MODE button to confirm, the hour digits will flash to prompt for input.
4. Tap the Adjust UP/DOWN button repeatedly to set the hour.
Note: Make sure the hour is set so that the PM indicator is displayed correctly.
5. Tap the MODE button after the hour is set, the Minute digits flash to prompting for input.
6. Tap the Adjust UP/DOWN button repeatedly to set the minute value. Press and hold the buttons to speed
up the forward or reverse scanning of the digits.
7. Tap the MODE button again to finish clock setting.
Note: If the unit was reset, you need to set the clock again.
CALENDAR SETTING
When the unit is in clock display mode:
1. Tap the MODE button once to enter the calendar setting mode. Month and Date digit shows on display.
2. When the Month and Date show on the display, press and hold the MODE button for 3 seconds, the Year
digits will flash to prompt for input.
3. Tap the Adjust UP/DOWN button repeatedly to set the year.
4. Tap the MODE button after the year is set, the Month digits flash to prompt for input.
5. Tap the Adjust UP/DOWN button repeatedly to set the month.
6. Tap the MODE button after the month is set, the Date digits flash to prompt for input.

-5-
7. Tap the Adjust UP/DOWN button repeatedly to set the date. Press and hold the buttons to speed up the
forward or reverse scanning of the digits.
8. Tap the MODE button to finish the setting. Tap the MODE button 3 times or wait for few seconds to exit
calendar setting mode.
ALARM SETTING
Setting the Alarm Time
1. In clock display mode, tap the MODE button twice to enter the Alarm setting mode, the alarm indicator
and time 12:00 appear on the display.
2. Press and hold the MODE button for 3 seconds, the Hour digits will flash.
3. Tap the Adjust UP/DOWN button repeatedly to set the hour value. Press and hold the buttons to speed up
the forward or reverse scanning of the digits.
Note: Make sure the hour is set so that the PM indicator is displayed correctly.
4. Tap the MODE button after the hour is set, the Minute digits flash to prompt for input.
5. Tap the Adjust UP/DOWN button repeatedly to set the minute value. Press and hold the button to speed
up the forward or reverse scanning of the digits.
6. Tap the MODE button after minute is set, Alarm melody type “00” flashing to prompt for input. There are
total 13 kinds of alarm melody (00-12) available for selection.
7. Tap the Adjust UP/DOWN button repeatedly to select the alarm melody you desired.
8. Tap the MODE button to finish the setting. Tap the MODE button twice again or wait for few seconds to
exit alarm setting mode.
9. Alarm will sound for 2 minutes when set time comes. Tap the MODE button once to turn off the alarm until
next day.
Note: The Display will blink when the alarm is sounding.
Turning the Alarm ON/OFF
In clock display mode,
- Tap the ALARM ON/OFF button repeatedly in alarm OFF mode until the alarm icon appears on display
to turn on the alarm.
- Tap the ALARM ON/OFF button repeatedly in alarm ON mode until the alarm icon disappear from
display to turn off the alarm.
SNOOZE
- When the alarm sounds, it can be temporarily stopped by pressing the SNOOZE/LIGHT button on top
Z
panel or SNOOZE button on back. Snooze indicator Z appears in display and flashing with Alarm
indicator together.
- The alarm will be delayed for 8 minutes and then come again.
- This manual snooze operation can be repeated again and again while alarm sounding.
SPECIAL DAY REMINDER SETTING
1. In clock display mode, tap the MODE button three times to enter the special day reminder setting mode.
The Month and Date of reminder indicator will appear in display.
Note: Make sure you are in special day setting mode, and not in calendar mode.
2. Press and hold the MODE button for 3 seconds, the reminder month digit flashes. Tap the Adjust UP/
DOWN button repeatedly to set your reminder month.
3. Tap the MODE button to confirm, the date digit flash. Tap the Adjust UP/ DOWN button repeatedly to set
your reminder date.
4. Tap the MODE button to confirm, the hour digits flash. Tap the Adjust UP/ DOWN button repeatedly to set
the hour.
Note: Make sure the hour is set so that the PM indicator is displayed correctly.
5. Tap the MODE button to confirm, the minute digits flash. Tap the Adjust UP/ DOWN button repeatedly to
set the minute.
6. Tap the MODE button to finish the setting. Special Day reminder indicator will show on the display.
7. The Special Day melody will play for 2 minutes when set date comes if not interrupted, the reminder
indicator will be flashing on the display.
8. Press any button to stop the melody immediately. It will sound again next year on the same day set.
Note: The Snooze has no effect on the special day reminder.
9. To cancel the special day reminder, tap the ALARM ON/OFF repeatedly until the special day reminder
indicator goes off on the display.
INDOOR TEMPERATURE OPERATION
INDOOR WEATHER MEASUREMENT
NOTE: 1.) The main unit display backlight will remain lit when using the AC power adaptor.
2.) When using battery power, the backlight will turn off automatically to save battery power. Press
the LIGHT/SNOOZE button once, and the backlight will turn on for 7 seconds.

Pressing other buttons on the back panel will not turn on the backlight.
3.) When a power outage occurs, the unit will switch to battery power automatically. The display
backlight will be off, and will only light when you press the LIGHT/SNOOZE button to check clock
and temperature.
Viewing the Time Zone
In clock display mode, tap the TIME ZONE button repeatedly to view the time in different time zones.
Changing the Temperature Display format
In clock display mode, press and hold the °C /°F button on back panel of the main unit to change the
temperature display degrees format from Celsius (°C) to Fahrenheit (°F) mode.
Indoor Weather Measurement
The indoor temperature and humidity is displayed in the Temperature Window on the main unit display.
Checking & Deleting the Max/Min Temperature Record
1. Tap the MAX/MIN button on back panel once to check the maximum temperature and humidity record. Tap
it twice to check the minimum record. Tap it again to exit.
2. Maximum and minimum temperature and humidity records will be deleted automatically at 12:00 AM
everyday.
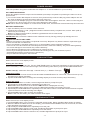
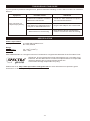
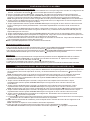
Comfortable level Indicators
The three comfortable weather icons below represent the current comfort levels (Dry, Comfort and Wet) of
the room the SFA2200 is placed in.
1. No matter what the temperature is, when the humidity is under 40%, the display will show the DRY icon.
2. When temperature is between 68°F (20°C) and 77°F (25°C), and when humidity is between 40% and
70%, the display will show the COMFORT icon.
3. No matter what the temperature is, when the humidity is higher than 70%, the display will show the WET
icon.
DRY COMFORT WET
NOTE: When temperature is between 68°F (20°C) and 77°F (25°C), and the humidity is
between 40% and 70%, no icon will be displayed.
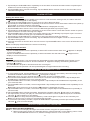
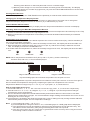
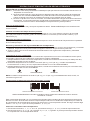
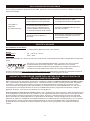
Temperature Trend of past 12 hours
Dynamic BAR graph trend of indoor temperature for the past 12 hours
This unit is equipped with a dynamic temperature trend feature for the past 12 hours. It moves from right to
left to indicate the temperature changes by comparing the past hour temperature to the current
temperature. Maximum range is up to +/- 5.4 °F (+/- 3 °C) at past 1, 2, 3, 6 and 12 hours.
How to read temperature trend
1. Horizontal scale of 0, -1, -2, -3. -6 & -12 mean current time (0), past 1, 2, 3, 6 & 12 hour respectively.
2. Vertical Scale of +/- 5.4, 3.6, 1.8, 0 degree °F (+/- 3, 2, 1, 0 degree °C) mean temperature changes
compared to current temperature.
3. The unit will detect temperature trends automatically and needs at least one hour before it can start
displaying the temperature changes. It’s recommended to begin reading the trend after the unit is on and
working for 12 hours or longer.
4. As time passes, the display will show the temperature rising or falling trend by turning the bars ON/OFF
automatically based on past 12 hour temperature readings.
Note: 1.) One lighting bar scale = 1.8 °F (1°C).
2.) If the temperature change exceeds +/-3°C, a full BAR graph or 1 BAR graph will be displayed.
3.) The temperature trend is calculated by changes in the temperature and is indicative only. The
calculation can be affected by many things including where the unit is placed.
4.) The unit is for indoor use only. There are no guarantees for the accuracy when using this unit for
forecasting outdoor weather conditions.
Degree Fahrenheit/Past hour Degree Celsius/Past hour
-6-

RESET
BUTTON
FS
200m
-7-
USING THE PROJECTOR
Rotate the projector to project the time onto a dark wall or ceiling within 2.3 – 6.6 feet (0.7 - 2 meters) away
from the projector, the projected time will be displayed on the wall or ceiling in the following format.
1. The projector stays on when the main unit is powered by the AC adaptor.
2. The projector will be off when the main unit is powered by batteries. Pressing the SNOOZE/LIGHT
button will momentarily turn on the display back light and the projection for 7 seconds.
3. Rotate the Projector angle to adjust where the time is projected.
4. Adjust the FOCUS control knob of projector to sharpen the projected time.
NOTE: The projector can be rotated ±90º.
CARE AND MAINTENANCE
1. Do not subject the unit to excessive force, shock, dust or extreme temperature.
2. Do not tamper the internal components of the unit.
3. Clean your unit with a damp (never wet) cloth. Solvent or detergent should never be used.
4. Avoid leaving your unit in direct sunlight or in hot, humid or dusty places.
5. Keep your unit away from heating appliances and sources of electrical noise such as fluorescent lamps or
motors.
CAUTION: Never allow any water or other liquids to get inside the unit while cleaning.
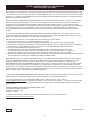
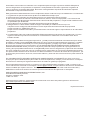
Resetting the Unit
If the unit experiences a power surge or electric shock, it is possible that the internal
micro-controller may lock up and the unit will not respond to any commands from the back panel controls. In
this event, use a straightened paper clip, toothpick or similar objects to press the RESET button located on
the back of the unit (see the below figure). The reset operation clears the system memory and all of your
previous settings will be erased.
CAUTION: DO NOT USE A SHARP OR POINTED OBJECT TO PRESS THE RESET
BUTTON. IT MAY DAMAGE THE RESET SWITCH INSIDE THE UNIT.

-8-
TROUBLESHOOTING GUIDE
If you experience problems using this unit, please check the following or call 1-800-777-5331 for Customer
Service.
SPECIFICATION
Power requirement:
DC Input: 2 X AAA (UM-4) Batteries or
DC 4.5V, 200mA
Range
o o
Temperature 32 - 122 F (0-50 C)
Humidity 20% - 95%
©2014 BRK Brands Inc. All rights reserved. First Alert® is a registered trademark of the First Alert Trust.
At Spectra, environmental and social responsibility is a core value of our
business. We are dedicated to continuous implementation of responsible
initiatives with an aim to conserve and maintain the
environment through responsible recycling.
Please visit us at http://www.spectraintl.com/green.htm for more information on Spectra’s green
initiatives or to find a recycler in your area.
Symptom
The unit does not
respond (no power).
Possible Cause
Solution
No batteries installed or installed
batteries are exhausted.
AC power source no function or
DC cable is not plugged into the
DC jack on the back of the unit.
Wall outlet is not functioning.
Install 2 x “AAA” batteries or replace
the exhausted batteries.
Plug the AC adaptor into a wall outlet.
Plug another device into the same
outlet to confirm the outlet is working.

1 YEAR LIMITED WARRANTY AND SERVICE
VALID IN THE U.S.A ONLY
This product is manufactured, distributed or sold by SPECTRA MERCHANDISING INTERNATIONAL, INC.,
official licensee for this product. All right, title and interest to use the “First Alert” logo trademarks and the
“First Alert” trade dress are exclusively licensed by BRK Brands, Inc. and are used under license from BRK
Brands, Inc.. Please contact SPECTRA’s Service Department for questions/comments, warranty, support,
or service related to this product.
SPECTRA MERCHANDISING INTERNATIONAL, INC. warrants that this product 1) is free from defects in
materials and workmanship and 2) conforms to its specifications for a period of 1 year from the date of
original customer purchase and provided the product is utilized within the U.S.A. This warranty is not
assignable or transferable. Our obligation under this warranty is the repair or replacement of the defective
unit or any part thereof, except batteries, when it is returned to the SPECTRA Service Department,
accompanied by proof of the date of original consumer purchase, such as a duplicated copy of a sales
receipt.
You must pay all shipping charges required to ship the product to SPECTRA for warranty service. If the
product is repaired or replaced under warranty, the return charges will be at SPECTRA’s expense. There
are no other express warranties other than those stated herein.
This warranty is valid only in accordance with the conditions set forth below:
1. The warranty applies to the SPECTRA product only while:
a. It remains in the possession of the original purchaser and proof of purchase is demonstrated
b. It has not been subjected to accident, misuse, abuse, improper service, usage outside the descriptions
and warnings covered within the owner’s manual or non-SPECTRA approved modifications
c. Claims are made within the warranty period
2. This warranty does not cover damage or equipment failure caused by electrical wiring not
in compliance with electrical codes or SPECTRA owner’s manual specifications, or failure to
provide reasonable care and necessary maintenance as outlined in the owner’s manual.
3. Warranty of all SPECTRA products applies to residential use only and is void when products are used in a
nonresidential environment or installed outside the United States.
This warranty gives you specific legal rights, and you may also have other rights which vary from state to
state. TO OBTAIN SERVICE please remove all batteries (if any) and pack the unit carefully and send it
prepaid by insured parcel post or UPS to SPECTRA at the address shown below. IF THE UNIT IS
RETURNED WITHIN THE WARRANTY PERIOD shown above, please include a proof of purchase (dated
cash register receipt) so that we may establish your eligibility for warranty service and repair of the unit
without cost. Also include a note with a description explaining how the unit is defective. A customer service
representative may need to contact you regarding the status of your repair, so include your name, address,
phone number and e-mail address to speed the process.
IF THE UNIT IS OUTSIDE THE WARRANTY PERIOD, please include a check for $8.00 to cover the cost of
repair, handling and return postage. All out of warranty returns must be sent prepaid.
It is recommended that you contact SPECTRA first at 1-800-777-5331 or by e-mail at
custserv@spectraintl.com for updated information on the unit requiring service. In some cases the model
you have may be discontinued and SPECTRA reserves the right to offer alternative options for repair or
replacement.
SPECTRA MERCHANDISING INTERNATIONAL, INC.
4230 North Normandy Avenue,
Chicago, IL60634, USA.
1-800-777-5331
To register your product, visit the link below on the website to enter your information.
http://www.spectraintl.com/wform.htm
0614 Printed in China
-9-

ESTACIÓN METEOROLÓGICA PARA ÁREAS
INTERIORES CON RELOJ DE PROYECCIÓN
Manual del Propietario
SFA2200
POR FAVOR LEA CUIDADOSAMENTE ESTE MANUAL DEL USUARIO
EN SU TOTALIDAD ANTES DE OPERAR ESTA UNIDAD Y GUARDE EL
FOLLETO PARA REFERENCIA POSTERIOR.

-1-
INSTRUCCIONES IMPORTANTES DE SEGURIDAD
Esta unidad ha sido diseñada y fabricada para proteger su seguridad personal cuando se utiliza según las
instrucciones. Sin embargo, su uso inadecuado podría causar una descarga eléctrica o representar riesgo
de incendio. Por favor, lea todas las instrucciones de seguridad y de funcionamiento detenidamente antes
de su instalación y uso, y mantenga estas instrucciones a mano para referencia posterior. Preste atención
a todas las advertencias en estas instrucciones y en la unidad.
1. Lea estas instrucciones-Es necesario leer totalmente las instrucciones de funcionamiento y seguridad
antes de usar este aparato.
2. Guarde estas instrucciones-Guarde las instrucciones de seguridad y funcionamiento para referencia
posterior.
3. Preste atención a todas las advertencias-Es necesario prestar debida atención a las advertencias
colocadas en el aparato y en las instrucciones de funcionamiento.
4. Siga todas las instrucciones-Es necesario cumplir con todas las instrucciones de funcionamiento y uso
de este aparato.
5. No bloquee ninguna de aberturas de ventilación. Instale de acuerdo con las instrucciones del fabricante.
El aparato se debe colocar de forma que su ubicación o posición no interfiera con una ventilación
correcta. Por ejemplo, el aparato no se debe colocar en una cama, sofá, alfombra o superficie similar que
pueda bloquear las aberturas de ventilación; o colocado en una instalación integrada, como una
estantería o armario que pueda impedir el flujo de aire por las aberturas de ventilación.
6. No lo instale cerca de fuentes de calor tales como radiadores, registros de calor, estufas u otros
artefactos (incluyendo amplificadores) que irradian calor.
7. Only use attachments/accessories specified by the manufacturer.
8. Remita todas las reparaciones a personal técnico cualificado. Se requiere servicio cuando el aparato ha
sido dañado de cualquier modo, como cuando el cable de alimentación o el enchufe está dañado, se ha
derramado líquido o han caído objetos dentro del aparato, el aparato ha sido expuesto a la lluvia o la
humedad, si no funciona normalmente , o si se ha caído.
9. Fuentes de alimentación-. El aparato debe ser conectado a una fuente de alimentación solo del tipo
descrito en las instrucciones operativas o según esté marcado en el aparato. No sobrecargue los
tomacorriente.
10. Existe peligro de explosión si la batería se sustituye de forma incorrecta. Sólo sustituya con el mismo
tipo o equivalente.
11. Hay una batería recargable de alta energía dentro de la caja del altavoz, no la arroje al fuego para evitar
el peligro de explosión.
12. No cargue la batería recargable interna mayor que la indicada para evitar el peligro de incendio. La
sobrecarga baterías recargables puede acortar su vida útil.
13. No intente desarmar, abrir o reparar este producto usted mismo. Si no funciona bien, busque a un
técnico calificado o comuníquese con el distribuidor al teléfono que se encuentra en la contraportada
de este manual del usuario.
14. La señal de precaución y la placa de identificación está situada en la parte posterior del producto.

COMUNICACIONES (FCC POR SUS SIGLAS EN INGLÉS)
Este dispositivo se conforma con la parte 15 de las reglas de la FCC. La operación cumple con las dos
condiciones siguientes:
(1) este dispositivo puede no causar interferencia dañosa, y
(2) este dispositivo debe aceptar cualquier interferencia recibida, incluyendo interferencia que pueda
causar la operación indeseada.
NOTA: Este equipo ha sido probado y se ha determinado que satisface los límites para un dispositivo
digital clase B, de acuerdo a lo que dispone la Parte 15 de los Reglamentos de la FCC, Estos límites tienen
el propósito de proporcionar una protección razonable contra interferencia dañina en una instalación
residencial. Este equipo genera, usa y puede emitir energía de radiofrecuencia, y si no se instala y se usa
de acuerdo con estas instrucciones, puede causar interferencia dañina a las radiocomunicaciones.
Sin embargo, no hay ninguna garantía de que no vaya a ocurrir interferencia en ninguna instalación
Determinada. Si este equipo causa interferencia no deseada contra la recepción de radio o televisión, lo
cual se puede determinar encendiendo y apagando el aparato, se exhorta al usuario a tratar de corregir el
problema de la interferencia tomando una o más de las siguientes medidas:
- Reoriente o reubique la antena de recepción.
- Aumente la distancia de separación entre el equipo y el receptor.
- Conecte el equipo a un receptáculo en un circuito distinto al que usa el receptor.
- Consulte al concesionario o a un radiotécnico experimentado para que le ayuden.
ADVERTENCIA: Los cambios o modificaciones a esta unidad que no estén expresamente aprobados por la
parte responsable de la conformidad podrían anular la autoridad del usuario para operar el equipo.
¡PROTEJA SUS MUEBLES!!
Este sistema está equipado con soportes de goma anti deslizante para prevenir que el equipo se mueva
mientras usted opera los controles. Éstos soportes están realizados en un material de goma no deslizante
especialmente formulado para evitar dejar marcas o manchas en sus muebles. Sin embargo, cierto tipo de
barnices de muebles con base de aceite, persevantes de la madera, o vaporizadores de limpieza pueden
ablandar dichos soportes, y dejar marcas o un residuo de goma en los muebles. Para prevenir cualquier
tipo de daño a sus muebles, recomendamos que compre pequeñas almohadillas de fieltro auto-adhesivas,
disponibles en ferreterías y todo tipo de centros de compra del hogar y aplique estas almohadillas en la
parte inferior del soporte de goma antes de colocar el producto sobre el mobiliario de madera fina.
-2-

1 2
3
4
5
6
78910
11
1. Indicador de alarma ENCENDIDA/APAGADA
2. Indicador de la hora PM
3. Pantalla Multifunción
4. Mapa de la zona horaria
5. Indicador del día de la semana
6. Recordatorio de fechas especiales
7. Lectura de la temperatura
8. Indicador de nivel de confort
9. Indicador de tendencias de temperatura según las 12 horas anteriores
10. Lectura de humedad
11. Indicador de dormitar
UBICACION DE LOS CONTROLES
-3-

200m
12
13
14
15 16
17
19
20
21
22
18
-4-
12. Proyector
13. Perilla de ajuste del enfoque del proyector
14. Botón de MODO
15. Botón de ajuste hacia ARRIBA; ALARMA ENCENDIDA/APAGADA; °C/°F
16. BOTÓN Dormitar/Luz
17. Botón de temperature/humedad Máxima/Mínima
18. BOTÓN de dormitar
19. Botón de ajuste HACIA ARRIBA/ ZONA HORARIA
20. BOTÓN para restablecer el sistema
21. Conector de entrada DC
22. Puerta de la Batería
FUENTE DE CORRIENTE
Esta unidad funciona con el adaptador de AC-DC incluidos o en 2 pilas AAA (no incluidas).
FUNCIONAMIENTO CON CORRIENTE AC (CORRIENTE ALTERNA)
Para operar la unidad utilizando el modo de corriente alterna (AC), se necesitará un adaptador AC-DC con
salida de 4.5V DC 200mA (incluido).
1.) Para conectar el adaptador AC-DC a la unidad, inserte con firmeza y asegure la espiga DC del
adaptador a la salida DC ubicada al lado izquierdo del respaldo de la unidad.
2.) Enchufe el adaptador AC-DC a un tomacorriente doméstico AC con una salida de 120V AC ~ 60Hz.
Conectar este sistema a cualquier otro tipo de corriente, puede dañar el sistema.
NOTA: Cuando el adaptador AC-DC se conecta a la toma de DC, las baterías se desconectan
automáticamente.

P M C E
-5-
!
FUNCIONAMIENTO CON BATERÍAS
1. Abra la puerta del compartimiento de baterías en la parte posterior de la unidad principal.
2. Siguiendo el diagrama de polaridad (+ y -) que se encuentra adentro del compartimiento de baterías,
inserte 2 baterías ‘AAA' (UM-4) (No incluidas).
Nota: Para obtener el máximo rendimiento, se recomienda usar baterías alcalinas.
3. Vuelva a colocar la puerta del compartimiento para las baterías.
IMPORTANTE: Asegúrese de que las pilas están instaladas correctamente. La polaridad incorrecta puede
dañar la unidad.
ADVERTENCIA:
Asegúrese de instalar correctamente las baterías. La polaridad equivocada podría dañar la unidad.
- No combine baterías viejas y nuevas.
- No combine baterías alcalinas, estándar (carbono-zinc) o recargables (níquel-cadmio).
- Se recomienda usar únicamente baterías iguales o equivalentes.
- Si no va a usar la unidad por un tiempo prolongado, quítele las baterías. Las baterías viejas o derramadas
pueden dañar la unidad y anular la garantía.
- No elimine las baterías en el fuego ya que podrían derramarse o hacer explosión.
- No intente recargar baterías no recargables; podrían recalentarsey derramarse (Siga las instrucciones
del fabricante de baterías).
- Sólo un adulto debe cambiar las pilas
CONFIGURACIÓN DEL RELOJ
Cuando la unidad se encuentra en modo de pantalla:
Configuración de la Zona horaria
La unidad predeterminada es hora del Pacífico (P). Toque repetidamente el botón de ZONA HORARIA en el
respaldo para seleccionar otra zona horaria si lo necesita. La zona horaria cambiará en el orden siguiente
cuando pulse el botón ZONA HORARIA.
Hora del pacífico ( P ) →Hora de montaña ( M )→Hora centro ( C )→Hora del este ( E )
Configuración de formato de12/24 horas
1. La unidad predeterminada es el formato de 12 horas. Pulse y sostenga el botón MODO por 3 segundos,
aparecerá el formato de 12 horas (H 12) intermitente en la pantalla.
2. Toque el botón ARRIBA/ABAJO para cambiar la configuración de la pantalla del reloj al formato de 24
horas (H 24) de ser necesario.
Configuración del reloj
3. Pulse el botón MODO para confirmar, aparecerán intermitentes los dígitos de las horas solicitando datos.
4. Toque repetidamente al botón ajustar ARRIBA/ABAJO para configurar el valor numérico de las horas.
Nota: Asegúrese de que la hora esté configurada de modo que el indicador PM que aparece esté
correcto.
5. Toque el botón de MODO después de haber configurado la hora, los dígitos de los minutos aparecerán
intermitentes solicitando el ingreso de datos.
6. Toque repetidamente al botón ajustar ARRIBA/ABAJO para configurar el valor numérico de los minutos.
Pulse y sostenga los botones para adelantar o retroceder rápidamente en la secuencia de dígitos.
7. Toque una vez más el botón MODO para finalizar la configuración del reloj.
Nota: Si restableció la unidad, deberá configurar de nuevo el reloj.
CONFIGURACIÓN DEL CALENDARIO
Cuando la unidad se encuentra en modo de pantalla:
1. Toque una vez el botón de MODO para ingresar al modo de configuración del calendario. En la pantalla
aparecerán los dígitos del mes y de la fecha.
2. Cuando el mes y la fecha aparecen en la pantalla, pulse y sostenga el BOTÓN Modo por 3 segundos, los
dígitos del año aparecerán intermitentes solicitando el ingreso de datos.
3. Toque repetidamente al botón ajustar ARRIBA/ABAJO para configurar el valor numérico del año.
4. Toque el botón de MODO después de haber configurado el año, los dígitos del mes aparecerán
intermitentes solicitando el ingreso de datos.
5. Toque repetidamente al botón ajustar ARRIBA/ABAJO para configurar el valor numérico del mes.
6. Toque el botón de MODO después de haber configurado el mes, los dígitos de la fecha aparecerán
intermitentes solicitando el ingreso de datos.
7. Toque repetidamente al botón ajustar ARRIBA/ABAJO para configurar el valor numérico de la fecha.
Oprima y sostenga los botones para adelantar o retroceder rápidamente en la secuencia de dígitos.
8. Toque el botón de MODO para completar la configuración. Toque 3 veces el botón MODO o espere unos
cuantos segundos para salir del modo de configuración del calendario.

-6-
CONFIGURACIÓN DE LA ALARMA
Configuración de la hora de la alarma
1. En modo de pantalla del reloj, toque el botón MODO dos veces para ingresar al modo de configuración de
Alarma, el indicador de alarma y la hora 12:00 aparecerán en la pantalla.
2. Pulse y sostenga el botón MODO por 3 segundos, los dígitos de la hora aparecerán intermitentes.
3. Toque repetidamente al botón ajustar ARRIBA/ABAJO para configurar el valor numérico de las horas.
Oprima y sostenga los botones para adelantar o retroceder rápidamente en la secuencia de dígitos.
Nota: Asegúrese de que la hora esté configurada de modo que el indicador PM aparezca correctamente.
4. Toque el botón de MODO después de haber configurado la hora, los dígitos de los minutos aparecerán
intermitentes solicitando el ingreso de datos.
5. Toque repetidamente al botón ajustar ARRIBA/ABAJO para configurar el valor numérico de los minutos.
Pulse y sostenga las teclas para adelantar o retroceder rápidamente el escaneo de la secuencia de
dígitos.
6. Toque el botón de MODO después de haber configurado los minutos, el tipo de melodía de Alarma “00”
aparecerá intermitente solicitando el ingreso de datos. Hay 13 diferentes melodías de alarma (00-12)
disponibles para su elección.
7. Toque repetidamente el botón Ajustar ARRIBA/ABAJO para seleccionar su melodía de alarma favorita.
8. Toque el botón de Modo para completar la configuración. Toque dos veces el botón MODO o espere unos
cuantos segundos para salir del modo de configuración de la alarma.
9. La alarma sonará durante 2 minutos cuando llegue el momento de activación. Toque el botón MODO una
vez para apagar la alarma hasta el día siguiente.
Nota: La pantalla parpadeará cuando el alarma esté sonando.
ENCENDER/APAGAR la Alarma
En el modo de pantalla del reloj,
- Para encender la alarma toque repetidamente el botón de ALARMA ENCENDIDA/APAGADA en el modo
de alarma APAGADA hasta que el ícono de la alarma aparezca en la pantalla.
- Para apagar la alarma toque repetidamente el botón de ALARMA ENCENDIDA/APAGADA en el modo de
alarma ENCENDIDA hasta que el ícono de la alarma desaparezca en la pantalla.
DORMITAR
- Al sonar la alarma se puede detener temporalmente pulsando el botón DORMITAR/LUZ en el tablero
Z
superior o el botón DORMITAR en el respaldo. El indicador de dormitar Z aparece en la pantalla e
intermitente junto con el indicador de Alarma .
- La alarma se retrasará por 8 minutos y luego se activará de nuevo.
- Esta operación manual de dormitar se puede repetir una y otra vez mientras la alarma esté activada.
CONFIGURACIÓN DEL RECORDATORIO DE FECHAS ESPECIALES
1. En el modo de pantalla del reloj, toque el botón MODO tres veces para ingresar al modo de configuración
de recordatorio de fechas especiales. El mes y el día del indicador de recordatorios aparecerá en la
pantalla.
Nota: Asegúrese de estar en el modo de configuración de fecha especial y no en modo de calendario.
2. Pulse y sostenga el botón de MODO por 3 segundos, los restantes dígitos del mes aparecerán
intermitentes. Toque repetidamente al botón ajustar ARRIBA/ABAJO para configurar el valor numérico
del mes del recordatorio.
3. Toque el botón de MODO para confirmar, el dígito de la fecha aparecerá intermitente. Toque
repetidamente al botón ajustar ARRIBA/ABAJO para configurar el valor numérico del mes del
recordatorio.
4. Toque el botón de MODO para confirmar, los dígitos de la hora aparecerán intermitentes. Toque
repetidamente al botón ajustar ARRIBA/ABAJO para configurar el valor numérico de las horas.
Nota: Asegúrese de que la hora esté configurada de modo que el indicador PM aparezca correctamente.
5. Toque el botón de MODO para confirmar, los dígitos de los minutos aparecerán intermitentes. Toque
repetidamente al botón ajustar ARRIBA/ABAJO para configurar el valor numérico de los minutos.
6. Toque el botón de Modo para completar la configuración. El indicador de recordatorio de Fechas
especiales aparecerá en la pantalla.
7. La melodía de la Fecha especial sonará durante 2 minutos al llegar la hora de activación sin interrupción,
el indicador de recordatorio aparecerá intermitente en al pantalla.
8. Para detener la melodía de inmediato, pulse cualquier botón. Sonará de nuevo al año siguiente en la
fecha configurada.
Nota: Dormitar no aplica en el recordatorio de fechas especiales.
9. Para cancelar el recordatorio de fechas especiales, toque repetidamente ALARMA
ENCENDIDA/APAGADA hasta que el indicador de fechas especiales se apague en la pantalla.

OPERACIÓN DE TEMPERATURA EN ÁREAS INTERIORES
MEDICIÓN DEL CLIMA EN INTERIORES
NOTA: 1.) La luz de fondo de la pantalla de la unidad principal permanecerá encendida cuando utilice el
adaptador de corriente AC.
2.) Cuando utiliza baterías, la luz de fondo se apagará para poder ahorrar carga de las baterías.
Pulse una vez el botón DORMITAR/LUZ y la luz de fondo se encenderá durante 7 segundos.
Pulsar cualquier otro botón en el tablero posterior no encenderá la luz de fondo.
3.) Cuando se produce un corte de corriente, la unidad cambiará a energía de la batería de forma
automática. La retroiluminación del visualizador estará apagado y solamente se encenderá
cuando pulse el botón LIGHT / SNOOZE para comprobar hora y la temperatura.
Para ver la zona horaria
En el modo de pantalla del reloj, dé toques repetidos al botón .ZONA HORARIA para ver las diferentes
zonas horarias.
Cambiar el formato de temperatura en pantalla
En modo de pantalla del reloj, pulse y sostenga el botón de °C/°F en el tablero posterior de la unidad
principal para cambiar el tipo de grados de la temperatura, en formato ya sea a modo Celsius (°C) a
Fahrenheit (°F).
Medición del clima en interiores
La temperatura y humedad de las áreas interiores aparece en la ventana de la Temperatura en la pantalla
de la unidad principal.
Revisión y eliminación del registro Max/Min de la temperatura
1. Toque el botón MAX/MIN una vez en el panel posterior para revisar el registro de temperatura y humedad
máximas. Toque dos veces para revisar los registros mínimos. Toque de nuevo para salir.
2. Todos los días a las 12:00 se eliminarán automáticamente los registros de temperatura y humedad
máxima y mínima.
Indicadores de nivel confortable
Los tres íconos de clima confortable a continuación representan los niveles confortables actuales (Seco,
Confortable y Húmedo) de la habitación en donde se coloque el SFA2200.
1. Independientemente de cual sea la temperatura, cuando la humedad se encuentre por debajo del 40%,
la pantalla mostrará el ícono de SECO.
2. Cuando la temperatura se encuentre entre 68°F (20°C) y 77°F (25°C), y cuando la humedad se
encuentra entre un 40% y un 70%, la pantalla mostrará el ícono de CONFORTABLE.
3. Independientemente de cual sea la temperatura, cuando la humedad se encuentre por encima del 70%,
la pantalla mostrará el ícono de HÚMEDO.
SECO CONFORTABLE HÚMEDO
NOTA: Cuando la temperatura es de 68 °F (20 °C) y 77 °F (25 °C) y la humedad es del 40% al 70%, se
mostrará ningún icono.
Tendencia de la temperatura durante las últimas 12 horas
Gráfica de BARRAS de la tendencia dinámica de la temperatura ambiente interior durante
las últimas 12 horas
Esta unidad está equipada con una característica dinámica de la tendencia de la temperatura durante las
últimas 12 horas. Se mueve de derecha a izquierda para indicar los cambios de temperatura por medio de
la comparación de la temperatura de las horas anteriores con la temperatura actual. El rango máximo llega
hasta +/- 5.4 °F (+/- 3 °C) en las horas pasadas 1, 2, 3, 6 y 12.
Cómo leer la tendencia de la temperatura
1. Escala horizontal de 0, -1, -2, -3. -6 & -12, promedio actual (0), 1, 2, 3, 6 y 12 horas respectivamente.
2. Escala vertical de +/- 5.4, 3.6, 1.8, 0 grados °F (+/- 3, 2, 1, 0 grados °C) la temperatura promedio cambia
en comparación con la temperatura actual.
-7-
Grados Farhenheit/hora anterior Grados Celcius/hora anterior

3. La unidad detectará las tendencias de la temperatura automáticamente y se necesita por lo menos 1
hora antes de que comience a mostrar los cambios de temperatura. Se recomienda comenzar la lectura
de la tendencia después de que la unidad ha estado encendida y funcionando 12 horas o más.
4. Conforme pase el tiempo, la pantalla mostrará la tendencia de ascenso o descenso de la temperatura,
ENCENDIENDO/APAGANDO las barras de la temperatura en base a las lecturas de la temperatura de
las 12 horas anteriores.
Nota: 1.) Iluminación de una barra de escala = 1.8 °F (1°C).
2.) Si el cambio de temperatura supera +/-3°C, aparecerá una gráfica con la BARRA completa o 1
BARRA.
3.) Se calcula la tendencia de la temperatura por los cambios de temperatura y únicamente es
indicativa. El cálculo puede verse afectado por muchas cosas, lo cual incluye la ubicación de la
unidad.
4.) La unidad principal únicamente debe utilizarse en áreas interiores. No hay garantía de la
precisión cuando la unidad se utiliza para el pronóstico de condiciones meteorológicas en áreas
exteriores.
COMO UTILIZAR EL PROYECTOR
Gire el proyector para desplegar la hora en una pared oscura o el techo oscuro más o menos a una
distancia del proyector de 2.3 – 6.6 pies (0.7 - 2 metros), la hora que aparece proyectada en la pared o
techo aparecerá en el formato siguiente.
1. El proyector se mantendrá ENCENDIDO cuando la alimentación de la unidad es continua
mediante el adaptador de AC.
2. El proyector se mantendrá APAGADO cuando la alimentación de la unidad principal es por medio de las
baterías. Pulsar el botón "DORMITAR/LUZ" encenderá momentáneamente la luz de fondo de la pantalla
y la proyección por 7 segundos.
3. Gire el ángulo del proyector para ajustar el lugar en donde se proyecta la hora.
4. Ajuste la perilla de control de ENFOQUE para afinar la hora proyectada.
NOTA: El proyector se puede girar ±90º.
CUIDADO Y MANTENIMIENTO
1. No ponga la unidad en un área con la fuerza excesiva, el choque, el polvo o las temperaturas extremas.
2. No trate de forzar con los componentes internos de la unidad.
3. Si se acumula polvo en la consola, límpiela con un paño suave de tela. Nunca use
ceras ni pulidores en aerosol en la consola.
4. Evite usar esta unidad bajo los rayos del sol o en lugares calientes, húmedos y llenos de polvo.
5. Mantenga su unidad alejada de electrodomésticos que producen calor y fuentes de ruido eléctrico como
las lámparas fluorescentes o motores.
PRECAUCIÓN: Nunca permita que caiga agua u otros líquidos adentro de la unidad mientras la limpia.
REINICIO de la Unidad
En caso de que la unidad haya sido sometida a sobretensión o descarga eléctrica, el micro-controlador
interno
puede bloquearse y la unidad no responderá a ninguno de los
controles del tablero. En este caso, utilice un clip enderezado, un palillo de dientes u objeto similar para
oprimir el botón de REINICIO ubicado en el respaldo de la unidad (consulte la figura siguiente). La
operación de reinicio borra la memoria del sistema, y todas las configuraciones que usted haya colocado.
PRECAUCIÓN: PARA OPRIMIR EL BOTÓN DE RENICIO NUNCA USE OBJETOS AFILADOS NI
PUNZANTES. ÉSTOS PODRÍAN DAÑAR EL INTERRUPTOR DE REINICIO DENTRO DE LA UNIDAD.
-8-
BOTÓN DE
RESTABLECIMIENTO
FS
200 m

SOLUCIONADOR DE PROBLEMAS
Si encuentra problemas al utilizar esta unidad, por favor revise lo siguiente o llame al 1-800-777-5331 de
Servicio al Cliente
ESPECIFICACIONES
Necesidades de corriente:
Entrada DC: 2 X AAA (UM-4) Baterías o DC 4.5V, 200mA
Rango
o o
Temperatura 32 – 122 F (0 – 50 C)
Humedad 20% – 95%
©2014 BRK Brands Inc. Todos los derechos reservados. First Alert® Es una marca registrada de First Alert
Trust.
En Spectra, la responsabilidad ambiental y social es uno de los valores
fundamentales de nuestra empresa. Nos dedicamos a la continua
implementación de iniciativas responsables con el objeto de conservar y
mantener el medio ambiente a través del reciclaje responsable.
Por favor visítenos en http://www.spectraintl.com/green.htm para mayor información sobre las iniciativas
de protección del medio ambiente o para encontrar los centros de reciclaje en su área.
GARANTÍA Y SERVICIOS DE COBERTURA LIMITADA POR 1 AÑO VÁLIDA EN LOS
ESTADOS UNIDOS SOLAMENTE
Este producto ha sido fabricado, distribuido o vendido por SPECTRA MERCHANDISING INTERNATIONAL,
INC., licenciatario oficial para este producto. Cualquier derecho, título el interés para utilizar el logotipo
“First Alert” y las marcas comerciales y la marca y acondicionamiento comercial de “First Alert” tiene
licencia exclusiva otorgada por las marcas BRK y se utilizan bajo licencia de BRK Brands, Inc. Por favor
comuníquese con el departamento de servicio de SPECTRA si tiene preguntas/comentarios, sobre la
garantía, el apoyo, o el servicio en relación con este producto.
SPECTRA MERCHANDISING INTERNATIONAL, INC. garantiza que este producto 1) está libre de defectos
en los materiales y mano de obra y 2) cumple con sus especificaciones por el período de 1 (un) año a partir
de la fecha de la compra original por parte del cliente, siempre y cuando el producto haya sido utilizado
dentro de losEE:UU. Esta garantía no es asignable ni transferible. Nuestra obligación de acuerdo a esta
garantía es reparar o reemplazar la unidad con defectos o cualquier pieza correspondiente, con excepción
de las baterías, cuando sea devuelta al Departamento de Servicios de SPECTRA, acompañada de la
prueba de la fecha original de compra por parte de cliente, como por ejemplo, una copia del recibo de
ventas.
-9-
Síntoma
La unidad no
responde
(sin alimentación).
Causa posible
Solución
No hay baterías instaladas o las
pilas instaladas están gastadas.
Fuente de alimentación de AC
sin función o el cable de DC no
está enchufado a la toma de DC
en la parte posterior de la unidad.
Tomacorriente de pared no
funciona.
Instale 2 baterías de x "AAA"
o reemplazar las baterías agotadas.
Conecte el adaptador de CA a una
toma de corriente.
Enchufe otro dispositivo en el mismo
enchufe para confirmar la toma de
corriente funciona.

-10-
Usted debe cubrir todos los costos de envío requeridos para entregar el producto a SPECTRA para el
servicio de garantía. Si el producto es reparado o reemplazado de acuerdo a garantía, los gastos de
retorno serán por cuenta de SPECTRA. No existen otras garantías expresas diferentes de aquellas
declaradas en el presente documento.
Esta garantía es válida solamente en el cumplimiento de las condiciones que se establecen a continuación:
1. La garantía se aplica solamente al producto de SPECTRA siempre que:
a. Permanezca en posesión del comprador original y se exhiba la prueba de compra.
b. Que no haya sufrido accidentes, sometido a mal uso, abuso, servicio inapropiado, o uso fuera de las
descripciones de advertencia cubiertas dentro del manual del propietario, o haya tenido modificaciones
no aprobadas por SPECTRA.
c. Las reclamaciones se deben presentar dentro del período de garantía.
2. Esta garantía no cubre daños o fallas al equipo causadas por cables eléctricos que no
cumplan con los códigos de electricidad o con las especificaciones del manual del propietario
proporcionado por, SPECTRA o por no
proporcionar el cuidado razonable y el mantenimiento necesario según lo especificado en el manual del
propietario.
3. La garantía de todos los productos de SPECTRA es aplicable únicamente al uso residencial y no tiene
vigencia cuando los productos se utilizan en un ambiente no residencial o se instalan fuera de los
Estados Unidos.
Esta garantía le da derechos legales específicos, y usted podría tener también otros derechos que varían
de estado a estado. Para OBTENER SERVICIO por favor remueva todas las baterías (si las hay) y embale
la unidad con cuidado enviándola por correo postal asegurado y prepago o por UPS a SPECTRA, a la
dirección que se menciona a continuación. SI LA UNIDAD ES DEVUELTA DENTRO DEL PERÍODO DE
GARANTÍA EXHIBIDO arriba, por favor incluya una prueba de compra (recibo de caja registradora con
fecha), para que podamos determinar su elegibilidad para el servicio de garantía y reparación de la unidad
sin costo. También incluya una nota con una descripción explicando en qué forma la unidad es defectuosa.
Un representante de atención al cliente tal vez deba contactarlo en relación al estado de su reparación, por
lo tanto incluya su nombre, dirección, número de teléfono y dirección de correo electrónico para acelerar el
proceso.
SI LA UNIDAD ESTÁ FUERA DEL PERÍODO DE COBERTURA DE LA GARANTÍA, por favor incluya un
cheque por quince dólares $8.00 para cubrir el costo de reparación, manejo y envío de retorno. Cualquier
devolución no cubierta por la garantía deberá ser enviada con gastos pre-pagados.
Se recomienda que primero entre en contacto con SPECTRA llamando al número 1-800-777-5331 o por
correo electrónico enviando un mensaje a custserv@spectraintl.com para obtener información actualizada
sobre la unidad que requiere servicio. En algunos casos el modelo puede haber sido descontinuado y
SPECTRA se reserva el derecho de ofrecer opciones alternativas de reparación o reemplazo.
SPECTRA MERCHANDISING INTERNATIONAL, INC.
4230 North Normandy Avenue,
Chicago, IL60634, USA.
1-800-777-5331
Para registrar su producto, siga el enlace a continuación en el sitio web para ingresar su información.
http://www.spectraintl.com/wform.htm
0614 Impreso en China
-
 1
1
-
 2
2
-
 3
3
-
 4
4
-
 5
5
-
 6
6
-
 7
7
-
 8
8
-
 9
9
-
 10
10
-
 11
11
-
 12
12
-
 13
13
-
 14
14
-
 15
15
-
 16
16
-
 17
17
-
 18
18
-
 19
19
-
 20
20
-
 21
21


First Alert SFA2200 Guía del usuario
- Categoría
- Relojes de alarma
- Tipo
- Guía del usuario
en otros idiomas
- English: First Alert SFA2200 User guide
Otros documentos
-
Denver DVBS-206HD Manual de usuario
-
Jensen SMPS-125 Manual de usuario
-
-
-
-
-
Bresser 7008001 El manual del propietario
-
-
Oregon Scientific BAR908HGA Manual de usuario
-
National Geographic IN102TOP Manual de usuario