
ENGLISH........................................................................... 3
ESPAÑOL....................................................................... 21
Before using your new product, please read these instructions to prevent any damage.
Antes de usar su producto nuevo, lea estas instrucciones para prevenir cualquier daño.
USER GUIDE | GUÍA DEL USUARIO
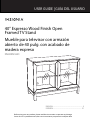
40” Espresso Wood Finish Open
Framed TV Stand
Mueble para televisor con armazón
abierto de 40 pulg. con acabado de
madera expreso
NS-HWG1641

2
40
”
E
spresso
W
oo
d
Fi
n
i
s
h
O
pen
F
rame
d
TV
S
tan
d
www.insigniaproducts.com
CONTENTS
ENGLISH........................................................................................3
SAFETY INFORMATION AND SPECIFICATIONS....................................................... 3
PACKAGE CONTENTS: PARTS........................................................................................ 4
PACKAGE CONTENTS: HARDWARE............................................................................. 5
ASSEMBLY INSTRUCTIONS............................................................................................ 6
CARE AND MAINTENANCE..........................................................................................18
ONE-YEAR LIMITED WARRANTY................................................................................19
ESPAÑOL.................................................................................... 21
INFORMACIÓN DE SEGURIDAD Y ESPECIFICACIONES......................................21
CONTENIDO DEL PAQUETE: PIEZAS.........................................................................22
CONTENIDO DEL PAQUETE: FERRETERÍA...............................................................23
INSTRUCCIONES DE MONTAJE ..................................................................................24
CUIDADO Y MANTENIMIENTO...................................................................................36
GARANTÍA LIMITADA DE UN AÑO............................................................................37

3
40
”
Espresso Woo
d
Finis
h
O
pen Frame
d
TV
S
tan
d
www.insigniaproducts.com
ENGLISH
SAFETY INFORMATION AND
SPECIFICATIONS
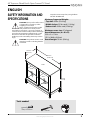
CAUTION: The top surface of this stand
is designed for use with a product
weighing no more than
50 lbs. (22.68 kg) and having a width
that permits it to sit evenly on the
stand with no more than a one-inch overhang on
each side of the shelf. Use with products that weigh
more than the maximum weight allowed, or with
dimensions that extend beyond the maximum
width may result in instability, which may result in
injury.
CAUTION: This product contains small
items that could be a choking hazard if
swallowed.
Keep these items away from young children!
Model #: NS-HWG1641
Maximum Supported Weights:
- Top shelf: 50 lbs. (22.68 kg)
- Middle shelves: 25 lbs. each (11.34 kg)
- Bottom shelf: 50 lbs. total (22.68 kg)
Maximum screen size: 42” diagonal
Overall dimensions (H × W × D):
29.9 x 41 x 17.8 in.
(75.9 x 104.0 x 45.0 cm)
Overall weight: 79 Lbs. (35.8 kg)
41 inch
(104.0 cm)
29.9 inch
(75.9 cm)
17.8 inch
(45.0 cm)
50 lbs.
25 lbs.
50 lbs. total
25 lbs
Tools needed:
Phillips screwdriver
Hammer

4
40
”
E
spresso
W
oo
d
Fi
n
i
s
h
O
pen
F
rame
d
TV
S
tan
d
www.insigniaproducts.com
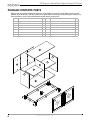
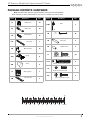
PACKAGE CONTENTS: PARTS
Make sure that you have all the parts necessary to assemble your new TV stand. While not all parts are
labeled, some of the parts will have a label or an inked letter on the edge to help distinguish similar parts
from each other. Use this part identification to help identify similar parts.
Label Part Qty Label Part Qty
A Right End 1 H Adjustable shelf 2
B Left End 1 I Leg 4
CUpright 1 JCenter leg 1
D Top 1 K Front skirt 1
E2 Bottom 1 L Back skirt 1
F Back 1 M Side skirt 2
G Door 2
E2

5
40
”
Espresso Woo
d
Finis
h
O
pen Frame
d
TV
S
tan
d
www.insigniaproducts.com
PACKAGE CONTENTS: HARDWARE
Note: The table below shows the required hardware. You may receive extra hardware.
Make sure that you have all the hardware necessary to assemble your new TV stand.
Label Hardware Qty.
1F 14
8F 14
15F 12
23F 1
4G 12
13H 4
25K 2
1L 1
1M 1
Hidden cam
Cam screw
Wood dowel
Foot screw
Metal bracket
Hinge
Knob
Warning label
Felt disk card
Label Hardware Qty.
54M 1
1N 42
1R 8
2R 8
1S 24
113S 6
11S 8
42S 2
Glue
Nail
Metal pin
Rubber sleeve
Black 9/16” large head screw
Black 1-15/16” flat head screw
Black 1/2” flat head screw
Silver 7/8” machine screw
1 0 20 30 40 50 60 70 80 90 100mm
1234in

6
40
”
E
spresso
W
oo
d
Fi
n
i
s
h
O
pen
F
rame
d
TV
S
tan
d
www.insigniaproducts.com
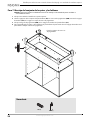
ASSEMBLY INSTRUCTIONS
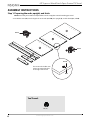
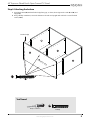
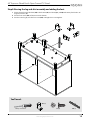
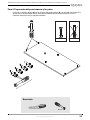
Step 1: Preparing the ends, upright, and skirts
Caution: Assemble your stand on a carpeted floor or on the empty box to avoid scratching your stand.
• Insert hidden cams (1F) into the large holes in the ends (A and B), the upright (C), and the skirts (K, L, and M).
1F
1F
Arrow
Arrow
Arrow
Hole
The arrow in the hidden cam
must point toward the hole
in the edge of the board.
You’ll need:
1F (14)

7
40
”
Espresso Woo
d
Finis
h
O
pen Frame
d
TV
S
tan
d
www.insigniaproducts.com
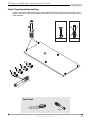
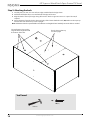
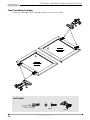
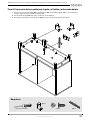
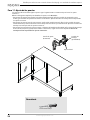
Step 2
:
Preparing the top and legs
• Screw 14 cam screws (8F) into the holes in the top (D) and the sides of the legs (I), then tighten with a
phillips screw driver until the raised collar of the cam screw is flush with the surface of the part. Use the
holes indicated.
8F
U
s
e
t
h
e
s
e
h
o
l
e
s
i
n
t
h
e
l
e
g
s
.
You’ll need:
Phillips screwdriver
8F (14)

8
40
”
E
spresso
W
oo
d
Fi
n
i
s
h
O
pen
F
rame
d
TV
S
tan
d
www.insigniaproducts.com
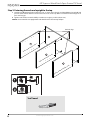
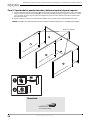
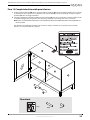
Step 3
:
Fastening the ends and upright to the top
1 Stand the top (D) with its finished edge facing up, as shown, then align the ends (A and B) and upright (C) and
push the holes with the hidden cams onto the cam screws on the top. Make sure that the finished edges of all
parts are facing up.
2 Tighten each hidden cam with a Phillips screwdriver as tight as possible (about 180°).
Caution: Do not stand the unit upright without the back fastened. The unit may collapse.
S
u
r
f
a
c
e
w
i
t
h
h
i
d
d
e
n
c
a
m
s
S
u
r
f
a
c
e
w
i
t
h
h
i
d
d
e
n
c
a
m
s
S
u
r
f
a
c
e
w
i
t
h
o
u
t
h
i
d
d
e
n
c
a
m
s
Finished edge
You’ll need:
Phillips screwdriver

9
40
”
Espresso Woo
d
Finis
h
O
pen Frame
d
TV
S
tan
d
www.insigniaproducts.com
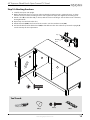
Step 4
:
Attaching the bottom
1 Stand the bottom (E2) with its finished edge facing up, as shown, then align it to the ends (A and B) and
upright (C).
2 Using a Phillips screwdriver, secure the bottom to the ends and upright with six black 1-15/16” flat head
screws (113S).
113S
E2
U
n
f
i
n
i
s
h
e
d
s
u
r
f
a
c
e
Finished edge
You’ll need:
Phillips screwdriver
113S (6)

10
40
”
E
spresso
W
oo
d
Fi
n
i
s
h
O
pen
F
rame
d
TV
S
tan
d
www.insigniaproducts.com
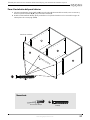
Step 5
:
Attaching the back
1 Carefully turn your unit over onto its front edges, with the finished edges down.
2 Unfold the back (F) and lay it over unfinished back edges of the unit.
3 Align the back to have equal edges along all four sides. Push on opposite corners to “square” the unit, if
required.
4 Using a hammer, fasten the back to the main body of the TV stand with the nails (1N). Make sure that you tap
nails into the holes that line up over the upright.
Note: Perforations have been provided for wire/cable access through the back. Carefully cut out the holes as needed.
1N
These holes must line up
over the upright
The perforations closer to the
edge should be aligned toward
the bottom of the unit.
You’ll need:
Hammer
1N (42)

11
40
”
Espresso Woo
d
Finis
h
O
pen Frame
d
TV
S
tan
d
www.insigniaproducts.com
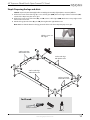
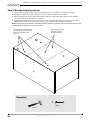
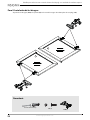
Step 6
:
Preparing the legs and skirts
Caution: Inspect the parts thoroughly before assembling. Disassembly of glued parts is extremely difficult.
1 Fill the holes in the sides of the legs (I) 1/4 to 1/2 full of glue (54M), then insert eight of the wood dowels (15F)
into the holes. Wipe away the excess glue.
2 Fill the holes in the ends of the skirts (K, L, and M) 1/4 to 1/2 full of glue (54M). Make sure not to put glue in the
holes for the cam screws.
3 Attach the legs (I) to the skirts (K, L, and M), then tighten the eight hidden cams.
Note: Make sure that the dowels in the legs go into the holes in the skirts. Wipe away any excess glue.
15F
54M
54M
54M
54M
54M
54M
54M
54M
Surface and edge
with hidden cams.
Surface and edge
with hidden cams.
Surface and edge
with hidden cams.
Surface and edge
with hidden cams.
Fill holes 1/4 to 1/2
full of glue.
You’ll need:
Phillips screwdriver
15F (8)
54M (1)

12
40
”
E
spresso
W
oo
d
Fi
n
i
s
h
O
pen
F
rame
d
TV
S
tan
d
www.insigniaproducts.com
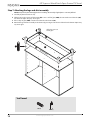
Step 7
:
Attaching the legs and skirt assembly
Caution: Inspect the parts thoroughly before assembling. Disassembly of glued parts is extremely difficult.
1 Carefully lay the stand onto its top.
2 Fill the holes in the corners of the bottom (E2) 1/4 to 1/2 full of glue (54M), then insert the wood dowels (15F)
into the holes. Wipe away any excess glue.
3 Place a drop of glue (54M) onto the wood dowels in the bottom (E2).
4 Attach the legs and skirt assembly to the bottom by pressing it onto the wood dowels in the bottom. Wipe away
any excess glue.
15F
E2
F
i
n
i
s
h
e
d
s
u
r
f
a
c
e
Fill holes 1/4 to 1/2
full of glue.
You’ll need:
15F (4)
54M (1)

13
40
”
Espresso Woo
d
Finis
h
O
pen Frame
d
TV
S
tan
d
www.insigniaproducts.com
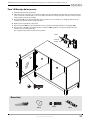
Step 8
:
Bracing the leg and skirt assembly and adding the foot
1 Fasten the twelve metal brackets (4G) to the bottom (E2) and skirts (K, L, and M) with twenty four black 9/16”
large head screws (1S).
2 Turn the foot screw (23F) a few turns into the bottom.
3 Turn the center leg (J) onto the foot screw (23F) until tight. Do not overtighten.
1S
4G
4G
4G
4G
23F
E2
You’ll need:
Phillips screwdriver
4G (12)
1S (24)
23F (1)

14
40
”
E
spresso
W
oo
d
Fi
n
i
s
h
O
pen
F
rame
d
TV
S
tan
d
www.insigniaproducts.com
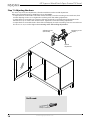
Step 9
:
Installing the hinges
• Attach the hinges (13H) to the doors (G) with the black 1/2” flat head screws (11S).
11S
13H
13H
You’ll need:
Phillips screwdriver
11S (8)
13H (4)

15
40
”
Espresso Woo
d
Finis
h
O
pen Frame
d
TV
S
tan
d
www.insigniaproducts.com
Step 10
:
Attaching the doors
1 Carefully stand your unit upright.
2 Before attaching the doors to your unit, make sure that the mounting screw is against the stops, as shown
below. If it isn’t, loosen the mounting screw to slide it against the stops, then tighten the mounting screw.
3 Attach a door (G) to the left end (B), as shown, with the screws in the hinges. Start all of the screws a few turns,
then tighten them.
4 Repeat step 2 to attach the other door.
5 Attach the knobs (25K) to the front of the doors with a 7/8” silver machine screw (42S).
6 Peel two felt disks from the felt disk card (1M) and stick them to the doors where they contact the upright (C).
See the next step for door adjustments.
42S
1M
1M
25K
Stop
Mounting
screw
Hinge
You’ll need:
Phillips screwdriver
25K (2)
42S (2)
1M (1)

16
40
”
E
spresso
W
oo
d
Fi
n
i
s
h
O
pen
F
rame
d
TV
S
tan
d
www.insigniaproducts.com
Step 11
:
Adjusting the doors
The doors may need some adjustments. Follow the text below to make needed adjustments.
Refer to the enlarged diagram to identify the parts on the HINGES.
• To adjust the doors toward either side of the stand (horizontal), loosen the mounting screw several turns, then
turn the adjusting screw in or out. Tighten the mounting screw after making adjustments.
• To adjust the doors toward the top or bottom of the stand (vertical), loosen both vertical adjustment screws.
Move the doors up or down to the desired location. Tighten the screws after making adjustments.
• To adjust the doors toward the back or front of the stand (depth), loosen the mounting screw one turn and move
the doors in or out, as needed. Tighten the
mounting screw after making adjustments.
Adjusting screw
(horizontal)
Vertical
adjustment
Mounting screw
(depth)
You’ll need:
Phillips screwdriver

17
40
”
Espresso Woo
d
Finis
h
O
pen Frame
d
TV
S
tan
d
www.insigniaproducts.com
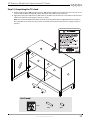
Step 12
:
Completing the TV stand
1 Push the rubber sleeves (2R) over the metal pins (1R). Insert the metal pins into the hole locations of your choice
in the ends (A and B) and upright (C). Set the adjustable shelves (H) onto the metal pins.
2 Apply the warning label (1L) to the top (D) so that it is readable only when the TV is removed from the unit. Peel
off the back of the label and apply it to the top as shown.
Note: This is a permanent label intended to last for the life of the product. After it is applied, do not try to remove it.
This completes the assembly of your TV stand. Clean with your favorite furniture polish or a damp cloth, then
wipe dry.
1L
1R
2R
You’ll need:
1L (1)
1R (8)
2R (8)

18
40
”
E
spresso
W
oo
d
Fi
n
i
s
h
O
pen
F
rame
d
TV
S
tan
d
www.insigniaproducts.com
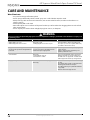
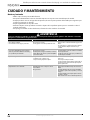
CARE AND MAINTENANCE
Wood/Laminate
• Use your favorite type of furniture polish.
• Do not spray polish directly onto the stand. Spray onto a soft cloth then wipe the stand.
• Always test any polish in a discrete location first, such as the back of the stand, to make sure that there is no
adverse reaction.
• Dust frequently with a soft cloth.
• Never slide objects across surfaces. Lift objects from the top surface rather than dragging them across the finish
when moving them.
• Do not expose your stand to direct sunlight, drying heat sources, or dampness.
WARNING
Please use your stand correctly and safely. Improper use can cause safety hazards or damage to your furniture or household items. Carefully read
the following chart.
Look out for: What can happen: How to avoid the problem:
• Children climbing on the stand.
• Children will play and be active near the TV.
• Risk of injury or death.
• A child playing with a TV can cause it to tip over.
• Never allow children to climb on or play with the stand.
• Do not place toys or food on the top shelves. Children may
try to climb to reach them out of curiosity.
• Improper use of the stand to support TVs.
• TV’s that exceed the specified size and weight limitations
for this stand.
• Risk of injury or death.
• TVs can be very heavy. Note, older CRT TVs tend to be
unbalanced and prone to tipping forward.
• A TV must only be set on furniture specifically designed to
support a television.
• Never use a TV that exceeds the weight ratings or size
guidelines specified for the stand.
• Overloaded shelves • Risk of injury.
• Top-heavy furniture can tip over.
• Overloaded shelves can break.
• Never exceed the weight limits shown in the instructions.
• Work from the bottom to the top when loading shelves.
• The middle shelves can support 25 lbs. each and the bottom
shelf can support 50 lbs. total. The top can support 50 lbs.
•Improperly moving the stand. • The stand can tip over or break if improperly moved.
• Risk of injury.
• Unload shelves from the top to the bottom before moving
the stand.
• Do not push the stand, especially on a carpeted floor. Have a
friend help you lift the item and set it in place.
• Do not lift the stand using the top shelf. Lift from the frame
or leg assembly.
• Remove the TV before moving the TV stand.

19
40
”
Espresso Woo
d
Finis
h
O
pen Frame
d
TV
S
tan
d
www.insigniaproducts.com
ONE-YEAR LIMITED
WARRANTY
Definitions:
The Distributor* of Insignia branded products warrants to you,
the original purchaser of this new Insignia-branded product
(“Product”), that the Product shall be free of defects in the
original manufacturer of the material or workmanship for a
period of one (1) year from the date of your purchase of the
Product (“Warranty Period”).
For this warranty to apply, your Product must be purchased in
the United States or Canada from a Best Buy branded retail store
or online at www.bestbuy.com or www.bestbuy.ca, and is
packaged with this warranty statement.
How long does the coverage last?
The Warranty Period lasts for 1 year (365 days) from the date you
purchased the Product. Your purchase date is printed on the
receipt you received with the Product.
What does this warranty cover?
During the Warranty Period, if the original manufacture of the
material or workmanship of the Product is determined to be
defective by an authorized Insignia repair center or store
personnel, Insignia will (at its sole option): (1) repair the Product
with new or rebuilt parts; or (2) replace the Product at no charge
with new or rebuilt comparable products or parts. Products and
parts replaced under this warranty become the property of
Insignia and are not returned to you. If service of Products or
parts are required after the Warranty Period expires, you must
pay all labor and parts charges. This warranty lasts as long as you
own your Insignia Product during the Warranty Period. Warranty
coverage terminates if you sell or otherwise transfer the Product.
How to obtain warranty service?
If you purchased the Product at a Best Buy retail store location,
please take your original receipt and the Product to any Best Buy
store. Make sure that you place the Product in its original
packaging or packaging that provides the same amount of
protection as the original packaging. If you purchased the
Product from a Best Buy online web site (www.bestbuy.com or
www.bestbuy.ca), mail your original receipt and the Product to
the address listed on the web site. Make sure that you put the
Product in its original packaging or packaging that provides the
same amount of protection as the original packaging.
To obtain warranty service, in the United States call
1-888-BESTBUY or in Canada call 1-866-BESTBUY. Call agents
may diagnose and correct the issue over the phone.
Where is the warranty valid?
This warranty is valid only in the United States and Canada at
Best Buy branded retail stores or websites to the original
purchaser of the product in the county where the original
purchase was made.
What does the warranty not cover?
This warranty does not cover:
• Customer instruction/education
• Installation
•Set up adjustments
• Cosmetic damage
• Damage due to weather, lightning, and other acts of God,
such as power surges
•Accidental damage
•Misuse
•Abuse
•Negligence
• Commercial purposes/use, including but not limited to use
in a place of business or in communal areas of a multiple
dwelling condominium or apartment complex, or
otherwise used in a place of other than a private home.
• Modification of any part of the Product, including the
antenna
• Display panel damaged by static (non-moving) images
applied for lengthy periods (burn-in).
• Damage due to incorrect operation or maintenance
• Connection to an incorrect voltage or power supply
• Attempted repair by any person not authorized by Insignia
to service the Product
• Products sold “as is” or “with all faults”
• Consumables, including but not limited to batteries (i.e. AA,
AAA, C etc.)
• Products where the factory applied serial number has been
altered or removed
• Loss or Theft of this product or any part of the product
• Display panels containing up to three (3) pixel failures (dots
that are dark or incorrectly illuminated) grouped in an area
smaller than one tenth (1/10) of the display size or up to
five (5) pixel failures throughout the display. (Pixel based
displays may contain a limited number of pixels that may
not function normally.)
• Failures or Damage caused by any contact including but
not limited to liquids, gels or pastes.
REPAIR REPLACEMENT AS PROVIDED UNDER THIS WARRANTY IS
YOUR EXCLUSIVE REMEDY FOR BREACH OF WARRANTY. INSIGNIA
SHALL NOT BE LIABLE FOR ANY INCIDENTAL OR
CONSEQUENTIAL DAMAGES FOR THE BREACH OF ANY EXPRESS
OR IMPLIED WARRANTY ON THIS PRODUCT, INCLUDING, BUT
NOT LIMITED TO, LOST DATA, LOSS OF USE OF YOUR PRODUCT,
LOST BUSINESS OR LOST PROFITS. INSIGNIA PRODUCTS MAKES
NO OTHER EXPRESS WARRANTIES WITH RESPECT TO THE
PRODUCT, ALL EXPRESS AND IMPLIED WARRANTIES FOR THE
PRODUCT, INCLUDING, BUT NOT LIMITED TO, ANY IMPLIED
WARRANTIES OF AND CONDITIONS OF MERCHANTABILITY AND
FITNESS FOR A PARTICULAR PURPOSE, ARE LIMITED IN
DURATION TO THE WARRANTY PERIOD SET FORTH ABOVE AND
NO WARRANTIES, WHETHER EXPRESS OR IMPLIED, WILL APPLY
AFTER THE WARRANTY PERIOD. SOME STATES, PROVINCES AND
JURISDICTIONS DO NOT ALLOW LIMITATIONS ON HOW LONG AN
IMPLIED WARRANTY LASTS, SO THE ABOVE LIMITATION MAY NOT
APPLY TO YOU. THIS WARRANTY GIVES YOU SPECIFIC LEGAL
RIGHTS, AND YOU MAY ALSO HAVE OTHER RIGHTS, WHICH VARY
FROM STATE TO STATE OR PROVINCE TO PROVINCE.
Contact Insignia:
For customer service please call 1-877-467-4289
www.insigniaproducts.com
INSIGNIA is a trademark of Best Buy and its affiliated companies.
Distributed by Best Buy Purchasing, LLC
©2015 Best Buy. All rights reserved.
Made in USA with U.S. and imported materials

20
Mueble para televisor con armazón abierto de 40 pulg. con acabado de madera expreso
www.insigniaproducts.com

21
Mue
bl
e para te
l
evisor con armaz
ó
n a
b
ierto
d
e 40 pu
l
g. con aca
b
a
d
o
d
e ma
d
era expreso
www.insigniaproducts.com
ESPAÑOL
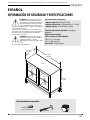
INFORMACIÓN DE SEGURIDAD Y ESPECIFICACIONES
CUIDADO: la parte superior de este
mueble está diseñada para utilizarse
con productos de un peso máximo de
50 lb (22.68 kg) y teniendo un ancho
que le permita asentarse de manera
uniforme con un saliente no mayor de una pulgada
a cada lado de la repisa.
El uso con otros productos o con productos que
pesen más de lo especificado o que se sobrepasen
del ancho máximo puede crear inestabilidad y
causar posibles lesiones.
CUIDADO: este producto contiene
piezas pequeñas que representan un
peligro de asfixia si se tragan.
¡Mantenga estas piezas alejadas de los
niños!
N.° de modelo: NS-HWG1641
Pesos máximos admitidos:
- Repisa superior: 50 lb (22.68 kg)
- Repisas del medio: 25 lb cada una (11.34 kg)
- Repisa inferior: total 50 lb (22.68 kg)
Tamaño máximo de pantalla: 42 pulg. en
diagonal
Dimensiones totales
(Alto×Ancho×Profundidad):
29.9 x 41 x 17.8 pulg.
(75.9 x 104 x 45 cm)
Peso total: 79 lb (35.8 kg)
41 pulg.
(104 cm)
29.9 pulg.
(75.9 cm)
17.8 pulg.
(45 cm)
50 lb
25 lb
Total 50 lb
25 lb
Herramientas requeridas:
Destornillador Phillips
Martillo

22
Mueble para televisor con armazón abierto de 40 pulg. con acabado de madera expreso
www.insigniaproducts.com
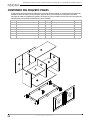
CONTENIDO DEL PAQUETE: PIEZAS
Asegúrese de que tenga todos los elementos necesarios para ensamblar su mueble nuevo para televisor.
Aunque no todas las partes están marcadas, algunas de las partes tendrán una etiqueta o una letra
marcada con tinta en el borde para ayudar a distinguir las partes similares una de la otra. Use esta parte de
identificación para ayudarle a identificar las partes similares.
Etiqueta Elemento Cantidad Etiqueta Elemento Cantidad
A Panel lateral derecho 1 H Repisa ajustable 2
B Panel lateral izquierdo 1 I Pata 4
CPanel vertical 1 JPata central 1
D Vista desde arriba 1 K Faldón frontal 1
E2 Panel inferior 1 L Faldón posterior 1
FRegresar 1 MFaldón lateral 2
GPuerta 2
E2

23
Mue
bl
e para te
l
evisor con armaz
ó
n a
b
ierto
d
e 40 pu
l
g. con aca
b
a
d
o
d
e ma
d
era expreso
www.insigniaproducts.com
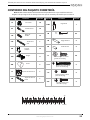
CONTENIDO DEL PAQUETE: FERRETERÍA
Nota: la tabla a continuación le muestra la ferretería requerida. Puede ser que reciba ferretería extra.
Asegúrese de que tenga todos los herrajes necesarios para el ensamblaje del mueble para su televisor.
Etiqueta Ferretería Cantidad
1F 14
8F 14
15F 12
23F 1
4G 12
13H 4
25K 2
1L 1
1M 1
Leva oculta
Tornillo de leva
Espiga de
madera
Tornillo de la
pata
Soporte
metálico
Bisagra
Perilla
Etiqueta de advertencia
Tarjeta de disco de
fieltro
Etiqueta Ferretería Cantidad
54M 1
1N 42
1R 8
2R 8
1S 24
113S 6
11S 8
42S 2
Pegamento
Clavo
Espiga metálica
Funda de hule
Tornillo negro con cabeza
grande de 9/16 pulg.
Tornillo negro con cabeza
plana de 1 15/16 pulg.
Tornillo negro de cabeza
plana de 1/2 pulg.
Tornillo plateado para
metal de 7/8 pulg.
1 0 20 30 40 50 60 70 80 90 100mm
1234in

24
Mueble para televisor con armazón abierto de 40 pulg. con acabado de madera expreso
www.insigniaproducts.com
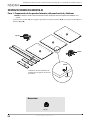
INSTRUCCIONES DE MONTAJE
Paso 1: Preparación de los paneles laterales, del panel vertical y faldones
Cuidado: ensamble el mueble sobre una alfombra o sobre una caja de cartón vacía para evitar ralladuras en el
mueble.
• Inserte las levas ocultas (1F) en los agujeros grandes de los paneles laterales (A y B) y en el panel vertical (C) y los
faldones (K, L y M).
1F
1F
Flecha
Flecha
Flecha
Agujero
La flecha en la leva oculta debe de
apuntar hacia el agujero en el borde
de la tabla.
Necesitará:
1F (14)

25
Mue
bl
e para te
l
evisor con armaz
ó
n a
b
ierto
d
e 40 pu
l
g. con aca
b
a
d
o
d
e ma
d
era expreso
www.insigniaproducts.com
Paso 2
:
Preparación del panel superior y las patas
• Enrosque 14 tornillos de leva (8F) en los agujeros del panel superior (D) y en los lados de las patas (I) y
apriete con un destornillador Phillips hasta que el collar del tornillo de leva quede al ras con la
superficie de la pieza. Use los agujeros indicados.
8F
U
t
i
l
i
c
e
e
s
t
o
s
a
g
u
j
e
r
o
s
e
n
l
a
s
p
a
t
a
s
.
Necesitará:
Destornillador Phillips
8F (14)

26
Mueble para televisor con armazón abierto de 40 pulg. con acabado de madera expreso
www.insigniaproducts.com
Paso 3
:
Sujeción de los paneles laterales y del panel vertical al panel superior
1 Coloque verticalmente el panel superior (D) con su borde con acabado mirando hacia arriba, como se muestra,
después alinee los paneles laterales (A y B) y el panel del medio (C) y empuje los agujeros con las levas ocultas
en los tornillos de leva en la parte superior. Asegúrese de que los bordes acabados de todas las piezas estén
mirando hacia arriba.
2 Apriete cada leva oculta con un destornillador Phillips lo mas ajustado posible (aproximadamente 180°)..
Cuidado: no coloque su mueble en posición vertical sin haber sujetado el panel posterior. La unidad puede colapsar.
S
u
p
e
r
f
i
c
i
e
c
o
n
l
e
v
a
s
o
c
u
l
t
a
s
S
u
p
e
r
f
i
c
i
e
c
o
n
l
e
v
a
s
o
c
u
l
t
a
s
S
u
p
e
r
f
i
c
i
e
s
i
n
l
e
v
a
s
o
c
u
l
t
a
s
Borde con acabado
Necesitará:
Destornillador Phillips

27
Mue
bl
e para te
l
evisor con armaz
ó
n a
b
ierto
d
e 40 pu
l
g. con aca
b
a
d
o
d
e ma
d
era expreso
www.insigniaproducts.com
Paso 4
:
Instalación del panel inferior
1 Coloque verticalmente el panel inferior (E2) con su borde acabado mirando hacia arriba, como se muestra y
alinee los paneles laterales (A y B) y el panel vertical central (C).
2 Usando un destornillador Phillips, fije el panel inferior a los paneles laterales con los seis tornillos negros de
cabeza plana de 1-15/16 pulg. (113S).
113S
E2
S
u
p
e
r
f
i
c
i
e
s
i
n
a
c
a
b
a
d
o
Borde con acabado
Necesitará:
Destornillador Phillips
113S (6)

28
Mueble para televisor con armazón abierto de 40 pulg. con acabado de madera expreso
www.insigniaproducts.com
Paso 5
:
Montaje del panel posterior
1 Cuidadosamente gire la unidad sobre sus patas delanteras, con los bordes con acabado hacia abajo.
2 Desdoble el panel posterior (F) y colóquelo sobre los bordes sin acabado de la unidad.
3 Alinee la parte posterior para tener bordes iguales a todos los cuatro lados. Ejerza presión en las esquinas
opuestas “cuadrado” de la unidad, si es necesario.
4 Utilizando un martillo, apriete el panel posterior al cuerpo principal del mueble para televisor con los clavos
(1N). Asegúrese de clavar los clavos en los agujeros que se alinean sobre losa paneles verticales.
Nota: se han incluido las perforaciones para cables/alambres para que tengan acceso a través del panel posterior. Corte
cuidadosamente los agujeros, como sean necesarios.
1N
Estos agujeros deben
alinearse sobre los
paneles verticales
Las perforaciones más cercanas
al borde deben estar alineadas
hacia la parte inferior de la
unidad
Necesitará:
Martillo
1N (42)

29
Mue
bl
e para te
l
evisor con armaz
ó
n a
b
ierto
d
e 40 pu
l
g. con aca
b
a
d
o
d
e ma
d
era expreso
www.insigniaproducts.com
Paso 6
:
Preparación de las patas y los faldones
Cuidado: inspeccione las partes cuidadosamente antes del montaje. El desarmado de piezas encoladas es
extremadamente difícil.
1 Llene los agujeros en los lados de las patas (I) de 1/4 a 1/2 de pegamento (54M), después, inserte ocho espigas
de madera (15F) en los agujeros. Limpie el exceso de pegamento.
2 Llene los agujeros en los lados de los faldones (K, L, y M) de 1/4 a 1/2 de pegamento (54M). Asegúrese de no
poner pegamento en los agujeros para los tornillos de leva.
3 Fije las patas (I) a los faldones (K, L, y M) y apriete las ocho leves ocultas.
Nota: asegúrese de que las espigas en las patas entren en los agujeros de los faldones. Limpie el exceso de
pegamento.
15F
54M
54M
54M
54M
54M
54M
54M
54M
Superficie y borde
con levas ocultas.
Superficie y borde
con levas ocultas.
Superficie y borde
con levas ocultas.
Llene los agujeros de 1/4
a 1/2 de pegamento.
Superficie y borde
con levas ocultas.
Necesitará:
Destornillador Phillips
15F (8)
54M (1)

30
Mueble para televisor con armazón abierto de 40 pulg. con acabado de madera expreso
www.insigniaproducts.com
Paso 7
:
Montaje del conjunto de las patas y los faldones
Cuidado: inspeccione las partes cuidadosamente antes del montaje. El desarmado de piezas encoladas es
extremadamente difícil.
1 Coloque con cuidado el mueble en su parte superior.
2 Llene los agujeros de las esquinas del panel inferior (E2) con 1/4 a 1/2 de pegamento (54M) e inserte las espigas
de madera (15F) en los agujeros. Limpie el exceso de pegamento.
3 Coloque una gota de pegamento (54M) en las espigas de madera en el panel inferior (E2).
4 Fije el ensamblaje de las patas y de los faldones al panel inferior al presionarlo sobre las espigas de madera en el
panel inferior. Limpie el exceso de pegamento.
15F
E2
S
u
p
e
r
f
i
c
i
e
c
o
n
a
c
a
b
a
d
o
Llene los agujeros de 1/4 a 1/2
de pegamento.
Necesitará:
15F (4)
54M (1)

31
Mue
bl
e para te
l
evisor con armaz
ó
n a
b
ierto
d
e 40 pu
l
g. con aca
b
a
d
o
d
e ma
d
era expreso
www.insigniaproducts.com
Paso 8
:
Preparación del ensamblaje de la pata y el faldón y adicionado del pie
1 Fije los doce soportes de metal (4G) a el panel inferior (E2) et los faldones (K, L, y M) con los veinticuatro
tornillos negros de cabeza grande 9/16 pulg. (1S).
2 Gire el tornillo de pie (23F) unas pocas vueltas en el panel inferior.
3 Gire la pata central (J) en el tornillo de pie (23F) hasta que se apriete. No apriete demasiado.
1S
4G
4G
4G
4G
23F
E2
Necesitará:
Destornillador Phillips
4G (12)
1S (24)
23F (1)

32
Mueble para televisor con armazón abierto de 40 pulg. con acabado de madera expreso
www.insigniaproducts.com
Paso 9
:
Instalación de las bisagras
• Fijación de las bisagras (13H) a las puertas (G) con los tornillos negros de cabeza plana de 1/2 pulg. (11S).
11S
13H
13H
Necesitará:
Destornillador Phillips
11S (8)
13H (4)

33
Mue
bl
e para te
l
evisor con armaz
ó
n a
b
ierto
d
e 40 pu
l
g. con aca
b
a
d
o
d
e ma
d
era expreso
www.insigniaproducts.com
Paso 10
:
Montaje de las puertas
1 Cuidadosamente levante la unidad.
2 Antes de colocar las puertas en su unidad, asegúrese de que el tornillo de montaje esté en contra de los topes,
como se muestra a continuación. Si no es así, afloje el tornillo de montaje para que se deslice contra los topes,
luego apriete el tornillo de montaje.
3 Fije la puerta (G) en el lado izquierdo (B), como se muestra, con los tornillos en las bisagras. Inicie todos los
tornillos unas cuantas vueltas y luego apriételos.
4 Repita el paso 2 para fijar la otra puerta.
5 Fije los tiradores (25K) a las puertas frontales con los tornillos para metal plateados de 7/8 pulg. (42S).
6 Pele dos discos de fieltro de la tarjeta de discos de fieltro (1M) y péguelos a las puertas donde entran en
contacto con el panel superior (C).
Vea el siguiente paso para los ajustes de las puertas.
42S
1M
1M
25K
Detener
Tornillo de
montaje
Bisagra
Necesitará:
Destornillador Phillips
25K (2)
42S (2)
1M (1)

34
Mueble para televisor con armazón abierto de 40 pulg. con acabado de madera expreso
www.insigniaproducts.com
Paso 11
:
Ajuste de las puertas
Las puertas podrían necesitar algunos ajustes. Siga el siguiente texto a continuación para hacer los ajustes
necesarios.
Refiérase al diagrama ampliado para identificar las partes en las BISAGRAS.
• Para ajustar las puertas hacia ambos lados del mueble (horizontal), afloje los tornillos de montaje de varias
vueltas, gire el tornillo de ajuste hacia adentro o hacia afuera. Apriete el tornillo de montaje una vez haya hecho
los ajustes necesarios.
• Para ajustar las puertas hacia la parte superior o inferior del mueble (vertical), afloje los dos tornillos de ajuste
vertical. Mueva las puertas hacia arriba o hacia abajo hasta encontrar la posición deseada. Apriete los tornillos de
montaje una vez haya hecho los ajustes necesarios.
• Para ajustar las puertas hacia la parte posterior o delantera del mueble (profundidad), afloje el tornillo de montaje
de una vuelta y mueva las puertas hacia adentro o hacia fuera, según sea necesario. Apriete el
tornillo de
montaje una vez haya hecho los ajustes necesarios.
Tornillo de ajuste
(horizontal)
Ajuste vertical
Tornillos de
montaje
(profundidad)
Necesitará:
Destornillador Phillips

35
Mue
bl
e para te
l
evisor con armaz
ó
n a
b
ierto
d
e 40 pu
l
g. con aca
b
a
d
o
d
e ma
d
era expreso
www.insigniaproducts.com
Paso 12
:
Completado del mueble para televisor
1 Inserte las fundas de hule (2R) en las espigas metálicas restantes (1R). Inserte el extremo metálico de las espigas
en la ubicación de los agujeros de su elección en los paneles (A y B) y el panel vertical (C). Coloque las repisas
ajustable (H) sobre las espigas metálicas.
2 Coloque la etiqueta de advertencia (1L) en la parte superior (D) para que se pueda leer al retirarse el televisor de
la unidad. Despegue la parte posterior de la etiqueta y aplíquela a la parte superior como se muestra.
Nota: esta es una etiqueta permanente que se diseñó para que dure por la vida del producto. Una vez aplicada, no
intente retirarla.
Esto finaliza el ensamblaje del mueble para su televisor. Limpie el mueble con su producto para muebles
favorito o con un paño húmedo y séquelo.
1L
1R
2R
Necesitará:
1L (1)
1R (8)
2R (8)

36
Mueble para televisor con armazón abierto de 40 pulg. con acabado de madera expreso
www.insigniaproducts.com
CUIDADO Y MANTENIMIENTO
Madera y laminado
• Utilice su tipo de cera para muebles favorita.
• No vaporice directamente la cera en el mueble. Vaporice en un paño suave cuando limpie el mueble.
• Siempre pruebe la cera en un lugar discreto primero, tal como la parte posterior del mueble para asegurarse que
no haya una reacción no deseada.
• Limpie regularmente con un paño suave.
• No deslice objetos en las superficies. Levante los objetos de la superficie superior para no arrastrarlos sobre el
acabado al moverlos.
• No exponga su mueble a la luz solar directa, a fuentes de calor secadoras o humedad.
ADVERTENCIA
Por favor use su mueble correctamente y con cuidado. El uso incorrecto puede causar riesgos para la seguridad o daños al mueble o a los artículos
del hogar. Lea cuidadosamente la siguiente tabla.
Preste atención a: ¿Qué puede suceder? Como evitar el problema:
• Niños subiéndose al mueble.
• Cerca del televisor los niños juegan y están activos.
• Riesgo de lesiones o muerte.
• Un niño jugando con un televisor podría hacerlo volcar.
• No deje que niños se suban sobre el mueble o jueguen con el
mismo.
• No coloque juguetes o comidas sobre las repisas superiores.
Los niños trataran de subir para alcanzarlos solo por
curiosidad.
• Uso incorrecto del mueble para sostener televisores.
• Televisores que excedan las limitaciones de tamaño y
peso especificados para este mueble.
• Riesgo de lesiones o muerte.
• El televisor puede ser muy pesado. Además, los televisores
antiguos CRT (con tubo catódico) se pueden desequilibrar
y volcarse hacia delante.
• Un televisor debe de ser colocado solamente en un mueble
diseñado para televisores.
• No utilice un televisor que exceda el peso y las dimensiones
especificadas para este mueble.
• Repisas sobrecargadas • Riesgo de lesiones.
• Los muebles pesados se pueden volcar.
• Las repisas sobrecargadas pueden romperse.
• No exceda nunca los limites de peso que se muestran en las
instrucciones.
• Llene las repisas de abajo hacia arriba.
• La repisas del medio solamente pueden aguantar 25 lb y la
repisa inferior puede aguantar 50 lb. Las repisa superiores
pueden aguantar 50 lb.
• Desplazamiento incorrecto del mueble. • El mueble puede volcarse o romperse si se mueve
incorrectamente.
• Riesgo de lesiones.
• Retire las repisas de arriba hacia a bajo antes de mover el
mueble.
• No empuje el mueble, sobre todo en un piso de alfombra.
Que un amigo le ayude a levantar el producto y colocarlo en
su lugar.
• No levante el mueble usando la repisa superior. Levántela
por el marco o las patas.
• Retire el televisor antes de mover el mueble para televisor.

37
Mue
bl
e para te
l
evisor con armaz
ó
n a
b
ierto
d
e 40 pu
l
g. con aca
b
a
d
o
d
e ma
d
era expreso
www.insigniaproducts.com
GARANTÍA LIMITADA DE UN
AÑO
Descripción:
El distribuidor* de los productos de la marca Insignia le garantiza
a usted, el comprador original de este producto nuevo de la
marca Insignia (“Producto”), que éste se encontrará libre de
defectos de material o de mano de obra en su fabricación
original por un período de un (1) año a partir de la fecha de
compra del Producto (“Período de garantía”).
Para que esta garantía se aplique, su Producto tiene que haberse
comprado en los Estados Unidos o en Canadá con un detallista
de la marca Best Buy o en línea en los sitios www.bestbuy.com o
www.bestbuy.ca y empacado con esta declaración de garantía.
¿Cuánto dura la garantía?
El Período de garantía dura por 1 año (365 días) a partir de la
fecha en que compró el Producto. La fecha de compra se
encuentra impresa en el recibo que recibió con el Producto.
¿Qué es lo que cubre esta garantía?
Durante el Período de garantía, si un centro de reparación
autorizado de Insignia concluye que la fabricación original del
material o la mano de obra del Producto se encuentran
defectuosos Insignia (cómo su opción exclusiva): (1) reparará el
Producto con repuestos nuevos o reconstruidos; o (2)
reemplazará el Producto sin costo alguno por un producto
nuevo o reconstruido con características similares. Los Productos
y repuestos reemplazados bajo esta garantía se volverán
propiedad de Insignia y no se le regresarán a usted. Si se requiere
la reparación de Productos o partes después de que se vence el
Período de garantía, usted deberá pagar todos los costos de
mano de obra y de repuestos. Esta garantía estará vigente tanto
como usted sea el dueño de su producto Insignia durante el
período de garantía. La cobertura de la garantía se anula si usted
vende o transfiere el Producto.
¿Cómo se obtiene el servicio de garantía?
Si se compró el Producto en una tienda de Best Buy, por favor
lleve su recibo original y el Producto a cualquier tienda de Best
Buy. Asegúrese de volver a colocar el Producto en su empaque
original o en un empaque que provea la misma protección que
el original. Si compró el Producto en un sitio Web de Best Buy
(www.bestbuy.com o www.bestbuy.ca), envíe por correo su
recibo original y el Producto a la dirección postal especificada en
el sitio Web. Asegúrese de colocar el Producto en su empaque
original o en un empaque que provea la misma protección que
el original.
Para obtener servicio de garantía, por favor llame al
1-888-BESTBUY en los Estados Unidos o llame al 1-866-BESTBUY
en Canadá. Los agentes de soporte técnico diagnosticarán y
corregirán el problema por teléfono.
¿Dónde es válida la garantía?
Esta garantía sólo es válida en los Estados Unidos y Canadá en las
tiendas de Best Buy o en sus sitios Web para el comprador
original del producto en el país donde se realizó la compra.
¿Qué es lo que no cubre la garantía?
Esta garantía no cubre:
• Capacitación o instrucción del cliente
•Instalación
• Ajustes de configuración
•Daños cosméticos
• Daños debidos al clima, relámpagos, causas de fuerza
mayor, tales como sobretensiones
• Danos accidentales
•Uso inapropiado
•Abuso
•Negligencia
• Uso o propósito comercial, incluyendo pero no limitado al
uso en centros comerciales o lugares comunes de un
condominio de varios pisos o un edificio de
departamentos, o cualquier uso en un lugar que no sea una
casa privada.
• Modificación de alguna parte del Producto, incluyendo la
antena
• Un panel de pantalla plasma dañado por la persistencia de
imágenes estáticas (sin movimiento), mostradas por
períodos de tiempo extendido (efecto “burn-in”).
• Daño debido al uso o mantenimiento inapropiado
• Conexión a una fuente de voltaje o de alimentación
incorrecta
• Intento de reparación por cualquier persona que no sea
autorizada por Insignia para reparar el Producto
• Productos vendidos “tal cual” (en el estado en que se
encuentran) o “con todas sus fallas”
• Consumibles, incluyendo pero no limitado a pilas (tipo AA,
AAA, C etc.)
• Productos en los cuales el número de serie asignado en la
fábrica ha sido alterado o removido
• Perdida o robo de este producto o cualquier parte de sus
componentes
• Las pantallas con hasta tres (3) píxeles defectuosos (puntos
oscuros o incorrectamente iluminados) agrupados en una
superficie más pequeña que la décima parte (1/10) del
tamaño de la pantalla ni hasta cinco (5) píxeles defectuosos
en toda la superficie de la pantalla. Las pantallas con
píxeles pueden tener un número limitado de píxeles
defectuosos.
• Los defectos o daños causados cómo resultado de
cualquier contacto, sin limitarse a líquidos, geles o pastas.
EL REEMPLAZO O LA REPARACIÓN ESTIPULADOS BAJO ESTA
GARANTÍA SON SU RECURSO EXCLUSIVO POR CUALQUIER
VIOLACIÓN DE LA GARANTÍA. INSIGNIA NO SERÁ RESPONSABLE
POR DAÑOS INCIDENTALES O CONSECUENTES DEBIDO AL
INCUMPLIMIENTO DE CUALQUIER GARANTÍA EXPRESA O
IMPLÍCITA RELACIONADA CON ESTE PRODUCTO, INCLUYENDO
PERO SIN LIMITARSE A LA PÉRDIDA DE INFORMACIÓN, LA
PÉRDIDA DE NEGOCIOS O DE GANANCIAS. INSIGNIA PRODUCTS
NO HACE NINGUNA OTRA GARANTÍA EXPRESA E IMPLÍCITA
RELACIONADA A ESTE PRODUCTO, INCLUYENDO PERO SIN
LIMITARSE A, CUALQUIER GARANTÍA IMPLÍCITA Y CONDICIONES
DE COMERCIALIZACIÓN Y IDONEIDAD PARA UN USO
PARTICULAR, ESTÁN LIMITADAS EN DURACIÓN AL PERÍODO DE
GARANTÍA DECLARADO ANTERIORMENTE Y NINGUNA
GARANTÍA YA SEA EXPRESA O IMPLÍCITA SE APLICARÁ DESPUÉS
DEL PERÍODO DE GARANTÍA. ALGUNOS ESTADOS, PROVINCIAS Y
JURISDICCIONES NO PERMITEN RESTRICCIONES SOBRE LA
DURACIÓN DE UNA GARANTÍA IMPLÍCITA, POR LO QUE LA
RESTRICCIÓN ANTERIOR PUEDE NO APLICARSE EN SU CASO.
ESTA GARANTÍA LE DA DERECHOS LEGALES ESPECÍFICOS, Y
USTED PUEDE POSEER OTROS DERECHOS QUE VARÍAN DE
ESTADO A ESTADO, O DE PROVINCIA A PROVINCIA.
Comuníquese con Insignia:
Para servicio al cliente favor llamar al 1-877-467-4289
www.insigniaproducts.com
INSIGNIA es una marca comercial de Best Buy y sus compañías
asociadas.
Distribuida por Best Buy Purchasing, LLC
© 2015 Best Buy. Todos los derechos reservados.
Hecho en los Estados Unidos con materiales de EE.UU. e
importados

Certificate of Conformity
1. This certificate applies to the Insignia Product
identified by this instruction booklet.
2. This certificate applies to the compliance of this
product with the CPSC Ban on Lead-Containing
Paint (16 CFR 1303).
3. This product was manufactured for:
Insignia
4. Date of Manufacture: _______________
Lot number: 374442
1-877-467-4289 (U.S. and Canada) or 01-800-926-3000 (Mexico)
www.insigniaproducts.com
INSIGNIA is a trademark of Best Buy and its affiliated companies.
Distributed by Best Buy Purchasing, LLC
©2015 Best Buy. All rights reserved.
Made in USA with U.S. and imported materials
1-877-467-4289 (EE.UU. y Canadá) o el 01-800-926-3000 (México)
www.insigniaproducts.com
INSIGNIA es una marca comercial de Best Buy y sus compañías asociadas.
Distribuida por Best Buy Purchasing, LLC
© 2015 Best Buy. Todos los derechos reservados.
Hecho en los Estados Unidos con materiales de EE.UU. e importados
V2 ENGLISH
V2 ESPAÑOL
15-0772
Certificado de conformidad
1. Este certificado aplica al producto de Insignia
identificado en este manual de instrucciones.
2. Este certificado aplica al cumplimiento de este
producto con la Prohibición CPSC de Pintura con
Plomo (16 CFR 1303).
3. Este producto fue fabricado por:
Insignia
4. Fecha de fabricación: ___________
Número de lote: 374442
-
 1
1
-
 2
2
-
 3
3
-
 4
4
-
 5
5
-
 6
6
-
 7
7
-
 8
8
-
 9
9
-
 10
10
-
 11
11
-
 12
12
-
 13
13
-
 14
14
-
 15
15
-
 16
16
-
 17
17
-
 18
18
-
 19
19
-
 20
20
-
 21
21
-
 22
22
-
 23
23
-
 24
24
-
 25
25
-
 26
26
-
 27
27
-
 28
28
-
 29
29
-
 30
30
-
 31
31
-
 32
32
-
 33
33
-
 34
34
-
 35
35
-
 36
36
-
 37
37
-
 38
38


en otros idiomas
- English: Insignia NS-HWG1641 User manual
Artículos relacionados
-
Insignia NS-HW1764G Guía del usuario
-
-
-
-
-
-
-
-
-
Otros documentos
-
Shimano CS-6800 Dealer's Manual
-
Dynex DX-WD1202 Manual de usuario
-
GYS PLASMA CUTTER 25 K Ficha de datos
-
-
Sauder 422893 Instrucciones de operación
-
-
-
-
-