
Capacitive Level Sensors M12
Näherungsschalter Kapazitiv / Détecteurs de niveau capacitifs /
Sensores de Nivel Capacitivos / Sensori di livello capacitivi /
Kapacitive level sensorer / 电容物位传感器
CA12CLC08BPxxRT
Transistor Output with Teach-in
Transistor-Ausgang mit Teach-in-Funktion / Sortie transistor à auto
apprentissage / Salida de Transistor con Teach-in (autoajuste) / Uscita a
transistor con funzione Teach-in (Autoapprendimento) / Transistorudgang
og Indlæringsfunktion / 晶体管输出与示教
User Manual
Bedienungsanleitung / Manuel de l’utilisateur / Manual del Usuario /
Manuale d’istruzione / Brugerhåndbog / 用户手册
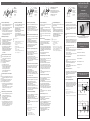
For maximum sensing distance (default setting)
1. Mount the sensor in the application without the object present.
Yellow LED is not important and green LED is ON.
2. Press the button for 3 seconds until both LEDs are flashing
simultaneously. (The first switch point is stored)
3. Press the button a second time and the sensor is ready to operate
(green LED ON, yellow LED ON). (The second switch point is
stored).
Für die Betriebsart maximaler Schaltabstand (Werkseinstellung)
1. Montieren Sie den Sensor und entfernen Sie das Objekt aus dem
Erfassungsbereich. Der Status der gelben LED ist unwichtig und
die grüne LED leuchtet.
2. Drücken Sie die Taste 3 Sekunden lang, bis beide LEDs
gleichzeitig blinken. (Der Hintergrund wird gespeichert).
3. Die Taste noch einmal drücken. Der Sensor ist betriebs bereit
(grüne und gelbe LED leuchten). Der Sensor ist nun auf den
maximalen Schaltabstand eingestellt ohne vom
Hintergrund beeinflusst zu werden.
Pour une distance de captage minimale (réglage par défaut)
1. Alignez le capteur dans l’application. La LED jaune n’a pas
d’importance et la LED verte est allumée.
2. Appuyez sur le bouton pendant 3 secondes jusqu’à ce que les
deux LED clignotent simultanément.
(Le premier point de commutation est mémorisé)
3. Appuyez sur le bouton une seconde fois et le capteur est prêt à
fonctionner (LED verte allumée, LED jaune allumée).
(Le capteur est configuré à la distance de détection maximale qui
n’est pas influencé par le fond).
Para la máxima distancia de detección (ajuste predeterminado)
1. Monte el sensor en la aplicación sin que el objeto esté presente. El
LED amarillo puede ignorarse y el LED verde está activado.
2. Pulse el botón durante 3 segundos hasta que ambos LED
parpadeen simultáneamente.
(Se almacena la información del fondo)
3. Pulse el botón una segunda vez y el sensor estará listo para
funcionar (el LED verde y el LED amarillo están encendidos).
(El sensor se configura con la máxima distancia de detección, sin
que se vea afectada por el fondo).
Per massima distanza di rilevamento (impostazione di default)
1. Montare il sensore nell’applicazione senza l’oggetto presente. Il
LED giallo non è importante e il LED verde è acceso.
2. Premere il pulsante per 3 secondi finché entrambi i LED
lampeggino contemporaneamente.
(Le informazioni di sfondo vengono memorizzate)
3. Premere una seconda volta il pulsante: il sensore è pronto per
entrare in funzione (il LED verde ed il LED giallo sono accesi)
(Il sensore è impostato con la massima distanza di rilevamento che
non viene influenzata dallo sfondo).
For maksimal tasteafstand (standardindstilling)
1. Sensoren monteres i applikationen uden at emnet er til stede. Gul
LED er ikke vigtig og grøn LED er tændt.
2. Tryk på knappen i tre sekunder indtil begge LED’er blinker
samtidig. (Information om bagrunden gemmes)
3. Tryk på knappen igen og aftasteren er klar til drift (grøn LED tændt,
gul LED tændt)
(Aftasteren er indstillet til maksimal tasteafstand som ikke påvirkes
af baggrunden).
对于最大感应距离(默认设置)
1.将传感器安装到没有目标存在的应用环境中。黄色LED的
状态无关紧要,绿色LED亮起。
2.按下按钮3秒,直到两个LED同时开始闪烁。
(背景信息即被储存)
3.再按一次按钮,传感器将准备好
开始工作(绿色LED和黄色LED亮起)
(将传感器设为不受背景影响的最大感应距离)。
Normal operation, optimized switching point
1. Mount the sensor in the application without the object present.
Yellow LED is not important and green LED is ON.
2. Press the button for 3 seconds until both LEDs are flashing
simultaneously. (The first switch point is stored)
3. Place the object in the detection zone.
4. Press the button once and the sensor is ready to operate (green
LED ON, yellow LED ON). (The second switch point is stored).
If the object is too close to the background, the sen
sor will
perceive both background and object as object.
Normalbetrieb, optimierter Schaltpunkt
1. Montieren Sie den Sensor und entfernen Sie das Objekt aus
dem Erfassungsbereich. Der Status der gelben LED ist
unwichtig und die grüne LED leuchtet.
2. Drücken Sie die Taste 3 Sekunden lang, bis beide LEDs
gleichzeitig blinken. (Der Hintergrund wird gespeichert)
3. Platzieren Sie das Objekt in den Erfassungsbereich.
4. Die Taste einmal drücken. Der Sensor ist betriebsbereit
(grüne und gelbe LED leuchten und der zweite
Schaltpunkt ist gespeichert). Wenn das Objekt zu nahe am
Hintergrund ist, wird das Objekt inklusive Hintergrund
als Objekt erkannt und die LEDs werden dreimal
alternierend blinken).
Fonctionnement normal, point de commutation optimisé
1. Montez le capteur
dans l’application sans que la cible
soit présente
. La LED jaune n’a pas d’importance et la
LED verte est allumée.
2. Appuyez sur le bouton pendant 3 secondes jusqu’à ce
que les deux LED clignotent simultanément.
(Le fond est mémorisé)
3. Placez la cible dans la zone de détection.
4. Appuyez sur le bouton une fois et le capteur est prêt à
fonctionner (LED verte allumée, LED jaune allumée)
(Le second point de commutation est mémorisé)
Si la cible est trop proche du fond, le capteur
considérera comme cible aussi bien le fond que la
cible,
et les LED alternent trois fois.
Funcionamiento normal, punto de conmutación optimizado
1. Monte el sensor en la aplicación sin que el objeto esté presente.
El estado del LED amarillo puede ignorarse y el LED verde está
activado.
2. Pulse el botón durante 3 segundos hasta que ambos LED
parpadeen simultáneamente. (Se almacena el fondo)
3. Coloque el objetivo en la zona de detección.
4. Pulse el botón una vez y el sensor estará listo para funcionar (el
LED verde y el LED amarillo están encendidos). (Se almacena el
segundo punto de detección).
Si el objeto está demasiado cerca el fondo, el sensor percibirá
como fondo tanto el fondo como el objeto y los LED se
alternarán 3 veces.
Funzionamento normale, punto di commutazione ottimizzato
1. Montare il sensore nell’applicazione senza l’oggetto presente. Il
LED giallo non è importante e il LED verde è acceso.
2. Premere il pulsante per 3 secondi finché entrambi i LED
lampeggino contemporaneamente.
(Lo sfondo viene memorizzato)
3. Posizionare l’oggetto nella zona di rilevamento.
4. Premere una volta il pulsante: il sensore è pronto per entrare in
funzione (il LED verde ed il LED giallo sono accesi). (Il secondo
punto di commutazione è memorizzato). Se l’oggetto è troppo
vicino allo sfondo, il sensore percepirà sia sfondo e oggetto
come sfondo e i LED si alterneranno per 3 volte.
12 4
3 sec. Push once
3
For a dynamic set-up (running process)
1. Line up the sensor at the object. Green LED is ON, status on the
yellow LED is not important.
2. Press the button for 3 seconds until both LEDs are flashing
simultaneously.
3. Press and hold the button a second time for at least one second
(both LEDs are flashing simultaneously and fast) and keep the
button pressed for at least one process cycle. Release the button
and the sensor is ready to operate (The second switch point is
stored).
If more process cycles are analysed, a more precise setting is
enabled.
Für die Betriebsart dynamischer Teach in (laufender Prozess)
1. Richten Sie den Sensor auf das Objekt aus. Die grüne LED
leuchtet, der Status der gelben LED ist unwichtig.
2. Drücken Sie die Taste 3 Sekunden lang, bis beide LEDs
gleichzeitig blinken.
3. Drücken Sie die Taste erneut und halten Sie diese für mindestens
eine Sekunde lang gedrückt ( beide LEDs blinken gleichzeitig sehr
schnell). Erst nach Ende des Prozesszyklus lassen Sie die Taste
los (der Schaltabstand ist gespeichert und auf das Objektund den
Hintergrund optimiert).
Eine genauere Einstellung ist möglich, wenn mehrere
Prozesszyklen analysiert werden.
Pour un réglage dynamique (processus de fonctionnement)
1. Alignez le capteur sur la cible. La LED verte est allumée, l’état de
la LED jaune n’a pas d’importance.
2. Appuyez sur le bouton pendant 3 secondes jusqu’à ce que les
deux LED clignotent simultanément.
3. Appuyez sur le bouton une deuxième fois pendant au moins
une seconde, les clignotements des deux LED s’accélèrent
simultanément et maintenez le bouton enfoncé pendant au moins
un cycle de processus, relâchez le bouton et le capteur est prêt à
fonctionner (le point de commutation est mémorisé dans le
capteur et optimisée tout en respectant à la fois le fond et
la cible).
On peut obtenir un réglage plus précis si plusieurs cycles de
processus sont analysés.
Para el ajuste dinámico (proceso en funcionamiento)
1. Alinie el sensor con el objeto. El LED verde está activado y el
estado del LED amarillo puede ignorarse.
2. Pulse el botón durante 3 segundos hasta que ambos LED
parpadeen simultáneamente.
3. Pulse y mantenga presionado el botón una segunda vez durante
al menos un segundo (ambos LED parpadean rápido y
simultáneamente) y mantenga el botón presionado durante al
menos un ciclo del proceso. Suelte el botón y el sensor
estará listo para funcionar (el punto de conmutación se almacena
en el sensor y se optimiza respecto a la información del fondo y
del objeto).
En caso de analizar más ciclos de proceso, es posible obtener un
ajuste más preciso.
Per regolazione dinamica (processo in corso)
1. Allineare il sensore all’oggetto. Il LED verde è acceso, lo stato sul
LED giallo non è importante.
2. Premere il pulsante per 3 secondi finché entrambi i LED
lampeggino contemporaneamente.
3. premere e mantenere premuto il pulsante una seconda volta per
almeno un secondo (entrambi i LED lampeggiano
simultaneamente e velocemente) e tenere premuto il pulsante per
almeno un ciclo di lavoro. Rilasciare il pulsante: il sensore è
pronto per entrare in funzione (il punto di commutazione è
memorizzato nel sensore ed è ottimizzato rispettando sia le
informazioni dello sfondo che dell’oggetto).
Se vengono analizzati più cicli di processo, è possibile
un’impostazione più precisa.
13
3 sec. Push once
2
13
3 sec. One cycle
2
2
10 sec. Push once
1
Teach Functions / Teach in Funktionen / Fonctions d’apprentissage / Funciones de programación / Funzioni teach-in / Indlæringsfunktioner / 教导功能
Factory settings / Werkseinstellung / Réglages d’usine
/ Configuración de fábrica / Impostazioni di fabbrica /
Fabriksindstillinger / 出厂设置
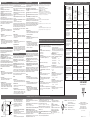
Dimensions / Abmessungen / Dimensions / Dimensiones /
Dimensioni / Dimensioner / 尺寸图
40
78
26
Ø10.7
M12 x 1
LED
Cable / Kabel / Câble / Cable / Cavo / Kabel / 电缆
80
40
M12 x 1
LED
M12 x 1 x 8
Ø10.7
24
Plug / Stecker / Connecteur / Conector / Connettore / Stik / 插头
Press the button for 16 sec.
Drücken Sie die Taste 16 Sekunden lang.
Appuyez sur le bouton pendant 16 secondes.
Pulse el botón durante 16 s.
Premere il pulsante per 16 secondi.
Tryk på knappen i 16 sek.
按下按钮16秒
Push once
Einmal drücken
Appuyez une fois
Pulsar una vez
Premere una volta
Tryk én gang
按一次按钮
Push once
Einmal drücken
Appuyez une fois
Pulsar una vez
Premere una volta
Tryk én gang
按一次按钮
Push once
Einmal drücken
Appuyez une fois
Pulsar una vez
Premere una volta
Tryk én gang
按一次按钮
Hold down within a processing cycle time
Ein Prozesszyklus lang drücken
Maintenez enfoncé pendant un cycle de processus
Mantenga el botón presionado durante un ciclo del proceso
Tenere premuto il pulsante un ciclo di lavoro
Hold knappen nede i én procescyklys
个处理周期的时间内保持按下
ENGLISH
ENGLISH
ENGLISH
ENGLISH
DEUTSCH
DEUTSCH
DEUTSCH
DEUTSCH
FRANÇAIS
FRANÇAIS
FRANÇAIS
FRANÇAIS
ESPAÑOL
ESPAÑOL
ESPAÑOL
ESPAÑOL
ITALIANO
ITALIANO
ITALIANO
ITALIANO
DANSK
DANSK
DANSK
DANSK
中國
中國
中國
中國
Normal funktion, optimeret aktiveringspunkt
1. Sensoren monteres i applikationen uden at emnet er til stede.
Gul LED er ikke vigtig og grøn LED er tændt.
2. Tryk på knappen i 3 sekunder, indtil begge LED’er blinker
samtidig. (Baggrunden gemmes)
3. Anbring emnet i detekteringszonen.
4. Tryk på knappen én gang, og aftasteren er klar til drift
(grøn LED tændt, gul LED tændt).
(Det andet aktiveringspunkt gemmes).
Hvis emnet er for tæt på baggrunden, vil aftasteren opfatte både
baggrund og emne som emnet, og LED’erne vil blinke skiftevis
tre gange.
正常运行,优化的开关点
1. 将传感器安装到没有目标存在的应用环境中。黄色LED
的状态无关紧要,绿色LED亮起。
2. 按下按钮3秒,直到两个LED同时开始闪烁。
(背景即被储存)
3. 将目标放置在检测区域中。
4. 按一次按钮,传感器将准备好开始工作(绿色LED和黄色
LED亮起)
(第二个开关点即被保存)。
如果目标太接近背景,传感器将同时把背景和对象感知为
背景,并且LED将交替闪动3次。
For make or break set-up (N.O. or N.C.)
1. Press the button for 10 seconds, until the green LED flashes.
2. While the green LED flashes, the output is inverted each time the
button is pressed. Yellow LED indicates N.O. function selected.
If the button is not pressed within the next 16 seconds, the
current output is stored.
Schaltart (NO und NC/Schließer und Öffner) des Schaltausgangs
wählen
1. Drücken Sie die Taste 10 Sekunden lang, bis die grüne LED
blinkt.
2. Während die grüne LED blinkt kann durch Drücken der Taste die
Schaltart invertiert werden. Wurde Schaltart NO gewählt leuchtet
die gelbe LED. Wenn die Taste nicht innerhalb der nächsten 16
Sekunden gedrückt wird, wird die aktuelle Schaltart gespeichert.
Pour commutation travail où repos (N.O. ou N.F.)
1. Appuyez sur le bouton pendant 10 secondes, jusqu’à ce que la
LED verte clignote.
2. Pendant que la LED verte clignote, la sortie est inversée chaque
fois que le bouton est appuyé. La LED Jaune indique que la
fonction N.O. est sélectionnée.
Si le bouton n’est pas appuyé dans les 16 secondes qui suivent,
la sortie de courant est enregistrée.
Para una configuración NA o NC
1. Pulse el botón durante 10 segundos hasta que el LED verde
parpadee.
2. Mientras parpadea el LED verde, la salida se invierte cada vez
que se pulse el botón. El LED amarillo indica que se ha
seleccionado la función NA.
Si el botón no se pulsa durante los siguientes 16 segundos, se
almacenará la salida actual.
Per regolazione luce/buio (N.O. o N.C.)
1. Premere il pulsante per 10 secondi finché il LED verde lampeggia.
2. Mentre lampeggia il LED verde, l’uscita è invertita ogni volta che
si preme il pulsante. Il LED giallo indica la funzione N.O.
selezionata.
Se il pulsante non viene premuto entro i prossimi 16 secondi,
l’attuale uscita viene memorizzata.
For slutte- eller brydeindstilling (NO eller NC)
1. Tryk på knappen i 10 sekunder indtil den grønne LED blinker.
2. Mens den grønne LED blinker, inverteres udgangen hver gang der
trykkes på knappen. Gul LED angiver sluttefunktion (NO) valgt.
Hvis knappen ikke røres inden for de næste 16 sekunder,
gemmes den pågældende udgangsfunktion.
对于断或续设置(N.O.或N.C.)
1.按下按钮10秒,直到绿色LED开始闪烁。
2.在绿色LED闪烁时,每次按下按钮都会使输出反转。黄色LED
指示选择了N.O.功能。
如果没有在接下来16秒内再次按下按钮,则会保存当前输出。
For en dynamisk indstilling (løbende proces)
1. Ret aftasteren ind efter emnet. Grøn LED er tændt, status på den
gule LED er ikke vigtig.
2. Tryk på knappen i tre sekunder indtil begge LED’er blinker
samtidig.
3. Tryk og hold knappen nede igen i mindst ét sekund (begge
LED’er blinker hurtigt og samtidigt) og hold knappen nede i
mindst én procescyklus. Slip knappen og sensoren er klar til
drift (aktiveringspunktet gemmes i aftasteren og optimeres så
den genkender både baggrund og emne).
Man kan opnå en mere præcis indstilling hvis flere
procescyklusser bliver analyseret.
对于动态设置(运行流程)
1.在目标前连接传感器。绿色LED亮起,
黄色LED的状态无关紧要。
2.按下按钮3秒,直到两个LED
同时开始闪烁。
3.再次按下按钮并按住至少一秒时间(两个LED都同时快
速闪烁)并让按钮在至少一个处理周期的时间内保持按下
状态。松开按钮,传感器即准备好工作(开关点存储在传
感器中并且根据背景和目标信息进行了优化)。
如果分析了数个处理周期,将可进行更为精确的设置。

Description and Installation UK
Beschreibung und Installation D
Description et Installation F
Descripción e Instalación E
Descrizione e installazione I
Beskrivelse og Installation DK
电容式传感器具有独特的能力,它能够检测液态或 固态的几乎所有材料。电容式传
感器还可以检测金属和非金属物体;但是,它们通常用于检测非金属材料,如:
* 塑料行业:树脂、再生材料或模制品。
* 化工行业:清洁剂、肥料、液体肥皂、腐蚀剂和石油化学产品。
* 木材行业:木屑、纸制品、门框和窗框。
* 陶瓷与玻璃行业:原材料、粘土或成品、瓶子。
* 包装行业:针对干货、蔬果、乳制品进行等级或内容物方面的包装检验。
根据材料的介电常数检测材料。物体越大,材料密度越高,物体检测起来越容易。
电容式传感器的标称感应距离指的是与接地金属板 (ST37) 之间的距离。有关材料
的介电额定值的其他信息,请参阅“电容式接近传感器技术信息”。
安装
1.安装传感器
将传感器安装到位,指向目标并确保与目标的距离在传感器的范围之内。
2.为传感器供电
要为传感器供电,请将蓝线(3)接地(0VDC)并将棕线(1)接+(10-40VDC)
。
3.对传感器进行编程
按照教导指南中的说明对传感器进行编程。可对以下功能进行编程:1.背景调整
和开关点设置,2.对象调整,3.NO/NC选择,4.恢复原厂设置(必须进行1.和
2.)。
说明与安装 CN
CARLO GAVAZZI
www.gavazziautomation.com
Certified in accordance with ISO 9001
Gerätehersteller mit dem ISO 9001/EN 29 001 Zertifikat
Une société qualifiée selon ISO 9001
Empresa que cumple con ISO 9001
Certificato in conformità con l’IS0 9001
Kvalificeret i overensstemmelse med ISO 9001
按照ISO9001认证标准
MAN M12 MUL rev. 01 - 06.2017
15-029-675
configurarse mediante el cable Teach-in.
Le funzioni descritte nella Guida Teach-in possono essere impostate per
mezzo del relativo cavo.
Ved hjælp af indlæringslederen er det muligt at indstille de funktioner, der er
beskrevet under ”Indlæringsguide”.
通过教导线路,可设置在教导指南中所述的功能。
It is possible to Teach-in more sensors at the same time by connecting
the WH-wires in parallel to the common ”-” supply.
Gleichzeitige Teach-In-Einstellung von mehreren Sensoren ist möglich,
wenn der WH-Leiter und Gemeinsamer Minus ”-” parallelgeschaltet werden.
Pour faire l’apprentissage de plusieurs détecteurs à la fois, raccorder les fils
WH en parallèle au commun “-” alimentation.
Es posible realizar el autoajuste de varios sensores a la vez conectando los
cables WH paralelamente a la alimentación “-” común.
Wiring Diagram / Schaltbild / Schéma de Câblage / Diagrama de Conexiones / Collegamenti elettrici / Forbindelsesdiagram / 布线图
BN+
BK
WH
BU-
/ Farbcode / Code couleur / Código de color /
Codice colore / Farvekode / 色码
/ Braun / Marron / Marrón / Marrone / Brun / 褐色
/ Weiss / Blanc / Blanco / Bianco / Hvid / 白色
/ Blau / Bleu / Azul / Blu / Blå / 蓝色
/ Schwarz / Noir / Negro / Nero / Sort / 黑色
1
4
3
2
I
load
< 200mA
I
alaRM
< 20 mA
Teach-in
The PNP- or NPN-load will automatically be detected.
Die PNP- oder NPN-Last wird automatisch detektiert.
La charge PNP- ou NPN est automatiquement détectée.
La carga PNP o NPN se detectará automáticamente.
Rilevamento automatico di carico NPN o PNP
PNP- eller NPN-belastningen aftastes automatisk.
将自动检测PNP或NPN负载。
By means of the Teach-in wire, the functions described in the
Teach-in Guide can be set up.
Die Einstellung der unter Teach-In-Anweisungen beschriebenen
Funktionen erfolgt mit dem Teach-In-Leiter.
Le fil Teach-In permet de configurer les fonctions décrites dans le Guide
d’Apprentissage.
Las funciones descritas en la guía Teach-in (autoajuste) pueden
E’ possibile applicare la funzione Teach-in a più sensori allo stesso tempo
connettendo i cavi WH in parallelo all’alimentazione “-” comune.
Det er muligt at foretage indlæring af flere aftastere samtidigt ved at tilslutte
WH-lederne parallelt med den fælles (-) forsyning.
通过平行于普通“BU-”电源连接WH线,可同时教导几个传感器。
(#): Plug connections/ Steckanschlüsse / Raccordements par connect-
eurs / Conexiones de conectores / Connessione mediante connettore /
Stiktilslutninger / 插头连接
Important: If the alarm output (WH-wire) is unused, it has to be connect-
ed to +supply
Wichtig: Wenn der Alarmausgang (WH-Leitung) nicht verwendet wird, muss
er mit der positiven Versorgungsspannung verbunden werden.
1 Brown
2 White
3 Blue
4 Black
Capacitive sensors have the unique ability to detect almost all materials,
either in liquid or solid form. Capa ci tive
sensors can detect metallic as well
as non-metallic objects, how ever, their traditional use is for non-metallic
materials such as:
• Plastic Industry: resins, regrinds or moulded products.
• Chemical Industry: cleansers, fertilisers, liquid soaps, corrosives and
petrochemicals.
• Wood Industry: saw dust, paper products, door and window
frames.
• Ceramic & Glass Industry: raw material, clay or finished product, bottles.
• Packaging Industry: package inspection for level or contents, dry goods,
fruits and vegetables, dairy products.
Materials are detected due to their dielectric constant. The bigger the
size of
an object, the higher the density of material, the better or easier it is to de
tect
the object. Nominal sensing di stan ce for a capacitive sensor is referenced to
a grounded me tal plate (ST37). For addi tional information regarding di elec
tric
ratings of materials
please refer to our catalogue: “SENSORS”.
Installation
1. Mounting the sensor
Mount the sensor in the required position pointing at the target and
make sure that the distance to the target is within the range of the
sensor.
2. Supplying the sensor
To supply the sensor, connect blue wire (3) to ground (0 VDC) and
brown wire (1) to + (10-40 VDC).
3. Programming the sensor
Program the sensor as described in the Teach-in guide. The following
functions are programmable: 1. Background adjustment and switch-point
setup, 2. Object adjustment, 3. NO/NC selection and 4. Restore factory
settings (1. and 2. are mandatory).
Kapazitive Näherungsschalter eignen sich zum Erfassen von Materialien in fester
oder flüssiger Form. Dazu gehören alle Metalle und nicht-metallischen Stoffe.
Einsatz-möglichkeiten ergeben sich in:
• Spritzgießmaschinen, z..B. Kleber, Granulat aus Kunststoff.
• Chemische Industrie, z.B. Wasseraufbereitung, Säure, Lauge, Lösungsmittel.
• Holzindustrie, z.B. Holz, Sägespäne, Papier.
• Keramik- und Glasindustrie, z.B. Quarzsand, Flaschenerfassung
• Verpackungsindustrie, z.B. Verpackungen, Füllmengenerfassung,
Futterm
ittel, Molkereierzeugnisse, Früchte und Gemüse
Die Erfassung von Materialien durch kapazitive Näherungsschalter hängt von der
Dichte und den elektrischen Eigenschaften des Objektes ab. Der angegebene
Schaltabstand für kapazitive Näherungsschalter bezieht sich auf eine genormte
Messplatte aus Stahl (ST37). Weitere Informationen über Reduktionsfaktoren
von Materialien finden Sie unter “Technische Informationen”.
Installation
1. Montage des Sensors
Montieren Sie den Sensor in der gewünschten Position mit Ausrichtung
auf das Objekt. Kontrollieren Sie, dass der Objektabstand innerhalb der
Sensorreichweite liegt.
2. Sensorversorgung
Zur Sensorversorgung ist blauer Leiter (Pin 3) an Erde (0 V DC) und
brauner Leiter (Pin 1) an + (10-40 VDC) zu verbinden.
3. Programmierung des Sensors
Programmieren Sie den Sensor wie unter Teach-in-Anweisungen
beschrieben. Die folgenden Funktionen sind programmierbar:
1. Einstellung - Hintergrund und Schaltpunkt. 2. Einstellung - Objekt.
3. Einstellung - Schließer - Öffner. 4. Rückkehr zu den werksseitigen
Einstellungen (1. und 2. sind obligatorisch).
Les détecteurs capacitifs disposent de la faculté exclusive de détecter pratiquement
tous les matériaux dans leur forme solide ou liquide.
Les détecteurs capacitifs sont capables de détecter à la fois les objets métalliques et
non métalliques. Cependant, leur usage est traditionnellement réservé aux matériaux
non métalliques, comme suit:
• Industrie des matières plastiques : Résines, produits moulus ou moulés.
• Industrie chimique : Produits de nettoyage, fertilisants, savons liquides, pro-
duits corrosifs et pétro-chimiques.
• Industrie du bois : Sciures, produits de l’industrie du papier, châssis de portes et
de fenêtres.
• Industrie de la céramique et du verre : Matières premières, argile ou produits
finis, bouteilles
• Vérification de contenus ou de niveaux dans l’industrie : de l’emballage et du
conditionnement de
marchandises sèches, fruits et légumes, produits laitiers.
Les matériaux sont détectés grâce à
leur constance diélectrique. Plus l’objet est de
grande taille, plus la densité du matériau est grande et plus cet objet pourra
être détecté aisément. La distance de détection nominale d’un détecteur cap-
acitif est étalonnée à partir d’une plaque en acier doux ST37 mise à la masse.
Pour de plus amples détails concernant les constantes diélectriques des
matériaux, voir Informations Techniques.
Installation
1. Montage du détecteur
Installer le détecteur dans la position requise en le faisant pointer sur la
cible et en s’assurant que la distance à la cible se situe dans les limites
de détection de celui-ci.
2. Alimentation du détecteur
Pour alimenter le détecteur, raccorder le fil bleu (3) à la masse (0 VCC)
et le fil marron (1) au + (10-40 VCC).
3. Programmation du détecteur
Programmer le détecteur comme décrit dans le guide d’apprentissage.
Les fonctions suivantes sont programmables: 1. Réglage de l’arrière
plan et configuration du seuil du point de commutation, 2. Ajustement
de l’objet, 3. sélection NO/NF 4. Restauration des réglages d’usine (les
opérations 1. et 2. sont obligatoires).
Los sensores capacitivos pueden detectar casi todos los materiales, en esta-
do líquido o sólido. Permiten detectar objetos metálicos y no metálicos, sin
embargo, se utilizan normalmente con materiales no metálicos en:
• Industria del plástico: Resinas, virutas o productos moldeados.
• Industria química: Detergentes, fertilizantes, jabones líquidos, productos
corrosivos y petroquímicos.
• Industria maderera: Serrín, papel, marcos de puertas y ventanas.
• Industria del vidrio y cerámica: Materias primas, arcilla o productos
acabados, botellas.
• Industria del embalaje: Inspección del embalaje: nivel, contenido, sus-
tancias secas, frutas y verduras, productos lácteos.
Los materiales se detectan por su constante dieléctrica. Cuanto mayor es el
objeto, mayor es su densidad y mejor se detecta. La distancia de detección
de un sensor capacitivo hace referencia a una placa metálica con toma de
tierra (ST37). Para más información sobre la escala dieléctrica de los materi-
ales, consulte la Información Técnica: “SENSORES”.
Instalación
1. Montaje del sensor
Monte el sensor en la posición requerida apuntando hacia el objeto y
com pruebe que la distancia al objeto esté dentro del alcance del sensor.
2. Alimentación del sensor
Para alimentar el sensor, conecte el hilo azul (3) a tierra (0 VCC) y el hilo
marrón (1) a + (10 a 40 VCC).
3. Programación del sensor
Siga las instrucciones de la guía Teach-in al programar el sensor. Las
siguientes funciones son programables: 1. Ajuste del fondo y configur-
ación de los puntos de conmutación, 2. Ajuste del objeto, 3. Selección
NA/NC y 4. Reponer ajuste de fábrica (1. y 2. son obligatorios).
I sensori capacitivi sono concepiti per rilevare tutti i tipi di materiale metallico
e non metallico, liquido o solido. Normalmente sono usati per rilevare materiali
non metallici nei seguenti settori:
• Industria della plastica: resine, materiali triturati o plasmati.
• Industria chimica: detergenti, fertilizzanti, saponi liquidi, prodotti corrosi-
vi e petrolchimici.
• Industria del legno: segatura, prodotti cartacei, intelaiature di porte e fine-
stre.
• Industria della ceramica e del vetro: materiali grezzi, prodotti finiti, bot-
tiglie.
• Industria dell’imballaggio: controllo degli imballaggi secondo livelli e
contenuto, cereali, frutta e verdura, prodotti caseari.
I materiali vengono rilevati grazie alla loro costante dielettrica. La facilità di
individuazione dell’oggetto cresce con l’aumentare delle sue dimensioni o della
densità del materiale. La distanza di attivazione nominale di un sensore
capacitivo viene considerata in relazione ad una piastra di metallo (ST37)
collegata a terra. Per maggiori delucidazioni riguardo alla classificazione
dielettrica dei materiali consultare il nostro catalogo: “SENSORI”.
Installazione
1. Montaggio del sensore
Montare il sensore nella posizione desiderata, puntato verso l’oggetto di
riferimento, ed assicurarsi che la distanza tra questo e il sensore ricada
all’interno della distanza di attivazione.
2. Alimentazione del sensore
Per alimentare il sensore collegare il filo blu (pin 3) a terra (0 VCC) ed il
filo marrone (pin 1) a + (10-40 VCC).
3. Programmazione del sensore
Programmare il sensore come descritto nella Guida alla funzione Teach-
in. Le seguenti funzioni sono programmabili: 1. Regolazione dello
sfondo e configurazione degli switch-point (punti di commutazione),
2. Regolazione dell’oggetto, 3. selezione NA/NC e 4. Ripristina valori
predefiniti (1. e 2. sono obbligatori).
Kapacitive aftastere har den enestående egenskab, at de kan aftaste praktisk talt
alle materialer, enten i flydende eller fast form. Kapacitive af tastere kan aftaste
metalliske såvel som ikke-metalliske objekter, men den traditionelle anvendelse
er til ikke-metalliske materialer, f.eks. inden for:
• Plastindustri: Harpiks, genformalede materialer eller støbte produkter.
• Kemisk industri: Rensemidler, gødning, flydende sæbe, ætsende og
petrokemiske stoffer.
• Træindustri:
Savsmuld, papirprodukter, dør- og vinduesrammer.
• Keramik- og glasindustri:
Råmaterialer, ler eller færdige produkter, flasker.
•
Emballageindustri:
Kontrol af niveau eller indhold i emballage, tørstoffer, frug-
ter og grøntsager, mejeriprodukter.
Materialerne aftastes efter deres dielektriske konstant. Jo større objekt eller
materialemassefylde, des bedre eller lettere aftastning af objektet. Den
nominelle tasteafstand for en kapacitiv aftaster måles med reference til en
jordforbundet metalplade (ST37). Yderligere oplysninger vedrørende dielektrisk
klassificering af materialer findes i vort sensorkatalog.
Installation
1. Montering af aftasteren
Monter aftasteren i den ønskede position, så den peger mod emnet.
Sørg for, at afstanden til emnet ligger inden for aftasterens rækkevidde.
2. Aftasterforsyning
For at forsyne aftasteren skal blå ledning (ben 3) forbindes til jord (0 V
DC), mens brun ledning (ben 1) skal forbindes til + (10-40 VDC).
3. Programmering af aftasteren
Programmer aftasteren jvf. ”Indlæringsguide”. Følgende funktioner
er programmerbare: 1. Baggrundsjustering og setpunktsindstilling,
2. Objektjustering, 3. Valg af NO/NC og 4. Genindsæt fabriksindstillinger
(1. og 2. er obligatoriske).
Important :
Si l’on n’utilise pas la sortie alarme (fil WH),
connecter impérativement le fil sur le plus (+) ali-
mentation.
Importante: Si no se utiliza la salida de
alarma (cable WH), debe conectarse a la alimen-
tación +
Importante: Se l’uscita di allarme (cavo WH) è inu-
tilizzata deve essere connessa su +supply
Vigtigt: Hvis alarmudgangen (WH-kablet) ikke
bruges, skal den tilsluttes plus (+).
重要:如果未使用警报输出(WH线),则必须将其
连接至+电源
ENGLISH
Relief of cable strain
Protection of the sensing face
Switch mounted on mobile carrier
To avoid interference from inductive
voltage/ current peaks, separate
the prox. switch power cables from
any other power cables, e.g. motor,
contactor or solenoid cables
The cable should not be
pulled
A proximity switch should not
serve as mechanical stop
Any repetitive flexing of the cable
should be avoided
Schutz vor Überdehnung des
Kabels
Schutz der Sensorfläche des
Schalters
Mobiler Näherungsschalter
Um Störungen durch induktive
Spannungs-/Stromspitzen zu
vermeiden, Kabel der
Näherungsschalter getrennt
von anderen stromführenden
Kabeln für z.B. Motoren und
Leistungsschalter halten
Nicht am Kabel ziehen Näherungsschalter nicht als
mechanischen Anschlag
verwenden
Wiederholtes Biegen des Kabels
vermeiden
Tension des câbles
Protection de la face de détection
du détecteur
Détecteur monté sur support mobile
Pour éviter les interférences issues
des pics de tension et/ou des courants
inductifs, veiller à toujours faire cheminer
séparément les câbles d’alimentation
des détecteurs de proximité et les
câbles d’alimentation des moteurs,
contacts ou solénoïdes
Eviter toute contrainte en
traction du câble
Ne jamais utiliser un détecteur
de proximité en tant que butée
mécanique
Eviter toute répétition de courbure
dans le cheminement du câble
Alivio de la tensión del cable
Protección de la cara de
detección
Conector montado sobre portadora
móvil
Para evitar interferencias de tensión
inductiva/ picos de intensidad se
deben separar los cables del sensor
del resto de los cables de alimentación
tales como cables de motor,
contactores o solenoides
No se debe tirar del cable
Un sensor de proximidad nunca
debe funcionar como tope
mecánico
Evitar doblar el cable repetidas veces
Aflastning af kabel
Beskyttelse af følerens tasteflade
Aftaster monteret på bevægeligt
underlag
For at undgå støjindflydelse fra
induktive strøm-/spændingsspidser
skal aftasterkablet adskilles fra andre
kraftkabler, f.eks. fra motorer, trans-
formatorer og magnetventiler
Der bør ikke trækkes i kablet
En aftaster bør ikke anvendes
som mekanisk stop
Gentagne bøjninger af kablet bør
undgås
Posizione del cavo
Protezione della parte sensibile
del sensore
Sensore installato su pedana mobile
Al fine di evitare interferenze di
tipo elettrico, separare i cavi di
alimentazione del sensore di pros-
simità dai cavi di potenza
Il cavo non deve essere teso
I sensori di prossimità non devono
essere usati per bloccaggi
meccanici
Evitare qualsiasi flessione ripetuta
del cavo
Installation Hints / Installationshinweise / Conseils d’Installation / Normas de Instalación / Consigli per l’Installazione /
Installationsråd og -vink / 安装提示
DEUTSCHFRANÇAISESPAÑOL
ITALIANO
DANSK
中國
线缆应力消除
感应面保护
安装在移动载体上的开关
为了避免受感应电压/峰值电流的干
扰,请将接近开关电源线缆与所有其
他电源线缆分开,例如电机、接触器
或螺线管的线缆
不能拉动线缆
接近开关不能用作机械式止动装置
避免反复弯曲线缆
Specifications / Technische Daten / Caractéristiques Techniques / Especificaciones / Caratteristiche Tecniche / Specifikationer / 产品规格
Rated operational voltage (U
e
)
Nenn-Betriebsspannung / Tension de fonctionnement nominale / Tensión
de alimentación / Tensione di alimentazione / Nominelt spændingsområde
/ 额定工作电压
Ripple included
Einschl. Restwelligkeit / ondulation inclue / ondulación incluida / ripple
incluso / inkl. ripple / 含纹波
10 - 40 VDC (10 - 40 VCC)
No load supply current (I
o
)
Leeraufstrom / Courant d’alimentation à vide / Consume de corriente sin
carga / Corrente di alimentazione / Tomgangsstrøm / 空载电流
≤ 12 mA
Ripple
Restwelligkeit / Ondulation / Ondulación / Ripple / 纹波
≤ 10%
Rated operational current (I
e
)
Nenn-Betriebsstrom / Courant de fonctionnement nominal / Intensidad de
salida / Corrente di carico / Max. strøm / 额定工作电流
≤ 200 mA (continuous / kontinuierlich / continu / continua / continua /
vedvarende / 连续)
Output function
Ausgangsfunktion / Fonction de commutation de sortie / Función de
salida / Funzione di uscita / Udgangsfunktion /输出功能
NPN/PNP
(auto detect)/ (automatische Erkennung) / (détection automatique) /
(detección automática) / (rilevamento automatico) / (automatisk
genkendelse) / (自动检测)
Output switching function
Schaltart / Fonction de commutation de sortie / Función de conmutación
de salida / Funzione di commutazione dell’uscita / 输出开关功能
N.O. or N.C. (teachable)
NO oder NC Programmierbar) / NO ou NC (par apprentissage) / NA o NC
(“Teach-in”) / N.O. o N.C. (Teach-in) / N.O. eller N.C. (programmerbar) /
N.O.或N.C.(可教导)
Protection
Schutz / Protection / Protección / Protezione / Beskyttelse / 防护措
Short-circuit, reverse polarity, transients
Verpolung, Kurzschluss und Transienten / Court-circuit, inversion de
polarité, transitoires / Cortocircuitos, inversión de polaridad, transitorios
/ Corto circuito, inversione di polarità, transitori / Kortslutning, omvendt
polaritet, transient / 短路、反极性、瞬态
TRIPLESHIELD
TM
protection
TRIPLESHIELD
TM
-Schutz / Protection TRIPLESHIELD
TM
/ Protección
TRIPLESHIELD
TM
/ ProtezioneTRIPLESHIELD
TM
/ TRIPLESHIELD
TM
-
beskyttelse / TRIPLESHIELD
TM
保护
IEC 1000-4-2/EN 61000-4-2 30 kV
IEC 1000-4-3/EN 61000-4-3 > 15 V/m
IEC 1000-4-4/EN 61000-4-4 3 kV
IEC 1000-4-6/EN 61000-4-6 >10 Vrm
Rated operating distance
(S
n
)
Nenn-Schaltabstand / Distance nominale de fonctionnement / Distancia nom-
inal de detección / Distanza di attivazione nominale / Nominel tasteafstand /
额定工作距离
0 - 8 mm
Operating temperature
Umgebungstemperatur, Betrieb / Température de fonctionnement /
Temperatura ambiente, trabajo / Temperatura di funzionamento /
Omgivelsestemperatur, drift / 工作温度
-20° --> +85°C (-4° --> +185°F)
Storage temperature
Umgebungstemperatur, Lager / Température de stockage /
Temperatura
ambiente, almacenamiento / Temperatura di immagazzinaggio /
Omgivelsestemperatur, lager / 存储温度
-40° --> +85°C (-40° --> +185°F)
Degree of protection
Schutzart / Indice de protection / Grado de protección / Grado di pro-
tezione / Tæthedsgrad / 防护等级最低
IP68
Colour code
Transcripción de documentos
Teach Functions / Teach in Funktionen / Fonctions d’apprentissage / Funciones de programación / Funzioni teach-in / Indlæringsfunktioner / 教导功能 2. 3. 4. Monte el sensor en la aplicación sin que el objeto esté presente. El estado del LED amarillo puede ignorarse y el LED verde está activado. Pulse el botón durante 3 segundos hasta que ambos LED parpadeen simultáneamente. (Se almacena el fondo) Coloque el objetivo en la zona de detección. Pulse el botón una vez y el sensor estará listo para funcionar (el LED verde y el LED amarillo están encendidos). (Se almacena el segundo punto de detección). Si el objeto está demasiado cerca el fondo, el sensor percibirá como fondo tanto el fondo como el objeto y los LED se alternarán 3 veces. Funzionamento normale, punto di commutazione ottimizzato 1. 2. 3. 4. Montare il sensore nell’applicazione senza l’oggetto presente. Il LED giallo non è importante e il LED verde è acceso. Premere il pulsante per 3 secondi finché entrambi i LED lampeggino contemporaneamente. (Lo sfondo viene memorizzato) Posizionare l’oggetto nella zona di rilevamento. Premere una volta il pulsante: il sensore è pronto per entrare in funzione (il LED verde ed il LED giallo sono accesi). (Il secondo punto di commutazione è memorizzato). Se l’oggetto è troppo vicino allo sfondo, il sensore percepirà sia sfondo e oggetto come sfondo e i LED si alterneranno per 3 volte. 1. Montare il sensore nell’applicazione senza l’oggetto presente. Il LED giallo non è importante e il LED verde è acceso. 2. Premere il pulsante per 3 secondi finché entrambi i LED lampeggino contemporaneamente. (Le informazioni di sfondo vengono memorizzate) 3. Premere una seconda volta il pulsante: il sensore è pronto per entrare in funzione (il LED verde ed il LED giallo sono accesi) (Il sensore è impostato con la massima distanza di rilevamento che non viene influenzata dallo sfondo). 1. Sensoren monteres i applikationen uden at emnet er til stede. Gul LED er ikke vigtig og grøn LED er tændt. 2. Tryk på knappen i tre sekunder indtil begge LED’er blinker samtidig. (Information om bagrunden gemmes) 3. Tryk på knappen igen og aftasteren er klar til drift (grøn LED tændt, gul LED tændt) (Aftasteren er indstillet til maksimal tasteafstand som ikke påvirkes af baggrunden). 对于最大感应距离(默认设置) 1. 将传感器安装到没有目标存在的应用环境中。黄色 LED 的 状态无关紧要,绿色 LED 亮起。 2. 按下按钮 3 秒,直到两个 LED 同时开始闪烁。 (背景信息即被储存) 3. 再按一次按钮,传感器将准备好 开始工作(绿色 LED 和黄色 LED 亮起) (将传感器设为不受背景影响的最大感应距离)。 1. 在目标前连接传感器。绿色 LED 亮起, 黄色 LED 的状态无关紧要。 2. 按下按钮 3 秒,直到两个 LED 同时开始闪烁。 3. 再次按下按钮并按住至少一秒时间(两个 LED 都同时快 速闪烁)并让按钮在至少一个处理周期的时间内保持按下 状态。松开按钮,传感器即准备好工作(开关点存储在传 感器中并且根据背景和目标信息进行了优化)。 如果分析了数个处理周期,将可进行更为精确的设置。 ENGLISH DEUTSCH 对于动态设置(运行流程) FRANÇAIS DANSK ENGLISH For maksimal tasteafstand (standardindstilling) 1. Ret aftasteren ind efter emnet. Grøn LED er tændt, status på den gule LED er ikke vigtig. 2. Tryk på knappen i tre sekunder indtil begge LED’er blinker samtidig. 3. Tryk og hold knappen nede igen i mindst ét sekund (begge LED’er blinker hurtigt og samtidigt) og hold knappen nede i mindst én procescyklus. Slip knappen og sensoren er klar til drift (aktiveringspunktet gemmes i aftasteren og optimeres så den genkender både baggrund og emne). Man kan opnå en mere præcis indstilling hvis flere procescyklusser bliver analyseret. Pour un réglage dynamique (processus de fonctionnement) 1. Alignez le capteur sur la cible. La LED verte est allumée, l’état de la LED jaune n’a pas d’importance. 2. Appuyez sur le bouton pendant 3 secondes jusqu’à ce que les deux LED clignotent simultanément. 3. Appuyez sur le bouton une deuxième fois pendant au moins Para la máxima distancia de detección (ajuste predeterminado) une seconde, les clignotements des deux LED s’accélèrent simultanément et maintenez le bouton enfoncé pendant au moins 1. Monte el sensor en la aplicación sin que el objeto esté presente. El un cycle de processus, relâchez le bouton et le capteur est prêt à LED amarillo puede ignorarse y el LED verde está activado. fonctionner (le point de commutation est mémorisé dans le 2. Pulse el botón durante 3 segundos hasta que ambos LED parpadeen simultáneamente. capteur et optimisée tout en respectant à la fois le fond et la cible). (Se almacena la información del fondo) On peut obtenir un réglage plus précis si plusieurs cycles de 3. Pulse el botón una segunda vez y el sensor estará listo para processus sont analysés. funcionar (el LED verde y el LED amarillo están encendidos). (El sensor se configura con la máxima distancia de detección, sin Para el ajuste dinámico (proceso en funcionamiento) que se vea afectada por el fondo). Per massima distanza di rilevamento (impostazione di default) 中國 1. Richten Sie den Sensor auf das Objekt aus. Die grüne LED leuchtet, der Status der gelben LED ist unwichtig. 2. Drücken Sie die Taste 3 Sekunden lang, bis beide LEDs gleichzeitig blinken. 3. Drücken Sie die Taste erneut und halten Sie diese für mindestens eine Sekunde lang gedrückt ( beide LEDs blinken gleichzeitig sehr schnell). Erst nach Ende des Prozesszyklus lassen Sie die Taste los (der Schaltabstand ist gespeichert und auf das Objektund den Hintergrund optimiert). Eine genauere Einstellung ist möglich, wenn mehrere Prozesszyklen analysiert werden. For en dynamisk indstilling (løbende proces) 1. Alinie el sensor con el objeto. El LED verde está activado y el estado del LED amarillo puede ignorarse. 2. Pulse el botón durante 3 segundos hasta que ambos LED parpadeen simultáneamente. 3. Pulse y mantenga presionado el botón una segunda vez durante al menos un segundo (ambos LED parpadean rápido y simultáneamente) y mantenga el botón presionado durante al menos un ciclo del proceso. Suelte el botón y el sensor estará listo para funcionar (el punto de conmutación se almacena en el sensor y se optimiza respecto a la información del fondo y del objeto). En caso de analizar más ciclos de proceso, es posible obtener un ajuste más preciso. Per regolazione dinamica (processo in corso) 1. Allineare il sensore all’oggetto. Il LED verde è acceso, lo stato sul LED giallo non è importante. 2. Premere il pulsante per 3 secondi finché entrambi i LED lampeggino contemporaneamente. 3. premere e mantenere premuto il pulsante una seconda volta per almeno un secondo (entrambi i LED lampeggiano simultaneamente e velocemente) e tenere premuto il pulsante per almeno un ciclo di lavoro. Rilasciare il pulsante: il sensore è pronto per entrare in funzione (il punto di commutazione è memorizzato nel sensore ed è ottimizzato rispettando sia le informazioni dello sfondo che dell’oggetto). Se vengono analizzati più cicli di processo, è possibile un’impostazione più precisa. Push once Push once Einmal drücken Appuyez une fois Pulsar una vez Premere una volta Tryk én gang 按一次按钮 Näherungsschalter Kapazitiv / Détecteurs de niveau capacitifs / Sensores de Nivel Capacitivos / Sensori di livello capacitivi / Kapacitive level sensorer / 电容物位传感器 CA12CLC08BPxxRT Transistor Output with Teach-in Transistor-Ausgang mit Teach-in-Funktion / Sortie transistor à auto apprentissage / Salida de Transistor con Teach-in (autoajuste) / Uscita a transistor con funzione Teach-in (Autoapprendimento) / Transistorudgang og Indlæringsfunktion / 晶体管输出与示教 For make or break set-up (N.O. or N.C.) 1. Press the button for 10 seconds, until the green LED flashes. 2. While the green LED flashes, the output is inverted each time the button is pressed. Yellow LED indicates N.O. function selected. If the button is not pressed within the next 16 seconds, the current output is stored. Schaltart (NO und NC/Schließer und Öffner) des Schaltausgangs wählen 1. Drücken Sie die Taste 10 Sekunden lang, bis die grüne LED blinkt. 2. Während die grüne LED blinkt kann durch Drücken der Taste die Schaltart invertiert werden. Wurde Schaltart NO gewählt leuchtet die gelbe LED. Wenn die Taste nicht innerhalb der nächsten 16 Sekunden gedrückt wird, wird die aktuelle Schaltart gespeichert. Pour commutation travail où repos (N.O. ou N.F.) 1. Appuyez sur le bouton pendant 10 secondes, jusqu’à ce que la LED verte clignote. 2. Pendant que la LED verte clignote, la sortie est inversée chaque fois que le bouton est appuyé. La LED Jaune indique que la fonction N.O. est sélectionnée. Si le bouton n’est pas appuyé dans les 16 secondes qui suivent, la sortie de courant est enregistrée. User Manual Bedienungsanleitung / Manuel de l’utilisateur / Manual del Usuario / Manuale d’istruzione / Brugerhåndbog / 用户手册 Factory settings / Werkseinstellung / Réglages d’usine / Configuración de fábrica / Impostazioni di fabbrica / Fabriksindstillinger / 出厂设置 Press the button for 16 sec. Drücken Sie die Taste 16 Sekunden lang. Appuyez sur le bouton pendant 16 secondes. Para una configuración NA o NC 1. Pulse el botón durante 10 segundos hasta que el LED verde parpadee. 2. Mientras parpadea el LED verde, la salida se invierte cada vez que se pulse el botón. El LED amarillo indica que se ha seleccionado la función NA. Si el botón no se pulsa durante los siguientes 16 segundos, se almacenará la salida actual. Per regolazione luce/buio (N.O. o N.C.) 1. Premere il pulsante per 10 secondi finché il LED verde lampeggia. 2. Mentre lampeggia il LED verde, l’uscita è invertita ogni volta che si preme il pulsante. Il LED giallo indica la funzione N.O. selezionata. Se il pulsante non viene premuto entro i prossimi 16 secondi, l’attuale uscita viene memorizzata. Pulse el botón durante 16 s. Premere il pulsante per 16 secondi. Tryk på knappen i 16 sek. 按下按钮 16 秒 Dimensions / Abmessungen / Dimensions / Dimensiones / Dimensioni / Dimensioner / 尺寸图 For slutte- eller brydeindstilling (NO eller NC) 1. Tryk på knappen i 10 sekunder indtil den grønne LED blinker. 2. Mens den grønne LED blinker, inverteres udgangen hver gang der trykkes på knappen. Gul LED angiver sluttefunktion (NO) valgt. Hvis knappen ikke røres inden for de næste 16 sekunder, gemmes den pågældende udgangsfunktion. 78 40 26 Ø10.7 1. ITALIANO Funcionamiento normal, punto de conmutación optimizado 1. Line up the sensor at the object. Green LED is ON, status on the yellow LED is not important. 2. Press the button for 3 seconds until both LEDs are flashing simultaneously. 3. Press and hold the button a second time for at least one second (both LEDs are flashing simultaneously and fast) and keep the button pressed for at least one process cycle. Release the button and the sensor is ready to operate (The second switch point is stored). If more process cycles are analysed, a more precise setting is enabled. Für die Betriebsart dynamischer Teach in (laufender Prozess) Pour une distance de captage minimale (réglage par défaut) 1. Alignez le capteur dans l’application. La LED jaune n’a pas d’importance et la LED verte est allumée. 2. Appuyez sur le bouton pendant 3 secondes jusqu’à ce que les deux LED clignotent simultanément. (Le premier point de commutation est mémorisé) 3. Appuyez sur le bouton une seconde fois et le capteur est prêt à fonctionner (LED verte allumée, LED jaune allumée). (Le capteur est configuré à la distance de détection maximale qui n’est pas influencé par le fond). For a dynamic set-up (running process) 10 sec. 2 对于断或续设置(N.O. 或 N.C.) 1. 按下按钮 10 秒,直到绿色 LED 开始闪烁。 2. 在绿色 LED 闪烁时,每次按下按钮都会使输出反转。黄色 LED 指示选择了 N.O. 功能。 如果没有在接下来 16 秒内再次按下按钮,则会保存当前输出。 LED M12 x 1 Cable / Kabel / Câble / Cable / Cavo / Kabel / 电缆 80 40 24 Ø10.7 ITALIANO ESPAÑOL 3. 4. 1. Montieren Sie den Sensor und entfernen Sie das Objekt aus dem Erfassungsbereich. Der Status der gelben LED ist unwichtig und die grüne LED leuchtet. 2. Drücken Sie die Taste 3 Sekunden lang, bis beide LEDs gleichzeitig blinken. (Der Hintergrund wird gespeichert). 3. Die Taste noch einmal drücken. Der Sensor ist betriebsbereit (grüne und gelbe LED leuchten). Der Sensor ist nun auf den maximalen Schaltabstand eingestellt ohne vom Hintergrund beeinflusst zu werden. Hold down within a processing cycle time Ein Prozesszyklus lang drücken Maintenez enfoncé pendant un cycle de processus Mantenga el botón presionado durante un ciclo del proceso Tenere premuto il pulsante un ciclo di lavoro Hold knappen nede i én procescyklys 个处理周期的时间内保持按下 ESPAÑOL 2. Montez le capteur dans l’application sans que la cible soit présente. La LED jaune n’a pas d’importance et la LED verte est allumée. Appuyez sur le bouton pendant 3 secondes jusqu’à ce que les deux LED clignotent simultanément. (Le fond est mémorisé) Placez la cible dans la zone de détection. Appuyez sur le bouton une fois et le capteur est prêt à fonctionner (LED verte allumée, LED jaune allumée) (Le second point de commutation est mémorisé) Si la cible est trop proche du fond, le capteur considérera comme cible aussi bien le fond que la cible, et les LED alternent trois fois. 3. 4. Für die Betriebsart maximaler Schaltabstand (Werkseinstellung) One cycle 1 ITALIANO 1. 2. 将传感器安装到没有目标存在的应用环境中。黄色 LED 的 状态无关紧要,绿色 LED 亮起。 按下按钮 3 秒,直到两个 LED 同时开始闪烁。 (背景即被储存) 将目标放置在检测区域中。 按一次按钮,传感器将准备好开始工作(绿色 LED 和黄色 LED 亮起) (第二个开关点即被保存)。 如果目标太接近背景,传感器将同时把背景和对象感知为 背景,并且 LED 将交替闪动 3 次。 1. Mount the sensor in the application without the object present. Yellow LED is not important and green LED is ON. 2. Press the button for 3 seconds until both LEDs are flashing simultaneously. (The first switch point is stored) 3. Press the button a second time and the sensor is ready to operate (green LED ON, yellow LED ON). (The second switch point is stored). 3 sec. 3 DANSK Fonctionnement normal, point de commutation optimisé 1. For maximum sensing distance (default setting) 2 中國 3. 4. 正常运行,优化的开关点 Push once Einmal drücken Appuyez une fois Pulsar una vez Premere una volta Tryk én gang 按一次按钮 DEUTSCH 2. Montieren Sie den Sensor und entfernen Sie das Objekt aus dem Erfassungsbereich. Der Status der gelben LED ist unwichtig und die grüne LED leuchtet. Drücken Sie die Taste 3 Sekunden lang, bis beide LEDs gleichzeitig blinken. (Der Hintergrund wird gespeichert) Platzieren Sie das Objekt in den Erfassungsbereich. Die Taste einmal drücken. Der Sensor ist betriebsbereit (grüne und gelbe LED leuchten und der zweite Schaltpunkt ist gespeichert). Wenn das Objekt zu nahe am Hintergrund ist, wird das Objekt inklusive Hintergrund als Objekt erkannt und die LEDs werden dreimal alternierend blinken). 中國 1. DANSK FRANÇAIS DEUTSCH Normalbetrieb, optimierter Schaltpunkt 1 FRANÇAIS 3. 4. Push once 3 ESPAÑOL 2. Sensoren monteres i applikationen uden at emnet er til stede. Gul LED er ikke vigtig og grøn LED er tændt. Tryk på knappen i 3 sekunder, indtil begge LED’er blinker samtidig. (Baggrunden gemmes) Anbring emnet i detekteringszonen. Tryk på knappen én gang, og aftasteren er klar til drift (grøn LED tændt, gul LED tændt). (Det andet aktiveringspunkt gemmes). Hvis emnet er for tæt på baggrunden, vil aftasteren opfatte både baggrund og emne som emnet, og LED’erne vil blinke skiftevis tre gange. ENGLISH 1. DEUTSCH Mount the sensor in the application without the object present. Yellow LED is not important and green LED is ON. Press the button for 3 seconds until both LEDs are flashing simultaneously. (The first switch point is stored) Place the object in the detection zone. Press the button once and the sensor is ready to operate (green LED ON, yellow LED ON). (The second switch point is stored). If the object is too close to the background, the sensor will perceive both background and object as object. Normal funktion, optimeret aktiveringspunkt FRANÇAIS 2. 3. 4. 3 sec. Push once Normal operation, optimized switching point 1. Push once Einmal drücken Appuyez une fois Pulsar una vez Premere una volta Tryk én gang 按一次按钮 2 ITALIANO 4 中國 ENGLISH 3 sec. 3 ESPAÑOL 2 DANSK 1 1 Capacitive Level Sensors M12 M12 x 1 LED M12 x 1 x 8 Plug / Stecker / Connecteur / Conector / Connettore / Stik / 插头 de fenêtres. • Industrie de la céramique et du verre : Matières premières, argile ou produits finis, bouteilles • Vérification de contenus ou de niveaux dans l’industrie : de l’emballage et du conditionnement de marchandises sèches, fruits et légumes, produits laitiers. Les matériaux sont détectés grâce à leur constance diélectrique. Plus l’objet est de grande taille, plus la densité du matériau est grande et plus cet objet pourra être détecté aisément. La distance de détection nominale d’un détecteur capacitif est étalonnée à partir d’une plaque en acier doux ST37 mise à la masse. Pour de plus amples détails concernant les constantes diélectriques des matériaux, voir Informations Techniques. Installation 2. Supplying the sensor To supply the sensor, connect blue wire (3) to ground (0 VDC) and brown wire (1) to + (10-40 VDC). 1. Montage du détecteur Installer le détecteur dans la position requise en le faisant pointer sur la cible et en s’assurant que la distance à la cible se situe dans les limites de détection de celui-ci. 3. Programming the sensor Program the sensor as described in the Teach-in guide. The following functions are programmable: 1. Background adjustment and switch-point setup, 2. Object adjustment, 3. NO/NC selection and 4. Restore factory settings (1. and 2. are mandatory). 2. Alimentation du détecteur Pour alimenter le détecteur, raccorder le fil bleu (3) à la masse (0 VCC) et le fil marron (1) au + (10-40 VCC). Beschreibung und Installation D Kapazitive Näherungsschalter eignen sich zum Erfassen von Materialien in fester oder flüssiger Form. Dazu gehören alle Metalle und nicht-metallischen Stoffe. Einsatz-möglichkeiten ergeben sich in: • Spritzgießmaschinen, z..B. Kleber, Granulat aus Kunststoff. • Chemische Industrie, z.B. Wasseraufbereitung, Säure, Lauge, Lösungsmittel. • Holzindustrie, z.B. Holz, Sägespäne, Papier. • Keramik- und Glasindustrie, z.B. Quarzsand, Flaschenerfassung • Verpackungsindustrie, z.B. Verpackungen, Füllmengenerfassung, Futtermittel, Molkereierzeugnisse, Früchte und Gemüse Die Erfassung von Materialien durch kapazitive Näherungsschalter hängt von der Dichte und den elektrischen Eigenschaften des Objektes ab. Der angegebene Schaltabstand für kapazitive Näherungsschalter bezieht sich auf eine genormte Messplatte aus Stahl (ST37). Weitere Informationen über Reduktionsfaktoren von Materialien finden Sie unter “Technische Informationen”. Installation 1. Montage des Sensors Montieren Sie den Sensor in der gewünschten Position mit Ausrichtung auf das Objekt. Kontrollieren Sie, dass der Objektabstand innerhalb der Sensorreichweite liegt. 2. Sensorversorgung Zur Sensorversorgung ist blauer Leiter (Pin 3) an Erde (0 V DC) und brauner Leiter (Pin 1) an + (10-40 VDC) zu verbinden. 3. Programmierung des Sensors Programmieren Sie den Sensor wie unter Teach-in-Anweisungen beschrieben. Die folgenden Funktionen sind programmierbar: 1. Einstellung - Hintergrund und Schaltpunkt. 2. Einstellung - Objekt. 3. Einstellung - Schließer - Öffner. 4. Rückkehr zu den werksseitigen Einstellungen (1. und 2. sind obligatorisch). I sensori capacitivi sono concepiti per rilevare tutti i tipi di materiale metallico e non metallico, liquido o solido. Normalmente sono usati per rilevare materiali non metallici nei seguenti settori: • Industria della plastica: resine, materiali triturati o plasmati. • Industria chimica: detergenti, fertilizzanti, saponi liquidi, prodotti corrosivi e petrolchimici. • Industria del legno: segatura, prodotti cartacei, intelaiature di porte e finestre. • Industria della ceramica e del vetro: materiali grezzi, prodotti finiti, bottiglie. • Industria dell’imballaggio: controllo degli imballaggi secondo livelli e contenuto, cereali, frutta e verdura, prodotti caseari. I materiali vengono rilevati grazie alla loro costante dielettrica. La facilità di individuazione dell’oggetto cresce con l’aumentare delle sue dimensioni o della densità del materiale. La distanza di attivazione nominale di un sensore capacitivo viene considerata in relazione ad una piastra di metallo (ST37) collegata a terra. Per maggiori delucidazioni riguardo alla classificazione dielettrica dei materiali consultare il nostro catalogo: “SENSORI”. Installazione 1. Montaggio del sensore Montare il sensore nella posizione desiderata, puntato verso l’oggetto di riferimento, ed assicurarsi che la distanza tra questo e il sensore ricada all’interno della distanza di attivazione. Beskrivelse og Installation E Los sensores capacitivos pueden detectar casi todos los materiales, en estado líquido o sólido. Permiten detectar objetos metálicos y no metálicos, sin embargo, se utilizan normalmente con materiales no metálicos en: • Industria del plástico: Resinas, virutas o productos moldeados. • Industria química: Detergentes, fertilizantes, jabones líquidos, productos corrosivos y petroquímicos. • Industria maderera: Serrín, papel, marcos de puertas y ventanas. • Industria del vidrio y cerámica: Materias primas, arcilla o productos acabados, botellas. • Industria del embalaje: Inspección del embalaje: nivel, contenido, sustancias secas, frutas y verduras, productos lácteos. Los materiales se detectan por su constante dieléctrica. Cuanto mayor es el objeto, mayor es su densidad y mejor se detecta. La distancia de detección de un sensor capacitivo hace referencia a una placa metálica con toma de tierra (ST37). Para más información sobre la escala dieléctrica de los materiales, consulte la Información Técnica: “SENSORES”. Instalación 1. Montaje del sensor Monte el sensor en la posición requerida apuntando hacia el objeto y com pruebe que la distancia al objeto esté dentro del alcance del sensor. 2. Alimentación del sensor Para alimentar el sensor, conecte el hilo azul (3) a tierra (0 VCC) y el hilo marrón (1) a + (10 a 40 VCC). 3. Programación del sensor Siga las instrucciones de la guía Teach-in al programar el sensor. Las siguientes funciones son programables: 1. Ajuste del fondo y configur- ación de los puntos de conmutación, 2. Ajuste del objeto, 3. Selección NA/NC y 4. Reponer ajuste de fábrica (1. y 2. son obligatorios). 说明与安装 Installation Hints / Installationshinweise / Conseils d’Installation / Normas de Instalación / Consigli per l’Installazione / Installationsråd og -vink / 安装提示 CN 电容式传感器具有独特的能力,它能够检测液态或 固态的几乎所有材料。电容式传 感器还可以检测金属和非金属物体;但是,它们通常用于检测非金属材料,如: * 塑料行业:树脂、再生材料或模制品。 * 化工行业:清洁剂、肥料、液体肥皂、腐蚀剂和石油化学产品。 * 木材行业:木屑、纸制品、门框和窗框。 * 陶瓷与玻璃行业:原材料、粘土或成品、瓶子。 * 包装行业:针对干货、蔬果、乳制品进行等级或内容物方面的包装检验。 根据材料的介电常数检测材料。物体越大,材料密度越高,物体检测起来越容易。 电容式传感器的标称感应距离指的是与接地金属板 (ST37) 之间的距离。有关材料 的介电额定值的其他信息,请参阅“电容式接近传感器技术信息”。 安装 1. 安装传感器 将传感器安装到位,指向目标并确保与目标的距离在传感器的范围之内。 2. 为传感器供电 要为传感器供电,请将蓝线 (3) 接地 (0 VDC) 并将棕线 (1) 接 + (10-40 VDC) 。 3. 对传感器进行编程 按照教导指南中的说明对传感器进行编程。可对以下功能进行编程:1.背景调整 和开关点设置,2.对象调整,3.NO/NC 选择,4.恢复原厂设置(必须进行 1. 和 2.)。 2. Alimentazione del sensore Per alimentare il sensore collegare il filo blu (pin 3) a terra (0 VCC) ed il filo marrone (pin 1) a + (10-40 VCC). 3. Programmazione del sensore Programmare il sensore come descritto nella Guida alla funzione Teachin. Le seguenti funzioni sono programmabili: 1. Regolazione dello sfondo e configurazione degli switch-point (punti di commutazione), 2. Regolazione dell’oggetto, 3. selezione NA/NC e 4. Ripristina valori predefiniti (1. e 2. sono obbligatori). 3. Programmation du détecteur Programmer le détecteur comme décrit dans le guide d’apprentissage. Les fonctions suivantes sont programmables: 1. Réglage de l’arrière plan et configuration du seuil du point de commutation, 2. Ajustement de l’objet, 3. sélection NO/NF 4. Restauration des réglages d’usine (les opérations 1. et 2. sont obligatoires). Descripción e Instalación I DK Kapacitive aftastere har den enestående egenskab, at de kan aftaste praktisk talt alle materialer, enten i flydende eller fast form. Kapacitive aftastere kan aftaste metalliske såvel som ikke-metalliske objekter, men den traditionelle anvendelse er til ikke-metalliske materialer, f.eks. inden for: • Plastindustri: Harpiks, genformalede materialer eller støbte produkter. • Kemisk industri: Rensemidler, gødning, flydende sæbe, ætsende og petrokemiske stoffer. • Træindustri: Savsmuld, papirprodukter, dør- og vinduesrammer. • Keramik- og glasindustri: Råmaterialer, ler eller færdige produkter, flasker. • Emballageindustri: Kontrol af niveau eller indhold i emballage, tørstoffer, frugter og grøntsager, mejeriprodukter. Materialerne aftastes efter deres dielektriske konstant. Jo større objekt eller materialemassefylde, des bedre eller lettere aftastning af objektet. Den nominelle tasteafstand for en kapacitiv aftaster måles med reference til en jordforbundet metalplade (ST37). Yderligere oplysninger vedrørende dielektrisk klassificering af materialer findes i vort sensorkatalog. Installation 1. Montering af aftasteren Monter aftasteren i den ønskede position, så den peger mod emnet. Sørg for, at afstanden til emnet ligger inden for aftasterens rækkevidde. 2. Aftasterforsyning For at forsyne aftasteren skal blå ledning (ben 3) forbindes til jord (0 V DC), mens brun ledning (ben 1) skal forbindes til + (10-40 VDC). 3. Programmering af aftasteren Programmer aftasteren jvf. ”Indlæringsguide”. Følgende funktioner er programmerbare: 1. Baggrundsjustering og setpunktsindstilling, 2. Objektjustering, 3. Valg af NO/NC og 4. Genindsæt fabriksindstillinger (1. og 2. er obligatoriske). Specifications / Technische Daten / Caractéristiques Techniques / Especificaciones / Caratteristiche Tecniche / Specifikationer / 产品规格 Rated operational voltage (Ue) Nenn-Betriebsspannung / Tension de fonctionnement nominale / Tensión de alimentación / Tensione di alimentazione / Nominelt spændingsområde / 额定工作电压 Ripple included Einschl. Restwelligkeit / ondulation inclue / ondulación incluida / ripple incluso / inkl. ripple / 含纹波 10 - 40 VDC (10 - 40 VCC) No load supply current (Io) Leeraufstrom / Courant d’alimentation à vide / Consume de corriente sin carga / Corrente di alimentazione / Tomgangsstrøm / 空载电流 ≤ 12 mA Ripple Restwelligkeit / Ondulation / Ondulación / Ripple / 纹波 ≤ 10% Rated operational current (Ie) Nenn-Betriebsstrom / Courant de fonctionnement nominal / Intensidad de salida / Corrente di carico / Max. strøm / 额定工作电流 ≤ 200 mA (continuous / kontinuierlich / continu / continua / continua / vedvarende / 连续 ) Output function Ausgangsfunktion / Fonction de commutation de sortie / Función de salida / Funzione di uscita / Udgangsfunktion / 输出功能 NPN/PNP (auto detect)/ (automatische Erkennung) / (détection automatique) / (detección automática) / (rilevamento automatico) / (automatisk genkendelse) / (自动检测) Output switching function Schaltart / Fonction de commutation de sortie / Función de conmutación de salida / Funzione di commutazione dell’uscita / 输出开关功能 N.O. or N.C. (teachable) NO oder NC Programmierbar) / NO ou NC (par apprentissage) / NA o NC (“Teach-in”) / N.O. o N.C. (Teach-in) / N.O. eller N.C. (programmerbar) / N.O. 或 N.C.(可教导) Protection Schutz / Protection / Protección / Protezione / Beskyttelse / 防护措 Short-circuit, reverse polarity, transients Verpolung, Kurzschluss und Transienten / Court-circuit, inversion de polarité, transitoires / Cortocircuitos, inversión de polaridad, transitorios / Corto circuito, inversione di polarità, transitori / Kortslutning, omvendt polaritet, transient / 短路、反 极性、瞬态 TRIPLESHIELDTM protection TRIPLESHIELDTM-Schutz / Protection TRIPLESHIELDTM / Protección TRIPLESHIELDTM / ProtezioneTRIPLESHIELDTM / TRIPLESHIELDTMbeskyttelse / TRIPLESHIELDTM 保护 IEC 1000-4-2/EN 61000-4-2 30 kV IEC 1000-4-3/EN 61000-4-3 > 15 V/m IEC 1000-4-4/EN 61000-4-4 3 kV IEC 1000-4-6/EN 61000-4-6 > 10 Vrm Rated operating distance (Sn) Nenn-Schaltabstand / Distance nominale de fonctionnement / Distancia nominal de detección / Distanza di attivazione nominale / Nominel tasteafstand / 额定工作距离 0 - 8 mm Operating temperature Umgebungstemperatur, Betrieb / Température de fonctionnement / Temperatura ambiente, trabajo / Temperatura di funzionamento / Omgivelsestemperatur, drift / 工作温度 -20° --> +85°C (-4° --> +185°F) Storage temperature Umgebungstemperatur, Lager / Température de stockage / Temperatura ambiente, almacenamiento / Temperatura di immagazzinaggio / Omgivelsestemperatur, lager / 存储温度 -40° --> +85°C (-40° --> +185°F) Degree of protection Schutzart / Indice de protection / Grado de protección / Grado di protezione / Tæthedsgrad / 防护等级 最低 IP68 DEUTSCH ENGLISH 1. Mounting the sensor Mount the sensor in the required position pointing at the target and make sure that the distance to the target is within the range of the sensor. Les détecteurs capacitifs disposent de la faculté exclusive de détecter pratiquement tous les matériaux dans leur forme solide ou liquide. Les détecteurs capacitifs sont capables de détecter à la fois les objets métalliques et non métalliques. Cependant, leur usage est traditionnellement réservé aux matériaux non métalliques, comme suit: • Industrie des matières plastiques : Résines, produits moulus ou moulés. • Industrie chimique : Produits de nettoyage, fertilisants, savons liquides, produits corrosifs et pétro-chimiques. • Industrie du bois : Sciures, produits de l’industrie du papier, châssis de portes et Descrizione e installazione To avoid interference from inductive voltage/ current peaks, separate the prox. switch power cables from any other power cables, e.g. motor, contactor or solenoid cables Relief of cable strain Protection of the sensing face Switch mounted on mobile carrier The cable should not be pulled A proximity switch should not serve as mechanical stop Any repetitive flexing of the cable should be avoided Um Störungen durch induktive Spannungs-/Stromspitzen zu vermeiden, Kabel der Näherungsschalter getrennt von anderen stromführenden Kabeln für z.B. Motoren und Leistungsschalter halten Schutz vor Überdehnung des Kabels Schutz der Sensorfläche des Schalters Mobiler Näherungsschalter Nicht am Kabel ziehen Näherungsschalter nicht als mechanischen Anschlag verwenden Wiederholtes Biegen des Kabels vermeiden FRANÇAIS Installation F Pour éviter les interférences issues des pics de tension et/ou des courants inductifs, veiller à toujours faire cheminer séparément les câbles d’alimentation des détecteurs de proximité et les câbles d’alimentation des moteurs, contacts ou solénoïdes Tension des câbles Protection de la face de détection du détecteur Détecteur monté sur support mobile Eviter toute contrainte en traction du câble Ne jamais utiliser un détecteur de proximité en tant que butée mécanique Eviter toute répétition de courbure dans le cheminement du câble ITALIANO ESPAÑOL Capacitive sensors have the unique ability to detect almost all materials, either in liquid or solid form. Capacitive sensors can detect metallic as well as non-metallic objects, how ever, their traditional use is for non-metallic materials such as: • Plastic Industry: resins, regrinds or moulded products. • Chemical Industry: cleansers, fertilisers, liquid soaps, corrosives and petrochemicals. • Wood Industry: saw dust, paper products, door and window frames. • Ceramic & Glass Industry: raw material, clay or finished product, bottles. • Packaging Industry: package inspection for level or contents, dry goods, fruits and vegetables, dairy products. Materials are detected due to their dielectric constant. The bigger the size of an object, the higher the density of material, the better or easier it is to detect the object. Nominal sensing distance for a capacitive sensor is referenced to a grounded metal plate (ST37). For additional information regarding dielectric ratings of materials please refer to our catalogue: “SENSORS”. Description et Installation Para evitar interferencias de tensión inductiva/ picos de intensidad se deben separar los cables del sensor del resto de los cables de alimentación tales como cables de motor, contactores o solenoides Alivio de la tensión del cable Protección de la cara de detección Conector montado sobre portadora móvil No se debe tirar del cable Un sensor de proximidad nunca debe funcionar como tope mecánico Evitar doblar el cable repetidas veces Al fine di evitare interferenze di tipo elettrico, separare i cavi di alimentazione del sensore di prossimità dai cavi di potenza Posizione del cavo Protezione della parte sensibile del sensore Sensore installato su pedana mobile Il cavo non deve essere teso I sensori di prossimità non devono essere usati per bloccaggi meccanici Evitare qualsiasi flessione ripetuta del cavo DANSK UK For at undgå støjindflydelse fra induktive strøm-/spændingsspidser skal aftasterkablet adskilles fra andre kraftkabler, f.eks. fra motorer, transformatorer og magnetventiler Aflastning af kabel Beskyttelse af følerens tasteflade Aftaster monteret på bevægeligt underlag Der bør ikke trækkes i kablet En aftaster bør ikke anvendes som mekanisk stop Gentagne bøjninger af kablet bør undgås 为了避免受感应电压/峰值电流的干 扰,请将接近开关电源线缆与所有其 他电源线缆分开,例如电机、接触器 或螺线管的线缆 线缆应力消除 感应面保护 安装在移动载体上的开关 中國 Description and Installation 不能拉动线缆 接近开关不能用作机械式止动装置 避免反复弯曲线缆 CARLO GAVAZZI www.gavazziautomation.com Wiring Diagram / Schaltbild / Schéma de Câblage / Diagrama de Conexiones / Collegamenti elettrici / Forbindelsesdiagram / 布线图 BK Iload < 200mA IALARM < 20 mA WH Teach-in BU- The PNP- or NPN-load will automatically be detected. Die PNP- oder NPN-Last wird automatisch detektiert. La charge PNP- ou NPN est automatiquement détectée. La carga PNP o NPN se detectará automáticamente. Rilevamento automatico di carico NPN o PNP PNP- eller NPN-belastningen aftastes automatisk. 将自动检测 PNP 或 NPN 负载。 By means of the Teach-in wire, the functions described in the Teach-in Guide can be set up. Die Einstellung der unter Teach-In-Anweisungen beschriebenen Funktionen erfolgt mit dem Teach-In-Leiter. Le fil Teach-In permet de configurer les fonctions décrites dans le Guide d’Apprentissage. Las funciones descritas en la guía Teach-in (autoajuste) pueden configurarse mediante el cable Teach-in. Le funzioni descritte nella Guida Teach-in possono essere impostate per mezzo del relativo cavo. Ved hjælp af indlæringslederen er det muligt at indstille de funktioner, der er beskrevet under ”Indlæringsguide”. 通过教导线路,可设置在教导指南中所述的功能。 It is possible to Teach-in more sensors at the same time by connecting the WH-wires in parallel to the common ”-” supply. Gleichzeitige Teach-In-Einstellung von mehreren Sensoren ist möglich, wenn der WH-Leiter und Gemeinsamer Minus ”-” parallelgeschaltet werden. Pour faire l’apprentissage de plusieurs détecteurs à la fois, raccorder les fils WH en parallèle au commun “-” alimentation. Es posible realizar el autoajuste de varios sensores a la vez conectando los cables WH paralelamente a la alimentación “-” común. E’ possibile applicare la funzione Teach-in a più sensori allo stesso tempo connettendo i cavi WH in parallelo all’alimentazione “-” comune. Det er muligt at foretage indlæring af flere aftastere samtidigt ved at tilslutte WH-lederne parallelt med den fælles (-) forsyning. 通过平行于普通“BU -”电源连接 WH 线,可同时教导几个传感器。 (#): Plug connections/ Steckanschlüsse / Raccordements par connecteurs / Conexiones de conectores / Connessione mediante connettore / Stiktilslutninger / 插头连接 Important: If the alarm output (WH-wire) is unused, it has to be connected to +supply Wichtig: Wenn der Alarmausgang (WH-Leitung) nicht verwendet wird, muss er mit der positiven Versorgungsspannung verbunden werden. Important : Si l’on n’utilise pas la sortie alarme (fil WH), connecter impérativement le fil sur le plus (+) alimentation. Importante: Si no se utiliza la salida de alarma (cable WH), debe conectarse a la alimentación + Importante: Se l’uscita di allarme (cavo WH) è inutilizzata deve essere connessa su +supply Vigtigt: Hvis alarmudgangen (WH-kablet) ikke bruges, skal den tilsluttes plus (+). 重要:如果未使用警报输出(WH 线),则必须将其 连接至 + 电源 1 Colour code Codice colore / Farvekode / 色码 4 2 / Farbcode / Code couleur / Código de color / 1 2 3 4 Brown White Blue Black / Braun / Marron / Marrón / Marrone / Brun / 褐色 / Weiss / Blanc / Blanco / Bianco / Hvid / 白色 / Blau / Bleu / Azul / Blu / Blå / 蓝色 / Schwarz / Noir / Negro / Nero / Sort / 黑色 Certified in accordance with ISO 9001 Gerätehersteller mit dem ISO 9001/EN 29 001 Zertifikat Une société qualifiée selon ISO 9001 Empresa que cumple con ISO 9001 Certificato in conformità con l’IS0 9001 Kvalificeret i overensstemmelse med ISO 9001 按照 ISO 9001认证标准 3 MAN M12 MUL rev. 01 - 06.2017 15-029-675 BN+-
 1
1
-
 2
2


CARLO GAVAZZI CA12CLC08BPRT Manual de usuario
- Tipo
- Manual de usuario
- Este manual también es adecuado para
en otros idiomas
Artículos relacionados
-
CARLO GAVAZZI CA30CLC30BPM1 Manual de usuario
-
CARLO GAVAZZI CA18CLL12BPM1 Manual de usuario
-
-
CARLO GAVAZZI CA30CAF16PCTA Manual de usuario
-
-
CARLO GAVAZZI PC50CNT20R Manual de usuario
-
-
-
-
CARLO GAVAZZI PD112CNB25BPM1 Manual de usuario