Kompernass Coffeemaker KH 1098 Manual de usuario
- Categoría
- Cafeteras
- Tipo
- Manual de usuario
Este manual también es adecuado para

CAFETERA ELÉCTRICA
Instrucciones de uso
MACCHINA DA CAFFÉ
Istruzioni per l'uso
COFFEE MACHINE
Operating instructions
5
CAFETERA ELÉCTRICA
MACCHINA DA CAFFÉ
KAFFEEMASCHINE
Bedienungsanleitung
KH 1098
KOMPERNASS GMBH · BURGSTRASSE 21 · D-44867 BOCHUM
www
.kompernass.com
ID-Nr.: KH1098-12/07-V4
CV_KH1098_E2690_LB5.qxd 06.03.2008 11:10 Uhr Seite 1

KH 1098
q
e
w
t
y
u
io
a
r
s
d
f
g
h
1(
l
k
j
CV_KH1098_E2690_LB5.qxd 06.03.2008 11:10 Uhr Seite 4

- 1 -
ÍNDICE PÁGINA
Indicaciones de seguridad 2
Datos técnicos 3
Volumen de suministro 3
Uso conforme al previsto 3
Descripción de aparatos 3
Preparativos 3
Antes del primer uso 3
Ajuste de la hora 4
Preparación del café 4
Extracción de café 4
Función de temporizador 5
Limpieza 5
Eliminación de la cal 6
Conservación 6
Eliminación de fallos 6
Eliminación 7
Garantía y asistencia técnica 7
Importador 7
¡Guardar estas instrucciones para preguntas posteriores – e, igualmente entregar éstas, en caso de dar el
aparato a terceras personas!
IB_KH1098_E2690_LB5 06.03.2008 10:31 Uhr Seite 1

- 2 -
CAFETERA ELÉCTRICA
KH 1098
Indicaciones de seguridad
¡Peligro de descarga eléctrica!
• Conecte el aparato únicamente a una base de
enchufe instalada y conectada a tierra de acuerdo
con la normativa.
• Extraiga el conector de la red antes de mover o
llenar la cafetera. así como en caso de avería,
al igual que antes de limpiarla o cuando prevea
que no va usarla.
No sumerja el aparato en líquidos. Si a pesar
de ello penetrase líquido al interior del aparato,
tire inmediatamente del cable de red y extraiga
el conector de la red. Encomiende su repara-
ción a personal especialista cualificado.
• No toque nunca el aparato, cable ni clavija de
red con manos húmedas.
• Extraiga siempre el cable de red del enchufe
tirando de la clavija y nunca directamente del
propio cable.
• No doble ni aplaste el cable de red.
• En caso de una clavija de red dañada o cable
de red dañado, encomiende su sustitución a
personal técnico autorizado o al servicio de
posventa con el fin de evitar riesgos.
¡Riesgo de incendio!
• No deje nunca el aparato desatendido durante
su funcionamiento.
• No ponga nunca en marcha el aparato sin
agua.
• Nunca coloque el aparato en la proximidad
alguna fuente de calor.
• No utilice cables de prolongación. En caso de
peligro debe quedar accesible rápidamente la
clavija de red.
¡Peligro de lesiones!
• Nunca utilice la jarra de cristal del aparato dentro
del microondas.
• Coloque el cable de red de modo que no pueda
tropezar o pisarlo.
• No permita utilizar el aparato a personas (incluidos
los niños) cuyas facultades físicas, sensoriales o
mentales, así como su falta de conocimientos o
de experiencia, les impida hacer un uso seguro
del mismo si no están bajo vigilancia o han sido
instruidos correctamente.
• Vigile a los niños para asegurarse de que no
juegan con el aparato.
No toque la placa de mantenimiento de calor.
¡Superficie caliente! ¡Peligro de incendios!
Advertencia y peligro de
quemaduras
• No abra nunca la tapa durante el proceso de
hervido.
• No toque el filtro caliente. No extraiga el filtro
hasta que se haya consumido la totalidad del
líquido y éste se haya enfriado.
• No mantenga sus manos sobre el vapor de
agua que se desprende.
• No mueva el aparato durante el proceso de
hervido.
Para evitar dañar su cafetera, observe
los siguientes puntos:
• Llene el tanque de agua exclusivamente con
agua corriente limpia.
• Nunca exponga la jarra de cristal a oscilaciones
de temperatura. El cristal podría deteriorarse.
IB_KH1098_E2690_LB5 06.03.2008 10:31 Uhr Seite 2

- 3 -
• No se responderá de roturas de vidrio y defectos
derivados de éstas!
Datos técnicos
Tensión de red: 220 - 240 V
~
50 Hz
Potencia nominal: 1050 W
Volumen de suministro
• Cafetera
• Jarra de cristal
• Cuchara dosificadora
• Instrucciones de uso
Antes de realizar la puesta en servicio, compruebe
que el volumen de suministro esté completo y que
no haya sufrido daños.
IInnddiiccaacciióónn::
En el suministro, la cuchara dosificadora pue-
de estar alojada en el tanque de agua o en
la jarra de cristal.
Uso conforme al previsto
La cafetera sirve únicamente para la preparación
de café. Esta cafetera está destinada únicamente
para el uso doméstico privado. No se permite un
uso industrial.
El aparato está sólo indicado para el uso en el interior.
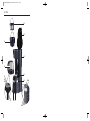
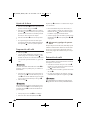
Descripción de aparatos
q
Filtro
w
Tapa
e
Tanque de agua
r
Placa de mantenimiento de calor
t
Pantalla
y
Piloto rojo
u
Piloto verde AUTO SET
i
Tecla MIN
o
Tecla HOUR
a
Tecla PROG
s
Tecla ON/AUTO/OFF
d
Tecla para café
f
Rejilla de recogida de gotas
g
Conducto para el café
h
Cierre externo
j
Cierre del conducto para el café
k
Cierre externo
l
Jarra de cristal
1(
Cesta del filtro
Preparativos
• Retire todos los materiales de embalaje del aparato
y accesorios.
• Limpie el aparato y todos los accesorios (véase
capítulo Limpieza).
• Coloque la máquina de café sobre una superficie
recta y no deslizante.
• Abra la tapa
w
.
• Coloque la cesta del filtro
1(
de modo que la
manecilla quede encajada en los huecos de la
cafetera.
• Coloque el filtro
q
en la cesta del filtro
1(
.
• Coloque la rejilla de recogida de gotas
f
en
la bandeja de recogida de la cafetera.
• Conecte la clavija de red en una base de enchufe.
Antes del primer uso
IInnddiiccaacciióónn::
Al introducir agua no supere nunca la marca
MAX del tanque de agua
e
. ¡Puede que el
líquido rebose!
• Antes del primer uso haga hervir 10 tazas de
agua sin café molido, para eliminar posibles
restos de producción.
IB_KH1098_E2690_LB5 06.03.2008 10:31 Uhr Seite 3

- 4 -
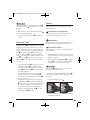
Ajuste de la hora
• Pulse la tecla PROG
a
una vez, de manera que
aparezca CLOCK en la pantalla
t
.
• Pulse la tecla HOUR
o
par las horas o bien la
tecla MIN
i
para los minutos, hasta que quede
ajustada la hora deseada. Si mantiene pulsada
la tecla, las cifras avanzan más rápido.
• Pulse la tecla PROG
a
. La hora está ajustada.
o
• Si no pulsa ninguna otra tecla durante aprox.
10 segundos, la indicación CLOCK desaparecerá
de la pantalla
t
y la hora quedará ajustada.
Preparación del café
• Abra la tapa
w
.
• Con la cuchara dosificadora, introduzca café
molido (de grueso a medio) en el filtro
q
. Una
medida de café de una cucharada dosificadora
rasa equivale aproximadamente a 6 gramos de
café.
IInnddiiccaacciióónn::
¡Si utiliza café molido demasiado fino el filtro
q
se
atascará, el agua no podrá pasar y la cafetera se
desbordará!
• Introduzca la cantidad de agua deseada en el
tanque de agua
e
. Para ello utilice la jarra de
cristal
l
con la escala. Al introducir agua no supere
nunca la marca MAX del tanque de agua
e
.
• Cierre la tapa
w
.
IInnddiiccaacciióónn::
Después del hervido siempre queda algo de café
en la jarra de cristal
l
, si ha introducido agua en
el tanque de agua
e
. El café molido absorbe un
poco de agua.
• Coloque la jarra de cristal
l
en la cafetera.
• Pulse una vez la tecla ON/AUTO/OFF
s
.
El piloto rojo
y
se ilumina. La cafetera inicia el pro-
ceso de hervido.
• Una vez finalizado el proceso de hervido, el
café se mantiene caliente con la placa de man-
tenimiento de calor
r
durante dos horas. Después
la cafetera se apaga automáticamente.
• Si desea apagar antes la cafetera, pulse la tecla
ON/AUTO/OFF
s
hasta que los pilotos
y
/
u
se apaguen.
Advertencia y peligro de quema-
duras
Después del proceso de hervido, debe dejar que la
cafetera se enfríe al menos durante 10 minutos antes
de iniciar un nuevo proceso de hervido. ¡De otro
modo existe peligro de escaldamiento por el vapor
expulsado!
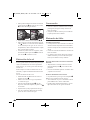
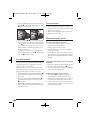
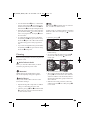
Extracción de café
Con esta cafetera usted puede introducir el café en
el recipiente con una mano:
• Si el café se encuentra en la jarra de cristal
l
,
mantenga su taza presionada contra la tecla de
café
d
. El café caerá en la taza.
• En cuanto la taza esté llena, apártela de la tecla
de café
d
.
• Las gotas que pudieran caer después, serán se
acumularán en la rejilla de recogida de gotas
f
.
IInnddiiccaacciióónn::
Vacíe la bandeja bajo la rejilla de recogida de gotas
f
regularmente. De otro modo podría desbordarse.
IB_KH1098_E2690_LB5 06.03.2008 10:31 Uhr Seite 4

- 5 -
IInnddiiccaacciióónn::
Si retira el café con la ayuda de la tecla de café
d
,
quedará siempre un resto de café en l a jarra de
cristal
l
.
También puede verter con normalidad el café desde
la jarra de cristal
l
:
• Levante la jarra de cristal
l
y échela hacia
delante.
Función de temporizador
Con la tecla PROG
a
puede ajustar la máquina
de café para que inicie el proceso de hervido en
un momento determinado (función temporizador).
Introduzca siempre primero el café molido en el filtro
q
en la cesta del filtro
1(
y agua en el tanque
e
.
Coloque la jarra de cristal
l
en la cafetera. Ase-
gúrese de que la jarra de cristal
l
está vacía y
que el nivel de llenado del tanque de agua
e
no
supera la marca Max.
• Pulse la tecla PROG
a
dos veces, de modo
que TIMER aparezca en la pantalla
t
. Ajuste
la hora de inicio deseada mediante la tecla
HOUR
o
y la tecla MIN
i
(véase capítulo
"ajuste y hora“).
• Cuando esté ajustada la hora de inicio deseada,
pulse la tecla PROG
a
de nuevo. A partir de
este momento la hora de inicio está programada.
La pantalla
t
mostrará la hora normal.
• Para activar el temporizador, pulse dos veces la
tecla ON/AUTO/OFF
s
. Se iluminará el piloto
verde AUTO SET
u
. La cafetera iniciará el pro-
ceso de hervido a la hora programada.
• Si desea volver a desactivar el temporizador,
pulse la tecla ON/AUTO/OFF
s
. Se apagará
el piloto verde AUTO SET
u
.
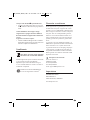
Limpieza
Antes de limpiar el aparato, extraiga siempre la
clavija de red de la base de enchufe.
¡Peligro por descarga eléctrica!
Antes de limpiar la cafetera debe extraer siempre
la clavija de red de la base de enchufe.
¡Atención!
No sumerja nunca la cafetera bajo el agua. Esto
puede ocasionar daños irreparables en el aparato.
¡Peligro de quemaduras!
Espere siempre, antes de limpiar la cafetera a que
ésta se enfríe.
• Limpie la carcasa con un paño húmedo. En caso
de suciedad persistente añada al paño un deter-
gente suave.
• Limpie la jarra de cristal
l
, el filtro
q
y la cesta
del filtro
1(
con agua jabonosa suave y enjuá-
guelos con abundante agua limpia.
IInnddiiccaacciióónn::
Limpie el filtro
q
inmediatamente después del uso.
Más tarde resulta muy difícil limpiarlo.
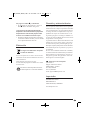
Si en el colador de la jarra de cristal
l
se deposita
café en polvo o similares, proceda de la siguiente
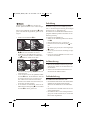
manera:
• Gire la jarra de cristal
l
.
• Presione los dos cierres exteriores
h
/
k
hacia
dentro y manténgalos pulsados con firmeza.
IB_KH1098_E2690_LB5 06.03.2008 10:31 Uhr Seite 5

- 6 -
• Ahora podrá deslizar hacia dentro el cierre del
conducto del café
j
. El conducto para el café
g
se abrirá. Manténgalo abierto.
• Puede volver a soltar los cierres exteriores
h
/
k
.
• Deje correr agua a través del conducto para el
café
g
abierto. Los restos del colador deberían
ser arrastrados por el agua. Si aun así no se
desprendiesen, utilice adicionalmente un cepillo
fino y páselo sobre el colador.
• Cuando no queden restos en el colador, suelte
el cierre del conducto para el café
j
. El conducto
para el café
g
se volverá a cerrar.
Eliminación de la cal
En caso grado extremo de dureza será preciso pro-
ceder a una eliminación de cal tras aproximada-
mente 30 usos, en caso de grado de dureza bajo
tras 60 usos.
Utilice siempre un medio de eliminación de cal
adecuado y cumpla el contenido de las instrucciones
de uso.
Proceso de eliminación de la cal:
• Añada el medio de eliminación de cal en el
depósito de agua
e.
• Añada como máximo el agua equivalente
a 12 tazas de agua.
• Pulse la tecla ON/AUTO/OFF
s
una vez.
El proceso de hervido empieza, el piloto rojo
y
se enciende.
• Esperar hasta que haya pasado todo el agua.
• Una vez concluida la eliminación de cal deje
pasar dos veces 12 tazas de agua.
Conservación
• Cuando no utilice la cafetera durante un tiempo
prolongado, extraiga la clavija de red de la
base de enchufe.
• Coloque el cable en el hueco para el cable de
la parte posterior de la cafetera.
Eliminación de fallos
La cafetera no funciona:
• La clavija de red no está conectada a una base de
enchufe. Conecte el aparato a la red de corriente.
Inserte la clavija de red en una base de enchufe
de red.
• La base de enchufe está defectuosa. Pruebe otra
base de enchufe.
• La cafetera está todavía demasiado caliente
debido al anterior proceso de hervido. Espere
hasta que la cafetera se haya enfriado.
El proceso de hervido no se inicia en el momento
deseado:
• Temporizador no activado. Pulse dos veces la
tecla ON/AUTO/OFF
s
, para activar el tem-
porizador.
• Hora incorrectamente ajustada. Controle la hora
y ajústela si es necesario.
El café es demasiado suave o fuerte:
• Hay demasiada o poca agua en el depósito
e
.
Rellene con la cantidad correcta de agua.
• Se ha rellenado con poco o demasiado café en
polvo. Rellene más o menos café molido.
• El café molido resulta demasiado fino o grueso.
Elija café molido de otro grado de molido.
IB_KH1098_E2690_LB5 06.03.2008 10:31 Uhr Seite 6

- 7 -
Hay agua en el filtro
q
y se desborda:
• El café molido es demasiado fino y atasca el
filtro
q
. Utilice café molido más grueso.
La preparación del café tarda demasiado.
El aparato se desconecta durante la preparación.
El aparato hace ruido mientras prepara el café.
Se forma una cantidad excesiva de vapor.
• El sistema de hervido del aparato ha acumulado
cal. Proceda a eliminar el cal tal y como se describe
en el capítulo "eliminación de la cal”.
Eliminación
En ningún caso deberá tirar el aparato
a la basura doméstica.
Evacue el aparato en un centro de evacuación
autorizado a través de las instalaciones de evacua-
ción comunitarias.
Preste atención a las normas en vigor.
En caso de dudas póngase en contacto con su centro
de evacuación.
El material de embalaje debe desecharse
de forma respetuosa con el medio ambiente.
Garantía y asistencia técnica
Con este aparato recibe usted 3 años de garantía
desde la fecha de compra. El aparato ha sido fabri-
cado cuidadosamente y ha sido probado antes de
su entrega. Guarde el comprobante de caja como
justificante de compra. Si necesitara hacer uso de
la garantía, póngase en contacto por teléfono con
su punto de servicio habitual. Éste es el único modo
de garantizar un envío gratuito.
La garantía cubre los defectos de fabricación o del
material, pero no las piezas sujetas a desgaste y
los daños sufridos por las piezas frágiles (p. ej. el
interruptor o las pilas). Este producto ha sido diseñado
exclusivamente para el uso particular y no para el
uso industrial.
En caso de un tratamiento inadecuado e indebido,
uso de la fuerza bruta e intervenciones por asistencia
técnica distinta a la autorizada por nosotros, se
extinguirá la garantía. Esta garantía no reduce en
forma alguna sus derechos legales.
Kompernass Service España
C/Invención 7
Polígono Industrial Los Olivos
28906 Getafe – Madrid
Tel.: 902/430758
Fax: 91/6652551
e-mail: support.es@kompernass.com
Importador
KOMPERNASS GMBH
BURGSTRASSE 21
44867 BOCHUM, GERMANY
www.kompernass.com
IB_KH1098_E2690_LB5 06.03.2008 10:31 Uhr Seite 7

- 8 -
IB_KH1098_E2690_LB5 06.03.2008 10:31 Uhr Seite 8

- 9 -
INDICE PAGINA
Avvertenze di sicurezza 10
Dati tecnici 11
Fornitura 11
Uso conforme 11
Descrizione dell'apparecchio 11
Preparativi 11
Prima del primo impiego 11
Impostazione dell'ora 12
Preparazione del caffè 12
Prelievo del caffè 12
Funzione Timer 13
Pulizia 13
Decalcificazione 14
Conservazione 14
Eliminazione dei guasti 14
Smaltimento 15
Garanzia e assistenza 15
Importatore 15
Conservare le presenti istruzioni per consultarle in futuro; in caso di cessione dell'apparecchio a terzi,
consegnare anche le istruzioni!
IB_KH1098_E2690_LB5 06.03.2008 10:31 Uhr Seite 9

- 10 -
MACCHINA DA CAFFÈ
KH 1098
Avvertenze di sicurezza
Pericolo di scossa elettrica!
• Collegare l'apparecchio esclusivamente a una
presa elettrica installata a norma e provvista di
messa a terra.
• Estrarre sempre la spina dalla presa prima di
spostare o riempire l'apparecchio, in caso di
guasti, prima della pulizia o in caso di mancato
utilizzo.
Non immergere mai l'apparecchio in liquidi.
Qualora fosse penetrato del liquido nell'
alloggiamento dell'apparecchio, estrarre im-
mediatamente la spina dalla presa. Fare riparare
l'apparecchio da personale specializzato e
qualificato.
• Non afferrare mai l'apparecchio, il cavo di rete
e la spina di rete con le mani umide.
• Per disinserire la spina dalla presa tirare sempre
dalla spina, mai dal cavo.
• Non piegare o schiacciare il cavo di alimenta-
zione.
• Fare sostituire immediatamente la spina o il cavo
di rete danneggiato da personale specializzato
autorizzato o dal centro di assistenza ai clienti,
per evitare possibili danni.
Pericolo d'incendio!
• Non lasciare mai l'apparecchio incustodito
durante l'uso.
• Non operare mai l'apparecchio senza acqua
corrente.
• Non posizionare mai l'apparecchio vicino a fonti
di calore.
• Non utilizzare alcun cavo di prolunga. In caso
di pericolo è necessario raggiungere rapida-
mente la presa di corrente.
Pericolo di lesioni!
• Non utilizzare mai il recipiente in vetro dell'ap-
parecchio nel forno a micro-onde.
• Sistemare il cavo di rete in modo che non venga
calpestato o costituisca intralcio.
• Questo apparecchio non è indicato per l'uso da
parte di persone (inclusi bambini) con limitate
capacità fisiche, sensoriali o mentali o prive dell'
esperienza e/o della conoscenza necessaria,
a meno che tali persone non vengano sorvegliate
da un responsabile per la sicurezza o abbiano
ricevuto indicazioni sull'impiego dell'apparecchio.
• Sorvegliare i bambini per assicurarsi che non
giochino con l'apparecchio.
Non toccare la piastra di riscaldamento.
Superficie bollente! Pericolo di ustioni!
Avvertenza relativa al rischio di
ustioni!
• Non aprire mai il coperchio durante il procedi-
mento di bollitura.
• Non toccare il filtro bollente. Prelevare il filtro
solo al termine del percolamento del liquido e
a seguito del raffreddamento del filtro.
• Non esporre le mani al vapore in fuoriuscita.
• Non spostare mai l'apparecchio durante il pro-
cedimento di bollitura.
Come evitare danni all'apparecchio:
• Riempire il serbatoio dell'acqua dell'apparecchio
esclusivamente con acqua potabile pulita.
• Non esporre mai il recipiente in vetro a forti
oscillazioni di temperatura.Il vetro potrebbe
danneggiarsi.
IB_KH1098_E2690_LB5 06.03.2008 10:31 Uhr Seite 10

- 11 -
• Si declina qualsiasi responsabilità per danni
dovuti alla rottura del vetro!
Dati tecnici
Tensione di rete: 220 - 240 V
~
50 Hz
Potenza nominale: 1050 W
Fornitura
• Macchina da caffè
• Recipiente in vetro
• Misurino
• Istruzioni per l'uso
Prima della messa in funzione, controllare l'integrità
della fornitura e l'eventuale presenza di danni.
AAvvvveerrtteennzzaa::
all'atto della fornitura il misurino si trova nel
serbatoio dell'acqua o nel recipiente in vetro.
Uso conforme
La macchina da caffè serve esclusivamente alla
preparazione del caffè. Questa macchina da caffè
è destinata esclusivamente all'uso in ambienti domestici
privati. Non utilizzarla a fini commerciali.
L'apparecchio è destinato solo all'uso in ambienti
interni.
Descrizione dell'apparecchio
q
Filtro
w
Coperchio
e
Serbatoio dell'acqua
r
Piastra di riscaldamento
t
Display
y
Spia rossa
u
Spia verde AUTO SET
i
Tasto MIN
o
Tasto HOUR
a
Tasto PROG
s
Tasto ON/AUTO/OFF
d
Tasto caffè
f
Griglia di raccolta delle gocce
g
Passaggio del caffè
h
Blocco esterno
j
Blocco passaggio del caffè
k
Blocco esterno
l
Recipiente in vetro
1(
Cestello del filtro
Preparativi
• Rimuovere tutti i materiali di imballaggio dall'
apparecchio e dagli accessori.
• Pulire l'apparecchio e tutti gli accessori (v. capi-
tolo Pulizia).
• Collocare la macchina da caffè su una superficie
piana e antisdrucciolo.
• Aprire il coperchio
w
.
• Inserire il cestello del filtro
1(
in modo che la
maniglia rientri nell'intaglio sulla macchina da
caffè.
• Inserire il filtro
q
nel cestello del filtro
1(
.
• Collocare la griglia di raccolta gocce
f
nella
vaschetta di raccolta della macchina da caffè.
• Inserire la spina in una presa di corrente.
Prima del primo impiego
AAvvvveerrtteennzzaa::
non versare una quantità di acqua maggiore
del livello MAX indicato sul serbatoio dell'
acqua
e
. Il liquido potrebbe fuoriuscire
dall'apparecchio.
• Prima del primo impiego, fare bollire 10 tazze
di acqua senza caffè, per eliminare eventuali
residui di produzione.
IB_KH1098_E2690_LB5 06.03.2008 10:31 Uhr Seite 11

- 12 -
Impostazione dell'ora
• Premere il tasto PROG
a
una volta, in modo da
ottenere nel display
t
il messaggio CLOCK .
• Premere il tasto HOUR
o
per le ore e il tasto
MIN
i
per i minuti fino a impostare l'ora desi-
derata. Tenendo premuto il tasto, i numeri scor-
reranno più rapidamente.
• Premere il tasto PROG
a
. L'ora è stata così im-
postata.
o
• Se non si premono altri tasti per ca. 10 secondi,
nel display
t
scompare il messaggio CLOCK,
segnalando che l'orario è stato così impostato.
Preparazione del caffè
• Aprire il coperchio
w
.
• Con il misurino versare il caffè in polvere (maci-
nato fine o meno fine) nel filtro
q
. Un misurino
raso corrisponde a ca. 6 g di caffè macinato.
AAvvvveerrtteennzzaa::
se si utilizza caffè macinato troppo fine, il filtro
q
si otturerà, l'acqua non potrà più passare attraverso
di esso e fuoriuscirà dalla macchina da caffè!
• Versare la quantità d'acqua desiderata nel ser-
batoio dell'acqua
e
. Utilizzare al riguardo il
recipiente di vetro
l
provvisto di scala graduata.
Non versare una quantità di acqua maggiore
del livello Max indicato sul serbatoio dell'acqua
e
.
• Chiudere il coperchio
w
.
AAvvvveerrtteennzzaa::
dopo la bollitura, nel recipiente in vetro
l
ci sarà
una quantità di caffè sempre un po' inferiore a quel-
la di acqua versata nel serbatoio dell'acqua
e
.
Il caffè in polvere assorbe una certa quantità di acqua.
• Collocare il recipiente in vetro
l
nella macchi-
na da caffè.
• Premere una volta il tasto ON/AUTO/OFF
s
.
La spia rossa
y
si accende. La macchina da caffè
comincia il procedimento di bollitura.
• Una volta terminato il procedimento di bollitura,
il caffè verrà tenuto caldo per due ore sulla pia-
stra riscaldante
r
. Trascorso questo periodo di
tempo, la macchina si spegnerà automaticamente.
• Se si desidera spegnere la macchina da caffè
prima, premere il tasto ON/AUTO/OFF
s
tante
volte fino a ottenere lo spegnimento delle spie
y
/
u
.
Avvertenza relativa al rischio
di ustioni!
La macchina da caffè deve raffreddarsi per almeno
10 minuti, prima di cominciare un nuovo procedi-
mento di bollitura. In caso contrario, sussiste il peri-
colo di ustione dovuto al vapore in fuoriuscita!
Prelievo del caffè
Con questa macchina da caffè è possibile versare
il caffè in un bicchiere con una mano sola:
• se il caffè si trova nel recipiente in vetro
l
, premere
e tenere premuto il bicchiere da caffè contro il tasto
per caffè
d
. Il caffè verrà versato nel bicchiere.
• Non appena il bicchiere si è riempito, allontanarlo
dal tasto per caffè
d
.
• Le gocce che dovessero eventualmente fuoriuscire
in seguito verranno raccolte dalla griglia di
raccolta gocce
f
.
AAvvvveerrtteennzzaa::
svuotare regolarmente la vaschetta di raccolta al
di sotto della griglia di raccolta gocce
f
. In caso
contrario, essa potrebbe traboccare.
IB_KH1098_E2690_LB5 06.03.2008 10:31 Uhr Seite 12

- 13 -
AAvvvveerrtteennzzaa::
prelevando il caffè con l'ausilio del tasto per caffè
d
,
nel recipiente in vetro
l
resterà sempre un residuo
di caffè.
Il caffè può essere versato dal recipiente in vetro
l
anche nel modo tradizionale:
• sollevare il recipiente in vetro
l
ed estrarlo in
avanti.
Funzione Timer
Con il tasto PROG
a
è possibile regolare la macchina
da caffè in modo da impostare l'inizio di un proce-
dimento di bollitura a un orario prefissato (funzione
Timer). Versare sempre prima il caffè in polvere nel
filtro
q
nel cestino del filtro
1(
e poi l'acqua nel
serbatoio dell'acqua
e
. Collocare il recipiente in
vetro
l
nella macchina da caffè. Assicurarsi che il
recipiente in vetro
l
sia vuoto e che il serbatoio
dell'acqua
e
non sia riempito oltre il livello indicato
come Max.
• Premere il tasto PROG
a
due volte, in modo da
ottenere nel display
t
il messaggio TIMER.
Impostare l'ora di avvio desiderata con il tasto
HOUR
o
e il tasto MIN
i
(vedi capitolo "Im-
postazione dell'ora“).
• Se è stata impostata l'ora di avvio desiderata,
premere ancora una volta il tasto PROG
a
.
L'ora di avvio è adesso impostata. Il display
t
mostra l'ora normale.
• Per attivare il timer, premere due volte il tasto
ON/AUTO/OFF
s
. La spia verde AUTO SET
u
si accende. La macchina da caffè comincia il
procedimento di bollitura all'ora programmata.
• Se si desidera disattivare nuovamente il timer,
premere il tasto ON/AUTO/OFF
s
. La spia
verde AUTO SET
u
si spegne.
Pulizia
Prima di ogni operazione di pulizia staccare la
spina dalla presa.
Pericolo di scossa elettrica!
Prima di pulire la macchina da caffè, staccare
sempre la spina dalla presa di corrente.
Attenzione!
Non immergere mai la macchina da caffè in acqua.
Ciò provoca danni irreparabili all'apparecchio.
Pericolo di ustioni!
Prima di pulire la macchina da caffè attendere che
si sia raffreddata.
• Pulire l'alloggiamento con un panno umido. In caso
di sporco resistente, versare un po' di detergente
delicato sul panno.
• Pulire il recipiente in vetro
l
, il filtro
q
e il cestello
del filtro
1(
in una soluzione detergente delicata,
risciacquando con molta acqua corrente.
AAvvvveerrtteennzzaa::
Pulire il filtro
q
subito dopo l'uso. In un secondo
momento diventa difficile pulirlo.
Se nel setaccio del caffè del recipiente di vetro
l
si è depositata polvere di caffè o simili, procedere
come segue:
• Ruotare il recipiente in vetro
l
.
• Premere i due blocchi esterni
h
/
k
verso l'interno
e mantenerli saldamente.
IB_KH1098_E2690_LB5 06.03.2008 10:31 Uhr Seite 13

- 14 -
• Ora è possibile spingere il blocco del passaggio
del caffè
j
verso l'interno. Il passaggio del caffè
g
si apre. Tenerlo aperto.
• I blocchi esterni
h
/
k
possono essere rilasciati.
• Fare scorrere l'acqua attraverso il passaggio del
caffè
g
aperto. I resti nel setaccio devono essere
rimossi con l'acqua. Se non si riesce a staccarli,
utilizzare inoltre una spazzola morbida con cui
strofinare il setaccio.
• Se il setaccio è esente da residui, rilasciare il
blocco del passaggio del caffè
j
. Il passaggio
del caffè
g
è di nuovo chiuso.
Decalcificazione
Con acqua molto dura, la decalcificazione può essere
necessaria già dopo circa 30 utilizzi, con acqua
meno dura dopo circa 60 utilizzi.
Utilizzare esclusivamente un decalcificante adatto
per macchine da caffè e seguire le istruzioni per l'uso.
Per la decalcificazione procedere come segue:
• Versare il decalcificante nel serbatoio dell'acqua
e
.
• Versare acqua fino a raggiungere il livello massimo
di 12 tazze.
• Premere una volta il tasto ON/AUTO/OFF
s
.
Il procedimento di bollitura si avvia, la spia rossa
y
si accende.
• Attendere fino al completo passaggio dell'acqua.
• Dopo la decalcificazione fate passare due volte
12 tazze di acqua.
Conservazione
• Se non si utilizza la macchina da caffè per un
periodo di tempo prolungato, staccare la spina
dalla presa di corrente.
• Riporre il cavo nell'apposito vano situato sul retro
della macchina da caffè.
Eliminazione dei guasti
La macchina da caffè non funziona:
• La spina non è inserita nella presa. Collegare
l'apparecchio con la rete elettrica.
Inserire la spina in una presa di rete.
• La presa di rete è guasta. Provare a utilizzare
un'altra presa di rete.
• La macchina da caffè è ancora troppo calda a
causa del precedente procedimento di bollitura.
Attendere fino al raffreddamento della macchina
da caffè.
Il procedimento di bollitura non si avvia all'ora
desiderata:
• Il timer non è attivato. Per attivare il timer, premere
due volte il tasto ON/AUTO/OFF
s
.
• L'ora non è impostata correttamente. Controllare
l'ora e all'occorrenza impostarla.
Il caffè è troppo forte/troppo leggero:
• Nel serbatoio
e
c'è troppo poca/troppa ac-
qua. Immettere la corretta quantità di acqua.
• È stato immesso troppo/troppo poco caffè maci-
nato. Ridurre/aumentare la quantità di caffè.
• Il caffè è macinato troppo finemente/troppo
grossolanamente. Selezionare un grado di maci-
natura diverso per il caffè.
IB_KH1098_E2690_LB5 06.03.2008 10:31 Uhr Seite 14

- 15 -
L'acqua resta nel filtro
q
e quindi trabocca:
• La polvere di caffè è troppo fine e ingorga il fil-
tro
q
. Utilizzare caffè macinato più grossolana-
mente.
La fase di bollitura dura troppo a lungo.
L'apparecchio si spegne durante la bollitura.
Durante la bollitura l'apparecchio emette forti
rumori.
Si genera un eccessivo vapore.
• Il sistema di bollitura dell'apparecchio è calcificato.
Decalcificare l'apparecchio seguendo le istruzioni
indicate al capitolo “Decalcificazione”.
Smaltimento
Non gettare per alcun motivo l'apparec-
chio insieme ai normali rifiuti domestici.
Smaltire l'apparecchio presso un'azienda autorizzata
o presso l'ente comunale di smaltimento.
Rispettare le prescrizioni attualmente in vigore.
In caso di dubbio mettersi in contatto con l'ente di
smaltimento competente.
Smaltire tutti i materiali dell'imballaggio
in modo ecologicamente conforme.
Garanzia e assistenza
Questo apparecchio è garantito per tre anni a par-
tire dalla data di acquisto. L'apparecchio è stato
prodotto con cura e debitamente collaudato prima
della consegna. Conservare lo scontrino come prova
d'acquisto. Nei casi contemplati dalla garanzia,
mettersi in comunicazione telefonicamente con il
centro di assistenza più vicino. Solo in tal modo è
possibile garantire una spedizione gratuita della
merce.
La garanzia copre solo i difetti del materiale o di
fabbricazione. Il prodotto è destinato esclusivamente
all'uso domestico e non a quello commerciale.
La garanzia decade in caso di impiego improprio
o manomissione, uso della forza e interventi non
eseguiti dalla nostra filiale di assistenza autorizzata.
Questa garanzia non costituisce alcun limite ai diritti
legali del consumatore.
Kompernass Service Italia
Corso Lino Zanussi 11
33080 Porcia (PN)
Tel.: 0434/550833
Fax: 0434/550833
e-mail: support.it@kompernass.com
Importatore
KOMPERNASS GMBH
BURGSTRASSE 21
44867 BOCHUM, GERMANY
www.kompernass.com
IB_KH1098_E2690_LB5 06.03.2008 10:31 Uhr Seite 15

- 16 -
IB_KH1098_E2690_LB5 06.03.2008 10:31 Uhr Seite 16

- 17 -
CONTENT PAGE
Safety information 18
Technical data 18
Items supplied 19
Correct Usage 19
Appliance description 19
Preparation 19
Before the First Use 19
Setting the Time 19
Making coffee 20
Coffee servings 20
Timer-Function 20
Cleaning 21
Removing scale 22
Storage 22
Troubleshooting 22
Disposal 23
Warranty and Service 23
Importer 23
Read the operating instructions carefully before using the appliance for the first time and preserve this
booklet for later reference. Pass the manual on to whomsoever might acquire the scale at a later date.
IB_KH1098_E2690_LB5 06.03.2008 10:31 Uhr Seite 17

- 18 -
COFFEE MACHINE
KH 1098
Safety information
Danger of electric shock!
• Connect the appliance only to correctly installed
and properly earthed power sockets.
• Remove the plug from the wall socket when you
move the appliance, fill it with water, if it malfunctions,
before cleaning it and when it is not in use.
NEVER submerse the appliance in liquids.
Should liquids nonetheless permate into the
appliance housing, immediately remove the
plug from the wall socket. Arrange for it to be
repaired by a qualified specialist.
• NEVER grasp the appliance, power cable or power
plug with wet hands.
• To disconnect, always pull out the plug itself out
of the power socket, do not pull the power cable.
• Do not fold or crush the power cable.
• Arrange for defective power plugs and/or cables
to be replaced at once by qualified technicians
or our Customer Service Department.
Risk of fire!
• Do not leave the appliance unattended when in use.
• Never operate the appliance without mains tap-
water.
• Never place the appliance near sources of heat.
• Do not use an extension cable. In the event of
danger, the plug must be quickly and easily
accessible.
Risk of personal injury!
• NEVER use the glass jug in a microwave oven.
• Lay the power cable in such a way that no one
can tread on or trip over it.
• This appliance is not intended for use by individuals
(including children) with restricted physical,
physiological or intellectual abilities or deficiences
in experience and/or knowledge unless they are
supervised by a person responsible for their safety
or receive from this person instruction in how the
appliance is to be used.
• Children should be supervised to ensure that
they do not play with the appliance..
Do not touch the keep-warm plate. Hot surfaces!
Risk of Burns!
Risk of scalding!
• Never open the lid during the brewing process.
• Do not touch the hot filter. Remove the filter bag
when all of the coffee has drained away and the
bag has cooled down somewhat.
• Do not hold your hands in the rising steam.
• Never move/transport the appliance during the
brewing process.
To avoid damage to the appliance!
• Fill the water tank of the appliance exclusively
with freshly drawn mains water.
• Never subject the glass jug to large temperature
fluctuations. The glass may be damaged.
• No liabilty will be accepted for damage caused
by glass breakage!
Technical data
Mains voltage: 220-240V
~
50Hz
Power consumption: 1050 W
IB_KH1098_E2690_LB5 06.03.2008 10:31 Uhr Seite 18

- 19 -
Items supplied
• Coffee Maker
• Glass jug
• Measuring spoon
• Operating Instructions
Before taking the appliance into use check to ensure
that all of the items listed have been supplied and
that there are no visible signs of damage.
NNoottee::
On delivery, the measuring spoon is to be
found in either the water tank or the glass jug.
Correct Usage
The coffee maker is intended exclusively for brewing
coffee. This coffee maker is intended exclusively for
use in private households. Do not use it commercial-
ly. This appliance in intended only for indoor use.
Appliance description
q
Filter
w
Lid
e
Water tank
r
Keep-warm plate
t
Display
y
red indicator lamp
u
green indicator lamp AUTO SET
i
Button MIN
o
Button HOUR
a
Button PROG
s
Button ON/AUTO/OFF
d
Coffee button
f
Driptray grill
g
Coffee passage
h
Outer lock
j
Coffee passage lock
k
Outer lock
l
Glass jug
1(
Filter basket
Preparation
• Remove all packaging material from the appliance
and the accessories.
• Clean the appliance and all accessories (see
chapter "Cleaning").
• Place the coffee maker on a level and slip-free
surface.
• Open the lid
w
.
• Install the filter basket
1(
so that the lever settles
into the recess on the coffee maker.
• Place the filter
q
in the filter basket
1(
.
• Lay the driptray grill
f
in the driptray on the
coffee maker.
• Insert the power plug into a power socket.
Before the First Use
NNoottee::
When filling the appliance with water, never
exceed the MAX marking in the water tank
e
.
The appliance could overflow!
• To remove possible production residues, before
the first use brew up 10 cups of plain water,
without coffee, and allow it to flow through the
appliance.
Setting the Time
• Press the button PROG
a
once, so that CLOCK
appears in the display
t
.
• Repeatedly press the button HOUR
o
for hours,
resp. the button MIN
i
for minutes, until the correct
time is programmed in. If you hold the buttons
down, the numbers run through faster.
• Press the button PROG
a
. The time display is
now programmed,
or
• if you do not press any other button for ca. 10
seconds, the indicator CLOCK extinguishes in
the display
t
and the time is programmed.
IB_KH1098_E2690_LB5 06.03.2008 10:31 Uhr Seite 19

- 20 -
Making coffee
• Open the lid
w
.
• Using the measuring spoon, place coffee powder
(coarse to medium ground) into the filter
q
.
A level measuring spoon of coffee approximates
to ca. 6 gr of coffee powder.
NNoottee::
Should you use finely ground coffee powder it
could block the filter
q
, water can no longer flow
through it and the coffee maker could overflow!
• Fill the water tank
e
with the required amount
of water. For this, use the glass jug
l
with the
scale. When filling the appliance with water, never
exceed the MAX marking in the water tank
e
.
• Close the lid
w
.
NNoottee::
After brewing, there is always somewhat less coffee
in the glass jug
l
than the amount of water that
you filled the water tank
e
with. The coffee powder
absorbs some of the water.
• Place the glass jug
l
in the coffee maker.
• Press the button ON/AUTO/OFF
s
once.
The red indicator lamp
y
glows. The coffee maker
begins the brewing process.
• When the brewing process is complete, the coffee
is kept warm by the keep-warm plate
r
for two
hours. On the expiry of this period the coffee
maker switches itself.
• Should you wish to switch the coffee maker off
earlier, repeatedly press the button
ON/AUTO/OFF
s
until the indicator lamps
y
/
u
are extinguished.
Risk of scalding!
After the brewing process the coffee machine must
first cool down, for at least 10 minutes, before you
start another brew. If you do not, there is a risk of
being scalded by escaping steam!
Coffee servings
With this coffee maker you can fill a cup with coffee
using only one hand:
• When there is coffee in the glass jug
l
, press
and hold your cup against the coffee button
d
.
Coffee flows into the cup.
• When the cup is full, remove the cup from the
coffee button
d
.
• Any drips that might fall will be caught by the
driptray grill
f
.
NNoottee::
Empty the driptray below the driptray grill
f
regularly.
Otherwise it could overflow.
NNoottee::
If you pour coffee using the coffee button
d
, a
small amount of coffee will always be left in the
glass jug
l
.
You can also pour coffee from the glass jug
l
in
the usual manner:
• Lift the glass jug
l
and then pull it to the front.
Timer-Function
By use of the button PROG
a
, you can programme
the coffee maker so that it starts the brewing process at
a pre-determined time (Timer function). First, always
fill the filter
q
in the filter basket
1(
with coffee powder
and the water tank
e
with water. Place the glass
jug
l
in the coffee maker. Ensure that the glass jug
l
is empty and the water tank
e
is not filled beyond
the Max marking.
IB_KH1098_E2690_LB5 06.03.2008 10:31 Uhr Seite 20

- 21 -
• Press the button PROG
a
twice, so that TIMER
appears in the display
t
. Programme in the
desired start time with the button HOUR
o
and
the button MIN
i
(see chapter "Setting the Time").
• When the desired start time has been entered in,
press the button PROG
a
once more. The start
time is now programmed. The display
t
shows
the normal time.
• To activate the timer, press twice on the button
ON/AUTO/OFF
s
. The green indicator lamp
AUTO SET
u
glows. The coffee maker will now
start the brewing process at the programmed
time.
• If you want to deactivate the timer, press the button
ON/AUTO/OFF
s
. The green indicator lamp
AUTO SET
u
extinguishes.
Cleaning
Before cleaning, ALWAYS remove the plug from the
wall power socket.
Risk of electric shock!
Before you clean the Coffee Maker you MUST
remove the plug from the power socket.
Attention!
NEVER submerge the Coffee Maker in water.
This would irreparably damage the appliance.
Risk of burns!
Always wait until the coffee maker has cooled
down before cleaning it.
• Wipe the housing with a damp cloth. For stubborn
soiling use a mild detergent on the cloth.
• Clean the glass jug
l
, filter
q
and filter basket
1(
in mild sudsy water and rinse them with lots
of clean and clear water.
NNoottee::
Clean the Filter
q
immediately after use. If left until
later, it will be more difficult to clean.
If coffee powder or something similar has deposited
itself in the coffee sieve of the glass jug
l
, proceed
as follows:
• Upturn the glass jug
l
.
• Press the two outer locks
h
/
k
inwards and
hold them firmly.
• You can now slide the coffee passage lock
j
inwards. The coffee passage
g
opens itself.
Hold it open.
• You can release the outer locks
h
/
k
.
• Allow water to flow through the opened coffee
passage
g
. The residues in the sieve should be
washed out with the water. Should they still not
dissolve/detach themselves, gently scrub the sieve
with a soft brush.
• When the sieve is free of residues, release the
coffee passage lock
j
. The coffee passage
g
is now closed.
IB_KH1098_E2690_LB5 06.03.2008 10:31 Uhr Seite 21

- 22 -
Removing scale
Scale removal is already necessary after ca.
30 brewing processes with hard water, after
ca. 60 brewing processes with soft water.
Use only scale removal products that are suitable
for coffee makers and pay heed to the instructions
for use.
The procedure for scale removal is:
• Place the scale removal product in the water
tank
e
.
• Fill it with enough water for max. 12 cups.
• Press the button ON/AUTO/OFF
s
once.
The brewing process starts, the red indicator
lamp
y
glows.
• Wait until the solution has completely run through
the Coffee Maker.
• After descaling, rinse the Coffee Maker through
twice with 12 cups of clean water each time.
Storage
• If you do not intend to use the Coffee Maker for
an extended period, remove the plug from the
power socket.
• Store the power cable in the cable shaft on the
rear of the Coffee Maker.
Troubleshooting
The Coffee Maker does not function:
• The plug is not inserted into a power socket.
Connect the appliance with the mains.
Push the power plug into the wall socket.
• The power socket is defective. Try another wall
socket.
• The Coffee Maker is still hot from the previous
brewing process. Wait until the Coffee Maker
has cooled down.
The brewing process does not start at the
desired time:
• The timer is not activated. To activate the timer,
press twice on the button ON/AUTO/OFF
s
.
• The time is not correctly programmed. Check the
time entered and, if necessary, re-programme it.
The coffee is too strong/too weak:
• There is too little/too much water in the water
tank
e
. Fill it with the correct amount of water.
• It is filled with too much/too little coffee powder.
Fill it with less/more coffee powder.
• The coffee powder is too finely/too coarsely
ground. Select a different grade of grinding for
your coffee powder.
Water collects in the filter
q
and it then flows
over:
• The coffee powder is too finely ground, causing
a blockage of the filter
q
. Use a more coarsely
ground coffee powder.
The brewing process takes unusually long.
The appliance switches itself off during the
brewing process.
The appliance is becoming louder when brewing.
There is excessive steam.
• The brewing system of the appliance is calcified.
Descale the appliance as described under
"Removing scale".
IB_KH1098_E2690_LB5 06.03.2008 10:31 Uhr Seite 22

- 23 -
Disposal
Do not dispose of the appliance in your
normal domestic waste.
Dispose of the appliance through an approved
disposal centre or at your community waste facility.
Observe the currently applicable regulations.
In case of doubt, please contact your waste disposal
centre.
Dispose of all packaging materials in an
environmentally friendly manner.
Warranty and Service
The warranty for this appliance is for 3 years from
the date of purchase. The appliance has been manufac-
tured with care and meticulously examined before
delivery. Please retain your receipt as proof of purchase.
In the case of a warranty claim, please make contact
by telephone with our service department. Only in
this way can a post-free despatch for your goods
be assured.
The warranty covers only claims for material and
maufacturing defects, not for wearing parts or for
damage to fragile components, e.g. buttons or bat-
teries. The appliance is intended for domestic use
only, NOT for commercial purposes.
If this product has been subjected to improper or
inappropriate handling, abuse, or modifications not
carried out by one of our authorised sales and service
outlets, the warranty will be considered void. Your
statutory rights are not restricted in any way by this
warranty.
DES Ltd
Units 14-15
Bilston Industrial Estate
Oxford Street
Bilston
WV14 7EG
Tel.: 0870/787-6177
Fax: 0870/787-6168
e-mail: support.uk@kompernass.com
Irish Connection
Harbour view
Howth
Co. Dublin
Tel: 00353 (0) 87 99 62 077
Fax: 00353 18398056
e-mail: support.ie@kompernass.com
Importer
KOMPERNASS GMBH
BURGSTRASSE 21
44867 BOCHUM, GERMANY
www.kompernass.com
IB_KH1098_E2690_LB5 06.03.2008 10:31 Uhr Seite 23

- 24 -
IB_KH1098_E2690_LB5 06.03.2008 10:31 Uhr Seite 24

- 25 -
INHALTSVERZEICHNIS SEITE
Sicherheitshinweise 26
Technische Daten 27
Lieferumfang 27
Bestimmungsgemäßer Gebrauch 27
Gerätebeschreibung 27
Vorbereitungen 27
Vor dem ersten Gebrauch 28
Einstellung der Uhrzeit 28
Kaffeezubereitung 28
Kaffeeentnahme 29
Timer-Funktion 29
Reinigung 29
Entkalkung 30
Aufbewahrung 30
Fehlerbehebung 30
Entsorgung 31
Garantie und Service 31
Importeur 32
Lesen Sie die Bedienungsanleitung vor der ersten Verwendung aufmerksam durch und heben Sie diese für
den späteren Gebrauch auf. Händigen Sie bei Weitergabe des Gerätes an Dritte auch die Anleitung aus.
IB_KH1098_E2690_LB5 06.03.2008 10:31 Uhr Seite 25

- 26 -
KAFFEEMASCHINE
KH 1098
Sicherheitshinweise
Gefahr durch Stromschlag!
• Schließen Sie das Gerät nur an eine vorschrifts-
mäßig installierte und geerdete Netzsteckdose
an.
• Ziehen Sie, wenn Sie das Gerät bewegen, befül-
len, bei Störungen, bevor Sie das Gerät reinigen
oder wenn Sie es nicht gebrauchen, den Netz-
stecker aus der Netzsteckdose.
Tauchen Sie das Gerät nie in Flüssigkeiten.
Falls doch einmal Flüssigkeit in das Gerätege-
häuse gelangt, ziehen Sie sofort den Netz-
stecker des Geräts aus der Netzsteckdose.
Lassen Sie es von qualifiziertem Fachpersonal
reparieren.
• Fassen Sie das Gerät, Netzkabel und -stecker
nie mit nassen Händen an.
• Ziehen Sie das Netzkabel stets am Stecker aus
der Steckdose, ziehen Sie nicht am Kabel selbst.
• Knicken oder quetschen Sie das Netzkabel
nicht.
• Lassen Sie beschädigte Netzstecker oder Netz-
kabel sofort von autorisiertem Fachpersonal
oder dem Kundenservice austauschen, um
Gefährdungen zu vermeiden.
Brandgefahr!
• Lassen Sie das Gerät während des Betriebs nie-
mals unbeaufsichtigt.
• Betreiben Sie das Gerät niemals ohne Leitungs-
wasser.
• Stellen Sie das Gerät niemals in der Nähe von
Wärmequellen auf.
• Benutzen Sie kein Verlängerungskabel. Bei Ge-
fahr muss der Netzstecker schnell erreichbar
sein.
Verletzungsgefahr!
• Benutzen Sie die Glaskanne des Geräts niemals
in der Mikrowelle.
• Verlegen Sie das Netzkabel so, dass niemand
darauf treten oder darüber stolpern kann.
• Dieses Gerät ist nicht dafür bestimmt, durch
Personen (einschließlich Kinder) mit einge-
schränkten, physischen, sensorischen oder
geistigen Fähigkeiten oder mangels Erfahrung
und/oder mangels Wissen benutzt zu werden,
es sei denn, sie werden durch eine für ihre
Sicherheit zuständige Person beaufsichtigt oder
erhielten von ihr Anweisungen, wie das Gerät
zu benutzen ist.
• Kinder sollten beaufsichtigt werden, um sicherzu-
stellen, dass sie nicht mit dem Gerät spielen.
Fassen Sie nicht auf die Warmhalteplatte. Hei-
ße Oberfläche! Verbrennungsgefahr!
Warnung vor Verbrühungen!
• Öffnen Sie niemals während des Brühvorgangs
den Deckel.
• Berühren Sie nicht den heißen Filter. Entnehmen
Sie den Filter erst, wenn die Flüssigkeit abgelau-
fen und der Filter abgekühlt ist.
• Halten Sie Ihre Hände nicht in den aufsteigen-
den Wasserdampf.
• Bewegen Sie niemals das Gerät während des
Brühvorgangs.
So vermeiden Sie Geräteschäden!
• Füllen Sie ausschließlich sauberes Leitungswas-
ser in den Wassertank des Geräts.
• Setzen Sie die Glaskanne nie starken Tempera-
turschwankungen aus. Das Glas kann beschä-
digt werden.
• Für Schäden durch Glasbruch wird
keine Haftung übernommen!
IB_KH1098_E2690_LB5 06.03.2008 10:31 Uhr Seite 26

- 27 -
Technische Daten
Netzspannung: 220 - 240 V
~
50 Hz
Nennleistung: 1050 W
Lieferumfang
• Kaffeemaschine
• Glaskanne
• Messlöffel
• Bedienungsanleitung
Bitte überprüfen Sie vor der Inbetriebnahme den Lie-
ferumfang auf Vollständigkeit und eventuelle Be-
schädigungen.
HHiinnwweeiiss::
Der Messlöffel kann sich bei Lieferung im Was-
sertank oder der Glaskanne befinden.
Bestimmungsgemäßer
Gebrauch
Die Kaffeemaschine dient ausschließlich dem Zube-
reiten von Kaffee. Diese Kaffeemaschine ist aus-
schließlich für die Benutzung in privaten Haushalten
bestimmt. Benutzen Sie sie nicht gewerblich.
Das Gerät ist nur für den Innengebrauch bestimmt.
Gerätebeschreibung
q
Filter
w
Deckel
e
Wassertank
r
Warmhalteplatte
t
Display
y
rote Anzeigelampe
u
grüne Anzeigelampe AUTO SET
i
Taste MIN
o
Taste HOUR
a
Taste PROG
s
Taste ON/AUTO/OFF
d
Kaffeetaste
f
Tropfen-Auffanggitter
g
Kaffeedurchlass
h
äußere Verriegelung
j
Kaffeedurchlass-Verriegelung
k
äußere Verriegelung
l
Glaskanne
1(
Filterkorb
Vorbereitungen
• Entfernen Sie alle Verpackungsmaterialien vom
Gerät und den Zubehörteilen.
• Reinigen Sie das Gerät und alle Zubehörteile
(siehe Kapitel Reinigung).
• Stellen Sie die Kaffeemaschine auf eine ebene
und rutschfeste Fläche.
• Öffnen Sie den Deckel
w
.
• Setzen Sie den Filterkorb
1(
so ein, dass der He-
bel in die Aussparung an der Kaffeemaschine
greift.
• Setzen Sie den Filter
q
in den Filterkorb
1(
.
• Legen Sie das Tropfen-Auffanggitter
f
in die
Auffangschale an der Kaffeemaschine.
• Stecken Sie den Netzstecker in eine Netz-
steckdose.
IB_KH1098_E2690_LB5 06.03.2008 10:31 Uhr Seite 27

- 28 -
Vor dem ersten Gebrauch
HHiinnwweeiiss::
Füllen Sie nie mehr Wasser, als bis zur MAX-
Markierung in den Wassertank
e
. Das Gerät
kann überlaufen!
• Lassen Sie vor dem ersten Gebrauch 10 Tassen
Wasser ohne Kaffeepulver brühen, um eventuel-
le Fertigungsrückstände zu entfernen.
Einstellung der Uhrzeit
• Drücken Sie die Taste PROG
a
einmal, so dass
CLOCK im Display
t
erscheint.
• Drücken Sie die Taste HOUR
o
für die Stunden
bzw. die Taste MIN
i
für die Minuten so oft,
bis die gewünschte Uhrzeit eingestellt ist. Wenn
Sie die Taste gedrückt halten, laufen die Zahlen
schneller durch.
• Drücken Sie die Taste PROG
a
. Die Uhrzeit ist
eingestellt.
oder
• Wenn Sie ca. 10 Sekunden keine weitere Taste
drücken, erlischt die Anzeige CLOCK im Display
t
und die Uhrzeit ist eingestellt.
Kaffeezubereitung
• Öffnen Sie den Deckel
w
.
• Füllen Sie mit dem Messlöffel Kaffeepulver
(grob bis mittel gemahlen) in den Filter
q
ein.
Dabei entspricht ein gestrichener Messlöffel ca.
6 g Kaffepulver.
HHiinnwweeiiss::
Wenn Sie zu fein gemahlenes Kaffeepulver verwen-
den verstopft der Filter
q
, das Wasser kann nicht
mehr hindurchlaufen und die Kaffeemaschine läuft
über!
• Füllen Sie die gewünschte Wassermenge in den
Wassertank
e
ein. Nutzen Sie dafür die Glas-
kanne
l
mit der Skala. Füllen Sie nie mehr
Wasser, als bis zur Max-Markierung in Wasser-
tank
e
ein.
• Schließen Sie den Deckel
w
.
HHiinnwweeiiss::
Es wird immer nach dem Brühen etwas weniger
Kaffee in der Glaskanne
l
sein, als Sie Wasser in
den Wassertank
e
gefüllt haben. Das Kaffeepulver
saugt etwas Wasser auf.
• Stellen Sie die Glaskanne
l
in die Kaffee-
maschine.
• Drücken Sie einmal die Taste ON/AUTO/OFF
s
.
Die rote Anzeigelampe
y
leuchtet. Die
Kaffeemaschine beginnt den Brühvorgang.
• Ist der Brühvorgang beendet, wird der Kaffee
auf der Warmhalteplatte
r
für zwei Stunden
warmgehalten. Danach schaltet sich die Kaffee-
maschine automatisch aus.
• Möchten Sie die Kaffeemschine vorher ausschal-
ten, drücken Sie die Taste ON/AUTO/OFF
s
so oft, bis die Anzeigelampen
y
/
u
erloschen
sind.
Warnung vor Verbrühungen!
Die Kaffeemaschine muss nach dem Brühvorgang
mindestens 10 Minuten abkühlen, bevor Sie einen
weiteren Brühvorgang starten. Ansonsten besteht
Verbrühungsgefahr durch austretenden Dampf!
IB_KH1098_E2690_LB5 06.03.2008 10:31 Uhr Seite 28

- 29 -
Kaffeeentnahme
Sie können mit dieser Kaffeemaschine den Kaffee
mit einer Hand in den Becher füllen:
• Wenn sich Kaffee in der Glaskanne
l
befindet,
drücken und halten Sie Ihren Kaffeebecher ge-
gen die Kaffeetaste
d
. Der Kaffee läuft in den
Becher.
• Sobald der Becher voll ist, ziehen Sie den Be-
cher von der Kaffeetaste
d
weg.
• Tropfen, die eventuell danach noch herunterfal-
len werden vom Tropfen-Auffanggitter
f
aufge-
fangen.
HHiinnwweeiiss::
Leeren Sie die Auffangschale unter dem Tropfen-Auf-
fanggitter
f
regelmäßig. Ansonsten kann sie über-
laufen.
HHiinnwweeiiss::
Wenn Sie den Kaffee mit Hilfe der Kaffeetaste
d
entnehmen, bleibt immer ein Rest Kaffee in der
Glaskanne
l
zurück.
Sie können auch auf herkömmlichem Weg den Kaf-
fee aus der Glaskanne
l
schütten:
• Heben Sie die Glaskanne
l
an und ziehen Sie
sie dann nach vorne heraus.
Timer-Funktion
Mit der Taste PROG
a
können Sie die Kaffeema-
schine so einstellen, dass sie zu einem festgelegten
Zeitpunkt mit dem Brühvorgang beginnt (Timer-
Funktion). Füllen Sie immer zuerst Kaffeepulver in
den Filter
q
im Filterkorb
1(
und Wasser in den
Wassertank
e
. Stellen Sie die Glaskanne
l
in die
Kaffeemaschine. Stellen Sie sicher, dass die
Glaskanne
l
leer ist und der Wassertank
e
nicht
über die Max-Markierung hinaus gefüllt ist.
• Drücken Sie die Taste PROG
a
zweimal, so
dass TIMER im Display
t
erscheint. Stellen Sie
die gewünschte Startzeit mit der Taste HOUR
o
und der Taste MIN
i
ein (siehe Kapitel „Einstel-
lung der Uhrzeit“).
• Wenn die gewünschte Startzeit eingestellt ist,
drücken Sie die Taste PROG
a
noch einmal.
Die Startzeit ist nun programmiert. Das Display
t
zeigt die normale Uhrzeit an.
• Um den Timer zu aktivieren, drücken Sie zwei-
mal die Taste ON/AUTO/OFF
s
. Die grüne
Anzeigelampe AUTO SET
u
leuchtet. Die Kaf-
feemaschine beginnt nun zur programmierten
Zeit mit dem Brühvorgang.
• Wenn Sie den Timer wieder deaktivieren möch-
ten, drücken Sie die Taste ON/AUTO/OFF
s
.
Die grüne Anzeigelampe AUTO SET
u
erlischt.
Reinigung
Ziehen Sie vor jeder Reinigung den Netzstecker aus
der Netzsteckdose.
Gefahr eines elektrischen Schlags!
Bevor Sie die Kaffeemaschine reinigen, müssen Sie
immer den Netzstecker aus der Netzsteckdose zie-
hen.
Achtung!
Tauchen Sie die Kaffeemaschine nie unter Wasser.
Das führt zu irreparablen Schäden am Gerät.
Verbrennungsgefahr!
Warten Sie immer, bis der Kaffeeautomat abgekühlt
ist, bevor Sie ihn reinigen.
• Wischen Sie das Gehäuse mit einem feuchten
Tuch ab. Bei hartnäckigen Verschmutzungen
geben Sie ein mildes Spülmittel auf das Tuch.
• Reinigen Sie Glaskanne
l
, Filter
q
und Filter-
korb
1(
in mildem Seifenwasser und spülen Sie
sie mit viel klarem Wasser ab.
IB_KH1098_E2690_LB5 06.03.2008 10:31 Uhr Seite 29

- 30 -
HHiinnwweeiiss::
Reinigen Sie den Filter
q
sofort nach dem Ge-
brauch. Später lässt dieser sich nur schwer reinigen.
Wenn sich im Kaffeesieb der Glaskanne
l
Kaffee-
pulver oder ähnliches abgesetzt hat, gehen Sie wie
folgt vor:
• Drehen Sie die Glaskanne
l
um.
• Drücken Sie die beiden äußeren Verriegelungen
h
/
k
nach innen und halten Sie sie fest.
• Sie können nun die Kaffeedurchlass-Verriege-
lung
j
nach innen schieben. Der Kaffeedurch-
lass
g
öffnet sich. Halten Sie ihn offen.
• Die äußeren Verriegelungen
h
/
k
können Sie
wieder los lassen.
• Lassen Sie Wasser durch den geöffneten Kaffee-
durchlass
g
laufen. Die Rückstände im Sieb soll-
ten mit dem Wasser heraus geschwemmt wer-
den. Sollten sie sich immer noch nicht lösen,
benutzen Sie zusätzlich eine weiche Bürste, mit
der Sie über das Sieb streichen.
• Ist das Sieb frei von Rückständen, lassen Sie die
Kaffeedurchlass-Verriegelung
j
los. Der Kaffee-
durchlass
g
ist wieder geschlossen.
Entkalkung
Bei hohem Härtegrad ist eine Entkalkung bereits
nach ca. 30 Benutzungen notwendig, bei niedrigem
Härtegrad nach ca. 60 Benutzungen.
Verwenden Sie ausschließlich für Kaffeemaschinen
geeignetes Entkalkungsmittel und beachten Sie die
Bedienungsanleitung.
So gehen Sie zum Entkalken vor:
• Geben Sie das Entkalkungsmittel in den Wasser-
tank
e
.
• Füllen Sie Wasser für max. 12 Tassen ein.
• Drücken Sie die Taste ON/AUTO/OFF
s
ein-
mal.
Der Brühvorgang startet, die rote Anzeigelampe
y
leuchtet.
• Warten Sie, bis das Wasser vollständig durchge-
laufen ist.
• Lassen Sie nach dem Entkalken zwei mal 12 Tas-
sen Wasser durchlaufen.
Aufbewahrung
• Wenn Sie die Kaffeemaschine für längere Zeit
nicht benutzen, ziehen Sie den Netzstecker aus
der Steckdose.
• Verstauen Sie das Kabel im Kabelschacht auf
der Rückseite der Kaffeemaschine.
Fehlerbehebung
Der Kaffeeautomat funktioniert nicht:
• Der Netzstecker steckt nicht in einer Netzsteckdose.
Verbinden Sie das Gerät mit dem Stromnetz.
Stecken Sie den Netzstecker in eine Netzsteckdo-
se.
• Die Netzsteckdose ist defekt. Probieren Sie eine
andere Netzsteckdose.
• Die Kaffeemaschine ist vom vorherigen Brühvor-
gang noch zu heiß. Warten Sie, bis sich die Kaf-
feemaschine abgekühlt hat.
IB_KH1098_E2690_LB5 06.03.2008 10:31 Uhr Seite 30

- 31 -
Der Brühvorgang startet nicht zur gewünschten
Zeit:
• Der Timer ist nicht aktiviert. Drücken Sie zweimal
die Taste ON/AUTO/OFF
s
, um den Timer zu
aktivieren.
• Die Uhrzeit ist nicht richtig eingestellt. Kontrollie-
ren Sie die Uhrzeit und stellen Sie sie gegebe-
nenfalls ein.
Der Kaffee ist zu stark/zu schwach:
• Es ist zu wenig/zu viel Wasser im Wassertank
e
. Füllen Sie die korrekte Wassermenge ein.
• Es ist zu viel/zu wenig Kaffeepulver eingefüllt.
Füllen Sie weniger/mehr Kaffeepulver ein.
• Das Kaffeepulver ist zu fein/zu grob gemahlen.
Wählen Sie einen anderen Mahlgrad für Ihr Kaf-
feepulver.
Das Wasser steht im Filter
q
und läuft dann
über:
• Das Kaffeepulver ist zu fein gemahlen und ver-
stopft den Filter
q
. Verwenden Sie gröber ge-
mahlenes Kaffeepulver.
Der Brühvorgang dauert ungewöhnlich lange.
Das Gerät schaltet sich während des Brühens
aus.
Das Gerät wird beim Brühen lauter.
Es entsteht übermäßiger Dampf.
• Das Brühsystem des Gerätes ist verkalkt. Entkalken
Sie das Gerät wie unter “Entkalkung” beschrieben.
Entsorgung
Werfen Sie das Gerät keinesfalls in den
normalen Hausmüll.
Entsorgen Sie das Gerät über einen zugelassenen
Entsorgungsbetrieb oder über Ihre kommunale
Entsorgungseinrichtung.
Beachten Sie die aktuell geltenden Vorschriften.
Setzen Sie sich im Zweifelsfall mit Ihrer Entsorgungs-
einrichtung in Verbindung.
Führen Sie alle Verpackungsmaterialien
einer umweltgerechten Entsorgung zu.
Garantie und Service
Sie erhalten auf dieses Gerät 3 Jahre Garantie ab
Kaufdatum. Das Gerät wurde sorgfältig produziert
und vor Anlieferung gewissenhaft geprüft. Bitte be-
wahren Sie den Kassenbon als Nachweis für den
Kauf auf. Bitte setzen Sie sich im Garantiefall mit
Ihrer Servicestelle telefonisch in Verbindung. Nur so
kann eine kostenlose Einsendung Ihrer Ware
gewährleistet werden.
Die Garantieleistung gilt nur für Material- oder Fa-
brikationsfehler, nicht aber für Verschleißteile oder
für Beschädigungen an zerbrechlichen Teilen, z. B.
Schalter oder Akkus. Das Produkt ist lediglich für
den privaten und nicht für den gewerblichen
Gebrauch bestimmt.
Bei missbräuchlicher und unsachgemäßer Behand-
lung, Gewaltanwendung und bei Eingriffen, die
nicht von unserer autorisierten Service-Niederlas-
sung vorgenommen wurden, erlischt die Garantie.
Ihre gesetzlichen Rechte werden durch diese
Garantie nicht eingeschränkt.
IB_KH1098_E2690_LB5 06.03.2008 10:31 Uhr Seite 31

- 32 -
Schraven
Service- und Dienstleistungs GmbH
Gewerbering 14
47623 Kevelaer, Germany
Tel.: +49 (0) 180 5 008107
(14 Ct/Min. aus dem dt. Festnetz, ggf. abweichende Preise
aus dem Mobilfunk)
Fax: +49 (0) 2832 3532
e-mail: support.de@kompernass.com
Kompernaß Service Österreich
Rittenschober KG
Gmundner Strasse 10
A-4816 Gschwandt
Tel.: +43 (0) 7612 6260516
Fax: +43 (0) 7612 626056
e-mail: support.at@kompernass.com
Importeur
KOMPERNASS GMBH
BURGSTRASSE 21
D-44867 BOCHUM, GERMANY
www.kompernass.com
IB_KH1098_E2690_LB5 06.03.2008 10:31 Uhr Seite 32
-
 1
1
-
 2
2
-
 3
3
-
 4
4
-
 5
5
-
 6
6
-
 7
7
-
 8
8
-
 9
9
-
 10
10
-
 11
11
-
 12
12
-
 13
13
-
 14
14
-
 15
15
-
 16
16
-
 17
17
-
 18
18
-
 19
19
-
 20
20
-
 21
21
-
 22
22
-
 23
23
-
 24
24
-
 25
25
-
 26
26
-
 27
27
-
 28
28
-
 29
29
-
 30
30
-
 31
31
-
 32
32
-
 33
33
-
 34
34


Kompernass Coffeemaker KH 1098 Manual de usuario
- Categoría
- Cafeteras
- Tipo
- Manual de usuario
- Este manual también es adecuado para
en otros idiomas
Artículos relacionados
Otros documentos
-
Beko CFM 4350 B Manual de usuario
-
Westinghouse WKCMR621RD Instrucciones de operación
-
Beko CFM6350I El manual del propietario
-
MIA KF 1740 El manual del propietario
-
Silvercrest Cafetera SKAD 1000 A1 Operating Instructions Manual
-
Braun KF 7020 Pur Aroma - 3109-B El manual del propietario
-
Braun KF 7120 - PurAroma 7 El manual del propietario
-
Beem 05958 Manual de usuario
-
 Caso Design 1848 Manual de usuario
-
Silvercrest SKAT 1000 EDS A1 Instrucciones de operación
