Korona 81100 El manual del propietario
- Categoría
- Raclettes
- Tipo
- El manual del propietario

KORONA electric GmbH, Sundern/Germany
www.korona-electric.de
Deutsch
Bedienungsanleitung
40cm Standventilator mit Fernbedienung
English
Instruction Manual
40cm Stand Fan with remote control
Nederlands
Handleiding
Statiefventilator met afstandsbediening
40 cm
Français
Manuel d‘instructions
Ventilateur sur pied de 40cm avec
télécommande
Italiano
Manuale delle Istruzioni
Ventilatore a Piantana da 40cm con
telecomando
Español
Manual de instrucciones
Ventilador de pedestal con mando a
distancia de 40 cm
Türkçe
Kullanma Kılavuzu
Uzaktan Kumandalı, 40 cm Ayaklı
Vantilatör
Polski
Instrukcja obsługi
Wentylator stojący 40 cm z pilotem
Český
Návod k použití
40cm stojanový ventilátor s dálkovým
ovládáním
81100

2
Bedienungsanleitung
Lesen Sie diese Bedienungsanleitung vor der Installation und/
oder Verwendung des Geräts sorgfältig durch. Bewahren
Sie die Bedienungsanleitung einschließlich Kaufbeleg und,
sofern möglich, Karton mit innerer Verpackung auf.
Wenn Sie das Gerät an Dritte weitergeben, überreichen Sie
bitte auch diese Bedienungsanleitung.
ZWECKMÄSSIGER GEBRAUCH
Dieses Gerät ist nur für den privaten Heimgebrauch und
nicht für gewerbliche oder industrielle Zwecke oder für den
Einsatz im Freien vorgesehen. Andere, nicht empfohlene
Verwendungsarten können Feuer, Stromschläge oder
Verletzungen verursachen.
Sicherheit:
Dieses Symbol weist auf Verletzungsgefahren hin!
Dieses Symbol weist auf Stromschlaggefahren hin!
Dieses Symbol weist auf Tipps und Informationen hin.
WICHTIGE SICHERHEITSHINWEISE
Warnung! Zur Vermeidung von Geräteschäden/
Verletzungen, Stromschlag und Feuern.
Gefahr von Verletzungen und Geräteschäden!

DEUTSCH
Bedienungsanleitung
3
• Der Hersteller haftet nicht für Schäden aufgrund
unsachgemäßer Nutzung.
• Inkorrekte oder unsachgemäße Nutzung können Schäden
am Gerät oder Verletzungen verursachen.
• Vergewissern Sie sich vor dem Anschluss des Geräts an
den Netzstrom, dass Ihre lokale Netzspannung mit den
technischen Daten des Geräts übereinstimmt. Anderenfalls
könnte das Gerät überhitzen oder beschädigt werden.
• Vermeiden Sie jeglichen Kontakt mit beweglichen Teilen.
Warten Sie immer, bis bewegliche Teile zum Stillstand
gekommen sind, bevor Sie diese anfassen.
• Stecken Sie keine Finger oder fremden Gegenstände in
die Schutzgitter.
• Verwenden Sie das Gerät nicht ohne ordnungsgemäß
installierte Schutzgitter oder falls die Schutzgitter
beschädigt oder locker sind.
• Vergewissern Sie sich, dass das Gerät nicht in der Nähe
von Vorhängen, Gardinen oder anderen Gegenständen
(einschließlich Haaren und Kleidung) steht, die vom
Ventilator angesaugt werden könnten.
• Platzieren oder verwenden Sie das Gerät niemals an
Orten mit folgenden Gegebenheiten:
- Wärmequellen wie z.B. Heizungen, Heizkörper, Öfen
oder andere wärmeerzeugende Geräte
- Direkte Sonneneinstrahlung
- Extreme Staubbelastung
- Mechanische Vibrationen und Aufprälle
- Keine Belüftung
- Unebene Untergründe, da das Gerät anderenfalls
während des Betriebs umkippen könnte.
• Schalten Sie das Gerät immer AUS (0) und trennen Sie es
vom Netzstrom, wenn das Gerät nicht in Betrieb ist und/
oder an einen anderen Ort gestellt wird.

4
Vorsicht! Stromschlaggefahr!
• Tauchen Sie das Gerät, das Netzkabel oder den
Netzstecker niemals in Wasser oder andere Flüssigkeiten.
• Verwenden Sie das Gerät nicht in der Nähe von Spülen
oder Waschbecken.
• Verwenden Sie das Gerät nicht mit nassen Händen.
• Verwenden Sie das Gerät nicht im Freien.
• Stellen Sie das Gerät nicht in die Nähe eines geöffneten
Fensters. Regenspritzer auf dem Gerät können
Stromschläge verursachen.
Elektrische Geräte sind kein Spielzeug!
• Lassen Sie das Gerät während des Betriebs niemals
unbeaufsichtigt.
• Dieses Gerät ist geeignet für den Gebrauch durch
Kinder ab 8 Jahren und Personen mit eingeschränkten
körperlichen, sensorischen oder geistigen Fähigkeiten
oder ohne Erfahrung und Wissen, sofern sie beaufsichtigt
oder hinsichtlich der sicheren Verwendung des Geräts
angeleitet werden und die damit einhergehenden Gefahren
verstehen. Kinder dürfen nicht mit dem Gerät spielen.
Reinigungsarbeiten und Nutzerwartungen dürfen nur von
Kindern über 8 Jahren und dann auch nur unter Aufsicht
durchgeführt werden.
• Halten Sie das Gerät und dessen Kabel von Kindern unter
8 Jahren fern.
• Trennen Sie das Gerät immer während des
Nichtgebrauchs und vor der Reinigung vom Netzstrom.
• Ziehen Sie immer am Stecker – niemals am Kabel.
• Halten Sie das Gerät und das Kabel von heißen Oberflächen
fern, um Schäden am Gerät zu vermeiden.
• Verlegen Sie das Kabel nicht unter einem Teppich.
Sorgen Sie dafür, dass während des Betriebs niemand

DEUTSCH
Bedienungsanleitung
5
versehentlich am Kabel ziehen oder darüber stolpern
kann.
• Lassen Sie das Kabel nicht über spitze Kanten hängen.
• Das Kabel darf nicht geknickt oder um das Gerät
gewickelt werden.
Verwenden Sie das Gerät nicht,
• falls das Netzkabel beschädigt ist.
• falls Fehlfunktionen auftreten.
• falls das Gerät fallengelassen oder anderweitig beschädigt
wurde.
Lassen Sie das Gerät überprüfen und ggf. von einem
qualifizierten Wartungstechniker/Kundendienst reparieren.
Versuchen Sie niemals, das Gerät eigenständig zu reparieren
oder zu modifizieren.
• Verwenden Sie nur Zubehör, das für dieses Gerät
empfohlen wurde.
• Versuchen Sie nicht, Gegenstände in das Gerät zu
stecken.
• Versuchen Sie nicht, das Gehäuse eigenständig zu öffnen!
• Das Gerät ist nicht für den Betrieb mit einer externen
Zeitschaltuhr oder einem separaten Fernsteuerungssystem
vorgesehen.

6
1. Vorderes Schutzgitter
(einschl. Zierplatte + 3 Schrauben)
2. Halterung Flügelblatt
3. Flügelblatt
4. Verschluss hinteres Schutzgitter
5. Hinteres Schutzgitter
6. Motorgehäuse
7. Feststellring Verlängerungsrohr
8. Innenrohr des verstellbaren Rohrs
9. Höheneinstellring
10. Sockelabdeckung
11. Äußeres Innenrohr des verstellbaren Rohrs
12. Sockel
13. Bedienfeld
14. Sicherheitsschraube
15. Anzeige für hohe Leistung
16. Anzeige für mittlere Leistung
17. Anzeige für niedrige Leistung
18. NA-Anzeige (Natürlicher Wind)
19. SL-Anzeige (Sleep-Timer)
20. Fernsensor
21. Betriebsanzeige
22. Modus-Taste
23. OSC-Anzeige (Oszillation)
24. Timer-Taste
25. Timer-Anzeige 0,5 h
26. Timer-Anzeige 1 h
27. Leistungstaste
28. Timer-Anzeige 2 h
29. EIN/AUS-Taste
30. Timer-Anzeige 4 h
31. Fernbedienung
Hinweis: Die Fernbedienung benötigt eine
CR2025-Knopfbatterie
32. EIN/AUS-Taste
33. OSC-Taste (Oszillation)
Hinweis: Die OSC-Funktion kann NUR via
Fernbedienung eingestellt werden.
34. Leistungstaste
35. Modus-Taste
36. Timer-Taste
ÜBERSICHT DES PRODUKTS
13
20
21
22
32
33
35
24
27
30
23
25
26
28
29
14
7
8
9
10
15
16
17
18
19
11
12
34
36
12345
31
6

DEUTSCH
Bedienungsanleitung
7
VOR DEM ERSTMALIGEN GEBRAUCH
• EntfernenSiealleVerpackungsmaterialienundüberprüfenSie,obdasGerätvollständigist
und alle Zubehörteile enthalten sind.
•WickelnSiedasNetzkabelvollständigab.
•ReinigenSiedasGerätgemäßdenAnleitungeninAbschnittReinigung und Wartung.
Falls Teile fehlen oder beschädigt sind, wenden Sie sich bitte an Ihren Händler oder
an den Kundendienst.
Warnung: Plastiktüten stellen für Kleinkinder und Babies eine besondere Gefahr dar und
müssen daher ferngehalten werden, um Erstickung zu vermeiden.
INSTALLATION
Stellen Sie immer sicher, dass das Gerät ausgeschaltet und vom Netzstrom
getrennt ist, bevor Sie mit der Installation beginnen.
1. Stellen Sie den Sockel (12) mit der Verschlusskappe auf einen trockenen, ebenen
Untergrund.
2. Lösen Sie das Innenrohr (8) des verstellbaren Rohrs, indem Sie den Höheneinstellring (9)
lockern.
3. Befestigen Sie das verstellbare Rohr (8, 9, 10) mit 4 Schrauben am Sockel (12). Stecken Sie
die Sockelabdeckung (10) auf die Abdeckung.
4. Befestigen Sie das Bedienfeld (13) am Innenrohr (8), indem Sie den Ring (9) festziehen.
5. Lösen Sie den Verschluss (4) des hinteren Gitters, indem Sie ihn entgegen dem Uhrzeigersinn
drehen.
6. Halten Sie das hintere Schutzgitter (5) mit dem Griff nach oben gerichtet an den Motor und
sorgen Sie dafür, dass die Passstifte am Motor richtig in der Öffnung des Schutzgitters
stecken.
7. Schrauben Sie den Verschluss (4) des Schutzgitters auf den vorstehenden Kopf der
vorderen Motorabdeckung, indem Sie ihn im Uhrzeigersinn drehen, bis er richtig fest sitzt.
8. Schieben Sie das Flügelblatt (3) auf die Motorwelle und schrauben Sie dann die Halterung
(2) gut fest.
9. Befestigen Sie die Logo-Platte mit den 3 Schrauben (1) am vorderen Schutzgitter. Halten
Sie das vordere Schutzgitter an das hintere Schutzgitter (5) und verbinden Sie beide Teile
miteinander.
Hinweis: Befestigen Sie immer die Sicherheitsschraube (14), um eine ordnungsgemäße
Installation des Gitters zu gewährleisten!
Vergewissern Sie sich vor der Inbetriebnahme, Einstellung des
Neigungswinkels und Änderung der Windrichtung (Oszillation), dass das Gerät richtig
installiert und vom Netzstrom getrennt ist.
BETRIEB
1. Stellen Sie das Gerät auf einen ebenen, trockenen und stabilen Untergrund.
2. Vergewissern Sie sich, dass die Einstellung 0 (AUS) aktiviert ist, bevor Sie das Gerät an eine
ordnungsgemäß installierte Steckdose anschließen.
Vergewissern Sie sich, dass Ihre Netzspannung vor Ort mit den technischen Daten des

8
Geräts übereinstimmt. Anderenfalls könnte das Gerät überhitzen oder beschädigt werden.
3. Neigen Sie den Kopf des Geräts je nach Bedarf (siehe NEIGUNGSWINKEL EINSTELLEN).
4. Drücken Sie die EIN/AUS-Taste am Gerät oder auf der Fernbedienung, um das Gerät
einzuschalten.
5. Drücken Sie die Modus-Taste, um zwischen den Modi Normaler Wind, Natürlicher Wind
und Schlafmodus umzuschalten.
Hinweis: Die jeweilige Anzeigelampe leuchtet auf.
6. Drücken Sie die Leistungstaste, um die niedrige/ mittlere/ hohe Leistung einzuschalten.
Hinweis: Die entsprechende Anzeigelampe leuchtet auf.
7. Drücken Sie die Timer-Taste wiederholt, um die Dauer bis zur automatischen Abschaltung
einzustellen.
Je nach Timer-Einstellung leuchtet die entsprechende Anzeige auf.
Wählen Sie einen Countdown-Timer bis zu 7,5 Stunden; die Anzeige am Bedienfeld
leuchtet auf.
NEIGUNGSWINKEL EINSTELLEN
Um den Neigungswinkel einzustellen, kippen Sie das Motorgehäuse nach oben oder unten,
bis es einrastet.
OSZILLATION
Änderung der Windrichtung!
- Drücken Sie die OSC-Taste auf der Fernbedienung, um den Oszillationsmodus ein-/
auszuschalten.
REINIGUNG UND WARTUNG
Schalten Sie das Gerät aus und trennen Sie den Netzstecker, bevor Sie das Gerät reinigen.
Tauchen Sie das Gerät nicht in Wasser. Warnung! Stromschlaggefahr!
- Reinigen Sie das Gerät mit einem weichen, feuchten Lappen.
- Besprühen Sie das Gerät nicht mit Flüssigkeiten und tauchen Sie es nicht in Wasser oder
Flüssigkeiten ein.
- Für Reinigungszwecke dürfen das vordere und das hintere Gitter und der Ventilatorflügel
entfernt werden.
Sorgen Sie nach der Reinigung dafür, dass alle Teile trocken sind und dass das vordere
unter hintere Schutzgitter einschließlich Ventilatorflügel wieder ordnungsgemäß
installiert werden.
Verwenden Sie niemals Alkohol, Benzin und/oder andere aggressive Reinigungsmittel/
harte Gegenstände.
VORSICHT: Der Ventilatorflügel hat spitze Kanten. Handhaben Sie ihn vorsichtig.

DEUTSCH
Bedienungsanleitung
9
LAGERUNG
Bewahren Sie das Gerät für Kinder unzugänglich und an einem sauberen, trockenen Ort auf.
Verwenden Sie dafür am besten die Originalverpackung oder decken Sie das Gerät zum
Schutz vor Staub ab.
Entsorgung
Elektrische Altgeräte, die mit diesem Symbol gekennzeichnet sind, dürfen nicht über den
normalen Hausmüll entsorgt, sondern müssen getrennt gesammelt werden. Geben Sie das
Gerät am Ende seiner Nutzungsdauer an speziellen Sammelstellen oder bei Ihrem Händler
vor Ort ab.
Der Standventilator 81100 ist mit einer Einzelhandelsverpackung verpackt. Solche
Verpackungen sind recycelbar, d.h. sie sind wiederverwendbar bzw. wiederverwertbar.
Entsorgung von Batterien
Herkömmliche und wiederaufladbare Batterien dürfen nicht über den normalen Hausmüll
entsorgt werden. Als Verbraucher sind Sie gesetzlich verpflichtet, Batterien für eine
ordnungsgemäße Entsorgung abzugeben. Sie können Altbatterien an einer öffentlichen
Sammelstelle vor Ort oder in Geschäften, in denen Batterien verkauft werden, abgeben.
Hinweis: Die nachfolgenden Codes befinden sich auf Batterien, die gefährliche
Substanzen enthalten:
Pb = Batterie enthält Blei
Cd = Batterie enthält Kadmium
Hg = Batterie enthält Quecksilber
TECHNISCHE DATEN
Spannung: 220 - 240 V ~ 50 Hz
Leistung: 40 W
Schutzklasse: II
Die technischen Daten unterliegen Änderungen

10
Parameter Symbol Wert Einhiet
Max. Luftdurchfluss F 41.1 m³/min
Eingangsleistung P 40.28 W
Servicewert SV 1.02 (m³/min)/W
Energieverbrauch Standby P
SB 0.42 W
Energieverbrauch Saison Q 13.4 kWh/a
Schallleistungspegel L
WA 54.20 dB(A)
Max. Luftgeschwindigkeit c 3.54 Meter/s
Bemessungsnorm für Servicewert
EN 50564:2011
IEC 60879:1986 +cor1:1992
EN 60704-2-7:1998
HINWEIS: Aufgrund der kontinuierlichen Weiterentwicklung des Produkts können das
Design und die technischen Daten von den Abbildungen und Angaben auf der Verpackung
abweichen.

DEUTSCH
Bedienungsanleitung
11
Garantie und Service:
Sie erhalten 2 Jahre Garantie ab Kaufdatum auf Material-
und Fabrikationsfehler der Produkte.
Die Garantie gilt nicht:
• im Falle von Schäden, die auf unsachgemäßer Bedienung
beruhen
• für Verschleißteile (z.B. Batterien)
• für Mängel, die dem Kunden bereits beim Kauf bekannt
waren
• bei Eigenverschulden des Kunden
Die gesetzlichen Gewährleistungen des Kunden bleiben
durch die Garantie unberührt. Für Geltendmachung eines
Garantiefalles innerhalb der Garantiezeit ist durch den
Kunden der Nachweis des Kaufes zu führen.
Die Garantie ist innerhalb eines Zeitraumes von 2 Jahren ab
Kaufdatum gegenüber der
KORONA electric GmbH, Sundern.
Telefon Hotline: +49 2933 90284-80
Mail: [email protected]
web: www.korona-electric.de
geltend zu machen. Der Kunde hat im Garantiefall das Recht
zur Reparatur der Ware bei unseren eigenen oder bei von uns
autorisierten Werkstätten. Weitergehende Rechte werden
dem Kunden (aufgrund der Garantie) nicht eingeräumt.

12
Instruction Manual
Read these instructions carefully before assembling and/or
operating the appliance. Keep these instructions including
receipt and, if possible, the box with the internal packing.
When passing on the appliance to a third party, make sure to
include these instructions for use.
INTENDED USE
This appliance is intended for household use only and not
for commercial, industrial or outdoor use. Other use not
recommended may cause fire, electric shock or injury.
Safety:
This symbol identifies hazards which may cause injuries!
This symbol identifies electric shock hazards!
This symbol identifies tips and information.
IMPORTANT SAFETY INSTRUCTIONS
Warning! To avoid the possibility of injury/damage to the
appliance, electric shock and risk of fire.
Danger of injury and damage to the appliance!
• Manufacturer takes no responsibility for any damage
caused by incorrect use.
• Incorrect or improper use can damage the appliance and
cause injuries to the user.

Instruction Manual
ENGLISH
13
• Before connecting this appliance to the mains, make
sure your local voltage matches the technical data of the
appliance. Otherwise the appliance may overheat and get
damaged.
• Do avoid contact with all moving parts. Always wait until
all moving parts have come to stand still before touching
them.
• Do not insert fingers or allow foreign objects to enter the
grill.
• Do not operate without the fan grills properly in place or if
the gril becomes damaged or loose.
• Make sure the fan is not placed near drapes, curtains, or
any objects that may be drawn (including hair and clothes)
into the fan.
• Never place or operate the unit where it could be subject
to:
- Heat sources such as radiators, heat registers, stoves
or other products that produce heat
- Direct sunlight
- Excessive dust
- Mechanical vibration or shock
- Lack of ventilation
- Uneven surfaces, to avoid the tipping of the fan during
use
• Always turn OFF (0) and unplug the fan when not in use
and/or when moving it from one location to another.
Caution! Danger of electric shock!
• Never put the appliance, cord or plug into water or any
other liquid.
• Do not use the appliance near a sink or wash basin.
• Do not use the appliance with wet hands.
• Do not use the appliance outdoors.

14
• Do not place the appliance close to an open window.
Rain splashing on the fan could cause an electric shock
hazard.
An electric appliance is not a toy!
• Never leave the appliance unattended during use.
• This appliance can be used by children aged from 8 years
and above and persons with reduced physical, sensory or
mental capabilities or lack of experience and knowledge
if they have been given supervision or instruction
concerning the use of the appliance in a safe way and
understand the hazards involved. Children shall not play
with the appliance. Cleaning and user maintenance shall
not be made by children unless they are older than 8 and
supervised.
• Keep the appliance and its cord out of reach of children
less than 8 years.
• Always unplug your appliance when it is not in use, and
before cleaning.
• Always pull the plug – not the cord.
• Keep the appliance and the cord well away from any hot
surfaces to avoid any damage to the appliance.
• Do not run cord under carpeting. Make sure the cord may
not inadvertently be pulled or cause anyone to trip when
in use.
• Do not allow the cord to hang over sharp edges.
• Do not bend the cord or wind it round the appliance.
Do not use the appliance,
• if the cord is damaged.
• in case of malfunction.
• if the appliance was dropped or is damaged otherwise.

Instruction Manual
ENGLISH
15
Have it checked and, if necessary, repaired by a qualified
person/Customer Service. Never attempt to make any
modifications to or repair the appliance yourself.
• Only use accessories evaluated for use with this appliance.
• Never attempt to drive any objects into the appliance.
• Never attempt to open the housing yourself!
• The appliance is not intended to be operated by means of
an external timer or separate remote-control system.

16
1. Front Grill
(incl. decorative plate + 3 screws)
2. Blade fastener
3. Blade
4. Rear Grill fasterner
5. Rear grill
6. Motor housing
7. Extension pole tigthen ring
8. Adjustable pole inner tube
9. Height adjustment ring
10. Base cover
11. Adjustable pole outer tube
12. Cross base
13. Control panel
14. Safety screw
15. High speed indicator
16. Mid speed indicator
17. Lo speed indicator
18. NA (Natural wind) indicator
19. SL (Sleep) indicator
20. Remote sensor
21. Power indicator
22. Mode button
23. OSC (Oscillation) indicator
24. Timer button
25. Timer 0.5hr indicator
26. Timer 1hr indicator
27. Speed button
28. Timer 2hr indicator
29. ON/OFF button
30. Timer 4hr indicator
31. Remote control
Note: Remote control operated
by CR2025 button cell
32. ON/OFF button
33. OSC (Oscillation button)
Note: OSC function control by
remote control ONLY
34. Speed button
35. Mode button
36. Timer button
DESCRIPTION OF PARTS
13
20
21
22
32
33
35
24
27
30
23
25
26
28
29
14
7
8
9
10
15
16
17
18
19
11
12
34
36
12345
31
6

Instruction Manual
ENGLISH
17
BEFORE FIRST USE
• Removeallpackagingmaterialandcheckwhethertheapplianceiscompleteandthatall
accessories are included.
•Fullyunwindthepowercord.
• CleantheapplianceasdescribedunderCleaning and Care.
If any items are damaged or missing, contact your dealer or customer service.
Warning: Plastic bags are a danger to toddlers and babies, therefore keep them away
to avoid suffocation.
ASSEMBLY
Always ensure that the fan is unplugged from the power supply and turned off
before commencing with the assembly process.
1. Place the cross base (12) with end cap on dry, flat surface
2. Release the adjustable pole inner tube (8) by loosening the height adjustment ring (9).
3. Attach the adjustable pole (8,9,10) to the cross base (12) by 4 screws. Insert the base cover
(10) to cover
4. Attach the control panel (13) to the adjustable pole inner tube (8) by tightening the ring (9)
5. Unscrew the rear grill fastener (4) by rotating it anticlockwise
6. Position the rear grill (5) against the front of the motor with its handle at the top, ensuring
that the locating peds on the motor are correctly inserted into the hole on the grill
7. Screw the grill fastener (4) onto the projecting thread on the motor front cover by rotating it
clockwise until it is firmly tightened.
8. Push the fan blade (3) onto the motor shaft. Then firmly screw on the blade fastener (2).
9. Attach the logo plate to the front grill by 3 screw (1). Then position the front grill against the
read grill (5) and join them together.
Note: Always attach the safety screw (14) to ensure that the grill is properly assembled!
Always make sure that the fan is properly assembled and unplugged before
operation, changing the tilting angle and changing the direction of the air current
(oscillation).
OPERATION
1. Place your fan on an even, dry and stable surface.
2. Ensure the fan is set to 0 (OFF) before plugging it into a a power socket.
Make sure your local voltage matches the technical data of the appliance. Otherwise the
appliance may overheat and get damaged.
4. Switch on the appliance by pressing ON/OFF button on the unit or remote control.
5. Press mode button to switch between normal, natural wind, sleep mode.
Note: Corresponding indicator will light up.
6. Press speed button to switch the fan speed between L / M / H.
Note: Corresponding indicator will light up.
7. Press timer button continuously to preset auto switch off timer.
Indicator light up according to the desire timerCount down timer up to 7.5hrs with indicator
light on the control panel.

18
ADJUST TILT ANGLE
To adjust the desired fan angle, tilt the motor housing up or down until it clicks into place.
OSCILLATION
Changing the direction of the air current!
- Press the OSC button on remote control, to start/stop the oscillation mode.
CLEANING AND CARE
Before cleaning, always switch off the appliance and disconnect it from the mains.
Never immerse the appliance in water. Danger! Electric Shock!
- Clean the appliance using a a soft damp cloth.
- Never spray the appliance with liquids or submerge it in water or other liquid.
- For cleaning purpose, front and back grill as well as the fan blade can be removed.
After the cleaning process is finished make sure that all parts are dry and that the front/
back grill incl. fan blade are properly reassembled.
Never use alcohol, gasoline, and/or any other aggressive cleaning agents/hard objects.
CAUTION: The Fan Blade may have sharp edges. Handle with extreme care.
STORAGE
Keep the appliance away from children and store it in a clean and dry place, best in its original
box or cover it to protect it from dust.

Instruction Manual
ENGLISH
19
Disposal Instructions
Waste electrical devices marked with this sign must not be disposed of with your
household waste, but are to be collected separately. Therefore, please return this device at the
end of its life cycle to special collection points for disposal or your local dealer.
Your Stand Fan 81100 is packed in a retail box. Such boxes are recyclable waste, i.e. they
are reusable or recyclable.
Disposal Instruction For Batteries
Standard and rechargeable batteries should not be thrown into regular household waste. As
a consumer, you are legally obliged to return used batteries for proper disposal. You can hand
in your used batteries at public collection points in your district or sales outlets where batteries
of this type are sold.
Note: The codes below are printed on batteries containing harmful substances:
Pb = Battery contains lead
Cd = Battery contains cadmium
Hg = Battery contains mercury
TECHNICAL DATA
Voltage: 220 - 240 V ~ 50 Hz
Power: 40 W
Protection class: II
Technical data subject to change!

20
Description Symbol Value Unit
Maximum fan flow rate F 41.1 m³/min
Fan power input P 40.28 W
Service value SV 1.02 (m³/min)/W
Standby power consumption P
SB 0.42 W
Seasonal electricity consumption Q 13.4 kWh/a
Fan sound power level L
WA 54.20 dB(A)
Maximum air velocity c 3.54 meter/sec
Measurement standard for service value
EN 50564:2011
IEC 60879:1986 +cor1:1992
EN 60704-2-7:1998
NOTE: As a result of continual improvements, the design and specifications of the
product within may differ slightly to the unit illustrated on the packaging.

Instruction Manual
ENGLISH
21
Guarantee:
This product is guaranteed against defects in materials and
workmanship for a period of 2 years.
This guarantee is not valid:
•iftheappliancehasnotbeenusedinaccordancetothe
instructions
•fordamagesduetowearandtear(batteries,etc.)
•fordamagesknownbycustomerattimeofpurchase
•fordamagescausedbyowner
This guarantee does not affect your statutory right, nor any
legal right you may have as a custumer under applicable
national legislation governing the purchase of goods.
In order to assert his/her right in a guarantee case during the
guaranteed period, the customer must provide evidence of
the date of purchase (receipt).
The guarantee is to be asserted against
KORONA electric GmbH, Sundern/Germany.
Telephone Hotline: +49 2933 90284-80
Mail: [email protected]
web: www.korona-electric.de
within 2 years after the date of purchase. In case of guarantee
the customer is given the right to get the appliance repaired
at our own or at an authorized shop. Further rights (due to
guarantee case) are not given to the customer.

22
Handleiding
Lees deze instructies aandachtig door voordat u het apparaat
monteert en/of gebruikt. Bewaar deze instructies, inclusief de
kassabon en, indien mogelijk, de doos en binnenverpakking.
Als u het apparaat doorgeeft aan een derde partij, zorg er
dan voor dat u deze handleiding bij het apparaat voegt.
BEOOGD GEBRUIK
Dit apparaat is uitsluitend bedoeld voor huishoudelijk gebruik
en niet voor commercieel of industrieel gebruik of gebruik
buitenshuis. Ander gebruik dat niet wordt aanbevolen kan
leiden tot brand, elektrische schokken en letsel.
Veiligheid:
Dit symbool wijst op gevaren die tot letsel kunnen
leiden!
Dit symbool wijst op elektrische schokgevaren!
Dit symbool geeft aan dat er tips en informatie worden
gegeven.
BELANGRIJKE VEILIGHEIDSINSTRUCTIES
Waarschuwing! Om de kans op verwondingen/schade
aan het apparaat, elektrische schokken, brand en
brandwonden te voorkomen.
Gevaar voor letsel en schade aan het apparaat!
• De fabrikant aanvaardt geen enkele verantwoordelijkheid
voor schade als gevolg van onjuist gebruik.

NEDERLANDS
Handleiding
23
• Onjuist gebruik kan schade aan het apparaat veroorzaken
en kan leiden tot letsel bij de gebruiker.
• Zorg er, voordat u het apparaat aansluit op het
stopcontact, voor dat uw lokale spanning overeenkomt
met de technische gegevens van het apparaat. Als dit niet
het geval is, kan het apparaat oververhit en beschadigd
raken.
• Vermijd contact met alle bewegende onderdelen. Wacht
altijd totdat alle bewegende onderdelen volledig tot
stilstand zijn gekomen voordat u ze aanraakt.
• Steek geen vingers in het rooster van de ventilator en zorg
ervoor dat er geen vreemde voorwerpen in het rooster
komen.
• Gebruik het apparaat niet als de ventilatorroosters niet
goed op hun plaats zitten of als de roosters zijn beschadigd
of loszitten.
• Zorg ervoor dat de ventilator uit in de buurt blijft van
gordijnen of andere voorwerpen (inclusief haar en kleding)
die in de ventilatoren kunnen worden getrokken.
• Plaats of gebruik het apparaat nooit op een plek waar het
kan worden blootgesteld aan:
- Warmtebronnen zoals radiatoren, verwarmingsroosters,
kachels of andere producten die warmte produceren
- Direct zonlicht
- Overmatig stof
- Mechanische trillingen of schokken
- Een gebrek aan ventilatie
- Ongelijke oppervlakken, om te voorkomen dat de
ventilator omvalt tijdens gebruik
• Schakel de ventilator altijd UIT (0) en trek de stekker uit
het stopcontact wanneer de ventilator niet wordt gebruikt
en/of bij het verplaatsen van de ventilator van de ene
locatie naar de andere.

24
Let op! Gevaar voor elektrische schokken!
• Plaats het apparaat, het netsnoer of de stekker nooit in
water of andere vloeistoffen.
• Gebruik het apparaat niet in de buurt van een gootsteen
of wastafel.
• Gebruik het apparaat niet met natte handen.
• Gebruik het apparaat niet buitenshuis.
• Plaats het apparaat niet in de buurt van een open raam.
Regen die op de ventilator spat kan leiden tot elektrische
schokken.
Een elektrische apparaat is geen speelgoed!
• Laat het apparaat nooit onbeheerd achter tijdens gebruik.
• Dit apparaat mag worden gebruikt door kinderen van 8
jaar en ouder en personen met verminderde lichamelijke,
zintuiglijke of verstandelijke vermogens of gebrek aan
ervaring en kennis indien ze onder toezicht staan of zijn
geïnstrueerd over het gebruik van het apparaat op een
veilige manier en de gevaren die samengaan met het
gebruik begrijpen. Kinderen mogen niet met het apparaat
spelen. Reiniging en onderhoud mag niet worden
uitgevoerd door kinderen, tenzij zij ouder zijn dan 8 en
worden begeleid.
• Houd het apparaat en het netsnoer buiten bereik van
kinderen jonger dan 8 jaar.
• Haal de stekker van het apparaat altijd uit het
stopcontact wanneer het apparaat niet wordt gebruikt
en vóór het reinigen.
• Trek altijd aan de stekker– niet het snoer.
• Houd het apparaat en netsnoer uit de buurt van hete
oppervlakken om schade aan het apparaat te voorkomen.
• Laat het netsnoer niet onder de vloerbedekking door
lopen. Zorg ervoor dat er niet per ongeluk aan het

NEDERLANDS
Handleiding
25
netsnoer kan worden getrokken en dat er niemand over
het netsnoer kan struikelen.
• Laat het netsnoer niet over scherpe randen hangen.
• Buig het netsnoer niet en wikkel het niet rond het apparaat.
Gebruik het apparaat niet,
• als het netsnoer is beschadigd.
• in geval van storing.
• als het apparaat is gevallen of anderszins beschadigd.
Laat het nakijken en, indien nodig, repareren door een
gekwalificeerd persoon/de klantenservice. Probeer nooit zelf
wijzigingen te maken of het apparaat te repareren.
• Gebruik alleen accessoires die zijn geëvalueerd voor
gebruik met dit apparaat.
• Probeer nooit om voorwerpen in het apparaat te steken.
• Probeer nooit zelf de behuizing te openen!
• Dit apparaat is niet bedoeld om gebruikt te worden met
een externe timer of apart afstandsbedieningssysteem.

26
1. Voorrooster
(incl. sierplaat + 3 schroeven)
2. Bladbevestiging
3. Blad
4. Achterroosterbevestiging
5. Achterrooster
6. Motorhuis
7. Aandraairing verlengstang
8. Binnenbuis verstelbare stang
9. Ring voor instellen hoogte
10. Afdekking voet
11. Buitenkant van binnenbuis verstelbare stang
12. Kruisvoet
13. Bedieningspaneel
14. Veiligheidsschroef
15. Indicatielampje hoge snelheid
16. Indicatielampje gemiddelde snelheid
17. Indicatielampje lage snelheid
18. Indicatielampje NA (natuurlijke wind)
19. Indicatielampje SL (slaap)
20. Afstandsbedieningssensor
21. Indicatielampje Power
22. Modus-knop
23. Indicatielampje OSC (oscillatie)
24. Timer-knop
25. Indicatielampje timer 0,5 uur
26. Indicatielampje timer 1 uur
27. Snelheidsknop
28. Indicatielampje timer 2 uur
29. AAN/UIT-knop
30. Indicatielampje timer 4 uur
31. Afstandsbediening
Opmerking: afstandsbediening werkt op
CR2025-knoopcel
32. AAN/UIT-knop
33. OSC (oscillatie-knop)
Opmerking: de OSC-functie kan ALLEEN
worden bediend met de afstandsbediening
34. Snelheidsknop
35. Modus-knop
36. Timer-knop
BESCHRIJVING VAN ONDERDELEN
13
20
21
22
32
33
35
24
27
30
23
25
26
28
29
14
7
8
9
10
15
16
17
18
19
11
12
34
36
12345
31
6

NEDERLANDS
Handleiding
27
1. Voorrooster
(incl. sierplaat + 3 schroeven)
2. Bladbevestiging
3. Blad
4. Achterroosterbevestiging
5. Achterrooster
6. Motorhuis
7. Aandraairing verlengstang
8. Binnenbuis verstelbare stang
9. Ring voor instellen hoogte
10. Afdekking voet
11. Buitenkant van binnenbuis verstelbare stang
12. Kruisvoet
13. Bedieningspaneel
14. Veiligheidsschroef
15. Indicatielampje hoge snelheid
16. Indicatielampje gemiddelde snelheid
17. Indicatielampje lage snelheid
18. Indicatielampje NA (natuurlijke wind)
19. Indicatielampje SL (slaap)
20. Afstandsbedieningssensor
21. Indicatielampje Power
22. Modus-knop
23. Indicatielampje OSC (oscillatie)
24. Timer-knop
25. Indicatielampje timer 0,5 uur
26. Indicatielampje timer 1 uur
27. Snelheidsknop
28. Indicatielampje timer 2 uur
29. AAN/UIT-knop
30. Indicatielampje timer 4 uur
31. Afstandsbediening
Opmerking: afstandsbediening werkt op
CR2025-knoopcel
32. AAN/UIT-knop
33. OSC (oscillatie-knop)
Opmerking: de OSC-functie kan ALLEEN
worden bediend met de afstandsbediening
34. Snelheidsknop
35. Modus-knop
36. Timer-knop
VOOR HET EERSTE GEBRUIK
• Verwijder alle verpakkingsmaterialen en controleer of het apparaat compleet is en alle
accessoires zijn inbegrepen.
•Rolhetnetsnoervollediguit.
•ReinighetapparaatzoalsbeschrevenonderReiniging en onderhoud.
Neem contact op met uw dealer of de klantenservice als er onderdelen zijn
beschadigd of ontbreken.
Waarschuwing: Plastic zakken vormen een verstikkingsgevaar voor peuters en baby’s
en moeten daarom uit de buurt worden gehouden.
MONTAGE
Zorg er altijd voor dat de ventilator is losgekoppeld van het lichtnet en is
uitgeschakeld voordat u begint met de montage.
1. Plaats de kruisvoet (12) met eindkap op een droge, vlakke ondergrond.
2. Ontgrendel de binnenbuis van de verstelbare stang (8) door de ring voor het instellen van
de hoogte (9) los te draaien.
3. Bevestig de verstelbare stang (8, 9, 10) met 4 schroeven aan de kruisvoet (12). Plaats de
afdekking van de voet (10) om de voet af te dekken.
4. Bevestig het bedieningspaneel (13) aan de binnenbuis van de verstelbare stang (8) door de
ring (9) vast te draaien.
5. Schroef de achterroosterbevestiging (4) los door deze tegen de klok in.
6. Plaats het achterrooster (5) met de handgreep aan de bovenkant tegen de voorkant van
de motor en zorg ervoor dat de pennen op de motor correct in het gat op het rooster zijn
gestoken.
7. Schroef de roosterbevestiging (4) op de uitstekende schroefdraad op de voorkap van de
motor door de bevestiging met de klok mee te draaien totdat deze stevig vastzit.
8. Schuif het ventilatorblad (3) op de motoras. Schroef vervolgens de bladbevestiging (2)
stevig vast.
9. Bevestig de logoplaat met 3 schroeven (1) aan het voorrooster. Plaats vervolgens het
voorrooster tegen het achterrooster (5) en maak de roosters aan elkaar vast.
Opmerking: bevestig de veiligheidsschroef (14) altijd om ervoor te zorgen dat het rooster
correct is gemonteerd!
Zorg er voordat u de kantelhoek en richting van de luchtstroom (oscillatie)
wijzigt altijd voor dat de ventilator juist is gemonteerd en de stekker uit het stopcontact
is getrokken.
GEBRUIK
1. Plaats uw ventilator op een vlakke, droge en stabiele ondergrond.
2. Zorg ervoor dat de ventilator in de stand 0 (UIT) staat voordat u de stekker in het stopcontact
steekt.
Controleer altijd of uw lokale spanning overeenkomt met de technische gegevens van het
apparaat. Als dit niet het geval is, kan het apparaat oververhit en beschadigd raken.
3. U kunt de gewenste kantelhoek instellen met behulp van de ventilatorkop (zie INSTELLEN
KANTELHOEK).

28
4. Schakel het apparaat in door op de AAN/UIT-knop op het apparaat of de afstandsbediening
te drukken.
5. Druk op de Modus-knop om te schakelen tussen normale wind, natuurlijke wind,
slaapmodus.
Opmerking: het bijbehorende indicatielampje licht op.
6. Druk op de Snelheidsknop om de ventilatorsnelheid in te stellen op L / M / H.
Opmerking: het bijbehorende indicatielampje licht op.
7. Druk herhaaldelijk op de Timer-knop om de automatische uitschakeltimer in te stellen.
De bijbehorende indicatielampjes lichten op volgens instelling van de timer.
Afteltimer tot 7,5 uur met indicatielampjes op het bedieningspaneel.
INSTELLEN KANTELHOEK
U kunt de ventilatorhoek aanpassen door het motorhuis omhoog of omlaag te kantelen totdat
deze op zijn plaats klikt.
OSCILLATIE
De richting van de luchtstroom wijzigen!
- Druk op de OSC-knop op de afstandsbediening om de oscillatie-modus te starten/stoppen.
REINIGING EN ONDERHOUD
Schakel het apparaat altijd uit en trek de stekker uit het stopcontact alvorens
reinigingshandelingen uit te voeren.
Dompel het apparaat nooit onder in water. Gevaar! Elektrische schokken!
- Reinig het apparaat met behulp van een zachte, vochtige doek.
- Spuit nooit vloeistoffen op het apparaat en dompel het niet onder in water of andere
vloeistoffen.
- Het voor- en achterrooster en ventilatorblad kunnen worden verwijderd voor
reinigingsdoeleinden.
Zorg er nadat het reinigingsproces is voltooid voor dat alle onderdelen droog zijn en dat
het voor- en achterrooster incl. ventilatorblad weer goed zijn gemonteerd.
Gebruik nooit alcohol, benzine en/of andere agressieve reinigingsmiddelen/harde
voorwerpen.
LET OP: het ventilatorblad kan scherpe randen hebben. Wees uiterst voorzichtig.
OPSLAG
Houd het apparaat uit de buurt van kinderen en bewaar het op een schone en droge plaats, bij
voorkeur in de originele doos of dek het apparaat af om het te beschermen tegen stof.

NEDERLANDS
Handleiding
29
Verwijderingsinstructies
Afgedankte elektrische apparaten die zijn gemarkeerd met dit symbool mogen niet met
het huishoudelijk afval worden weggegooid, maar moeten apart worden ingezameld. Breng dit
apparaat daarom aan het einde van zijn levensduur terug naar een speciaal inzamelpunt voor
verwijdering of naar uw dealer.
Uw bureauventilator 81100 is verpakt in een doos. Dergelijke dozen zijn recyclebaar afval,
d.w.z. ze zijn herbruikbaar of recyclebaar.
Instructies voor verwijdering van batterijen
Standaard en oplaadbare batterijen mogen niet bij het normale huisvuil worden weggegooid.
Als consument bent u wettelijk verplicht om gebruikte batterijen in te leveren voor correcte
verwijdering. U kunt uw gebruikte batterijen inleveren bij openbare inzamelpunten in uw
woonplaats of verkooppunten waar dergelijke batterijen worden verkocht.
Opmerking: de onderstaande codes zijn afgedrukt op batterijen die schadelijke stoffen
bevatten:
Pb = batterij bevat lood
Cd = batterij bevat cadmium
Hg = batterij bevat kwik
TECHNISCHE GEGEVENS
Spanning: 220 - 240 V ~ 50 Hz
Vermogen: 40 W
Beschermingsklasse: II
Technische gegevens kunnen worden gewijzigd

30
Beschrijving Symbool Waarde Eenheid
Maximaal ventilatordebiet F 41.1 m³/min
Opgenomen vermogen ventilator P 40.28 W
Servicewaarde SV 1.02 (m³/min)/W
Energieverbruik in stand-bystand P
SB 0.42 W
Seizoensgebonden elektriciteitsverbruik Q 13.4 kWh/a
Geluidsvermogensniveau ventilator L
WA 54.20 dB(A)
Maximale luchtsnelheid c 3.54 meter/sec
Meetstandaard voor servicewaarde
EN 50564:2011
IEC 60879:1986 +cor1:1992
EN 60704-2-7:1998
OPMERKING: het ontwerp en de specificaties van het product kunnen als gevolg van
voortdurende verbeteringen enigszins afwijken van het ontwerp en de specificaties op de
verpakking.

NEDERLANDS
Handleiding
31
Garantie:
Er zit op dit product 2 jaar garantie tegen defecten in
materialen en fabricagefouten.
Deze garantie is niet geldig:
•alshetapparaatnietisgebruiktinovereenstemmingmet
de instructies
•voorschadealsgevolgvanslijtage(batterijen,etc.)
•voorschadediebijdeklantbekendwasophetmoment
van aankoop
•voorschadeveroorzaaktdoordeeigenaar
Deze garantie heeft geen invloed op de wettelijke rechten die
u als klant kunt hebben onder de van kracht zijnde nationale
wetgeving inzake de aankoop van goederen.
De klant moet, om zich tijdens de garantieperiode op zijn/
haar garantierecht te beroepen, bewijs geven van de
aankoopdatum (aankoopbon).
De garantie kan worden ingesteld tegen
KORONA electric GmbH, Sundern/Duitsland.
Telefoon: +49 2933 90284-80
Mail: [email protected]
web: www.korona-electric.de
binnen 2 jaar vanaf de aankoopdatum. De klant heeft in geval
van garantie het recht om het apparaat te laten repareren in
onze winkel of bij een andere erkende winkel. Er worden (op
grond van de garantie) geen verdere rechten aan de klant
gegeven.

32
Mode d’emploi
Lisez attentivement ces instructions avant d’assembler et/
ou d’utiliser l’appareil. Conservez ces instructions, y compris
le reçu et, si possible, la boîte avec l’emballage interne.
Lorsque vous transmettez l’appareil à un tiers, veuillez-y
inclure ces instructions d’utilisation.
UTILISATION PRÉVUE
Cet appareil est destiné à un usage domestique uniquement
et non à un usage commercial, industriel ou à l’extérieur.
Toute autre utilisation non recommandée peut provoquer un
incendie, un risque d’électrocution ou des blessures.
Mesures de sécurité :
Ce symbole identifie les dangers qui peuvent causer
des blessures !
Ce symbole identifie les risques de choc électrique !
Ce symbole identifie les conseils et les informations
apportés à l’utilisateur.
CONSIGNES IMPORTANTES DE SÉCURITÉ
AVERTISSEMENT ! Pour éviter les risques de blessures/
dommages de l’appareil, de choc électrique et de brûlures.
Risque de blessure et de dommages à l’appareil !
• Le fabricant ne sera pas tenu responsable pour les
dommages causés par une utilisation incorrecte du
produit.

FRANÇAIS
Manuel d‘instructions
33
• Une utilisation incorrecte ou impropre peut endommager
l‘appareil et causer des blessures à l‘utilisateur.
• Avant de brancher cet appareil sur le secteur, assurez-
vous que la tension locale corresponde aux données
techniques de l‘appareil. Sinon, l‘appareil risquera de
surchauffer et d‘être endommagé.
• Évitez tout contact avec toutes les pièces mobiles.
Attendez toujours que toutes les pièces mobiles se soient
immobilisées avant de les toucher.
• N‘insérez pas les doigts et ne laissez aucun corps étranger
pénétrer dans la grille.
• N’utilisez pas le produit sans que les grilles soient
correctement en place ou si la grille est endommagée ou
desserrée.
• Assurez-vous que le ventilateur ne soit pas placé à
proximité de rideaux ou tout objet pouvant se prendre (y
compris les cheveux et les vêtements) dans le ventilateur.
• Ne placez jamais ni n’utilisez l‘appareil dans des endroits
où il pourrait être soumis :
- A des sources de chaleur telles que des radiateurs, des
poêles de chauffage, des cuisinières ou autres produits
qui produisent de la chaleur
- A la lumière directe du soleil
- A l’excès de poussière
- Aux vibrations mécaniques ou chocs
- A un manque de ventilation
- A des surfaces inégales, pour éviter le basculement du
ventilateur lors de son utilisation
• Mettez toujours le ventilateur sur Arrêt (0) et débranchez-
le lorsqu‘il n‘est pas utilisé et/ou lorsqu‘il est déplacé d‘un
endroit à un autre.

34
Attention ! Danger risque de choc électrique !
• Ne mettez jamais l‘appareil, le cordon ou la prise dans
l‘eau ou tout autre liquide.
• N’utilisez pas l‘appareil près d‘un évier ou d‘un lavabo.
• N’utilisez pas l‘appareil avec des mains mouillées.
• N‘utilisez pas l‘appareil à l‘extérieur.
• Ne placez pas l’appareil près d’une fenêtre ouverte.
Des éclaboussures de pluie sur le ventilateur pourraient
provoquer un choc électrique
Un appareil électrique n’est pas un jouet !
• Ne laissez jamais l’appareil sans surveillance pendant
l‘utilisation.
• Cet appareil peut être utilisé par des enfants âgés de 8 ans
et plus et des personnes ayant des capacités physiques,
sensorielles ou mentales réduites voire même un manque
d‘expérience et de connaissances uniquement s‘ils ont reçu
une supervision ou une instruction concernant l‘utilisation
de l‘appareil d‘une manière sûre et comprennent les
dangers qui y sont associés. Les enfants ne doivent pas
jouer avec l‘appareil. Le nettoyage et l‘entretien effectués
par des utilisateurs ne doivent pas être effectués par des
enfants à moins qu‘ils ne soient âgés de plus de 8 ans et
sous la surveillance d’un adulte.
• Gardez l‘appareil et son cordon hors de portée des enfants
de moins de 8 ans.
• Débranchez toujours l‘appareil lorsqu‘il n‘est pas utilisé
et avant de le nettoyer.
• Tirez toujours la fiche pour débrancher –et non pas le
cordon.
• Gardez l‘appareil et le cordon loin de toute surface chaude
pour éviter tout dommage à l‘appareil.

FRANÇAIS
Manuel d‘instructions
35
• Ne faites pas passer le cordon sous la moquette. Assurez-
vous que le cordon ne peut pas être tiré par inadvertance
ou que quelqu‘un ne trébuche lors de son utilisation.
• Ne laissez pas le cordon pendre sur des bords tranchants.
• Ne pliez pas le cordon et ne l’enroulez pas autour de
l’appareil.
N’utilisez pas l’appareil,
• si le cordon est endommagé.
• en cas de dysfonctionnement.
• si l‘appareil est tombé ou s‘il est endommagé.
Faites vérifier et, si nécessaire, réparé par une personne
qualifiée/service à la clientèle. N‘essayez jamais de modifier
ou de réparer vous-même l‘appareil.
• N‘utilisez que des accessoires testés pour l‘utilisation
avec cet appareil.
• N‘essayez jamais d‘enfoncer des objets dans l‘appareil.
• N‘essayez jamais d‘ouvrir le boîtier vous-même !
• L‘appareil n‘est pas conçu pour fonctionner au moyen
d‘une minuterie externe ou d‘un système de télécommande
séparé.

36
1. Grille avant
(y compris plaque décorative + 3 vis)
2. Vis de serrage des pales/hélice
3. Hélice/pales
4. Vis de serrage de la grille arrière
5. Grille arrière
6. Bloc moteur
7. Anneau de serrage du poteau d’extension
8. Tube intérieur du poteau réglable
9. Anneau de réglage de la hauteur
10. Couvercle de la base
11. Tube extérieur du poteau réglable
12. Base en croix
13. Panneau de contrôle
14. Vis de sécurité
15. Indicateur du mode vitesse élevée
16. Indicateur du mode vitesse moyenne
17. Indicateur du mode vitesse basse
18. Indicateur NA (vent naturel)
19. Indicateur SL (mode nuit/sommeil)
20. Capteur pour la télécommande
21. Indicateur de puissance
22. Bouton Mode
23. Indicateur OSC (Oscillation)
24. Bouton de minuterie
25. Indicateur 0,5 h de la minuterie
26. Indicateur 1h de la minuterie
27. Bouton Vitesse
28. Indicateur 2h de la minuterie
29. Bouton Marche / Arrêt
30. Indicateur 4h de la minuterie
31. Télécommande
Remarque : la télécommande fonctionne
avec une pile bouton CR2025
32. Bouton Marche / Arrêt
33. OSC (bouton d‘oscillation)
Remarque: Contrôle de fonction OSC
UNIQUEMENT par télécommande
34. Bouton de vitesse
35. Bouton Mode
36. Bouton de minuterie
DESCRIPTION DES PIECES
13
20
21
22
32
33
35
24
27
30
23
25
26
28
29
14
7
8
9
10
15
16
17
18
19
11
12
34
36
12345
31
6

FRANÇAIS
Manuel d‘instructions
37
AVANT LA PREMIÈRE UTILISATION
• Enleveztoutlematérield’emballageetvériezquel’appareilsoitcompletetquetousles
accessoires soient inclus.
•Déroulezcomplètementlecordond’alimentation.
•Nettoyezl’appareilcommedécritdanslasection«Nettoyage et entretien».
Si des éléments sont endommagés ou manquants, contactez votre revendeur ou
le service client.
AVERTISSEMENT : Les sacs en plastique sont un danger pour les tout-petits et les
bébés, donc tenez-les éloignés pour éviter tout risque d’étouffement.
ASSEMBLAGE
Assurez-vous toujours que le ventilateur soit débranché de l’alimentation électrique
et éteint avant de commencer la procédure d’assemblage.
1. Placez la base en croix (12) dotée de capuchon aux extrémités sur une surface plane et
sèche.
2. Libérez le tube intérieur du poteau réglable (8) en desserrant l’anneau de réglage de la
hauteur (9).
3. Fixez le poteau réglable (8,9,10) à la base en croix (12) à l’aide de 4 vis. Insérez le couvercle
de la base (10) pour tout recouvrir.
4. Fixez le panneau de contrôle (13) au tube intérieur du poteau réglable (8) en serrant l’anneau
(9).
5. Dévissez la vis de serrage de la grille arrière (4) en la tournant dans le sens inverse des
aiguilles d’une montre.
6. Positionnez la grille arrière (5) contre l’avant du moteur, poignée vers le haut, en veillant à ce
que les ergots de positionnement du moteur soient correctement insérés dans le trou de la
grille.
7. Vissez la vis de serrage de la grille (4) sur le filetage qui ressort du couvercle avant du moteur
en le tournant dans le sens des aiguilles d’une montre jusqu’à ce qu’elle soit fermement
serrée.
8. Poussez l’hélice du ventilateur (3) sur l’arbre du moteur. Vissez ensuite fermement la vis de
serrage de l’hélice (2).
9. Fixez la plaque du logo sur la grille avant à l’aide de 3 vis (1). Ensuite, placez la grille avant
contre la grille arrière (5) et assemblez-les.
Remarque : Fixez toujours la vis de sécurité (14) pour vous assurer que la grille soit
correctement assemblée !
Assurez-vous toujours que le ventilateur soit correctement assemblé et
débranché avant de l’utiliser, en modifiant l’angle d’inclinaison et le sens du courant
d’air (oscillation).
FONCTIONNEMENT
1. Placez votre ventilateur sur une surface plane, sèche et stable.
2. Assurez-vous que le ventilateur soit réglé sur 0 (Arrêt) avant de le brancher sur une prise de
courant correctement installée.

38
Assurez-vous que la tension locale correspond aux données techniques de l‘appareil.
Sinon, l‘appareil pourrait surchauffer et être endommagé.
3. Réglez la tête du ventilateur selon l’angle d’inclinaison souhaité (voir RÉGLER L’ANGLE
D’INCLINAISON).
4. Allumez l‘appareil en appuyant sur le bouton Marche /Arrêt de l‘appareil ou de la
télécommande.
5. Appuyez sur le bouton Mode pour passer entre les modes Normal, Vent naturel et Nuit.
Remarque : l‘indicateur correspondant s‘allumera
6. Appuyez sur le bouton Vitesse pour changer la vitesse du ventilateur entre L / M / H (Basse/
Moyenne/Elevée)
Remarque : l‘indicateur correspondant s‘allumera
7. Appuyez de façon répétitive sur le bouton de la minuterie pour prérégler la minuterie d‘arrêt
automatique.
L’indicateur s‘allumera selon la minuterie souhaitée
Compte à rebours jusqu‘à 7,5 heures avec voyant sur le panneau de contrôle.
REGLER L’ANGLE D’INCLINAISON
Pour régler l’angle souhaité du ventilateur, inclinez le boîtier du moteur vers le haut ou le bas
jusqu’à ce qu’il s’enclenche en place.
OSCILLATION
Changer la direction du courant d‘air !
- Appuyez sur le bouton OSC de la télécommande pour démarrer / arrêter le mode oscillation.
NETTOYAGE ET ENTRETIEN
Avant de nettoyer, éteignez toujours l’appareil et débranchez-le du secteur.
N’immergez jamais l’appareil dans l’eau. Danger ! Risque de choc électrique!
- Nettoyez l’appareil à l’aide d’un chiffon doux et humide.
- Ne vaporisez jamais de liquide l’appareil et ne le plongez pas dans de l’eau ou dans un
autre liquide.
- Pour le nettoyage, la grille avant et arrière ainsi que les pales du ventilateur peuvent être
retirés.
Une fois la procédure de nettoyage terminé, assurez-vous que toutes les pièces
soient sèches et que la grille avant/arrière comprenant les pales du ventilateur soient
correctement remontées.
N’utilisez jamais d’alcool, d’essence et/ou tout autre agent de nettoyage agressif/objet
dur.
ATTENTION : l’hélice du ventilateur peut avoir des arêtes vives. Manipulez avec
une extrême prudence.
STOCKAGE
Gardez l’appareil à l’écart des enfants et rangez-le dans un endroit propre et sec, dans son
emballage d’origine ou recouvrez-le pour le protéger de la poussière.

FRANÇAIS
Manuel d‘instructions
39
Instructions relatives à l’élimination
Les déchets d’appareils électriques marqués de ce signe ne doivent pas être éliminés
avec vos déchets ménagers, mais sont à collecter séparément. Par conséquent, veuillez
retourner cet appareil à la fin de son cycle de vie à des points de collecte spéciaux pour
l’élimination ou à votre revendeur local.
Votre ventilateur de table 81100 est emballé dans une boîte. Ces boîtes sont des déchets
recyclables, c’est-à-dire qu’elles sont réutilisables ou recyclables.
Instructions pour le recyclage des piles
Les piles standard et rechargeables ne doivent pas être jetées avec les déchets ménagers
ordinaires. En tant que consommateur, vous avez l’obligation légale de rapporter les piles
usagées pour une élimination appropriée. Vous pouvez déposer vos piles usagées dans les
points de collecte publics de votre quartier ou dans les points de vente où ce type de piles
est vendu.
Remarque : Les codes ci-dessous sont imprimés sur des piles contenant des substances
nocives.
Pb = La batterie contient du plomb
Cd = La batterie contient du cadmium
Hg = La batterie contient du mercure
DONNÉES TECHNIQUES
Tension : 220 - 240 V ~ 50 Hz
Puissance : 40 W
Classe de protection : II
Données techniques sujettes à changement

40
Description Symbole Valeur Unité
Débit maximum d’air du ventilateur F 41.1 m³/min
Puissance d'entrée du ventilateur P 40.28 W
Valeur de service SV 1.02 (m³/min)/W
Consommation électrique en mode veille P
SB 0.42 W
Consommation électrique saisonnière Q 13.4 kWh/a
Niveau de puissance acoustique du
ventilateur
L
WA 54.20 dB(A)
Vitesse maximale de l'air c 3.54 mètres/seconde
Normes de mesure pour la valeur de
service
EN 50564:2011
IEC 60879:1986 +cor1:1992
EN 60704-2-7:1998
REMARQUE : en raison d’améliorations constantes, la conception et les spécifications
du produit peuvent différer légèrement de l’appareil illustré sur l’emballage.

FRANÇAIS
Manuel d‘instructions
41
Garantie :
Ce produit est garanti contre les défauts de matériaux et de
fabrication pour une période de 2 ans.
Cette garantie n’est pas valide :
•si l’appareil n’a pas été utilisé conformément aux
instructions
•pourlesdommagescausésparl’usure(piles,etc.)
•pour les dommages connus du client au moment de
l’achat
•pourlesdommagescausésparlepropriétaire
Cette garantie n’affecte pas votre droit légal, ni aucun droit
légal que vous pourriez avoir en tant que client en vertu de
la législation nationale applicable régissant l’achat de biens.
Pour faire valoir son droit de garantie pendant la période de
garantie, le client doit fournir la preuve de la date d’achat
(reçu).
La garantie doit être demandé à
Ligne téléphonique : +49 2933 90284-80
E-mail : [email protected]
web : www.korona-electric.de
Dans les 2 ans suivant la date d’achat. En cas de garantie,
le client a le droit de réparer l’appareil avec nous ou dans un
magasin autorisé. Les droits supplémentaires (en raison du
droit de garantie) ne sont pas donnés au client.

42
Manuale delle Istruzioni
Leggi attentamente queste istruzioni prima di assemblare
e/o utilizzare l’apparecchio. Conserva queste istruzioni, la
ricevuta e, se possibile, la scatola con l’interno imballaggio.
Accertati di includere queste istruzioni per l’uso quando cedi
l’apparecchio a terzi.
DESTINAZIONE D’USO
Questo apparecchio è destinato esclusivamente agli usi
domestici e non commerciali, industriali o in ambienti esterni.
Altri usi non raccomandati possono causare incendi, scosse
elettriche o lesioni.
Sicurezza:
Questo simbolo segnala il rischio di lesioni personali!
Questo simbolo segnala il rischio di scosse elettriche!
Questo simbolo segnala suggerimenti e informazioni.
IMPORTANTI AVVERTENZE PER LA SICUREZZA
Avvertenza! Per evitare il rischio di lesioni, danni
all’apparecchio, scosse elettriche e incendi.
Pericolo di lesioni e danni all’apparecchio!
• Il produttore non si assume alcuna responsabilità per
eventuali danni causati da un uso errato dell’apparecchio.
• Un uso errato o improprio può danneggiare l‘apparecchio
e causare lesioni all’utente.

ITALIANO
Manuale delle Istruzioni
43
• Prima di collegare l’apparecchio alla rete elettrica,
accertati che la tensione locale corrisponda a quella
dell’apparecchio, o questo potrebbe surriscaldarsi e
danneggiarsi.
• Evita il contatto con le parti in movimento. Attendi che le
parti in movimento siano completamente ferme prima di
toccarle.
• Non infilare le dita e inserire oggetti di alcun tipo nella
grata.
• Non usare l’apparecchio senza che la grata sia
correttamente montata o se è danneggiata o allentata.
• Accertati che il ventilatore non sia in funzione nei pressi
di drappi, tende o altri oggetti (inclusi capelli e vestiti) che
potrebbero essere risucchiati dal ventilatore.
• Non collocare o usare mai l’apparecchio in luoghi nei quali
può essere esposta a:
- Fonti di calore quali termosifoni, stufe, radiatori o altri
dispositivi che producono calore;
- Luce solare diretta;
- Polvere eccessiva;
- Vibrazioni meccaniche o urti;
- Scarsa ventilazione;
- Superfici irregolari, per evitare il rovesciamento del
ventilatore durante l’uso.
• Spegni (0) sempre il ventilatore e staccane la spina
quando non lo usi o prima di trasportarlo in altro luogo.
Attenzione! Rischio di scossa elettrica!
• Non immergere mai l’apparecchio, il cavo o la spina in
acqua o altri liquidi.
• Non usare l’apparecchio nei pressi di vasche e lavandini.
• Non usare l’apparecchio con le mani bagnate.
• Non usare l’apparecchio in ambienti esterni.

44
• Non usare l’apparecchio nei pressi di una finestra aperta.
Il contatto con gocce di pioggia potrebbe causare scosse
elettriche.
Gli elettrodomestici non sono giocattoli!
• Non lasciare mai l’apparecchio incustodito durante l’uso.
• Questo apparecchio non è adatto ad essere usato da
bambini di età inferiore agli 8 anni o da persone con
ridotte capacità fisiche, sensoriali o mentali, o prive
della necessaria esperienza e perizia, a meno che non
supervisionate e istruite sull’uso sicuro dell’apparecchio
e sui rischi ad esso connessi. I bambini non devono
giocare con l‘apparecchio. La pulizia e la manutenzione
dell‘utente non devono essere eseguite da bambini a
meno che non maggiori di 8 anni e supervisionati.
• Tieni l’apparecchio e il suo cavo fuori dalla portata dei
bambini di età inferiore a 8 anni.
• Stacca sempre la spina dell’apparecchio quando non
lo usi e prima di pulirlo.
• Tira sempre afferrando la spina e mai il cavo.
• Tieni l’apparecchio ed il cavo lontano da superfici calde, in
modo che non si danneggi.
• Non far passare il cavo sotto i tappeti. Accertati che il
cavo non sia causa d’inciampo e che non possa essere
accidentalmente strattonato durante l’uso.
• Non far pendere il cavo da bordi spigolosi.
• Non piegare il cavo e non avvolgerlo attorno all’apparecchio.
Non usare l’apparecchio se…:
• …il cavo è danneggiato.
• …presenta guasti.
• …è caduto o ha subito danni di alcun tipo.
Se necessario, consegna l’apparecchio a un riparatore

ITALIANO
Manuale delle Istruzioni
45
professionista o al servizio clienti. Non tentare mai di
apportare modifiche o riparare l’apparecchio da solo.
• Utilizza solo accessori approvati per l’uso con questo
apparecchio.
• Non tentare mai di inserire oggetti all’interno
dell’apparecchio.
• Non tentare mai di aprire l’apparecchio da solo!
• L’apparecchio non è progettato per essere utilizzato con
un timer esterno od un telecomando separato.

46
1. Griglia anteriore
(inclusa piastra decorativa + 3 viti)
2. Chiusura delle pale
3. Pale
4. Chiusura della griglia posteriore
5. Griglia posteriore
6. Alloggiamento del motore
7. Anello di fissaggio dell’asta di prolunga
8. Tubo interno dell’asta regolabile
9. Anello di regolazione dell’altezza
10. Coperchio della base
11. Tubo esterno dell’asta regolabile
12. Base a croce
13. Pannello di controllo
14. Vite di sicurezza
15. Indicatore velocità alta
16. Indicatore velocità media
17. Indicatore velocità basso
18. Indicatore NA (vento naturale)
19. Indicatore SL (funzione “Sleep”)
20. Sensore del telecomando
21. Indicatore di alimentazione
22. Tasto Mode
23. Indicatore OSC (oscillazione)
24. Tasto Timer
25. Indicatore timer 0,5 ore
26. Indicatore timer 1 ora
27. Tasto Speed
28. Indicatore timer 2 ore
29. Tasto ON/OFF
30. Indicatore timer 4 ore
31. Telecomando
Nota: funziona con batteria a bottone
di tipo CR2025
32. Tasto ON/OFF
33. OSC (tasto di oscillazione)
Nota: la funzione OSC è controllabile
SOLO tramite telecomando
34. Tasto Speed
35. Tasto Mode
36. Tasto Timer
DESCRIZIONE DELLE PARTI
13
20
21
22
32
33
35
24
27
30
23
25
26
28
29
14
7
8
9
10
15
16
17
18
19
11
12
34
36
12345
31
6

ITALIANO
Manuale delle Istruzioni
47
1. Griglia anteriore
(inclusa piastra decorativa + 3 viti)
2. Chiusura delle pale
3. Pale
4. Chiusura della griglia posteriore
5. Griglia posteriore
6. Alloggiamento del motore
7. Anello di fissaggio dell’asta di prolunga
8. Tubo interno dell’asta regolabile
9. Anello di regolazione dell’altezza
10. Coperchio della base
11. Tubo esterno dell’asta regolabile
12. Base a croce
13. Pannello di controllo
14. Vite di sicurezza
15. Indicatore velocità alta
16. Indicatore velocità media
17. Indicatore velocità basso
18. Indicatore NA (vento naturale)
19. Indicatore SL (funzione “Sleep”)
20. Sensore del telecomando
21. Indicatore di alimentazione
22. Tasto Mode
23. Indicatore OSC (oscillazione)
24. Tasto Timer
25. Indicatore timer 0,5 ore
26. Indicatore timer 1 ora
27. Tasto Speed
28. Indicatore timer 2 ore
29. Tasto ON/OFF
30. Indicatore timer 4 ore
31. Telecomando
Nota: funziona con batteria a bottone
di tipo CR2025
32. Tasto ON/OFF
33. OSC (tasto di oscillazione)
Nota: la funzione OSC è controllabile
SOLO tramite telecomando
34. Tasto Speed
35. Tasto Mode
36. Tasto Timer
PRIMA DELL’USO INIZIALE
• Rimuovi tutto l’imballaggio e vericare che l’apparecchio sia completo e che tutti gli
accessori siano presenti.
• Srotolacompletamenteilcavodialimentazione.
• Puliscil’apparecchiocomedescrittonellasezionePulizia e Manutenzione.
Contatta il tuo rivenditore o il nostro servizio clienti nel caso di parti mancanti o
danneggiati.
Avvertenza: Le buste di plastica sono pericolose per i bambini, e vanno perciò tenute al
di fuori della loro portata, per evitare il rischio di soffocamento.
MONTAGGIO
Accertati sempre che la ventola sia spenta e scollegata dall’alimentazione prima
di iniziare l’assemblaggio.
1. Colloca la base a croce (12) completa di tappino su una superficie asciutta e piana.
2. Allenta il tubo interno dell’asta regolabile (8) allentando l’anello di regolazione dell’altezza (9).
3. Fissare l’asta regolabile (8, 9, 10) alla base a croce (12) con le 4 viti. Installa il coperchio della
base (10).
4. Collega il pannello di controllo (13) al tubo interno dell’asta regolabile (8) serrando l’anello
(9).
5. Svita la chiusura della griglia posteriore (4) ruotandola in senso antiorario.
6. Posiziona la griglia posteriore (5) contro la parte anteriore del motore con la maniglia vero
l’alto, accertandoti che i pioli di posizionamento del motore siano correttamente inseriti nei
fori sulla griglia
7. Avvita la chiusura della griglia (4) sulla filettatura sporgente posta sul coperchio anteriore del
motore, ruotandola in senso orario fino a quando non è ben stretto.
8. Spingi le pale del ventilatore (3) sull’albero del motore, quindi avvita saldamente la chiusura
delle pale (2).
9. Fissa la targhetta con il logo sulla griglia anteriore con le 3 viti (1), quindi posiziona la griglia
anteriore contro la griglia posteriore (5) e uniscile.
Nota: inserisci sempre la vite di sicurezza (14) per assicurarti che la griglia sia
correttamente installata!
Accertati sempre che il ventilatore sia correttamente montato e scollegato
prima di cambiare l’angolo di inclinazione e la direzione del getto d’aria (oscillazione).
FUNZIONAMENTO
1. Colloca il ventilatore su una superficie piana, asciutta e stabile.
2. Accertati che il ventilatore sia impostato su 0 (spento) prima di collegarlo a una presa di
corrente correttamente installata.
Accertati che la tensione locale sia compatibile con quella descritta nelle specifiche
tecniche dell’apparecchio, o l’apparecchio potrebbe surriscaldarsi e danneggiarsi.
4. Attiva l’apparecchio premendo il tasto di accensione ON/OFF sul telecomando o
sull’apparecchio stesso.
5. Premi il tasto Mode per commutare tra le modalità normale, vento naturale, funzione Sleep.

48
Nota: il relativo indicatore si accenderà.
6. Premi il tasto Speed per selezionare la velocità del ventilatore tra L/M/H.
Nota: il relativo indicatore si accenderà.
7. Premi più volte il tasto Timer per programmare lo spegnimento automatico.
L’ indicatore relativo al periodo selezionato si accenderà.
Conto alla rovescia fino a 7,5 ore con spia sul pannello di controllo.
REGOLAZIONE DELL’INCLINAZIONE
Per regolare il ventilatore all’inclinazione desiderata, alza o abbassa l’alloggiamento del motore
fino allo scatto.
OSCILLAZIONE
Cambiare la direzione del getto d’aria!
- Premi il tasto OSC del telecomando per attivare o disattivare la modalità di oscillazione.
PULIZIA E MANUTENZIONE
Prima di procedere alla pulizia, spegni sempre l’apparecchio e staccane la spina.
Non immergere mai l’apparecchio nell’acqua. Pericolo! Scossa Elettrica!
- Pulisci l’apparecchio con un panno morbido inumidito.
- Non spruzzare mai l’apparecchio con liquidi e non immergerlo in acqua o altri liquidi.
- Per una pulizia ottimale, rimuovi le grate anteriore e posteriore e le pale del ventilatore.
Una volta terminata la pulizia, accertati che tutte le parti siano asciutte e che le grate
anteriore e posteriore, incluse le pale del ventilatore, sia correttamente rimontate.
Non usare mai alcool, benzine e/o altri prodotti per la pulizia aggressivi o panni e spugne
abrasivi.
ATTENZIONE: I bordi delle pale del ventilatore sono affilati. Maneggiare con cura.
STOCCAGGIO
Tieni l’apparecchio lontano dalla portata dei bambini e riponilo in un luogo pulito e asciutto,
coprendolo per proteggerlo dalla polvere, meglio se nella sua scatola originale.

ITALIANO
Manuale delle Istruzioni
49
Smaltimento del Prodotto
I dispositivi elettrici di scarto contrassegnati da questo simbolo non vanno smaltiti insieme
ai rifiuti domestici, ma raccolti separatamente. Pertanto, alla fine del suo ciclo di servizio, questo
dispositivo va consegnato ad un punto di raccolta differenziata o al tuo rivenditore locale.
Il Ventilatore da Tavolo 81100 è confezionato in una scatola per la vendita al dettaglio. Queste
scatole sono riciclabili, ovvero possono essere riusate.
Istruzioni per lo smaltimento delle batterie
Le batterie standard e ricaricabili non vanno gettate con i normali rifiuti domestici. Come
consumatore, sei legalmente tenuto a smaltire correttamente le batterie usate. Puoi consegnare
le batterie usate ad un punto pubblico di raccolta nel tuo distretto o nei punti vendita in cui
vengono vendute batterie di questo tipo.
Nota: i seguenti codici stampati sulle batterie segnalano la presenza di sostanze tossiche:
Pb = La batteria contiene piombo
Cd = La batteria contiene cadmio
Hg = La batteria contiene mercurio
DATI TECNICI
Voltaggio: 220 - 240 V ~ 50 Hz
Alimentazione: 40 W
Classe di protezione: II
I dati tecnici sono soggetti a modifiche.

50
Descrizione Simbolo Valore Unità
Portata massima del ventilatore F 41.1 m³/min
Potenza assorbita dal ventilatore P 40.28 W
Valore del servizio SV 1.02 (m³/min)/W
Consumo energetico in standby P
SB 0.42 W
Consumo di elettricità stagionale Q 13.4 kWh/a
Pressione sonora del ventilatore L
WA 54.20 dB(A)
Massima velocità del getto d’aria c 3.54 metri/sec
Standard di misurazione per valore di
servizio
EN 50564:2011
IEC 60879:1986 +cor1:1992
EN 60704-2-7:1998
NOTA: per via dei continui miglioramenti apportati, il design e le specifiche del prodotto
descritti in questo manuale potrebbero differire da quelli effettivi.

ITALIANO
Manuale delle Istruzioni
51
Garanzia:
Questo prodotto è garantito per un periodo di 2 anni contro
difetti nei materiali e nella lavorazione.
Questa garanzia non è valida:
•sel’apparecchiononèstatoutilizzatosecondoleistruzioni;
•perdannicausatidausura(batterie,ecc.);
•perdanninotialclientealmomentodell’acquisto;
•perdannicausatidalproprietario.
Questa garanzia non pregiudica i diritti legali dell’utente,
né alcun diritto legale garantito all’utente dalla vigente
legislazione nazionale sull’acquisto di beni.
Al fine di inviare una richiesta di garanzia durante il periodo
valido, il cliente dovrà produrre la prova della data di acquisto
(ricevuta o fattura).
La richiesta di garanzia deve essere fatta valere inviandola a
KORONA electric GmbH, Sundern / Germania.
Hotline telefonica: +49 2933 90284-80
Mail: [email protected]
web: www.korona-electric.de
entro 2 anni dalla data di acquisto. In caso di garanzia, il
cliente ha il diritto di far riparare l’apparecchio presso la
nostra azienda o presso un rivenditore autorizzato. Il cliente
non detiene altri diritti relativi alla garanzia.

52
Manual de instrucciones
Lea detenidamente estas instrucciones antes de montar o
usar el aparato. Conserve estas instrucciones, incluido el
recibo y si fuera posible, la caja con el embalaje interno.
Al dejarle el aparato a terceros, asegúrese de incluir estas
instrucciones de uso.
USO PREVISTO
Este aparato está destinado únicamente para uso su
doméstico y no para uso comercial, industrial o en exteriores.
Otros usos no recomendados pueden causar incendios,
descargas eléctricas o lesiones.
Seguridad:
Este símbolo identifica peligros que pueden causar
lesiones.
Este símbolo identifica peligros de descarga eléctrica.
Este símbolo identifica consejos e información.
INSTRUCCIONES DE SEGURIDAD IMPORTANTES
Advertencia! Para evitar la posibilidad de lesiones o daños
al aparato, descargas eléctricas y riesgo de incendio.
Peligro de lesiones y daños al aparato
• El fabricante no se hace responsable de ningún daño
causado por un uso incorrecto.
• Un uso incorrecto o inadecuado puede dañar el aparato y
causar lesiones al usuario.

ESPAÑOL
Manual de instrucciones
53
• Antes de conectar este aparato a la red eléctrica,
asegúrese de que el voltaje local coincida con los datos
técnicos del aparato. De lo contrario el aparato podría
sobrecalentarse y dañarse.
• Evite el contacto con las piezas móviles. Espere siempre
a que todas las piezas móviles se hayan detenido antes
de tocarlas.
• No introduzca los dedos ni permita que objetos extraños
entren en la rejilla.
• No use el ventilador sin sus rejillas correctamente
colocadas o si la rejilla está dañada o suelta.
• Asegúrese de que el ventilador no está colocado cerca
de cortinas u objetos que puedan ser atraídos (incluidos
cabello y ropas) al ventilador.
• Nunca coloque o use la unidad donde pueda estar sujeta
a:
- Fuentes de calor como radiadores, rejillas de ventilación,
estufas u otros aparatos que produzcan calor.
- Luz solar directa.
- Polvo excesivo.
- Vibraciones o golpes mecánicos.
- Falta de ventilación.
- Superficies desiguales, para evitar la inclinación del
ventilador durante el uso.
• Cuando no esté en uso o al moverlo de un sitio a otro,
apague (0) y desenchufe siempre el ventilador.
Precaución. Peligro de descarga eléctrica.
• Nunca coloque el aparato, el cable o el enchufe en agua
o en cualquier otro líquido.
• No use el aparato cerca de un fregadero o lavamanos.
• No use el aparato con las manos mojadas.
• No use el aparato en exteriores.

54
• No coloque el aparato cerca de una ventana abierta. Si
la lluvia salpicase al ventilador, podría causar un riesgo de
descarga eléctrica.
Un aparato eléctrico no es un juguete.
• Nunca deje el aparato desatendido durante su uso.
• Este aparato puede ser usado por niños de 8 años en
adelante, y por personas con las capacidades físicas,
sensoriales o mentales disminuidas, o por personas
que carezcan de experiencia y conocimiento, si son
supervisadas o han sido instruidas sobre el uso seguro
del dispositivo y entienden los peligros involucrados.
Los niños no deben jugar con el aparato. Las tareas
de limpieza y mantenimiento no deben ser realizadas
por niños a menos que sean mayores de 8 años y estén
supervisados.
• Mantenga el aparato y su cable fuera del alcance de niños
menores de 8 años.
• Cuando no esté en uso y antes de limpiarlo, desenchufe
el aparato siempre.
• Tire siempre del enchufe no del cable.
• Mantenga el aparato y el cable alejados de cualquier
superficie caliente para evitar daños al aparato.
• No paseel cable por debajo de alfombras. Asegúrese de
no se pueda tirar del cable o tropezarse involuntariamente
con él mientras esté en uso.
• No permita que el cable cuelgue sobre bordes afilados.
• No doble ni enrolle el cable alrededor del aparato.
No use el aparato
• si el cable está dañado.
• en caso de mal funcionamiento.
• si el aparato se ha caído o está dañado de alguna manera.

ESPAÑOL
Manual de instrucciones
55
Haga que lo revise y, si fuera necesario, lo repare una persona
o servicio de atención al cliente cualificado. Nunca intente
realizar modificaciones o reparar el aparato usted mismo.
• Use solo los accesorios evaluados para su uso con este
aparato.
• Nunca trate de introducir objetos en el aparato.
• Nunca trate de abrir la carcasa usted mismo.
• Este aparato no está diseñado para ser usado mediante
un temporizador externo o un sistema de control remoto
independiente.

56
1. Rejilla delantera
(incluye placa decorativa y 3 tornillos)
2. Cierre del aspa
3. Aspa
4. Cierre de la rejilla trasera
5. Rejilla trasera
6. Carcasa del motor
7. Anillo de fijación del poste de extensión
8. Tubo interno del poste de extensión
9. Anillo de ajuste de altura
10. Cubierta de la base
11. Tubo interno externo del poste ajustable
12. Base en cruz
13. Panel de control
14. Tornillo de seguridad
15. Indicador de velocidad alta
16. Indicador de velocidad media
17. Indicador de velocidad baja
18. Indicador NA (viento natural)
19. Indicador SL (sueño)
20. Sensor del mando a distancia
21. Indicador de encendido
22. Botón de modo
23. Indicador OSC (oscilación)
24. Botón de temporizador
25. Indicador de temporizador de 0,5 horas
26. Indicador de temporizador de 1 hora
27. Botón de velocidad
28. Indicador de temporizador de 2 horas
29. Botón de encendido/apagado
30. Indicador de temporizador de 4 horas
31. Mando a distancia
Nota: El mando a distancia funciona con
pila de botón CR2025
32. Botón de encendido/apagado
33. Indicador OSC (oscilación)
Nota: Control de la función SOLO con el
mando a distancia
34. Botón de velocidad
35. Botón de modo
36. Botón de temporizador
DESCRIPCIÓN DE LAS PIEZAS
13
20
21
22
32
33
35
24
27
30
23
25
26
28
29
14
7
8
9
10
15
16
17
18
19
11
12
34
36
12345
31
6

ESPAÑOL
Manual de instrucciones
57
ANTES DEL PRIMER USO
• Retiretodoelmaterialdeembalajeycompruebequeelaparatoestécompletoyquetodos
los accesorios estén incluidos.
• Desenrollecompletamenteelcabledealimentación.
• LimpieelaparatocomosedescribeenlaseccióndeLimpieza y cuidado.
Si algún artículo está dañado o falta, póngase en contacto con el distribuidor o
servicio de atención al cliente.
Advertencia: Las bolsas de plástico son un peligro para niños pequeños y bebés, por
lo tanto, manténgalas alejadas de ellos para evitar riesgos de asfixia.
MONTAJE
Antes de comenzar con el proceso de montaje, asegúrese siempre de que el
ventilador está desenchufado de la fuente de alimentación y apagado.
1. Coloque la base en cruz (12) con la tapa del extremo en una superficie seca, y plana.
2. Suelte el tubo interno del poste de extensión (8) aflojando el anillo de ajuste de altura (9).
3. Coloque el poste ajustable (8, 9, 10) en la base en cruz (12) con 4 tornillos. Inserte la
cubierta de la base para cubrirla.
4. Fije el panel de control (13) al tubo interno del poste ajustable (8) apretando el anillo (9).
5. Desatornille el cierre de la rejilla trasera (4) girándola en sentido contrario a las agujas del
reloj.
6. Coloque la rejilla trasera (5) contra la parte delantera del motor, con el asa hacia arriba y
asegurándose de que las lengüetas de ubicación del motor estén insertadas correctamente
en el agujero de la rejilla.
7. Atornille el cierre de la rejilla (4) en la rosca saliente de la cubierta frontal del motor, girándola
en el sentido de las agujas del reloj hasta que esté firmemente apretada.
8. Empuje el aspa del ventilador (3) sobre el eje del motor. A continuación, atornille firmemente
el cierre del aspa (2).
9. Coloque la placa del logotipo a la rejilla delantera con 3 tornillos (1). A continuación, coloque
la rejilla delantera contra la rejilla trasera (5) y júntelas.
Nota: Fije siempre el tornillo de seguridad (14) para asegurarse de que la rejilla esté
montada correctamente.
Antes de usarlo, cambiar el ángulo de inclinación y cambiar la dirección de
la corriente de aire (oscilación), asegúrese siempre de que el ventilador esté montado
correctamente y desenchufado.
USO
1. Coloque el ventilador en una superficie uniforme, seca y estable.
2. Antes de enchufar el ventilador a una toma de corriente, asegúrese de que el ventilador
esté configurado en 0 (apagado).
Asegúrese de su voltaje local coincida con los datos técnicos del aparato. De lo contrario
el aparato podría sobrecalentarse y dañarse.
3. Ajuste el cabezal del ventilador al ángulo de inclinación deseado (consulte AJUSTE DEL
ÁNGULO DE INCLINACIÓN).

58
4. Encienda el aparato presionando el botón de encendido/apagado en la unidad o en el
mando a distancia.
5. Presione el botón de modo para cambiar entre los modos normal, viento natural y sueño.
Nota: El indicador correspondiente se encenderá.
6. Presione el botón de velocidad para cambiar la velocidad del ventilador entre Baja (L)/
Media (M)/Alta (H).
Nota: El indicador correspondiente se encenderá
7. Presione de forma continuada el botón del temporizador para establecer el temporizador
de apagado automático.
El indicador se ilumina según el tiempo deseado.
Cuenta atrás del temporizador de hasta 7,5 horas con luz indicadora en el panel de
control.
AJUSTE DEL ÁNGULO DE INCLINACIÓN
Para ajustar el ángulo deseado del ventilador, incline la carcasa del motor hacia arriba o abajo
hasta que encaje en su lugar.
OSCILACIÓN
Cambio de la dirección de la corriente de aire
- Presione el botón de OSC en el mando a distancia para iniciar/detener el modo oscilación.
LIMPIEZA Y CUIDADO
Antes de limpiarlo, apague siempre el aparato y desconéctelo de la red eléctrica.
Nunca sumerja el aparato en agua. Peligro. Descarga eléctrica.
- Limpie el aparato usando un paño suave y húmedo.
- Nunca rocíe el aparato con líquidos ni lo sumerja en agua u otros líquidos.
- Con fines de limpieza, es posible quitar las rejillas delantera y trasera así como el aspa del
ventilador.
Una vez terminado el proceso de limpieza, asegúrese de que todas las piezas estén
secas y de que las rejillas delanteras y traseras (incluida el aspa del ventilador) estén
correctamente montadas.
Nunca use alcohol, gasolina u otros agentes de limpieza agresivos/objetos duros.
PRECAUCIÓN: El aspa del ventilador puede tener bordes afilados. Manéjelo con
extremo cuidado.
ALMACENAMIENTO
Mantenga el aparato lejos del alcance de los niños y guárdelo en un lugar limpio y seco, y si
puede ser, mejor en su caja original o cúbralo para protegerlo del polvo.

ESPAÑOL
Manual de instrucciones
59
Instrucciones de eliminación
Los dispositivos eléctricos marcados con esta imagen no deben desecharse junto con la
basura doméstica, sino que deben recogerse por separado. Por lo tanto, al final de su vida útil,
lleve este dispositivo a un punto de recogida especial o al distribuidor local.
Su Ventilador de escritorio 81100 viene empaquetado en una caja de minorista. Dichas cajas
son basura reciclable, es decir, son reutilizables o reciclables.
Instrucciones de eliminación de las baterías
Las baterías estándar y recargables no deben desecharse junto con la basura doméstica.
Como consumidor, está legalmente obligado a devolver las baterías para su eliminación
correcta. Puede entregar las baterías usadas en los puntos de recogida públicos de su distrito
o en los puntos de venta donde se venden este tipo de baterías.
Nota: Los siguientes códigos están impresos en baterías que contienen sustancias
nocivas:
Pb = La batería contiene plomo
Cd = La batería contiene cadmio
Hg = La batería contiene mercurio
DATOS TÉCNICOS
Voltaje: 220 - 240 V ~ 50 Hz
Potencia: 40 W
Clase de protección: II
Datos técnicos sujetos a cambios

60
Descripción Símbolo Valor Unidad
Caudal máximo del ventilador F 41.1 m³/min
Entrada de alimentación del ventilador P 40.28 W
Valor de servicio SV 1.02 (m³/min)/W
Consumo de energía en modo espera P
SB 0.42 W
Consumo estacional de electricidad Q 13.4 kWh/a
Nivel de potencia acústica del ventilador L
WA 54.20 dB(A)
Velocidad máxima del aire c 3.54 Metros/segundos
Estándar de medición para el valor de
servicio
EN 50564:2011
IEC 60879:1986 +cor1:1992
EN 60704-2-7:1998
NOTA: Como resultado de las continuas mejoras, el diseño y las especificaciones del
producto pueden diferir ligeramente de la unidad ilustrada en el paquete.

ESPAÑOL
Manual de instrucciones
61
Garantía:
Este producto está garantizado contra defectos en materiales
y de mano de obra por un periodo de 2 años.
Esta garantía no es válida:
•sielaparatonosehausadosegúnlasinstrucciones.
•pordañosdebidosaldesgaste(baterías,etc.).
•pordañosconocidosporelclienteenelmomentodela
compra.
•pordañoscausadosporelpropietario.
Esta garantía no afecta su derecho estatutario, ni ningún
derecho legal que pueda tener como cliente bajo la legislación
nacional aplicable que rija la compra de bienes.
Para hacer valer su derecho de garantía durante el periodo
garantizado, el cliente debe proporcionar una evidencia de
la fecha de compra (recibo).
La garantía debe presentarse contra
KORONA electric GmbH, Sundern/Alemania.
Línea telefónica directa: +49 2933 90284-80
Correo electrónico: [email protected]
Página web: www.korona-electric.de
dentro de los 2 años posteriores a la fecha de compra. En
caso de hacer valer la garantía, el cliente tiene derecho a
tener su aparato reparado en nuestra tienda o en una tienda
autorizada. No se otorgan más derechos (por la garantía) al
consumidor.

62
Kullanma Kılavuzu
Cihazın montajını yapmadan ve/veya çalıştırmadan önce
bu talimatları dikkatlice okuyun. Bu talimatları, makbuzu ve
mümkünse iç paket kutusunu saklayın.
Cihazı üçüncü taraf kullanıcılara verirken bu kullanma
kılavuzunun da cihazla birlikte verildiğinden emin olun.
KULLANIM AMACI
Bu cihaz yalnızca evde kullanım için tasarlanmıştır ve ticari,
endüstriyel veya dış mekan kullanımı için uygun değildir.
Tavsiye edilmeyen diğer kullanımlar yangına, elektrik
çarpmasına veya yaralanmaya neden olabilir.
Güvenlik:
Bu sembol yaralanmalara neden olabilecek tehlikeleri
tanımlar!
Bu sembol elektrik çarpması tehlikelerini belirtir!
Bu sembol ipuçlarını ve bilgileri belirtir.
Önemli Güvenlik Talimatları
Uyarı! Yaralanmalar, cihazın hasar görmesi, elektrik
çarpması ve yangın riski olasılığını önlemek için.
Yaralanma ve cihazın zarar görmesi tehlikesi!
• Üretici yanlış kullanımından kaynaklanan herhangi bir zarar
için hiçbir sorumluluk kabul etmez.
• Hatalı ya da uygunsuz kullanım, cihazın zarar görmesine
ve kullanıcının yaralanmasına neden olabilir.

TÜRKÇE
Kullanma Kılavuzu
63
• Bu cihazı ana şebekeye bağlamadan önce yerel voltaj
değerlerinizin cihazın teknik verileriyle eşleştiğinden emin
olun. Aksi takdirde cihaz aşırı ısınır ve zarar görebilir.
• Tüm hareketli parçalarla temastan kaçının. Dokunmadan
önce her zaman tüm hareketli parçaların durmasını
bekleyin.
• Izgaranın içerisine parmaklarınızı sokmayın veya yabancı
nesnelerin girmesine izin vermeyin.
• Vantilatör ızgaraları uygun şekilde yerine yerleştirilmemişse
veya ızgara hasarlı veya gevşekse cihazı çalıştırmayın.
• Vantilatörün, stor, perde veya vantilatör içerisine doğru
çekilebilecek (saç ve kıyafetler de dahil) nesnelere yakın
bir yere yerleştirilmediğinden emin olun.
• Hiç bir zaman üniteyi şunların söz konusu olduğu yerlere
yerleştirmeyin veya çalıştırmayın:
- Radyatörler, ısı düzenleyiciler, sobalar veya başka ısı
üreten ısı kaynakları
- Doğrudan güneş ışığı
- Aşırı toz
- Mekanik titreşim veya şok
- Havalandırma eksikliği
- Düz olmayan yüzeyler, vantilatörün kullanım sırasında
devrilmesini önlemek için
• Kullanımda olmadığında ve/veya bir yerden başka bir yere
taşırken her zaman vantilatörü KAPATIN ve fişten çekin.
Dikkat! Elektrik çarpması tehlikesi!
• Cihazı, kablosunu veya fişini hiç bir zaman su veya başka
bir sıvı içerisine koymayın.
• Cihazı lavabo yakınında kullanmayın.
• Cihazı ıslak elle kullanmayın.
• Cihazı açık havada kullanmayın.
• Cihazı açık bir pencereye yakın bir yere yerleştirmeyin.

64
Vantilatör üzerine yağmur sıçraması elektrik çarpması
tehlikesine neden olabilir
Elektrikli cihaz oyuncak değildir!
• Cihazı kullanım sırasında hiç bir zaman kendi başına
bırakmayın.
• Bu cihaz, kullanıma ilişkin olarak uygun bir biçimde gerekli
gözetim ve talimatlar verilmiş ve cihazın güvenli bir şekilde
kullanımıyla ilgili tüm tehlikeler anlaşılmış ise, 8 yaş ve üzeri
çocuklar ile fiziksel, duyusal veya zihinsel kabiliyetleri sınırlı
veya deneyimsiz ve bilgisi olmayan kişiler tarafından da
kullanılabilir. Çocuklar cihazla oynamamalıdır. 8 yaşından
büyük ve gözetim altında olmadıkları sürece temizleme ve
kullanım bakımları çocuklar tarafından yapılmamalıdır.
• Cihazı ve kablosunu 8 yaşından küçük çocukların
ulaşamayacağı bir yerde tutun.
• Kullanılmadığında ve temizlemeden önce her zaman
cihazınızın fişini çekin.
• Her zaman fişi çekin – kabloyu değil.
• Cihaza herhangi bir zarar gelmesini önlemek için cihazı ve
kablosunu sıcak yüzeylerden yeterince uzakta tutun.
• Kabloyu halının altından geçirmeyin. Kullanım sırasında
kablonun yanlışlıkla çekilmediğinden veya birisinin ayağına
dolaşmadığından emin olun.
• Kablonun keskin kenarlardan asılmasına izin vermeyin.
• Kabloyu bükmeyin veya cihazın etrafına sarmayın.
Cihazı şu durumlarda kullanmayın,
• kablosunun hasarlı olması durumunda.
• arızalı olması durumunda.
• cihazın düşürülmesi veya başka şekilde hasar görmesi
durumunda.

TÜRKÇE
Kullanma Kılavuzu
65
Cihazın kontrolünün ve gerektiğinde tamirinin nitelikli bir kiși/
Müșteri Hizmetleri tarafından yapılmasını sağlayın. Cihazda
kendi bașınıza herhangi bir modifikasyon veya onarım
yapmaya kalkmayın.
• Yalnızca bu cihazla kullanıma uygun aksesuarlar kullanın.
• Cihazın için herhangi bir cisim sokmaya çalışmayın.
• Cihaz muhafazasını kendi başınıza açmaya çalışmayın!
• Cihaz harici bir zamanlayıcı veya ayrı uzaktan kumanda
sistemi ile çalıştırılmak için TASARLANMAMIŞTIR.

66
1. Ön Izgara
(dekoratif plaka + 3 vida dahil)
2. Kanat Bağlantı Elemanı
3. Kanat
4. Arka Izgara Bağlantı Elemanı
5. Arka Izgara
6. Motor muhafazası
7. Uzatma direği sıkma halkası
8. Ayarlanabilir içi boş iç boru
9. Yükseklik ayar halkası
10. Taban kapağı
11. Ayarlanabilir içi boş dış boru
12. Çapraz ayak
13. Kontrol paneli
14. Emniyet vidası
15. Yüksek hız göstergesi
16. Orta hız göstergesi
17. Düşük hız göstergesi
18. NA (Doğal rüzgar) göstergesi
19. SL (Uyku) göstergesi
20. Uzak sensör
21. Güç göstergesi
22. Mod düğmesi
23. OSC (Salınım) göstergesi
24. Zamanlayıcı düğmesi
25. Zamanlayıcı 0.5saat göstergesi
26. Zamanlayıcı 1aat göstergesi
27. Hız düğmesi
28. Zamanlayıcı 2aat göstergesi
29. AÇMA/KAPAMA düğmesi
30. Zamanlayıcı 4aat göstergesi
31. Uzaktan kumanda
Not: CR2025 düğme hücresi tarafından
işletilen uzaktan kumanda
32. AÇMA/KAPAMA düğmesi
33. OSC (Salınım düğmesi)
Not: OSC Salınım fonksiyonu YALNIZCA
uzaktan kumandayla yapılır
34. Hız düğmesi
35. Mod düğmesi
36. Zamanlayıcı düğmesi
PARÇALARIN TANIMI
13
20
21
22
32
33
35
24
27
30
23
25
26
28
29
14
7
8
9
10
15
16
17
18
19
11
12
34
36
12345
31
6

TÜRKÇE
Kullanma Kılavuzu
67
İLK KULLANIMDAN ÖNCE
• Tüm ambalaj malzemelerini sökün ve cihazın ve içerisindeki tüm aksesuarların tam olup
olmadığını kontrol edin.
• Güçkablosunutamamenaçın.
•CihazıTemizlik ve Bakım bölümünde belirtildiği şekilde temizleyin.
Herhangi bir parça hasar görmüşse veya eksikse, satıcınıza veya müşteri
hizmetlerine başvurun.
Uyarı: Plastik torbalar, küçük çocuklar ve bebekler için bir tehlike yaratabilir, bu nedenle
boğulmayı önlemek için onları uzak tutun.
MONTAJ
Montaj işlemine başlamadan önce her zaman vantilatörün fişinin çekilmiş ve kapalı
olduğundan emin olun.
1. Uçları kapsüllü çapraz ayağı (12) düzgün bir yüzeye yerleştirin
2. Ayarlanabilir içi boş boruyu (8) yükseklik ayarlama halkasını gevşeterek bırakın (9).
3. Ayarlanabilir direği (8,9,10) çapraz ayağa (12) 4 vida ile takın. Kapatmak için taban kapağını
(10) takın
4. Kontrol panelini (13) ayarlanabilir boruya (8) halkayı sıkarak takın (9)
5. Arka ızgara bağlantı elemanını (4) saat yönünün tersine döndürerek sökün
6. Arka ızgarayı (5) motorun ön tarafına, kolu üstte olacak şekilde yerleştirin, böylece motorun
üzerindeki sabitleme pedlerinin ızgaradaki deliğe doğru şekilde yerleştirildiğinden emin olun
7. Izgara bağlantı elemanını (4) motorun ön kapağındaki çıkıntılı yuvaya saat yönünde döndürüp
vidalayarak iyice sıkıştırın.
8. Vantilatör kanadını (3) motor şaftı üzerine doğru itin. Daha sonra bıçak bağlantı elemanını
sıkıca vidalayın (2).
9. Logo plakasını ön ızgaraya 3 vida ile takın (1). Sonra ön ızgarayı arka ızgaraya karşı (5)
konumlandırın ve bir araya getirin.
Not: Izgaranın uygun şekilde monte edildiğinden emin olmak için, her zaman emniyet
vidasını (14) takın!
Eğim açısını ve hava akımı (salınım) yönünü değiştirerek her zaman vantilatörün
uygun şekilde monte edildiğinden ve çalıştırmadan önce fişinin çekildiğinden emin olun.
ÇALIŞMA
1. Vantilatörünüzü eşit, kuru ve düzgün bir yüzeye yerleştirin.
2. Vantilatörün bir güç prizine takılmadan önce 0 (KAPALI) konumuna ayarlandığından emin
olun.
Yerel voltaj değerlerinizin cihazın teknik verileriyle eşleştiğinden emin olun. Aksi takdirde
cihaz aşırı ısınır ve zarar görebilir.
3. Fan kafasını istenilen eğim açısına göre ayarlayın (bkz. EĞİM AÇISININ AYARLANMASI)
4. Ünite veya uzaktan kumanda üzerindeki AÇMA/KAPAMA düğmesine basarak cihazı açın
5. Normal, doğal rüzgar, uyku modu arasında geçiş yapmak için mod düğmesine basın
Not: Karşılık gelen gösterge ışığı yanar

68
6. Vantilatör hızını L / M / H arasında değiştirmek için hız düğmesine basın
Not: Karşılık gelen gösterge ışığı yanar
7. Önceden ayarlanmış otomatik kapatma zamanlayıcısını kapatmak için zamanlayıcı
düğmesine sürekli basın.
İstem zamanlayıcıya göre gösterge ışığı yanacaktır
Kontrol panelinde gösterge ışığı ile 7,5 saate kadar geri sayım zamanı belirir
EĞİM AÇISININ AYARLANMASI
İstenilen vantilatör açısını ayarlamak için, motor gövdesini yerine oturana kadar yukarı veya
aşağı eğin.
SALINIM
Hava akımının yönünün değiştirilmesi!
- Salınım modunu çalıştırmak/durdurmak için uzaktan kumandadan OSC düğmesine basın.
TEMIZLIK VE BAKıM
Temizlemeden önce daima cihazı kapatın ve elektrik şebekesi bağlantısını kesin.
Cihazı asla suya sokmayın. Tehlike! Elektrik Çarpması!
- Cihazı yumuşak nemli bir bez kullanarak temizleyin.
- Hiç bir zaman cihaza sıvı püskürtmeyin veya onu suya veya başka sıvılara daldırmayın.
- Ön ve arka ızgaralar ile vantilatör kanatları temizleme amacıyla sökülebilir.
Temizleme işlemi tamamlandıktan sonra tüm parçaların kuru olduğundan ve ön/arka
ızgaranın vidalarla birlikte uygun şekilde monte edildiğinden emin olun.
Hiç bir zaman temizlemek için alkol, gaz ve/veya başka agresif temizleme ajanları/sert
nesneler kullanmayın.
DİKKAT: Vantilatör Kanadının keskin kenarları olabilir. Aşırı dikkatli olun.
MUHAFAZA
Cihazı çocuklardan uzak tutun ve temiz, kuru bir yerde muhafaza edin, en iyisi orijinal kutusunda
veya tozdan korumak için örtün.

TÜRKÇE
Kullanma Kılavuzu
69
Atma Talimatları:
Bu işaretle işaretlenmiş elektrikli cihaz atıkları ev atıklarınızla birlikte atılmamalı, bunun yerine
ayrı ayrı toplanmalıdır. Bu nedenle, lütfen bu cihazı ömrünün sonunda özel toplama noktalarına
veya yerel bayinize iade edin.
Masa Vantilatörü 81100 cihazınız perakende kutuda paketlenmiştir. Bu kutular geri
dönüştürülebilir atıklardır, yani, tekrar kullanılabilir ya da geri dönüştürülebilir.
Piller için Atma Talimatı
Standart ve șarj edilebilir piller normal evsel atıklarla birlikte atılmamalıdır . Tüketici olarak
kullanılan pillerin uygun șekilde atılmaları için iadesinden yasal olarak sorumlusunuz. Kullanılmıș
pillerinizi bulunduğunuz bölgedeki toplama noktalarına veya bu tür pillerin satıșının yapıldığı
satıș noktalarına bırakabilirsiniz.
Not:Așağıdaki kodlar zararlı maddeler içeren piller üzerinde yazılıdır:
Pb = Pil kurșun içerir
Cd = Pil kadmiyum içerir
Hg = Pil cıva içerir
TEKNİK VERİLER
Voltaj: 220 - 240 V ~ 50 Hz
Güç: 40 W
Koruma sınıfı: II
Teknik veriler değişiklik gösterebilir

70
Açıklama Sembol Değer Birim
Maksimum vantilatör üfleme hızı F 41.1 m³/dk
Vantilatör güç girişi P 40.28 W
Hizmet değeri SV 1.02 (m³/dk.)/W
Bekleme Konumunda Güç Tüketimi P
SB 0.42 W
Mevsimlik elektrik tüketimi Q 13.4 kWh/a
Vantilatör ses gücü seviyesi L
WA 54.20 dB(A)
Maksimum hava hızı c 3.54 metre/sn
Hizmet değeri için ölçüm standardı
EN 50564:2011
IEC 60879:1986 +cor1:1992
EN 60704-2-7:1998
NOT: Sürekli geliştirmeler sonucunda ürünün tasarım ve teknik özellikleri, ambalajda
gösterilen üniteden biraz farklı olabilir.

TÜRKÇE
Kullanma Kılavuzu
71
Garanti:
Bu ürün 2 yıl süreyle malzeme ve işçilik hatalarına karşı
garantilidir.
Bu garanti şu durumlarda geçerli değildir:
•Cihazıntalimatlarauygunolarakkullanılmadığıdurumlarda
•aşınmaveyıpranma(piller,vb.)nedeniyleoluşacakhasarlar
için
•satınalmasırasındamüşteritarafındanbilinenhasarlariçin
•ürünsahibininnedenolduğuhasarlariçin
Bu garanti, ulusal mevzuat uyarınca müşteri olarak sahip
olabileceğiniz herhangi bir yasal hakkı veya kanunlarla size
verilen müşteri haklarınızı etkilemez.
Garanti süresi boyunca, bir garanti durumunda hak iddia
edebilmek için müşterinin satın alma tarihini belgeleyen bir
kanıt (makbuz) sunmalıdır.
Garanti kapsamında hak iddiaları aşağıdaki şirkete
yöneltilecektir
KORONA electric GmbH, Sundern/Almanya.
Müşteri Hattı: +49 2933 90284-80
E-posta [email protected]
web: www.korona-electric.de
satın alma tarihinden itibaren 2 yıl içinde. Garanti durumunda
müşteriye cihazı masraflar kendisinden olmak üzere veya
yetkili bir mağazada tamir ettirme hakkı verilir. Müşteriye
başka ekstra haklar (garanti durumu nedeniyle) verilmez.

72
Instrukcja obsługi
Należy uważnie przeczytać niniejszą instrukcję przed
montażem i/lub obsługą urządzenia. Instrukcję tę należy
zachować wraz z paragonem i, jeśli to możliwe, pudełkiem z
opakowaniem wewnętrznym.
W przypadku przekazywania urządzenia osobom trzecim,
należy koniecznie dołączyć do niego tę instrukcję obsługi.
PRZEZNACZENIE
To urządzenie jest przeznaczone wyłącznie do użytku
domowego, a nie do użytku komercyjnego, przemysłowego
lub na zewnątrz. Wykorzystanie do innych celów może
spowodować pożar, porażenie prądem elektrycznym lub
obrażenia ciała.
Bezpieczeństwo:
Ten symbol wskazuje na zagrożenia, które mogą
powodować obrażenia!
Ten symbol wskazuje na ryzyko porażenia prądem!
Ten symbol oznacza wskazówki i informacje.
WAŻNE INSTRUKCJE DOTYCZĄCE
BEZPIECZEŃSTWA
Ostrzeżenie! Aby uniknąć możliwości zranienia/
uszkodzenia urządzenia, porażenia prądem i ryzyka
pożaru.

POLSKI
Instrukcja obsługi
73
Niebezpieczeństwo zranienia i uszkodzenia urządzenia!
• Producent nie ponosi odpowiedzialności za uszkodzenia
spowodowane nieprawidłowym użytkowaniem.
• Nieprawidłowe lub niewłaściwe użycie może spowodować
uszkodzenie urządzenia i obrażenia ciała użytkownika.
• Przed podłączeniem urządzenia do sieci elektrycznej
należy upewnić się, że lokalne napięcie jest zgodne z
danymi technicznymi urządzenia. W przeciwnym razie
urządzenie może się przegrzać i ulec uszkodzeniu.
• Należy unikać kontaktu ze wszystkimi ruchomymi
częściami. Należy zaczekać, aż wszystkie ruchome części
zatrzymają się, zanim się ich dotknie.
• Nie wkładaj palców ani nie dopuszczaj, aby ciała obce
dostały się za osłonę.
• Nie używaj urządzenia, jeśli osłony wentylatora nie są
prawidłowo zamontowane lub jeśli osłona zostanie
uszkodzona czy poluzowana.
• Upewnij się, że wentylator nie jest umieszczony w pobliżu
firan, zasłon lub jakichkolwiek przedmiotów, które mogą
zostać wciągnięte (w tym włosy i ubrania) do wentylatora
• Nigdy nie umieszczaj ani nie korzystaj z urządzenia w
miejscu, w którym mogłoby być narażone na:
- Źródła ciepła, takie jak kaloryfery, piecyki, kuchenki lub
inne produkty wytwarzające ciepło
- Bezpośrednie działanie promieni słonecznych
- Nadmierny kurz
- Wibracje mechanicznel ub wstrząsy
- Brak wentylacji
- Nierówne powierzchnie, aby uniknąć przewrócenia
wentylatora podczas użytkowania
• Zawsze wyłączaj (0) i odłączaj wentylator od zasilania, gdy
nie jest używany i/lub przenosząc go z jednego miejsca
na drugie.

74
Uwaga! Niebezpieczeństwo porażenia prądem
elektrycznym!
• Nigdy nie należy wkładać urządzenia, przewodu lub
wtyczki do wody lub jakiegokolwiek innego płynu.
• Nie należy używać urządzenia w pobliżu zlewu lub
umywalki.
• Nie należy używać urządzenia mokrymi rękami.
• Nie należy używać urządzenia na wolnym powietrzu.
• Nie należy umieszczać urządzenia w pobliżu otwartego
okna. Rozpryskiwanie deszczu na wentylatorze może
spowodować ryzyko porażenia prądem
Urządzenie elektryczne nie jest zabawką!
• Nigdy nie należy pozostawiać urządzenia bez nadzoru
podczas użytkowania.
• Urządzenie może być używane przez dzieci w wieku
od 8 lat i starsze, a także osoby o ograniczonej
sprawności fizycznej, sensorycznej lub umysłowej lub o
niewystarczającym doświadczeniu i wiedzy, wyłącznie
jeśli są pod nadzorem lub otrzymały instrukcje dotyczące
użytkowania urządzenia w bezpieczny sposób i rozumieją
związane z tym zagrożenia. Dzieci nie powinny bawić
się urządzeniem. Dzieci nie powinny czyścić ani
konserwować urządzenia, chyba że mają więcej niż 8 lat i
są pod nadzorem.
• Przechowuj urządzenie i przewód w miejscu niedostępnym
dla dzieci w wieku poniżej 8 lat.
• Zawsze odłączaj urządzenie od zasilania, gdy nie jest
używane oraz przed przystąpieniem do czyszczenia.
• Zawsze ciągnij za wtyczkę - nie za przewód.
• Trzymaj urządzenie i przewód z dala od gorących
powierzchni, aby uniknąć uszkodzenia urządzenia.

POLSKI
Instrukcja obsługi
75
• Nie należy prowadzić przewodu pod dywanem. Upewnij
się, że przewód nie może zostać przypadkowo pociągnięty
ani spowodować potknięcia się podczas użytkowania.
• Nie pozwól, aby przewód zwisał nad ostrymi krawędziami.
• Nie należy zginać przewodu, ani owijać go wokół
urządzenia.
Nie należy używać urządzenia,
• jeśli przewód jest uszkodzony.
• w przypadku awarii.
• jeśli zostało upuszczone lub uszkodzone w inny sposób.
Należy zlecić sprawdzenie i, w razie potrzeby, naprawę
wykwalifikowanej osobie/obsłudze klienta. Nigdy nie próbuj
samodzielnie modyfikować ani naprawiać urządzenia.
• Używaj tylko akcesoriów przeznaczonych do użytku z tym
urządzeniem.
• Nigdy nie próbuj wbijać żadnych przedmiotów w
urządzenie.
• Nigdy nie próbuj otwierać obudowy samodzielnie!
• Urządzenie nie jest przeznaczone do obsługi za pomocą
zewnętrznego wyłącznika czasowego lub oddzielnego
systemu zdalnego sterowania.

76
1. Przednia osłona
(zawiera płytkę dekoracyjną + 3 śrubki)
2. Nakładka mocująca śmigło
3. Śmigło
4. Nakładka mocująca tylną osłonę
5. Tylna osłona
6. Obudowa napędu
7. Pierścień zaciskowy rury przedłużającej
8. Teleskopowa ruraka wewnętrzna
9. Pierścień regulacji wysokości
10. Pokrywa podstawy
11. Teleskopowa ruraka zewnętrzna
12. Podstawa krzyżowa
13. Panel sterowania
14. Śruba zabezpieczająca
15. Wskaźnik wysokiej prędkości
16. Wskaźnik średniej prędkości
17. Wskaźnik niskiej prędkości
18. Wskaźnik NA (naturalny nawiew)
19. Wskaźnik SL (snu)
20. Czujnik pilota
21. Wskaźnik zasilania
22. Przycisk trybu
23. Wskaźnik OSC (wahania)
24. Przycisk timera
25. Wskaźnik timera 0,5 godz.
26. Wskaźnik timera 1 godz.
27. Przycisk prędkości
28. Wskaźnik timera 2 godz.
29. Przycisk WŁ./WYŁ.
30. Wskaźnik timera 4 godz.
31. Pilot
Uwaga: Pilot zasilany jest baterią guzikową
CR2025
32. Przycisk WŁ./WYŁ.
33. Wskaźnik OSC (wahania)
Uwaga: Funkcja OSC (wahania) może być
obsługiwana tylko przy pomocy pilota
34. Przycisk prędkości
35. Przycisk trybu
36. Przycisk timera
OPIS CZĘŚCI
13
20
21
22
32
33
35
24
27
30
23
25
26
28
29
14
7
8
9
10
15
16
17
18
19
11
12
34
36
12345
31
6

POLSKI
Instrukcja obsługi
77
PRZED PIERWSZYM UŻYCIEM
• Usuń wszystkie elementy opakowania i sprawdź, czy urządzenie jest kompletne i czy
wszystkie akcesoria są w zestawie.
• W pełni rozwiń przewód zasilający.
• Wyczyść urządzenie zgodnie z opisem w rozdziale Czyszczenie i pielęgnacja.
Jeśli jakiekolwiek elementy są uszkodzone lub ich brakuje, skontaktuj się ze
sprzedawcą lub działem obsługi klienta.
Ostrzeżenie: Plastikowe torby stanowią zagrożenie dla małych dzieci i niemowląt,
dlatego trzymaj je z daleka, aby uniknąć zadławienia.
MONTAŻ
Przed rozpoczęciem montażu upewnij się, że wentylator jest wyłączony i odłączony
od źródła zasilania.
1. Umieść podstawę krzyżową (12) z zaślepką na suchej, płaskiej powierzchni
2. Zwolnij teleskopową rurkę wewnętrzną (8), odkręcając pierścień regulacji wysokości (9).
3. Przymocuj teleskopową rurkę (8, 9, 10) do podstawy krzyżowej (12) za pomocą 4 śrub.
Załóż pokrywę podstawy (10)
4. Załóż panel sterowania (13) na teleskopowej rurce wewnętrznej (8), dokręcając pierścień
(9)
5. Odkręć mocowanie tylnej osłony (4), obracając je przeciwnie do ruchu wskazówek zegara
6. Ustaw tylną osłonę (5) na przedniej części napędu z uchwytem u góry, upewniając się, że
kołki pozycjonujące na jednostce napędowej są prawidłowo włożone w otwory osłony
7. Przykręć nakładkę mocującą osłonę (4) do wystającego gwintu na przedniej pokrywie
napędu, obracając ją w kierunku zgodnym z ruchem wskazówek zegara, aż zostanie
mocno dokręcona.
8. Wepchnij śmigło wentylatora (3) na wał napędu. Następnie mocno przykręć nakładkę
mocującą śmigło (2).
9. Przymocuj płytkę z logiem do przedniej oslony przy pomocy 3 śrubek (1). Przyłóż przednią
osłonę do tylnej osłony (5) i połącz je.
Uwaga: Zawsze przykręcaj śrubkę zabezpieczającą (14), aby mieć pewność, że osłona
jest prawidłowo zmontowana!
Zawsze upewnij się, że wentylator jest prawidłowo zmontowany i odłączony
od zasilania przed rozpoczęciem pracy, zmianą kąta nachylenia lub zmianą kierunku
przepływu powietrza (ruchu wahadłowego).
OBSŁUGA
1. Umieść wentylator na płaskiej, suchej i stabilnej powierzchni.
2. Przed podłączeniem wentylatora do gniazdka zasilania upewnij się, że jest on ustawiony na
0 (wył.).
Upewnij się, że napięcie lokalne odpowiada danym technicznym urządzenia. W
przeciwnym razie urządzenie może się przegrzać i ulec uszkodzeniu.
3. Ustaw głowicę wentylatora pod żądanym kątem pochylenia (patrz USTAWIENIE KĄTA
NACHYLENIA )

78
4. Włącz urządzenie, naciskając przycisk WŁ./WYŁ. na urządzeniu lub na pilocie
5. Naciśnij przycisk trybu, aby przełączyć między trybem normalnym, naturalnym wiatrem
oraz trybem snu
Uwaga: Zaświeci się odpowiedni wskaźnik
6. Naciśnij przycisk prędkości, aby zmienić prędkość wentylatora między L (niska)/M
(średnia)/H (wysoka)
Uwaga: Zaświeci się odpowiedni wskaźnik
7. Przytrzymaj przycisk timera, aby ustawić czas automatycznego wyłączenia.
Wskaźnik zapali się zgodnie z żądanym czasem
Odliczaj czas do 7,5 godziny zgodnie ze wskaźnikiem na panelu sterowania
USTAWIENIE KĄTA NACHYLENIA
Aby ustawić odpowiedni kąt nachylenia wentylatora, przechyl obudowę napędu w górę lub w
dół, aż usłyszysz kliknięcie.
RUCH WAHADŁOWY
Zmiana kierunku przepływu powietrza!
- Naciśnij przycisk OSC na pilocie, aby uruchomić/zatrzymać tryb wahania
CZYSZCZENIE I PIELĘGNACJA
Przed przystąpieniem do czyszczenia należy zawsze wyłączyć urządzenie i odłączyć je od
zasilania. Nigdy nie zanurzaj urządzenia w wodzie. Niebezpieczeństwo! Porażenie prądem!
- Wyczyść urządzenie za pomocą miękkiej, wilgotnej ściereczki.
- Nigdy nie spryskuj urządzenia płynami ani nie zanurzaj go w wodzie lub innym płynie.
- W celu czyszczenia można zdjąć przednią i tylną osłonę, a także śmigło wentylatora.
Po zakończeniu procesu czyszczenia upewnij się, że wszystkie części są suche i że
przednia/tylna osłona włącznie ze śmigłem są prawidłowo zamontowane.
Nigdy nie używaj alkoholu, benzyny i/lub innych agresywnych środków czyszczących
oraz twardych przedmiotów.
UWAGA: Śmigło wentylatora może mieć ostre krawędzie. Postępuj z najwyższą
ostrożnością.
PRZECHOWYWANIE
Trzymaj urządzenie z dala od dzieci i przechowuj je w czystym i suchym miejscu, najlepiej w
oryginalnym pudełku lub przykryj, aby chronić przed kurzem.

POLSKI
Instrukcja obsługi
79
Instrukcje dotyczące utylizacji
Zużytych urządzeń elektrycznych oznaczonych tym znakiem nie wolno wyrzucać wraz z
odpadami domowymi, lecz należy je utylizować osobno. Dlatego proszę zwrócić to urządzenie
pod koniec cyklu życia do specjalnych punktów zbiórki do utylizacji lub do lokalnego
dystrybutora.
Wentylator biurkowy 81100 jest zapakowany w pudełko detaliczne. Takie pudełka nadają się
do ponownego użycia lub recyklingu.
Instrukcja utylizacji baterii
Standardowe baterie i akumulatory nie powinny być wyrzucane do zwykłych śmieci domowych.
Jako konsument, jesteś prawnie zobowiązany do zwrotu zużytych baterii do utylizacji. Możesz
oddać zużyte baterie do publicznych punktów odbioru w twojej okolicy lub w punktach
handlowych, gdzie sprzedawane są baterie tego typu.
Uwaga: poniższe kody są drukowane na bateriach, zawierających szkodliwe substancje:
Pb = bateria zawiera ołów
Cd = bateria zawiera kadm
Hg = bateria zawiera rtęć
DANE TECHNICZNE
Napięcie: 220 - 240 V ~ 50 Hz
Moc: 40 W
Klasa ochrony: II
Dane techniczne mogą ulec zmianie

80
Opis Symbol Wartość Jednostka
Maksymalne natężenie przepływu
wentylatora
F 41.1 m³/min
Pobór mocy wentylatora P 40.28 W
Wartość serwisowa SV 1.02 (m³/min)/W
Pobór mocy w trybie gotowości P
SB 0.42 W
Sezonowe zużycie energii elektrycznej Q 13.4 kWh/a
Poziom mocy akustycznej wentylatora L
WA 54.20 dB(A)
Maksymalna prędkość powietrza c 3.54 meter/sek.
Standard pomiaru dla wartości
serwisowej
EN 50564:2011
IEC 60879:1986 +cor1:1992
EN 60704-2-7:1998
UWAGA: W wyniku ciągłych ulepszeń konstrukcja i dane techniczne produktu wewnątrz
mogą nieznacznie różnić się od jednostki, przedstawionej na opakowaniu.

POLSKI
Instrukcja obsługi
81
Gwarancja:
Ten produkt jest objęty gwarancją na wady materiałowe i
produkcyjne przez okres 2 lat.
Niniejsza gwarancja nie jest ważna, jeśli:
•urządzenieniebyłużywanyzgodniezinstrukcją
•uszkodzeniaspowodowanesązużyciem(baterie,itp.)
•uszkodzeniaznanebyłyklientowipodczaszakupu
•szkodywyrządzonezostałyprzezwłaściciela
Niniejsza gwarancja nie ma wpływu na twoje ustawowe
prawo, ani żadne prawo, które Ci przysługuje jako klientowi
zgodnie z obowiązującym ustawodawstwem krajowym,
dotyczącym zakupu towarów.
Aby dochodzić swojego prawa do gwarancji w okresie
gwarancyjnym, klient musi przedstawić dowód daty zakupu
(paragon).
Gwarancji należy dochodzić w
KORONA electric GmbH, Sundern/Niemcy.
Infolinia: +49 2933 90284-80
e-mail: [email protected]
strona internetowa: www.korona-electric.de
w ciągu 2 lat od daty zakupu. W przypadku gwarancji
klientowi przysługuje prawo do naprawy urządzenia u
producenta lub w autoryzowanym sklepie. Dalsze prawa (w
związku z gwarancją) klientowi nie przysługują.

82
Návod k použití
Před montáží a/nebo provozem spotřebiče si pečlivě
přečtěte tyto pokyny. Uschovejte tyto pokyny včetně
účtenky a pokud možno i krabičky s interním balení.
Při předávání zařízení třetí osobě nezapomeňte přiložit tento
návod k použití.
ZAMÝŠLENÉ POUŽITÍ
Tento spotřebič je určen pouze pro použití v domácnosti a
ne pro komerční, průmyslové nebo venkovní použití. Jiné ne
doporučené použití může způsobit požár, úraz elektrickým
proudem nebo zranění.
Bezpečnost:
Tento symbol označuje nebezpečí, která mohou
způsobit zranění!
Tento symbol označuje nebezpečí úrazu elektrickým
proudem!
Tento symbol označuje tipy a informace.
DŮLEŽITÉ BEZPEČNOSTNÍ POKYNY
Výstraha! Abyste předešli možnému zranění/poškození
zařízení, úrazu elektrickým proudem a nebezpečí požáru.
Nebezpečí zranění a poškození spotřebiče!
• Výrobce neodpovídá za škody způsobené nesprávným
použitím.

ČESKÝ
Návod k použití
83
• Nesprávné použití může poškodit spotřebič a způsobit
zranění uživatele.
• Před připojením tohoto spotřebiče k elektrické síti se
ujistěte, že vaše místní napětí odpovídá technickým
údajům o spotřebiči. Jinak se může přístroj přehřát a
poškodit.
• Vyvarujte se kontaktu se všemi pohyblivými částmi. Než
se jich dotknete, vždy počkejte, až se všechny pohyblivé
části zastaví.
• Nevkládejte prsty a nedovolte vniknout cizí předměty na
mřížku.
• Nepoužívejte ventilátor bez řádně nainstalovaných mřížek,
nebo pokud je mřížka poškozena, či uvolněna.
• Ujistěte se, že ventilátor není umístěn v blízkosti závěsů,
záclon nebo jiných předměty, které mohou být vtaženy
(včetně vlasů a oblečení) do ventilátoru.
• Nikdy neumisťujte nebo nepoužívejte jednotku tam, kde
by mohla být vystavena:
- Zdroji tepla, jako jsou radiátory, tepelné registry, kamna
nebo jiné výrobky, které produkují teplo
- Přímé sluneční světlo
- Nadměrný prach
- Mechanické vibrace nebo rázy
- Nedostatek ventilace
- Nerovnoměrné povrchy, aby se během používání
zabránilo naklopení ventilátoru
• Pokud se výrobek nepoužívá, vždy VYPNĚTE (0 - OFF) a
odpojte ventilátor, taktéž při přesunu z jednoho místa na
druhé.
Upozornění! Nebezpečí úrazu elektrickým
proudem!
• Nikdy nedávejte spotřebič, kabel, nebo zástrčku do vody,
nebo jiné kapaliny.

84
• Nepoužívejte spotřebič v blízkosti dřezu, nebo umyvadla.
• Nepoužívejte spotřebič mokrýma rukama.
• Nepoužívejte spotřebič venku.
• Neumisťujte spotřebič do blízkosti otevřeného okna.
Stříkání deště na ventilátor může způsobit nebezpečí
úrazu elektrickým proudem.
Elektrické zařízení není hračka!
• Během používání nikdy nenechávejte spotřebič bez
dozoru.
• Tento spotřebič mohou používat děti od 8 let a starší a
osoby se sníženými fyzickými, smyslovými nebo mentálními
schopnostmi, nebo nedostatkem zkušeností a znalostí,
pokud jim byl poskytnut dohled nebo poučení o používání
spotřebiče bezpečným způsobem a porozuměly jim
související rizika. Děti se se zařízením nesmí hrát. Čištění
a údržbu uživatelů nesmí provádět děti, pokud nejsou
starší než 8 let a nejsou pod dozorem.
• Udržujte spotřebič a jeho kabel mimo dosah dětí mladších
8 let.
• Vždy spotřebič odpojte, pokud se nepoužívá, a před
čištěním.
• Vždy vytáhněte zástrčku - ne kabel.
• Udržujte spotřebič a kabel v dostatečné vzdálenosti od
horkých povrchů, aby nedošlo k poškození spotřebiče.
• Nepoužívejte kabel pod kobercem. Dbejte na to, aby se
kabel při používání nechtěně netáhl, nebo aby o něj někdo
nezakopl.
• Nenechávejte kabel viset přes ostré hrany.
• Kabel neohýbejte, ani jej nenavíjejte kolem spotřebiče.

ČESKÝ
Návod k použití
85
Nepoužívejte spotřebič,
• pokud je kabel poškozen.
• v případě poruchy.
• pokud přístroj spadl nebo je jinak poškozen.
Nechte jej zkontrolovat a v případě potřeby opravit
kvalifikovanou osobou/zákaznickým servisem. Nikdy se
nepokoušejte sami provádět žádné úpravy nebo opravy
spotřebiče.
• Používejte pouze příslušenství určené k použití s tímto
zařízením.
• Nikdy se nepokoušejte vnést do zařízení žádné předměty.
• Nikdy se sami nepokoušejte otevřít kryt!
• Zařízení není určeno k provozu pomocí externího časovače
nebo samostatného systému dálkového ovládání.

86
1. Přední mřížka
(včetně ozdobné desky + 3 šrouby)
2. Sponka lopatky
3. Lopatka
4. Sponka zadní mřížky
5. Zadní mřížka
6. Pouzdro motoru
7. Utahovací kroužek prodlužovací tyče
8. Nastavitelná tyč - vnitřní trubka
9. Kroužek pro nastavení výšky
10. Kryt základny
11. Nastavitelná vnější vnitřní trubka
12. Křížová základna
13. Ovládací panel
14. Bezpečnostní šroub
15. Vysokorychlostní indikátor
16. Indikátor střední rychlosti
17. Indikátor nízké rychlosti
18. Indikátor NA (přirozený vítr)
19. Indikátor SL (Spánek)
20. Dálkový senzor
21. Indikátor napájení
22. Tlačítko režimu
23. Indikátor OSC (oscilace)
24. Tlačítko časovače
25. Indikátor časovače 0,5 hodiny
26. Indikátor časovače 1 h
27. Tlačítko rychlosti
28. Indikátor časovače 2hod
29. Tlačítko ON / OFF
30. Indikátor časovače 4h
31. Dálkové ovládání
Poznámka: Dálkové ovládání ovládané
CR2025 knoflíkovou baterií
32. Tlačítko ON / OFF
33. OSC (tlačítko oscilace)
Poznámka: Ovládání funkce OSC
POUZE pomocí dálkového ovládání
34. Tlačítko rychlosti
35. Tlačítko režimu
36. Tlačítko časovače
POPIS DÍLŮ
13
20
21
22
32
33
35
24
27
30
23
25
26
28
29
14
7
8
9
10
15
16
17
18
19
11
12
34
36
12345
31
6

ČESKÝ
Návod k použití
87
PŘED PRVNÍM POUŽITÍM
• Odstraňteveškerýobalovýmateriálazkontrolujte,zdaspotřebičjekompletníapříslušenství
je součástí dodávky.
• Napájecíkabelzcelaodmotejte.
• VyčistětespotřebičpodlepopisuvčástiČištění a péče.
Pokud jsou některé položky poškozené, nebo chybí, kontaktujte svého prodejce,
nebo zákaznický servis.
Varování: Plastové sáčky představují nebezpečí pro batolata a kojence, proto je udržujte
mimo dosah, aby nedošlo k udušení.
MONTÁŽ
Před zahájením montáže se vždy ujistěte, že je ventilátor odpojen od napájení a
vypnut.
1. Umístěte křížovou základnu (12) s koncovým uzávěrem na suchý rovný povrch
2. Uvolněte nastavitelného tyč – vnitřní trubku (8) uvolněním kroužku pro nastavení výšky (9).
3. Připevněte nastavitelný tyč (8,9,10) k příčné základně (12) pomocí 4 šroubů. Vložte kryt
základny (10) do krytu
4. Připevněte ovládací panel (13) k vnitřní trubce (8) nastavitelné tyče utažením kroužku (9).
5. Odšroubujte upevňovací prvek zadní mřížky (4) jeho otočením proti směru hodinových
ručiček
6. Umístěte zadní mřížku (5) proti přední straně motoru s držadlem nahoře a ujistěte se, že
jsou vodicí kolíky na motoru správně zasunuty do otvoru na mřížce.
7. Zašroubujte sponku mřížky (4) na vyčnívající závit na předním krytu motoru otáčením ve
směru hodinových ručiček, dokud není pevně utažena.
8. Zatlačte lopatku ventilátoru (3) na hřídel motoru. Potom pevně přišroubujte sponku lopatky
(2).
9. Připojte desku loga k přední mřížce pomocí 3 šroubů (1). Poté umístěte přední mřížku proti
čtecí mřížce (5) a spojte je k sobě.
Poznámka: Vždy upevněte bezpečnostní šroub (14), abyste se ujistili, že je mřížka
správně smontována!
Před zahájením provozu se vždy ujistěte, že je ventilátor řádně smontován
a odpojen ze sítě, změnou úhlu náklonu a změnou směru proudu vzduchu (oscilace).
PROVOZ
1. Postavte ventilátor na rovný, suchý a stabilní povrch.
2. Před zapojením do elektrické zásuvky se ujistěte, že je ventilátor v poloze VYPNUTO 0
(OFF).
Ujistěte se, že vaše místní napětí odpovídá technickým údajům spotřebiče. Jinak se
může přístroj přehřát a poškodit.
3. Nastavte hlavu ventilátoru do požadovaného úhlu náklonu (viz NASTAVENÍ ÚHLU
NÁKLESU)
4. Zapněte spotřebič stisknutím tlačítka ON/OFF na přístroji, nebo na dálkovém ovladači
5. Stisknutím tlačítka režimu přepínáte mezi normálním, přirozeným větrem a režimem spánku

88
Poznámka: Rozsvítí se odpovídající indikátor
6. Stisknutím tlačítka rychlosti přepněte rychlost ventilátoru mezi L / M / H
Poznámka: Rozsvítí se odpovídající indikátor
7. Stiskněte tlačítko časovače pro přednastavení automatického vypnutí časovače.
Kontrolka se rozsvítí podle nastavené délky časovače
Odpočítávání časovač až 7,5 hodiny s kontrolkou na ovládacím panelu
NASTAVENÍ ÚHLU
Chcete-li nastavit požadovaný úhel ventilátoru, sklopte kryt motoru nahoru nebo dolů, dokud
nezaklapne na místo.
OSCILACE
Změna směru proudu vzduchu
- Stisknutím tlačítka OSC na dálkovém ovladači spustíte / zastavíte režim oscilace
ČIŠTĚNÍ A PÉČE
Před čištěním, spotřebič vždy vypněte a odpojte od sítě. Nikdy neponořujte spotřebič do vody.
Nebezpečí! Elektrický šok!
- Vyčistěte spotřebič měkkým navlhčeným hadříkem.
- Nikdy nestříkejte spotřebič kapalinami, ani ho neponořujte do vody, nebo jiné kapaliny.
- Pro účely čištění je možné vyjmout přední a zadní mřížku, jakož i lopatku ventilátoru.
Po dokončení procesu čištění se ujistěte, že všechny části jsou suché a že přední/zadní
mřížka vč. lopatka ventilátoru je správně sestavena.
Nikdy nepoužívejte alkohol, benzín nebo jiné agresivní čisticí prostředky/tvrdé předměty.
UPOZORNĚNÍ: Lopatka ventilátoru může mít ostré hrany. Zacházejte s mimořádnou
opatrností.
SKLADOVÁNÍ
Spotřebič uchovávejte mimo dosah dětí a skladujte jej na čistém a suchém místě, nejlépe v
původní krabici nebo jej zakryjte, aby byl chráněn před prachem.

ČESKÝ
Návod k použití
89
Pokyny k likvidaci
Elektrická zařízení označená tímto symbolem nesmí být likvidována s domovním odpadem,
ale musí být sbírána odděleně. Proto je prosím vraťte na konci jejich životního cyklu na speciální
sběrná místa k likvidaci, nebo místnímu prodejci.
Váš stolní ventilátor 81100 je zabalen v maloobchodní krabici. Takové krabice jsou
recyklovatelné odpady, tj. jsou opakovaně použitelné nebo recyklovatelné.
Pokyny pro likvidaci baterií
Standardní a dobíjecí baterie by se neměly vyhazovat do běžného domovního odpadu. Jako
spotřebitel jste zákonně povinni vracet použité baterie k správné likvidaci. Použité baterie
můžete předat na veřejných sběrných místech ve vašem okrsku nebo v prodejnách, kde se
prodávají baterie tohoto typu.
Poznámka: níže uvedené kódy jsou vytištěny na bateriích obsahujících škodlivé
substance:
Pb = Baterie obsahující olovo
Cd = Baterie obsahující kadmium
Hg = Baterie obsahující rtuť
TECHNICKÁ DATA
Napětí: 220 - 240 V ~ 50 Hz
Výkon: 40 W
Třída ochrany: II
Technické údaje se mohou změnit

90
Popis Symbol Hodnota Jednotka
Maximální průtok ventilátoru F 41.1 m³/min
Příkon ventilátoru P 40.28 W
Servisní hodnota SV 1.02 (m³/min)/W
Spotřeba energie v pohotovostním režimu P
SB 0.42 W
Sezónní spotřeba elektřiny Q 13.4 kWh/a
Hladina akustického výkonu ventilátoru L
WA 54.20 dB(A)
Maximální rychlost vzduchu c 3.54 m/s
Měřicí standard pro servisní hodnotu
EN 50564:2011
IEC 60879:1986 +cor1:1992
EN 60704-2-7:1998
POZNÁMKA: V důsledku neustálého zlepšování se konstrukce a specifikace produktu
uvnitř mohou mírně lišit od jednotky zobrazené na obalu.

ČESKÝ
Návod k použití
91
Záruka:
Tento produkt je po dobu 2 let v záruce na vady materiálu a
zpracování.
Tato záruka nemůže být uplatněna:
•pokudnebylspotřebičpoužívánpodlepokynů
•zaškodyzpůsobenéopotřebením(baterieatd.)
•zaškodyznámézákazníkemvdoběnákupu
•zaškodyzpůsobenémajitelem
Tato záruka nemá vliv na vaše zákonné parvo, ani na žádné
zákonné právo, které můžete mít jako zákazník podle
platných vnitrostátních právních předpisů upravujících nákup
zboží.
Aby mohl zákazník během záruční doby uplatnit své právo
v záručním případě, musí zákazník předložit doklad o datu
nákupu (fakturu/stvrzenku).
Záruka musí být uplatněna za
KORONA electric GmbH, Sundern / Německo.
Telefonní horká linka: +49 2933 90284-80
Mail: [email protected]
web: www.korona-electric.de
do 2 let od data nákupu. V případě záruky má zákazník právo
na opravu spotřebiče u nás nebo v autorizovaném obchodě.
Další práva (z důvodu záruky) nejsou zákazníkovi udělena.

Ref: 81100/2019.12
-
 1
1
-
 2
2
-
 3
3
-
 4
4
-
 5
5
-
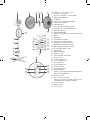 6
6
-
 7
7
-
 8
8
-
 9
9
-
 10
10
-
 11
11
-
 12
12
-
 13
13
-
 14
14
-
 15
15
-
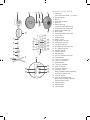 16
16
-
 17
17
-
 18
18
-
 19
19
-
 20
20
-
 21
21
-
 22
22
-
 23
23
-
 24
24
-
 25
25
-
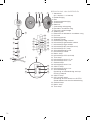 26
26
-
 27
27
-
 28
28
-
 29
29
-
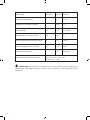 30
30
-
 31
31
-
 32
32
-
 33
33
-
 34
34
-
 35
35
-
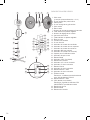 36
36
-
 37
37
-
 38
38
-
 39
39
-
 40
40
-
 41
41
-
 42
42
-
 43
43
-
 44
44
-
 45
45
-
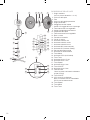 46
46
-
 47
47
-
 48
48
-
 49
49
-
 50
50
-
 51
51
-
 52
52
-
 53
53
-
 54
54
-
 55
55
-
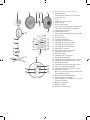 56
56
-
 57
57
-
 58
58
-
 59
59
-
 60
60
-
 61
61
-
 62
62
-
 63
63
-
 64
64
-
 65
65
-
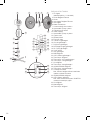 66
66
-
 67
67
-
 68
68
-
 69
69
-
 70
70
-
 71
71
-
 72
72
-
 73
73
-
 74
74
-
 75
75
-
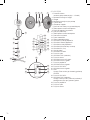 76
76
-
 77
77
-
 78
78
-
 79
79
-
 80
80
-
 81
81
-
 82
82
-
 83
83
-
 84
84
-
 85
85
-
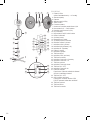 86
86
-
 87
87
-
 88
88
-
 89
89
-
 90
90
-
 91
91
-
 92
92


Korona 81100 El manual del propietario
- Categoría
- Raclettes
- Tipo
- El manual del propietario
En otros idiomas
- français: Korona 81100 Le manuel du propriétaire
- italiano: Korona 81100 Manuale del proprietario
- Deutsch: Korona 81100 Bedienungsanleitung
- Nederlands: Korona 81100 de handleiding
- polski: Korona 81100 Instrukcja obsługi
- Türkçe: Korona 81100 El kitabı
Documentos relacionados
Otros documentos
-
 Pro Breeze PB-F12W-UK-FBA Manual de usuario
-
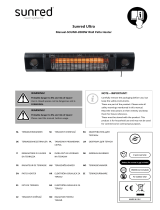 SunRed Wandheizstrahler Heater Sun and Sound Ultra Wall 2000 Watt Instrucciones de operación
-
Black & Decker BD DF1210 Manual de usuario
-
Taurus Alpatec ICE BRISE El manual del propietario
-
PREMIUM PFS1600 Guía del usuario
-
-
Tristar AT-5450 El manual del propietario
-
Beper P206VEN130 Stand Fan Manual de usuario
-
Bimar VC116 Manual de usuario
-
PUR LINE FANY 05 El manual del propietario

