Sangean HDR-15 Manual de usuario
- Categoría
- Relojes de alarma
- Tipo
- Manual de usuario

3A81d40S10030
HD RADIO / FM RDS / AM
Digital Radio
HDR-15
GB
E
01 - 18
19 - 37

GBGB
EE
01
HD Radio technology manufactured under license from iBiquity Digital Corporation. U.S. and Foreign Patents.
HD Radio™ and the HD, HD Radio and “Arc” logos are proprietary trademarks of iBiquity Digital Corp.
For United States:
Cautions to the user
The changes or modifications not expressly approved by the party responsible for compliance
could void the users authority to operate the equipment.
The equipment has been tested and found to comply with the limits for a Class B Digital Device,
pursuant to part 15 of the FCC Rules. These limits are designed to provide reasonable protection
against harmful interference in a residential installation. This equipment generates, uses and can
radiate radio frequency energy and, if not installed and used in accordance with the instruction, may
cause harmful interference to radio communication. However, there is no guaranty that interference
will not occur in a particular installation. If this equipment does cause harmful interference to radio
or television reception, which can be determined by turning the equipment off and on, the user is
encouraged to try to correct the interference by one or more of the following measures:
− Reorient or relocate the receiving antenna.
− Increase the separation between the equipment and receiver.
− Connect the equipment into an outlet on a circuit different from that to which the receiver is connected.
− Consult the dealer or an experienced radio / TV technician for help.
These servicing instructions are for use by qualified service personnel only. To reduce the risk
of the electric shock, do not perform any servicing other than that contained in the operating
instructions unless you are qualied to so.
CAUTION
VERY IMPORTANT PLEASE READ
Sangean suggest that you keep your AC Adapter at least 12 inches away from the radio while
listening to the AM Band.
Your Sangean Radio is powered by an AC adapter which is a “switching” or “switch-mode” type.
The DOE (Department Of Energy) has a Federal mandate; requiring all manufactures to use this
type of power supply.
This newer power saving technology has the unfortunate side effect of causing interference to the
AM radio band.
Therefore, we recommend that customers keep at least a 1 foot distance between the AC adapter
and the radio. This interference will not affect the FM Band. If you have any questions please
contact customer service at (888)726-4326, (562)941-9900 or [email protected]
If an AC adapter isn’t included in this model and if you wish to purchase an AC Adapter separately,
please refer to the specications for the AC Adapter stated on the nal page of the manual, or
please contact Sangean for the correct AC Adapter and specications.
To learn more about the DOE mandate please visit:
http://www1.eere.energy. gov/buildings/appliance_standards/product.aspx/productid/23

GBGB
EE
02
Cautions
Please note not all AC adapters are alike.
The AC adapter that is included with this radio is designed to be used exclusively with this device.
Do not use an AC adapter that differs from the specications on the AC adapter that is included.
If an AC adapter is NOT included with your radio and in order not to damage the unit and void
your warranty, specifications for the AC Adapter are stated on the final page of the manual, or
please contact Sangean for the correct AC Adapter and specications. For customers in the US
and Canada, please call 562-941-9900 or 888-726-4326. For all other areas, please contact us via
Do not use an AC adapter that does not meet the correct specications.
Do not allow this radio to be exposed to water, steam or sand. Do not
leave your radio where excessive heat could cause damage such as in
a parked car where the heat from the sun can build up even though the
outside temperature may not seem too high.
● Your radio should not be exposed to dripping or splashing water and that no objects lled with
liquids, such as vases, shall be placed on the radio.
● It is recommended to operate the product such that there is a minimum distance (4”
recommended) to adjacent objects in order to ensure good ventilation.
● The ventilation of the product should not be restricted by covering it or its ventilation openings
with items such as newspapers, tablecloths, curtains etc.
● No open ame sources such as lighted candles should be placed on the product.
● It is recommended to avoid using or storing the product at extr eme temperatures. Avoid leaving
the unit in cars, on window sills or in direct sunlight etc.

GBGB
EE
03
Controls
1
Speaker
2
Band button
3
Preset button
4
HD Seek / APS button
5
Alarm 1 button
6
Alarm 2 button
7
Tuning up / down / Snooze button
8
Alarm 3 button
9
Nap timer button
10
Sleep timer button
11
Info / Menu button
12
Select button
13
Power button
14
LCD display
15
Volume control
16
REC out socket
17
AUX IN socket
18
Headphone socket
19
Wire antenna
20
USB charging socket
21
DC IN socket
Top view
Front view
Right view
Back view

GBGB
EE
04
If the clock time was not auto adjusted within 24 hours, the symbol “CT” will disappear on the display.
If the clock time from local RDS / RBDS station is not correct, you should consider disabling the
“RBDS Auto CT” function and set the time using the manual setting.
Please note that at times the RDS / RBDS signal may broadcast the wrong time, this is the fault
of the radio station and not your radio.
Using the AC power adaptor
Auto clock set mode
The AC power adaptor required for this unit should be 6 volts DC at 2A center pin positive. Insert
the adaptor plug into the DC socket on the rear of the radio. Plug the adaptor into a standard AC
outlet. If no time is displayed, the screen will show ----:----. The AC adaptor should be disconnected
from the AC outlet when not in use for long periods of time.
Fully extend the wire antenna located on the rear of your radio.
Press and release the Power button to switch on your radio. It may be necessary to relocate your
radio to get better reception.
Press the Power button to switch on your radio.
Press the Band button to select FM radio mode.
Press and hold the Menu button to enter the menu setting and then press the Tuning up / down
button to select “RBDS Auto CT”. Press the Select button to enter the setting.
Press the Tuning up / down button to select “Auto” or “Manual”. With “Auto” selected, press the
Select button to conrm the setting. Your radio will synchronize its clock time whenever it tunes
to a radio station using RDS / RBDS with CT signals. The symbol “CT” will appear on the display
indicating the radio time is RDS / RBDS clock time.
If you wish to cancel the “RBDS Auto CT” function, select “Manual” and press the Select button to
conrm the setting. Please refer to the next section “Setting the clock manually” to set the clock
time and date.
1.
2.
3.
1.
2.
3.
4.
5.
1.
2.
3.
The display will revert to a conventional time display 10 seconds after
the last button press except when displaying scrolling text.
NOTE
NOTE
The AC adaptor is used as the means of connecting the radio to the power supply. The AC Adapter
used for the radio must remain accessible during normal use in order to disconnect the radio from the
power supply completely, the AC Adaptor should be removed from the power supply outlet completely.
IMPORTANT

GBGB
EE
05
Setting the clock manually
Setting the time format
Scan tuning FM / AM
Press and hold the Menu button to enter the menu setting and then press the Tuning up / down
button to select “Clock”.
Press the Select button to enter the time setting. The hour digit will ash on the display.
Press the Tuning up / down button to set the desired hour. Then press the Select button to conrm
the setting. The minute digit will ash on the display.
Press the Tuning up / down button to set the desired minute and press the Select button to conrm
the setting. Now the month digit will ash on the display.
Follow the steps above to set the month / day / year. When the time and date setting is completed,
the display will show “Saved”.
Press and hold the Menu button to enter the menu setting and then press the Tuning up / down
button to select “12 / 24 hour”.
Press the Select button and press the Tuning up / down button to select 12 or 24 hour format. Press
the Select button to conrm the setting. The selected format is used in standby mode, in playing
mode and when setting the alarms.
Make sure the wire antenna is fully extended in advance.
Press the Power button to switch on your radio.
Press the Band button repeatedly to select the desired frequency band.
To scan up in frequency, press and hold the Tuning up button. Your radio will scan in an upwards
direction (low frequency to high frequency) and stop automatically when it finds a station of
sufcient strength. To scan down in frequency, press and hold the Tuning down button. Your radio
will scan in a downwards direction and stop automatically when it finds a station of sufficient
strength.
After a few seconds the display will update. The display will show the frequency of the signal found.
If the signal is strong enough and there is RDS / RBDS data present then the radio will display the
station name.
1.
2.
3.
4.
5.
1.
2.
1.
2.
3.
4.
5.
When choosing manual setting as the clock time setting of your radio, the “RBDS Auto CT” function
will be disabled.

GBGB
EE
06
Manual tuning – FM / AM
Press the Power button to switch on your radio.
Press the Band button repeatedly to select the desired frequency band.
Press and release the Tuning up / down button to tune to a station. The frequency will change in
steps of 50kHz / 100kHz / 200kHz in FM or 9kHz / 10kHz in AM.
When the frequency band end is reached the radio will recommence tuning from the opposite
frequency band end.
Adjust the Volume control to the desired volume settings.
To switch off your radio press the Power button.
1.
2.
3.
4.
5.
6.
If your radio has any interference in the AM band because of its adaptor, please move your radio
away from its AC adaptor at least 12”.
NOTE
Resetting the tuning region will erase your preset stations stored in the radio. The memory presets
will revert to the factory default settings.
NOTE
Tuning region
Press the Power button to switch on your radio.
Press the Band button to select your required frequency band.
Press and hold the Menu button to enter the menu setting and then press the Tuning up / down
button to select “Region”. Press the Select button to enter the setting.
Press the Tuning up / down button to select your required tuning region and then press the Select
button to conrm your selection.
Region A (Most countries)
FM: 87.5-108, 100kHz
Region A (Philippines, Romania)
AM: 522-1710, 9kHz
Region B (US, Mexico, Canada)
FM: 87.5-107.9, 200kHz
Region B (US, Mexico, Canada)
AM: 520-1710, 10kHz
Region C (Most countries)
FM: 87.5-108, 50kHz
Region C (SE Asia)
AM: 522-1620, 9kHz
Region D (Brazil, Japan)
FM: 76-108, 100kHz
Region D (Brazil)
AM: 522-1629, 9kHz
1.
2.
3.
4.
Your radio can be congured for any one of the four international tuning regions.

GBGB
EE
07
Presetting stations
Recalling a preset station
Press the Power button to switch on your radio.
Tune to the required radio station as previously described.
To store the station as a preset, press and hold the Preset button and then press Tuning up / down
button to select the required preset number. Press the Select button to store the current station.
The corresponding preset number e.g. “P02” will show on the display.
Stations which are already stored in the presets may be overwritten by following the above
procedure.
Press the Power button to switch on your radio.
Select the required operating mode using the Band button.
Press the Preset button and then press Tuning up / down button to select the required preset
number. Press the Select button to recall the memory station.
1.
2.
3.
4.
1.
2.
3.
There are 20 presets each for FM and AM radio. They are used the same way for each operating
mode.
FM stereo is only available via earphones or in HD Radio mode.
NOTE
Stereo / Mono switching
Press the Power button to switch on your radio.
Press the Band button as needed to select the FM radio mode and tune to the desired FM station
as previously described.
Press and hold the Menu button to enter the menu setting and then press the Tuning up / down
button to select “Force Mono”. Press the Select button to enter the setting.
Press the Tuning up / down button to select the “Mono” or “Stereo”. Press the Select button to
conrm the setting.
1.
2.
3.
4.
If the FM radio station being listened to has a weak signal, some hiss may be audible. It is possible to
reduce this hiss by forcing the radio to play the station in mono rather than stereo.

GBGB
EE
08
Receiving HD Radio stations
Receiving Multicast Stations
HD SEEK function
HD Radio (APS) Auto Preset System
When the radio is tuned to an HD Radio station, the HD Radio logo will ash in the display, indicating
that the signal is blending from analog to digital. Once the receiver acquires the HD Radio signal, the
HD Radio logo will remain solid on the screen.
Press the Band button to select your required frequency band.
Press and hold the APS button to initiate scan. The radio will scan from the lowest frequency on the
selected band, automatically storing stations in preset memory based on signal strength order.
During the scanning process, as new stations are detected the station counter on the right hand
side of the display will increase.
1.
2.
When the radio is tuned to an HD Radio station, it will determine that one or more Multicast stations
are available and “HD1+”, for example, may appear on the display. “HD1” indicates the number of the
current multicast program and plus (+) means that additional HD Radio programs are available. Press
the Tuning up / down button on the radio to tune to HD2 / HD3 Multicast channel.
Using the HD Seek button, the radio will seek to the next available HD Radio station. This function will
also scan to the Multicast program if available.
Pressing and releasing the HD Seek button will tune to the next available HD Radio station of sufcient
signal strength.
This system will automatically scan and preset the received stations in the order of signal strength,.i.e.
the best reception station will be preset at Preset 1 and so on. APS function is only available in the HD
Radio FM / AM bands.
The maximum number of presets is 20 each for HD Radio FM and AM band. If during APS operation
more than 20 (HD Radio FM or AM) are found only 20 strongest stations will be stored in the preset
memories.
All previously stored preset stations will be erased when APS operation commences and HD
Stations are found.
To recall the preset station, press the Preset button and then press Tuning up / down button to select
the required preset number. Press the Select button to recall the memory station.
1.
2.
3.
NOTE

GBGB
EE
09
Emergency alert (EA)
Press and hold the Menu button to enter the menu setting and then press the Tuning up / down
button to select “Alert”. Press the Select button to enter the setting.
Press the Tuning up / down button to select “On” or “Off”. To disable the Emergency Alerts feature,
Select “Off” and then press the Select button to conrm the setting. With “On” selected, press the
Select button to enter the Emergency Alerts Location setting.
Press the Tuning up / down button to select your required location setting.
If you choose “Off”:
all the alerts that are broadcast within the radio’s range will be received. The
default setting is “Off”. Press the Select button to conrm the setting.
If you choose “On”:
you can define the location, then the receiver will display text alerts (or
awaken the radio from standby mode) only when the received data includes location-matching
alerts. If location data is not included in the received data, then the receiver disregards the locations
that are dened in the receiver. Press the Select button to conrm the setting.
The location preset “1” (for example) will ash on the top right corner of the screen. Now choose
your required location preset you would like to setup. Press the Tuning up / down button to select
your required location preset and press the Select button to confirm your selection. Up to 10
locations can be saved.
There are three options for Alert Location: State / County, Zip and Off. Press the Tuning up / down
button to select your desired Alert Location option and then press the Select button to enter the
setting.
If State / County was selected:
Press the Tuning up / down button to change the State and press the Select button to conrm
the setting.
Press the Tuning up / down button to change the County and press the Select button to conrm
the setting.
Press the Tuning up / down button to select “Save” or “Back”. To conrm the setting, select
“Save” and press the Select button to save the setting. To change the setting, select “Back”
and press the Select button to change your setting.
1.
2.
3.
4.
5.
Emergency Alerts (EA) is a warning system used by broadcasters to notify listeners about potential
hazardous situations related to extreme weather, oods, and infrastructure failures, amber alerts (child
abductions), and more.
Your Radio must be in a location that allows for adequate reception of audio and data services and
tuned to a station that provides the Emergency Alerts. When enabled, the Emergency Alerts feature
allows audio and text-based alerts to be played or displayed by the radio, the alerts can also awaken
the radio from standby mode.
Emergency alerts setting
(1)
(2)
(3)

GBGB
EE
10
6.
If Zip was selected:
The rst digit of your US Zip code will ash on the display. Press the Tuning up / down button to
select the desired digit and press the Select button to cause the next digit to ash on the display.
Continue to change all the digits in your Zip code. Press the Select button to conrm the setting.
Press the Tuning up / down button to select “Save” or “Back”. To conrm the setting, select
“Save” and press the Select button to save the setting. To change the setting, select “Back”
and press the Select button to change your setting.
If Off was selected:
the current Location preset will be disabled. Press the Select button to conrm
the setting. Press the Tuning up / down button to select “Save” or “Back”. To conrm the setting,
select “Save” and press the Select button to save the setting. To change the setting, select “Back”
and press the Select button to change your setting.
After completing your EA setting, it is necessary to tune to an HD Radio station (AM or FM) which
supports Emergency alerts (it is indicated with a symbol “a” on the top of the screen), in order to
receive an alert. Please note that EA can be received when the radio is in power on mode. If you
want to receive the EA in the Standby mode, make sure the radio is in an environment that it can
receive HD Radio broadcast signals properly.
(1)
(2)
Alert Volume
To adjust the Alerts volume, Press and hold the Menu button to enter the menu setting and then press
the Tuning up / down button to select “Alert Volume”. Press the Select button and then press the Tuning
up / down button to select your required volume level. Press the Select button to conrm the setting.
Emergency Alerts History
Once the radio detects an alert, it will sound an alert tone, display the alert category (e.g, Weather,
Hazmat, etc.), and scroll the alert text.
To view the Emergency Alerts History, press and hold the Menu button to enter the menu setting
and then press the Tuning up / down button to select “EA History”.
Press the Select button and press the Tuning up / down button to scroll through the history, which
contains the ve most recent Emergency alerts.
Press the Select button to view your required EA history.
Snoozing and ignoring an EA
Once the alert is triggered, the EA will remain on the display until the user snoozes or ignores the
alert by pressing any button. The EA will be shown in the “Emergency Alerts History” after snoozing /
ignoring is activated.
Snooze an EA:
Press and release any button other than the Power button will snooze the EA for 10
minutes. Before the “snooze” time has expired, no alert functionality will be triggered. However, if a
new alert message is received, “snooze” will be cancelled immediately.
Ignore an EA:
Press and release the Power button will ignore the EA for 12 hours. Before the “ignore”
time has expired, no alert functionality will be triggered. However, if a new alert message is received,
“ignore” will be cancelled immediately.
1.
2.
3.

GBGB
EE
11
Indicators for Emergency alerts
Your radio may display various EA indicators on the display.
Emergency Alerts indicator
Exclamation mark (!)
Emergency Alerts feature is disabled
Symbol (a) Current station supports Emergency Alerts
Symbol (i) Emergency Alerts message “ignored”
Symbol (s) Emergency Alerts message “snoozed”
Symbol (t) Test Alerts message OK
Display options
a. RDS (Radio Data System) status
Your radio has a range of display options when in FM mode. Press and release the Info button to cycle
through the various options.
The radio only provides displays when there is information available. So if there is no text, for
example, that display is not available. If no RDS information is available, the radio will be unable to
display the program service (e.g. station name), scrolling text and program type information.
NOTE
Date
Audio mode
Signal strength indicator
RDS clock
time indicator
Time
Station
frequency
RDS indicator
Preset number
Frequency band
Program service
(e.g. station name)
Call sign
1
5
Radio text
2
6
Program type
3
7
4

GBGB
EE
12
b. HD Radio status
Press and release the Info button to cycle through the various options.
Station name
HD Radio indicator
Multicast set index
Current station supports
Emergency Alerts
Plus (+) indicator: additional HD Radio
stations are available
Preset number
Frequency band
Station frequency
Date
Radio text
Audio mode
Program type
Signal strength indicator
Time
1
5
2
6
3
7
4
Setting the alarm clock
Your radio has 3 separate alarms which can be set to wake you to FM, AM or buzzer. Each alarm can
be set to sound once, daily, on weekdays or weekends.
Ensure that the time is set correctly before setting the alarms.
If no buttons are pressed for 10 seconds, the radio will exit the alarm setup.
NOTE
Press and hold any of the Alarm button to enter the alarm setting (e.g. Alarm 1 button to enter the
alarm 1 setting).
1.
If the time is not set before setting the alarms, “Time is not set” will show on the display. Use the
Tuning up / down button and Select button to set the time and date. When the setting is complete,
proceed to step 2.
NOTE

GBGB
EE
13
You can only set the alarm to use a preset which has already been stored.
NOTE
2.
3.
4.
5.
6.
7.
8.
Press the Tuning up / down button to select “On” or “Off”. If “Off” is selected any current setting for
that alarm will be cancelled. With “On” selected, press and release the Select button to enter the “A1
time” (for example) setting. The alarm hour digits will ash on the display.
Press the Tuning up / down button to choose the desired hour for the alarm and press the Select
button to cause the minute digits to ash on the display.
Press the Tuning up / down button to choose the desired minute for the alarm and press the Select
button to conrm the setting. The display will show the frequency options for the alarm.
“Daily” - the alarm will sound everyday
“Weekends” - the alarm will sound only on weekends
“Weekdays” - the alarm will sound on weekdays only
“Once” - the alarm will sound only once
Press the Tuning up / down button to select your required frequency and press the Select button to
conrm your setting.
Press the Tuning up / down button to choose the desired source for the alarm (Buzzer, FM or AM).
Press the Select button to conrm the setting. If setting alarm to Buzzer proceed to step 7.
For which ever radio mode is selected, the radio alarm may be set to any of the stations which have
been stored as presets or to the station last listened to. If setting the alarm to a radio option, Press
the Tuning up / down button to select either last listened or from presets 1-20.
Press the Tuning up / down button to choose your desired volume and press the Select button to
conrm the setting. Your radio will show “Alarm 1 Saved” (for example) and exit the alarm setting
screen. The symbol “A” will show on the top right corner of the screen.
To view and quick change the On / Off status of the alarm, press and release the Alarm 1 button (for
example).
When the alarm sounds
To cancel a sounding alarm, press the Power button to cancel a sounding alarm.
When the buzzer alarm activates, the alarm will start softly and gradually increase in level (Humane
Wake System). It will sound for 1 minute and silence for 1 minute in repetition for 60 minutes unless
cancelled.
When the radio alarm is activated, the alarm will go off in Humane Waking System. It will increase its
volume from 0 to your set volume.
When the Alarm 1(Alarm 2 or Alarm 3) is activated, the symbol “A1” (“A2” or “A3”) will show on the
display and then the symbol “A” will ash on the clock display after 10 seconds.

GBGB
EE
14
Disabling / canceling alarm setting
Snooze
Sleep timer
Nap timer
To cancel the alarm setting before the alarm sounds, press and release the corresponding alarm
button to select “Off”. The alarm indicator will disappear from the screen and the chosen alarm will now
be disabled.
Press and hold the Sleep Timer button until “Sleep Time” is shown on the display.
Press the Tuning up / down button to select the desired sleep time.
Press the Select button to conrm the setting. An active sleep timer is shown using a symbol “S” on
the playing display. Your radio will switch into standby mode after the preset time has elapsed.
To view the remaining time of an active sleep timer setting, press and hold the Sleep timer button.
The remaining time will ash on the display.
To view and change the On / Off status of the Sleep timer, press and release the Sleep timer button.
To cancel the sleep timer before the preset time has elapsed and to turn off the radio, press the
Power button to turn the unit off manually.
Press and hold the Nap timer button to enter the adjustment mode.
Press the Tuning up / down button to select your desired Nap time (1-60 minutes).
Press the Select button to conrm the setting. Symbol “N” will show on the display.
To view the remaining time of an active nap timer setting, press and hold the Nap timer button. The
remaining time will ash on the display.
To cancel a sounding Nap timer, press the Power button. If the tuning up / down button is pressed
when the alarm is sounding, the snooze function will be activated.
To view and change the On / Off status of the Nap timer, press and release the Nap timer button.
1.
2.
3.
4.
5.
6.
1.
2.
3.
4.
5.
6.
The buzzer or radio alarm can be silenced for 5 minutes by pressing tuning up / down button. The
symbol “Z” will flash on the clock display. In order to cancel the Snooze timer while the alarm is
suspended, press the Power button.
Your radio can be set to turn off after a preset time has elapsed. The sleep timer setting can be
adjusted between 15 and 180 minutes.

GBGB
EE
15
Dimmer control
Contrast
Language
Headphone socket
Press and hold the Menu button to enter the menu setting.
To adjust the brightness level of the LCD display when the radio is in power on mode or standby
mode, press the Tuning up / down button to select “Power On Dimmer” or “Standby Dimmer”. Press
the Select button to enter the setting.
Press the Tuning up / down button to select the brightness level of the LCD display. You’ll be able
to see the effect of the change. Press the Select button to save the setting.
Press and hold the Menu button to enter the menu setting.
Press the Tuning up / down button to select “Set Contrast” and press the Select button to enter the setting.
Press the Tuning up / down button to adjust the contrast. The contrast level indication on the screen
will change at the same time. When you nd the setting that gives the best legibility for the location
in which the radio is used, press the Select button to save the setting.
Press and hold the Menu button to enter the menu setting and then press the Tuning up / down
button to select “Language”. Press the Select button to enter the setting.
Press the Tuning up / down button to select your required language.
Press the Select button to conrm your selection. The display will change to the chosen language.
1.
2.
3.
1.
2.
3.
1.
2.
3.
The brightness of the display may be adjusted.
The contrast of the display can be adjusted.
Your radio can be congured to a different language, English or Spanish.
A 3.5mm Headphone socket located on the right hand side of your radio is provided for use with
headphones. Inserting headphones automatically mutes the internal loudspeaker.
Please be aware that the sensitivity of headphones can vary widely. We therefore recommend setting
the volume to a low level before connecting headphones to the radio.
Excessive sound pressure from earphones and headphones can cause hearing loss.
To prevent possible hearing damage, do not listen at high volume levels for long periods.
IMPORTANT
1.
2.

GBGB
EE
16
Auxiliary input socket
Rec-out socket
Software version
Reset the radio
A 3.5mm Auxiliary input socket is provided on the right hand side of your radio to permit an audio signal to
be fed into the unit from an external audio device such as an iPod, MP3 or CD player.
Press the Power button to switch on your radio.
Connect a stereo or mono audio source (for example, iPod, MP3 or CD player) to the Auxiliary input
socket (marked “AUX IN”).
Press the Band button to select AUX IN mode and the display will show “AUX IN”.
Adjust the Volume control on your iPod, MP3 or CD player to ensure an adequate signal and then
adjust the volume on the radio for comfortable listening.
Press and hold the Menu button to enter the menu setting.
Press the Tuning up / down button to select “Factory Default” and press the Select button to enter
the setting.
Press the Tuning up / down button to select “Yes” or “No”. If you do not wish to carry out a system
reset, select “No” and then press the Select button to conrm the setting.
With “Yes” selected, press the Select button. A full reset will be performed. The radio will erase all
saved settings and all settings will revert to the factory default settings. In case of malfunction due
to electrostatic discharge, reset the product (reconnection of the power source may be required) to
resume normal operation.
1.
2.
3.
4.
1.
2.
3.
4.
On the right hand side of your radio a Rec-out socket is provided for use with a tape recording / mini
disc or to allow connection to line input of a Hi-Fi system.
The signal on the Record out socket is unaffected by the volume control.
The software version display cannot be altered and is just for your reference.
Press and hold the Menu button to enter the menu setting. Then press the Tuning up / down button to
select “Version” and you can view the software version on the display.
If your radio fails to operate correctly or some digits on the display are missing or incomplete, please
carry out the following procedure.

GBGB
EE
17
Charging with USB socket
Your radio has a USB socket which is intended for charging an iPhone, smart phone or similar devices.
Charge time may vary and in some cases may take longer to charge than when using the
manufacturers charging unit supplied with the smart phone.
The radio can charge the iPhone, smart phone or similar devices when the radio is in power on or
standby mode.
● The USB jack can only provide power to USB devices with a 1A 5V maximum input. It does not
support external Hard disk drives, and some mobile phones or electronic devices.
● The charger may not supply power to some USB devices.
● Do not connect a power source to the USB port. Otherwise there is a risk of re. The USB port
is only intended for charging lower voltage devices.
● Do not insert a nail, wire, etc. into USB power supply port. Otherwise a short circuit may cause
smoke or re.
● Do not connect this USB socket with your PC USB port, as it is highly possible that it may cause
breakdown of both units.
● Never use the USB socket in rainy or moist conditions to prevent moisture from entering the
radio.
IMPORTANT
Charging mobile phones (for example) or other devices may affect the listening quality while
listening to the AM or FM band.
NOTE

GBGB
EE
18
If at any time in the future you should need to dispose of this product please note that:
Waste electrical products should not be disposed of with household waste. Please recycle
where facilities exist. Check with your Local Authority or retailer for recycling advice. (Waste
Electrical and Electronic Equipment Directive)
Sangean reserves the right to amend the specications without notice.
※
The barcode label on the product is dened as below:
Serial number
Production month
Production year
Product code
Specications
Power requirements
Power Supply
AC 100~240 volts, 50Hz-60Hz,DC 6V 2A only
(switching adaptor)
Frequency Coverage
Region A (Most countries)
FM: 87.5-108, 100kHz
Region A (Philippines, Romania)
AM: 522-1710, 9kHz
Region B (US, Mexico, Canada)
FM: 87.5-107.9, 200kHz
Region B (US, Mexico, Canada)
AM: 520-1710, 10kHz
Region C (Most countries)
FM: 87.5-108, 50kHz
Region C (SE Asia)
AM: 522-1620, 9kHz
Region D (Brazil, Japan)
FM: 76-108, 100kHz
Region D (Brazil)
AM: 522-1629, 9kHz
Antenna system
FM wire antenna
AM built-in ferrite antenna
Output power
1.4W @ 10% T.H.D.
Headphones socket
3.5mm diameter stereo jack
Output power 1.5mW + 1.5mW (load 32ohm)
DC IN
6V / 2A center pin positive
Maximum Supplying Power of USB Socket
5V, 1A
Operating temperature range
0°C to +35°C

GBGB
EE
19
Tecnología de HD Radio fabricada bajo licencia de iBiquity Digital Corporation. Patentes
estadounidenses y extranjeras. HD Radio™ y los logos de HD, HD Radio y de los "arcos" son marcas
registradas de iBiquity Digital Corp.
Para usuarios de los EE.UU.:
Precauciones para el usuario
Los cambios o modificaciones no aprobados expresamente por la parte responsable de su
cumplimiento podrían anular la autoridad del usuario para usar el equipo.
Este equipo ha sido probado, hallándose que cumple con los límites de un dispositivo digital
de clase B, conforme a la parte 15 del Reglamento FCC. Estos límites se han diseñado para
proporcionar una protección razonable contra interferencias perjudiciales en una instalación
residencial. Este equipo genera, utiliza y puede irradiar energía de radio frecuencia y, si no es
instalado y usado siguiendo las instrucciones, podría causar interferencias en las comunicaciones
por radio. Sin embargo, esto no supone ninguna garantía de que no habrá interferencias en
determinadas instalaciones. Si este equipo produjera interferencias en la recepción de radio o
televisión, lo que podrá ser determinado encendiendo y apagando el equipo, animamos al usuario
a intentar corregir las interferencias aplicando una o más de las siguientes medidas:
− Reoriente o recoloque la antena receptora.
− Aumente la separación entre el equipo y el receptor.
− Conecte el equipo a una toma o circuito distinto del usado para la conexión del receptor.
− Consulte a su distribuidor o un técnico experto en radio / TV para que le ofrezcan ayuda.
Estas instrucciones de mantenimiento son para el usoexclusivo de personal cualificado. Para
reducir el riesgo de descargaeléctrica, no lleve a cabo ninguna tarea de mantenimiento que no
estéincluida en las instrucciones de funcionamiento, a menos que estécualicado para ello.
PRECAUCIÓN
MUY IMPORTANTE, POR FAVOR LEA
Sangean recomienda que mantenga su adaptador de CA al menos a 12 pulgadas de distancia de
la radio mientras escuche la banda AM.
Su radio Sangean se alimenta por un adaptador CA del tipo “conmutante” o “modo conmutación”.
El DOE (Departamento de energía, Deparment Of Energy) tiene un mandato federal, requiriendo a
todos los fabricantes usar este tipo de fuentes de alimentación.
Esta nueva tecnología de ahorro de energía tiene el desafortunado efecto secundario de causar
interferencias en la banda AM.
Por lo tanto, se recomienda que los clientes mantengan una distancia de al menos de un pie
entre el adaptador CA y la radio. Esta interferencia no afectará a la banda FM. Si tiene alguna
pregunta, póngase en contacto con el servicio de atención al cliente en los números (888)726-4326,
(562)941-9900 o en la dirección [email protected]
Si en este modelo no se incluye un adaptador CA y si desea comprar un adaptador CA por separado,
refiérase a las especificaciones para el adaptador CA indicadas en la página final del manual, o
póngase en contacto con Sangean para las especicaciones correctas del adaptador CA.
Para más información sobre el mandato del DOE, visite:
http://www1.eere.energy. gov/buildings/appliance_standards/product.aspx/productid/23

GBGB
EE
20
Tenga en cuenta que no todos los adaptadores de CA son iguales.
El adaptador de CA incluido con esta radio está diseñado para ser usado exclusivamente con este
dispositivo. No use un adaptador de CA que diera de las especicaciones del adaptador de CA
incluido.
Si NO se incluye un adaptador de CA con la radio y para no dañar la unidad y anular la garantía, las
especicaciones para el adaptador de CA se encuentran en la página nal del manual, o póngase
en contacto con Sangean para obtener un adaptador de CA correcto y sus especicaciones. Para
clientes en los EE.UU. o Canadá llame al 562-941-9900 o 888-726-4326. Para el resto de áreas,
póngase en contacto con nosotros vía: [email protected]
No use un adaptador de CA que no cumpla con las especicaciones correctas.
No permita que esta radio sea expuesta al agua, vapor o arena. No deje
la radio en lugares donde un calor excesivo pueda dañarla, como en un
coche aparcado en el cual el calor del sol puede llegar a acumularse,
incluso cuando la temperatura externa no parezca ser muy alta.
● La radio no debe ser expuesta a goteos o salpicaduras de agua. Tampoco deben colocarse
sobre la radio objetos llenos de agua como jarrones.
● Se recomienda que durante el uso del producto haya una distancia mínima (se recomiendan 4
pulgadas) entre el producto y los objetos adyacentes para asegurar una correcta ventilación.
● No debe restringirse la ventilación del producto cubriéndolo o cubriendo las aperturas de
ventilación con elementos como periódicos, manteles, cortinas, etc.
● No deben colocarse sobre el producto llamas como por ejemplo velas.
● Se recomienda que evite usar o almacenar el producto en temperaturas extremas. Evite dejar
el producto en coches, alfeizares o bajo luz solar directa.
Precauciones

GBGB
EE
21
Controles
1
Altavoz
2
Botón de banda
3
Botón de presintonía
4
Botón de búsqueda HD / APS
5
Botón de alarma 1
6
Botón de alarma 2
7
Botón de sintonizar hacia arriba /
abajo / posponer
8
Botón de alarma 3
9
Botón de siesta
10
Botón de apagado automático
11
Botón de información / menú
12
Botón de seleccionar
13
Botón de encendido
14
Pantalla LCD
15
Control de volumen
16
Toma de salida REC
17
Toma de entrada AUX
18
Toma de auriculares
19
Antena de cable
20
Toma de carga USB
21
Toma de entrada de CC
Vista superior
Vista frontal
Vista derecha
Vista trasera

GBGB
EE
22
Si el reloj no se conguró automáticamente dentro de 24 horas, el símbolo "CT" desaparecerá
de la pantalla.
Si la hora del reloj de la emisora local RDS / RBDS no es correcta, considere desactivar la
función "RBDS Auto CT" y congurar la hora usando los ajustes manuales.
Tenga en cuenta que a veces la señal RDS / RBDS puede emitir la hora incorrecta, esto es
culpa de la emisora de radio no de su radio.
Usando el adaptador de corriente de CA
Modo de conguración automática del reloj
El adaptador de corriente de CA requerido para esta unidad debe ser de 6 voltios de CC en 2
A, pin central positivo. Inserte la clavija del adaptador en la toma de CC en la parte posterior de
la radio. Enchufe el adaptador a una toma estándar de CA. Si no se muestra la hora, la pantalla
mostrará ----:----. El adaptador de CA se debe desconectar de la toma de CA cuando no vaya a
usarse durante periodos largos de tiempo.
Extienda completamente la antena de cable ubicada en la parte trasera de la radio.
Presione y suelte el Botón de encendido para encender la radio. Puede que sea necesario reubicar
la radio para obtener una mejor recepción.
Presione el Botón de encendido para encender la radio.
Presione el Botón de banda para seleccionar el modo radio FM.
Mantenga presionado el Botón de menú para entrar al menú de conguración y a continuación,
presione el Botón de sintonizar hacia arriba / abajo para seleccionar "RBDS Auto CT". Presione el
Botón de seleccionar para entrar a la conguración.
Presione el Botón de sintonizar hacia arriba / abajo para seleccionar "Auto" (automático) o
"Manual". Con "Auto" (automático) seleccionado, presione el Botón de seleccionar para conrmar
el ajuste. La radio sincronizará la hora del reloj cuando sintonice una emisora de radio usando
RDS / RBDS con señales CT. El símbolo "CT" aparecerá en pantalla indicando que la hora de la
radio es la hora RDS / RBDS del reloj.
Si desea cancelar la función "RBDS Auto CT", seleccione "Manual" y presione el Botón de
seleccionar para conrmar los ajustes. Consulte la siguiente sección de "Conguración manual del
reloj" para congurar la hora y fecha.
1.
2.
3.
1.
2.
3.
4.
5.
1.
2.
3.
La pantalla volverá a mostrar la hora 10 segundos después desde
la última vez que se presionó el botón, excepto cuando se muestre
texto con desplazamiento.
NOTA
NOTA
El adaptador de CA se usa como medio para conectar la radio a la fuente de alimentación. El
adaptador de CA usado para la radio, debe mantenerse accesible durante su uso normal. Para
desconectar la radio de la corriente completamente, retire completamente el adaptador de CA de
la toma de corriente.
IMPORTANTE

GBGB
EE
23
Congurar el reloj de forma manual
Conguración del formato de la hora
Sintonización por escaneo FM / AM
Mantenga presionado el Botón de menú para entrar al menú de conguración y a continuación,
presione el Botón de sintonizar hacia arriba / abajo para seleccionar "Clock" (reloj).
Presione el Botón de seleccionar para entrar a la conguración de la hora. El dígito de la hora
parpadeará en pantalla.
Presione el Botón de sintonizar hacia arriba / abajo para establecer la hora deseada. A
continuación, presione el Botón de seleccionar para conrmar los ajustes. El dígito de los minutos
parpadeará en pantalla.
Presione el Botón de sintonizar hacia arriba / abajo para establecer los minutos deseados y presione
el Botón de seleccionar para conrmar los ajustes. Ahora el dígito del mes parpadeará en pantalla.
Siga los pasos anteriores para congurar el mes, día y año. Cuando la conguración de hora y
fecha se haya completado, en pantalla se mostrará "Saved" (guardado).
Mantenga presionado el Botón de menú para entrar al menú de conguración y a continuación,
presione el Botón de sintonizar hacia arriba / abajo para seleccionar "12 / 24 hour" (12 / 24 horas).
Presione el Botón de seleccionar y presione el Botón de sintonizar hacia arriba / abajo para
seleccionar entre formato de 12 o 24 horas. Presione el Botón de seleccionar para conrmar los
ajustes. El formato seleccionado se usará en el modo espera, en el modo de reproducción y al
establecer alarmas.
Asegúrese de antemano de que la antena de cable esté completamente extendida.
Presione el Botón de encendido para encender la radio.
Presione el Botón de banda repetidamente para seleccionar la banda de frecuencia deseada.
Para escanear hacia arriba en una frecuencia, mantenga presionado el Botón de sintonizar hacia arriba.
La radio escaneará en dirección ascendente (de frecuencias bajas a altas) y parará automáticamente
cuando encuentre una emisora lo sucientemente fuerte. Para escanear hacia abajo en una frecuencia,
mantenga presionado el Botón de sintonizar hacia abajo. La radio escaneará en dirección descendente
y parará automáticamente cuando encuentre una emisora lo sucientemente fuerte.
Tras unos segundos, la pantalla se actualizará. La pantalla mostrará la frecuencia de la señal
encontrada. Si la señal es lo suficientemente fuerte y tiene información RDS / RBDS, la radio
mostrará el nombre de la emisora.
1.
2.
3.
4.
5.
1.
2.
1.
2.
3.
4.
5.
Cuando seleccione la conguración manual de la del reloj de su radio, la función “RBDS Auto CT” se
desactivará.

GBGB
EE
24
Sintonización manual FM / AM
Presione el Botón de encendido para encender la radio.
Presione el Botón de banda repetidamente para seleccionar la banda de frecuencia deseada.
Presione y suelte el Botón de sintonizar hacia arriba / abajo para sintonizar una emisora. La
frecuencia cambiará a intervalos de 50kHz / 100kHz / 200kHz en FM o 9kHz / 10kHz en AM.
Cuando se llegue al nal de una frecuencia de banda, la radio recomenzará la sintonización por el
extremo opuesto de la frecuencia de banda.
Ajuste el control de volumen al nivel deseado.
Para apagar la radio presione el Botón de encendido.
1.
2.
3.
4.
5.
6.
Si la radio tiene interferencias en la banda AM debido al adaptador, mueva la radio al menos a una
distancia de 12 pulgadas del adaptador de CA.
NOTA
El reseteo de la región de sincronización borrará todas las estaciones preestablecidas y
almacenadas en la radio. Las estaciones preestablecidas volverán a los valores de fábrica.
NOTA
Región de sintonización
Presione el Botón de encendido para encender la radio.
Presione el Botón de banda para seleccionar la frecuencia de banda deseada.
Mantenga presionado el Botón de menú para entrar al menú de conguración y a continuación,
presione el Botón de sintonizar hacia arriba / abajo para seleccionar "Region" (región). Presione el
Botón de seleccionar para entrar a la conguración.
Presione el Botón de sintonizar hacia arriba / abajo para seleccionar para seleccionar la región de
sintonización y a continuación, presione el Botón de seleccionar para conrmar los ajustes.
Región A (la mayoría de los países)
FM: 87.5-108, 100kHz
Región A (Filipinas, Rumanía)
AM: 522-1710, 9kHz
Región B (EE.UU., México, Canadá)
FM: 87.5-107.9, 200kHz
Región B (EE.UU., México, Canadá)
AM: 520-1710, 10kHz
Región C (la mayoría de los países)
FM: 87.5-108, 50kHz
Región C (sudeste asiático)
AM: 522-1620, 9kHz
Región D (Brasil, Japón)
FM: 76-108, 100kHz
Región D (Brasil)
AM: 522-1629, 9kHz
1.
2.
3.
4.
La radio se puede congurar para cualquiera de las cuatro regiones internacionales de sintonización.

GBGB
EE
25
Presintonizar emisoras
Seleccionar una presintonía
Presione el Botón de encendido para encender la radio.
Sintonice la emisora de radio deseada tal y como se describió anteriormente.
Para guardar una emisora como presintonía, mantenga presionado el Botón de presintonía y a
continuación, presione el Botón de sintonizar hacia arriba / abajo para seleccionar el número de
presintonía deseado. Presione el Botón de seleccionar para guardar la emisora actual. El número
de presintonía correspondiente, por ejemplo "P02" se mostrará en pantalla.
Las emisoras ya guardadas en las presintonías pueden sobrescribirse siguiendo el procedimiento
anterior.
Presione el Botón de encendido para encender la radio.
Seleccione el modo de funcionamiento deseado usando el Botón de banda.
Presione el Botón de presintonía y a continuación, presione el Botón de sintonizar hacia arriba /
abajo para seleccionar el número de presintonía deseado. Presione el Botón de seleccionar para
seleccionar la emisora en memoria.
1.
2.
3.
4.
1.
2.
3.
Hay 20 presintonías para radio FM y 20 para radio AM. Se usan de la misma manera en ambos
modos de funcionamiento.
El modo estéreo solo está disponible a través de auriculares o en el modo HD Radio.
NOTA
Interruptor estéreo / mono
Presione el Botón de encendido para encender la radio.
Presione el Botón de banda según sea necesario para seleccionar el modo de radio FM y sintonice
la emisora FM deseada como se describió anteriormente.
Mantenga presionado el Botón de menú para entrar al menú de conguración y a continuación,
presione el Botón de sintonizar hacia arriba / abajo para seleccionar "Force Mono" (forzar mono).
Presione el Botón de seleccionar para entrar a la conguración.
Presione el Botón de sintonizar hacia arriba / abajo para seleccionar "Mono" o "Stereo" (estéreo).
Presione el Botón de seleccionar para conrmar los ajustes.
1.
2.
3.
4.
Si la emisora de radio FM que está escuchando tiene una señal débil, puede que escuche algunos
silbidos. Es posible reducir estos silbidos forzando a la radio reproducir la emisora en mono en vez de
estéreo.

GBGB
EE
26
Recepción de emisoras de HD Radio
Recibir emisoras multidifusión
Función de búsqueda HD
Sistema de presintonización automática
(APS - Auto Preset System) de HD Radio
Cuando la radio está sintonizada en una emisora de HD Radio, el logo HD Radio parpadeará en la
pantalla, indicando que la señal se está mezclando de analógica a digital. Una vez que el receptor
adquiere la señal de HD Radio, el logo HD Radio permanecerá jo en pantalla.
Presione el Botón de banda para seleccionar la frecuencia de banda requerida.
Mantenga presionado el Botón de APS para iniciar el escaneo. La radio escaneará desde la
frecuencia más baja de la banda seleccionada, almacenando automáticamente las emisoras en
las presintonías según la intensidad de la señal. Durante el proceso de escaneo, a medida que se
detecten nuevas emisoras el contador de emisoras en el lado derecho de la pantalla se incrementará.
1.
2.
Cuando la radio está sintonizada a una emisora de HD Radio, determinará que una o más emisoras
multidifusión están disponibles, y por ejemplo "HD1+" puede aparecer en pantalla. "HD1" indica el
número del programa de multidifusión actual, y el más (+) indicada que hay disponibles programas de
HD Radio adicionales. Presione el Botón de sintonizar hacia arriba / abajo en la radio para sintonizar
el canal multidifusión HD2 / HD3.
Usando el Botón de búsqueda HD, la radio buscará la siguiente emisora de HD Radio disponible. Esta
función también escaneará el programa multidifusión si estuviese disponible.
Presionar y soltar el Botón de búsqueda HD sintonizará la siguiente emisora de HD Radio con una
señal lo sucientemente fuerte.
Este sistema escaneará y presintonizará automáticamente las emisoras recibidas según la intensidad
de la señal, es decir, la emisora con mejor recepción se presintonizará en la Presintonía 1 y así
sucesivamente. La función APS solo está disponible en las bandas de HD Radio FM / AM.
El número máximo de presintonías es de 20 para cada banda de HD Radio FM y AM. Si durante el
uso de la función APS se encuentran más de 20 emisoras (HD Radio FM o AM), solo las 20 más
fuertes se guardarán en las presintonías de memoria.
Cuando comience la operación de APS y se encuentres emisoras HD, todas las emisoras
previamente guardadas en las presintonías se borrarán.
Para seleccionar emisoras presintonizadas, presione el Botón de presintonía y a continuación,
presione el Botón de sintonizar hacia arriba / abajo para seleccionar el número de presintonía
deseado. Presione el Botón de seleccionar para seleccionar la emisora en memoria.
1.
2.
3.
NOTA

GBGB
EE
27
Alerta de emergencia (AE)
Mantenga presionado el Botón de menú para entrar al menú de conguración y a continuación,
presione el Botón de sintonizar hacia arriba / abajo para seleccionar "Alert" (alerta). Presione el
Botón de seleccionar para entrar a la conguración.
Presione el Botón de sintonizar hacia arriba / abajo para seleccionar "On" (encendida) u "Off"
(apagada). Para deshabilitar la función de Alertas de emergencia, seleccione "Off" (apagada) y a
continuación, presione el Botón de seleccionar para conrmar los ajustes. Estando "On" (encendida)
seleccionado, presione el Botón de seleccionar para entrar a la conguración de Ubicación de las
alertas de emergencia.
Presione el Botón de sintonizar hacia arriba / abajo para seleccionar la conguración de ubicación
requerida.
Si selecciona "Off" (apagada):
Se recibirán todas las alertas emitidas en el radio de alcance de
la radio. La conguración por defecto es "Off" (apagada). Presione el Botón de seleccionar para
conrmar los ajustes.
Si selecciona "On" (encendida):
puede denir la ubicación, con lo que el receptor mostrará las
alertas de texto (o despertará la radio del modo espera) solo cuando los datos de las alarmas
recibidas concuerden con la ubicación. Si en los datos recibidos no se incluye información de
ubicación, el receptor no tendrá en cuenta las ubicaciones definidas. Presione el Botón de
seleccionar para conrmar el ajuste.
La ubicación preestablecida “1” (por ejemplo) parpadeará en la esquina superior derecha de la
pantalla. Ahora puede escoger la ubicación preestablecida que desee congurar. Presione el Botón
de sintonizar hacia arriba / abajo para seleccionar la ubicación preestablecida que quiera y, a
continuación, presione el Botón de seleccionar para conrmar su selección. Se pueden almacenar
hasta 10 localizaciones.
Hay tres opciones para la ubicación de la alerta: estado / condado, código ZIP y apagado. Presione
el Botón de sintonizar hacia arriba / abajo para elegir la opción de ubicación de la alerta deseada,
y a continuación, presione el Botón de seleccionar para entrar a la conguración.
Si ha seleccionado estado / condado:
Presione el Botón de sintonizar hacia arriba / abajo para cambiar el estado y presione el Botón
de seleccionar para conrmar el ajuste.
Presione el Botón de sintonizar hacia arriba / abajo para cambiar el condado y presione el
Botón de seleccionar para conrmar el ajuste.
1.
2.
3.
4.
5.
Las Alertas de emergencia (AE) (Emergency Alerts (EA)) es un sistema advertencia usado por las
emisoras para notificar a los oyentes acerca de posibles situaciones de riesgo relacionadas con
condiciones meteorológicas extremas, inundaciones, fallos de infraestructura, alertas ámbar (secuestro
de niños) y más.
La radio debe estar en un lugar que permita la recepción adecuada de servicios de audio y datos y
sintonizada en una emisora que proporcione Alertas de emergencia. Cuando está activada, la función
de Alertas de emergencia permite que alertas de audio y texto se reproduzcan o muestren en la radio,
las alertas también pueden despertar la radio del modo de espera.
Conguración de Alertas de emergencia
(1)
(2)

GBGB
EE
28
6.
Presione el Botón de sintonizar hacia arriba / abajo para seleccionar "Save" (guardar) o
"Back" (atrás). Para conrmar los ajustes, seleccione "Save" (guardar) y presione el Botón de
seleccionar para guardar los ajustes. Para cambiar los ajustes, seleccione "Back" (atrás) y
presione el Botón de seleccionar para cambiar los ajustes.
Si ha seleccionado código ZIP:
El primer dígito de su código ZIP parpadeará en pantalla. Presione el Botón de sintonizar
hacia arriba / abajo para seleccionar el dígito deseado y presione el Botón de seleccionar para
hacer que el siguiente dígito parpadee en pantalla. Continúe para cambiar todos los dígitos de
su código ZIP. Presione el Botón de seleccionar para conrmar los ajustes.
Presione el Botón de sintonizar hacia arriba / abajo para seleccionar "Save" (guardar) o
"Back" (atrás). Para conrmar los ajustes, seleccione "Save" (guardar) y presione el Botón de
seleccionar para guardar los ajustes. Para cambiar los ajustes, seleccione "Back" (atrás) y
presione el Botón de seleccionar para cambiar los ajustes.
Si selecciona "Off" (apagada):
La ubicación predeterminada actual se desactivará. Presione
el Botón de Seleccionar para conrmar los ajustes. Presione el Botón de sintonizar hacia arriba /
abajo para seleccionar "Save" (guardar) o "Back" (atrás). Para conrmar los ajustes, seleccione
"Save" (guardar) y presione el Botón de seleccionar para guardar los ajustes. Para cambiar los
ajustes, seleccione "Back" (atrás) y presione el Botón de seleccionar para cambiar los ajustes.
Tras completar la configuración de las AE, es necesario que sintonice con una emisora de HD
Radio (AM o FM) que sea compatible con las Alertas de emergencia (esto se indica con una "a"
en la parte superior de la pantalla) para así poder recibir las alertas. Tenga en cuenta que las AE
pueden recibirse cuando la radio está en modo de encendido. Si desea recibir una AE en modo
de espera, asegúrese de que la radio está en un entorno en el que pueda recibir señales de
transmisión de HD Radio adecuadamente.
(3)
(1)
(2)
Volumen de las alertas
Para ajustar el volumen de las alertas, mantenga presionado el Botón de menú para entrar al menú de
conguración y a continuación, presione el Botón de sintonizar hacia arriba / abajo para seleccionar
"Alert volumen" (volumen de las alertas). Presione el Botón de seleccionar y a continuación, presione
el Botón de sintonizar hacia arriba / abajo para seleccionar el nivel de volumen requerido. Presione el
Botón de seleccionar para conrmar los ajustes.
Historial de alertas de emergencia
Una vez que la radio detecte una alerta, sonará un pitido de alerta, se mostrará la categoría de la
alerta (por ejemplo, el Tiempo, Material Peligroso, etc.) y el texto de la alerta se irá desplazando hacia
abajo en la pantalla.
Para ver el historial de Alertas de emergencia, mantenga presionado el Botón de menú para entrar
al menú de conguración y a continuación, presione el Botón de sintonizar hacia arriba / abajo para
seleccionar "EA History" (historial de alertas de emergencia).
Presione el Botón de seleccionar y a continuación, presione el Botón de sintonizar hacia arriba /
abajo para moverse por el historial, el cual contiene las 5 Alertas de emergencia más recientes.
Presione el Botón de seleccionar para ver su historial de AE requerido.
1.
2.
3.

GBGB
EE
29
Posponer e ignorar una AE
Una vez que la alarma se ha activado, la AE permanecerá en la pantalla hasta que el usuario la
posponga o ignore pulsando cualquier botón. La Alerta de emergencia se mostrará en el “Emergency
Alerts History” (historial de alertas de emergencia) tras ser pospuesta o ignorada.
Posponer una AE:
Presione y suelte cualquier botón que no sea el Botón de encendido para que la
AE se posponga cada 10 minutos. Antes de que el tiempo de posposición se haya acabado no se
activará ninguna funcionalidad de la alerta. Sin embargo, si se recibiese un nuevo mensaje de alerta,
la posposición se cancelaría inmediatamente.
Ignorar una AE:
Presione y suelte el Botón de encendido para ignorar la AE durante 12 horas. Antes
de que el tiempo de "ignorar" se haya acabado no se activará ninguna funcionalidad de la alerta. Sin
embargo, si se recibiese un nuevo mensaje de alerta, "ignorar" se cancelaría inmediatamente.“ignore”
will be cancelled immediately.
Indicadores para Alertas de emergencia
Puede que en la pantalla de su radio se muestren varios indicadores de AE:
Indicador de Alerta de Emergencia
Signo de exclamación (!)
La función de Alertas de emergencia está
desactivada
Símbolo (a) Emisora actual soporta Alertas de emergencia
Símbolo (i) Mensaje de Alerta de emergencia ignorado
Símbolo (s) Mensaje de Alerta de emergencia pospuesto
Símbolo (t) El test de mensaje de alerta está bien
Opciones de la pantalla
a. Estado RDS (Radio Data System)
Su radio tiene varias opciones de pantalla cuando se encuentra en modo FM. Presione y suelte el
Botón de información para navegar por las diferentes opciones.
La pantalla de la radio sólo se mostrará cuando haya algún tipo de información disponible. Así
que si no hay ningún texto en la pantalla, por ejemplo, signica que la pantalla no está disponible.
Si no hay ninguna información RDS disponible, la pantalla de la radio no podrá mostrar ningún
programa (por ejemplo, el nombre de la estación), texto o información sobre el tipo de programa.
NOTA
Frecuencia de
la emisora
Indicador RDS
Número de presintonías
Banda de frecuencia
Servicios del
programa (como el
nombre de la emisora)
Señal de llamada
1
Texto de la radio
2

GBGB
EE
30
b. Estado de HD Radio
Presione y suelte el Botón de información para desplazarse por las diferentes opciones.
Nombre de
la emisora
Indicador de HD Radio
Índice de conjuntos
de multidifusión
La emisora actual soporta
Alertas de emergencia
Indicador más (+): emisoras de
HD Radio adicionales disponibles
Número de presintonías
Banda de
frecuencia
Frecuencia de la emisora
Fecha
Texto de la radio
Modo de audio
Tipo de programa
Indicador de intensidad
de la señal
Hora
1
5
2
6
3
7
4
Fecha
Modo de audio
Indicador de intensidad de la señal
Indicador de la
hora del reloj RDS
Hora
5
6
Tipo de programa
3
7
4

GBGB
EE
31
Congurar la alarma del reloj
La radio tiene 3 alarmas que pueden ser usadas para despertarle usando la radio FM, AM o un
zumbador. Cada alarma puede ajustarse para que suene una vez, diariamente, de lunes a viernes o
los nes de semana. Asegúrese de que la hora está ajustada correctamente antes de establecer las
alarmas.
Si no presiona ningún botón durante 10 segundos, la radio saldrá de la conguración de alarmas.
NOTA
Mantenga presionado cualquiera de los Botones de alarma para entrar a la conguración de la
alarma (por ejemplo, el Botón de alarma 1 para entrar a la conguración de la alarma 1).
1.
Si la hora no está configurada antes de configurar las alarmas, en pantalla se mostrará "Time
is not set" (hora no congurada). Use el Botón de sintonizar hacia arriba / abajo y el Botón de
seleccionar para congurar la hora y fecha. Cuando la conguración esté completa, prosiga al
segundo paso.
NOTA
2.
3.
4.
5.
6.
Presione el Botón de sintonizar hacia arriba / abajo para seleccionar "On" (encendida) u "Off"
(apagada). Si se selecciona "Off" (apagada), cualquier ajuste para la alarma actual se cancelará.
Con "On" (encendida) seleccionado, presione y suelte el Botón de seleccionar para entrar a los
ajustes de "A1 time" (hora de a1) (por ejemplo). Los dígitos de la hora de la alarma parpadearán
en pantalla.
Presione el Botón de sintonizar hacia arriba / abajo para seleccionar la hora deseada para la
alarma y presione el Botón de seleccionar para hacer que los dígitos de los minutos parpadeen en
la pantalla.
Presione el Botón de sintonizar hacia arriba / abajo para seleccionar los minutos deseados para la
alarma y presione el Botón de seleccionar para conrmar los ajustes. En pantalla se mostrarán las
opciones de frecuencia para la alarma.
"Daily" (diariamente) - la alarma sonará a diario
"Weekends" (nes de semana) - la alarma solo sonará los nes de semana
"Weekdays" (de lunes a viernes) - la alarma solo sonará en los días laborables
"Once" (una vez) - la alarma solo sonará una vez
Presione el Botón de sintonizar hacia arriba / abajo para seleccionar la frecuencia requerida y
presione el Botón de seleccionar para conrmar los ajustes.
Presione el Botón de sintonizar hacia arriba / abajo para seleccionar el tipo de la alarma (zumbador,
FM o AM). Presione el Botón de seleccionar para confirmar los ajustes. Si configura la alarma
como zumbador, vaya al paso 7.
Para cualquier modo de radio que se haya seleccionado, la alarma puede establecerse para
cualquiera de las emisoras guardadas como presintonías o para la última emisora escuchada. Si
congura la alarma a la opción de radio, presione el Botón de sintonizar hacia arriba / abajo para
seleccionar la última emisora escuchada o una de presintonía de la 1 a la 20.
Solo puede congurar la alarma a una presintonía que ya haya sido guardada.
NOTA

GBGB
EE
32
7.
8.
Presione el Botón de sintonizar hacia arriba / abajo para seleccionar el volumen deseado y
presione el Botón de seleccionar para conrmar los ajustes.
La radio mostrará "Alarma 1 guardada" (por ejemplo) y saldrá de la pantalla de conguración de la
alarma. El símbolo "A" se mostrará en la esquina superior derecha de la pantalla.
Para ver y cambiar rápidamente el estado (encendida / apagada) de una alarma, presione y suelte
el Botón de alarma 1 (por ejemplo).
Al sonar la alarma
Para cancelar una alarma que esté sonando, presione el Botón de encendido.
Cuando el zumbador se activa, la alarma empezará a sonar suavemente e irá incrementando el nivel
de forma gradual (Humane Wake System – Sistema de despertar humano). Sonará durante 1 minuto
y se mantendrá en silencio durante 1 minuto. Así durante 60 minutos a menos que se cancele.
Cuando la alarma de radio se activa, la alarma sonará en Humane Waking System (Sistema de
despertar humano). Incrementará el volumen de 0 hasta el volumen establecido.
Cuando la alarma 1 (alarma 2 o alarma 3) se activa, en pantalla se mostrará "A1" ("A2" o "A3") y a
continuación el símbolo "A" parpadeará en la pantalla del reloj tras 10 segundos.
Desactivar / cancelar los ajustes de alarma
Función posponer
Apagado automático
Para cancelar los ajustes de la alarma antes de que suene, presione y suelte el botón de alarma
correspondiente para seleccionar "Off" (apagada). El indicador de alarma desaparecerá de la pantalla
y la alarma seleccionada estará ahora desactivada.
Mantenga presionado el Botón de apagado automático hasta que "Sleep time" (tiempo de apagado
automático) se muestre en pantalla.
Presione el Botón de sintonización hacia arriba / abajo para seleccionar el tiempo de apagado
automático deseado.
1.
2.
El zumbador o la alarma de radio pueden silenciarse por 5 minutos presionando el Botón de sintonizar
hacia arriba / abajo. En la pantalla del reloj parpadeará el símbolo "Z". Para cancelar la posposición
mientras la alarma esté suspendida, presione el Botón de encendido.
La radio puede congurarse para que se apague transcurrido un tiempo preestablecido. El apagado
automático puede congurarse entre 15 y 180 minutos.

GBGB
EE
33
Temporizador de siesta
Mantenga presionado el Botón de siesta para entrar al modo de ajuste.
Presione el Botón de sintonizar hacia arriba / abajo para seleccionar el tiempo de siesta deseado (de
1 a 60 minutos).
Presione el Botón de seleccionar para confirmar los ajustes. El símbolo "N" se mostrará en
pantalla.
Para ver el tiempo restante de un temporizador de siesta activo, mantenga presionado el Botón de
siesta. El tiempo restante se mostrará en pantalla.
Para cancelar un temporizador de siesta que esté sonando, presione el Botón de encendido. Si se
presiona el Botón de sintonizar hacia arriba / abajo cuando la alarma esté sonando, la función de
posponer se activará.
Para ver o cambiar el estado del temporizador de siesta (encendido / apagado), presione y suelte
el Botón de siesta.
1.
2.
3.
4.
5.
6.
Presione el Botón de seleccionar para confirmar los ajustes. Cuando el ajuste de apagado
automático esté activo, en pantalla se mostrará "S". La radio se pondrá en modo de espera una
vez transcurrido el tiempo preestablecido.
Para ver el tiempo restante del ajuste de apagado automático, mantenga presionado el Botón de
apagado automático. El tiempo restante parpadeará en pantalla.
Para ver o cambiar el estado del ajuste de apagado automático (encendido / apagado), presione y
suelte el Botón de apagado automático.
Para cancelar el ajuste de apagado automático antes de que el tiempo preestablecido haya
transcurrido y para apagar la radio, presione el Botón de encendido para así apagar la unidad
manualmente.
3.
4.
5.
6.
Control de atenuación
Mantenga presionado el Botón de menú para acceder al menú de ajustes.
Para ajustar el nivel de brillo de la pantalla LCD cuando la radio está encendida o en modo de
espera, presione el Botón de sintonizar hacia arriba / abajo para seleccionar "Power On Dimmer"
(atenuación en encendido) o "Standby Dimmer" (atenuación en modo de espera). Presione el
Botón de seleccionar para acceder a los ajustes.
Presione el Botón de sintonizar hacia arriba / abajo para seleccionar el nivel de brillo de la pantalla
LCD. Podrá ver el efecto del cambio. Presione el Botón de seleccionar para guardar los ajustes.
1.
2.
3.
El brillo de la pantalla se puede ajustar.

GBGB
EE
34
Contraste
Idioma
Toma de auriculares
Mantenga presionado el Botón de Menú para entrar al menú de conguración.
Presione el Botón de sintonizar hacia arriba / abajo para seleccionar "Set Contrast" (establecer
contraste) y presione el Botón de seleccionar para entrar a la conguración.
Presione el Botón de sintonizar hacia arriba / abajo para ajustar el contraste. El indicador de nivel
de contraste en pantalla cambiará a la vez. Una vez encuentre la conguración que le proporcione
la mejor legibilidad para la ubicación en la que se usa la radio, presione el Botón de seleccionar
para guardar el ajuste.
Mantenga presionado el Botón de menú para entrar al menú de conguración y a continuación,
presione el Botón de sintonizar hacia arriba / abajo para seleccionar "Language" (idioma). Presione
el Botón de seleccionar para entrar a la conguración.
Presione el Botón de sintonizar hacia arriba / abajo para seleccionar el idioma requerido.
Presione el Botón de seleccionar para confirmar su selección. La pantalla cambiará al idioma
seleccionado.
1.
2.
3.
1.
2.
3.
El contraste de la pantalla puede ajustarse.
La radio puede congurarse en distintos idiomas, Ingles o Español.
En el lado derecha de la radio se encuentra situada una toma para auriculares de 3,5 mm para su uso
con auriculares. Conectar unos auriculares silenciará automáticamente el altavoz interno.
Tenga en cuenta que la sensibilidad de los auriculares puede variar ampliamente. Nosotros
recomendamos que congure el volumen a un nivel bajo antes de conectar los auriculares a la radio.
Una presión excesiva del sonido de los auriculares puede causar pérdida de audición.
Para prevenir posibles daños auditivos, no escuche a volúmenes altos durante periodos
prolongados de tiemp.
IMPORTANTE
1.
2.
Toma de entrada auxiliar
La radio está provista de una toma de entrada auxiliar de 3,5 mm en la parte derecha, para permitir la
entrada de una señal de audio desde un dispositivo de audio externo como un iPod o un reproductor
de MP3 o CD.

GBGB
EE
35
Toma de salida REC
Versión del software
Restablecer la radio
Presione el Botón de encendido para encender la radio.
Conecte una fuente de audio estéreo o mono (por ejemplo, un iPod o un reproductor de MP3 o
CD) a la toma de entrada auxiliar (marcada como "AUX IN").
Presione el Botón de banda para seleccionar el modo AUX IN (entrada auxiliar), en pantalla se
mostrará "AUX IN".
Ajuste el control de volumen en su iPod o reproductor de MP3 o CD para asegurarse de que haya
una señal adecuada y a continuación, ajuste el volumen en la radio para una escucha cómoda.
Mantenga presionado el Botón de menú para entrar al menú de conguración.
Presione el Botón de sintonizar hacia arriba / abajo para seleccionar "Factory Default" (valores
predeterminados de fábrica) y presione el Botón de seleccionar para entrar a la conguración.
Presione el Botón de sintonizar hacia arriba / abajo para seleccionar "Yes" (sí) o "No". Si no desea
llevar a cabo un restablecimiento del sistema, seleccione "No" y a continuación, presione el Botón
de seleccionar para conrmar los ajustes.
Estando "Yes" (sí) seleccionado, presione el Botón de seleccionar. Se realizará un restablecimiento
completo. La radio borrará todos los ajustes guardados y todos los ajustes volverán a los valores
de fábrica. En caso de malfuncionamiento causado por una descarga electroestática, resetee el
producto (puede que se requiera la reconexión con la fuente de alimentación) para que la unidad
vuelva a funcionar con normalidad.
1.
2.
3.
4.
1.
2.
3.
4.
En el lado derecho de la radio se proporciona una toma de salida REC para su uso con una cinta /
MiniDisc o para permitir la conexión a la entrada de línea de un sistema Hi-Fi.
La señal en la toma de salida de grabación no se ve afectada por el control de volumen.
La visualización de la versión del software no puede alterarse y es solo para referencia.
Mantenga presionado el Botón de menú para entrar al menú de configuración. A continuación,
presione el Botón de sintonizar hacia arriba / abajo para seleccionar "Version" (versión) y así ver la
versión del software en pantalla.
Si la radio no funciona correctamente o algunos dígitos en la pantalla faltan o aparecen incompletos,
lleve a cabo el siguiente procedimiento.

GBGB
EE
36
Carga con la toma USB
La radio tiene una toma USB destinada a la carga de un iPhone, smartphone o dispositivos similares.
El tiempo de carga puede variar y en algunos casos puede llevar más tiempo que cargar el dispositivo
con la unidad de carga del fabricante que se suministra con el smartphone.
La radio puede cargar el iPhone, smartphone o dispositivos similares cuando está encendida o en
modo de espera.
● La toma USB solo puede alimentar dispositivos USB con una entrada máxima de 1 A y 5 V. No
soporta discos duros externos ni algunos teléfonos móviles o dispositivos electrónicos.
● El cargador puede no alimentar algunos dispositivos USB.
● No conecte una fuente de alimentación al puerto USB. De lo contrario existe riesgo de incendio.
El puerto USB está diseñado solo para la carga de dispositivos de voltaje bajo.
● No inserte un clavo, cable, etc. en el puerto de alimentación USB. De lo contrario, un
cortocircuito podría causar humo o un incendio.
● No conecte esta toma USB con el puerto USB de un PC ya que es muy posible que ambas
unidades se estropeen.
● Nunca use la toma USB en condiciones lluviosas o de humedad para evitar que la humedad
entre en la radio.
IMPORTANTE
Cargar teléfonos móviles (por ejemplo) u otros dispositivos puede afectar la calidad de escucha
mientras escucha la banda AM o FM.
NOTA

GBGB
EE
37
Si, en lo sucesivo, usted tuviera que deshacerse de este producto, por favor, tenga en
cuenta que la eliminación de productos eléctricos no deberá realizarse junto con los
desechos del hogar. Por favor, recicle allá donde haya instalaciones para tales nes. Pida
consejos sobre reciclaje a las autoridades locales o a su distribuidor. (Directiva de Residuos
de Aparatos Eléctricos y Electrónicos)
La compañía se reserva el derecho a modicar las especicaciones sin previo aviso.
※
El código de barras en el producto se dene de la siguiente manera:
Número de serie
Mes de producción
Año de producción
Código del producto
Especicaciones
Requisitos de alimentación
Fuente de alimentación
CA 100~240 voltios, 50Hz-60Hz, CC 6V 2A solo
(adaptador de conmutación)
Cobertura de frecuencia
Región A (la mayoría de los países)
FM: 87.5-108, 100kHz
Región A (Filipinas, Rumanía)
AM: 522-1710, 9kHz
Región B (EE.UU., México, Canadá)
FM: 87.5-107.9, 200kHz
Región B (EE.UU., México, Canadá)
AM: 520-1710, 10kHz
Región C (la mayoría de los países)
FM: 87.5-108, 50kHz
Región C (sudeste asiático)
AM: 522-1620, 9kHz
Región D (Brasil, Japón)
FM: 76-108, 100kHz
Región D (Brasil)
AM: 522-1629, 9kHz
Sistema de antena
Antena de cable FM
Antena AM de ferrita integrada
Potencia de salida
1,4W a 10 % T.H.D.
Toma de auriculares
Toma estéreo de 3,5mm de diámetro
Potencia de salida 1,5mW +1,5mW (carga de
32ohmios)
Entrada de CC
6V / 2A pin central positivo
Potencia máxima suministrada por la toma
USB
5V, 1A
Temperatura de funcionamiento
de 0°C a + 35°C
-
 1
1
-
 2
2
-
 3
3
-
 4
4
-
 5
5
-
 6
6
-
 7
7
-
 8
8
-
 9
9
-
 10
10
-
 11
11
-
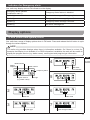 12
12
-
 13
13
-
 14
14
-
 15
15
-
 16
16
-
 17
17
-
 18
18
-
 19
19
-
 20
20
-
 21
21
-
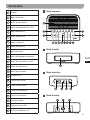 22
22
-
 23
23
-
 24
24
-
 25
25
-
 26
26
-
 27
27
-
 28
28
-
 29
29
-
 30
30
-
 31
31
-
 32
32
-
 33
33
-
 34
34
-
 35
35
-
 36
36
-
 37
37
-
 38
38


Sangean HDR-15 Manual de usuario
- Categoría
- Relojes de alarma
- Tipo
- Manual de usuario
en otros idiomas
- English: Sangean HDR-15 User manual
Artículos relacionados
-
Sangean HDR-15 Manual de usuario
-
Sangean SG-114X Manual de usuario
-
Sangean HDR-15X Manual de usuario
-
-
Sangean HDR-14CL Manual de usuario
-
-
-
-
-
Otros documentos
-
Jensen MSR7007 El manual del propietario
-
 Sangean Electronics Sangean RCR-10 Manual de usuario
-
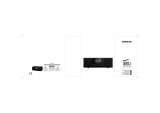 Sangean Electronics WFR-1 Manual de usuario
-
Eton Satellit El manual del propietario
-
-
-
Makita XRM09B Manual de usuario
-
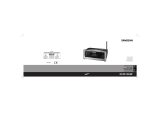 Sangean Electronics RCR-8WF Manual de usuario
-
Acoustic Research ART7 Manual de usuario


