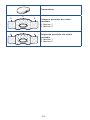
Sensor UserGuide
Guía del usuario del sensor
探头用户指南


- 1 -
English
Introduction
The Guardian 4 sensor is part of the
Continuous Glucose Monitoring (CGM)
system. The sensor converts small
amounts of glucose from the interstitial
fluid under the skin into an electronic
signal. The system then uses these
signals to provide sensor glucose
values.
Sensor assembly
Indications for use
The Guardian 4 sensor (MMT-7040) is intended to monitor glucose
levels for the management of diabetes for persons ages seven
years and older. It is indicated for use as an adjunctive device to
complement, not replace, information obtained from the standard
blood glucose monitoring devices. The sensor is intended for
single use and requires a prescription. The Guardian 4 sensor is
indicated for up to seven days of continuous use. Refer to the
system user guide for treatment decisions.
Contraindications
Refer to the system guide for contraindications associated with
Guardian 4 sensor use.
User safety
Warnings
Read this entire user guide before attempting to insert the
Guardian 4 sensor. The one-press serter (MMT-7512) is the only
serter approved for use with the sensor. Failure to follow directions,
or the use of a different insertion device, may result in improper
insertion, pain, or injury.
Do not attempt to connect a transmitter or recorder that is not
compatible with the sensor. The sensor is designed to work with
approved transmitters only. Connecting the sensor to a transmitter
or recorder that is not approved for use with the sensor may
damage the components. Refer to the system user guide for a list
of compatible products.
Do not use continuous glucose monitoring if hydroxyurea, also
known as hydroxycarbamide, is taken. Hydroxyurea is used to
treat certain diseases, such as cancer and sickle cell anemia.
Hydroxyurea use results in higher sensor glucose readings
compared to blood glucose readings. Taking hydroxyurea while
using continuous glucose monitoring can result in substantially

- 2 -
higher sensor glucose readings in reports than actual blood
glucose readings. For pump users, taking hydroxyurea while using
continuous glucose monitoring can result in hypoglycemia caused
by over-delivery of insulin.
Always check the label of any medication being taken to confirm
if hydroxyurea or hydroxycarbamide is an active ingredient. If
hydroxyurea is taken, consult a healthcare professional. Use
additional blood glucose meter readings to verify glucose levels.
Taking medications that contain acetaminophen or paracetamol,
including, but not limited to fever reducers and cold medicine, while
wearing the sensor, may falsely raise sensor glucose readings.
The level of inaccuracy depends on the amount of acetaminophen
or paracetamol active in the body and may be different for each
person. Always check the label of any medications to confirm
whether acetaminophen or paracetamol is an active ingredient.
Do not expose the sensor to MRI equipment, diathermy devices,
or other devices that generate strong magnetic fields. The
performance of the sensor has not been evaluated under those
conditions and may be unsafe. If the sensor is exposed to a strong
magnetic field, discontinue use and contact 24-hour Technical
support for further assistance.
Always inspect the packaging for damage prior to use. Sensors are
sterile and non-pyrogenic, unless the package has been opened or
damaged. If the sensor packaging is open or damaged, discard the
sensor directly into a sharps container. Use of a non-sterile sensor
may result in infection at the insertion site.
Do not allow children to put small parts in their mouth. This product
poses a choking hazard for young children.
Do not use the Guardian 4 sensor if you are pregnant or critically
ill. Since the sensor has not been studied in these populations,
the impact of medications common to these conditions on sensor
performance is unknown and the sensor may be inaccurate in
these populations.
Healthcare professionals and caregivers:
• Always wear gloves to insert the sensor. A retractable needle is
attached to the sensor. Minimal bleeding may occur.
• Cover the sensor with sterile gauze to remove the needle
housing from the sensor.
Place the needle housing directly into a sharps container after
sensor insertion to prevent accidental needlestick injury.
Watch for bleeding at the insertion site (under, around, or on top of
the sensor).

- 3 -
If bleeding occurs, do the following:
1. Apply steady pressure, using sterile gauze or a clean cloth
placed on top of the sensor, for up to three minutes. The use of
unsterile gauze may cause site infection.
2. If bleeding stops, connect the transmitter (or recorder) to the
sensor.
If bleeding does not stop, do not connect the transmitter to the
sensor because blood may get into the transmitter connector,
and may damage the device.
If bleeding continues, causes excessive
pain or discomfort, or is significantly visible
in the plastic base of the sensor, do the
following:
Plastic base
1. Remove the sensor and continue to apply
steady pressure until the bleeding stops.
Discard the sensor in a sharps container.
2. Check the site for redness, bleeding, irritation, pain,
tenderness, or inflammation. Treat based on instructions from
a healthcare professional.
3. Insert a new sensor in a different location.
For questions or concerns related to sensor use, contact
24-Hour Technical Support for assistance.
For medical questions or concerns, contact a healthcare
professional.
Precautions
Wash hands with soap and water before inserting the Guardian 4
sensor to help prevent site infection.
Do not insert the sensor through tape. Inserting the sensor through
tape may cause improper sensor insertion and function.
Only use alcohol to prepare the insertion site. Using alcohol to
prepare the insertion site makes sure that residue is not left on the
skin.
Rotate the sensor insertion site so that sites do not become
overused.
Do not clean, resterilize, or try to extract the needle from the
needle housing. An accidental needlestick or puncture may occur.
Do not reuse sensors. Reuse of a sensor may cause damage to
the sensor surface and lead to inaccurate glucose values, site
irritation, or infection.

- 4 -
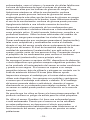
Risks and side effects
Risks related to sensor use include
• Skin irritation or other reactions
• Bruising
• Discomfort
• Redness
• Bleeding
• Pain
• Rash
• Infection
• Raised bump
• Appearance of a small “freckle-like” dot where the sensor was
inserted
• Allergic reaction
• Fainting secondary to anxiety or fear of needle insertion
• Soreness or tenderness
• Swelling at insertion site
• Sensor fracture, breakage or damage
• Minimal blood splatter associated with sensor needle removal
• Residual redness associated with adhesive or tapes or both
• Scarring
Reagents
The Guardian 4 sensor contains two biological reagents: glucose
oxidase, and human serum albumin (HSA). Glucose oxidase is
derived from Aspergillus niger and manufactured to meet industry
requirements for the extraction and purification of enzymes for use
in diagnostic, immunodiagnostic, and biotechnical applications.
The HSA used on the sensor consists of purified and dried albumin
fraction V derived from pasteurized human serum, which is cross-
linked via glutaraldehyde. Approximately 3 μg of glucose oxidase
and approximately 10 μg of HSA are used to manufacture each
sensor. HSA is approved for IV infusion in humans at quantities
much larger than in the sensor.
Removing the sensor
To change the Guardian 4 sensor, disconnect the transmitter from
the sensor as described in the Guardian 4 transmitter user guide.
Gently pull the sensor from the body to remove it. Discard the
sensor in a sharps container.

- 5 -
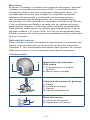
Components
BA
One-press serter
A. bump on both buttons
B. thumbprint marking
C
D
A
B
Glucose sensor assembly
A. pedestal
B. needle housing
C. sensor
D. clear liner
A
B
Sensor base
A. sensor connector
B. sensor snaps
Transmitter
BB
A
First piece of oval tape
A. liner 1
B. liner 2
BB
A
Second piece of oval tape
A. liner 1
B. liner 2

- 6 -
Where to insert the sensor
Choose an insertion site for the applicable age group and make
sure that the site has an adequate amount of subcutaneous fat.
Ages 7-17 years
Back of the upper arm
Caution: Guardian 4 sensor is indicated for arm use only.
Do not use Guardian 4 sensor in other sites, including the
abdomen or buttocks, due to a difference in performance
that could result in hypoglycemia or hyperglycemia
Ages 18 years and older
Back of the upper arm
Note:
• Assistance will likely be needed for sensor insertion into the
back of the upper arm. Some users find it difficult to insert the
sensor into their arm by themselves.
For best sensor glucose performance, and to prevent accidental
sensor removal:
• Do not insert the sensor into muscle, tough skin, or scar tissue.
• Avoid areas that are constrained by clothing or accessories.
• Avoid areas subjected to vigorous movement during exercise.

- 7 -
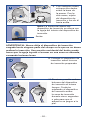
Inserting the sensor
WARNING: Always wear gloves when inserting the sensor into
another person to avoid contact with patient blood. Minimal
bleeding may occur. Contact with patient blood may cause
infection.
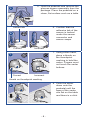
11. Wash hands thoroughly with soap
and water.
22. Choose an insertion site that has
a sufficient amount of fat.
33. Clean the insertion site with
alcohol. Let the area air dry.
44. Open the sensor package.

- 8 -
55. Hold the pedestal and remove the
glucose sensor assembly from the
package. Place the pedestal on a
clean, flat surface such as a table.
6
Correct
tucked tab
Incorrect
6. Confirm that the
adhesive tab of the
sensor is tucked
under the sensor
connector and
sensor snaps.
7
thumb on thumbprint marking
Correct Incorrect
7. Using either hand,
place a thumb on
the thumbprint
marking to hold the
serter. Fingers must
not touch the serter
buttons.
88. Push the serter
down onto the
pedestal until the
base of the serter
sits flat on the table
and there is a click.

- 9 -
99. With either hand,
place two fingers
on the base of the
pedestal. With the
other hand, grip the
serter and pull the
serter upwards.
arrow
Note: The arrow on the side of the
serter aligns with the needle inside
the serter.
WARNING: Never point a loaded serter toward any body part
where insertion is not desired. An accidental button-push may
cause the needle to inject the sensor in an undesired location,
causing minor injury.
10 10. Place the serter on top
of the prepared insertion
site.
11 11. Press and release both
serter buttons at the
same time. Continue to
hold the serter on top
of the insertion site for
five seconds or more to
let the adhesive stick to
the skin.

- 10 -
12 12. Lift the serter away
from the insertion site.
Fingers must not press
the buttons while lifting
the serter.
B
A
AC
D
E
Sensor base
A. sensor snaps
B. sensor connector
C. adhesive tab
D. adhesive liner
E. adhesive pad
If the sensor is inserted without assistance, complete step 13a. If a
healthcare professional or caregiver assisted with sensor insertion,
complete step 13b.
13a Patient:
13. a. Hold the sensor base
against the skin at the sensor
connector and at the opposite
end of the sensor base. Hold
the needle housing at the
top and pull away from the
sensor.
OR
13b
Healthcare professional or
caregiver:
13. b. Wrap sterile gauze around
the sensor. Hold the sensor
base against the skin at the
sensor connector and the
opposite end of the sensor
base. Hold the needle
housing at the top and pull
away from the sensor.

- 11 -
WARNING: Always watch for bleeding at the insertion site. If
bleeding occurs under, around, or on top of the sensor, apply
steady pressure using sterile gauze or a clean cloth placed
on top of the sensor for up to three minutes. The use of
unsterile gauze may cause an infection. If bleeding does not
stop, remove the sensor and apply steady pressure until the
bleeding stops.
Note: After insertion, use of adhesive products, such as
Skin Tac™, in addition to the oval tape is optional. If optional
adhesive products are used, apply them to the skin under the
adhesive pad prior to removing the liner. Adhesive products
may also be applied to the adhesive pad or the skin around the
sensor base. Allow the product to dry before continuing.
14 14. Remove the adhesive liner from under
the adhesive pad. Pull the liner away
from the sensor, staying close to the
skin. Do not pull on the sensor when
you remove the liner.
Note: Do not remove the adhesive
liner from the rectangular adhesive
tab. This tab will be used to secure
the transmitter in a later step.
Note: If the sensor base moves,
hold the sensor base down.
15 15. Firmly press the adhesive pad against
the insertion site to confirm that the
sensor base remains on the skin.

- 12 -
16 16. Untuck the adhesive tape from under
the sensor connector.
17 17. Straighten the sensor adhesive tab so
that it lies flat against the skin.
Applying oval tape
11. Remove the liner marked 1.
22. Apply the tape as shown and
press down firmly.
wide part of tape covers half
of sensor base

- 13 -
33. Remove liners marked 2 from
each side.
44. Smooth the tape.
55. Connect the transmitter to the
sensor.
Note: Wait for the green light on
the transmitter to flash. If the green
light does not flash, refer to the
Troubleshooting section of the
Guardian 4 transmitter user guide.
66. Cover the transmitter with the
adhesive tab.
Note: Do not pull the tab too tightly.

- 14 -
77. To apply a second tape, remove
liner marked 1.
88. Apply the second tape in
the opposite direction to the
first tape and place it on the
transmitter. Press down firmly.
99. Remove liners marked 2 from
each side.
10 10. Smooth the tape.
Note: For details on how to enter sensor settings into a
compatible display device, refer to the system user guide.
wide part of tape covers end
of transmitter and skin

- 15 -
Maintenance
Storage
CAUTION: Do not freeze the sensor, or store it in direct
sunlight, extreme temperatures, or humidity. These conditions
may damage the sensor.
Only store sensors at room temperature between 36 °F to 80 °F
(2 °C to 27 °C). Discard sensor after the “Use-by date” indicated
on the label, if the package is damaged, or if the seal is broken.
Disposal
Dispose of the Guardian 4 sensor into a sharps container.
Assistance
Department Telephone Number
24-Hour Technical Support
(calls within the United States) +1 800 646 4633
24-Hour Technical Support
(calls outside the United States) +1 818 576 5555
Website www.medtronicdiabetes.com
Technical specifications
Approximate dimensions
1.50 x 2.60 x 2.00 inches (3.80 x 6.70 x 5.20 centimeters)
Approximate weight
0.09 ounces (2.80 grams)
Sensor life of use
The Guardian 4 sensor can be used one time and has a maximum
life of up to 170 hours (seven days). The 170-hour life span of the
sensor begins when the sensor is connected to the transmitter.
Icon table
Use-by date
Medical device
Do not re-use
Caution: consult instructions for use for important
warnings or precautions not found on the label.
(1x)
One sensor per container/package
(5x)
Five sensors per container/package

- 16 -
(2x)
Two tapes per package
(10x)
Ten tapes per package
Consult instructions for use
Catalogue or model number
Batch code
Sterilized using irradiation
Do not use if package is damaged
Single sterile barrier system
XX°C
XX°F
XX°C
XX°F
Storage temperature limit
Open here
Manufacturer
Date of manufacture
Do not resterilize
Fragile, handle with care
Keep dry
Recyclable, contains recycled content.
Authorized representative in the European Community.
Conformité Européenne (European Conformity). This
symbol means that the device fully complies with
applicable European Union Acts.
Magnetic Resonance (MR) unsafe
Non-pyrogenic
Requires prescription in the USA
Icon glossary
For definitions of the symbols on the device and package labels,
see www.medtronicdiabetes.com/symbols-glossary.
©2023 Medtronic. All rights reserved. Medtronic, Medtronic logo, and Engineering the extraordinary are
trademarks of Medtronic. ™* Third-party brands are trademarks of their respective owners. All other
brands are trademarks of a Medtronic company.

- 17 -
Español
Introducción
El sensor Guardian 4 forma parte del
sistema de monitorización continua de
glucosa (MCG). El sensor convierte
pequeñas cantidades de glucosa del
líquido intersticial que se encuentra
bajo la piel en una señal eléctrica. A
continuación, el sistema utiliza estas
señales para proporcionar valores de
glucosa del sensor. Conjunto de sensor
Indicaciones de uso
El sensor Guardian 4 (MMT-7040) está indicado para controlar los
niveles de glucosa en el tratamiento de la diabetes en personas
mayores de siete años. Está indicado para utilizarse como
dispositivo adicional para complementar la información obtenida
mediante los dispositivos de monitorización de glucosa en sangre
habituales, y no para sustituirla. El sensor está diseñado para un
solo uso y requiere prescripción facultativa. El sensor Guardian 4
está diseñado para utilizarse durante siete días como máximo de
manera continuada. Consulte la guía del usuario del sistema para
tomar decisiones acerca de la terapia.
Contraindicaciones
Consulte la guía del sistema para conocer las contraindicaciones
asociadas al uso del sensor Guardian 4.
Seguridad del usuario
Advertencias
Lea esta guía del usuario en su totalidad antes de intentar insertar
el sensor Guardian 4. El dispositivo de inserción One-press
(MMT- 7512) es el único dispositivo de inserción aprobado para
utilizar con el sensor. Si no se siguen las indicaciones o se utiliza
un dispositivo de inserción diferente, pueden producirse una
inserción incorrecta, dolor o lesiones.
No intente conectar un transmisor o registrador que no sea
compatible con el sensor. El sensor se ha diseñado para funcionar
únicamente con los transmisores aprobados. Si conecta el sensor
a un transmisor o registrador que no esté aprobado para utilizarse
con él, pueden producirse daños en los componentes. Consulte
la guía del usuario del sistema para ver una lista de productos
compatibles.
No utilice la monitorización continua de glucosa si toma
hidroxiurea, también conocida como hidroxicarbamida. La
hidroxiurea se utiliza en el tratamiento de determinadas

- 18 -
enfermedades, como el cáncer y la anemia de células falciformes.
La toma de hidroxiurea da lugar a lecturas de glucosa del
sensor más altas que las lecturas de glucosa en sangre. Tomar
hidroxiurea mientras se utiliza la monitorización continua
de glucosa puede provocar lecturas de glucosa del sensor
sustancialmente más altas que las lecturas de glucosa en sangre
reales. Para los usuarios de la bomba, tomar hidroxiurea durante
el uso de la monitorización continua de glucosa puede provocar
hipoglucemia debido a una infusión excesiva de insulina.
Compruebe siempre el prospecto de los medicamentos que
toma para verificar si contienen hidroxiurea o hidroxicarbamida
como principio activo. Si está tomando hidroxiurea, consulte a un
profesional sanitario. Utilice lecturas adicionales del medidor de
glucosa en sangre para comprobar los niveles de glucosa.
Tomar medicamentos que contengan paracetamol (acetaminofén),
tales como antipiréticos y medicamentos contra el resfriado,
durante el uso del sensor puede elevar erróneamente las lecturas
de glucosa del sensor. El nivel de inexactitud depende de la
cantidad de paracetamol (acetaminofén) que esté activa en el
cuerpo y puede variar de una persona a otra. Compruebe siempre
el prospecto de los medicamentos para verificar si contienen
paracetamol (acetaminofén) como principio activo.
No exponga el sensor a equipos de RM, dispositivos de diatermia
u otros dispositivos que generen campos magnéticos potentes. No
se ha evaluado el funcionamiento del sensor en estas condiciones
y puede no ser seguro. Si el sensor se expone a un campo
magnético intenso, deje de utilizarlo y póngase en contacto con la
línea de asistencia técnica 24 horas para obtener ayuda.
Inspeccione siempre el embalaje por si tuviese daños antes de
utilizar este dispositivo. Los sensores son estériles y apirógenos,
a menos que el embalaje esté abierto o dañado. Si el embalaje
del sensor presenta daños o está abierto, deseche el sensor
directamente en un contenedor para objetos cortantes. El uso de
un sensor no estéril puede producir una infección en la zona de
inserción.
No permita que los niños se lleven a la boca piezas pequeñas. El
producto conlleva un peligro de asfixia para los niños pequeños.
No utilice el sensor Guardian 4 si tiene una enfermedad grave
o está embarazada. Puesto que el sensor no se ha estudiado
en estas poblaciones, se desconoce el efecto que pueden
tener los medicamentos habituales para estas situaciones en el
funcionamiento del sensor, que puede no ser preciso en estas
poblaciones.

- 19 -
Profesionales sanitarios y cuidadores:
• Utilice siempre guantes para insertar el sensor. El sensor tiene
conectada una aguja retráctil. Puede producirse un sangrado
mínimo.
• Cubra el sensor con una gasa estéril para extraer la funda de la
aguja del sensor.
Ponga la funda de la aguja directamente en un recipiente para
objetos cortantes tras la inserción del sensor para evitar daños por
punción accidental con la aguja.
Observe si se produce sangrado en la zona de inserción (debajo,
alrededor o encima del sensor).
Si se produce sangrado, haga lo siguiente:
1. Presione firmemente utilizando una gasa estéril o un paño
limpio colocado sobre el sensor durante un máximo de tres
minutos. El uso de una gasa no estéril puede causar una
infección en la zona.
2. Si se detiene el sangrado, conecte el transmisor (o registrador)
al sensor.
Si no se detiene el sangrado, no conecte el transmisor al sensor
porque puede entrar sangre en el conector del transmisor y
causar daños en el dispositivo.
Si el sangrado continúa, causa dolor
excesivo o molestias, o es claramente visible
en la base de plástico del sensor, haga lo
siguiente:
Base de plástico
1. Extraiga el sensor y continúe presionando
con fuerza hasta que se detenga el
sangrado. Deseche el sensor en un
recipiente para objetos cortantes.
2. Compruebe la zona en busca de enrojecimiento, sangrado,
irritación, dolor, hipersensibilidad o inflamación. Trátela
siguiendo las instrucciones de un equipo médico.
3. Inserte un nuevo sensor en otro lugar.
Para preguntas relacionadas con el uso del sensor, póngase
en contacto con la línea de asistencia técnica 24 horas para
obtener ayuda.
Para preguntas o dudas médicas, póngase en contacto con un
profesional sanitario.
Medidas preventivas
Antes de insertar el sensor Guardian 4, lávese las manos con
agua y jabón para evitar infecciones en la zona.

- 20 -
No inserte el sensor a través de la cinta adhesiva. Si lo hace,
se puede producir una inserción incorrecta y un funcionamiento
inadecuado del sensor.
Utilice únicamente alcohol para preparar la zona de inserción. El
uso de alcohol para preparar la zona de inserción garantiza que
no queden residuos en la piel.
Cambie las zonas de inserción del sensor para que no se utilicen
en exceso.
No limpie, ni vuelva a esterilizar la aguja, ni intente extraerla de su
funda. Puede producirse un pinchazo o punción accidental con la
aguja.
No reutilice los sensores. La reutilización de un sensor puede
dañar la superficie del sensor y causar valores de glucosa
inexactos, irritación en la zona de inserción o infección.
Riesgos y efectos secundarios
Entre los riesgos asociados al uso del sensor se incluyen
• Irritación de la piel u otras reacciones
• Hematoma
• Molestias
• Enrojecimiento
• Hemorragia
• Dolor
• Sarpullido
• Infección
• Abultamiento
• Aparición de un pequeño punto con aspecto de peca en el lugar
de inserción del sensor
• Reacción alérgica
• Desmayo como consecuencia de la ansiedad o el miedo a la
inserción de la aguja
• Inflamación o sensibilidad
• Hinchazón en la zona de inserción
• Rotura o daños en el sensor
• Mínima salpicadura de sangre asociada a la extracción de la
aguja del sensor
• Enrojecimiento residual asociado al adhesivo, a las cintas o a
ambos
• Cicatrices

- 21 -
Reactivos
El sensor Guardian 4 contiene dos reactivos biológicos: glucosa
oxidasa y sueroalbúmina humana (HSA). La enzima glucosa
oxidasa se obtiene del microorganismo Aspergillus niger y se
ha elaborado de forma que cumple los requisitos del sector
relativos a la extracción y purificación de enzimas para su
uso en aplicaciones de diagnóstico, de inmunodiagnóstico y
biotécnicas. La HSA utilizada en el sensor consiste en la fracción
V de la albúmina purificada y secada que se obtiene del suero
pasteurizado humano y está reticulada mediante glutaraldehído.
Para fabricar cada sensor se utilizan aproximadamente 3 μg de
glucosa oxidasa y 10 μg de HSA. La HSA se ha aprobado para
infusión intravenosa en humanos en cantidades mucho más altas
que en el sensor.
Retirada del sensor
Para cambiar el sensor Guardian 4, desconecte el transmisor del
sensor como se describe en la guía del usuario del transmisor
Guardian 4. Tire suavemente del sensor para retirarlo del cuerpo.
Deseche el sensor en un recipiente para objetos cortantes.
Componentes
BA Dispositivo de inserción
One- press
A. Protuberancia en ambos
botones
B. Marca para el pulgar
C
D
A
B
Conjunto de sensor de glucosa
A. Peana
B. Funda de la aguja
C. Sensor
D. Lámina transparente
A
B
Base del sensor
A. Conector del sensor
B. Enganches del sensor

- 22 -
Transmisor
BB
A
Primera porción de cinta
ovalada
A. lámina 1
B. lámina 2
BB
A
Segunda porción de cinta
ovalada
A. lámina 1
B. lámina 2

- 23 -
Dónde insertar el sensor
Elija una zona de inserción para el grupo de edad correspondiente
y asegúrese de que la zona cuente con una cantidad adecuada de
grasa subcutánea.
De 7 a 17 años de edad
Parte de atrás de la parte superior del brazo
Precaución: El sensor Guardian 4 está indicado para usarse
solamente en el brazo. No utilice el sensor Guardian 4 en
ningún otro lugar, incluidos el abdomen o las nalgas, ya
que la diferencia en el funcionamiento podría provocar
hipoglucemia o hiperglucemia
Mayores de 18 años de edad
Parte de atrás de la parte superior del brazo
Nota:
• Es posible que necesite ayuda para insertar el sensor en
la parte de atrás de la parte posterior del brazo. A algunos
usuarios les resulta difícil insertar ellos mismos el sensor en
el brazo.
Para lograr un funcionamiento óptimo de la glucosa del sensor y
evitar que el sensor se salga accidentalmente:
• No inserte el sensor en músculos ni en áreas con piel dura o
tejido cicatricial.
• Evite las áreas constreñidas por ropa o accesorios.
• Evite las áreas que estén sometidas a un movimiento intenso
durante el ejercicio.

- 24 -
Inserción del sensor
ADVERTENCIA: Póngase siempre guantes para insertar el
sensor en otra persona a fin de evitar el contacto con la
sangre del paciente. Puede producirse un sangrado mínimo.
El contacto con la sangre del paciente puede causar una
infección.
11. Lávese bien las manos con agua
y jabón.
22. Elija una zona de inserción que
tenga una cantidad suficiente de
grasa.
33. Limpie la zona de inserción con
alcohol. Deje que la zona se
seque al aire.
44. Abra el envase del sensor.

- 25 -
55. Sujete la peana y retire el conjunto
de sensor de glucosa de su
envase. Coloque la peana sobre
una superficie plana y limpia,
como una mesa.
6
Correcto
tira metida debajo
Incorrecto
6. Confirme que
la tira adhesiva
del sensor esté
metida debajo del
conector del sensor
y los enganches del
sensor.
7
pulgar en la marca para el pulgar
Correcto Incorrecto
7. Con cualquier mano,
coloque el pulgar
sobre la marca
para el pulgar para
sujetar el dispositivo
de inserción. Los
dedos no deben
tocar los botones
del dispositivo de
inserción.
88. Presione el
dispositivo de
inserción sobre la
peana hasta que la
base del dispositivo
de inserción quede
plana sobre la mesa
y se oiga un clic.

- 26 -
99. Con cualquier mano,
coloque dos dedos
sobre la base de
la peana. Con la
otra mano, sujete
del dispositivo de
inserción y tire de él
hacia arriba.
flecha
Nota: La flecha del lateral del
dispositivo de inserción se alinea con
la aguja del interior del dispositivo de
inserción.
ADVERTENCIA: Nunca dirija el dispositivo de inserción
cargado hacia ninguna parte del cuerpo en la que no se desee
realizar la inserción. Una presión accidental del botón puede
hacer que la aguja inyecte el sensor en una zona no deseada,
causando lesiones leves.
10 10. Coloque el dispositivo de
inserción sobre la zona
de inserción preparada.
11
11. Presione y suelte ambos
botones del dispositivo
de inserción al mismo
tiempo. Continúe
sujetando el dispositivo
de inserción sobre
la zona de inserción
durante cinco segundos
o más para que el
adhesivo se pegue a la
piel.

- 27 -
12 12. Levante el dispositivo
de inserción de la zona
de inserción. No debe
presionar los botones
con los dedos mientras
levanta el dispositivo de
inserción.
B
A
AC
D
E
Base del sensor
A. enganches del sensor
B. conector del sensor
C. tira adhesiva
D. lámina del adhesivo
E. almohadilla adhesiva
Si el sensor se inserta sin ayuda, lleve a cabo el paso 13a. Si un
profesional sanitario o cuidador ha ayudado a insertar el sensor,
lleve a cabo el paso 13b.
13a Paciente:
13. a. Sujete la base del sensor
contra la piel por el conector
del sensor y el extremo
opuesto de la base del
sensor. Sujete la funda de la
aguja por la parte superior y
tire para separarla del sensor.
O
13b
Profesional sanitario o
cuidador:
13. b. Envuelva el sensor con
una gasa estéril. Sujete la
base del sensor contra la piel
por el conector del sensor
y el extremo opuesto de la
base del sensor. Sujete la
funda de la aguja por la parte
superior y tire para separarla
del sensor.

- 28 -
ADVERTENCIA: Asegúrese siempre de que no se produzca
sangrado en el lugar de inserción. Si se produce sangrado
bajo el sensor, alrededor de él o sobre él, presione
firmemente utilizando una gasa estéril o un paño limpio
colocado sobre el sensor durante un máximo de tres minutos.
El uso de una gasa no estéril puede causar una infección.
Si el sangrado no se detiene, extraiga el sensor y presione
firmemente hasta que se detenga.
Nota: Después de la inserción, es opcional el uso de productos
adhesivos, como Skin Tac™, además de la cinta ovalada. Si se
utilizan productos adhesivos opcionales, aplíquelos en la piel
debajo de la almohadilla adhesiva antes de retirar la lámina. Los
productos adhesivos también pueden aplicarse en la almohadilla
adhesiva o en la piel que rodea la base del sensor. Deje que el
producto se seque antes de continuar.
14 14. Retire la lámina del adhesivo de
la parte inferior de la almohadilla
adhesiva. Tire de la lámina para
separarla del sensor, sin levantarla
mucho de la piel. No tire del sensor
cuando retire la lámina.
Nota: No retire la lámina del
adhesivo de la tira adhesiva
rectangular. Esta tira se utilizará
en un paso posterior para fijar el
transmisor.
Nota: Si la base del sensor se
mueve, sujétela hacia abajo.

- 29 -
15 15. Presione firmemente la almohadilla
adhesiva contra la zona de inserción
para confirmar que la base del sensor
permanezca sobre la piel.
16 16. Saque la cinta adhesiva de debajo del
conector del sensor.
17 17. Estire la tira adhesiva del sensor para
que quede contra la piel.
Aplicación de la cinta ovalada
11. Retire la lámina marcada con el
número 1.
22. Aplique la cinta como se
muestra en la ilustración y
presione con firmeza.
la parte ancha de la cinta
cubre la mitad de la base
del sensor

- 30 -
33. Retire las láminas marcadas con
el número 2 de cada lado.
44. Alise la cinta.
55. Conecte el transmisor al sensor.
Nota: Espere a que la luz verde
del transmisor parpadee. Si la
luz verde no parpadea, consulte
la sección de resolución de
problemas de la guía del usuario
del transmisor Guardian 4.
66. Cubra el transmisor con la tira
adhesiva.
Nota: No estire en exceso la tira.

- 31 -
77. Para aplicar una segunda cinta,
retire la lámina marcada con el
número 1.
88. Aplique la segunda cinta en
dirección opuesta a la primera
cinta y colóquela sobre el
transmisor. Presione con
firmeza.
99. Retire las láminas marcadas con
el número 2 de cada lado.
10 10. Alise la cinta.
Nota: Para ver los detalles sobre cómo introducir la
configuración del sensor en un dispositivo de visualización
compatible, consulte la guía del usuario del sistema.
la parte ancha de la cinta
cubre el extremo del
transmisor y la piel

- 32 -
Mantenimiento
Almacenamiento
PRECAUCIÓN: No congele el sensor ni lo guarde bajo luz
solar directa ni en condiciones de temperaturas o humedad
extremas. Estas condiciones pueden dañar el sensor.
Guarde los sensores únicamente a temperatura ambiente, entre
36 °F y 80 °F (2 °C y 27 °C). Deseche el sensor después de la
fecha de caducidad indicada en la etiqueta, si el envase está
dañado o si el precinto está roto.
Eliminación
Deseche el sensor Guardian 4 en un recipiente para objetos
cortantes.
Asistencia técnica
Departamento Número de teléfono
Asistencia técnica 24 horas
(llamadas desde Estados
Unidos)
+1 800 646 4633
Asistencia técnica 24 horas
(llamadas desde fuera de
Estados Unidos)
+1 818 576 5555
Sitio web www.medtronicdiabetes.com
Especificaciones técnicas
Dimensiones aproximadas
1,50 x 2,60 x 2,00 pulgadas (3,80 x 6,70 x 5,20 centímetros)
Peso aproximado
0,09 onzas (2,80 gramos)
Vida útil del sensor
El sensor Guardian 4 es para un solo uso y tiene una vida
útil máxima de 170 horas (siete días). El periodo de vida útil
de 170 horas del sensor comienza cuando este se conecta al
transmisor.

- 33 -
Tabla de iconos
Fecha de caducidad
Producto sanitario
No reutilizar
Precaución: Consulte las instrucciones de uso para
obtener información importante sobre las advertencias
y las medidas preventivas que no aparecen en la
etiqueta.
(1x)
Un sensor por recipiente/envase
(5x)
Cinco sensores por recipiente/envase
(2x)
Dos cintas por envase
(10x)
Diez cintas por envase
Consultar las instrucciones de uso
Número de catálogo o modelo
Código de lote
Esterilizado mediante radiación
No utilizar si el envase está dañado
Sistema de barrera estéril única
XX°C
XX°F
XX°C
XX°F
Límite de temperatura de almacenamiento
Abrir aquí
Fabricante
Fecha de fabricación
No reesterilizar
Frágil, manipular con cuidado
Mantener seco
Reciclable, tiene contenido reciclado.
Representante autorizado en la Comunidad Europea.
Conformité Européenne (Conformidad Europea). Este
símbolo indica que el dispositivo cumple totalmente las
leyes vigentes de la Unión Europea.
No seguro ante resonancia magnética (RM)

- 34 -
Apirógeno
Requiere prescripción médica en EE. UU.
Glosario de iconos
Si desea ver las definiciones de los símbolos mostrados
en las etiquetas del dispositivo y del envase, consulte
www. medtronicdiabetes.com/symbols-glossary.
©2023 Medtronic. Reservados todos los derechos. Medtronic, el logotipo de Medtronic y Engineering
the extraordinary son marcas comerciales de Medtronic. Las marcas de terceros con el símbolo ™* son
marcas comerciales de sus respectivos propietarios. Todas las demás marcas son marcas comerciales
de una compañía de Medtronic.

- 35 -
简体中文
简介
Guardian 4探头是持续葡萄糖监测
(CGM)系统的组成部分。此探头可将
皮肤下组织间液中的少量葡萄糖转换为电
信号。随后,系统将根据这些信号提供探
头葡萄糖浓度值。
探头装组件
适应证
Guardian 4探头(MMT-7040)预期用于监测葡萄糖浓度,以管理
年满七岁的患者的糖尿病。其适合作为辅助器械使用,用于补充而
不是取代从普通血糖监测设备中获得的信息。该探头仅供一次性使
用,且需要处方。Guardian 4探头最长可连续使用七天。要获取治
疗决定意见,请参见系统用户指南。
禁忌证
对于Guardian 4探头使用相关禁忌证,请参见系统指南。
用户安全
警告
在尝试植入Guardian 4探头前,请完整阅读本用户指
南。One- press传感器助针器(MMT-7512)是唯一已获准可与该
探头一同使用的助针器。不按说明操作或使用其他植入器械,可能
会导致植入不当、疼痛或受伤。
不要尝试连接与此探头不兼容的发送器或记录器。此探头仅设计为
与已获准使用的发送器一同使用。将此探头与未获准与其一同使用
的发送器或记录器相连,可能会损坏这些部件。关于兼容产品的列
表,请参见系统用户指南。
如果服用了羟基脲(又称为羟基尿素),则不要进行持续葡萄糖监
测。羟基脲用于治疗某些疾病,如癌症和镰状细胞贫血症。服用羟
基脲会使探头葡萄糖浓度读数比血糖浓度读数大。进行持续葡萄糖
浓度监测时服用羟基脲,可能会使报告中的探头葡萄糖浓度读数比
实际血糖浓度读数大得多。对于胰岛素泵用户,进行持续葡萄糖浓
度监测时服用羟基脲,可能会导致胰岛素输注过量引起的低血糖。
始终都要检查服用的任何药物的标签,确认羟基脲或羟基尿素是否
为其活性成分。如果服用了羟基脲,请咨询医疗专业人员。请用更
多血糖仪读数验证葡萄糖浓度。
佩戴此探头时服用含有对乙酰氨基酚或扑热息痛的药物(包括但不
限于退烧药和感冒药),可能会误使探头葡萄糖浓度读数增大。误
差大小取决于体内对乙酰氨基酚或扑热息痛的有效量,并且可能因

- 36 -
人而异。始终都要检查所有药物的标签,以核实对乙酰氨基酚或扑
热息痛是否为其有效成分。
不要让此探头受到MRI设备、透热疗法设备或可产生强磁场的其他设
备的影响。此探头的性能尚未在那些情况下评估,可能不安全。如
果此探头已直接接触强磁场,请停止使用,并联系24小时技术支持
部门,以获取更多帮助。
在使用前务必检查包装有无破损。探头为无菌无热原器械,除非包
装已打开或破损。如果探头包装已打开或受损,请直接将探头丢弃
在锐器盒中。使用非无菌探头可能导致植入部位感染。
严禁让儿童将小部件放入口中。该产品会对儿童造成窒息危险。
如果您已怀孕或病情严重,请切勿使用Guardian 4探头。由于尚未
在怀孕或病情严重群体中对此探头进行研究,这些群体的常用药物
对此探头性能的影响尚且不明,所以此探头在这些群体中提供的数
据可能不准确。
医疗专业人员或护理人员:
• 始终都要戴着手套植入探头。探头上带有可回缩针头。可能会出
现轻微出血。
• 用无菌纱布裹住探头,将针帽从探头上移除。
探头植入后,要将针帽直接放入锐器盒中,以防被针头意外刺伤。
观察植入部位(探头下面、周围或上面)是否有出血。
如果出现出血的情况,请执行下述操作:
1. 将无菌纱布或干净的布放在探头上面,施加稳定的压力,最长可
按压三分钟。使用未消毒的纱布会导致植入部位感染。
2. 流血停止后将发送器(或记录器)连接到此探头上。
如果出血不止,则不要将发送器连接到此探头上,因为血液可能
会进入发送器连接器,从而损坏器械。
如果出血不止,引起过于强烈的疼痛或不适,或
者能在此探头的塑料底座中清楚地看到出血,则
执行以下操作:
塑料底部
1. 取下探头并继续稳定按压,直到不再流血。将
探头丢弃在锐器盒中。
2. 检查植入部位有无红肿、出血、过敏、疼痛、压痛或发炎症
状。根据医疗专业人员的指示进行处理。

- 37 -
3. 在其他位置植入新的探头。
对于探头使用相关问题或疑虑,请联系24小时技术支持部门求
助。
关于医疗方面的问题或顾虑,请联系医疗专业人员。
预防措施
植入Guardian 4探头之前,请用肥皂和水清洗双手,以防植入部位
感染。
请勿穿过胶布植入探头。穿过胶布植入探头可能导致探头植入不当
和运作失常。
仅用酒精清洁植入部位。用酒精将植入部位准备好,可确保残留物
不会留在皮肤上。
轮换探头植入部位,以免过度使用。
请勿清洗或再灭菌针头,也不要试图将针从针帽中抽出。可能会发
生意外的针刺或刺伤情况。
不能重复使用探头。重复使用探头可能会损坏探头表面,从而导致
测量的探头值不准确、植入部位过敏或感染。
风险和副作用
与探头使用有关的风险包括
• 皮肤刺激或其他反应
• 瘀伤
• 不适感
• 红肿
• 出血
• 疼痛
• 皮疹
• 感染
• 突起肿块
• 探头植入部位出现“雀斑样”小圆点
• 过敏反应
• 植入时由于焦虑或恐惧产生的晕厥
• 酸痛或压痛
• 植入部位肿胀
• 探头断裂、破损或损坏
• 拔出探头针头时的少量溅血
• 与不粘胶和/或胶布有关的残留皮肤发红现象
• 结疤

- 38 -
试剂
Guardian 4探头中有以下两种生物试剂:葡萄糖氧化酶和人血清
白蛋白(HSA)。葡萄糖氧化酶从黑曲霉中提取,生产时旨在满足
用于免疫诊断、其他诊断和生物技术应用的酶的提取和纯化工业要
求。用于此探头的HSA含有已经提纯和干燥的白蛋白组份五(从经
过巴氏灭菌的人血清中提取,已通过戊二醛交联)。制造每个探头
大约都会使用3μg葡萄糖氧化酶和10μg的HSA。HSA被批准用于人
体静脉注射的用量远远超过本探头的用量。
取下探头
要更换Guardian 4探头,请按Guardian 4发送器用户指南中所述断
开发送器与此探头的连接。将探头轻轻从体内拉出以取出探头。将
探头丢弃在锐器盒中。
组件
BA
One-press传感器助针器
A. 两个按钮上的突起部分
B. 拇指纹标记
C
D
A
B
探头组件
A. 底座
B. 针帽
C. 探头
D. 透明衬纸
A
B
探头底部
A. 探头连接器
B. 探头插扣
发送器

- 39 -
BB
A
第一块椭圆形胶布
A. 衬纸1
B. 衬纸2
BB
A
第二块椭圆形胶布
A. 衬纸1
B. 衬纸2

- 40 -
植入探头的位置
选择相应年龄段的植入部位,并确保该部位有足量皮下脂肪。
7-17岁
上臂后侧
注意:Guardian 4探头仅适用于臂部。不要在其他部位使用
Guardian 4探头,包括腹部或臀部,因为性能会有所不同,可能
会导致出现低血糖或高血糖
18岁及以上
上臂后侧
注:
• 您可能需要他人协助来将探头植入上臂后侧。一些用户发现自
已很难将探头植入手臂。
为了获得最佳探头葡萄糖浓度表现,以及防止探头意外脱落:
• 不要将此探头植入肌肉、硬皮或疤痕组织。
• 避开衣物或配饰束缚的部位。
• 避开在运动过程中有剧烈动作的部位。

- 41 -
植入探头
警告:在别人体内植入此探头时始终都要戴手套,以免接触患者的
血液。可能会出现轻微出血。接触患者血液可能引起感染。
11. 用肥皂和水彻底清洗双手。
22. 选择有足量脂肪的植入部位。
33. 用酒精清洁植入部位。使该区域
风干。
44. 打开探头包装。

- 42 -
5
5. 握住底座,然后从包装中取出探头
组件。将底座放在干净平坦的表面
(如桌面)上。
6
正确
已折叠的标签
不正确
6. 确证此探头的胶布标
签已折到探头连接器
和探头插扣下方。
7
拇指纹标志上的拇指
正确 不正确
7. 用一只手,将一个拇
指放在拇指纹标志处
握住助针器。手指不
得触碰助针器按钮。
88. 将助针器向下按到底
座上,直到将助针器
底部平放在桌面上并
且听到咔嗒声为止。

- 43 -
99. 将一只手的两根手指
放在底座底部。用另
一只手抓住助针器,
然后向上拉助针器。
箭头
注:助针器一侧的箭头同助针器内的
针头位置一致。
警告:切勿将已装载(探头)的助针器指向身体的任何非植入部
位。意外按下按钮可能导致针头将探头植入不需要的植入部位,导
致轻微伤害。
10 10. 将助针器放在已准备好的
植入部位上。
11 11. 同时按住两个助针器按
钮,然后同时松开。继续
让助针器一直处在植入部
位上,至少持续五秒钟,
以使胶布粘到皮肤上。

- 44 -
12 12. 将助针器从植入部位上提
起。提起助针器时手指不
得按住按钮。
B
A
AC
D
E
探头底部
A. 探头插扣
B. 探头连接器
C. 胶布标签
D. 胶布衬纸
E. 胶布衬垫
如果在没有帮助的情况下植入此探头,则要完成步骤13a。如果医疗
专业人员或护理人员帮您植入探头,则要完成步骤13b。
13a 患者:
13. a.将手指放在探头连接器处,
以及与探头底部相对的另一
端,将此探头底部按在皮肤
上。捏住针帽顶部,然后从探
头中拔出。
或
13b
医疗专业人员或护理人员:
13. b.将无菌纱布裹住探头。将手
指放在探头连接器处,以及与
探头底部相对的另一端,将此
探头底部按在皮肤上。捏住针
帽顶部,然后从探头中拔出。

- 45 -
警告:始终都要观察植入部位是否有出血。如果发生出血(在探头
下面、周围或上面),将无菌纱布或干净的布放在探头上面,持续
按压,最长可按压三分钟。使用非无菌纱布会导致感染。如果流血
不止,则移除探头并持续稳定按压到不再流血为止。
注:植入后,除了椭圆形胶布,还可以自愿使用Skin Tac™之类的
不干胶产品。如果已使用自愿使用的胶布产品,则先将其贴到胶
布衬垫下的皮肤上,然后再撕掉衬纸。也可将胶布产品贴到胶布
衬垫或此探头底部周围的皮肤上。让产品风干,然后继续操作。
14 14. 从胶布衬垫下揭下胶布衬纸。向远离
探头的方向拉衬纸,拉动时一直紧贴皮
肤。揭下衬纸时不要拖拉此探头。
注:不要从长方形胶布标签上揭下胶
布衬纸。该标签将在后续步骤中用于
牢固地固定发送器。
注:如果此探头底座移动,则向下按
此探头。
15 15. 将胶布衬垫紧紧按在植入部位上,以确
保此探头底部始终在皮肤上。

- 46 -
16 16. 从探头连接器下方展开胶布。
17 17. 拉平探头的胶布标签,使它平置在皮
肤上。
椭圆形胶布的贴法
11. 揭下标有“1”的衬纸。
22. 按图所示贴上胶布,然后向下
压紧。
胶布宽的部分覆盖探头底部
的一半

- 47 -
33. 从两侧揭下标有“2”的衬纸。
44. 将胶布压平。
55. 将发送器连接到探头。
注:等待发送器上的绿灯闪烁。如果
绿灯不闪烁,则参见Guardian 4发
送器用户指南的“故障排除”一节。
66. 用胶布凸舌盖住发送器。
注:不要将凸舌拉得过紧。

- 48 -
77. 要再贴一块胶布,请揭下标
有“1”的衬纸。
88. 将第二块胶布贴上,方向与第一
块胶布相反,并且将其放在发送
器上。向下压紧。
99. 从两侧揭下标有“2”的衬纸。
10 10. 将胶布压平。
注:对于有关如何将探头设置输入兼容显示设备的详细信息,请
参见系统用户指南。
胶布宽的部分覆盖发送器末端
和皮肤

- 49 -
保养
储存
注意:严禁冰冻探头,或将其存放在日光直射、极端温度或潮湿
处。这些条件可能使探头损坏。
仅可将探头储存在36°F到80°F(2°C到27°C)之间的室温下。如果
标在标签上的“使用期限”已过,包装已受损或封签已破损,则应
将探头丢弃。
废弃处理
要将Guardian 4探头丢弃在锐器盒中。
帮助
部门 电话号码
24小时技术支持部门(在美
国境内拨打) +1 800 646 4633
24小时技术支持部门(在美
国境外拨打) +1 818 576 5555
网站 www.medtronicdiabetes.com
技术规格
约计尺寸
1.50 x 2.60 x 2.00英寸(3.80 x 6.70 x 5.20厘米)
约计重量
0.09盎司(2.80克)
探头使用寿命
Guardian 4探头只能使用一次,其使用寿命最长为170小时(七
天)。此探头170小时的使用寿命始于将此探头连接到发送器之时。
图标表
有效期
医疗器械
请勿重复使用
注意:关于未在标签上找到的重要警告或注意事项,请
查阅使用说明。
(1x)
每盒/包一个探头
(5x)
每盒/包五个探头
(2x)
每包两块胶布
(10x)
每包十块胶布

- 50 -
查阅使用说明
目录编号或型号
批次代码
经辐射灭菌
如包装破损切勿使用
单道无菌屏障系统
XX°C
XX°F
XX°C
XX°F
存储温度限制
由此处打开
制造商
生产日期
不得二次灭菌
易碎物品,小心搬运
保持干燥
可回收利用,含有已回收利用的成分。
欧盟授权代表。
Conformité Européenne(欧洲合规)。该符号表示器
械完全符合适用的欧盟法案。
磁共振(MR)不安全
无热原
在美国需要处方
图标词汇表
对于器械和包装标签上的符号的定义,请参见
www.medtronicdiabetes.com/symbols-glossary。
©2023 Medtronic。保留所有权利。Medtronic、Medtronic徽标和“生命因科技不凡”都是Medtronic
的商标。™*第三方品牌是其各自所有者的商标。所有其他品牌都是Medtronic所属公司的商标。


MMT-7040
M021376C002_1 2023-03-10
-
 1
1
-
 2
2
-
 3
3
-
 4
4
-
 5
5
-
 6
6
-
 7
7
-
 8
8
-
 9
9
-
 10
10
-
 11
11
-
 12
12
-
 13
13
-
 14
14
-
 15
15
-
 16
16
-
 17
17
-
 18
18
-
 19
19
-
 20
20
-
 21
21
-
 22
22
-
 23
23
-
 24
24
-
 25
25
-
 26
26
-
 27
27
-
 28
28
-
 29
29
-
 30
30
-
 31
31
-
 32
32
-
 33
33
-
 34
34
-
 35
35
-
 36
36
-
 37
37
-
 38
38
-
 39
39
-
 40
40
-
 41
41
-
 42
42
-
 43
43
-
 44
44
-
 45
45
-
 46
46
-
 47
47
-
 48
48
-
 49
49
-
 50
50
-
 51
51
-
 52
52
-
 53
53
-
 54
54
-
 55
55
-
 56
56


en otros idiomas
- English: Medtronic Guardian 4 User guide
- 日本語: Medtronic Guardian 4 ユーザーガイド