
La EOS 6D (N) no dispone de las funciones Wi-Fi ni GPS que se explican en
este manual.
The EOS 6D (N) does not have the Wi-Fi and GPS functions explained in this
manual.
Instruction Manual
Manual de instrucciones
Español English
EOS 6D (WG)
EOS 6D (N)


2
The EOS 6D (WG/N) is a digital single-lens reflex camera featuring a
full-frame (approx. 35.8 x 23.9 mm) CMOS sensor with approx. 20.2
effective megapixels, DIGIC 5+, high-precision and high-speed 11-point
AF, approx. 4.5 fps continuous shooting, Live View shooting, Full High-
Definition (Full HD) movie shooting, Wi-Fi*, and GPS*.
* The EOS 6D (N) does not have the Wi-Fi and GPS functions.
Before Starting to Shoot, Be Sure to Read the Following
To avoid botched pictures and accidents, first read the “Safety
Precautions” (p.138-140) and “Handling Precautions” (p.12-13). Also,
read this manual carefully to ensure that you use the camera correctly.
Refer to This Manual while Using the Camera to Further
Familiarize Yourself with the Camera
While reading this manual, take a few test shots and see how they
come out. You can then better understand the camera. Be sure to store
this manual safely, too, so that you can refer to it again when necessary.
Testing the Camera Before Use and Liability
After shooting, play images back and check whether they have been
properly recorded. If the camera or memory card is faulty and the
images cannot be recorded or downloaded to a computer, Canon
cannot be held liable for any loss or inconvenience caused.
Copyrights
Copyright laws in your country may prohibit the use of your recorded
images or copyrighted music and images with music in the memory
card for anything other than private enjoyment. Also be aware that
certain public performances, exhibitions, etc., may prohibit photography
even for private enjoyment.
Introduction

3
The camera can use the following cards regardless of capacity:
• SD memory cards
• SDHC memory cards*
• SDXC memory cards*
* UHS-I cards compatible.
When shooting movies, use a large-capacity card with a fast reading/
writing speed as shown in the table.
If you use a slow-writing card when shooting movies, the movie may
not be recorded properly. Also, if you play back a movie on a card
with a slow reading speed, the movie may not play back properly.
If you want to shoot still photos while shooting a movie, you will need
an even faster card.
To check the card’s reading/writing speed, refer to the card
manufacturer’s Web site.
Compatible Cards
Cards that Can Record Movies
Compression Method (p.116) Card
IPB 6 MB/sec. or faster
ALL-I (I-only) 20 MB/sec. or faster
In this manual, “card” refers to SD memory cards, SDHC memory
cards, and SDXC memory cards.
* The camera does not come with a card for recording images/
movies. Please purchase it separately.

4
Before starting, check that all the following items have been included
with your camera. If anything is missing, contact your dealer.
* Battery Charger LC-E6 or LC-E6E is provided. (The LC-E6E comes with a power
cord.)
The Instruction Manuals provided are listed on the next page.
If you purchased a Lens Kit, check that the lenses are included.
Depending on the Lens Kit type, lens instruction manuals may also be included.
Be careful not to lose any of the above items.
Item Check List
Battery Pack
LP-E6
(with protective cover)
Battery Charger
LC-E6/LC-E6E*
Interface Cable IFC-200U Stereo AV Cable
AVC-DC400ST
Camera
(with body cap)
Wide Strap
EW-EOS6D
EOS DIGITAL Solution Disk
(Software and Software Instruction Manuals)
When you need Lens Instruction Manuals, download them from the Canon
Web site (p.5).
The lens instruction manuals (PDF) are for lenses sold individually. Note
that when purchasing the Lens Kit, some of the accessories included with
the lens may not match those listed in the Lens Instruction Manual.

5
Camera Basic Instruction Manual, Wi-Fi Function
Basic Instruction Manual and GPS Function
Instruction Manual
The booklet is composed of Camera Instruction Manual
(Basic-version), Wi-Fi Function Instruction Manual (Basic-
version), and GPS Function Instruction Manual (Full-
version). More detailed Instruction Manuals (PDF files) can
be downloaded from the Canon Web site.
1 Download the Instruction Manuals (PDF files).
Connect to the Internet and access the following Canon Web site.
www.canon.com/icpd
Select your country or region of residence and download the
Instruction Manuals.
Instruction Manuals Available for Download
• Camera Instruction Manual
• Wi-Fi Function Instruction Manual
• Camera Basic Instruction Manual, Wi-Fi Function Basic
Instruction Manual and GPS Function Instruction Manual
• Lens Instruction Manuals
• Software Instruction Manuals
2 View the Instruction Manuals (PDF files).
Double-click a downloaded Instruction Manual (PDF file) to open it.
To view the Instruction Manuals (PDF files), Adobe Acrobat
Reader DC or other Adobe PDF viewer (most recent version
recommended) is required.
Adobe Acrobat Reader DC can be downloaded free from the
Internet.
To learn how to use a PDF viewer, refer to its Help section.
Instruction Manuals
Downloading and Viewing the Instruction Manuals (PDF Files)
Software Instruction Manuals (PDF files) are also available on EOS
DIGITAL Solution Disk (p.4).

6
Icons in this Manual
<6> : Indicates the Main Dial.
<
5> : Indicates the Quick Control Dial.
<9> <V> <U> : Indicates the Multi-controller and the push
direction.
<0> : Indicates the Setting button.
0, 9, 7, 8 : Indicates that the corresponding function
remains active for 4 sec., 6 sec., 10 sec., or
16 sec. respectively after you let go of the
button.
* In this manual, the icons and markings indicating the camera’s buttons, dials,
and settings correspond to the icons and markings on the camera and on the
LCD monitor.
3 : Indicates a function that can be changed by pressing the
<
M> button and changing the setting.
M : When shown on the upper right of a page, it indicates that the
function is available only in the Creative Zone modes (p.20).
(p.**) : Reference page numbers for more information.
: Warning to prevent shooting problems.
: Supplemental information.
: Tips or advice for better shooting.
: Problem-solving advice.
Basic Assumptions
All operations explained in this manual assume that the power switch
has been set to <
1> and the <R> switch has been set to the
left (Multi function lock released) (p.30, 43).
It is assumed that all the menu settings and Custom Functions are
set to their defaults.
The illustrations in this manual show the camera attached with an
EF50mm f/1.4 USM lens as an example.
Conventions Used in this Manual

7
For first-time DSLR users, Chapters 1 and 2 explain the camera’s
basic operations and shooting procedures.
Chapters
Introduction
2
Getting Started
23
Basic Shooting
57
Setting the AF and Drive Modes
77
Image Settings
83
Advanced Operations
95
Shooting with the LCD Monitor
(Live View Shooting)
103
Shooting Movies
113
Image Playback
119
Downloading Images to Your Computer
129
1
2
3
4
5
6
7
8
9

8
1
Introduction 2
Compatible Cards............................................................................. 3
Item Check List................................................................................. 4
Instruction Manuals .......................................................................... 5
Conventions Used in this Manual..................................................... 6
Chapters........................................................................................... 7
Handling Precautions ..................................................................... 12
Quick Start Guide ........................................................................... 14
Nomenclature................................................................................. 16
Getting Started 23
Charging the Battery ...................................................................... 24
Installing and Removing the Battery............................................... 26
Installing and Removing the Card .................................................. 27
Turning on the Power ..................................................................... 30
Setting the Date, Time, and Zone .................................................. 32
Selecting the Interface Language................................................... 34
Attaching and Detaching a Lens .................................................... 35
About the Lens Image Stabilizer .................................................... 38
Basic Operation.............................................................................. 39
Q Quick Control for Shooting Functions ....................................... 45
3 Menu Operations.................................................................. 47
Before You Start............................................................................. 49
Formatting the Card..................................................................... 49
Setting the Power-off Time/Auto Power Off ................................. 51
Setting the Image Review Time................................................... 51
Turning the LCD Monitor Off/On.................................................. 52
Reverting the Camera to the Default Settings ............................. 52
Contents

9
Contents
2
3
Q Displaying the Electronic Level ...............................................53
Feature Guide and Help..................................................................54
Basic Shooting 57
A Fully Automatic Shooting (Scene Intelligent Auto) ...................58
A Full Auto Techniques (Scene Intelligent Auto) .........................61
C Creative Auto Shooting.............................................................63
8: Special Scene Mode .............................................................66
2 Shooting Portraits ......................................................................67
3 Shooting Landscapes ...............................................................68
4 Shooting Close-ups....................................................................69
5 Shooting Moving Subjects ........................................................70
6 Shooting Night Portraits (With a Tripod) ....................................71
F Shooting Night Scenes (Handheld)............................................72
G Shooting Backlit Scenes............................................................73
Q Quick Control.............................................................................75
Setting the AF and Drive Modes 77
f: Selecting the AF Operation .....................................................78
S Selecting AF Points ..................................................................79
MF: Manual Focusing .....................................................................80
i Selecting the Drive Mode..........................................................81
j Using the Self-timer ...................................................................82

Contents
10
7
6
4
5
Image Settings 83
Setting the Image-Recording Quality ............................................. 84
i: Setting the ISO Speed ........................................................... 86
A Selecting a Picture Style ........................................................ 87
Setting the White Balance.............................................................. 88
Auto Correction of Brightness and Contrast................................... 89
Noise Reduction Settings............................................................... 90
Highlight Tone Priority.................................................................... 92
Lens Peripheral Illumination / Chromatic Aberration Correction .... 93
Advanced Operations 95
d: Program AE.............................................................................. 96
s: Shutter-Priority AE.................................................................. 97
f: Aperture-Priority AE ............................................................... 98
a: Manual Exposure ..................................................................... 99
Setting Exposure Compensation.................................................. 100
A AE Lock................................................................................... 101
Shooting with the LCD Monitor (Live View Shooting) 103
A Shooting with the LCD Monitor .............................................. 104
Using AF to Focus (AF Method)................................................... 106
Focusing Manually ....................................................................... 111
Shooting Movies 113
k Shooting Movies..................................................................... 114
Setting the Movie-Recording Size ................................................ 116

11
Contents
9
8
Image Playback 119
x Image Playback......................................................................120
H Searching for Images Quickly.................................................121
u Magnified View ........................................................................122
k Playing Movies........................................................................123
L Erasing Images........................................................................125
Downloading Images to Your Computer 129
Downloading Images to a Computer.............................................130
About the Software .......................................................................132
Installing the Software...................................................................134
Software Instruction Manual .........................................................135
Safety Precautions........................................................................138
For Troubleshooting guide and Specifications, refer to the Instruction
Manual downloadable from the Canon Web site. For how to download the
Instruction Manual, see page 5.

12
Also read “Handling Precautions” on page 142.
Camera Care
This camera is a precision instrument. Do not drop it or subject it to physical
shock.
The camera is not waterproof and cannot be used underwater.
To maximize the camera's dust- and drip- resistance, keep the terminal
cover, battery compartment cover, card slot cover, and all other covers firmly
closed.
This camera is designed to be dust- and drip- resistant, in order to help
prevent sand, dust, dirt, or water that falls on it unexpectedly from getting
inside, but it is impossible to prevent dirt, dust, water, or salt from getting
inside at all. As far as possible, do not allow dirt, dust, water, and salt to get
on the camera.
If water gets on the camera, wipe it off with a dry and clean cloth. If dirt, dust,
or salt gets on the camera, wipe it off with a clean, well-wrung wet cloth.
Using the camera in a location with large amounts of dirt or dust may cause
a malfunction.
Cleaning the camera after use is recommended. Allowing dirt, dust, water, or
salt to remain on the camera may cause a malfunction.
If you accidentally drop the camera into water or are concerned that
moisture (water), dirt, dust, or salt may have gotten inside it, promptly
consult the nearest Canon Service Center.
Never leave the camera near anything having a strong magnetic field such
as a magnet or electric motor. Also avoid using or leaving the camera near
anything emitting strong radio waves such as a large antenna. Strong
magnetic fields can cause camera misoperation or destroy image data.
Do not leave the camera in excessive heat such as in a car in direct sunlight.
High temperatures can cause the camera to malfunction.
The camera contains precision electronic circuitry. Never attempt to
disassemble the camera yourself.
Handling Precautions

13
Handling Precautions
Do not block the mirror operation with your finger, etc. Doing so may cause a
malfunction.
Use a blower to blow away dust on the lens, viewfinder, reflex mirror, and
focusing screen. Do not use cleaners that contain organic solvents to clean
the camera body or lens. For stubborn dirt, take the camera to the nearest
Canon Service Center.
Do not touch the camera’s electrical contacts with your fingers. This is to prevent
the contacts from corroding. Corroded contacts can cause camera misoperation.
If the camera is suddenly brought in from the cold into a warm room,
condensation may form on the camera and internal parts. To prevent
condensation, first put the camera in a sealed plastic bag and let it adjust to
the warmer temperature before taking it out of the bag.
If condensation forms on the camera, do not use the camera. This is to avoid
damaging the camera. If there is condensation, remove the lens, card and
battery from the camera, and wait until condensation has evaporated before
using the camera.
If the camera will not be used for an extended period, remove the battery
and store the camera in a cool, dry, well-ventilated location. Even while the
camera is in storage, press the shutter button a few times once in a while to
check that the camera is still working.
Avoid storing the camera where there are chemicals that result in rust and
corrosion such as in a chemical lab.
If the camera has not been used for an extended period, test all its functions
before using it. If you have not used the camera for some time or if there is
an important shoot such as a foreign trip coming up, have the camera
checked by your Canon dealer or check the camera yourself and make sure
it is working properly.

14
Quick Start Guide
1
Insert the battery (p.26).
To charge the battery, see page 24.
2
Insert a card (p.27).
With the card’s label facing
toward the back of the
camera, insert it into the
card slot.
3
Attach the lens (p.35).
Align it with the red dot.
4
Set the lens focus mode switch
to <f> (p.35).
5
Set the power switch to <1>
(p.30)
.
When the LCD monitor displays the
date/time/zone setting screens, see
page 32.

15
Quick Start Guide
6
While holding down the center
of the Mode Dial, set it to <A>
(Scene Intelligent Auto) (p.58).
All the necessary camera settings
will be set automatically.
7
Focus the subject (p.40).
Look through the viewfinder and
aim the viewfinder center over the
subject.
Press the shutter button halfway,
and the camera will focus the
subject.
8
Take the picture (p.40).
Press the shutter button completely
to take the picture.
9
Review the picture (p.51).
The captured image will be
displayed for 2 sec. on the LCD
monitor.
To display the image again, press
the <
x> button (p.120).
To shoot while looking at the LCD monitor, see “Live View
Shooting” (p.103).
To view the images captured so far, see “Image Playback” (p.120).
To delete an image, see “Erasing Images” (p.125).

16
Nomenclature
LCD panel (p.18)
<i> ISO speed
setting button (p.86)
<q> Metering mode
selection button
<U> LCD panel
illumination button (p.44)
<6> Main Dial
(p.41)
Shutter button
(p.40)
Self-timer lamp
(p.82)
Remote control
sensor
Grip (Battery
compartment)
DC coupler cord hole
Depth-of-field preview button
Mirror
Body cap (p.35)
<q/C>Audio/video OUT/
Digital terminal (p.130)
<F> Remote control terminal (N3 type)
<Y> External microphone IN terminal
<D> HDMI mini OUT terminal
Contacts (p.13)
Lens mount
Lens lock pin
Lens release
button (p.36)
Microphone
Speaker
(p.123)
Strap mount
(p.23)
Mode Dial (p.20)
Mode Dial lock release
button (p.41)
Hot shoe
Flash-sync contacts
Lens mount index (p.35)
<f> AF operation selection button (p.78)
<R> Drive mode selection button (p.81)

17
Nomenclature
<V> Focal plane mark
<M>
Menu button (p.47)
<B>
Info button
(p.44, 53, 55, 120)
Dioptric adjustment knob (p.39)
Eyecup
Power switch (p.30)
LCD monitor (p.47)
Tripod socket
<u> Index/Magnify/Reduce
button (p.121/122)
<x> Playback button (p.120)
<9> Multi-controller (p.43)
<L> Erase button (p.125)
<5> Quick Control Dial (p.42)
<0> Setting button (p.47)
Multi function lock
switch (p.43)
Access lamp (p.29)
Battery compartment
cover (p.26)
Card slot
cover (p.27)
Strap mount
(p.23)
<Q> Quick Control
button (p.45)
<S> AF point selection
button (p.79)
<A> AE lock/
FE lock button (p.101)
<p> AF start button
(p.40, 105)
Battery
compartment
cover release
lever (p.26)
Card slot (p.27)
Viewfinder eyepiece
<A/k> Live View shooting/
Movie shooting switch (p.103/113)
<0> Start/Stop button (p.104, 114)

Nomenclature
18
LCD Panel
The display will show only the settings currently applied.
Drive mode (p.81)
u Single shooting
i Continuous shooting
B Silent single shooting
M Silent continuous
shooting
Q Self-timer: 10 sec./
Remote control
k Self-timer: 2 sec./
Remote control
<h> AEB
A
F operation (p.78)
X
One-Shot AF
9
A
I Focus AF
Z
A
I Servo AF
4 L
Manual focus
Wi-Fi function
<k/l>
1 2
<r> GPS
acquisition status
<x> Logging function
<M> Multi Shot Noise
Reduction (p.90)
<P> Multiple-exposure
shooting
Aperture
Battery check (p.31)
ISO speed (p.86)
<g> ISO speed (p.86)
<A> Highlight tone priority (p.92)
<w>
HDR shooting
Electronic level
Exposure level indicator
Exposure compensation amount
(p.100)
AEB range
Flash exposure compensation
amount
Metering mode
q Evaluative metering
w Partial metering
r Spot metering
e Center-weighted
average metering
Possible shots
Self-timer countdown
Bulb exposure time
Error No.
Remaining images to record
Shutter speed
FE lock (FEL)
Busy (buSY)
Multi function lock warning (L)
No card warning (Card)
Error code (Err)
Cleaning image sensor (CLn)
AF point selection
(
[ ] AF, SEL [ ], SEL AF)
Card full warning (FuLL)
Card error warning (Card Err)
--
-
-
--

19
Nomenclature
Viewfinder Information
The display will show only the settings currently applied.
AF point selection
(
[ ] AF, SEL [ ], SEL AF)
Card full warning (FuLL)
Card error warning (Card)
No card warning (Card)
--
-
-
-
-
Shutter speed (p.97)
FE lock (FEL)
Busy (buSY)
Multi function lock warning (L)
<y> Flash exposure
compensation
<d> FE lock/
FEB in-progress
<e> High-speed sync
<D> Flash-ready
Improper FE lock warning
<A> AE lock (p.101) /
AEB in-progress
<z> Battery check (p.31)
<h> Warning symbol
Aperture (p.98)
Exposure level indicator
Exposure compensation amount (p.100)
AEB range
Flash exposure compensation amount
Electronic level
<A> Highlight tone priority (p.92)
ISO speed (p.86)
Max. burst
Number of remaining multiple
exposures
<o> Focus
confirmation
light (p.59)
<g> ISO speed
(p.86)
Spot metering circle
AF points (p.79)
(Superimposed display)
Focusing screen

Nomenclature
20
Mode Dial
Turn the Mode Dial while holding down the Mode Dial center (Mode Dial
lock release button).
Basic Zone
All you do is press the shutter
button. The camera sets everything
to suit the subject or scene.
A: Scene Intelligent Auto (p.58)
C : Creative Auto (p.63)
8: Special scene (p.66)
2 : Portrait (p.67)
3 : Landscape (p.68)
4 : Close-up (p.69)
5 : Sports (p.70)
6 : Night Portrait (p.71)
F :
Handheld Night Scene (p.72)
G : HDR Backlight Control (p.73)
Creative Zone
These modes give you more control
for shooting various subjects.
d : Program AE (p.96)
s : Shutter-priority AE (p.97)
f : Aperture-priority AE (p.98)
a : Manual exposure (p.99)
F : Bulb
Custom shooting mode
You can register the shooting
mode (d/s/f/a/F), AF
operation, menu settings,
etc., to the w or x Mode
Dial setting and shoot.

21
Nomenclature
Lens
EF24-105mm f/4L IS USM
Focus mode switch (p.35)
Hood mount (p.37)
Focusing ring (p.80, 111)
Image Stabilizer switch (p.38)
Lens mount index (p.35)
Contacts (p.13)
Zoom position
index (p.36)
Zoom ring (p.36)
Infrared index
Distance scale
φ77mm filter thread
(front of lens)

Nomenclature
22
Battery Charger LC-E6
Charger for Battery Pack LP-E6/LP-E6N (p.24).
Battery Charger LC-E6E
Charger for Battery Pack LP-E6/LP-E6N (p.24).
Battery pack slot
Charge lamp
Power plug
IMPORTANT SAFETY INSTRUCTIONS-SAVE THESE INSTRUCTIONS.
DANGER-TO REDUCE THE RISK OF FIRE OR ELECTRIC SHOCK,
CAREFULLY FOLLOW THESE INSTRUCTIONS.
For connection to a supply not in the U.S.A., use an attachment plug adapter
of the proper configuration for the power outlet, if needed.
Power cord
Power cord socket
Battery pack slot
Charge lamp

23
1
Getting Started
This chapter explains preparatory steps before you start
shooting and basic camera operations.
Attaching the Strap
Pass the end of the strap through
the camera’s strap mount eyelet
from the bottom. Then pass it
through the strap’s buckle as shown
in the illustration. Pull the strap to
take up any slack and make sure
the strap will not loosen from the
buckle.
The eyepiece cover is also
attached to the strap.
Eyepiece cover

24
1
Remove the protective cover.
Detach the protective cover provided
with the battery.
2
Attach the battery.
As shown in the illustration, attach the
battery securely to the charger.
To detach the battery, follow the
above procedure in reverse.
3
Recharge the battery.
For LC-E6
As shown by the arrow, flip out the
battery charger’s prongs and insert
the prongs into a power outlet.
For LC-E6E
Connect the power cord to the
charger and insert the plug into a
power outlet.
X Recharging starts automatically and
the charge lamp blinks in orange.
It takes approx. 2.5 hours to fully recharge a completely exhausted battery at room
temperature (23
°
C / 73
°
F). The time required to recharge the battery will vary greatly
depending on the ambient temperature and the battery’s remaining capacity.
For safety reasons, recharging in low temperatures (5°C - 10°C /
41°F - 50°F) will take longer (up to approx. 4 hours).
Charging the Battery
LC-E6
LC-E6E
Charge Level
Charge Lamp
Color Indicator
0 - 49%
Orange
Blinks once per second
50 - 74% Blinks twice per second
75% or higher Blinks three times per second
Fully charged Green Lights up

25
Charging the Battery
Upon purchase, the battery is not fully charged.
Recharge the battery before using.
Recharge the battery on the day before or on the day it is to be used.
Even during storage, a charged battery will gradually drain and lose its capacity.
After recharging the battery, detach it and disconnect the
charger from the power outlet.
You can attach the cover in a different
orientation to indicate whether the battery
has been recharged or not.
If the battery has been recharged, attach the
cover so that the battery-shaped hole < > is
aligned over the blue sticker on the battery. If the battery is
exhausted, attach the cover in the opposite orientation.
When not using the camera, remove the battery.
If the battery is left in the camera for a prolonged period, a small amount
of power current is released, resulting in excess discharge and shorter
battery life. Store the battery with the protective cover attached. Storing
the battery when it is fully charged may lower the battery’s performance.
The battery charger can also be used in foreign countries.
The battery charger is compatible with a 100 V AC to 240 V AC 50/60 Hz
power source. If necessary, attach a commercially-available plug adapter for
the respective country or region. Do not attach any portable voltage
transformer to the battery charger. Doing so can damage the battery charger.
If the battery becomes exhausted quickly even after being fully
charged, the battery has reached the end of its service life.
Check the battery’s recharge performance and purchase a new
battery.
Tips for Using the Battery and Charger
After disconnecting the charger’s power plug, do not touch the prongs for
approx. 10 sec.
If the battery’s remaining capacity is 94% or higher, the battery will not be
recharged.
The charger cannot charge any battery other than Battery Pack LP-E6/LP-E6N
.

26
Load a fully charged Battery Pack LP-E6 (or LP-E6N) into the camera.
1
Open the cover.
Slide the lever as shown by the
arrows and open the cover.
2
Insert the battery.
Insert the end with the battery
contacts.
Insert the battery until it locks in
place.
3
Close the cover.
Press the cover until it snaps shut.
Open the cover and remove the
battery.
Press the battery lock lever as shown
by the arrow and remove the battery.
To prevent short circuiting of the
battery contacts, be sure to attach the
provided protective cover (p.24) to
the battery.
Installing and Removing the Battery
Installing the Battery
Removing the Battery
Only Battery Pack LP-E6/LP-E6N can be used.

27
The camera can use an SD, SDHC, or SDXC memory card. UHS-I
Speed Class SDHC and SDXC memory cards can also be used. The
captured images are recorded onto the card.
Make sure the card’s write-protect switch is set upward to
enable writing/erasing.
1
Open the cover.
Slide the cover as shown by the
arrows to open it.
2
Insert the card.
As shown by the illustration, face
the card’s label side toward you
and insert it until it clicks in place.
3
Close the cover.
Close the cover and slide it in the
direction shown by the arrows until it
snaps shut.
When you set the power switch to
<1>, the number of possible shots
(p.31) will be displayed on the LCD
monitor.
Installing and Removing the Card
Installing the Card
Write-protect switch
Possible shots

Installing and Removing the Card
28
1
Open the cover.
Set the power switch to <2>.
Make sure the access lamp is off,
then open the cover.
If [Recording...] is displayed, close
the cover.
2
Remove the card.
Gently push in the card, then let go to
eject it.
Pull the card straight out, then close
the cover.
Removing the Card
The number of possible shots depends on the remaining capacity of the
card, image-recording quality, ISO speed, etc.
Setting [z1: Release shutter without card] to [Disable] will prevent
you from forgetting to insert a card.
Access lamp

29
Installing and Removing the Card
When the access lamp is lit or blinking, it indicates that images are
being written to or read by the card, being erased, or data is being
transferred. Do not open the card slot cover during this time. Also,
never do any of the following while the access lamp is lit or
blinking. Otherwise, it can damage the image data, card, or camera.
• Removing the card.
• Removing the battery.
• Shaking or banging the camera around.
If the card already contains recorded images, the image number may not
start from 0001.
If a card-related error message is displayed on the LCD monitor, remove
and reinsert the card. If the error persists, use a different card.
If you can transfer all the images on the card to a computer, transfer all
the images and then format the card with the camera (p.49). The card
may then return to normal.
Do not touch the card’s contacts with your fingers or metal objects.

30
If you turn on the power switch and the Date/Time/Zone setting screen
appears, see page 32 to set the Date/Time/Zone.
<1> : The camera turns on.
<2> : The camera is turned off and
does not operate. Set to this
position when not using the
camera.
Whenever you set the power switch
to <1> or <2>, sensor
cleaning will be executed
automatically. (A small sound may be
heard.) During the sensor cleaning,
the LCD monitor will display <f>.
You can still shoot during sensor
cleaning by pressing the shutter
button halfway (p.40) to stop the
sensor cleaning and take a picture.
If you repeatedly turn the power switch <1>/<2> at a short
interval, the <f> icon may not be displayed. This is normal and
not a problem.
To save battery power, the camera turns off automatically after 1
minute of non-operation. To turn on the camera again, just press the
shutter button halfway (p.40).
You can set the auto power off time with [52: Auto power off]
(p.51).
Turning on the Power
About the Automatic Self-Cleaning Sensor
3 About Auto Power Off
If you set the power switch to <2> while an image is being recorded to
the card, [Recording...] will be displayed and the power will turn off after the
card finishes recording the image.

31
Turning on the Power
When the power switch is set to <1>, the battery level will be
indicated in one of six levels. A blinking battery icon (b) indicates
that the battery will be exhausted soon.
Number of Possible Shots [Approx. number of shots]
The figures above are based on a fully-charged Battery Pack LP-E6, no Live
View shooting, and CIPA (Camera & Imaging Products Association) testing
standards.
Possible shots with Battery Grip BG-E13
• With LP-E6 x 2: approx. twice the shots without the battery grip.
• With size-AA/LR6 alkaline batteries at room temperature (23°C / 73°F):
approx. 480 shots.
z Checking the Battery Level
Icon
Level (%) 100 - 70 69 - 50 49 - 20 19 - 10 9 - 1 0
Temperature
Room Temperature
(23°C / 73°F)
Low Temperature
(0°C / 32°F)
Possible shots 1090 980
The number of possible shots will decrease with any of the following
operations:
• Pressing the shutter button halfway for a prolonged period.
• Activating the AF frequently without taking a picture.
• Using the lens Image Stabilizer.
• Using the LCD monitor often.
The number of possible shots may decrease depending on the actual
shooting conditions.
The lens operation is powered by the camera’s battery. Depending on
the lens used, the number of possible shots may be lower.
For the number of possible shots with Live View shooting, see page 105.
See [54: Battery info.] to check the battery’s condition in detail.
If size-AA/LR6 batteries are used in Battery Grip BG-E13, a four-level
indicator will be displayed. ([x/m] will not be displayed.)

32
When you turn on the power for the first time or if the date/time/zone
have been reset, the Date/Time/Zone setting screens will appear.
Follow the steps below to set the time zone first. If you set the camera
to the correct time zone for where you currently live, when you travel to
another time zone you can simply set the camera to the correct time
zone for your destination to update the camera’s date/time
automatically.
Note that the date/time appended to recorded images will be based
on this date/time setting. Be sure to set the correct date/time.
1
Display the menu screen.
Press the <M> button to display
the menu screen.
2
Under the [52] tab, select [Date/
Time/Zone].
Press the <U> key to select the
[52] tab.
Press the <V> key to select [Date/
Time/Zone], then press <0>.
3
Set the time zone.
[London] is set by default.
Press the <U> key to select the
time zone box.
Press <0> so <r> is displayed.
Press the <V> key to select the time
zone, then press <0>. (Returns to
<s>.)
3
Setting the Date, Time, and Zone
The menu setting procedure is explained on pages 47-48.
The time displayed on the upper right is the time difference compared
with Coordinated Universal Time (UTC). If you do not see your time
zone, set the time zone while referring to the difference with UTC.

33
3 Setting the Date, Time, and Zone
4
Set the date and time.
Press the <U> key to select the
number.
Press <0> so <r> is displayed.
Press the <V> key to set the
number, then press <0>. (Returns
to <s>.)
5
Set the Daylight Saving Time.
Set it if necessary.
Press the <U> key to select [Y].
Press <0> so <r> is displayed.
Press the <V> key to select [Z],
then press <0>.
When the daylight saving time is set
to [Z], the time set in step 4 will
advance by 1 hour. If [Y] is set, the
daylight saving time will be canceled
and the time will go back by 1 hour.
6
Exit the setting.
Press the <U> key to select [OK],
then press <0>.
X The Date/Time/Zone and daylight
saving time will be set and the menu
will reappear.
The date/time that was set will start from when you press <0> in step 6.
After changing the time zone, check that the correct date/time has been
set.
If you store the camera without the battery or if the camera’s battery
becomes exhausted, the date/time/zone may be reset. If this happens, set
the time zone and date/time again.

34
1
Display the menu screen.
Press the <M> button to display
the menu screen.
2
Under the [52] tab, select
[LanguageK].
Press the <U> key to select the
[52] tab.
Press the <V> key to select
[Language
K], then press <0>.
3
Set the desired language.
Press the <V> key to select the
language, then press <0>.
X The interface language will change.
3 Selecting the Interface Language

35
The camera is compatible with all Canon EF lenses. The camera
cannot be used with EF-S and EF-M lenses.
1
Remove the caps.
Remove the rear lens cap and the
body cap by turning them as shown
by the arrows.
2
Attach the lens.
Align the red dots on the lens and
camera and turn the lens as shown by
the arrow until it clicks in place.
3
Set the lens focus mode switch to
<AF>.
<AF> stands for Autofocus.
If it is set to <MF> (manual focus),
autofocus will not operate.
4
Remove the front lens cap.
Attaching and Detaching a Lens
Do not look at the sun directly through any lens. Doing so may cause
loss of vision.
If the front part (focusing ring) of the lens rotates during autofocusing, do
not touch the rotating part.
Minimizing Dust
When changing lenses, do it quickly in a place with minimal dust.
When storing the camera without a lens attached, be sure to attach the
body cap to the camera.
Remove dust on the body cap before attaching it.

Attaching and Detaching a Lens
36
To zoom, turn the zoom ring on the lens
with your fingers.
If you want to zoom, do it before
focusing. Turning the zoom ring after
achieving focus may throw off the
focus slightly.
While pressing the lens release
button, turn the lens as shown by
the arrows.
Turn the lens until it stops, then
detach it.
Attach the rear lens cap to the
detached lens.
To owners of the EF24-105mm f/3.5-5.6 IS STM lens:
You can prevent the lens from extending
out while you are carrying it around. Set
the zoom ring to the 24mm wide-angle
end, then slide the zoom ring lock lever
to <LOCK>. The zoom ring can be
locked only at the wide-angle end.
About Zooming
Detaching the Lens

37
Attaching and Detaching a Lens
A lens hood can block unwanted light and protect the front of the lens
from rain, snow, dust, etc. Before storing the lens in a bag, etc., you can
attach the hood in reverse.
1
Align the red dots on the hood
and lens edges, and turn the
hood as shown by the arrow.
2
Turn the hood as shown in the
illustration.
Turn the hood clockwise until it
attaches securely.
Attach the hood.
Turn the hood as shown by the arrow
until it attaches securely.
Attaching a Lens Hood
If the Lens Hood and Lens Have a Mount Index
If Neither the Lens Hood Nor the Lens Have a Mount Index
If the lens has a mount index and you do not attach the hood properly, it
may obstruct the image’s periphery, making it look dark.
When attaching or detaching the hood, grasp the base of the hood when
turning it. Grasping the hood’s edges when turning it may deform the
hood, resulting in failure to turn.

38
When you use the IS lens’ built-in Image Stabilizer, camera shake is
corrected to obtain a sharper shot. The procedure explained here is
based on the EF24-105mm f/4L IS USM lens as an example.
* IS stands for Image Stabilizer.
1
Set the Image Stabilizer switch to
<1>.
Also set the camera’s power switch to
<1>.
2
Press the shutter button halfway.
X The Image Stabilizer will operate.
3
Take the picture.
When the picture looks steady in the
viewfinder, press the shutter button
completely to take the picture.
About the Lens Image Stabilizer
The Image Stabilizer cannot correct “subject blur”, when the subject
moves at the time of exposure.
For bulb exposures, set the IS switch to <2>. If <1> is set, Image
Stabilizer misoperation may occur.
The Image Stabilizer may not be effective for excessive shaking such as
on a rocking boat.
The Image Stabilizer may not be effective when you use the EF24-
105mm f/4L IS USM lens for panned shots.
The Image Stabilizer can operate with the lens focus mode switch set to
either <AF> or <MF>.
When using a tripod, you can still shoot with the IS switch set to <1>
with no problem. However, to save battery power, setting the IS switch to
<2> is recommended.
The Image Stabilizer is effective even when the camera is mounted on a
monopod.
With the EF24-105mm f/3.5-5.6 IS STM lens, the Image Stabilizer mode
may switch automatically to suit the shooting conditions.

39
Turn the dioptric adjustment
knob.
Turn the knob left or right so that the
AF points in the viewfinder look sharp.
If the knob is difficult to turn, remove
the eyecup.
To obtain sharp images, hold the camera still to minimize camera
shake.
1. Wrap your right hand around the camera grip firmly.
2. Hold the lens bottom with your left hand.
3. Rest your hand’s right index finger lightly on the shutter button.
4. Press your arms and elbows lightly against the front of your body.
5.
To maintain a stable stance, place one foot slightly ahead of the other.
6. Press the camera against your face and look through the viewfinder.
Basic Operation
Adjusting the Viewfinder Clarity
Holding the Camera
If the camera’s dioptric adjustment still cannot provide a sharp viewfinder
image, using E-series Dioptric Adjustment Lenses (10 types, sold
separately) is recommended.
Vertical shooting
Horizontal shooting
To shoot while looking at the LCD monitor, see page 103.

Basic Operation
40
The shutter button has two steps. You can press the shutter button
halfway. Then you can further press the shutter button completely.
Pressing halfway
This activates autofocusing and the
automatic exposure system that sets the
shutter speed and aperture.
The exposure setting (shutter speed and
aperture) is displayed in the viewfinder
and on the LCD panel (0).
Pressing completely
This releases the shutter and takes the
picture.
Preventing Camera Shake
Hand-held camera movement during the moment of exposure is called
camera shake. It can cause blurred pictures. To prevent camera shake,
note the following:
• Hold and steady the camera as shown on the preceding page.
• Press the shutter button halfway to autofocus, then slowly press the
shutter button completely.
Shutter Button
In Creative Zone modes, pressing the <p> button is the same as
pressing the shutter button halfway.
If you press the shutter button completely without pressing it halfway first
or if you press the shutter button halfway and then press it completely
immediately, the camera will take a moment before it takes the picture.
Even during menu display, image playback, or image recording, you can
instantly go back to shooting-ready by pressing the shutter button
halfway.

41
Basic Operation
Turn the dial while holding down
the lock release button at the
center of the dial.
(1)
After pressing a button, turn the
<6> dial.
When you press a button such as <f>
<R> <i>, the respective function
remains selected for the duration of the
timer (9). During this time, you can
turn the <6> dial to set the desired
setting.
When the function selection ends or if
you press the shutter button halfway, the
camera will be ready to shoot.
Use this dial to select or set the AF
operation, drive mode, ISO speed,
metering mode, AF point selection,
etc.
(2)
Turn the <6> dial only.
While looking at the viewfinder or LCD
panel, turn the <6> dial to set the
desired setting.
Use this dial to set the shutter speed,
aperture, etc.
Mode Dial
6 Main Dial
The operations in (1) are also possible while the <R> switch is set to
the right (Multi function lock, p.43).

Basic Operation
42
(1)
After pressing a button, turn the
<5> dial.
When you press a button such as <f>
<R> <i>, the respective function
remains selected for the duration of the
timer (9). During this time, you can
turn the <5> dial to set the desired
setting.
When the function selection ends or if
you press the shutter button halfway, the
camera will be ready to shoot.
Use this dial to select or set the AF
operation, drive mode, ISO speed,
metering mode, AF point selection,
etc.
(2)
Turn the <5> dial only.
While looking at the viewfinder or LCD
panel, turn the <
5> dial to set the
desired setting.
Use this dial to set the exposure
compensation amount, the aperture
setting for manual exposures, etc.
5 Quick Control Dial
The operations in (1) are also possible while the <R> switch is set to
the right (Multi function lock, p.43).

43
Basic Operation
The Multi-controller <9> has eight keys which tilt in the directions
shown by the arrows.
Use the eight keys to select the AF
point, correct the white balance,
move the AF point or magnifying
frame during Live View shooting,
scroll around magnified images
during playback, etc.
For menus and the Quick Control, the
Multi-controller works only in the
vertical and horizontal directions
<V> <U>. It does not work in
diagonal directions.
With [8C.Fn III -3: Multi function lock] set and the <R> switch
set to the right, it prevents the Main Dial, Quick Control Dial, and Multi-
controller from moving and changing a setting inadvertently.
<R> switch set to the left:
Lock released
<R> switch set to the right:
Lock engaged
9 Multi-controller
R Multi function Lock
If the <R> switch is set to the right and you try to use one of the locked
camera controls, <L> will be displayed in the viewfinder and on the LCD
panel. On the shooting function settings display (p.44), [LOCK] will be
displayed.

Basic Operation
44
Turn on (9)/off the LCD panel
illumination by pressing the <U> button.
During a bulb exposure, pressing the
shutter button completely will turn off the
LCD panel illumination.
After you press the <B> button a number of times, the shooting
function settings will be displayed.
With the shooting settings displayed, you can turn the Mode Dial to see
the settings for each shooting mode.
Pressing the <Q> button enables Quick Control of the shooting
function settings (p.45).
Press the <B> button again to turn off the display.
U LCD Panel Illumination
Displaying Shooting Function Settings

45
You can directly select and set the shooting functions displayed on the
LCD monitor. This is called the Quick Control screen.
1
Press the <Q> button.
X The Quick Control screen will appear
(7).
2
Set the desired function.
Press the <V> <U> key to select
a function.
X The setting of the selected function is
displayed.
Turn the <6> or <5> dial to
change the setting.
3
Take the picture.
Press the shutter button completely to
take the picture.
X The captured image will be displayed.
Q Quick Control for Shooting Functions
Basic Zone modes Creative Zone modes
For the functions settable in Basic Zone modes and the setting procedure,
see page 75.

Q Quick Control for Shooting Functions
46
Select the desired function and press
<0>. The function’s setting screen
will appear.
Turn the <
6
> or <
5
> dial to
change the setting. You can also press
the <
U
> key to change some of the
settings. Also, some functions can be
set by pressing the <
B
> button.
Press <0> to finalize the setting and
return to the Quick Control screen.
When you select < > (Custom
Controls) or < > (AF point, p.79) and
press the <
M
> button, the shooting
function settings display will reappear.
Sample Quick Control Screen
Function Setting Screen
Shutter speed (p.97)
AF operation (p.78)
White balance correction
Shooting mode*
1
(p.20)
Highlight tone priority*
1
(p.92)
Metering mode
Picture Style (p.87)
Exposure
compensation/AEB
setting (p.100)
Flash exposure compensation
ISO speed (p.86)
Aperture (p.98)
Wi-Fi function*
2
Drive mode (p.81)
Custom Controls
White balance (p.88)
AE lock*
1
(p.101)
AF point (p.79)
Auto Lighting Optimizer (p.89)
Image-recording
quality (p.84)
White balance bracketing
*1: These functions cannot be set with the Quick Control screen.
*2: Refer to the Wi-Fi Function Instruction Manual for Wi-Fi function settings.
<0>
Ð

47
You can set various settings with the menus such as the image-
recording quality, date/time, etc. While looking at the LCD monitor, use
the <M> button, <V> <U> keys, and <
0> button on the
camera back.
* Some menu tabs and menu items are not displayed in Basic Zone modes.
3 Menu Operations
Menus in Basic Zone Modes
Menus in Creative Zone Modes
<V> <U>
LCD monitor
<0> button
<M> button
Tab
Menu items
Menu settings
z Shooting
5
Set-up
9 My Menu
3 Playback
8 Custom
Functions
A Live View shooting

3 Menu Operations
48
1
Display the menu screen.
Press the <M> button to display
the menu screen.
2
Select a tab.
Press the <U> key to select a
menu tab.
For example, the [z4] tab refers to
the screen displayed when the forth
tab from the left [ ] is selected.
3
Select the desired item.
Press the <V> key to select the
item, then press <0>.
4
Select the setting.
Press the <V> or <U> key to
select the desired setting. (Some
settings require you to press either
the <V> or <U> key to select
them.)
The current setting is indicated in blue.
5
Set the desired setting.
Press <0> to set it.
6
Exit the setting.
Press the <M> button to return to
the shooting function settings display.
Menu Setting Procedure
In step 2, you can also turn the <6> dial to select a menu tab. In step
4, you can also turn the <5> dial to select certain settings.
The explanation of menu functions hereinafter assumes that you have
pressed the <M> button to display the menu screen.
To cancel, press the <M> button.

49
If the card is new or was previously formatted by another camera or
computer, format the card with the camera.
When the card is formatted, all images and data in the card will
be erased. Even protected images will be erased, so make
sure there is nothing you need to keep. If necessary, transfer
the images and data to a computer, etc., before formatting the
card.
1
Select [Format card].
Under the [51] tab, select [Format
card], then press <0>.
2
Format the card.
Select [OK], then press <0>.
X The card will be formatted.
X When the formatting is completed,
the menu will reappear.
For low-level formatting, press the
<L> button to append [Low level
format] with a checkmark <X>, then
select [OK].
Before You Start
3 Formatting the Card

Before You Start
50
The card is new.
The card was formatted by a different camera or a computer.
The card is full with images or data.
A card-related error is displayed.
Execute [Format card] in the following cases:
About Low-level Formatting
Perform low-level formatting if the card’s recording or reading speed seems
slow or if you want to totally erase data in the card.
Since low-level formatting will format all recordable sectors in the card, the
formatting will take slightly longer than normal formatting.
You can stop the low-level formatting by selecting [Cancel]. Even in this
case, normal formatting will be completed and you can use the card as
usual.
When the card is formatted or data is erased, only the file management
information is changed. The actual data is not completely erased. Be
aware of this when selling or discarding the card. When discarding the
card, execute low-level formatting or destroy the card physically to
prevent the personal data from being leaked.
Before using a new Eye-Fi card, the software in the card must be
installed in your computer. Then format the card with the camera.
The card capacity displayed on the card format screen may be smaller
than the capacity indicated on the card.
This device incorporates exFAT technology licensed from Microsoft.

51
Before You Start
To save battery power, the camera turns off automatically after a set
time of idle operation elapses. If you do not want the camera to turn off
automatically, set this to [Disable]. After the power turns off, you can
turn on the camera again by pressing the shutter button or other
buttons.
1
Select [Auto power off].
Under the [52] tab, select [Auto
power off], then press <0>.
2
Set the desired time.
Select the desired setting, then press
<0>.
You can set how long the image is displayed on the LCD monitor
immediately after capture. To keep the image displayed, set [Hold]. To
not have the image displayed, set [Off].
1
Select [Image review].
Under the [z1] tab, select [Image
review], then press <0>.
2
Set the desired time.
Select the desired setting, then press
<0>.
3 Setting the Power-off Time/Auto Power Off
3 Setting the Image Review Time
Even if [Disable] is set, the LCD monitor will turn off automatically after 30
min. to save power. (The camera’s power does not turn off.)
If [Hold] is set, the image will be displayed until the auto power off time
elapses.

Before You Start
52
The shooting settings display (p.44) can be set to remain on even when
you press the shutter button halfway.
Under the [52] tab, select [LCD off/on
btn], then press <0>. The available
settings are described below. Select one,
then press <0>.
[Remains on] : Display remains on even when you press the shutter
button halfway. To turn off display, press the
<B> button.
[Shutter btn.] : When you press the shutter button halfway, the
display will turn off. When you let go of the shutter
button, the display will turn on.
The camera’s shooting settings and menu settings can be reverted to
their defaults.
1
Select [Clear all camera settings].
Under the [54] tab, select [Clear all
camera settings], then press <0>.
2
Select [OK].
Select [OK], then press <0>.
3 Turning the LCD Monitor Off/On
3 Reverting the Camera to the Default SettingsN

53
1
Press the <B> button.
Each time you press the <B>
button, the screen display will
change.
Display the electronic level.
If the electronic level does not
appear, set [53: z button
display options] so that the
electronic level can be displayed.
2
Check the camera’s tilt.
The horizontal tilt is displayed in 1°
increments.
When the red line turns green, it
indicates that the tilt is corrected.
Q Displaying the Electronic Level
Displaying the Electronic Level on the LCD Monitor
Horizontal level

54
While you set some function, the feature’s description can be displayed.
The Feature guide displays a simple description of the respective
shooting mode, function or option. It appears when you change the
shooting mode or set a shooting function, Live View shooting, Movie
shooting, or Quick Control for playback. When you select a function or
option on the Quick Control screen, the Feature guide description
appears. When you proceed with the operation, the Feature guide will
disappear.
Shooting mode (Sample)
Quick Control (Sample)
Select [Feature guide].
Under the [53] tab, select [Feature
guide], then press <0>.
Select [Disable], then press <0>.
Feature Guide and Help
Feature Guide
3 Disabling the Feature Guide
Shooting settings Live View shooting Playback

55
Feature Guide and Help
When [zHelp] is displayed at the bottom of the menu screen,
pressing the <B> button displays the function’s description (Help). If
the Help fills more than one screen, a scroll bar will appear on the right
edge. You can turn the <5> dial to scroll down.
Example: [z4: Long exp. noise reduction]
Example: [8C.Fn I -1: Exposure level increments]
Example: [8C.Fn II -1: Tracking sensitivity]
Help
B
Î
Scroll bar
B
Î
B
Î


57
2
Basic Shooting
This chapter explains how to use the Basic Zone modes
on the Mode Dial for best results.
With Basic Zone modes, all you do is point and shoot while the
camera sets everything automatically (p.75). Also, to prevent
botched pictures due to mistaken operations, the main
shooting function settings cannot be changed.
B
a
s
i
c
Z
o
n
e

58
<A> is a fully automatic mode. The camera analyzes the scene
and sets the optimum settings automatically. It also adjusts focus
automatically by detecting whether the subject is still or moving (p.61).
1
Set the Mode Dial to <A>.
Turn the Mode Dial while holding
down the lock release button at the
center.
2
Aim any AF point over the
subject.
All the AF points will be used to focus,
and generally the closest object will
be focused.
Aiming the center AF point over the
subject will make focusing easier.
3
Focus the subject.
Press the shutter button halfway. The
lens elements will shift to focus.
X The AF point achieving focus flashes
briefly in red. At the same time, the
beeper will sound and the focus
confirmation light <o> in the
viewfinder will light up.
A
Fully Automatic Shooting (Scene Intelligent Auto)
AF point
Focus confirmation light

59
A Fully Automatic Shooting (Scene Intelligent Auto)
4
Take the picture.
Press the shutter button completely to
take the picture.
X The captured image will be displayed
for 2 sec. on the LCD monitor.
The focus confirmation light <o> blinks and focus is not
achieved.
Aim the AF point over an area having good contrast, then press the
shutter button halfway (p.40). If you are too close to the subject,
move away and try again.
Multiple AF points flash simultaneously.
This indicates that focus is achieved at all those AF points. When the
AF point covering the desired subject flashes, take the picture.
The beeper continues to beep softly. (The focus confirmation
light <o> does not light up.)
It indicates that the camera is focusing continuously on a moving
subject. (The focus confirmation light <o> does not light up.) You
can take sharp pictures of a moving subject.
Note that focus lock (p.61) will not work in this case.
Pressing the shutter button halfway does not focus the subject.
If the focus mode switch on the lens is set to <MF> (manual focus),
set it to <AF> (autofocus).
FAQ
The <A> mode makes the colors look more impressive in nature, outdoor,
and sunset scenes. If the desired color tone is not obtained, use a Creative
Zone mode and select a Picture Style other than <D> and shoot (p.87).

A Fully Automatic Shooting (Scene Intelligent Auto)
60
The shutter speed display is blinking.
Since it is too dark, taking the picture may result in a blurred subject
due to camera shake. Using a tripod or a Canon EX-series Speedlite
(sold separately) is recommended.
When the external flash was used, the bottom part of the
picture came out unnaturally dark.
If a hood is attached to the lens, it can obstruct the flash coverage. If
the subject is close, detach the hood before taking the picture with
flash.
In Basic Zone modes except <G>, using a Canon EX-series Speedlite
(sold separately) in low-light or backlit conditions can capture the subject
brightly while avoiding camera shake or reduce backlit shadows.

61
Depending on the scene, position the subject toward the left or right to
create a balanced background and good perspective.
In the <A> mode, while you press the shutter button halfway to focus
a still subject, the focus will be locked. You can then recompose the
shot and press the shutter button completely to take the picture. This is
called “focus lock”. Focus lock is also possible in other Basic Zone
modes (except <5> Sports).
In the <A> mode, if the subject moves (distance to camera changes)
while or after you focus, AI Servo AF will take effect to focus the subject
continuously. (The beeper will continue beeping softly.) As long as you
keep aiming the AF point on the subject while pressing the shutter
button halfway, the focusing will be continuous. When you want to take
the picture, press the shutter button completely.
A
Full Auto Techniques (Scene Intelligent Auto)
Recomposing the Shot
Shooting a Moving Subject

A Full Auto Techniques (Scene Intelligent Auto)
62
You can shoot while viewing the image on the LCD monitor. This is
called “Live View shooting”. For details, see page 103.
1
Set the Live View shooting/Movie
shooting switch to <A>.
2
Display the Live View image on
the LCD monitor.
Press the <0> button.
X The Live View image will appear on
the LCD monitor.
3
Focus the subject.
Aim the center AF point < > on the
subject.
Press the shutter button halfway to
focus.
X When focus is achieved, the AF point
will turn green and the beeper will
sound.
4
Take the picture.
Press the shutter button completely.
X The picture will be taken and the
captured image is displayed on the
LCD monitor.
X After the image review ends, the
camera will return to Live View
shooting automatically.
Press the <0> button to end the
Live View shooting.
A Live View Shooting

63
In the <C> mode, you can easily change the depth of field and drive
mode. You can also choose the ambience you want to convey in your
images. The default settings are the same as the <A> mode.
* CA stands for Creative Auto.
1
Set the Mode Dial to <C>.
2
Press the <Q> button. (7)
X The Quick Control screen will appear.
3
Set the desired function.
Press the <V> key to select a
function.
X The selected function and Feature
guide (p.54) will appear.
For setting procedure and details on
each function, see pages 64-65.
4
Take the picture.
Press the shutter button completely to
take the picture.
C Creative Auto Shooting

C Creative Auto Shooting
64
Pressing the <Q> button enables you to set the following:
(1) Ambience-based shots
You can choose the ambience you want to convey in your images.
Turn the <6> or <5> dial to select the desired ambience. You
can also select it from a list by pressing <0>.
(2) Blurring/sharpening the background
If you move the index mark toward the left, the background will look
more blurred. If you move it toward the right, the background will
look more in focus. If you want to blur the background, see “Shooting
Portraits” on page 67. Set it by pressing the <U> key. You can
also use the <6> or <5> dial to move the mark.
Depending on the lens and shooting conditions, the background
may not look so blurred. If flash is used, this setting will not be
applied.
Shutter speed
(1)
(2)
Battery check
Possible shots
ISO speed
Image-recording quality
Aperture
(3)

65
C Creative Auto Shooting
(3) Drive mode: Press the <U> key to select the desired drive mode.
You can also select the drive mode by turning the <6> or <5>
dial, or pressing <0> to select it from a list.
<u> Single shooting:
Shoot one image at a time.
<i> Continuous shooting:
While you hold down the shutter button completely, shots will be
taken continuously. You can shoot up to approx. 4.5 shots per
second.
<B> Silent single shooting:
Single shooting with less shooting sound than <u>.
<M> Silent continuous shooting:
Continuous shooting (max. approx. 3.0 shots per second) with
less shooting sound than <i>.
<> Self-timer: 10 sec./Remote control:
<> Self-timer: 2 sec./Remote control:
The picture is taken 10 seconds or 2 seconds after you press
the shutter button. A remote controller can also be used.

66
When you set a shooting mode suiting the scene, the camera sets the
optimum settings automatically.
1
Set the Mode Dial to <8>.
2
Press the <Q> button. (7)
X The Quick Control screen will appear.
3
Select the shooting mode.
Press the <V> key to select the
shooting mode section.
Turn the <6> or <5> dial to select
a shooting mode.
You can also select a shooting mode
from a list by selecting the shooting
mode section and pressing <0>.
Available Shooting Modes in the <8> Mode
8: Special Scene Mode
Shooting Mode
Page
Shooting Mode
Page
2 Portrait p.67 6 Night Portrait p.71
3 Landscape p.68 F Handheld Night Scene p.72
4 Close-up p.69 G HDR Backlight Control p.73
5 Sports p.70

67
The <2> (Portrait) mode blurs the background to make the human
subject stand out. It also makes skin tones and the hair look softer.
The further the distance between the subject and background,
the better.
The further the distance between the subject and background, the
more blurred the background will look. The subject will also stand
out better in front of a plain, dark background.
Use a telephoto lens.
If you have a zoom lens, use the telephoto end to fill the frame with
the subject from the waist up. Move in closer if necessary.
Focus the face.
Check that the AF point covering the face flashes in red. For close-
ups of the face, focus the eyes.
2 Shooting Portraits
Shooting Tips
The default setting is <i> (Continuous shooting). If you hold down the
shutter button, you can shoot continuously to obtain different poses and
facial expressions (max. approx. 4.5 shots/sec.).

68
Use the <3> (Landscape) mode for wide scenery or to have
everything in focus from near to far. For vivid blues and greens, and
very sharp and crisp images.
With a zoom lens, use the wide-angle end.
When using the wide-angle end of a zoom lens, objects near and far
will be in focus better than at the telephoto end. It also adds breadth
to landscapes.
Shooting night scenes.
When shooting night scenes, use a tripod to prevent camera shake.
3 Shooting Landscapes
Shooting Tips

69
When you want to photograph flowers or small things up close, use the
<4> (Close-up) mode. To make small things appear much larger, use a
macro lens (sold separately).
Use a simple background.
A simple background makes the flower, etc., stand out better.
Move as close as possible to the subject.
Check the lens for its minimum focusing distance. Some lenses
have indications such as <40.25m/0.8ft>. The lens minimum
focusing distance is measured from the <V> (focal plane) mark on
the top left of the camera to the subject. If you are too close to the
subject, the focus confirmation light <o> will blink.
With a zoom lens, use the telephoto end.
If you have a zoom lens, using the telephoto end will make the
subject look larger.
4 Shooting Close-ups
Shooting Tips

70
To photograph a moving subject, whether it is a child running or a
moving vehicle, use the <5> (Sports) mode.
Use a telephoto lens.
Using a telephoto lens is recommended so you can shoot from afar.
Use the center AF point to focus.
Aim the center AF point over the subject, then press the shutter
button halfway to autofocus. During autofocusing, the beeper will
continue beeping softly. If focus cannot be achieved, the focus
confirmation light <o> will blink.
The default setting is <i> (Continuous shooting). When you want
to take the picture, press the shutter button completely. If you hold
down the shutter button, continuous shooting (max. approx. 4.5
shots per sec.) and autofocusing will take effect to capture the
movement of the subject.
5 Shooting Moving Subjects
Shooting Tips
Under low light when camera shake is prone to occur, the viewfinder’s
shutter speed display on the bottom left will blink. Hold the camera steady
and shoot.

71
To shoot people at night and obtain a natural-looking night scene in the
background, use the <6> (Night Portrait) mode. Flash is required.
Using a tripod is also recommended.
Use a wide-angle lens, Speedlite, and a tripod.
When using a zoom lens, use the wide-angle end to obtain a wide
night view. Also, use a tripod to prevent camera shake.
Also shoot in another shooting modes.
Since camera shake is prone to occur with night shots, shooting also
with <A> and <F> is recommended.
6
Shooting Night Portraits (With a Tripod)
Shooting Tips
Tell the subject to keep still even after the flash fires.
If you use the self-timer together with flash, the self-timer lamp will light
up briefly after the picture is taken.
During Live View shooting, it may be difficult to focus dots of light such as
in a night scene. In such a case, you should set the AF method to [Quick
mode] and shoot. If it is still difficult to focus, set the lens’ focus mode
switch to [MF] and focus manually.

72
Normally, a tripod is necessary to steady your camera when shooting a
night scene. However, with the <F> (Handheld Night Scene) mode,
you can shoot night scenes while handholding the camera. In this
mode, four shots are taken continuously for each picture, and a
resulting bright image with reduced camera shake is recorded.
Hold the camera firmly.
While shooting, hold the camera firmly and steadily. If any of the four
shots are greatly misaligned due to camera shake, etc., they may
not align properly in the final image.
When including a human subject:
With flash, you can shoot both the human subject and night scene
background while handholding the camera. To take a nice portrait,
the first shot will use flash. Tell the person not to move until all four
continuous shots are taken.
F Shooting Night Scenes (Handheld)
Shooting Tips
See the cautions on page 74.

73
When shooting a scene having both bright and dark areas, use the
<G> (HDR Backlight Control) mode. When you take a picture, three
continuous shots are taken at different exposures, and the resulting
image with the least loss of shadow detail due to backlighting and
widest tonal range is recorded.
Hold the camera firmly.
While shooting, hold the camera firmly and steadily. If any of the
three shots are greatly misaligned due to camera shake, etc., they
may not align properly in the final image.
G Shooting Backlit Scenes
Shooting Tips
Even if a Speedlite is attached to the camera, it will not fire.
See the cautions on page 74.
HDR stands for High Dynamic Range.

74
Cautions for <F> (Handheld Night Scene)
During Live View shooting, it may be difficult to focus dots of light such as
in a night scene. In such a case, you should set the AF method to [Quick
mode] and shoot. If it is still difficult to focus, set the lens’ focus mode
switch to [MF] and focus manually.
When shooting flash photography, if the subject is too close to the
camera, the picture may come out extremely bright (overexposure).
If you use flash when shooting dimly lit night scenes, or human subjects
in situations where the subject and background are both near enough to
be illuminated by the flash, the shots may not align correctly. This can
result in a blurry photo.
Regarding flash coverage:
• When using a Speedlite with automatic flash coverage setting, the zoom
position will be fixed to the wide end, regardless of the lens’ zoom position.
• When using a Speedlite with manual flash coverage switch, shoot with
the flash head retracted to the wide (normal) position.
Cautions for <G> (HDR Backlight Control)
Note that the image may not be rendered with a smooth gradation and
may look irregular or have significant noise.
HDR Backlight Control may not be effective for excessively backlit
scenes or extremely high-contrast scenes.
Cautions for both <F> (Handheld Night Scene) and <G> (HDR
Backlight Control)
Compared with other shooting modes, the shooting area will be smaller.
You cannot select RAW and RAW+JPEG. In other shooting modes, if
RAW is set, the image quality will be 73. Also, if RAW+JPEG is set, the
image will be recorded in the set JPEG quality.
If you shoot a moving subject, the subject’s movement will leave
afterimages.
The image alignment may not function properly with repetitive patterns
(lattice, stripes, etc.), flat or single-tone images, or greatly misaligned
shots caused by camera shake.
Recording the image to the card will take longer than with normal
shooting. During the processing of the images, “buSY” will be displayed
in the viewfinder and on the LCD panel and you cannot take another
picture until the processing is completed.
If the shooting mode is set to <F> or <G>, direct printing is not
possible. Select another shooting mode and do direct printing.

75
In Basic Zone modes when the shooting
function settings screen is displayed, you
can press the <Q> button to display the
Quick Control screen. The table below
indicates the functions that can be set
with the Quick Control screen in each
Basic Zone mode.
1 Set the Mode Dial to a Basic Zone mode.
2Press the <Q> button. (7)
X The Quick Control screen will appear.
3Set the function.
Press the <V> key to select a function. (This step is not
necessary in the A mode.)
X The selected function and Feature guide (p.54) will appear.
Functions can also be selected with the <6> or <5> dial.
Settable Functions in Basic Zone Modes
o: Default setting k: User selectable : Not selectable
* If you change the shooting mode or set the power switch to <2>, it will revert
to the default settings (except the self-timer).
Q Quick Control
Function A C
8
2 3 4 5 6 F G
Drive mode
(p.81)
u: Single shooting
o o k o o k o o o
i: Continuous shooting
k k o k k o k k k
B: Silent single shooting
k k k k k k k k k
M: Silent continuous shooting
k k k k k k k k k
Self-timer (p.82)
Q
k k k k k k k k k
k
k k k k k k k k k
Ambience-based shots
k k k k k k k
Light/scene-based shots
k k k k
Blurring/sharpening the background (p.64)
k
Example: Portrait mode


77
3
Setting the AF and
Drive Modes
The viewfinder has 11 AF points.
By selecting the optimum AF point,
you can compose the picture as
desired while autofocusing.
You can also select the AF operation and drive mode
that best match the shooting conditions and subject.
The M icon at the upper right of the page title indicates that
the function is available only in Creative Zone modes (d/
s/f/a/F).
In Basic Zone modes, the AF operation and AF point are
set automatically.
<AF> stands for autofocus. <MF> stands for manual focus.

78
You can select the AF operation characteristics to suit the shooting
conditions or subject. In Basic Zone modes, the optimum AF operation
is set automatically for the respective shooting mode.
1
Set the lens focus mode switch to
<AF>.
2
Turn the Mode Dial to a Creative
Zone mode.
3
Press the <f> button. (9)
4
Select the AF operation.
While looking at the LCD panel, turn
the <6> or <5> dial.
X : One-Shot AF
9 : AI Focus AF
Z : AI Servo AF
f: Selecting the AF OperationN

79
You can select an AF point for focusing from among eleven AF points.
In Basic Zone modes, the AF point will be selected automatically and
you cannot select the AF point.
1
Press the <S> button. (9)
X The selected AF point will be
displayed in the viewfinder and on the
LCD panel.
When all the AF points light up,
automatic AF point selection will be
set.
2
Select an AF point.
You can either use <9> or turn the
<6> or <5> dial to select an AF
point.
You can use <9> to select an AF
point.
If all the AF points light up, automatic
AF point selection will be set.
Press <0> to toggle between the
center AF point and automatic
selection.
Turn the <6> dial to select an AF
point on the left or right or turn the
<5> dial to select an AF point above
or below.
If all the AF points light up, automatic
AF point selection will be set.
S Selecting AF PointsN
Selecting with the Multi-controller
Selecting with the Dials

80
1
Set the lens focus mode switch to
<MF>.
X <4 L> will be displayed on the
LCD panel.
2
Focus the subject.
Focus by turning the lens focusing
ring until the subject looks sharp in
the viewfinder.
MF: Manual Focusing
Focusing ring

81
Single and continuous drive modes are provided.
1
Press the <R> button. (9)
2
Select the drive mode.
While looking at the LCD panel, turn
the <6> or <5> dial.
u : Single shooting
When you press the shutter button completely, only one shot will
be taken.
i : Continuous shooting (Max. approx. 4.5 shots/sec.)
While you hold down the shutter button completely, shots will be
taken continuously.
B : Silent single shooting
Single shooting with less shooting sound than <u>.
M : Silent continuous shooting (Max. approx. 3.0 shots/sec.)
Continuous shooting with less shooting sound than <i>.
Q : 10-sec. self-timer/Remote control
k: 2-sec. self-timer/Remote control
For self-timer shooting, see page 82.
i Selecting the Drive Mode

82
Use the self-timer when you want to be in the picture.
1
Press the <R> button. (9)
2
Select the self-timer.
While looking at the LCD panel, turn
the <6> or <5> dial to select the
self-timer delay.
Q : 10-sec. self-timer
k : 2-sec. self-timer
3
Take the picture.
Look through the viewfinder, focus
the subject, then press the shutter
button completely.
X You can check the self-timer
operation with the self-timer lamp,
beeper, and countdown display (in
seconds) on the LCD panel.
X Two seconds before the picture is
taken, the self-timer lamp will light up
and the beeper will sound faster.
j Using the Self-timer

83
4
Image Settings
This chapter explains image-related function settings:
Image-recording quality, ISO speed, Picture Style, white
balance, Auto Lighting Optimizer, lens peripheral
illumination correction, chromatic aberration correction,
and other functions.
The M icon at the upper right of the page title indicates that
the function is available only in Creative Zone modes (d/
s/f/a/F).

84
You can select the pixel count and the image quality. There are eight JPEG
image-recording quality settings:
73, 83, 74, 84, 7a, 8a, b, c.
There are three RAW image quality settings: 1, 41, 61
.
1
Select [Image quality].
Under the [z1] tab, select [Image
quality], then press <0>.
2
Select the image-recording quality.
To select a RAW setting, turn the
<6> dial. To select a JPEG setting,
press the <U> key.
On the upper right, the “**M
(megapixels) **** x ****” numbers
indicate the recorded pixel count, and
[***] is the number of possible shots
(displayed up to 9999).
Press <0> to set it.
3 Setting the Image-Recording Quality

85
3 Setting the Image-Recording Quality
Guide to Image-Recording Quality Settings (Approx.)
*1: b is suitable for playing the images on a digital photo frame.
*2: c is suitable for emailing the image or using it on a Web site.
b and c will be in 7 (Fine) quality.
The file size, possible shots, and maximum burst during continuous shooting
are based on Canon’s testing standards (3:2 aspect ratio, ISO 100 and
Standard Picture Style) using an 8 GB card. These figures will vary
depending on the subject, card brand, aspect ratio, ISO speed, Picture
Style, Custom Functions, and other settings.
Figures in parentheses apply to an UHS-I class 8 GB card based on Canon’s
testing standards.
Image
Quality
Pixels
Recorded
Printing Size
File Size
(MB)
Possible
Shots
Maximum
Burst
JPEG
73
20M A2
6.0 1250 73 (1250)
83 3.1 2380 2380 (2380)
74
8.9M A3
3.2 2300 2300 (2300)
84 1.7 4240 4240 (4240)
7a
5.0M A4
2.1 3450 3450 (3450)
8a 1.1 6370 6370 (6370)
b
*1
2.5M 9x13 cm 1.2 6130 6130 (6130)
c
*2
0.3M - 0.3 23070 23070 (23070)
RAW
1 20M A2 23.5 300 14 (17)
41 11M A3 18.5 380 8 (10)
61 5.0M A4 13.0 550 12 (17)
RAW
+
JPEG
1
73
20M
20M
A2
A2
23.5+6.0 240 7(8)
41
73
11M
20M
A3
A2
18.5+6.0 290 8 (9)
61
73
5.0M
20M
A4
A2
13.0+6.0 380 10 (12)

86
Set the ISO speed (image sensor’s sensitivity to light) to suit the
ambient light level. In Basic Zone modes, the ISO speed is set
automatically.
1
Press the <i> button. (9)
2
Set the ISO speed.
While looking at the LCD panel or the
viewfinder, turn the <6> or <5>
dial.
ISO speed can be set within ISO 100
- 25600 in 1/3-stop increments.
“A” indicates ISO Auto. The ISO
speed will be set automatically. You
can also press the <B> button to
set it to “A (AUTO)”.
ISO Speed Guide
* High ISO speeds will result in grainier images.
i: Setting the ISO SpeedN
ISO Speed
Shooting Situation
(No flash)
Flash Range
L, ISO 100 - 400 Sunny outdoors
The higher the ISO speed,
the farther the flash range
will be.
ISO 400 - 1600
Overcast skies or
evening time
ISO 1600 - 25600, H1, H2 Dark indoors or night

87
By selecting a Picture Style, you can obtain image characteristics
matching your photographic expression or the subject.
In Basic Zone modes, <D> (Auto) is set automatically.
1
Select [Picture Style].
Under the [z4] tab, select [Picture
Style], then press <0>.
X The Picture Style selection screen will
appear.
2
Select a Picture Style.
Press the <V> key to select a
Picture Style, then press <0>.
X The Picture Style will be set and the
menu will reappear.
A Selecting a Picture StyleN

88
White balance (WB) is for making the white areas look white. Normally,
the <Q> (Auto) setting will obtain the correct white balance. If natural-
looking colors cannot be obtained with <Q>, you can select the white
balance to match the light source or set it manually by shooting a white
object.
In Basic Zone modes, <Q> is set automatically.
1
Select [White balance].
Under the [z3] tab, select [White
balance], then press <0>.
2
Select the white balance.
Select the desired setting, then press
<0>.
3 Setting the White BalanceN

89
If the image comes out dark or the contrast is low, the brightness and
contrast can be corrected automatically. This function is called Auto
Lighting Optimizer. The default setting is [Standard]. With JPEG
images, the correction is applied when the image is captured.
In Basic Zone modes, [Standard] is set automatically.
1
Select [Auto Lighting Optimizer].
Under the [z3] tab, select [Auto
Lighting Optimizer], then press
<0>.
2
Select the setting.
Select the desired setting, then press
<0>.
3
Take the picture.
The image will be recorded with the
brightness and contrast corrected if
necessary.
3
Auto Correction of Brightness and Contrast
N

90
This function reduces the noise generated in the image. Although noise
reduction is applied at all ISO speeds, it is particularly effective at high
ISO speeds. At low ISO speeds, the noise in the darker parts of the
image (shadow areas) is further reduced.
1
Select [High ISO speed NR].
Under the [z4] tab, select [High ISO
speed NR], then press <0>.
2
Set the level.
Select the desired noise reduction
level, then press <0>.
X The setting screen closes and the
menu will reappear.
[M: Multi Shot Noise Reduction]
Noise reduction with higher image quality than when [High] is
applied. For a single photo, four shots are taken in a burst and
merged automatically into a single JPEG image.
3
Take the picture.
The image will be recorded with noise
reduction applied.
3 Noise Reduction SettingsN
High ISO Speed Noise Reduction

91
3 Noise Reduction SettingsN
Noise reduction is possible with images exposed for 1 sec. or longer.
1
Select [Long exp. noise
reduction].
Under the [z4] tab, select [Long
exp. noise reduction], then press
<0>.
2
Set the desired setting.
Select the desired setting, then press
<0>.
X The setting screen closes and the
menu will reappear.
[Auto]
For 1 sec. or longer exposures, noise reduction is performed
automatically if noise typical of long exposures is detected. This
[Auto] setting is effective in most cases.
[Enable]
Noise reduction is performed for all exposures of 1 sec. or longer.
The [Enable] setting may be able to reduce noise that cannot be
detected with the [Auto] setting.
3
Take the picture.
The image will be recorded with noise
reduction applied.
Long Exposure Noise Reduction

92
You can minimize overexposed highlight areas.
1
Select [Highlight tone priority].
Under the [z4] tab, select
[Highlight tone priority], then press
<0>.
2
Select [Enable].
Select [Enable], then press <0>.
Highlight details are improved. The
dynamic range is expanded from the
standard 18% gray to bright
highlights. The gradation between the
grays and highlights becomes
smoother.
3
Take the picture.
The image will be recorded with
highlight tone priority applied.
3 Highlight Tone PriorityN

93
Peripheral light fall-off is a phenomenon that makes the image corners
look darker due to the lens characteristics. Color fringing along subject
outlines is called chromatic aberration. Both lens aberrations can be
corrected. The default settings are [Enable] for both corrections.
If [Cannot correct - no data] is displayed, see “About the Lens
Correction Data” on page 94.
1
Select [Lens aberration
correction].
Under the [z2] tab, select [Lens
aberration correction], then press
<0>.
2
Select the setting.
Check that [Correction data
available] is displayed for the
attached lens.
Select [Peripheral illumin.], then
press <0>.
Select [Enable], then press <0>.
3
Take the picture.
The image will be recorded with the
peripheral illumination corrected.
3
Lens Peripheral Illumination / Chromatic Aberration Correction
Peripheral Illumination Correction

3 Lens Peripheral Illumination / Chromatic Aberration Correction
94
1
Select the setting.
Check that [Correction data
available] is displayed for the
attached lens.
Select [Chromatic aberration], then
press <0>.
Select [Enable], then press <0>.
2
Take the picture.
The image will be recorded with the
chromatic aberration corrected.
The camera already contains lens peripheral illumination correction
data and chromatic aberration correction data for approx. 25 lenses. If
you select [Enable], the peripheral illumination correction and
chromatic aberration correction will be applied automatically for any
lens whose correction data is registered in the camera.
With EOS Utility (provided software), you can check which lenses have
their correction data registered in the camera. You can also register the
correction data for unregistered lenses. For details, refer to the EOS
Utility Instruction Manual (p.135).
Chromatic Aberration Correction
About the Lens Correction Data

95
5
Advanced Operations
In Creative Zone modes, you
can set the shutter speed and/or
aperture to set the exposure as
desired. By changing the
camera settings, you can obtain
various results.
The M icon at the upper right of the page title indicates that
the function is available only in Creative Zone modes (d/
s/f/a/F).
After you press the shutter button halfway and let go, the
exposure values will remain displayed in the viewfinder and
on the LCD panel for 4 sec. (0).
Set the <R> switch to the left.

96
The camera automatically sets the shutter speed and aperture to suit
the subject’s brightness. This is called Program AE.
*<d> stands for Program.
* AE stands for Auto Exposure.
1
Set the Mode Dial to <d>.
2
Focus the subject.
Look through the viewfinder and aim
the selected AF point over the
subject. Then press the shutter button
halfway.
X The AF point which achieves focus
flashes in red, and the focus
confirmation light <o> in the
viewfinder’s bottom right lights up
(when in One-Shot AF mode).
X The shutter speed and aperture will
be set automatically and displayed in
the viewfinder and on the LCD panel.
3
Check the display.
A standard exposure will be obtained
as long as the shutter speed and
aperture display do not blink.
4
Take the picture.
Compose the shot and press the
shutter button completely.
d:
Program AE

97
In this mode, you set the shutter speed and the camera automatically
sets the aperture to obtain the standard exposure suiting the brightness
of the subject. This is called shutter-priority AE. A faster shutter speed
can freeze the action or a moving subject. A slower shutter speed can
create a blurred effect, giving the impression of motion.
* <s> stands for Time value.
1
Set the Mode Dial to <s>.
2
Set the desired shutter speed.
While looking at the LCD panel, turn
the <6> dial.
3
Focus the subject.
Press the shutter button halfway.
X The aperture is set automatically.
4
Check the viewfinder display and
shoot.
As long as the aperture is not
blinking, a standard exposure will be
obtained.
s:
Shutter-Priority AE
Blurred motion
(Slow shutter speed: 1/30 sec.)
Frozen action
(Fast shutter speed: 1/2000 sec.)

98
In this mode, you set the desired aperture and the camera sets the shutter
speed automatically to obtain the standard exposure suiting the subject
brightness. This is called aperture-priority AE. A higher f/number (smaller
aperture hole) will make more of the foreground and background fall within
acceptable focus. On the other hand, a lower f/number (larger aperture hole)
will make less of the foreground and background fall within acceptable focus.
* <f> stands for Aperture value (aperture opening).
1
Set the Mode Dial to <f>.
2
Set the desired aperture.
While looking at the LCD panel, turn
the <6> dial.
3
Focus the subject.
Press the shutter button halfway.
X
The shutter speed is set automatically.
4
Check the viewfinder display and
shoot.
As long as the shutter speed is not
blinking, a standard exposure will be
obtained.
f:
Aperture-Priority AE
Sharp foreground and background
(With a high aperture f/number: f/32)
Blurred background
(With a low aperture f/number: f/5.6)

99
In
this mode, you set both the shutter speed and aperture as desired. To
determine the exposure, refer to the exposure level indicator in the
viewfinder or use a commercially-available exposure meter. This
method is called manual exposure.
* <a> stands for Manual.
1
Set the Mode Dial to <a>.
2
Set the ISO speed
(p.86)
.
3
Set the shutter speed and
aperture.
To set the shutter speed, turn the
<6> dial.
To set the aperture, turn the <
5
> dial.
If it cannot be set, set the <R>
switch to the left, then turn the <6>
or <5> dial.
4
Focus the subject.
Press the shutter button halfway.
X
The exposure setting will be displayed
in the viewfinder and on the LCD panel.
The exposure level mark <
h
> indicates
how far the current exposure level is
from the standard exposure level.
5
Set the exposure and take the
picture.
Check the exposure level indicator
and set the desired shutter speed and
aperture.
If the exposure level exceeds ±3
stops, the end of the exposure level
indicator will display <I> or <J>.
a:
Manual Exposure
Exposure level mark
Standard exposure index

100
Exposure compensation can brighten (increased exposure) or darken
(decreased exposure) the standard exposure set by the camera.
Exposure compensation can be set in the d/s/f shooting modes.
Although you can set the exposure compensation up to ±5 stops in 1/3-
stop increments, the exposure compensation indicator in the viewfinder
and on the LCD panel can only display the setting up to ±3 stops. If you
want to set the exposure compensation setting beyond ±3 stops, you
should use the Quick Control (p.45) or follow the instructions for [z3:
Expo.comp./AEB].
1
Check the exposure level
indicator.
Press the shutter button halfway
(0) and check the exposure level
indicator.
2
Set the exposure compensation
amount.
While looking at the viewfinder or
LCD panel, turn the <5> dial.
If it cannot be set, set the <R>
switch to the left, then turn the <5>
dial.
3
Take the picture.
To cancel the exposure
compensation, set the exposure
compensation amount back to <E>.
Setting Exposure Compensation N
Increased exposure for a brighter image
Decreased exposure for a darker image

101
Use AE lock when the area of focus is to be different from the exposure
metering area or when you want to take multiple shots at the same
exposure setting. Press the <A> button to lock the exposure, then
recompose and take the shot. This is called AE lock. It is effective for
backlit subjects.
1
Focus the subject.
Press the shutter button halfway.
X The exposure setting will be
displayed.
2
Press the <A> button. (0)
X The <A> icon lights up in the
viewfinder to indicate that the
exposure setting is locked (AE lock).
Each time you press the <A> button,
the current autoexposure setting is
locked.
3
Recompose and take the picture.
If you want to maintain the AE lock
while taking more shots, hold down
the <A> button and press the shutter
button to take another shot.
A
AE Lock
N


103
6
Shooting with the LCD Monitor
(Live View Shooting)
You can shoot while viewing the
picture on the camera’s LCD
monitor. This is called “Live View
shooting”.
Live View shooting is enabled by
setting the Live View shooting/
Movie shooting switch to <A>.

104
1
Set the Live View shooting/Movie
shooting switch to <A>.
2
Display the Live View image.
Press the <0> button.
X The Live View image will appear on
the LCD monitor.
The Live View image will closely
reflect the brightness level of the
actual image you capture.
3
Focus the subject.
When you press the shutter button
halfway, the camera will focus with
the current AF method (p.106).
4
Take the picture.
Press the shutter button completely.
X The picture will be taken and the
captured image is displayed on the
LCD monitor.
X After the image review ends, the
camera will return to Live View
shooting automatically.
Press the <0> button to exit Live
View shooting.
A Shooting with the LCD Monitor

105
A Shooting with the LCD Monitor
Set [A1: Live View shoot.] to
[Enable].
Number of Possible Shots with Live View Shooting
[Approx. number of shots]
The figures above are based on a fully-charged Battery Pack LP-E6 and CIPA
(Camera & Imaging Products Association) testing standards.
With a fully-charged Battery Pack LP-E6, continuous Live View shooting is
possible for approx. 1 hr. 45 min. at room temperature (23°C / 73°F).
Enabling Live View Shooting
Temperature
Room Temperature
( 23°C / 73°F)
Low Temperature
(0°C / 32°F)
Possible shots 220 190

106
The AF methods available are [FlexiZoneAF (Single)], [u Live
mode] (face detection, p.107), and [Quick mode] (p.109).
If you want to achieve precise focus, set the lens focus mode switch to
<MF>, magnify the image, and focus manually (p.111).
Select the AF method.
Under the [A1] tab, select [AF
method].
While the Live View image is
displayed, you can also press the
<f> button to select the AF method
on the setting screen.
The image sensor is used to focus. Although AF is possible with the
Live View image displayed, the AF operation will take longer than
with the Quick mode. Also, achieving focus may be more difficult than
with the Quick mode.
1
Display the Live View image.
Press the <0> button.
X The Live View image will appear on
the LCD monitor.
X The AF point < > will appear.
2
Move the AF point.
You can use <9> to move the AF
point to where you want to focus. (It
cannot go to the edges of the picture.)
To return the AF point to the center,
press the <0> or <L> button.
Using AF to Focus (AF Method)
Selecting the AF Method
FlexiZone - Single: d
AF point

107
Using AF to Focus (AF Method)
3
Focus the subject.
Aim the AF point over the subject and
press the shutter button halfway.
X When focus is achieved, the AF point
will turn green and the beeper will
sound.
X If focus is not achieved, the AF point
will turn orange.
4
Take the picture.
Check the focus and exposure, then
press the shutter button completely to
take the picture (p.104).
This is the same AF method as with FlexiZone - Single. It detects the
human face and focuses. Have the target person face the camera.
1
Display the Live View image.
Press the <0> button.
X The Live View image will appear on
the LCD monitor.
When a face is detected, the <p>
frame will appear over the face to be
focused.
If multiple faces are detected, <q>
will be displayed. Use <9> to move
the <q> frame over the target face.
u (Face detection) Live mode: c

Using AF to Focus (AF Method)
108
2
Focus the subject.
Press the shutter button halfway and
the camera will focus the face
covered by the <p> frame.
X When focus is achieved, the AF point
will turn green and the beeper will
sound.
X If focus is not achieved, the AF point
will turn orange.
If a face cannot be detected, the AF
point < > will be displayed and AF
will be executed at the center.
3
Take the picture.
Check the focus and exposure, then
press the shutter button completely to
take the picture (p.104).

109
Using AF to Focus (AF Method)
The dedicated AF sensor is used to focus in One-Shot AF mode, using
the same AF method as with viewfinder shooting.
Although you can focus the target area quickly, the Live View image
will be interrupted momentarily during the AF operation.
You can use eleven AF points to focus (automatically selected). You
can also select one AF point to focus and focus only the area covered
by that AF point (manually selected). In Basic Zone modes, the AF point
will be selected automatically. You cannot select the AF point.
1
Display the Live View image.
Press the <0> button.
X The Live View image will appear on
the LCD monitor.
The small boxes are the AF points.
2
Select the AF point.N
Press the <S> button.
You can either use <9> or turn the
<6> or <5> dial to select an AF
point.
Press <0> to toggle between the
center AF point and automatic
selection.
Quick Mode: f
AF point

Using AF to Focus (AF Method)
110
3
Focus the subject.
Aim the AF point over the subject and
press the shutter button halfway.
X The Live View image will turn off, the
reflex mirror will go back down, and
AF will be executed. (No picture is
taken.)
X When focus is achieved, the beeper
will sound and the Live View image
will reappear.
X The AF point used to focus will light
up in green.
X If focus is not achieved, the AF point
will blink in orange.
4
Take the picture.
Check the focus and exposure, then
press the shutter button completely to
take the picture (p.104).

111
You can magnify the image and focus precisely with manual focus.
1
Set the lens focus mode switch to
<MF>.
Turn the lens focusing ring to focus
roughly.
2
Display the magnifying frame.
Press the <u> button.
3
Move the magnifying frame.
Press <9 > to move the magnifying
frame to the position where you want
to focus.
To return the magnifying frame to the
center, press <0> or the <L>
button.
4
Magnify the image.
Each time you press the <u> button,
the magnification within the frame will
change as follows:
Focusing Manually
Magnifying frame
AE lock
Magnified area position
Magnification
5x 10x Normal
view
1x

Focusing Manually
112
5
Focus manually.
While looking at the magnified image,
turn the lens focusing ring to focus.
After achieving focus, press the <u>
button to return to the normal view.
6
Take the picture.
Check the focus and exposure, then
press the shutter button completely to
take the picture (p.104).

113
7
Shooting Movies
Movie shooting is enabled by
setting the Live View shooting/
Movie shooting switch to <k>.
The movie recording format will
be MOV.
For cards which can record movies, see page 3.
Under the [53] tab, if you set [Wi-Fi] to [Enable], you cannot shoot
movies. Before shooting movies, set [Wi-Fi] to [Disable].

114
When the shooting mode is set to other than <a>, autoexposure
control will take effect to suit the scene’s current brightness.
1
Set the shooting mode.
Set the Mode Dial to any shooting
mode except <a>.
2
Set the Live View shooting/Movie
shooting switch to <k>.
X The reflex mirror will make a sound,
then the image will appear on the
LCD monitor.
3
Focus the subject.
Before shooting a movie, focus with
AF or manual focus (p.106-112).
When you press the shutter button
halfway, the camera will focus with
the current AF method.
4
Shoot the movie.
Press the <0> button to start
shooting a movie.
X While the movie is being shot, the
“o” mark will be displayed on the
upper right of the screen.
To stop shooting the movie, press the
<0> button again.
k Shooting Movies
Autoexposure Shooting
Recording movie
Microphone

115
k Shooting Movies
You can manually set the shutter speed, aperture, and ISO speed for
movie shooting. Using manual exposure to shoot movies is for
advanced users.
1
Set the Mode Dial to <a>.
2
Set the Live View shooting/Movie
shooting switch to <k>.
3
Set the ISO speed.
Press the <i> button.
X The ISO speed setting screen will
appear on the LCD monitor.
Turn the <6> dial to set the ISO
speed.
4
Set the shutter speed and aperture.
Press the shutter button halfway and
check the exposure level indicator.
To set the shutter speed, turn the
<
6
> dial. The settable shutter speeds
depend on the frame rate <
9
>.
• 6 5 4 : 1/4000 sec. - 1/30 sec.
• 8 7 : 1/4000 sec. - 1/60 sec.
To set the aperture, turn the <
5
> dial.
If it cannot be set, set the <R>
switch to the left, then turn the <6>
or <5> dial.
5
Focus and shoot the movie.
The procedure is the same as steps 3
and 4 for “Autoexposure Shooting”
(p.114).
Manual Exposure Shooting
Shutter speed
Aperture

116
With [Z2: Movie rec. size], you can
set the movie’s image size, frame rate
per second, and compression method.
The frame rate switches automatically
depending on the [53: Video system]
setting.
Image size
A [1920x1080] : Full High-Definition (Full HD) recording quality.
The aspect ratio will be 16:9.
B [1280x720] : High-Definition (HD) recording quality. The
aspect ratio will be 16:9.
C [640x480] : Standard-definition recording quality. The
aspect ratio will be 4:3.
Frame rate (fps: frames per second)
6/8 : For areas where the TV format is NTSC (North America,
Japan, Korea, Mexico, etc.).
5/7 : For areas where the TV format is PAL (Europe, Russia,
China, Australia, etc.).
4 : Mainly for motion pictures.
Compression method
X IPB : Compresses multiple frames at a time
efficiently for recording. Since the file size will
be smaller than with ALL-I, you can shoot
longer.
W ALL-I (I-only) : Compresses one frame at a time for recording.
Although the file size will be bigger than with
IPB, the movie will be more suited for editing.
3 Setting the Movie-Recording Size

117
3 Setting the Movie-Recording Size
About Movie Files Exceeding 4 GB
Even if you shoot a movie exceeding 4 GB, you can keep shooting
without interruption.
During movie shooting, approx. 30 sec. before the movie reaches
the 4 GB file size, the elapsed shooting time or time code displayed
in the movie-shooting image will start blinking. If you keep shooting
until the movie file size exceeds 4 GB, a new movie file will be
created automatically and the elapsed shooting time or time code
will stop blinking.
When you play back the movie, you will have to play each movie file
individually. Movie files cannot play back consecutively automatically.
After the movie playback ends, select the next movie to be played.
Movie Shooting Time Limit
The maximum recording time of one movie clip is 29 min. 59 sec. If
the movie shooting time reaches 29 min. 59 sec., the movie shooting
will stop automatically. You can start shooting a movie again by
pressing the <0> button. (A new movie file starts being recorded.)
Total Movie Recording Time and File Size Per Minute
Movie-
Recording Size
Total Recording Time (approx.)
File Size
(approx.)
4 GB Card 8 GB Card 16 GB Card
A
65
4
X 16 min. 32 min. 1 hr. 4 min. 235 MB/min.
65
4
W 5 min. 11 min. 22 min. 685 MB/min.
B
87 X 18 min. 37 min. 1 hr. 14 min. 205 MB/min.
87 W 6 min. 12 min. 25 min. 610 MB/min.
C65 X 48 min. 1 hr. 37 min. 3 hr. 14 min. 78 MB/min.


119
8
Image Playback
This chapter explains basic procedures to play back
images and movies.
About images shot and saved with another device
The camera may not be able to properly display images captured
with a different camera, edited with a computer, or had their file
names changed.

120
1
Play back the image.
Press the <x> button.
X The last captured image or last image
viewed will appear.
2
Select an image.
To play back images starting with the
last image, turn the <5> dial
counterclockwise. To play back
images starting with the first captured
image, turn the dial clockwise.
Each time you press the <B>
button, the display format will change.
3
Exit the image playback.
Press the <x> button to exit the
image playback and return to
shooting-ready state.
x Image Playback
Single-Image Display
No information
Histogram
With basic information
Shooting information display

121
Search for images quickly with the index display showing four or nine
images on one screen.
1
Press the <u> button.
Press the <u> button during image
playback.
X [6u] will be displayed on the lower
right of the screen.
2
Switch to the index display.
Turn the <
6
> dial counterclockwise.
X
The 4-image index display will appear. The
selected image is highlighted in a orange frame.
If you turn the <
6
> dial further to the left,
the 9-image index display will appear. If you
turn the <
6
> dial to the right, the index
display will change as follows: 9-image, 4-
image, and single-image display.
3
Select an image or movie.
Turn the <
5
> dial to move the orange
frame and select the image. You can also
select it with the <
V
> or <
U
> key.
Press the <u> button to turn off the
[6u] icon, then turn the <6> dial
to go to the next or preceding screen.
Press <
0
> in the index display, and the selected
image will be displayed as a single image.
x Searching for Images Quickly
H Display Multiple Images on One Screen (Index Display)
Î
Î

122
You can magnify a captured image by approx. 1.5x to 10x on the LCD
monitor.
1
Magnify the image.
The image can be magnified during
image playback (single-image
display), during image review after
image capture, and from shooting-
ready state.
Press the <u> button.
X The magnified view will appear. The
magnified area and [6u] will be
displayed on the lower right of the
screen.
The image magnification increases
as you turn the <6> dial clockwise.
You can magnify the image up to
approx. 10x.
The image magnification decreases
as you turn the <6> dial
counterclockwise. Turning the dial
further will display the index display
(p.121).
2
Scroll around the image.
Use <9> to scroll around the
magnified image.
To exit the magnified display, press
the <u> button or <x> button and
the single-image display will
reappear.
u Magnified View
Magnified area position

123
1
Play back the image.
Press the <x> button to display
images.
2
Select a movie.
Turn the <5> dial to select the
movie to be played.
On the single-image display, the
<s1> icon displayed on the
upper left indicates a movie. If the
movie is a video snapshot, < >
will be displayed.
You can press the <B> button to
switch to the shooting information
display.
In the index display, perforations at
the left edge of a thumbnail indicate a
movie. As movies cannot be played
on the index display, press <0>
to switch to the single-image
display.
3
In the single-image display, press
<0>.
X The movie playback panel will appear
at the bottom of the screen.
4
Play back the movie.
Select [7] (Play), then press <0>.
X The movie will start playing.
You can pause the movie playback by
pressing <0>.
You can adjust the sound volume by
turning the <6> dial even during
movie playback.
For more details on the playback
procedure, see the next page.
k Playing Movies
Speaker

k Playing Movies
124
Movie Playback Panel
* When background music is set, the movie’s sound will not be played.
Operation Playback Description
7 Play Pressing <0> toggles between play and stop.
8 Slow motion
Adjust the slow motion speed by pressing the <U> key.
The slow-motion speed is indicated at the upper right of the
screen.
5 First frame Displays the movie’s first frame.
3 Previous
frame
Each time you press <0>, the previous frame is displayed.
If you hold down <0>, it will rewind the movie.
6 Next frame
Each time you press <0>, the movie will play frame-by-
frame. If you hold down <0>, it will fast forward the movie.
4 Last frame Displays the movie’s last frame.
Background
music*
Play back a movie with the selected background music.
X Edit Displays the editing screen.
Playback position
mm’ ss”
Playback time (minutes:seconds with [Movie play count:
Rec time] set)
hh:mm:ss:ff
Time code (hours:minutes:seconds:frames with [Movie play
count: Time code] set)
9 Volume
You can adjust the built-in speaker’s (p.123) volume by
turning the <6> dial.
32
Pressing the <M> button returns to the single-image
display.

125
You can either select and erase images one by one or erase them in
one batch. Protected images will not be erased.
Once an image is erased, it cannot be recovered. Make sure
you no longer need the image before erasing it. To prevent
important images from being erased accidentally, protect
them. Erasing a RAW+JPEG image will erase both the RAW
and JPEG images.
1
Play back the image to be erased.
2
Press the <L> button.
X The Erase menu will appear at the
bottom of the screen.
3
Erase the image.
Select [Erase], then press <0>. The
image displayed will be erased.
L Erasing Images
Erasing a Single Image

126
MEMO

127
MEMO

128
MEMO

129
9
Downloading Images
to Your Computer
This chapter explains how to download images from the
camera to your computer, gives an overview of the
software in the EOS DIGITAL Solution Disk (CD-ROM),
and explains how to install the software on your
computer. It also explains how to view the Software
Instruction Manuals.
EOS DIGITAL Solution Disk
(Software/Software Instruction Manuals)

130
You can use the provided software to download the images in the
camera to your computer. There are two ways to do this.
1
Install the software (p.134).
2
Use the provided interface cable
to connect the camera to your
computer.
Use the interface cable provided with
the camera.
Connect the cable to the camera’s
<C> terminal with the cable
plug’s <D> icon facing the front of
the camera.
Connect the cord’s plug to the
computer’s USB terminal.
3
Use EOS Utility to download the
images/movies.
For details, refer to the EOS Utility
Instruction Manual (p.135).
Downloading Images to a Computer
Download by Connecting the Camera to the Computer
Under the [53] tab, if [Wi-Fi] is set to [Enable], the camera cannot connect
to a computer. Set [Wi-Fi] to [Disable], then connect the interface cable.

131
Downloading Images to a Computer
If you have a commercially-available card reader, you can use it to
download images to your computer.
1
Install the software (p.134).
2
Insert the card into the card
reader.
3
Use Canon software to download
the images/movies.
X Use Digital Photo Professional.
X Use ImageBrowser EX.
For details, refer to the Software
Instruction Manual (p.135).
Downloading Images with a Card Reader
When downloading images from the camera to your computer, with a card
reader without using Canon software, copy the DCIM folder on the card to
your computer.

132
EOS DIGITAL Solution Disk
Various software for EOS DIGITAL cameras are contained
on the EOS DIGITAL Solution Disk.
With the camera connected to a computer, EOS Utility enables you to
transfer still photos and movies shot with the camera to the computer.
You can also use this software to set various camera settings and shoot
remotely with the computer connected to the camera. Also, you can copy
background music tracks, such as EOS Sample Music*, to the card.
* Five original background music tracks are provided by Canon. Use EOS Utility
to copy the background music tracks to the card, and you can play the
background music during playback of video snapshot albums, movies, and slide
shows with the camera.
This software is recommended for users who mainly shoot RAW images.
You can view, edit, process, and print RAW images at high speed. You
can also edit JPEG images while retaining the original images.
You can edit Picture Styles, and create and save original Picture Style
files. This software is aimed at advanced users who are experienced in
processing images.
About the Software
EOS Utility
Digital Photo Professional
Picture Style Editor

133
About the Software
An Internet connection is necessary to install the software below.
Insert the EOS DIGITAL Solution Disk into your Internet-connected
computer.
Connect to the Internet to download and install the software*.
This software is recommended for users who mainly shoot JPEG
images. You can easily view still photos and play back MOV movies and
video snapshot albums, and also edit and print JPEG images.
* EOS DIGITAL Solution Disk is necessary for downloading and installing
ImageBrowser EX.
Connect to the Internet to download and install the software.
Shooting locations can be displayed on a map on a computer screen by
using the geotag information recorded using the GPS function.
ImageBrowser EX
Map Utility
The ZoomBrowser EX/ImageBrowser programs that came with previous
cameras does not support the EOS 6D’s still photos and MOV movie files.
Use ImageBrowser EX.

134
1
Insert the EOS DIGITAL Solution Disk into your computer.
For Macintosh, double-click to open the CD-ROM icon displayed
on the desktop, then double-click on [setup].
2 Click [Easy Installation] and follow the on-screen
instructions to install.
If the install screen for “Microsoft Silverlight” is displayed during
installation, install “Microsoft Silverlight”.
3 Click [Restart] and remove the CD-ROM after the
computer restarts.
When the computer has restarted, the installation is complete.
Installing the Software
Do not connect the camera to your computer before you install the
software. The software will not be installed correctly.
Follow the procedure below to install ImageBrowser EX, Map Utility, and
other software on the EOS DIGITAL Solution Disk. Software installation
requires an Internet connection. You cannot download and install the
software without an Internet connection.
Even if a previous version of ImageBrowser EX and Map Utility are
installed in your computer, follow the procedure below to install/update
ImageBrowser EX and Map Utility. They are optimized for this camera.
You can also use the auto update feature to add the latest functions.
If there is a previous version of the software already installed on your
computer, follow the procedure below to install the latest version. (The
previous version will be overwritten.)

135
Software Instruction Manuals are contained on the EOS
DIGITAL Solution Disk. You can copy and view the
software instruction manual (PDF files) as follows:
1 Insert the EOS DIGITAL Solution Disk into your
computer.
2 Close the install screen.
When the EOS DIGITAL Solution Disk install screen appears,
close the install screen.
3 Open the CD-ROM.
4 Open the [Manual] folder.
5 Copy the [English] folder to your computer.
Instruction Manual PDFs with the names below are copied.
Instruction manual for ImageBrowser EX (ImageBrowser EX
User Guide) is included in the software.
6 Double-click the copied PDF file.
Adobe Reader (most recent version recommended) must be
installed on your computer.
Adobe Reader can be downloaded free from the Internet.
Software Instruction Manual
Windows Macintosh
EOS Utility EUx.xW_E_xx EUx.xM_E_xx
Digital Photo Professional DPPx.xW_E_xx DPPx.xM_E_xx
Picture Style Editor PSEx.xW_E_xx PSEx.xM_E_xx
Map Utility MUx.x_E_xx

136
Trademarks
Adobe is a trademark of Adobe Systems Incorporated.
Microsoft and Windows are trademarks or registered trademarks of Microsoft
Corporation in the United States and/or other countries.
Macintosh and Mac OS are trademarks of Apple Inc., registered in the U.S.
and other countries.
SDXC logo is a trademark of SD-3C, LLC.
HDMI, HDMI logo, and High-Definition Multimedia Interface are trademarks or
registered trademarks of HDMI Licensing LLC.
All other trademarks are the property of their respective owners.
About MPEG-4 Licensing
“This product is licensed under AT&T patents for the MPEG-4 standard and may be
used for encoding MPEG-4 compliant video and/or decoding MPEG-4 compliant video
that was encoded only (1) for a personal and non-commercial purpose or (2) by a
video provider licensed under the AT&T patents to provide MPEG-4 compliant video.
No license is granted or implied for any other use for MPEG-4 standard.”
* Notice displayed in English as required.
Certification Logo
Under the [54] tab, if you select [Certification Logo Display] and press
<0>, some of the logos of the camera’s certifications will appear. Other
certification logos can be found in this Instruction Manual, on the camera
body, and on the camera’s package.

137
Use of genuine Canon accessories is recommended
This product is designed to achieve excellent performance when used with
genuine Canon accessories.
Canon shall not be liable for any damage to this product and/or accidents such
as fire, etc., caused by the malfunction of non-genuine Canon accessories
(e.g., a leakage and/or explosion of a battery pack). Please note that this
warranty does not apply to repairs arising out of the malfunction of non-genuine
Canon accessories, although you may request such repairs on a chargeable
basis.
Battery Pack LP-E6/LP-E6N is dedicated to Canon products only. Using it
with an incompatible battery charger or product may result in malfunction or
accidents for which Canon cannot be held liable.

138
The following precautions are provided to prevent harm or injury to
yourself and others. Make sure to thoroughly understand and follow
these precautions before using the product.
If you experience any malfunctions, problems, or damage to the
product, contact the nearest Canon Service Center or the dealer
from whom you purchased the product.
Safety Precautions
Warnings:
Follow the warnings below. Otherwise, death or
serious injuries may result.
To prevent fire, excessive heat, chemical leakage, explosions, and electrical shock,
follow the safeguards below:
• Do not use any batteries, power sources, or accessories not specified in the
Instruction Manual. Do not use any home-made or modified batteries.
• Do not short-circuit, disassemble, or modify the battery. Do not apply heat or
solder to the battery. Do not expose the battery to fire or water. Do not subject the
battery to strong physical shock.
• Do not insert the battery’s plus and minus ends incorrectly.
• Do not recharge the battery in temperatures outside the allowable ambient
temperature range. Also, do not exceed the recharging time indicated in the
Instruction Manual.
• Do not insert any foreign metallic objects into the electrical contacts of the camera,
accessories, connecting cables, etc.
When disposing of a battery, insulate the electrical contacts with tape to prevent
contact with other metallic objects or batteries. This is to prevent a fire or an explosion.
If excessive heat, smoke, or fumes are emitted when recharging the battery,
immediately unplug the battery charger from the power outlet to stop recharging.
Otherwise, it may cause a fire, heat damage, or electrical shock.
If the battery leaks, changes color, deforms, or emits smoke or fumes, remove it
immediately. Be careful not to get burned in the process. It may cause a fire,
electrical shock or skin burn if you keep using it.
Prevent any battery leakage from contacting your eyes, skin, and clothing. It can
cause blindness or skin problems. If the battery leakage contacts your eyes, skin, or
clothing, flush the affected area with lots of clean water without rubbing it. See a
physician immediately.
Do not leave any cords near a heat source. It can deform the cord or melt the
insulation and cause a fire or electrical shock.
Do not hold the camera in the same position for long periods of time. Even if the
camera does not feel too hot, prolonged contact with the same body part may cause
skin redness, blistering or low-temperature contact burns. Using a tripod is
recommended for people with circulation problems or very sensitive skin, or when
using the camera in very hot places.
Do not fire the flash at anyone driving a car or other vehicle. It may cause an accident.

139
Safety Precautions
When the camera or accessories are not in use, make sure to remove the battery
and disconnect the power plug from the equipment before storing. This is to prevent
electrical shock, excessive heat, fire, or corrosion.
Do not use the equipment where there is flammable gas. This is to prevent an
explosion or a fire.
If you drop the equipment and the casing breaks open to expose the internal parts,
do not touch the internal parts. There is a possibility of an electrical shock.
Do not disassemble or modify the equipment. High-voltage internal parts can cause
electrical shock.
Do not look at the sun or an extremely bright light source through the camera or
lens. Doing so may damage your vision.
Keep equipment out of the reach of children and infants, including when in use. Straps
or cords may accidentally cause choking, electrical shock, or injury. Choking or injury
may also occur if a child or infant accidentally swallows a camera part or accessory. If
a child or infant swallows a part or accessory, consult a physician immediately.
Do not use or store the equipment in dusty or humid places. Likewise, store the
battery with its protective cover attached to prevent short-circuit. This is to prevent a
fire, excessive heat, electrical shock, or burn.
Before using the camera inside an airplane or hospital, check if it is allowed.
Electromagnetic waves emitted by the camera may interfere with the plane’s
instruments or the hospital’s medical equipment.
To prevent a fire and electrical shock, follow the safeguards below:
• Always insert the power plug all the way in.
• Do not handle a power plug with wet hands.
• When unplugging a power plug, grasp and pull the plug instead of the cord.
• Do not scratch, cut, or excessively bend the cord or put a heavy object on the
cord. Also do not twist or tie the cords.
• Do not connect too many power plugs to the same power outlet.
• Do not use a cord whose wire is broken or insulation is damaged.
Unplug the power plug periodically and clean off the dust around the power outlet
with a dry cloth. If the surrounding is dusty, humid, or oily, the dust on the power
outlet may become moist and short-circuit the outlet, causing a fire.
Do not connect the battery directly to an electrical outlet or a car’s cigarette lighter
outlet. The battery may leak, generate excessive heat or explode, causing a fire,
burns or injuries.
A thorough explanation of how to use the product by an adult is required when the
product is used by children. Supervise children while they are using the product.
Incorrect usage may result in electrical shock or injury.
Do not leave a lens or lens-attached camera in the sun without the lens cap
attached. Otherwise, the lens may concentrate the sun’s rays and cause a fire.
Do not cover or wrap the product with a cloth. Doing so may trap heat within and
cause the casing to deform or catch fire.
Be careful not to get the camera wet. If you drop the product in the water or if water
or metal get inside the product, promptly remove the battery. This is to prevent a fire
and an electrical shock.
Do not use paint thinner, benzene, or other organic solvents to clean the product.
Doing so may cause fire or a health hazard.

Safety Precautions
140
Cautions:
Follow the cautions below. Otherwise, physical injury
or property damage may result.
Do not use or store the product inside a car under the hot sun or near a heat source.
The product may become hot and cause skin burns. Doing so may also cause
battery leakage or explosion, which will degrade the performance or shorten the life
of the product.
Do not carry the camera around when it is attached to a tripod. Doing so may cause
injury. Also make sure the tripod is sturdy enough to support the camera and lens.
Do not leave the product in a low-temperature environment for an extended period of
time. The product will become cold and may cause injury when touched.
Do not fire the flash near the eyes. It may hurt the eyes.
Never play the provided CD-ROM in a drive that is not compatible with the CD-ROM.
If you use it in a music CD player, you may damage the speakers and other
components. When using headphones, there is also a risk of injury to your ears from
excessively loud volume.
CAN ICES-3 (B) / NMB-3 (B)
USA and Canada only:
The Lithium ion/polymer battery that powers the product is
recyclable. Please call 1-800-8-BATTERY for information on
how to recycle this battery.
For CA, USA only
Included lithium battery contains Perchlorate Material – special handling may apply.
See www.dtsc.ca.gov/hazardouswaste/perchlorate/ for details.
CAUTION
RISK OF EXPLOSION IF BATTERY IS REPLACED BY AN INCORRECT TYPE.
DISPOSE OF USED BATTERIES ACCORDING TO LOCAL REGULATION.

141
Digital Camera Model DS126401 / DS126402 / DS126403 Systems
This device complies with Part 15 of the FCC Rules. Operation is subject to the
following two conditions: (1) This device may not cause harmful interference,
and (2) this device must accept any interference received, including
interference that may cause undesired operation.
Note:
This equipment has been tested and found to comply with the limits for
class B digital devices, pursuant to Part 15 of the FCC Rules. These limits
are designed to provide reasonable protection against harmful
interference in a residential installation. This equipment generates, uses
and can radiate radio frequency energy and, if not installed and used in
accordance with the instructions, may cause harmful interference to radio
communications. However, there is no guarantee that interference will not
occur in a particular installation. If this equipment does cause harmful
interference to radio or television reception, which can be determined by
turning the equipment off and on, the user is encouraged to try to correct
the interference by one or more of the following measures:
— Reorient or relocate the receiving antenna.
— Increase the separation between the equipment and receiver.
— Connect the equipment into an outlet on a circuit different from
that to which the receiver is connected.
—
Consult the dealer or an experienced radio/TV technician for help.
The cable with the ferrite core provided with the digital camera must be used
with this equipment in order to comply with Class B limits in Subpart B of Part
15 of the FCC rules.
Do not make any changes or modifications to the equipment unless otherwise
specified in the manual. If such changes or modifications should be made, you
could be required to stop operation of the equipment.
Canon U.S.A. Inc.
One Canon Park, Melville, NY 11747, U.S.A.
Tel No. 1-800-OK-CANON (1-800-652-2666)

142
LCD Panel and LCD Monitor
Although the LCD monitor is manufactured with very high precision
technology with over 99.99% effective pixels, there may be a few dead pixels
displaying only black or red, etc. among the remaining 0.01% or less pixels.
Dead pixels are not a malfunction. They do not affect the images recorded.
If the LCD monitor is left on for a prolonged period, screen burn-in may occur
where you see remnants of what was displayed. However, this is only
temporary and will disappear when the camera is left unused for a few days.
The LCD monitor display may seem slow in low temperatures, or look black
in high temperatures. It will return to normal at room temperature.
Cards
To protect the card and its recorded data, note the following:
Do not drop, bend, or wet the card. Do not subject it to excessive force,
physical shock, or vibration.
Do not touch the card’s electronic contacts with your fingers or anything
metallic.
Do not affix any stickers, etc., on the card.
Do not store or use the card near anything having a strong magnetic field
such as a TV set, speakers, or magnet. Also avoid places prone to having
static electricity.
Do not leave the card in direct sunlight or near a heat source.
Store the card in a case.
Do not store the card in hot, dusty, or humid locations.
Lens
After detaching the lens from the camera, put down the
lens with the rear end up and attach the lens caps to
avoid scratching the lens surface and electrical contacts.
Cautions regarding Prolonged Use
If you use continuous shooting, Live View shooting, or movie shooting for a
prolonged period, the camera may become hot. Although this is not a
malfunction, holding the hot camera for a long period can cause slight skin
burns.
Handling Precautions
Contacts

143
MEMO

144
MEMO

145
MEMO

146
MEMO

147
MEMO

148
MEMO

Wi-Fi Function Basic Instruction Manual
EOS 6D (WG)
In the Wi-Fi Function Basic Instruction Manual, basic operation
procedures for easy-to-use “Transferring Images between Cameras” and
“Connecting to a smartphone” are explained.
English

W-2
This camera’s wireless LAN functions let you perform a range of tasks
wirelessly, from sending images to Web services and other cameras to
controlling the camera remotely, simply by connecting to a Wi-Fi
network or other device supporting this camera’s wireless LAN
functions.
* To use function (2) via an access point, refer to the “Wi-Fi Function Instruction
Manual” PDF file.
* For the procedure to use functions (3) to (6), refer to the “Wi-Fi Function
Instruction Manual” PDF file.
What You Can Do Using the Wireless LAN Functions
(1) Transfer images
between cameras
Exchange images
(6) View images using
a media player
View images
(5) Send images to
a Web service
Save and share images
(4) Operate the camera
remotely using EOS Utility
Remotely control the camera
(3) Print images using
a Wi-Fi printer
Print images
(2) Connect to a
smartphone
Make images
viewable
Remote shooting
(Canon Image Gateway)

W-3
What You Can Do Using the Wireless LAN Functions
(1)z Transfer images between cameras (p.W-13)
Transfer images between this camera and other Canon cameras
with built-in wireless LAN functions.
(2)q Connect to a smartphone (p.W-21)
View saved images or operate the camera from your smartphone.
You must install the dedicated application “EOS Remote” on your
smartphone to use these functions.
(3)l Print images using a Wi-Fi printer
Connect the camera to a wireless LAN compatible printer supporting
PictBridge (Wireless LAN) to print images wirelessly.
(4)D Operate the camera remotely using EOS Utility
Use EOS Utility via a wireless LAN instead of an interface cable, and
operate your camera from computer wirelessly.
(5)w Send images to a Web service
Upload your images to CANON iMAGE GATEWAY, an online photo
service for Canon users (free registration required), to share them
with family and friends.
(6) View images using a media player
Display images on the camera’s memory card on your TV set, by
using a media player supporting DLNA* via a wireless LAN.
* Digital Living Network Alliance
For more detailed procedures, refer to the Instruction Manual
downloadable from the Canon Web site. For how to download the
Instruction Manual, see page 5.
Instruction Manual

W-4
In this manual, the term “wireless LAN” is used as a general term for
Wi-Fi and Canon’s original wireless communication functions.
The ** (numbers) for “(p.**)” in this manual indicate reference page
numbers for more information.
Sections of this manual labeled with the following symbols contain
particular types of information as described below.
:
Warnings to prevent potential problems during operation.
:
Supplemental information to basic operation.
Conventions Used in This Manual
Microsoft and Windows are trademarks or registered trademarks of
Microsoft Corporation in the United States and/or other countries.
Macintosh and Mac OS are trademarks of Apple Inc., registered in the U.S.
and other countries.
Wi-Fi is a registered trademark of the Wi-Fi Alliance.
Wi-Fi Certified, WPA, WPA2, and the Wi-Fi Certified logo are trademarks of
the Wi-Fi Alliance.
WPS used on camera settings screens and in this manual stands for Wi-Fi
Protected Setup.
UPnP is a trademark of the UPnP Implementers Corporation.
All other trademarks are the property of their respective owners.
Note that Canon cannot be held liable for any loss or damage from erroneous
wireless LAN settings for using the camera. In addition, Canon cannot be held
liable for any other loss or damage caused by use of the camera.

W-5
2
1
3
Introduction
What You Can Do Using the Wireless LAN Functions ................ W-2
Conventions Used in This Manual ............................................... W-4
[Wi-Fi] Settings and Connection Status....................................... W-6
Basic Settings for Wireless LAN Functions W-7
Registering a Nickname............................................................... W-8
Basic Operation and Settings .................................................... W-11
Transferring Images Between Cameras W-13
Selecting the Connection Destination........................................ W-14
Sending Images......................................................................... W-16
Reconnecting............................................................................. W-19
Connecting to a Smartphone W-21
Preparation ................................................................................ W-22
Using Camera Access Point Mode to Establish a Connection .. W-23
Operating the Camera Using a Smartphone.............................. W-26
Reconnecting............................................................................. W-28
Contents
Wi-Fi (Wireless LAN) Precautions .............................................G-20
For Troubleshooting guide and Specifications, refer to the Instruction
Manual downloadable from the Canon Web site. For how to download the
Instruction Manual, see page 5.

W-6
Settings and connection status for [Wi-Fi] under the [53] tab can be
checked on the camera’s LCD panel and LCD monitor.
[Wi-Fi] Settings and Connection Status
Wi-Fi connection status
Wi-Fi function
When [53: Wi-Fi] is set to
[Disable]
When [53: Wi-Fi] is set to
[Enable] but there is no
connection
Connected
(I J)
Data is being transmitted
(Blinking) Connection error
(Blinking)
Waiting for connection
Waiting for reconnection
Wi-Fi function
(Off)
Not connected
Connected
Data is being transmitted
(Blinking)
Waiting for connection
Waiting for reconnection
(Blinking)
Connection error
(Blinking)

W-7
1
Basic Settings for
Wireless LAN Functions
This chapter describes settings necessary for using the
camera’s wireless LAN functions.

W-8
First, set the camera’s nickname.
When the camera is connected to another device via a wireless LAN,
the nickname will be displayed on the device. Be sure to set a nickname
for your camera.
1
Select [Wi-Fi].
Under the [53] tab, select [Wi-Fi],
then press <0>.
2
Select [Enable].
Press the <V> key to select
[Enable], then press <0>.
X [Wi-Fi function] is now selectable.
3
Select [Wi-Fi function].
Under the [53] tab, select [Wi-Fi
function], then press <0>.
X When this setting is selected for the
first time, a screen to register a
nickname is displayed. Select [OK]
and proceed on to step 4.
Registering a Nickname

W-9
Registering a Nickname
4
Enter a nickname.
For instructions on entering
characters, see “Virtual Keyboard
Operation” on the next page.
Up to 16 characters can be entered.
5
Finish.
When you are finished, press the
<M> button.
Select [OK] on the confirmation
screen, then press <0>. The
nickname is registered, and [Wi-Fi
function] screen will appear.
To change the nickname, press the
<B> button on the screen above,
then select [Edit nickname] on the
screen displayed.

Registering a Nickname
W-10
Switching to other input areas
To switch between top and bottom
input areas, press the <Q> button.
Moving the cursor
To move the cursor, press the <U>
key in the top area.
Entering text
In the bottom input area, press the <V> or <U> key to select
characters and press <0> to enter them.
You can check how many characters you have entered, and how
many more can be entered, by referring to [*/*] on the upper right of
the screen.
Deleting text
If you make a mistake, press the <L> button to erase it.
Finishing text entry
Press the <M> button to confirm what you have entered and
exit. If a confirmation screen is displayed, select [OK] to exit.
Canceling text entry
Press the <B> button to cancel text entry and exit. If a
confirmation screen is displayed, select [OK] to exit.
Virtual Keyboard Operation

W-11
When you want to prioritize wireless LAN functions, do not operate
the shutter button, Mode Dial, or playback button. Otherwise,
shooting or playback operation may be prioritized and wireless LAN
functions may be ended during the process.
When [Wi-Fi] is set to [Enable], movie shooting is disabled. Even if
the camera is connected to a computer, printer, GPS receiver, or
other devices via an interface cable, they cannot be used (p.W-12).
Under the [52] tab, set [Auto power
off] to [Disable] if necessary.
If the camera’s auto power off is
activated during the wireless LAN
connection, the wireless LAN function
will turn off. Wireless LAN connection
is restored when the camera wakes
up from auto power off.
If the use of electronic devices and
wireless device is prohibited on board
airplanes or in hospitals, set [Wi-Fi]
under the [53] tab to [Disable].
Basic Operation and Settings
Using the Camera While Wireless LAN Functions Are Active
Auto Power Off
[Wi-Fi] Under the [53] Tab

Basic Operation and Settings
W-12
Connecting with an Interface Cable
When [Wi-Fi] under the [53] tab is set to [Enable], interface cable
connection is disabled. Set it to [Disable] to connect the interface cable.
When the camera is connected to a computer, printer, GPS receiver, or
any other devices via an interface cable, the settings for [Wi-Fi] cannot
be changed. Disconnect the interface cable and then configure settings.
Using an Eye-Fi card
When [Wi-Fi] under the [53] tab is set to [Enable], image transfer using
an Eye-Fi card is disabled.

W-13
2
Transferring Images
Between Cameras
Images can be transferred between Canon cameras via
the built-in wireless LAN functions.
Wireless connection is possible for Canon cameras with built-in
wireless LAN functions marketed in 2012 or later. Note that the
camera cannot be connected to Canon camcorders, even if they
have built-in wireless LAN functions.
The camera cannot be connected to Canon cameras without
built-in wireless LAN functions, even if they support Eye-Fi
cards.
Still photos can be transferred only if their file format is JPEG.
Although movies can be transferred, some target cameras may
not be able to play them back depending on their functionality.

W-14
Register the target camera to connect to via a wireless LAN.
The camera can be connected to only one camera at a time.
1
Select [Wi-Fi function].
Under the [53] tab, set [Wi-Fi] to
[Enable], then select [Wi-Fi
function].
2
Select [z].
Press the <V> or <U> key to
select [z] (Transfer imgs between
cameras), then press <0>.
3
Start the connection on the target
camera.
When the screen on the left is
displayed, start the connection on the
target camera as well. For the
operation procedure, refer to the
instruction manual of the target
camera.
When a connection is established,
the settings are automatically saved
and the images on the card are
displayed.
Selecting the Connection Destination

W-15
Selecting the Connection Destination
4
Select the images to send.
Select images on the camera sending
the images (p.W-16).
Do not operate the camera receiving
the images.
Note that GPS information is not displayed on the camera’s playback
screen even if GPS information is appended to the received image.
Shooting locations can be viewed on a virtual map, using the Map Utility
software.
The connection settings are automatically saved/registered with the
nickname of the camera to which a connection was established.
Auto power off does not function when the camera is connected to
another camera.

W-16
Selected images are sent one by one.
1
Select an image to send.
Press the <U> key to select an
image to send, then press <0>.
Press the <u> button and turn the
<6> dial to the left to select an
image on the index display. To return
to the single-image display, turn the
<6> dial to the right.
2
Select [Send img shown].
To select the size of the image to
send, press the <U> key and
select [Resize image].
Press the <U> key to select [Send
img shown], then press <0>.
X The transfer progress screen is
displayed.
To send another image, repeat steps
1 and 2.
3
Terminate connection.
Press the <M> button to display
the confirmation screen. Press the
<U> key to select [OK], then press
<0> to terminate the connection.
X The [Wi-Fi function] setting screen
will reappear.
Sending Images
Sending Images One by One
If playback or shooting operation is started during the connection, the
connection will be terminated.
RAW images cannot be sent.

W-17
Sending Images
Multiple images (up to 50 files) can be selected and sent.
1
Press <0>.
2
Select [Send selected].
To select the size of the image to
send, press the <U> key and
select [Resize image].
Press the <U> key to select [Send
selected], then press <0>.
3
Select the images to send.
Press the <U> key to select the
images to send, then press <0>.
X <X> is displayed on the upper left of
the image to send.
Press the <u> button and turn the
<6> dial to the left to select an
image on the three-image display. To
return to the single-image display,
turn the <6> dial to the right.
After selecting the images to send,
press the <Q> button.
Sending Selected Images

Sending Images
W-18
4
Reduce the image size.
Set it if necessary.
5
Send the images.
Press the <V> key to select [Send],
then press <0> to send the images.
X The transfer progress screen is
displayed.
To transfer other images, repeat
steps 1 to 5.
6
Terminate connection.
Press the <M> button to display
the confirmation screen. Press the
<U> key to select [OK], then press
<0> to terminate the connection.
X The [Wi-Fi function] setting screen
will reappear.
If playback or shooting operation is started during the connection, the
connection will be terminated. Operations such as shooting cannot be
performed when data is being sent or received. When [Cancel] is
selected on the camera being used to send images, image transfer is
stopped so that shooting and other operations can be performed.
When sending large files, make sure that the battery is adequately
charged so it does not run out during the process.
RAW images cannot be sent.
You can send up to 50 files.

W-19
The camera can reconnect to another camera for which connection
settings have been registered.
1
Select [Wi-Fi function].
Under the [53] tab, set [Wi-Fi] to
[Enable], then select [Wi-Fi
function].
2
Select [z].
Select [z] (Transfer imgs between
cameras) and press <0>.
3
Establish a connection.
Select [Connect] and press <0>.
On the confirmation screen, select
[OK].
Perform the reconnection procedure
on the target camera as well.
X The images on the card are displayed
and the images to send can be
selected.
When settings for multiple connection
destinations are registered, select
[Choose set.], select the connection
destination, then connect to the
destination.
By default, settings are named after
the nickname of the camera that was
connected to.
Reconnecting

W-20
MEMO

W-21
3
Connecting to a
Smartphone
Connecting the camera to a smartphone lets you use
the smartphone to view, manage, and receive images
stored in the camera. You can also use the smartphone
to perform remote shooting.

W-22
To communicate with a smartphone, the camera needs to be connected
to the smartphone using the dedicated application EOS Remote.
EOS Remote can be downloaded from the App Store or Google
Play. Install EOS Remote on the smartphone and then perform the
procedures to establish the connection.
To use EOS Remote, a smartphone on which iOS or Android
installed is necessary. For information on supported operating
system, refer to the download site of EOS Remote software.
Preparation
EOS Remote Installation Required

W-23
The camera and smartphone can be directly connected via a wireless
LAN.
Because the camera acts as an access point, no other access point is
necessary, so you can establish communications easily even when you
are out.
To establish connection, operations on the smartphone are required.
For details, refer to the smartphone instruction manual.
1
Select [Wi-Fi function].
Under the [53] tab, set [Wi-Fi] to
[Enable], then select [Wi-Fi
function].
2
Select [q].
Select [q] (Connect to smartphone)
and press <0>.
3
Select [Camera access point
mode].
Press the <V> key to select
[Camera access point mode], then
press <0>.
Select [OK] and press <0> to go to
the next screen.
4
Select [Easy connection].
Press the <V> key to select [Easy
connection], then press <0>.
Select [OK] and press <0> to go to
the next screen.
Using Camera Access Point Mode to Establish a Connection

Using Camera Access Point Mode to Establish a Connection
W-24
5
Connect the smartphone to the
camera.
On the Wi-Fi settings menu of the
smartphone, select the SSID
(network name) displayed on the
camera’s LCD monitor.
For the password, enter the
encryption key displayed on the
camera’s LCD monitor.
X The next screen may be
automatically displayed even when
the operation on the smartphone is
not completed.
6
Start EOS Remote on the
smartphone.
When the Wi-Fi settings are
completed, start EOS Remote on the
smartphone.
7
Select [Camera Connection] on
the smartphone.
Select [Camera Connection] on
EOS Remote.
8
Select the target camera on the
smartphone.
Select the camera to connect to from
the [Detected Cameras] on EOS
Remote.
X Pairing starts.

W-25
Using Camera Access Point Mode to Establish a Connection
9
Connect to the camera.
When pairing is completed, the
screen on the left is displayed. Press
the <U> key to select [OK], then
press <0>.
10
Perform further settings.
To finish settings in this stage, press
the <V> key to select [OK], then
press <0> to go to step 11.
To change the name of the settings,
select [Settings name] and press
<0>.
X The virtual keyboard is displayed
(p.W-10). Up to 30 characters can be
entered for a settings name.
11
Save the settings.
Select [OK] and press <0> to save
the settings.
X The [qConnection] screen will be
displayed.
The settings for communicating with a smartphone are now complete.
A character other than in ASCII
format is displayed as 8.

W-26
You can use a smartphone with EOS Remote installed to view images
stored on the camera and shoot remotely.
The main functions of EOS Remote are
described below. Touch the screen to
learn the operation procedures.
[Camera Image Viewing]
Images stored in the camera can be
viewed.
Images stored in the camera can be
saved on a smartphone.
Operations such as deletion can be
performed on images stored in the
camera.
[Remote Shooting]
The camera’s Live View image can
be viewed using a smartphone.
Camera settings can be changed.
You can shoot using remote
operation.
(Settings button)
Use this button to access various
settings for EOS Remote.
Operating the Camera Using a Smartphone
EOS Remote Main Screen

W-27
Operating the Camera Using a Smartphone
1
Select [Exit].
If the screen on the left is not
displayed, select [Wi-Fi function]
under the [53] tab on the camera’s
menu screen.
Select [Exit] and press <0>.
2
Select [OK].
Press the <U> key to select [OK],
then press <0> to terminate the
connection.
Terminating the Connection
Images are saved in S2 size JPEG format on smartphones. RAW
images are also saved as S2 size JPEG images.
Although movies are included in the list, they cannot be saved.
If the camera’s auto power off is activated during the wireless LAN
connection, the wireless LAN function will turn off. Wireless LAN
connection is restored when the camera wakes up from auto power off.

W-28
The camera can reconnect to a smartphone for which connection
settings have been registered.
1
Select [Wi-Fi function].
Under the [53] tab, set [Wi-Fi] to
[Enable], then select [Wi-Fi
function].
2
Select [q].
Select [q] (Connect to smartphone)
and press <0>.
3
Establish a connection.
Select [Connect] and press <0>.
On the confirmation screen, select
[OK].
X The camera will reconnect to the
smartphone.
When settings for multiple connection
destinations are registered, select
[Choose set.], select the connection
destination, then connect to the
destination.
Reconnecting

W-29
MEMO

W-30
MEMO

W-31
MEMO

W-32
MEMO

W-33
MEMO

W-34
MEMO

EOS 6D (WG)
GPS Function Instruction Manual
English

G-2
Location information*
1
(latitude,
longitude, elevation, and coordinated
universal time*
2
) can be added to
images.
Shooting locations of geotagged
images can be viewed on a virtual
map on a computer.
*1: Certain travel conditions or GPS settings may cause inaccurate location
information to be added to images. The digital compass function is not
incorporated.
*2: Coordinated Universal Time, abbreviated UTC, is essentially the same as
Greenwich Mean Time.
Using the GPS logging function, location information for the route
the camera traveled can be recorded. This route can be viewed on a
virtual map.
* Certain traveling conditions, locations, or GPS settings may cause inaccurate
location information to be added to images.
Features
Geotagging Images
Logging the Route Traveled

G-3
Features
The camera time can be set using GPS signals.
Shooting locations and the route traveled can be viewed on a virtual
map, using the Map Utility (EOS software) (p.G-18).
Setting the Camera Time
Viewing Images and Information on a Virtual Map
Map data ©2012 ZENRIN -

G-4
Meaning of Symbols
: Warning to prevent shooting problems.
: Supplemental information.
(p.**) : Reference page numbers for further information.
The icons and markings indicating the camera’s controls and settings
used in the manual correspond to the icons and marking on the camera.
Basic Assumptions
All operation procedures in this manual assume that the camera
power switch is set to <ON>.
Conventions Used in this Manual
Trademarks
Microsoft and Windows are trademarks or registered trademarks
of Microsoft Corporation in the United States and/or other
countries.
Macintosh and Mac OS are trademarks of Apple Inc., registered
in the U.S. and other countries.
Google
TM
, Google Maps
TM
, and Google Earth
TM
are trademarks
of Google Inc.
Map Utility uses Google Maps
TM
to display images and routes
traveled on a map.
All other trademarks are the property of their respective owners.

G-5
Features ...................................................................................... G-2
Conventions Used in this Manual.............................................. G-4
Acquiring GPS Signals ............................................................... G-6
Setting the Positioning Interval ............................................... G-11
Setting Time from GPS on the Camera ................................... G-12
Logging the Route Traveled..................................................... G-13
GPS Precautions ....................................................................... G-17
Map Utility .................................................................................. G-18
Specifications............................................................................ G-19
Table of Contents

G-6
To acquire GPS signals, bring the camera outdoors where the sky is
unobstructed and aim it upwards. Keep your hands and other objects
off the top of the camera.
1
Select [GPS].
On the [52] tab, select [GPS] and
press <0>.
2
Set [Select GPS device] to
[Internal GPS].
3
Exit the menu.
Press the <M> button.
When [Select GPS device] is set to [Internal GPS], the camera will
continue to receive GPS signals at set intervals even while the
camera’s power is switched off. This will drain the battery faster,
reducing the number of shots that can be taken.
Additionally, when [Log GPS position] (p.G-13, G-14) is set to
[Enable], shorter update intervals will drain the battery more quickly.
When you will not use GPS function, when you are not traveling, or
when GPS signals are weak, setting [Select GPS device] to [Disable]
is recommended.
Acquiring GPS Signals
Battery Consumption

G-7
Acquiring GPS Signals
GPS signal status is indicated by the <r> icon on the camera’s LCD
panel and LCD monitor.
• Constant <r> : Signal acquired
• Blinking <r> : Signal not acquired yet
GPS Acquisition Status
LCD panel LCD monitor
When you shoot while the <r> mark is lit, the image will be
geotagged.
When [Internal GPS] is selected, the <r> mark is displayed on the
camera’s LCD panel even when the camera’s power is turned off
because signals from satellites are constantly received.
Status details can be checked as described in “Viewing GPS
Information” (p.G-9).

Acquiring GPS Signals
G-8
Under favorable conditions, signal acquisition takes approx. 30-60
seconds after turning on the camera if radiowave conditions are good.
The antenna of the internal GPS is located at the front of the hot shoe.
GPS signals can be received even when an external flash is attached.
However, acquisition will slightly be weakened.
GPS signals can be received even when shooting with the camera
positioned vertically.
When traveling long distance, inaccurate information may be recorded.
Poor GPS Coverage
Location information may not be recorded, or inaccurate information may be
recorded where GPS signal coverage is poor, such as in the following
locations.
Indoors, underground, in tunnels or forests, near buildings or in valleys.
Near high-voltage power lines or mobile phones operating on the
1.5 GHz band.
When traveling through different environments.
Even in other locations, satellite movement may interfere with
geotagging and cause missing or inaccurate location information. The
information may also indicate that the camera has been used in a
different location, even if you are shooting at the same place.

G-9
Acquiring GPS Signals
1
Select [GPS].
On the [52] tab, select [GPS] and
press <0>.
2
Set [Select GPS device] to
[Internal GPS].
When using the GPS Receiver GP-E2
(sold separately), select
[
External GPS
].
3
Select [Set up].
4
Select [GPS information display].
X
Detailed GPS information is displayed.
[UTC]
(Coordinated Universal Time) in
this sample screenshot is essentially
the same as Greenwich Mean Time.
The icon <A> indicates signal
conditions. When <C> is displayed,
elevation can also be recorded.
However, elevation cannot be
recorded when <B> is displayed.
Generally, elevation is not as
accurate as latitude and longitude
due to the characteristic of GPS.
Viewing GPS Information

Acquiring GPS Signals
G-10
5
Take a picture.
X Shots taken after GPS signal
acquisition are geotagged.
The screen below is displayed when pressing the <B> button
several times during image playback.
Geotagging Information
Latitude
Longitude
Elevation
UTC
During movie shooting, information at the start of shooting is recorded. Note
that signal reception conditions are not recorded.
Connecting External GPS
It is recommended to attach an external GPS to the hot shoe. When [Wi-Fi]
on the [53] tab is set to [Enable], interface cable connection to the external
GPS is disabled.
Note that if you play back an image with GPS information shot with another
EOS 6D (WG) camera, GPS information is not displayed on the camera’s
playback screen. Shooting locations can be viewed on a virtual map, using
the Map Utility software.

G-11
The interval (time) to update the location information can be set. Shorter
positioning intervals yield more accurate location information for your
images. However, fewer shots can be taken per charge.
1
Select [GPS].
On the [52] tab, select [GPS] and
press <0>.
2
Set [Select GPS device] to
[Internal GPS].
3
Select [Set up].
4
Select [Position update timing].
5
Select the time.
Setting the Positioning Interval
The number of possible shots is less when signal conditions are
unfavorable.
The nature of GPS may cause some inconsistency in positioning
intervals.

G-12
The camera time can be set using GPS signals.
1
Select [GPS].
On the [52] tab, select [GPS] and
press <0>.
2
Set [Select GPS device] to
[Internal GPS].
3
Select [Set up].
4
Select [Auto time setting].
Select an option and press <0>.
[Auto update] updates the time after
the camera is turned on and a GPS
signal is received.
Setting Time from GPS on the Camera
If the GPS signal cannot be received from five or more satellites, time
setting is not possible. [Set now] will be unavailable.
Even if [Set now] is selected, auto time adjustment may not be possible,
depending on the timing of GPS signal acquisition.
When [Auto time setting] is set to [Auto update], the date or time
cannot be manually set from [Date/Time] setting on the [52] tab.

G-13
Using the GPS logging function, the
location information of the route the
camera traveled can be automatically
recorded on the camera’s internal
memory. When you shoot while using
the GPS logging function, images will
be geotagged. The recorded location
information can be viewed on a virtual
map on a computer using the Map
Utility (EOS software) (p.G-18).
The GPS logging function is enabled
even during auto power off and when
the power is turned <2>.
1
Select [GPS].
On the [52] tab, select [GPS] and
press <0>.
2
Set [Select GPS device] to
[Internal GPS].
3
Select [Set up].
4
Select [GPS Logger].
Logging the Route Traveled
Map data ©2012 ZENRIN -

Logging the Route Traveled
G-14
5
Set [Log GPS position] to
[Enable].
Location information is recorded at regular intervals along the route the
camera traveled, as shown in [Position update timing] in the table
below. Daily logs are saved on the camera’s internal memory. The
number of days for which you can store logs depends on the positioning
interval you specify in [Position update timing] (p.G-11).
Log File Capacity, by Positioning Interval
* Capacity when logging eight hours per day
Log file names consist of date and number (e.g.12103100). Files are
created per day. When the time zone is changed, a different file is
created.
Log files stored on the internal memory can be transferred to a card
(p.G-15).
When the camera’s internal memory becomes full, the oldest log
files are overwritten with new information, one by one.
Location Information Logs
Position update
timing
Log Files (Approx.)
Position update
timing
Log Files (Approx.)
Every 1 sec. 4.4 days Every 30 sec. 100 days
Every 5 sec. 22 days Every 1 min. 100 days
Every 10 sec. 44 days Every 2 min. 100 days
Every 15 sec. 67 days Every 5 min. 100 days
When the GPS logging function is enabled, the <x> icon is displayed on
the camera LCD panel and LCD monitor.

G-15
Logging the Route Traveled
You can import log files to a computer using the EOS Utility (EOS
software), or by transferring the log data to a card at first. Routes
travelled will be displayed on a virtual map when you open the log files
imported to the computer with the Map Utility software (p.G-18).
Importing using EOS software
Log files can be imported to a computer using the EOS Utility (EOS
software), via the provided interface cable connecting the camera and
the computer. For details, refer to the EOS Utility Instruction Manual
(CD-ROM).
Importing by transferring the log data to a card
Set [GPS logger] to [Transfer log
data to card] to transfer the log files
stored on the internal memory to a
card. After the data is transferred to
the card, log files on the internal
memory are deleted.
The log files imported to the card will
be stored in the “GPS” folder in the
“MISC” folder. The extension is
“.LOG”.
Set [GPS logger] to [Delete log data]
to completely delete the log data
stored on the internal memory.
Deleting data may take approx. one
minute.
Importing log files to a computer

Logging the Route Traveled
G-16
When carrying the camera in a bag or suitcase as you travel, make sure
the camera faces upward and nothing is on top of it.
Set the camera time and date as accurately as possible. Also, set
appropriate time zone and daylight saving time for the shooting location.
Since location information, date, and time are constantly recorded, the
battery is consumed even when the camera is turned off. Therefore, the
battery level may already be low when the camera is used. Charge the
battery when necessary or prepare a charged spare battery (sold
separately).
When you shoot while using the GPS logging function, images taken will be
geotagged. The recorded location information can be viewed on a virtual
map on a computer using the Map Utility (EOS software).

G-17
9Countries and Regions Permitting GPS Function Use
Use of GPS function is restricted in some countries and regions, and
illegal use may be punishable under national or local regulations. To
avoid violating GPS function regulations, visit the Canon Web site to
check where use is allowed.
Note that Canon cannot be held liable for any problems arising from
GPS function use in other countries and regions.
9Model Number
EOS 6D (WG) : DS126401 (including WLAN module model: ZC-ST)
(including GPS module model: CH9-1242)
In certain countries and regions, the use of GPS function may be
restricted. Therefore, be sure to use GPS function in accordance
with the laws and regulations of your country or region. Be
particularly careful when using GPS function outside your home
country.
Be careful about using GPS function where the operation of
electronic devices is restricted.
Others may be able to locate or identify you by using location data in
your geotagged pictures or movies. Be careful when sharing these
geotagged images, movies or GPS log files with others, such as
when posting them online where many people can view them.
GPS signal reception may take a longer time in some cases.
Hereby, Canon Inc., declares that this DS126401 is in compliance with the
essential requirements and other relevant provisions of Directive 1999/5/EC.
Please contact the following address for the original Declaration of Conformity:
CANON EUROPA N.V.
Bovenkerkerweg 59, 1185 XB Amstelveen, The Netherlands
CANON INC.
30-2, Shimomaruko 3-chome, Ohta-ku, Tokyo 146-8501, Japan
GPS Precautions

G-18
Shooting locations or route traveled can be displayed on
a virtual map on a computer using location information
recorded on the camera.
Map Utility software and its Instruction Manual are
included in EOS DIGITAL Solution Disk.
Internet access is necessary to install Map Utility.
For the installation procedure, refer to the Camera
Instruction Manual.
Internet access is necessary to use Map Utility as well.
For details, refer to the Map Utility Instruction Manual.
Map Utility

G-19
Geotagging Images: Latitude, longitude, elevation, time (UTC) and signal
acquisition
Reception frequency: 1575.42 MHz (L1 band)
Positioning Interval: 1, 5, 10, 15, or 30 seconds, or 1, 2, or 5 minutes
Time adjustment: Camera time is set from GPS time data.
Log data: NMEA-0183 format
One file per day
* When the time zone is changed, a different file is
created.
* Log files stored on the internal memory can be
transferred to a card/computer.
* When the camera’s internal memory becomes full, the
oldest log files are overwritten with new information,
one by one.
Deleting log data: Supported
All information in this manual is based on Canon testing standards.
Product specifications and the exterior are subject to change without notice.
Specifications

G-20
9Countries and Regions Permitting Wireless LAN Use
Use of wireless LAN is restricted in some countries and regions, and illegal use may
be punishable under national or local regulations. To avoid violating wireless LAN
regulations, visit the Canon Web site to check where use is allowed.
Note that Canon cannot be held liable for any problems arising from wireless LAN
use in other countries and regions.
9Model Number
EOS 6D (WG) : DS126401 (including WLAN module model: ZC-ST)
(including GPS module model: CH9-1242)
FCC/IC NOTICE
Model: DS126401 (including WLAN Module Model ZC-ST, FCC ID:
AZD220 / IC:498J-220)
This device complies with Part 15 of FCC Rules and Industry Canada’s licence-
exempt RSSs. Operation is subject to the following two conditions:
(1) this device may not cause harmful interference, and
(2) this device must accept any interference received, including interference that
may cause undesired operation.
This transmitter must not be co-located or operated in conjunction with any other
antenna or transmitter except Canon accessories supplied or designated for this
product.
The available scientific evidence does not show that any health problems are
associated with using low power wireless devices. There is no proof, however,
that these low power wireless devices are absolutely safe. Low power Wireless
devices emit low levels of radio frequency energy (RF) in the microwave range
while being used. Whereas high levels of RF can produce health effects (by
heating tissue), exposure of low-level RF that does not produce heating effects
causes no known adverse health effects. Many studies of low-level RF exposures
have not found any biological effects. Some studies have suggested that some
biological effects might occur, but such findings have not been confirmed by
additional research. This model has been tested and found to comply with FCC/IC
radiation exposure limits set forth for an uncontrolled environment and meets the
FCC radio frequency (RF) Exposure Guidelines and RSS-102 of the IC radio
frequency (RF) Exposure rules.
Wi-Fi (Wireless LAN) Precautions

G-21
Wi-Fi (Wireless LAN) Precautions
Hereby, Canon Inc., declares that this DS126401 is in compliance with the
essential requirements and other relevant provisions of Directive 1999/5/EC.
Please contact the following address for the original Declaration of Conformity:
CANON EUROPA N.V.
Bovenkerkerweg 59, 1185 XB Amstelveen, The Netherlands
CANON INC.
30-2, Shimomaruko 3-chome, Ohta-ku, Tokyo 146-8501, Japan

G-22
MEMO

G-23
MEMO

G-24
MEMO

G-25
MEMO

The descriptions in this Instruction Manual are current as of February 2017. For
information on the compatibility with any products introduced after this date,
contact any Canon Service Center. For the latest version Instruction Manual,
refer to the Canon Web site.

Español
Las Instrucciones básicas de la cámara tratan sobre las operaciones
más básicas.
Instrucciones básicas de la cámara
EOS 6D (WG)
EOS 6D (N)
Las Instrucciones (archivos PDF) se pueden descargar desde el sitio
web de Canon (p. 5).
www.canon.com/icpd

2
La EOS 6D (WG/N) es una cámara SLR digital que incorpora un sensor
CMOS de fotograma completo (aprox. 35,8 x 23,9 mm) con aprox.
20,2 megapíxeles efectivos, DIGIC 5+, AF de 11 puntos de alta
precisión y alta velocidad, disparos en serie a aprox. 4,5 fps, disparo
con Visión en Directo, grabación de vídeo Full HD (alta definición
completa), Wi-Fi* y GPS*.
* La EOS 6D (N) no dispone de las funciones Wi-Fi ni GPS.
Antes de empezar a disparar, lea lo siguiente
Para evitar accidentes y fotografías mediocres, primero lea las
“Precauciones de seguridad” (p. 138-140) y las “Precauciones de
manejo” (p. 12-13). También, lea atentamente este manual para
asegurarse de utilizar la cámara correctamente.
Consulte este manual mientras utiliza la cámara para
conocerla mejor
Haga algunos disparos de prueba mientras lee este manual y observe
los resultados. De este modo entenderá mejor cómo funciona la cámara.
Asegúrese de guardar este manual en un lugar seguro, de modo que
pueda consultarlo de nuevo cuando sea necesario.
Prueba de la cámara antes de usarla y responsabilidad
Después de fotografiar, reproduzca y revise si las imágenes se
registraron correctamente. Si la cámara o la tarjeta de memoria fallan y
las imágenes no se pueden grabar o descargar en un ordenador,
Canon no se hará responsable de las pérdidas o de los inconvenientes
causados.
Derechos de autor
Las leyes sobre derechos de autor de su país pueden prohibir el uso de
sus imágenes grabadas, o de la música sujeta a derechos de autor y
las imágenes con música que se encuentran en la tarjeta de memoria,
fuera del uso privado. Asimismo, debe tener en cuenta que en algunas
representaciones públicas, exposiciones, etc., se prohíbe tomar
fotografías incluso para uso privado.
Introducción

3
La cámara puede utilizar las siguientes tarjetas, independientemente
de su capacidad:
• Tarjetas de memoria SD
• Tarjetas de memoria SDHC*
• Tarjetas de memoria SDXC*
* Tarjetas compatibles con UHS-I.
Cuando grabe vídeos, utilice una tarjeta de gran capacidad con una alta
velocidad de lectura/escritura según se muestra en la tabla.
Si utiliza una tarjeta con una velocidad de escritura lenta para grabar
vídeos, es posible que el vídeo no se grabe correctamente.
Además, si reproduce un vídeo en una tarjeta que tenga una
velocidad de lectura lenta, es posible que el vídeo no se reproduzca
correctamente.
Si desea tomar fotos mientras graba un vídeo, necesitará una tarjeta
aún más rápida.
Para comprobar la velocidad de lectura/escritura de la tarjeta,
consulte el sitio web del fabricante de la tarjeta.
Tarjetas compatibles
Tarjetas que pueden grabar vídeos
Método de compresión (p. 116) Tarjeta
IPB 6 MB/seg. o más rápida
ALL-I (sólo-I) 20 MB/seg. o más rápida
En este manual, el término “tarjeta” hace referencia a las tarjetas de
memoria SD, las tarjetas de memoria SDHC y las tarjetas de
memoria SDXC.
* La cámara no incluye una tarjeta para la grabación de
imágenes/vídeos. Debe adquirirla por separado.

4
Antes de empezar, compruebe si los siguientes elementos acompañan
a la cámara. Si falta alguno, póngase en contacto con el distribuidor.
* Se proporciona el cargador de batería LC-E6 o LC-E6E. (El LC-E6E incluye un
cable de alimentación.)
En la página siguiente se detallan las Instrucciones que se proporcionan.
Si adquirió un kit con objetivo, compruebe que se hayan incluido los objetivos.
Según el tipo de kit con objetivo, puede que se incluyan también manuales de
instrucciones de objetivos.
Procure no perder ninguno de los elementos mencionados.
Lista de comprobación de elementos
Batería LP-E6
(con tapa protectora)
Cargador de batería
LC-E6/LC-E6E*
Cable de interfaz IFC-200U Cable AV estéreo
AVC-DC400ST
Cámara
(con tapa del cuerpo)
Correa ancha
EW-EOS6D
EOS DIGITAL Solution Disk
(Software e Instrucciones del software)
Cuando necesite las Instrucciones de objetivos, puede descargarlas desde
el sitio web de Canon (p. 5).
Las Instrucciones de objetivos (PDF) son para objetivos que se venden por
separado. Tenga en cuenta que cuando adquiere el kit con objetivos,
algunos de los accesorios incluidos con el objetivo pueden no coincidir con
los que figuran en las Instrucciones del objetivo.

5
Instrucciones básicas de la cámara, Instrucciones
básicas de la función Wi-Fi y Instrucciones de la
función GPS
El folleto está compuesto por las Instrucciones de la cámara
(Versión básica), las Instrucciones de la función Wi-Fi
(Versión básica) y las instrucciones de la Función GPS
(Versión completa). Puede descargar instrucciones más
detalladas (archivos PDF) desde el sitio web de Canon.
1 Descargue las Instrucciones (archivos PDF).
Conéctese a Internet y acceda al siguiente sitio web de Canon.
www.canon.com/icpd
Seleccione su país o región de residencia y descargue las
Instrucciones.
Instrucciones disponibles para descargar
• Instrucciones de la cámara
• Instrucciones de la función Wi-Fi
• Instrucciones básicas de la cámara, Instrucciones básicas
de la función Wi-Fi y Instrucciones de la función GPS
• Instrucciones de objetivos
• Instrucciones del software
2 Consulte las Instrucciones (archivos PDF).
Haga doble clic en un archivo de Instrucciones (archivo PDF)
descargado para abrirlo.
Para ver las Instrucciones (archivos PDF), se necesita Adobe
Acrobat Reader DC u otro lector de PDF de Adobe (se
recomienda la versión más reciente).
Adobe Acrobat Reader DC se puede descargar gratis de Internet.
Para obtener información acerca de cómo utilizar un lector de
PDF, consulte la sección de Ayuda.
Instrucciones
Descarga y visualización de las Instrucciones (archivos PDF)
Las Instrucciones del software (archivos PDF) están también disponibles en
el EOS DIGITAL Solution Disk (p. 4).

6
Iconos de este manual
<6> : Indica el dial principal.
<
5> : Indica el dial de control rápido.
<9> <V> <U> : Indica el multicontrolador y la dirección en la
que pulsar.
<0> : Indica el botón de ajuste.
0
,
9
,
7
,
8
: Indica que la función correspondiente permanece
activa durante 4, 6, 10 ó 16 segundos,
respectivamente, tras soltar el botón.
* En este manual, los iconos y las marcas que reflejan los botones, diales y
ajustes de la cámara se corresponden con los iconos y las marcas de la cámara
y del monitor LCD.
3 : Indica una función que se puede cambiar presionando el
botón <
M> y cambiando el ajuste.
M : Cuando se muestra en la esquina superior derecha de una
página, indica que la función solamente está disponible en los
modos de la zona creativa (p. 20).
(p. **) : Números de páginas de referencia para obtener más
información.
: Advertencia para evitar problemas al fotografiar.
: Información complementaria.
: Sugerencia o consejo para fotografiar mejor.
: Consejo para solucionar problemas.
Supuestos básicos
En todas las operaciones que se explican en este manual se asume
que se ha situado el interruptor de alimentación en <
1> y que el
conmutador <R> se ha situado hacia la izquierda (Bloqueo de
función múltiple desactivado) (p. 30, 43).
Se asume que todos los ajustes de menú y las funciones
personalizadas son los predeterminados.
Las ilustraciones de este manual muestran como ejemplo la cámara
montando un objetivo EF50mm f/1,4 USM.
Símbolos utilizados en este manual

7
Para los usuarios noveles de DSLR, los capítulos 1 y 2 explican las
operaciones básicas y los procedimientos de disparo de la cámara.
Capítulos
Introducción
2
Para empezar
23
Fotografía básica
57
Ajuste de los modos AF y de avance
77
Ajustes de imagen
83
Operaciones avanzadas
95
Fotografía con el monitor LCD
(Disparo con Visión en Directo)
103
Grabación de vídeo
113
Reproducción de imágenes
119
Descarga de imágenes en el ordenador
129
1
2
3
4
5
6
7
8
9

8
1
Introducción 2
Tarjetas compatibles......................................................................... 3
Lista de comprobación de elementos............................................... 4
Instrucciones .................................................................................... 5
Símbolos utilizados en este manual................................................. 6
Capítulos .......................................................................................... 7
Precauciones de manejo................................................................ 12
Guía de iniciación rápida................................................................ 14
Nomenclatura................................................................................. 16
Para empezar 23
Carga de la batería......................................................................... 24
Inserción y extracción de la batería................................................ 26
Inserción y extracción de la tarjeta ................................................. 27
Encendido de la alimentación......................................................... 30
Ajuste de la fecha, hora y zona horaria.......................................... 32
Selección del idioma de la interfaz................................................. 34
Montaje y desmontaje de un objetivo............................................. 35
Acerca del estabilizador de imagen del objetivo ............................ 38
Funcionamiento básico .................................................................. 39
Q Control rápido para funciones de disparo................................. 45
3 Operaciones de menú.......................................................... 47
Antes de empezar .......................................................................... 49
Formateado de la tarjeta.............................................................. 49
Ajuste del tiempo de desconexión/Desconexión automática....... 51
Ajuste del tiempo de revisión de imagen..................................... 51
Apagado y encendido del monitor LCD ....................................... 52
Reversión de la cámara a los ajustes predeterminados.............. 52
Q Mostrar el nivel electrónico..................................................... 53
Guía de funciones y ayuda............................................................. 54
Contenido

9
Contenido
2
3
Fotografía básica 57
A Toma de fotografías totalmente automática (Escena inteligente
automática) .....................................................................................58
A Técnicas de fotografía totalmente automática (Escena inteligente
automática) .....................................................................................61
C Disparo automático creativo .....................................................63
8: Modo de escena especial .....................................................66
2 Fotografía de retratos ................................................................67
3 Fotografía de paisajes ..............................................................68
4 Fotografía de primeros planos ...................................................69
5 Fotografía de objetos en movimiento .......................................70
6 Fotografía de retratos nocturnos (con trípode) ..........................71
F Fotografía de escenas nocturnas (Sin trípode)..........................72
G Fotografía de escenas a contraluz ............................................73
Q Control rápido............................................................................75
Ajuste de los modos AF y de avance 77
f: Selección de la operación AF..................................................78
S Selección de puntos AF............................................................79
MF: Enfoque manual.......................................................................80
i Selección del modo de avance.................................................81
j Uso del autodisparador..............................................................82

Contenido
10
7
6
4
5
Ajustes de imagen 83
Ajuste de la calidad de grabación de imágenes............................. 84
i: Ajuste de la sensibilidad ISO ................................................. 86
A Selección de un estilo de imagen........................................... 87
Ajuste del balance de blancos........................................................ 88
Corrección automática de la luminosidad y el contraste ................ 89
Ajustes de reducción de ruido ........................................................ 90
Prioridad a tonos de altas luces ..................................................... 92
Corrección de iluminación periférica del objetivo / aberración
cromática........................................................................................ 93
Operaciones avanzadas 95
d: AE programada......................................................................... 96
s: AE con prioridad a la velocidad de obturación ....................... 97
f: AE con prioridad a la abertura ............................................... 98
a: Exposición manual................................................................... 99
Ajuste de la compensación de la exposición................................ 100
A Bloqueo AE............................................................................. 101
Fotografía con el monitor LCD
(Disparo con Visión en Directo) 103
A Fotografía con el monitor LCD............................................... 104
Uso del AF para enfocar (Sistema AF)......................................... 106
Enfoque manual ............................................................................111
Grabación de vídeo 113
k Grabación de vídeo.................................................................114
Ajuste del tamaño de grabación de vídeo .....................................116

11
Contenido
9
8
Reproducción de imágenes 119
x Reproducción de imágenes....................................................120
H Búsqueda rápida de imágenes ...............................................121
u Vista ampliada .........................................................................122
k Reproducción de vídeos.........................................................123
L Borrado de imágenes...............................................................125
Descarga de imágenes en el ordenador 129
Descarga de imágenes en un ordenador......................................130
Acerca del software ......................................................................132
Instalación del software.................................................................134
Software INSTRUCCIONES .........................................................135
Precauciones de seguridad ..........................................................138
Para una guía de solución de problemas y especificaciones, consulte las
Instrucciones que se puede descargar desde el sitio Web de Canon. Para
ver cómo descargar las Instrucciones, consulte la página 5.

12
Lea también las “Precauciones de manejo” en la página 141.
Cuidado de la cámara
La cámara es un instrumento de precisión. No la deje caer ni la someta a
golpes.
La cámara no es sumergible y no se puede utilizar bajo el agua.
Para maximizar la resistencia de la cámara al polvo y a las salpicaduras,
mantenga firmemente cerradas la tapa de terminales, la tapa del
compartimento de la batería, la tapa de la ranura de la tarjeta y todas las
demás tapas.
Esta cámara se ha diseñado para que sea resistente al polvo y las
salpicaduras, con el propósito de evitar que penetren en su interior la arena,
el polvo, la suciedad o el agua que caigan sobre ella accidentalmente, pero
es imposible evitar por completo que penetre polvo, suciedad, agua o sal.
En la medida de lo posible, no permita que la cámara entre en contacto con
la suciedad, el polvo, el agua y la sal.
Si entra agua en la cámara, séquela con un paño seco y limpio. Si entra
suciedad, polvo o sal en la cámara, límpiela con un paño limpio y húmedo
bien escurrido.
El uso de la cámara donde haya grandes cantidades de suciedad o de polvo
puede provocar una avería.
Es recomendable limpiar la cámara después de usarla. Si se permite que
quede suciedad, polvo, agua o sal en la cámara, es posible que se produzca
una avería.
Si, por accidente, deja caer la cámara al agua o le preocupa que haya
penetrado humedad (agua), suciedad, polvo o sal en su interior, consulte
inmediatamente al centro de asistencia de Canon más próximo.
Nunca deje la cámara junto a dispositivos con un campo magnético fuerte,
como un imán o un motor eléctrico. Evite usar o dejar la cámara cerca de
cualquier dispositivo que emita fuertes ondas de radio, como una antena de
grandes dimensiones. Los campos magnéticos fuertes pueden causar fallos
en el funcionamiento de la cámara o destruir los datos de las imágenes.
No deje la cámara en lugares demasiado calurosos, como el interior de un
coche expuesto a la luz directa del sol. Las altas temperaturas pueden
producir averías.
La cámara contiene un sistema de circuitos electrónicos de precisión. No
intente nunca desmontarla.
Precauciones de manejo

13
Precauciones de manejo
No bloquee el funcionamiento del espejo con el dedo, etc. Si lo hace, puede
provocar una avería.
Utilice un soplador para eliminar el polvo del objetivo, el visor, el espejo
réflex y la pantalla de enfoque. No utilice limpiadores con disolventes
orgánicos para limpiar el objetivo o el cuerpo de la cámara. Si se encuentra
con algún tipo de suciedad de difícil eliminación, lleve la cámara al centro de
asistencia de Canon más próximo.
No toque los contactos eléctricos de la cámara con los dedos. Así evitará
que los contactos se corroan. La corrosión de los contactos puede provocar
que la cámara deje de funcionar correctamente.
Si la cámara se traslada repentinamente de un entorno frío a uno caliente,
puede producirse condensación de agua en la cámara y en el interior de la
misma. Para evitar la condensación, coloque la cámara en una bolsa de
plástico con cierre hermético y permita que se adapte a esa temperatura
más cálida antes de sacarla.
Si se forma condensación de agua en la cámara, no la utilice. Así evitará
causar daños en la cámara. Si hay condensación, extraiga el objetivo, la
tarjeta y la batería de la cámara; espere a que se haya evaporado
totalmente antes de volver a utilizarla.
Si no va a utilizar la cámara durante un período de tiempo prolongado,
extraiga la batería y guarde la cámara en un lugar fresco, seco y con buena
ventilación. Aunque la cámara esté guardada, presione el disparador unas
cuantas veces de vez en cuando para comprobar que la cámara aún
funciona.
Evite almacenar la cámara en lugares donde haya productos químicos que
provoquen óxido o corrosión, tales como un laboratorio.
Si la cámara no se ha utilizado durante un período de tiempo prolongado,
compruebe todas sus funciones antes de utilizarla. Si no ha utilizado la
cámara durante cierto tiempo o tiene prevista una sesión fotográfica
importante, tal como un viaje al extranjero, llévela a un distribuidor de Canon
para que la revisen o compruebe usted mismo que funciona correctamente.

14
Guía de iniciación rápida
1
Inserte la batería (p. 26).
Para cargar la batería, consulte la
página 24.
2
Inserte una tarjeta (p. 27).
Con la etiqueta de la tarjeta
orientada hacia la parte
trasera de la cámara,
insértela en la ranura de la
tarjeta.
3
Monte el objetivo (p. 35).
Alinéelo con el punto rojo.
4
Sitúe el conmutador de modos
de enfoque del objetivo en
<f>
(p. 35).
5
Sitúe el interruptor de
alimentación en <1>
(p. 30).
Cuando se muestren en el monitor
LCD las pantallas de ajuste de
fecha/hora/zona, consulte la página
32.

15
Guía de iniciación rápida
6
Mantenga presionado el centro
del dial de modo y ajústelo en
<A> (Escena inteligente
automática)
(p. 58).
Todos los ajustes necesarios de la
cámara se realizarán
automáticamente.
7
Enfoque el motivo (p. 40).
Mire por el visor y sitúe el motivo de
modo que quede encuadrado en el
centro del visor.
Presione el disparador hasta la
mitad y la cámara enfocará el
motivo.
8
Tome la fotografía (p. 40).
Presione el disparador hasta el
fondo para tomar la fotografía.
9
Revise la imagen (p. 51).
La imagen captada aparecerá en el
monitor LCD durante 2 segundos.
Para volver a visualizar la imagen,
presione el botón <
x> (p. 120).
Para disparar mientras observa el monitor LCD, consulte “Disparo
con Visión en Directo” (p. 103).
Para ver las imágenes captadas, consulte “Reproducción de
imágenes” (p. 120).
Para eliminar una imagen, consulte “Borrado de imágenes”
(p. 125).

16
Nomenclatura
Panel LCD (p. 18)
<i> Botón de ajuste de la
sensibilidad ISO (p. 86)
<q> Botón de selección
del modo de medición
<U> Botón de
iluminación del panel
LCD (p. 44)
<6> Dial principal
(p. 41)
Disparador (p. 40)
Sensor de control
remoto
Orificio del cable del
acoplador de CC
Botón de previsualización de la
profundidad de campo
Espejo
<R> Botón de selección del modo de avance
(p. 81)
<f> Botón de selección del funcionamiento de
AF (p. 78)
Índice de montaje para objetivo (p. 35)
Contactos de sincronización del flash
Zapata para accesorios
Botón de liberación de
bloqueo del dial de
modo (p. 41)
Dial de modo (p. 20)
Montura de la
correa (p. 23)
Altavoz
(p. 123)
Micrófono
Botón de
desbloqueo del
objetivo (p. 36)
Clavija de bloqueo del objetivo
Montura del objetivo
Contactos (p. 13)
<q/C> Terminal audio/vídeo
OUT/digital (p. 130)
<F> Terminal de disparador remoto (Tipo N3)
<Y> Terminal de entrada de micrófono
externo
<D> Terminal HDMI mini OUT
Tapa del cuerpo
(p. 35)
Lámpara del
autodisparador
(p. 82)
Empuñadura
(Compartimiento
de la batería)

17
Nomenclatura
<V> Marca del plano focal
<A/k> Conmutador de disparo con Visión en
Directo/grabación de vídeo (p. 103/113)
<0> Botón de Inicio/Parada (p. 104, 114)
Rueda de ajuste dióptrico (p. 39)
Marco del ocular
Ocular del visor
Interruptor de
alimentación (p. 30)
<
M
>
Botón de menú (p. 47)
<
B
>
Botón de información
(p. 44, 53, 55, 120)
Monitor LCD (p. 47)
Rosca de trípode
<u> Botón de índice/ampliar/
reducir (p. 121/122)
<x> Botón de reproducción (p. 120)
<9> Multicontrolador (p. 43)
<L> Botón de borrado (p. 125)
<p> Botón de inicio AF
(p. 40, 105)
<
A
> Botón de bloqueo AE/
bloqueo FE (p. 101)
<S> Botón de
selección del punto AF
(p. 79)
<Q> Botón de
control rápido
(p. 45)
Montura de la
correa (p. 23)
Tapa de la
ranura de la
tarjeta (p. 27)
Palanca de
liberación de la
tapa del
compartimiento
de la batería
(p. 26)
Tapa del compartimiento
de la batería (p. 26)
Lámpara de acceso (p. 29)
Conmutador de bloqueo de
función múltiple (p. 43)
<0> Botón de ajuste (p. 47)
<5> Dial de control rápido (p. 42)
Ranura de la tarjeta (p. 27)

Nomenclatura
18
Panel LCD
La pantalla sólo mostrará los ajustes aplicados actualmente.
Modo de avance (p. 81)
u Disparo único
i Disparos en serie
B Disparo silencioso único
M Disparo en serie
silencioso
Q Autodisparador: 10 seg./
Control a distancia
k Autodisparador: 2 seg./
Control a distancia
<h> AEB
Operación AF (p. 78)
X
AF foto a foto
9
AF AI Foco
Z
AF AI Servo
4 L
Enfoque manual
Función Wi-Fi
<k/l>
1 2
<x> Función de registro
<M> Reducción de ruido
multidisparo (p. 90)
<P> Disparo con exposición
múltiple
<A> Prioridad a tonos de altas luces
(p. 92)
<g> Sensibilidad ISO (p. 86)
Sensibilidad ISO (p. 86)
Disparos posibles
Cuenta atrás del
autodisparador
Tiempo de exposición “B”
Número de error
Imágenes restantes para grabar
Modo de medición
q Medición evaluativa
w Medición parcial
r Medición puntual
e Medición
promediada con
preponderancia
central
<w> Disparo
HDR
Comprobación del nivel
de carga de la batería
(p. 31)
Indicador del nivel de exposición
Cantidad de compensación de
la exposición (p. 100)
Intervalo AEB
Cantidad de compensación de
la exposición con flash
Nivel electrónico
Abertura
Selección del punto AF
([ ] AF, SEL [ ], SEL AF)
Aviso de tarjeta llena (FuLL)
Aviso de error de tarjeta (Card Err)
<r> Estado de
adquisición del
GPS
Velocidad de obturación
Bloqueo FE (FEL)
Ocupado (buSY)
Advertencia de bloqueo de función
múltiple (L)
Aviso de tarjeta ausente (Card)
Código de error (Err)
Limpieza del sensor de imagen (CLn)

19
Nomenclatura
Información del visor
La pantalla sólo mostrará los ajustes aplicados actualmente.
Pantalla de enfoque
<h> Símbolo de advertencia
<
z
> Comprobación del nivel
de carga de la batería (p. 31)
<A> Bloqueo AE (p. 101) /
AEB en curso
<e> Sincronización de alta
velocidad
<y> Compensación de la
exposición con flash
Velocidad de obturación (p. 97)
Bloqueo FE (FEL)
Ocupado (buSY)
Advertencia de bloqueo de
función múltiple (L)
Puntos AF (p. 79)
(Superponer imagen)
Círculo de medición
puntual
<
g
> Sensibilidad
ISO (p. 86)
<
o
> Luz de
confirmación
de enfoque
(p. 59)
Ráfaga máxima
Número de exposiciones
múltiples restantes
Sensibilidad ISO (p. 86)
<
A
> Prioridad a tonos de altas luces (p. 92)
Indicador del nivel de exposición
Cantidad de compensación de la
exposición (p. 100)
Intervalo AEB
Cantidad de compensación de la
exposición con flash
Nivel electrónico
Selección del punto AF
([ ] AF, SEL [ ], SEL AF)
Aviso de tarjeta llena (FuLL)
Aviso de error de tarjeta (Card)
Aviso de tarjeta ausente (Card)
Abertura (p. 98)
<d>Bloqueo FE/Ahorquillado
de la exposición con flash
en curso
<D> Flash listo
Aviso de bloqueo FE
incorrecto

Nomenclatura
20
Dial de modo
Gire el dial de modo manteniendo presionado el centro (botón de
liberación de bloqueo del dial de modo).
Zona básica
Sólo es necesario presionar el
disparador. La cámara establece
todos los ajustes adecuados para
el motivo o la escena.
A: Escena inteligente
automática (p. 58)
C : Automático creativo (p. 63)
8: Escena especial (p. 66)
2 : Retratos (p. 67)
3 : Paisajes (p. 68)
4 : Primeros planos (p. 69)
5 : Deportes (p. 70)
6 : Retratos nocturnos (p. 71)
F : Escena nocturna sin trípode
(p. 72)
G : Control contraluz HDR
(p. 73)
Zona creativa
Estos modos ofrecen más control
para fotografiar diversos motivos.
d : AE programada (p. 96)
s
: AE con prioridad a la velocidad
de obturación (p. 97)
f : AE con prioridad a la
abertura (p. 98)
a : Exposición manual (p. 99)
F : Exposición “B”
Modo de disparo personalizado
Puede registrar el modo de
disparo (d/s/f/a/F),
la operación AF, los ajustes
del menú, etc. en los ajustes
del dial de modo w o x y
disparar.

21
Nomenclatura
Objetivo
EF24-105mm f/4L IS USM
Conmutador de modos de enfoque
(p. 35)
Montura del parasol
(p. 37)
Rosca de filtro de
φ77mm (parte frontal
del objetivo)
Anillo de enfoque
(p. 80, 111)
Conmutador del estabilizador de
imagen (p. 38)
Escala de distancia
Índice infrarrojo
Anillo de zoom (p. 36)
Índice de posición
del zoom (p. 36)
Contactos (p. 13)
Índice de montaje para
objetivo (p. 35)

Nomenclatura
22
Cargador de batería LC-E6
Cargador para batería LP-E6/LP-E6N (p. 24).
Cargador de batería LC-E6E
Cargador para batería LP-E6/LP-E6N (p. 24).
Ranura de la batería
Lámpara de carga
Clavija de alimentación
Cable de alimentación
Toma del cable de alimentación
Ranura de la
batería
Lámpara de carga

23
1
Para empezar
En este capítulo se explican los pasos preparatorios
antes de empezar a disparar, así como las operaciones
básicas de la cámara.
Colocación de la correa
Pase el extremo de la correa a través
del ojal de la montura de la cámara,
desde abajo. Seguidamente, páselo a
través de la hebilla de la correa, como
se muestra en la ilustración. Tire de la
correa para que quede tensa y
asegúrese de que no se afloja en la
hebilla.
La tapa del ocular también está
sujeta a la correa.
Tapa del ocular

24
1
Retire la tapa protectora.
Quite la tapa protectora que se
proporciona con la batería.
2
Monte la batería.
Monte la batería firmemente en el
cargador, como se muestra en la
ilustración.
Para retirar la batería, siga el
procedimiento anterior en orden inverso.
3
Recargue la batería.
Para el LC-E6
Tal como indica la flecha, saque las
patillas del cargador de batería e
insértelas en la toma de electricidad.
Para el LC-E6E
Conecte el cable de alimentación al
cargador e inserte la clavija en la
toma de electricidad.
X La recarga se inicia automáticamente
y la lámpara de carga parpadea en
naranja.
La recarga de una batería completamente agotada tarda
aproximadamente 2,5 horas a temperatura ambiente (23°C / 73°F). El
tiempo necesario para recargar la batería variará mucho en función de
la temperatura ambiente y de la capacidad restante en la batería.
Por motivos de seguridad, la recarga a bajas temperaturas (5°C -
10°C / 41°F - 50°F) tardará más tiempo (hasta aprox. 4 horas).
Carga de la batería
LC-E6
LC-E6E
Nivel de carga
Lámpara de carga
Color Indicador
0 - 49%
Naranja
Parpadea una vez por segundo
50 - 74% Parpadea dos veces por segundo
75% o más Parpadea tres veces por segundo
Completamente cargada
Verde Se ilumina

25
Carga de la batería
Al comprarla, la batería no está cargada por completo.
Recargue la batería antes de utilizarla.
Recargue la batería el día antes o el mismo día en el que vaya a utilizarla.
Incluso mientras estén guardadas, las baterías cargadas se
vaciarán gradualmente y perderán su capacidad.
Una vez que se haya recargado la batería, desmóntela y
desenchufe el cargador de la toma de electricidad.
Puede colocar la tapa con una orientación
diferente para indicar si la batería se ha
recargado o no.
Si se ha recargado la batería, coloque la tapa
de modo que el orificio con forma de batería
< > quede alineado con la pegatina azul de la batería. Si la
batería está agotada, coloque la tapa en la orientación opuesta.
Cuando no utilice la cámara, retire la batería.
Si se deja la batería en la cámara durante un período prolongado de
tiempo, se libera una pequeña cantidad de corriente que descarga
la batería en exceso y acorta su duración. Conserve la batería con
la tapa protectora puesta. Almacenar la batería cuando está
completamente cargada puede reducir su rendimiento.
El cargador de batería puede utilizarse también en otros países.
El cargador de batería es compatible con una fuente de alimentación de
100 V CA a 240 V CA 50/60 Hz. Si es necesario, monte un adaptador
de clavija comercial para el país o la región correspondiente. No
conecte ningún transformador de tensión portátil al cargador de batería.
Si lo hace puede dañar el cargador de batería.
Si la batería se agota rápidamente, incluso tras cargarla por
completo, ha alcanzado el final de su vida útil.
Compruebe el rendimiento de recarga de la batería y compre una
batería nueva.
Sugerencias para usar la batería y el cargador
Después de desconectar la clavija de alimentación del cargador de
batería, no toque el enchufe durante, aproximadamente, 10 seg.
Si la capacidad restante de la batería es del 94% o superior, la batería
no se recargará.
El cargador no cargará ninguna batería diferente de la batería LP-E6/LP-E6N.

26
Cargue en la cámara una batería LP-E6 (o LP-E6N) completamente
cargada.
1
Abra la tapa.
Deslice la palanca como indican las
flechas y abra la tapa.
2
Inserte la batería.
Inserte el extremo con los contactos
de la batería.
Inserte la batería hasta que quede
encajada en su sitio.
3
Cierre la tapa.
Presione la tapa para cerrarla hasta
que encaje en su lugar.
Abra la tapa y extraiga la batería.
Presione la palanca de bloqueo de la
batería, como indica la flecha, y
extraiga la batería.
Para evitar cortocircuitos de los
contactos de la batería, no olvide
colocar la tapa protectora
suministrada (p. 24) en la batería.
Inserción y extracción de la batería
Inserción de la batería
Extracción de la batería
Solamente se puede usar la batería LP-E6/LP-E6N.

27
La cámara puede utilizar una tarjeta de memoria SD, SDHC o SDXC.
También se pueden utilizar tarjetas SDHC y SDXC de Clase de
velocidad UHS-I. Las imágenes captadas se graban en la tarjeta.
Asegúrese de que el conmutador de protección contra
escritura de la tarjeta esté situado en la posición superior para
permitir la escritura y el borrado.
1
Abra la tapa.
Deslice la tapa como indican las
flechas para abrirla.
2
Inserte la tarjeta.
Como se muestra en la ilustración,
oriente la cara de la etiqueta de la
tarjeta hacia usted e inserte la
tarjeta hasta que encaje en su
lugar.
3
Cierre la tapa.
Cierre la tapa y deslícela en la
dirección que muestran las flechas
hasta que encaje en su lugar.
Cuando sitúe el interruptor de
alimentación en <1>, se mostrará
en el monitor LCD el número de
disparos posibles (p. 31).
Inserción y extracción de la tarjeta
Inserción de la tarjeta
Conmutador de protección
contra escritura
Disparos posibles

Inserción y extracción de la tarjeta
28
1
Abra la tapa.
Sitúe el interruptor de alimentación
en <2>.
Compruebe que la lámpara de
acceso está apagada y abra la
tapa.
Si se muestra [Grabando...], cierre la
tapa.
2
Extraiga la tarjeta.
Empuje suavemente la tarjeta y luego
suéltela para expulsarla.
Tire de la tarjeta para extraerla y, a
continuación, cierre la tapa.
Extracción de la tarjeta
El número de disparos posibles depende de la capacidad que le quede a
la tarjeta, de la calidad de grabación de imágenes, de la sensibilidad
ISO, etc.
Si ajusta [z1: Disparar sin tarjeta] en [Desactivar] evitará olvidarse
de insertar una tarjeta.
Lámpara de acceso

29
Inserción y extracción de la tarjeta
Cuando la lámpara de acceso está iluminada o parpadeando, indica
que la tarjeta está escribiendo o leyendo imágenes, que se están
borrando imágenes o que se están transfiriendo datos. No abra la
tapa de la ranura de la tarjeta en este momento. Tampoco debe
hacer nunca nada de lo siguiente mientras la lámpara de acceso
esté iluminada o parpadeando. De lo contrario, puede dañar los
datos de imagen, la tarjeta o la cámara.
• Extraer la tarjeta.
• Extraer la batería.
• Agitar o golpear la cámara.
Si la tarjeta ya contiene imágenes grabadas, es posible que el número
de imagen no se inicie desde 0001.
Si se muestra un error relativo a la tarjeta en el monitor LCD, retire e
inserte de nuevo la tarjeta. Si el error persiste, utilice una tarjeta
diferente.
Si puede transferir todas las imágenes de la tarjeta a un ordenador,
transfiera todas las imágenes y, a continuación, formatee la tarjeta con la
cámara (p. 49). Después puede que la tarjeta vuelva a la normalidad.
No toque los contactos de la tarjeta con los dedos ni con objetos
metálicos.

30
Si enciende el interruptor de alimentación y aparece la pantalla de
ajuste de fecha, hora y zona, consulte la página 32 para ajustar la
fecha, la hora y la zona.
<1> : La cámara se enciende.
<2> : La cámara se apaga y no
funciona. Ajuste el interruptor
en esta posición cuando no
utilice la cámara.
Siempre que sitúe el interruptor de
alimentación en <1> u <2>, se
ejecutará automáticamente la
limpieza del sensor. (Es posible que
se oiga un pequeño sonido.) Durante
la limpieza del sensor, el monitor LCD
mostrará <f>.
Puede seguir disparando durante la
limpieza del sensor; para ello,
presione el disparador hasta la mitad
(p. 40) para detener la limpieza y
tomar una fotografía.
Si sitúa repetidamente el interruptor de alimentación en <1>/
<2> en un corto intervalo de tiempo, es posible que no se
muestre el icono <f>. Esto es normal, y no supone un problema.
Para ahorrar energía de la batería, la cámara se apaga
automáticamente después de 1 minuto de inactividad. Para encender
de nuevo la cámara, presione el disparador hasta la mitad (p. 40).
Puede ajustar el tiempo de desconexión automática con
[52: Descon. auto] (p. 51).
Encendido de la alimentación
Acerca de la autolimpieza automática del sensor
3 Acerca de la desconexión automática
Si sitúa el interruptor de alimentación en <2> mientras se está
grabando una imagen en la tarjeta, se mostrará [Grabando...] y se apagará
la alimentación una vez que la tarjeta termine de grabar la imagen.

31
Encendido de la alimentación
Cuando el interruptor de alimentación está situado en <1>, se indica
el nivel de la batería en seis niveles. Un icono de batería intermitente
(b) indica que la batería se agotará pronto.
Número de disparos posibles [Número aproximado de disparos]
Las cifras anteriores son válidas si se utiliza una batería LP-E6 completamente
cargada y no se dispara con Visión en Directo, y se basan en los criterios de
prueba de la CIPA (Camera & Imaging Products Association).
Disparos posibles con la empuñadura BG-E13
• Con LP-E6 x 2: aprox. el doble de disparos que sin la empuñadura.
• Con pilas alcalinas de tamaño AA/LR6 a temperatura ambiente (23°C /
73°F): aprox. 480 disparos.
z Comprobación del nivel de carga de la batería
Icono
Nivel (%) 100 - 70 69 - 50 49 - 20 19 - 10 9 - 1 0
Temperatura
Temperatura ambiente
(23°C / 73°F)
Baja temperatura
(0°C / 32°F)
Disparos posibles 1090 980
El número de disparos posibles se reducirá con cualquiera de las
operaciones siguientes:
• Presionar el disparador hasta la mitad durante un período prolongado.
• Activar frecuentemente el AF sin tomar una fotografía.
• Usar el estabilizador de imagen del objetivo.
• Usar con frecuencia el monitor LCD.
Es posible que el número de disparos posibles se reduzca en función de
las condiciones de disparo reales.
El objetivo se alimenta de la energía de la batería de la cámara. Según
el objetivo utilizado, el número de disparos posibles puede ser inferior.
Para ver el número de disparos posibles cuando se usa el disparo con
Visión en Directo, consulte la página 105.
Consulte [54: Info. Batería] para examinar de manera detallada el
estado de la batería.
Si se utilizan pilas AA/LR6 en la empuñadura BG-E13, se mostrará un
indicador de cuatro niveles. ([x/m] no se mostrará.)

32
Cuando encienda la alimentación por primera vez, o si se ha reiniciado la
fecha, hora y zona, aparecerá la pantalla de ajuste de fecha, hora y zona.
En primer lugar, siga estos pasos para ajustar la zona horaria. Si ajusta la
cámara en la zona horaria correcta correspondiente al lugar donde vive
actualmente, cuando viaje a otra zona horaria le bastará con ajustar la
cámara en la zona horaria correcta de su destino para que la fecha y la
hora de la cámara se actualicen automáticamente.
Tenga en cuenta que la fecha y hora que se añadan a las imágenes
grabadas se basarán en este ajuste de fecha/hora. Asegúrese de
ajustar la fecha y la hora correctas.
1
Muestre la pantalla de menú.
Presione el botón <M> para
mostrar la pantalla de menú.
2
Bajo la ficha [52], seleccione
[Fecha/Hora/Zona].
Presione la tecla <U> para
seleccionar la ficha [52].
Presione la tecla <V> para
seleccionar [Fecha/Hora/Zona] y, a
continuación, presione <0>.
3
Ajustar la zona horaria
De forma predeterminada, se
ajusta [Londres].
Presione la tecla <
U
> para
seleccionar la casilla de la zona horaria.
Presione <0> para mostrar <r>.
Presione la tecla <V> para
seleccionar la zona horaria y, a
continuación, presione <0>.
(Vuelve a <s>.)
3
Ajuste de la fecha, hora y zona horaria
El procedimiento de ajuste del menú se explica en las páginas 47-48.
La hora que se muestra arriba a la derecha es la diferencia horaria
respecto a la hora universal coordinada (Coordinated Universal Time
(UTC)). Si no ve su zona horaria, ajuste la zona horaria consultando la
diferencia respecto al UTC.

33
3 Ajuste de la fecha, hora y zona horaria
4
Ajuste la fecha y la hora.
Presione la tecla <U> para
seleccionar el número.
Presione <0> para mostrar <r>.
Presione la tecla <V> para ajustar
el número y, a continuación, presione
<0>. (Vuelve a <s>.)
5
Ajuste el horario de verano.
Ajústelo si es necesario.
Presione la tecla <U> para
seleccionar [Y].
Presione <0> para mostrar <r>.
Presione la tecla <V> para
seleccionar [Z] y, a continuación,
presione <0>.
Cuando se ajuste el horario de
verano en [Z], la hora ajustada en el
paso 4 avanzará 1 hora. Si se ajusta
[Y], se cancelará el horario de
verano y la hora se retrasará en
1 hora.
6
Salga del ajuste.
Presione la tecla <U> para
seleccionar [OK] y, a continuación,
presione <0>.
X Se ajustará la fecha, la hora, la zona
y el horario de verano, y volverá a
aparecer el menú.
La fecha y la hora ajustadas se iniciarán en el momento en que presione
<0> en el paso 6.
Después de cambiar la zona horaria, compruebe que se hayan ajustado
la fecha y la hora correctas.
Si guarda la cámara sin la batería, o si la batería de la cámara se agota, es
posible que se reajusten la fecha, hora y zona. Si ocurre así, ajuste de
nuevo la zona horaria y la fecha/hora.

34
1
Muestre la pantalla de menú.
Presione el botón <M> para
mostrar la pantalla de menú.
2
Bajo la ficha [52], seleccione
[IdiomaK].
Presione la tecla <U> para
seleccionar la ficha [52].
Presione la tecla <V> para
seleccionar [Idioma
K] y, a
continuación, presione <0>.
3
Ajuste el idioma deseado.
Presione la tecla <V> para
seleccionar el idioma y, a
continuación, presione <0>.
X El idioma de la interfaz cambiará.
3 Selección del idioma de la interfaz

35
La cámara es compatible con todos los objetivos Canon EF. La cámara
no se puede utilizar con objetivos EF-S y EF-M.
1
Quite las tapas.
Quite la tapa posterior del objetivo y
la tapa del cuerpo girándolas de la
forma que indican las flechas.
2
Monte el objetivo.
Alinee los puntos rojos del objetivo y
de la cámara, y gire el objetivo como
indica la flecha hasta que encaje en
su lugar.
3
Sitúe el conmutador de modos de
enfoque del objetivo en <AF>.
<AF> significa “Autofocus” (enfoque
automático).
Si se ajusta en <MF> (enfoque
manual), el enfoque automático no
funcionará.
4
Quite la tapa de la parte frontal
del objetivo.
Montaje y desmontaje de un objetivo
No mire al sol directamente a través de ningún objetivo. Si lo hace puede
provocarse una pérdida de visión.
Si la parte delantera (el anillo de enfoque) del objetivo gira durante el
enfoque automático, no toque la parte que gira.
Minimizar el polvo
Cuando cambie de objetivo, hágalo rápidamente en un lugar con el
mínimo polvo posible.
Cuando guarde la cámara sin un objetivo montado, no olvide colocar la
tapa del cuerpo en la cámara.
Quite el polvo de la tapa del cuerpo antes de colocarla.

Montaje y desmontaje de un objetivo
36
Para usar el zoom, gire con los dedos el
anillo de zoom del objetivo.
Si desea utilizar el zoom, hágalo antes
de enfocar. Si gira el anillo de zoom
después de haber enfocado, es
posible que pierda ligeramente el
enfoque.
Mantenga presionado el botón de
desbloqueo del objetivo y gire el
objetivo como indican las
flechas.
Gire el objetivo hasta que se detenga
y desmóntelo.
Coloque la tapa posterior del objetivo
en el objetivo desmontado.
Para los usuarios del objetivo EF24-105mm f/3,5-5,6 IS STM:
Puede impedir que el objetivo se
extienda hacia fuera durante el
transporte. Ajuste el anillo de zoom en el
extremo de gran angular de 24 mm y, a
continuación, deslice la palanca de
bloqueo del anillo de zoom a la posición
<LOCK>. El anillo de zoom solamente
puede bloquearse en el extremo de gran
angular.
Acerca del zoom
Desmontaje del objetivo

37
Montaje y desmontaje de un objetivo
Un parasol puede bloquear la luz no deseada y proteger la parte frontal
del objetivo de la lluvia, la nieve, el polvo, etc. Antes de guardar el
objetivo en una bolsa, etc., puede montar el parasol en posición
invertida.
1
Alinee los puntos rojos del
parasol y los bordes del objetivo,
y gire el parasol como indica la
flecha.
2
Gire el parasol como se muestra
en la ilustración.
Gire el parasol en sentido horario
hasta que quede firmemente
montado.
Monte el parasol.
Gire el parasol como muestra la
flecha hasta que quede firmemente
montado.
Montaje de un parasol
Si el parasol y el objetivo tienen índice de montaje
Si ni el parasol ni el objetivo tienen índice de montaje
Si el objetivo tiene índice de montaje y no se monta correctamente
puede obstruir la periferia de la imagen y provocar que se oscurezca.
Al montar y desmontar el parasol, sujete la base del parasol mientras lo
hace girar. Si sujeta el parasol por el borde al hacerlo girar puede
provocar que se deforme y no gire.

38
Cuando utilice el estabilizador de imagen integrado en un objetivo IS,
las trepidaciones se corregirán para obtener imágenes más nítidas. El
procedimiento que se explica aquí se basa, como ejemplo, en el
objetivo EF24-105mm f/4L IS USM.
* IS significa “Image Stabilizer” (estabilizador de imagen).
1
Sitúe el conmutador del
estabilizador de imagen en <
1
>.
Sitúe también el interruptor de
alimentación de la cámara en <1>.
2
Presione el disparador hasta la mitad.
X El estabilizador de imagen entrará en
funcionamiento.
3
Tome la fotografía.
Cuando la imagen parezca estable en
el visor, presione el disparador hasta
el fondo para tomar la fotografía.
Acerca del estabilizador de imagen del objetivo
El estabilizador de imagen no puede corregir la “borrosidad del motivo”
si el motivo se mueve en el momento de la exposición.
Para las exposiciones “B”, ajuste el conmutador IS en <
2
>. Si se ajusta
<
1
>, es posible que el estabilizador de imagen no funcione correctamente.
Es posible que el estabilizador de imagen no sea eficaz cuando la
trepidación sea excesiva, por ejemplo en un barco que oscila.
Es posible que el estabilizador de imagen no sea eficaz cuando utilice el
objetivo EF24-105mm f/4L IS USM para fotografías de barrido.
El estabilizador de imagen puede funcionar con el conmutador de modo
de enfoque ajustado en <AF> o <MF>.
Cuando utilice un trípode, puede continuar fotografiando con el
conmutador IS ajustado en <1> sin ningún problema. No obstante,
para ahorrar energía de la batería, es recomendable situar el
conmutador IS en <2>.
El estabilizador de imagen es efectivo incluso cuando la cámara está
montada en un monopié.
Con los objetivos EF24-105mm f/3,5-5,6 IS STM, es posible que el modo
del estabilizador de imagen cambie automáticamente para ajustarse a
las condiciones de disparo.

39
Gire la rueda de ajuste dióptrico.
Gire la rueda a la derecha o la
izquierda de manera que los puntos
AF del visor aparezcan nítidamente.
Si resulta difícil girar la rueda, retire el
marco del ocular.
Para obtener imágenes nítidas, sujete firmemente la cámara para
minimizar las trepidaciones.
1. Sujete firmemente con la mano derecha la empuñadura de la cámara.
2. Sujete el objetivo desde abajo con la mano izquierda.
3. Apoye ligeramente sobre el disparador el dedo índice de la mano
derecha.
4. Apriete los brazos y los codos ligeramente contra la parte delantera
del cuerpo.
5. Para mantener una postura estable, coloque un pie ligeramente por
delante del otro.
6. Acérquese la cámara a la cara y mire a través del visor.
Funcionamiento básico
Ajuste de la claridad del visor
Sujeción de la cámara
Si tras el ajuste dióptrico de la cámara aún no consigue ver nítidamente a
través del visor, es recomendable que utilice objetivos de ajuste dióptrico de
la serie E (10 tipos, se venden por separado).
Con la cámara en vertical
Con la cámara en horizontal
Para disparar mientras observa el monitor LCD, consulte la página 103.

Funcionamiento básico
40
El disparador tiene dos posiciones. Puede presionar el disparador hasta
la mitad. A continuación, puede presionar el disparador hasta el fondo.
Presionar el disparador hasta la
mitad
De este modo se activa el enfoque
automático y el sistema automático de
exposición, que ajusta la velocidad de
obturación y la abertura.
En el visor y en el panel LCD aparece el
ajuste de la exposición (velocidad de
obturación y abertura) (0).
Presionar el disparador hasta el
fondo
Esta acción dispara el obturador y toma
la fotografía.
Prevención de trepidaciones
El movimiento de la cámara cuando se sostiene a mano durante el
momento de la exposición se denomina trepidación. Puede causar
imágenes borrosas. Para evitar trepidaciones, tenga en cuenta lo siguiente:
• Sujete y estabilice la cámara como se muestra en la página
anterior.
• Presione el disparador hasta la mitad para enfocar
automáticamente y, a continuación, presione lentamente el
disparador hasta el fondo.
Disparador
En los modos de la zona creativa, pulsar el botón <p> equivaldrá a
presionar el disparador hasta la mitad.
Si presiona el disparador hasta el fondo sin antes presionarlo hasta la
mitad, o si lo presiona hasta la mitad e inmediatamente después lo
presiona a fondo, pasará un momento antes de que la cámara tome la
fotografía.
Puede volver al modo listo para disparo al instante presionando el
disparador hasta la mitad, incluso mientras se muestra el menú, o se
reproducen o graban imágenes.

41
Funcionamiento básico
Gire el dial mientras mantiene
presionado el botón de liberación
de bloqueo situado en el centro
del dial.
(1)
Tras presionar un botón, gire el
dial <6>.
Cuando se presiona un botón tal como
<f>, <R> o <i>, la función
correspondiente permanece
seleccionada mientras dure el
temporizador (9). Durante este tiempo
puede girar el dial <6> para
establecer el ajuste deseado.
Cuando termine de seleccionar la función
o presione el disparador hasta la mitad, la
cámara estará lista para disparar.
Utilice este dial para seleccionar o
ajustar la operación AF, el modo de
avance, la sensibilidad ISO, el modo de
medición, la selección del punto AF, etc.
(2)
Gire únicamente el dial <6>.
Mientras observa el visor o el panel LCD,
gire el dial <6> para establecer el
ajuste deseado.
Utilice este dial para ajustar la
velocidad de obturación, la abertura,
etc.
Dial de modo
6 Dial principal
Las operaciones de (1) también son posibles cuando se sitúa el conmutador
<R> a la derecha (bloqueo de función múltiple, p. 43).

Funcionamiento básico
42
(1)
Tras presionar un botón, gire el
dial <5>.
Cuando se presiona un botón tal como
<f>, <R> o <i>, la función
respectiva permanece seleccionada
mientras dure el temporizador (9).
Durante este tiempo puede girar el dial
<5> para establecer el ajuste deseado.
Cuando termine de seleccionar la
función o presione el disparador hasta la
mitad, la cámara estará lista para
disparar.
Utilice este dial para seleccionar o
ajustar la operación AF, el modo de
avance, la sensibilidad ISO, el modo
de medición, la selección del punto
AF, etc.
(2)
Gire únicamente el dial <5>.
Mientras observa el visor o el panel LCD,
gire el dial <
5> para establecer el
ajuste deseado.
Utilice este dial para establecer la
cantidad de compensación de la
exposición, el ajuste de abertura para
las exposiciones manuales, etc.
5 Dial de control rápido
Las operaciones de (1) también son posibles cuando se sitúa el conmutador
<R> a la derecha (bloqueo de función múltiple, p. 43).

43
Funcionamiento básico
El multicontrolador <9> tiene ocho teclas que se inclinan en las
direcciones que muestran las flechas.
Utilice las ocho teclas para
seleccionar el punto AF, corregir el
balance de blancos, mover el punto
AF o el marco de ampliación mientras
se dispara con Visión en Directo,
desplazar imágenes ampliadas
durante la reproducción, etc.
Para los menús y el control rápido, el
multicontrolador solamente funciona
en las direcciones vertical y
horizontal <V> <U>. No funciona
en direcciones diagonales.
Con [8C.Fn III -3: Bloqueo función múltiple] ajustado y el
conmutador <R> situado a la derecha, impide que el dial principal,
el dial de control rápido y el multicontrolador se muevan y cambien
accidentalmente algún ajuste.
Conmutador <R> situado a la
izquierda: bloqueo desactivado
Conmutador <R> situado a la
derecha: bloqueo activado
9 Multicontrolador
R Bloqueo de función múltiple
Si se ajusta el conmutador <R> a la derecha y se intenta utilizar uno
de los controles de la cámara bloqueados, se mostrará <L> en el visor y en
el panel LCD. En la pantalla de ajustes de funciones de disparo (p. 44), se
mostrará [LOCK].

Funcionamiento básico
44
Encienda (9)/apague la iluminación
del panel LCD pulsando el botón <U>.
Durante una exposición “B”, al presionar
el disparador hasta el fondo se apaga la
iluminación del panel LCD.
Después de presionar el botón <B> varias veces, se mostrarán los
ajustes de las funciones de disparo.
Mientras se muestran los ajustes de disparo, puede girar el dial de
modo para ver los ajustes de cada modo de disparo.
Al presionar el botón <Q> se activa el control rápido de los ajustes de
las funciones de disparo (p. 45).
Presione de nuevo el botón <B> para apagar la pantalla.
U Iluminación del panel LCD
Mostrar ajustes de funciones de disparo

45
Puede seleccionar y establecer directamente las funciones de disparo
que se muestran en el monitor LCD. Esto se denomina pantalla de
control rápido.
1
Presione el botón <Q>.
X Aparecerá la pantalla de control
rápido (7).
2
Ajuste la función que desee.
Presione la tecla <V> <U> para
seleccionar una función.
X El ajuste de la función seleccionada
se muestra.
Gire el dial <6> o <5> para
cambiar el ajuste.
3
Tome la fotografía.
Presione el disparador hasta el fondo
para tomar la fotografía.
X Se mostrará la imagen captada.
Q
Control rápido para funciones de disparo
Modos de la zona básica Modos de la zona creativa
Para ver las funciones ajustables en los modos de la zona básica y el
procedimiento de ajuste, consulte la página 75.

Q Control rápido para funciones de disparo
46
Seleccione la función que desee y
presione <0>. Aparecerá la pantalla
de ajuste de la función.
Gire el dial <
6
> o <
5
> para
cambiar el ajuste. También puede
presionar la tecla <
U
> para cambiar
algunos de los ajustes. Además,
algunas funciones se pueden ajustar
presionando el botón <
B
>.
Presione <
0
> para finalizar el ajuste y
volver a la pantalla de control rápido.
Cuando seleccione < > (Controles
personalizados) o < > (Punto AF,
p. 79) y presione el botón <M>,
aparecerá de nuevo la pantalla de
ajustes de funciones de disparo.
Ejemplo de pantalla de control rápido
Pantalla de ajuste de funciones
Velocidad de obturación (p. 97)
Operación AF (p. 78)
Corrección del balance de blancos
Modo de disparo*
1
(p. 20)
Prioridad a tonos de altas luces*
1
(p. 92)
Modo de medición
Estilo de imagen (p.
87
)
Ajuste de compensación
de la exposición/AEB
(p. 100)
Sensibilidad ISO (p. 86)
Abertura (p. 98)
Función Wi-Fi*
2
Modo de avance (p. 81)
Controles
personalizados
Balance de blancos (p. 88)
Bloqueo AE*
1
(p. 101)
Punto AF (p. 79)
Luminosidad Automática (p. 89)
Calidad de grabación
de imágenes (p. 84)
Ahorquillado del balance de blancos
Compensación de la exposición con flash
*1: Estas funciones no se pueden ajustar con la pantalla de control rápido.
*2: Consulte el Manual de instrucciones de la función Wi-Fi para ver los
ajustes de la función Wi-Fi.
<0>
Ð

47
Puede establecer diversos ajustes con los menús, tales como la calidad
de grabación de imágenes, la fecha y la hora, etc. Mientras observa el
monitor LCD, utilice el botón <M>, las teclas <V> <U> y el
botón <0> de la parte posterior de la cámara.
* Algunas fichas y elementos de menú no se muestran en los modos de la
zona básica.
3 Operaciones de menú
Menús de los modos de la zona básica
Menús de los modos de la zona creativa
<V> <U>
Monitor LCD
Botón <0>
Botón <M>
Ficha
Elementos de menú
Ajustes de
menú
z Disparo
5
Configuración
9 Mi menú
3 Reproducción
8 Funciones
personalizadas
A Disparo con Visión en Directo

3 Operaciones de menú
48
1
Muestre la pantalla de menú.
Presione el botón <M> para
mostrar la pantalla de menú.
2
Seleccione una ficha.
Presione la tecla <U> para
seleccionar una ficha de menú.
Por ejemplo, la ficha [z4] se refiere
a la pantalla que se muestra cuando
se selecciona la cuarta ficha desde la
izquierda [ ].
3
Seleccione el elemento que
desee.
Presione la tecla <V> para
seleccionar el elemento y, a
continuación, presione <0>.
4
Seleccione el ajuste.
Presione la tecla <V> o <U>
para seleccionar el ajuste que desee.
(Algunos ajustes requieren que se
presione la tecla <V> o <U>
para seleccionarlos.)
El ajuste actual se indica en azul.
5
Establezca el ajuste deseado.
Presione <0> para establecerlo.
6
Salga del ajuste.
Presione el botón <M> para
volver a la pantalla de ajustes de
funciones de disparo.
Procedimiento de ajuste de los menús
En el paso 2, también puede girar el dial <6> para seleccionar una
ficha de menú. En el paso 4, también puede girar el dial <5> para
seleccionar determinados ajustes.
Las explicaciones de las funciones de menú de aquí en adelante
asumen que ha presionado el botón <M> para visualizar la pantalla
de menú.
Para cancelar, presione el botón <M>.

49
Si la tarjeta es nueva o fue formateada previamente por otra cámara u
ordenador, formatee la tarjeta con la cámara.
Cuando se formatea la tarjeta, todas las imágenes y los datos
de la tarjeta se borran. Se borrarán incluso las imágenes
protegidas, así que debe asegurarse de que no haya nada que
desee conservar. Si es necesario, transfiera las imágenes y
los datos a un ordenador, etc. antes de formatear la tarjeta.
1
Seleccione [Formatear tarjeta].
Bajo la ficha [51], seleccione
[Formatear tarjeta] y, a continuación,
presione <0>.
2
Formatee la tarjeta.
Seleccione [OK] y, a continuación,
presione <0>.
X Se formateará la tarjeta.
X Una vez que finalice el formateado,
volverá a aparecer el menú.
Para el formateado de bajo nivel,
presione el botón <L> para agregar
a [Formateado de bajo nivel] una
marca de verificación <X> y, a
continuación, seleccione [OK].
Antes de empezar
3 Formateado de la tarjeta

Antes de empezar
50
La tarjeta es nueva.
La tarjeta fue formateada por una cámara diferente o un
ordenador.
La tarjeta está llena de imágenes o datos.
Se muestra un error relacionado con la tarjeta.
Ejecute [Formatear tarjeta] en los casos siguientes:
Acerca del formateado de bajo nivel
Haga un formateado de bajo nivel si la velocidad de grabación o de lectura
de la tarjeta parece lenta, o si desea borrar completamente los datos de la
tarjeta.
Dado que el formateado de bajo nivel formateará todos los sectores grabables
de la tarjeta, el formateado tardará algo más que el formateado normal.
Puede detener el formateado de bajo nivel seleccionando [Cancelar].
Incluso en este caso, el formateado normal se completará y podrá utilizar
normalmente la tarjeta.
Cuando se formatea la tarjeta o se borran los datos, solamente se cambia la
información de administración de los archivos. Los datos reales no se borran
por completo. Tenga esto en cuenta cuando venda o deseche la tarjeta.
Cuando deseche la tarjeta, ejecute un formateado de bajo nivel o destruya la
tarjeta físicamente para evitar la filtración de los datos personales.
Antes de utilizar una tarjeta Eye-Fi nueva, debe instalar en el
ordenador el software de la tarjeta. A continuación, formatee la
tarjeta con la cámara.
La capacidad de la tarjeta que se muestra en la pantalla de formateado
de la tarjeta puede ser inferior a la capacidad indicada en la tarjeta.
Este dispositivo incorpora tecnología exFAT con licencia de Microsoft.

51
Antes de empezar
Para ahorrar energía de la batería, la cámara se apaga automáticamente
después del tiempo de inactividad ajustado. Si no desea que la cámara
se apague automáticamente, ajuste este parámetro en [
Desactivada
].
Una vez apagada la alimentación, puede encender otra vez la cámara
presionando el disparador u otros botones.
1
Seleccione [Descon. auto].
Bajo la ficha [52], seleccione
[Descon. auto] y, a continuación,
presione <0>.
2
Ajuste el tiempo que desee.
Seleccione el ajuste que desee y, a
continuación, presione <0>.
Puede ajustar cuánto tiempo se mostrará la imagen en el monitor LCD
inmediatamente después de la captura. Para conservar la imagen en el
monitor, ajuste [Retención]. Para que no se muestre la imagen,
seleccione el ajuste [Off].
1
Seleccione [Revisión imag.].
Bajo la ficha [z1], seleccione
[Revisión imag.] y, a continuación,
presione <0>.
2
Ajuste el tiempo que desee.
Seleccione el ajuste que desee y, a
continuación, presione <0>.
3 Ajuste del tiempo de desconexión/
Desconexión automática
3 Ajuste del tiempo de revisión de imagen
Aunque se haya ajustado en [Desactivada], el monitor LCD se
desconectará automáticamente después de 30 min. para ahorrar energía.
(La alimentación de la cámara no se apaga.)
Si se ajusta [Retención], la imagen se muestra hasta que transcurre el
tiempo de desconexión automática.

Antes de empezar
52
La visualización de ajustes de disparo (p. 44) se puede ajustar de modo
que permanezca activa incluso cuando se presione el disparador hasta
la mitad.
Bajo la ficha [52], seleccione [Btn LCD
off/on] y, a continuación, presione
<0>. A continuación se describen los
ajustes disponibles. Seleccione uno y, a
continuación, presione <0>.
[Sigue activo] : La pantalla permanece encendida aunque se
presione el disparador hasta la mitad. Para apagar
la pantalla, presione el botón <B>.
[Disparador] : Cuando presione el disparador hasta la mitad, la
pantalla se apagará. Cuando suelte el disparador, la
pantalla se encenderá de nuevo.
Es posible revertir los ajustes de disparo y de menú de la cámara a sus
valores predeterminados.
1
Seleccione [Borrar los ajustes de
cámara].
Bajo la ficha [54], seleccione [Borrar
los ajustes de cámara] y, a
continuación, presione <0>.
2
Seleccione [OK].
Seleccione [OK] y, a continuación,
presione <0>.
3 Apagado y encendido del monitor LCD
3
Reversión de la cámara a los ajustes predeterminados
N

53
1
Presione el botón <B>.
Cada vez que presione el botón
<B>, la presentación de la
pantalla cambiará.
Muestre el nivel electrónico.
Si no aparece el nivel electrónico,
ajuste [53: Opciones pres. botón
z] para que pueda mostrarse el
nivel electrónico.
2
Compruebe la inclinación de la
cámara.
La inclinación horizontal se muestra
en incrementos de 1°.
Cuando la línea roja se vuelve verde,
indica que se ha corregido la
inclinación.
Q Mostrar el nivel electrónico
Mostrar el nivel electrónico en el monitor LCD
Nivel horizontal

54
Mientras ajusta algunas de las funciones se puede mostrar la
descripción de la característica.
La guía de funciones muestra una sencilla descripción del modo de
disparo, la función o la opción respectivos. Aparece cuando se cambia el
modo de disparo o se ajusta una función de disparo, el disparo con
Visión en Directo, la grabación de vídeo o el control rápido para la
reproducción. Cuando seleccione una función o una opción en la pantalla
de control rápido, aparecerá la descripción de la guía de funciones.
Cuando pase a realizar la operación, la guía de funciones desaparecerá.
Modo de disparo (Ejemplo)
Control rápido (Ejemplo)
Seleccione [Guía de funciones].
Bajo la ficha [53], seleccione [Guía
de funciones] y, a continuación,
presione <0>.
Seleccione [Desactivada] y, a
continuación, presione <0>.
Guía de funciones y ayuda
Guía de funciones
3 Desactivar la guía de funciones
Ajustes de disparo Disparo con Visión en
Directo
Reproducción

55
Guía de funciones y ayuda
Cuando se muestra [zAyuda] en la parte inferior de la pantalla de
menú, si se presiona el botón <B> se mostrará la descripción de la
función (Ayuda). Si la ayuda ocupa más de una pantalla, aparecerá una
barra de desplazamiento en el borde derecho. También puede girar el
dial <5> para desplazarse hacia abajo.
Ejemplo: [z4: Red. ruido en largas expo.]
Ejemplo: [8C.Fn I -1: Aumento nivel de exposición]
Ejemplo: [8C.Fn II -1: Sensib. seguimiento]
Ayuda
B
Î
Barra de desplazamiento
B
Î
B
Î


57
2
Fotografía básica
En este capítulo se describe cómo utilizar los modos de
la zona básica en el dial de modo para obtener los
mejores resultados.
Con los modos de la zona básica, todo lo que tiene que hacer
es apuntar y disparar mientras la cámara realiza
automáticamente todos los ajustes (p. 75). Además, para
evitar fotografías mediocres debido a operaciones
equivocadas, no es posible cambiar los ajustes de las
principales funciones de disparo.
Z
o
n
a
b
á
s
i
c
a

58
<A> es un modo totalmente automático. La cámara analiza la
escena y establece automáticamente los ajustes óptimos. También
detecta si el motivo está estático o en movimiento, y ajusta
automáticamente el enfoque (p. 61).
1
Ajuste el dial de modo en <A>.
Gire el dial de modo mientras
mantiene presionado el botón de
liberación de bloqueo del centro.
2
Sitúe cualquier punto AF sobre el
motivo.
Para enfocar se utilizan todos los
puntos AF y, en general, se enfoca el
objeto más cercano.
Apuntar el punto AF central sobre el
motivo facilita el enfoque.
3
Enfoque el motivo.
Presione el disparador hasta la mitad.
Los elementos del objetivo se
desplazarán para enfocar.
X El punto AF que realice el enfoque
parpadeará brevemente en rojo. Al
mismo tiempo, sonará un aviso
sonoro y se iluminará en el visor la
luz de confirmación de enfoque <o>.
A
Toma de fotografías totalmente automática (Escena inteligente automática)
Punto AF
Luz de confirmación
de enfoque

59
A Toma de fotografías totalmente automática (Escena inteligente automática)
4
Tome la fotografía.
Presione el disparador hasta el fondo
para tomar la fotografía.
X La imagen captada aparecerá en el
monitor LCD durante 2 segundos.
La luz de confirmación de enfoque <o> parpadea y no se
consigue enfocar.
Apunte el punto AF sobre una zona que tenga un buen contraste y,
a continuación, presione el disparador hasta la mitad (p. 40). Si está
demasiado cerca del motivo, aléjese e inténtelo de nuevo.
Parpadean simultáneamente varios puntos AF.
Esto indica que se ha enfocado en todos esos puntos AF. Cuando
parpadee el punto AF que cubre el motivo deseado, tome la
fotografía.
El aviso sonoro continúa sonando suavemente. (Tampoco se
ilumina la luz de confirmación de enfoque <o>.)
Indica que la cámara está enfocando de forma continua un motivo
en movimiento. (Tampoco se ilumina la luz de confirmación de
enfoque <o>.) Puede tomar fotos nítidas de motivos en
movimiento.
Tenga en cuenta que, en este caso, el bloqueo del enfoque (p. 61)
no funcionará.
Presionar el disparador hasta la mitad no enfoca el motivo.
Si el conmutador de modos de enfoque del objetivo está ajustado en
<MF> (manual focus, enfoque manual), ajústelo en <AF>
(autofocus, enfoque automático).
Preguntas frecuentes
El modo <A> hace que los colores resulten más impactantes en escenas
de naturaleza, exteriores y puestas de sol. Si no se obtiene el tono de color
deseado, utilice un modo de la zona creativa y seleccione un estilo de
imagen diferente de <D> y dispare (p. 87).

A Toma de fotografías totalmente automática (Escena inteligente automática)
60
La visualización de la velocidad de obturación parpadea.
Como está demasiado oscuro, si se toma la fotografía el motivo
saldrá borroso debido a la trepidación de la cámara. Se recomienda
utilizar un trípode o un flash Canon Speedlite serie EX (se vende por
separado).
Usando el flash externo, la parte inferior de la imagen salió
anormalmente oscura.
Si hay un parasol montado en el objetivo, puede obstruir la
cobertura del flash. Si el motivo está cerca, quite el parasol antes de
tomar la fotografía con flash.
En los modos de la zona básica, excepto <G>, el uso de un flash Canon
Speedlite serie EX (se vende por separado) en condiciones de contraluz o
de baja iluminación permite captar el motivo iluminado evitando las
trepidaciones o reduciendo las sombras del contraluz.

61
Según la escena, coloque el motivo a la izquierda o a la derecha para
crear un fondo equilibrado y una buena perspectiva.
En el modo <
A
>, el enfoque quedará bloqueado mientras presiona el
disparador hasta la mitad para enfocar un objeto estático. A continuación
puede recomponer la toma y presionar el disparador hasta el fondo para
tomar la fotografía. Esta técnica se denomina “bloqueo del enfoque”. El
bloqueo del enfoque también se puede aplicar en los otros modos de la
zona básica (excepto en <
5
> Deportes).
En el modo <
A
>, si el motivo se mueve (si cambia la distancia a la
cámara) mientras enfoca o después, se activará el AF AI Servo para
enfocar el motivo de forma continua. (El aviso sonoro continuará sonando
suavemente.) Mientras mantenga el punto AF apuntado al motivo, con el
disparador presionado hasta la mitad, el enfoque será continuo. Cuando
desee tomar la fotografía, presione el disparador hasta el fondo.
A
Técnicas de fotografía totalmente automática (Escena inteligente automática)
Recomposición de la toma
Fotografía de motivos en movimiento

A Técnicas de fotografía totalmente automática (Escena inteligente automática)
62
Puede disparar mientras ve la imagen en el monitor LCD. Esto se
denomina “disparo con Visión en Directo”. Para obtener información
detallada, consulte la página 103.
1
Sitúe el conmutador de disparo
con Visión en Directo/grabación
de vídeo en <A>.
2
Muestre la imagen de Visión en
Directo en el monitor LCD.
Presione el botón <0>.
X La imagen de Visión en Directo
aparecerá en el monitor LCD.
3
Enfoque el motivo.
Sitúe el punto AF central < > sobre
el motivo.
Presione el disparador hasta la mitad
para enfocar.
X Cuando se logre el enfoque, el punto
AF se iluminará en verde y sonará el
aviso sonoro.
4
Tome la fotografía.
Presione el disparador hasta el fondo.
X Se tomará la imagen y se mostrará la
imagen captada en el monitor LCD.
X Cuando termine la revisión de
imagen, la cámara volverá
automáticamente al disparo con
Visión en Directo.
Presione el botón <0> para
finalizar el disparo con Visión en
Directo.
A Disparo con Visión en Directo

63
En el modo <C>, puede cambiar fácilmente la profundidad de campo
y el modo de avance. También puede elegir el ambiente que desee
expresar en las imágenes. Los ajustes predeterminados son los
mismos que en el modo <A>.
* CA significa “Creative Auto” (automático creativo).
1
Ajuste el dial de modo en <C>.
2
Presione el botón <Q>. (7)
X Aparecerá la pantalla de control
rápido.
3
Ajuste la función que desee.
Presione la tecla <V> para
seleccionar una función.
X Aparecerán la función seleccionada y
la guía de funciones (p. 54).
Para ver el procedimiento de ajuste e
información detallada acerca de cada
función, consulte las páginas 64-65.
4
Tome la fotografía.
Presione el disparador hasta el fondo
para tomar la fotografía.
C Disparo automático creativo

C Disparo automático creativo
64
Si presiona el botón <Q > podrá ajustar lo siguiente:
(1) Disparos de selección de ambiente
Puede elegir el ambiente que desee expresar en las imágenes. Gire
el dial <6> o <5> para seleccionar el ambiente deseado.
También puede seleccionarlo de una lista presionando <0>.
(2) Difuminado/definición del fondo
Si mueve la marca de índice hacia la izquierda, el fondo aparecerá
más difuminado. Si lo mueve hacia la derecha, el fondo parecerá
más enfocado. Si desea difuminar el fondo, consulte “Fotografía de
retratos” en la página 67. Ajústela presionando la tecla <U>.
También puede utilizar el dial <6> o <5> para mover la marca.
Según cuál sea el objetivo y las condiciones de disparo, es posible
que el fondo no aparezca tan difuminado. Si se utiliza el flash no se
aplicará este ajuste.
Velocidad de
obturación
(1)
(2)
Comprobación del nivel de
carga de la batería
Disparos posibles
Sensibilidad
ISO
Calidad de grabación de imágenes
Abertura
(3)

65
C Disparo automático creativo
(3) Modo de avance: Presione la tecla <U> para seleccionar el
modo de avance que desee. Para seleccionar el modo de avance,
también puede girar el dial <6> o <5>, o presione <0> para
seleccionarlo en una lista.
<u> Disparo único:
Las fotos se toman de una en una.
<i> Disparos en serie:
Cuando se mantiene presionado el disparador hasta el fondo,
se toman disparos en serie. Puede tomar hasta aprox.
4,5 disparos por segundo.
<B> Disparo silencioso único:
Disparo único con menos sonido de disparo que <u>.
<M> Disparo en serie silencioso:
Disparos en serie (máx. aprox. 3,0 disparos por segundo) con
menos sonido de disparo que <i>.
<> Autodisparador: 10 seg./Control a distancia:
<> Autodisparador: 2 seg./Control a distancia:
La foto se toma 10 segundos o 2 segundos después de
presionar el disparador. También se puede utilizar un control
remoto.

66
Cuando ajuste un modo de disparo adecuado para la escena, la
cámara establecerá los ajustes óptimos automáticamente.
1
Ajuste el dial de modo en <8>.
2
Presione el botón <Q>. (7)
X Aparecerá la pantalla de control
rápido.
3
Seleccione el modo de disparo.
Presione la tecla <V> para
seleccionar la sección de modo de
disparo.
Gire el dial <6> o <5> para
seleccionar un modo de disparo.
También puede seleccionar un modo
de disparo en una lista seleccionando
la sección de modo de disparo y
presionando <0>.
Modos de disparo disponibles en el modo <8>
8: Modo de escena especial
Modo de disparo
Página
Modo de disparo
Página
2 Retratos p. 67 6 Retratos nocturnos p. 71
3 Paisajes p. 68 F
Escena nocturna sin
trípode
p. 72
4 Primeros planos p. 69 G Control contraluz HDR p. 73
5 Deportes p. 70

67
El modo <2> (Retratos) desenfoca el fondo para hacer resaltar a las
personas que son el motivo de la imagen. También hace que los tonos
de la piel y el pelo aparezcan más suaves.
Cuanto mayor sea la distancia entre el motivo y el fondo, mejor.
Cuanto mayor sea la distancia entre el motivo y el fondo, más
difuminado aparecerá el fondo. El motivo destacará también mejor
frente a un fondo sencillo y oscuro.
Utilice un teleobjetivo.
Si tiene un objetivo zoom, utilice el extremo teleobjetivo para hacer
que el motivo ocupe el encuadre de cintura hacia arriba. Acérquese
si es necesario.
Enfoque la cara.
Compruebe que el punto AF que cubre la cara parpadee en rojo.
Para primeros planos de la cara, enfoque los ojos.
2 Fotografía de retratos
Sugerencias para fotografiar
El ajuste predeterminado es <i> (Disparos en serie). Si mantiene
presionado el disparador, puede disparar de forma continua para obtener
diferentes poses y expresiones faciales (máx. aprox. 4,5 disparos/seg.).

68
Utilice el modo <3> (Paisajes) para fotografiar grandes paisajes, o
para que todo quede enfocado, de lo más cercano a lo más lejano.
Para obtener imágenes muy nítidas con azules y verdes vivos.
Con un objetivo zoom, use el extremo gran angular.
Cuando utilice el extremo gran angular de un objetivo zoom, los
objetos cercanos y lejanos estarán mejor enfocados que en el
extremo teleobjetivo. También dará amplitud a los paisajes.
Fotografía de escenas nocturnas.
Cuando fotografíe escenas nocturnas, utilice un trípode para evitar
trepidaciones en la cámara.
3 Fotografía de paisajes
Sugerencias para fotografiar

69
Si desea fotografiar primeros planos de flores o cosas pequeñas, utilice
el modo <4> (Primeros planos). Para hacer que las cosas pequeñas
aparezcan mucho más grandes, utilice un objetivo macro (se vende por
separado).
Utilice un fondo sencillo.
Un fondo sencillo hace que la flor, etc. resalte mejor.
Acérquese lo más posible al motivo.
Compruebe que utiliza la distancia mínima de enfoque del objetivo.
Algunos objetivos tienen indicaciones tales como <40.25m/0.8ft>.
La distancia mínima de enfoque del objetivo se mide desde la marca
<V> (plano focal) de la esquina superior izquierda de la cámara
hasta el motivo. Si se acerca demasiado al motivo, la luz de
confirmación de enfoque <o> parpadeará.
Con un objetivo zoom, utilice el extremo teleobjetivo.
Si tiene un objetivo zoom, el uso del extremo teleobjetivo hará que
el motivo aparezca más grande.
4 Fotografía de primeros planos
Sugerencias para fotografiar

70
Para fotografiar un motivo en movimiento, ya sea un niño corriendo o
un vehículo en movimiento, utilice el modo <5> (Deportes).
Utilice un teleobjetivo.
Es recomendable utilizar un teleobjetivo para poder disparar desde
lejos.
Utilice el punto AF central para enfocar.
Sitúe el punto AF central sobre el motivo y, a continuación, presione
el disparador hasta la mitad para enfoque automático. Durante el
enfoque automático, el aviso sonoro continuará sonando
suavemente. Si no es posible enfocar, la luz de confirmación de
enfoque <o> parpadeará.
El ajuste predeterminado es <i> (Disparos en serie). Cuando
desee tomar la fotografía, presione el disparador hasta el fondo. Si
mantiene presionado el disparador, se enfocará automáticamente y
se realizarán disparos en serie (máx. aprox. 4,5 disparos por
segundo) para captar el movimiento del motivo.
5 Fotografía de objetos en movimiento
Sugerencias para fotografiar
Cuando haya poca luz, y sea probable que se produzca trepidación,
parpadeará la indicación de velocidad de obturación en la esquina inferior
izquierda del visor. Sujete la cámara con firmeza y dispare.

71
Para fotografiar personas de noche y obtener una exposición de
aspecto natural en el fondo, utilice el modo <6> (Retratos nocturnos).
Se necesita flash. También es recomendable utilizar un trípode.
Utilice un objetivo gran angular, flash Speedlite y un trípode.
Cuando utilice un objetivo zoom, use el extremo gran angular para
obtener una vista nocturna amplia. Además, utilice un trípode para
evitar trepidaciones de la cámara.
Dispare también en otros modos de disparo.
Dado que es probable que al disparar de noche se produzca
trepidación, es recomendable disparar también con <A> y <F>.
6
Fotografía de retratos nocturnos (con trípode)
Sugerencias para fotografiar
Indique al motivo que debe estar quieto incluso después de que se
dispare el flash.
Si utiliza el autodisparador junto con el flash, la lámpara del
autodisparador se iluminará brevemente después de tomar la fotografía.
Durante el disparo con Visión en Directo, puede que sea difícil enfocar
puntos de luz tales como los de una escena nocturna. En tal caso, es
recomendable que ajuste el sistema AF en [Modo Rápido] y dispare. Si
continúa siendo difícil enfocar, sitúe el conmutador de modo de enfoque
del objetivo en [MF] y enfoque manualmente.

72
Normalmente se necesita un trípode para estabilizar la cámara al tomar
escenas nocturnas. Sin embargo, con el modo <F> (Escena nocturna
sin trípode), es posible fotografiar escenas nocturnas sosteniendo la
cámara con la mano. En este modo se realizan cuatro disparos
continuos para cada imagen y se graba una imagen luminosa
resultante en la que se reduce la trepidación de la cámara.
Sujete firmemente la cámara.
Mientras dispara, sujete la cámara de manera firme y estable. Si
cualquiera de los cuatro disparos está muy desalineado debido a la
trepidación de la cámara, etc., es posible que no se alineen
correctamente en la imagen final.
Cuando se incluye un motivo humano:
Con flash, es posible fotografiar tanto el motivo humano como el
fondo de escena nocturna sosteniendo la cámara con la mano. Para
tomar un bonito retrato, en la primera toma se utilizará el flash. Diga
a la persona que no se mueva hasta que se hayan realizado los
cuatro disparos continuos.
F
Fotografía de escenas nocturnas (Sin trípode)
Sugerencias para fotografiar
Consulte las precauciones en la página 74.

73
Cuando fotografíe una escena que tenga tanto zonas luminosas como
zonas oscuras, utilice el modo <G> (Control contraluz HDR). Cuando
tome la imagen, se realizarán tres disparos continuos con diferentes
exposiciones, y se grabará la imagen resultante con menos pérdida de
detalle en las sombras debida al contraluz y rango tonal más amplio.
Sujete firmemente la cámara.
Mientras dispara, sujete la cámara de manera firme y estable. Si
cualquiera de los tres disparos está muy desalineado debido a la
trepidación de la cámara, etc., es posible que no se alineen
correctamente en la imagen final.
G Fotografía de escenas a contraluz
Sugerencias para fotografiar
Aunque haya un flash Speedlite montado en la cámara, no disparará.
Consulte las precauciones en la página 74.
HDR significa “High Dynamic Range” (alto rango dinámico).

74
Precauciones para <F> (Escena nocturna sin trípode)
Durante el disparo con Visión en Directo, puede que sea difícil enfocar
puntos de luz tales como los de una escena nocturna. En tal caso, es
recomendable que ajuste el sistema AF en [Modo Rápido] y dispare. Si
continúa siendo difícil enfocar, sitúe el conmutador de modo de enfoque
del objetivo en [MF] y enfoque manualmente.
Cuando tome fotos con flash, si el motivo está demasiado cercano a la
cámara, es posible que la foto salga extremadamente luminosa
(sobreexpuesta).
Si utiliza el flash para fotografiar escenas nocturnas poco iluminadas o
motivos humanos en situaciones en las que tanto el motivo como el
fondo estén suficientemente cercanos para que el flash los ilumine, es
posible que los disparos no se alineen correctamente. El resultado
puede ser una foto borrosa.
Sobre la cobertura del flash:
• Cuando utilice un flash Speedlite con el ajuste de cobertura del flash
automático, la posición del zoom se fijará en el extremo angular,
independientemente de la posición del zoom del objetivo.
• Cuando utilice un flash Speedlite con conmutador manual de la
cobertura del flash, dispare con la cabeza del flash replegada en la
posición angular (normal).
Precauciones para <G> (Control contraluz HDR)
Tenga en cuenta que es posible que la imagen no se reproduzca con una
gradación suave y tenga un aspecto irregular o un nivel significativo de ruido.
Puede que el control contraluz HDR no sea eficaz para escenas con
excesivo contraluz o con un alto contraste extremo.
Precauciones para <F> (Escena nocturna sin trípode) y <G> (Control
contraluz HDR)
En comparación con otros modos de disparo, el área de disparo será menor.
No se puede seleccionar RAW ni RAW+JPEG. En otros modos de
disparo, si se ajusta RAW, la calidad de imagen será 73. Además, si se
ajusta RAW+JPEG, la imagen se grabará con la calidad JPEG ajustada.
Si fotografía un motivo en movimiento, el movimiento del motivo dejará
una estela de imágenes.
Puede que la alineación de imágenes no funcione correctamente con
patrones repetitivos (cuadrículas, bandas, etc.), con imágenes planas o
con un único tono, o con tomas muy desalineadas debido a la
trepidación de la cámara.
La grabación de la imagen en la tarjeta tardará más tiempo que con el
disparo normal. Durante el procesado de las imágenes, se mostrará
“buSY” en el visor y en el panel LCD, y no podrá tomar otra fotografía
hasta que se complete el procesado.
Si se ajusta el modo de disparo en <
F
> o <
G
>, no es posible la impresión
directa. Seleccione otro modo de disparo y realice la impresión directa.

75
En los modos de la zona básica, cuando
se muestre la pantalla de ajustes de
funciones, puede presionar el botón
<Q> para mostrar la pantalla de control
rápido. En la tabla siguiente se indican
las funciones que se pueden ajustar con
la pantalla de control rápido en cada
modo de la zona básica.
1 Ajuste el dial de modo en un modo de la zona básica.
2Presione el botón <Q>. (7)
X Aparecerá la pantalla de control rápido.
3Ajuste la función.
Presione la tecla <V> para seleccionar una función. (Este paso
no es necesario en el modo A.)
X
Aparecerán la función seleccionada y la guía de funciones (p. 54).
También puede seleccionar funciones con el dial <6> o <5>.
Funciones ajustables en los modos de la zona básica
o
: Ajuste predeterminado
k
: Ajuste por el usuario : No seleccionable
* Si cambia el modo de disparo o sitúa el interruptor de alimentación en <2>,
volverá a los ajustes predeterminados (excepto el autodisparador).
Q Control rápido
Función A C
8
2 3 4 5 6 F G
Modo de
avance
(p. 81)
u: Disparo único
o o k o o k o o o
i: Disparos en serie
k k o k k o k k k
B: Disparo silencioso único
k k k k k k k k k
M: Disparo en serie silencioso
k k k k k k k k k
Autodisparador
(p. 82)
Q
k k k k k k k k k
k
k k k k k k k k k
Disparos de selección de ambiente
k k k k k k k
Disparos por luz/escena
k k k k
Difuminado/definición del fondo (p. 64)
k
Ejemplo: Modo Retratos


77
3
Ajuste de los modos
AF y de avance
El visor tiene 11 puntos AF. Si
selecciona el punto AF óptimo
podrá componer la foto como
desee mientras enfoca
automáticamente.
También puede seleccionar la operación AF y el modo
de avance que mejor se ajusten a las condiciones del
disparo y al motivo.
El icono M de la esquina superior derecha de la página
indica que la función sólo está disponible en los modos de
la zona creativa (d/s/f/a/F).
En los modos de la zona básica, la operación AF y el punto
AF se ajustan automáticamente.
<AF> significa “autofocus” (enfoque automático). <MF> significa
“manual focus” (enfoque manual).

78
Puede seleccionar las características de la operación AF adecuadas
para las condiciones de disparo o para el motivo. En modos de la zona
básica, se ajusta automáticamente la operación AF óptima para el
modo de disparo correspondiente.
1
Sitúe el conmutador de modos de
enfoque del objetivo en <AF>.
2
Gire el dial de modo a un modo
de la zona creativa.
3
Presione el botón <f>. (9)
4
Seleccione la operación AF.
Mientras observa el panel LCD, gire
el dial <6> o <5>.
X : AF foto a foto
9 : AF AI Foco
Z : AF AI Servo
f: Selección de la operación AFN

79
Puede seleccionar uno de los once puntos AF para enfocar. En los
modos de la zona básica, el punto AF se seleccionará
automáticamente y no se podrá seleccionar el punto AF.
1
Presione el botón <S>. (9)
X
El punto AF seleccionado se mostrará
en el visor y en el panel LCD.
Cuando todos los puntos AF se
iluminen, se ajustará la selección
automática del punto AF.
2
Seleccione un punto AF.
Puede utilizar <9> o girar el dial
<6> o <5> para seleccionar un
punto AF.
Puede utilizar <9> para seleccionar
un punto AF.
Si todos los puntos AF se iluminan,
se ajustará la selección automática
del punto AF.
Presione <0> para alternar entre el
punto AF central y la selección
automática.
Gire el dial <6> para seleccionar
un punto AF a la izquierda o la
derecha o gire el dial <5> para
seleccionar un punto AF encima o
debajo.
Si todos los puntos AF se iluminan,
se ajustará la selección automática
del punto AF.
S Selección de puntos AFN
Selección con el multicontrolador
Selección con los diales

80
1
Sitúe el conmutador de modos de
enfoque del objetivo en <MF>.
X <4 L> se mostrará en el panel
LCD.
2
Enfoque el motivo.
Enfoque girando el anillo de enfoque
del objetivo hasta que el motivo
aparezca nítido en el visor.
MF: Enfoque manual
Anillo de enfoque

81
Se ofrecen modos de avance con disparo único y continuo.
1
Presione el botón <R>. (9)
2
Seleccione el modo de avance.
Mientras observa el panel LCD, gire
el dial <6> o <5>.
u : Disparo único
Cuando presione el disparador hasta el fondo, se tomará
solamente una fotografía.
i : Disparos en serie (Máx. aprox. 4,5 disparos/seg.)
Cuando se mantiene presionado el disparador hasta el fondo, se
toman disparos en serie.
B : Disparo silencioso único
Disparo único con menos sonido de disparo que <u>.
M : Disparo en serie silencioso (Máx. aprox. 3,0 disparos/seg.)
Disparos en serie con menos sonido de disparo que <i>.
Q : Autodisparador de 10 seg./Control a distancia
k: Autodisparador de 2 seg./Control a distancia
Para el disparo con autodisparador, consulte la página 82.
i Selección del modo de avance

82
Utilice el autodisparador cuando desee aparecer en la fotografía.
1
Presione el botón <R>. (9)
2
Seleccione el autodisparador.
Mientras observa el panel LCD, gire
el dial <6> o <5> para
seleccionar el retardo del
autodisparador.
Q : Autodisparador de 10 seg.
k : Autodisparador de 2 seg.
3
Tome la fotografía.
Mire por el visor, enfoque el motivo y,
a continuación, presione el
disparador hasta el fondo.
X Puede comprobar el funcionamiento
del autodisparador con la lámpara del
autodisparador, el aviso sonoro y la
visualización de la cuenta atrás (en
segundos) en el panel LCD.
X Dos segundos antes de tomar la
fotografía, se iluminará la lámpara del
autodisparador y el aviso sonoro será
más rápido.
j Uso del autodisparador

83
4
Ajustes de imagen
Este capítulo explica ajustes de funciones relacionadas
con la imagen: Calidad de grabación de imágenes,
sensibilidad ISO, estilo de imagen, balance de blancos,
Luminosidad Automática, corrección de la iluminación
periférica del objetivo, corrección de la aberración
cromática y otras funciones.
El icono M de la esquina superior derecha del título de la
página indica que la función sólo está disponible en los
modos de la zona creativa (d/s/f/a/F).

84
Puede seleccionar el número de píxeles y la calidad de imagen. Hay
ocho ajustes de calidad de grabación de imágenes JPEG: 73, 83,
74, 84, 7a, 8a, b, c. Hay tres ajustes de calidad de imagen
RAW: 1, 41, 61.
1
Seleccione [Calid. imagen].
Bajo la ficha [z1], seleccione [Calid.
imagen] y, a continuación, presione
<0>.
2
Seleccione la calidad de
grabación de imágenes.
Para seleccionar un ajuste RAW, gire
el dial <6>. Para seleccionar un
ajuste JPEG, presione la tecla
<U>.
En la esquina superior derecha, los
números “**M (megapíxeles) **** x
****” indican el número de píxeles
grabados y [***] es el número de
disparos posibles (se muestra hasta
9999).
Presione <0> para establecerlo.
3
Ajuste de la calidad de grabación de imágenes

85
3 Ajuste de la calidad de grabación de imágenes
Guía de ajustes de la calidad de grabación de imágenes (Aprox.)
*1: b es adecuado para reproducir las imágenes en un marco de fotos digital.
*2: c es adecuado para enviar la imagen por correo electrónico o utilizarla en un
sitio web.
b y c estarán en calidad 7 (Fina).
El tamaño de archivo, disparos posibles y ráfaga máxima durante los disparos
en serie se basan en los métodos de comprobación estándar de Canon
(formato 3:2, ISO 100 y estilo de imagen normal) usando una tarjeta de 8 GB.
Estas cifras variarán en función del motivo, la marca de tarjeta, el
formato, la sensibilidad ISO, el estilo de imagen, las funciones
personalizadas y otros ajustes.
Las cifras entre paréntesis se aplican a una tarjeta de 8 GB de clase UHS-I
basándose en los métodos de comprobación estándar de Canon.
Calidad de
imagen
Píxeles
grabados
Tamaño de
impresión
Tamaño del
archivo (MB)
Disparos
posibles
Ráfaga máxima
JPEG
73
20M A2
6,0 1250 73 (1250)
83 3,1 2380 2380 (2380)
74
8,9M A3
3,2 2300 2300 (2300)
84 1,7 4240 4240 (4240)
7a
5,0M A4
2,1 3450 3450 (3450)
8a 1,1 6370 6370 (6370)
b*
1
2,5M 9x13 cm 1,2 6130 6130 (6130)
c*
2
0,3M - 0,3 23070 23070 (23070)
RAW
1 20M A2 23,5 300 14 (17)
41 11M A3 18,5 380 8 (10)
61 5,0M A4 13,0 550 12 (17)
RAW+
JPEG
1
73
20M
20M
A2
A2
23,5+6,0 240 7(8)
41
73
11M
20M
A3
A2
18,5+6,0 290 8 (9)
61
73
5,0M
20M
A4
A2
13,0+6,0 380 10 (12)

86
Ajuste la sensibilidad ISO (sensibilidad del sensor de imagen a la luz)
adecuada para el nivel de luz ambiental. En los modos de la zona
básica, se ajusta automáticamente la sensibilidad ISO.
1
Presione el botón <i>. (9)
2
Ajuste la sensibilidad ISO.
Mientras observa el panel LCD o el
visor, gire el dial <6> o <5>.
La sensibilidad ISO se puede ajustar
entre ISO 100 - 25600, en
incrementos de 1/3 de punto.
“A” indica ISO Auto. La sensibilidad
ISO se ajustará también
automáticamente. También puede
presionar el botón <B> para
ajustarla en “A (AUTO)”.
Guía de sensibilidad ISO
* Las altas sensibilidades ISO producirán imágenes con más grano.
i: Ajuste de la sensibilidad ISON
Sensibilidad ISO
Situación fotográfica
(Sin flash)
Alcance del flash
L, ISO 100 - 400 Exteriores soleados
Cuanto mayor sea la
sensibilidad ISO, mayor
será el alcance del flash.
ISO 400 - 1600
Cielos cubiertos o
anochecer
ISO 1600 - 25600, H1, H2
Interiores oscuros o
noche

87
Seleccionando un estilo de imagen, puede obtener características de
imagen adecuadas para su expresión fotográfica o para el motivo.
En los modos de la zona básica, se ajusta automáticamente <D>
(Auto).
1
Seleccione [Estilo imagen].
Bajo la ficha [z4], seleccione [Estilo
imagen] y, a continuación, presione
<0>.
X Aparece la pantalla de selección de
estilo de imagen.
2
Seleccione un estilo de imagen.
Presione la tecla <V> para
seleccionar un estilo de imagen y, a
continuación, presione <0>.
X Se ajustará el estilo de imagen y
reaparecerá el menú.
A Selección de un estilo de imagenN

88
El balance de blancos (WB) sirve para hacer que las áreas blancas
sean realmente blancas. Normalmente, el ajuste <Q> (Auto) obtendrá
el balance de blancos correcto. Si con <Q> no puede obtener colores
naturales, puede seleccionar el balance de blancos correspondiente a
la fuente de luz, o ajustarlo manualmente fotografiando un objeto
blanco.
En modos de la zona básica, se ajusta automáticamente <Q>.
1
Seleccione [Bal. Blancos].
Bajo la ficha [z3], seleccione [Bal.
Blancos] y, a continuación, presione
<0>.
2
Seleccione el balance de blancos.
Seleccione el ajuste que desee y, a
continuación, presione <0>.
3 Ajuste del balance de blancosN

89
Si la imagen sale oscura o el contraste es bajo, la luminosidad y el
contraste pueden corregirse automáticamente. Esta función se
denomina Luminosidad Automática. El ajuste predeterminado es
[Estándar]. Con las imágenes JPEG, la corrección se aplica en el
momento de captar la imagen.
En los modos de la zona básica, se ajusta automáticamente
[Estándar].
1
Seleccione [Luminosidad
Automática].
Bajo la ficha [z3], seleccione
[Luminosidad Automática] y, a
continuación, presione <0>.
2
Seleccione el ajuste.
Seleccione el ajuste que desee y, a
continuación, presione <0>.
3
Tome la fotografía.
La imagen se grabará con la
iluminación y el contraste corregidos,
si es necesario.
3
Corrección automática de la luminosidad y el contraste
N

90
Esta función reduce el ruido generado en la imagen. Aunque la
reducción de ruido se aplica a todas las sensibilidades ISO, es
particularmente efectivo con altas sensibilidades ISO. Con bajas
sensibilidades ISO, el ruido de las partes más oscuras de la imagen
(zonas de sombra) se reduce aún más.
1
Seleccione [Reducc. ruido alta
sens. ISO].
Bajo la ficha [z4], seleccione
[Reducc. ruido alta sens. ISO] y, a
continuación, presione <0>.
2
Ajuste el nivel.
Seleccione el nivel de reducción de
ruido que desee y, a continuación,
presione <0>.
X La pantalla de ajuste se cierra y el
menú reaparece.
[M: Reduc. de ruido multidisparo]
Reducción de ruido con mayor calidad de imagen que cuando se
aplica [Alta]. Para una única foto se realizan cuatro disparos en
ráfaga y se combinan automáticamente en una única imagen JPEG.
3
Tome la fotografía.
La imagen se grabará con la
reducción de ruido aplicada.
3 Ajustes de reducción de ruidoN
Reducción de ruido de alta sensibilidad ISO

91
3 Ajustes de reducción de ruidoN
La reducción de ruido es posible con imágenes expuestas durante
1 seg. o más.
1
Seleccione [Red. ruido en largas
expo.].
Bajo la ficha [z4], seleccione [Red.
ruido en largas expo.] y, a
continuación, presione <0>.
2
Establezca el ajuste deseado.
Seleccione el ajuste que desee y, a
continuación, presione <0>.
X La pantalla de ajuste se cierra y el
menú reaparece.
[Auto]
Para las exposiciones de 1 seg. o más, la reducción de ruido se
realiza automáticamente si se detecta ruido típico de las largas
exposiciones. Este ajuste [Auto] es eficaz en la mayoría de los
casos.
[Activar]
Se realiza la reducción de ruido para todas las exposiciones de
1 seg. o más. Es posible que el ajuste [Activar] pueda reducir ruido
que no se pueda detectar con el ajuste [Auto].
3
Tome la fotografía.
La imagen se grabará con la
reducción de ruido aplicada.
Reducción de ruido de larga exposición

92
Puede minimizar las áreas de altas luces sobreexpuestas.
1
Seleccione [Prioridad tonos altas
luces].
Bajo la ficha [z4], seleccione
[Prioridad tonos altas luces] y, a
continuación, presione <0>.
2
Seleccione [Activada].
Seleccione [Activada] y, a
continuación, presione <0>.
Los detalles de las altas luces
mejoran. El rango dinámico se
expande desde el gris estándar al
18% hasta las altas luces más claras.
La gradación entre los grises y las
altas luces se suaviza.
3
Tome la fotografía.
La imagen se grabará con la
prioridad a tonos de altas luces
aplicada.
3 Prioridad a tonos de altas lucesN

93
La caída de la iluminación periférica es un fenómeno que hace que las
esquinas de la imagen se vean más oscuras debido a las
características del objetivo. Los halos de color a lo largo de los
contornos del motivo se denominan aberración cromática. Ambas
aberraciones del objetivo se pueden corregir. Los ajustes
predeterminados son [Activada] para ambas correcciones.
Si se muestra [No puede corregir - sin datos], consulte “Acerca de los
datos de corrección del objetivo” en la página 94.
1
Seleccione [Corrección
aberración obj.].
Bajo la ficha [z2], seleccione
[Corrección aberración obj.] y, a
continuación, presione <0>.
2
Seleccione el ajuste.
Compruebe si se muestra [Datos
Corrección disponibles] para el
objetivo montado.
Seleccione [Ilumin. periférica] y, a
continuación, presione <0>.
Seleccione [Activada] y, a
continuación, presione <0>.
3
Tome la fotografía.
La imagen se grabará con la
iluminación periférica corregida.
3
Corrección de iluminación periférica del objetivo / aberración cromática
Corrección de la iluminación periférica

3 Corrección de iluminación periférica del objetivo / aberración cromática
94
1
Seleccione el ajuste.
Compruebe si se muestra [Datos
Corrección disponibles] para el
objetivo montado.
Seleccione [Aberrac. cromática] y, a
continuación, presione <0>.
Seleccione [Activada] y, a
continuación, presione <0>.
2
Tome la fotografía.
La imagen se grabará con la
aberración cromática corregida.
La cámara contiene ya datos de corrección de la iluminación periférica
del objetivo y datos de corrección de la aberración cromática para,
aproximadamente, 25 objetivos. Si selecciona [Activada], la corrección
de la iluminación periférica y la corrección de la aberración cromática
se aplicarán automáticamente para cualquier objetivo cuyos datos de
corrección se hayan registrado en la cámara.
Con EOS Utility (software suministrado), puede comprobar qué
objetivos tienen sus datos de corrección registrados en la cámara.
También puede registrar datos de corrección para objetivos no
registrados. Para ver información detallada, consulte las Instrucciones
de EOS Utility (p. 135).
Corrección de la aberración cromática
Acerca de los datos de corrección del objetivo

95
5
Operaciones
avanzadas
En los modos de la zona
creativa, puede ajustar la
velocidad de obturación y/o la
abertura para ajustar la
exposición que desee.
Cambiando los ajustes de la
cámara puede obtener
diversos resultados.
El icono M de la esquina superior derecha del título de la
página indica que la función sólo está disponible en los
modos de la zona creativa (d/s/f/a/F).
Si presiona el disparador hasta la mitad y lo suelta, los
valores de exposición continuarán mostrándose en el visor
y en el panel LCD durante 4 seg. (0).
Ajuste el conmutador <R> a la izquierda.

96
La cámara ajusta automáticamente la velocidad de obturación y la
abertura para ajustarse a la luminosidad del motivo. Esta función se
denomina AE programada.
*<d> significa “Program” (programa).
* AE significa “Auto Exposure” (exposición automática).
1
Ajuste el dial de modo en <d>.
2
Enfoque el motivo.
Mire por el visor y sitúe el motivo de
modo que esté cubierto por el punto
AF seleccionado. Después presione
el disparador hasta la mitad.
X El punto AF que obtiene el enfoque
parpadea en rojo, y la luz de
confirmación de enfoque <o> de la
parte inferior derecha del visor se
ilumina (en el modo AF foto a foto).
X La velocidad de obturación y la
abertura se ajustarán
automáticamente y se mostrarán en
el visor y en el panel LCD.
3
Compruebe la información del
visor.
Si las indicaciones de velocidad de
obturación y de abertura no
parpadean, la exposición es
estándar.
4
Tome la fotografía.
Encuadre la toma y presione el
disparador hasta el fondo.
d: AE programada

97
En este modo, el usuario ajusta la velocidad de obturación y la cámara
ajusta automáticamente la abertura para obtener la exposición
estándar adecuada a la luminosidad del motivo. Esta función se
denomina AE con prioridad a la velocidad de obturación. Una velocidad
de obturación más rápida puede congelar la acción o un motivo en
movimiento. O bien, una velocidad de obturación más lenta puede
crear un efecto de difuminado, dando la impresión de movimiento.
* <s> significa “Time value” (valor de tiempo).
1
Ajuste el dial de modo en <s>.
2
Ajuste la velocidad de obturación
deseada.
Mientras observa el panel LCD, gire
el dial <6>.
3
Enfoque el motivo.
Presione el disparador hasta la mitad.
X La abertura se ajusta
automáticamente.
4
Compruebe la indicación del
visor y tome la fotografía.
Si la abertura no parpadea, se
obtendrá una exposición estándar.
s
: AE con prioridad a la velocidad de obturación
Movimiento difuminado
(Velocidad de obturación lenta: 1/30 seg.)
Acción congelada
(Velocidad de obturación rápida: 1/2000 seg.)

98
En este modo, el usuario ajusta la abertura que desee y la cámara ajusta
automáticamente la velocidad de obturación para obtener la exposición
estándar correspondiente a la luminosidad del motivo. Esta función se
denomina AE con prioridad a la abertura. Un número f/ mayor (orificio de
abertura menor) hace que una mayor proporción del primer plano y del
fondo caigan dentro de un enfoque aceptable. Por el contrario, un número
f/ menor (orificio de abertura mayor) hace que una menor proporción del
primer plano y del fondo caigan dentro del enfoque aceptable.
* <f> significa “Aperture value” (valor de abertura).
1
Ajuste el dial de modo en <f>.
2
Ajuste la abertura que desee.
Mientras observa el panel LCD, gire
el dial <6>.
3
Enfoque el motivo.
Presione el disparador hasta la mitad.
X
La velocidad de obturación se ajusta
automáticamente.
4
Compruebe la indicación del
visor y tome la fotografía.
Si la velocidad de obturación no
parpadea, se obtendrá una
exposición estándar.
f: AE con prioridad a la abertura
Primer plano y fondo nítidos
(Con un número de abertura f/ mayor: f/32)
Fondo difuminado
(Con un número de abertura f/ menor: f/5,6)

99
En este modo puede ajustar la velocidad de obturación y la abertura
según desee. Para determinar la exposición, consulte el indicador del
nivel de exposición en el visor o utilice un fotómetro disponible en el
mercado. Este método se denomina exposición manual.
* <a> significa “Manual”.
1
Ajuste el dial de modo en <a>.
2
Ajuste la sensibilidad ISO (p. 86).
3
Ajuste la velocidad de obturación
y la abertura.
Para ajustar la velocidad de
obturación, gire el dial <6>.
Para ajustar la abertura, gire el dial
<5>.
Si no se puede ajustar, ajuste el
conmutador <R> a la izquierda
y, a continuación, gire el dial <6> o
<5>.
4
Enfoque el motivo.
Presione el disparador hasta la mitad.
X En el visor y en el panel LCD aparece
el ajuste de la exposición.
La marca del nivel de exposición <h>
indica a qué distancia del nivel de
exposición estándar se encuentra el
nivel de exposición actual.
5
Ajuste la exposición y tome la
fotografía.
Compruebe el indicador del nivel de
exposición y ajuste la velocidad de
obturación y la abertura deseadas.
Si el nivel de exposición supera ±3
puntos, el extremo del indicador del
nivel de exposición mostrará <I> o
<J>.
a: Exposición manual
Marca del nivel de
exposición
Índice de exposición
estándar

100
La compensación de la exposición puede aclarar (aumentando la
exposición) u oscurecer (reduciendo la exposición) la exposición
estándar ajustada por la cámara.
La compensación de la exposición se puede ajustar en los modos de
disparo d/s/f. Aunque puede ajustar la compensación de la
exposición hasta ±5 puntos en incrementos de 1/3 de punto, el
indicador de compensación de la exposición del panel visor y del panel
LCD solamente puede mostrar el ajuste hasta ±3 puntos. Si desea
establecer el ajuste de compensación de la exposición más allá de ±3
puntos, debe utilizar la pantalla de control rápido (p. 45) o siga las
instrucciones para [z3: Comp. Exp./AEB].
1
Compruebe el indicador del nivel
de exposición.
Presione el disparador hasta la mitad
(0) y compruebe el indicador del
nivel de exposición.
2
Ajuste la cantidad de
compensación de la exposición.
Mientras observa el visor o el panel
LCD, gire el dial <5>.
Si no se puede ajustar, ajuste el
conmutador <R> a la izquierda
y, a continuación, gire el dial <5>.
3
Tome la fotografía.
Para cancelar la compensación de la
exposición, vuelva a ajustar la
cantidad de compensación de la
exposición en <E>.
Ajuste de la compensación de la exposición
N
Exposición aumentada para
obtener una imagen más
luminosa
Exposición reducida para
obtener una imagen más
oscura

101
Utilice el bloqueo AE cuando el área de enfoque sea diferente del área
de medición de la exposición, o cuando desee hacer varias tomas con
el mismo ajuste de exposición. Presione el botón <A> para bloquear
la exposición y, a continuación, recomponga y tome la fotografía. Esta
función se denomina bloqueo AE. Resulta útil para motivos a contraluz.
1
Enfoque el motivo.
Presione el disparador hasta la mitad.
X Aparecerá el ajuste de exposición.
2
Presione el botón <A>. (0)
X El icono <A> se ilumina en el visor
para indicar que el ajuste de
exposición está bloqueado (bloqueo
AE).
Cada vez que se presiona el botón
<A>, se bloquea el ajuste de
exposición automática actual.
3
Recomponga el encuadre y tome
la fotografía.
Si desea mantener el bloqueo AE y
tomar más fotografías, mantenga
presionado el botón <A> y presione
el disparador para tomar otra
fotografía.
A
Bloqueo AE
N


103
6
Fotografía con el monitor LCD
(Disparo con Visión en Directo)
Puede disparar mientras ve la
imagen en el monitor LCD de la
cámara. Esto se denomina
“disparo con Visión en Directo”.
El disparo con Visión en Directo
se activa situando el conmutador
de disparo con Visión en Directo/
grabación de vídeo en <A>.

104
1
Sitúe el conmutador de disparo
con Visión en Directo/grabación
de vídeo en <A>.
2
Muestre la imagen de Visión en
Directo.
Presione el botón <0>.
X La imagen de Visión en Directo
aparecerá en el monitor LCD.
La imagen de Visión en Directo
reflejará fielmente el nivel de
luminosidad de la imagen real que
capture.
3
Enfoque el motivo.
Cuando presione el disparador hasta
la mitad, la cámara enfocará con el
sistema AF actual (p. 106).
4
Tome la fotografía.
Presione el disparador hasta el
fondo.
X Se tomará la imagen y se mostrará la
imagen captada en el monitor LCD.
X Cuando termine la revisión de
imagen, la cámara volverá
automáticamente al disparo con
Visión en Directo.
Presione el botón <0> para salir
del disparo con Visión en Directo.
A Fotografía con el monitor LCD

105
A Fotografía con el monitor LCD
Ajuste [A1: Disp. Visión dir.] en
[Activado].
Número de disparos posibles con el disparo con Visión en Directo
[Número aproximado de disparos]
Las cifras anteriores son válidas si se utiliza una batería LP-E6 completamente
cargada y se basan en los métodos de comprobación estándar de la CIPA
(Camera & Imaging Products Association).
Con una batería LP-E6 completamente cargada, es posible disparar en serie
con Visión en Directo durante, aproximadamente, 1 hr. 45 min. a temperatura
ambiente (23°C / 73°F).
Activar el disparo con Visión en Directo
Temperatura
Temperatura ambiente
(23°C / 73°F)
Baja temperatura
(0°C / 32°F)
Disparos posibles 220 190

106
Los sistemas AF disponibles son [FlexiZoned (Single)], [u Modo
dir.] (detección de caras, p. 107) y [Modo Rápido] (p. 109).
Si desea obtener un enfoque preciso, ajuste el conmutador de modos
de enfoque del objetivo en <MF>, amplíe la imagen y enfoque
manualmente (p. 111).
Seleccione el sistema AF.
Bajo la ficha [A1], seleccione
[Sistema AF].
Mientras se muestra la imagen de
Visión en Directo, también puede
presionar el botón <f> para
seleccionar el sistema AF en la
pantalla de ajustes.
Para enfocar se utiliza el sensor de imagen. Aunque el AF es posible
mientras se muestra la imagen de Visión en Directo, la operación de
AF tardará más que con el modo Rápido. Además, puede que sea
más difícil lograr el enfoque que con el modo Rápido.
1
Muestre la imagen de Visión en
Directo.
Presione el botón <0>.
X La imagen de Visión en Directo
aparecerá en el monitor LCD.
X Aparecerá el punto AF < >.
2
Mueva el punto AF.
Puede utilizar <9> para mover el
punto AF a donde desee enfocar. (No
puede ir a los bordes de la imagen.)
Para devolver el punto AF al centro,
presione el botón <0> o <L>.
Uso del AF para enfocar (Sistema AF)
Seleccionar el sistema AF
FlexiZone - Single: d
Punto AF

107
Uso del AF para enfocar (Sistema AF)
3
Enfoque el motivo.
Apunte el punto AF hacia el motivo y
presione el disparador hasta la mitad.
X Cuando se logre el enfoque, el punto
AF se iluminará en verde y sonará el
aviso sonoro.
X Si no se logra enfocar, el punto AF se
ilumina en naranja.
4
Tome la fotografía.
Revise el enfoque y la exposición y, a
continuación, presione el disparador
hasta el fondo para tomar la
fotografía (p. 104).
Es el mismo método AF que con FlexiZone - Single. Detecta la cara
humana y enfoca. Haga que la persona que va a fotografiar mire hacia
la cámara.
1
Muestre la imagen de Visión en
Directo.
Presione el botón <0>.
X La imagen de Visión en Directo
aparecerá en el monitor LCD.
Cuando se detecte una cara,
aparecerá el marco <p> sobre la
cara que se va a enfocar.
Si se detectan varias caras, se
muestra <q>. Utilice <9> para
mover el marco <q> sobre la cara
que desee.
u (detección de caras) modo directo: c

Uso del AF para enfocar (Sistema AF)
108
2
Enfoque el motivo.
Presione el disparador hasta la mitad
y la cámara enfocará la cara cubierta
por el marco <p>.
X Cuando se logre el enfoque, el punto
AF se iluminará en verde y sonará el
aviso sonoro.
X Si no se logra enfocar, el punto AF se
ilumina en naranja.
Si no se puede detectar una cara, se
mostrará el punto AF < > y se
ejecutará el AF en el centro.
3
Tome la fotografía.
Revise el enfoque y la exposición y, a
continuación, presione el disparador
hasta el fondo para tomar la
fotografía (p. 104).

109
Uso del AF para enfocar (Sistema AF)
El sensor AF dedicado se utiliza para enfocar en el modo AF foto a foto
usando el mismo sistema AF que cuando se dispara usando el visor.
Aunque puede enfocar rápidamente el área deseada, la imagen de
Visión en Directo se interrumpirá momentáneamente durante la
operación de AF.
Puede utilizar once puntos AF para enfocar (seleccionados
automáticamente). También puede seleccionar un punto AF para
enfocar y enfocar sólo la zona cubierta por ese punto AF (seleccionada
manualmente). En los modos de la zona básica, el punto AF se
seleccionará automáticamente. No es posible seleccionar el punto AF.
1
Muestre la imagen de Visión en
Directo.
Presione el botón <0>.
X La imagen de Visión en Directo
aparecerá en el monitor LCD.
Los pequeños cuadros son los
puntos AF.
2
Seleccione el punto AF.N
Presione el botón <S>.
Puede utilizar <9> o girar el dial
<6> o <5> para seleccionar un
punto AF.
Presione <0> para alternar entre el
punto AF central y la selección
automática.
Modo Rápido: f
Punto AF

Uso del AF para enfocar (Sistema AF)
110
3
Enfoque el motivo.
Apunte el punto AF hacia el motivo y
presione el disparador hasta la mitad.
X La imagen de Visión en Directo se
apagará, el espejo réflex volverá a
bajar y se ejecutará el AF. (No se
toma ninguna foto.)
X Cuando se logre el enfoque, sonará
un aviso y reaparecerá la imagen de
Visión en Directo.
X El punto AF utilizado para enfocar se
iluminará en verde.
X Si no se logra enfocar, el punto AF
parpadea en naranja.
4
Tome la fotografía.
Revise el enfoque y la exposición y, a
continuación, presione el disparador
hasta el fondo para tomar la
fotografía (p. 104).

111
Puede ampliar la imagen y enfocar con precisión con el enfoque
manual.
1
Sitúe el conmutador de modos de
enfoque del objetivo en <MF>.
Gire el anillo de enfoque del objetivo
para enfocar aproximadamente.
2
Muestre el marco de ampliación.
Presione el botón <u>.
3
Mueva el marco de ampliación.
Presione <9> para mover el marco
de ampliación a la posición donde
desee enfocar.
Para devolver el marco de ampliación
al centro, presione el botón <0> o
<L>.
4
Amplíe la imagen.
Cada vez que presione el botón
<u>, la ampliación cambiará dentro
del marco de la manera siguiente:
Enfoque manual
Marco de ampliación
Bloqueo AE
Posición del área ampliada
Ampliación
5x 10x Vista
normal
1x

Enfoque manual
112
5
Enfoque manualmente.
Mientras observa la imagen
ampliada, gire el anillo de enfoque
del objetivo para enfocar.
Una vez logrado el enfoque, presione
el botón <u> para volver a la vista
normal.
6
Tome la fotografía.
Revise el enfoque y la exposición y, a
continuación, presione el disparador
hasta el fondo para tomar la
fotografía (p. 104).

113
7
Grabación de vídeo
La grabación de vídeo se activa
situando el conmutador de
disparo con Visión en Directo/
grabación de vídeo en <k>. El
formato de grabación de vídeo
será MOV.
Para ver las tarjetas que permiten la grabación de vídeos,
consulte la página 3.
Bajo la ficha [53], si ajusta [Wi-Fi] en [Activada], no podrá grabar
vídeos. Antes de grabar vídeos, ajuste [Wi-Fi] en [Desactivada].

114
Cuando se ajuste un modo de disparo diferente de <
a
>, se utilizará el control
de exposición automática para ajustarse a la luminosidad actual de la escena.
1
Ajuste el modo de disparo.
Ajuste el dial de modo en cualquier
modo de disparo excepto <a>.
2
Sitúe el conmutador de disparo
con Visión en Directo/grabación
de vídeo en <k>.
X El espejo réflex producirá un sonido
y, a continuación, la imagen
aparecerá en el monitor LCD.
3
Enfoque el motivo.
Antes de grabar un vídeo, enfoque con
AF o con enfoque manual (p. 106-112).
Cuando presione el disparador hasta
la mitad, la cámara enfocará con el
método AF actual.
4
Grabe el vídeo.
Presione el botón <0> para
empezar a grabar un vídeo.
X Mientras se está grabando el vídeo,
en la esquina superior derecha de la
pantalla se muestra la marca “o”.
Para detener la grabación de vídeo,
presione de nuevo el botón <0>.
k Grabación de vídeo
Grabación con exposición automática
Grabación de vídeo
Micrófono

115
k Grabación de vídeo
Puede ajustar manualmente la velocidad de obturación, la abertura y la
sensibilidad ISO para la grabación de vídeo. El uso de la exposición
manual para grabar vídeos es para usuarios avanzados.
1
Ajuste el dial de modo en <a>.
2
Sitúe el conmutador de disparo
con Visión en Directo/grabación
de vídeo en <k>.
3
Ajuste la sensibilidad ISO.
Presione el botón <i>.
X La pantalla de ajuste de la
sensibilidad ISO aparecerá en el
monitor LCD.
Gire el dial <6> para ajustar la
sensibilidad ISO.
4
Ajuste la velocidad de obturación
y la abertura.
Presione el disparador hasta la mitad
y compruebe el indicador del nivel de
exposición.
Para ajustar la velocidad de
obturación, gire el dial <6>. Las
velocidades de obturación que se
pueden ajustar dependen de la
frecuencia de fotogramas <9>.
• 6 5 4 : 1/4000 seg. - 1/30 seg.
• 8 7 : 1/4000 seg. - 1/60 seg.
Para ajustar la abertura, gire el dial <
5
>.
Si no se puede ajustar, ajuste el
conmutador <
R
> a la izquierda y, a
continuación, gire el dial <
6
> o <
5
>.
5
Enfoque y grabe el vídeo.
El procedimiento es el mismo de los
pasos 3 y 4 para “Grabación con
exposición automática” (p. 114).
Grabación con exposición manual
Velocidad de obturación
Abertura

116
Con [Z2: Tamaño de vídeo], puede
ajustar el tamaño de imagen del vídeo, la
frecuencia de fotogramas por segundo y
el método de compresión. La frecuencia
de fotogramas cambia automáticamente
en función del ajuste de [53: Sistema
vídeo].
Tamaño de imagen
A [1920x1080] : Calidad de grabación alta definición completa
(Full HD). El formato será 16:9.
B [1280x720] : Calidad de grabación alta definición (HD). El
formato será 16:9.
C [640x480] : Calidad de grabación de definición estándar. El
formato será 4:3.
Frecuencia de fotogramas (fps: fotogramas por segundo)
6/8 : Para áreas en las que el formato de TV es NTSC
(Norteamérica, Japón, Corea, México, etc.).
5/7 : Para áreas en las que el formato de TV es PAL (Europa,
Rusia, China, Australia, etc.).
4 : Principalmente para películas.
Método de compresión
X IPB : Comprime varios cuadros a la vez
eficientemente para la grabación. Dado que el
tamaño de archivo será menor que con ALL-I,
podrá grabar más tiempo.
W ALL-I (sólo-I) : Comprime los fotogramas de uno en uno para
la grabación. Aunque el tamaño de archivo
será mayor que con IPB, el vídeo será más
adecuado para la edición.
3
Ajuste del tamaño de grabación de vídeo

117
3 Ajuste del tamaño de grabación de vídeo
Acerca de los archivos de vídeo que superan 4 GB
Aunque grabe un vídeo que supere 4 GB, puede continuar
grabando sin interrupción.
Durante la grabación de vídeo, aprox. 30 seg. antes de que el vídeo
alcance los 4 GB de tamaño de archivo, el tiempo de grabación
transcurrido o el código de tiempo que se muestra en la imagen de
grabación de vídeo comenzará a parpadear. Si continúa grabando
hasta que el tamaño del archivo de vídeo supere 4 GB, se creará
automáticamente un nuevo archivo de vídeo y el tiempo de
grabación transcurrido o el código de tiempo dejarán de parpadear.
Cuando reproduzca el vídeo, deberá reproducir cada archivo de
vídeo individualmente. No se pueden reproducir archivos de vídeo
de manera consecutiva automáticamente. Cuando finalice la
reproducción del vídeo, seleccione el siguiente vídeo que se va a
reproducir.
Límite de tiempo de grabación de vídeo
El tiempo máximo de grabación de un clip de vídeo es de 29 min. 59
seg. Si el tiempo de grabación de vídeo alcanza 29 min. 59 seg., la
grabación de vídeo se detendrá automáticamente. Puede iniciar de
nuevo la grabación de vídeo presionando el botón <0>. (Se inicia
la grabación de un nuevo archivo de vídeo.)
Tiempo total de grabación de vídeo y tamaño de archivo por minuto
Tamaño de
grabación de
vídeo
Tiempo total de grabación (aprox.)
Tamaño del
archivo
(aprox.)
Tarjeta 4 GB Tarjeta 8 GB
Tarjeta
16 GB
A
65
4
X 16 min. 32 min. 1 hr. 4 min. 235 MB/min.
65
4
W 5 min. 11 min. 22 min. 685 MB/min.
B
87 X 18 min. 37 min. 1 hr. 14 min. 205 MB/min.
87 W 6 min. 12 min. 25 min. 610 MB/min.
C65 X 48 min. 1 hr. 37 min. 3 hr. 14 min. 78 MB/min.


119
8
Reproducción de
imágenes
En este capítulo se explican los procedimientos básicos
para reproducir imágenes y vídeos.
Acerca de las imágenes tomadas y guardadas con otro
dispositivo
Es posible que la cámara no pueda mostrar correctamente las
imágenes captadas con una cámara distinta, editadas con un
ordenador o cuyo nombre de archivo se haya cambiado.

120
1
Reproduzca la imagen.
Presione el botón <x>.
X Aparecerá la última imagen captada
o vista.
2
Seleccione una imagen.
Para reproducir imágenes desde la última,
gire el dial <
5
> en sentido antihorario.
Para reproducir imágenes desde la primera
captada, gire el dial en el sentido horario.
Cada vez que presione el botón <
B
>,
el formato de visualización cambiará.
3
Salga de la reproducción de
imágenes.
Presione el botón <x> para salir de
la reproducción de imágenes y volver
al estado listo para fotografiar.
x Reproducción de imágenes
Visualización de una única imagen
Sin información
Histograma
Con información básica
Visualización de información sobre el disparo

121
Busque imágenes rápidamente con la visualización de índice, que
muestra cuatro o nueve imágenes en una pantalla.
1
Presione el botón <u>.
Presione el botón <u> durante la
reproducción de imágenes.
X Se mostrará [6u] en la esquina
inferior derecha de la pantalla.
2
Cambie a la visualización de índice.
Gire el dial <
6
> en sentido antihorario.
X
Aparecerá la visualización de índice de 4 imágenes. La
imagen seleccionada se resalta con un marco naranja.
Si continúa girando el dial <
6
> hacia la
izquierda, aparecerá la visualización de índice
de 9 imágenes. Si gira el dial <
6
> hacia la
derecha, la visualización de índice cambiará
de la manera siguiente: 9 imágenes, 4
imágenes y visualización de una única imagen.
3
Seleccione una imagen o un vídeo.
Gire el dial <
5
> para mover el marco naranja
para seleccionar la imagen. También puede
seleccionarla con la tecla <
V
> o <
U
>.
Presione el botón <
u
> para desactivar el icono
[
6u
] y, a continuación, gire el dial <
6
>
para ir a la pantalla anterior o a la siguiente.
Presione <
0
> en la visualización de índice, y la imagen
seleccionada se mostrará como una imagen única.
x Búsqueda rápida de imágenes
H
Visualización de varias imágenes en una pantalla (visualización de índice)
Î
Î

122
Puede ampliar una imagen captada de 1,5x a 10x, aproximadamente,
en el monitor LCD.
1
Amplíe la imagen.
La imagen se puede ampliar durante
la reproducción de imágenes
(visualización de una única imagen),
durante la revisión de imagen
después de la captura de imágenes,
y desde el estado listo para
fotografiar.
Presione el botón <u>.
X Aparecerá la vista ampliada. El área
ampliada y [6u] se mostrarán en
la esquina inferior derecha de la
pantalla.
La ampliación de la imagen aumenta
a medida que se gira el dial <6> en
sentido horario. Puede ampliar la
imagen hasta aprox. 10x.
La ampliación de la imagen se
reduce a medida que se gira el dial
<6> en sentido antihorario. Si se
continúa girando el dial se mostrará
la visualización de índice (p. 121).
2
Desplácese por la imagen.
Use <9> para desplazarse por la
imagen ampliada.
Para salir de la vista ampliada, pulse
el botón <u> o <x> y aparecerá
de nuevo la visualización de una
única imagen.
u Vista ampliada
Posición del área ampliad
a

123
1
Reproduzca la imagen.
Presione el botón <x> para mostrar
imágenes.
2
Seleccione un vídeo.
Gire el dial <5> para seleccionar el
vídeo que se va a reproducir.
Durante la visualización de una única
imagen, el icono <
s1
> que se
muestra arriba a la izquierda indica un
vídeo. Si el vídeo es una instantánea
de vídeo, se mostrará < >.
Puede presionar el botón <B>
para cambiar a la visualización de
información sobre el disparo.
En la visualización de índice, las
perforaciones del borde izquierdo de las
miniaturas indican vídeos.
Dado que los
vídeos no se pueden reproducir en la
visualización de índice, presione el
botón <
0
> para cambiar a la
visualización de una única imagen.
3
En la visualización de una única
imagen, presione <0>.
X Aparecerá en la parte inferior de la
pantalla el panel de reproducción de
vídeos.
4
Reproduzca el vídeo.
Seleccione [7] (Reproducir) y, a
continuación, presione <0>.
X Se iniciará la reproducción de vídeo.
Puede detener la reproducción de
vídeo presionando <0>.
Puede ajustar el volumen del sonido
girando el dial <6> incluso durante
la reproducción de vídeo.
Para obtener información detallada
sobre el procedimiento de reproducción,
consulte la página siguiente.
k Reproducción de vídeos
Altavoz

k Reproducción de vídeos
124
Panel de reproducción de vídeos
* Cuando se ajuste una música de fondo, no se reproducirá el sonido del vídeo.
Operaciones Descripción de la reproducción
7 Reproducir
Al presionar <0> se alterna entre la reproducción y la
parada.
8 Cámara lenta
Ajuste la velocidad de cámara lenta presionando la tecla
<U>. La velocidad de cámara lenta se indica en la parte
superior derecha de la pantalla.
5 Primer
fotograma
Muestra el primer fotograma del vídeo.
3 Fotograma
anterior
Cada vez que presione <0>, se mostrará el fotograma
anterior. Si mantiene presionado <0>, rebobinará el vídeo.
6 Fotograma
siguiente
Cada vez que presione <0>, el vídeo se reproducirá
fotograma a fotograma. Si mantiene presionado <0>, el
vídeo avanzará rápidamente.
4 Último
fotograma
Muestra el último fotograma del vídeo.
Música de
fondo*
Reproducir un vídeo con la música de fondo seleccionada.
X Editar Muestra la pantalla de edición.
Posición de reproducción
mm’ ss”
Tiempo de reproducción (minutos:segundos con [Contador
rep.: Tiempo grab.] ajustado)
hh:mm:ss:ff
Código de tiempo (horas:minutos:segundos:fotogramas con
[Contador rep.: Cód. tiempo] ajustado)
9 Volumen
Puede ajustar el volumen del altavoz incorporado (p. 123)
girando el dial <6>.
32
Si presiona el botón <M> volverá a la visualización de
una única imagen.

125
Puede seleccionar y borrar las imágenes una a una o borrarlas como
un lote. Las imágenes protegidas no se borrarán.
Cuando se borra una imagen, no se puede recuperar. Antes de
borrar una imagen, asegúrese de que ya no la necesita.
Proteja las imágenes importantes para impedir que se borren
accidentalmente. Al borrar una imagen RAW+JPEG se borrará
tanto la imagen RAW como la JPEG.
1
Reproduzca la imagen que va a
borrar.
2
Presione el botón <L>.
X El menú de borrado aparecerá en la
parte inferior de la pantalla.
3
Borre la imagen.
Seleccione [Borrar] y, a continuación,
presione <0>. La imagen mostrada
se borrará.
L Borrado de imágenes
Borrado de una única imagen

126
NOTAS

127
NOTAS

128
NOTAS

129
9
Descarga de imágenes
en el ordenador
En este capítulo se explica cómo descargar imágenes
de la cámara en un ordenador, se ofrece información
general sobre el software del disco EOS DIGITAL
Solution Disk (CD-ROM) y se explica cómo instalar el
software en un ordenador. También se explica cómo ver
las Instrucciones del software.
EOS DIGITAL Solution Disk
(Software/Instrucciones del software)

130
Puede utilizar el software que se suministra para descargar las
imágenes de la cámara en un ordenador. Hay dos formas de hacerlo.
1
Instale el software (p. 134).
2
Utilice el cable de interfaz que se
proporciona para conectar la
cámara al ordenador.
Utilice el cable de interfaz que se
proporciona con la cámara.
Conecte el cable al terminal
<C> de la cámara con el
icono <D> de la clavija del cable
orientado hacia la parte delantera de
la cámara.
Conecte la clavija del cable al
terminal USB del ordenador.
3
Utilice EOS Utility para descargar
las imágenes o vídeos.
Para ver información detallada,
consulte las Instrucciones de EOS
Utility (p. 135).
Descarga de imágenes en un ordenador
Descarga conectando la cámara al ordenador
Bajo la ficha [53], si ajusta [Wi-Fi] en [Activada], la cámara no se podrá
conectar a un ordenador. Ajuste [Wi-Fi] en [Desactivada] y, a continuación,
conecte el cable de interfaz.

131
Descarga de imágenes en un ordenador
Si tiene un lector de tarjetas disponible en el mercado, puede utilizarlo
para descargar imágenes en el ordenador.
1
Instale el software (p. 134).
2
Inserte la tarjeta en el lector de
tarjetas.
3
Utilice software de Canon para
descargar las imágenes o vídeos.
X Utilice Digital Photo Professional.
X Utilice ImageBrowser EX.
Para obtener información detallada,
consulte las instrucciones del
software (p. 135).
Descargar imágenes con un lector de tarjetas
Cuando descargue imágenes de la cámara en el ordenador con un lector de
tarjetas sin utilizar el software de Canon, copie la carpeta DCIM de la tarjeta
en el ordenador.

132
EOS DIGITAL Solution Disk
El disco EOS DIGITAL Solution Disk contiene diversas
aplicaciones de software para cámaras EOS DIGITAL.
Con la cámara conectada a un ordenador, EOS Utility permite transferir al
ordenador fotos y vídeos tomados con la cámara. También puede utilizar
este software para ajustar diversas configuraciones de cámara y disparar a
distancia con el ordenador conectado a la cámara. Además, es posible
copiar pistas de música de fondo, como EOS Sample Music*, en la tarjeta.
* Canon suministra cinco pistas de música de fondo originales. Utilice EOS Utility
para copiar las pistas de música de fondo en la tarjeta, y podrá reproducir la
música de fondo durante la reproducción de álbumes de instantáneas de vídeo,
vídeos y presentaciones de diapositivas con la cámara.
Este software está recomendado para usuarios que toman, mayoritariamente, imágenes
RAW. Usted puede ver, editar, procesar e imprimir imágenes RAW a alta velocidad.
También puede editar imágenes JPEG conservando las imágenes originales.
Puede editar estilos de imagen, así como crear y guardar archivos de
estilo de imagen originales. Este software está destinado a usuarios
avanzados con experiencia en el procesamiento de imágenes.
Acerca del software
EOS Utility
Digital Photo Professional
Picture Style Editor

133
Acerca del software
Para instalar el software siguiente se necesita una conexión a
Internet. Inserte el disco EOS DIGITAL Solution Disk en el ordenador
conectado a Internet.
Conéctese a Internet para descargar e instalar el software*.
Este software está recomendado para usuarios que toman,
mayoritariamente, imágenes JPEG. Puede ver fotos y reproducir vídeos
MOV y álbumes de instantáneas de vídeo fácilmente, así como editar e
imprimir imágenes JPEG.
* Para descargar e instalar ImageBrowser EX se necesita el disco EOS DIGITAL
Solution Disk.
Conéctese a Internet para descargar e instalar el software.
La información de etiquetado geográfico que se registra al utilizar la
función GPS permite mostrar las ubicaciones de toma sobre un mapa
en una pantalla de ordenador.
ImageBrowser EX
Map Utility
Los programas ZoomBrowser EX/ImageBrowser que acompañaban a
cámaras anteriores no admiten las fotos ni los archivos de vídeo MOV
captados con la EOS 6D. Utilice ImageBrowser EX.

134
1
Inserte el disco EOS DIGITAL Solution Disk en el
ordenador.
Para Macintosh, haga doble clic para abrir el icono del CD-ROM
que se muestra en el escritorio y, a continuación, haga doble clic
en [setup].
2 Haga clic en [Instalación simple] y siga las instrucciones
que aparecen en la pantalla para realizar la instalación.
Si se muestra la pantalla de instalación de “Microsoft Silverlight”
durante la instalación, instale “Microsoft Silverlight”.
3 Haga clic en [Reiniciar] y retire el CD-ROM una vez que
se reinicie el ordenador.
La instalación finaliza cuando se reinicia el ordenador.
Instalación del software
Nunca conecte la cámara al ordenador antes de instalar el software.
Éste no se instalará correctamente.
Siga el procedimiento que se indica a continuación para instalar
ImageBrowser EX, Map Utility y el resto del software del disco EOS
DIGITAL Solution Disk. La instalación de software requiere conexión a
Internet. No es posible descargar e instalar el software sin conexión a
Internet.
Aunque haya una versión anterior de ImageBrowser EX y Map Utility
instalada en el ordenador, siga el procedimiento que se indica a
continuación para instalar o actualizar ImageBrowser EX y Map Utility.
Se han optimizado para esta cámara. También puede utilizar la función
de actualización automática para añadir las funciones más recientes.
Si ya hay una versión anterior del software instalada en el ordenador,
siga el procedimiento siguiente para instalar la versión más reciente. (La
versión anterior se sobrescribirá).

135
El disco EOS DIGITAL Solution Disk contiene las
Instrucciones del software. Puede copiar y ver las
instrucciones del software (archivos PDF) de la manera
siguiente:
1 Inserte el disco EOS DIGITAL Solution Disk en el
ordenador.
2 Cierre la pantalla de instalación.
Cuando aparezca la pantalla de instalación del disco EOS
DIGITAL Solution Disk, ciérrela.
3 Abra el CD-ROM.
4 Abra la carpeta [Manual].
5 Copie la carpeta [Spanish] en su ordenador.
Se copian los PDF de Instrucciones con los nombres siguientes.
Las Instrucciones de ImageBrowser EX (Guía del usuario de
ImageBrowser EX) se incluyen en el software.
6 Haga doble clic en el archivo PDF copiado.
Adobe Reader (se recomienda la versión más reciente) debe
estar instalado en el ordenador.
Adobe Reader se puede descargar gratis desde Internet.
Software INSTRUCCIONES
Windows Macintosh
EOS Utility EUx.xW_S_xx EUx.xM_S_xx
Digital Photo Professional DPPx.xW_S_xx DPPx.xM_S_xx
Picture Style Editor PSEx.xW_S_xx PSEx.xM_S_xx
Map Utility MUx.x_S_xx

136
Marcas comerciales
Adobe es una marca comercial de Adobe Systems Incorporated.
Microsoft y Windows son marcas comerciales de Microsoft Corporation,
registradas en los Estados Unidos y/o en otros países.
Macintosh y Mac OS son marcas comerciales de Apple Inc., registradas en los
EE.UU. y en otros países.
El logotipo de SDXC es una marca comercial de SD-3C, LLC.
HDMI, el logotipo HDMI y High-Definition Multimedia Interface son marcas
comerciales o marcas comerciales registradas de HDMI Licensing LLC.
Todas las demás marcas comerciales son propiedad de sus respectivos
dueños.
Acerca de la licencia MPEG-4
“This product is licensed under AT&T patents for the MPEG-4 standard and may be
used for encoding MPEG-4 compliant video and/or decoding MPEG-4 compliant video
that was encoded only (1) for a personal and non-commercial purpose or (2) by a
video provider licensed under the AT&T patents to provide MPEG-4 compliant video.
No license is granted or implied for any other use for MPEG-4 standard.”
* Aviso mostrado en inglés según lo requerido.
Logotipo de certificación
Bajo la ficha [54], si selecciona [Pantalla logo certificación] y presiona
<0>, aparecerán algunos de los logotipos de las certificaciones de la
cámara. Otros logotipos de certificación pueden encontrarse en este manual
de instrucciones, en el cuerpo de la cámara y en el embalaje de la cámara.

137
Se recomienda el uso de accesorios originales de Canon
Este producto está diseñado para alcanzar un excelente rendimiento si se
utiliza con accesorios originales de Canon.
Canon no será responsable de ningún daño en el producto ni accidentes como
fuego, etc., provocados por un funcionamiento incorrecto de accesorios que no
sean originales de Canon (por ejemplo, fugas y/o explosiones de la batería).
Tenga en cuenta que esta garantía no se aplica a reparaciones como
consecuencia de un funcionamiento incorrecto de accesorios que no sean
originales de Canon. No obstante, podrá solicitar dichas reparaciones, que
estarán sujetas a un cargo.
La batería LP-E6/LP-E6N solamente puede usarse con productos Canon.
Si la utiliza con un cargador de batería o un producto incompatible, puede
provocar averías o accidentes de los que Canon no se hace responsable.

138
El propósito de las precauciones siguientes es evitarle, a usted y a
otras personas, daños y lesiones. Asegúrese de entender y cumplir
plenamente estas precauciones antes de usar el producto.
Si experimenta cualquier avería, problema o daño en el producto,
póngase en contacto con el centro de asistencia de Canon más
próximo o con el comercio donde adquirió el producto.
Precauciones de seguridad
Advertencias:
Tenga en cuenta las siguientes advertencias. De
lo contrario, podrían producirse lesiones graves
o, incluso, la muerte.
Siga estas medidas de seguridad para evitar incendios, calentamiento excesivo,
descargas eléctricas, fugas de productos químicos y explosiones:
• No utilice baterías, fuentes de alimentación ni accesorios que no se especifiquen
en las Instrucciones. No utilice baterías modificadas ni de fabricación casera.
• No cortocircuite, desmonte ni modifique la batería. No aplique calor ni soldadura a
la batería. No exponga la batería al fuego ni al agua. No someta la batería a
impactos físicos fuertes.
• No inserte incorrectamente los extremos más y menos de la batería.
• No recargue la batería a temperaturas fuera del intervalo de temperatura ambiente
admisible. Tampoco supere el tiempo de recarga indicado en las instrucciones.
• No inserte objetos metálicos extraños en los contactos eléctricos de la cámara,
accesorios, cables de conexión, etc.
Cuando deseche una batería, cubra los contactos eléctricos con cinta aislante para
evitar el contacto con otros objetos metálicos u otras baterías. Así evitará incendios
y explosiones.
Si al recargar la batería emite demasiado calor, humo o gases, desconecte
inmediatamente el cargador de batería de la fuente de alimentación para detener la
recarga. De lo contrario, puede provocar un incendio, daños por calor o descargas
eléctricas.
Si la batería tiene una fuga, cambia de color, se deforma o emite humo o gases,
extráigala inmediatamente. Tenga cuidado de no quemarse al hacerlo. Si continúa
usándola, puede provocar un incendio, descargas eléctricas o quemaduras en la piel.
Si se produce una fuga, evite que el electrólito entre en contacto con los ojos, la piel
y la ropa. Puede producir ceguera o problemas cutáneos. Si el electrólito entra en
contacto con los ojos, la piel o la ropa, lave la zona afectada con abundante agua
limpia, sin frotarla. Acuda a un médico inmediatamente.
No deje ningún cable cerca de una fuente de calor. El cable podría deformarse o el
material aislante podría fundirse, con el consiguiente peligro de incendio o descarga
eléctrica.
No sujete la cámara en la misma posición durante largos períodos de tiempo. Aunque la
cámara no parezca caliente, el contacto prolongado con una misma parte del cuerpo puede
provocar enrojecimiento, ampollas en la piel o quemaduras por contacto a baja
temperatura. Se recomienda el uso de un trípode a las personas que tengan problemas de
circulación o la piel muy sensible, o cuando se utilice la cámara en lugares muy cálidos.
No dispare el flash a nadie que esté conduciendo un automóvil u otro vehículo.
Puede provocar un accidente.

139
Precauciones de seguridad
Cuando no esté utilizando la cámara o los accesorios, extraiga la batería y
desconecte la clavija de alimentación del equipo antes de guardarlo. De este modo
evitará descargas eléctricas, exceso de calor, incendios y corrosión.
No utilice el equipo en lugares en los que haya gas inflamable. Así evitará
explosiones e incendios.
Si el equipo se cae, la carcasa se rompe y las piezas internas quedan al
descubierto, no las toque. Existe la posibilidad de una descarga eléctrica.
No desmonte ni modifique el equipo. Las piezas internas tienen un alto voltaje y
pueden generar una descarga eléctrica.
No mire al sol o a una fuente de luz de gran potencia a través de la cámara o el
objetivo. Su visión podría resultar dañada.
Mantenga el equipo lejos del alcance de niños y bebés, incluso mientras lo utiliza.
Las correas y los cables pueden provocar accidentalmente asfixia, descargas
eléctricas o lesiones. También pueden producirse lesiones o asfixia si un niño o un
bebé se traga accidentalmente una pieza o un accesorio de la cámara. Si un niño o
un bebé se traga una pieza o un accesorio, acuda a un médico inmediatamente.
No almacene el equipo en lugares con polvo o humedad. De manera similar, guarde
la batería con su tapa protectora puesta para evitar cortocircuitos. De este modo
evitará incendios, exceso de calor, descargas eléctricas y quemaduras.
Antes de utilizar la cámara en un avión o un hospital, compruebe si está permitido.
Las ondas electromagnéticas que emite la cámara pueden interferir con los
instrumentos del avión o el equipo del hospital.
Siga estas medidas de seguridad para evitar incendios y descargas eléctricas:
• Introduzca siempre la clavija de alimentación por completo.
• No sujete la clavija de alimentación con las manos húmedas.
• Cuando vaya a desconectar una clavija de alimentación, sujete la clavija y tire de
ella en vez de tirar del cable.
• No arañe, corte ni doble excesivamente el cable; asimismo, no ponga ningún
objeto pesado encima del mismo. No retuerza ni ate los cables.
• No conecte demasiadas clavijas de alimentación a la misma fuente de alimentación.
• No utilice un cable si tiene los hilos rotos o el material aislante deteriorado.
Desenchufe periódicamente la clavija de alimentación y limpie el polvo alrededor de
la toma de corriente con un paño seco. Si esa zona tiene polvo o grasa, o está
húmeda, el polvo de la fuente de alimentación puede humedecerse y provocar un
cortocircuito, con el consiguiente peligro de incendio.
No conecte la batería directamente a una toma eléctrica o a una toma de mechero
de automóvil. La batería puede tener fugas, generar demasiado calor o explotar
provocando incendios, quemaduras o lesiones.
Cuando un niño utilice el producto, un adulto deberá explicarle detalladamente
cómo utilizarlo. Supervise a los niños mientras utilicen el producto. Un uso
incorrecto puede provocar descargas eléctricas o lesiones.
No deje al sol un objetivo suelto o fijado a una cámara sin la tapa puesta. El objetivo
puede concentrar los rayos del sol y provocar un incendio.
No cubra ni envuelva el producto con un paño. El calor que se acumule puede
deformar la carcasa o producir un incendio.
Tenga cuidado de que la cámara no se moje. Si el producto cae al agua o si
penetran en el mismo agua u objetos metálicos, extraiga inmediatamente la batería.
Así evitará incendios y descargas eléctricas.
No utilice disolvente de pintura, benceno ni disolventes orgánicos para limpiar el
producto. Puede provocar incendios o riesgos para la salud.

Precauciones de seguridad
140
Precauciones:
Cumpla las precauciones siguientes. De lo
contrario, podrían producirse lesiones físicas o
daños a la propiedad.
No utilice ni almacene el equipo dentro de un automóvil expuesto al calor del sol ni
cerca de una fuente de calor. El producto puede calentarse y provocar quemaduras
en la piel. Si lo hace, también puede provocar fugas o la explosión de la batería, lo
que degradará el rendimiento o acortará la vida útil del producto.
No transporte la cámara si está fijada en un trípode. Hacerlo podría provocar
lesiones. Compruebe que el trípode es lo suficientemente robusto como para
soportar la cámara y el objetivo.
No deje el producto en un entorno de bajas temperaturas durante un largo período
de tiempo. El producto se enfriará y puede provocar lesiones al tocarlo.
No dispare el flash cerca de los ojos. Podría dañar los ojos.
No reproduzca nunca el CD-ROM suministrado en una unidad que no sea
compatible con el CD-ROM. Si lo utiliza en un reproductor de CD, puede dañar los
altavoces y otros componentes. Cuando utilice auriculares, existe también riesgo de
lesiones en los oídos debido a un volumen excesivamente alto.
Los EE.UU. y Canadá solamente:
La batería de ion de litio que acciona el producto es reciclable.
Llame por favor 1-800-8-BATTERY para la información sobre
cómo reciclar esta batería.
Cuando se utilice la conexión a una toma eléctrica doméstica, utilice solamente
el cargador de batería LC-E6 (alimentación nominal: 100-240 V CA, 50/60 Hz,
salida nominal: 8,4 V CC). El uso de cualquier otro aparato puede provocar
incendios, sobrecalentamiento o descargas eléctricas.
Cuando se utilice la conexión a una toma eléctrica doméstica, utilice solamente
el adaptador de CA AC-E6N (alimentación nominal: 100-240 V CA, 50/60 Hz,
salida nominal: 8,0 V CC). El uso de cualquier otro aparato puede provocar
incendios, sobrecalentamiento o descargas eléctricas.
PRECAUCIÓN
EXISTE RIESGO DE EXPLOSIÓN SI SE SUSTITUYEN LAS BATERÍAS POR
OTRAS DE UN TIPO INCORRECTO.
DESECHE LAS BATERÍAS USADAS SEGÚN LAS NORMAS LOCALES.

141
Panel LCD y monitor LCD
Aunque el monitor LCD está fabricado con tecnología de muy alta precisión
y más del 99,99% de píxeles efectivos, es posible que haya algunos píxeles
vacíos que muestren sólo negro o rojo, etc., entre el 0,01% o menos de
píxeles restantes. Los píxeles vacíos no suponen una avería. Estos píxeles
no afectan a las imágenes grabadas.
Si se deja encendido el monitor LCD durante un período prolongado de
tiempo, puede que haya quedado marcada la pantalla si ve restos de lo que
se estaba mostrando. No obstante, esto es sólo temporal y desaparecerá si
no se utiliza la cámara durante unos días.
La pantalla del monitor LCD puede parecer lenta a bajas temperaturas o
mostrarse en negro a altas temperaturas. Volverá a la normalidad a
temperatura ambiente.
Tarjetas
Para proteger la tarjeta y sus datos grabados, tenga en cuenta lo siguiente:
No deje caer la tarjeta, no la doble ni la moje. No la someta a una fuerza
excesiva, a impactos físicos ni a vibraciones.
No toque los contactos electrónicos de la tarjeta con los dedos ni con nada
metálico.
No adhiera pegatinas, etc., a la tarjeta.
No almacene ni utilice una tarjeta cerca de dispositivos con un fuerte campo
magnético, como un televisor, unos altavoces o un imán. Evite también los
lugares que puedan tener electricidad estática.
No deje la tarjeta a la luz directa del sol ni cerca de una fuente de calor.
Guarde la tarjeta en un estuche.
No almacene las tarjetas en lugares polvorientos, húmedos o demasiado calurosos.
Objetivo
Después de desmontar el objetivo de la cámara, deje el
objetivo con el extremo posterior hacia arriba y coloque
las tapas del objetivo para evitar que se rayen la
superficie del objetivo y los contactos eléctricos.
Precauciones relacionadas con el uso prolongado
Si utiliza los disparos en serie, el disparo con Visión en Directo o la grabación de
vídeo durante un período prolongado, es posible que la cámara se caliente.
Aunque esto no es una avería, si sujeta la cámara caliente durante mucho
tiempo puede sufrir quemaduras leves.
Precauciones de manejo
C
ontactos

142
NOTAS

143
NOTAS

144
NOTAS

145
NOTAS

146
NOTAS

147
NOTAS

148
NOTAS

Instrucciones básicas de la función Wi-Fi
EOS 6D (WG)
En las Instrucciones básicas de la función Wi-Fi, se explican
procedimientos operativos básicos para el uso fácil de “Transferencia de
imágenes entre cámaras” y “Conexión con un smartphone”.
Español

W-2
Las funciones de red LAN inalámbrica de esta cámara permiten realizar
diversas funciones de manera inalámbrica, desde enviar imágenes a
servicios Web y a otras cámaras hasta controlar la cámara de manera
remota, con solo conectarse a una red Wi-Fi o a otro dispositivo
compatible con las funciones de red LAN inalámbrica de esta cámara.
* Para utilizar la función (2) a través de un punto de acceso, consulte el archivo
PDF “Instrucciones de la función Wi-Fi”.
* Para ver el procedimiento de uso de las funciones (3) a (6), consulte el archivo
PDF “Instrucciones de la función Wi-Fi”.
Qué puede hacer con las funciones de red LAN inalámbrica
(Canon Image Gateway)
(2) Conectar con un
smartphone
Hacer visibles
las imágenes
Disparo remoto
(3) Imprimir imágenes
con una impresora
Wi-Fi
Imprimir imágenes
(4) Manejar la cámara de manera remota
con EOS Utility
Controlar la cámara de manera remota
(5) Enviar imágenes a
un servicio Web
Guardar y compartir
imágenes
(6) Ver imágenes con
un reproductor
multimedia
Ver imágenes
(1) Transferir imágenes
entre cámaras
Intercambiar imágenes

W-3
Qué puede hacer con las funciones de red LAN inalámbrica
(1)z Transferir imágenes entre cámaras (p. W-13)
Transfiera imágenes entre esta cámara y otras cámaras Canon con
funciones de red LAN inalámbrica integradas.
(2)q Conectar con un smartphone (p. W-21)
Vea imágenes guardadas o maneje la cámara desde un
smartphone.
Para utilizar estas funciones, debe instalar en el smartphone la
aplicación dedicada “EOS Remote”.
(3)l Imprimir imágenes con una impresora Wi-Fi
Conecte la cámara a una impresora compatible con red LAN
inalámbrica que admita PictBridge (red LAN inalámbrica) para
imprimir imágenes de manera remota.
(4)D Manejar la cámara de manera remota con EOS Utility
Utilice EOS Utility mediante una red LAN inalámbrica en lugar de un
cable de interfaz y maneje la cámara desde un ordenador de
manera inalámbrica.
(5)w Enviar imágenes a un servicio Web
Cargue las imágenes en CANON iMAGE GATEWAY, un servicio
fotográfico en línea para usuarios de Canon (deberá registrarse, de
manera gratuita), para compartirlas con la familia y los amigos.
(6) Ver imágenes con un reproductor multimedia
Muestre en su televisor las imágenes de la tarjeta de memoria de la
cámara, utilizando un reproductor multimedia compatible con
DLNA* a través de una red LAN inalámbrica.
* Digital Living Network Alliance
Para ver procedimientos más detallados, consulte las Instrucciones
que se pueden descargar desde el sitio web de Canon. Para ver cómo
descargar las Instrucciones, consulte la página 5.
Instrucciones

W-4
En este manual, el término “red LAN inalámbrica” se utiliza como
término general para Wi-Fi y las funciones de comunicación
inalámbrica originales de Canon.
Los ** (números) de “(p. **)” de este manual indican números de
referencia de páginas para obtener más información.
Las secciones de este manual etiquetadas con los siguientes
símbolos contienen tipos particulares de información, como se
describe a continuación.
: Advertencias para evitar potenciales problemas durante el
funcionamiento.
: Información complementaria al funcionamiento básico.
Convenciones utilizadas en este manual
Microsoft y Windows son marcas comerciales de Microsoft Corporation,
registradas en los Estados Unidos y/o en otros países.
Macintosh y Mac OS son marcas comerciales de Apple Inc., registradas en
los EE.UU. y en otros países.
Wi-Fi es una marca comercial registrada de Wi-Fi Alliance.
Wi-Fi Certified, WPA, WPA2 y el logotipo Wi-Fi Certified son marcas
comerciales de Wi-Fi Alliance.
WPS, cuando se utiliza en las pantallas de ajustes de la cámara y en este
manual, significa Wi-Fi Protected Setup (Configuración protegida de
Wi-Fi).
UPnP es una marca comercial de UPnP Implementers Corporation.
Todas las demás marcas comerciales son propiedad de sus respectivos
dueños.
Tenga en cuenta que Canon no será responsable de ninguna pérdida ni
ningún daño derivado de ajustes incorrectos de red LAN inalámbrica para el
uso de la cámara. Además, Canon no será responsable de ninguna otra
pérdida ni ningún otro daño provocados por el uso de la cámara.

W-5
2
1
3
Introducción
Qué puede hacer con las funciones de red LAN inalámbrica...... W-2
Convenciones utilizadas en este manual..................................... W-4
Estado de conexión y ajustes de [Wi-Fi] ..................................... W-6
Ajustes básicos de las funciones de red LAN inalámbrica W-7
Registro de un apodo................................................................... W-8
Ajustes y manejo básico ............................................................ W-11
Transferencia de imágenes entre cámaras W-13
Selección del destino de conexión............................................. W-14
Envío de imágenes .................................................................... W-16
Reconexión................................................................................ W-19
Conexión con un smartphone W-21
Preparación................................................................................ W-22
Uso del modo de punto de acceso de cámara
para establecer una conexión.................................................... W-23
Manejo de la cámara con un smartphone.................................. W-26
Reconexión................................................................................ W-28
Contenido
Para una guía de solución de problemas y especificaciones, consulte las
Instrucciones que se puede descargar desde el sitio Web de Canon. Para
ver cómo descargar las Instrucciones, consulte la página 5.
Precauciones relativas a Wi-Fi (red LAN inalámbrica)............... G-20

W-6
Se pueden examinar los ajustes y el estado de conexión de [Wi-Fi] bajo
la ficha [53] en el panel LCD y el monitor LCD de la cámara.
Estado de conexión y ajustes de [Wi-Fi]
Estado de conexión de Wi-Fi
Función Wi-Fi
Cuando [53: Wi-Fi] se ha
ajustado en [Desactivada]
Cuando [53: Wi-Fi] se ha
ajustado en [Activada] pero
no hay ninguna conexión
Conectada
(I J)
Se están transmitiendo
datos
(Parpadeando)
Error de conexión
(Parpadeando)
Esperando a la conexión
Esperando a la
reconexión
Funciones Wi-Fi
(Off)
No conectada
Conectada
Se están transmitiendo datos
(Parpadeando)
Esperando a la conexión
Esperando a la reconexión
(Parpadeando)
Error de conexión
(Parpadeando)

W-7
1
Ajustes básicos de las funciones
de red LAN inalámbrica
En este capítulo se describen los ajustes necesarios
para utilizar las funciones de red LAN inalámbrica de la
cámara.

W-8
En primer lugar, ajuste el apodo de la cámara.
Cuando la cámara se conecte a otro dispositivo mediante una red LAN
inalámbrica, el apodo se mostrará en el dispositivo. No olvide ajustar un
apodo para la cámara.
1
Seleccione [Wi-Fi].
Bajo la ficha [53], seleccione [Wi-Fi]
y, a continuación, presione <0>.
2
Seleccione [Activada].
Presione la tecla <V> para
seleccionar [Activada] y, a
continuación, presione <0>.
X Ahora se puede seleccionar
[Función Wi-Fi].
3
Seleccione [Función Wi-Fi].
Bajo la ficha [53], seleccione
[Función Wi-Fi] y, a continuación,
presione <0>.
X
Cuando se selecciona este ajuste por
primera vez, se muestra una pantalla
para registrar un apodo. Seleccione
[
OK
] y, a continuación, vaya al paso 4.
Registro de un apodo

W-9
Registro de un apodo
4
Escriba un apodo.
Para ver instrucciones sobre cómo
escribir caracteres, consulte
“Funcionamiento del teclado virtual”
en la página siguiente.
Puede introducir como máximo 16
caracteres.
5
Termine.
Cuando haya terminado, presione el
botón <M>.
Seleccione [OK] en la pantalla de
confirmación y, a continuación,
presione <0>. El apodo se registra
y aparece la pantalla [Función
Wi-Fi].
Para cambiar el apodo, presione el
botón <B> de la pantalla anterior
y, a continuación, seleccione [Editar
apodo] en la pantalla que se
muestra.

Registro de un apodo
W-10
Cambio a otras áreas de entrada
Para cambiar entre las áreas de
entrada superior e inferior, presione
el botón <Q>.
Movimiento del cursor
Para mover el cursor, presione la
tecla <U> en el área superior.
Entrada de texto
En el área de entrada inferior, presione la tecla <V> o <U> para
seleccionar caracteres y presione <0> para escribirlos.
Para comprobar cuántos caracteres ha escrito y cuántos más puede
escribir, consulte [*/*] en la esquina superior derecha de la pantalla.
Eliminación de texto
Si comete un error, presione el botón <L> para borrarlo.
Finalización de la entrada de texto
Presione el botón <M> para confirmar lo que ha escrito y salir.
Si se muestra una pantalla de confirmación, seleccione [OK] para
salir.
Cancelación de la entrada de texto
Presione el botón <B> para cancelar la entrada de texto y salir.
Si se muestra una pantalla de confirmación, seleccione [OK] para
salir.
Funcionamiento del teclado virtual

W-11
Cuando desee dar prioridad a las funciones de red LAN
inalámbricas, no utilice el disparador, el dial de modo ni el botón de
reproducción. De lo contrario, es posible que se dé prioridad a la
operación de disparo o reproducción y que las funciones de red LAN
inalámbricas finalicen durante el proceso.
Cuando se ajusta [Wi-Fi] en [Activada], la grabación de vídeo se
desactiva. Aunque la cámara esté conectada a un ordenador, una
impresora, un receptor GPS u otro dispositivo mediante un cable de
interfaz, no se podrán utilizar (p. W-12).
Bajo la ficha [52], ajuste [Descon.
auto] en [Desactivada] si es
necesario.
Si se activa el apagado automático
de la cámara durante la conexión a la
red LAN inalámbrica, la función LAN
inalámbrica se apagará. La conexión
a la red LAN inalámbrica se restaura
cuando la cámara se despierta de la
desconexión automática.
Si está prohibido el uso de
dispositivos electrónicos y
dispositivos inalámbricos a bordo de
aviones o en hospitales, ajuste
[Wi-Fi], bajo la ficha [53], en
[Desactivada].
Ajustes y manejo básico
Uso de la cámara mientras están activas las funciones de
red LAN inalámbricas
Desconexión automática
[Wi-Fi] bajo la ficha [53]

Ajustes y manejo básico
W-12
Conectando con un cable de interfaz
Cuando la opción [Wi-Fi] bajo la ficha [53] se ajusta en [Activada], la
conexión del cable de interfaz se desactiva. Ajústelo en [Desactivada]
para conectar el cable de interfaz.
Cuando la cámara está conectada a un ordenador, una impresora, un
receptor GPS o cualquier otro dispositivo mediante un cable de interfaz,
no se pueden cambiar los ajustes de [Wi-Fi]. Desconecte el cable de
interfaz y, a continuación, configure los ajustes.
Uso de una tarjeta Eye-Fi
Cuando la opción [Wi-Fi] bajo la ficha [53] se ajusta en [Activada], la
transferencia de imágenes mediante una tarjeta Eye-Fi se desactiva.

W-13
2
Transferencia de
imágenes entre cámaras
Se pueden transferir imágenes entre cámaras Canon
mediante las funciones de red LAN inalámbrica
integradas.
La conexión inalámbrica se puede utilizar con cámaras Canon
con funciones de red LAN inalámbrica integradas,
comercializadas a partir de 2012 o más tarde. Tenga en cuenta
que la cámara no se puede conectar a videocámaras Canon,
aunque tengan funciones de red LAN inalámbrica integradas.
La cámara no se puede conectar a cámaras Canon sin
funciones de red LAN inalámbrica integradas, aunque sean
compatibles con tarjetas Eye-Fi.
Se pueden transferir fotos si su formato de archivo es JPEG.
Aunque se puede transferir vídeos, es posible algunas cámaras
de destino no puedan reproducirlos, según su funcionalidad.

W-14
Registre la cámara de destino con la que se conectará mediante una
red LAN inalámbrica.
La cámara solo puede conectarse a una única cámara a la vez.
1
Seleccione [Función Wi-Fi].
Bajo la ficha [53], ajuste [Wi-Fi] en
[Activada] y, a continuación,
seleccione [Función Wi-Fi].
2
Seleccione [z].
Presione la tecla <V> o <U>
para seleccionar [z] (Transf. imág.
entre cámaras) y, a continuación,
presione <0>.
3
Inicie la conexión en la cámara de
destino.
Cuando se muestre la pantalla de la
izquierda, inicie la conexión también
en la cámara de destino. Para ver el
procedimiento de manejo, consulte el
manual de instrucciones de la
cámara de destino.
Cuando se establezca una conexión,
los ajustes se guardarán
automáticamente y se mostrarán las
imágenes de la tarjeta.
Selección del destino de conexión

W-15
Selección del destino de conexión
4
Seleccione las imágenes a enviar.
Seleccione las imágenes en la
cámara que envía las imágenes
(p. W-16).
No realice ninguna operación en la
cámara que recibe las imágenes.
Tenga en cuenta que la información GPS no se muestra en la pantalla de
reproducción de la cámara aunque se haya añadido información GPS a la
imagen recibida. Las ubicaciones de toma se pueden ver en un mapa
virtual, utilizando el software Map Utility.
Los ajustes de conexión se guardan o se registran automáticamente con
el apodo de la cámara con la que se estableció una conexión.
La desconexión automática no funciona cuando se conecta la cámara a
otra cámara.

W-16
Las imágenes seleccionadas se envían una por una.
1
Seleccione una imagen a enviar.
Presione la tecla <U> para
seleccionar la imagen que va a enviar
y, a continuación, presione <0>.
Presione el botón <
u
> y gire el dial <
6
>
a la izquierda para seleccionar una imagen
en la visualización de índice. Para volver a
la visualización de una única imagen, gire el
dial <
6
> hacia la derecha.
2
Seleccione [Env. mostrada].
Para seleccionar el tamaño de la imagen
a enviar, presione la tecla <
U
> y
seleccione [
Redimensionar
].
Presione la tecla <U> para
seleccionar [Env. mostrada] y, a
continuación, presione <0>.
X Se muestra la pantalla de progreso
de la transferencia.
Para enviar otra imagen, repita los pasos 1 y 2.
3
Cierre la conexión.
Presione el botón <
M
> para mostrar la
pantalla de confirmación. Presione la tecla
<
U
> para seleccionar [
OK
] y, a continuación,
presione <
0
> para cerrar la conexión.
X Volverá a aparecer la pantalla de
ajuste de [Función Wi-Fi].
Envío de imágenes
Envío de imágenes una por una
Si se inicia la operación de reproducción o de disparo durante la conexión,
la conexión se cerrará.
No se pueden enviar imágenes RAW.

W-17
Envío de imágenes
Se pueden seleccionar y enviar varias imágenes (hasta 50 archivos).
1
Presione <0>.
2
Seleccione [Enviar selec.].
Para seleccionar el tamaño de la
imagen a enviar, presione la tecla
<U> y seleccione
[Redimensionar].
Presione la tecla <U> para
seleccionar [Enviar selec.] y, a
continuación, presione <0>.
3
Seleccione las imágenes a enviar.
Presione la tecla <
U
> para
seleccionar las imágenes que va a enviar
y, a continuación, presione <
0
>.
X
Se mostrará <
X
> en la esquina superior
izquierda de la imagen a enviar.
Presione el botón <u> y gire el dial
<6> a la izquierda para seleccionar
una imagen en la visualización de
tres imágenes. Para volver a la
visualización de una única imagen,
gire el dial <6> hacia la derecha.
Después de seleccionar las imágenes a
enviar, presione el botón <
Q
>.
Envío de imágenes seleccionadas

Envío de imágenes
W-18
4
Reduzca el tamaño de imagen.
Ajústelo si es necesario.
5
Envíe las imágenes.
Presione la tecla <V> para
seleccionar [Enviar] y, a
continuación, presione <0> para
enviar las imágenes.
X Se muestra la pantalla de progreso
de la transferencia.
Para transferir otras imágenes, repita
los pasos 1 a 5.
6
Cierre la conexión.
Presione el botón <M> para
mostrar la pantalla de confirmación.
Presione la tecla <U> para
seleccionar [OK] y, a continuación,
presione <0> para cerrar la
conexión.
X Volverá a aparecer la pantalla de
ajuste de [Función Wi-Fi].
Si se inicia la operación de reproducción o de disparo durante la conexión,
la conexión se cerrará. Mientras se envían o reciben datos, no se puede
realizar operaciones tales como disparar. Cuando se selecciona [
Cancelar
]
en la cámara que se está utilizando para enviar imágenes, la transferencia
de imágenes se detiene para poder disparar y realizar otras operaciones.
Cuando envíe archivos grandes, asegúrese de que la batería esté
adecuadamente cargada para que no se agote durante el proceso.
No se pueden enviar imágenes RAW.
Puede enviar como máximo 50 archivos.

W-19
La cámara se puede reconectar a otra cámara para la que se hayan
registrado ajustes de conexión.
1
Seleccione [Función Wi-Fi].
Bajo la ficha [53], ajuste [Wi-Fi] en
[Activada] y, a continuación,
seleccione [Función Wi-Fi].
2
Seleccione [z].
Seleccione [z] (Transf. imág. entre
cámaras) y presione <0>.
3
Establezca una conexión.
Seleccione [
Conectar
] y presione <
0
>.
En la pantalla de confirmación,
seleccione [OK].
Realice también el procedimiento de
reconexión en la cámara de destino.
X Se mostrarán las imágenes de la
tarjeta y podrá seleccionar las
imágenes a enviar.
Cuando se registren ajustes para
varios destinos de conexión,
seleccione [Elegir ajuste],
seleccione el destino de conexión y, a
continuación, conecte con el destino.
De manera predeterminada, los ajustes
se nombran según el apodo de la
cámara con la que se estableció la
conexión.
Reconexión

W-20
NOTAS

W-21
3
Conexión con un
smartphone
La conexión de la cámara a un smartphone permite
utilizar el smartphone para ver, administrar y recibir
imágenes almacenadas en la cámara. También puede
utilizar el smartphone para disparar de manera remota.

W-22
Para comunicarse con un smartphone, la cámara debe conectarse al
smartphone utilizando la aplicación dedicada EOS Remote.
EOS Remote puede descargarse desde App Store o Google Play.
Instale EOS Remote en el smartphone y, a continuación, realice los
procedimientos para establecer la conexión.
Para utilizar EOS Remote, se necesita un smartphone que tenga
instalado iOS o Android. Para ver información sobre el sistema
operativo compatible, consulte el sitio de descarga del software
EOS Remote.
Preparación
Se requiere la instalación de EOS Remote

W-23
La cámara y el smartphone pueden conectarse directamente mediante una red LAN inalámbrica.
Dado que la cámara actúa como un punto de acceso no se necesita ningún otro punto de
acceso, así que podrá establecer comunicaciones fácilmente incluso cuando esté fuera.
Para establecer la conexión, es necesario realizar operaciones en el smartphone. Para
obtener información detallada, consulte el manual de instrucciones del smartphone.
1
Seleccione [Función Wi-Fi].
Bajo la ficha [53], ajuste [Wi-Fi] en
[Activada] y, a continuación,
seleccione [Función Wi-Fi].
2
Seleccione [q].
Seleccione [q] (Conectar con
smartphone) y presione <0>.
3
Seleccione [Modo punto de
acceso cámara].
Presione la tecla <V> para
seleccionar [Modo punto de acceso
cámara] y, a continuación, presione
<0>.
Seleccione [OK] y, a continuación,
presione <0> para ir a la pantalla
siguiente.
4
Seleccione [Conexión fácil].
Presione la tecla <V> para
seleccionar [Conexión fácil] y, a
continuación, presione <0>.
Seleccione [OK] y, a continuación,
presione <0> para ir a la pantalla
siguiente.
Uso del modo de punto de acceso de cámara para establecer una conexión

Uso del modo de punto de acceso de cámara para establecer una conexión
W-24
5
Conecte el smartphone a la
cámara.
En el menú de ajustes de Wi-Fi del
smartphone, seleccione el SSID
(nombre de red) que se muestra en el
monitor LCD de la cámara.
Para la contraseña, escriba la clave
de cifrado que se muestra en el
monitor LCD de la cámara.
X Es posible que se muestre
automáticamente la pantalla
siguiente aunque no se complete la
operación en el smartphone.
6
Inicie EOS Remote en el
smartphone.
Cuando se completen los ajustes de
Wi-Fi, inicie EOS Remote en el
smartphone.
7
Seleccione [Conexión de la
cámara] en el smartphone.
Seleccione [Conexión de la cámara]
en EOS Remote.
8
Seleccione la cámara de destino
en el smartphone.
Seleccione la cámara con la que
conectar en [Cámaras detectadas]
en EOS Remote.
X Se iniciará el emparejamiento.

W-25
Uso del modo de punto de acceso de cámara para establecer una conexión
9
Conecte con la cámara.
Una vez completado el
emparejamiento, se muestra la
pantalla de la izquierda. Presione la
tecla <U> para seleccionar [OK] y,
a continuación, presione <0>.
10
Realice el resto de los ajustes.
Para terminar los ajustes de esta
etapa, presione la tecla <V> para
seleccionar [OK] y, a continuación,
presione <0> para ir al paso 11.
Para cambiar el nombre de los
ajustes, seleccione [Nombre de
ajustes] y presione <0>.
X Se muestra el teclado virtual
(p. W-10). Para un nombre de ajuste
se puede escribir como máximo
30 caracteres.
11
Guarde los ajustes.
Seleccione [OK] y presione <0>
para guardar los ajustes.
X Se mostrará la pantalla
[qConexión].
Los ajustes para la comunicación con un smartphone están ahora
completos.
Los caracteres que no están en
formato ASCII se muestran
como un 8.

W-26
Puede utilizar un smartphone que tenga instalado EOS Remote para ver
las imágenes almacenadas en la cámara y disparar de manera remota.
A continuación se describen las
principales funciones de EOS Remote.
Toque la pantalla para aprender los
procedimientos operativos.
[Vis. imágenes cámara]
Se pueden ver las imágenes
almacenadas en la cámara.
Las imágenes almacenadas en la
cámara se pueden guardar en un
smartphone.
Se pueden realizar operaciones, como
la eliminación, sobre las imágenes
almacenadas en la cámara.
[Disparo remoto]
Se puede ver la imagen de Visión en
Directo de la cámara utilizando un
smartphone.
Se pueden cambiar los ajustes de la
cámara.
Puede disparar manejando la cámara
de manera remota.
(Botón de ajustes)
Utilice este botón para acceder a
diversos ajustes para EOS Remote.
Manejo de la cámara con un smartphone
Pantalla principal de EOS Remote

W-27
Manejo de la cámara con un smartphone
1
Seleccione [Salir].
Si no se muestra la pantalla de la
izquierda, seleccione [Función
Wi-Fi] bajo la ficha [53] de la pantalla
de menú de la cámara.
Seleccione [Salir] y presione <0>.
2
Seleccione [OK].
Presione la tecla <U> para
seleccionar [OK] y, a continuación,
presione <0> para cerrar la
conexión.
Cierre de la conexión
Las imágenes se guardan en los smartphones en formato JPEG de
tamaño S2. Las imágenes RAW también se guardan como imágenes
JPEG de tamaño S2.
Aunque los vídeos se incluyen en la lista, no se pueden guardar.
Si se activa el apagado automático de la cámara durante la conexión a
la red LAN inalámbrica, la función LAN inalámbrica se apagará. La
conexión a la red LAN inalámbrica se restaura cuando la cámara se
despierta de la desconexión automática.

W-28
La cámara se puede reconectar a un smartphone para el que se hayan
registrado ajustes de conexión.
1
Seleccione [Función Wi-Fi].
Bajo la ficha [53], ajuste [Wi-Fi] en
[Activada] y, a continuación,
seleccione [Función Wi-Fi].
2
Seleccione [q].
Seleccione [q] (Conectar con
smartphone) y presione <0>.
3
Establezca una conexión.
Seleccione [Conectar] y presione
<0>.
En la pantalla de confirmación,
seleccione [OK].
X La cámara se reconectará al
smartphone.
Cuando se registren ajustes para
varios destinos de conexión,
seleccione [Elegir ajuste],
seleccione el destino de conexión y, a
continuación, conecte con el destino.
Reconexión

W-29
NOTAS

W-30
NOTAS

W-31
NOTAS

W-32
NOTAS

W-33
NOTAS

W-34
NOTAS

EOS 6D (WG)
Instrucciones de la función GPS
Español

G-2
Se puede añadir a las imágenes
información de ubicación*
1
(latitud,
longitud, elevación y hora universal
coordinada*
2
).
Las ubicaciones donde se tomaron
las imágenes etiquetadas
geográficamente pueden verse en un
mapa virtual, en un ordenador.
*1: Ciertas condiciones de viaje o ciertos ajustes del GPS pueden provocar que
se añada a las imágenes información de ubicación inexacta. No se incorpora
la función de brújula digital.
*2: La hora universal coordinada (Coordinated Universal Time), abreviada como
UTC, es esencialmente igual a la Hora media de Greenwich (Greenwich Mean
Time).
Mediante la función de registro GPS, se puede registrar información
de la ruta recorrida por la cámara. Esta ruta se puede ver en un
mapa virtual.
* Ciertas condiciones de viaje o ubicaciones, o ciertos ajustes del GPS, pueden
provocar que se añada a las imágenes información de ubicación inexacta.
Funciones
Etiquetado geográfico de imágenes
Registro de la ruta recorrida

G-3
Funciones
Se puede ajustar la hora de la cámara utilizando señales GPS.
Las ubicaciones de toma y la ruta recorrida se pueden ver en un
mapa virtual, utilizando Map Utility (software EOS) (p. G-18).
Ajuste de la hora de la cámara
Visualización de imágenes e información en un mapa virtual
Datos de mapa ©2012 ZENRIN -

G-4
Significado de los símbolos
: Advertencia para evitar problemas al fotografiar.
: Información complementaria.
(p. **) : Números de páginas de referencia para obtener más
información.
Los iconos y las marcas que indican los controles y los ajustes de la
cámara utilizados en el manual corresponden a los iconos y las marcas
de la cámara.
Supuestos básicos
En todos los procedimientos operativos que se explican en este
manual se asume que se sitúa el interruptor de alimentación de la
cámara en <ON>.
Convenciones utilizadas en este manual
Marcas comerciales
Microsoft y Windows son marcas comerciales de Microsoft
Corporation, registradas en los Estados Unidos y/o en otros
países.
Macintosh y Mac OS son marcas comerciales de Apple Inc.,
registradas en los EE.UU. y en otros países.
Google
TM
, Google Maps
TM
y Google Earth
TM
son marcas
comerciales de Google Inc.
Map Utility utiliza Google Maps
TM
para mostrar las imágenes y
las rutas recorridas sobre un mapa.
Todas las demás marcas comerciales son propiedad de sus
respectivos dueños.

G-5
Funciones ................................................................................... G-2
Convenciones utilizadas en este manual ................................. G-4
Adquisición de señales GPS...................................................... G-6
Ajuste del intervalo de registro de posición .......................... G-11
Ajuste de la hora desde el GPS de la cámara ........................ G-12
Registro de la ruta recorrida .................................................... G-13
Precauciones con el GPS......................................................... G-17
Map Utility .................................................................................. G-18
Especificaciones ....................................................................... G-19
Tabla de contenido

G-6
Para adquirir señales GPS, lleve la cámara al exterior, donde el cielo
esté a la vista, y apunte hacia arriba. No ponga las manos ni otros
objetos encima de la cámara.
1
Seleccione [GPS].
En la ficha [52], seleccione [GPS] y
presione <0>.
2
Ajuste [Seleccionar GPS] en [GPS
interno].
3
Salga del menú.
Presione el botón <M>.
Cuando [Seleccionar GPS] se ajuste en [GPS interno], la cámara
continuará recibiendo señales GPS a intervalos establecidos aunque la
alimentación de la cámara esté apagada. Esto agotará la batería con
mayor rapidez, reduciendo el número de fotos que se pueden tomar.
Además, cuando [Registro posición] (p. G-13, G-14) se ajuste en
[Activar], los intervalos de actualización más cortos agotarán la batería
con mayor rapidez.
Cuando no se vaya a utilizar la función GPS, cuando no se esté
viajando o cuando las señales GPS sean débiles, es recomendable
ajustar [Seleccionar GPS] en [Desactivada].
Adquisición de señales GPS
Consumo de batería

G-7
Adquisición de señales GPS
El estado de la señal GPS lo indica el icono <r> en el panel LCD y
el monitor LCD de la cámara.
• <r> constante : señal adquirida
• <r> parpadeando : aún no se ha adquirido la señal
Estado de adquisición del GPS
Panel LCD Monitor LCD
Cuando dispare mientras esté iluminada la marca <r>, la imagen se
etiquetará geográficamente.
Cuando se selecciona [GPS interno], la marca <r> se muestra en el
panel LCD de la cámara incluso cuando la alimentación de la cámara
está apagada, porque constantemente se reciben señales de los
satélites.
Los datos de estado se pueden consultar como se describe en
“Visualización de información GPS” (p. G-9).

Adquisición de señales GPS
G-8
En condiciones favorables, la adquisición de la señal tarda
aproximadamente de 30 a 60 segundos después de encender la cámara
si las condiciones son buenas para las ondas de radio.
La antena del GPS interno se encuentra en la parte frontal de la zapata
para accesorios. Las señales GPS se pueden recibir incluso cuando hay
un flash externo montado. No obstante, la adquisición se debilitará
ligeramente.
Se pueden recibir señales GPS incluso cuando se dispara con la cámara
en posición vertical.
Cuando recorra largas distancias, es posible que se registre información
inexacta.
Mala cobertura de GPS
Es posible que la información de ubicación no se registre o que se registre
información inexacta cuando la cobertura de la señal GPS sea mala, tal
como en las ubicaciones siguientes.
Interiores, bajo tierra, en túneles o bosques, cerca de edificios o en
valles.
Cerca de líneas eléctricas de alta tensión o de teléfonos móviles que
operen en la banda de 1,5 GHz.
Cuando se viaje a través de diferentes entornos.
Incluso en otras ubicaciones, es posible que el movimiento de los
satélites interfiera con el etiquetado geográfico y provoque que falte
información de ubicación o que sea inexacta. La información también
puede indicar que la cámara se ha utilizado en una ubicación diferente,
incluso cuando se dispara en el mismo lugar.

G-9
Adquisición de señales GPS
1
Seleccione [GPS].
En la ficha [52], seleccione [GPS] y
presione <0>.
2
Ajuste [Seleccionar GPS] en [GPS
interno].
Cuando utilice el receptor GPS
GP-E2 (se vende por separado),
seleccione [GPS externo].
3
Seleccione [Config].
4
Seleccione [Mostrar información
GPS].
X
Se muestra información GPS detallada.
La [
UTC
] (hora universal coordinada)
de esta captura de pantalla de ejemplo
es esencialmente igual a la Hora media
de Greenwich (Greenwich Mean Time).
El icono <
A
> indica las condiciones
de la señal. Cuando se muestra <
C
>,
también se puede registrar la elevación.
Sin embargo, cuando se muestra <
B
>
no se puede registrar la elevación.
En general, la elevación no es tan
precisa como la latitud y la longitud,
debido a las características del GPS.
Visualización de información GPS

Adquisición de señales GPS
G-10
5
Tome una fotografía.
X Las fotos tomadas después de la
adquisición de la señal GPS se
etiquetan geográficamente.
La pantalla siguiente se muestra cuando se presiona el botón <B>
varias veces durante la reproducción de imágenes.
Información de etiquetado geográfico
Latitud
Longitud
Elevación
UTC
Conexión de un GPS externo
Es recomendable montar un GPS externo en la zapata para accesorios.
Cuando la opción [Wi-Fi] de la ficha [53] se ajusta en [Activada], la
conexión del cable de interfaz al GPS externo se desactiva.
Tenga en cuenta que si reproduce una imagen con información GPS
captada con otra cámara EOS 6D (WG), la información GPS no se muestra
en la pantalla de reproducción de la cámara. Las ubicaciones de toma se
pueden ver en un mapa virtual, utilizando el software Map Utility.
Durante la grabación de vídeo, la información se registra al principio de la
grabación. Tenga en cuenta que las condiciones de recepción de la señal
no se registran.

G-11
Se puede ajustar el intervalo (tiempo) para actualizar la información de
ubicación. Los intervalos de registro de posición más cortos generan
información de ubicación más precisa para las imágenes. No obstante,
el número de disparos posibles por carga se reduce.
1
Seleccione [GPS].
En la ficha [52], seleccione [GPS] y
presione <0>.
2
Ajuste [Seleccionar GPS] en [GPS
interno].
3
Seleccione [Config].
4
Seleccione [Actualizando
posición].
5
Seleccione el tiempo.
Ajuste del intervalo de registro de posición
El número de disparos posibles es menor cuando las condiciones de la
señal son desfavorables.
La naturaleza del GPS puede provocar incoherencias en los intervalos
de registro de posición.

G-12
Se puede ajustar la hora de la cámara utilizando señales GPS.
1
Seleccione [GPS].
En la ficha [52], seleccione [GPS] y
presione <0>.
2
Ajuste [Seleccionar GPS] en [GPS
interno].
3
Seleccione [Config].
4
Seleccione [Ajuste hora auto].
Seleccione una opción y presione
<0>.
[Actual. auto] actualiza la hora una
vez que se enciende la cámara y que
se recibe una señal GPS.
Ajuste de la hora desde el GPS de la cámara
Si no se puede recibir la señal GPS de cinco o más satélites, el ajuste de
hora no será posible. [Ajust. ahora] no estará disponible.
Aunque se seleccione [Ajust. ahora] quizá no sea posible el ajuste de
hora automático, según el momento en que se adquiera la señal GPS.
Cuando [Ajuste hora auto] se establece en [Actual. auto], no es
posible ajustar manualmente la fecha o la hora desde el ajuste [Fecha/
Hora] de la ficha [52].

G-13
Mediante la función de registro GPS,
se puede registrar automáticamente,
en la memoria interna de la cámara,
información de ubicación de la ruta
recorrida por la cámara. Cuando
dispare mientras se utiliza la función de
registro GPS, las imágenes se
etiquetarán geográficamente. La
información de ubicación registrada se
puede ver en un mapa virtual en un
ordenador, mediante Map Utility
(software EOS) (p. G-18).
La función de registro GPS está activa
incluso durante la desconexión
automática y cuando se ajusta la
alimentación en <2>.
1
Seleccione [GPS].
En la ficha [52], seleccione [GPS] y
presione <0>.
2
Ajuste [Seleccionar GPS] en [GPS
interno].
3
Seleccione [Config].
4
Seleccione [GPS Logger].
Registro de la ruta recorrida
Datos de mapa ©2012 ZENRIN -

Registro de la ruta recorrida
G-14
5
Ajuste [Registro posición] en
[Activar].
La información de ubicación se registra a intervalos regulares a lo largo
de la ruta recorrida por la cámara, como se muestra en [Actualizando
posición] en la tabla siguiente. Los registros diarios se guardan en la
memoria interna de la cámara. El número de días para los que se
pueden almacenar registros depende del intervalo de registro de
posición especificado en [Actualizando posición] (p. G-11).
Capacidad del archivo de registro, por intervalo de registro de posición
* Capacidad registrando ocho horas al día
Los nombres de los archivos de registro constan de fecha y número
(p. ej. 12103100). Los archivos se crean cada día. Cuando cambia
la zona horaria, se crea un archivo diferente.
Los archivos de registro almacenados en la memoria interna se
pueden transferir a una tarjeta (p. G-15).
Cuando la memoria interna de la cámara se llena, los archivos de registro
más antiguos se sobrescriben con información nueva, uno por uno.
Registros de información de ubicación
Tiempos de
actualización
de posición
Archivos de
registro (aprox.)
Tiempos de
actualización
de posición
Archivos de
registro (aprox.)
Cada 1 seg. 4,4 días Cada 30 seg. 100 días
Cada 5 seg. 22 días Cada 1 min. 100 días
Cada 10 seg. 44 días Cada 2 min. 100 días
Cada 15 seg. 67 días Cada 5 min. 100 días
Cuando se activa la función de registro GPS, el icono <x> se muestra en
el panel LCD y en el monitor LCD de la cámara.

G-15
Registro de la ruta recorrida
Puede importar archivos de registro en un ordenador con EOS Utility
(software EOS) o transfiriendo primero los datos de registro a una
tarjeta. Las rutas recorridas se mostrarán en un mapa virtual cuando
abra los archivos de registro importados en el ordenador con el
software Map Utility (p. G-18).
Importación con el software EOS
Los archivos de registro se pueden importar en un ordenador con EOS
Utility (software EOS), conectando la cámara y el ordenador mediante
el cable de interfaz proporcionado. Para ver información detallada,
consulte el Manual de instrucciones de EOS Utility (CD-ROM).
Importación mediante la transferencia de datos de registro a
una tarjeta
Ajuste [GPS logger] en [Transf.
datos reg. a tarjeta] para transferir
los archivos de registro almacenados
de la memoria interna a una tarjeta.
Una vez transferidos los datos a la
tarjeta, los archivos de registro se
eliminan de la memoria interna.
Los archivos de registro importados
en la tarjeta se almacenarán en la
carpeta “GPS” de la carpeta “MISC”.
La extensión es “.LOG”.
Ajuste [GPS logger] en [Eliminar
datos de registro] para eliminar por
completo los datos de registro
almacenados en la memoria interna.
La eliminación de los datos puede
tardar aprox. un minuto.
Importación de archivos de registro en un ordenador

Registro de la ruta recorrida
G-16
Cuando transporte la cámara en una bolsa o una maleta mientras viaja,
asegúrese de que la cámara esté orientada hacia arriba y que no haya
nada encima de ella.
Ajuste la fecha y la hora de la cámara con la máxima precisión posible.
Además, ajuste la zona horaria y el horario de verano adecuados para la
ubicación de la toma.
Dado que se registra constantemente información de ubicación, fecha y
hora, la batería se consume incluso cuando la cámara está apagada. En
consecuencia, es posible que el nivel de la batería esté ya bajo cuando
se utilice la cámara. Cargue la batería cuando sea necesario o prepare
una batería de repuesto cargada (se vende por separado).
Cuando dispare mientras se utiliza la función de registro GPS, las imágenes
tomadas se etiquetarán geográficamente. La información de ubicación
registrada se puede ver en un mapa virtual en un ordenador, mediante Map
Utility (software EOS).

G-17
9Países y regiones que permiten el uso de la función GPS
El uso de la función GPS está restringido en algunos países y regiones
y su uso ilegal puede ser sancionable según las legislaciones
nacionales o locales. Para evitar infringir la normativa relativa a la
función GPS, visite el sitio web de Canon para comprobar dónde está
permitido su uso.
Tenga en cuenta que Canon no se hará responsable de ningún problema
derivado del uso de la función GPS en otros países y regiones.
9Número de modelo
EOS 6D (WG): DS126401 (incluido el modelo de módulo WLAN: ZC-ST)
(incluido el modelo de módulo GPS: CH9-1242)
En determinados países y regiones, es posible que el uso de la
función GPS esté restringido. En consecuencia, debe asegurarse de
utilizar la función GPS de acuerdo con las leyes y normativas de su
país o región. Tenga especial cuidado cuando viaje fuera de su país.
Tenga cuidado al utilizar la función GPS donde el uso de
dispositivos electrónicos esté restringido.
Es posible que otros puedan localizarlo o identificarlo utilizando los
datos de ubicación de sus imágenes o vídeos etiquetados
geográficamente. Tenga cuidado cuando compare imágenes,
vídeos o archivos de registro GPS etiquetados geográficamente con
otros, por ejemplo si los publica en línea, donde mucha gente puede
verlos.
La recepción de la señal GPS puede tardar más tiempo en algunos
casos.
Por medio de la presente Canon Inc. declara que el DS126401 cumple con los
requisitos esenciales y cualesquiera otras disposiciones aplicables o exigibles de
la Directiva 1999/5/CE.
Póngase en contacto con la siguiente dirección para obtener la Declaración de
conformidad original:
CANON EUROPA N.V.
Bovenkerkerweg 59, 1185 XB Amstelveen, The Netherlands
CANON INC.
30-2, Shimomaruko 3-chome, Ohta-ku, Tokyo 146-8501, Japan
Precauciones con el GPS

G-18
Las ubicaciones de toma y la ruta recorrida se pueden
mostrar en un mapa virtual en un ordenador utilizando la
información de ubicación registrada en la cámara.
El software Map Utility y su Manual de instrucciones
están incluidos en el disco EOS DIGITAL Solution
Disk.
Para instalar Map Utility se necesita acceso a Internet.
Para ver el procedimiento de instalación, consulte el
Manual de instrucciones de la cámara.
Para utilizar Map Utility también se necesita acceso a
Internet. Para obtener información detallada, consulte
el Manual de instrucciones de Map Utility.
Map Utility

G-19
Etiquetado geográfico
de imágenes: Latitud, longitud, elevación, hora (UTC) y adquisición de
la señal
Frecuencia de recepción:
1575,42 MHz (banda L1)
Intervalo de registro de posición:
1, 5, 10, 15 ó 30 segundos, o 1, 2 ó 5 minutos
Ajuste de hora: Se puede ajustar la hora de la cámara a partir de los
datos de hora del GPS.
Datos de registro: Formato NMEA-0183
Un archivo cada día
* Cuando cambia la zona horaria, se crea un archivo
diferente.
* Los archivos de registro almacenados en la memoria
interna se pueden transferir a una tarjeta o a un
ordenador.
* Cuando la memoria interna de la cámara se llena, los
archivos de registro más antiguos se sobrescriben con
información nueva, uno por uno.
Eliminación de datos de registro:
Se admite
Toda la información de este manual se basa en los métodos de comprobación
estándar de Canon.
Las especificaciones y el exterior del producto pueden cambiar sin previo
aviso.
Especificaciones

G-20
9Países y regiones que permiten el uso de red LAN inalámbrica
El uso de red LAN inalámbrica está restringido en algunos países y regiones y su
uso ilegal puede ser sancionable según las legislaciones nacionales o locales.
Para evitar infringir la normativa relativa a red LAN inalámbrica, visite el sitio Web
de Canon para comprobar dónde está permitido su uso. Tenga en cuenta que
Canon no se hará responsable de ningún problema derivado del uso de red LAN
inalámbrica en otros países y regiones.
9Número de modelo
EOS 6D (WG): DS126401 (incluido el modelo de módulo WLAN: ZC-ST)
(incluido el modelo de módulo GPS: CH9-1242)
Por medio de la presente, Canon Inc. declara que el DS126401 cumple con los
requisitos esenciales y cualesquiera otras disposiciones aplicables o exigibles de
la Directiva 1999/5/CE.
Póngase en contacto con la siguiente dirección para obtener la Declaración de
conformidad original:
CANON EUROPA N.V.
Bovenkerkerweg 59, 1185 XB Amstelveen, The Netherlands
CANON INC.
30-2, Shimomaruko 3-chome, Ohta-ku, Tokyo 146-8501, Japan
Precauciones relativas a Wi-Fi (red LAN inalámbrica)

G-21
NOTAS

G-22
NOTAS

G-23
NOTAS

G-24
NOTAS

G-25
NOTAS

Las descripciones de estas instrucciones están actualizadas a fecha de febrero
de 2017. Para obtener información sobre la compatibilidad con cualquiera de
los productos presentados después de esta fecha, póngase en contacto con
cualquier Centro de servicios de Canon. Para obtener la versión más
actualizada de las instrucciones, consulte el sitio web de Canon.


CPH-Y331-000 © CANON INC. 2017
-
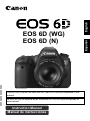 1
1
-
 2
2
-
 3
3
-
 4
4
-
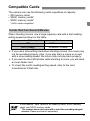 5
5
-
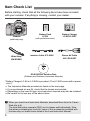 6
6
-
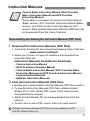 7
7
-
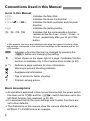 8
8
-
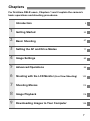 9
9
-
 10
10
-
 11
11
-
 12
12
-
 13
13
-
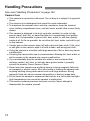 14
14
-
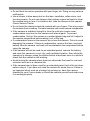 15
15
-
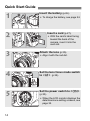 16
16
-
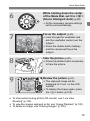 17
17
-
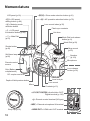 18
18
-
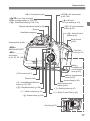 19
19
-
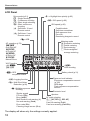 20
20
-
 21
21
-
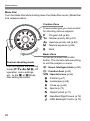 22
22
-
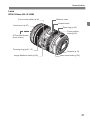 23
23
-
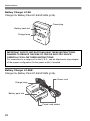 24
24
-
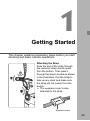 25
25
-
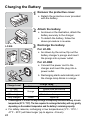 26
26
-
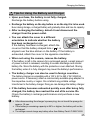 27
27
-
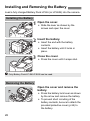 28
28
-
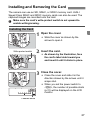 29
29
-
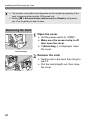 30
30
-
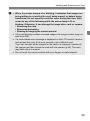 31
31
-
 32
32
-
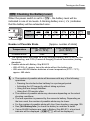 33
33
-
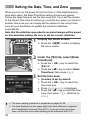 34
34
-
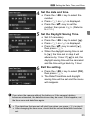 35
35
-
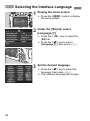 36
36
-
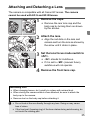 37
37
-
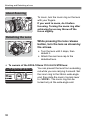 38
38
-
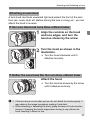 39
39
-
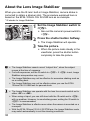 40
40
-
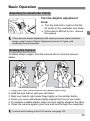 41
41
-
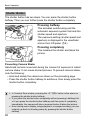 42
42
-
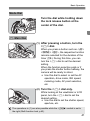 43
43
-
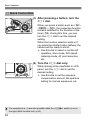 44
44
-
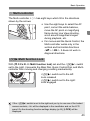 45
45
-
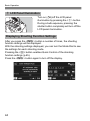 46
46
-
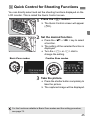 47
47
-
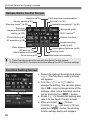 48
48
-
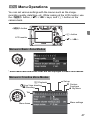 49
49
-
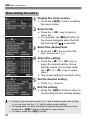 50
50
-
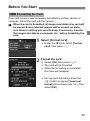 51
51
-
 52
52
-
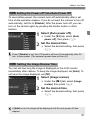 53
53
-
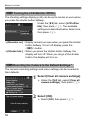 54
54
-
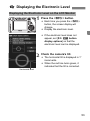 55
55
-
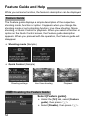 56
56
-
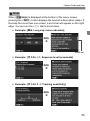 57
57
-
 58
58
-
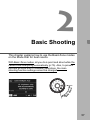 59
59
-
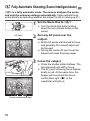 60
60
-
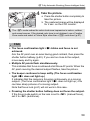 61
61
-
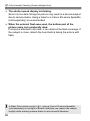 62
62
-
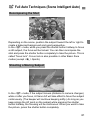 63
63
-
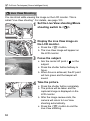 64
64
-
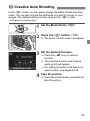 65
65
-
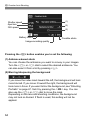 66
66
-
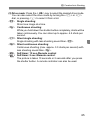 67
67
-
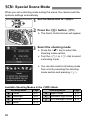 68
68
-
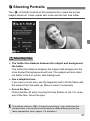 69
69
-
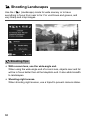 70
70
-
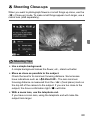 71
71
-
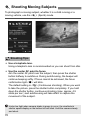 72
72
-
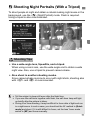 73
73
-
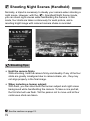 74
74
-
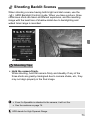 75
75
-
 76
76
-
 77
77
-
 78
78
-
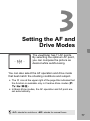 79
79
-
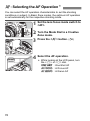 80
80
-
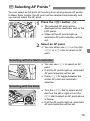 81
81
-
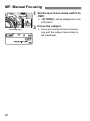 82
82
-
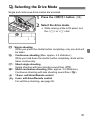 83
83
-
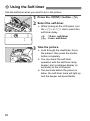 84
84
-
 85
85
-
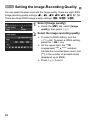 86
86
-
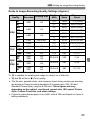 87
87
-
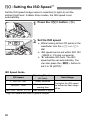 88
88
-
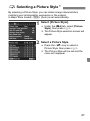 89
89
-
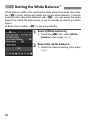 90
90
-
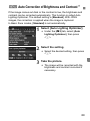 91
91
-
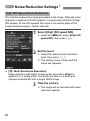 92
92
-
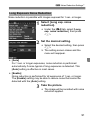 93
93
-
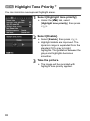 94
94
-
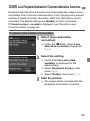 95
95
-
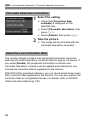 96
96
-
 97
97
-
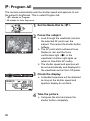 98
98
-
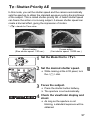 99
99
-
 100
100
-
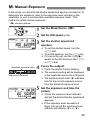 101
101
-
 102
102
-
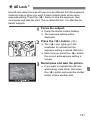 103
103
-
 104
104
-
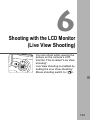 105
105
-
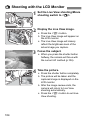 106
106
-
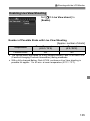 107
107
-
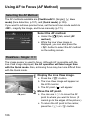 108
108
-
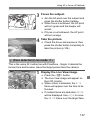 109
109
-
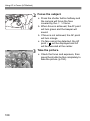 110
110
-
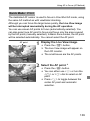 111
111
-
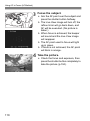 112
112
-
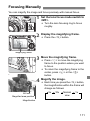 113
113
-
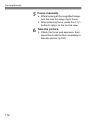 114
114
-
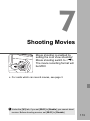 115
115
-
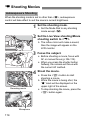 116
116
-
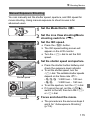 117
117
-
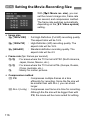 118
118
-
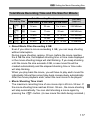 119
119
-
 120
120
-
 121
121
-
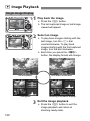 122
122
-
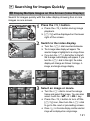 123
123
-
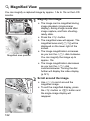 124
124
-
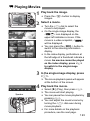 125
125
-
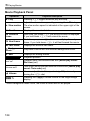 126
126
-
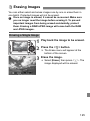 127
127
-
 128
128
-
 129
129
-
 130
130
-
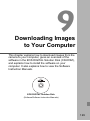 131
131
-
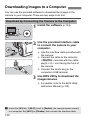 132
132
-
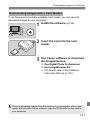 133
133
-
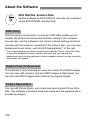 134
134
-
 135
135
-
 136
136
-
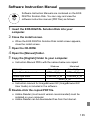 137
137
-
 138
138
-
 139
139
-
 140
140
-
 141
141
-
 142
142
-
 143
143
-
 144
144
-
 145
145
-
 146
146
-
 147
147
-
 148
148
-
 149
149
-
 150
150
-
 151
151
-
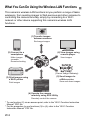 152
152
-
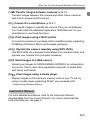 153
153
-
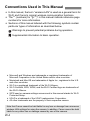 154
154
-
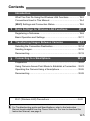 155
155
-
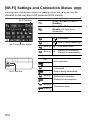 156
156
-
 157
157
-
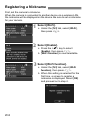 158
158
-
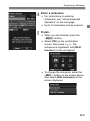 159
159
-
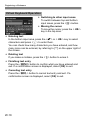 160
160
-
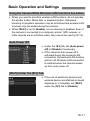 161
161
-
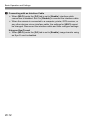 162
162
-
 163
163
-
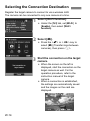 164
164
-
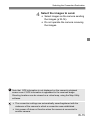 165
165
-
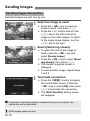 166
166
-
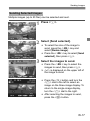 167
167
-
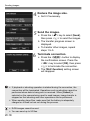 168
168
-
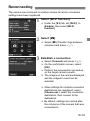 169
169
-
 170
170
-
 171
171
-
 172
172
-
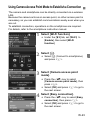 173
173
-
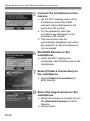 174
174
-
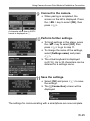 175
175
-
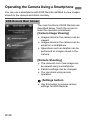 176
176
-
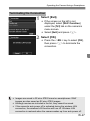 177
177
-
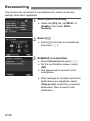 178
178
-
 179
179
-
 180
180
-
 181
181
-
 182
182
-
 183
183
-
 184
184
-
 185
185
-
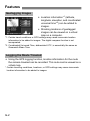 186
186
-
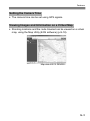 187
187
-
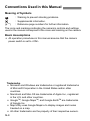 188
188
-
 189
189
-
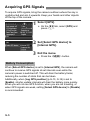 190
190
-
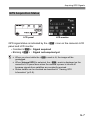 191
191
-
 192
192
-
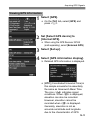 193
193
-
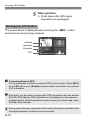 194
194
-
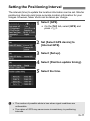 195
195
-
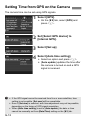 196
196
-
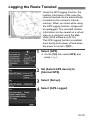 197
197
-
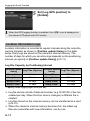 198
198
-
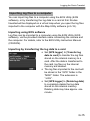 199
199
-
 200
200
-
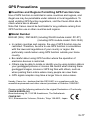 201
201
-
 202
202
-
 203
203
-
 204
204
-
 205
205
-
 206
206
-
 207
207
-
 208
208
-
 209
209
-
 210
210
-
 211
211
-
 212
212
-
 213
213
-
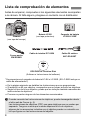 214
214
-
 215
215
-
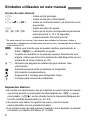 216
216
-
 217
217
-
 218
218
-
 219
219
-
 220
220
-
 221
221
-
 222
222
-
 223
223
-
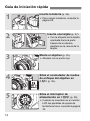 224
224
-
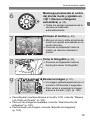 225
225
-
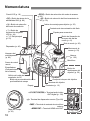 226
226
-
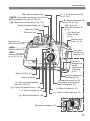 227
227
-
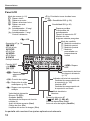 228
228
-
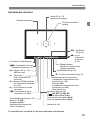 229
229
-
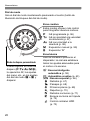 230
230
-
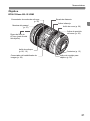 231
231
-
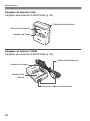 232
232
-
 233
233
-
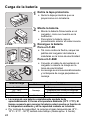 234
234
-
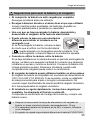 235
235
-
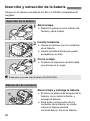 236
236
-
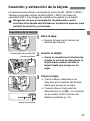 237
237
-
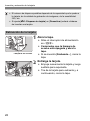 238
238
-
 239
239
-
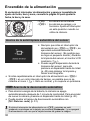 240
240
-
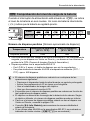 241
241
-
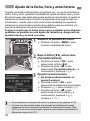 242
242
-
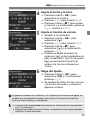 243
243
-
 244
244
-
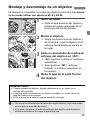 245
245
-
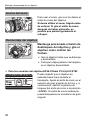 246
246
-
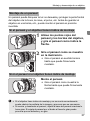 247
247
-
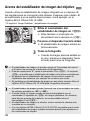 248
248
-
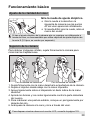 249
249
-
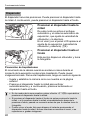 250
250
-
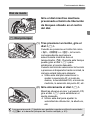 251
251
-
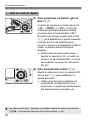 252
252
-
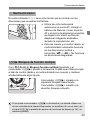 253
253
-
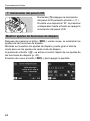 254
254
-
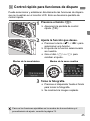 255
255
-
 256
256
-
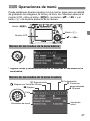 257
257
-
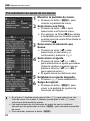 258
258
-
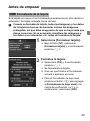 259
259
-
 260
260
-
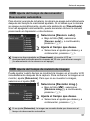 261
261
-
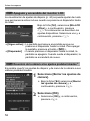 262
262
-
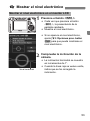 263
263
-
 264
264
-
 265
265
-
 266
266
-
 267
267
-
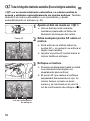 268
268
-
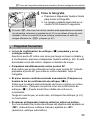 269
269
-
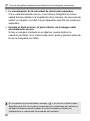 270
270
-
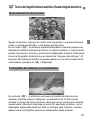 271
271
-
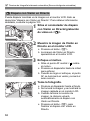 272
272
-
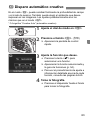 273
273
-
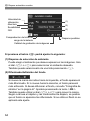 274
274
-
 275
275
-
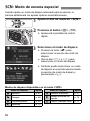 276
276
-
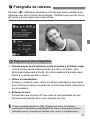 277
277
-
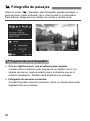 278
278
-
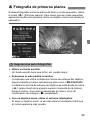 279
279
-
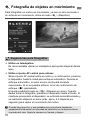 280
280
-
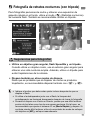 281
281
-
 282
282
-
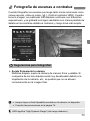 283
283
-
 284
284
-
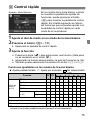 285
285
-
 286
286
-
 287
287
-
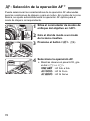 288
288
-
 289
289
-
 290
290
-
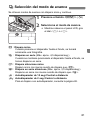 291
291
-
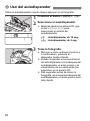 292
292
-
 293
293
-
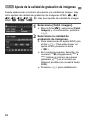 294
294
-
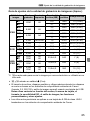 295
295
-
 296
296
-
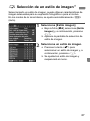 297
297
-
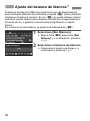 298
298
-
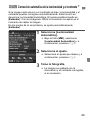 299
299
-
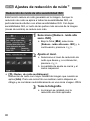 300
300
-
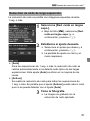 301
301
-
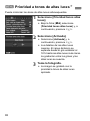 302
302
-
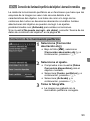 303
303
-
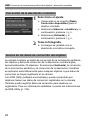 304
304
-
 305
305
-
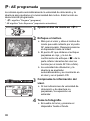 306
306
-
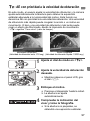 307
307
-
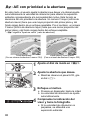 308
308
-
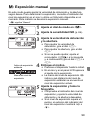 309
309
-
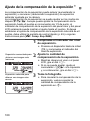 310
310
-
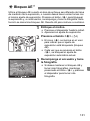 311
311
-
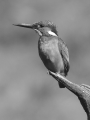 312
312
-
 313
313
-
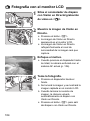 314
314
-
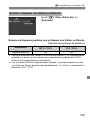 315
315
-
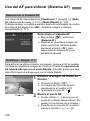 316
316
-
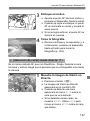 317
317
-
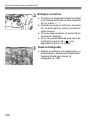 318
318
-
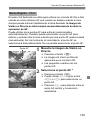 319
319
-
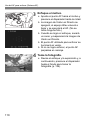 320
320
-
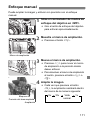 321
321
-
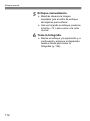 322
322
-
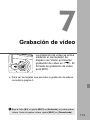 323
323
-
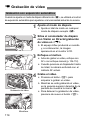 324
324
-
 325
325
-
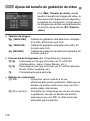 326
326
-
 327
327
-
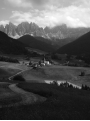 328
328
-
 329
329
-
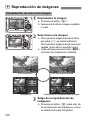 330
330
-
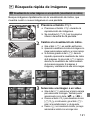 331
331
-
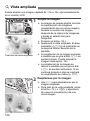 332
332
-
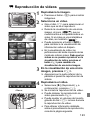 333
333
-
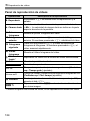 334
334
-
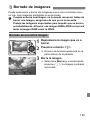 335
335
-
 336
336
-
 337
337
-
 338
338
-
 339
339
-
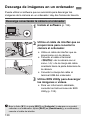 340
340
-
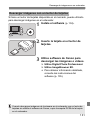 341
341
-
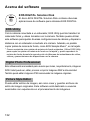 342
342
-
 343
343
-
 344
344
-
 345
345
-
 346
346
-
 347
347
-
 348
348
-
 349
349
-
 350
350
-
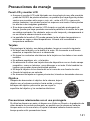 351
351
-
 352
352
-
 353
353
-
 354
354
-
 355
355
-
 356
356
-
 357
357
-
 358
358
-
 359
359
-
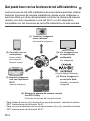 360
360
-
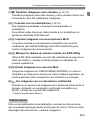 361
361
-
 362
362
-
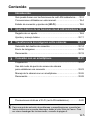 363
363
-
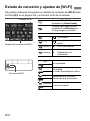 364
364
-
 365
365
-
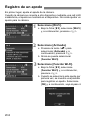 366
366
-
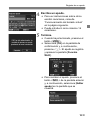 367
367
-
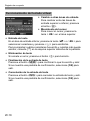 368
368
-
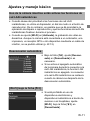 369
369
-
 370
370
-
 371
371
-
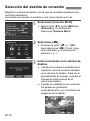 372
372
-
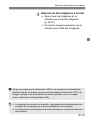 373
373
-
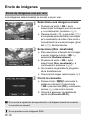 374
374
-
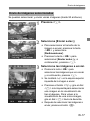 375
375
-
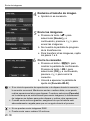 376
376
-
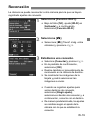 377
377
-
 378
378
-
 379
379
-
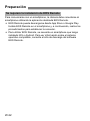 380
380
-
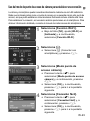 381
381
-
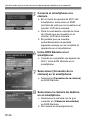 382
382
-
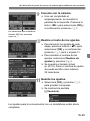 383
383
-
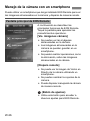 384
384
-
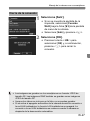 385
385
-
 386
386
-
 387
387
-
 388
388
-
 389
389
-
 390
390
-
 391
391
-
 392
392
-
 393
393
-
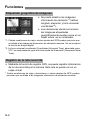 394
394
-
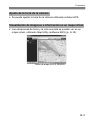 395
395
-
 396
396
-
 397
397
-
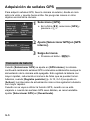 398
398
-
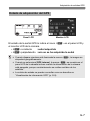 399
399
-
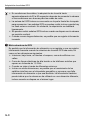 400
400
-
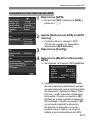 401
401
-
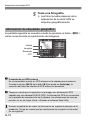 402
402
-
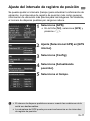 403
403
-
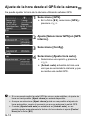 404
404
-
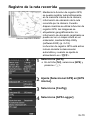 405
405
-
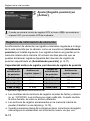 406
406
-
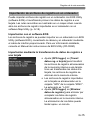 407
407
-
 408
408
-
 409
409
-
 410
410
-
 411
411
-
 412
412
-
 413
413
-
 414
414
-
 415
415
-
 416
416
-
 417
417
-
 418
418
-
 419
419
-
 420
420


en otros idiomas
- English: Canon EOS 6D User manual
Artículos relacionados
-
Canon EOS Rebel SL2 Manual de usuario
-
Canon EOS 6D Mark II Manual de usuario
-
Canon EOS 7D Mark II Manual de usuario
-
Canon EOS 6D Manual de usuario
-
Canon EOS Rebel T7 Manual de usuario
-
-
Canon EOS Rebel T6 Manual de usuario
-
Canon PowerShot SX40 HS Manual de usuario
-
Canon EOS 80D (W) El manual del propietario
-
Canon IXUS 310 HS Manual de usuario