Ford Escape 2013 El manual del propietario
- Categoría
- Carros
- Tipo
- El manual del propietario

Introduction
About This Manual...........................................7
Symbols Glossary.............................................7
Data Recording..................................................9
California Proposition 65.............................10
Perchlorate........................................................10
Ford Credit..........................................................11
Replacement Parts
Recommendation........................................11
Special Notices.................................................11
Mobile Communications
Equipment.....................................................12
Export Unique Options..................................13
Child Safety
General Information.......................................14
Child Seats.........................................................16
Child Seat Positioning...................................16
Booster Seats....................................................17
Installing Child Seats.....................................19
Child Safety Locks.........................................24
Safety Belts
Principle of Operation..................................26
Fastening the Safety Belts..........................27
Safety Belt Height Adjustment................30
Safety Belt Warning Lamp and Indicator
Chime.............................................................30
Safety Belt Minder..........................................31
Child Restraint and Safety Belt
Maintenance................................................33
Personal Safety System™
Personal Safety System™..........................34
Supplementary Restraints
System
Principle of Operation..................................35
Driver and Passenger Airbags...................36
Knee Airbag.......................................................37
Front Passenger Sensing System.............37
Side Airbags.....................................................40
Safety Canopy®..............................................41
Crash Sensors and Airbag Indicator........42
Airbag Disposal...............................................43
Keys and Remote Controls
Principle of Operation..................................44
General Information on Radio
Frequencies..................................................44
Remote Control..............................................44
Replacing a Lost Key or Remote
Control...........................................................48
MyKey®
Principle of Operation..................................49
Creating a MyKey...........................................49
Clearing All MyKeys.......................................50
Checking MyKey System Status..............50
Using MyKey With Remote Start
Systems.........................................................50
MyKey Troubleshooting................................51
Locks
Locking and Unlocking.................................54
Manual Liftgate...............................................57
Power Liftgate..................................................57
Keyless Entry...................................................60
Security
Passive Anti-Theft System.........................62
Anti-Theft Alarm............................................63
Steering Wheel
Adjusting the Steering Wheel...................64
Audio Control..................................................64
Voice Control...................................................66
Cruise Control.................................................66
Information Display Control......................66
1
Table of Contents

Wipers and Washers
Windshield Wipers.........................................67
Autowipers........................................................67
Windshield Washers.....................................68
Rear Window Wiper and Washers..........69
Lighting
Lighting Control..............................................70
Autolamps........................................................70
Instrument Lighting Dimmer.......................71
Headlamp Exit Delay......................................71
Daytime Running Lamps..............................71
Front Fog Lamps.............................................72
Direction Indicators........................................72
Interior Lamps..................................................72
Ambient Lighting............................................73
Windows and Mirrors
Power Windows..............................................74
Exterior Mirrors.................................................75
Interior Mirror....................................................76
Sun Visors..........................................................77
Moonroof............................................................77
Instrument Cluster
Gauges................................................................79
Warning Lamps and Indicators................80
Audible Warnings and Indicators.............83
Information Displays
General Information.....................................84
Trip Computer.................................................86
Information Messages..................................87
Audio System
General Information......................................97
Audio unit - Vehicles With:
AM/FM/CD...................................................98
Audio unit - Vehicles With:
AM/FM/CD/SYNC...................................100
Audio unit - Vehicles With:
AM/FM/CD/Satellite
Radio/SYNC...............................................102
Audio unit - Vehicles With: Premium
AM/FM/CD.................................................105
Audio unit - Vehicles With: Sony
AM/FM/CD.................................................106
Auxiliary Input Jack......................................109
USB Port...........................................................110
Media Hub........................................................110
Satellite Radio................................................110
Climate Control
Manual Climate Control..............................113
Automatic Climate Control........................114
Hints on Controlling the Interior
Climate..........................................................115
Heated Windows and Mirrors...................119
Cabin Air Filter................................................119
Remote Start..................................................119
Seats
Sitting in the Correct Position...................121
Head Restraints..............................................121
Manual Seats.................................................123
Power Seats....................................................124
Memory Function..........................................125
Rear Seats.......................................................126
Heated Seats..................................................127
Rear Seat Armrest........................................127
Universal Garage Door
Opener
Universal Garage Door Opener...............128
Auxiliary Power Points
Auxiliary Power Points................................132
Storage Compartments
Center Console..............................................134
Overhead Console........................................134
2
Table of Contents

Starting and Stopping the
Engine
General Information....................................135
Ignition Switch...............................................135
Keyless Starting.............................................135
Starting a Gasoline Engine........................137
Engine Block Heater....................................138
Fuel and Refueling
Safety Precautions......................................140
Fuel Quality......................................................141
Running Out of Fuel......................................141
Refueling..........................................................142
Emission Control System..........................143
Fuel Consumption........................................145
Transmission
Automatic Transmission............................147
Hill Start Assist..............................................149
Four-Wheel Drive
Using Four-Wheel Drive..............................151
Brakes
General Information....................................156
Hints on Driving With Anti-Lock
Brakes...........................................................156
Parking Brake..................................................157
Traction Control
Principle of Operation.................................158
Using Traction Control................................158
Stability Control
Principle of Operation.................................159
Using Stability Control...............................160
Parking Aids
Parking Aid.......................................................161
Active Park Assist.........................................163
Rear View Camera........................................167
Cruise Control
Principle of Operation.................................170
Using Cruise Control....................................170
Driving Aids
Blind Spot Monitor........................................171
Eco Mode.........................................................175
Steering............................................................176
Load Carrying
Rear Under Floor Storage...........................177
Luggage Covers..............................................177
Roof Racks and Load Carriers..................178
Load Limit........................................................179
Towing
Towing a Trailer.............................................188
Trailer Sway Control....................................188
Recommended Towing Weights............188
Essential Towing Checks..........................190
Towing Points.................................................191
Transporting the Vehicle............................192
Towing the Vehicle on Four Wheels......192
Driving Hints
Breaking-In.....................................................194
Economical Driving......................................194
Driving Through Water...............................194
Floor Mats.......................................................195
Roadside Emergencies
Roadside Assistance...................................197
Hazard Warning Flashers..........................198
Fuel Cut-Off Switch....................................198
Jump-Starting the Vehicle........................198
3
Table of Contents

Customer Assistance
Getting the Services You Need...............201
In California (U.S. Only)............................202
The Better Business Bureau (BBB) Auto
Line Program (U.S. Only).....................203
Utilizing the Mediation/Arbitration
Program (Canada Only).......................203
Getting Assistance Outside the U.S. and
Canada.......................................................204
Ordering Additional Owner's
Literature....................................................205
Reporting Safety Defects (U.S.
Only)............................................................205
Reporting Safety Defects (Canada
Only)............................................................206
Fuses
Changing a Fuse...........................................207
Fuse Specification Chart..........................208
Maintenance
General Information.....................................217
Opening and Closing the Hood................217
Under Hood Overview - 1.6L
EcoBoost®..................................................218
Under Hood Overview - 2.0L
EcoBoost®..................................................219
Under Hood Overview - 2.5L...................220
Engine Oil Dipstick - 1.6L
EcoBoost®..................................................221
Engine Oil Dipstick - 2.5L/2.0L
EcoBoost®..................................................221
Engine Oil Check...........................................221
Engine Coolant Check................................222
Automatic Transmission Fluid
Check............................................................225
Brake Fluid Check........................................225
Power Steering Fluid Check.....................225
Fuel Filter........................................................225
Washer Fluid Check....................................225
Changing the Vehicle Battery.................226
Checking the Wiper Blades......................227
Changing the Wiper Blades......................227
Changing the Engine Air Filter.................228
Adjusting the Headlamps.........................229
Removing a Headlamp...............................231
Changing a Bulb............................................231
Bulb Specification Chart...........................235
Vehicle Care
General Information...................................236
Cleaning Products.......................................236
Cleaning the Exterior..................................236
Repairing Minor Paint Damage...............237
Waxing..............................................................237
Cleaning the Engine....................................237
Cleaning the Windows and Wiper
Blades..........................................................238
Cleaning the Interior...................................238
Cleaning the Instrument Panel and
Instrument Cluster Lens.......................239
Cleaning Leather Seats.............................239
Cleaning the Alloy Wheels.......................240
Vehicle Storage............................................240
Wheels and Tires
General Information...................................243
Tire Care..........................................................245
Using Snow Chains.....................................256
Tire Pressure Monitoring System...........257
Changing a Road Wheel...........................260
Technical Specifications...........................265
Capacities and Specific-
ations
Engine Specifications.................................267
Motorcraft Parts...........................................267
Vehicle Identification Number...............269
Vehicle Certification Label.......................270
Transmission Code Designation............270
Technical Specifications............................271
4
Table of Contents

Accessories
Accessories....................................................274
Ford Extended Service Plan
(ESP)
Ford Extended Service Plan (ESP).......276
SYNC®
General Information...................................279
Using Voice Recognition............................281
Using SYNC® With Your Phone.............283
SYNC® Applications and Services.......295
Using SYNC® With Your Media
Player............................................................301
SYNC® Troubleshooting..........................308
MyFord Touch®
General Information....................................315
Menu.................................................................326
Entertainment...............................................332
Phone...............................................................352
Information....................................................358
Climate............................................................367
Navigation........................................................371
Appendices
End User License Agreement.................380
Scheduled Maintenance
Scheduled Maintenance..........................396
5
Table of Contents
The information contained in this publication was correct at the time of going to print. In the interest of
continuous development, we reserve the right to change specifications, design or equipment at any time
without notice or obligation. No part of this publication may be reproduced, transmitted, stored in a
retrieval system or translated into any language in any form by any means without our written permission.
Errors and omissions excepted.
© Ford Motor Company 2012
All rights reserved.
Part Number: 20120308005357

6

ABOUT THIS MANUAL
Thank you for choosing Ford. We
recommend that you take some time to
get to know your vehicle by reading this
manual. The more that you know about it,
the greater the safety and pleasure you
will get from driving it.
WARNING
Always drive with due care and
attention when using and operating
the controls and features on your
vehicle.
Note: This manual describes product
features and options available throughout
the range, sometimes even before they are
generally available. It may describe options
not fitted to your vehicle.
Note: Some of the illustrations in this
manual may be used for different models,
so may appear different to your vehicle.
However, the essential information in the
illustrations is always correct.
Note: Always use and operate your vehicle
in line with all applicable laws and
regulations.
Note: Pass on this manual when selling
your vehicle. It is an integral part of the
vehicle.
Protecting the Environment
You must play your part in protecting the
environment. Correct vehicle usage and
the authorized disposal of waste, cleaning
and lubrication materials are significant
steps toward this aim.
SYMBOLS GLOSSARY
These are some of the symbols you may
see on your vehicle.
Safety alert
See Owner's Manual
Anti-lock braking system
Avoid smoking, flames or sparks
Battery
Battery acid
Brake fluid - non petroleum
based
Brake system
Cabin air filter
Check fuel cap
Child safety door lock or unlock
Child seat lower anchor
Child seat tether anchor
E71340
Cruise control
7
Introduction

Do not open when hot
Engine air filter
Engine coolant
Engine coolant temperature
Engine oil
Explosive gas
Fan warning
Fasten safety belt
Front airbag
Front fog lamps
Fuel pump reset
Fuse compartment
Hazard warning flashers
Heated rear window
E91392
Heated windshield
Interior luggage compartment
release
Jack
Lighting control
Low tire pressure warning
Maintain correct fluid level
Panic alarm
E139213
Parking aid
Parking brake
Power steering fluid
Power windows front/rear
Power window lockout
Service engine soon
Side airbag
Stability control
8
Introduction

Windshield wash and wipe
DATA RECORDING
Service Data Recording
Service data recorders in your vehicle are
capable of collecting and storing
diagnostic information about your vehicle.
This potentially includes information about
the performance or status of various
systems and modules in the vehicle, such
as engine, throttle, steering or brake
systems. In order to properly diagnose and
service your vehicle, Ford Motor Company,
Ford of Canada, and service and repair
facilities may access or share among them
vehicle diagnostic information received
through a direct connection to your vehicle
when diagnosing or servicing your vehicle.
For U.S. only (if equipped), if you choose
to use the SYNC Vehicle Health Report,
you consent that certain diagnostic
information may also be accessed
electronically by Ford Motor Company and
Ford authorized service facilities, and that
the diagnostic information may be used
for any purpose. See SYNC® (page 279).
Event Data Recording
This vehicle is equipped with an event
data recorder. The main purpose of an
event data recorder is to record, in
certain crash or near crash-like
situations, such as an airbag
deployment or hitting a road obstacle;
this data will assist in understanding
how a vehicle’s systems performed.
The event data recorder is designed to
record data related to vehicle dynamics
and safety systems for a short period
of time, typically 30 seconds or less.
The event data recorder in this vehicle
is designed to record such data as:
• How various systems in your vehicle
were operating;
• Whether or not the driver and
passenger safety belts were
buckled/fastened;
• How far (if at all) the driver was
depressing the accelerator and/or
the brake pedal; and
• How fast the vehicle was travelling;
and
• Where the driver was positioning
the steering wheel.
This data can help provide a better
understanding of the circumstances in
which crashes and injuries occur.
Note: Event data recorder data is
recorded by your vehicle only if a
non-trivial crash situation occurs; no data
is recorded by the event data recorder
under normal driving conditions and no
personal data or information (e.g., name,
gender, age, and crash location) is
recorded (see limitations regarding 911
Assist and Traffic, directions and
Information privacy below). However,
parties, such as law enforcement, could
combine the event data recorder data
with the type of personally identifying
data routinely acquired during a crash
investigation.
9
Introduction

To read data recorded by an event data
recorder, special equipment is required,
and access to the vehicle or the event
data recorder is needed. In addition to
the vehicle manufacturer, other
parties, such as law enforcement, that
have such special equipment, can read
the information if they have access to
the vehicle or the event data recorder.
Ford Motor Company and Ford of
Canada do not access event data
recorder information without obtaining
consent, unless pursuant to court order
or where required by law enforcement,
other government authorities or other
third parties acting with lawful
authority. Other parties may seek to
access the information independently
of Ford Motor Company and Ford of
Canada.
Note: Including to the extent that any
law pertaining to Event Data Recorders
applies to SYNC or its features, please
note the following: Once 911 Assist (if
equipped) is enabled (set ON), 911 Assist
may, through any paired and connected
cell phone, disclose to emergency
services that the vehicle has been in a
crash involving the deployment of an
airbag or, in certain vehicles, the
activation of the fuel pump shut-off.
Certain versions or updates to 911 Assist
may also be capable of being used to
electronically or verbally provide to 911
operators the vehicle location (such as
latitude and longitude), and/or other
details about the vehicle or crash or
personal information about the
occupants to assist 911 operators to
provide the most appropriate emergency
services. If you do not want to disclose
this information, do not activate the 911
Assist feature. See SYNC® (page 279).
Additionally, when you connect to
Traffic, Directions and Information (if
equipped, U.S. only), the service uses
GPS technology and advanced vehicle
sensors to collect the vehicle’ s current
location, travel direction, and speed
(“vehicle travel information”), only to
help provide you with the directions,
traffic reports, or business searches
that you request. If you do not want
Ford or its vendors to receive this
information, do not activate the
service. Ford Motor Company and the
vendors it uses to provide you with this
information do not store your vehicle
travel information. For more
information, see Traffic, Directions and
Information, Terms and Conditions.
See SYNC® (page 279).
CALIFORNIA PROPOSITION 65
WARNING
Some constituents of engine
exhaust, certain vehicle components,
certain fluids contained in vehicles
and certain products of component wear
contain or emit chemicals known to the
State of California to cause cancer and
birth defects or other reproductive harm.
PERCHLORATE
Certain components in your vehicle such
as airbag modules, safety belt
pretensioners and remote control batteries
may contain perchlorate material. Special
handling may apply for service or vehicle
end of life disposal. See
www.dtsc.ca.gov/hazardouswaste/perchlorate
for more information.
10
Introduction

FORD CREDIT
(U.S. Only)
Ford Credit offers a full range of financing
and lease plans to help you acquire your
vehicle. If you have financed or leased your
vehicle through Ford Credit, thank you for
your business.
For your convenience we offer a number
of ways to contact us, as well as help
manage your account.
Phone: 1-800-727-7000
For more information regarding Ford Credit,
as well as access Account Manager, please
go to www.fordcredit.com.
REPLACEMENT PARTS
RECOMMENDATION
Your vehicle has been built to the highest
standards using quality parts. We
recommend that you demand the use of
genuine Ford and Motorcraft parts
whenever your vehicle requires scheduled
maintenance or repair. You can clearly
identify genuine Ford and Motorcraft parts
by looking for the Ford, FoMoCo or
Motorcraft branding on the parts or their
packaging.
Scheduled Maintenance and
Mechanical Repairs
One of the best ways for you to make sure
that your vehicle provides years of service
is to have it maintained in line with our
recommendations using parts that
conform to the specifications detailed in
this Owner’s Manual. Genuine Ford and
Motorcraft parts meet or exceed these
specifications.
Collision Repairs
We hope that you never experience a
collision but, accidents do happen. Genuine
Ford replacement collision parts meet our
stringent requirements for fit, finish,
structural integrity, corrosion protection
and dent resistance. During vehicle
development we validate these parts
deliver the intended level of protection as
a whole system. A great way to know for
sure you are getting this level of protection
is to use genuine Ford replacement
collision parts.
Warranty on Replacement Parts
Genuine Ford and Motorcraft replacement
parts are the only replacement parts that
benefit from a Ford Warranty. Damage
caused to your vehicle as a result of the
failure of non-Ford parts may not be
covered by the Ford Warranty. For
additional information, refer to the terms
and conditions of the Ford Warranty.
SPECIAL NOTICES
New Vehicle Limited Warranty
For a detailed description of what is
covered and what is not covered by your
vehicle’s New Vehicle Limited Warranty,
refer to the Warranty Manual that is
provided to you along with your Owner’s
Manual.
Special Instructions
For your added safety, your vehicle is fitted
with sophisticated electronic controls.
WARNINGS
Failure to follow the specific
warnings and instructions could
result in personal injury. See
Supplementary Restraints System
(page 35).
11
Introduction

WARNINGS
Front seat mounted rear-facing child
or infant seats should NEVER be
placed in front of an active
passenger airbag.
Notice to Owners of Pickup Trucks
and Utility Type Vehicles
WARNING
Utility vehicles have a significantly
higher rollover rate than other types
of vehicles.
Before you drive your vehicle, please read
this Owner’s Guide carefully. Your vehicle
is not a passenger car. As with other
vehicles of this type, failure to operate this
vehicle correctly may result in loss of
vehicle control, vehicle rollover, personal
injury or death.
Using Your Vehicle With a
Snowplow
Do not use this vehicle for
snowplowing.
Your vehicle is not equipped with a
snowplowing package.
Using Your Vehicle as an
Ambulance
Do not use this vehicle as an
ambulance.
Your vehicle is not equipped with the Ford
Ambulance Preparation Package.
MOBILE COMMUNICATIONS
EQUIPMENT
Using mobile communications equipment
is becoming increasingly important in the
conduct of business and personal affairs.
However, you must not compromise your
own or others’ safety when using such
equipment. Mobile communications can
enhance personal safety and security when
appropriately used, particularly in
emergency situations. Safety must be
paramount when using mobile
communications equipment to avoid
negating these benefits. Mobile
communication equipment includes, but
is not limited to, cellular phones, pagers,
portable email devices, text messaging
devices and portable two-way radios.
WARNING
Driving while distracted can result in
loss of vehicle control, accident and
injury. We strongly recommend that
you use extreme caution when using any
device or feature that may take your focus
off the road. Your primary responsibility is
the safe operation of your vehicle. We
recommend against the use of any
handheld device while driving and that you
comply with all applicable laws.
12
Introduction

EXPORT UNIQUE OPTIONS
For your particular global region, your
vehicle may be equipped with features and
options that are different from the features
and options that are described in this
Owner’s Manual. A market unique
supplement may be supplied that
complements this book. By referring to the
market unique supplement, if provided,
you can properly identify those features,
recommendations and specifications that
are unique to your vehicle. This Owner’s
Manual is written primarily for the U.S. and
Canadian Markets. Features or equipment
listed as standard may be different on units
built for Export. Refer to this Owner’s
Manual for all other required
information and warnings.
13
Introduction

GENERAL INFORMATION
See the following sections for directions
on how to properly use safety restraints
for children.
WARNINGS
Always make sure your child is
secured properly in a device that is
appropriate for their height, age and
weight. Child safety restraints must be
purchased separately from the vehicle.
Failure to follow these instructions and
guidelines may result in an increased risk
of serious injury or death to your child.
All children are shaped differently.
The recommendations for safety
restraints are based on probable
child height, age and weight thresholds
from National Highway Traffic Safety
Administration (NHTSA) and other safety
organizations, or are the minimum
WARNINGS
requirements of law. Ford recommends
checking with a NHTSA Certified Child
Passenger Safety Technician (CPST) and
consult your pediatrician to make sure your
child seat is appropriate for your child, and
is compatible with and properly installed
in the vehicle. To locate a child seat fitting
station and CPST, contact the NHTSA toll
free at 1-888-327-4236 or on the internet
at http://www.nhtsa.dot.gov. In Canada,
check with your local St. John Ambulance
office for referral to a CPST or for further
information, contact your provincial
ministry of transportation, your local St.
John Ambulance office at
http://www.sfa.ca, or Transport Canada
at 1-800-333-0371 (http://www.tc.gc.ca).
Failure to properly restrain children in
safety seats made especially for their
height, age, and weight may result in an
increased risk of serious injury or death to
your child.
14
Child Safety

Recommendations for Safety Restraints for Children
Recommended restraint
type
Child size, height, weight, or ageChild
Use a child safety seat
(sometimes called an
infant carrier, convertible
seat, or toddler seat).
Children weighing 40 lb (18 kg) or less
(generally age four or younger).
Infants or
toddlers
Use a belt-positioning
booster seat.
Children who have outgrown or no longer
properly fit in a child safety seat (gener-
ally children who are less than 4 feet 9
inches (1.45 meters) tall, are greater than
age four (4) and less than age twelve
(12), and between 40 lb (18 kg) and 80
lb (36 kg) and upward to 100 lb (45 kg)
if recommended by your child restraint
manufacturer).
Small children
Use a vehicle safety belt
having the lap belt snug
and low across the hips,
shoulder belt centered
across the shoulder and
chest, and seatback
upright.
Children who have outgrown or no longer
properly fit in a belt-positioning booster
seat (generally children who are at least
4 feet 9 inches (1.45 meters) tall or
greater than 80 lb (36 kg) or 100 lb (45
kg) if recommended by child restraint
manufacturer).
Larger children
15
Child Safety

• You are required by law to properly use
safety seats for infants and toddlers in
the U.S. and Canada.
• Many states and provinces require that
small children use approved booster
seats until they reach age eight, a
height of 4 feet 9 inches (1.45 meters)
tall, or 80 pounds (36 kilograms).
Check your local and state or provincial
laws for specific requirements
regarding the safety of children in your
vehicle.
• When possible, always properly
restrain children twelve (12) years of
age and under in a rear seating position
of your vehicle. Accident statistics
suggest that children are safer when
properly restrained in the rear seating
positions than in a front seating
position.
CHILD SEATS
E142594
Use a child safety seat (sometimes called
an infant carrier, convertible seat, or
toddler seat) for Infants, toddlers or
children weighing 40 pounds (18
kilograms) or less (generally age four or
younger)
CHILD SEAT POSITIONING
WARNINGS
Airbags can kill or injure a child in a
child seat. NEVER place a rear-facing
child seat in front of an active airbag.
If you must use a forward-facing child seat
in the front seat, move the vehicle seat all
the way back. When possible, all children
age 12 and under should be properly
restrained in a rear seating position. If all
children cannot be seated and restrained
properly in a rear seating position, properly
restrain the largest child in the front seat.
Always carefully follow the
instructions and warnings provided
by the manufacturer of any child
restraint to determine if the restraint device
is appropriate for your child's size, height,
weight, or age. Follow the child restraint
manufacturer's instructions and warnings
provided for installation and use in
conjunction with the instructions and
warnings provided by the vehicle
manufacturer. A safety seat that is
improperly installed or utilized, is
inappropriate for your child's height, age,
or weight or does not properly fit the child
may increase the risk of serious injury or
death.
Never let a passenger hold a child on
his or her lap while the vehicle is
moving. The passenger cannot
protect the child from injury in a collision,
which may result in serious injury or death.
Never use pillows, books, or towels
to boost a child. They can slide
around and increase the likelihood
of injury or death in a collision.
Always restrain an unoccupied child
seat or booster seat. These objects
may become projectiles in a collision
or sudden stop, which may increase the
risk of serious injury.
16
Child Safety

WARNINGS
Never place, or allow a child to place,
the shoulder belt under a child's arm
or behind the back because it
reduces the protection for the upper part
of the body and may increase the risk of
WARNINGS
injury or death in a collision.
Do not leave children, unreliable
adults, or pets unattended in your
vehicle.
Use any attachment method as indicated below by XChild
Weight
Restraint
Type
Safety belt
only
Safety belt
and LATCH
(lower
anchors
and top
tether
anchor)
Safety belt
and top
tether
anchor
LATCH
(lower
anchors
only)
LATCH
(lower
anchors
and top
tether
anchor)
XXUp to 48 lb
(21 kg)
Rear facing
child seat
XXXUp to 48 lb
(21 kg)
Forward
facing
child seat
XXOver 48 lb
(21 kg)
Forward
facing
child seat
Note: The child seat must rest tightly
against the vehicle seat. It may be necessary
to lift or remove the head restraint. See the
Seats chapter for information on head
restraints.
BOOSTER SEATS
WARNING
Never place, or allow a child to place,
the shoulder belt under a child's arm
or behind the back because it
reduces the protection for the upper part
of the body and may increase the risk of
injury or death in a collision.
Use a belt-positioning booster seat for
children who have outgrown or no longer
properly fit in a child safety seat (generally
children who are less than 4 feet 9 inches
(1.45 meters) tall, are greater than age four
(4) and less than age twelve (12), and
between 40 pounds (18 kilograms) and
80 pounds (36 kilograms) and upward to
100 pounds (45 kilograms) if
recommended by your child restraint
manufacturer). Many state and provincial
laws require that children use approved
booster seats until they reach age eight, a
height of 4 feet 9 inches (1.45 meters) tall,
or 80 pounds (36 kilograms).
Booster seats should be used until you can
answer YES to ALL of these questions
when seated without a booster seat:
17
Child Safety

E142595
• Can the child sit all the way back
against the vehicle seat back with
knees bent comfortably at the edge of
the seat cushion?
• Can the child sit without slouching?
• Does the lap belt rest low across the
hips?
• Is the shoulder belt centered on the
shoulder and chest?
• Can the child stay seated like this for
the whole trip?
Always use booster seats in conjunction
with the vehicle lap and shoulder belt.
Types of Booster Seats
E68924
• Backless booster seats
If your backless booster seat has a
removable shield, remove the shield. If a
vehicle seating position has a low seat
back or no head restraint, a backless
booster seat may place your child's head
(as measured at the tops of the ears)
above the top of the seat. In this case,
move the backless booster to another
seating position with a higher seat back or
head restraint and lap and shoulder belts,
or consider using a high back booster seat.
E70710
• High back booster seats
If, with a backless booster seat, you cannot
find a seating position that adequately
supports your child's head, a high back
booster seat would be a better choice.
Children and booster seats vary in size and
shape. Choose a booster that keeps the
lap belt low and snug across the hips,
never up across the stomach, and lets you
adjust the shoulder belt to cross the chest
and rest snugly near the center of the
shoulder. The following drawings compare
the ideal fit (center) to a shoulder belt
uncomfortably close to the neck and a
shoulder belt that could slip off the
shoulder. The drawings also show how the
lap belt should be low and snug across the
child's hips.
18
Child Safety

E142596
E142597
If the booster seat slides on the vehicle
seat, placing a rubberized mesh sold as
shelf or carpet liner under the booster seat
may improve this condition. Do not
introduce any item thicker than this under
the booster seat. Check with the booster
seat manufacturer's instructions.
INSTALLING CHILD SEATS
Using LAP AND SHOULDER BELTS
WARNINGS
Airbags can kill or injure a child in a
child seat. NEVER place a rear-facing
child seat in front of an active airbag.
If you must use a forward-facing child seat
in the front seat, move the seat all the way
back.
WARNINGS
Children 12 and under should be
properly restrained in the rear seat
whenever possible.
Depending on where you secure a
child restraint, and depending on the
child restraint design, you may block
access to certain safety belt buckle
assemblies and LATCH lower anchors,
rendering those features potentially
unusable. To avoid risk of injury, occupants
should only use seating positions where
they are able to be properly restrained.
19
Child Safety

When installing a child safety seat with
combination lap and shoulder belts:
• Use the correct safety belt buckle for
that seating position.
• Insert the belt tongue into the proper
buckle until you hear a snap and feel it
latch. Make sure the tongue is securely
fastened in the buckle.
• Keep the buckle release button
pointing up and away from the safety
seat, with the tongue between the child
seat and the release button, to prevent
accidental unbuckling.
• Place the vehicle seat back in the
upright position.
• Put the safety belt in the automatic
locking mode. Refer to Step 5. This
vehicle does not require the use of a
locking clip.
Perform the following steps when
installing the child seat with combination
lap and shoulder belts:
Note: Although the child seat illustrated is
a forward facing child seat, the steps are
the same for installing a rear facing child
seat.
E142528
1. Position the child safety seat in a seat
with a combination lap and shoulder
belt.
E142529
2. Pull down on the shoulder belt and
then grasp the shoulder belt and lap
belt together.
E142530
3. While holding the shoulder and lap belt
portions together, route the tongue
through the child seat according to the
child seat manufacturer's instructions.
Be sure the belt webbing is not twisted.
E142531
20
Child Safety

4. Insert the belt tongue into the proper
buckle (the buckle closest to the
direction the tongue is coming from)
for that seating position until you hear
a snap and feel the latch engage. Make
sure the tongue is latched securely by
pulling on it.
E142875
5. To put the retractor in the automatic
locking mode, grasp the shoulder
portion of the belt and pull downward
until all of the belt is pulled out.
Note: The automatic locking mode is
available on the front passenger and rear
seats. This vehicle does not require the use
of a locking clip.
6. Allow the belt to retract to remove
slack. The belt will click as it retracts
to indicate it is in the automatic locking
mode.
7. Try to pull the belt out of the retractor
to make sure the retractor is in the
automatic locking mode (you should
not be able to pull more belt out). If the
retractor is not locked, unbuckle the
belt and repeat Steps 5 and 6.
E142533
8. Remove remaining slack from the belt.
Force the seat down with extra weight,
e.g., by pressing down or kneeling on
the child restraint while pulling up on
the shoulder belt in order to force slack
from the belt. This is necessary to
remove the remaining slack that will
exist once the additional weight of the
child is added to the child restraint. It
also helps to achieve the proper
snugness of the child seat to the
vehicle. Sometimes, a slight lean
towards the buckle will additionally
help to remove remaining slack from
the belt.
9. Attach the tether strap (if the child seat
is equipped).
E142534
21
Child Safety

10. Before placing the child in the seat,
forcibly move the seat forward and
back to make sure the seat is securely
held in place. To check this, grab the
seat at the belt path and attempt to
move it side to side and forward and
back. There should be no more than
1 inch (2.5 centimeters) of movement
for proper installation.
Ford recommends checking with a NHTSA
Certified Child Passenger Safety
Technician to make certain the child
restraint is properly installed. In Canada,
check with your local St. John Ambulance
office for referral to a Certified Passenger
Seat Technician.
Using Lower Anchors AND Tethers
FOR CHildren (LATCH)
WARNINGS
Never attach two child safety seats
to the same anchor. In a crash, one
anchor may not be strong enough to
hold two child safety seat attachments
and may break, causing serious injury or
death.
Depending on where you secure a
child restraint, and depending on the
child restraint design, you may block
access to certain safety belt buckle
assemblies or LATCH lower anchors,
rendering those features potentially
unusable. To avoid risk of injury, occupants
should only use seating positions where
they are able to be properly restrained.
The LATCH system is composed of three
vehicle anchor points: two (2) lower
anchors located where the vehicle seat
back and seat cushion meet (called the
seat bight) and one (1) top tether anchor
located behind that seating position.
LATCH compatible child safety seats have
two rigid or webbing mounted
attachments that connect to the two lower
anchors at the LATCH equipped seating
positions in your vehicle. This type of
attachment method eliminates the need
to use safety belts to attach the child seat,
however the safety belt can still be used
to attach the child seat. For forward-facing
child seats, the top tether strap must also
be attached to the proper top tether
anchor, if a top tether strap has been
provided with your child seat.
E142535
Your vehicle has LATCH lower anchors for
child seat installation at the seating
positions marked with the child seat
symbol.
E144054
22
Child Safety

The LATCH anchors are located at the rear
section of the rear seat between the
cushion and seatback below the symbols
as shown. Follow the child seat
manufacturer's instructions to properly
install a child seat with LATCH
attachments. Follow the instructions on
attaching child safety seats with tether
straps.
Attach LATCH lower attachments of the
child seat only to the anchors shown.
Use of Inboard Lower Anchors from the
Outboard Seating Positions (Center
Seating Use)
WARNING
The standardized spacing for LATCH
lower anchors is 11 inches (28
centimeters) center to center. Do not
use LATCH lower anchors for the center
seating position unless the child seat
manufacturer's instructions permit and
specify using anchors spaced at least as
far apart as those in this vehicle.
The lower anchors at the center of the
second row rear seat are spaced 18 inches
(46 centimeters) apart. A child seat with
rigid LATCH attachments cannot be
installed at the center seating position.
LATCH compatible child seats (with
attachments on belt webbing) can only be
used at this seating position provided that
the child seat manufacturer's instructions
permit use with the anchor spacing stated.
Do not attach a child seat to any lower
anchor if an adjacent child seat is attached
to that anchor.
Each time you use the safety seat, check
that the seat is properly attached to the
lower anchors and tether anchor, if
applicable. Tug the child seat from side to
side and forward and back where it is
secured to the vehicle. The seat should
move less than one inch when you do this
for a proper installation.
If the safety seat is not anchored properly,
the risk of a child being injured in a crash
greatly increases.
Combining Safety Belt and LATCH
Lower Anchors for Attaching Child
Safety Seats
When used in combination, either the
safety belt or the LATCH lower anchors
may be attached first, provided a proper
installation is achieved. Attach the tether
strap afterward, if included with the child
seat.
Using Tether Straps
Many forward-facing child safety
seats include a tether strap
which extends from the back of
the child safety seat and hooks to an
anchoring point called the top tether
anchor. Tether straps are available as an
accessory for many older safety seats.
Contact the manufacturer of your child
seat for information about ordering a
tether strap, or to obtain a longer tether
strap if the tether strap on your safety seat
does not reach the appropriate top tether
anchor in the vehicle.
Once the child safety seat has been
installed using either the safety belt, the
lower anchors of the LATCH system, or
both, you can attach the top tether strap.
The tether strap anchors in your vehicle
are in the following positions (shown from
top view):
23
Child Safety

E142537
Perform the following steps to install a
child safety seat with tether anchors:
Note: If you install a child seat with rigid
LATCH attachments, do not tighten the
tether strap enough to lift the child seat off
the vehicle seat cushion when the child is
seated in it. Keep the tether strap just snug
without lifting the front of the child seat.
Keeping the child seat just touching the
vehicle seat gives the best protection in a
severe crash.
1. Route the child safety seat tether strap
over the back of the seat. For outboard
seating positions, route the tether strap
under the head restraint and between
the head restraint posts. For the center
seating positions, route the tether strap
over the top of the head restraint. If
needed, the head restraints can also
be removed.
E142538
2. Locate the correct anchor on the back
panel of the rear seat for the selected
seating position. The anchors are
labeled with the tether strap symbol
and are partially covered by the gap
panel. Pull the panel back to fully
expose the anchors.
E142539
3. Clip the tether strap to the anchor as
shown.
4. Tighten the child safety seat tether
strap according to the manufacturer's
instructions. If your child restraint
system is equipped with a tether strap,
and the child restraint manufacturer
recommends its use, Ford also
recommends its use.
CHILD SAFETY LOCKS
When these locks are set, the rear doors
cannot be opened from the inside.
24
Child Safety

E112197
The childproof locks are located on the
rear edge of each rear door and must be
set separately for each door.
• Driver side: turn counterclockwise to
lock and clockwise to unlock.
• Passenger side: turn clockwise to lock
and counterclockwise to unlock.
25
Child Safety

PRINCIPLE OF OPERATION
WARNINGS
Always drive and ride with your
seatback upright and the lap belt
snug and low across the hips.
To reduce the risk of injury, make
sure children sit where they can be
properly restrained.
Never let a passenger hold a child on
his or her lap while the vehicle is
moving. The passenger cannot
protect the child from injury in a collision.
All occupants of the vehicle,
including the driver, should always
properly wear their safety belts, even
when an airbag supplemental restraint
system is provided.
It is extremely dangerous to ride in a
cargo area, inside or outside of a
vehicle. In a collision, people riding in
these areas are more likely to be seriously
injured or killed. Do not allow people to ride
in any area of your vehicle that is not
equipped with seats and safety belts. Be
sure everyone in your vehicle is in a seat
and using a safety belt properly.
In a rollover crash, an unbelted
person is significantly more likely to
die than a person wearing a safety
belt.
Each seating position in your vehicle
has a specific safety belt assembly
which is made up of one buckle and
one tongue that are designed to be used
as a pair. 1) Use the shoulder belt on the
outside shoulder only. Never wear the
shoulder belt under the arm. 2) Never
swing the safety belt around your neck over
the inside shoulder. 3) Never use a single
belt for more than one person.
When possible, all children 12 years
old and under should be properly
restrained in a rear seating position.
WARNINGS
Safety belts and seats can become
hot in a vehicle that has been closed
up in sunny weather; they could burn
a small child. Check seat covers and
buckles before you place a child anywhere
near them.
Front and rear seat occupants,
including pregnant women, should
wear safety belts for optimum
protection in an accident.
All seating positions in this vehicle have
lap and shoulder safety belts. All
occupants of the vehicle should always
properly wear their safety belts, even when
an airbag supplemental restraint system
is provided.
The safety belt system consists of:
• Lap and shoulder safety belts.
• Shoulder safety belt with automatic
locking mode, (except driver safety
belt).
• Height adjuster at the front outboard
seating positions.
• Retractor and anchor pretensioner at
the front outboard seating positions.
• Belt tension sensor at the front
outboard passenger seating position.
• Safety belt warning light and chime.
• Crash sensors and monitoring system
with readiness indicator.
26
Safety Belts

The safety belt pretensioners are designed
to activate in frontal, near-frontal and side
collisions, and in rollovers. The safety belt
pretensioners on the retractor and anchor
at the front seating positions are designed
to tighten the safety belts firmly against
the occupant's body when activated. This
helps increase the effectiveness of the
safety belts. In frontal collisions, the safety
belt pretensioners can be activated alone
or, if the collision is of sufficient severity,
together with the front airbags.
FASTENING THE SAFETY
BELTS
The front outboard and rear safety
restraints in the vehicle are combination
lap and shoulder belts.
E142587
1. Insert the belt tongue into the proper
buckle (the buckle closest to the
direction the tongue is coming from)
until you hear a snap and feel it latch.
Make sure the tongue is securely
fastened in the buckle.
E142588
2. To unfasten, press the release button
and remove the tongue from the
buckle.
E142589
When in use, the rear safety belts should
be placed in the belt guides on the
outboard seatbacks.
Restraint of Pregnant Women
WARNING
Always ride and drive with your
seatback upright and the safety belt
properly fastened. The lap portion of
the safety belt should fit snug and be
positioned low across the hips. The
shoulder portion of the safety belt should
be positioned across the chest. Pregnant
women should also follow this practice.
See the following figure.
27
Safety Belts

E142590
Pregnant women should always wear their
safety belt. The lap belt portion of a
combination lap and shoulder belt should
be positioned low across the hips below
the belly and worn as tight as comfort will
allow. The shoulder belt should be
positioned to cross the middle of the
shoulder and the center of the chest.
Safety Belt Locking Modes
WARNINGS
After any vehicle collision, the safety
belt system at all passenger seating
positions must be checked by an
authorized dealer to verify that the
automatic locking retractor feature for
child seats is still functioning properly. In
addition, all safety belts should be checked
for proper function.
BELT AND RETRACTOR ASSEMBLY
MUST BE REPLACED if the safety
belt assembly automatic locking
retractor feature or any other safety belt
function is not operating properly when
checked by an authorized dealer. Failure
to replace the belt and retractor assembly
could increase the risk of injury in collisions.
All safety restraints in the vehicle are
combination lap and shoulder belts. The
driver safety belt has the first type of
locking mode, and the front outboard
passenger and rear seat safety belts have
both types of locking modes described as
follows:
Vehicle Sensitive Mode
This is the normal retractor mode, which
allows free shoulder belt length
adjustment to your movements and
locking in response to vehicle movement.
For example, if the driver brakes suddenly
or turns a corner sharply, or the vehicle
receives an impact of approximately 5 mph
(8 km/h) or more, the combination safety
belts will lock to help reduce forward
movement of the driver and passengers.
In addition, the retractor is designed to lock
if the webbing is pulled out too quickly. If
this occurs, let the belt retract slightly and
pull webbing out again in a slow and
controlled manner.
Automatic Locking Mode
In this mode, the shoulder belt is
automatically pre-locked. The belt will still
retract to remove any slack in the shoulder
belt. The automatic locking mode is not
available on the driver safety belt.
When to Use the Automatic Locking
Mode
This mode should be used any time a child
safety seat, except a booster, is installed
in passenger front or rear seating positions.
Children 12 years old and under should be
properly restrained in a rear seating
position whenever possible. See Child
Safety (page 14).
28
Safety Belts

How to Use the Automatic Locking
Mode
E142591
1. Buckle the combination lap and
shoulder belt.
2. Grasp the shoulder portion and pull
downward until the entire belt is pulled
out.
Allow the belt to retract. As the belt
retracts, you will hear a clicking sound. This
indicates the safety belt is now in the
automatic locking mode.
How to Disengage the Automatic
Locking Mode
Disconnect the combination lap and
shoulder belt and allow it to retract
completely to disengage the automatic
locking mode and activate the vehicle
sensitive (emergency) locking mode.
How to Extract Safety Belts in the
Rear Outboard Positions
Safety belts in the rear outboard positions
can lock if the seat back is returned firmly
to its upright position. The safety belts can
be unlocked using the following
procedures.
For vehicles where the rear seats recline:
1. Recline the seat to its full rear recline
position. See Safety Belts (page 26).
2. The safety belt should then unlock.
3. Return the seat back to its desired
upright position.
For vehicles with rear seats that do not
recline or are locked with the seat in its full
rear recline position:
1. Grasp the safety belt webbing at the
top of the seat back.
2. Pull the safety belt webbing forward,
firmly.
3. After pulling the safety belt forward,
allow the safety belt to feed back into
the safety belt retractor as much as
possible. If necessary, press the seat
back down to allow the safety belt
webbing to retract further.
4. The safety belt should then unlock.
5. If the safety belt does not unlock,
repeat steps 1-3.
Safety Belt Extension Assembly
WARNING
Position the safety belt height
adjusters so that the belt rests
across the middle of your shoulder.
Failure to adjust the safety belt properly
could reduce the effectiveness of the
safety belt and increase the risk of injury in
a collision.
If the safety belt is too short when fully
extended, a safety belt extension assembly
can be obtained from an authorized dealer.
Use only extensions manufactured by the
same supplier as the safety belt.
Manufacturer identification is located at
the end of the webbing on the label. Also,
use the safety belt extension only if the
safety belt is too short for you when fully
extended.
29
Safety Belts

SAFETY BELT HEIGHT
ADJUSTMENT
WARNING
Position the safety belt height
adjusters so that the belt rests
across the middle of your shoulder.
Failure to adjust the safety belt properly
could reduce the effectiveness of the
safety belt and increase the risk of injury in
a collision.
E87511
Adjust the height of the shoulder belt so
the belt rests across the middle of your
shoulder.
To adjust the shoulder belt height, squeeze
the button and slide the height adjuster up
or down. Release the button and pull down
on the height adjuster to make sure it is
locked in place.
SAFETY BELT WARNING LAMP
AND INDICATOR CHIME
This lamp illuminates and an
audible warning will sound if the
driver's safety belt has not been
fastened when the vehicle's ignition is
turned on.
Conditions of operation
Then...If...
The safety belt warning light illuminates 1-
2 minutes and the warning chime sounds
4-8 seconds.
The driver's safety belt is not buckled
before the ignition switch is turned to the
on position...
The safety belt warning light and warning
chime turn off.
The driver's safety belt is buckled while the
indicator light is illuminated and the
warning chime is sounding...
The safety belt warning light and indicator
chime remain off.
The driver's safety belt is buckled before
the ignition switch is turned to the on posi-
tion...
30
Safety Belts

SAFETY BELT MINDER
Belt-Minder®
This feature supplements the safety belt
warning function by providing additional
reminders by intermittently sounding a
chime and illuminating the safety belt
warning light when the driver's or front
passenger's seat is occupied and the
safety belt is unbuckled.
The system uses information from the
front passenger sensing system to
determine if a front seat passenger is
present and therefore potentially in need
of a warning. To avoid activating the
Belt-Minder feature for objects placed in
the front passenger seat, warnings will only
be given to large front seat occupants as
determined by the front passenger sensing
system.
If the Belt-Minder warnings have expired
(warnings for approximately five minutes)
for one occupant (driver or front
passenger), the other occupant can still
activate the Belt-Minder feature.
Then...If...
The Belt-Minder feature will not activate.The driver's and front passenger's safety
belts are buckled before the ignition switch
is turned to the on position or less than 1-2
minutes have elapsed since the ignition
switch has been turned to on...
The Belt-Minder feature is activated - the
safety belt warning light illuminates and
the warning chime sounds for six seconds
every 25 seconds, repeating for approxim-
ately five minutes or until the safety belts
are buckled.
The driver's or front passenger's safety belt
is not buckled when the vehicle has reached
at least 6 mph (9.7 km/h) and 1-2 minutes
have elapsed since the ignition switch has
been turned to on...
The Belt-Minder feature is activated - the
safety belt warning light illuminates and
the warning chime sounds for six seconds
every 25 seconds, repeating for approxim-
ately five minutes or until the safety belts
are buckled.
The driver's or front passenger's safety belt
becomes unbuckled for approximately one
minute while the vehicle is traveling at least
6 mph (9.7 km/h) and more than 1-2
minutes have elapsed since the ignition
switch has been turned to on...
31
Safety Belts

Deactivating and Activating the
Belt-Minder Feature
WARNING
While the system allows you to
deactivate it, this system is designed
to improve your chances of being
safely belted and surviving an accident.
We recommend you leave the system
activated for yourself and others who may
use the vehicle. To reduce the risk of injury,
do not deactivate or activate the system
while driving the vehicle.
Note: The driver and front passenger
warning are deactivated and activated
independently. When deactivating or
activating one seating position, do not
buckle the other position as this will
terminate the process.
Read Steps 1 - 4 thoroughly before
proceeding with the deactivation or
activation programming procedure.
The system can be deactivated or
activated by performing the following
procedure:
Before following the procedure, make sure
that:
• The parking brake is set
• The gearshift is in position P
• The ignition is off
• The driver and front passenger safety
belts are unbuckled.
1. Turn the ignition on. DO NOT START
THE ENGINE.
2. Wait until the safety belt warning light
turns off (approximately one minute).
After Step 2, wait an additional five
seconds before proceeding with Step
3. Once Step 3 is started, the procedure
must be completed within 60 seconds.
3. For the seating position being disabled,
buckle then unbuckle the safety belt
four times at a moderate speed, ending
in the unbuckled state. After Step 3,
the safety belt warning light will turn
on.
4. While the safety belt warning light is
on, buckle and then unbuckle the
safety belt. After Step 4, the safety belt
warning light will flash three times for
confirmation.
• This will disable the feature for that
seating position if it is currently
enabled.
• This will enable the feature for that
seating position if it is currently
disabled.
32
Safety Belts

CHILD RESTRAINT AND
SAFETY BELT MAINTENANCE
Inspect the vehicle safety belts and child
safety seat systems periodically to make
sure they work properly and are not
damaged. Inspect the vehicle and child
seat safety belts to make sure there are no
nicks, tears or cuts. Replace if necessary.
All vehicle safety belt assemblies, including
retractors, buckles, front safety belt buckle
assemblies, buckle support assemblies
(slide bar-if equipped), shoulder belt
height adjusters (if equipped), shoulder
belt guide on seatback (if equipped), child
safety seat LATCH and tether anchors, and
attaching hardware, should be inspected
after a collision. Read the child restraint
manufacturer's instructions for additional
inspection and maintenance information
specific to the child restraint. Ford Motor
Company recommends that all safety belt
assemblies in use in vehicles involved in a
collision be replaced. However, if the
collision was minor and an authorized
dealer finds that the belts do not show
damage and continue to operate properly,
they do not need to be replaced. Safety
belt assemblies not in use during a collision
should also be inspected and replaced if
either damage or improper operation is
noted.
Properly care for safety belts. See Vehicle
Care (page 236).
33
Safety Belts

The Personal Safety System provides an
improved overall level of frontal crash
protection to front seat occupants and is
designed to help further reduce the risk of
airbag-related injuries. The system is able
to analyze different occupant conditions
and crash severity before activating the
appropriate safety devices to help better
protect a range of occupants in a variety
of frontal crash situations.
Your vehicle's Personal Safety System
consists of:
• Driver and passenger dual-stage airbag
supplemental restraints.
• Front outboard safety belts with
pretensioners, energy management
retractors (first row only), and safety
belt usage sensors.
• Driver’s seat position sensor.
• Front passenger sensing system.
• Passenger airbag off and on indicator
lamp.
• Front crash severity sensors.
• Restraints Control Module with impact
and safing sensors.
• Restraint system warning light and
backup tone.
• The electrical wiring for the airbags,
crash sensor(s), safety belt
pretensioners, front safety belt usage
sensors, driver seat position sensor,
front passenger sensing system, and
indicator lights.
How Does the Personal Safety
System Work?
The Personal Safety System can adapt the
deployment strategy of your vehicle’s
safety devices according to crash severity
and occupant conditions. A collection of
crash and occupant sensors provides
information to the Restraints Control
Module. During a crash, the Restraints
Control Module may activate the safety
belt pretensioners and may activate either
one or both stages of the dual-stage airbag
supplemental restraints based on crash
severity and occupant conditions.
34
Personal Safety System™

PRINCIPLE OF OPERATION
WARNINGS
Airbags DO NOT inflate slowly or
gently, and the risk of injury from a
deploying airbag is the greatest close
to the trim covering the airbag module.
All occupants of the vehicle,
including the driver, should always
properly wear their safety belts, even
when an airbag supplemental restraint
system is provided.
Always transport children 12 years
old and under in the back seat and
always properly use appropriate
child restraints.
Never place your arm over the airbag
module as a deploying airbag can
result in serious arm fractures or
other injuries.
Airbags can kill or injure a child in a
child seat. NEVER place a rear-facing
child seat in front of an active airbag.
If you must use a forward-facing child seat
in the front seat, move the seat all the way
back.
Do not attempt to service, repair, or
modify the airbag supplemental
restraint systems or its fuses.
Contact your authorized dealer as soon as
possible.
Several airbag system components
get hot after inflation. Do not touch
them after inflation.
If the airbag has deployed, the airbag
will not function again and must be
replaced immediately. If the airbag
is not replaced, the unrepaired area will
increase the risk of injury in a collision.
All occupants of the vehicle,
including the driver, should always
properly wear their safety belts, even
when an air bag supplemental restraint
system is provided.
The airbags are a supplemental restraint
system and are designed to work with the
safety belts to help protect the driver and
right front passenger from certain upper
body injuries. Airbags DO NOT inflate
slowly; there is a risk of injury from a
deploying airbag.
Note: You will hear a loud bang and see a
cloud of harmless powdery residue if an
airbag deploys. This is normal.
The airbags inflate and deflate rapidly
upon activation. After airbag deployment,
it is normal to notice a smoke-like, powdery
residue or smell the burnt propellant. This
may consist of cornstarch, talcum powder
(to lubricate the bag) or sodium
compounds (e.g., baking soda) that result
from the combustion process that inflates
the airbag. Small amounts of sodium
hydroxide may be present which may
irritate the skin and eyes, but none of the
residue is toxic. While the system is
designed to help reduce serious injuries,
contact with a deploying airbag may also
cause abrasions or swelling. Temporary
hearing loss is also a possibility as a result
of the noise associated with a deploying
airbag. Because airbags must inflate
rapidly and with considerable force, there
is the risk of death or serious injuries such
as fractures, facial and eye injuries or
internal injuries, particularly to occupants
who are not properly restrained or are
otherwise out of position at the time of
airbag deployment. Thus, it is extremely
important that occupants be properly
restrained as far away from the airbag
module as possible while maintaining
vehicle control.
Routine maintenance of the airbags is not
required.
35
Supplementary Restraints System

SOS POST-CRASH ALERT
SYSTEM
The system flashes the turn signal lamps
and sounds the horn (intermittently) in the
event of a serious impact that deploys an
airbag (front, side, side curtain or Safety
Canopy) or the safety belt pretensioners.
The horn and lamps will turn off when:
• the hazard control button is pressed
• the panic button is pressed on the
remote entry transmitter, or
• the vehicle runs out of power.
DRIVER AND PASSENGER
AIRBAGS
WARNINGS
Never place your arm or any objects
over an airbag module. Placing your
arm over a deploying airbag can
result in serious arm fractures or other
injuries. Objects placed on or over the
airbag inflation area may cause those
objects to be propelled by the airbag into
your face and torso causing serious injury.
Airbags can kill or injure a child in a
child seat. Never place a rear-facing
child seat in front of an active airbag.
If you must use a forward-facing child seat
in the front seat, move the seat all the way
back.
E74302
The driver and front passenger airbags will
deploy during significant frontal and near
frontal collisions.
The driver and passenger front airbag
system consists of:
• Driver and passenger airbag modules.
• Front passenger sensing system.
• Crash sensors and monitoring system
with readiness indicator. See Crash
Sensors and Airbag Indicator (page
42).
Proper Driver and Front Passenger
Seating Adjustment
WARNING
National Highway Traffic Safety
Administration (NHTSA)
recommends a minimum distance
of at least 10 in. (25 cm) between an
occupant’s chest and the driver airbag
module.
36
Supplementary Restraints System

To properly position yourself away from
the airbag:
• Move your seat to the rear as far as you
can while still reaching the pedals
comfortably.
• Recline the seat slightly (one or two
degrees) from the upright position.
After all occupants have adjusted their
seats and put on safety belts, it’s very
important that they continue to sit
properly. A properly seated occupant sits
upright, leaning against the seat back, and
centered on the seat cushion, with their
feet comfortably extended on the floor.
Sitting improperly can increase the chance
of injury in a crash event. For example, if
an occupant slouches, lies down, turns
sideways, sits forward, leans forward or
sideways, or puts one or both feet up, the
chance of injury during a crash is greatly
increased.
Children and Airbags
WARNING
Airbags can kill or injure a child in a
child seat. NEVER place a rear-facing
child seat in front of an active airbag.
If you must use a forward-facing child seat
in the front seat, move the seat all the way
back.
E142846
Children must always be properly
restrained. Accident statistics suggest that
children are safer when properly restrained
in the rear seating positions than in the
front seating position. Failure to follow
these instructions may increase the risk of
injury in a collision.
KNEE AIRBAG
The driver's side knee airbag is located
under the instrument panel. The system
works along with the driver's front airbag
to help reduce injury to the legs. When the
driver's airbag activates in a collision, the
knee airbag deploys from under the
instrument panel. As with front and side
airbags, it is important to be properly
seated and restrained to reduce the risk of
death or serious injury.
Make sure the knee airbag is
operating properly. See Crash
Sensors and Airbag Indicator
(page 42).
FRONT PASSENGER SENSING
SYSTEM
WARNINGS
Even with Advanced Restraints
Systems, children 12 and under
should be properly restrained in a
rear seating position.
Sitting improperly out of position or
with the seat back reclined too far
can take off weight from the seat
cushion and affect the decision of the front
passenger sensing system, resulting in
serious injury or death in a crash
Always sit upright against your seat
back, with your feet on the floor.
37
Supplementary Restraints System

WARNINGS
Any alteration or modification to the
front passenger seat may affect the
performance of the front passenger
sensing system.
This system works with sensors that are
part of the front passenger’s seat and
safety belt to detect the presence of a
properly–seated occupant and determine
if the front passenger’s frontal airbag
should be enabled (may inflate) or not.
E145987
The front passenger sensing system uses
a passenger airbag off indicator which will
illuminate and stay lit to remind you that
the front passenger frontal airbag is
disabled. The indicator lamp is located in
the center stack of the instrument panel.
Note: The passenger airbag off light will
illuminate for a short period of time when
the ignition is first turned on to confirm it is
functional.
The front passenger sensing system is
designed to disable (will not inflate) the
front passenger’s frontal airbag when the
front passenger seat is unoccupied, or a
rear facing infant seat, a forward-facing
child restraint, or a booster seat is
detected.
• When the front passenger sensing
system disables (will not inflate) the
front passenger frontal airbag, the
passenger airbag status indicator will
illuminate and stay lit to remind you
that the front passenger frontal airbag
is disabled.
• If the child restraint has been installed
and the passenger airbag status
indicator illuminates, then turn the
vehicle off, remove the child restraint
from the vehicle and reinstall the
restraint following the child restraint
manufacturer’s instructions.
The front passenger sensing system is
designed to enable (may inflate) the front
passenger’s frontal airbag anytime the
system senses that a person of adult size
is sitting properly in the front passenger
seat.
• When the front passenger sensing
system enables the front passenger
frontal airbag (may inflate), the
passenger airbag status indicator will
not illuminate.
If a person of adult size is sitting in the front
passenger's seat, but the passenger airbag
status indicator lamp is lit, it is possible
that the person isn't sitting properly in the
seat. If this happens:
• Turn the vehicle off and ask the person
to place the seat back in the full upright
position.
• Have the person sit upright in the seat,
centered on the seat cushion, with the
person's legs comfortably extended.
• Restart the vehicle and have the person
remain in this position for about two
minutes. This will allow the system to
detect that person and enable the
passenger’s frontal airbag.
• If the passenger airbag status indicator
lamp remains lit even after this, the
person should be advised to ride in the
rear seat.
38
Supplementary Restraints System

Passenger AirbagPassenger Airbag Status
Indicator
Occupant
DisabledUnlitEmpty
DisabledLitChild
EnabledUnlitAdult
Note: When the passenger airbag status
indicator lamp is illuminated, the passenger
side airbag (seat mounted) may be disabled
to avoid the risk of airbag deployment
injuries.
After all occupants have adjusted their
seats and put on safety belts, it’s very
important that they continue to sit
properly. A properly seated occupant sits
upright, leaning against the seat back, and
centered on the seat cushion, with their
feet comfortably extended on the floor.
Sitting improperly can increase the chance
of injury in a crash event. For example, if
an occupant slouches, lies down, turns
sideways, sits forward, leans forward or
sideways, or puts one or both feet up, the
chance of injury during a crash is greatly
increased.
If you think that the status of the passenger
airbag off indicator lamp is incorrect, check
for the following:
• Objects lodged underneath the seat
• Objects between the seat cushion and
the center console (if equipped)
• Objects hanging off the seat back
• Objects stowed in the seat back map
pocket (if equipped)
• Objects placed on the occupant's lap
• Cargo interference with the seat
• Other passengers pushing or pulling on
the seat
• Rear passenger feet and knees resting
or pushing on the seat
The conditions listed above may cause the
weight of a properly seated occupant to
be incorrectly interpreted by the passenger
sensing system. The person in the front
passenger seat may appear heavier or
lighter due to the conditions described in
the list above.
To know if the front passenger
sensing system is operating
properly, See Crash Sensors
and Airbag Indicator (page 42).
If the airbag readiness lamp is lit, do
the following:
The driver or adult passengers should
check for any objects that may be lodged
underneath the front passenger seat or
cargo interfering with the seat.
If objects are lodged or cargo is interfering
with the seat; please take the following
steps to remove the obstruction:
• Pull the vehicle over.
• Turn the vehicle off.
• Driver or adult passengers should
check for any objects lodged
underneath the front passenger seat
or cargo interfering with the seat.
• Remove the obstruction(s) (if found).
• Restart the vehicle.
39
Supplementary Restraints System

• Wait at least two minutes and verify
that the airbag readiness lamp is no
longer illuminated.
• If the airbag readiness lamp remains
illuminated, this may or may not be a
problem due to the front passenger
sensing system.
DO NOT attempt to repair or service the
system; take your vehicle immediately to
an authorized dealer.
If it is necessary to modify an advanced
front airbag system to accommodate a
person with disabilities, contact your
authorized dealer.
SIDE AIRBAGS
WARNINGS
Do not place objects or mount
equipment on or near the airbag
cover, on the side of the seatbacks
(of the front seats), or in front seat areas
that may come into contact with a
deploying airbag. Failure to follow these
instructions may increase the risk of
personal injury in the event of a collision.
Do not use accessory seat covers.
The use of accessory seat covers
may prevent the deployment of the
side airbags and increase the risk of injury
in an accident.
Do not lean your head on the door.
The side airbag could injure you as it
deploys from the side of the
seatback.
Do not attempt to service, repair, or
modify the airbag, its fuses or the
seat cover on a seat containing an
airbag. Contact your authorized dealer as
soon as possible.
WARNINGS
If the side airbag has deployed, the
airbag will not function again. The
side airbag system (including the
seat) must be inspected and serviced by
an authorized dealer. If the airbag is not
replaced, the unrepaired area will increase
the risk of injury in a collision.
The side airbags are fitted on the outboard
side of the seatbacks of the front seats. In
certain lateral collisions, the airbag on the
side affected by the collision will be
inflated. The airbag was designed to inflate
between the door panel and occupant to
further enhance the protection provided
occupants in side impact collisions.
E142848
The system consists of the following:
• A label or embossed side panel
indicating that side airbags are fitted
to your vehicle.
• Side airbags located inside the
seatback of the driver and front
passenger seatbacks.
• Front passenger sensing system
Crash sensors and monitoring
system with readiness indicator.
See Crash Sensors and Airbag
Indicator (page 42).
40
Supplementary Restraints System

Note: The passenger sensing system will
deactivate the passenger seat-mounted
side airbag if it detects an empty, unbuckled
passenger seat.
The design and development of the side
airbag system included recommended
testing procedures that were developed
by a group of automotive safety experts
known as the Side Airbag Technical
Working Group. These recommended
testing procedures help reduce the risk of
injuries related to the deployment of side
airbags.
SAFETY CANOPY®
WARNINGS
Do not place objects or mount
equipment on or near the headliner
at the siderail that may come into
contact with a deploying curtain airbag.
Failure to follow these instructions may
increase the risk of personal injury in the
event of a collision.
Do not lean your head on the door.
The curtain airbag could injure you
as it deploys from the headliner.
Do not attempt to service, repair, or
modify the curtain airbags, its fuses,
the A, B, or C pillar trim, or the
headliner on a vehicle containing curtain
airbags. Contact your authorized dealer as
soon as possible.
All occupants of the vehicle including
the driver should always wear their
safety belts even when an airbag
supplemental restraint system and curtain
airbag is provided.
To reduce risk of injury, do not
obstruct or place objects in the
deployment path of the curtain
airbag.
WARNINGS
If the curtain airbags have deployed,
the curtain airbags will not function
again. The curtain airbags (including
the A, B and C pillar trim and headliner)
must be inspected and serviced by an
authorized dealer. If the curtain airbag is
not replaced, the unrepaired area will
increase the risk of injury in a collision.
The Safety Canopy will deploy during
significant side collisions or when a certain
likelihood of a rollover event is detected
by the rollover sensor. The Safety Canopy
is mounted to the roof side-rail sheet
metal, behind the headliner, above each
row of seats. In certain lateral collisions or
rollover events, the Safety Canopy will be
activated, regardless of which seats are
occupied. The Safety Canopy is designed
to inflate between the side window area
and occupants to further enhance
protection provided in side impact
collisions and rollover events.
E75004
The system consists of the following:
• Safety canopy curtain airbags fitted
above the trim panels over the front
and rear side windows identified by a
label or wording on the headliner or
roof-pillar trim.
• A flexible headliner which opens above
the side doors to allow air curtain
deployment
41
Supplementary Restraints System

• The crash sensors and monitoring
system have a readiness indicator. See
Crash Sensors and Airbag Indicator
(page 42).
Children 12 years old and under should
always be properly restrained in the second
or third row seats. The Safety Canopy will
not interfere with children restrained using
a properly installed child or booster seat
because it is designed to inflate downward
from the headliner above the doors along
the side window opening.
The design and development of the Safety
Canopy included recommended testing
procedures that were developed by a
group of automotive safety experts known
as the Side Airbag Technical Working
Group. These recommended testing
procedures help reduce the risk of injuries
related to the deployment of side airbags
(including the Safety Canopy).
CRASH SENSORS AND
AIRBAG INDICATOR
WARNING
Modifying or adding equipment to
the front end of the vehicle (including
frame, bumper, front end body
structure and tow hooks) may affect the
performance of the airbag system,
increasing the risk of injury. Do not modify
the front end of the vehicle.
The vehicle has a collection of crash and
occupant sensors which provide
information to the Restraints Control
Module which deploys (activates) the front
safety belt pretensioners, driver airbag,
passenger airbag, seat mounted side
airbags, and the Safety Canopy. Based on
the type of accident (frontal impact, side
impact or rollover) the restraints control
module will deploy the appropriate safety
devices.
The restraints control module also
monitors the readiness of the above safety
devices plus the crash and occupant
sensors. The readiness of the safety
system is indicated by a warning indicator
light in the instrument cluster or by a
backup tone if the warning light is not
working. Routine maintenance of the
airbag is not required.
A difficulty with the system is indicated by
one or more of the following:
• The readiness light will not illuminate
immediately after the ignition is turned
on.
• The readiness light will either flash or
stay lit.
• A series of five beeps will be heard. The
tone pattern will repeat periodically
until the problem, the light or both are
repaired.
If any of these things happen, even
intermittently, have the supplemental
restraint system serviced at an authorized
dealer immediately. Unless serviced, the
system may not function properly in the
event of a collision.
42
Supplementary Restraints System

The safety belt pretensioners and the
airbag supplemental restraint system is
designed to activate when the vehicle
sustains longitudinal or lateral deceleration
sufficient to cause the restraints control
module to deploy a safety device or when
a certain likelihood of a rollover event is
detected by the rollover sensor.
The fact that the safety belt pretensioners
or airbags did not activate for both front
seat occupants in a collision does not
mean that something is wrong with the
system. Rather, it means the restraints
control module determined the accident
conditions (crash severity, belt usage, etc.)
were not appropriate to activate these
safety devices.
• Front airbags are designed to activate
only in frontal and near-frontal
collisions (not rollovers, side impacts
or rear impacts) unless the collision
causes sufficient longitudinal
deceleration.
• The safety belt pretensioners and rear
inflatable safety belts are designed to
activate in frontal, near-frontal and
side collisions, and in rollovers.
• Side airbags are designed to inflate in
side-impact collisions, not rollovers,
rear impacts, frontal or near-frontal
collisions, unless the collision causes
sufficient lateral deceleration.
• The Safety Canopy is designed to
inflate in certain side impact collisions
or rollover events, not in rear impact,
frontal or near-frontal collisions, unless
the collision causes sufficient lateral
deceleration or rollover likelihood.
AIRBAG DISPOSAL
Contact your authorized dealer as soon as
possible. Airbags MUST BE disposed of by
qualified personnel.
43
Supplementary Restraints System

PRINCIPLE OF OPERATION
The remote control allows you to:
• remotely lock or unlock the vehicle
doors
• unlock the doors without actively using
a key or remote control (intelligent
access only)
• remotely open the power liftgate (if
equipped)
• remotely start or stop the engine (if
equipped)
• arm and disarm the anti-theft system
• activate the panic alarm.
GENERAL INFORMATION ON
RADIO FREQUENCIES
The remote control complies with part 15
of the FCC rules and with RSS-210 of
Industry Canada. Operation is subject to
the following two conditions: (1) This
device may not cause harmful interference,
and (2) This device must accept any
interference received, including
interference that may cause undesired
operation.
Note: Changes or modifications not
expressly approved by the party responsible
for compliance could void the user’s
authority to operate the equipment.
The typical operating range for your
transmitter is approximately 33 feet (10
meters). Vehicles with the remote start
feature will have a greater range. A
decrease in operating range could be
caused by:
• weather conditions
• nearby radio towers
• structures around the vehicle
• other vehicles parked next to your
vehicle.
Intelligent Access (If Equipped)
The system uses a radio frequency signal
to communicate with your vehicle and
authorize your vehicle to unlock when
commanded (either by touching the inside
of the front exterior door handle, by
activating the exterior luggage
compartment button, or a button on the
transmitter itself). If excessive radio
frequency interface is present in the area,
or if the transmitter battery is low, it may
be necessary to mechanically unlock your
door. The mechanical key blade in your
intelligent access key can be used to open
the driver’s door in this situation. See
Remote Control (page 44).
REMOTE CONTROL
Integrated Keyhead Transmitters
(If Equipped)
E142585
Your vehicle may be equipped with two
integrated keyhead transmitters. The key
blade is used to start the vehicle and
unlock or lock the driver’s door from
outside the vehicle. The transmitter portion
functions as the remote control.
44
Keys and Remote Controls

E138615
Note: Your vehicle’s keys were issued with
a security label that provides important
vehicle key cut information. Keep the label
in a safe place for future reference.
Intelligent Access Key (If Equipped)
Note: A three-button remote control will
operate similarly.
E138616
Your vehicle may be equipped with two
intelligent access keys which operate the
power locks and the remote start system.
The key must be in the vehicle to activate
the push button start system.
E142431
The intelligent access key also contains a
removable mechanical key blade that can
be used to unlock the driver door. Slide the
release on the back of the transmitter to
release the key blade, then pull the blade
out.
E138618
Note: Your vehicle’s back-up keys were
issued with a security tag that provides
important vehicle key cut information. Keep
the tag in a safe place for future reference.
Replacing the Battery
Note: Refer to local regulations when
disposing of transmitter batteries.
Note: Do not wipe off any grease on the
battery terminals or on the back surface of
the circuit board.
Note: Replacing the battery will not delete
the transmitter from the vehicle. The
transmitter should operate normally.
The remote control uses one coin-type
three-volt lithium battery CR2032 or
equivalent.
45
Keys and Remote Controls

Integrated Keyhead Transmitter
E138619
1. Twist a thin coin in the slot of the
transmitter near the key ring to remove
the battery cover.
2. Remove the old battery.
E138620
3. Insert the new battery. Refer to the
instructions inside the transmitter for
the correct orientation of the battery.
Press the battery down to make sure
it is fully in the housing.
4. Snap the battery cover back onto the
transmitter.
Intelligent Access Transmitter
1. Remove the backup key from the
transmitter.
E142432
2. Twist a thin coin in the slot hidden
behind the backup key slot to remove
the battery cover.
E138622
3. Remove the old battery.
4. Insert the new battery. Refer to the
instruction inside the transmitter for
the correct orientation of the battery.
Press the battery down to make sure
it is fully in the housing.
5. Snap the battery cover back onto the
transmitter and install the backup key.
Car Finder
E138623
Press the button twice within
three seconds. The horn will
chirp and the turn signals will
flash. It is recommended that this method
be used to locate your vehicle, rather than
using the panic alarm.
46
Keys and Remote Controls

Note: If locking was not successful or any
door or the liftgate is not closed, or if the
hood is not closed on vehicles equipped
with a perimeter alarm or remote start, the
horn will chirp twice and the lamps will not
flash.
Sounding a Panic Alarm
Note: The panic alarm will only operate
when the ignition is off.
E138624
Press the button to activate the
alarm. Press the button again or
turn the ignition on to deactivate.
Remote Start (If Equipped)
WARNING
To avoid exhaust fumes, do not use
remote start if your vehicle is parked
indoors or areas that are not well
ventilated.
Note: Do not use remote start if your vehicle
is low on fuel.
E138625
Your vehicle has remote start if
the transmitter has this button.
The remote start feature allows you to
start the engine from outside the vehicle.
The transmitter has an extended operating
range.
Vehicles with automatic climate control
can be configured to operate when the
vehicle is remote started. See Automatic
Climate Control (page 114).
Many states and provinces have
restrictions for the use of remote start.
Check your local and state or provincial
laws for specific requirements regarding
remote start systems.
The remote start system will not work if:
• the ignition is on
• the alarm system is triggered
• the feature has been disabled
• the hood is not closed
• two remote vehicle starts have already
been attempted within the last hour
• the vehicle is not in P (Park)
• the vehicle battery voltage is too low
• the service engine soon indicator was
on the last time the vehicle was driven.
Remote Starting the Engine
Note: Each button press must be done
within three seconds of each other. The
vehicle will not remote start if this sequence
is not followed and the horn will not chirp.
E138626
The label on your transmitter details the
starting procedure. To remote start the
engine:
1. Press the lock button to lock all the
doors.
2. Press the remote start button twice.
The exterior lamps will flash twice.
The horn will chirp if the system fails to
start, unless quiet start is on. Quiet start
will run the blower fan at a slower speed
to reduce noise. It can be switched on or
off in the information display. See General
Information (page 84).
47
Keys and Remote Controls

Note: If the vehicle has been remote started
and is equipped with an integrated keyhead
transmitter, you must turn the ignition on
before driving the vehicle. If equipped with
an intelligent access transmitter, you must
press the START/STOP button on the
instrument panel once while applying the
brake pedal before driving the vehicle.
The power windows will be inhibited during
the remote start and the radio will not turn
on automatically.
The parking lamps will remain on and the
engine will run for 5, 10, or 15 minutes,
depending on the setting.
Extending the Engine Run Time
Repeat Steps 1 and 2 with the engine still
running to extend the run time for another
remote start duration. If you programmed
the duration to last 10 minutes, the second
10 minutes will be added. For example, if
the vehicle had been running from the first
remote start for five minutes, the engine
will continue to run now for a total of 20
minutes. You can only extend the remote
start once.
Wait at least five seconds before remote
starting after an engine shutdown. Only
two remote starts are allowed.
The vehicle must be started without
remote start then switched off or allow
one hour to pass before using remote start
again if additional remote starts are
desired.
Turning the Engine Off After Remote
Starting
E138625
Press the button once. The
parking lamps will turn off.
You may have to be closer to the
vehicle than when starting due to ground
reflection and the added noise of the
running engine.
You can disable or enable the remote start
system through the information display.
See General Information (page 84).
REPLACING A LOST KEY OR
REMOTE CONTROL
Replacement or additional keys or remote
controls can be purchased from your
authorized dealer. Your dealer can program
the transmitters to your vehicle or you may
be able to program them yourself. See
Passive Anti-Theft System (page 62).
48
Keys and Remote Controls

PRINCIPLE OF OPERATION
MyKey allows you to program keys with
restricted driving modes to promote good
driving habits. All but one of the keys
programmed to the vehicle can be
activated with these restricted modes. Any
keys that have not been programmed are
referred to as an "administrator key" or
"admin key" which can be used to:
• create a restricted key
• program optional MyKey settings
• clear all MyKey features altogether.
Once a key has been programmed you can
access the following information using the
information display control:
• How many admin keys and MyKeys are
programmed to the vehicle.
• The total distance the vehicle has been
driven with a MyKey.
For vehicles equipped with intelligent
access key (push button start), when both
a MyKey and an admin intelligent access
key (fob) are present, the admin fob will
be recognized by the vehicle to start the
engine.
Standard Settings
These settings cannot be changed.
• Belt-Minder®. This cannot be disabled
and the five-minute timer does not
expire. The audio system is muted
when MyKey Belt-Minder® is activated.
• Early low fuel. Warnings are displayed
in the information display control
followed by an audible tone when the
fuel tank is at one-eighth tank or less.
• Driver assist features, if equipped on
your vehicle, are forced on: Parking aid,
blind spot information system (BLIS®)
with cross traffic alert and the collision
warning system.
Optional Settings
These settings can be configured right after
a MyKey is first created or changed
afterword with an Admin key.
• Vehicle speed limit of 80 mph (130
km/h). Visual warnings are displayed
followed by an audible tone when
vehicle speed has reached 80 mph
(130 km/h).
• Vehicle speed warning of 45, 55 or 65
mph (75, 90, or 105 km/h). Visual
warnings are displayed followed by an
audible tone when the preselected
vehicle speed is exceeded.
• Audio system maximum volume of
45%. A message in the audio system
is displayed when attempting to
exceed the limited volume.
• AdvanceTrac®. The system cannot be
turned off when Always-on has been
set.
CREATING A MYKEY
Use the information display control to
create a MyKey:
1. Insert the key you want to program into
the ignition or, if the vehicle is equipped
with push button start, put the
intelligent access key in the backup
slot. Backup slot information is located
in a different chapter. See Starting
and Stopping the Engine (page 135).
2. Turn the ignition on.
3. Access the main menu on the
information display controls and select
Settings, then MyKey by pressing OK
or the > button.
4. Press OK to select Create.
5. When prompted, hold the OK button
until you see a message informing you
to label this key as a MyKey. The key
will be restricted at the next start.
49
MyKey®

The key is successfully programmed. Make
sure you label it so you can distinguish it
from the admin keys.
You can program optional settings for the
key(s). Refer to Programming/Changing
optional settings.
Vehicles equipped with remote start need
to follow a separate procedure. See Using
MyKey With Remote Start Systems
(page 50).
Programming/Changing Optional
Settings
All programmed keys can be cleared within
the same key cycle in which a key was
programmed, otherwise an admin key is
required to clear the keys. See Clearing
All MyKeys (page 50).
You can access the optional settings
through the information display control.
1. Turn the ignition on using an admin key.
2. Access the main menu and select
Settings, then MyKey.
3. Use the arrow buttons to get to an
optional feature.
4. Press OK or > to scroll through settings.
5. Press OK or > to make a selection.
CLEARING ALL MYKEYS
All programmed MyKeys can be cleared
within the same key cycle in which a MyKey
was created, otherwise an admin key is
required to clear the keys.
To clear all MyKeys (which removes all
restrictions and returns them to admin key
status), use the information display control
to do the following:
1. Access the main menu and select
Settings, then MyKey.
2. Scroll to Clear All and press the OK
button.
3. Hold the OK button until ALL MYKEYS
CLEARED is displayed.
CHECKING MYKEY SYSTEM
STATUS
The information display control displays
information about keys programmed to
the vehicle:
• MYKEY MILES: Tracks mileage when
a restricted key is used. If mileage does
not accumulate as expected, then the
key is not being used by the intended
user. The only way to reset this to zero
is by resetting the keys. If the mileage
is lower than the last time you checked,
then the key system has been recently
reset.
• #MYKEY(S): Indicates how many
restricted keys are programmed to the
vehicle. Can also be used to detect
deletion of a restricted key.
• #ADMIN KEY(S): Indicates how
many admin keys are programmed to
the vehicle. Can also be used to detect
if an additional key has been
programmed to the vehicle.
USING MYKEY WITH REMOTE
START SYSTEMS
MyKey is NOT compatible with
non-Ford-approved aftermarket remote
start systems. If you choose to install a
remote start system please see your Ford
authorized dealer for a Ford-approved
remote start system.
The following information MAY help
customers who choose to use a
non-Ford-approved remote start system.
The actions provided below do NOT make
MyKey compatible with
non-Ford-approved remote start system,
but it MAY help you to retain some MyKey
functions.
50
MyKey®

Vehicles Equipped with Traditional
Keys
When using a non-Ford-approved remote
start system, the default settings may
recognize the remote start system as an
additional admin key with its associated
privileges. This makes it NOT compatible
with MyKey. Restart the engine when you
insert a key into the ignition cylinder it may
help you to retain some MyKey functions.
In addition to the key that has been
programmed as a MyKey, owners of
vehicles equipped with traditional keys
have the option to program the
non-Ford-approved remote start system
as a MyKey if the remote start fob is used
by the MyKey driver.
To program a non-Ford-approved remote
start system as a MyKey, do the following:
• Enter the vehicle and close all doors.
• Remote start the vehicle using your
non-Ford-approved remote start fob.
• See Creating a MyKey (page 49).
Follow Steps 1-5.
Vehicles Equipped with Intelligent
Access Key (Push Button Start)
Note: It is not possible to program the
remote start system as a MyKey on vehicles
equipped with intelligent access key (push
button start). Therefore, you should treat
the remote start fob as you would any other
admin key. When the vehicle is started using
remote start, the system will stall the engine
when you either enter the vehicle or shift the
vehicle into gear. Prior to the engine stall,
the vehicle will have administrative
privileges. When you restart the engine, the
vehicle will identify the user as an admin or
MyKey driver depending on the settings of
the actual key used to start the vehicle.
Note: For all vehicles, the number of
MYKEY(S) PROGRAMMED or ADMIN KEYS
PROGRAMMED that is displayed in the
MyKey system status menus, may include
the non-Ford-approved remote start system
as an additional key in the total count. See
Checking MyKey System Status (page
50).
For all vehicles with a non-Ford-approved
remote start installed, it is possible to
program all "real" keys as MyKeys, in which
case, you will need to use your remote start
system to clear all MyKeys (which removes
all restrictions and returns them to admin
key status) by doing the following:
• Enter the vehicle and close all doors.
• Remote start the vehicle using your
non-Ford-approved remote start fob.
• See Clearing All MyKeys (page 50).
Follow Steps 1-3.
MYKEY TROUBLESHOOTING
Potential CausesCondition
The key in the ignition does not have admin
privileges.
I cannot program a key
51
MyKey®

Potential CausesCondition
The key in the ignition is the only admin key
(there always has to be at least one admin
key).
The intelligent access key is not in the backup
slot (vehicles with push button start).
SecuriLock® passive anti-theft system is
disabled or in unlimited mode.
The vehicle has been started using a remote
start system that is not programmed with
admin privileges. See Using MyKey With
Remote Start Systems (page 50).
The key in the ignition does not have admin
privileges.
I cannot program the optional settings
No keys are programmed to the vehicle. See
Creating a MyKey.
The vehicle has been started using a remote
start system that is not programmed with
admin privileges. See Using MyKey With
Remote Start Systems (page 50).
Key in the ignition does not have admin priv-
ileges.
I cannot clear the restricted keys
No restricted keys are programmed to the
vehicle. See Creating a MyKey.
The vehicle has been started using a remote
start system that is not programmed with
admin privileges. See Using MyKey With
Remote Start Systems (page 50).
Purchase a new key from your authorized
dealer.
I lost the only admin key
Program a spare key. See Passive Anti-Theft
System (page 62).
I lost a key
The vehicle has a remote start system that is
recognized as an admin key. Restricted keys
can be reset using remote start. See Using
MyKey With Remote Start Systems (page
50).
I accidentally programmed all keys as
restricted keys
An admin key is present at engine start-up.No restricted key functions with intelli-
gent access key (push button start) No restricted keys are programmed to the
vehicle. See Creating a MyKey.
52
MyKey®

Potential CausesCondition
An unknown key has been programmed to the
vehicle as a restricted key.
Restricted key programmed total
includes one additional key
The vehicle is equipped with a remote start
system. See Using MyKey With Remote
Start Systems (page 50).
An unknown key has been programmed to the
vehicle as an admin key.
Admin keys programmed total includes
one additional key
The vehicle is equipped with a remote start
system. See Using MyKey With Remote
Start Systems (page 50).
The restricted key is not being used by the
intended user.
MyKey miles do not accumulate
The key system has been reset.
53
MyKey®

LOCKING AND UNLOCKING
You can use the power door lock control
or the remote control to lock and unlock
the vehicle.
Power Door Locks
E138628
UnlockA
LockB
Remote Control
The remote control can be used any time
the vehicle is not running.
Unlocking the Doors (Two-Stage
Unlock)
E138629
Press the button to unlock the
driver’s door.
Press the button again within
three seconds to unlock all doors. The turn
signals will flash.
Press and hold both the lock and unlock
buttons on the remote control for four
seconds to disable or enable two-stage
unlocking. Disabling two-stage unlocking
allows all vehicle doors to unlock with one
press of the button. The turn signals will
flash twice to indicate the unlocking mode
was changed. The unlocking mode will be
applied to the remote control, keyless entry
keypad and intelligent access.
Intelligent access at the driver’s door will
unlock all doors when two-stage unlocking
is disabled.
Locking the Doors
E138623
Press the button to lock all the
doors. The turn signals will
illuminate.
Press the button again within three
seconds to confirm that all the doors are
closed. The doors will lock again, the horn
will chirp and the turn signals will
illuminate if all the doors and the luggage
compartment are closed.
Note: If locking was not successful or any
door or the liftgate is not closed, or if the
hood is not closed on vehicles equipped
with a perimeter alarm or remote start, the
horn will chirp twice and the lamps will not
flash.
Power Liftgate (if equipped)
WARNINGS
Make sure all persons are clear of the
liftgate area before using power
liftgate control.
Make sure the liftgate is closed to
prevent exhaust fumes from being
drawn into the vehicle. This will also
prevent passengers and cargo from falling
out. If you must drive with the liftgate open,
keep the vents open so outside air comes
into the vehicle.
Note: Be careful when opening or closing
the liftgate in a garage or other enclosed
area to avoid damaging the liftgate.
E138630
Press twice within three seconds
to open or close the liftgate, or
to reverse the movement. See
Power Liftgate (page 57).
54
Locks

Activating Intelligent Access (If
Equipped)
The intelligent access key must be within
3 feet (1 meter) of the vehicle.
At the Front Doors
Pull a front exterior door handle. The door
will unlock and can be opened.
E87384
Press and hold the door handle lock sensor
to lock the vehicle. To avoid unlocking the
door inadvertently, be sure to only touch
the lock sensor and not other areas of the
door handle.
At the Liftgate
Press the exterior liftgate release button
on the top of the liftgate pull-cup handle.
Smart Unlocks For Integrated
Keyhead Transmitter
This feature helps to prevent you from
locking yourself out of the vehicle if your
key is still in the ignition.
When you open one of the front doors and
lock the vehicle with the power door lock
control, all the doors will lock then unlock
if your key is still in the ignition.
The vehicle can still be locked with the key
in the ignition by using the keyless entry
keypad with the driver door closed, or by
pressing the lock button on the transmitter
even if the doors are not closed.
If both front doors are closed, the vehicle
can be locked by any method, regardless
of whether the key is in the ignition or not.
Smart Unlocks For Intelligent
Access Keys (If Equipped)
This feature helps to prevent you from
unintentionally locking your intelligent
access key inside your vehicle’s passenger
compartment or rear cargo area.
When you lock your vehicle using the driver
or passenger power door lock control (with
the door open, vehicle in park and ignition
off), after you close the door the vehicle
will search for an intelligent access key in
the passenger compartment. If an
intelligent access key is found inside the
vehicle, all of the doors will immediately
unlock and the horn will chirp, indicating
that the intelligent access key is inside.
In order to override the smart unlock
feature and intentionally lock the
intelligent access key inside the vehicle,
you can lock your vehicle after all doors
are closed by using the keyless entry
keypad, pressing the lock button on
another intelligent access key or touching
the locking area on the handle with another
intelligent access key in your hand.
When you open one of the front doors and
lock the vehicle using the power door lock
control, all doors will lock then unlock if:
• the ignition is on, or
• the ignition is off and the vehicle is not
in P (Park).
55
Locks

Autolock and Autounlock (If Equipped)
The autolock feature will lock all the doors
when:
• all doors are closed
• the ignition is on
• you shift into any gear putting the
vehicle in motion, and
• the vehicle attains a speed greater than
4 mph (7 km/h).
When autounlock is enabled, all doors will
unlock when the driver door is opened.
Enabling or Disabling Autolock and
Autounlock
Note: Your authorized dealer can perform
this procedure, or you can do the procedure
yourself.
To enable or disable these features, do the
following:
Note: You will have 30 seconds to
complete the procedure.
1. Switch the ignition on.
2. Press the power door lock button three
times.
3. Switch the ignition off.
4. Press the power door lock button three
times.
5. Switch the ignition on. The horn will
chirp indicating the programming mode
has been entered.
Autolock: Once in programming mode,
each subsequent short press (less than 1
second) of the power door lock button will
toggle autolock between on and off.
Autounlock: Each subsequent long press
(more than 2 seconds) of the power door
lock button will toggle autounlock between
on and off.
Note: The autounlock feature can be
enabled or disabled independently of the
autolock feature.
Illuminated Entry
The interior lamps and select exterior
lamps will illuminate when the remote
entry system is used to unlock the door(s).
The illuminated entry system will turn off
the lights if:
• the ignition is on
• the remote transmitter lock control is
pressed, or
• after 25 seconds of illumination.
The lights will not turn off if:
• they have been turned on with the
dimmer control, or
• any door is open.
Illuminated Exit
The interior lamps and select exterior
lamps will illuminate when all doors are
closed, the ignition is turned off and the
key is removed from the ignition
(integrated keyhead transmitter only).
The lamps will turn off if all the doors
remain closed and:
• 25 seconds elapse
• the key is inserted in the ignition
(integrated keyhead transmitter only)
• the START/STOP button is pressed
(intelligent access key only).
Battery Saver
If the courtesy lamps, dome lamps or
headlamps are left on, the battery saver
will shut them off 10 minutes after the
ignition has been turned off.
Accessory Mode Battery Saver for
Intelligent Access Keys (If Equipped)
If you shut off the engine and leave the
ignition in the on or accessory mode, the
ignition will shut off after 30 minutes.
56
Locks

MANUAL LIFTGATE
WARNINGS
It is extremely dangerous to ride in a
cargo area, inside or outside of a
vehicle. In a collision, people riding in
these areas are more likely to be seriously
injured or killed. Do not allow people to ride
in any area of your vehicle that is not
equipped with seats and safety belts. Be
sure everyone in your vehicle is in a seat
and using a safety belt properly.
Make sure that the liftgate is closed
to prevent exhaust fumes from being
drawn into the vehicle. This will also
prevent passengers and cargo from falling
out. If you must drive with the liftgate door
open, keep the vehicle well ventilated so
outside air comes into the vehicle.
Note: Be careful when opening or closing
the liftgate in a garage or other enclosed
area to avoid damaging the liftgate.
Note: Do not hang anything (bike rack, etc.)
from the spoiler, glass or liftgate. This could
damage the liftgate and its components.
Note: Do not leave the liftgate open while
driving. This could damage the liftgate and
its components.
E138632
To open the liftgate: Press the button
located in the top of the liftgate pull cup
handle to unlatch the liftgate, then pull on
the outside handle.
POWER LIFTGATE (IF EQUIPPED)
WARNINGS
It is extremely dangerous to ride in a
cargo area, inside or outside of a
vehicle. In a collision, people riding in
these areas are more likely to be seriously
injured or killed. Do not allow people to ride
in any area of your vehicle that is not
equipped with seats and safety belts. Be
sure everyone in your vehicle is in a seat
and using a safety belt properly.
Make sure that the liftgate is closed
to prevent exhaust fumes from being
drawn into the vehicle. This will also
prevent passengers and cargo from falling
out. If you must drive with the liftgate door
open, keep the vehicle well ventilated so
outside air comes into the vehicle.
Keep keys out of reach of children.
Do not allow children to play near an
open or moving power liftgate.
Note: Cycling the ignition while the liftgate
is power closing and is near the latch may
cause the liftgate to reverse to full open
position. Make sure that the liftgate is closed
before operating or moving the vehicle,
especially in an enclosure, like a garage or
a parking structure. The liftgate or its
components could be damaged.
Note: Do not hang anything (bike rack, etc.)
from the spoiler, glass or liftgate. This could
damage the liftgate and its components.
The liftgate will only operate with the
vehicle in P (Park).
57
Locks

Three warning chimes will sound once as
the liftgate begins to power close. Five
short chimes indicate a problem with the
open or close request, caused by:
• the ignition is on and the transmission
is not in P (Park);
• or the battery voltage is below the
minimum operating voltage;
• or the vehicle speed is at or above 3
mph (5 km/h).
If the liftgate falls to the closed direction
after the liftgate has stopped in the open
position, four short warning chimes
indicate excessive weight on the gate or a
possible gas strut failure. See your
authorized dealer if you still have the issue
after the load is removed.
Opening and Closing the Liftgate
WARNING
Make sure all persons are clear of the
power liftgate area before using the
power liftgate control.
Note: Be careful when opening or closing
the liftgate in a garage or other enclosed
area to avoid damaging the liftgate.
Note: Do not leave the liftgate open while
driving. This could damage the liftgate and
its components.
E138633
To open or close from the
instrument panel: Press the
instrument panel button.
E138630
To open or close with the
remote control: Press the
remote control button twice
within three seconds.
To open or close using the hands-free
liftgate feature (if equipped):
1. Make sure you have an intelligent
access transmitter within 3 feet (1
meter) of the liftgate.
1
2
+
E142731
2. Raise and lower your leg, moving your
foot toward and under, then away
from, the rear bumper (similar to a
kicking motion).The liftgate will power
open or close.
Note: Allow the power system to open the
liftgate. Manually pushing or pulling the
liftgate may activate the system’s obstacle
detection feature and stops the power
operation.
Note: Splashing water may cause the
hands-free liftgate to open. Keep the
intelligent access transmitter away from the
rear bumper detection area while washing
your car.
To open with the outside liftgate
control button:
1. Unlock the liftgate with the remote
control or power door unlock control.
If the intelligent access transmitter (if
equipped) is within 3 feet (1 meter) of
the liftgate, the liftgate will unlock
when you press the liftgate release
button.
58
Locks

E138632
2. Press the control button located in the
top of the liftgate pull-cup handle.
Note: Allow the power system to open the
liftgate after pressing the control. Manually
pushing or pulling the liftgate may activate
the system’ s obstacle detection feature and
stops the power operation.
E138636
To close with the control on the
liftgate: Press and release the button.
WARNING
Keep clear of the liftgate when
activating the rear switch.
Setting the Liftgate Open Height
1. Open the liftgate.
2. Manually move the liftgate to the
desired height.
3. Press and hold the control button on
the liftgate until a chime is heard,
indicating the new height has been
programmed.
Note: The height cannot be programmed
if the liftgate position is too low.
The new open liftgate height will now be
recalled when the power liftgate is opened.
To change the programmed height, repeat
the above procedure. Once the power
liftgate is opened it can be manually
moved to a different height.
When operating the power liftgate after a
lower height than full-open has been
programmed, the liftgate can be fully
opened by manually pushing it upward to
the maximum open position.
Obstacle Detection
When closing: The system will stop when
it detects an obstacle and two short
chimes will sound. Once the obstacle is
removed the liftgate can be closed under
power.
Note: Entering the vehicle while the liftgate
is closing can cause the vehicle to bounce
and activate obstacle detection. To prevent
this, allow the power liftgate to fully close
before entering the vehicle. Before driving
off, check the instrument cluster for a
liftgate or door ajar message or warning
indicator. Driving off without first checking
for the liftgate or door ajar message or
warning indicator could result in the liftgate
being left open, unintentionally, while you
are driving.
When opening: The system will stop and
two short chimes will sound when it
detects an obstacle. Remove the obstacle
to operate the liftgate.
59
Locks

KEYLESS ENTRY (IF EQUIPPED)
SECURICODE™ KEYLESS ENTRY
KEYPAD
1 2
3 4
5 6
7 8
9 0
E138637
You can use the keypad to:
• lock or unlock the doors
• recall memory seat and mirror
positions (if equipped)
• program and erase user codes
• arm and disarm the anti-theft alarm.
The keypad can be operated with the
factory set 5-digit entry code. The code is
located on the owner’s wallet card in the
glove box and is available from your
authorized dealer. You can also create up
to five of your own 5-digit personal entry
codes.
Programming a Personal Entry Code
To create your own personal entry code:
1. Enter the factory set code.
2. Press the 1·2 on the keypad within five
seconds.
3. Enter your personal 5-digit code. Each
number must be entered within five
seconds of each other.
4. For memory recall feature, enter the
sixth digit 1·2 to store driver 1 settings
or 3·4 to store driver 2 settings.
Note: Pressing 5·6, 7·8, or 9·0 keypad
numbers as a sixth digit will not recall a
driver memory setting.
Note: The factory-set code cannot be
associated with a memory setting.
5. The doors will lock then unlock to
confirm that your personal entry code
has been programmed.
You may also program a personal entry
code through the MyFord Touch® system
(if equipped). See General Information
(page 326).
Tips:
• Do not set a code that uses five of the
same number.
• Do not use five numbers in sequential
order.
• The factory set code will work even if
you have set your own personal code.
Erasing a Personal Code
1. Enter the factory set 5-digit code.
2. Press and release the 1·2 on the keypad
within five seconds.
3. Press and hold the 1·2 for two seconds.
This must be done within five seconds
of completing Step 2.
All personal codes are now erased and only
the factory set 5–digit code will work.
Anti-Scan Feature
The keypad will go into an anti-scan mode
if the wrong code has been entered seven
times (35 consecutive button presses).
This mode disables the keypad for one
minute and the keypad lamp will flash.
60
Locks

The anti-scan feature will turn off after:
• one minute of keypad inactivity
• pressing the unlock button on the
remote control
• the ignition is turned on
• unlocking the vehicle using intelligent
access (if equipped)
Unlocking and Locking the Doors
To Unlock the Driver’s Door
Enter the factory set 5-digit code or your
personal code. Each number must be
pressed within five seconds of each other.
The interior lamps will illuminate.
Note: All doors will unlock if the two-stage
unlocking feature is disabled. See Locking
and Unlocking (page 54).
To Unlock All Doors
Enter the factory set code or your personal
code, then press the 3·4 control within five
seconds.
To Lock All Doors
Press and hold 7·8 and 9·0 at the same
time (with the driver’s door closed). You
do not need to enter the keypad code first.
61
Locks

PASSIVE ANTI-THEFT
SYSTEM
Note: The system is not compatible with
non-Ford aftermarket remote start systems.
Use of these systems may result in vehicle
starting problems and a loss of security
protection.
Note: Metallic objects, electronic devices
or a second coded key on the same key
chain may cause vehicle starting problems
if they are too close to the key when starting
the engine. Prevent these objects from
touching the coded key while starting the
engine. Switch the ignition off, move all
objects on the key chain away from the
coded key and restart the engine if a
problem occurs.
Note: Do not leave a duplicate coded key
in the vehicle. Always take your keys and
lock all doors when leaving the vehicle.
SecuriLock®
The system is an engine immobilization
system. It is designed to help prevent the
engine from being started unless a coded
key programmed to your vehicle is used.
Using the wrong key may prevent the
engine from starting. A message may
appear in the information display.
If you are unable to start the engine with a
correctly coded key, a malfunction has
happened and a message may appear in
the information display.
Automatic Arming
The vehicle is armed immediately after
switching the ignition off.
Automatic Disarming
Switching the ignition on with a coded key
disarms the vehicle.
Replacement Keys
Note: Your vehicle comes equipped with
two integrated keyhead transmitters or two
intelligent access keys.
The integrated keyhead transmitter
functions as a programmed ignition key
that operates all the locks and starts the
vehicle, as well as a remote control.
The intelligent access key functions as a
programmed key that operates the driver's
door lock and activates the intelligent
access with push button start systems, as
well as a remote control.
If your programmed transmitters or
standard SecuriLock coded keys
(integrated keyhead transmitters only) are
lost or stolen and you don’t have an extra
coded key, you will need to have your
vehicle towed to an authorized dealer. The
key codes need to be erased from your
vehicle and new coded keys will need to
be programmed.
Store an extra programmed key away from
the vehicle in a safe place to help prevent
any inconveniences. See your authorized
dealer to purchase additional spare or
replacement keys.
Programming a Spare Integrated
Keyhead Transmitter
Note: A maximum of eight coded keys can
be programmed to your vehicle. All eight
can be integrated keyhead transmitters.
You can program your own integrated
keyhead transmitter or standard
SecuriLock coded keys to your vehicle. This
procedure will program both the engine
immobilizer keycode and the remote entry
portion of the remote control to your
vehicle
Only use integrated keyhead transmitters
or standard SecuriLock keys.
62
Security

You must have two previously
programmed coded keys and the new
unprogrammed key readily accessible. See
your authorized dealer to have the spare
key programmed if two previously
programmed coded keys are not available.
Read and understand the entire procedure
before you begin.
1. Insert the first previously programmed
coded key into the ignition.
2. Switch the ignition from off to on. Keep
the ignition on for at least three
seconds, but no more than 10 seconds.
3. Switch the ignition off and remove the
first coded key from the ignition.
4. After three seconds but within 10
seconds of switching the ignition off,
insert the second previously coded key
into the ignition.
5. Switch the ignition from off to on. Keep
the ignition on for at least three
seconds, but no more than 10 seconds.
6. Switch the ignition off and remove the
second previously programmed coded
key from the ignition.
7. After three seconds but within 10
seconds of switching the ignition off
and removing the previously
programmed coded key, insert the new
unprogrammed key into the ignition.
8. Switch the ignition from off to on. Keep
the ignition on for at least six seconds.
9. Remove the newly programmed coded
key from the ignition.
If the key has been successfully
programmed it will start the engine and
operate the remote entry system (if the
new key is an integrated keyhead
transmitter).
If it was not programmed successfully,
wait 10 seconds and repeat Steps 1 through
8. If you are still unsuccessful, take your
vehicle to your authorized dealer.
Programming a Spare Intelligent
Access Key
See your authorized dealer to have
additional keys programmed to your
vehicle.
ANTI-THEFT ALARM (IF EQUIPPED)
The system will warn you of an
unauthorized entry to your vehicle. It will
be triggered if any door, the luggage
compartment or the hood is opened
without using the key or the remote
control.
The park and turn lamps will flash and the
horn will sound if unauthorized entry is
attempted while the alarm is armed.
Take all remote controls to an authorized
dealer if there is any potential alarm
problem with your vehicle.
Arming the Alarm
The alarm is ready to arm when there is
not a key in the ignition. Lock the vehicle
to arm the alarm.
Disarming the Alarm
Disarm the alarm by any of the following
actions:
• Unlock the doors or luggage
compartment with the remote control
or keyless entry keypad.
• Switch the ignition on or start the
vehicle.
• Use a key in the driver’s door to unlock
the vehicle, then switch the ignition on
within 12 seconds.
63
Security

ADJUSTING THE STEERING
WHEEL
WARNING
Do not adjust the steering wheel
when your vehicle is moving.
Note: Make sure that you are sitting in the
correct position. See Sitting in the Correct
Position (page 121).
1
2
2
E95178
1. Unlock the steering column.
2. Adjust the steering wheel to the desired
position.
3
E95179
3. Lock the steering column.
AUDIO CONTROL (IF EQUIPPED)
Select the required source on the audio
unit.
You can operate the following functions
with the control:
Type 1
E145434
Use the arrows on the steering wheel to
navigate through the menus. Press OK to
make a selection.
64
Steering Wheel

Type 2
E129462
B
D
C
A
E
Volume upA
Seek up or nextB
Volume downC
Seek down or previousD
ModeE
Press M to select the audio source.
Type 3
E129463
C
D
A
B
Volume upA
Seek up or nextB
Volume downC
Seek down or previousD
Seek, Next or Previous
Press the seek button to:
• tune the radio to the next or previous
stored preset
• play the next or the previous track.
Press and hold the seek button to:
• tune the radio to the next station up or
down the frequency band
• seek through a track.
65
Steering Wheel

VOICE CONTROL (IF EQUIPPED)
E129464
Pull the control to select or deselect voice
control. See SYNC® (page 279). See
MyFord Touch® (page 315).
MyFord Touch® Controls (If Equipped)
Your steering wheel controls may also
have these additional features.
E142613
Press to go to the home screen.
E142608
Press to go to the information
screen.
See MyFord Touch® (page 315).
CRUISE CONTROL
E142437
See Cruise Control (page 170).
INFORMATION DISPLAY
CONTROL
E130248
See Information Displays (page 84).
66
Steering Wheel

WINDSHIELD WIPERS
Note: Fully defrost the windshield before
switching on the windshield wipers.
Note: Make sure the windshield wipers are
switched off before entering a car wash.
Note: Clean the windshield and wiper
blades if they begin to leave streaks or
smears. If that doesn't resolve the issue,
install new wiper blades.
Note: Do not operate the wipers on a dry
windshield. This may scratch the glass,
damage the wiper blades or cause the wiper
motor to burn out. Always use the
windshield washers before wiping a dry
windshield.
E128444
A
C
D
B
Single wipeA
Intermittent wipeB
Normal wipeC
High speed wipeD
Intermittent Wipe
C
A
B
E128445
Short wipe intervalA
Intermittent wipeB
Long wipe intervalC
Use the rotary control to adjust the
intermittent wipe interval.
Speed Dependent Wipers
When your vehicle speed increases, the
interval between wipes will decrease.
AUTOWIPERS (IF EQUIPPED)
Note: Fully defrost the windshield before
switching on the windshield wipers.
Note: Make sure the windshield wipers are
switched off before entering a car wash.
Note: Clean the windshield and wiper
blades if they begin to leave streaks or
smears. If that doesn't resolve the issue,
install new wiper blades.
Note: If you switch autolamps on in
conjunction with autowipers, your low beam
headlamps will illuminate automatically
when the rain sensor activates the
windshield wipers continuously.
Note: Wet road conditions can cause
unexpected wiping or smearing.
67
Wipers and Washers

To reduce smearing we recommend the
following:
• Lower the sensitivity of the autowipers.
• Switch to normal or high speed wipe.
• Switch the autowipers off.
C
A
B
E128445
High sensitivityA
OnB
Low sensitivityC
The wipers will function when moisture is
detected on the windshield. The rain
sensor will continue to monitor the amount
of moisture on the windshield and adjust
the speed of the wipers automatically.
Use the rotary control to adjust the
sensitivity of the rain sensor. With low
sensitivity, the wipers will operate when
the sensor detects a large amount of
moisture on the windshield. With high
sensitivity, the wipers will operate when
the sensor detects a small amount of
moisture on the windshield.
Keep the outside of the windshield clean.
Sensor performance will be affected if the
area around the interior mirror is dirty. The
rain sensor is very sensitive and the wipers
may operate if dirt, mist or flies hit the
windshield.
WINDSHIELD WASHERS
Note: Do not operate the washers when
the washer reservoir is empty. This may
cause the washer pump to overheat.
E129188
The washers will spray for as long as you
pull the lever toward you. When you
release the lever, the wipers will operate
for a short time.
A wipe will occur a few seconds after
washing to clear any remaining washer
fluid.
68
Wipers and Washers

REAR WINDOW WIPER AND
WASHERS
Rear Window Wiper
E129193
A
B
Intermittent wipeA
Low speed wipeB
Press the button at the end of the lever to
change between off, intermittent and low
speed.
When you shift into R (Reverse), the rear
wiper will switch on to intermittent if the
front wipers are activated.
Rear Window Washer
E129194
The washer will spray for as long as you
push the lever away from you. When you
release the lever, the wiper will operate for
a short time.
69
Wipers and Washers

LIGHTING CONTROL
E142449
OffA
Parking lamps, instrument panel
lamps, license plate lamps and
tail lamps
B
HeadlampsC
High Beams
E130140
Push the lever forward to switch the high
beams on.
Push the lever forward again or pull the
lever toward you to switch the high beams
off.
Headlamp Flasher
E142450
Pull the lever toward you slightly and
release it to flash the headlamps.
AUTOLAMPS (IF EQUIPPED)
Note: It may be necessary to switch your
headlamps on manually in severe weather
conditions.
E142451
The headlamps will switch on and off
automatically in low light situations or
during inclement weather.
The headlamps will remain on for a period
of time after you switch the ignition off.
You can adjust the time delay using the
information display controls. See
Information Displays (page 84).
70
Lighting

Note: If you switch autolamps on in
conjunction with autowipers, low beam
headlamps will illuminate automatically
when the rain sensor activates the
windshield wipers continuously.
INSTRUMENT LIGHTING
DIMMER
Note: If you disconnect the battery or it
becomes discharged, the illuminated
components will switch to the maximum
setting.
Vehicles With Front Fog Lamps
E132712
Press repeatedly or press and hold until
the desired level is reached.
Vehicles Without Front Fog Lamps
A
B
A
E142452
Press repeatedly or press and
hold to dim.
A
Press repeatedly or press and
hold to brighten.
B
HEADLAMP EXIT DELAY
After you switch the ignition off, you can
switch the headlamps on by pulling the
direction indicator lever toward you. You
will hear a short tone. The headlamps will
switch off automatically after three
minutes with any door open or 30 seconds
after the last door has been closed. You
can cancel this feature by pulling the
direction indicator toward you again or
switching the ignition on.
DAYTIME RUNNING LAMPS (IF
EQUIPPED)
WARNING
Always remember to switch your
headlamps on in low light situations
or during inclement weather. The
system does not activate the tail lamps
and may not provide adequate lighting
during these conditions. Failure to activate
your headlamps under these conditions
may result in a collision.
71
Lighting

If equipped with halogen headlamps, the
system switches the low beam headlamps
on at a reduced intensity in day light
conditions.
If equipped with high intensity discharge
(HID) headlamps, the system switches the
fog lamps on in day light conditions.
To switch the system on, switch the
ignition on, and switch the lighting control
to the off, autolamp, or parking lamp
position.
FRONT FOG LAMPS
E142453
Press the control to switch the fog lamps
on or off.
You can switch the fog lamps on when the
lighting control is in any position except off
and the high beams are not on.
DIRECTION INDICATORS
E130141
Push the lever up or down to use the
direction indicators.
Note: Tap the lever up or down to make the
direction indicators flash three times to
indicate a lane change.
INTERIOR LAMPS
The lamps will switch on when one of the
following conditions have been met:
• You open any door.
• You press a remote control button.
• You press switch B on the front interior
lamp.
Front Interior Lamp
Note: Press A to switch them off when you
open a door. The indicator lamp will
illuminate yellow. Press A again to switch
them back on. The indicator lamp will
illuminate blue.
72
Lighting

B
C
A
E142454
Door function switch.A
All lamps on and off switch.B
Individual lamp on and off
switch.
C
Rear Interior Lamp (If Equipped)
A
E142455
You can switch individual map lamps on
independently by pressing switch A.
AMBIENT LIGHTING (IF EQUIPPED)
The ambient lighting system illuminates
the interior with a choice of several colors.
The ambient lighting control is located in
the overhead console.
A
B
C
E142456
Color paletteA
Control knobB
Search modeC
Rotate B past the first detent to switch on
and adjust to the desired brightness.
Press A to cycle through the color choices.
Press C to switch on all interior lamps and
the ambient lighting. Press C again to
switch off the interior lamps and return the
ambient lighting to the previously selected
color.
The ambient lighting will switch on when
the following conditions have been met:
• you switch the ignition on
• you switch the headlamps on
• the outside ambient light level is low.
The ambient lighting will remain on until
you switch the ignition off and one of the
following conditions have been met:
• you lock your vehicle
• the accessory delay timer expires.
73
Lighting

POWER WINDOWS
WARNINGS
Do not leave children unattended in
the vehicle and do not let them play
with the power windows. They may
seriously injure themselves.
When closing the power windows,
you should verify they are free of
obstructions and make sure that
children and pets are not in the proximity
of the window openings.
E70848
Note: You may hear a rumbling noise when
just one of the windows are open. Lower the
opposite window slightly to reduce this
noise.
Press the switch to open the window.
Lift the switch to close the window.
One-Touch Down (If Equipped)
Press the switch fully and release it. Press
or lift it again to stop the window.
One-Touch Up (If Equipped)
Lift the switch fully and release it. Press or
lift it again to stop the window.
Window Lock
E70850
Press the control to lock or unlock the rear
window controls. It will illuminate when
the rear window controls are locked.
Bounce-Back (If Equipped)
The window will stop automatically while
closing. It will reverse some distance if
there is an obstacle in the way.
Overriding the Bounce-Back Feature
Proceed as follows to override this
protection feature when there is a
resistance, e.g. in winter:
1. Close the window twice until it reaches
the point of resistance and let it
reverse.
2. Close the window a third time to the
point of resistance. The bounce-back
feature is now disabled and you can
close the window manually. The
window will go past the point of
resistance and you can close it fully.
Contact your authorized dealer as soon as
possible if the window does not close after
the third attempt.
74
Windows and Mirrors

Resetting the Bounce-Back Feature
WARNING
The bounce-back function remains
deactivated until you have reset the
memory.
If you have disconnected the battery, you
must reset the bounce-back memory
separately for each window.
1. Lift and hold the switch until the
window is fully closed.
2. Release the switch.
3. Lift the switch again for one more
second.
4. Press and hold the switch until the
window is fully open.
5. Release the switch.
6. Lift and hold the switch until the
window is fully closed.
7. Open the window and then try to close
it automatically.
8. Reset and repeat the procedure if the
window does not close automatically.
Accessory Delay (If Equipped)
You can use the window switches for
several minutes after you have switched
the ignition off or until either front door is
opened.
EXTERIOR MIRRORS
Power Exterior Mirrors
WARNING
Do not adjust the mirrors when your
vehicle is moving.
A
C
B
E70846
Left-hand mirrorA
OffB
Right-hand mirrorC
E70847
Press the arrows to adjust the mirror.
Fold-Away Exterior Mirrors
Push the mirror toward the door window
glass. Make sure that you fully engage the
mirror in its support when returning it to its
original position.
Heated Exterior Mirrors (If Equipped)
See Heated Windows and Mirrors (page
119).
Memory Mirrors (If Equipped)
You can save and recall the mirror
positions through the memory function.
See Memory Function (page 125).
75
Windows and Mirrors

Integrated Blind Spot Mirrors (If
Equipped)
WARNING
Objects in the blind spot mirror are
closer than they appear.
Blind spot mirrors have an integrated
convex mirror built into the upper outboard
corner of the exterior mirrors. They are
designed to increase your visibility along
the side of your vehicle.
Check the main mirror first before a lane
change, then check the blind spot mirror.
If no vehicles are present in the blind spot
mirror and the traffic in the adjacent lane
is at a safe distance, signal that you intend
to change lanes. Glance over your shoulder
to verify traffic is clear and carefully
change lanes.
A
B
C
E138665
The image of the approaching vehicle is
small and near the inboard edge of the
main mirror when it is at a distance. The
image becomes larger and begins to move
outboard across the main mirror as the
vehicle approaches (A). The image will
transition from the main mirror and begin
to appear in the blind spot mirror as the
vehicle approaches (B). The vehicle will
transition to your peripheral field of view
as it leaves the blind spot mirror (C).
Blind Spot Monitor (If Equipped)
See Blind Spot Monitor (page 171).
INTERIOR MIRROR
WARNING
Do not adjust the mirror when your
vehicle is moving.
Note: Do not clean the housing or glass of
any mirror with harsh abrasives, fuel or other
petroleum or ammonia-based cleaning
products.
You can adjust the interior mirror to your
preference. Some mirrors also have a
second pivot point. This lets you move the
mirror head up or down and from side to
side.
Pull the tab below the mirror toward you
to reduce glare at night.
Auto-Dimming Mirror (If Equipped)
Note: Do not block the sensors on the front
and back of the mirror. Mirror performance
may be affected. A rear center passenger or
raised rear center head restraint may also
block light from reaching the sensor.
76
Windows and Mirrors

The mirror will dim automatically to reduce
glare when bright lights are detected from
behind your vehicle. It will automatically
return to normal reflection when you select
reverse gear to make sure you have a clear
view when backing up.
SUN VISORS
E138666
Rotate the sun visor toward the side
window and extend it rearward for extra
shade.
Illuminated Vanity Mirror (If Equipped)
E138667
Lift the cover to switch the lamp on.
MOONROOF (IF EQUIPPED)
WARNINGS
Do not let children play with the
moonroof or leave them unattended
in the vehicle. They may seriously
hurt themselves.
WARNINGS
When closing the moonroof, you
should verify that it is free of
obstructions and make sure that
children and pets are not in the proximity
of the roof opening.
The moonroof and sunscreen controls are
located on the overhead console.
The moonroof and sunscreen have a
one-touch open and close feature. To stop
them during one-touch operation, press
the control a second time.
Opening and Closing the
Sunscreen
E138668
Press and release the rear of the control
to open the sunscreen.
Press and release the front of the control
to close the sunscreen. If it is open, the
moonroof will automatically close before
the sunscreen closes.
Opening and Closing the Moonroof
E138669
77
Windows and Mirrors

Press and release the rear of the control
to open the moonroof. If it is closed, the
sunscreen will automatically open before
the moonroof opens. The moonroof will
stop short of the fully opened position.
Note: This position helps to reduce wind
noise or rumbling which may happen with
the moonroof fully open. Press and hold the
control again to fully open the moonroof.
Press and release the front of the control
to close the moonroof.
Bounce-Back
The moonroof will stop automatically
while closing. It will reverse some distance
if there is an obstacle in the way.
Press and hold the front of the control
within two seconds of a bounce-back
event to override this function. While
bounce-back is active, the closing force
increases for each of the next three times
that you close the moonroof.
Venting the Moonroof
Press and release the front of the control
to vent the moonroof. Press and release
the rear of the control to close the
moonroof.
78
Windows and Mirrors

GAUGES
E145825
Information displayA
SpeedometerB
Engine coolant temperature gaugeC
Fuel gaugeD
TachometerE
Information Display
Compass (If Equipped)
Displays the vehicle’s heading direction.
To calibrate and set the compass zone use
the information display menu. See
Information Displays (page 84).
Use the diagram to determine your
magnetic zone.
79
Instrument Cluster

123
4
5
6 7 8 91011
12
13
14
15
E142800
Odometer
Located in the bottom of the information
display Registers the accumulated
distance your vehicle has traveled.
Outside Air Temperature
Shows the outside air temperature.
Trip Computer
See Trip Computer (page 86).
Vehicle Settings and Personalization
See General Information (page 84).
Engine Coolant Temperature
Gauge
WARNING
Never remove the coolant reservoir
cap while the engine is running or hot.
At normal operating temperature, the
needle will remain in the center section.
Note: Do not restart the engine until the
cause of overheating has been resolved.
If the needle enters the red section, the
engine is overheating. Stop the engine,
switch the ignition off and determine the
cause once the engine has cooled down.
See Engine Coolant Check (page 222).
Fuel Gauge
Switch the ignition on. The fuel gauge will
indicate approximately how much fuel is
left in the fuel tank. The fuel gauge may
vary slightly when your vehicle is moving
or on a gradient. The arrow adjacent to the
fuel pump symbol indicates on which side
of the vehicle the fuel filler door is located.
WARNING LAMPS AND
INDICATORS
The following warning lamps and
indicators will alert you to a vehicle
condition that may become serious. Some
lamps will illuminate when you start your
vehicle to make sure they work. If any
lamps remain on after starting your vehicle,
refer to the respective system warning
lamp for further information.
Note: Some warning indicators appear in
the information display and function the
same as a warning lamp but do not display
when you start your vehicle.
Airbag - Front
If it fails to illuminate when you
start your vehicle, continues to
flash or remains on, it indicates
a malfunction. Have the system checked
by your authorized dealer.
Anti-Lock Braking System
If it illuminates when you are
driving, this indicates a
malfunction. You will continue
to have the normal braking system
(without ABS) unless the brake system
warning lamp is also illuminated. Have the
system checked by your authorized dealer.
80
Instrument Cluster

Battery
If it illuminates while driving, it
indicates a malfunction. Switch
off all unnecessary electrical
equipment and have the system checked
by your authorized dealer immediately.
Blind Spot Monitor (If Equipped)
E124823
It will illuminate when you switch
this feature off or in conjunction
with a message. See Blind Spot
Monitor (page 171). See Information
Messages (page 87).
Brake System
E138644
It will illuminate when you
engage the parking brake with
the ignition on.
If it illuminates when you are driving, check
that the parking brake is not engaged. If
the parking brake is not engaged, this
indicates low brake fluid level or a brake
system malfunction. Have the system
checked immediately by your authorized
dealer.
WARNING
Driving your vehicle with the warning
lamp on is dangerous. A significant
decrease in braking performance
may occur. It will take you longer to stop
your vehicle. Have your vehicle checked by
your authorized dealer immediately. Driving
extended distances with the parking brake
engaged can cause brake failure and the
risk of personal injury.
Cruise Control (If Equipped)
E71340
It will illuminate when you switch
this feature on. See Using
Cruise Control (page 170).
Direction Indicator
Illuminates when the left or right
turn signal or the hazard warning
flasher is turned on. If the
indicators stay on or flash faster, check for
a burned out bulb. See Changing a Bulb
(page 231).
Engine Oil
If it illuminates with the engine
running or when you are driving,
this indicates a malfunction.
Stop your vehicle as soon as it is safe to
do so and switch the engine off. Check the
engine oil level. See Engine Oil Check
(page 221).
Note: Do not resume your journey if it
illuminates despite the level being correct.
Have the system checked by your authorized
dealer immediately.
Fasten Safety Belt
It will illuminate and a chime will
sound to remind you to fasten
your safety belt. See Safety
Belt Minder (page 31).
Fog Lamps - Front (If Equipped)
It will illuminate when you switch
the front fog lamps on.
High Beam
It will illuminate when you switch
the high beam headlamps on. It
will flash when you use the
headlamp flasher.
81
Instrument Cluster

Information (If Equipped)
It will illuminate when a new
message is stored in the
information display. It will be red
or amber in color depending on the severity
of the message and will remain on until the
cause of the message has been rectified.
See Information Messages (page 87).
Low Fuel Level
It will illuminate when the fuel
level is low or the fuel tank is
nearly empty. Refuel as soon as
possible.
Low Tire Pressure Warning
It will illuminate when your tire
pressure is low. If the lamp
remains on with the engine
running or when driving, check
your tire pressure as soon as possible.
It will also illuminate momentarily when
you switch the ignition on to confirm the
lamp is functional. If it does not illuminate
when you switch the ignition on, or begins
to flash at any time, have the system
checked by your authorized dealer.
Parking Lamps
It will illuminate when you switch
the parking lamps on.
Service Engine Soon
If the service engine soon
indicator light stays illuminated
after the engine is started, it
indicates that the On Board Diagnostics
system (OBD) has detected a malfunction
of the vehicle emissions control system.
Refer to On board diagnostics (OBD) in
the Fuel and Refueling chapter for more
information about having your vehicle
serviced. See Emission Control System
(page 143).
If the light is blinking, engine misfire is
occurring which could damage your
catalytic converter. Drive in a moderate
fashion (avoid heavy acceleration and
deceleration) and have your vehicle
serviced immediately.
Note: Under engine misfire conditions,
excessive exhaust temperatures could
damage the catalytic converter or other
vehicle components.
The service engine soon indicator light
illuminates when the ignition is first turned
on prior to engine start to check the bulb
and to indicate whether the vehicle is ready
for Inspection/Maintenance (I/M) testing.
Normally, the service engine soon light will
stay on until the engine is cranked, then
turn itself off if no malfunctions are
present. However, if after 15 seconds the
service engine soon light blinks eight times,
it means that the vehicle is not ready for
I/M testing. See Emission Control
System (page 143).
82
Instrument Cluster

Stability Control
It will flash when the system is
active. If it remains illuminated
or does not illuminate when you
switch the ignition on, this indicates a
malfunction. During a malfunction the
system will switch off. Have the system
checked by your authorized dealer
immediately.
Stability Control Off
It will illuminate when you switch
the system off. It will go out
when you switch the system
back on or when you switch the ignition
off.
AUDIBLE WARNINGS AND
INDICATORS
Key in Ignition Warning Chime
Sounds when you open the driver's door
and you have left the key in the ignition
with it in the off or accessory position.
Headlamps On Warning Chime
Sounds when you remove the key from the
ignition and open the driver's door and you
have left the headlamps or parking lamps
on.
Parking Brake On Warning Chime
Sounds when you have left the parking
brake on and drive your vehicle. If the
warning chime remains on after you have
released the parking brake, have the
system checked by your authorized dealer
immediately.
83
Instrument Cluster

GENERAL INFORMATION
WARNING
Driving while distracted can result in
loss of vehicle control, accident and
injury. Ford strongly recommends
that drivers use extreme caution when
using any device or feature that may take
their focus off the road. Your primary
responsibility is the safe operation of the
vehicle. We recommend against the use
of any handheld device while driving and
that you comply with all applicable laws.
Various systems on your vehicle can be
controlled using the information display
controls on the steering wheel.
Corresponding information is displayed in
the information display.
Information Display Controls
E138659
• Press the up and down arrow buttons
to scroll through and highlight the
options within a menu.
• Press the right arrow button to enter a
sub-menu.
• Press the left arrow button to exit a
menu.
• Press and hold the left arrow button at
any time to return to the main menu
display (escape button).
• Press the OK button to choose and
confirm settings or messages.
Menu Structure - Information
Display
All Vehicles
You can access the menu using the
information display control.
Note: Some options may appear slightly
different or not at all if the items are
optional.
Trip 1 and 2
1
Distance to E
Trip 1 or 2
Trip timer
AnticipationFord EcoModeAverage fuel
84
Information Displays

Trip 1 and 2
1
Speed
Ford EcoMode
2
1
See Trip Computer (page 86).
2
See Eco Mode (page 175).
Information
Intelligent 4WD
MyKey Dist.
MyKey Info
Settings
On or OffTraction CtrlDriver Assist
On or OffBlind spot
On or OffCross traffic alert
On or OffHill Start Assist
On or OffRear Park Aid
On or OffRain LightLighting
Auto or ManualDimming
Off or xx SecondsAutolamp delay
Always off, On guidance or Always onNavigation infoDisplay
Choose your applicable settingLanguage
Choose your applicable settingDistance
Choose your applicable settingTemperature
Park Slot Information WarningChimes
On or OffDisplayCompass
(non–navigation
systems only)
Convenience
Zone (1–15)Set Zone
85
Information Displays

Settings
Hold OK to CalibrateCalibrate
Heater – A/C / Auto or
Last Settings
Climate ControlRemote Start
Front Defrost / Automatic
or Off
Rear Defrost / Automatic
or Off
(5, 10 or 15 minutes)Duration
On/OffQuiet Start
Restore Default
Enable or DisableSystem
Hold OK to Create MyKeyCreate MyKeyMyKey
Always On or User SelectableTraction Ctrl
80 MPH (130 km/h) or OffMax Speed
45 mph (75 km/h), 55 mph (90 km/h), 65 mph
(105 km/h) or Off
Speed Warning
On or OffVolume Limiter
Hold OK to Clear All MyKeysClear MyKeys
Hold OK to Reset System to Factory DefaultSystem Reset
System Check
All active warnings will display first if
applicable. The system check menu may
appear different based upon equipment
options and current vehicle status. Use the
up/down arrow buttons to scroll through
the list.
TRIP COMPUTER
Resetting the Trip Computer
Press and hold OK on the current screen
to reset the respective trip, distance, time
and average fuel information.
Trip Odometer
Registers the distance traveled of
individual journeys.
Trip Timer
Registers the time of individual journeys.
86
Information Displays

Fuel Used
Indicates the approximate distance the
vehicle will travel on the fuel remaining in
the tank. Changes in driving pattern may
cause the value to vary.
Average Fuel
Indicates the average fuel consumption
since the function was last reset.
All Value
Indicates all the respective trip, distance,
time and average fuel information.
INFORMATION MESSAGES
Note: Depending on the vehicle options
equipped with your vehicle, not all of the
messages will display or be available.
Certain messages may be abbreviated or
shortened depending upon which cluster
type you have.
E130248
Press the OK button to acknowledge and
remove some messages from the
information display. Other messages will
be removed automatically after a short
time.
Certain messages need to be confirmed
before you can access the menus.
Message indicator (If Equipped)
The message indicator
illuminates to supplement some
messages. It will be red or amber
depending on the severity of the message
and will remain on until the cause of the
message has been rectified.
Some messages will be supplemented by
a system specific symbol with a message
indicator.
Airbag
ActionMessage
Indicator
Message
Displays when the system requires service due
to a malfunction. Contact your authorized
dealer.
AmberAirbag fault Service now
87
Information Displays

Alarm
ActionMessage
Indicator
Message
Displays when the alarm has been triggered
due to unauthorized entry. See Anti-Theft
Alarm (page 63).
AmberAlarm activated Check
Vehicle
Displays when the system requires service due
to a malfunction. Contact your authorized
dealer.
-Alarm fault Service
required
Battery and Charging System
ActionMessage
Indicator
Message
Stop your vehicle as soon as it is safe to do so
and switch off the ignition. Contact your
authorized dealer.
RedElectrical system over-
voltage Stop safely
Displays to warn of a low battery condition.
Turn off all unneeded electrical accessories.
Contact your authorized dealer.
AmberBattery low See manual
Blind Spot Information and Cross Traffic Alert System
ActionMessage
Indicator
Message
Displayed when the blind spot information
system and cross traffic alert system sensors
are blocked. See Blind Spot Monitor (page
171).
AmberBLIS Low visibility See
manual
Displayed when a fault with the system has
occurred. Contact your authorized dealer as
soon as possible.
AmberBLIS: X sensor fault
Service required
Displayed when the system is not available due
to trailer use. See Blind Spot Monitor (page
171).
AmberBLIS not available Trailer
attached
Displayed when the system detects a vehicle.
See Blind Spot Monitor (page 171).
AmberCross Traffic Vehicle
coming from X
88
Information Displays

ActionMessage
Indicator
Message
Displayed when the blind spot information
system and cross traffic alert system sensors
are blocked. See Blind Spot Monitor (page
171).
AmberCross Traffic Sensor
blocked See manual
Displays when the system requires service due
to a malfunction. Contact your authorized
dealer.
AmberCross Traffic fault
Service required
Displayed when the system is not available due
to trailer use. See Blind Spot Monitor (page
171).
-Cross Traffic disabled
Trailer attached
Doors
ActionMessage
Indicator
Message
Displays when the door(s) listed is not
completely closed and the vehicle is moving.
RedX door open
Displays when the door(s) listed is not
completely closed.
-
Displays when the luggage compartment is not
completely closed and the vehicle is moving.
Redtrunk ajar
Displays when the luggage compartment is not
completely closed.
-
Displays when the hood is not completely
closed and the vehicle is moving.
RedHood open
Displays when the hood is not completely
closed.
-
89
Information Displays

Engine
ActionMessage
Indicator
Message
Engine service is required. Contact your
authorized dealer.
AmberEngine fault Service now
Displays when the engine temperature is too
high. Stop the vehicle in a safe place and allow
to engine to cool. If the problem persists,
contact your authorized dealer. See Engine
Coolant Check (page 222).
RedHigh engine temperature
Stop safely
Hill Start Assist
ActionMessage
Indicator
Message
Displays when hill start assist is not available.
Contact your authorized dealer. See Hill Start
Assist (page 149).
AmberHill start assist not avail-
able
Keyless Vehicle
ActionMessage
Indicator
Message
Displays to remind you that the key is in the
trunk. See Keyless Starting (page 135).
AmberFord KeyFree Key inside
vehicle
Displayed if the key is not detected by the
system. See Keyless Starting (page 135).
-Ford KeyFree No key
detected
Displayed as a reminder to turn off the vehicle.
See Keyless Starting (page 135).
RedSwitch ign. off Press
ENGINE Start/Stop
button
90
Information Displays

ActionMessage
Indicator
Message
Displayed as a reminder to press the brake
while starting the vehicle.
-Press brake to start
Displayed when a valid key is not detected
within the vehicle. See Keyless Starting (page
135).
RedFord KeyFree Key not
inside car
Displays when the key battery is low. Change
the battery as soon as possible. See Remote
Control (page 44).
-Key Battery low Replace
soon
Lighting
ActionMessage
Indicator
Message
Displays when the brake lamp bulb has burned
out. Contact your authorized dealer.
-Brake lamp Bulb fault
Displays when the low beam headlamp bulb
has burned out. Contact your authorized dealer.
-Low beam Bulb fault
Displays when an electrical system problem
occurs with the headlamp system. Contact your
authorized dealer.
AmberHeadlamp fault Service
required
91
Information Displays

Maintenance
ActionMessage
Indicator
Message
Displays when the engine oil life is depleted and
requires a change. See Engine Oil Check (page
221).
-Engine oil change due
Indicates the brake fluid level is low and the
brake system should be inspected immediately.
See Brake Fluid Check (page 225).
RedBrake fluid level low
Service now
Displays when the washer fluid is low and needs
to be refilled. See Washer Fluid Check (page
225).
-Washer fluid level low
Displays when the fuel fill inlet was not properly
closed. See Refueling (page 142).
-Check fuel fill inlet
MyKey
ActionMessage
Indicator
Message
Displays when MyKey is active.-MyKey active Drive
Safely
Displays when starting the vehicle and MyKey
is in use and the MyKey speed limit is on.
-MyKey Speed Limited to
XX MPH/km/h
Displays when a MyKey is in use and the MyKey
speed limit is on and the vehicle speed is
approaching 80 mph (130 km/h).
AmberMyKey Vehicle Near Top
Speed
Displays when a MyKey is in use and the MyKey
speed limit is reached.
AmberMyKey Vehicle at Top
Speed
Displays when MyKey is active.-MyKey Check Speed
Drive Safely
Displays when a MyKey is in use and Belt-
Minder is activated.
-MyKey Buckle Up to
Unmute Audio
Displays when a MyKey is in use and park aid is
activated.
-MyKey Park aid cannot
be deactivated
92
Information Displays

ActionMessage
Indicator
Message
Displays when trying to create a MyKey with a
key already designated as a MyKey.
-Key is Already a MyKey
Displays when programming a MyKey.-Hold key next to symbol
on steering column
Displays when programming a MyKey.-MyKey ESC cannot be
deactivated
Park Aid
ActionMessage
Indicator
Message
Displays when the system has detected a
condition that requires service. Contact your
authorized dealer. See Parking Aid (page 161).
AmberParking aid malfunction
Service required
Park Brake
ActionMessage
Indicator
Message
Displays when the parking brake is set, the
engine is running and the vehicle is driven more
than 3 mph (5 km/h). If the warning stays on
after the parking brake is released, contact your
authorized dealer.
RedPark brake applied
93
Information Displays

Power Steering
ActionMessage
Indicator
Message
The power steering system is not working. Stop
the vehicle a safe place. Contact your author-
ized dealer.
RedSteering loss Stop safely
The power steering system is not working. Stop
the vehicle a safe place. Contact your author-
ized dealer.
AmberSteering assist fault
Service required
The power steering system has detected a
condition within the power steering system or
passive entry or passive start system requires
service. Contact your authorized dealer.
AmberSteering fault Service
now
Starting System
ActionMessage
Indicator
Message
Displays when starting the vehicle as a reminder
to apply the brake.
-Press brake to start
Displays when the vehicle fails to start.-Cranking time exceeded
Transmission and Four-Wheel Drive
ActionMessage
Indicator
Message
See your authorized dealer.-Transmission fault
Service now
The transmission is overheating and needs to
cool. Stop in a safe place as soon as it’s
possible.
AmberTransmission overtem-
perature Stop safely
See your authorized dealer.AmberTransmission Service
required
Transmission is getting hot. Stop to let it cool
or speed up.
-Transmission Hot Stop
or Speed Up
94
Information Displays

ActionMessage
Indicator
Message
Transmission is hot. Wait as needed to let it
cool.
-Transmission Hot Wait
...
The system is not functioning correctly and
defaulted to front-wheel drive. See your
authorized dealer. See Using Four-Wheel
Drive (page 151).
Amber4WD fault Service
required
Displays when the system disables automatic-
ally and enters front-wheel drive only mode to
protect driveline components. See Using Four-
Wheel Drive (page 151).
Amber4WD Off
The system has overheated and defaulted to
front-wheel drive. See Using Four-Wheel
Drive (page 151).
Amber4WD temporarily
disabled
Displays when system operation has been
restored. See Using Four-Wheel Drive (page
151).
-4WD restored
Displays as a reminder to shift into park.-Transmission not in Park
Select P
Displays to request the operator to apply the
brake as needed by the transmission.
-Press brake to unlock
gearshift lever
Displays when the transmission shift lever is
unlocked and free to select gears.
-Gearshift lever unlocked
95
Information Displays

Tire Pressure Monitoring System
ActionMessage
Indicator
Message
Displays when one or more tires on your vehicle
have low tire pressure. See Tire Pressure
Monitoring System (page 257).
AmberLow Tire Pressure
Displays when the tire pressure monitoring
system is malfunctioning. If the warning stays
on or continues to come on, contact your
authorized dealer. See Tire Pressure Monit-
oring System (page 257).
AmberTire Pressure Monitor
Fault
Displayed when a tire pressure sensor is
malfunctioning, or your spare tire is in use. For
more information on how the system operates
under these conditions, see See Tire Pressure
Monitoring System (page 257). If the warning
stays on or continues to come on, contact your
authorized dealer as soon as possible.
AmberTire Pressure Sensor
Fault
Traction Control
ActionMessage
Indicator
Message
Displays when the traction control system has
been switched off. See Using Traction
Control (page 158).
-Traction control off
96
Information Displays

GENERAL INFORMATION
Radio Frequencies and Reception
Factors
AM and FM frequencies are established by
the Federal Communications Commission
(FCC) and the Canadian Radio and
Telecommunications Commission (CRTC).
Those frequencies are:
• AM: 530, 540-1700, 1710 kHz
• FM: 87.9-107.7, 107.9 MHz
Radio Reception Factors
The further you travel from an FM station, the weaker the
signal and the weaker the reception.
Distance/Strength
Hills, mountains, tall buildings, bridges, tunnels, freeway
overpasses, parking garages, dense tree foliage and
thunderstorms can interfere with your reception.
Terrain
When you pass a ground-based broadcast repeating
tower, a stronger signal may overtake a weaker one and
result the audio system muting.
Station overload
CD and CD Player Information
Note: CD units are designed to play
commercially-pressed 4.75 inch (12
centimeter) audio compact discs only. Due
to technical incompatibility, certain
recordable and re-recordable compact discs
may not function correctly when used in
Ford CD players.
Note: CDs with homemade paper
(adhesive) labels should not be inserted
into the CD player as the label may peel and
cause the CD to become jammed. It is
recommended that homemade CDs be
identified with permanent felt tip marker
rather than adhesive labels. Ballpoint pens
may damage CDs. Please contact your
authorized dealer for further information.
Note: Do not use any irregularly shaped
discs or discs with a scratch protection film
attached.
Always handle discs by their edges only.
Clean the disc with an approved CD
cleaner only, wiping from the center of the
disc toward the edge. Do not clean in a
circular motion.
Do not expose discs to direct sunlight or
heat sources for extended periods of time.
MP3 Track and Folder Structure
Audio systems capable of recognizing and
playing MP3 individual tracks and folder
structures work as follows:
• There are two different modes for MP3
disc playback: MP3 track mode
(system default) and MP3 folder
mode.
• MP3 track mode ignores any folder
structure on the MP3 disc. The player
numbers each MP3 track on the disc
(noted by the .mp3 file extension) from
T001 to a maximum of T255. The
maximum number of playable MP3
files may be less depending on the
structure of the CD and exact model
of radio present.
97
Audio System

• MP3 folder mode represents a folder
structure consisting of one level of
folders. The CD player numbers all MP3
tracks on the disc (noted by the .mp3
file extension) and all folders
containing MP3 files, from F001
(folder) T001 (track) to F253 T255.
• Creating discs with only one level of
folders helps with navigation through
the disc files.
If you are burning your own MP3 discs, it is
important to understand how the system
reads the structures you create. While
various files may be present, (files with
extensions other than mp3), only files with
the .mp3 extension are played; other files
are ignored by the system. This enables
you to use the same MP3 disc for a variety
of tasks on your work computer, home
computer and your in-vehicle system.
In track mode, the system displays and
plays the structure as if it were only one
level deep (all .mp3 files are played,
regardless of being in a specific folder). In
folder mode, the system only plays the
.mp3 files in the current folder.
AUDIO UNIT - VEHICLES WITH:
AM/FM/CD
WARNING
Driving while distracted can result in
loss of vehicle control, accident and
injury. Ford strongly recommends
that you use extreme caution when using
any device or feature that may take your
focus off the road. Your primary
responsibility is the safe operation of the
vehicle. We recommend against the use
of any handheld device while driving,
encourage the use of voice-operated
systems when possible and that you
become aware of applicable state and
local laws that may affect use of electronic
devices while driving.
98
Audio System

E142600
Eject: Press to eject a CD.A
Cursor arrows: Press to scroll through on-screen choices.B
CD slot: Insert a CD.C
OK: Press to confirm on-screen selections.D
Clock: Press to set the time. Use the H and M buttons outside the audio display
to adjust the hours and minutes. Press OK to finish. (The clock can also be set
by pressing MENU, then scrolling to the clock settings menu.)
E
INFO: Press to access radio or CD information.F
Number block: Press a button to store your favorite radio stations. When tuned
to a station, press and hold the button until sound returns.
G
Seek: Press to go to the next station up the radio frequency band or the next
track on a CD.
H
ON/OFF: Press to switch the audio system on or off by pressing the button.
Turn to adjust the volume.
I
Seek: Press to go to the next station down the radio frequency band or the
previous track on a CD.
J
99
Audio System

MENU: Press to access different audio system features. See Menu Structure
later in this chapter.
K
SOUND: Press to adjust the sound settings for Bass, Treble, Balance and Fade.L
AUX: Press to access the media features of the SYNC® system by pressing
MENU, then AUX. See SYNC® (page 279).
M
RADIO: Press to access different radio features by pressing RADIO, then MENU.
See Menu Structure later in this chapter.
N
CD: Press to access different CD features by pressing CD, then MENU. See
Menu Structure later in this chapter.
O
AUDIO UNIT - VEHICLES WITH:
AM/FM/CD/SYNC
WARNING
Driving while distracted can result in
loss of vehicle control, accident and
injury. Ford strongly recommends
that you use extreme caution when using
any device or feature that may take your
focus off the road. Your primary
responsibility is the safe operation of the
vehicle. We recommend against the use
of any handheld device while driving,
encourage the use of voice-operated
systems when possible and that you
become aware of applicable state and
local laws that may affect use of electronic
devices while driving.
100
Audio System

E142601
Eject: Press to eject a CD.A
Cursor arrows: Press to scroll through on-screen choices.B
CD slot: Insert a CD.C
OK: Press to confirms on-screen selections.D
Clock: Press to set the time. Use the H and M buttons outside the audio display
to adjust the hours and minutes. Press OK to finish. (The clock can also be set
by pressing MENU, then scrolling to the clock settings menu.)
E
INFO: Press to access radio or CD information.F
SOUND: Press to adjust the sound settings for Bass, Treble, Balance and Fade.G
Number block: Press to store your favorite radio stations, when in radio mode.
When tuned to a station, press and hold a button until sound returns. When in
CD mode, press a button to select a track. In phone mode, use the buttons to
dial a phone number.
H
Function button 4: Press to select different functions of the audio system
depending on which mode (i.e. radio or CD) you are in.
I
Function button 3: Press to select different functions of the audio system
depending on which mode (i.e. radio or CD) you are in.
J
101
Audio System

Seek: Press to go to the next station up the radio frequency band or the next
track on a CD.
K
ON/OFF: Press to switch the audio system on or off by pressing the button.
Turn the dial to adjust the volume.
L
Seek: Press to go to the next station down the radio frequency band or the
previous track on a CD.
M
Function button 2: Press to select different functions of the audio system
depending on which mode (i.e. radio or CD) you are in.
N
Function button 1: Press to select different functions of the audio system
depending on which mode (i.e. radio or CD) you are in.
O
MENU: Press to access different audio system features. See Menu Structure
later in this chapter.
P
PHONE: Press to access the phone features of the SYNC® system by pressing
MENU, then PHONE. See SYNC® (page 279).
Q
AUX: Press to access the media features of the SYNC® system by pressing
MENU, then AUX. See SYNC® (page 279).
R
RADIO: Press to access different radio features by pressing RADIO, then MENU.
See Menu Structure later in this chapter.
S
CD: Press to access different CD features by pressing CD, then MENU. See
Menu Structure later in this chapter.
T
AUDIO UNIT - VEHICLES WITH:
AM/FM/CD/SATELLITE
RADIO/SYNC
WARNING
Driving while distracted can result in
loss of vehicle control, accident and
injury. Ford strongly recommends
that you use extreme caution when using
any device or feature that may take your
focus off the road. Your primary
responsibility is the safe operation of the
vehicle. We recommend against the use
of any handheld device while driving,
encourage the use of voice-operated
systems when possible and that you
become aware of applicable state and
local laws that may affect use of electronic
devices while driving.
Note: Your audio system can operate for
up to one hour after the ignition is turned
off. Press the ON/OFF control to operate
the system with the ignition turned off. The
system automatically turns off after one
hour.
Note: Some features such as SIRIUS
satellite radio may not be available in your
location. Check with your authorized dealer.
102
Audio System

E142602
Eject Press to eject a CD.A
Cursor arrows: Press to scroll through on-screen choices.B
CD slot: Insert a CD.C
OK: Press to confirm on-screen selections.D
INFO: Press to access radio or CD information.E
MENU: Press to access different audio system features. See Menu Structure
later in this chapter.
F
SOUND: Press to adjust the sound settings for Bass, Treble, Balance and Fade.G
Number block: Press a button to store your favorite radio stations, when in
radio mode. When tuned to a station, press and hold the button until sound
returns. When in CD mode, press a button to select a track. In phone mode, use
the buttons to dial a phone number. In clock mode, use the H and M buttons
outside the audio display to adjust the hours and minutes. Press OK to finish.
(The clock can also be set by pressing MENU, then scrolling to the clock settings
menu.)
H
Function button 4: Press to select different functions of the audio system
depending on which mode (i.e. radio or CD) you are in.
I
103
Audio System

Function button 3: Press to select different functions of the audio system
depending on which mode (i.e. radio or CD) you are in.
J
Seek: Press to go to the next station up the radio frequency band or the next
track on a CD.
K
ON/OFF: Press to switch the audio system on or off by pressing the button.
Turn to adjust the volume.
L
Seek: Press to go to the next station down the radio frequency band or the
previous track on a CD.
M
Function button 2: Press to select different functions of the audio system
depending on which mode (i.e. radio or CD) you are in.
N
Function button 1: Press to select different functions of the audio system
depending on which mode (i.e. radio or CD) you are in.
O
PHONE: Press to access the phone features of the SYNC® system by pressing
MENU, then PHONE. See SYNC® (page 279).
P
AUX: Press to access the media features of the SYNC® system by pressing
MENU, then AUX. See SYNC® (page 279).
Q
SIRIUS: Press to access different satellite radio features by pressing SIRIUS,
then MENU. See Menu Structure later in this chapter.
R
RADIO: Press to access different radio features by pressing RADIO, then MENU.
See Menu Structure later in this chapter.
S
CD: Press to access different CD features by pressing CD, then MENU. See
Menu Structure later in this chapter.
T
104
Audio System

AUDIO UNIT - VEHICLES WITH:
PREMIUM AM/FM/CD
WARNING
Driving while distracted can result in
loss of vehicle control, accident and
injury. Ford strongly recommends
that you use extreme caution when using
any device or feature that may take your
focus off the road. Your primary
responsibility is the safe operation of the
vehicle. We recommend against the use
of any handheld device while driving,
encourage the use of voice-operated
systems when possible and that you
become aware of applicable state and
local laws that may affect use of electronic
devices while driving.
Note: The CD slot is directly above the
touchscreen.
Note: Most of the audio features are
controlled through the MyFord Touch®
system. See MyFord Touch® (page 315).
E143843
- TUNE +: Press to search the frequency band in individual increments.A
ON/OFF and Volume: Press to switch the audio system on and off. Turn the
dial to adjust the volume.
B
Eject: Eject a CD.C
SEEK: Press to go to the next station up or down the radio frequency band or
the next or previous track on a CD.
D
105
Audio System

SOUND: Press to adjust the sound settings for Bass, Treble, Balance and Fade.E
SOURCE: Press to access different audio modes such as AM, FM and A/V Input.F
AUDIO UNIT - VEHICLES WITH:
SONY AM/FM/CD
WARNING
Driving while distracted can result in
loss of vehicle control, accident and
injury. Ford strongly recommends
that you use extreme caution when using
any device or feature that may take your
focus off the road. Your primary
responsibility is the safe operation of the
vehicle. We recommend against the use
of any handheld device while driving,
encourage the use of voice-operated
systems when possible and that you
become aware of applicable state and
local laws that may affect use of electronic
devices while driving.
Note: The CD slot is directly above the
touchscreen.
Note: Most of the audio features are
controlled through the MyFord Touch®
system. See MyFord Touch® (page 315).
E143844
On/Off: Press to switch the audio system on and off.A
SOURCE: Press to access different audio modes such as AM, FM and A/V Input.B
106
Audio System

Seek: Press to go to the next station up or down the radio frequency band or
the next or previous track on a CD.
C
- TUNE +: Press to search the frequency band in individual increments.D
Volume: Turn the dial to adjust the volume.E
SOUND: Press to adjust the sound settings for Bass, Treble, Balance and Fade.F
Eject: Press to eject a CD.G
Menu Structure
Note: Depending on your system, some
options may appear slightly different, not
at all or on-screen and able to be selected
using the function buttons.
Press MENU.
Press the up and down arrow buttons to
scroll through the options (if active).
Press the right arrow to enter a menu.
Press the left arrow to exit a menu.
Radio
Use the left and right arrows to go up or down the
frequency band.
Manual tune
Select for a brief sampling of all available channels.Scan
Select to store the six strongest local stations on the AM
and FM frequency bands.
Autostore
Select to have the system search by certain music
categories (rock, pop, country, etc).
PTY/Set category
Select to view additional broadcast data, if available. This
feature defaults to off. RBDS/RDS must be on for you to
set a category.
RBDS/RDS
SIRIUS
Select for a brief sampling of all available channels.Scan
Select to view your satellite radio electronic serial number
(ESN). You will need this number when communicating
with SIRIUS® to activate, modify or track your account.
Show ESN
Select to view available satellite radio channels. Press OK
to select Tune Channel, Skip Channel or Lock Channel.
Once a channel is skipped or locked, you can only access
it by pressing Direct and entering the channel number.
Locking or unlocking a channel requires your PIN.
Channel guide
107
Audio System

SIRIUS
Select to view channel categories (pop, rock, news, etc).
If you select a category, seek and scan functions will only
stop on channels in that category.
Set category
Select to enable/disable an alert for a song, artist or team.
The system alerts you when the selection is playing on
another channel. Save up to 20 alerts.
Alerts
Use your PIN to unlock previously locked stations.Unlock all stations
Use to restore any channels you previously skipped.Skip no stations
Select to create a PIN which allows you to lock or unlock
channels. Your initial PIN is 1234.
Parental lock (PIN)
Audio Settings
Automatically adjusts the volume to compensate for
speed and wind noise. You can set the system between
off and + 7.
SCV level
Allows you to adjust sound settings such as treble, bass,
middle, fade and balance.
Sound
Optimizes sound quality for the chosen seating position.Occupancy mode
Select to view channel categories (pop, rock, news, etc).
If you select a category, seek and scan functions will only
stop on channels in that category.
Set category
Select to view additional broadcast data, if available. This
feature defaults to off. RBDS/RDS must be on for you to
set a category.
RBDS/RDS
CD
Select to scan all disc selections.Scan all
Select to scan all music in the current MP3 folder.Scan folder
Select to bring soft and loud passages together for a more
consistent listening level.
CD compression
108
Audio System

Display Settings
Select to change display brightness.Dimming
Select to display the language in English, French or
Spanish.
Language
Select to display the outside temperature in Fahrenheit
or Celsius.
Temp setting
Clock Settings
Select to set the time.Set time
Select to set the calendar date.Set date
Select to view clock time in a 12-hour mode or 24-hour
mode.
12/24 hour
AUXILIARY INPUT JACK
WARNINGS
Driving while distracted can result in
loss of vehicle control, accident and
injury. Ford strongly recommends
that you use extreme caution when using
any device or feature that may take your
focus off the road. Your primary
responsibility is the safe operation of the
vehicle. We recommend against the use
of any handheld device while driving,
encourage the use of voice-operated
systems when possible and that you
become aware of applicable state and
local laws that may affect use of electronic
devices while driving.
For safety reasons, do not connect
or adjust the settings on your
portable music player while the
vehicle is moving.
WARNINGS
Store the portable music player in a
secure location, such as the center
console or the glove box, when the
vehicle is in motion. Hard objects may
become projectiles in a collision or sudden
stop, which may increase the risk of serious
injury. The audio extension cable must be
long enough to allow the portable music
player to be safely stored while the vehicle
is in motion.
E142603
109
Audio System

The auxiliary input jack (AIJ) allows you to
connect and play music from your portable
music player through the vehicle speakers.
You can use any portable music player
designed for use with headphones. Your
audio extension cable must have male
one-eighth inch (three and one-half
millimeter) connectors at each end.
1. Make sure the vehicle, radio and
portable music player are turned off
and the transmission is in position P.
2. Plug the extension cable from the
portable music player into the AIJ.
3. Turn on the radio. Select either a tuned
FM station or a CD.
4. Adjust the volume as desired.
5. Turn on your portable music player and
adjust its volume to half its maximum
level.
6. Press AUX until LINE or LINE IN
appears in the display. You should hear
music from your device even if it is low.
7. Adjust the volume on your portable
music player until it reaches the volume
level of the FM station or CD. Do this
by switching back and forth between
the AUX and FM or CD controls.
USB PORT (IF EQUIPPED)
E142604
The USB port allows you to plug in media
playing devices, memory sticks and charge
devices (if supported). See SYNC® (page
279).
MEDIA HUB (IF EQUIPPED)
The media hub is located in the center
console and has the following features:
C
B
A
E142605
A/V inputsA
SD card slotB
USB portsC
See MyFord Touch® (page 315).
SATELLITE RADIO (IF EQUIPPED)
SIRIUS® broadcasts a variety of music,
news, sports, weather, traffic and
entertainment satellite radio channels. For
more information and a complete list of
SIRIUS satellite radio channels, visit
www.siriusxm.com in the United States,
www.siriuscanada.ca in Canada, or call
SIRIUS at 1-888-539-7474.
110
Audio System

Satellite Radio Reception Factors
Potential Satellite Radio Reception Issues
For optimal reception performance, keep the antenna
clear of snow and ice build-up and keep luggage and other
material as far away from the antenna as possible.
Antenna obstructions
Hills, mountains, tall buildings, bridges, tunnels, freeway
overpasses, parking garages, dense tree foliage and
thunderstorms can interfere with your reception.
Terrain
When you pass a ground-based broadcast repeating
tower, a stronger signal may overtake a weaker one and
the audio system may mute.
Station overload
Your display may show ACQUIRING...to indicate the
interference and the audio system may mute.
Satellite radio signal interfer-
ence
SIRIUS® Satellite Radio Service
Note: SIRIUS reserves the unrestricted right
to change, rearrange, add or delete
programming including canceling, moving
or adding particular channels, and its prices,
at any time, with or without notice to you.
Ford Motor Company shall not be
responsible for any such programming
changes.
E142593
SIRIUS satellite radio is a
subscription-based satellite radio service
that broadcasts a variety of music, sports,
news, weather, traffic and entertainment
programming. Your factory-installed
SIRIUS satellite radio system includes
hardware and a limited subscription term
which begins on the date of sale or lease
of the vehicle. Refer to your authorized
dealer for availability.
For more information on extended
subscription terms (a service fee is
required), the online media player and a
complete list of SIRIUS satellite radio
channels, and other features, please visit
www.siriusxm.com in the United States,
www.sirius.ca in Canada, or call SIRIUS at
1-888-539-7474.
Satellite Radio Electronic Serial
Number (ESN)
You need your ESN to activate, modify or
track your satellite radio account. When in
satellite radio mode, you can view this
number by pressing SIRIUS and memory
preset 1 at the same time.
111
Audio System

Troubleshooting
Possible ActionConditionRadio Display
No action required. This
message should disappear
shortly.
Radio requires more than
two seconds to produce
audio for the selected
channel.
Acquiring
If this message does not
clear shortly, or with an igni-
tion key cycle, your receiver
may have a fault. See your
authorized dealer for service.
Internal module or system
failure present.
Sat Fault/SIRIUS system
failure
Tune to another channel or
choose another preset.
Channel is no longer avail-
able.
Invalid Channel
Contact SIRIUS at 1-888-
539-7474 to subscribe to
the channel, or tune to
another channel.
Subscription not available
for this channel.
Unsubscribed Channel
The signal is currently being
blocked. When you move
into an open area, the signal
should return.
Loss of signal from the
SIRIUS satellite or SIRIUS
tower to the vehicle
antenna.
No Signal
No action required. The
process may take up to
three minutes.
Update of channel
programming in progress.
Updating
Contact SIRIUS at 1-888-
539-7474 to reactivate or
resolve subscription issues.
Satellite service has been
deactivated by SIRIUS
Satellite Radio.
Call SIRIUS 1-888-539-7474
Using the channel guide,
unlock or unskip the chan-
nels.
All the channels in the
selected category are
skipped or locked.
No Channels Available
No action required.SIRIUS has updated the
channels available for your
vehicle.
Subscription Updated
112
Audio System

MANUAL CLIMATE CONTROL
E141421
A
B
D
E
C
Fan speed control: Controls the volume of air circulated in your vehicle. Adjust
to select the desired fan speed or switch off. If you switch the fan off, the
windshield may fog up.
A
Recirculated air: Press the button to switch between outside air and
recirculated air. When you select recirculated air, the button illuminates and
the air currently in the passenger compartment recirculates. This can reduce
the time needed to cool the interior and reduce unwanted odors from entering
your vehicle.
B
Temperature control: Controls the temperature of the air circulated in your
vehicle. Adjust to select the desired temperature. If you select MAX A/C, the
system distributes recirculated air through the instrument panel air vents. This
mode is more economical and efficient than normal air conditioning. When the
temperature control is in the MAX A/C position, neither the air conditioning or
recirculated air can be turned off.
C
Air conditioning: Press the button to switch the air conditioning on or off. Air
conditioning cools your vehicle using outside air. To improve air conditioning
when starting your vehicle, drive with the windows slightly open for two to three
minutes.
D
Air distribution control: Adjust to select the desired air distribution.E
Select to distribute air through
the instrument panel air vents.
Select to distribute air through
the instrument panel and
footwell air vents.
Select to distribute air through
the footwell air vents.
Select to distribute air through
the windshield and footwell air
vents.
113
Climate Control

Select to distribute air through
the windshield air vents. You can
also use this setting to defog and
clear the windshield of a thin covering of
ice. You can also increase the temperature
and fan speed to improve clearing.
AUTOMATIC CLIMATE CONTROL
E141422
A
C
D
E
B
J
I
H
G
F
AUTO: Press the button to select automatic operation. The system
automatically controls the temperature, amount and distribution of the airflow
to reach and maintain your previously selected temperature.
A
Fan speed: Controls the volume of air circulated in your vehicle. Press the
buttons to select the desired fan speed. The setting is shown in the display.
B
On and off button: Press the button to switch the system on and off.C
MAX Defrost: Press the button to distribute outside air through the windshield
air vents. Air conditioning is automatically selected. The fan is set to the highest
speed and the temperature to HI. When the air distribution is set in this position,
you are unable to select recirculated air or manually adjust the fan speed and
temperature control. Press the AUTO button to return to auto mode.
D
MAX A/C: Press the button to distribute maximum air conditioning through
the instrument panel air vents. This mode is more economical and efficient
than normal air conditioning.
E
Recirculated air: Press the button to switch between outside air and
recirculated air. The air currently in the passenger compartment recirculates.
This can reduce the time needed to cool the interior and reduce unwanted odors
from entering your vehicle.
F
114
Climate Control

Defrost: Press the button to distribute air through the windshield air vents. You
can also use this setting to defog and clear the windshield of a thin covering of
ice.
G
Instrument panel: Press the button to distribute air through the instrument
panel air vents.
H
Footwell: Press the button to distribute air through the footwell air vents.I
Air conditioning: Press the button to switch the air conditioning on or off. Air
conditioning cools your vehicle using outside air. To improve air conditioning
when starting your vehicle, drive with the windows slightly open for two to three
minutes.
J
Temperature Control
E133115
You can set the temperature between
60°F (15.5°C) and 85°F (29.5°C) in steps
of 1°F (0.5°C). In position LO, 59°F (15°C),
the system switches to permanent cooling.
In position HI, 86°F (30°C), the system
switches to permanent heating.
Note: If you select either position LO or HI,
the system does not regulate a stable
temperature.
Mono Mode
In this mode, the temperature settings for
both the driver's side and passenger's side
are linked. If you adjust the setting using
the rotary control on the driver’s side, the
system adjusts the temperature to the
same setting on the passenger’s side.
Switching Mono Mode Off
Select a temperature for the passenger’s
side using the rotary control on the
passenger’s side. Mono mode
automatically switches off. The
temperature on the driver’s side remains
unchanged. You can now adjust the
driver's side and passenger's side
temperatures independently. The
temperature settings for each side are
shown in the display.
Switching Mono Mode Back On
Press and hold the AUTO button. The
passenger’s side temperature is adjusted
to the driver’s side temperature setting.
HINTS ON CONTROLLING THE
INTERIOR CLIMATE
General Hints
Note: Prolonged use of recirculated air may
cause the windows to fog up.
Note: A small amount of air may be felt
from the footwell air vents regardless of the
air distribution setting.
Note: To reduce humidity build-up inside
your vehicle, do not drive with the system
switched off or with recirculated air always
switched on.
115
Climate Control

Note: Do not place objects under the front
seats as this may interfere with the airflow
to the rear seats.
Note: Remove any snow, ice or leaves from
the air intake area at the base of the
windshield.
Manual Climate Control
Note: To reduce fogging of the windshield
during humid weather, adjust the air
distribution control to the windshield air
vents position. Increase the temperature
and fan speed to improve clearing, if
required.
Automatic Climate Control
Note: Do not adjust the settings when your
vehicle interior is extremely hot or cold. The
system automatically adjusts to the
previously stored settings. For the system
to function efficiently, the instrument panel
and side air vents should be fully open.
Note: At low ambient temperatures with
AUTO selected, the air stream is directed
toward the windshield and side windows
for as long as the engine remains cold.
Note: When the system is switched off,
outside air is prevented from entering your
vehicle.
Note: When the system is in AUTO mode,
and the interior and exterior temperatures
are high, the system automatically selects
recirculated air to maximize cooling of the
interior. When the selected air temperature
is reached, the system automatically selects
outside air.
Note: When you select windshield
defrosting and defogging, the instrument
panel and footwell level functions
automatically switch off and air conditioning
switches on. Outside air flows into your
vehicle.
Heating the Interior Quickly
Vehicle With Automatic Climate ControlVehicle With Manual Climate Control
Press the high fan speed button control.Adjust the fan speed to the highest
speed setting.
1
Adjust the temperature control to the
highest setting.
Adjust the temperature control to the
highest setting.
2
Press the footwell button to distribute
air to the footwell air vents.
Adjust the air distribution control to the
footwell air vents position.
3
116
Climate Control

Recommended Settings for Heating
Vehicle With Automatic Climate ControlVehicle With Manual Climate Control
Press the slow fan speed button.Adjust the fan speed to the second
speed setting.
1
Adjust the temperature control to the
midway point of the hot settings.
Adjust the temperature control to the
midway point of the hot settings.
2
Press the footwell and windshield air
distribution buttons.
Adjust the air distribution control to the
footwell and windshield air vents posi-
tion.
3
Close the instrument panel air vents.
Open the side air vents and direct them
toward the side windows.
4
Cooling the Interior Quickly
Vehicle With Automatic Climate ControlVehicle With Manual Climate Control
Press the AUTO button.Adjust the fan speed to the highest
speed setting.
1
Adjust the temperature control to the
desired setting.
Adjust the temperature control to the
MAX A/C position.
2
Adjust the air distribution control to the
instrument panel air vents position.
3
Recommended Settings for Cooling
Vehicle With Automatic Climate ControlVehicle With Manual Climate Control
Press the slow fan speed button.Adjust the fan speed to the second
speed setting.
1
Adjust the temperature control to the
midway point of the cold settings.
Adjust the temperature control to the
midway point of the cold settings.
2
Press the instrument panel vent button
to distribute air to the instrument panel
air vents.
Adjust the air distribution control to the
instrument panel air vents position.
3
117
Climate Control

Vehicle Stationary for Extended Periods During Extreme High Ambient
Temperatures
Vehicle With Automatic Climate ControlVehicle With Manual Climate Control
Apply the parking brake.Apply the parking brake.1
Move the transmission selector lever to
position P.
Move the transmission selector lever to
position P.
2
Press the MAX A/C button.Adjust the temperature control to the
MAX A/C position.
3
Adjust the fan speed to the lowest speed
setting.
4
Side Window Defogging in Cold Weather
Vehicle With Automatic Climate ControlVehicle With Manual Climate Control
Press the windshield defrosting and
defogging button.
Adjust the air distribution control to the
instrument panel and footwell air vents
positions.
1
Adjust the temperature control to the
desired setting.
Press the A/C button.2
Adjust the temperature control to the
desired setting.
3
Adjust the fan speed to the highest
setting.
4
Direct the instrument panel side air vents
toward the side windows.
5
Close the instrument panel vents.6
118
Climate Control

Maximum Cooling Performance in
Instrument Panel or Instrument
Panel and Footwell Positions
1. Adjust the temperature control to the
lowest setting.
2. Press the A/C and recirculated air
buttons.
3. Adjust the fan speed to the highest
setting initially and then adjust it to suit
the desired comfort level.
HEATED WINDOWS AND
MIRRORS
Heated Rear Window
Note: The ignition must be switched on to
use this feature.
Press the button to clear the rear window
of thin ice and fog. Press the button again
within 10 minutes to switch it off. It
switches off automatically after 10
minutes, or when you switch the ignition
off.
Do not use razor blades or other sharp
objects to clean the inside of the rear
window or to remove decals from the
inside of the rear window. This may
cause damage to the heated grid lines
and will not be covered by your
warranty.
Heated Exterior Mirror (If Equipped)
Note: Do not remove ice from the mirrors
with a scraper or attempt to readjust the
mirror glass if it is frozen in place. These
actions could cause damage to the glass
and mirrors.
Note: Do not clean the housing or glass of
any mirror with harsh abrasives, fuel or other
petroleum-based cleaning products.
Both mirrors are heated to remove ice, mist
and fog when the heated rear window is
switched on.
CABIN AIR FILTER
Your vehicle is equipped with a cabin air
filter. It is located just in front of the
windshield under the cowl panel grille on
the passenger's side of your vehicle.
The particulate filtration system is
designed to reduce the concentration of
airborne particles such as dust, spores and
pollen in the air being supplied to the
interior of your vehicle.
Note: A cabin air filter must be installed at
all times to prevent foreign objects from
entering the system. Running the system
without a filter in place could result in
degradation or damage to the system.
The particulate filtration system gives you
and your passengers the following
benefits:
• It improves your driving comfort by
reducing particle concentration.
• It improves the interior compartment
cleanliness.
• It protects the climate control
components from particle deposits.
The filter should be replaced at regular
intervals. See the Scheduled
Maintenance chapter.
For additional cabin air filter information,
or to replace the filter, see an authorized
dealer.
REMOTE START (IF EQUIPPED)
The climate control system adjusts the
cabin temperature during remote start.
119
Climate Control

You cannot adjust the system during
remote start operation. Turn the ignition
on to return the system to its previous
settings. You can now make adjustments.
You will need to turn certain
vehicle-dependent features back on, such
as:
• heated seats
• cooled seats
• heated steering wheel
• heated mirrors
• heated rear window.
You can adjust the settings using the
information display controls. See
Information Displays (page 84).
Automatic Settings
You can set the climate control to operate
in AUTO mode through the information
display setting: Remote Start > Climate
Control > Heater-A/C > Auto. The climate
control system automatically sets the
interior temperature to 72°F (22°C).
In hot weather, the system is set to 72°F
(22°C). Cooled seats are set to high (if
available, and selected to AUTO in the
information display).
In moderate weather, the system either
heats or cools (based on previous
settings). The rear defroster, heated
mirrors and heated/cooled seats are not
automatically turned on.
In cold weather, the system is set to 72°F
(22°C). The heated seats and heated
steering wheel are set to high (if available,
and selected to AUTO in the information
display). The rear defroster and heated
mirrors are automatically turned on.
Last Settings
You can set the climate control to operate
using the last climate control settings
through the information display setting:
Remote Start > Climate Control >
Heater–A/C > Last Settings. The climate
control system automatically uses the
settings last selected before the vehicle
was turned off.
Heated and Cooled Devices
The climate control system controls other
heated and cooled devices inside the
vehicle. These devices (if available, and
selected to AUTO in the information
displays) may also be switched on during
remote start. Heated devices are typically
switched on during cold weather, and
cooled devices during hot weather.
120
Climate Control

SITTING IN THE CORRECT
POSITION
WARNINGS
Sitting improperly, out of position or
with the seatback reclined too far
can take weight off the seat cushion
and affect the decision of the passenger
sensing system, resulting in serious injury
or death in the event of a collision. Always
sit upright against your seatback, with your
feet on the floor.
Do not recline the seatback as this
can cause the occupant to slide
under the safety belt, resulting in
serious injury in the event of a collision.
Do not place objects higher than the
seatback to reduce the risk of serious
injury in the event of a collision or
during heavy braking.
E68595
When you use them properly, the seat,
head restraint, safety belt and air bags will
provide optimum protection in the event
of a collision.
We recommend that you follow these
guidelines:
• Sit in an upright position with the base
of your spine as far back as possible.
• Do not recline the seatback more than
30 degrees.
• Adjust the head restraint so that the
top of it is level with the top of your
head and as far forward as possible.
Make sure that you remain
comfortable.
• Keep sufficient distance between
yourself and the steering wheel. We
recommend a minimum of 10 inches
(25 centimeters) between your
breastbone and the air bag cover.
• Hold the steering wheel with your arms
slightly bent.
• Bend your legs slightly so that you can
press the pedals fully.
• Position the shoulder strap of the
safety belt over the center of your
shoulder and position the lap strap
tightly across your hips.
Make sure that your driving position is
comfortable and that you can maintain full
control of your vehicle.
HEAD RESTRAINTS
WARNINGS
Fully adjust the head restraint before
you sit in or operate your vehicle. This
will help minimize the risk of neck
injury in the event of a collision. Do not
adjust the head restraint when your vehicle
is moving.
The head restraint is a safety device.
Whenever possible it should be
installed and properly adjusted when
the seat is occupied.
121
Seats

WARNINGS
Install the head restraint properly to
help minimize the risk of neck injury
in the event of a collision.
Front seat head restraint
E138642
Rear seat outboard head restraints
E138643
Rear center head restraint
E138645
The head restraints consist of:
An energy absorbing head
restraint
A
Two steel stemsB
Guide sleeve adjust and unlock
button
C
Guide sleeve unlock and remove
button
D
Fold buttonE
Note: Adjust the seatback to an upright
driving position before adjusting the head
restraint. Adjust the head restraint so that
the top of it is level with the top of your head
and as far forward as possible. Make sure
that you remain comfortable. If you are
extremely tall, adjust the head restraint to
its highest position.
Adjusting the Head Restraint
Raising the Head Restraint
Pull the head restraint up.
Lowering the Head Restraint
1. Press and hold button C.
2. Push the head restraint down.
Removing the Head Restraint
1. Pull the head restraint up until it
reaches its highest position.
2. Press and hold buttons C and D.
3. Pull the head restraint up.
Installing the Head Restraint
Align the steel stems into the guide sleeves
and push the head restraint down until in
locks.
Folding the Head Restraint
1. Press and hold button E.
2. Pull it back up to reset.
122
Seats

Tilting Head Restraints (If Equipped)
The front head restraints may have a tilting
feature for extra comfort. To tilt the head
restraint, do the following:
E144727
1. Adjust the seatback to an upright
driving or riding position.
2. Pivot the head restraint forward toward
your head to the desired position.
After the head restraint reaches the
forward-most tilt position, pivoting it
forward again will then release it to the
rearward, un-tilted position.
MANUAL SEATS
WARNING
Do not adjust the driver's seat or
seatback when your vehicle is
moving.
Moving the Seat Backward and
Forward
E130249
WARNING
Rock the seat backward and forward
after releasing the lever to make sure
that it is fully engaged.
Adjusting the Height of the
Driver's Seat
E70730
123
Seats

Recline Adjustment
E138646
WARNING
Do not place cargo or any objects
behind the seatback before returning
it to the original position. Pull on the
seatback to make sure that it has fully
latched after returning the seatback to its
original position. An unlatched seat may
become dangerous if you stop suddenly or
have a collision.
POWER SEATS (IF EQUIPPED)
WARNINGS
Do not adjust the driver's seat or
seatback when your vehicle is
moving.
Do not place cargo or any objects
behind the seatback before returning
it to the original position.
124
Seats

E138647
Power Lumbar (If Equipped)
E138648
MEMORY FUNCTION (IF EQUIPPED)
WARNINGS
Before activating the seat memory,
make sure that the area immediately
surrounding the seat is clear of
obstructions and that all occupants are
clear of moving parts.
Do not use the memory function
when your vehicle is moving.
This feature will automatically recall the
position of the driver's seat and power
mirrors. The memory control is located on
the driver’s door.
125
Seats

E142554
Saving a Pre-Set Position
1. Switch the ignition on.
2. Adjust the seat and exterior mirrors to
your desired position.
3. Press and hold the desired pre-set
button until you hear a single chime.
Recalling a Pre-Set Position
Press the pre-set button associated with
your desired driving position. The seat and
mirrors will move to the position stored for
that pre-set.
Saving a Passive Setting
The vehicle stores the seating and mirror
positions for up to three remote controls
or passive keys. Next time the vehicle is
unlocked, the position of the seat and
mirrors will adjust to the last used position.
Each time you turn the ignition off, the
current seat and mirror settings are stored
on the remote control or passive key used.
Recalling a Stored Seat Position
Note: Press any driver seat adjustment
control, any of the memory buttons or any
mirror control switch, to stop seat
movement during a recall. Seat movement
will also stop if you move the vehicle.
Passive Recall
Note: If more than one passive key is in
range, the memory function will move to the
settings of the first key stored.
When you unlock the vehicle with the
remote control or pull the driver door
handle with a passive key in range, the seat
and mirrors will move to the position stored
on that remote control or passive key.
REAR SEATS
E138650
Recline Adjustment (If Equipped)
With the seat occupied, pull the lever up
to recline the seatback.
Folding the Seatback
With the seat empty, pull the lever up to
fold the seatback forward. You may need
to fold the outboard head restraints and
lower the center head restraint first.
Unfolding the Seatback
Pull the lever up and pull the seatback
upward.
126
Seats

HEATED SEATS (IF EQUIPPED)
WARNING
People who are unable to feel pain
to their skin because of advanced
age, chronic illness, diabetes, spinal
cord injury, medication, alcohol use,
exhaustion or other physical conditions,
must exercise care when using the heated
seat. The heated seat may cause burns
even at low temperatures, especially if
used for long periods of time. Do not place
anything on the seat that insulates against
heat, such as a blanket or cushion. This
may cause the heated seat to overheat.
Do not puncture the seat with pins, needles
or other pointed objects. This may damage
the heating element which may cause the
heated seat to overheat. An overheated
seat may cause serious personal injury.
Do not do the following:
• Place heavy objects on the seat.
• Operate the heated seat if water or any
other liquid is spilled on the seat. Allow
the seat to dry thoroughly.
• Operate the heated seats unless the
engine is running. Doing so could drain
your vehicle battery.
E138653
Adjust the control to the desired heat
setting.
REAR SEAT ARMREST (IF
EQUIPPED)
E138656
Fold the armrest down to use the armrest
and cupholder.
127
Seats

Homelink® Wireless Control
System (If Equipped)
WARNINGS
Make sure that the garage door and
security device are free from
obstruction when you are
programming. Do not program the system
with the vehicle in the garage.
Do not use the system with any
garage door opener that does not
have the safety stop and reverse
feature as required by U.S. Federal Safety
Standards (this includes any garage door
opener manufactured before April 1, 1982).
Note: Make sure you keep the original
remote control transmitter for use in other
vehicles as well as for future system
programming.
Note: We recommend that upon the sale
or lease termination of your vehicle, you
erase the programmed function buttons for
security reasons. See Erasing the function
button codes later in this section.
Note: You can program a maximum of
three devices. To change or replace any of
the three devices after it has been initially
programmed, you must first erase the
current settings. See Erasing the function
button codes later in this section.
E142657
The universal garage door opener replaces
the common hand-held garage door
opener with a three-button transmitter
that is integrated into the driver’ s sun visor.
The system includes two primary features,
a garage door opener and a platform for
remote activation of devices within the
home. As well as being programmed for
garage doors, the system transmitter can
be programmed to operate entry gate
operators, security systems, entry door
locks and home or office lighting.
Additional system information can be
found online at www.homelink.com or by
calling the toll-free help line on
1-800-355-3515.
Programming
Note: Put a new battery in the hand-held
transmitter. This will ensure quicker training
and accurate transmission of the
radio-frequency signal.
Note: During programming, the hand-held
transmitter may stop transmitting. If this
occurs press and hold the function button
on the visor while you press and release the
hand-held transmitter every two seconds.
The indicator light will flash slowly and then
rapidly once the radio frequency signal is
accepted.
E142658
1. Switch the ignition on.
2. Hold the garage door hand-held
transmitter 1–3 inches (2–8
centemeter) away from the button you
want to program.
128
Universal Garage Door Opener

3. Press and hold both the button on the
visor you want to program and the
hand-held transmitter button until the
indicator light on the visor changes
from flashing slowly to rapidly, then
release.
4. Press and hold the function button you
programmed for 5 seconds, then
release. You may need to do this twice
to activate the door. If your garage door
does not operate, observe the indicator
light.
If the indicator light stays on, programming
is complete. Press and release the
programmed button to activate the door.
If the indicator light on the visor flashes
rapidly for two seconds then turns to a
constant light, follow the steps below.
Note: You may need a ladder to reach the
unit and you may need to remove the cover
or lamp lens.
E142659
1. Press the learn button on the garage
door opener motor.
Note: You will have 30 seconds to
complete the next step.
2. Return to your vehicle.
E142658
3. Press and hold the function button you
want to program on the visor for 2
seconds, then release. Repeat this step.
Depending on the brand of garage door
opener you may need to repeat this
sequence a third time.
To program additional buttons repeat
steps one through four.
For questions or comments, please contact
HomeLink at www.homelink.com or
1-800-355-3515.
Erasing the Function Button Codes
Note: You cannot erase individual buttons.
E142660
1. Press and hold the outer two function
buttons simultaneously for
approximately 20 seconds until the
indicator lights above the buttons flash
rapidly.
2. When the indicator lights flash, release
the buttons. The codes for all buttons
are erased.
Reprogramming a Single Button
To program a device to a previously trained
button, follow these steps:
1. Press and hold the desired button. Do
NOT release the button.
2. The indicator light will begin to flash
after 20 seconds. Without releasing the
button, follow Step 1 in the
Programming section.
129
Universal Garage Door Opener

For questions or comments, contact
HomeLink at www.homelink.com or
1-800-355-3515.
Programming to a Genie Intellicode®
2 Garage Door Opener
Note: The Genie Intellicode 2 transmitter
must already be programmed to operate
with the garage door opener.
Note: To program HomeLink to the
transmitter you must first put the
transmitter into programming mode.
E142661
Red indicator lightA.
Green indicator lightB.
1. Press and hold one of the buttons on
the hand-held transmitter for 10
seconds. The indicator light will change
from green to red and green.
2. Press the same button twice to confirm
the change to programming mode. If
done properly the indicator light will
appear red.
3. Hold the transmitter within 1–3 inches
(2–8 centemeter) of the button on the
visor you want to program.
4. Press and hold both the programmed
Genie button on the hand-held
transmitter and the button you want
to program. The indicator light on the
visor will flash rapidly when the
programming is successful.
Note: The Genie transmitter will transmit
for up to 30 seconds. If HomeLink does not
program within 30 seconds the Genie
transmitter will need to be pressed again. If
the Genie transmitter indicator light displays
green and red, release the button until the
indicator light turns off before pressing the
button again.
Once HomeLink has been programmed
successfully, the Genie transmitter must
be changed out of program mode. To do
this:
1. Press and hold the previously
programmed Genie button on the
hand-held transmitter for 10 seconds.
The indicator light will change from red
to red and green.
2. Press the same button twice to confirm
the change. If done correctly the
indicator light will turn green.
Programming HomeLink to the Genie
Intellicode Garage Door Opener Motor
Note: You may need a ladder to access the
garage door opener motor.
E142662
1. Press and hold the program button on
the Garage door opener motor until
both blue indicator lights turn on.
2. Release the program button. Only the
smaller round indicator light should be
on.
130
Universal Garage Door Opener

3. Press and release the program button.
The larger purple indicator light will
flash.
Note: The next two steps must be
completed in 30 seconds.
4. Press and release the Genie Intellicode
2 hand-held transmitter’s previously
programmed button. Both indicator
lights on the garage door opener motor
unit should now flash purple.
5. Press and hold the previously
programmed button on the visor for 2
seconds. Repeat this step up to 3 times
until the garage door moves.
Programming is now complete.
Clearing a HomeLink Device
To erase programming from the three
HomeLink buttons press and hold the two
outer HomeLink buttons until the indicator
light begins to flash. The indicator light will
begin flashing in 10 to 20 seconds, at which
time both buttons should be released.
Programming has now been erased, and
the indicator light should blink slowly to
indicate the device is in train mode when
any of the three HomeLink buttons are
pressed.
FCC and RSS-210 Industry Canada
Compliance
This device complies with Part 15 of the
FCC Rules and with RSS-210 of Industry
Canada. Operation is subject to the
following two conditions: (1) this device
may not cause harmful interference, and
(2) this device must accept any
interference received, including
interference that may cause undesired
operation.
Changes or modifications to your device
not expressly approved by the party
responsible for compliance can void the
user’ s authority to operate the equipment.
131
Universal Garage Door Opener

WARNING
Do not plug optional electrical
accessories into the cigar lighter
socket (if equipped). Improper use
of the lighter can cause damage not
covered by your warranty, and can result
in fire or serious injury.
Note: Do not insert objects other than an
accessory plug into the power point. This
will damage the outlet and blow the fuse.
Note: Do not hang any type of accessory or
accessory bracket from the plug.
Note: Do not use the power point over the
vehicle capacity of 12 volt DC 180 watts or
a fuse may blow.
Note: Do not use the power point for
operating a cigar lighter element.
Note: Improper use of the power point can
cause damage not covered by your
warranty.
Note: Always keep the power point caps
closed when not in use.
Run the engine for full capacity use of the
power point. To prevent the battery from
being discharged:
• Do not use the power point longer than
necessary when the engine is not
running.
• Do not leave devices plugged in
overnight or when the vehicle is parked
for extended periods.
Locations
Power points may be found:
• on the center console
• inside the center console storage bin
• on the rear of the center console.
110 Volt AC Power Point (If Equipped)
WARNING
Do not keep electrical devices
plugged in the power point whenever
the device is not in use. Do not use
any extension cord with the 110 volt AC
power point, since it will defeat the safety
protection design provided by the cap and
twist tab. Doing so my cause the power
point to overload due to powering multiple
devices that can reach beyond the 150
watt load limit and could result in fire or
serious injury.
Note: The power point will turn off after 13
minutes if the ignition is on without the
engine running. Keep the engine running or
cycle the ignition to keep the power point
on.
E143941
The power point is used for powering
electrical devices that require up to 150
watts. It is located on the rear of the center
console.
When the green indicator light, located on
the power point, is:
• on — power point is ready to supply
power.
• off — power point power supply is off;
ignition is not on.
• blinking — power point is in fault mode.
132
Auxiliary Power Points

The power point temporarily turns off
power if the 150 watt limit is exceeded. It
can also switch to a fault mode when it is
overloaded, overheated, or shorted. Unplug
your device and turn the ignition off then
on for overloading and shorting conditions.
Let the system cool off, then turn the
ignition off then on for an overheating
condition.
The power point is not designed for electric
devices such as:
• Cathode ray tube type televisions
• Motor loads, such as vacuum cleaners,
electric saws and other electric power
tools, compressor-driven refrigerators,
etc.
• Measuring devices, which process
precise data, such as medical
equipment, measuring equipment, etc.
• Other appliances requiring an
extremely stable power supply:
microcomputer-controlled electric
blankets, touch sensor lamps, etc.
133
Auxiliary Power Points

CENTER CONSOLE
WARNING
Use only soft cups in the cupholder.
Hard objects can injure you in a
collision.
Your vehicle may be equipped with a
variety of features.
A
B
C
E142433
CupholderA
Storage compartment with
auxiliary power point, auxiliary
input jack, USB port and media
hub
B
Auxiliary power pointC
OVERHEAD CONSOLE
E75193
Press near the rear edge of the door to
open it.
134
Storage Compartments

GENERAL INFORMATION
If you disconnect the battery, your vehicle
may exhibit some unusual driving
characteristics for approximately 5 miles
(8 kilometers) after you reconnect it. This
is because the engine management system
must realign itself with the engine. You can
disregard any unusual driving
characteristics during this period.
WARNINGS
Extended idling at high engine
speeds can produce very high
temperatures in the engine and
exhaust system, creating the risk of fire or
other damage.
Do not park, idle or drive your vehicle
on dry grass or other dry ground
cover. The emission system heats up
the engine compartment and exhaust
system, creating the risk of fire.
Do not start the engine in a closed
garage or in other enclosed areas.
Exhaust fumes can be toxic. Always
open the garage door before you start the
engine.
If you smell exhaust fumes inside
your vehicle, have your vehicle
checked by your authorized dealer
immediately. Do not drive your vehicle if
you smell exhaust fumes.
This system meets all Canadian
interference-causing equipment standard
requirements regulating the impulse
electrical field or radio noise.
When you start the engine, avoid pressing
the accelerator pedal before and during
operation. Only use the accelerator pedal
when you have difficulty starting the
engine.
IGNITION SWITCH
E72128
0 (off) - The ignition is off.
Note: When you switch the ignition off and
leave your vehicle, do not leave your key in
the ignition. This could discharge your
vehicle battery.
Note: To switch the engine off when your
vehicle is moving, move the transmission
selector lever to position N. Use the brakes
to bring the vehicle to a safe stop. After your
vehicle has stopped, switch the engine off
and move the transmission selector lever to
position P. Turn the key to position 0 or I.
I (accessory) - Allows the electrical
accessories such as the radio to operate
while the engine is not running.
Note: Do not leave the ignition key in this
position for too long to avoid discharging
the battery.
II (on) - All electrical circuits operational.
Warning lamps and indicators are
illuminated.
III (start) - cranks the engine. Release the
key as soon as the engine starts.
KEYLESS STARTING (IF EQUIPPED)
WARNINGS
The keyless starting system may not
function if the key is close to metal
objects or electronic devices such as
mobile phones.
135
Starting and Stopping the Engine

WARNINGS
Always check that the steering wheel
lock is deactivated before
attempting to move your vehicle.
Note: A valid key must be located inside
your vehicle to switch the ignition on and
start the engine.
Switching the Ignition On (Accessory
Mode)
E142555
Press the START button once without your
foot on the brake pedal. The button is
located on the instrument panel near the
steering wheel. All electrical circuits and
accessories are operational and the
warning lamps and indicators illuminate.
Press the START button again without your
foot on the brake pedal to turn the vehicle
off completely.
Starting Your Vehicle
Carry out the following steps to start your
vehicle:
1. Move the transmission selector lever
to position P.
2. Fully press the brake pedal.
3. Press the START button.
The system does not function if:
• The key frequencies are jammed.
• The key battery has no charge.
If you are unable to start your vehicle, do
the following.
5-button remote
E142874
3-button remote
E145988
1. Hold the key next to the symbol on the
steering column.
2. With the key in this position, you can
use the start button to switch the
ignition on and start your vehicle.
Stopping the Engine When Your
Vehicle is Stationary
1. Move the transmission selector lever
to position P.
2. Press the START button.
Note: The ignition, all electrical circuits
warning lamps and indicators will be
switched off.
136
Starting and Stopping the Engine

Stopping the Engine When Your
Vehicle is Moving
1. Press and hold the START button for
a moment, or press it three times within
two seconds.
2. Move the transmission selector lever
to position N and use the brakes to
bring your vehicle to a safe stop.
3. When your vehicle has stopped, move
the transmission selector lever to
position P and switch the ignition off.
WARNING
Switching off the engine when the
vehicle is still moving will result in a
loss of brake and steering assistance.
The steering will not lock, but higher effort
will be required. When the ignition is
switched off, some electrical circuits,
warning lamps and indicators may also be
off.
Fast Restart
The fast restart feature allows you to
restart your vehicle within 20 seconds of
switching it off, even if a valid key is not
present.
Within 20 seconds of switching your
vehicle off, press the brake pedal and press
the start button. After 20 seconds have
expired, you can no longer start your
vehicle without the key present inside the
vehicle.
Once your vehicle has started, it remains
running until you press the start button,
even if a valid key has not been detected.
If you open and close a door while your
vehicle is running, the system searches for
a valid key. You cannot start your vehicle
if a valid key is not detected within 20
seconds.
STARTING A GASOLINE
ENGINE
When you start the engine the idle speed
will be increased to warm up the engine. If
the engine idle speed does not slow down
automatically, have your vehicle checked
by your authorized dealer.
Before starting the engine check the
following:
• Make sure all occupants have fastened
their safety belts.
• Make sure the headlamps and
electrical accessories are off.
• Make sure the parking brake is on.
• Move the transmission selector lever
to position P.
• Turn the ignition key to position II.
Note: Do not touch the accelerator pedal.
1. Move the transmission selector lever
to position P or N.
2. Fully press the brake pedal.
3. Start the engine. The engine may
continue cranking for up to 15 seconds
or until it starts.
Note: If you cannot start the engine on the
first try, wait for a short period of time and
try again.
If you have difficulty starting the engine
when the temperature is below -13°F
(-25°C), press the accelerator pedal
slightly and try again.
If you cannot start the engine after three
attempts, wait 10 seconds and follow this
procedure.
1. Move the transmission selector lever
to position P.
2. Fully press the accelerator pedal and
hold it there.
3. Fully press the brake pedal.
4. Start the engine.
137
Starting and Stopping the Engine

Guarding Against Exhaust Fumes
WARNING
If you smell exhaust fumes inside
your vehicle, have your vehicle
checked by your authorized dealer
immediately. Do not drive your vehicle if
you smell exhaust fumes. Carbon
monoxide is present in exhaust fumes.
Take precautions to avoid its dangerous
effects.
Important Ventilating Information
If you stop your vehicle and the leave the
engine idling for long periods of time, we
recommend that you do one of the
following:
• Open the windows at least 1 inch (2.5
centimeters)
• Set your climate control to outside air.
ENGINE BLOCK HEATER (IF
EQUIPPED)
WARNINGS
Failure to follow engine block heater
instructions could result in property
damage or serious personal injury.
Do not use your heater with
ungrounded electrical systems or
two-pronged adapters. There is a risk
of electrical shock.
Note: The heater is most effective when
outdoor temperatures are below 0°F
(-18°C).
The heater acts as a starting aid by
warming the engine coolant. This allows
the climate control system to respond
quickly. The equipment includes a heater
element (installed in the engine block) and
a wire harness. You can connect the
system to a grounded 120 volt AC electrical
source.
We recommend that you do the following
for a safe and correct operation:
• Use a 16-gauge outdoor extension cord
that is product certified by
Underwriter’s Laboratory (UL) or
Canadian Standards Association
(CSA). This extension cord must be
able to be used outdoors, in cold
temperatures, and be clearly marked
Suitable for Use with Outdoor
Appliances. Do not use an indoor
extension cord outdoors. This could
result in an electric shock or become a
fire hazard.
• Use as short an extension cord as
possible.
• Do not use multiple extension cords.
• Make sure that when in operation, the
extension cord plug and heater cord
plug connections are free and clear of
water. This could cause an electric
shock or fire.
• Make sure the vehicle is parked in a
clean area, clear of combustibles.
• Make sure the heater, heater cord and
extension cord are firmly connected.
• Check for heat anywhere in the
electrical hookup once the system has
been operating for approximately 30
minutes.
138
Starting and Stopping the Engine

• Make sure the system is unplugged and
properly stowed before driving your
vehicle. Make sure the protective cover
seals the prongs of the block heater
cord plug when not in use.
• Make sure the heater system is
checked for proper operation before
winter.
Using the Engine Block Heater
Make sure the receptacle terminals are
clean and dry prior to use. Clean them with
a dry cloth if necessary.
The heater uses 0.4 to 1.0 kilowatt-hours
of energy per hour of use. The system does
not have a thermostat. It will achieve
maximum temperature after
approximately three hours of operation. If
you use the heater longer than three hours,
this will not improve system performance
and will use unnecessary electricity.
139
Starting and Stopping the Engine

SAFETY PRECAUTIONS
WARNINGS
Do not overfill the fuel tank. The
pressure in an overfilled tank may
cause leakage and lead to fuel spray
and fire.
The fuel system may be under
pressure. If you hear a hissing sound
near the fuel filler door (Easy Fuel no
cap fuel system), do not refuel until the
sound stops. Otherwise, fuel may spray
out, which could cause serious personal
injury.
Automotive fuels can cause serious
injury or death if misused or
mishandled.
The flow of fuel through a fuel pump
nozzle can produce static electricity,
which can cause a fire if fuel is
pumped into an ungrounded fuel container.
Fuel ethanol and gasoline may
contain benzene, which is a
cancer-causing agent.
When refueling always shut the
engine off and never allow sparks or
open flames near the filler neck.
Never smoke while refueling. Fuel vapor is
extremely hazardous under certain
conditions. Care should be taken to avoid
inhaling excess fumes.
Observe the following guidelines when
handling automotive fuel:
• Extinguish all smoking materials and
any open flames before refueling your
vehicle.
• Always turn off the vehicle before
refueling.
• Automotive fuels can be harmful or
fatal if swallowed. Fuel such as
gasoline is highly toxic and if
swallowed can cause death or
permanent injury. If fuel is swallowed,
call a physician immediately, even if no
symptoms are immediately apparent.
The toxic effects of fuel may not be
visible for hours.
• Avoid inhaling fuel vapors. Inhaling too
much fuel vapor of any kind can lead
to eye and respiratory tract irritation.
In severe cases, excessive or prolonged
breathing of fuel vapor can cause
serious illness and permanent injury.
• Avoid getting fuel liquid in your eyes. If
fuel is splashed in the eyes, remove
contact lenses (if worn), flush with
water for 15 minutes and seek medical
attention. Failure to seek proper
medical attention could lead to
permanent injury.
• Fuels can also be harmful if absorbed
through the skin. If fuel is splashed on
the skin, clothing or both, promptly
remove contaminated clothing and
wash skin thoroughly with soap and
water. Repeated or prolonged skin
contact with fuel liquid or vapor causes
skin irritation.
• Be particularly careful if you are taking
“ Antabuse” or other forms of disulfiram
for the treatment of alcoholism.
Breathing gasoline vapors, or skin
contact could cause an adverse
reaction. In sensitive individuals, serious
personal injury or sickness may result.
If fuel is splashed on the skin, promptly
wash skin thoroughly with soap and
water. Consult a physician immediately
if you experience an adverse reaction.
140
Fuel and Refueling

FUEL QUALITY
Note: We recommend that you use only
high quality fuel without additives or other
engine treatments.
Do not use leaded gasoline or gasoline with
additives containing other metallic
compounds (e.g. manganese-based). They
could damage the emission system.
Choosing the Right Fuel
Note: Use of any fuel other than those
recommended may cause powertrain
damage, a loss of vehicle performance and
repairs may not be covered under warranty.
If your vehicle is not a flexible fuel vehicle,
then only use unleaded fuel or unleaded
fuel blended with a maximum of 15%
ethanol. Do not use fuel ethanol (E85),
diesel fuel, fuel methanol, leaded fuel or
any other fuel because it could damage or
impair the emission control system.
The use of leaded fuel is prohibited by law.
Your vehicle was not designed to use fuel
or fuel additives with metallic compounds,
including manganese-based additives.
Octane Recommendations
Regular unleaded gasoline with a pump
(R+M)/2 octane rating of 87 is
recommended. Some fuel stations offer
fuels posted as regular with an octane
rating below 87, particularly in high altitude
areas. Fuels with octane levels below 87
are not recommended.
Note: Premium fuel will provide improved
performance for vehicles with EcoBoost®
engines and is recommended for severe duty
use such as trailer tow.
Do not be concerned if your engine
sometimes knocks lightly. However, if it
knocks heavily while you are using fuel with
the recommended octane rating, see your
authorized dealer to prevent any engine
damage.
RUNNING OUT OF FUEL
Avoid running out of fuel because this
situation may have an adverse effect on
powertrain components.
If you have run out of fuel:
• You may need to cycle the ignition from
off to on several times after refueling
to allow the fuel system to pump the
fuel from the tank to the engine. On
restarting, cranking time will take a few
seconds longer than normal. With
keyless ignition, just start the engine.
Crank time will be longer than usual.
• Normally, adding 1 gallon (3.8 liters) of
fuel is enough to restart the engine. If
the vehicle is out of fuel and on a steep
grade, more than 1 gallon (3.8 liters)
may be required.
• The service engine soon indicator may
come on. For more information on the
service engine soon indicator, See
Warning Lamps and Indicators
(page 80).
Refilling With a Portable Fuel
Container
WARNINGS
Do not insert the nozzle of portable
fuel containers or aftermarket
funnels into the capless fuel system.
This could damage the fuel system and its
seal, and may cause fuel to run onto the
ground instead of filling the tank, which
could result in serious personal injury.
141
Fuel and Refueling

WARNINGS
Do not try to pry open or push open
the capless fuel system with foreign
objects. This could damage the fuel
system and its seal and cause injury to you
or others.
Note: Do not use aftermarket funnels; they
will not work with the capless fuel system
and can damage it. The included funnel has
been specially designed to work safely with
your vehicle.
When filling the vehicle’s fuel tank from a
portable fuel container, use the funnel
included with the vehicle.
E142668
1. Locate the white plastic funnel in the
spare tire compartment.
2. Slowly insert the funnel into the
capless fuel system.
3. Fill the vehicle with fuel from the
portable fuel container.
4. When done, clean the funnel or
properly dispose of it. Extra funnels can
be purchased from your authorized
dealer if you choose to dispose of the
funnel.
REFUELING
WARNINGS
Fuel vapor burns violently and a fuel
fire can cause severe injuries.
Read and follow all the instructions
on the pump island.
Turn off your engine when you are
refueling.
Do not smoke if you are near fuel or
refueling your vehicle.
Keep sparks, flames and smoking
materials away from fuel.
Stay outside your vehicle and do not
leave the fuel pump unattended
when refueling your vehicle. This is
against the law in some places.
Keep children away from the fuel
pump; never let children pump fuel.
Do not use personal electronic
devices while refueling.
Use the following guidelines to avoid
electrostatic charge build-up when filling
an ungrounded fuel container:
• Place approved fuel container on the
ground.
• Do not fill a fuel container while it is in
the vehicle (including the cargo area).
• Keep the fuel pump nozzle in contact
with the fuel container while filling.
• Do not use a device that would hold
the fuel pump handle in the fill position.
142
Fuel and Refueling

Easy Fuel® No Cap Fuel System
WARNING
The fuel system may be under
pressure. If you hear a hissing sound
near the fuel filler door, do not refuel
until the sound stops. Otherwise, fuel may
spray out, which could cause serious
personal injury.
When fueling your vehicle:
1. Turn the engine off.
2. Open the fuel filler door.
3. Slowly insert the fuel filler nozzle fully
into the fuel system, and leave the
nozzle fully inserted until you are done
pumping.
4. After you are done pumping fuel, slowly
remove the fuel filler nozzle. Allow
about ten seconds after pumping fuel
before removing the fuel filler nozzle.
This allows residual fuel to drain back
into the fuel tank and not spill onto the
vehicle.
Note: A fuel spillage concern may occur if
overfilling the fuel tank. Do not overfill the
tank to the point that the fuel is able to
bypass the fuel filler nozzle. The overfilled
fuel may run down the drain located below
and in front of the fuel filler door.
If the fuel fill inlet was not properly closed,
a Check fuel fill inlet message may appear
on the instrument cluster. See Warning
Lamps and Indicators (page 80).
At the next opportunity, do the following:
1. Safely pull off the road.
2. Turn off the engine.
3. Open the fuel filler door and remove
any visible debris from the fuel fill
opening.
4. Insert either the fuel fill nozzle or the
fuel fill funnel provided with the vehicle
several times to dislodge any debris
and allow the inlet to close properly.
If this action corrects the problem, the
message may not reset immediately. It
may take several driving cycles for the
message to turn off. A driving cycle
consists of an engine start-up (after four
or more hours with the engine off) followed
by city or highway driving. Continuing to
drive with the message on may cause the
service engine soon lamp to turn on as
well.
EMISSION CONTROL SYSTEM
WARNINGS
Do not park, idle, or drive your vehicle
in dry grass or other dry ground cover.
The emission system heats up the
engine compartment and exhaust system,
which can start a fire.
Exhaust leaks may result in entry of
harmful and potentially lethal fumes
into the passenger compartment. If
you smell exhaust fumes inside your
vehicle, have your dealer inspect your
vehicle immediately. Do not drive if you
smell exhaust fumes.
Your vehicle is equipped with various
emission control components and a
catalytic converter which will enable your
vehicle to comply with applicable exhaust
emission standards. To make sure that the
catalytic converter and other emission
control components continue to work
properly:
To make sure that the catalytic converter
and other emission control components
continue to work properly:
• Use only the specified fuel listed.
• Avoid running out of fuel.
143
Fuel and Refueling

• Do not turn off the ignition while your
vehicle is moving, especially at high
speeds.
• Have the items listed in scheduled
maintenance information performed
according to the specified schedule.
The scheduled maintenance items listed
in scheduled maintenance information are
essential to the life and performance of
your vehicle and to its emissions system
If other than Ford, Motorcraft or
Ford-authorized parts are used for
maintenance replacements or for service
of components affecting emission control,
such non-Ford parts should be equivalent
to genuine Ford Motor Company parts in
performance and durability.
Illumination of the service engine soon
indicator, charging system warning light or
the temperature warning light, fluid leaks,
strange odors, smoke or loss of engine
power could indicate that the emission
control system is not working properly.
An improperly operating or damaged
exhaust system may allow exhaust to
enter the vehicle. Have a damaged or
improperly operating exhaust system
inspected and repaired immediately.
Do not make any unauthorized changes to
your vehicle or engine. By law, vehicle
owners and anyone who manufactures,
repairs, services, sells, leases, trades
vehicles, or supervises a fleet of vehicles
are not permitted to intentionally remove
an emission control device or prevent it
from working. Information about your
vehicle’s emission system is on the Vehicle
Emission Control Information Decal
located on or near the engine. This decal
also lists engine displacement
Please consult your Warranty Guide for
complete emission warranty information
On-Board Diagnostics (OBD-II)
Your vehicle is equipped with a computer
that monitors the engine’ s emission control
system. This system is commonly known
as the on-board diagnostics system
(OBD-II). The OBD-II system protects the
environment by ensuring that your vehicle
continues to meet government emission
standards. The OBD-II system also assists
your authorized dealer in properly servicing
your vehicle.
When the service engine soon
indicator illuminates, the OBD-II
system has detected a
malfunction. Temporary malfunctions may
cause the service engine soon indicator to
illuminate. Examples are:
1. The vehicle has run out of fuel—the
engine may misfire or run poorly.
2. Poor fuel quality or water in the
fuel—the engine may misfire or run
poorly.
3. The fuel fill inlet may not have been
properly closed. See Refueling (page
142).
4. Driving through deep water—the
electrical system may be wet.
These temporary malfunctions can be
corrected by filling the fuel tank with good
quality fuel, properly closing the fuel fill
inlet or letting the electrical system dry out.
After three driving cycles without these or
any other temporary malfunctions present,
the service engine soon indicator should
stay off the next time the engine is started.
A driving cycle consists of a cold engine
startup followed by mixed city/highway
driving. No additional vehicle service is
required.
144
Fuel and Refueling

If the service engine soon indicator remains
on, have your vehicle serviced at the first
available opportunity. Although some
malfunctions detected by the OBD-II may
not have symptoms that are apparent,
continued driving with the service engine
soon indicator on can result in increased
emissions, lower fuel economy, reduced
engine and transmission smoothness, and
lead to more costly repairs.
Readiness for
Inspection/Maintenance (I/M)
Testing
Some state/provincial and local
governments may have
Inspection/Maintenance (I/M) programs
to inspect the emission control equipment
on your vehicle. Failure to pass this
inspection could prevent you from getting
a vehicle registration.
If the service engine soon
indicator is on or the bulb does
not work, the vehicle may need
to be serviced. See On-Board Diagnostics.
Your vehicle may not pass the I/M test if
the service engine soon indicator is on or
not working properly (bulb is burned out),
or if the OBD-II system has determined
that some of the emission control systems
have not been properly checked. In this
case, the vehicle is considered not ready
for I/M testing.
If the vehicle’s engine or transmission has
just been serviced, or the battery has
recently run down or been replaced, the
OBD-II system may indicate that the
vehicle is not ready for I/M testing. To
determine if the vehicle is ready for I/M
testing, turn the ignition key to the on
position for 15 seconds without cranking
the engine. If the service engine soon
indicator blinks eight times, it means that
the vehicle is not ready for I/M testing; if
the service engine soon indicator stays on
solid, it means that the vehicle is ready for
I/M testing.
The OBD-II system is designed to check
the emission control system during normal
driving. A complete check may take several
days. If the vehicle is not ready for I/M
testing, the following driving cycle
consisting of mixed city and highway
driving may be performed:
15 minutes of steady driving on an
expressway/highway followed by 20
minutes of stop-and-go driving with at
least four 30-second idle periods
Allow the vehicle to sit for at least eight
hours without starting the engine. Then,
start the engine and complete the above
driving cycle. The engine must warm up to
its normal operating temperature. Once
started, do not turn off the engine until the
above driving cycle is complete. If the
vehicle is still not ready for I/M testing, the
above driving cycle will have to be
repeated.
FUEL CONSUMPTION
Note: The amount of usable fuel in the
empty reserve varies and should not be
relied upon to increase driving range. When
refueling your vehicle after the fuel gauge
indicates empty, you might not be able to
refuel the full amount of the advertised
capacity of the fuel tank due to the empty
reserve still present in the tank.
145
Fuel and Refueling

The advertised capacity is the indicated
capacity and the empty reserve combined.
Indicated capacity is the difference in the
amount of fuel in a full tank and a tank
when the fuel gauge indicates empty.
Empty reserve is the amount of fuel in the
tank after the fuel gauge indicates empty.
Filling the Tank
For consistent results when filling the fuel
tank:
• Turn the ignition off before fueling; an
inaccurate reading results if the engine
is left running.
• Use the same fill rate
(low-medium-high) each time the tank
is filled.
• Allow no more than two automatic
click-offs when filling.
Results are most accurate when the filling
method is consistent.
Calculating Fuel Economy
Do not measure fuel economy during the
first 1000 miles (1600 km) of driving (this
is your engine’s break-in period); a more
accurate measurement is obtained after
2000 miles - 3000 miles (3200 km - 4800
km). Also, fuel expense, frequency of fill
ups or fuel gauge readings are not accurate
ways to measure fuel economy.
1. Fill the fuel tank completely and record
the initial odometer reading.
2. Each time you fill the tank, record the
amount of fuel added.
3. After at least three to five tank fill ups,
fill the fuel tank and record the current
odometer reading.
4. Subtract your initial odometer reading
from the current odometer reading.
5. Calculate fuel economy by dividing
miles traveled by gallons used (For
Metric: Multiply liters used by 100, then
divide by kilometers traveled).
Keep a record for at least one month and
record the type of driving (city or highway).
This provides an accurate estimate of the
vehicle’s fuel economy under current
driving conditions. Additionally, keeping
records during summer and winter show
how temperature impacts fuel economy.
In general, lower temperatures mean lower
fuel economy.
146
Fuel and Refueling

AUTOMATIC TRANSMISSION
WARNINGS
Always set the parking brake fully
and make sure the gearshift is
latched in P (Park). Turn the ignition
to the off position and remove the key
whenever you leave your vehicle.
Do not apply the brake pedal and
accelerator pedal simultaneously.
Applying both pedals simultaneously
for more than three seconds will limit
engine rpm, which may result in difficulty
maintaining speed in traffic and could lead
to serious injury.
Understanding the Positions of
Your Automatic Transmission
Putting your vehicle in gear:
1. Fully press down the brake pedal.
2. Press and hold the button on the front
of the gearshift lever.
3. Move the gearshift lever into the
desired gear.
4. Release the button and your
transmission will remain in the selected
gear.
E133124
P (Park)
This position locks the transmission and
prevents the front wheels from turning.
Come to a complete stop before putting
your vehicle into and out of P (Park)
R (Reverse)
With the gearshift lever in R (Reverse), the
vehicle will move backward. Always come
to a complete stop before shifting into and
out of R (Reverse).
N (Neutral)
With the gearshift lever in N (Neutral), the
vehicle can be started and is free to roll.
Hold the brake pedal down while in this
position.
D (Drive)
The normal driving position for the best
fuel economy. Transmission operates in
gears one through six.
S (Sport)
Moving the gearshift lever to S (Sport):
• Provides additional grade (engine)
braking and extends lower gear
operation to enhance performance for
uphill climbs, hilly terrain or
mountainous areas. This will increase
engine RPM during engine braking.
• Provides additional lower gear
operation through the automatic
transmission shift strategy.
• Gears are selected more quickly and
at higher engine speeds.
147
Transmission

SelectShift Automatic®
Transmission (If Equipped)
Your SelectShift automatic transmission
gives you the ability to manually change
gears if you'd like. To use SelectShift, move
the gearshift lever into S (Sport). Now you
can use the +/- buttons on the side of your
gearshift lever to select gears.
When using the toggle for manual shifting:
• Press the (+) button to upshift.
• Press the (-) button to downshift.
Note: After you have assumed manual
control with SelectShift your vehicle will
remain in this mode until you return the
gearshift lever from (S) Sport, back to (D)
Drive.
Upshift to the recommended shift speeds
according to the following chart:
Upshifts when accelerating (recom-
mended for best fuel economy)
Shift from:
15 mph (24 km/h)1 - 2
25 mph (40 km/h)2 - 3
40 mph (64 km/h)3 - 4
45 mph (72 km/h)4 - 5
50 mph (80 km/h)5 - 6
The instrument cluster will display the
selected gear that you are currently in.
SelectShift will automatically make some
shifts for you in the event that your engine
speed is running at too high, or to low an
RPM.
Note: Engine damage may occur if
excessive engine revving is held without
shifting.
Brake-Shift Interlock
WARNINGS
Do not drive your vehicle until you
verify that the brake lamps are
working.
When doing this procedure, you will
be taking the vehicle out of park
which means the vehicle can roll
freely. To avoid unwanted vehicle
movement, always fully set the parking
brake prior to doing this procedure. Use
wheel chocks if appropriate.
If the parking brake is fully released,
but the brake warning lamp remains
illuminated, the brakes may not be
working properly. See your authorized
dealer.
Use the brake shift interlock lever to move
the gearshift lever from the park position
in the event of an electrical malfunction or
if your vehicle has a dead battery.
Apply the parking brake and turn the
ignition off before performing this
procedure.
1. Insert a screwdriver (or similar tool)
between the shifter bezel and the top
finish panel.
2. Use the tool to unsnap the shifter bezel
from the finish panel.
E142627
148
Transmission

3. Locate the white lever located on the
left side of the shifter.
4. Using the tool move the white lever
towards the rear of the shifter.
5. While holding the white lever in the rear
position, move the shifter from the park
position.
6. Press the shifter bezel back into the top
finish panel until it snaps back into
position.
7. Apply the brake pedal, start the vehicle
and release the parking brake.
Note: See your authorized dealer as soon
as possible if this procedure is used.
If Your Vehicle Gets Stuck In Mud
or Snow
Note: Do not rock the vehicle if the engine
is not at normal operating temperature or
damage to the transmission may occur.
Note: Do not rock the vehicle for more than
a minute or damage to the transmission and
tires may occur, or the engine may overheat.
If your vehicle gets stuck in mud or snow,
it may be rocked out by shifting between
forward and reverse gears, stopping
between shifts in a steady pattern. Press
lightly on the accelerator in each gear.
HILL START ASSIST
WARNINGS
The hill start assist feature does not
replace the parking brake. When you
leave the vehicle, always apply the
parking brake and shift the transmission
into P (Park).
You must remain in the vehicle once
you have activated the hill start
assist feature.
WARNINGS
During all times, you are responsible
for controlling the vehicle,
supervising the hill start assist
system and intervening, if required.
If the engine is revved excessively, or
if a malfunction is detected when the
hill start assist feature is active, the
hill start assist feature will be deactivated.
This feature makes it easier to pull away
when the vehicle is on a slope without the
need to use the parking brake.
When this feature is active, the vehicle will
remain stationary on the slope for two to
three seconds after you release the brake
pedal. This allows you time to move your
foot from the brake to the accelerator
pedal. The brakes are released
automatically once the engine has
developed sufficient drive to prevent the
vehicle from rolling down the slope. This
is an advantage when pulling away on a
slope, (for example from a car park ramp,
traffic lights or when reversing uphill into
a parking space).
This feature is activated automatically on
any slope that can result in significant
vehicle rollback. This feature will not
operate if the parking brake is activated.
Using Hill Start Assist
1. Press the brake pedal to bring the
vehicle to a complete standstill. Keep
the brake pedal pressed.
2. If the sensors detect that the vehicle is
on a slope, the hill start assist feature
will be activated automatically.
3. When you remove your foot from the
brake pedal, the vehicle will remain on
the slope without rolling away for
approximately two or three seconds.
This hold time will automatically be
extended if you are in the process of
driving off.
149
Transmission

4. Drive off in the normal manner. The
brakes will be released automatically.
150
Transmission

USING FOUR-WHEEL DRIVE
Note: The 4WD temporarily disabled
message will be displayed if the 4WD
system has overheated and defaulted to
front-wheel drive. This condition may occur
if the vehicle is operated in extreme high
load conditions or with excessive wheel slip,
such as deep sand. To resume normal 4WD
function as soon as possible, stop the
vehicle in a safe location and turn off the
engine. The 4WD restored message will be
displayed for approximately five seconds
after the system cools and normal 4WD
function returns.
Note: The Intelligent 4WD system gives
your vehicle some limited off-road
capabilities. Operating your vehicle in
conditions other than moderate sand, snow,
mud or rough roads could subject it to
excessive stress which might result in
damage. This damage is not covered under
your warranty.
Note: When a 4WD system fault is present,
the warning 4WD malfunction Service
required will display in the information
display. The 4WD system is not functioning
correctly and defaulted to front-wheel drive.
When this warning is displayed, have your
vehicle serviced at an authorized dealer.
E142669
You will be able to see the power
distribution between the front and rear
wheels represented by an icon in your
information display. More power to either
front or rear wheels will be displayed by
more area filled in.
Your vehicle may be equipped with a
full-time four-wheel drive (4WD) system.
The 4WD system is a proactive system,
meaning it not only responds to wheel slip
between the front and rear wheels but also
has the ability to anticipate wheel slip and
transfer torque to the rear wheels before
slip occurs. Even when no wheel slip is
present, the Intelligent 4WD system is
continuously making adjustments to the
torque distribution, in an attempt to
improve the vehicle’s straight line and
cornering behavior, both on and off road.
The system is active all the time and
requires no input from the operator.
All components of the Intelligent 4WD
system are sealed for life and require no
maintenance.
If your vehicle is equipped with Intelligent
4WD, a spare tire of a different size other
than the tire provided should never be
used. If the spare tire is installed, the 4WD
system may disable automatically and
enter front-wheel drive only mode to
protect driveline components. This
condition may be indicated by a 4WD Off
message in the Information displays
chapter. See Information displays in the
Instrument Cluster chapter for more
information. If there is a 4WD Off message
in the information display from using the
spare tire, this indicator should turn off
after reinstalling the repaired or replaced
normal road tire and driving a short
distance. It is recommended to reinstall
the repaired or replaced road tire as soon
as possible. Major dissimilar tire sizes
between the front and rear axles could
cause the 4WD system to stop functioning
and default to front-wheel drive or damage
the 4WD system.
151
Four-Wheel Drive (If Equipped)

Driving in Special Conditions With
Four-Wheel Drive
4WD vehicles are equipped for driving on
sand, snow, mud and rough roads and have
operating characteristics that are
somewhat different from conventional
vehicles, both on and off the highway.
When driving at slow speeds off-highway
under high outside temperatures, use a low
gear when possible. Low gear operation
will maximize the engine and transmission
cooling capability.
Under severe operating conditions, the A/C
may cycle on and off to protect
overheating of the engine.
Basic operating principles
• Drive slower in strong crosswinds which
can affect the normal steering
characteristics of your vehicle.
• Be extremely careful when driving on
pavement made slippery by loose sand,
water, gravel, snow or ice.
If your vehicle goes off the edge of the
pavement
• If your vehicle goes off the edge of the
pavement, slow down, but avoid severe
brake application, ease the vehicle
back onto the pavement only after
reducing your speed. Do not turn the
steering wheel too sharply while
returning to the road surface.
• It may be safer to stay on the apron or
shoulder of the road and slow down
gradually before returning to the
pavement. You may lose control if you
do not slow down or if you turn the
steering wheel too sharply or abruptly.
• It often may be less risky to strike small
objects, such as highway reflectors,
with minor damage to your vehicle
rather than attempt a sudden return to
the pavement which could cause the
vehicle to slide sideways out of control
or rollover. Remember, your safety and
the safety of others should be your
primary concern.
Emergency maneuvers
• In an unavoidable emergency situation
where a sudden sharp turn must be
made, remember to avoid
“over-driving” your vehicle (for
example; turn the steering wheel only
as rapidly and as far as required to
avoid the emergency). Excessive
steering will result in less vehicle
control, not more. Additionally, smooth
variations of the accelerator and/or
brake pedal pressure should be utilized
if changes in vehicle speed are called
152
Four-Wheel Drive (If Equipped)

for. Avoid abrupt steering, acceleration
or braking which could result in an
increased risk of loss of vehicle control,
vehicle rollover and/or personal injury.
Use all available road surface to return
the vehicle to a safe direction of travel.
• In the event of an emergency stop,
avoid skidding the tires and do not
attempt any sharp steering wheel
movements.
• If the vehicle goes from one type of
surface to another (i.e., from concrete
to gravel) there will be a change in the
way the vehicle responds to a
maneuver (steering, acceleration or
braking). Again, avoid these abrupt
inputs.
Sand
When driving over sand, try to keep all four
wheels on the most solid area of the trail.
Avoid reducing the tire pressures but shift
to a lower gear and drive steadily through
the terrain. Apply the accelerator slowly
and avoid spinning the wheels.
Do not drive your 4WD vehicle in deep sand
for an extended period of time. This will
cause the 4WD system to overheat. The
instrument cluster will display the message
4WD temporarily disabled. To resume
normal 4WD operation, turn off the vehicle
and allow the 4WD system to cool down
for a minimum of 15 minutes. After the
system has cooled down, normal 4WD
function will return and the instrument
cluster will briefly display 4WD restored.
When driving at slow speeds in deep sand
under high outside temperatures, use a low
gear when possible. Low gear operation
will maximize the engine and transmission
cooling capability.
Avoid excessive speed because vehicle
momentum can work against you and
cause the vehicle to become stuck to the
point that assistance may be required from
another vehicle. Remember, you may be
able to back out the way you came if you
proceed with caution.
Mud and water
If you must drive through high water, drive
slowly. Traction or brake capability may
be limited.
When driving through water, determine the
depth; avoid water higher than the bottom
of the wheel rims (for cars) or the bottom
of the hubs (for trucks) (if possible) and
proceed slowly. If the ignition system gets
wet, the vehicle may stall.
E142667
Once through water, always try the brakes.
Wet brakes do not stop the vehicle as
effectively as dry brakes. Drying can be
improved by moving your vehicle slowly
while applying light pressure on the brake
pedal.
Be cautious of sudden changes in vehicle
speed or direction when you are driving in
mud. Even 4WD vehicles can lose traction
in slick mud. If the vehicle does slide, steer
in the direction of the slide until you regain
control of the vehicle.
153
Four-Wheel Drive (If Equipped)

After driving through mud, clean off residue
stuck to rotating driveshafts and tires.
Excess mud stuck on tires and rotating
driveshafts causes an imbalance that
could damage drive components.
Note: Driving through deep water may
damage the transmission. If the front or rear
axle is submerged in water, the axle
lubricant and power transfer unit lubricant
should be checked and changed if
necessary.
E143950
“Tread Lightly” is an educational program
designed to increase public awareness of
land-use regulations and responsibilities
in our nations wilderness areas. Ford Motor
Company joins the U.S. Forest Service and
the Bureau of Land Management in
encouraging you to help preserve our
national forest and other public and private
lands by “treading lightly”.
Driving on hilly or sloping terrain
Although natural obstacles may make it
necessary to travel diagonally up or down
a hill or steep incline, you should always
try to drive straight up or straight down.
Note: Note: Avoid driving crosswise or
turning on steep slopes or hills. A danger lies
in losing traction, slipping sideways and
possibly rolling over. Whenever driving on a
hill, determine beforehand the route you will
use. Do not drive over the crest of a hill
without seeing what conditions are on the
other side. Do not drive in reverse over a hill
without the aid of an observer.
When climbing a steep slope or hill, start
in a lower gear rather than downshifting to
a lower gear from a higher gear once the
ascent has started. This reduces strain on
the engine and the possibility of stalling.
If you do stall out, do not try to turnaround
because you might roll over. It is better to
back down to a safe location.
Apply just enough power to the wheels to
climb the hill. Too much power will cause
the tires to slip, spin or lose traction,
resulting in loss of vehicle control.
E143949
Descend a hill in the same gear you would
use to climb up the hill to avoid excessive
brake application and brake overheating.
Do not descend in neutral; instead,
disengage overdrive or manually shift to a
lower gear. When descending a steep hill,
avoid sudden hard braking as you could
lose control. The front wheels have to be
turning in order to steer the vehicle.
Your vehicle has anti-lock brakes, therefore
apply the brakes steadily. Do not “pump”
the brakes.
Driving on snow and ice
WARNING
If you are driving in slippery
conditions that require tire chains or
cables, then it is critical that you drive
cautiously. Keep speeds down, allow for
longer stopping distances and avoid
aggressive steering to reduce the chances
of a loss of vehicle control which can lead
to serious injury or death. If the rear end of
the vehicle slides while cornering, steer in
the direction of the slide until you regain
control of the vehicle.
154
Four-Wheel Drive (If Equipped)

Note: Excessive tire slippage can cause
transmission damage.
4WD vehicles have advantages over 2WD
vehicles in snow and ice but can skid like
any other vehicle. Should you start to slide
while driving on snowy or icy roads, turn
the steering wheel in the direction of the
slide until you regain control.
Avoid sudden applications of power and
quick changes of direction on snow and
ice. Apply the accelerator slowly and
steadily when starting from a full stop.
Avoid sudden braking as well. Although an
4WD vehicle may accelerate better than
a two-wheel drive vehicle in snow and ice,
it won't stop any faster, because as in other
vehicles, braking occurs at all four wheels.
Do not become overconfident as to road
conditions.
Make sure you allow sufficient distance
between you and other vehicles for
stopping. Drive slower than usual and
consider using one of the lower gears. In
emergency stopping situations, apply the
brake steadily. Since your vehicle is
equipped with a four wheel anti-lock brake
system (ABS), do not “pump” the brakes.
Refer to the Brakes section of this chapter
for additional information on the operation
of the anti-lock brake system.
Maintenance and modifications
The suspension and steering systems on
your vehicle have been designed and
tested to provide predictable performance
whether loaded or empty and durable load
carrying capability. For this reason, Ford
Motor Company strongly recommends that
you do not make modifications such as
adding or removing parts (such as lift kits
or stabilizer bars) or by using replacement
parts not equivalent to the original factory
equipment.
Any modifications to a vehicle that raise
the center of gravity can make it more likely
the vehicle will rollover as a result of a loss
of control. Ford Motor Company
recommends that caution be used with
any vehicle equipped with a high load or
device (such as ladder or luggage racks).
Failure to maintain your vehicle properly
may void the warranty, increase your repair
cost, reduce vehicle performance and
operational capabilities and adversely
affect driver and passenger safety.
Frequent inspection of vehicle chassis
components is recommended if the vehicle
is subjected to off-highway usage.
155
Four-Wheel Drive (If Equipped)

GENERAL INFORMATION
Note: Occasional brake noise is normal. If
a metal-to-metal, continuous grinding or
continuous squeal sound is present, the
brake linings may be worn-out and should
be inspected by an authorized dealer. If the
vehicle has continuous vibration or shudder
in the steering wheel while braking, the
vehicle should be inspected by an
authorized dealer.
Note: Brake dust may accumulate on the
wheels, even under normal driving
conditions. Some dust is inevitable as the
brakes wear and does not contribute to
brake noise. See Cleaning the Alloy
Wheels (page 240).
E138644
See Warning Lamps and
Indicators (page 80).
Wet brakes result in reduced braking
efficiency. Gently press the brake pedal a
few times when driving from a car wash or
standing water to dry the brakes.
Brake Over Accelerator
In the event the accelerator pedal
becomes stuck or entrapped, apply steady
and firm pressure to the brake pedal to
slow the vehicle and reduce engine power.
If you experience this condition, apply the
brakes and bring your vehicle to a safe
stop. Turn the engine off, shift to position
P and apply the parking brake, and then
inspect the accelerator pedal for any
interferences. If none are found and the
condition persists, have your vehicle towed
to the nearest authorized dealer.
Emergency Brake Assist
Emergency brake assist detects when you
brake heavily by measuring the rate at
which you press the brake pedal. It
provides maximum braking efficiency as
long as you press the pedal. Emergency
brake assist can reduce stopping distances
in critical situations.
Anti-lock Brake System
This system helps you maintain steering
control during emergency stops by keeping
the brakes from locking.
This lamp momentarily
illuminates when the ignition is
turned on. If the light does not
illuminate during start up, remains on or
flashes, the anti-lock braking system may
be disabled and may need to be serviced.
E138644
If the system is disabled, normal
braking is still effective. If the
brake warning lamp illuminates
with the parking brake released, have your
brake system serviced immediately.
HINTS ON DRIVING WITH
ANTI-LOCK BRAKES
Note: When the system is operating, the
brake pedal will pulse and may travel
further. Maintain pressure on the brake
pedal. You may also hear a noise from the
system. This is normal.
The ABS will not eliminate the risks when:
• you drive too closely to the vehicle in
front of you
• your vehicle is hydroplaning
• you take corners too fast
• the road surface is poor.
156
Brakes

PARKING BRAKE
WARNING
Always set the parking brake fully
and leave your vehicle with the
transmission selector lever in
position P.
Note: Do not press the release button while
pulling the lever up.
To apply the parking brake:
1. Press the foot brake pedal firmly.
2. Pull the parking brake lever up to its
fullest extent.
Note: If you park your vehicle on a hill and
facing uphill, move the transmission selector
lever to position P and turn the steering
wheel away from the curb.
Note: If you park your vehicle on a hill and
facing downhill, move the transmission
selector lever to P and turn the steering
wheel toward the curb.
To release the parking brake:
1. Press the brake pedal firmly.
2. Pull the lever up slightly.
3. Press the release button and push the
lever down.
157
Brakes

PRINCIPLE OF OPERATION
The traction control system helps avoid
drive wheel spin and loss of traction.
If your vehicle begins to slide, the system
applies the brakes to individual wheels
and, when needed, reduces engine power
at the same time. If the wheels spin when
accelerating on slippery or loose surfaces,
the system reduces engine power in order
to increase traction.
USING TRACTION CONTROL
In certain situations (e.g. stuck in snow or
mud), turning the traction control off may
be beneficial as this allows the wheels to
spin with full engine power. Turn off the
traction control system using the
information display control. See General
Information (page 84).
System Indicator Lights and
Messages
WARNING
If a failure has been detected within
the AdvanceTrac system, the
stability control light will illuminate
steadily. Verify that the AdvanceTrac
system was not manually disabled using
the information display control. If the
stability control light still illuminates
steadily, have the system serviced by an
authorized dealer immediately. Operating
your vehicle with AdvanceTrac disabled
could lead to an increased risk of loss of
vehicle control, vehicle rollover, personal
injury and death.
E138639
The stability control light
temporarily illuminates on
engine start-up and flashes
when a driving condition activates the
stability system.
The stability control off light
temporarily illuminates on
engine start-up and stays on
when the traction control system is turned
off.
When the traction control system is turned
off or on, a message appears in the
information display showing system status.
158
Traction Control

PRINCIPLE OF OPERATION
WARNINGS
Vehicle modifications involving
braking system, aftermarket roof
racks, suspension, steering system,
tire construction and wheel and tire size
may change the handling characteristics
of the vehicle and may adversely affect
the performance of the AdvanceTrac
system. In addition, installing any stereo
loudspeakers may interfere with and
adversely affect the AdvanceTrac system.
Install any aftermarket stereo loudspeaker
as far as possible from the front center
console, the tunnel, and the front seats in
order to minimize the risk of interfering with
the AdvanceTrac sensors. Reducing the
effectiveness of the AdvanceTrac system
could lead to an increased risk of loss of
vehicle control, vehicle rollover, personal
injury and death.
Remember that even advanced
technology cannot defy the laws of
physics. It’s always possible to lose
control of a vehicle due to inappropriate
driver input for the conditions. Aggressive
driving on any road condition can cause
you to lose control of your vehicle
increasing the risk of personal injury or
property damage. Activation of the
AdvanceTrac system is an indication that
at least some of the tires have exceeded
their ability to grip the road; this could
reduce the operator’s ability to control the
vehicle potentially resulting in a loss of
vehicle control, vehicle rollover, personal
injury and death. If your AdvanceTrac
system activates, SLOW DOWN.
The AdvanceTrac with Roll Stability
Control system helps you keep control of
your vehicle when on a slippery surface.
The electronic stability control portion of
the system helps avoid skids and lateral
slides and roll stability control helps avoid
a vehicle rollover. The traction control
system helps avoid drive wheel spin and
loss of traction. See Using Traction
Control (page 158).
E72903
A
A
A
B
B
B
B
Vehicle without AdvanceTrac
with RSC skidding off its
intended route.
A
Vehicle with AdvanceTrac with
RSC maintaining control on a
slippery surface.
B
159
Stability Control

USING STABILITY CONTROL
AdvanceTrac® with Roll Stability
Control™ (RSC®)
The system automatically activates when
you start your engine. The AdvanceTrac
with RSC system cannot be completely
turned off, but the ESC and RSC portions
of the system are disabled when the
transmission is in R (Reverse). The traction
control portion of the system can be turned
off independently. See Using Traction
Control (page 158).
160
Stability Control

PARKING AID (IF EQUIPPED)
WARNINGS
To help avoid personal injury, please
read and understand the limitations
of the system as contained in this
section. Sensing is only an aid for some
(generally large and fixed) objects when
moving in reverse on a flat surface at
parking speeds. Traffic control systems,
inclement weather, air brakes, and external
motors and fans may also affect the
function of the sensing system; this may
include reduced performance or a false
activation.
To help avoid personal injury, always
use caution when in R (Reverse) and
when using the sensing system.
This system is not designed to
prevent contact with small or moving
objects. The system is designed to
provide a warning to assist the driver in
detecting large stationary objects to avoid
damaging the vehicle. The system may not
detect smaller objects, particularly those
close to the ground.
Certain add-on devices such as large
trailer hitches, bike or surfboard racks
and any device that may block the
normal detection zone of the system, may
create false beeps.
Note: Keep the sensors, located on the
bumper or fascia, free from snow, ice and
large accumulations of dirt. If the sensors
are covered, the system’s accuracy can be
affected. Do not clean the sensors with
sharp objects.
Note: If your vehicle sustains damage to
the bumper or fascia, leaving it misaligned
or bent, the sensing zone may be altered
causing inaccurate measurement of
obstacles or false alarms.
Note: If your vehicle is equipped with
MyKey®, it is possible to prevent turning the
sensing system off. See MyKey® (page 49).
The sensing system warns the driver of
obstacles within a certain range of the
bumper area. The system turns on
automatically whenever the ignition is
switched on.
When receiving a detection warning, the
radio volume is reduced to a
predetermined level. After the warning
goes away, the radio volume returns to the
previous level.
Rear Sensing System
The rear sensors are only active when the
transmission is in R (Reverse). As the
vehicle moves closer to the obstacle, the
rate of the audible warning increases.
When the obstacle is fewer than 10 inches
(25 centimeters) away, the warning
sounds continuously. If a stationary or
receding object is detected farther than 10
inches (25 centimeters) from the side of
the vehicle, the tone sounds for only three
seconds. Once the system detects an
object approaching, the warning sounds
again.
E130178
A
Coverage area of up to 6 feet (2
meters) from the rear bumper.
There is decreased coverage
area at the outer corners of the
bumper.
A
161
Parking Aids

The system detects certain objects while
the transmission is in R (Reverse):
• and moving toward a stationary object
at a speed of 3 mph (5 km/h) or less
• but not moving, and a moving object is
approaching the rear of the vehicle at
a speed of 3 mph (5 km/h) or less
• and moving at a speed of less than 3
mph (5 km/h) and a moving object is
approaching the rear of the vehicle at
a speed of less than 3 mph (5 km/h).
The system can be turned off using the
information display control. See General
Information (page 84). If a fault is
present in the system, a warning message
appears in the information display and
does not allow the driver to switch the
faulted system on.
Front Sensing System
The front sensors are active when the
gearshift is in any position other than P
(Park) or N (Neutral) and the vehicle speed
is below 6 mph (10 km/h).
E130382
A
Coverage area of up to 27 inches
(70 centimeters) from the front
of the vehicle and about 6–14
inches (15–35 centimeters) to
the side of the front end of the
vehicle. Refer to the reverse
sensing section for details on
coverage area.
A
The system sounds an audible warning
when obstacles are near either bumper in
the following manner:
• Objects detected by the front sensors
are indicated by a high-pitched tone
from the front radio speakers.
• Objects detected by the rear sensors
are indicated by a lower pitched tone
from the rear radio speakers.
• The sensing system reports the
obstacle which is closest to the front
or rear of the vehicle. For example, if
an obstacle is 24 inches (60
centimeters) from the front of the
vehicle and, at the same time, an
obstacle is only 16 inches (40
centimeters) from the rear of the
vehicle, the lower pitched tone sounds.
• An alternating warning sounds from
the front and rear if there are objects
at both bumpers that are closer than
10 inches (25 centimeters).
162
Parking Aids

For specific information on the reverse
sensing portion of the system, refer to that
section.
E142434
Press the button to switch the system off.
It will remain off for the entire ignition
cycle.
ACTIVE PARK ASSIST (IF
EQUIPPED)
WARNING
This system is designed to be a
supplementary park aid. It may not
work in all conditions and is not
intended to replace the driver’s attention
and judgment. The driver is responsible for
avoiding hazards and maintaining a safe
distance and speed, even when the system
is in use.
Note: The driver is always responsible for
controlling the vehicle, supervising the
system and intervening if required.
The system detects an available parallel
parking space and automatically steers
the vehicle into the space (hands-free)
while you control the accelerator, gearshift
and brakes. The system visually and
audibly instructs you to park the vehicle.
The system may not function correctly if
something passes between the front
bumper and the parking space (i.e. a
pedestrian or cyclist) or if the edge of the
neighboring parked vehicle is high from the
ground (i.e. a bus, tow truck or flatbed
truck).
Note: The sensors may not detect objects
in heavy rain or other conditions that cause
disruptive reflections.
Note: The sensors may not detect objects
with surfaces that absorb ultrasonic waves.
The system should not be used if:
• a foreign object (i.e. bike rack or trailer)
is attached to the front or rear of the
vehicle or at another location close to
the sensors.
• an overhanging object (i.e. surfboard)
is attached to the roof.
• the front bumper or side sensors are
damaged (i.e. in a collision) or
obstructed by a foreign object (i.e. front
bumper cover).
• a mini-spare tire is in use.
Using Active Park Assist
E142733
Press the button. The touch screen
displays a message and a corresponding
graphic to indicate it's searching for a
parking space. Use the turn signal to
indicate which side of the vehicle you want
the system to search on.
163
Parking Aids

Note: If the turn signal is not on, the system
automatically searches on the vehicle's
passenger side.
A
E130107
When a suitable space is found, the touch
screen displays a message and a chime
sounds. Slow down and stop at
approximately position (A), then follow
the instructions on the touch screen.
Note: You must observe that the selected
space remains clear of obstructions at all
times in the maneuver.
Note: Vehicles with overhanging loads (e.g.
a bus or a truck), street furniture and other
items may not be detected by active park
assist. You must make sure the selected
space is suitable for parking.
Note: The vehicle should be driven as
parallel to other vehicles as possible while
passing a parking space.
Note: The system always offers the last
detected parking space (i.e. if the vehicle
detects multiple spaces while you are
driving, it offers the last one).
Note: If driven above approximately 20
mph (35 km/h), the touch screen shows a
message to alert you to reduce vehicle
speed.
Automatic Steering into Parking
Space
Note: If vehicle speed exceeds 6 mph (10
km/h), the system switches off and you
need to take full control of the vehicle.
Note: If a maneuver is interrupted before
completion, the system switches off. The
steering wheel position will not indicate the
actual position of the steering and you have
to full take control of the vehicle.
With your hands off the wheel (and
nothing obstructing its movement) and
the transmission in R (Reverse), the vehicle
steers itself as instructions to safely move
the vehicle back and forward in the space
are displayed in the touch screen. While
reversing, the touch screen displays a
message instructing you to check your
surroundings (for safety reasons) and to
back-up slowly, accompanied by a
corresponding graphic.
164
Parking Aids

E130108
When you think the vehicle has enough
space in front and behind it, or you hear a
solid tone from the parking aid, bring the
vehicle to a complete stop.
E130109
When automatic steering is finished, the
touch screen displays a message indicating
that the active park assist process is done.
The driver is responsible for checking the
parking job and making any necessary
corrections before putting the transmission
in P (Park).
Deactivating the Park Assist
Feature
The system can be deactivated manually
by:
• pressing the active park assist button
• grabbing the steering wheel
• driving above approximately 20 mph
(35 km/h) for 30 seconds during an
active park search
• driving above 6 mph (10 km/h) during
automatic steering
• turning off the traction control system.
Certain vehicle conditions can also
deactivate the system, such as:
• Traction control has activated on a
slippery or loose surface.
• There is an anti-lock brake system
activation or failure.
165
Parking Aids

• Any door (except the driver’s) opens.
• Something touches the steering wheel.
If a problem occurs with the system, a
warning message is displayed, followed
by a chime. Occasional system messages
may occur in normal operation. For
recurring or frequent system faults, contact
an authorized dealer to have your vehicle
serviced.
Troubleshooting the System
The system does not look for a space
The traction control system may be off
Any door (except the driver’s) may not be completely closed
The system does not offer a particular space
Something may be contacting the front bumper or side sensors
There is not enough room on both sides of the vehicle in order to park
There is not enough space for the parking maneuver on the opposite side of the parking
space
The vehicle is farther than 5 ft (1.5 m) from the parking space
The vehicle is closer than 16 in. (40 cm) from neighboring parked vehicles
The transmission is in R (Reverse); the vehicle must be moving forward to detect a
parking space
The system does not position the vehicle where I want in the space
The vehicle is rolling in the opposite direction of the transmission (i.e. rolling forward
when R [Reverse] is selected)
The transmission is in R (Reverse); the vehicle must be moving forward to detect a
parking space
An irregular curb along the parking space prevents the system from aligning the vehicle
properly
Vehicles or objects bordering the space may not be positioned correctly
The vehicle was pulled too far past the parking space. The system performs best when
you drive the same distance past the parking space
166
Parking Aids

The system does not position the vehicle where I want in the space
The tires may not be installed or maintained correctly (i.e. not inflated correctly, improper
size, or of different sizes)
A repair or alteration has changed detection capabilities
A parked vehicle has a high attachment (i.e. salt sprayer, snowplow, moving truck bed,
etc.)
The parking space length or position of parked objects changed after your vehicle passed
The temperature around your vehicle changes quickly (i.e. driving from a heated garage
into the cold, or after leaving a car wash)
REAR VIEW CAMERA (IF EQUIPPED)
WARNINGS
The rear view camera system is a
reverse aid supplement device that
still requires the driver to use it in
conjunction with the interior and exterior
mirrors for maximum coverage.
Objects that are close to either
corner of the bumper or under the
bumper, might not be seen on the
screen due to the limited coverage of the
camera system.
Back up as slow as possible since
higher speeds might limit your
reaction time to stop the vehicle.
Use caution when using the rear
video camera and the liftgate is ajar.
If the liftgate is ajar, the camera will
be out of position and the video image may
be incorrect. All guidelines (if enabled)
have been removed when the liftgate is
ajar.
Use caution when turning camera
features on or off while in R
(Reverse). Make sure the vehicle is
not moving.
The rear view camera system provides a
video image of the area behind the vehicle.
During operation, lines appear in the
display which represent your vehicle’ s path
and proximity to objects behind the vehicle.
E142435
The camera is located on the liftgate.
Using the Rear View Camera
System
The rear view camera system displays
what is behind your vehicle when you place
the transmission in R (Reverse).
167
Parking Aids

The system uses three types of guides to
help you see what is behind your vehicle:
• Active guidelines: Show the intended
path of your vehicle when reversing.
• Fixed guidelines: Show the actual path
your vehicle is moving in while reversing
in a straight line. This can be helpful
when backing into a parking space or
aligning your vehicle with another
object behind you.
• Centerline: Helps align the center of
your vehicle with an object (i.e. a
trailer).
Note: If the transmission is in R (Reverse)
and the luggage compartment is ajar, no
rear view camera features are displayed.
Note: If the image comes on while the
transmission is not in R (Reverse), have the
system inspected by your authorized dealer.
Note: When towing, the camera only sees
what is being towed behind your vehicle.
This might not provide adequate coverage
as it usually provides in normal operation
and some objects might not be seen. In
some vehicles, the guidelines may disappear
once the trailer tow connector is engaged.
Note: The camera may not operate
correctly under the following conditions:
• Nighttime or dark areas if one or both
reverse lamps are not operating.
• The camera's view is obstructed by
mud, water or debris. Clean the lens
with a soft, lint-free cloth and
non-abrasive cleaner.
• The rear of the vehicle is hit or
damaged, causing the camera to
become misaligned.
To access any of the rear view camera
system settings, make the following
selections in the touch screen when the
transmission is not in R (Reverse):
• Menu > Vehicle > Rear View Camera
After changing a system setting, the touch
screen shows a preview of the selected
features.
Guidelines and the Centerline
Note: Active guidelines and fixed guidelines
are only available when the transmission is
in R (Reverse).
Note: The centerline is only available if
Active or Fixed guidelines are on.
A
B
C
D
F
E
E142436
Active guidelinesA
CenterlineB
Fixed guideline: Green zoneC
Fixed guideline: Yellow zoneD
Fixed guideline: Red zoneE
Rear bumperF
168
Parking Aids

Active guidelines are only shown with fixed
guidelines. To use active guidelines, turn
the steering wheel to point the guidelines
toward an intended path. If the steering
wheel position is changed while reversing,
the vehicle might deviate from the original
intended path.
The fixed and active guidelines fade in and
out depending on the steering wheel
position. The active guidelines are not
shown when the steering wheel position
is straight.
Always use caution while reversing.
Objects in the red zone are closest to your
vehicle and objects in the green zone are
farther away. Objects are getting closer to
your vehicle as they move from the green
zone to the yellow or red zones. Use the
side view mirrors and rear view mirror to
get better coverage on both sides and rear
of the vehicle.
Selectable settings for this feature are
ACTIVE + FIXED, FIXED and OFF.
Visual Park Aid Alert
Note: Visual park alert is only available
when the transmission is in R (Reverse).
Note: The reverse sensing system is not
effective at speeds above 3 mph (5 km/h)
and may not detect certain angular or
moving objects.
The system uses red, yellow and green
highlights which appear on top of the video
image when an object is detected by the
reverse sensing system. The alert highlights
the closest object detected. The reverse
sensing alert can be disabled and if visual
park aid alert is enabled, highlighted areas
are still displayed.
Selectable settings for this feature are ON
and OFF.
Manual Zoom
WARNING
When manual zoom is on, the full
area behind the vehicle is not shown.
Be aware of your surroundings when
using the manual zoom feature.
Note: Manual zoom is only available when
the transmission is in R (Reverse).
Note: When manual zoom is enabled, only
the centerline is shown.
This allows you to get a closer view of an
object behind the vehicle. The zoomed
image keeps the bumper in the image to
provide a reference. The zoom is only
active while the transmission is in R
(Reverse). When the transmission is
shifted out of R (Reverse), the feature
automatically turns off and must be reset
when it is used again.
Selectable settings for this feature are OFF,
Level 1, Level 2 or Level 3. Press the up and
down arrows to change the view. The
selection level appears between the
buttons (i.e. Level 1). The default setting
for the manual zoom is OFF.
Rear Camera Delay
When shifting the transmission out of R
(Reverse) and into any gear other than P
(Park), the camera image remains in the
display until the vehicle speed reaches 5
mph (8 km/h). This occurs when the rear
camera delay feature is on, or until a radio
button is selected.
Selectable settings for this feature are ON
and OFF. The default setting for the rear
camera delay is OFF.
169
Parking Aids

PRINCIPLE OF OPERATION
Cruise control lets you maintain a set
speed without keeping your foot on the
accelerator pedal.
USING CRUISE CONTROL
WARNING
Do not use cruise control in heavy
traffic or on roads that are winding,
slippery or unpaved.
Note: Vehicle speed may vary momentarily
when driving up or down a steep hill. Apply
the brakes if the vehicle speed increases
above the set speed while driving downhill.
Note: Cruise control will disengage if the
vehicle speed decreases more than 10 mph
(16 km/h) below your set speed while
driving uphill.
Switching On Cruise Control
E142437
Press and release ON.
Setting a Speed
Press and release SET+.
E71340
The indicator will display in the
instrument cluster.
Changing the Set Speed
E142438
AccelerateA
DecelerateB
• Press and hold SET+ or SET-. Release
the control when you reach the desired
speed.
• Press and release SET+ or SET-. The
set speed will change in approximately
1 mph (2 km/h) increments.
• Press the accelerator or brake pedal
until you reach the desired speed. Press
and release SET+.
Canceling a Set Speed
Pull CAN toward you and release, or tap
the brake pedal. The set speed will not be
erased.
Resuming a Set Speed
Pull RES toward you and release.
Switching Off Cruise Control
Note: The set speed is erased when you
switch off cruise control.
Press and release OFF or switch off the
ignition.
170
Cruise Control

BLIND SPOT MONITOR
Blind Spot Information System
(BLIS®) with Cross Traffic Alert (If
Equipped)
WARNING
To help avoid injuries, NEVER use the
BLIS as a replacement for using the
interior and exterior mirrors and
looking over your shoulder before changing
lanes. BLIS is not a replacement for careful
driving and only an assist.
A
A
E124788
BLIS aids you in detecting vehicles that
may have entered the blind spot zone (A).
The detection area is on both sides of the
vehicle, extending rearward from the
exterior mirrors to approximately 10 feet
(3 meters) beyond the bumper. The
system alerts you if certain vehicles enter
the blind spot zone while driving.
Cross traffic alert warns you of vehicles
approaching from the sides when the
transmission is in R (Reverse).
Note: BLIS is not designed to prevent
contact with other vehicles or objects; or to
detect parked vehicles, people, animals or
infrastructure (fences, guardrails, trees,
etc.). It is designed to alert the driver to
vehicles in the blind zones.
Note: When a vehicle passes quickly
through the blind zone, typically fewer than
two seconds, the system does not trigger.
Using the Systems
BLIS turns on when the engine is started
and the vehicle is driven forward above 3
mph (5 km/h); it remains on while the
transmission is in D (Drive) and N
(Neutral). If shifted out of D (Drive) or N
(Neutral), the system enters cross traffic
alert mode. Once shifted back into D
(Drive), BLIS turns back on when the
vehicle is driven above 3 mph (5 km/h).
Note: BLIS does not function in R (Reverse)
or P (Park) or provide any additional
warning when a turn signal is on.
Cross traffic alert detects approaching
vehicles from up to 45 feet (14 meters)
away though coverage decreases when the
sensors are blocked. Reversing slowly helps
increase the coverage area and
effectiveness.
WARNING
To help avoid personal injury, NEVER
use the cross traffic alert system as
a replacement for using the interior
and exterior mirrors and looking over your
shoulder before backing out of a parking
space. Cross traffic alert is not a
replacement for careful driving and only
an assist.
171
Driving Aids

E142440
In this first example, the left sensor is only
partially obstructed; zone coverage is
nearly maximized.
E142441
Zone coverage also decreases when
parking at shallow angles. Here, the left
sensor is mostly obstructed; zone coverage
on that side is severely limited.
172
Driving Aids

System Lights and Messages
E142442
The BLIS and cross traffic alert systems
illuminate a yellow alert indicator in the
outside mirror on the side of the vehicle
the approaching vehicle is coming from.
Note: The alert indicator dims when
nighttime darkness is detected.
Cross traffic alert also sounds a series of
tones and a message appears in the
information display indicating a vehicle is
coming from the right or left. Cross traffic
alert works with the reverse sensing
system which sounds its own series of
tones. See Parking Aid (page 161).
System Sensors
WARNING
Just prior to the system recognizing
a blocked condition and alerting the
driver, the number of missed objects
will increase. To help avoid injuries, NEVER
use the BLIS as a replacement for using
the side and rear view mirrors and looking
over your shoulder before changing lanes.
BLIS is not a replacement for careful
driving and only an assist.
Note: It is possible to get a blockage
warning with no blockage present; this is
rare and known as a false blockage warning.
A false blocked condition either
self-corrects or clears after a key cycle.
E142443
The system uses radar sensors which are
located behind the bumper fascia on each
side of your vehicle. Do not allow these
areas to become obstructed by mud, snow
or bumper stickers, as this can cause
degraded system performance.
If the system detects a degraded
performance condition, a message warning
of a blocked sensor or a message warning
of low visibility will appear in the
information display and the alert indicator
illuminates in the appropriate mirror(s).
The information display warning can be
cleared but the alert indicator remains
illuminated.
When the blockage is removed, the system
can be reset in two ways:
• when at least two objects are detected
while driving, or
• turn the ignition from on to off, then
back on.
If the blockage is still present after the key
cycle, the system senses again that it is
blocked after driving in traffic.
173
Driving Aids

Reasons for messages being displayed
Clean the fascia area in
front of the radar or remove
the obstruction.
The radar
surface is
dirty or
obstructed
Drive normally in traffic for
a few minutes to allow the
radar to detect passing
vehicles so it can clear the
blocked state.
The radar
surface is
not dirty or
obstructed
No action required. The
system automatically
resets to an unblocked
state once the rainfall or
snowfall rate decreases or
stops. Do not use BLIS or
cross traffic alert in these
conditions.
Heavy rain-
fall/snow-
fall inter-
feres with
the radar
signals
System Limitations
The BLIS and cross traffic alert systems
do have their limitations; situations such
as severe weather conditions or debris
build-up on the sensor area may limit
vehicle detection.
The following are other situations that may
limit the BLIS:
• Certain maneuvering of vehicles
entering and exiting the blind zone.
• Vehicles passing through the blind zone
at very fast rates.
• When several vehicles forming a
convoy pass through the blind zone.
The following are other situations that may
limit the cross traffic alert system:
• Adjacently parked vehicles or objects
obstructing the sensors.
• Approaching vehicles passing at
speeds greater than 15 mph (24 km/h).
• Driving in reverse faster than 3 mph (5
km/h).
• Backing out of an angled parking spot.
False Alerts
Note: If the vehicle has a factory equipped
tow bar, and it is towing a trailer, the sensors
will detect the trailer and turn the BLIS off
to avoid false alerts. For non-factory
equipped tow bars you may want to turn
the BLIS off manually.
There may be certain instances when
either the BLIS or cross traffic alert
systems illuminate the alert indicator with
no vehicle in the coverage zone; this is
known as a false alert. Some amount of
false alerts are normal; they are temporary
and self-correct.
System Errors
If either system senses a problem with the
left or right sensor, the BLIS telltale
illuminates and remains on and the
following will appear in the information
display:
• BLIS: X sensor fault Service req’d or
• Cross Traffic malfunction Service req’d
When problems that may cause the left or
right indicator not to illuminate, only the
information display faults appear.
Switching the Systems Off and On
One or both systems can be switched off
temporarily by using the information
display control. See General Information
(page 84). When the BLIS is switched off,
you will not receive alerts and a telltale
illuminates in the information display. The
system switches back on whenever the
ignition is switched on.
174
Driving Aids

One or both systems can also be switched
off permanently at your authorized dealer.
Once switched off, switching it back on
must also be done at your authorized
dealer.
ECO MODE
This system assists you in driving more
efficiently by constantly monitoring
characteristics of gear changing,
anticipation of traffic conditions and
speeds while driving.
The value of these characteristics is
represented by petals shown in the display,
with five petals being the most efficient.
The more efficiently you drive, the better
the rating, and the better your overall fuel
economy
Note: These efficiency values do not result
in a defined fuel consumption figure. It might
vary as it is not only related to these driving
habits, but also influenced by many other
factors such as short trips and cold starts.
Note: Frequent short trips, where the engine
does not fully warm up, will also increase
fuel consumption
The system is accessed using the
information display control. See General
Information (page 84).
Type 1
A
B
E142444
AnticipationA
Efficient speedB
Anticipation
Adjust your vehicle speed and the distance
to other vehicles to avoid the need for
heavy braking or acceleration to improve
fuel economy.
Efficient speed
Reduce your cruising speed on open roads
to improve economy. Higher speeds use
more fuel.
Type 2 and 3
The relevant information is shown in the
display.
Resetting Eco Mode
Reset the average fuel consumption by
using the information display control.
Note: New values may take a short time to
calculate
175
Driving Aids

STEERING
Electric Power Steering
WARNINGS
The electric power steering system
has diagnostic checks that
continuously monitor the system to
ensure proper operation. When a system
error is detected a steering message will
appear in the information display.
The electric power steering system
has diagnostic checks that
continuously monitor the system to
ensure proper operation of the electronic
system. When an electronic error is
detected, a message will be displayed in
the information display. If this happens,
stop the vehicle in a safe place, and turn
off the engine. After at least 10 seconds,
reset the system by restarting the engine,
and watch the information display for a
steering message. If a steering message
returns, or returns while driving, take the
vehicle to your dealer to have it checked.
Obtain immediate service if a system
error is detected. You may not notice
any difference in the feel of your
steering, but a serious condition may exist.
Failure to do so may result in loss of
steering control.
Your vehicle is equipped with an electric
power-assisted steering system. There is
no fluid reservoir to check or fill.
If your vehicle loses electrical power while
you are driving (or if the ignition is turned
off), you can steer the vehicle manually,
but it takes more effort. Extreme
continuous steering may increase the effort
it takes for you to steer. This occurs to
prevent internal overheating and
permanent damage to your steering
system. If this should occur, you will neither
lose the ability to steer the vehicle
manually nor will it cause permanent
damage. Typical steering and driving
maneuvers will allow the system to cool
and steering assist will return to normal.
Steering Tips
If the steering wanders or pulls, check for:
• an improperly inflated tire
• uneven tire wear
• loose or worn suspension components
• loose or worn steering components
• improper vehicle alignment
A high crown in the road or high crosswinds
may also make the steering seem to
wander or pull.
176
Driving Aids

REAR UNDER FLOOR
STORAGE
Passenger Compartment Floor
E78097
The under floor storage compartment is
located behind the front passenger seat.
Cargo Management System (If
Equipped)
E142445
The system is located in the floor of the
cargo area. Lift the handle to open.
Adjustable Load Floor (If Equipped)
E142446
Vehicles with the standard size spare tire
can adjust the load floor to two positions.
The front of the load floor can be placed
either on (for high position) or below (for
low position) the ledges behind the rear
seats. The rear of the load floor always sits
on the two small shelves located on the
liftgate trim.
LUGGAGE COVERS
WARNINGS
Make sure that the posts are properly
latched in mounting features. The
cover may cause injury in a sudden
stop or accident if it is not securely
installed.
Do not place any objects on the
cargo area shade. They may obstruct
your vision or strike occupants of
vehicle in the case of a sudden stop or
collision.
Use the shade to cover items in the cargo
area of your vehicle.
177
Load Carrying

E142447
Insert the ends of the cargo shade into the
mounting features located behind the rear
seat on the rear trim panels to install the
shade.
To operate the shade:
1. Pull the rear edge of the cargo shade
rearward.
2. Secure both ends of the support rod
into the retention slots located on the
rear quarter trim panels.
ROOF RACKS AND LOAD
CARRIERS
WARNING
When loading the roof rail crossbars,
it is recommended to evenly
distribute the load, as well as
maintain a low center of gravity. Loaded
vehicles, with higher centers of gravity, may
handle differently than unloaded vehicles.
Extra precautions, such as slower speeds
and increased stopping distance, should
be taken when driving a heavily loaded
vehicle.
The maximum recommended load, evenly
distributed on the crossbars, is:
• 100 pounds (45 kilograms) for vehicles
without a moonroof
• 45 pounds (20 kilograms) for vehicles
with a moonroof.
Note: Loads should never be placed directly
on the roof panel. The roof panel is not
designed to directly carry a load.
For proper function of the roof rack system,
loads must be placed directly on crossbars
affixed to the roof rack side rails. Your
vehicle may be equipped with
factory-installed crossbars. Ford Genuine
Accessory crossbars, designed specifically
for your vehicle, are also recommended for
use with your roof rack system.
Make sure that the load is securely
fastened. Check the tightness of the load
before driving and at each fuel stop.
Adjusting the Crossbar (If Equipped)
Note: Wind noise can be minimized by
either removing or repositioning the crossbar
when not is use. Position the front crossbar
in the rearward position to minimize wind
noise. The front crossbar can be adjusted
or removed using the steps below. The rear
crossbar fasteners can be removed by
unscrewing the assembly.
E142448
178
Load Carrying

1. Remove the crossbar thumbwheels at
both sides of the front crossbar by
turning them counterclockwise.
Note: A small screwdriver or similar tool
can be used to loosen the thumbwheel.
Apply to the fastener head on the top of the
thumbwheel or insert the shaft between the
two paddles of the thumbwheel and rotate
it loose.
2. Remove the crossbar by sliding the
ends off of the shoulder bolts in the
side rails.
3. Move the crossbar to the new side rail
position and slide the crossbar onto
the shoulder bolt at that position.
4. Replace and tighten the thumbwheels
at both sides of the crossbar by turning
them clockwise until tight. A small
screwdriver or similar tool can be used
to tighten if necessary.
Make sure to check that the thumbwheels
are tight each time load is added or
removed from the roof rack, and
periodically while traveling. Make sure that
the load is secure before traveling.
LOAD LIMIT
Vehicle loading - with and without
a trailer
This section will guide you in the proper
loading of your vehicle, trailer or both, to
keep your loaded vehicle weight within its
design rating capability, with or without a
trailer. Properly loading your vehicle will
provide maximum return of vehicle design
performance. Before loading your vehicle,
familiarize yourself with the following
terms for determining your vehicle’ s weight
ratings, with or without a trailer, from the
vehicle’s Tire Label or Safety Compliance
Certification Label:
Base Curb Weight - is the weight of the
vehicle including a full tank of fuel and all
standard equipment. It does not include
passengers, cargo, or optional equipment.
Vehicle Curb Weight - is the weight of
your new vehicle when you picked it up
from your authorized dealer plus any
aftermarket equipment.
E142513
179
Load Carrying

Payload - is the combined weight of cargo
and passengers that the vehicle is carrying.
The maximum payload for your vehicle can
be found on the Tire Label on the B-Pillar
or the edge of the driver’s door (vehicles
exported outside the US and Canada may
not have a Tire Label). Look for “THE
COMBINED WEIGHT OF OCCUPANTS
AND CARGO SHOULD NEVER EXCEED
XXX kg OR XXX lb.” for maximum
payload. The payload listed on the Tire
Label is the maximum payload for the
vehicle as built by the assembly plant. If
any aftermarket or authorized-dealer
installed equipment has been installed on
the vehicle, the weight of the equipment
must be subtracted from the payload
listed on the Tire Label in order to
determine the new payload.
WARNING
The appropriate loading capacity of
your vehicle can be limited either by
volume capacity (how much space
is available) or by payload capacity (how
much weight the vehicle should carry).
Once you have reached the maximum
payload of your vehicle, do not add more
cargo, even if there is space available.
Overloading or improperly loading your
vehicle can contribute to loss of vehicle
control and vehicle rollover.
Example only:
E142516
180
Load Carrying

E142517
E142518
Cargo Weight – includes all weight added
to the Base Curb Weight, including cargo
and optional equipment. When towing,
trailer tongue load or king pin weight is also
part of cargo weight.
GAW (Gross Axle Weight) - is the total
weight placed on each axle (front and rear)
– including vehicle curb weight and all
payload.
GAWR (Gross Axle Weight Rating) - is
the maximum allowable weight that can
be carried by a single axle (front or rear).
These numbers are shown on the
Safety Compliance Certification Label.
The label shall be affixed to either the
door hinge pillar, door-latch post, or
the door edge that meets the
door-latch post, next to the driver's
seating position. The total load on each
axle must never exceed its GAWR.
Note: For trailer towing information refer
to the RV and Trailer Towing Guide provided
by your authorized dealer.
181
Load Carrying

E142521
GVW (Gross Vehicle Weight) - is the
Vehicle Curb Weight + cargo + passengers.
GVWR (Gross Vehicle Weight Rating)
- is the maximum allowable weight of the
fully loaded vehicle (including all options,
equipment, passengers and cargo). The
GVWR is shown on the Safety
Compliance Certification Label. The
label shall be affixed to either the door
hinge pillar, door-latch post, or the
door edge that meets the door-latch
post, next to the driver's seating
position.
182
Load Carrying

Example only:
E142523
E142524
183
Load Carrying

WARNING
Exceeding the Safety Compliance
Certification Label vehicle weight
rating limits could result in
substandard vehicle handling or
performance, engine, transmission and/or
structural damage, serious damage to the
vehicle, loss of control and personal injury.
E142526
GCW (Gross Combined Weight) - is the
weight of the loaded vehicle (GVW) plus
the weight of the fully loaded trailer
GCWR (Gross Combined Weight
Rating) -is the maximum allowable
weight of the vehicle and the loaded trailer
-including all cargo and passengers - that
the vehicle can handle without risking
damage. (Important: The towing vehicle’s
braking system is rated for operation at
GVWR, not at GCWR.) Separate functional
brakes should be used for safe control of
towed vehicles and for trailers where the
GCW of the towing vehicle plus the trailer
exceed the GVWR of the towing vehicle.
The GCW must never exceed the GCWR.
Maximum Loaded Trailer Weight - is the
highest possible weight of a fully loaded
trailer the vehicle can tow. It assumes a
vehicle with only mandatory options, no
cargo (internal or external), a tongue load
of 10–15% (conventional trailer) or king
pin weight of 15–25% (fifth wheel trailer),
and driver only (150 lb. [68 kg]). Consult
your authorized dealer (or the RV and
Trailer Towing Guide provided by your
authorized dealer) for more detailed
information.
Tongue Load or Fifth Wheel King Pin
Weight - refers to the amount of the
weight that a trailer pushes down on a
trailer hitch.
Examples: For a 5000 lb. (2268 kg)
conventional trailer, multiply 5000 by 0.10
and 0.15 to obtain a proper tongue load
range of 500 to 750 lb. (227 to 340 kg).
For an 11500 lb. (5216 kg) fifth wheel
trailer, multiply by 0.15 and 0.25 to obtain
a proper king pin load range of 1725 to 2875
lb. (782 to 1304 kg).
WARNINGS
Do not exceed the GVWR or the
GAWR specified on the Safety
Compliance Certification Label.
Do not use replacement tires with
lower load carrying capacities than
the original tires because they may
lower the vehicle’s GVWR and GAWR
limitations. Replacement tires with a higher
limit than the original tires do not increase
the GVWR and GAWR limitations.
Exceeding any vehicle weight rating
limitation could result in serious
damage to the vehicle and/or
personal injury.
184
Load Carrying

Steps for determining the correct load
limit:
1. Locate the statement "The combined
weight of occupants and cargo should
never exceed XXX kg or XXX lb." on
your vehicle’s placard.
2. Determine the combined weight of the
driver and passengers that will be riding
in your vehicle.
3. Subtract the combined weight of the
driver and passengers from XXX kg or
XXX lb.
4. The resulting figure equals the
available amount of cargo and luggage
load capacity. For example, if the “XXX”
amount equals 1,400 lb. and there will
be five 150 lb. passengers in your
vehicle, the amount of available cargo
and luggage load capacity is 650 lb.
(1400-750 (5 x 150) = 650 lb.). In
metric units (635-340 (5 x 68) = 295
kg.)
5. Determine the combined weight of
luggage and cargo being loaded on the
vehicle. That weight may not safely
exceed the available cargo and luggage
load capacity calculated in Step 4.
6. If your vehicle will be towing a trailer,
load from your trailer will be transferred
to your vehicle. Consult this manual to
determine how this reduces the
available cargo and luggage load
capacity of your vehicle.
185
Load Carrying

The following gives you a few examples
on how to calculate the available amount
of cargo and luggage load capacity:
• Another example for your vehicle with
1400 lb. (635 kg) of cargo and luggage
capacity. You decide to go golfing. Is
there enough load capacity to carry
you, 4 of your friends and all the golf
bags? You and four friends average
220 lb. (99 kg) each and the golf bags
weigh approximately 30 lb. (13.5 kg)
each. The calculation would be: 1400
- (5 x 220) - (5 x 30) = 1400 - 1100 -
150 = 150 lb. Yes, you have enough load
capacity in your vehicle to transport
four friends and your golf bags. In
metric units, the calculation would be:
635 kg - (5 x 99 kg) - (5 x 13.5 kg) =
635 - 495 - 67.5 = 72.5 kg.
• A final example for your vehicle with
1,400 lb. (635 kg) of cargo and luggage
capacity. You and one of your friends
decide to pick up cement from the local
home improvement store to finish that
patio you have been planning for the
past 2 years. Measuring the inside of
the vehicle with the rear seat folded
down, you have room for 12-100 lb. (45
kg) bags of cement. Do you have
enough load capacity to transport the
cement to your home? If you and your
friend each weigh 220 lb. (99 kg), the
calculation would be: 1400 - (2 x 220)
- (12 x 100) = 1400 - 440 - 1200 = - 240
lb. No, you do not have enough cargo
capacity to carry that much weight. In
metric units, the calculation would be:
635 kg - (2 x 99 kg) - (12 x 45 kg) = 635
- 198 - 540 = -103 kg. You will need to
reduce the load weight by at least 240
lb. (104 kg). If you remove 3-100 lb. (45
kg) cement bags, then the load
calculation would be:1400 - (2 x 220)
- (9 x 100) = 1400 - 440 - 900 = 60 lb.
Now you have the load capacity to
transport the cement and your friend
home. In metric units, the calculation
would be: 635 kg - (2 x 99 kg) - (9 x 45
kg) = 635 - 198 - 405 = 32 kg.
The above calculations also assume that
the loads are positioned in your vehicle in
a manner that does not overload the Front
or the Rear Gross Axle Weight Rating
specified for your vehicle on the Safety
Compliance Certification Label. The label
shall be affixed to either the door hinge
pillar, door-latch post, or the door edge
that meets the door-latch post, next to the
driver's seating position.
186
Load Carrying

Special Loading Instructions for
Owners of Pick-up Trucks and
Utility-type Vehicles
WARNING
Loaded vehicles may handle
differently than unloaded vehicles.
Extra precautions, such as slower
speeds and increased stopping distance,
should be taken when driving a heavily
loaded vehicle.
Your vehicle can haul more cargo and
people than most passenger cars.
Depending upon the type and placement
of the load, hauling cargo and people may
raise the center of gravity of the vehicle.
187
Load Carrying

TOWING A TRAILER
WARNINGS
Do not exceed the GVWR or the
GAWR specified on the certification
label.
Towing trailers beyond the maximum
recommended gross trailer weight
exceeds the limit of the vehicle and
could result in engine damage,
transmission damage, structural damage,
loss of vehicle control, vehicle rollover and
personal injury.
Your vehicle's load capacity is designated
by weight, not by volume, so you cannot
necessarily use all available space when
loading a vehicle.
Towing a trailer places an additional load
on your vehicle's engine, transmission, axle,
brakes, tires and suspension. Inspect these
components periodically during, and after,
any towing operation.
TRAILER SWAY CONTROL (IF
EQUIPPED)
Note: This feature does not prevent trailer
sway, but reduces it once it begins.
Note: This feature cannot stop all trailers
from swaying.
Note: In some cases, if vehicle speed is too
high, the system may activate multiple
times, gradually reducing vehicle speed.
This feature applies the vehicle brakes at
individual wheels and, if necessary, reduces
engine power. If the trailer begins to sway,
the stability control light flashes. The first
thing to do is slow the vehicle down, then
pull safely to the side of the road and
check for proper tongue load and trailer
load distribution. See Load Carrying
(page 177).
RECOMMENDED TOWING
WEIGHTS
Note: For high altitude operation, reduce
the gross combined weight by 2% per 1000
feet (300 meters) elevation.
Note: Certain states require electric trailer
brakes for trailers over a specified weight.
Be sure to check state regulations for this
specified weight. The maximum trailer
weights listed may be limited to this
specified weight, as the vehicle's electrical
system does not include the wiring
connector needed to activate electric trailer
brakes.
Maximum Trailer
Frontal Area - ft
2
(m
2
)
Maximum Trailer
Weight - lb (kg)
Maximum GCWR - lb
(kg)
Powertrain
20 (1.86)2000 (907)5866 (2661)2WD 1.6L
20 (1.86)2000 (907)6035 (2737)4WD 1.6L
20 (1.86)2000 (907)5977 (2711)
2WD 2.0L
1
30 (2.78)3500 (1588)7477 (3391)
2WD 2.0L
2
20 (1.86)2000 (907)6126 (2779)
4WD 2.0L
1
188
Towing

Maximum Trailer
Frontal Area - ft
2
(m
2
)
Maximum Trailer
Weight - lb (kg)
Maximum GCWR - lb
(kg)
Powertrain
30 (2.78)3500 (1588)7626 (3459)
4WD 2.0L
2
20 (1.86)2000 (907)5417 (2457)2WD 2.5L
1
Without trailer tow package.
2
With trailer tow package.
189
Towing

ESSENTIAL TOWING CHECKS
Follow these guidelines to ensure safe
towing:
• Do not tow a trailer until your vehicle
has been driven at least 1000 miles
(1600 kilometers).
• Consult your local motor vehicle laws
for towing a trailer.
• Refer to the instructions included with
towing accessories for the proper
installation and adjustment
specifications.
• Service your vehicle more frequently if
you tow a trailer. Refer to your
scheduled maintenance information.
Load specification terms are found on the
tire label and Safety Compliance
Certification Label. Instructions on
calculating your vehicle's load can be
found earlier in this manual. See Load
Limit (page 179). Remember to account
for the trailer tongue weight as part of the
vehicle load when calculating the total
vehicle weight.
Hitches
Do not use a hitch that either clamps onto
the bumper or attaches to the axle.
Distribute the trailer load so 10-15% of the
total trailer weight is on the tongue.
Safety Chains
Note: Never attach safety chains to the
bumper.
Always connect the safety chains to the
vehicle's hook retainers. To connect the
safety chains, cross them under the trailer
tongue and allow slack for turning corners.
If you use a rental trailer, follow the rental
agency's instructions.
Trailer Brakes
WARNING
Do not connect a trailer's hydraulic
brake system directly to your
vehicle's brake system. Your vehicle
may not have enough braking power and
your chances of having a collision greatly
increase.
Electric brakes and manual, automatic or
surge-type trailer brakes are safe if
installed properly and adjusted to the
manufacturer's specifications. The trailer
brakes must meet local and Federal
regulations.
The braking system of the tow vehicle is
rated for operation at the GVWR not
GCWR.
Trailer Lamps
Trailer lamps are required on most towed
vehicles. Ensure all running lights, brake
lights, turn signals and hazard lights are
working. Contact your authorized dealer
or trailer rental agency for proper
instructions and equipment for hooking up
the lamps.
Before Towing a Trailer
Practice turning, stopping and backing-up
to get the feel of the vehicle-trailer
combination before starting on a trip.
When turning, make wider turns so the
trailer wheels will clear curbs and other
obstacles.
190
Towing

When Towing a Trailer
• Do not drive faster than 70 mph (113
km/h) during the first 500 miles (800
kilometers) and do not make
full-throttle starts.
• Check your hitch, electrical connections
and trailer wheel lug nuts thoroughly
after you have traveled 50 miles (80
km).
• Place the gearshift lever in position P
to aid in engine and transmission
cooling and A/C efficiency during hot
weather while stopped in traffic.
• Turn off the speed control. The speed
control may turn off automatically
when you are towing on long, steep
grades.
• Shift to a lower gear when driving down
a long or steep hill. Do not apply the
brakes continuously, as they may
overheat and become less effective.
• If your transmission is equipped with
the grade assist feature, use this
feature when towing. This provides
engine braking and helps eliminate
excessive transmission shifting for
optimum fuel economy and
transmission cooling.
• Allow more distance for stopping with
a trailer attached; anticipate stops and
brake gradually.
• Avoid parking on a grade. However, if
you must park on a grade, place wheel
chocks under the trailer's wheels.
TOWING POINTS (IF EQUIPPED)
Towing Eye Location
The screw-in towing eye is located in the
spare wheel well.
The towing eye must always be carried in
the vehicle.
Installing the Towing Eye
The screw-in towing eye has a left-hand
thread. Turn it counterclockwise to install
it. Make sure that the towing eye is fully
tightened.
E146284
Insert a suitable object to pry open the
cover (1). Use recessed/notched portion
of the cover. Screw in the towing eye (2).
Towing the Vehicle on Four Wheels
Switch the ignition to the on position.
Failure to do so results in steering lock and
non-function of indicator and brake lamps.
Braking and steering efforts are high if the
engine is not running. Maintain increased
stopping distances.
191
Towing

TRANSPORTING THE VEHICLE
E143886
If you need to have your vehicle towed,
contact a professional towing service or,
if you are a member of a roadside
assistance program, your roadside
assistance service provider.
It is recommended that your vehicle be
towed with a wheel lift and dollies or
flatbed equipment. Do not tow with a
slingbelt. Ford Motor Company has not
approved a slingbelt towing procedure.
Ford Motor Company produces a towing
manual for all authorized tow truck
operators. Have your tow truck operator
refer to this manual for proper hook-up
and towing procedures for your vehicle.
Front-wheel drive (FWD) vehicles can be
towed from the front if proper wheel lift
equipment is used to raise the front wheels
off the ground. The rear wheels can be left
on the ground when towed in this fashion.
FWD vehicles can also be towed from the
rear using wheel lift equipment; however,
it is required that the front wheels be
placed on a dolly to prevent damage to
the transmission.
Four-wheel drive (4WD) vehicles must be
towed with a wheel lift and dollies or
flatbed equipment, with all the wheels off
the ground, to prevent damage to the
transmission, 4WD system or vehicle. If the
vehicle is towed by other means or
incorrectly, vehicle damage may occur.
TOWING THE VEHICLE ON
FOUR WHEELS
Emergency Towing
In the event your vehicle becomes disabled
(without access to wheel dollies,
car-hauling trailer, or flatbed transport
vehicle), it can be flat-towed (all wheels
on the ground, regardless of the
powertrain/transmission configuration)
under the following conditions:
• The vehicle is facing forward so that it
is towed in a forward direction.
• The transmission gear shift lever is
placed in position N. If The
transmission is gear shift lever cannot
be moved to position N, it may need to
be overridden. See Transmission
(page 147).
• Maximum speed is 35 mph (56 km/h).
• Maximum distance is 50 miles (80
kilometers).
192
Towing

Recreational Towing
Follow these guidelines if you have a need
for recreational (RV) towing. An example
of recreational towing would be towing
your vehicle behind a motorhome. These
guidelines are designed to ensure that your
transmission is not damaged.
Front-wheel drive (FWD) vehicles can be
towed with the front wheels off the ground
by using a tow dolly. If you are using a tow
dolly follow the instructions specified by
the equipment provider.
Four-wheel drive (4WD) vehicles cannot
be towed with any wheels on the ground,
as vehicle or transmission damage may
occur. It is recommended to tow your
vehicle with all four (4) wheels off the
ground such as when using a car-hauling
trailer. Otherwise, no recreational towing
is permitted.
193
Towing

BREAKING-IN
You need to break in new tires for
approximately 300 miles (480
kilometers). During this time, your vehicle
may exhibit some unusual driving
characteristics.
Avoid driving too fast during the first 1000
miles (1600 kilometers). Vary your speed
frequently and change up through the
gears early. Do not labor the engine.
Do not tow during the first 1000 miles
(1600 kilometers).
ECONOMICAL DRIVING
Fuel economy is affected by several things
such as how you drive, the conditions you
drive under and how you maintain your
vehicle.
There are some things to keep in mind that
may improve your fuel economy:
• Accelerate and slow down in a smooth,
moderate fashion.
• Drive at steady speeds without
stopping.
• Anticipate stops; slowing down may
eliminate the need to stop.
• Combine errands and minimize
stop-and-go driving.
• Close the windows for high-speed
driving.
• Drive at reasonable speeds (traveling
at 55 mph [88 km/h] uses 15% less
fuel than traveling at 65 mph [105
km/h]).
• Keep the tires properly inflated and use
only the recommended size.
• Use the recommended engine oil.
• Perform all regularly scheduled
maintenance.
There are also some things you may not
want to do because they may reduce your
fuel economy:
• Sudden accelerations or hard
accelerations.
• Rev the engine before turning it off.
• Idle for periods longer than one minute.
• Warm up your vehicle on cold
mornings.
• Use the air conditioner or front
defroster.
• Use the speed control in hilly terrain.
• Rest your foot on the brake pedal while
driving.
• Drive a heavily loaded vehicle or tow a
trailer.
• Carry unnecessary weight
(approximately 1 mpg [0.4 km/L] is
lost for every 400 lb [180 kg] of weight
carried).
• Add particular accessories to your
vehicle (e.g. bug deflectors,
rollbars/light bars, running boards, ski
racks).
• Drive with the wheels out of alignment.
DRIVING THROUGH WATER
Note: Driving through deep water above
the recommended levels can cause vehicle
damage.
Note: Once through the water, always dry
the brakes by moving your vehicle slowly
while applying light pressure on the brake
pedal. Wet brakes do not stop the vehicle
as quickly as dry brakes.
194
Driving Hints

E142667
If driving through deep or standing water
is unavoidable, proceed very slowly. Never
drive through water that is higher than the
bottom of the wheel rims (for cars) or the
bottom of the hubs (for trucks).
When driving through water, traction or
brake capability may be limited. Also,
water may enter your engine’s air intake
and severely damage your engine or your
vehicle may stall.
FLOOR MATS
E142666
WARNINGS
Always use floor mats that are
designed to fit the foot well of your
vehicle. Only use floor mats that
leave the pedal area unobstructed. Only
use floor mats that are firmly secured to
retention posts so that they cannot slip out
of position and interfere with the pedals
or impair safe operation of your vehicle in
other ways.
Pedals that cannot move freely can
cause loss of vehicle control and
increase the risk of serious personal
injury.
Always make sure that the floor
mats are properly attached to the
retention posts in the carpet that are
supplied with your vehicle. Floor mats must
be properly secured to both retention posts
to ensure mats do not shift out of position.
Never place floor mats or any other
covering in the vehicle foot well that
cannot be properly secured to
prevent them from moving and interfering
with the pedals or the ability to control the
vehicle.
Never place floor mats or any other
covering on top of already installed
floor mats. Floor mats should always
rest on top of vehicle carpeting surface and
not another floor mat or other covering.
Additional floor mats or any other covering
will reduce the pedal clearance and
potentially interfere with pedal operation.
Check attachment of floor mats on
a regular basis. Always properly
reinstall and secure floor mats that
have been removed for cleaning or
replacement.
Always make sure that objects
cannot fall into the driver foot well
while the vehicle is moving. Objects
that are loose can become trapped under
the pedals causing a loss of vehicle control.
195
Driving Hints

WARNINGS
Failure to properly follow floor mat
installation or attachment
instructions can potentially cause
interference with pedal operation causing
loss of control of vehicle.
To install floor mats, position the
floor mat so that the eyelet is over
the retention post and press down
to lock in.
To remove the floor mat, reverse the
installation procedure.
196
Driving Hints

ROADSIDE ASSISTANCE
Vehicles Sold In The U.S.: Getting
Roadside Assistance
To fully assist you should you have a
vehicle concern Ford Motor Company
offers a complimentary roadside
assistance program. This program is
separate from the New Vehicle Limited
Warranty. The service is available:
• 24-hours, seven days a week.
• for the coverage period listed on the
Roadside Assistance Card included in
your Owner's Manual portfolio.
Roadside assistance will cover:
• a flat tire change with a good spare
(except vehicles that have been
supplied with a tire inflation kit).
• battery jump start.
• lock-out assistance (key replacement
cost is the customer's responsibility).
• fuel delivery — Independent Service
Contractors, if not prohibited by state,
local or municipal law shall deliver up
to 2.0 gallons (7.5L) of gasoline or 5.0
gallons (18.9L) of diesel fuel to a
disabled vehicle. Fuel delivery service
is limited to two no-charge occurrences
within a 12-month period.
• winch out — available within 100 feet
(30.5 meters) of a paved or county
maintained road, no recoveries.
• towing — Ford and Lincoln eligible
vehicles towed to an authorized dealer
within 35 miles (56 km) of the
disablement location or to the nearest
authorized dealer. If a member
requests to be towed to an authorized
dealer more than 35 miles (56 km)
from the disablement location, the
member shall be responsible for any
mileage costs in excess of 35 miles (56
km).
Trailers shall be covered up to $200 if the
disabled eligible vehicle requires service at
the nearest authorized dealer. If the trailer
is disabled, but the towing vehicle is
operational, the trailer does not qualify for
any roadside services.
Vehicles Sold In The U.S. : Using
Roadside Assistance
Complete the roadside assistance
identification card and place it in your
wallet for quick reference. This card is
found in the owner's information portfolio
in the glove compartment.
U.S. Ford vehicle customers who require
Roadside Assistance, call 1-800-241-3673.
If you need to arrange roadside assistance
for yourself, Ford Motor Company will
reimburse a reasonable amount for towing
to the nearest dealership within 35 miles
(56 km). To obtain reimbursement
information, U.S. Ford vehicle customers
call 1-800-241-3673. Customers will be
asked to submit their original receipts.
Vehicles Sold In Canada : Getting
Roadside Assistance
Canadian customers who require roadside
assistance, call 1-800-665-2006.
Vehicles Sold In Canada : Using
Roadside Assistance
Complete the roadside assistance
identification card and place it in your
wallet for quick reference. In Canada, the
card is found in the Warranty Guide in the
glove box.
Canadian Roadside coverage and benefits
may differ from the U.S. coverage. Please
refer to your Warranty Guide or visit our
website at www.ford.ca for information on
Canadian services and benefits.
197
Roadside Emergencies

Canadian customers who need to obtain
roadside information, call
1-800-665-2006 or visit our website at
www.ford.ca.
HAZARD WARNING FLASHERS
Note: With extended use, the flashers may
run down your battery.
The hazard flasher control is
located on the instrument panel
by the radio. Use it when your
vehicle is disabled and is creating a safety
hazard for other motorists.
• Press the flasher control and all front
and rear direction signals will flash.
• Press the flasher control again to turn
them off.
FUEL CUT-OFF SWITCH
WARNING
Failure to inspect and if necessary
repair fuel leaks after a collision may
increase the risk of fire and serious
injury. Ford Motor Company recommends
that the fuel system be inspected by an
authorized dealer after any collision.
In the event of a moderate to severe
collision, this vehicle is equipped with a
fuel pump shut-off feature that stops the
flow of fuel to the engine. Not every impact
will cause a shut-off.
Should your vehicle shut off after a
collision, you may restart your vehicle by
doing the following:
1. Turn the ignition off.
2. Turn the ignition on.
3. Repeat steps 1 and 2 to re-enable fuel
pump.
Note: If your vehicle has the push button
start system, press the stop/start button
twice to reactivate the fuel system.
JUMP-STARTING THE VEHICLE
WARNINGS
The gases around the battery can
explode if exposed to flames, sparks,
or lit cigarettes. An explosion could
result in injury or vehicle damage.
Batteries contain sulfuric acid which
can burn skin, eyes and clothing, if
contacted.
Do not attempt to push-start your
automatic transmission vehicle. Automatic
transmissions do not have push-start
capability. Attempting to push-start a
vehicle with an automatic transmission
may cause transmission damage.
Preparing Your Vehicle
Note: Use only a 12-volt supply to start your
vehicle.
Note: Do not disconnect the battery of the
disabled vehicle as this could damage the
vehicle's electrical system.
1. Park the booster vehicle close to the
hood of the disabled vehicle making
sure the two vehicles do not touch. Set
the parking brake on both vehicles and
stay clear of the engine cooling fan and
other moving parts.
2. Check all battery terminals and remove
any excessive corrosion before you
attach the battery cables. Ensure that
vent caps are tight and level.
3. Turn the heater fan on in both vehicles
to protect from any electrical surges.
Turn all other accessories off.
198
Roadside Emergencies

Connecting the Jumper Cables
Note: In the illustration, the vehicle on the
bottom is used to designate the assisting
(boosting) battery.
4
2
1
3
E142664
1. Connect the positive (+) jumper cable
to the positive (+) terminal of the
discharged battery.
2. Connect the other end of the positive
(+) cable to the positive (+) terminal
of the assisting battery.
3. Connect the negative (-) cable to the
negative (-) terminal of the assisting
battery.
4. Make the final connection of the
negative (-) cable to an exposed metal
part of the stalled vehicle's engine,
away from the battery and the
carburetor or fuel injection system.
Note: Do not attach the negative (-) cable
to fuel lines, engine rocker covers, the intake
manifold or electrical components as
grounding points.
WARNING
Do not connect the end of the
second cable to the negative (-)
terminal of the battery to be jumped.
A spark may cause an explosion of the
gases that surround the battery.
Ensure that the cables are clear of fan
blades, belts, moving parts of both engines,
or any fuel delivery system parts.
Jump Starting
1. Start the engine of the booster vehicle
and run the engine at moderately
increased speed.
2. Start the engine of the disabled vehicle.
3. Once the disabled vehicle has been
started, run both engines for an
additional three minutes before
disconnecting the jumper cables.
Removing the Jumper Cables
Remove the jumper cables in the reverse
order that they were connected.
Note: In the illustration, the vehicle on the
bottom is used to designate the assisting
(boosting) battery.
199
Roadside Emergencies

4
1
3
2
E142665
1. Remove the jumper cable from the
ground metal surface.
2. Remove the jumper cable on the
negative (-) terminal of the booster
vehicle's battery.
3. Remove the jumper cable from the
positive (+) terminal of the booster
vehicle's battery.
4. Remove the jumper cable from the
positive (+) terminal of the disabled
vehicle's battery.
After the disabled vehicle has been started
and the jumper cables removed, allow it
to idle for several minutes so the engine
computer can relearn its idle conditions.
200
Roadside Emergencies

GETTING THE SERVICES YOU
NEED
Warranty repairs to your vehicle must be
performed by an authorized dealer. While
any authorized dealer handling your vehicle
line will provide warranty service, we
recommend you return to your selling
authorized dealer who wants to ensure
your continued satisfaction.
Please note that certain warranty repairs
require special training and equipment, so
not all authorized dealers are authorized
to perform all warranty repairs. This means
that, depending on the warranty repair
needed, you may have to take your vehicle
to another authorized dealer.
A reasonable time must be allowed to
perform a repair after taking your vehicle
to the authorized dealer. Repairs will be
made using Ford or Motorcraft® parts, or
remanufactured or other parts that are
authorized by Ford.
Away From Home
If you are away from home when your
vehicle needs service, contact the Ford
Customer Relationship Center or use the
online resources listed below to find the
nearest authorized dealer.
In the United States:
Mailing address
Ford Motor Company
Customer Relationship Center
P.O. Box 6248
Dearborn, MI 48121
Telephone
1-800-392-3673 (FORD)
(TDD for the hearing impaired:
1-800-232-5952)
Online
Additional information and resources are
available online at www.fordowner.com
These are some of the items that can be
found online:
• U.S. dealer locator by Dealer Name,
City/State, or Zip Code
• Owner Manuals
• Maintenance Schedules
• Recalls
• Ford Extended Service Plans
• Ford Genuine Accessories
• Service specials and promotions.
In Canada:
Mailing address
Customer Relationship Centre
Ford Motor Company of Canada, Limited
P.O. Box 2000
Oakville, Ontario L6J 5E4
Telephone
1-800-565-3673 (FORD)
Online
www.ford.ca
Additional Assistance
If you have questions or concerns, or are
unsatisfied with the service you are
receiving, follow these steps:
1. Contact your Sales Representative or
Service Advisor at your selling/servicing
authorized dealer.
2. If your inquiry or concern remains
unresolved, contact the Sales Manager,
Service Manager or Customer Relations
Manager.
3. If you require assistance or clarification
on Ford Motor Company policies,
please contact the Ford Customer
Relationship Center.
201
Customer Assistance

In order to help you serve you better,
please have the following information
available when contacting a Customer
Relationship Center:
• Vehicle Identification Number.
• Your telephone number (home and
business).
• The name of the authorized dealer and
city where located.
• The vehicle’ s current odometer reading.
In some states, you must directly notify
Ford in writing before pursuing remedies
under your state’s warranty laws. Ford is
also allowed a final repair attempt in some
states.
In the United States, a warranty dispute
must be submitted to the BBB AUTO LINE
before taking action under the
Magnuson-Moss Warranty Act, or to the
extent allowed by state law, before
pursuing replacement or repurchase
remedies provided by certain state laws.
This dispute handling procedure is not
required prior to enforcing state created
rights or other rights which are independent
of the Magnuson-Moss Warranty Act or
state replacement or repurchase laws.
IN CALIFORNIA (U.S. ONLY)
California Civil Code Section 1793.2(d)
requires that, if a manufacturer or its
representative is unable to repair a motor
vehicle to conform to the vehicle’s
applicable express warranty after a
reasonable number of attempts, the
manufacturer shall be required to either
replace the vehicle with one substantially
identical or repurchase the vehicle and
reimburse the buyer in an amount equal to
the actual price paid or payable by the
consumer (less a reasonable allowance
for consumer use). The consumer has the
right to choose whether to receive a refund
or replacement vehicle.
California Civil Code Section 1793.22(b)
presumes that the manufacturer has had
a reasonable number of attempts to
conform the vehicle to its applicable
express warranties if, within the first 18
months of ownership of a new vehicle or
the first 18000 miles (29 000 km),
whichever occurs first:
1. Two or more repair attempts are made
on the same non-conformity likely to
cause death or serious bodily injury OR
2. Four or more repair attempts are made
on the same nonconformity (a defect
or condition that substantially impairs
the use, value or safety of the vehicle)
OR
3. The vehicle is out of service for repair
of nonconformities for a total of more
than 30 calendar days (not necessarily
all at one time).
In the case of 1 or 2 above, the consumer
must also notify the manufacturer of the
need for the repair of the nonconformity
at the following address:
Ford Motor Company
16800 Executive Plaza Drive
Mail Drop 3NE-B
Dearborn, MI 48126
You are required to submit your warranty
dispute to BBB AUTO LINE before asserting
in court any rights or remedies conferred
by California Civil Code Section 1793.22(b).
You are also required to use BBB AUTO
LINE before exercising rights or seeking
remedies created by the Federal
Magnuson-Moss Warranty Act, 15 U.S.C.
sec. 2301 et seq. If you choose to seek
redress by pursuing rights and remedies
not created by California Civil Code Section
1793.22(b) or the Magnuson-Moss
Warranty Act, resort to BBB AUTO LINE is
not required by those statutes.
202
Customer Assistance

THE BETTER BUSINESS
BUREAU (BBB) AUTO LINE
PROGRAM (U.S. ONLY)
Your satisfaction is important to Ford
Motor Company and to your dealer. If a
warranty concern has not been resolved
using the three-step procedure outlined
earlier in this chapter in the Getting the
Services you need section, you may be
eligible to participate in the BBB AUTO
LINE program.
The BBB AUTO LINE program consists of
two parts – mediation and arbitration.
During mediation, a representative of the
BBB will contact both you and Ford Motor
Company to explore options for settlement
of the claim. If an agreement is not reached
during mediation or you do not want to
participate in mediation, and if your claim
is eligible, you may participate in the
arbitration process. An arbitration hearing
will be scheduled so that you can present
your case in an informal setting before an
impartial person. The arbitrator will
consider the testimony provided and make
a decision after the hearing.
Disputes submitted to the BBB AUTO LINE
program are usually decided within forty
days after you file your claim with the BBB.
You are not bound by the decision, and
may reject the decision and proceed to
court where all findings of the BBB Auto
Line dispute, and decision, are admissible
in the court action. Should you choose to
accept the BBB AUTO LINE decision, Ford
is then bound by the decision, and must
comply with the decision within 30 days
of receipt of your acceptance letter.
BBB AUTO LINE Application: Using the
information provided below, please call or
write to request a program application.
You will be asked for your name and
address, general information about your
new vehicle, information about your
warranty concerns, and any steps you have
already taken to try to resolve them. A
Customer Claim Form will be mailed that
will need to be completed, signed and
returned to the BBB along with proof of
ownership. Upon receipt, the BBB will
review the claim for eligibility under the
Program Summary Guidelines.
You can get more information by
calling BBB AUTO LINE at
1-800-955-5100, or writing to:
BBB AUTO LINE
4200 Wilson Boulevard, Suite 800
Arlington, Virginia 22203-1833
BBB AUTO LINE applications can also be
requested by calling the Ford Motor
Company Customer Relationship Center
at 1-800-392-3673.
Note: Ford Motor Company reserves the
right to change eligibility limitations, modify
procedures, or to discontinue this process
at any time without notice and without
obligation.
UTILIZING THE
MEDIATION/ARBITRATION
PROGRAM (CANADA ONLY)
For vehicles delivered to authorized
Canadian dealers. In those cases where
you continue to feel that the efforts by Ford
of Canada and the authorized dealer to
resolve a factory-related vehicle service
concern have been unsatisfactory, Ford of
Canada participates in an impartial third
party mediation/arbitration program
administered by the Canadian Motor
Vehicle Arbitration Plan (CAMVAP).
203
Customer Assistance

The CAMVAP program is a straight forward
and relatively speedy alternative to resolve
a disagreement when all other efforts to
produce a settlement have failed. This
procedure is without cost to you and is
designed to eliminate the need for lengthy
and expensive legal proceedings.
In the CAMVAP program, impartial
third-party arbitrators conduct hearings at
mutually convenient times and places in
an informal environment. These impartial
arbitrators review the positions of the
parties, make decisions and, when
appropriate, render awards to resolve
disputes. CAMVAP decisions are fast, fair,
and final as the arbitrator’s award is
binding on both you and Ford of Canada.
CAMVAP services are available in all
Canadian territories and provinces. For
more information, without charge or
obligation, call your CAMVAP Provincial
Administrator directly at 1-800-207-0685
or visit www.camvap.ca.
GETTING ASSISTANCE
OUTSIDE THE U.S. AND
CANADA
Before exporting your vehicle to a foreign
country, contact the appropriate foreign
embassy or consulate. These officials can
inform you of local vehicle registration
regulations and where to find unleaded
fuel.
If you cannot find unleaded fuel or can only
get fuel with an anti-knock index lower
than is recommended for your vehicle,
contact a regional office or owner
relations/customer relationship office.
The use of leaded fuel in your vehicle
without proper conversion may damage
the effectiveness of your emission control
system and may cause engine knocking or
serious engine damage. Ford Motor
Company/Ford of Canada is not
responsible for any damage caused by use
of improper fuel. Using leaded fuel may
also result in difficulty importing your
vehicle back into the U.S.
If your vehicle must be serviced while you
are traveling or living in Asia-Pacific Region,
Sub-Saharan Africa, U.S. Virgin Islands,
Central America, the Caribbean, and Israel,
contact the nearest authorized dealer. If
the authorized dealer cannot help you,
contact:
FORD MOTOR COMPANY
FORD EXPORT OPERATIONS & GLOBAL
INITIATIVES
1555 Fairlane Drive
Fairlane Business Park #3
Allen Park, Michigan 48101
U.S.A.
Telephone: (313) 594-4857
For customers in Guam, the
Commonwealth of the Northern Mariana
Islands (CNMI), America Samoa, and the
U.S. Virgin Islands, please feel free to call
our Toll-Free Number: (800) 841-FORD
(3673).
FAX: (313) 390-0804
Email: expcac@ford.com
If your vehicle must be serviced while you
are traveling or living in Puerto Rico,
contact the nearest authorized dealer. If
the authorized dealer cannot help you,
contact:
204
Customer Assistance

Ford International Business Development
Inc.
Customer Relationship Center
P.O. Box 11957
Caparra Heights Station
San Juan, Puerto Rico 00922-1957
Telephone: (800) 841-FORD (3673)
FAX: (313) 390-0804
Email: prcac@ford.com
www.ford.com.pr
If your vehicle must be serviced while you
are traveling or living in the Middle East,
contact the nearest authorized dealer. If
the authorized dealer cannot help you,
contact:
Ford Middle East
Customer Relationship Center
P.O. Box 21470
Dubai, United Arab Emirates
Telephone: +971 4 3326084
Toll-Free Number for the Kingdom of Saudi
Arabia: 800 8971409
Local Telephone Number for Kuwait:
24810575
FAX: +971 4 3327299
Email: menacac@ford.com
www.me.ford.com
If you buy your vehicle in North America
and then relocate to any of the above
locations, register your vehicle
identification number (VIN) and new
address with Ford Motor Company Export
Operations & Global Growth Initiatives by
emailing expcac@ford.com.
If you are in another foreign country,
contact the nearest authorized dealer. If
the authorized dealer employees cannot
help you, they can direct you to the nearest
Ford affiliate office.
Customers in the U.S. should call
1-800-392-3673.
ORDERING ADDITIONAL
OWNER'S LITERATURE
To order the publications in this portfolio,
contact Helm, Incorporated at:
HELM, INCORPORATED
47911 Halyard Drive
Plymouth, Michigan 48170
Attention: Customer Service
Or to order a free publication catalog, call
toll free: 1-800-782-4356
Monday-Friday 8:00 a.m. - 6:00 p.m. EST
Helm, Incorporated can also be reached
by their website:
www.helminc.com
(Items in this catalog may be purchased
by credit card, check or money order.)
Obtaining a French Owner’s
Manual
French Owner’s Manual can be obtained
from your authorized dealer or by
contacting Helm, Incorporated using the
contact information listed previously in this
section.
REPORTING SAFETY DEFECTS
(U.S. ONLY)
E142557
If you believe that your vehicle has a defect
which could cause a crash or could cause
injury or death, you should immediately
inform the National Highway Traffic Safety
Administration (NHTSA) in addition to
notifying Ford Motor Company.
205
Customer Assistance

If NHTSA receives similar complaints, it
may open an investigation, and if it finds
that a safety defect exists in a group of
vehicles, it may order a recall and remedy
campaign. However, NHTSA cannot
become involved in individual problems
between you, your dealer, or Ford Motor
Company.
To contact NHTSA, you may call the
Vehicle Safety Hotline toll-free at
1-888-327-4236 (TTY: 1-800-424-9153);
go to http://www.safercar.gov; or write to:
Administrator
1200 New Jersey Avenue, Southeast
Washington, D.C. 20590
You can also obtain other information
about motor vehicle safety from
http://www.safercar.gov.
REPORTING SAFETY DEFECTS
(CANADA ONLY)
If you believe that your vehicle has a defect
which could cause a crash or could cause
injury or death, you should immediately
inform Transport Canada, using their
toll-free number: 1–800–333–0510, or
online at:
https://wwwapps.tc.gc.ca/Saf-Sec-Sur/7/PCDB-BDPP/Index.aspx.
206
Customer Assistance

CHANGING A FUSE
Fuses
E142430
If electrical components in the vehicle are
not working, a fuse may have blown. Blown
fuses are identified by a broken wire within
the fuse. Check the appropriate fuses
before replacing any electrical
components.
Note: Always replace a fuse with one that
has the specified amperage rating. Using a
fuse with a higher amperage rating can
cause severe wire damage and could start
a fire.
Standard Fuse Amperage Rating and Color
Color
Fuse Link
Cartridge
Cartridge
Maxi Fuses
Maxi FusesStandard
Fuses
Mini FusesFuse Rating
---GreyGrey2A
---VioletViolet3A
---PinkPink4A
---TanTan5A
---BrownBrown7.5A
---RedRed10A
---BlueBlue15A
BlueBlueYellowYellowYellow20A
NaturalNatural-NaturalNatural25A
PinkPinkGreenGreenGreen30A
GreenGreenOrange--40A
RedRedRed--50A
YellowYellowBlue--60A
Brown-Tan--70A
BlackBlackNatural--80A
207
Fuses

FUSE SPECIFICATION CHART
Pre-Fuse Box
Your vehicle is equipped with a pre-fuse
box located in the engine compartment
attached to the positive battery post. This
box contains several high current fuses. If
replacement of these high current fuses is
required, see your authorized dealer.
Power Distribution Box
WARNINGS
Always disconnect the battery before
servicing high current fuses.
WARNINGS
To reduce risk of electrical shock,
always replace the cover to the
power distribution box before
reconnecting the battery or refilling fluid
reservoirs.
The power distribution box is located in
the engine compartment. It has
high-current fuses that protect your
vehicle's main electrical systems from
overloads.
If the battery has been disconnected and
reconnected, some features will need to
be reset. See Changing the Vehicle
Battery (page 226).
E129925
Lift the release lever at the rear of the cover
to remove it.
The high-current fuses are coded as
follows:
208
Fuses

Protected ComponentsFuse Amp RatingFuse/Relay Number
Not used-F1
Not used-F2
Not used-F3
Not used-F4
Not used-F5
Not used-F6
Anti-lock brake system / Electronic stability
program pump
40A**F7
Electronic stability program valve30A**F8
Not used-F9
Heater blower motor40A**F10
Not used-F11
Powertrain control module relay fuse30A**F12
Starter relay30A**F13
Rear power window (without door control
unit)
25A**F14
Front cigar lighter / Power outlet20A**F15
Front power window (without door control
unit)
25A**F16
Rear power outlet20A**F17
Center power outlet20A**F18
Anti-lock brake system / Electronic stability
program 15 feed
5A*F19
Horn15A*F20
Stop light switch5A*F21
Battery monitor system15A*F22
Relay coils5A*F23
Light switch module5A*F24
209
Fuses

Protected ComponentsFuse Amp RatingFuse/Relay Number
Power exterior mirror (without door control
unit)
10A*F25
Keep-alive power5A*F26
A/C clutch15A*F27
Vehicle power - fuel injector10A*F28
Rear window defroster25A*F29
Not used-F30
Power transfer unit oil cooling fan (Middle
East specification)
5A*F31
Vehicle power15A*F32
Vehicle power 210A*F33
Vehicle power 310A*F34
Vehicle power 415A*F35
Active grill shutters5A*F36
Occupant classification sensor / Passenger
airbag deactivation indicator feed
10A*F37
Engine control module / Transmission
control module ignition feed
5A*F38
Daytime running lamps / Headlamp control
module ignition feed
5A*F39
Electronic power assist steering 15 feed5A*F40
Body control module 15 feed20A*F41
Rear wiper15A*F42
Headlamp control module supply15A*F43
Front fog daytime running lamps15A*F44
Not used-F45
Smart wiper motor modules50A**F46
Not used-F47
Keypad5A*F48
210
Fuses

Protected ComponentsFuse Amp RatingFuse/Relay Number
Not used-R1
HornMicro relayR2
Power transfer unit oil cooling fan (Middle
East specification)
-R3
Front fog daytime running lamps-R4
Not used-R5
Not used-R6
Not used-R7
Delayed accessory relayMini relayR8
Not used-R9
Starter relayMini relayR10
A/C clutchMicro relayR11
Cooling fanPower relayR12
Heater blowerMini relayR13
Engine control relayMini relayR14
Heated rear windowPower relayR15
Ignition 15Power relayR16
*Mini fuses **Cartridge fuses
Passenger Compartment Fuse
Panel
The fuse panel is located on the right side
below the glove box.
211
Fuses

E129926
The fuses are coded as follows:
212
Fuses

Protected ComponentsFuse Amp RatingFuse/Relay Number
Fuel pump supply, Air mass meter20A56
Not used-57
Not used-58
Passive anti-theft transceiver5A59
Interior light, Driver door switch pack, Glove
box illumination, Overhead console switch
bank
10A60
Cigar lighter, Power point20A61
Rain sensor module, Auto-dimming mirror5A62
Not used-63
Not used-64
Liftgate release10A65
Driver door unlock supply, Double lock20A66
SYNC®, Multifunction display, Global
positioning system module
7.5A67
Not used-68
Instrument cluster5A69
Central lock and unlock supply20A70
Heating control head (manual A/C), Duel
electronic automatic temperature control
10A71
Steering wheel module7.5A72
Data link connector5A73
High beam headlamp supply15A74
Fog lamp supply15A75
Reversing lamp supply10A76
Windshield washer supply20A77
Ignition switch, Start button5A78
213
Fuses

Protected ComponentsFuse Amp RatingFuse/Relay Number
Radio, Navigation DVD player, Touch
screen, Hazard light switch, Door lock
switch
15A79
Moonroof supply20A80
Radio frequency receiver5A81
Windshield washer relay20A82
Central locking20A83
Drive door unlock supply, Double lock20A84
Electronic 15 feed7.5A85
Air bag module, Occupant classification
system, Passenger air bag deactivation
indicator
10A86
Not used-87
Not used-88
Not used-89
Luggage Compartment Fuse Panel
The fuse panel is located in the luggage
compartment behind the passenger's side
wheel well. Remove the fuse panel cover
to gain access to the fuses.
E129927
The fuses are coded as follows:
214
Fuses

Protected ComponentsFuse Amp RatingFuse/Relay Number
Hands-free liftgate entry module5AF1
Keyless vehicle module10AF2
Keyless vehicle door handles5AF3
Door control unit front left25AF4
Door control unit front right25AF5
Door control unit rear left25AF6
Door control unit rear right25AF7
Not used-F8
Driver seat motor25AF9
Driver seat memory module logic feed5AF10
Rear ignition coil feed5AF11
Not used-F12
Not used-F13
Not used-F14
Not used-F15
Not used-F16
Not used-F17
Not used-F18
Not used-F19
Not used-F20
Not used-F21
Not used-F22
Audio amplifier25AF23
DC/AC power converter30AF24
Power liftgate25AF25
Accessories / Trailer tow module 30 feed
1
40AF26
215
Fuses

Protected ComponentsFuse Amp RatingFuse/Relay Number
Not used-F27
Not used-F28
Blind spot detection system, Rear view
camera with park assist
5AF29
Parking aid module5AF30
Not used-F31
DC/AC power converter5AF32
Not used-F33
Driver seat heater20AF34
Passenger seat heater20AF35
Not used-F36
Moonroof5AF37
Not used-F38
Not used-F39
Not used-F40
Not used-F41
Not used-F42
Not used-F43
Not used-F44
Not used-F45
Not used-F46
Rear 15 relayPower relayR1
Not used-R2
Not used-R3
Not used-R4
Not used-R5
Not used-R6
216
Fuses

GENERAL INFORMATION
Have your vehicle serviced regularly to help
maintain its roadworthiness and resale
value. There is a large network of Ford
authorized dealers that are there to help
you with their professional servicing
expertise. We believe that their specially
trained technicians are best qualified to
service your vehicle properly and expertly.
They are supported by a wide range of
highly specialized tools developed
specifically for servicing your vehicle.
To help you service your vehicle, we
provide scheduled maintenance
information which makes tracking routine
service easy. See Scheduled
Maintenance (page 396).
If your vehicle requires professional service,
your authorized dealer can provide the
necessary parts and service. Check your
Warranty Guide to find out which parts and
services are covered.
Use only recommended fuels, lubricants,
fluids and service parts conforming to
specifications. Motorcraft® parts are
designed and built to provide the best
performance in your vehicle.
Precautions
• Do not work on a hot engine.
• Make sure that nothing gets caught in
moving parts.
• Do not work on a vehicle with the
engine running in an enclosed space,
unless you are sure you have enough
ventilation.
• Keep all open flames and other burning
material (such as cigarettes) away
from the battery and all fuel related
parts.
Working with the Engine Off
1. Set the parking brake and shift to P
(Park).
2. Turn off the engine and remove the key
(if equipped).
3. Block the wheels.
Working with the Engine On
WARNING
To reduce the risk of vehicle damage
and/or personal burn injuries, do not
start your engine with the air cleaner
removed and do not remove it while the
engine is running.
1. Set the parking brake and shift to P
(Park).
2. Block the wheels
OPENING AND CLOSING THE
HOOD
E142457
1. Inside the vehicle, pull the hood release
handle located under the instrument
panel.
217
Maintenance

E142458
2. Go to the front of the vehicle and
locate the auxiliary latch located under
the front of the hood (left of center)
and then release it by pushing the
auxiliary latch to the right.
3. Open the hood and support it with the
prop rod.
To close the hood, lower the hood and
allow it to drop from under its own weight
for the last 8-11 inches (20-30
centimeters).
Note: Make sure that the hood is closed
properly.
UNDER HOOD OVERVIEW - 1.6L ECOBOOST®
A B C D E
F
GH
E142459
Engine coolant reservoirA
Engine oil filler capB
218
Maintenance

Brake fluid reservoirC
BatteryD
Power distribution boxE
Air filter assemblyF
Engine oil dipstickG
Windshield washer fluid reservoirH
UNDER HOOD OVERVIEW - 2.0L ECOBOOST®
A
B
C
D
E
F
G
H
E146022
Engine coolant reservoirA
Engine oil dipstickB
Brake fluid reservoirC
BatteryD
Power distribution boxE
Air filter assemblyF
219
Maintenance

Engine oil filler capG
Windshield washer fluid reservoirH
UNDER HOOD OVERVIEW - 2.5L
A
C
B
D
E
G
F
H
E146023
Windshield washer fluid reservoirA
Engine coolant reservoirB
Engine oil filler capC
Engine oil dipstickD
Brake fluid reservoirE
BatteryF
Power distribution boxG
Air filter assemblyH
220
Maintenance

ENGINE OIL DIPSTICK - 1.6L
ECOBOOST®
E146020
MINA
MAXB
ENGINE OIL DIPSTICK -
2.5L/2.0L ECOBOOST®
E142462
MINA
MAXB
ENGINE OIL CHECK
Note: Check the level before starting the
engine.
Note: Make sure that the level is between
the MIN and the MAX marks.
1. Make sure that your vehicle is on level
ground.
2. Turn the engine off and wait 10 minutes
for the oil to drain into the oil pan.
3. Remove the dipstick and wipe it with
a clean, lint-free cloth. Replace the
dipstick and remove it again to check
the oil level.
If the level is at the MIN mark, add oil
immediately.
Adding Engine Oil
Note: Do not remove the filler cap when
the engine is running.
Note: Do not add oil further than the MAX
mark. Oil levels above the MAX mark may
cause engine damage.
E142732
Only use oils certified for gasoline engines
by the American Petroleum Institute (API).
An oil with this trademark symbol
conforms to the current engine and
emission system protection standards and
fuel economy requirements of the
International Lubricants Specification
Advisory Council (ILSAC), comprised of
U.S. and Japanese automobile
manufacturers.
221
Maintenance

1. Remove the filler cap.
2. Add engine oil that meets the Ford
specifications. See Capacities and
Specifications (page 267).
3. Replace the filler cap. Turn it until you
feel a strong resistance.
Resetting the Oil Life Monitoring
System
Note: Reset the oil life monitoring only after
an oil change.
1. Turn the ignition key to the on position.
Do not start the engine. For vehicles
with push-button start, press and hold
the start button for two seconds
without pressing the brake pedal. Do
not attempt to start the engine.
2. Press both the accelerator and brake
pedals at the same time.
3. Keep both pedals fully pressed.
4. After three seconds, the Service: Oil
reset in prog. message will be
displayed.
5. After 25 seconds, the Service: Oil reset
complete message will be displayed.
6. Release both the accelerator and brake
pedals.
7. The Service: Oil reset complete
message will no longer be displayed.
8. Rotate the key to the off position. For
vehicles with push-button start, press
the start button to turn the vehicle off
completely.
ENGINE COOLANT CHECK
Checking the Engine Coolant
When the engine is cold, check the
concentration and level of the engine
coolant at the intervals listed in the
scheduled maintenance information. See
Scheduled Maintenance (page 396).
Note: Make sure that the level is between
the MIN and MAX marks on the coolant
reservoir.
Note: Coolant expands when it is hot. The
level may extend beyond the MAX mark
Note: If the level is at the MIN mark, below
the MIN mark, or empty, add coolant
immediately. See Adding Engine Coolant
in this chapter.
The coolant concentration should be
maintained at 50%.
Note: For best results, coolant
concentration should be tested with a
refractometer such as Rotunda tool
ROB75240 available from your dealer. Ford
does not recommend the use of
hydrometers or coolant test strips for
measuring coolant concentrations.
Note: Automotive fluids are not
interchangeable. Do not use engine coolant
or antifreeze or windshield washer fluid
outside of its specified function and vehicle
location.
Adding Engine Coolant
WARNINGS
Do not add engine coolant when the
engine is hot. Steam and scalding
liquids released from a hot cooling
system can burn you badly. Also, you can
be burned if you spill coolant on hot engine
parts.
Do not put engine coolant in the
windshield washer fluid container. If
sprayed on the windshield, engine
coolant could make it difficult to see
through the windshield.
To reduce the risk of personal injury,
make sure the engine is cool before
unscrewing the coolant pressure
relief cap. The cooling system is under
pressure; steam and hot liquid can come
out forcefully when the cap is loosened
slightly.
222
Maintenance

WARNINGS
Do not add coolant further than the
MAX mark.
Note: Do not use stop leak pellets, cooling
system sealants, or additives as they can
cause damage to the engine cooling or
heating systems. This damage would not
be covered under your vehicle’s warranty.
Note: During normal vehicle operation, the
engine coolant may change color from
orange to pink or light red. As long as the
engine coolant is clear and uncontaminated,
this color change does not indicate the
engine coolant has degraded nor does it
require the engine coolant to be drained, the
system to be flushed, or the engine coolant
to be replaced.
• Do not mix different colors or types of
coolant in your vehicle. Make sure the
correct coolant is used. Mixing of
engine coolants may harm your
engine’s cooling system. The use of an
improper coolant may harm engine and
cooling system components and may
void the warranty. Use prediluted
engine coolant meeting the Ford
specification. See Capacities and
Specifications (page 267).
• In case of emergency, a large amount
of water without engine coolant may
be added in order to reach a vehicle
service location. In this instance, the
cooling system must be drained,
chemically cleaned with Motorcraft®
Premium Cooling System Flush, and
refilled with prediluted engine coolant
as soon as possible. Water alone
(without engine coolant) can cause
engine damage from corrosion,
overheating or freezing.
• Do not use alcohol, methanol, brine or
any engine coolants mixed with alcohol
or methanol antifreeze (coolant).
Alcohol and other liquids can cause
engine damage from overheating or
freezing.
• Do not add extra inhibitors or additives
to the coolant. These can be harmful
and compromise the corrosion
protection of the engine coolant.
Unscrew the cap slowly. Any pressure will
escape as you unscrew the cap.
Add prediluted engine coolant meeting the
Ford specification. See Capacities and
Specifications (page 267).
Whenever coolant has been added, the
coolant level in the coolant reservoir
should be checked the next few times you
drive the vehicle. If necessary, add enough
prediluted engine coolant to bring the
coolant level to the proper level.
Recycled Engine Coolant
Ford Motor Company does not recommend
the use of recycled engine coolant since a
Ford-approved recycling process is not yet
available.
Always dispose of used automotive fluids
in a responsible manner. Follow your
community’s regulations and standards
for recycling and disposing of automotive
fluids.
223
Maintenance

Severe Climates
If you drive in extremely cold climates:
• It may be necessary to have a Ford
authorized dealer increase the coolant
concentration above 50%.
• A coolant concentration of 60% will
provide improved freeze point
protection. Engine coolant
concentrations above 60% will
decrease the overheat protection
characteristics of the engine coolant
and may cause engine damage
If you drive in extremely hot climates:
• It may be necessary to have a Ford
authorized dealer decrease the coolant
concentration to 40%.
• A coolant concentration of 40% will
provide improved overheat protection.
Engine coolant concentrations below
40% will decrease the corrosion/freeze
protection characteristics of the engine
coolant and may cause engine
damage.
Vehicles driven year-round in non-extreme
climates should use prediluted engine
coolant for optimum cooling system and
engine protection.
What you Should Know About Fail-
Safe Cooling
If the engine coolant supply is depleted,
this feature allows the vehicle to be driven
temporarily before incremental component
damage is incurred. The “fail-safe”
distance depends on ambient
temperatures, vehicle load and terrain.
How Fail-Safe Cooling Works
If the engine begins to overheat, the engine
coolant temperature gauge will move to
the red (hot) area and:
The coolant temperature
warning light will illuminate.
The service engine soon
indicator will illuminate.
If the engine reaches a preset
over-temperature condition, the engine
will automatically switch to alternating
cylinder operation. Each disabled cylinder
acts as an air pump and cools the engine.
When this occurs the vehicle will still
operate. However:
• The engine power will be limited.
• The air conditioning system will be
disabled.
Continued operation will increase the
engine temperature and the engine will
completely shut down, causing steering
and braking effort to increase.
Once the engine temperature cools, the
engine can be re-started. Take your vehicle
to an authorized dealer as soon as possible
to minimize engine damage.
When Fail-Safe Mode Is Activated
WARNINGS
Fail-safe mode is for use during
emergencies only. Operate the
vehicle in fail-safe mode only as long
as necessary to bring the vehicle to rest in
a safe location and seek immediate repairs.
When in fail-safe mode, the vehicle will
have limited power, will not be able to
maintain high-speed operation, and may
completely shut down without warning,
potentially losing engine power, power
steering assist, and power brake assist,
which may increase the possibility of a
crash resulting in serious injury.
Never remove the coolant reservoir
cap while the engine is running or hot.
224
Maintenance

You have limited engine power when in the
fail-safe mode, so drive the vehicle with
caution. The vehicle will not be able to
maintain high-speed operation and the
engine will run rough. Remember that the
engine is capable of completely shutting
down automatically to prevent engine
damage, therefore:
1. Pull off the road as soon as safely
possible and turn off the engine.
2. Arrange for the vehicle to be taken to
an authorized dealer.
3. If this is not possible, wait a short
period for the engine to cool.
4. Check the coolant level and replenish
if low.
5. Re-start the engine and take your
vehicle to an authorized dealer.
Note: Driving the vehicle without repairing
the engine problem increases the chance of
engine damage. Take your vehicle to an
authorized dealer as soon as possible.
AUTOMATIC TRANSMISSION
FLUID CHECK
Note: Transmission fluid should be checked
by an authorized dealer. If required, fluid
should be added by an authorized dealer.
The automatic transmission does not have
a transmission fluid dipstick.
Have an authorized dealer check and
change the transmission fluid and filter at
the correct service interval. See
Scheduled Maintenance (page 396). Your
transmission does not consume fluid.
However, the fluid level should be checked
if the transmission is not working properly,
(i.e., if the transmission slips or shifts
slowly) or if you notice some sign of fluid
leakage.
Do not use supplemental transmission
fluid additives, treatments or cleaning
agents. The use of these materials may
affect transmission operation and result
in damage to internal transmission
components.
BRAKE FLUID CHECK
Fluid levels between the MIN and MAX
lines are within the normal operating range;
there is no need to add fluid. If the fluid
levels are outside of the normal operating
range, the performance of the system
could be compromised; seek service from
your authorized dealer immediately.
POWER STEERING FLUID
CHECK
Your vehicle is equipped with an electric
power steering (EPS) system. There is no
fluid reservoir to check or fill.
FUEL FILTER
Your vehicle is equipped with a lifetime
fuel filter that is integrated with the fuel
tank. Regular maintenance or replacement
is not needed.
WASHER FLUID CHECK
WARNING
If you operate your vehicle in
temperatures below 40°F (5°C), use
washer fluid with antifreeze
protection. Failure to use washer fluid with
antifreeze protection in cold weather could
result in impaired windshield vision and
increase the risk of injury or accident.
Note: The front and rear washer systems
are supplied from the same reservoir.
225
Maintenance

Add fluid to fill the reservoir if the level is
low. Only use a washer fluid that meets
Ford specifications. See Capacities and
Specifications (page 267).
State or local regulations on volatile
organic compounds may restrict the use
of methanol, a common windshield washer
antifreeze additive. Washer fluids
containing non-methanol antifreeze
agents should be used only if they provide
cold weather protection without damaging
the vehicle’s paint finish, wiper blades or
washer system.
CHANGING THE VEHICLE
BATTERY
WARNINGS
Batteries normally produce explosive
gases which can cause personal
injury. Therefore, do not allow
flames, sparks or lighted substances to
come near the battery. When working near
the battery, always shield your face and
protect your eyes. Always provide proper
ventilation.
When lifting a plastic-cased battery,
excessive pressure on the end walls
could cause acid to flow through the
vent caps, resulting in personal injury
and/or damage to the vehicle or battery.
Lift the battery with a battery carrier or
with your hands on opposite corners.
Keep batteries out of reach of
children. Batteries contain sulfuric
acid. Avoid contact with skin, eyes or
clothing. Shield your eyes when working
near the battery to protect against possible
splashing of acid solution. In case of acid
contact with skin or eyes, flush
immediately with water for a minimum of
15 minutes and get prompt medical
attention. If acid is swallowed, call a
physician immediately.
WARNINGS
Battery posts, terminals and related
accessories contain lead and lead
compounds. Wash hands after
handling.
Your vehicle is equipped with a
Motorcraft® maintenance-free battery
which normally does not require additional
water during its life of service.
Note: If your battery has a cover/shield,
make sure it is reinstalled after the battery
has been cleaned or replaced.
For longer, trouble-free operation, keep the
top of the battery clean and dry. Also,
make certain the battery cables are always
tightly fastened to the battery terminals.
If you see any corrosion on the battery or
terminals, remove the cables from the
terminals and clean with a wire brush. You
can neutralize the acid with a solution of
baking soda and water.
It is recommended that the negative
battery cable terminal be disconnected
from the battery if you plan to store your
vehicle for an extended period of time.
To ensure proper operation of the battery
management system (BMS), any electrical
devices that are added to the vehicle
should not have their ground connection
made directly at the negative battery post.
A connection at the negative battery post
can cause inaccurate measurements of
the battery condition and potential
incorrect system operation.
Note: Electrical or electronic accessories
or components added to the vehicle by the
dealer or the owner may adversely affect
battery performance and durability and may
also affect the performance of other
electrical systems in the vehicle.
226
Maintenance

When a battery replacement is required,
the battery should only be replaced with
a Ford recommended replacement battery
that matches the electrical requirements
of the vehicle.
When the battery is disconnected or a new
battery installed, the automatic
transmission must relearn its adaptive
strategy. As a result of this, the
transmission may shift firmly when first
driven. This operation is considered normal
and will fully update transmission
operation to its optimum shift feel.
If the battery has been disconnected or a
new battery has been installed, the clock
and the preset radio stations must be reset
once the battery is reconnected.
Note: Always dispose of automotive
batteries in a responsible manner. Follow
your local authorized standards for disposal.
Call your local authorized recycling center
to find out more about recycling automotive
batteries.
CHECKING THE WIPER
BLADES
E142463
Run the tip of your fingers over the edge of
the blade to check for roughness.
Clean the wiper blades with washer fluid
or water applied with a soft sponge or
cloth.
CHANGING THE WIPER
BLADES
The wiper arms can be manually moved
when the ignition is off. This allows for ease
of blade replacement and cleaning under
the blades.
E129990
1
1
2
1. Pull the wiper blade and arm away
from the glass.
2. Press the locking buttons together.
3. Rotate and remove the wiper blade.
4. Install in the reverse order.
Note: Make sure that the wiper blade locks
into place. Lower the wiper arm and blade
back to the windshield. The wiper arms will
automatically return to their normal position
when the ignition is turned on.
To change the rear blades, do the
following:
227
Maintenance

E130060
3
2
1. Lift the wiper arm.
2. Slightly rotate the wiper blade from the
wiper arm.
3. Disengage the wiper blade from the
wiper arm.
4. Remove the wiper blade.
5. Install in the reverse order.
Note: Make sure that the wiper blade locks
into place.
Replace wiper blades at least once per
year for optimum performance.
Poor wiper quality can be improved by
cleaning the wiper blades and the
windshield.
CHANGING THE ENGINE AIR
FILTER
WARNING
To reduce the risk of vehicle damage
and/or personal burn injuries do not
start your engine with the air cleaner
removed and do not remove it while the
engine is running.
When changing the air filter element, use
only the air filter element listed. See
Capacities and Specifications (page
267).
For EcoBoost® equipped vehicles: When
servicing the air cleaner, it is important that
no foreign material enter the air induction
system. The engine and turbocharger are
susceptible to damage from even small
particles.
Change the air filter element at the proper
interval. See Scheduled Maintenance
(page 396).
Note: Failure to use the correct air filter
element may result in severe engine
damage. The customer warranty may be
void for any damage to the engine if the
correct air filter element is not used.
1.6L and 2.0L EcoBoost® Engines
E142710
228
Maintenance

2.5L Engine
E142711
1. Loosen the screws on the air tube
clamp that fasten it to the air filter
assembly tray.
2. Separate the clean air tube from the
air cleaner.
3. Remove the air cleaner from the
vehicle.
4. Loosen the screws that secure the air
filter housing cover.
5. Carefully separate the two halves of
the air filter housing.
6. Remove the air filter element from the
air filter housing.
7. Wipe the air filter housing and cover
clean to remove any dirt or debris and
to ensure good sealing.
8. Slide the open end of the air filter
element in first, below the tab. Then
push the closed end cap into the
bottom of the tray. The closed end cap
should fit inside the groove in the tray.
The tab at the end of the closed end
cap should be oriented down and fit
between the forks on the tray.
9. Replace the air filter housing cover and
secure the screws.
10. Reinstall the air cleaner assembly into
the vehicle.
11. Reinstall the clean air tube assembly
into the air cleaner assembly.
12. Tighten the air tube fastening screws.
ADJUSTING THE HEADLAMPS
Vertical Aim Adjustment
The headlamps on your vehicle are
properly aimed at the assembly plant. If
your vehicle has been in an accident, the
alignment of your headlamps should be
checked by your authorized dealer.
E142592
8 feet (2.4 meters)A
Center height of lamp to groundB
25 feet (7.6 meters)C
Horizontal reference lineD
Vehicles With Halogen Headlamps
1. Park the vehicle directly in front of a
wall or screen on a level surface,
approximately 25 feet (7.6 meters)
away.
2. Measure the height of the headlamp
bulb center from the ground and mark
an 8 foot (2.4 meter) horizontal
reference line on the vertical wall or
screen at this height.
229
Maintenance

Note: To see a clearer light pattern for
adjusting, you may want to block the light
from one headlamp while adjusting the
other.
3. Turn on the low beam headlamps to
illuminate the wall or screen and open
the hood.
E142465
4. On the wall or screen you will observe
a flat zone of high intensity light
located at the top of the right hand
portion of the beam pattern. If the top
edge of the high intensity light zone is
not at the horizontal reference line, the
headlamp will need to be adjusted.
E142467
5. Locate the vertical adjuster on each
headlamp. Using a Phillips #2
screwdriver, turn the adjuster either
clockwise or counterclockwise in order
to aim the headlamp. The horizontal
edge of the brighter light should touch
the horizontal reference line.
6. Close the hood and turn off the lamps.
Vehicles With High Intensity Discharge
Headlamps
1. Park the vehicle directly in front of a
wall or screen on a level surface,
approximately 25 feet (7.6 meters)
away.
2. Measure the height of the headlamp
bulb center from the ground and mark
an 8 foot (2.4 meter) horizontal
reference line on the vertical wall or
screen at this height.
Note: To see a clearer light pattern for
adjusting, you may want to block the light
from one headlamp while adjusting the
other.
3. Turn on the low beam headlamps to
illuminate the wall or screen and open
the hood.
E142466
4. There is a distinct cut-off (change from
light to dark) in the left portion of the
beam pattern. The top edge of this
cut-off should be positioned two
inches (5 centimeters) below the
horizontal reference line.
230
Maintenance

E142467
5. Locate the vertical adjuster on each
headlamp. Using a Phillips #2
screwdriver, turn the adjuster either
clockwise or counterclockwise in order
to aim the headlamp.
6. Close the hood and turn off the lamps.
Horizontal Aim Adjustment
Horizontal aim is not required for this
vehicle and is non-adjustable.
REMOVING A HEADLAMP
2
2
E142468
1. Make sure the headlamp control is in
the off position and open the hood.
2. Remove the two screws from the
headlamp assembly.
3. Carefully pull the headlamp assembly
as far as possible towards the front of
the vehicle to disengage it from the
lower fixing point.
4. Carefully lift the outer side of the
headlamp and remove it.
5. Disconnect the electrical connector.
CHANGING A BULB
Lamp Assembly Condensation
Exterior lamps are vented to
accommodate normal changes in pressure.
Condensation can be a natural by-product
of this design. When moist air enters the
lamp assembly through the vents, there is
a possibility that condensation can occur
when the temperature is cold. When
normal condensation occurs, a thin film of
mist can form on the interior of the lens.
The thin mist eventually clears and exits
through the vents during normal operation.
Clearing time may take as long as 48 hours
under dry weather conditions.
Examples of acceptable condensation are:
• Presence of thin mist (no streaks, drip
marks or droplets).
• Fine mist covers less than 50% of the
lens.
Examples of unacceptable moisture
(usually caused by a lamp water leak) are:
• Water puddle inside the lamp.
• Large water droplets, drip marks or
streaks present on the interior of the
lens.
Take your vehicle to a dealer for service if
any of the above conditions of
unacceptable moisture are present.
231
Maintenance

Replacing Headlamp Bulbs
WARNING
Handle a halogen headlamp bulb
carefully and keep out of children’s
reach. Grasp the bulb by only its
plastic base and do not touch the glass.
The oil from your hand could cause the
bulb to break the next time the headlamps
are operated.
Note: If the bulb is accidentally touched, it
should be cleaned with rubbing alcohol
before being used.
Headlamp:
A
B
C
E142469
Side markerA
Low beam headlampB
High beam headlampC
High beam headlamp:
2
4
E142470
1. Remove the headlamp.
2. Remove service cap.
3. Disconnect the electrical connector.
4. Remove bulb from the headlamp
assembly by turning it
counterclockwise, then pull it straight
out.
Low beam headlamp:
2
4
E142471
1. Remove the headlamp.
2. Remove service cap.
3. Disconnect the electrical connector.
4. Remove bulb from the headlamp
assembly by turning it
counterclockwise, then pull it straight
out.
Install the new bulbs in reverse order from
the steps above. Be sure that the spring
clip is not damaged or detached from the
headlamp assembly during the
replacement procedure.
Replacing HID Headlamp Bulbs (If
Equipped)
The low beam headlamps on your vehicle
use a high intensity discharge source.
These lamps operate at a high voltage.
When the bulb is burned out, the bulb and
starter capsule assembly must be replaced
by your authorized dealer.
232
Maintenance

Replacing Side Marker Bulbs
E142472
1. Remove the bulb socket from the
headlamp assembly by turning it
counterclockwise.
2. Remove the bulb by gently pull the
bulb straight out of the socket.
Install the new bulb in reverse order.
Replacing Fog, Park and Turn
Signal Bulbs
A
B
C
E142797
Fog LampA
Park LampB
Turn Signal lampC
E142798
1. Remove the screws from the splash
shield at the wheel well to gain access
to the lamp assembly.
E142799
2. Remove the bulb holder from the lamp
assembly by turning it
counterclockwise.
3. Disconnect the electrical connector.
4. Remove the bulb from the bulb holder
by pulling it straight out.
Install the new bulbs in reverse order from
the steps above.
233
Maintenance

Replacing Tail, Brake and Turn
Signal Bulbs
2
3
E142473
1. Make sure the headlamp control is in
the off position and open the liftgate.
2. Remove the two bolt covers using a
standard flat tip screwdriver.
3. Remove the two bolts from the lamp
assembly.
4. Gently pull the lamp assembly away
from the vehicle.
E142475
5. Disconnect the electrical connector.
6. Remove the turn signal bulb or the tail
and brake bulb by turning the bulb
socket counterclockwise. Gently pull
the bulb straight out of the socket.
Install the new bulb in reverse order.
Replacing Reverse Lamp Assembly
For bulb replacement, see your authorized
dealer.
Replacing License Plate Lamp Bulb
3
2
1
E72789
1. Carefully release the spring clip.
2. Remove the lamp.
3. Remove the bulb.
Reverse steps to reinstall bulb.
Replacing High-Mount Brake Lamp
Bulb
Your vehicle is equipped with an LED
center high-mount stop lamp located in
the spoiler. It is designed to last the life of
the vehicle. If replacement is required, see
your authorized dealer.
234
Maintenance

BULB SPECIFICATION CHART
Replacement bulbs are specified in the
chart below. Headlamp bulbs must be
marked with an authorized “D.O.T.” for
North America to ensure lamp
performance, light brightness and pattern
and safe visibility. The correct bulbs will
not damage the lamp assembly or void the
lamp assembly warranty and will provide
quality bulb burn time.
Trade numberFunction
9005LLHeadlamps high beam (Halogen)
H1* Headlamps high beam (HID)
H11LLHeadlamp low beam (Halogen)
D3S* Headlamp low beam (HID)
168Sidemarker - front
WY5WPark lamp - front (HI Series)
194Park lamp - front (Low Series)
WY21WTurn lamp - front (HI Series)
W21WTurn lamp - front (Low Series)
H10 (9145)Fog lamps
3157KTail/brake lamp
T20Turn lamp - rear
921Backup lamp
W5WLicense plate lamp
LED* High-mount brake lamp
LED* Interior lamps
* To replace these lamps - see your authorized dealer.
To replace all instrument panel lights - see your authorized dealer
235
Maintenance

GENERAL INFORMATION
Your Ford or Lincoln authorized dealer has
many quality products available to clean
your vehicle and protect its finishes.
CLEANING PRODUCTS
For best results, use the following products
or products of equivalent quality:
Motorcraft® Bug and Tar Remover
(ZC-42)
Motorcraft® Custom Bright Metal Cleaner
(ZC-15)
Motorcraft® Detail Wash (ZC-3-A)
Motorcraft® Dusting Cloth (ZC-24)
Motorcraft® Engine Shampoo and
Degreaser (U.S. only) (ZC-20)
Motorcraft® Engine Shampoo (Canada
only) (CXC-66-A)
Motorcraft® Multi-Purpose Cleaner
(Canada only) (CXC-101)
Motorcraft® Premium Glass Cleaner
(Canada only) (CXC-100)
Motorcraft® Premium Quality Windshield
Washer Fluid (Canada only) [CXC-37-(A,
B, D or F)]
Motorcraft® Premium Windshield Washer
Concentrate (U.S. only) (ZC-32-A)
Motorcraft® Professional Strength Carpet
& Upholstery Cleaner (ZC-54)
Motorcraft® Spot and Stain Remover (U.S.
only) (ZC-14)
Motorcraft® Ultra-Clear Spray Glass
Cleaner (ZC-23)
Motorcraft® Vinyl Cleaner (Canada only)
(CXC-93)
Motorcraft® Wheel and Tire Cleaner
(ZC-37-A)
CLEANING THE EXTERIOR
Wash your vehicle regularly with cool or
lukewarm water and a neutral pH
shampoo, such as Motorcraft® Detail
Wash.
• Never use strong household detergents
or soap, such as dish washing or
laundry liquid. These products can
discolor and spot painted surfaces.
• Never wash a vehicle that is “hot to the
touch” or during exposure to strong,
direct sunlight.
• Dry the vehicle with a chamois or soft
terry cloth towel in order to eliminate
water spotting.
• Immediately remove items such as
gasoline, diesel fuel, bird droppings and
insect deposits because they can cause
damage to the vehicle’s paintwork and
trim over time. Use Motorcraft® Bug
and Tar Remover.
• Remove any exterior accessories, such
as antennas, before entering a car
wash.
Note: Suntan lotions and insect repellents
can damage any painted surface; if these
substances come in contact with your
vehicle, wash off as soon as possible.
Exterior Chrome
Note: Never use abrasive materials such as
steel wool or plastic pads as they can
scratch the chrome surface.
Note: Do not use chrome cleaner, metal
cleaner or polish on wheels and wheel
covers
236
Vehicle Care

• Wash the vehicle first, using cool or
lukewarm water and a neutral pH
shampoo, such as Motorcraft® Detail
Wash.
• Use Motorcraft® Custom Bright Metal
Cleaner. Apply the product as you
would a wax to clean bumpers and
other chrome parts; allow the cleaner
to dry for a few minutes, then wipe off
the haze with a clean, dry rag.
• Do not apply cleaning product to hot
surfaces and do not leave cleaning
product on chrome surfaces for a
period of time exceeding that which is
recommended.
• Using other non-recommended
cleaners can result in severe and
permanent cosmetic damage.
Underbody
Flush the complete underside of your
vehicle frequently. Keep body and door
drain holes free from packed dirt.
Cleaning Plastic Exterior Parts
Use only approved products to clean
plastic parts
• For routine cleaning, use Motorcraft®
Detail Wash.
• If tar or grease spots are present, use
Motorcraft® Bug and Tar Remover.
REPAIRING MINOR PAINT
DAMAGE
Your authorized dealer has touch-up paint
to match your vehicle’s color. Take your
color code (printed on a sticker in the
driver’s door jamb) to your authorized
dealer to ensure you get the correct color.
• Remove particles such as bird
droppings, tree sap, insect deposits, tar
spots, road salt and industrial fallout
before repairing paint chips.
• Always read the instructions before
using the products.
WAXING
• Wash the vehicle first.
• Use a quality wax that does not contain
abrasives.
• Do not allow paint sealant to come in
contact with any non-body (low-gloss
black) colored trim, such as grained
door handles, roof racks, bumpers, side
moldings, mirror housings or the
windshield cowl area. The paint sealant
will “gray” or stain the parts over time.
CLEANING THE ENGINE
Engines are more efficient when they are
clean because grease and dirt buildup keep
the engine warmer than normal.
When washing:
• Take care when using a power washer
to clean the engine. The high-pressure
fluid could penetrate the sealed parts
and cause damage.
• Do not spray a hot engine with cold
water to avoid cracking the engine
block or other engine components.
• Spray Motorcraft® Engine Shampoo
and Degreaser on all parts that require
cleaning and pressure rinse clean. In
Canada, use Motorcraft® Engine
Shampoo.
• Never wash or rinse the engine while it
is hot or running; water in the running
engine may cause internal damage.
237
Vehicle Care

• Never wash or rinse any ignition coil,
spark plug wire or spark plug well, or
the area in and around these locations.
• Cover the battery, power distribution
box, and air filter assembly to prevent
water damage when cleaning the
engine.
CLEANING THE WINDOWS AND
WIPER BLADES
The windows and wiper blades should be
cleaned regularly. If the wipers do not wipe
properly, substances on the vehicle’ s glass
or the wiper blades may cause squeaking
or chatter noise from the blades, and
streaking and smearing of the windshield.
To clean these items, follow these tips:
• The windows may be cleaned with a
non-abrasive cleaner such as
Motorcraft® Ultra-Clear Spray Glass
Cleaner.
• The wiper blades can be cleaned with
isopropyl (rubbing) alcohol or
Motorcraft® Premium Windshield
Washer Concentrate in the U.S., or
Premium Quality Windshield Washer
Fluid in Canada. Be sure to replace
wiper blades when they appear worn
or do not function properly.
• Do not use abrasives, as they may
cause scratches
• Do not use fuel, kerosene, or paint
thinner to clean any parts.
If you cannot remove those streaks after
cleaning with the glass cleaner or if the
wipers chatter and move in a jerky motion,
clean the outer surface of the windshield
and the wiper blades using a sponge or
soft cloth with a neutral detergent or
mild-abrasive cleaning solution. After
cleaning, rinse the windshield and wiper
blades with clean water. The windshield
is clean if beads do not form when you
rinse the windshield with water.
Note: Do not use sharp objects, such as a
razor blade, to clean the inside of the rear
window or to remove decals, as it may cause
damage to the rear window defroster’s
heated grid lines.
CLEANING THE INTERIOR
WARNINGS
Do not use cleaning solvents, bleach
or dye on the vehicle’s safety belts,
as these actions may weaken the
belt webbing.
On vehicles equipped with
seat-mounted airbags, do not use
chemical solvents or strong
detergents. Such products could
contaminate the side airbag system and
affect performance of the side airbag in a
collision.
For fabric, carpets, cloth seats, safety belts
and seats equipped with side airbags:
• Remove dust and loose dirt with a
vacuum cleaner.
• Remove light stains and soil with
Motorcraft® Professional Strength
Carpet & Upholstery Cleaner.
238
Vehicle Care

• If grease or tar is present on the
material, spot-clean the area first with
Motorcraft® Spot and Stain Remover.
In Canada, use Motorcraftt
Multi-Purpose Cleaner.
• If a ring forms on the fabric after spot
cleaning, clean the entire area
immediately (but do not oversaturate)
or the ring will set.
• Do not use household cleaning
products or glass cleaners, which can
stain and discolor the fabric and affect
the flame retardant abilities of the seat
materials.
CLEANING THE INSTRUMENT
PANEL AND INSTRUMENT
CLUSTER LENS
WARNING
Do not use chemical solvents or
strong detergents when cleaning the
steering wheel or instrument panel
to avoid contamination of the airbag
system.
Clean the instrument panel and cluster
lens with a clean, damp, white cotton
cloth, then use a clean and dry white
cotton cloth to dry these areas.
• Avoid cleaners or polishes that increase
the gloss of the upper portion of the
instrument panel. The dull finish in this
area helps protect the driver from
undesirable windshield reflection.
• Be certain to wash or wipe your hands
clean if you have been in contact with
certain products such as insect
repellent and suntan lotion in order to
avoid possible damage to the interior
painted surfaces.
• Do not use household or glass cleaners
as these may damage the finish of the
instrument panel, interior trim and
cluster lens.
• Do not allow air fresheners and hand
sanitizers to spill on interior surfaces.
If a spill occurs, wipe off immediately.
Damage may not be covered by your
warranty.
If a staining liquid like coffee/juice has
been spilled on the instrument panel or on
interior trim surfaces, clean as follows:
1. Wipe up spilled liquid using a clean,
white, cotton cloth.
2. Wipe the surface with a damp, clean,
white cotton cloth. For more thorough
cleaning, use a mild soap and water
solution. If the spot cannot be
completely cleaned by this method,
the area may be cleaned using a
commercially available cleaning
product designed for automotive
interiors.
3. If necessary, apply more soap and
water solution or cleaning product to
a clean, white, cotton cloth and press
the cloth onto the soiled area–allow
this to set at room temperature for 30
minutes.
4. Remove the soaked cloth, and if it is
not soiled badly, use this cloth to clean
the area by using a rubbing motion for
60 seconds.
5. Following this, wipe area dry with a
clean, white, cotton cloth.
CLEANING LEATHER SEATS (IF
EQUIPPED)
• Remove dust and loose dirt with a
vacuum cleaner.
• Clean spills and stains as quickly as
possible.
239
Vehicle Care

• For routine cleaning, wipe the surface
with a soft, damp cloth. For more
thorough cleaning, wipe the surface
with a mild soap and water solution. In
Canada, use Motorcraft® Vinyl Cleaner.
Dry the area with a soft cloth.
• If the leather cannot be completely
cleaned using a mild soap and water
solution, the leather may be cleaned
using a commercially available leather
cleaning product designed for
automotive interiors.
• To check for compatibility, first test any
cleaner or stain remover on an
inconspicuous part of the leather.
• Do not use household cleaning
products, alcohol solutions, solvents
or cleaners intended for rubber, vinyl
and plastics, or oil/petroleum-based
leather conditioners. These products
may cause premature wearing or
damage to the leather.
CLEANING THE ALLOY
WHEELS (IF EQUIPPED)
Note: Do not use chrome cleaner, metal
cleaner or polish on wheels and wheel
covers.
Aluminum wheels and wheel covers are
coated with a clear coat paint finish. In
order to maintain their shine:
• Clean weekly with Motorcraft® Wheel
and Tire Cleaner. Heavy dirt and brake
dust accumulation may require
agitation with a sponge. Rinse
thoroughly with a strong stream of
water.
• Never apply any cleaning chemical to
hot or warm wheel rims or covers.
• Some automatic car washes may
cause damage to the finish on your
wheel rims or covers.
Industrial-strength (heavy-duty)
cleaners, or cleaning chemicals, in
combination with brush agitation to
remove brake dust and dirt, could wear
away the clear coat finish over time.
• Do not use hydrofluoric acid-based or
high caustic-based wheel cleaners,
steel wool, fuels or strong household
detergent.
• To remove tar and grease, use
Motorcraft® Bug and Tar Remover.
VEHICLE STORAGE
If you plan on storing your vehicle for an
extended period of time (30 days or more),
read the following maintenance
recommendations to make sure your
vehicle stays in good operating condition.
All motor vehicles and their components
were engineered and tested for reliable,
regular driving. Long term storage under
various conditions may lead to component
degradation or failure unless specific
precautions are taken to preserve the
components.
General
• Store all vehicles in a dry, ventilated
place.
• Protect from sunlight, if possible.
• If vehicles are stored outside, they
require regular maintenance to protect
against rust and damage.
240
Vehicle Care

Body
• Wash vehicle thoroughly to remove
dirt, grease, oil, tar or mud from exterior
surfaces, rear-wheel housing and
underside of front fenders.
• Periodically wash vehicles stored in
exposed locations.
• Touch-up raw or primed metal to
prevent rust
• Cover chrome and stainless steel parts
with a thick coat of auto wax to prevent
discoloration. Re-wax as necessary
when the vehicle is washed.
• Lubricate all hood, door and trunk lid
hinges, and latches with a light grade
oil.
• Cover interior trim to prevent fading.
• Keep all rubber parts free from oil and
solvents.
Engine
• The engine oil and filter should be
changed prior to storage, as used
engine oil contain contaminates that
may cause engine damage.
• Start the engine every 15 days. Run at
fast idle until it reaches normal
operating temperature
• With your foot on the brake, shift
through all the gears while the engine
is running.
Fuel system
• Fill the fuel tank with high-quality fuel
until the first automatic shutoff of the
fuel pump nozzle.
Note: During extended periods of vehicle
storage (30 days or more), fuel may
deteriorate due to oxidation. Add a quality
gas stabilizer product to the vehicle fuel
system whenever actual or expected
storage periods exceed 30 days. Follow the
instructions on the additive label. The
vehicle should then be operated at idle
speed to circulate the additive throughout
the fuel system.
Cooling system
• Protect against freezing temperatures.
• When removing vehicle from storage,
check coolant fluid level. Confirm there
are no cooling system leaks, and fluid
is at the recommended level.
Battery
• Check and recharge as necessary. Keep
connections clean.
• If storing your vehicle for more than 30
days without recharging the battery, it
may be advisable to disconnect the
battery cables to ensure battery charge
is maintained for quick starting.
Note: If battery cables are disconnected, it
will be necessary to reset memory features.
Brakes
• Make sure brakes and parking brake
are fully released.
Tires
• Maintain recommended air pressure.
Miscellaneous
• Make sure all linkages, cables, levers
and pins under vehicle are covered with
grease to prevent rust.
• Move vehicles at least 25 feet (8
meters) every 15 days to lubricate
working parts and prevent corrosion.
241
Vehicle Care

Removing Vehicle From Storage
When your vehicle is ready to come out of
storage, do the following:
• Wash your vehicle to remove any dirt
or grease film build-up on window
surfaces.
• Check windshield wipers for any
deterioration.
• Check under the hood for any foreign
material that may have collected
during storage (mice/squirrel nests).
• Check the exhaust for any foreign
material that may have collected
during storage.
• Check tire pressures and set tire
inflation per the Tire Label.
• Check brake pedal operation. Drive the
vehicle 15 feet (4.5 meters) back and
forth to remove rust build-up.
• Check fluid levels (including coolant,
oil and gas) to make sure there are no
leaks, and fluids are at recommended
levels.
• If the battery was removed, clean the
battery cable ends and inspect.
Contact your authorized dealer if you have
any concerns or issues.
242
Vehicle Care

GENERAL INFORMATION
Notice to utility vehicle and truck
owners
WARNINGS
Utility vehicles have a significantly
higher rollover rate than other types
of vehicles. To reduce the risk of
serious injury or death from a rollover or
other crash you must avoid sharp turns and
abrupt maneuvers, drive at safe speeds for
the conditions, keep tires properly inflated,
never overload or improperly load your
vehicle, and make sure every passenger is
properly restrained.
In a rollover crash, an unbelted
person is significantly more likely to
die than a person wearing a seat belt.
All occupants must wear seat belts and
children/infants must use appropriate
restraints to minimize the risk of injury or
ejection.
Do not become overconfident in the
ability of four-wheel drive vehicles.
Although a four-wheel drive vehicle
may accelerate better than a two-wheel
drive vehicle in low traction situations, it
won't stop any faster than two-wheel drive
vehicles. Always drive at a safe speed.
E145298
Utility vehicles and trucks handle
differently than passenger cars in the
various driving conditions that are
encountered on streets, highways and
off-road. Utility vehicles and trucks are not
designed for cornering at speeds as high
as passenger cars any more than low-slung
sports cars are designed to perform
satisfactorily under off-road conditions.
Study your owner's manual and any
supplements for specific information about
equipment features, instructions for safe
driving and additional precautions to
reduce the risk of an accident or serious
injury.
Four-wheel drive system (if
equipped)
WARNING
Do not become overconfident in the
ability of four-wheel drive vehicles.
Although a four-wheel drive vehicle
may accelerate better than a two-wheel
drive vehicle in low traction situations, it
won't stop any faster than two-wheel drive
vehicles. Always drive at a safe speed.
A vehicle equipped with four-wheel drive
(when selected) has the ability to use all
four wheels to power itself. This increases
traction which may enable you to safely
drive over terrain and road conditions that
a conventional two-wheel drive vehicle
cannot.
For four-wheel drive vehicles, a spare tire
of a different size other than the tire
provided should never be used. A dissimilar
spare tire size (other than the spare tire
provided) or major dissimilar tire sized
between the front and rear axles could
cause the four-wheel drive system to stop
functioning and default to front-wheel
drive.
243
Wheels and Tires

How your vehicle differs from
other vehicles
Sport utility vehicles s and trucks can differ
from some other vehicles in a few
noticeable ways. Your vehicle may be:
E145299
• Higher - to allow higher load carrying
capacity and to allow it to travel over
rough terrain without getting hung up
or damaging underbody components.
• Shorter - to give it the capability to
approach inclines and drive over the
crest of a hill without getting hung up
or damaging underbody components.
All other things held equal, a shorter
wheelbase may make your vehicle
quicker to respond to steering inputs
than a vehicle with a longer wheelbase.
• Narrower - to provide greater
maneuverability in tight spaces,
particularly in off-road use.
E145300
As a result of the above dimensional
differences, Sport utility vehicles and
trucks often will have a higher center of
gravity and a greater difference in center
of gravity between the loaded and
unloaded condition. These differences that
make your vehicle so versatile also make
it handle differently than an ordinary
passenger car.
244
Wheels and Tires

TIRE CARE
Information About Uniform Tire
Quality Grading
E142542
Tire Quality Grades apply to new
pneumatic passenger car tires. The Quality
grades can be found where applicable on
the tire sidewall between tread shoulder
and maximum section width. For example:
Treadwear 200 Traction AA
Temperature A.
These Tire Quality Grades are determined
by standards that the United States
Department of Transportation has set.
Tire Quality Grades apply to new
pneumatic passenger car tires. They do
not apply to deep tread, winter-type snow
tires, space-saver or temporary use spare
tires, light truck or LT type tires, tires with
nominal rim diameters of 10 to 12 inches
or limited production tires as defined in
Title 49 Code of Federal Regulations Part
575.104 (c)(2).
U.S. Department of Transportation Tire
quality grades: The U.S. Department of
Transportation requires Ford Motor
Company to give you the following
information about tire grades exactly as
the government has written it.
Treadwear
The treadwear grade is a comparative
rating based on the wear rate of the tire
when tested under controlled conditions
on a specified government test course. For
example, a tire graded 150 would wear one
and one-half (11⁄2) times as well on the
government course as a tire graded 100.
The relative performance of tires depends
upon the actual conditions of their use,
however, and may depart significantly from
the norm due to variations in driving habits,
service practices, and differences in road
characteristics and climate.
Traction AA A B C
WARNING
The traction grade assigned to this
tire is based on straight-ahead
braking traction tests, and does not
include acceleration, cornering,
hydroplaning or peak traction
characteristics.
The traction grades, from highest to lowest
are AA, A, B, and C. The grades represent
the tire’s ability to stop on wet pavement
as measured under controlled conditions
on specified government test surfaces of
asphalt and concrete. A tire marked C may
have poor traction performance.
Temperature A B C
WARNING
The temperature grade for this tire
is established for a tire that is
properly inflated and not overloaded.
Excessive speed, underinflation, or
excessive loading, either separately or in
combination, can cause heat buildup and
possible tire failure.
245
Wheels and Tires

The temperature grades are A (the
highest), B and C, representing the tire’s
resistance to the generation of heat and
its ability to dissipate heat when tested
under controlled conditions on a specified
indoor laboratory test wheel. Sustained
high temperature can cause the material
of the tire to degenerate and reduce tire
life, and excessive temperature can lead
to sudden tire failure. The grade C
corresponds to a level of performance
which all passenger car tires must meet
under the Federal Motor Vehicle Safety
Standard No. 139. Grades B and A
represent higher levels of performance on
the laboratory test wheel than the
minimum required by law.
Glossary of Tire Terminology
• Tire label: A label showing the OE
(Original Equipment) tire sizes,
recommended inflation pressure and
the maximum weight the vehicle can
carry.
• Tire Identification Number (TIN): A
number on the sidewall of each tire
providing information about the tire
brand and manufacturing plant, tire
size and date of manufacture. Also
referred to as DOT code.
• Inflation pressure: A measure of the
amount of air in a tire.
• Standard load: A class of P-metric or
Metric tires designed to carry a
maximum load at 35 psi [37 psi (2.5
bar) for Metric tires]. Increasing the
inflation pressure beyond this pressure
will not increase the tire’ s load carrying
capability.
• Extra load: A class of P-metric or
Metric tires designed to carry a heavier
maximum load at 41 psi [43 psi (2.9
bar) for Metric tires]. Increasing the
inflation pressure beyond this pressure
will not increase the tire’ s load carrying
capability.
• kPa: Kilopascal, a metric unit of air
pressure.
• PSI: Pounds per square inch, a
standard unit of air pressure.
• Cold inflation pressure: The tire
pressure when the vehicle has been
stationary and out of direct sunlight for
an hour or more and prior to the vehicle
being driven for 1 mile (1.6 km).
• Recommended inflation pressure:
The cold inflation pressure found on
the Safety Compliance Certification
Label (affixed to either the door hinge
pillar, door-latch post, or the door edge
that meets the door-latch post, next
to the driver's seating position), or Tire
Label located on the B-Pillar or the
edge of the driver’s door.
• B-pillar: The structural member at the
side of the vehicle behind the front
door
• Bead area of the tire: Area of the tire
next to the rim.
• Sidewall of the tire: Area between
the bead area and the tread.
• Tread area of the tire: Area of the
perimeter of the tire that contacts the
road when mounted on the vehicle.
• Rim: The metal support (wheel) for a
tire or a tire and tube assembly upon
which the tire beads are seated.
Information Contained on the Tire
Sidewall
Both U.S. and Canada Federal regulations
require tire manufacturers to place
standardized information on the sidewall
of all tires. This information identifies and
describes the fundamental characteristics
of the tire and also provides a U.S. DOT
Tire Identification Number for safety
standard certification and in case of a
recall.
246
Wheels and Tires

Information on P Type Tires
H
I
J
K
L
M
A
B
C
D
E
F
G
E142543
P215/65R15 95H is an example of a tire
size, load index and speed rating. The
definitions of these items are listed below.
(Note that the tire size, load index and
speed rating for your vehicle may be
different from this example.)
A. P: Indicates a tire, designated by the Tire
and Rim Association (T&RA), that may be
used for service on cars, SUVs, minivans
and light trucks. Note: If your tire size does
not begin with a letter this may mean it is
designated by either ETRTO (European
Tire and Rim Technical Organization) or
JATMA (Japan Tire Manufacturing
Association).
B. 215: Indicates the nominal width of the
tire in millimeters from sidewall edge to
sidewall edge. In general, the larger the
number, the wider the tire.
C. 65: Indicates the aspect ratio which
gives the tire's ratio of height to width.
D. R: Indicates a radial type tire.
E. 15: Indicates the wheel or rim diameter
in inches. If you change your wheel size,
you will have to purchase new tires to
match the new wheel diameter.
F. 95: Indicates the tire's load index. It is
an index that relates to how much weight
a tire can carry. You may find this
information in your owner’ s manual. If not,
contact a local tire dealer.
Note: You may not find this information on
all tires because it is not required by federal
law.
G. H: Indicates the tire's speed rating. The
speed rating denotes the speed at which
a tire is designed to be driven for extended
periods of time under a standard condition
of load and inflation pressure. The tires on
your vehicle may operate at different
conditions for load and inflation pressure.
These speed ratings may need to be
adjusted for the difference in conditions.
The ratings range from 81 mph (130 km/h)
to 186 mph (299 km/h). These ratings are
listed in the following chart.
Note: You may not find this information on
all tires because it is not required by federal
law.
Speed rating - mph (km/
h)
Letter rating
81 mph (130 km/h)M
87 mph (140 km/h)N
99 mph (159 km/h)Q
106 mph (171 km/h)R
112 mph (180 km/h)S
118 mph (190 km/h)T
124 mph (200 km/h)U
130 mph (210 km/h)H
149 mph (240 km/h)V
247
Wheels and Tires

Speed rating - mph (km/
h)
Letter rating
168 mph (270 km/h)W
186 mph (299 km/h)Y
Note: For tires with a maximum speed
capability over 149 mph (240 km/h), tire
manufacturers sometimes use the letters
ZR. For those with a maximum speed
capability over 186 mph (299 km/h), tire
manufacturers always use the letters ZR.
H. U.S. DOT Tire Identification Number
(TIN): This begins with the letters DOT
and indicates that the tire meets all federal
standards. The next two numbers or letters
are the plant code designating where it
was manufactured, the next two are the
tire size code and the last four numbers
represent the week and year the tire was
built. For example, the numbers 317 mean
the 31st week of 1997. After 2000 the
numbers go to four digits. For example,
2501 means the 25th week of 2001. The
numbers in between are identification
codes used for traceability. This
information is used to contact customers
if a tire defect requires a recall.
I. M+S or M/S: Mud and Snow, or
AT: All Terrain, or
AS: All Season.
J. Tire Ply Composition and Material
Used: Indicates the number of plies or the
number of layers of rubber-coated fabric
in the tire tread and sidewall. Tire
manufacturers also must indicate the ply
materials in the tire and the sidewall, which
include steel, nylon, polyester, and others.
K. Maximum Load: Indicates the
maximum load in kilograms and pounds
that can be carried by the tire. Refer to the
Safety Compliance Certification Label
(affixed to either the door hinge pillar,
door-latch post, or the door edge that
meets the door-latch post, next to the
driver's seating position), for the correct
tire pressure for your vehicle.
L. Treadwear, Traction and
Temperature Grades:
• Treadwear The treadwear grade is a
comparative rating based on the wear
rate of the tire when tested under
controlled conditions on a specified
government test course. For example,
a tire graded 150 would wear one and
one-half times as well on the
government course as a tire graded
100.
• Traction: The traction grades, from
highest to lowest are AA, A, B, and C.
The grades represent the tire's ability
to stop on wet pavement as measured
under controlled conditions on
specified government test surfaces of
asphalt and concrete. A tire marked C
may have poor traction performance.
• Temperature: The temperature
grades are A (the highest), B and C,
representing the tire's resistance to the
generation of heat and its ability to
dissipate heat when tested under
controlled conditions on a specified
indoor laboratory test wheel.
248
Wheels and Tires

M. Maximum Permissible Inflation
Pressure: Indicates the tire
manufacturers' maximum permissible
pressure or the pressure at which the
maximum load can be carried by the tire.
This pressure is normally higher than the
manufacturer's recommended cold
inflation pressure which can be found on
the Safety Compliance Certification Label
(affixed to either the door hinge pillar,
door-latch post, or the door edge that
meets the door-latch post, next to the
driver's seating position), or Tire Label
which is located on the B-Pillar or the edge
of the driver’s door. The cold inflation
pressure should never be set lower than
the recommended pressure on the vehicle
label.
The tire suppliers may have additional
markings, notes or warnings such as
standard load, radial tubeless, etc.
Additional Information Contained on
the Tire Sidewall for LT Type Tires
Note: Tire Quality Grades do not apply to
this type of tire.
A
B
C
B
D
E142544
LT type tires have some additional
information beyond those of P type tires;
these differences are described below.
A. LT: Indicates a tire, designated by the
Tire and Rim Association (T&RA), that is
intended for service on light trucks.
B. Load Range and Load Inflation
Limits: Indicates the tire's load-carrying
capabilities and its inflation limits.
C. Maximum Load Dual lb (kg) at psi
(kPa) cold: Indicates the maximum load
and tire pressure when the tire is used as
a dual; defined as four tires on the rear axle
(a total of six or more tires on the vehicle).
D. Maximum Load Single lb (kg) at psi
(kPa) cold: Indicates the maximum load
and tire pressure when the tire is used as
a single; defined as two tires (total) on the
rear axle.
Information on T Type Tires
T145/80D16 is an example of a tire size.
Note: The temporary tire size for your
vehicle may be different from this example.
Tire Quality Grades do not apply to this type
of tire.
249
Wheels and Tires

A
B
C
D
E
E142545
T type tires have some additional
information beyond those of P type tires;
these differences are described below:
A. T: Indicates a type of tire, designated by
the Tire and Rim Association (T&RA), that
is intended for temporary service on cars,
SUVs, minivans and light trucks.
B. 145: Indicates the nominal width of the
tire in millimeters from sidewall edge to
sidewall edge. In general, the larger the
number, the wider the tire.
C. 80: Indicates the aspect ratio which
gives the tire's ratio of height to width.
Numbers of 70 or lower indicate a short
sidewall.
D. D: Indicates a diagonal type tire.
R: Indicates a radial type tire.
E. 16: Indicates the wheel or rim diameter
in inches. If you change your wheel size,
you will have to purchase new tires to
match the new wheel diameter.
Location of the Tire Label
You will find a Tire Label containing tire
inflation pressure by tire size and other
important information located on the
B-Pillar or the edge of the driver’s door.
Inflating Your Tires
Safe operation of your vehicle requires that
your tires are properly inflated. Remember
that a tire can lose up to half of its air
pressure without appearing flat.
Every day before you drive, check your tires.
If one looks lower than the others, use a
tire gauge to check pressure of all tires and
adjust if required.
At least once a month and before long
trips, inspect each tire and check the tire
pressure with a tire gauge (including spare,
if equipped). Inflate all tires to the inflation
pressure recommended by Ford Motor
Company.
You are strongly urged to buy a reliable tire
pressure gauge, as automatic service
station gauges may be inaccurate. Ford
recommends the use of a digital or
dial-type tire pressure gauge rather than a
stick-type tire pressure gauge.
Use the recommended cold inflation
pressure for optimum tire performance and
wear. Under-inflation or over-inflation may
cause uneven treadwear patterns
250
Wheels and Tires

WARNING
Under-inflation is the most common
cause of tire failures and may result
in severe tire cracking, tread
separation or blowout, with unexpected
loss of vehicle control and increased risk
of injury. Under-inflation increases sidewall
flexing and rolling resistance, resulting in
heat buildup and internal damage to the
tire. It also may result in unnecessary tire
stress, irregular wear, loss of vehicle
control and accidents. A tire can lose up
to half of its air pressure and not appear
to be flat!
Always inflate your tires to the Ford
recommended inflation pressure even if it
is less than the maximum inflation
pressure information found on the tire. The
Ford recommended tire inflation pressure
is found on the Safety Compliance
Certification Label (affixed to either the
door hinge pillar, door-latch post, or the
door edge that meets the door-latch post,
next to the driver's seating position), or Tire
Label which is located on the B-Pillar or
the edge of the driver’s door. Failure to
follow the tire pressure recommendations
can cause uneven treadwear patterns and
adversely affect the way your vehicle
handles
Maximum Permissible Inflation
Pressure is the tire manufacturer's
maximum permissible pressure and the
pressure at which the maximum load can
be carried by the tire. This pressure is
normally higher than the manufacturer’s
recommended cold inflation pressure
which can be found on the Safety
Compliance Certification Label (affixed to
either the door hinge pillar, door-latch post,
or the door edge that meets the door-latch
post, next to the driver's seating position),
or Tire Label which is located on the
B-Pillar or the edge of the driver’s door. The
cold inflation pressure should never be set
lower than the recommended pressure on
the Safety Compliance Certification Label
or Tire Label.
When weather temperature changes
occur, tire inflation pressures also change.
A 10°F (6°C) temperature drop can cause
a corresponding drop of 1 psi (7 kPa) in
inflation pressure. Check your tire pressures
frequently and adjust them to the proper
pressure which can be found on the Safety
Compliance Certification Label or Tire
Label.
To check the pressure in your tire(s):
1. Make sure the tires are cool, meaning
they are not hot from driving even a
mile.
Note: If you are checking tire pressure when
the tire is hot, (i.e. driven more than 1 mile
[1.6 km]), never bleed or reduce air pressure.
The tires are hot from driving and it is normal
for pressures to increase above
recommended cold pressures. A hot tire at
or below recommended cold inflation
pressure could be significantly
under-inflated.
Note: If you have to drive a distance to get
air for your tire(s), check and record the tire
pressure first and add the appropriate air
pressure when you get to the pump. It is
normal for tires to heat up and the air
pressure inside to go up as you drive.
251
Wheels and Tires

2. Remove the cap from the valve on one
tire, then firmly press the tire gauge
onto the valve and measure the
pressure.
3. Add enough air to reach the
recommended air pressure.
Note: If you overfill the tire, release air by
pressing on the metal stem in the center of
the valve. Then recheck the pressure with
your tire gauge.
4. Replace the valve cap.
5. Repeat this procedure for each tire,
including the spare.
Note: Some spare tires operate at a higher
inflation pressure than the other tires. For T
type mini-spare tires (refer to the Dissimilar
spare wheel and tire assembly information
for a description): Store and maintain at 60
psi (4.15 bar). For full-size and dissimilar
spare tires (refer to the Dissimilar spare
wheel and tire assembly information for a
description): Store and maintain at the
higher of the front and rear inflation pressure
as shown on the Tire Label.
6. Visually inspect the tires to make sure
there are no nails or other objects
embedded that could poke a hole in
the tire and cause an air leak.
7. Check the sidewalls to make sure there
are no gouges, cuts or bulges.
Inspecting Your Tires and Wheel Valve
Stems
Periodically inspect the tire treads for
uneven or excessive wear and remove
objects such as stones, nails or glass that
may be wedged in the tread grooves.
Check the tire and valve stems for holes,
cracks, or cuts that may permit air leakage
and repair or replace the tire and replace
the valve stem. Inspect the tire sidewalls
for cracking, cuts, bruises and other signs
of damage or excessive wear. If internal
damage to the tire is suspected, have the
tire demounted and inspected in case it
needs to be repaired or replaced. For your
safety, tires that are damaged or show
signs of excessive wear should not be used
because they are more likely to blow out
or fail.
Improper or inadequate vehicle
maintenance can cause tires to wear
abnormally. Inspect all your tires, including
the spare, frequently, and replace them if
one or more of the following conditions
exist:
Tire Wear
E142546
252
Wheels and Tires

When the tread is worn down to one
sixteenth of an inch (2 mm), tires must be
replaced to help prevent your vehicle from
skidding and hydroplaning. Built-in
treadwear indicators, or wear bars, which
look like narrow strips of smooth rubber
across the tread will appear on the tire
when the tread is worn down to one
sixteenth of an inch (2 mm)
When the tire tread wears down to the
same height as these wear bars, the tire is
worn out and must be replaced.
Damage
Periodically inspect the tire treads and
sidewalls for damage (such as bulges in
the tread or sidewalls, cracks in the tread
groove and separation in the tread or
sidewall). If damage is observed or
suspected have the tire inspected by a tire
professional. Tires can be damaged during
off-road use, so inspection after off-road
use is also recommended.
Age
WARNING
Tires degrade over time depending
on many factors such as weather,
storage conditions, and conditions
of use (load, speed, inflation pressure, etc.)
the tires experience throughout their lives.
In general, tires should be replaced after
six years regardless of tread wear.
However, heat caused by hot climates or
frequent high loading conditions can
accelerate the aging process and may
require tires to be replaced more
frequently.
You should replace your spare tire when
you replace the road tires or after six years
due to aging even if it has not been used.
U.S. DOT Tire Identification Number
(TIN)
Both U.S. and Canada Federal regulations
require tire manufacturers to place
standardized information on the sidewall
of all tires. This information identifies and
describes the fundamental characteristics
of the tire and also provides a U.S. DOT
Tire Identification Number for safety
standard certification and in case of a
recall.
This begins with the letters DOT and
indicates that the tire meets all federal
standards. The next two numbers or letters
are the plant code designating where it
was manufactured, the next two are the
tire size code and the last four numbers
represent the week and year the tire was
built. For example, the numbers 317 mean
the 31st week of 1997. After 2000 the
numbers go to four digits. For example,
2501 means the 25th week of 2001. The
numbers in between are identification
codes used for traceability. This
information is used to contact customers
if a tire defect requires a recall.
Tire Replacement Requirements
Your vehicle is equipped with tires
designed to provide a safe ride and
handling capability.
WARNINGS
Only use replacement tires and
wheels that are the same size, load
index, speed rating and type (such
as P-metric versus LT-metric or all-season
versus all-terrain) as those originally
provided by Ford. The recommended tire
and wheel size may be found on either the
Safety Compliance Certification Label
(affixed to either the door hinge pillar,
door-latch post, or the door edge that
meets the door-latch post, next to the
driver's seating position), or the Tire Label
which is located on the B-Pillar or edge of
the driver’s door. If this information is not
253
Wheels and Tires

WARNINGS
found on these labels then you should
contact your authorized dealer as soon as
possible. Use of any tire or wheel not
recommended by Ford can affect the
safety and performance of your vehicle,
which could result in an increased risk of
loss of vehicle control, vehicle rollover,
personal injury and death. Additionally the
use of non-recommended tires and wheels
could cause steering, suspension, axle,
transfer case or power transfer unit failure.
If you have questions regarding tire
replacement, contact your authorized
dealer as soon as possible.
When mounting replacement tires
and wheels, you should not exceed
the maximum pressure indicated on
the sidewall of the tire to set the beads
without additional precautions listed
below. If the beads do not seat at the
maximum pressure indicated, re-lubricate
and try again
When inflating the tire for mounting
pressures up to 20 psi (1.38 bar) greater
than the maximum pressure on the tire
sidewall, the following precautions must
be taken to protect the person mounting
the tire:
1. Make sure that you have the correct tire
and wheel size.
2. Lubricate the tire bead and wheel bead
seat area again.
3. Stand at a minimum of 12 ft (3.66 m)
away from the wheel and tire assembly.
4. Use both eye and ear protection.
For a mounting pressure more than 20 psi
(1.38 bar) greater than the maximum
pressure, a Ford dealer or other tire service
professional should do the mounting.
WARNINGS
Always inflate steel carcass tires with a
remote air fill with the person inflating
standing at a minimum of 12 ft (3.66 m)
away from the wheel and tire assembly
Important: Remember to replace the
wheel valve stems when the road tires are
replaced on your vehicle
It is recommended that the two front tires
or two rear tires generally be replaced as
a pair.
The tire pressure sensors mounted in the
wheels (originally installed on your vehicle)
are not designed to be used in aftermarket
wheels.
The use of wheels or tires not
recommended by Ford Motor Company
may affect the operation of your tire
pressure monitoring system.
If the TPMS indicator is flashing, your
TPMS is malfunctioning. Your replacement
tire might be incompatible with your TPMS,
or some component of the TPMS may be
damaged.
Safety Practices
WARNINGS
If your vehicle is stuck in snow, mud,
sand, etc., do not rapidly spin the
tires; spinning the tires can tear the
tire and cause an explosion. A tire can
explode in as little as three to five seconds.
Do not spin the wheels at over 35
mph (56 km/h). The tires may fail
and injure a passenger or bystander.
Driving habits have a great deal to do with
your tire mileage and safety.
• Observe posted speed limits
• Avoid fast starts, stops and turns
254
Wheels and Tires

• Avoid potholes and objects on the road
• Do not run over curbs or hit the tire
against a curb when parking
Highway Hazards
No matter how carefully you drive there’s
always the possibility that you may
eventually have a flat tire on the highway.
Drive slowly to the closest safe area out of
traffic. This may further damage the flat
tire, but your safety is more important.
If you feel a sudden vibration or ride
disturbance while driving, or you suspect
your tire or vehicle has been damaged,
immediately reduce your speed. Drive with
caution until you can safely pull off the
road. Stop and inspect the tires for
damage. If a tire is under-inflated or
damaged, deflate it, remove wheel and
replace it with your spare tire and wheel.
If you cannot detect a cause, have the
vehicle towed to the nearest repair facility
or tire dealer to have the vehicle inspected.
Tire and Wheel Alignment
A bad jolt from hitting a curb or pothole
can cause the front end of your vehicle to
become misaligned or cause damage to
your tires. If your vehicle seems to pull to
one side when you’re driving, the wheels
may be out of alignment. Have an
authorized dealer check the wheel
alignment periodically.
Wheel misalignment in the front or the rear
can cause uneven and rapid treadwear of
your tires and should be corrected by an
authorized dealer. Front-wheel drive
vehicles and those with an independent
rear suspension (if equipped) may require
alignment of all four wheels.
The tires should also be balanced
periodically. An unbalanced tire and wheel
assembly may result in irregular tire wear.
Tire Rotation
Note: If your tires show uneven wear ask
an authorized dealer to check for and correct
any wheel misalignment, tire imbalance or
mechanical problem involved before tire
rotation.
Note: Your vehicle may be equipped with
a dissimilar spare wheel and tire assembly.
A dissimilar spare wheel and tire assembly
is defined as a spare wheel and tire
assembly that is different in brand, size or
appearance from the road tires and wheels.
If you have a dissimilar spare wheel and tire
assembly it is intended for temporary use
only and should not be used in a tire
rotation.
Note: After having your tires rotated,
inflation pressure must be checked and
adjusted to the vehicle requirements.
Rotating your tires at the recommended
interval (as indicated in the Scheduled
Maintenance chapter) will help your tires
wear more evenly, providing better tire
performance and longer tire life.
Front-wheel drive vehicles (front tires on
the left side of the diagram)
E142547
Four-wheel drive vehicles (front tires on
the left side of the diagram)
255
Wheels and Tires

E142548
Sometimes irregular tire wear can be
corrected by rotating the tires.
USING SNOW CHAINS
WARNING
Snow tires must be the same size,
load index, speed rating as those
originally provided by Ford. Use of
any tire or wheel not recommended by
Ford can affect the safety and
performance of your vehicle, which could
result in an increased risk of loss of vehicle
control, vehicle rollover, personal injury and
death. Additionally, the use of
non-recommended tires and wheels could
cause steering, suspension, axle, transfer
case or power transfer unit failure.
The tires on your vehicle have all-weather
treads to provide traction in rain and snow.
However, in some climates, you may need
to use snow tires and cables. If you need
to use cables, it is recommended that steel
wheels (of the same size and
specifications) be used, as cables may chip
aluminum wheels.
Follow these guidelines when using snow
tires and traction devices
• If possible, avoid fully loading your
vehicle
• Purchase chains or cables from a
manufacturer that clearly labels body
to tire dimension restrictions.
• Use 10 mm cables or chains ONLY on
front axle with 235/55R17 tires.
• Not all S-class snow chains or cables
meet these restrictions. Chains of this
size restriction will include a tensioning
device.
• The snow chains or cables must be
mounted in pairs on the front axle.
• Do not use chains or cables on
235/50R18 and 235/45R19 tires.
• Install cables securely, verifying that
the cables do not touch any wiring,
brake lines or fuel lines.
• When driving with tire cables do not
exceed 30 mph (48 km/h) or the
maximum speed recommended by the
chain manufacturer, whichever is less.
• Drive cautiously. If you hear the cables
rub or bang against the vehicle, stop
and retighten them. If this does not
work, remove the cables to prevent
vehicle damage.
• Remove the cables when they are no
longer needed. Do not use cables on
dry roads.
If you have any questions regarding snow
chains or cables, please contact your
authorized dealer.
256
Wheels and Tires

TIRE PRESSURE MONITORING
SYSTEM
WARNING
The tire pressure monitoring system
is NOT a substitute for manually
checking tire pressure. The tire
pressure should be checked periodically
(at least monthly) using a tire gauge, see
Inflating your tires in this chapter. Failure
to properly maintain your tire pressure
could increase the risk of tire failure, loss
of control, vehicle rollover and personal
injury.
Each tire, including the spare (if
provided), should be checked
monthly when cold and inflated
to the inflation pressure
recommended by the vehicle manufacturer
on the vehicle placard or tire inflation
pressure label. (If your vehicle has tires of
a different size than the size indicated on
the vehicle placard or tire inflation pressure
label, you should determine the proper tire
inflation pressure for those tires.)
As an added safety feature, your vehicle
has been equipped with a tire pressure
monitoring system (TPMS) that
illuminates a low tire pressure telltale
when one or more of your tires is
significantly under-inflated. Accordingly,
when the low tire pressure telltale
illuminates, you should stop and check
your tires as soon as possible, and inflate
them to the proper pressure. Driving on a
significantly under-inflated tire causes the
tire to overheat and can lead to tire failure.
Under-inflation also reduces fuel efficiency
and tire tread life, and may affect the
vehicle’s handling and stopping ability.
Please note that the TPMS is not a
substitute for proper tire maintenance, and
it is the driver’s responsibility to maintain
correct tire pressure, even if under-inflation
has not reached the level to trigger
illumination of the TPMS low tire pressure
telltale.
Your vehicle has also been equipped with
a TPMS malfunction indicator to indicate
when the system is not operating properly.
The malfunction indicator is combined
with the low tire pressure telltale. When
the system detects a malfunction, the
telltale will flash for approximately one
minute and then remain continuously
illuminated. This sequence will continue
upon subsequent vehicle start-ups as long
as the malfunction exists.
When the malfunction indicator is
illuminated, the system may not be able
to detect or signal low tire pressure as
intended. TPMS malfunctions may occur
for a variety of reasons, including the
installation of replacement or alternate
tires or wheels on the vehicle that prevent
the TPMS from functioning properly.
Always check the TPMS malfunction
telltale after replacing one or more tires or
wheels on your vehicle to ensure that the
replacement or alternate tires and wheels
allow the TPMS to continue to function
properly.
The tire pressure monitoring system
complies with part 15 of the FCC rules and
with RSS-210 of Industry Canada.
Operation is subject to the following two
conditions: (1) This device may not cause
harmful interference, and (2) This device
must accept any interference received,
including interference that may cause
undesired operation.
257
Wheels and Tires

Changing Tires with a Tire
Pressure Monitoring System
E142549
Note: Each road tire is equipped with a tire
pressure sensor located inside the wheel
and tire assembly cavity. The pressure
sensor is attached to the valve stem. The
pressure sensor is covered by the tire and is
not visible unless the tire is removed. Care
must be taken when changing the tire to
avoid damaging the sensor
It is recommended that you always have
your tires serviced by an authorized dealer.
The tire pressure should be checked
periodically (at least monthly) using an
accurate tire gauge, refer to Inflating your
tires in this chapter.
Understanding Your Tire Pressure
Monitoring System
The tire pressure monitoring system
measures pressure in your four road tires
and sends the tire pressure readings to
your vehicle. The low tire pressure warning
light will turn on if the tire pressure is
significantly low. Once the light is
illuminated, your tires are under-inflated
and need to be inflated to the
manufacturer’s recommended tire
pressure. Even if the light turns on and a
short time later turns off, your tire pressure
still needs to be checked. Visit
www.checkmytires.org for additional
information.
When your Temporary Spare Tire is
Installed
When one of your road tires needs to be
replaced with the temporary spare, the tire
pressure monitoring system will continue
to identify an issue to remind you that the
damaged road wheel and tire assembly
needs to be repaired and put back on your
vehicle.
To restore the full functionality of the tire
pressure monitoring system, have the
damaged road wheel and tire assembly
repaired and remounted on your vehicle.
When you Believe your System is not
Operating Properly
The main function of the tire pressure
monitoring system is to warn you when
your tires need air. It can also warn you in
the event the system is no longer capable
of functioning as intended. Please refer to
the following chart for information
concerning your tire pressure monitoring
system:
258
Wheels and Tires

Customer action requiredPossible causeLow tire pressure
warning light
1. Make sure tires are at the proper pres-
sure. See Inflating your tires in this
chapter. 2. After inflating your tires to the
manufacturer’s recommended pressure
as shown on the Tire Label (located on
the edge of driver’s door or the B-Pillar),
the vehicle must be driven for at least
two minutes over 20 mph (32 km/h)
before the light turns off.
Tire(s) under-inflatedSolid warning light
Repair the damaged road wheel and tire
assembly and reinstall it on the vehicle
to restore system functionality. For a
description on how the system functions,
refer to When your temporary spare tire
is installed in this section.
Spare tire in use
If the tires are properly inflated and the
spare tire is not in use but the light
remains on, contact your authorized
dealer as soon as possible.
TPMS malfunction
Repair the damaged road wheel and tire
assembly and reinstall it on the vehicle
to restore system functionality. For a
description on how the system functions,
refer to When your temporary spare tire
is installed in this section.
Spare tire in useFlashing warning
light
If the tires are properly inflated and the
spare tire is not in use but the light
remains on, contact your authorized
dealer as soon as possible.
TPMS malfunction
When Inflating your Tires
When putting air into your tires (such as at
a gas station or in your garage), the tire
pressure monitoring system may not
respond immediately to the air added to
your tires.
It may take up to two minutes of driving
over 20 mph (32 km/h) for the light to turn
off after you have filled your tires to the
recommended inflation pressure
259
Wheels and Tires

How Temperature Affects your Tire
Pressure
The tire pressure monitoring system
monitors tire pressure in each pneumatic
tire. While driving in a normal manner, a
typical passenger tire inflation pressure
may increase approximately 2 to 4 psi (14
to 28 kPa) from a cold start situation. If
the vehicle is stationary overnight with the
outside temperature significantly lower
than the daytime temperature, the tire
pressure may decrease approximately 3
psi (21 kPa) for a drop of 30°F (17°C) in
ambient temperature. This lower pressure
value may be detected by the TPMS as
being significantly lower than the
recommended inflation pressure and
activate the TPMS warning light for low
tire pressure. If the low tire pressure
warning light is on, visually check each tire
to verify that no tire is flat. (If one or more
tires are flat, repair as necessary.) Check
air pressure in the road tires. If any tire is
under-inflated, carefully drive the vehicle
to the nearest location where air can be
added to the tires. Inflate all the tires to
the recommended inflation pressure.
CHANGING A ROAD WHEEL
WARNINGS
The use of tire sealants may damage
your tire pressure monitoring system
and should not be used. However, if
you must use a sealant, the tire pressure
monitoring system sensor and valve stem
on the wheel must be replaced by an
authorized Ford dealer.
See Tire Pressure Monitoring
System (page 257). for important
information. If the tire pressure
monitor sensor becomes damaged, it will
no longer function.
Note: The tire pressure monitoring system
indicator light will illuminate when the spare
tire is in use. To restore the full functionality
of the monitoring system, all road wheels
equipped with tire pressure monitoring
sensors must be mounted on the vehicle.
If you get a flat tire while driving, do not
apply the brake heavily. Instead, gradually
decrease your speed. Hold the steering
wheel firmly and slowly move to a safe
place on the side of the road.
Have a flat serviced by an authorized
dealer in order to prevent damage to the
tire pressure monitoring system sensors.
See Tire Pressure Monitoring System
(page 257). Replace the spare tire with a
road tire as soon as possible. During
repairing or replacing of the flat tire, have
the authorized dealer inspect the tire
pressure monitoring system sensor for
damage.
Dissimilar Spare Wheel and Tire
Assembly Information
WARNING
Failure to follow these guidelines
could result in an increased risk of
loss of vehicle control, injury or death.
If you have a dissimilar spare wheel and
tire, then it is intended for temporary use
only. This means that if you need to use it,
you should replace it as soon as possible
with a road wheel and tire assembly that
is the same size and type as the road tires
and wheels that were originally provided
by Ford. If the dissimilar spare tire or wheel
is damaged, it should be replaced rather
than repaired.
A dissimilar spare wheel and tire assembly
is defined as a spare wheel and tire
assembly that is different in brand, size or
appearance from the road tires and wheels
and can be one of three types:
260
Wheels and Tires

1. T-type mini-spare: This spare tire
begins with the letter T for tire size and
may have Temporary Use Only molded in
the sidewall.
2. Full-size dissimilar spare with label
on wheel: This spare tire has a label on
the wheel that states: THIS WHEEL AND
TIRE ASSEMBLY FOR TEMPORARY USE
ONLY.
When driving with one of the dissimilar
spare tires listed above, do not:
• Exceed 50 miles per hour (80
kilometers per hour)
• Load the vehicle beyond maximum
vehicle load rating listed on the Safety
Compliance Label.
• Tow a trailer.
• Use snow chains on the end of the
vehicle with the dissimilar spare tire.
• Use more than one dissimilar spare tire
at a time.
• Use commercial car washing
equipment.
• Try to repair the dissimilar spare tire.
Use of one of the dissimilar spare tires
listed above at any one wheel location can
lead to impairment of the following:
• Handling, stability and braking
performance.
• Comfort and noise.
• Ground clearance and parking at curbs.
• Winter weather driving capability.
• Wet weather driving capability.
• All-wheel driving capability (if
applicable).
3. Full-size dissimilar spare without
label on wheel
When driving with the full-size dissimilar
spare wheel and tire assembly, do not:
• Exceed 70 miles per hour (113
kilometers per hour).
• Use more than one dissimilar spare
wheel and tire assembly at a time.
• Use commercial car washing
equipment.
• Use snow chains on the end of the
vehicle with the dissimilar spare wheel
and tire assembly.
The usage of a full-size dissimilar spare
wheel and tire assembly can lead to
impairment of the following:
• Handling, stability and braking
performance.
• Comfort and noise.
• Ground clearance and parking at curbs.
• Winter weather driving capability.
• Wet weather driving capability.
• All-wheel driving capability (if
applicable).
• Load leveling adjustment (if
applicable).
When driving with the full-size dissimilar
spare wheel and tire assembly additional
caution should be given to:
• Towing a trailer.
• Driving vehicles equipped with a
camper body.
• Driving vehicles with a load on the
cargo rack.
Drive cautiously when using a full-size
dissimilar spare wheel and tire assembly
and seek service as soon as possible.
261
Wheels and Tires

Tire Change Procedure
WARNINGS
When one of the front wheels is off
the ground, the transmission alone
will not prevent the vehicle from
moving or slipping off the jack, even if the
vehicle is in position P.
To help prevent the vehicle from
moving when you change a tire, be
sure the parking brake is set, then
block (in both directions) the wheel that
is diagonally opposite (other side and end
of the vehicle) to the tire being changed.
If the vehicle slips off the jack, you or
someone else could be seriously
injured.
Do not attempt to change a tire on
the side of the vehicle close to
moving traffic. Pull far enough off the
road to avoid the danger of being hit when
operating the jack or changing the wheel.
To lessen the risk of personal injury,
do not put any part of your body
under the vehicle while changing a
tire. Do not start the engine when your
vehicle is on the jack. The jack is only
meant for changing the tire.
Note: Passengers should not remain in the
vehicle when the vehicle is being jacked.
1. Park on a level surface, set the parking
brake and activate the hazard flashers.
2. Place the gearshift lever in position P
and turn the engine off.
3. Remove the carpeted wheel cover.
E142550
4. Remove the lug wrench and jack from
the foam holder. Then, remove the flat
tire retainer strap from the jack base.
E142551
5. Block the diagonally opposite wheel.
6. Loosen each wheel lug nut one-half
turn counterclockwise but do not
remove them until the wheel is raised
off the ground.
7. The vehicle jacking points are shown
here, and are depicted on the yellow
warning label on the jack. Jack at the
specified locations to avoid
damage to the vehicle.
262
Wheels and Tires

E142552
8. Small arrow-shaped marks on the sills
show the location of the jacking points.
E142553
9. Remove the lug nuts with the lug
wrench.
Note: If equipped with full wheel covers
with exposed wheel nuts, the wheel nuts
must be removed prior to removing the
wheel cover or damage to the wheel cover
may occur.
10. Replace the flat tire with the spare
tire, making sure the valve stem is
facing outward. Reinstall the lug nuts
until the wheel is snug against the
hub. Do not fully tighten the lug nuts
until the wheel has been lowered.
11. Lower the wheel by turning the jack
handle counterclockwise.
1
2
3
4
5
E75442
12. Remove the jack and fully tighten the
lug nuts in the order shown. See
Technical Specifications (page
265).
Stowing the flat tire
1. Put the jack and lug wrench away.
Make sure the jack is fastened so it
does not rattle when you drive.
2. Unblock the wheels.
263
Wheels and Tires

3. Stow the flat tire on the floor in the
cargo area. Secure with the flat tire
retainer strap by following the next
steps:
E142906
4. Locate the cargo tie-down near the
seatback. Push the loop of the retainer
strap through the tie-down. Thread the
non-loop end through the loop.
E142985
5. Weave the retainer strap through the
wheel openings.
6. Locate the front cargo tie-down at the
opposite corner of the cargo area to
the tie-down used in Step 4. Thread
the retainer strap through the tie-down
and pull tight.
7. Secure by tying a 2-half hitch knot.
264
Wheels and Tires

E143746
TECHNICAL SPECIFICATIONS
Wheel Lug Nut Torque Specifications
WARNING
When a wheel is installed, always remove any corrosion, dirt or foreign materials
present on the mounting surfaces of the wheel or the surface of the wheel hub,
brake drum or brake disc that contacts the wheel. Ensure that any fasteners that
attach the rotor to the hub are secured so they do not interfere with the mounting surfaces
of the wheel. Installing wheels without correct metal-to-metal contact at the wheel
mounting surfaces can cause the wheel nuts to loosen and the wheel to come off while
the vehicle is in motion, resulting in loss of control.
Ib-ft (Nm)
*
Bolt size
100 (135)M12 x 1.5
*
Torque specifications are for nut and bolt threads free of dirt and rust. Use only Ford
recommended replacement fasteners.
Retighten the lug nuts to the specified torque within 100 miles (160 km) after any wheel
disturbance (tire rotation, changing a flat tire, wheel removal, etc.).
265
Wheels and Tires

E145950
Wheel pilot boreA
Inspect the wheel pilot bore and
mounting surface prior to installation.
Remove any visible corrosion or loose
particles.
266
Wheels and Tires

ENGINE SPECIFICATIONS
2.5L engine2.0L EcoBoost engine1.6L EcoBoost engineEngine
15212298Cubic inches
Minimum 87 octaneMinimum 87 octaneMinimum 87 octaneRequired fuel
9.7:19.3:110.0:1Compression
ratio
0.049-0.053 in.
(1.25-1.35 mm)
0.027-0.031 in.
(0.70-0.80 mm)
0.027-0.031 in. (0.70-
0.80 mm)
Spark plug gap
Drivebelt Routing
1.6L engine
E142479
2.0L and 2.5L engines
A
B
E142480
Long drivebelt is on first pulley
groove closest to engine
A
Short drivebelt is on second
pulley groove farthest from
engine
B
MOTORCRAFT PARTS
2.5L engine2.0L EcoBoost® engine1.6L EcoBoost®
engine
Component
FA-1908Air filter
element
1
FL-910-S
Oil filter
2
BXT-96R-500Battery
BXT-96R-590
267
Capacities and Specifications

2.5L engine2.0L EcoBoost® engine1.6L EcoBoost®
engine
Component
AYFS-32-YR
Spark plugs
3
FP70Cabin air filter
WW-2750 (driver side)Windshield
wiper blade WW-2705-WA (passenger side)
1
Failure to use the correct air filter element may result in severe engine damage. The
customer warranty may be void for any damage to the engine if the correct air filter
element is not used.
2
Only use the specified replacement oil filter. The use of a non-specified oil filter can
result in engine damage.
3
For spark plug replacement, see your authorized dealer. Replace the spark plugs at the
appropriate intervals. See Scheduled Maintenance (page 396).
Note: Replace the spark plugs with ones that meet Ford material and design specifications
for your vehicle, such as Motorcraft® or equivalent replacement parts. The customer
warranty may be void for any damage to the engine if such spark plugs are not used.
268
Capacities and Specifications

VEHICLE IDENTIFICATION
NUMBER
The vehicle identification number is
located on the driver side instrument panel.
E142476
Please note that in the graphic, XXXX is
representative of your vehicle identification
number.
The Vehicle Identification Number contains
the following information:
E142477
World manufacturer identifierA
Brake system, Gross Vehicle
Weight Rating, Restraint Devices
and their locations
B
Make, vehicle line, series, body
type
C
Engine typeD
Check digitE
Model yearF
Assembly plantG
Production sequence numberH
269
Capacities and Specifications

VEHICLE CERTIFICATION
LABEL
E142478
The National Highway Traffic Safety
Administration Regulations require that a
Safety Compliance Certification Label be
affixed to a vehicle and prescribe where
the Safety Compliance Certification Label
may be located. The Safety Compliance
Certification Label shall be affixed to either
the door hinge pillar, the door latch post,
or the edge of the door near the door latch,
next to the driver's seating position.
TRANSMISSION CODE
DESIGNATION
E142806
You can find a transmission code on the
Safety Compliance Certification Label. The
following table tells you which
transmission each code represents.
CodeDescription
6Six-speed automatic
transmission (6F35)
270
Capacities and Specifications

TECHNICAL SPECIFICATIONS
Ford Part Number /
Ford Specification
Ford Part Name or
Equivalent
CapacityItem
PM-1-C / WSS-
M6C65-A2
Motorcraft® High
Performance DOT 4
Motor Vehicle Brake
Fluid
Between MIN
and MAX on
reservoir
Brake fluid
1
XG-4 or XL-5 or equi-
valent / ESB-M1C93-
B
Multi-Purpose
Grease (Lithium
grease)
Not applicableDoor latch, hood latch,
auxiliary hood latch,
trunk latch, seat tracks.
XL-1 / NoneMotorcraft® Penet-
rating and Lock
Lubricant
Not applicableLock cylinder
XT-10-QLV
MERCON® LV
Motorcraft®
MERCON® LV ATF
9.0 qt (8.5L)Automatic transmission
fluid
2, 3
XY-80W90-QL /
WSP-M2C197-A
Motorcraft® SAE
80W-90 Premium
Rear Axle Lubricant
2.4 pt (1.15L)Rear differential (AWD)
fluid
XY-75W140-QL /
WSL-M2C192-A
Motorcraft® SAE
75W-140 Synthetic
Rear Axle Lubricant
12 oz (0.35L)Power Transfer Unit
(PTU) fluid (AWD)
4
- XO-5W30-QSP
(U.S.)
- Motorcraft® SAE
5W-30 Premium
Synthetic Blend
Motor Oil (U.S.)
5.7 qt (5.4L)2.0L EcoBoost® engine
oil
5, 6
- XO-5W30-QFS
(U.S.)
- Motorcraft® SAE
5W-30 Full
Synthetic Motor Oil
(U.S.)
- CXO-5W30-LSP12
(Canada)
- CXO-5W30-LFS12
(Canada)
- Motorcraft® SAE
5W-30 Super
Premium Motor Oil
(Canada)
/ WSS-M2C946-A
with API Certification
Mark
- Motorcraft® SAE
5W-30 Synthetic
Motor Oil (Canada)
- XO-5W20-QSP
(U.S.)
- Motorcraft® SAE
5W-20 Premium
Synthetic Blend
Motor Oil (U.S.)
4.3 qt (4.1L)1.6L EcoBoost engine oil
5, 6
- XO-5W20-QFS
(U.S.)
271
Capacities and Specifications

Ford Part Number /
Ford Specification
Ford Part Name or
Equivalent
CapacityItem
5.7 qt (5.4L)
2.5L engine oil
5, 6
- CXO-5W20-LSP12
(Canada)
- Motorcraft® SAE
5W-20 Full
Synthetic Motor Oil
(U.S.)
- CXO-5W20-LFS12
(Canada)
- Motorcraft® SAE
5W-20 Super
Premium Motor Oil
(Canada)
/ WSS-M2C945-A
and API Certification
Mark
- Motorcraft® SAE
5W-20 Synthetic
Motor Oil (Canada)
- VC-3DIL-B (U.S.)Motorcraft® Orange
Antifreeze / Coolant
Prediluted
9.7 qt (9.2L)2.0L EcoBoost engine
coolant
7
- CVC-3DIL-B
(Canada)
8.5 qt (8L)1.6L EcoBoost engine
coolant
7
/ WSS-M97B44-D2
9.2 qt (8.7L)
2.5L engine coolant
7
- ZC-32-A (U.S.)- Motorcraft®
Premium Windshield
Washer Concentrate
(U.S.)
Fill as requiredWindshield washer fluid
- CXC-37-(A, B, D,
and F) (Canada)
272
Capacities and Specifications

Ford Part Number /
Ford Specification
Ford Part Name or
Equivalent
CapacityItem
/ WSB-M8B16-A2/--Premium Quality
Windshield Washer
Fluid (Canada)
Not applicableNot applicable15.1 gal (57L)Fuel tank
1
Use only Motorcraft® DOT 4 LV High Performance Brake Fluid or equivalent meeting
WSS-M6C65-A2 and ISO 4925 Class 6. Use of any fluid other than the recommended
fluid may cause brake system damage.
2
Approximate dry fill capacity. Actual amount may vary during fluid changes.
3
Automatic transmissions that require Motorcraft® MERCON® LV transmission fluid
should only use Motorcraft® MERCON® LV transmission fluid.
Use of any fluid other than the recommended fluid may cause transmission damage.
Change the automatic transmission fluid and filter at the correct service interval. See
Scheduled Maintenance (page 396).
4
See your authorized dealer for fluid level checking or filling.
5
Use of synthetic or synthetic blend motor oil is not mandatory. Engine oil need only meet
the requirements of Ford specification WSS-M2C946-A, SAE 5W-30 (2.0L engine) or
WSS-M2C945-A, SAE 5W-20 (1.6L and 2.5L engines) and display the API Certification
Mark.
6
Your engine has been designed to be used with Ford engine oil, which gives a fuel economy
benefit while maintaining the durability of your engine.
Using oils other than the one specified can result in longer engine cranking periods, reduced
engine performance, reduced fuel economy and increased emission levels.
7
Add the coolant type originally equipped in your vehicle.
273
Capacities and Specifications

For a complete listing of the accessories
that are available for your vehicle, please
contact your dealer or visit our online store
at: Accessories.Ford.com (U.S. only).
Ford Custom Accessories are available for
your vehicle through your local Ford or Ford
of Canada dealer. Ford Motor Company
will repair or replace any properly
dealer-installed Ford Custom Accessories
found to be defective in factory-supplied
materials or workmanship during the
warranty period, as well as any component
damaged by the defective accessories. The
accessories will be warranted for
whichever provides you the greatest
benefit:
• 12 months or 12,000 miles (20,000
km) (whichever occurs first), or
• the remainder of your new vehicle
limited warranty.
Contact your dealer for details and a copy
of the warranty.
Exterior style
• Asterisk hood deflectors
• Side window deflectors
• Splash guards
• Custom graphics*
Interior style
• Floor mats
Lifestyle
• Ash cup / smoker's packages
• Soft cargo organizers
• Cargo net*
• Roof racks and carriers*
Peace of mind
• Keyless entry keypad
• Remote start
• Vehicle security systems
• Wheel locks
• Bumper mounted parking assist
system*
*Ford Licensed Accessories (FLA) are
warranted by the accessory
manufacturer's warranty. Ford Licensed
Accessories are fully designed and
developed by the accessory manufacturer
and have not been designed or tested to
Ford Motor Company engineering
requirements. Contact your Ford dealer for
details regarding the manufacturer's
limited warranty and a copy of the FLA
product limited warranty offered by the
accessory manufacturer.
For maximum vehicle performance, keep
the following information in mind when
adding accessories or equipment to your
vehicle:
• When adding accessories, equipment,
passengers and luggage to your
vehicle, do not exceed the total weight
capacity of the vehicle or of the front
or rear axle (GVWR or GAWR as
indicated on the Safety Compliance
Certification label). Consult your
authorized dealer for specific weight
information.
• The Federal Communications
Commission (FCC) and Canadian
Radio Telecommunications
Commission (CRTC) regulate the use
of mobile communications systems —
such as two-way radios, telephones
and theft alarms - that are equipped
with radio transmitters. Any such
equipment installed in your vehicle
should comply with FCC or CRTC
regulations and should be installed
only by a qualified service technician.
• Mobile communications systems may
harm the operation of your vehicle,
particularly if they are not properly
designed for automotive use.
274
Accessories

• To avoid interference with other vehicle
functions, such as anti-lock braking
systems, amateur radio users who
install radios and antennas onto their
vehicle should not locate the amateur
radio antennas in the area of the
driver's side hood.
• Any non-Ford custom electrical or
electronic accessories or components
that are added to the vehicle by the
authorized dealer or the owner, may
adversely affect battery performance
and durability, and may also adversely
affect the performance of other
electrical systems in the vehicle.
275
Accessories

SERVICE PLANS (U.S. only)
More than 32 million Ford and Lincoln
owners have discovered the powerful
protection of Ford Extended Service Plan.
It is the only extended service plan backed
by Ford Motor Company, and provides
peace of mind protection beyond the New
Vehicle Limited Warranty coverage.
Up to 500+ Covered Vehicle
Components
There are four, new-vehicle Extended
Service Plans with different levels of
coverage. Ask your dealer for details.
1. PremiumCare - Our most
comprehensive coverage. With over
500 covered components, this plan is
so complete that we generally only
discuss what’s not covered!
2. ExtraCare - Covers 113 components,
and includes many high-tech items.
3. BaseCare - Covers 84 components.
4. PowertrainCare - Covers 29 critical
components.
Ford Extended Service Plan is honored by
all Ford and Lincoln Dealers in the U.S. and
Canada. It is the only extended service plan
authorized and backed by Ford Motor
Company. That means you get:
• Reliable, quality service anywhere you
go.
• Factory-trained technicians.
• Ford Authorized Parts used with every
covered repair.
Rental Car Reimbursement
If your vehicle is kept overnight for covered
repairs, you are eligible for rental car
coverage, including Bumper-to-Bumper
warranty repairs, or manufacturer’s recalls.
Transferable Coverage
If you sell your vehicle before your Ford
Extended Service Plan coverage expires,
you can transfer any remaining coverage
to the new owner. Whenever you’re ready
to sell your car, prospective buyers may
feel better about taking a risk on your used
vehicle. Ford Extended Service Plan may
add resale value!
Plus, exclusive 24/7 roadside assistance,
including:
• Towing, flat-tire change and battery
jump starts.
• Out-of-fuel and lock-out assistance.
• Travel expense reimbursement for
lodging, meals and rental car.
• Destination assistance for taxi, shuttle,
rental car coverage and emergency
transportation.
Ford Extended Service Plan Can
Quickly Pay for Itself
One service bill – the cost of parts and
labor – can easily exceed the price of your
Ford Extended Service Plan Service
Contract. With a Ford Extend Service Plan,
you minimize your risk for unexpected
repair bills and rising repair costs.
Avoid the Rising Cost of Properly
Maintaining Your Vehicle!
Ford Extended Service Plan also offers a
Premium Maintenance Plan that covers
items that routinely wear out.
The coverage is prepaid, so you never have
to worry about affording your vehicle
maintenance. It covers regular checkups,
routine inspections, preventive care and
replacement of items that require periodic
attention for normal wear:
• Wiper blades
• Spark plugs (except California)
• Clutch disc
276
Ford Extended Service Plan (ESP)

• Brake pads and linings
• Shock absorbers
• Belts and hoses
Contact your selling Ford or Lincoln
dealership today so they can customize a
Ford Extended Service Plan that fits your
driving lifestyle and budget.
Interest Free Finance Options
Available
Take advantage of our installment
payment plan, just a 10% down payment
will provide you with an affordable no
interest, no-fee payment opportunity.
For More Information
PROTECT YOURSELF FROM THE RISING
COST OF VEHICLE REPAIRS WITH A FORD
EXTENDED SERVICE PLAN.
To learn more, call our Ford ESP specialists
at 800-367-3377, and don't forget to ask
about our interest free payment program,
allowing you all the security and benefits
Ford ESP has to offer while paying over
time. your pre-approved with no credit
checks, no hassles!
Or, complete the information below and
mail to:
Ford ESP
P.O. Box 8072
Royal Oak, MI 48068-0039
Name (PLEASE PRINT)
APT.#ADDRESS
ZIPSTATECITY
E-MAIL
SERVICE PLANS (CANADA ONLY)
You can get more protection for your
vehicle by purchasing a Ford Extended
Service Plan. Ford Extended Service Plan
is the only service contract backed by Ford
Motor Company of Canada, Limited.
Depending on the plan you purchase, Ford
Extended Service Plan provides benefits
such as:
• Rental reimbursement
• Coverage for certain maintenance and
wear items
• Protection against repair costs after
your New Vehicle Limited Warranty
Coverage expires
• Roadside Assistance benefits
There are several Ford Extended Service
Plans available in various time, distance
and deductible combinations. Each plan
is tailored to fit your own driving needs,
including reimbursement for towing and
rental.
277
Ford Extended Service Plan (ESP)

When you purchase Ford Extended Service
Plan, you receive added peace-of-mind
protection throughout Canada and the
United States, provided by a network of
participating Ford Motor Company dealers.
The Lincoln Maintenance Protection Plan
is honored at authorized Lincoln dealers.
Note: Repairs performed outside of Canada
and the United States are not eligible for
Ford Extended Service Plan coverage.
This information is subject to change.
For more information, visit your local Ford
of Canada dealer or www.ford.ca to find
the Ford Extended Service Plan that is right
for you.
278
Ford Extended Service Plan (ESP)

GENERAL INFORMATION
E142598
SYNC is an in-vehicle communications
system that works with your
Bluetooth-enabled mobile phone and
portable media player. This allows you to:
• make and receive calls
• access and play music from your
portable music player
• use 911 Assist™, Vehicle Health Report
and SYNC Services (Traffic, Directions
& Information) (if equipped)
• access phonebook contacts and music
using voice commands
• stream music from your connected
phone
• text message
• use the advanced voice recognition
system
• charge your USB device (if your device
supports this).
Make sure that you review your device's
user guide before using it with SYNC.
Support
The SYNC support team is available to
help you with any questions you cannot
answer on your own.
Monday-Saturday, 8:30 am-8:00 pm EST.
In the United States, call: 1-888-270-1055.
In Canada, call: 1-800-565-3673.
Times are subject to change due to
holidays.
279
SYNC®

Driving Restrictions
For your safety, certain features are
speed-dependent and restricted when your
vehicle is traveling over 3 mph (5 km/h).
Safety Information
WARNING
Driving while distracted can result in
loss of vehicle control, accident and
injury. Ford strongly recommends
that drivers use extreme caution when
using any device that may take their focus
off the road. Your primary responsibility is
the safe operation of the vehicle. We
recommend against the use of any
handheld device while driving, encourage
the use of voice-operated systems when
possible and that you become aware of
applicable state and local laws that may
affect use of electronic devices while
driving.
When using SYNC:
• Do not operate playing devices if the
power cords or cables are broken, split
or damaged. Carefully place cords and
cables where they cannot be stepped
on or interfere with the operation of
pedals, seats, compartments or safe
driving abilities.
• Do not leave playing devices in the
vehicle during extreme conditions as it
could cause them damage. Refer to
your device's user guide for further
information.
• Do not attempt to service or repair the
system. See your authorized dealer.
Privacy Information
When a mobile phone is connected to
SYNC, the system creates a profile within
your vehicle that is linked to that mobile
phone. This profile is created in order to
offer you more mobile features and to
operate more efficiently. Among other
things, this profile may contain data about
your mobile phone book, text messages
(read and unread), and call history,
including history of calls when your mobile
phone was not connected to the system.
In addition, if you connect a media device,
the system creates and retains an index of
supported media content. The system also
records a short development log of
approximately 10 minutes of all recent
system activity. The log profile and other
system data may be used to improve the
system and help diagnose any problems
that may occur.
The mobile profile, media device index, and
development log will remain in the vehicle
unless you delete it and are generally
accessible only in the vehicle when the
mobile phone or media player is
connected. If you no longer plan to use the
system or the vehicle, we recommend you
perform a Master Reset to erase all stored
information.
280
SYNC®

System data cannot be accessed without
special equipment and access to the
vehicle's SYNC module. Ford Motor
Company and Ford of Canada will not
access the system data for any purpose
other than as described absent consent, a
court order, or where required by law
enforcement, other government
authorities, or other third parties acting
with lawful authority. Other parties may
seek to access the information
independently of Ford Motor Company and
Ford of Canada. For further privacy
information, see the sections on 911 Assist
(if equipped), Vehicle Health Report (if
equipped), and Traffic, Directions and
Information (if equipped).
USING VOICE RECOGNITION
This system helps you control many
features using voice commands. This
allows you to keep your hands on the
wheel and focus on what is in front of you.
Helpful Hints
Make sure the interior of the vehicle is as
quiet as possible. Wind noise from open
windows and road vibrations may prevent
the system from correctly recognizing
spoken commands.
After pressing the voice icon, wait until
after the tone sounds and "Listening"
appears before saying a command. Any
command spoken prior to this does not
register with the system.
Speak naturally, without long pauses
between words.
At any time you can interrupt the system
while it is speaking by pressing the voice
icon.
Initiating a Voice Session
E142599
Push the voice icon; a tone
sounds and "Listening" appears
in the display. Say any of the
following:
If You Want ToSay
Stream audio from your phone."Bluetooth audio"
Cancel the requested action."Cancel"
Access the device connected to the auxiliary input jack."Line in"
Access mobile applications.
"Mobile apps"
*
Make calls."Phone"
Access the SYNC Services portal.
"Services"
*
Return to the main menu."SYNC"
Access the device connected to your USB port."USB"
Run a vehicle health report.
"Vehicle health report"
*
281
SYNC®

If You Want ToSay
Adjust the level of voice interaction and feedback."Voice settings"
Hear a list of voice commands available in the current
mode.
"Help"
*
If equipped, U.S. only
System Interaction and Feedback
The system provides feedback through
audible tones, prompts, questions and
spoken confirmations depending on the
situation and the chosen level of
interaction (voice settings). You can
customize the voice recognition system to
provide more or less instruction and
feedback.
The default setting is to a higher level of
interaction in order to help you learn to use
the system. You can change these settings
at any time.
Adjusting the Interaction Level
E142599
Push the voice icon. Say "Voice
settings" when prompted, then
any of the following:
The SystemWhen You Say
Provides less audible interaction and more
tone prompts.
"Interaction mode advanced"
Provides more detailed interaction and
guidance.
"Interaction mode standard"
The system defaults to the standard interaction mode.
Confirmation prompts are short questions
the system asks when it is not sure of your
request or when there are multiple possible
responses to your request. For example,
the system may ask "Phone, is that
correct?".
The SystemWhen You Say
Makes a best guess from the command;
you may still occasionally be asked to
confirm settings.
"Confirmation prompts off"
Clarifies your voice command with a short
question.
"Confirmation prompts on"
282
SYNC®

The system creates candidate lists when
it has the same confidence level of several
options based on your voice command.
When turned on, you may be prompted
with as many as four possibilities for
clarification.
For example, say "Say 1 after the tone to
call John Doe at home. Say 2 after the tone
to call Johnny Doe on mobile. Say 3 after
the tone to call Jane Doe at home." You
could also say "Say 1 after the tone to play
John Doe, Say 2 after the tone to play
Johnny Doe."
The SystemWhen You Say
Makes a best guess from the media
candidate list; you may still occasionally be
asked questions.
"Media candidate lists off"
Clarifies your voice command for media
candidates.
"Media candidate lists on"
Makes a best guess from the phone
candidate list; you may still occasionally be
asked questions.
"Phone candidate lists off"
Clarifies your voice command for phone
candidates
"Phone candidate lists on"
USING SYNC® WITH YOUR
PHONE
Hands-free calling is one of the main
features of SYNC. While the system
supports a variety of features, many are
dependent on your mobile phone's
functionality. At a minimum, most mobile
phones with Bluetooth wireless technology
support the following functions:
• Answering an incoming call
• Ending a call
• Using privacy mode
• Dialing a number
• Redialing
• Call waiting notification
• Caller ID
Other features such as text messaging
using Bluetooth and automatic phonebook
download are phone-dependent features.
To check your phone's compatibility, refer
to your phone's user manual and visit
www.SYNCMyRide.com or
www.syncmaroute.ca.
Pairing a Phone for the First Time
Note: SYNC can support downloading up
to approximately 2000 entries per
Bluetooth-enabled mobile phone.
Note: Make sure the vehicle ignition and
radio are turned on and the transmission is
in position P.
Note: To scroll through the menus, press
the up and down arrows on your audio
system.
Wirelessly pairing your phone with SYNC
allows you to make and receive hands-free
calls.
283
SYNC®

1. Press the phone button; when the
display indicates no phone is paired,
press OK.
2. When Add Bluetooth Device appears,
press OK.
3. When Find SYNC appears in the
display, press OK.
4. Put your phone into Bluetooth
discovery mode. Refer to your phone's
user guide if necessary.
5. When prompted on your phone's
display, enter the six-digit PIN provided
by SYNC in the radio display. The
display indicates when the pairing is
successful
Depending on your phone's capability and
your market, the system may prompt you
with questions such as setting the current
phone as the primary phone (the phone
SYNC automatically tries to connect with
first upon vehicle start-up), downloading
your phone book, etc.
Pairing Subsequent Phones
Note: Make sure the vehicle ignition and
radio are turned on and the transmission is
in position P.
Note: To scroll through the menus, press
the up and down arrows on your audio
system.
1. Press the phone button and scroll until
System Settings is selected.
2. Press OK and scroll until Bluetooth
Devices is selected, then press OK.
3. Scroll until Add Bluetooth Device is
selected, then press OK.
4. When Find SYNC appears in the
display, press OK.
5. Put your phone into Bluetooth
discovery mode. Refer to your phone's
user guide if necessary.
6. When prompted on your phone's
display, enter the six-digit PIN provided
by SYNC in the radio display. The
display indicates when the pairing is
successful.
The system then prompts with questions
such as if you would like to set the current
phone as the primary phone (the phone
SYNC automatically tries to connect with
first upon vehicle start-up), download your
phone book, etc.
Phone Voice Commands
"PHONE"
"Go to privacy"
"Call <name>"
1
"Hold"
"Call <name> at home"
1
"Join"
"Call <name> at work"
1
"Menu"
2,4
"Call <name> in office"
1
"Phone book <name>"
2
"Call <name> on mobile OR cell"
1
"Phone book <name> at home"
2
"Call <name> on other"
1
284
SYNC®

"PHONE"
"Phone book <name> at office"
2
"Call history incoming"
2
"Phone book <name> at work"
2
"Call history missed"
2
"Phone book <name> on mobile OR cell"
2
"Call history outgoing"
2
"Phone book <name> on other"
2
"Connections"
2
"Dial"
1,3
1
These commands do not require you to say "Phone" first.
2
These commands are not available until phone information is completely downloaded
using Bluetooth.
3
See Dial table below.
4
See Menu table below.
Phone book commands: When you ask
SYNC to access a phone book name,
number, etc., the requested information
appears in the display to view. Press the
phone button and say "Call" to call the
contact.
"DIAL"
"411 (four-one-one)", "911" (nine-one-one), etc.
"700" (seven hundred)
"800" (eight hundred)
"900" (nine hundred)
"Pound", "Slash" (#,/)
"Number <0-9>"
"Asterisk" (*)
"Clear" (deletes all entered digits)
"Delete" (deletes one digit)
"Plus"
"Star"
285
SYNC®

Note: To exit dial mode, press and hold the
phone button or press Menu to go to the
Phone menu.
"MENU"
"(Phone) connections"
"(Phone) settings (message) notification off"
"(Phone) settings (message) notification on"
"(Phone) settings (set) phone ringer"
"(Phone) settings (set) ringer 1"
"(Phone) settings (set) ringer 2"
"(Phone) settings (set) ringer 3"
"(Phone) settings (set) ringer off"
"Battery"
"Phone name"
"Signal"
"Text message inbox"
Words in ( ) are optional and do not have to be spoken for the system to understand
the command.
Making Calls
Press the voice icon and when prompted
say:
1. Say "Call <name>" or "Dial", then the
desired number.
2. When the system confirms the number,
say "Dial" again to initiate the call.
To erase the last spoken digit, say "Delete"
or press the left arrow button. To erase all
spoken digits, say "Clear" or press and hold
the left arrow button.
To end the call, press and hold the phone
button.
Receiving Calls
When receiving a call, you can:
• Answer the call by pressing the phone
button.
• Reject the call by pressing and holding
the phone button.
• Ignore the call by doing nothing.
Phone Options during an Active
Call
During an active call, you have additional
menu features which become available
such as putting a call on hold, joining calls,
etc. Use the arrow buttons to scroll through
the menu options.
286
SYNC®

To access:
• Press Menu during an active call.
• When Active Call Menu is selected,
press OK.
• Scroll to cycle through the following
options:
You CanWhen You Select
Mute the call.Mute Call?
Switch a call from an active hands-free environment to
your mobile phone for a more private conversation.
Privacy
Press OK when Privacy on/off appears. (The display
indicates In Privacy and the system transfers your call.)
Put an active call on hold.Call Hold
Press OK when Hold on/off appears. To answer another
call at this time, press the phone button.
Enter "tones" such as numbers for passwords.Enter Tones
Scroll until the desired number appears in the display, then
press OK; a tone sounds as confirmation. Repeat as
necessary.
Join two separate calls. (SYNC supports a maximum of
three callers on a multi-party/conference call.)
Join Calls
1. Press the phone button.
2. Access the desired contact through SYNC or use voice
commands to place the second call. Once actively in the
second call, press Menu.
3. Scroll until Join Calls appears and press OK. Press OK
again when Join Calls? appears.
Access your phonebook contacts.Phonebook
1. Press OK to select, then scroll through your phonebook
contacts.
2. Press OK again when the desired selection appears in
the display.
3. Press the phone button.
Access your call history log.Call History
1. Press OK to select, then scroll through your call history
options (incoming, outgoing or missed).
2. Press OK when the desired selection appears in the
display.
3. Press the phone button to call the selection.
Exit the current menu.Return
287
SYNC®

Accessing Features through the
Phone Menu
The phone menu allows you to redial a
number, access your call history and phone
book and send text messages as well as
access phone and system settings. You
can also access advanced features such
as 911 Assist™, Vehicle Health Report and
SYNC Services.
1. Press the phone button to enter the
Phone menu.
2. Scroll to cycle through:
You CanWhen You Select
Redial the last number called (if available). Press OK to
select, then press OK again to confirm.
Phone Redial
Allows you to access any previously dialed, received or
missed calls while your phone has been connected to the
system.
Call History
1
1. Press OK to select.
2. Scroll to select from Call History Incoming, Call
History Outgoing or Call History Missed. Press OK
make your selection.
3. Press OK or the phone button to call the desired selec-
tion.
The system attempts to automatically re-download your
phone book and call history each time your phone
connects to SYNC (if the auto download feature is on and
your Bluetooth-enabled mobile phone supports this
feature).
Allows you to access your downloaded phonebook.
Phonebook
1,2
1. Press OK to confirm and enter. If your phonebook has
fewer than 255 listings, they appear alphabetically in flat
file mode. If there are more, they are organized into
alphabetical categories.
2. Scroll until the desired contact appears, then press OK.
3. Press OK or the phone button.
Enables you to send, download and delete text messages.
Text Message
1
Allows you to view your phone's status, set ring tones,
select your message notification, change phone book
entries and automatically download your mobile phone
among other features.
Phone Settings
1
Access the SYNC Services portal where you can request
various types of information, traffic reports and directions.
SYNC Services
3
288
SYNC®

You CanWhen You Select
Place an emergency call to a 911 operator for you after an
accident (if the feature is used properly).
911 Assist
4
Create and receive a diagnostic report card on your vehicle.
Vehicle Health Report
3
Interact with SYNC-capable mobile applications on your
smartphone.
Mobile Apps
3
Access Bluetooth Devices menu listings (add, connect,
set as primary, on/off, delete) as well as Advanced menu
listings (prompts, languages, defaults, master reset, install
application and system information).
System Settings
Exit the phone menu by pressing OK.Exit Phone Menu
1
This is a phone-dependent feature.
2
This is a phone-dependent and speed-dependent feature.
3
If equipped, U.S. only.
4
If equipped, U.S. and Canada only.
Text Messaging
Note: This is a phone-dependent feature.
SYNC allows you to receive, send,
download and delete text messages. The
system can also read incoming text
messages to you so that you do not have
to take your eyes off the road.
Receiving a Text Message
Note: This is a phone-dependent feature.
Your phone must support downloading text
messages using Bluetooth to receive
incoming text messages.
Note: Forwarding a text message is a
speed-dependent feature and can only be
done when the vehicle is traveling at 3 mph
(5 km/h) or less.
Note: Only one recipient is allowed per text
message.
289
SYNC®

When a new message arrives, an audible
tone sounds and the display indicates you
have a new message. You have these
options:
• Press the voice button, wait for the
prompt and say "Read message" to
have SYNC read the message to you.
• Press OK to receive and open the text
message or do nothing and the
message goes into your text message
inbox. Press OK again and SYNC reads
your message aloud as you are not able
to view the message. You can then also
choose whether you'd like to reply or
forward the message.
• Press OK and scroll to choose
between:
• Reply to Text Message: Press OK
to access and then scroll through
the list of pre-defined messages to
send.
• Forward Text Message: Press OK
to forward the message to anyone
in your Phonebook or Call
History. You can also choose Enter
Number.
Sending, Downloading and Deleting
Your Text Messages
Text messaging is a phone-dependent
feature. If your phone is compatible, SYNC
allows you to receive, send, download and
delete text messages.
1. Press the phone button.
2. Scroll until Text Message appears,
then press OK.
Scroll to select from the following options:
• Send Text Message? enables you to
send a new text message based on a
pre-defined set of 15 messages.
• Download Unread Msgs allows you
to download your unread messages
(only) to SYNC. To download the
messages, press OK to select. The
display indicates your messages are
being downloaded. When complete,
SYNC takes you to your inbox.
• Delete All Messages? allows you to
delete current text messages from
SYNC (not your phone). To delete the
messages, press OK to select. The
display indicates when all your text
messages have been deleted and
SYNC returns you to the text message
menu
• Return exits the current menu when
you press OK.
When you select Send Text Message?
(and your phone supports this feature),
you have the following choices of
pre-defined messages:
• Be there in 10 minutes
• Be there in 20 minutes
• Call me
• Call U later
• Can't talk right now
• Can't wait to see you
• I love you
• I need more directions
• I'm stuck in traffic
• No
• Thanks
• Too funny
• Where R you?
• Why?
• Yes
To send the message:
290
SYNC®

1. Press OK when the desired selection is
in the display. The system now needs
to know who to send the message to.
2. Scroll to cycle through Phonebook or
Call History entries. You can also
select Enter Number to audibly enter
the desired number.
3. Press OK to enter the desired menu
and scroll to select the specific
contact.
4. Press OK when the contact appears
and press OK again to confirm when
the system asks if you would like to
send the message. Each text message
is sent with the following signature:
"This message was sent from my
<Ford or Lincoln>".
Accessing Your Phone Settings
These are phone-dependent features. Your
phone settings allow you to access and
adjust features such as your ring tone, text
message notification, modify your phone
book and also set up automatic download.
1. Press the phone button.
2. Scroll until Phone Settings appears,
then press OK.
3. Scroll to select from the following
options:
You CanWhen You Select
See the provider, name, signal power, battery power and
roaming status of your connected phone.
Phone Status
Press OK to select and scroll to view the information. When
done, press OK again to return to the phone status menu.
Select which ring tone sounds during an incoming call (one
of the system's or your phone's).
Set Ringer
1. Press OK to select and scroll to hear Ringer 1, Ringer
2, Ringer 3 and Phone Ringer.
2. Press OK to select.
If your phone supports in-band ringing, your phone's ringer
sounds when Phone Ringer is chosen.
Have the option of hearing an audible tone to notify you
when a text message arrives.
Message Notification
1. Press OK to select and scroll between Message Noti-
fication On or Message Notification Off.
2. Press OK to select.
Modify the contents of your phone book (i.e. add, delete,
download). Press OK to select and scroll between:
Modify Phonebook
Add Contacts: Press OK to add more contacts from your
phone book. "Push" the desired contact(s) on your phone.
Refer to your phone's user guide on how to "push"
contacts.
291
SYNC®

You CanWhen You Select
Delete Phonebook: Press OK to delete the current phone
book and call history. When Delete Phonebook appears,
press OK to confirm. SYNC takes you back to the Phone
Settings menu.
Download Phonebook: Press OK to select and press OK
again when Confirm Download? appears.
Automatically download your phone book each time your
phone connects to SYNC. (Downloading times are phone-
dependent and quantity-dependent.)
Auto Download
Press OK to select. When Auto Download On? appears,
press OK to have your phonebook automatically down-
loaded each time. (When auto download is on, any
changes, additions or deletions saved since your last
download are deleted.)
Select Off to NOT download your phonebook every time
your phone connects to SYNC. Your phonebook, call
history and text messages can only be accessed when
your specific phone is connected to SYNC.
Exit the current menu.Return
System Settings
This menu provides access to your
Bluetooth Devices and Advanced menu
features. Use the arrow buttons to scroll
through the menu options.
The Bluetooth Devices menu allows you
to add, connect and delete devices, set a
phone as "primary" as well as turn your
Bluetooth feature on and off.
The Advanced menu allows you to access
and set prompts, languages, defaults,
perform a master reset, install an
application and view system information.
Bluetooth Devices Menu Options
1. Press the phone button to enter the
Phone menu
2. Scroll until System Settings appears,
then press OK.
3. Scroll until Bluetooth Devices
appears, then select OK.
4. Scroll to select from the following
options:
You CanIf You Select
Pair additional phones to the system.
Add Bluetooth Device
*
1. Press OK to select, then again when Find SYNC appears
in the display.
292
SYNC®

You CanIf You Select
2. Follow the directions in your phone's user guide to put
your phone into discovery mode. A six-digit PIN appears
in the display.
3. When prompted on your phone's display, enter the six-
digit PIN provided by SYNC.
4. When Set as Primary Phone? appears, press OK. Scroll
to toggle between Yes and No, then press OK.
5. Depending on the functionality of your phone, you may
be asked additional questions (i.e. if you would like to
download your phonebook). Scroll and use OK to select
your responses.
Connect a previously paired Bluetooth-enabled phone.
(Only one device can be connected at a time. When
another phone is connected, the previous one is discon-
nected.)
Connect Bluetooth Device
1. Press OK to select and view a list of previously paired
phones.
2. Scroll until the desired device is chosen, then press OK
to connect the phone.
Set a previously paired phone as your primary phone.Set as Primary Phone?
Press OK to select and scroll to select the desired phone.
Press OK to confirm.
SYNC attempts to connect with the primary phone at every
ignition cycle. When a phone is selected as primary, it
appears first in the list and is marked with an
*
Turn the Bluetooth feature on and off.Set Bluetooth On/Off
Press OK and scroll to toggle between On and Off. When
the desired selection is chosen, press OK. (Turning
Bluetooth off disconnects all Bluetooth devices and
deactivates all Bluetooth features. )
Delete a paired phone.Delete Device
Press OK and scroll to select the device. Press OK to
confirm.
Delete all previously paired phones (and all information
originally saved with those phones).
Delete All Devices
Press OK to select.
Exit the current menu.Return
*
This is a speed-dependent feature.
293
SYNC®

Advanced Menu Options
1. Press the phone button to enter the
Phone menu
2. Scroll until System Settings appears,
then press OK.
3. Scroll until Advanced appears, then
select OK.
4. Scroll to select from the following
options:
You CanIf You Select
Get help from SYNC by using questions, helpful hints or
asking you for a specific action. To turn these prompts on
or off:
Prompts
1. Press OK to select and scroll to select between on or
off.
2. Press OK when the desired selection appears in the
display. SYNC takes you back to the Advanced menu.
Choose between English, Français and Español. Once
selected, all of the radio displays and prompts are in the
selected language.
Languages
1. Press OK to select and then scroll through the languages.
2. Press OK when the desired selection appears in the
display. If you change the language setting, the display
indicates that the system is updating. When complete,
SYNC takes you back to the Advanced menu.
Return to the factory default settings. This selection does
not erase your indexed information (phonebook, call
history, text messages and paired devices).
Factory Defaults
1. Press OK to select and then press OK again when
Restore Defaults? appears in the display.
2. Press OK to confirm.
Completely erase all information stored on SYNC
(phonebook, call history, text messages and paired
devices) and return to the factory default settings.
Master Reset
Press OK to select. The display indicates when complete
and SYNC takes you back to the Advanced menu.
Install applications you have downloaded.Install Application?
Press OK and scroll to select. Press OK to confirm.
Delete all previously paired phones (and all information
originally saved with those phones).
Delete All Devices
Press OK to select.
Access the Auto Version number as well as the FDN
number.
System Info
294
SYNC®

You CanIf You Select
Press OK to select.
This is a Bluetooth component which can further help your
phone with the exchange of text messages.
MAP Profile
Exit the current menu.Return
SYNC® APPLICATIONS AND
SERVICES
In order for the following features to work,
your mobile phone must be compatible
with SYNC. To check your phone's
compatibility, visit www.SYNCMyRide.com
or www.syncmaroute.ca.
• SYNC Services (if equipped, U.S. only):
Provides access to traffic, directions
and information such as travel,
horoscopes, stock prices and more.
• 911 Assist™: Can alert 911 in the event
of an emergency.
• Vehicle Health Report (if equipped,
U.S. only): Provides a diagnostic and
maintenance report card of your
vehicle.
911 Assist
WARNINGS
Unless the 911 Assist setting is set on
prior to a crash, the system will not
dial for help which could delay
response time, potentially increasing the
risk of serious injury or death after a crash.
Do not wait for 911 Assist to make an
emergency call if you can do it
yourself. Dial emergency services
immediately to avoid delayed response
time which could increase the risk of
serious injury or death after a crash. If you
do not hear 911 Assist within five seconds
of the crash, the system or phone may be
damaged or non-functional.
WARNINGS
Always place your phone in a secure
location in the vehicle so it does not
become a projectile or get damaged
in a collision. Failure to do so may cause
serious injury to someone or damage the
phone which could prevent 911 Assist from
working properly.
Note: The SYNC 911 Assist feature must be
set on prior to the incident.
Note: Before setting this feature on, ensure
that you read the 911 Assist privacy notice
later in this section for important
information.
Note: If 911 Assist is turned on or off by any
user, that setting applies for all paired
phones. If 911 Assist is turned off, either a
voice message plays or a display
message/icon comes on (or both) when the
vehicle is started after a previously paired
phone connects.
Note: Every phone operates differently.
While SYNC 911 Assist works with most
mobile phones, some may have trouble
using this feature.
If a crash deploys an airbag or activates
the fuel pump shut-off, your
SYNC-equipped vehicle may be able to
contact emergency services by dialing 911
through a paired and connected
Bluetooth-enabled phone. For more
information about 911 Assist visit
www.SYNCMyRide.com or
www.syncmaroute.ca.
295
SYNC®

See Supplementary Restraints System
(page 35). Important information
regarding airbag deployment is in this
chapter.
See Roadside Emergencies (page 197).
Important information regarding the fuel
pump shut-off is in this chapter.
Setting 911 Assist On
1. Press the phone button to enter the
Phone menu.
2. Scroll until 911 Assist is selected.
3. Press OK to confirm and enter the 911
Assist menu.
4. Scroll to choose between the On and
Off selections.
5. Press OK when the desired option
appears in the radio display. Set On or
Set Off appears in the display as
confirmation.
Off selections include: Off with reminder
and Off without reminder. Off with
reminder provides a display and voice
reminder at phone connection at vehicle
start. Off without reminder provides a
display reminder only without a voice
reminder at phone connection.
To make sure that 911 Assist works
properly:
• SYNC must be powered and working
properly at the time of the incident and
throughout feature activation and use.
• The 911 Assist feature must be set on
prior to the incident.
• A Bluetooth-enabled and compatible
phone has to be paired and connected
to SYNC.
• A connected Bluetooth-enabled phone
must have the ability to make and
maintain an outgoing call at the time
of the incident.
• A connected Bluetooth-enabled phone
must have adequate network coverage,
battery power and signal strength.
• The vehicle must have battery power
and be located in the U.S., Canada or
in a territory in which 911 is the
emergency number.
In the Event of a Crash
Not all crashes deploy an airbag or activate
the fuel pump shut-off (which would
activate 911 Assist); however, if 911 Assist
is triggered, SYNC tries to contact
emergency services. If a connected phone
is damaged or loses connection to SYNC,
SYNC searches for, and tries to connect
to, any available previously paired phone
and tries to make the call to 911.
Before making the call:
• SYNC provides a short window of time
(about 10 seconds) to cancel the call.
Failure to cancel the call results in
SYNC attempting to dial 911.
• SYNC says the following, or a similar
message: "SYNC will attempt to call
911, to cancel the call, press Cancel on
your screen or press and hold the
phone button on your steering wheel."
If the call is not cancelled and a successful
call is made, a pre-recorded message is
played for the 911 operator, then the
occupant(s) in the vehicle is able to talk
with the operator. Be prepared to provide
your name, phone number and location
immediately, because not all 911 systems
are capable of receiving this information
electronically.
296
SYNC®

911 Assist May Not Work If
• Your mobile phone or 911 Assist
hardware was damaged in a crash.
• The vehicle's battery or the SYNC
system has no power.
• The phone(s) paired and connected to
the system was thrown from the
vehicle.
911 Assist Privacy Notice
Once 911 Assist is set on, it may disclose to
emergency services that the vehicle has
been in a crash involving the deployment
of an airbag or activation of the fuel pump
shut-off. Certain versions or updates to 911
Assist may also be capable of
electronically or verbally disclosing to 911
operators the vehicle location or other
details about the vehicle or crash to assist
911 operators to provide the most
appropriate emergency services. If you do
not want to disclose this information, do
not turn the feature on.
Vehicle Health Report
WARNING
Always follow scheduled
maintenance instructions, regularly
inspect your vehicle, and seek repair
for any damage or problem you suspect.
Vehicle Health Report supplements, but
cannot replace normal maintenance and
vehicle inspection. Vehicle Health Report
only monitors certain systems that are
electronically monitored by the vehicle and
will not monitor or report the status of any
other system, (i.e., brake lining wear).
Failure to perform scheduled maintenance
and regularly inspect your vehicle may
result in vehicle damage and serious injury.
Note: Your Vehicle Health Report feature
requires activation prior to use. Visit
www.SYNCMyRide.com to register. There
is no fee or subscription associated with
Vehicle Health Report, but you must register
to use this feature.
Note: This feature may not function
properly if you have enabled caller ID
blocking on your mobile phone. Before
running a report, review Vehicle Health
Report privacy notice.
Note: In order to allow a break-in period for
your vehicle, you may not be able to create
a Vehicle Health Report until your vehicle
odometer has reached 200 miles.
Register for Vehicle Health Report and set
your report preferences at
www.SYNCMyRide.com. After registering
you can request a Vehicle Health Report
(inside your vehicle). Return to your
account at www.SYNCMyRide.com to view
your report. You can also choose for SYNC
to automatically remind you to run reports
at specific mileage intervals. Mobile phone
airtime usage may apply when reporting.
The system allows you to check your
vehicle's overall health in the form of
diagnostic report card. The vehicle health
report contains valuable information such
as:
• Vehicle diagnostic information
• Scheduled maintenance
• Open Recalls and Field Service Actions
• Unserviced items from vehicle
inspections by your authorized dealer
To run a report (after the vehicle has been
running a minimum of 60 seconds):
1. Press the phone button to enter the
Phone menu.
2. Scroll until Vehicle Health is selected
and press OK.
3. Scroll to select from User
Preferences or Run Report.
297
SYNC®

Vehicle Health Report Options
Automatic Reports: Press OK and select on or off. Select
"On" to have SYNC automatically prompt you to run a
health report at certain mileage intervals. You must first
turn this feature on before you can select the mileage
intervals at which you would like to be prompted.
User Preferences: Press
OK to select and enter the
menu. Scroll to select from:
Mileage Intervals: Press OK. Scroll to select between
5000, 7500 or 10000 mile intervals and press OK to make
your selection.
Return: Press OK to exit the menu.
Press OK for SYNC to run a health report of your vehicle's
diagnostic systems and send the results to Ford where it
is combined with scheduled maintenance information,
open recalls and other field service actions and un-serviced
vehicle inspection items from your authorized dealer.
Run Report
Vehicle Health Report Privacy Notice
When you run a Vehicle Health Report,
Ford Motor Company may collect your
mobile phone number (to process your
report request) and diagnostic information
about your vehicle. Certain versions or
updates to Vehicle Health Report may also
collect additional vehicle information. Ford
may use the vehicle information it collects
for any purpose. If you do not want to
disclose your mobile phone number or
vehicle information, do not run the feature
or set up your Vehicle Health Report profile
at www.SYNCMyRide.com. Refer to
Vehicle Health Report Terms and
Conditions, and Privacy Statement at
www.SYNCMyRide.com for more
information.
SYNC Services: Traffic, Directions
& Information (TDI)
Note: SYNC Services requires activation
prior to use. Visit www.SYNCMyRide.com
to register and check your eligibility for
complimentary services. Standard phone
and message rates may apply. Subscription
may be required. You must also have the
active SYNC Services Bluetooth-enabled
mobile phone paired and connected to the
system in order to connect to, and use,
SYNC Services. See Using SYNC® With
Your Phone (page 283).
Note: This feature does not function
properly if you have enabled caller ID
blocking on your mobile phone. Make sure
your mobile phone is not blocking caller ID
before using SYNC Services.
298
SYNC®

Note: The driver is ultimately responsible
for the safe operation of the vehicle, and
therefore, must evaluate whether it is safe
to follow the suggested directions. Any
navigation features are provided only as an
aid. Make your driving decisions based on
your observations of local conditions and
existing traffic regulations. Do not follow
the route suggestions if doing so would
result in an unsafe or illegal maneuver, if you
would be placed in an unsafe situation, or
if you would be directed into an area that
you consider unsafe. Maps used by this
system may be inaccurate because of errors,
changes in roads, traffic conditions or driving
conditions.
Note: When you connect, the service uses
GPS technology and advanced vehicle
sensors to collect the vehicle's current
location, travel direction and speed to help
provide you with the directions, traffic
reports, or business searches you request.
Further, to provide the services you request
and for continuous improvement, the service
may collect and record call details and voice
communications. For more information, see
SYNC Services Terms and Conditions at
www.SYNCMyRide.com. If you do not want
Ford or its service providers to collect the
vehicle travel information or other
information identified in the Terms and
Conditions, do not activate or use the
service.
SYNC Services uses advanced vehicle
sensors, integrated GPS technology and
comprehensive map and traffic data, to
give you personalized traffic reports,
precise turn-by-turn directions, business
search, news, sports, weather and more.
For a complete list of services, or to learn
more, please visit www.SYNCMyRide.com.
Connecting to SYNC Services Using
Voice Commands
1. Press the voice button.
2. When prompted, say "Services". This
initiates an outgoing call to SYNC
Services using your paired and
connected Bluetooth-enabled mobile
phone.
3. Once you're connected to the service,
follow the voice prompts to request
the desired service such as traffic or
directions. You can also say "What are
my choices?" to receive a complete list
of available services from which to
choose.
4. Say "Services" to return to the services
main menu or for help, say "Help".
Connecting to SYNC Services Using
the Phone Menu
1. Press the phone button to enter the
Phone menu.
2. Scroll until Services appears in the
display.
3. Press OK to confirm and enter the
Services menu. The display indicates
the system is connecting.
4. Press OK. SYNC initiates the call to the
services portal.
5. Once you're connected to the service,
follow the voice prompts to request
the desired service such as traffic or
directions. You can also say "What are
my choices?" to receive a complete list
of available services from which to
choose.
6. Say "Services" to return to the services
main menu or for help, say "Help".
Receiving Turn-by-Turn Directions
1. When connected to SYNC Services,
say "Directions" or "Business search".
To find the closest business or type of
business to your current location just
say "Business search" and then
"Search near me". If you need further
assistance in finding a location you can
299
SYNC®

say "Operator" at any time within a
directions or business search to speak
with a live operator. You may also be
prompted to speak with an operator.
The live operator can assist you by
searching for businesses by name or
by category, residential addresses by
street address or by name or specific
street intersections. Operator Assist is
a feature of your SYNC Services
subscription. For more information on
Operator Assist visit
www.SYNCMyRide.com/support.
2. Follow the voice prompts to select your
destination. Once your destination is
selected, your current vehicle location
is uploaded and a route based on
current traffic conditions is calculated
and sent back to your vehicle. After the
route download is complete, the phone
call is automatically ended. You then
receive audible and visual driving
instructions as you travel towards you
destination.
3. While on an active route, you can select
or say "Route summary" or "Route
status" to view the Route Summary
turn list or the Route Status ETA. You
can also turn voice guidance on or off,
cancel the route or update the route.
If you miss a turn, SYNC automatically asks
if you want the route updated. Just say
"Yes" when prompted and a new route is
delivered to your vehicle.
Disconnecting from SYNC Services
1. Press and hold the phone button on
the steering wheel.
2. Say "Goodbye" from the SYNC
Services main menu.
SYNC Services Quick Tips
You can personalize your services feature to provide
quicker access to your most used or favorite information.
You can save address points such as work or home. You
can also save favorite information like sports teams or a
news category. To learn more, log onto
www.SYNCMyRide.com.
Personalizing
Press the voice button at any time (while you are
connected to SYNC TDI Services) to interrupt a voice
prompt or an audio clip (such as a sports report), wait for
the listening tone, then say your voice command.
Push to interrupt
Your subscription is associated with your Bluetooth-
enabled mobile phone number, not your VIN (Vehicle
Identification Number). You can pair and connect your
phone to any vehicle equipped with Traffic, Directions and
Information and continue enjoying your personalized
services.
Portable
300
SYNC®

SYNC Services Quick Tips
You can even access your account outside the vehicle.
Just use the number on your phone's call history. Traffic
and Directions features do not function properly but
information services and the 411 connect and text message
features are available.
USING SYNC® WITH YOUR
MEDIA PLAYER
You can access and play music from your
digital music player over the vehicle's
speaker system using the system's media
menu or voice commands. You can also
sort and play your music by specific
categories such as artists, albums, etc.
SYNC is capable of hosting nearly any
digital media player including: iPod®,
Zune™, "Plays from device" players, and
most USB drives. SYNC also supports
audio formats such as MP3, WMA, WAV
and ACC.
Connecting Your Digital Media
Player to the USB Port
Note: If your digital media player has a
power switch, ensure that the device is
turned on.
To Connect Using Voice Commands
1. Plug the device into the vehicle's USB
port.
2. Press the voice icon and when
prompted, say "USB".
3. You can now play music by saying any
of the appropriate voice commands.
Refer to the media voice commands.
To Connect Using the System Menu
1. Plug the device into the vehicle's USB
port.
2. Press AUX and then MENU to enter
the Media menu.
3. Scroll until Select Source appears,
then press OK.
4. Scroll to select USB and press OK.
5. Depending on how many digital media
files are on your connected device,
Indexing may appear in the radio
display. When indexing is complete, the
screen returns to the Play menu.
Press OK and scroll through selections of:
• Play All
• Albums
• Genres
• Playlists
• Tracks
• Explore USB
• Similar Music
• Return
What's Playing?
At any time when a track is playing, you
can press the voice icon and ask the
system "What's playing?". The system
reads the metadata tags (if populated) of
the playing track to you.
Media Voice Commands
E142599
Press the voice icon and, when
prompted, say "USB", then any
of the following:
301
SYNC®

"USB"
"Refine album <name>"
1,2
"Autoplay off"
"Refine artist <name>"
1,2
"Autoplay on"
"Refine song <name>"
1
"Connections"
"Refine track <name>"
1,2
"Pause"
"Repeat off""Play"
"Repeat on"
"Play album <name>"
1,2
"Search album <name>"
1,2
"Play all"
"Search artist <name>"
1,2
"Play artist <name>"
1,2
"Search genre <name>"
1
"Play genre <name>"
1,2
"Search song <name>"
1
"Play next folder"
3
"Search track <name>"
1,2
"Play next track"
"Shuffle off"
"Play playlist <name>"
1,2
"Shuffle on"
"Play previous folder"
3
"Similar music""Play previous track"
"What's playing?"
"Play song <name>"
1
"Play track <name>"
1,2
1
<name> is a dynamic listing, meaning that it could be the name of any desired group,
artist, song, etc.
2
Voice commands which are not available until indexing is complete.
3
Voice commands which are only available in folder mode.
Voice Command Guide
· Turn on to listen to music which has already been
randomly indexed during the indexing process.
"Autoplay"
302
SYNC®

Voice Command Guide
· Turn off and the system does not begin to play any of
your music until all media has all been indexed. Indexing
times can vary from device to device and also with regard
to the number of songs being indexed.
The system searches all the data from your indexed music
and, if available, begins to play the chosen type of music.
You can only play genres of music which are present in
the GENRE metadata tags that you have on your digital
media player.
"Search genre" or "Play
genre"
The system compiles a playlist and then plays similar
music to what is currently playing from the USB port using
indexed metadata information.
"Similar music"
The system searches for a specific artist, track or album
from the music indexed through the USB port.
"Search", "Play", "Artist",
"Track, "Album"
This allows you to make your previous command more
specific. For example, if you asked to search and play all
music by a certain artist, you could then say "Refine album"
and choose a specific album from the list to view. If you
then select Play, the system only plays music from that
specific album.
"Refine"
Press the voice icon and when prompted
say "Bluetooth audio", then any of the
following:
"BLUETOOTH AUDIO"
"Connections"
"Pause"
"Play"
"Play next track"
"Play previous track"
Media Menu Features
The media menu allows you to select your
media source, how to play your music (by
artist, genre, shuffle, repeat, etc.), and also
to add, connect or delete devices.
1. Press AUX and then MENU to enter
the Media menu.
2. Scroll to cycle through:
303
SYNC®

You CanWhen You Select
Play your music by artist, album, genre, playlists, tracks,
similar music or to simply, play all. You can also choose
to Explore USB to view the supported digital music files
on your playing device.
Play Menu
· Select and play music from your USB port, auxiliary input
jack (line in) or stream music from your Bluetooth-enabled
phone.
Select Source
· Press OK to select, then scroll to choose from USB,
Bluetooth Audio, and Line In.
· When you select USB, and Autoplay is on, you can
access media files randomly as they are indexed. If turned
off, indexed media is not available until the indexing
process is complete. SYNC is capable of indexing thou-
sands of average size media and notifies you if the
maximum indexing file size is reached.
· Users who have Bluetooth phones that are capable of
streaming audio can press SEEK to play the previous or
next track.
· When you have already connected a device to the USB
port, you cannot access the line in feature. Some digital
media players require both USB and line in ports to stream
data and music separately.
· Choose to shuffle or repeat your music and select your
Autoplay settings. Once these selections are turned on,
they remain on until turned off.
Media Settings
· Some digital media players require both USB and line in
ports to stream data and music separately. Press OK to
select and then scroll to choose from Shuffle, Repeat or
Autoplay.
Interact with SYNC-capable mobile applications on your
smartphone.
Mobile Apps
Access Bluetooth Device menu listings (add, connect,
set as primary, on/off, delete) as well as Advanced menu
listings (prompts, languages, defaults, master reset, install
application and system information).
System Settings
Press OK to exit the media menu.Exit Media Menu
304
SYNC®

Accessing Your Play Menu
This menu allows you to select and play
your media by artist, album, genre, playlist,
track, similar music or even to explore what
is on your USB device.
1. Make sure that your device is plugged
into the USB port and is turned on.
2. Press AUX and then MENU to enter
the Media menu.
3. Scroll to select the Play menu, then
press OK.
If there are no media files to access, the
display indicates there is no media. If there
are media files, you have the following
options to scroll through and select from:
You CanWhen You Select
· Play all indexed media (tracks) from your playing device
in flat file mode, one at a time in numerical order.
Play All
· Press OK to select. The first track title appears in the
display.
Sort all indexed media by artist. Once selected, the system
lists and then play all artists and tracks alphabetically. If
there are fewer than 255 indexed artist, they are listed
alphabetically in flat file mode. If there are more, they are
categorized in alphabetical categories.
Artists
1. Press OK to select. You can select to play All Artists or
any indexed artist.
2. Scroll until the desired artist is chosen and press OK.
Sort all indexed media by albums. If there are fewer than
255 indexed albums, they are listed alphabetically in flat-
file mode. If there are more, they are organized into
alphabetical categories.
Albums
1. Press OK to enter the album menu and select from
playing all albums or from any individual indexed album.
2. Scroll until the desired album is chosen, then press OK.
· Sort indexed music by genre (category) type. SYNC lists
the genres alphabetically in flat-file mode. If there are
more than 255, SYNC automatically organizes them into
alphabetical categories.
Genres
· Press OK to select. Scroll to select the desired genre, then
press OK.
· Access your playlists (from formats such as .ASX, .M3U,
.WPL or .MTP). The system lists your playlists alphabetic-
ally in flat-file mode. If there are more than 255, they are
organized into alphabetical categories.
Playlists
· Press OK to select. Scroll to select the desired playlist,
then press OK.
305
SYNC®

You CanWhen You Select
· Search for and play a specific track which has been
indexed. SYNC lists your tracks alphabetically in flat-file
mode. If there are more than 255, SYNC automatically
organizes them into alphabetical categories.
Tracks
· Press OK to select. Scroll to select the desired track, then
press OK.
· Explore all supported digital media on your media device
connected to the USB port. You can only view media
content which is compatible with SYNC; other files saved
are not visible.
Explore USB
· Press OK to select. Scroll to explore indexed media on
your flash drive.
· Play music similar to what is currently playing from the
USB port. The system uses the metadata information of
each song to compile a playlist for you.
Similar Music
· Press OK to select. The system creates a new list of
similar songs and begin playing. The metadata tags must
be populated for this feature to include each track.
· With certain playing devices, if your metadata tags are
not populated, the tracks won't be available in voice
recognition, play menu or similar music. However, if you
place these tracks onto your playing device in Mass
Storage Device Mode they are available in voice recogni-
tion, Play menu browsing and Similar Music. Unknowns
are placed into any unpopulated metadata tag.
Exit the current menu.Return
System Settings
System settings provide access to your
Bluetooth Devices and Advanced menu
features.
The Bluetooth Devices menu allows you
to add, connect and delete a device as turn
the Bluetooth feature on and off.
The Advanced menu allows you to access
and set prompts, languages, defaults and
perform a master reset.
Bluetooth Devices Menu Options
1. Press AUX and then MENU to enter
the Media menu.
2. Scroll until System Settings appears
and select OK, then press OK.
3. Scroll until Bluetooth Devices
appears.
4. Press OK and then scroll to select from:
306
SYNC®

You CanWhen You Select
Allows you to pair additional devices to the system.
Add Bluetooth Device
*
1. Press OK to select and press OK again when Find SYNC
appears in the display.
2. Follow the directions in your phone's user guide to put
your phone into discovery mode. A six-digit PIN appears
in the display.
3. When prompted on your phone's six-digit display, enter
the PIN.
Connect a previously paired Bluetooth-enabled phone.Connect Bluetooth Device
1. Press OK to select and view a list of devices.
2. Scroll until the desired device is chosen and press OK
to connect the device.
· Turn the Bluetooth feature on and off.Set Bluetooth On/Off
· Press OK and scroll to toggle between On and Off. When
the desired selection is chosen, press OK. Turning
Bluetooth off disconnects all Bluetooth devices and
deactivates Bluetooth features.
· Delete a paired media device.Delete Device
· Press OK and scroll to select the device. Press OK to
confirm.
· Delete all previously paired devices.Delete All Devices
· Press OK to select.
Exit the current menu.Return
*
This is a speed-dependent feature.
Advanced Menu Options
1. Press AUX and then MENU to enter
the Media menu.
2. Scroll until System Settings appears
and select OK, then press OK.
3. Scroll until Advanced appears.
4. Press OK and then scroll to select from:
You CanWhen You Select
Have SYNC guide you by asking questions, helpful hints
or ask you for a specific action.
Prompts
1. Press OK to select and scroll to select between on or
off.
307
SYNC®

You CanWhen You Select
2. Press OK when the desired selection appears in the
display. SYNC takes you back to the Advanced menu.
Choose from English, Français or Español. The displays
and prompts are in the selected language.
Languages
1. Press OK to select and then scroll through the languages.
2. Press OK when the desired selection appears in the
display.
3. If you change the language setting, the display indicates
that the system is updating. When complete, SYNC takes
you back to the Advanced menu.
Return to the factory default settings. This selection does
not erase your indexed information (phonebook, call
history, text messages and paired devices).
Factory Defaults
1. Press OK to select and then press OK again when
Restore Defaults? appears in the display.
2. Press OK to confirm.
Completely erase all information stored on SYNC (all
phonebook, call history, text messages and all paired
devices) and return to the factory default settings.
Master Reset
Download new software applications (if available) and
then load the desired applications through your USB port.
Refer to the web site for more information.
Application
Exit the current menu.Return
SYNC® TROUBLESHOOTING
Your SYNC system is easy to use. However,
should questions arise, please refer to the
tables below.
Use the website at any time to check your
phone's compatibility, register your
account and set preferences as well as
access a customer representative via an
on-line chat (during certain hours). Visit
www.SYNCMyRide.com or
www.syncmaroute.ca for more
information.
308
SYNC®

Phone Issues
Possible Solution(s)Possible Cause(s)Issue
Review your phone's user
guide regarding audio
adjustments.
The audio control settings
on your phone may be
affecting SYNC perform-
ance.
A lot of background noise
during a phone call.
Try turning off the device,
resetting the device,
removing the device's
battery, then trying again.
Possible phone malfunction.During a call, I can hear the
other person but they
cannot hear me.
· Go to the website to review
your phone's compatibility.
· This is a phone-dependent
feature.
SYNC is not able to down-
load my phonebook.
· Try turning off the device,
resetting the device or
removing the device's, then
trying again.
· Possible phone malfunc-
tion.
· Try "pushing" your phone-
book contacts to SYNC by
using the Add Contacts
feature.
· Use the "SYNCmyphone"
feature available on the
website.
· Try "pushing" your phone-
book contacts to SYNC by
using the Add Contacts
feature.
Limitations on your phone's
capability.
The system says "Phone-
book downloaded" but my
phonebook in SYNC is
empty or is missing
contacts. · If the missing contacts are
stored on your SIM card, try
moving them to the device
memory.
· Remove any pictures or
special ring tones associ-
ated with the missing
contact.
· Go to the website to review
your phone's compatibility.
· This is a phone-dependent
feature.
I'm having trouble
connecting my phone to
SYNC. · Try turning off the device,
resetting the device or
removing the device's, then
trying again.
· Possible phone malfunc-
tion.
309
SYNC®

Phone Issues
Possible Solution(s)Possible Cause(s)Issue
· Try deleting your device
from SYNC, deleting SYNC
from your device and trying
again.
· Check the security and
"auto accept/prompt
always" settings relative to
the SYNC Bluetooth
connection on your phone.
· Update your device's firm-
ware.
· Turn off the Auto phone-
book download setting.
· Go to the website to review
your phone's compatibility.
· This is a phone-dependent
feature.
Text messaging is not
working on SYNC.
· Try turning off the device,
resetting the device or
removing the device's, then
trying again.
· Possible phone malfunc-
tion.
USB/Media Issues
Possible Solution(s)Possible Cause(s)Issue
· Try turning off the device,
resetting the device,
removing the device's
battery, then trying again.
Possible device malfunction.I'm having trouble
connecting my device.
· Make sure you are using the
manufacturer's cable.
· Make sure the USB cable is
properly inserted into the
device and the vehicle's USB
port.
310
SYNC®

USB/Media Issues
Possible Solution(s)Possible Cause(s)Issue
· Make sure that the device
does not have an auto-
install program or active
security settings.
Make sure you are not
leaving the device in your
vehicle during very hot or
cold temperatures.
This is a device limitation.SYNC does not recognize
my device when I turn on the
car.
Make sure the device is
connected to SYNC and that
you have pressed play on
your device.
This is a phone-dependent
feature.
The device is not connected.
Bluetooth audio does not
stream.
· Make sure that all song
details are populated.
· Your music files may not
contain the proper artist,
song title, album or genre
information.
SYNC does not recognize
music that is on my device.
· Some devices require you
to change the USB settings
from mass storage to MTP
class.
· The file may be corrupted.
· The song may have copy-
right protection which does
not allow it to play.
Vehicle Health Report/Services (Traffic, Directions and Information) Issues
Possible Solution(s)Possible Cause(s)Issue
· This is a free feature, but
you must first register online
to use it.
· Your account may not be
activated on the website.
· You may have the wrong
VIN (vehicle identification
number) listed.
I received a text that the
Vehicle Health Report is not
activated.
311
SYNC®

Vehicle Health Report/Services (Traffic, Directions and Information) Issues
Possible Solution(s)Possible Cause(s)Issue
· Make sure that your VIN is
correctly listed in your
account.
When you register your
account, you must list a
preferred dealer. If one is
already listed, try selecting
another dealer and logging
out. Log back in and change
it back to your preferred
dealer and retrieve the
report.
The preferred dealer
information did not load
correctly.
I'm unable to retrieve the
report on the website, or I
receive a system error.
· Update your mobile
number in your account on
the website.
· This could be due to your
phone's compatibility.
· Bad signal strength.
I'm unable to submit a
report.
· Make sure you have full
signal strength and that your
Bluetooth volume level has
been turned up.
· Your phone may not be
activated on the website.
· Try deleting your phone
and performing a clean
pairing.
· This is a free feature, but
you must first register online
to use it.
· The phone in use is not
activated.
· Your phone has ID blocker
active.
I heard a commercial when
I tried to use Traffic, Direc-
tions and Information.
· Turn off ID blocker on your
phone as the system recog-
nizes you by your phone
number.
· Make sure the currently
connected phone is the
same one that is registered
on your SyncMyRide
account.
312
SYNC®

Voice Command Issues
Possible Solution(s)Possible Cause(s)Issue
· Review the phone voice
commands and the media
voice commands at the
beginning of their respective
sections.
· You may be using the
wrong voice commands.
· You may be speaking too
soon or at the wrong time.
SYNC does not understand
what I am saying.
· Be aware that SYNC's
microphone is either in your
rear view mirror or in the
headliner just above the
windshield.
· Review the media voice
commands at the beginning
of the media section.
· You may be using the
wrong voice commands.
· You may not be saying the
name exactly as it is saved.
SYNC does not understand
the name of a song or artist.
· Say the song or artist
exactly as they are listed. If
you say "Play Artist Prince"
the system does not play
music by Prince and the
Revolution or Prince and the
New Power Generation.
· The system may not be
"reading" the name the
same way you are saying it.
· Make sure you are saying
the complete title such as
"California remix featuring
Jennifer Nettles".
· If the songs are saved in all
CAPS, you have to spell
them. LOLA requires you to
say "L-O-L-A".
· Do not use special charac-
ters in the title as the system
does not recognize them.
· Review the phone voice
commands at the beginning
of the phone section.
· You may be using the
wrong voice commands.
· You may not be saying the
name exactly as it is saved.
SYNC does not understand
or is calling the wrong
contact when I want to
make a call. · Make sure you are saying
the contacts exactly as they
are listed. For example, if a
contact is saved as Joe
Wilson, say "Call Joe
Wilson".
· Contacts in your phone-
book may be very short and
similar, or they may contain
special characters.
· Your phonebook contacts
may be saved in CAPS.
313
SYNC®

Voice Command Issues
Possible Solution(s)Possible Cause(s)Issue
· The system works better if
you list full names such as
"Joe Wilson" rather than
"Joe".
· Do not use special charac-
ters such as 123 or ICE as the
system does not recognize
them.
· If contacts are saved in
CAPS, you have to spell
them. JAKE requires you to
say "Call J-A-K-E".
314
SYNC®

GENERAL INFORMATION
WARNING
Driving while distracted can result in
loss of vehicle control, accident and
injury. Ford strongly recommends
that drivers use extreme caution when
using any device or feature that may take
their focus off the road. Your primary
responsibility is the safe operation of the
vehicle. We recommend against the use
of any handheld device while driving,
encourage the use of voice-operated
systems when possible and that you
become aware of applicable state and
local laws that may affect use of electronic
devices while driving.
Note: Some features are not available while
the vehicle is moving.
Note: You can also directly access the
Home screen and Information screen by
pressing the Home ("house" icon) and
Information ("i" icon) buttons on your
steering wheel controls.
This system uses a four-corner strategy to
provide quick access to vehicle features
and settings. The comprehensive
touchscreen provides easy interaction with
your mobile phone, multimedia, climate
control and navigation system. The corners
display any active modes within those
menus, such as your phone being
connected or the climate temperature.
E142607
MENU
Press to select any of the following:
• Clock
• Sound
• Settings
• Display
• Vehicle
• Help
INFORMATION
Press to select any of the following:
• SYNC® Services
• Notifications
• SYNC Apps
• SIRIUS® Travel Link™
• Calendar
PHONE
Press to select any of the following:
• Quick Dial
• Call History
• Settings
• Phonebook
• Text Messaging
• Making and Receiving Calls
NAVIGATION
Press to select any of the following:
• My Home
• Previous Destinations
• Emergency
• Intersection
• Map
• Favorites
• Point of Interest
• Street Address
• City Center
ENTERTAINMENT
Press to select any of the following:
• AM or FM
• CD
• BT Stereo
• SD Card
• SIRIUS
315
MyFord Touch®

• USB
• AV In
CLIMATE
Press to select any of the following:
• Driver Settings
• Recirculated Air
• Auto
• Dual
• Passenger Settings
• A/C
• Defrost
Using the Touch-Sensitive
Controls on Your System
Your vehicle's centerstack has
touch-sensitive switches for your
infotainment and climate control systems.
To turn a feature on and off, just touch the
graphic with your finger. To get the best
performance from the touch-sensitive
controls:
• Make sure your hands are clean and
dry.
• Since the touchscreen operates based
on the touch of a finger, you may have
trouble using it if you are wearing
gloves.
• Use your bare finger to touch the center
of a touch-control graphic. Touching
off-center of the graphic may cause a
nearby control to turn on or off.
• Do not press hard on the controls. They
are sensitive to light touch.
• Metal and other conductive material
should be kept away from the surface
of the touchscreen as this may cause
electronic interference (i.e. control
activation).
Depending on your vehicle and option
package, you may also have these controls
on your bezel:
• Power: Turn the media (or climate
features) on or off.
• VOL: Increase or decrease the volume.
• Fan: Increase or decrease the fan
speed.
• Seek and Tune buttons: Use as you
normally would in media modes.
• Eject: Eject a CD.
• SOURCE: Touch the word repeatedly
to see all available media modes. The
screen does not change, but you see
the media changes in the lower left
status bar.
• SOUND: Touch the word to access the
Sound menu where you can make
adjustments to settings such as: Bass,
Treble, Midrange, Balance and Fade,
THX Deep Note Demo (if equipped),
DSP (if equipped), Occupancy Mode
(if equipped), and Speed
Compensated Volume settings.
• Hazard flasher: Press the button to turn
the hazard flashers on or off.
Cleaning the Touchscreen Display
Clean the display with a clean, soft cloth
such as one used for cleaning glasses. If
dirt or finger prints are still visible, apply a
small amount of alcohol to the cloth. Do
not pour or spray alcohol onto the display.
Do not use detergent or any type of solvent
to clean the display.
Support
The SYNC support team is available to
help you with any questions you aren't able
to answer on your own.
Monday-Saturday, 8:30 am-8:00 pm.
In the United States, call: 1-888-270-1055
In Canada, call: 1-800-565-3673
316
MyFord Touch®

Times are subject to change due to
holidays.
Safety Information
WARNING
Driving while distracted can result in
loss of vehicle control, accident and
injury. Ford strongly recommends
that drivers use extreme caution when
using any device or feature that may take
their focus off the road. Your primary
responsibility is the safe operation of the
vehicle. We recommend against the use
of any handheld device while driving,
encourage the use of voice-operated
systems when possible and that you
become aware of applicable state and
local laws that may affect use of electronic
devices while driving.
When using SYNC:
• Do not operate playing devices if the
power cords or cables are broken, split
or damaged. Carefully place cords and
cables where they cannot be stepped
on or interfere with the operation of
pedals, seats, compartments or safe
driving abilities.
• Do not leave playing devices in the
vehicle during extreme conditions as it
could cause them damage. Refer to
your device's user guide for further
information.
• Do not attempt to service or repair the
system. See your authorized dealer.
• For your safety, some SYNC functions
are speed-dependent and cannot be
performed when the vehicle is traveling
at speeds greater than 3 mph (5 km/h).
Make sure that you review your device's
user guide before using it with SYNC.
Speed-Restricted Features
Some features of this system may be too
difficult to use while the vehicle is in
motion so they're restricted from being
modified unless the vehicle is not moving.
Some examples of these are listed below:
• Screens that are too crowded with
information, such as Point of Interest
(POI) reviews and ratings, SIRIUS
Travel Link sports scores, movie times,
ski conditions, etc.
• Any action that requires using a
keyboard, such as entering a navigation
destination or editing information
• All lists are limited so the user can view
fewer entries (e.g. phone contacts,
recent phone call entries)
Listed below are more specific features
that can only be modified while the vehicle
is not moving:
Restricted Features
Pairing a Bluetooth phoneMobile Phone
Adding phonebook contacts or uploading phonebook
contacts (from a USB)
Lists entries are limited for phone contacts and recent
phone call entries
Editing the keypad codeSystem Functionality
317
MyFord Touch®

Restricted Features
Enabling Valet Mode
Editing settings while the rear view camera or active park
assist are active
Editing wireless settingsWi-Fi or Wireless
Editing the list of wireless networks
Playing videoVideos, photos or graphics
Editing the screen's wallpaper or adding new wallpaper
Composing text messagesText Messages
Viewing received text messages
Editing preset text messages
Using the keyboard to enter a destinationNavigation
Demo navigation route
Adding or editing Address Book entries or Avoid Areas
Privacy Information
When a mobile phone is connected to
SYNC, SYNC creates a profile within your
vehicle that is linked to that mobile phone.
This profile is created in order to offer you
more mobile features and to operate more
efficiently. Among other things, this profile
may contain data about your mobile phone
book, text messages (read and unread),
and call history, including history of calls
when your mobile phone was not
connected to SYNC. In addition, if you
connect a media device, SYNC creates and
retains an index of media content
supported by SYNC. SYNC also records a
short development log of approximately
10 minutes of all recent SYNC activity. The
log profile and other SYNC data may be
used to improve SYNC and help diagnose
any problems that may occur.
The mobile profile, media device index, and
development log will remain in the vehicle
unless you delete it and are generally
accessible only in the vehicle when the
mobile phone or media player is
connected. If you no longer plan to use
SYNC, or the vehicle, we recommend you
perform a Master Reset to erase all
information stored in SYNC.
318
MyFord Touch®

SYNC data cannot be accessed without
special equipment and access to the
vehicle's SYNC module. Ford Motor
Company and Ford of Canada will not
access SYNC data for any purpose other
than as described absent consent, a court
order, or where required by law
enforcement, other government
authorities, or other third parties acting
with lawful authority. Other parties may
seek to access the information
independently of Ford Motor Company and
Ford of Canada. For further privacy
information, see the sections on 911
Assist™(if equipped), Vehicle Health
Report (if equipped), and Traffic,
Directions and Information (if equipped).
Accessing Your Home Screen
E142613
Press the house icon to access
the home screen.
319
MyFord Touch®

Using Your Voice Recognition
System
This system helps you control many
features using voice commands. This
allows you to keep your hands on the
wheel and focus on what is in front of you.
The system provides feedback through
audible tones, prompts, questions and
spoken confirmations depending on the
situation and the chosen level of
interaction (voice settings).
The system also asks short questions
(confirmation prompts) when it is not sure
of your request or when there are multiple
possible responses to your request.
When using voice commands, words and
icons may also appear in the lower left
status bar indicating the status of the voice
session (i.e., listening, success, failed,
paused or try again).
How to Use Voice Commands with Your
System
E142599
Press the voice icon; after the
tone, speak your command
clearly.
What Can I Say?
To access the available voice commands
for the current session, do one of the
following:
• During a voice session, press the lower
left status bar of the screen
• Say "What can I say?" for an on-screen
listing of the possible voice commands
associated with your current voice
session
• Press the voice icon; after the tone, say
"Help" for an audible list of possible
voice commands.
320
MyFord Touch®

Helpful Hints
• Make sure the interior of the vehicle is
as quiet as possible. Wind noise from
open windows and road vibrations may
prevent the system from correctly
recognizing spoken commands.
• After pressing the voice icon, wait until
after the tone sounds and "Listening"
appears before saying a command. Any
command spoken before this does not
register with the system.
• Speak naturally, without long pauses
between words.
• At any time you can interrupt the
system while it is speaking by pressing
the voice icon.
Basic commands
If You Want ToSay
Make calls."Phone"
Access the device connected to your USB port."USB"
Stream audio from your phone."Bluetooth audio"
Access the device connected to the auxiliary input jack."Line in"
Cancel the requested action."Cancel"
Return to the main menu."SYNC"
Adjust the level of voice interaction and feedback."Voice settings"
Run a vehicle health report.
*
"Vehicle health report"
Access the SYNC Services portal.
*
"Services"
Access mobile applications.
*
"Mobile apps"
Hear a list of voice commands available in the current
mode.
"Help"
*
If equipped, U.S. only
These commands can be said at any time during a voice session
"Main menu"
"List of commands"
"What can I say?"
"Next page"
321
MyFord Touch®

These commands can be said at any time during a voice session
"Previous page"
"Go back"
"Cancel"
"Exit"
"Help"
Accessing a List of Available Commands
1. Using the touchscreen, press the Menu
icon, Help, then Voice Command List.
2. Using the steering wheel control, press
the voice icon. After the tone, speak
your command clearly.
Available Voice Commands
"Radio list of commands""Audio list of commands"
"SD card list of commands""Bluetooth audio list of commands"
"Sirius satellite list of commands"
*
"Browse list of commands"
"Travel link list of commands"
*
"CD list of commands"
"USB list of commands""Climate control list of commands"
"Voice instructions list of commands""List of commands"
"Voice settings list of commands"
"Navigation list of commands"
*
"Help""Phone list of commands"
*
If equipped
Voice Settings
Voice settings allow you to customize the
level of system interaction, help and
feedback. The system defaults to standard
interaction which uses candidate lists and
confirmation prompts as these provide the
highest level of guidance and feedback.
322
MyFord Touch®

• Interaction Mode: Novice mode
provides more detailed interaction and
guidance while the advanced mode
has less audible interaction and more
tone prompts.
• Confirmation Prompts: These are
short questions the system asks when
it is not sure of your request or when
there are multiple possible responses
to your request. If turned off, the
system simply makes a best guess as
to what you requested and you may
still occasionally be asked to confirm
settings.
• Phone and Media Candidate Lists:
These are lists of possible results from
your voice commands. The system
creates these lists when it has the
same confidence level of several
options based on your voice command.
To access these settings using the
touchscreen:
1. Press the Menu icon, Settings, then
Voice Control.
2. Select from the following:
• Interaction Mode
• Confirmation Prompts
• Media Candidate Lists
• Phone Candidate Lists
• Voice Control Volume
To access these settings using voice
commands:
1. Press the voice icon; after the tone
sounds, the system says "Please say a
command". Another tone sounds to let
you know the system is listening.
2. Say any of the following commands:
Voice Settings Using Voice Commands
"Interaction mode novice"
"Interaction mode advanced"
"Confirmation prompts on"
"Confirmation prompts off"
"Phone candidate lists on"
"Phone candidate lists off"
"Media candidate lists on"
"Media candidate lists off"
"Help"
Using Voice Commands with the
Touchscreen Options
Your voice system has a dual mode feature
which allows you to switch between using
voice commands and making on-screen
selections. This is most often available
when using navigation.
323
MyFord Touch®

On-screen buttons are outlined in blue to
indicate the selections that are part of the
dual mode feature. For example, if while
you are in a voice session rather than
saying the command "Enter street name"
to change the field, you can press Street
and the voice session does not end.
Instead, the voice system changes to the
Street field and asks you to say the street
name. The buttons not outlined in blue
cannot be used as voice commands; if they
are touched during a voice session, the
voice session is canceled.
For example, you can choose from the
following on the Navigation home screen:
• My Home
• Favorites
• Previous Destinations
• Point of Interest (POI)
• Emergency
• Street Address
• Intersection
• Cancel Route
Some of the voice commands that are
available while viewing this screen are:
Destination
"Destination my home"
"Destination street address"
"Destination favorites"
"Destination previous destinations"
"Destination POI"
"Destination intersection"
"Destination emergency"
If you choose Street Address from the
navigation screen, you can choose from
the following:
• Number
• City
• Street Name
• State/Prov
Some of the voice commands that are
available while viewing this screen are:
Street Address
"Enter house number"
"Change house number"
"Enter street name"
"Change street name"
"Enter city"
324
MyFord Touch®

Street Address
"Change city"
"Enter state"
"Change state"
If you choose Points of Interest from the
navigation screen, you can choose from
the following:
• Search Area
• Search By Name
• Fuel Station
• ATM
• All Restaurants
• Accommodations
• Parking
Some of the voice commands that are
available while viewing this screen are:
Points of Interest or POI
"Destination <POI category name>"
"Search by name"
"Search by category"
"Change search area"
"Change state"
Note: These are just a sample of the voice
commands available within the Points of
Interest section; the categories themselves
are also technically voice commands.
If you choose Intersection from the
navigation screen, you can choose from
the following:
• 1st Street
• 2nd Street
• City
• State/Prov
Some of the voice commands that are
available while viewing this screen are:
Intersection
"Enter first street name"
"Change first street name"
"Enter second street name"
"Change second street name"
325
MyFord Touch®

Intersection
"Enter city"
"Change city"
"Enter state"
"Change state"
The dual mode feature is also available
when the voice system displays a list of
items to pick from during a voice session,
where you would be able to touch the line
item or say "Line 2". If a command is not
understood or there are multiple options,
the system returns a list for you to choose
from.
MENU
Under the menu setting, you can set your
clock, access and make adjustments to
the display, sound and vehicle settings as
well as access settings for specific modes
or the help feature.
Setting the Clock
Note: The date is set by your vehicle's GPS;
you cannot manually set the date.
Note: If the battery has been disconnected,
the vehicle needs to acquire a GPS signal
to update the clock. Once your vehicle
acquires the signal, it may take a few
minutes for the update to display the correct
time.
1. Press Menu, then Clock.
2. Press + and - to adjust the time.
From this screen, you can also make other
adjustments such as 12-hour or 24-hour
mode, activate GPS time synchronization
and have the system automatically update
new time zones.
Once you update any settings they are
automatically saved.
Display Settings
To access and make adjustments to the
touchscreen display using the touchscreen,
press Menu, then Display. Select any of the
following:
• Brightness
• Auto Dim On/Off
• Mode: Auto, Day or Night
• Edit Wallpaper
E142599
To access and make
adjustments to the touchscreen
display using voice commands,
press the voice button on your steering
wheel controls and, when prompted, say
"Display Settings".
Uploading Photos for Your Home
Screen Wallpaper
Note: You cannot load photos directly from
your camera. You must access the photos
from either your USB mass storage device
or from an SD card.
Your system allows you to upload and view
up to 32 photos. To upload photos, press
Menu, Display, then Edit Wallpaper. Follow
the system prompts to upload your
photographs.
Photo Display Limitations
Note: Photographs with extremely large
dimensions (i.e. 2048 x 1536) may not be
compatible and appear as a blank (black)
image on the display.
326
MyFord Touch®

Only the photograph(s) which meet the
following conditions are displayed:
• Compatible file formats are as follows:
.jpg, .gif, .png, .bmp
• Each file must be 1.5 MB or less.
• Recommended dimensions: 800 x 384
Sound
Press Menu, then Sound to access settings
for:
Sound Settings
THX Deep Note Demo
*
Bass
DSP
*
Treble
Occupancy Mode
*
Midrange
Speed Compensated VolumeBalance and fade
*
If equipped.
Rear View Camera (If Equipped)
This menu allows you to access settings
for your rear view camera.
Press Menu, Vehicle, then Reverse Camera.
Select from the following settings:
• Rear Camera Delay
• Guideline
• Visual Park Aid Alert
Valet Mode
Note: If you are locked out and need to
reset the PIN, you can enter 3681 and the
system unlocks.
Valet mode allows you to lock the system
so that none of your information on the
system can be accessed until it is unlocked
with the correct PIN.
1. Press Menu, Vehicle, then Valet Mode.
2. Select Enable Valet Mode.
3. When prompted, enter a four-digit PIN.
After you press Continue the system is
locked until the correct PIN is entered
again.
Changing Your Door Keypad Code
(If Equipped)
To change the keypad code for your
keyless entry keypad system:
1. Press Menu, Vehicle, then Edit Door
Keypad Code.
2. Enter your current factory code, then,
when prompted, enter your new code.
Active Park Assist (If Equipped)
When activated, your system displays
directions for you regarding the active park
assist process. See Active Park Assist
(page 163).
Settings
Access and adjust system settings, voice
features, as well as phone, navigation and
wireless settings. Some of these settings
can also be accessed with regard to their
specific modes (i.e., phone and media).
System Settings
Press Menu, Settings, System. Select from
the following:
327
MyFord Touch®

System Settings
Distance UnitsLanguage
System Prompt VolumeTemperature Units
Keyboard LayoutTouchscreen Beeps
Master ResetInstall Applications
Voice Settings
Customize the level of system interaction,
help and feedback.
Press Menu, Settings, then Voice.
Voice Settings
· Standard interaction mode provides more detailed
interaction and guidance.
Interaction Mode
· Advanced mode has less audible interaction and more
tone prompts.
Short questions asked by the system when the system
has not clearly heard or understood your request. (Even
with confirmation prompts turned off, you may be asked
to confirm settings occasionally.)
Confirmation Prompts
Candidate lists are possible results from your voice
commands. If these are turned off, the system simply
makes a best guess at your request.
Media Candidate Lists
Phone Candidate Lists
Allows you to adjust the voice volume level.Voice Control Volume
Media Player Settings
To access settings for your media player,
press Menu, Settings, then Media Player.
Select from the following:
• Autoplay On/Off
• Bluetooth Devices
• Index Bluetooth On/Off
• Database Info
• Media Management On/Off
Note: With Autoplay and Index Bluetooth
turned on, you can listen to music which has
already been indexed. With these features
turned off, SYNC does not play any of your
music until all the media (on your USB
thumb drive, flash drive, portable music
player, etc.) has been indexed.
Navigation Settings
To access settings for your media player,
press Menu, Settings, then Navigation.
328
MyFord Touch®

Select from the following:
• Map Preferences
• Route Preferences
• Navigation Preferences
• Traffic Preferences
• Avoid Areas
Phone Settings
To access settings for your media player,
press Menu, Settings, then Phone (or
Phone, then Settings).
Phone Settings
Connect, disconnect, add or delete a device, as well as
save it as a favorite.
Bluetooth Devices
Turn Bluetooth on or off.Bluetooth On/Off
Have all calls go directly to your voice mail and not ring in
the vehicle cabin. With this feature turned on, text message
notifications are also suppressed and do not ring inside
the cabin.
Do Not Disturb
Turn 911 Assist™ on or off. See Information (page 358).911 Assist
Select how you would like to be notified when you receive
a text message, if supported by your phone. Choose from
possible system alert tones, text-to-speech or silent.
Text Message Notification
Use this screen to make adjustments to your internet data
connection. Select to make your connection profile with
the PAN (personal area network) or to turn off your
connection. You can also choose to make adjustments to
your settings or have the system always connect, never
connect when roaming or query on connect. Press ? for
additional information.
Internet Data Connection
*
Access features such as automatic phonebook download,
re-download your phonebook, add contacts from your
phone as well as delete or upload your phonebook.
Manage Phonebook
Display call history.Display Call History
*
If compatible.
Wireless and Internet
To access, press Menu, Settings, then
Wireless and Internet.
Select from the following:
• Wi-Fi settings
• Bluetooth settings
• USB mobile broadband
• Prioritize connection methods
329
MyFord Touch®

Wi-Fi
Your system has a Wi-Fi feature which
creates a wireless network within your
vehicle, thereby allowing other devices (i.e.
personal computers or phones) in your
vehicle to speak to each other, share files,
play games, etc.
Using this feature, everyone in your vehicle
can also gain access the internet if:
• You have a USB mobile broadband
connection inside the vehicle
• Your phone supports PAN (personal
area networking)
• You are parked outside of a wireless
hotspot
To access, press Menu, Settings, Wireless
and Internet, then Wi-Fi settings. Select
from the following options:
You CanIf You Select
Turn the Wi-Fi feature on or off in your vehicle. Make sure
that On is selected for connectivity purposes.
Wi-Fi Network (Client)
Mode On/Off
Use a previously stored wireless network. You can
categorize by alphabetical listing, Priority and Signal
Strength. You can also choose to search for a network,
connect to a network, disconnect from a network, receive
more information, prioritize a network or delete a network.
Choose a Wireless Network
View a list of wireless networks.Search for Wireless
Networks
Make SYNC an access point for a phone or a computer by
turning this feature on. This forms the local area network
within the vehicle for things such as game playing, file
transfer, internet browsing, etc.
Gateway Access Point Mode
(On/Off)
View who has connected to your Wi-Fi connection recently.Gateway Access Point
Device List
Press the ? button (if available) for
additional information.
E142626
The
Wi-Fi
CERTIFIED Logo is a certification mark of
the Wi-Fi Alliance.
USB Mobile Broadband
Note: You must activate your mobile
broadband device on your PC prior to
connecting it to the system.
Note: USB mobile broadband settings may
not be displayed if the device is already
activated.
330
MyFord Touch®

Instead of using Wi-Fi, your system can
also use a USB mobile broadband
connection to access the internet. This
screen allows you to set up what is your
typical area for your USB mobile
broadband connection.
You can select the following:
• Country
• Carrier
• Phone Number
• User Name
• Password
Prioritize Connection Methods
This screen allows you to choose your
connection methods and change them as
needed. You can select to Change Order
and have the system either always attempt
to connecting using a USB mobile
broadband or using Wi-Fi.
Bluetooth Settings
This screen shows you what device is
currently paired with the system as well as
giving you your typical Bluetooth options
to connect, disconnect, set as favorite,
delete and add device.
Bluetooth is a registered trademark of the
Bluetooth SIG.
Help
Your touchscreen system has a help
feature which you can access at any time.
To access, press Menu, then Help. Select
from the following options:
You CanIf You Select
View the vehicle's current location, if your vehicle is
equipped with navigation. If your vehicle is not equipped
with navigation, nothing is displayed.
Where Am I?
Access the 911 Assist settings, vehicle restart instructions
and emergency quick dial contacts.
911 Assist
· In Case of Emergency (ICE) Quick Dial: This feature
allows you to save up to two numbers as ICE contacts for
quick access in the event of an emergency. Select Edit to
access your phonebook and then select the desired
contacts. The numbers then appear as options on this
screen for the ICE 1 and ICE 2 buttons. The ICE contacts
you select are presented to you at the completion of the
911 Assist call process for quick access.
View possible voice commands.Voice Command List
From this screen, you can also access
System information, Software Licenses
and Driving Restrictions.
To access Help using the voice commands,
press the voice button, then, after the tone,
say "Help". The system provides voice
commands that can be used in the current
mode.
331
MyFord Touch®

ENTERTAINMENT
Your system offers many media options.
You can access these options using the
touchscreen or voice commands.
Browsing Device Content
When listening to any type of audio, you
can browse through other devices without
having to change sources. For example, if
you are currently listening to the radio, you
can browse all the artists that are stored
on your USB device.
E142599
Press the voice icon on the
steering wheel. When prompted,
you can say:
"BROWSE" within Devices
"Browse"
1
"Browse <league> games"
2
"Browse <Sirius category> channels"
2
"Browse CD track list"
"Browse SD card"
"Browse SIRIUS channel guide"
2
"Browse USB"
"Help"
1
If you only say "Browse", you can then say any commands in the following chart.
2
If equipped with SIRIUS® satellite radio.
"BROWSE"
"<League> Games"
1
"<Sirius category> channels"
1
"CD Track List"
"SD card"
2
"SIRIUS Channel Guide"
1
332
MyFord Touch®

"BROWSE"
"USB"
2
"Help"
1
If equipped with SIRIUS® satellite radio.
2
For more commands in SD card or USB mode, see the "SD Card and USB Port" section
of this chapter.
AM/FM Radio
E142611
Press the lower left corner of the
touchscreen and then select the
AM or FM tab.
To change between AM and FM presets,
just touch the AM or FM tab.
You CanWhen You Select
Save a station by pressing and holding one of the memory
preset areas. There is a brief mute while the station is being
saved, then sound returns when it's done.
Preset
Enter the desired station number when prompted. Press
Enter.
Direct Tune
Allows you to receive radio broadcasts digitally (where
available), providing free, crystal clear sound.
HD Radio
Go to the next strong AM or FM radio station.Scan
Adjust more audio system settings:Options
· Sound Settings adjusts Bass, Treble, Midrange, Balance
and Fade, THX Deep Note Demo (if equipped), DSP (if
equipped), Occupancy Mode (if equipped), and Speed
Compensated Volume settings.
· Set PTY for Seek/Scan allows you to select a category
of music you would like to search for and then choose to
either seek or scan for the stations.
· RDS Text Display allows you to always view the
information broadcast by FM stations by selecting On.
· Auto Presets (AST) allows you to have the system
automatically store the six strongest stations in your
current location.
333
MyFord Touch®

You CanWhen You Select
· TAG (if available) allows you to tag a song to download
later. When you select On, TAG appears on-screen when
HD radio is active. You can press TAG to save the inform-
ation of the song that is playing. When you plug in your
portable music player, the information is transferred (if
supported by your device). When you are connected to
iTunes®, the tags appear to remind you of the songs you’ d
like to download.
HD Radio™ Information (If Available)
Note: HD Radio broadcasts are not
available in all markets.
HD Radio technology is the digital
evolution of analog AM/FM radio. Your
system has a special receiver which allows
it to receive digital broadcasts (where
available) in addition to the analog
broadcasts it already receives. Digital
broadcasts provide a better sound quality
than analog broadcasts with free, crystal
clear audio and no static or distortion. For
more information, and a guide to available
stations and programming, please visit
www.hdradio.com.
When this feature is enabled and you are
tuned to a station broadcasting HD Radio
technology, you may notice the following
indicators on your screen:
E142616
The HD Radio logo blinks when a digital
station is being acquired and is solid when
digital audio is playing. When this logo is
available, you may also see Title and Artist
fields on-screen .
The multicast indicator appears in FM
mode (only) if the current station is
broadcasting multiple digital broadcasts.
The numbers that are highlighted signify
available digital channels where new or
different content is available. HD1 signifies
the main programming status and is
available in analog and digital broadcasts.
Any additional multicast stations (HD2
through HD7) are only broadcast digitally.
TAG allows you to save a song to
download later. When you are on an
acquired HD Radio station, the TAG button
is available (provided the feature has been
turned on). To use the tag feature:
1. Press AM or FM, Options, then TAG On
2. When you hear a song you like, touch
TAG.
3. The system automatically saves the
song's information and transfers it to
your portable music player (if
supported) when it is connected to the
system. If your music player is
connected at the time, the system
automatically transfers the tag to your
player and a pop-up confirms the
transfer.
334
MyFord Touch®

4. When you access iTunes® with your
portable music player, the tags appear
to you to be reminded of the song. The
system allows you to tag up to
approximately 100 songs. For a list of
devices that support tagging, refer to
www.SYNCMyRide.com or
www.syncmaroute.ca.
When HD Radio broadcasts are active, you
can access the following functions:
You CanWhen You Select
Hear a brief sampling of all available stations.Scan
This feature still works when HD Radio reception is activ-
ated, although it does not scan for HD2-HD7 channels.
You may see the HD logo appear if the station has a digital
broadcast.
Hear the next strong radio station.Seek
If the current station has multiple digital broadcasts, the
multicast indicator appears. Press Seek repeatedly to
advance through all available broadcasts. If you are on
the last multicast channel, press Seek to advance to the
next strong station.
Go up and down the frequency in individual increments.Tune
If the current station has multiple digital broadcasts, the
multicast indicator appears. Press Tune repeatedly to
advance through all available broadcasts. If you are on
the last broadcast channel, turn to advance to the next
frequency on the band.
When the channel is active on-screen, press and hold a
memory preset slot until the sound returns. There is a brief
mute, then the sound returns signifying it was saved. When
recalling a HD2 or HD3 memory preset, there is a mute
before the digital audio is played as the system must once
again acquire the digital signal. As with any saved radio
station, you cannot access the saved station if your vehicle
is outside the station's reception area.
To save a multicast station
as a preset
335
MyFord Touch®

HD Radio Reception and Station Troubleshooting
Potential Reception Issues
If you are listening to a multicast station and you are on
the fringe of the reception area, the station may mute due
to weak signal strength.
If you are listening to HD1, the system switches back to
the analog broadcast until the digital broadcast is available
again. However, if you are listening to any of the possible
HD2-HD7 multicast channels, the station mutes and stay
muted unless it is able to connect to the digital signal
again.
Reception area
When a station is first received (aside from HD2-HD7
multicast stations), the system first plays the station in
the analog version and then, if receiver verifies the station
is an HD Radio station, it shifts to the digital version.
Depending on the station quality, you may hear a slight
sound change when the station changes from analog to
digital. This shift from analog to digital sound or digital
back to analog, is known as "blending".
Station blending
In order to provide the best possible
experience, a contact form has been
developed to report any station issues
found while listening to a station
broadcasting with HD Radio technology.
Every station is independently owned and
operated. These stations are responsible
for ensuring all audio streams and data
fields are accurate.
336
MyFord Touch®

Potential Station Issues
ActionCauseIssues
None. Broadcast issue.Poor time-alignment by the
radio broadcaster.
Echo, stutter, skip or repeat
in audio. Increase or
decrease in audio volume.
None. Reception issue that
may clear up as you
continue to drive.
The radio is shifting between
analog and digital audio.
Sound fading or blending in
and out.
None. This is normal beha-
vior. Wait until the audio is
available.
The digital multicast is not
available until the HD Radio
broadcast is decoded. Once
decoded, the audio is avail-
able.
Audio mute delay when
selecting HD2/HD3,
multicast preset or Direct
Tune.
None. The station is not
available in your current
location.
The previously stored
multicast preset or direct
tune is not available in your
current reception area.
Cannot access HD2/HD3
multicast channel when
recalling a preset or from a
direct tune.
Fill out the station issue
form at website listed
below.
*
Data service issue by the
radio broadcaster.
Text information does not
match currently playing
audio.
Fill out the station issue
form at website listed
below.
*
Data service issue by the
radio broadcaster.
No text information shown
for currently selected
frequency.
None. This is normal beha-
vior.
Pressing Scan disables HD2-
HD7 channel search.
HD2-HD7 stations not found
when Scan is pressed.
*
http://www.ibiquity.com/automotive/report_radio_station_experiences
HD Radio Technology manufactured under
license from iBiquity Digital Corp. U.S. and
foreign patents. HD Radio and the HD and
HD Radio logos are proprietary trademarks
of iBiquity Digital Corp. Ford Motor
Company and iBiquity Digital Corp. are not
responsible for the content sent using HD
Radio technology. Content may be
changed, added or deleted at any time at
the station owner's discretion.
Radio Voice Commands
E142599
If you are listening to the radio,
press the voice button on the
steering wheel controls. When
prompted, say any of the following
commands.
If you are not listening to the radio, press
the voice button and, after the tone, say
"Radio", then any of the following
commands.
337
MyFord Touch®

"RADIO"
"FM autoset preset <#>""<87.9-107.9>"
"FM preset <#>"
"<87.9-107.9> HD"
1
"FM 1""<530-1710>"
"FM 1 preset <#>""AM"
"FM 2""AM <530-1710>"
"FM 2 preset <#>""AM autoset"
"HD <#>"
1
"AM autoset preset <#>"
"Preset <#>""AM preset <#>"
"Radio off"
"Browse"
2
"Radio on""FM"
"Set PTY""FM <87.9-107.9>"
"Tune"
3
"FM <87.9-107.9> HD <#>"
1
"Help""FM autoset"
1
If available
2
If you have said "Browse", refer to the "Browse" chart later in this section.
3
If you have said "Tune", refer to the following "Tune" chart.
"TUNE"
"FM autoset""<530-1710>"
"FM autoset preset <#>"
"<87.9-107.9> HD <#>"
*
"FM preset <#>""AM"
"FM1""AM <530-1710>"
"FM1 preset <#>""AM preset <#>"
"FM2""AM autoset"
"FM2 preset <#>""AM autoset preset <#>"
338
MyFord Touch®

"TUNE"
"HD <#>"
*
"<87.9-107.9>"
"Preset <#>""FM"
"Help""FM <87.9-107.9>"
"FM <87.9-107.9> HD <#>"
*
If available
SIRIUS® Satellite Radio (If
Activated)
E142611
Press the lower left corner of the
touchscreen, then select the
SIRIUS tab.
You CanWhen You Select
Save a station by pressing and holding one of the memory
preset areas. There is a brief mute while the station is being
saved, then sound returns when it's done.
A memory preset area (on
the right side of the screen)
Enter the desired satellite channel number using the on-
screen keypad.
Direct Tune
Press repeatedly to change SIRIUS modes (SIRIUS 1, 2 or
3).
SIRIUS
Save the current song, artist, or team as a favorite. The
system alerts you when it plays again on any SIRIUS
channel.
ALERT
View a list of all available stations. Scroll and select the
desired station.
Browse
You can also lock or skip unwanted channels or view the
song/artist on other stations.
Hear a brief sampling of channels.Scan
Replay audio on the current channel. You can replay
approximately 45 minutes of audio as long as you have
remained tuned to the current station. If you change
stations, the previous audio is erased.
Replay
· Press and release the seek buttons to hear the previous
or next song.
339
MyFord Touch®

You CanWhen You Select
· Press and hold the seek buttons to advance to reverse
or fast forward in the current track.
· Press play or pause to play or pause the audio.
· Press Replay again to return to live audio if you had been
using the replay feature to replay audio.
Adjust more audio system settings:Options
· Sound Settings adjusts Bass, Treble, Midrange, Balance
and Fade, THX Deep Note Demo (if equipped), DSP (if
equipped), Occupancy Mode (if equipped), and Speed
Compensated Volume settings.
· Set Category for Seek/Scan allows you to select a
category of music you would like to search for and then
choose to either seek or scan for the stations.
· Parental Lockout allows you to lock and unlock chan-
nels, change or reset your PIN or unlock all channels. To
use this feature you need your initial PIN which is 1234.
· Artist/Title Alerts
*
allows you to select Artists and
Titles that you would like the system to alert you to when
they are playing on other channels. Press Edit Alerts to
delete or turn off alerts. You can also set all alerts to on
or off. When an alert appears on the screen, you can
choose to Tune to the channel, to Cancel the alert or to
Disable Alerts. If you are listening to a sporting event,
you can save your favorite teams so that the system can
alert you when they are playing on a satellite radio channel.
This is required when communicating with SIRIUS about
your account.
Electronic Serial Number
(ESN)
*
SIRIUS does not support the Alert feature on all channels. Ford Motor Company shall
not be responsible for Alert feature variation.
SIRIUS Satellite Radio Information
Note: SIRIUS reserves the unrestricted right
to change, rearrange, add or delete
programming including canceling, moving
or adding particular channels, and its prices,
at any time, with or without notice to you.
Ford Motor Company shall not be
responsible for any such programming
changes.
340
MyFord Touch®

E142593
SIRIUS satellite radio is a
subscription-based satellite radio service
that broadcasts a variety of music, sports,
news, weather, traffic and entertainment
programming. Your factory-installed
SIRIUS satellite radio system includes
hardware and a limited subscription term
which begins on the date of sale or lease
of the vehicle. Refer to your authorized
dealer for availability.
For more information on extended
subscription terms (a service fee is
required), the online media player and a
complete list of SIRIUS satellite radio
channels, and other features, please visit
www.siriusxm.com in the United States,
www.sirius.ca in Canada, or call SIRIUS at
1-888-539-7474.
Satellite Radio Electronic Serial Number
(ESN)
You need your ESN to activate, modify or
track your satellite radio account. The ESN
is found on the System Information Screen
(SR ESN:XXXXXXXXXXXX). To access
your ESN, touch the bottom left corner of
the touchscreen. Touch SIRIUS, Options,
then ESN.
SIRIUS Satellite Radio Reception Factors and Troubleshooting
Potential Reception Issues
For optimal reception performance, keep the antenna
clear of snow and ice build-up and keep luggage and other
material as far away from the antenna as possible.
Antenna obstructions
Hills, mountains, tall buildings, bridges, tunnels, freeway
overpasses, parking garages, dense tree foliage and
thunderstorms can interfere with your reception.
Terrain
When you pass a ground-based broadcast repeating
tower, a stronger signal may overtake a weaker one and
the audio system may mute.
Station overload
Your display may show ACQUIRING... to indicate the
interference and the audio system may mute.
Satellite radio signal interfer-
ence
341
MyFord Touch®

Troubleshooting Tips
ActionCauseRadio Display
None. This message should
disappear shortly.
Radio requires more than
two seconds to produce
audio for the selected
channel.
ACQUIRING...
If this message does not
clear shortly, or with an igni-
tion key cycle, your receiver
may have a fault. See your
authorized dealer for service.
Internal module or system
failure present.
Sat Fault/SIRIUS System
Failure
Tune to another channel or
choose another preset.
Channel no longer available.Invalid Channel
Contact SIRIUS at 1-888-
539-7474 to subscribe to
the channel, or tune to
another channel.
Subscription not available
for this channel.
Unsubscribed Channel
The signal is currently being
blocked. When you move
into an open area, the signal
should return.
Loss of signal from the
SIRIUS satellite or SIRIUS
tower to the vehicle
antenna.
No Signal
None. The process may take
up to three minutes.
Update of channel
programming in progress.
Updating
Contact SIRIUS at 1-888-
539-7474 to reactivate or
resolve subscription issues.
Satellite service has been
deactivated by SIRIUS
satellite radio.
Call SIRIUS
1-888-539-7474
Using the channel guide,
unlock or unskip the chan-
nels.
All the channels in the
selected category are
skipped or locked.
No Channels Available
None.SIRIUS has updated the
channels available for your
vehicle.
Subscription Updated
342
MyFord Touch®

SIRIUS Satellite Radio Voice
Commands
E142599
If you are listening to SIRIUS
satellite radio, press the voice
button on the steering wheel
controls. When prompted, say any of the
following commands.
If you are not listening to SIRIUS satellite
radio, press the voice button and, after the
tone, say "SIRIUS", then any of the
following commands.
"SIRIUS"
"SAT 2 preset <#>""<0-223>"
"SAT 3""<Channel name>"
"SAT 3 preset <#>""Preset <#>"
"SIRIUS off""SAT"
"SIRIUS on""SAT preset <#>"
"Sports game"
1
"SAT 1"
"Tune"
2
"SAT 1 Preset <#>"
"Help""SAT 2"
1
Late availability. If you have said "Sports game", refer to the following "Sports game"
chart.
2
If you have said "Tune", refer to the following "Tune" chart.
"SPORTS GAME"
"Tune to the <college name> game"
"Tune to the <team city> game"
"Tune to the <team city> <team name> game"
"Tune to the <team name> game"
"Help"
343
MyFord Touch®

"TUNE"
"<0-223>"
"<Channel Name>"
"Preset <#>"
"SAT"
"SAT 1"
"SAT 1 preset <#>"
"SAT 2"
"SAT 2 preset <#>"
"SAT 3"
"SAT 3 preset <#>"
"Help"
CD
E142611
Press the lower left corner of the
touchscreen, then select the CD
tab.
You CanWhen You Select
Repeat the currently playing track.Repeat
Play the tracks in random order.Shuffle
Hear a brief sampling of all available tracks.Scan
See disc information.More Info
Look through all available audio sources.Browse
· Sound Adjust Bass, Treble, Midrange, Balance and Fade,
THX Deep Note Demo (if equipped), DSP (if equipped),
Occupancy Mode (if equipped), and Speed Compensated
Volume settings.
Options
· Compression Access compression settings.
344
MyFord Touch®

You can also advance and reverse the
current track or current folder (if
applicable).
CD Voice Commands
E142599
If you are listening to a CD, press
the voice button on the steering
wheel controls. When prompted,
say any of the following commands.
If you are not listening to a CD, press the
voice button and, after the tone, say "CD",
then any of the following commands.
"CD"
"Pause"
"Play"
"Play next track"
"Play previous track"
"Play track <1-512>"
"Repeat"
"Repeat folder"
*
"Repeat off"
"Repeat track"
"Shuffle"
"Shuffle CD"
*
"Shuffle folder"
*
"Shuffle off"
"Help"
*
WMA or MP3 only
345
MyFord Touch®

SD Card Slot and USB Port
SD Card
Note: Your SD card slot is spring-loaded.
To remove the SD card, press the card in
and the system ejects it. Do not attempt to
pull the card to remove it as this could cause
damage.
The card slot can also be used for your
navigation system (if equipped). See
Navigation (page 371).
E142619
The SD card slot is located either in the
center console or behind a small access
door in the instrument panel. To access
and play music from your device, press the
lower left corner of the touchscreen.
E142620
SD logo is a trademark of SD-3C, LLC.
USB Port
E142621
The USB ports are located either in the
center console or behind a small access
door in the instrument panel. To access
and play music from your device, press the
lower left corner of the touchscreen.
This feature allows you to plug in media
playing devices, memory sticks, flash drives
or thumb drives, and also charge devices
if they support this feature.
Playing Music from Your Device
E142611
Insert your device and select the
USB or SD Card tab once the
system recognizes it. You can
choose from the following options:
346
MyFord Touch®

You CanWhen You Select
Repeat the currently playing song or album.Repeat
Play music on the selected album or folder in random
order.
Shuffle
Browse the contents of the device. It also allows you to
search and play by genre, artist, album, etc.
Browse
Choose music similar to that which is currently playing.Similar Music
Select more settings:Options
· Sound Settings allows you to adjust Bass, Treble,
Midrange, Balance and Fade, THX Deep note demo (if
equipped), DSP (if equipped), Occupancy mode (if
equipped), and speed compensated volume.
· Media Player Settings allows you to select more
settings.
· Device Information displays software and firmware
information about the currently-connected media device.
· Update Media Index indexes the device each time it is
connected to make sure you have the latest voice
commands available for all media on the device.
Media Player settings include:
· Autoplay: When on, the system automatically switches
to the media source when first connected so you can listen
to music that has been indexed. When off, the system
does not automatically switch to the media source.
· Bluetooth Devices: Connect, disconnect, add or delete
a device. Also set a device as your favorite so the system
automatically tries to connect to it at every ignition cycle.
· Gracenote Database Info: View the version level of the
Gracenote Database.
· Gracenote Media Management: When on, this feature
gets metadata information from the Gracenote Database
for your music files. This overrides information from your
device. The feature default is off.
· Cover Art Priority: This feature retrieves cover art for
your music files from either your device or the Gracenote
Database. The feature default is Device.
Displays information about the device, if connected and
available.
Media Device Information
Allows you to choose how you would like the information
to display on-screen.
Text Display
347
MyFord Touch®

To view song information such as Title,
Artist, File, Folder, Album, and Genre, touch
the on-screen album art. You can also
press What's Playing? to hear how the
system pronounces the current band and
song. This can be helpful when using voice
commands to make sure the system
correctly plays your request.
USB and SD Card Voice Commands
E142599
If you are listening to a USB
device or an SD card, press the
voice button on the steering
wheel controls. When prompted, say any
of the following commands.
If you are not listening to a USB device or
an SD card, press the voice button and,
after the tone, say "USB" or "SD card",
then any of the following commands.
"USB" or "SD CARD"
"Play podcast episode <name>"
"Browse"
1
"Play similar music""Next"
"Play song <name>""Pause"
"Play TV show episode <name>"
2
"Play"
"Play video <name>"
2
"Play album <name>"
"Play video podcast episode <name>"
2
"Play all"
"Play video playlist <name>"
2
"Play artist <name>"
"Previous""Play audiobook <name>"
"Repeat all""Play author <name>"
"Repeat off""Play composer <name>"
"Repeat one""Play folder <name>"
"Shuffle""Play genre <name>"
"Shuffle off"
"Play movie <name>"
2
"What's this?""Play playlist <name>"
"Help""Play podcast <name>"
1
If you have said you would like to browse your USB or SD card, the system prompts you
to specify what you would like to browse. When prompted, refer to the following "Browse"
chart.
2
These commands are only available in USB mode and are device-dependent.
348
MyFord Touch®

"BROWSE"
"All video podcasts"
*
"Album <name>"
"All videos"
*
"All albums"
"Artist <name>""All artists"
"Audiobook <name>""All audiobooks"
"Author <name>""All authors"
"Composer <name>""All composers"
"Folder <name>""All folders"
"Genre <name>""All genres"
"Playlist <name>"
"All movies"
*
"Podcast <name>"
"All music videos"
*
"TV show <name>"
*
"All playlists"
"Video <name>"
*
"All podcasts"
"Video playlist <name>"
*
"All songs"
"Video podcast <name>"
*
"All TV shows"
*
"Help"
"All video playlists"
*
*
These commands are only available in USB mode and are device-dependent.
Supported Media Players, Formats
and Metadata Information
SYNC is capable of hosting nearly any
digital media player, including iPod®,
Zune™, "plays from device" players, and
most USB drives. Supported audio formats
include MP3, WMA, WAV and AAC.
It is also able to organize your indexed
media from your playing device by
metadata tags. Metadata tags are
descriptive software identifiers embedded
in the media files which provide
information about the file.
If your indexed media files contain no
information embedded in these metadata
tags, SYNC may classify the empty
metadata tags as Unknown.
349
MyFord Touch®

In order to playback video from your iPod®
or iPhone®, (if compatible), you MUST
have a special combination USB/RCA
composite video cable (available for
purchase from Apple® ). When the cable
is connected to your iPod® or iPhone®,
plug the other end into both the RCA jacks
and the USB port.
Bluetooth Audio
Your system allows you to stream audio
over your vehicle's speakers from your
connected, Bluetooth-enabled mobile
phone.
E142611
To access, press the lower left
corner on the touchscreen, then
select the BT tab.
Bluetooth Audio Voice Commands
Note: If your Bluetooth device supports
streaming metadata, all the commands
below are available. If your device does not,
only "Next song", "Pause", "Play" and
"Previous song" are available.
E142599
If you are listening to a Bluetooth
audio device, press the voice
button on the steering wheel
controls. When prompted, say any of the
commands in the following chart.
If you are not listening to a Bluetooth audio
device, press the voice button and, after
the tone, say “Bluetooth Audio”, then any
of the commands in the following chart.
"BLUETOOTH AUDIO"
"Play genre <name>""Browse composer
<name>"
"Browse album <name>"
"Play playlist <name>""Browse folder <name>""Browse all albums"
"Play podcast episode
<name>"
"Browse genre <name>""Browse all artists"
"Play similar music""Browse playlist <name>""Browse all audiobooks"
"Play song <name>""Browse podcast <name>""Browse all authors"
"Previous""Next""Browse all composers"
"Repeat all""Pause""Browse all folders"
"Repeat off""Play""Browse all genres"
"Repeat one""Play album <name>""Browse all playlists"
"Shuffle""Play artist <name>""Browse all podcasts"
"Shuffle album""Play audiobook <name>""Browse all songs"
"Shuffle off""Play author <name>""Browse artist <name>"
"What’s this?""Play composer <name>""Browse audiobook
<name>"
"Help""Play folder <name>""Browse author <name>"
350
MyFord Touch®

A/V Inputs
Note: For safety reasons, connecting or
adjusting the settings on your portable
music player should not be attempted while
the vehicle is moving. Also, the portable
music player should be stored in a secure
location, such as the center console or the
glove box, when the vehicle is in motion. The
audio extension cable must be long enough
to allow the portable music player to be
safely stored while the vehicle is in motion.
E142622
Your A/V inputs allow you to connect an
auxiliary audio/video source (e.g. game
systems or personal camcorders) by
connecting RCA cords (not included) to
these input jacks. The jacks are yellow, red
and white and are located either in the
center console or behind a small access
door in the instrument panel.
You can also use the A/V inputs as an
auxiliary input jack (AIJ) to play music from
your portable music player over your
vehicle's speakers. Plug in your one-eighth
inch (3.5 millimeter) RCA adapter into the
two left A/V input jacks (red and white).
Press the lower left corner of the
touchscreen, then select the A/V Inputs
tab.
To use the auxiliary input jack feature,
make sure that your portable music player
is designed to be used with headphones
and that it is fully charged. You also need
an audio extension cable with stereo male
one-eighth inch (3.5 millimeter)
connectors at one end and a RCA jack at
the other.
1. Begin with the vehicle parked and the
radio and portable device are turned
off.
2. Attach one end of the audio extension
cable to the headphone output of your
player and the other end into the
adaptor in one of the two left A/V input
jacks (white or red) inside the center
console.
3. Press the lower left corner on the
touchscreen. Select either a tuned
station from the FM tab or the CD tab
(if there is a CD already loaded into the
system.) Adjust the volume to a
comfortable listening level.
4. Turn the portable music player on and
adjust the volume to one-half.
5. Press the lower left corner on the
touchscreen. Select the A/V Input tab.
(You should hear audio from your
portable music player although it may
be low.)
6. Adjust the sound on your portable
music player until it reaches the level
of the FM station or CD by switching
back and forth between the controls.
In order to playback video from your iPod®
or iPhone®, (if compatible), you MUST
have a special combination USB/RCA
composite video cable (available for
purchase from Apple® ). When the cable
is connected to your iPod® or iPhone®,
plug the other end into both the RCA jacks
and the USB port.
351
MyFord Touch®

Note: Do not connect the audio input jack
to a line level output. The AIJ only works
correctly with devices that have a
headphone output with a volume control.
Note: Do not set the portable music
player's volume level higher than is
necessary to match the volume of the CD
or FM radio as this causes distortion and
reduces sound quality.
Note: If the music sounds distorted at lower
listening levels, turn the portable music
player volume down. If the problems
persists, replace or recharge the batteries
in the portable music player.
Note: The portable music player must be
controlled in the same manner when it is
used with headphones as the AIJ does not
provide control (play, pause, etc.) over the
attached portable music player.
PHONE
Hand's-free calling is one of the main
features of SYNC. Once your phone is
paired, you can access many options using
the touchscreen or voice commands. While
the system supports a variety of features,
many are dependent on your mobile
phone's functionality.
At a minimum, most mobile phones with
Bluetooth wireless technology support the
following functions:
• Answering an incoming call
• Ending a call
• Using privacy mode
• Dialing a number
• Redial
• Call waiting notification
• Caller ID
Other features such as text messaging
using Bluetooth and automatic phonebook
download are phone-dependent features.
To check your phone's compatibility, refer
to your phone's user manual and visit
www.SYNCMyRide.com or
www.syncmaroute.ca.
Pairing Your Phone for the First
Time
WARNING
Driving while distracted can result in
loss of vehicle control, accident and
injury. Ford strongly recommends
that drivers use extreme caution when
using any device that may take their focus
off the road. Your primary responsibility is
the safe operation of the vehicle. We
recommend against the use of any
handheld device while driving, encourage
the use of voice-operated systems when
possible and that you become aware of
applicable state and local laws that may
affect use of electronic devices while
driving.
The first thing you must do to use SYNC's
phone features is to pair your
Bluetooth-enabled mobile phone with
SYNC. This allows you to use your phone
in a hands-free manner.
Note: Make sure the vehicle ignition and
radio are turned on and that the
transmission is in position P.
1. Touch Add Phone in the upper left
corner of the touchscreen.
2. When prompted, select Add.
3. Select Add Device.
4. Make sure that Bluetooth is set to On
and that your mobile phone is in the
proper mode. Refer to your phone's
user guide if necessary.
352
MyFord Touch®

5. When prompted on your phone's
display, enter the six-digit PIN provided
by SYNC in the radio display. The
display indicates when the pairing is
successful and asks you if you want to
download your phone book.
Depending on your phone's capability, you
may be prompted with additional options.
For more information on your phone's
capability, refer to your phone's user guide
and visit the website.
Pairing Subsequent Phones
Note: Make sure the vehicle ignition and
radio are turned on and that the
transmission is in position P.
1. Press the phone corner of the
touchscreen, Settings, BT Devices,
then Add Device.
2. Make sure that Bluetooth is set to On
and that your mobile phone is in the
proper mode. Refer to your phone's
user guide if necessary.
3. When prompted on your phone's
display, enter the six-digit PIN provided
by SYNC on the screen. The display
indicates when the pairing is
successful. The system asks you if you
want to download your phone book.
Depending on your phone's capability, you
may be prompted with additional options.
For more information on your phone's
capability, refer to your phone's user guide
and visit the website.
Making Calls
E142599
Press the voice button. When
prompted, say "Call <name>" or
say "Dial", the desired number.
E142632
To end the call or exit phone
mode, press and hold the phone
button.
Receiving Calls
During an incoming call, an audible tone
sounds. Call information appears in the
display if it's available.
Accept the call by pressing
Accept on the touchscreen or
by pressing this phone button on
your steering wheel controls.
E142632
Reject the call by pressing
Reject on the touchscreen or by
pressing and holding this phone
button on your steering wheel controls.
Ignore the call by doing nothing. SYNC logs
it as a missed call.
Phone Menu Options
Press the top left corner on your
touchscreen to select from the following
options:
You CanWhen You Select
Access the on-screen numerical pad to enter a number
and place a call.
Phone
353
MyFord Touch®

You CanWhen You Select
· During an active call, you can also choose to mute the
call, put it on hold, activate privacy (returns the call to your
mobile phone), join two calls or end the call.
Select and call contacts stored in your phone book
contacts and call history folder.
Quick Dial
Access and call any contacts in your previously down-
loaded phone book. The system places the entries in
alphabetical categories summarized at the top of the
screen.
Phone Book
· To turn on contact picture settings (if your device
supports this feature), press Phone, Settings, Manage
Phone Book, Download Photos from Phone Book,
then select On.
· Certain smartphones may support transferring street
addresses when listed with phone book contact informa-
tion. If this feature is supported, you can select and use
these addresses as destinations and also save them as
favorites.
Access any previously dialed, received or missed calls
while your Bluetooth-enabled phone was connected to
SYNC. You can also choose to save these to Favorites or
Quick Dial.
Call History
· This is a phone-dependent feature. If your phone does
not support downloading call history using Bluetooth,
SYNC keeps track of calls made with the SYNC system.
Send text messages using your touchscreen. See the Text
Messaging section for more information.
Messaging
Access various phone settings such as turning your
Bluetooth on and off and managing your phone book. See
the Phone Settings section for more information.
Settings
Text Messaging
Note: Downloading and sending text
messages using Bluetooth are
phone-dependent features.
Note: Certain features in text messaging
are speed-dependent and cannot be
completed when the vehicle is traveling at
speeds over 3 mph (5 km/h).
Note: SYNC does not download read text
messages from your phone.
You can send and receive text messages
using Bluetooth, read them aloud and
translate text messaging acronyms such
as "LOL".
1. Touch the top left corner of the display
to access the Phone menu.
2. Select Messaging.
354
MyFord Touch®

3. Choose from the following:
• Listen
• Dial
• Send Text
• View
• Delete
Composing a Text Message
Note: Downloading and sending text
messages using Bluetooth are
phone-dependent features.
Note: This is a speed-dependent and
cannot be completed when the vehicle is
traveling at speeds over 3 mph (5 km/h).
1. Touch the top left corner of the display
to access the Phone menu.
2. Select Messaging, then Send Text.
3. You can select Edit Text and use the
system keyboard to create a text
message or select from the following
options:
Text Message Options
Call me later
Can you give me a call?
I just left, I'll be there soon
I'll call you back in a few minutes
I'll call you when I get there
I'm ahead of schedule, so I'll be there early
I'm on my way
I'm outside
I'm running a few minutes late
LOL
No
OK
Stuck in traffic
Thanks
Yes
355
MyFord Touch®

Receiving a Text Message
Note: If you select View and your vehicle is
traveling over 3 mph (5 km/h), the system
offers to read the message to you instead
of allowing you to view it while driving.
When a new message arrives, an audible
tone sounds and the screen displays a
pop-up with the caller name and ID, if
supported by your phone. You can press:
• View to view the text message.
• Listen for SYNC to read the message
to you.
• Dial to call the contact.
• Ignore to exit the screen.
Phone Settings
Press Phone, then Settings or Menu,
Settings, then Phone to select from the
following settings:
You CanWhen You Select
Connect, disconnect, add or delete a device, as well as
save it as a favorite.
Bluetooth Devices
Turn Bluetooth on or off.Bluetooth On/Off
Have all calls go directly to your voice mail and not ring in
the vehicle cabin. With this feature turned on, text message
notifications are also suppressed and do not ring inside
the cabin.
Do not disturb
Turn 911 Assist™ on or off. See Information (page 358).911 Assist
Select what ring tone you would like to hear when you
receive a call. Choose from possible system ring tones,
your currently paired phone's ring tone, a beep, text-to-
speech or if you would like the notification to be silent.
Phone ringer
Select how you would like to be notified when you receive
a text message, if supported by your phone. Choose from
possible system alert tones, text-to-speech or silent.
Text message notification
Use this screen to make adjustments to your internet data
connection. Select to make your connection profile with
the PAN (personal area network) or to turn off your
connection. You can also choose to make adjustments to
your settings or have the system always connect, never
connect when roaming or query on connect. Press ? for
more information.
Internet Data Connection
*
356
MyFord Touch®

You CanWhen You Select
Access features such as automatic phonebook download,
re-download your phonebook, add contacts from your
phone as well as delete or upload your phonebook.
Manage Phonebook
Display call history.Display call history
*
If compatible.
Phone Voice Commands
E142599
Press the voice button on the
steering wheel controls. When
prompted, say any of the
following commands:
"PHONE"
"Hold call off"
1
"Bluetooth off"
"Hold on"
1
"Bluetooth on"
"Join calls"
1
"Call"
"Listen to text messages""Call <name>"
"Messages"
2
"Call <name> at home"
"Mute call"
1
"Call <name> at work"
"Pair phone""Call <name> on cell"
"Privacy on"
1
"Call <name> on other"
"Reply to text messages""Call voicemail"
"Turn ringer off""Dial"
"Turn ringer on""Do not disturb off"
"Unmute call""Do not disturb on"
357
MyFord Touch®

"PHONE"
"Help""Forward text messages"
"Go to hands free"
1
1
These commands are only available during an active call.
2
If you say "Messages", see the following "Messages" chart for additional commands.
"MESSAGES"
"Call"
"Forward text messages"
"Listen to text message <#>"
"Listen to text messages"
"Reply to text messages"
"Help"
INFORMATION
Under the Information menu, you can
access features such as SYNC® Services,
SIRIUS® Travel Link™ and SYNC Apps or
view your calendar and system
notifications.
If your vehicle is equipped with the
navigation system, press the Information
button to access these features. If your
vehicle is not equipped with the navigation
system, press the corner of the
touchscreen with the green tab.
SYNC Services (If Equipped, U.S.
Only)
Note: SYNC Services requires activation
prior to use. Visit www.SYNCMyRide.com
to register and check your eligibility for
complimentary services. Standard phone
and message rates may apply. Subscription
may be required. You must also have the
active SYNC Services Bluetooth-enabled
mobile phone paired and connected to the
system in order to connect to, and use,
SYNC Services. See Phone (page 352).
Note: This feature does not function
properly if you have enabled caller ID
blocking on your mobile phone. Make sure
your mobile phone is not blocking caller ID
before using SYNC Services.
358
MyFord Touch®

Note: The driver is ultimately responsible
for the safe operation of the vehicle, and
therefore, must evaluate whether it is safe
to follow the suggested directions. Any
navigation features are provided only as an
aid. Make your driving decisions based on
your observations of local conditions and
existing traffic regulations. Do not follow
the route suggestions if doing so would
result in an unsafe or illegal maneuver, if you
would be placed in an unsafe situation, or
if you would be directed into an area that
you consider unsafe. Maps used by this
system may be inaccurate because of errors,
changes in roads, traffic conditions or driving
conditions.
Note: When you connect, the service uses
GPS technology and advanced vehicle
sensors to collect the vehicle's current
location, travel direction and speed to help
provide you with the directions, traffic
reports, or business searches you request.
Further, to provide the services you request
and for continuous improvement, the service
may collect and record call details and voice
communications. For more information, see
SYNC Services Terms and Conditions at
www.SYNCMyRide.com. If you do not want
Ford or its service providers to collect the
vehicle travel information or other
information identified in the Terms and
Conditions, do not activate or use the
service.
SYNC Services uses advanced vehicle
sensors, integrated GPS technology and
comprehensive map and traffic data, to
give you personalized traffic reports,
precise turn-by-turn directions, business
search, news, sports, weather and more.
For a complete list of services, or to learn
more, please visit www.SYNCMyRide.com.
Connecting to SYNC Services Using
Voice Commands
1. Press the voice button.
2. When prompted, say "Services". This
initiates an outgoing call to SYNC
Services using your paired and
connected Bluetooth-enabled mobile
phone.
3. Once you're connected to the service,
follow the voice prompts to request
the desired service such as traffic or
directions. You can also say "What are
my choices?" to receive a complete list
of available services from which to
choose.
4. Say "Services" to return to the services
main menu or for help, say "Help".
Connecting to SYNC Services Using
the Touchscreen
If your vehicle is equipped with the
navigation system, press the Information
button.
If your vehicle is not equipped with the
navigation system, press the green tab on
your touchscreen.
1. Select Connect to Services to initiate
an outgoing call to SYNC Services
using your phone.
2. Once connected, follow the voice
prompts to request your desired service
such as traffic or directions. You can
also say "What are my choices?" to
receive a complete list of available
services from which to choose.
3. Say "Services" to return to the services
main menu or for help, say "Help".
Receiving Turn-by-Turn Directions
1. When connected to SYNC Services,
say "Directions" or "Business search".
To find the closest business or type of
business to your current location just
say "Business search", then "Search
near me". If you need further assistance
in finding a location you can say
"Operator" at any time within a
Directions or Business search to speak
359
MyFord Touch®

with a live operator. You may also be
prompted to speak with an operator.
The live operator can assist you by
searching for businesses by name or
by category, residential addresses by
street address or by name or specific
street intersections. Operator Assist is
a feature of your SYNC Services
subscription. For more information on
Operator Assist visit
www.SYNCMyRide.com/support.
2. Follow the voice prompts to select your
destination. After the route download
is complete, the phone call is
automatically ended.
If your vehicle is not equipped with the
navigation feature:
• Turn-by-turn directions appear in the
infotainment display, in the status bar
of your touchscreen system and also
on the SYNC Services screen. You also
receive driving instructions from
audible prompts.
• When on an active route, you can
select Route Summary or Route
Status using the touchscreen controls
or voice commands to view the Route
Summary Turn List or the Route
Status ETA. You can also turn voice
guidance on or off, cancel the route or
update the route.
If you miss a turn, SYNC automatically asks
if you want the route updated. When
prompted, say "yes" and a new route is
delivered to your vehicle.
If your vehicle is equipped with the
navigation feature, SYNC Services
downloads your requested destination to
the navigation system. The navigation
system then calculates the route and
provides driving instructions. See
Navigation (page 371).
Disconnecting from SYNC Services
1. Press and hold the hang-up phone
button on the steering wheel.
2. Say "Good-bye" from the SYNC
Services main menu.
360
MyFord Touch®

Traffic, Directions and Information options
You can personalize your services feature to provide
quicker access to your most used or favorite information.
You can save address points such as, work or home. You
can also save favorite information like sports teams, such
as Detroit Lions, or a news category. To learn more, log
onto www.SYNCMyRide.com.
Personalizing
Press the voice button at any time (while you are
connected to SYNC TDI Services) to interrupt a voice
prompt or an audio clip (such as a sports report) and say
your voice command.
Push to interrupt
Your subscription is associated with your Bluetooth-
enabled mobile phone number, not your VIN (Vehicle
Identification Number). You can pair and connect your
phone to any vehicle equipped with Traffic, Directions and
Information and continue enjoying your personalized
services.
Portable
SYNC Services Voice Commands
E142599
When a route has been
downloaded (non-navigation
systems), press the voice button
on the steering wheel controls. When
prompted, say any of the following
commands:
"SERVICES"
"Cancel route"
"Navigation voice off"
"Navigation voice on"
"Next turn"
"Route status"
"Route summary"
"Services"
"Update route"
"Help"
361
MyFord Touch®

SIRIUS Travel Link (If Equipped)
WARNING
Driving while distracted can result in
loss of vehicle control, accident and
injury. Ford strongly recommends
that drivers use extreme caution when
using any device or feature that may take
their focus off the road. Your primary
responsibility is the safe operation of the
vehicle. We recommend against the use
of any handheld device while driving,
encourage the use of voice-operated
systems when possible and that you
become aware of applicable state and
local laws that may affect use of electronic
devices while driving.
Note: In order to use SIRIUS Travel Link,
your vehicle must be equipped with
navigation and your navigation SD card
must be in the SD card slot.
Note: A paid subscription is required to
access and use these features. Go to
www.siriusxm.com/travellink for more
information.
Note: Visit www.siriusxm.com/traffic# and
click on Coverage map and details for a
complete listing of all traffic areas covered
by SIRIUS Travel Link.
Note: Neither SIRIUS nor Ford is responsible
for any errors or inaccuracies in the SIRIUS
Travel Link services or its use in vehicles.
SIRIUS Travel Link (if activated) can help
you locate the best gas prices, find movie
listings, get current traffic alerts, access
the current weather map, get accurate ski
conditions and scores to current sports
games.
Press the Information button, select Sirius
Travel Link, then choose from any of the
following services:
You CanWhen You Select
Identify traffic incidents on your route, nearby your vehicle's
current location or near any of your favorite places (if
programmed).
Traffic On Route
Traffic Nearby
View fuel prices at stations close to your vehicle's location
or on an active navigation route.
Fuel Prices
View the nearby weather, current weather, or the 5-day
forecast for the chosen area. Select Map to see the
weather map which can show storms, radar information,
charts and winds. Select Area to select from a listing of
weather locations.
Weather
View scores and schedules from a variety of sports. You
can also save up to 10 favorite teams for easier access.
The score automatically refreshes when a game is in
progress.
Sports Info.
View nearby movie theaters and their show times (if
available).
Movie Listings
View ski conditions for a specific area.Ski Conditions
362
MyFord Touch®

SIRIUS Travel Link Voice Commands
E142599
Press the voice button on the
steering wheel controls. When
prompted, say any of the
following commands:
"SIRIUS TRAVEL LINK"
"5-day weather forecast"
"Fuel prices"
"Movie listings"
"Sports headlines"
"Sports schedules"
"Sports scores"
"Traffic"
"Weather"
"Weather map"
"Help"
*
If you say "Sports headlines", "Sports schedules" or "Sports scores", you can then say
any of the commands in the following chart.
Sports-related Commands
*
"Baseball"
"College basketball"
"College football"
"Golf"
"MLS"
"My teams"
"NBA"
"NFL"
"NHL"
363
MyFord Touch®

Sports-related Commands
*
"WNBA"
"Help"
*
If you want to hear headlines, schedules or scores from a particular sport, or your
favorite team(s), say the sport (or team), then "headlines", "schedules" or "scores".
Additional Sports-related Voice Commands
"NBA scores""MLS headlines""Baseball headlines"
"NFL headlines""MLS schedule""Baseball schedule"
"NFL schedule""MLS scores""Baseball scores"
"NFL scores""Motor sports headlines""College basketball
schedule"
"NHL headlines""Motor sports order""College basketball scores"
"NHL schedule""Motor sports schedule""College football headlines"
"NHL scores""My team headlines""College football schedule"
"WNBA headlines""My teams schedule""College football scores"
"WNBA schedule""My teams scores""Golf headlines"
"WNBA scores""NBA headlines""Golf leaderboard"
"Help""NBA schedule""Golf schedule"
Notifications
Press the information button, then select
Notifications.
You can select a message and choose to:
• View the complete message
• Delete the message
• Delete All messages
This screen displays any system messages
(i.e. SD card fault).
Note: The system alerts you to any
messages by turning the information icon
yellow. When the messages are read or
deleted, the icon returns to white.
Calendar
Press the information button, then select
Calendar.
364
MyFord Touch®

911 Assist® (If Equipped)
WARNINGS
Unless the 911 Assist setting is set on
prior to a crash, the system will not
dial for help which could delay
response time, potentially increasing the
risk of serious injury or death after a crash.
Do not wait for 911 Assist to make an
emergency call if you can do it
yourself. Dial emergency services
immediately to avoid delayed response
time which could increase the risk of
serious injury or death after a crash. If you
do not hear 911 Assist within five seconds
of the crash, the system or phone may be
damaged or non-functional.
Always place your phone in a secure
location in the vehicle so it does not
become a projectile or get damaged
in a collision. Failure to do so may cause
serious injury to someone or damage the
phone which could prevent 911 Assist from
working properly.
Note: The SYNC 911 Assist feature must be
set on prior to the incident.
Note: Before setting this feature on, ensure
that you read the 911 Assist privacy notice
later in this section for important
information.
Note: If 911 Assist is turned on or off by any
user, that setting applies for all paired
phones. If 911 Assist is turned off, either a
voice message plays or a display
message/icon comes on (or both) when the
vehicle is started after a previously paired
phone connects.
Note: Every phone operates differently.
While SYNC 911 Assist works with most
mobile phones, some may have trouble
using this feature.
If a crash deploys an airbag or activates
the fuel pump shut-off, your
SYNC-equipped vehicle may be able to
contact emergency services by dialing 911
through a paired and connected
Bluetooth-enabled phone. For more
information about 911 Assist, visit
www.SYNCMyRide.com or
www.syncmaroute.ca.
See Supplementary Restraints System
(page 35). Important information
regarding airbag deployment is in this
chapter.
See Roadside Emergencies (page 197).
Important information regarding the fuel
pump shut-off is in this chapter.
Setting 911 Assist On
Press the Information button, Apps, 911
Assist, then On.
You can also access 911 Assist by:
• Pressing the Menu icon, Settings,
Phone, then 911 Assist
• Pressing the Menu icon, Help, 911 Assist
To make sure that 911 Assist works
properly:
• SYNC must be powered and working
properly at the time of the incident and
throughout feature activation and use.
• The 911 Assist feature must be set on
prior to the incident.
• A Bluetooth-enabled and compatible
phone has to be paired and connected
to SYNC.
• A connected Bluetooth-enabled phone
must have the ability to make and
maintain an outgoing call at the time
of the incident.
365
MyFord Touch®

• A connected Bluetooth-enabled phone
must have adequate network coverage,
battery power and signal strength.
• The vehicle must have battery power
and be located in the U.S., Canada or
in a territory in which 911 is the
emergency number.
In the Event of a Crash
Not all crashes deploy an airbag or activate
the fuel pump shut-off (which would
activate 911 Assist); however, if 911 Assist
is triggered, SYNC tries to contact
emergency services. If a connected phone
is damaged or loses connection to SYNC,
SYNC searches for, and tries to connect
to, any available previously paired phone
and tries to make the call to 911.
Before making the call:
• SYNC provides a short window of time
(about 10 seconds) to cancel the call.
Failure to cancel the call results in
SYNC attempting to dial 911.
• SYNC says the following, or a similar
message: "SYNC will attempt to call
911, to cancel the call, press Cancel on
your screen or press and hold the
phone button on your steering wheel."
If the call is not cancelled and a successful
call is made, a pre-recorded message is
played for the 911 operator, then the
occupant(s) in the vehicle is able to talk
with the operator. Be prepared to provide
your name, phone number and location
immediately, because not all 911 systems
are capable of receiving this information
electronically.
911 Assist May Not Work If
• Your mobile phone or 911 Assist
hardware was damaged in a crash.
• The vehicle's battery or the SYNC
system has no power.
• The phone(s) paired and connected to
the system was thrown from the
vehicle.
911 Assist Privacy Notice
Once 911 Assist is set on, it may disclose to
emergency services that the vehicle has
been in a crash involving the deployment
of an airbag or activation of the fuel pump
shut-off. Certain versions or updates to 911
Assist may also be capable of
electronically or verbally disclosing to 911
operators the vehicle location or other
details about the vehicle or crash to assist
911 operators to provide the most
appropriate emergency services. If you do
not want to disclose this information, do
not turn the feature on.
Vehicle Health Report (If Equipped)
WARNING
Always follow scheduled
maintenance instructions, regularly
inspect your vehicle, and seek repair
for any damage or problem you suspect.
Vehicle Health Report supplements, but
cannot replace, normal maintenance and
vehicle inspection. Vehicle Health Report
only monitors certain systems that are
electronically monitored by the vehicle and
will not monitor or report the status of any
other system, (i.e., brake lining wear).
Failure to perform scheduled maintenance
and regularly inspect your vehicle may
result in vehicle damage and serious injury.
Note: This feature is only available in the
United States.
366
MyFord Touch®

Note: Your Vehicle Health Report feature
requires activation prior to use. Visit
www.SYNCMyRide.com to register. There
is no fee or subscription associated with
Vehicle Health Report, but you must register
to use this feature
Note: This feature may not function
properly if you have enabled caller ID
blocking on your mobile phone. Before
running a report, review the Vehicle Health
Report Privacy Notice.
Note: In order to allow a break-in period for
your vehicle, you may not be able to create
a Vehicle Health Report until your vehicle
odometer has reached 200 miles.
Note: Mobile phone and SMS charges may
apply when making a report.
Register for Vehicle Health Report and set
your report preferences at
www.SYNCMyRide.com. After registering
you can request a Vehicle Health Report
(inside your vehicle). Return to your
account at www.SYNCMyRide.com to view
your report. You can also choose for SYNC
to automatically remind you to run reports
at specific mileage intervals. Mobile phone
airtime usage may apply when reporting.
The system allows you to check your
vehicle's overall health in the form of
diagnostic report card. The Vehicle Health
Report contains valuable information such
as:
• Vehicle diagnostic information
• Scheduled maintenance
• Open recalls and Field Service Actions
• Unserviced items from vehicle
inspections by your authorized dealer
Making a Report
To run a report by touchscreen, touch the
Information button, Apps, then Vehicle
Health Report.
E142599
To run a report by voice
command, press the voice
button on the steering wheel
and, when prompted, say "Vehicle health
report".
Vehicle Health Report Privacy Notice
When you run a Vehicle Health Report,
Ford Motor Company may collect your
mobile phone number (to process your
report request) and diagnostic information
about your vehicle. Certain versions or
updates to Vehicle Health Report may also
collect additional vehicle information. Ford
may use the vehicle information it collects
for any purpose. If you do not want to
disclose your mobile phone number or
vehicle information, do not run the feature
or set up your Vehicle Health Report profile
at www.SYNCMyRide.com. Refer to
www.SYNCMyRide.com (Vehicle Health
Report Terms and Conditions, and Privacy
Statement) for more information.
CLIMATE
E142612
Press the lower right corner on
the touchscreen to access your
climate control features.
Depending on your vehicle line and option
package, your climate screen may look
different than what is shown here.
367
MyFord Touch®

E146988
Power: Touch to turn the system on and off. Outside air cannot enter the vehicle
when the system is off.
A
Passenger settings: Touch + or – to adjust the temperature.B
Fan speed: Touch + or - to adjust fan speed.C
DUAL: Touch to turn on the passenger side temperature control.D
Recirculated air: ouch to turn the recirculated air on or off which may reduce
the amount of time needed to cool down the interior and help reduce odors
from reaching the interior. Recirculated air also engages automatically when
MAX A/C or MAX defrost is selected and may be engaged manually in any
airflow mode except defrost. It may also turn off in all airflow modes except
MAX A/C and MAX defrost to reduce fog potential.
E
MAX A/C: Touch to cool the vehicle with recirculated air. Touch again for
normal A/C operation. MAX A/C distributes air through instrument panel vents
and may help reduce odors from entering the vehicle. MAX A/C is more
economical and efficient than normal A/C mode.
F
A/C: Touch to turn the air conditioning on or off. Use A/C with recirculated air
to improve cooling performance and efficiency. A/C engages automatically in
MAX A/C, defrost and footwell/defrost.
G
AUTO: Touch to engage automatic operation, then set the temperature using
the temperature control. The system automatically controls fan speed, airflow
distribution, A/C on or off and the use of fresh or recirculated air.
H
368
MyFord Touch®

Manual airflow distribution controls:Footwell/Defrost: Distributes air
through the windshield defroster vents, demister vents, footwell vents and rear
seat floor vents, and provides outside air to reduce window fogging. Panel:
Distributes air through the instrument panel vents. Panel/Floor: Distributes
air through the instrument panel vents, demister vents, floor vents and rear seat
floor vents. Floor: Distributes air through the demister vents, floor vents and
I
rear seat floor vents. Defrost: Touch to clear the windshield of fog and thin ice.
Touch again to return to the previous airflow selection. When on, defrost provides
outside air to reduce window fogging and distributes air through the windshield
defroster vents and demister vents. MAX Defrost: Distributes outside air
through the windshield air vents. Air conditioning is automatically selected. The
fan is set to the highest speed and the temperature to HI. When the air
distribution is set in this position, you are unable to select recirculated air or
manually adjust the fan speed and temperature control.
Driver settings: Touch + or – adjust the temperature.J
Climate Control Voice Commands
E142599
Press the voice button on the
steering wheel controls. When
prompted, say any of the
following commands:
Climate Control Commands
"Climate automatic"
"Climate my temperature"
"Climate off"
"Climate on"
"Climate temperature <15.5-29.5> degrees"
"Climate temperature <60-85> degrees"
"Help"
There are additional climate control
commands but in order to access them,
you have to say "Climate" first. When the
system is ready to listen, you may say any
of the following commands:
369
MyFord Touch®

"CLIMATE"
"Panel on""A/C off"
"Rear defrost on""A/C on"
"Rear defrost off""Automatic"
"Recirc off""Defrost off"
"Recirc on""Defrost on"
"Temperature"
*
"Dual off"
"Temperature <15.5-29.5> degrees""Floor on"
"Temperature <60-85> degrees""Fan decrease"
"Temperature decrease""Fan increase"
"Temperature high""MAX A/C off"
"Temperature increase""MAX A/C on"
"Temperature low""My temp"
"Windshield floor on""Off"
"Help""On"
"Panel floor on"
*
If you say "Temperature", you can then say any of the commands in the following chart.
"TEMPERATURE"
"<15.5-29.5> degrees"
"<60-85> degrees"
"High"
"Low"
"Help"
370
MyFord Touch®

NAVIGATION
Note: The navigation SD card must be in
the SD card slot to operate the navigation
system. If you need a replacement SD card,
see your authorized dealer.
Note: The SD card slot is spring-loaded. To
remove the SD card, just push the card in
and release it. Do not attempt to pull the
card out to remove it; this could cause
damage.
Your navigation system is comprised of
two main features, destination mode and
map mode.
To set a destination, press the green corner
of your touchscreen, then the Dest button
when it appears. Refer to Setting a
destination later in this chapter.
To view the navigation map and the
vehicle's current location, touch the green
bar in the upper right hand corner of the
touchscreen, or, press Dest, then Map. refer
to Map mode later in this chapter.
Setting a Destination
Press the green corner of your touchscreen,
then the Dest button when it appears.
Choose any of the following:
Destination
Street AddressMy Home
IntersectionFavorites
City CenterPrevious Destinations
MapPoint of Interest (POI)
Previous Starting PointEmergency
Latitude/LongitudeFreeway Entrance/Exit
1. Enter the necessary information into
the highlighted text fields (in any
order). For address destination entry,
the Go! button appears once all the
necessary information has been
entered. Pressing the Go! button makes
the address location to appear on the
map. If you choose Previous
Destination, the last 20 destinations
you have selected appear.
2. Select Set as Dest to make this your
destination. You can also choose to set
this as a waypoint (have the system
route to this point on the way to your
current destination) or save it as a
favorite. Any Avoid Areas selections are
also considered in route calculation.
3. Choose from up to three different types
of routes, then select Start Route.
• Fastest: Uses the fastest moving roads
possible.
• Shortest: Uses the shortest distance
possible.
• Eco (EcoRoute): Uses the most fuel
efficient route.
371
MyFord Touch®

You can cancel the route or have the
system demo the route for you. Select
Route Prefs to set route preferences like
avoiding freeways, toll roads, ferries and
car trains as well as to use or not use HOV
lanes. (HOV lanes are High Occupancy
Vehicle Lanes also known as carpool or
diamond lanes. These lanes are reserved
for people who ride in buses, vanpools or
carpools.)
Note: If Start Route button is not pressed
and the vehicle is driven on a recognized
road, the system defaults to the fastest
route option and begins guidance.
During route guidance, the "talking bubble"
icon that appears in the upper right
navigation corner (green bar) can be
pressed if the user wants the system to
repeat a route guidance instruction.
Instructions decrease with each press.
Point of Interest (POI) Categories
Your system offers a variety if POI (Points
of Interest) categories.
Main Categories
AutomotiveFood/Drink & Dining
ShoppingTravel & Transportation
Entertainment & ArtsFinancial
Recreation & SportsEmergency
GovernmentCommunity
Domestic ServicesHealth & Medicine
Subcategories
Restaurant
Golf
Parking
Home & Garden
Personal Care Services
Auto Dealership
Govt Office
Public Transit
Education
372
MyFord Touch®

To expand these listings, press the + in
front of the POI listing.
The system also allows you to sort the
POIs alphabetically, by distance or by
cityseekr listings (if available).
cityseekr
Note: cityseekr point of interest (POI)
information is limited to approximately 154
cities (132 in the U.S., 13 in Canada and 9 in
Mexico).
E142634
cityseekr, when available, is a service which
provides additional information about
certain POIs such as restaurants, hotels
and attractions.
When you have selected a POI, the
location and information appear, such as
address and phone number. If the POI is
listed with cityseekr, you also see
information such as a brief description,
check-in and check-out times, when the
restaurant is open, etc.
Press More Information for a longer review,
a list of services and facilities, the average
room or meal price as well as the website.
This screen displays the POI icon such as:
E143884
Hotel
E142636
Coffeehouse
E142637
Food & Drink
E142638
Nightlife
E142639
Attraction
E142640
This icon appears when your
selection exists in multiple
categories within the system.
When you are viewing additional
information for hotels, cityseekr will also
tell you if the hotel has certain services and
facilities using icons.
For restaurants, cityseekr can provide
information such as star rating, average
cost, review, handicap access, hours of
operation, and website address.
For hotels, cityseekr can provide
information such as star rating, price
category, review, check in/out times, hotel
service icons and website address.
Setting Your Navigation
Preferences
Select settings for the system to take into
account when planning your route.
E142607
Press the icon at the bottom of
the Home screen, then select
Settings, then Navigation.
373
MyFord Touch®

You CanWhen You Select
· Turn breadcrumbs on and off.Map Preferences
· Choose how you want to view the turn list (top-to-bottom
or bottom-to-top).
· Set the automatic parking POI notification. (When parking
POI notification is on, parking POI icons display on the map
when you get close to your destination. This may not be
very useful in dense areas, and may clutter the map if other
POIs are also set for display.)
· Avoid freeways, toll roads, ferries and car trains when
planning your route.
Route Preferences
· Use HOV lanes (if available), and have the system always
select the shortest distance, fastest time or most
economical route.
· Choose prompts to be either voice or tone only.Navigation Preferences
· Have the system automatically fill in the state and
province based on the information already entered into
the system.
Choose how you want the system to handle traffic prob-
lems along your route.
Traffic Preferences
· Automatic: Have the system reroute you to avoid traffic
incidents that develop and impact the current route (no
notification is provided).
· Manual: Have the system always provide a traffic alert
notification for traffic incidents along the planned route.
You have a choice to accept or ignore the notification
before the route deviation is made.
Choose areas which you want the system to avoid when
calculating a route for you. Press Add to select a category.
Avoid Areas
Once you make a selection, the system tries to avoid the
area(s) if possible for all routes. To delete a selection,
choose the listing on the screen; when the screen changes
to Avoid Areas Edit, press Delete at the bottom right of
the screen.
Map Mode
Press the green bar in the upper right area
of the touchscreen to view map mode. Map
mode shows advanced viewing comprised
of both 2D city maps as well as 3D
landmarks (when available).
2D city maps show detailed outlines of
buildings, visible land use and land
elements and detailed railway
infrastructure for the most essential cities
around the globe. These maps also contain
features such as town blocks, building
footprints, and railways.
374
MyFord Touch®

3D landmarks appear as clear, visible
objects which are typically recognizable
and have a certain tourist value. The 3D
landmarks appear in 3D map mode only.
E142641
Change the appearance of the map display
by repeatedly pressing the arrow button in
the upper left corner of the screen. It
toggles between three different map
modes: Heading up, North up, and 3D.
E142642
Heading up (2D map) always
shows the direction of forward
travel to be upward on the screen.
This view is available for map
scales up to 2.5 mi (4 km). For larger map
scales, this setting is remembered, but the
map is shown in North up only. If the scale
returns below this level, then Heading up
is restored.
E142643
North up (2D map) always shows
the northern direction to be
upward on the screen.
E142644
3D map mode provides an
elevated perspective of the map.
This viewing angle can be adjusted
and the map can be rotated 180
degrees by dragging your finger along the
shaded bar with arrows at the bottom of
the map.
E146188
Re-centering the map can be
done by pressing this icon
whenever you scroll the map
away from your vehicle's current location.
Map Icons
E142646
Vehicle mark shows current
location of the vehicle. It stays in
the center of the map display,
except when in scroll mode.
E142647
Scroll cursor allows you to scroll
the map; the icon is fixed in the
center of the screen. The map
position closest to the cursor is in
a window on the top center part of the
screen.
E142648
Address book entry default
icon(s) indicate the location on
the map of an address book entry.
This is the default symbol shown
after the entry has been stored to the
Address Book by any method other than
the map. A different icon can be selected
from the 22 icons available; each icon can
be used more than once.
E142649
Home indicates the location on
the map currently stored as the
home position. Only one entry from
the Address Book can be saved as
Home. This icon cannot be changed.
E142650
POI (Point Of Interest) icons
can be displayed on the map and
can be turned on or off. There are
about 56 subcategories of POIs
that can be selected to be displayed on
the map one at a time.
E142651
Starting point indicates the
starting point of a planned route.
E142652
Waypoint indicates the location
of a waypoint on the map. The
number inside the circle is different
for each waypoint and represents
the position of the waypoint in the route
list.
375
MyFord Touch®

E142653
Destination symbol indicates the
ending point of a planned route.
E142654
Next maneuver point indicates
the location of the next turn on the
planned route.
E142655
No GPS symbol indicates that
insufficient GPS satellite signals
are available for accurate map
positioning. This icon may be
intermittently displayed under normal
operation in an area with poor GPS access.
Quick-touch Buttons
When in map mode, touch anywhere on
the map display to access the following
options:
You CanWhen You Select
Select a scrolled location on the map as your destination.
(You may scroll the map by pressing your index finger on
the map display. When you reach the desired location,
simply let go and then press Set as Dest.)
Set as Dest
Set the current location as a waypoint.Set as Waypoint
Save the current location to your favorites.Save to Favorites
Select POI icons to be displayed on the map. Up to three
icons can be selected for display on the map at the same
time.
POI Icons On/Off
Cancel the active route.Cancel Route
Access these features when a route is active:View/Edit Route
· View route
· Edit destination/waypoints
· Edit turn list
· Detour
· Edit route preferences
· Edit traffic preferences
· Cancel route
376
MyFord Touch®

E142656
Rotate the map view by swiping your finger
across the shaded bar with the arrows.
Navteq is the digital map provider for the
navigation application. If you find map data
errors, you may report them directly to
Navteq by going to
http://mapreporter.navteq.com. Navteq
evaluates all reported map errors and
responds with the result of their
investigation by e-mail.
Navigation Map Updates
Annual navigation map updates are
available for purchase through your
dealership, by calling 1-800-NAVMAPS (in
Mexico, call 01-800-557-5539) or going
to www.navigation.com/ford. You need to
specify the make and model of your vehicle
to determine if there is an update available.
Navigation Voice Commands
E142599
When in navigation mode, press
the voice button on the steering
wheel controls. After the tone,
say any of the following commands:
Navigation System Voice Commands
"Navigation"
3
"Cancel next waypoint"
1
"Repeat instruction"
"Cancel route"
1
"Show 3D"
"Destination"
2
"Show heading up""Destination <nametag>"
"Show map""Destination <POI category>"
"Show north up""Destination favorites"
"Show route"
1
"Destination home"
"Show turn list"
1
"Destination intersection"
"Voice off""Destination nearest <POI category>"
"Voice on""Destination nearest POI"
"Voice volume decrease""Destination play nametags"
"Voice volume increase""Destination POI"
377
MyFord Touch®

Navigation System Voice Commands
"Where am I?""Destination POI category"
"Zoom in""Destination previous destination"
"Zoom out""Destination street address"
"Help""Detour"
1
These commands are only available when a navigation route is active.
2
If you say "Destination", you can then say any command in the following "Destination"
chart.
3
If you say "Navigation", you can then say any command in the following "Navigation"
chart.
"DESTINATION"
"<nametag>"
"<POI category>"
"Favorites"
"Home"
"Intersection"
"Nearest <POI category>"
"Nearest POI"
"Play nametags"
"POI category"
"Previous destination"
"Street address"
"Help"
378
MyFord Touch®

"NAVIGATION"
"Destination"
*
"Zoom city"
"Zoom country"
"Zoom minimum"
"Zoom maximum"
"Zoom province"
"Zoom state"
"Zoom street"
"Zoom to <distance>"
"Help"
*
If you say "Destination", you can then say any command in the "Destination" chart.
If your vehicle is equipped with the SD card
navigation feature, you have the ability to
enter in a street address using a feature
called One-Shot Destination Street
Address. When you say either "Navigation
destination street address" or "Destination
street address", the system asks you to say
the full address. The system displays an
example on-screen. You can then speak
the address naturally, such as "One two
three four Main Street, Anytown".
379
MyFord Touch®

END USER LICENSE
AGREEMENT
SYNC® End User License
Agreement (EULA)
• You have acquired a device ("DEVICE")
that includes software licensed by
FORD MOTOR COMPANY from an
affiliate of Microsoft Corporation
("MS") . Those installed software
products of MS origin, as well as
associated media, printed materials,
and "online" or electronic
documentation ("MS SOFTWARE")
are protected by international
intellectual property laws and treaties.
The MS SOFTWARE is licensed, not
sold. All rights reserved.T
• The MS SOFTWARE may interface with
and/or communicate with, or may be
later upgraded to interface with and/or
communicate with additional software
and/or systems provided by FORD
MOTOR COMPANY. The additional
software and systems of FORD
MOTOR COMPANY origin, as well as
associated media, printed materials,
and "online" or electronic
documentation ("FORD SOFTWARE")
are protected by international
intellectual property laws and treaties.
The FORD SOFTWARE is licensed, not
sold. All rights reserved.
• The MS SOFTWARE and/or FORD
SOFTWARE may interface with and/or
communicate with, or may be later
upgraded to interface with and/or
communicate with additional software
and/or systems provided by third party
software and service suppliers. The
additional software and services of
third party origin, as well as associated
media, printed materials, and "online"
or electronic documentation ("THIRD
PARTY SOFTWARE") are protected by
international intellectual property laws
and treaties. The THIRD PARTY
SOFTWARE is licensed, not sold. All
rights reserved.
• The MS SOFTWARE, FORD
SOFTWARE and THIRD PARTY
SOFTWARE hereinafter collectively
and individually will be referred to as
"SOFTWARE".
IF YOU DO NOT AGREE TO THIS END
USER LICENSE AGREEMENT ("EULA")
DO NOT USE THE DEVICE OR COPY
THE SOFTWARE. ANY USE OF THE
SOFTWARE, INCLUDING BUT NOT
LIMITED TO USE ON THE DEVICE, WILL
CONSTITUTE YOUR AGREEMENT TO
THIS EULA (OR RATIFICATION OF ANY
PREVIOUS CONSENT).
GRANT OF SOFTWARE LICENSE: This
EULA grants you the following license:
• You may use the SOFTWARE as
installed on the DEVICE and as
otherwise interfacing with systems
and/or services provide by or through
FORD MOTOR COMPANY or its third
party software and service providers.
380
Appendices

Description of Other Rights and
Limitations
• Speech Recognition: If the
SOFTWARE includes speech
recognition component(s), you should
understand that speech recognition is
an inherently statistical process and
that recognition errors are inherent in
the process. Neither FORD MOTOR
COMPANY nor its suppliers shall be
liable for any damages arising out of
errors in the speech recognition
process.
• Limitations on Reverse Engineering,
Decompilation and Disassembly:
You may not reverse engineer,
decompile, or disassemble nor permit
others to reverse engineer, decompile
or disassemble the SOFTWARE, except
and only to the extent that such activity
is expressly permitted by applicable
law notwithstanding this limitation.
• Limitations on Distributing,
Copying, Modifying and Creating
Derivative Works: You may not
distribute, copy, make modifications
to or create derivative works based on
the SOFTWARE, except and only to the
extent that such activity is expressly
permitted by applicable law
notwithstanding this limitation.
• Single EULA: The end user
documentation for the DEVICE and
related systems and services may
contain multiple EULAs, such as
multiple translations and/or multiple
media versions (e.g., in the user
documentation and in the software).
Even if you receive multiple EULAs, you
are licensed to use only one (1) copy of
the SOFTWARE.
• SOFTWARE Transfer: You may
permanently transfer your rights under
this EULA only as part of a sale or
transfer of the DEVICE, provided you
retain no copies, you transfer all of the
SOFTWARE (including all component
parts, the media and printed materials,
any upgrades, and, if applicable, the
Certificate(s) of Authenticity), and the
recipient agrees to the terms of this
EULA. If the SOFTWARE is an upgrade,
any transfer must include all prior
versions of the SOFTWARE.
• Termination: Without prejudice to any
other rights, FORD MOTOR COMPANY
or MS may terminate this EULA if you
fail to comply with the terms and
conditions of this EULA.
• Security Updates/Digital Rights
Management: Content owners use
the WMDRM technology included in
your DEVICE to protect their
intellectual property, included
copyrighted content. Portions of the
SOFTWARE on your DEVICE use
WMDRM software to access
WMDRM-protected content. If the
WMDRM software fails to protect the
content, content owners may ask
Microsoft to revoke the SOFTWARE's
ability to use WMDRM to play or copy
protected content. This action does
not affect unprotected content. When
your DEVICE downloads licenses for
protected content, you agree that
Microsoft may include a revocation list
with the licenses. Content owners may
require you to upgrade the SOFTWARE
on your DEVICE to access their content.
If you decline an upgrade, you will not
be able to access content that requires
the upgrade.
381
Appendices

• Consent to Use of Data: You agree
that MS, Microsoft Corporation, FORD
MOTOR COMPANY, third party
software and systems suppliers, their
affiliates and/or their designated agent
may collect and use technical
information gathered in any manner as
part of product support services related
to the SOFTWARE or related services.
MS, Microsoft Corporation, FORD
MOTOR COMPANY, third party
software and services suppliers, their
affiliates and/or their designated agent
may use this information solely to
improve their products or to provide
customized services or technologies to
you. MS, Microsoft Corporation, FORD
MOTOR COMPANY, third party
software and systems suppliers, their
affiliates and/or their designated agent
may disclose this information to others,
but not in a form that personally
identifies you.
• Internet-Based Services
Components: The SOFTWARE may
contain components that enable and
facilitate the use of certain
Internet-based services. You
acknowledge and agree that MS,
Microsoft Corporation, FORD MOTOR
COMPANY, third party software and
service suppliers, their affiliates and/or
their designated agent may
automatically check the version of the
SOFTWARE and/or its components
that you are utilizing and may provide
upgrades or supplements to the
SOFTWARE that may be automatically
downloaded to your DEVICE.
• Additional Software/Services: The
SOFTWARE may permit FORD MOTOR
COMPANY, third party software and
service suppliers, MS, Microsoft
Corporation, their affiliates and/or their
designated agent to provide or make
available to you SOFTWARE updates,
supplements, add-on components, or
Internet-based services components
of the SOFTWARE after the date you
obtain your initial copy of the
SOFTWARE ("Supplemental
Components").
If FORD MOTOR COMPANY or third party
software and services suppliers provide or
make available to you Supplemental
Components and no other EULA terms are
provided along with the Supplemental
Components, then the terms of this EULA
shall apply.
If MS, Microsoft Corporation, their affiliates
and/or their designated agent make
available Supplemental Components, and
no other EULA terms are provided, then
the terms of this EULA shall apply, except
that the MS, Microsoft Corporation or
affiliate entity providing the Supplemental
Component(s) shall be the licensor of the
Supplemental Component(s).
FORD MOTOR COMPANY, MS, Microsoft
Corporation, their affiliates and/or their
designated agent reserve the right to
discontinue without liability any
Internet-based services provided to you or
made available to you through the use of
the SOFTWARE.
382
Appendices

• Links to Third Party Sites: The MS
SOFTWARE may provide you with the
ability to link to third party sites through
the use of the SOFTWARE. The third
party sites are not under the control of
MS, Microsoft Corporation, their
affiliates and/or their designated
agent. Neither MS nor Microsoft
Corporation nor their affiliates nor their
designated agent are responsible for
(i) the contents of any third party sites,
any links contained in third party sites,
or any changes or updates to third
party sites, or (ii) webcasting or any
other form of transmission received
from any third party sites. If the
SOFTWARE provides links to third
party sites, those links are provided to
you only as a convenience, and the
inclusion of any link does not imply an
endorsement of the third party site by
MS, Microsoft Corporation, their
affiliates and/or their designated
agent.
• Obligation to Drive Responsibly:
You recognize your obligation to drive
responsibly and keep attention on the
road. You will read and abide with the
DEVICE operating instructions
particularly as they pertain to safety
and assumes any risk associated with
the use of the DEVICE.
UPGRADES AND RECOVERY MEDIA:
If the SOFTWARE is provided by FORD
MOTOR COMPANY separate from the
DEVICE on media such as a ROM chip, CD
ROM disk(s) or via web download or other
means, and is labeled "For Upgrade
Purposes Only" or "For Recovery Purposes
Only" you may install one (1) copy of such
SOFTWARE onto the DEVICE as a
replacement copy for the existing
SOFTWARE, and use it in accordance with
this EULA, including any additional EULA
terms accompanying the upgrade
SOFTWARE.
INTELLECTUAL PROPERTY RIGHTS:
All title and intellectual property rights in
and to the SOFTWARE (including but not
limited to any images, photographs,
animations, video, audio, music, text and
"applets" incorporated into the
SOFTWARE), the accompanying printed
materials, and any copies of the
SOFTWARE, are owned by MS, Microsoft
Corporation, FORD MOTOR COMPANY, or
their affiliates or suppliers. The
SOFTWARE is licensed, not sold. You may
not copy the printed materials
accompanying the SOFTWARE. All title
and intellectual property rights in and to
the content which may be accessed
through use of the SOFTWARE is the
property of the respective content owner
and may be protected by applicable
copyright or other intellectual property
laws and treaties. This EULA grants you no
rights to use such content. All rights not
specifically granted under this EULA are
reserved by MS, Microsoft Corporation,
FORD MOTOR COMPANY, third party
software and service providers, their
affiliates and suppliers. Use of any on-line
services which may be accessed through
the SOFTWARE may be governed by the
respective terms of use relating to such
services. If this SOFTWARE contains
documentation that is provided only in
electronic form, you may print one copy of
such electronic documentation.
EXPORT RESTRICTIONS: You
acknowledge that the SOFTWARE is
subject to U.S. and European Union export
jurisdiction. You agree to comply with all
applicable international and national laws
that apply to the SOFTWARE, including
the U.S. Export Administration Regulations,
as well as end-user, end-use and
destination restrictions issued by U.S. and
other governments. For additional
information, see
http://www.microsoft.com/exporting/.
383
Appendices

TRADEMARKS: This EULA does not grant
you any rights in connection with any
trademarks or service marks of FORD
MOTOR COMPANY, MS, Microsoft
Corporation, third party software or service
providers, their affiliates or suppliers.
PRODUCT SUPPORT: Product support
for the SOFTWARE is not provided by MS,
its parent corporation Microsoft
Corporation, or their affiliates or
subsidiaries. For product support, please
refer to FORD MOTOR COMPANY
instructions provided in the documentation
for the DEVICE. Should you have any
questions concerning this EULA, or if you
desire to contact FORD MOTOR
COMPANY for any other reason, please
refer to the address provided in the
documentation for the DEVICE.
No Liability for Certain Damages:
EXCEPT AS PROHIBITED BY LAW, FORD
MOTOR COMPANY, ANY THRID PARTY
SOFTWARE OR SERVICES SUPPLIERS,
MS, MICROSOFT CORPORATION AND
THEIR AFFILIATES SHALL HAVE NO
LIABILITY FOR ANY INDIRECT, SPECIAL,
CONSEQUENTIAL OR INCIDENTAL
DAMAGES ARISING FROM OR IN
CONNECTION WITH THE USE OR
PERFORMANCE OF THE SOFTWARE. THIS
LIMITATION SHALL APPLY EVEN IF ANY
REMEDY FAILS OF ITS ESSENTIAL
PURPOSE. IN NO EVENT SHALL MS,
MICROSOFT CORPORATION AND/OR
THEIR AFFILIATES BE LIABLE FOR ANY
AMOUNT IN EXCESS OF U.S. TWO
HUNDRED FIFTY DOLLARS (U.S.
$250.00).
• THERE ARE NO WARRANTIES OTHER
THAN THOSE THAT MAY EXPRESSLY
BE PROVIDED FOR YOUR NEW
VEHICLE.
End User Notice
Microsoft® Windows® Mobile for
Automotive Important Safety
Information
This system Ford SYNC™ contains
software that is licensed to Manufacturer
FORD MOTOR COMPANY by an affiliate
of Microsoft Corporation pursuant to a
license agreement. Any removal,
reproduction, reverse engineering or other
unauthorized use of the software from this
system in violation of the license
agreement is strictly prohibited and may
subject you to legal action.
Read and follow instructions: Before
using your Windows Automotive- based
system, read and follow all instructions
and safety information provided in this end
user manual ("User's Guide"). Not
following precautions found in this User's
Guide can lead to an accident or other
serious consequences.
Keep User's Guide in vehicle: When kept
in the vehicle, the User's Guide will be a
ready reference for you and other users
unfamiliar with the Windows
Automotive-based system. Please make
certain that before using the system for
the first time, all persons have access to
the User's Guide and read its instructions
and safety information carefully.
384
Appendices

WARNING
Operating certain parts of this
system while driving can distract
your attention away from the road,
and possibly cause an accident or other
serious consequences. Do not change
system settings or enter data non-verbally
(using your hands) while driving. Stop the
vehicle in a safe and legal manner before
attempting these operations. This is
important since while setting up or
changing some functions you might be
required to distract your attention away
from the road and remove your hands from
the wheel.
General Operation
Voice Command Control: Functions
within the Windows Automotive-based
system may be accomplished using only
voice commands. Using voice commands
while driving allows you to operate the
system without removing your hands from
the wheel.
Prolonged Views of Screen: Do not
access any function requiring a prolonged
view of the screen while you are driving.
Pull over in a safe and legal manner before
attempting to access a function of the
system requiring prolonged attention. Even
occasional short scans to the screen may
be hazardous if your attention has been
diverted away from your driving task at a
critical time.
Volume Setting: Do not raise the volume
excessively. Keep the volume at a level
where you can still hear outside traffic and
emergency signals while driving. Driving
while unable to hear these sounds could
cause an accident.
Use of Speech Recognition Functions:
Speech recognition software is inherently
a statistical process which is subject to
errors. It is your responsibility to monitor
any speech recognition functions included
in the system and address any errors.
Navigation Features: Any navigation
features included in the system are
intended to provide turn by turn
instructions to get you to a desired
destination. Please make certain all
persons using this system carefully read
and follow instructions and safety
information fully.
Distraction Hazard: Any navigation
features may require manual (non-verbal)
setup. Attempting to perform such set-up
or insert data while driving can seriously
distract your attention and could cause an
accident or other serious consequences.
Stop the vehicle in a safe and legal manner
before attempting these operations.
Let Your Judgment Prevail: Any
navigation features are provided only as
an aid. Make your driving decisions based
on your observations of local conditions
and existing traffic regulations. Any such
feature is not a substitute for your personal
judgment. Any route suggestions made by
this system should never replace any local
traffic regulations or your personal
judgment or knowledge of safe driving
practices.
Route Safety: Do not follow the route
suggestions if doing so would result in an
unsafe or illegal maneuver, if you would be
placed in an unsafe situation, or if you
would be directed into an area that you
consider unsafe. The driver is ultimately
responsible for the safe operation of the
vehicle and therefore, must evaluate
whether it is safe to follow the suggested
directions.
385
Appendices

Potential Map Inaccuracy: Maps used
by this system may be inaccurate because
of changes in roads, traffic controls or
driving conditions. Always use good
judgment and common sense when
following the suggested routes.
Emergency Services: Do not rely on any
navigation features included in the system
to route you to emergency services. Ask
local authorities or an emergency services
operator for these locations. Not all
emergency services such as police, fire
stations, hospitals and clinics are likely to
be contained in the map database for such
navigation features.
TeleNav Software End User License
Agreement
Please read these terms and conditions
carefully before you use the TeleNav
Software. Your use of the TeleNav
Software indicates that you accept these
terms and conditions. If you do not accept
these terms and conditions, do not break
the seal of the package, launch, or
otherwise use the TeleNav Software.
TeleNav may revise this Agreement and
the privacy policy at any time, with or
without notice to you. You agree to visit
http://www.telenav.com from time to time
to review the then current version of this
Agreement and of the privacy policy.
1. Safe and Lawful Use
You acknowledge that devoting attention
to the TeleNav Software may pose a risk
of injury or death to you and others in
situations that otherwise require your
undivided attention, and you therefore
agree to comply with the following when
using the TeleNav Software: (a) observe
all traffic laws and otherwise drive safely;
(b) use your own personal judgment while
driving. If you feel that a route suggested
by the TeleNav Software instructs you to
perform an unsafe or illegal maneuver,
places you in an unsafe situation, or directs
you into an area that you consider to be
unsafe, do not follow such instructions; (c)
do not input destinations, or otherwise
manipulate the TeleNav Software, unless
your vehicle is stationary and parked; (d)
do not use the TeleNav Software for any
illegal, unauthorized, unintended, unsafe,
hazardous, or unlawful purposes, or in any
manner inconsistent with this Agreement;
(e) arrange all GPS and wireless devices
and cables necessary for use of the
TeleNav Software in a secure manner in
your vehicle so that they will not interfere
with your driving and will not prevent the
operation of any safety device (such as an
airbag).
You agree to indemnify and hold TeleNav
harmless against all claims resulting from
any dangerous or otherwise inappropriate
use of the TeleNav Software in any moving
vehicle, including as a result of your failure
to comply with the directions above.
2. Account Information
You agree: (a) when registering the
TeleNav Software, to provide TeleNav with
true, accurate, current, and complete
information about yourself, and (b) to
inform TeleNav promptly of any changes
to such information, and to keep it true,
accurate, current and complete.
386
Appendices

3. Software License
Subject to your compliance with the terms
of this Agreement, TeleNav hereby grants
to you a personal, non-exclusive,
non-transferable license (except as
expressly permitted below in connection
with your permanent transfer of the
TeleNav Software license), without the
right to sublicense, to use the TeleNav
Software (in object code form only) in
order to access and use the TeleNav
Software. This license shall terminate upon
any termination or expiration of this
Agreement. You agree that you will use the
TeleNav Software only for your personal
business or leisure purposes, and not to
provide commercial navigation services to
other parties.
3.1 License Limitations
You agree not to do any of the following:
(a) reverse engineer, decompile,
disassemble, translate, modify, alter or
otherwise change the TeleNav Software
or any part thereof; (b) attempt to derive
the source code, audio library or structure
of the TeleNav Software without the prior
express written consent of TeleNav; (c)
remove from the TeleNav Software, or
alter, any of TeleNav's or its suppliers'
trademarks, trade names, logos, patent or
copyright notices, or other notices or
markings; (d) distribute, sublicense or
otherwise transfer the TeleNav Software
to others, except as part of your permanent
transfer of the TeleNav Software; or (e)
use the TeleNav Software in any manner
that (i) infringes the intellectual property
or proprietary rights, rights of publicity or
privacy or other rights of any party, (ii)
violates any law, statute, ordinance or
regulation, including but not limited to laws
and regulations related to spamming,
privacy, consumer and child protection,
obscenity or defamation, or (iii) is harmful,
threatening, abusive, harassing, tortuous,
defamatory, vulgar, obscene, libelous, or
otherwise objectionable; and (f) lease, rent
out, or otherwise permit unauthorized
access by third parties to the TeleNav
Software without advanced written
permission of TeleNav.
387
Appendices

4. Disclaimers
To the fullest extent permissible pursuant
to applicable law, in no event will TeleNav,
its licensors and suppliers, or agents or
employees of any of the foregoing, be
liable for any decision made or action
taken by you or anyone else in reliance on
the information provided by the TeleNav
Software. TeleNav also does not warrant
the accuracy of the map or other data used
for the TeleNav Software. Such data may
not always reflect reality due to, among
other things, road closures, construction,
weather, new roads and other changing
conditions. You are responsible for the
entire risk arising out of your use of the
TeleNav Software. For example but
without limitation, you agree not to rely on
the TeleNav Software for critical
navigation in areas where the well-being
or survival of you or others is dependent
on the accuracy of navigation, as the maps
or functionality of the TeleNav Software
are not intended to support such high risk
applications, especially in more remote
geographical areas.
TELENAV EXPRESSLY DISCLAIMS AND
EXCLUDES ALL WARRANTIES IN
CONNECTION WITH THE TELENAV
SOFTWARE, WHETHER STATUTORY,
EXPRESS OR IMPLIED, INCLUDING ALL
WARRANTIES WHICH MAY ARISE FROM
COURSE OF DEALING, CUSTOM OR
TRADE AND INCLUDING, BUT NOT
LIMITED TO, THE IMPLIED WARRANTIES
OF MERCHANTABILITY, FITNESS FOR A
PARTICULAR PURPOSE AND
NON-INFRINGEMENT OF THIRD PARTY
RIGHTS WITH RESPECT TO THE TELENAV
SOFTWARE. Certain jurisdictions do not
permit the disclaimer of certain warranties,
so this limitation may not apply to you.
5. Limitation of Liability
TO THE EXTENT PERMITTED UNDER
APPLICABLE LAW, UNDER NO
CIRCUMSTANCES SHALL TELENAV OR
ITS LICENSORS AND SUPPLIERS BE
LIABLE TO YOU OR TO ANY THIRD PARTY
FOR ANY INDIRECT, INCIDENTAL,
CONSEQUENTIAL, SPECIAL OR
EXEMPLARY DAMAGES (INCLUDING IN
EACH CASE, BUT NOT LIMITED TO,
DAMAGES FOR THE INABILITY TO USE
THE EQUIPMENT OR ACCESS DATA,
LOSS OF DATA, LOSS OF BUSINESS,
LOSS OF PROFITS, BUSINESS
INTERRUPTION OR THE LIKE) ARISING
OUT OF THE USE OF OR INABILITY TO
USE THE TELENAV SOFTWARE, EVEN IF
TELENAV HAS BEEN ADVISED OF THE
POSSIBILITY OF SUCH DAMAGES.
NOTWITHSTANDING ANY DAMAGES
THAT YOU MIGHT INCUR FOR ANY
REASON WHATSOEVER (INCLUDING,
WITHOUT LIMITATION, ALL DAMAGES
REFERENCED HEREIN AND ALL DIRECT
OR 09/22/09 - 10 of 19 - Confidential
GENERAL DAMAGES IN CONTRACT, TORT
(INCLUDING NEGLIGENCE) OR
OTHERWISE), THE ENTIRE LIABILITY OF
TELENAV AND OF ALL OF TELENAV'S
SUPPLIERS SHALL BE LIMITED TO THE
AMOUNT ACTUALLY PAID BY YOU FOR
THE TELENAV SOFTWARE. SOME
STATES AND/OR JURISDICTIONS DO NOT
ALLOW THE EXCLUSION OR LIMITATION
OF INCIDENTAL OR CONSEQUENTIAL
DAMAGES, SO THE ABOVE LIMITATIONS
OR EXCLUSIONS MAY NOT APPLY TO
YOU.
388
Appendices

6. Arbitration and Governing Law
You agree that any dispute, claim or
controversy arising out of or relating to this
Agreement or the TeleNav Software shall
be settled by independent arbitration
involving a neutral arbitrator and
administered by the American Arbitration
Association in the County of Santa Clara,
California. The arbitrator shall apply the
Commercial Arbitration Rules of the
American Arbitration Association, and the
judgment upon the award rendered by the
arbitrator may be entered by any court
having jurisdiction. Note that there is no
judge or jury in an arbitration proceeding
and the decision of the arbitrator shall be
binding upon both parties. You expressly
agree to waive your right to a jury trial.
This Agreement and performance
hereunder will be governed by and
construed in accordance with the laws of
the State of California, without giving
effect to its conflict of laws provisions. To
the extent judicial action is necessary in
connection with the binding arbitration,
both TeleNav and you agree to submit to
the exclusive jurisdiction of the courts of
the County of Santa Clara, California. The
United Nations Convention on Contracts
for the International Sale of Goods shall
not apply.
7. Assignment
You may not resell, assign, or transfer this
Agreement or any of your rights or
obligations, except in totality, in connection
with your permanent transfer of the
TeleNav Software, and expressly
conditioned upon the new user of the
TeleNav Software agreeing to be bound
by the terms and conditions of this
Agreement. Any such sale, assignment or
transfer that is not expressly permitted
under this paragraph will result in
immediate termination of this Agreement,
without liability to TeleNav, in which case
you and all other parties shall immediately
cease all use of the TeleNav Software.
Notwithstanding the foregoing, TeleNav
may assign this Agreement to any other
party at any time without notice, provided
the assignee remains bound by this
Agreement.
8. Miscellaneous
8.1
This Agreement constitutes the entire
agreement between TeleNav and you with
respect to the subject matter hereof.
8.2
Except for the limited licenses expressly
granted in this Agreement, TeleNav retains
all right, title and interest in and to the
TeleNav Software, including without
limitation all related intellectual property
rights. No licenses or other rights which are
not expressly granted in this Agreement
are intended to, or shall be, granted or
conferred by implication, statute,
inducement, estoppel or otherwise, and
TeleNav and its suppliers and licensors
hereby reserve all of their respective rights
other than the licenses explicitly granted
in this Agreement
389
Appendices

8.3
By using the TeleNav Software, you
consent to receive from TeleNav all
communications, including notices,
agreements, legally required disclosures
or other information in connection with the
TeleNav Software (collectively, "Notices")
electronically. TeleNav may provide such
Notices by posting them on TeleNav's
Website or by downloading such Notices
to your wireless device. If you desire to
withdraw your consent to receive Notices
electronically, you must discontinue your
use of the TeleNav Software.
8.4
TeleNav's or your failure to require
performance of any provision shall not
affect that party's right to require
performance at any time thereafter, nor
shall a waiver of any breach or default of
this Agreement constitute a waiver of any
subsequent breach or default or a waiver
of the provision itself.
8.5
If any provision herein is held
unenforceable, then such provision will be
modified to reflect the intention of the
parties, and the remaining provisions of
this Agreement will remain in full force and
effect
8.6
The headings in this Agreement are for
convenience of reference only, will not be
deemed to be a part of this Agreement,
and will not be referred to in connection
with the construction or interpretation of
this Agreement. As used in this Agreement,
the words "include" and "including" and
variations thereof, will not be deemed to
be terms of limitation, but rather will be
deemed to be followed by the words
"without limitation".
9. Other Vendors Terms and Conditions
The TeleNav Software utilizes map and
other data licensed to TeleNav by third
party vendors for the benefit of you and
other end users. This Agreement includes
end-user terms applicable to these
companies (included at the end of this
Agreement), and thus your use of the
TeleNav Software is also subject to such
terms. You agree to comply with the
following additional terms and conditions,
which are applicable to TeleNav's third
party vendor licensors:
NavTeq End User License Agreement
END USER TERMS
The content provided ("Data") is licensed,
not sold. By opening this package, or
installing, copying, or otherwise using the
Data, you agree to be bound by the terms
of this agreement. If you do not agree to
the terms of this agreement, you are not
permitted to install, copy, use, resell or
transfer the Data. If you wish to reject the
terms of this agreement, and have not
installed, copied, or used the Data, you
must contact your retailer or NAVTEQ
North America, LLC ("NT") within thirty
(30) days of purchase for a refund of your
purchase price. To contact NT, please visit
www.navteq.com.
The Data is provided for your personal,
internal use only and may not be resold. It
is protected by copyright, and is subject to
the following terms (this "End User License
Agreement") and conditions which are
agreed to by you, on the one hand, and
NAVTEQ North America, LLC ("NT") and
its licensors (including their licensors and
suppliers) on the other hand.
The Data for areas of Canada includes
information taken with permission from
Canadian authorities, including: © Her
Majesty the Queen in Right of Canada, ©
Queen's Printer for Ontario, © Canada Post
Corporation, GeoBase®.
390
Appendices

NT holds a nonexclusive license from the
United States Postal Service ® to publish
and sell ZIP+4 ® information.
© United States Postal Service ® 2009.
Prices are not established, controlled or
approved by the United States Postal
Service ® The following trademarks and
registrations are owned by the USPS:
United States Postal Service, USPS, and
ZIP+4.
The Data for Mexico includes certain Data
from Instituto Nacional de Estadística y
Geografía.
TERMS AND CONDITIONS
License Limitations on Use: You agree
that your license to use this Data is limited
to and conditioned on use for solely
personal, noncommercial purposes, and
not for service bureau, timesharing or other
similar purposes. Except as otherwise set
forth herein, you agree not to otherwise
reproduce, copy, modify, decompile,
disassemble or reverse engineer any
portion of this Data, and may not transfer
or distribute it in any form, for any purpose,
except to the extent permitted by
mandatory laws.
License Limitations on Transfer: Your
limited license does not allow transfer or
resale of the Data, except on the condition
that you may transfer the Data and all
accompanying materials on a permanent
basis if: (a) you retain no copies of the
Data; (b) the recipient agrees to the terms
of this End User License Agreement; and
(c) you transfer the Data in the exact same
form as you purchased it by physically
transferring the original media (e.g., the
CD-ROM or DVD you purchased), all
original packaging, all Manuals and other
documentation. Specifically, Multi-disc
sets may only be transferred or sold as a
complete set as provided to you and not
as a subset thereof.
Additional License Limitations: Except
where you have been specifically licensed
to do so by NT in a separate written
agreement, and without limiting the
preceding paragraph, your license is
conditioned on use of the Data as
prescribed in this agreement, and you may
not (a) use this Data with any products,
systems, or applications installed or
otherwise connected to or in
communication with vehicles capable of
vehicle navigation, positioning, dispatch,
real time route guidance, fleet
management or similar applications; or (b)
with, or in communication with, including
without limitation, cellular phones,
palmtop and handheld computers, pagers,
and personal digital assistants or PDAs.
WARNING
This Data may contain inaccurate or
incomplete information due to the
passage of time, changing
circumstances, sources used and the
nature of collecting comprehensive
geographic Data, any of which may lead
to incorrect results.
No Warranty: This Data is provided to you
"as is" , and you agree to use it at your own
risk. NT and its licensors (and their
licensors and suppliers) make no
guarantees, representations or warranties
of any kind, express or implied, arising by
law or otherwise, including but not limited
to, content, quality, accuracy,
completeness, effectiveness, reliability,
fitness for a particular purpose, usefulness,
use or results to be obtained from this
Data, or that the Data or server will be
uninterrupted or error free.
391
Appendices

Disclaimer of Warranty: NT AND ITS
LICENSORS (INCLUDING THEIR
LICENSORS AND SUPPLIERS) DISCLAIM
ANY WARRANTIES, EXPRESS OR IMPLIED,
OF QUALITY, PERFORMANCE,
MERCHANTABILITY, FITNESS FOR A
PARTICULAR PURPOSE OR
NON-INFRINGEMENT. Some States,
Territories and Countries do not allow
certain warranty exclusions, so to that
extent the above exclusion may not apply
to you.
Disclaimer of Liability: NT AND ITS
LICENSORS (INCLUDING THEIR
LICENSORS AND SUPPLIERS) SHALL NOT
BE LIABLE TO YOU IN RESPECT OF ANY
CLAIM, DEMAND OR ACTION,
IRRESPECTIVE OF THE NATURE OF THE
CAUSE OF THE CLAIM, DEMAND OR
ACTION ALLEGING ANY LOSS, INJURY OR
DAMAGES, DIRECT OR INDIRECT, WHICH
MAY RESULT FROM THE USE OR
POSSESSION OF THIS DATA; OR FOR ANY
LOSS OF PROFIT, REVENUE, CONTRACTS
OR SAVINGS, OR ANY OTHER DIRECT,
INDIRECT, INCIDENTAL, SPECIAL OR
CONSEQUENTIAL DAMAGES ARISING
OUT OF YOUR USE OF OR INABILITY TO
USE THIS DATA, ANY DEFECT IN THIS
DATA, OR THE BREACH OF THESE TERMS
OR CONDITIONS, WHETHER IN AN
ACTION IN CONTRACT OR TORT OR
BASED ON A WARRANTY, EVEN IF NT OR
ITS LICENSORS HAVE BEEN ADVISED OF
THE POSSIBILITY OF SUCH DAMAGES.
Some States, Territories and Countries do
not allow certain liability exclusions or
damages limitations, so to that extent the
above may not apply to you.
Export Control: You agree not to export
from anywhere any part of the Data or any
direct product thereof except in
compliance with, and with all licenses and
approvals required under, applicable
export laws, rules and regulations,
including but not limited to the laws, rules
and regulations administered by the Office
of Foreign Assets Control of the U.S.
Department of Commerce and the Bureau
of Industry and Security of the U.S.
Department of Commerce. To the extent
that any such export laws, rules or
regulations prohibit NT from complying
with any of its obligations hereunder to
deliver or distribute Data, such failure shall
be excused and shall not constitute a
breach of this Agreement.
Entire Agreement: These terms and
conditions constitute the entire agreement
between NT (and its licensors, including
their licensors and suppliers) and you
pertaining to the subject matter hereof,
and supersedes in their entirety any and
all written or oral agreements previously
existing between us with respect to such
subject matter.
Severability: You and NT agree that if any
portion of this agreement is found illegal
or unenforceable, that portion shall be
severed and the remainder of the
Agreement shall be given full force and
effect.
Governing Law: The above terms and
conditions shall be governed by the laws
of the State of Illinois, without giving effect
to (i) its conflict of laws provisions, or (ii)
the United Nations Convention for
Contracts for the International Sale of
Goods, which is explicitly excluded. You
agree to submit to the personal jurisdiction
of the State of Illinois for any and all
disputes, claims and actions arising from
or in connection with the Data provided to
you hereunder.
392
Appendices

Government End Users: If the Data is
being acquired by or on behalf of the
United States government or any other
entity seeking or applying rights similar to
those customarily claimed by the United
States government, this Data is a
"commercial term" as that term is defined
at 48 C.F.R. ("FAR") 2.101, is licensed in
accordance with this End User License
Agreement, and each copy of Data
delivered or otherwise furnished shall be
marked and embedded as appropriate
with the following "Notice of Use", and be
treated in accordance with such Notice:
NOTICE OF USE
CONTRACTOR
(MANUFACTURER/SUPPLIER)
NAME:
NAVTEQ
CONTRACTOR
(MANUFACTURER/SUPPLIER)
ADDRESS:
425 West Randolph Street, Chicago, IL
60606.
This Data is a commercial item as defined
in FAR 2.101
and is subject to the End User License
Agreement under
which this Data was provided.
© 2011 NAVTEQ. All rights reserved.
If the Contracting Officer, federal
government agency, or any federal official
refuses to use the legend provided herein,
the Contracting Officer, federal
government agency, or any federal official
must notify NAVTEQ prior to seeking
additional or alternative rights in the Data.
Wi-Fi hotspot data provided by JiWire, ©
2013 JiWire.
Gracenote® Copyright
CD and music-related data from
Gracenote, Inc., copyright© 2000-2007
Gracenote. Gracenote Software, copyright
© 2000-2007 Gracenote. This product and
service may practice one or more of the
following U.S. Patents #5,987,525,
#6,061,680, #6,154,773, #6,161,132,
#6,230,192, #6,230,207, #6.240,459,
#6,330,593 and other patents issued or
pending. Some services supplied under
license from Open Globe, Inc. for U.S.
Patent: #6,304,523.
Gracenote and CDDB are registered
trademarks of Gracenote. The Gracenote
logo and logotype, and the "Powered by
Gracenote™" logo are trademarks of
Gracenote.
Gracenote® End User License Agreement
(EULA)
This device contains software from
Gracenote, Inc. of 2000 Powell Street
Emeryville, California 94608
("Gracenote").
The software from Gracenote (the
"Gracenote Software") enables this device
to do disc and music file identification and
obtain music-related information, including
name, artist, track, and title information
("Gracenote Data") from online servers
("Gracenote Servers"), and to perform
other functions. You may use Gracenote
Data only by means of the intended End
User functions of this device.
This device may contain content belonging
to Gracenote's providers. If so, all of the
restrictions set forth herein with respect to
Gracenote Data shall also apply to such
content and such content providers shall
be entitled to all of the benefits and
protections set forth herein that are
available to Gracenote.
393
Appendices

You agree that you will use the content
from Gracenote ("Gracenote Content") ,
Gracenote Data, the Gracenote Software,
and Gracenote Servers for your own
personal, non-commercial use only. You
agree not to assign, copy, transfer or
transmit the Gracenote Content,
Gracenote Software or any Gracenote
Data (except in a Tag associated with a
music file) to any third party. YOU AGREE
NOT TO USE OR EXPLOIT GRACENOTE
CONTENT, GRACENOTE DATA, THE
GRACENOTE SOFTWARE, OR
GRACENOTE SERVERS, EXCEPT AS
EXPRESSLY PERMITTED HEREIN.
You agree that your non-exclusive licenses
to use the Gracenote Content, Gracenote
Data, the Gracenote Software, and
Gracenote Servers will terminate if you
violate these restrictions. If your licenses
terminate, you agree to cease any and all
use of the Gracenote Content, Gracenote
Data, the Gracenote Software, and
Gracenote Servers. Gracenote,
respectively, reserve all rights in Gracenote
Data, the Gracenote Software, and the
Gracenote Servers and Gracenote Content,
including all ownership rights. Under no
circumstances will either Gracenote
become liable for any payment to you for
any information that you provide, including
any copyrighted material or music file
information. You agree that Gracenote
may enforce its respective rights,
collectively or separately, under this
agreement against you, directly in each
company's own name.
Gracenote uses a unique identifier to track
queries for statistical purposes. The
purpose of a randomly assigned numeric
identifier is to allow Gracenote to count
queries without knowing anything about
who you are. For more information, see the
web page at www.gracenote.com for the
Gracenote Privacy Policy.
THE GRACENOTE SOFTWARE, EACH ITEM
OF GRACENOTE DATA AND THE
GRACENOTE CONTENT ARE LICENSED
TO YOU "AS IS". NEITHER GRACENOTE
MAKES ANY REPRESENTATIONS OR
WARRANTIES, EXPRESS OR IMPLIED,
REGARDING THE ACCURACY OF ANY
GRACENOTE DATA FROM THE
GRACENOTE SERVERS OR GRACENOTE
CONTENT. GRACENOTE COLLECTIVELY
AND SEPARATELY RESERVE THE RIGHT
TO DELETE DATA AND/OR CONTENT
FROM THE COMPANIES' RESPECTIVE
SERVERS OR, IN THE CASE OF
GRACENOTE, CHANGE DATA
CATEGORIES FOR ANY CAUSE THAT
GRACENOTE DEEMS SUFFICIENT. NO
WARRANTY IS MADE THAT EITHER
GRACENOTE CONTENT OR THE
GRACENOTE SOFTWARE OR
GRACENOTE SERVERS ARE ERROR-FREE
OR THAT THE FUNCTIONING OF THE
GRACENOTE SOFTWARE OR
GRACENOTE SERVERS WILL BE
UNINTERRUPTED. GRACENOTE IS NOT
OBLIGATED TO PROVIDE YOU WITH ANY
ENHANCED OR ADDITIONAL DATA TYPES
THAT GRACENOTE MAY CHOOSE TO
PROVIDE IN THE FUTURE AND IS FREE
TO DISCONTINUE ITS ONLINE SERVICES
AT ANY TIME. GRACENOTE DISCLAIM ALL
WARRANTIES EXPRESS OR IMPLIED,
INCLUDING, BUT NOT LIMITED TO,
IMPLIED WARRANTIES OF
MERCHANTABILITY, FITNESS FOR A
PARTICULAR PURPOSE, TITLE, AND
NON-INFRINGEMENT. NEITHER
GRACENOTE WARRANTS THE RESULTS
THAT WILL BE OBTAINED BY YOUR USE
OF THE GRACENOTE SOFTWARE OR ANY
GRACENOTE SERVER. IN NO CASE WILL
GRACENOTE BE LIABLE FOR ANY
CONSEQUENTIAL OR INCIDENTAL
DAMAGES OR FOR ANY LOST PROFITS
OR LOST REVENUES FOR ANY REASON
WHATSOEVER.
© Gracenote 2007.
394
Appendices

FCC ID: KMHSYNCG2
IC: 1422A-SYNCG2
This device complies with Part 15 of the
FCC Rules and with RSS-210 of Industry
Canada. Operation is subject to the
following two conditions: (1) This device
may not cause harmful interference, and
(2) this device must accept any
interference received, including
interference that may cause undesired
operation.
WARNING
Changes or modifications not
expressively approved by the party
responsible for compliance could
void the user's authority to operate the
equipment. The term "IC" before the radio
certification number only signifies that
Industry Canada technical specifications
were met.
The antenna used for this transmitter must
not be co-located or operating in
conjunction with any other antenna or
transmitter.
395
Appendices

General Maintenance Information
Why Maintain Your Vehicle?
Carefully following the maintenance
schedule helps protect against major repair
expenses resulting from neglect or
inadequate maintenance and may also
help to increase the value of your vehicle
when you sell or trade it. Keep all receipts
for completed maintenance with your
vehicle.
Regular maintenance intervals for your
vehicle have been established based upon
rigorous testing. It is important that you
have your vehicle serviced at the proper
times. These intervals serve two purposes;
one is to maintain the reliability of your
vehicle and the second is keep your cost
of owning the vehicle down.
It is your responsibility to see that all
scheduled maintenance is performed and
that the materials used meet the
specifications identified in this Owner's
Manual. See Capacities and
Specifications (page 267).
Failure to perform scheduled maintenance
invalidates warranty coverage on parts
affected by the lack of maintenance.
Why Maintain Your Vehicle at Your
Dealership?
Factory-Trained Technicians
Service technicians participate in extensive
factory-sponsored certification training to
help them become experts on the
operation of your vehicle. Ask your
dealership about the training and
certification their technicians, have
received.
Your vehicle is very sophisticated and built
with multiple complex performance
systems. Every manufacturer develops
these systems using different
specifications and performance features.
That is why it is important to rely upon your
dealership to properly diagnose and repair
your vehicle.
Genuine Ford and Motorcraft®
Replacement Parts
Dealerships stock Ford, Motorcraft and
Ford-authorized branded remanufactured
replacement parts. These parts meet or
exceed our specifications. Parts installed
at your dealership carry a nationwide 12
month or 12000 mile (20000 kilometer)
parts and labor limited warranty.
If you do not use Ford authorized parts they
may not meet our specifications and
depending on the part it could affect
emissions compliance.
Convenience
Many dealerships have extended evening
and Saturday hours to make your service
visit more convenient and they offer one
stop shopping. They can perform any
services that are required on your vehicle,
from general maintenance to collision
repairs.
Note: Not all dealers have extended hours
or body shops. Please contact your dealer
for details.
Protecting Your Investment
Maintenance is an investment that pays
dividends in the form of improved
reliability, durability and resale value. To
ensure the proper performance of your
vehicle and its emission control systems,
it is imperative that scheduled
maintenance be completed at the
designated intervals.
396
Scheduled Maintenance

Your vehicle is equipped with the
Intelligent Oil Life Monitor® system which
displays a message in the message center
at the proper oil change service interval.
This interval may be up to one year or
10000 miles (16000 kilometers).
When ENGINE OIL CHANGE DUE or OIL
CHANGE REQUIRED appears in the
message center display, it is time for an oil
change. The oil change must be done
within two weeks or 500 miles (800
kilometers) of the ENGINE OIL CHANGE
DUE or OIL CHANGE REQUIRED message
appearing. The Intelligent Oil Life Monitor®
must be reset after each oil change. See
Engine Oil Check (page 221).
If your message center is prematurely reset
or becomes inoperative, you should
perform the oil change interval at six
months or 5000 miles (8000 km) from
your last oil change. Never exceed one year
or 10000 miles (16000 kilometers)
between oil change intervals.
Your vehicle is very sophisticated and built
with multiple complex performance
systems. Every manufacturer develops
these systems using different
specifications and performance features.
That is why it is important to rely upon your
dealership to properly diagnose and repair
your vehicle.
We recommend maintenance intervals for
various parts and component systems
based upon engineering testing. We rely
upon this testing to determine the most
appropriate mileage for replacement of
oils and fluids to protect your vehicle at
the lowest overall cost to you and
recommend against maintenance
schedules that deviate from the scheduled
maintenance information.
We strongly recommend the using only
genuine Ford, Motorcraft or
Ford-authorized re-manufactured
replacement for parts because they are
engineered for your vehicle.
Additives and Chemicals
Recommended additives and chemicals
are listed in this Owner's Manual and in the
Workshop Manual. Additional chemicals
or additives not approved by Ford Motor
Company are not recommended as part
of normal maintenance. Please consult
your Warranty Manual for complete
warranty information.
Oils, Fluids and Flushing
In many cases, fluid discoloration is a
normal operating characteristic and, by
itself, does not necessarily indicate a
concern or that the fluid needs to be
changed. However, discolored fluids that
also show signs of overheating or foreign
material contamination should be
inspected immediately by a qualified
expert such as the factory-trained
technicians at your dealership.
Your vehicle’s oils and fluids should be
changed at the specified intervals or in
conjunction with a repair. Flushing is a
viable way to change fluid for many vehicle
sub-systems during scheduled
maintenance. It is critical that systems are
flushed only with new fluid that is the same
as that required to fill and operate the
system or using a Ford-approved flushing
chemical.
Owner Checks and Services
Certain basic maintenance checks and
inspections should be performed every
month or at six months intervals.
Check Every Month
• Engine oil level.
• Function of all interior and exterior
lights.
• Tires for wear and proper pressure,
including the spare tire.
• Windshield washer fluid level.
397
Scheduled Maintenance

Check Every Six Months
• Battery connections. Clean if
necessary.
• Body and door drain holes for
obstructions. Clean if necessary.
• Cooling system fluid level and coolant
strength.
• Door weatherstrips for wear. Lubricate
if necessary.
• Hinges, latches and outside locks for
proper operation. Lubricate if
necessary.
• Parking brake for proper operation.
• Safety belts and seat latches for wear
and function.
• Safety warning lamps (brake, ABS,
airbag and safety belt) for operation.
• Washer spray and wiper operation.
Clean or replace blades as necessary.
Multi-Point Inspection
In order to keep your vehicle running right,
it is important to have the systems on your
vehicle checked regularly. This can help
identify potential issues and prevent major
problems. We recommend the following
multi-point inspection be performed at
every scheduled maintenance interval to
help ensure your vehicle keeps running
great.
Multi-Point Inspection
Hazard warning system operationAccessory drive belt(s)
Horn operationBattery performance
Radiator, cooler, heater and A/C hosesEngine air filter
Suspension components for leaks or
damage
Exhaust system
Steering and linkageExterior lamps operation
Tires (including spare) for wear and proper
pressure
Fluid levels
*
; fill if necessary
Windshield for cracks, chips or pitsFor oil and fluid leaks
Washer spray and wiper operationHalf-shaft dust boots
*
Brake, coolant recovery reservoir, automatic transmission and window washer
398
Scheduled Maintenance

Be sure to ask your dealership service
advisor or technician about the multi-point
vehicle inspection. It is a comprehensive
way to perform a thorough inspection of
your vehicle. It is your checklist that gives
you immediate feedback on the overall
condition of your vehicle. You know what
has been checked, what is okay as well as
those things that may require future or
immediate attention. The multi-point
vehicle inspection is one more way to keep
your vehicle running great.
Normal Scheduled Maintenance
Intelligent Oil Life Monitor®
Your vehicle is equipped with an Intelligent
Oil Life Monitor that determines when the
engine oil should be changed based on
how your vehicle is used. By using several
important factors in its calculations, the
monitor helps reduce the cost of owning
your vehicle and reduce environmental
waste at the same time.
This means you won’t have to remember
to change the oil on a mileage-based
schedule; the vehicle lets you know when
an oil change is due by displaying ENGINE
OIL CHANGE DUE or OIL CHANGE
REQUIRED in the message center.
The following table is intended to provide
examples of vehicle use and its impact on
engine oil change intervals. It is provided
as a guideline only. Actual engine oil
change intervals depends on several
factors and generally decreases with
severity of use.
When to expect the OIL CHANGE REQUIRED message
Vehicle use and exampleMiles (kilometers)
Normal
7500-10000
(12000-16000)
Normal commuting with highway driving
No or moderate load or towing
Flat to moderately hilly roads
No extended idling
Severe
5000-7499
(8000-11999)
Moderate to heavy load or towing
Mountainous or off-road conditions
Extended idling
Extended hot or cold operation
Extreme
3000-4999
(4000-7999)
Maximum load or towing
Extreme hot or cold operation
399
Scheduled Maintenance

At every oil change interval as indicated by the message center
1
Change engine oil and filter.
2
Rotate the tires.
Perform a multi-point inspection (recommended).
Inspect the automatic transmission fluid level. Consult your dealer for requirements.
Inspect the brake pads, shoes, rotors, drums, brake linings, hoses and parking brake.
Inspect the cabin air filter.
Inspect the engine cooling system strength and hoses.
Inspect the exhaust system and heat shields.
Inspect the rear axle and U-joints. Lubricate any areas with grease fittings (4WD
vehicles).
Inspect the half-shaft boots.
Inspect the steering linkage, ball joints, suspension, tire-rod ends, driveshaft and U-
joints. Lubricate any areas with grease fittings (4WD vehicles).
Inspect the tires, tire wear and measure the tread depth.
Inspect the wheels and related components for abnormal noise, wear, looseness or
drag.
1
Do not exceed one year or 10000 miles (16000 km) between service intervals.
2
Reset the Intelligent Oil Life Monitor® after each engine oil and filter change. See Engine
Oil Check (page 221).
Additional Maintenance Items
1
Replace cabin air filter.Every 20000 miles (32000
km)
Replace engine air filter.Every 30000 miles (48000
km)
Change engine coolant.
2
At 100000 miles (160000
km)
Replace spark plugs.Every 100000 miles
(160000 km)
400
Scheduled Maintenance

Additional Maintenance Items
1
Inspect accessory drive belt(s).
3
Change automatic transmission fluid.
Every 150000 miles
(240000 km)
Replace accessory drive belt(s).
4
1
Additional maintenance items can be performed within 3000 miles (4800 km) of the
last engine oil and filter change. Do not exceed the designated distance for the interval.
2
Initial replacement at six years or 100000 miles (160000 km), then every three years
or 50000 miles (80000 km).
3
Perform a follow-up inspection at 120000 miles (192000 km).
4
If not replaced within the last 100000 miles (160000 km).
Maintenance Schedule Log
E146852
Repair Order #:
Distance:
Engine hours (optional):
Multi-point inspection (recommended):
Signature:
Dealer stamp
401
Scheduled Maintenance

E146852
Repair Order #:
Distance:
Engine hours (optional):
Multi-point inspection (recommended):
Signature:
Dealer stamp
E146852
Repair Order #:
Distance:
Engine hours (optional):
Multi-point inspection (recommended):
Signature:
Dealer stamp
E146852
Repair Order #:
Distance:
Engine hours (optional):
Multi-point inspection (recommended):
Signature:
Dealer stamp
402
Scheduled Maintenance

E146852
Repair Order #:
Distance:
Engine hours (optional):
Multi-point inspection (recommended):
Signature:
Dealer stamp
E146852
Repair Order #:
Distance:
Engine hours (optional):
Multi-point inspection (recommended):
Signature:
Dealer stamp
E146852
Repair Order #:
Distance:
Engine hours (optional):
Multi-point inspection (recommended):
Signature:
Dealer stamp
403
Scheduled Maintenance

E146852
Repair Order #:
Distance:
Engine hours (optional):
Multi-point inspection (recommended):
Signature:
Dealer stamp
E146852
Repair Order #:
Distance:
Engine hours (optional):
Multi-point inspection (recommended):
Signature:
Dealer stamp
E146852
Repair Order #:
Distance:
Engine hours (optional):
Multi-point inspection (recommended):
Signature:
Dealer stamp
404
Scheduled Maintenance

E146852
Repair Order #:
Distance:
Engine hours (optional):
Multi-point inspection (recommended):
Signature:
Dealer stamp
E146852
Repair Order #:
Distance:
Engine hours (optional):
Multi-point inspection (recommended):
Signature:
Dealer stamp
Special Operating Conditions
If you operate your vehicle primarily in any
of the following conditions, you need to
perform additional maintenance as
indicated. If you operate your vehicle
occasionally under any of these
conditions, it is not necessary to perform
the additional maintenance. For specific
recommendations, see your dealership
service advisor or technician.
405
Scheduled Maintenance

Perform the services shown in the
following tables when specified or within
3000 miles (4800 km) of the OIL CHANGE
REQUIRED message appearing in the
message center.
• Example 1: The OIL CHANGE
REQUIRED message comes on at 28751
miles (46270 km); perform the 30000
mile (48000 km) automatic
transmission fluid replacement.
• Example 2: The OIL CHANGE
REQUIRED message has not come on
but the odometer reads 30000 miles
(48000 km); perform the engine air
filter replacement. (i.e., Intelligent Oil
Life Monitor® was reset at 25000
miles [40000 km].)
Towing a Trailer or Using a Car-top Carrier
Change engine oil and filter as indicated by message center
and perform services listed in the Normal Scheduled
Maintenance chart.
As required
· Inspect and lubricate U-joints.Inspect frequently, service
as required · See axle maintenance items under Exceptions.
Change automatic transmission fluid.Every 30000 miles (48000
km)
Extensive Idling or Low-speed Driving for Long Distances, as in Heavy Commercial Use
(i.e. Delivery, Taxi, Patrol Car or Livery)
Change engine oil and filter as indicated by message center
and perform services listed in the Normal Scheduled
Maintenance chart.
As required
· Replace cabin air filter (if equipped).Inspect frequently, service
as required · Replace engine air filter.
Change automatic transmission fluid.Every 30000 miles (48000
km)
Replace spark plugs.Every 60000 miles (96000
km)
Operating in Dusty or Sandy Conditions Such as Unpaved or Dusty Roads
· Replace cabin air filter (if equipped).Inspect frequently, service
as required · Replace engine air filter.
· Inspect the wheels and related components for abnormal
noise, wear, looseness or drag.
Every 5000 miles (8000
km)
406
Scheduled Maintenance

Operating in Dusty or Sandy Conditions Such as Unpaved or Dusty Roads
· Rotate tires, inspect tires for wear and measure tread
depth.
· Change engine oil and filter.Every 5000 miles (8000
km) or six months · Perform multi-point inspection.
Change automatic transmission fluid.Every 30000 miles (48000
km)
Reset your Intelligent Oil Life Monitor® after each engine oil and filter change. See Engine
Oil Check (page 221).
Exclusive Use of E85 (Flex Fuel Vehicles only)
If ran exclusively on E85, fill the fuel tank full with regular
unleaded fuel.
Every oil change
Special Operating Condition Log
E146852
Repair Order #:
Distance:
Engine hours (optional):
Multi-point inspection (recommended):
Signature:
Dealer stamp
407
Scheduled Maintenance

E146852
Repair Order #:
Distance:
Engine hours (optional):
Multi-point inspection (recommended):
Signature:
Dealer stamp
E146852
Repair Order #:
Distance:
Engine hours (optional):
Multi-point inspection (recommended):
Signature:
Dealer stamp
E146852
Repair Order #:
Distance:
Engine hours (optional):
Multi-point inspection (recommended):
Signature:
Dealer stamp
408
Scheduled Maintenance

E146852
Repair Order #:
Distance:
Engine hours (optional):
Multi-point inspection (recommended):
Signature:
Dealer stamp
E146852
Repair Order #:
Distance:
Engine hours (optional):
Multi-point inspection (recommended):
Signature:
Dealer stamp
Exceptions
There are several exceptions to the Normal
Schedule:
409
Scheduled Maintenance

Normal vehicle axle maintenance: Rear
axles and power take-off (PTO) units with
synthetic fluid and light-duty trucks
equipped with Ford-design axles are
lubricated for life; do not check or change
fluid unless a leak is suspected, service is
required or the assembly has been
submerged in water. During long periods
of trailer towing with outside temperatures
above 70°F (21°C) and at wide-open
throttle for long periods above 45 mph (72
km/h), non-synthetic rear axle fluids
should be changed every 3000 miles
(4800 km) or three months, whichever
comes first. This interval can be waived if
the axle is filled with 75W140 synthetic
gear fluid meeting Ford specification
WSL-M2C192-A, part number
F1TZ-19580-B, or equivalent. Add friction
modifier XL-3 (EST-M2C118-A) or
equivalent for complete refill of
Traction-Lok rear axles. See Technical
Specifications (page 271).
Police/Taxi/Livery vehicle axle
maintenance: Change rear axle fluid every
100000 miles (160000 km). Rear axle
fluid change may be waived if the axle was
filled with 75W140 synthetic gear fluid
meeting Ford specification
WSL-M2C192-A, part number
F1TZ-19580-B, or equivalent. Add four
ounces (118 mL) of additive friction
modifier XL-3 (EST-M2C118-A) or
equivalent for complete refill of
Traction-Lok rear axles. The axle fluid
should be changed anytime the axle has
been submerged in water.
California fuel filter replacement: If the
vehicle is registered in California, the
California Air Resources Board has
determined that the failure to perform this
maintenance item will not nullify the
emission warranty or limit recall liability
prior to the completion of the vehicle's
useful life. Ford Motor Company, however,
urges you to have all recommended
maintenance services performed at the
specified intervals and to record all vehicle
service.
Hot climate oil change intervals:
Vehicles operating in the Middle East,
North Africa, Sub-Saharan Africa or
locations with similar climates using an
American Petroleum Institute (API)
Certified for Gasoline Engines (Certification
mark) oil of SM or SN quality, the normal
oil change interval is 5000 miles (8000
km). If the available API "SM" or "SN" oils
are not available, then the oil change
service interval is 3000 mile (4800 km).
Engine air filter and cabin air filter
replacement: Engine air filter and cabin
air filter life is dependent on exposure to
dusty and dirty conditions. Vehicles
operated in these conditions will require
frequent inspection and replacement of
the engine air filter and cabin air filter.
Engine Coolant Change Record
Initial change: Six years or 100000 miles
(160000 km) (whichever comes first).
After initial change: Every three years or
50000 miles (80000 km).
410
Scheduled Maintenance

Engine Coolant Change Log
E146852
Repair Order #:
Distance:
Engine hours (optional):
Multi-point inspection (recommended):
Signature:
Dealer stamp
E146852
Repair Order #:
Distance:
Engine hours (optional):
Multi-point inspection (recommended):
Signature:
Dealer stamp
411
Scheduled Maintenance

E146852
Repair Order #:
Distance:
Engine hours (optional):
Multi-point inspection (recommended):
Signature:
Dealer stamp
E146852
Repair Order #:
Distance:
Engine hours (optional):
Multi-point inspection (recommended):
Signature:
Dealer stamp
E146852
Repair Order #:
Distance:
Engine hours (optional):
Multi-point inspection (recommended):
Signature:
Dealer stamp
412
Scheduled Maintenance

4
4WD
See: Four-Wheel Drive.......................................151
A
A/C
See: Climate Control..........................................113
About This Manual...........................................7
Protecting the Environment................................7
ABS
See: Brakes...........................................................156
ABS driving hints
See: Hints on Driving With Anti-Lock
Brakes................................................................156
Accessories.....................................................274
Exterior style.........................................................274
Interior style..........................................................274
Lifestyle..................................................................274
Peace of mind......................................................274
Accessories
See: Replacement Parts
Recommendation.............................................11
Active Park Assist.........................................163
Automatic Steering into Parking
Space.................................................................164
Deactivating the Park Assist Feature..........165
Troubleshooting the System.........................166
Using Active Park Assist...................................163
Adjusting the Headlamps.........................229
Horizontal Aim Adjustment............................231
Vertical Aim Adjustment.................................229
Adjusting the Steering Wheel...................64
Airbag Disposal...............................................43
Air Conditioning
See: Climate Control..........................................113
Alarm
See: Anti-Theft Alarm........................................63
Ambient Lighting............................................73
Anti-Theft Alarm............................................63
Arming the Alarm.................................................63
Disarming the Alarm...........................................63
Appendices...................................................380
Audible Warnings and Indicators.............83
Headlamps On Warning Chime......................83
Key in Ignition Warning Chime........................83
Parking Brake On Warning Chime..................83
Audio Control..................................................64
Type 1........................................................................64
Type 2.......................................................................65
Type 3.......................................................................65
Audio System...................................................97
General Information............................................97
Audio unit - Vehicles With:
AM/FM/CD/Satellite
Radio/SYNC................................................102
Audio unit - Vehicles With:
AM/FM/CD/SYNC....................................100
Audio unit - Vehicles With:
AM/FM/CD....................................................98
Audio unit - Vehicles With: Premium
AM/FM/CD..................................................105
Audio unit - Vehicles With: Sony
AM/FM/CD..................................................106
Menu Structure....................................................107
Autolamps........................................................70
Automatic Climate Control........................114
Mono Mode............................................................115
Switching Mono Mode Back On.....................115
Switching Mono Mode Off...............................115
Temperature Control..........................................115
Automatic Transmission............................147
Brake-Shift Interlock.........................................148
If Your Vehicle Gets Stuck In Mud or
Snow..................................................................149
SelectShift Automatic®
Transmission...................................................148
Understanding the Positions of Your
Automatic Transmission.............................147
Automatic Transmission Fluid
Check.............................................................225
Autowipers........................................................67
Auxiliary Input Jack......................................109
Auxiliary Power Points................................132
110 Volt AC Power Point....................................132
Locations................................................................132
B
Blind Spot Monitor.........................................171
Blind Spot Information System (BLIS®)
with Cross Traffic Alert..................................171
Booster Seats....................................................17
Types of Booster Seats.......................................18
Brake Fluid Check........................................225
413
Index

Brakes...............................................................156
General Information..........................................156
Breaking-In.....................................................194
Bulb Specification Chart...........................235
C
Cabin Air Filter................................................119
California Proposition 65.............................10
Capacities and Specifications................267
Technical Specifications...................................271
Car Wash
See: Cleaning the Exterior..............................236
Center Console..............................................134
Changing a Bulb............................................231
Lamp Assembly Condensation.....................231
Replacing Fog, Park and Turn Signal
Bulbs..................................................................233
Replacing Headlamp Bulbs...........................232
Replacing HID Headlamp Bulbs...................232
Replacing High-Mount Brake Lamp
Bulb....................................................................234
Replacing License Plate Lamp Bulb...........234
Replacing Reverse Lamp Assembly...........234
Replacing Side Marker Bulbs.........................233
Replacing Tail, Brake and Turn Signal
Bulbs..................................................................234
Changing a Fuse...........................................207
Fuses.......................................................................207
Changing a Road Wheel...........................260
Dissimilar Spare Wheel and Tire Assembly
Information.....................................................260
Tire Change Procedure....................................262
Changing the Engine Air Filter.................228
..................................................................................229
1.6L and 2.0L EcoBoost® Engines...............228
2.5L Engine...........................................................229
Changing the Vehicle Battery.................226
Changing the Wiper Blades......................227
Checking MyKey System Status..............50
Checking the Wiper Blades......................227
Child Restraint and Safety Belt
Maintenance.................................................33
Child Safety.......................................................14
General Information.............................................14
Child Safety Locks..........................................24
Child Seat Positioning...................................16
Child Seats.........................................................16
Cleaning Leather Seats.............................239
Cleaning Products.......................................236
Cleaning the Alloy Wheels.......................240
Cleaning the Engine....................................237
Cleaning the Exterior..................................236
Cleaning Plastic Exterior Parts......................237
Exterior Chrome.................................................236
Underbody............................................................237
Cleaning the Instrument Panel and
Instrument Cluster Lens.........................239
Cleaning the Interior...................................238
Cleaning the Windows and Wiper
Blades...........................................................238
Clearing All MyKeys.......................................50
Climate.............................................................367
Climate Control Voice Commands.............369
Climate Control..............................................113
Coolant Check
See: Engine Coolant Check............................222
Crash Sensors and Airbag Indicator........42
Creating a MyKey...........................................49
Programming/Changing Optional
Settings...............................................................50
Cruise Control.................................................66
Principle of Operation.......................................170
Cruise Control
See: Using Cruise Control................................170
Customer Assistance..................................201
D
Data Recording..................................................9
Event Data Recording...........................................9
Service Data Recording........................................9
Daytime Running Lamps..............................71
Direction Indicators........................................72
Driver and Passenger Airbags...................36
Children and Airbags...........................................37
Proper Driver and Front Passenger Seating
Adjustment........................................................36
Driving Aids.......................................................171
Driving Hints...................................................194
Driving Through Water...............................194
DRL
See: Daytime Running Lamps..........................71
414
Index

E
Eco Mode.........................................................175
Resetting Eco Mode...........................................175
Type 1.......................................................................175
Type 2 and 3..........................................................175
Economical Driving......................................194
Emission Control System..........................143
On-Board Diagnostics (OBD-II)...................144
Readiness for Inspection/Maintenance
(I/M) Testing...................................................145
End User License Agreement.................380
SYNC® End User License Agreement
(EULA).............................................................380
Engine Block Heater....................................138
Using the Engine Block Heater......................139
Engine Coolant Check................................222
Adding Engine Coolant....................................222
Checking the Engine Coolant........................222
Recycled Engine Coolant................................223
Severe Climates.................................................224
What you Should Know About Fail-Safe
Cooling..............................................................224
Engine Immobilizer
See: Passive Anti-Theft System.....................62
Engine Oil Check...........................................221
Adding Engine Oil................................................221
Resetting the Oil Life Monitoring
System..............................................................222
Engine Oil Dipstick - 1.6L
EcoBoost®...................................................221
Engine Oil Dipstick - 2.5L/2.0L
EcoBoost®...................................................221
Engine Specifications.................................267
Drivebelt Routing................................................267
Entertainment...............................................332
A/V Inputs.............................................................351
AM/FM Radio......................................................333
Bluetooth Audio.................................................350
Browsing Device Content................................332
CD............................................................................344
SD Card Slot and USB Port...........................346
SIRIUS® Satellite Radio (If
Activated)........................................................339
Supported Media Players, Formats and
Metadata Information................................349
Essential Towing Checks..........................190
Before Towing a Trailer....................................190
Hitches...................................................................190
Safety Chains......................................................190
Trailer Brakes.......................................................190
Trailer Lamps.......................................................190
When Towing a Trailer.......................................191
Event Data Recording
See: Data Recording..............................................9
Export Unique Options..................................13
Exterior Mirrors.................................................75
Blind Spot Monitor...............................................76
Fold-Away Exterior Mirrors................................75
Heated Exterior Mirrors.......................................75
Integrated Blind Spot Mirrors...........................76
Memory Mirrors.....................................................75
Power Exterior Mirrors.........................................75
F
Fastening the Safety Belts..........................27
How to Extract Safety Belts in the Rear
Outboard Positions........................................29
Restraint of Pregnant Women.........................27
Safety Belt Extension Assembly....................29
Safety Belt Locking Modes...............................28
Floor Mats.......................................................195
Fog Lamps - Front
See: Front Fog Lamps.........................................72
Ford Credit..........................................................11
(U.S. Only).................................................................11
Ford Extended Service Plan (ESP).......276
SERVICE PLANS (CANADA ONLY).............277
SERVICE PLANS (U.S. only)..........................276
Four-Wheel Drive...........................................151
Front Fog Lamps.............................................72
Front Passenger Sensing System.............37
Fuel and Refueling.......................................140
Fuel Consumption........................................145
Calculating Fuel Economy..............................146
Filling the Tank....................................................146
Fuel Cut-Off Switch....................................198
Fuel Filter........................................................225
Fuel Quality......................................................141
Choosing the Right Fuel....................................141
Octane Recommendations.............................141
Fuses................................................................207
415
Index

Fuse Specification Chart..........................208
Luggage Compartment Fuse Panel............214
Passenger Compartment Fuse Panel..........211
Power Distribution Box...................................208
Pre-Fuse Box.......................................................208
G
Gauges................................................................79
Engine Coolant Temperature Gauge............80
Fuel Gauge.............................................................80
Information Display.............................................79
Gearbox
See: Transmission...............................................147
General Information on Radio
Frequencies...................................................44
Intelligent Access.................................................44
Getting Assistance Outside the U.S. and
Canada.........................................................204
Getting the Services You Need...............201
Away From Home...............................................201
H
Hazard Warning Flashers..........................198
Headlamp Exit Delay......................................71
Head Restraints..............................................121
Adjusting the Head Restraint.........................122
Heated Seats..................................................127
Heated Windows and Mirrors...................119
Heated Exterior Mirror........................................119
Heated Rear Window.........................................119
Heating
See: Climate Control..........................................113
Hill Start Assist..............................................149
Using Hill Start Assist.......................................149
Hints on Controlling the Interior
Climate...........................................................115
Cooling the Interior Quickly..............................117
General Hints.........................................................115
Heating the Interior Quickly.............................116
Maximum Cooling Performance in
Instrument Panel or Instrument Panel
and Footwell Positions.................................119
Recommended Settings for Cooling............117
Recommended Settings for Heating............117
Side Window Defogging in Cold
Weather..............................................................118
Vehicle Stationary for Extended Periods
During Extreme High Ambient
Temperatures...................................................118
Hints on Driving With Anti-Lock
Brakes............................................................156
Hood Lock
See: Opening and Closing the Hood............217
I
Ignition Switch...............................................135
In California (U.S. Only)............................202
Information Display Control......................66
Information Displays....................................84
General Information...........................................84
Information....................................................358
911 Assist®...........................................................365
Calendar...............................................................364
Notifications........................................................364
SIRIUS Travel Link.............................................362
SYNC Services (If Equipped, U.S.
Only)..................................................................358
Vehicle Health Report.....................................366
416
Index

Information Messages..................................87
Airbag........................................................................87
Alarm........................................................................88
Battery and Charging System.........................88
Blind Spot Information and Cross Traffic
Alert System.....................................................88
Doors........................................................................89
Engine......................................................................90
Hill Start Assist.....................................................90
Keyless Vehicle.....................................................90
Lighting.....................................................................91
Maintenance..........................................................92
Message indicator................................................87
MyKey.......................................................................92
Park Aid....................................................................93
Park Brake...............................................................93
Power Steering......................................................94
Starting System ...................................................94
Tire Pressure Monitoring System...................96
Traction Control...................................................96
Transmission and Four-Wheel Drive............94
Installing Child Seats.....................................19
Using LAP AND SHOULDER BELTS...............19
Using Lower Anchors AND Tethers FOR
CHildren (LATCH)............................................22
Using Tether Straps.............................................23
Instrument Cluster.........................................79
Instrument Lighting Dimmer.......................71
Vehicles With Front Fog Lamps.......................71
Vehicles Without Front Fog Lamps................71
Interior Lamps..................................................72
Front Interior Lamp..............................................72
Rear Interior Lamp................................................73
Interior Mirror....................................................76
Auto-Dimming Mirror..........................................76
Introduction.........................................................7
J
Jump-Starting the Vehicle........................198
Connecting the Jumper Cables.....................199
Jump Starting......................................................199
Preparing Your Vehicle.....................................198
Removing the Jumper Cables........................199
K
Keyless Entry...................................................60
SECURICODE™ KEYLESS ENTRY
KEYPAD..............................................................60
Keyless Starting.............................................135
Fast Restart...........................................................137
Stopping the Engine When Your Vehicle is
Moving................................................................137
Stopping the Engine When Your Vehicle is
Stationary.........................................................136
Keys and Remote Controls.........................44
Principle of Operation........................................44
Knee Airbag.......................................................37
L
Lighting Control..............................................70
Headlamp Flasher...............................................70
High Beams............................................................70
Lighting..............................................................70
Load Carriers
See: Roof Racks and Load Carriers..............178
Load Carrying..................................................177
Load Limit........................................................179
Vehicle loading - with and without a
trailer...................................................................179
Locking and Unlocking.................................54
Activating Intelligent Access ...........................55
Autolock and Autounlock ................................56
Battery Saver.........................................................56
Illuminated Entry..................................................56
Illuminated Exit.....................................................56
Power Door Locks................................................54
Remote Control....................................................54
Smart Unlocks For Integrated Keyhead
Transmitter........................................................55
Smart Unlocks For Intelligent Access Keys
................................................................................55
Locks...................................................................54
Luggage Covers..............................................177
M
Maintenance...................................................217
General Information...........................................217
Manual Climate Control..............................113
Manual Liftgate...............................................57
417
Index

Manual Seats.................................................123
Adjusting the Height of the Driver's
Seat.....................................................................123
Moving the Seat Backward and
Forward..............................................................123
Recline Adjustment...........................................124
Media Hub........................................................110
Memory Function..........................................125
Recalling a Stored Seat Position..................126
Saving a Passive Setting..................................126
Saving a Pre-Set Position................................126
Menu.................................................................326
Active Park Assist...............................................327
Changing Your Door Keypad Code..............327
Display Settings.................................................326
Rear View Camera.............................................327
Settings..................................................................327
Setting the Clock...............................................326
Sound.....................................................................327
Valet Mode............................................................327
Message Center
See: Information Displays.................................84
Mirrors
See: Heated Windows and Mirrors...............119
See: Windows and Mirrors................................74
Mobile Communications Equipment.......12
Moonroof............................................................77
Bounce-Back.........................................................78
Opening and Closing the Moonroof...............77
Opening and Closing the Sunscreen.............77
Venting the Moonroof.........................................78
Motorcraft Parts...........................................267
MyFord Touch®.............................................315
General Information..........................................315
MyKey®..............................................................49
Principle of Operation........................................49
MyKey Troubleshooting................................51
N
Navigation........................................................371
cityseekr.................................................................373
Map Mode.............................................................374
Navigation Map Updates.................................377
Navigation Voice Commands........................377
Point of Interest (POI) Categories...............372
Quick-touch Buttons........................................376
Setting a Destination.........................................371
Setting Your Navigation Preferences..........373
O
Oil Check
See: Engine Oil Check........................................221
Opening and Closing the Hood................217
Ordering Additional Owner's
Literature.....................................................205
Obtaining a French Owner’s Manual.........205
Overhead Console........................................134
P
Parking Aid.......................................................161
Front Sensing System.......................................162
Rear Sensing System.........................................161
Parking Aids.....................................................161
Parking brake
See: Parking Brake..............................................157
Parking Brake..................................................157
Passive Anti-Theft System.........................62
SecuriLock®...........................................................62
PATS
See: Passive Anti-Theft System.....................62
Perchlorate........................................................10
Personal Safety System™..........................34
How Does the Personal Safety System
Work?..................................................................34
Phone...............................................................352
Making Calls........................................................353
Pairing Subsequent Phones..........................353
Pairing Your Phone for the First Time........352
Phone Menu Options.......................................353
Phone Settings...................................................356
Receiving Calls....................................................353
Text Messaging...................................................354
418
Index

Power Door Locks
See: Locking and Unlocking.............................54
Power Liftgate..................................................57
Obstacle Detection.............................................59
Opening and Closing the Liftgate..................58
Setting the Liftgate Open Height...................59
Power Seats....................................................124
Power Lumbar......................................................125
Power Steering Fluid Check.....................225
Power Windows..............................................74
Accessory Delay....................................................75
Bounce-Back..........................................................74
One-Touch Down.................................................74
One-Touch Up.......................................................74
Window Lock..........................................................74
R
Rear Seat Armrest.........................................127
Rear Seats.......................................................126
Folding the Seatback........................................126
Recline Adjustment...........................................126
Unfolding the Seatback...................................126
Rear Under Floor Storage...........................177
Adjustable Load Floor........................................177
Cargo Management System...........................177
Passenger Compartment Floor......................177
Rear View Camera........................................167
Using the Rear View Camera System.........167
Rear View Camera
See: Rear View Camera....................................167
Rear Window Wiper and Washers..........69
Rear Window Washer.........................................69
Rear Window Wiper............................................69
Recommended Towing Weights............188
Refueling..........................................................142
Easy Fuel® No Cap Fuel System..................143
Remote Control..............................................44
Car Finder................................................................46
Integrated Keyhead Transmitters .................44
Intelligent Access Key.........................................45
Remote Start .........................................................47
Replacing the Battery.........................................45
Sounding a Panic Alarm....................................47
Remote Start...................................................119
Automatic Settings............................................120
Heated and Cooled Devices...........................120
Last Settings........................................................120
Removing a Headlamp...............................231
Repairing Minor Paint Damage...............237
Replacement Parts
Recommendation.........................................11
Collision Repairs.....................................................11
Scheduled Maintenance and Mechanical
Repairs...................................................................11
Warranty on Replacement Parts......................11
Replacing a Lost Key or Remote
Control............................................................48
Reporting Safety Defects (Canada
Only).............................................................206
Reporting Safety Defects (U.S.
Only)..............................................................205
Roadside Assistance...................................197
Vehicles Sold In Canada : Getting Roadside
Assistance........................................................197
Vehicles Sold In Canada : Using Roadside
Assistance........................................................197
Vehicles Sold In The U.S.: Getting Roadside
Assistance........................................................197
Vehicles Sold In The U.S. : Using Roadside
Assistance........................................................197
Roadside Emergencies...............................197
Roof Racks and Load Carriers..................178
Adjusting the Crossbar.....................................178
Running Out of Fuel......................................141
Refilling With a Portable Fuel
Container...........................................................141
S
Safety Belt Height Adjustment................30
Safety Belt Minder..........................................31
Belt-Minder®..........................................................31
Safety Belts......................................................26
Principle of Operation........................................26
Safety Belt Warning Lamp and Indicator
Chime..............................................................30
Conditions of operation.....................................30
Safety Canopy®..............................................41
Safety Precautions......................................140
Satellite Radio................................................110
Satellite Radio Electronic Serial Number
(ESN)....................................................................111
Satellite Radio Reception Factors..................111
SIRIUS® Satellite Radio Service.....................111
Troubleshooting...................................................112
419
Index

Scheduled Maintenance..........................396
Engine Coolant Change Record....................410
Exceptions...........................................................409
General Maintenance Information.............396
Normal Scheduled Maintenance................399
Special Operating Conditions......................405
Seats...................................................................121
Security..............................................................62
Side Airbags.....................................................40
Sitting in the Correct Position...................121
Snow Chains
See: Using Snow Chains.................................256
Special Notices.................................................11
New Vehicle Limited Warranty..........................11
Notice to Owners of Pickup Trucks and
Utility Type Vehicles........................................12
Special Instructions...............................................11
Using Your Vehicle as an Ambulance............12
Using Your Vehicle With a Snowplow............12
Speed Control
See: Cruise Control.............................................170
Stability Control............................................159
Principle of Operation.......................................159
Starter Switch
See: Ignition Switch...........................................135
Starting a Gasoline Engine........................137
Guarding Against Exhaust Fumes................138
Important Ventilating Information...............138
Starting and Stopping the Engine..........135
General Information..........................................135
Steering............................................................176
Electric Power Steering.....................................176
Steering Wheel...............................................64
Storage Compartments.............................134
Sun Visors..........................................................77
Illuminated Vanity Mirror....................................77
Supplementary Restraints System.........35
Principle of Operation.........................................35
Symbols Glossary.............................................7
SYNC® Applications and Services.......295
911 Assist...............................................................295
SYNC Services: Traffic, Directions &
Information (TDI).........................................298
Vehicle Health Report......................................297
SYNC®.............................................................279
General Information..........................................279
SYNC® Troubleshooting..........................308
T
Technical Specifications
See: Capacities and Specifications.............267
The Better Business Bureau (BBB) Auto
Line Program (U.S. Only).......................203
Tire Care..........................................................245
Glossary of Tire Terminology........................246
Information About Uniform Tire Quality
Grading.............................................................245
Information Contained on the Tire
Sidewall...........................................................246
Temperature A B C............................................245
Traction AA A B C...............................................245
Treadwear.............................................................245
Tire Pressure Monitoring System...........257
Changing Tires with a Tire Pressure
Monitoring System.......................................258
Understanding Your Tire Pressure
Monitoring System ......................................258
Tire Pressures
See: Technical Specifications.......................265
Tires
See: Wheels and Tires.....................................243
Towing a Trailer.............................................188
Towing Points.................................................191
Installing the Towing Eye..................................191
Towing Eye Location...........................................191
Towing the Vehicle on Four Wheels.............191
Towing the Vehicle on Four
Wheels...........................................................192
Emergency Towing.............................................192
Recreational Towing..........................................193
Towing..............................................................188
Traction Control............................................158
Principle of Operation.......................................158
Trailer Sway Control....................................188
Transmission Code Designation............270
Transmission...................................................147
Transporting the Vehicle............................192
Trip Computer.................................................86
All Value...................................................................87
Average Fuel...........................................................87
Fuel Used.................................................................87
Resetting the Trip Computer...........................86
Trip Odometer.......................................................86
Trip Timer................................................................86
420
Index

U
Under Hood Overview - 1.6L
EcoBoost®...................................................218
Under Hood Overview - 2.0L
EcoBoost®...................................................219
Under Hood Overview - 2.5L...................220
Universal Garage Door Opener...............128
Homelink® Wireless Control System.........128
USB Port...........................................................110
Using Cruise Control....................................170
Switching Off Cruise Control..........................170
Switching On Cruise Control..........................170
Using Four-Wheel Drive..............................151
Driving in Special Conditions With
Four-Wheel Drive...........................................152
Using MyKey With Remote Start
Systems..........................................................50
Vehicles Equipped with Intelligent Access
Key (Push Button Start)................................51
Vehicles Equipped with Traditional
Keys.......................................................................51
Using Snow Chains.....................................256
Using Stability Control...............................160
AdvanceTrac® with Roll Stability Control™
(RSC®).............................................................160
Using SYNC® With Your Media
Player.............................................................301
Accessing Your Play Menu.............................305
Connecting Your Digital Media Player to the
USB Port...........................................................301
Media Menu Features......................................303
Media Voice Commands.................................301
System Settings................................................306
What's Playing?..................................................301
Using SYNC® With Your Phone.............283
Accessing Features through the Phone
Menu.................................................................288
Accessing Your Phone Settings.....................291
Making Calls........................................................286
Pairing a Phone for the First Time...............283
Pairing Subsequent Phones..........................284
Phone Options during an Active Call.........286
Phone Voice Commands................................284
Receiving Calls...................................................286
System Settings.................................................292
Text Messaging..................................................289
Using Traction Control................................158
System Indicator Lights and
Messages..........................................................158
Using Voice Recognition............................281
Helpful Hints........................................................281
Initiating a Voice Session.................................281
System Interaction and Feedback..............282
Utilizing the Mediation/Arbitration
Program (Canada Only)........................203
V
Vehicle Care...................................................236
General Information.........................................236
Vehicle Certification Label.......................270
Vehicle Identification Number................269
Vehicle Storage............................................240
Battery....................................................................241
Body.........................................................................241
Brakes......................................................................241
Cooling system....................................................241
Engine......................................................................241
Fuel system...........................................................241
General..................................................................240
Miscellaneous......................................................241
Removing Vehicle From Storage..................242
Tires.........................................................................241
Ventilation
See: Climate Control..........................................113
VIN
See: Vehicle Identification Number............269
Voice Control...................................................66
MyFord Touch® Controls..................................66
421
Index

W
Warning Lamps and Indicators................80
Airbag - Front........................................................80
Anti-Lock Braking System................................80
Battery.......................................................................81
Blind Spot Monitor...............................................81
Brake System..........................................................81
Cruise Control.........................................................81
Direction Indicator................................................81
Engine Oil.................................................................81
Fasten Safety Belt................................................81
Fog Lamps - Front................................................81
High Beam...............................................................81
Information.............................................................82
Low Fuel Level.......................................................82
Low Tire Pressure Warning...............................82
Parking Lamps......................................................82
Service Engine Soon...........................................82
Stability Control....................................................83
Stability Control Off............................................83
Washer Fluid Check....................................225
Washers
See: Cleaning the Exterior..............................236
See: Wipers and Washers..................................67
Waxing..............................................................237
Wheels and Tires.........................................243
General Information.........................................243
Technical Specifications.................................265
Windows and Mirrors....................................74
Windshield Washers.....................................68
Windshield Wipers.........................................67
Intermittent Wipe.................................................67
Speed Dependent Wipers.................................67
Wipers and Washers.....................................67
422
Index


La informacion contenida en esta publicacion es correcta al momento de ser enviada a impresión. En
interes del desarrollo continuo, nos reservamos el derecho a cambiar las especificaciones, el diseño o el
equipo en cualquier momento, sin previo aviso y sin ninguna obligacion. Ninguna parte de esta publicacion
puede ser reproducida, trasmitida, almacenada en cualquier sistema de recuperacion de informacion o
traducida en cualquier idioma, forma o medio, sin un autorizacion por escrito. Se exceptúan errores y
omisiones.
© Ford Motor Company 2012
Todos los derechos reservados.
Número de parte: 20120327133508


Introducción
Acerca de este Manual....................................7
Glosario de Símbolos......................................7
Retención de Datos.........................................9
Proposición 65 de California........................11
Perclorato............................................................11
Ford Credit..........................................................11
Recomendación de partes de repuesto
............................................................................12
Notas Especiales.............................................12
Equipo Móvil de Comunicaciones.............13
Opciónes Únicas de Exportación..............14
Seguridad de los Niños
Información general.......................................15
Asientos para Niños........................................17
Colocación de los Asientos para
Niños................................................................17
Asientos Elevados..........................................19
Instalación de asientos para niños ..........21
Seguros a Prueba de Niños.........................27
Cinturones de Seguridad
Funcionamiento.............................................28
Sujecion de los Cinturones de
Seguridad......................................................29
Ajuste de altura de los cinturones de
seguridad.......................................................32
Luz de advertencia del cinturón de
seguridad y repique indicador ..............33
Recordatorio de Cinturones de
Seguridad......................................................33
Mantenimiento del sistema de sujeción
para niños y de los cinturones de
seguridad......................................................35
Personal Safety System™
Personal Safety System™..........................37
Sistema de Seguridad
Complementaria
Funcionamiento.............................................38
Bolsas de aire del conductor y del
pasajero ........................................................39
Bolsa de Aire para Rodillas..........................41
Sistema de detección del pasajero
delantero........................................................41
Bolsas de Aire Laterales..............................44
Safety Canopy®.............................................45
Sensores de choque e indicador de
bolsas de aire .............................................46
Disposición de una Bolsa de Aire.............47
Llaves y Controles Remotos
Funcionamiento.............................................48
Información General sobre las
Frecuencias de Radio...............................48
Transmisor Remoto......................................48
Reemplazo de una Llave Extraviada o
un Transmisor Remoto............................53
MyKey®
Funcionamiento.............................................54
Creación de MyKey........................................55
Borrado de toda la información de
MyKeys ..........................................................55
Comprobación del estado del sistema
MyKey ............................................................56
Uso de MyKey con un Sistema de
Arranque Remoto......................................56
Detección de Problemas de MyKey.........57
Seguros
Asegurar y Desasegurar..............................60
Compuerta levadiza manual ....................63
Compuerta Levadiza Eléctrica..................64
Entrada sin Llave............................................67
Seguridad
Sistema Pasivo Anti-Robo.........................69
1
Índice

Alarma Anti-Robo..........................................70
Volante de Dirección
Ajuste del Volante de Dirección................72
Control de Audio.............................................72
Control de Voz.................................................74
Control de Crucero.........................................74
Control de la Pantalla de
Información..................................................74
Limpiadores y Lavadores
Limpia Parabrisas...........................................75
Limpiadores Automáticos...........................75
Lava Parabrisas...............................................76
Limpiador y Lavador de Medallón............77
Iluminación
Control de Iluminación.................................78
Encendido Automático de Faros
Principales....................................................78
Atenuador de Iluminación de Tablerol
de Instrumentos.........................................79
Retardo de Apagado de Faros
Principales....................................................79
Faros de Operación Diurna........................80
Faros de Niebla Delanteros.......................80
Indicadores de Luces Direccionales.......80
Iluminación Interior.......................................80
Luz Ambiental..................................................81
Ventanas y espejos
retrovisores
Ventanas eléctricas.......................................83
Espejos retrovisores exteriores.................84
Espejo retrovisor interior.............................86
Viseras................................................................86
Techo solar.......................................................86
Tablero de instrumentos
Indicadores.......................................................88
Indicadores y luces de advertencia.........89
Advertencias e Indicadores
Audibles.........................................................92
Pantallas de información
Información general......................................93
Computadora de viaje.................................96
Mensajes de información...........................96
Sistema de audio
Información general....................................106
Unidad de audio - Vehículos con:
AM/FM/CD..................................................107
Unidad de audio - Vehículos con:
AM/FM/CD/SYNC...................................109
Unidad de audio - Vehículos con:
AM/FM/CD/Radio
satelital/SYNC............................................112
Unidad de audio - Vehículos con:
AM/FM/CD Premium...............................114
Unidad de audio - Vehículos con: Sony
AM/FM/CD..................................................116
Toma de entrada auxiliar..........................120
Puerto USB.......................................................121
Concentrador de medios............................121
Radio satelital.................................................121
Control de clima
Control de clima manual...........................125
Control Automático de Clima..................126
Consejos para el control del clima
interior ..........................................................128
Ventanas y espejos retrovisores
calentados...................................................131
Filtro de aire para la cabina ......................132
Arranque a control remoto........................132
Asientos
Modo correcto de sentarse.......................134
Cabeceras........................................................134
Asientos manuales......................................136
Asientos eléctricos.......................................137
2
Índice

Función de memoria...................................138
Asientos traseros..........................................139
Asientos calentados...................................140
Descansabrazos del asiento trasero.....140
Abridor Universal de
Cochera
Abridor Universal de Cochera...................141
Tomas de energía auxiliares
Tomas Auxiliares de Corriente................146
Compartimientos para
Almacenaje
Consola central.............................................148
Consola del toldo.........................................148
Arranque y Paro del Motor
Información general....................................149
Interruptor de encendido..........................149
Arranque sin llave.........................................150
Arranque de un motor de gasolina ........151
Calentador del Bloque del Motor...........152
Combustible y llenado
Precauciones de seguridad......................154
Calidad del combustible...........................155
Funcionamiento sin combustible...........155
Llenado ...........................................................156
Sistema de control de emisiones .........158
Consumo de combustible..........................161
Transmisión
Transmisión Automática...........................163
Asistencia de arranque en
pendientes..................................................165
Doble Tracción
Uso de la tracción en las cuatro ruedas
.........................................................................167
Frenos
Información general.....................................173
Consejos para Conducir con Frenos
Antibloqueo................................................173
Freno de estacionamiento........................174
Control de tracción
Funcionamiento............................................175
Uso del control de tracción.......................175
Control de estabilidad
Funcionamiento............................................176
Uso del control de estabilidad.................177
Ayudas de Estacionamiento
Asistencia de estacionamiento ..............178
Asistencia Activa para Estacionarse.....180
Cámara de vista trasera ............................185
Control de Crucero
Funcionamiento...........................................188
Uso del control de crucero.......................188
Ayudas de Conducción
Monitor de Punto Ciego.............................190
Modo de Economico...................................194
Dirección .........................................................195
Transporte de carga
Almacenamiento de la parte inferior
trasera del piso.........................................196
Cubiertas del compartimiento de
equipajes.....................................................196
Parrillas para equipaje y portadores de
carga..............................................................197
Límite de Carga.............................................198
Remolque
Conducción con remolque.......................207
3
Índice

Control de Bamboleo del
Remolque...................................................207
Pesos de remolque recomendados......207
Comprobaciones esenciales de
remolque....................................................209
Puntos de remolque....................................210
Transporte del vehículo...............................211
Remolque del vehículo sobre las cuatro
ruedas...........................................................212
Indicaciones de conducción
Rodaje...............................................................213
Conducción económica..............................213
Conducción por el agua.............................213
Tapetes del piso............................................214
Emergencias en el Camino
Asistencia en carretera...............................216
Luces de emergencia...................................217
Interruptor de corte de combustible......217
Arranque en frío del vehículo...................218
Asistencia al cliente
Cómo obtener los servicios necesarios
........................................................................220
En California (únicamente en EE. UU.)
.........................................................................221
Programa Auto Line de Better Business
Bureau (BBB) (únicamente en EE. UU.)
........................................................................222
Utilización del programa de
mediación/arbitraje (únicamente en
Canadá) .....................................................223
Cómo obtener asistencia fuera de EE.
UU. y Canadá ............................................223
Cómo ordenar otro Manual del
propietario .................................................225
Denuncia de defectos de seguridad
(únicamente en EE. UU.) .....................225
Denuncia de defectos de seguridad
(únicamente en Canadá) ....................225
Fusibles
Cambio de fusibles.....................................226
Tabla de especificaciones de
fusibles.........................................................227
Mantenimiento
Información general...................................238
Apertura y cierre del cofre........................239
Revisión el Compartimiento del Motor -
1.6L EcoBoost®........................................240
Revisión el Compartimiento del Motor -
2.0L EcoBoost®........................................241
Revisión el Compartimiento del Motor -
2.5L................................................................242
Varilla indicadora de nivel de aceite del
motor - 1.6L EcoBoost®........................243
Varilla indicadora de nivel de aceite del
motor - 2.5L/2.0L EcoBoost®............243
Comprobación del aceite de motor......243
Comprobación del refrigerante de
motor...........................................................244
Verificación del Fluído de la Transmisión
Automática................................................248
Verificación del Fluído de Frenos..........248
Comprobación del fluido de la dirección
hidráulica....................................................248
Filtro de combustible ................................248
Comprobación del fluido del
lavador........................................................248
Cambio de la batería del vehículo........249
Comprobación de las hojas del
limpiador....................................................250
Cambio de las hojas del limpiador.......250
Cambio del filtro de aire del motor .......251
Ajuste de los Faros Principales...............252
Desmontaje de faros..................................254
Cambio de focos..........................................254
Tabla de Especificaciones de los
Focos............................................................258
Cuidado del vehículo
Información general...................................260
4
Índice

Productos de limpieza..............................260
Limpieza del exterior.................................260
Reparación de daños menores en la
pintura..........................................................261
Encerado..........................................................261
Limpieza del Motor......................................261
Limpieza de las Ventanas y las Hojas de
los Limpiadores........................................262
Limpieza del interior...................................263
Limpieza del Panel de Instrumentos y
Cristal del Tablero...................................263
Limpieza de Asientos de Piel..................264
Limpieza de las ruedas de aleación......264
Almacenamiento del Vehículo...............265
Ruedas y llantas
Información general...................................268
Cuidado de las llantas...............................270
Uso de cadenas para nieve.....................284
Sistema de monitoreo de presión de las
llantas..........................................................285
Cambio de una rueda................................289
Especificaciones técnicas........................295
Capacidades y Especifica-
ciones
Especificaciones del motor.....................296
Repuestos de Motorcraft .........................297
Número de identificación del
vehículo.......................................................298
Etiqueta de certificación del
vehículo.......................................................298
Código de la Transmisión.........................299
Especificaciones técnicas........................299
Accesorios
Accesorios .....................................................302
Ford Protect
Ford Protect..................................................304
SYNC®
Información general...................................307
Uso del reconocimiento de voz ............309
Uso de SYNC® con el teléfono ...............312
Aplicaciones y servicios SYNC® ...........325
Uso de SYNC® con el reproductor
multimedia ................................................332
Diagnóstico de fallas SYNC® .................341
MyFord Touch®
Información general...................................348
Menú................................................................359
Entretenimiento...........................................365
Teléfono..........................................................388
Información...................................................394
Climatización................................................405
Navegación...................................................408
Apéndices
Acuerdo de Licencia del Usuario............418
Reparación del vehículo
Reparación del vehículo ...........................437
5
Índice

6

ACERCA DE ESTE MANUAL
Gracias por escoger un Ford. Le
recomendamos que invierta un poco de su
tiempo para conocer su vehículo leyendo
este manual. Mientras más lo conozca,
obtendrá mayor seguridad y placer al
conducirlo.
ALERTA
Siempre que conduzca con cuidado
y atencion durante el uso y
funcionamiento de controles y
caracteristicas de su vehiculo.
Nota: Este manual describe las
características y opciones disponibles del
producto en todo el rango, algunas veces
incluso antes de que estén disponibles en
forma general. Puede describir opciones que
no están equipadas en su vehículo.
Nota: Algunas ilustraciones de este manual
pueden ser usadas por diferentes modelos,
por lo que pueden aparecer en vehiculos
diferentes a su vehiculo. Sin embargo la
informacion escencial de las ilustraciones
siempre es correcta.
Nota: Siempre utilice y opere su vehículo
de acuerdo a las leyes y regulaciones
aplicables.
Nota: Deje este manual en el vehículo
cuando lo venda. Forma parte del vehículo.
Protección del medio ambiente
Usted debe colaborar en la protección del
medio ambiente. El uso correcto del
vehículo y el desecho autorizado de
materiales de lubricación y limpieza son
pasos importantes para lograr este
objetivo.
GLOSARIO DE SÍMBOLOS
Estos son algunos de los símbolos que
puede ver en su vehículo.
Alerta de seguridad
Consulte el Manual del
propietario
Sistema de frenos antibloqueo
Evitar fumar, producir llamas o
chispas
Batería
Ácido de batería
Líquido de frenos, no derivado
del petróleo
Sistema de frenos
Filtro de aire de la cabina
Revisar tapón de combustible
Cierre y apertura de las puertas
de seguridad para niños
Anclaje inferior del asiento para
niños
Anclaje para las correas de
sujeción del asiento para niños
E71340
Control de crucero
7
Introducción

No abrir cuando esté caliente
Filtro de aire del motor
Refrigerante del motor
Temperatura del refrigerante del
motor
Aceite para motor
Gas explosivo
Advertencia del ventilador
Abrochar cinturón de seguridad
Bolsa de aire delantera
Faros para niebla delanteros
Restablecimiento de la bomba
de combustible
Compartimiento de fusibles
Luces intermitentes de
emergencia
Ventana trasera calentada.
E91392
Parabrisas desempañado
Manija de apertura interior de la
cajuela
Gato
Control de iluminación
Advertencia de presión de llanta
desinflada
Mantener el nivel de líquido
correcto
Alarma de pánico
E139213
Asistencia de estacionamiento
Freno de estacionamiento
Fluido de dirección hidráulica
Ventanas eléctricas delanteras
y traseras
Bloqueo de las ventanas
eléctricas
Servicio del motor a la brevedad
Bolsa de aire lateral
Control de estabilidad
8
Introducción

Limpiaparabrisas y
lavaparabrisas
RETENCIÓN DE DATOS
Grabación de datos de servicio
Las grabadoras de datos de servicio de su
vehículo son capaces de recopilar y
almacenar información de diagnóstico
sobre su vehículo. Esto incluye información
sobre el rendimiento o el estado de los
diversos sistemas y módulos del vehículo,
como el motor, acelerador, sistemas de
frenos o dirección. Para diagnosticar y
reparar su vehículo en forma adecuada,
Ford Motor Company, Ford of Canada y los
talleres de servicio y reparación pueden
acceder o compartir entre ellos
información de diagnóstico del vehículo
recibida a través de una conexión directa
a su vehículo cuando se le realiza un
diagnóstico o servicio. Para los EE.UU.
solamente (si está equipado), si decide
usar el Informe de mantenimiento del
vehículo de SYNC, usted acepta que Ford
Motor Company y los establecimientos de
servicio autorizados de Ford también
podrán obtener acceso electrónico a cierta
información de diagnóstico, y que dicha
información podrá usarse con cualquier
tipo de propósito. Ver SYNC® (página 307).
Grabación de datos de eventos
Este vehículo está equipado con una
grabadora de datos de eventos. El
propósito principal de una grabadora
de datos de eventos (EDR) es grabar
datos en ciertas situaciones de choque
o casi choque, como cuando se
despliega una bolsa de aire o se golpea
un obstáculo en el camino. Estos datos
permiten saber cómo estaban
funcionando los sistemas del vehículo.
La EDR está diseñada para grabar
datos relacionados con la dinámica y
los sistemas de seguridad del vehículo
durante un breve lapso, por lo general
de 30 segundos o menos.
La grabadora de datos de eventos de
este vehículo está diseñada para
grabar información como:
• Cómo estaban funcionando los
diversos sistemas del vehículo;
• Si el conductor y el pasajero
llevaban abrochados o no los
cinturones de seguridad;
• Qué tan fuerte estaba pisando el
conductor (si lo estaba pisando) el
pedal del acelerador y/o el freno;
• A qué velocidad se desplazaba el
vehículo; y
• En qué posición llevaba el
conductor el volante de la dirección.
Estos datos permiten conocer mejor
las circunstancias en que ocurren
choques y lesiones.
9
Introducción

Nota: La información de la grabadora de
datos de evento es registrada por el
vehículo únicamente si ocurre una
situación de choque importante; la
grabadora no registra datos en
condiciones de manejo normales, y
tampoco registra datos o información
personal (por ejemplo, nombre, sexo,
edad y ubicación del choque) (consulte
más adelante las limitaciones de
privacidad relacionadas con el servicio
de asistencia y tráfico 911, indicaciones
e información). Sin embargo, algunas
instancias, como las autoridades
policiales, pueden combinar los datos de
la grabadora con los datos de
identificación personal recopilados
durante la investigación de un choque.
Para leer los datos registrados por una
grabadora de datos de evento, se
necesita equipo especial y acceso al
vehículo o a la grabadora. Además del
fabricante del vehículo, otras
instancias que tienen este equipo
especial, como las autoridades
policiales, pueden leer la información
si tienen acceso al vehículo o a la
grabadora de datos de evento. Ford
Motor Company y Ford of Canada no
tienen acceso a la información de la
grabadora de datos de eventos sin
tener su consentimiento, a menos que
se cumpla con una orden judicial o si lo
requiere la ley, las autoridades
gubernamentales u otras terceras
partes que actúen como autoridad
legal. Otras terceras partes pueden
solicitar acceso a la información en
forma independiente de Ford Motor
Company y Ford of Canada.
Nota: En la medida que cualquier ley
relacionada con las grabadoras de datos
de eventos sea aplicable al sistema SYNC
o sus funciones, tenga en cuenta lo
siguiente: una vez que se habilita (se
pone en ON) la Asistencia 911 (si está
equipada), ésta puede, a través de
cualquier teléfono celular vinculado y
conectado, informar a los servicios de
emergencia que el vehículo estuvo
involucrado en un choque que provocó el
despliegue de una bolsa de aire o, en
ciertos vehículos, la activación del corte
de la bomba de combustible. Algunas
versiones o actualizaciones de Asistencia
911 se pueden utilizar para proporcionar
a los operadores del servicio 911, de
manera verbal o electrónica, la ubicación
geográfica del vehículo (latitud y
longitud), u otros detalles acerca del
vehículo o el choque, e incluso datos
personales de los ocupantes, para ayudar
a los operadores del servicio 911 a
proporcionar los servicios de emergencia
más apropiados. Si no desea que se
divulgue esta información, no active el
sistema de Asistencia 911. Ver SYNC®
(página 307).
10
Introducción

Además, cuando usted se conecta a
Tráfico, Indicaciones e Información (si
está equipado, y sólo en EE.UU.), el
servicio utiliza tecnología de GPS y los
avanzados sensores del vehículo para
recopilar información sobre la
ubicación actual del vehículo, su
dirección y velocidad de viaje
(“información de viaje del vehículo”)
únicamente para poder proporcionarle
las indicaciones, informes de tránsito
o búsquedas de negocios que usted
solicite. Si no desea que Ford ni sus
proveedores reciban esta información,
no active el servicio. Ford Motor
Company y los proveedores solo
utilizan este servicio para
proporcionarle esta información y no
almacenan los datos de viaje de su
vehículo. Para obtener más detalles,
consulte los términos y condiciones
del servicio de tráfico, indicaciones e
información. Ver SYNC® (página 307).
PROPOSICIÓN 65 DE
CALIFORNIA
ALERTA
Algunos componentes del escape
del motor, ciertos componentes del
vehículo, algunos líquidos que
contienen los vehículos y determinados
productos para el uso de los componentes
contienen o emiten sustancias químicas
conocidas en el Estado de California como
causantes de cáncer y defectos de
nacimiento u otro daño reproductivo.
PERCLORATO
Ciertos componentes de su vehículo, como
los módulos de bolsas de aire, pretensores
de cinturones de seguridad y baterías de
control remoto, pueden contener material
perclorado. Se deben manipular con
cuidado al realizar el servicio o al desechar
el vehículo cuando termine su vida útil.
Consulte
www.dtsc.ca.gov/hazardouswaste/perchlorate
para obtener más información.
FORD CREDIT
(EE.UU. solamente)
Ford Credit ofrece una amplia gama de
planes de financiamiento y arrendamiento
para que pueda adquirir su vehículo. Si ha
financiado o arrendado su vehículo a
través de Ford Credit, le agradecemos su
preferencia.
Para su comodidad, ofrecemos diversas
maneras de ponerse en contacto con
nosotros, además de ayuda para
administrar su cuenta.
Teléfono: 1-800-727-7000
Para obtener más información acerca de
Ford Credit y comunicarse con el
Administrador de cuentas, visite
www.fordcredit.com.
11
Introducción

RECOMENDACIÓN DE PARTES
DE REPUESTO
Su vehículo ha sido construido con los más
altos estándares y usando piezas de alta
calidad. Recomendamos que exija el uso
de refacciones y piezas Ford y Motorcraft
originales cada vez que su vehículo
requiera mantenimiento programado o una
reparación. Puede reconocer claramente
las refacciones Ford y Motorcraft originales
si observa la marca Ford, FoMoCo o
Motorcraft en las refacciones o en sus
paquetes.
Mantenimiento programado y
reparaciones mecánicas
Una de las mejores maneras de asegurarse
de que su vehículo funcione durante años
es realizar los mantenimientos
recomendados y usar refacciones que
cumplan con las especificaciones
detalladas en este Manual del propietario.
Las refacciones Ford y Motorcraft
originales cumplen o exceden estas
especificaciones.
Reparaciones de choques
Esperamos que jamás sufra un choque,
pero los accidentes suceden. Las
refacciones Ford originales para casos de
choques cumplen con nuestros estrictos
requisitos de ajuste, acabado, integridad
estructural, protección contra corrosión y
resistencia a abolladuras. Durante el
desarrollo del vehículo, validamos que
estas piezas proporcionen el nivel
necesario de protección como un sistema
completo. Una excelente manera de
asegurarse de obtener este nivel de
protección es utilizar refacciones Ford
originales para casos de choque.
Garantía de las refacciones
Las refacciones Ford y Motorcraft
originales son las únicas refacciones que
cuentan con la garantía de Ford. El daño
causado en su vehículo a causa de una
falla relacionada con piezas que no son
Ford no están cubiertos por la Garantía de
Ford. Para obtener más información,
consulte los términos y condiciones de la
Garantía de Ford.
NOTAS ESPECIALES
Garantía limitada para vehículos
nuevos
Para obtener una descripción detallada de
los aspectos que contempla y que no
contempla la Garantía limitada para
vehículos nuevos de su vehículo, consulte
el Manual de garantía que se entrega junto
con el Manual del propietario.
Instrucciones especiales
Para su seguridad, su vehículo cuenta con
controles electrónicos sofisticados.
AVISOS
Si no se siguen las advertencias e
instrucciones específicas se podrían
producir lesiones personales. Ver
Sistema de Seguridad Complementaria
(página 38).
Los asientos de niños o de bebés
orientados hacia atrás y montados
en el asiento delantero no se deben
colocar NUNCA frente a una bolsa de aire
del pasajero activa.
12
Introducción

Aviso para los propietarios de
camiones y camionetas pickup y
vehículos utilitarios
ALERTA
Los vehículos utilitarios se vuelcan
con frecuencia significativamente
mayor que otros tipos de vehículos.
Antes de manejar el vehículo, lea
atentamente este Manual del propietario.
Su vehículo no es un automóvil de
pasajeros. Al igual que con otros vehículos
de este tipo, si no se hace funcionar
correctamente, se puede producir la
pérdida del control del vehículo, la
volcadura de éste, lesiones personales o
la muerte.
Uso del vehículo con un barredor
de nieve
No utilice este vehículo para quitar la
nieve.
Su vehículo no está equipado con un
paquete para quitar nieve.
Uso del vehículo como ambulancia
No utilice este vehículo como
ambulancia.
Su vehículo no está equipado con el
Paquete de preparación de ambulancia
Ford.
EQUIPO MÓVIL DE
COMUNICACIONES
El uso de equipos móviles de comunicación
es cada vez más importante en la atención
de negocios y asuntos personales. Sin
embargo, no debe arriesgar su seguridad
ni la de otros al usar dichos equipos. La
comunicación móvil puede mejorar la
seguridad personal cuando se emplea en
forma correcta, especialmente en
situaciones de emergencia. Para evitar
anular los beneficios de estos equipos de
comunicación móvil, la seguridad debe ser
lo principal al momento de utilizarlos. Los
equipos de comunicación móvil incluyen,
entre otros, teléfonos celulares,
localizadores, dispositivos de correo
electrónico portátiles, dispositivos de
mensajería de texto y radios portátiles de
transmisión y recepción.
ALERTA
Manejar mientras está distraído
puede tener como consecuencia la
pérdida de control del vehículo, un
accidente y lesiones. Le recomendamos
enfáticamente que tenga extrema
precaución cuando utilice cualquier
dispositivo que pudiera distraerlo mientras
conduce. Su responsabilidad principal es
la operación segura de su vehículo. No
recomendamos el uso de dispositivos
portátiles mientras maneja; debe cumplir
con todas las leyes aplicables.
13
Introducción

OPCIÓNES ÚNICAS DE
EXPORTACIÓN
Para su región en particular, este vehículo
puede contar con funciones y opciones
que sean diferentes a las que se describen
en el Manual del propietario. Es posible
que se le entregue un suplemento
exclusivo para su mercado, que
complementa este folleto. Al consultar el
suplemento exclusivo para su mercado,
en caso de que se le proporcione, puede
identificar correctamente las
características, recomendaciones y
especificaciones exclusivas para su
vehículo. Este Manual del propietario fue
creado básicamente para los mercados
de Estados Unidos y Canadá. Las funciones
o equipamiento mencionado como
estándar pueden ser diferentes en las
unidades fabricadas para exportación.
Consulte este Manual del propietario
para ver toda la información y
advertencias requeridas.
14
Introducción

INFORMACIÓN GENERAL
Vea las siguientes secciones para obtener
instrucciones sobre cómo utilizar los
sistemas de seguridad para niños en forma
correcta.
AVISOS
Siempre asegúrese de que el niño
esté correctamente asegurado en un
dispositivo apropiado para su
estatura, edad y peso. Los sistemas de
seguridad para niños se deben comprar en
forma independiente del vehículo. Si no se
siguen estas instrucciones y pautas,
aumenta el riesgo de que el niño sufra
lesiones graves o incluso la muerte.
Todos los niños tienen talla
diferente. Las recomendaciones para
los sistemas de seguridad se basan
en límites de altura, edad y peso probables
del niño establecidos por la Administración
Nacional de Seguridad del Tráfico en las
Carreteras (NHTSA) y otras organizaciones
de seguridad o corresponden a los
requisitos mínimos de la ley. Ford
AVISOS
recomienda que consulte a un técnico en
seguridad de pasajeros infantiles
certificado (CPST) de la NHTSA y a su
pediatra para asegurarse de que su asiento
para niños sea adecuado para su hijo y que
sea compatible y pueda instalarse
correctamente en el vehículo. Para ubicar
a una estación de ajuste de asiento para
niños y un CPST comuníquese con el
número de llamada sin cargo de la NHTSA
1-888-327-4236 o a través de Internet en
http://www.nhtsa.dot.gov. En Canadá,
consulte a su oficina local de St. John
Ambulance para que le recomiende a un
CPST. Si desea obtener más información,
póngase en contacto con la dependencia
de transporte provincial, con su oficina
local de St. John Ambulance en
http://www.sfa.ca o con Transport
Canada en el 1-800-333-0371
(http://www.tc.gc.ca). Si no sienta a los
niños en asientos de seguridad fabricados
especialmente para su estatura, edad y
peso, puede aumentar el riesgo de que
sufran lesiones graves o incluso la muerte.
15
Seguridad de los Niños

Recomendaciones para sistemas de seguridad para niños
Tipo de sistema de segu-
ridad recomendado
Tamaño, estatura, peso o edad del niñoNiño
Use un asiento de segu-
ridad para niños (a veces
llamado carro para bebé,
asiento convertible o
asiento infantil).
Niños que pesan 18 kg (40 lb) o menos
(por lo general de cuatro años o menos).
Bebés o niños
muy pequeños
Use un asiento auxiliar.Niños que crecieron o que ya no caben
adecuadamente en el asiento de segu-
ridad (por lo general, niños de menos de
1,45 m (4 pies 9 pulg) de estatura, entre
cuatro y doce años de edad, y entre 18 y
36 kg (40 y 80 lb) de peso, y hasta 45 kg
(100 lb) si lo recomienda el fabricante
del sistema de sujeción para niños).
Niños pequeños
Use un cinturón de segu-
ridad del vehículo con la
correa pélvica bien ajustada
y baja a través de la parte
inferior de las caderas, la
correa del hombro centrada
entre el hombro y el pecho,
y el respaldo en posición
vertical.
Niños que crecieron o que ya no caben en
un asiento auxiliar para posicionamiento
del cinturón de seguridad (por lo general,
niños de 1.45 metros (4 pies 9 pulg) de
estatura o de más de 36 kg (80 lb) de
peso, o hasta 45 kg (100 lb) si lo reco-
mienda el fabricante del sistema de
sujeción para niños).
Niños más
grandes
16
Seguridad de los Niños

• La ley en Estados Unidos y Canadá
exige el uso de asientos de seguridad
para niños e infantes.
• Muchos estados, provincias y
municipios exigen que los niños
pequeños usen asientos auxiliares
aprobados hasta la edad de ocho años,
una estatura de 1,45 m (4 pies 9 pulg),
o 36 kg (80 lb). Consulte los
reglamentos de tránsito locales y
estatales para ver si hay requisitos
específicos con relación a la seguridad
de los niños en su vehículo.
• Siempre que sea posible, siente a los
niños menores de doce años en
sistemas de seguridad y ubíquelos en
el asiento trasero del vehículo. Las
estadísticas de accidentes demuestran
que los niños están más seguros
cuando viajan en el asiento trasero, con
los sistemas de seguridad ajustados
correctamente, que cuando viajan en
el asiento delantero.
ASIENTOS PARA NIÑOS
E142594
Use un asiento de seguridad para niños (a
veces llamado carro para bebé, asiento
convertible o asiento infantil) para los
bebés o niños que pesen 18 kg (40 libras)
o menos (generalmente de 4 años o
menos).
COLOCACIÓN DE LOS
ASIENTOS PARA NIÑOS
AVISOS
Las bolsas de aire pueden causar la
muerte o lesionar a un niño que se
encuentre en un asiento para niños.
NUNCA coloque un asiento para niños
orientado hacia atrás frente a una bolsa
de aire activa. Si debe usar un asiento para
niños orientado hacia delante en el asiento
delantero, mueva el asiento
completamente hacia atrás. Siempre que
sea posible, los niños de 12 años y menos
deben ir correctamente asegurados en el
asiento trasero. Si no le es posible sentar
y asegurar correctamente a todos los niños
en el asiento trasero, asegure
correctamente al niño más grande en el
asiento delantero.
Siempre siga atentamente las
instrucciones y advertencias
proporcionadas por el fabricante de
cualquier sistema de seguridad para niños
con el fin de determinar si el dispositivo de
sujeción es adecuado para el tamaño, la
estatura, el peso o la edad del niño. Siga
las instrucciones y advertencias del
fabricante del sistema de seguridad para
niños proporcionadas para la instalación
y uso en conjunto con las instrucciones y
advertencias entregadas por el fabricante
del vehículo. Un asiento de seguridad mal
instalado o mal utilizado, que no sea
apropiado para la estatura, la edad o el
peso del niño o que no se ajuste
correctamente al niño podría implicar un
mayor riesgo de sufrir lesiones graves o
incluso la muerte.
Nunca deje que un pasajero lleve a
un niño en su regazo mientras el
vehículo esté en movimiento. Éste
no podrá proteger al niño en caso de un
choque, lo que puede significar lesiones
graves o incluso la muerte del menor.
17
Seguridad de los Niños

AVISOS
Nunca use almohadas, libros ni
toallas para sentar al niño a mayor
altura sobre el asiento. Esos objetos
pueden deslizarse y aumentar la
probabilidad de que el niño sufra lesiones
e incluso la muerte en caso de un choque.
Asegure siempre los asientos para
niños o los asientos auxiliares
cuando no estén ocupados. Estos
objetos podrían transformarse en
proyectiles en un choque o frenada
repentina, lo cual podría aumentar el riesgo
de sufrir lesiones graves.
AVISOS
Nunca coloque la correa del hombro
debajo del brazo ni detrás de la
espalda del niño, ni permita que el
niño lo haga, porque eso reduce la
protección de la parte superior del cuerpo
y puede aumentar el riesgo de sufrir
lesiones o incluso la muerte en un choque.
No deje sin vigilancia en su vehículo
a niños, a adultos que no pueden
valerse por sí mismos ni a mascotas.
Use cualquier método de sujeción según lo indica la X a conti-
nuación
Peso del
niño
Tipo de
sistema de
protección
Solo
cinturón de
seguridad
Cinturón
de segu-
ridad y
LATCH
(anclajes
inferiores y
anclaje
superior
para
correas de
sujeción)
Cinturón
de segu-
ridad y
anclaje
superior
para
correas de
sujeción
LATCH
(solo
anclajes
inferiores)
LATCH
(anclajes
inferiores y
anclaje
superior
para
correas de
sujeción)
XXHasta 21 kg
(48 lb)
Asiento
para niños
orientado
hacia atrás
XXXHasta 21 kg
(48 lb)
Asiento
para niños
orientado
hacia
delante
XXMás de
21 kg
(48 lb)
Asiento
para niños
orientado
hacia
delante
18
Seguridad de los Niños

Nota: El asiento de seguridad para niños
debe estar firmemente ajustado en el
asiento del vehículo. Puede ser necesario
levantar o quitar el apoyacabezas. Consulte
el capítulo Asientos para obtener más
información sobre los apoyacabezas.
ASIENTOS ELEVADOS
ALERTA
Nunca coloque la correa del hombro
debajo del brazo ni detrás de la
espalda del niño, ni permita que el
niño lo haga, porque eso reduce la
protección de la parte superior del cuerpo
y puede aumentar el riesgo de sufrir
lesiones o incluso la muerte en un choque.
Utilice un asiento auxiliar para colocación
del cinturón en el caso de niños que han
crecido o que ya no caben adecuadamente
en el asiento de seguridad (por lo general,
niños de menos de 1,45 m (4 pies 9 pulg)
de estatura, entre cuatro (4) y doce (12)
años de edad, y entre 18 y 36 kg (40 y
80 lb) de peso, y hasta 45 kg (100 lb), si
lo recomienda el fabricante del sistema de
sujeción para niños). Muchas leyes
estatales, provinciales y municipales
exigen que los niños usen asientos
auxiliares aprobados hasta la edad de
ocho años, una estatura de 1,45 m (4 pies
9 pulg), o 36 kg (80 lb).
Los asientos auxiliares se deben usar hasta
que usted pueda responder que SÍ a
TODAS estas preguntas al sentar al niño
sin el asiento auxiliar:
E142595
• ¿El niño se puede sentar con la espalda
totalmente apoyada en el respaldo del
asiento del vehículo y con las rodillas
cómodamente flexionadas en el borde
del asiento?
• ¿El niño se puede sentar sin
encorvarse?
• ¿La correa pélvica del cinturón
descansa en un punto bajo, apoyada
en las caderas?
• ¿La correa del hombro está bien
centrada en el hombro y en el pecho?
• ¿El niño puede permanecer sentado
de esa manera durante todo el viaje?
Siempre use los asientos auxiliares junto
con el cinturón pélvico y de hombros del
vehículo.
19
Seguridad de los Niños

Tipos de asientos auxiliares
E68924
• Asientos auxiliares sin respaldo
Si el asiento auxiliar sin respaldo tiene una
cubierta removible, retírela. Si una posición
de asiento del vehículo tiene un respaldo
bajo y no tiene cabecera, un asiento auxiliar
sin respaldo puede ubicar la cabeza del
niño (medido en la parte superior de las
orejas) sobre la parte superior del asiento.
En este caso, mueva el asiento auxiliar sin
respaldo a otra posición de asiento con un
respaldo más alto o equipado con
cabecera y cinturón pélvico y de hombros
combinado, o utilice un asiento auxiliar con
respaldo alto.
E70710
• Asientos auxiliares con respaldo alto
Si no encuentra un asiento que pueda
apoyar de manera adecuada la cabeza del
niño cuando utilice un asiento auxiliar sin
respaldo, su mejor alternativa será un
asiento auxiliar con respaldo alto.
La forma y el tamaño de los niños y de los
asientos auxiliares varía
considerablemente. Seleccione un asiento
auxiliar que mantenga la correa pélvica en
un punto bajo, bien ajustada sobre las
caderas, y nunca sobre el vientre del niño,
y que le permita ajustar la correa del
hombro de tal modo que cruce sobre el
pecho del niño y descanse holgadamente
cerca del centro del hombro. En los
siguientes dibujos se compara el ajuste
ideal (centro) con una correa del hombro
incómodamente cercana al cuello y una
correa del hombro que pudiera deslizarse
fuera del hombro. Además, se muestra
cómo ajustar correctamente la correa
pélvica del cinturón, en un punto bajo y
bien ajustada sobre las caderas del niño.
20
Seguridad de los Niños

E142596
E142597
Si el asiento auxiliar se desliza en el asiento
del vehículo, colocar bajo el asiento auxiliar
una malla ahulada (se vende como
plataforma o como base para tapetes)
puede resolver el problema. No introduzca
ningún elemento más grueso que éste bajo
el asiento auxiliar. Consulte las
instrucciones del fabricante del asiento
auxiliar.
INSTALACIÓN DE ASIENTOS
PARA NIÑOS
Usando CINTURONES PÉLVICOS
Y DE HOMBROS
AVISOS
Las bolsas de aire pueden causar la
muerte o lesionar a un niño que se
encuentre en un asiento para niños.
NUNCA coloque un asiento para niños
orientado hacia atrás frente a una bolsa
de aire activa. Si debe usar un asiento para
niños orientado hacia delante en el asiento
delantero, mueva el asiento
completamente hacia atrás.
Los niños de hasta 12 años de edad
deben ir correctamente sujetos en el
asiento trasero cada vez que sea
posible.
21
Seguridad de los Niños

AVISOS
Dependiendo de dónde asegure el
sistema de seguridad para niños y
del diseño del mismo, éste puede
obstruir el acceso a ciertos conjuntos de
hebillas de cinturón de seguridad y anclajes
inferiores LATCH, dejando esas funciones
potencialmente inservibles. Para evitar el
riesgo de lesiones, los ocupantes sólo
deberían utilizar posiciones de asiento
donde ellos puedan estar correctamente
restringidos.
Al instalar un asiento de seguridad para
niños con cinturones pélvicos y de
hombros combinados:
• Utilice la hebilla del cinturón de
seguridad correcta para esa posición
de asiento.
• Inserte la lengüeta del cinturón en la
hebilla correspondiente hasta que
escuche un chasquido y sienta que se
engancha. Asegúrese de ajustar
firmemente la lengüeta en la hebilla.
• Mantenga el botón de apertura de la
hebilla apuntando hacia arriba y
opuesto al asiento de seguridad, con
la lengüeta entre el asiento para niños
y el botón de apertura, para evitar que
se desabroche accidentalmente.
• Coloque el respaldo del asiento del
vehículo en posición vertical.
• Ponga el cinturón de seguridad en el
modo de bloqueo automático.
Consulte el paso 5. Este vehículo no
requiere el uso de un broche de fijación.
Realice los siguientes pasos cuando instale
el asiento para niños con cinturones
pélvicos y de hombros combinados:
Nota: A pesar de que el asiento para niños
que aparece en la imagen es un asiento
orientado hacia delante, son los mismos
pasos para la instalación de un asiento
orientado hacia atrás.
E142528
1. Coloque el asiento de seguridad para
niños en un asiento con un cinturón
pélvico y de hombros combinado.
E142529
2. Jale hacia abajo la correa del hombro
y luego sujete la correa pélvica.
E142530
22
Seguridad de los Niños

3. Mientras sostiene juntas las dos
correas, pase la lengüeta a través del
asiento para niños de acuerdo con las
instrucciones del fabricante. Asegúrese
de que las correas del cinturón no
estén torcidas.
E142531
4. Inserte la lengüeta del cinturón en la
hebilla adecuada (la hebilla más
cercana a la dirección desde la cual
proviene la lengüeta) para esa posición
del asiento hasta que escuche un
chasquido y sienta que se ha
enganchado. Jale la lengüeta para
asegurarse de que esté firmemente
enganchada.
E142875
5. Para poner el retractor en el modo de
bloqueo automático, tome la parte del
hombro del cinturón y jale hacia abajo
hasta extraer todo el cinturón.
Nota: El modo de bloqueo automático está
disponible en los asientos del pasajero
delantero y traseros. Este vehículo no
requiere el uso de un broche de fijación.
6. Deje que el cinturón se retraiga para
eliminar el aflojamiento. El cinturón
emite un chasquido a medida que se
retrae para indicar que está en el modo
de bloqueo automático.
7. Trate de sacar el cinturón del retractor
para asegurarse que el retractor esté
en el modo de bloqueo automático
(será imposible sacar más el cinturón).
Si el retractor no está bloqueado,
desabroche el cinturón y repita los
pasos 5 y 6.
E142533
8. Elimine la holgura restante del
cinturón. Fuerce el asiento hacia abajo
con peso adicional, por ejemplo,
presionando o empujando hacia abajo
con las rodillas el sistema de sujeción
para niños mientras tira de la correa
del hombro hacia arriba para eliminar
la holgura del cinturón. Esto es
necesario para eliminar la holgura que
existirá una vez que se agregue el peso
del niño al sistema de seguridad para
niños. También ayuda a lograr un
ajuste adecuado del asiento del niño
al vehículo. En ocasiones, una leve
inclinación hacia la hebilla ayudará
también a eliminar la holgura restante
del cinturón.
23
Seguridad de los Niños

9. Enganche la correa de sujeción (si el
asiento para niños está instalado).
E142534
10. Antes de poner al niño en el asiento,
incline con fuerza el asiento hacia
delante y atrás para cerciorarse que
esté firmemente ajustado. Para
verificar esto, tome el asiento en el
trayecto del cinturón e intente
moverlo de lado a lado y de adelante
hacia atrás. Si está bien instalado, no
debe moverse más de 2.5 cm (1 pulg).
Ford recomienda verificar con un técnico
en seguridad de niños pasajeros certificado
de la NHTSA para cerciorarse de que el
sistema de seguridad para niños esté
correctamente instalado. En Canadá,
consulte a su oficina local de St. John
Ambulance para que le recomiende a un
técnico en seguridad de pasajeros
infantiles certificado.
Uso de anclajes inferiores Y
correas para niños (LATCH)
AVISOS
Nunca fije dos asientos de seguridad
para niños al mismo anclaje. En caso
de accidente, es posible que un
anclaje no sea lo suficientemente fuerte
como para sostener dos conexiones de
asientos para niños y puede romperse,
provocando lesiones graves o incluso la
muerte.
AVISOS
Dependiendo de dónde asegure el
sistema de seguridad para niños y
del diseño del mismo, éste puede
obstruir el acceso a ciertos conjuntos de
hebillas de cinturón de seguridad o
anclajes inferiores LATCH, dejando esas
funciones potencialmente inservibles. Para
evitar el riesgo de lesiones, los ocupantes
sólo deberían utilizar posiciones de asiento
donde ellos puedan estar correctamente
restringidos.
El sistema LATCH consta de tres puntos
de anclaje en el vehículo: dos (2) anclajes
inferiores ubicados donde se juntan el
respaldo del asiento y el cojín del asiento
(llamado recodo del asiento) y un (1)
anclaje superior para correas de sujeción
ubicado detrás del mismo asiento.
Los asientos de seguridad para niños
compatibles con LATCH tienen dos
conexiones rígidas o instaladas en la correa
que se conectan a los dos anclajes
inferiores en las posiciones de asiento
equipadas con LATCH en el vehículo. Este
tipo de método de conexión elimina la
necesidad de utilizar cinturones de
seguridad para fijar el asiento para niños;
sin embargo, se puede seguir usando el
cinturón de seguridad para enganchar el
asiento para niños. En el caso de los
asientos para niños orientados hacia
delante, la correa de sujeción superior
también debe engancharse en el anclaje
superior para correas si el asiento para
niños cuenta con correa de sujeción
superior.
24
Seguridad de los Niños

E142535
Su vehículo tiene anclajes inferiores LATCH
para la instalación de asientos para niños
en las posiciones de asiento marcadas con
el símbolo de asiento para niños.
E144054
Los anclajes LATCH se localizan en la
sección posterior del asiento trasero, entre
el cojín y el respaldo, debajo de los
símbolos que se muestran. Siga las
instrucciones del fabricante del asiento
para niños para instalar correctamente los
asientos para niños con conexiones
LATCH. Siga las instrucciones para
enganchar los asientos de seguridad para
niños con correas de sujeción.
Una las conexiones inferiores LATCH del
asiento para niños sólo a los anclajes que
se muestran.
Uso de anclajes inferiores interiores de
los asientos exteriores (uso del asiento
central)
ALERTA
El espacio estándar para los anclajes
inferiores LATCH es de 11 mm
(28 pulg) de centro a centro. No use
anclajes inferiores LATCH para la posición
de asiento central a menos que las
instrucciones del fabricante del asiento
para niños lo permitan y especifiquen el
uso de anclajes separados al menos con
la separación de los incluidos en este
vehículo.
Los anclajes inferiores del centro de la
segunda fila de asientos traseros tienen
una separación de 46 centímetros (18
pulgadas). No se puede instalar un asiento
para niños con conexiones LATCH rígidas
en el asiento central. Los asientos para
niños compatibles con LATCH (con
conexiones en el tejido del cinturón) sólo
se pueden utilizar en esta posición de
asiento, siempre y cuando las instrucciones
del fabricante del asiento para niños
permitan el uso con el espacio de anclajes
indicado. No fije un asiento para niños en
cualquier anclaje inferior usado para la
instalación del asiento para niños si hay
un asiento para niños cerca fijado a ese
anclaje.
Cada vez que use el asiento de seguridad,
revise que el asiento esté correctamente
sujeto a los anclajes inferiores y al anclaje
para correas de sujeción. Jale el asiento
hacia delante y atrás y de lado a lado para
cerciorarse de que esté asegurado en el
vehículo. Si está bien instalado, el asiento
no debería moverse más de 2.5 cm (1 pulg).
Si el asiento de seguridad no está
correctamente anclado, el riesgo de que
un niño resulte lesionado en un choque
aumenta considerablemente.
25
Seguridad de los Niños

Combinación de cinturones de
seguridad y anclajes inferiores LATCH
para la sujeción de asientos de
seguridad para niños
Cuando se usan juntos, cualquiera de los
dos puede conectarse primero, siempre y
cuando se logre una instalación correcta.
Enganche la correa de sujeción después,
si se incluye con el asiento para niños.
Uso de correas de sujeción
Muchos asientos de seguridad
para niños orientados hacia
delante incluyen una correa de
sujeción que se extiende desde la parte
posterior del asiento de seguridad y se
engancha en un punto de anclaje
denominado anclaje superior para correas
de sujeción. Las correas de sujeción están
disponibles como accesorio para muchos
modelos antiguos de asientos de
seguridad.
Comuníquese con el fabricante del asiento
de seguridad para niños a fin de ordenar
una correa de sujeción u obtener una más
larga si la de su asiento de seguridad no
logra alcanzar el anclaje superior para
correas que le corresponde en el vehículo.
Cuando se ha instalado el asiento de
seguridad para niños, ya sea que use el
cinturón de seguridad, los anclajes
inferiores del sistema LATCH, o ambos,
puede conectar la correa de sujeción
superior.
Los anclajes para correas de sujeción de
su vehículo están en las siguientes
posiciones (vistas desde arriba):
E142537
Realice los siguientes pasos para instalar
un asiento de seguridad para niños con los
anclajes de correas de sujeción:
Nota: Si instala un asiento para niños con
conexiones rígidas LATCH, no apriete la
correa de sujeción tanto que el asiento para
niños se levante del cojín del asiento del
vehículo cuando el niño esté sentado en él.
Mantenga la correa de sujeción bien
ajustada, pero sin que se levante la parte
delantera del asiento para niños. Mantener
el asiento para niños tocando levemente el
asiento del vehículo, proporciona la mejor
protección en caso de un accidente grave.
1. Pase la correa de sujeción del asiento
de seguridad para niños por encima del
respaldo del asiento. En el caso de los
asientos exteriores, pase la correa de
sujeción por debajo de la cabecera y
entre los postes de la misma. Para el
asiento central, pase la correa de
sujeción sobre la parte superior de la
cabecera. De ser necesario, también
puede desmontar las cabeceras.
26
Seguridad de los Niños

E142538
2. Localice el anclaje correcto en el panel
posterior del asiento posteior para
conocer posición de asiento trasero
seleccionada. Los anclajes están
etiquetados con el símbolo de correa
de sujeción y están parcialmente
cubiertos por el panel de separación.
Tire el panel hacia atrás para exponer
completamente los anclajes.
E142539
3. Enganche la correa de sujeción al
anclaje tal como se ilustra.
4. Ajuste la correa de sujeción del asiento
de seguridad para niños según las
instrucciones del fabricante. Si el
sistema de seguridad para niños está
equipado con una correa de sujeción y
el fabricante del sistema de seguridad
para niños recomienda su uso, Ford
también recomienda su uso.
SEGUROS A PRUEBA DE
NIÑOS
Al colocar estos seguros, las puertas
traseras no se pueden abrir desde el
interior.
E112197
Los seguros a prueba de niños están
ubicados en el borde trasero de cada
puerta trasera y deben colocarse por
separado para cada puerta.
• Lado del conductor: gire hacia la
izquierda para bloquear y hacia la
derecha para desbloquear.
• Lado del pasajero: gire hacia la derecha
para bloquear y hacia la izquierda para
desbloquear.
27
Seguridad de los Niños

FUNCIONAMIENTO
AVISOS
Maneje y viaje siempre con el
respaldo en posición vertical y con
la correa pélvica del cinturón bien
ajustada, lo más baja posible y apoyada
sobre los huesos de las caderas.
Para reducir el riesgo de lesiones,
asegúrese de sentar a los niños
donde estén apropiadamente
asegurados.
Nunca deje que un pasajero lleve a
un niño en su regazo mientras el
vehículo esté en movimiento. El
pasajero no puede proteger al niño de una
lesión en caso de una colisión.
Todos los ocupantes del vehículo,
incluido el conductor, deben usar
siempre los cinturones de seguridad
en forma apropiada, incluso si se cuenta
con un sistema de sujeción suplementario
de bolsas de aire.
Es extremadamente peligroso viajar
en el área de carga de un vehículo,
ya sea dentro o fuera de él. En una
colisión, la gente que viaja en estas áreas
es la más propensa a quedar herida o
morir. No permita que la gente viaje en
ningún área de su vehículo que no esté
equipada con cinturones de seguridad.
Asegúrese de que todos los pasajeros de
su vehículo estén en un asiento y usen
apropiadamente un cinturón de seguridad.
En un choque con volcadura, la
probabilidad de muerte es mucho
mayor para una persona que no lleva
cinturón de seguridad, que para una que
sí lo lleva.
AVISOS
Cada asiento de su vehículo tiene un
cinturón de seguridad específico, que
consta de una hebilla y una lengüeta
diseñadas para trabajar juntas. 1) Utilice
la correa del hombro sólo en el hombro del
lado externo. Nunca pase la correa del
hombro por debajo de su brazo. 2) Nunca
pase el cinturón de seguridad alrededor de
su cuello, por encima del hombro del lado
interno. 3) Nunca utilice un cinturón de
seguridad para más de una persona.
Cuando sea posible, todos los niños
de hasta 12 años deben ir
correctamente sujetos en el asiento
trasero.
Los cinturones de seguridad y los
asientos pueden calentarse en un
vehículo que ha permanecido
cerrado durante la época veraniega y
podrían causarle quemaduras a un niño
pequeño. Revise las cubiertas de los
asientos y las hebillas antes de poner a un
niño en algún lugar cercano a ellas.
Los pasajeros del asiento delantero
y trasero, incluidas las mujeres
embarazadas, deben usar los
cinturones de seguridad para tener una
protección óptima en caso de accidente.
Todos los asientos de este vehículo
cuentan con cinturones pélvicos y de
hombros. Todos los ocupantes del
vehículo deben usar siempre los cinturones
de seguridad en forma apropiada, incluso
si se cuenta con un sistema de sujeción
suplementario de bolsas de aire.
El sistema de cinturón de seguridad consta
de:
• Cinturones de seguridad pélvicos y de
hombros.
• Cinturón de seguridad de hombros con
modo de bloqueo automático (a
excepción del cinturón de seguridad
del conductor).
28
Cinturones de Seguridad

• Ajustador de altura en los asientos
delanteros.
• Retractor y pretensor de ancla en los
asientos delanteros.
• Sensor de tensión del cinturón en el
asiento del pasajero delantero.
• Luz de advertencia y campanilla
indicadora del cinturón de seguridad.
• Sensores de choque y sistema de
monitoreo con indicador de estado.
Los pretensores del cinturón de seguridad
están diseñados para activarse en choques
frontales, semifrontales y laterales y en
volcaduras. Los pretensores del cinturón
de seguridad del retractor y el ancla en las
posiciones de asiento delantero están
diseñados para ajustar firmemente los
cinturones de seguridad contra el cuerpo
del ocupante cuando se activan. Esto
ayuda a aumentar la eficacia de los
cinturones de seguridad. En choques
frontales, los pretensores del cinturón de
seguridad se pueden activar solos o, si el
choque es suficientemente grave, se
pueden activar junto con las bolsas de aire
delanteras.
SUJECION DE LOS
CINTURONES DE SEGURIDAD
Los sistemas de seguridad de los asientos
delanteros exteriores y traseros del
vehículo son una combinación de
cinturones pélvicos y de hombros.
E142587
1. Inserte la lengüeta del cinturón en la
hebilla correcta (la hebilla más cercana
a la dirección de la cual proviene la
lengüeta) hasta que escuche un
chasquido y sienta que se ha
enganchado. Asegúrese de ajustar
firmemente la lengüeta en la hebilla.
E142588
2. Para desabrocharlo, oprima el botón
de apertura y quite la lengüeta de la
hebilla.
E142589
29
Cinturones de Seguridad

Durante el uso, los cinturones de seguridad
traseros deben colocarse en las guías del
cinturón en los asientos traseros.
Protección de mujeres
embarazadas
ALERTA
Siempre conduzca con el respaldo
de su asiento vertical y el cinturón de
seguridad correctamente abrochado.
La parte pélvica del cinturón de seguridad
se debe ajustar cómodamente y posicionar
lo más abajo posible, sobre los huesos de
las caderas. La parte del hombro del
cinturón de seguridad se debe posicionar
a lo largo del pecho. Las mujeres
embarazadas también lo deben utilizar de
esta forma. Consulte la ilustración
siguiente.
E142590
Las mujeres embarazadas siempre deben
utilizar su cinturón de seguridad. La correa
pélvica del cinturón combinado debe
quedar lo más baja posible, apoyada sobre
los huesos de las caderas y cruzando por
debajo del vientre, ajustada del modo más
firme pero cómodo posible. La correa del
hombro se debe posicionar de tal modo
que pase sobre la parte media del hombro
y el centro del pecho.
Modos de bloqueo de los
cinturones de seguridad
AVISOS
Después de cualquier choque del
vehículo, el sistema de cinturones de
seguridad de todos los asientos de
pasajeros debe ser revisado por un
distribuidor autorizado para verificar que
la función del retractor de bloqueo
automático de los asientos para niños siga
operando correctamente. Además, todos
los cinturones de seguridad deben
revisarse para comprobar que funcionen
correctamente.
EL MECANISMO DE CINTURÓN Y
RETRACTOR DEBE REEMPLAZARSE
si el dispositivo retractor de bloqueo
automático del mecanismo de cinturones
de seguridad o algún otro dispositivo de
éste no funciona correctamente al ser
revisado por un distribuidor autorizado. Si
no se reemplaza el conjunto de cinturón y
retractor, puede aumentar el riesgo de
lesiones en caso de un choque.
Todos los sistemas de seguridad del
vehículo son cinturones pélvicos y de
hombros combinados. El cinturón de
seguridad del conductor solo tiene el
primer tipo de modo de bloqueo, mientras
que los cinturones del asiento del pasajero
delantero y de los asientos traseros tienen
los dos modos de bloqueo que se
describen a continuación:
30
Cinturones de Seguridad

Modo sensible del vehículo
Éste es el modo normal del retractor que
permite el libre ajuste de la longitud de la
correa del hombro según los movimientos
del pasajero y el bloqueo según el
movimiento del vehículo. Por ejemplo, si
el conductor frena repentinamente, hace
un viraje muy cerrado o el vehículo recibe
un impacto de aproximadamente 8 km/h
(5 mph) o más, los cinturones de seguridad
combinados se bloquean para ayudar a
reducir el movimiento hacia delante del
conductor y de los pasajeros.
Además, el retractor está diseñado para
bloquearse cuando se jala rápidamente la
correa. Si esto ocurre, permita que el
cinturón se retraiga ligeramente y jale otra
vez la correa hacia fuera, de manera lenta
y controlada.
Modo de bloqueo automático
En este modo, la correa del hombro se
bloquea previamente en forma
automática. El cinturón aún se podrá
retraer para eliminar la holgura en la correa
del hombro. El cinturón de seguridad del
conductor no tiene modo de bloqueo
automático.
Cuándo usar el modo de bloqueo
automático
Este modo se debe usar cada vez que se
instale un asiento de seguridad para niños,
salvo un asiento auxiliar, en el asiento del
pasajero delantero o en el asiento trasero.
Los niños de hasta 12 años deben ir
correctamente sujetos en el asiento
trasero siempre que sea posible. Ver
Seguridad de los Niños (página 15).
Uso del modo de bloqueo automático
E142591
1. Abroche el cinturón pélvico y de
hombros combinado.
2. Sujete la correa del hombro y jálela
hacia abajo hasta extraer todo el
cinturón.
Deje que el cinturón se retraiga. Al retraerse
el cinturón, se escuchará un chasquido.
Esto indica que el cinturón de seguridad
está ahora en el modo de bloqueo
automático.
Cómo desactivar el modo de bloqueo
automático
Desabroche el cinturón pélvico y de
hombros combinado y deje que se retraiga
por completo para desactivar el modo de
bloqueo automático y activar el modo de
bloqueo sensible (emergencia) del
vehículo.
Cómo quitar los cinturones de
seguridad de los asientos traseros
laterales
Los cinturones de seguridad de los
asientos traseros laterales se pueden
bloquear si el asiento abatido se regresa
firmemente a su posición vertical. Para
desbloquearlos, puede usar los siguientes
procedimientos.
En los vehículos con asientos traseros
reclinables:
31
Cinturones de Seguridad

1. Recline el asiento a su posición
completamente abatida. Ver
Cinturones de Seguridad (página
28).
2. El cinturón de seguridad se
desbloqueará.
3. Regrese el asiento a la posición vertical
deseada.
En el caso de vehículos con asientos que
no se reclinan o que tienen el asiento
bloqueado en su posición de reclinada
trasera completa:
1. Tome la correa del cinturón de
seguridad en la parte superior del
respaldo del asiento.
2. Jale la correa hacia adelante
firmemente.
3. Después de jalar el cinturón hacia
delante, permita que se vuelva a
introducir en el retractor lo más posible.
Si es necesario, presione el asiento
hacia atrás para que la correa se
retraiga todavía más.
4. El cinturón de seguridad se
desbloqueará.
5. Si el cinturón de seguridad no se
desbloquea, repita los pasos 1 a 3.
Conjunto de extensión para
cinturón de seguridad
ALERTA
Ubique los ajustadores de altura de
la correa del hombro de tal modo
que ésta se apoye en la parte media
de su hombro. Si el cinturón de seguridad
no se ajusta adecuadamente, se puede
reducir su eficacia y aumentar el riesgo de
lesiones en un choque.
Si el cinturón de seguridad es demasiado
corto cuando se extiende completamente,
puede obtener un conjunto de extensión
en un distribuidor autorizado.
Use solo extensiones fabricadas por el
mismo proveedor del cinturón de
seguridad. La identificación del fabricante
se encuentra al final de la correa en la
etiqueta. Además, use la extensión solo si
el cinturón de seguridad es demasiado
corto para usted al extenderlo
completamente.
AJUSTE DE ALTURA DE LOS
CINTURONES DE SEGURIDAD
ALERTA
Ubique los ajustadores de altura de
la correa del hombro de tal modo
que ésta se apoye en la parte media
de su hombro. Si el cinturón de seguridad
no se ajusta adecuadamente, se puede
reducir su eficacia y aumentar el riesgo de
lesiones en un choque.
E87511
Ajuste la altura de la correa del hombro de
tal manera que ésta se apoye en la parte
media de su hombro.
Para ajustar la altura de la correa del
hombro, presione el botón y deslice el
ajustador de altura hacia arriba o hacia
abajo. Suelte el botón y jale el ajustador
de altura hacia abajo para asegurarse de
que quede bloqueado en su lugar.
32
Cinturones de Seguridad

LUZ DE ADVERTENCIA DEL
CINTURÓN DE SEGURIDAD Y
REPIQUE INDICADOR
Esta luz se ilumina y se
escuchará una advertencia
audible si el cinturón de
seguridad del conductor no ha sido
abrochado cuando se enciende la ignición.
Condiciones de funcionamiento
Entonces...Si...
La luz de advertencia del cinturón de segu-
ridad se ilumina entre 1 y 2 minutos y la
campanilla de advertencia suena entre 4 y
8 segundos.
El cinturón de seguridad del conductor no
se abrocha antes de poner el interruptor de
encendido en la posición ON...
La luz de advertencia del cinturón de segu-
ridad y la campanilla de advertencia se
apagan.
El cinturón de seguridad del conductor se
abrocha mientras la luz indicadora está
encendida y la campanilla de advertencia
está sonando...
La luz de advertencia del cinturón de segu-
ridad y la campanilla indicadora perma-
necen apagadas.
El cinturón de seguridad del conductor se
abrocha antes de que el interruptor de
encendido se coloque en la posición ON...
RECORDATORIO DE
CINTURONES DE SEGURIDAD
Belt-Minder®
Esta característica complementa la
función de advertencia del cinturón de
seguridad al proporcionar recordatorios
adicionales haciendo sonar en forma
intermitente una campanilla e iluminando
la luz de advertencia del cinturón de
seguridad cuando el asiento del conductor
y del pasajero delantero estén ocupados
y los cinturones de seguridad continúen
desbrochados.
Esta función utiliza información del
sistema de sensores del pasajero delantero
para determinar si hay un pasajero en el
asiento delantero y por lo tanto, si necesita
una advertencia. Para evitar que se active
la característica Belt-Minder cuando
coloca objetos en el asiento del pasajero
delantero, solo se emitirán advertencias
para los ocupantes grandes, según lo
determinado por el sistema de sensores
del pasajero delantero.
Si las advertencias de Belt-Minder han
finalizado (duran aproximadamente 5
minutos) para un ocupante (conductor o
pasajero delantero), el otro ocupante aún
puede activar la característica Belt-Minder.
33
Cinturones de Seguridad

Entonces...Si...
La característica Belt-Minder no se activará.Los cinturones de seguridad del conductor
y del pasajero delantero se abrochan antes
de que el interruptor de encendido se gire
a la posición ON o antes de que hayan
transcurrido 1 a 2 minutos de haber colo-
cado el interruptor de encendido en ON...
Cuando la característica Belt-Minder está
activa, se enciende la luz de advertencia de
cinturón de seguridad y suena la campanilla
de advertencia durante seis segundos cada
25 segundos, y se repite durante aproxima-
damente cinco minutos o hasta que se
abrochen los cinturones de seguridad.
El cinturón de seguridad del conductor o
del pasajero delantero no se abrocha antes
de que el vehículo haya alcanzado al menos
9,7 km/h (6 mph) y hayan transcurrido de
1 a 2 minutos desde que el interruptor de
encendido se giró a la posición ON...
Cuando la característica Belt-Minder está
activa, se enciende la luz de advertencia de
cinturón de seguridad y suena la campanilla
de advertencia durante seis segundos cada
25 segundos, y se repite durante aproxima-
damente cinco minutos o hasta que se
abrochen los cinturones de seguridad.
El cinturón de seguridad del conductor o
del pasajero delantero permanece desabro-
chado durante aproximadamente un
minuto mientras el vehículo se desplaza a
menos de 9,7 km/h (6 mph) y si transcurren
más de 1 a 2 minutos desde que el inte-
rruptor de encendido se giró a la posición
ON...
Desactivación y activación de la
función Belt-Minder
ALERTA
Si bien el sistema le permite
desactivarla, esta función está
diseñada para mejorar sus
posibilidades de sobrevivir a un accidente
cuando esté con el cinturón abrochado.
Recomendamos que deje la función
activada para usted y otros que puedan
utilizar el vehículo. Para reducir el riesgo
de lesiones, no active ni desactive la
función mientras maneja.
Nota: La advertencia del conductor y del
pasajero delantero se desactivan y se
activan de modo independiente. Cuando
desactive o active una posición de asiento,
no abroche la otra posición, ya que esto
terminará el proceso.
Lea detalladamente los pasos 1 al 4 antes
de continuar con el procedimiento de
programación de activación o
desactivación.
La función se puede activar y desactivar
efectuando el siguiente procedimiento:
Antes de efectuar el procedimiento,
asegúrese de que:
• El freno de estacionamiento esté
puesto
• La palanca de cambios está en
posición P
34
Cinturones de Seguridad

• El encendido está en OFF.
• Los cinturones de seguridad del
conductor y del pasajero delantero
estén desabrochados.
1. Active el encendido. NO ARRANQUE
EL MOTOR.
2. Espere hasta que la luz de advertencia
de cinturón de seguridad se apague
(aproximadamente un minuto).
Después del paso 2, espere unos cinco
segundos más, antes de continuar con
el paso 3. Una vez iniciado el paso 3, es
necesario completar el procedimiento
en menos de 60 segundos.
3. Abroche y desabroche el cinturón de
seguridad del asiento que desee
desactivar nueve veces, a velocidad
moderada, finalizando con el cinturón
desabrochado. Después del paso 3, la
luz de advertencia del cinturón de
seguridad se encenderá.
4. Mientras la luz de advertencia del
cinturón de seguridad está encendida,
abroche y luego desabroche el cinturón
de seguridad. Después del Paso 4, la
luz de advertencia del cinturón de
seguridad destellará tres veces como
confirmación.
• Esto desactivará la función para ese
asiento si se encuentra actualmente
activada.
• Esto activará la función para ese
asiento si se encuentra actualmente
desactivada.
MANTENIMIENTO DEL
SISTEMA DE SUJECIÓN PARA
NIÑOS Y DE LOS CINTURONES
DE SEGURIDAD
Revise los cinturones de seguridad del
vehículo y los sistemas de asientos de
seguridad para niños en forma periódica
para asegurarse de que funcionen
correctamente y que no estén dañados.
Revise los cinturones de seguridad del
vehículo y de los asientos para niños para
asegurarse de que no haya roturas,
rasgaduras o cortes. Reemplácelas si es
necesario. Después de un choque se deben
inspeccionar todos los conjuntos de
cinturón de seguridad, lo que incluye
retractores, hebillas, mecanismos de la
hebilla del cinturón de seguridad del
asiento delantero, mecanismos de soporte
de la hebilla (barra de deslizamiento, si
está equipada), ajustadores de altura del
cinturón del hombro (si está equipado),
guía de la correa del hombro en el respaldo
(si está equipado), anclajes para correas
de sujeción y sistema LATCH de los
asientos de seguridad para niños, y
accesorios de fijación. Lea las instrucciones
del fabricante del sistema de sujeción para
niños para conocer sus recomendaciones
específicas de inspección y
mantenimiento. Ford Motor Company
recomienda reemplazar todos los
conjuntos de cinturones de seguridad que
hayan estado en uso en los vehículos
involucrados en un choque. Sin embargo,
si el choque fue leve y un distribuidor
autorizado considera que los cinturones
no presentan daños y siguen funcionando
correctamente, no es necesario
reemplazarlos. Los conjuntos de cinturón
de seguridad que no hayan estado en uso
al producirse un accidente, también
deberán ser revisados y reemplazados si
se detectan daños o fallas en su
funcionamiento.
35
Cinturones de Seguridad

Cuide adecuadamente los cinturones de
seguridad. Ver Cuidado del vehículo
(página 260).
36
Cinturones de Seguridad

Personal Safety System (Sistema de
seguridad personal) proporciona un mejor
nivel total de protección de choques
frontales a los ocupantes de los asientos
delanteros y está diseñado para ayudar a
reducir aún más el riesgo de lesiones
relacionadas con la bolsa de aire. El
sistema tiene la capacidad de analizar las
diferentes condiciones de los ocupantes y
la gravedad del choque antes de activar
los dispositivos de seguridad correctos
para proteger mejor a una variedad de
ocupantes, en diversas situaciones,
durante un choque frontal.
El sistema de seguridad personal del
vehículo consta de:
• Dispositivos de sujeción
suplementarios de bolsas de aire de
etapa dual para el conductor y el
pasajero.
• Cinturones de seguridad de los
asientos exteriores delanteros con
pretensores, retractores de
administración de energía (sólo
primera fila) y sensores de uso del
cinturón de seguridad.
• Sensor de posición del asiento del
conductor.
• Sistema de sensores del pasajero
delantero.
• Luz indicadora de bolsa de aire del
pasajero activa e inactiva.
• Sensores de gravedad de choque
frontal.
• Módulo de control de sistemas de
seguridad con sensores de impacto y
seguridad.
• Luz de advertencia y campanilla de
respaldo del sistema de sujeción.
• El cableado eléctrico de las bolsas de
aire, sensores de choque, pretensores
del cinturón de seguridad, sensores de
uso del cinturón de seguridad
delantero, sensor de posición del
asiento del conductor, sistema de
sensores del pasajero delantero y luces
indicadoras.
¿Cómo funciona el sistema de
seguridad personal?
El Sistema de seguridad personal puede
adaptar la estrategia de despliegue de los
dispositivos de seguridad de su vehículo
según la gravedad del choque y las
condiciones de los ocupantes. Todos los
sensores de choque y de los ocupantes
proporcionan información acerca del
Módulo de control de los sistemas de
seguridad. En un choque, el módulo de
control de seguridad puede accionar los
pretensores del cinturón de seguridad y
puede activar uno o ambos estados del
sistema de sujeción suplementario de
bolsas de aire de doble etapa según la
gravedad del choque y la condición de los
ocupantes.
37
Personal Safety System™

FUNCIONAMIENTO
AVISOS
Las bolsas de aire NO se inflan lenta
y suavemente, y el riesgo de sufrir
lesiones provocadas por el
despliegue de una bolsa de aire es mayor
cerca de la vestidura que cubre el módulo
de la bolsa de aire.
Todos los ocupantes del vehículo,
incluido el conductor, deben usar
siempre los cinturones de seguridad
en forma apropiada, incluso si se cuenta
con un sistema de sujeción suplementario
de bolsas de aire.
Todos los niños de hasta 12 años
deberán viajar siempre en el asiento
trasero y utilizar en todo momento
sistemas de seguridad apropiados para
niños.
Nunca coloque el brazo sobre el
módulo de la bolsa de aire, ya que
ésta puede provocar graves fracturas
a los brazos u otras lesiones al inflarse.
Las bolsas de aire pueden causar la
muerte o lesionar a un niño que se
encuentre en un asiento para niños.
NUNCA coloque un asiento para niños
orientado hacia atrás frente a una bolsa
de aire activa. Si debe usar un asiento para
niños orientado hacia delante en el asiento
delantero, mueva el asiento
completamente hacia atrás.
No intente revisar, reparar ni
modificar los sistemas de sujeción
suplementarios de bolsas de aire ni
sus fusibles. Comuníquese de inmediato
con su distribuidor autorizado.
Después del inflado, se calientan
varios componentes del sistema de
bolsa de aire. No los toque después
del inflado.
AVISOS
Si la bolsa de aire se ha inflado, ya
no volverá a funcionar y se debe
reemplazar de inmediato. Si no
reemplaza la bolsa de aire, el área sin
reparar aumentará el riesgo de lesiones en
caso de un choque.
Todos los ocupantes del vehículo,
incluido el conductor, deben usar
siempre los cinturones de seguridad
en forma apropiada, incluso si se cuenta
con un sistema de sujeción suplementario
de bolsas de aire.
Las bolsas de aire son un sistema de
sujeción suplementario y están diseñadas
para funcionar junto con los cinturones de
seguridad, para proteger al conductor y al
pasajero delantero de algunas lesiones en
la parte superior del cuerpo. Las bolsas de
aire NO se inflan lentamente; existe el
riesgo de que al inflarse, provoquen
lesiones.
Nota: Si se abre una bolsa de aire,
escuchará un fuerte sonido y verá una nube
de residuos de polvo inofensivo. Esto es
normal.
38
Sistema de Seguridad Complementaria

Las bolsas de aire se inflan y desinflan
rápidamente al activarse. Después de que
la bolsa de aire se infla, es normal observar
residuos de polvo, similares al humo, u oler
el propelente quemado. Esto puede
consistir en fécula de maíz, polvos de talco
(para lubricar la bolsa) o compuestos de
sodio (por ejemplo, bicarbonato de sodio),
producidos por el proceso de combustión
que infla la bolsa de aire. Es posible que
haya pequeñas cantidades de hidróxido
de sodio que pueden irritar la piel y los ojos,
pero ninguno de los residuos es tóxico. Si
bien el sistema está diseñado para ayudar
a reducir lesiones graves, el contacto con
una bolsa de aire que se infla también
podría causar abrasiones o hinchazones.
La pérdida temporal de la audición es
también una posibilidad como resultado
del ruido asociado al inflado de una bolsa
de aire. Debido a que las bolsas de aire se
deben inflar rápidamente y con una fuerza
considerable, existe el riesgo de muerte o
de lesiones graves tales como fracturas,
lesiones faciales y oculares o lesiones
internas, particularmente para los
ocupantes que no cumplen con las
medidas de seguridad o están mal
sentados en el momento en que la bolsa
de aire se infla. Por lo tanto, es
extremadamente importante que los
ocupantes estén correctamente sujetos y
lo más lejos posible del módulo de la bolsa
de aire, sin dejar de mantener el control
del vehículo.
Las bolsas de aire no requieren
mantenimiento de rutina.
Sistema de alerta posterior a un
choque SOS POST-CRASH ALERT
SYSTEM
El sistema hace destellar las luces
direccionales y hace sonar el claxon
(intermitentemente) en caso de un
impacto grave que despliegue una bolsa
de aire (delantera, lateral, lateral tipo
cortina o Safety Canopy) o los pretensores
de los cinturones de seguridad.
El claxon y las luces se apagan cuando:
• se oprime el botón de control de
emergencia
• se presionar el botón de emergencia
en el transmisor de entrada a control
remoto, o
• el vehículo se queda sin energía.
BOLSAS DE AIRE DEL
CONDUCTOR Y DEL PASAJERO
AVISOS
Nunca coloque el brazo ni ningún
objeto sobre un módulo de bolsa de
aire. El apoyo de un brazo sobre una
bolsa de aire que se despliega puede
provocar graves fracturas a los brazos u
otras lesiones. Colocar objetos sobre o al
lado del área de inflado de la bolsa de aire
puede hacer que estos objetos sean
proyectados por la bolsa de aire hacia su
rostro y torso, causándole lesiones graves.
Las bolsas de aire pueden causar la
muerte o lesionar a un niño que se
encuentre en un asiento para niños.
Nunca coloque un asiento para niños
orientado hacia atrás frente a una bolsa
de aire activa. Si debe usar un asiento para
niños orientado hacia delante en el asiento
delantero, mueva el asiento
completamente hacia atrás.
39
Sistema de Seguridad Complementaria

E74302
Las bolsas de aire del conductor y el
pasajero delantero se desplegarán durante
colisiones frontales o casi frontales
importantes.
El sistema de bolsas de aire para el
conductor y el pasajero delantero consta
de:
• Módulos de bolsas de aire del
conductor y el pasajero
• Sistema de sensores del pasajero
delantero.
• Sensores de choque y sistema de
monitoreo con indicador de estado.
Ver Sensores de choque e indicador
de bolsas de aire (página 46).
Ajuste adecuado de asiento de
conductor y pasajero delantero
ALERTA
La National Highway Traffic Safety
Administration (NHTSA) recomienda
una distancia mínima de al menos
25 cm (10 pulg) entre el pecho de un
ocupante y el módulo de la bolsa de aire
del conductor.
Para colocarse a una distancia correcta de
la bolsa de aire:
• Mueva su asiento hacia atrás lo más
posible, sin dejar de alcanzar
cómodamente los pedales.
• Recline levemente el asiento (uno o
dos grados) desde la posición vertical.
Después de que todos los pasajeros hayan
ajustado sus asientos y puesto los
cinturones de seguridad, es muy
importante que mantengan su posición
vertical.’ Un ocupante correctamente
sentado se sienta siempre derecho contra
el respaldo y en el centro del cojín, con sus
pies cómodamente extendidos. Sentarse
de manera incorrecta puede aumentar la
probabilidad de lesiones en el caso de un
choque. Por ejemplo, si un pasajero viaja
en una posición irregular, se recuesta,
voltea hacia los lados, se sienta hacia
delante, se inclina hacia delante o hacia
los lados o levanta uno o ambos pies,
aumenta en gran medida la probabilidad
de sufrir lesiones en un choque.
Los niños y las bolsas de aire
ALERTA
Las bolsas de aire pueden causar la
muerte o lesionar a un niño que se
encuentre en un asiento para niños.
NUNCA coloque un asiento para niños
orientado hacia atrás frente a una bolsa
de aire activa. Si debe usar un asiento para
niños orientado hacia delante en el asiento
delantero, mueva el asiento
completamente hacia atrás.
40
Sistema de Seguridad Complementaria

E142846
Los niños siempre deben estar asegurados
correctamente. Las estadísticas de
accidentes demuestran que los niños están
más seguros cuando viajan en el asiento
trasero, con los sistemas de seguridad
ajustados correctamente, que cuando
viajan en el asiento delantero. Si no se
siguen estas instrucciones puede aumentar
el riesgo de lesiones en una colisión.
BOLSA DE AIRE PARA
RODILLAS
La bolsa de aire para rodillas del lado del
conductor está ubicada debajo del tablero
de instrumentos. El sistema funciona junto
con la bolsa de aire delantera del
conductor para ayudar a reducir lesiones
en las piernas. Cuando la bolsa de aire del
conductor se activa en un choque, la bolsa
de aire para rodillas se despliega desde la
parte de abajo del tablero de instrumentos.
Al igual que con las bolsas de aire
delanteras y laterales, es importante estar
correctamente sentado y asegurado para
reducir el riesgo de muerte o de heridas
graves.
Asegúrese de que la bolsa de
aire para rodillas funcione
correctamente. Ver Sensores
de choque e indicador de bolsas de aire
(página 46).
SISTEMA DE DETECCIÓN DEL
PASAJERO DELANTERO
AVISOS
Incluso con Sistemas de seguridad
avanzados, los niños hasta 12 años
deben ser asegurados
adecuadamente en el asiento trasero.
Sentarse de manera incorrecta fuera
de posición con el respaldo muy
reclinado hacia atrás puede levantar
el peso del cojín del asiento y afectar la
decisión del sistema de sensores del
pasajero, lo que puede ocasionar lesiones
graves o la muerte en un choque.
Siéntese siempre derecho contra el
respaldo, con los pies en el piso.
Cualquier cambio o modificación en
el asiento del pasajero delantero
puede afectar el funcionamiento del
sistema de detección del pasajero
delantero.
El sistema funciona con sensores que son
parte del asiento y cinturón de seguridad
del pasajero delantero para detectar la
presencia de un ocupante correctamente
sentado y para determinar si la bolsa de
aire frontal del pasajero delantero debe
activarse (puede inflarse) o no.
E145987
41
Sistema de Seguridad Complementaria

El sistema sensor del pasajero delantero
usa un indicador que se ilumina y
permanece encendido para recordarle que
la bolsa de aire frontal del pasajero
delantero está desactivada. La luz
indicadora se ubica en el área central del
tablero de instrumentos.
Nota: La luz indicadora de desactivación
de la bolsa de aire del pasajero se iluminará
brevemente al activar por primera vez el
encendido para confirmar que funciona.
El sistema sensor del pasajero delantero
está diseñado para desactivar (no inflar)
la bolsa de aire frontal del pasajero
delantero cuando se detecta que dicho
asiento está desocupado o que tiene
instalado un asiento para niños orientado
hacia atrás, un sistema de sujeción para
niños orientado hacia adelante o un
asiento auxiliar.
• Cuando el sistema sensor del pasajero
delantero desactiva la bolsa de aire
frontal del pasajero delantero (para
que no se infle), el indicador de estado
de la bolsa de aire enciende
permanentemente la luz para
recordarle que la bolsa de aire frontal
del pasajero delantero está
desactivada.
• Si se instala un sistema de sujeción
para niños y la luz indicadora de estado
de la bolsa de aire del pasajero está
encendida, apague el vehículo, retire
el sistema de sujeción para niños del
vehículo y vuelva a instalarlo siguiendo
las instrucciones del fabricante.
El sistema de sensores del pasajero
delantero está diseñado para activar
(puede inflarse) la bolsa de aire delantera
del pasajero delantero cada vez que el
sistema detecte que una persona de
tamaño adulto está correctamente
sentada en esta ubicación.’
• Cuando el sistema de sensores del
pasajero delantero activa la bolsa de
aire frontal del pasajero delantero (se
puede inflar), el indicador de estado
de la bolsa de aire del pasajero no se
ilumina.
Si una persona de tamaño adulto está
sentada en el asiento del pasajero
delantero, pero la luz indicadora de estado
de la bolsa de aire permanece encendida,
es posible que la persona no esté
correctamente sentada. Si esto sucede:
• Apague el vehículo y pídale a la
persona que ponga el respaldo en
posición completamente vertical.
• Haga que la persona se siente derecha
y en el centro del cojín del asiento con
las piernas cómodamente extendidas.
• Vuelva a arrancar el vehículo y pídale
a la persona que mantenga la posición
por alrededor de dos minutos. Esto le
permitirá al sistema detectar a la
persona y activar la bolsa de aire
frontal del pasajero.’
• Si la luz indicadora de estado
permanece encendida después de este
paso, recomiende al pasajero que
ocupe un asiento trasero.
Bolsa de aire del pasajeroIndicador de estado de la
bolsa de aire del pasajero
Ocupante
DesactivadaApagadaVacío
DesactivadaEncendidaNiño
ActivadaApagadaAdulto
42
Sistema de Seguridad Complementaria

Nota: Cuando la luz indicadora de estado
de la bolsa de aire del pasajero está
iluminada, es posible desactivar la bolsa de
aire del lado del pasajero (instalada en el
asiento) para evitar el riesgo de lesiones en
caso de que se despliegue.
Después de que todos los pasajeros hayan
ajustado sus asientos y puesto los
cinturones de seguridad, es muy
importante que mantengan su posición
vertical.’ Un ocupante correctamente
sentado se sienta siempre derecho contra
el respaldo y en el centro del cojín, con sus
pies cómodamente extendidos. Sentarse
de manera incorrecta puede aumentar la
probabilidad de lesiones en el caso de un
choque. Por ejemplo, si un pasajero viaja
en una posición irregular, se recuesta,
voltea hacia los lados, se sienta hacia
delante, se inclina hacia delante o hacia
los lados o levanta uno o ambos pies,
aumenta en gran medida la probabilidad
de sufrir lesiones en un choque.
Si cree que el estado de la luz indicadora
de bolsa de aire del pasajero apagada no
es el correcto, compruebe lo siguiente:
• Objetos que se encuentran bajo el
asiento
• Objetos entre el cojín y la consola
central (si está equipado)
• Objetos que cuelgan del respaldo del
asiento
• Objetos guardados en el bolsillo del
mapa en el respaldo del asiento (si
está equipado)
• Objetos en el regazo del ocupante
• Interferencia de la carga con el asiento
• Otros pasajeros empujando y jalando
del asiento
• Pies y rodillas de los pasajeros de atrás
que se apoyan en el asiento
Las condiciones antes mencionadas
pueden causar que el peso de un ocupante
correctamente sentado sea interpretado
erróneamente por el sistema de sensores
del pasajero. La persona ubicada en el
asiento del pasajero delantero puede
parecer más pesada o más liviana debido
a las condiciones que se describen en la
lista antes mencionada.
Para saber si el sistema sensor
del pasajero delantero funciona
adecuadamente, Ver Sensores
de choque e indicador de bolsas de aire
(página 46).
Si la luz de disponibilidad de la bolsa
de aire está encendida, haga lo
siguiente:
El conductor o los pasajeros adultos deben
buscar objetos que puedan estar
almacenados debajo del asiento del
pasajero delantero o alguna carga que
interfiera con el asiento.
Si hay objetos guardados o existe carga
que interfiera con el asiento; realice los
siguientes pasos para eliminar el
obstáculo:
• Estacione el vehículo.
• Apague el vehículo.
• El conductor o los pasajeros adultos
deben buscar objetos que puedan estar
almacenados debajo del asiento del
pasajero delantero o alguna carga que
interfiera con el asiento.
• Retire los obstáculos (si los hubiera).
• Vuelva a arrancar el vehículo.
• Espere al menos dos minutos y
compruebe que la luz de disponibilidad
de la bolsa de aire ya no esté
encendida.
• Si permanece iluminada, puede
tratarse de un problema del sistema
de sensores del pasajero delantero.
43
Sistema de Seguridad Complementaria

NO intente reparar el sistema; lleve su
vehículo inmediatamente a un distribuidor
autorizado.
Si es necesario modificar un sistema de
bolsas de aire delantero avanzado para
acomodar a una persona discapacitada,
comuníquese con un distribuidor
autorizado.
BOLSAS DE AIRE LATERALES
AVISOS
No coloque objetos ni instale equipos
sobre o cerca de la cubierta de la
bolsa de aire, en el costado de los
respaldos (de los asientos delanteros) o
en las áreas de los asientos delanteros,
que puedan entrar en contacto con una
bolsa de aire que se infle. Si no se siguen
estas instrucciones, el riesgo de lesiones
puede aumentar en caso de una colisión.
No utilice cubiertas adicionales en
los asientos. El uso de cubiertas
adicionales en los asientos puede
impedir que las bolsas de aire laterales se
inflen y aumentar el riesgo de lesiones en
un accidente.
No apoye su cabeza contra la puerta.
La bolsa de aire lateral puede
lesionarlo ya que se infla desde el
lado del respaldo.
No intente revisar, reparar ni
modificar la bolsa de aire, sus
fusibles ni la cubierta de un asiento
que contenga una bolsa de aire.
Comuníquese de inmediato con su
distribuidor autorizado.
Si se ha inflado, la bolsa de aire
lateral no volverá a funcionar. El
sistema de bolsas de aire laterales
(incluido el asiento) debe ser
inspeccionado y reparado por un
distribuidor autorizado. Si no reemplaza la
bolsa de aire, el área sin reparar aumentará
el riesgo de lesiones en caso de un choque.
Las bolsas de aire laterales están
instaladas en el costado exterior de los
respaldos de los asientos delanteros. En
algunos choques laterales, se inflará la
bolsa de aire lateral afectada por el
accidente. La bolsa de aire se diseñó para
inflarse entre el tablero de la puerta y el
ocupante, para mejorar la protección
proporcionada a los ocupantes en los
choques de impacto lateral.
E142848
El sistema de consta de lo siguiente:
• Una etiqueta o panel lateral grabado
en relieve que indica que el vehículo
dispone de bolsas de aire laterales.
• Bolsas de aire laterales ubicadas
dentro del respaldo del conductor y de
los respaldos de los asientos de
pasajero delanteros.
• Sistema de sensores del pasajero
delantero
Sensores de choque y sistema
de monitoreo con indicador de
estado. Ver Sensores de
choque e indicador de bolsas de aire
(página 46).
Nota: Si el sistema de sensores del pasajero
desactivará la bolsa de aire instalada en el
asiento del pasajero si detecta un asiento
vacío y con el cinturón desabrochado.
44
Sistema de Seguridad Complementaria

El diseño y el desarrollo del sistema de
bolsas de aire laterales incluyeron
procedimientos de prueba recomendados,
los que fueron desarrollados por un grupo
de expertos en seguridad automotriz
conocidos como Side Airbag Technical
Working Group (Grupo de trabajo técnico
de bolsas de aire laterales). Estos
procedimientos de prueba recomendados
ayudan a reducir el riesgo de lesiones
relacionadas con el despliegue de las
bolsas de aire laterales.
SAFETY CANOPY®
AVISOS
No coloque objetos ni monte equipos
sobre o cerca del forro del techo, en
la barandilla lateral, que puedan
entrar en contacto con una bolsa de aire
tipo cortina que se infle. Si no se siguen
estas instrucciones, el riesgo de lesiones
puede aumentar en caso de una colisión.
No apoye su cabeza contra la puerta.
Las bolsas de tipo cortina pueden
lesionarlo al inflarse desde el forro
del techo.
No intente revisar, reparar ni
modificar las bolsas de aire de tipo
cortina, los fusibles de las mismas,
la vestidura de los pilares A, B o C, ni el
forro del techo de un vehículo equipado
con bolsas de aire de tipo cortina.
Comuníquese de inmediato con su
distribuidor autorizado.
Todos los ocupantes del vehículo,
incluido el conductor, deben usar
siempre los cinturones de seguridad
, incluso si se cuenta con un sistema de
sujeción suplementario y bolsas de aire de
tipo cortina.
Para reducir el riesgo de lesiones, no
obstruya ni coloque objetos en el
espacio donde se despliega la bolsa
de aire de tipo cortina.
AVISOS
Si las bolsas de aire de tipo cortina
se han activado, ya no volverán a
funcionar. Las bolsas de aire de tipo
cortina (incluyendo el tapizado de los
pilares A, B y C y forro del techo) deben ser
inspeccionadas y reparadas por un
distribuidor autorizado. Si no reemplaza la
bolsa de aire de tipo cortina, el área sin
reparar aumentará el riesgo de lesiones en
caso de un choque.
El sistema Safety Canopy se activará
durante choques laterales importantes o
cuando el sensor de volcadura detecte
cierta probabilidad de volcadura. El
sistema Safety Canopy está instalado en
la lámina metálica del riel lateral del techo,
detrás del forro y sobre cada fila de
asientos. En ciertos choques laterales o
eventos de volcadura, el sistema Safety
Canopy se activará, sin considerar qué
asientos estén ocupados. El sistema
Safety Canopy está diseñado para inflarse
entre el área de las ventanas laterales y
los pasajeros con el fin de aumentar la
protección proporcionada en caso de
choques laterales y eventos de volcadura.
E75004
45
Sistema de Seguridad Complementaria

El sistema de consta de lo siguiente:
• Bolsas de aire de tipo cortina de Safety
Canopy instaladas sobre los paneles
que se encuentran sobre las ventanas
delantera y trasera, identificados con
una etiqueta o inscripción en el forro
del techo o en el pilar del techo.
• Un forro de techo flexible que se abre
sobre las puertas laterales y permitir
que la cortina de aire se infle.
• Los sensores de choque y el sistema
de monitoreo tienen un indicador de
estado. Ver Sensores de choque e
indicador de bolsas de aire (página
46).
Los niños de hasta 12 años de edad deben
ir siempre correctamente asegurados en
los asientos de la segunda o tercera fila.
El sistema Safety Canopy no interferirá con
los niños que estén asegurados en un
asiento para niños o un asiento auxiliar
correctamente instalado, ya que está
diseñado para inflarse hacia abajo, desde
el forro del techo, sobre las puertas a lo
largo de los vanos de las ventanas
laterales.
El diseño y el desarrollo del sistema del
sistema Safety Canopy incluyeron
procedimientos de prueba recomendados,
los que fueron desarrollados por un grupo
de expertos en seguridad automotriz
conocidos como Side Airbag Technical
Working Group (Grupo de trabajo técnico
de bolsas de aire laterales). Estos
procedimientos de prueba recomendados
ayudan a reducir el riesgo de lesiones
relacionadas con el despliegue de las
bolsas de aire laterales (incluido el sistema
Safety Canopy).
SENSORES DE CHOQUE E
INDICADOR DE BOLSAS DE
AIRE
ALERTA
Modificar o agregar equipos al
extremo delantero del vehículo
(incluido el bastidor, la defensa, la
estructura de la carrocería delantera del
extremo y los ganchos para remolque)
puede afectar el rendimiento del sistema
de bolsas de aire, aumentando el riesgo
de lesiones. No modifique el extremo
delantero del vehículo.
El vehículo cuenta con un conjunto de
sensores de choque y ocupantes, los
cuales proporcionan información al
módulo de control de sujeción, el cual
despliega (activa) los pretensores de
cinturón de seguridad, bolsa de aire del
conductor, bolsas de aire laterales
montadas en los asientos y Safety Canopy.
Según el tipo de accidente (impacto
frontal, impacto lateral o vuelco) el
módulo de control de sistemas de
seguridad implementará los dispositivos
de seguridad adecuados.
El módulo de control de los sistemas de
seguridad también monitorea el estado de
los dispositivos de seguridad anteriores
además de los sensores de choque y
ocupantes. El estado del sistema de
seguridad se indica mediante una luz
indicadora de advertencia en el grupo de
instrumentos o mediante un tono de
respaldo, si la luz de advertencia no
funciona. La bolsa de aire no requiere
mantenimiento de rutina.
La presencia de una o más de las
siguientes situaciones indica que hay
problemas en el sistema:
46
Sistema de Seguridad Complementaria

• La luz de disponibilidad no se iluminará
inmediatamente después de activar el
encendido.
• La luz de disponibilidad destella o
permanece encendida.
• Se escucha una serie de cinco pitidos.
El patrón de tono se repite de manera
periódica hasta que se reparan el
problema y la luz.
Si sucede alguna de estas cosas, aunque
en forma intermitente, un distribuidor
autorizado debe revisar inmediatamente
el sistema de sujeción suplementario. A
menos que se haga la reparación
necesaria, es posible que el sistema no
funcione correctamente en caso de un
choque.
Los pretensores del cinturón de seguridad
y el sistema de sujeción suplementario de
bolsas de aire están diseñados para
activarse cuando el vehículo sufre una
desaceleración longitudinal o lateral
suficiente como para hacer que módulo
del control de los sistemas de seguridad
desplieguen un dispositivo de seguridad o
cuando el sensor de volcadura detecta la
posibilidad de un evento de volcadura.
El hecho de que los pretensores de
cinturón de seguridad o las bolsas de aire
no se activen para ambos ocupantes de
los asientos delanteros en un choque no
significa que el sistema funcione
incorrectamente. Más bien, significa que
el módulo de control de sistemas de
seguridad determinó que las condiciones
del accidente (gravedad del choque, uso
del cinturón de seguridad, etc.) no eran
adecuadas para activar estos dispositivos
de seguridad.
• Las bolsas de aire delanteras están
diseñadas para activarse sólo en caso
de choques frontales o casi frontales
(no volcaduras, impactos laterales o
traseros) a menos que el choque
provoque una desaceleración
longitudinal suficiente.
• Los pretensores del cinturón de
seguridad y los cinturones de seguridad
inflables traseros están diseñados para
activarse en choques frontales,
semifrontales y laterales y en
volcaduras.
• Las bolsas de aire laterales están
diseñadas para inflarse en choques de
impacto lateral, no en volcaduras,
impactos traseros, choques frontales
ni semifrontales, a menos que el
choque provoque una desaceleración
lateral suficiente.
• El sistema Safety Canopy está
diseñado para inflarse en ciertos
choques de impacto lateral o en
eventos de volcadura, no en choques
de impacto trasero, delantero o
semidelantero, a menos que el choque
produzca una desaceleración lateral
suficiente o exista la posibilidad de una
volcadura.
DISPOSICIÓN DE UNA BOLSA
DE AIRE
Comuníquese de inmediato con su
distribuidor autorizado. Las bolsas de aire
DEBEN ser eliminadas por personal
calificado.
47
Sistema de Seguridad Complementaria

FUNCIONAMIENTO
El control remoto le permite:
• bloquear o desbloquear de manera
remota los seguros de las puertas del
vehículo
• desbloquear las puertas sin utilizar
activamente una llave o control remoto
(solo acceso inteligente)
• abrir la compuerta levadiza eléctrica a
control remoto (si está equipado)
• arrancar o detener el motor de manera
remota (si está equipado).
• armar y desarmar el sistema antirrobo
• activar la alarma de emergencia.
INFORMACIÓN GENERAL
SOBRE LAS FRECUENCIAS DE
RADIO
El control remoto cumple con la Parte 15
de las Normas de la FCC y con la norma
RSS-210 de Industry Canada. La operación
está sujeta a estas dos condiciones: (1)
Este dispositivo no debiera causar
interferencia dañina y (2) Este dispositivo
debe aceptar cualquier interferencia que
reciba, incluso interferencias que pudieran
causar un funcionamiento no deseado.
Nota: Los cambios o modificaciones que
no estén expresamente aprobados por la
parte responsable del cumplimiento podrían
invalidar la autoridad del usuario para
operar el equipo.
El alcance normal del transmisor es de
10 m (33 pies) aproximadamente. Los
vehículos con la característica de arranque
a control remoto tendrán un mayor
alcance. Las disminuciones del alcance
funcional pueden deberse a:
• condiciones climáticas
• torres de antenas de radio en las
proximidades
• estructuras en torno al vehículo
• otros vehículos estacionados cerca del
suyo.
Acceso inteligente (AI) (If Equipped)
El sistema utiliza una señal de
radiofrecuencia para comunicarse con el
vehículo y autorizar el desbloqueo de los
seguros al recibir la orden (tocando la
parte interna de la manija exterior de la
puerta frontal, activando el botón exterior
del compartimiento de equipaje o un botón
del propio transmisor). Si hay interferencia
excesiva de radiofrecuencia en el área, o
si la batería del transmisor está baja, puede
ser necesario desbloquear la puerta
mecánicamente. La hoja de llave mecánica
de la llave de acceso inteligente también
se puede usar para abrir la puerta del
conductor en esta situación. Ver
Transmisor Remoto (página 48).
TRANSMISOR REMOTO
Transmisores integrados a la llave
(If Equipped)
E142585
Es posible que el vehículo cuente con dos
transmisores integrados a la llave. La hoja
de la llave se utiliza para arrancar el
vehículo y desbloquear o bloquear la
puerta del conductor desde afuera del
vehículo. La parte del transmisor funciona
como control remoto.
48
Llaves y Controles Remotos

E138615
Nota: Las llaves de su vehículo vienen con
una etiqueta de seguridad que proporciona
importante información sobre el corte de la
llave del vehículo. Mantenga la etiqueta en
un lugar seguro para referencia futura.
Llave de acceso inteligente (If
Equipped)
Nota: El control remoto de tres botones
funciona de manera similar.
E138616
El vehículo puede contar con dos llaves de
acceso inteligente que hacen funcionar los
seguros eléctricos y el sistema de arranque
a control remoto. La llave de debe estar
en el vehículo al activar el sistema de
arranque con botón.
E142431
La llave de acceso inteligente también
contiene una hoja de llave mecánica
extraíble que se puede usar para quitar el
seguro de la puerta del conductor. Deslice
el control de liberación de la parte
posterior del transmisor para liberar la hoja
de la llave y jale la hoja hacia afuera.
E138618
Nota: La copia de seguridad de las llaves
de su vehículo viene con una etiqueta de
seguridad que proporciona importante
información sobre el corte de la llave del
vehículo. Mantenga la etiqueta en un lugar
seguro para referencia futura.
Cambio de la batería
Nota: Consulte las normas locales para
eliminar adecuadamente la batería del
transmisor.
Nota: No limpie la grasa de los terminales
de la batería de la superficie trasera del
tablero de circuitos.
49
Llaves y Controles Remotos

Nota: El reemplazo de la batería no
provocará que el transmisor se desvincule
del vehículo. El transmisor debe funcionar
normalmente.
El control remoto usa una batería de litio
de tres voltios CR2032, tipo moneda, o
equivalente.
Transmisor integrado a la llave
E138619
1. Inserte y gire una moneda delgada en
la ranura del transmisor cerca del anillo
llavero para quitar la tapa de la batería.
2. Quite la batería vieja.
E138620
3. Inserte la batería nueva. Consulte las
instrucciones que están dentro del
transmisor para conocer la orientación
correcta de la batería. Presione la
batería hacia abajo para asegurarse de
que esté completamente asentada.
4. Ponga la tapa de la batería en el
transmisor y presiónela para cerrarla.
Transmisor de acceso inteligente
1. Quite la llave de respaldo del
transmisor.
E142432
2. Gire una moneda delgada en la ranura
oculta detrás de la ranura de la llave
de respaldo para quitar la tapa de la
batería.
E138622
3. Quite la batería vieja.
4. Inserte la batería nueva. Consulte las
instrucciones que están dentro del
transmisor para conocer la orientación
correcta de la batería. Presione la
batería hacia abajo para asegurarse de
que esté completamente asentada.
5. Coloque nuevamente la tapa de la
batería en el transmisor e instale la
llave de respaldo.
50
Llaves y Controles Remotos

Localizador del automóvil
E138623
Oprima el botón dos veces en
menos de tres segundos. El
claxon sonará y destellarán las
luces direccionales. Se recomienda usar
este método para ubicar el vehículo, en
lugar de utilizar el alarma de emergencia.
Nota: Si el vehículo no se cerró
correctamente o si alguna puerta o la
compuerta levadiza están abiertas, o si el
cofre no está cerrado en los vehículos
equipados con alarma de perímetro o
arranque remoto, el claxon sonará dos veces
y las luces no destellarán.
Activación de una alarma de
emergencia
Nota: La alarma de emergencia solo
funcionará cuando el encendido esté en
OFF.
E138624
Oprima el botón para activar el
alarma. Oprima el botón
nuevamente o gire el encendido
a la posición ON para desactivarla.
Arranque a control remoto (If Equipped)
ALERTA
Para evitar los gases de escape, no
use el arranque a control remoto si
el vehículo está estacionado dentro
un recinto cerrado o un lugar con poca
ventilación.
Nota: No utilice el arranque a control
remoto si su vehículo tiene poco
combustible.
E138625
El vehículo tiene arranque a
control remoto si el transmisor
incluye este botón.
La función de arranque a control remoto
le permite arrancar el motor desde fuera
del vehículo. El transmisor tiene un amplio
rango operativo.
Los vehículos con control automático de
aire acondicionado y calefacción se
pueden configurar para que esta función
se inicie al arrancar el vehículo. Ver
Control Automático de Clima (página
126).
Muchos estados y provincias tienen
restricciones para el uso del arranque a
control remoto. Verifique el reglamento de
tránsito de su localidad y estado o
provincia para ver los requisitos específicos
con respecto a los sistemas de arranque
a control remoto.
El sistema de arranque a control remoto
no funcionará si:
• el encendido está en ON
• el sistema de alarma se activa
• la función fue desactivada
• la tapa del cofre no está cerrada
• se hicieron dos intentos de arranque a
control remoto del vehículo durante la
última hora
• la transmisión del vehículo no está en
P (Estacionamiento)
• el voltaje de la batería del vehículo está
demasiado bajo
• el indicador de servicio del motor
estaba encendido la última vez que se
condujo el vehículo.
Arranque del motor a control remoto
Nota: Deberá presionar cada botón en
menos de tres segundos, uno después de
otro. Si no sigue esta secuencia, el vehículo
no arrancará a control remoto y el claxon
no emitirá un pitido breve.
51
Llaves y Controles Remotos

E138626
Los detalles del procedimiento de
arranque a control remoto se describen en
la etiqueta del transmisor. Para arrancar
el motor a control remoto:
1. Oprima el botón de bloqueo para
bloquear los seguros de todas las
puertas.
2. Oprima el botón de arranque a control
remoto dos veces. Las luces exteriores
destellarán dos veces.
El claxon emitirá un pitido breve si el
sistema no arranca, a menos que esté
activada la función de arranque silencioso.
El arranque silencioso hará funcionar el
ventilador a una menor velocidad para
disminuir el ruido. Se puede activar o
desactivar en la pantalla de información.
Ver Información general (página 93).
Nota: Si el vehículo se arrancó de manera
remota y está equipado con un transmisor
integrado a la llave, primero debe girar el
encendido a ON antes de conducir el
vehículo. Si está equipado con un transmisor
de acceso inteligente, debe oprimir una vez
el botón Start/Stop en el tablero de
instrumentos mientras aplica el pedal del
freno antes de conducir el vehículo.
Las ventanas eléctricas se inhibirán
durante el arranque remoto y el radio no
se encenderá automáticamente.
Las luces de estacionamiento quedarán
encendidas y el motor estará en marcha
por 5, 10 o 15 minutos, según la
programación.
Cómo ampliar el tiempo de
funcionamiento del motor
Para ampliar la duración del arranque a
control remoto, repita los pasos 1 y 2 con
el motor todavía en marcha. Si programó
la duración para 10 minutos, los segundos
10 minutos se sumarán. Por ejemplo, si el
vehículo estuvo en marcha 5 minutos en
el primer arranque a control remoto, el
motor continuará en marcha hasta
completar 20 minutos. Solo podrá ampliar
una vez el tiempo de arranque a control
remoto.
Espere al menos 5 segundos antes del
arranque a control remoto después de
haber apagado el motor. Solamente se
admiten dos arranques a control remoto.
El vehículo se debe encender sin arranque
remoto y luego girar a OFF o dejar que pase
una hora antes de utilizar el arranque
remoto nuevamente, si desea realizar más
arranques remotos.
Cómo apagar el motor después de
arrancarlo a control remoto
E138625
Presione el botón una vez. Las
luces de estacionamiento se
apagarán.
Posiblemente tenga que estar más cerca
del vehículo que al arrancarlo, debido a la
reflexión de la señal en la tierra y al ruido
agregado del motor en marcha.
Puede desactivar o activar el sistema de
arranque a control remoto mediante la
pantalla de información. Ver Información
general (página 93).
52
Llaves y Controles Remotos

REEMPLAZO DE UNA LLAVE
EXTRAVIADA O UN
TRANSMISOR REMOTO
Puede adquirir llaves o controles remotos
de reemplazo o adicionales en su
distribuidor autorizado. El distribuidor
puede programar los transmisores para su
vehículo o bien, puede programarlos usted
mismo. Ver Sistema Pasivo Anti-Robo
(página 69).
53
Llaves y Controles Remotos

FUNCIONAMIENTO
La función MyKey le permite programar
llaves con modos de conducción
restringidos para promover buenos hábitos
de manejo. Es posible programar con estos
modos restringidos todas las llaves del
vehículo, menos una. La llave que no se
programe recibe el nombre de "llave de
administración" y se puede usar para:
• crear una llave restringida
• programar ajustes opcionales de
MyKey
• borrar todas las características de
MyKey a la vez.
Una vez que programa una llave, puede
acceder a la siguiente información
mediante el control de la pantalla de
información:
• Cuántas llaves de administrador y
llaves MyKey hay programadas para el
vehículo.
• La distancia total que se ha conducido
el vehículo con una llave MyKey.
En el caso de vehículos equipados con
llave de acceso inteligente (botón de
arranque), cuando hay presente una llave
MyKey y también una llave de acceso
inteligente de administrador (control), el
vehículo reconoce el control de
administrador para arrancar el motor.
Configuraciones estándar
Estas configuraciones no pueden
modificarse.
• Belt-Minder®. Esta función no se
puede desactivar y el temporizador de
5 minutos no expira. Cuando la función
Belt-Minder® de MyKey está activada,
el sistema de audio se silencia.
• Advertencia anticipada de nivel de
combustible bajo. Las advertencias se
muestran en el control de la pantalla
de información seguidas por una
indicación sonora cuando el tanque de
combustible está a un octavo o menos.
• Las funciones de asistencia para el
conductor, de estar equipadas en su
vehículo, se activan obligatoriamente:
Asistencia de estacionamiento,
sistema de información de puntos
ciegos (BLIS®) con alerta de tráfico
cruzado y sistema de advertencia de
choque.
Configuraciones opcionales
Estas configuraciones se pueden ajustar
inmediatamente después de crear una
llave MyKey o bien, se pueden cambiar en
otro momento usando una llave de
administración.
• Límite de velocidad del vehículo de
80 km/h (130 mph). Aparecen
advertencias visuales seguidas de una
indicación sonora cuando la velocidad
del vehículo ha alcanzado los 80 km/h
(130 mph).
• Advertencia de velocidad del vehículo
de 75, 90 o 105 km/h (45, 55 o
65 mph). Aparecen advertencias
visuales seguidas de una indicación
sonora cuando se excede la velocidad
preseleccionada.
54
MyKey®

• Volumen máximo del sistema de audio
de 45%. Aparece un mensaje en el
sistema de audio cuando se intenta
superar el límite de volumen.
• AdvanceTrac®. El sistema no se puede
desactivar si se programó en modo
Always-on (siempre encendido).
CREACIÓN DE MYKEY
Use el control de pantalla de información
para crear una MyKey:
1. Inserte la llave que desea programar
en la ignición o, si el vehículo está
equipado con sistema de arranque con
botón, ponga la llave de acceso
inteligente en la ranura de respaldo. La
información sobre la ranura de
respaldo se encuentra en otro capítulo.
Ver Arranque y Paro del Motor
(página 149).
2. Active el encendido.
3. Acceda al menú principal en los control
de la pantalla de información y
seleccione Configuración, luego
MyKey al presionar OK o el botón >.
4. Oprima "OK" para seleccionar Crear.
5. Cuando se le indique, mantenga
oprimido el botón OK hasta que vea un
mensaje que le indica que etiquete esta
llave como MyKey. La llave se
restringirá en el próximo encendido.
La llave fue programada con éxito.
Asegúrese de etiquetarla para poder
distinguirla de las llaves de administración.
Puede programar las configuraciones
opcionales para las llaves. Consulte
Programación/Cambio de
configuración opcional.
Los vehículos equipados con encendido
remoto deben seguir un procedimiento
separado. Ver Uso de MyKey con un
Sistema de Arranque Remoto (página
56).
Programación/Cambio de
configuración opcional
Todas las llaves programadas pueden ser
borradas en el mismo ciclo de llave en el
que se programó una llave, de lo contrario
se requiere una llave de administrador para
borrar las llaves. Ver Borrado de toda la
información de MyKeys (página 55).
Puede acceder a la configuración opcional
mediante el control de pantalla de
información.
1. Active el encendido con una llave de
administración.
2. Acceda al menú principal y seleccione
Configuración, luego MyKey.
3. Utilice los botones de las flechas para
llegar a una función opcional.
4. Presione OK > para desplazarse a
través de las configuraciones.
5. Presione OK o > para hacer una
selección.
BORRADO DE TODA LA
INFORMACIÓN DE MYKEYS
Todas MyKeys programadas pueden ser
borradas en el mismo ciclo de llave en el
que se creó una MyKeys, de lo contrario se
requiere una llave de administrador para
borrar las llaves.
Para borrar todas las MyKeys (lo cual
elimina todas las restricciones y las regresa
al estado de llave de administrador), use
el control de la pantalla de información
para hacer lo siguiente:
1. Acceda al menú principal y seleccione
Configuración, luego MyKey.
2. Desplácese a Borrar todo y pulse el
botón OK.
3. Mantenga presionado el botón "OK"
hasta que aparezca TODAS LAS
MYKEYS BORRADAS.
55
MyKey®

COMPROBACIÓN DEL ESTADO
DEL SISTEMA MYKEY
El control de pantalla de información
muestra información sobre las llaves
programadas en el vehículo:
• MYKEY MILES (Kilometraje MyKey):
rastrea el kilometraje cuando se usa
una llave restringida. Si el kilometraje
no se acumula como se esperaba,
entonces la llave no está siendo
utilizada por el usuario al que está
destinada. La única manera de
restablecer esto a cero es restablecer
las llaves. Si el kilometraje es menor
que la última vez que lo verificó, eso
significa que el sistema de llaves fue
restablecido recientemente.
• #MYKEY(S) (No. de MyKeys):
indica la cantidad de llaves restringidas
que se programan en el vehículo.
También se puede utilizar para
detectar el borrado de una llave
restringida.
• # ADMIN KEY(S) (No. de llaves de
admin.): indica cuántas llaves de
administración están programadas
para el vehículo. También se puede
utilizar para detectar si se ha
programado una llave adicional para
el vehículo.
USO DE MYKEY CON UN
SISTEMA DE ARRANQUE
REMOTO
MyKey NO es compatible con sistemas de
arranque a control remoto de postventa
no aprobados por Ford. Si decide instalar
un sistema de arranque a control remoto,
visite a su distribuidor Ford autorizado para
que le recomiende un sistema de arranque
a control remoto aprobado por Ford.
La siguiente información PUEDE ayudar a
los clientes que deciden utilizar un sistema
de arranque a control remoto no aprobado
por Ford. Las acciones que se indican a
continuación NO hacen que el sistema
MyKey sea compatible con sistemas de
arranque a control remoto no aprobados
por Ford, pero PUEDEN ayudarle a
conservar algunas funciones de MyKey.
Vehículos equipados con llaves
físicas
Cuando se usa un sistema de arranque a
control remoto no aprobado por Ford, las
configuraciones predeterminadas pueden
reconocer el sistema de arranque a control
remoto como otra llave de administración,
con sus privilegios asociados. Esto NO lo
hace compatible con MyKey. Volver a
arrancar el motor cuando inserta una llave
en el cilindro de encendido puede ayudarle
a conservar algunas funciones de MyKey.
Además de la llave que ya se programó
como MyKey, los dueños de los vehículos
equipados con llaves tradicionales tienen
la opción de programar el sistema de
arranque a control remoto no aprobado
por Ford como MyKey si el llavero de
arranque a control remoto es utilizado por
el conductor de MyKey.
Para programar un sistema de arranque a
control remoto no aprobado por Ford
como MyKey, haga lo siguiente:
• Entre al vehículo y cierre todas las
puertas.
• Arranque el vehículo a control remoto
con su llavero transmisor no aprobado
por Ford.
• Ver Creación de MyKey (página 55).
Siga los pasos 1 a 5.
56
MyKey®

Vehículos equipados con llave de
acceso inteligente (arranque con
botón)
Nota: No es posible programar el sistema
de arranque a control remoto como una
MyKey en los vehículos equipados con llave
de acceso inteligente (interruptor de
arranque con botón). Por lo tanto, debe
tratar el llavero de arranque a control
remoto como cualquier otra llave de
administración. Si se arranca el vehículo a
control remoto, el sistema parará el motor
cuando usted entre al vehículo o cuando
ponga la transmisión en alguna velocidad.
Antes de que el motor se pare, el vehículo
tendrá privilegios administrativos. Cuando
se vuelva a arrancar el motor, el vehículo
identificará al usuario como un conductor
con llave de administración o MyKey,
dependiendo de la configuración de la llave
utilizada para arrancar el vehículo.
Nota: En todos los vehículos, el número de
MYKEY o LLAVES DE ADMINISTRACIÓN
PROGRAMADAS que aparece en los menús
de estado del sistema MyKey puede incluir
el sistema de arranque a control remoto no
aprobado por Ford como una llave adicional
en el conteo total. Ver Comprobación del
estado del sistema MyKey (página 56).
En todos los vehículos equipados con
sistema de arranque a control remoto no
aprobado por Ford, es posible programar
todas las llaves "reales" como MyKey, en
cuyo caso tendrá que usar su sistema de
arranque a control remoto para restablecer
todas las llaves MyKey (con lo cual se
eliminan las restricciones y las llaves
vuelven al estado de llave de
administración) haciendo lo siguiente:
• Entre al vehículo y cierre todas las
puertas.
• Arranque el vehículo a control remoto
con su llavero transmisor no aprobado
por Ford.
• Ver Borrado de toda la información
de MyKeys (página 55). Siga los
pasos 1 a 3.
DETECCIÓN DE PROBLEMAS DE MYKEY
Causas posiblesCondición
La llave puesta en el encendido no tiene privile-
gios de administración.
No puedo programar una llave
La llave en el encendido es la única llave de
administración (siempre debe haber al menos
una llave de administración).
La llave de acceso inteligente no está en la
ranura de respaldo (en vehículos con arranque
con botón).
El sistema antirrobo pasivo SecuriLock® está
deshabilitado o en modo ilimitado.
57
MyKey®

Causas posiblesCondición
Se arrancó el vehículo utilizando un sistema de
arranque a control remoto que no está progra-
mado con privilegios de administración. Ver
Uso de MyKey con un Sistema de Arranque
Remoto (página 56).
La llave puesta en el encendido no tiene privile-
gios de administración.
No puedo programar las configura-
ciones opcionales
No hay llaves programadas para el vehículo.
Consulte Cómo crear una MyKey.
Se arrancó el vehículo utilizando un sistema de
arranque a control remoto que no está progra-
mado con privilegios de administración. Ver
Uso de MyKey con un Sistema de Arranque
Remoto (página 56).
La llave puesta en el encendido no tiene privile-
gios de administración.
No puedo borrar las llaves restringidas
No hay llaves restringidas programadas para
el vehículo. Consulte Cómo crear una MyKey.
Se arrancó el vehículo utilizando un sistema de
arranque a control remoto que no está progra-
mado con privilegios de administración. Ver
Uso de MyKey con un Sistema de Arranque
Remoto (página 56).
Adquiera una llave nueva con su distribuidor
autorizado.
Perdí la única llave de administración
Programe una llave de repuesto. Ver Sistema
Pasivo Anti-Robo (página 69).
Perdí una llave
El vehículo tiene un sistema de arranque a
control remoto que es reconocido como una
llave de administración. Las llaves restringidas
se pueden restablecer usando el arranque a
control remoto. Ver Uso de MyKey con un
Sistema de Arranque Remoto (página 56).
Programé accidentalmente todas las
llaves como llaves restringidas
Hay una llave de administración en el arranque
del motor.
Sin funciones de llave restringida con
llave de acceso inteligente (arranque
con botón) No hay llaves restringidas programadas para
el vehículo. Consulte Cómo crear una MyKey.
Se programó una llave desconocida como llave
restringida para el vehículo.
El número total de llaves restringidas
programadas incluye una llave
adicional
58
MyKey®

Causas posiblesCondición
El vehículo está equipado con un sistema de
arranque a control remoto. Ver Uso de MyKey
con un Sistema de Arranque Remoto
(página 56).
Se programó una llave desconocida como llave
de administración para el vehículo.
El número total de llaves de administra-
ción programadas incluye una llave
adicional El vehículo está equipado con un sistema de
arranque a control remoto. Ver Uso de MyKey
con un Sistema de Arranque Remoto
(página 56).
La llave restringida no está siendo utilizada por
el usuario al que está destinada.
No se acumula el kilometraje (millaje)
MyKey
El sistema de llave se restableció.
59
MyKey®

ASEGURAR Y DESASEGURAR
Puede usar el control de los seguros
eléctricos de las puertas o el control
remoto para bloquear y desbloquear el
vehículo.
Seguros eléctricos de las puertas
E138628
DesbloqueoA
SeguroB
Control remoto
El control remoto se puede usar en
cualquier momento mientras el vehículo
no esté en marcha.
Desbloqueo de las puertas
(desbloqueo en dos pasos)
E138629
Presione el botón para
desbloquear la puerta del
conductor.
Presione el botón nuevamente antes de
que transcurran tres segundos para
desbloquear todas las puertas. Las luces
direccionales destellarán.
Mantenga presionado los botones de
bloqueo y desbloqueo del control remoto
durante cuatro segundos para desactivar
o activar el desbloqueo en dos pasos. La
desactivación del desbloqueo en dos
pasos permite desbloquear todas las
puertas con solo presionar el botón. Las
luces direccionales destellarán dos veces
para indicar que se cambió el modo de
desbloqueo. El modo de desbloqueo se
aplicará al control remoto, al teclado de
entrada sin llave y al acceso inteligente.
El acceso inteligente en la puerta del
conductor desbloqueará todas las puertas
cuando del desbloqueo en dos pasos no
esté activado.
Bloqueo de los seguros de las puertas
E138623
Oprima el botón para bloquear
los seguros de todas las puertas.
Las luces direccionales se
encenderán.
Oprima el botón y suéltelo nuevamente en
un lapso de tres segundos para confirmar
que todas las puertas estén cerradas. Las
puertas se volverán a bloquear, el claxon
sonará y las luces direccionales se
encenderán si todas las puertas y la
cajuela están cerradas.
Nota: Si el vehículo no se cerró
correctamente o si alguna puerta o la
compuerta levadiza están abiertas, o si el
cofre no está cerrado en los vehículos
equipados con alarma de perímetro o
arranque remoto, el claxon sonará dos veces
y las luces no destellarán.
Compuerta levadiza eléctrica (si está
equipada)
AVISOS
Asegúrese de que no haya nadie en
el área de la compuerta levadiza
antes de utilizar el control de la
compuerta levadiza eléctrica.
60
Seguros

AVISOS
Asegúrese que la compuerta
levadiza esté cerrada para evitar que
los gases de escape ingresen al
vehículo. Esto también evitará que los
pasajeros y la carga se caigan. Si debe
manejar con la compuerta levadiza abierta,
mantenga las ventilas abiertas para que
ingrese aire exterior al vehículo.
Nota: Tenga cuidado al abrir o cerrar la
compuerta levadiza en un garaje o en otra
área cerrada para evitar dañarla.
E138630
Presione dos veces dentro de un
lapso de tres segundos para
abrir la compuerta levadiza o
para revertir el movimiento. Ver
Compuerta Levadiza Eléctrica (página
64).
Activación del acceso inteligente
(If Equipped)
La llave de acceso inteligente debe estar
a 1 metro (3 pies) del vehículo.
En las puertas delanteras
Jale la manija exterior de una puerta
delantera. La puerta se desbloqueará y se
podrá abrir.
E87384
Mantenga presionado el sensor de bloqueo
de la manija de la puerta para bloquear el
vehículo. Para evitar desbloquear la puerta
accidentalmente, asegúrese de tocar
solamente el sensor de bloqueo y no otras
áreas de la manija de la puerta.
En la compuerta levadiza
Oprima el botón de apertura exterior de la
compuerta levadiza en la parte superior
de la manija de la compuerta levadiza.
Desbloqueo inteligente de seguros
para el transmisor integrado a la
llave
Esta función ayuda a evitar que bloquee
el vehículo desde afuera cuando la llave
está en el encendido.
Cuando abre una de las puertas delanteras
y bloquea el vehículo con el control de
cierre eléctrico de las puertas, todas las
puertas se bloquearán y luego se
desbloquearán si la llave aún sigue en el
encendido.
El vehículo de todos modos se puede
bloquear, con la llave en el encendido,
utilizando el teclado de entrada sin llave
con la puerta del conductor cerrada, u
oprimiendo el botón de bloqueo en el
transmisor incluso si las puertas no están
cerradas.
Si ambas puertas delanteras están
cerradas, el vehículo se puede bloquear
con cualquier método, sin importar si la
llave está o no en el encendido.
Apertura inteligente para llaves de
acceso inteligente (If Equipped)
Esta función ayuda a evitar que deje
accidentalmente la llave de acceso
inteligente dentro del vehículo en el
compartimiento de pasajeros o en la
cajuela.
61
Seguros

Si usted asegura su vehículo con el control
de seguros eléctricos de las puertas del
conductor o el pasajero (con la puerta
abierta, la transmisión en "P" y el
encendido en "OFF"), al cerrar la puerta,
el vehículo buscará una llave de acceso
inteligente en el compartimiento de
pasajeros. Si se encuentra una llave de
acceso inteligente dentro del vehículo,
inmediatamente se quitará el seguro de
todas las puertas y sonará el claxon,
indicando que la llave de acceso
inteligente está en el interior.
Con el fin de neutralizar la característica
de apertura inteligente y bloquear
intencionalmente el vehículo con la llave
de acceso inteligente en el interior, puede
bloquear el vehículo después de cerrar
todas las puertas utilizando el teclado de
entrada sin llave, oprimiendo el botón de
bloqueo de otra llave de acceso inteligente
o tocando el área de bloqueo de la manija
con otra llave de acceso inteligente en la
mano.
Cuando abre una de las puertas delanteras
y bloquea el vehículo con el control de
cierre eléctrico de las puertas, todas las
puertas se bloquearán y luego se
desbloquearán si:
• el encendido está en ON, o
• el encendido está en OFF y el vehículo
no está en P (Estacionamiento).
Bloqueo y desbloqueo automático
de las puertas (If Equipped)
La función de bloqueo automático
bloqueará los seguros de todas las puertas
cuando:
• todas las puertas están cerradas
• el encendido está en ON
• cambia la transmisión a cualquier
velocidad y pone el vehículo en
movimiento y
• el vehículo alcanza una velocidad
superior a 7 km/h (4 mph).
Si la función de desbloqueo automático
de seguros está activa, los seguros de
todas las puertas se desbloquearán al abrir
la puerta del conductor.
Activar o desactivar el bloqueo y el
desbloqueo automático
Nota: El distribuidor autorizado puede llevar
a cabo este procedimiento o puede hacerlo
usted mismo.
Para habilitar o deshabilitar estas
características, haga lo siguiente:
Nota: Tendrá 30 segundos para completar
el procedimiento.
1. Gire el encendido a ON.
2. Oprima el botón de los seguros
eléctricos de las puertas tres veces.
3. Gire el encendido a OFF.
4. Oprima el botón de los seguros
eléctricos de las puertas tres veces.
5. Gire el encendido a ON. El claxon
sonará para indicar que ha ingresado
al modo de programación.
Bloqueo automático de seguros: una
vez en el modo de programación, cada vez
que presione brevemente (menos de 1
segundo) el botón de bloqueo de los
seguros eléctricos de las puertas, se
activará y desactivará el bloqueo
automático de seguros.
Desbloqueo automático de seguros:
cada vez que presione por más tiempo
(más de 2 segundos) el botón de bloqueo
de los seguros eléctricos de las puertas, se
activará y desactivará el desbloqueo
automático de seguros.
62
Seguros

Nota: El sistema de desbloqueo
automático se puede activar o desactivar
en forma independiente de la función de
bloqueo automático.
Sistema de entrada iluminada
Las luces interiores y algunas exteriores se
iluminan cuando se utiliza el sistema de
entrada a control remoto para desbloquear
las puertas.
El sistema de entrada iluminada apagará
las luces si:
• el encendido está en ON
• se presiona el control de seguros del
transmisor remoto, o
• han estado encendidas 25 segundos.
Las luces no se apagarán si:
• se encendieron con el control del
atenuador o
• alguna puerta está abierta.
Salida iluminada
Las luces interiores y algunas exteriores se
iluminarán cuando todas las puertas del
vehículo estén cerradas, el encendido esté
en "OFF" y la llave no esté en el encendido
(solamente con transmisor integrado a la
llave).
Las luces se apagarán si todas las puertas
permanecen cerradas y:
• transcurren 25 segundos
• se inserta la llave en el encendido (solo
transmisor integrado a la llave)
• se presiona el botón START/STOP
(solo llave de acceso inteligente).
Ahorrador de batería
Si las luces de cortesía, las luces superiores
de techo o los faros delanteros se dejan
encendidos, el economizador de batería
las apagará 10 minutos después de que el
encendido se haya girado a OFF.
Economizador de batería del modo de
accesorios para llaves de acceso
inteligente (si está equipado)
Si apaga el motor y deja el encendido en
ON o en modo de accesorios, el encendido
se apagará después de 30 minutos.
COMPUERTA LEVADIZA
MANUAL
AVISOS
Es extremadamente peligroso viajar
en el área de carga de un vehículo,
ya sea dentro o fuera de él. En una
colisión, la gente que viaja en estas áreas
es la más propensa a quedar herida o
morir. No permita que la gente viaje en
ningún área de su vehículo que no esté
equipada con cinturones de seguridad.
Asegúrese de que todos los pasajeros de
su vehículo estén en un asiento y usen
apropiadamente un cinturón de seguridad.
Asegúrese que la puerta de la
compuerta levadiza esté cerrada
para evitar que los gases de escape
ingresen al vehículo. Esto también evitará
que los pasajeros y la carga se caigan. Si
tuviese que manejar con la compuerta
levadiza abierta, mantenga una buena
ventilación, de modo que el aire exterior
ingrese al vehículo.
Nota: Tenga cuidado al abrir o cerrar la
compuerta levadiza en un garaje o en otra
área cerrada para evitar dañarla.
Nota: No cuelgue nada (parillas
portabicicletas, etc.) en el
estabilizador/vidrio o la compuerta levadiza.
Podría dañar la compuerta o sus
componentes.
Nota: No deje abierta la compuerta
levadiza mientras maneja. Podría dañar la
compuerta o sus componentes.
63
Seguros

E138632
Para abrir la compuerta levadiza:
oprima el botón en la parte superior de la
manija de tiro de la compuerta levadiza
para liberar el pestillo, luego jale la manija
exterior.
COMPUERTA LEVADIZA
ELÉCTRICA (IF EQUIPPED)
AVISOS
Es extremadamente peligroso viajar
en el área de carga de un vehículo,
ya sea dentro o fuera de él. En una
colisión, la gente que viaja en estas áreas
es la más propensa a quedar herida o
morir. No permita que la gente viaje en
ningún área de su vehículo que no esté
equipada con cinturones de seguridad.
Asegúrese de que todos los pasajeros de
su vehículo estén en un asiento y usen
apropiadamente un cinturón de seguridad.
Asegúrese que la puerta de la
compuerta levadiza esté cerrada
para evitar que los gases de escape
ingresen al vehículo. Esto también evitará
que los pasajeros y la carga se caigan. Si
tuviese que manejar con la compuerta
levadiza abierta, mantenga una buena
ventilación, de modo que el aire exterior
ingrese al vehículo.
AVISOS
Mantenga las llaves fuera del
alcance de los niños. No permita que
los niños jueguen cerca de una
compuerta levadiza eléctrica abierta o en
movimiento.
Nota: Si se realiza un ciclo de encendido
durante el cierre eléctrico de la compuerta
levadiza y ésta se encuentra cerca del
pestillo, podría ocasionar que vuelva a la
posición completamente abierta. Asegúrese
de que la compuerta esté cerrada antes de
hacer funcionar o mover el vehículo,
especialmente en un entorno cerrado, como
un garaje o un estacionamiento estrecho.
Podría dañar la compuerta o sus
componentes.
Nota: No cuelgue nada (parillas
portabicicletas, etc.) en el
estabilizador/vidrio o la compuerta levadiza.
Podría dañar la compuerta o sus
componentes.
La compuerta levadiza solo funcionará con
el vehículo en P (Estacionamiento).
Tres timbres de advertencia sonarán una
vez que la compuerta levadiza comienza
a cerrarse. Cinco timbres cortos indican un
problema con la solicitud de apertura o
cierre, que puede tener las siguientes
causas:
• el motor está encendido y la
transmisión no está en P
(Estacionamiento)
• el voltaje de la batería del vehículo está
por debajo del voltaje operativo
mínimo
• o la velocidad del vehículo es igual o
mayor que 5 km/h (3 mph).
64
Seguros

Si la compuerta levadiza se cierra después
de que esta se ha detenido en la posición
de abierto, cuatro timbres cortos de
advertencia indican exceso de peso en la
puerta o una posible falla en los
amortiguadores. Consulte con su
distribuidor autorizado si el problema
persiste aun después de retirar la carga.
Apertura y cierre de la compuerta
levadiza
ALERTA
Asegúrese de que no haya nadie en
el área de la compuerta levadiza
antes de utilizar el control de la
compuerta levadiza eléctrica.
Nota: Tenga cuidado al abrir o cerrar la
compuerta levadiza en un garaje o en otra
área cerrada para evitar dañarla.
Nota: No deje abierta la compuerta
levadiza mientras maneja. Podría dañar la
compuerta o sus componentes.
E138633
Para abrir o cerrar
eléctricamente la compuerta
levadiza desde el tablero de
instrumentos: Presione el
botón del tablero de instrumentos.
E138630
Para abrirla o cerrarla con el
control remoto: Oprima el
botón del control remoto dos
veces en menos de tres segundos.
Para abrirla o cerrarla usando la
función de compuerta manos libres (si
está equipada):
1. Asegúrese de tener un transmisor de
acceso inteligente a menos de 1 metro
(3 pies) de la compuerta levadiza.
1
2
+
E142731
2. Levante y baje la pierna, acercando y
poniendo el pie debajo de la defensa
trasera (movimiento similar a una
patada). La compuerta levadiza se
abrirá o se cerrará.
Nota: Permita que el sistema eléctrico abra
la compuerta levadiza. Empujar o jalar
manualmente la compuerta levadiza puede
activar la característica de detección de
obstáculos del sistema y detener el
funcionamiento eléctrico.
Nota: Salpicar agua puede causar que la
compuerta manos libres se abra. Mantenga
el transmisor de acceso inteligente alejado
del área de detección de la defensa trasera
mientras lava su automóvil.
Para abrir la compuerta levadiza con
el botón del control exterior:
1. Quite el seguro de la compuerta
levadiza con el control remoto o el
control de seguros eléctricos de las
puertas. Si el transmisor de acceso
inteligente (si está equipado) está a
menos de 1 metro (3 pies) de la
compuerta levadiza, el seguro de ésta
será desbloqueado al oprimir el botón
de apertura de la compuerta levadiza.
65
Seguros

E138632
2. Presione el botón de control ubicado
en la parte superior de la manija para
jalar la compuerta levadiza.
Nota: Permita que el sistema eléctrico abra
la compuerta levadiza después de presionar
el control. Empujar o jalar manualmente la
compuerta levadiza puede activar la
característica de detección de obstáculos
del sistema y detener el funcionamiento
eléctrico.
E138636
Para cerrarla con el control en la
compuerta levadiza: Oprima y suelte el
botón.
ALERTA
Manténgase lejos de la compuerta
levadiza cuando active el interruptor
trasero.
Cómo establecer la altura de la
compuerta levadiza abierta
1. Abra la compuerta levadiza.
2. Mueva manualmente la compuerta
levadiza a la altura deseada.
3. Mantenga oprimido el botón de control
en la compuerta levadiza hasta que se
escuche un timbre que indica que la
altura nueva ha sido programada.
Nota: La altura no se puede programar si
la posición de la compuerta levadiza es
demasiado baja.
La altura nueva de apertura de la
compuerta levadiza se recuperará cuando
se abra la compuerta levadiza. Para
cambiar la altura programada, repita el
procedimiento descrito anteriormente. Una
vez que la compuerta levadiza eléctrica
esté abierta se podrá mover manualmente
a una altura diferente.
Cuando se opera la compuerta levadiza
después de haber programado una altura
menor a la de totalmente abierta, la
compuerta levadiza se puede abrir
totalmente empujándola manualmente
hacia arriba a la apertura máxima.
Detección de obstáculos
Durante el cierre: El sistema se detendrá
si detecta un obstáculo y se escucharán
dos campanillas breves. Cuando se haya
quitado el obstáculo, la compuerta
levadiza se puede cerrar eléctricamente.
66
Seguros

Nota: Ingresar al vehículo mientras se está
cerrando la compuerta levadiza puede
causar que el vehículo se mueva y se active
la detección de obstáculos. Para evitar esto,
espere hasta que la compuerta levadiza
eléctrica se cierre completamente antes de
ingresar al vehículo. Antes de emprender el
viaje, revise el grupo de instrumentos para
ver si hay algún mensaje de compuerta o
puerta abierta o algún indicador de
advertencia. Comenzar a conducir sin
comprobar estos mensajes o indicadores
de advertencia podría causar que la
compuerta levadiza quede abierta,
accidentalmente, mientras conduce.
Durante la apertura: El sistema se
detendrá si detecta un obstáculo y se
escucharán dos campanillas breves. Retire
el obstáculo para operar la compuerta
levadiza.
ENTRADA SIN LLAVE (IF EQUIPPED)
TECLADO DE ENTRADA SIN LLAVE
SECURICODE™
1 2
3 4
5 6
7 8
9 0
E138637
Puede usar el teclado para:
• bloquear o desbloquear los seguros de
las puertas
• recordar las posiciones de los asientos
con memoria y los espejos (si está
equipado)
• programar y borrar códigos de usuario
• activar y desactivar la alarma antirrobo.
El teclado se puede operar con el código
de entrada de 5 dígitos programado de
fábrica. El código está ubicado en la tarjeta
de billetera del propietario, en la guantera,
y está disponible en su distribuidor
autorizado. También puede crear hasta
cinco códigos de entrada personales de 5
dígitos.
Programación de un código de entrada
personal
Para crear su código de entrada personal:
1. Ingrese el código programado de
fábrica.
2. En un lapso de cinco segundos, oprima
1·2 en el teclado.
3. Ingrese su código personal de 5 dígitos.
Cada número se debe ingresar en un
lapso de cinco segundos.
4. Para la función de recordar memoria,
ingrese el sexto dígito 1·2 para
almacenar el ajuste 1 del conductor 1 o
bien, 3·4 para almacenar el ajuste del
conductor 2.
Nota: Si se presionan los números del
teclado 5·6, 7·8 o 9·0 como sexto dígito no
se recuperará un ajuste de memoria de
conductor.
Nota: El código programado de fábrica no
se puede asociar a ningún ajuste de
memoria.
5. Las puertas se bloquearán y se
desbloquearán para confirmar que se
ha programado su código de entrada
personal.
67
Seguros

También puede programar un código de
entrada personal en el sistema MyFord
Touch® (si está equipado). Ver
Información general (página 359).
Consejos:
• No programe un código que use cinco
números iguales.
• No use cinco números en orden
secuencial.
• El código programado de fábrica
funcionará aunque programe un código
personal propio.
Borrado del código personal
1. Ingrese el código de 5 dígitos
programado de fábrica.
2. En un lapso de cinco segundos,
presione y suelte 1·2 en el teclado.
3. Mantenga presionado 1·2 durante dos
segundos. Esto se debe hacer en un
lapso de cinco segundos después del
paso 2.
Todos los códigos personales ahora se
borrarán y sólo funcionará el código de
5–dígitos programado de fábrica.
Función de antiexploración (anti-scan)
Si se ingresa un código incorrecto siete
veces (35 presiones consecutivas de los
botones), el teclado entra en un modo
antiexploración. Este modo desactiva el
teclado durante un minuto y la luz del
teclado destella.
La función de antiexploración se apagará
después de:
• un minuto de inactividad del teclado
• presionar el botón de desbloqueo en
el control remoto
• que el encendido se gire a ON
• desbloqueo del vehículo utilizando
acceso inteligente (si está equipado)
Bloqueo y desbloqueo de las puertas
Para desbloquear la puerta del conductor
Ingrese el código de 5 dígitos programado
de fábrica o su código personal. Cada
número se debe presionar en un lapso de
cinco segundos. Se encenderán las luces
interiores.
Nota: Todas las puertas se desbloquearán
en caso de que la característica de apertura
en dos pasos esté desactivada. Ver
Asegurar y Desasegurar (página 60).
Para desbloquear todas las puertas
Ingrese el código programado de fábrica,
luego presione el control 3·4 en menos de
cinco segundos.
Para desbloquear todas las puertas
Mantenga presionados 7·8 y 9·0 al mismo
tiempo (con la puerta del conductor
cerrada). No es necesario ingresar primero
el código del teclado.
68
Seguros

SISTEMA PASIVO ANTI-ROBO
Nota: El sistema no es compatible con
sistemas de arranque a control remoto de
posventa que no son de Ford. El uso de
estos sistemas puede provocar problemas
en el arranque del vehículo y pérdida de la
protección de seguridad.
Nota: Los objetos metálicos, dispositivos
electrónicos o una segunda llave codificada
en el mismo llavero pueden causar
problemas en el arranque del vehículo si se
acercan demasiado a la llave cuando se
arranca el motor. Evite que estos objetos
toquen la llave codificada al arrancar el
motor. Si se produce un problema, gire el
encendido a OFF, aleje de la llave codificada
todos los objetos del llavero y vuelva a
arrancar el motor.
Nota: No deje un duplicado de la llave
codificada en el vehículo. Siempre lleve las
llaves con usted y ponga los seguros de
todas las puertas cuando salga del vehículo.
SecuriLock®
Este es un sistema de inmovilización del
motor. Está diseñado para evitar el
arranque del motor, a menos que se use
una llave codificada programada para el
vehículo. Usar la llave incorrecta puede
impedir el arranque del motor. También
puede aparecer un mensaje en la pantalla
de información.
Si no puede arrancar el motor con una llave
correctamente codificada, significa que se
ha producido una falla y es posible que
aparezca un mensaje en la pantalla de
información.
Activación automática del sistema
antirrobo
El vehículo se activa inmediatamente
después de colocar el encendido en la
posición OFF.
Desactivación automática del sistema
antirrobo
La activación del encendido con una llave
codificada desactiva el sistema de alarma
del vehículo.
Llaves de reemplazo
Nota: El vehículo incluye dos transmisores
integrados a la llave o dos llaves de acceso
inteligente.
El transmisor integrado a la llave opera
como una llave de encendido programada
que hace funcionar todos los seguros y
arranca el vehículo, y como un control
remoto.
Las funciones de la llave de acceso
inteligente como una llave programada
que hace funcionar el seguro de la puerta
del conductor y activa el acceso inteligente
con los sistemas de arranque oprimiendo
botón, y también como un control remoto.
Si programó los transmisores o llaves
codificadas SecuriLock estándar (solo
transmisores a la llave) y éstos se
perdieron o fueron robados y no tiene una
llave codificada adicional, deberá remolcar
el vehículo hasta un distribuidor
autorizado. Es necesario borrar los códigos
de llave del vehículo y programar nuevas
llaves codificadas.
Almacene una llave programada adicional
lejos del vehículo, en un lugar seguro, como
ayuda para evitar molestias. Consulte a su
distribuidor autorizado para adquirir
duplicados de llaves o llaves de reemplazo
adicionales.
Programación de duplicados de llaves
de transmisor integrado a la llave
Nota: Se puede programar un máximo de
ocho llaves codificadas para su vehículo.
Las ocho pueden ser transmisores
integrados a la llave.
69
Seguridad

Usted puede programar sus propios
transmisores integrados a la llave o llaves
codificadas SecuriLock estándar para su
vehículo. Este procedimiento programará
el código de llave inmovilizador del motor
y la parte del transmisor de entrada a
control remoto del control remoto de su
vehículo.
Use solamente transmisores integrados a
la llave o llaves SecuriLock estándar.
Debe tener a la mano dos llaves
codificadas previamente programadas y
la o las nuevas llaves sin programar. Si no
dispone de dos llaves codificadas
previamente programadas, consulte a su
distribuidor autorizado para que
programen los duplicados de la llave.
Antes de comenzar, asegúrese de leer y
entender el procedimiento completo.
1. Inserte la primera llave codificada
previamente programada en el
encendido.
2. Gire el encendido de OFF a ON.
Mantenga el encendido en ON por al
menos tres segundos, pero no más de
10.
3. Gire el encendido a OFF y quite la
primera llave codificada del encendido.
4. Después de tres segundos, pero antes
de diez de haber girado el encendido a
OFF, inserte la segunda llave
codificada previamente en el
encendido.
5. Gire el encendido de OFF a ON.
Mantenga el encendido en ON por al
menos tres segundos, pero no más de
10.
6. Gire el encendido a OFF y quite la
segunda llave codificada previamente
programada del encendido.
7. Luego de tres segundos, pero antes de
10 segundos después de girar el
encendido a OFF y quitar la llave
codificada previamente programada,
inserte en el encendido la nueva llave
no programada.
8. Gire el encendido de OFF a ON.
Mantenga el encendido en ON por al
menos seis segundos.
9. Quite la llave codificada recientemente
programada del encendido.
Si se programó con éxito, la llave hará
arrancar el motor del vehículo y hará
funcionar el sistema de entrada a control
remoto (si la nueva llave es un transmisor
integrado a la llave).
Si no se programó correctamente, espere
10 segundos y repita los pasos 1 a 8. Si
sigue sin poder programar la llave, lleve el
vehículo a un distribuidor autorizado.
Programación de una llave de acceso
inteligente de repuesto
Consulte a su distribuidor autorizado para
programar duplicados de llaves
adicionales para su vehículo.
ALARMA ANTI-ROBO (IF EQUIPPED)
El sistema le advertirá en caso de entrada
no autorizada al vehículo. El sistema
armado se activará si alguna puerta, el
compartimiento de equipaje o el cofre se
abre sin usar la llave o el control remoto.
Las luces de estacionamiento y
direccionales destellarán y el claxon
sonará si se intenta ingresar al vehículo sin
autorización mientras la alarma está
activada.
Lleve todos los controles remoto a un
distribuidor autorizado si existe cualquier
posible problema con la alarma de su
vehículo.
70
Seguridad

Activación de la alarma
La alarma está lista para activarse cuando
no hay una llave en el encendido. Bloquee
el vehículo para activar la alarma.
Desactivación de la alarma
Desactive la alarma mediante cualquiera
de las siguientes acciones:
• Desbloquee las puertas o el
compartimiento de equipaje con el
control remoto o el teclado de entrada
sin llave
• Ponga el encendido en ON o arranque
el vehículo.
• Utilice una llave en la puerta del
conductor para desbloquear el vehículo
y gire el encendido a ON antes de 12
segundos.
71
Seguridad

AJUSTE DEL VOLANTE DE
DIRECCIÓN
ALERTA
No ajuste el volante de la dirección
cuando el vehículo esté en
movimiento.
Nota: Cerciórese de que esté sentado en
la posición correcta. Ver Modo correcto de
sentarse (página 134).
1
2
2
E95178
1. Desbloquee la columna de la dirección.
2. Ajuste el volante de la dirección en la
posición deseada.
3
E95179
3. Asegure la columna de la dirección.
CONTROL DE AUDIO (IF EQUIPPED)
Seleccione el origen requerido en la unidad
de audio.
Puede operar las siguientes funciones con
el control:
Tipo 1
E145434
Utilice las flechas del volante de la
dirección para navegar por los menús.
Presione OK para hacer una selección.
72
Volante de Dirección

Tipo 2
E129462
B
D
C
A
E
Subir volumenA
Buscar hacia arriba o siguienteB
Bajar volumenC
Buscar hacia abajo o anteriorD
ModoE
Oprima M para seleccionar el origen de
audio.
Tipo 3
E129463
C
D
A
B
Subir volumenA
Buscar hacia arriba o siguienteB
Bajar volumenC
Buscar hacia abajo o anteriorD
Buscar, Siguiente o Anterior
Presione el botón Buscar para:
• sintonizar el radio en la estación
preestablecida anterior o siguiente
• reproducir la pista siguiente o anterior.
Mantenga oprimido el botón Buscar para:
• sintonizar el radio en la siguiente
estación hacia arriba o hacia abajo de
la banda de frecuencia
• buscar en una pista.
73
Volante de Dirección

CONTROL DE VOZ (IF EQUIPPED)
E129464
Tire del control para seleccionar o cancelar
la selección del control de voz. Ver
SYNC® (página 307). Ver MyFord
Touch® (página 348).
Controles de MyFord Touch® (If
Equipped)
Los controles del volante de la dirección
también pueden tener estas características
adicionales.
E142613
Presione para ir a la pantalla de
inicio.
E142608
Presione para ir a la pantalla de
información.
Ver MyFord Touch® (página 348).
CONTROL DE CRUCERO
E142437
Ver Control de Crucero (página 188).
CONTROL DE LA PANTALLA DE
INFORMACIÓN
E130248
Ver Pantallas de información (página
93).
74
Volante de Dirección

LIMPIA PARABRISAS
Nota: Desempañe completamente el
parabrisas antes de encender los
limpiaparabrisas.
Nota: Asegúrese de que los
limpiaparabrisas estén desactivados antes
de ingresar a un sistema de lavado
automático de automóviles.
Nota: Limpie el parabrisas y las hojas de
los limpiadores si comienzan a dejar rayas
o manchas. Si eso no resuelve el problema,
instale nuevos limpiaparabrisas.
Nota: No haga funcionar los limpiadores
con el parabrisas seco. Esto puede rayar el
vidrio, dañar las hojas del limpiador o
quemar el motor del limpiador. Siempre use
los lavadores del parabrisas antes de limpiar
el parabrisas seco.
E128444
A
C
D
B
Un solo barridoA
Barrido intermitenteB
Barrido normalC
Barrido a alta velocidadD
Barrido intermitente
C
A
B
E128445
Intervalo de barrido cortoA
Barrido intermitenteB
Intervalo de barrido largoC
Use el control giratorio para ajustar el
intervalo de barrido intermitente.
Limpiadores dependientes de la
velocidad
Cuando aumenta la velocidad del vehículo,
el intervalo entre los barridos disminuye.
LIMPIADORES AUTOMÁTICOS
(IF EQUIPPED)
Nota: Desempañe completamente el
parabrisas antes de encender los
limpiaparabrisas.
Nota: Asegúrese de que los
limpiaparabrisas estén desactivados antes
de ingresar a un sistema de lavado
automático de automóviles.
Nota: Limpie el parabrisas y las hojas de
los limpiadores si comienzan a dejar rayas
o manchas. Si eso no resuelve el problema,
instale nuevos limpiaparabrisas.
75
Limpiadores y Lavadores

Nota: Si activa el encendido automático
de luces en conjunto con los
limpiaparabrisas automáticos, las luces
bajas de los faros delanteros se encenderán
automáticamente cuando el sensor de lluvia
active los limpiaparabrisas
Nota: Las condiciones de camino húmedo
pueden producir barrido inesperado o con
manchas.
Para reducir las manchas recomendamos
lo siguiente:
• Disminuya la sensibilidad de los
limpiaparabrisas automáticos.
• Cambie a barrido de velocidad normal
o alta.
• Apague los limpiaparabrisas
automáticos.
C
A
B
E128445
Alta sensibilidadA
EncendidoB
Baja sensibilidadC
Los limpiaparabrisas funcionarán cuando
se detecte humedad en el
limpiaparabrisas. El sensor de lluvia seguirá
monitoreando la cantidad de humedad en
el parabrisas y ajustará la velocidad de los
limpiadores automáticamente.
Use el control giratorio para ajustar la
sensibilidad del sensor de lluvia. En
sensibilidad baja, los limpiadores
funcionarán cuando el sensor detecta una
gran cantidad de humedad en el
parabrisas. En sensibilidad alta, los
limpiadores funcionarán cuando el sensor
detecta una pequeña cantidad de
humedad en el parabrisas.
Mantenga el exterior del parabrisas limpio.
El rendimiento del sensor se verá afectado
si el área alrededor del espejo interior está
sucia. El sensor de lluvia es muy sensible
y los limpiadores se pueden activar cuando
cae suciedad o niebla o insectos golpean
el parabrisas.
LAVA PARABRISAS
Nota: No haga funcionar los lavadores
cuando el depósito esté vacío. Esto puede
ocasionar que la bomba del lavador se
sobrecaliente.
E129188
Los lavadores rociarán mientras mantenga
la palanca jalada hacia usted. Cuando
suelte la palanca, los limpiadores
funcionarán por un breve período.
Se llevará a cabo un barrido unos pocos
segundos después de lavar para eliminar
cualquier exceso de líquido lavaparabrisas.
76
Limpiadores y Lavadores

LIMPIADOR Y LAVADOR DE
MEDALLÓN
Limpiador de la ventana trasera
E129193
A
B
Barrido intermitenteA
Barrido a baja velocidadB
Oprima el botón que se encuentra en el
extremo de la palanca para cambiar entre
apagado, intermitente y velocidad baja.
Cuando cambie a R (Reversa), el limpiador
trasero cambiará a intermitente si se
activan los limpiadores frontales.
Lavador de la ventana trasera
E129194
El lavador rociará mientras mantenga la
palanca presionada lejos de usted. Cuando
suelte la palanca, el limpiador funcionarán
por un breve período.
77
Limpiadores y Lavadores

CONTROL DE ILUMINACIÓN
E142449
Desactiv. (OFF)A
Las luces de estacionamiento,
del tablero de instrumentos, de
placa y luces traseras
B
FarosC
Luces altas
E130140
Empuje la palanca hacia adelante para
encender las luces altas.
Empuje otra vez la palanca hacia adelante
o jálela hacia usted para apagar las luces
altas.
Destellador de los faros
E142450
Jale la palanca levemente hacia usted y
suéltela para hacer destellar los faros.
ENCENDIDO AUTOMÁTICO DE
FAROS PRINCIPALES (IF EQUIPPED)
Nota: Tal vez sea necesario encender los
faros manualmente en condiciones
climáticas severas.
E142451
Los faros se encienden y se apagan
automáticamente en situaciones de
escasa iluminación o cuando hace mal
tiempo.
Los faros permanecerán encendidos por
un período de tiempo después de girar el
encendido a OFF. Puede ajustar la demora
usando los controles de la pantalla de
información. Ver Pantallas de
información (página 93).
78
Iluminación

Nota: Si activa el encendido automático
de luces en conjunto con los
limpiaparabrisas automáticos, las luces
bajas de los faros delanteros se encenderán
automáticamente cuando el sensor de lluvia
active los limpiaparabrisas
ATENUADOR DE ILUMINACIÓN
DE TABLEROL DE
INSTRUMENTOS
Nota: Si desconecta la batería o si ésta se
descarga, los componentes iluminados
cambiarán al ajuste máximo.
Vehículos con faros para niebla
delanteros
E132712
Presione varias veces o mantenga
presionado hasta llegar al nivel de
deseado.
Vehículos sin faros para niebla
delanteros
A B
A
E142452
Presione varias veces o
mantenga presionado para
atenuar.
A
Presione varias veces o
mantenga presionado para
aumentar el brillo.
B
RETARDO DE APAGADO DE
FAROS PRINCIPALES
Después de mover el encendido a la
posición OFF, puede encender los faros
tirando la palanca del indicador de
dirección hacia usted. Escuchará un sonido
corto. Los faros se apagarán
automáticamente después de tres minutos
si hay alguna puerta abierta, o 30
segundos después de cerrar la última
puerta. Puede cancelar esta característica
tirando la palanca del indicador de
dirección hacia usted nuevamente o
girando el encendido a la posición ON.
79
Iluminación

FAROS DE OPERACIÓN
DIURNA (IF EQUIPPED)
ALERTA
Recuerde siempre encender sus
faros en situaciones de escasa
iluminación o cuando haga mal
tiempo. El sistema no activa con las luces
traseras y puede que no proporcione una
iluminación adecuada durante estas
condiciones. Si no se activan los faros en
estas condiciones, se podría producir un
choque.
Si cuenta con faros halógenos, el sistema
enciende los faros de luces bajas a una
menor intensidad en condiciones de luz de
día.
Si cuenta con faros de descarga de alta
intensidad (HID), el sistema enciende lo
faros de niebla en condiciones de luz de
día.
Para activar el sistema, arranque el
vehículo y cambie el control de luces a la
posición Off, encendido automático de
luces o luz de estacionamiento.
FAROS DE NIEBLA
DELANTEROS
E142453
Presione el control para encender o apagar
los faros de niebla.
Puede encender los faros de niebla cuando
el control de luces se encuentra en
cualquier posición, excepto OFF y las luces
altas están apagadas.
INDICADORES DE LUCES
DIRECCIONALES
E130141
Empuje la palanca hacia arriba o hacia
abajo para usar los indicadores de
dirección.
Nota: Empuje la palanca ligeramente hacia
arriba o hacia abajo para que los indicadores
de dirección destellen tres veces para
indicar un cambio de pista.
ILUMINACIÓN INTERIOR
Las luces se encenderán cuando se haya
cumplido una de las siguientes
condiciones:
• Usted abre alguna puerta.
• Oprime un botón del control remoto.
• Oprime el interruptor B de la luz interior
delantera.
80
Iluminación

Luz interior delantera
Nota: Oprima A para apagarlas al abrir una
puerta. La luz indicadora se encenderá de
color amarillo. Oprima A nuevamente para
volver a encenderlas. La luz indicadora se
encenderá de color azul.
B
C
A
E142454
Interruptor de función de la
puerta.
A
Interruptor de encendido y
apagado de todas las luces.
B
Interruptor de encendido y
apagado de luces individuales.
C
Luz interior trasera (If Equipped)
A
E142455
Puede encender luces de mapa
individuales de manera independiente al
oprimir A.
LUZ AMBIENTAL (IF EQUIPPED)
El sistema de iluminación ambiental
ilumina el interior con una selección de
varios colores. El control de la iluminación
ambiental se encuentra en la consola de
toldo.
A B C
E142456
Paleta de colorA
Perilla de controlB
Modo de búsquedaC
Gire B más allá del primer tope para
encender y ajustar al brillo deseado.
Oprima A para recorrer las opciones de
color.
Oprima C para encender todas las luces
interiores y la iluminación ambiental.
Oprima C nuevamente para apagar las
luces interiores y volver al color
seleccionado anteriormente para la
iluminación ambiental.
La iluminación ambiental se encenderá
cuando se hayan cumplido las siguientes
condiciones:
• activa el encendido
• enciende los faros delanteros
• el nivel de la luz ambiental externa es
bajo.
81
Iluminación

La iluminación ambiental se mantendrá
encendida hasta que desactive el
encendido y se hayan cumplido las
siguientes condiciones:
• bloquea el vehículo
• expira el plazo del temporizador de
demora de accesorios.
82
Iluminación

VENTANAS ELÉCTRICAS
AVISOS
No deje a los niños solos en el
vehículo ni les permita jugar con las
ventanas eléctricas. Podrían sufrir
lesiones graves.
Al cerrar las ventanas eléctricas,
debe verificar que estén libres de
obstrucciones y asegurarse de que
los niños o mascotas no estén cerca de las
aberturas de la ventana.
E70848
Nota: Es posible que escuche un ruido
sordo cuando solo una de las ventanas está
abierta. Baje la ventana contraria para
reducirlo levemente.
Oprima el interruptor para abrir la ventana.
Levante el interruptor para cerrar la
ventana.
Apertura de un solo toque (If Equipped)
Oprima el interruptor por completo y
suéltelo. Oprímalo o levántelo nuevamente
para detener la ventana.
Cierre de un solo toque (If Equipped)
Levante el interruptor por completo y
suéltelo. Oprímalo o levántelo nuevamente
para detener la ventana.
Bloqueo de ventanas
E70850
Oprima el control para bloquear o
desbloquear los controles de las ventanas
traseras. Se iluminará cuando los controles
de las ventanas traseras queden
bloqueados.
Rebote (If Equipped)
La ventana se detendrá automáticamente
al cerrarse. Se bajará un poco si se
encuentra con un obstáculo.
Cancelación de la característica de
rebote
Proceda de la siguiente manera para
cancelar esta característica de protección
cuando existe resistencia, por ejemplo, en
el invierno:
1. Cierre la ventana dos veces hasta que
llegue al punto de resistencia y permita
que baje.
83
Ventanas y espejos retrovisores

2. Cierre la ventana una tercera vez hasta
el punto de resistencia. La
característica de rebote ahora está
desactivada y podrá cerrar la ventana
en forma manual. La ventana pasará
el punto de resistencia y la podrá cerrar
completamente.
Póngase en contacto con su distribuidor
autorizado lo antes posible, si la ventana
no se cierra después del tercer intento.
Restablecimiento de la característica
de rebote
ALERTA
La función de rebote permanece
desactivada hasta que se lleva a
cabo el restablecimiento de la
memoria.
Si ha desconectado la batería, debe
restablecer la memoria de rebote en cada
una de las ventanas de manera
independiente.
1. Mantenga levantado el interruptor
hasta que la ventana esté totalmente
cerrada.
2. Suelte el interruptor.
3. Nuevamente levante el interruptor
durante un segundo más.
4. Mantenga oprimido el interruptor hasta
que la ventana esté totalmente abierta.
5. Suelte el interruptor.
6. Mantenga levantado el interruptor
hasta que la ventana esté totalmente
cerrada.
7. Abra la ventana e intente cerrarla
automáticamente.
8. Restablezca y repita el procedimiento
si la ventana no cierra
automáticamente.
Demora de accesorios (If Equipped)
Puede usar los interruptores de las
ventanas por varios minutos después de
desconectar el encendido o hasta que se
abra cualquier puerta delantera.
ESPEJOS RETROVISORES
EXTERIORES
Espejos eléctricos exteriores
ALERTA
No ajuste los espejos cuando el
vehículo esté en movimiento.
A C
B
E70846
Espejo izquierdoA
Desactiv. (OFF)B
Espejo derechoC
E70847
Oprima las flechas para ajustar el espejo.
84
Ventanas y espejos retrovisores

Espejos plegables exteriores
Empuje el espejo hacia el cristal de la
ventanilla de la puerta. Asegúrese de fijar
por completo el espejo en su soporte al
volverlo a colocar en la posición original.
Espejos térmicos exteriores (If
Equipped)
Ver Ventanas y espejos retrovisores
calentados (página 131).
Espejos con memoria (If Equipped)
Puede guardar y recordar las posiciones
de los espejos a través de la función de
memoria. Ver Función de memoria
(página 138).
Espejos para puntos ciegos
integrados (If Equipped)
ALERTA
Los objetos en el espejo para puntos
ciegos se ven más cerca de lo que
están en realidad.
Los espejos para puntos ciegos tienen
integrado un espejo convexo en la esquina
superior externa de los espejos exteriores.
Están diseñados para incrementar su
visibilidad a los lados del vehículo.
Revise primero el espejo principal antes de
cambiar de carril y luego el espejo para
puntos ciegos. Si no se ve ningún vehículo
en el espejo para puntos ciegos y el
tránsito en el carril adyacente está a una
distancia segura, ponga su direccional para
indicar que intenta cambiar de carril. Mire
brevemente por encima del hombro para
verificar que no haya tráfico, y cambie de
carril con cuidado.
A
B
C
E138665
La imagen del vehículo que se aproxima
se ve pequeña y cerca del borde interno
del espejo principal cuando está a cierta
distancia. La imagen se hace más grande
y comienza a moverse hacia fuera del
espejo principal conforme el vehículo se
acerca (A). La imagen saldrá del espejo
principal y comenzará a aparecer en el
espejo para puntos ciegos, conforme el
vehículo se acerca (B). El vehículo pasará
a su zona de visión periférica conforme
salga del espejo para puntos ciegos (C).
Espejo para puntos ciegos (If Equipped)
Ver Monitor de Punto Ciego (página 190).
85
Ventanas y espejos retrovisores

ESPEJO RETROVISOR
INTERIOR
ALERTA
No ajuste el espejo cuando el
vehículo esté en movimiento.
Nota: No limpie el alojamiento ni los vidrios
de ningún espejo con abrasivos,
combustibles u otros productos de limpieza
fuertes a base de petróleo o amoníaco.
Puede ajustar el espejo interior según su
preferencia. Algunos espejos también
tienen un segundo punto de pivote. Esto
le permite mover el espejo hacia arriba o
abajo y de lado a lado.
Tire la lengüeta debajo del espejo hacia
usted para reducir el reflejo por la noche.
Espejo de atenuación automática
(If Equipped)
Nota: No bloquee los sensores en la parte
delantera y trasera del espejo. El
desempeño del espejo podría verse
afectado. Asimismo, la presencia de un
pasajero o una cabeza elevada en el asiento
trasero central puede impedir que la luz
llegue al sensor.
El espejo se atenuará de manera
automática para reducir el reflejo cuando
se detecten luces brillantes desde detrás
del vehículo. Volverá automáticamente al
reflejo normal cuando seleccione reversa
para asegurarse de que tiene una visión
clara al retroceder.
VISERAS
E138666
Gire la visera hacia la ventana lateral y
extiéndala hacia atrás para obtener más
sombra.
Espejo de la visera iluminado (If
Equipped)
E138667
Levante la cubierta para encender la luz.
TECHO SOLAR (IF EQUIPPED)
AVISOS
No deje que los niños jueguen con el
toldo corredizo ni deje niños solos en
el vehículo. Podrían lesionarse de
gravedad.
Al cerrar el toldo corredizo, debe
verificar que esté libre de
obstrucciones y asegurarse de que
no haya niños ni mascotas cerca de la
abertura.
86
Ventanas y espejos retrovisores

Los controles del toldo corredizo la
pantalla solar están ubicados en la consola
de toldo.
El toldo corredizo y la pantalla solar
cuentan con una función de apertura y
cierre de un solo toque. Para detenerlos
durante la operación de un solo toque,
oprima el control por segunda vez.
Apertura y cierre de la pantalla
solar
E138668
Oprima y suelte la parte trasera del control
para abrir la pantalla solar.
Oprima y suelte la parte delantera del
control para cerrar la pantalla solar. Si está
abierto, el toldo corredizo se cerrará
automáticamente antes de que la pantalla
solar lo haga.
Apertura y cierre del toldo
corredizo
E138669
Oprima y suelte la parte trasera del control
para abrir el toldo corredizo Si está
cerrado, la pantalla solar se abrirá
automáticamente antes de que el toldo
corredizo lo haga. El toldo corredizo se
detendrá poco antes de la posición de
apertura total.
Nota: Esta posición ayuda a reducir el ruido
del viento o ruido sordo que se puede
producir con el toldo totalmente abierto.
Mantenga presionado el control
nuevamente para abrir el toldo corredizo
por completo.
Oprima y suelte la parte delantera del
control para cerrar el toldo corredizo.
Rebote
El toldo corredizo se detendrá
automáticamente al cerrarse. Se devolverá
un poco si se encuentra con un obstáculo.
Mantenga oprimida la parte delantera del
control durante dos segundos de un evento
de rebote para neutralizar esta función.
Mientras el rebote está activo, la fuerza de
cerrado aumenta para cada una de las tres
veces siguientes que cierra el toldo
corredizo.
Ventilación del toldo corredizo
Oprima y suelte la parte delantera del
control para ventilar el toldo corredizo.
Oprima y suelte la parte trasera del control
para cerrar el toldo corredizo.
87
Ventanas y espejos retrovisores

INDICADORES
E145825
Pantalla de informaciónA
VelocímetroB
Indicador de temperatura del refrigerante del motorC
Indicador de combustibleD
TacómetroE
Pantalla de información
Brújula (si está equipado)
Muestra la dirección hacia donde se dirige
el vehículo.
Para calibrar y fijar la zona de la brújula,
use el menú de visualización de
información. Ver Pantallas de
información (página 93).
Use el diagrama para determinar su zona
magnética.
88
Tablero de instrumentos

123
4
5
6 7 8 91011
12
13
14
15
E142800
Odómetro
Ubicado en la parte inferior de la pantalla
de información, registra la distancia
acumulada que el vehículo ha recorrido.
Temperatura del aire exterior
Muestra la temperatura ambiente del
exterior.
Computadora de viaje
Ver Computadora de viaje (página 96).
Configuración y personalización del
vehículo
Ver Información general (página 93).
Indicador de temperatura del
líquido refrigerante del motor
ALERTA
Nunca quite el tapón del depósito
del líquido refrigerante mientras el
motor esté caliente o en
funcionamiento.
A temperatura normal de funcionamiento,
la aguja permanecerá en la parte central.
Nota: No vuelva a arrancar el motor hasta
que se haya resuelto la causa del
sobrecalentamiento.
Si la aguja llega a la sección roja, esto
significa que el motor se está
sobrecalentando. Detenga el vehículo,
apáguelo y determine la causa una vez que
el motor se haya enfriado. Ver
Comprobación del refrigerante de
motor (página 244).
Indicador de combustible
Gire el encendido a ON. El indicador de
combustible indicará aproximadamente
cuánto combustible queda en el tanque.
El indicador de combustible puede variar
levemente cuando el vehículo está en
movimiento o en una pendiente. La flecha
adyacente al símbolo de la bomba de
combustible indica en qué lado del
vehículo está ubicada la puerta de llenado
de combustible.
INDICADORES Y LUCES DE
ADVERTENCIA
Las siguientes luces de advertencia e
indicadores lo alertarán de una condición
del vehículo que puede volverse grave. Al
arrancar el motor se encenderán algunas
luces para probar su funcionamiento. Si
alguna de las luces permanece encendida
después de arrancar el vehículo, consulte
la luz de advertencia del sistema
correspondiente para obtener información
adicional.
Nota: Algunos indicadores de advertencia
aparecen en la pantalla de información y
funcionan igual que una luz de advertencia,
pero no aparecen al encender el vehículo.
Bolsa de aire delantera
Si no se enciende cuando da
partida al vehículo, continúa
destellando o si permanece
encendida, indica una falla. Haga que su
distribuidor autorizado revise el sistema.
89
Tablero de instrumentos

Sistema de frenos antibloqueo
Si se enciende mientras usted
conduce, indica una falla.
Seguirá con el sistema de frenos
normal (sin ABS), a menos que la luz de
advertencia del mismo se encienda. Haga
que su distribuidor autorizado revise el
sistema.
Batería
Si se enciende mientras
conduce, indica una falla.
Apague todo equipo eléctrico
innecesario y haga que su distribuidor
autorizado verifique el sistema de
inmediato.
Espejo para puntos ciegos (If Equipped)
E124823
Se encenderá cuando apague
esta característica o en conjunto
con un mensaje. Ver Monitor
de Punto Ciego (página 190). Ver
Mensajes de información (página 96).
Sistema de frenos
E138644
Se encenderá cuando active el
freno de estacionamiento con el
encendido activado.
Si se enciende cuando está conduciendo,
verifique que el freno de estacionamiento
no esté activado. Si el freno de
estacionamiento no está activado, indica
nivel de líquido de frenos bajo o una falla
en el sistema de frenos. Solicite a su
distribuidor autorizado que revise de
inmediato el vehículo.
ALERTA
Es peligroso conducir el vehículo con
la luz de advertencia encendida. Se
puede producir una disminución
importante en el rendimiento de los frenos.
Le tomará más tiempo detener el vehículo.
Solicite de inmediato que el distribuidor
autorizado revise el vehículo. Manejar
grandes distancias con el freno de
estacionamiento accionado puede hacer
que los frenos fallen, con el riesgo de sufrir
lesiones personales.
Control de crucero (C/C) (If Equipped)
E71340
Se enciende cuando activa esta
característica. Ver Uso del
control de crucero (página 188).
Intermitente
Se ilumina cuando la
intermitente izquierda o derecha,
o las luces intermitentes de
advertencia están encendidas. Si los
indicadores permanecen encendidos o
destellan más rápido, verifique si hay un
foco fundido. Ver Cambio de focos
(página 254).
Aceite de motor
Si se enciende con el motor
encendido o mientras usted
conduce, indica una falla. Pare
el vehículo tan pronto como encuentre la
forma segura de hacerlo y apague el
motor. Compruebe el nivel de aceite del
motor. Ver Comprobación del aceite de
motor (página 243).
Nota: No reanude su viaje si se enciende a
pesar de que el nivel del aceite es correcto.
Solicite a su distribuidor autorizado que
revise de inmediato el vehículo.
90
Tablero de instrumentos

Abrochar cinturón de seguridad
Se iluminará y también sonará
una campanilla como
recordatorio para que se
abroche el cinturón. Ver Recordatorio de
Cinturones de Seguridad (página 33).
Faros de niebla delanteros (If Equipped)
Éste se enciende cuando
enciende los faros para niebla
delanteros.
Luces altas
Se enciende cuando enciende
las luces altas de los faros.
Destellará cuando utilice el
destellador de los faros.
Información (If Equipped)
Éste se enciende cuando se
almacena un nuevo mensaje en
la pantalla de información. Será
de color rojo o ámbar, dependiendo de la
gravedad del mensaje, y se quedará
encendido hasta que se haya rectificado
la causa del mensaje. Ver Mensajes de
información (página 96).
Nivel de combustible bajo
Se encenderá cuando el nivel de
combustible esté bajo o el
tanque de combustible esté casi
vacío. Reabastezca el combustible tan
pronto como sea posible.
Advertencia de llanta con baja
presión
Se encenderá cuando la presión
de las llantas es baja. Si la luz
permanece encendida con el
motor funcionando o mientras
conduce, revise la presión de las llantas a
la brevedad posible.
También se encenderá
momentáneamente cuando dé partida al
vehículo para confirmar que la luz
funciona. Si no se enciende al activar el
encendido o comienza a destellar en
cualquier momento, acuda al distribuidor
autorizado para que revise el sistema de
inmediato.
Luces de estacionamiento
Éste se enciende cuando
enciende las luces de
estacionamiento.
Servicio del motor a la brevedad
Si la luz indicadora de servicio
del motor a la brevedad
permanece encendida luego de
encender el motor, indica que el sistema
de Diagnóstico a bordo (OBD) ha
detectado una falla del sistema de control
de emisiones del vehículo. Consulte la
sección Diagnóstico a bordo (OBD) en el
capítulo Combustible y reabastecimiento
para obtener más información sobre el
servicio a su vehículo. Ver Sistema de
control de emisiones (página 158).
Si la luz destella, se está produciendo una
falla de encendido del motor que podría
dañar su convertidor catalítico. Conduzca
de manera moderada (evite aceleraciones
y desaceleraciones bruscas) y haga revisar
su vehículo inmediatamente.
91
Tablero de instrumentos

Nota: En condiciones de falla de encendido
del motor, las temperaturas excesivas de
escape podrían dañar el convertidor
catalítico u otros componentes del vehículo.
La luz indicadora de servicio del motor a
la brevedad se enciende cuando el
encendido se activa antes de arrancar el
motor para revisar el foco y para indicar si
el vehículo está listo para prueba de
inspección y mantenimiento (I/M).
Normalmente, la luz Servicio del motor a
la brevedad permanecerá iluminada hasta
que el motor se arranque y luego se
apagará si no se presentan desperfectos.
Sin embargo, si después de 15 segundos,
la luz Servicio del motor a la brevedad
parpadea ocho veces, significa que el
vehículo no está listo para la prueba de
inspección y mantenimiento (I/M). Ver
Sistema de control de emisiones
(página 158).
Control de estabilidad
Destellará cuando el sistema
está activo. Si permanece
encendida o no se ilumina
cuando activa el encendido, indica una
falla. Durante una falla, el sistema se
apagará. Solicite a su distribuidor
autorizado que revise de inmediato el
vehículo.
Control de estabilidad apagado
Se enciende cuando desactiva
el sistema. Se apagará cuando
usted vuelva a encender el
sistema o cuando apague el encendido.
ADVERTENCIAS E
INDICADORES AUDIBLES
Campanilla de advertencia de llave
en el encendido
Suena cuando abre la puerta del conductor
y ha dejado la llave en el encendido en la
posición de apagado o accesorio.
Campanilla de advertencia de
faros encendidos
Suena cuando quita la llave del encendido
y abre la puerta del conductor y ha dejado
encendidos los faros o las luces de
estacionamiento.
Campanilla de advertencia de
freno de estacionamiento activado
Suena cuando ha dejado activado el freno
de estacionamiento y conduce el vehículo.
Si la campanilla de advertencia permanece
activada después de soltar el freno de
estacionamiento, solicite a su distribuidor
autorizado que revise de inmediato el
vehículo.
92
Tablero de instrumentos

INFORMACIÓN GENERAL
ALERTA
Manejar mientras está distraído
puede tener como consecuencia la
pérdida de control del vehículo, un
accidente y lesiones. Ford le recomienda
enfáticamente que extreme las
precauciones cuando utilice cualquier
dispositivo o función que pudiera distraerlo
mientras conduce. Su responsabilidad
principal es manejar en forma segura el
vehículo. No recomendamos el uso de
dispositivos portátiles mientras maneja;
debe cumplir con todas las leyes
aplicables.
Varios sistemas del vehículo se pueden
controlar usando los controles de la
pantalla de información que se encuentran
en el volante de la dirección. La
información correspondiente aparece en
la pantalla de información.
Controles de la pantalla de
información
E138659
• Oprima los botones con las flechas
hacia arriba y hacia abajo para recorrer
y resaltar las opciones de un menú.
• Oprima el botón con la flecha hacia la
derecha para ingresar a un submenú.
• Oprima el botón con la flecha hacia la
izquierda para salir de un menú.
• Cuando desee volver a la pantalla del
menú principal, mantenga oprimido el
botón con la flecha hacia la izquierda
(botón de escape).
• Oprima el botón "OK" (Aceptar) para
seleccionar y confirmar ajustes o
mensajes.
Estructura de menús: Pantalla de
información
Todos los vehículos
Puede acceder al menú usando el control
de la pantalla de información.
Nota: Es posible que algunas opciones
luzcan diferentes o que no aparezcan si se
trata de elementos opcionales.
93
Pantallas de información

Viaje 1 y 2
1
Distancia antes de quedar vacío
Viaje 1 o 2
Temporizador de viaje
AnticipaciónFord EcoModeConsumo promedio
de combustible
Velocidad
Ford EcoMode
2
1
Ver Computadora de viaje (página 96).
2
Ver Modo de Economico (página 194).
Información
4WD inteligente
Distancia MyKey
Información de MyKey
Configuración
Activar o desactivarCtrl tracciónAsistencia para el
conductor
Activar o desactivarPunto ciego del
espejo
Activar o desactivarAlerta de tráfico
cruzado
Activar o desactivarAsistencia de
arranque en
pendientes
Activar o desactivarAsistencia de esta-
cionamiento en
reversa
Activar o desactivarLuz de lluviaIluminación
Automática o ManualAtenuación
94
Pantallas de información

Configuración
Desactivar o XXX segundosRetardo del encen-
dido automático
de luces
Siempre apagado, Durante la guía o Siempre
encendido
Información de
navegación
Pantalla
Seleccione el ajuste que correspondaIdioma
Seleccione el ajuste que correspondaDistancia
Seleccione el ajuste que correspondaTemperatura
Advertencia de información de espacio para estacionarCampanillas
Activar o desactivarPantallaBrújula (solo en
sistemas sin nave-
gación)
Conveniencia
Zona (1–15)Ajustar zona
Mantenga oprimido "OK"
para calibrar
Calibración
Calefactor – A/A / Auto-
mático o Último ajuste
Control de tempe-
ratura
Arranque a control
remoto
Desempañador delantero
/ Automático o Desacti-
vado
Desempañador trasero /
Automático o Desacti-
vado
(5, 10 o 15 minutos)Duración
Activar/DesactivarArranque silen-
cioso
Restaurar valores predeterminados
Activar o desactivarSistema
Mantenga oprimido "OK" para crear MyKeyCrear MyKeyMyKey
Siempre encendido o Selección del usuarioCtrl tracción
130 km/h (80 MPH) o ApagadoVelocidad máxima
75 km/h (45 mph), 90 km/h (55 mph), 105
km/h (65 mph) o Apagado
Advertencia de
velocidad
95
Pantallas de información

Configuración
Activar o desactivarLimitador de
volumen
Mantenga oprimido "OK" para borrar todas las
llaves MyKey
Borrar MyKey
Mantenga oprimido "OK" para restablecer el sistema a los valores
predeterminados de fábrica
Restablecimiento
del sistema
Comprobación del sistema
Aparecerán primero todas las advertencias
activas, si corresponde. El menú de revisión
del sistema puede tener otro aspecto,
dependiendo de las opciones de
equipamiento y el estado actual del
vehículo. Utilice los botones de flecha
hacia arriba o hacia abajo para desplazarse
en la lista.
COMPUTADORA DE VIAJE
Restablecimiento de la
computadora de viaje
Mantenga presionado "OK" en la pantalla
actual para restablecer la información
respectiva de viaje, distancia, tiempo y
rendimiento promedio del combustible.
Odómetro de viaje
Registra la distancia recorrida en cada viaje
individual.
Temporizador de viaje
Registra el tiempo de cada viaje individual.
Distancia antes de quedar el
tanque vacío (DTE)
Indica la distancia aproximada que el
vehículo puede recorrer con el combustible
que resta en el tanque. Los cambios en el
modo de manejar el vehículo pueden hacer
que el valor varíe.
Consumo promedio de
combustible
Indica el consumo promedio de
combustible a partir del último
restablecimiento de la función.
MENSAJES DE INFORMACIÓN
Nota: Dependiendo de las opciones con
que cuente el vehículo, no todos los
mensajes aparecerán o estarán disponibles.
Es posible que algunos mensajes aparezcan
abreviados o acortados según el tipo de
grupo de instrumentos que tenga su
vehículo.
E130248
96
Pantallas de información

Oprima el botón "OK" para confirmar que
desea eliminar algunos mensajes de la
pantalla de información. Los demás
mensajes se borrarán automáticamente
después de un momento.
Es necesario confirmar ciertos mensajes
para poder ingresar a los menús.
Indicador de mensajes (If Equipped)
El indicador de mensajes se
ilumina para acompañar algunos
mensajes. Será de color rojo o
ámbar, dependiendo de la gravedad del
mensaje, y se quedará encendido hasta
que se haya rectificado la causa del
mensaje.
Algunos mensajes se complementarán
con un símbolo específico del sistema con
un indicador de mensaje.
Bolsa de aire
Acción a tomarIndicador del
mensaje
Mensaje
Aparece cuando el sistema requiere servicio
debido a una falla. Póngase en contacto con
su distribuidor autorizado.
ÁmbarBolsa de aire averiada
Servicio inmediato
Alarma
Acción a tomarIndicador del
mensaje
Mensaje
Aparece cuando la alarma se activa debido a
un acceso no autorizado. Ver Alarma Anti-
Robo (página 70).
ÁmbarAlarma activada Revisar
el vehículo
Aparece cuando el sistema requiere servicio
debido a una falla. Póngase en contacto con
su distribuidor autorizado.
-Sistema de alarma
averiado Requiere
servicio
97
Pantallas de información

Batería y sistema de carga
Acción a tomarIndicador del
mensaje
Mensaje
Detenga el vehículo tan pronto como pueda
hacerlo con seguridad y apague el encendido.
Póngase en contacto con su distribuidor auto-
rizado.
RojoSistema eléctrico sobre-
voltaje Pare con cuidado
Aparece para advertir que la carga de la batería
del vehículo está baja. Apague todos los acce-
sorios eléctricos innecesarios. Póngase en
contacto con su distribuidor autorizado.
ÁmbarBatería baja Ver manual
Sistema de información de puntos ciegos y alerta de tráfico cruzado
Acción a tomarIndicador del
mensaje
Mensaje
Aparece cuando los sensores del sistema de
información de puntos ciegos y alerta de tráfico
cruzado están bloqueados. Ver Monitor de
Punto Ciego (página 190).
ÁmbarBLIS Baja visibilidad Ver
manual
Aparece cuando ocurre una falla en el sistema.
Comuníquese de inmediato con su distribuidor
autorizado.
ÁmbarBLIS: X sensor izquierdo
Requiere servicio
Aparece cuando el sistema no está disponible
porque se está usando un remolque. Ver
Monitor de Punto Ciego (página 190).
ÁmbarBLIS no disponible Modo
remolque
Aparece cuando el sistema detecta un vehículo.
Ver Monitor de Punto Ciego (página 190).
ÁmbarTráfico cruzado Vehículo
por la X
Aparece cuando los sensores del sistema de
información de puntos ciegos y alerta de tráfico
cruzado están bloqueados. Ver Monitor de
Punto Ciego (página 190).
ÁmbarTráfico cruzado Sensor
bloqueado Ver manual
Aparece cuando el sistema requiere servicio
debido a una falla. Póngase en contacto con
su distribuidor autorizado.
ÁmbarTráfico cruzad averiado
Requiere servicio
Aparece cuando el sistema no está disponible
porque se está usando un remolque. Ver
Monitor de Punto Ciego (página 190).
-Tráfico cruzado desacti-
vado Modo remolque
98
Pantallas de información

Puertas
Acción a tomarIndicador del
mensaje
Mensaje
Aparece cuando las puertas indicadas no están
cerradas completamente y el vehículo está en
movimiento.
RojoPuerta del X abierta
Aparece cuando las puertas indicadas no están
cerradas completamente.
-
Aparece cuando la tapa del compartimiento
de equipaje no está cerrada completamente y
el vehículo está en movimiento.
RojoCajuela abierta
Aparece cuando la tapa del compartimiento
de equipaje no está cerrada completamente.
-
Aparece cuando la tapa del cofre no está
cerrada completamente y el vehículo está en
movimiento.
RojoCofre abierto
Aparece cuando la tapa del cofre no está
cerrada completamente.
-
Motor
Acción a tomarIndicador del
mensaje
Mensaje
El motor requiere servicio. Póngase en contacto
con su distribuidor autorizado.
ÁmbarMotor averiado Servicio
inmediato
Aparece cuando la temperatura del motor es
demasiado alta. Detenga el vehículo en un lugar
seguro y permita que el motor se enfríe. Si el
problema persiste, póngase en contacto con
su distribuidor autorizado. Ver Comprobación
del refrigerante de motor (página 244).
RojoTemperatura de motor
alta Pare con cuidado
99
Pantallas de información

Asistencia de arranque en pendientes
Acción a tomarIndicador del
mensaje
Mensaje
Aparece cuando no se dispone de asistencia
de arranque en pendientes. Póngase en
contacto con su distribuidor autorizado. Ver
Asistencia de arranque en pendientes
(página 165).
ÁmbarAsistencia freno de
pendiente no disponible
Acceso sin llave del vehículo
Acción a tomarIndicador del
mensaje
Mensaje
Aparece para recordarle que la llave está en el
compartimiento de equipaje. Ver Arranque
sin llave (página 150).
ÁmbarFord KeyFree Llave
dentro del auto
Aparece si el sistema no detecta la llave. Ver
Arranque sin llave (página 150).
-Ford KeyFree No detectó
llave
Aparece como recordatorio para que apague
el vehículo. Ver Arranque sin llave (página
150).
RojoApagar motor Presione
ENGINE Start/Stop
Aparece como recordatorio de pisar el freno
mientras arranca el vehículo.
-Pise el freno para
arrancar
Aparece cuando no se detecta una llave válida
dentro del vehículo. Ver Arranque sin llave
(página 150).
RojoFord KeyFree Llave no en
el auto
Aparece cuando la batería de la llave está baja.
Cambie la batería tan pronto como pueda. Ver
Transmisor Remoto (página 48).
-Batería de llave baja
Reemplace pronto
100
Pantallas de información

Iluminación
Acción a tomarIndicador del
mensaje
Mensaje
Aparece cuando se funde el foco de la luz de
freno. Póngase en contacto con su distribuidor
autorizado.
-Luces de freno Falla en
Aparece cuando se funde el foco de luces bajas
de los faros. Póngase en contacto con su
distribuidor autorizado.
-Luces de cruce Falla en
Aparece cuando ocurre un problema eléctrico
en el sistema de faros. Póngase en contacto
con su distribuidor autorizado.
ÁmbarFaro delantero averiado
Requiere servicio
Mantenimiento
Acción a tomarIndicador del
mensaje
Mensaje
Aparece cuando se agota la vida útil del aceite
del motor y es necesario cambiarlo. Ver
Comprobación del aceite de motor (página
243).
-Aceite de motor Cambio
requerido
Indica que el nivel del líquido de frenos está
bajo y que es necesario inspeccionar el sistema
de frenos de inmediato. Ver Verificación del
Fluído de Frenos (página 248).
RojoNivel líquido frenos bajo
Servicio inmediato
Aparece cuando el nivel de líquido limpia
parabrisas está bajo y es necesario reponerlo.
Ver Comprobación del fluido del lavador
(página 248).
-Nivel de líquido limpia
parabrisas bajo
Aparece cuando la entrada de llenado de
combustible no está bien cerrada. Ver Llenado
(página 156).
-Revisar la entrada
llenado combustible
101
Pantallas de información

MyKey
Acción a tomarIndicador del
mensaje
Mensaje
Aparece cuando MyKey está activo.-MyKey activa Conducir
con cuidado
Aparece al arrancar el motor cuando se usa
una MyKey y el límite de velocidad MyKey está
activo.
-MyKey Velocidad limi-
tada a XX MPH/km/h
Aparece cuando se usa una MyKey, el límite de
velocidad de MyKey está activo y la velocidad
del vehículo se acerca a 130 km/h (80 mph).
ÁmbarMyKey Cerca de velo-
cidad máxima de
vehículo
Aparece cuando se usa una MyKey y se alcanza
el límite de velocidad MyKey.
ÁmbarMyKey Vehículo a velo-
cidad máx.
Aparece cuando MyKey está activo.-MyKey Verificar velo-
cidad Conducir c/
cuidado
Aparece cuando se usa una MyKey y el sistema
Belt-Minder está activo.
-MyKey Abrochar cinturón
p/recuperar audio
Aparece cuando se usa una MyKey y el sistema
de asistencia de estacionamiento está activo.
-MyKey Asist. estac. no
puede desactivarse
Aparece al tratar de crear una MyKey con una
llave previamente designada como MyKey.
-La llave ya es MyKey
Aparece al programar una MyKey.-Sostenga la llave junto
al símbolo en la col. de
dirección
Aparece al programar una MyKey.-MyKey ESC no puede
desactivarse
Asistencia para estacionamiento
Acción a tomarIndicador del
mensaje
Mensaje
Aparece cuando el sistema detecta una condi-
ción que requiere servicio. Póngase en contacto
con su distribuidor autorizado. Ver Asistencia
de estacionamiento (página 178).
ÁmbarFalla asist. estac.
Requiere servicio
102
Pantallas de información

Freno de estacionamiento
Acción a tomarIndicador del
mensaje
Mensaje
Aparece cuando el freno de estacionamiento
está aplicado, el motor está en marcha y se
conduce el vehículo a más de 5 km/h (3 mph).
Si la advertencia permanece encendida
después de soltar el freno de estacionamiento,
póngase en contacto con su distribuidor autori-
zado.
RojoFreno de mano activado
Dirección hidráulica
Acción a tomarIndicador del
mensaje
Mensaje
El sistema de dirección asistida no funciona.
Detenga el vehículo en un lugar seguro.
Póngase en contacto con su distribuidor auto-
rizado.
RojoDirección averiada Pare
con cuidado
El sistema de dirección asistida no funciona.
Detenga el vehículo en un lugar seguro.
Póngase en contacto con su distribuidor auto-
rizado.
ÁmbarDirección asistida
averiada Revisar
El sistema de dirección asistida detectó una
condición que requiere servicio en el sistema
de dirección asistida o el sistema de acceso y
arranque pasivo. Póngase en contacto con su
distribuidor autorizado.
ÁmbarDirección averiada
Servicio inmediato
Sistema de arranque
Acción a tomarIndicador del
mensaje
Mensaje
Aparece al arrancar el motor como recordatorio
de aplicación de los frenos.
-Pise el freno para
arrancar
Aparece cuando el vehículo no arranca.-Tiempo de arranque
excedido
103
Pantallas de información

Transmisión y tracción en las cuatro ruedas
Acción a tomarIndicador del
mensaje
Mensaje
Consulte con su distribuidor autorizado.-Transmisión averiada
Servicio inmediato
La transmisión se está sobrecalentando y es
necesario enfriarla. Detenga el vehículo en un
lugar seguro tan pronto como sea posible.
ÁmbarTransmisión sobrecalen-
tada Pare con cuidado
Consulte con su distribuidor autorizado.ÁmbarTransmisión Requiere
servicio
La transmisión se está calentando. Deténgase
para dejarla enfriar o acelere.
-Transmisión caliente
Pare o acelere
La transmisión está caliente. Espere el tiempo
necesario hasta que se enfríe.
-Transmisión caliente
Espere . . .
El sistema no está funcionando correctamente
y pasó automáticamente a tracción en las
ruedas delanteras. Consulte con su distribuidor
autorizado. Ver Uso de la tracción en las
cuatro ruedas (página 167).
Ámbar4WD averiado Requiere
servicio
Aparece cuando el sistema se desactiva en
forma automática e ingresa al modo de solo
tracción delantera para proteger los compo-
nentes de la transmisión. Ver Uso de la trac-
ción en las cuatro ruedas (página 167).
Ámbar4WD apagado
El sistema se sobrecalentó y pasó automática-
mente a tracción en las ruedas delanteras. Ver
Uso de la tracción en las cuatro ruedas
(página 167).
Ámbar4WD desactivado
temporalmente
Aparece cuando se restaura el funcionamiento
del sistema. Ver Uso de la tracción en las
cuatro ruedas (página 167).
-4WD reactivado
Aparece como recordatorio de cambiar la
transmisión a Park.
-Transmisión no está en
Park Seleccione P
Aparece para solicitar al conductor que aplique
los frenos tal como lo necesita la transmisión.
-Pise el freno para
desbloquear la pal. de
cambios
Aparece cuando la palanca de cambios está
desbloqueada y lista para seleccionar marchas.
-Pal. de cambios desblo-
queada
104
Pantallas de información

Sistema de control de presión de las llantas
Acción a tomarIndicador del
mensaje
Mensaje
Aparece cuando una o más de las llantas del
vehículo tienen baja presión. Ver Sistema de
monitoreo de presión de las llantas (página
285).
ÁmbarBaja presión neumáticos
Aparece cuando el sistema de monitoreo de
presión de las llantas está fallando. Si la
advertencia permanece encendida o continúa
encendiéndose, póngase en contacto con su
distribuidor autorizado. Ver Sistema de
monitoreo de presión de las llantas (página
285).
ÁmbarFalla en monitor presión
neumáticos
Aparece cuando un sensor de presión de llantas
no funciona correctamente o cuando está en
uso la llanta de refacción. Para obtener más
información sobre el funcionamiento del
sistema en estas condiciones, consulte Ver
Sistema de monitoreo de presión de las
llantas (página 285). Si la advertencia perma-
nece activa o aparece nuevamente, comuní-
quese con el distribuidor autorizado lo antes
posible.
ÁmbarFalla en sensor presión
neumáticos
Control de tracción
Acción a tomarIndicador del
mensaje
Mensaje
Aparece cuando el sistema de control de trac-
ción se ha apagado. Ver Uso del control de
tracción (página 175).
-Control de tracción
apagado
105
Pantallas de información

INFORMACIÓN GENERAL
Frecuencias de radio y factores de
recepción
La Comisión Federal de Comunicaciones
de Estados Unidos (Federal
Communications Commission [FCC]) y la
Comisión de Radio y Telecomunicaciones
de Canadá (Canadian Radio and
Telecommunications Commission
[CRTC]) establecen las frecuencias AM y
FM. Estas frecuencias son:
• AM: 530, 540-1700, 1710 kHz
• FM: 87.9-107.7, 107.9 MHz
Factores de la recepción de radio
Mientras más se aleja de una estación FM, más débil es
la señal y la recepción.
Distancia/Potencia
Los cerros, montañas, edificios altos, puentes, túneles,
pasos elevados en autopistas, estacionamientos de varios
pisos, follajes de árboles densos y las tormentas eléctricas
pueden interferir con la recepción.
Terreno
Cuando pasa por una torre de radiodifusión basada en
tierra, una señal más potente puede superar a una más
débil y generar un silencio del sistema de audio.
Sobrecarga de estaciones
Información de CD y el reproductor
de CD
Nota: Las unidades de CD están diseñadas
para tocar solamente discos compactos de
audio de 12 cm (4.75 pulg) originales.
Debido a incompatibilidad técnica, ciertos
discos compactos grabables y regrabables
podrían no funcionar correctamente cuando
se usan en reproductores de CD Ford.
Nota: Los CD con etiquetas caseras de
papel (adhesivas) no se deben insertar en
el reproductor, ya que éstas podrían
desprenderse y hacer que el disco se
atasque. Se recomienda identificar los CD
caseros con un marcador permanente en
vez de utilizar etiquetas adhesivas. Los
bolígrafos pueden dañar los CD. Para
obtener más información, comuníquese con
el distribuidor autorizado.
Nota: No use ningún disco con forma
irregular o con una película protectora
antirrayaduras adherida.
Siempre tome los discos únicamente por
los bordes. Limpie el disco con un
limpiador de CD aprobado solamente,
limpiando desde el centro del disco hacia
el borde. No limpie con movimientos
circulares.
No exponga los discos directamente a la
luz del sol ni a fuentes de calor por
períodos prolongados.
106
Sistema de audio

Estructura de canciones y carpetas
MP3
Los sistemas de audio capaces de
reconocer y reproducir canciones
individuales MP3 y la estructura de
carpetas funciona de la siguiente forma:
• Existen dos modos diferentes para
reproducir discos MP3: modo de
canción MP3 (sistema
predeterminado) y modo de archivo
MP3.
• El modo de canción MP3 ignora
cualquier estructura de carpetas en el
disco MP3. El reproductor enumera
cada canción MP3 en el disco
(señaladas con la extensión de archivo
.mp3) desde T001 hasta un máximo
de T255. Es posible que el número
máximo de archivos MP3 reproducibles
sea menor según la estructura del CD
y el modelo exacto del radio.
• El modo de archivo MP3 representa
una estructura de carpeta que consta
de un nivel de archivos. El reproductor
de CD enumera todas las canciones
MP3 en el disco (señaladas con la
extensión de archivo .mp3) y todas las
carpetas que contienen archivos MP3,
desde F001 (carpeta) T001 (canción)
hasta F253 T255.
• La creación de discos con un sólo nivel
de carpetas ayuda a la navegación a
través de ellos.
Si está grabando sus propios discos MP3,
es importante comprender la manera en
que el sistema lee las estructuras que crea.
Si bien pudieran haber varios archivos
presentes, (archivos con extensiones
distintas a mp3), se reproducirán sólo los
archivos con extensión .mp3; el sistema
ignora otros archivos. Esto le permite usar
el mismo disco MP3 para diversas tareas
en la computadora de su trabajo, de su
casa y del sistema de su vehículo.
En el modo de canción, el sistema muestra
y reproduce la estructura como si tuviese
sólo un nivel (se reproducen todos los
archivos .mp3, sin importar si se
encuentran en una carpeta específica). En
el modo de carpeta, el sistema solo
reproduce los archivos .mp3 en la carpeta
actual.
UNIDAD DE AUDIO -
VEHÍCULOS CON: AM/FM/CD
ALERTA
Manejar mientras está distraído
puede tener como consecuencia la
pérdida de control del vehículo, un
accidente y lesiones. Ford le recomienda
enfáticamente que tenga extrema
precaución cuando utilice cualquier
dispositivo que pudiera distraerlo cuando
conduce. Su responsabilidad principal es
manejar en forma segura el vehículo. No
se recomienda el uso de ningún dispositivo
portátil al conducir; se sugiere el uso de
sistemas operados por voz cuando sea
posible y que se informe de las leyes
estatales y locales aplicables al uso de
dispositivos electrónicos al conducir.
107
Sistema de audio

E142600
Eject (Expulsar): presione para expulsar un CD.A
Flechas de cursor: presione para desplazarse por las opciones en pantalla.B
Ranura de CD: inserte un CD.C
OK: presione para confirmar las selecciones en pantalla.D
Reloj: presione para ajustar la hora. Use los botones H y M fuera de la pantalla
de audio para ajustar las horas y minutos. Presione OK para terminar. (El reloj
también se puede configurar al presionar MENU, luego desplazar el menú de
configuración de reloj).
E
INFO: presione para acceder a información del radio o el reproductor de CD.F
Bloqueo de números: presione un botón para almacenar estaciones de radio
favoritas. Cuando se sintoniza una estación, mantenga presionado el botón
hasta que el sonido retorne.
G
Seek (Buscar): presione para subir a la siguiente estación de la banda de
frecuencia o siguiente pista de un CD.
H
ON/OFF: active o desactive el sistema de audio al presionar el botón. Gire para
ajustar el volumen.
I
108
Sistema de audio

Seek (Buscar): presione para subir a la siguiente estación de la banda de
frecuencia o pista anterior de un CD.
J
MENU: presione para acceder a distintas funciones del sistema de audio.
Consulte Estructura de menús más adelante en este capítulo.
K
SONIDO: oprima para ajustar la configuración de sonido para graves, agudos,
balance y distribución.
L
AUX: presione para acceder a las funciones de medios del sistema SYNC® al
presionar MENU, luego AUX. Ver SYNC® (página 307).
M
RADIO: presione para acceder a distintas funciones de radio al presionar RADIO,
luego MENU. Consulte Estructura de menús más adelante en este capítulo.
N
CD: presione para acceder a distintas funciones de CD al presionar CD, luego
MENU. Consulte Estructura de menús más adelante en este capítulo.
O
UNIDAD DE AUDIO -
VEHÍCULOS CON:
AM/FM/CD/SYNC
ALERTA
Manejar mientras está distraído
puede tener como consecuencia la
pérdida de control del vehículo, un
accidente y lesiones. Ford le recomienda
enfáticamente que tenga extrema
precaución cuando utilice cualquier
dispositivo que pudiera distraerlo cuando
conduce. Su responsabilidad principal es
manejar en forma segura el vehículo. No
se recomienda el uso de ningún dispositivo
portátil al conducir; se sugiere el uso de
sistemas operados por voz cuando sea
posible y que se informe de las leyes
estatales y locales aplicables al uso de
dispositivos electrónicos al conducir.
109
Sistema de audio

E142601
Expulsar: presione para expulsar un CD.A
Flechas de cursor: presione para desplazarse por las opciones en pantalla.B
Ranura de CD: inserte un CD.C
OK: presione para confirmar las selecciones en pantalla.D
Reloj: presione para ajustar la hora. Use los botones H y M fuera de la pantalla
de audio para ajustar las horas y minutos. Oprima "OK" para terminar. (El reloj
también se puede configurar al presionar MENU, luego desplazar el menú de
configuración de reloj).
E
INFO: presione para acceder a información del radio o el reproductor de CD.F
SONIDO: oprima para ajustar la configuración de sonido para graves, agudos,
balance y distribución.
G
Bloqueo de números: presione un botón para almacenar estaciones de radio
favoritas cuando se encuentre en modo de radio. Cuando sintonice una estación,
mantenga presionado el botón hasta que el sonido retorne. En el modo CD,
presione un botón para seleccionar una canción. En el modo de teléfono, use
los botones para marcar un número de teléfono.
H
110
Sistema de audio

Botón de función 4: oprímalo para seleccionar distintas funciones del sistema
de audio, dependiendo del modo en que se encuentre (por ejemplo, radio o
CD).
I
Botón de función 3: oprímalo para seleccionar distintas funciones del sistema
de audio, dependiendo del modo en que se encuentre (por ejemplo, radio o
CD).
J
Buscar: presione para subir a la siguiente estación de la banda de frecuencia
o siguiente pista de un CD.
K
ON/OFF: active o desactive el sistema de audio al presionar el botón. Gire el
selector para ajustar el volumen.
L
Buscar: presione para subir a la siguiente estación de la banda de frecuencia
o pista anterior de un CD.
M
Botón de función 2: oprímalo para seleccionar distintas funciones del sistema
de audio, dependiendo del modo en que se encuentre (por ejemplo, radio o
CD).
N
Botón de función 1: oprímalo para seleccionar distintas funciones del sistema
de audio, dependiendo del modo en que se encuentre (por ejemplo, radio o
CD).
O
MENU: presione para acceder a distintas funciones del sistema de audio.
Consulte Estructura de menús más adelante en este capítulo.
P
TELÉFONO: presione para acceder a las funciones telefónicas del sistema
SYNC® al presionar MENU y luego TELÉFONO. Ver SYNC® (página 307).
Q
AUX: presione para acceder a las funciones de medios del sistema SYNC® al
presionar MENU, luego AUX. Ver SYNC® (página 307).
R
RADIO: presione para acceder a distintas funciones de radio al presionar RADIO,
luego MENU. Consulte Estructura de menús más adelante en este capítulo.
S
CD: presione para acceder a distintas funciones de CD al presionar CD, luego
MENU. Consulte Estructura de menús más adelante en este capítulo.
T
111
Sistema de audio

UNIDAD DE AUDIO -
VEHÍCULOS CON:
AM/FM/CD/RADIO
SATELITAL/SYNC
ALERTA
Manejar mientras está distraído
puede tener como consecuencia la
pérdida de control del vehículo, un
accidente y lesiones. Ford le recomienda
enfáticamente que tenga extrema
precaución cuando utilice cualquier
dispositivo que pudiera distraerlo cuando
conduce. Su responsabilidad principal es
manejar en forma segura el vehículo. No
se recomienda el uso de ningún dispositivo
portátil al conducir; se sugiere el uso de
sistemas operados por voz cuando sea
posible y que se informe de las leyes
estatales y locales aplicables al uso de
dispositivos electrónicos al conducir.
Nota: Su sistema de audio puede funcionar
hasta una hora después de haber apagado
el encendido. Presione el control ON/OFF
(encendido/apagado) para hacer funcionar
el sistema con el encendido apagado. El
sistema se apaga automáticamente
después de una hora.
Nota: Es posible que algunas
características, como la radio satelital
SIRIUS, no estén disponibles en su región.
Consulte primero a su distribuidor
autorizado.
E142602
112
Sistema de audio

Expulsar: presione para expulsar un CD.A
Flechas de cursor: presione para desplazarse por las opciones en pantalla.B
Ranura de CD: inserte un CD.C
OK: presione para confirmar las selecciones en pantalla.D
INFO: presione para acceder a información del radio o el reproductor de CD.E
MENU: presione para acceder a distintas funciones del sistema de audio.
Consulte Estructura de menús más adelante en este capítulo.
F
SOUND: oprima para ajustar la configuración de sonido para graves, agudos,
balance y distribución.
G
Bloqueo de números: presione un botón para almacenar estaciones de radio
favoritas cuando se encuentre en modo de radio. Cuando se sintoniza una
estación, mantenga presionado el botón hasta que el sonido retorne. En el
modo CD, presione un botón para seleccionar una canción. En el modo de
teléfono, use los botones para marcar un número de teléfono. En el modo de
reloj, use los botones H y M fuera de la pantalla de audio para ajustar las horas
y minutos. Oprima "OK" para terminar. (El reloj también se puede configurar al
presionar MENU, luego desplazar el menú de configuración de reloj).
H
Botón de función 4: oprímalo para seleccionar distintas funciones del sistema
de audio, dependiendo del modo en que se encuentre (por ejemplo, radio o
CD).
I
Botón de función 3: oprímalo para seleccionar distintas funciones del sistema
de audio, dependiendo del modo en que se encuentre (por ejemplo, radio o
CD).
J
Buscar: presione para subir a la siguiente estación de la banda de frecuencia
o siguiente pista de un CD.
K
ON/OFF: active o desactive el sistema de audio al presionar el botón. Gire para
ajustar el volumen.
L
Buscar: presione para subir a la siguiente estación de la banda de frecuencia
o pista anterior de un CD.
M
Botón de función 2: oprímalo para seleccionar distintas funciones del sistema
de audio, dependiendo del modo en que se encuentre (por ejemplo, radio o
CD).
N
Botón de función 1: oprímalo para seleccionar distintas funciones del sistema
de audio, dependiendo del modo en que se encuentre (por ejemplo, radio o
CD).
O
PHONE: presione para acceder a las funciones telefónicas del sistema SYNC®
al presionar MENU y luego PHONE. Ver SYNC® (página 307).
P
AUX: presione para acceder a las funciones de medios del sistema SYNC® al
presionar MENU, luego AUX. Ver SYNC® (página 307).
Q
113
Sistema de audio

SIRIUS: presione para acceder a distintas funciones de radio satelital al
presionar SIRIUS, luego MENÚ. Consulte Estructura de menús más adelante
en este capítulo.
R
RADIO: presione para acceder a distintas funciones de radio al presionar RADIO,
luego MENU. Consulte Estructura de menús más adelante en este capítulo.
S
CD: presione para acceder a distintas funciones de CD al presionar CD, luego
MENU. Consulte Estructura de menús más adelante en este capítulo.
T
UNIDAD DE AUDIO -
VEHÍCULOS CON: AM/FM/CD
PREMIUM
ALERTA
Manejar mientras está distraído
puede tener como consecuencia la
pérdida de control del vehículo, un
accidente y lesiones. Ford le recomienda
enfáticamente que tenga extrema
precaución cuando utilice cualquier
dispositivo que pudiera distraerlo cuando
conduce. Su responsabilidad principal es
manejar en forma segura el vehículo. No
se recomienda el uso de ningún dispositivo
portátil al conducir; se sugiere el uso de
sistemas operados por voz cuando sea
posible y que se informe de las leyes
estatales y locales aplicables al uso de
dispositivos electrónicos al conducir.
Nota: La ranura para CD se encuentra
directamente arriba de la pantalla táctil.
Nota: La mayoría de las funciones de audio
se controlan mediante el sistema MyFord
Touch®. Ver MyFord Touch® (página 348).
114
Sistema de audio

E143843
- TUNE +: oprima para buscar la banda de frecuencias en incrementos
individuales.
A
ON/OFF y VOL.: oprima para encender o apagar el sistema de audio. Gire el
selector para ajustar el volumen.
B
Expulsar: expulsar un CD.C
SEEK: oprímalo para ir a la estación siguiente o anterior en la banda de
frecuencia de radio o a la canción siguiente o anterior de un CD.
D
SOUND: oprima para ajustar la configuración de sonido para graves, agudos,
balance y distribución.
E
SOURCE: oprima para acceder a diferentes modos de audio, como AM, FM y
entrada de A/V.
F
115
Sistema de audio

UNIDAD DE AUDIO -
VEHÍCULOS CON: SONY
AM/FM/CD
ALERTA
Manejar mientras está distraído
puede tener como consecuencia la
pérdida de control del vehículo, un
accidente y lesiones. Ford le recomienda
enfáticamente que tenga extrema
precaución cuando utilice cualquier
dispositivo que pudiera distraerlo cuando
conduce. Su responsabilidad principal es
manejar en forma segura el vehículo. No
se recomienda el uso de ningún dispositivo
portátil al conducir; se sugiere el uso de
sistemas operados por voz cuando sea
posible y que se informe de las leyes
estatales y locales aplicables al uso de
dispositivos electrónicos al conducir.
Nota: La ranura para CD se encuentra
directamente arriba de la pantalla táctil.
Nota: La mayoría de las funciones de audio
se controlan mediante el sistema MyFord
Touch®. Ver MyFord Touch® (página 348).
E143844
Encendido: oprima para encender o apagar el sistema de audio.A
SOURCE: oprima para acceder a diferentes modos de audio, como AM, FM y
entrada de A/V.
B
Buscar: oprímalo para ir a la estación siguiente o anterior en la banda de
frecuencia de radio o a la canción siguiente o anterior de un CD.
C
116
Sistema de audio

- TUNE +: oprima para buscar la banda de frecuencias en incrementos
individuales.
D
Volumen: gire el selector para ajustar el volumen.E
SOUND: oprima para ajustar la configuración de sonido para graves, agudos,
balance y distribución.
F
Expulsar: presione para expulsar un CD.G
Estructura de menú
Nota: Dependiendo del sistema, puede que
algunas opciones luzcan diferentes, que no
aparezcan o que aparezcan en la pantalla
y pueda seleccionarlas usando los botones
de función.
Presione MENU.
Oprima los botones con las flechas hacia
arriba y hacia abajo para recorrer las
opciones (si están activas).
Oprima la flecha hacia la derecha para
ingresar a un menú. Oprima la flecha hacia
la izquierda para salir de un menú.
Radio
Use las flechas hacia la izquierda y la derecha para ir hacia
arriba o hacia abajo en la banda de frecuencia.
Sintonización manual
Seleccione para obtener una breve muestra de todos los
canales disponibles.
Explorar
Seleccione para almacenar las seis estaciones locales
con mejor recepción en las bandas de AM y FM.
Autoguardar
Seleccione esta opción para que el sistema busque ciertas
categorías de música (rock, pop, country, etc.).
PTY/Elegir categoría
Seleccione esta opción para ver información de transmi-
sión adicional, si está disponible. La configuración prede-
terminada de esta función es Inactiva. RBDS/RDS debe
estar activado para que pueda definir una categoría.
RBDS/RDS
117
Sistema de audio

SIRIUS
Seleccione para obtener una breve muestra de todos los
canales disponibles.
Explorar
Seleccione esta opción para ver su número de serie elec-
trónico de radio satelital (ESN). Necesitará este número
para comunicarse con SIRIUS® para activar, modificar o
rastrear su cuenta.
Mostrar ESN
Seleccione esta opción para los canales de radio satelital
disponibles. Oprima "OK" para seleccionar ingresar
Sintonizar canal, Saltar canal o Bloquear canal. Una vez
que se salta o se bloquea un canal, puede acceder a él
solamente presionando Direct e ingresando el número de
canal. Para bloquear o desbloquear un canal se requiere
que ingrese su PIN.
Guía de canales
Seleccione esta opción para ver las categorías de canales
(pop, rock, noticias, etc.). Si selecciona una categoría, las
funciones buscar y explorar solo se detendrán en los
canales que pertenezcan a la categoría seleccionada.
Elegir categoría
Seleccione esta opción para activar o desactivar una alerta
para una canción, artista o equipo específico. El sistema
le avisará cuando se esté reproduciendo la selección en
otro canal. Puede guardar hasta 20 alertas.
Alertas
Utilice su PIN para desbloquear las estaciones bloqueadas
anteriormente.
Desbloquear todas las esta-
ciones
Utilice esta opción para restaurar canales que haya
omitido anteriormente.
No saltar estaciones
Seleccione esta opción para crear un PIN que le permita
bloquear o desbloquear canales. Su PIN inicial es 1234.
Bloqueo infantil (PIN)
118
Sistema de audio

Configuración del audio
Ajusta automáticamente el volumen para compensar el
ruido de la velocidad y el viento. Se puede ajustar el
sistema entre desactivado y + 7.
Nivel de SCV
Le permite ajustar la configuración de sonido, como
agudos, graves, medios, distribución y balance.
Sonido
Optimiza la calidad del sonido para las posiciones de
asientos seleccionadas.
Modo de ocupación
Seleccione esta opción para ver las categorías de canales
(pop, rock, noticias, etc.). Si selecciona una categoría, las
funciones buscar y explorar solo se detendrán en los
canales que pertenezcan a la categoría seleccionada.
Elegir categoría
Seleccione esta opción para ver información de transmi-
sión adicional, si está disponible. La configuración prede-
terminada de esta función es Inactiva. RBDS/RDS debe
estar activado para que pueda definir una categoría.
RBDS/RDS
CD
Seleccione esta opción para explorar todas las selecciones
de discos.
Explorar todo
Seleccione esta opción para explorar toda la música
almacenada en la carpeta de MP3 actual.
Explorar carpeta
Seleccione esta opción para reunir los pasajes suaves y
fuertes para un nivel de audición más uniforme.
Compresión de CD
Configuración de la pantalla
Seleccione esta opción para cambiar el brillo de la
pantalla.
Atenuación
Seleccione para ver el idioma en inglés, francés o español.Idioma
Seleccione esta opción para ver la temperatura externa
en grados Fahrenheit o centígrados.
Ajuste de temperatura
119
Sistema de audio

Ajuste del reloj
Seleccione esta opción para ajustar la hora.Configurar hora
Seleccione esta opción para la fecha.Configurar la fecha
Seleccione para ver el reloj en modo de 12 horas o de 24
horas.
12/24 horas
TOMA DE ENTRADA AUXILIAR
AVISOS
Manejar mientras está distraído
puede tener como consecuencia la
pérdida de control del vehículo, un
accidente y lesiones. Ford le recomienda
enfáticamente que tenga extrema
precaución cuando utilice cualquier
dispositivo que pudiera distraerlo cuando
conduce. Su responsabilidad principal es
manejar en forma segura el vehículo. No
se recomienda el uso de ningún dispositivo
portátil al conducir; se sugiere el uso de
sistemas operados por voz cuando sea
posible y que se informe de las leyes
estatales y locales aplicables al uso de
dispositivos electrónicos al conducir.
Por razones de seguridad, no conecte
ni ajuste las configuraciones de su
reproductor de música portátil
mientras el vehículo esté en movimiento.
Cuando el vehículo esté en
movimiento, guarde el reproductor
de música portátil en un lugar
seguro; por ejemplo, en la consola central
o en la guantera. Los objetos sólidos
pueden convertirse en proyectiles cuando
ocurre un choque o frenado repentino, lo
que aumenta el riesgo de sufrir lesiones
graves. El cable de extensión del sistema
de audio debe ser lo suficientemente largo
para permitir que el reproductor de música
se guarde en forma segura mientras el
vehículo está en movimiento.
E142603
El enchufe de entrada auxiliar (AIJ) le
permite conectar y reproducir la música
de su reproductor portátil en los altavoces
del vehículo. Puede usar cualquier
reproductor de música portátil diseñado
para ser utilizado con auriculares. El cable
de extensión de audio debe tener
conectores machos de tres y medio
milímetros (un octavo de pulgada) en cada
extremo.
1. Asegúrese de que el vehículo, radio y
reproductor de música portátil están
apagados y la transmisión está en
posición P.
2. Jale el cable de extensión del
reproductor de música portátil en el
AIJ.
3. Active la radio. Seleccione una estación
FM sintonizada o un CD.
4. Ajuste el volumen según lo desee.
5. Encienda su reproductor de música
portátil y ajuste su volumen a la mitad
de su nivel máximo.
120
Sistema de audio

6. Presione AUX hasta que LINE o LINE
IN aparezca en la pantalla. Deberá
escuchar música desde el dispositivo
incluso si está bajo.
7. Ajuste el volumen de su reproductor
de música portátil hasta que alcance
el nivel de volumen de la estación FM
o el CD. Hágalo cambiando de vuelta
hacia adelante y en reversa entre los
controles AUX y FM o CD.
PUERTO USB (IF EQUIPPED)
E142604
El puerto USB le permite conectar
dispositivos de reproducción de medios,
memory sticks y cargar dispositivos (si se
admite). Ver SYNC® (página 307).
CONCENTRADOR DE MEDIOS
(IF EQUIPPED)
El concentrador de medios se ubica en la
consola central y tiene las siguientes
funciones:
C
B
A
E142605
Entradas A/VA
Ranura para tarjeta SDB
Puertos USBC
Ver MyFord Touch® (página 348).
RADIO SATELITAL (IF EQUIPPED)
SIRIUS® transmite una variedad de
canales de radio satelital de música,
noticias, deportes, clima, tráfico y
entretenimiento. Para obtener más
información y una lista completa de los
canales de radio satelital SIRIUS, visite
www.siriusxm.com en los Estado Unidos,
www.siriuscanada.ca en Canadá, o llame
a SIRIUS al 1–888–539–7474.
121
Sistema de audio

Factores de recepción de radio satelital
Posibles problemas de recepción de radio satelital
Para lograr un óptimo rendimiento de la recepción,
mantenga la antena sin acumulaciones de nieve y hielo y
mantenga el equipaje y otro material en el techo del
vehículo lo más alejado posible de la antena.
Obstrucciones de la antena
Los cerros, montañas, edificios altos, puentes, túneles,
pasos elevados en autopistas, estacionamientos de varios
pisos, follajes de árboles densos y las tormentas eléctricas
pueden interferir con la recepción.
Terreno
Cuando pasa por una torre de radiodifusión basada en
tierra, una señal más potente puede superar a una más
débil y generar un silencio del sistema de audio.
Sobrecarga de estaciones
La pantalla mostrará ADQUIRIENDO... para indicar la
interferencia y es posible que se silencie el sistema.
Interferencia de la señal de
radio satelital
Servicio de radio satelital SIRIUS®
Nota: SIRIUS se reserva el derecho sin
restricción de cambiar, redisponer, agregar
o borrar programación, incluida cancelación,
movimiento o adición de canales específicos
y precios en cualquier momento, con o sin
previo aviso. Ford Motor Company no será
responsable de ninguno de estos cambios
en la programación.
E142593
La radio satelital SIRIUS es un servicio de
radio satelital de suscripción que transmite
una diversidad de programación de
música, deportes, noticias, tiempo, tráfico
y entretenimiento. Su sistema de radio
satelital SIRIUS instalado en fábrica
incluye el dispositivo y una suscripción
limitada que comienza en la fecha de
venta o arrendamiento del vehículo.
Consulte la disponibilidad con su
distribuidor autorizado.
Para obtener más información acerca de
los términos de suscripción extendida (se
requiere una tarifa de servicio), el
reproductor multimedia en línea y una lista
completa de canales de radio satelital
SIRIUS, así como otras funciones, visite
www.siriusxm.com en Estados Unidos,
www.sirius.ca en Canadá o llame a SIRIUS
al 1–888–539–7474.
122
Sistema de audio

Número de serie electrónico de
radio satelital (ESN)
Necesitará su ESN para activar, modificar
o rastrear su cuenta de radio satelital.
Cuando esté en el modo de radio satelital,
podrá ver este número si presiona SIRIUS
y el preestablecimiento de memoria 1 en
forma simultánea.
Localización y solución de problemas
Acción posibleCondiciónPantalla de la radio
No se necesita tomar
ninguna acción. Este
mensaje debe desaparecer
dentro de unos segundos.
La radio requiere más de dos
segundos para generar el
audio para el canal seleccio-
nado.
Acquiring (Adquiriendo)
Si este mensaje no se borra
en breve, o con un ciclo de
la llave de encendido, el
receptor puede tener una
falla. Visite a un distribuidor
autorizado para solicitar
servicio.
Falla de sistema o módulo
interno presente.
Falla satelital/de sistema
SIRIUS
Sintonice otro canal o
seleccione otra memoria
preestablecida.
El canal ya no está dispo-
nible.
Canal inválido
Comuníquese con SIRIUS al
1-888-539-7474 para
suscribirse al canal o bien,
sintonice otro canal.
Suscripción no disponible
para este canal.
Canal sin suscripción
La señal está actualmente
bloqueada. Cuando se
mueva a un área abierta, la
señal volverá.
Se perdió la señal del saté-
lite de SIRIUS o torre de
SIRIUS hacia la antena del
vehículo.
No Signal (Sin señal)
No se necesita tomar
ninguna acción. El proceso
puede tomar hasta tres
minutos.
Actualización de programa-
ción de canales en curso.
Updating (Actualizando)
123
Sistema de audio

Acción posibleCondiciónPantalla de la radio
Póngase en contacto con
SIRIUS llamando al 1-888-
539-7474 para volver a
activar o resolver problemas
de suscripción.
La radio satelital SIRIUS
desactivó el servicio sate-
lital.
Comuníquese con SIRIUS al
1-888-539-7474
Utilizando la guía de
canales, desbloquee o quite
el salto de los canales.
Todos los canales en la
categoría seleccionada
están programados para
saltarse o están
bloqueados.
No Channels Available (No
hay canales disponibles)
No se necesita tomar
ninguna acción.
SIRIUS ha actualizado los
canales disponibles para su
vehículo.
Subscription Updated
(Suscripción actualizada)
124
Sistema de audio

CONTROL DE CLIMA MANUAL
E141421
A
B
D
E
C
Control de velocidad del ventilador: Controla el volumen de aire que circula
en el vehículo. Ajuste para seleccionar la velocidad deseada del ventilador o
apague. Si apaga el ventilador, es posible que el parabrisas se empañe.
A
Aire recirculado: Oprima el botón para cambiar entre aire externo y aire
recirculado. Cuando selecciona aire recirculado, el botón se ilumina y el aire
actualmente en el compartimiento de pasajeros vuelve a circular. Esto puede
reducir el tiempo necesario para enfriar el interior y evitar que ingresen al vehículo
olores indeseados.
B
Control de temperatura: Controla la temperatura del aire que circula en el
vehículo. Ajuste para seleccionar la temperatura deseada. Si selecciona MAX
A/C, el sistema distribuye el aire que vuelve a circular a través de las
ventilaciones del panel de instrumentos. Este modo es más económico y
eficiente que el aire acondicionado normal. Cuando el control de temperatura
está en la posición MAX A/C, ni el aire acondicionado ni el aire recirculado se
pueden apagar.
C
Aire acondicionado: Oprima el botón para activar o desactivar el aire
acondicionado. El aire acondicionado enfría el vehículo usando el aire externo.
Para mejorar el acondicionamiento de aire al arrancar el vehículo, conduzca
con las ventanas ligeramente abiertas durante dos a tres minutos.
D
Control de distribución del aire: Ajustar para seleccionar la distribución de
aire deseada.
E
Seleccione para distribuir el aire
a través de las ventilaciones del
tablero de instrumentos.
Seleccione para distribuir el aire
a través de las ventilaciones del
tablero de instrumentos y el piso.
125
Control de clima

Seleccione para distribuir el aire
a través de las ventilaciones del
piso.
Seleccione para distribuir el aire
a través de las ventilaciones del
parabrisas y el piso.
Seleccione para distribuir el aire
a través de las ventilaciones del
parabrisas. También puede usar
esta configuración para desempeñar y
limpiar el parabrisas de una capa delgada
de hielo. También puede aumentar la
temperatura y la velocidad del ventilador
para mejorar la limpieza.
CONTROL AUTOMÁTICO DE CLIMA
E141422
A C
D E
B
J I H G F
AUTO: Oprima el botón para seleccionar la operación automática. El sistema
controla automáticamente la temperatura, la cantidad y la distribución del
flujo de aire para alcanzar y mantener la temperatura seleccionada
anteriormente.
A
Velocidad del ventilador: Controla el volumen de aire que circula en el
vehículo. Oprima los botones para seleccionar la velocidad del ventilador que
desea. Puede ver la configuración en pantalla.
B
Botón de encendido y apagado: Oprima el botón para encender o apagar el
sistema.
C
Desempañador MAX: Oprima el botón para distribuir el aire a través de las
ventilas del parabrisas. El aire acondicionado se selecciona de manera
automática. El ventilador se fija en la velocidad más alta y la temperatura en
HI (alto). Cuando la distribución del aire se fija en esta posición, no podrá
seleccionar aire recirculado ni ajustar manualmente la velocidad del ventilador
y el control de temperatura. Oprima el botón AUTO para volver al modo
automático.
D
126
Control de clima

MAX A/C: Oprima el botón para distribuir el máximo de aire acondicionado a
través de las ventilas del tablero de instrumentos. Este modo es más económico
y eficiente que el aire acondicionado normal.
E
Aire recirculado: Oprima el botón para cambiar entre aire externo y aire
recirculado. El aire actualmente del compartimento de pasajeros vuelve a
circular. Esto puede reducir el tiempo necesario para enfriar el interior y evitar
que ingresen al vehículo olores indeseados.
F
Desempañador: Oprima el botón para distribuir el aire a través de las ventilas
del parabrisas. También puede usar esta configuración para desempeñar y
limpiar el parabrisas de una capa delgada de hielo.
G
Tablero de instrumentos: Oprima el botón para distribuir el aire a través de
las ventilas del tablero de instrumentos.
H
Piso: Oprima el botón para distribuir el aire a través de las ventilas respectivas.I
Aire acondicionado: Oprima el botón para activar o desactivar el aire
acondicionado. El aire acondicionado enfría el vehículo usando el aire externo.
Para mejorar el acondicionamiento de aire al arrancar el vehículo, conduzca
con las ventanas ligeramente abiertas durante dos a tres minutos.
J
Control de temperatura
E133115
Puede fijar la temperatura entre 60°F
(15.5°C) y 85°F (29.5°C) en pasos de 1°F
(0.5°C). En posición LO (bajo), 59°F
(15°C), el sistema cambia a enfriamiento
permanente. En posición HI (alto), 86°F
(30°C), el sistema cambia a calefacción
permanente.
Nota: Si selecciona cualquiera de las
posiciones LO o HI, el sistema no regula una
temperatura estable.
Mono modo
En este modo, las configuraciones de
temperatura para el lado del conductor y
el lado del copiloto están vinculadas. Si
ajusta la configuración mediante el control
giratorio del lado del conductor, el sistema
ajusta la temperatura a la misma
configuración del lado del copiloto.
Desactivación de mono modo
Seleccione una temperatura para el lado
del pasajero mediante el control giratorio
en el lado del copiloto. El mono modo de
desactiva automáticamente. La
temperatura del lado del conductor no
varía. Ahora puede ajustar las
temperaturas del lado del conductor y el
copiloto de manera independiente. Las
configuraciones de temperatura para cada
lado aparecen en la pantalla.
127
Control de clima

Reactivación de mono modo
Mantenga oprimido el botón AUTO. La
temperatura del lado del copiloto se ajusta
de acuerdo con la configuración de
temperatura del lado del conductor.
CONSEJOS PARA EL CONTROL
DEL CLIMA INTERIOR
Consejos generales
Nota: El uso prolongado del aire recirculado
puede causar que las ventanas se empañen.
Nota: Se puede sentir una cantidad
pequeña de aire de la ventilación del piso
sin importar el ajuste de distribución de aire.
Nota: Para reducir la humedad acumulada
dentro del vehículo, no maneje con el
sistema desactivado o con el aire
recirculado activado siempre.
Nota: No coloque objetos bajo los asientos
delanteros, ya que pueden interferir con el
flujo de aire hacia los asientos traseros.
Nota: Retire toda la nieve, hielo u hojas del
área de admisión de aire en la parte inferior
del parabrisas.
Control manual del aire acondicionado
y la calefacción
Nota: Para reducir el empañamiento del
parabrisas en un clima húmedo, ajuste el
control de distribución de aire en la posición
de respiraderos de parabrisas. Aumente la
temperatura y la velocidad del ventilador
para mejora la limpieza, si es necesario.
Control de aire acondicionado y
calefacción automático
Nota: No ajuste la configuración cuando el
interior del vehículo está extremadamente
caliente o frío. El sistema se ajusta
automáticamente a la configuración
almacenada anteriormente. Para que el
sistema funcione eficientemente, el tablero
de instrumentos y los respiraderos laterales
deben estar completamente abiertos.
Nota: A baja temperatura ambiental con
configuración automática, el flujo de aire se
dirige hacia el parabrisas y las ventanas
laterales mientras el motor permanezca frío.
Nota: Cuando el sistema está desactivado,
el aire exterior no puede ingresar al vehículo.
Nota: Cuando el sistema está configurado
en modo automático y las temperaturas
interior y exterior son altas, el sistema
selecciona automáticamente el aire
recirculado para maximizar el enfriamiento
del interior. Cuando se alcanza la
temperatura de aire seleccionada, el
sistema automáticamente selecciona aire
exterior.
Nota: Cuando selecciona
desempañamiento y quitar escarcha, el
tablero de instrumentos y las funciones de
nivel de ventilación del piso
automáticamente se desactivan y se activa
el aire acondicionado. Fluye aire exterior
hacia el vehículo.
128
Control de clima

Calefacción del interior rápidamente
Vehículo con control automático del aire
acondicionado y la calefacción
Vehículo con control manual del aire
acondicionado y la calefacción
Presione el control del botón de alta
velocidad del ventilador.
Ajuste la velocidad del ventilador al
máximo.
1
Ajuste el control de temperatura al
máximo.
Ajuste el control de temperatura al
máximo.
2
Presione el botón del piso para distribuir
aire hacia los respiraderos del piso.
Ajuste el control de distribución de aire
hacia la posición de respiraderos del
piso.
3
La configuración recomendada calefacción
Vehículo con control automático del aire
acondicionado y la calefacción
Vehículo con control manual del aire
acondicionado y la calefacción
Presione el botón de baja velocidad del
ventilador.
Ajuste la velocidad del ventilador al
segundo máximo ajuste.
1
Ajuste el control de temperatura al punto
medio de la configuración caliente.
Ajuste el control de temperatura al punto
medio de la configuración caliente.
2
Presione los botones de distribución de
aire hacia el piso y el parabrisas.
Ajuste el control de distribución de aire
hacia la posición de respiraderos del piso
y parabrisas.
3
Cierre los respiraderos del tablero de
instrumentos. Abra los respiraderos de
aire laterales y diríjalos hacia las
ventanas laterales.
4
129
Control de clima

Enfriamiento del interior rápidamente
Vehículo con control automático del aire
acondicionado y la calefacción
Vehículo con control manual del aire
acondicionado y la calefacción
Presione el botón automático.Ajuste la velocidad del ventilador al
máximo.
1
Ajuste el control de temperatura a la
configuración deseada.
Ajuste el control de temperatura a la
posición A/A MÁX.
2
Ajuste el control de distribución de aire
hacia la posición de respiraderos del
tablero de instrumentos.
3
La configuración recomendada enfriamiento
Vehículo con control automático del aire
acondicionado y la calefacción
Vehículo con control manual del aire
acondicionado y la calefacción
Presione el botón de baja velocidad del
ventilador.
Ajuste la velocidad del ventilador al
segundo máximo ajuste.
1
Ajuste el control de temperatura al punto
medio de la configuración fría.
Ajuste el control de temperatura al punto
medio de la configuración fría.
2
Presione el botón de ventilación del
tablero de instrumentos para distribuir
aire hacia los respiraderos del tablero de
instrumentos.
Ajuste el control de distribución de aire
hacia la posición de respiraderos del
tablero de instrumentos.
3
Vehículo detenido durante períodos extendidos durante temperaturas
ambiente extremadamente altas
Vehículo con control automático del aire
acondicionado y la calefacción
Vehículo con control manual del aire
acondicionado y la calefacción
Aplique el freno de estacionamiento.Aplique el freno de estacionamiento.1
Mueva la palanca selectora de transmi-
sión a la posición P.
Mueva la palanca selectora de transmi-
sión a la posición P.
2
Presione el botón automático MAX A/C.Ajuste el control de temperatura a la
posición A/A MÁX.
3
Ajuste la velocidad del ventilador al
ajuste mínimo.
4
130
Control de clima

Desempañar la ventana lateral en clima frío
Vehículo con control automático del aire
acondicionado y la calefacción
Vehículo con control manual del aire
acondicionado y la calefacción
Presione el botón de desempañamiento
y quitar escarcha del parabrisas.
Ajuste el control de distribución de aire
hacia las posiciones del tablero de
instrumentos y los respiraderos del piso.
1
Ajuste el control de temperatura a la
configuración deseada.
Presione el botón A/C.2
Ajuste el control de temperatura a la
configuración deseada.
3
Ajuste la velocidad del ventilador al
máximo.
4
Dirija las ventilas de aire laterales del
tablero de instrumentos hacia las
ventanas laterales.
5
Cierre los respiraderos del tablero de
instrumentos.
6
Rendimiento de enfriamiento
máximo en tablero de
instrumentos o tablero de
instrumentos y piso
1. Ajuste el control de temperatura al
mínimo.
2. Presione los botones de aire A/A y aire
recirculado.
3. Ajuste la velocidad del ventilador al
máximo inicialmente y ajústelo para
adaptarse al nivel de comodidad
deseado.
VENTANAS Y ESPEJOS
RETROVISORES CALENTADOS
Ventana trasera calentada
Nota: El encendido debe estar activado
para usar esta característica.
Oprima el botón para eliminar el hielo y
desempañar la ventana trasera. Oprímalo
nuevamente dentro de 10 minutos para
apagarlo. Se desactiva automáticamente
después de 10 minutos o al girar el
encendido a la posición OFF.
No utilice hojas de afeitar ni otros
objetos afilados para limpiar el interior
de la ventana trasera o para quitar
calcomanías. Esto podría dañar las
líneas de la rejilla de calefacción, lo que
no está cubierto por la garantía.
Espejos térmicos exteriores (If
Equipped)
Nota: No quite el hielo de los espejos con
un raspador ni intente ajustar el vidrio del
espejo mientras está congelado. Esto puede
dañar el vidrio y los espejos.
131
Control de clima

Nota: No limpie el alojamiento ni los vidrios
de ningún espejo con abrasivos,
combustibles u otros productos de limpieza
fuertes a base de petróleo.
Ambos espejos se calientan
automáticamente para eliminar el hielo,
la escarcha y la condensación, cuando se
activa la ventana trasera térmica.
FILTRO DE AIRE PARA LA
CABINA
Su vehículo está equipado con un filtro de
aire de la cabina. Se encuentra justo en
frente del lavaparabrisas, bajo la rejilla del
panel de la cubierta de motor en el lado
del pasajero del vehículo.
El sistema de filtración de partículas está
diseñado para reducir la concentración de
partículas, como polvo, esporas y polen,
suspendidas en el aire que entra al
vehículo.
Nota: Debe instalarse un filtro de aire de la
cabina en todo momento para evitar que
entren objetos extraños al sistema. Si se
hace funcionar el sistema sin un filtro se
podría deteriorar o dañar el sistema.
El sistema de filtración de partículas
proporciona los siguientes beneficios a
usted y sus pasajeros:
• Mejora la comodidad de manejo del
usuario, ya que reduce la concentración
de partículas.
• Ayuda a mantener la limpieza del
compartimiento interior.
• Protege a los componentes del control
de aire acondicionado y calefacción
del depósito de partículas.
El filtro debe reemplazarse a intervalos
regulares. Consulte el capítulo
Mantenimiento programado.
Para obtener información adicional sobre
el filtro de aire de la cabina, o para
reemplazar el filtro, consulte a un
distribuidor autorizado.
ARRANQUE A CONTROL
REMOTO (IF EQUIPPED)
El sistema de control de temperatura
ajusta la temperatura de la cabina durante
el arranque a control remoto.
No puede ajustar el sistema durante la
operación de arranque a control remoto.
Ponga el encendido en "ON" para que el
sistema vuelva a la configuración anterior.
Ahora puede hacer ajustes. Tendrá que
volver a activar algunas características que
dependen del vehículo, como por ejemplo:
• asientos térmicos
• asientos enfriados
• volante de dirección térmico
• espejos calentados
• ventana trasera calentada.
Puede seleccionar los ajustes usando los
controles de la pantalla de información.
Ver Pantallas de información (página
93).
Ajustes automáticos
Puede ajustar el control de temperatura
para que funcione en modo automático
mediante la pantalla de información:
Arranque a control remoto > Control de
temperatura > Calefactor-A/A >
Automático. El sistema de control de
temperatura ajusta automáticamente la
temperatura interior en 22°C (72°F).
En clima caluroso, el sistema se ajusta en
22° C (72° F). Los asientos enfriados se
ajustan el alto (si está disponible y si la
función está seleccionada en AUTO en la
pantalla de información).
132
Control de clima

En clima moderado, el sistema
proporciona calefacción o enfriamiento
(según configuraciones anteriores). El
desempañador trasero, los espejos
calentados y los asientos calentados o
enfriados no se activan automáticamente.
En clima frío, el sistema se ajusta en 22° C
(72° F). Los asientos calentados y el
volante de dirección térmico se ajustan el
alto (si está disponible y si la función está
seleccionada en AUTO en la pantalla de
información). El desempañador trasero y
los espejos calentados se activan
automáticamente.
Último ajuste
Puede ajustar el control de temperatura
para que funcione con el último ajuste
utilizado mediante la pantalla de
información: Arranque a control remoto >
Control de temperatura > Calefactor–A/A
> Último ajuste. El sistema de control de
temperatura utiliza automáticamente el
último ajuste seleccionado antes de
apagar el vehículo.
Asientos y dispositivos enfriados
El sistema de control de temperatura
controla otros dispositivos calentados y
enfriados dentro del vehículo. Estos
dispositivos (si están disponibles, y si la
función está seleccionada en AUTO en la
pantalla de información) también se
pueden activar durante el arranque a
control remoto. Los dispositivos
calentados generalmente se activan en
climas fríos y los dispositivos enfriados, en
climas calurosos.
133
Control de clima

MODO CORRECTO DE
SENTARSE
AVISOS
Sentarse de manera incorrecta, fuera
de posición con el respaldo muy
reclinado hacia atrás puede levantar
el peso del cojín del asiento y afectar la
decisión del sistema de sensores del
copiloto, lo que puede ocasionar lesiones
graves o la muerte en caso de un choque.
Siéntese siempre derecho contra el
respaldo, con los pies en el piso.
No recline el respaldo, ya que esto
podría causar que el ocupante se
deslice por debajo del cinturón de
seguridad, lo que le provocaría graves
lesiones en caso de un choque.
No coloque objetos más altos que el
respaldo para reducir el riesgo de
lesiones graves en caso de choque
o durante una frenada brusca.
E68595
Cuando se los usa correctamente, al
apoyacabeza del asiento, el cinturón de
seguridad y las bolsas de aire proporcionan
óptima protección en el caso de un
choque.
Recomendamos que siga estas pautas:
• Siéntese derecho con la base de la
columna lo más atrás posible.
• No recline el respaldo más de 30
grados.
• Ajuste la cabecera para que la parte
superior se nivele con la parte superior
de su cabeza y lo más adelante como
sea posible. Asegúrese de permanecer
cómodo.
• Mantenga suficiente distancia entre sí
y el volante. Recomendamos un
mínimo de 10 pulgadas (25
centímetros) entre el esternón y la
cubierta de la bolsa de aire.
• Sostenga el volante con los brazos
levemente doblados.
• Doble las piernas ligeramente para que
pueda presionar los pedales por
completo.
• Coloque la correo de hombro del
cinturón de seguridad sobre el centro
de su hombro y la correa de pelvis
apretada alrededor de sus caderas.
Asegúrese de que la posición de
conducción le sea cómoda y que puede
mantener total control del vehículo.
CABECERAS
AVISOS
Ajuste por completo la cabecera
antes de sentarse u operar el
vehículo. Esto ayudará a minimizar
el riesgo de lesiones en el cuello en el caso
de un choque. No ajuste la cabecera
cuando el vehículo esté en movimiento.
La cabecera es un dispositivo de
seguridad. Cuando sea posible, debe
instalarse y ajustarse correctamente
cuando el asiento está ocupado.
134
Asientos

AVISOS
Instale la cabecera correctamente
para ayudar a minimizar el riesgo de
lesiones en el cuello en el caso de un
choque.
Cabecera del asiento delantero
E138642
Cabeceras de los asiento traseros
externos
E138643
Cabecera del asiento trasero central
E138645
Las cabeceras constan de:
Una cabecera absorbe-energíaA
Dos vástagos de aceroB
Botón de ajuste y desbloqueo de
la manga de guía
C
Botón de desbloqueo y
extracción de guía
D
Botón de plegadoE
Nota: Ajuste el respaldo en posición de
conducción vertical antes de ajustar la
cabecera. Ajuste la cabecera para que la
parte superior se nivele con la parte superior
de su cabeza y lo más adelante como sea
posible. Asegúrese de permanecer cómodo.
Si es extremadamente alto, ajuste la
cabecera en su posición más alta.
Ajuste de las cabeceras
Elevación de las cabeceras
Tire la cabecera hacia arriba.
Bajada de las cabeceras
1. Mantenga oprimido el botón C.
2. Presione la cabecera hacia abajo.
135
Asientos

Extracción de las cabeceras
1. Hale la cabecera hacia arriba hasta que
alcance su posición más alta.
2. Mantenga oprimidos los botones C y
D.
3. Tire la cabecera hacia arriba.
Instalación de las cabeceras
Alinee los vástagos de acero en las
mangas guía y empuje la cabecera hacia
abajo hasta que se trabe.
Plegado de las cabeceras
1. Mantenga oprimido el botón E.
2. Vuelva a halarla para restablecerla a
su lugar.
Cabeceras reclinables (si está
equipado)
Las cabeceras de los asientos delanteros
pueden ser inclinadas para darle mayor
confort. Para inclinar la cabecera:
E144727
1. Ajuste el respaldo en posición de
manejo o vertical.
2. Gire la cabecera hacia delante (hacia
su cabeza) hasta la posición deseada.
Una vez que la cabecera llegue a su límite
de inclinación hacia delante, girarla otra
vez hacia delante la liberará hasta la
posición no inclinada posterior.
ASIENTOS MANUALES
ALERTA
No ajuste el asiento ni el respaldo del
conductor cuando el vehículo esté
en movimiento.
Movimiento del asiento hacia atrás
y hacia delante
E130249
ALERTA
Trate de mover el asiento hacia atrás
y hacia adelante después de soltar
la palanca, para asegurarse de que
esté perfectamente trabado.
136
Asientos

Ajuste de la altura del asiento del
conductor
E70730
Ajuste de reclinación
E138646
ALERTA
No coloque carga ni ningún objeto
detrás del respaldo antes de
devolverlo a la posición original. Hale
el respaldo para asegurarse de que quedó
completamente asegurado después de
regresarlo a su posición original. Un asiento
sin seguro puede ser peligroso en caso de
un frenado repentino o choque.
ASIENTOS ELÉCTRICOS (IF
EQUIPPED)
AVISOS
No ajuste el asiento ni el respaldo del
conductor cuando el vehículo esté
en movimiento.
No coloque carga ni ningún objeto
detrás del respaldo antes de
devolverlo a la posición original.
137
Asientos

E138647
Soporte lumbar eléctrico (If Equipped)
E138648
FUNCIÓN DE MEMORIA (IF
EQUIPPED)
AVISOS
Antes de activar la memoria del
asiento, asegúrese de que el área
inmediatamente alrededor del
mismo esté despejada y que todos los
ocupantes están a resguardo de piezas
móviles.
No use la función de memoria
cuando el vehículo esté en
movimiento.
Este función recordará automáticamente
la posición del asiento del conductor y de
los espejos eléctricos. El control de
memoria está situado en la puerta del
conductor.
138
Asientos

E142554
Guardado de una posición
preprogramada
1. Gire el encendido a ON.
2. Ajuste el asiento y los espejos
exteriores a la posición deseada.
3. Mantenga oprimido el botón
prerprogramado deseado hasta
escuchar una campanilla.
Recuerdo de una posición
preprogramada
Oprima el botón preprogramado asociado
con la posición de conducción deseada.
Los asientos y los espejos se moverán a la
posición almacenada para esa
programación previa.
Guardado de una posición pasiva
El vehículo almacena las posiciones de los
asientos y espejos para hasta tres
controles remotos o llaves pasivas. La
próxima vez que el vehículo esté
desbloqueado, la posición del asiento y los
espejos se ajustarán a la última posición
usada.
Cada vez que apaga el encendido, las
configuraciones actuales de asientos y
espejos se almacenan en el control remoto
o la llave pasiva usada.
Recuerdo de una posición de
asiento almacenada
Nota: Oprima cualquier control de ajuste
del asiento del conductor, cualquier botón
de memoria o cualquier interruptor de
control de espejos, para detener el
movimiento del asiento durante un
recordatorio. El movimiento del asiento
también se detendrá si mueve el vehículo.
Recordatorio pasivo
Nota: Si hay más de una llave pasiva en
rango, la función de memoria se moverá de
acuerdo con las configuraciones de la
primera llave almacenada.
Cuando desbloquea el vehículo con el
control remoto o hala la manija de la
puerta del conductor con una llave pasiva
en rango, el asiento y los espejos se
mueven a la posición almacenada en ese
control remoto o llave pasiva.
ASIENTOS TRASEROS
E138650
Ajuste de reclinación (If Equipped)
Con el asiento ocupado, jale la palanca
hacia arriba para reclinar el respaldo.
139
Asientos

Para plegar el respaldo del asiento
Con el asiento vacío, jale la palanca hacia
arriba para plegar el respaldo hacia
delante. Es posible que deba plegar las
cabeceras externas y bajar la cabecera
central primero.
Para desplegar el respaldo del
asiento
Jale la palanca hacia arriba y jale el
respaldo hacia arriba.
ASIENTOS CALENTADOS (IF
EQUIPPED)
ALERTA
Las personas que no tienen mucha
sensibilidad en la piel debido a edad
avanzada, enfermedad crónica,
diabetes, lesión en la columna,
medicamentos, consumo de alcohol,
cansancio u otra condición física, deben
tener cuidado al utilizar el asiento térmico.
Este puede provocar quemaduras incluso
a bajas temperaturas, especialmente si se
utiliza por períodos prolongados de tiempo.
No coloque nada en el asiento que aísle el
calor, como una frazada o cojín. Esto
puede ocasionar que el asiento térmico se
sobrecaliente. No pinche el asiento con
alfileres, agujas u otros objetos
puntiagudos. Esto podría causar daños al
elemento de calefacción, generando un
sobrecalentamiento del calefactor del
asiento. Un asiento sobrecalentado podría
provocar serias lesiones personales.
No haga lo siguiente:
• Colocar objetos pesados en el asiento.
• Hacer funcionar el asiento térmico si
se ha derramado agua u otro líquido
en el asiento. Deje que el asiento se
seque completamente.
• Operar los asientos térmicos cuando
el motor no esté en marcha. Hacerlo
podría agotar la batería del vehículo.
E138653
Ajuste el control en la configuración de
calor deseada.
DESCANSABRAZOS DEL
ASIENTO TRASERO (IF EQUIPPED)
E138656
Pliegue el descansabrazos hacia abajo
para usar el descansabrazos y portavasos.
140
Asientos

Sistema de control inalámbrico
HomeLink® (If Equipped)
AVISOS
Asegúrese de que la puerta del
garaje y el dispositivo de seguridad
estén libres de obstáculos cuando
esté programando. No programe el
sistema con el vehículo estacionado en el
garaje.
No use el sistema con ningún
sistema para abrir puertas de garajes
que no cuente con la característica
de seguridad de paro y reversa que exigen
las Normas Federales de Seguridad de
Estados Unidos (esto incluye cualquier
modelo de sistema para abrir puertas de
garajes fabricado antes del 1 de abril de
1982).
Nota: Asegúrese de conservar el transmisor
de control remoto original para usarlo en
otros vehículos y también para futuros
procedimientos de programación del
sistema.
Nota: Recomendamos que al vender o
devolver el vehículo en arrendamiento
directo, borre los botones de función
programados por motivos de seguridad.
Consulte los códigos de borrado de los
botones de funciones más adelante en esta
sección.
Nota: Puede programar un máximo de tres
dispositivos. Para cambiar o reemplazar
cualquiera de los tres dispositivos después
de realizar la programación, primero debe
borrar la configuración actual. Consulte los
códigos de borrado de los botones de
funciones más adelante en esta sección.
E142657
El sistema universal para abrir la puerta
del garaje reemplaza al sistema manual
de apertura de garajes con un transmisor
de tres botones integrado en la visera del
vehículo.
El sistema incluye dos características
principales: un aparato para abrir la puerta
del garaje y una plataforma para
activación remota de dispositivos dentro
del hogar. Así como se programa para las
puertas del garaje, el trasmisor del sistema
puede programarse para operar
operadores de portones de entrada,
sistemas de seguridad, seguros de la
puerta de entrada y luces de hogares o de
oficinas.
Puede encontrar información adicional
acerca de este sistema en línea en
www.homelink.com o llamando a la línea
gratuita de ayuda, al 1-800-355-3515.
Programación
Nota: Coloque una batería nueva en el
transmisor manual. Esto asegurará una
preparación más rápida y una transmisión
precisa de la señal de radiofrecuencia.
Nota: Durante la programación, es posible
que el transmisor manual deje de transmitir.
Si esto ocurre, oprima y suelte el botón de
función del visor mientras oprime y suelta
el transmisor manual cada dos segundos.
La luz indicadora destellará lenta y luego
rápidamente una vez que se acepte la señal
de radiofrecuencia.
141
Abridor Universal de Cochera

E142658
1. Gire el encendido a ON.
2. Mantenga el transmisor manual de la
puerta del garaje 1–3 pulgadas (2–8
cm) alejado del botón que desea
programar.
3. Mantenga oprimido al mismo tiempo
el botón del visor que desea programar
y el botón del transmisor manual hasta
que la luz indicadora del visor cambie
de una luz de parpadeo lenta a una de
parpadeo rápido. Después, suelte los
botones.
4. Mantenga oprimido el botón de función
que programó durante 5 segundos y
suelte. Es posible que deba hacer esto
dos veces para activar la puerta. Si la
puerta del garaje no funciona, observe
la luz indicadora.
Si la luz indicadora permanece encendida,
la programación está completa. Oprima y
suelte el botón programado para activar
la puerta.
Si la luz indicadora del visor parpadea
rápidamente durante dos segundos y luego
pasa a una luz constante, siga los pasos a
continuación.
Nota: Es posible que necesite una escalera
para llegar hasta donde está la unidad y
tenga que retirar la cubierta o las lentes de
la luz.
E142659
1. Oprima el botón de aprendizaje del
motor del sistema de apertura de la
puerta del garaje.
Nota: Tendrá 30 segundos para completar
el paso siguiente.
2. Vuelva a su vehículo.
E142658
3. Mantenga oprimido el botón de función
que desea programar en el visor
durante 2 segundos y suelte. Repita
este paso Dependiendo de la marca
del sistema para abrir puertas de
garajes, es posible que deba repetir
esta secuencia una tercera vez.
Para programar más botones, repita los
los pasos del uno al cuatro.
Si tiene alguna consulta o comentario,
contáctese con HomeLink en el sitio
www.homelink.com o bien llame al
1-800-355-3515.
Borrado de los códigos de los botones
de funciones
Nota: No puede borrar botones
individuales.
142
Abridor Universal de Cochera

E142660
1. Mantenga oprimidos los dos botones
de función externos al mismo tiempo
durante aproximadamente 20
segundos, hasta que las luces
indicadoras sobre los botones
parpadeen rápidamente.
2. Suelte los botones cuando la luz
indicadora parpadee. Se borrarán los
códigos de todos los botones.
Reprogramación de un botón único
Para programar un dispositivo de acuerdo
con un botón preparado anteriormente,
siga estos pasos:
1. Mantenga oprimido el botón deseado.
NO suelte el botón.
2. La luz indicadora comenzará a
destellar después de 20 segundos. Sin
soltar el botón, siga el paso 1 de la
sección de Programación.
Si tiene alguna consulta o comentario,
contáctese con HomeLink en el sitio
www.homelink.com o bien llame al
1-800-355-3515.
Programación a un sistema de apertura
de puertas de garaje Genie Intellicode®
2
Nota: El transmisor Genie Intellicode 2 ya
debe estar programado para operar con el
sistema de apertura de puertas de garaje.
Nota: Para programar HomeLink al
transmisor, primero debe colocar este en
modo de programación.
E142661
Luz indicadora rojaA.
Luz indicadora verdeB.
1. Mantenga oprimido uno de los botones
del transmisor manual durante 10
segundos. La luz indicadora cambiará
de verde a verde y roja y verde.
2. Oprima el mismo botón dos veces para
confirmar el cambio en el modo de
programación. Si se hizo
correctamente, la luz indicadora se
encenderá de color rojo.
3. Mantenga el transmisor a no más de
1–3 pulgadas (2–8 cm) del botón del
visor que desea programar.
4. Mantenga oprimido el botón Genie
programado en el transmisor manual
y el botón que desea programar. La luz
indicadora del visor parpadeará
rápidamente cuando la programación
esté correcta.
Nota: El transmisor Genie transmitirá hasta
por 30 segundos. Si HomeLink no se
programa dentro de 30 segundos, el
transmisor Genie tendrá que oprimirse
nuevamente. Si la luz indicadora del
transmisor Genie se enciende en verde y
rojo, suelte el botón hasta que la se apague
antes de volver a presionar el botón.
143
Abridor Universal de Cochera

Una vez que HomeLink se ha programado
correctamente, el transmisor Genie debe
cambiarse fuera del modo de programa.
Para hacerlo:
1. Mantenga oprimido el botón Genie
programado anteriormente en el
transmisor manual durante 10
segundos. La luz indicadora cambiará
de verde a roja y verde.
2. Oprima el mismo botón dos veces para
confirmar el cambio. Si se hizo
correctamente, la luz indicadora se
encenderá de color verde.
Programación de HomeLink al motor
del sistema de apertura de puertas de
garaje Genie Intellicode
Nota: Es posible que necesite una escalera
el motor del sistema de apertura de la
puerta del garaje.
E142662
1. Mantenga oprimido el botón de
programa en el motor del sistema de
apertura de la puerta del garaje hasta
que ambas luces indicadoras azules se
enciendan.
2. Suelte el botón de programa. Solo la
luz indicadora redonda más pequeña
debe estar encendida.
3. Oprima y suelte el botón de programa.
La luz indicadora púrpura más grande
destellará.
Nota: Los dos pasos siguientes se deben
completar en 30 segundos.
4. Oprima y suelte el botón programado
anteriormente del transmisor manual
Genie Intellicode 2. Ambas luces
indicadoras de la unidad del motor del
sistema de apertura de la puerta del
garaje ahora deben parpadear en
púrpura.
5. Mantenga oprimido el botón del visor
programado anteriormente durante 2
segundos. Repita este paso hasta 3
veces hasta que la puerta del garaje se
mueva.
La programación ahora está completa.
Limpieza de un dispositivo HomeLink
Para borrar la programación de los tres
botones HomeLink, mantenga presionados
los dos botones exteriores de HomeLink
hasta que la luz indicadora comience a
parpadear. La luz indicadora comenzará a
parpadear en 10 a 20 segundos, momento
en que ambos botones deben soltarse. La
programación ahora ha sido borrada y la
luz indicadora debe parpadear lentamente
para indicar que el dispositivo está en
modo de práctica cuando se oprime
alguno de los tres botones HomeLink.
Homologado con la FCC y con la norma
RSS-210 de Industry Canada
Este dispositivo cumple con la Parte 15 de
las Normas de la FCC (Federal
Communications Commission) y con la
norma RSS-210 de Industry Canada. La
operación está sujeta a estas dos
condiciones: (1) este dispositivo no debiera
causar interferencia dañina y (2) este
dispositivo debe aceptar cualquier
interferencia que reciba, incluso
interferencias que pudieran causar un
funcionamiento no deseado.
144
Abridor Universal de Cochera

Los cambios o modificaciones al
dispositivo que no estén expresamente
aprobados por la parte responsable del
cumplimiento pueden invalidar la
autoridad del usuario para operar el
equipo.
145
Abridor Universal de Cochera

TOMAS AUXILIARES DE
CORRIENTE
ALERTA
No conecte accesorios eléctricos
opcionales en el enchufe del
encendedor (si está equipado). El
uso incorrecto del encendedor puede
causar daños no cubiertos por la garantía,
y provocar un incendio o graves heridas.
Nota: No inserte objetos que no sean un
enchufe de accesorio en el tomacorriente.
Esto daña la toma y quema el fusible.
Nota: No cuelgue del enchufe ningún tipo
de accesorio ni abrazadera de accesorio.
Nota: No use el tomacorriente con más
capacidad que la del vehículo de 12 voltios
CC o 180 vatios o podría quemarse un
fusible.
Nota: No utilice el tomacorriente para hacer
funcionar el encendedor.
Nota: El uso incorrecto del tomacorriente
puede provocar daños que la garantía no
cubre.
Nota: Mantenga siempre cerradas las tapas
de los tomacorrientes cuando no estén en
uso.
Haga funcionar el motor para usar toda la
capacidad del tomacorriente. Para evitar
que la batería del vehículo se descargue:
• No utilice el tomacorriente más de lo
necesario cuando el motor no está
encendido.
• No deje dispositivos conectados en la
noche o cuando el vehículo esté
estacionado durante períodos largos.
Ubicaciones
Se pueden encontrar tomacorrientes:
• en la consola central
• dentro del área de almacenamiento de
la consola central
• en la parte posterior de la consola
central.
Tomacorriente de 110 voltios de
CA. (If Equipped)
ALERTA
No deje dispositivos eléctricos
conectados en el tomacorriente si
no los está utilizando. No utilice
ninguna extensión en el tomacorriente de
110 voltios de CA, ya que inhabilitará el
diseño de protección de seguridad
proporcionado por la tapa y la lengüeta
giratoria. Si lo hace, el tomacorriente
podría sobrecargarse si la alimentación
eléctrica de múltiples dispositivos supera
el límite de carga de 150 vatios, lo que
podría provocar un incendio o heridas
graves.
Nota: El tomacorriente se apagará después
de 13 minutos si el encendido está activado
sin que el motor esté funcionando.
Mantenga el motor funcionando o cicle el
encendido para mantener el tomacorriente
activado.
E143941
146
Tomas de energía auxiliares

El tomacorriente e utiliza para energizar
dispositivos eléctricos que requieren hasta
150 vatios. Se ubica en la parte posterior
de la consola central.
Cuando la luz indicadora de color verde
ubicada en el tomacorriente, está:
• encendida: el tomacorriente está listo
para suministrar energía .
• apagada: el suministro eléctrico del
tomacorriente está apagado; el
encendido no está activado.
• parpadeando: el tomacorriente está
en el modo de falla.
El tomacorriente temporalmente
desconecta la energía si se sobrepasa el
límite de 150 vatios. También puede entrar
a un modo de falla cuando está
sobrecargado, sobrecalentado, o en corto.
Desconecte el dispositivo y gire la llave de
encendido a la posición OFF y luego a la
posición ON, en caso de una condición de
sobrecarga y cortocircuito. Permita que el
sistema se enfríe, posteriormente gire la
llave de encendido a la posición OFF y
luego a la posición ON, en caso de una
condición de sobrecalentamiento.
El tomacorriente no está diseñado para
dispositivos eléctricos como:
• Televisiones tipo tubo de rayos
catódicos
• Cargas motrices, como aspiradoras,
sierras eléctricas y otras herramientas
eléctricas, refrigeradores impulsados
por compresor, etc.
• Dispositivos de medición, que procesan
datos precisos, como equipo médico,
equipo de medición, etc.
• Otros aparatos que requieren un
suministro eléctrico extremadamente
estable: mantas eléctricas controladas
por microcomputadora, luces de
sensado al tacto, etc.
147
Tomas de energía auxiliares

CONSOLA CENTRAL
ALERTA
Utilice solo vasos blandos en el
portavasos. Los objetos duros
pueden lesionar a alguien en caso de
un choque.
Es posible que la consola de su vehículo
venga equipada con una variedad de
funciones.
A
B
C
E142433
PortavasosA
Compartimiento de
almacenamiento con
tomacorriente auxiliar, enchufe
de entrada auxiliar, puerto USB
y centro de medios
B
Tomacorriente auxiliarC
CONSOLA DEL TOLDO
E75193
Presione cerca del borde trasero de la
puerta para abrirlo.
148
Compartimientos para Almacenaje

INFORMACIÓN GENERAL
Si desconecta la batería, el vehículo puede
exhibir características de manejo fuera de
lo común por unas 5 millas (8 kilómetros)
después de volver a conectarlo. Esto se
debe a que el sistema de administración
del motor se debe realinear con el motor.
Puede descartar cualquier característica
de manejo poco común durante este
período.
AVISOS
El ralentí prolongado a altas
velocidades del motor puede
producir temperaturas muy altas en
el motor y en el sistema de escape, lo que
significa riesgo de incendio y otros daños.
No estacione, ni deje en ralentí ni
conduzca el vehículo sobre pasto
seco u otras superficies secas. El
sistema de emisión de gases calienta el
compartimiento del motor y el sistema de
escape, lo cual crea riesgo de incendio.
No arranque el motor en un garaje
cerrado ni en otras áreas encerradas.
Los gases de escape pueden ser
tóxicos. Siempre abra la puerta del garaje
antes de arrancar el motor.
Si huele gases de escape dentro de
su vehículo, hágalo inspeccionar de
inmediato por un distribuidor
autorizado. No conduzca el vehículo si
percibe olor de gases de escape.
Este sistema cumple con todos los
requisitos de las normas canadienses para
equipos que provocan interferencias, que
regulan la potencia del impulso del campo
eléctrico de la interferencia de radio.
Al arrancar el motor, evite pisar el
acelerador antes y durante la operación.
Use el acelerador solo cuando tenga
dificultad para arrancar el motor.
INTERRUPTOR DE ENCENDIDO
E72128
0 (desconectado): El encendido está en
OFF.
Nota: Cuando gire el encendido a OFF y
salga del vehículo, no deje la llave puesta
en encendido. Podría descargar la batería
del vehículo.
Nota: Para apagar el motor cuando el
vehículo está en movimiento, mueva la
palanca del selector de transmisión a la
posición N. Use los frenos para que el
vehículo se detenga de manera segura.
Después de detener el vehículo, apague el
motor y mueva la palanca del selector de
transmisión a la posición P. Gire la llave a
la posición 0 o I.
I (accesorios): se pueden operar accesorios
eléctricos como el radio mientras el motor
está apagado.
Nota: No deje la llave de encendido en esta
posición demasiado tiempo para evitar
descargar la batería.
II (encendido): todos los circuitos
eléctricos funcionan. Las luces e
indicadores de advertencia se encienden.
III (arranque): da marcha al motor. Suelte
la llave tan pronto como arranque el
motor.
149
Arranque y Paro del Motor

ARRANQUE SIN LLAVE (IF
EQUIPPED)
AVISOS
Es posible que el sistema de partida
sin llave no funcione si la llave está
cerca de objetos metálicos o de
dispositivos electrónicos como celulares.
Revise siempre que el bloqueo del
volante se encuentre desactivado
antes de intentar mover el vehículo.
Nota: Se debe ubicar una llave válida
dentro del vehículo para activar el
encendido y arrancar el motor.
Activación del encendido (Modo de
accesorios)
E142555
Oprima el botón START una vez sin pisar
el pedal del freno. Este botón se ubica en
el tablero de instrumentos cerca del
volante. Todos los circuitos y accesorios
eléctricos funcionan y las luces e
indicadores de advertencia se encienden.
Oprima el botón START nuevamente sin
pisar el pedal del freno para apagar el
vehículo por completo.
Arranque del vehículo
Siga estos pasos para arrancar el vehículo
1. Mueva la palanca selectora de
transmisión a la posición P.
2. Pise el pedal del freno a fondo.
3. Oprima el botón START (arranque).
El sistema no funciona si:
• Las frecuencias de la lleva estén
atascadas.
• La batería de la llave no tiene carga.
Si no puede para arrancar el vehículo, haga
lo siguiente.
Control remoto de 5 botones
E142874
Control remoto de 3 botones
E145988
1. Sostenga la llave junto al símbolo en
la columna de dirección.
2. Con la llave en esta posición, puede
utilizar el botón de arranque para
activar el encendido y arrancar su
vehículo.
Detención del moto cuando el
vehículo está detenido
1. Mueva la palanca selectora de
transmisión a la posición P.
2. Oprima el botón START (arranque).
150
Arranque y Paro del Motor

Nota: El encendido, todos los circuitos
eléctricos, luces de advertencia e
indicadores se apagarán.
Detención del moto cuando el
vehículo está en movimiento
1. Mantenga oprimido el botón START
(arranque) durante un momento u
oprímalo tres veces dentro de dos
segundos.
2. Mueva la palanca del selector de
transmisión a la posición N y use los
frenos para detener el vehículo por
completo.
3. Cuando el vehículo se ha detenido,
mueva la palanca del selector de
transmisión a la posición P y apague el
encendido.
ALERTA
Apagar el motor cuando el vehículo
todavía está en movimiento causará
pérdida de asistencia para los frenos
y la dirección. La dirección no se trabará,
pero se necesitará más esfuerzo para
moverla. Al apagar el encendido, algunos
circuitos eléctricos, luces de advertencia
e indicadores también pueden apagarse.
Rearranque rápido
La característica de rearranque rápido le
permite volver a arrancar el vehículo dentro
de 20 segundos luego de haberlo apagado,
incluso si no hay una llave válida presente.
Dentro de 20 segundos de haber apagado
el vehículo, pise el freno y oprima el botón
de arranque. Una vez transcurridos los 20
segundos, ya no podrá arrancar el vehículo
sin una llave dentro del vehículo.
Una vez arrancado el vehículo,
permanecerá en funcionamiento hasta
que oprima el botón de arranque, incluso
si no se ha detectado una llave válida. Si
abre y cierra una puerta mientras el
vehículo está en funcionamiento, el
sistema busca una llave válida. No podrá
arrancar el vehículo si no se detecta una
llave válida dentro de 20 segundos.
ARRANQUE DE UN MOTOR DE
GASOLINA
Cuando arranca el motor, la velocidad en
ralentí aumentará para calentar el motor.
Si la velocidad en ralentí del motor no
disminuye automáticamente, haga que
revisen el vehículo en un distribuidor
autorizado.
Antes de arrancar el motor, revise lo
siguiente:
• Asegúrese de que todos los ocupantes
tengan sus cinturones de seguridad
abrochados.
• Asegúrese que los faros y los
accesorios eléctricos estén apagados.
• Asegúrese que esté puesto el freno de
estacionamiento.
• Mueva la palanca selectora de
transmisión a la posición P.
• Gire la llave de encendido a la posición
II.
Nota: No toque el pedal del acelerador.
1. Mueva la palanca selectora de
transmisión a la posición P o N.
2. Pise el pedal del freno a fondo.
3. Ponga en marcha el motor. El motor
puede continuar girando durante unos
15 segundos o hasta que el vehículo
arranque.
Nota: Si no puede arrancar en el primer
intento, espere un momento y vuelva a
intentarlo.
151
Arranque y Paro del Motor

Si tiene problemas para arrancar el motor
cuando la temperatura está por debajo de
los -13°F (-25°C), pise el acelerador
levemente y vuelva a intentarlo.
Si no puede arrancar el motor después de
tres intentos, espere 10 segundos y siga
este procedimiento.
1. Mueva la palanca selectora de
transmisión a la posición P.
2. Pise el pedal del acelerador a fondo y
manténgalo así.
3. Pise el pedal del freno a fondo.
4. Ponga en marcha el motor.
Protección contra los gases de
escape
ALERTA
Si huele gases de escape dentro de
su vehículo, hágalo inspeccionar de
inmediato por un distribuidor
autorizado. No conduzca el vehículo si
percibe olor de gases de escape. Los gases
de escape contienen monóxido de
carbono. Tome precauciones para evitar
sus efectos tóxicos.
Información importante sobre la
ventilación
Si detiene el vehículo y luego deja el motor
en ralentí durante largos períodos de
tiempo, recomendamos que aplique una
de las siguientes opciones:
• Abra las ventanas al menos 1 pulgada
(2.5 centímetros)
• Fije el control de aire acondicionado en
aire externo.
CALENTADOR DEL BLOQUE
DEL MOTOR (IF EQUIPPED)
AVISOS
No seguir las instrucciones del
calefactor de bloque del motor
puede provocar daños a la propiedad
o lesiones personales graves.
No use su calefactor con sistemas
eléctricos sin conexión a tierra o
adaptadores de dos puntas. Existe
riesgo de descarga eléctrica.
Nota: El calefactor es más eficaz si las
temperaturas exteriores no supera los 0°F
(-18°C).
El calefactor actúa como ayuda de
arranque al calentar el refrigerante del
motor. Esto permite que el sistema de
control de clima responda rápidamente.
El equipo incluye un elemento calefactor
(instalado en el bloque del motor) y un
mazo de cables. No puede conectar el
sistema a una fuente eléctrica de 120
voltios CA.
Recomendamos que haga lo siguiente para
una operación segura y correcta:
• Use un cable de extensión para
exteriores calibre 16 certificado por
Underwriter's Laboratory (UL ) o
Canadian Standards Association
(CSA). Este cable de extensión debe
poder usarse en exteriores, bajas
temperaturas y esté claramente
marcado "Apropiado para usarse en
aparatos exteriores". No use un cable
de extensión para interiores en el
exterior. Esto podría generar una
descarga eléctrica o peligro de
incendio.
• Procure que sea lo más corto posible.
• No utilice varios cables de extensión.
152
Arranque y Paro del Motor

• Cuando esté en funcionamiento,
asegúrese de que las conexiones del
enchufe del cable de
extensión/enchufe del cable del
calefactor estén libres de agua. Esto
podría ocasionar una descarga
eléctrica o peligro de incendio.
• Asegúrese de que el vehículo esté
estacionado en un área limpia, libre de
combustibles.
• Asegúrese de que estén bien
conectados el calefactor, el cable del
calefactor y el cable de extensión.
• Compruebe si hay calor en la conexión
eléctrica cuando el sistema haya
funcionado durante aproximadamente
30 minutos.
• Asegúrese de que el sistema esté
desconectado y adecuadamente
guardado antes de conducir el vehículo.
Asegúrese de que la tapa protectora
selle las puntas del enchufe del cable
del calefactor de bloque cuando no
esté en uso.
• Asegúrese de que se compruebe que
el sistema del calefactor funciona
correctamente antes del invierno.
Uso del calefactor de bloque del
motor
Asegúrese de que los terminales del
tomacorriente estén limpios y secos antes
de utilizarlos. Límpielos con un paño seco
si fuera necesario.
El calefactor usa 0.4 a 1.0 kilovatios-hora
de energía por hora de uso. El sistema no
tiene termostato. Alcanzará temperatura
máxima después de aproximadamente
tres horas de operación. Si usa el
calefactor por más de tres horas, no
mejorará el rendimiento del sistema y
utilizará electricidad de manera
innecesaria.
153
Arranque y Paro del Motor

PRECAUCIONES DE
SEGURIDAD
AVISOS
No llene en exceso el tanque de
combustible. La presión en un
tanque excesivamente lleno puede
causar fugas y aumentar las
probabilidades de derrame de combustible
e incendio.
El sistema de combustible puede
estar bajo presión. Si siente un siseo
cerca de la puerta de llenado de
combustible (sistema de combustible "sin
tapón" Easy Fuel), no cargue combustible
hasta que el sonido se detenga. De lo
contrario, se podría derramar combustible,
pudiendo ocasionar serias lesiones
personales.
Los combustibles para automóviles
pueden causar serias heridas o la
muerte si se usan o se manejan de
modo indebido.
El flujo de combustible a través de
una boquilla de la bomba de
combustible puede producir
electricidad estática, lo que podría
provocar un incendio si el combustible se
bombea hacia un recipiente de
combustible no conectado a tierra.
El etanol y la gasolina pueden
contener benceno, que es un agente
cancerígeno.
Al abastecerse de combustible,
apague siempre el motor y nunca
permita la presencia de chispas ni
llamas cerca del cuello de llenado. Nunca
fume mientras carga combustible. El vapor
del combustible es extremadamente
peligroso en ciertas condiciones. Se debe
tener cuidado para evitar la inhalación en
exceso de los gases.
Observe las siguientes recomendaciones
al manipular combustible para
automóviles:
• Apague cualquier artículo de
tabaquería y/o llama al descubierto
antes de abastecer de combustible el
vehículo.
• Siempre apague el vehículo antes de
abastecerlo de combustible.
• Los combustibles para automóviles
son tóxicos y pueden ser mortales si
son ingeridos. La gasolina es muy
tóxica y si se ingiere, puede causar la
muerte o lesiones permanentes. Si
ingiere combustible, llame a un médico
cuanto antes, incluso si no se
presentan síntomas inmediatos. Los
efectos tóxicos del combustible
pueden tardar horas en hacerse
notorios.
• Evite inhalar los vapores del
combustible. Inhalar demasiado vapor
de combustible de cualquier tipo,
puede provocar irritación a los ojos y a
las vías respiratorias. En casos graves,
la respiración excesiva o prolongada
de vapor de combustible puede causar
enfermedades graves y lesiones
permanentes.
• Evite el contacto del combustible con
los ojos. Si se salpica de combustible
los ojos, quítese los lentes de contacto
(si los usa), lávese con agua
abundante durante 15 minutos y
busque atención médica. Si no busca
atención médica adecuada puede
sufrir lesiones permanentes.
154
Combustible y llenado

• Los combustibles también pueden ser
dañinos si se absorben a través de la
piel. Si se salpica de combustible la piel
o la ropa, o bien ambos, quítese de
inmediato la ropa contaminada y
lávese minuciosamente la piel con
agua y jabón. El contacto reiterado o
prolongado de la piel con combustibles
o sus vapores produce irritación de la
piel.
• Tenga especial cuidado si está
tomando “Antabuse” u otras formas
de disulfiram para el tratamiento del
alcoholismo. Inhalar vapores de
gasolina o salpicarse la piel con ella
puede provocarle una reacción
adversa. En personas sensibles, puede
producir lesiones o enfermedades
graves. Si se salpica de combustible la
piel, lave la parte afectada en forma
inmediata y minuciosa con agua y
jabón. Consulte de inmediato a un
médico si sufre una reacción adversa.
CALIDAD DEL COMBUSTIBLE
Nota: Le recomendamos que utilice
únicamente combustible de alta calidad,
sin aditivos ni otros tratamientos para el
motor.
No utilice gasolina con plomo o gasolina
con aditivos que contengan otros
compuestos metálicos, por ejemplo,
aditivos a base de manganeso. Podrían
dañar el sistema de emisión.
Cómo escoger el combustible
correcto
Nota: El uso de cualquier otro combustible
que no sea aquellos recomendados puede
causar daño al tren motriz, pérdida de
rendimiento del vehículo y es posible que
las reparaciones no estén cubiertas por la
garantía.
Si su vehículo no utiliza combustible
flexible, entonces solo use combustible sin
plomo o combustible sin plomo mezclado
con un máximo de 15% de etanol. No
utilice combustible de etanol (E85),
combustible diesel, metanol, combustible
con plomo ni ningún otro combustible o
podría dañar o impedir el funcionamiento
del sistema de control de emisiones.
El uso de combustible con plomo está
prohibido por ley.
Su vehículo no está diseñado para usar
combustible ni aditivos para combustible
con compuestos metálicos, lo que incluye
los aditivos con base de manganeso.
Recomendaciones de octanaje
Se recomienda gasolina sin plomo regular
con un octanaje de 87 (R+M)/2. Algunas
estaciones de servicio ofrecen
combustibles anunciados como regulares
con una clasificación de octanaje menor
de 87, especialmente en lugares de altitud
elevada. No se recomienda el uso de
combustibles con niveles de octanaje
menores de 87.
Nota: El combustible Premium le
proporcionará un mejor rendimiento para
vehículos con motores EcoBoost® y es
recomendado para el uso de servicio
pesado, como el arrastre de remolques.
No se preocupe si a veces su motor tiene
leves detonaciones. Sin embargo, si
presenta un cascabeleo fuerte mientras
usa combustible del octanaje
recomendado, consulte con su distribuidor
autorizado para evitar daños en el motor.
FUNCIONAMIENTO SIN
COMBUSTIBLE
Evite quedarse sin combustible, ya que
esta situación puede afectar
negativamente los componentes del tren
motriz.
155
Combustible y llenado

Si se queda sin combustible:
• Es posible que deba realizar un ciclo
de encendido desde OFF (Apagado) a
ON (Encendido) varias veces después
de agregar combustible, para permitir
que el sistema bombee el combustible
desde el tanque hasta el motor. Al
volver a arrancar, el tiempo de giro del
motor tomará unos segundos más que
lo normal. Con encendido sin llave, solo
arranque el motor. El tiempo de giro
será más largo que lo usual.
• Normalmente, agregar 3.8 L (1 gal) de
combustible es suficiente para que
vuelva a arrancar el motor. Si el
vehículo se queda sin combustible en
una pendiente, podrían requerirse más
de 3.8 L (1 gal).
• Es posible que se encienda el indicador
de servicio del motor a la brevedad.
Para obtener más información sobre
el indicador de servicio del motor a la
brevedad, Ver Indicadores y luces de
advertencia (página 89).
Carga de combustible con un
recipiente portátil
AVISOS
No inserte ni la boquilla del recipiente
portátil de combustible ni embudos
de posventa en el sistema sin tapón.
Esto podría dañar el sistema de
combustible y su sello y podría hacer que
el combustible caiga al suelo en lugar de
llenar el taque, lo cual podría provocar
serias lesiones personales.
No intente abrir por la fuerza el
sistema de combustible sin tapón
con objetos extraños. Esto podría
dañar el sistema de combustible y su sello
y provocar lesiones a usted o a otros.
Nota: No use embudos de posventa; no
funcionarán con el sistema de combustible
sin tapón y pueden dañarlo. El embudo
incluido tiene un diseño especial que
funciona en forma segura con su vehículo.
Cuando llene el tanque de combustible del
vehículo desde un recipiente de
combustible portátil, utilice el embudo que
se incluye con el vehículo.
E142668
1. Ubique el embudo de plástico blanco
en el compartimiento de la llanta de
refacción.
2. Inserte lentamente el embudo en el
sistema de combustible sin tapón.
3. Llene el vehículo con el combustible
del recipiente portátil.
4. Cuando termine, limpie el embudo o
elimínelo correctamente. Puede
adquirir embudos adicionales en un
distribuidor autorizado si decide
eliminar el embudo.
LLENADO
AVISOS
El vapor del combustible arde en
forma violenta y la inflamación del
combustible puede causar graves
quemaduras.
Lea y acate las instrucciones del
lugar donde se abastecerá de
combustible.
156
Combustible y llenado

AVISOS
Apague el motor antes de
abastecerse de combustible.
No fume si se encuentra cerca de
combustible o si está abasteciendo
su vehículo de combustible.
Mantenga cualquier chispa, llama y
artículo de tabaquería lejos del
combustible.
Permanezca fuera del vehículo y no
deje la bomba de combustible sin
supervisión cuando abastezca el
vehículo de combustible. En algunos
lugares, esto es ilegal.
Mantenga a los niños lejos de la
bomba de combustible; nunca
permita que los niños bombeen
combustible.
No utilice dispositivos electrónicos
personales mientras carga
combustible.
Use las siguientes pautas para evitar la
acumulación de carga electroestática al
llenar un recipiente de combustible no
conectado a tierra:
• Coloque en el suelo el recipiente
aprobado de combustible.
• No llene un recipiente de combustible
mientras éste se encuentre en el
vehículo (incluida el área de carga).
• Mantenga la boquilla de la bomba de
combustible en contacto con el
recipiente mientras lo llena.
• No use el dispositivo para mantener la
manija de la bomba de combustible en
la posición de llenado.
Sistema de combustible sin tapón
de Easy Fuel®
ALERTA
El sistema de combustible puede
estar bajo presión. Si oye un silbido
cerca de la puerta de llenado de
combustible, no cargue combustible hasta
que el sonido se detenga. De lo contrario,
se podría derramar combustible, pudiendo
ocasionar serias lesiones personales.
Cuando llene el tanque de combustible de
su vehículo:
1. Apague el motor.
2. Abra la puerta de llenado de
combustible.
3. Inserte lenta y completamente la
boquilla de llenado de combustible en
el sistema de combustible y déjela así
hasta que termine de cargar
combustible.
4. Luego de que termine de bombear el
combustible, saque lentamente la
boquilla del surtidor de combustible.
Permita unos diez segundos luego de
que termine de bombear el
combustible, antes de retirar la
boquilla. Esto permite que el
combustible residual regrese al tanque
de combustible y que no se derrame
sobre el automóvil.
Nota: Si llena en demasía el tanque de
combustible, puede producirse un derrame
de combustible. No llene el tanque a tal
punto que el combustible sobrepase la
boquilla del surtidor. El combustible
sobrante puede dejarse correr por el
desagüe ubicado debajo y frente a la puerta
del surtidor de combustible.
157
Combustible y llenado

Si la entrada de llenado de combustible
no se cerró correctamente, es posible que
aparezca un mensaje para recordarle que
compruebe dicha entrada de llenado en el
grupo de instrumentos. Ver Indicadores
y luces de advertencia (página 89).
En la próxima oportunidad, haga lo
siguiente:
1. Salga del camino con cuidado
2. Apague el motor.
3. Abra la puerta de llenado de
combustible y quite cualquier suciedad
visible de la apertura de llenado de
combustible.
4. Inserte la boquilla de llenado de
combustible o el embudo que viene
con el vehículo varias veces para
desalojar la suciedad que impide un
cierre correcto.
Si esta acción corrige el problema, el
mensaje podría no eliminarse de
inmediato. Es posible que tarde varios
ciclos de manejo para que dicho mensaje
se borre. Un ciclo de manejo consta de un
arranque del motor (luego de cuatro o más
horas con el motor apagado) seguido de
un manejo por la ciudad o carretera.
Continuar manejando con el mensaje
podría hacer que se encienda también la
luz de servicio del motor a la brevedad.
SISTEMA DE CONTROL DE
EMISIONES
AVISOS
No estacione, ni deje en ralentí ni
maneje su vehículo sobre pasto seco
u otras superficies secas. El sistema
de emisión de gases calienta el
compartimiento del motor y el sistema de
escape, lo que puede iniciar un incendio.
AVISOS
Las fugas del escape pueden
provocar el ingreso de gases dañinos
y potencialmente letales al
compartimiento de pasajeros. Si huele a
gases de escape dentro de su vehículo,
haga que su distribuidor lo inspeccione de
inmediato. No conduzca si percibe olor de
gases de escape.
Su vehículo está equipado con diversos
componentes de control de emisión de
gases y un convertidor catalítico que le
permitirán cumplir con las normas de
emisión de gases correspondientes. Para
asegurarse que el convertidor catalítico y
los demás componentes de control de
emisión de gases sigan funcionando
correctamente:
Para asegurarse que el convertidor
catalítico y los demás componentes de
control de emisión de gases sigan
funcionando correctamente:
• Use sólo el combustible especificado.
• Evite quedarse sin combustible.
• No apague el encendido mientras su
vehículo está en movimiento,
especialmente a altas velocidades.
• Lleve a cabo los puntos mencionados
en la información de mantenimiento
programado de acuerdo con el
programa especificado.
Las indicaciones de mantenimiento
programado mencionados en la
información de mantenimiento
programado son esenciales para la vida
útil y el rendimiento de su vehículo y de su
sistema de emisión de gases.
158
Combustible y llenado

Si se usan refacciones que no sean Ford,
Motorcraft o autorizadas por Ford para los
reemplazos de mantenimiento o para el
servicio de componentes que afecten el
control de emisión de gases, dichas
refacciones que no son Ford deben ser
equivalentes a las refacciones Ford Motor
Company originales en cuanto a
rendimiento y durabilidad.
El encendido del indicador Servicio del
motor a la brevedad, la luz de advertencia
del sistema de carga o la luz de
advertencia de temperatura, las fugas de
líquido, los olores extraños, el humo o la
pérdida de potencia del motor, podrían
indicar que el sistema de control de
emisión de gases no está funcionando
correctamente.
Un sistema de escape dañado o con fallas
puede permitir que los gases de escape
ingresen al vehículo. Lleve a inspeccionar
y reparar de inmediato el sistema de
escape dañado o con fallas.
No efectúe cambios no autorizados en el
vehículo o el motor. Por ley, los propietarios
de vehículos y las personas que fabriquen,
reparen, revisen, vendan, renten,
comercialicen o supervisen una flotilla de
vehículos, no están autorizados para quitar
intencionalmente un dispositivo de control
de emisión de gases ni para impedir su
funcionamiento. En la Calcomanía de
información sobre el control de emisión de
gases del vehículo, que se encuentra en o
cerca del motor, está la información acerca
del sistema de emisión de gases de su
vehículo. Esta calcomanía también incluye
la cilindrada del motor
Consulte su Manual de garantías para
obtener una completa información sobre
la garantía del sistema de emisión de
gases
Diagnóstico a bordo (OBD-II)
Su vehículo tiene una computadora que
monitorea el sistema de control de emisión
de gases del motor. Este sistema se
conoce comúnmente como Sistema de
diagnóstico a bordo (OBD-II). El sistema
OBD II protege el medio ambiente,
asegurando que su vehículo siga
cumpliendo con las normas
gubernamentales sobre emisión de gases.
El sistema OBD-II además ayuda a su
distribuidor autorizado a prestar la
asistencia adecuada a su vehículo.
Cuando el indicador Servicio del
motor a la brevedad se enciende,
el sistema OBD-II ha detectado
una falla. Las fallas temporales pueden
causar que el indicador Servicio del motor
a la brevedad se ilumine. Por ejemplo:
1. El vehículo se quedó sin combustible;
—el motor puede fallar o funcionar en
forma deficiente
2. El combustible es de mala calidad o
contiene agua; —el motor puede fallar
o funcionar en forma deficiente.
3. Es posible que el orificio de llenado de
combustible no se haya cerrado
correctamente. Ver Llenado (página
156).
4. Manejar en agua profunda—el sistema
eléctrico podría estar húmedo.
159
Combustible y llenado

Estos desperfectos temporales se pueden
corregir llenando el tanque de combustible
con combustible de alta calidad, cerrando
firmemente el orificio de llenado de
combustible o permitiendo que el sistema
eléctrico se seque. Después de tres ciclos
de manejo sin que se presenten éstos u
otros desperfectos temporales, el
indicador Servicio del motor a la brevedad
debe permanecer apagado la próxima vez
que arranque el motor. Un ciclo de manejo
consta de un arranque del motor en frío
seguido de un manejo combinado en
carretera y ciudad. No se requiere un
servicio adicional del vehículo.
Si el indicador Servicio del motor a la
brevedad permanece encendido, haga
revisar su vehículo a la brevedad posible.
A pesar de que algunos desperfectos
detectados por el OBD-II pueden no tener
síntomas claros, si continúa manejando
con el indicador Servicio del motor a la
brevedad encendido puede generar
aumentos de emisiones, reducir el
rendimiento del combustible, disminuir la
suavidad de funcionamiento del motor y
de la transmisión y ocasionar reparaciones
más costosas.
Disponibilidad para prueba de
inspección y mantenimiento (I/M)
Algunos gobiernos estatales, provinciales
y locales tienen programas de verificación
vehicular (VV) para revisar el equipo de
control de emisiones del vehículo. No
aprobar esta inspección puede impedir que
obtenga un registro del vehículo.
Si el indicador Servicio del motor
a la brevedad está encendido o
si el foco no funciona, es posible
que el vehículo necesite revisión. Consulte
Diagnóstico a bordo
Es posible que el vehículo no pase la
prueba de verificación vehicular si el
indicador Servicio del motor a la brevedad
está encendido o no funciona
correctamente (el foco está quemado) o
si el sistema OBD-II determina que algunos
de los sistemas de control de emisiones
no se han supervisado adecuadamente.
En este caso, el vehículo se considera no
listo para la prueba de VV.
Si el motor o la transmisión del vehículo
acaban de ser revisado o si la batería se ha
descargado o se ha reemplazado
recientemente, es posible que el sistema
OBD-II indique que el vehículo no esté listo
para la prueba de I/M’. Para determinar si
el vehículo está listo para la prueba de VV,
gire la llave de encendido a la posición ON
durante 15 segundos sin arrancar el motor.
Si el indicador Servicio del motor a la
brevedad destella ocho veces, significa
que el vehículo no está listo para la prueba
de verificación vehicular (VV); si el
indicador Servicio del motor a la brevedad
permanece encendido, significa que el
vehículo está listo para la prueba de VV.
El sistema OBD-II está diseñado para
revisar el sistema de control de emisiones
durante la conducción normal. Una revisión
completa puede tardar varios días. Si el
vehículo no está listo para la prueba VV,
debe realizarse el siguiente ciclo de manejo
compuesto por un manejo combinado en
carretera y ciudad:
15 minutos de conducción sin paradas en
una autopista o carretera, seguidos de 20
minutos de conducción con frenadas y
arranques por al menos cuatro períodos
en ralentí de 30 segundos.
160
Combustible y llenado

Deje detenido el vehículo por al menos
ocho horas sin arrancar el motor. Luego,
arranque el motor y complete el ciclo de
manejo anterior. El motor debe alcanzar
su temperatura normal de funcionamiento.
Una vez que haya arrancado, no apague
el motor hasta completar el ciclo de
manejo indicado. Si el vehículo aún no está
listo para la prueba de VV, deberá repetirse
el ciclo de conducción anterior.
CONSUMO DE COMBUSTIBLE
Nota: La cantidad de combustible en la
reserva de vacío varía y no se puede confiar
en ella para aumentar la capacidad de
manejo. Al llenar el tanque de combustible
de su vehículo después que el indicador de
combustible ha señalado vacío, es posible
que no pueda llenar la cantidad completa
de capacidad anunciada del tanque de
combustible debido a la reserva de vacío
aún presente en el tanque.
La capacidad anunciada es la capacidad
indicada y la reserva de vacío combinadas.
La capacidad nominal es la diferencia
entre la cantidad de combustible en un
tanque lleno y un tanque cuyo indicador
de combustible señala vacío. La reserva
de vacío es la cantidad de combustible en
el tanque después que el indicador de
combustible señala vacío.
Llenado del tanque
Para obtener resultados concretos al llenar
el tanque de combustible:
• Apague el encendido antes de llenar
con combustible; se obtendrá una
lectura inadecuada si el motor queda
funcionando.
• Use la misma velocidad de llenado
(baja - media - alta) cada vez que llene
el tanque.
• No permita más de dos chasquidos
automáticos cuando llene con
combustible.
Los resultados son más precisos cuando
el método de llenado es constante.
Cálculo del rendimiento del
combustible
No mida el rendimiento del combustible
durante las primeras 1000 millas (1600
km) de conducción (es el período de ajuste
del motor); se obtiene una medida más
precisa después de las 2000 a 3000 millas
(3200 km - 4800 km). Además, el gasto
en combustible, la frecuencia de llenado
o las lecturas del indicador de combustible
no son buenas maneras para medir el
rendimiento del combustible.
1. Llene el tanque por completo y anote
la lectura inicial del odómetro.
2. Cada vez que llene el tanque, anote la
cantidad de gasolina agregada.
3. Después de llenar al menos tres a cinco
veces el tanque, llene el tanque de
combustible y registre la lectura actual
del odómetro.
4. Reste la lectura inicial del odómetro
de la lectura actual.
5. Calcule el rendimiento del combustible
dividiendo las millas recorridas por los
galones usados (en el caso del sistema
métrico: Multiplique los litros usados
por 100 y luego divida por los
kilómetros recorridos).
161
Combustible y llenado

Mantenga un registro durante al menos un
mes y anote el tipo de conducción (ciudad
o carretera). Esto proporciona una
estimación precisa del rendimiento del
combustible del vehículo en las
condiciones actuales de conducción.
Además, mantener registros durante el
verano y el invierno muestra la forma en
que la temperatura afecta el rendimiento
del combustible. En general, temperaturas
más bajas significan menor rendimiento
del combustible.
162
Combustible y llenado

TRANSMISIÓN AUTOMÁTICA
AVISOS
Aplique siempre el freno de
estacionamiento a fondo y
compruebe que la palanca de
cambio de velocidades esté asegurada en
P (Estacionamiento). Gire el encendido a
la posición OFF (Apagado) y saque la llave
cada vez que baje de su vehículo.
No aplique el pedal del freno y el
pedal del acelerador
simultáneamente. Si aplica ambos
pedales simultáneamente durante más de
tres segundos se limitarán las rpm del
motor, lo que podría dificultar el
mantenimiento de la velocidad en el tráfico
y provocar heridas graves.
Comprensión de las posiciones de
la transmisión automática
Cómo poner el vehículo en una
velocidad:
1. Pise el pedal del freno a fondo.
2. Mantenga presionado el botón del
frente de la palanca de cambio de
velocidades.
3. Mueva la palanca de cambio de
velocidades al cambio deseado.
4. Suelte el botón y la transmisión se
mantendrá en la velocidad
seleccionada.
E133124
P (Estacionamiento)
Esta posición bloquea la transmisión e
impide que giren las ruedas delanteras.
Detenga completamente el vehículo antes
de ponerlo y sacarlo de P
(Estacionamiento)
R (Reversa)
Con la palanca de cambio de velocidades
en R (Reversa), el vehículo se mueve hacia
atrás. Siempre detenga completamente
el vehículo antes de cambiar hacia y desde
R (Reversa).
N (Neutral)
Con la palanca de cambio de velocidades
en N (Neutral), el vehículo puede arrancar
y desplazarse libremente. Mantenga
presionado el pedal del freno mientras
está en esta posición.
D (Directa)
La posición normal de conducción para
lograr el máximo rendimiento del
combustible. La transmisión funciona en
las velocidades primera a sexta.
163
Transmisión

S (Deportivo)
Cómo mover la palanca de cambio de
velocidades a S (Deportivo):
• Proporciona mayor frenado (con
motor) en pendientes y prolonga el
funcionamiento en relaciones de
transmisión inferiores para mejorar el
rendimiento al subir cuestas en
terrenos con colinas y áreas
montañosas. Esto aumentará las RPM
del motor durante el frenado.
• Proporciona mayor funcionamiento en
relaciones de transmisión inferiores a
través de la estrategia de cambios de
la transmisión automática.
• Las marchas se seleccionan más
rápidamente y a velocidades de motor
más altas.
Transmisión automática
SelectShift Automatic® (If Equipped)
La transmisión automática SelectShift le
ofrece la capacidad de pasar los cambios
manualmente si lo desea. Para usar
SelectShift, mueva la palanca de cambios
a S (Deportivo). Ahora puede usar los
botones +/- del lado de la palanca de
cambio para seleccionar las marchas.
Cuando use la alternancia para cambios
manuales:
• Oprima el botón (+) para pasar un
cambio de velocidad ascendente.
• Oprima el botón (-) para pasar un
cambio de velocidad descendente.
Nota: Después de asumir el control manual
con SelectShift, el vehículo permanecerá
en este modo hasta que devuelva la
palanca de cambios de (S) Deportivo a (D)
Directa.
Realice los cambios ascendentes a las
velocidades que se recomiendan en la
tabla siguiente:
Cambios ascendentes al acelerar (se
recomienda para lograr el máximo ahorro
de combustible)
Cambio de:
24 km/h (15 mph)1 - 2
40 km/h (25 mph)2 - 3
64 km/h (40 mph)3 - 4
72 km/h (45 mph)4 - 5
80 km/h (50 mph)5 - 6
El grupo de instrumentos mostrará la
velocidad seleccionada en la que se
encuentra actualmente.
SelectShift pasará automáticamente
algunos cambios por usted en caso de que
la velocidad en RPM del motor sea
demasiado elevada o baja.
Nota: El motor se puede dañar si mantiene
el revolucionamiento excesivo sin efectuar
un cambio en la transmisión.
palanca de interbloqueo de cambio
de velocidades del freno
AVISOS
No conduzca el vehículo hasta que
verifique que las luces de freno están
funcionando.
Cuando lleve a cabo este
procedimiento, estará colocando la
transmisión fuera de P
(Estacionamiento), lo que significa que el
vehículo puede rodar libremente. Para
evitar un desplazamiento no deseado del
vehículo, siempre aplique el freno de
estacionamiento completamente antes
de llevar a cabo este procedimiento. Use
bloques para ruedas si resulta adecuado
164
Transmisión

AVISOS
Si suelta completamente el freno de
estacionamiento, pero la luz de
advertencia de frenos permanece
iluminada, es posible que los frenos no
estén funcionando correctamente.
Consulte con su distribuidor autorizado.
Use la palanca de interbloqueo de cambio
de velocidades del freno para mover la
palanca de cambios desde la posición de
estacionamiento en caso de una falla
eléctrica o si el vehículo se ha quedado sin
batería.
Aplique el freno de estacionamiento y gire
el encendido a la posición OFF antes de
realizar este procedimiento.
1. Inserte un destornillador (o una
herramienta similar) entre el marco de
la palanca de cambios y el tablero de
terminación superior.
2. Use la herramienta para soltar el marco
de la palanca de cambios del panel de
terminación.
E142627
3. Localice la palanca blanca situada en
el costado izquierdo de la palanca de
cambios.
4. Con la herramienta, mueva la palanca
blanca hacia la parte trasera de la
palanca de cambios.
5. Mientras sostiene la palanca blanca en
la posición trasera, mueva la palanca
de cambios desde la posición de
estacionamiento.
6. Presione el marco de la palanca de
cambios de vuelta contra el panel de
terminación superior hasta que se
ajuste otra vez en su posición.
7. Aplique el pedal del freno, arranque el
vehículo y libere el freno de
estacionamiento.
Nota: Cuando se utiliza este procedimiento,
se debe visitar a su distribuidor autorizado
lo antes posible.
Si el vehículo se atasca en lodo o
nieve
Nota: No balancee el vehículo si el motor
no está a la temperatura de funcionamiento
normal, de lo contrario, es posible que se
dañe la transmisión.
Nota: No balancee el vehículo por más de
un minuto, de lo contrario, es posible que
se dañen la transmisión y las llantas o bien,
se sobrecaliente el motor.
Si su vehículo queda atascado en lodo o
nieve, es posible balancearlo para sacarlo
cambiando entre velocidades de avance
y reversa y haciendo una pausa entre
cambios con un patrón constante. Oprima
levemente el acelerador en cada
velocidad.
ASISTENCIA DE ARRANQUE
EN PENDIENTES
AVISOS
La función de arranque asistido en
pendientes no reemplaza al freno de
estacionamiento. Cuando abandone
el vehículo, siempre aplique el freno de
estacionamiento y seleccione la posición
P (estacionamiento).
165
Transmisión

AVISOS
Debe permanecer en el vehículo una
vez que active la función de arranque
asistido en pendientes.
En todo momento, usted es
responsable de controlar el vehículo,
de supervisar el sistema de
asistencia de arranque en pendientes y de
intervenir si fuera necesario.
Si el motor se revoluciona
excesivamente, o si se detecta una
falla cuando está activa la función
de arranque asistido en pendientes, la
función de arranque asistido en pendientes
se desactivará.
Esta característica de asistencia en
pendientes permite mover el vehículo con
mayor facilidad cuando se encuentra en
una pendiente pronunciada sin necesidad
de utilizar el freno de estacionamiento.
Cuando esta característica está activa, el
vehículo permanecerá inmóvil en la
pendiente durante dos a tres segundos
después de soltar el pedal del freno. Esto
permite que tenga tiempo de mover el pie
del freno al pedal del acelerador. Los
frenos se liberan automáticamente una
vez que el motor desarrolle potencia
suficiente para prevenir que el vehículo se
vaya hacia abajo en la pendiente. Esto es
una ventaja cuando se tiene que poner el
vehículo en movimiento en una pendiente,
(por ejemplo, en una rampa de
estacionamiento, en un semáforo de
subida o al entrar de reversa en un lugar
de estacionamiento empinado).
Esta característica se activa
automáticamente en cualquier pendiente
que pueda derivar en que el vehículo se
devuelva hacia abajo. Esta característica
no operará si se activa el freno de
estacionamiento.
Uso del sistema de arranque
asistido en pendientes (HSA)
1. Pise el pedal del freno para detener el
vehículo por completo. Mantenga
oprimido el pedal del freno.
2. Si los sensores detectan que el
vehículo está en una pendiente, la
función de arranque asistido en
pendientes se activará
automáticamente.
3. Cuando usted retire el pie del pedal del
freno, el vehículo se mantendrá en la
pendiente, sin irse hacia abajo, durante
dos o tres segundos. El tiempo de
asistencia se prolongará de modo
automático si usted está en el proceso
de poner el vehículo en movimiento.
4. Ponga el vehículo en movimiento de la
manera normal. Los frenos se quitarán
automáticamente.
166
Transmisión

USO DE LA TRACCIÓN EN LAS
CUATRO RUEDAS
Nota: Se mostrará el mensaje "4WD
disabled temporarily" (4WD temporalmente
desactivado) si el sistema 4WD se ha
sobrecalentado y pasado automáticamente
a tracción en las ruedas delanteras. Esta
condición puede ocurrir si el vehículo se ha
operado en condiciones de carga alta
extrema o con derrapes excesivos de las
ruedas, como cuando se conduce sobre
arena profunda. Para restablecer el
funcionamiento normal de 4WD lo más
pronto posible, detenga el vehículo en un
lugar seguro y apague el motor. Se mostrará
el mensaje "4WD restored" (4WD
restaurado) durante aproximadamente
cinco segundos después de que el sistema
se enfría y regresa a la función 4WD normal.
Nota: El sistema 4WD inteligente le
proporciona a su vehículo algunas
capacidades a campo traviesa limitadas.
La operación del vehículo en condiciones
distintas a caminos de arena, nieve o lodo
moderado o terrenos irregulares podría
someter al vehículo a un esfuerzo excesivo,
lo que podría causarle daños, que no los
cubre la garantía. Estos daños no están
cubiertos por su garantía.
Nota: Cuando se presenta una falla en el
sistema 4WD, se mostrará la advertencia
"4WD malfunction Service required" (se
requiere servicio por desperfecto 4WD) en
la pantalla de información. El sistema 4WD
no está funcionando correctamente y pasó
automáticamente a tracción en las ruedas
delanteras. Cuando aparece esta
advertencia, lleve el vehículo a un
distribuidor autorizado para que lo revisen.
E142669
Podrá ver la distribución de potencia entre
las ruedas delanteras y traseras
representada por un icono en la pantalla
de información. Si se suministra más
potencia a las ruedas delanteras o
traseras, lo mostrará llenando un área
mayor.
Su vehículo puede tener un sistema de
tracción en las cuatro ruedas (4WD)
constante. El sistema 4WD es en un
sistema proactivo, lo que significa que no
sólo responde al deslizamiento de la rueda
entre las ruedas delanteras y traseras, sino
también tiene la capacidad de anticipar el
deslizamiento de la rueda y de transferir
el par motor a las ruedas traseras antes
de que se produzca el deslizamiento.
Incluso no hay derrape de ruedas, el
sistema 4WD inteligente continuamente
realiza ajustes a la distribución de par
motor, en un intento por mejorar el
comportamiento en línea recta y’ curvas
del vehículo, tanto en carretera como en
campo traviesa. El sistema está activo
todo el tiempo y no requiere intervención
del usuario.
Todos los componentes del sistema 4WD
inteligente están sellados de por vida y no
requieren mantenimiento.
167
Doble Tracción (If Equipped)

Si su vehículo tiene 4WD inteligente, nunca
se debe usar una llanta de refacción de un
tamaño distinto al de las llantas
habituales. Si está instalada la rueda de
refacción, el sistema 4WD podría
desactivarse en forma automática e
ingresar sólo al modo de tracción delantera
para proteger los componentes de la
transmisión. Esta condición se puede
indicar con un mensaje "4WD Off" (4WD
desactivado) en el capítulo de pantallas
de información. Consulte pantallas de
información en el capítulo Grupo de
instrumentos para obtener más
información. Si en la pantalla de
información aparece "4WD Off" (4WD
desactivado) por el uso de la llanta de
refacción, este indicador se debe apagar
al volver a instalar la llanta reparada o al
instalar una llanta normal de reemplazo y
manejar una breve distancia. Se
recomienda volver a instalar la llanta
reparada o una llanta para camino de
reemplazo lo antes posible. El uso de
llantas de tamaño diferente entre los ejes
delantero y trasero podría hacer que el
sistema 4WD deje de funcionar y se ajuste
en forma predeterminada en la tracción
delantera o bien podría dañar el sistema
4WD.
Conducción en condiciones
especiales con tracción en las
cuatro ruedas
Los vehículos con 4WD están
especialmente equipados para manejar
en arena, nieve, lodo y terreno irregular y
tienen características de funcionamiento
distintas de las de los vehículos
convencionales, tanto dentro como fuera
de la carretera.
Al manejar en una velocidad reducida a
campo traviesa con temperaturas
exteriores altas, utilice una velocidad baja
siempre que sea posible. El
funcionamiento en velocidad baja
aumentará al máximo la capacidad del
motor y la capacidad de enfriamiento de
la transmisión.
Bajo condiciones extremas de
funcionamiento, el A/A puede realizar un
ciclo de encendido y apagado para evitar
que el motor se sobrecaliente.
Principios de funcionamiento básicos
• Maneje más lento si hay vientos fuertes
de costado, ya que estos pueden
afectar el manejo normal del vehículo.
• Tenga mucho cuidado cuando maneje
sobre pavimento resbaloso a causa de
arena suelta, agua, grava, nieve o hielo.
168
Doble Tracción (If Equipped)

Si su vehículo se sale del camino
• Si su vehículo se sale del camino,
disminuya la velocidad, evitando frenar
bruscamente. Vuelva al pavimento
sólo cuando haya disminuido la
velocidad. No gire el volante de la
dirección con demasiada brusquedad
cuando vuelva al pavimento.
• Puede ser más seguro permanecer en
la cuneta o el acotamiento y disminuir
en forma gradual la velocidad antes de
volver al pavimento. Puede perder el
control si no disminuye la velocidad o
si gira demasiado el volante de la
dirección o lo hace en forma abrupta.
• A menudo, puede ser menos riesgoso
golpear pequeños objetos, como
reflectores de carreteras, que
ocasionarían daños menores a su
vehículo, que intentar volver
repentinamente al pavimento, ya que
esto puede hacer que el vehículo
resbale de lado y pierda el control o se
vuelque. Recuerde, su seguridad y la
de otros debe ser su principal
preocupación.
Maniobras de emergencia
• En una situación de emergencia
inevitable en que se tiene que hacer un
viraje brusco, recuerde evitar “las
maniobras excesivas” con su vehículo
(por ejemplo, gire el volante de la
dirección sólo con la rapidez y la
cantidad necesarias para evitar la
emergencia). Hacer movimientos
excesivos con la dirección resultará en
un menor control del vehículo, no en
más. Además, se deben utilizar
variaciones leves de la presión del
pedal del acelerador o del freno si se
requieren cambios en la velocidad del
vehículo. Evite maniobras,
aceleraciones o frenadas bruscas que
puedan aumentar el riesgo de pérdida
de control del vehículo, volcaduras y
lesiones personales. Use todas las
superficies de la carretera disponibles
para devolver el vehículo a una
dirección segura de viaje.
• En caso de una frenada de emergencia,
evite derrapar las llantas y no haga
ningún movimiento brusco con el
volante de la dirección.
• Si el vehículo pasa de una superficie a
otra (es decir, de concreto a grava),
habrá un cambio en la forma en que el
vehículo responde a una maniobra
(viraje, aceleración o frenado).
Nuevamente, evite maniobras bruscas.
Lijar
Al manejar sobre arena, intente mantener
las cuatro ruedas en el área más sólida del
trayecto. Evite reducir las presiones de las
llantas; pero cambie a una velocidad
inferior y maneje uniformemente por el
terreno. Oprima lentamente el acelerador
y evite hacer patinar las ruedas.
169
Doble Tracción (If Equipped)

No conduzca el vehículo con 4WD en
arenas profundas por un período de tiempo
prolongado. Esto hará que el sistema 4WD
se sobrecaliente. El grupo de instrumentos
mostrará el mensaje "4WD temporarily
disabled" (4WD temporalmente
desactivado). Para reanudar el
funcionamiento normal de 4WD, apague
el vehículo y deje que el sistema 4WD se
enfríe durante al menos 15 minutos.
Después de que el sistema se ha enfriado,
la función 4WD normal volverá y el
conjunto de instrumentos mostrará
brevemente "4WD restored" (4WD
restaurado). Al manejar en una velocidad
reducida en arena profunda con
temperaturas exteriores altas, utilice una
marcha lenta siempre que sea posible. El
funcionamiento en velocidad baja
aumentará al máximo la capacidad del
motor y la capacidad de enfriamiento de
la transmisión.
Evite el exceso de velocidad, porque el
impulso que lleva el vehículo puede jugarle
en contra y hacer que el vehículo se
atasque, al punto que requiera de la ayuda
de otro vehículo. Recuerde, usted puede
ser capaz de salir en reversa por donde
entró si procede con cuidado.
Lodo y agua
Si debe manejar en superficies cubiertas
de agua, hágalo lentamente. La tracción
o la capacidad de frenado se pueden ver
limitadas.
Cuando se desplaza por el agua, determine
la profundidad; evite pasar por agua cuyo
nivel esté por sobre la parte inferior de los
rines de las llantas (para los automóviles)
o la parte inferior de la tracción delantera
(para las camionetas) (si es posible) y
maneje lentamente. Si el sistema de
encendido se moja, es posible que el
vehículo se pare.
E142667
Tras pasar por el agua, pruebe siempre los
frenos. Los frenos mojados no detienen el
vehículo con la eficacia de los frenos secos.
El secado se puede acelerar si avanza
lentamente con el vehículo mientras pisa
levemente el pedal del freno.
Tenga precaución con los cambios bruscos
en la velocidad o dirección del vehículo
cuando maneje sobre lodo. Incluso los
vehículos con tracción en las cuatro ruedas
pueden perder tracción en lodo
resbaladizo. Si el vehículo se desliza, vire
en la dirección del deslizamiento hasta que
recobre el control del vehículo.
Después de manejar a través de lodo,
limpie los residuos adheridos a los ejes de
transmisión giratorios y a las llantas. El
exceso de lodo adherido a las llantas y a
los ejes de transmisión giratorios produce
un desequilibrio que puede dañar los
componentes de la transmisión.
Nota: La conducción por agua profunda
puede dañar la transmisión. Si el eje
delantero o trasero se sumerge en agua, el
lubricante del eje y el lubricante de la unidad
de transferencia de potencia se deben
revisar y cambiar si es necesario.
E143950
170
Doble Tracción (If Equipped)

“Tread Lightly” (Transitar con cuidado) es
un programa educacional diseñado para
mejorar el conocimiento público de las
leyes y responsabilidades del uso de tierras
en las áreas salvajes de nuestra nación.
Ford Motor Company se une a Servicio
Forestal de EE.UU (U.S. Forest Service) y
a la Oficina de Administración de Tierras
(Bureau of Land Management) instándolo
a ayudar a preservar el bosque y otros
terrenos públicos y privados, mediante el
programa “transitar con cuidado”.
Manejo en terrenos montañosos o
empinados
Aunque puede que los obstáculos
naturales hagan necesario viajar
diagonalmente en subidas y bajadas o
pendientes pronunciadas, siempre debe
intentar manejar en forma recta.
Nota: Nota: nunca maneje
transversalmente ni realice virajes en
cuestas o pendientes pronunciadas. Un
peligro radica en perder tracción, resbalar
de lado y posiblemente volcarse. Cuando
maneje en terreno montañoso, determine
de antemano la ruta que va a usar. No
maneje sobre la cima de una colina sin ver
cuáles son las condiciones del otro lado. No
maneje en reversa por una colina sin la
ayuda de alguien que lo guíe.
Al subir una montaña o cuesta empinada,
comience en una velocidad baja en lugar
de efectuar un cambio descendente desde
una velocidad más alta luego de iniciado
el ascenso. Esto reduce la tensión del
motor y la posibilidad de que el motor se
apague.
Si se para, no intente virar ya que podría
volcarse. Es mejor intentar retroceder
hasta un lugar seguro.
Aplique tan sólo la suficiente potencia a
las ruedas para subir la cuesta. Usar
demasiada potencia puede hacer que las
llantas resbalen, giren velozmente o
pierdan tracción, resultando en la pérdida
del control del vehículo.
E143949
Descienda la cuesta en la misma velocidad
que usaría para subirla, a fin de evitar el
uso excesivo de los frenos y el
sobrecalentamiento de éstos. No
descienda en neutral; desactive la
sobremarcha o cambie manualmente a
una velocidad inferior. Cuando descienda
una cuesta empinada, evite el frenado
brusco ya que puede perder el control. Las
ruedas delanteras tienen que girar para
poder maniobrar el vehículo.
Su vehículo tiene frenos antibloqueo; por
lo tanto, aplíquelos uniformemente. No
“bombee” los frenos.
171
Doble Tracción (If Equipped)

Manejo sobre nieve y hielo
ALERTA
Si conduce en condiciones
resbaladizas que requieran el uso de
cables o cadenas para llantas,
entonces es vital que conduzca con
cuidado. Mantenga velocidades bajas, deje
una mayor distancia para detenerse y evite
mover el volante con agresividad para
reducir las posibilidades de perder el
control del vehículo, lo que podría dar lugar
a lesiones serias o la muerte. Si el extremo
posterior del vehículo patina al tomar una
curva, gire el volante en la dirección del
deslizamiento hasta que retome el control
del vehículo.
Nota: El deslizamiento excesivo de las
llantas puede dañar la transmisión.
Un vehículo con tracción en las cuatro
ruedas (4WD) tiene ventajas sobre los
vehículos 2WD en nieve y en hielo, pero
puede derraparse como cualquier otro
vehículo. Si comienza a resbalarse al
manejar en caminos con nieve o hielo, gire
el volante en la dirección del deslizamiento
hasta que retome el control.
Evite las aplicaciones de potencia
repentinas y los cambios rápidos de
dirección en nieve y en hielo. Pise el
acelerador en forma lenta y uniforme
cuando ponga el vehículo en movimiento
después de haberse detenido por
completo.
Evite también el frenado brusco. A pesar
de que los vehículos 4WD pueden acelerar
mejor que los de tracción en dos ruedas
sobre nieve y hielo, éstos no frenan más
rápido, ya que al igual que en otros
vehículos, el frenado se produce en las
cuatro ruedas. No se confíe de las
condiciones del camino.
Asegúrese de conservar entre usted y los
demás vehículos una distancia suficiente
para detenerse. Maneje más lento de lo
normal y considere el uso de una de las
velocidades inferiores. En situaciones de
paradas de emergencia, presione el freno
en forma constante. Como el vehículo
tiene un sistema de frenos antibloqueo
(ABS) en las cuatro ruedas, no “bombee”
los frenos. Consulte la sección Frenos de
este capítulo para obtener información
adicional acerca del funcionamiento del
sistema de frenos antibloqueo.
Mantenimiento y modificaciones
Los sistemas de suspensión y dirección de
su vehículo se han diseñado y probado
para proporcionar un rendimiento
predecible, ya sea con carga o en vacío, así
como también una capacidad duradera
de transporte de carga. Por este motivo,
Ford Motor Company recomienda no
efectuar modificaciones tales como
agregar o eliminar piezas (como equipos
elevadores o barras estabilizadoras) ni
usar refacciones no equivalentes a los
equipos originales de fábrica.
Toda modificación al vehículo que eleve
el centro de gravedad puede hacer que el
vehículo tenga más probabilidades de
volcarse como resultado de una pérdida
de control. Ford Motor Company
recomienda tener precaución con cualquier
vehículo equipado con cargas o
dispositivos altos (como escaleras o
portaequipajes).
Si no mantiene su vehículo
adecuadamente, podría anular la garantía,
aumentar el costo de reparación, disminuir
el rendimiento y las capacidades
operativas del vehículo, y afectar en forma
adversa la seguridad del conductor y los
pasajeros. Se recomienda efectuar
inspecciones frecuentes a los
componentes del chasis si el vehículo está
sujeto a uso a campo traviesa.
172
Doble Tracción (If Equipped)

INFORMACIÓN GENERAL
Nota: Los ruidos ocasionales del freno son
normales. Si durante el frenado se produce
un sonido de “metal contra metal”, de
chirrido o rechinado continuo, es posible que
las balatas estén desgastadas y sea
necesario que las inspeccione un distribuidor
autorizado. Si el vehículo presenta una
vibración o temblor continuo en el volante
de la dirección durante el frenado, debe ser
revisado por un distribuidor autorizado.
Nota: Se puede acumular polvo de los
frenos en las ruedas, incluso en condiciones
normales de operación. La acumulación de
polvo en los frenos es inevitable a medida
que estos se desgastan y no contribuye a
que tengan ruido. Ver Limpieza de las
ruedas de aleación (página 264).
E138644
Ver Indicadores y luces de
advertencia (página 89).
Los frenos húmedos provocan una
eficiencia de freno reducida. Presione
suavemente el pedal de frenos unas veces
al conducir desde un lavado de autos o
agua inmóvil a fin de secar los frenos.
Frenado sobre aceleración
En el caso de que el pedal del acelerador
se quedara pegado o atrapado, aplique
una presión constante y firme al pedal de
freno para bajar la velocidad del vehículo
y la potencia del motor se reducirá. Si
experimenta esta condición, aplique los
frenos y detenga el vehículo por completo.
Apague el motor, cambie la palanca a P y
aplique el freno de estacionamiento, y
luego inspeccione el pedal del acelerador
para eliminar cualquier interferencia. Si no
encuentra ninguna y la condición persiste,
haga que se remolque su vehículo al
distribuidor autorizado más cercano.
Asistencia de freno de emergencia
La asistencia de freno de emergencia
detecta cuando frena bruscamente para
medir la velocidad en que presiona el pedal
de freno. Proporciona máxima eficiencia
de frenado mientras presiona el pedal. La
asistencia de freno de emergencia puede
reducir las distancias de detención en
situaciones críticas.
sistema de frenos antibloqueo
Este sistema ayuda a mantener el control
de la dirección durante detenciones de
emergencia al impedir el bloqueo de los
frenos.
Esta luz se enciende
momentáneamente cuando se
activa la ignición. Si la luz no
enciende durante el arranque, si
permanece encendida o destella, es
posible que el sistema de frenos
antibloqueo esté desactivado y necesite
revisión.
E138644
Si el sistema está desactivado,
el frenado normal sigue siendo
eficaz. Si se enciende la luz de
advertencia de freno con el freno de
estacionamiento desenganchado, haga
revisar inmediatamente su sistema de
frenos.
CONSEJOS PARA CONDUCIR
CON FRENOS ANTIBLOQUEO
Nota: Cuando el sistema está operativo, el
pedal del freno se pulsará y puede avanzar
más allá. Mantenga presión en el pedal de
freno. También es posible que escuche un
ruido proveniente del sistema. Esto es
normal.
173
Frenos

El ABS no eliminará riesgos cuando:
• conduzca demasiado cerca del
vehículo delante de usted
• el vehículo está en hidroplaneo
• toma las esquinas demasiado rápido
• la superficie del camino no está en
buenas condiciones.
FRENO DE
ESTACIONAMIENTO
ALERTA
Siempre ajuste a fondo el freno de
estacionamiento y deje del vehículo
con la palanca del selector de
transmisión en posición P.
Nota: No oprima el botón para
desenganchar el vehículo mientras jala la
palanca hacia arriba.
Para aplicar el freno de estacionamiento:
1. Presione el pedal de freno de pie
firmemente.
2. Jale hacia arriba la palanca de freno de
estacionamiento hasta accionarla por
completo.
Nota: Si estaciona el vehículo en una
pendiente y se enfrenta con una subida,
mueva la palanca del selector de
transmisión a la posición P y gire el volante
hacia el lado contrario de la banqueta.
Nota: Si estaciona el vehículo en una
pendiente y se enfrenta con una bajada,
mueva la palanca del selector de
transmisión a P y gire el volante hacia la
banqueta.
Para desenganchar el freno de
estacionamiento:
1. Pise el pedal de freno firmemente.
2. Jale levemente la palanca hacia arriba.
3. Oprima el botón de desenganche y
presione la palanca hacia abajo.
174
Frenos

FUNCIONAMIENTO
El sistema de control de tracción ayuda a
evitar que las ruedas de tracción patinen
y pierdan tracción.
Si el vehículo comienza a deslizarse, el
sistema aplica los frenos a ruedas
individuales y, cuando se necesita, reduce
la potencia del motor al mismo tiempo. Si
las ruedas giran al acelerar en superficies
resbalosas o sueltas, el sistema reduce la
potencia del motor para aumentar la
tracción.
USO DEL CONTROL DE
TRACCIÓN
En ciertas situaciones (por ejemplo,
atrapado en la nieve o el lodo), desactivar
el control de tracción puede ser útil, ya que
permite que las ruedas giren con toda la
potencia del motor. Apague el sistema de
control de tracción mediante el control de
la pantalla de información. Ver
Información general (página 93).
Mensajes y luces indicadoras del
sistema
ALERTA
Si se detecta una falla en el sistema
AdvanceTrac, la luz del control de
estabilidad se encenderá
continuamente. Verifique que el sistema
AdvanceTrac no haya sido desactivado en
forma manual mediante el control de la
pantalla de información. Si la luz del
control de estabilidad se enciende
continuamente, lleve inmediatamente el
vehículo a un distribuidor autorizado para
que revisen el sistema. Conducir con
AdvanceTrac desactivado podría implicar
un mayor riesgo de pérdida de control del
vehículo, volcaduras, lesiones personales
e incluso la muerte.
E138639
La luz de control de estabilidad
se ilumina temporalmente al
arrancar el motor y parpadea
cuando la condición de conducción activa
el sistema de estabilidad.
La luz de apagado de control de
estabilidad se ilumina
temporalmente al arrancar el
motor y permanece encendida cuando el
sistema de control de tracción está
apagado.
Cuando el sistema de control de tracción
está apagado o activo, aparece un
mensaje en la pantalla de información que
muestra el estado del sistema.
175
Control de tracción

FUNCIONAMIENTO
AVISOS
Las modificaciones al vehículo que
incluyen sistema de frenos, parrillas
portaequipaje de postventa,
suspensión, sistema de dirección,
fabricación de llantas y tamaño de la
rueda/llanta puede cambiar las
características de manejo del vehículo y
podrían afectar adversamente el
rendimiento del sistema AdvanceTrac.
Además, la instalación de altavoces
estéreo puede interferir con el sistema
AdvanceTrac y afectarlo adversamente.
Dentro de lo posible, instale cualquier
bocina estéreo de posventa desde la
consola central delantera, el túnel y los
asientos delanteros con el fin de reducir el
riesgo de interferencia con los sensores
AdvanceTrac. Reducir la eficacia del
sistema AdvanceTrac puede derivar en un
mayor riesgo de perder el control del
vehículo, una volcadura, lesiones
personales o la muerte.
Recuerde que ni siquiera la
tecnología avanzada puede desafiar
las leyes de la física. Siempre existe
la posibilidad de perder el control de un
vehículo debido al análisis incorrecto que
hace el conductor respecto de las
condiciones. Un manejo agresivo en
cualquier condición del camino puede
hacerlo perder el control de su vehículo,
aumentando el riesgo de sufrir lesiones
personales o daños materiales. La
activación del sistema AdvanceTrac es
una indicación de que al menos una de las
llantas excedió su capacidad de agarre;
esto podría reducir la capacidad del
usuario de controlar el vehículo,
ocasionando posiblemente una pérdida
de control del vehículo, volcadura, lesiones
personales e incluso la muerte. Si el
sistema AdvanceTrac se activa, REDUZCA
LA VELOCIDAD.
El sistema AdvanceTrac con Roll Stability
Control lo ayuda a mantener el control de
su vehículo cuando se encuentra sobre una
superficie resbaladizo. La porción de
control de estabilidad electrónica del
sistema ayuda a evitar derrapes o
deslizamientos laterales y el control de
estabilidad de balanceo ayuda a evitar que
el vehículo se vuelque. El sistema de
control de tracción ayuda a evitar que las
ruedas de tracción patinen y pierdan
tracción. Ver Uso del control de tracción
(página 175).
E72903
A
A
A
B
B
B
B
Vehículo sin AdvanceTrac con
RSC derrapando respecto de la
ruta que pretende seguir.
A
Vehículo con AdvanceTrac con
RSC manteniendo el control en
una superficie resbalosa.
B
176
Control de estabilidad

USO DEL CONTROL DE
ESTABILIDAD
AdvanceTrac® con Roll Stability
Control™ (RSC®)
El sistema se activa automáticamente al
arrancar el motor. El sistema AdvanceTrac
con RSC no puede desactivarse por
completo, pero las porciones ESC y RSC
del sistema se deshabilitan cuando la
transmisión está en R (Reversa). La
porción del control de tracción del sistema
se puede desactivar de manera
independiente. Ver Uso del control de
tracción (página 175).
177
Control de estabilidad

ASISTENCIA DE
ESTACIONAMIENTO (IF EQUIPPED)
AVISOS
Para evitar lesiones, lea y comprenda
las limitaciones del sistema incluidas
en esta sección. El sistema de
detección solo ayuda en el caso de ciertos
objetos (generalmente grandes y fijos) al
desplazarse en reversa en una superficie
plana a velocidades de estacionamiento.
Los sistemas de control de tráfico, el clima
inclemente, los frenos de aire y los motores
y ventiladores externos también pueden
afectar la función del sistema de sensores;
esto puede incluir un rendimiento reducido
o una activación falsa.
Para prevenir lesiones, tenga siempre
precaución al estar en R (Reversa) y
al usar el sistema de detección.
Este sistema no está diseñado para
evitar el contacto con objetos
pequeños o en movimiento. El
sistema está diseñado para proporcionar
una advertencia que ayude al conductor a
detectar objetos grandes y fijos y evitar
dañar el vehículo. Es posible que el sistema
no detecte objetos más pequeños,
especialmente aquellos que estén cerca
del suelo.
Ciertos dispositivos adicionales,
como enganches de remolque
grandes, parrillas para bicicletas o
tablas de surfeo y todo dispositivo que
pueda bloquear la zona de detección
normal del sistema, pueden generar pitidos
falsos.
Nota: Mantenga los sensores, ubicados en
la defensa o placa protectora, libres de
nieve, hielo y grandes cantidades de tierra.
Si los sensores están cubiertos, la precisión
del sistema se puede ver afectada. No
limpie los sensores con objetos afilados.
Nota: Si el vehículo sufre daños en la
defensa o placa protectora (fascia), de
modo que se desalineen o curven, la zona
de detección se puede alterar provocando
mediciones inexactas de los obstáculos o
falsas alarmas.
Nota: Si su vehículo está equipado con
MyKey®, es posible evitar desactivar el
sistema de sensores. Ver MyKey® (página
54).
El sistema de sensores advierte al
conductor de obstáculos dentro de cierto
rango del área de defensa. El sistema se
activa automáticamente cada vez que se
el encendido está activado.
Al recibir una advertencia de detección, el
volumen del radio disminuye a un nivel
predeterminado. Después de la
advertencia, el volumen del radio vuelve
al nivel normal.
Sistema trasero de sensores
Los sensores traseros solo se activan
cuando la transmisión está en R (Reversa).
A medida que el vehículo se acerca al
obstáculo, la frecuencia de la advertencia
audible aumenta. Cuando el obstáculo
está a menos de 10 pulgadas (25
centímetros) de distancia, la advertencia
suena en forma continua. Si se detecta un
objeto que está estático o se aleja a más
de 10 pulgadas (25 centímetros) del
costado del vehículo, el tono suena solo
durante tres segundos. Una vez que el
sistema detecta un objeto que se
aproxima, la advertencia vuelve a sonar.
178
Ayudas de Estacionamiento

E130178
A
Área de cobertura de hasta 6
pies (2 metros) desde la defensa
trasera. Existe un área de
cobertura menor en las esquinas
externas de la defensa.
A
El sistema detecta ciertos objetos mientras
la transmisión está en R (Reversa):
• y se mueve hacia un objeto
estacionario a una velocidad de 3 mph
(5 km/h) o menos
• pero no en movimiento y un objeto en
movimiento se acerca a la parte trasera
del vehículo a una velocidad de 3 mph
(5 km/h) o menos
• y se mueve a una velocidad de menos
de 3 mph (5 km/h) y un objeto en
movimiento se acerca por atrás del
vehículo a una velocidad de menos de
3 mph (5 km/h).
El sistema se puede desactivar mediante
el control de la pantalla de información.
Ver Información general (página 93). Si
el sistema presenta una falla, aparece un
mensaje de advertencia en la pantalla de
información y no permite que el conductor
active el sistema con falla.
Sistema delantero de sensores
Los sensores delanteros se activan cuando
la palanca de cambios está en cualquier
posición distinta de P (Estacionamiento)
o N (Neutro) y la velocidad del vehículo
esté por abajo de 6 mph (10 km/h).
E130382
A
Área de cobertura de hasta 27
pulgadas (70 centímetros)
desde la parte delantera del
vehículo y aproximadamente 6
a 14 pulgadas (15 a 35
centímetros) al costado del
extremo delantero del vehículo.
Consulte la sección de sensores
en reversa para obtener detalles
sobre el área de cobertura.
A
El sistema emite una advertencia audible
cuando hay obstáculos cercanos a alguna
defensa, de la siguiente manera:
• Los objetos detectados por los
sensores delanteros se indican
mediante un tono agudo en las bocinas
delanteras del radio.
• Los objetos detectados por los
sensores traseros se indican mediante
un tono más grave en las bocinas
traseras del radio.
179
Ayudas de Estacionamiento

• El sistema de detección informa los
obstáculos que están más cerca del
frente o de atrás del vehículo. Por
ejemplo, si un obstáculo se encuentra
a 24 pulgadas (60 centímetros) de la
parte delantera del vehículo, y al
mismo tiempo hay un obstáculo a solo
16 pulgadas (40 centímetros) de la
parte trasera del vehículo, suena el
tono más grave.
• Suena una advertencia alternante
entre la parte delantera y trasera si hay
objetos en ambas defensas a menos
de 10 pulgadas (25 centímetros).
Para obtener información específica sobre
la porción de sensores en reversa del
sistema, consulte la sección
correspondiente.
E142434
Oprima el botón para desactivar el
sistema. Permanecerá apagado durante
todo el ciclo de encendido.
ASISTENCIA ACTIVA PARA
ESTACIONARSE (IF EQUIPPED)
ALERTA
Este sistema está diseñado para ser
una ayuda adicional al estacionarse.
Podría no funcionar en todas las
condiciones y no está diseñado para
sustituir la atención y buen juicio del
conductor. El conductor es responsable de
evitar riesgos y mantener una distancia y
velocidad seguras, aun cuando el sistema
esté en uso.
Nota: El conductor siempre es responsable
de controlar el vehículo, supervisar el
sistema e intervenir si fuera necesario.
El sistema detecta un espacio de
estacionamiento en paralelo disponible y
dirige automáticamente el vehículo al
espacio (manos libres) mientras usted
controla el acelerador, la trasmisión y los
frenos. El sistema le da instrucciones tanto
visuales como auditivas para estacionar
el vehículo.
Es posible que el sistema no funcione
correctamente si pasa algo entre la
defensa delantera y el espacio de
estacionamiento (es decir, un peatón o
ciclista) o si el borde del vehículo
estacionado de manera contigua es alto
respecto del suelo (es decir, un bus,
camión de remolque o camión de
plataforma plana).
Nota: Es posible que los sensores no
detecten objetos bajo lluvia torrencial u
otras condiciones que provocan reflejos de
interrupción.
Nota: Es posible que los sensores no
detecten objetos con superficies que
absorben ondas ultrasónicas
180
Ayudas de Estacionamiento

El sistema no debe usarse si:
• se ha colocado, en la parte delantera
o trasera del vehículo o en alguna otra
parte cerca de los sensores, algún
objeto extraño (por ejemplo, un
soporte para bicicletas o un remolque).
• se ha añadido un objeto aéreo (por
ejemplo, tablas de surfeo) al techo.
• los sensores laterales o los de la
defensa delantera están dañados (por
ejemplo, por un choque) u obstruidos
por un objeto extraño (como una
cubierta para la defensa delantera),
• se está usando una llanta de refacción
pequeña.
Uso de Asistencia de
estacionamiento activa
E142733
oprima el botón. En la pantalla táctil
aparece un mensaje y un gráfico
correspondiente para indicar que está
buscando un espacio para estacionar. Use
la señal de viraje para indicar hacia qué
lado del vehículo desea que el sistema
busque.
Nota: Si no se utiliza la direccional, el
sistema busca automáticamente del lado
del pasajero.
A
E130107
Cuando se encuentra un espacio
apropiado, la pantalla táctil muestra un
mensaje y suena una campanilla.
Disminuya la velocidad y deténgase
aproximadamente en la posición (A), luego
siga las instrucciones en la pantalla táctil.
Nota: Debe observar que el espacio
seleccionado permanezca libre de
obstáculos en todo momento mientras
maniobra.
181
Ayudas de Estacionamiento

Nota: Es posible que la asistencia de
estacionamiento activa no detecte
vehículos con cargas aéreas (como un bus
o camión), mobiliario de calle y otros
elementos. Debe asegurarse de que el
espacio seleccionado sea apropiado para
estacionar.
Nota: El vehículo debe conducirse lo más
paralelo posible a los otros vehículos
mientras pasa por un lugar de
estacionamiento.
Nota: El sistema siempre ofrece el último
espacio de estacionamiento detectado (es
decir, si el vehículo detecta varios espacios
mientras conduce, ofrece el último).
Nota: Si se conduce por sobre
aproximadamente 20 mph (35 km/h), la
pantalla táctil muestra un mensaje para
alertarlo a que reduzca la velocidad del
vehículo.
Conducción automática hacia el
espacio de estacionamiento
Nota: Si la velocidad del vehículo
sobrepasa las 6 mph (10 km/h), el sistema
se apaga y debe tomar control total del
vehículo.
Nota: Si una maniobra se interrumpe antes
de completarse, el sistema se apaga. La
posición del volante no indicará la posición
real de la dirección y debe tomar control
total del vehículo.
Con las manos fuera del volante (y sin
nada que obstruya su movimiento) y la
transmisión en R (Reversa), el vehículo se
conduce solo a medida que en la pantalla
táctil aparecen instrucciones para mover
con seguridad el vehículo hacia atrás y
delante en el espacio. Mientras retrocede,
en la pantalla táctil aparece un mensaje
con instrucciones para que revise sus
alrededores (por razones de seguridad) y
para que retroceda lentamente,
acompañadas de un gráfico
correspondiente.
E130108
Cuando considere que el vehículo tiene
suficiente espacio delante y atrás o
escuche un tono continuo proveniente de
la asistencia de estacionamiento, detenga
el vehículo por completo.
182
Ayudas de Estacionamiento

E130109
Una vez finalizada la conducción
automática, en la pantalla táctil aparece
un mensaje que indica que el proceso de
asistencia de estacionamiento activa ha
finalizado. El conductor es responsable de
verificar el estacionamiento y asegurarse
de realizar cualquier corrección necesaria
antes de poner la transmisión en P
(Estacionamiento).
Desactivación de la característica
de asistencia de estacionamiento
El sistema puede desactivarse
manualmente al:
• oprimir el botón de asistencia de
estacionamiento activa
• tomar el volante
• conducir a más de 20 mph (35 km/h)
durante 30 segundos durante una
búsqueda de estacionamiento activa
• conducir a más de 6 mph (10 km/h)
durante la conducción automático
• desactivar el sistema de control de
tracción.
Ciertas condiciones del vehículo también
pueden desactivar el sistema, tales como:
• El control de tracción se ha activado
en una superficie resbalosa o suelta.
• Se produjo una activación o falla del
sistema de frenos antibloqueo.
• Se abre cualquier puerta (excepto la
del conductor).
• Algo toca el volante.
Si se produce un problema con el sistema,
aparecerá un mensaje de advertencia,
seguido de una campanilla. Durante la
operación normal, pueden aparecer
mensajes ocasionales del sistema. Si las
fallas del sistema son recurrentes o
frecuentes, lleve el vehículo a un
distribuidor autorizado para que le den
servicio.
Solución de problemas del sistema
El sistema no busca espacio
Es posible que el sistema de control de tracción esté desactivado
Alguna de las puertas (excepto la puerta del conductor) puede no estar completamente
cerrada
183
Ayudas de Estacionamiento

El sistema no ofrece un espacio determinado
Algo puede estar tocando los sensores laterales o los de la defensa delantera
No hay suficiente espacio en ambos lados del vehículo para estacionar
No hay suficiente espacio para la maniobra de estacionamiento en el lado opuesto del
espacio de estacionamiento
El vehículo está a más de 5 pies (1.5 m) del espacio de estacionamiento
El vehículo está a menos de 16 pulgadas (40 cm) de vehículos estacionados colindantes
La transmisión está en R (Reversa); el vehículo debe moverse hacia delante para detectar
un espacio de estacionamiento
El sistema no coloca el vehículo donde yo quiero en el espacio
El vehículo se mueve en la dirección contraria a la de la trasmisión (es decir, se mueva
hacia delante cuando está seleccionada la posición R [Reversa])
La transmisión está en R (Reversa); el vehículo debe moverse hacia delante para detectar
un espacio de estacionamiento
Un borde de la banqueta a lo largo del espacio de estacionamiento evita que el sistema
alinee el vehículo correctamente
Los vehículos u objetos que bordean el espacio podrían no estar colocados correcta-
mente
El vehículo se pasó demasiado del espacio de estacionamiento. El sistema funciona al
máximo cuando conduce hacia delante una distancia equivalente al espacio de esta-
cionamiento.
Es posible que las llantas no estén instaladas ni mantenidas correctamente (es decir,
sin la presión de aire suficiente, no tienen el tamaño adecuado o son de diferentes
tamaños)
Una reparación o alteración ha variado las capacidades de detección
Un vehículo estacionado tiene un aditamento alto (como un rociador de sal, un quita-
nieves, una plataforma de camión de mudanzas, etc.)
La longitud o posición del espacio de estacionamiento de los objetos estacionados
cambió después de que el vehículo pasó
La temperatura alrededor de su vehículo cambia rápidamente (como cuando acaba
de salir de un garaje con calefacción y al aire frío o cuando sale de un lavado de autos)
184
Ayudas de Estacionamiento

CÁMARA DE VISTA TRASERA
(IF EQUIPPED)
AVISOS
El sistema de cámara de vista trasera
es un dispositivo complementario de
ayuda que el conductor debe usar en
conjunto con los espejos interiores y
exteriores para obtener una máxima
cobertura.
Es posible que no se vean en la
pantalla los objetos que están cerca
de los extremos de la defensa o bajo
la defensa, debido a la cobertura limitada
del sistema de cámara retrovisora.
Retroceda lo más lento que pueda,
ya que las velocidades altas pueden
limitar su tiempo de reacción para
detener el vehículo.
Sea cauteloso cuando use la cámara
retrovisora y la compuerta levadiza
esté entreabierta. Si la compuerta
levadiza está entreabierta, la cámara
estará fuera de posición y la imagen de
video pudiera ser inexacta. Todas las guías
(si están activas) desaparecerán si la
compuerta levadiza está entreabierta.
Extreme las precauciones al activar
o desactivar las funciones de la
cámara cuando esté en R (Reversa).
Asegúrese de que el vehículo esté inmóvil.
El sistema de cámara retrovisora
proporciona un imagen de video del área
ubicada detrás del vehículo.
Durante la operación, aparecen líneas en
la pantalla que representan la ruta del
vehículo y la proximidad respecto de
objetos detrás de este.
E142435
La cámara está ubicada en la compuerta
levadiza.
Uso del sistema de cámara
retrovisora
El sistema de cámara retrovisora muestra
lo que hay debajo del vehículo cuando
coloca la transmisión en R (Reversa).
El sistema usa tres tipos de guías para
ayudarlo a ver lo que hay detrás del
vehículo:
• Guías activas: Muestran la ruta
pretendida del vehículo en reversa.
• Guías fijas: Muestran la ruta real en que
se mueve el vehículo en reversa en
línea recta. Esto puede ser útil al meter
el vehículo en reversa en un lugar de
estacionamiento o alinearlo con otro
objeto situado detrás de usted.
• Línea central: Ayuda a alinear el centro
del vehículo con un objeto (como un
remolque).
Nota: Si la transmisión está en R (Reversa)
y el compartimiento de equipaje está
abierto, no se muestran características de
la cámara retrovisora.
Nota: Si la imagen aparece mientras la
transmisión no está en R (Reversa), haga
que el distribuidor autorizado revise el
sistema.
185
Ayudas de Estacionamiento

Nota: Cuando arrastre algo, la cámara solo
ve lo que esté remolcando. En esas
condiciones, la cobertura no es tan
adecuada como en la operación normal y
quizá no pueda ver algunos objetos. En
algunos vehículos, las guías pueden
desaparecer una vez que el se engancha el
conector del arrastre del remolque.
Nota: Es posible que la cámara no funcione
correctamente bajo las siguientes
condiciones:
• Uso en la noche o en áreas oscuras si
una o ambas luces de reversa no
funcionan.
• La vista de la cámara está obstruida
por lodo, agua o desechos. Limpie la
lente con un paño suave sin pelusas y
un limpiador no abrasivo.
• La parte trasera del vehículo es
golpeada o dañada, lo cual provoca
que la cámara se desalinee.
Para obtener acceso a alguna de las
configuraciones del sistema de la cámara
retrovisora, realice las siguientes
selecciones en la pantalla táctil cuando
las transmisiones no están en R (Reversa):
• Menú > Vehículo > Cámara retrovisora
Después de cambiar una configuración del
sistema, la pantalla táctil muestra una
vista previa de las características
seleccionadas.
Guías y línea central
Nota: Las guías activas y las guías fijas solo
están disponibles cuando la transmisión
está en R (Reversa).
Nota: La línea central solo está disponible
cuando las guías activas o fijas están
activas.
A B C D
F
E
E142436
Guías activasA
Línea centralB
Guía fija: Zona verdeC
Guía fija: Zona amarillaD
Guía fija: Zona rojaE
Defensa traseraF
Las guías solo se muestran con guías fijas.
Para utilizar las guías activas, gire el
volante para dirigir las guías activas hacia
una ruta intencionada. Si se cambia la
posición del volante de la dirección cuando
está en reversa, el vehículo se puede
desviar de la ruta intencionada original.
Las guías fijas y activas se desvanecen y
aparecen, dependiendo de la posición del
volante de la dirección. Las guías activas
no se muestran cuando el volante está en
posición recta.
186
Ayudas de Estacionamiento

Tenga siempre precaución al retroceder.
Los objetos en la zona roja están más
cerca de su vehículo y los objetos en la
zona verde están lejos. Los objetos se
acercan a su vehículo a medida que se
mueven de la zona verde a las zonas
amarilla o roja. Use los espejos laterales y
el espejo retrovisor para obtener una mejor
cobertura de los lados y la parte trasera
del vehículo.
Las configuraciones seleccionables para
esta característica son ACTIVE + FIXED,
FIXED and OFF (Activa + Fija, Fija y
Desactivada).
Alarma visual de asistencia para
estacionamiento
Nota: Solo está disponible cuando las
transmisiones están en R (Reversa).
Nota: El sistema sensor de reversa no es
eficaz a velocidades de más de 3 mph (5
km/h) y puede no detectar ciertos objetos
angulares o en movimiento.
El sistema usa sombras rojas, amarillas y
verdes que aparecen sobre la imagen de
video cuando el sistema sensor de reversa
detecta un objeto. La alerta destaca el
objeto más cercano seleccionado. La
alerta del sensor de reversa puede ser
desactivada, pero si la alerta visual de
asistencia para estacionamiento está
activa, se siguen mostrando las áreas
resaltadas.
Las configuraciones seleccionables para
esta característica son ON y OFF (Activada
y Desactivada).
Teleobjetivo (zoom) manual
ALERTA
Cuando el sistema de teleobjetivo
manual está activo, la pantalla no
muestra toda el área ubicada detrás
del vehículo. Procure estar consciente de
su entorno cuando use la función de
teleobjetivo manual.
Nota: El teleobjetivo manual solo está
disponible cuando las transmisiones están
en R (Reversa).
Nota: Cuando el teleobjetivo manual está
activo, solo aparece la línea central.
Eso le permite obtener una vista más
cercana de un objeto ubicado detrás del
vehículo. La imagen de acercamiento
mantiene la defensa a la vista para
proporcionarle una referencia. El
teleobjetivo solo está activo cuando las
transmisiones están en R (Reversa).
Cuando la transmisión se cambia de R
(Reversa), la característica se apaga
automáticamente y debe reiniciarse
cuando se usa nuevamente.
Las configuraciones seleccionables para
esta característica son OFF, Level 1, Level
2 o Level 3(Desactivada, Nivel 1, Nivel 2 o
Nivel 3). Oprima las flechas hacia arriba y
hacia abajo para cambiar la vista. El nivel
de selección aparece entre los botones
(por ejemplo, Nivel 1). El valor
predeterminado del teleobjetivo manual
es OFF (Desactivado).
Demora de la cámara retrovisora
Cuando se saca la transmisión de R
(Reversa) a cualquier otra velocidad,
excepto P (Estacionamiento), la imagen
de la cámara permanece en pantalla hasta
que la velocidad del vehículo alcance 5
mph (8 km/h). Esto ocurre cuando la
función de demora de la cámara
retrovisora está activa, o hasta que se
seleccione un botón del radio.
Las configuraciones seleccionables para
esta característica son ON y OFF (Activada
y Desactivada). El valor de demora
predeterminado de la cámara retrovisora
es OFF (Desactivado).
187
Ayudas de Estacionamiento

FUNCIONAMIENTO
El control de crucera mantiene una
velocidad programada sin mantener el pie
en el pedal del acelerador.
USO DEL CONTROL DE
CRUCERO
ALERTA
No use el control de crucero cuando
haya mucho tráfico o en caminos con
curvas, resbalosos o no
pavimentados.
Nota: La velocidad del vehículo puede
variar momentáneamente al subir o bajar
una colina empinada. Aplique el freno si la
velocidad del vehículo supera la velocidad
establecida en una pendiente.
Nota: El control de crucero se desactivará
si la velocidad del vehículo desciende a
menos de 10 mph (16 km/h) por debajo de
la velocidad establecida al manejar cuesta
arriba.
Encendido del control de crucero
E142437
Oprima y suelte ON (Encender).
Configuración de una velocidad
Oprima y suelte el botón SET+
(Configurar+).
E71340
El indicador se encenderá en el
grupo de instrumentos.
Modificación de la velocidad
programada
E142438
AcelerarA
DesacelerarB
• Mantenga oprimido SET+ or SET-.
Suelte el control cuando alcance la
velocidad deseada.
• Oprima y suelte SET+ or SET-. La
velocidad programada cambiará en
incrementos de aproximadamente 2
km/h (1 mph).
• Oprima el acelerador o el freno hasta
que alcance la velocidad deseada.
Oprima y suelte el botón SET+.
Cancelación de una velocidad
establecida
Jale el control CAN hacia usted y suelte, o
pise el pedal de freno. La velocidad
establecida no se borrará.
Reanudación de una velocidad
establecida
Jale el control RES hacia usted y libérelo.
188
Control de Crucero

Apagado del control de crucero
Nota: La velocidad establecida se borra
cuando apaga el control de crucero.
Oprima y suelte OFF (Apagado) o apague
el encendido.
189
Control de Crucero

MONITOR DE PUNTO CIEGO
Sistema de información de puntos
ciegos (BLIS) con alerta de tráfico
cruzado (If Equipped)
ALERTA
Para evitar lesiones, NUNCA utilice
el sistema BLIS como reemplazo del
uso de los espejos interiores y
exteriores, y asegúrese de voltear hacia
atrás antes de cambiar de carril. BLIS no
es un reemplazo para un manejo
cuidadoso, solo es una ayuda.
A
A
E124788
BLIS lo ayuda a detectar vehículos que
puedan haber entrado a la zona de punto
ciego (A). El área de detección está en
ambos lados del vehículo, dentro del área
que abarca desde los espejos exteriores
hasta unos 10 pies (3 metros) más allá de
la defensa. El sistema lo alerta si ciertos
vehículos ingresan a la zona de punto ciego
mientras conduce.
La alerta de tráfico cruzado le advierte de
vehículos que se aproximan desde los
costados cuando la transmisión está en R
(Reversa).
Nota: BLIS no está diseñado para evitar el
contacto con otros vehículos u objetos; ni
para detectar vehículos estacionados,
personas, animales o infraestructura (rejas,
protecciones, árboles, etc.). Está diseñado
para alertar al conductor respecto de
vehículos en las zonas ciegas.
Nota: Cuando un vehículo pasa
rápidamente por la zona ciega,
normalmente menos de dos segundos, el
sistema no se activa.
Uso de los sistemas
BLIS se activa cuando se arranca el motor
y el vehículo se conduce hacia delante por
sobre 3 mph (5 km/h); se mantiene
encendida mientras la transmisión esté en
D (Directa) y N (Neutro). Si se sale de D
(Directa) o N (Neutro), el sistema ingresa
al modo de alerta de tráfico cruzado.
Cuando vuelve a cambiar a D (Directa),
BLIS se vuelve a encender cuando el
vehículo se conduce por sobre las 3 mph
(5 km/h).
Nota: BLIS no funciona en R (Reversa) ni
P (Estacionamiento) ni proporciona
advertencia adicional alguna cuando se
activa una señal de viraje.
La alerta de tráfico cruzado detecta
vehículos que se aproximan desde hasta 45
pies (14 metros) de distancia, aunque la
cobertura disminuye cuando los sensores
están bloqueados. Retroceder lentamente
ayudar a aumentar el área de cobertura y la
eficacia.
ALERTA
Para evitar lesiones, NUNCA utilice
el sistema de alerta de tráfico
cruzado como reemplazo del uso de
los espejos interiores y exteriores, y
asegúrese de voltear hacia atrás antes de
moverse en reversa para salir de un
espacio de estacionamiento. La alerta de
tráfico cruzado no es un reemplazo de un
manejo cuidadoso, solo es una ayuda.
190
Ayudas de Conducción

E142440
En este primer ejemplo, el sensor izquierdo
solo está parcialmente obstruido; la
cobertura de la zona casi se maximiza.
E142441
La cobertura de la zona también disminuye
al estacionar en ángulos pronunciados.
Aquí, el sensor izquierdo está obstruido en
su mayoría; la cobertura de la zona en ese
lado está gravemente limitada.
191
Ayudas de Conducción

Mensajes y luces del sistema
E142442
Los sistemas de alerta de tráfico cruzado
y BLIS encienden un indicador de alerta
amarilla en el espejo externo del lado del
vehículo por donde viene el vehículo que
se aproxima.
Nota: El indicador de alerta se atenúa
cuando se detecta oscuridad de la noche.
La alerta de tráfico cruzado también emite
una serie de tonos y aparece un mensaje
en la pantalla de información que indica
que un vehículo viene de derecha o
izquierda. La alerta de tráfico cruzado
funciona con el sistema de sensores de
reversa, el cual emite su propia serie de
tonos. Ver Asistencia de
estacionamiento (página 178).
Sensores del sistema
ALERTA
Apenas antes de que el sistema
reconozca una condición de bloqueo
y alerte al conductor, aumentará el
número de objetos no detectados. Para
evitar lesiones, NUNCA utilice el sistema
BLIS como reemplazo del uso de los
espejos laterales y retrovisores, y
asegúrese de voltear hacia atrás antes de
cambiar de carril. BLIS no es un reemplazo
para un manejo cuidadoso, solo es una
ayuda.
Nota: Es posible obtener una advertencia
de bloqueo sin tener ningún bloqueo; esto
es poco común y se conoce como
advertencia de bloqueo falso. Una condición
de bloqueo falso se corrige
automáticamente o se borra después de un
ciclo de la llave.
E142443
El sistema usa sensores de radar ubicados
detrás de la defensa fascia a cada lado del
vehículo. No permita que estas áreas
resulten obstruidas por lodo, nieve o
adhesivos para la defensa, ya que esto
puedo provocar una disminución en el
desempeño del sistema.
Si el sistema detecta una disminución del
desempeño, aparecerá una advertencia
de mensaje de un sensor bloqueado o una
advertencia de mensaje de baja visibilidad
en la pantalla de información y el indicador
de alerta se enciende en los espejos
apropiados. La advertencia de la pantalla
de información se puede borrar, pero el
indicador de alerta permanece iluminado.
Cuando el bloqueo se elimina, el sistema
se puede restablecer de dos maneras:
• cuando se detectan al menos dos
objetos al conducir o
• o conecte y desconecte el encendido,
y luego vuelva a conectarlo.
Si el bloqueo todavía está presente
después del ciclo de la llave, el sistema
detecta que está bloqueado después de
manejar en medio del tráfico.
192
Ayudas de Conducción

Motivos para la aparición de mensajes
Limpie el área de la placa
protectora de la defensa
frente al radar o elimine la
obstrucción.
La super-
ficie del
radar está
sucia u
obstruida
Conduzca normalmente en
la zona de tráfico por unos
minutos para permitir que
el radar detecte los
vehículos que pasan para
que pueda borrar el estado
bloqueado.
La super-
ficie del
radar no
está sucia
u obstruida
No se necesita tomar
ninguna acción. El sistema
se restablece automática-
mente al estado desblo-
queado una vez que la lluvia
o la nevada extrema dismi-
nuyan o se detengan. No
use BLIS ni la alerta de
tráfico cruzado en estados
condiciones.
La lluvia
torrencial o
la caída de
nieve inter-
fieren con
las señales
del radar
Limitaciones del sistema
Los sistemas de alerta de tráfico cruzado
y BLIS de todas maneras tienen sus
limitaciones; situaciones tales como
condiciones meteorológicas graves o
desechos acumulados en el área del
sensor pueden limitar la detección del
vehículo.
Lo siguiente son otras situaciones que
pueden limitar el sistema BLIS:
• Ciertas maniobras de vehículos que
ingresan y salen de la zona ciega.
• Los vehículos que pasan por la zona
ciega a velocidades muy altas.
• Cuando varios vehículos en caravana
pasan por la zona ciega.
Las siguientes son otras situaciones que
pueden limitar el sistema de alerta de
tráfico cruzado:
• Vehículos u objetos estacionados de
manera adyacente que obstruyen los
sensores.
• Vehículos que se aproximan y que
pasan a velocidades mayores de 15
mph (24 km/h).
• Conducir en reversa a más de 3 mph
(5 km/h).
• Retroceder de un sitio de
estacionamiento esquinado.
Alertas falsas
Nota: Si el vehículo cuenta con una barra
de arrastre equipada de fábrica y está
arrastrando un remolque, los sensores
detectarán el remolque y desactivarán el
sistema BLIS para evitar alertas falsas. Si
tiene barras de arrastre que no fueron
equipadas de fábrica, es recomendable
desactivar el sistema BLIS manualmente.
Es posible que haya ciertas instancias en
que los sistemas de alerta de tráfico
cruzado o BLIS encienden el indicador de
alerta sin vehículo en la zona de cobertura;
esto se conoce como alerta falsa. Cierta
cantidad de alertas falsas es normal; son
temporales y se corrigen
automáticamente.
Errores del sistema
Si cualquiera de los sistemas detecta un
problema con el sensor izquierdo o
derecho, el indicador luminoso de BLIS se
enciende y permanece encendido, y
aparece lo siguiente en la pantalla de
información:
• BLIS: X sensor izquierdo Requiere
servicio o
• Falla de tráfico cruzado Requiere
servicio
193
Ayudas de Conducción

Cuando los problemas que puedan afectar
la iluminación del indicador derecho o
izquierdo, solo aparecen las fallas de la
pantalla de información.
Encendido y apagado de los sistemas
Uno o ambos sistemas se pueden apagar
temporalmente al usar el control de la
pantalla de información. Ver Información
general (página 93). Cuando BLIS se
apaga, no recibe alertas y se enciende un
indicador luminoso en la pantalla de
información. El sistema se vuelve a
encender cada vez que se el encendido se
activa.
Uno o ambos sistemas también se pueden
apagar de manera permanente en su
distribuidor autorizado. Una vez apagado,
para volver a encenderlo debe llevarlo a
que lo hagan en el distribuidor.
MODO DE ECONOMICO
Este sistema lo ayuda a conducir de
manera más eficaz al monitorear
constantemente los cambios en las
características del equipo, la anticipación
de las condiciones de tráfico y las
velocidades al conducir.
El valor de estas características está
representado por los pétalos que aparecen
en la pantalla, donde cinco pétalos es el
estado más eficiente. Mientras más
eficientemente conduzca, mejor será su
clasificación y mejor será su ahorro de
combustible en general.
Nota: Estos valores de eficiencia no arrojan
una cifra definida de consumo de
combustible. Podría variar, ya que no solo
se relaciona con estos hábitos de
conducción, sino que además se ve influido
por muchos otros factores como viajes
cortos y arranques en frío.
Nota: Los viajes cortos frecuentes, en que
el motor no se calienta por completo,
también aumentarán el consumo de
combustible
Puede acceder al sistema mediante el
control de la pantalla de información. Ver
Información general (página 93).
Tipo 1
A B
E142444
AnticipaciónA
Velocidad eficienteB
Anticipación
Ajuste la velocidad del vehículo y la
distancia respecto a otros vehículos para
evitar la necesidad de frenar o acelerar a
fin de mejorar el rendimiento del
combustible.
Velocidad eficiente
Reduzca su velocidad de crucero en
carreteras despejadas para mejoras el
rendimiento del combustible. Velocidades
más altas consumen más combustible.
Tipo 2 y 3
En la pantalla se muestra información
pertinente.
194
Ayudas de Conducción

Restablecimiento de modo
ecológico
Restablezca el consumo de combustible
promedio mediante el control de la
pantalla de información.
Nota: Es posible que haya una pequeña
demorar en calcular nuevos valores
DIRECCIÓN
Dirección hidráulica eléctrica
AVISOS
El sistema de dirección hidráulica
eléctrica cuenta con verificaciones
que constantemente monitorean el
sistema para garantizar el funcionamiento
adecuado. Cuando se detecta un error del
sistema, aparece un mensaje sobre la
dirección en la pantalla de información.
El sistema de dirección hidráulica
eléctrica cuenta con verificaciones
de diagnóstico que constantemente
monitorean el sistema para garantizar el
funcionamiento adecuado del sistema
electrónico. Cuando se detecta un error
electrónico, aparece un mensaje en la
pantalla de información. Si esto sucede,
detenga el vehículo en un lugar seguro y
apague el motor. Después de al menos 10
segundos, restablezca el sistema volviendo
a arrancar el motor y verifique si aparecer
un mensaje sobre la dirección en la
pantalla de información. Si vuelve a
aparecer el mensaje de la dirección o si
aparece mientras está conduciendo, lleve
su vehículo con su distribuidor para que lo
revise.
Acuda a servicio inmediatamente si
se detecta un error en el sistema. Es
posible que no sienta ninguna
diferencia en el desempeño de la dirección,
pero puede existir una situación grave. No
llevarlo a revisión puede resultar en
pérdida de control de la dirección.
Su vehículo cuenta con un sistema de
dirección eléctrica servoasistida. No existe
un depósito de líquido que revisar ni
rellenar.
Si el vehículo pierde la potencia eléctrica
mientras maneja (o si el encendido se gira
a OFF [Apagado]), puede maniobrar la
dirección del vehículo manualmente, pero
con mayor esfuerzo. Las maniobras
continuas y extremas pueden aumentar el
esfuerzo que se requiere para maniobrar.
Esto se produce para evitar el
sobrecalentamiento y el daño permanente
interna en el sistema de dirección. Si esto
ocurriera, no se pierde la capacidad de
maniobrar el vehículo en forma manual ni
se generan daños permanentes. Las típicas
maniobras en la dirección y manejo
permitirán que el sistema se enfríe y que
la dirección servoasistida vuelva a la
normalidad.
Consejos de dirección
Si la dirección se desvía o se pone dura,
revise si hay:
• una llanta mal inflada
• desgaste disparejo de las llantas
• componentes de la suspensión sueltos
o desgastados
• componentes de la dirección sueltos
o desgastados
• alineación del vehículo no adecuada
Una comba alta en el camino o el viento
de costado alto también pueden hacer que
la dirección parezca desviarse o tirar hacia
un lado.
195
Ayudas de Conducción

ALMACENAMIENTO DE LA
PARTE INFERIOR TRASERA
DEL PISO
Piso del compartimiento del
copiloto
E78097
El compartimiento de almacenamiento
debajo del piso se encuentra detrás del
asiento del pasajero delantero.
Sistema de manejo de carga (If
Equipped)
E142445
El sistema se ubica en el piso del área de
carga. Levante la manija para abrir.
Piso para carga ajustable (If Equipped)
E142446
Los vehículos con llanta de refacción
tamaño estándar puede ajustar el piso de
carga en dos posiciones. El frente del piso
de carga se puede colocar encima (para
una posición alta) o debajo (para una
posición baja) de los bordes detrás de los
asientos traseros. La parte trasera del piso
de carga siempre se asienta en los dos
pequeños anaqueles ubicados en la
moldura de la compuerta levadiza.
CUBIERTAS DEL
COMPARTIMIENTO DE
EQUIPAJES
AVISOS
Asegúrese de que los montantes
estén correctamente enganchados
en los dispositivos de instalación. En
un frenado repentino o accidente, la
cubierta puede causar lesiones personales
si no está instalada adecuadamente.
No coloque ningún objeto en la
cubierta del área de carga. Pueden
obstruir su visión o golpear a los
ocupantes del vehículo en caso de un
frenado repentino o choque.
Use la cubierta para cubrir los elementos
en el área de carga de su vehículo.
196
Transporte de carga

E142447
Inserte los extremos de la cubierta de
carga en los dispositivos de instalación que
se ubican detrás del asiento trasero en los
paneles de adorno traseros para instalar
la cubierta.
Para hacer funcionar la cubierta:
1. Jale el borde trasero de la cubierta de
carga hacia atrás.
2. Fije ambos extremos de la varilla de
soporte a las ranuras de retención que
se ubican en los paneles de adorno de
cuarto traseros.
PARRILLAS PARA EQUIPAJE
Y PORTADORES DE CARGA
ALERTA
Al cargar las barras transversales de
la parrilla portaequipaje, se
recomienda distribuir la carga
uniformemente, así como mantener un
centro de gravedad bajo. Los vehículos
cargados, cuyo centro de gravedad es más
alto, se comportan distinto de los vehículos
sin carga. Al manejar un vehículo
demasiado cargado se deben tomar
mayores precauciones, tales como
manejar a velocidades más bajas y
mantener una mayor distancia de frenado.
La carga máxima recomendada,
distribuida en forma uniforme en las barras
transversales es:
• 100 libras (45 kilogramos) para
vehículos sin toldo corredizo
• 45 libras (20 kilogramos) para
vehículos con toldo corredizo.
Nota: Las cargas nunca deben colocarse
directamente sobre el panel del techo. El
panel del techo no está diseñado para
transportar una carga directamente.
Para el buen funcionamiento del sistema
de parrilla portaequipaje, las cargas deben
colocarse directamente sobre las barras
transversales fijas a los rieles laterales de
la parrilla portaequipaje. Es posible que su
vehículo venga equipado con barras
transversales de fábrica. También se
recomienda que utilice las barras
transversales Ford genuinas, pues están
diseñadas específicamente para su
vehículo, si requiere colocarlas en el
sistema de parrilla portaequipaje.
Asegúrese de que la carga esté firmemente
sujeta. Verifique la tensión de la carga
antes de conducir en cada parada para
cargar combustible.
Ajuste de la barra transversal (If
Equipped)
Nota: El ruido del viento se puede minimizar
ya sea retirando o reposicionando las barras
transversales cuando no están en uso.
Coloque la barra transversal frontal en la
posición hacia atrás para minimizar el ruido
del viento. La barra transversal frontal
puede ajustarse o extraerse mediante los
pasos a continuación. Los sujetadores de la
barra transversal trasera pueden extraerse
al desatornillar el conjunto.
197
Transporte de carga

E142448
1. Extraiga los controles de
accionamiento con el pulgar de la barra
transversal en ambos lados de la barra
transversal frontal al girarlos hacia la
izquierda.
Nota: Se puede utilizar un destornillador
pequeño o herramienta similar para aflojar
el control de accionamiento con el pulgar.
Aplique el cabezal del sujetador en la parte
superior del control o inserte el eje entre las
dos palancas del control y gírelo para
soltarlo.
2. Deslice los extremos fuera de los
pernos de los rieles laterales para
extraer la barra transversal.
3. Mueva la barra transversal a la nueva
posición del lado del riel y deslice la
barra sobre el perno en esa posición.
4. Reemplace y apriete los controles de
accionamiento con el pulgar en ambos
lados de la barra transversal girándolos
a la derecha hasta que estén
apretados. Se puede utilizar un
destornillador pequeño o herramienta
similar para apretar si es necesario.
Asegúrese de revisar que los controles de
accionamiento con el pulgar estén
apretados cada vez que agregue o retire
carga de la parrilla portaequipaje y en
forma periódica durante su viaje.
Asegúrese de que la carga esté firme antes
de viajar.
LÍMITE DE CARGA
Carga del vehículo: con y sin
remolque
Esta sección lo guiará en la forma
adecuada de cargar el vehículo, el
remolque o ambos, para mantener el peso
del vehículo cargado dentro de su
capacidad de diseño, con o sin remolque.
La carga adecuada del vehículo le
permitirá aprovechar al máximo el diseño
de su vehículo. Antes de cargar su vehículo,
familiarícese con los siguientes términos
para determinar los pesos máximos del
vehículo, con o sin remolque, que se
encuentran en la Etiqueta de llantas y en
la Etiqueta de certificación del
cumplimiento de las normas de seguridad
del vehículo:
Peso base listo para rodar: es el peso
del vehículo con tanque lleno de
combustible y todo su equipamiento
estándar. No incluye pasajeros, carga, ni
equipos opcionales.
Peso del vehículo listo para rodar: es el
peso del vehículo nuevo, al momento de
recogerlo con su distribuidor autorizado,
más todo su equipamiento optativo y/o
de posventa.
198
Transporte de carga

E142513
Carga útil: es el peso combinado de carga
y pasajeros que transporta el vehículo. La
carga útil máxima del vehículo se puede
encontrar en la Etiqueta de llantas o en el
Pilar B o en el borde de la puerta del
conductor (es posible que los vehículos
exportados fuera de Estados Unidos y
Canadá no tengan una Etiqueta de
llantas). Busque “THE COMBINED
WEIGHT OF OCCUPANTS AND CARGO
SHOULD NEVER EXCEED XXX kg OR
XXX lb.” (EL PESO COMBINADO DE
OCUPANTES Y CARGA NUNCA DEBE
SUPERAR LOS XXX kg O XXX lb) para
conocer la carga útil máxima. La carga útil
señalada en la Etiqueta de llantas es la
carga útil máxima para el vehículo según
lo determinado en la planta de
ensamblaje. Si se ha instalado en el
vehículo algún equipo de posventa o
instalado por el distribuidor autorizado, el
peso de dicho equipo se debe restar de la
carga útil señalada en la Etiqueta de
llantas para determinar la nueva carga útil.
ALERTA
La capacidad de carga real de su
vehículo puede estar limitada por la
capacidad de volumen (cuánto
espacio disponible hay) o por la capacidad
de carga útil (cuánto peso puede
transportar el vehículo). Una vez que ha
alcanzado la carga útil máxima de su
vehículo, no agregue más carga, incluso si
hay espacio disponible. La sobrecarga o
carga inadecuada del vehículo puede
contribuir a que usted pierda el control del
vehículo y ocurra una volcadura.
199
Transporte de carga

Solo ejemplo:
E142516
E142517
E142518
200
Transporte de carga

Peso de la carga–: es todo el peso
agregado al Peso base listo para rodar,
incluyendo la carga y el equipamiento
opcional. Al arrastrar remolques, la carga
de la lanza del remolque o el peso del
pivote de arrastre también es parte de la
carga.
GAW (Peso bruto del eje): es el peso
total que se apoya en cada eje (delantero
y trasero) – incluido el peso del vehículo
listo para rodar y toda la carga útil.
GAWR (Peso bruto vehicular del eje):
es el peso máximo admisible que puede
transportar un solo eje (delantero o
trasero). Estas cifras se indican en la
Etiqueta de certificación del
cumplimiento de las normas de
seguridad. La etiqueta debe estar fijada
en el pilar de bisagra de la puerta, poste
de seguro de la puerta o el borde de la
puerta junto al poste de poste de
seguro de la puerta, junto a la posición
del asiento del conductor). La carga
total en cada eje nunca debe exceder
su GAWR.
Nota: Para obtener información sobre
remolques, consulte la Guía de arrastre de
remolques y vehículos recreativos que le
proporciona su distribuidor autorizado.
E142521
GVW (Peso bruto vehicular): es el peso
del vehículo listo para rodar + la carga +
los pasajeros.
GVWR (Peso bruto vehicular máximo):
es el peso máximo admisible del vehículo
totalmente cargado (incluidas todas las
opciones, el equipamiento, los pasajeros
y la carga). El GVWR se indica en la
Etiqueta de certificación del
cumplimiento de las normas de
seguridad. La etiqueta debe estar fijada
en el pilar de bisagra de la puerta, el
poste de seguro de la puerta o el borde
de la puerta junto al poste de poste de
seguro de la puerta, junto a la posición
del asiento del conductor.
201
Transporte de carga

Solo ejemplo:
E142523
E142524
202
Transporte de carga

ALERTA
Si excede los límites de peso
vehicular del eje que indica la
Etiqueta de certificación de
cumplimiento de las normas de seguridad,
puede ocasionar deficiencias en el
rendimiento y la maniobrabilidad del
vehículo; daños en el motor, la transmisión
y/o la estructura del vehículo; graves daños
al vehículo; pérdida de control y lesiones
personales.
E142526
GCW (Peso bruto combinado): es el
peso del vehículo cargado (GVW) más el
peso del remolque totalmente cargado.
GCWR (Peso bruto vehicular
combinado máximo): es el peso máximo
admisible del vehículo y del remolque
cargado, incluyendo toda la carga y los
pasajeros, que el vehículo puede
transportar sin riesgo de sufrir daños.
(Importante: El sistema de frenos de los
vehículos de arrastre está calculado en
función del GVWR, no del GCWR). Deben
usarse frenos funcionales independientes
para el control seguro de los vehículos y
remolques arrastrados si el GCW del
vehículo de arrastre más el remolque
sobrepasa el GVWR del vehículo de
arrastre. El GCW nunca debe exceder el
GCWR.
Peso máximo del remolque cargado:
Es el mayor peso de un remolque
completamente cargado que el vehículo
puede arrastrar. Supone un vehículo solo
con opciones indispensables, sin carga (ni
interna ni externa), una carga de la lanza
de 10 a 15% (remolque convencional) o un
peso del pivote de arrastre de 15 a 25%
(remolque con quinta rueda) y solo el
conductor (68 kg [150 lb]). Consulte a su
distribuidor autorizado (o la Guía de
arrastre de remolques y vehículos
recreativos proporcionada por su
distribuidor autorizado) para obtener
información más detallada.
Carga de la lanza o peso del pivote de
arrastre con quinta rueda: se refiere al
peso que un remolque aplica sobre el
enganche de arrastre.
203
Transporte de carga

Ejemplos: para un remolque convencional
de 2268 kg (5000 lb), multiplique 5000
por 0.10 y 0.15 para obtener el límite de
carga de la lanza apropiado, es decir, de
227 a 340 kg (500 a 750 lb). Para un
remolque con quinta rueda de 5,216 kg
(11,500 lb), multiplique por 0.15 y 0.25 para
obtener el rango de carga adecuado del
pivote de arrastre, que es de 782 a 1,304 kg
(1,725 a 2,875 lb).
AVISOS
No exceda el GVWR o el GAWR
específicos en la Etiqueta de
certificación del cumplimiento de las
normas de seguridad.
No utilice llantas de refacción con
una capacidad de transporte de
carga inferior a las originales, porque
pueden disminuir las limitaciones del
GVWR y del GAWR del vehículo. Las
llantas de refacción con un límite mayor
que las originales no aumentan las
limitaciones del GVWR ni del GAWR.
Si excede alguna limitación de peso
vehicular máximo puede provocar
graves daños al vehículo o lesiones
personales.
Pasos para determinar el límite
correcto de carga:
1. Ubique el mensaje "The combined
weight of occupants and cargo should
never exceed XXX kg or XXX lbs". (“El
peso combinado de ocupantes y carga
nunca debe exceder los XXX kilos o
XXX libras”) en la etiqueta del vehículo.
2. Determine el peso combinado del
conductor y los pasajeros que viajarán
en el vehículo.
3. Reste el peso combinado del
conductor y los pasajeros de XXX kg o
XXX lb.
4. La cifra resultante es igual a la
cantidad disponible de carga y
capacidad de carga de equipaje. Por
ejemplo, si la cantidad “XXX” es igual
a 1,400 lb y habrán cinco pasajeros de
150 lb en el vehículo, la cantidad de
carga y capacidad de carga de equipaje
disponible es 650 lb (1400–750 (5 x
150) = 650 lb). En unidades métricas
(635 – 340 (5x68) = 295 kg).
5. Determine el peso combinado del
equipaje y la carga que llevará el
vehículo. Ese peso no puede exceder,
sin correr peligro, la capacidad de carga
de equipaje y la carga disponible
calculadas en el Paso 4.
6. Si el vehículo va a arrastrar un
remolque, la carga del remolque se
trasladará al vehículo. Consulte este
manual para determinar cómo esto
reduce la capacidad de carga de
equipaje y la carga disponible del
vehículo.
204
Transporte de carga

Esto son algunos ejemplos de cómo
calcular la capacidad de transporte de
carga y equipaje disponible:
• Otro ejemplo para su vehículo con una
capacidad de carga y equipaje de
635 kg (1,400 libras). Usted decide ir
a jugar golf. ¿Hay suficiente capacidad
de carga para transportar a sus cuatro
amigos y todas las bolsas de golf?
Usted y sus amigos tienen un peso
promedio de 99 kg (220 lb) cada uno
y las bolsas de golf pesan
aproximadamente 13.5 kg (30 lb) cada
una. El cálculo sería: 1400 – (5 x 220)
– (5 x 30) = 1400 – 1100 – 150 = 150
lb. Sí, tiene suficiente capacidad en su
vehículo para transportar a cuatro
amigos más las bolsas de golf. En
unidades métricas decimales, el
cálculo sería: 635 kg – (5 x 99 kg) – (5
x 13.5 kg) = 635 – 495 – 67.5 = 72.5 kg.
• Un último ejemplo para su vehículo con
una capacidad para carga y equipaje
de 635 kg (1,400 lb). Usted y uno de
sus amigos deciden ir a comprar
cemento a una tienda local para
mejoras en el hogar a fin de terminar
ese patio que ha estado planificando
durante los dos últimos años. Al medir
el interior del vehículo con el asiento
trasero plegado, tiene espacio para 12
bolsas de cemento de 45 kg (100 lb).
¿Tiene suficiente capacidad de carga
para transportar el cemento hasta su
casa? Si usted y su amigo pesan cada
uno 220 lb (99 kg), el cálculo sería:
1,400 – (2 x 220) – (12 x 100) = 1,400
– 440 – 1,200 = –240 lb. No; no tiene
suficiente capacidad de carga para
transportar tanto peso. En unidades
métricas decimales, el cálculo sería:
635 kg – (2 x 99 kg) – (12 x 45 kg) =
635 – 198 – 540 = 103 kg. Deberá
reducir el peso de la carga en al menos
104 kg (240 lb). Si quita 3 bolsas de
cemento de 45 kg (100 lb), el cálculo
de la carga sería:1400 - (2 x 220) - (9
x 100) = 1400 - 440 - 900 = 60 lb.
Ahora, tiene la capacidad de carga
para transportar el cemento y a su
amigo también. En unidades métricas
decimales, el cálculo sería: 635 kg – (2
x 99 kg) – (9 x 45 kg) = 635 – 198 –
405 = 32 kg.
En los cálculos anteriores también se
asume que la carga se distribuye de tal
forma en el vehículo que no se recarga el
peso bruto vehicular del eje delantero ni
trasero especificado para su vehículo en
la Etiqueta de certificación del
cumplimiento de las normas de seguridad.
La etiqueta debe estar adherida al pilar de
bisagra de la puerta, al poste de seguro de
la puerta o al borde de la puerta junto al
poste de poste de seguro de la puerta,
junto a la posición del asiento del
conductor.
205
Transporte de carga

Instrucciones especiales de carga para
propietarios de camiones o camionetas
pickup y vehículos utilitarios
ALERTA
Los vehículos cargados se
comportan de modo distinto a los
vehículos sin carga. Al manejar un
vehículo demasiado cargado se deben
tomar mayores precauciones, tales como
manejar a velocidades más bajas y
mantener una mayor distancia de frenado.
Su vehículo puede transportar más carga
y personas que la mayoría de los
automóviles de pasajeros. Dependiendo
del tipo y ubicación de la carga, el
transporte de carga y de personas puede
elevar el centro de gravedad del vehículo.
206
Transporte de carga

CONDUCCIÓN CON
REMOLQUE
AVISOS
No exceda el GVWR o el GAWR
especificados en la Etiqueta de
certificación del cumplimiento de las
normas de seguridad.
Arrastrar remolques con un peso
superior al peso bruto máximo
recomendado para el remolque
excede el límite del vehículo y puede
producir daños en el motor, en la
transmisión y en la estructura, pérdida de
control del vehículo, volcaduras y lesiones
personales.
La capacidad de carga del vehículo se
designa por peso, no por volumen, de
modo que no necesariamente podrá usar
todo el espacio disponible al cargar un
vehículo.
El arrastre de un remolque significa una
carga adicional para el motor, la
transmisión, el eje, los frenos, las llantas y
la suspensión del vehículo. Inspeccione
periódicamente estos componentes
durante y después de cualquier operación
de remolque.
CONTROL DE BAMBOLEO DEL
REMOLQUE (IF EQUIPPED)
Nota: Esta función no permite que el
remolque oscile, pero reduce la oscilación
cuando comienza.
Nota: Esta función no puede detener la
oscilación de todos los remolques.
Nota: En algunos casos, si la velocidad del
vehículo es demasiado alta, el sistema
activarse varias veces, reduciendo la
velocidad del vehículo gradualmente.
Esta función se aplica a frenos de vehículos
en ruedas individuales y, si es necesario,
reduce la potencia del motor. Si el
remolque comienza a oscilar, la luz del
control de estabilidad destella. Lo primero
que debe hacer es reducir la velocidad del
vehículo, luego aparte el vehículo a un lado
de la carretera de forma segura y verifique
la carga adecuada de la lanza y la
distribución de carga del remolque. Ver
Transporte de carga (página 196).
PESOS DE REMOLQUE
RECOMENDADOS
Nota: Para el funcionamiento de gran
altitud, reduzca el peso combinado en en
2% a una elevación de 1,000 pies (300
metros).
Nota: Ciertos Estados requieren frenos
eléctricos de remolque para remolques
sobre el peso específico. Consulte el
reglamento de tránsito del estado para
conocer dicho peso especificado. Los pesos
máximos del remolque podrían limitarse al
peso especificado, ya que el sistema
eléctrico del vehículo no incluye el conector
de cableado necesario para activar los
frenos eléctricos del remolque.
207
Remolque

Área delantera
máxima del
remolque: m
2
(pies
2
)
Peso máximo del
remolque: lb (kg)
Máximo GCWR: lb
(kg)
Tren motriz
20 (1,86)2000 (907)5866 (2661)2WD 1.6L
20 (1,86)2000 (907)6035 (2737)4WD 1.6L
20 (1,86)2000 (907)5977 (2711)
2WD 2.0L
1
30 (2,78)3500 (1588)7477 (3391)
2WD 2.0L
2
20 (1,86)2000 (907)6126 (2779)
4WD 2.0L
1
30 (2,78)3500 (1588)7626 (3459)
4WD 2.0L
2
20 (1,86)2000 (907)5417 (2457)2WD 2.5L
1
sin paquete de arrastre de remolques.
2
Con paquete de arrastre de remolques.
208
Remolque

COMPROBACIONES
ESENCIALES DE REMOLQUE
Siga estas pautas para asegurar un
arrastre de remolque seguro:
• No arrastre un remolque hasta que el
vehículo haya recorrido por lo menos
1.600 km (1.000 millas).
• Consulte el reglamento local de
vehículos motorizados para el arrastre
de un remolque.
• Consulte las instrucciones incluidas
con los accesorios de arrastre para
obtener las especificaciones
adecuadas de instalación y ajuste.
• Haga revisar el vehículo con mayor
frecuencia si arrastra un remolque.
Consulte su información de
mantenimiento programado.
Los términos de especificación de carga
se encuentran en la etiqueta de llantas y
la etiqueta de certificación del
cumplimiento de las normas de seguridad.
Las instrucciones para calcular la carga de
su vehículo se puede encontrar
anteriormente en este manual. Ver Límite
de Carga (página 198). Recuerde
considerar la el peso de la lanza del
remolque como parte de la carga del
vehículo al calcular el peso total del
vehículo.
Enganches de arrastre
No utilice ningún enganche de arrastre que
vaya fijo a la defensa o al eje. Distribuya la
carga del remolque de manera que sólo
un 10 a un 15% del peso total del remolque
esté sobre la lanza.
Cadenas de seguridad
Nota: Nunca fije las cadenas de seguridad
en la defensa.
Siempre conecte las cadenas de seguridad
a los retenes de gancho del vehículo. Para
colocar las cadenas de seguridad, crúcelas
por debajo de la lanza del remolque y
déjelas holgadas para poder hacer virajes.
Si usa un remolque arrendado, siga las
instrucciones de la agencia de
arrendamiento.
Frenos del remolque
ALERTA
No conecte el sistema de frenos
hidráulicos del remolque
directamente al sistema de frenos
del vehículo. Es posible que su vehículo no
tenga suficiente potencia de frenado, por
lo que aumenta la posibilidad de sufrir un
choque.
Los frenos eléctricos y los frenos de
remolque manuales, automáticos o por
impulso son seguros si están instalados
adecuadamente y si se ajustan a las
especificaciones del fabricante. Los frenos
del remolque deben cumplir con la
normativa local y federal.
El sistema de frenos del vehículo de
arrastre tiene capacidad para soportar el
GVWR, pero no el GCWR.
Luces del remolque
La mayoría de los vehículos remolcados
requieren luces de remolque. Asegúrese
que todas las luces de posición, luces de
freno, direccionales y luces de emergencia
estén funcionando. Consulte a su
distribuidor autorizado o la agencia de
arrendamiento de remolques para obtener
las instrucciones y los equipos adecuados
para conectar las luces.
209
Remolque

Antes de arrastrar un remolque
Practique los virajes, el frenado y el
retroceso para acostumbrarse a la
combinación del vehículo y el remolque
antes de comenzar un viaje. Al dar vuelta,
haga giros más amplios, de manera que
las ruedas del remolque no toquen los
bordes de las banquetas ni otros
obstáculos.
Al arrastrar un remolque
• No conduzca a más de 113 km/h
(70 mph) durante los primeros 800 km
(500 millas) y no arranque con el
acelerador a fondo.
• Revise el enganche, las conexiones
eléctricas y las tuercas de seguridad
de ruedas del remolque
completamente después de haber
viajado 80 km (50 millas).
• Coloque la palanca de cambio de
velocidades en P para que se enfríe el
motor y la transmisión, y el A/A
funcione en forma óptima en climas
calurosos mientras se está detenido
en el tráfico.
• Apague el control de velocidad. El
control de velocidad se puede
desactivar automáticamente al
arrastrar remolques en pendientes
largas y empinadas.
• Cambie a una velocidad menor si está
manejando en bajada en una
pendiente pronunciada. No aplique los
frenos muy seguido, ya que se pueden
sobrecalentar y ser menos eficaces.
• Si la transmisión está equipada con la
función de asistencia en pendientes,
use esta función al remolcar. Esta
función proporciona frenado con motor
y ayuda a eliminar cambios de
transmisión excesivos para optimizar
el rendimiento del combustible y el
enfriamiento de la transmisión.
• Si tiene enganchado un remolque, deje
más distancia para detenerse, anticipe
las paradas y frene gradualmente.
• Evite estacionar en desnivel. Sin
embargo, si se ve obligado a hacerlo,
coloque cuñas debajo de las ruedas
del remolque.
PUNTOS DE REMOLQUE (IF
EQUIPPED)
Ubicación del anillo de remolque
El anillo de remolque de rosca se ubica en
el pozo de la llanta de refacción.
El anillo de remolque siempre debe
llevarse en el vehículo.
Instalación del anillo de remolque
El anillo de remolque de rosca tiene un hilo
izquierdo. Gírelo hacia la izquierda para
instalarlo. Asegúrese de que el anillo de
remolque esté bien apretado.
E146284
Inserte un objeto adecuado para abrir por
la fuerza la cubierta (1). Use la porción
remetida o con muescas de la cubierta.
Atornille el anillo de remolque (2).
210
Remolque

Remolque del vehíclo en cuatro
ruedas
Gire el interruptor de encendido a la
posición ON. El no hacerlo bloquerá la
dirección y el indicador y las luces de freno
no funcionarán.
Los esfuerzos de frenado y dirección son
altos si el motor no está funcionando.
Mantenga mayores distancia de detención.
TRANSPORTE DEL VEHÍCULO
E143886
Si necesita remolcar su vehículo, póngase
en contacto con un servicio profesional de
arrastre o, si es socio de un programa de
asistencia en el camino, con su proveedor
de asistencia en el camino.
Se recomienda hacer el arrastre de su
vehículo con un elevador y plataformas
rodantes o equipos de plataforma plana.
No arrastre su vehículo con una eslinga.
Ford Motor Company no ha aprobado el
procedimiento de arrastre con eslingas.
Ford Motor Company elabora un manual
de arrastre para todos los operadores
autorizados de camiones de remolque.
Haga que el operador de la grúa de arrastre
consulte este manual para que vea los
procedimientos adecuados de enganche
y arrastre de su vehículo.
Los vehículos con tracción delantera
(FWD) se pueden remolcar desde el frente
si se utiliza equipo de elevación para
levantar las ruedas del suelo. Las ruedas
traseras se pueden dejar en el suelo
cuando se hace el arrastre de esta manera.
Los vehículos con tracción delantera
también se pueden remolcar desde la
parte trasera usando un equipo elevador;
sin embargo, es necesario que las ruedas
delanteras estén sobre una plataforma
rodante para evitar dañar la transmisión
automática.
Los vehículos con tracción en las cuatro
ruedas (4WD) se deben remolcar con un
elevador y plataformas rodantes o con
equipos de plataforma plana con todas
las ruedas separadas del suelo para evitar
que se dañe la transmisión, el sistema
4WD o el vehículo. Su vehículo puede
dañarse si es arrastrado en forma
incorrecta o usando otros medios.
211
Remolque

REMOLQUE DEL VEHÍCULO
SOBRE LAS CUATRO RUEDAS
Remolque de emergencia
En caso de que el vehículo quede
deshabilitado (sin acceso a plataformas
rodantes, grúas de arrastre de automóviles
o vehículos con plataforma de arrastre),
puede ser remolcado (con todas sus
ruedas en el suelo, independientemente
de la configuración del tren
motriz/transmisión) en las siguientes
condiciones:
• El vehículo esté orientado hacia el
frente, de modo que se le arrastre hacia
delante.
• La palanca de cambios de la
transmisión se coloca la posición N. Si
no se puede mover la palanca de
cambios de la transmisión no se puede
colocar en la posición N, es posible que
sea necesario anularla. Ver
Transmisión (página 163).
• La velocidad máxima es 56 km/h (35
mph).
• La distancia máxima es 80 km
(50 millas).
Arrastre vacacional
Siga estas instrucciones si necesita hacer
un arrastre recreativo. Un ejemplo de esto
sería arrastrar su vehículo con una casa
rodante. Estas pautas están diseñadas
para asegurar que la transmisión no resulte
dañada.
Los vehículos con tracción delantera
(FWD) se pueden remolcar con las ruedas
delanteras fuera del suelo usando una
plataforma de arrastre. Si utiliza una
plataforma de arrastre, siga las
instrucciones especificadas por el
proveedor del equipo.
Los vehículos con tracción en las cuatro
ruedas (4WD) no se pueden remolcar con
ninguna rueda en el suelo, ya que se
podrían producir daños en el vehículo o la
transmisión. Se recomienda remolcar el
vehículo con las cuatro (4) ruedas
separadas del suelo como cuando se usa
un remolque de transporte de automóviles.
De lo contrario, no se permite llevar a cabo
el arrastre vacacional.
212
Remolque

RODAJE
Es posible que deba asentar las llantas
nuevas por aproximadamente 480 km
(300 millas). Durante este período, el
vehículo puede exhibir algunas
características de manejo excepcionales.
Evitar conducir muy rápido durante los
primeros 1,600 km (1,000 millas). Varíe la
velocidad frecuentemente y realice
cambios ascendentes de forma temprana.
No fuerce el motor.
No remolque durante los primeros 1,600
km (1,000 millas).
CONDUCCIÓN ECONÓMICA
La economía de combustible se ve
afectada por diversos aspectos como la
forma en que conduce, las condiciones en
la que conduce y la forma en que mantiene
el vehículo.
Algunas cosas que debe considerar y que
pueden mejorar la economía de
combustible:
• Acelere y disminuya la velocidad de
forma suave y moderada.
• Conduzca a velocidades constantes
sin detenerse.
• Anticipar las detenciones; disminuir la
velocidad puede eliminar la necesidad
de detenerse.
• Combine sus actividades y diligencias
y minimice el manejo con frenadas y
arranques.
• Cierre las ventanas para manejar a alta
velocidad.
• Al manejar a velocidades razonables
(viajar a 88 km/h [55 mph]), se usa un
15% menos de combustible que
cuando se viaja a 105 km/h (65 mph).
• Mantenga las llantas correctamente
infladas y use sólo el tamaño
recomendado.
• Solo use el aceite de motor
recomendado.
• Realice todo el mantenimiento
programado en forma regular.
También es posible que haya algunas
cosas que no desea realizar debido a que
pueden reducir la economía de
combustible:
• Las aceleraciones repentinas o
aceleraciones bruscas.
• Revolucionar el motor antes de
apagarlo.
• Ralentí durante períodos mayores a un
minuto.
• Calentar el vehículo en mañanas frías.
• Use el aire acondicionado o el
desempañador delantero.
• Use el control de velocidad en terrenos
montañosos.
• Apoyar el pie sobre el pedal del freno
al manejar.
• Conducir un vehículo con una carga
sumamente pesado o arrastrar un
remolque.
• Transporte de peso innecesario (se
pierden unos 0.4 km/L [1 mpg] por
cada 180 kg [400 lb] de peso
transportado).
• Adición de accesorios en particular al
vehículo (por ejemplo, deflectores de
insectos, barras de volcadura y de
luces, estribos, portaesquíes o parrillas
portaequipaje).
• Conducir con las ruedas mal alineadas.
CONDUCCIÓN POR EL AGUA
Nota: Manejar en agua profunda sobre los
niveles recomendados puede causar daños
en el vehículo.
213
Indicaciones de conducción

Nota: Una vez que pasó por el agua,
siempre seque los frenos moviendo el
vehículo lentamente ejerciendo una leve
presión sobre el pedal del freno. Los frenos
mojados no detienen el vehículo tan rápido
como los frenos secos.
E142667
Si no puede evitar pasar por agua profunda
o estancada, hágalo muy lentamente.
Nunca conduzca por agua cuyo nivel esté
por encima de la parte inferior de las
ruedas (rines) de las llantas (si se trata de
automóviles) o de la parte inferior de los
cubos de las ruedas (en el caso de
camiones y camionetas).
Cuando se desplaza por el agua, es posible
que disminuya la capacidad de la tracción
o de los frenos. Además, el agua puede
entrar en la admisión de aire del motor y
dañar gravemente el motor o hacer que el
vehículo se detenga.
TAPETES DEL PISO
E142666
AVISOS
Siempre utilice tapetes diseñados
para ajustarse al espacio para pies
de su vehículo. Únicamente utilice
tapetes que no obstruyan el área del pedal.
Únicamente utilice tapetes que se
aseguren firmemente a los postes de
retención de manera que no se
desacomoden e interfieran con los pedales
ni obstaculicen de otra forma la operación
segura de su vehículo.
Los pedales que no se pueden mover
libremente pueden causar la pérdida
de control del vehículo y aumentar
el riesgo de sufrir graves lesiones
personales.
Siempre asegúrese de que los
tapetes estén bien asegurados a los
postes de retención en la alfombra
que viene con el vehículo. Los tapetes se
deben asegurar apropiadamente a ambos
postes de retención para garantizar que
no se desacomoden.
Nunca coloque tapetes ni cualquier
otra cubierta en el espacio para pies
del vehículo que no se pueda
asegurar apropiadamente para evitar que
se mueva e interfiera con los pedales o con
la capacidad de controlar el vehículo.
214
Indicaciones de conducción

AVISOS
Nunca coloque tapetes ni cualquier
otra cubierta encima de los tapetes
que ya están instalados. Los tapetes
siempre deben apoyarse en la superficie
de la alfombra del vehículo y no en otro
tapete ni cubierta. Los tapetes o cualquier
otra cubierta adicional reducirán el espacio
del pedal y posiblemente interferirán con
su operación.
Verifique regularmente la sujeción
de los tapetes. Siempre reinstale y
asegure de manera correcta los
tapetes que se hayan desmontado para
limpieza o reemplazo.
Siempre asegúrese de que no caigan
objetos en el espacio para pies del
conductor mientras el vehículo está
en movimiento. Estos objetos pueden
quedar atrapados debajo de los pedales
causando la pérdida de control del
vehículo.
Si no se siguen correctamente las
instrucciones de instalación o
sujeción de los tapetes es posible
que interfieran con la operación del pedal
causando la pérdida de control del
vehículo.
Para instalar los tapetes, colóquelos
de manera que el ojal quede sobre
el poste de retención y oprima para
asegurarlos.
Para quitar el tapete, siga el
procedimiento de instalación en
orden inverso.
215
Indicaciones de conducción

ASISTENCIA EN CARRETERA
Vehículos vendidos en EE.UU.:
cómo conseguir asistencia en el
camino
Para brindarle una ayuda total en caso de
que tenga un problema con el vehículo,
Ford Motor Company ofrece un programa
gratuito de asistencia en el camino. Este
programa es independiente de la Garantía
limitada de vehículos nuevos. El servicio
está disponible:
• las 24 horas, los siete días de la
semana.
• para el período de cobertura
mencionado en la Tarjeta de asistencia
en el camino, que se incluye en la
carpeta del Manual del propietario.
La asistencia en el camino cubrirá:
• cambio de una llanta desinflada por
una de refacción en buen estado (salvo
los vehículos a los que se les ha
suministrado un equipo de inflado de
llantas).
• arranque con cables pasacorriente de
la batería.
• asistencia al quedarse afuera (el costo
del repuesto de llave es
responsabilidad del cliente).
• suministro de combustible:
Contratistas de servicio independiente,
si no lo prohíben las leyes estatales,
locales o municipales se deberá
suministrar 7.5 litros (2.0 galones) de
gasolina o 18.9 litros (5 galones) de
combustible diesel a un vehículo
descompuesto. El servicio de
suministro de combustible se limita a
dos ocasiones sin cargo dentro de un
período de 12 meses.
• rescate con grúa: disponible a menos
de 30.5 metros (100 pies) de un
camino pavimentado o rural, sin pago
alguno.
• arrastre: vehículos Ford y Lincoln
elegibles que sean arrastrados hasta
un distribuidor autorizado a menos de
56 km (35 millas) del lugar en que
ocurrió el desperfecto o al distribuidor
autorizado más cercano. Si un
miembro solicita servicio de arrastre a
un distribuidor autorizado a más de 56
km (35 millas) del lugar en que ocurrió
el desperfecto, el miembro asumirá los
costos por sobrepasar el kilometraje
de 56 km (35 millas).
Los remolques tendrán una cobertura
hasta $200 si el vehículo elegible con el
desperfecto requiere servicio, en el
distribuidor autorizado más cercano. Si el
remolque está descompuesto, pero el
vehículo de arrastre funciona, el remolque
no califica para ningún servicio de
asistencia en el camino.
Vehículos vendidos en Estados
Unidos : Uso de la asistencia en el
camino
Complete la tarjeta de identificación de
asistencia en el camino y colóquela en su
billetera para tener una referencia rápida.
Esta tarjeta se encuentra en la carpeta de
información del propietario, dentro de la
guantera.
EE.UU. Los propietarios de vehículos Ford
que necesiten asistencia en el camino
deberán llamar al 1-800-241-3673.
216
Emergencias en el Camino

Si necesita coordinar asistencia en el
camino para usted, Ford Motor Company
le reembolsará un monto razonable para
el arrastre hasta el distribuidor más
cercano, dentro de 56 km (35 millas). Para
obtener información acerca del reembolso,
los clientes de vehículos Ford en EE.UU.
deben llamar al 1-800-241-3673. Se
solicitará a los usuarios que presenten el
comprobante de pago original.
Vehículos vendidos en Canadá:
Cómo conseguir asistencia en el
camino
Los clientes canadienses que necesiten
asistencia en el camino, llamen al
1-800-665-2006.
Vehículos vendidos en Canadá:
Uso de la asistencia en el camino
Complete la tarjeta de identificación de
asistencia en el camino y colóquela en su
billetera para tener una referencia rápida.
En Canadá, la tarjeta se encuentra en el
Manual de garantías, en la guantera.
La cobertura y los beneficios de asistencia
en el camino de Canadá pueden diferir de
los de EE.UU. Consulte el Manual de
garantías o visite nuestro sitio web en
www.ford.ca para obtener información
sobre los servicios y beneficios
canadienses.
Los clientes canadienses que deseen
obtener información sobre asistencia en
el camino deben llamar al
1-800-665-2006 o visitar nuestro sitio
web www.ford.ca.
LUCES DE EMERGENCIA
Nota: Con el uso prolongado, las luces
intermitentes pueden descargar la batería.
El control de las luces de
emergencia está ubicado en el
tablero de instrumentos cerca
del radio. Úselas cuando su vehículo esté
descompuesto y represente un riesgo para
la seguridad de los demás conductores.
• Si presiona el control de las luces
intermitentes, todas las luces
direccionales delanteras y traseras
destellarán.
• Oprima nuevamente el control de las
luces intermitentes para apagarlas.
INTERRUPTOR DE CORTE DE
COMBUSTIBLE
ALERTA
Si no inspecciona y, si es necesario,
repara las fugas de combustible
después de un choque, se podría
aumentar el riesgo de incendio o de sufrir
lesiones graves. Ford Motor Company
recomienda que el sistema de combustible
sea revisado por un distribuidor autorizado
después de cualquier choque.
En caso de choque moderado a grave, este
vehículo cuenta con una característica de
desactivación de la bomba de combustible
que detiene el flujo de combustible hacia
el motor. No todo impacto producirá la
desactivación.
En caso de que el vehículo se apague
después de un choque, usted podría volver
a arrancarlo, realizando lo siguiente:
1. Apague el encendido.
2. Active el encendido.
3. Repita los pasos 1 y 2 para reactivar la
bomba de combustible.
Nota: Si el vehículo tiene el sistema de
encendido con botón de presión, oprima el
botón START/STOP dos veces para volver
a activar el sistema de combustible.
217
Emergencias en el Camino

ARRANQUE EN FRÍO DEL
VEHÍCULO
AVISOS
Los gases que se encuentran
alrededor de la batería del vehículo
pueden explotar si se exponen a
llamas, chispas o cigarrillos encendidos.
Una explosión podría ocasionar lesiones
personales o daños al vehículo.
La batería del vehículo contiene
ácido sulfúrico, el cual puede quemar
la piel, los ojos y la ropa en caso de
contacto.
No trate de empujar su vehículo de
transmisión automática para arrancarlo.
Las transmisiones automáticas no
permiten arrancar el motor empujando el
vehículo. Intentar empujar un vehículo con
transmisión automática para arrancarlo
podría provocar daños en la transmisión.
Preparación del vehículo
Nota: Use sólo un suministro de 12 voltios
para arrancar su vehículo.
Nota: No desconecte la batería del vehículo
descompuesto, ya que esto podría dañar el
sistema eléctrico del vehículo.
1. Estacione el vehículo auxiliar cerca del
cofre del vehículo descompuesto,
asegurándose de que los vehículos no
entren en contacto. Ponga el freno de
estacionamiento en ambos vehículos
y aléjese del ventilador de enfriamiento
del motor y otras piezas móviles.
2. Revise todas las terminales de la
batería y elimine el exceso de corrosión
antes de conectar los cables de la
batería. Asegúrese de que todos los
tapones de ventilación estén apretados
y nivelados.
3. Encienda el ventilador del calefactor
en ambos vehículos para evitar daños
causados por descargas de voltaje.
Apague todos los demás accesorios.
Conexión de los cables
pasacorriente
Nota: En la ilustración, el vehículo de la
parte inferior se utiliza para indicar la batería
auxiliar (refuerzo).
4
2
1
3
E142664
1. Conecte el cable pasacorriente positivo
(+) a la terminal positiva (+) de la
batería descargada.
2. Conecte el otro extremo del cable
positivo (+) a la terminal positiva (+)
de la batería auxiliar.
3. Conecte el cable negativo (–) a la
terminal negativa (–) de la batería
auxiliar.
218
Emergencias en el Camino

4. Haga la conexión final del cable
negativo (–) a una parte metálica
expuesta del motor del vehículo
descompuesto, lejos de la batería, del
carburador o del sistema de inyección
de combustible.
Nota: No fije el cable negativo (-) en las
líneas de combustible, las tapas de
balancines del motor, el múltiple de
admisión, ni ningún componente eléctrico
para usarlo como punto de conexión a tierra.
ALERTA
No conecte el extremo del segundo
cable a la terminal negativa (–) de
la batería descargada. Una chispa
podría provocar una explosión de los gases
alrededor de la batería.
Asegúrese que los cables estén alejados
de las aspas de ventiladores, bandas,
piezas móviles de ambos motores o de
cualquier pieza del sistema de suministro
de combustible.
Arranque con cables pasacorriente
1. Encienda el motor del vehículo auxiliar
y haga funcionar el motor aumentando
la velocidad en forma moderada.
2. Arranque el motor del vehículo
descompuesto.
3. Una vez que el vehículo descompuesto
arranque, deje funcionar ambos
motores durante tres minutos antes
de desconectar los cables
pasacorriente.
Retiro de los cables pasacorriente
Retire los cables pasacorriente en orden
inverso al de conexión.
Nota: En la ilustración, el vehículo de la
parte inferior se utiliza para indicar la batería
auxiliar (refuerzo).
4
1
3
2
E142665
1. Retire el cable pasacorriente de la
superficie metálica de conexión a tierra.
2. Retire el cable pasacorriente de la
terminal negativa (–) de la batería del
vehículo auxiliar.
3. Retire el cable pasacorriente de la
terminal positiva (+) de la batería del
vehículo auxiliar.
4. Retire el cable pasacorriente de la
terminal positiva (+) de la batería del
vehículo descompuesto.
Después de encender el vehículo
descompuesto y de retirar los cables
pasacorriente, déjelo funcionar en ralentí
durante varios minutos, de modo que la
computadora del motor pueda reaprender
sus condiciones de ralentí.
219
Emergencias en el Camino

CÓMO OBTENER LOS
SERVICIOS NECESARIOS
Las reparaciones a su vehículo cubiertas
por la garantía deben ser realizadas por un
distribuidor autorizado. Si bien cualquier
distribuidor autorizado que trabaje con la
línea de su vehículo le proveerá servicio
cubierto por la garantía, le recomendamos
regresar al distribuidor autorizado que le
vendió el vehículo, el que le asegurará una
satisfacción continua.
Tenga en cuenta que algunas reparaciones
cubiertas por la garantía requieren de
entrenamiento o equipo especial, por lo
que no todos los distribuidores autorizados
cuentan con permiso para realizar todas
las reparaciones cubiertas por la garantía.
Esto significa que, dependiendo de la
reparación con cobertura de garantía que
se necesite, tal vez deba llevar el vehículo
a otro distribuidor autorizado.
Cuando lleve el vehículo al distribuidor
autorizado, debe considerar un tiempo
razonable para realizar las reparaciones.
Las reparaciones se realizarán utilizando
refacciones Ford o Motorcraft® o bien
refacciones remanufacturadas o similares,
que estén autorizadas por Ford.
Fuera de la ciudad
Si estuviera lejos de su casa cuando
necesite hacer una reparación,
comuníquese con el Centro de relaciones
con el cliente de Ford o utilice los recursos
en línea indicados a continuación para
encontrar el distribuidor más cercano a
usted.
En los Estados Unidos:
Dirección postal
Ford Motor Company
Customer Relationship Center
P.O. Box 6248
Dearborn, MI 48121
Teléfono
1-800-392-3673 (FORD)
(TDD para personas con discapacidad
auditiva: 1-800-232-5952)
En línea
En el sitio www.fordowner.com encontrará
información y recursos adicionales
Estos son algunos de los elementos que
se pueden encontrar en línea:
• Localizador de distribuidores en los
EE.UU. por nombre, ciudad/estado o
Código postal de distribuidor
• Manuales del propietario
• Programas de mantenimiento
• Productos retirados del mercado
• Planes de servicio extendido de Ford
• Accesorios genuinos de Ford
• Especiales y promociones de servicio.
En Canadá:
Dirección postal
Customer Relationship Centre
Ford Motor Company of Canada, Limited
P.O. Box 2000
Oakville, Ontario L6J 5E4
Teléfono
1-800-565-3673 (FORD)
En línea
www.ford.ca
Asistencia adicional
Si tiene preguntas o inquietudes o no está
satisfecho con el servicio que recibe, siga
estos pasos:
1. Comuníquese con su Representante
de ventas o Asesor de servicio de su
distribuidor autorizado de ventas y
servicio.
220
Asistencia al cliente

2. Si sus preguntas o preocupaciones
quedan sin resolver, póngase en
contacto con el Gerente de ventas o el
Gerente de relaciones comerciales.
3. Si requiere asistencia o aclaración con
respecto a las políticas o
procedimientos de Ford Motor
Company, comuníquese con Ford
Customer Relationship Center.
Para poder brindarle un mejor servicio,
tenga a mano la siguiente información
cuando se comunique con un Centro de
relaciones con el cliente:
• Número de identificación del vehículo.
• Su número de teléfono (particular y
laboral).
• El número del distribuidor autorizado
y la ciudad donde se encuentra.
• La lectura actual del odómetro del
vehículo.
En algunos estados, debe notificar
directamente a Ford (por escrito) antes de
proceder con soluciones, de acuerdo con
las leyes de garantía de su estado. En
algunos estados también se le permitirá a
Ford intentar una reparación final.
En Estados Unidos, una disputa de garantía
se debe enviar a BBB AUTO LINE antes de
tomar acciones bajo la ley
Magnuson–Moss Warranty Act, o en la
medida que lo permitan las leyes del
estado, antes de solicitar soluciones de
reemplazo o renovación que proporcionan
ciertas leyes estatales. Este procedimiento
del manejo de la disputa no se requiere
antes de ejercer los derechos creados por
el estado u otros derechos que son
independientes de las leyes del
Magnuson–Moss Warranty Act o de las
leyes de reemplazo o devolución del
estado.
EN CALIFORNIA
(ÚNICAMENTE EN EE. UU.)
El Código civil de California, sección
1793.2(d) exige que, si un fabricante o su
representante no es capaz de reparar un
vehículo motorizado para cumplir con la
garantía expresa aplicable del vehículo,
luego de un número razonable de intentos,
se le exigirá al fabricante reemplazar el
vehículo por uno prácticamente idéntico
o adquirir el vehículo y reembolsar al
comprador una cantidad igual al precio
actual pagado o pagadero por el cliente
(menos un descuento razonable por el uso
que ejerció el consumidor). El consumidor
tiene el derecho de escoger si recibe un
reembolso o el reemplazo del vehículo.
El Código civil de California, sección
1793.22(b) asume que el fabricante ha
realizado un número razonable de intentos
por cumplir con las garantías expresas
aplicables al vehículo si, dentro de los
primeros 18 meses de la propiedad de un
vehículo nuevo o durante los primeros
29,000 km. (18,000 millas), lo que se
produzca primero:
1. Se han hecho dos o más intentos de
reparación para el mismo problema
que podría provocar la muerte o
lesiones corporales graves O
2. Se han realizado cuatro o más intentos
de reparación para el mismo problema
(un defecto o condición que afecta
considerablemente el uso, el valor o la
seguridad del vehículo) O
3. El vehículo está fuera de servicio en
reparaciones por un total de más de
30 días calendario (no necesariamente
todo de una vez).
En el caso del número 1 ó 2 anterior, el
consumidor también debe notificar al
fabricante de la necesidad de
reparaciones, a la siguiente dirección:
221
Asistencia al cliente

Ford Motor Company
16800 Executive Plaza Drive
Mail Drop 3NE-B
Dearborn, MI 48126
Deberá presentar su disputa de garantía a
la BBB AUTO LINE antes de hacer valer en
los tribunales cualquier derecho o
soluciones contempladas en el Artículo
1793.22(b) del Código Civil de California.
También deberá recurrir a BBB AUTO LINE
antes de ejercer sus derechos o de buscar
soluciones bajo el Acta de garantías
Federal de Magnuson-Moss, 15 U.S.C. sec.
2301 y posteriores. Si elige buscar
compensación siguiendo derechos y
soluciones no creadas por el Artículo
1793.22(b) del Código Civil de California o
el Acta de Garantías de Magnuson-Moss,
dichos estatutos no requieren acudir a BBB
AUTO LINE.
PROGRAMA AUTO LINE DE
BETTER BUSINESS BUREAU
(BBB) (ÚNICAMENTE EN EE.
UU.)
Su satisfacción es importante para Ford
Motor Company y su distribuidor. Si no se
ha resuelto un problema con la garantía
mediante el procedimiento de tres pasos
sugerido en este capítulo de la sección
Cómo conseguir los servicios que necesita,
usted podría ser elegible para participar
en el programa BBB AUTO LINE.
El programa BBB AUTO LINE consta de
dos partes – mediación y arbitraje. Al cabo
de la mediación, un representante de BBB
se comunicará con usted y con Ford Motor
Company para explorar las opciones para
resolver el reclamo. Si no se llega a un
acuerdo durante la mediación o no desea
participar en la mediación, si su reclamo
es elegible, podrá participar en el proceso
de arbitraje. Se programará una audiencia
de arbitraje de modo que pueda presentar
su caso de manera informal ante una
persona imparcial. El árbitro considerará
el testimonio proporcionado y tomará una
decisión después de la audiencia.
Los conflictos enviados al programa BBB
AUTO LINE normalmente se deciden
dentro de cuarenta días a contar de la
fecha en que presenta su solicitud a BBB.
La decisión no lo compromete y la puede
rechazar y llevar el caso a los tribunales,
en donde todas las conclusiones de la
disputa de BBB Auto Line, así como las
decisiones, son admisibles para el proceso.
En caso de que decida aceptar la decisión
de BBB AUTO LINE, Ford está entonces
comprometida por la decisión y la debe
acatar dentro de los siguientes 30 días
después de la recepción de su carta de
aceptación.
Solicitud de BBB AUTO LINE: Con la
información proporcionada a continuación,
llame o escriba para pedir una solicitud de
programa. Se le pedirá su nombre y
dirección, información general sobre su
nuevo vehículo, información sobre los
problemas con la garantía y todos los
pasos que ya hubiera seguido para tratar
de resolver la situación. Se le enviará un
Formulario de reclamo del cliente que
deberá completar, firmar y regresar a BBB,
junto con la prueba de propiedad. Una vez
recibido, BBB revisará el reclamo para
verificar que califique según las Pautas
resumidas del programa.
222
Asistencia al cliente

Puede obtener más información
llamando a BBB AUTO LINE al
1-800-955-5100, o escribir a:
BBB AUTO LINE
4200 Wilson Boulevard, Suite 800
Arlington, Virginia 22203-1833
También se pueden pedir las solicitudes
de BBB AUTO LINE llamando a Ford Motor
Company Customer Relationship Center,
al 1-800-392-3673.
Nota: Ford Motor Company se reserva el
derecho de modificar las restricciones para
la participación en el Consejo, modificar los
procedimientos o interrumpir este proceso
en cualquier momento, sin mediar
obligación ni notificación alguna.
UTILIZACIÓN DEL PROGRAMA
DE MEDIACIÓN/ARBITRAJE
(ÚNICAMENTE EN CANADÁ)
Para vehículos entregados a distribuidores
autorizados canadienses. En aquellos
casos en que considere que los esfuerzos
realizados por Ford of Canada y por el
distribuidor autorizado para resolver un
problema del servicio del vehículo
relacionado con la fabricación han sido
insatisfactorios, Ford of Canada participa
en un programa de mediación y arbitraje
imparcial de terceros dirigido por el Plan
de arbitraje para vehículos motorizados de
Canadá (CAMVAP).
El programa CAMVAP es una alternativa
directa y relativamente rápida para
resolver conflictos, cuando todos los otros
esfuerzos para llegar a un acuerdo han
fracasado. Este procedimiento no tiene
costo para usted y está diseñado para
eliminar la necesidad de procedimientos
legales caros y prolongados.
En el Programa de arbitraje para vehículos
motorizados de Canadá (CAMVAP),
árbitros imparciales que actúan como la
tercera parte dirigen audiencias en tiempos
y lugares convenientes para ambos y en
un ambiente informal. Dichos árbitros
imparciales revisaron las posiciones de las
partes, tomaron decisiones y, cuando lo
estimaron conveniente, emitieron juicios
para resolver las disputas. Las decisiones
del CAMVAP son rápidas, justas e
inapelables, pues el fallo del juez es de
carácter obligatorio, tanto para usted
como para Ford de Canadá.
Los servicios del Plan de arbitraje para
vehículos motorizados de Canadá
(CAMVAP) se encuentran disponibles en
todos los territorios y provincias
canadienses. Para obtener mayor
información, sin cargos u obligaciones,
llame directamente a su Administrador
provincial de CAMVAP al
1-800–207–0685 o visite
www.camvap.ca..
CÓMO OBTENER ASISTENCIA
FUERA DE EE. UU. Y CANADÁ
Antes de exportar su vehículo a otro país,
contacte a la embajada o consulado
extranjero que corresponda. Dichos
funcionarios pueden informarle sobre las
normas locales para registrar el vehículo
y dónde encontrar combustible sin plomo.
Si no puede encontrar combustible sin
plomo o sólo puede obtener combustible
con un índice anticascabeleo más bajo de
lo recomendado para su vehículo, contacte
una oficina de relación con el cliente de la
región.
223
Asistencia al cliente

El uso de combustible con plomo en su
vehículo sin la conversión correcta puede
dañar la efectividad del sistema de control
de emisión de gases y puede causar
detonaciones del motor o graves daños al
motor. Ford Motor Company y Ford de
Canadá no se responsabilizan de cualquier
daño causado por el uso del combustible
inadecuado. El uso de combustible con
plomo también puede tener como
consecuencia que sea más difícil importar
nuevamente el vehículo a Estados Unidos.
Si su vehículo debe recibir servicio mientras
usted está viajando o viviendo en la Región
de Asia-Pacífico, África del SubSahara, las
Islas Vírgenes de Estados Unidos, América
Central, el Caribe e Israel, comuníquese
con el distribuidor autorizado más cercano.
Si el distribuidor autorizado no puede
ayudarlo, comuníquese con:
FORD MOTOR COMPANY
FORD EXPORT OPERATIONS & GLOBAL
INITIATIVES
1555 Fairlane Drive
Fairlane Business Park #3
Allen Park, Michigan 48101
EE.UU.
Teléfono: (313) 594-4857
Para clientes en Guam, la Comunidad de
las Islas Marianas del Norte (CNMI),
Samoa Americana y las Islas Vírgenes de
Estados Unidos, llame a nuestro número
de larga distancia sin costo: (800)
841-FORD (3673).
FAX: (313) 390-0804
Correo: expcac@ford.com
Si su vehículo debe recibir servicio mientras
usted está viajando o viviendo en Puerto
Rico, comuníquese con el distribuidor
autorizado más cercano. Si el distribuidor
autorizado no puede ayudarlo,
comuníquese con:
Ford International Business Development
Inc.
Customer Relationship Center
P.O. Box 11957
Caparra Heights Station
San Juan, Puerto Rico 00922-1957
Teléfono: (800) 841-FORD (3673)
FAX: (313) 390-0804
Correo electrónico: prcac@ford.com
www.ford.com.pr
Si su vehículo debe recibir servicio mientras
usted está viajando o viviendo en Oriente
Medio, comuníquese con el distribuidor
autorizado más cercano. Si el distribuidor
autorizado no puede ayudarlo,
comuníquese con:
Ford Middle East
Customer Relationship Center
P.O. Box 21470
Dubai, Emiratos Árabes Unidos
Teléfono: +971 4 3326084
Larga distancia sin costo para Reino de
Arabia Saudita: 800 8971409
Número de teléfono local para Kuwait:
24810575
FAX: +971 4 3327299
Correo electrónico: menacac@ford.com
www.me.ford.com
Si compra su vehículo en Norteamérica y
luego se muda a cualquiera de las
ubicaciones mencionadas anteriormente,
registre el número de identificación del
vehículo (VIN) y su nueva dirección con
Ford Motor Company Export Operations
& Global Growth Initiatives en un correo
electrónico a expcac@ford.com..
Si se encuentra en otro país, comuníquese
con el distribuidor autorizado más cercano.
Si los empleados del distribuidor
autorizado no pueden ayudarlo, ellos
pueden llevarlo a la oficina afiliada de Ford
más cercana.
Los clientes en los EE.UU. pueden
llamar al 1-800-392-3673.
224
Asistencia al cliente

CÓMO ORDENAR OTRO
MANUAL DEL PROPIETARIO
Para solicitar las publicaciones de esta
carpeta, contacte a Helm, Incorporated
en:
HELM, INCORPORATED
47911 Halyard Drive
Plymouth, Michigan 48170
Atención: Servicio al cliente
O bien, para solicitar un catálogo de
publicaciones gratuito, llame sin costo al
1-800-782-4356
Lunes a viernes de 8:00 a.m. a 6:00 p.m.
Hora del este (EST)
También puede contactar a Helm,
Incorporated a través de su sitio Web:
www.helminc.com
(Los elementos de este catálogo se
pueden adquirir con tarjeta de crédito,
cheque o giro postal.)
Cómo obtener un manual del
propietario en francés
Puede obtener el Manual del propietario
en francés con su distribuidor autorizado
o ponerse en contacto con Helm,
Incorporated usando la información de
contacto mencionada anteriormente en
esta sección.
DENUNCIA DE DEFECTOS DE
SEGURIDAD (ÚNICAMENTE EN
EE. UU.)
E142557
Si usted considera que su vehículo tiene
un desperfecto que podría causar un
choque, o podría producir lesiones o la
muerte, debería informar inmediatamente
a la Administración nacional de seguridad
de tránsito en carreteras (NHTSA) además
de notificar a Ford Motor Company.
Si la NHTSA recibe quejas similares, puede
abrir una investigación y si encuentra que
existe un defecto de seguridad en un grupo
de vehículos, puede solicitar una campaña
de devolución y reparación. Sin embargo,
la Administración nacional de seguridad
de tránsito en carreteras no se puede
involucrar en problemas individuales entre
usted, su distribuidor o Ford Motor
Company.
Para comunicarse con la Administración
nacional de seguridad de tránsito en
carreteras, puede llamar sin cargo a la línea
directa de seguridad de vehículos al
1-888-327-4236 (TTY: 1-800-424-9153);
visitar la página de Internet
http://www.safercar.gov; o bien escribir a:
Administrador
1200 New Jersey Avenue, Southeast
Washington, D.C. 20590
También puede obtener más información
acerca de la seguridad del vehículo
motorizado en la página de Internet
http://www.safercar.gov.
DENUNCIA DE DEFECTOS DE
SEGURIDAD (ÚNICAMENTE EN
CANADÁ)
Si piensa que su vehículo presenta un
defecto que podría causar un accidente o
provocar lesiones o incluso la muerte, debe
informarlo de inmediato a Transport
Canada al número de larga distancia sin
costo: 1–800–2333–0510 o en línea en:
https://wwwapps.tc.gc.ca/Saf-Sec-Sur/ 7/PCDB-BDPP/Index.aspx.
225
Asistencia al cliente

CAMBIO DE FUSIBLES
Fusible(s)
E142430
Si los componentes eléctricos del vehículo
no funcionan, es posible que se haya
fundido un fusible. Los fusibles fundidos
se reconocen por tener un alambre roto en
su interior. Revise los fusibles
correspondientes antes de reemplazar
algún componente eléctrico.
Nota: Siempre reemplace un fusible por
otro que tenga el amperaje especificado. El
uso de un fusible con un amperaje mayor
puede causar graves daños al cableado y
podría provocar un incendio.
Amperaje y color de los fusibles estándar
Color
Cartucho con
eslabón
fusible
Maxifusibles
de cartucho
MaxifusiblesFusibles
estándar
MinifusiblesAmperaje del
fusible
---GrisGris2A
---VioletaVioleta3A
---RosaRosa4A
---CanelaCanela5A
---CaféCafé7,5A
---RojoRojo10A
---AzulAzul15A
AzulAzulAmarilloAmarilloAmarillo20A
NaturalNatural-NaturalNatural25A
RosaRosaVerdeVerdeVerde30A
VerdeVerdeNaranja--40A
RojoRojoRojo--50A
AmarilloAmarilloAzul--60A
Café-Canela--70A
NegroNegroNatural--80A
226
Fusibles

TABLA DE ESPECIFICACIONES
DE FUSIBLES
Caja de prefusibles
Su vehículo tiene instalada una caja de
prefusibles ubicada en el compartimiento
del motor forjado al borne positivo de
batería. Esta caja contiene varios fusibles
de alta potencia. Si se requiere el
reemplazado de estos fusibles de alta
potencia, consulte a su distribuidor
autorizado.
Caja de distribución eléctrica
AVISOS
Siempre desconecte la batería del
vehículo antes de trabajar con
fusibles de alta potencia.
AVISOS
Para reducir el riesgo de una
descarga eléctrica, siempre vuelva a
colocar la cubierta en la caja de
distribución de la corriente antes de
conectar nuevamente la batería del
vehículo o de rellenar los depósitos de
líquidos.
La caja de distribución eléctrica se ubica
en el compartimiento del motor. Contiene
fusibles de alta potencia que protegen a
los sistemas eléctricos centrales del
vehículo contra sobrecargas.
Si la batería se ha desconectado y vuelto
a conectar, se debe reiniciar algunas
funciones. Ver Cambio de la batería del
vehículo (página 249).
E129925
Levante la palanca de liberación en la
parte posterior de la tapa para retirarla.
Los fusibles de alta potencia están
codificados de la siguiente manera:
227
Fusibles

Componentes protegidosAmperaje de los fusi-
bles
Número de fusible/
relevador
Sin uso-F1
Sin uso-F2
Sin uso-F3
Sin uso-F4
Sin uso-F5
Sin uso-F6
Sistema de frenos antibloqueo / bomba
de programa de estabilidad electrónica
40A**F7
Válvula de programa de estabilidad elec-
trónica
30A**F8
Sin uso-F9
Motor del soplador del calefactor40A**F10
Sin uso-F11
Fusible del relevador del módulo de control
del tren motriz
30A**F12
Relevador del motor arranque30A**F13
Ventana eléctrica trasera (sin unidad de
control de la puerta)
25A**F14
Encendedor/Tomacorriente delantero20A**F15
Ventana eléctrica delantera (sin unidad de
control de la puerta)
25A**F16
Tomacorriente trasero20A**F17
Tomacorriente central20A**F18
Sistema de frenos antibloqueo / alimenta-
ción 15 de programa de estabilidad electró-
nica
5A*F19
Claxon15A*F20
Interruptor de la luz de freno5A*F21
228
Fusibles

Componentes protegidosAmperaje de los fusi-
bles
Número de fusible/
relevador
Sistema de monitoreo de la batería del
vehículo
15A*F22
Bobinas del relevador5A*F23
Módulo de interruptor de luz5A*F24
Espejo eléctrico exterior (sin unidad de
control de la puerta)
10A*F25
Mantenimiento de energía5A*F26
Embrague del A/A15A*F27
Alimentación del vehículo - inyector de
combustible
10A*F28
Desempañador de la ventana trasera25A*F29
Sin uso-F30
Ventilador de enfriamiento de aceite de la
unidad de transferencia de potencia
(especificación de Medio Oriente)
5A*F31
Alimentación de vehículo15A*F32
Alimentación del vehículo 210A*F33
Alimentación del vehículo 310A*F34
Alimentación del vehículo 415A*F35
Obturadores activos de la parrilla5A*F36
Sensor de clasificación del ocupante /
alimentación de indicador de desactivación
de la bolsa de aire del pasajero
10A*F37
Módulo de control de motor / Alimentación
de ignición de módulo de control de trans-
misión
5A*F38
Luces diurnas automáticas / Alimentación
de ignición de módulo de control de faro
delantero
5A*F39
Alimentación 15 de dirección electrónica
servoasistida
5A*F40
229
Fusibles

Componentes protegidosAmperaje de los fusi-
bles
Número de fusible/
relevador
Alimentación 15 de módulo de control de
la carrocería
20A*F41
Limpiador trasero15A*F42
Alimentación de módulo de control de los
faros delanteros
15A*F43
Luces diurnas automáticas de niebla
delanteras
15A*F44
Sin uso-F45
Módulos de motor del limpiador inteligente50A**F46
Sin uso-F47
Teclado5A*F48
Sin uso-R1
ClaxonRelevador microR2
Ventilador de enfriamiento de aceite de la
unidad de transferencia de potencia
(especificación de Medio Oriente)
-R3
Luces diurnas automáticas de niebla
delanteras
-R4
Sin uso-R5
Sin uso-R6
Sin uso-R7
Relevador de demora de accesoriosRelevador miniR8
Sin uso-R9
Relevador del motor arranqueRelevador miniR10
Embrague del A/ARelevador microR11
Ventilador de enfriamiento.Relevador de
alimentación
R12
Soplador del calefactorRelevador miniR13
Relevador de control del motorRelevador miniR14
230
Fusibles

Componentes protegidosAmperaje de los fusi-
bles
Número de fusible/
relevador
Ventana trasera calentada.Relevador de
alimentación
R15
Encendido 15Relevador de
alimentación
R16
*Mini fusibles **Fusibles de cartucho
Tablero de fusibles del
compartimiento de pasajeros
El tablero de fusibles se encuentra en el
lado derecho, debajo de la guantera.
231
Fusibles

E129926
Los fusibles están codificados de la
siguiente manera:
232
Fusibles

Componentes protegidosAmperaje de los fusi-
bles
Número de fusible/
relevador
Alimentación de la bomba de combustible,
medidor de masa de aire
20A56
Sin uso-57
Sin uso-58
Transceptor del sistema pasivo antirrobo5A59
Luz interior, Paquete de interruptores de la
puerta del conductor, Iluminación de la
guantera, Banco de interruptores de la
consola de toldo
10A60
Encendedor, Tomacorriente20A61
Módulo sensor de lluvia, espejo de
atenuación automática
5A62
Sin uso-63
Sin uso-64
Apertura de la puerta levadiza10A65
Alimentación de desbloqueo de puerta del
conductor, seguro doble
20A66
SYNC®, pantalla multifunción, módulo del
sistema de posicionamiento global
7,5A67
Sin uso-68
Cluster5A69
Alimentación central de bloqueo y
desbloqueo de seguros
20A70
Unidad de control de la calefacción (A/A
manual), Doble control electrónico auto-
mático de temperatura
10A71
Módulo del volante de dirección7,5A72
Enlace de comunicaciones del conector5A73
SUministro de faro de luces altas15A74
Alimentación de los faros de niebla15A75
233
Fusibles

Componentes protegidosAmperaje de los fusi-
bles
Número de fusible/
relevador
Alimentación de la luz de reversa10A76
Alimentación del lavaparabrisas20A77
Interruptor de encendido, Botón de
arranque
5A78
Radio, Sistema de navegación, Repro-
ductor de DVD, Pantalla táctil, Interruptor
de luces de emergencia, Interruptores de
seguros de las puertas
15A79
Alimentación del toldo corredizo20A80
Receptor de frecuencia de radio5A81
Relevador del lavaparabrisas20A82
Bloqueo central20A83
Alimentación de desbloqueo de puerta del
conductor, seguro doble
20A84
Alimentación 15 electrónica7,5A85
Módulo de la bolsa de aire, sistema de
clasificación del pasajero, indicador de
desactivación de bolsa de aire del pasajero
10A86
Sin uso-87
Sin uso-88
Sin uso-89
Tablero de fusibles del
compartimiento de equipaje
El tablero de fusibles se encuentra en el
compartimiento de equipaje, detrás del
alojamiento de la rueda del lado del
pasajero. Desmonte la cubierta del tablero
de fusibles para acceder a los fusibles.
234
Fusibles

E129927
Los fusibles están codificados de la
siguiente manera:
Componentes protegidosAmperaje de los fusi-
bles
Número de fusible/
relevador
Módulo de entrada de compuerta levadiza
manos libre
5AF1
Módulo del sistema de apertura y arranque
sin llave
10AF2
Manijas de las puertas de un vehículo sin
llaves
5AF3
Unidad de control de la puerta delantera
izquierda
25AF4
Unidad de control de la puerta delantera
derecha
25AF5
Unidad de control de la puerta trasera
izquierda
25AF6
Unidad de control de la puerta trasera
derecha
25AF7
Sin uso-F8
Motor del asiento del conductor25AF9
Alimentación lógica de módulo de
memoria del asiento del conductor
5AF10
Alimentación de la bobina de encendido
trasera
5AF11
235
Fusibles

Componentes protegidosAmperaje de los fusi-
bles
Número de fusible/
relevador
Sin uso-F12
Sin uso-F13
Sin uso-F14
Sin uso-F15
Sin uso-F16
Sin uso-F17
Sin uso-F18
Sin uso-F19
Sin uso-F20
Sin uso-F21
Sin uso-F22
Amplificador de audio25AF23
Convertidor de alimentación CC/CA30AF24
Compuerta levadiza eléctrica25AF25
Accesorios / Alimentación 1 módulo 30 de
arrastre de remolque
40AF26
Sin uso-F27
Sin uso-F28
Sistema de detección puntos ciegos,
cámara retrovisora con asistencia de
estacionamiento
5AF29
Módulo de ayuda de estacionamiento5AF30
Sin uso-F31
Convertidor de alimentación CC/CA5AF32
Sin uso-F33
Calefactor del asiento del conductor20AF34
Calefactor del asiento del pasajero20AF35
236
Fusibles

Componentes protegidosAmperaje de los fusi-
bles
Número de fusible/
relevador
Sin uso-F36
Toldo corredizo5AF37
Sin uso-F38
Sin uso-F39
Sin uso-F40
Sin uso-F41
Sin uso-F42
Sin uso-F43
Sin uso-F44
Sin uso-F45
Sin uso-F46
Relevador trasero 15Relevador de
alimentación
R1
Sin uso-R2
Sin uso-R3
Sin uso-R4
Sin uso-R5
Sin uso-R6
237
Fusibles

INFORMACIÓN GENERAL
Lleve su vehículo a servicio en forma
regular para ayudar a mantener su valía
de carretera y su valor de reventa. Existe
una gran red de distribuidores Ford
autorizados disponibles para ayudarle con
su experiencia en servicios profesionales.
Creemos que sus técnicos capacitados
especialmente son los mejores calificados
para dar servicio a su vehículo en forma
adecuada y experta. Ellos cuentan con el
respaldo de un amplio rango de
herramientas altamente especializadas,
desarrolladas específicamente para dar
servicio a su vehículo.
Para ayudarlo con el mantenimiento de su
vehículo, le entregamos la información de
mantenimiento programado, la cual
facilita el seguimiento del servicio de
rutina. Ver Reparación del vehículo
(página 437).
Si su vehículo requiere servicio profesional,
un distribuidor autorizado puede
proporcionar las refacciones y el servicio
necesarios. Consulte el Manual de
garantías para saber qué refacciones y
servicios se cubren.
Use solo los combustibles, lubricantes,
líquidos y refacciones recomendados que
cumplan con las especificaciones. Las
refacciones Motorcraft® están diseñadas
y fabricadas para proporcionar el mejor
rendimiento en su vehículo.
Precauciones
• No trabaje con el motor caliente.
• Asegúrese que no quede nada
atrapado en las partes en movimiento.
• No trabaje en un vehículo con el motor
en funcionamiento dentro de un
espacio cerrado, a menos que esté
seguro que tiene suficiente ventilación.
• Mantenga todas las llamas al
descubierto y cualquier otro material
incandescente (por ejemplo,
cigarrillos) lejos de la batería del
vehículo y de todas las piezas
relacionadas con el sistema de
combustible.
Trabajo con el motor apagado
1. Coloque el freno de estacionamiento
y cambie a P (Estacionamiento).
2. Apague el motor y quite la llave (si está
equipada).
3. Bloquee las ruedas.
Trabajo con el motor encendido
ALERTA
Para reducir el riesgo de daño al
vehículo y/o quemaduras
personales, no arranque el motor con
el filtro de aire extraído y no lo saque
mientras el motor está funcionando.
1. Coloque el freno de estacionamiento
y cambie a P (Estacionamiento).
2. Bloquee las ruedas.
238
Mantenimiento

APERTURA Y CIERRE DEL
COFRE
E142457
1. Desde el interior del vehículo, jale la
manija de apertura del cofre que se
encuentra debajo del tablero de
instrumentos.
E142458
2. Vaya a la parte delantera del vehículo
y localice el pestillo auxiliar, situado
debajo del frente de la tapa del cofre
(a la izquierda del centro), y libérelo
empujándolo hacia la derecha.
3. Abra el cofre y asegure la tapa con la
varilla de soporte.
Para cerrar el cofre, baje el cofre y déjelo
caer sobre su propio peso de una altura de
al menos 20-30 cm (8-11 pulg).
Nota: Asegúrese de que la tapa del cofre
esté perfectamente cerrada.
239
Mantenimiento

REVISIÓN EL COMPARTIMIENTO DEL MOTOR - 1.6L ECOBOOST®
A B C D E
FGH
E142459
Depósito de líquido refrigerante del motorA
Tapón de llenado del aceite del motorB
Depósito de fluido de frenosC
BateríaD
Caja de distribución eléctricaE
Conjunto del filtro de aireF
Varilla indicadora de aceite del motorG
Depósito del líquido lavaparabrisasH
240
Mantenimiento

REVISIÓN EL COMPARTIMIENTO DEL MOTOR - 2.0L ECOBOOST®
A
B
C D E
FGH
E146022
Depósito de líquido refrigerante del motorA
Varilla indicadora de aceite del motorB
Depósito de fluido de frenosC
BateríaD
Caja de distribución eléctricaE
Conjunto del filtro de aireF
Tapón de llenado del aceite del motorG
Depósito del líquido lavaparabrisasH
241
Mantenimiento

REVISIÓN EL COMPARTIMIENTO DEL MOTOR - 2.5L
A CB D E GF
H
E146023
Depósito del líquido lavaparabrisasA
Depósito de líquido refrigerante del motorB
Tapón de llenado del aceite del motorC
Varilla indicadora de aceite del motorD
Depósito de fluido de frenosE
BateríaF
Caja de distribución eléctricaG
Conjunto del filtro de aireH
242
Mantenimiento

VARILLA INDICADORA DE
NIVEL DE ACEITE DEL MOTOR
- 1.6L ECOBOOST®
E146020
MÍNA
MÁXB
VARILLA INDICADORA DE
NIVEL DE ACEITE DEL MOTOR
- 2.5L/2.0L ECOBOOST®
E142462
MÍNA
MÁXB
COMPROBACIÓN DEL ACEITE
DE MOTOR
Nota: Compruebe el nivel antes de arrancar
el motor.
Nota: Asegúrese de que el nivel está entre
las marcas de MIN y MAX.
1. Asegúrese de que el vehículo esté en
una superficie nivelada.
2. Apague el motor y espere unos 10
minutos a que el aceite se drene hacia
el colector de aceite.
3. Quite la varilla indicadora de nivel y
límpiela con un trapo limpio que no
deje pelusas. Vuelva a colocar la varilla
indicadora de nivel y quítela
nuevamente para comprobar el nivel
del aceite.
Si el nivel está en la marca MIN, agregue
aceite inmediatamente.
Cómo agregar aceite de motor
Nota: No quite el tapón de llenado cuando
el motor esté funcionando.
Nota: No agregue aceite sobre la marca
MAX. Los niveles de aceite por encima de
la marca MAX pueden causar daños en el
motor.
E142732
243
Mantenimiento

Utilice exclusivamente aceites para
motores de gasolina certificados por
American Petroleum Institute (API). Un
aceite con este símbolo de marca
registrada cumple con las normas actuales
de protección del sistema de emisión de
gases y motor y los requerimientos de
ahorro de combustible del International
Lubricants Specification Advisory Council
(ILSAC), integrado por fabricantes de
automóviles de los Estados Unidos y
Japón.
1. Quite el tapón de llenado.
2. Agregue aceite de motor que cumpla
con las especificaciones de Ford. Ver
Capacidades y Especificaciones
(página 296).
3. Vuelva a colocar el tapón de llenado.
Gírelo hasta que sienta una fuerte
resistencia.
Restablecimiento del sistema de
monitoreo de la vida útil del aceite
Nota: Restablezca el monitoreo de la vida
útil del aceites solo luego de un cambio de
aceite.
1. Gire la llave de encendido a la posición
de encendido. No arranque el motor.
En vehículos con botón de arranque de
presión, mantenga presionado el botón
de arranque por 2 segundos sin oprimir
el pedal de freno. No intente arrancar
el motor.
2. Presione al mismo tiempo el
acelerador y el pedal del freno.
3. Mantenga ambos pedales presionados
a fondo.
4. Después de tres segundos, aparecerá
el mensaje Service: Oil reset in prog.
5. Después de 25 segundos, aparecerá el
mensaje Service: Oil reset complete.
6. Libere el acelerador y el pedal del
freno.
7. El mensaje Service: Oil reset complete
desaparecerá.
8. Gire la llave a la posición OFF
(Apagado). En vehículos con botón de
arranque de presión, oprima el botón
de arranque para apagar el vehículo
por completo.
COMPROBACIÓN DEL
REFRIGERANTE DE MOTOR
Revisión del líquido refrigerante
del motor
Cuando el motor esté frío, revise la
concentración y nivel del líquido
refrigerante del motor en los intervalos
indicados en el registro de mantenimiento
programado. Ver Reparación del
vehículo (página 437).
Nota: Asegúrese de que el nivel está entre
las marcas de MIN y MAX en el depósito del
líquido refrigerante.
Nota: El líquido refrigerante se expande
cuando está caliente. Es posible que el nivel
sobrepasa la marca MAX.
Nota: Si el nivel está en la marca MIN, por
debajo del la marca MIN o vacío, agregue
líquido refrigerante inmediatamente.
Consulte Llenado de líquido refrigerante
del motor en este capítulo.
La concentración de refrigerante se debe
mantener en 50%.
Nota: Para mejores resultados, la
concentración del refrigerante se debe
probar con un refractómetro, como la
herramienta ROB75240 de Rotunda,
disponible con su distribuidor. Ford no
recomiende el uso de hidrómetros ni tiras
de prueba de refrigerante para medir las
concentraciones del refrigerante.
244
Mantenimiento

Nota: Los líquidos del automóvil no son
intercambiables. No utilice líquido
refrigerante del motor o anticongelante o
líquido de lavaparabrisas para una función
diferente a la especificada, ni en otra parte
del vehículo.
Llenado del líquido refrigerante del
motor
AVISOS
No agregue líquido refrigerante del
motor cuando el motor esté caliente.
Al salir, el vapor y los líquidos
hirvientes de un sistema de enfriamiento
caliente pueden producirle graves
quemaduras. También puede sufrir
quemaduras si derrama líquido refrigerante
en las piezas calientes del motor.
No ponga líquido refrigerante del
motor en el depósito del líquido
lavaparabrisas. Si se rocía en el
parabrisas, el líquido refrigerante del motor
puede dificultar la visión a través del
parabrisas.
Para disminuir el riesgo de sufrir
lesiones personales, asegúrese que
el motor esté frío antes de quitar el
tapón de descarga de presión del líquido
refrigerante. El sistema de enfriamiento
está bajo presión, por lo que pueden salir
con fuerza vapor y líquido caliente cuando
se suelta ligeramente la tapa.
No agregue líquido refrigerante por
sobre la marca MAX.
Nota: No use selladores de fugas,
selladores para sistemas de enfriamiento
ni aditivos, ya que pueden dañar los
sistemas de enfriamiento o calefacción del
motor. Este tipo de daño no está cubierto
por la garantía del vehículo.
Nota: Durante el funcionamiento normal
del vehículo, el líquido refrigerante del motor
puede cambiar de color de anaranjado a
rosado o rojo pálido. Siempre y cuando el
líquido refrigerante del motor sea claro y no
esté contaminado, este cambio de color no
indica que se haya echado a perder ni que
deba drenarse, reemplazarse ni que el
sistema deba lavarse.
• No mezcle diferentes colores o tipos
de líquido refrigerante en su vehículo.
Asegúrese de usar el líquido
refrigerante correcto. La mezcla de
líquidos refrigerantes del motor puede
dañar el sistema de enfriamiento del
motor. El uso de un líquido refrigerante
inadecuado puede dañar los
componentes del motor y del sistema
de enfriamiento e invalidar la garantía.
Use líquido refrigerante de motor
prediluido que cumpla con la
especificación de Ford. Ver
Capacidades y Especificaciones
(página 296).
• En caso de emergencia, se puede
agregar una gran cantidad de agua sin
líquido refrigerante del motor para
poder llegar a un taller de servicio para
su vehículo. En este caso, el sistema
de enfriamiento se debe drenar, limpiar
químicamente con Premium Cooling
System Flush de Motorcraft y rellenar
con líquido refrigerante de motor
prediluido tan pronto como sea
posible. Agregar solamente agua (sin
líquido refrigerante del motor) puede
provocar daños en el motor por
corrosión, sobrecalentamiento o
congelamiento.
245
Mantenimiento

• No use alcohol, metanol, agua salobre
ni ningún líquido refrigerante del motor
mezclado con anticongelante (líquido
refrigerante) que contenga alcohol o
metanol. El alcohol y otros líquidos
pueden provocar daños en el motor
por sobrecalentamiento o
congelamiento.
• No agregue inhibidores o aditivos
adicionales al líquido refrigerante.
Éstos pueden ser dañinos y pueden
comprometer la protección contra la
corrosión del líquido refrigerante del
motor.
Desatornille la tapa lentamente. Cualquier
presión escapará cuando desatornille la
tapa.
Agregue líquido refrigerante de motor
prediluido que cumpla con la
especificación de Ford. Ver Capacidades
y Especificaciones (página 296).
Cada vez que se agregue líquido
refrigerante, el nivel de éste en el depósito
del líquido refrigerante se debe revisar las
próximas veces que conduzca el vehículo.
De ser necesario, agregue suficiente líquido
refrigerante de motor prediluido para llevar
el nivel del líquido al punto apropiado.
Líquido refrigerante del motor
reciclado
Ford Motor Company no recomienda el
uso de un líquido refrigerante reciclado,
dado que aún no se encuentra disponible
un proceso de reciclaje aprobado por Ford.
Elimine siempre de manera responsable
los líquidos usados en automóviles. Siga
las normas y reglamentos de su
comunidad para reciclar y eliminar los
líquidos de automóviles.
Climas extremos
Si conduce en climas extremadamente
fríos:
• Puede ser necesario solicitar que un
distribuidor autorizado de Ford
aumente la concentración del líquido
refrigerante por encima del 50%.
• Una concentración del refrigerante de
60% proporcionará una protección
mejorada en el punto de congelación.
Las concentraciones de líquido
refrigerante del motor por encima del
60% disminuyen las características de
protección contra el
sobrecalentamiento que posee el
líquido refrigerante del motor y pueden
causar daños en el motor
Si conduce en climas extremadamente
cálidos:
• Puede ser necesario solicitar que un
distribuidor autorizado de Ford
disminuya la concentración del líquido
refrigerante a un 40%.
• Una concentración del refrigerante de
40% proporcionará una protección
mejorada contra el
sobrecalentamiento. Las
concentraciones de líquido refrigerante
del motor por debajo de 40%
disminuyen las propiedades de
protección contra
corrosión/congelamiento del líquido
refrigerante del motor y pueden causar
daños en el motor.
Los vehículos que se manejan durante
todo el año en climas que no son extremos
deben usar líquido refrigerante prediluido
para un sistema de enfriamiento óptimo y
para la protección del motor.
246
Mantenimiento

Lo que debe saber sobre el
enfriamiento de seguridad a
prueba de fallas
Si se agota el suministro de líquido
refrigerante del motor, esta función
permite manejar temporalmente el
vehículo antes que aumenten los daños
en los componentes debido al aumento
de la temperatura. El margen “seguridad
ante fallas” depende de las temperaturas
ambientales, de la carga del vehículo y del
terreno.
Cómo funciona el sistema de
enfriamiento a prueba de fallas
Si el motor comienza a sobrecalentarse,
el indicador de temperatura del líquido
refrigerante del motor llegará al área H
(Caliente) y:
Se encenderá la luz de
advertencia de temperatura del
líquido refrigerante .
Se encenderá el indicador de
servicio del motor a la brevedad
.
Si alcanza una condición de temperatura
excesiva preestablecida, el motor cambia
automáticamente al funcionamiento
alterno de cilindros. Cada cilindro
desactivado actúa como una bomba de
aire y enfría el motor.
Cuando esto sucede, el vehículo sigue
funcionando. Sin embargo:
• La potencia del motor será limitada.
• El sistema de aire acondicionado se
desactivará.
El funcionamiento continuo incrementará
la temperatura del motor y éste se
detendrá por completo, provocando un
aumento en el esfuerzo de la dirección y
del frenado.
Una vez que el motor se enfríe, podrá
volver a arrancarlo. Lleve el vehículo a un
distribuidor autorizado lo antes posible
para minimizar el daño del motor.
Cuándo se activa el modo a prueba de
fallas
AVISOS
El modo de seguridad ante fallas
sólo se debe usar en emergencias.
Haga funcionar el vehículo en modo
de seguridad ante fallas sólo el tiempo
necesario para conducir el vehículo a un
lugar seguro y buscar ayuda para
reparación inmediatamente. Cuando el
vehículo está en modo de seguridad ante
fallas, puede tener potencia limitada, no
podrá mantener el funcionamiento a alta
velocidad y podría apagarse
completamente, sin advertencia previa,
provocando pérdida de la potencia en el
motor, la asistencia de dirección hidráulica
y la asistencia de frenos de potencia, lo
que puede incrementar la posibilidad de
accidentes con heridas graves.
Nunca quite el tapón del depósito
del líquido refrigerante mientras el
motor esté caliente o en
funcionamiento.
La potencia del motor es limitada en el
modo a prueba de fallas; por lo tanto,
maneje con cuidado. El vehículo no podrá
mantener el funcionamiento en alta
velocidad y el motor funcionará en forma
irregular. Recuerde que el motor es capaz
de detenerse por completo en forma
automática para evitar daños en el motor,
por lo tanto:
1. Sálgase del camino lo antes posible y
apague el motor.
2. Haga que su vehículo sea trasladado
a un distribuidor autorizado.
3. Si esto no es posible, espere un período
corto para que el motor se enfríe.
247
Mantenimiento

4. Revise el nivel de líquido refrigerante y
llénelo si está bajo.
5. Vuelva a arrancar el motor y lleve el
vehículo a un distribuidor autorizado.
Nota: Si maneja el vehículo sin reparar el
problema del motor, las probabilidades de
daño en el motor aumentan. Lleve su
vehículo a un distribuidor autorizado lo
antes posible.
VERIFICACIÓN DEL FLUÍDO DE
LA TRANSMISIÓN
AUTOMÁTICA
Nota: El aceite de la transmisión debe ser
revisado por un distribuidor autorizado. Si
es necesario, el distribuidor autorizado debe
agregar aceite.
La transmisión automática no tiene una
varilla indicadora del nivel de aceite de la
transmisión.
Solicite a un distribuidor autorizado que
revise y cambie el aceite de la transmisión
y el filtro en el intervalo de servicio
correspondiente. Ver Reparación del
vehículo (página 437). La transmisión de
su vehículo no consume aceite. Sin
embargo, el nivel de aceite se debe revisar
si la transmisión no funciona
correctamente; es decir, si se resbala o
cambia lentamente o si observa alguna
señal de fuga de aceite.
No utilice aditivos suplementarios para
aceite de transmisión, otros tratamientos
ni agentes limpiadores. El uso de estos
materiales puede afectar el
funcionamiento de la transmisión y
provocar daños a los componentes
internos de ésta.
VERIFICACIÓN DEL FLUÍDO DE
FRENOS
Los niveles del líquido entre las líneas MIN
y MAX están dentro de los límites normales
de funcionamiento; no es necesario
agregar líquido. Si los niveles de los
líquidos están fuera de los límites normales
de funcionamiento, el rendimiento del
sistema puede verse comprometido;
busque servicio de inmediato en su
distribuidor autorizado.
COMPROBACIÓN DEL FLUIDO
DE LA DIRECCIÓN HIDRÁULICA
Su vehículo está equipado con un sistema
de dirección hidráulica eléctrica (EPS). No
existe un depósito de líquido que revisar ni
rellenar.
FILTRO DE COMBUSTIBLE
Su vehículo está equipado con un filtro de
combustible de por vida que está integrado
al tanque de combustible. No es necesario
realizar mantenimiento periódico ni
reemplazarlo.
COMPROBACIÓN DEL FLUIDO
DEL LAVADOR
ALERTA
Si hace funcionar el vehículo a
temperaturas inferiores a 5 °C
(40 °F), use líquido lavaparabrisas
con protección anticongelante. No usar
líquido lavaparabrisas con protección
anticongelante en climas fríos puede
producir una visión difusa a través del
parabrisas y aumentar el riesgo de lesiones
o de accidentes.
248
Mantenimiento

Nota: Los sistemas de lavadores delantero
y trasero se abastecen desde el mismo
depósito.
Agregue líquido en el depósito si el nivel
está bajo. Use sólo un líquido
lavaparabrisas que cumpla con las
especificaciones de Ford. Ver
Capacidades y Especificaciones (página
296).
Es probable que las normas estatales o
locales de compuestos orgánicos volátiles
restrinjan el uso de metanol, un aditivo
anticongelante común para
lavaparabrisas. Los líquidos lavaparabrisas
que contienen agentes anticongelantes
sin metanol sólo se deben usar si brindan
una protección ante clima frío sin dañar el
acabado de la pintura del vehículo, las
hojas de los limpiadores ni el sistema del
lavador.
CAMBIO DE LA BATERÍA DEL
VEHÍCULO
AVISOS
Normalmente, las baterías producen
gases explosivos los cuales pueden
producir lesiones personales. Por
esto, no permita que llamas, chispas o
sustancias encendidas se acerquen a la
batería. Al trabajar cerca de la batería,
protéjase siempre la cara y los ojos.
Suministre siempre una ventilación
adecuada.
Al levantar una batería con caja de
plástico, la presión excesiva en las
paredes del extremo puede hacer
que el ácido fluya a través de los tapones
de ventilación y provoque lesiones
personales o daños al vehículo o a la
batería. Levante la batería con un
portabaterías o con las manos apoyadas
en esquinas opuestas.
AVISOS
Mantenga las baterías fuera del
alcance de los niños. Las baterías
contienen ácido sulfúrico. Evite el
contacto con la piel, los ojos o la ropa.
Protéjase los ojos al trabajar cerca de la
batería para resguardarse contra posibles
salpicaduras de solución ácida. En caso de
que el ácido le caiga en la piel o en los ojos,
lávelos inmediatamente con agua durante
15 minutos mínimo y solicite ayuda médica
urgentemente. Lo mismo si ingiere el ácido.
Los bornes, las terminales y los
accesorios relacionados con la
batería contienen plomo y
compuestos de plomo. Lávese las manos
después de manipular.
Su vehículo tiene una batería Motorcraft
libre de mantenimiento y que
normalmente no requiere agua adicional
durante su vida útil.
Nota: Si la batería tiene una cubierta o un
protector, asegúrese que se vuelva a instalar
después de limpiar o reemplazar la batería.
Para un funcionamiento más prolongado
y sin problemas, mantenga la parte
superior de la batería limpia y seca.
Además, asegúrese que los cables de la
batería siempre estén firmemente
conectados a las terminales de ésta.
Si observa indicios de corrosión en la
batería o en las terminales, quite los cables
de las terminales y límpielos con un cepillo
de alambre. Puede neutralizar el ácido con
una solución de bicarbonato de sodio y
agua.
Se recomienda que desconecte la terminal
negativa del cable de la batería si su
intención es guardar su vehículo por un
período de tiempo prolongado.
249
Mantenimiento

Para asegurar el buen funcionamiento del
sistema de administración de la batería
(BMS), ningún dispositivo eléctrico
añadido al vehículo deberá tener su
conexión a tierra directamente al borne
negativo de la batería. La conexión directa
al borne negativo de la batería puede
causar mediciones inexactas del estado
de la batería y posibles fallas en el sistema.
Nota: Los accesorios o componentes
eléctricos o electrónicos añadidos al
vehículo por el distribuidor o el propietario
pueden afectar adversamente el
rendimiento y la durabilidad de la batería,
así como el desempeño de otros sistemas
eléctricos del vehículo.
Cuando sea necesario reemplazar la
batería, ésta deberá ser reemplazada
exclusivamente con la batería de refacción
que Ford recomiende, de modo que
coincida con los requisitos eléctricos del
vehículo.
Cuando la batería se desconecta o se
instala una nueva, la transmisión
automática debe volver a aprender su
estrategia adaptativa. Como resultado, la
transmisión puede cambiar firmemente la
primera vez que se conduzca. Esta
operación se considera normal y el
funcionamiento de la transmisión se
actualizará completamente a su
percepción de cambio óptima.
Si la batería se ha desconectado o si se ha
instalado una batería nueva, el reloj y las
estaciones de radio preestablecidas se
deben restablecer al volver a conectar la
batería.
Nota: Siempre elimine de manera
responsable las baterías de automóviles.
Respete las normas locales autorizadas
para eliminarlas. Llame a su centro de
reciclaje local autorizado para averiguar más
acerca del reciclaje de baterías de
automóviles.
COMPROBACIÓN DE LAS
HOJAS DEL LIMPIADOR
E142463
Pase la punta de los dedos sobre el borde
de la hoja para comprobar la aspereza.
Frote las hojas del limpiador con líquido
lavaparabrisas o agua aplicada con una
esponja o paño suave.
CAMBIO DE LAS HOJAS DEL
LIMPIADOR
Los brazos del limpiador se pueden mover
manualmente cuando el motor está
apagado. Esto facilita el reemplazo de las
hojas y la limpieza debajo de las hojas.
E129990
1
1
2
1. Aparte la hoja y el brazo del limpiador
del vidrio.
2. Oprima los botones de bloqueo juntos.
3. Gire y retire la hoja del limpiador.
4. Instale siguiendo el procedimiento de
desmontaje en orden inverso.
250
Mantenimiento

Nota: Asegúrese que la hoja del limpiador
se asegure en su lugar. Baje el brazo del
limpiador y la hoja de vuelta al parabrisas.
Los brazos del limpiador regresan
automáticamente a su posición normal
cuando se activa el encendido.
Para modificar las hojas traseras, haga lo
siguiente:
E130060
3
2
1. Levante el brazo del limpiador.
2. Levemente gire la hoja del limpiador
desde el brazo del limpiador.
3. Desactive la hoja del limpiador desde
el brazo del limpiador.
4. Desmonte la hoja del limpiador.
5. Instale siguiendo el procedimiento de
desmontaje en orden inverso.
Nota: Asegúrese que la hoja del limpiador
se asegure en su lugar.
Cambie las hojas de los limpiadores al
menos una vez al año para obtener un
rendimiento óptimo.
La calidad de los limpiadores puede
mejorar si se limpian las hojas de los
limpiadores y el parabrisas.
CAMBIO DEL FILTRO DE AIRE
DEL MOTOR
ALERTA
Para reducir el riesgo de daño al
vehículo y/o quemaduras
personales, no arranque el motor con
el filtro de aire extraído y no lo saque
mientras el motor está funcionando.
Al cambiar el elemento del filtro de aire,
use solo el elemento del filtro de aire
indicado. Ver Capacidades y
Especificaciones (página 296).
En los vehículos equipados con
EcoBoost®: al dar servicio al filtro de aire
es importante que ninguna materia extraña
entre al sistema de inducción de aire. El
motor y el turbocargador pueden sufrir
daños, incluso con partículas muy
pequeñas.
Cambie el elemento del filtro de aire a los
intervalos correspondientes. Ver
Reparación del vehículo (página 437).
Nota: No usar el filtro de aire correcto
puede causar daños graves al motor. La
garantía del usuario se puede anular por
cualquier daño al motor, si no usa el
elemento del filtro de aire correcto.
Motores 1.6L y 2.0L EcoBoost®
E142710
251
Mantenimiento

Motor 2.5L
E142711
1. Afloje los tornillos de la abrazadera de
la tubería de aire que la sujeta a la
bandeja del conjunto del filtro de aire.
2. Separe la tubería de aire limpia del
purificador de aire.
3. Quite el purificador de aire del vehículo.
4. Afloje los tornillos que aseguran la
cubierta del alojamiento del filtro de
aire.
5. Separe cuidadosamente las dos
mitades del alojamiento del filtro de
aire.
6. Saque el elemento del filtro de aire del
alojamiento.
7. Limpie el alojamiento y la cubierta del
filtro de aire para eliminar cualquier
suciedad o residuo y garantizar un buen
sellado.
8. Primero deslice al interior el extremo
abierto del filtro de aire, debajo de la
lengüeta. Luego, empuje el extremo
cerrado hacia el fondo de la bandeja.
El extremo cerrado debe ajustarse
dentro de la ranura de la bandeja. La
lengüeta del extremo cerrado debe
estar orientada hacia abajo y ajustarse
entre los dientes de la bandeja.
9. Vuelva a instalar la cubierta del
alojamiento del filtro de aire y apriete
los tornillos.
10. Vuelva a instalar el conjunto del
purificador de aire en el vehículo.
11. Vuelva a instalar el conjunto de la
tubería de aire limpio en el conjunto del
purificador de aire.
12. Apriete los tornillos de sujeción de la
tubería de aire.
AJUSTE DE LOS FAROS
PRINCIPALES
Ajuste de la alineación vertical
Los faros del vehículo se han alineado
correctamente en la planta de ensamblaje.
Si su vehículo ha tenido algún accidente,
un distribuidor autorizado debe revisar la
alineación de los faros.
E142592
2,4 m (8 pies)A
Altura del centro del faro al
suelo
B
7,6 m (25 pies)C
Línea horizontal de referenciaD
Vehículos con faros de halógeno
1. Estacione el vehículo directamente
frente a una pared o pantalla sobre una
superficie nivelada, a unos 7,6 metros
(25 pies) de distancia.
252
Mantenimiento

2. Mida la altura del piso al centro del faro
y ponga, a esa altura, una línea de
referencia horizontal de 2,4 m (8 pies)
de largo en la pared o la pantalla
vertical (un trozo de cinta adhesiva
sirve).
Nota: Para ver un patrón de luz más claro
para el ajuste, es posible que quiera
bloquear la luz de un faro delantero
mientras ajusta el otro.
3. Encienda la luz baja de los faros para
iluminar la pared o pantalla y abra el
cofre.
E142465
4. En la pared o pantalla observará una
zona plana de luz de alta intensidad
ubicada en la parte superior del lado
derecho del haz de luz. Si el borde
superior de la zona de luz de alta
intensidad no está en la línea de
referencia horizontal, será necesario
ajustar el faro.
E142467
5. Localice el ajustador vertical de cada
faro. Con un desarmador Phillips #2,
gire el ajustador a la derecha o a la
izquierda para dirigir el faro. El borde
horizontal de la luz más brillante debe
tocar la línea de referencia horizontal.
6. Cierre el cofre y apague las luces.
Vehículos con faros de descarga de alta
intensidad
1. Estacione el vehículo directamente
frente a una pared o pantalla sobre una
superficie nivelada, a unos 7,6 metros
(25 pies) de distancia.
2. Mida la altura del piso al centro del faro
y ponga, a esa altura, una línea de
referencia horizontal de 2,4 m (8 pies)
de largo en la pared o la pantalla
vertical (un trozo de cinta adhesiva
sirve).
Nota: Para ver un patrón de luz más claro
para el ajuste, es posible que quiera
bloquear la luz de un faro delantero
mientras ajusta el otro.
3. Encienda la luz baja de los faros para
iluminar la pared o pantalla y abra el
cofre.
E142466
4. Hay un límite muy definido (cambio de
luz a oscuridad) en la porción izquierda
del haz de luz. El borde superior de este
límite se debe posicionar 5 cm (2 pulg)
debajo de la línea horizontal de
referencia.
253
Mantenimiento

E142467
5. Localice el ajustador vertical de cada
faro. Con un desarmador Phillips #2,
gire el ajustador a la derecha o a la
izquierda para dirigir el faro.
6. Cierre el cofre y apague las luces.
Ajuste de la alineación horizontal
Este vehículo no requiere alineación
horizontal y no es ajustable.
DESMONTAJE DE FAROS
2
2
E142468
1. Asegúrese de que el control de los
faros esté en la posición OFF
(Apagado) y abra el cofre.
2. Quite los dos tornillos del conjunto del
faro.
3. Empuje cuidadosamente el conjunto
del faro hacia la parte delantera del
vehículo para desconectarlo del punto
de fijación inferior.
4. Levante cuidadosamente el lado
exterior del faro y retírelo.
5. Desconecte el conector eléctrico.
CAMBIO DE FOCOS
Condensación en los conjuntos de
luces
Las luces exteriores tienen respiraderos
para compensar los cambios normales de
la presión. La condensación puede ser
producto natural de este diseño. Cuando
penetra aire húmedo en los conjuntos de
luces a través de los respiraderos, existe
la posibilidad de que se produzca
condensación si la temperatura es fría.
Cuando hay condensación normal, se
puede formar una delgada película de
vaho en el interior de la mica. A la larga, el
vaho se despeja y sale a través de los
respiraderos durante el funcionamiento
normal. El tiempo de despeje puede tomar
unas 48 horas en condiciones de clima
seco.
Ejemplos de condensación aceptable:
• Presencia de vaho (sin rayas, marcas
de goteo o gotitas).
• El vaho cubre menos del 50% de la
mica.
Ejemplos de humedad no aceptable
(normalmente causada por una fuga de
agua de la luz):
• Acumulación de agua dentro de la luz.
• Gotas de agua grandes, marcas de
goteo o rayas presentes en el interior
de la mica.
254
Mantenimiento

Lleve el vehículo al distribuidor para que
lo reparen si existe cualquiera de las
condiciones anteriores de humedad no
aceptable.
Reemplazo de los focos de los
faros
ALERTA
Manipule los focos de halógeno con
cuidado y manténgalos fuera del
alcance de los niños. Tome el foco
únicamente de la base plástica y no toque
el cristal. El aceite de las manos puede
hacer que el foco se quiebre la próxima vez
que se usen los faros.
Nota: Si el foco se toca accidentalmente,
éste debe limpiarse con alcohol de fricción
antes de su uso.
Faro delantero:
A B C
E142469
Indicadora lateralA
Faro de luces bajasB
Faro de luces altasC
Faro de luces altas:
2 4
E142470
1. Quite los faros delanteros.
2. Desmonte la tapa de servicio.
3. Desconecte el conector eléctrico.
4. Retire el foco del conjunto del faro
girándolo hacia la izquierda y
extrayéndolo en línea recta.
Faro de luces bajas:
2 4
E142471
1. Quite los faros delanteros.
2. Desmonte la tapa de servicio.
3. Desconecte el conector eléctrico.
4. Retire el foco del conjunto del faro
girándolo hacia la izquierda y
extrayéndolo en línea recta.
Instale los nuevos focos en el orden inverso
al mencionado. Asegúrese de que la
abrazadera de resorte no se dañe ni separe
del conjunto del faro durante el
procedimiento de reemplazo.
255
Mantenimiento

Reemplazo de los focos de los
faros HID (If Equipped)
Los focos delanteros de luz baja de su
vehículo utilizan una fuente de descarga
de gran intensidad. Estas luces funcionan
a alto voltaje. Cuando el foco se quema,
es necesario que el distribuidor autorizado
reemplace el conjunto de la cápsula del
electrodo de encendido y el foco.
Reemplazo de los focos de las
luces indicadoras laterales
E142472
1. Retire el portafocos del conjunto del
faro girándolo hacia la izquierda.
2. Saque el foco jalándolo suavemente
hacia fuera del portafocos.
Instale el nuevo foco en orden inverso.
Reemplazo de focos de niebla,
estacionamiento y direccionales
A B C
E142797
Faro de nieblaA
Luz de estacionamientoB
Luz direccionalC
E142798
1. Retire los tornillos de la protección
contra salpicaduras del
compartimiento de la rueda para
acceder al conjunto de luces.
256
Mantenimiento

E142799
2. Retire el portafocos del soporte
girándolo hacia la izquierda.
3. Desconecte el conector eléctrico.
4. Retire el foco del portafocos jalándolo
en línea recta hacia afuera.
Instale los nuevos focos en el orden inverso
al mencionado.
Reemplazo de focos de las luces
traseras, de freno y direccionales
2
3
E142473
1. Asegúrese de que el control de los
faros esté en la posición OFF
(Apagado) y abra la compuerta
levadiza.
2. Quite las dos cubiertas de perno con
un destornillador de punta plana
estándar.
3. Quite los dos tornillos del conjunto de
la luz.
4. Separe cuidadosamente el conjunto
de la luz del vehículo.
E142475
5. Desconecte el conector eléctrico.
6. Desmonte el foco de la luz direccional
o el foco de la luz trasera y de freno
girando el portafocos hacia la
izquierda. Extraiga cuidadosamente el
foco del portafocos.
Instale el nuevo foco en orden inverso.
Reemplazo del conjunto de luces
traseras
Para reemplazar el foco, acuda a su
distribuidor autorizado.
257
Mantenimiento

Reemplazo del foco de la luz de
placa
3
2
1
E72789
1. Libere con cuidado la abrazadera de
muelle.
2. Retire la luz.
3. Retire el foco.
Invierta los pasos para reinstalar el foco.
Reemplazo del foco de la luz
superior de freno
El vehículo está equipado con una luz LED
de alto superior central ubicada en el
estabilizador. Está diseñada para que dure
el tiempo que dura el vehículo. Si es
necesario efectuar un reemplazo, consulte
a su distribuidor autorizado.
TABLA DE ESPECIFICACIONES
DE LOS FOCOS
Los focos de reemplazo se especifican en
la tabla que aparece a continuación. Los
focos de los faros deben tener una marca
“D.O.T.” autorizada para América del Norte
para asegurar el funcionamiento de la luz,
la luminosidad, el patrón de luz y la
visibilidad segura. Los focos correctos no
dañan el conjunto de luces ni anulan la
garantía del conjunto de luces y
proporcionan calidad en el tiempo de
consumo del foco.
Número comercialFunción
9005LLLuces altas de los faros (halógeno)
H1* Faros delanteros (HID)
H11LLLuces bajas de los faros (halógeno)
D3S* Luces bajas de los faros (HID)
168Luz de posición - delantera
WY5WLuz de estacionamiento - delantera (serie
Alta)
194Luz de estacionamiento - delantera (serie
Baja)
WY21WLuces direccionales - delantera (serie Alta)
W21WLuces direccionales - delantera (serie Baja)
H10 (9145)Luces para niebla
258
Mantenimiento

Número comercialFunción
3157KLuces traseras/freno
T20Luces direccionales - trasera
921Luz de reversa
W5WLuces de placa de circulación
LED* Luz superior de freno
LED* Luces interiores
* Para reemplazar estas luces, consulte a su distribuidor autorizado.
Para reemplazar todas las luces del tablero de instrumentos, consulte con su distribuidor
autorizado.
259
Mantenimiento

INFORMACIÓN GENERAL
Su distribuidor autorizado Ford o Lincoln
dispone de muchos productos de calidad
para limpiar su vehículo y proteger sus
acabados.
PRODUCTOS DE LIMPIEZA
Para obtener mejores resultados, use los
siguientes productos o alguno de calidad
equivalente:
Motorcraft® Bug and Tar Remover
(ZC-42)
Motorcraft® Custom Bright Metal Cleaner
(ZC-15)
Motorcraft® Detail Wash (ZC-3-A)
Motorcraft® Dusting Cloth (ZC-24)
Motorcraft® Engine Shampoo and
Degreaser (sólo en EE.UU.) (ZC-20)
Motorcraft® Engine Shampoo (sólo en
Canadá) (CXC-66-A)
Motorcraft® Multi-Purpose Cleaner (sólo
en Canadá) (CXC-101)
Motorcraft® Carlite Glass Cleaner (sólo
en Canadá) (CXC-100)
Motorcraft® Premium Quality Windshield
Washer Fluid (sólo en Canadá)
[CXC-37-(A, B, D o F)]
Motorcraft® Premium Windshield Washer
Concentrate (sólo EE.UU.) (ZC-32-A)
Motorcraft® Professional Strength Carpet
& Upholstery Cleaner (ZC-54)
Motorcraft® Spot and Stain Remover (sólo
en EE.UU.) (ZC-14)
Motorcraft® Ultra-Clear Spray Glass
Cleaner (ZC-23)
Motorcraft® Vinyl Cleaner (sólo en
Canadá) (CXC-93)
Motorcraft® Wheel and Tire Cleaner
(ZC-37-A)
LIMPIEZA DEL EXTERIOR
Lave el vehículo regularmente con agua
fría o tibia y un champú con pH neutro,
como por ejemplo Motorcraft® Detail
Wash.
• Nunca utilice detergentes o jabones
caseros fuertes, como los detergentes
líquidos para lavavajillas o para la ropa.
Estos productos pueden decolorar y
manchar las superficies pintadas.
• No lave nunca un vehículo que esté
“caliente al tacto” ni durante la
exposición a la luz solar intensa y
directa.
• Seque el vehículo con una gamuza o
con una toalla de tela suave con el fin
de eliminar las manchas de agua.
• Quite de inmediato cualquier residuo
de gasolina, combustible diesel,
excrementos de aves y de insectos, ya
que pueden dañar la pintura y el
acabado del vehículo con el tiempo.
Use Motorcraft® Bug and Tar Remover.
• Retire todos los accesorios exteriores,
como antenas, antes de ingresar a un
lavado de autos.
Nota: Los bronceadores y los repelentes
contra insectos pueden dañar cualquier
superficie pintada; por eso si estas
sustancias entran en contacto con el
vehículo, lávelas lo antes posible.
Piezas cromadas exteriores
Nota: Nunca use materiales abrasivos,
como esponjas metálicas o plásticas, ya
que éstas podrían rayar la superficie
cromada.
Nota: No use limpiador para cromo,
limpiador para metal o pulidor en las ruedas
o tapones de las ruedas
260
Cuidado del vehículo

• Lave el vehículo primero, con agua fría
o tibia y un champú con ph neutro,
como por ejemplo Motorcraft® Detail
Wash.
• Use Motorcraft® Custom Bright Metal
Cleaner. Aplique el producto tal como
lo haría con una cera para limpiar las
defensas y otras partes cromadas; deje
que el limpiador se seque durante unos
minutos, luego limpie con un paño
limpio y seco.
• No aplique producto de limpieza a
superficies calientes y no deje producto
de limpieza en superficies de cromo
durante un período que supera lo
recomendado.
• El uso de otros limpiadores no
recomendados puede derivar en daños
cosméticos graves y permanentes.
Parte inferior de la carrocería
Lave frecuentemente toda la parte inferior
del vehículo. Mantenga los orificios de
drenaje de la carrocería y de las puertas
libres de suciedad.
Limpieza de piezas exteriores de
plástico
Use sólo productos aprobados para limpiar
las piezas plásticas
• Para la limpieza de rutina, utilice
Motorcraft® Detail Wash.
• Si hay manchas de grasa o alquitrán,
use Motorcraft® Bug y Tar Remover.
REPARACIÓN DE DAÑOS
MENORES EN LA PINTURA
Su distribuidor autorizado cuenta con
pintura para retocar que coincide con el
color de su vehículo. Lleve a su distribuidor
autorizado el código de color (impreso en
la etiqueta autoadhesiva ubicada en la
puerta del conductor) para asegurarse de
obtener el color correcto.
• Elimine las partículas tales como
excrementos de pájaros, savia de árbol,
restos de insectos, manchas de
alquitrán, sal del camino y polvo
residual de las industrias antes de
reparar los descascarados de la
pintura.
• Lea siempre las instrucciones antes de
utilizar los productos.
ENCERADO
• Primero lave el vehículo.
• Utilice una cera de alta calidad sin
abrasivos.
• No permita que el sellador de pintura
entre en contacto con ningún tapizado
de color que no sea parte de la
carrocería (piezas negras opacas),
como manijas granuladas de las
puertas, parrillas portaequipajes,
defensas, molduras laterales,
alojamientos de espejos o el área del
cubretablero del parabrisas. El sellador
de pintura “pone gris” o mancha las
piezas con el tiempo.
LIMPIEZA DEL MOTOR
Los motores son más eficaces cuando
están limpios, ya que la acumulación de
grasa y suciedad mantiene el motor más
caliente de lo normal.
261
Cuidado del vehículo

Cuando lo lave:
• Tenga cuidado al usar un lavador de
alta presión para limpiar el motor. El
líquido a alta presión podría penetrar
en las piezas selladas y provocar
daños.
• No rocíe un motor caliente con agua
fría para evitar el agrietamiento del
bloque del motor o de otros
componentes del motor.
• Rocíe Motorcraft® Engine Shampoo
and Degreaser (ZC-20) en todas las
zonas que necesiten limpieza y
enjuague a presión. En Canadá use
Motorcraft® Engine Shampoo.
• Nunca lave ni enjuague el motor
mientras está funcionando, ya que se
podría dañar internamente.
• Nunca lave ni enjuague las bobinas de
encendido, los cables de las bujías ni
los pozos de las bujías, ni las áreas
alrededor de esos puntos.
• Cubra la batería, caja de distribución
de corriente y conjunto de filtro de aire
para evitar daños causados por el agua
al limpiar el motor.
LIMPIEZA DE LAS VENTANAS
Y LAS HOJAS DE LOS
LIMPIADORES
La ventana y las hojas de los limpiadores
se deben limpiar en forma regular. Si los
limpiadores no limpian adecuadamente,
las sustancias en el vidrio del vehículo o
las hojas del limpiador pueden causar
chirrido o castañeteo de las hojas, y rayas
y manchas en el parabrisas.
Para limpiar estos elementos, siga estos
consejos:
• La ventana se puede limpiar con un
limpiador no abrasivo como por
ejemplo Motorcraft® Ultra-Clear Spray
Glass Cleaner.
• Las hojas de los limpiadores pueden
limpiarse con alcohol isopropilo (de
fricción) o Motorcraft® Premium
Windshield Washer Concentrate en
EE.UU. o Premium Quality Windshield
Washer Fluid en Canadá. Asegúrese de
reemplazar las hojas del limpiador
cuando tengan un aspecto desgastado
o no funcionen correctamente.
• No utilice abrasivos, ya que pueden
causar ralladuras
• No utilice combustible, queroseno o
diluyente de pintura para limpiar
ninguna pieza.
Si no puede eliminar esas marcas después
de limpiar con el limpiavidrios o si los
limpiadores se mueven de manera
entrecortada, limpie la superficie exterior
del parabrisas y las hojas de los
limpiadores con una esponja o un paño
suave con detergente neutro o una
solución de limpieza levemente abrasiva.
Después de limpiar, enjuague el parabrisas
y las hojas de los limpiadores con agua
limpia. El parabrisas está limpio si no se
forman puntos cuando lo enjuaga con
agua.
Nota: No use objetos afilados, como una
hoja de afeitar, para limpiar el interior de la
ventana trasera o para remover
calcomanías, ya que puede dañar las líneas
térmicas de la rejilla eléctrica del
desempañador de la ventana trasera.
262
Cuidado del vehículo

LIMPIEZA DEL INTERIOR
AVISOS
No use solventes para limpieza,
blanqueadores ni tintura en los
cinturones de seguridad del vehículo,
ya que pueden aflojar el tejido del cinturón.
En vehículos equipados con bolsas
de aire instaladas en el asiento, no
use solventes químicos ni
detergentes fuertes. Dichos productos
pueden contaminar el sistema de bolsas
de aire laterales y afectar su rendimiento
en un choque.
Para telas, alfombras, asientos de tela,
cinturones de seguridad y asientos
equipados con bolsas de aire laterales.
• Quite el polvo y la suciedad suelta con
una aspiradora.
• Elimine las manchas leves y la
suciedad con Motorcraft® Professional
Strength Carpet & Upholstery Cleaner.
• Si hay grasa o alquitrán en el material,
limpie las manchas del área primero
con Motorcraft® Spot and Stain
Remover. En Canadá, use Motorcraft
Multi-Purpose Cleaner.
• Si se forma un anillo sobre la tela luego
de limpiar una mancha, limpie el área
completa de inmediato (pero sin
saturar en exceso) o el anillo se fijará.
• No use productos de limpieza caseros
ni limpiadores de vidrios, ya que
pueden decolorar y manchar la tela y
afectar la capacidad de retardo de
llama de los materiales del asiento.
LIMPIEZA DEL PANEL DE
INSTRUMENTOS Y CRISTAL
DEL TABLERO
ALERTA
No use solventes químicos ni
detergentes fuertes al limpiar el
volante de la dirección o el tablero
para evitar que se contamine el sistema
de la bolsa de aire.
Limpie el grupo de instrumentos y las
micas del grupo de instrumentos con un
paño de algodón blanco, limpio y húmedo,
y luego con un paño de algodón blanco,
limpio y seco.
• Evite el uso de limpiadores o pulidores
que aumenten el lustre de la parte
superior del tablero. El acabado mate
en esta área ayuda a proteger al
conductor de reflejos molestos del
parabrisas.
• Asegúrese de lavar o secar sus manos
si ha estado en contacto con ciertos
productos, tales como, repelente
contra insectos o loción bronceadora,
a fin de evitar posibles daños a las
superficies pintadas del interior.
• No use limpiadores caseros o
limpiavidrios, puesto que éstos podrían
dañar el acabado del tablero de
instrumentos, las vestiduras interiores
y la mica del grupo de instrumentos.
• No permita derrames de desodorantes
ambientales y desinfectantes para
manos en las superficies interiores. Si
hay un derrame, límpielo
inmediatamente. Los daños de este
tipo pueden no estar cubiertos por su
garantía.
Si se derrama un líquido que manche,
como café o jugo, en las superficies del
tablero de instrumentos o tapizado interior,
límpielo de la siguiente forma:
263
Cuidado del vehículo

1. Recoja el líquido derramado con un
paño de algodón blanco y limpio.
2. Limpie la superficie con un paño de
algodón limpio y húmedo. Para una
limpieza más profunda, utilice una
solución de jabón neutro y agua. Si no
puede limpiar el área por completo
siguiendo este método, le conviene
limpiarla con un producto de limpieza
diseñado para el interior de los
automóviles.
3. De ser necesario, aplique un poco más
de solución de agua y jabón neutro o
un producto de limpieza sobre un paño
de algodón blanco y limpio, oprima el
paño sobre el área sucia y déjelo así
por 30 minutos a temperatura
ambiente.
4. Retire el paño impregnado y, si no se
encuentra demasiado sucio, úselo para
limpiar el área con un movimiento de
fricción durante 60 segundos.
5. A continuación, seque el área con un
paño de algodón blanco y limpio.
LIMPIEZA DE ASIENTOS DE
PIEL (IF EQUIPPED)
• Quite el polvo y la suciedad suelta con
una aspiradora.
• Limpie derrames y manchas lo más
rápido posible.
• Para la limpieza rutinaria, limpie la
superficie con un paño húmedo y
suave. Para una limpieza más
profunda, limpie la superficie con una
solución de agua y jabón leve. En
Canadá, use Motorcraft® Vinyl Cleaner.
Seque el área con un paño suave.
• Si la piel no puede limpiarse por
completo con una solución de agua y
jabón neutro, podría limpiarla con un
producto de limpieza para piel
disponible comercialmente, diseñado
para interiores automotrices.
• Para verificar la compatibilidad, pruebe
primero cualquier limpiador o
quitamanchas en una parte que no sea
visible de la piel.
• No utilice productos de limpieza de uso
casero, soluciones de alcohol,
solventes ni limpiadores para hule,
vinilo y plástico, ni acondicionadores
para piel a base de aceites o petróleo.
Estos productos pueden causar
desgaste prematuro o daños a la piel.
LIMPIEZA DE LAS RUEDAS DE
ALEACIÓN (IF EQUIPPED)
Nota: No use limpiador para cromo,
limpiador para metal o pulidor en las ruedas
o tapones de las ruedas.
Las ruedas (o rines) de aluminio y los
tapones de las ruedas se revisten con un
acabado de pintura transparente. A fin de
mantener el brillo:
• Limpie semanalmente con
Motorcraft® Wheel and Tire Cleaner.
Si hay una gran acumulación de
suciedad y polvo en los frenos puede
que requiera una esponja para
removerla. Enjuague a fondo con un
chorro fuerte de agua.
• Nunca aplique ningún producto
químico de limpieza a los rines o
tapones de las ruedas cuando estén
calientes o tibios.
264
Cuidado del vehículo

• Algunos lavados automáticos de autos
pueden producir daño al acabado de
las ruedas o los tapones de las ruedas.
Los limpiadores para uso industrial
(servicio pesado) o los productos
químicos de limpieza, junto con la
agitación del cepillo para quitar el
polvo de los frenos y la suciedad, con
el tiempo pueden desgastar el
acabado de pintura transparente.
• No use limpiadores para ruedas a base
de ácido fluorhídrico ni de sustancias
cáusticas, ni tampoco fibras metálicas,
combustibles o detergentes fuertes de
uso casero.
• Para eliminar la grasa y el alquitrán,
use Motorcraft® Bug and Tar Remover.
ALMACENAMIENTO DEL
VEHÍCULO
Si planea almacenar su vehículo durante
un periodo prolongado (30 días o más),
lea las siguientes recomendaciones de
mantenimiento para garantizar que su
vehículo permanezca en buenas
condiciones de operación.
Todos los automóviles motorizados y sus
componentes fueron diseñados y
probados para un manejo confiable y
regular. El almacenamiento a largo plazo
bajo diversas condiciones podría provocar
que los componentes se degraden o fallen
a menos que se tomen en cuenta
precauciones específicas para preservar
los componentes.
Información general
• Almacene todos los vehículos en un
lugar seco y ventilado.
• Protéjalos de la luz del sol, si es posible.
• Si los vehículos se almacenan en el
exterior, se requiere mantenimiento
regular para protegerlos contra óxido
y daños.
Carrocería
• Lave el vehículo perfectamente para
eliminar suciedad, grasa, aceite,
alquitrán o lodo de las superficies
exteriores, del alojamiento de las
ruedas traseras y de la parte inferior de
las salpicaderas delanteras.
• Lave periódicamente los vehículos
almacenados en ubicaciones
expuestas.
• Retoque el metal al natural o
imprimado para prevenir el óxido
• Cubra las partes cromadas y de acero
inoxidable con una capa gruesa de cera
para automóvil para prevenir la
decoloración. Vuelva a poner cera
según sea necesario cuando lave el
vehículo.
• Lubrique las bisagras del cofre, de las
puertas y de la tapa de la cajuela, y los
pestillos con aceite de grado ligero.
• Cubra la vestidura interior para evitar
que se decolore.
• Mantenga todas las partes de hule
libres de aceite y solventes.
Motor
• El aceite del motor y el filtro se deben
cambiar antes del almacenamiento,
ya que el aceite del motor usado
contiene contaminantes que podrían
dañar el motor.
• Arranque el motor cada 15 días. Hágalo
funcionar en ralentí acelerado hasta
que alcance su temperatura normal de
funcionamiento.
• Con el pie en el pedal del freno, cambie
a todas las velocidades mientras el
motor está funcionando.
265
Cuidado del vehículo

Sistema de combustible.
• Llene el tanque de combustible con
combustible de alta calidad hasta el
primer corte automático de la boquilla
de la bomba de combustible.
Nota: Durante períodos prolongados de
almacenamiento del vehículo (30 días o
más), el combustible podría deteriorarse
debido a la oxidación. Agregue al sistema
de combustible del vehículo un buen
producto estabilizador de gasolina si los
períodos de almacenamiento reales o
esperados exceden de 30 días. Siga las
instrucciones de la etiqueta del aditivo. El
vehículo se debe operar a velocidad de
ralentí para que circule aditivo por todo el
sistema de combustible.
Sistema de refrigeración
• Proteja contra temperaturas de
congelación.
• Cuando saque el vehículo de
almacenamiento, verifique el nivel de
líquido refrigerante. Confirme que no
haya fugas en el sistema de
enfriamiento y que el líquido esté en el
nivel recomendado.
Batería
• Compruebe y recargue según sea
necesario. Mantenga limpias las
conexiones.
• Si el vehículo estuvo almacenado más
de 30 días sin recargar la batería,
podría ser conveniente desconectar los
cables de la batería para garantizar que
se mantenga la carga de la batería
para un arranque rápido.
Nota: Si se desconectan los cables de la
batería, será necesario restablecer las
funciones de la memoria.
Frenos
• Asegúrese de que los frenos y el freno
de estacionamiento estén totalmente
liberados.
Neumáticos
• Mantenga la presión de aire
recomendada.
Otros puntos misceláneos
• Asegúrese de que todos los varillajes,
cables, palancas y clavijas debajo del
vehículo están cubiertos con grasa
para prevenir el óxido.
• Mueva los vehículos al menos 8 m (25
pies) cada 15 días para lubricar las
piezas de operación y prevenir la
corrosión.
Retiro del vehículo del
almacenamiento
Si el vehículo ya no va a estar almacenado,
haga lo siguiente:
• Lave el vehículo para eliminar cualquier
suciedad o capa de grasa acumulada
en las superficies de las ventanas.
• Verifique si los limpiaparabrisas están
deteriorados.
• Verifique debajo del cofre para ver si
hay materias extrañas que pudieran
haberse acumulado durante el
almacenamiento (nidos de
ratones/ardillas).
• Verifique el escape en busca de
cualquier materia extraña que pudiera
haberse acumulado durante el
almacenamiento.
• Verifique la presión de las llantas y
ajuste de acuerdo a la Etiqueta de las
llantas.
266
Cuidado del vehículo

• Verifique el funcionamiento del pedal
del freno. Maneje el vehículo 4.5
metros (15 pies) hacia adelante y hacia
atrás para eliminar el óxido acumulado.
• Verifique los niveles de líquidos
(incluyendo el líquido refrigerante, el
aceite y la gasolina) para asegurarse
de que no haya fugas, y de que los
líquidos estén en los niveles
recomendados.
• Si se desmontó la batería, limpie los
extremos de los cables de la batería e
inspeccione.
Contacte a su distribuidor autorizado si
tiene alguna duda o problema.
267
Cuidado del vehículo

INFORMACIÓN GENERAL
Aviso a los propietarios de
vehículos utilitarios, camiones y
camionetas
AVISOS
Los vehículos utilitarios se vuelcan
con frecuencia significativamente
mayor que otros tipos de vehículos.
Para reducir el riesgo de sufrir lesiones
graves o la muerte a causa de un
volcamiento u otro tipo de choque, evite
hacer virajes cerrados y maniobras bruscas,
maneje a velocidades seguras para las
condiciones, mantenga las llantas infladas
correctamente, evite sobrecargar o cargar
incorrectamente su vehículo y asegúrese
de que cada pasajero esté usando los
cinturones de seguridad correctamente.
En un choque con volcadura, la
probabilidad de muerte es mucho
mayor para una persona que no lleva
cinturón de seguridad, que para una que
sí lo lleva. Todos los ocupantes deben usar
siempre los cinturones de seguridad y los
niños deben usar sistemas de seguridad
adecuados para minimizar el riesgo de
lesiones o expulsión.
No confíe demasiado en la
capacidad de los vehículos con
tracción en las cuatro ruedas. A
pesar de que los vehículos con tracción en
las cuatro ruedas pueden acelerar mejor
que los de tracción en dos ruedas en
situaciones que requieran baja tracción,
éstos no frenan más rápido. Siempre
maneje a una velocidad segura.
E145298
Los vehículos utilitarios, camiones y
camionetas se maniobran en forma
diferente a los vehículos de pasajeros en
las diversas condiciones de manejo que
pueden encontrarse en calles, carreteras
y a campo traviesa. Los vehículos
utilitarios, camiones y camionetas no están
diseñados para tomar curvas a velocidades
tan altas como los automóviles de
pasajeros, así como tampoco los vehículos
deportivos bajos están diseñados para
desempeñarse satisfactoriamente en
condiciones a campo traviesa.
Lea el manual del propietario y sus
suplementos para informarse
específicamente de las características de
cada equipo, así como las instrucciones
de manejo seguro y todas las precauciones
adicionales, para reducir el riesgo de sufrir
accidentes o lesiones graves.
Sistema de tracción en las cuatro
ruedas (si está equipado)
ALERTA
No confíe demasiado en la
capacidad de los vehículos con
tracción en las cuatro ruedas. A
pesar de que los vehículos con tracción en
las cuatro ruedas pueden acelerar mejor
que los de tracción en dos ruedas en
situaciones que requieran baja tracción,
éstos no frenan más rápido. Siempre
maneje a una velocidad segura.
268
Ruedas y llantas

Un vehículo equipado con tracción en las
cuatro ruedas (cuando lo seleccione), tiene
la capacidad de usar las cuatro ruedas
para obtener energía. Esto aumenta la
tracción y puede permitirle manejar con
seguridad sobre terrenos y caminos en
condiciones que los vehículos
convencionales con tracción en dos ruedas
no pueden recorrer.
Para vehículos con tracción en las cuatro
ruedas, nunca se debe usar una llanta de
refacción de tamaño distinto al de las
llantas habituales. Una llanta de refacción
de diferente tamaño (distinto al de las
llantas originales) o un tamaño diferente
de las llantas de los ejes delantero y
trasero podría hacer que el sistema de
tracción en las cuatro ruedas deje de
funcionar y por omisión quede solo con
tracción en las ruedas delanteras.
En qué se diferencia su vehículo de
los demás
Los vehículos utilitarios deportivos y los
camionetas pueden presentar algunas
diferencias perceptibles en comparación
a otros vehículos. Su vehículo puede ser:
E145299
• Más alto: para permitir una capacidad
de transporte de carga superior y para
permitir que viaje sobre terrenos
irregulares sin quedar atrapado o dañar
los componentes de la parte baja.
• Más corto: para otorgar la capacidad
de aproximarse a las pendientes y
sobrepasar la cima de una colina sin
quedar atrapado o dañar los
componentes de la parte baja. Aunque
hay igualdad en todos los demás
aspectos, una distancia entre ejes más
corta puede hacer que su vehículo
responda más rápido a la dirección que
un vehículo con una distancia entre
ejes más larga.
• Más angosto: para proporcionar mayor
maniobrabilidad en espacios estrechos,
especialmente en uso a campo
traviesa.
269
Ruedas y llantas

E145300
Como resultado de las diferencias en
dimensiones indicadas arriba, los vehículos
utilitarios deportivos y las camionetas
generalmente tienen un centro de
gravedad superior y una mayor diferencia
en el centro de gravedad entre las
condiciones con y sin carga. Estas
diferencias que hacen que su vehículo sea
tan versátil también provocan que se
maniobre en forma diferente a otros
vehículos comunes de pasajeros.
CUIDADO DE LAS LLANTAS
Información acerca del grado de
uniformidad de la calidad de las
llantas
E142542
Los grados de calidad de las llantas se
aplican a llantas neumáticas nuevas para
automóviles de pasajeros. Los grados de
calidad se pueden encontrar, donde sea
aplicable, en el costado de la llanta entre
el reborde de la banda de rodadura y el
ancho máximo de sección. Por ejemplo:
Treadwear 200, Traction AA,
Temperature A
Estos grados de calidad de las llantas se
determinan según normas que ha
establecido el Departamento de
Transportes de los Estados Unidos.
Los grados de calidad de las llantas se
aplican a llantas neumáticas nuevas para
automóviles de pasajeros. No se aplican a
llantas para nieve con rodaduras
profundas, llantas de refacción
economizadoras de espacio o para uso
provisional, llantas para camioneta o tipo
LT, llantas con diámetros de rueda (rin)
nominales de 25 a 30 cm (10 a 12 pulg) o
llantas de producción limitada según se
define en el Título 49 del Código de
normas federales, Parte 575.104 (c)(2).
270
Ruedas y llantas

Grados de calidad de llantas del
Departamento de Transportes de
Estados Unidos: EE.UU. El Departamento
de Transporte exige que Ford Motor
Company le proporcione a usted la
siguiente información acerca de los grados
de las llantas, exactamente como el
gobierno la ha redactado.
Índice de desgaste (Treadwear)
El índice de desgaste es una clasificación
comparativa basada en la tasa de
desgaste de la llanta cuando se prueba en
condiciones controladas en una pista de
prueba gubernamental específica. Por
ejemplo, una llanta de grado 150 se
desgastaría una y media (11⁄2) veces más
en la pista de prueba gubernamental que
una llanta de grado 100. El rendimiento
relativo de las llantas depende, sin
embargo, de sus condiciones reales de uso
y puede apartarse significativamente de
la norma debido a variaciones en hábitos
de conducción, prácticas de servicio y
diferencias en las características del
camino y el clima.
Tracción (Traction) AA, A, B y C
ALERTA
El grado de tracción asignado a esta
llanta se basa en pruebas de tracción
de frenado en línea recta y no incluye
características de aceleración, curveo,
hidroplaneo o tracción máxima.
Los grados de tracción de mayor a menor
son AA, A, B, y C. Los grados representan
la capacidad de la llanta para parar en
pavimento mojado, medida bajo
condiciones controladas en superficies de
asfalto y concreto de prueba especificadas
por el gobierno. Una llanta tipo C puede
tener un desempeño de tracción deficiente.
Temperatura A B C
ALERTA
El grado de temperatura para esta
llanta se establece con la llanta
debidamente inflada y no
sobrecargada. La velocidad excesiva, la
falta de aire o la carga excesiva, ya sea por
separado o en combinación, pueden
causar el calentamiento progresivo y una
posible falla de las llantas.
Las clases de temperatura son A (la más
alta), B y C, las cuales representan la
resistencia de la llanta a la generación de
calor y su capacidad de disiparlo cuando
se prueban en condiciones controladas en
una rueda de prueba de laboratorio
especificada. Una temperatura alta
prolongada puede hacer que el material
de la llanta se degrade, reduciendo su vida
útil. Una temperatura excesiva puede
provocar fallas repentinas de la llanta. La
clase C corresponde a un nivel de
rendimiento que deben cumplir todas las
llantas de vehículos de pasajeros de
acuerdo con la Norma federal de seguridad
para vehículos motorizados No. 139. Las
clases B y A representan niveles más altos
de rendimiento de la rueda en pruebas de
laboratorio que el mínimo exigido por la
ley.
271
Ruedas y llantas

Glosario de terminología sobre
llantas
• Etiqueta de llantas: una etiqueta que
muestra los tamaños de llantas del OE
(Equipamiento original), la presión de
inflado recomendada y el peso máximo
que puede transportar el vehículo.
• Número de identificación de llanta
(TIN): un número en el costado de
cada llanta que entrega información
acerca de la marca de la llanta y de la
planta del fabricante, el tamaño de la
llanta y la fecha de fabricación.
Conocido también como código DOT.
• Presión de inflado: una medida de la
cantidad de aire en la llanta.
• Carga estándar: un tipo de llantas
P-metric o Metric diseñadas para
transportar una carga máxima a 35 psi
(37 psi [2.5 bares] para llantas Metric).
Si aumenta la presión de inflado más
allá de esta medida, no aumentará la
capacidad de transporte de carga de
las llantas.
• Carga extra: un tipo de llantas
P-metric o Metric diseñadas para
transportar una carga máxima más
pesada a 41 psi (43 psi [2.9 bares] para
llantas Metric). Si aumenta la presión
de inflado más allá de esta medida, no
aumentará la capacidad de transporte
de carga de las llantas.
• kPa: kilopascales, unidad métrica de
presión de aire.
• PSI: libras por pulgada cuadrada, una
unidad estándar de presión de aire.
• Presión de inflado en frío: presión de
la llanta cuando el vehículo ha estado
quieto y no expuesto directamente al
sol durante una hora o más y antes de
que el vehículo se manejara por 1.6 km
(1 milla).
• Presión de inflado recomendado:
presión de inflado en frío que se
encuentra en la Etiqueta de
certificación del cumplimiento de las
normas de seguridad (fijada en el pilar
de bisagra de la puerta, poste de
seguro de la puerta o el borde de la
puerta junto al poste de poste de
seguro de la puerta, junto a la posición
del asiento del conductor), o en el
borde de la puerta del ’conductor.
• Pilar B: la barra estructural al costado
del vehículo detrás de la puerta
delantera
• Ceja de la llanta: área de la llanta que
hace contacto con la rueda (rin).
• Costado de la llanta: área entre la
ceja y el área de rodamiento de la
llanta.
• Área de rodamiento de la llanta:
área perimetral de la llanta que hace
contacto con el camino una vez
montada en el vehículo.
• Rueda (rin): soporte metálico de la
llanta, o de un conjunto de llanta y
cámara, sobre el cual se apoya la ceja
de la llanta.
Información contenida en el
costado de la llanta
Las normas federales de Estados Unidos
y Canadá requieren que los fabricantes de
llantas pongan información estandarizada
en un costado de las llantas. Esta
información identifica y describe las
características fundamentales de la llanta
y también proporciona un Número de
identificación de la llanta DOT de Estados
Unidos para la certificación estándar de
seguridad y en caso de un retiro.
272
Ruedas y llantas

Información en llantas tipo P
H
I
J
K
L
M
A
B
C
D
E
F
G
E142543
P215/65R15 95H es un ejemplo de un
tamaño de llanta, índice de carga y
régimen de velocidad. A continuación, se
enumeran las definiciones de estos
elementos. (Tome en cuenta que el
tamaño de llanta, índice de carga y
régimen de velocidad de su vehículo
pueden diferir de los de este ejemplo.)
A. P: indica una llanta, diseñada por la Tire
and Rim Association (T&RA), que se puede
usar para servicio en automóviles,
vehículos todo terreno, minivanes y
camionetas. Nota: si el tamaño de la llanta
no comienza con una letra, esto puede
significar que fue diseñada por la ETRTO
(European Tire and Rim Technical
Organization) o la JATMA (Japan Tire
Manufacturing Association).
B. 215: indica el ancho nominal de la llanta,
en milímetros, de borde a borde del
costado. En general, cuanto mayor es el
número, más ancha es la llanta.
C. 65: indica la proporción dimensional,
que representa la relación de altura y
ancho de la llanta.
D. R: indica una llanta tipo radial.
E. 15: Indica el diámetro de la rueda o rin
en pulgadas. Si cambia el tamaño de la
rueda, tendrá que adquirir llantas nuevas
que coincidan con el diámetro de la rueda
nueva.
F. 95: indica el índice de carga de la llanta.
Es un índice que se relaciona con el peso
que puede transportar una llanta. Puede
encontrar esta información en el Manual
del propietario. Si no es así, comuníquese
con un distribuidor local de llantas.
Nota: Es posible que no encuentre esta
información en todas las llantas ya que la
ley federal no la exige.
G. H: indica la calificación de velocidad de
la llanta. El régimen de velocidad indica la
velocidad a la que se puede someter una
llanta por períodos prolongados, bajo
condiciones estándar de carga y presión
de inflado. Es posible que las llantas de su
vehículo funcionen en condiciones
diferentes para carga y presión de inflado.
Puede que deba ajustar estos regímenes
de velocidad a la diferencia en las
condiciones. Las calificaciones van de
130 km/h (81 mph) a 299 km/h (186 mph).
Estos regímenes se enumeran en el
siguiente cuadro.
Nota: Es posible que no encuentre esta
información en todas las llantas ya que la
ley federal no la exige.
Calificación de velocidad:
km/h (mph)
Rotulación
del régimen
130 km/h (81 mph)M
140 km/h (87 mph)N
159 km/h (99 mph)Q
171 km/h (106 mph)R
180 km/h (112 mph)S
190 km/h (118 mph)T
273
Ruedas y llantas

Calificación de velocidad:
km/h (mph)
Rotulación
del régimen
200 km/h (124 mph)U
210 km/h (130 mph)H
240 km/h (149 mph)V
270 km/h (168 mph)W
299 km/h (186 mph)Y
Nota: Para las llantas con una capacidad
de velocidad máxima superior a 240 km/h
(149 mph), los fabricantes de llantas, a
veces, usan las letras ZR. Para aquellos que
tienen una capacidad de velocidad máxima
superior a 299 km/h (186 mph), los
fabricantes de llantas siempre usan las
letras ZR.
H. Número de identificación de llanta
(TIN) DOT de EE.UU. : éste comienza con
las letras DOT e indica que la llanta
cumple con todas las normas federales.
Los próximos dos números o letras son el
código de la planta donde se fabricó, los
dos siguientes son el código del tamaño
de la llanta y los últimos cuatro números
representan la semana y año en que se
fabricó la llanta. Por ejemplo, los números
317 significan la semana 31 de 1997. A partir
de 2000, los números llevan cuatro dígitos.
Por ejemplo, 2501 significa la semana 25
del 2001. Los números del medio son
códigos de identificación que se usan para
seguimiento. Esta información se usa para
contactar a los clientes si un defecto en
las llantas exige su retiro del mercado.
I. M+S o M/S: lodo y nieve, o
AT: todo terreno, o
AS: toda estación.
J. Composición de las bandas de las
llantas y material usado: indica el
número de bandas o el número de capas
de la tela revestida de hule en la banda de
rodadura y costados de las llantas. Los
fabricantes de llantas también deben
indicar los materiales de las bandas y del
costado, que incluyen acero, nylon,
poliéster y otros.
K. Carga máxima: indica la capacidad de
carga máxima, en kilogramos y libras, que
la llanta puede transportar. Consulte la
Etiqueta de certificación del cumplimiento
de las normas de seguridad (fijada en el
pilar de bisagra de la puerta, poste de
seguro de la puerta o el borde de la puerta
junto al poste de poste de seguro de la
puerta, junto a la posición del asiento del
conductor), para conocer la presión de
llantas correcta para su vehículo.
L. Grados de calidad por Índice de
desgaste, Tracción y Temperatura:
274
Ruedas y llantas

• Índice de desgaste (Treadwear) el
índice de desgaste es una clasificación
comparativa basada en la tasa de
desgaste de la llanta cuando se prueba
en condiciones controladas en una
pista de prueba gubernamental
específica. Por ejemplo, una llanta de
grado 150 se desgastaría una y media
veces más en la pista de prueba
gubernamental que una llanta de
grado 100.
• Tracción: los grados de tracción, de la
más alta a la más baja, son AA, A, B y
C. Los grados representan la capacidad
de la llanta para parar en pavimento
mojado, medida bajo condiciones
controladas en superficies de asfalto
y concreto de prueba especificadas por
el gobierno. Una llanta tipo C puede
tener un desempeño de tracción
deficiente.
• Temperatura (Temperature): las
clases de temperatura son A (la más
alta), B y C, las cuales representan la
resistencia de la llanta a la generación
de calor y su capacidad de disiparlo
cuando se prueban en condiciones
controladas en una rueda de prueba
de laboratorio especificada.
M. Presión de inflado máxima
permitida: indica la presión máxima
permitida por los fabricantes de llantas o
la presión con la cual la llanta puede
transportar la carga máxima. Esta presión
normalmente es mayor que la presión de
inflado en frío recomendada por el
fabricante, que se puede encontrar en la
Etiqueta de certificación del cumplimiento
de las normas de seguridad (fijada en el
pilar de bisagra de la puerta, poste de
seguro de la puerta o el borde de la puerta
junto al poste de poste de seguro de la
puerta, junto a la posición del asiento del
conductor), o la Etiqueta de llanta que se
ubica en el Pilar B o el borde de la puerta
del conductor.’ La presión de inflado en
frío nunca debe ser inferior a la presión
recomendada en la etiqueta del vehículo.
Los proveedores de llantas pueden aplicar
indicaciones, notas o advertencias
adicionales, tales como carga estándar,
radial sin cámara, etc.
Información adicional contenida en el
costado de la llanta para llantas tipo
LT
Nota: Los grados de calidad de las llantas
no se aplican a este tipo de llantas.
275
Ruedas y llantas

A
B
C
B
D
E142544
Las llantas tipo LT tienen información
adicional en comparación a las llantas tipo
P. Estas diferencias se describen a
continuación.
A. LT: indica una llanta, diseñada por la
Tire and Rim Association (T&RA) para
servicio en camionetas.
B. Límites de carga e inflado para carga:
indica las capacidades de transporte de
carga de las llantas y sus límites de inflado.
C. Carga máxima dual en kg (lb) a kPa
(psi) en frío: indica la capacidad de carga
máxima y la presión de las llantas cuando
la llanta se usa en pares; un par es cuando
se instalan cuatro llantas en el eje trasero
(un total de seis o más llantas en el
vehículo).
D. Carga máxima sencilla en kg (lb) a
kPa (psi) en frío: indica la capacidad de
carga máxima y la presión de las llantas
cuando la llanta se usa sola; una sola
llanta se define así cuando se ponen dos
llantas (total) en el eje trasero.
Información en llantas tipo T
T145/80D16 es un ejemplo de un tamaño
de llanta.
Nota: El tamaño de llanta provisional para
su vehículo puede ser diferente al de este
ejemplo. Los grados de calidad de las
llantas no se aplican a este tipo de llantas.
A
B
C
D
E
E142545
Las llantas tipo T tienen información
adicional en comparación a las llantas tipo
P. Estas diferencias se describen a
continuación:
A. T: indica un tipo de llanta, diseñada por
la Tire and Rim Association (T&RA), para
servicio provisional en automóviles,
vehículos todo terreno, minivanes y
camionetas.
B. 145: indica el ancho nominal de la llanta,
en milímetros, de borde a borde del
costado. En general, cuanto mayor es el
número, más ancha es la llanta.
276
Ruedas y llantas

C. 80: indica la proporción dimensional,
que representa la relación de altura y
ancho de la llanta. Números de 70 o menos
indican un costado corto.
D. D: indica una llanta de tipo diagonal.
R: indica una llanta tipo radial.
E. 16: Indica el diámetro de la rueda o rin
en pulgadas. Si cambia el tamaño de la
rueda, tendrá que adquirir llantas nuevas
que coincidan con el diámetro de la rueda
nueva.
Ubicación de la Etiqueta de llantas
Encontrará una Etiqueta de llanta que
contiene la presión de inflado de la llanta
según el tamaño de ésta y otra información
importante ubicada en el Pilar B o en la
puerta del conductor.
Inflado de llantas
Para una operación segura del vehículo,
es necesario que las llantas estén infladas
correctamente. Recuerde que una llanta
puede perder hasta la mitad de su presión
de aire sin verse desinflada.
Revise sus llantas todos los días, antes de
empezar a manejar. Si una parece estar
más baja que las otras, use un manómetro
para llantas para revisarlas y ajustarlas
según sea necesario.
Al menos una vez al mes y antes de
emprender viajes largos, inspeccione cada
llanta y revise la presión de aire con un
manómetro para llantas (incluyendo la
llanta de refacción, si está equipado). Infle
todas las llantas según la presión de
inflado recomendada por Ford Motor
Company.
Es muy importante que adquiera un
manómetro de llantas confiable, ya que
los manómetros automáticos de las
estaciones de servicio pueden ser
inexactos. Ford recomienda el uso de
manómetros de llantas digitales o
analógicos en lugar de los manómetros de
varilla.
Use la presión de inflado en frío
recomendada para conseguir un
rendimiento y desgaste óptimo de las
llantas. El inflado insuficiente o excesivo
puede causar patrones de desgaste
disparejo.
ALERTA
El inflado insuficiente es la causa
más común de fallas en las llantas
y puede tener como consecuencia
un agrietamiento severo de la llanta, la
separación de la banda de rodadura o un
"reventón", con la pérdida inesperada del
control del vehículo y un mayor riesgo de
lesiones. El inflado insuficiente aumenta
la deformación del costado y la resistencia
de rodamiento, teniendo como
consecuencia la acumulación de calor y el
daño interno a la llanta. También puede
ocasionar tensión innecesaria en la llanta,
desgaste irregular, pérdida de control del
vehículo y accidentes. ¡Una llanta puede
perder hasta la mitad de su presión de aire
sin verse desinflada!
277
Ruedas y llantas

Siempre infle sus llantas según la presión
de inflado recomendada por Ford, incluso
si ésta es menor a la información de
presión de inflado máxima que aparece en
la llanta. La presión de inflado de llantas
recomendada por Ford se encuentra en la
Etiqueta de certificación del cumplimiento
de las normas de seguridad (fijada en el
pilar de bisagra de la puerta, poste de
seguro de la puerta o el borde de la puerta
junto al poste de poste de seguro de la
puerta, junto a la posición del asiento del
conductor), o en el borde de la puerta del
conductor.’ Si no se siguen las
recomendaciones de presión de las llantas,
podría crear patrones de desgaste
disparejo y afectar la forma de manejo de
su vehículo
Máxima presión de inflado permitida
es la presión máxima permitida por los
fabricantes de la llanta y la presión con la
cual la llanta puede transportar la carga
máxima. Esta presión normalmente es
mayor que la presión de inflado en frío
recomendada por el fabricante, que se
puede encontrar en la Etiqueta de
certificación del cumplimiento de las
normas de seguridad (fijada en el pilar de
bisagra de la puerta, poste de seguro de la
puerta o el borde de la puerta junto al
poste de poste de seguro de la puerta,
junto a la posición del asiento del
conductor), o la Etiqueta de llanta que se
ubica en el Pilar B o el borde de la puerta
del conductor.’ La presión de inflado en
frío nunca debe ser más baja que la presión
recomendada en la Etiqueta de
certificación del cumplimiento de las
normas de seguridad o en la Etiqueta de
llantas.
Cuando se producen cambios de
temperatura en el ambiente, las presiones
de inflado de las llantas también cambian.
Una caída de temperatura de 6 °C (10 °F)
puede causar una disminución
correspondiente de 7 kPa (1 psi) en la
presión de inflado. Revise la presión de las
llantas con frecuencia y ajústela hasta
obtener la presión correcta, la cual se
puede encontrar en la Etiqueta de
certificación del cumplimiento de las
normas de seguridad o en la Etiqueta de
llantas.
Para revisar la presión de las llantas:
1. Asegúrese que las llantas estén frías;
es decir, que no hayan rodado ni
siquiera 1.6 km (1 milla).
Nota: Si está revisando la presión cuando
la llanta está caliente (es decir, cuando ha
conducido más de 1.6 km [1 milla]), no
reduzca la presión del aire. Las llantas están
calientes debido al uso y es normal que la
presión aumente sobre el nivel
recomendado en frío. Una llanta caliente
cuya presión de inflado sea igual o menor
que la presión recomendada en frío, puede
estar considerablemente desinflada.
Nota: Si debe conducir a cierta distancia
para conseguir aire para las llantas, verifique
y registre la presión primero y agregue la
presión de aire correcta cuando llegue a la
bomba. Es normal que las llantas se
calienten y que la presión del aire aumente
mientras conduce.
2. Retire el tapón de la válvula de una
llanta; luego oprima firmemente el
manómetro de llantas contra la válvula
para medir la presión.
3. Agregue suficiente aire hasta alcanzar
la presión de aire recomendada.
Nota: Si infla la llanta en exceso, libere aire
presionando el vástago metálico en el
centro de la válvula. Luego, vuelva a revisar
la presión con el manómetro.
4. Vuelva a colocar la tapa de la válvula.
278
Ruedas y llantas

5. Repita este procedimiento para cada
llanta, incluida la de refacción.
Nota: Algunas llantas de refacción operan
a mayor presión de inflado que las demás
llantas. En el caso de las llantas de
refacción pequeñas Tipo T (consulte la
información de la llanta y rueda de repuesto
para obtener una descripción): almacene y
mantenga a 60 psi (4.15 bares). Para las
llantas de refacción desiguales y de tamaño
completo (consulte la información de
ruedas y llantas de refacción desiguales
para obtener una descripción): almacene y
mantenga en lo más alto la presión de
inflado delantera y trasera, tal como se
muestra en la Etiqueta de la llanta.
6. Inspeccione visualmente las llantas
para asegurarse que no haya clavos u
otros objetos incrustados que pudieran
perforar la llanta y provocar una fuga
de aire.
7. Verifique los costados para asegurarse
que no tengan grietas, cortes ni
protuberancias.
Inspección de las llantas y los vástagos
de las válvulas de las ruedas
Inspeccione periódicamente si las bandas
de rodamiento de las llantas están
disparejas o excesivamente gastadas y
quite objetos como piedras, clavos o vidrio
que se puedan haber incrustado en las
ranuras de la banda de rodamiento.
Verifique si hay agujeros, grietas o cortes
en las llantas y los vástagos de las válvulas
por donde pudiera fugarse el aire, y repare
o reemplace la llanta y reemplace el
vástago de la válvula. Inspeccione el
costado de la llanta por si presenta fisuras,
cortes, magulladuras u otras señales de
daño o desgaste excesivo. Si sospecha que
hay daño interno en la llanta, desmóntela
e inspecciónela por si fuera necesario
repararla o reemplazarla. Por su seguridad,
no use llantas que estén dañadas o que
muestren signos de desgaste excesivo,
porque es más probable que estallen o
fallen.
El mantenimiento incorrecto o inadecuado
del vehículo puede provocar que las llantas
se desgasten en forma anormal.
Inspeccione frecuentemente todas las
llantas, incluida la de refacción, y
reemplácelas si encuentra una o más de
las siguientes condiciones:
Desgaste
E142546
279
Ruedas y llantas

Cuando la banda de rodamiento se
desgaste hasta que sólo queden 2 mm (un
dieciseisavo de pulg.) de espesor, se deben
reemplazar las llantas para evitar que su
vehículo derrape y se deslice sobre el agua
(hidroplaneo). Los indicadores de desgaste
o barras de desgaste incorporados, que se
ven como bandas angostas de hule suave
a lo largo de la banda de rodadura,
aparecerán en la llanta cuando la banda
de rodadura tenga 2 mm de desgaste (un
dieciseisavo de pulg.).
Cuando la banda de rodadura de la llanta
se desgasta a la misma altura que estas
barras de desgaste, la llanta está gastada
por lo que se debe reemplazar.
Daño
Inspeccione periódicamente las bandas
de rodadura y los costados de las llantas
para detectar daños (como protuberancias
en las bandas de rodadura o costados,
grietas en las ranuras de las bandas de
rodadura y separación en las bandas de
rodadura o costados). Si observa daños o
sospecha que los hay, solicite a un
profesional que inspeccione las llantas de
su vehículo. Las llantas se pueden dañar
durante el uso a campo traviesa, por eso
se recomienda la inspección posterior a
este uso.
Edad
ALERTA
Las llantas se degradan con el paso
del tiempo, dependiendo de muchos
factores, como el clima, las
condiciones de guardado y condiciones de
uso (carga, velocidad, presión de inflado,
etc.), que éstas experimentan a lo largo de
su vida útil.
En general, las llantas se deben reemplazar
cada seis años, independiente del
desgaste de la banda de rodadura. Sin
embargo, el calor presente en los climas
calurosos o las condiciones de carga
frecuente pueden acelerar el proceso de
envejecimiento y podría ser necesario
reemplazar las llantas con mayor
frecuencia.
Debe reemplazar la llanta de refacción
cuando cambie las llantas para el camino
o después de seis años debido al
envejecimiento, incluso si no se ha
utilizado.
EE.UU. Número de identificación de
llanta (TIN) DOT
Las normas federales de Estados Unidos
y Canadá requieren que los fabricantes de
llantas pongan información estandarizada
en un costado de las llantas. Esta
información identifica y describe las
características fundamentales de la llanta
y también proporciona un Número de
identificación de la llanta DOT de Estados
Unidos para la certificación estándar de
seguridad y en caso de un retiro.
280
Ruedas y llantas

Éste comienza con las letras DOT e indica
que la llanta cumple todos los estándares
federales. Los próximos dos números o
letras son el código de la planta donde se
fabricó, los dos siguientes son el código
del tamaño de la llanta y los últimos cuatro
números representan la semana y año en
que se fabricó la llanta. Por ejemplo, los
números 317 significan la semana 31 de
1997. A partir de 2000, los números llevan
cuatro dígitos. Por ejemplo, 2501 significa
la semana 25 del 2001. Los números del
medio son códigos de identificación que
se usan para seguimiento. Esta
información se usa para contactar a los
clientes si un defecto en las llantas exige
su retiro del mercado.
Requisitos para el reemplazo de llantas
Su vehículo está equipado con llantas
diseñadas para proporcionarle conducción
segura y buen control del vehículo.
AVISOS
Sólo use llantas y ruedas de
reemplazo que sean del mismo
tamaño, índice de carga, régimen de
velocidad y tipo (como P-metric en vez de
LT-metric, o toda estación [All-Season]
en vez de todo terreno [All-Terrain]) de
las proporcionadas originalmente por Ford.
El tamaño de rueda y llanta recomendado
se encuentra en la Etiqueta de certificación
del cumplimiento de las normas de
seguridad (fijada en el pilar de bisagra de
la puerta, poste de seguro de la puerta o
el borde de la puerta junto al poste de
poste de seguro de la puerta, junto a la
posición del asiento del conductor), o en
el borde de la puerta del conductor.’ Si esta
información no se encuentra en estas
etiquetas, deberá ponerse en contacto con
su distribuidor autorizado lo antes posible.
El uso de cualquier llanta o rueda no
recomendada por Ford puede afectar la
seguridad y el rendimiento de su vehículo,
lo que podría significar mayor riesgo de
pérdida de control del vehículo, volcadura,
AVISOS
lesiones e incluso la muerte. De manera
adicional, el uso de llantas y ruedas no
recomendadas podría causar que la
dirección, la suspensión, el eje, la caja de
transferencia o el tren de fuerza fallen. Si
tiene dudas acerca del reemplazo de
llantas, póngase en contacto con su
distribuidor lo antes posible.
Cuando monte la llanta en la rueda
de refacción, no supere la presión
máxima que se indica en el costado
de la llanta para asentar la ceja en la rueda
metálica sin necesidad de observar las
precauciones adicionales que se detallan
a continuación. Si la ceja no asienta a la
presión máxima indicada, lubríquela una
vez más y vuelva a intentarlo.
Al inflar la llanta para presiones de
montaje hasta 20 psi (1.38 bares)
superiores a la presión máxima en el
costado de la llanta, se deben tomar las
siguientes precauciones para proteger a la
persona que realiza la instalación:
1. Cerciórese de que la llanta y la rueda
sean del tamaño correcto.
2. Vuelva a lubricar la ceja y el área de
asentamiento de la ceja en la rueda.
3. Colóquese al menos a 3.66 m (12 pies)
de distancia del conjunto de la llanta y
rueda.
4. Utilice protección para los ojos y los
oídos.
Si desea instalar una llanta cuya presión
esté 20 psi (1.38 bares) por arriba de la
presión máxima indicada, la instalación
debe realizarla un distribuidor Ford u otro
servicio de llantas profesional.
281
Ruedas y llantas

AVISOS
Siempre infle las llantas con armazón de
acero con un inflador remoto, y la persona
que las infle debe estar al menos a 3.66 m
(12 pies) de distancia del conjunto de la
llanta y rueda.
Importante: Recuerde reemplazar los
vástagos de las válvulas de aire de las
llantas cuando reemplace las llantas del
vehículo
En general, se recomienda reemplazar por
pares las llantas delanteras o traseras.
Los sensores de presión de las llantas
montados en las ruedas (que vienen
originalmente en su vehículo) no están
diseñados para uso en ruedas de posventa.
El uso de ruedas o llantas no
recomendadas por Ford Motor Company
puede afectar el funcionamiento del
sistema de monitoreo de presión de las
llantas (TPMS).
Si el indicador de TPMS destella, el TPMS
no está funcionando correctamente. La
llanta de reemplazo puede ser
incompatible con el TPMS o alguno de los
componentes del TPMS puede estar
dañado.
Prácticas de seguridad
AVISOS
Si su vehículo está atascado en
nieve, lodo, arena, etc., no haga girar
las llantas rápidamente; esto puede
provocar la ruptura de una de ellas y
causar una explosión. Una llanta puede
explotar en apenas tres a cinco segundos.
No gire las ruedas a más de 56 km/h
(35 mph). Si lo hace, las llantas
pueden estallar y lesionar a alguien.
Los hábitos de conducción tienen mucho
que ver con el kilometraje y la seguridad
de las llantas.
• Respete los límites de velocidad de los
caminos.
• Evite hacer arranques, paradas y virajes
rápidos.
• Evite los baches y objetos en el camino.
• No pase sobre los bordes de las
banquetas ni golpee las llantas contra
éstos al estacionarse.
Riesgos en las carreteras
No importa lo cuidadoso que sea al
conducir, siempre existe la posibilidad que
se desinfle una llanta en la carretera.
Conduzca lentamente hasta el área más
segura posible, lejos del tráfico vehicular.
Esto puede dañar aun más la llanta
desinflada, pero su seguridad es lo más
importante.
Si siente una vibración o alteración
repentina de la maniobrabilidad mientras
conduce, o sospecha que una llanta o el
vehículo se han dañado, reduzca
inmediatamente la velocidad. Conduzca
con precaución hasta que pueda salirse en
forma segura del camino. Pare y revise si
hay daño en las llantas. Si una llanta está
desinflada o dañada, desínflela, desmonte
la rueda y reemplácela con la llanta y
rueda de refacción. Si no puede encontrar
una causa, haga remolcar el vehículo hasta
el taller de reparaciones o distribuidor de
llantas más cercano para que revisen el
vehículo.
282
Ruedas y llantas

Alineación de ruedas y llantas
Una mala sacudida por golpear el borde
de las banquetas o un bache, puede
provocar que la parte delantera de su
vehículo pierda la alineación o se dañen
las llantas. Si su vehículo parece tirar hacia
un lado mientras conduce, es posible que
las ruedas hayan perdido la alineación.
Haga que un distribuidor autorizado revise
periódicamente la alineación de las ruedas.
La desalineación de las ruedas delanteras
o traseras puede provocar un desgaste
disparejo y rápido de las llantas y la debe
corregir un distribuidor autorizado. Los
vehículos con tracción en las ruedas
delanteras y aquellos con suspensión
trasera independiente (si está equipado)
pueden requerir alineación de las cuatro
ruedas.
Las llantas se deben balancear
periódicamente. Un conjunto de llanta y
rueda desbalanceado puede tener como
resultado el desgaste irregular de la llanta.
Rotación de las llantas
Nota: Si las llantas muestran un desgaste
disparejo, solicite a un distribuidor
autorizado que revise y corrija la
desalineación de las ruedas, el desequilibrio
de las llantas o cualquier problema
mecánico relacionado antes de rotar las
llantas.
Nota: Es posible que su vehículo esté
equipado con un conjunto de rueda y llanta
de refacción distinto. Un conjunto de rueda
y llanta de refacción distinta se define como
un conjunto de rueda y llanta de refacción
de otra marca, tamaño o apariencia que las
llantas y ruedas normales. Si tiene un
conjunto de rueda y llanta de refacción
distinto, debe usarlo sólo temporalmente y
no incluirlo en la rotación de llantas.
Nota: Después de rotar sus ruedas, revise
y ajuste la presión de inflado según los
requisitos del vehículo.
Girar las llantas según el intervalo
recomendado (como se indica en el
capítulo de Mantenimiento programado)
permitirá que las llantas se desgasten de
forma más equilibrada, entregando un
mejor rendimiento de las llantas y una vida
útil más prolongada de estas.
Vehículos con tracción en las ruedas
delanteras (llantas delanteras en la parte
izquierda de la ilustración)
E142547
Vehículos con tracción en las cuatro
ruedas (llantas delanteras en la parte
izquierda de la ilustración)
E142548
En ocasiones, el desgaste irregular de las
llantas se puede corregir rotándolas.
283
Ruedas y llantas

USO DE CADENAS PARA
NIEVE
ALERTA
Las llantas para nieve deben ser del
mismo tamaño, índice de carga,
régimen de velocidad que aquellas
proporcionadas originalmente por Ford. El
uso de cualquier llanta o rueda no
recomendada por Ford puede afectar la
seguridad y el rendimiento de su vehículo,
lo que podría significar mayor riesgo de
pérdida de control del vehículo, volcadura,
lesiones e incluso la muerte. De manera
adicional, el uso de llantas y ruedas no
recomendadas podría causar que la
dirección, la suspensión, el eje, la caja de
transferencia o el tren de fuerza fallen.
Las llantas de su vehículo tienen bandas
de rodadura para todas las condiciones
climáticas con el fin de proporcionar
tracción con lluvia y con nieve. Sin
embargo, en algunos climas, puede ser
necesario utilizar llantas para la nieve y
cables. Si necesita usar cables, se
recomienda el uso de ruedas de acero (del
mismo tamaño y especificaciones), ya que
los cables pueden rayar las ruedas de
aluminio.
Siga estas pautas al usar llantas y
dispositivos de tracción para la nieve
• Si es posible, evite cargar el vehículo al
máximo
• Compre cadenas o cables de un
fabricante que claramente etiqueta la
carrocería según las restricciones de
dimensión.
• Use cables de 10 mm o las cadenas
SOLO en e eje delantero con
235/55R17.
• No todas las cadenas o cables para
nieve clase S cumplen estas
restricciones. Las cadenas de esta
restricción de tamaño incluirán un
dispositivo de tensionamiento.
• Las cadenas o cables para nieve se
deben montar en pares en el eje
delantero.
• No use los cadenas o cables en llantas
235/50R18 ni 235/45R19.
• Instale los cables de manera segura,
verificando que no toquen ningún
cableado, líneas de frenos o de
combustible.
• Al conducir con cables de llantas no
supere 48 km/h (30 mph) o la
velocidad máxima recomendada por
el fabricante de cadenas, lo que sea
menor.
• Maneje con precaución. Si siente que
los cables rozan o golpean contra el
vehículo, deténgase y vuelva a
apretarlos. Si esto no funciona, quite
los cables para evitar daños en el
vehículo.
• Quite los cables cuando ya no los
necesite. No los use en caminos secos.
Si tiene dudas acerca de cadenas o cables
para nieve, póngase en contacto con su
distribuidor autorizado.
284
Ruedas y llantas

SISTEMA DE MONITOREO DE
PRESIÓN DE LAS LLANTAS
ALERTA
El sistema de monitoreo de presión
de las llantas NO sustituye la revisión
manual de la presión de las llantas.
La presión de las llantas se debe revisar
periódicamente (al menos una vez al mes)
usando un manómetro de presión para
llantas, consulte Inflado de las llantas en
este capítulo. Si no se mantiene
correctamente la presión de las llantas,
puede aumentar el riesgo de una falla de
las llantas, de pérdida de control, de
volcadura del vehículo y de lesiones
personales.
Cada llanta, incluida la de
refacción (si la tiene), se debe
revisar mensualmente cuando
hace frío y debe tener la presión
de inflado recomendada por el fabricante,
la que se encuentra en la etiqueta del
vehículo o en la etiqueta de presión de
inflado de llantas. (Si su vehículo tiene
llantas de distinto tamaño al que se indica
en la etiqueta del vehículo o en la etiqueta
de presión de inflado de llantas, debe
determinar la presión de inflado de las
llantas adecuada.)
Como una función de seguridad adicional,
su vehículo cuenta con sistema de
monitoreo de presión de las llantas
(TPMS), el cual enciende un indicador de
llanta con baja presión cuando una o más
llantas están considerablemente
desinfladas. Por consiguiente, cuando el
indicador de llanta con baja presión se
enciende, debe detenerse y revisar la llanta
lo antes posible para inflarla hasta obtener
la presión correcta. Si maneja con llantas
desinfladas, hará que éstas se
sobrecalienten, lo que puede provocar una
falla de las llantas. Las llantas desinfladas
también reducen la eficiencia del
combustible y la vida de las bandas de
rodamiento de las llantas y puede afectar
la capacidad de manejo y detención del
vehículo.
Observe que el TPMS no es un sustituto
del mantenimiento de llantas adecuado,
y que es responsabilidad del conductor
mantener la presión de inflado correcta,
incluso si el inflado insuficiente no ha
alcanzado el nivel necesario para activar
el indicador de llanta con baja presión del
TPMS.
El vehículo también cuenta con un
indicador de falla del TPMS para señalar
cuando el sistema no está funcionando en
forma adecuada. El indicador de falla se
combina con el indicador de presión de
llanta baja. Cuando el sistema detecta una
falla, el indicador destella durante
aproximadamente un minuto y luego
permanece encendido en forma continua.
Esta secuencia continuará en los siguientes
arranques del vehículo, mientras exista la
falla.
285
Ruedas y llantas

Cuando el indicador de falla esté
encendido, el sistema no podrá detectar
o señalar una presión de llanta baja, como
es su objetivo. Las fallas del TPMS pueden
obedecer a diversas razones, como la
instalación de llantas o ruedas de
reemplazo o alternativas en el vehículo,
que impiden que el TPMS funcione como
corresponde. Siempre revise el indicador
de falla del TPMS después de cambiar una
o más llantas o ruedas en el vehículo, para
asegurarse de que éstas permitan el
correcto funcionamiento del TPMS.
El sistema de monitoreo de presión de las
llantas cumple con la Parte 15 del
reglamento de la Federal Communications
Commission (FCC) y con la norma
RSS-210 de Industry Canada. La operación
está sujeta a estas dos condiciones: (1)
Este dispositivo no debiera causar
interferencia dañina y (2) Este dispositivo
debe aceptar cualquier interferencia que
reciba, incluso interferencias que pudieran
causar un funcionamiento no deseado.
Cambio de llantas con un Sistema
de monitoreo de presión de las
llantas
E142549
Nota: Cada llanta para el camino incluye
un detector de presión de la llanta ubicado
en el interior de la cavidad de la llanta
conjunto de llanta. El sensor de presión está
unido al vástago de la válvula. El sensor de
presión está cubierto por la llanta por lo que
no se puede ver, a menos que quite la llanta.
Debe tener cuidado cuando cambie las
llantas para evitar dañar el sensor
Se recomienda que siempre repare sus
llantas en un distribuidor autorizado.
La presión de las llantas se debe revisar
periódicamente (al menos una vez al mes)
usando un manómetro de precisión,
consulte Inflado de las llantas en este
capítulo.
Comprensión del Sistema de
monitoreo de presión de las llantas
El sistema de monitoreo de presión de las
llantas mide la presión de las cuatro
llantas de carretera y envía las lecturas de
la presión de las llantas al vehículo. La luz
de advertencia de llanta con baja presión
se iluminará si la presión de la llanta es
significativamente baja. Una vez que se
enciende la luz, las llantas no están
suficientemente infladas y es necesario
inflarlas según la presión recomendada
por el fabricante. Incluso si la luz se
enciende y luego se apaga, sigue siendo
necesaria la revisión de la presión de las
llantas. Visite www.checkmytires.org para
obtener información adicional.
Cuando se instala la llanta de refacción
provisional
Cuando se ha reemplazado una de las
llantas de carretera por la de refacción
provisional, el sistema de monitoreo de
presión de las llantas continúa
identificando un problema, para recordarle
que la rueda y el conjunto de llanta de
carretera dañada se debe reparar y volver
a colocar en el vehículo.
286
Ruedas y llantas

Para restaurar toda la funcionalidad del
Sistema de monitoreo de presión de las
llantas, repare y vuelva a montar la rueda
y conjunto de llanta de carretera dañada
en el vehículo.
Cuando piense que el sistema no está
funcionando correctamente
La función principal del sistema de
monitoreo de presión de las llantas es
avisarle cuando éstas necesitan aire.
También podría avisarle en caso de que el
sistema ya no pudiera funcionar como se
espera. Para obtener más información
relacionada con el sistema de monitoreo
de presión de las llantas, consulte la
siguiente tabla:
287
Ruedas y llantas

Pasos a seguir por el usuarioCausa posibleLuz de advertencia
de baja presión de
las llantas
1. Asegúrese de que las llantas estén a
la presión adecuada. Consulte Inflado
de las llantas en este capítulo. 2.
Después de inflar las llantas a la presión
de inflado recomendada por el fabri-
cante que se muestra en la Etiqueta de
llantas (ubicada en el borde de la puerta
del conductor o en el pilar B), el vehículo
se debe manejar cuando menos dos
minutos a más de 32 km/h (20 mph)
para que se apague la luz.
Llantas desinfladasLuz de advertencia
encendida
Repare la rueda y conjunto de llanta para
carretera dañada y vuelva a instalarla en
el vehículo para restablecer la funciona-
lidad del sistema. Para obtener una
descripción de cómo funciona el sistema,
consulte Cuando se instala la llanta de
refacción provisional en esta sección.
Llanta de refacción en
uso
Si las llantas del vehículo están debida-
mente infladas y su refacción no está en
uso, pero la luz permanece iluminada,
visite a su distribuidor autorizado lo antes
posible.
Falla del TPMS
Repare la rueda y conjunto de llanta para
carretera dañada y vuelva a instalarla en
el vehículo para restablecer la funciona-
lidad del sistema. Para obtener una
descripción de cómo funciona el sistema,
consulte Cuando se instala la llanta de
refacción provisional en esta sección.
Llanta de refacción en
uso
Luz de advertencia
destellando
Si las llantas del vehículo están debida-
mente infladas y su refacción no está en
uso, pero la luz permanece iluminada,
visite a su distribuidor autorizado lo antes
posible.
Falla del TPMS
288
Ruedas y llantas

Al inflar las llantas
Al poner aire a las llantas (como por
ejemplo, en una estación de gasolina o en
el garaje), es posible que el sistema de
monitoreo de presión de las llantas no
responda inmediatamente.
Una vez que las llantas se inflan a la
presión recomendada, deberá manejar
aproximadamente dos minutos a más de
32 km/h (20 mph) para que la luz se
apague
Cómo la temperatura afecta la presión
de las llantas
El sistema de monitoreo de presión de las
llantas controla la presión en cada llanta
de neumático. Mientras maneja en forma
normal, la presión habitual de inflado de
una llanta para transporte de pasajeros
puede aumentar de unas 14 a 28 kPa (2 a
4 psi) desde una situación de arranque en
frío. Si el vehículo permanece estacionado
durante la noche con una temperatura
exterior considerablemente menor a la del
día, la presión de la llanta puede disminuir
unos 21 kPa (3 psi) por cada descenso de
17 °C (30 °F) en la temperatura ambiente.
Este valor de presión más bajo podría ser
detectado por el TPMS si fuera
significativamente menor que la presión
de inflado recomendada y se activaría la
advertencia de TPMS de llanta con baja
presión. Si se enciende la luz de
advertencia de baja presión de las llantas,
compruebe visualmente todas las llantas
para verificar que no estén desinfladas. (Si
una o más llantas están desinfladas,
repárelas según sea necesario.) Revise la
presión de aire de las llantas para
carretera. Si hubiera alguna llanta
desinflada, maneje con cuidado al lugar
más cercano donde pueda poner aire a las
llantas. Infle todas las llantas a la presión
recomendada.
CAMBIO DE UNA RUEDA
AVISOS
El uso de selladores de llantas puede
dañar el sistema de monitoreo de
presión de llantas, por lo que no debe
usarlos. Sin embargo, si tiene que utilizar
un sellador, el sistema de monitoreo de
presión de las llantas y el vástago de la
válvula de la rueda se deben reemplazar
en un distribuidor Ford autorizado.
Ver Sistema de monitoreo de
presión de las llantas (página 285).
para obtener información
importante. Si se daña, el sensor del
monitor de presión de las llantas no
volverá a funcionar.
Nota: El indicador del sistema de monitoreo
de presión de las llantas se encenderá
cuando la llanta de refacción esté en uso.
Para restablecer la funcionalidad completa
del sistema de monitoreo, se deben instalar
en el vehículo todas las ruedas para el
camino equipadas con sensores de
monitoreo de presión de llantas.
Si se desinfla una llanta mientras conduce,
no frene en forma brusca. Disminuya la
velocidad en forma gradual. Sujete con
firmeza el volante de la dirección y
trasládese lentamente hasta una zona
segura a un costado del camino.
Solicite al distribuidor autorizado que
revise la llanta desinflada para evitar que
se produzca daño en los sensores del
sistema de monitoreo de presión de las
llantas. Ver Sistema de monitoreo de
presión de las llantas (página 285).
Reemplace la llanta de refacción por una
llanta de carretera lo antes posible.
Durante la reparación o reemplazo de la
llanta desinflada, solicite que un
distribuidor autorizado inspeccione si el
sensor del sistema de monitoreo de
presión de las llantas presenta daños.
289
Ruedas y llantas

Información del conjunto de rueda
o llanta de refacción distinta
ALERTA
De no seguir estas instrucciones,
podrían aumentar los riesgos de
pérdida de control del vehículo,
lesiones o la muerte.
Si tiene una llanta o rueda de refacción
distinta, entonces, debe usarla sólo
temporalmente. Esto significa que si debe
usarla, tiene que reemplazarla lo antes
posible por un conjunto de rueda y llanta
de carretera que sea del mismo tamaño y
tipo que las ruedas y llantas para el camino
que suministró Ford originalmente. Si la
llanta o rueda de refacción distinta está
dañada, en lugar de repararla, debe
reemplazarla.
Un conjunto de llanta y rueda de refacción
distinto se define como un conjunto de
rueda y llanta de refacción que tiene
diferente marca, tamaño o apariencia con
respecto a las llantas y ruedas para el
camino, y pueden ser de tres tipos:
1. Mini llanta de refacción tipo T: esta
llanta de refacción comienza con la letra
T para el tamaño de llanta y puede tener
impreso "Temporary Use Only" (sólo para
uso temporal) en el costado.
2. Llanta de refacción distinta, de
tamaño normal, con etiqueta en la
rueda: esta llanta de refacción tiene una
etiqueta en la rueda que dice: “THIS AND
TIRE WHEEL FOR TEMPORARY USE
ONLY” (Este conjunto de rueda y llanta
son solo para uso temporal).
Al manejar con una de las llantas de
refacción distintas que se indican arriba,
no:
• Sobrepase 80 kilómetros por hora (50
millas por hora)
• Cargue el vehículo más allá de la
capacidad máxima indicada en la
Etiqueta de cumplimiento de las
normas de seguridad.
• Arrastre un remolque.
• Use cadenas para la nieve en el lado
del vehículo que tiene la llanta de
refacción distinta.
• Use cadenas para la nieve en el lado
del vehículo que tiene la llanta de
refacción distinta.
• Use equipos de lavado de automóviles
comerciales.
• Intente reparar la llanta de refacción
distinta.
El uso de una de las llantas de refacción
distinta que se indican arriba en cualquier
posición de la rueda puede provocar un
deterioro de lo siguiente:
• Manejo, estabilidad y rendimiento de
los frenos.
• Comodidad y ruido.
• Distancia entre el suelo y el vehículo, y
lugar de estacionamiento junto a las
banquetas.
• Capacidad de manejo en invierno.
• Capacidad de manejo en climas
húmedos.
• Capacidad de manejo de todas las
ruedas (si se aplica).
3. Llanta de refacción distinta de
tamaño completo sin etiqueta en la
rueda
Al conducir con el conjunto de rueda o
llanta de refacción distinta de tamaño
completo, no:
• Sobrepase 113 kilómetros por hora (70
millas por hora).
• Use más de un conjunto de rueda y
llanta refacción distinta a la vez.
290
Ruedas y llantas

• Use equipos de lavado de automóviles
comerciales.
• use cadenas para la nieve en el lado
del vehículo que tiene el conjunto de
rueda o llanta de refacción distinta.
El uso de un conjunto de rueda y llanta de
refacción distinta de tamaño completo
puede ocasionar un empeoramiento en:
• Manejo, estabilidad y rendimiento de
los frenos.
• Comodidad y ruido.
• Distancia entre el suelo y el vehículo, y
lugar de estacionamiento junto a las
banquetas.
• Capacidad de manejo en invierno.
• Capacidad de manejo en climas
húmedos.
• Capacidad de manejo de todas las
ruedas (si se aplica).
• ajuste de nivelación de carga (si se
aplica).
Al conducir con el conjunto de rueda y
llanta de refacción diferente de tamaño
completo, debe poner cuidado cuando:
• Arrastre de un remolque.
• maneje vehículos equipados con una
carrocería para transportar equipo
necesario para acampar.
• maneje vehículos con carga en una
parrilla para carga.
Maneje con cuidado cuando use un
conjunto de rueda y llanta de refacción
distinta de tamaño completo y busque
servicio lo antes posible.
Procedimiento de cambio de
llantas
AVISOS
Cuando alguna de las llantas
delanteras no está en el suelo, la
transmisión no evitará por sí misma
que el vehículo se mueva o se deslice del
gato, incluso si el vehículo está en posición
P.
Para impedir que el vehículo se
mueva mientras cambia una llanta,
asegúrese que esté puesto el freno
de mano, luego bloquee (en ambas
direcciones) la rueda que está
diagonalmente opuesta (otro lado y
extremo del vehículo) para poder cambiar
la llanta.
Si el vehículo se resbala del gato,
usted o alguien podría sufrir lesiones
graves.
No intente cambiar una llanta en el
costado del vehículo cercano al
tráfico en movimiento. Saque el
vehículo del camino para evitar el peligro
de ser golpeado al manejar el gato o al
cambiar la rueda.
Para reducir el riesgo de lesiones
personales, no coloque ninguna
parte de su cuerpo bajo el vehículo
mientras realiza un cambio de llanta. No
encienda el motor cuando su vehículo esté
sobre el gato. El gato sólo debe utilizarse
para cambiar llantas.
Nota: Los pasajeros no deben permanecer
en el vehículo al levantarlo con el gato.
1. Estaciónese en una superficie nivelada,
accione el freno de estacionamiento y
active las luces intermitentes de
emergencia.
2. Coloque la palanca de cambios en
posición P apague el motor.
291
Ruedas y llantas

3. Desmonte la cubierta tapizada de la
rueda.
E142550
4. Desmonte la llave de birlos de rueda y
el gato del soporte de hule espuma.
Luego, retire la correa de sujeción de
llanta desinflada de la base del gato.
E142551
5. Bloquee la rueda diagonalmente
opuesta.
6. Afloje todas las tuercas de seguridad
de la rueda girándolas media vuelta
hacia la izquierda, pero no las quite
hasta que la rueda se haya levantado
del suelo.
7. Aquí se muestran los puntos de apoyo
para el gato en el vehículo, así como
en la etiqueta de advertencia amarilla
adherida al gato. Apoye el gato en los
puntos indicados para evitar daños
al vehículo.
E142552
292
Ruedas y llantas

8. Pequeñas marcas de flecha en los
estribos muestran la ubicación de los
puntos de apoyo para el gato.
E142553
9. Quite las tuercas de seguridad con la
llave de rueda.
Nota: Si está equipado con tapones de
rueda completos con tuercas expuestas, las
tuercas de rueda se deben retirar antes de
quitar el tapón de rueda o es posible que se
dañe el tapón de rueda.
10. Reemplace la llanta desinflada con
la llanta de refacción, asegurándose
de que el vástago de la válvula quede
hacia fuera. Vuelva a instalar las
tuercas de seguridad hasta que la
rueda quede ajustada contra el cubo.
No apriete completamente las
tuercas de seguridad sino hasta
después de haber bajado la rueda.
11. Baje la rueda girando la manivela del
gato hacia la izquierda.
1
2
3
4
5
E75442
12. Quite el gato y apriete
completamente las tuercas de
seguridad en el orden que se indica.
Ver Especificaciones técnicas
(página 295).
Almacenamiento de la llanta
desinflada
1. Guarde el gato y la llave de rueda.
Asegúrese de que el gato quede
asegurado de modo que no vibre al
manejar.
2. Desbloquee las ruedas.
3. Deje la llanta desinflada en el piso en
el área de carga. Fije con la correa de
sujeción de llanta siguiendo los
siguientes pasos:
E142906
293
Ruedas y llantas

4. Ubique el punto de anclaje de carga
cerca del respaldo del asiento. Empuje
el bucle de la correa de sujeción a
través del punto de anclaje. Enrosque
el extremo sin bucle a través del bucle.
E142985
5. Pase la correa de sujeción a través de
las aberturas de la rueda.
6. Ubique el punto de anclaje de carga
delantero en la esquina opuesta del
área de carga al punto de anclaje
usado en el paso 4. Enrosque la correa
de sujeción a través del punto de
anclaje y tire firmemente.
7. Fije al amarrar un nudo de lazo de 2
mitades.
E143746
294
Ruedas y llantas

ESPECIFICACIONES TÉCNICAS
Especificaciones de apriete de las tuercas de seguridad de las ruedas
ALERTA
Cuando instale una rueda, elimine siempre la corrosión, la tierra o los materiales
extraños de las superficies de montaje de la rueda o de la superficie del cubo de la
rueda, el tambor o el disco de los frenos donde hacen contacto con la rueda.
Verifique que todos los sujetadores que fijan el rotor al cubo estén asegurados, de manera
que no interfieran con las superficies de montaje de la rueda. La instalación de las ruedas
sin el contacto metal con metal correcto en las superficies de montaje de las ruedas
puede hacer que las tuercas de las ruedas se suelten y la rueda se salga mientras el
vehículo está en movimiento, lo que haría perder el control.
Ib-ft (Nm)
*
Medida del birlo
100 (135)M12 x 1.5
*
Las especificaciones de apriete son para roscas de pernos y tuercas sin suciedad ni
óxido. Sólo utilice los sujetadores de repuesto que recomienda Ford.
Vuelva a apretar las tuercas de seguridad al par de apriete especificado a los 160 km
(100 millas) luego de cualquier problema con las ruedas (rotación de las llantas, cambio
de una llanta desinflada, extracción de la rueda, etc.).
E145950
Orificio de guía de la ruedaA
Inspeccione orificio de guía de la rueda y
la superficie de montaje antes de la
instalación. Elimine cualquier corrosión
visible o partículas sueltas.
295
Ruedas y llantas

ESPECIFICACIONES DEL MOTOR
Motor 2.5LMotor 2.0L EcoBoostMotor 1.6L EcoBoostMotor
15212298Pulgadas cúbicas
87 octanos mínimo87 octanos mínimo87 octanos mínimoCombustible
requerido
9,7:19,3:110,0:1Relación de
compresión
0,049-0,053 in.
(1,25-1,35 mm)
0,027-0,031 in.
(0,70-0,80 mm)
0,027-0,031 in. (0,70-
0,80 mm)
Separación de
bujías
Enrutado de correa (drivebelt)
Motor 1.6L
E142479
Motores 2.0L y 2.5L
A
B
E142480
La banda impulsora larga se
encuentra en el primer surco de
la polea, en la ubicación más
cercana al motor
A
La banda impulsora corta se
encuentra en el segundo surco
de la polea, en la ubicación más
lejana al motor
B
296
Capacidades y Especificaciones

REPUESTOS DE MOTORCRAFT
Motor 2.5LMotor 2.0L EcoBoost®Motor 1.6L EcoBoost®Componente
FA-1908Elemento del
filtro de aire
1
FL-910-SFiltro de
aceite
2
BXT-96R-500Batería
BXT-96R-590
AYFS-32-YR
Bujías
3
FP70Filtro de aire
de la cabina
WW-2750 (lado del conductor)Pluma del
limpiapara-
brisas
WW-2705-WA (lado del pasajero)
1
No usar el filtro de aire correcto puede causar daños graves al motor. La garantía del
usuario se puede anular por cualquier daño al motor, si no usa el elemento del filtro de
aire correcto.
2
Sólo utilice el filtro de aire de refacción especificado. La utilización de un filtro de aceite
no especificado puede dañar el motor.
3
Para reemplazar las bujías, consulte a un distribuidor autorizado. Reemplace las bujías
a intervalos adecuados. Ver Reparación del vehículo (página 437).
Nota: reemplace las bujías por otras que cumplan con los materiales y especificaciones
de diseño de Ford para su vehículo, como las refacciones Motorcraft® o equivalentes.
La garantía al usuario se puede anular por cualquier daño al motor si no se usan tales
bujías.
297
Capacidades y Especificaciones

NÚMERO DE IDENTIFICACIÓN
DEL VEHÍCULO
El número de identificación del vehículo se
ubica en el tablero de instrumentos en el
lado del conductor.
E142476
Tenga en cuenta que, en la ilustración,
XXXX representa el número de
identificación del vehículo.
El número de identificación del vehículo
contiene la siguiente información:
E142477
Código de planta de fabricaciónA
Sistema de frenos, peso bruto
vehicular máximo, dispositivos
de sujeción y sus ubicaciones
B
Modelo, línea de vehículo, serie,
tipo de carrocería
C
Tipo de motorD
Dígito de verificaciónE
Año modeloF
Planta de ensambleG
Número de secuencia de
producción
H
ETIQUETA DE CERTIFICACIÓN
DEL VEHÍCULO
E142478
Los reglamentos de la Administración
nacional de seguridad de tránsito en
carreteras (NHTSA) exigen que se adhiera
una Etiqueta de certificación del
cumplimiento de las normas de seguridad
y establecen el lugar en que esta etiqueta
debe estar ubicada. La Etiqueta de
certificación del cumplimiento de las
normas de seguridad debe estar adherida
al pilar de bisagra de la puerta, al poste de
seguro de la puerta o al borde de la puerta
junto al poste de poste de seguro de la
puerta, junto a la posición del asiento del
conductor.
298
Capacidades y Especificaciones

CÓDIGO DE LA TRANSMISIÓN
E142806
Puede encontrar el código de transmisión
en la Etiqueta de certificación del
cumplimiento de las normas de seguridad.
El siguiente cuadro le indica qué
transmisión representa cada código.
CódigoDesignación
6Transmisión automática
de seis velocidades
(6F35)
ESPECIFICACIONES TÉCNICAS
Número de refacción
Ford / Especificación
Ford
Nombre de la refac-
ción Ford o equiva-
lente
CapacidadElemento
PM-1-C / WSS-
M6C65-A2
Motorcraft® High
Performance DOT 4
Motor Vehicle Brake
Fluid
Entre Mín y Máx
en el depósito
Líquido de frenos
1
XG-4 o XL-5 o equiva-
lente / ESB-M1C93-
B
Grasa de usos múlti-
ples (grasa de litio)
No correspondePestillo de la puerta,
pestillo del cofre,
pestillo auxiliar del
cofre, pestillo de la
cajuela, rieles de los
asientos.
XL-1 / NingunoMotorcraft® Penetra-
ting and Lock Lubri-
cant
No correspondeCilindro de los seguros
XT-10-QLV
MERCON® LV
Motorcraft®
MERCON® LV ATF
8.5L (9 qt)Aceite de la transmisión
automática
2, 3
299
Capacidades y Especificaciones

Número de refacción
Ford / Especificación
Ford
Nombre de la refac-
ción Ford o equiva-
lente
CapacidadElemento
XY-80W90-QL /
WSP-M2C197-A
Motorcraft® SAE
80W-90 Premium
Rear Axle Lubricant
1.15 L (2.4 pt)Aceite del diferencial
trasero (AWD)
XY-75W140-QL /
WSL-M2C192-A
Motorcraft® SAE
75W-140 Synthetic
Rear Axle Lubricant
0.35L (12 oz)Líquido de la Unidad de
transferencia de
potencia (PTU) (AWD)
4
- XO-5W30-QSP
(EE.UU.)
- Motorcraft® SAE
5W-30 Premium
Synthetic Blend
Motor Oil (EE.UU.)
5.4L (5.7 qt)Aceite de motor 2.0L
EcoBoost®
5, 6
- XO-5W30-QFS
(EE.UU.)
- Motorcraft® SAE
5W-30 Full Synt-
hetic Motor Oil
(EE.UU.)
- CXO-5W30-LSP12
(Canadá)
- CXO-5W30-LFS12
(Canadá)
- Motorcraft® SAE
5W-30 Super
Premium Motor Oil
(Canadá)
/ WSS-M2C946-A
con Marca de certifi-
cación API
- Motorcraft® SAE
5W-30 Synthetic
Motor Oil (Canadá)
- XO-5W20-QSP
(EE.UU.)
- Motorcraft® SAE
5W-20 Premium
Synthetic Blend
Motor Oil (EE.UU.)
4.1L (4.3 qt)Aceite de motor 1.6L
EcoBoost
5, 6
- XO-5W20-QFS
(EE.UU.)
5.4L (5.7 qt)
Aceite de motor 2.5L
5, 6
- CXO-5W20-LSP12
(Canadá)
- Motorcraft® SAE
5W-20 Full Synt-
hetic Motor Oil
(EE.UU.)
- CXO-5W20-LFS12
(Canadá)
- Motorcraft® SAE
5W-20 Super
Premium Motor Oil
(Canadá)
/ WSS-M2C945-A y
marca de certifica-
ción API
- Motorcraft® SAE
5W-20 Synthetic
Motor Oil (Canadá)
- VC-3DIL-B (EE.
UU.)
Motorcraft® Orange
Antifreeze / Coolant
Prediluted
9.2L (9.7 qt)Refrigerante de motor
2.0L EcoBoost
7
300
Capacidades y Especificaciones

Número de refacción
Ford / Especificación
Ford
Nombre de la refac-
ción Ford o equiva-
lente
CapacidadElemento
- CVC-3DIL-B
(Canadá)
8L (8.5 qt)Refrigerante de motor
1.6L EcoBoost
7
/ WSS-M97B44-D2
8.7L (9.2 qt)Refrigerante de motor
2.5L
7
- ZC-32-A (EE. UU.)- Motorcraft®
Premium Windshield
Washer Concentrate
(EE. UU.)
Llene según sea
necesario
Líquido limpia para-
brisas - CXC-37-(A, B, D y
F) (Canadá)
/ WSB-M8B16-A2/--
Premium Quality
Windshield Washer
Fluid (Canadá)
No correspondeNo corresponde57L (15.1 gal)Tanque de combustible
1
Utilice solo líquido de frenos Motorcraft® DOT 4 LV High Performance Brake Fluid o uno
equivalente que cumpla con las normas WSS-M6C65-A2 e ISO 4925 Clase 6. El uso de
cualquier aceite distinto del recomendado puede causar daño en el sistema de frenos.
2
Capacidad aproximada de llenado en seco. La cantidad real puede variar durante los
cambios de líquido.
3
Las transmisiones automáticas que requieren aceite de transmisión Motorcraft®
MERCON® LV solo deben usar aceite de transmisión Motorcraft® MERCON® LV.
El uso de cualquier aceite distinto del recomendado puede causar daño en la transmisión.
Cambie el aceite de la transmisión automática y el filtro en el intervalo de servicio
correspondiente. Ver Reparación del vehículo (página 437).
4
Consulte a su distribuidor autorizado para la revisión del nivel de combustible o llenado.
5
No es obligatorio el uso de aceite de motor sintético o de mezcla sintética. El aceite de
motor solo debe cumplir con los requisitos de la especificación WSS-M2C946-A, SAE
5W-30 (motor 2.0L) o WSS-M2C945-A, SAE 5W-20 (motores 1.6L y 2.5L) de Ford y
tener la Marca de certificación API.
6
Su motor ha sido diseñado para usarse con aceite de motor Ford, que proporciona
ventajas de economía de combustible y a la vez mantiene la durabilidad del motor.
El uso de aceites que no sean los especificados puede ocasionar que se requiera un
período más largo de giro del motor, que se reduzca el rendimiento del motor, que
disminuya el ahorro de combustible y que aumenten los niveles de emisiones.
7
Agregue el tipo de líquido refrigerante que venía originalmente en su vehículo.
301
Capacidades y Especificaciones

Para obtener una lista completa de los
accesorios que están disponibles para su
vehículo, comuníquese con su distribuidor
o visite nuestra tienda en línea en la
dirección Accessories.Ford.com (solo en
Estados Unidos).
Existen accesorios personalizados Ford
disponibles para su vehículo a través de su
distribuidor local Ford o Ford de Canadá.
Ford Motor Company reparará o
reemplazará cualquier accesorio
personalizado Ford instalado
adecuadamente por un distribuidor, que
se encuentre defectuoso de fábrica en sus
materiales o en su ensamblaje durante el
período de vigencia de la garantía, como
también cualquier componente que se
haya dañado debido a los accesorios
defectuosos. Los accesorios serán
garantizados según lo que le proporcione
el mayor beneficio:
• 12 meses o 20,000 km (12,000 millas)
(lo que ocurra primero) o
• lo que resta de la garantía limitada
para vehículo nuevo.
Contacte a su distribuidor para obtener
más detalles y una copia de la garantía.
Estilo exterior
• Deflectores para el cofre
• Deflectores de viento laterales
• Salpicaderas
• Gráficas a la medida*
Estilo interior
• Tapetes
Estilo de vida
• Cenicero / conjuntos para fumadores
• Organizadores de carga flexibles
• Red de carga*
• Parrillas y portadores*
Tranquilidad
• Teclado de entrada sin llave
• Arranque a control remoto
• Sistemas de seguridad del vehículo
• Bloqueos de las ruedas
• Sistema de asistencia de
estacionamiento instalados en la
defensa*
*Los Accesorios con licencia de Ford (Ford
Licensed Accessories, [FLA]) tienen la
garantía del fabricante de los accesorios.
Los Accesorios con licencia de Ford han
sido totalmente diseñados y desarrollados
por el fabricante de accesorios y no han
sido diseñados ni probados con los
requerimientos de ingeniería de Ford Motor
Company. Solicite los detalles a su
distribuidor Ford con respecto a la garantía
limitada del fabricante y una copia de la
garantía limitada del producto FLA
ofrecida por el fabricante de los accesorios.
Para obtener el máximo rendimiento del
vehículo tenga en mente la siguiente
información al momento de agregar
accesorios o equipos a su vehículo:
• Al agregar accesorios, equipos,
pasajeros y equipaje a su vehículo, no
exceda la capacidad total de peso del
vehículo o del eje delantero o trasero
(GVWR, peso bruto vehicular máximo
o GAWR, peso bruto vehicular del eje
302
Accesorios

trasero como se indica en la Etiqueta
de certificación del cumplimiento de
las normas de seguridad). Consulte
con su distribuidor autorizado para
obtener información específica del
peso.
• La Comisión federal de
comunicaciones de Estados Unidos
(FCC, Federal Communications
Commission) y la Comisión canadiense
de radio y telecomunicaciones (CRTC,
Canadian Radio Telecommunications
Commission) regula el uso de sistemas
móviles de comunicación, como por
ejemplo, radios de dos vías, teléfonos
y alarmas antirrobos, los cuales están
equipados con transmisores de radio.
Todos los equipos instalados en su
vehículo deben cumplir con las normas
de la FCC o la CRTC y ser instalados
por un técnico de servicio calificado.
• Los sistemas móviles de comunicación
pueden dañar el funcionamiento de su
vehículo, especialmente si no están
correctamente diseñados para uso en
automóviles.
• Para evitar interferencia con otras
funciones del vehículo, tales como
sistemas de freno antibloqueo, los
usuarios de la radio para aficionados,
que instalan radios y antenas en su
vehículo, no deben ubicar las antenas
de la radio para aficionados en el área
del cofre del lado del conductor.
• La incorporación de accesorios o
componentes eléctricos o electrónicos
que no sean Ford al vehículo, ya sea
por parte del distribuidor autorizado o
del propietario, puede afectar el
rendimiento y la durabilidad de la
batería y puede también afectar el
rendimiento de otros sistemas
eléctricos del vehículo.
303
Accesorios

PLANES DE SERVICIO (Estados
Unidos solamente)
Más de 32 millones de propietarios de Ford
y Lincoln han descubierto la poderosa
protección de la Extensión de servicio Ford.
Ésta es la única extensión de servicio
respaldada por Ford Motor Company que
proporciona protección para mayor
tranquilidad, más allá de la cobertura de
la garantía limitada para vehículos nuevos.
Cobertura para más de 500
componentes del vehículo
Existen cuatro extensiones de servicio para
vehículos nuevos con diferentes niveles de
cobertura. Pregunte los detalles a su
distribuidor.
1. PremiumCare: Nuestra cobertura más
completa. ¡Con más de 500
componentes cubiertos, este plan es
tan completo que generalmente solo
informamos lo que no está cubierto!
2. ExtraCare: Cubre 113 componentes e
incluye muchas piezas de alta
tecnología.
3. BaseCare: Cubre 84 componentes.
4. PowertrainCare: Cubre 29
componentes críticos.
La Extensión de servicio Ford se encuentra
disponible en todos los distribuidores de
Ford y Lincoln de Estados Unidos y
Canadá. Es la única extensión de servicio
autorizada y respaldada por Ford Motor
Company. Eso significa que usted
obtendrá:
• Servicio confiable y de alta calidad en
cualquier parte.
• Técnicos entrenados en la fábrica.
• Uso de piezas autorizadas por Ford en
cada reparación cubierta.
Reembolso de automóvil de alquiler
Si para realizar las reparaciones cubiertas
tiene que dejar su vehículo hasta el día
siguiente, tiene derecho a cobertura de
vehículo alquilado, incluyendo
reparaciones cubiertas por la garantía de
defensa a defensa, o llamados a revisión
del fabricante.
Cobertura transferible
Si vende su vehículo antes de que venza
la cobertura de su Extensión de servicio
Ford, puede transferir cualquier cobertura
restante al nuevo propietario. Cuando
desee vender su vehículo, los posibles
compradores tendrán más confianza
respecto al hecho de adquirir su vehículo
usado. La Extensión de servicio Ford puede
aumentar el valor de reventa.
Además, brinda exclusiva asistencia en el
camino 24/7, que incluye:
• Remolque, cambio de llantas
desinfladas y arranque con cables
pasacorriente de la batería.
• Asistencia en caso de que se quede sin
combustible u olvide las llaves dentro
del vehículo.
• Reembolso de gastos de viaje como
alojamiento, comidas y alquiler de
vehículo.
• Asistencia de destino como servicio de
taxi, transbordador, cobertura de
vehículo alquilado y transporte de
emergencia.
La Extensión de servicio Ford puede
pagarse rápidamente por sí sola
Una factura de servicio que incluya el costo
de piezas y mano de obra puede exceder
fácilmente el costo del contrato de la
Extensión de servicio Ford. Con la
Extensión de servicio Ford, minimiza el
riesgo de facturas de reparación
inesperadas y costos de reparación cada
vez mayores.
304
Ford Protect

¡Evite los costos cada vez mayores que
se requieren para mantener en buen
estado su vehículo!
La Extensión de servicio Ford también
ofrece un Plan de mantenimiento Premium
que cubre piezas que se desgastan por el
uso cotidiano.
La cobertura se paga por adelantado, así
que nunca tendrá que preocuparse por
pagar el mantenimiento de su vehículo.
Este plan cubre chequeos regulares,
inspecciones rutinarias, cuidado preventivo
y reemplazo de partes que requieren
atención periódica debido al desgaste
normal:
• Hojas de limpiadores
• Bujías (excepto California)
• El disco del embrague
• Patines y balatas de los frenos
• Amortiguadores
• Bandas y mangueras
Contacte a su distribuidor Ford o Lincoln
para que le personalicen una Extensión de
Servicio Ford que se ajuste a su estilo de
vida y presupuesto.
Opciones de financiamiento sin
intereses
Aproveche nuestro plan de pago a plazos:
con sólo un 10% de enganche tendrá la
oportunidad de realizar sus pagos sin
comisiones ni intereses.
Para obtener más información
PROTÉJASE DEL ALTO COSTO DE LAS
REPARACIONES DEL VEHÍCULO CON UNA
EXTENSIÓN DE SERVICIO FORD.
Para obtener más información, llame a
nuestros especialistas de Ford ESP al
800-367-3377, y no olvide preguntar por
nuestro programa de pagos sin interés, que
le ofrece toda la seguridad y los beneficios
de Ford ESP mientras paga en cuotas.
¡Obtendrá una aprobación previa sin
verificación de crédito ni molestias!
O si lo prefiere, complete la información a
continuación y envíela por correo a:
Ford ESP
P.O. Box 8072
Royal Oak, MI 48068-0039
Nombre (SÍRVASE ESCRIBIR EN LETRAS DE IMPRENTA)
N° de apartamentoDIRECCIÓN
CÓD. POSTALESTADOCIUDAD
CORREO ELECTRÓNICO
305
Ford Protect

PLANES DE SERVICIO (CANADÁ
SOLAMENTE)
Puede obtener mayor protección para su
vehículo al adquirir una Extensión de
servicio Ford. La Extensión de servicio Ford
es el único contrato de servicio respaldado
por Ford Motor Company of Canada,
Limited. Dependiendo del plan que
compre, la Extensión de servicio Ford
proporciona beneficios como:
• Reembolso de renta
• Cobertura de ciertos elementos de
mantenimiento y desgaste
• Protección contra costos de reparación
después del vencimiento de su
Cobertura de garantía limitada para
vehículos nuevos
• Beneficios de Asistencia en el camino
Existen varios planes de Extensión de
servicio Ford para diferentes tiempos,
distancias y combinaciones de deducibles.
Cada plan ha sido diseñado para
adaptarse a sus propias necesidades de
manejo, incluido el reembolso por servicios
de remolque y alquiler.
Cuando adquiere una Extensión de servicio
Ford, recibe una mayor protección en todos
los Estados Unidos y Canadá
proporcionada por una red de
distribuidores de Ford Motor Company
participantes. El Plan de protección de
mantenimiento de Lincoln se aplica en
todos los distribuidores Lincoln
autorizados.
Nota: Las reparaciones realizadas fuera de
Canadá y de los Estados Unidos no son
elegibles para la cobertura de la Extensión
de servicio Ford.
Esta información está sujeta a
modificaciones.
Para más información, visite a su
distribuidor Ford local de Canadá o
www.ford.ca para saber cuál es el plan de
Extensión de servicio Ford adecuado para
usted.
306
Ford Protect

INFORMACIÓN GENERAL
E142598
SYNC es un sistema de comunicaciones
para vehículos que funciona en conjunto
con el teléfono celular con tecnología
Bluetooth y el reproductor de medios
portátil. Le permite:
• hacer y recibir llamadas
• acceder a música y tocarla en su
reproductor de música portátil
• usar 911 Assist™, Informe del
mantenimiento del vehículo y Servicios
SYNC (Tráfico, indicaciones e
información) (si está equipado)
• acceder a contactos de agenda y
música mediante comandos de voz
• reproducir audio desde el teléfono
conectado
• enviar mensajes de texto
• usar el sistema avanzado de
reconocimiento de voz
• cargar el dispositivo USB (si su
dispositivo es compatible).
Asegúrese de revisar la guía del usuario del
dispositivo antes de usarlo con SYNC.
Soporte
El equipo de soporte de SYNC está
disponible para ayudarle a responder las
preguntas que no pueda contestar por su
cuenta.
De lunes a sábado, de 8:30 a.m. a 8 p.m.,
hora del este (EST).
En los Estados Unidos, llame al:
1-888-270-1055.
En Canadá, llame al: 1-800-565-3673.
307
SYNC®

Los horarios están sujetos a cambios
debido a los días festivos.
Restricciones de manejo
Para su seguridad, ciertas características
en la mensajería de texto dependen de la
velocidad y no se pueden realizar cuando
el vehículo viaja a más de 5 km/h (3 mph).
Información de seguridad
ALERTA
Manejar mientras está distraído
puede tener como consecuencia la
pérdida de control del vehículo, un
accidente y lesiones. Ford recomienda
encarecidamente que los conductores
presten especial cuidado cuando utilicen
dispositivos que pudieran quitar su
atención del camino. Su responsabilidad
principal es manejar en forma segura el
vehículo. No se recomienda el uso de
ningún dispositivo portátil al conducir; se
sugiere el uso de sistemas operados por
voz cuando sea posible y que se informe
de las leyes estatales y locales aplicables
al uso de dispositivos electrónicos al
conducir.
Al usar SYNC:
• No haga funcionar dispositivos de
juegos si los cables de corriente están
rotos, separados o dañados. Coloque
con cuidado los cables de corriente
donde no los puedan pisar y no
interfieran con el funcionamiento de
pedales, asientos, compartimentos o
capacidades de manejo seguro.
• No deje los dispositivos de juego en el
vehículo en condiciones extremas, ya
que podría dañarlos. Para obtener más
información, consulte la guía del
usuario del dispositivo.
• No intente revisar o reparar el sistema.
Consulte con su distribuidor autorizado.
Información de privacidad
Cuando un teléfono móvil se conecta a
SYNC®, el sistema crea un perfil dentro de
su vehículo que está asociado a ese
teléfono móvil. Este perfil se crea para
ofrecerle más funciones móviles y para
una operación más eficiente. Entre otras
cosas, este perfil puede contener datos
acerca de la agenda del teléfono móvil,
mensajes de texto (leídos y sin leer) y el
historial de llamadas, incluyendo el
historial de llamadas de cuando el teléfono
móvil no estaba conectado al sistema.
Además, si conecta un dispositivo de
medios, el sistema crea y retiene un índice
del contenido de medios compatible. El
sistema también lleva un breve registro de
aproximadamente 10 minutos de toda su
actividad reciente. El perfil del registro y
otros datos del sistema pueden utilizarse
para mejorar el sistema y para ayudar en
el diagnóstico de cualquier problema que
pueda ocurrir.
El perfil del teléfono móvil, el índice del
dispositivo de medios y el registro
quedarán almacenados en el vehículo a
menos que usted los borre, y por lo general
solo se tiene acceso a ellos en el vehículo
cuando el teléfono móvil o el reproductor
multimedia están conectados. Si ya no va
a utilizar el sistema o el vehículo, le
recomendamos que realice el proceso de
Reconfiguración total para borrar toda la
información almacenada.
308
SYNC®

No se puede tener acceso a los datos del
sistema sin equipo especial y sin acceso
al módulo SYNC del vehículo. Ford Motor
Company y Ford Motor Company of
Canada no revisarán los datos del sistema
para otros fines que no sean los ya
descritos sin el consentimiento
correspondiente o sin un mandato judicial,
petición de las autoridades de policía,
petición de las autoridades
gubernamentales o petición de terceros
que actúen con la debida autoridad legal.
Otras terceras partes pueden solicitar
acceso a la información en forma
independiente de Ford Motor Company y
Ford of Canada. Para obtener información
adicional sobre privacidad, consulte las
secciones sobre 911 Assist (si está
equipado), Informe de mantenimiento del
vehículo (si está equipado) y Tráfico,
indicaciones e información (si está
equipado).
USO DEL RECONOCIMIENTO
DE VOZ
Este sistema le ayuda a controlar
numerosas funciones mediante comandos
de voz. Esto le permite tener las manos en
el volante y concentrarse en lo que está
delante suyo.
Sugerencias útiles
Asegúrese de que el interior del vehículo
esté lo más silencioso posible. Es posible
que las vibraciones del camino y el ruido
del viento que entra por las ventanas
abiertas impidan que el sistema reconozca
en forma correcta los comandos que diga.
Después de oprimir el icono de voz, espere
hasta que escuche el tono y que aparezca
"Escuchando" antes de decir un comando.
Cualquier comando que se diga antes de
esto no se registra en el sistema.
Hable con naturalidad, sin hacer pausas
largas entre palabras.
En cualquier momento, puede interrumpir
el sistema mientras éste habla al presionar
el icono de voz.
Iniciando sesión de voz
E142599
Empuje el icono de voz; se
escuchan sonidos de tono y
aparece "Escuchando" en la
pantalla. Diga cualquiera de las siguientes
opciones:
Si deseaDiga
Reproducir audio desde el teléfono."Audio Bluetooth"
Cancelar la acción solicitada."Cancelar"
Acceder al dispositivo conectado en la entrada auxiliar."Entrada Auxiliar"
Acceder a aplicaciones móviles.
"Mobile apps"
*
Realizar llamadas."Teléfono"
Acceder al portal de servicios SYNC.
"Servicios"
*
Regresar el menú principal."SYNC"
309
SYNC®

Si deseaDiga
Acceder al dispositivo conectado en su puerto USB."USB"
Ejecutar un informe de mantenimiento del vehículo."Reporte de Condición
Vehicular"
*
Ajustar el nivel de interacción y retroalimentación de voz."Configuración de voz"
Escuche una lista de comandos de voz disponibles en el
modo actual.
"Ayuda"
*
Si está equipado, solo EE.UU.
Interacción y retroalimentación
del sistema
El sistema proporciona retroalimentación
mediante tonos audibles, indicadores,
preguntas y confirmaciones habladas que
dependen de la situación y del nivel de
interacción elegido (configuración de voz).
Puede personalizar el sistema de
reconocimiento de voz para que le
proporcione más o menos instrucciones y
retroalimentación.
La configuración de fábrica está en un nivel
más alto de interacción para que le enseñe
a usar el sistema. Puede cambiar esta
configuración en cualquier momento.
Configuración del nivel de interacción
E142599
Presione el icono de voz. Diga
"Configuración de voz" cuando
se le indique, luego diga
cualquiera de las siguientes opciones:
El sistemaCuando diga
Proporciona menos interacción audible y
más indicadores de tono.
"Modo de Interacción Avanzado"
Proporciona interacción más detallada y
orientación.
"Modo de Interacción Estándar"
La configuración de fábrica del sistema es el modo de interacción estándar.
Los mensajes de confirmación son
preguntas cortas que el sistema hace
cuando no está seguro de su petición o
cuando la petición tiene varias respuestas
posibles. Por ejemplo, el sistema puede
decir, “Teléfono, ¿es correcto?”.
310
SYNC®

El sistemaCuando diga
Hace la mejor suposición del comando; es
posible que aun se le pida confirmar
ocasionalmente la configuración.
"Mensajes de Confirmación Desactivados"
Clarifica el comando de voz con una
pregunta breve.
"Mensajes de Confirmación Activados"
El sistema crea listas de candidatos
cuando tiene el mismo nivel de confianza
en varias opciones basadas en su
comando de voz. Cuando está activado,
es posible que se le indiquen cuatro
posibilidades para aclaración.
Por ejemplo, diga "Diga 1 después del tono
para llamar a Juan Pérez a la casa. Diga 2
después del tono para llamar a Juanito
Pérez al teléfono móvil. Diga 3 después del
tono para llamar a Juana Pérez en la casa".
O bien puede decir "Diga 1 después del
tono para reproducir a Juan Pérez; Diga 2
después del tono para reproducir a Juanito
Pérez".
El sistemaCuando diga
Hace la mejor suposición de la lista de
opciones de medios; es posible que aun se
le hagan preguntas.
"Lista de Candidatos de Medios Desacti-
vados"
Clarifica el comando de voz para candi-
datos de medios.
"Lista de Candidatos de Medios Activada"
Hace la mejor suposición de la lista de
opciones de teléfonos; es posible que aun
se le hagan preguntas.
"Lista de Candidatos de Teléfono Desacti-
vada"
Clarifica el comando de voz para candi-
datos de teléfonos.
"Lista de Candidatos de Teléfono Activada"
311
SYNC®

USO DE SYNC® CON EL
TELÉFONO
La llamada de manos libres es una de las
características principales de SYNC.
Aunque el sistema tiene una amplia
variedad de características, muchas de
ellas dependen de la funcionalidad de su
teléfono. La mayoría de los teléfonos
móviles con tecnología inalámbrica
Bluetooth admiten, al menos, las
siguientes funciones:
• Responder una llamada entrante
• Finalizar una llamada
• Usar el modo de privacidad
• Marcar un número
• Volver a marcar
• Aviso de llamada en espera
• Identificación de quien llama.
Otras características, como mensajes de
texto mediante Bluetooth y descarga
automática de agenda, dependen del
teléfono. Para verificar la compatibilidad
del teléfono, consulte la guía del usuario
del teléfono y visite
www.SYNCMyRide.com o
www.syncmaroute.ca.
Asociación de un teléfono por
primera vez
Nota: SYNC puede admitir la descarga de
hasta aproximadamente 2000 entradas
por teléfono móvil con tecnología Bluetooth.
Nota: Asegúrese de que el encendido del
vehículo y el radio estén activados y que la
transmisión esté en posición P.
Nota: Para recorrer los menús, oprima las
flechas hacia arriba y hacia abajo en su
sistema de audio.
Asociar de manera inalámbrica su teléfono
con SYNC le permite hacer y recibir
llamadas con manos libres.
1. Oprima el botón del teléfono; cuando
la pantalla indique que no hay ningún
teléfono asociado, oprima "OK".
2. Cuando aparezca Agregar
dispositivos Bt, oprima "OK".
3. Cuando aparezca Buscar SYNC en la
pantalla, oprima "OK".
4. Ponga su teléfono en el modo de
detección de Bluetooth . Si fuera
necesario, consulte la guía del usuario
del teléfono.
5. Cuando la pantalla del teléfono se lo
indique, ingrese en la pantalla del radio
el número de identificación personal
(PIN) de seis cifras que SYNC le
proporcionó. La pantalla indicará si la
asociación tuvo éxito.
Dependiendo de la capacidad del teléfono
y del mercado, el sistema podría
preguntarle si configura el teléfono actual
como teléfono principal (el primer teléfono
con que SYNC tratará de conectarse
automáticamente al arrancar el vehículo),
descarga su agenda de teléfonos, etc.
Asociación de teléfonos
subsiguientes
Nota: Asegúrese de que el encendido del
vehículo y el radio estén activados y que la
transmisión esté en posición P.
Nota: Para recorrer los menús, oprima las
flechas hacia arriba y hacia abajo en su
sistema de audio.
1. Presione el botón del teléfono y recorra
el menú hasta que seleccione
Configuración del sistema.
2. Oprima "OK" y recorra el menú hasta
seleccionar Dispositivos Bluetooth,
y oprima nuevamente "OK".
3. Desplácese hasta seleccionar Agregar
disp Bt y oprima "OK".
4. Cuando aparezca Buscar SYNC en la
pantalla, oprima "OK".
312
SYNC®

5. Ponga su teléfono en el modo de
detección de Bluetooth . Si fuera
necesario, consulte la guía del usuario
del teléfono.
6. Cuando la pantalla del teléfono se lo
indique, ingrese en la pantalla del radio
el número de identificación personal
(PIN) de seis cifras que SYNC le
proporcionó. La pantalla indicará si la
asociación tuvo éxito.
Luego, el sistema le hará preguntas como
si le gustaría configurar el teléfono actual
como teléfono principal (el primer teléfono
con que SYNC tratará de conectarse
automáticamente al arrancar el vehículo),
descargar su agenda, etc.
Comandos de voz del teléfono
"TELÉFONO"
"Ir a Privacidad"
"Llamar a <nombre>"
1
"En espera"
"Llamar a <nombre> a la casa"
1
"Conectar"
"Llamar a <nombre> al trabajo"
1
"Menú"
2,4
"Llamar a <nombre> a la oficina"
1
"Mostrar en agenda número de <nombre>
2
"Llamar a <nombre> al móvil O celular"
1
"Mostrar en agenda número de casa de
<nombre>"
2
"Llamar a <nombre> a otro"
1
"Mostrar en agenda número de oficina de
<nombre>"
2
"Historial de llamadas entrantes"
2
"Mostrar en agenda número de trabajo de
<nombre>"
2
"Historial de llamadas perdidas"
2
"Mostrar en agenda número de teléfono
móvil O celular de <nombre>"
2
"Historial de llamadas salientes"
2
313
SYNC®

"TELÉFONO"
"Mostrar en agenda otro número de
<nombre>"
2
"Conexiones"
2
"Marcar"
1,3
1
Para estos comandos, no es necesario decir "Teléfono" primero.
2
Estos comandos no están disponibles sino hasta que se completa la descarga de la
información del teléfono mediante Bluetooth.
3
Consulte la tabla Marcar a continuación.
4
Consulte la tabla Menú a continuación.
Comandos de agenda: cuando le solicita
a SYNC acceder a un nombre, número, etc.
de la agenda, la información solicitada
aparece en la visualización. Oprima el
botón de teléfono o diga "Llamar" para
llamar al contacto.
"MARCAR"
"411 (cuatro uno uno)", "911" (nueve uno uno), etc.
"700" (setecientos)
"800" (ochocientos)
"900" (novecientos)
"Tecla de número", "Barra" (#,/)
"Número <0-9>"
"Asterisco" (*)
"Borrar" (borra todos los dígitos ingresados)
"Quitar" (quita un dígito)
"Más"
"Estrella"
Nota: Para salir del modo de marcar,
mantenga presionado el botón de teléfono
u oprima Menú para ir al menú Teléfono.
314
SYNC®

"MENÚ"
"Conexiones (de teléfono)"
"Aviso de (mensaje de) configuración (telefónica) desactivado"
"Aviso de (mensaje de) configuración (telefónica) activado"
"Configuración (telefónica) (definir) timbre"
"Configuración (telefónica) (definir) timbre 1"
"Configuración (telefónica) (definir) timbre 2"
"Configuración (telefónica) (definir) timbre 3"
"Configuración (telefónica) (definir) timbre desactivado"
"Batería"
"Nombre del teléfono"
"Señal"
"Bandeja de entrada de mensajes de texto"
Las palabras entre ( ) son opcionales y no es necesario que se digan para que el sistema
entienda el comando.
Hacer llamadas
Presione el icono de voz y cuando se le
indique, diga:
1. Diga, "Llamar a <nombre> o diga
"Marcar" y el número deseado.
2. Cuando el sistema confirme el número,
diga otra vez "Marcar" para iniciar la
llamada.
Para borrar el último dígito que pronunció,
diga "Quitar" u oprima el botón de flecha
hacia la izquierda. Para borrar todos los
dígitos dichos, diga “Borrar” o mantenga
presionado el botón de flecha hacia la
izquierda.
Para finalizar la llamada, mantenga
presionado el botón de teléfono.
Recepción de llamadas
Al recibir una llamada, puede:
• Contestar la llamada oprimiendo el
botón de teléfono.
• Rechazar la llamada manteniendo
oprimido el botón de teléfono.
• Ignorar la llamada no realizando
ninguna acción.
Opciones de teléfono durante una
llamada activa
Durante una llamada activa dispone de
características adicionales del menú, como
poner una llamada en espera, añadir
llamadas, etc. Utilice los botones de flecha
para desplazarse por las opciones del
menú.
315
SYNC®

Para acceder a:
• Oprima Menú durante una llamada
activa.
• Después de seleccionar Menú de
llamadas activas, oprima OK.
• Recorra el menú para ver las opciones
siguientes:
PuedeCuando selecciona
Silencia la llamada.Silenciar llamada
Cambiar una llamada del entorno de manos libres al
teléfono móvil para tener una conversación más privada.
Privacidad
Oprima "OK" cuando aparezca Activar/Desactivar
privacidad. (La pantalla indica En Privacidad y el sistema
transfiere su llamada).
Poner una llamada activa en espera.Llamada en espera
Oprima "OK" cuando aparezca Activar/Desactivar
llamada en espera. Para contestar otra llamada en este
momento, oprima el botón de teléfono.
Ingresar "tonos" como por ejemplo, números de contra-
señas.
Ingresar tonos
Recorra la pantalla hasta que aparezca el número deseado
y oprima "OK"; se escucha un tono de confirmación. Repita
cuantas veces sea necesario.
Conectar dos llamadas distintas. (SYNC admite un
máximo de tres llamadas en una llamada multipartita/de
conferencia).
Añadir llamadas
1. Presione el botón de teléfono.
2. Acceda al contacto deseado mediante SYNC o use
comandos de voz para hacer la segunda llamada. Una vez
activa la segunda llamada, oprima Menú.
3. Recorra el menú hasta que aparezca Añadir llamadas
y oprima "OK". Oprima "OK" nuevamente cuando
aparezca ¿Añadir llamadas?
Acceder a los contactos de la agenda del teléfono.Agenda
1. Oprima "OK" para seleccionar y desplácese por los
contactos de su agenda telefónica.
2. Oprima "OK" nuevamente cuando la selección deseada
aparezca en la pantalla.
3. Presione el botón de teléfono.
Acceder al registro del historial de llamadas.Historial de llamadas
1. Oprima "OK" para seleccionar y desplazarse por las
opciones de su historial de llamadas (llamadas entrantes,
salientes o perdidas).
316
SYNC®

PuedeCuando selecciona
2. Oprima "OK" cuando la selección deseada aparezca en
la pantalla.
3. Oprima el botón del teléfono para llamar a la selección.
Cerrar el menú actual.Volver
Acceso a las características del
menú Teléfono
El menú Teléfono le permite volver a
marcar un número, acceder a su historial
de llamadas y su agenda, mandar
mensajes de texto y acceder a la
configuración del teléfono y el sistema.
Puede también acceder a funciones
avanzadas como 911 Assist™, Informe del
mantenimiento del vehículo y Servicios
SYNC.
1. Oprima el botón de teléfono para
ingresar al menú Teléfono.
2. Desplácese entre:
PuedeCuando selecciona
Volver a marcar el último número al que llamó (si está
disponible). Oprima "OK" para seleccionar y oprima "OK"
otra vez para confirmar.
Volver a marcar
Le permite acceder a cualquier llamada marcada, recibida
o perdida mientras su teléfono ha estado conectado al
sistema.
Historial de llamadas
1
1. Oprima "OK" para seleccionar.
2. Desplácese para seleccionar entre Historial de
llamadas entrantes, Historial de llamadas salientes
o Historial de llamadas perdidas. Oprima "OK" para
seleccionar una opción.
3. Oprima "OK" o el botón de teléfono para llamar a la
selección deseada.
El sistema intenta volver a descargar automáticamente
su agenda e historial de llamadas cada vez que el teléfono
se conecta a SYNC (si la característica de descarga auto-
mática está activa y su teléfono móvil con tecnología
Bluetooth admite esta característica).
Le permite acceder a su agenda telefónica descargada.
Agenda
1,2
317
SYNC®

PuedeCuando selecciona
1. Oprima "OK" para confirmar e ingresar. Si su agenda
tiene menos de 255 entradas, éstas aparecerán en orden
alfabético en un formato de archivo plano. Si hay más, se
organizarán por categorías en orden alfabético.
2. Recorra el menú hasta que aparezca el contacto
deseado y oprima OK.
3. Oprima "OK" o el botón de teléfono.
Le permite enviar, descargar y quitar mensajes de texto.
Mensaje de texto
1
Le permite ver el estado del teléfono, configurar tonos de
timbre, seleccionar su aviso de mensaje, cambiar las
entradas de la agenda y descargar automáticamente su
teléfono móvil, entre otras funciones.
Configuración del teléfono
1
Acceder al portal de Servicios SYNC donde puede solicitar
varios tipos de información, informes de tránsito e indica-
ciones.
Servicios SYNC
3
Hacer una llamada a los operadores del servicio 911
después de un accidente (si la función se utiliza adecua-
damente).
911 Assist
4
Crear y recibir una tarjeta de informe de diagnóstico sobre
su vehículo.
Informe de mantenimiento
del vehículo
3
Interactuar con aplicaciones móviles compatibles con
SYNC en su teléfono inteligente.
Aplicaciones móviles
3
Acceder a las listas del menú Dispositivos Bluetooth
(agregar, conectar, configurar como principal, activar/
desactivar, quitar), así como a las listas del menú
Opciones avanzadas (indicadores, idiomas, configura-
ciones de fábrica, reconfiguración total, instalación de
aplicaciones e información del sistema).
Configuración del sistema
Salga del menú del teléfono oprimiendo "OK".Salir del menú de teléfono
1
Ésta es una característica dependiente del teléfono.
2
Ésta es una característica dependiente de la velocidad.
3
Si está equipado, solo EE.UU.
4
Si está equipado, solo EE.UU. y Canadá.
318
SYNC®

Mensajes de texto
Nota: Ésta es una característica
dependiente del teléfono.
SYNC le permite recibir, mandar, descargar
y quitar mensajes de texto. El sistema
puede leerle incluso los mensajes de texto
entrantes, de modo que no tenga que
quitar los ojos del camino.
Recibir un mensaje de texto
Nota: Ésta es una característica
dependiente del teléfono. Su teléfono debe
soportar la descarga de mensajes de texto
vía Bluetooth para recibir mensajes de texto
entrantes.
Nota: Reenviar un mensaje de texto es una
característica dependiente de la velocidad
y solo se puede realizar cuando el vehículo
viaja a 5 km/h (3 mph) o menos.
Nota: Solo se permite un destinatario por
mensaje de texto.
Cuando llegue un mensaje nuevo, sonará
un tono y la pantalla indicará que tiene un
nuevo mensaje. Tiene estas opciones:
• Presione el botón de voz, espere el
indicador y diga: "Leer mensaje" para
que SYNC le lea el mensaje.
• Oprima "OK" para recibir y abrir el
mensaje de texto o no realice ninguna
acción y el mensaje quedará en la
bandeja de entrada de mensajes de
texto. Oprima "OK" nuevamente y
SYNC leerá su mensaje en voz alta,
dado que no podrá verlo. También
puede elegir si quiere responder o
reenviar el mensaje.
• Oprima "OK" y recorra el menú para
escoger entre:
• Responder a msj de texto: oprima
"OK" para acceder y recorra la lista
de mensajes predefinidos que
puede mandar.
• Reenviar msj de texto: oprima
"OK" para reenviar el mensaje a
cualquier contacto en su Agenda
o Historial de llamadas. También
puede optar por Ingresar número.
Enviar, descargar y quitar mensajes de
texto
La mensajería de texto es una
característica dependiente del teléfono.
Si su teléfono es compatible, el sistema
SYNC le permite recibir, mandar, descargar
y quitar mensajes de texto.
1. Presione el botón de teléfono.
2. Recorra el menú hasta que aparezca
Mensaje de texto y oprima "OK".
319
SYNC®

Recorra el menú para seleccionar entre las
opciones siguientes:
• ¿Enviar mensaje de texto? le
permite mandar un nuevo mensaje de
texto basado en uno de los 15
mensajes predefinidos.
• Descargar mensajes no leídos le
permite descargar a SYNC sus
mensajes sin leer (exclusivamente).
Para descargar los mensajes, oprima
"OK" para seleccionar. La pantalla
indicará que sus mensajes están siendo
descargados. Al terminar, SYNC abrirá
su bandeja de entrada.
• ¿Quitar todos los mensajes? le
permite quitar de SYNC (pero no del
teléfono) los mensajes de texto
actuales. Para borrar los mensajes,
oprima "OK" para seleccionar. La
pantalla le indicará cuando todos sus
mensajes de texto que se hayan
quitado y SYNC volverá al menú de
mensajes del texto.
• Volver sale del menú actual si oprime
"OK".
Si selecciona ¿Enviar mensaje de texto?
(y su teléfono es compatible con esta
característica), tiene las siguientes
opciones de mensajes predefinidos:
• Nos vemos en 10 minutos
• Nos vemos en 20 minutos
• Llámame
• Te llamo más tarde
• No puedo hablar ahora
• No puedo esperar a verte
• Te quiero
• Necesito más indicaciones
• Estoy en un atasco
• No
• Gracias
• Qué gracioso
• ¿Dónde estás?
• ¿Por qué?
• Sí
Para enviar el mensaje:
1. Oprima "OK" cuando la selección que
desee esté en la pantalla. Ahora, el
sistema necesita saber a quién desea
mandarle el mensaje.
2. Recorra el menú para ver las entradas
de la Agenda o el Historial de
llamadas. También puede seleccionar
Ingresar número para dictar con su
voz el número deseado.
3. Oprima "OK" para entrar al menú
deseado y recórralo para seleccionar
el contacto específico.
4. Oprima "OK" cuando el contacto
aparezca, y oprima de nuevo "OK"
como confirmación cuando el sistema
le pregunte si desea enviar el mensaje.
Cada mensaje de texto será enviado
con la siguiente firma: "Este mensaje
fue enviado desde mi <Ford o
Lincoln>".
Acceso a la configuración del
teléfono
Éstas características son dependientes del
teléfono. La configuración del teléfono le
permite acceder a, y configurar
características como tono del timbre, aviso
de mensajes de texto, modificar la agenda
y configurar la descarga automática.
1. Presione el botón de teléfono.
2. Recorra el menú hasta que aparezca
Configuración de teléfono y oprima
"OK".
3. Recorra el menú para seleccionar entre
las opciones siguientes:
320
SYNC®

PuedeCuando selecciona
Ver el proveedor, nombre, potencia de señal, nivel de carga
de la batería y estado de "roaming" del teléfono conec-
tado.
Estado del teléfono
Oprima "OK" para seleccionar y recorra el menú para ver
la información. Cuando termine, oprima otra vez "OK" para
volver al menú de estado del teléfono.
Seleccionar el tono de timbre que suena cuando recibe
una llamada entrante (del sistema o del teléfono).
Configurar timbre
1. Oprima "OK" para seleccionar y recorra el menú para oír
Timbre 1, Timbre 2, Timbre 3 y Timbre del teléfono.
2. Oprima "OK" para seleccionar.
Si su teléfono cuenta con timbre dentro de banda, el
timbre del teléfono sonará si selecciona Timbre del
teléfono.
Le da la opción de escuchar un tono que le avise cada vez
que llegue un nuevo mensaje de texto.
Aviso de mensaje
1. Oprima "OK" para seleccionar y desplácese para selec-
cionar entre Activar aviso de msj o Desactivar aviso
de msj.
2. Oprima "OK" para seleccionar.
Modificar los contenidos de su agenda descargada (es
decir, agregar, quitar, descargar. Oprima "OK" para selec-
cionar y desplazarse entre:
Modificar agenda
Agregar contactos: oprima "OK" para agregar más
contactos de su agenda. Utilizar "Push" para enviar los
contactos deseados de su teléfono. Consulte la guía del
usuario del teléfono para ver cómo se usa "Push" con los
contactos.
Quitar agenda: oprima "OK" para eliminar la agenda y el
historial de llamadas actuales. Cuando aparezca Quitar
agenda, oprima "OK" para confirmar. SYNC le llevará de
vuelta al menú Configuración de teléfono.
Descargar agenda: oprima "OK" para seleccionar y
oprima "OK" otra vez cuando aparezca ¿Confirmar
descarga?
Descargar automáticamente su agenda cada vez que su
teléfono se conecte a SYNC. (Los tiempos de descarga
dependen del teléfono y la cantidad de entradas).
Descarga automática
321
SYNC®

PuedeCuando selecciona
Oprima "OK" para seleccionar. Cuando aparezca ¿Activar
desc autom?, oprima "OK" para descargar su agenda
automáticamente en cada ocasión. (Cuando la descarga
automática esté activada, se borrarán los cambios,
adiciones o eliminaciones guardados a partir de la última
descarga).
Seleccione Desactivar si NO desea descargar su agenda
cada vez que su teléfono se conecte a SYNC. Solo puede
acceder a su agenda, historial de llamadas y mensajes de
texto cuando el teléfono específico está conectado a
SYNC.
Cerrar el menú actual.Volver
Configuración del sistema
Este menú le da acceso a las
características de los menús Dispositivo
Bluetooth y Opciones avanzadas. Utilice
los botones de flecha para desplazarse
por las opciones del menú.
El menú Dispositivo Bluetooth le permite
agregar, conectar y quitar dispositivos,
configurar un teléfono como "principal", y
activar y desactivar la característica
Bluetooth.
El menú Opciones avanzadas le permite
acceder a, y configurar indicadores,
idiomas, configuraciones de fábrica,
realizar una reconfiguración total, instalar
una aplicación y ver Información del
sistema.
Opciones del menú Dispositivo
Bluetooth
1. Oprima el botón de teléfono para
ingresar al menú Teléfono.
2. Recorra el menú hasta que aparezca
Configuración del sistema y oprima
"OK".
3. Recorra el menú hasta que aparezca
Dispositivos Bluetooth y seleccione
"OK".
4. Recorra el menú para seleccionar entre
las opciones siguientes:
PuedeSi selecciona
Asociar teléfonos adicionales al sistema.Agregar dispositivo Blue-
tooth
*
1. Oprima "OK" para seleccionar, y oprima otra vez "OK"
cuando aparezca Buscar SYNC en la pantalla.
2. Siga las instrucciones de la guía del usuario de su telé-
fono para poner el teléfono en modo de detección. En la
pantalla aparece un número de identificación personal
(PIN) de seis dígitos.
3. Cuando se lo indique la pantalla del teléfono, ingrese
el PIN de seis dígitos que SYNC le proporcionó.
322
SYNC®

PuedeSi selecciona
4. Cuando aparezca ¿Configurar como principal?,
oprima "OK". Recorra el menú para cambiar entre Sí y No,
y oprima "OK".
5. Dependiendo de la funcionalidad de su teléfono, es
posible que le haga preguntas adicionales, como si le
gustaría descargar su agenda). Recorra el menú y utilice
"OK" para seleccionar las respuestas deseadas.
Conectar un teléfono con tecnología Bluetooth previa-
mente asociado. (Solo se puede conectar un dispositivo
a la vez. Si conecta otro teléfono, el anterior se desconec-
tará).
Conectar dispositivo Blue-
tooth
1. Oprima "OK" para seleccionar y ver una lista de teléfonos
previamente asociados.
2. Recorra el menú hasta seleccionar el dispositivo
deseado y oprima "OK" para conectar el teléfono.
Configurar un teléfono previamente asociado como su
teléfono principal.
¿Configurar como principal?
Oprima "OK" para seleccionar y recorra el menú hasta
seleccionar el teléfono deseado. Oprima "OK" para
confirmar.
SYNC intentará conectarse con el teléfono principal en
cada ciclo de encendido del vehículo. El teléfono seleccio-
nado como principal será el primero de la lista y estará
marcado con
*
.
Activar/desactivar la característica Bluetooth.Activar/Desactivar Blue-
tooth Oprima "OK" y recorra el menú para cambiar entre Activar
y Desactivar. Una vez que seleccione la opción deseada,
oprima "OK". (Si desactiva el sistema Bluetooth, se
desconectarán todos los dispositivos Bluetooth y se
desactivarán todas las funciones Bluetooth). )
Eliminar un teléfono asociado.Quitar dispositivos
Oprima "OK" y recorra el menú para seleccionar el dispo-
sitivo. Oprima "OK" para confirmar.
Quitar todos los teléfonos asociados anteriormente (y
toda la información originalmente guardada con esos
teléfonos).
Quitar todos
Oprima "OK" para seleccionar.
Cerrar el menú actual.Volver
*
Ésta es una característica dependiente de la velocidad.
323
SYNC®

Opciones avanzadas del menú
1. Oprima el botón de teléfono para
ingresar al menú Teléfono.
2. Recorra el menú hasta que aparezca
Configuración del sistema y oprima
"OK".
3. Recorra el menú hasta que aparezca
Opciones avanzadas y seleccione
"OK".
4. Recorra el menú para seleccionar entre
las opciones siguientes:
PuedeSi selecciona
Obtener ayuda de SYNC haciendo preguntas y recibiendo
consejos útiles o bien, solicitándole una acción específica.
Para activar o desactivar los indicadores:
Indicadores
1. Oprima "OK" para seleccionar y recorra el menú para
seleccionar activar o desactivar.
2. Oprima "OK" cuando la selección deseada aparezca en
la pantalla. SYNC lo llevará de vuelta al menú de Confi-
guración avanzada.
Seleccione entre English, Français o Español. Una vez
seleccionado el idioma, todos los mensajes e indicaciones
de la visualización del radio aparecerán en ese idioma.
Idiomas
1. Oprima "OK" para seleccionar y recorra la lista de
idiomas.
2. Oprima "OK" cuando la selección deseada aparezca en
la pantalla. Si cambia la configuración de idioma, la
pantalla indicará que el sistema se está actualizando.
Cuando complete la actualización, SYNC lo llevará de
vuelta al menú Opciones avanzadas.
Volver a los valores predeterminados de fábrica. Esta
selección no borrará su información indexada (agenda,
historial de llamadas, mensajes de texto y dispositivos
asociados).
Valores de fábrica
1. Oprima "OK" para seleccionar, y oprima otra vez "OK"
cuando aparezca Restaurar valores fáb.? en la pantalla.
2. Oprima "OK" para confirmar.
Borrar completamente toda la información almacenada
en SYNC (agenda, historial de llamadas, mensajes de
texto y todos los dispositivos asociados) y regresar a la
configuración de fábrica.
Reconfiguración total
Oprima "OK" para seleccionar. La pantalla indica cuando
termina la operación y SYNC lo lleva de regreso al menú
Opciones avanzadas.
Instalar aplicaciones que haya descargado.Inst aplic? (¿Instalar aplica-
ción?) Oprima "OK" y recorra el menú para seleccionar la opción.
Oprima "OK" para confirmar.
324
SYNC®

PuedeSi selecciona
Quitar todos los teléfonos asociados anteriormente (y
toda la información originalmente guardada con esos
teléfonos).
Quitar todos
Oprima "OK" para seleccionar.
Acceder al número de Versión Automática y el número
FDN.
Info del sistema
Oprima "OK" para seleccionar.
Es un componente de Bluetooth que puede ayudar aún
más a su teléfono con el intercambio de mensajes de
texto.
Perfil MAP
Cerrar el menú actual.Volver
APLICACIONES Y SERVICIOS
SYNC®
Para activar las siguientes funciones, su
teléfono móvil debe ser compatible con
SYNC. Para verificar la compatibilidad del
teléfono, visite www.SYNCMyRide.com o
www.syncmaroute.ca.
• Servicios SYNC (si está equipado, solo
los EE.UU.): proporcionan acceso a
tráfico, indicaciones e información
como viajes, horóscopo, valor de las
acciones y más.
• 911 Assist™: puede avisar al 911 en caso
de una emergencia.
• Informe de mantenimiento del vehículo
(si está equipado, únicamente en
EE.UU.): proporciona una tarjeta de
informe de diagnóstico y
mantenimiento del vehículo.
911 Assist
AVISOS
A menos que la configuración de 911
Assist se ajuste antes de un
accidente, el sistema no llamará
para solicitar ayuda, lo cual podría retrasar
el tiempo de respuesta, aumentando
potencialmente el riesgo de sufrir heridas
graves o la muerte después de un
accidente.
No espere a que 911 Assist realice
una llamada de emergencia si puede
hacerla usted mismo. Llame a los
servicios de emergencia inmediatamente
para evitar retrasos en el tiempo de
respuesta, lo cual podría aumentar el
riesgo de sufrir heridas graves o la muerte
después de un accidente. Si no escucha la
función 911 Assist después de cinco
segundos del accidente, es posible que el
sistema esté dañado o no esté
funcionando.
325
SYNC®

AVISOS
Siempre coloque su teléfono en un
lugar seguro en el vehículo de
manera que no se convierta en un
proyectil o se dañe en un choque. Si no lo
hace, puede causarle heridas graves a
alguien o dañar el teléfono, lo cual podría
impedir el funcionamiento adecuado de
911 Assist.
Nota: La función SYNC 911 Assist debe
ajustarse antes del incidente.
Nota: Antes de activar esta función,
asegúrese de leer el aviso de privacidad de
911 Assist más adelante en esta sección
para obtener información importante.
Nota: Si un usuario activa o desactiva 911
Assist, esa configuración se aplica a todos
los teléfonos asociados. Si 911 Assist está
desactivado, se reproducirá un mensaje de
voz o aparecerá un mensaje o icono (o
ambos) al arrancar el vehículo después de
haber conectado un teléfono previamente
asociado.
Nota: Cada teléfono funciona de manera
diferente. Aunque SYNC 911 Assist funciona
con la mayoría de los teléfonos móviles,
algunos pueden presentar problemas para
usar esta función.
Si un accidente despliega una bolsa de aire
o activa el corte de la bomba de
combustible, es posible que el vehículo
equipado con SYNC se comunique con los
servicios de emergencia marcando el 911
a través de un teléfono asociado y
conectado con tecnología Bluetooth. Para
obtener más información sobre 911 Assist,
visite www.SYNCMyRide.com o
www.syncmaroute.ca.
Ver Sistema de Seguridad
Complementaria (página 38). Este
capítulo contiene información importante
con respecto al despliegue de las bolsas
de aire.
Ver Emergencias en el Camino (página
216). Este capítulo contiene información
importante con respecto al corte de la
bomba de combustible.
Activación de 911 Assist
1. Oprima el botón de teléfono para
ingresar al menú Teléfono.
2. Recorra el menú hasta seleccionar 911
Assist.
3. Presione OK para confirmar e ingresar
al menú 911 Assist.
4. Desplácese para elegir entre las
opciones Activar y Desactivar.
5. Presione OK cuando la opción que
desee aparezca en la pantalla del
radio. Activado o Desactivado
aparecerá en la pantalla del radio
como confirmación.
Las opciones de desactivación incluyen:
Desactivación con recordatorio y
Desactivación sin recordatorio. La
Desactivación con recordatorio
proporciona un recordatorio de voz y un
mensaje en pantalla cuando conecta el
teléfono al momento del arranque del
vehículo. La Desactivación sin recordatorio
muestra solo un recordatorio en la
pantalla, sin recordatorio de voz al
conectar el teléfono.
Para asegurarse que 911 Assist funcione
adecuadamente:
• SYNC debe contar con energía y
funcionar adecuadamente al momento
del incidente y durante la activación y
uso de la función.
• La función 911 Assist debe ajustarse
antes del incidente.
• Un teléfono compatible y con
tecnología Bluetooth debe estar
asociado y conectado a SYNC.
326
SYNC®

• Un teléfono compatible con tecnología
Bluetooth conectado debe poder
realizar y mantener una llamada al
momento del incidente.
• Un teléfono con tecnología Bluetooth
conectado debe tener cobertura de red
adecuada, energía de la batería e
intensidad de la señal.
• El vehículo debe tener energía de la
batería y estar ubicado en los Estados
Unidos, Canadá o en un territorio donde
el 911 sea el número de emergencia.
En caso de un accidente
No todos los accidentes despliegan una
bolsa de aire o activan el corte de la
bomba de combustible (lo que activaría
la función 911 Assist); sin embargo, si se
activa 911 Assist, SYNC intentará
comunicarse con los servicios de
emergencia. Si un teléfono conectado está
dañado o pierde la conexión con SYNC,
SYNC buscará e intentará conectarse a
cualquier teléfono disponible previamente
asociado y tratará de realizar la llamada
al 911.
Antes de hacer la llamada:
• SYNC proporciona un breve período de
tiempo (aproximadamente 10
segundos) para cancelar la llamada.
Si no se cancela, SYNC tratará de
marcar el 911.
• SYNC proporciona el siguiente mensaje
o uno similar: "SYNC tratará de llamar
al 911, para cancelar la llamada
presione Cancelar en su pantalla o
mantenga presionado el botón de
teléfono en el volante de la dirección".
Si la llamada no se cancela y se realiza de
manera satisfactoria, se reproducirá un
mensaje pregrabado para el operador del
911, luego el o los ocupantes del vehículo
podrán hablar con el operador. Esté
preparado para indicar su nombre, número
de teléfono y ubicación inmediatamente,
ya que no todos los sistemas del 911 son
capaces de recibir esta información de
manera electrónica.
Es posible que 911 Assist no funcione
si
• El hardware del teléfono móvil o de 911
Assist se dañó en el accidente.
• La batería del vehículo o el sistema
SYNC no tienen energía.
• El o los teléfonos asociados y
conectados al sistema salieron
expulsados del vehículo.
Aviso de privacidad de 911 Assist
Una vez que se activa 911 Assist, es posible
que éste se comunique con los servicios
de emergencia indicando el choque del
vehículo y el despliegue de una bolsa de
aire o la activación del corte de la bomba
de combustible. Es posible que ciertas
versiones de 911 Assist también puedan
comunicar de manera verbal o electrónica
a los operadores del 911 la ubicación del
vehículo u otros detalles sobre el mismo o
sobre el choque, para ayudarlos a
proporcionar los servicios de emergencia
más adecuados. Si no desea transmitir
esta información, no active la función.
327
SYNC®

Informe de mantenimiento del
vehículo
ALERTA
Siempre siga las instrucciones de
mantenimiento programadas,
inspeccione su vehículo de manera
regular y solicite la reparación de cualquier
daño o problema que sospeche. El Informe
de mantenimiento del vehículo
complementa, pero no reemplaza el
mantenimiento normal ni la inspección del
vehículo. El Informe de mantenimiento del
vehículo solo monitorea ciertos sistemas
que el vehículo supervisa electrónicamente
y no controlará ni informará el estado de
ningún otro sistema (por ejemplo, el
desgaste de las balatas). Si no realiza el
mantenimiento programado y no
inspecciona regularmente su vehículo,
podría provocar daños en el vehículo o
sufrir lesiones graves.
Nota: Para usar la función de Informe de
mantenimiento del vehículo, primero debe
activarla. Visite www.SYNCMyRide.com
para registrarse. No hay cobros ni
suscripciones asociados con el Informe de
mantenimiento del vehículo, pero debe
registrarse para utilizar esta función.
Nota: Es posible que esta función no opere
adecuadamente si ha activado el bloqueo
de la identificación de quien llama en su
teléfono móvil. Antes de ejecutar un
informe, lea el aviso de privacidad sobre el
Informe de mantenimiento del vehículo.
Nota: Para permitir un período de ajuste
para el vehículo, es posible que no pueda
crear un Informe de mantenimiento del
vehículo hasta que el odómetro del vehículo
haya alcanzado 200 millas.
Regístrese para ver el Informe de
mantenimiento del vehículo y para ajustar
las preferencias del informe en
www.SYNCMyRide.com. Después de
registrarse, podrá solicitar un Informe de
mantenimiento del vehículo (dentro de su
vehículo). Vuelva a su cuenta en
www.SYNCMyRide.com para ver el
informe. También tiene la opción de que
SYNC le recuerde de manera automática
ejecutar informes en intervalos de
kilometraje específicos. Puede que se
apliquen cargos por uso del tiempo de
llamada del teléfono móvil al ejecutar
informes.
El sistema le permite comprobar el
mantenimiento general del vehículo a
través de una tarjeta de informe de
diagnóstico. El informe de mantenimiento
del vehículo contiene información valiosa,
como por ejemplo:
• Información de diagnóstico del
vehículo
• Mantenimiento programado
• Llamados a revisión abiertos y acciones
de servicio en terreno
• Elementos que no han sido revisados
en inspecciones del vehículo del
distribuidor autorizado
Para ejecutar un informe (después de que
el vehículo haya estado en funcionamiento
por un mínimo de 60 segundos):
1. Oprima el botón de teléfono para
ingresar al menú Teléfono.
2. Desplácese hasta seleccionar
Mantenimiento del vehículo y
oprima OK.
3. Desplácese para seleccionar entre las
opciones Preferencias de usuario o
Ejecutar informe.
328
SYNC®

Opciones del informe de mantenimiento del vehículo
Informes automáticos: oprima OK y seleccione activado
o desactivado. Seleccione "Activado" para que SYNC le
avise de manera automática que ejecute un informe de
mantenimiento cada cierto intervalo de kilometrajes. Para
seleccionar los intervalos de kilometraje en los cuales
desea recibir avisos, primero debe activar esta función.
Preferencias de usuario:
oprima OK para seleccionar
e ingresar al menú. Desplá-
cese para seleccionar entre:
Intervalos de kilometraje: oprima OK. Desplácese para
seleccionar entre intervalos de 5000, 7500 o 10000 millas
y oprima OK para confirmar la selección.
Volver: oprima OK para salir del menú.
Oprima OK para que SYNC ejecute un informe de mante-
nimiento de los sistemas de diagnóstico del vehículo y
envíe los resultados a Ford, donde se combinarán con la
información de su distribuidor autorizado, como manteni-
miento programado, llamados a revisión abiertos y otras
acciones de servicio en terreno y de elementos de inspec-
ción no revisados del vehículo.
Ejecutar informe
Aviso de privacidad sobre el Informe
de mantenimiento del vehículo
Cuando ejecute un Informe de
mantenimiento del vehículo, es posible
que Ford Motor Company recopile su
número de teléfono móvil (para procesar
la solicitud del informe) e información de
diagnóstico de su vehículo. Algunas
versiones o actualizaciones del Informe de
mantenimiento del vehículo pueden
también recopilar información adicional
sobre el vehículo. Ford puede utilizar la
información que recopile del vehículo para
cualquier propósito. Si no desea dar a
conocer su número de teléfono móvil o la
información de su vehículo, no ejecute la
función y no configure el perfil del Informe
de mantenimiento del vehículo en
www.SYNCMyRide.com. Para obtener más
información, consulte los términos y
condiciones del Informe de mantenimiento
del vehículo y la declaración de privacidad
en www.SYNCMyRide.com.
Servicios SYNC: Tráfico,
indicaciones e información (TDI)
Nota: Los servicios SYNC deben activarse
antes de utilizarlos. Visite
www.SYNCMyRide.com para registrarse y
comprobar que está calificado para obtener
servicios complementarios. Pueden
aplicarse tarifas estándar de teléfono y
mensajes. Puede que deba suscribirse.
También debe tener el teléfono móvil con
tecnología Bluetooth y Servicios SYNC
activado, asociado y vinculado al sistema
para que pueda comunicarse y utilizar los
Servicios SYNC. Ver Uso de SYNC® con el
teléfono (página 312).
Nota: Esta función no opera
adecuadamente si ha activado el bloqueo
de la identificación de quien llama en su
teléfono móvil. Asegúrese de que el teléfono
móvil no esté bloqueando la identificación
de quien llama antes de utilizar los Servicios
SYNC.
329
SYNC®

Nota: El conductor es el responsable final
de utilizar en forma segura el vehículo y, por
lo tanto, debe evaluar si es seguro seguir las
indicaciones sugeridas. Cualquier función
de navegación se entrega sólo como ayuda.
Tome sus decisiones de manejo según sus
observaciones de las condiciones locales y
reglamentos de tráfico existentes. No siga
las sugerencias de la ruta si hacerlo pudiera
generar una maniobra no segura o ilegal, si
implicara quedar en una situación poco
segura o si fuera dirigido a un área que
considere no segura. Los mapas que este
sistema utiliza pueden ser imprecisos
debido a errores, cambios en los caminos,
condiciones de tráfico o condiciones de
manejo.
Nota: Cuando se conecta, el servicio utiliza
tecnología GPS y sensores avanzados del
vehículo para recopilar información sobre
la ubicación actual del vehículo, la dirección
del viaje y la velocidad para proporcionarle
las indicaciones, informes de tráfico o
ubicaciones de negocios que usted solicite.
Además, para brindarle los servicios
solicitados y para mejorar continuamente,
es posible que el servicio recopile y registre
detalles de llamadas y comunicaciones de
voz. Para obtener más información, consulte
los términos y condiciones del Servicio
SYNC en www.SYNCMyRide.com. Si no
desea que Ford o sus proveedores de
servicios recopilen la información de viaje
del vehículo u otra información indicada en
los Términos y condiciones, no active ni
utilice el servicio.
Los Servicios SYNC utilizan sensores
avanzados del vehículo, tecnología GPS
integrada y datos completos de mapas y
tránsito para proporcionarle informes de
tráfico, indicaciones precisas para llegar a
su destino, ubicaciones de negocios,
noticias, deportes, clima y más. Para
obtener una lista completa de los servicios
o para recibir más información, visite
www.SyncMyRide.com.
Conexión a Servicios SYNC mediante
comandos de voz
1. Presione el botón de voz.
2. Cuando se le indique, diga "Servicios".
Esto inicia una llamada a los Servicios
SYNC mediante el teléfono móvil con
tecnología Bluetooth asociado y
conectado.
3. Luego de conectarse al servicio, siga
los indicadores de voz para solicitar el
servicio deseado, como tráfico o
indicaciones. También puede decir
"¿Cuáles son mis opciones?" para
recibir una lista completa de los
servicios disponibles que puede elegir.
4. Diga "Servicios" para volver al menú
principal de los servicios; para solicitar
ayuda, diga "Ayuda".
Conexión a Servicios SYNC mediante
el menú del teléfono.
1. Oprima el botón de teléfono para
ingresar al menú Teléfono.
2. Desplácese hasta que aparezca
Servicios en la pantalla.
3. Oprima OK para confirmar e ingresar
al menú Servicios. La pantalla indicará
que el sistema se está conectando.
4. Presione OK. SYNC inicia la llamada al
portal de servicios.
5. Luego de conectarse al servicio, siga
los indicadores de voz para solicitar el
servicio deseado, como tráfico o
indicaciones. También puede decir
"¿Cuáles son mis opciones?" para
recibir una lista completa de los
servicios disponibles que puede elegir.
6. Diga "Servicios" para volver al menú
principal de los servicios; para solicitar
ayuda, diga "Ayuda".
330
SYNC®

Recepción de indicaciones de viaje
1. Al conectarse a los Servicios SYNC,
diga "Indicaciones" o "Ubicación de
negocios". Para encontrar el negocio o
tipo de negocio más cercano a su
ubicación actual, diga "Ubicación de
negocios" y después "Buscar cerca de
mí". Si necesita más ayuda para
encontrar un lugar, puede decir
"Operador" en cualquier momento
mientras se encuentra en Indicaciones
o Ubicación de negocios para hablar
con un operador en directo. También
es posible que se le solicite que hable
con un operador. El operador en directo
puede ayudarle a buscar negocios por
nombre o categoría, direcciones
residenciales por calle o por nombre o
por intersecciones de calles
específicas. Operator Assist es una
función de su suscripción a los
Servicios SYNC. Para obtener más
información sobre Operator Assist,
visite www.SYNCMyRide.com/support.
2. Siga las indicaciones de voz para
seleccionar su destino. Después de que
selecciona su destino, se carga la
ubicación actual del vehículo y se
calcula una ruta basada en las
condiciones de tráfico actuales, la que
luego se envía al vehículo. Después de
terminar la descarga de la ruta, la
llamada telefónica finaliza
automáticamente. De esta manera,
recibe instrucciones de manejo
audibles y visuales a medida que viaja
hacia su destino.
3. Mientras se encuentra en una ruta
activa, puede seleccionar o decir
"Resumen de ruta" u "Hora estimada
de llegada" para ver la lista resumida
de instrucciones de ruta o el tiempo
estimado de llegada. También puede
activar o desactivar una guía de voz,
cancelar la ruta o actualizar la ruta.
Si se pasa del lugar donde debía virar,
SYNC le pregunta automáticamente si
desea actualizar la ruta. Solo diga "Sí"
cuando se le indique y se le entregará una
nueva ruta a su vehículo.
Desconexión de los Servicios SYNC
1. Mantenga oprimido el botón del
teléfono en el volante de la dirección.
2. Diga "Adiós" desde el menú principal
de Servicios SYNC.
331
SYNC®

Consejos rápidos para el uso de los Servicios SYNC
Puede personalizar la función de servicios para obtener
un acceso más rápido a su información favorita o la que
usa con más frecuencia. Puede guardar direcciones como
el trabajo o la casa. También puede guardar su información
favorita, como equipos deportivos o una categoría de
noticias. Para obtener más información, inicie sesión en
www.SyncMyRide.com.
Personalización
Oprima el botón de voz en cualquier momento (mientras
está conectado a los Servicios SYNC TDI) para interrumpir
una indicación de voz o un clip de audio (como un informe
deportivo), espere que suene el tono y diga el comando
de voz.
Presione para interrumpir
La suscripción está asociada con su número de teléfono
móvil con tecnología Bluetooth, no con su VIN (Número
de identificación del vehículo). Puede asociar y conectar
su teléfono a cualquier vehículo que cuente con Tráfico,
indicaciones e información y seguir disfrutando de sus
servicios personalizados.
Portátil
Incluso puede acceder a su cuenta fuera del vehículo.
Simplemente utilice el número que aparece en el historial
de llamadas del teléfono. Las funciones de tráfico e indi-
caciones no funcionan correctamente, pero los servicios
de información y las funciones de conexión 411 y mensa-
jería de texto están disponibles.
USO DE SYNC® CON EL
REPRODUCTOR MULTIMEDIA
Puede acceder a música y reproducirla
desde su reproductor de música digital,
mediante el sistema de bocinas del
vehículo utilizando el menú de medios o
los comandos de voz del sistema. Además,
puede ordenar y reproducir su música por
categorías específicas, como artistas,
álbumes, etc.
SYNC tiene la capacidad de alojar
prácticamente todos los reproductores de
medios digitales, incluyendo iPod®,
Zune™, reproductores “Toca desde
dispositivo” y la mayoría de los
controladores USB. SYNC® también es
compatible con formatos de audio como
MP3, WMA, WAV y ACC.
Conexión de un reproductor de
medios digitales al puerto USB
Nota: Si su reproductor de medios digitales
tiene un interruptor de encendido/apagado,
asegúrese de que el dispositivo esté
encendido.
332
SYNC®

Para conectarlo mediante comandos
de voz
1. Conecte el dispositivo al puerto USB
del vehículo.
2. Presione el icono de voz y cuando se le
indique, diga "USB".
3. Ahora puede escuchar música diciendo
cualquiera de los comandos
apropiados. Consulte los comandos de
voz para el control de medios
Para conectarlo mediante el menú del
sistema
1. Conecte el dispositivo al puerto USB
del vehículo.
2. Presione AUX y después MENU para
ingresar al menú Medios.
3. Desplácese hasta que aparezca
Seleccionar fuente y oprima "OK".
4. Desplácese para seleccionar USB y
oprima "OK".
5. Dependiendo de la cantidad de
archivos de medios digitales que se
encuentren en el dispositivo
conectado, es posible que aparezca
Indexando en la pantalla del radio. Al
finalizar la indexación, la pantalla
regresa al menú Reproducir.
Oprima "OK" y recorra las selecciones de:
• Tocar todo
• Álbumes
• Géneros
• Playlists
• Canciones
• Explorar USB
• Música similar
• Volver
¿Qué es esto?
En cualquier momento, mientras se
escucha una canción, puede presionar el
icono de voz y preguntarle al sistema
"¿Qué es esto?". El sistema lee las
etiquetas de metadatos de la canción (si
están completas).
Comandos de voz de medios
E142599
Presione el icono de voz y
cuando se le indique, diga "USB"
y después, cualquiera de las
siguientes opciones:
"USB"
"Redefinir álbum <nombre>"
1,2
"Autoplay desactivado"
"Redefinir artista <nombre>"
1,2
"Autoplay activado"
"Refinar canción <nombre>"
1
"Conexiones"
"Redefinir canción <nombre>"
1,2
"Pausa"
"Desactivar repetición""Reproducir"
"Activar Repetición"
"Reproducir Disco <nombre>"
1,2
"Buscar Disco <nombre>"
1,2
"Reproducir todo"
333
SYNC®

"USB"
"Buscar artista <nombre>"
1,2
"Reproducir Artista <nombre>"
1,2
"Buscar género <nombre>"
1
"Reproducir género <nombre>"
1,2
"Buscar canción <nombre>"
1
"Reproducir siguiente carpeta"
3
"Buscar canción <nombre>"
1,2
"Siguiente canción"
"Desactivar reproducción aleatoria"
"Reproducir lista <nombre>"
1,2
"Activar reproducción aleatoria"
"Reproducir carpeta anterior"
3
"Reproducir Música Similar""Canción anterior"
"¿Qué es esto?"
"Reproducir canción <nombre>"
1
"Reproducir la canción <nombre>"
1,2
1
<nombre> es una lista dinámica, lo que significa que puede ser el nombre de cualquier
banda, artista, canción, etc.
2
Comandos de voz que no están disponibles hasta que la indexación esté completa.
3
Comandos de voz que solo están disponibles en el modo de carpeta.
Guía de comandos de voz
· Active esta función para escuchar la música indexada en
forma aleatoria durante el proceso de indexación.
"Autoplay"
334
SYNC®

Guía de comandos de voz
· Desactive esta función para que el sistema no empiece
a reproducir su música sino hasta que todos los medios
hayan sido incluidos en la lista. El tiempo de indexación
puede variar de un dispositivo a otro y también a causa
de la cantidad de canciones que se están indexando.
El sistema busca todos los datos de su música indexada
y, si está disponible, comenzará a tocar el tipo de música
seleccionada. Puede tocar géneros de música que estén
presentes en las etiquetas de metadatos de género que
tenga en su reproductor de medios digitales.
"Buscar género" o "Repro-
ducir género"
El sistema compila una lista y reproduce música similar a
la que está escuchando actualmente desde el puerto USB
usando la información de los metadatos indexados.
"Reproducir Música Similar"
El sistema busca un artista, canción o álbum específico
entre la música indexada a través del puerto USB.
"Buscar", "Reproducir",
"Artista", "Canción",
"Álbum"
Le permite ser más específico con respecto a los
comandos anteriores. Por ejemplo, si pidió al sistema que
buscara y tocara toda la música de un cierto artista, luego
puede decir “Redefinir álbum” y seleccionar un álbum
específico en la lista. Si después selecciona Reproducir,
el sistema reproduce solamente la música de ese álbum
específico.
"Redefinir"
Presione el icono de voz y cuando se le
indique, diga "Audio Bluetooth" y después,
cualquiera de las siguientes opciones:
"AUDIO BLUETOOTH"
"Conexiones"
"Pausa"
"Reproducir"
"Siguiente canción"
"Canción anterior"
335
SYNC®

Características del menú Medios
El menú Medios le permite seleccionar la
fuente de los medios, cómo le gustaría
reproducir su música (por artista, género,
al azar, repetir, etc.), y también si necesita
agregar, conectar o quitar dispositivos.
1. Presione AUX y después MENU para
ingresar al menú Medios.
2. Desplácese entre:
PuedeCuando selecciona
Reproduce su música por artista, álbum, género, listas de
reproducción (playlists), canciones, música similar, o
simplemente reproducir todo. También puede escoger
Explorar USB para ver qué archivos de música digital
soporta su dispositivo reproductor.
Menú Tocar
· Seleccione y reproduzca música desde el puerto USB, la
toma de entrada auxiliar (entrada de audio) o reproduzca
música desde teléfono con tecnología Bluetooth.
Seleccionar fuente
· Oprima "OK" para seleccionar y luego desplácese para
seleccionar entre USB, Audio Bluetooth y Entrada de
audio.
· Si selecciona USB y Autoplay está activado, puede
acceder a archivos de media de manera aleatoria a medida
que se indexan. Si está desactivado, los medios indexados
no estarán disponibles sino hasta que termine el proceso
de indexado. SYNC puede indexar miles de medios de
tamaño mediano y le avisa cuando se alcanza el tamaño
máximo de indexado de archivos.
· Los usuarios que tienen teléfonos Bluetooth capaces de
transmitir audio pueden oprimir SEEK para reproducir la
pista anterior o siguiente.
· Si tiene conectado un dispositivo en el puerto USB, no
podrá acceder a la característica de entrada de audio.
Algunos reproductores de medios digitales requieren
puertos USB y de entrada de audio para recibir flujos de
datos y música en forma separada.
· Seleccione esta opción para reproducir en forma aleatoria
o repetir su música y seleccionar los ajustes de Autoplay.
Una vez activas estas selecciones, permanecerán de ese
modo hasta que las cancele.
Configuración de medios
· Algunos reproductores de medios digitales requieren
puertos USB y de entrada de audio para recibir flujos de
datos y música en forma separada. Oprima "OK" para
seleccionar y luego desplácese para seleccionar entre
Mezclar, Repetir o Autoplay.
336
SYNC®

PuedeCuando selecciona
Interactuar con aplicaciones móviles compatibles con
SYNC en su teléfono inteligente.
Aplicaciones móviles
Acceder a las listas del menú Dispositivo Bluetooth
(agregar, conectar, configurar como principal, activar/
desactivar, quitar), así como a las listas del menú
Opciones avanzadas (indicadores, idiomas, configura-
ciones de fábrica, reconfiguración total, instalación de
aplicaciones e información del sistema).
Configuración del sistema
Oprima "OK" para salir del menú Medios.Salir Menú medios
Acceso al menú Tocar
Este menú le permite seleccionar y
reproducir sus medios por artista, álbum,
género, lista de reproducción (playlist),
canción o música semejante, e incluso
explorar lo que hay en su dispositivo USB.
1. Asegúrese de que su dispositivo esté
conectado al puerto USB y encendido.
2. Presione AUX y después MENU para
ingresar al menú Medios.
3. Desplácese para seleccionar el menú
Tocar y oprima "OK".
Si no hay archivos de medios a los cuales
acceder, la pantalla indica que no hay
medios. Si hay archivos de medios, tiene
las siguientes opciones para recorrer y
seleccionar:
PuedeCuando selecciona
· Reproducir todos los medios (canciones) indexados de
su dispositivo en modo de archivo plano, uno a la vez en
orden numérico.
Tocar todo
· Oprima "OK" para seleccionar. En la pantalla aparece el
título de la primera canción.
Ordenar todos los medios indexados por artista. Una vez
seleccionado, el sistema hace una lista y luego toca todos
los artistas y canciones en orden alfabético. Si hay menos
de 255 artistas indexados, se ordenan en orden alfabético
en el modo de archivo plano. Si hay más, se organizarán
por categorías en orden alfabético.
Artistas
1. Oprima "OK" para seleccionar. Puede reproducir Todos
los artistas o cualquier artista indexado.
2. Recorra el menú hasta seleccionar el artista deseado y
oprima "OK".
Ordenar todos los medios indexados por álbum. Si hay
menos de 255 álbumes indexados, se ordenan en orden
alfabético en el modo de archivo plano. Si hay más, se
organizarán por categorías en orden alfabético.
Álbumes
337
SYNC®

PuedeCuando selecciona
1. Oprima "OK" para ingresar al menú Álbumes y seleccione
entre tocar todos los álbumes o tocar uno de los álbumes
indexados.
2. Recorra el menú hasta seleccionar el álbum deseado y
oprima "OK".
· Ordenar la música indexada por tipo de género (cate-
goría). SYNC lista los géneros en orden alfabético en el
modo de archivo plano. Si hay más de 255, SYNC los
organiza automáticamente por categorías en orden alfa-
bético.
Géneros
· Oprima "OK" para seleccionar. Recorra el menú para
seleccionar el género deseado y oprima "OK".
· Acceder a sus listas de reproducción (en formatos como
. ASX, .M3U, . WPL o . MTP). El sistema organiza las listas
de reproducción en orden alfabético en el modo de archivo
plano. Si hay más de 255, se organizan por categorías en
orden alfabético.
Playlists
· Oprima "OK" para seleccionar. Recorra el menú para
seleccionar la lista de reproducción deseada y oprima
"OK".
· Buscar y tocar una canción específica que haya sido
indexada. SYNC ordena las canciones en orden alfabético
en el modo de archivo plano. Si hay más de 255, SYNC los
organiza automáticamente por categorías en orden alfa-
bético.
Canciones
· Oprima "OK" para seleccionar. Recorra el menú para
seleccionar la pista deseada y oprima "OK".
· Explorar todos los medios digitales soportados ubicados
en el dispositivo de medios conectado al puerto USB. Solo
puede ver el contenido de los medios compatibles con
SYNC; otros archivos almacenados no serán visibles.
Explorar USB
· Oprima "OK" para seleccionar. Recorra el menú para
explorar los medios indexados en su dispositivo de
memoria Flash.
· Tocar música similar a la que se está reproduciendo
desde el puerto USB. El sistema usará la información de
metadatos de cada canción para crear una lista de repro-
ducción.
Música similar
· Oprima "OK" para seleccionar. El sistema crea una nueva
lista de canciones similares y comienza a tocar. Las
etiquetas de metadatos deben estar completas para que
esta característica incluya todas las canciones.
338
SYNC®

PuedeCuando selecciona
· Con ciertos dispositivos de reproducción, si las etiquetas
de metadatos no están completas, las canciones no
estarán disponibles en el modo de reconocimiento de voz
ni en los menús tocar o música similar. No obstante, si
pone estas canciones en su dispositivo de reproducción
en el modo de Dispositivo de almacenamiento masivo,
estarán disponibles en el modo de reconocimiento de voz
y en los menús Tocar y Música similar. Se colocará
DESCONOCIDO en las etiquetas de metadatos incom-
pletas.
Cerrar el menú actual.Volver
Configuración del sistema
Configuración del sistema le da acceso a
las características de los menús
Dispositivo Bluetooth y Opciones
avanzadas.
El menú Dispositivo Bluetooth le permite
agregar, conectar y quitar un dispositivo,
así como activar o desactivar la
característica Bluetooth.
El menú Opciones avanzadas le permite
acceder y configurar indicadores, idiomas
y configuraciones de fábrica, y realizar una
reconfiguración total.
Opciones del menú Dispositivo
Bluetooth
1. Presione AUX y después MENU para
ingresar al menú Medios.
2. Desplácese hasta que aparezca
Configuración del sistema,
seleccione "OK" y oprima "OK".
3. Recorra el menú hasta que aparezca
Dispositivo Bluetooth.
4. Oprima "OK" y recorra la pantalla para
escoger entre:
PuedeCuando selecciona
Le permite vincular dispositivos adicionales con el sistema.Agregar dispositivo Blue-
tooth
*
1. Oprima "OK" para seleccionar, y oprima otra vez "OK"
cuando aparezca Buscar SYNC en la pantalla.
2. Siga las instrucciones de la guía del usuario de su telé-
fono para poner el teléfono en modo de detección. En la
pantalla aparece un número de identificación personal
(PIN) de seis dígitos.
3. Cuando se lo indiquen en la pantalla de seis cifras del
teléfono, ingrese el PIN.
Conectar un teléfono con tecnología Bluetooth previa-
mente asociado.
Conectar dispositivo Blue-
tooth
1. Oprima "OK" para seleccionar y ver una lista de disposi-
tivos.
339
SYNC®

PuedeCuando selecciona
2. Recorra el menú hasta seleccionar el dispositivo
deseado, y oprima "OK" para conectarlo.
· Activar/desactivar la característica Bluetooth.Activar/Desactivar Blue-
tooth · Oprima "OK" y recorra el menú para cambiar entre
Activar y Desactivar. Una vez que seleccione la opción
deseada, oprima "OK". Si desactiva el sistema Bluetooth,
se desconectarán todos los dispositivos Bluetooth y se
desactivarán todas las funciones Bluetooth.
· Eliminar un dispositivo de medios asociado.Quitar dispositivos
· Oprima "OK" y recorra el menú para seleccionar el
dispositivo. Oprima "OK" para confirmar.
· Quitar todos los dispositivos previamente asociados.Quitar todos
· Oprima "OK" para seleccionar.
Cerrar el menú actual.Volver
*
Ésta es una característica dependiente de la velocidad.
Opciones avanzadas del menú
1. Presione AUX y después MENU para
ingresar al menú Medios.
2. Desplácese hasta que aparezca
Configuración del sistema,
seleccione "OK" y oprima "OK".
3. Recorra el menú hasta que aparezca
Opciones avanzadas.
4. Oprima "OK" y recorra la pantalla para
escoger entre:
PuedeCuando selecciona
Usar SYNC como guía haciendo preguntas y recibiendo
consejos útiles o bien, solicitándole una acción específica.
Indicadores
1. Oprima "OK" para seleccionar y recorra el menú para
seleccionar activar o desactivar.
2. Oprima "OK" cuando la selección deseada aparezca en
la pantalla. SYNC lo llevará de vuelta al menú de Confi-
guración avanzada.
Seleccione entre English, Français o Español. Los
mensajes e indicaciones de la visualización aparecerán
en ese idioma.
Idiomas
1. Oprima "OK" para seleccionar y recorra la lista de
idiomas.
2. Oprima "OK" cuando la selección deseada aparezca en
la pantalla.
340
SYNC®

PuedeCuando selecciona
3. Si cambia la configuración de idioma, la pantalla indicará
que el sistema se está actualizando. Cuando complete la
actualización, SYNC lo llevará de vuelta al menú Opciones
avanzadas.
Volver a los valores predeterminados de fábrica. Esta
selección no borrará su información indexada (agenda,
historial de llamadas, mensajes de texto y dispositivos
asociados).
Valores de fábrica
1. Oprima "OK" para seleccionar, y oprima otra vez "OK"
cuando aparezca Restaurar valores fáb.? en la pantalla.
2. Oprima "OK" para confirmar.
Borrar completamente toda la información almacenada
en SYNC (agenda, historial de llamadas, mensajes de
texto y todos los dispositivos asociados) y regresar a la
configuración de fábrica.
Reconfiguración total
Descargar nuevas aplicaciones de software (si están
disponibles) y luego cargar las aplicaciones que desee en
SYNC a través del puerto USB. Consulte el sitio web para
más información.
Aplicación
Cerrar el menú actual.Volver
DIAGNÓSTICO DE FALLAS
SYNC®
Su sistema SYNC es fácil de usar. Sin
embargo, en caso de duda, consulte las
tablas a continuación.
Visite el sitio web en cualquier momento
para verificar la compatibilidad de su
teléfono, registrar su cuenta y configurar
sus preferencias, y para comunicarse en
línea con un representante de atención al
cliente (en ciertos horarios). Si desea más
información, visite www.SYNCMyRide.com
o www.syncmaroute.ca.
341
SYNC®

Problemas del teléfono
Solución(es) posible(s)Causa(s) posible(s)Problema
Consulte la guía del usuario
de su teléfono para ver la
configuración de audio.
La configuración del control
de audio de su teléfono
puede estar afectando el
desempeño de SYNC.
Mucho ruido de fondo
durante una llamada telefó-
nica.
Apague el dispositivo, resta-
blézcalo o quítele la batería,
e inténtelo de nuevo.
Posible falla del teléfono.Durante una llamada, puedo
oír a la otra persona, pero
ésta no puede oírme.
· Visite el sitio web para veri-
ficar la compatibilidad de su
teléfono.
Ésta es una característica
dependiente del teléfono.
· Posible falla del teléfono.
SYNC no puede descargar
mi agenda.
· Apague el dispositivo,
restablézcalo o quítele la
batería, e inténtelo de
nuevo.
· Intente "empujar" los
contactos de su agenda a
SYNC® mediante la función
Agregar contactos.
· Use la característica
"SYNCmyphone" disponible
en el sitio web.
· Intente "empujar" los
contactos de su agenda a
SYNC® mediante la función
Agregar contactos.
Limitaciones en la capa-
cidad de su teléfono.
El sistema dice "Agenda
descargada" pero mi
agenda en SYNC aparece
vacía o le faltan contactos.
· Si los contactos que faltan
están almacenados en su
tarjeta SIM, trate de
moverlos a la memoria del
dispositivo.
· Elimine las imágenes o
tonos de timbre especiales
asociados con el contacto
faltante.
· Visite el sitio web para veri-
ficar la compatibilidad de su
teléfono.
· Ésta es una característica
dependiente del teléfono.
· Posible falla del teléfono.
Tengo problemas para
conectar mi teléfono a
SYNC.
342
SYNC®

Problemas del teléfono
Solución(es) posible(s)Causa(s) posible(s)Problema
· Apague el dispositivo,
restablézcalo o quítele la
batería, e inténtelo de
nuevo.
· Quite su dispositivo de
SYNC y quite SYNC de su
dispositivo, e intente nueva-
mente.
· Verifique la configuración
de seguridad y de "aceptar
automáticamente/indicar
siempre" de la conexión
Bluetooth SYNC de su telé-
fono.
· Actualice la aplicación
oficial del fabricante de su
dispositivo.
· Desactive la configuración
de descarga automática de
la agenda.
· Visite el sitio web para veri-
ficar la compatibilidad de su
teléfono.
· Ésta es una característica
dependiente del teléfono.
· Posible falla del teléfono.
Los mensajes de texto no
funcionan en SYNC.
· Apague el dispositivo,
restablézcalo o quítele la
batería, e inténtelo de
nuevo.
Problemas de USB y medios
Solución(es) posible(s)Causa(s) posible(s)Problema
· Apague el dispositivo,
restablézcalo o quítele la
batería, e inténtelo de
nuevo.
Posible falla del dispositivo.Tengo problemas para
conectar mi dispositivo.
· Asegúrese de utilizar el
cable del fabricante.
· Asegúrese de que el cable
USB esté bien conectado en
el dispositivo y en el puerto
USB del vehículo.
343
SYNC®

Problemas de USB y medios
Solución(es) posible(s)Causa(s) posible(s)Problema
· Asegúrese de que el dispo-
sitivo no tenga un programa
de instalación automática
ni una configuración de
seguridad activa.
Asegúrese de no dejar el
dispositivo dentro del
vehículo en condiciones muy
calurosas o muy frías.
Ésta es una limitación del
dispositivo.
SYNC no reconoce mi
dispositivo cuando arranco
el vehículo.
Asegúrese de que el disposi-
tivo esté conectado a
SYNC® y de haber presio-
nado Reproducir en su
dispositivo.
Ésta es una característica
dependiente del teléfono.
El dispositivo no está
conectado.
No hay flujo de audio Blue-
tooth.
· Asegúrese de que haya
datos en todas las etiquetas
de información de la
canción.
· Es probable que sus
archivos de música no
contengan información
correcta de artista, título de
canción, álbum o género.
SYNC no reconoce la
música que está en mi
dispositivo.
· En algunos dispositivos es
necesario cambiar la confi-
guración de USB de almace-
namiento masivo a clase
MTP.
· El archivo puede estar
corrupto.
· La canción puede tener
mecanismos de protección
de derechos de autor que no
permiten reproducirla.
Problemas de informe/servicio de mantenimiento del vehículo (tráfico, indicaciones e
información)
Solución(es) posible(s)Causa(s) posible(s)Problema
· Ésta es una función
gratuita, pero primero debe
registrarse en línea para
usarla.
· Su cuenta no se puede
activar en el sitio web.
· Es posible que se indique el
VIN (número de identifica-
ción del vehículo) erróneo.
Recibí un texto que indica
que el informe de manteni-
miento del vehículo no está
activado.
344
SYNC®

Problemas de informe/servicio de mantenimiento del vehículo (tráfico, indicaciones e
información)
Solución(es) posible(s)Causa(s) posible(s)Problema
· Asegúrese de que el VIN se
indica correctamente en la
cuenta.
Cuando registra la cuenta,
debe indicar un distribuidor
preferido. Si ya se indica
uno, intente seleccionar otro
distribuidor y cerrar sesión.
Vuelva a iniciar sesión y
vuelva a su distribuidor
preferido y recupere el
informe.
La información de distri-
buidor preferido no se cargó
correctamente.
No puedo recuperar el
informe en el sitio Web o
recibí un error de sistema.
· Actualice su número móvil
en su cuenta en el sitio web.
· Esto se puede deber a la
compatibilidad de su telé-
fono.
No puedo enviar un informe.
· Asegúrese de tener inten-
sidad de señal completa y
que se aumentó el nivel de
volumen Bluetooth.
· Mala intensidad de señal.
· El teléfono no se puede
activar en el sitio web.
· Intente eliminar el teléfono
y realizar una asociación
limpia.
· Ésta es una función
gratuita, pero primero debe
registrarse en línea para
usarla.
· El teléfono en uso no está
activado.
· El teléfono tiene un
bloqueador de ID activo.
Escuché un comercial
cuando intenté usar Tráfico,
indicaciones e información.
· Desactive el bloqueador de
ID del teléfono ya que el
sistema lo reconoce por el
número de teléfono.
· Asegúrese de que el telé-
fono conectado actual-
mente es el mismo que el
registrado en su cuenta
SyncMyRide.
345
SYNC®

Problemas de comandos de voz
Solución(es) posible(s)Causa(s) posible(s)Problema
Revise los comandos de voz
del teléfono y los comandos
de voz de medios al principio
de sus respectivas
secciones.
Posiblemente esté usando
comandos de voz inco-
rrectos.
Probablemente habla
demasiado pronto o en el
momento inoportuno.
SYNC no entiende lo que
digo.
Recuerde que el micrófono
SYNC® está en el espejo
retrovisor o el acabado del
techo, justo encima del
parabrisas.
Revise los comandos de voz
de medios al principio de la
sección correspondiente.
Posiblemente esté usando
comandos de voz inco-
rrectos.
SYNC no entiende el
nombre de una canción o un
artista.
Diga o pronuncie el nombre
de la canción o el artista tal
como aparece en la lista. Si
usted dice: "Reproducir
artista Prince", el sistema no
reproduce la música que
diga "Prince and the Revolu-
tion" ni "Prince and the New
Power Generation".
Quizá no dice o pronuncia el
nombre exactamente como
lo guardó.
Es posible que el sistema no
"lea" el nombre de la misma
manera que usted lo dice o
pronuncia.
Asegúrese de decir o
pronunciar el título
completo, por ejemplo:
"Remix de California con
Jennifer Nettles".
Si guardó las canciones con
letras MAYÚSCULAS, debe
que deletrearlas. LOLA
requiere que diga "L-O-L-A".
No utilice caracteres espe-
ciales en el título, pues el
sistema no lo reconoce.
Revise los comandos de voz
del teléfono al principio de
la sección correspondiente.
Posiblemente esté usando
comandos de voz inco-
rrectos.
SYNC no entiende, o llama
al contacto equivocado
cuando quiero hacer una
llamada.
346
SYNC®

Problemas de comandos de voz
Solución(es) posible(s)Causa(s) posible(s)Problema
Asegúrese de decir o
pronunciar los contactos
exactamente como están
listados. Por ejemplo, si
guardó un contacto como
José Gutiérrez, diga: "Llamar
a José Gutiérrez".
Quizá no dice o pronuncia el
nombre exactamente como
lo guardó.
Es probable que los
contactos de su agenda
sean muy cortos y pare-
cidos, o que contengan
caracteres especiales. El sistema funciona mejor si
escribe los nombres y
apellidos; por ejemplo, "José
Gutiérrez" en vez de "José".
Probablemente guardó los
contactos de su agenda en
MAYÚSCULAS.
No utilice caracteres espe-
ciales como 123 o ICE pues
el sistema no lo reconoce.
Si guardó los contactos con
letras MAYÚSCULAS, tiene
que deletrearlos. Si requiere
"JAIME", tendrá que decir:
"Llamar a J-A-I-M-E”.
347
SYNC®

INFORMACIÓN GENERAL
ALERTA
Manejar mientras está distraído
puede tener como consecuencia la
pérdida de control del vehículo, un
accidente y lesiones. Ford le recomienda
enfáticamente que extreme las
precauciones cuando utilice cualquier
dispositivo o función que pudiera distraerlo
mientras conduce. Su responsabilidad
principal es manejar en forma segura el
vehículo. No se recomienda el uso de
ningún dispositivo portátil al conducir; se
sugiere el uso de sistemas operados por
voz cuando sea posible y que se informe
de las leyes estatales y locales aplicables
al uso de dispositivos electrónicos al
conducir.
Nota: Algunas funciones no están
disponibles mientras el vehículo está en
movimiento.
Nota: También puede ingresar
directamente a la pantalla de inicio y a la
pantalla de información oprimiendo el
botón de Inicio (el icono de "casa") y el
botón de Información (el icono de "i") en
los controles del volante de dirección.
Este sistema usa una estrategia de cuatro
esquinas para proporcionar acceso rápido
a las funciones y ajustes del vehículo. La
completa pantalla táctil le permite
interactuar de manera sencilla con su
teléfono móvil, archivos de medios, control
de temperatura y sistema de navegación.
En las esquinas también verá cualquier
modo activo de esos menús, como su
teléfono en proceso de conexión o la
temperatura ambiente.
E142607
MENÚ
Oprima para seleccionar cualquiera de
estas opciones:
• Reloj
• Sonido
• Configuración
• Pantalla
• Vehículo
• Ayuda
INFORMACIÓN
Oprima para seleccionar cualquiera de
estas opciones:
• Servicios SYNC®
• Notificaciones
• Aplicaciones SYNC
• SIRIUS® Travel Link™
• Calendario
TELÉFONO
Oprima para seleccionar cualquiera de
estas opciones:
• Marcación rápida
• Historial de llamadas
• Configuración
• Agenda
• Mensajes de texto
• Hacer y recibir llamadas
NAVEGACIÓN
Oprima para seleccionar cualquiera de
estas opciones:
• Mi casa
• Destinos anteriores
• Emergencia
• Intersección
• Mapa
• Favoritos
• Punto de interés
• Calle y número
• Centro de la ciudad
348
MyFord Touch®

ENTRETENIMIENTO
Oprima para seleccionar cualquiera de
estas opciones:
• AM o FM
• CD
• Estéreo BT
• Tarjeta SD
• SIRIUS
• USB
• Entrada de AV
CLIMATIZACIÓN
Oprima para seleccionar cualquiera de
estas opciones:
• Configuración del conductor
• Aire recirculado
• Automático
• Doble
• Configuración del pasajero
• A/A
• Desempañar
Uso de los controles sensibles al
tacto de su sistema
El pilar central de su vehículo cuenta con
interruptores sensibles al tacto para los
sistemas de entretenimiento y de
climatización. Para activar o desactivar
una función, únicamente debe tocar la
imagen con el dedo. Para obtener un
rendimiento óptimo de los controles
sensibles al tacto:
• Asegúrese de que sus manos estén
limpias y secas.
• Debido a que la pantalla táctil funciona
con el toque de un dedo, podría tener
problemas si usa guantes.
• Utilice su dedo descubierto para tocar
la parte central de una imagen de
control táctil. Si no toca la parte central
de la imagen, podría activar o
desactivar un control adyacente.
• No presione los controles con fuerza.
Son sensibles al tacto ligero.
• El metal y otros materiales conductivos
se deben mantener alejados de la
superficie de la pantalla táctil, ya que
de lo contrario podrían causar
interferencia electrónica (es decir, la
activación del control).
Dependiendo del vehículo y del paquete
de opciones, podría también tener los
siguientes controles en su bisel:
• Encendido: encender o apagar los
medios (o las funciones de
climatización).
• VOL: aumenta o disminuye el volumen.
• Ventilador: aumenta o disminuye la
velocidad del ventilador.
• Botones Seek (Buscar) y Tune
(Sintonizar): utilice como lo haría
normalmente en los modos de medios.
• Expulsar: expulsar un CD.
• SOURCE: toque la palabra
repetidamente para ver todos los
modos de medios disponibles. La
pantalla no cambiará, pero podrá ver
los cambios de medios en la barra de
estado inferior izquierda.
• SOUND: toque la palabra para acceder
al menú de Sonido de la pantalla
donde puede hacer los ajustes de
configuración tales como: graves,
agudos, alcances intermedios, balance
y atenuación del sonido, demostración
de Deep Note THX (si está equipado),
DSP (si está equipado), modo de
ocupación (si está equipado) y
configuración del Volumen
compensado por velocidad.
• Luces intermitentes de emergencia:
oprima el botón para activar o
desactivar las luces intermitentes de
emergencia.
349
MyFord Touch®

Limpieza de la pantalla táctil
Limpie la pantalla con un paño limpio y
suave, como los que se utilizan para limpiar
anteojos. Si todavía queda suciedad o
huellas digitales, aplique una pequeña
cantidad de alcohol al paño. No vierta ni
rocíe alcohol sobre la pantalla. No utilice
detergente ni ningún otro tipo de solvente
para limpiar la pantalla.
Soporte
El equipo de soporte de SYNC está
disponible para ayudarle a responder las
preguntas que no pueda contestar por su
cuenta.
De lunes a sábado, de 8:30 a.m. a 8 p.m.
En los Estados Unidos, llame al:
1-888-270-1055
En Canadá, llame al: 1-800-565-3673
Los horarios están sujetos a cambios
debido a los días festivos.
Información de seguridad
ALERTA
Manejar mientras está distraído
puede tener como consecuencia la
pérdida de control del vehículo, un
accidente y lesiones. Ford le recomienda
enfáticamente que extreme las
precauciones cuando utilice cualquier
dispositivo o función que pudiera distraerlo
mientras conduce. Su responsabilidad
principal es manejar en forma segura el
vehículo. No se recomienda el uso de
ningún dispositivo portátil al conducir; se
sugiere el uso de sistemas operados por
voz cuando sea posible y que se informe
de las leyes estatales y locales aplicables
al uso de dispositivos electrónicos al
conducir.
Al usar SYNC:
• No haga funcionar dispositivos de
juegos si los cables de corriente están
rotos, separados o dañados. Coloque
con cuidado los cables de corriente
donde no los puedan pisar y no
interfieran con el funcionamiento de
pedales, asientos, compartimentos o
capacidades de manejo seguro.
• No deje los dispositivos de juego en el
vehículo en condiciones extremas, ya
que podría dañarlos. Para obtener más
información, consulte la guía del
usuario del dispositivo.
• No intente revisar o reparar el sistema.
Consulte con su distribuidor autorizado.
• Para su seguridad, algunas funciones
de SYNC dependen de la velocidad y
no se pueden ejecutar cuando el
vehículo viaja a velocidades superiores
a 5 km/h (3 mph).
Asegúrese de revisar la guía del usuario del
dispositivo antes de usarlo con SYNC.
350
MyFord Touch®

Características restringidas por la
velocidad
Algunas características de este sistema
pueden ser demasiado difíciles de utilizar
mientras el vehículo está en movimiento,
por lo tanto no se permite modificarlas a
menos que el vehículo esté detenido.
Algunos ejemplos de ellas se indican a
continuación:
• Las pantallas demasiado abarrotadas
con información, como revisiones y
calificaciones de Punto de interés,
resultados deportivos, horarios de
películas, condiciones para esquiar que
aparecen en SIRIUS Travel Link, etc.
• Cualquier acción que requiera el uso
de un teclado, como entrar un destino
de navegación o información de
edición.
• Todas las listas son limitadas de modo
que el usuario pueda ver menos
entradas (por ejemplo, contactos
telefónicos, entradas de llamadas
telefónicas recientes).
A continuación aparecen las
características más específicas que solo
pueden modificarse mientras el vehículo
no se encuentre en movimiento:
Características restringidas
Asociación de un teléfono con BluetoothTeléfono móvil
Incorporación de contactos a la agenda telefónica o carga
de estos (desde USB)
Las entradas de listas son limitadas para los contactos
telefónicos y las entradas de llamadas telefónicas
recientes.
Edición del código del tecladoFuncionalidad del sistema
Activación del modo valet
Configuración de la edición mientras se encuentran activas
la cámara retrovisora o la asistencia de estacionamiento
activa
Edición de la configuración de la conexión inalámbricaWi-Fi o conexión inalám-
brica
Edición de la lista de redes inalámbricas
Reproducción de videoVideos, fotos o gráficas
Edición de un fondo de pantalla e incorporación de uno
nuevo
Composición de mensajes de textoMensajes de texto
Visualización de los mensajes de texto recibidos
Edición de los mensajes de texto preestablecidos
351
MyFord Touch®

Características restringidas
Uso del teclado para ingresar un destinoNavegación
Ruta de navegación de demostración
Incorporación o edición de entradas de la libreta de direc-
ciones o áreas por evitar
Información de privacidad
Cuando un teléfono móvil se conecta a
SYNC, este crea un perfil dentro de su
vehículo que está asociado a ese teléfono
móvil. Este perfil se crea para ofrecerle
más funciones móviles y para una
operación más eficiente. Entre otras cosas,
este perfil puede contener datos acerca
de la agenda del teléfono móvil, mensajes
de texto (leídos y sin leer) y el historial de
llamadas, incluyendo el historial de
llamadas de cuando el teléfono móvil no
estaba conectado a SYNC. Además, si
conecta un dispositivo de medios, SYNC
crea y retiene un índice del contenido de
medios compatible con SYNC. SYNC
también lleva un breve registro de
aproximadamente 10 minutos de toda la
actividad reciente de SYNC. El perfil del
registro y otros datos de SYNC pueden
utilizarse para mejorar SYNC y para ayudar
en el diagnóstico de cualquier problema
que pueda ocurrir.
El perfil del teléfono móvil, el índice del
dispositivo de medios y el registro
quedarán almacenados en el vehículo a
menos que usted los borre, y por lo general
solo se tiene acceso a ellos en el vehículo
cuando el teléfono móvil o el reproductor
multimedia están conectados. Si ya no va
a utilizar SYNC o el vehículo, le
recomendamos que realice el proceso de
Reconfiguración total para borrar toda la
información almacenada en SYNC.
No se puede tener acceso a los datos de
SYNC sin equipo especial y sin acceso al
módulo SYNC del vehículo. Ford Motor
Company y Ford Motor Company of
Canada no revisarán los datos de SYNC
para otros fines que no sean los ya
descritos sin el consentimiento
correspondiente o sin un mandato judicial,
petición de las autoridades de policía,
petición de las autoridades
gubernamentales o petición de terceros
que actúen con la debida autoridad legal.
Otras terceras partes pueden solicitar
acceso a la información en forma
independiente de Ford Motor Company y
Ford of Canada. Para obtener información
adicional sobre privacidad, consulte las
secciones sobre 911 Assist™ (si está
equipado), Informe de mantenimiento del
vehículo (si está equipado) y Tráfico,
indicaciones e información (si está
equipado).
Acceso a la pantalla de inicio
E142613
Presione el icono de casa para
ingresar a la pantalla de inicio.
352
MyFord Touch®

Uso del sistema de reconocimiento
de voz
Este sistema le ayuda a controlar
numerosas funciones mediante comandos
de voz. Esto le permite tener las manos en
el volante y concentrarse en lo que está
delante suyo. El sistema proporciona
retroalimentación mediante tonos
audibles, indicadores, preguntas y
confirmaciones habladas que dependen
de la situación y del nivel de interacción
elegido (configuración de voz).
El sistema también le hace preguntas
breves (indicaciones de confirmación) si
no está seguro de su petición o cuando la
petición tiene varias respuestas posibles.
Cuando se usan comandos de voz,
también pueden aparecer palabras e
iconos en la barra de estado inferior
izquierda para indicar el estado de la
sesión de voz (por ejemplo, escuchando,
éxito, error, en pausa o intente de nuevo).
Cómo utilizar los comandos de voz con
el sistema
E142599
Oprima el icono de voz; después
del tono, diga el comando
claramente.
¿Qué puedo decir?
Para acceder a los comandos de voz
disponibles para la sesión actual, haga lo
siguiente:
• Durante una sesión de voz, oprima la
barra de estado en la parte inferior
izquierda de la pantalla.
• Diga "¿Qué puedo decir?" para ver en
la pantalla una lista de los posibles
comandos de voz asociados con su
sesión de voz actual.
• Oprima el icono de voz; después del
tono, diga "Ayuda" para escuchar una
lista de los posibles comandos de voz.
Sugerencias útiles
• Asegúrese de que el interior del
vehículo esté lo más silencioso posible.
Es posible que las vibraciones del
camino y el ruido del viento que entra
por las ventanas abiertas impidan que
el sistema reconozca en forma correcta
los comandos que diga.
• Después de oprimir el icono de voz,
espere hasta que escuche el tono y que
aparezca "Escuchando" antes de decir
un comando. Cualquier comando que
se diga antes de esto no se registra en
el sistema.
• Hable con naturalidad, sin hacer
pausas largas entre palabras.
• En cualquier momento, puede
interrumpir el sistema mientras éste
habla al presionar el icono de voz.
Comandos básicos
Si deseaDiga
Realizar llamadas."Teléfono"
Acceder al dispositivo conectado en su puerto USB."USB"
Reproducir audio desde el teléfono."Audio Bluetooth"
Acceder al dispositivo conectado en la entrada auxiliar."Entrada Auxiliar"
353
MyFord Touch®

Si deseaDiga
Cancelar la acción solicitada."Cancelar"
Regresar el menú principal."SYNC"
Ajustar el nivel de interacción y retroalimentación de voz."Configuración de voz"
Ejecutar un informe de mantenimiento del vehículo.
*
"Informe de mantenimiento
del vehículo"
Acceder al portal de servicios SYNC.
*
"Servicios"
Acceder a aplicaciones móviles.
*
"Aplicaciones móviles"
Escuche una lista de comandos de voz disponibles en el
modo actual.
"Ayuda"
*
Si está equipado, solo EE.UU.
Estos comandos se pueden decir en cualquier momento durante una sesión de voz
"Menú principal"
"Lista de comandos"
"¿Qué puedo decir?"
"Siguiente página"
"Página anterior"
"Regresar"
"Cancelar"
"Salir"
"Ayuda"
Acceso a una lista de comandos
disponibles
1. En la pantalla táctil, oprima el icono de
Menú, Ayuda y Lista de comandos de
voz.
2. Oprima el icono de voz en los controles
del volante de la dirección. Después
del tono, diga el comando claramente.
354
MyFord Touch®

Comandos de voz disponibles
"Lista de comandos de radio""Lista de comandos de audio"
"Lista de comandos de tarjeta SD""Lista de comandos de audio Bluetooth"
"Lista de comandos satelitales de Sirius"
*
"Revisar lista de comandos"
"Lista de comandos de Travel Link"
*
"Lista de comandos de CD"
"Lista de comandos USB""Lista de comandos del control de tempe-
ratura"
"Lista de comandos de las instrucciones
de voz"
"Lista de comandos"
"Lista de comandos de la configuración de
voz"
"Lista de comandos de navegación"
*
"Ayuda""Lista de comandos del teléfono"
*
Si está equipado
Configuración de voz
Configuración de voz le permite
personalizar el nivel de interacción con el
sistema, ayuda y retroalimentación. La
configuración predeterminada del sistema
es interacción estándar, que utiliza listas
de candidatos e indicadores de
confirmación, pues estos proporcionan el
nivel más alto de orientación y
retroalimentación.
• Modo de interacción: el modo para
principiantes proporciona interacción
y orientación más detalladas, mientras
que el modo avanzado tiene menos
interacción audible y más indicaciones
por tonos.
• Indicaciones de confirmación: son
preguntas cortas que el sistema hace
cuando no está seguro de su petición
o cuando la petición tiene varias
respuestas posibles. Si está
desactivado, el sistema simplemente
hará su mejor suposición en cuanto a
lo que usted solicitó y puede que le
pida, de vez en cuando, que confirme
la configuración.
• Listas de teléfonos y opciones
similares: son listas de posibles
resultados de sus comandos de voz. El
sistema crea estas listas cuando tiene
el mismo nivel de confianza en varias
opciones basadas en su comando de
voz.
355
MyFord Touch®

Para acceder a esta configuración
mediante la pantalla táctil:
1. Oprima el icono de Menú,
Configuración y Control de voz.
2. Seleccione entre lo siguiente:
• Modo de interacción
• Indicadores de confirmación
• Listas de opciones similares
• Listas de opciones de telefonía
• Volumen del control de voz
Para acceder a esta configuración
mediante los comandos de voz:
1. Oprima el icono de voz; después del
tono, el sistema dice: "Diga un
comando". Sonará otro tono para
indicar que el sistema está
escuchando.
2. Diga cualquiera de los comandos
siguientes:
Configuración de voz mediante los comandos de voz
"Modo de interacción para principiantes"
"Modo de Interacción Avanzado"
"Mensajes de Confirmación Activados"
"Mensajes de Confirmación Desactivados"
"Lista de Candidatos de Teléfono Activada"
"Lista de Candidatos de Teléfono Desactivada"
"Lista de Candidatos de Medios Activada"
"Lista de Candidatos de Medios Desactivados"
"Ayuda"
Uso de comandos de voz con las opciones
de pantalla táctil
Su sistema de voz tiene una característica
de modo doble que le permite cambiar
entre utilizar comandos de voz y
seleccionar opciones en la pantalla. Esto
se encuentra disponible con más
frecuencia cuando se usa la navegación.
Los botones en la pantalla están
delineados con azul para indicar las
opciones que son parte de la función de
modo doble. Por ejemplo, si mientras está
en una sesión de voz, en lugar de decir el
comando "Ingresar nombre de la calle"
para cambiar el campo, puede oprimir
Calle y la sesión de voz no terminará. En
lugar de eso, el sistema de voz cambiará
al campo Calle y le solicitará que diga el
nombre de la calle. Los botones no
delineados en azul no se pueden utilizar
como comandos de voz; si los toca durante
una sesión de voz, se cancelará la sesión.
356
MyFord Touch®

Por ejemplo, puede escoger entre las
siguientes opciones en la pantalla de inicio
de Navegación:
• Mi casa
• Favoritos
• Destinos anteriores
• Punto de interés (POI)
• Emergencia
• Calle y número
• Intersección
• Cancelar ruta
Algunos de los comandos de voz
disponibles mientras ve esta pantalla son:
Destino
"Destino mi casa"
"Destino calle y número"
"Destino favoritos"
"Destino Destino previo"
"Destino Punto de interés"
"Destino intersección"
"Destino emergencia"
Si selecciona Calle y número en la pantalla
de navegación, puede escoger entre las
siguientes opciones:
• Número
• Ciudad
• Calle
• Estado/Provincia
Algunos de los comandos de voz
disponibles mientras ve esta pantalla son:
Calle y número
"Ingresar número de casa"
"Cambiar número de casa"
"Ingresar nombre de la calle"
"Cambiar nombre de la calle"
"Ingresar ciudad"
"Cambiar ciudad"
"Ingresar estado"
"Cambiar estado"
357
MyFord Touch®

Si selecciona Puntos de interés en la
pantalla de navegación, puede escoger
entre las siguientes opciones:
• Área de búsqueda
• Buscar por nombre
• Estación de servicio
• Cajero automático
• Todos los restaurantes
• Alojamiento
• Estacionamiento
Algunos de los comandos de voz
disponibles mientras ve esta pantalla son:
Puntos de interés o POI
"Destino <nombre de categoría del punto de interés>"
"Buscar por nombre"
"Buscar por categoría"
"Cambiar área de búsqueda"
"Cambiar estado"
Nota: Esta es solo un ejemplo de los
comandos de voz disponibles en la sección
Puntos de interés; técnicamente, las
categorías en sí mismas también son
comandos de voz.
Si selecciona Intersección en la pantalla
de navegación, puede escoger entre las
siguientes opciones:
• Primera calle
• Segunda calle
• Ciudad
• Estado/Provincia
Algunos de los comandos de voz
disponibles mientras ve esta pantalla son:
Intersección
"Ingresar nombre de la primera calle"
"Cambiar nombre de la primera calle"
"Ingresar nombre de la segunda calle"
"Cambiar nombre de la segunda calle"
"Ingresar ciudad"
"Cambiar ciudad"
"Ingresar estado"
"Cambiar estado"
358
MyFord Touch®

La función de modo doble también se
encuentra disponible cuando el sistema
de voz muestra una lista de elementos
para seleccionar durante una sesión de
voz, donde puede tocar el elemento en la
línea o decir "Línea 2". Si un comando no
se entiende o si hay varias opciones, el
sistema muestra una lista para que elija
una opción.
MENÚ
En la opción de configuración del menú,
puede ajustar el reloj, acceder y realizar
ajustes de la pantalla, configuraciones de
sonido y del vehículo así como acceder a
configuraciones de modos específicos o a
la característica de ayuda.
Ajuste del reloj
Nota: La fecha será ajustada por el GPS de
su vehículo; no podrá ajustarla
manualmente.
Nota: Si se ha desconectado la batería, el
vehículo debe adquirir la señal del GPS para
actualizar el reloj. Una vez que su vehículo
adquiere la señal, pueden transcurrir
algunos minutos para que se actualice la
hora correcta en la pantalla.
1. Oprima Menú y Reloj.
2. Oprima + y – para ajustar la hora.
También puede hacer otros ajustes desde
esta pantalla, como el modo horario de 12
o 24 horas, activar la sincronización del
GPS con la hora, y hacer que el sistema
actualice automáticamente las nuevas
zonas horarias.
Una vez que actualice su nueva
configuración, ésta se guardará
automáticamente.
Configuración de la pantalla
Para acceder y hacer ajustes en la pantalla
táctil mediante la pantalla táctil, oprima
Menú y Pantalla. Seleccione cualquiera de
las siguientes opciones:
• Brillo
• Atenuación automática
activada/desactivada
• Modo: Auto, Día o Noche
• Editar su imagen de fondo
E142599
Para acceder y hacer ajustes en
la pantalla táctil mediante
comandos de voz, oprima el
botón de voz en los controles del volante
de la dirección, y cuando reciba la
indicación, diga, "Configurar pantalla".
Carga de fotografías para su fondo de
pantalla principal
Nota: No puede cargar fotografías
directamente de su cámara. Debe acceder
a las fotografías desde su dispositivo de
almacenamiento masivo USB o desde una
tarjeta SD.
Este sistema le permite cargar y ver hasta
32 fotografías. Para cargar fotografías,
oprima Menú, Pantalla y Editar fondo de
pantalla. Siga las indicaciones del sistema
para cargar sus fotografías.
Limitaciones de la pantalla de fotos
Nota: Las fotografías con dimensiones
extremadamente grandes (es decir, 2048
x 1536) podrían no ser compatibles y
aparecer como una imagen en blanco
(negra) en la pantalla.
359
MyFord Touch®

Solo aparecerán fotografías que cumplan
las siguientes condiciones:
• Los formatos de archivos compatibles
son los siguientes: .jpg, .gif, .png, .bmp
• Cada archivo debe ser de 1,5 MB o
menos.
• Dimensiones recomendadas: 800 X
384
Sonido
Oprima Menú y Sonido para acceder a las
configuraciones de:
Configuración de sonido
Demostración de Deep Note THX
*
Graves
DSP
*
Agudos
Modo de ocupación
*
Intermedios
Volumen compensado por la velocidadBalance y distribución
*
Si está equipado.
Cámara retrovisora (If Equipped)
Este menú le permite acceder a la
configuración de su cámara retrovisora.
Oprima Menú, Vehículo y Cámara de
reversa. Seleccione una de las siguientes
configuraciones:
• Demora de la cámara retrovisora
• Guía
• Alarma visual de asistencia para
estacionamiento
Modo valet
Nota: Si el sistema no le da acceso y
necesita restablecer su PIN, puede ingresar
el número 3681 para desbloquear el
sistema.
El modo valet le permite bloquear el
sistema para que nadie pueda acceder a
la información del mismo en tanto no sea
desbloqueado con el número de
identificación personal (PIN) correcto.
1. Oprima Menú, Vehículo y Modo valet.
2. Seleccione Activar modo valet
3. Cuando reciba la indicación, ingrese un
PIN de cuatro dígitos.
Una vez que oprime Continuar, el sistema
se bloquea hasta que usted ingresa otra
vez el PIN correcto.
Cambio del código del teclado de
la puerta (If Equipped)
Para cambiar el código del teclado de su
sistema de entrada sin llave:
1. Oprima Menú, Vehículo, Editar código
del teclado de la puerta.
2. Ingrese su código de fábrica actual y,
cuando se le indique, ingrese el nuevo
código.
Asistencia de estacionamiento
activa (If Equipped)
Cuando está activa esta característica, el
sistema muestra instrucciones
relacionadas con el proceso de asistencia
de estacionamiento activa. Ver
Asistencia Activa para Estacionarse
(página 180).
360
MyFord Touch®

Configuración
Acceda y ajuste la configuración del
sistema, las características de voz y las
configuraciones del teléfono, la
navegación y la conexión inalámbrica.
Algunas de estas configuraciones también
se pueden acceder con base en sus modos
específicos (es decir, teléfono y medios).
Configuración del sistema
Oprima Menú, Configuración; Sistema.
Seleccione entre lo siguiente:
Configuración del sistema
Unidades de distanciaIdioma
Volumen de la indicación del sistemaUnidades de temperatura
Disposición del tecladoPitidos de la pantalla táctil
Reconfiguración totalInstalar aplicaciones
Configuración de voz
Personalice el nivel de interacción con el
sistema, la ayuda y la retroalimentación.
Oprima Menú, Configuración y Voz.
Configuración de voz
· El modo de interacción estándar proporciona interacción
más detallada y orientación.
Modo de interacción
· El modo avanzado proporciona menos interacción audible
y más indicadores de tono.
Preguntas breves que realiza el sistema cuando no
escucha claramente o no comprende la solicitud. (Incluso
con las indicaciones de confirmación desactivadas, es
posible que se le pida que confirme ocasionalmente las
configuraciones).
Indicadores de confirmación
Las listas de opciones similares son listas de posibles
resultados de los comandos de voz. Si están desactivadas,
el sistema hará simplemente su mejor suposición en
cuanto a su solicitud.
Listas de opciones similares
Listas de opciones de tele-
fonía
Permite ajustar el nivel de volumen de la voz.Volumen del control de voz
361
MyFord Touch®

Configuraciones del reproductor de
medios
Para acceder a la configuración del
reproductor de medios, oprima Menú,
Configuración y Reproductor de medios.
Seleccione entre lo siguiente:
• "Autoplay activado/desactivado"
• Dispositivos Bluetooth
• Índice Bluetooth activado/desactivado
• Información de base de datos
• Administración de medios
activada/desactivada
Nota: Con Autoplay e Índice Bluetooth
activados, puede escuchar la música que
ya está indexada. Con estas características
desactivadas, SYNC no reproduce nada de
música hasta que todos los medios (de la
unidad USB, unidad flash, reproductor de
música portátil, etc.) se hayan indexado.
Configuraciones del sistema de
navegación
Para acceder a la configuración del
reproductor de medios, oprima Menú,
Configuración y Navegación.
Seleccione entre lo siguiente:
• Preferencias de mapa
• Preferencias de ruta
• Preferencias de navegación
• Preferencias de tránsito
• Áreas por evitar
Configuración del teléfono
Para acceder a la configuración del
reproductor de medios, oprima Menú,
Configuración y después, Teléfono (o
Teléfono y después, Configuración).
Configuración del teléfono
Conectar, desconectar, agregar o quitar un dispositivo, así
como guardarlo como favorito.
Dispositivos Bluetooth
Activar o desactivar Bluetooth.Bluetooth activado/desac-
tivo
Hacer que todas las llamadas vayan directamente a su
buzón de voz y no suenen en la cabina del vehículo. Con
esta función activada, las notificaciones de mensaje de
texto también se silencian y no suenan dentro de la cabina.
No molestar
Activar o desactivar 911 Assist™. Ver Información (página
394).
911 Assist
Seleccionar cómo quiere ser notificado al recibir un
mensaje de texto, si su teléfono es compatible. Seleccione
entre los posibles tonos de alerta del sistema, texto de
conversación o silencio.
Aviso de mensaje de texto
362
MyFord Touch®

Configuración del teléfono
Utilice esta pantalla para configurar su conexión de datos
de Internet. Seleccione para crear su perfil de conexión
con la red de área personal (PAN) o para desactivar su
conexión. También puede ajustar su configuración o hacer
que el sistema siempre esté conectado, que nunca se
conecte en roaming, o que pregunte antes de conectarse.
Oprima ? para obtener más información.
Conexión de datos de
Internet
*
Acceder a funciones como descarga automática de la
agenda, volver a descargar su agenda, agregar contactos
desde su teléfono y borrar o cargar su agenda.
Administrar agenda
Muestra el historial de llamadas.Historial de llamadas
*
Si es compatible.
Conexión inalámbrica y de Internet
Para acceder, oprima Menú, Configuración
y después, Conexión inalámbrica y de
Internet.
Seleccione entre lo siguiente:
• Configuración de Wi-Fi
• Configuración de Bluetooth
• USB de banda ancha móvil
• Priorizar métodos de conexión
Wi-Fi
Su sistema tiene una característica Wi-Fi
que crea una red inalámbrica dentro de su
vehículo, permitiendo de esta forma que
otros dispositivos (por ejemplo
computadoras personales o teléfonos) en
su vehículo se comuniquen mutuamente,
compartir archivos, jugar juegos, etc.
Si se utiliza esta característica, todas las
personas en su vehículo pueden también
tener acceso a Internet si:
• Usted dispone de una conexión USB
de banda ancha móvil dentro del
vehículo
• Su teléfono soporta una PAN (red
personal de contactos locales)
• Usted está estacionado fuera de un
lugar con conectividad inalámbrica
activa
Para acceder, oprima Menú, Configuración,
Conexión inalámbrica y de Internet y
Configuración de Wi-Fi. Seleccione una de
las siguientes opciones:
363
MyFord Touch®

PuedeSi selecciona
Activar o desactivar la característica de Wi-Fi en el
vehículo. Asegúrese de que Activar esté seleccionado si
desea tener conectividad.
Modo de red de Wi-Fi
(cliente) activado/desacti-
vado
Usar una red inalámbrica almacenada anteriormente.
Puede ordenar sus redes por lista alfabética, prioridad e
intensidad de la señal. También puede buscar una red,
conectarse a una red, desconectarse de una red, recibir
más información, priorizar una red o borrar una red.
Escoja una red inalámbrica
Ver una lista de redes inalámbricas.Buscar redes inalámbricas
Active esta función para que SYNC se convierta en un
punto de acceso para un teléfono o una computadora.
Esto integra una red de área local dentro del vehículo, para
cosas como jugar videojuegos, transferir archivos, navegar
por Internet, etc.
Modo de punto de acceso
(activado/desactivado)
Ver quién ha utilizado su conexión Wi-Fi últimamente.Lista de dispositivos de
punto de acceso
Oprima el botón ? (si está equipado) para
ver información adicional.
E142626
El
logotipo
"Wi-Fi
CERTIFIED" es una marca de certificación
de Wi-Fi Alliance.
USB de banda ancha móvil
Nota: Debe activar su dispositivo de banda
ancha móvil en su computadora personal
antes de conectarlo al sistema.
Nota: Las configuraciones del USB de
banda ancha móvil podrían no mostrarse si
el dispositivo ya está activado.
En vez de utilizar Wi-Fi, su sistema también
puede usar una conexión USB de banda
ancha móvil para acceder a la Internet.
Esta pantalla le permite configurar lo que
será el área típica de conexión para su USB
de banda ancha móvil.
Puede seleccionar lo siguiente:
• País
• Proveedor
• Número de teléfono
• Nombre de usuario
• Contraseña
Priorizar métodos de conexión
Esta pantalla le permite escoger sus
métodos de conexión y cambiarlos como
lo necesite. Puede seleccionar Cambiar
orden y hacer que el sistema siempre
intente conectarse utilizando, o un USB de
banda ancha móvil, o la función Wi-Fi.
364
MyFord Touch®

Configuración de Bluetooth
Esta pantalla muestra qué dispositivo está
asociado actualmente al sistema, y le dará
las opciones típicas de Bluetooth para
conectarse, desconectarse, configurar su
predilecto, y borrar y agregar dispositivos.
Bluetooth es una marca registrada de
Bluetooth SIG.
Ayuda
Su sistema de pantalla táctil tiene una
función de ayuda, a la cual puede acceder
en cualquier momento.
Para acceder, presione Menú y después,
Ayuda. Seleccione una de las siguientes
opciones:
PuedeSi selecciona
Ver la ubicación actual del vehículo, si su vehículo está
equipado con sistema de navegación. Si su vehículo no
está equipado con navegación, no habrá información
disponible.
¿Dónde estoy?
Acceder a los ajustes de 911 Assist, instrucciones de reinicio
del vehículo y contactos de marcación rápida de emergen-
cias.
911 Assist
· Marcación rápida de emergencia (ICE): Esta función
le permite guardar hasta dos números como contactos
de emergencia para acceder a ellos rápidamente en caso
de emergencia. Seleccione Editar para acceder a la
agenda del teléfono y seleccionar los contactos deseados.
Los números aparecen como opciones en esta pantalla
para los botones ICE 1 e ICE 2. Los contactos ICE que
seleccione se le presentarán al finalizar el proceso de
llamada de 911 Assist para un rápido acceso.
Ver posibles comandos de voz.Lista de comandos de voz
Desde esta pantalla, también puede
acceder a Información del sistema,
Licencias de software y Restricciones de
manejo.
Para acceder a la Ayuda usando los
comandos de voz, oprima el botón de voz
y después del tono, diga "Ayuda". El
sistema le proporciona los comandos de
voz que puede utilizar en el modo actual.
ENTRETENIMIENTO
Su sistema ofrece muchas opciones de
medios. Puede acceder a estas opciones
a través de la pantalla táctil o mediante
comandos de voz.
365
MyFord Touch®

Exploración del contenido del
dispositivo
Mientras escucha cualquier tipo de audio,
puede revisar las opciones de otros
dispositivos sin tener que cambiar las
fuentes. Por ejemplo, si está escuchando
la radio, puede revisar todos los artistas
almacenados en su dispositivo USB.
E142599
Oprima el icono de voz en los
controles del volante de la
dirección. Cuando se le indique,
puede decir:
"REVISAR" en los dispositivos
"Revisar"
1
"Revisar juegos de <liga>"
2
"Mostrar canales de <categoría de Sirius>"
2
"Mostrar CD"
"Revisar tarjeta SD"
"Mostrar SIRIUS"
2
"Revisar USB"
"Ayuda"
*
Si dice solamente "Revisar", puede decir cualquiera de los comandos del cuadro
siguiente.
2
Si está equipado con radio satelital SIRIUS®.
"REVISAR"
"Juegos de <liga>"
1
"Canales de <categoría de Sirius>"
1
"CD"
"Tarjeta SD"
*
"Guía de canales SIRIUS"
1
"USB"
*
366
MyFord Touch®

"REVISAR"
"Ayuda"
1
Si está equipado con radio satelital SIRIUS®.
2
Para conocer más comandos relacionados con la tarjeta SD o el modo USB, consulte
la sección "Tarjeta SD y puerto USB" en este capítulo.
Radio AM/FM
E142611
Oprima la esquina inferior
izquierda de la pantalla táctil, y
luego seleccione la pestaña AM
o FM.
Para alternar entre las memorias AM y FM,
simplemente toque la lengüeta AM o FM.
PuedeCuando selecciona
Guardar una estación manteniendo oprimida una de las
áreas de preestablecimiento de memoria. El sonido se
silenciará brevemente mientras se guarda la estación y
volverá a activarse cuando haya finalizado la operación.
Memoria
Ingrese el número de la estación deseada cuando reciba
la indicación. Oprima Intro.
Sintonizar directo
Permite recibir transmisiones de radio digitalmente (donde
esté disponible), proporcionando un sonido claro y nítido.
Radio HD
Ir a la siguiente estación de radio AM o FM con señal
potente.
Explorar
Puede ajustar más configuraciones del sistema de audio:Opciones
· Configuración de sonido ajusta Bajos, Agudos, Medios,
Balance y Distribución, la demostración de Deep Note THX
(si está equipado), DSP (si está equipado), Modo de
ocupación (si está equipado) y la configuración del
volumen compensado por velocidad.
· Establecer PTY de Búsqueda/Exploración le permite
seleccionar una categoría de música que desee buscar y
luego optar por buscar o explorar las estaciones.
· Pantalla de texto RDS le permite ver siempre la infor-
mación de transmisión de las estaciones de FM.
· Memorias preestablecidas (AST) permite que el
sistema almacene automáticamente las seis estaciones
más potentes de su localidad actual.
367
MyFord Touch®

PuedeCuando selecciona
· ETIQUETA (si está disponible) le permite etiquetar
una canción para descargarla posteriormente. Cuando
selecciona Activar, aparece ETIQUETA en la pantalla
cuando está activa la función HD Radio. Puede oprimir
ETIQUETA para guardar la información de la canción que
se está reproduciendo. Cuando conecte su reproductor
de música portátil, la información será transferida (si es
admitido por su dispositivo). Cuando se conecte a iTunes®,
aparecerán las etiquetas para recordarle las canciones
que quería descargar.
Información de HD Radio™ (si está
disponible)
Nota: Las transmisiones de HD Radio no
están disponibles en todos los mercados.
La tecnología HD Radio es la evolución
digital de la radio AM/FM analógica. Su
sistema cuenta con un receptor especial
que le permite recibir transmisiones
digitales (si están disponibles), además
de las transmisiones analógicas que ya
recibe. Las transmisiones digitales ofrecen
una mejor calidad de sonido que las
analógicas, con un audio nítido y sin
estática ni distorsión. Para obtener más
información y una guía de las estaciones
y la programación disponible, visite
www.hdradio.com.
Si tiene esta función activada y tiene
sintonizada una estación que transmite
con tecnología HD Radio, es posible que
observe los siguientes indicadores en la
pantalla:
E142616
El logotipo de HD Radio parpadea cuando
se está adquiriendo una estación digital y
permanece encendido cuando se está
reproduciendo audio digital. Cuando este
logo aparezca, también podrá ver los
campos de Título y Artista en la pantalla.
El indicador de multidifusión aparece en
el modo FM (solamente) si la estación
actual está emitiendo varias transmisiones
digitales. Los números resaltados indican
los canales digitales disponibles que tienen
contenido nuevo o diferente. HD1 indica el
estado de la programación principal y que
se encuentra disponible en transmisiones
analógica y digital. Cualquier estación de
multidifusión adicional (desde HD2 hasta
HD7) solamente se transmite en formato
digital.
ETIQUETA le permite guardar una canción
para descargarla posteriormente. Cuando
tiene sintonizada una estación de HD
Radio, el botón ETIQUETA se encuentra
disponible (siempre que la función esté
activada). Para usar la función de etiqueta:
368
MyFord Touch®

1. Oprima AM o FM, Opciones y luego
Etiqueta activada
2. Cuando escuche una canción que le
guste, toque ETIQUETA.
3. El sistema guarda automáticamente
la información de la canción y la
transfiere a su reproductor de música
portátil (si es compatible) cuando lo
conecta al sistema. Si tiene el
reproductor de música conectado en
ese momento, el sistema transfiere
automáticamente la etiqueta a su
reproductor y un mensaje emergente
confirma la transferencia.
4. Cuando accede a iTunes® con su
reproductor de música portátil, las
etiquetas aparecen para recordarle la
canción. El sistema le permite etiquetar
aproximadamente hasta 100
canciones. Para obtener una lista de
dispositivos compatibles con las
etiquetas, consulte
www.SYNCMyRide.com o
www.syncmaroute.ca.
Cuando las transmisiones de HD Radio
están activas, puede acceder a las
siguientes funciones:
PuedeCuando selecciona
Escuchar una breve muestra de todas las estaciones
disponibles.
Explorar
Esta característica funciona cuando está activada la
recepción de HD Radio, aunque no explora los canales de
HD2 a HD7. Puede que aparezca el logotipo HD si la esta-
ción tiene una transmisión digital.
Escuchar la siguiente estación de radio con señal potente.Búsqueda
Si la estación actual tiene varias transmisiones digitales,
aparece el indicador de multidifusión. Oprima Buscar
repetidamente para avanzar a través de todas las trans-
misiones disponibles. Si está en el último canal de multi-
difusión, oprima Buscar para avanzar a la siguiente esta-
ción con señal potente.
Recorra la frecuencia hacia arriba o hacia abajo en incre-
mentos individuales.
Sintonizar
369
MyFord Touch®

PuedeCuando selecciona
Si la estación actual tiene varias transmisiones digitales,
aparece el indicador de multidifusión. Oprima Sintonizar
radio repetidamente para avanzar a través de todas las
transmisiones disponibles. Si está en el último canal de
transmisión, gire para avanzar a la siguiente frecuencia de
la banda.
Cuando el canal está activo en la pantalla, mantenga
oprimida una ranura preestablecida de memoria hasta
que vuelva el sonido. El sonido se silenciará brevemente
y volverá a activarse, lo que significa que la estación se
guardó. Al oprimir una memoria preestablecida HD2 o
HD3, se produce un silencio antes de que se reproduzca
el audio digital, ya que el sistema debe volver a adquirir la
señal digital. Al igual que con cualquier estación de radio
guardada, no podrá acceder a la estación guardada si el
vehículo se encuentra fuera del área de recepción.
Para guardar una estación
de multidifusión como
memoria
Recepción y solución de problemas de estaciones de HD Radio
Posibles problemas de recepción
Si está escuchando una estación de multidifusión y se
encuentra en el límite del área de recepción, es posible
que la estación se silencie a causa de la baja intensidad
de la señal.
Si está escuchando HD1, el sistema cambia a la transmi-
sión analógica hasta que la transmisión digital esté
disponible nuevamente. Sin embargo, si está escuchando
cualquiera de los posibles canales de multidifusión de
HD2 a HD7, la estación se silencia y permanece en silencio
hasta que sea posible conectarse a la señal digital
nuevamente.
Área de recepción
Cuando se recibe una estación por primera vez (aparte de
las estaciones de multidifusión HD2 a HD7), el sistema
primero reproduce la estación en la versión analógica y
luego, si el receptor verifica que se trata de una estación
de HD Radio, cambia a la versión digital. Dependiendo de
la calidad de la estación, es posible que escuche un leve
cambio de sonido cuando la estación pase del modo
analógico al digital. Este cambio de sonido analógico a
digital o de digital a analógico, se conoce como "combina-
ción".
Combinación de estaciones
370
MyFord Touch®

Para ofrecer la mejor experiencia posible,
se ha desarrollado un formulario de
contacto para informar cualquier problema
con las estaciones que se presente
mientras escucha la transmisión de una
estación con la tecnología HD Radio. Cada
estación tiene propietarios y operaciones
diferentes. Estas estaciones son
responsables de asegurar que todas las
transmisiones de audio y campos de datos
sean correctos.
Posibles problemas de las estaciones
Acción a tomarCausaProblemas
Ninguna. Problema de difu-
sión.
Alineación de tiempo defi-
ciente por parte del difusor
de radio.
Eco, tartamudez, saltos o
repetición del audio.
Aumento o disminución del
volumen.
Ninguna. Problema de
recepción que puede solucio-
narse al continuar condu-
ciendo.
El radio está cambiando
entre el modo de audio
analógico y el digital.
El sonido se desvanece o
aumenta y disminuye.
Ninguna. Este es un
comportamiento normal.
Espere hasta que el audio
esté disponible.
La multidifusión digital no
está disponible hasta que se
decodifica la transmisión de
HD Radio. Una vez decodifi-
cada, el audio estará dispo-
nible.
Retraso del silencio de audio
al seleccionar HD2/HD3,
memoria de multidifusión o
Sintonización directa.
Ninguna. La estación no está
disponible en su ubicación
actual.
La memoria de multidifusión
almacenada anteriormente
o la sintonización directa no
están disponibles en el área
de recepción actual.
No se puede acceder al
canal de multidifusión HD2/
HD3 cuando se intenta
acceder a una memoria o
desde una sintonización
directa.
Complete el formulario de
problemas de estación en el
sitio web indicado a conti-
nuación.
*
Problema del servicio de
datos por parte del difusor
de radio.
La información de texto no
coincide con el audio que se
está reproduciendo.
371
MyFord Touch®

Posibles problemas de las estaciones
Acción a tomarCausaProblemas
Complete el formulario de
problemas de estación en el
sitio web indicado a conti-
nuación.
*
Problema del servicio de
datos por parte del difusor
de radio.
No se muestra información
de texto para la frecuencia
seleccionada actualmente.
Ninguna. Este es un
comportamiento normal.
Al oprimir Explorar se
desactiva la búsqueda de
canales HD2 a HD7.
Las estaciones HD2 a HD7
no se encuentran cuando se
oprime Explorar.
*
http://www.ibiquity.com/automotive/report_radio_station_experiences
Tecnología HD Radio fabricada con
licencia de iBiquity Digital Corp. Patentes
de Estados Unidos y extranjeras. HD Radio
y los logotipos de HD Radio y HD son
marcas registradas de iBiquity Digital Corp.
Ford Motor Company e iBiquity Digital
Corp. no son responsables del contenido
que se distribuye mediante la tecnología
HD Radio. El contenido puede estar sujeto
a cambios, adiciones o eliminación en
cualquier momento a discreción del
propietario de la estación.
Comandos de voz por radio
E142599
Si está escuchando el radio,
oprima el botón de voz en los
controles del volante de la
dirección. Cuando se le indique, diga
cualquiera de los siguientes comandos.
Si no está escuchando la radio, oprima el
botón de voz y, después del tono, diga
"Radio" y cualquiera de los comandos
siguientes.
"RADIO"
"Programación automática <número> de
FM"
"<87.9-107.9>"
"Memoria <número> de FM"
"<87.9-107.9> HD"
1
"FM 1""<530-1710>"
"Memoria <número> de FM 1""AM"
"FM 2""AM <530-1710>"
"Memoria <número> de FM 2""Programación automática de AM"
"HD <número>"
1
"Programación automática <número> de
AM"
"Memoria <número>""Memoria <número> de AM"
"Apagar radio"
"Revisar"
*
372
MyFord Touch®

"RADIO"
"Encender radio""FM"
"Fijar tipo de programa""FM <87.9-107.9>"
"Sintonizar radio"
3
"FM <87.9-107.9> HD <número>"
1
"Ayuda""Programación automática de FM"
1
Si está disponible
1
Si dijo "Revisar", consulte el cuadro "Revisar" más adelante en esta sección.
2
Si dijo "Sintonizar radio", consulte el cuadro "Sintonizar radio" a continuación.
"SINTONIZAR RADIO"
"Programación automática de FM""<530-1710>"
"Programación automática <número> de
FM"
"<87.9-107.9> HD <número>"
*
"Memoria <número> de FM""AM"
"FM1""AM <530-1710>"
"Memoria <número> de FM1""Memoria <número> de AM"
"FM2""Programación automática de AM"
"Memoria <número> de FM2""Programación automática <número> de
AM"
"HD <número>"
*
"<87.9-107.9>"
"Memoria <número>""FM"
"Ayuda""FM <87.9-107.9>"
"FM <87.9-107.9> HD <número>"
*
Si está disponible
Radio satelital SIRIUS® (si está
activado)
E142611
Oprima la esquina inferior
izquierda de la pantalla táctil y
seleccione la pestaña SIRIUS.
373
MyFord Touch®

PuedeCuando selecciona
Guardar una estación manteniendo oprimida una de las
áreas de preestablecimiento de memoria. El sonido se
silenciará brevemente mientras se guarda la estación y
volverá a activarse cuando haya finalizado la operación.
Un área de preestableci-
miento de memoria (en el
lado derecho de la pantalla)
Ingresar el número del canal satelital deseado usando el
teclado en pantalla.
Sintonizar directo
Oprimir repetidamente para cambiar entre los modos
SIRIUS (SIRIUS 1, 2 o 3).
SIRIUS
Guardar la canción, artista o equipo actual como favorito.
El sistema le avisará cuando se reproduzca nuevamente
en cualquier canal SIRIUS.
ALERTA
Ver una lista de las estaciones disponibles. Recorra la lista
y seleccione la estación deseada.
Revisar
También puede bloquear u omitir canales que no desee
escuchar o ver la canción/artista en otras estaciones.
Escuchar una breve muestra de los canales.Explorar
Repetir el audio en el canal actual. Puede volver a repro-
ducir aproximadamente 45 minutos de audio siempre y
cuando haya estado sintonizado a la estación actual. Si
cambia estaciones, el audio anterior se borrará.
Repetir
· Oprima y suelte los botones de búsqueda para escuchar
la canción anterior o siguiente.
· Mantenga oprimidos los botones de búsqueda para
adelantar o retroceder rápidamente en la pista actual.
· Oprima reproducir o pausar para reproducir o pausar el
audio.
· Oprima Repetir nuevamente para volver al audio en
directo si ha estado usando la función de repetición para
repetir audio.
Puede ajustar más configuraciones del sistema de audio:Opciones
· Configuración de sonido ajusta Bajos, Agudos, Medios,
Balance y Distribución, la demostración de Deep Note THX
(si está equipado), DSP (si está equipado), Modo de
ocupación (si está equipado) y la configuración del
volumen compensado por velocidad.
· Establecer categoría de búsqueda/exploración le
permite seleccionar una categoría de música que desee
buscar y luego optar por buscar o explorar las estaciones.
374
MyFord Touch®

PuedeCuando selecciona
· Bloqueo infantil le permite bloquear y desbloquear
canales, cambiar o restablecer su PIN o desbloquear todos
los canales. Para usar esta función, necesitará su PIN
inicial, que es 1234.
· Alertas de artista/título
*
le permite seleccionar artistas
y títulos para los cuales desea que el sistema le avise
cuando se reproduzcan en otros canales. Oprima Editar
alertas para eliminar o desactivar alertas. También puede
activar o desactivar todas las alertas. Cuando aparece
una alerta en la pantalla, puede optar por Sintonizar
radio en el canal, Cancelar la alerta o Desactivar
alertas. Si está escuchando un evento deportivo, puede
guardar sus equipos favoritos de modo que el sistema le
avise cuando estén jugando en un canal de radio satelital.
Es necesario para comunicarse con SIRIUS para interac-
tuar con su cuenta.
Número de serie electrónico
(ESN)
*
SIRIUS no es compatible con la función de Alerta en todos los canales. Ford Motor
Company no será responsable de ninguna variación en la función de Alerta.
Información de radio satelital SIRIUS
Nota: SIRIUS se reserva el derecho sin
restricción de cambiar, redisponer, agregar
o borrar programación, incluida cancelación,
movimiento o adición de canales específicos
y precios en cualquier momento, con o sin
previo aviso. Ford Motor Company no será
responsable de ninguno de estos cambios
en la programación.
E142593
La radio satelital SIRIUS es un servicio de
radio satelital de suscripción que transmite
una diversidad de programación de
música, deportes, noticias, tiempo, tráfico
y entretenimiento. Su sistema de radio
satelital SIRIUS instalado en fábrica
incluye el dispositivo y una suscripción
limitada que comienza en la fecha de
venta o arrendamiento del vehículo.
Consulte la disponibilidad con su
distribuidor autorizado.
375
MyFord Touch®

Para obtener más información acerca de
los términos de suscripción extendida (se
requiere una tarifa de servicio), el
reproductor multimedia en línea y una lista
completa de canales de radio satelital
SIRIUS, así como otras funciones, visite
www.siriusxm.com en Estados Unidos,
www.sirius.ca en Canadá o llame a SIRIUS
al 1–888–539–7474.
Número de serie electrónico de radio
satelital (ESN)
Necesitará su ESN para activar, modificar
o rastrear su cuenta de radio satelital. El
ESN se encuentra en la pantalla System
Information (Información del sistema) (SR
ESN:XXXXXXXXXXXX). Para acceder a su
ESN, toque la esquina inferior izquierda de
la pantalla táctil. Toque SIRIUS, Opciones
y luego, ESN.
Factores de recepción de radio satelital SIRIUS y solución de problemas
Posibles problemas de recepción
Para lograr un óptimo rendimiento de la recepción,
mantenga la antena sin acumulaciones de nieve y hielo y
mantenga el equipaje y otro material en el techo del
vehículo lo más alejado posible de la antena.
Obstrucciones de la antena
Los cerros, montañas, edificios altos, puentes, túneles,
pasos elevados en autopistas, estacionamientos de varios
pisos, follajes de árboles densos y las tormentas eléctricas
pueden interferir con la recepción.
Terreno
Cuando pasa por una torre de radiodifusión basada en
tierra, una señal más potente puede superar a una más
débil y generar un silencio del sistema de audio.
Sobrecarga de estaciones
La pantalla mostrará ADQUIRIENDO... para indicar la
interferencia y es posible que se silencie el sistema.
Interferencia de la señal de
radio satelital
376
MyFord Touch®

Localización y solución de problemas
Acción a tomarCausaPantalla de la radio
Ninguna. Este mensaje debe
desaparecer dentro de unos
segundos.
La radio requiere más de dos
segundos para generar el
audio para el canal seleccio-
nado.
ADQUIRIENDO...
Si este mensaje no se borra
en breve, o con un ciclo de
la llave de encendido, el
receptor puede tener una
falla. Visite a un distribuidor
autorizado para solicitar
servicio.
Falla de sistema o módulo
interno presente.
Falla satelital/de sistema
SIRIUS
Sintonice otro canal o
seleccione otra memoria
preestablecida.
El canal ya no está dispo-
nible.
Canal inválido
Comuníquese con SIRIUS al
1-888-539-7474 para
suscribirse al canal o bien,
sintonice otro canal.
Suscripción no disponible
para este canal.
Canal sin suscripción
La señal está actualmente
bloqueada. Cuando se
mueva a un área abierta, la
señal volverá.
Se perdió la señal del saté-
lite de SIRIUS o torre de
SIRIUS hacia la antena del
vehículo.
No Signal (Sin señal)
Ninguna. El proceso puede
tomar hasta tres minutos.
Actualización de programa-
ción de canales en curso.
Updating (Actualizando)
Póngase en contacto con
SIRIUS llamando al 1-888-
539-7474 para volver a
activar o resolver problemas
de suscripción.
La radio satelital SIRIUS
desactivó el servicio sate-
lital.
Llamar a SIRIUS
1-888-539-7474
Utilizando la guía de
canales, desbloquee o quite
el salto de los canales.
Todos los canales en la
categoría seleccionada
están programados para
saltarse o están
bloqueados.
No Channels Available (No
hay canales disponibles)
Ninguna.SIRIUS ha actualizado los
canales disponibles para su
vehículo.
Subscription Updated
(Suscripción actualizada)
377
MyFord Touch®

Comandos de voz por radio satelital
SIRIUS
E142599
Si está escuchando la radio
satelital SIRIUS, oprima el botón
de voz en los controles del
volante de la dirección. Cuando se le
indique, diga cualquiera de los siguientes
comandos.
Si no está escuchando la radio satelital
SIRIUS, oprima el botón de voz y, después
del tono, diga "SIRIUS" y cualquiera de los
comandos siguientes.
"SIRIUS"
"Memoria <número> de SAT 2""<0-223>"
"SAT 3""<Nombre del canal>"
"Memoria <número> de SAT 3""Memoria <número>"
"Apagar SIRIUS""SAT"
"Activar SIRIUS""Memoria <número> de SAT"
"Sintonizar deportes"
1
"SAT 1"
"Sintonizar radio"
2
"Memoria <número> de SAT 1"
"Ayuda""SAT 2"
1
Disponibilidad posterior. Si dijo "Sintonizar deportes", consulte la tabla "Sintonizar
deportes" a continuación.
2
Si dijo "Sintonizar radio", consulte el cuadro "Sintonizar radio" a continuación.
"SINTONIZAR DEPORTES"
"Sintonizar partido de <universidad>"
"Sintonizar partido de <ciudad>"
"Sintonizar partido de <equipo> de <ciudad>"
"Sintonizar partido de <equipo>"
"Ayuda"
378
MyFord Touch®

"SINTONIZAR RADIO"
"<0-223>"
"<Nombre del canal>"
"Memoria <número>"
"SAT"
"SAT 1"
"Memoria <número> de SAT 1"
"SAT 2"
"Memoria <número> de SAT 2"
"SAT 3"
"Memoria <número> de SAT 3"
"Ayuda"
CD
E142611
Oprima la esquina inferior
izquierda de la pantalla táctil y
seleccione la pestaña CD.
PuedeCuando selecciona
Repetir la pista de reproducción actual.Repetir
Reproducir las pistas en orden aleatorio.Mezclar
Escuche una breve muestra de todas las canciones
disponibles.
Explorar
Ver información del disco.Más información
Ver todas los orígenes de audio disponibles.Revisar
· Sonido ajusta Bajos, Agudos, Medios, Balance y Distribu-
ción, la demostración de Deep Note THX (si está equi-
pado), DSP (si está equipado), Modo de ocupación (si
está equipado) y la configuración del volumen compen-
sado por velocidad.
Opciones
· Compresión da acceso a la configuración de compresión.
379
MyFord Touch®

También puede avanzar y regresar la
canción o carpeta actual (en su caso).
Comandos de voz de CD
E142599
Si está escuchando un CD,
oprima el botón de voz en los
controles del volante de la
dirección. Cuando se le indique, diga
cualquiera de los siguientes comandos.
Si no está escuchando un CD, oprima el
botón de voz y, después del tono, diga
"CD" y cualquiera de los comandos
siguientes.
"CD"
"Pausa"
"Reproducir"
"Siguiente canción"
"Canción anterior"
"Reproducir la canción <1–512>"
"Activar repetición"
"Repetir carpeta"
*
"Desactivar repetición"
"Repetir canción"
"Reproducción aleatoria"
"Reproducción aleatoria del disco"
*
"Reproducción aleatoria de la carpeta"
*
"Desactivar reproducción aleatoria"
"Ayuda"
*
WMA o MP3 solamente
380
MyFord Touch®

Ranura para tarjeta SD y puerto
USB
Tarjeta SD
Nota: La ranura para tarjeta SD cuenta con
un resorte. Para extraer la tarjeta SD,
presione la tarjeta hacia dentro y el sistema
la expulsa. No intente jalar la tarjeta para
extraerla, pues eso podría dañarla.
La ranura para la tarjeta también se puede
usar con el sistema de navegación (si está
equipado). Ver Navegación (página 408).
E142619
La ranura para tarjeta SD se encuentra en
la consola central, o detrás de una puerta
pequeña de acceso en el tablero de
instrumentos. Para acceder a la música de
su dispositivo y reproducirla, oprima la
esquina inferior izquierda de la pantalla
táctil.
E142620
El
logo SD es una marca registrada de SD-3C,
LLC.
Puerto USB
E142621
Los puertos USB se encuentran en la
consola central, o detrás de una puerta
pequeña de acceso en el tablero de
instrumentos. Para acceder a la música de
su dispositivo y reproducirla, oprima la
esquina inferior izquierda de la pantalla
táctil.
Este sistema permite conectar dispositivos
de reproducción multimedia, tarjetas de
memoria o unidades de almacenamiento,
así como cargar dispositivos compatibles
con el sistema.
Reproducción de música desde el
dispositivo
E142611
Inserte el dispositivo y seleccione
la pestaña USB o Tarjeta SD
cuando el sistema lo reconozca.
Ahora puede elegir entre las siguientes
opciones:
381
MyFord Touch®

PuedeCuando selecciona
Repetir la canción o álbum de reproducción actual.Repetir
Reproducir música del álbum o carpeta seleccionado en
orden aleatorio.
Mezclar
Explorar el contenido del dispositivo. Esta función también
le permite buscar y reproducir música por género, artista,
álbum, etc.
Revisar
Seleccionar música similar a la que se está reproduciendo
actualmente.
Música similar
Seleccionar más opciones:Opciones
· Configuración de sonido le permite ajustar Bajos,
Agudos, Medios, Balance y Distribución, la Demostración
de Deep Note THX (si está equipado), DSP (si está equi-
pado), Modo de ocupación (si está equipado) y el volumen
compensado por velocidad.
· Configuraciones del reproductor de medios le permite
seleccionar más configuraciones.
· Información del dispositivo muestra información del
software y el firmware del dispositivo de medios conec-
tado.
· Actualizar índice de medios indexa el dispositivo cada
vez que se conecta para asegurarse de que tenga los
comandos de voz más recientes disponibles para todos
los medios del dispositivo.
Las configuraciones del reproductor de medios incluyen:
· Autoplay: con esta característica activada, el sistema
cambia automáticamente a la fuente de medios durante
la conexión inicial, de modo que puede escuchar la música
que ya ha sido indexada. Con esta característica desacti-
vada, el sistema no cambia automáticamente a la fuente
de medios.
· Dispositivos Bluetooth: conectar, desconectar, agregar
o borrar un dispositivo. También puede configurar un
dispositivo como su favorito, de modo que el sistema
intente conectarse a ese dispositivo en cada ciclo de
encendido del vehículo.
· Información de la base de datos Gracenote: permite
ver la versión de su base de datos Gracenote.
382
MyFord Touch®

PuedeCuando selecciona
· Administración de medios Gracenote: cuando está
activa, esta función obtiene información de los metadatos
de la base de datos Gracenote para sus archivos de
música. Esto anula la información de su dispositivo. El
ajuste predeterminado es desactivado.
· Prioridad de imagen de portada: esta característica
recupera la portada de los archivos de música desde el
dispositivo o bien, desde la base de datos Gracenote. El
ajuste predeterminado es Dispositivo.
Muestra información del dispositivo, si está conectado y
disponible.
Información de dispositivo
de medios
Le permite escoger cómo desea que aparezca la informa-
ción en la pantalla.
Pantalla de texto
Para ver los datos de la canción, como
Título, Artista, Archivo, Carpeta, Álbum y
Género, toque la portada del álbum en la
pantalla. También puede oprimir ¿Qué es
esto? para que el sistema diga el nombre
de la banda y la canción actuales. Esto
puede ser útil cuando se usan comandos
de voz para asegurarse de que el sistema
reproduzca correctamente su petición.
Comandos de voz para USB y tarjetas
SD
E142599
Si está escuchando un
dispositivo USB o una tarjeta SD,
oprima el botón de voz en los
controles del volante de la dirección.
Cuando se le indique, diga cualquiera de
los siguientes comandos.
Si no está escuchando un dispositivo USB
o una tarjeta SD, oprima el botón de voz y,
después del tono, diga "USB" o "Tarjeta
SD" y cualquiera de los comandos
siguientes.
"USB" o "TARJETA SD"
"Reproducir episodio <nombre> del
podcast"
"Revisar"
1
"Reproducir música similar""Siguiente"
"Reproducir canción <nombre>""Pausa"
"Reproducir episodio <nombre> del
programa de TV"
2
"Reproducir"
"Reproducir video <nombre>"
2
"Reproducir disco <nombre>"
383
MyFord Touch®

"USB" o "TARJETA SD"
"Reproducir episodio <nombre> del
podcast de video"
2
"Reproducir todo"
"Reproducir lista de video <nombre>"
2
"Reproducir artista <nombre>"
"Canción anterior""Reproducir audiolibro <nombre>"
"Activar repetición de todas""Reproducir autor <nombre>"
"Desactivar repetición""Reproducir compositor <nombre>"
"Activar repetición de una""Reproducir carpeta <nombre>"
"Reproducción aleatoria""Reproducir género <nombre>"
"Desactivar reproducción aleatoria"
"Reproducir Película <nombre>"
2
¿Qué canción es esa?"Reproducir lista <nombre>"
"Ayuda""Reproducir podcast <nombre>"
1
Si dijo que quería revisar su USB o tarjeta SD, el sistema le pedirá que especifique lo que
quiere revisar. Cuando eso suceda, consulte el siguiente cuadro "Revisar".
*
Estos comandos solo están disponibles en el modo USB y dependen del dispositivo.
"REVISAR"
"Todos los podcasts de video"
*
"Disco <nombre >"
"Todos los videos"
*
"Todos los discos"
"Artista <nombre>""Todos los artistas"
"Audiolibro <nombre>""Todos los audiolibros"
"Autor <nombre>""Todos los autores"
"Compositor <nombre>""Todos los compositores"
"Carpeta <nombre>""Todas las carpetas"
"Género <nombre>""Todos los géneros"
"Lista <nombre>"
"Todas las películas"
*
"Podcast <nombre>"
"Todos los videos musicales"
*
384
MyFord Touch®

"REVISAR"
"Programa de TV <nombre>"
*
"Todas las listas"
"Video <nombre>"
*
"Todos los podcasts"
"Lista de video <nombre>"
*
"Todas las canciones"
"Reproducir podcast de video <nombre>"
*
"Todos los programas de TV"
*
"Ayuda"
"Todas las listas de video"
*
*
Estos comandos solo están disponibles en el modo USB y dependen del dispositivo.
Reproductores de medios,
formatos e información de
metadatos compatibles
SYNC tiene la capacidad de alojar
prácticamente todos los reproductores de
medios digitales, incluyendo iPod®,
Zune™, reproductores “Toca desde
dispositivo” y la mayoría de los
controladores USB. Entre los formatos de
audio admitidos se incluye MP3, WMA,
WAV y AAC.
También puede organizar mediante
etiquetas de metadatos los medios
indexados desde su dispositivo de
reproducción. Las etiquetas de metadatos
son identificadores de software
descriptivos incluidos en los archivos de
medios que proporcionan información
acerca de éstos.
Si los archivos de medios indexados no
contienen información en estas etiquetas
de metadatos, SYNC clasificará las
etiquetas de metadatos vacías como
Desconocidas.
Para reproducir video desde su iPod® o
iPhone® (si es compatible), DEBE tener
un cable de video compuesto USB/RCA
de combinación especial (a la venta en
Apple®). Después de conectar el cable en
su iPod® o iPhone®, conecte el otro
extremo en los enchufes RCA y en el puerto
USB.
Audio Bluetooth
El sistema le permite reproducir, en los
altavoces del vehículo, flujos de audio
procedentes de su teléfono móvil
conectado con acceso Bluetooth.
E142611
Para acceder, oprima la esquina
inferior izquierda de la pantalla
táctil y seleccione la pestaña BT.
Comandos de voz del sistema de audio
Bluetooth
Nota: Si su dispositivo Bluetooth admite la
transmisión de metadatos, todos los
comandos siguientes están disponibles. De
lo contrario, solamente los comandos
"Canción siguiente", "Pausa", "Reproducir"
y "Canción anterior" están disponibles.
385
MyFord Touch®

E142599
Si está escuchando un
dispositivo de audio Bluetooth,
oprima el botón de voz en los
controles del volante de la dirección.
Cuando se le indique, diga cualquiera de
los comandos de la siguiente tabla.
Si no está escuchando un dispositivo de
audio Bluetooth, oprima el botón de voz y,
después del tono, diga “Audio Bluetooth”
y cualquiera de los comandos de la
siguiente tabla.
"AUDIO BLUETOOTH"
"Reproducir género
<nombre>"
"Mostrar compositor
<nombre>"
"Mostrar disco <nombre>"
"Reproducir lista
<nombre>"
"Mostrar carpeta
<nombre>"
"Mostrar todos los discos"
"Reproducir episodio
<nombre> del podcast"
"Mostrar género <nombre>""Mostrar todos los artistas"
"Reproducir música similar""Mostrar lista <nombre>""Mostrar todos los audioli-
bros"
"Reproducir canción
<nombre>"
"Mostrar podcast
<nombre>"
"Mostrar todos los autores"
"Canción anterior""Siguiente""Mostrar todos los composi-
tores"
"Activar repetición de todas""Pausa""Mostrar todas las
carpetas"
"Desactivar repetición""Reproducir""Mostrar todos los géneros"
"Activar repetición de una""Reproducir disco
<nombre>"
"Mostrar todas las listas"
"Reproducción aleatoria""Reproducir artista
<nombre>"
"Mostrar todos los
podcasts"
"Activar reproducción alea-
toria del disco"
"Reproducir audiolibro
<nombre>"
"Mostrar todas las
canciones"
"Desactivar reproducción
aleatoria"
"Reproducir autor
<nombre>"
"Mostrar artista <nombre>"
"¿Qué canción es esa?""Reproducir compositor
<nombre>"
"Mostrar audiolibro
<nombre>"
"Ayuda""Reproducir carpeta
<nombre>"
"Mostrar autor <nombre>"
386
MyFord Touch®

Entradas de A/V
Nota: Por motivos de seguridad, no se debe
intentar conectar o regular la configuración
del reproductor de música portátil mientras
el vehículo está en movimiento. Además,
cuando el vehículo esté en movimiento, el
reproductor se debe guardar en un lugar
seguro, como por ejemplo en la consola
central o en la guantera. El cable de
extensión del sistema de audio debe ser lo
suficientemente largo para permitir que el
reproductor de música se guarde en forma
segura mientras el vehículo está en
movimiento.
E142622
Sus entradas de A/V le permiten conectar
una fuente auxiliar de audio/video (por
ejemplo, sistemas de videojuego o
videocámaras personales,) mediante
cables tipo RCA (no se incluyen) en estos
enchufes de entrada. Dichos enchufes, de
colores amarillo, rojo y blanco, están en la
consola central o detrás de una pequeña
puerta de acceso en el tablero de
instrumentos.
También puede utilizar las entradas de
A/V como enchufe de entrada auxiliar
(AIJ), para escuchar la música de su
reproductor de música portátil en los
altavoces del vehículo. Conecte su
adaptador RCA de 3,5 mm (1/8 pulg) en
los dos enchufes de entrada de A/V
restantes (rojo y blanco).
Oprima la esquina inferior izquierda de la
pantalla táctil y seleccione la pestaña
Entradas de A/V.
Para utilizar el enchufe de entrada auxiliar,
asegúrese de que su reproductor de
música portátil esté diseñado para usarse
con auriculares, y que esté completamente
cargado. También necesitará un cable de
extensión de audio con conectores
estereofónicos machos de 3,5 mm
(1/8 pulg) en un extremo, y un enchufe
RCA en el otro.
1. Empiece con el vehículo estacionado
y el radio y el dispositivo portátil
apagados.
2. Conecte un extremo del cable de
extensión de audio en la salida del
auricular de su reproductor, y el otro
extremo en el adaptador de uno de los
dos enchufes de entrada de A/V
restantes (blanco o rojo) de la consola
central.
3. Oprima la esquina inferior izquierda de
la pantalla táctil. Seleccione una
estación sintonizada en la pestaña FM
o una canción en la pestaña CD (si hay
un CD cargado en el sistema). Ajuste
el volumen a un nivel de audición
cómodo.
4. Encienda el reproductor de música
portátil y ajuste el volumen en la mitad
de su nivel.
5. Oprima la esquina inferior izquierda de
la pantalla táctil. Seleccione la pestaña
Entrada de A/V. (Deberá escuchar el
audio del reproductor de música
portátil, pero el volumen puede ser
bajo).
6. Ajuste el sonido del reproductor de
música portátil hasta que alcance el
nivel de la estación FM o CD alternando
los controles.
387
MyFord Touch®

Para reproducir video desde su iPod® o
iPhone® (si es compatible), DEBE tener
un cable de video compuesto USB/RCA
de combinación especial (a la venta en
Apple®). Después de conectar el cable en
su iPod® o iPhone®, conecte el otro
extremo en los enchufes RCA y en el puerto
USB.
Nota: No conecte el enchufe de entrada de
audio a una salida de nivel de línea. El
enchufe de entrada auxiliar solo funciona
correctamente con dispositivos que poseen
salida para auriculares con control de
volumen.
Nota: No ajuste el volumen del reproductor
de música portátil en un nivel más alto que
lo necesario para coincidir con el volumen
del CD o radio FM, ya que esto provoca
distorsión y disminuye la calidad del sonido.
Nota: Si la música se oye distorsionada en
niveles más reducidos, baje el volumen del
reproductor. Si el problema persiste,
reemplace o recargue las baterías.
Nota: El reproductor de música portátil se
debe controlar en la misma forma que
cuando se usa con auriculares, ya que el
Enchufe de entrada auxiliar no proporciona
control (reproducción, pausa, etc.) sobre
éste.
TELÉFONO
La llamada de manos libres es una de las
características principales de SYNC. Una
vez que se enlaza su teléfono, puede
acceder a muchas opciones utilizando la
pantalla táctil o comandos de voz. Aunque
el sistema tiene una amplia variedad de
características, muchas de ellas dependen
de la funcionalidad de su teléfono.
La mayoría de los teléfonos móviles con
tecnología inalámbrica Bluetooth admiten,
al menos, las siguientes funciones:
• Responder una llamada entrante
• Finalizar una llamada
• Usar el modo de privacidad
• Marcar un número
• Volver a marcar
• Aviso de llamada en espera
• Identificación de quien llama.
Otras características, como mensajes de
texto mediante Bluetooth y descarga
automática de agenda, dependen del
teléfono. Para verificar la compatibilidad
del teléfono, consulte la guía del usuario
del teléfono y visite
www.SYNCMyRide.com o
www.syncmaroute.ca.
Asociación del teléfono por
primera vez
ALERTA
Manejar mientras está distraído
puede tener como consecuencia la
pérdida de control del vehículo, un
accidente y lesiones. Ford recomienda
encarecidamente que los conductores
presten especial cuidado cuando utilicen
dispositivos que pudieran quitar su
atención del camino. Su responsabilidad
principal es manejar en forma segura el
vehículo. No se recomienda el uso de
ningún dispositivo portátil al conducir; se
sugiere el uso de sistemas operados por
voz cuando sea posible y que se informe
de las leyes estatales y locales aplicables
al uso de dispositivos electrónicos al
conducir.
388
MyFord Touch®

Lo primero que debe hacer para utilizar las
funciones de teléfono del sistema SYNC,
es asociar su teléfono móvil compatible
con tecnología Bluetooth y el sistema
SYNC. Esto le permite utilizar su teléfono
en el modo de manos libres.
Nota: Asegúrese de que el encendido del
vehículo y el radio estén activados y que la
transmisión esté en posición P.
1. Toque Agregar teléfono en la esquina
superior izquierda de la pantalla táctil.
2. Cuando reciba la indicación, seleccione
Agregar.
3. Seleccione Agregar dispositivo.
4. Asegúrese de que la opción Bluetooth
esté ajustada en Activado y que su
teléfono móvil esté en el modo
apropiado. Si fuera necesario, consulte
la guía del usuario del teléfono.
5. Cuando la pantalla del teléfono se lo
indique, ingrese en la pantalla del radio
el número de identificación personal
(PIN) de seis cifras que SYNC le
proporcionó. La pantalla indica si la
asociación se realizó correctamente y
le pregunta si quiere descargar su
libreta de teléfonos.
Dependiendo de la capacidad de su
teléfono, es posible que se le indiquen
opciones adicionales. Para más
información sobre la capacidad de su
teléfono, consulte la guía del usuario del
teléfono y visite el sitio web.
Asociación de teléfonos
subsiguientes
Nota: Asegúrese de que el encendido del
vehículo y el radio estén activados y que la
transmisión esté en posición P.
1. Oprima la esquina del teléfono de la
pantalla táctil, Configuración,
Dispositivos Bluetooth y Agregar
dispositivo.
2. Asegúrese de que la opción Bluetooth
esté ajustada en Activado y que su
teléfono móvil esté en el modo
apropiado. Si fuera necesario, consulte
la guía del usuario del teléfono.
3. Cuando se lo indique la pantalla del
teléfono, ingrese el PIN de seis dígitos
que SYNC le proporcionó en la
pantalla. La pantalla indicará si la
asociación tuvo éxito. El sistema le
preguntará si quiere descargar su
libreta de teléfonos.
Dependiendo de la capacidad de su
teléfono, es posible que se le indiquen
opciones adicionales. Para más
información sobre la capacidad de su
teléfono, consulte la guía del usuario del
teléfono y visite el sitio web.
Hacer llamadas
E142599
Presione el botón de voz. Cuando
reciba la indicación, diga,
"Llamar a <nombre> o diga
"Marcar" y el número deseado.
E142632
Para finalizar la llamada o salir
del modo de teléfono, mantenga
oprimido el botón de teléfono.
Recepción de llamadas
Durante una llamada entrante, suena un
tono audible. La información de la llamada
aparece en la pantalla, si está disponible.
Acepte la llamada oprimiendo
Aceptar en la pantalla táctil u
oprimiendo este botón de
teléfono en los controles del volante de la
dirección.
E142632
Rechace la llamada oprimiendo
Rechazar en la pantalla táctil,
o manteniendo oprimido este
botón de teléfono en los controles del
volante de la dirección.
389
MyFord Touch®

Ignore la llamada no realizando ninguna
acción. SYNC registra la llamada como
llamada perdida.
Opciones del menú de teléfono
Oprima la esquina superior izquierda de la
pantalla táctil para seleccionar una de las
siguientes opciones:
PuedeCuando selecciona
Acceder al teclado numérico en pantalla, ingresar un
número y hacer una llamada.
Teléfono
· Durante una llamada activa, puede optar por silenciar la
llamada, ponerla en espera, activar la privacidad (envía
la llamada a su teléfono móvil), unir dos llamadas o
terminar la llamada.
Seleccionar y llamar a los contactos almacenados en su
agenda telefónica y en la carpeta del historial de llamadas.
Marcación rápida
Acceder y llamar a cualquier contacto de su agenda tele-
fónica previamente descargada. El sistema ordenará las
entradas en las categorías alfabéticas que se resumen en
la parte superior de la pantalla.
Libreta de teléfonos
· Para activar las configuraciones de imágenes de los
contactos (si su dispositivo cuenta con esta función),
oprima Teléfono, Configuración, Administrar agenda,
Descargar fotos de la agenda y después, Activar.
· Algunos teléfonos inteligentes pueden admitir la transfe-
rencia de direcciones si están incluidas en la información
de contacto de la agenda telefónica. Si esta característica
es admitida, puede seleccionar y utilizar estas direcciones
como destinos y también guardarlas como favoritos.
Acceder a cualquier llamada marcada, recibida o perdida
mientras su teléfono con tecnología Bluetooth ha estado
conectado a SYNC. También puede guardar cualquiera
de sus llamadas en Favoritos o Marcación rápida.
Historial de llamadas
Ésta es una característica dependiente del teléfono. Si su
teléfono no admite la descarga del historial de llamadas
a través de Bluetooth, SYNC mantendrá un registro de las
llamadas realizadas con el sistema SYNC.
Enviar mensajes de texto usando la pantalla táctil
Consulte la sección Mensajes de texto para obtener más
información.
Mensajes
Acceder a diversas configuraciones del teléfono, como
activar y desactivar Bluetooth y administrar la agenda.
Consulte la sección Configuración del teléfono para
obtener más información.
Configuración
390
MyFord Touch®

Mensajes de texto
Nota: La descarga y el envío de mensajes
de texto a través de Bluetooth son
características que dependen del teléfono.
Nota: Ciertas características en la
mensajería de texto dependen de la
velocidad y no se pueden realizar cuando el
vehículo viaja a más de 5 km/h (3 mph).
Nota: SYNC no descarga mensajes de texto
leídos desde su teléfono.
Puede enviar y recibir mensajes de texto a
través de Bluetooth, leerlos en voz alta y
traducir acrónimos de uso frecuente en
mensajería de texto, como “LOL”.
1. Toque la esquina superior izquierda de
la pantalla para acceder al menú
Teléfono.
2. Seleccione Mensajería.
3. Elija entre las selecciones siguientes:
• Escuchar
• Marcar
• Enviar texto
• Ver
• Borrar
Escribir un mensaje de texto
Nota: La descarga y el envío de mensajes
de texto a través de Bluetooth son
características que dependen del teléfono.
Nota: Ésta es una característica
dependiente de la velocidad y no puede
usarse si el vehículo viaja a más de 5 km/h
(3 mph).
1. Toque la esquina superior izquierda de
la pantalla para acceder al menú
Teléfono.
2. Seleccione Mensajes y después,
Enviar texto.
3. También puede seleccionar Editar
Texto y utilizar el teclado del sistema
para crear un mensaje de texto o
seleccionar entre las siguientes
opciones:
Opciones de mensajes de texto
Llámeme luego
¿Puede llamarme?
Acabo de salir, volveré pronto.
Le llamaré dentro de unos minutos
Le llamaré en cuanto llegue.
Voy adelantado, así que llegaré temprano.
Voy en camino.
Estoy afuera.
Voy con unos minutos de retraso.
LOL (Carcajada)
No
OK
391
MyFord Touch®

Opciones de mensajes de texto
Estoy en un atasco
Gracias
Sí
Recibir un mensaje de texto
Nota: Si selecciona Ver y su vehículo viaja
a más de 5 km/h (3 mph), el sistema le
ofrecerá leer en voz alta el mensaje en lugar
de permitir que usted lo vea mientras
conduce.
Cuando llega un nuevo mensaje, se
escucha un tono y en la pantalla aparece
un mensaje emergente con el nombre e ID
de la persona que llama, si lo admite el
teléfono. Puede oprimir:
• Ver para ver el mensaje de texto.
• Escuchar para que SYNC lea los
mensajes en voz alta.
• Marcar para llamar al contacto.
• Ignorar para salir de la pantalla.
Configuración del teléfono
Oprima Teléfono, a continuación
Configuración o Menú, Configuración
y después Teléfono para seleccionar entre
las siguientes opciones:
PuedeCuando selecciona
Conectar, desconectar, agregar o quitar un dispositivo, así
como guardarlo como favorito.
Dispositivos Bluetooth
Activar o desactivar Bluetooth.Bluetooth activado/desac-
tivo
Hacer que todas las llamadas vayan directamente a su
buzón de voz y no suenen en la cabina del vehículo. Con
esta función activada, las notificaciones de mensaje de
texto también se silencian y no suenan dentro de la cabina.
No molestar
Activar o desactivar 911 Assist™. Ver Información (página
394).
911 Assist
Seleccionar lo que quiera oír al recibir una llamada.
Seleccione ya sea de los posibles tonos de timbre del
sistema, el tono de timbre de su teléfono actualmente
asociado, un pitido, texto de conversación o si desea que
la notificación sea silenciosa.
Timbre del teléfono
392
MyFord Touch®

PuedeCuando selecciona
Seleccionar cómo quiere ser notificado al recibir un
mensaje de texto, si su teléfono es compatible. Seleccione
entre los posibles tonos de alerta del sistema, texto de
conversación o silencio.
Aviso de mensaje de texto
Utilice esta pantalla para configurar su conexión de datos
de Internet. Seleccione para crear su perfil de conexión
con la red de área personal (PAN) o para desactivar su
conexión. También puede ajustar su configuración o hacer
que el sistema siempre esté conectado, que nunca se
conecte en roaming, o que pregunte antes de conectarse.
Oprima ? para obtener más información.
Conexión de datos de
Internet
*
Acceder a funciones como descarga automática de la
agenda, volver a descargar su agenda, agregar contactos
desde su teléfono y borrar o cargar su agenda.
Administrar agenda
Muestra el historial de llamadas.Historial de llamadas.
*
Si es compatible.
Comandos de voz del teléfono
E142599
Oprima el botón de voz en los
controles del volante de la
dirección. Cuando se le indique,
diga cualquiera de los siguientes
comandos:
"TELÉFONO"
"Desactivar llamada en espera"
1
"Desactivar Bluetooth"
"Activar llamada en espera"
1
"Bluetooth activado"
"Añadir llamadas"
1
"Llamar"
"Escuchar mensaje de texto""Llamar a <nombre>"
"Mensajes"
2
"Llamar a <nombre> a la casa"
"Silenciar llamada"
1
"Llamar a <nombre> al trabajo"
"Sincronizar teléfono""Llamar a <Nombre> al teléfono móvil"
"Activar privacidad"
1
"Llamar a <nombre> a otro"
393
MyFord Touch®

"TELÉFONO"
"Contestar mensaje de texto""Correo de voz"
"Desactivar timbre""Marcar"
"Activar timbre""Desactivar no molestar"
"Silenciar llamada""Activar no molestar"
"Ayuda""Reenviar mensaje de texto"
"Activar manos libres"
1
1
Estos comandos solo están disponibles durante una llamada activa.
2
Si dice, "Mensajes", consulte la siguiente tabla de "Mensajes" para conocer mensajes
adicionales.
"MENSAJES"
"Llamar"
"Reenviar mensaje de texto"
"Escuchar mensaje de texto <#>"
"Escuchar mensaje de texto"
"Contestar mensaje de texto"
"Ayuda"
INFORMACIÓN
En el menú Información, puede acceder a
características como Servicios SYNC®,
SIRIUS® Travel Link™ y Aplicaciones
SYNC o ver su calendario y notificaciones
del sistema.
Si su vehículo está equipado con sistema
de navegación, oprima el Información para
acceder a estas funciones. Si su vehículo
está equipado con sistema de navegación,
oprima la esquina de la pantalla táctil con
la pestaña verde.
Servicios SYNC (si está equipado,
EE.UU. solamente)
Nota: Los servicios SYNC deben activarse
antes de utilizarlos. Visite
www.SYNCMyRide.com para registrarse y
comprobar que está calificado para obtener
servicios complementarios. Pueden
aplicarse tarifas estándar de teléfono y
mensajes. Puede que deba suscribirse.
También debe tener el teléfono móvil con
tecnología Bluetooth y Servicios SYNC
activado, asociado y vinculado al sistema
para que pueda comunicarse y utilizar los
Servicios SYNC. Ver Teléfono (página 388).
394
MyFord Touch®

Nota: Esta función no opera
adecuadamente si ha activado el bloqueo
de la identificación de quien llama en su
teléfono móvil. Asegúrese de que el teléfono
móvil no esté bloqueando la identificación
de quien llama antes de utilizar los Servicios
SYNC.
Nota: El conductor es el responsable final
de utilizar en forma segura el vehículo y, por
lo tanto, debe evaluar si es seguro seguir las
indicaciones sugeridas. Cualquier función
de navegación se entrega sólo como ayuda.
Tome sus decisiones de manejo según sus
observaciones de las condiciones locales y
reglamentos de tráfico existentes. No siga
las sugerencias de la ruta si hacerlo pudiera
generar una maniobra no segura o ilegal, si
implicara quedar en una situación poco
segura o si fuera dirigido a un área que
considere no segura. Los mapas que este
sistema utiliza pueden ser imprecisos
debido a errores, cambios en los caminos,
condiciones de tráfico o condiciones de
manejo.
Nota: Cuando se conecta, el servicio utiliza
tecnología GPS y sensores avanzados del
vehículo para recopilar información sobre
la ubicación actual del vehículo, la dirección
del viaje y la velocidad para proporcionarle
las indicaciones, informes de tráfico o
ubicaciones de negocios que usted solicite.
Además, para brindarle los servicios
solicitados y para mejorar continuamente,
es posible que el servicio recopile y registre
detalles de llamadas y comunicaciones de
voz. Para obtener más información, consulte
los términos y condiciones del Servicio
SYNC en www.SYNCMyRide.com. Si no
desea que Ford o sus proveedores de
servicios recopilen la información de viaje
del vehículo u otra información indicada en
los Términos y condiciones, no active ni
utilice el servicio.
Los Servicios SYNC utilizan sensores
avanzados del vehículo, tecnología GPS
integrada y datos completos de mapas y
tránsito para proporcionarle informes de
tráfico, indicaciones precisas para llegar a
su destino, ubicaciones de negocios,
noticias, deportes, clima y más. Para
obtener una lista completa de los servicios
o para recibir más información, visite
www.SyncMyRide.com.
Conexión a Servicios SYNC mediante
comandos de voz
1. Presione el botón de voz.
2. Cuando se le indique, diga "Servicios".
Esto inicia una llamada a los Servicios
SYNC mediante el teléfono móvil con
tecnología Bluetooth asociado y
conectado.
3. Luego de conectarse al servicio, siga
los indicadores de voz para solicitar el
servicio deseado, como tráfico o
indicaciones. También puede decir
"¿Cuáles son mis opciones?" para
recibir una lista completa de los
servicios disponibles que puede elegir.
4. Diga "Servicios" para volver al menú
principal de los servicios; para solicitar
ayuda, diga "Ayuda".
Conexión a Servicios SYNC mediante
la pantalla táctil
Si su vehículo está equipado con sistema
de navegación, oprima el botón
Información.
Si su vehículo no está equipado con
sistema de navegación, oprima la pestaña
verde en la pantalla táctil.
1. Seleccione Conectarse a los
servicios para iniciar una llamada
saliente a los Servicios SYNC usando
su teléfono.
395
MyFord Touch®

2. Luego de conectarse, siga los
indicadores de voz para solicitar el
servicio deseado, como tráfico o
indicaciones. También puede decir
"¿Cuáles son mis opciones?" para
recibir una lista completa de los
servicios disponibles que puede elegir.
3. Diga "Servicios" para volver al menú
principal de los servicios; para solicitar
ayuda, diga "Ayuda".
Recepción de indicaciones de viaje
1. Al conectarse a los Servicios SYNC,
diga "Indicaciones" o "Ubicación de
negocios". Para encontrar el negocio o
tipo de negocio más cercano a su
ubicación actual, diga "Ubicación de
negocios" y después "Buscar cerca de
mí". Si necesita más ayuda para
encontrar un lugar, puede decir
"Operador" en cualquier momento
mientras se encuentra en Indicaciones
o Ubicación de negocios para hablar
con un operador en directo. También
es posible que se le solicite que hable
con un operador. El operador en directo
puede ayudarle a buscar negocios por
nombre o categoría, direcciones
residenciales por calle o por nombre o
por intersecciones de calles
específicas. Operator Assist es una
función de su suscripción a los
Servicios SYNC. Para obtener más
información sobre Operator Assist,
visite www.SYNCMyRide.com/support.
2. Siga las indicaciones de voz para
seleccionar su destino. Después de
terminar la descarga de la ruta, la
llamada telefónica finaliza
automáticamente.
Si su vehículo no está equipado con la
función de navegación:
• Las indicaciones de viaje aparecerán
en la pantalla de información y
entretenimiento, en la barra de estado
del sistema de pantalla táctil y también
en la pantalla de los Servicios SYNC.
También puede recibir instrucciones
de conducción mediante indicaciones
audibles.
• Mientras se encuentra en una ruta
activa, puede seleccionar Resumen
de ruta o Estado de la ruta usando
los controles de la pantalla táctil o los
comandos de voz para ver la Lista
resumida de instrucciones de ruta
o el Tiempo estimado de llegada del
estado de la ruta. También puede
activar o desactivar una guía de voz,
cancelar la ruta o actualizar la ruta.
Si se pasa del lugar donde debía virar,
SYNC le pregunta automáticamente si
desea actualizar la ruta. Cuando se le
pregunte, diga "sí" y se le entregará una
nueva ruta a su vehículo.
Si el vehículo está equipado con la función
de navegación, Servicios SYNC descarga
el destino solicitado al sistema de
navegación. A continuación, el sistema de
navegación calcula la ruta y le proporciona
las instrucciones de conducción. Ver
Navegación (página 408).
Desconexión de los Servicios SYNC
1. Mantenga presionado el botón de
finalizar llamada en el volante de la
dirección.
2. Diga "Adiós" desde el menú principal
de Servicios SYNC.
396
MyFord Touch®

Opciones de tráfico, indicaciones e información
Puede personalizar la función de servicios para obtener
un acceso más rápido a su información favorita o la que
usa con más frecuencia. Puede guardar direcciones como
el trabajo o la casa. También puede guardar su información
favorita como equipos deportivos, por ejemplo Detroit
Lions, o una categoría de noticias. Para obtener más
información, inicie sesión en www.SyncMyRide.com.
Personalización
Oprima el botón de voz en cualquier momento (mientras
está conectado a los Servicios SYNC TDI) para interrumpir
un indicador de voz o un clip de audio (como un informe
deportivo) y diga el comando de voz.
Presione para interrumpir
La suscripción está asociada con su número de teléfono
móvil con tecnología Bluetooth, no con su VIN (Número
de identificación del vehículo). Puede asociar y conectar
su teléfono a cualquier vehículo que cuente con Tráfico,
indicaciones e información y seguir disfrutando de sus
servicios personalizados.
Portátil
Comandos de voz de Servicios SYNC
E142599
Cuando se haya descargado una
ruta (en sistemas sin
navegación), oprima el botón de
voz en los controles del volante de la
dirección. Cuando se le indique, diga
cualquiera de los siguientes comandos:
"SERVICIOS"
"Cancelar ruta"
"Desactivar voz de navegación"
"Activar voz de navegación"
"Siguiente viraje"
"Hora estimada de llegada"
"Resumen de ruta"
397
MyFord Touch®

"SERVICIOS"
"Servicios"
"Actualizar ruta"
"Ayuda"
SIRIUS Travel Link (If Equipped)
ALERTA
Manejar mientras está distraído
puede tener como consecuencia la
pérdida de control del vehículo, un
accidente y lesiones. Ford le recomienda
enfáticamente que extreme las
precauciones cuando utilice cualquier
dispositivo o función que pudiera distraerlo
mientras conduce. Su responsabilidad
principal es manejar en forma segura el
vehículo. No se recomienda el uso de
ningún dispositivo portátil al conducir; se
sugiere el uso de sistemas operados por
voz cuando sea posible y que se informe
de las leyes estatales y locales aplicables
al uso de dispositivos electrónicos al
conducir.
Nota: Para usar SIRIUS Travel Link, su
vehículo debe estar equipado con un
sistema de navegación y su tarjeta SD de
navegación debe estar inserta en la ranura
para tarjeta SD.
Nota: Se requiere una suscripción pagada
para tener acceso a estas funciones y
usarlas. Visite www.siriusxm.com/travellink
para obtener más información.
Nota: Visite www.siriusxm.com/traffic# y
haga clic en Coverage map and details
(Mapa de cobertura y detalles) para obtener
una lista completa de todas las áreas de
tráfico que cubre SIRIUS Travel Link.
Nota: SIRIUS y Ford no son responsables
de ningún error o imprecisión en los servicios
de SIRIUS Travel Link o su uso en vehículos.
SIRIUS Travel Link (si está activado) puede
ayudarle a encontrar los mejores precios
de combustible, consultar horarios de
películas, obtener alertas de tráfico
actualizadas, acceder al mapa del clima
actual, obtener información precisa sobre
las condiciones para esquiar y resultados
de juegos deportivos.
Oprima el botón Información, seleccione
Sirius Travel Link y seleccione cualquiera
de los siguientes servicios:
PuedeCuando selecciona
Identificar incidentes de tráfico en la ruta, cerca de la
ubicación actual del vehículo o cerca de cualquiera de sus
lugares favoritos (si están programados).
Tráfico en la ruta
Tráfico cercano
Ver los precios del combustible en estaciones cercanas a
la ubicación de su vehículo o en una ruta de navegación
activa.
Precios de combustible
398
MyFord Touch®

PuedeCuando selecciona
Ver el clima de lugares cercanos, el clima actual o el
pronóstico para 5 días del área seleccionada. Seleccione
Mapa para ver el mapa de clima, que puede indicar
tormentas, información de radar, cuadros sinópticos y
vientos. Seleccione Área para seleccionar una opción en
una lista de ubicaciones climáticas.
Clima
Ver resultados y horarios de diversos deportes. También
puede guardar hasta 10 equipos favoritos para acceder
más fácilmente a la información. Los resultados se
actualizan automáticamente cuando hay un juego en
desarrollo.
Información deportiva
Ver los cines cercanos y los horarios de las funciones (si
está disponible).
Cartelera de cine
Ver las condiciones para esquiar de un área específica.Condiciones para esquiar
Comandos de voz de SIRIUS Travel
Link
E142599
Oprima el botón de voz en los
controles del volante de la
dirección. Cuando se le indique,
diga cualquiera de los siguientes
comandos:
"SIRIUS TRAVEL LINK"
"Pronóstico del clima"
"Precios de la gasolina"
"Cartelera de cine"
"Noticias deportivas"
"Calendario deportivo"
"Resultados deportivos"
"Tráfico"
"Clima"
399
MyFord Touch®

"SIRIUS TRAVEL LINK"
"Mapa del clima"
"Ayuda"
*
Si dice "Noticias deportivas", "Calendario deportivo" o "Resultados deportivos", puede
decir cualquiera de los comandos del cuadro siguiente.
Comandos relacionados con los deportes
*
"Béisbol"
"Basquetbol colegial"
"Futbol americano colegial"
"Golf"
"MLS"
"Mis equipos"
"NBA"
"NFL"
"Hockey"
"Basquetbol femenil"
"Ayuda"
*
Si desea escuchar las notificas, el calendario o los resultados de un deporte en
particular, o de sus equipos favoritos, diga el deporte (o equipo) y luego, "noticias",
"calendarios" o "resultados".
Comandos de voz adicionales relacionados con los deportes
"Resultados de la NBA""Noticias de la MLS""Noticias del béisbol"
"Noticias de la NFL""Calendario de la MLS""Calendario del béisbol"
"Calendario de la NFL""Resultados de la MLS""Resultados del béisbol"
"Resultados de la NFL""Noticias del automovi-
lismo"
"Calendario del basquetbol
colegial"
400
MyFord Touch®

Comandos de voz adicionales relacionados con los deportes
"Noticias de la NHL""Resultados del automovi-
lismo"
"Resultados del basquetbol
colegial"
"Calendario de la NHL""Calendario del automovi-
lismo"
"Noticias del futbol ameri-
cano colegial"
"Resultados de la NHL""Noticias de mis equipos""Calendario del futbol cole-
gial"
"Noticias de la WNBA""Calendario de mis equipos""Resultados del futbol cole-
gial"
"Calendario de la WNBA""Resultados de mis
equipos"
"Noticias del golf"
"Resultados de la WNBA""Noticias de la NBA""Posiciones del golf"
"Ayuda""Calendario de la NBA""Calendario de golf"
Notificaciones
Oprima el botón de información y
seleccione Notificaciones.
Puede seleccionar un mensaje y luego
elegir:
• Ver el mensaje completo
• Borrar el mensaje
• Borrar todos los mensajes
Esta pantalla muestra los mensajes del
sistema (por ejemplo, Error en la tarjeta
SD).
Nota: El sistema le avisará que tiene
mensajes encendiendo el icono de
información en amarillo. Una vez que lea o
borre sus mensajes, el icono volverá a
ponerse blanco.
Calendario
Oprima el botón de información y
seleccione Calendario.
911 Assist® (If Equipped)
AVISOS
A menos que la configuración de 911
Assist se ajuste antes de un
accidente, el sistema no marcará
para solicitar ayuda lo cual podría retrasar
el tiempo de respuesta, aumentando
potencialmente el riesgo de causar serias
heridas o la muerte después de un
accidente.
No espere a que 911 Assist realice
una llamada de emergencia si puede
hacerla usted mismo. Marque los
servicios de emergencia inmediatamente
para evitar retrasos en el tiempo de
respuesta lo cual podría aumentar el riesgo
de causar serias heridas o la muerte
después de un accidente. Si no oye al 911
Assist después de cinco segundos del
accidente, es posible que el sistema esté
dañado o no esté funcionando.
401
MyFord Touch®

AVISOS
Siempre coloque su teléfono en un
lugar seguro en el vehículo de
manera que no se convierta en un
proyectil o se dañe en un choque. Si no lo
hace, puede causarle serias heridas a
alguien o dañar el teléfono lo cual podría
impedir el funcionamiento adecuado de
911 Assist.
Nota: La función SYNC 911 Assist debe
ajustarse antes del incidente.
Nota: Antes de activar esta función,
asegúrese de leer el aviso de privacidad de
911 Assist al final de esta sección para
acceder a información importante.
Nota: Si un usuario activa o desactiva 911
Assist, esa configuración se aplica para
todos los teléfonos asociados. Si 911 Assist
está desactivado, se reproducirá un mensaje
de voz o aparecerá un mensaje o icono (o
ambos) si se arranca un vehículo después
de que conecte un teléfono previamente
asociado.
Nota: Cada teléfono funciona de manera
diferente. Aunque SYNC 911 Assist funciona
con la mayoría de los teléfonos móviles,
algunos pueden presentar problemas al usar
esta función.
Si un accidente despliega una bolsa de aire
o activa el corte de la bomba de
combustible, es posible que el vehículo
equipado con SYNC se conecte con los
servicios de emergencia marcando el 911
a través de un teléfono asociado y
conectado con acceso a Bluetooth. Para
obtener más información sobre 911 Assist,
visite www.SYNCMyRide.com o
www.syncmaroute.ca.
Ver Sistema de Seguridad
Complementaria (página 38). Este
capítulo contiene información importante
con respecto al despliegue de la bolsa de
aire.
Ver Emergencias en el Camino (página
216). Este capítulo contiene información
importante con respecto al corte de la
bomba de combustible.
Activación de 911 Assist
Oprima el botón de información,
Aplicaciones, 911 Assist y seleccione
Activar.
También puede acceder a 911 Assist de la
siguiente manera:
• Al oprimir el icono de Menú,
Configuración, Teléfono y 911 Assist
• Al oprimir el icono de Menú, Ayuda y
911 Assist
Para asegurarse que 911 Assist funcione
adecuadamente:
• SYNC debe contar con energía y
funcionar adecuadamente al momento
del incidente y durante la activación y
uso de la función.
• La función 911 Assist debe ajustarse
antes del incidente.
• Un teléfono compatible y con
tecnología Bluetooth debe estar
asociado y conectado a SYNC.
• Un teléfono compatible con tecnología
Bluetooth conectado debe poder
realizar y mantener una llamada al
momento del incidente.
• Un teléfono con tecnología Bluetooth
conectado debe tener cobertura de red
adecuada, energía de la batería e
intensidad de la señal.
• El vehículo debe tener energía de la
batería y estar ubicado en Estados
Unidos, Canadá o en un territorio donde
el 911 sea el número de emergencia.
402
MyFord Touch®

En caso de un accidente
No todos los accidentes despliegan una
bolsa de aire o activan el corte de la
bomba de combustible (lo que activaría
la función 911 Assist); sin embargo, si se
activa 911 Assist, SYNC intentará
comunicarse con los servicios de
emergencia. Si un teléfono conectado está
dañado o pierde la conexión con SYNC,
SYNC buscará e intentará conectarse a
cualquier teléfono disponible previamente
asociado y tratará de realizar la llamada
al 911.
Antes de hacer la llamada:
• SYNC proporciona un breve período de
tiempo (aproximadamente 10
segundos) para cancelar la llamada.
Si no se cancela, SYNC tratará de
marcar el 911.
• SYNC proporciona el siguiente mensaje
o uno similar: "SYNC tratará de llamar
al 911, para cancelar la llamada
presione Cancelar en su pantalla o
mantenga presionado el botón de
teléfono en el volante de la dirección".
Si la llamada no se cancela y se realiza de
manera satisfactoria, se reproducirá un
mensaje pregrabado para el operador del
911, luego el o los ocupantes del vehículo
podrán hablar con el operador. Esté
preparado para indicar su nombre, número
de teléfono y ubicación inmediatamente,
ya que no todos los sistemas del 911 son
capaces de recibir esta información de
manera electrónica.
Es posible que 911 Assist no funcione
si
• El hardware del teléfono móvil o de 911
Assist se dañó en el accidente.
• La batería del vehículo o el sistema
SYNC no tienen energía.
• El o los teléfonos asociados y
conectados al sistema salieron
expulsados del vehículo.
Aviso de privacidad de 911 Assist
Una vez que se activa 911 Assist, es posible
que éste se comunique con los servicios
de emergencia indicando el choque del
vehículo y el despliegue de una bolsa de
aire o la activación del corte de la bomba
de combustible. Es posible que ciertas
versiones de 911 Assist también puedan
comunicar de manera verbal o electrónica
a los operadores del 911 la ubicación del
vehículo u otros detalles sobre el mismo o
sobre el choque, para ayudarlos a
proporcionar los servicios de emergencia
más adecuados. Si no desea transmitir
esta información, no active la función.
Informe de mantenimiento del
vehículo (If Equipped)
ALERTA
Siempre siga las instrucciones de
mantenimiento programadas,
inspeccione su vehículo de manera
regular y solicite la reparación de cualquier
daño o problema que sospeche. El Informe
de mantenimiento del vehículo
complementa pero no puede reemplazar
el mantenimiento normal ni la inspección
del vehículo. El Informe de mantenimiento
del vehículo solo monitorea ciertos
sistemas que el vehículo supervisa
electrónicamente y no controlará ni
informará el estado de ningún otro sistema
(por ejemplo, el desgaste de las balatas).
Si no realiza el mantenimiento programado
y no inspecciona regularmente su vehículo,
podría provocar daños en el vehículo o
sufrir lesiones graves.
Nota: Esta característica está disponible
solamente en Estados Unidos.
403
MyFord Touch®

Nota: Para usar la función de Informe de
mantenimiento del vehículo, primero debe
activarla. Visite www.SYNCMyRide.com
para registrarse. No hay cobros ni
suscripciones asociados con el Informe de
mantenimiento del vehículo, pero debe
registrarse para utilizar esta función.
Nota: Es posible que esta función no opere
adecuadamente si ha activado el bloqueo
de la identificación de quien llama en su
teléfono móvil. Antes de ejecutar un
informe, lea el aviso de privacidad sobre el
Informe de mantenimiento del vehículo.
Nota: Para permitir un período de ajuste
para el vehículo, es posible que no pueda
crear un Informe de mantenimiento del
vehículo hasta que el odómetro del vehículo
haya alcanzado 200 millas.
Nota: Puede que se apliquen cargos de
teléfono móvil y SMS al ejecutar un informe.
Regístrese para ver el Informe de
mantenimiento del vehículo y para ajustar
las preferencias del informe en
www.SYNCMyRide.com. Después de
registrarse, podrá solicitar un Informe de
mantenimiento del vehículo (dentro de su
vehículo). Vuelva a su cuenta en
www.SYNCMyRide.com para ver el
informe. También tiene la opción de que
SYNC le recuerde de manera automática
ejecutar informes en intervalos de
kilometraje específicos. Puede que se
apliquen cargos por uso del tiempo de
llamada del teléfono móvil al ejecutar
informes.
El sistema le permite comprobar el
mantenimiento general del vehículo a
través de una tarjeta de informe de
diagnóstico. El Informe de mantenimiento
del vehículo contiene información valiosa,
como por ejemplo:
• Información de diagnóstico del
vehículo
• Mantenimiento programado
• Llamados a revisión abiertos y acciones
de servicio en terreno
• Elementos que no han sido revisados
en inspecciones del vehículo del
distribuidor autorizado
Obtención de un informe
Para ejecutar un informe mediante la
pantalla táctil, toque el botón Información,
Aplicaciones y luego, Informe de
mantenimiento del vehículo.
E142599
Para ejecutar un informe
mediante comandos de voz,
oprima el botón de voz en el
volante de la dirección y cuando se le
indique, diga "Reporte de condición
vehicular".
Aviso de privacidad sobre el Informe
de mantenimiento del vehículo
Cuando ejecute un Informe de
mantenimiento del vehículo, es posible
que Ford Motor Company recopile su
número de teléfono móvil (para procesar
la solicitud del informe) e información de
diagnóstico de su vehículo. Algunas
versiones o actualizaciones del Informe de
mantenimiento del vehículo pueden
también recopilar información adicional
sobre el vehículo. Ford puede utilizar la
información que recopile del vehículo para
cualquier propósito. Si no desea dar a
conocer su número de teléfono móvil o la
información de su vehículo, no ejecute la
función y no configure el perfil del Informe
de mantenimiento del vehículo en
www.SYNCMyRide.com. Para obtener más
información, consulte
www.SYNCMyRide.com (Términos y
condiciones del Informe de mantenimiento
del vehículo y declaración de privacidad).
404
MyFord Touch®

CLIMATIZACIÓN
E142612
Oprima la esquina inferior derecha de la
pantalla táctil para acceder a las
características del control de temperatura.
Dependiendo de la línea de su vehículo y
del paquete de opciones, la pantalla de
temperatura puede verse diferente a la
que se muestra aquí.
E146988
Encendido: toque para encender o apagar el sistema. Cuando el sistema está
desactivado no puede ingresar aire exterior al vehículo.
A
Configuraciones del pasajero: Toque + o – ajuste la temperatura.B
Velocidad del ventilador: Toque + o - ajuste la velocidad del ventilador.C
DOBLE: Toque para encender el control de temperatura del lado del pasajero.D
Aire recirculado: toque para encender o apagar el aire recirculado que tal vez
disminuya el tiempo requerido para enfriar el interior y ayudar a reducir los
olores. El aire recirculado también es automático cuando se selecciona MAX
A/C o MAX desempañamiento y puede utilizarse manualmente en cualquier
modo de flujo de aire excepto desempañamiento. También puede apagarse
en todos los modos de flujo de aire excepto en MAX A/C y MAX
desempañamiento para disminuir el potencial de niebla.
E
MAX A/C: toque para enfriar el vehículo con aire recirculado. Toque
nuevamente para regresar a la operación normal del A/A. MAX A/C distribuye
aire recirculado a través de los respiraderos del tablero de instrumentos y ayuda
a reducir el ingreso de malos olores al vehículo. MAX A/C es más económico y
eficiente que el modo de A/A normal.
F
405
MyFord Touch®

A/A: toque para activar y desactivar el aire acondicionado. Utilice el A/C con
aire recirculado para mejorar el desempeño y la eficacia de enfriamiento. El
A/C es automático en MAX A/C, desempañamiento y para los
pies/desempañamiento.
G
AUTO: toque para activar el funcionamiento automático, luego ajuste la
temperatura utilizando el control de temperatura. El sistema controla
automáticamente la velocidad del ventilador, la distribución del flujo de aire,
el encendido o apagado del A/C y el uso de aire fresco o recirculado.
H
Controles de distribución del flujo de aire manual:Para los
pies/desempañamiento: distribuye el aire mediante las ventilas de
descongelamiento del parabrisas, las ventilas del desempañador, las ventilas
del piso y las ventilas del piso del asiento trasero, y proporciona aire exterior
para disminuir el empañamiento de las ventanas. Tablero: distribuye aire a
través de las ventilas del tablero de instrumentos. Tablero/Piso: distribuye
I
aire por las ventilas del tablero de instrumentos, el desempañador, el piso, y el
piso de los asientos traseros. Piso: distribuye aire por las ventilas del
desempañador, el piso y el piso de los asientos traseros. Desempañador:
toque para eliminar el empañamiento y escarcha del parabrisas. Toque
nuevamente para volver a la selección de flujo de aire anterior. Cuando esté
encendido, el desempañamiento proporciona aire exterior para disminuir el
empañamiento de las ventanas y distribuye aire mediante las ventilas de
descongelamiento del parabrisas y las ventilas del desempañador. MAX
descongelamiento: distribuye el aire exterior mediante las ventilas de aire del
parabrisas. El aire acondicionado se selecciona de manera automática. El
ventilador se fija en la velocidad más alta y la temperatura en HI (alto). Cuando
la distribución del aire se fija en esta posición, no podrá seleccionar aire
recirculado ni ajustar manualmente la velocidad del ventilador y el control de
temperatura.
Ajustes del conductor: Toque + o – ajuste la temperatura.J
Comandos de voz de control de
aire acondicionado y calefacción
E142599
Oprima el botón de voz en los
controles del volante de la
dirección. Cuando se le indique,
diga cualquiera de los siguientes
comandos:
Comandos de control de aire acondicionado y calefacción
"Activar Control Automático"
"Activar Mi Temperatura Favorita"
"Apagar Control de Temperatura"
406
MyFord Touch®

Comandos de control de aire acondicionado y calefacción
"Encender Control de Temperatura"
"Control de Temperatura Fijar Temperatura a <15.5-29.5> grados"
"Control de Temperatura Fijar Temperatura a <60-85> grados"
"Ayuda"
Existen otros comandos de control del aire
acondicionado y la calefacción, pero para
acceder a ellos, primero tiene que decir
"Climatización". Cuando el sistema esté
listo para escuchar, puede decir cualquiera
de los comandos siguientes:
"CLIMATIZACIÓN"
"Activar Tablero""Apagar Aire Acondicionado"
"Activar Desempañador Trasero""Encender Aire Acondicionado"
"Desactivar desempañador trasero""Activar Control Automático"
"Desactivar Circulación de Aire""Desactivar Desempañador Delantero"
"Activar Circulación de Aire""Activar Desempañador Delantero"
"Temperatura"
*
"Desactivar Control en Dos Zonas"
"Temperatura <15.5-29.5> grados""Activar Piso"
"Temperatura <60-85> grados""Disminuir Velocidad del Ventilador"
"Disminuir Temperatura""Incrementar Velocidad del Ventilador"
"Activar Temperatura Máxima""Apagar Aire Acondicionado Al Máximo"
"Incrementar Temperatura""Encender Aire Acondicionado Al Máximo"
"Activar Temperatura Mínima""Activar Mi Temperatura Favorita"
"Activar Desempañador y Piso""Apagar"
"Ayuda""Encender"
"Activar Tablero y Piso"
*
Si dice "Temperatura", puede decir cualquiera de los comandos del cuadro siguiente.
407
MyFord Touch®

"TEMPERATURA"
"<15.5-29.5> grados"
"<60-85> grados"
"Máxima"
"Mínima"
"Ayuda"
NAVEGACIÓN
Nota: La tarjeta SD de navegación debe
estar en la ranura de tarjetas SD para que
el sistema de navegación funcione. Si
necesita una tarjeta SD de reemplazo,
consulte a su distribuidor autorizado.
Nota: La ranura para tarjeta SD cuenta con
un resorte. Para extraer la tarjeta SD,
simplemente empuje la tarjeta y suéltela.
No intente jalar la tarjeta para extraerla,
pues eso podría dañarla.
Su sistema de navegación consta de dos
funciones principales: modo de destino y
modo de mapa.
Para configurar un destino, oprima la
esquina verde derecha de la pantalla táctil
y después el botón Dest, cuando aparezca.
Consulte Configuración de un destino
posteriormente en este capítulo.
Para ver el mapa de navegación y la
localización actual del vehículo, toque la
barra verde de la esquina superior derecha
de la pantalla táctil u oprima Dest, luego
Mapa. Consulte Modo de mapa más
adelante en este capítulo.
Configuración de un destino
Oprima la esquina verde derecha de la
pantalla táctil y después el botón Dest,
cuando aparezca. Seleccione cualquiera
de las siguientes opciones:
Destino
Calle y númeroMi casa
IntersecciónFavoritos
Centro de la ciudadDestinos anteriores
MapaPunto de interés (POI)
Punto de inicio anteriorEmergencia
Latitud/longitudEntrada/Salida de autopista
408
MyFord Touch®

1. Ingrese la información necesaria en los
campos de texto resaltados (en
cualquier orden). En el caso del ingreso
de una dirección de destino, aparece
el botón Ir una vez que ingresa toda la
información necesaria. Oprimir el botón
Ir hace que la dirección aparezca en el
mapa. Si selecciona Destino anterior,
aparecen los últimos 20 destinos que
ha seleccionado.
2. Seleccione Configurar como Dest para
que éste sea su destino. También
puede optar por definirlo como etapa
(para que el sistema le dirija hacia ese
punto en su camino hacia el destino
final) o guardarlo como favorito. En el
cálculo de la ruta también se
consideran las Áreas por evitar que
haya seleccionado.
3. Seleccione entre hasta tres tipos
distintos de rutas y después seleccione
Iniciar ruta.
• Más rápida: utiliza los caminos más
rápidos posibles.
• Más corta: utiliza la distancia más corta
posible.
• Más económica (Eco-Ruta): utiliza la
ruta que consume menos combustible.
También puede cancelar la ruta o hacer
que el sistema le haga una demostración
de la misma. Seleccione Preferencias de
ruta para configurar sus preferencias de
ruta, como evitar carreteras secundarias,
autopistas de peaje, transbordadores y
trenes para transporte de automóviles, así
como para utilizar o no utilizar los carriles
de alta ocupación vehicular (AOV). (Los
carriles AOV también se conocen como
carriles diamante o de viaje compartido.
Estos carriles están reservados para
personas que viajan en autobuses,
minibuses o automóviles de viaje
compartido).
Nota: Si no oprime el botón Iniciar ruta y
conduce el vehículo por un camino
reconocido, el sistema utiliza de manera
predeterminada la opción de ruta más
rápida y comienza con a guiar el viaje.
Durante la guía de la ruta, puede oprimir
el icono de "burbuja de conversación" que
aparece en la esquina superior derecha de
la navegación (barra verde) si desea que
el sistema repita una instrucción. Las
instrucciones disminuyen cada vez que
oprime el icono.
Categorías de punto de interés
(POI)
Su sistema le ofrece una variedad de
categorías de POI (puntos de interés).
Categorías principales
AutomovilísticoAlimentos / bebidas y cena
ComprasViaje y transporte
Entretenimiento y arteFinanzas
Recreación y deportesEmergencia
GobiernoComunidad
Servicios domésticosSalud y medicina
409
MyFord Touch®

Subcategorías
Restaurante
Golf
Estacionamiento
Casa y jardín
Servicios de cuidado personal
Negocio de venta de automóviles
Gobierno
Transporte público
Educación
Para expandir estas listas, oprima el signo
"+" frente a la lista de puntos de interés.
El sistema también le permite clasificar los
puntos de interés alfabéticamente, por
distancia o por listas cityseekr (si está
disponible).
cityseekr
Nota: La información de puntos de interés
de cityseekr se limita aproximadamente a
unas 154 ciudades (132 de Estados Unidos,
13 de Canadá y 9 de México).
E142634
cityseekr, si está disponible, es un servicio
que proporciona información adicional
sobre ciertos puntos de interés, como
restaurantes, hoteles y atracciones
turísticas.
Una vez que seleccione un punto de
interés, aparecerá su localización, e
información como dirección y número de
teléfono. Si el punto de interés aparece en
la lista de cityseekr, también verá
información como una breve descripción,
horas de llegada/salida del hotel, horario
del restaurante, etc.
Oprima Más información si desea ver más
datos, una lista de servicios e instalaciones,
precio promedio de una habitación o
comida, así como el sitio web. Esta
pantalla muestra el icono del punto de
interés, como:
E143884
Hotel
E142636
Cafetería
E142637
Alimentos y bebidas
410
MyFord Touch®

E142638
Vida nocturna
E142639
Atracción turística
E142640
Este icono aparece cuando su
selección existe en varias
categorías dentro del sistema.
Cuando esté viendo información adicional
sobre hoteles, cityseekr también le dirá,
mediante iconos, si el hotel cuenta con
ciertos servicios e instalaciones.
En caso de restaurantes, cityseekr puede
proporcionar información como número
de tenedores, costo promedio, críticas,
acceso para minusválidos, horarios de
operación y dirección del sitio web.
En caso de hoteles, cityseekr puede
proporcionar información como número
de estrellas, categoría de precio, críticas,
horas de llegada/salida, iconos de servicios
del hotel y dirección del sitio web.
Configuración de sus preferencias
de navegación
Seleccione la configuración que el sistema
debe tomar en cuenta al planificar su ruta.
E142607
Oprima el icono en la parte
inferior de la pantalla de inicio y
seleccione Configuración, luego
Navegación.
PuedeCuando selecciona
· Activar y desactivar el trazo del camino recorrido.Preferencias de mapa
· Seleccionar cómo desea ver la lista de virajes (de arriba
a abajo o viceversa).
· Ajustar la notificación automática de estacionamiento
de POI. (Si la notificación de estacionamiento del punto
de interés está activa, aparecerán iconos de estaciona-
miento del punto de interés en el mapa cuando usted se
aproxime a su destino. La utilidad de esta función puede
ser menor en áreas muy densamente pobladas, y puede
obstruir el mapa si otros puntos de interés aparecen al
mismo tiempo en el mapa).
· Evitar autopistas, autopistas de peaje, transbordadores
y trenes para transporte de automóviles al planear su ruta.
Preferencias de ruta
· Usar los carriles de AOV (si están disponibles), y hacer
que el sistema seleccione siempre la distancia más corta,
la vía más rápida o la trayectoria que requiera menos
combustible.
· Escoger si sus indicaciones de navegación serán solo de
voz o de tonos.
Preferencias de navegación
411
MyFord Touch®

PuedeCuando selecciona
· Hacer que el sistema llene automáticamente los datos
de estado y/o provincia con base en la información
previamente ingresada al sistema.
Seleccione cómo desea que el sistema maneje los
problemas de tránsito a lo largo de la ruta.
Preferencias de tránsito
· Automático: el sistema cambia automáticamente el
itinerario con el fin de evitar los incidentes de tráfico que
surjan en la ruta actual y la afecten (no hay notificación).
· Manual: el sistema proporciona siempre una notificación
de los incidentes de tráfico que surgen en la ruta planifi-
cada. Usted tendrá que decidir si acepta o ignora la notifi-
cación antes que se modifique la ruta.
Selecciona áreas que desea que el sistema evite al calcular
una ruta. Presione Agregar para seleccionar una categoría
diferente.
Áreas por evitar
Una vez que seleccione una opción, el sistema tratará de
evitar las áreas, de ser posible, al calcular todas las rutas.
Para borrar una selección, escoja la lista en la pantalla, y
cuando la pantalla cambie a Editar áreas por evitar,
oprima el botón Borrar en la parte inferior derecha de la
pantalla.
Modo de mapa
Oprima la barra verde en la parte superior
derecha de la pantalla táctil para ver el
modo de mapa. El modo de mapa muestra
una visualización avanzada, que incluye
mapas bidimensionales de ciudades y
referencias visuales tridimensionales
(cuando las haya).
Los mapas bidimensionales de ciudades
muestran los contornos detallados de
edificios, elementos geográficos y de uso
del suelo visibles, y la infraestructura de
ferrocarriles detallada de las ciudades más
importantes del mundo. Estos mapas
también contienen detalles, como
manzanas, plantas de grandes edificios y
ferrocarriles.
Las referencias visuales tridimensionales
aparecen como objetos claramente
visibles, fácilmente reconocibles y con
cierto valor turístico. Las referencias
visuales tridimensionales aparecen
solamente en el modo de mapa
tridimensional.
412
MyFord Touch®

E142641
Cambie la apariencia de la pantalla de
mapa oprimiendo varias veces el botón de
flecha del lado superior izquierdo de la
pantalla. Alterna entre tres modos de
mapa: Rumbo arriba, Norte arriba y 3D.
E142642
Rumbo arriba (mapa 2D)
muestra siempre la dirección hacia
donde viaja arriba en la pantalla.
Esta vista se encuentra disponible
para mapas en escalas de hasta 4 km
(2.5 mi). Para escalas de mapas
superiores, la configuración se recuerda
pero el mapa solo aparece en Norte arriba.
Si la escala vuelve más abajo de este nivel,
entonces se restablece la configuración
Rumbo arriba.
E142643
Norte arriba (mapa 2D) muestra
siempre la dirección hacia el norte
arriba en la pantalla.
E142644
Modo de mapa tridimensional
permite ver el mapa en
perspectiva tridimensional. Es
posible configurar el ángulo de
visualización y hacer girar el mapa 180
grados arrastrando el dedo a lo largo de la
barra sombreada con flechas que aparece
en la parte inferior del mapa.
E146188
Volver a centrar el mapa es
una acción que puede realizar
oprimiendo el icono cada vez
que mueva el mapa a una posición lejos
de la ubicación actual del vehículo.
Iconos del mapa
E142646
Marca de vehículo muestra la
ubicación actual del vehículo.
Permanece en el centro de la
pantalla del mapa, excepto
cuando está en el modo de
desplazamiento.
E142647
Cursor de desplazamiento le
permite desplazarse por el mapa;
este icono está fijo en el centro de
la pantalla. La posición del mapa
más cercana al cursor es en una ventana
en la parte central superior de la pantalla.
E142648
Icono predeterminado de
entrada de la libreta de
direcciones indica la ubicación en
el mapa de una entrada en la
libreta de direcciones. Éste es el símbolo
predeterminado que aparece después de
que la entrada se ha almacenado en la
Libreta de direcciones mediante cualquier
método distinto al mapa. Se puede
seleccionar un icono diferente entre los 22
disponibles; cada icono se puede usar más
de una vez.
E142649
Inicio indica la ubicación en el
mapa actualmente almacenada
como la posición inicial. Solo se
puede guardar como Inicial una
entrada de la Libreta de direcciones. Este
icono no se puede cambiar.
E142650
Iconos de punto de interés,
pueden aparecer en el mapa y se
pueden activar o desactivar.
Existen unas 56 subcategorías de
puntos de interés que se pueden
seleccionar para que aparezcan en el
mapa, una a la vez.
E142651
Punto de partida indica el punto
de partida de una ruta de
navegación planificada.
413
MyFord Touch®

E142652
Etapas indica la ubicación de una
etapa en el mapa. El número
dentro del círculo es diferente para
cada etapa y representa la
posición de la etapa en la lista de rutas.
E142653
Símbolo de destino indica el
punto final de una ruta planificada.
E142654
Punto de siguiente maniobra
indica la ubicación del siguiente
viraje en la ruta planificada.
E142655
Símbolo Sin GPS indica que no
hay suficientes señales satelitales
GPS disponibles para un
posicionamiento preciso en el
mapa. Este icono podría aparecer en forma
intermitente bajo funcionamiento normal
en un área con mal acceso a GPS.
Botones de toque rápido
Estando en el modo de mapa, toque
cualquier parte de la pantalla del mapa
para acceder a las siguientes opciones:
PuedeCuando selecciona
Seleccione una ubicación desplazada en el mapa para
que sea su destino. (Puede desplazar el mapa presionando
el dedo índice en la pantalla). Cuando vea al lugar
deseado, simplemente retire el dedo de la pantalla y
oprima Configurar como Dest).
Configurar como Dest
Defina la ubicación actual como etapa.Configurar como etapa
Guardar la localidad actual entre sus favoritos.Guardar en Favoritos
Seleccionar los iconos de POI que quiere que aparezcan
en el mapa. Se pueden seleccionar hasta tres iconos para
mostrar en el mapa a la vez.
Activar o desactivar iconos
de POI
Cancelar la ruta activa.Cancelar ruta
Acceder a estas características cuando hay una ruta activa:Ver/editar ruta
· Ver ruta
· Editar destino/etapa
· Editar listado de instrucciones
· Desvío
· Editar preferencias de ruta
· Editar preferencias de tráfico
· Cancelar ruta
414
MyFord Touch®

E142656
Gire la vista del mapa desplazando el dedo
por la barra sombreada con flechas.
Navteq es el proveedor de mapas digitales
para la aplicación del sistema de
navegación. Si encuentra errores en los
datos de los mapas, puede reportarlos
directamente en
http://mapreporter.navteq.com. Navteq
evalúa todos los errores de mapas
reportados y responderá vía correo
electrónico el resultado de su
investigación.
Actualizaciones del mapa de
navegación
Las actualizaciones anuales del mapa de
navegación están disponibles para su
compra a través de su distribuidor,
llamando al 1-800-NAVMAPS (en México,
llame al 01-800-557-5539) o visitando
www.navigation.com/ford. Debe
especificar la marca y el modelo de su
vehículo para determinar si hay alguna
actualización disponible.
Comandos de voz de navegación
E142599
Cuando esté en el modo de
navegación, oprima el botón de
voz en los controles del volante
de la dirección. Después del tono, diga
cualquiera de los siguientes comandos:
Comandos de voz del sistema de navegación
"Navegación"
3
"Cancelar siguiente etapa"
1
"Repetir instrucción"
"Cancelar ruta"
1
"Mostrar 3D"
"Destino"
*
"Mostrar hacia arriba""Destino: <etiqueta>"
"Mostrar mapa""Destino <categoría de punto de interés>"
"Mostrar alineación norte""Destino favoritos"
"Mostrar ruta"
1
"Destino casa"
"Mostrar lista de giros"
1
"Destino intersección"
"Desactivar instrucciones por voz""Destino <categoría punto de interés> más
cercano"
"Activar instrucciones por voz""Punto de interés más cercano"
415
MyFord Touch®

Comandos de voz del sistema de navegación
"Disminuir volumen de instrucciones por
voz"
"Destino escuchar etiquetas"
"Incrementar volumen de instrucciones por
voz"
"Destino Punto de interés"
"¿Dónde estoy?""Destino categoría de punto de interés"
"Zoom para acercar""Destino Destino previo"
"Zoom para alejar""Destino calle y número"
"Ayuda""Desvío"
1
Estos comandos solo están disponibles cuando hay una ruta de navegación activa.
2
Si dice "Destino", puede decir cualquiera de los comandos del siguiente cuadro "Destino".
3
Si dice "Navegación", puede decir cualquiera de los comandos del siguiente cuadro
"Navegación".
"DESTINO"
"<etiqueta>"
"<Categoría de punto de interés>"
"Favoritos"
"Casa"
"Intersección"
"<Categoría punto de interés> más cercano"
"Punto de interés más cercano"
"Escuchar etiquetas"
"Categoría de punto de interés"
"Destino previo"
"Calle y número"
"Ayuda"
416
MyFord Touch®

"NAVEGACIÓN"
"Destino"
*
"Zoom nivel ciudad"
"Zoom nivel país"
"Zoom para acercar al mínimo"
"Zoom para alejar al máximo"
"N/A"
"Zoom nivel estado"
"Zoom nivel calle"
"Zoom a <distancia>"
"Ayuda"
*
Si dice "Destino", puede decir cualquiera de los comandos del cuadro "Destino".
Si su vehículo está equipado con la función
de tarjeta SD de navegación, podrá
localizar un destino de calle y número
utilizando una función llamada Destino
calle y número en un intento. Cuando
dice "Navegación, Destino calle y número"
o "Destino calle y número", el sistema le
pide que diga la dirección completa. El
sistema mostrará un ejemplo en la
pantalla. Entonces puede decir la dirección
de modo natural, como "Uno dos tres
cuatro, Calle principal, Cualquier ciudad".
417
MyFord Touch®

ACUERDO DE LICENCIA DEL
USUARIO
Acuerdo de licencia de usuario
final (EULA) de SYNC®
• Usted ha adquirido un dispositivo
(“DISPOSITIVO”) que incluye software
licenciado por FORD MOTOR
COMPANY de un afiliado de Microsoft
Corporation (“MS”). Estos productos
de software instalados de MS, así
como los medios asociados, materiales
impresos y documentación electrónica
o “en línea” (“SOFTWARE MS”) están
protegidos por leyes de propiedad
intelectual y tratados internacionales.
El SOFTWARE MS se otorga bajo
licencia, no es objeto de venta. Todos
los derechos reservados.
• El SOFTWARE MS puede interactuar
con y/o comunicarse con, o puede
actualizarse posteriormente para
interactuar con y/o comunicarse con
sistemas y/o programas de software
adicionales proporcionados por FORD
MOTOR COMPANY. Los sistemas y
programas de software adicionales de
FORD MOTOR COMPANY, así como
los medios asociados, materiales
impresos y documentación electrónica
o “en línea” (“SOFTWARE FORD”)
están protegidos por leyes de
propiedad intelectual y tratados
internacionales. El SOFTWARE FORD
se otorga bajo licencia, no es objeto de
venta. Todos los derechos reservados.
• El SOFTWARE MS y/o el SOFTWARE
FORD pueden interactuar con y/o
comunicarse con, o pueden
actualizarse posteriormente para
interactuar con y/o comunicarse con
sistemas y/o programas de software
adicionales proporcionados por otros
proveedores de software y servicios.
Los sistemas y programas de software
adicionales de terceros, así como los
medios asociados, materiales impresos
y documentación electrónica o “en
línea” (“SOFTWARE DE TERCEROS”)
están protegidos por leyes de
propiedad intelectual y tratados
internacionales. El SOFTWARE DE
TERCEROS se otorga bajo licencia, no
es objeto de venta. Todos los derechos
reservados.
• En adelante, se hará referencia
colectiva e individual al SOFTWARE
MS, al SOFTWARE FORD y al
SOFTWARE DE TERCEROS
simplemente como "SOFTWARE".
SI USTED NO ESTÁ DE ACUERDO CON
ESTE ACUERDO DE LICENCIA DEL
USUARIO FINAL (“EULA”), NO USE EL
DISPOSITIVO NI COPIE EL SOFTWARE.
CUALQUIER USO DEL SOFTWARE,
INCLUIDO EL USO DEL DISPOSITIVO,
PERO NO LIMITADO A ÉSTE,
IMPLICARÁ SU ACEPTACIÓN DE ESTE
EULA (O RATIFICACIÓN DE
CUALQUIER CONSENTIMIENTO
ANTERIOR).
DERECHOS DE LA LICENCIA DE
SOFTWARE: este EULA otorga la
siguiente licencia:
• Puede utilizar el SOFTWARE tal como
está instalado en el DISPOSITIVO y de
cualquier otra forma en que interactúe
con los sistemas y/o servicios
proporcionados por o a través de FORD
MOTOR COMPANY o sus proveedores
externos de software y servicios.
418
Apéndices

Descripción de otros derechos y
limitaciones:
• Reconocimiento de voz: si el
SOFTWARE incluye componentes de
reconocimiento de voz, usted debe
comprender que el reconocimiento de
voz es un proceso inherentemente
estadístico y que los errores de
reconocimiento son inherentes a dicho
proceso. Ni FORD MOTOR COMPANY
ni sus proveedores serán responsables
por ningún daño ocasionado por
errores en el proceso de
reconocimiento de voz.
• Limitaciones a la modificación de
ingeniería, descompilación y
desmontaje: usted no puede
modificar la ingeniería, descompilar o
desmontar ni permitir a otros modificar
la ingeniería, descompilar o desmontar
el SOFTWARE, excepto y sólo en caso
de que estas acciones estén
expresamente permitidas por leyes
aplicables no obstante esta limitación.
• Limitaciones de distribución,
copiado, modificación y creación de
obras derivadas: usted no puede
distribuir, copiar, modificar ni crear
obras derivadas que se basen en el
SOFTWARE, excepto cuando tal
actividad esté expresamente permitida
por las leyes vigentes, y sólo hasta
donde éstas lo permitan, a pesar de
esta limitación.
• Un solo EULA: la documentación para
el usuario final del DISPOSITIVO y
sistemas y servicios relacionados
puede contener varios EULA, como
varias traducciones y/o varias
versiones de medios (por ejemplo, en
la documentación del usuario y en el
software). Aunque reciba varios EULA,
sólo podrá usar una (1) copia del
SOFTWARE.
• Transferencia de SOFTWARE: usted
puede transferir en forma permanente
sus derechos otorgados por este EULA
sólo como parte de una venta o
transferencia del DISPOSITIVO,
siempre y cuando no retenga copias,
transfiera todo el SOFTWARE
(incluidos todos los componentes,
medios y materiales impresos,
cualquier actualización y, si
corresponde, los Certificados de
autenticidad), y el receptor acepte los
términos de este EULA. Si el
SOFTWARE es una actualización,
cualquier transferencia debe incluir
todas las versiones anteriores del
SOFTWARE.
• Terminación: sin perjuicio de cualquier
otro derecho, FORD MOTOR
COMPANY o MS pueden terminar este
EULA si usted no cumple con los
términos y condiciones de este EULA.
• Administración de actualizaciones
de seguridad/derechos digitales:
los propietarios del contenido utilizan
la tecnología WMDRM incluida en el
DISPOSITIVO para proteger su
propiedad intelectual, incluido el
contenido con derechos de autor. Parte
del SOFTWARE del DISPOSITIVO
utiliza un software WMDRM para
acceder al contenido protegido por
WMDRM. Si el software WMDRM no
logra proteger el contenido, los
propietarios de éste pueden solicitar a
Microsoft la revocación de la
capacidad del SOFTWARE para usar
WMDRM para reproducir o copiar el
contenido protegido. Esta acción no
afecta el contenido no protegido.
Cuando el DISPOSITIVO descarga
licencias para contenido protegido,
usted acepta que Microsoft pueda
incluir una lista de revocaciones con
las licencias. Los propietarios del
contenido pueden requerir que se
419
Apéndices

actualice el SOFTWARE en el
DISPOSITIVO para acceder a su
contenido. Si no realiza una
actualización, no podrá acceder al
contenido que requiere la
actualización.
• Consentimiento para el uso de
datos: usted acepta que MS, Microsoft
Corporation, FORD MOTOR COMPANY,
los proveedores externos de software
y servicios, sus afiliados y/o sus
agentes designados puedan recopilar
y usar información técnica obtenida de
cualquier manera como parte de
servicios de soporte de productos
relacionados con el SOFTWARE o
servicios relacionados. MS, Microsoft
Corporation, FORD MOTOR COMPANY,
los proveedores externos de software
y servicios, sus afiliados y/o sus
agentes designados pueden usar esta
información solamente para mejorar
sus productos o para proporcionar
tecnologías o servicios personalizados.
MS, Microsoft Corporation, FORD
MOTOR COMPANY, los proveedores
externos de software y servicios, sus
afiliados y/o sus agentes designados
pueden revelar esta información a
otros, pero no en una forma que lo
identifique.
• Componentes de servicios basados
en Internet: el SOFTWARE puede
contener componentes que permitan
y faciliten el uso de ciertos servicios
basados en Internet. Usted reconoce
y acepta que MS, Microsoft
Corporation, FORD MOTOR COMPANY,
los proveedores externos de software
y servicios, sus afiliados y/o sus
agentes designados puedan
comprobar automáticamente la
versión del SOFTWARE y/o los
componentes que usted está utilizando
y puedan proporcionar actualizaciones
o suplementos al SOFTWARE, que
pueden ser descargados
automáticamente a su DISPOSITIVO.
• Software/servicios adicionales: el
SOFTWARE puede permitir que FORD
MOTOR COMPANY, los proveedores
externos de software y servicios, MS,
Microsoft Corporation, sus afiliados y/o
sus agentes designados proporcionen
o pongan a su disposición
actualizaciones de SOFTWARE,
suplementos, componentes de
complementos o componentes de
servicios basados en Internet del
SOFTWARE después de la fecha en
que obtuvo su copia inicial del
SOFTWARE (“Componentes
suplementarios”).
Si FORD MOTOR COMPANY o los
proveedores externos de software y
servicios proporcionan o ponen a su
disposición Componentes suplementarios
y no se proporcionan otros términos de
EULA junto con los Componentes
suplementarios, entonces se aplicarán los
términos de este EULA.
420
Apéndices

Si MS, Microsoft Corporation, sus afiliados
y/o sus agentes designados ponen a su
disposición Componentes suplementarios,
y no se proporcionan otros términos de
EULA, entonces se aplicarán los términos
de este EULA, excepto que MS, Microsoft
Corporation o la entidad afiliada que
proporcione los Componentes
suplementarios sea quien otorgue la
licencia de los Componentes
suplementarios.
FORD MOTOR COMPANY, MS, Microsoft
Corporation, sus afiliados y/o sus agentes
designados se reservan el derecho a
suspender sin responsabilidad alguna
cualquier servicio basado en Internet
proporcionado o puesto a su disposición
a través del uso del SOFTWARE.
• Vínculos a sitios de terceros: el
SOFTWARE MS puede proporcionarle
la capacidad de acceder a sitios de
terceros a través del uso del
SOFTWARE. Los sitios de terceros no
están bajo el control de MS, Microsoft
Corporation, sus afiliados y/o sus
agentes designados. Ni MS, Microsoft
Corporation, sus afiliados ni sus
agentes designados son responsables
de (i) los contenidos de cualquier sitio
de terceros, cualquier vínculo
contenido en sitios de terceros o
cualquier cambio o actualización en
sitios de terceros, o (ii) las difusiones
por Web o cualquier otra forma de
transmisión recibida de cualquier sitio
de terceros. Si el SOFTWARE
proporciona vínculos a sitios de
terceros, estos vínculos se
proporcionan sólo para su
conveniencia, y la inclusión de
cualquier vínculo no implica una
aprobación del sitio de terceros por
parte de MS, Microsoft Corporation,
sus afiliados y/o sus agentes
designados.
• Obligación de manejar
responsablemente: usted reconoce
la obligación de manejar
responsablemente y mantener la
atención en el camino. Usted leerá y se
atendrá a las instrucciones de
funcionamiento del DISPOSITIVO,
debido a que son parte de la seguridad,
y asume cualquier riesgo asociado al
uso del DISPOSITIVO.
421
Apéndices

ACTUALIZACIONES Y MEDIOS DE
RECUPERACIÓN: si el SOFTWARE lo
proporciona FORD MOTOR COMPANY
separado del DISPOSITIVO en medios
como un chip ROM, discos CD ROM o a
través de descarga vía Internet u otros
medios, y está etiquetado “Sólo para
actualización” o "Sólo para recuperación",
usted puede instalar una (1) copia del
SOFTWARE en el DISPOSITIVO como
copia de reemplazo del SOFTWARE
existente, y usarlo de acuerdo con este
EULA, incluido cualquier término de EULA
adicional que acompañe al SOFTWARE
de actualización.
DERECHOS DE PROPIEDAD
INTELECTUAL: todos los títulos y
derechos de propiedad intelectual del
SOFTWARE (lo que incluye, entre otros,
imágenes, fotografías, animaciones, video,
audio, música, texto y “applets”
incorporados al SOFTWARE), los
materiales impresos adjuntos, y cualquier
copia del SOFTWARE, son propiedad de
MS, Microsoft Corporation, FORD MOTOR
COMPANY o sus afiliados o proveedores.
El SOFTWARE se otorga bajo licencia y no
es objeto de venta. Usted no puede copiar
los materiales impresos incluidos con el
SOFTWARE. Todos los títulos y derechos
de propiedad intelectual del contenido al
cual se puede acceder mediante el uso del
SOFTWARE son propiedad de los
respectivos propietarios de contenidos y
pueden estar protegidos por derechos de
autor y otras leyes y tratados de propiedad
intelectual aplicables. Este EULA no otorga
derechos para usar este tipo de
contenidos. Todos los derechos no
otorgados específicamente por este EULA
están reservados por MS, Microsoft
Corporation, FORD MOTOR COMPANY,
los proveedores externos de software y
servicios, sus afiliados y proveedores. El
uso de servicios en línea a los cuales se
puede acceder a través del SOFTWARE
puede estar sujeto a los términos de uso
respectivos relacionados con dichos
servicios. Si este SOFTWARE contiene
documentación proporcionada sólo en
forma electrónica, usted puede imprimir
una copia de dicha documentación.
422
Apéndices

RESTRICCIONES DE EXPORTACIÓN:
usted reconoce que el SOFTWARE está
sujeto a la jurisdicción de exportación de
EE.UU. y la Unión Europea. Usted acepta
cumplir con todas las leyes nacionales e
internacionales aplicables al SOFTWARE,
incluidas las regulaciones de
administración de exportaciones de
Estados Unidos, así como las restricciones
de destino, uso final y usuario final
impuestas por EE.UU. y otros estados. Para
obtener información adicional, visite
http://www.microsoft.com/exporting/.
MARCAS REGISTRADAS: este EULA no
otorga derechos relacionados con marcas
registradas o marcas de servicio de FORD
MOTOR COMPANY, MS, Microsoft
Corporation, los proveedores externos de
software y servicios, sus afiliados o
proveedores.
SOPORTE DEL PRODUCTO: MS, su
corporación matriz Microsoft Corporation
o sus afiliados o subsidiarias no
proporcionan soporte del producto para
el SOFTWARE. Para obtener soporte del
producto, consulte las instrucciones de
FORD MOTOR COMPANY proporcionadas
en la documentación del DISPOSITIVO. Si
tiene dudas relacionadas con este EULA,
o si desea ponerse en contacto con FORD
MOTOR COMPANY por alguna otra razón,
consulte la dirección proporcionada en la
documentación del DISPOSITIVO.
Exención de responsabilidad por daños
determinados: EXCEPTO QUE SE
PROHÍBA POR LEY, FORD MOTOR
COMPANY Y CUALQUIER PROVEEDOR
EXTERNO DE SOFTWARE Y SERVICIOS,
MS, MICROSOFT CORPORATION Y SUS
AFILIADOS NO TENDRÁN
RESPONSABILIDAD ALGUNA POR
NINGÚN DAÑO INDIRECTO, ESPECIAL,
RESULTANTE O INCIDENTAL CAUSADO
POR O RELACIONADO CON EL USO O
EJECUCIÓN DEL SOFTWARE Y/O DEL
SOFTWARE FORD. ESTA LIMITACIÓN SE
APLICARÁ INCLUSO SI CUALQUIER
SOLUCIÓN FALLA EN SU PROPÓSITO
ESENCIAL. EN NINGÚN CASO MS,
MICROSOFT CORPORATION Y/O SUS
AFILIADOS SERÁN RESPONSABLES POR
NINGÚN MONTO QUE EXCEDA LOS
DOSCIENTOS CINCUENTA DÓLARES
ESTADOUNIDENSES (U.S.$250.00).
• NO EXISTEN OTRAS GARANTÍAS
APARTE DE LAS QUE HAYAN SIDO
EXPRESAMENTE OTORGADAS PARA
SU VEHÍCULO NUEVO.
Aviso para el usuario final
Información de seguridad importante de
Microsoft® Windows® Mobile for
Automotive
Este sistema Ford SYNC™ contiene
software licenciado para FORD MOTOR
COMPANY por un afiliado de Microsoft
Corporation según un acuerdo de licencia.
Cualquier remoción, reproducción,
modificación de ingeniería u otro uso no
autorizado del software de este sistema
que contravenga el acuerdo de licencia
queda estrictamente prohibido y puede
estar sujeto a acciones legales.
423
Apéndices

Lea y siga las instrucciones: antes de
usar el sistema basado en Windows
Automotive, lea y siga todas las
instrucciones y la información de seguridad
proporcionada en este manual del usuario
final (“Guía del usuario”). No seguir las
precauciones que se encuentran en esta
Guía del usuario puede conducir a un
accidente u otras consecuencias graves.
Mantenga la Guía del usuario en el
vehículo: al mantenerla en el vehículo, la
Guía del usuario será una referencia para
usted y otros usuarios poco familiarizados
con el sistema basado en Windows
Automotive. Asegúrese de que antes de
usar el sistema por primera vez, todas las
personas tengan acceso a la Guía del
usuario y lean con atención las
instrucciones y la información de
seguridad.
ALERTA
Utilizar ciertas partes del sistema
mientras maneja puede distraer su
atención del camino y, posiblemente,
causar un accidente u otras consecuencias
graves. No cambie la configuración del
sistema ni ingrese datos en forma no
verbal (usando las manos) mientras
maneja. Detenga el vehículo de forma
segura y legal antes de realizar estas
acciones. Esto es importante debido a que
la configuración o el cambio de algunas
funciones pueden requerir que distraiga su
atención del camino y retire sus manos del
volante.
Funcionamiento general
Control de comandos de voz: las
funciones del sistema basado en Windows
Automotive pueden ejecutarse sólo
mediante comandos de voz. El uso de los
comandos de voz mientras maneja le
permite operar el sistema sin quitar las
manos de volante.
Visión prolongada de la pantalla: no
acceda a funciones que requieran una
visión prolongada de la pantalla mientras
maneja. Estacione de forma segura y legal
antes de intentar acceder a una función
del sistema que requiera una atención
prolongada. Incluso mirar rápidamente la
pantalla puede ser perjudicial si su
atención se desvía en un momento crítico
de su tarea de manejar.
Configuración de volumen: no aumente
el volumen de forma excesiva. Mantenga
el volumen en un nivel en que puede
escuchar el tráfico exterior y las señales
de emergencia mientras maneja. Manejar
sin poder escuchar estos sonidos puede
ocasionar un accidente.
Uso de las funciones de
reconocimiento de voz: el software de
reconocimiento de voz es inherentemente
un proceso estadístico que está sujeto a
errores. Es su responsabilidad controlar
cualquier función de reconocimiento de
voz incluida en el sistema y corregir los
errores.
Funciones de navegación: todas las
funciones de navegación incluidas en el
sistema tienen como objetivo proporcionar
instrucciones detalladas para llevarlo a un
destino deseado. Asegúrese de que todas
las personas que utilicen este sistema lean
detenidamente y sigan las instrucciones e
información de seguridad en su totalidad.
Peligro de distracción: toda función de
navegación puede requerir una
configuración manual (no verbal). Al
intentar realizar dicha configuración o
insertar datos mientras maneja puede
distraer seriamente su atención causar un
accidente u otras consecuencias graves.
Detenga el vehículo de forma segura y
legal antes de realizar estas acciones.
424
Apéndices

Deje que su criterio prevalezca:
Cualquier función de navegación se
entrega sólo como ayuda. Tome sus
decisiones de manejo según sus
observaciones de las condiciones locales
y reglamentos de tráfico existentes.
Cualquiera de estas funciones no sustituye
a su criterio personal. Toda sugerencia de
ruta entregada por este sistema nunca
debe reemplazar a ninguna
reglamentación de tráfico local o a su
criterio personal o conocimiento de las
prácticas seguras de manejo.
Seguridad en la ruta: no siga las
sugerencias de la ruta si hacerlo pudiera
generar una maniobra no segura o ilegal,
si implicara quedar en una situación poco
segura o si fuera dirigido a un área que
considere no segura. El conductor es el
responsable final de utilizar en forma
segura el vehículo y, por lo tanto, debe
evaluar si es seguro seguir las indicaciones
sugeridas.
Posible imprecisión de mapa: los mapas
que este sistema utiliza pueden ser
imprecisos debido a cambios en los
caminos, controles de tráfico o condiciones
de manejo. Siempre aplique un buen
criterio y sentido común al seguir las rutas
sugeridas.
Servicios de emergencia: no confié en
ninguna función de navegación incluida en
el sistema para dirigirse a los servicios de
emergencia. Pida a las autoridades locales
o a una operadora de servicios de
emergencia que le indiquen estas
ubicaciones. No todos los servicios de
emergencia como policía, bomberos,
hospitales y cínicas se incluyen en la base
de datos del mapa para dichas funciones
de navegación.
Acuerdo de licencia del usuario final
del software TeleNav
Lea con cuidado estos términos y
condiciones antes de utilizar el software
TeleNav. Su uso del software TeleNav
indica que usted acepta estos términos y
condiciones. Si no acepta estos términos
y condiciones, no rompa el sello del
paquete, no instale o no utilice de ningún
otro modo el software TeleNav.
TeleNav puede modificar el presente
Acuerdo y la política de privacidad en
cualquier momento, con o sin previo aviso.
Usted está de acuerdo en visitar de vez en
cuando el sitio http://www.telenav.com
para revisar la versión actualizada de este
Acuerdo y de la política de privacidad.
425
Apéndices

1. Uso seguro y legítimo
Usted reconoce que poner atención al
software TeleNav puede representar un
riesgo de lesiones o muerte para usted y
otras personas en situaciones que, de otro
modo, requieren su atención total, y por lo
tanto, usted está de acuerdo en cumplir
con lo siguiente al usar el software
TeleNav: (a) observar lo señalado por los
reglamentos de tránsito y conducir en
forma segura; (b) utilizar su propio criterio
al conducir. Si considera que una ruta
sugerida por el software TeleNav le pide
realizar una maniobra peligrosa o ilegal, le
pone en una situación peligrosa, o le dirige
hacia un lugar que usted considere
peligroso, no siga tales instrucciones; (c)
no configure destinos, ni manipule de
ninguna otra forma el software TeleNav,
a menos que su vehículo esté inmóvil y
estacionado; (d) no utilice el software
TeleNav para ningún fin ilegal, no
autorizado, no intencional, inseguro,
peligroso o ilícito, ni lo use de ninguna otra
manera que contradiga el presente
Acuerdo; (e) disponga el GPS y todos los
dispositivos inalámbricos y cables
necesarios para usar el software TeleNav
de manera segura en su vehículo, de tal
modo que estos no entorpezcan la
conducción del vehículo ni impidan el
funcionamiento de los dispositivos de
seguridad del mismo (como una bolsa de
aire).
Usted está de acuerdo en indemnizar y
exculpar a TeleNav de cualquier
reclamación resultante del uso peligroso,
o de algún otro modo inadecuado, del
software TeleNav en cualquier vehículo
móvil, incluso debido al incumplimiento
de las indicaciones anteriores por parte de
usted.
2. Información de cuenta
Usted está de acuerdo en: (a) registrar el
software TeleNav con el fin de
proporcionarle a TeleNav información
verídica, exacta, actualizada y completa
acerca de usted, y (b) informar a la
brevedad a TeleNav sobre cualquier
cambio en dicha información, y a
mantenerla verídica, exacta, actualizada
y completa.
3. Licencia de software
Dependiendo del cumplimiento de los
términos de el presente Acuerdo, TeleNav
otorga a usted, mediante el presente
documento, una licencia personal, no
exclusiva e intransferible (con salvedad de
lo expresamente permitido a continuación
con respecto de su transferencia
permanente de la licencia del software
TeleNav), sin derecho a sublicenciar, para
que use el software TeleNav (sólo en la
forma de código objetivo) para acceder al
software TeleNav y hacer uso del mismo.
Esta licencia quedará anulada por la
cancelación o vencimiento del presente
Acuerdo. Usted está de acuerdo en utilizar
el software TeleNav exclusivamente para
sus propósitos personales, de negocio u
ocio, y en no proporcionar a terceros
servicios comerciales de navegación.
426
Apéndices

3.1 Limitaciones del sistema
3.1 Limitaciones de la licencia Usted está
de acuerdo en no hacer ninguna de las
siguientes cosas: (a) aplicar
retroingeniería, descompilar,
desensamblar, traducir, modificar, alterar
o cambiar de algún otro modo el software
TeleNav o cualquier parte del mismo; (b)
intentar derivar el código fuente, la
audioteca o la estructura del software
TeleNav, sin el previo consentimiento
expreso y por escrito de TeleNav; (c) retirar
del software TeleNav, o alterar, cualquiera
de las marcas registradas, nombres
comerciales, logos, avisos de patente o
derechos de autoría, u otros avisos o
marcas de TeleNav o sus proveedores; (d)
distribuir, sublicenciar o transferir de otro
modo el software TeleNav a terceros, salvo
como parte de la transferencia
permanente del software TeleNav; o (e)
usar el software TeleNav de alguna
manera que (i) infrinja los derechos de
propiedad intelectual o titularidad,
derechos de publicidad o privacidad, u
otros derechos de cualquier tercero, (ii)
infrinja alguna ley, estatuto, ordenanza o
reglamento, inclusive, de modo no
limitado, las leyes y los reglamentos
relacionados con envío de correo no
deseado (spam), privacidad, protección
de consumidores y niños, obscenidad o
difamación, o (iii) resulte perjudicial,
amenazante, abusiva, acosadora, tortuosa,
difamatoria, vulgar, obscena, difamatoria
u objetable de otro modo; y (f) arrendar,
alquilar o permitir de cualquier otro modo
el acceso no autorizado de terceros, al
software TeleNav, sin el permiso previo y
por escrito de TeleNav.
4. Descargo de responsabilidades
Dentro del máximo alcance permisible de
la legislación vigente, en ningún caso
TeleNav, su licenciatarios y proveedores,
o los representantes o empleados de
cualquiera de las partes antedichas,
asumirá responsabilidad civil alguna por
cualquier decisión o acción que usted o
cualquier otra persona tomen teniendo por
base la información proporcionada por el
software TeleNav. Asimismo, TeleNav no
garantiza la exactitud del mapa ni de los
otros datos utilizados para el software
TeleNav. Tales datos no siempre reflejan
la realidad debido, entre otras cosas, a
cierres de caminos, obras de construcción,
condiciones climáticas, nuevas carreteras
y otras condiciones cambiantes. Usted es
responsable del riesgo total relacionado
con el uso que haga del software TeleNav.
Por ejemplo, y sin limitación alguna, usted
está de acuerdo en no depender del
software TeleNav para tomar decisiones
de navegación críticas, en lugares donde
el bienestar y/o la supervivencia de usted
y otras personas dependan de la precisión
de la navegación, pues ni los mapas ni la
funcionalidad del software TeleNav están
pensados para apoyar tales usos de alto
riesgo, especialmente en áreas geográficas
remotas.
427
Apéndices

TELENAV RENUNCIA A, Y SE EXIME
EXPRESAMENTE DE, TODAS LAS
GARANTÍAS RELACIONADAS CON EL
SOFTWARE TELENAV, SEAN
ESTATUTARIAS, IMPLÍCITAS O
EXPLÍCITAS, LO QUE INCLUYE
CUALQUIER GARANTÍA QUE PUDIERA
SURGIR DE NEGOCIACIONES Y/O
ACTIVIDADES DE PERSONALIZACIÓN O
COMERCIALIZACIÓN, INCLUYENDO, DE
MODO NO LIMITADO, LAS GARANTÍAS
IMPLÍCITAS DE COMERCIABILIDAD,
APTITUD PARA UN FIN ESPECÍFICO, Y
RESPETO DE LOS DERECHOS DE
TERCEROS CON RESPECTO AL
SOFTWARE TELENAV. Ciertas
jurisdicciones no permiten declinar la
responsabilidad de ciertas garantías, así
que la anterior limitación pudiera no ser
aplicable al caso de usted.
5. Limitación de responsabilidad
DENTRO DEL ALCANCE DE LA
LEGISLACIÓN VIGENTE, EN NINGUNA
CIRCUNSTANCIA TELENAV O SUS
LICENCIATARIOS Y PROVEEDORES
SERÁN RESPONSABLES, NI ANTE USTED
NI ANTE NINGÚN TERCERO, POR
CUALQUIER DAÑO INDIRECTO, CASUAL,
CONSECUENTE, ESPECIAL O EJEMPLAR
(INCLUYENDO EN CADA CASO, DE MODO
NO LIMITADO, DAÑOS RELACIONADOS
CON LA INCAPACIDAD DE UTILIZAR EL
EQUIPO O ACCEDER A DATOS, PÉRDIDA
DE DATOS, PÉRDIDA DE
OPORTUNIDADES DE NEGOCIOS,
PÉRDIDA DE GANANCIAS, INTERRUPCIÓN
DE NEGOCIOS O CUALQUIER OTRA
SITUACIÓN) COMO CONSECUENCIA DEL
USO O LA INCAPACIDAD DE USO DEL
SOFTWARE TELENAV, AUNQUE TELENAV
HAYA SIDO ADVERTIDO DE LA
POSIBILIDAD DE TALES DAÑOS.
INDEPENDIENTEMENTE DE LOS DAÑOS
QUE USTED PUDIERA SUFRIR POR
CUALQUIER MOTIVO O RAZÓN
(INCLUYENDO, DE MODO NO LIMITADO,
TODOS LOS DAÑOS AQUÍ REFERIDOS Y
CUALQUIER DAÑO DIRECTO O GENERAL,
SEA POR CONTRATO, AGRAVIO
[INCLUSO NEGLIGENCIA] O CUALQUIER
OTRA CAUSA), LA RESPONSABILIDAD
TOTAL DE TELENAV, Y DE TODOS LOS
PROVEEDORES DE TELENAV, SE
LIMITARÁ AL MONTO QUE USTED HAYA
PAGADO POR EL SOFTWARE TELENAV.
ALGUNOS ESTADOS Y/O
JURISDICCIONES NO PERMITEN LA
EXCLUSIÓN O LIMITACIÓN DE LOS
DAÑOS CASUALES O CONSECUENTES,
DE MODO QUE LAS LIMITACIONES O
EXCLUSIONES ANTERIORES PUDIERAN
NO APLICAR EN EL CASO DE USTED.
6. Arbitraje y legislación vigente
Usted está de acuerdo en que cualquier
disputa, reclamación o controversia que
pudiera surgir de, o relacionarse con el
presente Acuerdo o con el software
TeleNav, será resuelta mediante el recurso
de arbitraje independiente ejercido por un
árbitro neutral y dependiente de la
American Arbitration Association, en el
Condado de Santa Clara, California. El
árbitro aplicará las Reglas de Arbitraje
Comercial de la American Arbitration
Association, y la evaluación del veredicto
emitido por el árbitro podrá ser admitida
en cualquier tribunal competente. Nótese
que no hay ni juez ni jurado en un
procedimiento de arbitraje, y que la
decisión del árbitro es de carácter
obligatorio para ambas partes. Usted está
de acuerdo expresamente en renunciar a
su derecho a un juicio ordinario.
428
Apéndices

El presente Acuerdo, y lo que del mismo
se desprenda, serán regidos por, e
interpretados de acuerdo con, las leyes del
Estado de California, sin que surtan efecto
sus conflictos con las cláusulas de otras
leyes. En la medida que sea necesario
ampliar la acción judicial con respecto al
arbitraje de carácter obligatorio, tanto
TeleNav como usted están de acuerdo en
someterse a la jurisdicción exclusiva de los
tribunales del Condado de Santa Clara,
California. En este caso no aplicará la
Convención de Contratos de las Naciones
Unidas para la Venta Internacional de
Bienes.
7. Asignación
Usted no puede revender, asignar, ni
transferir el presente Acuerdo, o cualquiera
de sus derechos u obligaciones, a menos
que sea en su totalidad por transferencia
permanente del software TeleNav, y
expresamente condicionada a que el
nuevo usuario del software TeleNav esté
de acuerdo en sujetarse a los términos y
condiciones del presente Acuerdo.
Cualquiera venta, asignación o
transferencia de ese tipo que no esté
expresamente permitida por este párrafo,
tendrá por consecuencia la anulación
inmediata del presente Acuerdo, sin
responsabilidad alguna por parte de
TeleNav, en cuyo caso usted y todas las
otras partes suspenderán de inmediato y
por completo el uso del software TeleNav.
A pesar de lo anterior, TeleNav puede
asignar el presente Acuerdo a cualquier
otra parte, en cualquier momento y sin
aviso, siempre y cuando el asignatario esté
dispuesto a sujetarse al presente Acuerdo.
8. Otros puntos misceláneos
8,1
El presente Acuerdo constituye el único
convenio que media entre TeleNav y usted
con respecto al asunto en cuestión.
8,2
Con salvedad de las licencias limitadas
que otorga expresamente el presente
Acuerdo, TeleNav retiene todos los
derechos, la titularidad y el interés en y del
software TeleNav, incluyendo, sin
limitación alguna, todos los derechos sobre
la propiedad intelectual del caso. Ninguna
licencia o otros derechos que no hayan
sido expresamente otorgados en el
presente Acuerdo, están pensados para,
o serán otorgados o concedidos por
implicación, estatuto, incentivo, limitación
u otros recursos legales, y TeleNav y sus
proveedores y licenciatarios conservarán,
en este mismo acto, todos sus derechos
respectivos con salvedad de las licencias
otorgadas explícitamente mediante el
presente Acuerdo.
8,3
Al hacer uso del software TeleNav, usted
consiente en recibir electrónicamente
todos los comunicados de TeleNav,
incluyendo avisos, acuerdos, divulgaciones
legalmente necesarias u otra información
relacionada con el software TeleNav
(colectivamente, los "Avisos"). TeleNav
puede proporcionar tales Avisos
publicándolos en el sitio Web de TeleNav,
o descargándolos directamente en su
dispositivo inalámbrico. Si desea anular su
consentimiento para recibir Avisos
electrónicamente, deberá suspender el
uso del software TeleNav.
8,4
La omisión, sea por parte de TeleNav o de
usted, de exigir el cumplimiento de
cualquier cláusula, no afectará el derecho
de dicha parte a exigir tal cumplimiento
tiempo después, y la renuncia a cualquier
infracción u omisión de el presente
Acuerdo tampoco constituirá una renuncia
a ninguna infracción u omisión
subsiguiente, ni una renuncia a la cláusula
en sí.
429
Apéndices

8,5
Si alguna cláusula del presente Acuerdo
es declarada improcedente, dicha cláusula
será modificada para ajustarla a la
intención de las partes, pero las cláusulas
restantes del Acuerdo seguirán en plena
vigencia y efecto.
8,6
Los encabezados del presente Acuerdo
son sólo con fines de referencia, de modo
que no serán considerados como parte del
mismo, y no serán citados como parte de
la estructura o interpretación del Acuerdo.
Tal como se usan en el presente Acuerdo,
las expresiones "lo que incluye",
"incluyendo" y cualquier otra variante de
las mismas, no serán interpretadas como
términos limitantes, sino que se entenderá
siempre que van seguidas por las palabras
"sin limitación alguna".
9. Términos y condiciones de otros
proveedores
El software TeleNav utiliza un mapa y otros
datos, licenciados a TeleNav por terceros
proveedores, en beneficio de usted y otros
usuarios finales. El presente Acuerdo
incluye los términos y condiciones de
usuario final aplicables a dichas
compañías (se anexan al final de el
presente Acuerdo) y, por lo tanto, el uso
del software TeleNav por parte de usted
también está sujeto a tales términos.
Usted está de acuerdo en sujetarse a los
siguientes términos y condiciones
adicionales, ya que son aplicables a los
licenciatarios de los terceros proveedores
de TeleNav:
Acuerdo de licencia de usuario final de
NavTeq
TÉRMINOS DE USUARIO FINAL
El contenido ("Datos") se proporciona se
otorga bajo licencia, no es objeto de venta.
Al abrir este paquete, instalar, copiar o usar
de alguna forma los Datos, acepta regirse
por los términos de este acuerdo. Si no
acepta regirse por los términos de este
acuerdo, no tiene permiso para instalar,
copiar, usar, revender o transferir los Datos.
Si desea rechazar los términos de este
acuerdo y no ha instalado, copiado o usado
los datos, debe comunicarse con minorista
o NAVTEQ North America, LLC ("NT")
dentro de treinta (30) días de compra para
obtener el reembolso del precio de
compra. Para comunicarse NT, visite
www.navteq.com.
Los Datos se entregan sólo para su uso
personal, interno y no se permite su venta.
Están protegidos por las leyes de derechos
de autor y están sujetos a los siguientes
términos (este "Acuerdo de licencia de
usuario final") y condiciones que usted
acepta, por una parte, y NAVTEQ North
America, LLC ("NT") y emisores de licencia
(incluidos sus emisores de licencia y
proveedores) por otra.
Los Datos para áreas de Canadá incluyen
información tomada con permiso de las
autoridades canadienses, incluido: © Her
Majesty the Queen in Right of Canada, ©
Queen's Printer for Ontario, © Canada Post
Corporation, Geobase ®.
NT tiene una licencia no exclusiva del
servicio postal de Estados Unidos ® para
publicar y vender ZIP+4 ® información.
© Servicio Postal de Estados Unidos ®
2009. El Servicio Postal de Estados Unidos
no establece, controla o aprueba los
precios ® Las siguientes marcas
comerciales y registros son propiedad de
USPS: Servicio Postal de Estados Unidos,
USPS y ZIP+4.
Los datos para México incluyen ciertos
datos del Instituto Nacional de Estadística
y Geografía.
430
Apéndices

TÉRMINOS Y CONDICIONES
Limitaciones de licencia en uso: acepta
la licencia para usar estos datos está
limitada y condicionada en el uso
únicamente para fines únicamente no
comerciales y no para oficina de servicios,
tiempo compartido u otros fines similares.
Excepto cuando se indique lo contrario en
el presente documento, usted acepta no
reproducir una copia, modificar, recopilar,
desarmar o revertir el diseño de cualquier
parte de estos Datos, y no transferirlos o
distribuirlos en ninguna forma, para ningún
fin, salvo hasta el punto permitido por las
leyes vigentes.
Limitaciones de licencia en
transferencia: la licencia limitada no
permite la transferencia o reventa de
datos, excepto con la condición de que
puede transferir los datos y todo el
material incluido de forma permanente si:
(a) no retiene copias de los datos; (b) el
destinatario acepta los términos de este
acuerdo de licencia de usuario final; y (c)
transfiere los datos de la forma exacta en
que los compró al transferir el medio
original (por ejemplo, CD-ROM o DVD que
compró), todo el paquete original, todos
los manuales y otra documentación.
Específicamente, los conjuntos con
múltiples discos solo se pueden transferir
o vender como conjunto completo según
lo recibió y no como un subconjunto de sí
mismo.
Limitaciones de licencia adicionales:
salvo donde haya obtenido licencia
específica para hacerlo por NT en un
acuerdo por escrito separado, y sin limitar
el párrafo anterior, la licencia se condiciona
al uso de los datos como se preestablece
en este acuerdo, y no podrá (a) usar estos
Datos con ningún producto, sistema o
aplicación instalada o de lo contrario
conectada a o en comunicación con
vehículos, con capacidad de navegación
en el vehículo, posicionamiento, despacho,
guía de ruta en tiempo real, administración
de flota o aplicaciones similares; o (b) con
o en comunicación con cualquier
dispositivo de posicionamiento o aparato
móvil o dispositivo electrónico o de
computación conectado en forma
inalámbrica, incluido, pero sin limitarse a
teléfonos celulares, computadoras
portátiles y de mano, buscapersonas y
asistentes personales digitales o PDA.
ALERTA
Estos datos pueden contener
información inexacta o incompleta
debido al paso del tiempo,
circunstancias, fuentes usadas y la
naturaleza de la recopilación de datos
geográficamente completos, cualquiera
de los cuales puede derivar en resultados
incorrectos.
431
Apéndices

Sin garantía: estos Datos se le entregan
“como están” y usted acepta utilizarlos, a
su propio riesgo. NT y sus emisores de
licencia (y sus emisores de licencia y
proveedores) no entregan ninguna
garantía, representación o garantía de
ningún tipo, expresa o implícita, que surja
por ley o de lo contrario, incluida pero sin
limitarse al contenido, calidad, precisión,
integridad, efectividad, confiabilidad,
ajuste para un fin en particular, utilidad,
uso o resultados que se obtendrán de
estos Datos o que los Datos o el servidor
se mantendrá ininterrumpido o libre de
errores.
Denegación de garantía: NT Y SUS
EMISORES DE LICENCIA (INCLUIDOS SUS
EMISORES DE LICENCIA Y
PROVEEDORES) DENIEGAN CUALQUIER
GARANTÍA, EXPRESA O IMPLÍCITA DE
CALIDAD, RENDIMIENTO,
COMERCIABILIDAD, AJUSTE PARA UN FIN
EN PARTICULAR O NO CUMPLIMIENTO.
Algunos estados, territorios y países no
permiten ciertas exclusiones de garantía,
por lo tanto hasta ese punto, la exclusión
anterior podría no aplicarse.
Descargo de responsabilidades: NT Y
SUS EMISORES DE LICENCIA (INCLUIDOS
SUS EMISORES DE LICENCIA Y
PROVEEDOR) NO SERÁN
RESPONSABLES: CON RESPECTO A
CUALQUIER QUEJA, DEMANDA O ACCIÓN,
SIN IMPORTAR LA NATURALEZA DE LA
QUEJA, DEMANDA O ACCIÓN QUE ALEGA
CUALQUIER PÉRDIDA, LESIÓN O DAÑO,
DIRECTO O INDIRECTO, PRODUCTO DEL
USO O POSESIÓN DE LA INFORMACIÓN;
O DE CUALQUIER PÉRDIDA DE
GANANCIAS, INGRESOS, CONTRATOS O
AHORROS, O CUALQUIER OTRO DAÑO
DIRECTO, INDIRECTO, INCIDENTAL
ESPECIAL O POR CONSECUENCIA QUE
SURJA DEL USO O INCAPACIDAD DE
USAR ESTA INFORMACIÓN, CUALQUIER
DEFECTO EN LA INFORMACIÓN O EL
INCUMPLIMIENTO DE ESTOS TÉRMINOS
Y CONDICIONES, YA SEA EN UNA ACCIÓN
EN CONTRATO O ACTO ILÍCITO BASADO
EN UNA GARANTÍA, INCLUSO SI EL NT O
SUS EMISORES DE LICENCIA HAN SIDO
ADVERTIDOS DE LA POSIBILIDAD DE
DICHOS DAÑOS.. Algunos estados,
territorios y países no autorizan ciertas
exclusiones de responsabilidad o
limitación de daños, de modo que hasta
ese punto lo anterior podría no aplicarse a
usted.
432
Apéndices

Control de exportación: usted acepta
no exportar desde ninguna parte de los
Datos proporcionados o ningún producto
del mismo, salvo en cumplimiento con, y
con todas las licencias y aprobaciones
requeridas, las leyes de exportación, reglas
y reglamentos aplicables, incluidos entre
otros, las leyes, reglas y regulaciones
administradas por la Oficina de Control de
Activos Extranjeros de EE.UU.
Departamento de comercio y Oficina de
Industria y Seguridad de EE.UU.
Departamento de Comercio. En la medida
que cualquier ley, regla o reglamento
prohíba que NT cumpla alguna de sus
obligaciones suscritas de entregar o
distribuir datos, dicho incumplimiento será
excusado y no constituirá una violación de
este acuerdo.
Acuerdo total: estos términos y
condiciones constituyen el acuerdo total
entre el NT (y sus emisores de licencia,
incluidos sus emisores de licencia y
proveedores) y usted que pertenece al
tema de esto, y sustituye cualquier o todo
acuerdo escrito u oral previamente
existente entre nosotros con respecto a
dicho tema.
Gravedad: usted y NT acuerdan que si
alguna parte de este acuerdo se considera
ilegal o inaplicable, dicha parte debe
omitirse y el resto del acuerdo debe
permanecer completamente vigente.
Ley vigentes: los términos y condiciones
anteriores se deben regir por las leyes del
Estado de Illinois, sin otorgar efecto a (i)
su conflicto de las disposiciones de las
leyes, o (ii) la Convención de las Naciones
Unidas para la venta internacional de
mercaderías, que está explícitamente
excluida. Usted acepta presentarse a la
jurisdicción personal del Estado de Illinois
para cualquier o todos los litigios, quejas
y acciones que surjan o se relacionen con
los Datos que se le proporcionan en el
presente.
Usuarios finales de gobierno: si los
datos son adquiridos por o en nombre del
gobierno de Estados Unidos o cualquier
entidad que busca o aplica derechos
similar a aquellos indicados especialmente
por el gobierno de Estado Unidos, estos
Datos son un "término comercial" según
se define en 48 C.F.R. ("FAR") 2.101, se
licencia de acuerdo con este acuerdo de
licencia de usuario final y cada copia de
datos entregados o proporcionados se
debe marcar e incrustar según lo que
corresponde con el siguiente "Aviso de
uso", y se debe tratar de acuerdo con dicho
aviso:
AVISO DE USO
CONTRATISTA
(FABRICANTE/PROVEEDOR)
NOMBRE:
NAVTEQ
CONTRATISTA
(FABRICANTE/PROVEEDOR)
DIRECCIÓN:
425 West Randolph Street, Chicago, IL
60606.
Estos datos son un elemento comercial
según se define en FAR 2.101
y se somete al acuerdo de licencia de
usuario final
que estos datos proporcionaron.
© 2011 NAVTEQ. Todos los derechos
reservados.
Si el funcionario de contratación, agencia
de gobierno federal o cualquier funcionario
federal se niega a usar la leyenda
proporcionada en el presente documento,
el funcionario de contratación, agencia de
gobierno federal o funcionario federal debe
notificar a NAVTEQ antes de buscar
derechos adicionales o alternativos en los
Datos.
433
Apéndices

Datos de puntos con conexión Wi-Fi
entregados por JiWire ©2012 JiWire.
Gracenote® Copyright
Datos relacionados con CD y música de
Gracenote, Inc., copyright© 2000–2007
Gracenote. Gracenote Software, copyright
© 2000–2007 Gracenote. Este producto
y servicio puede incluir una o más de las
siguientes patentes de EE.UU. #5,987,525,
#6,061,680, #6,154,773, #6,161,132,
#6,230,192, #6,230,207, #6.240,459,
#6,330,593 y otras patentes emitidas
pendientes. Algunos servicios
suministrados bajo licencia de Open Globe,
Inc. para la Patente de EE.UU. :
#6,304,523.
Gracenote y CDDB son marcas registradas
de Gracenote. El logo y el logotipo de
Gracenote, y el logotipo "Powered by
Gracenote™" son macas registradas de
Gracenote.
Acuerdo de licencia de usuario final de
Gracenote® (EULA)
Este dispositivo incluye software de
Gracenote, Inc. de 2000 Powell Street
Emeryville, California 94608
(“Gracenote”).
El software de Gracenote (el “Software de
Gracenote”) permite que este dispositivo
realice identificación de disco y archivos
de música y obtenga información
relacionada con música, incluida
información de nombre, artista, canción y
título (“Datos de Gracenote”) de los
servidores en línea (“Servidores de
Gracenote”), y ejecute otras funciones.
Puede usar los Datos de Gracenote sólo
por medio de las funciones del Usuario
final objetivo de este dispositivo.
Este dispositivo puede incluir contenido
perteneciente a los proveedores de
Gracenote. Si es así, todas las restricciones
establecidas en el presente con respecto
a los Datos de Gracenote también se
deberán aplicar a dicho contenido y los
proveedores de dicho contenido estarán
autorizados a recibir todos los beneficios
y protecciones aquí establecidos,
disponibles para Gracenote.
Usted acepta que usará el contenido de
Gracenote (“Contenido de Gracenote”),
Datos de Gracenote, Software de
Gracenote y Servidores de Gracenote
solamente para uso personal, no
comercial. Usted acepta que no asignará,
copiará, transferirá o trasmitirá el
Contenido de Gracenote, Software de
Gracenote o Datos de Gracenote (excepto
en una Etiqueta asociada con un archivo
de música) a ningún tercero. USTED
ACEPTA QUE NO USARÁ O EXPLOTARÁ
EL CONTENIDO DE GRACENOTE, DATOS
DE GRACENOTE, SOFTWARE DE
GRACENOTE O SERVIDORES DE
GRACENOTE, EXCEPTO COMO SE
PERMITE EXPRESAMENTE EN EL
PRESENTE DOCUMENTO.
434
Apéndices

Usted acepta que sus licencias no
exclusivas para usar el Contenido de
Gracenote, Datos de Gracenote, Software
de Gracenote y Servidores de Gracenote
finalizará si viola estas restricciones. Si su
licencia finaliza, usted acepta cesar
cualquier y todo uso del Contenido de
Gracenote, Datos de Gracenote, Software
de Gracenote y Servidores de Gracenote.
Gracenote, respectivamente, reserva todos
los derechos en los Datos de Gracenote,
Software de Gracenote y Servidores de
Gracenote y Contenido de Gracenote,
incluidos todos los derechos de propiedad.
Bajo ninguna circunstancia Gracenote será
responsable de efectuarle ningún pago por
ninguna información que usted entregue,
incluido material con derechos de autor o
información de archivos de música. Usted
acepta que Gracenote pueda imponer sus
respectivos derechos, en forma colectiva
o por separado, en este acuerdo ante
usted, directamente en el nombre de cada
compañía.
Gracenote usa un identificador único para
rastrear consultas para fines estadísticos.
El objetivo de un identificador numérico
asignado al azar es permitir que Gracenote
cuente las consultas sin saber nada sobre
quién es usted. Para obtener más
información, consulte la página Web
www.gracenote.com donde aparece la
Política de privacidad de Gracenote
435
Apéndices

SE LE OTORGA LICENCIA DEL SOFTWARE
DE GRACENOTE, DE CADA ELEMENTO DE
LOS DATOS DE GRACENOTE Y DEL
CONTENIDO DE GRACENOTE “COMO
ESTÁ”. GRACENOTE TAMPOCO OTORGA
NINGUNA REPRESENTACIÓN O
GARANTÍA, EXPRESA O IMPLÍCITA, CON
RESPECTO A LA PRECISIÓN DE
CUALQUIERA DE LOS DATOS DE
GRACENOTE DE LOS SERVIDORES DE
GRACENOTE O DEL CONTENIDO DE
GRACENOTE. GRACENOTE EN FORMA
COLECTIVA Y POR SEPARADO SE
RESERVA EL DERECHO DE ELIMINAR
DATOS Y/O CONTENIDO DE LOS
SERVIDORES RESPECTIVOS DE LAS
COMPAÑÍAS O, EN CASO DE GRACENOTE,
CAMBIAR LAS CATEGORÍAS DE DATOS
POR CUALQUIER CAUSA QUE
GRACENOTE ESTIME SUFICIENTE. NO SE
OTORGA NINGUNA GARANTÍA DE QUE
EL CONTENIDO DE GRACENOTE,
SOFTWARE DE GRACENOTE O
SERVIDORES DE GRACENOTE NO
PRESENTEN ERRORES O QUE EL
FUNCIONAMIENTO DEL SOFTWARE DE
GRACENOTE O DE LOS SERVIDORES DE
GRACENOTE SERÁ ININTERRUMPIDO.
GRACENOTE NO ESTÁ OBLIGADO A
PROPORCIONARLE NINGÚN TIPO DE
DATO MEJORADO O ADICIONAL QUE
GRACENOTE PUDIERA ELEGIR
PROPORCIONAR EN EL FUTURO Y TIENE
LA LIBERTAD PARA DESCONTINUAR LOS
SERVICIOS EN LÍNEA EN CUALQUIER
MOMENTO. GRACENOTE DENIEGA TODA
GARANTÍA, EXPRESA O IMPLÍCITA,
INCLUIDA, PERO SIN LIMITARSE A,
GARANTÍAS IMPLÍCITAS DE
COMERCIABILIDAD O IDONEIDAD PARA
UN FIN EN PARTICULAR, TÍTULO Y NO
INCUMPLIMIENTO. GRACENOTE
TAMPOCO GARANTIZA LOS
RESULTADOS QUE SE OBTENDRÁN POR
EL USO DEL SOFTWARE DE GRACENOTE
O CUALQUIER SERVIDOR DE
GRACENOTE. EN NINGÚN CASO,
GRACENOTE SERÁ RESPONSABLE DE
DAÑOS POR CONSECUENCIA O
INCIDENTALES O DE CUALQUIER
PÉRDIDA DE UTILIDADES O PÉRDIDA DE
INGRESOS POR CUALQUIER OTRO
MOTIVO.
© Gracenote 2007.
FCC ID: KMHSYNCG2
IC: 1422A-SYNCG2
Este dispositivo cumple con la Parte 15 de
las Normas de la FCC (Federal
Communications Commission) y con la
norma RSS-210 de Industry Canada. La
operación está sujeta a estas dos
condiciones: (1) este dispositivo no debiera
causar interferencia dañina y (2) este
dispositivo debe aceptar cualquier
interferencia que reciba, incluso
interferencias que pudieran causar un
funcionamiento no deseado.
ALERTA
Los cambios o modificaciones que
no sean aprobados expresamente
por la parte responsable del
cumplimiento normativo pueden invalidar
la autoridad del usuario para operar el
equipo. El término "IC" antepuesto al
número de certificación de radio, sólo
significa que se cumplen las
especificaciones técnicas de Industry
Canada.
La antena utilizada para este transmisor
no debe colocarse ni operarse junto con
ninguna otra antena o equipo de
transmisión.
436
Apéndices

Información general acerca del
mantenimiento
¿Por qué debe realizar el
mantenimiento de su vehículo?
Si acata esta programación de
mantenimiento en forma rigurosa, podrá
protegerse contra grandes gastos en
reparaciones, los que surgen como
resultado de negligencias o mantenimiento
inadecuado y posiblemente también
pueda aumentar el valor de su vehículo al
venderlo o comercializarlo. Conserve todos
los recibos del mantenimiento realizado
en su vehículo.
Se han establecido intervalos de
mantenimiento regulares para su vehículo
basados en rigurosos análisis. Es
importante que lleve su vehículo a servicio
en los intervalos adecuados. Estos
intervalos sirven para dos propósitos; el
primero para mantener la confiabilidad de
su vehículo y el segundo para mantener
bajos los costos de ser propietario del
vehículo.
Es su responsabilidad ver que se realicen
todos los mantenimientos programados
y controlar que todos los materiales
usados cumplan con las especificaciones
indicadas en este Manual del propietario.
Ver Capacidades y Especificaciones
(página 296).
Si no realiza el mantenimiento programado
se invalidará la cobertura de la garantía
con respecto a las piezas afectadas por la
falta de mantenimiento.
¿Por qué debe realizar el
mantenimiento del vehículo en su
distribuidor?
Técnicos entrenados en la fábrica
Los técnicos de servicio participan en
amplios cursos de capacitación certificada
patrocinados por la fábrica, lo que les
ayuda a volverse expertos en el
funcionamiento de su vehículo. Pregunte
a su distribuidor acerca del entrenamiento
y la certificación que han recibido sus
técnicos.
Su vehículo es muy moderno y está
fabricado con complejos sistemas de
rendimiento. Cada fabricante crea estos
sistemas usando diferentes
especificaciones y funciones de
rendimiento. Por eso es importante que le
confíe a su distribuidor autorizado los
trabajos de diagnóstico y reparación de su
vehículo.
Piezas de refacción originales® de Ford
y Motorcraft
Los distribuidores tienen en existencia
piezas de refacción de marca Ford,
Motorcraft y refacciones
remanufacturadas autorizadas por Ford.
Estas refacciones cumplen o exceden
nuestras especificaciones. Las partes que
su distribuidor instala tienen una garantía
limitada de calidad y mano de obra,
vigente en todo el país, de 12 meses o
20,000 km (12,000 millas).
Si no utiliza refacciones autorizadas por
Ford, es posible que no cumplan con
nuestras especificaciones y según la
refacción, ésta podría afectar el
cumplimiento de las emisiones.
437
Reparación del vehículo

Conveniencia
Muchos distribuidores han ampliado su
horario hasta la noche e incluso abren los
días sábado para que usted tenga más
tiempo para llevar su automóvil a servicio
y ofrecen todos los servicios en un solo
lugar. Pueden realizar cualquier servicio
que requiera su vehículo, desde un
mantenimiento general hasta reparaciones
de choques.
Nota: No todos los distribuidores tienen
horario prolongado o talleres de carrocería.
Comuníquese con su distribuidor para
obtener información.
Protección de su inversión
El mantenimiento es una inversión que
arroja dividendos en la forma de una mejor
fiabilidad, durabilidad y valor de reventa.
Para garantizar el funcionamiento
adecuado de su vehículo y de sus sistemas
de control de emisiones, es fundamental
que el mantenimiento programado se
realice en los intervalos designados para
ello.
Su vehículo está equipado con el sistema
Intelligent Oil Life Monitor®, que muestra
un mensaje en el centro de mensajes para
indicar el intervalo de servicio adecuado
para efectuar el cambio de aceite. Este
intervalo puede ser de hasta un año o
16,000 km (10,000 millas).
Cuando ACEITE MOTOR CAMBIE PRONTO
o CAMBIO ACEITE REQUERIDO aparece
en la pantalla del centro de mensajes, es
momento de cambiar el aceite. El cambio
de aceite se debe realizar en un lapso de
dos semanas u 800 km (500 millas)
después de que aparezca el mensaje
ACEITE MOTOR CAMBIE PRONTO o
CAMBIO ACEITE REQUERIDO. La función
Intelligent Oil Life Monitor® debe
restablecerse después de cada cambio de
aceite. Ver Comprobación del aceite de
motor (página 243).
Si se restablece antes de tiempo el centro
de mensajes o éste deja de funcionar,
realice el cambio de aceite cada seis
meses, 8,000 km (5,000 millas) a partir
del último cambio de aceite. Nunca espere
más de un año o 16,000 km (10,000
millas) entre intervalos de cambio de
aceite.
Su vehículo es muy moderno y está
fabricado con complejos sistemas de
rendimiento. Cada fabricante crea estos
sistemas usando diferentes
especificaciones y funciones de
rendimiento. Por eso es importante que le
confíe a su distribuidor autorizado los
trabajos de diagnóstico y reparación de su
vehículo.
Recomendamos intervalos de
mantenimiento para diversas refacciones
y sistemas de componentes en base a
pruebas de ingeniería. Confiamos en estas
pruebas para determinar el kilometraje
más adecuado para reemplazar aceites y
líquidos con el fin de proteger su vehículo
al menor costo general y recomendamos
programas de mantenimiento que derivan
de la información de mantenimiento
programado.
Recomendamos encarecidamente usar
solo refacciones marca Ford y Motorcraft
originales o refacciones remanufacturadas
autorizadas por Ford, ya que están
diseñadas para su vehículo.
Aditivos y sustancias químicas
Los aditivos y sustancias químicas
recomendados se indican en este Manual
de propietario y en el Manual del taller.
Para el mantenimiento normal no se
recomienda agregar otras sustancias
químicas ni aditivos no aprobados por Ford
Motor Company. Consulte su Manual de
garantía para obtener información
completa sobre la garantía.
438
Reparación del vehículo

Aceites, líquidos y vaciado
En muchos casos, el cambio de color de
un líquido es una característica de
funcionamiento normal y no indica
necesariamente que haya un problema o
que sea necesario cambiarlo. Sin embargo,
los líquidos que cambian de color, y que
además muestran signos de
sobrecalentamiento o contaminación con
materias extrañas, deben ser
inspeccionados inmediatamente por un
experto calificado, como los técnicos
capacitados en fábrica de su distribuidor
autorizado.
Los aceites y líquidos de su vehículo se
deben cambiar en los intervalos
especificados o al realizar una reparación.
El lavado es una manera viable de cambiar
el líquido de muchos subsistemas del
vehículo durante el mantenimiento
programado. Es importante que los
sistemas se laven únicamente con líquido
nuevo que sea el mismo que se requiere
para llenar y operar el sistema, o utilizando
una sustancia química de lavado aprobada
por Ford.
Revisiones y servicios del propietario
Todos los meses o en intervalos de seis
meses deben realizarse algunas revisiones
e inspecciones de mantenimiento básicas.
Revisar cada mes
• Nivel de aceite del motor.
• El funcionamiento de todas las luces
interiores y exteriores.
• Grado de desgaste y presión de inflado
de las llantas, incluyendo la llanta de
refacción.
• Nivel del líquido lavaparabrisas.
Revisar cada seis meses
• Conexiones de la batería. Límpielas si
es necesario.
• Que los orificios de drenado de la
carrocería y de las puertas no tengas
obstrucciones. Límpielos si es
necesario.
• El nivel del líquido refrigerante del
motor y la concentración del líquido
refrigerante.
• Que los burletes de las puertas no
estén desgastados. Lubríquelos si es
necesario.
• El funcionamiento correcto de las
bisagras, los pestillos y las cerraduras
exteriores. Lubríquelos si es necesario.
• Que el freno de estacionamiento
funcione correctamente.
• Que los cinturones de seguridad y las
trabas de los asientos no estén
desgastados y que funcionen
correctamente.
• El buen funcionamiento de las luces
de advertencia de seguridad (frenos,
ABS, bolsas de aire y cinturones de
seguridad).
• Funcionamiento del rocío del
lavaparabrisas y los limpiaparabrisas.
Limpie o reemplace las hojas, según
sea necesario.
Inspección multipunto
Para que su vehículo funcione en forma
correcta, es importante que se revisen
regularmente los sistemas en su vehículo.
Esto puede ayudar a identificar problemas
potenciales y a evitar problemas mayores.
Recomendamos que se realice la siguiente
inspección multipunto en cada intervalo
de mantenimiento programado para
asegurarse de que su vehículo funcione
correctamente.
439
Reparación del vehículo

Inspección multipunto
Funcionamiento del sistema de luces de
emergencia
Bandas impulsoras de accesorios
Funcionamiento del claxonNivel de carga de la batería
Radiador, enfriador, calefactor y mangueras
del A/A
Filtro de aire del motor
Fugas o daños en los componentes de la
suspensión
Sistema de escape
Dirección y su varillajeFuncionamiento las luces exteriores
Grado de desgaste y presión de inflado de
las llantas (incluyendo la de refacción)
Niveles de líquidos
*
; rellene si fuera nece-
sario
Parabrisas en busca de fracturas, desporti-
lladuras o golpes de piedras
Fugas de aceite y otros líquidos y lubri-
cantes
Funcionamiento del rocío del lavapara-
brisas y los limpiaparabrisas
Las botas cubrepolvo de la semiflecha
*
Frenos, depósito de recuperación del líquido refrigerante, transmisión automática y
lavaparabrisas
Recuerde preguntarle al asesor o al técnico
de servicio de su distribuidor sobre la
inspección multipunto del vehículo. Es un
formato completo para realizar una
inspección minuciosa de su vehículo. Es
una lista de verificación que le proporciona
información inmediata acerca de la
condición general de su vehículo. Con él
sabrá lo que se revisó, lo que está bien, y
los componentes que podrían requerir
atención futura o inmediata. La inspección
multipunto del vehículo es otra manera de
mantener su vehículo en buen estado.
Mantenimiento programado
normal
Intelligent Oil Life Monitor®
Su vehículo está equipado con el sistema
Intelligent Oil Life Monitor, que determina
cuándo es necesario cambiar el aceite del
motor según el uso del vehículo. Puesto
que usa varios factores importantes para
efectuar sus cálculos, este sistema ayuda
a reducir el costo de mantenimiento del
vehículo y, al mismo tiempo, reduce los
residuos ambientales.
Esto significa que no tendrá que recordar
cambiar el aceite según un programa de
kilometraje (millaje); el vehículo le
informará cuando sea necesario cambiar
el aceite al mostrar ACEITE MOTOR
CAMBIE PRONTO o CAMBIO ACEITE
REQUERIDO en el centro de mensajes.
440
Reparación del vehículo

La siguiente tabla proporciona ejemplos
de uso del vehículo y su impacto en los
intervalos de cambio de aceite del motor.
Se proporciona únicamente como guía.
Los intervalos reales para el cambio de
aceite del motor dependen de diversos
factores y generalmente disminuyen al
aumentar la severidad del uso.
Cuándo esperar que aparezca el mensaje CAMBIO ACEITE REQUERIDO
Uso del vehículo y ejemplosKilómetros (millas)
Normal
7500-10000
(12000-16000)
Transporte normal al trabajo con manejo en carreteras
Con poco o ningún arrastre o carga
Caminos planos o con pendientes moderadas
Sin ralentí prolongado
Severo
5000-7499
(8000-11999)
Arrastre o carga de moderada a pesada
Condiciones montañosas o de campo traviesa
Ralentí prolongado
Operación prolongada en climas calientes o fríos
Extremo
3000-4999
(4000-7999)
Carga o remolque máximo
Operación en climas calientes o fríos extremos
En cada intervalo de cambio de aceite, según lo indique el centro de mensajes
1
Cambie el aceite del motor y el filtro.
2
Gire las llantas.
Realice una inspección multipunto (recomendado).
Inspeccione el nivel de aceite de la transmisión automática. Consulte a su distribuidor
para satisfacer sus requerimientos.
Inspeccione los patines, las zapatas, los rotores, los tambores, las balatas y las
mangueras de los frenos, y el freno de estacionamiento.
Inspeccione el filtro de aire de la cabina.
Inspeccione la resistencia del sistema de enfriamiento del motor y las mangueras.
441
Reparación del vehículo

En cada intervalo de cambio de aceite, según lo indique el centro de mensajes
1
Inspeccione el sistema de escape y las pantallas térmicas.
Inspeccione el eje trasero y las juntas cardán. Lubrique cualquier área con conexiones
de engrase (vehículos 4WD).
Inspeccione las botas de la semiflecha.
Inspeccione el varillaje de la dirección, juntas de rótula, suspensión, extremos de barras
de acoplamiento, eje de transmisión y juntas cardán. Lubrique cualquier área con
conexiones de engrase (vehículos 4WD).
Inspeccione si las llantas están desgastadas y mida la profundidad de la banda de
rodadura.
Inspeccione las ruedas (rines) y los componentes relacionados en busca de ruido
anormal, desgaste, flojedad o arrastre.
1
No espere más de un año o 16,000 km (10,000 millas) entre intervalos de servicio.
2
Restablezca la función Intelligent Oil Life Monitor® después de cada cambio de aceite
y filtro del motor. Ver Comprobación del aceite de motor (página 243).
Puntos de mantenimiento adicionales
1
Reemplace el filtro de aire de la cabina.Cada 32000 km (20000
millas)
Reemplace el filtro de aire del motor.Cada 48000 km (30000
millas)
Cambie el refrigerante del motor.
2
Cada 160000 km (100000
millas)
Reemplace las bujías.
Cada 160000 km (100000
millas)
Inspeccione la o las bandas de accesorios.
3
442
Reparación del vehículo

Puntos de mantenimiento adicionales
1
Cambie el líquido de la transmisión automática.
Cada 240000 km (150000
millas)
Inspeccione la o las bandas de accesorios.
4
1
Los puntos de mantenimiento adicionales se pueden realizar antes de 4,800 km (3,000
millas) contados a partir del último cambio de aceite y filtro del motor. No exceda la
distancia designada para el intervalo.
2
Reemplazo inicial a los seis años o 160,000 km (100,000 millas); a partir de entonces,
cada tres años u 80,000 km (50,000 millas).
3
Realice una inspección de seguimiento a los 192,000 km (120,000 millas).
4
Si no se han reemplazado durante los últimos 160,000 km (100,000 millas).
Registro del programa de mantenimiento
E146852
Repair Order #:
Distance:
Engine hours (optional):
Multi-point inspection (recommended):
Signature:
Dealer stamp
443
Reparación del vehículo

E146852
Repair Order #:
Distance:
Engine hours (optional):
Multi-point inspection (recommended):
Signature:
Dealer stamp
E146852
Repair Order #:
Distance:
Engine hours (optional):
Multi-point inspection (recommended):
Signature:
Dealer stamp
E146852
Repair Order #:
Distance:
Engine hours (optional):
Multi-point inspection (recommended):
Signature:
Dealer stamp
444
Reparación del vehículo

E146852
Repair Order #:
Distance:
Engine hours (optional):
Multi-point inspection (recommended):
Signature:
Dealer stamp
E146852
Repair Order #:
Distance:
Engine hours (optional):
Multi-point inspection (recommended):
Signature:
Dealer stamp
E146852
Repair Order #:
Distance:
Engine hours (optional):
Multi-point inspection (recommended):
Signature:
Dealer stamp
445
Reparación del vehículo

E146852
Repair Order #:
Distance:
Engine hours (optional):
Multi-point inspection (recommended):
Signature:
Dealer stamp
E146852
Repair Order #:
Distance:
Engine hours (optional):
Multi-point inspection (recommended):
Signature:
Dealer stamp
E146852
Repair Order #:
Distance:
Engine hours (optional):
Multi-point inspection (recommended):
Signature:
Dealer stamp
446
Reparación del vehículo

E146852
Repair Order #:
Distance:
Engine hours (optional):
Multi-point inspection (recommended):
Signature:
Dealer stamp
E146852
Repair Order #:
Distance:
Engine hours (optional):
Multi-point inspection (recommended):
Signature:
Dealer stamp
Condiciones de manejo severo
Si el vehículo se opera por lo general en
cualquiera de las siguientes condiciones,
debe realizarse el mantenimiento adicional
que se indica. Si opera su vehículo
ocasionalmente en cualquiera de estas
condiciones, no es necesario realizar el
mantenimiento adicional. Para conocer
las recomendaciones específicas, consulte
al asesor o técnico de servicio de su
distribuidor autorizado.
447
Reparación del vehículo

Realice los servicios indicados en las
siguientes tablas cuando se especifique o
dentro de los 4,800 km (3,000 millas)
siguientes a la aparición del mensaje de
CAMBIO ACEITE REQUERIDO en el centro
de mensajes.
• Ejemplo 1: El mensaje CAMBIO ACEITE
REQUERIDO se enciende a los 46,270
km (28,751 millas); realice el cambio
de aceite de la transmisión automática
de los 48,000 km (30,000 millas).
• Ejemplo 2: El mensaje CAMBIO
ACEITE REQUERIDO no ha aparecido
pero el odómetro indica 48,000 km
(30,000 millas); reemplace el filtro de
aire del motor (por ejemplo, si la
función Intelligent Oil Life Monitor® se
restableció a los 40,000 km [25,000
millas]). )
Arrastre de un remolque o uso de un aditamento de carga para el techo
Cambie el aceite y el filtro de aceite del motor tal como
lo indique el centro de mensajes y realice los servicios
indicados en la tabla de Mantenimiento programado
normal.
Según sea necesario
· Inspeccione y lubrique las juntas cardán.Inspeccione con frecuencia
y dé servicio, según se
requiera
· Consulte elementos de mantenimiento del eje en
Excepciones.
Cambie el líquido de la transmisión automática.Cada 48000 km (30000
millas)
Intenso funcionamiento en ralentí o manejo a baja velocidad por largas distancias, como
en el caso de uso comercial (por ejemplo, repartos, taxi o patrullas)
Cambie el aceite y el filtro de aceite del motor tal como
lo indique el centro de mensajes y realice los servicios
indicados en la tabla de Mantenimiento programado
normal.
Según sea necesario
· Reemplace el filtro de aire de la cabina, si está equipado.Inspeccione con frecuencia
y dé servicio, según se
requiera
· Reemplace el filtro de aire del motor.
Cambie el líquido de la transmisión automática.Cada 48000 km (30000
millas)
Reemplace las bujías.Cada 96000 km (60000
millas)
448
Reparación del vehículo

Uso en condiciones de polvo o arena, como en caminos sin pavimentar o polvorientos
· Reemplace el filtro de aire de la cabina, si está equipado.Inspeccione con frecuencia
y dé servicio, según se
requiera
· Reemplace el filtro de aire del motor.
· Inspeccione las ruedas (rines) y los componentes relacio-
nados en busca de ruido anormal, desgaste, flojedad o
arrastre.
Cada 8,000 km (5,000
millas)
· Rote las llantas, inspeccione si las llantas están desgas-
tadas y mida la profundidad de la banda de rodadura.
· Cambie el aceite del motor y el filtro.Cada 8,000 km (5,000
millas) o 6 meses · Realice una inspección multipunto.
Cambie el líquido de la transmisión automática.Cada 48000 km (30000
millas)
Restablezca la función Intelligent Oil Life Monitor® después de cada cambio de aceite y
filtro del motor. Ver Comprobación del aceite de motor (página 243).
Uso exclusivo de E85 (solo vehículos de combustible flexible)
Si utiliza exclusivamente E85, llene completamente el
tanque de combustible con gasolina sin plomo regular.
Cada cambio de aceite
Registro de condiciones especiales de funcionamiento
E146852
Repair Order #:
Distance:
Engine hours (optional):
Multi-point inspection (recommended):
Signature:
Dealer stamp
449
Reparación del vehículo

E146852
Repair Order #:
Distance:
Engine hours (optional):
Multi-point inspection (recommended):
Signature:
Dealer stamp
E146852
Repair Order #:
Distance:
Engine hours (optional):
Multi-point inspection (recommended):
Signature:
Dealer stamp
E146852
Repair Order #:
Distance:
Engine hours (optional):
Multi-point inspection (recommended):
Signature:
Dealer stamp
450
Reparación del vehículo

E146852
Repair Order #:
Distance:
Engine hours (optional):
Multi-point inspection (recommended):
Signature:
Dealer stamp
E146852
Repair Order #:
Distance:
Engine hours (optional):
Multi-point inspection (recommended):
Signature:
Dealer stamp
Excepciones
Existen varias excepciones a la
Programación normal:
451
Reparación del vehículo

Mantenimiento normal del eje del
vehículo: Los ejes traseros y las unidades
de toma de fuerza (PTO) con lubricante
sintético y las camionetas de servicio
liviano equipadas con ejes diseñados por
Ford están lubricados de por vida; No
revise ni cambie estos lubricantes, a menos
que exista sospecha de una fuga, se
requiera servicio o el eje se haya sumergido
en agua. Durante períodos prolongados de
arrastre de remolques a temperaturas
exteriores de más de 21 °C (70 °F) y
conducción con el acelerador totalmente
abierto por períodos prolongados a más
de 72 km/h (45 mph), los lubricantes no
sintéticos del eje trasero se deben
reemplazar cada 4,800 km (3,000 millas)
o tres meses, lo que ocurra primero. Este
intervalo puede obviarse si se llena el eje
con lubricante de velocidades sintético
75W140 que cumpla con la especificación
WSL-M2C192-A de Ford, número de
refacción F1TZ-19580-B o equivalente.
Agregue modificador de fricción XL-3
(EST-M2C118-A) o equivalente para
completar el relleno de los ejes traseros
Traction-Lok. Ver Especificaciones
técnicas (página 299).
Mantenimiento del eje de vehículos
policiales, taxis y de alquiler: Cambie el
aceite del eje trasero cada 160,000 km
(100,000 millas). El cambio de aceite del
eje trasero se puede omitir si el eje se llenó
con un aceite de transmisión sintético
75W140 que cumpla con la especificación
WSL-M2C192-A de Ford, número de
refacción F1TZ-19580-B o equivalente.
Agregue 118 mL (cuatro onzas) de aditivo
modificador de fricción XL-3
(EST-M2C118-A) o equivalente para
completar el relleno de los ejes traseros
Traction-Lok. Cambie el lubricante del eje
cada vez que el eje haya estado sumergido
en agua.
Reemplazo del filtro de combustible
en California: Si el vehículo está
registrado en California, el Consejo de
recursos atmosféricos de California ha
establecido que el hecho de no realizar
este punto de mantenimiento no anulará
la garantía de emisión de gases, ni limitará
la demanda de llamado a revisión antes
de que termine la vida útil del vehículo. Sin
embargo, Ford Motor Company lo exhorta
a que realice todos los servicios de
mantenimiento recomendados en los
intervalos especificados y que registre
todos los servicios realizados al vehículo.
Intervalos de cambio de aceite en
climas cálidos: En el caso de los vehículos
que operan en Oriente Medio, África del
Norte, el Sub-Sahara Africano u otros
lugares con climas semejantes y usan un
aceite definido por el American Petroleum
Institute (API) para motores de gasolina
(marca de certificación) de calidad SM o
SN, el intervalo de cambio normal del
aceite es de 8,000 km (5,000 millas). Si
los aceites API SM o SN no están
disponibles, el intervalo de servicio del
cambio de aceite es de 4,800 km (3,000
millas).
Reemplazo del filtro de aire del motor
y el filtro de aire de la cabina: La vida útil
del filtro de aire del motor y del filtro de
aire de la cabina dependen de la
exposición a condiciones de polvo y
suciedad. Los vehículos que funcionan en
tales condiciones requerirán inspección y
reemplazo más frecuentes del filtro de aire
del motor y el filtro de aire de la cabina.
Registro de cambio de refrigerante
del motor
Cambio inicial: Seis años o 160,000 km
(100,000 millas), lo que ocurra primero.
Después del cambio inicial: Cada tres
años u 80,000 km (50,000 millas).
452
Reparación del vehículo

Registro de cambio de refrigerante del motor
E146852
Repair Order #:
Distance:
Engine hours (optional):
Multi-point inspection (recommended):
Signature:
Dealer stamp
E146852
Repair Order #:
Distance:
Engine hours (optional):
Multi-point inspection (recommended):
Signature:
Dealer stamp
453
Reparación del vehículo

E146852
Repair Order #:
Distance:
Engine hours (optional):
Multi-point inspection (recommended):
Signature:
Dealer stamp
E146852
Repair Order #:
Distance:
Engine hours (optional):
Multi-point inspection (recommended):
Signature:
Dealer stamp
E146852
Repair Order #:
Distance:
Engine hours (optional):
Multi-point inspection (recommended):
Signature:
Dealer stamp
454
Reparación del vehículo

4
4WD
Véase: Doble Tracción.......................................167
A
A/C
Véase: Control de clima...................................125
Abridor Universal de Cochera...................141
Sistema de control inalámbrico
HomeLink®.......................................................141
ABS
Véase: Frenos........................................................173
Accesorios .....................................................302
Estilo de vida.......................................................302
Estilo exterior......................................................302
Estilo interior.......................................................302
Tranquilidad........................................................302
Accesorios
Véase: Recomendación de partes de repuesto
.................................................................................12
Acerca de este Manual....................................7
Protección del medio ambiente........................7
Acuerdo de Licencia del Usuario............418
Acuerdo de licencia de usuario final (EULA)
de SYNC®........................................................418
Advertencias e Indicadores
Audibles..........................................................92
Campanilla de advertencia de faros
encendidos........................................................92
Campanilla de advertencia de freno de
estacionamiento activado...........................92
Campanilla de advertencia de llave en el
encendido..........................................................92
Aire acondicionado
Véase: Control de clima...................................125
Ajuste de altura de los cinturones de
seguridad........................................................32
Ajuste de los Faros Principales...............252
Ajuste de la alineación horizontal...............254
Ajuste de la alineación vertical.....................252
Ajuste del Volante de Dirección................72
Alarma
Véase: Alarma Anti-Robo.................................70
Alarma Anti-Robo..........................................70
Activación de la alarma.......................................71
Desactivación de la alarma...............................71
Almacenamiento de la parte inferior
trasera del piso...........................................196
Piso del compartimiento del
copiloto.............................................................196
Piso para carga ajustable................................196
Sistema de manejo de carga.........................196
Almacenamiento del Vehículo...............265
Batería...................................................................266
Carrocería.............................................................265
Frenos....................................................................266
Información general.........................................265
Motor......................................................................265
Neumáticos.........................................................266
Otros puntos misceláneos.............................266
Retiro del vehículo del
almacenamiento..........................................266
Sistema de combustible................................266
Sistema de refrigeración................................266
Apéndices.......................................................418
Apertura y cierre del cofre........................239
Aplicaciones y servicios SYNC® ...........325
911 Assist...............................................................325
Informe de mantenimiento del
vehículo............................................................328
Servicios SYNC: Tráfico, indicaciones e
información (TDI).........................................329
Arranque a control remoto........................132
Ajustes automáticos..........................................132
Asientos y dispositivos enfriados.................133
Último ajuste........................................................133
Arranque de un motor de gasolina ........151
Información importante sobre la
ventilación........................................................152
Protección contra los gases de
escape................................................................152
Arranque en frío del vehículo...................218
Arranque con cables pasacorriente.............219
Conexión de los cables
pasacorriente..................................................218
Preparación del vehículo.................................218
Retiro de los cables pasacorriente...............219
Arranque sin llave.........................................150
Detención del moto cuando el vehículo está
detenido............................................................150
Detención del moto cuando el vehículo está
en movimiento.................................................151
Rearranque rápido...............................................151
455
Índice alfabético

Arranque y Paro del Motor........................149
Información general..........................................149
Véase: Asegurar y Desasegurar......................60
A
Asegurar y Desasegurar..............................60
Activación del acceso inteligente...................61
Ahorrador de batería...........................................63
Apertura inteligente para llaves de acceso
inteligente...........................................................61
Bloqueo y desbloqueo automático de las
puertas................................................................62
Control remoto.....................................................60
Desbloqueo inteligente de seguros para el
transmisor integrado a la llave....................61
Salida iluminada..................................................63
Seguros eléctricos de las puertas.................60
Sistema de entrada iluminada.......................63
Asientos...........................................................134
Asientos calentados...................................140
Asientos eléctricos.......................................137
Soporte lumbar eléctrico.................................138
Asientos Elevados..........................................19
Tipos de asientos auxiliares.............................20
Asientos manuales......................................136
Ajuste de la altura del asiento del
conductor..........................................................137
Ajuste de reclinación..........................................137
Movimiento del asiento hacia atrás y hacia
delante...............................................................136
Asientos para Niños........................................17
Asientos traseros..........................................139
Ajuste de reclinación.........................................139
Para desplegar el respaldo del
asiento...............................................................140
Para plegar el respaldo del asiento.............140
Asistencia Activa para
Estacionarse...............................................180
Conducción automática hacia el espacio
de estacionamiento......................................182
Desactivación de la característica de
asistencia de estacionamiento................183
Solución de problemas del sistema............183
Uso de Asistencia de estacionamiento
activa...................................................................181
Asistencia al cliente ...................................220
Asistencia de arranque en
pendientes...................................................165
Uso del sistema de arranque asistido en
pendientes (HSA).........................................166
Asistencia de estacionamiento ..............178
Sistema delantero de sensores.....................179
Sistema trasero de sensores..........................178
Asistencia en carretera...............................216
Vehículos vendidos en Canadá: Cómo
conseguir asistencia en el camino...........217
Vehículos vendidos en Canadá: Uso de la
asistencia en el camino................................217
Vehículos vendidos en EE.UU.: cómo
conseguir asistencia en el camino..........216
Vehículos vendidos en Estados Unidos :
Uso de la asistencia en el camino...........216
Atenuador de Iluminación de Tablerol
de Instrumentos..........................................79
Vehículos con faros para niebla
delanteros..........................................................79
Vehículos sin faros para niebla
delanteros..........................................................79
Ayudas de Conducción..............................190
Ayudas de Estacionamiento....................178
B
Bolsa de Aire para Rodillas..........................41
Bolsas de aire del conductor y del
pasajero .........................................................39
Ajuste adecuado de asiento de conductor
y pasajero delantero......................................40
Los niños y las bolsas de aire..........................40
Bolsas de Aire Laterales..............................44
Borrado de toda la información de
MyKeys ...........................................................55
C
Cabeceras........................................................134
Ajuste de las cabeceras....................................135
Cadenas para nieve
Véase: Uso de cadenas para nieve.............284
Caja de velocidades
Véase: Transmisión ...........................................163
Calefacción
Véase: Control de clima...................................125
456
Índice alfabético

Calentador del Bloque del Motor...........152
Uso del calefactor de bloque del
motor..................................................................153
Calidad del combustible...........................155
Cómo escoger el combustible
correcto.............................................................155
Recomendaciones de octanaje....................155
Véase: Cámara de vista trasera ...................185
C
Cámara de vista trasera ............................185
Uso del sistema de cámara
retrovisora........................................................185
Cambio de focos..........................................254
Condensación en los conjuntos de
luces...................................................................254
Reemplazo de focos de las luces traseras,
de freno y direccionales..............................257
Reemplazo de focos de niebla,
estacionamiento y direccionales............256
Reemplazo del conjunto de luces
traseras..............................................................257
Reemplazo del foco de la luz de
placa..................................................................258
Reemplazo del foco de la luz superior de
freno..................................................................258
Reemplazo de los focos de las luces
indicadoras laterales...................................256
Reemplazo de los focos de los faros..........255
Reemplazo de los focos de los faros
HID......................................................................256
Cambio de fusibles.....................................226
Fusible(s)..............................................................226
Cambio de la batería del vehículo........249
Cambio de las hojas del limpiador.......250
Cambio del filtro de aire del motor .......251
...................................................................................252
Motor 2.5L.............................................................252
Motores 1.6L y 2.0L EcoBoost®.....................251
Cambio de una rueda................................289
Información del conjunto de rueda o llanta
de refacción distinta...................................290
Procedimiento de cambio de llantas..........291
Capacidades y Especificaciones...........296
Especificaciones técnicas..............................299
Centro de mensajes
Véase: Pantallas de información...................93
Cinturones de Seguridad............................28
Funcionamiento...................................................28
Claxon
Véase: Freno de estacionamiento................174
Climatización................................................405
Comandos de voz de control de aire
acondicionado y calefacción...................406
Código de la Transmisión.........................299
Colocación de los Asientos para
Niños..................................................................17
Combustible y llenado...............................154
Cómo obtener asistencia fuera de EE.
UU. y Canadá .............................................223
Cómo obtener los servicios necesarios
.........................................................................220
Fuera de la ciudad.............................................220
Cómo ordenar otro Manual del
propietario ..................................................225
Cómo obtener un manual del propietario
en francés........................................................225
Compartimientos para
Almacenaje.................................................148
Comprobación del aceite
Véase: Comprobación del aceite de
motor.................................................................243
Comprobación del aceite de
motor.............................................................243
Cómo agregar aceite de motor.....................243
Restablecimiento del sistema de monitoreo
de la vida útil del aceite.............................244
Comprobación de las hojas del
limpiador.....................................................250
Comprobación del estado del sistema
MyKey .............................................................56
Comprobación del fluido de la dirección
hidráulica.....................................................248
Comprobación del fluido del
lavador..........................................................248
Comprobación del refrigerante
Véase: Comprobación del refrigerante de
motor.................................................................244
457
Índice alfabético

Comprobación del refrigerante de
motor.............................................................244
Climas extremos................................................246
Líquido refrigerante del motor
reciclado..........................................................246
Llenado del líquido refrigerante del
motor.................................................................245
Lo que debe saber sobre el enfriamiento
de seguridad a prueba de fallas..............247
Revisión del líquido refrigerante del
motor.................................................................244
Comprobaciones esenciales de
remolque.....................................................209
Al arrastrar un remolque..................................210
Antes de arrastrar un remolque....................210
Cadenas de seguridad....................................209
Enganches de arrastre....................................209
Frenos del remolque........................................209
Luces del remolque..........................................209
Compuerta Levadiza Eléctrica..................64
Apertura y cierre de la compuerta
levadiza...............................................................65
Cómo establecer la altura de la compuerta
levadiza abierta...............................................66
Detección de obstáculos..................................66
Compuerta levadiza manual ....................63
Computadora de viaje.................................96
Consumo promedio de combustible...........96
Distancia antes de quedar el tanque vacío
(DTE)...................................................................96
Odómetro de viaje...............................................96
Restablecimiento de la computadora de
viaje......................................................................96
Temporizador de viaje........................................96
Concentrador de medios............................121
Conducción con remolque.......................207
Conducción económica..............................213
Conducción por el agua.............................213
Consejos para Conducir con Frenos
Antibloqueo..................................................173
Consejos para el control del clima
interior ...........................................................128
Calefacción del interior rápidamente.........129
Consejos generales............................................128
Desempañar la ventana lateral en clima
frío.........................................................................131
Enfriamiento del interior
rápidamente....................................................130
La configuración recomendada
calefacción.......................................................129
La configuración recomendada
enfriamiento ...................................................130
Rendimiento de enfriamiento máximo en
tablero de instrumentos o tablero de
instrumentos y piso........................................131
Vehículo detenido durante períodos
extendidos durante temperaturas
ambiente extremadamente altas...........130
Consola central.............................................148
Consola del toldo.........................................148
Consumo de combustible..........................161
Cálculo del rendimiento del
combustible......................................................161
Llenado del tanque.............................................161
Control Automático de Clima..................126
Control de temperatura....................................127
Desactivación de mono modo.......................127
Mono modo...........................................................127
Reactivación de mono modo.........................128
Control de Audio.............................................72
Tipo 1..........................................................................72
Tipo 2.........................................................................73
Tipo 3.........................................................................73
Control de Bamboleo del
Remolque....................................................207
Control de clima............................................125
Control de clima manual...........................125
Control de Crucero.........................................74
Funcionamiento.................................................188
Control de Crucero
Véase: Control de Crucero..............................188
Véase: Uso del control de crucero...............188
Control de estabilidad................................176
Funcionamiento..................................................176
Control de Iluminación.................................78
Destellador de los faros.....................................78
Luces altas..............................................................78
458
Índice alfabético

Control de la Pantalla de
Información....................................................74
Control de tracción.......................................175
Funcionamiento..................................................175
Control de Voz.................................................74
Controles de MyFord Touch®..........................74
Creación de MyKey........................................55
Programación/Cambio de configuración
opcional..............................................................55
Cubiertas del compartimiento de
equipajes......................................................196
Cuidado de las llantas...............................270
Glosario de terminología sobre
llantas................................................................272
Índice de desgaste (Treadwear)...................271
Información acerca del grado de
uniformidad de la calidad de las
llantas................................................................270
Información contenida en el costado de la
llanta..................................................................272
Temperatura A B C..............................................271
Tracción (Traction) AA, A, B y C.....................271
Cuidado del vehículo.................................260
Información general.........................................260
D
Denuncia de defectos de seguridad
(únicamente en Canadá) .....................225
Denuncia de defectos de seguridad
(únicamente en EE. UU.) ......................225
Descansabrazos del asiento
trasero...........................................................140
Desmontaje de faros..................................254
Detección de Problemas de MyKey.........57
Diagnóstico de fallas SYNC® .................341
Dirección .........................................................195
Dirección hidráulica eléctrica.........................195
Disposición de una Bolsa de Aire.............47
Doble Tracción...............................................167
DRL
Véase: Faros de Operación Diurna................80
E
Emergencias en el Camino.......................216
En California (únicamente en EE. UU.)
...........................................................................221
Encendido Automático de Faros
Principales......................................................78
Encerado..........................................................261
Entrada sin Llave............................................67
TECLADO DE ENTRADA SIN LLAVE
SECURICODE™...............................................67
Entretenimiento...........................................365
Audio Bluetooth.................................................385
CD............................................................................379
Entradas de A/V.................................................387
Exploración del contenido del
dispositivo.......................................................366
Radio AM/FM......................................................367
Radio satelital SIRIUS® (si está
activado)..........................................................373
Ranura para tarjeta SD y puerto USB.........381
Reproductores de medios, formatos e
información de metadatos
compatibles....................................................385
Equipo Móvil de Comunicaciones.............13
Especificaciones del motor.....................296
Enrutado de correa (drivebelt)....................296
Especificaciónes Técnicas
Véase: Capacidades y
Especificaciones...........................................296
Espejo retrovisor interior.............................86
Espejo de atenuación automática................86
Espejos retrovisores exteriores.................84
Espejo para puntos ciegos...............................85
Espejos con memoria.........................................85
Espejos eléctricos exteriores...........................84
Espejos para puntos ciegos
integrados..........................................................85
Espejos plegables exteriores...........................85
Espejos térmicos exteriores.............................85
Espejos retrovisores
Véase: Ventanas y espejos retrovisores.......83
Véase: Ventanas y espejos retrovisores
calentados.........................................................131
Etiqueta de certificación del
vehículo........................................................298
F
Faros de Niebla Delanteros.......................80
Faros de Niebla Delanteros
Véase: Faros de Niebla Delanteros...............80
Faros de Operación Diurna........................80
459
Índice alfabético

Filtro de aire para la cabina ......................132
Filtro de combustible ................................248
Ford Credit..........................................................11
(EE.UU. solamente)...............................................11
Ford Protect..................................................304
PLANES DE SERVICIO (CANADÁ
SOLAMENTE)................................................306
PLANES DE SERVICIO (Estados Unidos
solamente).....................................................304
Freno de estacionamiento........................174
Frenos................................................................173
Información general...........................................173
Funcionamiento sin combustible...........155
Carga de combustible con un recipiente
portátil...............................................................156
Función de memoria...................................138
Guardado de una posición pasiva................139
Guardado de una posición
preprogramada..............................................139
Recuerdo de una posición de asiento
almacenada....................................................139
Fusibles...........................................................226
G
Glosario de Símbolos......................................7
I
Iluminación.......................................................78
Iluminación Interior.......................................80
Luz interior delantera...........................................81
Luz interior trasera................................................81
Indicaciones de conducción con ABS
Véase: Consejos para Conducir con Frenos
Antibloqueo......................................................173
Indicaciones de conducción.....................213
Indicadores de Luces Direccionales.......80
Indicadores.......................................................88
Indicador de combustible.................................89
Indicador de temperatura del líquido
refrigerante del motor...................................89
Pantalla de información...................................88
Indicadores y luces de advertencia.........89
Abrochar cinturón de seguridad......................91
Aceite de motor....................................................90
Advertencia de llanta con baja presión........91
Batería......................................................................90
Bolsa de aire delantera......................................89
Control de crucero (C/C)..................................90
Control de estabilidad........................................92
Control de estabilidad apagado.....................92
Espejo para puntos ciegos...............................90
Faros de niebla delanteros................................91
Información.............................................................91
Intermitente...........................................................90
Luces altas...............................................................91
Luces de estacionamiento................................91
Nivel de combustible bajo.................................91
Servicio del motor a la brevedad....................91
Sistema de frenos...............................................90
Sistema de frenos antibloqueo.....................90
Información General sobre las
Frecuencias de Radio................................48
Acceso inteligente (AI)......................................48
Información...................................................394
911 Assist®............................................................401
Calendario.............................................................401
Informe de mantenimiento del
vehículo............................................................403
Notificaciones.....................................................401
Servicios SYNC (si está equipado, EE.UU.
solamente).....................................................394
SIRIUS Travel Link.............................................398
Inmovilizador del motor
Véase: Sistema Pasivo Anti-Robo.................69
Instalación de asientos para niños ..........21
Usando CINTURONES PÉLVICOS Y DE
HOMBROS..........................................................21
Uso de anclajes inferiores Y correas para
niños (LATCH)..................................................24
Uso de correas de sujeción...............................26
Interruptor de arranque
Véase: Interruptor de encendido..................149
Interruptor de corte de
combustible.................................................217
Interruptor de encendido..........................149
Introducción........................................................7
460
Índice alfabético

L
Lavado de automóviles
Véase: Limpieza del exterior.........................260
Lavado
Véase: Limpieza del exterior.........................260
Lavadores
Véase: Limpiadores y Lavadores....................75
Lava Parabrisas...............................................76
Límite de Carga.............................................198
Carga del vehículo: con y sin
remolque..........................................................198
Limpiadores Automáticos...........................75
Limpiadores y Lavadores.............................75
Limpiador y Lavador de Medallón............77
Lavador de la ventana trasera.........................77
Limpiador de la ventana trasera.....................77
Limpia Parabrisas...........................................75
Barrido intermitente............................................75
Limpiadores dependientes de la
velocidad.............................................................75
Limpieza de Asientos de Piel..................264
Limpieza de las ruedas de
aleación........................................................264
Limpieza de las Ventanas y las Hojas de
los Limpiadores.........................................262
Limpieza del exterior.................................260
Limpieza de piezas exteriores de
plástico..............................................................261
Parte inferior de la carrocería.........................261
Piezas cromadas exteriores..........................260
Limpieza del interior...................................263
Limpieza del Motor......................................261
Limpieza del Panel de Instrumentos y
Cristal del Tablero....................................263
Llantas
Véase: Ruedas y llantas..................................268
Llaves y Controles Remotos......................48
Funcionamiento...................................................48
Llenado ...........................................................156
Sistema de combustible sin tapón de Easy
Fuel®...................................................................157
Luces de emergencia...................................217
Luz Ambiental..................................................81
Luz de advertencia del cinturón de
seguridad y repique indicador ...............33
Condiciones de funcionamiento....................33
M
Mantenimiento del sistema de sujeción
para niños y de los cinturones de
seguridad........................................................35
Mantenimiento.............................................238
Información general.........................................238
Mensajes de información...........................96
Acceso sin llave del vehículo.........................100
Alarma......................................................................97
Asistencia de arranque en
pendientes.......................................................100
Asistencia para estacionamiento................102
Batería y sistema de carga...............................98
Bolsa de aire...........................................................97
Control de tracción............................................105
Dirección hidráulica...........................................103
Freno de estacionamiento..............................103
Iluminación............................................................101
Indicador de mensajes.......................................97
Mantenimiento.....................................................101
Motor........................................................................99
MyKey......................................................................102
Puertas.....................................................................99
Sistema de arranque........................................103
Sistema de control de presión de las
llantas................................................................105
Sistema de información de puntos ciegos
y alerta de tráfico cruzado...........................98
Transmisión y tracción en las cuatro
ruedas................................................................104
Menú................................................................359
Ajuste del reloj....................................................359
Asistencia de estacionamiento
activa................................................................360
Cámara retrovisora...........................................360
Cambio del código del teclado de la
puerta...............................................................360
Configuración.......................................................361
Configuración de la pantalla.........................359
Modo valet...........................................................360
Sonido...................................................................360
Modo correcto de sentarse.......................134
Modo de Economico...................................194
Restablecimiento de modo
ecológico...........................................................195
Tipo 1.......................................................................194
Tipo 2 y 3................................................................194
461
Índice alfabético

Monitor de Punto Ciego.............................190
Sistema de información de puntos ciegos
(BLIS) con alerta de tráfico
cruzado.............................................................190
MyFord Touch®...........................................348
Información general.........................................348
MyKey®..............................................................54
Funcionamiento...................................................54
N
Navegación...................................................408
Actualizaciones del mapa de
navegación.......................................................415
Botones de toque rápido.................................414
Categorías de punto de interés
(POI).................................................................409
cityseekr.................................................................410
Comandos de voz de navegación................415
Configuración de sus preferencias de
navegación........................................................411
Configuración de un destino........................408
Modo de mapa....................................................412
Notas Especiales.............................................12
Aviso para los propietarios de camiones y
camionetas pickup y vehículos
utilitarios..............................................................13
Garantía limitada para vehículos
nuevos...................................................................12
Instrucciones especiales....................................12
Uso del vehículo como ambulancia...............13
Uso del vehículo con un barredor de
nieve......................................................................13
Número de identificación del
vehículo........................................................298
O
Opciónes Únicas de Exportación..............14
P
Pantallas de información............................93
Información general............................................93
Parrillas para equipaje y portadores de
carga...............................................................197
Ajuste de la barra transversal.........................197
PATS
Véase: Sistema Pasivo Anti-Robo.................69
Perclorato............................................................11
Personal Safety System™..........................37
¿Cómo funciona el sistema de seguridad
personal?............................................................37
Pesos de remolque
recomendados...........................................207
Portadores de carga
Véase: Parrillas para equipaje y portadores
de carga.............................................................197
Precauciones de seguridad......................154
Presiones de las llantas
Véase: Especificaciones técnicas................295
Productos de limpieza..............................260
Programa Auto Line de Better Business
Bureau (BBB) (únicamente en EE. UU.)
..........................................................................222
Proposición 65 de California........................11
Puerto USB.......................................................121
Puntos de remolque....................................210
Instalación del anillo de remolque..............210
Remolque del vehíclo en cuatro
ruedas..................................................................211
Ubicación del anillo de remolque................210
R
Radio satelital.................................................121
Factores de recepción de radio
satelital..............................................................122
Localización y solución de problemas........123
Número de serie electrónico de radio
satelital (ESN)................................................123
Servicio de radio satelital SIRIUS®..............122
Recomendación de partes de repuesto
.............................................................................12
Garantía de las refacciones...............................12
Mantenimiento programado y reparaciones
mecánicas...........................................................12
Reparaciones de choques..................................12
Recordatorio de Cinturones de
Seguridad.......................................................33
Belt-Minder®.........................................................33
Reemplazo de una Llave Extraviada o
un Transmisor Remoto..............................53
Registro de datos del caso
Véase: Retención de Datos.................................9
462
Índice alfabético

Remolque del vehículo sobre las cuatro
ruedas.............................................................212
Arrastre vacacional............................................212
Remolque de emergencia...............................212
Remolque.......................................................207
Reparación de daños menores en la
pintura............................................................261
Reparación del vehículo ...........................437
Condiciones de manejo severo....................447
Excepciones..........................................................451
Información general acerca del
mantenimiento..............................................437
Mantenimiento programado normal........440
Registro de cambio de refrigerante del
motor.................................................................452
Repuestos de Motorcraft .........................297
Retardo de Apagado de Faros
Principales......................................................79
Retención de Datos.........................................9
Grabación de datos de eventos........................9
Grabación de datos de servicio.........................9
Revisión el Compartimiento del Motor -
1.6L EcoBoost®.........................................240
Revisión el Compartimiento del Motor -
2.0L EcoBoost®.........................................241
Revisión el Compartimiento del Motor -
2.5L.................................................................242
Rodaje...............................................................213
Ruedas y llantas..........................................268
Especificaciones técnicas..............................295
Información general.........................................268
S
Safety Canopy®.............................................45
Seguridad de los Niños.................................15
Información general.............................................15
Seguridad.........................................................69
Seguro del cofre
Véase: Apertura y cierre del cofre................239
Seguros a Prueba de Niños.........................27
Seguros.............................................................60
Sensores de choque e indicador de
bolsas de aire ..............................................46
Sistema de audio ........................................106
Información general..........................................106
Sistema de control de emisiones .........158
Diagnóstico a bordo (OBD-II)........................159
Disponibilidad para prueba de inspección
y mantenimiento (I/M)...............................160
Sistema de detección del pasajero
delantero.........................................................41
Sistema de monitoreo de presión de las
llantas...........................................................285
Cambio de llantas con un Sistema de
monitoreo de presión de las
llantas...............................................................286
Comprensión del Sistema de monitoreo de
presión de las llantas..................................286
Sistema de Seguridad
Complementaria.........................................38
Funcionamiento...................................................38
Sistema Pasivo Anti-Robo.........................69
SecuriLock®...........................................................69
Sujecion de los Cinturones de
Seguridad.......................................................29
Cómo quitar los cinturones de seguridad
de los asientos traseros laterales...............31
Conjunto de extensión para cinturón de
seguridad............................................................32
Modos de bloqueo de los cinturones de
seguridad...........................................................30
Protección de mujeres embarazadas..........30
SYNC®.............................................................307
Información general..........................................307
T
Tabla de especificaciones de
fusibles..........................................................227
Caja de distribución eléctrica........................227
Caja de prefusibles............................................227
Tablero de fusibles del compartimiento de
equipaje............................................................234
Tablero de fusibles del compartimiento de
pasajeros...........................................................231
Tabla de Especificaciones de los
Focos.............................................................258
Tablero de instrumentos.............................88
Tapetes del piso............................................214
463
Índice alfabético

Techo solar.......................................................86
Apertura y cierre de la pantalla solar............87
Apertura y cierre del toldo corredizo.............87
Rebote......................................................................87
Ventilación del toldo corredizo.......................87
Teléfono..........................................................388
Asociación del teléfono por primera
vez......................................................................388
Asociación de teléfonos
subsiguientes.................................................389
Configuración del teléfono.............................392
Hacer llamadas..................................................389
Mensajes de texto..............................................391
Opciones del menú de teléfono..................390
Recepción de llamadas..................................389
Toma de entrada auxiliar..........................120
Tomas Auxiliares de Corriente................146
Tomacorriente de 110 voltios de CA............146
Ubicaciones..........................................................146
Tomas de energía auxiliares.....................146
Transmisión Automática...........................163
Comprensión de las posiciones de la
transmisión automática..............................163
palanca de interbloqueo de cambio de
velocidades del freno..................................164
Si el vehículo se atasca en lodo o
nieve...................................................................165
Transmisión automática SelectShift
Automatic®.....................................................164
Transmisión ...................................................163
Transmisor Remoto......................................48
Activación de una alarma de
emergencia.........................................................51
Arranque a control remoto................................51
Cambio de la batería..........................................49
Llave de acceso inteligente..............................49
Localizador del automóvil.................................51
Transmisores integrados a la llave................48
Transporte de carga....................................196
Transporte del vehículo...............................211
U
Unidad de audio - Vehículos con:
AM/FM/CD/Radio
satelital/SYNC.............................................112
Unidad de audio - Vehículos con:
AM/FM/CD/SYNC....................................109
Unidad de audio - Vehículos con:
AM/FM/CD Premium................................114
Unidad de audio - Vehículos con:
AM/FM/CD...................................................107
Unidad de audio - Vehículos con: Sony
AM/FM/CD....................................................116
Estructura de menú.............................................117
Uso de cadenas para nieve.....................284
Uso de la tracción en las cuatro ruedas
...........................................................................167
Conducción en condiciones especiales con
tracción en las cuatro ruedas...................168
Uso del control de crucero.......................188
Apagado del control de crucero...................189
Encendido del control de crucero................188
Uso del control de estabilidad.................177
AdvanceTrac® con Roll Stability Control™
(RSC®)...............................................................177
Uso del control de tracción.......................175
Mensajes y luces indicadoras del
sistema...............................................................175
Uso del reconocimiento de voz ............309
Iniciando sesión de voz...................................309
Interacción y retroalimentación del
sistema..............................................................310
Sugerencias útiles.............................................309
Uso de MyKey con un Sistema de
Arranque Remoto.......................................56
Vehículos equipados con llave de acceso
inteligente (arranque con botón)..............57
Vehículos equipados con llaves
físicas...................................................................56
Uso de SYNC® con el reproductor
multimedia .................................................332
¿Qué es esto?.....................................................333
Acceso al menú Tocar......................................337
Características del menú Medios................336
Comandos de voz de medios........................333
Conexión de un reproductor de medios
digitales al puerto USB...............................332
Configuración del sistema.............................339
464
Índice alfabético

Uso de SYNC® con el teléfono ...............312
Acceso a la configuración del
teléfono............................................................320
Acceso a las características del menú
Teléfono.............................................................317
Asociación de teléfonos
subsiguientes...................................................312
Asociación de un teléfono por primera
vez........................................................................312
Comandos de voz del teléfono......................313
Configuración del sistema..............................322
Hacer llamadas...................................................315
Mensajes de texto..............................................319
Opciones de teléfono durante una llamada
activa..................................................................315
Recepción de llamadas....................................315
Utilización del programa de
mediación/arbitraje (únicamente en
Canadá) .......................................................223
V
Varilla indicadora de nivel de aceite del
motor - 1.6L EcoBoost®.........................243
Varilla indicadora de nivel de aceite del
motor - 2.5L/2.0L EcoBoost®.............243
Ventanas eléctricas.......................................83
Apertura de un solo toque................................83
Bloqueo de ventanas..........................................83
Cierre de un solo toque......................................83
Demora de accesorios.......................................84
Rebote......................................................................83
Ventanas y espejos retrovisores
calentados.....................................................131
Espejos térmicos exteriores.............................131
Ventana trasera calentada..............................131
Ventanas y espejos retrovisores...............83
Ventilación
Véase: Control de clima...................................125
Verificación del Fluído de Frenos..........248
Verificación del Fluído de la Transmisión
Automática.................................................248
VIN
Véase: Número de identificación del
vehículo............................................................298
Viseras................................................................86
Espejo de la visera iluminado..........................86
Volante de Dirección.....................................72
465
Índice alfabético

466

-
 1
1
-
 2
2
-
 3
3
-
 4
4
-
 5
5
-
 6
6
-
 7
7
-
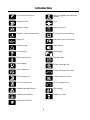 8
8
-
 9
9
-
 10
10
-
 11
11
-
 12
12
-
 13
13
-
 14
14
-
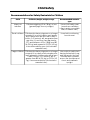 15
15
-
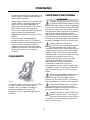 16
16
-
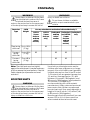 17
17
-
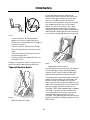 18
18
-
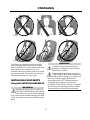 19
19
-
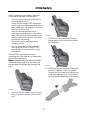 20
20
-
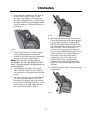 21
21
-
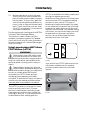 22
22
-
 23
23
-
 24
24
-
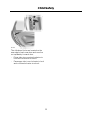 25
25
-
 26
26
-
 27
27
-
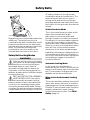 28
28
-
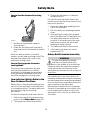 29
29
-
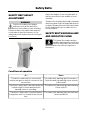 30
30
-
 31
31
-
 32
32
-
 33
33
-
 34
34
-
 35
35
-
 36
36
-
 37
37
-
 38
38
-
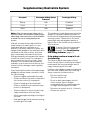 39
39
-
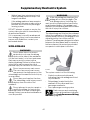 40
40
-
 41
41
-
 42
42
-
 43
43
-
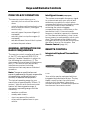 44
44
-
 45
45
-
 46
46
-
 47
47
-
 48
48
-
 49
49
-
 50
50
-
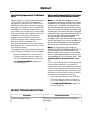 51
51
-
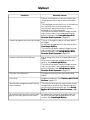 52
52
-
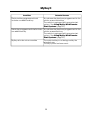 53
53
-
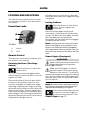 54
54
-
 55
55
-
 56
56
-
 57
57
-
 58
58
-
 59
59
-
 60
60
-
 61
61
-
 62
62
-
 63
63
-
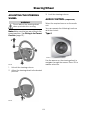 64
64
-
 65
65
-
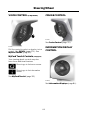 66
66
-
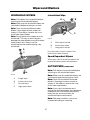 67
67
-
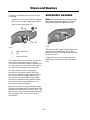 68
68
-
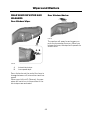 69
69
-
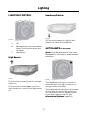 70
70
-
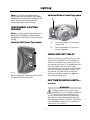 71
71
-
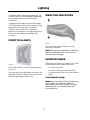 72
72
-
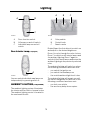 73
73
-
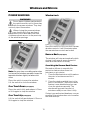 74
74
-
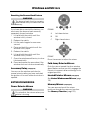 75
75
-
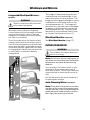 76
76
-
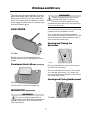 77
77
-
 78
78
-
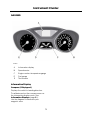 79
79
-
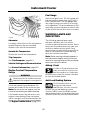 80
80
-
 81
81
-
 82
82
-
 83
83
-
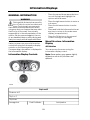 84
84
-
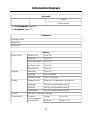 85
85
-
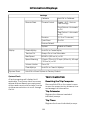 86
86
-
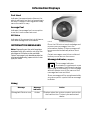 87
87
-
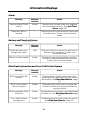 88
88
-
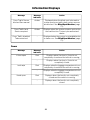 89
89
-
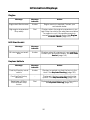 90
90
-
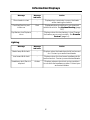 91
91
-
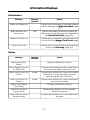 92
92
-
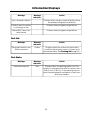 93
93
-
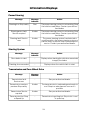 94
94
-
 95
95
-
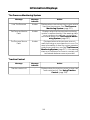 96
96
-
 97
97
-
 98
98
-
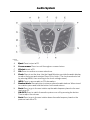 99
99
-
 100
100
-
 101
101
-
 102
102
-
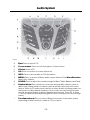 103
103
-
 104
104
-
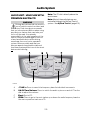 105
105
-
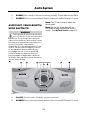 106
106
-
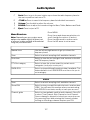 107
107
-
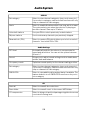 108
108
-
 109
109
-
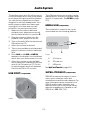 110
110
-
 111
111
-
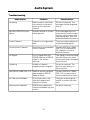 112
112
-
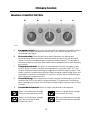 113
113
-
 114
114
-
 115
115
-
 116
116
-
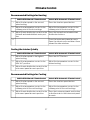 117
117
-
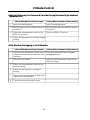 118
118
-
 119
119
-
 120
120
-
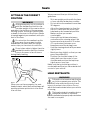 121
121
-
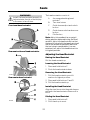 122
122
-
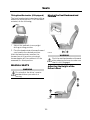 123
123
-
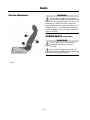 124
124
-
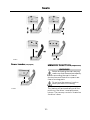 125
125
-
 126
126
-
 127
127
-
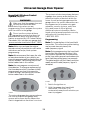 128
128
-
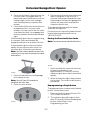 129
129
-
 130
130
-
 131
131
-
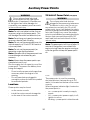 132
132
-
 133
133
-
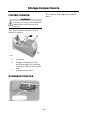 134
134
-
 135
135
-
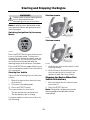 136
136
-
 137
137
-
 138
138
-
 139
139
-
 140
140
-
 141
141
-
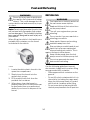 142
142
-
 143
143
-
 144
144
-
 145
145
-
 146
146
-
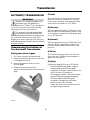 147
147
-
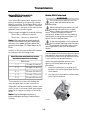 148
148
-
 149
149
-
 150
150
-
 151
151
-
 152
152
-
 153
153
-
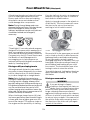 154
154
-
 155
155
-
 156
156
-
 157
157
-
 158
158
-
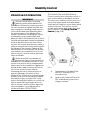 159
159
-
 160
160
-
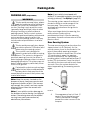 161
161
-
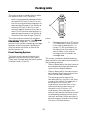 162
162
-
 163
163
-
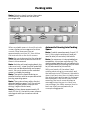 164
164
-
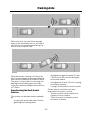 165
165
-
 166
166
-
 167
167
-
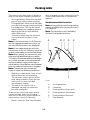 168
168
-
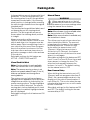 169
169
-
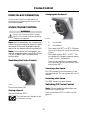 170
170
-
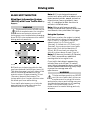 171
171
-
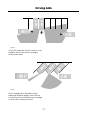 172
172
-
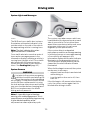 173
173
-
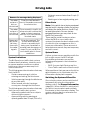 174
174
-
 175
175
-
 176
176
-
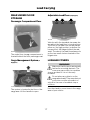 177
177
-
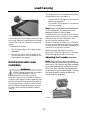 178
178
-
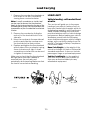 179
179
-
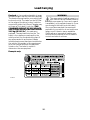 180
180
-
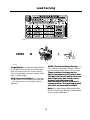 181
181
-
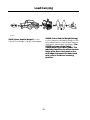 182
182
-
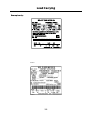 183
183
-
 184
184
-
 185
185
-
 186
186
-
 187
187
-
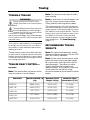 188
188
-
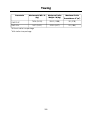 189
189
-
 190
190
-
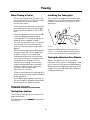 191
191
-
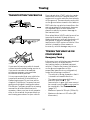 192
192
-
 193
193
-
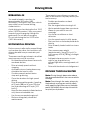 194
194
-
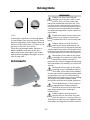 195
195
-
 196
196
-
 197
197
-
 198
198
-
 199
199
-
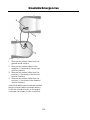 200
200
-
 201
201
-
 202
202
-
 203
203
-
 204
204
-
 205
205
-
 206
206
-
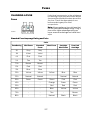 207
207
-
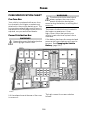 208
208
-
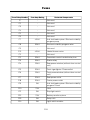 209
209
-
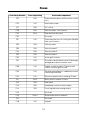 210
210
-
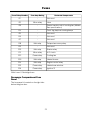 211
211
-
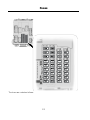 212
212
-
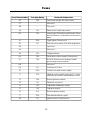 213
213
-
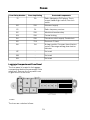 214
214
-
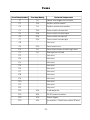 215
215
-
 216
216
-
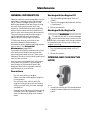 217
217
-
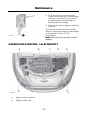 218
218
-
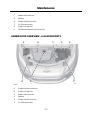 219
219
-
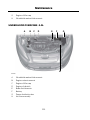 220
220
-
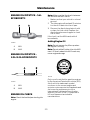 221
221
-
 222
222
-
 223
223
-
 224
224
-
 225
225
-
 226
226
-
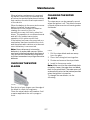 227
227
-
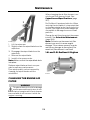 228
228
-
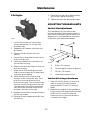 229
229
-
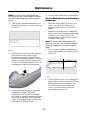 230
230
-
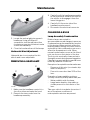 231
231
-
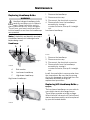 232
232
-
 233
233
-
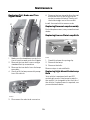 234
234
-
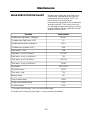 235
235
-
 236
236
-
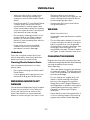 237
237
-
 238
238
-
 239
239
-
 240
240
-
 241
241
-
 242
242
-
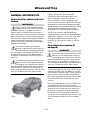 243
243
-
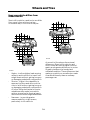 244
244
-
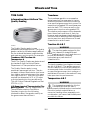 245
245
-
 246
246
-
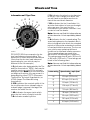 247
247
-
 248
248
-
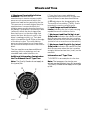 249
249
-
 250
250
-
 251
251
-
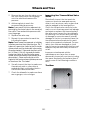 252
252
-
 253
253
-
 254
254
-
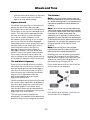 255
255
-
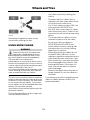 256
256
-
 257
257
-
 258
258
-
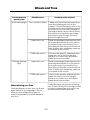 259
259
-
 260
260
-
 261
261
-
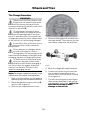 262
262
-
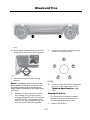 263
263
-
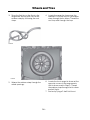 264
264
-
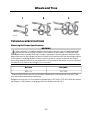 265
265
-
 266
266
-
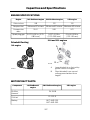 267
267
-
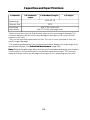 268
268
-
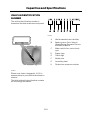 269
269
-
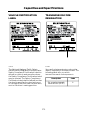 270
270
-
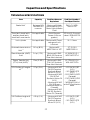 271
271
-
 272
272
-
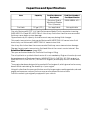 273
273
-
 274
274
-
 275
275
-
 276
276
-
 277
277
-
 278
278
-
 279
279
-
 280
280
-
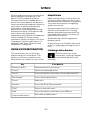 281
281
-
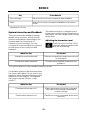 282
282
-
 283
283
-
 284
284
-
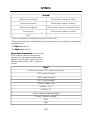 285
285
-
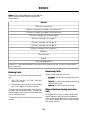 286
286
-
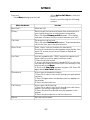 287
287
-
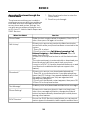 288
288
-
 289
289
-
 290
290
-
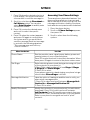 291
291
-
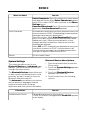 292
292
-
 293
293
-
 294
294
-
 295
295
-
 296
296
-
 297
297
-
 298
298
-
 299
299
-
 300
300
-
 301
301
-
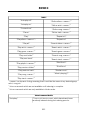 302
302
-
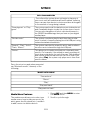 303
303
-
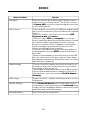 304
304
-
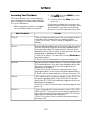 305
305
-
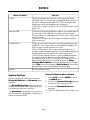 306
306
-
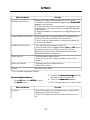 307
307
-
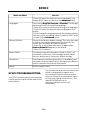 308
308
-
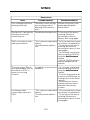 309
309
-
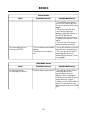 310
310
-
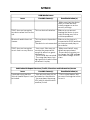 311
311
-
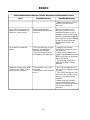 312
312
-
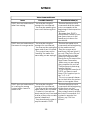 313
313
-
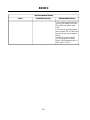 314
314
-
 315
315
-
 316
316
-
 317
317
-
 318
318
-
 319
319
-
 320
320
-
 321
321
-
 322
322
-
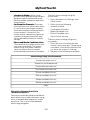 323
323
-
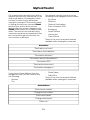 324
324
-
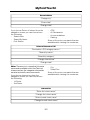 325
325
-
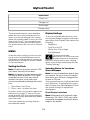 326
326
-
 327
327
-
 328
328
-
 329
329
-
 330
330
-
 331
331
-
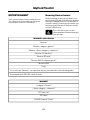 332
332
-
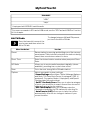 333
333
-
 334
334
-
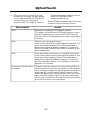 335
335
-
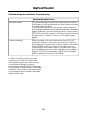 336
336
-
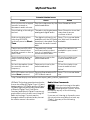 337
337
-
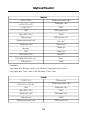 338
338
-
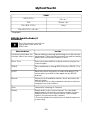 339
339
-
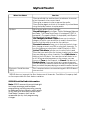 340
340
-
 341
341
-
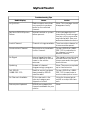 342
342
-
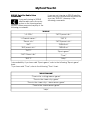 343
343
-
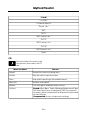 344
344
-
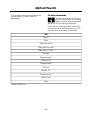 345
345
-
 346
346
-
 347
347
-
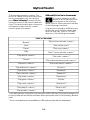 348
348
-
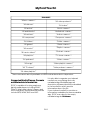 349
349
-
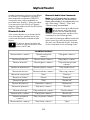 350
350
-
 351
351
-
 352
352
-
 353
353
-
 354
354
-
 355
355
-
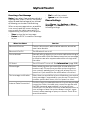 356
356
-
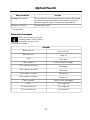 357
357
-
 358
358
-
 359
359
-
 360
360
-
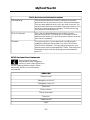 361
361
-
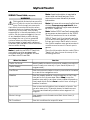 362
362
-
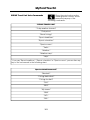 363
363
-
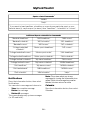 364
364
-
 365
365
-
 366
366
-
 367
367
-
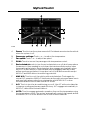 368
368
-
 369
369
-
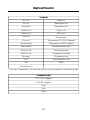 370
370
-
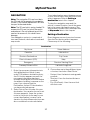 371
371
-
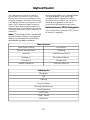 372
372
-
 373
373
-
 374
374
-
 375
375
-
 376
376
-
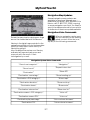 377
377
-
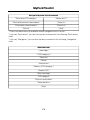 378
378
-
 379
379
-
 380
380
-
 381
381
-
 382
382
-
 383
383
-
 384
384
-
 385
385
-
 386
386
-
 387
387
-
 388
388
-
 389
389
-
 390
390
-
 391
391
-
 392
392
-
 393
393
-
 394
394
-
 395
395
-
 396
396
-
 397
397
-
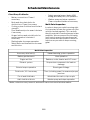 398
398
-
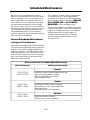 399
399
-
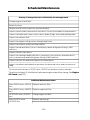 400
400
-
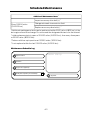 401
401
-
 402
402
-
 403
403
-
 404
404
-
 405
405
-
 406
406
-
 407
407
-
 408
408
-
 409
409
-
 410
410
-
 411
411
-
 412
412
-
 413
413
-
 414
414
-
 415
415
-
 416
416
-
 417
417
-
 418
418
-
 419
419
-
 420
420
-
 421
421
-
 422
422
-
 423
423
-
 424
424
-
 425
425
-
 426
426
-
 427
427
-
 428
428
-
 429
429
-
 430
430
-
 431
431
-
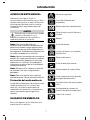 432
432
-
 433
433
-
 434
434
-
 435
435
-
 436
436
-
 437
437
-
 438
438
-
 439
439
-
 440
440
-
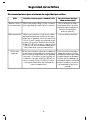 441
441
-
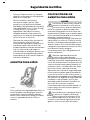 442
442
-
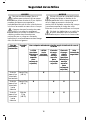 443
443
-
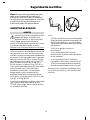 444
444
-
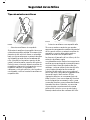 445
445
-
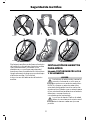 446
446
-
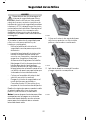 447
447
-
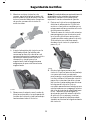 448
448
-
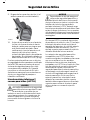 449
449
-
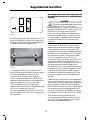 450
450
-
 451
451
-
 452
452
-
 453
453
-
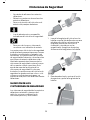 454
454
-
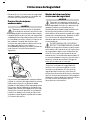 455
455
-
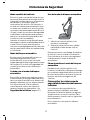 456
456
-
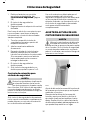 457
457
-
 458
458
-
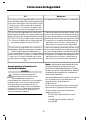 459
459
-
 460
460
-
 461
461
-
 462
462
-
 463
463
-
 464
464
-
 465
465
-
 466
466
-
 467
467
-
 468
468
-
 469
469
-
 470
470
-
 471
471
-
 472
472
-
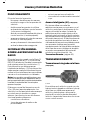 473
473
-
 474
474
-
 475
475
-
 476
476
-
 477
477
-
 478
478
-
 479
479
-
 480
480
-
 481
481
-
 482
482
-
 483
483
-
 484
484
-
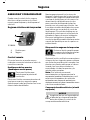 485
485
-
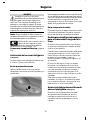 486
486
-
 487
487
-
 488
488
-
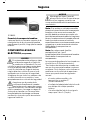 489
489
-
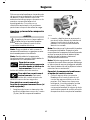 490
490
-
 491
491
-
 492
492
-
 493
493
-
 494
494
-
 495
495
-
 496
496
-
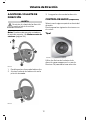 497
497
-
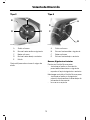 498
498
-
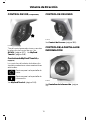 499
499
-
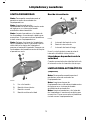 500
500
-
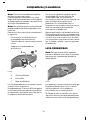 501
501
-
 502
502
-
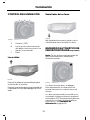 503
503
-
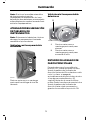 504
504
-
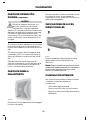 505
505
-
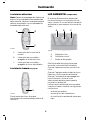 506
506
-
 507
507
-
 508
508
-
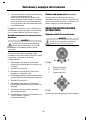 509
509
-
 510
510
-
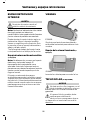 511
511
-
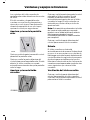 512
512
-
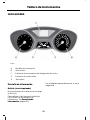 513
513
-
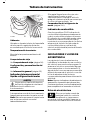 514
514
-
 515
515
-
 516
516
-
 517
517
-
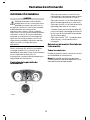 518
518
-
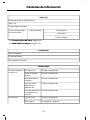 519
519
-
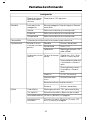 520
520
-
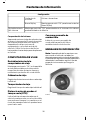 521
521
-
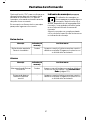 522
522
-
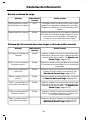 523
523
-
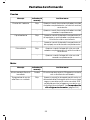 524
524
-
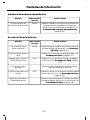 525
525
-
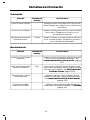 526
526
-
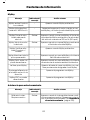 527
527
-
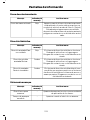 528
528
-
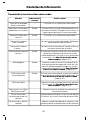 529
529
-
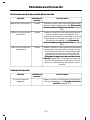 530
530
-
 531
531
-
 532
532
-
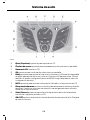 533
533
-
 534
534
-
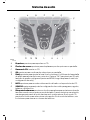 535
535
-
 536
536
-
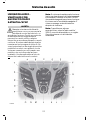 537
537
-
 538
538
-
 539
539
-
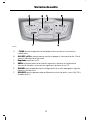 540
540
-
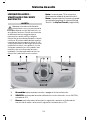 541
541
-
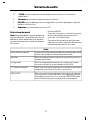 542
542
-
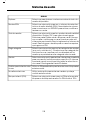 543
543
-
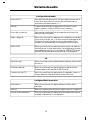 544
544
-
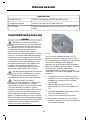 545
545
-
 546
546
-
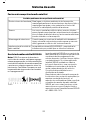 547
547
-
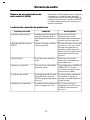 548
548
-
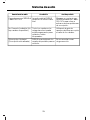 549
549
-
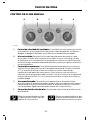 550
550
-
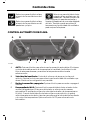 551
551
-
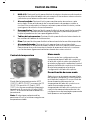 552
552
-
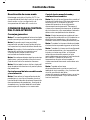 553
553
-
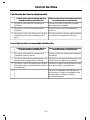 554
554
-
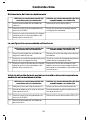 555
555
-
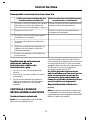 556
556
-
 557
557
-
 558
558
-
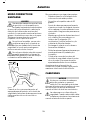 559
559
-
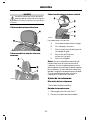 560
560
-
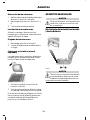 561
561
-
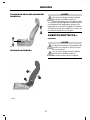 562
562
-
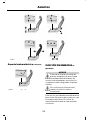 563
563
-
 564
564
-
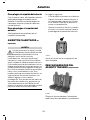 565
565
-
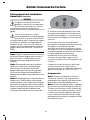 566
566
-
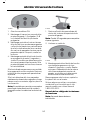 567
567
-
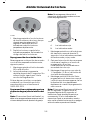 568
568
-
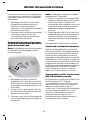 569
569
-
 570
570
-
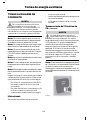 571
571
-
 572
572
-
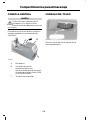 573
573
-
 574
574
-
 575
575
-
 576
576
-
 577
577
-
 578
578
-
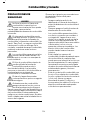 579
579
-
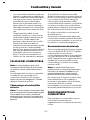 580
580
-
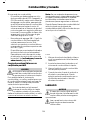 581
581
-
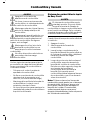 582
582
-
 583
583
-
 584
584
-
 585
585
-
 586
586
-
 587
587
-
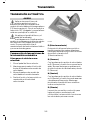 588
588
-
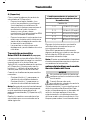 589
589
-
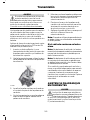 590
590
-
 591
591
-
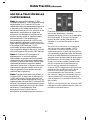 592
592
-
 593
593
-
 594
594
-
 595
595
-
 596
596
-
 597
597
-
 598
598
-
 599
599
-
 600
600
-
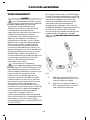 601
601
-
 602
602
-
 603
603
-
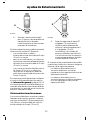 604
604
-
 605
605
-
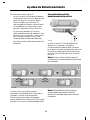 606
606
-
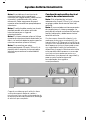 607
607
-
 608
608
-
 609
609
-
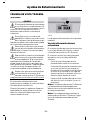 610
610
-
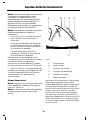 611
611
-
 612
612
-
 613
613
-
 614
614
-
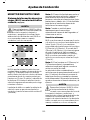 615
615
-
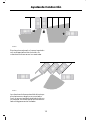 616
616
-
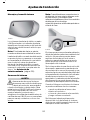 617
617
-
 618
618
-
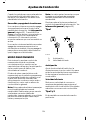 619
619
-
 620
620
-
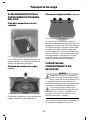 621
621
-
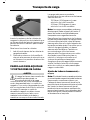 622
622
-
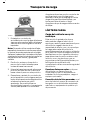 623
623
-
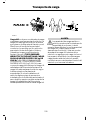 624
624
-
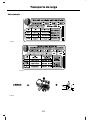 625
625
-
 626
626
-
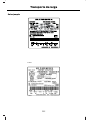 627
627
-
 628
628
-
 629
629
-
 630
630
-
 631
631
-
 632
632
-
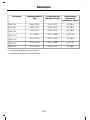 633
633
-
 634
634
-
 635
635
-
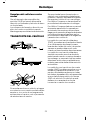 636
636
-
 637
637
-
 638
638
-
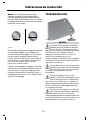 639
639
-
 640
640
-
 641
641
-
 642
642
-
 643
643
-
 644
644
-
 645
645
-
 646
646
-
 647
647
-
 648
648
-
 649
649
-
 650
650
-
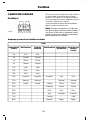 651
651
-
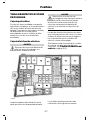 652
652
-
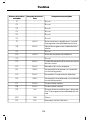 653
653
-
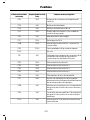 654
654
-
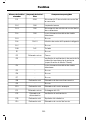 655
655
-
 656
656
-
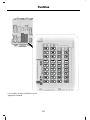 657
657
-
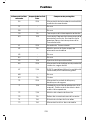 658
658
-
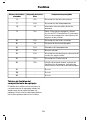 659
659
-
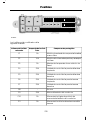 660
660
-
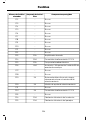 661
661
-
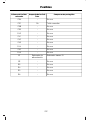 662
662
-
 663
663
-
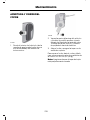 664
664
-
 665
665
-
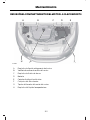 666
666
-
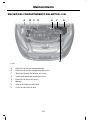 667
667
-
 668
668
-
 669
669
-
 670
670
-
 671
671
-
 672
672
-
 673
673
-
 674
674
-
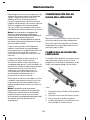 675
675
-
 676
676
-
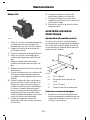 677
677
-
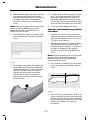 678
678
-
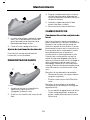 679
679
-
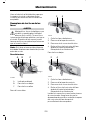 680
680
-
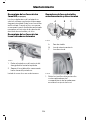 681
681
-
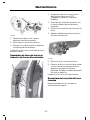 682
682
-
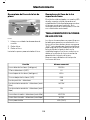 683
683
-
 684
684
-
 685
685
-
 686
686
-
 687
687
-
 688
688
-
 689
689
-
 690
690
-
 691
691
-
 692
692
-
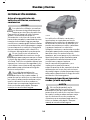 693
693
-
 694
694
-
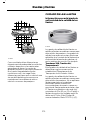 695
695
-
 696
696
-
 697
697
-
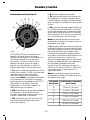 698
698
-
 699
699
-
 700
700
-
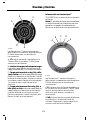 701
701
-
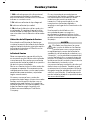 702
702
-
 703
703
-
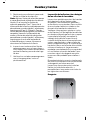 704
704
-
 705
705
-
 706
706
-
 707
707
-
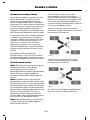 708
708
-
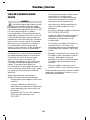 709
709
-
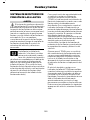 710
710
-
 711
711
-
 712
712
-
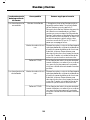 713
713
-
 714
714
-
 715
715
-
 716
716
-
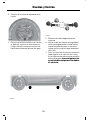 717
717
-
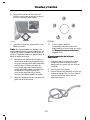 718
718
-
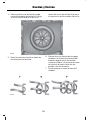 719
719
-
 720
720
-
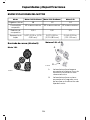 721
721
-
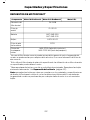 722
722
-
 723
723
-
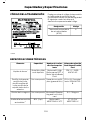 724
724
-
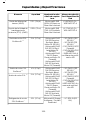 725
725
-
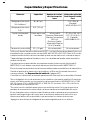 726
726
-
 727
727
-
 728
728
-
 729
729
-
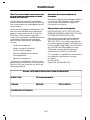 730
730
-
 731
731
-
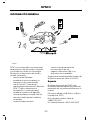 732
732
-
 733
733
-
 734
734
-
 735
735
-
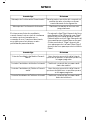 736
736
-
 737
737
-
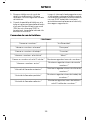 738
738
-
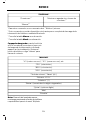 739
739
-
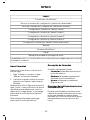 740
740
-
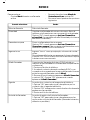 741
741
-
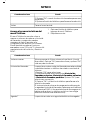 742
742
-
 743
743
-
 744
744
-
 745
745
-
 746
746
-
 747
747
-
 748
748
-
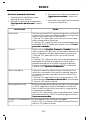 749
749
-
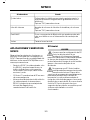 750
750
-
 751
751
-
 752
752
-
 753
753
-
 754
754
-
 755
755
-
 756
756
-
 757
757
-
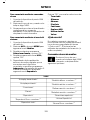 758
758
-
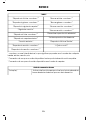 759
759
-
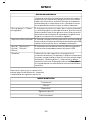 760
760
-
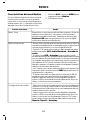 761
761
-
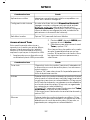 762
762
-
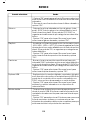 763
763
-
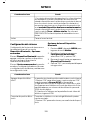 764
764
-
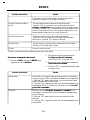 765
765
-
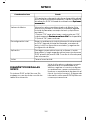 766
766
-
 767
767
-
 768
768
-
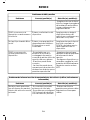 769
769
-
 770
770
-
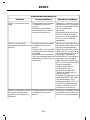 771
771
-
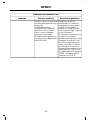 772
772
-
 773
773
-
 774
774
-
 775
775
-
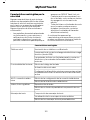 776
776
-
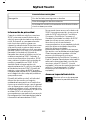 777
777
-
 778
778
-
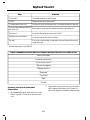 779
779
-
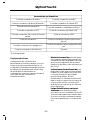 780
780
-
 781
781
-
 782
782
-
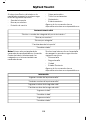 783
783
-
 784
784
-
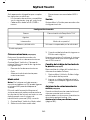 785
785
-
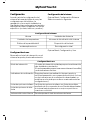 786
786
-
 787
787
-
 788
788
-
 789
789
-
 790
790
-
 791
791
-
 792
792
-
 793
793
-
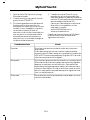 794
794
-
 795
795
-
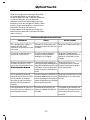 796
796
-
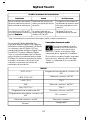 797
797
-
 798
798
-
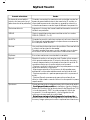 799
799
-
 800
800
-
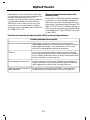 801
801
-
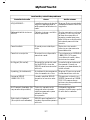 802
802
-
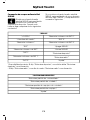 803
803
-
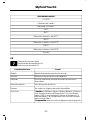 804
804
-
 805
805
-
 806
806
-
 807
807
-
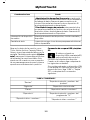 808
808
-
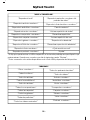 809
809
-
 810
810
-
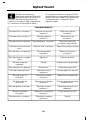 811
811
-
 812
812
-
 813
813
-
 814
814
-
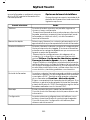 815
815
-
 816
816
-
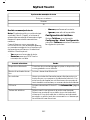 817
817
-
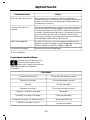 818
818
-
 819
819
-
 820
820
-
 821
821
-
 822
822
-
 823
823
-
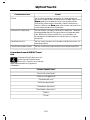 824
824
-
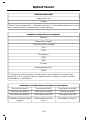 825
825
-
 826
826
-
 827
827
-
 828
828
-
 829
829
-
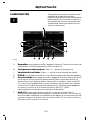 830
830
-
 831
831
-
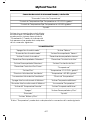 832
832
-
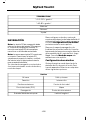 833
833
-
 834
834
-
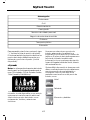 835
835
-
 836
836
-
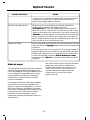 837
837
-
 838
838
-
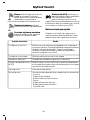 839
839
-
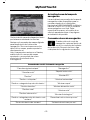 840
840
-
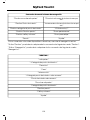 841
841
-
 842
842
-
 843
843
-
 844
844
-
 845
845
-
 846
846
-
 847
847
-
 848
848
-
 849
849
-
 850
850
-
 851
851
-
 852
852
-
 853
853
-
 854
854
-
 855
855
-
 856
856
-
 857
857
-
 858
858
-
 859
859
-
 860
860
-
 861
861
-
 862
862
-
 863
863
-
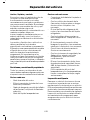 864
864
-
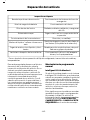 865
865
-
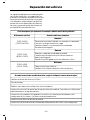 866
866
-
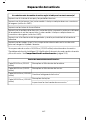 867
867
-
 868
868
-
 869
869
-
 870
870
-
 871
871
-
 872
872
-
 873
873
-
 874
874
-
 875
875
-
 876
876
-
 877
877
-
 878
878
-
 879
879
-
 880
880
-
 881
881
-
 882
882
-
 883
883
-
 884
884
-
 885
885
-
 886
886
-
 887
887
-
 888
888
-
 889
889
-
 890
890
-
 891
891
-
 892
892


Ford Escape 2013 El manual del propietario
- Categoría
- Carros
- Tipo
- El manual del propietario
En otros idiomas
- English: Ford Escape 2013 Owner's manual
Documentos relacionados
-
Ford 2008 Explorer Sport Trac Manual de usuario
-
-
-
-
-
Ford 2005 Lincoln Navigator El manual del propietario
-
-
-
Ford C-Max El manual del propietario
-
Otros documentos
-
Lincoln 2008 Navigator Manual de usuario
-
LG KM710C.ACRDWA Manual de usuario
-
-
Dometic MCS6 Instrucciones de operación
-
Audiovox RCRV06GR El manual del propietario
-
PEAK PKC0BU7 El manual del propietario
-
-
 Sensitech TempTale RF Instrucciones de operación
-
Bad Boy Exceed Hybrid El manual del propietario
-
Peg Perego Convertible Kinetic Manual de usuario
