Cuisinart MG-100 El manual del propietario
- Categoría
- Picadoras
- Tipo
- El manual del propietario

INSTRUCTION AND
RECIPE BOOKLET
Electric Meat Grinder
MG-100 Series
For your safety and continued enjoyment of this product, always read the Instruction Book carefully before using.

2 3
IMPORTANT
SAFEGUARDS
When using electrical appliances, basic safety
precautions should always be taken, including
the following:
1. READ ALL INSTRUCTIONS.
2. TURN THE APPLIANCE OFF, THEN
UNPLUG FROM THE OUTLET WHEN
NOT IN USE, BEFORE ASSEMBLING OR
DISASSEMBLING PARTS AND BEFORE
CLEANING. TO UNPLUG, GRASP THE
PLUG AND PULL FROM THE OUTLET.
NEVER PULL FROM THE POWER CORD.
3. To protect against risk of electrical shock, do
not put appliance in water or other liquids.
4. This appliance is not intended for use
by children or by persons with reduced
physical, sensory, or mental capabilities,
or lack of experience and knowledge.
Close supervision is necessary when any
appliance is used near children. Children
should be supervised to ensure that they do
not play with the appliance.
5. Avoid contact with moving parts.
6. Never put the unit near a hot burner, in an
oven, or in a dishwasher.
7. Do not operate any appliance with a
damaged cord or plug or after the appliance
malfunctions, or is dropped or damaged in
any manner. Contact the manufacturer at
their customer service telephone number
for information on examination, repair, or
adjustment.
8. Never feed food by hand; always use the
pusher. Keep hands, hair, clothing and
utensils away from moving discs during
operation to reduce the risk of personal
injury and/or damage to the Cuisinart
®
Electric Meat Grinder.
9. Do not use outdoors, or use for other than its
intended use.
10. WARNING – THE CUTTING BLADE IS
SHARP; HANDLE WITH CARE BOTH
WHEN USING AND WHEN CLEANING.
11. Do not let cord hang over edge of table
or counter, come into contact with sharp
edges, or touch hot surfaces.
12. Do not pull on the power cord to disconnect.
13. Never plug in the appliance where water may
ood the area.
14. Place the appliance on a rm and stable
surface.
15. NEVER PUT YOUR FINGERS NEAR THE
FOOD CHUTE (GRINDER/FEEDER HEAD)
WHILE GRINDER IS IN OPERATION.
16. Ensure that the appliance is not placed close
to the edge of the table, worktop, etc., where
it can be pushed off or fall.
17. The use of attachments not recommended
or sold by the manufacturer may cause re,
electric shock or injury.
18. Never use abrasive cleaning agents or
abrasive cloths when cleaning the unit.
19. Do not use ngers to scrape food away from
cutting blade while appliance is plugged in.
Laceration may result.
20. Use the unit only when completely
assembled.
21. Do not leave the Cuisinart
®
Electric Meat
Grinder unattended while it is running.
22. Before using for the rst time, remove all
packaging and wash and dry parts.
23. This appliance has a polarized plug (one
blade is wider than the other). To reduce
the risk of electric shock, this plug will t in
a polarized outlet only one way. If the plug
does not t the outlet perfectly, reverse
the plug. If it should still not t, contact a
qualied electrician. Do not modify the plug
in any way.
24. Do not operate your appliance in an
appliance garage or under a wall cabinet.
When storing in an appliance garage,
always unplug the unit from the electrical
outlet. Not doing so could create a risk of
re, especially if the appliance touches the
walls of the garage or the door touches the
unit as it closes.
SAVE THESE
INSTRUCTIONS
FOR HOUSEHOLD
USE ONLY

2 3
CONTENTS
Important Safeguards ........................................ 2
Features ............................................................. 3
Assembling ........................................................ 4
Cleaning and Maintenance ................................ 6
Tips and Hints .................................................... 6
Recipes .............................................................. 6
Warranty ........................................................... 14
6
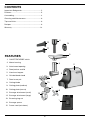
FEATURES
1. ON/OFF/REVERSE switch
2. Motor housing
3. Attachment opening
4. Food pusher and lid
5. Aluminum hopper
6. Grinder/feeder head
7. Feed screw pin
8. Cutting blade
9. Cutting plate (medium)
10. Cutting plate (coarse)
11. Sausage attachment (small)
12. Sausage attachment (large)
13. Screwing ring nut
14. Sausage spacer
15. Power cord (not shown)
1
14
12
11
4
10
13
9
8
7
5
3
2

4 5
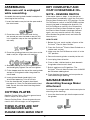
ASSEMBLING
Make sure unit is unplugged
while assembling.
Assemble the meat grinder feeder head prior to
attaching to the housing.
1. Insert the feed screw pin into the open end of
the attachment.
2. Place the cutter with the at side facing
out toward you over the feed screw pin (this
is an important step or the meat grinder will
not work).
3. Place the grinding plate over the cutter on the
feed screw pin. Align tabs with notches.
4. Screw on the ring nut by turning it clockwise
and hand lightly tighten. Do not over tighten.
5. Fit the hopper onto the top of the meat grinder
and put a mixing bowl under the grinder to
catch food.
6. Insert grinder/feeder head tightly into
attachment opening. Twist on to lock.
7. Use the food pusher to gently feed food,
one piece at a time. Do not overload the feed
tube. Do not force the food into the grinder/
feeder head.
CUTTING PLATES
Medium Cutting Plate – Great for ground meat
used in soups, or for relishes
Coarse Cutting Plate – Great for ground meat
used in chili and sausages, or for vegetables
THESE PLATES ARE NOT
DISHWASHER SAFE.
PLEASE HAND-WASH ONLY!
DRY COMPLETELY AND
COAT IN VEGETABLE OIL.
NOTE – REVERSE SWITCH
If the motor slows or stops, it may be due to
jammed food. Immediately switch the Cuisinart
®
Electric Meat Grinder to its OFF position. Put the
On/Off/Reverse switch in the REVERSE position
to push the food in the opposite direction. Put
the On/Off/Reverse switch in the ON position
and turn the Electric Meat Grinder on again. If
the Electric Meat Grinder should get jammed
again, you may need to switch it off, unplug,
disassemble the grinder head, and clean the
internal parts.
HOW TO USE
1. Before rst use, wash and dry all parts of the
Cuisinart
®
Electric Meat Grinder.
2. Place the Cuisinart
®
Electric Meat Grinder on a
stable work surface.
3. Make sure the On/Off/Reverse switch is in the
OFF position.
4. Secure the meat grinder assembly to the unit.
5. Insert plug into wall outlet.
6. Place a wide, shallow bowl or plate beneath
the grinder tube to catch food.
7. Switch appliance to ON position. The
Cuisinart
®
Electric Meat Grinder must ALWAYS
be ON before adding food.
8. Place food on the hopper and use pusher to
feed food through opening.
SAUSAGE MAKER
Assembling Sausage Maker
Attachment
Assemble the sausage maker attachment prior to
attaching to the housing.
1. Insert the feed screw pin into the open end of
the grinder.

4 5
2. Place the sausage spacer with the notches
tting into the notch openings on the feed
screw pin.
3. Place the sausage nozzle onto the ring nut
and screw it onto the meat grinder nozzle by
turning it clockwise and lightly hand tighten.
Do not over tighten.
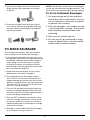
TO MAKE SAUSAGES
The sausage attachments allow you to blend
meats and spices for homemade sausages.
1. If you have purchased dry casings, they must
be soaked in cold water until they become soft
and pliable, and then rinsed under lukewarm
water, being sure that the water is running
through the casings. Assemble the Electric
Meat Grinder with sausage maker attachment
per instructions on page 4–5.
2. Grind meat and seasonings of your choice,
following the instructions on page 4.
3. Place ground meat in the hopper and turn
the unit ON. Push the meat into the die-cast
hopper opening with pusher until the mixture
appears at the end of the sausage attachment.
Turn the unit OFF and tie a knot at the end of
the 2-inch casing overhang.
4.
Turn unit ON and feed more ground meat into
the die-cast hopper opening until all the meat
has been used or the casing is approximately 2
inches from being completely full
.
5. Turn unit OFF, remove the end of the casing
from the sausage attachment, and tie a knot
in the open end of the casing. Use a knife or
needle to poke holes in the length of sausage
to let out air bubbles.
6. Sausages can be made to the desired length
by twisting the casing at intervals.
NOTE: To avoid over-stretching and splitting the
casing, do not make the sausages too thick. The
meat mixture will expand slightly during cooking.
To Form Individual Sausages
1. Lay long sausage on at tray and poke
hole all over with a sharp object, similar in
size to a needle or cake tester, to prevent
air pockets from forming.
2. Twist into sausages – you choose the size
– by twisting each “sausage” rst forward,
then backward, to prevent them from
untwisting.
3. Pierce any air pockets you see.
4. For best results, dry uncovered in refrig-
erator for about 6 hours, then ip and dry
another 6 hours before cooking.

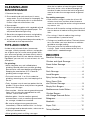
6 7
CLEANING AND
MAINTENANCE
1. Remove the ring nut.
2. Disassemble and wash each part in warm,
soapy water. Dry all of the parts thoroughly. Do
not put any of the metal parts in a dishwasher.
Pusher is top rack dishwasher safe.
3. Reassemble.
4. Wipe the grinding plates with vegetable oil and
wrap each plate with greaseproof paper. This
will prevent discoloring/rusting.
5. Store the sausage attachments and grinding
plates inside the pusher and attach the lid.
6. Any other servicing should be performed by an
authorized service representative.
TIPS AND HINTS
A wide variety of meat dishes, homemade
sausages, chunky spreads, relishes, and purées
are all great ways to use the meat grinder. With
your own meat grinder you know exactly what is
going into your food. You are able to control the
ingredients you use such as cuts of meat, fat, salt
and spices.
For grinding:
• Meat should be very well chilled before
grinding. Should meat heat up while grinding,
pause and re-chill meat before grinding again.
Keeping the meat below 45°F is ideal for
grinding and sausage making.
• Cut meat into small 1- to 2-inch cubes for
grinding, removing any skin, but keeping all of
the fat.
• Fatty, cheaper cuts of meat are perfect for the
grinder. Fat gives avor and juiciness to ground
meats and sausages.
• Coarse plate − Use for coarse-ground textured
items such as coarsely ground beef for chili,
relishes, sauces and salsas.
• Medium plate − Use for medium-ground
textured items, such as medium-ground meat
for sausage, meatballs or meatloaf.
• Be sure to refrigerate any ground meats
immediately. Cook or freeze within 1 or 2 days.
• If grinding bread for breadcrumbs, make sure to
use dry or toasted bread.
• When grinding meats or lling sausages:
After the last piece of meat has gone through
the chute, place a slice of bread through the
machine in order to clear the last bit of ground
meat or to clear the sausage nozzle of ground
meat.
For making sausages:
• Soak natural casings in water for at least 30
minutes to an hour and then allow lukewarm
water to run through the entire casing to remove
any excess salt.
• Be sure to ll the entire casing and then prick all
over to release air before twisting into individual
links.
• For casings, 2 feet of medium hog casings
accommodates 1 pound of meat.
• Casings can be difcult to nd. The best places
to try are either your local butcher or websites
geared to sausage making.
• Taste your mixture rst before stufng into
casings. Cook a small amount of the mix in a
skillet until it’s cooked through.
RECIPES
Breakfast Sausage................... 7
Chicken and Apple Sausage ........... 7
Sweet Italian Sausage ................ 7
Chorizo............................ 8
Duck Sausage ...................... 8
Lamb Merguez...................... 8
Spicy Venison Sausage ............... 9
Spicy Green Chile
and Chicken Sausage ................ 9
Simply Rich Burgers ................. 9
Mediterranean Lamb Sliders .......... 10
Chicken Burgers
with Mango-Avocado Salsa .......... 10
Bolognese .........................11
Meatballs ..........................11
Super Chili ........................ 12
Turkey Meatloaf .................... 12

14
WARRANTY
Limited Three-Year Warranty
(U.S. and Canada only)
This warranty is available to U.S. consumers
only. You are a consumer if you own a Cuisinart
®
Electric Meat Grinder that was purchased at
retail for personal, family or household use.
Except as otherwise required under applicable
law, this warranty is not available to retailers or
other commercial purchasers or owners. We
warrant that your Cuisinart
®
Electric Meat
Grinder will be free of defects in materials and
workmanship under normal home use for 3 years
from the date of original purchase.
We recommend that you visit our website,
www.cuisinart.com for a fast, efficient way to
complete your product registration. However,
product registration does not eliminate the need
for the consumer to maintain the original proof of
purchase in order to obtain the warranty
benefits. In the event that you do not have proof
of purchase date, the purchase date for
purposes of this warranty will be the date of
manufacture.
CALIFORNIA RESIDENTS ONLY
California law provides that for In-Warranty
Service, California residents have the option of
returning a nonconforming product (A) to the
store where it was purchased or (B) to another
retail store that sells Cuisinart products of the
same type. The retail store shall then, according
to its preference, either repair the product, refer
the consumer to an independent repair facility,
replace the product, or refund the purchase price
less the amount directly attributable to the
consumer’s prior usage of the product. If neither
of the above two options results in the
appropriate relief to the consumer, the consumer
may then take the product to an independent
repair facility, if service or repair can be
economically accomplished. Cuisinart and not
the consumer will be responsible for the
reasonable cost of such service, repair,
replacement, or refund for nonconforming
products under warranty. California residents
may also, according to their preference, return
nonconforming products directly to Cuisinart for
repair or, if necessary, replacement by calling our
Consumer Service Center toll-free at
800-726-0190. Cuisinart will be responsible for
the cost of the repair, replacement, and shipping
and handling for such nonconforming products
under warranty.
HASSLE-FREE REPLACEMENT WARRANTY
Your ultimate satisfaction in Cuisinart products
is our goal, so if your Cuisinart
®
Electric Meat
Grinder should fail within the generous warranty
period, we will repair it or, if necessary, replace it
at no cost to you. To obtain a return shipping
label, email us at https://www.cuisinart.com/
customer-care/product-assistance/
product-inquiry/. Or call our toll-free customer
service department at 1-800-726-0190 to speak
with a representative.
Your Cuisinart
®
Electric Meat Grinder has been
manufactured to the strictest specifications and
has been designed for use only in 120-volt
outlets and only with authorized accessories and
replacement parts. This warranty expressly
excludes any defects or damages caused by
attempted use of this unit with a converter, as
well as use with accessories, replacement parts
or repair service other than those authorized by
Cuisinart. This warranty does not cover any
damage caused by accident, misuse, shipment
or other than ordinary household use. This
warranty excludes all incidental or consequential
damages. Some states do not allow the
exclusion or limitation of these damages,
so these exclusions may not apply to you.
You may also have other rights, which vary from
state to state.
Important: If the nonconforming product is to be
serviced by someone other than Cuisinart’s
Authorized Service Center, please remind the
servicer to call our Consumer Service Center at
1-800-726-0190 to ensure that the problem is
properly diagnosed, the product is serviced with
the correct parts, and to ensure that the product
is still under warranty.

14 15
NOTES:

IB-14254-ESP-B
©2021 Cuisinart
East Windsor, NJ 08520
Printed in China
19CE065180
Trademarks or service marks of third parties used herein are
the trademarks or service marks of their respective owners.

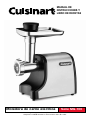
Moledora de carne eléctrica
MANUAL DE
INSTRUCCIONES Y
LIBRO DE RECETAS
Serie MG-100
Para su seguridad y para disfrutar plenamente de este producto,
siempre lea cuidadosamente las instrucciones antes de usarlo.

2 3
MEDIDAS DE
SEGURIDAD
IMPORTANTES
Al usar aparatos eléctricos, siempre debe
tomar precauciones básicas de seguridad,
incluso las siguientes:
1. LEA TODAS LAS INSTRUCCIONES.
2. APAGUE (“OFF”) Y DESENCHUFE
EL APARATO CUANDO NO ESTÁ EN
USO, ANTES DE INSTALAR/SACAR
PIEZAS Y ANTES DE LIMPIARLO. PARA
DESENCHUFAR, AGARRE EL ENCHUFE Y
JÁLELO PARA SACARLO DE LA TOMA DE
CORRIENTE. NUNCA JALE EL CABLE.
3. Para reducir el riesgo de electrocución, no
coloque el aparato en agua u otro líquido.
4. Los niños o las personas que carezcan
de la experiencia o de los conocimientos
necesarios para manipular el aparato,
o aquellas cuyas capacidades físicas,
sensoriales o mentales estén limitadas, no
deben utilizar este aparato. Supervise el uso
de este aparato cuidadosamente cuando sea
usado cerca de niños. No permita que los
niños jueguen con este aparato.
5. Evite el contacto con las piezas móviles.
6. No coloque el aparato sobre o cerca de
una hornilla caliente, ni adentro de un horno
caliente; tampoco lo ponga en el lavavajillas.
7. No utilice este aparato si el cable o el enchufe
están dañados, si no funciona correctamente,
si está dañado, o después de que se haya
caído, incluso en el agua; llame al servicio de
atención al cliente del fabricante para obtener
información sobre cómo hacer revisar, reparar
o ajustar el aparato.
8. Nunca introduzca la mano en la boca de
llenado. Para evitar el riesgo de heridas
y/o daños al aparato, mantenga los dedos,
cabello, ropa y utensilios lejos de las rejillas
durante el funcionamiento.
9. No lo utilice en exteriores, ni para ningún otro
fin que no sea el indicado.
10. ADVERTENCIA – LA CUCHILLA ES MUY
AFILADA; MANIPÚLELA CON SUMO
CUIDADO, TANTO DURANTE EL USO
COMO DURANTE LA LIMPIEZA.
11. No permita que el cable cuelgue del borde
de la encimera o de la mesa, ni que haga
contacto con superficies calientes o tajantes.
12. No jale el cable para desconectar el aparato.
13. Nunca enchufe el aparato en un lugar donde
pueda quedar sumergido en agua.
14. Ponga el aparato sobre una superficie llana
y segura.
15. MANTENGA LOS DEDOS LEJOS DE
LA CABEZA/BOCA DE ALIMENTACIÓN
DURANTE EL USO.
16. No coloque el aparato cerca del borde de
una mesa o encimera, de donde pueda ser
empujado o caerse.
17. El uso de accesorios no recomendados o
vendidos por el fabricante presenta un riesgo
de incendio, electrocución o heridas.
18. Nunca limpie el aparato con productos o
materiales abrasivos.
19. No limpie las rejillas con los dedos mientras el
aparato está enchufado; esto puede provocar
laceraciones.
20. Cerciórese de que la unidad esté
debidamente ensamblada antes de usarla.
21. No descuide ni abandone el aparato durante
el funcionamiento.
22. Lave y seque todas las piezas antes del
primer uso.
23. El cable de este aparato está dotado de una
clavija polarizada (una pata es más ancha
que la otra). Como medida de seguridad,
se podrá enchufar de una sola manera en la
toma de corriente polarizada. Si no entrara
en la toma de corriente, inviértela. Si aún no
entrara completamente, comuníquese con un
electricista. No intente modificarla.
24. No haga funcionar el aparato debajo o
dentro de un armario/gabinete. Siempre
desconecte el aparato antes de guardarlo
en un armario/gabinete. Dejar el aparato
conectado presenta un riesgo de incendio,
especialmente si este toca las paredes o la
puerta del armario/gabinete cuando cierra.

3
GUARDE ESTAS
INSTRUCCIONES
PARA USO
DOMÉSTICO
SOLAMENTE
ÍNDICE
Medidas de seguridad importantes ................... 2
Características.................................................... 3
Ensamblaje ......................................................... 4
Limpieza y mantenimiento ................................ 6
Consejos útiles ................................................... 6
Recetas .............................................................. 6
Garantía ............................................................ 14
6
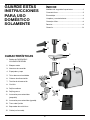
CARACTERÍSTICAS
1. Botón de ENCENDIDO/
APAGADO/REVERSA
2. Bloque-motor
3. Abertura de conexión
4. Empujador y tapa
5. Tolva de acero inoxidable
6. Cabeza de alimentación
7. Tornillo de alimentación
8. Cuchilla
9. Rejilla mediana
10. Rejilla gruesa
11. Accesorio para embutidos
(pequeño)
12. Accesorio para embutidos (grande)
13. Tuerca de fijación
14. Separador de salchichas
15. Cable (no ilustrado)
1
14
12
11
4
10
13
9
8
7
5
3
2

4 5
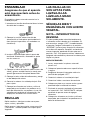
ENSAMBLAJE
Asegúrese de que el aparato
esté desconectado antes de
ensamblarlo.
Ensamble la cabeza antes de conectarla a la
unidad principal.
1. Introduzca el tornillo de alimentación en la boca
de salida de la cabeza.
2. Coloque la cuchilla sobre el tornillo de
alimentación, el lado plano apuntando hacia
fuera (esto es importante, o la moledora no
funcionará).
3. Instale la rejilla deseada sobre la punta del
tornillo de alimentación, alineando las patas
con las muescas.
4. Coloque la tuerca de sujeción sobre la boca de
salida y gire en sentido horario (a mano) para
apretar ligeramente. No apriete demasiado.
5. Coloque la tolva arriba del aditamento y ponga
un bol debajo del mismo.
6. Conecte la cabeza a la unidad principal. Gire
para sujetar.
7. Coloque los alimentos en la tolva y utilice el
empujador para introducir los pedazos en la
boca de alimentación, un pedazo a la vez. No
sobrellene el conducto de alimentación. No
empuje los alimentos con mucha fuerza.
REJILLAS
Rejilla mediana – Ideal para moler carne para
sopas, salsas y picadillos.
Rejilla gruesa – Ideal para moler carne para chile
y salchichas. También puede usarse para picar
vegetales.
LAS REJILLAS NO
SON APTAS PARA
LAVAVAJILLAS.
LÁVELAS A MANO
SOLAMENTE.
SÉQUELAS BIEN Y
ENGRÁSELAS CON ACEITE
VEGETAL.
NOTA – INTERRUPTOR DE
REVERSA
El motor puede perder velocidad o detenerse
si alimentos están trabados en la moledora. Si
esto ocurriera, apague (“OFF”) inmediatamente
el aparato. Ponga el interruptor en la posición
“REVERSE” (reversa) para empujar los alimentos
en la dirección opuesta. Después, encienda de
nuevo el aparato, poniendo el interruptor en la
posición “ON”. Si el aparato volviera a detenerse,
apáguelo, desconéctelo y desarme la cabeza para
limpiar las piezas.
MODO DE EMPLEO
1. Lave y seque todas las piezas antes del
primer uso.
2. Coloque el aparato sobre una superficie llana
y segura.
3. Asegúrese de que el interruptor esté en la
posición de apagado “OFF”.
4. Conecte la cabeza a la unidad principal.
5. Conecte el cable a una toma de corriente.
6. Coloque un plato o un cuenco ancho y poco
profundo bajo la salida de la cabeza.
7. Encienda el aparato, poniendo el interruptor
en la posición “ON”. IMPORTANTE: siempre
encienda el aparato antes de agregar
alimentos.
8. Coloque los alimentos en la tolva y utilice el
empujador para introducir los pedazos en la
boca de alimentación.

5
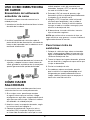
USO COMO EMBUTIDORA
DE CARNE
Ensamblado del aditamento
embutidor de carne
Ensamble la cabeza antes de conectarla a la
unidad principal.
1. Introduzca el tornillo de alimentación en la boca
de salida de la cabeza.
2. Instale el separador de salchichas sobre la
punta del tornillo de alimentación, alineando las
muescas del separador con las aberturas en el
tornillo de alimentación.
3. Introduzca el embudo deseado en la tuerca de
sujeción y coloque la tuerca sobre la boca de
salida, girando en sentido horario (a mano) para
apretar ligeramente No apriete demasiado.
CÓMO HACER
SALCHICHAS
Los accesorios para embutidos permiten hacer
salchichas frescas con carne presazonada.
1. Si usa tripas secas, permita que remojen
en agua fría hasta que se suavicen. Luego,
enjuáguelas en agua tibia, asegurándose que el
agua pase por toda la tripa. Conecte la cabeza
ensamblada a la unidad principal.
2. Muela la carne y las especias deseadas, según
las instrucciones en la página 4.
3. Coloque los pedazos de carne en la tolva y
encienda (“ON”) el aparato. Empuje la carne
en la boca de alimentación hasta que la carne
molida empiece a salir del accesorio para
embutidos. Apague (“OFF”) el aparato y haga
un nudo al final de la tripa.
4.
Encienda (“ON”) de nuevo el aparato y siga
llenando la salchicha, dejando aproximadamente
2 pulgadas (5 cm) de tripa vacía
.
5. Apague (“OFF”) el aparato, retire la tripa del
accesorio para embutidos y ate un nudo al
final de la misma. Pinche la salchicha todo a
lo largo, usando un cuchillo o una aguja, para
eliminar las burbujas de aire.
6. Si desea hacer ristra de salchichas, tuerza la
tripa a intervalos regulares.
NOTA: para evitar estirar o reventar la tripa, no
haga salchichas muy gruesas. La carne se dilatará
ligeramente durante la cocción.
Para formar ristra de
salchichas
1. Coloque la salchicha larga sobre una bandeja
plana y haga agujeros todo a lo largo con una
aguja o un probador de pastel para evitar que
se formen burbujas de aire.
2. Tuerza la tripa en los lugares deseados, primero
en una dirección y luego en otra para evitar que
la tripa se desenrolle.
3. Pinche las burbujas de aire.
4. Para obtener mejores resultados, permita
que la salchicha se seque (destapada) en el
refrigerador por aproximadamente 6 horas.
Luego, voltéela y permita que se seque por 6
horas más antes de cocinarla.

6 7
LIMPIEZA Y
MANTENIMIENTO
1. Desenrosque la tuerca de sujeción.
2. Desarme la cabeza y lave todas las piezas
en agua jabonosa tibia. Seque bien todas
las piezas. No meta ninguna pieza metálica
al lavavajillas. El empujador es apto para
lavavajillas (bandeja superior solamente).
3. Vuelva a ensamblar la cabeza.
4. Cepille las rejillas con aceite vegetal y
envuélvalas individualmente en papel encerado
para evitar la decoloración y la oxidación.
5. Coloque las rejillas y los embudos adentro del
empujador y cierre la tapa.
CONSEJOS Y
SUGERENCIAS
El aditamento moledor/embutidor es perfecto
para preparar una variedad de salchichas caseras,
patés, picadillos y purés. Moler su propia carne le
permite elegir los ingredientes, controlando el tipo
de carne, la cantidad de grasa, la cantidad de sal
y las especias en las recetas finales.
Para moler/picar:
• Refrigere la carne antes de molerla/picarla. Si la
carne se calienta, refrigérela antes de molerla/
picarla. Para resultados óptimos, mantenga la
carne a una temperatura inferior a 45°F (7°C).
• Corte la carne en cubos de 1–2 pulgadas
(1.5–2.5 cm), quitando la piel pero no la grasa.
• Los cortes más baratos y grasosos son
perfectos para moler/picar. La grasa da sabor
a la carne molida y a las salchichas, y las
mantiene jugosas.
• Rejilla gruesa – úsela para conseguir una textura
gruesa, por ej. para moler/picar res para hacer
chile o ingredientes para hacer picadillos y
salsas.
• Rejilla mediana – úsela para conseguir una
textura mediana, por ej. para moler/picar carne
para hacer salchichas, albóndigas o pan de
carne.
• Cerciórese de refrigerar la carne molida/picada
inmediatamente. Cocine o congele la carne
dentro de 1–2 días.
• Cuando use la moledora para rallar pan,
cerciórese de usar pan seco o tostado.
• Después de moler/picar carne o rellenar
salchichas, procese una rebanada de pan; esto
limpiará el mecanismo interno y el embudo.
Para hacer salchichas:
• Remoje las tripas en agua por 30–60 minutos
para suavizarlas, y luego enjuáguelas en agua
tibia para eliminar el exceso de sal.
• Cerciórese de llenar toda la tripa, y luego haga
agujeros todo a lo largo antes de torcer la tripa
para hacer ristras.
• Una tripa de cerdo de 2 pies (60 cm) tiene
capacidad para 1 libra (455 g) de carne.
• Si no encuentra tripa, visite su carnicería local o
busque en Internet, en sitios especializados.
• Pruebe la mezcla antes de rellenar la tripa,
cocinando una pequeña cantidad en un sartén.
RECETAS
Salchicha de desayuno ............... 7
Salchicha de pollo con manzana........ 7
Salchicha italiana dulce ............... 7
Chorizo ............................ 8
Salchicha de pato ................... 8
“Merguez” de cordero ................ 8
Salchicha de venado picante........... 9
Salchicha de pollo picante
con chile verde...................... 9
Simplemente suculentas
hamburguesas ...................... 9
Mini hamburguesas
mediterráneas de cordero ............ 10
Hamburguesas de pollo
con salsa de mango-aguacate......... 10
Salsa boloñesa..................... 11
Albóndigas ........................ 11
Súper chile con carne ............... 12
Pan de pavo ....................... 12

14 15
GARANTÍA
Garantía limitada de tres años
(válida en los EE.UU. y en Canadá solamente)
Esta garantía es para los consumidores que
residen en los EE.UU. solamente. Usted es un
consumidor si posee un aparato Cuisinart
®
que
fue comprado en una tienda para uso personal,
familiar o casero. A menos que la ley aplicable
exija lo contrario, esta garantía no es para los
minoristas u otros consumidores/compradores
comerciales. Cuisinart garantiza este producto
contra todo defecto de materiales o fabricación
durante 3 años después de la fecha de compra
original, siempre que el aparato haya sido
utilizado para uso doméstico y según las
instrucciones.
Le aconsejamos que llene el formulario de
registro disponible en www.cuisinart.com a fin
de facilitar la verificación de la fecha de compra
original. Sin embargo, no es necesario registrar el
producto para recibir servicio bajo esta garantía.
En ausencia de prueba de la fecha de compra, el
período de garantía será calculado a partir de la
fecha de fabricación del producto.
RESIDENTES DE CALIFORNIA
La ley del estado de California ofrece dos
opciones bajo el período de garantía. Los
residentes del estado de California pueden
regresar el producto defectuoso (A) a la tienda
donde lo compraron o (B) a otra tienda que venda
productos Cuisinart
®
de este tipo. La tienda, a su
opción, reparará el producto, referirá el
consumidor a un centro de servicio
independiente, sustituirá el producto, o
reembolsará al consumidor el precio de compra
menos la cantidad directamente atribuible al uso
anterior del producto por el consumidor. Si estas
dos opciones no satisfacen al consumidor, podrá
llevar el aparato a un centro de servicio
independiente, siempre que se pueda arreglar o
reparar el aparato de manera económica.
Cuisinart (no el consumidor) será responsable por
los gastos de servicio, reparación, sustitución o
reembolso de los productos defectuosos bajo
garantía. Los residentes de California también
pueden, si así lo desean, mandar el aparato
defectuoso directamente a Cuisinart para que sea
reparado o sustituido. Para esto, deben llamar a
nuestro servicio de atención al cliente al 800-726-
0190. Cuisinart será responsable por los gastos
de reparación, reemplazo, manejo y envío de los
productos defectuosos durante el período de
garantía.
GARANTÍA DE REEMPLAZO SIN
DIFICULTADES
Su máxima satisfacción es nuestra prioridad,
así que si su producto Cuisinart
®
falla dentro del
generoso período de garantía, lo repararemos o,
de ser necesario, lo reemplazaremos, sin costo
alguno para usted. Para obtener una etiqueta
de envío de devolución, envíenos un correo
electrónico, visitando https://www.cuisinart.
com/customer-care/product-assistance/
product-inquiry/. O llame sin cargo a nuestro
servicio de atención al cliente, al
1-800-726-0190, para hablar con un representante.
Este producto satisface las más altas exigencias
de fabricación y ha sido diseñado para funcionar
con 120 V, usando accesorios y repuestos
autorizados solamente. Esta garantía excluye
expresamente los defectos o daños causados por
accesorios, piezas o reparaciones no autorizados
por Cuisinart, así como los defectos o daños
causados por el uso de un convertidor de voltaje.
Esta garantía no cubre el uso comercial o
industrial del producto, y no es válida en caso de
daños causados por mal uso, negligencia o
accidente. Esta garantía excluye todos los daños
incidentales o consecuentes. Algunos Estados no
permiten la exclusión o limitación de daños
incidentales o consecuentes, de modo que las
limitaciones mencionadas pueden no regir para
usted. Usted puede tener otros derechos que
varían de un Estado a otro.
Importante: si debe llevar el producto defectuoso
a un centro de servicio no autorizado, por favor
informe al personal del centro de servicio que
deben llamar al servicio posventa de Cuisinart, al
1-800-726-0190, a fin de diagnosticar el problema
correctamente, usar las piezas correctas para
repararlo y asegurarse de que el producto aún
está bajo garantía.

15
NOTAS:

IB-14254-ESP-B
©2021 Cuisinart
East Windsor, NJ 08520
Impreso en China
19CE065180
Todas las marcas registradas, comerciales o de servicio mencionadas en
este documento pertenecen a sus titulares respectivos.
-
 1
1
-
 2
2
-
 3
3
-
 4
4
-
 5
5
-
 6
6
-
 7
7
-
 8
8
-
 9
9
-
 10
10
-
 11
11
-
 12
12
-
 13
13
-
 14
14
-
 15
15
-
 16
16
-
 17
17
-
 18
18


Cuisinart MG-100 El manual del propietario
- Categoría
- Picadoras
- Tipo
- El manual del propietario
en otros idiomas
- English: Cuisinart MG-100 Owner's manual
Artículos relacionados
Otros documentos
-
KitchenAid SAUSAGE STUFFER Instructions Manual
-
-
Weston 36-1001-W Guía del usuario
-
-
Nesco 400 Watt Food Grinder Instrucciones de operación
-
Weston 36-0801-W El manual del propietario
-
Magic Chef MCLMGRT Manual de usuario
-
-
Whirlpool 5SSA Guía del usuario
-
Premier ED-4819 Manual de usuario