Samsung HT-J5100K Manual de usuario
- Categoría
- Reproductores de DVD
- Tipo
- Manual de usuario

5.1CH Blu-ray™
Home Entertainment System
User manual
HT-J5100K
imagine the possibilities
Thank you for purchasing this Samsung product.
To receive more complete service, please register your product at
www.samsung.com/register

2 - English
Safety Information
Class II product : This symbol indicates that
it does not require a safety connection to
electrical earth (ground).
AC voltage : This symbol indicates that the
rated voltage marked with the symbol is AC
voltage.
DC voltage : This symbol indicates that the
rated voltage marked with the symbol is DC
voltage.
Caution, Consult instructions for use : This
symbol instructs the user to consult the user
manual for further safety related information.
•
The slots and openings in the cabinet and in the back
or bottom are provided for necessary ventilation. To
ensure reliable operation of this apparatus, and to
protect it from overheating, these slots and openings
must never be blocked or covered.
-
Do not place this apparatus in a confined space,
such as a bookcase, or built-in cabinet, unless proper
ventilation is provided.
-
Do not place this apparatus near or over a radiator or
heat register, or where it is exposed to direct sunlight.
-
Do not place vessels (vases etc.) containing water on
this apparatus. A water spill can cause a fire or electric
shock.
•
Do not expose this apparatus to rain or place it near water
(near a bathtub, washbowl, kitchen sink, or laundry tub,
in a wet basement, or near a swimming pool, etc.). If this
apparatus accidentally gets wet, unplug it and contact an
authorized dealer immediately.
•
This apparatus uses batteries. In your community, there
might be environmental regulations that require you to
dispose of these batteries properly. Please contact your
local authorities for disposal or recycling information.
•
Do not overload wall outlets, extension cords or adaptors
beyond their capacity, since this can result in fire or
electric shock.
•
Route power-supply cords so that they are not likely to be
walked on or pinched by items placed on or against them.
Pay particular attention to cords at the plug end, at wall
outlets, and the point where they exit from the apparatus.
•
To protect this apparatus from a lightning storm, or when
it is left unattended and unused for long periods of time,
unplug it from the wall outlet and disconnect the antenna
or cable system. This will prevent damage to the set due
to lightning and power line surges.
•
Before connecting the AC power cord to the DC adaptor
outlet, make sure the voltage designation of the DC
adaptor corresponds to the local electrical supply.
•
Never insert anything metallic into the open parts of this
apparatus. Doing so may create a danger of electric
shock.
•
To avoid electric shock, never touch the inside of this
apparatus. Only a qualified technician should open this
apparatus.
•
Make sure to plug the power cord in until it is firmly
seated. When unplugging the power cord from a wall
outlet, always pull on the power cord's plug. Never unplug
by pulling on the power cord. Do not touch the power
cord with wet hands.
•
If this apparatus does not operate normally - in particular,
if there are any unusual sounds or smells coming from it -
unplug it immediately and contact an authorized dealer or
service center.
•
Maintenance of Cabinet.
-
Before connecting other components to this product,
be sure to turn them off.
-
If you move your product suddenly from a cold place
to a warm place, condensation may occur on the
operating parts and lens and cause abnormal disc
playback. If this occurs, unplug the product, wait for
two hours, and then connect the plug to the power
outlet. Then, insert the disc, and try to play back again.
CAUTION
RISK OF ELECTRIC SHOCK. DO NOT OPEN
CAUTION: TO REDUCE THE RISK OF ELECTRIC SHOCK, DO
NOT REMOVE THE COVER (OR BACK). THERE ARE NO USER
SERVICEABLE PARTS INSIDE. REFER ALL SERVICING TO
QUALIFIED PERSONNEL.
This symbol indicates that high voltage is
present inside. It is dangerous to make
any kind of contact with any internal part
of this product.
This symbol indicates that this product
has included important literature
concerning operation and maintenance.

3 - English
Safety Information
•
Be sure to pull the power plug out of the outlet if the
product is to remain unused or if you are leaving the
house for an extended period of time (especially when
children, elderly, or disabled people will be left alone in the
house).
-
Accumulated dust can cause an electric shock, an
electric leakage, or a fire by causing the power cord
to generate sparks and heat or the insulation to
deteriorate.
•
Contact an authorized service center for information if
you intend to install your product in a location with heavy
dust, high or low temperatures, high humidity, chemical
substances, or where it will operate 24 hours a day such
as in an airport, a train station, etc. Failing to do so may
lead to serious damage of your product.
•
Use only a properly grounded plug and wall outlet.
-
An improper ground may cause electric shock or
equipment damage. (Class l Equipment only.)
•
To turn this apparatus off completely, you must disconnect
it from the wall outlet. Consequently, the wall outlet and
power plug must be readily accessible at all times.
•
Do not allow children to hang on the product.
•
Store the accessories (battery, etc.) in a location safely out
of the reach of children.
•
Do not install the product in an unstable location such
as a shaky self, a slanted floor, or a location exposed to
vibration.
•
Do not drop or strike the product. If the product is
damaged, disconnect the power cord and contact a
service center.
•
To clean this apparatus, unplug the power cord from
the wall outlet and wipe the product using a soft, dry
cloth. Do not use any chemicals such as wax, benzene,
alcohol, thinners, insecticide, air fresheners, lubricants, or
detergent. These chemicals can damage the appearance
of the product or erase the printing on the product.
•
Do not expose this apparatus to dripping or splashing.
Do not put objects filled with liquids, such as vases on the
apparatus.
•
Do not dispose of batteries in a fire.
•
Do not plug multiple electric devices into the same wall
socket. Overloading a socket can cause it to overheat,
resulting in a fire.
•
There is danger of an explosion if you replace the batteries
used in the remote with the wrong type of battery. Replace
only with the same or equivalent type.
WARNING :
•
TO PREVENT THE SPREAD OF FIRE,
KEEP CANDLES AND OTHER ITEMS
WITH OPEN FLAMES AWAY FROM THIS
PRODUCT AT ALL TIMES.
•
To reduce the risk of fire or electric shock,
do not expose this appliance to rain or moisture.
CLASS 1 LASER PRODUCT
This product is classified as a CLASS 1 LASER product.
Use of controls, adjustments or performance of procedures
other than those specified herein may result in hazardous
radiation exposure.
CAUTION :
•
INVISIBLE LASER RADIATION WHEN OPEN AND
INTERLOCKS DEFEATED, AVOID EXPOSURE TO BEAM.
CLASS 1 LASER PRODUCT
KLASSE 1 LASER PRODUKT
LUOKAN 1 LASER LAITE
KLASS 1 LASER APPARAT
PRODUCTO LÁSER CLASE 1

4 - English
Contents
GETTING STARTED
5 Accessories
5 Speaker Components
5 Front Panel
6 Rear Panel
7 Remote Control
CONNECTIONS
8 Connecting the Speakers
10 Connecting to a TV and External Devices
SETTINGS
11 The Initial Settings Procedure
11 The Home Screen at a Glance
12 Accessing the Settings Screen
12 Settings Menu Functions
15 Radio Setup
16 Upgrading Software
PLAYING CONTENT
17 Switching the Source Device
17 Playing Commercial Discs
17 Playing a Disc with User Recorded Content
18 Playing Files on a USB Device
19 Controlling Video Playback
21 Playing a Pre-Recorded Commercial Audio Disc
21 Controlling Music Playback
23 Playing Photo Content
23 Using Karaoke
24 Using the Special Effects Remote Control Buttons
APPENDIX
25 Additional Information
26 Disk and Format Compatibility
31 Troubleshooting
34 Specifications
35 Licenses
Figures and illustrations in this User Manual
are provided for reference only and may differ
from actual product appearance.

5 - English
Getting Started
Check the box for the accessories and speaker components listed or shown below.
Accessories
•
Remote Control
•
Batteries (AAA size)
•
User Manual
Power Cable FM Antenna HDMI Cable
Speaker Components
Front x 2 Surround x 2 Center Subwoofer
Front Panel
MIC JACK
DISPLAY ICONS
FUNCTION
STOP
PLAY/PAUSE
OPEN/
CLOSE
VOLUME
CONTROL
POWER
5V 0.5A
MIC 2MIC 1
USB REMOTE CONTROL SENSOR
DISPLAY
DISC TRAY
✎
When the product is on, do not let children touch the product's surface. It will be hot.
✎
To upgrade the product's software through the USB jack, you must use a USB flash drive.
Getting Started

6 - English
Getting Started
✎
When the product displays a Blu-ray Disc menu, you cannot start the movie by pressing the /
6
button
on the product or the remote. To play the movie, you must select Play Movie or Start in the disc menu, and
then press the
E
button.
✎
If you are playing content from a USB device on your TV through the home theater, you cannot select the
BD/DVD mode with the
FUNCTION button. To select the BD/DVD mode, stop the content you are playing
on the TV, and then select the BD/DVD mode.
✎
Plug the microphone jack before using Karaoke function.
Rear Panel
SURROUND
SURROUND
COOLING FAN
* FM ANTENNA
AUX IN
HDMI OUT
SPEAKER OUTPUT
CONNECTORS
POWER CORD EXTERNAL DIGITAL
AUDIO IN (OPTICAL)
* Connecting the FM Antenna
1.
Connect the supplied FM antenna to the FM ANT Jack.
2.
Slowly move the antenna wire around until you find a location where reception is good, then fasten it to a wall or
other rigid surface.
✎
Maintain a minimum of 10cm of clear space on all sides of the home theater to ensure adequate ventilation.
Do not obstruct the cooling fan or ventilation holes.
✎
This product does not receive AM broadcasts.

7 - English
Getting Started
Remote Control
Tour of the Remote Control
Turn the product on and off.
Adjust the volume.
Press numeric buttons to operate
options.
Press to skip backwards or forwards.
Press to use the karaoke function
(Mic. vol., Echo, Key Cotrol).
Press to move to the Home screen.
Select on-screen menu items and
change menu values.
Return to the previous menu.
These buttons are used both for
menus on the product and also
several Blu-ray Disc functions.
Press to view the disc menu.
Press to use the Tools menu.
Press to play a disc or files.
Press to direct the audio signal to the
home theater speakers or TV speaker.
(See page 24)
Select the desired DSP/EQ audio
mode.
Press to record FM radio broadcasts.
Press to stop a disc or files.
Cut off the sound temporarily.
Press to search backwards or
forwards.
Press to pause playing.
Allows you to repeat a title,
chapter, track or disc.
Use to enter the Popup menu/
Title menu.
Select MONO or STEREO for radio
broadcasts.
Search for active FM stations and
to change channels.
Use to display the playback
information when playing
a Blu-ray/DVD disc or files.
To open and close the disc tray.
Press to exit the menu.
Press to select Home Theater's
mode. (BD/DVD, D. IN, AUX, etc.).
Use to set a preset radio frequency.
TOOLS
RETURN
EXIT
INFO
KARAOKE HOME
REPEAT
1
2
3
7
89
DISC MENU TITLE MENU
0
POPUP
4
56
MUTE
MO/ST
TUNER
MEMORY
DSP/EQTV SOUND
ABCD
TUNING
DOWN
UP
VOLUME
-
+
FUNCTION
Installing batteries in the Remote Control
✎
Make sure to match the "+" and "–" ends of the batteries with
the diagram inside the compartment.
✎
Assuming typical usage, the batteries last for about one year.
✎
The remote control can be used up to approximately
7 meters from the product in a straight line.
Battery size: AAA

8 - English
Connections
This section describes various methods of connecting the product to other external components.
Before moving or installing the product, be sure to turn off the power and disconnect the power cord.
Connecting the Speakers
Surround (L)
Surround (R)
Product
Center
Subwoofer
Front (L)
Front (R)
Position of the product
Place it on a stand or cabinet shelf,
or under the TV stand.
Selecting the Listening Position
The listening position should be
located about 2.5 to 3 times the
TV's screen size away from the TV.
For example, if you have a 46 inch
screen, locate the listening position
2.92 to 3.50 meters from the screen.
Front Speakers
Place these speakers in front of your listening position, facing inwards (about 45°)
toward you. Place the front speakers so that their tweeters will be at the same height
as your ear. Align the front face of the front speakers with the front face of the center
speaker or place them slightly in front of the center speakers.
Center Speaker
It is best to install the center speaker at the same height as the front speakers. You
can also install it directly over or under the TV.
Surround Speakers
Place these speakers to the side of your listening position. If there isn't enough
room, place these speakers so they face each other. Position them about 60 to
90cm above your ear, facing slightly downward.
* Unlike the front and center speakers, the surround speakers are used mainly for
sound effects. Sound will not come from them all the time.
Subwoofer
The position of the subwoofer is not so critical. Place it anywhere you like.
* The appearance of your speakers may differ from the illustrations in this manual.
* Each speaker has a colored label on its back or underside. Each cable has a single colored band near
its end. Match the band on each cable to the speaker label by color, and then connect the cable to the
speaker. See page 9 for exact instructions.

9 - English
Connections
Speaker Cable Connections
SURROUND
SURROUND
SURROUND
SURROUND
Front Speaker (R)
Subwoofer
Center Speaker
Surround
Speaker (L)
Front Speaker (L)
Surround
Speaker (R)
✎
If you place a speaker near your TV set, the screen color may be distorted because of the magnetic field.
| CAUTION |
If you want to install the speakers on the wall, fasten screws or nails (not provided) firmly to the wall wherever
you want to hang a speaker, and then, using the hole in the rear of each speaker, carefully hang each
speaker on a screw or nail.
Do not let children play with or near the speakers. They could get hurt if a speaker falls.
When connecting the speaker wires to the speakers, make sure that the polarity (+/ –) is correct.
Keep the subwoofer speaker out of reach of children to prevent children from inserting their hands or alien
substances into the duct (hole) of the subwoofer speaker.
Do not hang the subwoofer on the wall
by
the duct (hole).

10 - English
Connections
Connecting to a TV and External Devices
OPTICAL OUT
AUDIO OUT
HDMI IN (ARC)
SURROUND
SURROUND
Method 1 Method 2
R
Red
W
White
External Devices
Connecting to a TV
Connect an HDMI cable from the HDMI OUT jack on the back of the product to the HDMI IN jack on your TV. If the
TV supports ARC, you can hear the audio from your TV through the home theater with only this cable connected. See
page 13 in this manual and the section on ARC in your TV's user's manual for details.
Connecting to External Devices
Two methods of connecting external devices to your home theater are explained below.
Method 1 AUX IN : Connecting an External Analog Component
Using an RCA audio cable (not supplied), connect the AUDIO In jack on the product to the AUDIO Out jack on the
external analog component.
Select the AUX mode.
•
Be sure to match the colors on the cable plugs to the colors on the input and output jacks.
Method 2 OPTICAL : Connecting an External Digital Audio Component
Use to connect the digital audio output of digital signal components such as Cable Boxes and Satellite Receivers (Set-
Top-Boxes) to the home theater. Using a digital optical cable (not supplied), connect the Optical Digital Audio In jack
on the product to the Digital Optical Out jack of the external digital device using a digital optical cable.
Select the
D. IN mode.
✎
To see video from your Cable Box/Satellite receiver, you must connect its video output directly to your TV.
✎
This system supports Digital sampling frequencies of 32 kHz or higher from external digital components.
✎
This system supports only DTS and Dolby Digital audio. MPEG audio, a bitstream format, is not supported.
Selecting an External Device to Use
To select an external device after you have connected it, press the FUNCTION button. Each time you press the
button, the mode changes in this order : BD/DVD
D. IN
AUX
FM

11 - English
Settings
The Initial Settings Procedure
•
The Home menu will not appear if you do not
configure the initial settings.
•
The OSD (On Screen Display) may change in this
product after you upgrade the software version.
•
The access steps may differ depending on the
menu you selected.
1.
Turn on your TV after connecting the product, and
then turn on the product. When you turn on the
product for the first time, the product automatically
displays the Setup Language screen.
2.
Press the ▲▼ buttons to select the desired
language, and then press the
E
button.
3.
The TV Aspect Ratio screen appears. Press the
▲▼ buttons to select a TV aspect ratio, and then
press the
E
button.
You have four choices:
16:9 Original - For widescreen TVs. Displays
widescreen pictures in their original 16:9 format
and 4:3 pictures (the old, standard format) in 4:3
pillar box format with black bars on the left and
right.
16:9 Full - For widescreen TVs. Displays
widescreen pictures in their original 16:9 format
and expands 4:3 pictures to fill the 16:9 screen.
4:3 Letter Box - For older, standard screen, analog
TVs. Displays 4:3 pictures in full screen and 16:9
pictures in letter box format that retains the 16:9
aspect ratio but puts black bars above and below
the picture.
4:3 Pan-Scan - For older, standard screen, analog
TVs. Displays 4:3 pictures in full screen and 16:9
pictures in Pan-Scan format that fills the screen,
but cuts off the left and right sides of the picture
and enlarges the middle vertically.
4.
The "Initial settings completed." screen appears,
and then the Home screen appears.
✎
If you want to display the Setup screen again
and make changes, select the Reset option. (See
page 14)
✎
If you use an HDMI cable to connect the product
to an Anynet+ (HDMI-CEC)-compliant Samsung
TV and 1.) You have set the Anynet+ (HDMI-CEC)
feature to On in both the TV and the product and
2.) You have set the TV to a language supported
by the product, the product will select that
language as the preferred language automatically.
The Home Screen at a Glance
PLAY DISC
Change
Device
Function
No Disc
Settings
PHOTOS VIDEOS MUSIC
1
345
2
1
PLAY DISC
The disc currently in the tray is displayed.
Press
E
to start playing the disc.
2
PHOTOS/VIDEOS/MUSIC
Play photos, videos, or music content from a
Disc or a USB device.
3
Change Device
Displays a list of external devices connected to the
main unit. Switch to the desired device.
4
Function
Use for switching to an external device or to the radio.
You can use the remote control’s FUNCTION button
and the main unit’s button for mode switching.
5
Settings
Set various functions to suit your personal
preferences.
Settings

12 - English
Settings
Accessing the Settings Screen
1.
Select Settings on the Home screen, and then
press
E
. The Settings screen appears.
Settings
Picture
Sound
System
Language
Security
Support
TV Aspect Ratio : 16:9 Original
BD Wise : Off
Resolution : Auto
Movie Frame (24Fs) : Off
HDMI Color Format : Auto
HDMI Deep Color : Off
Progressive Mode : Auto
2.
To access the menus, sub-menus, and options
on the Settings screen, please refer to the remote
control illustration. (See below)
✎
If you leave the product in the stop mode for more
than 5 minutes without using it, a screen saver
appears on your TV. If the product is left in the
screen saver mode for more than 20 minutes, the
power automatically turns off.
Buttons on the Remote Control Used for
the Settings Menu
TOOLS
RETURN
EXIT
INFO
KARAOKE HOME
REPEAT
TUNER
24
3
1
1
HOME Button : Press to move to the Home
screen.
2
RETURN Button : Press to return to the
previous menu.
3
E
(
ENTER) / DIRECTION Button :
•
Press ▲▼◄► to move the cursor or select
an item.
•
Press the
E
button to activate the currently
selected item or confirm a setting.
4
EXIT Button : Press to exit the current menu.
Detailed Function Information
Each Settings function, menu item, and individual option
is explained in detail on-screen. To view an explanation,
use the ▲▼◄► buttons to select the function, menu
item, or option. The explanation will usually appear on
the bottom of the screen.
A short description of each Settings function starts
on this page. Additional information on some of the
functions is also in the Appendix of this manual.
Settings Menu Functions
Picture
TV Aspect Ratio
Lets you adjust the output of the product to the
screen size of your TV. (See page 25)
BD Wise
BD Wise is Samsung’s latest inter-connectivity
feature. When you connect a Samsung product and
a Samsung TV with BD Wise to each other via HDMI,
and BD Wise is on in both the product and TV, the
product outputs video at the video resolution and
frame rate of the Blu-ray/DVD Disc.
Resolution
Lets you set the output resolution of the HDMI video
signal to BD Wise, Auto, 1080p, 1080i, 720p, 480p.
The number indicates the number of lines of video per
frame. The i and p indicate interlaced and progressive
scan, respectively. The more lines, the higher quality.
Movie Frame (24Fs)
Setting the Movie Frame (24Fs) feature to Auto lets
the product adjust its HDMI output to 24 frames per
second automatically for improved picture quality if
attached to a 24Fs compatible TV.
•
You can enjoy the Movie Frame (24Fs) feature
only on a TV supporting this frame rate.
•
Movie Frame is only available when the product is
in the HDMI 1080p output resolution modes.

13 - English
Settings
HDMI Color Format
Lets you set the color space format for the HDMI
output to match the capabilities of the connected
device (TV, monitor, etc).
HDMI Deep Color
Lets you set the product to output video from the
HDMI OUT jack with Deep Color. Deep Color provides
more accurate color reproduction with greater color
depth.
Progressive Mode
Lets you improve picture quality when viewing DVDs.
Sound
Karaoke Scoring
This feature rates your singing ability and gives you a
score for each song you sing.
My Karaoke
Set the volume of the vocals when using the karaoke
feature.
Original Vocals: Volume is set to the level of the
original sound.
Reduce Vocals: Volume is set to a level lower than
that of the original sound.
Speaker Settings
Lets you adjust the following speaker settings and
turn the speaker test on and off so you can test the
speakers.
Level
: Lets you adjust the relative loudness of
each speaker from 6dB to -6dB. For example, if
you like deep bass, you can increase the loudness
of the subwoofer by 6dB.
Distance
: Lets you adjust the relative distance
of each speaker from the listening position up to
9 meters. The farther the distance, the louder the
speaker will be.
Speaker Test
:
Lets you run the Speaker Test
function so you can test your adjustments. Setting
Speaker Test to On turns the Speaker Test on.
Setting it to Off turns it off.
Speaker Selection
Lets you select which speakers you want active,
either the TV's speakers or the home theater's
speakers.
Equalizer Mode
Set Equalizer Mode on to use the equalizer.
Equalizer Settings
Lets you set the equalizer.
✎
Equalizer Settings only appears when
Equalizer Mode is On.
Audio Return Channel
Lets you direct the sound from the TV to the Home
Theater speakers. Requires an HDMI connection and
an Audio Return Channel (ARC) compatible TV.
•
If Audio Return Channel is set to on and you are
using an HDMI cable to connect the product to the
TV, digital optical input will not work.
•
If Audio Return Channel is set to Auto and you
are using an HDMI cable to connect the product
to the TV, ARC or digital optical input is selected
automatically.
Digital Output
Lets you set the Digital Output to match the
capabilities of the AV receiver you’ve connected to
the product. For more details, please refer to the
digital output selection table. (See page 30)
Dynamic Range Control
Lets you apply dynamic range control to Dolby Digital,
Dolby Digital Plus, and Dolby TrueHD audio.
Auto:
Automatically controls the dynamic range of
Dolby TrueHD audio, based on information in the
Dolby TrueHD soundtrack. Also turns dynamic range
control off for Dolby Digital and Dolby Digital Plus.
Off: Leaves the dynamic range uncompressed,
letting you hear the original sound.
On: Turns dynamic range control on for all three
Dolby formats. Quieter sounds are made louder
and the volume of loud sounds is reduced.

14 - English
Settings
Downmixing Mode
Lets you select the multi-channel downmix method
that is compatible with your stereo system. You can
choose to have the product downmix to Normal
Stereo or to Surround Compatible.
Audio Sync
When the product is attached to a digital TV, lets you
adjust the audio delay so that the audio syncs with
the video. You can set the delay between 0 and 300
milliseconds.
System
Setup
Lets you re-run the Setup procedure. (See page 11)
Quick Start
You can turn on the power quickly by decreasing the
boot time.
✎
If this function is set to On, Standby power
consumption will be increased. (About 12W ~
20W)
Anynet+ (HDMI-CEC)
Anynet+ is a convenient function that offers linked
operations with other Samsung products that have
the Anynet+ feature and lets you control those
products with one Samsung TV remote. To operate
this function, you must connect this product to an
Anynet+ Samsung TV using an HDMI cable.
BD Data Management
Enables you to manage the downloaded contents
you accessed through a Blu-ray disc and stored on a
flash drive.
You can check the device's information including the
available storage size, delete the BD data, or change
the Flash memory device.
DivX® Video On Demand
View DivX® VOD Registration Codes to purchase and
play DivX® VOD contents.
Language
Lets you select the language you prefer for the On-
Screen Menu, Disc Menu, etc.
•
The selected language will only appear if it is
supported on the disc.
Security
The default PIN is 0000. Enter the default PIN to
access the security function if you haven't created
your own PIN.
BD Parental Rating
Prevents playback of Blu-ray Discs with a rating equal
to or above a specific age rating unless you enter the
PIN.
DVD Parental Rating
Prevents playback of DVDs with a rating above a
specific numerical rating unless you enter the PIN.
Change PIN
Changes the 4-digit PIN used to access security
functions.
Support
Software Upgrade
For more information about this function, see page
16.
Contact Samsung
Provides contact information for assistance with your
product.
Reset
Reverts all settings to their defaults. Requires that you
enter your security PIN. The default security PIN is
0000.

15 - English
Settings
Radio Setup
•
To listen to the radio, you must connect the
supplied FM antenna.
Operating the Radio with the Remote Control
1.
Press the FUNCTION button to select FM.
2.
Tune to the desired station.
•
Preset Tuning 1 : Press the
5
button to select
PRESET, and then press the TUNING UP,
DOWN button to select a preset station.
Before you can tune to preset stations, you
must add preset stations to the product's
memory.
•
Manual Tuning : Press the
5
button to select
MANUAL, and then press the TUNING UP,
DOWN button to tune in to a lower or higher
frequency.
•
Automatic Tuning : Press the
5
button to
select MANUAL, and then press and hold the
TUNING UP, DOWN button for a few seconds
to automatically search the band.
Selecting Mono or Stereo
Press the MO/ST button.
•
Each time you press the button, the sound switches
between STEREO and MONO.
•
In a poor reception area, select MONO for a clear,
interference-free broadcast.
Presetting Stations
Example : Presetting FM 89.10 into memory.
1.
Press the FUNCTION button to select FM.
2.
Press the TUNING UP, DOWN button to scroll the
FM frequencies, and then select <89.10>.
3.
Press the TUNER MEMORY button (the yellow C
button at the bottom of the remote).
4.
Press the TUNER MEMORY button again within
about 5 seconds. The station is stored in memory.
✎
If you press the
TUNER MEMORY
button
repeatedly without changing the station, the
inputted station may be overwritten.
5.
To preset another station, repeat steps 2 to 4.
•
To tune in to a preset station, press the TUNING
UP, DOWN button.
✎
To delete all Preset FM stations at once, press the
TITLE MENU button for about 5 seconds in FM
Manual mode until DEFAULT PRESET appears
on the display.
Recording FM Radio
You can record your favorite radio broadcast on a USB
storage device.
1.
Insert a USB device into the USB jack on the front
of the product.
2.
Press the FUNCTION button to select FM, and
then press the TUNING UP, DOWN button to
select the station you want to record.
3.
Press the RED (A) button to start recording. The
recording process begins.
•
The recorded time is displayed on the left and
the recording time still available, based on the
amount of free space in the USB storage device,
is displayed on the right.
4.
Press the EXIT button to finish your recording. The
recording is stopped and saved as an .mp3 file at
the same time. To play the recorded file, refer to
"Playing Files on a USB Device".
✎
The recorded file is saved in the Tuner folder which
is created automatically.
✎
Only the ( OPEN/CLOSE), (POWER), EXIT,
MUTE, and VOLUME +/-, buttons are operable
while FM radio is being recorded.
✎
If you don't press any buttons while recording, the
screen saver will be enabled.
✎
Sound effects, such as DSP, EQ, etc., are not
recorded during FM radio recording.
✎
The radio is recorded at a set, default volume
even if you change the volume or press the
MUTE
button during the recording process.
✎
If you remove the USB device or Power Cable
during the recording process, the portion of the
file which has already been recorded may not play
back.

16 - English
Settings
✎
Recording will not start if the remaining free space
in the USB storage device is less than 2MB.
✎
If the USB device is removed or has insufficient
space (under 2MB), the appropriate message is
displayed and the recording stops.
Upgrading Software
The Software Upgrade menu allows you to upgrade
the product’s software for performance improvements or
additional services.
•
Never turn the product off or back on manually
during the update process.
•
The update is complete when the product turns off
after restarting. Press the POWER button to turn
on the updated product for your use.
1.
Visit Samsung's website on a computer and
download the update package to a USB device.
✎
Save the update package in the USB device's
top-level folder. Otherwise, the product will not be
able to locate the update package.
2.
Connect the USB device with the update package
to the product.
3.
Select Support > Software Upgrade >
By USB. The software is updated using the update
package on the USB device.
✎
There should be no disc in the product when you
upgrade the software using the USB Host jack.
✎
When the software upgrade is done, check the
software details in the Software Upgrade menu.

17 - English
Playing Content
Your home theater can play content located on
Blu-ray/DVD/CD discs and USB devices.
Switching the Source Device
If two or more external devices are connected to
the main unit, you can use any of the three methods
described below to change the source device.
Method 1
From the Home screen, use the ▲▼◄► buttons to
move to Change Device, and then press
E
.
The Change Device popup window will appear. Use the
▲▼ buttons to move to the desired device, and then
press
E
.
Method 2
If you move to PHOTOS, VIDEOS, MUSIC or other file-
based contents, a list of folders and files will appear.
Press the RED (A) button to display the Change Device
popup window, use the ▲▼ buttons to move to the
desired device, and then press
E
.
Method 3
When a device is connected for the first time, a popup
window appears. In the popup, you can change the
source device by using the ◄► buttons, and then
pressing
E
.
Playing Commercial Discs
1.
Press the
button to open the disc tray.
2.
Place a disc gently into the disc tray with the disc’s
label facing up.
3.
Press the
button to close the disc tray.
Playback starts automatically.
4.
If playback does not start automatically, press the
6
button on the remote.
Disc Storage & Management
•
Holding Discs
- Fingerprints or scratches on
a disc may reduce sound and
picture quality or cause skipping.
- Avoid touching the surface of a disc where data has
been recorded.
- Hold the disc by the edges so that fingerprints will
not get on the surface.
- Do not stick paper or tape on the disc.
•
Cleaning Discs
- If you get fingerprints or dirt on a disc,
clean it with a mild detergent diluted in
water and wipe with a soft cloth.
- When cleaning, wipe gently from the
inside to the outside of the disc.
- Disc Storage
Do not keep in direct sunlight.
Keep in a cool ventilated area.
Keep in a clean protective jacket and store
vertically.
Playing a Disc with User Recorded
Content
You can play multimedia files you have recorded on Blu-
ray, DVD, or CD discs.
1.
Place a user recorded disc into the disc tray with
the disc’s label facing up, and then close the tray.
2.
Use the ◄► buttons to select the type of content
you want to view or play - PHOTOS, VIDEOS, or
MUSIC - and then press the
E
button.
OR
2
-1
. Select PLAY DISC from the Home screen. The
PLAY DISC screen appears. Use the ▲▼ buttons
to select the desired content type, Photos, Videos,
or Music.
3.
A screen appears listing the contents of the disc.
Depending on how the contents are arranged, you
will see either folders, individual files, or both.
4.
If necessary, use the ▲▼◄► buttons to select a
folder, and then press the
E
button.
Playing Content

18 - English
Playing Content
5.
Use the ▲▼◄► buttons to select a file to view or
play, and then press the
E
button.
6.
Press the RETURN button one or more times to
exit a current screen, exit a folder, or to return to
the Home screen.
Press the
EXIT button to return directly to the
Home Screen.
7.
Go to pages 19~23 for instructions that
explain how to control playback of videos, music,
and pictures on a disc.
Playing Files on a USB Device
There are two methods you can use to play or view
multimedia files located on a USB device through your
product.
Method 1 : If you connect a USB device while
the product is turned on
1.
The "New device connected." pop-up appears.
PLAY DISC
Change
Device
Function
No Disc
Settings
PHOTOS VIDEOS MUSIC
P
LAY DI
SC
Chan
g
e
De
vi
ce
F
u
n
c
ti
on
N
o
Di
sc
S
ettin
gs
PH
O
T
OS
V
IDE
OS
M
US
I
C
New device connected.
STORAGE DEVICE
Photos
Videos
Music
> Move " Enter ' Return
✎
If the pop-up does not appear, go to Method 2.
2.
Use the ▲▼ buttons to select Photos, Videos, or
Music and then press the
E
button. Depending
on how the contents are arranged, you will see
either folders, individual files, or both.
3.
If necessary, use the ▲▼◄► buttons to select a
folder, and then press the
E
button.
4.
Select a file to view or play, and then press the
E
button.
5.
Press the RETURN button to exit a folder or the
EXIT button to return to the Home screen.
6.
Go to pages 19~23 for instructions that
explain how to control playback of videos, music,
and pictures on a USB device.
Method 2 : If the product is turned on after
you connect a USB device
1.
Turn the product on.
2.
Press Change Device and select a USB device.
3.
Use the ◄► buttons to select PHOTOS, VIDEOS,
or MUSIC on the Home screen, and then press the
E
button.
4.
If necessary, use the ▲▼◄► buttons to select a
folder, and then press the
E
button.
5.
Select a file to view or play, and then press the
E
button.
6.
Press the RETURN button to exit a folder or the
EXIT button to return to the Home screen.
7.
Go to pages 19~23 for instructions that
explain how to control playback of videos, music,
and pictures on a USB device.
✎
If you insert a disc while playing a USB device, the
device mode changes to "Disc" automatically.

19 - English
Playing Content
Controlling Video Playback
You can control the playback of video content located
on a Blu-ray/DVD disc or USB device. Depending on the
disc or contents, some of the functions described in this
manual may not be available.
Buttons on the Remote Control used for
Video Playback
KARAOKE HOME
REPEAT
DISC MENU TITLE MENU
0
POPUP
1
2
3
1
Playback related buttons
The product does not play sound in Search, Slow, or
Step mode.
•
To return to normal speed playback, press the
6
button.
6
Starts playback.
5
Stops playback.
7
Pauses playback.
Fast Motion
Play
During playback, press the
3
or
button.
Each time you press the
3
or
button, the playback speed will
change.
Slow
Motion Play
In pause mode, press the
button.
Each time you press the
button,
the playback speed will change.
Step Motion
Play
In pause mode, press the
7
button.
Each time you press the
7
button, a
new frame appears.
Skip Motion
Play
During playback, press the
1
or
2
button.
Each time you press the
1
or
2
button, the disc moves to the
previous or next chapter or file.
2
Using the disc menu, title menu, popup
menu, and title list
DISC MENU
During playback, press this button to display the Disc
menu.
TITLE MENU
During playback, press this button to display the Title
menu.
•
If your disc has a playlist, press the GREEN (B)
button to go to the playlist.
POPUP MENU
During playback, press this button to display the
Popup menu.
3
Repeat Playback
1.
During playback, press the REPEAT button on
the remote control.
2.
Press the ▲▼ buttons to select Off, Title,
Chapter, All or Repeat A-B, and then press the
E
button.
Repeat A-B
1.
Press the
E
button at the point where you
want repeat play to start (A).
2.
Press the
E
button at the point where you
want repeat play to stop (B).
3.
To return to normal play, press the REPEAT
button again.
4.
Press the
E
button.
✎
Depending on the disc, the screen may not
display all repeat options.
✎
The screen may not display Chapter or Title
immediately. Continue to press the ▲▼ buttons
until your choice is inside the applicable field.
✎
To return to normal play, press the REPEAT
button again, press the ▲▼ buttons to select
Off, and then press the
E
button.
✎
The screen may not display Repeat A-B
immediately. Continue to press the ▲▼ buttons
until Repeat A-B is inside the applicable field.
✎
You must set point (B) at least 5 seconds of
playing time after point (A).

20 - English
Playing Content
Using the TOOLS Menu
During playback, press the TOOLS button.
Title
If there is more than one title on a disk or device, lets
you move to or select a desired title.
✎
When searching DVD title, in stop mode, enter
the
TOOLS button and title number (01,02,...)
you want.
Playing Time
Lets you go to a specific playback point. Use the
numeric buttons to input the playback point.
Repeat Mode
Lets you repeat a specific title, chapter, or marked
section.
Audio Sync
Lets you adjust the audio delay so that the audio
syncs with the video. You can set the delay from
0 to 300 milliseconds.
Equalizer Mode
Set Equalizer Mode on to use the equalizer.
Equalizer Settings
Lets you set the equalizer.
✎
Equalizer Settings only appears when
Equalizer Mode is On.
Picture Settings
Lets you set the picture mode.
Mode
- User : Go to Advanced Settings, and then
press the
E
button. Lets you adjust the
Brightness, Contrast, Color, and Sharpness
functions manually.
- Dynamic : Choose this setting to increase
sharpness.
- Normal : Choose this setting for most viewing
applications.
- Movie : This is the best setting for watching movies.
Menu selections that appear only when a
BD/DVD disc plays
Chapter
Lets you move to a chapter that you want to watch.
Audio
Lets you set the desired audio language.
Subtitle
Lets you set the desired subtitle language.
Angle
To view a scene from another angle. The Angle
option displays the number of angles available to view
(1/1, 1/2, 1/3, etc.).
BONUSVIEW Video BONUSVIEW Audio
Lets you set the desired Bonusview option.
Menu selections that appear only while a file
plays
Full Screen
Lets you set the desired full screen size. You can
select Original, Mode1 (larger), and Mode2 (largest).
Information
Select to view video file information.
✎
Depending on the disc or storage device, the
Tools menu may differ. All options may not be
displayed.

21 - English
Playing Content
Creating a Video Playlist
You can create a playlist of video files in nearly the same
way you create a playlist of music files. See page 22
for instructions. Select video files instead of music files.
Playing a Pre-Recorded Commercial
Audio Disc
1.
Insert an Audio CD (CD-DA) or an MP3 Disc into
the disc tray.
•
For an Audio CD (CD-DA), the first track will be
played automatically. Tracks on a disc are played
in the order in which they were recorded on the
disc.
•
For an MP3 disc, press the ◄► buttons to
select MUSIC, then press the
E
button.
0/16
00:00/00:00
Playlist
Pl l
i
TRACK 004 04:02
TRACK 005 03:43
TRACK 006 03:40
TRACK 001
CD
Tools
Repeat Mode Track
Equalizer Mode Off
Rip
Karaoke Recording
> Move < Adjust ' Return
" Pause Select
Tools ' Return
2.
To play a particular track, use the ▲▼ buttons on
the remote to select the track, and then press the
E
button.
✎
For more information about playing music, see
Controlling Music Playback below.
Controlling Music Playback
You can control the playback of music content located
on a DVD, CD, or USB. Depending on the disc or
contents, some of the functions described in this manual
may not be available.
Buttons on the Remote Control used for
Music Playback
1
2
3
7
89
DISC MENU TITLE MENU
0
POPUP
4
56
1
4
6
5
3
2
1
Number buttons : During Playlist playback,
press the desired track number. The selected
track is played.
2
Skip : During playback, press the
1
or
2
button to move to the previous or next music
track.
3
5
button : Stops a track.
4
Fast Play (Audio CD [CD-DA] only) :
During playback, press the
3
or
button.
Each time you press the
3
or
button, the
playback speed will change.
5
7
button : Pauses a track.
6
6
button : Plays the currently selected track.
Repeating Tracks
You can set the product to repeat tracks.
1.
During music playback, press the TOOLS button.
2.
Select Repeat Mode, then use the ◄► buttons to
select Off, Track or One, All or Shuffle, and then
press the
E
button.

22 - English
Playing Content
Creating a Music Playlist
1.
If you are playing music from a commercial CD or
DVD, press the
5
or RETURN button. The Music
List Screen appears. If you are creating a playlist
from music on a user created disk or USB device,
access the Music list as described on page 17
or 18.
2.
Press the ▲▼◄► buttons to move to a desired
file, and then press the YELLOW (C) button to
select it. Repeat this procedure to select additional
files.
3.
If you want to select all files, press the TOOLS
button, use the ▲▼ buttons to select Select All,
and then press
E
. If you want to deselect all files,
press the TOOLS button, select Deselect All, and
then press
E
.
㾎
CD a Change Device
Select
Tools
()
Jump Page ' Return
MUSIC TRACK 001 1 file selected 1/2 Page
TRACK 001
05:57
TRACK 002
04:27
TRACK 003
04:07
TRACK 004
03:41
TRACK 005
03:17
TRACK 006
03:35
TRACK 007
03:47
TRACK 008
03:49
TRACK 009
03:53
TRACK 010
03:45
4.
To remove a file from the Playlist, move to the file,
and then press the YELLOW (C) button.
5.
Press the
E
button to play the selected files. The
Playlist screen appears.
6.
To go to the Music List, press the
5
or RETURN
button.
7.
To go back to the Playlist, press the
E
button.
✎
You can create a playlist with up to 99 tracks on
Audio CDs (CD-DA).
✎
If you go to the Music List from the Playlist, and
then return to the Playlist, the Playlist will start
playing again from the beginning.
Ripping
1.
Insert a USB device into the USB jack on the front
of the product.
2.
With the Playback screen displayed, use the ▲▼
buttons to select a track, and then press the
YELLOW (C) button. A check appears to the left of
the track.
3.
Repeat Step 2 to select and check additional
tracks.
4.
To remove a track from the list, move to the track,
and then press the YELLOW (C) button again. The
check on the track is removed.
5.
When done, press the TOOLS button.
The Tools menu appears.
6.
Use the ▲▼ buttons to select Rip, and then press
the
E
button. The Rip screen appears.
7.
Use the ▲▼ buttons to select the device to store
the ripped files on, and then press the
E
button.
✎
Do not disconnect the device while ripping is in
progress.
8.
If you want to cancel ripping, press the
E
button,
and then select Yes. Select No to continue ripping.
9.
When ripping is complete, the "Ripping is
completed." message appears.
10.
Press the
E
button to go back to the Playback
screen.
✎
This function is not available for DTS Audio CDs.
✎
This function may not be supported by some
discs.
✎
Ripping encodes music in the .mp3 format at
192kbps.
✎
On the Track list screen, you can choose Select
All or Deselect All.
- Use Select All to select all tracks, and then press
the
E
button. This cancels your individual track
selections.
- Use Deselect All to deselect all selected tracks at
once.

23 - English
Playing Content
Playing Photo Content
You can play photo content located on a DVD or USB.
Using the Tools Menu
During playback, press the TOOLS button.
Start / Stop Slide Show
Select to play/pause the slide show.
Slide Show Speed
Select to adjust the slide show speed.
Background Music
Select to listen to music while viewing a slide show.
Zoom
Select to enlarge the current picture.
(Enlarge up to 4 times)
Rotate
Select to rotate a picture. (This will rotate the picture
either clockwise or counter clockwise.)
Information
Shows the picture information including the file name
and size, etc.
✎
Depending on the disc or storage device, the
Tools menu may differ. All options may not be
displayed.
✎
To enable the background music function, the
photo file must be in the same storage media as
the music file. However, the sound quality can be
affected by the bitrate of the MP3 file, the size of
the photo, and the encoding method.
Creating a Photo Playlist
You can create a photo playlist in nearly the same
way you create a music playlist. See page 22 for
instructions. Select photo files instead of music files.
Using Karaoke
You can enjoy the Karaoke with music.
1.
Connect the microphone on the front of the
product.
2.
In the Home menu, select the Settings, and then
press the
E
button.
3.
Select the Sound, and then press the
E
button.
4.
Select My Karaoke, and then press the
E
button.
•
You can check the Karaoke score and adjust the
volume of playback music's vocal.
•
Your Karaoke score is automatically displayed if
Karaoke Scoring is set to On and a microphone
is connected. If you don't want to see the score,
set Karaoke Scoring to Off.
•
If you want to decrease the volume of the vocals
in the original sound, select Reduce Vocals in
My Karaoke settings.
Recording
You can make a recording of karaoke with music.
1.
During the playback, press the TOOLS button to
select Karaoke Recording, and then press
E
button.
2.
Press
5
button if you want to finish recording.
3.
When recording is done, KARAOKE folder is
created in the USB storage driver and saved as the
form of KARAOKE.mp3.
✎
To save recording file, USB storage driver must be
inserted.
✎
Recording file is shown if you re-entry to Photos,
Videos, and Music.
✎
If you hear strange noises (squealing or howling)
while using the Karaoke feature, move the
microphone away from the speakers. Turning
down the microphone's volume or the speaker
volume is also effective.
✎
The microphone does not operate in the D. IN,
AUX and FM mode.
✎
The karaoke scoring displays the score
automatically when the Karaoke Scoring is set to
On and a microphone is connected. Disconnect
the microphone if you do not want to display the
score.
✎
The mic becomes available 10 seconds after the
Home menu appears on the screen.

24 - English
Playing Content
Using the Special Effects Remote
Control Buttons
TV SOUND
TV SOUND
If you have a TV that supports Anynet+ (HDMI-CEC),
the TV SOUND button lets you direct the TV's audio
to the Home Theater Speakers or the TV Speakers. To
use this function, follow these steps:
1.
Connect an HDMI cable to the TV and home
theater. (See page 10)
2.
Set Anynet+ (HDMI-CEC) On in the home
theater and TV.
3.
Press the TV SOUND button on the remote
control. TV SOUND ON flashes on the display on
the front panel, and then changes to
D. IN.
•
When TV SOUND is on, TV audio outputs
through the Home Theater speakers.
4.
Press the TV SOUND button again to turn TV
SOUND off.
•
When TV SOUND is off, TV audio outputs
through the speakers of the connected
Anynet+ TV.
Use TV SOUND:
1) When you want to listen to the TV's audio
through the home theater speakers.
2) When you want to listen to the audio from a USB
device plugged into the TV through the home
theater speakers.
TV SOUND ON/OFF support specifications:
Anynet+
(HDMI-CEC)
Setting
TV Sound ON TV Sound OFF
ON
HTS Speaker
Output
HTS Speaker
Mute
TV Speaker Mute
TV Speaker
Output
OFF
HTS Speaker
Output
HTS Speaker
Mute
TV Speaker
Output
TV Speaker
Output
No Operation
HTS Speaker
Output
HTS Speaker
Mute
TV Speaker
Output
TV Speaker
Output
DSP/EQ
DSP/EQ
You can adjust the sound with various sound modes.
DSPOFF : Select for normal listening.
CINEMA : Produces realistic and powerful sound
for movies.
MUSIC : Suitable for all music sources.
GAME : Revs up video games with powerful and
realistic sound.
M-STEREO (Multi Stereo) : Produces surround
sound from 2 channel input sources.
POWER BASS : Pumps up the bass sound.
LOUD : Improves bass sound characteristics
according to output level.
NIGHT : Optimizes sound for night time listening
by compressing the dynamic range and softening
the sound.
USER EQ : Provides a user adjustable equalizer
so you can adjust music to your liking.
LOCAL EQ : It provides a unique EQ curve for
fitting to local music.

25 - English
Appendix
Additional Information
Notes
Connections
HDMI OUT
•
Certain HDMI output resolutions may not work,
depending on your TV.
•
A long HDMI cable may cause screen noise. If this
occurs, set HDMI Deep Color to Off in the menu.
Settings
TV Aspect Ratio
•
Depending on the disc type, some aspect ratios may
not be available.
•
If you select an aspect ratio and option which is
different than the aspect ratio of your TV screen, the
picture might appear to be distorted.
•
If you select 16:9 Original, your TV may display 4:3
Pillarbox (black bars on the sides of the picture).
BD Wise (Samsung Products only)
•
When BD Wise is on, the Resolution setting
automatically defaults to BD Wise and BD Wise
appears in the Resolution menu.
•
If the product is connected to a device that does
not support BD Wise, you cannot use the BD Wise
function.
•
For proper operation of BD Wise, set the BD Wise
option in both the product and the TV to On.
Digital Output
•
Be sure to select the correct Digital Output or you will
hear no sound or just loud noise.
•
If the HDMI device (AV receiver, TV) is not compatible
with compressed formats (Dolby Digital, DTS), the
audio signal outputs as PCM.
•
Regular DVDs do not have BONUSVIEW audio and
Navigation Sound Effects.
•
Some Blu-ray Discs do not have BONUSVIEW audio
and Navigation Sound Effects.
•
This Digital Output setup does not affect the analog (L/
R) audio or HDMI audio output to your TV. It affects the
optical and HDMI audio output when your product is
connected to an AV receiver.
•
If you play MPEG audio soundtracks, the audio signal
outputs as PCM regardless of your Digital Output
selections (PCM or Bitstream).
•
Digital Output can be activated when Speaker
Selection is set to TV Speaker.
Anynet+ (HDMI-CEC)
•
Depending on your TV, certain HDMI output resolutions
may not work. Please refer to the user manual of your
TV.
•
This function is not available if the HDMI cable does
not support CEC.
•
If your Samsung TV has an Anynet+ logo, then it
supports the Anynet+ function.
BD Data Management
•
In the external memory mode, disc playback may
be stopped if you disconnect the USB device in the
middle of playback.
•
Only those USB devices formatted in the FAT file
system (DOS 8.3 volume label) are supported.
We recommend you use USB devices that support the
USB 2.0 protocol with 4 MB/sec or faster read/write
speeds.
•
The Resume Play function may not work after you
format the storage device.
•
The total memory available to BD Data Management
may differ, depending on conditions.
DivX® Video On Demand
•
For more information about DivX(R) VOD, visit
“http://vod.divx.com”.
Speaker Settings
•
When Speaker Selection is set to TV Speaker, audio
is produced by the TV speakers.
HDMI audio
•
When HDMI audio is output to the TV speakers, it is
automatically down-mixed to 2 channels.
Audio Return Channel
•
When Anynet+ (HDMI-CEC) is Off, the Audio Return
Channel function is not available.
•
Using an HDMI cable not certified for ARC (Audio
Return Channel) may cause a compatibility problem.
•
The ARC function is only available if an ARC-compliant
TV is connected.
Playback
Playing Video files
•
Video files with high bitrates of 20Mbps or more strain
the product’s capabilities and may stop playing during
playback.
Appendix

26 - English
Appendix
Selecting the Audio Language
•
The
◄►
indicator will not appear on the screen
if the BONUSVIEW section does not contain any
BONUSVIEW audio settings.
•
The languages available through the Audio Language
function depend on the languages that are encoded on
the disc. This function or certain languages may not be
available.
•
Some Blu-ray Discs may allow you to select either the
PCM or Dolby Digital audio English soundtrack.
Selecting the Subtitle Language
•
Depending on the Blu-ray Disc / DVD, you may be
able to change the subtitle language in the Disc Menu.
Press the DISC MENU button.
•
This function depends on the selection of subtitles that
are encoded on the disc and may not be available on
all Blu-ray Discs/DVDs.
•
Information about the main feature BONUSVIEW mode
will also appear if the Blu-ray Disc has a BONUSVIEW
section.
•
This function changes both the primary and secondary
subtitles at the same time.
•
The total number of primary and secondary subtitles,
respectively, is displayed.
Playing JPEG files
•
You can’t enlarge the subtitle and PG graphics in the
full screen mode.
Playing Content
Using the
TOOLS button while playing pictures
•
If the home theater is connected to a BD Wise
compliant TV that has BD Wise On, the Picture
Settings menu will not appear.
•
The Background Music function will not work unless
the music file and the photo file are located on the
same storage media. Also, sound quality can be
impacted by the bitrate of the MP3 music file, the size
of the photos, and the encoding method.
Disk and Format Compatibility
Disc types and content your Product can
Play
Media Disc Type Details
VIDEO
Blu-ray Disc
BD-ROM or BD-RE/-R disc
recorded in the BD-RE
format.
DVD-VIDEO,
DVD-RW,
DVD-R,
DVD+RW,
DVD+R,
VCD 1.1
DVD-VIDEO, recorded
DVD+RW/DVD-RW(V)/
DVD-R/+R discs that have
been recorded and finalized,
or a USB storage media
containing DivX, MKV, MP4,
VCD 1.1 contents.
MUSIC
CD-RW/-R,
DVD-RW/-R,
BD-RE/-R
Music recorded on CD-
RW/-R, DVD-RW/-R, BD-
RE/-R discs or a USB
storage media containing
MP3 or WMA contents.
PHOTO
CD-RW/-R,
DVD-RW/-R,
BD-RE/-R
Photos recorded on CD-
RW/-R, DVD-RW/-R, BD-
RE/-R discs or a USB
storage media containing
JPEG contents.
✎
The product may not play certain CD-RW/-R and
DVD-R because of the disc type or recording
conditions.
✎
If a DVD-RW/-R disc has not been recorded properly
in DVD video format, it will not be playable.
✎
Your product will not play content that has been
recorded on a DVD-R at a bitrate that exceeds 10
Mbps.
✎
Your product will not play content that has been
recorded on a BD-R or USB device at a bitrate that
exceeds 30 Mbps.
✎
Playback may not work for some types of discs, or
when you use specific operations, such as angle
change and aspect ratio adjustment. Information
about the discs is written in detail on the disc box.
Please refer to this if necessary.
✎
When you play a BD-J title, loading may take longer than
a normal title or some functions may perform slowly.

27 - English
Appendix
Disc Types your Product cannot Play
•
HD DVD
•
DVD-ROM/PD/MV-Disc,
etc
•
DVD-RW(VR mode)
•
CVD/CD-ROM/CDV/
CD-G/CD-I/LD
(CD-Gs play audio only, not
graphics.)
•
DVD-RAM
•
Super Audio CD
(except CD layer)
•
3.9 GB DVD-R Disc for
Authoring.
✎
This product may not respond to all operating
commands because some Blu-ray Disc, DVD, and
CD discs allow specific or limited operation and
provide only certain features during playback.
Please note that this is not a defect in the product.
✎
Samsung cannot guarantee that this product will
play every disc bearing the Blu-ray Disc, DVD, or CD
logo because disc formats evolve, and problems and
errors may occur during the creation of Blu-ray Disc,
DVD, and CD software and/or the manufacture of
discs.
✎
Please contact the SAMSUNG Customer Care
Center at, if you have questions or encounter difficulty
when playing Blu-ray Discs, DVD, or CD discs in this
product. Also, refer to the rest of this user manual for
additional information on playback restrictions.
✎
Some commercial discs and DVD discs purchased
outside your region may not play on this product.
Logos of Discs the Product can Play
Blu-ray Disc
NTSC broadcast system in U.S.A,
Canada, Korea, Japan
Dolby DTS
Java DivX
Region Code
Both products and discs are coded by region. These
regional codes must match for a disc to play. If the codes do
not match, the disc will not play.
The Region Number for this product is displayed on the rear
panel of the product.
Disc Type
Region
Code
Area
Blu-ray
Disc
A
North America, Central America,
South America, Korea, Japan,
Taiwan, Hong Kong and South
East Asia.
B
Europe, Greenland, French
territories, Middle East, Africa,
Australia and New Zealand.
C
India, China, Russia, Central and
South Asia.
DVD-
VIDEO
1
The U.S., U.S. territories and
Canada
2
Europe, Japan, the Middle East,
Egypt, Africa, Greenland
3
Taiwan, Korea, the Philippines,
Indonesia, Hong Kong
4
Mexico, South America, Central
America, Australia, New Zealand,
Pacific Islands, Caribbean
5
Russia, Eastern Europe, India,
North Korea, Mongolia
6
China
✎
If the Region number of a Blu-ray Disc/DVD does
not correspond to the Region number of this
product, the product cannot play the disc.

28 - English
Appendix
AVCHD (Advanced Video Codec High
Definition)
•
This product can play back AVCHD format discs. These
discs are normally recorded and used in camcorders.
•
The AVCHD format is a high definition digital video camera
format.
•
The MPEG-4 AVC/H.264 format compresses images
with greater efficiency than the conventional image
compressing format.
•
Some AVCHD discs use the "x.v.Color" format. This
product can play back AVCHD discs that use the
"x.v.Color" format.
•
"x.v.Color" is a trademark of Sony Corporation.
•
"AVCHD" and the AVCHD logo are trademarks of
Matsushita Electronic Industrial Co., Ltd. and Sony
Corporation.
✎
Some AVCHD format discs may not play, depending
on the recording conditions.
✎
AVCHD format discs need to be finalized.
✎
"x.v.Color" offers a wider color range than normal
DVD camcorder discs.
✎
Some DivX, MKV and MP4 format discs may not play,
depending on their video resolution and frame rate.
Supported Formats
Notes on the USB connection
•
Your product supports USB storage media, MP3 players,
digital cameras, and USB card readers.
•
The product does not support folder or file names longer
than 128 characters.
•
Some USB/digital camera devices may not be compatible
with the product.
•
Your product supports the FAT 16, FAT 32, and NTFS file
systems.
•
Connect USB devices directly to the product’s USB port.
Connecting through a USB cable may cause compatibility
problems.
•
Inserting more than one memory device into a multi-card
reader may cause the reader to operate improperly.
•
The product does not support the PTP (Peer to Peer)
protocol.
•
Do not disconnect a USB device while it is transferring or
recording data.
•
The bigger the image resolution, the longer the image
takes to display.
•
This product cannot play MP3 files with DRM (Digital
Rights Management) downloaded from commercial sites.
•
Your product only supports video that is under 30fps
(frames per second).
•
Your product only supports USB Mass Storage Class
(MSC) devices such as thumb drives and USB HDD. (HUB
is not supported.)
•
Certain USB HDD Devices, multi-card readers and thumb
drives may not be compatible with this product.
•
If some USB devices require excessive power, they may
be limited by the circuit safety device.
•
If playback from a USB HDD is unstable, provide
additional power by plugging the HDD into a wall
socket. If the problem continues, contact the USB HDD
manufacturer.
•
SAMSUNG is not responsible for any data file damage or
data loss.

29 - English
Appendix
Video File Support
File Extension Container Video Codec Audio Codec Resolution
*.avi
AVI
DivX 3.11/4/5/6
MP4v3
H.264 BP/MP/HP
MP3, Dolby Digital, DTS,
WMA, PCM
1920x1080
*.mkv
MKV
VC-1 AP, DivX 5/6
H.264 BP/MP/HP
MP3, Dolby Digital, DTS
*.wmv
WMV (wmv9)
VC-1 AP
VC-1 SM
WMA
*.mp4
MP4
MP4 (mp4v)
H.264 BP/MP/HP
AAC
*.mpg / *.mpeg
PS
MPEG1
MPEG2
H.264 BP/MP/HP
MP1, 2
Dolby Digital, DTS
Limitations
- Even when a file is encoded by a supported codec listed above, the file might not play if its content has a problem.
- Normal playback is not guaranteed if the file’s container information is wrong or the file itself is corrupted.
- Files having a higher bitrate/frame rate than standard may stutter during sound/video playback.
- The Seek (skip) function is not available if the file’s index table is damaged.
Video decoder
- Supports up to H.264 Level 4.1 and AVCHD
- Does not support H.264 FMO/ASO/RS and VC1 SP/MP/AP L4
- MPEG4 SP, ASP :
Below 1280 x 720 : 60 frames max
Above 1280 x 720 : 30 frames max
- Does not support GMC 2 or higher
Audio decoder
- Supports WMA 7, 8, 9 and STD
- Does not support WMA sampling rate of 22050Hz mono.
- AAC: Max sampling rate: 96Khz (8, 11, 12, 16, 22,24, 32, 44.1, 48, 64, 88.2, 96) Max bitrate: 320kbps
Supported DivX subtitle file formats
- *.ttxt, *.smi, *.srt, *.sub, *.txt
Music File Support
File Extension Container Audio Codec Support Range
*.mp3
MP3
MP3 -
*.wma
WMA
WMA
* Sampling rates (in kHz) - 8, 11, 16, 22, 32, 44.1, 48
* Bitrates - All bitrates from 5kbps to 384kbps
Picture File Support
File Extension Type Resolution
*.jpg / *.jpeg / *.jpe
JPEG
15360x8640
*.png
PNG

30 - English
Appendix
Digital Output Selections
Setup PCM
Bitstream
(Unprocessed)
Bitstream
(Re-encoded DTS)
Bitstream
(Re-encoded
Dolby D)
Connection HDMI supported AV receiver
Audio Stream
on Blu-ray
Disc
PCM Up to PCM 7.1ch PCM
DTS re-encoded
Re-encoded
Dolby Digital *
Dolby Digital
Up to PCM 5.1ch
Dolby Digital
Dolby Digital Plus Dolby Digital Plus
Dolby TrueHD Dolby TrueHD
DTS DTS
DTS-HD High
Resolution Audio
DTS-HD High
Resolution Audio
DTS-HD Master
Audio
DTS-HD Master
Audio
Audio Stream
on DVD
PCM PCM 2ch
Dolby Digital
Up to PCM 5.1ch
Dolby Digital
DTS DTS
Definition for
Blu-ray Disc
Any
Decodes the main
feature audio and
BONUSVIEW audio
stream together into
PCM audio and adds
Navigation Sound
Effects.
Outputs only the main
feature audio stream
so that your AV
receiver can decode
the audio bitstream.
You will not hear
BONUSVIEW audio
or Navigation Sound
Effects.
Decodes the main
feature audio and
BONUSVIEW audio
stream together into
PCM audio and adds
Navigation Sound
Effects, then re-
encodes the PCM
audio into DTS
bitstream.
Decodes the main
feature audio and
BONUSVIEW
audio stream
together into PCM
audio and adds
Navigation Sound
Effects, then re-
encodes the PCM
audio into Dolby
Digital bitstream
or PCM.
If the Source Stream is 2ch or mono, "Re-encoded Dolby D" Setting are not applied. Output will be PCM 2ch.
Blu-ray Discs may include three audio streams :
- Main Feature Audio : The audio soundtrack of the main feature.
- BONUSVIEW audio : An additional soundtrack such as the director or actor’s commentary.
- Navigation Sound Effects : When you choose some menu navigation options, Navigation Sound Effects may sound.
Navigation Sound Effects are different on each Blu-ray Disc.

31 - English
Appendix
Resolution according to the output mode
Blu-ray Disc/E-contents/Digital Contents playback DVD playback
Output
Setup
HDMI Mode
HDMI Mode
Blu-ray Disc
E-contents/
Digital contents
BD Wise
Resolution of Blu-ray
Disc
1080p@60F 480i
Auto Max. Resolution of TV input Max. Resolution of TV input
1080p@60F 1080p@60F -
1080p - 1080p
Movie Frame : Auto (24Fs) 1080p@24F -
1080i 1080i 1080i
720p 720p 720p
480p 480p 480p
Troubleshooting
Refer to the table below when this product does not function properly. If the problem you are experiencing is not listed below or
if the instructions below do not help, turn off the product, disconnect the power cord and contact the nearest authorized dealer
or Samsung Electronics Service Center.
Symptom Check/Remedy
You cannot eject the disc.
•
Is the power cord plugged securely into the outlet?
•
Turn off the power, and then turn it back on.
Playback does not start.
•
Check the region number of the Blu-ray/DVD disc.
A Blu-ray/DVD disc purchased from abroad may not be playable.
•
CD-ROMs and DVD-ROMs cannot be played on this product.
•
Make sure that the rating level is correct.
Playback does not start
immediately when you press
the
6
/
7
button.
•
Are you using a deformed disc or a disc with scratches on the surface?
•
Wipe the disc clean.
No sound.
•
The home theater does not play sound during fast playback, slow playback, and
step motion playback.
•
Are the speakers connected properly? Is the speaker setup correctly customized?
•
Is the disc severely damaged?
You can only hear sound
from a few speakers, but not
all 6.
•
On certain Blu-ray/DVD discs, sound is output from the front speakers only.
•
Check if the speakers are connected properly.
•
Adjust the volume.
•
When playing audio from a CD, the radio, or a TV, the unit outputs sound to the front
speakers only.

32 - English
Appendix
Symptom Check/Remedy
Dolby Digital 5.1 CH
Surround Sound is not
produced.
•
Is there "Dolby Digital 5.1 CH" mark on the disc? Dolby Digital 5.1 CH Surround Sound
is produced only if the disc is recorded with 5.1 channel sound.
•
Is the audio language correctly set to Dolby Digital 5.1-CH in the information display?
The remote control does not
work.
•
Are you operating the remote within its operational range and within the proper angle
relative to the sensor?
•
Are the batteries drained?
•
Have you selected the correct mode? Press the function button to change the mode
(BD/DVD, D. IN, AUX, etc.).
•
The disc is rotating but
there is no picture.
•
Picture quality is poor and
the picture is shaking.
•
Is the TV power on?
•
Are the video cables connected properly?
•
Is the disc dirty or damaged?
•
A poorly manufactured disc may not be playable.
Audio language and subtitles
do not work.
•
The Audio Language and subtitle functions will not work if the disc does not contain
multiple language sound tracks or subtitles.
The menu screen does
not appear even when you
select the menu function.
•
Are you using a disc that does not contain menus?
The aspect ratio cannot be
changed.
•
The home theater can play 16:9 Blu-ray/DVD discs in 16:9 Full mode, 4:3 Letter Box
mode, or 4:3 Pan-Scan mode, but plays 4:3 Blu-ray/DVD discs in 4:3 mode only. Refer
to the Blu-ray Disc jacket, and then select the appropriate aspect ratio.
•
The product is not
working.
(Example: The power goes
off or you hear a strange
noise.)
•
The Product is not
working normally.
•
Press and hold the remote control's
5
button for 5 seconds in STANDBY mode. This
will reset the unit.
- Using the RESET function will erase all stored settings.
Do not use this function unless necessary.
You have forgotten the rating
level password.
•
With no disc in the product, press and hold the product's
5
button for longer than 5
seconds. INIT appears on the display and all settings will return to their default values.
- Using the RESET function will erase all stored settings.
Do not use this function unless necessary.
Can't receive radio
broadcasts.
•
Is the antenna connected properly?
•
If the antenna's input signal is weak, install an external FM antenna in an area with
good reception.
There is no sound when
you try to listen to TV audio
through the home theater
speakers.
•
If you press the
^
button while listening to TV audio using the D. IN or AUX functions,
the Blu-ray/DVD disc functions are turned on and the TV audio is muted.

33 - English
Appendix
Symptom Check/Remedy
"Not Available" appears on
screen.
•
The feature is unavailable or the action cannot be completed at this time because:
1. The Blu-ray/DVD disc's software restricts it.
2. The Blu-ray/DVD disc's software doesn’t support the feature (e.g., angles)
3. The feature is not available at the moment.
4. You’ve requested a title or chapter number or search time that is out of range.
If the HDMI output is set to
a resolution your TV cannot
support (for example,
1080p), you may not see a
picture on your TV.
•
Press and hold the
5
button on front panel for more than 5 seconds with no disc in
the product. All settings will revert to their factory settings.
No HDMI output.
•
Check the connection between the TV and the HDMI jack of the product.
•
Check if your TV supports 480p/720p/1080i/1080p HDMI input resolution.
Abnormal HDMI output
appears on the screen.
•
If random noise appears on the screen, it means that TV does not support HDCP
(High-bandwidth Digital Content Protection).
✎
When the factory default settings are restored, all stored user BD data is deleted.

34 - English
Appendix
General
Weight 1.90 kg
Dimensions 430.0 (W) x 55.0 (H) x 224.0 (D) mm
Operating Temperature Range +5°C to +35°C
Operating Humidity Range 10 % to 75 %
FM Tuner
Signal/noise ratio 55 dB
Usable sensitivity 12 dB
Total harmonic distortion 1.0 %
HDMI
Video 1080p, 1080i, 720p, 480p
Audio PCM multichannel audio, Bitstream audio, PCM audio
Amplifier
Front speaker output 165W x 2 (3)
Center speaker output 170W (3)
Surround speaker output 165W x 2 (3)
Subwoofer speaker output 170W (3)
Frequency response 20Hz~20kHz (±3dB)
S/N Ratio 70dB
Channel separation 60dB
Input sensitivity (AUX) 500mV
Speaker (5.1ch speaker system)
Speaker
system
Impedance Frequency range Rated input
Dimensions
(W x H x D) (mm)
Weights
(kg)
Front
3
200Hz ~ 20kHz
165W
90.0 x 139.0 x 70.0 0.40
Surround 77.0 x 107.0 x 68.0 0.34
Center
170W
228.0 x 77.0 x 70.0 0.49
Subwoofer 20Hz ~ 200Hz 168.0 x 350.0 x 285.0 3.67
✎
Samsung Electronics Co., Ltd reserves the right to change the specifications without notice.
✎
Weight and dimensions are approximate.
✎
Design and specifications are subject to change without prior notice.
✎
For the power supply and Power Consumption, refer to the label attached to the product.
Specifications

35 - English
Appendix
Licenses
Manufactured under license from Dolby Laboratories. Dolby, Dolby Audio, Pro Logic, and the double-D symbol
are trademarks of Dolby Laboratories.
For DTS patents, see http://patents.dts.com. Manufactured under license from DTS
Licensing Limited. DTS, DTS-HD, the Symbol, & DTS and the Symbol together are
registered trademarks, and DTS-HD Master Audio | Essential is a trademark of DTS,
Inc. © DTS, Inc. All Rights Reserved.
This DivX Certified® device has passed rigorous testing to ensure it plays DivX® video.
To play purchased DivX movies, first register your device at vod.divx.com. Find your registration
code in the DivX VOD section of your device setup menu.
DivX Certified® to play DivX® video up to HD 1080p, including premium content.
DivX®, DivX Certified® and associated logos are trademarks of DivX, LLC and are used under license.
Covered by one or more of the following U.S. patents: 7,295,673; 7,460,668; 7,515,710; 7,519,274.
The terms HDMI and HDMI High-Definition Multimedia Interface, and the HDMI Logo are trademarks
or registered trademarks of HDMI Licensing LLC in the United States and other countries.
Oracle and Java are registered trademarks of Oracle and/or its affiliates. Other names may be trademarks of their
respective owners.
This item incorporates copy protection technology that is protected by U.S. patents and other intellectual property rights of
Rovi Corporation. Reverse engineering and disassembly are prohibited.
Blu-ray Disc™, Blu-ray™, and the logos are trademarks of Blu-ray Disc Association.
This product uses Cinavia technology to limit the use of unauthorized copies of some commercially-produced film and
videos and their soundtracks. When a prohibited use of an unauthorized copy is detected, a message will be displayed and
playback or copying will be interrupted.
More information about Cinavia technology is provided at the Cinavia Online Consumer Information Center at http://www.
cinavia.com. To request additional information about Cinavia by mail, send a postcard with your mailing address to: Cinavia
Consumer Information Center, P.O. Box 86851, San Diego, CA, 92138, USA."
This product incorporates proprietary technology under license from Verance Corporation and is protected by U.S. Patent
7,369,677 and other U.S. and worldwide patents issued and pending as well as copyright and trade secret protection
for certain aspects of such technology. Cinavia is a trademark of Verance Corporation. Copyright 2004-2010 Verance
Corporation. All rights reserved by Verance. Reverse engineering or disassembly is prohibited.
- Open Source License Notice
In the case of using open source software, Open Source Licenses are available on the product menu.

Para evitar cualquier avería o daños, lea detalladamente este manual de instrucciones antes de conectar
y utilizar este aparato. Conserve el manual para referencia futura. (Sólo México)
Blu-ray™ de 5,1 canales
Sistema de entretenimiento
Manual del usuario
HT-J5100K
imagine las posibilidades
Gracias por adquirir un producto Samsung.
Para recibir un servicio más completo, registre su producto en
www.samsung.com/register

2 - Español
Información de seguridad
Producto de Clase II: Este símbolo indica que
no es necesaria una conexión eléctrica de
seguridad (toma de tierra).
Voltaje CA: Este símbolo indica que la tensión
nominal marcada con el símbolo es CA.
Voltaje CC: Este símbolo indica que la tensión
nominal marcada con el símbolo es CC.
Precaución, consulte las instrucciones antes
de usar: Este símbolo indica que se debe
consultar el manual del usuario para obtener
información relacionada con la seguridad.
• Las ranuras y aberturas existentes en la unidad y en la
parte trasera o inferior se facilitan para proporcionar la
ventilación necesaria. Para garantizar el funcionamiento
fiable de este aparato, y para protegerlo frente a
sobrecalentamiento, estas ranuras y aberturas nunca
deben bloquearse ni cubrirse.
- No coloque este aparato en un espacio cerrado,
como una librería, o un armario empotrado, a menos
que se proporcione una ventilación correcta.
- No coloque este aparato cerca o sobre un radiador
o una rejilla de aire caliente, ni en lugares expuestos
a luz solar directa.
- No coloque recipientes (jarrones, etc.) que contengan
agua sobre este aparato. El agua derramada puede
causar un incendio o una descarga eléctrica.
• No exponga este aparato a la lluvia ni lo coloque cerca
de agua (cerca de una bañera, lavabo, fregadero o
lavadero, en un sótano húmedo ni cerca de una piscina
o similar). Si este aparato accidentalmente se moja,
desenchúfelo y póngase en contacto inmediatamente
con un distribuidor autorizado.
• Este aparato utiliza pilas. En su comunidad puede que
existan normativas medioambientales que requieran
la eliminación de estas pilas de forma adecuada.
Póngase en contacto con las autoridades locales para
obtener información sobre su eliminación y reciclaje.
• No sobrecargue las tomas murales, los alargadores ni
los adaptadores por encima de su capacidad, ya que
esto puede generar incendios o descargas eléctricas.
• Instale los cables de alimentación eléctrica de forma
que no se puedan pisar ni doblar por elementos
colocados encima o contra ellos. Preste especial
atención a los cables en los enchufes, en las tomas de
corriente y en los puntos de salida del aparato.
• Para proteger este aparato durante una tormenta
eléctrica o cuando no lo utilice durante largos periodos
de tiempo, desenchúfelo de la toma de la pared y
desconecte la antena o el cable del sistema. Esto
evitará que el equipo se dañe por rayos o picos de
tensión de la línea eléctrica.
• Antes de conectar el cable de alimentación de CA
a la toma del adaptador de CC, asegúrese de que
la designación del voltaje del adaptador de CC
corresponde a la fuente eléctrica local.
• Nunca inserte nada metálico en las partes abiertas de
este aparato. Hacerlo así puede representar un peligro
de descarga eléctrica.
• Para evitar descarga eléctrica, no toque nunca el
interior de este aparato. Solo un técnico cualificado
debe abrir este aparato.
•
Asegúrese de enchufar el cable de alimentación de
forma que quede bien seguro. Al desenchufar el
cable de alimentación de una toma de corriente, tire
siempre del enchufe del cable de alimentación. Nunca
desenchufe tirando del cable de alimentación. No toque
el cable de alimentación con las manos mojadas.
•
Si este aparato no funciona normalmente, en concreto, si
emite sonidos extraños o desprende olores desde el interior,
desenchúfelo inmediatamente y póngase en contacto con
el distribuidor autorizado o el centro de servicio técnico.
• Mantenimiento del armario.
- Antes de conectar otros componentes a este
producto, asegúrese de que estén apagados.
- Si traslada de forma repentina el producto de
un lugar frío a un lugar cálido, es posible que se
produzca condensación en sus componentes y en
la óptica, y provoque una reproducción anormal del
disco. Si sucede, desenchufe el producto, espere
dos horas y vuelva a conectar el enchufe a la toma
de corriente eléctrica. A continuación, inserte el
disco e intente reproducirlo de nuevo.
PRECAUCIÓN
NO ABRIR, PELIGRO DE DESCARGAS ELÉCTRICAS
PRECAUCIÓN: PARA REDUCIR EL PELIGRO DE DESCARGA
ELÉCTRICA, NO RETIRE LA TAPA (NI LA PARTE TRASERA).
NO HAY PIEZAS EN EL INTERIOR QUE PUEDA REPARAR
EL USUARIO. CONSULTE AL PERSONAL CUALIFICADO DE
SERVICIO TÉCNICO.
Este símbolo indica que el dispositivo
contiene alto voltaje. Es peligroso
establecer cualquier tipo de contacto
con cualquier parte interna del producto.
Este símbolo indica que con este
producto se incluye documentación
importante relativa a la operación y el
mantenimiento.

3 - Español
Información de seguridad
• Asegúrese de desconectar el enchufe de la toma de
corriente si el producto no se va a utilizar o si se va a
ausentar durante un tiempo prolongado (especialmente
cuando niños, ancianos y personas discapacitadas se
queden solos en casa).
- La acumulación de polvo puede causar riesgo de
descarga eléctrica, una fuga eléctrica o un incendio
si el cable de alimentación genera chispas y se
caliente o se deteriora el aislamiento.
• Póngase en contacto con el centro de servicio técnico
autorizado para obtener información si pretende
instalar el producto en un espacio muy polvoriento,
sometido a temperaturas altas o bajas, alto grado de
humedad, sustancias químicas o en sitios en los que
funcione las 24 horas del día como un aeropuerto, una
estación de tren, etc. No hacerlo podría dar lugar a
daños en el producto.
• Utilice únicamente un enchufe con una toma de tierra
y una toma de pared.
- Una toma de tierra inadecuada puede provocar
una descarga eléctrica o daños en el equipo. (Solo
equipo de Clase l.)
• Para apagar completamente este aparato, debe
desconectarlo de la toma de corriente. Por tanto, la
toma de corriente y el enchufe deben estar accesibles
en todo momento.
• No permita que los niños se cuelguen del producto.
• Guarde los accesorios (pila, etc.) en un lugar seguro
fuera del alcance de los niños.
• No instale el producto en un sitio inestable como
un estante inestable, un suelo inclinado o un lugar
expuesto a las vibraciones.
• No deje caer o golpee el producto. Si el producto
está dañado, desconecte el cable de alimentación y
póngase en contacto con servicio técnico.
• Para limpiar este aparato, desenchufe el cable de
alimentación de la toma de pared y limpie el producto
utilizando un paño suave seco. No utilice productos
químicos como cera, benceno, alcohol, disolventes,
insecticidas, ambientadores, lubricantes o detergentes.
Estos productos químicos pueden dañar el aspecto
del producto o borrar las impresiones del mismo.
• No debe exponer este aparato a gotas ni salpicaduras
de agua. No coloque en el aparato objetos con líquido,
como jarrones.
• No arroje las pilas al fuego.
• No enchufe varios dispositivos electrónicos en la
misma toma de corriente. Si se sobrecarga una toma
puede provocar sobrecalentamiento y causar un
incendio.
• Existe peligro de explosión si sustituye pilas del mando
a distancia por un tipo de pila erróneo. Cambie la pila
solo por una del mismo tipo o de especificaciones
equivalentes.
ADVERTENCIA :
• PARA EVITAR INCENDIOS, MANTENGA
EN TODO MOMENTO VELAS Y OTROS
ARTÍCULOS CON LLAMA ALEJADOS
DE ESTE PRODUCTO.
• Para reducir el riesgo de incendio o
descarga eléctrica, no exponga este aparato a la lluvia
ni a la humedad.
PRODUCTO LÁSER DE LA CLASE 1
Este producto se ha clasificado como un producto
LÁSER de CLASE 1.
El uso de controles, ajustes o la ejecución de
procedimientos distintos a los especificados en este
documento pueden dar como resultado la exposición
peligrosa a radiaciones.
PRECAUCIÓN :
• RADIACIÓN INVISIBLE DEL LÁSER AL ABRIR
E IGNORAR EL INTERBLOQUEO; EVITE LA
EXPOSICIÓN AL HAZ.
CLASS 1 LASER PRODUCT
KLASSE 1 LASER PRODUKT
LUOKAN 1 LASER LAITE
KLASS 1 LASER APPARAT
PRODUCTO LÁSER CLASE 1

4 - Español
Índice general
INTRODUCCIÓN
5 Accesorios
5 Componentes de las bocinas
5 Panel frontal
6 Panel posterior
7 Mando a distancia
CONEXIONES
8 Conexión de las bocinas
10 Conexión a un TV y dispositivos externos
CONFIGURACIÓN
11 Procedimiento de ajustes iniciales
11 Visión general de la pantalla de inicio
12 Acceso a la pantalla de configuración
12 Funciones del menú Config.
15 Configuración de radio
16 Actualización de software
REPRODUCCIÓN DE CONTENIDO
17 Cambio del dispositivo de origen
17 Reproducción de discos comerciales
17 Reproducción de un disco con contenido
grabado por el usuario
18 Reproducción de archivos en un dispositivo USB
19 Control de reproducción de video
21 Reproducción de discos de audio pregrabados
comerciales
21 Control de reproducción de música
23 Reproducción de contenido fotográfico
23 Utilización de Karaoke
24 Utilización de los botones del mando a distancia
de efectos especiales
APÉNDICE
25 Información adicional
26 Compatibilidad de discos y formatos
31 Solución de problemas
34 Especificaciones
35 Licencia
Las figuras e ilustraciones de este Manual
del usuario se facilitan sólo como referencia
y pueden diferir del aspecto real del
producto.

5 - Español
Introducción
Compruebe si la caja incluye los accesorios y los componentes de los altavoces que se enumeran y se
muestran a continuación.
Accesorios
• Mando a distancia
• Pilas (tamaño AAA)
• Manual del usuario
Cable de alimentación Antena FM Cable de HDMI
Componentes de las bocinas
2 Frontales 2 Surround Central Subwoofer
Panel frontal
MICRÓFONO
ICONOS DE PANTALLA
FUNCIÓN
DETENER
REPRODUCIR/
PAUSA
ABRIR/
CERRAR
CONTROL DE
VOLUMEN
ALIMENTACIÓN
5V 0.5A
MIC 2MIC 1
USBSENSOR DE MANDO A
DISTANCIA
PANTALLA
BANDEJA DE DISCO
✎
Cuando el producto está encendido, no deje que los niños toquen la superficie del producto. Es probable
que esté caliente.
✎
Para actualizar el software del producto a través de la toma de USB, debe utilizar una unidad Flash USB.
Introducción

6 - Español
Introducción
✎
Cuando el producto muestra el menú del disco Blu-ray, no es posible iniciar el video presionando el botón
/
6
del producto o del mando a distancia. Para reproducir el video, debe seleccionar Reproducir video o
Inicio en el menú del disco y presionar el botón
E
.
✎
Si está utilizando Internet o reproduciendo contenido desde un dispositivo USB en su TV a través de un
sistema de cine en casa, no es posible seleccionar el modo BD/DVD con el botón
FUNCTION. Para
seleccionar el modo BD/DVD, detenga el contenido que esté reproduciendo en el TV y, a continuación,
seleccione el modo BD/DVD.
✎
Enchufe la clavija del micrófono antes de utilizar la función de Karaoke.
Panel posterior
SURROUND
SURROUND
VENTILADOR DE
REFRIGERACIÓN
* ANTENA FM
ENTR. AUX
SALIDA HDMI
CONECTORES DE
SALIDA DE LAS
BOCINAS
CABLE DE
ALIMENTACIÓN
ENTRADA DE AUDIO
DIGITAL EXTERNO
(ÓPTICA)
* Conecte de la antena de FM
1. Conecte la antena de FM que se suministra a la toma FM AN.
2. Mueva lentamente el cable de la antena alrededor hasta que encuentre un punto en el que haya una buena
recepción y fíjelo en la pared o en otra superficie rígida.
✎
Mantenga un espacio libre mínimo de 10 cm. alrededor del sistema de cine en casa para garantizar su
adecuada ventilación. No obstruya el ventilador de refrigeración ni los orificios de ventilación.
✎
Este producto no recibe emisiones de AM.

7 - Español
Introducción
Mando a distancia
Guía del mando a distancia
Enciende o apaga el producto.
Ajusta el volumen.
Presione los botones numéricos
para utilizar las opciones.
Se presiona para saltar hacia adelante
o hacia atrás.
Se presiona para utilizar la función karaoke
(Volumen de mic., eco, Control de teclas).
Se presiona para ir a la pantalla de inicio.
Selecciona las opciones del menú en
pantalla y cambia los valores del menú.
Vuelve al menú anterior.
Estos botones se utilizan para
menús del producto y también para
diversas funciones del disco Blu-ray.
Se presiona para ver el menú del
disco.
Se presiona para usar el menú de
herramientas.
Se pulsa para reproducir el disco o
los archivos.
Se pulsa para dirigir la señal de
audio al altavoz del sistema de cine
en casa o al altavoz de TV.
(Consulte la página 24)
permite seleccionar el modo de
audio DSP/EQ deseado.
Se pulsa para detener el disco o los
archivos.
Corta temporalmente el sonido.
Se presiona para buscar hacia
adelante o hacia atrás.
Se pulsa para hacer una pausa
en la reproducción.
Permite repetir un título, un
capítulo, una pista o un disco.
Se utiliza para entrar en el menú
emergente / menú de títulos.
Para seleccionar MONO o STEREO
para la emisión de radio.
Busca emisoras de FM activas y
cambia los canales.
Se utiliza para ver la información
de reproducción al reproducir un
disco Blu-ray/DVD o archivos.
Se presiona para abrir y cerrar la
bandeja del disco.
Se presiona para salir del menú.
Se presiona para seleccionar
el modo del sistema de cine en
casa. (BD/DVD, D. IN, AUX, etc.).
Se utiliza para definir la frecuencia
de radio predefinida.
TOOLS
RETURN
EXIT
INFO
KARAOKE HOME
REPEAT
1
2
3
7
89
DISC MENU TITLE MENU
0
POPUP
4
56
MUTE
MO/ST
TUNER
MEMORY
DSP/EQTV SOUND
ABCD
TUNING
DOWN
UP
VOLUME
-
+
FUNCTION
Instalación de las pilas en el mando a distancia
✎
Asegúrese de respetar los extremos “+” y "–" de las pilas que
se indican en el diagrama del interior del compartimento.
✎
Basado en el uso normal del TV, las pilas duran
aproximadamente un año.
✎
El mando a distancia se puede utilizar a una distancia de unos
7 metros del producto en línea recta.
Tamaño de las
pilas: AAA
Se presiona para grabar una emisión
de radio FM.

8 - Español
Conexiones
En esta sección se describen diversos métodos de conexión del producto a otros componentes externos.
Antes de trasladar o instalar el producto, asegúrese de apagar y desconectar el cable de alimentación.
Conexión de las bocinas
Delantero (I)
Surround (I)
Surround (D)
Delantero (D)
Producto
Central
Subwoofer
Posición del producto
Colóquelo en un soporte o en
un estante, o bien debajo del
soporte del televisor.
Selección de la posición de
audición
La posición de audición debe
estar a una distancia del televisor
de aproximadamente 2,5 a 3
veces el tamaño de la pantalla
del TV. Por ejemplo, si tiene
una pantalla de 46 pulgadas, la
posición de audición debe estar
entre 2,92 y 3,50 metros de la
pantalla.
Bocinas delanteras
Coloque estas bocinas frente a la posición de audición, con el interior
(aproximadamente 45°) hacia usted. Coloque las bocinas frontales de forma que
sus potenciadores de agudos se encuentren a la misma altura de sus oídos.
Alinee la cara frontal de las bocinas frontales con la cara frontal de la bocina
central o colóquelas ligeramente frente a las bocinas centrales.
Bocina central
Es mejor instalar la bocina central a la misma altura que las bocinas delanteras.
También puede instalarla directamente encima o debajo del televisor.
Bocinas Surround
Coloque estas bocinas al lado de la posición de audición. Si no hay espacio
suficiente, coloque estas bocinas de forma que se sitúen una frente a la otra.
Colóquelas a una distancia de entre 60 y 90 cm por encima de sus oídos,
ligeramente hacia abajo.
* A diferencia de las bocinas delanteras y centrales, las bocinas Surround se
usan principalmente para los efectos de sonido. El sonido no saldrá por ellos
en todo momento.
Subwoofer
La posición del subwoofer no es importante. Colóquelo donde quiera.
* El aspecto de sus altavoces puede diferir de las ilustraciones de este manual.
* Cada bocina tiene una etiqueta de color en su parte trasera o lateral. Cada cable tiene una banda
de un solo color en su extremo. Haga coincidir la banda de cada cable con la etiqueta de la bocina
del mismo color y, a continuación, conecte el cable a la bocina. Consulte la página 9 para obtener
instrucciones precisas.

9 - Español
Conexiones
Conexión de las bocinas
SURROUND
SURROUND
SURROUND
SURROUND
Bocina delantera (D)
Subwoofer
Bocina central
Bocina
Surround (I)
Bocina delantera (I)
Bocina
Surround (D)
✎
Si coloca la bocina cerca del equipo de televisión, es posible que se distorsione el color de la pantalla
debido al campo magnético.
| PRECAUCIÓN |
Si desea instalar los altavoces en la pared, coloque firmemente las alcayatas (no suministrados) en el punto
de la pared en el que desee colgar los altavoces y, a continuación cuelgue los altavoces de las alcayatas por
el orificio de cada uno de los altavoces.
No permita que los niños jueguen con las bocinas o cerca de ellas. Podrían sufrir lesiones por la caída de
una bocina.
Al conectar los cables de las bocinas a los mismas, asegúrese de que la polaridad (+/ –) sea correcta.
Mantenga la bocina del Subwoofer fuera del alcance de los niños para evitar que inserten las manos u
objetos extraños en el conducto (orificio) del mismo.
No cuelgue el Subwoofer en la pared por el conducto (orificio).

10 - Español
Conexiones
Conexión a un TV y dispositivos externos
OPTICAL OUT
AUDIO OUT
HDMI IN (ARC)
SURROUND
SURROUND
Método 1 Método 2
R
Rojo
W
Blanco
Dispositivos
externos
Conexión a un TV
Conecte un cable HDMI desde la toma HDMI OUT de la parte trasera del producto a la toma HDMI IN del TV. Si el
TV admite ARC, puede oír el sonido del TV a través del sistema de cine en casa solo con este cable conectado.
Consulte la página 13 de este manual y la sección sobre ARC del manual de usuario del TV para más detalles.
Conexión a dispositivos externos
A continuación se explican dos métodos de conectar dispositivos externos a su sistema de cine en casa.
Método 1 ENTR. AUX: Conexión de un componente analógico externo
Utilizando un cable de audio RCA (no suministrado), conecte la toma de entrada de AUDIO del producto a la
toma de salida de AUDIO del componente analógico externo.
Seleccione el modo AUX.
• Asegúrese de que los colores de los conectores de los cables coincidan con los colores de las tomas de
entrada y salida.
Método 2 ÓPTICO: Conexión de un componente de audio digital externo
Se utiliza para conectar la salida de audio digital de los componentes de señales digitales como los
descodificadores de cable y los receptores de satélite: Utilizando el cable óptico (no suministrado), conecte el
terminal de salida de audio digital óptico del producto a la toma de salida digital óptica del dispositivo externo
utilizando un cable óptico digital.
Seleccione el modo D. IN.
✎
Para ver video desde el decodificador/receptor de satélite, debe conectar su salida de video directamente al TV.
✎
Este sistema admite las frecuencias de muestreo digital de 32 kHz o superior desde componentes digitales
externos.
✎
Este sistema sólo admite audio DTS y Dolby Digital. No se admite audio MPEG, formato bitstream.
Selección de un dispositivo externo para utilizarlo
Para seleccionar un dispositivo externo tras haberlo conectado, presione el botón FUNCTION. Cada vez que
presione el botón, el modo cambia en este orden : BD/DVD
D. IN
AUX
FM

11 - Español
Configuración
Procedimiento de ajustes iniciales
• El menú de inicio no aparecerá si no configura
los ajustes iniciales.
• La OSD (presentación en pantalla) puede
cambiar en este producto tras actualizar la
versión de software.
• Los pasos de acceso pueden diferir según el
menú seleccionado.
1. Encienda su TV después de conectar el producto
y, a continuación, encienda el producto. Cuando
encienda el producto por primera vez, el
producto muestra automáticamente la pantalla
de idioma de Configuración.
2. Pulse los botones
para seleccionar el
idioma que desee y, a continuación, pulse el
botón
E
.
3. Aparece la pantalla de Formato de TV. Presione
los botones ▲▼ para la relación de aspecto
de TV que desee y, a continuación, presione el
botón
E
.
Tiene cuatro opciones:
16:9 original - para TV panorámicos. Muestra
imágenes panorámicas en su formato 16:9
original e imágenes 4:3 (formato antiguo
estándar) en formato 4:3 Pillar box con las
barras en negro en el lado izquierdo y derecho.
16:9 Completo - para TV panorámicos. Muestra
imágenes panorámicas en su formato 16:9
original y amplía las imágenes 4:3 hasta ocupar
la pantalla 16:9.
4:3 Buzón - para TV analógicos antiguos con
pantalla estándar. Muestra imágenes 4:3 a toda
pantalla e imágenes 16:9 en formato Letter box
que conservan la relación de aspecto 16:9 pero
incluyen las barras en negro en la parte superior
e inferior de la imagen.
4:3 Pan-Scan - para TV analógicos antiguos
con pantalla estándar. Muestra imágenes 4:3 a
toda pantalla y las imágenes 16:9 con formato
Pan-Scan que ocupan la pantalla, pero corta los
lados izquierdo y derecho de la imagen y amplía
el centro verticalmente.
4. Aparece la pantalla de "Configuración inicial
completada." y aparece la pantalla de inicio.
✎
Si desea ver de nuevo la pantalla de
Configuración y hacer cambios, seleccione la
opción de Rest.. (Consulte la página 14)
✎
Si utiliza el cable HDMI para conectar el producto
a un TV Samsung compatible con Anynet+
(HDMI-CEC) y 1. Ha definido la función Anynet+
(HDMI-CEC) en On (Encendido) tanto en el TV
como en el producto y 2. Ha definido el TV en
un idioma admitido por el producto, el producto
seleccionará automáticamente dicho idioma
como el idioma preferente.
Visión general de la pantalla de inicio
REPRODUCIR DISCO
Cambiar
dispositivo
Función
No hay disco
Config.
FOTOS VIDEOS MÚSICA
1
345
2
1
REPRODUCIR DISCO
Aparece el disco insertado en la bandeja.
Pulse
E
para iniciar la reproducción del disco.
2
FOTOS/VIDEOS/MÚSICA
Permite reproducir fotos, videos o música desde
un disco o USB.
3
Cambiar dispositivo
Muestra una lista de dispositivos externos
conectados a la unidad principal. Cambia al
dispositivo que desee.
4
Función
Se utiliza para cambiar a un dispositivo externo
y para radio. Puede utilizar el botón
FUNCTION
del mando a distancia y el botón de la unidad
principal para el cambio de modo.
5
Config.
define varias funciones para adaptarse a las
preferencias personales.
Configuración

12 - Español
Configuración
Acceso a la pantalla de configuración
1. Seleccione Config. en la pantalla de inicio y, a
continuación, presione el botón
E
. Aparece la
pantalla de Config..
Config.
Imagen
Sonido
Sistema
Idioma
Seguridad
Soporte técnico
Formato de TV : 16:9 original
BD Wise : Apagado
Resolución : Auto
Fotograma (24 fps) : Apagado
Formato color HDMI : Auto
Color profundo HDMI : Apagado
Modo progresivo : Auto
2. Para acceder a los menús, submenús y
opciones en la pantalla Config., consulte la
ilustración del mando a distancia que se incluye
a continuación. (Ver más abajo)
✎
Si deja el producto en modo de parada durante
más de 5 minutos sin usarse, se activará en el TV
un protector de pantalla. Si el producto se deja en
el modo de protector de pantalla durante más de
20 minutos, se apagará automáticamente.
Botones del mando a distancia utilizados
para el menú de configuración
TOOLS
RETURN
EXIT
INFO
KARAOKE HOME
REPEAT
TUNER
24
3
1
1
Botón HOME : se presiona para ir a la
pantalla de inicio.
2
Botón RETURN : se pulsa para volver al
menú anterior
3
Botón
E
(INTRO) / DIRECCIÓN :
• Presione
▲▼◄►
para mover el cursor o
seleccionar un elemento.
• Presione el botón
E
para activar la
opción actualmente seleccionada o
confirmar un ajuste.
4
Botón EXIT : se presiona para salir del
menú actual.
Información detallada de las funciones
Cada función de Config., opción de menú y opción
individual de configuración se explica detalladamente
en pantalla. Para ver una explicación, utilice los
botones ▲▼◄► para seleccionar la función, la
opción de menú o la opción. La explicación aparecerá
normalmente en la parte inferior de la pantalla.
En esta página se incluye una descripción breve de
las funciones de Config.. También se incluye en el
Apéndice de este manual información adicional sobre
algunas de las funciones.
Funciones del menú Config.
Imagen
Formato de TV
Permite ajustar la salida del producto al tamaño de
pantalla del TV. (Consulte la página 25)
BD Wise
BD Wise es la función de interconectividad más
reciente de Samsung. Cuando conecte entre sí
un producto Samsung y un TV Samsung con BD
Wise a través de HDMI, y BD Wise esté activado
en el producto y el TV, el producto genera la
salida de video con la resolución y la velocidad de
fotogramas del disco Blu-ray/DVD.
Resolución
Permite definir la resolución de salida de la señal
de video HDMI en BD Wise, Auto, 1080p, 1080i,
720p, 480p. El número indica el número de
líneas de video por fotograma. La i y la p indican
respectivamente el rastreo interlazado y progresivo.
Cuanto más líneas, más alta será la calidad.
Fotograma (24 fps)
Si se define la función Fotograma (24 fps) en Auto
es posible que el producto ajuste la salida HDMI
en 24 fotogramas por segundo automáticamente
para obtener una mejor calidad de imagen si se
conecta a un TV compatible de 24 Fs.
• Puede disfrutar de la función Fotograma (24
fps) únicamente en un televisor que admita esta
velocidad de fotogramas.
• Solo está disponible Fotograma (24Fs) cuando
el producto esté en los modos de resolución de
salida HDMI 1080p.

13 - Español
Configuración
Formato color HDMI
Permite definir el formato de espacio de color para la
salida HDMI para que coincida con las capacidades
del dispositivo conectado (TV, monitor, etc).
Color profundo HDMI
Permite definir que la salida de video se genere
desde la toma HDMI OUT con color profundo. Color
profundo proporciona una reproducción del color
más precisa con una mayor profundidad del color.
Modo progresivo
Permite mejorar la calidad de la imagen al ver
DVD.
Sonido
Clasificación de karaoke
Esta función puntúa la capacidad de cantar y le da
una puntuación por cada canción que cante.
Mi karaoke
Establece el volumen de la voz al utilizar la función
karaoke.
Voces originales: el volumen se define en el nivel
del sonido original.
Disminuir voz: el volumen se define en un nivel de
sonido más bajo que el original.
Altavoz
Permite configurar los siguientes ajustes de las
bocinas, así como activar y desactivar el tono de
prueba para poder probar las bocinas.
Nivel: Permite ajustar el sonido de cada bocina
entre 6dB y -6dB. Por ejemplo, si le gustan los
graves profundos, puede subir el sonido del
subwoofer 6dB.
Distancia
: Permite ajustar la distancia relativa de
cada bocina con respecto a la posición de audición
hasta 9 metros. Cuanto mayor sea la distancia,
más alto será el sonido de la bocina.
Prueba de altavoz
: Permite ejecutar la función
Prueba de altavoz para poder probar los ajustes.
Si se establece Prueba de altavoz en
Encendido
se activa Prueba de altavoz. Si se establece en
Apagado
se desactiva.
Selección de altavoz
Permite seleccionar las bocinas que desee activar,
bien las bocinas del TV o las bocinas del sistema de
cine en casa.
Modo ecualizador
Active Modo ecualizador para usar el ecualizador.
Config. del ecualizador
Permite definir el ecualizador.
✎
Config. del ecualizador solo aparece
cuando
Modo ecualizador
está definido en
Encendido.
Canal retorno audio
Permite dirigir el sonido desde el TV a los
altavoces del sistema de cine en casa. Requiere
una conexión HDMI y un TV compatible con Canal
retorno audio (ARC).
• Si Canal retorno audio se activa y está
utilizando un cable HDMI para conectar el
producto al TV, no funcionará la entrada óptica
digital.
• Si Canal retorno audio se define en Auto y
está utilizando un cable HDMI para conectar el
producto al TV, se selecciona automátivcamete
ARC o la entrada óptica digital.
Salida Digital
Permite definir la Salida Digital para que
coincida con las funcionalidades del receptor de
AV conectado al producto: Para más detalles,
consulte la tabla de selección de salida digital.
(Consulte la página 30)
Compresión Dinámica.
Permite aplicar el control de rango dinámico a
audio Dolby Digital, Dolby Digital Plus y Dolby True
HD.
Auto:
controla automáticamente el rango
dinámico del audio Dolby TrueHD, basándose en
la información de la banda sonora Dolby TrueHD.
También desactiva el control de rango dinámico para
Dolby Digital y Dolby Digital Plus.
Apagado
: deja el rango dinámico sin comprimir, lo
que le permite oír el sonido original.
Encendido
: activa el control de rango dinámico
para los tres formatos. Los sonidos más bajos se
suben y se reduce el volumen de los sonidos altos.

14 - Español
Configuración
Modo Downmixing
Permite seleccionar el método de Downmix de
varios canales que es compatible con el sistema
estéreo. Puede elegir en el producto Downmix
en Estéreo Estándar o en Compatible con
Surround.
Sinc. audio
Cuando el producto está conectado a un TV
digital, permite ajustar la demora de audio de
forma que el audio se sincronice con el video.
Puede establecer la demora entre 0 y 300
milisegundos.
Sistema
Configuración
Permite volver a ejecutar el procedimiento de
Configuración. (Consulte la página 11)
Inicio rápido
Puede encender rápidamente reduciendo el
tiempo de arranque.
✎
Si esta función se define en
Encendido
,
aumentará el consumo de alimentación de
espera. (Aprox. 12 W ~ 20 W)
Anynet+ (HDMI-CEC)
Anynet+ es una función que ofrece operaciones
asociadas a otros productos Samsung que tengan
la función Anynet+ y le permite controlar dichos
productos con un mando a distancia de TV
remoto. Para utilizar esta función, debe conectar
este producto a un TV Samsung Anynet+ con un
cable HDMI.
Gestión de datos BD
Permite gestionar el contenido descargado
desde un disco Blu-ray y almacenado en una
unidad flash. Puede comprobar la información del
dispositivo incluido el tipo de almacenamiento,
borrar los datos de BD o cambiar el dispositivo de
memoria Flash.
Video de pago DivX®
Permite ver los códigos de registro VOD de DivX®
VOD para comprar y reproducir contenido DivX®
VOD.
Idioma
Permite seleccionar el idioma que prefiera para
Menú en pantalla, Menú del disco, etc.
• El idioma seleccionado sólo aparecería si el
disco lo incluyese.
Seguridad
El PIN de seguridad predeterminado es 0000.
Ingrese el PIN predeterminado para acceder a la
función de seguridad si no ha creado su propio
PIN.
Clasif. padres BD
Impide la reproducción de discos Blu-ray con una
calificación igual o superior a una calificación de
edad específica a menos que se introduzca el PIN.
Clasif. padres DVD
Impide la reproducción de DVDs con una
calificación superior a la calificación numérica
especificada a menos que introduzca el PIN.
Cambiar Código
Permite cambiar el PIN de 4 dígitos utilizado para
acceder a las funciones de seguridad.
Soporte técnico
Actualización del software
Para más información sobre esta función, consulte
la página 16.
Contacto con Samsung
Proporciona información de contacto para obtener
asistencia sobre su producto.
Rest.
Recupera los valores por defecto. Requiere la
introducción del PIN de seguridad.
El PIN de seguridad predeterminado es 0000.

15 - Español
Configuración
Configuración de radio
• Para escuchar la radio, debe conectar la antena
de FM que se suministra.
Utilización de la radio con el mando a distancia
1.
Presione el botón FUNCTION para seleccionar FM.
2. Sintonice la emisora que desee.
• Sintonización de presintonía 1 : Presione
el botón
5
para seleccionar PRESET y, a
continuación, presione el botón
TUNING UP,
DOWN para seleccionar emisora predefinida.
- Antes de sintonizar las emisoras predefinidas,
debe añadir emisoras predefinidas a la
memoria productos.
• Sintonización manual : Presione el botón
5
para seleccionar MANUAL y, a continuación,
presione el botón TUNING UP, DOWN para
seleccionar emisora predefinida.
•
Sintonización automática : Presione el
botón
5
para seleccionar
MANUAL
y, a
continuación, mantenga presionado el botón
TUNING UP, DOWN
durante unos segundos
para buscar automáticamente la banda.
Selección de Mono o Estéreo
Presione el botón MO/ST.
• Cada vez que presione el botón, el sonido cambia
entre STEREO y MONO.
• En un área de recepción pobre, seleccione MONO
para una emisión clara sin interferencias.
Preajuste de emisoras
Ejemplo: preajuste de FM 89.10 en la memoria.
1. Presione el botón
FUNCTION para seleccionar
FM.
2. Presione el botón TUNING UP, DOWN para
desplazarse por las frecuencias FM y seleccione
<89.10>.
3. Presione el botón TUNER MEMORY (el botón
amarillo C en la parte inferior del mando a
distancia).
4. Presione de nuevo el botón
TUNER MEMORY
antes de que transcurran 5 segundos. La
estación se almacena en memoria.
✎
Si presiona de forma repetida el botón TUNER
MEMORY
sin cambiar la emisora, se sobrescribe
la emisora ingresada.
5. Para memorizar otra emisora, repita los pasos
del 2 al 4.
• Para sintonizar una emisora predefinida, pulse
el botón
TUNING UP, DOWN.
✎
Para eliminar todas las emisoras de presintonías
FM al mismo tiempo, presione el botón
TITLE
MENU por unos 5 segundos en modo FM Manual
hasta que aparezca DEFAULT PRESET en la
pantalla.
Grabación de radio FM
Puede grabar su programa de radio favorito en el
dispositivo de almacenamiento USB.
1. Inserte un dispositivo USB en la toma USB del
frontal del producto.
2. Presione el botón
FUNCTION para seleccionar
FM y, a continuación, presione los botones
TUNING UP, DOWN para seleccionar la
emisora que desee grabar.
3. Presione el botón
ROJO (A) para iniciar la
grabación de a emisión de radio. Se inicia la
grabación.
• El tiempo grabado aparece a la izquierda y
el tiempo de grabación disponible según la
cantidad de espacio libre en el dispositivo
de almacenamiento USB se muestra a la
derecha.
4. Presione el botón
EXIT para finalizar la
grabación. La grabación se detiene y se guarda
como un archivo .mp3 file al mismo tiempo.
Para reproducir el archivo grabado, consulte
"Reproducción de archivos en un dispositivo
USB".
✎
El archivo guardado se guarda en la carpeta
Tuner que se crea automáticamente.
✎
Solo están operativos los botones
( ABRIR/
CERRAR)
,
(ALIMENTACIÓN)
,
EXIT, MUTE
, y
VOLUME +/-
, mientras se graba la radio FM.
✎
Si no presiona ningún botón mientras se graba,
se activa el protector de pantalla.
✎
Los efectos de sonido, como DSP, EQ, etc., no
se graban durante la grabación de radio FM.
✎
La radio se graba con el volumen por defecto
especificado incluso aunque se cambie el
volumen o se presione el botón
MUTE
durante el
proceso de grabación.
✎
Si retira el dispositivo USB o el cable de
alimentación durante el proceso de grabación,
es posible que la parte del archivo grabado hasta
entonces no se pueda reproducir.

16 - Español
Configuración
✎
La grabación no se inicia si el resto de espacio
del dispositivo de almacenamiento USB es inferior
a 2 MB.
✎
Si se retira el dispositivo USB o no hay espacio
suficiente (menos de 2 MB), aparece el mensaje
correspondiente y se detiene la grabación.
Actualización de software
Este menú de Actualización del software permite
actualizar el software del producto para mejoras del
rendimiento o servicios adicionales.
• Nunca apague o encienda manualmente el
producto durante el proceso de actualización.
• La actualización se completa cuando el
producto se apague tras reiniciar. Pulse el botón
ALIMENTACIÓN para encender el producto
actualizado para usarlo.
1. Visite el sitio web de Samsung con una
computadora y descargue el paquete de
actualización en un dispositivo USB.
✎
Guarde el paquete de actualización en la
carpeta del nivel superior del dispositivo USB.
De lo contrario, el producto no podrá localizar el
paquete de actualización.
2. Conecte al producto el dispositivo USB que
contiene el paquete de actualización.
3. Seleccione Soporte técnico > Actualización
del software > Por USB. El software se
actualiza utilizando el paquete de actualización
del dispositivo USB.
✎
No debería haber ningún disco en el producto al
actualizar el software utilizando la toma USB Host.
✎
Una vez finalizada la actualización del software,
compruebe los detalles del software en el menú
Actualización del software.

17 - Español
Reproducción de contenido
Su sistema de cine en casa puede reproducir
contenido de discos Blu-ray/DVD/CD y dispositivos
USB.
Cambio del dispositivo de origen
Si dos o más dispositivos externos están conectados
a la unidad principal, puede utilizar cualquiera de los
tres métodos descritos a continuación para cambiar
el dispositivo de origen.
Método 1
En la pantalla de inicio, utilice los botones ▲▼◄►
para ir a Cambiar dispositivo y, a continuación,
pulse
E
.
Aparecerá la ventana Cambiar dispositivo. Utilice
los ▲▼ para moverlo al dispositivo que desee y pulse
el botón
E
.
Método 2
Si se traslada a FOTOS, VIDEOS, MÚSICA u otro
contenido basado en archivos, aparecerá una lista de
carpetas y archivos. Pulse el botón ROJO (A) para
mostrar la ventana emergente Cambiar dispositivo,
utilice los botones ▲▼ para ir al dispositivo deseado y,
a continuación, pulse
E
.
Método 3
Cuando se conecta un dispositivo por primera vez,
aparece una ventana emergente. En la ventana
emergente, puede cambiar el dispositivo de origen
utilizando los botones
◄►
y presionando
E
.
Reproducción de discos comerciales
1. Presione el botón
para abrir la bandeja de
disco.
2. Coloque el disco en la bandeja con el lado de la
etiqueta hacia arriba.
3. Presione el botón
para cerrar la bandeja
de disco. La reproducción se inicia
automáticamente.
4. Si la reproducción no se inicia automáticamente,
pulse el botón
6
del mando a distancia.
Almacenamiento y manejo de discos
• Sujeción de discos
- Huellas o arañazos en el disco
pueden reducir la calidad del
sonido y de la imagen o provocar
saltos.
- Evite tocar la superficie del disco en la que se
van a grabar datos.
- Sujete el disco por sus bordes de forma que no
deje huellas en su superficie.
- No adhiera papel ni cinta en el disco.
• Limpieza de discos
- Si deja huellas en el disco, límpielas
con un detergente suave diluido en
agua y límpielo con un paño suave.
- Al limpiar, pase el paño suavemente
de dentro a fuera del disco.
- Almacenamiento de discos
No los exponga a la luz directa del sol.
Guárdelos en un área ventilada fresca.
Guárdelos en una funda de protección
limpia y en posición vertical.
Reproducción de un disco con
contenido grabado por el usuario
Es posible reproducir archivos multimedia grabados
en discos Blu-ray, DVD o CD.
1. Coloque un disco grabado por el usuario en la
bandeja de disco con la etiqueta hacia arriba y
cierre la bandeja.
2. Utilice los botones ◄► para seleccionar el
tipo de contenido que desee ver o reproducir -
FOTOS, VIDEOS, o MÚSICA y, a continuación,
pulse el botón
E
.
O BIEN
2
-1
. Seleccione REPRODUCIR DISCO en la pantalla
de inicio. Aparece la pantalla REPRODUCIR
DISCO. Utilice los botones ▲▼ para seleccionar
el tipo de contenido deseado, Fotos, Videos, o
Música.
3. Aparece una pantalla con el contenido del
dispositivo. Según la forma en que se organice
el contenido, verá carpetas, archivos individuales
o ambos.
4. Si es necesario, utilice los botones ▲▼◄►
para seleccionar una carpeta y, a continuación,
presione el botón
E
.
Reproducción de contenido

18 - Español
Reproducción de contenido
5. Utilice los botones ▲▼◄► para seleccionar
un archivo para verlo o reproducirlo y, a
continuación, presione el botón
E
.
6. Presione el botón RETURN una o más veces
para salir de la pantalla actual, de una carpeta o
para volver a la pantalla de inicio.
Presione el botón EXIT para volver directamente
a la pantalla de inicio.
7. Vaya a las páginas 19~23 para obtener
instrucciones sobre la forma de controlar la
reproducción de videos, música e imágenes de
un disco.
Reproducción de archivos en un
dispositivo USB
Existen dos métodos que puede utilizar para
reproducir o ver archivos multimedia de un dispositivo
USB a través del producto.
Método 1: si coneca un doispositivo USB con
el producto encendido
1. Aparece el mensaje emergente que indica
"Nuevo dispositivo.".
REPRODUCIR DISCO
Cambiar
dispositivo
Función
No hay disco
Config.
FOTOS VIDEOS MÚSICA
R
EPR
O
D
UC
IR DI
SCO
C
ambia
r
di
spos
i
t
i
v
o
F
u
n
c
i
ón
N
o hay disco
Config
.
FO
T
OS
V
IDE
OS
MÚS
I
CA
Nuevo dispositivo.
STORAGE DEVICE
Fotos
Videos
Música
> Mover " Ingresar ' Regresar
✎
Si no aparece este mensaje emergente, vaya al
Método 2.
2. Utilice los botones ▲▼ para seleccionar Fotos,
Videos o Música y, a continuación, presione el
botón
E
. Según la forma en que se organice el
contenido, verá carpetas, archivos individuales o
ambos.
3. Si es necesario, utilice los botones ▲▼◄►
para seleccionar una carpeta y, a continuación,
presione el botón
E
.
4. Seleccione un archivo para verlo o reproducirlo y,
a continuación, presione el botón
E
.
5. Presione el botón RETURN para salir de una
carpeta o el botón EXIT para volver a la pantalla
de inicio.
6. Vaya a las páginas 19~23 para obtener
instrucciones sobre la forma de controlar la
reproducción de videos, música e imágenes del
dispositivo USB.
Método 2: si el producto está encendido
después de conectar un dispositivo USB
1. Encienda el producto.
2. Pulse Cambiar dispositivo y seleccione un
dispositivo USB.
3. Utilice los botones ◄► para seleccionar
FOTOS, VIDEOS, o MÚSICA en la pantalla de
inicio y, a continuación, pulse el botón
E
.
4. Si es necesario, utilice los botones ▲▼◄►
para seleccionar una carpeta y, a continuación,
presione el botón
E
.
5. Seleccione un archivo para verlo o reproducirlo y,
a continuación, presione el botón
E
.
6. Presione el botón
RETURN para salir de una
carpeta o el botón EXIT para volver a la pantalla
de inicio.
7. Vaya a las páginas 19~23 para obtener
instrucciones sobre la forma de controlar la
reproducción de videos, música e imágenes del
dispositivo USB.
✎
Si inserta el disco al reproducir el dispositivo USB,
el modo de dispositivo cambia automáticamente
a "Disco".

19 - Español
Reproducción de contenido
Control de reproducción de video
Puede controlar la reproducción del contenido de
video de un disco Blu-ray/DVD o dispositivo USB.
Según el disco o el contenido, es posible que no
estén disponibles algunas de las funciones descritas
en este manual.
Botones del mando a distancia
utilizados para reproducción de video
KARAOKE HOME
REPEAT
DISC MENU TITLE MENU
0
POPUP
1
2
3
1
Botones relacionados con la reproducción
El producto no reproduce sonido en el modo
Buscar, Lento, o Paso.
• Para volver a la reproducción a velocidad
normal, presione el botón
6
.
6
inicia la reproducción.
5
detiene la reproducción.
7
hace una pausa en la reproducción.
Reproducción
a cámara
rápida
Durante la reproducción, presione
el botón
3
o
. Cada vez
que presione el botón
3
o
, cambiará la velocidad de
reproducción.
Reproducción
a cámara
lenta
En modo de pausa, presione el
botón
. Cada vez que presione
el botón
, cambiará la velocidad
de reproducción.
Reproducción
por
fotogramas
En modo de pausa, presione el
botón
7
. Cada vez que presione
el botón
7
, aparece un nuevo
fotograma.
Salto en
reproducción
Durante la reproducción, presione
el botón
1
o
2
.
Cada vez que presione el botón
1
o
2
, el disco va al capítulo o al
archivo anterior o siguiente.
2
Uso del menú de disco, menú de título,
menú emergente y lista de títulos
DISC MENU
Durante la reproducción, presione este botón para
ver el menú del disco.
TITLE MENU
Durante la reproducción, presione este botón para
ver el menú del título.
• Si el disco tiene una lista de reproducción,
pulse el botón
VERDE (B) para ir a la lista de
reproducción.
POPUP MENU
Durante la reproducción, presione este botón para
ver el menú emergente.
3
Repetir reproducción
1. Durante la reproducción, presione el botón
REPEAT del mando a distancia.
2. Presione los botones ▲▼ para seleccionar
Apagado, Título, Capítulo, Todo o Repetir
A-B y, a continuación, presione el botón
E
.
Repetir A-B
1.
Presione el botón
E
en el punto en el que
desea iniciar la repetición de la reproducción (A).
2. Presione el botón
E
en el punto donde
quiere que termine (B) la reproducción
repetida.
3. Para volver a la reproducción normal,
presione de nuevo el botón
REPEAT.
4. Presione el botón
E
.
✎
Según el disco, es posible que la pantalla no
muestre todas las opciones de repetición.
✎
Es posible que en pantalla no aparezca
inmediatamente Capítulo o Título immediately.
Continúe pulsando los botones ▲▼ hasta que su
elección aparezca dentro del campo aplicable.
✎
Para regresar a la reproducción normal,
presione
REPEAT de nuevo, presione los
botones ▲▼ para seleccionar Apagado y, a
continuación, presione el botón
E
.
✎
Es posible que en pantalla no aparezca
inmediatamente Repetir A-B. Continúe
pulsando los botones ▲▼ hasta que Repetir
A-B aparezca dentro del campo aplicable.
✎
Debe definir el punto (B) al menos 5 segundos
de reproducción después del punto (A).

20 - Español
Reproducción de contenido
Utilización del menú Herramientas
Durante la reproducción, presione el botón TOOLS.
Título
Si hay más de un título en un disco o dispositivo,
vaya al título que desee o selecciónelo.
✎
Al buscar el título del DVD, en modo de
parada, presione el botón
TOOLS e ingrese el
número del título (01,02,...) que desee.
Tpo. reproducción
Le permite ir a un punto de reproducción
específico. Utilice los botones numéricos para
introducir el punto de reproducción.
Modo de repetición
Permite repetir un título, un capítulo o una sección
marcada específica.
Sinc. audio
Permite ajustar la demora de audio de forma que
el audio se sincronice con el vídeo. Puede definir la
demora de entre 0 y 300 milisegundos.
Modo ecualizador
Active Modo ecualizador para usar el ecualizador.
Config. del ecualizador
Permite definir el ecualizador.
✎
Config. del ecualizador solo aparece
cuando
Modo ecualizador
está definido en
Encendido.
Ajustes de imagen
Permite establecer el modo de imagen.
Modo
- Usuario : Vaya a Configuración avanzada
y presione el botón
E
. Permite ajustar
manualmente las funciones Brillo, Contraste,
Color, y Definición.
- Dinámico : Elija este ajuste para aumentar la
nitidez.
- Normal : Elija este ajuste para la mayoría de
aplicaciones de visualización.
- Cine : Este es el mejor ajuste para ver
películas.
Selecciones de menú que aparecen solo
cuando se reproduce un disco BD/DVD
Capítulo
Permite seleccionar para ir a un capítulo que desee
ver.
Audio
Permite definir el idioma de audio deseado.
Subtítulos
Permite definir el idioma de subtítulos deseado.
Ángulo
Se selecciona para ver una escena desde otro
ángulo. La opción Ángulo muestra el número de
ángulos disponibles (1/1, 1/2, 1/3, etc.).
Video BONUSVIEW Audio BONUSVIEW
Permite definir la opción de Bonusview deseada.
Selecciones de menú que aparecen solo
mientras se reproduce un archivo
Pant completa
Permite establecer el tamaño de pantalla
completa. Puede seleccionar Original, Modo1
(larger) y Modo2 (largest).
Información
Se selecciona para ver la información del archivo
de video.
✎
Según el disco o del dispositivo de
almacenamiento, es posible que no funcione
el menú de herramientas. Es posible que no se
muestren todas las opciones.

21 - Español
Reproducción de contenido
Creación de una lista de reproducción
de vídeo
Puede crear una lista de reproducción de archivos de
video casi de la misma forma que se crea una lista
de reproducción de archivos de música. Consulte la
página 22 para obtener instrucciones. Seleccione los
archivos de video en vez de los archivos de música.
Reproducción de discos de audio
pregrabados comerciales
1. Introduzca un CD de audio (CD-DA) o un Disco
MP3 en la bandeja del disco.
• En un CD de audio (CD-DA), la primera pista
se reproducirá automáticamente. Las pistas
de un disco se reproducen en el orden en el
que se grabaron en el disco.
•
En un disco MP3, pulse los botones ◄► para
seleccionar MÚSICA y pulse el botón
E
.
0/16
00:00/00:00
Playlist
Pl li
TRACK 004 04:02
TRACK 005 03:43
TRACK 006 03:40
TRACK 001
CD
Herramientas
Modo de repetición Pista
Modo ecualizador Apagado
Copiar
Grabación de karaoke
>
Mover
<
Ajustar
'
Regresar
"
Pausa
Seleccionar
Herramientas
'
Regresar
2. Para reproducir una pista concreta, utilice
los botones ▲▼ del mando a distancia para
seleccionar la pista y, a continuación, pulse el
botón
E
.
✎
Para más información sobre la reproducción de
música, consulte Control de reproducción de
música a continuación.
Control de reproducción de música
Puede controlar la reproducción del contenido de
música de un DVD, CD o USB. Según el disco o
el contenido, es posible que no estén disponibles
algunas de las funciones descritas en este manual.
Botones del mando a distancia
utilizados para reproducción de música
1
2
3
7
89
DISC MENU TITLE MENU
0
POPUP
4
56
1
4
6
5
3
2
1
Botones Numéricos : Durante la
reproducción de la lista de reproducción,
pulse el número de pista que desee. Se
reproduce la pista seleccionada.
2
Omitir : Durante la reproducción, pulse el
botón
1
o
2
para ir a la pista anterior o
siguiente.
3
5
Botón : detiene una pista.
4
Reproducción rápida (sólo CD de audio
(CD-DA))
Durante la reproducción, presione el
botón
3
o
. Cada vez que presione el
botón
3
o
, cambiará la velocidad de
reproducción.
5
7
Botón : hace una pausa en la pista.
6
6
Botón : reproduce la pista actualmente
seleccionada.
Repetición de pistas
Es posible configurar el producto para que repita pistas.
1. Durante la reproducción de música, pulse el
botón
TOOLS.
2. Seleccione Modo de repetición y utilice los
botones
◄►
para seleccionar Apagado, Pista
o Uno, Todo o Mezcla y presione el botón
E
.

22 - Español
Reproducción de contenido
Creación de una lista de reproducción de
música
1. Si va a reproducir música de un CD o DVD
comercial, pulse el botón
5
o RETURN.
Aparece la pantalla de lista de música. Si está
creando una lista de reproducción a partir de
música de un disco creado por un usuario o
un dispositivo USB, acceda a la lista de música
como se describe en la página 17 o 18.
2. Pulse los botones ▲▼◄► para ir al archivo
que desee y, a continuación, pulse el botón
AMARILLO (C) para seleccionarlo. Repita
este procedimiento para seleccionar archivos
adicionales.
3.
Si desea seleccionar todos los archivos, pulse
el botón
TOOLS, utilice los botones ▲▼ para
seleccionar Seleccionar todo y, a continuación,
pulse
E
. Si desea seleccionar todos los archivos,
pulse el botón
TOOLS, seleccione Deseleccionar
todos y, a continuación, pulse
E
.
㾎
CD
a
Cambiar dispositivo
Seleccionar
Herramientas
()
Salt. de pág
'
Regresar
MÚSICA TRACK 001 1 archivo sel. 1/2 Página
TRACK 001
05:57
TRACK 002
04:27
TRACK 003
04:07
TRACK 004
03:41
TRACK 005
03:17
TRACK 006
03:35
TRACK 007
03:47
TRACK 008
03:49
TRACK 009
03:53
TRACK 010
03:45
4. Para eliminar un archivo de List. Repr., vaya
al archivo y, a continuación, pulse el botón
AMARILLO (C).
5. Pulse el botón
E
para reproducir los archivos
seleccionados. Aparece la pantalla List. Repr..
6. Para ir a la Lista de música, pulse el botón
5
o
RETURN.
7. Para volver a List. Repr., pulse el botón
E
.
✎
Puede crear una lista de reproducción de hasta
99 pistas en un CD de audio (CD-DA).
✎
Si va a la lista de música desde List. Repr. y,
a continuación, vuelve a List. Repr., la List.
Repr. iniciará de nuevo la reproducción desde el
principio.
Copia
1. Inserte un dispositivo USB en la toma USB del
frontal del producto.
2. Con la pantalla de reproducción en pantalla.
utilice los botones ▲▼ para seleccionar
una pista y, a continuación, pulse el botón
AMARILLO (C). Aparece una marca a la
izquierda de la pista.
3. Repita el paso 3 para seleccionar y marcar
pistas adicionales.
4. Para eliminar una pista de la lista, vaya a la
pista y, a continuación, pulse de nuevo el botón
AMARILLO (C). Se borra la marca de la pista.
5. Una vez hecho, pulse el botón
TOOLS.
Aparece el menú Herramientas.
6. Utilice los botones ▲▼ para seleccionar Copiar
y, a continuación, pulse el botón
E
. Aparece la
pantalla Copiar.
7. Presione los botones ▲▼ hasta seleccionar el
dispositivo para almacenar los archivos copiados
y, a continuación, presione el botón
E
.
✎
No desconecte el dispositivo mientras se
encuentra en curso la copia.
8. Si desea cancelar la copia de la pista, presione
el botón v y, a continuación, seleccione Sí.
Seleccione No para continuar copiando.
9. Una vez que se finalice la copia, aparece el
mensaje "Copia completa.".
10. Presione el botón
E
para volver a la pantalla
de reproducción.
✎
Esta función no está disponible con CD de audio
DTS.
✎
Es posible que esta función no se admita en
algunos discos.
✎
La copia codifica la música en formato .mp3 a
192 kbps.
✎
En la pantalla de la lista de pistas, puede elegir
Seleccionar todo o Deseleccionar todos.
- Utilice Seleccionar todo para seleccionar
todas las pistas y pulse el botón
E
. Con esto
se cancelan las selecciones individuales de
pistas.
- Utilice Deseleccionar todos para cancelar la
selección de todas las pistas seleccionadas al
mismo tiempo.

23 - Español
Reproducción de contenido
Reproducción de contenido fotográfico
Puede reproducir contenido fotográfico de un DVD o
USB.
Utilización del menú Herramientas
Durante la reproducción, presione el botón TOOLS.
Inic. vis. aut. / Detener presentacion
Se selecciona para reproducir/hacer una pausa en
la presentación.
Veloc. de presentación
Se selecciona para ajustar e la velocidad de la
presentación.
Música de fondo
Se selecciona para escuchar música mientras se
ve una presentación.
Zoom
Se selecciona para ampliar la imagen actual. (Se
amplía hasta 4 veces.)
Girar
Se selecciona para girar la imagen. (Esto hará girar
la imagen a la derecha o a la izquierda.)
Información
Muestra la información de la imagen, incluido el
nombre y el tamaño, etc.
✎
Según el disco o del dispositivo de
almacenamiento, es posible que no funcione
el menú Herramientas. Es posible que no se
muestren todas las opciones.
✎
Para activar la función de música de fondo, el
archivo de foto debe estar en el mismo medio
de almacenamiento que el archivo de música.
No obstante, la calidad del sonido puede verse
afectada por la velocidad de bits del archivo MP3,
el tamaño de la foto y el método de codificación.
Creación de una lista de reproducción
de fotos
Puede crear una lista de reproducción de foto casi de
la misma forma que se crea una lista de reproducción
de música. Consulte la página 22 para obtener
instrucciones. Seleccione los archivos de fotos en vez
de los archivos de música.
Utilización de Karaoke
Puede disfrutar del Karaoke con música.
1. Conecte el micrófono en el frontal del producto.
2. En el menú de inicio, seleccione Config. y, a
continuación, presione el botón
E
.
3. Seleccione Sonido y, a continuación, presione el
botón
E
.
4. Seleccione Mi karaoke y, a continuación,
presione el botón
E
.
• Puede comprobar la puntuación del Karaoke
y ajustar el volumen de la voz de la música de
la reproducción.
• Su puntuación de karaoke se muestra
automáticamente so Clasificación de
karaoke se define en Encendido y se
conecta un micrófono. Si no quiere ver la
puntuación, defina Clasificación de karaoke
en Apagado.
• Si desea bajar el volumen de la voz del sonido
original, seleccione Disminuir voz voz en los
ajustes de Mi karaoke.
Grabación
Puede realizar una grabación del karaoke con música.
1. Durante la reproducción, pulse el botón TOOLS
para seleccionar Grabación de karaoke y, a
continuación, pulse el botón
E
.
2. Presione el botón
5
para finalizar la grabación.
3. Una vez finalizada la grabación, se crea
la carpeta KARAOKE en la unidad de
almacenamiento USB y se guarda como
KARAOKE.mp3.
✎
Para guardar el archivo de la grabación, debe
insertar la unidad de almacenamiento USB.
✎
El archivo de grabación se muestra si vuelve a
entrar en Fotos, Videos y Música.
✎
Si detecta ruidos extraños (como chillidos) al
utilizar la función de Karaoke, aleje el micrófono
de las bocinas. También resulta eficaz bajar el
volumen del micrófono o de la bocina.
✎
El micrófono no funciona en los modos D. IN,
AUX ni FM.
✎
La puntuación del karaoke muestra
automáticamente la puntuación cuando
Clasificación de karaoke se define en
Encendido y está conectado el micrófono.
Desconecte el micrófono si no aparece la
puntuación.
✎
El micrófono se activa 10 segundos después de
que aparezca en pantalla el menú inicio.

24 - Español
Reproducción de contenido
Utilización de los botones del mando
a distancia de efectos especiales
Sonido de TV
TV SOUND
Si tiene un TV que admita Anynet+ (HDMI-CEC),
el botón TV SOUND permite dirigir el del TV a las
bocinas de cine en casa o las bocinas del TV. Para
usar, siga estos pasos:
1. Conecte un cable HDMI al TV y al sistema de
cine en casa (Consulte la página 10)
2. Defina Anynet+ (HDMI-CEC) Encendido en
el sistema de cine en casa y en el TV.
3.
Pulse el botón TV SOUND en el mando a
distancia. TV SOUND ON parpadea en la pantalla
del panel frontal y, a continuación en D. IN.
• Cuando TV SOUND está activo, la salida
del audio del TV se produce a través de las
bocinas del sistema de cine en casa.
4. Pulse de nuevo el botón TV SOUND para
apagar TV SOUND.
• Cuando TV SOUND está desactivado, la
salida del audio del TV se genera a través
de los altavoces del TV Anynet+ conectado.
Usar TV SOUND:
1) Cuando desee escuchar el audio del TV a través
de las bocinas del sistema de cine en casa.
2) Cuando desee escuchar el audio desde un
dispositivo USB enchufado al TV a través de las
bocinas del sistema de cine en casa.
Especificación de soporte TV SOUND ON/OFF
Ajuste de
Anynet+
(HDMI-CEC)
Sonido de TV
ACT.
Sonido de TV
DES.
ACT
Salida de
altavoz HTS
Silencio de
altavoz HTS
Silencio de
altavoz TV
Salida de
altavoz TV
DES
Salida de
altavoz HTS
Silencio de
altavoz HTS
Salida de
altavoz TV
Salida de
altavoz TV
Sin
funcionamiento
Salida de
altavoz HTS
Silencio de
altavoz HTS
Salida de
altavoz TV
Salida de
altavoz TV
DSP/EQ
DSP/EQ
Puede ajustar el sonido con diversos modos de
sonido.
DSPOFF : Se selecciona para una audición
normal.
CINEMA : Reproduce sonido real y potente
para películas.
MUSIC : Ideal para todo tipo de música.
GAME : Reproduce videojuegos con sonido
potente y real.
M-STEREO (Multi Stereo) : Produce sonido
Surround para fuentes de entrada de 2 canales.
POWER BASS : Refuerza el efecto de sonido
grabe.
LOUD : Mejora las características del sonido
grave según el nivel de salida.
NIGHT : Optimiza el sonido para su audición
nocturna comprimiendo el rango dinámico y
suavizando el sonido.
USER EQ : Proporciona un ecualizador
ajustable para el usuario para poder ajustar la
música a su gusto.
LOCAL EQ : Proporciona una curva de EC
única para adaptarla a la música local.

25 - Español
Apéndice
Información adicional
Notas
Conexiones
SALIDA HDMI
• Según el TV, es posible que no funcionen algunas
resoluciones de salida de HDMI.
• Es posible que un cable HDMI largo pueda causar
ruido en pantalla. Si esto ocurre, defina Color
profundo HDMI en Apagado en el menú.
Config.
Formato de TV
• Según el tipo de disco, es posible que no estén
disponibles algunas relaciones de aspecto.
• Si selecciona una relación de aspecto y una opción
que sea diferente de la pantalla de televisión, es
posible que la imagen aparezca distorsionada.
• Si selecciona 16:9 original, el TV mostrará 4:3
Pillarbox (barras negras en los lados de la imagen).
BD Wise (sólo productos Samsung)
• Cuando BD Wise esté activado, el ajuste
Resolución se define de forma automática en BD
Wise y BD Wise aparecen en el menú Resolución.
• Si el producto se conecta a un dispositivo que no
admite BD Wise, no puede utilizar la función BD
Wise.
• Para un funcionamiento apropiado de BD Wise,
defina tanto la opción BD Wise del reproductor
como del TV en Encendido.
Salida Digital
• Asegúrese de seleccionar la Salida Digital correcta
o es posible que no oiga nada o sólo un ruido alto.
•
Si el dispositivo HDMI (receptor de AV, TV) no es
compatible con formatos comprimidos (Dolby digital,
DTS), la señal de audio se genera como PCM.
• Los DVD normales no tienen audio BONUSVIEW ni
efectos de sonido de navegación.
• Algunos discos Blu-ray no tienen audio
BONUSVIEW ni efectos de sonido de navegación.
•
Esta configuración Salida Digital no tiene efecto en
el audio analógico (I/D) ni en la salida de audio HDMI
en el TV. Tiene efecto en la salida de audio coaxial
y HDMI cuando el producto está conectado a un
receptor de AV.
• Si reproduce pistas sonoras de audio MPEG, la
señal de salida de audio se genera como PCM
independientemente de las selecciones de Salida
Digital (PCM o Bitstream).
•
La Salida Digital se puede activar cuando Selección
de altavoz se establece en Altavoz de TV.
Anynet+ (HDMI-CEC)
• Según el TV, es posible que no funcionen algunas
resoluciones de salida de HDMI. Consulte el manual
del usuario del TV.
• La función no está disponible si el cable HDMI no
admite CEC.
• Si el televisor Samsung tiene un logotipo Anynet+,
admite la función Anynet+.
Gestión de datos BD
• En el modo de memoria externa, la reproducción del
disco puede detenerse si desconecta el dispositivo
USB en medio de la reproducción.
• Sólo se admiten los dispositivos USB formateados
en el sistema de de archivos FAT (etiqueta de
volumen DOS 8.3).
Recomendamos utilizar los dispositivos USB que
admiten el protocolo USB 2.0 con velocidades de
lectura/escritura de 4 MB/seg. o mayores.
• Es posible que no esté operativa la función Reiniciar
reproducción tras formatear el dispositivo de
almacenamiento.
• La memoria total disponible para Gestión de datos
BD puede diferir, dependiendo de las condiciones.
Video de pago DivX®
• Para obtener información adicional sobre VOD
DivX(R), visite “http://vod.divx.com”.
Altavoz
• Cuando Selección de altavoz se establece en
Altavoz de TV, el audio se produce a través de los
altavoces del TV.
Audio HDMI
• Cuando la salida de audio HDMI se establece en las
bocinas del TV, se mezcla automáticamente en
2 canales.
Canal retorno audio
• Cuando Anynet+ (HDMI-CEC) se define en
Apagado la función Canal retorno audio no está
disponible.
• El uso de un cable HDMI no certificado para (Canal
retorno audio) puede causar un problema de
compatibilidad.
• La función ARC sólo está disponible si está
conectado un TV compatible con ARC.
Reproducción
Reproducción de archivos de video
• Los archivos de video con velocidades de bits altas
de 20 Mbps o más fuerzan las capacidades del
producto y pueden detener la reproducción.
Apéndice

26 - Español
Apéndice
Selección del idioma del audio
• El indicador ◄► no aparecerá en pantalla si
BONUSVIEW no contiene ningún ajuste de audio
BONUSVIEW.
• Los idiomas disponibles a través de la función
de idioma de audio dependen de los idiomas
codificados en el disco. Es posible que esta función
o algunos idiomas no estén disponibles.
• Es posible que algunos discos Blu-ray le permitan
seleccionar pistas de sonido de audio PCM o Dolby
digital en inglés.
Selección del idioma de los subtítulos
• Según el disco Blu-ray / DVD, puede cambiar el
idioma de los subtítulos en el menú del disco.
Presione el botón
DISC MENU.
• Esta función depende de la selección de los
subtítulos codificados en el disco y no estará
operativa en todos los discos Blu-ray/DVD.
• La información sobre el modo de función principal/
BONUSVIEW también aparecerá si el disco Blu-ray
tiene una sección BONUSVIEW.
• Esta función cambia tanto los subtítulos tanto
principales como secundarios al mismo tiempo.
• Aparece respectivamente el número total de
subtítulos principales y secundarios.
Reproducción de archivos JPEG
• No puede ampliar los subtítulos ni el gráfico PG en
el modo de pantalla completa.
Reproducción de medios
Utilización del botón
TOOLS mientras se
reproduce imágenes
• Si el sistema está conectado a un TV compatible
con BD Wise que tenga BD Wise Encendido, no
aparecerá Ajustes de imagen.
• La función Música de fondo no estará
operativa a menos que el archivo de música y
de foto se encuentren en el mismo soporte de
almacenamiento. Asimismo, la calidad del sonido
puede verse afectada por la velocidad de bits del
archivo de música MP3, el tamaño de las fotos y el
método de codificación.
Compatibilidad de discos y formatos
Tipos de disco y contenido que pueden
reproducirse en el producto
Medio Tipo de disco Detalles
VIDEO
Disco Blu-ray
Disco BD-ROM o BD-
RE/-R grabado con
formato BD-RE.
DVD-VIDEO,
DVD-RW,
DVD-R,
DVD+RW,
DVD+R,
VCD 1,1
Discos DVD-VIDEO,
DVD+RW/DVD-RW(V)/
DVD-R/+R grabados y
finalizados o un soporte de
almacenamiento USB que
incluya contenido DivX,
MKV, MP4, VCD 1,1.
MÚSICA
CD-RW/-R,
DVD-RW/-R,
BD-RE/-R
Música grabada en discos
CD-RW/-R, DVD-RW/-R,
BD-RE/-R o en un soporte
de almacenamiento USB
que tenga contenido MP3
o WMA.
FOTO
CD-RW/-R,
DVD-RW/-R,
BD-RE/-R
Fotos grabadas en discos
CD-RW/-R, DVD-RW/-R,
BD-RE/-R o en un soporte
de almacenamiento USB
que tenga contenido
JPEG.
✎
Quizá el producto no pueda reproducir CD-RW/-R y
DVD-R en todos los casos debido al tipo de disco o
al estado de la grabación.
✎
Si no se ha grabado correctamente un disco DVD-
RW /-R en formato de video DVD, no se podrá
reproducir.
✎
El producto no reproducirá contenido grabado en un
DVD-R con una velocidad de bits que supere los 10
Mbps.
✎
El producto no reproducirá contenido grabado en un
BD-R o un dispositivo USB con una velocidad de bits
que supere los 30 Mbps.
✎
Es posible que la reproducción no funcione en
algunos tipos de discos o cuando se estén realizando
operaciones específicas como el cambio de ángulo
o el ajuste de la relación de aspecto. En la caja del
disco se incluye información detallada sobre los
discos. Consúltela en caso necesario.
✎
Cuando se reproduce un título de BD-J, la carga puede
tardar más tiempo que un título normal o es posible que
algunas funciones se ejecuten más lentamente.

27 - Español
Apéndice
Tipos de disco que no se pueden
reproducir en el producto
• HD DVD
• Disco DVD-ROM/PD/MV,
etc
• DVD-RW (modo VR)
• CVD/CD-ROM/CDV/
CD-G/CD-I/LD
(los CD-G reproducen
sólo audio, no gráficos.)
• DVD-RAM
• Super Audio CD
(excepto reproductor de
CD)
• Disco DVD-R de 3,9 GB
de diseño personalizado
(Authoring).
✎
Es posible que el producto no responda a todos los
comandos debido a que los discos Blu-ray, DVD y CD
permiten unas operaciones y unas funciones específicas
o limitadas durante la reproducción. Recuerde que no
se trata de ningún defecto del producto.
✎
Samsung no puede garantizar que este producto
reproduzca todos los discos que lleven el logotipo
de Blu-ray, DVD o CD, ya que los formatos de disco
pueden evolucionar y pueden surgir problemas y
errores durante la creación de software para BD,
DVD, CD y el fabricante de los discos.
✎
Póngase en contacto con el Servicio de atención al
cliente de SAMSUNG en el número si tiene preguntas
o encuentra dificultades al reproducir discos Blu-ray,
DVD o CD en este producto. Asimismo, consulte el
resto del manual del usuario para obtener información
adicional sobre las restricciones de reproducción.
✎
Es posible que no puedan reproducirse en este
producto algunos discos comerciales ni discos DVD
adquiridos fuera de la región.
Logotipos de discos que el producto
puede reproducir
Disco Blu-ray
Sistema NTSC en EE.UU.,
Canadá, Corea, Japón
Dolby DTS
Java
DivX
Código de región
Tanto los productos como los discos están codificados
por región. Estos códigos regionales deben concordar
para que el disco se reproduzca. De lo contrario, no se
reproducirá. El número regional de este producto viene
indicado en el panel trasero del producto.
Tipo de
disco
Código
de
región
Área
Disco
Blu-ray
A
Norteamérica, Centroamérica,
Sudamérica, Corea, Japón,
Taiwán, Hong Kong y Sureste de
Asia.
B
Europa, Groenlandia, Territorios
franceses, Oriente Próximo, África,
Australia y Nueva Zelanda.
C
India, China, Rusia, Asia Central y
Sur.
DVD-
VIDEO
1
EE.UU., territorios de EE.UU. y
Canadá
2
Europa, Japón, Oriente Próximo,
Egipto, África, Groenlandia
3
Taiwán, Corea, Filipinas, Indonesia,
Hong Kong
4
México, Sudamérica,
Centroamérica, Australia, Nueva
Zelanda, Islas del Pacífico, El
Caribe
5
Rusia, Europa del Este, India,
Corea del Norte, Mongolia
6
China
✎
Si el número de región de un disco Blu-ray/DVD
no corresponde con el número de región de este
producto, éste no podrá reproducir el disco.

28 - Español
Apéndice
AVCHD (Advanced Video Codec High
Definition)
• Este producto puede reproducir discos con
formato AVCHD. Estos discos se graban y se usan
normalmente en videocámaras.
• El formato AVCHD es un formato digital de alta
resolución para videocámaras.
• El formato MPEG-4 AVC/H.264 comprime imágenes
con una eficacia mayor que el formato de compresión
de imágenes convencional.
• Algunos discos AVCHD utilizan el formato “x.v.Color”.
Este producto puede reproducir discos AVCHD que
utilizan el formato “x.v.Color”.
• “x.v.Color” es una marca comercial de Sony
Corporation.
• “AVCHD” y el logotipo de AVCHD son marcas
comerciales de Matsushita Electronic Industrial Co.,
Ltd. y Sony Corporation.
✎
Es posible que algunos discos con formato AVCHD
no se reproduzcan, según las condiciones de
grabación.
✎
Los discos con formato AVCHD no tienen que
finalizarse.
✎
“x.v.Color” ofrece una gama de colores más amplia
que los discos DVD normales para videocámara.
✎
Algunos discos con formato DivX, MKV y MP4 no se
pueden reproducir, según la resolución de video y la
configuración de la velocidad de fotogramas.
Formatos admitidos
Notas sobre la conexión USB
• El producto admite soportes de almacenamiento USB,
reproductores MP3, cámaras digitales y lectores de
tarjetas USB.
• El producto no admite nombres de carpetas o títulos
que tengan más de 128 caracteres.
• Es posible que algunos dispositivos USB/cámaras
digitales no sean compatibles con este producto.
• El producto admite los sistemas de archivos FAT 16,
FAT 32 y NTFS.
• Conecte directamente los dispositivos USB al puerto
USB del producto. La conexión a través del cable USB
puede causar problemas de compatibilidad.
• Si inserta más de un dispositivo de memoria en
un lector de varias tarjetas puede que no funcione
correctamente el lector.
• El producto no admite el protocolo PTP (igual a igual).
• No desconecte un dispositivo USB mientras esté
transfiriendo o grabando datos.
• Cuanto más alta sea la resolución, mayor tiempo
tardará la imagen en mostrarse.
• Este producto no puede reproducir archivos MP3 con
DRM (Digital Rights Management) descargados de
sitios comerciales.
• El producto solo admite vídeo por debajo de 30 fps
(fotogramas por segundo).
• El producto solo admite dispositivos de clase de
almacenamiento masivo (MSC) USB como "pen drives"
y discos duros USB. (No se admite concentrador.)
• Es posible que algún dispositivo HDD USB, los lectores
de varias tarjetas y alguna unidad en miniatura no sean
compatibles con este producto.
• Si algunos dispositivos USB requieren mucha energía,
es posible que el dispositivo se vea limitado por el
dispositivo de seguridad del circuito.
• Si la reproducción desde un disco duro USB es
inestable, facilite alimentación adicional enchufando
el disco duro en la toma de corriente. Si el problema
persiste, póngase en contacto con el fabricante del
disco duro USB.
• SAMSUNG no se hace responsable de ningún daño
en los archivos ni de la pérdida de datos.

29 - Español
Apéndice
Soporte de archivos de video
Extensión de archivo Contenedor Códec de video Códec de audio Resolución
*.avi
AVI
DivX 3.11/4/5/6
MP4v3
H.264 BP/MP/HP
MP3, Dolby Digital, DTS,
WMA, PCM
1920x1080
*.mkv
MKV
VC-1 AP, DivX 5/6
H.264 BP/MP/HP
MP3, Dolby Digital, DTS
*.wmv
WMV (wmv9)
VC-1 AP
VC-1 SM
WMA
*.mp4
MP4
MP4 (mp4v)
H.264 BP/MP/HP
AAC
*.mpg / *.mpeg
PS
MPEG1
MPEG2
H.264 BP/MP/HP
MP1, 2
Dolby Digital, DTS
Limitaciones
- Incluso cuando el archivo esté codificado con un códec admitido mencionado anteriormente, es posible que un
archivo no pueda reproducirse si su contenido tiene un problema.
- No se garantiza la reproducción normal si la información del contenedor de archivos es erróneo o el archivo en sí está
dañado.
- Los archivos que tienen una velocidad de bits/fotogramas más alta que la estándar es posible que funcionen de
forma interrumpida durante la reproducción de sonido/vídeo.
- La función de búsqueda (salto) no está disponible si la tabla del índice del archivo está dañada.
Descodificador de video
- Admite hasta H.264 Nivel 4.1 y AVCHD
- No admite H.264 FMO/ASO/RS ni VC1 SP/MP/AP L4
- MPEG4 SP, ASP :
Por debajo de 1280 X 720: 60 fotogramas máx.
Por encima de 1280 X 720: 30 fotogramas máx.
- No admite GMC 2 o superior
Descodificador de audio
- Admite WMA 7, 8, 9 y STD
- No admite velocidad de muestreo WMA de 22050 Hz mono
- AAC: Vel. máx. de muestreo: 96 Khz (8, 11, 12, 16, 22, 24, 32, 44,1, 48, 64, 88,2, 96) Vel. de bits máx.: 320 kbps
Formatos de archivos de subtítulos DivX admitidos
- *.ttxt, *.smi, *.srt, *.sub, *.txt
Soporte de archivos de música
Extensión de archivo Contenedor Códec de audio Rango de soporte
*.mp3
MP3
MP3 -
*.wma
WMA
WMA
* Velocidades de muestreo (en kHz) - 8, 11,
16, 22, 32, 44,1, 48
* Velocidades de bits: todas las velocidades
de bits desde 5 kbps a 384 kbps.
Soporte de archivo de imagen
Extensión de archivo Tipo Resolución
*.jpg / *.jpeg / *.jpe
JPEG
15360x8640
*.png
PNG

30 - Español
Apéndice
Selección de salida digital
Configuración
PCM
Bitstream
(sin procesar)
Bitstream
(recodificación
DTS)
Bitstream
(recodificación
Dolby D)
Conexión Receptor de AV que admita HDMI
Flujo de
datos de
audio en
disco Blu-
ray
PCM
Hasta PCM 7,1
can.
PCM
DTS recodificado
Dolby Digital
recodificado *
Dolby Digital
Hasta PCM 5,1
can.
Dolby Digital
Dolby Digital
Plus
Dolby Digital Plus
Dolby TrueHD Dolby TrueHD
DTS DTS
Sonido de alta
resolución DTS-
HD
Sonido de alta
resolución DTS-HD
DTS-HD Master
Audio
DTS-HD Master
Audio
Flujo de
datos de
audio en
DVD
PCM PCM 2 canales
Dolby Digital
Hasta PCM 5,1
can.
Dolby Digital
DTS DTS
Definición
para disco
Blu-ray
Cualquiera
Descodifica al
mismo tiempo
el audio de la
función principal
y el flujo de
datos de audio
BONUSVIEW
en audio PCM
y añade los
efectos de
sonido de
navegación.
Genera sólo la salida
del flujo de datos del
audio de la función
principal de forma
que el receptor de AV
pueda descodificar el
flujo de bits de audio.
No oirá el audio de
BONUSVIEW ni los
efectos de sonido de
navegación.
Descodifica
el audio de la
función principal
y el flujo de
datos de audio
de BONUSVIEW
en audio PCM y
añade los efectos
de sonido de
navegación, a
continuación
recodifica el
audio de PCM en
flujo de bits DTS.
Descodifica el audio
de la función principal
y el flujo de datos de
audio de BONUSVIEW
en audio PCM y añade
los efectos de sonido
de navegación, a
continuación recodifica
el audio de PCM en
flujo de bits de Dolby
digital o PCM.
Si el flujo de origen es de 2 canales o mono, no se aplica el ajuste de “recodificación Dolby D”. La salida será PCM de
2 canales.
Los discos Blu-ray pueden incluir tres flujos de audio:
- Audio de función principal: la pista sonora de la función principal.
- Audio BONUSVIEW: pista sonora adicional como los comentarios del director o del actor.
- Efectos de sonido de navegación : Cuando se eligen algunas opciones de navegación de menú, pueden oírse los
efectos de sonido de navegación. Los efectos de sonido de navegación son diferentes en cada disco Blu-ray.

31 - Español
Apéndice
Resolución según el modo de salida
Reproducción de discos Blu-ray / contenido electrónico / contenido digital Reproducción de DVD
Salida
Configuración
Modo HDMI
Modo HDMI
Disco Blu-ray
Contenido electrónico/
Contenido digital
BD Wise
Resolución del disco
Blu-ray
1080p@60F 480i
Auto Resolución máx. de la entrada de TV
Resolución máx. de la entrada
de TV
1080p@60F 1080p@60F -
1080p - 1080p
Fotogramas de video: Auto
(24Fs)
1080p@24F -
1080i 1080i 1080i
720p 720p 720p
480p 480p 480p
Solución de problemas
Consulte la tabla que se incluye a continuación cuando este producto no funcione debidamente. Si el problema que
experimente no se encuentra en la lista que se incluye a continuación o si dichas instrucciones no sirven de ayuda,
apague el producto, desconecte el cable de alimentación y póngase en contacto con el distribuidor autorizado más
cercano o con el centro de asistencia técnica de Samsung Electronics.
Síntoma Comprobación/Remedio
No se puede expulsar el
disco.
• ¿Está el cable de alimentación bien enchufado a su toma de corriente?
• Apague la unidad y enciéndala de nuevo.
No se inicia la
reproducción.
• Compruebe el código regional del disco Blu-ray/DVD.
Es posible que no puedan reproducirse los discos Blu-Ray/DVD adquiridos en el
extranjero.
• Los CD-ROM y DVD-ROM no se pueden reproducir en este producto.
• Asegúrese de que el nivel de calificación sea correcto.
La reproducción no se inicia
inmediatamente cuando se
pulsa el botón
6
/
7
.
• ¿Está utilizando un disco deformado o un disco con arañazos en la superficie?
• Limpie el disco.
No hay sonido.
• El sistema de cine en casa no reproduce el sonido durante la reproducción rápida,
la reproducción lenta ni la reproducción por fotogramas.
• ¿Están las bocinas correctamente conectadas? ¿Se ha personalizado
correctamente la configuración de las bocinas?
• ¿Está el disco seriamente dañado?
El sonido solo se puede oír
en algunos altavoces pero
no en los 6.
• En algunos discos Blu-ray/DVD, el sonido se genera sólo desde los parlantes
frontales.
• Compruebe si las bocinas están debidamente conectadas.
• Ajusta el volumen.
• Cuando se reproduce audio desde un CD, la radio o un TV, la unidad genera la
salida del sonido solo por las bocinas frontales.

32 - Español
Apéndice
Síntoma Comprobación/Remedio
No se genera el sonido
Surround Dolby Digital 5.1
CH.
• ¿Tiene el disco la marca "Dolby Digital 5.1 CH"? El sonido Surround Dolby Digital
de 5,1 canales sólo se genera si el disco se graba con sonido de 5,1 canales.
• ¿Se ha definido correctamente el idioma de audio en Dolby Digital de 5,1 canales
en la pantalla de información?
El mando a distancia no
funciona.
• ¿Está utilizando el mando a distancia dentro de la distancia de servicio y con el
ángulo correcto con respecto al sensor?
• ¿Se han agotado las pilas?
• ¿Ha seleccionado el modo correcto? Presione el botón de función para cambiar el
modo (BD/DVD, D. IN, AUX, etc.)
• El disco gira pero no
se produce ninguna
imagen.
• La calidad de la imagen
es mala y la imagen
tiembla.
• ¿Está encendido el TV?
• ¿Están los cables de video correctamente conectados?
• ¿Está el disco sucio o dañado?
• No es posible reproducir discos con fallos de fabricación.
No funciona el idioma del
audio ni los subtítulos.
• El idioma del audio y los subtítulos no funcionan si el disco no contiene pistas o
subtítulos de sonido en varios idiomas.
No aparece la pantalla
del menú aunque se
seleccione la función de
menú.
• ¿Está utilizando un disco que contiene menús?
No se puede cambiar la la
relación de aspecto de la
pantalla.
• Puede reproducir discos Blu-ray/DVD 16:9 en el modo 16:9 Full (16:9 Completa),
modo 4:3 Letter Box (4:3 Buzón) o 4:3 Pan - Scan (4:3 Pan – Scan), pero los
discos Blu-ray/DVD 4:3 se pueden reproducir solo en el modo 4:3. Consulte la
portada del disco Blu-ray y seleccione la función apropiada.
• El producto no funciona.
(Ejemplo: se apaga la
unidad o se oye un ruido
extraño.)
• El producto no funciona
con normalidad.
• Mantenga pulsado el botón
5
del mando a distancia durante 5 segundos en
modo de ESPERA. Con esto se reinicia la unidad.
- Si se utiliza la función REINIC. se eliminarán todos los ajustes memorizados.
No utilice esta función a menos que sea necesario.
Ha olvidado la contraseña
de nivel de calificación.
• Sin ningún disco en el producto, mantenga presionado el botón
5
del mando
a distancia durante más de 5 segundos. INIT aparece en pantalla y todos los
ajustes retomaran los valores predeterminados.
- Si se utiliza la función REINIC. se eliminarán todos los ajustes memorizados.
No utilice esta función a menos que sea necesario.
No se reciben las
emisiones de radio.
• ¿Está la antena correctamente conectada?
• Si la señal de entrada de la antena es débil, instale la antena FM en un área que
tenga una buena recepción.
No hay sonido cuando
intenta escuchar el audio
al TV a través de los
altavoces del sistema de
cine en casa.
• Su presiona el botón
^
mientras escucha el audio del TV utilizando las funciones
D. IN o AUX, las funciones del disco Blu-ray/DVD se activan y el audio del TV se
silencia.

33 - Español
Apéndice
Síntoma Comprobación/Remedio
Aparece en pantalla "No
Disponible".
• En este momento no puede realizarse la función o acción porque:
1. El software del disco Blu-ray/DVD los restringe.
2. El software del disco Blu-ray/DVD no admite la función (por ej.: ángulos)
3. La función no está disponible en ese momento.
4. Ha solicitado un título, un número de capítulo o un punto de búsqueda que
está fuera de rango.
Si la salida HDMI se define
en una resolución que no
sea compatible con el TV
(por ejemplo, 1080p), es
posible que no pueda ver
ninguna imagen en el TV.
• Presione el botón
5
del panel frontal durante más de 5 segundos sin ningún
disco cargado en el producto. Todos los ajustes volverán a los ajustes originales
de fábrica.
No hay salida de HDMI.
• Compruebe la conexión entre el TV y el terminal de HDMI del producto.
• Compruebe si el TV admite la resolución de entrada de HDMI
480p/720p/1080i/1080p HDMI.
Aparece en pantalla una
salida de HDMI anómala.
• Si aparecen interferencias en pantalla, significa que el TV no admite HDCP
(protección de contenido digital de ancho de banda alto).
✎
Cuando se recuperan los ajustes predeterminados de fábrica, todos los datos de usuario almacenados en la BD se
borran.

34 - Español
Apéndice
Generales
Peso 1,90 kg
Dimensiones 430,0 (An.) x 55,0 (Al.) x 224,0 (Pr.) mm
Rango de temperatura de
servicio
De +5°C a +35°C
Rango de humedad de servicio De 10 % a 75 %
Sintonizador
de FM
Relación de señal/ruido 55 dB
Sensibilidad útil 12 dB
Distorsión armónica total 1.0 %
HDMI
Video 1080p, 1080i, 720p, 480p
Audio Audio multicanal PCM, audio de serie de bits, audio PCM
Amplificador
Salida de la bocina delantera 165W x 2 (3)
Salida de bocina central 170W (3)
Salida de bocina surround 165W x 2 (3)
Salida de bocina subwoofer 170W (3)
Respuesta de frecuencias 20Hz~20kHz (±3dB)
Índice S/N 70dB
Separación de canales 60dB
Sensibilidad de entrada (AUX) 500mV
Bocina (bocinas de 5,1 canales)
Sistema de
bocinas
Impedancia
Rango de
frecuencia
Entrada nominal
Dimensiones
(An. x Al. x Pr.) (mm)
Peso (kg)
Frontal
3
200Hz ~ 20kHz
165W
90,0 x 139,0 x 70,0 0,40
Surround 77,0 x 107,0 x 68,0 0,34
Central
170W
228,0 x 77,0 x 70,0 0,49
Subwoofer 20Hz ~ 200Hz 168,0 x 350,0 x 285,0 3,67
✎
Samsung Electronics S.A. reserva los derechos para cambiar las especificaciones sin el aviso previo.
✎
El peso y dimensiones son aproximados.
✎
El diseño y las especificaciones están sujetos a cambio sin aviso.
✎
Para la fuente de alimentación y el consumo de energía, consulte la etiqueta pegada en el producto.
Especificaciones

35 - Español
Apéndice
Licencia
Manufactured under license from Dolby Laboratories. Dolby, Dolby Audio, Pro Logic, and the double-D
symbol are trademarks of Dolby Laboratories.
Para patentes de DTS, consulte http://patents.dts.com. Fabricado con licencia de DTS
Licensing Limited. DTS, DTS-HD, el símbolo y DTS y el símbolo juntos son marcas
comerciales registradas y DTS-HD Master Audio es una marca comercial de DTS, Inc.
©DTS, Inc. El producto incluye el software.
Este dispositivo DivX Certified® ha pasado pruebas rigurosas para garantizar la reproducción
de video DivX®.
Para reproducir películas DivX adquiridas, primero debe registrar el dispositivo en vod.divx.
com. Busque su código de registro en la sección DivX VOD del menú de configuración del
dispositivo.
DivX Certified® reproduce video DivX® hasta HD 1080p, incluido contenido premium.
DivX®, DivX Certified® y los logotipos asociados son marcas comerciales de DivX LLC y se utilizan con licencia.
Este producto está cubierto por una de las siguientes patentes de EE.UU.: 7.295.673; 7.460.668; 7.515.710;
7.519.274.
The terms HDMI and HDMI High-Definition Multimedia Interface, and the HDMI Logo are
trademarks or registered trademarks of HDMI Licensing LLC in the United States and other
countries.
Oracle y Java son marcas registradas de Oracle y sus filiales. Otros nombres pueden ser marcas
comerciales de sus respectivos propietarios.
Esta unidad incorpora tecnología de protección de copia, protegida por patentes estadounidenses y otros derechos
de propiedad intelectual de Rovi Corporation. La ingeniería inversa y desensamblaje están prohibidos.
Blu-ray Disc™, Blu-ray™ y los logotipos son marcas comerciales de Blu-ray Disc Association.
Este producto utiliza tecnología Cinavia para limitar el uso de copias no autorizadas de algunas películas de
producción comercial, videos y sus bandas sonoras. Cuando se detecta el uso de una copia no autorizada, aparecerá
un mensaje y se interrumpirá la reproducción o la copia.
Información adicional sobre la tecnología Cinavia se facilita en el Centro de información al cliente en línea de Cinavia
en http://www.cinavia.com. Para solicitar información adicional sobre Cinavia por correo, envíe una tarjeta con su
dirección postal a: Cinavia Consumer Information Center, P.O. Box 86851, San Diego, CA, 92138, EE.UU.
Este producto incorpora tecnología de propietario bajo licencia de Verance Corporation y está protegido mediante
la patente en EE.UU. 7.369.677 y otras patentes en EE.UU. y en otros países pendientes, así como por copyright
y la protección de secreto comercial de ciertos aspectos tecnológicos. Cinavia es una marca comercial de Verance
Corporation. Copyright 2004-2010 Verance Corporation. Todos los derechos reservados por Verance. La ingeniería
inversa o desensamblaje están prohibidos.
- Aviso sobre licencia de código abierto
En caso de que se utilice software de código abierto, las licencias de código abierto están disponibles en el menú del
producto.

© 2015 Samsung Electronics Co., Ltd. Reservados todos los derechos.
Contacte con SAMSUNG WORLD WIDE
Si tiene alguna pregunta o comentario acerca de productos Samsung, por favor contacte con el servicio de
atención al cliente de SAMSUNG.
AH68-02798D-01
AH68-02798D-01
© 2015 Samsung Electronics Co., Ltd. All rights reserved.
Contact SAMSUNG WORLD WIDE
If you have any questions or comments relating to Samsung products, please contact the SAMSUNG customer
care center.
Country Contact Center
Web Site
`
Latin America
MEXICO 01-800-SAMSUNG (726-7864) www.samsung.com/mx/support
BRAZIL
0800-124-421 (Demais cidades e regiões)
4004-0000 (Capitais e grandes centros)
www.samsung.com/br/support
COSTA RICA 00-800-1-SAMSUNG (726-7864)
www.samsung.com/latin/support (Spanish)
www.samsung.com/latin_en/support (English)
DOMINICAN REPUBLIC 1-809-200-7264
ECUADOR 1-800-SAMSUNG (72-6786)
EL SALVADOR 8000-SAMSUNG (726-7864)
GUATEMALA 1-800-299-0033
HONDURAS 800-2791-9111
JAMAICA 1-800-SAMSUNG (726-7864) www.samsung.com/latin_en/support (English)
NICARAGUA 001-800-5077267
www.samsung.com/latin/support (Spanish)
www.samsung.com/latin_en/support (English)
PANAMA 800-0101
PUERTO RICO 1-800-682-3180
TRINIDAD & TOBAGO 1-800-SAMSUNG (726-7864)
VENEZUELA 0-800-SAMSUNG (726-7864)
COLOMBIA
Bogotá en el 600 12 72
Sin costo en todo el pais 01 8000 112 112
Y desde tu celular #726
www.samsung.com/co/support
CHILE 800-SAMSUNG (726-7864)
www.samsung.com/cl/support
BOLIVIA 800-10-7260
PERU 080077708 Desde teléfonos fijos, públicos o celulares www.samsung.com/pe/support
ARGENTINA 0800-555-SAMS (7267) www.samsung.com/ar
URUGUAY 0800-SAMS (7267) www.samsung.com/uy
PARAGUAY 0800-11-SAMS (7267) www.samsung.com/py
-
 1
1
-
 2
2
-
 3
3
-
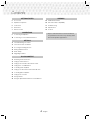 4
4
-
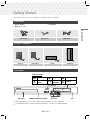 5
5
-
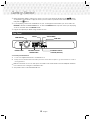 6
6
-
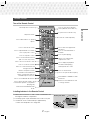 7
7
-
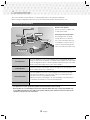 8
8
-
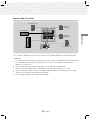 9
9
-
 10
10
-
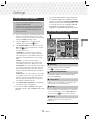 11
11
-
 12
12
-
 13
13
-
 14
14
-
 15
15
-
 16
16
-
 17
17
-
 18
18
-
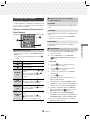 19
19
-
 20
20
-
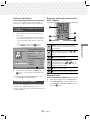 21
21
-
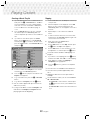 22
22
-
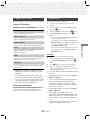 23
23
-
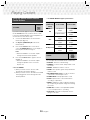 24
24
-
 25
25
-
 26
26
-
 27
27
-
 28
28
-
 29
29
-
 30
30
-
 31
31
-
 32
32
-
 33
33
-
 34
34
-
 35
35
-
 36
36
-
 37
37
-
 38
38
-
 39
39
-
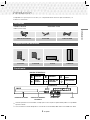 40
40
-
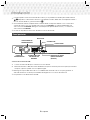 41
41
-
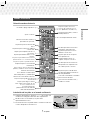 42
42
-
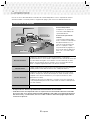 43
43
-
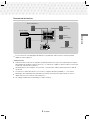 44
44
-
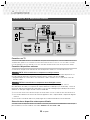 45
45
-
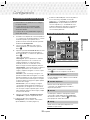 46
46
-
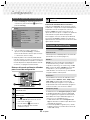 47
47
-
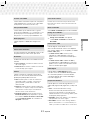 48
48
-
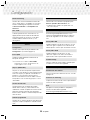 49
49
-
 50
50
-
 51
51
-
 52
52
-
 53
53
-
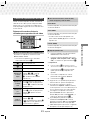 54
54
-
 55
55
-
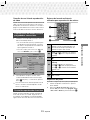 56
56
-
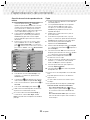 57
57
-
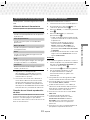 58
58
-
 59
59
-
 60
60
-
 61
61
-
 62
62
-
 63
63
-
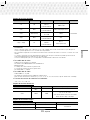 64
64
-
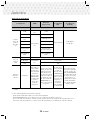 65
65
-
 66
66
-
 67
67
-
 68
68
-
 69
69
-
 70
70
-
 71
71


Samsung HT-J5100K Manual de usuario
- Categoría
- Reproductores de DVD
- Tipo
- Manual de usuario
en otros idiomas
- English: Samsung HT-J5100K User manual
Artículos relacionados
-
Samsung HT-J5100K Manual de usuario
-
Samsung HT-J5530K Manual de usuario
-
-
-
-
-
Samsung BD-F7500 El manual del propietario
-
Samsung BD-C6900 Manual de usuario
-
Samsung MX-JS9000 Manual de usuario
-
Samsung MX-JS8000 Manual de usuario
Otros documentos
-
Pioneer DCS-FS303K El manual del propietario
-
Yamaha RX V3900 - AV Network Receiver Manual de usuario
-
Yamaha DVD-S2500 El manual del propietario
-
-
Furrion DV3300S-BL Manual de usuario
-
-
The Singing Machine STVD-1001 Manual de usuario
-
Furrion 3-Zone Entertainment System Manual de usuario
-
Ryobi P765-P761 Manual de usuario
-