
98647-004-03
98647-004-03
Operating Instructions | Betriebsanleitung | Mode d’emploi |
Istruzioni per l'uso | Instrucciones de manejo
YFP02CWS
Fastening Kit for Combics Weighing Platforms (Size II and Larger) and
Combics Pit Installation Frames | Fixierset für Combics Wägeplattformen
(ab Plattformgröße II) und Combics Grubenrahmen | Kit de fixation pour les
plates-formes de pesée Combics (à partir des dimensions II) et les cuvelages
de fosse Combics | Kit di fissaggio per piattaforme di pesata Combics
(per dimensioni a partire da II) e telaio per l’installazione in fossa Combics |
Kit de fijación para plataformas de pesaje Combics (desde tamaño de
plataformas II) y marcos Combics para fosos
98647-004-03

2 YFP02CWS Fastening Kit YFP02CWS Fastening Kit 3
English – page 3
Deutsch – Seite 6
Français – page 9
Italiano – pagina 12
Español – página 15

2 YFP02CWS Fastening Kit YFP02CWS Fastening Kit 3
3
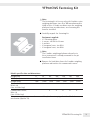
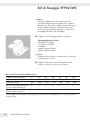
YFP02CWS Fastening Kit
!Note:
The fastening kit is for use only with Combics series
weighing platforms sizes II to WR manufactured in
2006 or later. If loads are driven onto the weighing
platform from two directions, two fastening kits
must be installed.
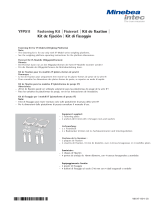
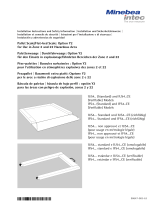
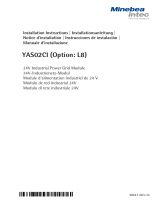
§Carefully unpack the fastening kit
Equipment supplied:
–2+fastening plates
– 2 screws, size M12+50 mm
– 2 washers
– 2 hexagonal nuts, size M12
– 2 hexagonal nuts, size M10
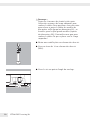
!Note:
The Combics weighing platform referred to in
these instructions is already mounted in the pit
installation frame.
§Remove the load plate from the Combics weighing
platform and remove the countersunk screws.
Model-specific data and dimensions:
Designation II LL NL NN RN RR WR
Width (mm) 800 1000 1000 1250 1250 1500 1500
Length (mm) 800 1000 1250 1250 1500 1500 2000
Countersunk screws, 4444444
M16+30
(size 10 Allen key)
Countersunk screws, 24668
M8+16
(size 5 Allen key)
It is not necessary to remove the screws if the platform is equipped with a lift deck
mechanism (Option T8).

4 YFP02CWS Fastening Kit YFP02CWS Fastening Kit 5
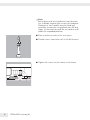
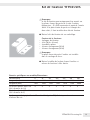
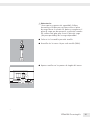
!Note:
Safety gloves and steel-toed boots must be worn.
Use a suitable vacuum lifter to raise the load plate.
Platforms of size II and LL must be lifted and
carried by two persons; for platform sizes NL and
larger, a crane must be used. Do not stand or walk
under the suspended platform.
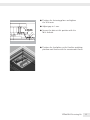
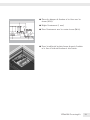
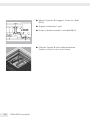
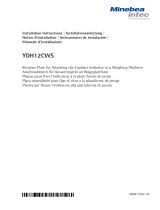
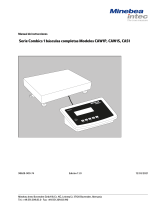
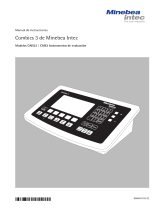
§Place a washer on each of the two screws.
§Thread a size 12 nut onto each of the M12 screws.
§Tighten the screws on the corners of the frame.
4

4 YFP02CWS Fastening Kit YFP02CWS Fastening Kit 5
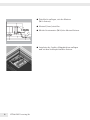
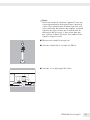
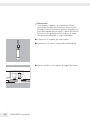
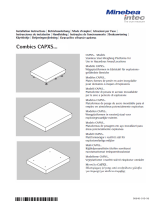
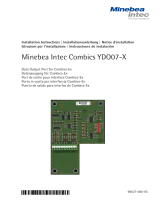
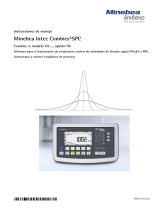
§Position the fastening plates and tighten
the M10 nuts.
§Adjust gap to 1 mm.
§Secure the plate at this position with the
M12 locknut.
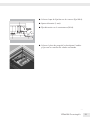
§Position the load plate on the Combics weighing
platform and fasten with the countersunk screws.
5
1mm

6 YFP02CWS Fastening Kit YFP02CWS Fastening Kit 7
YFP02CWS Fixierset
!Hinweis:
Das Fixierset kann nur an den Wägeplattformen der
Serie Combics Wägeplattformen (Größe: II bis WR)
ab Fertigungsjahr 2006 montiert werden! Wird die
Wägeplattform in beide Richtungen befahren,
so müssen zwei Fixiersets angebracht werden!
§Fixierset aus der Verpackung nehmen
Lieferumfang:
–2+Fixierblech
–2+Schraube (M12+50 mm)
–2+Unterlegscheibe
–2+Sechskantmutter (M12)
–2+Sechskantmutter (M10)
!Hinweis:
Die Combics-Wägeplattform steht im Gruben-
rahmen.
§Lastplatte der Combics-Wägeplattform abnehmen,
Senkkopfschrauben lösen.
6
Modellspezifische Daten/Abmessungen:
Kennung II LL NL NN RN RR WR
Breite (mm) 800 1000 1000 1250 1250 1500 1500
Länge (mm) 800 1000 1250 1250 1500 1500 2000
Senkschrauben M16+304444444
(10er Sechskantschlüssel)
Senkschrauben M8+16 24668
(5er Sechskantschlüssel)
Bei Geräten mit Klappmechanismus (Option T8) müssen keine Schrauben gelöst werden!

6 YFP02CWS Fastening Kit YFP02CWS Fastening Kit 7
!Hinweis:
Sicherheitsschuhe und Handschuhe tragen!
Geeignete Vakuum-Heber zum Heben der
Lastplatten benutzen. Bis zu der Größe LL mit
zwei Personen die Lastplatte abnehmen und tragen,
ab Baugröße NL einen Kran zum Anheben der
Lastplatte benutzen. Nicht unter die schwebende
Last treten!
§2+die Unterlegscheibe je Schraube auflegen.
§2+die 12er Mutter je Schraube (M12)
aufschrauben.
§Schrauben an den Rahmeneckpunkten eindrehen.
7

8 YFP02CWS Fastening Kit YFP02CWS Fastening Kit 9
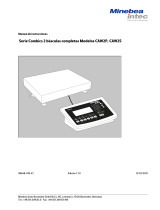
§Fixierbleche auflegen, mit den Muttern
(M10 fixieren).
§Abstand (1mm) einstellen.
§Mit der Kontermutter (M12) den Abstand fixieren.
§Lastplatte der Combics-Wägeplattform auflegen
und mit den Senkkopfschrauben fixieren.
8
1mm

8 YFP02CWS Fastening Kit YFP02CWS Fastening Kit 9
Kit de fixation YFP02CWS
!Remarque :
Le kit de fixation peut uniquement être monté sur
les plates–formes de pesée de la série Combics
(dimensions : II à WR) construites à partir de l’année
2006. Si la plate-forme de pesée est chargée des
deux côtés, il faut installer deux kits de fixation.
§Retirer le kit de fixation de son emballage.
Contenu de la livraison :
– 2 plaques de fixation
– 2 vis (M12+50 mm)
– 2 rondelles plates
– 2 écrous hexagonaux (M12)
– 2 écrous hexagonaux (M10)
!Remarque :
La plate-forme de pesée Combics est installée
dans le cuvelage de fosse.
§Retirer le tablier de la plate-forme Combics et
enlever les boulons à tête fraisée.
9
Données spécifiques aux modèles/Dimensions :
Identification II LL NL NN RN RR WR
Largeur (mm) 800 1000 1000 1250 1250 1500 1500
Longueur (mm) 800 1000 1250 1250 1500 1500 2000
Vis à têtes fraisée M16+304444444
(clé à fourche de 10)
Vis à têtes fraisée M8+16 24668
(clé à fourche de 5)
Sur les appareils équipés d’un tablier relevable (option T8), il n’est pas nécessaire
d’enlever des vis.

10 YFP02CWS Fastening Kit YFP02CWS Fastening Kit 11
!Remarque :
Porter des chaussures de sécurité et des gants.
Utiliser des ventouses de levage adéquates pour
soulever le tablier. Deux personnes sont nécessaires
pour enlever et porter le tablier des modèles de
plus petites tailles (jusqu’aux dimensions LL) ; en
revanche, pour les plus grands modèles (à partir
des dimensions NL), il faut utiliser une grue pour
soulever le tablier. Ne pas se placer sous la charge
suspendue !
§Mettre une rondelle plate sur chacune des deux vis.
§Visser un écrou de 12 sur chacune des deux vis
(M12).
§Visser les vis aux points d’angle du cuvelage.
10

10 YFP02CWS Fastening Kit YFP02CWS Fastening Kit 11
§Placer les plaques de fixation et les fixer avec les
écrous (M10).
§Régler l’écartement (1 mm).
§Fixer l’écartement avec les contre-écrous (M12).
§Poser le tablier de la plate-forme de pesée Combics
et le fixer à l’aide des boulons à tête fraisée.
11
1mm

12 YFP02CWS Fastening Kit YFP02CWS Fastening Kit 13
Kit di fissaggio YFP02CWS
!Nota:
Il kit di fissaggio può essere montato solo
sulle piattaforme di pesata della serie Combics
(dimensioni: da II fino a WR) a partire dall’anno
di costruzione 2006! Se la piattaforma viene
caricata da entrambe le direzioni, è richiesto il
montaggio di due kit di fissaggio!
§Togliere il kit di fissaggio dalla confezione.
Equipaggiamento fornito:
– 2 piastre di fissaggio
– 2 viti (M12+50 mm)
– 2 rondelle
– 2 dadi esagonali (M12)
– 2 dadi esagonali (M10)
!Nota:
La piattaforma Combics è montata nel telaio per
l’installazione in fossa.
§Togliere il piatto di carico della piattaforma
Combics, svitare la vite a testa svasata.
12
Dati specifici del modello/Dimensioni:
Codice di identificazione II LL NL NN RN RR WR
Larghezza (mm) 800 1000 1000 1250 1250 1500 1500
Lunghezza (mm) 800 1000 1250 1250 1500 1500 2000
Viti a testa svasata M16+30 4 4 4 4 4 4 4
(chiave esagonale da 10)
Viti a testa svasata M8+16 2 4 6 6 8
(chiave esagonale da 5)
Per gli apparecchi dotati di meccanismo di sollevamento (Opzione T8), le viti non devono
essere svitate!

12 YFP02CWS Fastening Kit YFP02CWS Fastening Kit 13
!Nota:
Indossare scarpe di sicurezza e guanti! Usare una
ventosa pneumatica adatta per alzare il piatto di
carico. Per le piattaforme di dimensioni fino a LL,
sono sufficienti due persone per togliere e portare
il piatto di carico; mentre per le piattaforme di
dimensioni da NL in poi, si deve usare una gru
per sollevare il piatto di carico. Non andare sotto
il piatto sospeso in aria!
§Mettere una rondella su ogni vite.
§Avvitare il dado da 12 su ogni vite (M12).
§Avvitare le viti agli angoli del telaio.
13

14 YFP02CWS Fastening Kit YFP02CWS Fastening Kit 15
§Mettere le piastre di fissaggio e fissare con i dadi
(M10).
§Regolare la distanza (1 mm).
§Fissare la distanza usando i controdadi (M12).
§Collocare il piatto di carico della piattaforma
Combics e fissare le viti a testa svasata.
14
1mm

14 YFP02CWS Fastening Kit YFP02CWS Fastening Kit 15
!Advertencia:
¡Usar zapatos y guantes de seguridad! ¡Utilizar
mecanismo elevador por vacío para elevar el plato
de carga! Hasta el tamaño LL, quitar y transportar el
plato de carga por dos personas; a partir del tamaño
NL, utilizar una grúa para elevar el plato de carga.
¡No pasar por debajo de la carga suspendida!
§Colocar 2+la arandela por cada tornillo.
§Atornillar 2+la tuerca 12 por cada tornillo (M12).
§Apretar tornillos en los puntos de ángulo del marco.
16

16 YFP02CWS Fastening Kit YFP02CWS Fastening Kit 17
§Colocar chapa de fijación con las tuercas (fijar M10).
§Ajustar distancia (1 mm).
§Fijar distancia con la contratuerca (M12).
§Colocar el plato de carga de la plataforma Combics
y fijar con los tornillos de cabeza avellanada.
17
1mm

18 YFP02CWS Fastening Kit YFP02CWS Fastening Kit 19

18 YFP02CWS Fastening Kit YFP02CWS Fastening Kit 19

Minebea Intec Bovenden GmbH & Co. KG
Leinetal 2, 37120 Bovenden, Germany
Phone +49.551.309.83.0
Fax +49.551.309.83.190
www.minebea-intec.com
Copyright by Minebea Intec ,Bovenden,
Germany.
No part of this publication may be reprinted
or translated in any form or by any means
without prior written permission from
Minebea Intec . All rights reserved.
The status of the information, specifications
and illustrations in this manual is indicated
by the date given below. Minebea Intec
reserves the right to make changes to the
technology, features, specifications, and
design oftheequipment without notice.
Date: January 2019
Printed in Germany on paper that has been
bleached without any use of chlorine.
MS · KT
Publication No.: WYF6053-p19014
-
 1
1
-
 2
2
-
 3
3
-
 4
4
-
 5
5
-
 6
6
-
 7
7
-
 8
8
-
 9
9
-
 10
10
-
 11
11
-
 12
12
-
 13
13
-
 14
14
-
 15
15
-
 16
16
-
 17
17
-
 18
18
-
 19
19
-
 20
20


Minebea Intec YFP02CWS Fastening Kit for Combics Weighing Platforms El manual del propietario
- Tipo
- El manual del propietario
- Este manual también es adecuado para
en otros idiomas
Artículos relacionados
-
 Minebea Intec YFP01I Fastening Kit for IF Models (Weighing Platforms) El manual del propietario
-
 Minebea Intec YDH12CWS Retainer Plate for Attaching the Combics Indicator to a Weighing Platform Guía de instalación
-
 Minebea Intec CAPXS.. Models Stainless Steel Weighing Platforms for Use in Hazardous Areas/Locations El manual del propietario
-
 Minebea Intec Pallet Scale/Flat-bed Scale: Option Y2 for Use in Zone 2 and 22 Hazardous Areas El manual del propietario
-
 Minebea Intec Combics Básculas completas CAW1P | CAW1S | CAS1 El manual del propietario
-
 Minebea Intec YDO07-X Datenausgang für Combics-Ex El manual del propietario
-
 Minebea Intec Combics Básculas completas CAW2P | CAW2S El manual del propietario
-
 Minebea Intec YAS02CI (Option: L8) 24V Industrial Power Grid Module El manual del propietario
-
 Minebea Intec Combics 3 CAISL3 | CAIS3 Instrumentos de evaluación El manual del propietario
-
 Minebea Intec Combics® SPC Combics 3, modelo CA...., opción H5 El manual del propietario


