Jensen JTA-325 Manual de usuario
- Categoría
- Tocadiscos de audio
- Tipo
- Manual de usuario

3-SPEED STEREO TURNTABLE WITH
STEREO SPEAKERS AND
SPEED ADJUSTMENT
MODEL: JTA-325
USER MANUAL
PLEASE READ THIS USER MANUAL COMPLETELY BEFORE OPERATING THIS UNIT
AND RETAIN THIS BOOKLET FOR FUTURE REFERENCE.

E1
WARNING
TO PREVENT FIRE OR SHOCK HAZARD, DO NOT USE THIS PLUG WITH AN EXTENSION
CORD, RECEPTACLE OR OTHER OUTLET UNLESS THE BLADES CAN BE FULLY
INSERTED TO PREVENT BLADE EXPOSURE. TO PREVENT FIRE OR SHOCK HAZARD, DO
NOT EXPOSE THIS APPLIANCE TO RAIN OR MOISTURE.
IMPORTANT SAFETY INSTRUCTIONS
1. Read these instructions - All the safety and operating instructions should be read before the
appliance is operated
2. Keep these instructions - The safety and operating instructions should be kept for future
reference.
3. Heed all warnings - All warnings on the appliance and in the operating instructions should
be adhered to.
4. Follow all instructions - All operation and use instructions should be followed.
5. Do not use this apparatus near water - The appliance should not be used near water; for
example, near a bathtub, washbowl, kitchen sink, laundry tub, in a wet basement, or near a
swimming pool, and the like.
6. Clean only with dry cloth - The appliance should be cleaned only as recommended by the
manufacturer.
7. Do not block any ventilation openings. Install in accordance with the manufacturer’s
instructions. - The appliance should be situated so that its location or position does not
interfere with its proper ventilation. For example, the appliance should not be situated on a
bed, sofa, rug, or similar surface that may block the ventilation openings; or placed in a
built-in installation, such as a bookcase or cabinet that may impede the flow of air through
the ventilation openings.
8. Do not install near any heat sources such as radiators, heat registers, stoves or other
apparatus (including amplifiers) that produce heat.
9. Do not defeat the safety purpose of the polarized or grounding-type plug. A polarized plug
has two blades with one wider than the other. A grounding type has two blades and a third
grounding prong. The wide blade or the third prong are provided for your safety. If the
provided plug does not fit into your outlet, consult an electrician for replacement of the
obsolete outlet.
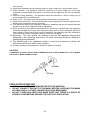
10. Protect the power cord from being walked on or pinched particularly at
plugs, convenience receptacles, and the point where they exit from the
apparatus.
11. Only use attachments / accessories specified by the manufacturer
12. Use only with the cart, stand, tripod, bracket, or table specified by the
manufacturer, or sold with the apparatus. When a cart is used, use
caution when moving the cart/apparatus combination to avoid injury

E2
from tip-over.
13. Unplug this apparatus during lightning storms or when unused for a long periods of time.
14. Power Sources - The appliance should be connected to a power supply only of the type
described in the operating instructions or as marked on the appliance. Do not overload wall
outlet.
15. Wall and Ceiling Mounting - The appliance should be mounted to a wall or ceiling only as
recommended by the manufacturer.
16. Power Lines - An outdoor antenna should be located away from power lines.
17. Object and Liquid Entry - Care should be taken so that objects do not fall and liquids are not
spilled into the enclosure through openings.
18. The apparatus shall not be exposed to dripping or splashing and that no objects filled with
liquids, such as vases, shall be placed on apparatus.
19. Refer all servicing to qualified service personnel. Servicing is required when the apparatus
has been damaged in any way, such as power-supply cord or plug is damaged, liquid has
been spilled or objects have fallen into the apparatus, the apparatus has been exposed to
rain or moisture, does not operate normally, or has been dropped.
20.
Servicing - The user should not attempt to service the appliance beyond that
described in the operating instructions. All other servicing should be referred to
qualified service personnel.
21.
The MAINS plug or an appliance coupler is used as the disconnect device, the
disconnect device shall remain readily operable.
22. Caution marking and nameplate are located on bottom of product.
CAUTION
TO PREVENT ELECTRIC SHOCK, MATCH WIDE BLADE OF PLUG TO WIDE SLOT. FULLY INSERT
THE PLUG TO MAIN POWER SOCKET.
PRECAUTION FORE USE
UNPACK ALL PARTS AND REMOVE PROTECTIVE MATERIAL.
DO NOT CONNECT THE UNIT TO THE MAINS BEFORE CHECKING THE MAINS
VOLTAGE AND ALL OTHER CONNECTIONS HAVE BEEN MADE.
DO NOT COVER ANY VENTS AND MAKE SURE THAT THERE IS A SPACE OF
SEVERAL CENTIMETERS AROUND THE UNIT FOR VENTILATION.

E3
IMPORTANT NOTES
Avoid installing the unit in locations described below:
Places exposed to direct sunlight or close to heat radiating appliances such as
electric heaters.
Places subject to constant vibration.
Dusty, humid or moist places.
COMPLIANCE WITH FCC REGULATIONS
This device complies with Part 15 of the FCC Rules. Operation is subject to the following two
conditions:
(1) this device may not cause harmful interference, and
(2) this device must accept any interference received, including interference that may cause
undesired operation.
NOTE : This equipment has been tested and found to comply with the limits for a Class B digital
device, pursuant to Part 15 of the FCC Rules. These limits are designed to provide reasonable
protection against harmful interference in a residential installation. This equipment generates,
uses and can radiate radio frequency energy and, if not installed and used in accordance with
the instructions, may cause harmful interference to radio communications. However, there is no
guarantee that interference will not occur in a particular installation. If this equipment does cause
harmful interference to radio or television reception, which can be determined by turning the
equipment off and on, the user is encouraged to try to correct the interference by one or more of
the following measures:
- Reorient or relocate the receiving antenna.
- Increase the separation between the equipment and receiver.
- Connect the equipment into an outlet on a circuit different from that to which the receiver is
connected.
- Consult the dealer or an experienced radio/TV technician for help.
CAUTION: Changes or modifications not expressly approved by the party
responsible for compliance could void the user’s authority to operate
the equipment.
PROTECT YOUR FURNITURE
This model is equipped with non-skid rubber 'feet' to prevent the product from moving
when you operate the controls. These 'feet' are made from non-migrating rubber material
specially formulated to avoid leaving any marks or stains on your furniture. However
certain types of oil based furniture polishes, wood preservatives, or cleaning sprays may
cause the rubber 'feet' to soften, and leave marks or a rubber residue on the furniture. To
prevent any damage to your furniture we strongly recommend that you purchase small
self-adhesive felt pads, available at hardware stores and home improvement centers
everywhere, and apply these pads to the bottom of the rubber 'feet' before you place the
product on fine wooden furniture.

E4
DEAR JENSEN® CUSTOMER
Selecting fine audio equipment such as the unit you've just purchased is only the start of your
musical enjoyment. Now it's time to consider how you can maximize the fun and excitement
your equipment offers. This manufacturer and the Electronic Industries Association's
Consumer Electronics Group want you to get the most out of your equipment by playing it at a
safe level. One that lets the sound come through loud and clear without annoying blaring or
distortion and, most importantly, without affecting your sensitive hearing.
Sound can be deceiving. Over time your hearing "comfort level" adapts to higher volumes of
sound. So what sounds "normal" can actually be loud and harmful to your hearing. Guard
against this by setting your equipment at a safe level BEFORE your hearing adapts.
To establish a safe level:
Start your volume control at a low setting.
Slowly increase the sound until you can hear it comfortably and clearly, and without
distortion.
Once you have established a comfortable sound level:
Set the dial and leave it there.
Taking a minute to do this now will help to prevent hearing damage or loss in the future. After
all, we want you listening for a lifetime.
We Want You Listening For a Lifetime
Used wisely, your new sound equipment will provide a lifetime of fun and enjoyment. Since
hearing damage from loud noise is often undetectable until it is too late, this manufacturer and
the Electronic Industries Association's Consumer Electronics Group recommend you avoid
prolonged exposure to excessive noise.
Customer's Record:
The serial number of this product is found on its bottom cover. You should note the serial
number of this unit in the space provided as a permanent record of your purchase to aid in
identification in the event of theft of loss.
Model Number: JTA-325 Serial Number: ____________________

E5
ACCESSORIES INCLUDED
- Application CD
- USB cable
- User Manual
- 45 RPM Record Adapter
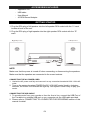
GETTING STARTED
SPEAKER CONNECTION
1. Plug the RCA plug of left speaker into the left speaker RCA socket with the “L” mark
locates at back of the unit.
2. Plug the RCA plug of right speaker into the right speaker RCA socket with the “R”
mark.
NOTE:
Make sure that the power is turned off when connecting or disconnecting the speakers.
Make sure that the speakers are connected to the correct sockets.
CONNECTING THE AC POWER CORD
1. Unwind the AC power cord fully and connect it to any convenient household 120V~ 60Hz AC
outlet.
2. Turn on the system by rotate POWER On/Off / VOLUME control knob in clockwise
direction, the Power LED indicator will light up. Your system is now ready to play your
music.
CONNECTING THE USB CABLE
1. To encode music from your records or from the Aux-in line, connect the USB Port of
the Turntable to a suitable USB port on your computer via the USB cable provided.
2. Please refer to CONNECTING TO A COMPUTER FOR RECORDING section of this
manual for detail.

E6
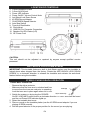
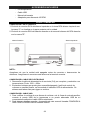
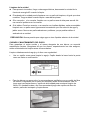
LOCATION OF CONTROLS
1. 3.5mm Headphone Jack
2. 3.5mm AUX-IN jack
3. Power LED Indicator
4. Power On/Off / Volume Control Knob
5. Anti Shock Lock Down Screw
6. 45 RPM Record Adaptor
7. 33/45/78RPM Speed Selector
8. Auto Stop Switch
9. Tone Arm Rest/Holder
10. Pitch Adjust
11. USB Port For Computer Connection
12. Speaker Out RCA Jacks (L/R)
13. AC Power Cord
CAUTION:
This unit should not be adjusted or repaired by anyone except qualified service
personnel.
ANTI-SHOCK LOCK DOWN SCREW
IMPORTANT: This turntable features a built in Anti-Shock system, and the turntable is
locked down when shipped from the factory. Rotate the ANTI-SHOCK LOCK DOWN
SCREW, in a clockwise direction to release the turntable and activate the anti-shock
feature before using the turntable.
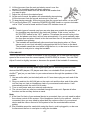
STEREO PHONOGRAPH OPERATION
Please Note - Before Use
- Remove the stylus protector.
- Make sure that the tone arm is unlocked and free
to move from the tone arm rest prior to operating.
Lock the tone arm in place again when not in use.
1. Switch the system on by turning the POWER
On/Off / VOLUME Control Knob in a clockwise direction. A “Click” sound will be heard
and the red Power LED Indicator lights up.
2. Raise the turntable dust cover.
3. Place a record on the turntable platter (use the 45 RPM record adaptor if you are
playing 45 RPM records).
4. Set the speed selector to the proper position for the record you are playing.
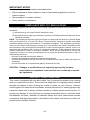
Cartridge
Stylus assembly

E7
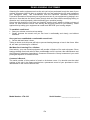
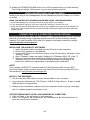
5. Lift the tone arm from the rest and slowly move it over the
record. The turntable platter will begin spinning.
6. Place the tone arm down onto the record at the location that
you want to play.
7. Adjust the volume to the desired level.
8. At the end of record, the platter will automatically stop spinning.
Lift the tone arm from the record and return it to the rest.
9. To stop playing manually, lift the tone arm from the record and return it to the rest.
10. To turn the system OFF, rotate the POWER/VOLUME Knob in a counter-clockwise
until a “Click” sound is heard and the Power LED indicator turns off.
NOTES:
1. Certain types of records may have an auto-stop area outside the preset limit, so
the turntable may stop before the last track finishes. If this occurs, set the
AUTO-STOP switch to the “OFF” position. This allows the record to play to the
end, but please note that it will not stop automatically. You must manually raise
the tone arm and place it back in the rest and then turn off the power to stop the
turntable from spinning.
2. The turntable will automatically disconnect and stop playing when a 3.5mm
stereo aux-in cord (not included) is plugged into the Aux-in Jack on the back.
The turntable cannot be used while using the Aux-in, so be sure to disconnect
the Aux-in cord prior to using the turntable.
PITCH ADJUST
The PITCH ADJUST locates on the back of the unit allows you to fine tune the playing
speed of the record once the correct speed (33/45/78 RPM) is chosen. Turn the Pitch
Adjust Control to slightly increase or decrease the speed of the turntable if necessary
AUXILIARY INPUT
This unit provides an auxiliary audio signal input jack for connecting external audio
devices like MP3 players, CD players and older, non-dockable iPods (except iPod
shuffle 3
rd
gen) so you can listen to your external source through the speakers of this
system.
1. Use an audio cable (not included) with one 3.5 mm stereo plug on each end of the
cable.
2. Plug one end into the AUX-IN jack on the main unit and the other end of the cable
into the Line-out Jack or Headphone Jack of your external audio device. It will
automatically switch the unit to AUX mode.
3. Turn on unit power and your external audio device.
4. The volume level can now be controlled through the main unit. Operate all other
functions on the auxiliary device as usual.
Note:
(1.)If the Line Out Jack of your external device is connected, then you only need to adjust
the volume control of this system. If the Headphone Jack of your external device is
connected, then you may need to adjust both the volume control of your external
device and the volume control of this system to find the most desirable volume
setting.
(2.)The turntable cannot be used while using the Aux-in cord is plugged in, so be sure
to disconnect the Aux-in cord prior to using the turntable.

E8
(3.)Rotate the POWER/VOLUME knob to turn off the system when you finish listening.
Don't forget to switch off the power on your external device as well.
USING HEADPHONES (NOT INCLUDED)
Inserting the plug of your headphones into the Headphone jack will enable you to listen
in private.
READ THIS IMPORTANT INFORMATION BEFORE USING YOUR HEADPHONES
1. Avoid extended play at very high volume as it may impair your hearing.
2. If you experience ringing in your ears, reduce the volume or shut off your unit.
3. Keep the volume at a reasonable level even if your headset is an open-air type designed to
allow you to hear outside sounds. Please note that excessively high volume may still block
outside sounds.
CONNECTING TO A COMPUTER FOR RECORDING
Before getting start, please install the “ AUDACITY ” recording software to your computer.
Below is an example using a computer with Microsoft XP and the Audacity software
installed. For other Windows OS or Mac OS, please visit Audacity website for details.
http://audacity.sourceforge.net/
INSTALLING THE AUDACITY SOFTWARE
1. Insert the Audacity disc (included) into the CD drive of your computer.
2. Click on My computer on the desktop.
3. Double click CD drive to view the contents of the CD and select “Windows” under
“Audacity” folder.
4. Open “Windows” folder and select “Audacity 2.0 (Windows 2000, XP, Vista, 7)”.
5. Open the folder and then double click Audacity set up icon with file name
“audacity-win-2[1].0.exe)” to install the Audacity software according to the
instruction, read license agreements of Audacity before installation.
NOTE:
Free software (AUDACITY) licensed under the GNU general public license (GPL).
More information as well as open source code can be found on the provided CD or on
the website at: http://audacity.sourceforge.net/
INSTALL THE USB DRIVE
1. Use the included USB cable to connect the turntable to your computer.
2. Your computer will detect the JTA-230 as a “ USB PnP Audio Device ” & start to install
USB drivers for it automatically.
3. Waiting for the installation complete until your computer shows a pop up a message
that it is installed properly and ready to use.
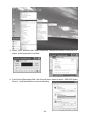
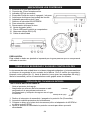
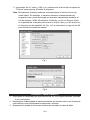
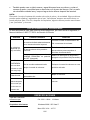
SET RECORDING INPUT LEVEL (USE WINDOWS XP COMPUTER)
1. Click the “Start“ in the left corner of your computer
2. Select “All Programs“ “Accessories” “Entertainment“ “Sound Recorder“ to
open the sound record interface.

E9
3. Select “Edit” and then click “Audio Properties“ towards the bottom of the menu to
select “Audio properties” interface.
4. In the Sound Recording field, click the pull down menu to select “ USB PnP Audio
Device ” as Default device of sound recording.

E10
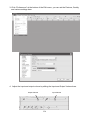
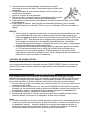
5. Click the Volume button under the Sound recording tab to open ”Recording
Control“ interface;
6. Adjust the line in volume to a level without distortion. You can play a record on the
turntable and use the Sound Recorder to record a short clip of music for testing. The
sound wave will show on the interface screen when recording.
RUNNING AUDACITY SOFTWARE
Note: Please review the software license and distribution restrictions found on the
software disc. Use of the Audacity software is subject to those conditions and restriction.
For additional help with recording and editing music by using the Audacity software,
please visit http://audacity.sourceforge.net/
1. Run the Audacity from the Windows start menu or double click the Audacity icon on
your computer desktop.
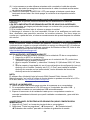
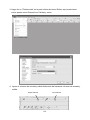
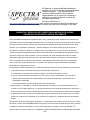
2. The Audacity main screen appears. You will find the Record, Play, Pause, Stop, Skip
to Start and Skip to End control buttons here. Use the File, Edit, View, Transport,
Tracks, Generate, Effect and Analyze menus from your computer screen to Save,
Export or Edit the music.

E11
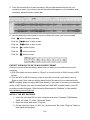
3. Click “Preferences” at the bottom of the Edit menu, you can set the Devices, Quality,
and various settings here.
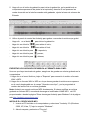
4. Adjust the input and output volume by sliding the Input and Output Volume bars.
Output Volume Input Volume

E12
5. Click the record button to start recording, left and right tracks will show on your
computer screen. If you cannot see the sound waves appear on the Interface when
recording, adjust the Input volume bar.
6. Use the Audacity control panel to record or listen the music you have recorded
- Click button to start recording.
- Click the button to skip to start;
- Click the
button to skip to end;
- Click the
button to play;
- Click the button to pause;
- Click the button to stop.
EXPORT THE MUSIC FILES TO WAV OR MP3 FORMAT
Once you have finished recording, make sure you save your recorded music to the
computer.
1. Click File menu and move down to “Export” to convert the file to WAV format or MP3
format.
2. Click on WAV or MP3 format you want to save the music as in pull down menu of
“Save as type” field, and you will be asked for the file name of your recorded music
NOTE: Audacity does not export MP3 files directly. If you want to encode your recorded
music to MP3 format, you need to download the LAME MP3 encoder either in the CD
provided or under the page “Other Audacity Downloads for Windows” of the website
http://audacity.sourceforge.net/
INSTALL THE MP3 ENCODER
1. Insert the included CD into your computer and select “Audacity 2.0(Windows
2000, XP, Vista, 7)” under “Windows” folder.
2. Open the folder and select “Plug-ins”.
3. Double click the “Lame_v3.99.3_for_windows.exe” file under “Plug-ins” folder to
start install the program.

E13
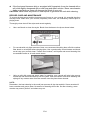
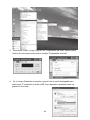
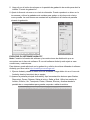
Note: Normally, Audacity will automatically locate the Lame file that you installed.
However, if you change default directory of Lame program, you may need to
manually locate it by using AudacityEditPreferenceLibraries and the
click “Locate” button on computer screen to browse “lame_enc.dll” file where
the directory you have installed. See Fig.1 & 2 below and click OK to finish
manual installation.
Fig. 1
Fig.2
CARE AND MAINTENANCE
1. Avoid operating your unit under direct sunlight or in hot, humid or dusty places.
2. Keep your unit away from heating appliances and sources of electrical noise such as
fluorescent lamps or motors.
3. Unplug the unit from the electrical power outlet immediately in case of malfunction.
CLEANING THE UNIT
To prevent fire or shock hazard, disconnect your unit from the AC power source
when cleaning.
The finish on the unit may be cleaned with a dust cloth and cared for as other
furniture, Use caution when cleaning and wiping the plastic parts.
If the cabinet becomes dusty wipe it with a soft dry dust cloth. Do not use any wax or
polish sprays on the cabinet.

E14
If the front panel becomes dirty or smudged with fingerprints it may be cleaned with a
soft cloth slightly dampened with a mild soap and water solution. Never use abrasive
cloths or polishes as these will damage the finish of your unit.
CAUTION: Never allow any water or other liquids to get inside the unit while cleaning.
RECORD CARE AND MAINTENANCE
To ensure the best sound and the least amount of wear on your records, it’s essential that they
are kept clean. Make sure your records, especially older ones, are sufficiently cleaned prior to
playing them.
Thoroughly clean dust off the stylus and record regularly.
Use a soft brush to clean the stylus. Brush from the base to the tip as shown below.
For records with only light amounts of dust, we recommend brushing them off with a carbon
fiber brush or velvet pad before playing them. Use a good quality record cleaner and brush
set to keep your records clean. Carbon fiber brushes, velvet pads and record cleaning kits
are available online or in local record stores.
Using a mild dish soap and warm water for washing your records will also help remove
excess dirt and dust that builds up over the years. Use a microfiber cloth when washing and
wiping off any excess water from the records once they have been cleaned
NOTE:
Remember, the best cleaning in the world just removes all the dust and dirt. Some records will
have scratches and groove wear. No amount of cleaning will fix this. So after cleaning, some
records may sound “perfect” and others may not.

E15
TROUBLESHOOTING GUIDE
SHOULD YOU EXPERIENCE DIFFICULTIES IN THE USE OF THIS PLAYER PLEASE REFER TO THE
FOLLOWING CHART OR CALL 1-800-777-5331 FOR CUSTOMER SERVICE.
PROBLEM POSSIBLE CAUSE SOLUTION
The unit does
not respond (no
power).
AC power cord is not plugged into a
wall outlet or the connector is not
plugged into the power supply jack
on the back of the unit.
Plug the AC power cord into a wall
outlet and plug the connector into the
supply jack on the unit.
Wall outlet is not functioning.
Plug another device into the same
outlet to confirm the outlet is working.
POWER Switch in the OFF position
Rotate the POWER/VOLUME knob
clockwise to turn on the unit.
Unit is ON but
there is low or
no volume.
The volume Control has been
turned all the way down.
Rotate the Volume control knob to a
higher output.
Sound is
distorted.
Volume level is set too high Decrease the volume
Unit gets warm
after extended
play at high
volume.
This is normal. Turn the unit off a period of time or lower
volume.
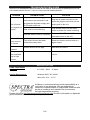
SPECIFICATION
Power requirement:
Main Unit
AC 120V ~ 60Hz 13 Watts
System Requirement:
Windows 2000 / XP/ Vista/7
Mac OS X 10.4 – 10.7.5
At Spectra, environmental and social responsibility is a
core value of our business. We are dedicated to
continuous implementation of responsible initiatives with
an aim to conserve and maintain the environment
through responsible recycling.
Please visit us at http://www.spectraintl.com/green.htm
for more information on Spectra’s
green initiatives or to find a recycler in your area.

E16
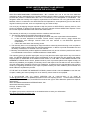
90 DAY LIMITED WARRANTY AND SERVICE
VALID IN THE U.S.A. ONLY
SPECTRA MERCHANDISING INTERNATIONAL, INC. warrants this unit to be free from defective
materials or factory workmanship for a period of 90 days from the date of original customer purchase and
provided the product is utilized within the U.S.A. This warranty is not assignable or transferable. Our
obligation under this warranty is the repair or replacement of the defective unit or any part thereof, except
batteries, when it is returned to the SPECTRA Service Department, accompanied by proof of the date of
original consumer purchase, such as a duplicate copy of a sales receipt.
You must pay all shipping charges required to ship the product to SPECTRA for warranty service. If the
product is repaired or replaced under warranty, the return charges will be at SPECTRA’s expense. There
are no other express warranties other than those stated herein.
This warranty is valid only in accordance with the conditions set forth below:
1. The warranty applies to the SPECTRA product only while:
a. It remains in the possession of the original purchaser and proof of purchase is demonstrated.
b. It has not been subjected to accident, misuse, abuse, improper service, usage outside the
descriptions and warnings covered within the user manual or non-SPECTRA approved
modifications.
c. Claims are made within the warranty period.
2. This warranty does not cover damage or equipment failure caused by electrical wiring not in compliance
with electrical codes or SPECTRA user manual specifications, or failure to provide reasonable care and
necessary maintenance as outlined in the user manual.
3. Warranty of all SPECTRA products applies to residential use only and is void when products are used in
a nonresidential environment or installed outside the United States.
This warranty gives you specific legal rights, and you may also have other rights which vary from state to
state. TO OBTAIN SERVICE please remove all batteries (if any) and pack the unit carefully and send it
freight prepaid to SPECTRA at the address shown below. IF THE UNIT IS RETURNED WITHIN THE
WARRANTY PERIOD shown above, please include a proof of purchase (dated cash register receipt) so
that we may establish your eligibility for warranty service and repair of the unit without cost. Also include a
note with a description explaining how the unit is defective. A customer service representative may need to
contact you regarding the status of your repair, so please include your name, address, phone number and
email address to expedite the process.
IF THE UNIT IS OUTSIDE THE WARRANTY PERIOD, please include a check for $40.00 to cover the cost
of repair, handling and return postage. All out of warranty returns must be sent prepaid.
It is recommended that you contact SPECTRA first at 1-800-777-5331 or by email at
custserv@spectraintl.com
for updated information on the unit requiring service. In some cases the model
you have may be discontinued, and SPECTRA reserves the right to offer alternative options for repair or
replacement.
SPECTRA MERCHANDISING INTERNATIONAL, INC.
4230 North Normandy Avenue,
Chicago, IL 60634, USA.
1-800-777-5331
To register your product, visit the link on the website below to enter your information.
http://www.spectraintl.com/wform.htm
0516 Printed in China

TORNAMESA ESTÉREO DE 3
VELOCIDADES CON ALTAVOCES Y
AJUSTE DE VELOCIDAD
MODEL: JTA-325
MANUAL DEL PROPIETARIO
Por favor lea y observe cuidadosamente este manual de Instrucciones
cuidadosamente antes de utilizar la unidad y reténgalo para futura referencia

S1
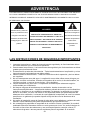
ADVERTENCIA
PARA REDUCIR EL RIESGO DE INCENDIO O CHOQUE ELÉCTRICO, NO EXPONGA ESTE EQUIPO A
LA LLUVIA O HUMEDAD. EXISTE ALTO VOLTAJE PELIGROSO PARA LA SALUD EN LA PARTE
INTERIOR. NO ABRA EL GABINETE, REALICE EL MANTENIMIENTO SOLAMENTE CON LA AYUDA
DE PERSONAL CALIFICADO
.
El destello de luz y diseño de
flecha con punta dentro de un
triángulo es una señal de
advertencia, alertando sobre
“voltaje peligroso” dentro del
producto
PRECAUCIÓN: PARA REDUCIR EL REISGO DE
CHOQUE ELÉCTRICO NO REMUEVA LA TAPA O LA
PARTE TRASERA – NO EXISTEN EN EL INTERIOR
PARTES ÚTILES PARA EL USUARIO. REALICE EL
SERVICIO CON PERSONAL DE MANTENIMIENTO
CALIFICADO
PRECAUCIÓN
RIESGO DE CHOQUE ELÉCTRICO
NO ABRIR
El signo de exclamación
dentro de un triángulo es
una señal de advertencia
alertando de importantes
instrucciones
acompañando este
producto
LAS INSTRUCCIONES DE SEGURIDAD IMPORTANTES
1. Lea estas Instrucciones.- todas las instrucciones de seguridad y de funcionamiento deben
ser leídas antes de que se funcione la aplicación.
2. Guarde estas Instrucciones - Las instrucciones de seguridad y de funcionamiento se deben
guardar para la referencia futura.
3. Preste atención a todas las Advertencias - Todas las advertencias en la aplicación y en las
instrucciones de funcionamiento se deben adherir.
4. Observe todas las instrucciones - Todas las instrucciones de la operación y del uso deben
ser seguidas.
5. No use este aparato cerca del agua - La aplicación no se debe utilizar cerca del agua; por
ejemplo, cerca de una bañera, el lavabo el fregadero de la cocina, la tina del lavadero, en
un sótano mojado, o acercan a una piscina, y a los similares.
6. Limpie solamente con paño seco - La aplicación se debe limpiar solamente según lo
recomendado por el fabricante.
7. No bloquee ninguna de las aberturas de ventilación. Instalar de acuerdo con las
instrucciones del fabricante. - La aplicación debe ser situada de modo que su localización o
posición no interfiera con su ventilación apropiada. Por ejemplo, la aplicación no se debe
situar en una cama, un sofá, una manta, o una superficie similar que pueda bloquear las
aberturas de la ventilación; o colocado en una instalación incorporada, tal como un estante
para libros o un gabinete que pueden impedir el flujo del aire con las aberturas de la
ventilación.
8. No realice la instalación cerca de fuentes de calor tales como radiadores, registros de calor,
estufas u otros artefactos (incluyendo amplificadores) que produzcan calor.
9. No contradiga los propósitos de seguridad de la conexión a tierra o polaridad. Un enchufe
polarizado tiene dos elementos siendo uno más grueso que el otro. Un enchufe de tipo de
conexión a tierra tiene dos elementos y una tercera pata para la conexión a tierra. El
elemento más grueso o tercera pata se suministra para su seguridad. Si el enchufe

S2
suministrado no encaja en su tomacorrientes, consulte a un electricista para reemplazar el
tomacorrientes obsoleto.
10. Proteja el cable eléctrico para que no sea pisado o pellizcado particularmente en los
enchufes, en los receptáculos utilitarios, y en el lugar donde los enchufes salen del aparato.
11. Solamente utilice accesorios/conexiones especificadas por el
fabricante.
12. Utilice el equipo solamente con soportes, trípodes, carros, abrazaderas
o mesa especificados por el fabricante, o vendidos junto con el aparato.
Cuando se utiliza un carro, tenga cuidado al mover el conjunto
carro/aparato para evitar lesiones provocadas por caídas o inclinación.
13. Desenchufe este aparato durante tormentas eléctricas o cuando no sea
utilizado por largos períodos de tiempo.
14. Fuentes de energía - la aplicación se debe conectar con una fuente de
alimentación solamente del tipo descrito en las instrucciones de funcionamiento o según lo
marcado en la aplicación. No sobrecargar el enchufe de pared.
15. Montaje de la pared y del techo - la aplicación se debe montar a una pared o a un techo
solamente según lo recomendado por el fabricante.
16. Líneas de energía - una antena al aire libre se debe situar lejos de líneas de energía.
17. Entrada del objeto y del líquido - el cuidado debe ser tomado de modo que no caigan los
objetos y los líquidos no estén derramados en el recinto con aberturas.
18. El aparato no debe exponerse a goteos ni salpicaduras y ningún objeto con líquido, como
un jarrón, debe colocarse sobre el aparato.
19. Referir todos que mantienen al personal de servicio cualificado. El mantenimiento se
requiere cuando el aparato se ha dañado de cualquier manera, por ejemplo energía-provee
la cuerda o se daña el enchufe, se ha derramado el líquido o los objetos han caído en el
aparato, el aparato se ha expuesto a la lluvia o a la humedad, no funciona normalmente, ni
se ha caído.
20. Mantenimiento - el usuario no debe procurar mantener la aplicación más allá de eso
descrita en las instrucciones de funcionamiento. Todo el otro que mantiene se debe referir
calificó a personal de servicio.
21. Las CAÑERÍAS tapan o un acoplador de la aplicación se utiliza como el dispositivo de la
desconexión, el dispositivo de la desconexión sigue siendo fácilmente operable.
22. La marca y la placa de identificación de la precaución están situadas encendido detrás de
producto.
PRECAUCIÓN:
PARA PREVENIR DESCARGA ELÉCTRICA,
EMPAREJAR LA LÁMINA ANCHA DEL ENCHUFE A LA
RANURA ANCHA. INSERTAR COMPLETAMENTE EL
ENCHUFE AL ZÓCALO DE LA ALIMENTACIÓN
PRINCIPAL.
PRECAUCIONES ANTES DE USAR LA UNIDAD
DESEMPAQUE TODAS LAS PIEZAS Y QUITE EL MATERIAL PROTECTOR.
NO ENCHUFE LA UNIDAD AL CIRCUITO ELÉCTRICO HASTA REVISAR EL
VOLTAJE Y HABER HECHO TODAS LAS DEMÁS CONEXIONES
NO CUBRA LAS REJILLAS DE VENTILACIÓN Y ASEGÚRESE DE DEJAR
VARIOS CENTÍMETROS DE ESPACIO ALREDEDOR DE LA UNIDAD PARA
CIRCULACIÓN DE AIRE.

S3
NOTAS IMPORTANTES
Evite instalar la unidad en los lugares siguientes:
Lugares expuestos a la luz directa del sol o cerca de aparatos generadores de calor,
por ejemplo, calentadores eléctricos.
Lugares que reciben vibración constante.
Lugares con mucho polvo o humedad.
CUMPLIMIENTO CON LAS REGULACIONES DE LA COMISIÓN FEDERAL DE
COMUNICACIONES (FCC POR SUS SIGLAS EN INGLÉS)
Este dispositivo se conforma con la parte 15 de las reglas de la FCC. La operación
cumple con las dos condiciones siguientes:
(1) este dispositivo puede no causar interferencia dañosa, y
(2) este dispositivo debe aceptar cualquier interferencia recibida, incluyendo
interferencia que pueda causar la operación indeseada.
NOTA: Este equipo ha sido probado y se ha determinado que satisface los límites para un
dispositivo digital clase B, de acuerdo a lo que dispone la Parte 15 de los Reglamentos de la
FCC, Estos límites tienen el propósito de proporcionar una protección razonable contra
interferencia dañina en una instalación residencial. Este equipo genera, usa y puede emitir
energía de radiofrecuencia, y si no se instala y se usa de acuerdo con estas instrucciones,
puede causar interferencia dañina a las radiocomunicaciones.
Sin embargo, no hay ninguna garantía de que no vaya a ocurrir interferencia en ninguna
instalación
Determinada. Si este equipo causa interferencia no deseada contra la recepción de radio o
televisión, lo cual se puede determinar encendiendo y apagando el aparato, se exhorta al
usuario a tratar de corregir el problema de la interferencia tomando una o más de las siguientes
medidas:
- Reoriente o reubique la antena de recepción
- Aumente la distancia de separación entre el equipo y el receptor
- Conecte el equipo a un receptáculo en un circuito distinto al que usa el receptor.
- Consulte al concesionario o a un radiotécnico experimentado para que le ayuden.
ADVERTENCIA: Los cambios o modificaciones a esta unidad que no estén expresamente
aprobados por la parte responsable de la conformidad podrían anular la autoridad del usuario
para operar el equipo
.
PROTEJA SUS MUEBLES!!
Este sistema está equipado con pies de goma anti deslizante para prevenir que el equipo se
mueva mientras usted opera los controles. Éstos pies están realizados en un material de goma
no migratorio especialmente formulado para evitar dejar marcas o manchas en sus muebles. Sin
embargo, ciertos tipos de barnices de muebles basados en aceites, preservativos de la madera,
o vaporizadores de limpieza pueden ablandar dichos pies, y dejar marcas o un residuo de goma

S4
en los muebles.
Para prevenir cualquier tipo de daño a sus muebles, recomendamos que compre pequeñas
almohadillas de fieltro auto-adhesivas, disponibles en ferreterías y todo tipo de centros de
compra del hogar, y aplique estas almohadillas en la parte inferior del pie de goma antes de
colocar el producto sobre el mobiliario de madera fina
.
ESTIMADO CLIENTE JENSEN®
Seleccionar equipo de audio de alta calidad como esta unidad que acaba de adquirir, es
solamente el inicio de su experiencia musical. Ahora es el momento de determinar cómo
obtener de este equipo la máxima emoción y diversión. El fabricante y el Grupo de
Consumidores de productos Electrónicos de la Asociación de Industrias Electrónicas, desea que
usted obtenga lo mejor de su equipo utilizándolo dentro de un rango de seguridad. Esto
permite escuchar los sonidos fuerte y claramente sin ninguna distorsión molesta y lo más
importante, sin afectar la sensibilidad de su oído. El sonido puede ser engañoso. Con el tiempo
el "nivel de comodidad" de su oído se adapta a un mayor volumen. Entonces, lo que suena
"normal" podría ser realmente fuerte y dañino para su oído. Prevéngalo sintonizando su equipo
dentro de un rango de seguridad ANTES de que su oído se adapte.
Para establecer un nivel seguro:
- Inicie el control del volumen con un volumen bajo.
- Vaya aumentando lentamente el sonido hasta que pueda escucharlo cómoda, claramente y sin
distorsión.
Una vez haya establecido un nivel confortable de sonido:
- Sintonícelo y déjelo allí.
Tomar un minuto ahora le ayudará a prevenir daños futuros en el oído o la pérdida del mismo.
Nosotros queremos que usted escuche siempre.
Queremos que Usted Escuche Siempre
Utilizado adecuadamente, su nuevo equipo de sonido le brindará diversión y alegría para toda la
vida. Debido a que el daño auditivo ocasionado por ruidos muy fuertes no es detectado
muchas veces hasta que es demasiado tarde, este fabricante y el Grupo de Consumidores de
productos Electrónicos de la Asociación de Industrias Electrónicas, le recomienda evitar una
exposición prolongada al ruido excesivo.
Registro del Consumidor:
El número de serie de este producto se encuentra en la parte inferior de la unidad. Es
recomendable anotar el número de serie en el espacio proporcionado para ese propósito como
un registro permanente de compra y para identificación en caso de robo o pérdida.
Número de Modelo: JTA-325 Número de Serie:

S5
ACCESORIOS INCLUIDOS
- CD de aplicación
- Cable USB
- Manual del usuario
- Adaptador para discos de 45 RPM
PARA COMENZAR
CONEXIÓN DE LOS ALTAVOCES
1. Enchufe el conector RCA del altavoz izquierdo en la toma RCA altavoz izquierdo con
la marca "L" se localiza en la parte posterior de la unidad.
2. Enchufe el conector RCA del altavoz derecho en la toma del altavoz del RCA derecha
con la marca "R".
NOTA:
Asegúrese de que la unidad esté apagada antes de conectar o desconectar los
altavoces. Asegúrese de conectar cada altavoz a la terminal correcta.
CONEXIÓN DEL CABLE DE ELECTRICIDAD
1. Desenrolle el cable de alimentación de corriente (CA) por completo y conéctelo a un
tomacorriente CA de 120V ~ 60Hz .
2. Encienda el sistema por poder girar encendido/apagado / perilla de control de
volumen en sentido horario, se encenderá el indicador LED de alimentación. Su
sistema está ahora listo para jugar su música.
CONEXIÓN DEL CABLE USB
1. Para codificar la música de sus discos de música o de la línea de entrada auxiliar,
conecte el puerto USB de la tornamesa a un puerto adecuado USB de su
computadora mediante el cable USB suministrado.
2. Para obtener detalles consulte la sección de este manual llamada CONEXIÓN A
UNA COMPUTADORA PARA GRABACIONES.
Altavoz Derecho
Altavoz Izquierdo

S6
UBICACION DE LOS CONTROLES
1. Enchufe de 3.5mm para audífonos
2. Conector de 3.5mm entrada auxiliar
3. Indicador LED de encendido
4. Encendido Perilla de control / apagado / volumen.
5. Antichoque de bloqueo hacia abajo del tornillo.
6. Adaptador para discos de 45 rpm
7. Selector de velocidad 33/45/78RPM
8. Paro automático interruptor
9. Descansador del brazo de tono
10. Ajuste de grado (pitch)
11. Puerto USB para conexión a computadora
12. Altavoces clavijas RCA (L/R)
13. Cable de electricidad
PRECAUCIÓN:
Esta unidad no debe ser ajustada ni reparada por ninguna persona que no sea personal
calificado de servicio.
TORNILLO DE SEGURIDAD Y BLOQUEO CONTRA GOLPES
La tornamesa de esta unidad tiene un sistema integrado antigolpes y la tornamesa tiene
un bloqueo de seguridad al ser enviada de la fábrica. Gire el tornillo de seguridad y
bloqueo contra golpes (No. 6), hacia la derecha (como giran las manecillas del reloj) y
libere la tornamesa y active la característica contra golpes antes de utilizarla.
OPERACIÓN DEL TOCADISCOS ESTÉREO
NOTA PARA ANTES DE USARLO:
- Quite el protector de la aguja.
- Asegúrese que el brazo de la tornamesa no esté
asegurado en el apoya-brazo antes de su
funcionamiento y colóquelo de regreso en su lugar
al terminar.
1. Deslice el interruptor de encendido / apagado a la posición On (Encendido)
2. Levante la cubierta protectora de la tornamesa.
3. Coloque un disco en el plato de la tornamesa (utilice el adaptador de 45 RPM si .
su disco es de 45 RPM).
4. Ajuste el selector de velocidad a la posición correcta para disco que está
escuchando.
Cartucho
Montaje de la aguja

S7
5. Levante el brazo del descansador y lentamente muévalo
colocándolo encima del disco. Comenzará a girar el plato de la
tornamesa
6. Coloque el brazo de tono encima del disco en la posición que
usted quiera reproducir.
7. Ajuste el volumen al nivel deseado.
8. Al final del disco, el dejará de girar automáticamente. Levante
el brazo de tono del disco y devuélvalo al descansador.
9. Para detener la reproducción manualmente, levante el brazo del disco y devuélvalo
al descansador.
10. Para apagar el sistema, gire la perilla de encendido/volumen en un en sentido
antihorario hasta que un sonido "Click" se oye y el indicador LED de encendido se
apaga.
NOTAS:
1. Ciertos tipos de registros pueden tener un área de parada automática fuera del
límite preestablecido, por lo que el plato giratorio pueden dejar antes de los
últimos acabados de pista. Si esto ocurre, ajuste el interruptor AUTO-STOP a la
posición "OFF". Esto permite que el registro para jugar hasta el final, pero por
favor tenga en cuenta que no se detendrá automáticamente. Usted debe
levantar manualmente el brazo y colóquelo de nuevo en el resto y luego apague
el poder de detener el tocadiscos de hilado.
2. Desconexión automática de la bandeja giratoria y deje de reproducirse cuando
un 3,5 mm stereo entrada aux-in cable (no incluido) está enchufado en el
conector Aux-in en la parte posterior. El plato giratorio no se puede utilizar
mientras que utilizando la entrada Aux-in, así que asegúrese de desconectar el
cable Aux-in antes de utilizar el tocadiscos.
CONTROL DE GRADO (PITCH)
El control de Grado (Pitch) le permite afinar la velocidad de reproducción del disco una
vez se haya seleccionado la velocidad correcta (33/45/78 RPM). Deslice el control de
grado (Pitch) para aumentar o disminuir ligeramente la velocidad de la tornamesa si
fuera necesario.
ENTRADA AUXILIAR
Esta unidad proporciona un conector de entrada auxiliar de audio para conectar
dispositivos de audio externos, como por ejemplo, reproductores MP3s, reproductores
de CD y otros dispositivos más antiguos, no acoplables (excepto iPod shuffle 3
a
gen)
para poder escuchar su fuente externa a través de los altavoces de este sistema.
1. Use un cable de audio (no incluido) con enchufe estéreo de 3.5 mm en cada uno de
los extremos del cable.
2. Enchufe uno de los extremos en el conector de ENTRADA AUXILIAR de la unidad
principal y el otro extremo del cable al conector de Salida o conector de audífonos de
su dispositivo externo. Automáticamente el aparato cambiará a modalidad AUX.
3. Encienda la unidad y su dispositivo externo de audio.
4. Ahora puede controlar el nivel de volumen a través de su unidad principal. Opere
todas las demás funciones en el dispositivo auxiliar como siempre.
Nota:
(1). Si está enchufado su conector auxiliar de salida, entonces solo necesitará ajustar el
control de volumen de este sistema. Si está enchufado el conector de audífonos de
su dispositivo externo, entonces podría ser necesario que tenga que ajustar el
control de volumen de su dispositivo externo, y también el control de volumen de
este sistema para encontrar el nivel de volumen de su preferencia.

S8
(2). La tornamesa no puede utilizarse mientras esté conectado el cable de entrada
auxiliar, de modo que asegúrese de desconectar el cable de entrada auxiliar antes
de utilizar la tornamesa.
(3). Deslice el interruptor POWER ON / OFF para apagar el sistema cuando haya
terminado de escuchar. No olvide apagar la corriente de su dispositivo externo
también.
USO DE AUDÍFONOS (NO INCLUIDOS)
Para escuchar en privado, inserte el enchufe de sus audífonos en la salida de
audífonos.
LEA ESTA IMPORTANTE INFORMACIÓN ANTES DE USAR SUS AUDÍFONOS
1. Evite escuchar por largos períodos de tiempo con volumen alto ya que puede dañar
su sentido auditivo.
2. Si le zumban los oídos, baje el volumen o apague la unidad.
3. Mantenga el volumen a un nivel razonable, incluso si los audífonos son estilo aire
libre, diseñados para permitirle escuchar los sonidos externos. Por favor tenga en
cuenta que, a pesar de esto, el volumen excesivamente alto puede bloquear los sonidos
del exterior.
CONEXIÓN A UNA COMPUTADORA PARA GRABACIONES
Antes de comenzar, instale el software de grabación "AUDACITY" en su computadora. A
continuación se muestra un ejemplo utilizando un equipo con Microsoft XP y el software
Audacity instalado. Para otros sistemas operativos de Windows o Mac OS, visite el sitio
web de Audacity para obtener más información.
http://audacity.sourceforge.net/
INSTALACIÓN DEL SOFTWARE AUDACITY
1. Inserte el disco de Audacity (incluido) en la unidad de CD de su computadora.
2. Haga clic en Mi PC en su escritorio.
3. Haga doble clic en la unidad de CD para ver el contenido del CD y seleccione
"Windows" bajo la carpeta "Audacity".
4. Abra la carpeta "Windows" y seleccione "Audacity 2.0 (Windows 2000, XP, Vista,
7)".
5. Abra la carpeta y haga doble clic en el ícono del archivo de configuración (set up)
Audacity con el nombre "audacity-win-2 [1] .0. Exe)" para instalar el software
Audacity de acuerdo con las instrucciones, lea los acuerdos de licencia de
Audacity antes de la instalación.
NOTA:
El software libre (Audacity) bajo la licencia GNU General Public License (GPL).
Más información, así como el código de fuente abierto se pueden encontrar en el CD o
en el sitio web en: http://audacity.sourceforge.net/
INSTALE LA UNIDAD USB
1. Utilice el cable USB incluido para conectar la tornamesa a su computadora.
2. Su computadora detectará el JTA-232 como un "controlador de audio USB y
comenzará a instalar sus controladores USB automáticamente.
3. Espere el transcurso de la instalación hasta que su computadora muestre un
mensaje instantáneo indicando que quedó instalado correctamente y que está listo
para usarlo.
AJUSTE DEL NIVEL DE ENTRADA DE GRABACIÓN (USAR COMPUTADORA
WINDOWS XP)
1. Haga clic en "Inicio" en la esquina izquierda de su computadora
2. Seleccione "Todos los programas", ."Accesorios", "Entretenimiento",
"Grabadora de sonidos" para abrir la interfaz de grabación de sonido.

S9
3. Seleccione "Editar" y luego haga clic en "Propiedades de audio" hacia la parte
inferior del menú para seleccionar la interfaz "Propiedades de audio".
4. En el campo Grabación de sonidos, haga clic en el menú desplegable para
seleccionar "Controlador de Audio USB" como dispositivo predeterminado de
grabación de sonido.

S10
5. Haga clic en el botón de volumen en la pestaña de grabación de sonido para abrir la
interfaz "Control de grabación".
6. Ajuste la línea de volumen a un nivel sin distorsión. Puede reproducir un disco en la
tornamesa y utilizar la grabadora de sonidos para grabar un clip breve de música
como prueba. La onda sonora se mostrará en la pantalla de la interfaz de pantalla
durante la grabación.
EJECUTAR EL SOFTWARE AUDACITY
Nota: Consulte la licencia del software y las restricciones de distribución que se
encuentran en el disco de software. El uso del software Audacity está sujeto a esas
condiciones y restricciones.
Para obtener ayuda adicional con la grabación y edición de música utilizando el software
Audacity, por favor visite http://audacity.sourceforge.net/
1. Ejecute Audacity desde el menú Inicio de Windows o haga doble clic en el ícono de
Audacity desde el escritorio de su equipo.
2. Aparece la pantalla principal de Audacity. Aquí encontrará los botones para Grabar,
Reproducir, Pausa, Detener, Saltar al inicio y Saltar al final. Utilice los menús de
Archivo, Edición, Ver, Transporte, Pistas, Generar, Efectos y Analizar desde la
pantalla de su computadora para guardar, exportar o editar la música.

S11
3. Haga clic en "Preferencias" en la parte inferior del menú Editar, aquí puede hacer
varios ajustes como Dispositivos, Calidad y varios.
4. Ajuste el volumen de entrada y salida deslizando las barras de volumen de entrada y
salida.
Output Volume Input Volume

S12
5. Haga clic en el botón de grabación para iniciar la grabación, en la pantalla de su
computadora aparecerán las pistas a la izquierda y derecha Si no aparecen las
ondas de sonido en la Interfaz cuando esté grabando, ajuste la barra de volumen de
Entrada.
6. Utilice el panel de control de Audacity para grabar o escuchar la música que grabó
- Haga clic en el botón para iniciar la grabación.
- Haga clic en el botón para saltar al inicio;
- Haga clic en el botón para saltar al final;
- Haga clic en el botón para reproducir;
- Haga clic en el botón para pausar;
- Haga clic en el botón para detener;
EXPORTAR LOS ARCHIVOS DE MÚSICA A FORMATO WAV O MP3
Una vez que haya terminado de grabar, asegúrese de guardar su música grabada en la
computadora.
1. Haga clic en el menú Archivo y baje a "Exportar" para convertir el archivo a formato
WAV o MP3.
2. Haga clic en formato WAV o MP3 en el que desea guardar la música como aparece
en el menú desplegable en el campo "Guardar como tipo", y se le preguntará el
nombre del archivo de su música guardada.
Nota: Audacity no exporta archivos MP3 directamente. Si desea codificar su música
grabada en formato MP3, necesitará descargar el codificador LAME MP3 del CD
proporcionado o desde la página "Otras descargas Audacity para Windows" de la página
web http://audacity.sourceforge.net/
INSTALE EL CODIFICADOR MP3
1. Inserte el CD incluido en la computadora y seleccione "Audacity 2.0 (Windows
2000, XP, Vista, 7)" bajo la carpeta "Windows".
2. Abra la carpeta y seleccione "Plug-ins".

S13
3. Haga doble clic en "Lame_v3.99.3_for_windows.exe" archivo bajo la carpeta de
"Plug-ins" para empezar a instalar el programa.
Nota: Normalmente, Audacity localizará automáticamente el archivo Lame que
usted instaló. Sin embargo, si cambia el directorio predeterminado del
programa Lame, puede que tenga que buscarlo manualmente mediante el
uso de Audacity Edit Preference Libraries y el clic en "Buscar" botón
en la pantalla del ordenador para buscar el archivo "lame_enc.dll" archivo en
el directorio que ha instalado. Ver Fig. 1 y 2 a continuación y haga clic en OK
para finalizar la instalación manual.
Fig. 1
Fig.2
CUIDADO Y MANTEMIENTO
1. Evite operar su unidad bajo los rayos directos del sol, o en lugares calientes, húmedos,
o con mucho polvo
2. Mantenga su unidad alejada de electrodomésticos que emanan calor o son fuentes de
ruido eléctrico como las lámparas fluorescentes o motores.
3. Desenchufe la unidad de la corriente eléctrica de inmediato en caso de fallas.

S14
Limpieza de la unidad
Para prevenir incendios, fuego o descarga eléctrica, desconecte la unidad de la
fuente de emergía AC cuando la limpie.
El acabado de la unidad puede limpiarse con un paño de limpieza, al igual que otros
muebles. Tenga cuidado cuando limpie o sacuda las piezas.
Si le cae polvo a la consola, límpiela con un paño suave de tela para sacudir No
use ceras ni pulidores en la consola.
Si el tablero Fontal se ensucia, o se mancha con huellas digitales, sería aconsejable
limpiarlo con un paño suave ligeramente humedecido por una solución de agua y
jabón suave. Nunca use paños abrasivos o pulidores ya que podrían dañar el
acabado de su unidad.
PRECAUCIÓN: Nunca permita que caiga agua u otros líquidos adentro de la unidad.
CUIDADO Y MANTENIMIENTO DEL DISCO
Para garantizar el mejor sonido y el menor desgaste de sus discos, es esencial
mantenerlos limpios. Asegúrese de que los discos, especialmente los más antiguos,
estén suficientemente limpios antes de escucharlos.
Limpie cuidadosamente la aguja y el disco con regularidad.
Use un cepillo suave para limpiar la aguja. Cepille desde la base hacia la punta
como se ilustra a continuación.
Para los discos con poco polvo, le recomendamos cepillarlos con un cepillo de fibra
de carbón o limpiarlos con un paño de terciopelo antes de escucharlos. Use un
juego que trae limpia-discos y cepillo de alta calidad para mantener limpios los
discos. En tiendas locales o en línea encontrará juegos de cepillos de fibra de
carbón, paños de terciopelo y limpia-discos.

S15
También puede usar un jabón suave y agua tibia para lavar sus discos y quitar el
exceso de polvo y suciedad que se acumulan con el paso del tiempo. Use un paño
de microfibras cuando lave y seque el agua de los discos después de lavarlos.
NOTA:
Recuerde: la mejor limpieza del mundo solo quita el polvo y la suciedad. Algunos discos
pueden estar rayados y agrietados por el uso. La limpieza, aunque sea meticulosa, no
puede eliminar esto. Por ello, después de limpiarlos, algunos discos pueden escucharse
y ser “perfectos” y otros no.
SOLUCIONADOR DE PROBLEMAS
Si tiene dificultad al usar este Sistema de Acoplamiento, por favor revise lo siguiente, o
llame al teléfono 1-800-777-5331 de Servicio al Cliente.
Síntoma Posible Problema Solución
La unidad no
responde (no
hay corriente)
El cable de suministro de corriente
no está enchufado adecuadamente
a un tomacorriente de la pared.
Conecte el cable de alimentación de
CA a una toma de corriente.
El tomacorriente de la pared no
funciona.
Enchufe otro dispositivo en el mismo
tomacorriente para comprobar si
funciona el tomacorriente.
Coloque el interruptor de la
UNIDAD PRINCIPAL en posición
de OFF (Apagado)
Deslice el interruptor de encendido /
apagado a la posición ON (Encendido)
La unidad está
ENCENDIDA
pero no tiene
volumen o este
está muy bajo
Se ha movido totalmente hacia
abajo el control de volumen.
Coloque el control de volumen en una
posición más alta.
El sonido está
distorsionado.
El nivel de volumen está
demasiado alto.
Bájele el volumen.
La unidad se
calienta después
de funcionar por
mucho rato con
volumen alto.
Esto es normal. Apague la unidad un rato o baje el
volumen.
ESPECIFICACIONES
Tipo de Corriente
Unidad Principal CA 120V ~ 60Hz 13 Watts
Requisitos del sistema:
Windows 2000 / XP/ Vista/7
Mac OS X 10.4 – 10.7.5

S16
En Spectra, la responsabilidad ambiental y
social es uno de los valores fundamentales de
nuestra empresa. Nos dedicamos a la
continua implementación de iniciativas
responsables con el objeto de conservar y
mantener el medio ambiente a través del
reciclaje responsable.
Por favor visítenos en
http://www.spectraintl.com/green.htm para mayor información sobre las iniciativas de
protección del medio ambiente o para encontrar los centros de reciclaje en su área.
GARANTÍA Y SERVICIOS DE COBERTURA LIMITADA POR 90 DÍAS
VÁLIDA EN LOS ESTADOS UNIDOS SOLAMENTE
SPECTRA MERCHANDISING INTERNATIONAL, INC. garantiza que esta unidad se encuentra libre de
materiales o mano de obra de fábrica defectuosos, por un período de 90 días, desde la fecha de la compra
original por parte del cliente, siempre que el producto sea utilizado dentro de los Estados Unidos. Esta
garantía no es asignable o transferible. Nuestra obligación de acuerdo a esta garantía es reparar o
reemplazar la unidad con defectos o cualquier parte correspondiente, con excepción de las baterías,
cuando es devuelta al Departamento de Servicios de SPECTRA, acompañada de la prueba de la fecha
original de compra por parte de cliente, como por ejemplo una copia duplicada del recibo de ventas.
Usted debe pagar todos los costos de envío requeridos para entregar el producto a SPECTRA para el
servicio de garantía. Si el producto es reparado o reemplazado de acuerdo a garantía, los gastos de
retorno serán por cuenta de SPECTRA. No existen otras garantías expresas diferentes de aquellas
declaradas en el presente documento.
Esta garantía es válida solamente en el cumplimiento de las condiciones que se establecen a continuación:
1. La garantía se aplica solamente al producto de SPECTRA siempre que:
a. Permanezca en posesión del comprador original y se exhiba la prueba de compra.
b. Que no ha sido sometido a accidentes, mal uso, abuso, servicio inapropiado, uso fuera de las
descripciones de advertencia cubiertas dentro del manual del propietario, o modificaciones no
aprobada por SPECTRA.
c. Los reclamos deben ser hechos dentro del período de garantía.
2. Esta garantía no cubre daños o fallas del equipamiento causados por conexiones eléctricas que no
cumplen con los códigos eléctricos, con las especificaciones del manual del propietario de SPECTRA, o
la falta de cuidado razonable y mantenimiento necesario como se describe en el manual del propietario.
3. La garantía de todos los productos de SPECTRA se aplica solamente al uso residencial y es anulada
cuando los productos son utilizados en un ambiente no residencial, o instalados fuera de los Estados
Unidos.
Esta garantía le da derechos legales específicos, y usted puede tener también otros derechos que varían
de estado a estado. Para OBTENER SERVICIO por favor remueva todas las baterías (de existir) y embale
la unidad con cuidado enviándola por correo postal asegurado y prepago o UPS a SPECTRA, a la
dirección que se menciona abajo. SI LA UNIDAD ES DEVUELTA DENTRO DEL PERÍODO DE GARANTÍA

S17
EXHIBIDO arriba, por favor incluya una prueba de compra (recibo de caja registradora con fecha), para
que podamos determinar su elegibilidad para el servicio de garantía y reparación de la unidad sin costo.
También incluya una nota con una descripción explicando en qué forma la unidad es defectuosa. Un
representante de atención al cliente tal vez deba contactarlo en relación al estado de su reparación, por lo
tanto incluya su nombre, dirección, número de teléfono y dirección de correo electrónico para acelerar el
proceso.
SI LA GARANTÍA SE ENCUENTRA FUERA DEL PERÍODO DE GARANTÍA, por favor incluya un cheque
por $40.00 para cubrir el costo de reparación, manejo y correo de retorno. Todas las devoluciones
cubiertas por la garantía deben ser enviadas por correo prepago.
Se recomienda que primero entre en contacto con SPECTRA llamando al número 1-800-777-5331 o por
correo electrónico enviando un mensaje a custse[email protected]m
para obtener información actualizada
sobre la unidad que requiere servicio. En algunos casos el modelo puede haber sido discontinuado y
SPECTRA se reserva el derecho de ofrecer opciones alternativas de reparación o reemplazo.
SPECTRA MERCHANDISING INTERNATIONAL, INC.
4230 North Normandy Avenue,
Chicago, IL 60634, USA.
1-800-777-5331
Para registrar su producto, siga el vínculo a continuación en el sitio web para ingresar su información.
http://www.spectraintl.com/wform.htm
0516 Impreso en China
-
 1
1
-
 2
2
-
 3
3
-
 4
4
-
 5
5
-
 6
6
-
 7
7
-
 8
8
-
 9
9
-
 10
10
-
 11
11
-
 12
12
-
 13
13
-
 14
14
-
 15
15
-
 16
16
-
 17
17
-
 18
18
-
 19
19
-
 20
20
-
 21
21
-
 22
22
-
 23
23
-
 24
24
-
 25
25
-
 26
26
-
 27
27
-
 28
28
-
 29
29
-
 30
30
-
 31
31
-
 32
32
-
 33
33
-
 34
34
-
 35
35


Jensen JTA-325 Manual de usuario
- Categoría
- Tocadiscos de audio
- Tipo
- Manual de usuario
en otros idiomas
- English: Jensen JTA-325 User manual
Artículos relacionados
Otros documentos
-
QFX TURN-105 Manual de usuario
-
Lenco Classic Manual de usuario
-
Akiyama Harmonic Manual de usuario
-
Lenco L-30 El manual del propietario
-
Denver VPL-200WOOD Manual de usuario
-
Lenco LBT-188 El manual del propietario
-
Lenco LBT-188PI Manual de usuario
-
Lenco Classic El manual del propietario
-
Lenco L-91 Manual de usuario
-
Brigmton BTC-405 El manual del propietario