Makita XLC03R1BX4 Manual de usuario
- Categoría
- Herramientas eléctricas
- Tipo
- Manual de usuario
Este manual también es adecuado para

INSTRUCTION MANUAL
MANUAL DE INSTRUCCIONES
Cordless Cleaner
Aspiradora Inalámbrica
XLC03
IMPORTANT: Read Before Using.
IMPORTANTE: Lea antes de usar.

2 ENGLISH
ENGLISH (Original instructions)
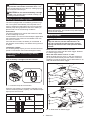
SPECIFICATIONS
Model: XLC03
Capacity 750 mL
Continuous use (with battery BL1830B) Approx. 20 min
Overall length 1,016 mm (40")
Rated voltage D.C. 18 V
Net weight 1.2 - 1.6 kg (2.7 - 3.5 lbs)
• Duetoourcontinuingprogramofresearchanddevelopment,thespecicationshereinaresubjecttochange
without notice.
• Specicationsmaydifferfromcountrytocountry.
• The weight does not include accessories but battery cartridge(s). The lightest and heaviest combination weight
of the appliance and battery cartridge(s) are shown in the table.
Applicable battery cartridge and charger
Battery cartridge
BL1815N / BL1820B / BL1830 / BL1830B / BL1840B / BL1850B /
BL1860B
Charger DC18RC / DC18RD / DC18RE / DC18SD / DC18SE / DC18SF
• Some of the battery cartridges and chargers listed above may not be available depending on your region of
residence.
WARNING: Only use the battery cartridges and chargers listed above. Use of any other battery cartridges
andchargersmaycauseinjuryand/orre.
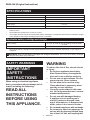
SAFETY WARNINGS
IMPORTANT
SAFETY
INSTRUCTIONS
When using an electrical appliance,
basic precautions should always be fol-
lowed, including the following:
READ ALL
INSTRUCTIONS
BEFORE USING
THIS APPLIANCE.
WARNING
To reduce the risk of re, electric shock
or injury:
1.
Do not leave appliance when battery
tted. Remove battery from appliance
when not in use and before servicing.
2. Do not use on wet surfaces. Do not
expose to rain. Store indoors.
3. Do not allow to be used as a toy.
Close attention is necessary when
used by or near children.
4. Use only as described in this man-
ual. Use only manufacturer's recom-
mended attachments.
5. Do not use with damaged battery.
If appliance is not working as it
should, has been dropped, dam-
aged, left outdoors, or dropped into
water, return it to a service center.
6.
Do not handle appliance with wet hands.
7.
Do not put any object into openings. Do
not use with any opening blocked; keep
free of dust, lint, hair, and anything that

3 ENGLISH
may reduce air ow.
8. Keep hair, loose clothing, ngers,
and all parts of body away from
openings and moving parts.
9. Turn off all controls before removing
the battery cartridge.
10.
Use extra care when cleaning on stairs.
11.
Do not use to pick up ammable or com-
bustible liquids, such as gasoline, or
use in areas where they may be present.
12. Do not pick up anything that is burn-
ing or smoking, such as cigarettes,
matches, or hot ashes.
13. Do not use without dust bag and/or
lters in place.
14. Do not charge the battery outdoors.
15.
Prevent unintentional starting. Ensure
the switch is in the off-position before
connecting to battery pack, picking up
or carrying the appliance. Carrying the
appliancewithyourngerontheswitchor
energizing appliance that have the switch
on invites accidents.
16. Disconnect the battery pack from
the appliance before making any
adjustments, changing accessories,
or storing appliance. Such preventive
safety measures reduce the risk of
starting the appliance accidentally.
17. Recharge only with the charger
specied by the manufacturer. A
charger that is suitable for one type of
batterypackmaycreateariskofre
when used with another battery pack.
18.
Use appliances only with specically
designated battery packs. Use of any
other battery packs may create a risk of
injuryandre.
19.
When battery pack is not in use, keep
it away from other metal objects, like
paper clips, coins, keys, nails, screws
or other small metal objects, that can
make a connection from one terminal
to another. Shorting the battery terminals
togethermaycauseburnsorare.
20.
Under abusive conditions, liquid may be
ejected from the battery; avoid contact.
If contact accidentally occurs, ush with
water. If liquid contacts eyes, additionally
seek medical help. Liquidejectedfromthe
battery may cause irritation or burns.
21. Do not use a battery pack or appli-
ance that is damaged or modied.
Damaged or modied batteries may
exhibit unpredictable behaviour
resulting in re, explosion or risk of
injury.
22. Do not expose a battery pack or
appliance to re or excessive tem-
perature. Exposure to re or tem-
perature above 130 °C may cause
explosion.
23. Follow all charging instructions
and do not charge the battery
pack or appliance outside of the
temperature range specied in the
instructions. Charging improperly or
at temperatures outside of the speci-
edrangemaydamagethebatteryand
increasetheriskofre.
24. Have servicing performed by a
qualied repair person using only
identical replacement parts. This will
ensure that the safety of the product is
maintained.
25. Do not modify or attempt to repair
the appliance or the battery pack
except as indicated in the instruc-
tions for use and care.
SAVE THESE
INSTRUCTIONS.
ADDITIONAL
SAFETY RULES
This appliance is intended for house-
hold use.
1. Read this instruction manual and
the charger instruction manual care-
fully before use.
2. Do not vacuum the following:
• Flammable liquid (kerosene,
gasoline, solvents such as ben-
zine, thinner, etc.)
• Hot substances that are burn-
ing or smoking (cigarettes,
matches, incense sticks, can-
dles, hot ashes), sparks and
metal dust generated by cutting

4 ENGLISH
or grinding metal, etc.
• Flammable material (toner,
paint, spray, etc.)
• Foam like carpet cleaning agent,
etc. (they may cause explosion
or re)
• Explosive or pyrophoric sub-
stances (nitroglycerin, alumi-
num, magnesium, titanium, zinc,
red phosphorus, yellow phos-
phorus, celluloid, etc. and their
dust, gas or steam)
• Sharp objects (glass, cutlery,
wood splinter, metal, stone, nail,
razor, push pin, etc.)
• Solidifying and conductive
ne powder (metal or carbon
powder)
• Dehumidier
• Large amount of powder (our,
re extinguisher powder, etc.)
• Substances that cause toxic
symptoms
• Aggressive chemicals (acid,
leach, etc.)
• Liquid or damp garbage, includ-
ing vomit and excreta
• Asbestos
• Pesticides
Such action may cause re, injury
and/or property damage.
To reduce your exposure to these chem-
icals, always wear approved respiratory
protection such as dust masks that are
specially designed to lter out micro-
scopic particles. Direct the exhaust air
away from your face and body.
3. Stop operation immediately if you
notice anything abnormal.
4. If you drop or strike the cleaner,
check it carefully for cracks or dam-
age before operation.
5. Do not bring close to stoves or other
heat sources.
6. Do not block the intake hole or vent
holes.
SAVE THESE
INSTRUCTIONS.
Symbols
The followings show the symbols used for
tool.
volts
direct current
Important safety
instructions for
battery cartridge
1. Before using battery cartridge,
read all instructions and cautionary
markings on (1) battery charger,
(2) battery, and (3) product using
battery.
2. Do not disassemble battery
cartridge.
3. If operating time has become
excessively shorter, stop operating
immediately. It may result in a risk
of overheating, possible burns and
even an explosion.
4. If electrolyte gets into your eyes,
rinse them out with clear water and
seek medical attention right away. It
may result in loss of your eyesight.
5. Do not short the battery cartridge:
(1) Do not touch the terminals with
any conductive material.
(2) Avoid storing battery cartridge
in a container with other metal
objects such as nails, coins, etc.
(3) Do not expose battery cartridge
to water or rain.
A battery short can cause a large
current ow, overheating, possible
burns and even a breakdown.
6. Do not store the tool and battery
cartridge in locations where the
temperature may reach or exceed 50
°C (122 °F).
7. Do not incinerate the battery car-
tridge even if it is severely damaged
or is completely worn out. The bat-
tery cartridge can explode in a re.

5 ENGLISH
8.
Be careful not to drop or strike
battery.
9. Do not use a damaged battery.
10. The contained lithium-ion batteries
are subject to the Dangerous Goods
Legislation requirements.
For commercial transports e.g. by
third parties, forwarding agents,
special requirement on packaging
and labeling must be observed.
For preparation of the item being
shipped, consulting an expert for
hazardous material is required.
Please also observe possibly more
detailed national regulations.
Tape or mask off open contacts and
pack up the battery in such a man-
ner that it cannot move around in
the packaging.
11. Follow your local regulations relat-
ing to disposal of battery.
12. Use the batteries only with the prod-
ucts specied by Makita. Installing
the batteries to non-compliant products
mayresultinare,excessiveheat,
explosion, or leak of electrolyte.
SAVE THESE
INSTRUCTIONS.
CAUTION: Only use genuine Makita batteries.
Use of non-genuine Makita batteries, or batteries that
have been altered, may result in the battery bursting
causingres,personalinjuryanddamage.Itwill
also void the Makita warranty for the Makita tool and
charger.
Tips for maintaining maximum
battery life
1. Charge the battery cartridge before completely
discharged. Always stop tool operation and
charge the battery cartridge when you notice
less tool power.
2. Never recharge a fully charged battery car-
tridge. Overcharging shortens the battery
service life.
3. Charge the battery cartridge with room tem-
perature at 10 °C - 40 °C (50 °F - 104 °F). Let
a hot battery cartridge cool down before
charging it.
4. Charge the battery cartridge if you do not use
it for a long period (more than six months).
FUNCTIONAL
DESCRIPTION
CAUTION: Always be sure that the tool is
switched off and the battery cartridge is removed
before adjusting or checking function on the tool.
CAUTION: Take care not to trap nger(s)
between cleaner and battery as shown in diagram
when loading battery. Trappingnger(s)maycause
injury.
Installing or removing battery
cartridge
CAUTION: Always switch off the tool before
installing or removing of the battery cartridge.
CAUTION: Hold the tool and the battery car-
tridge rmly when installing or removing battery
cartridge. Failure to hold the tool and the battery
cartridgermlymaycausethemtoslipoffyourhands
and result in damage to the tool and battery cartridge
andapersonalinjury.
3
1
2
►1. Red indicator 2. Button 3. Battery cartridge
To remove the battery cartridge, slide it from the tool
while sliding the button on the front of the cartridge.
To install the battery cartridge, align the tongue on the
battery cartridge with the groove in the housing and slip
it into place. Insert it all the way until it locks in place
with a little click. If you can see the red indicator on the
upper side of the button, it is not locked completely.

6 ENGLISH
CAUTION: Always install the battery cartridge
fully until the red indicator cannot be seen. If not,
itmayaccidentallyfalloutofthetool,causinginjuryto
you or someone around you.
CAUTION: Do not install the battery cartridge
forcibly. If the cartridge does not slide in easily, it is
not being inserted correctly.
Battery protection system
The tool is equipped with a tool/battery protection sys-
tem. This system automatically cuts off power to the
motor to extend tool and battery life. The tool will auto-
matically stop during operation if the tool or battery is
placed under one of the following conditions.
Overloaded:
The tool is operated in a manner that causes it to draw
an abnormally high current.
In this situation, turn the tool off and stop the application
that caused the tool to become overloaded. Then turn
the tool on to restart.
If the tool does not start, the battery is overheated. In
this situation, let the battery cool before turning the tool
on again.
Low battery voltage:
The remaining battery capacity is too low and the tool will not
operate. In this situation, remove and recharge the battery.
Indicating the remaining battery
capacity
Only for battery cartridges with the indicator
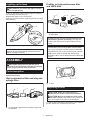
1
2
►1. Indicator lamps 2. Check button
Press the check button on the battery cartridge to indi-
cate the remaining battery capacity. The indicator lamps
light up for a few seconds.
Indicator lamps Remaining
capacity
Lighted Off Blinking
75% to 100%
50% to 75%
25% to 50%
Indicator lamps Remaining
capacity
Lighted Off Blinking
0% to 25%
Charge the
battery.
The battery
may have
malfunctioned.
NOTE: Depending on the conditions of use and the
ambient temperature, the indication may differ slightly
from the actual capacity.
Switch action
CAUTION: Before installing the battery car-
tridge into the tool, set the slide switch to "O"
side and check that the switch trigger actuates
properly and returns to the "OFF" position when
released.
When the slide switch is set to "O" side:
To start the tool, simply pull the switch trigger. Release
the switch trigger to stop.
When the slide switch is set to "I" side:
While the slide switch is set to "I" side, the switch trig-
ger is pulled automatically and the cleaner continues
actuating. To stop the cleaner, set the slide switch to "O"
side and release the switch trigger.
1
2
►1. Slide switch 2. Switch trigger

7 ENGLISH
Lighting up the lamp
CAUTION: Do not look in the light or see the
source of light directly.
To turn on the lamp, pull the switch trigger. During the
tool actuating, the lamp turns on.
Release the switch to turn off the lamp.
When the remaining battery capacity gets low, the lamp
starts blinking.
1
2
►1. Lamp 2. Switch trigger
NOTE: The timing, at which the lamp starts blinking,
depends on the temperature at work place and the
battery cartridge conditions.
ASSEMBLY
CAUTION: Always be sure that the tool is
switched off and the battery cartridge is removed
before carrying out any work on the tool.
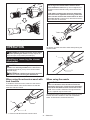
Parts description
Optional accessory
High performance lter and stay and
sponge lter
1
2
3
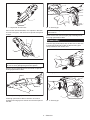
►1. Capsule 2.Highperformancelter3. Stay and
spongelter
Prelter or high performance lter
and HEPA lter
1
2
4
3
►1. Capsule 2.Prelter3.Highperformancelter
4.HEPAlter
NOTICE: Do not use the high performance lter
with the lter (optional accessory). The high per-
formanceltermaybecomeunremovablefromthe
cleaner.
NOTE:Whenusingtheoptionalprelterandlterwith
theHEPAlter,useonlytheprelterovertheHEPA
lter.IfyouuseprelterandlterwiththeHEPAlter
at the same time, the suction power may be reduced.
NOTE:WhenusingtheHEPAlterwiththehigh
performancelter,usethehighperformancelterwith
the stay.
1
►1. Stay
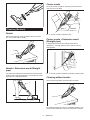
Disposing of dust
CAUTION: Empty the cleaner before it
becomes too full, or the suction force weakens.
CAUTION: Be sure to empty the inside of the
cleaner itself of dust. Failure to do so may cause the
ltertobecloggedorthemotortobedamaged.
Inordertodropduststickingonthelterinthecapsule,
tap the capsule 4 or 5 times with your hand.

8 ENGLISH
1
2
►1. Capsule 2. Suction inlet
Point suction inlet downwards, turn capsule in direction
of arrow in diagram, and disconnect capsule slowly and
straight.
1
2
►1. Capsule 2. Suction inlet
NOTE: Dust may spill out when capsule is opened, so
be sure to set a garbage bag beneath capsule.
Remove accumulated dust from the inside of capsule
andhighperformancelter.
1
2
►1. Capsule 2.Highperformancelter
Twisthighperformancelterindirectionofarrowto
unfasten securing lip from cleaner unit and then pull off
thelter.
1
►1. Securing lip
NOTE:Whenusingtheprelter,alsofollowthepro-
cedure above.
Cleanoutthenedustandlightlytaptodislodgedust
fromhighperformancelter.
Reassembly
Connecthighperformancelter.Atthistime,makesure
totwisthighperformanceltersothatsecuringlipis
rmlylockedintothecleanerunit.
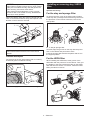
1
►1.Highperformancelter
1
►1. Securing lip

9 ENGLISH
NOTICE: Always be sure to check that high perfor-
mancelterisloadedcorrectlypriortousingcleaner.
If they are not loaded correctly, dust will get into the
motor housing, and cause motor failure.
If the problem as described later occurs, high per-
formancelterisnotloadedcorrectly.Reloadthem
correctly to rectify problem.
Attach the capsule. Align the mark on capsule with the
markonthehandleandthenrmlytwistcapsuleinthe
direction of arrow until it is secured.
3
2
1
►1. Mark 2. Handle 3. Capsule
NOTE: Always remove dust ahead of time, as suction
power will be reduced if there is too much dust in
cleaner.
Problem Examples
Thesecuringlipofhighperformancelterisnotrmly
locked into groove of cleaner housing.
2
1
►1. Securing lip 2. Groove of cleaner housing
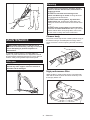
Installing or removing stay / HEPA
lter
Optional accessory
For the stay and sponge lter
To remove the stay, push up the bottom part of pillars
ofthestaywithyourngersandreleaseitsgroovefrom
the protrusion on the cleaner. After that, remove the
spongelter.
1
2
►1. Stay 2.Spongelter
To install, align the grooves on the stay with the protru-
sion on the cleaner and push until it clicks.
Insertthespongelterbetweenthepillarsandsetitin
the original position.
For the HEPA lter
WheninstallingtheHEPAlter,tthegrooveofthe
HEPAlterwiththeprotrusiononthecleaner.Then,put
theprelterorthehighperformancelterontheHEPA
lterandtwistittosecure.Toremove,followtheinstal-
lation procedure in reverse.
1
2
►1.HEPAlter2.Prelter

10 ENGLISH
1
2
►1.HEPAlter2.Highperformancelter
OPERATION
CAUTION:
Do not move your face close to the air
vent when operating the cleaner.Ifforeignobjectsare
blownintoeyes,itmayresultinpersonalinjury.
Installing or removing the cleaner
attachment
CAUTION: After installing attachment,
check if it is securely installed. If the attachment
is installed imperfectly, it may come off and cause
personalinjury.
CAUTION: Be careful not to hit your hand on
the wall etc. when removing the attachment.
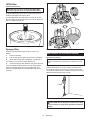
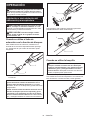
When using the extension wand with
lock function
To install the extension wand, insert it to the suction
inlet of the cleaner until it clicks. Make sure that the
extension wand is locked.
1
2
3
►1. Suction inlet 2. Extension wand 3. Hook
NOTE: When installing the extension wand, be
sure to align the release button with the hook
on the extension wand. If they are not aligned, the
wand will not be locked and may come off from the
cleaner.
NOTE: When installing the extension wand with-
out lock function (optional accessory), twist and
insert it to the suction inlet of the cleaner in direc-
tion of the arrow. To disconnect, twist and remove it
also in direction of the arrow.
To remove, pull the extension wand while pushing the
release button.
1
2
►1. Release button 2. Extension wand
When using the nozzle
CAUTION: To connect the nozzle, twist and
insert it in direction of the arrow to secure the
connection during use. To disconnect the attach-
ment, twist and extract it also in direction of the
arrow. If the nozzle is twisted in the opposite direc-
tion, the capsule may become loose.
To install the nozzle, twist and insert it securely to the
suction inlet of the cleaner or the end of extension
wand. To disconnect, twist and remove it.

11 ENGLISH
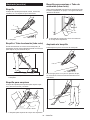
Cleaning (Suction)
Nozzle
Attach the nozzle to clean off tables, desks, furniture,
etc. The nozzle slips on easily.
1
►1. Nozzle
Nozzle + Extension wand (Straight
pipe)
Theextensionwandtsinbetweenthenozzleandthe
cleaner itself. This arrangement is convenient for clean-
ingaoorinastandingposition.
2
1
3
►1. Cleaner body 2. Extension wand 3. Nozzle
Corner nozzle
Fit on the corner nozzle for cleaning corners and crev-
ices of a car or furniture.
1
2
►1. Corner nozzle 2. Cleaner body
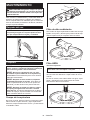
Corner nozzle + Extension wand
(Straight pipe)
In tight quarters where the cleaner itself cannot
squeeze in, or in high places hard to reach, use this
arrangement.
1
2
3
►1. Corner nozzle 2. Extension wand 3. Cleaner body
Cleaning without nozzle
You can pick up powder and dust without nozzle.
Forpickingupdustonaoorinastandingposition,itis
convenient to attach the extension wand to the cleaner.

12 ENGLISH
1
►1. Extension wand
MAINTENANCE
CAUTION: Always be sure that the tool is
switched off and the battery cartridge is removed
before attempting to perform inspection or
maintenance.
To maintain product SAFETY and RELIABILITY,
repairs,anyothermaintenanceoradjustmentshould
be performed by Makita Authorized or Factory Service
Centers, always using Makita replacement parts.
After use
NOTICE: Putting the cleaner against the wall
without any other support cause the cleaner to
fall down and be damaged.
Cleaning
NOTICE: Never use gasoline, benzine, thinner,
alcohol or the like. Discoloration, deformation or
cracks may result.
NOTICE: Do not blow dust sticking on the
cleaner and lters by air duster. It brings dust into
the housing and causes failure.
NOTICE: After washing lters, dry them thor-
oughly before use.Insufcientlydriedltersmay
cause poor suction and shorten the service life of the
motor.
NOTICE: After cleaning lters and sponge lter,
be sure to re-install them before use. If you use the
cleanerwithoutltersandspongelter,dustcomes
into the motor housing and cause malfunction.
Cleaner body
From time to time wipe off the outside (cleaner body) of
the cleaner using a cloth dampened in soapy water.
Cleanoutalsothesuctionopeningandltermounting
area.
High performance lter
Washthelterinsoapywaterwhenitiscloggedwith
dust and the cleaner power becomes weak. Dry it out
thoroughly before use.

13 ENGLISH
HEPA lter
Optional accessory
NOTICE: Do not rub or scratch the HEPA lter
with hard objects such as a brush and a paddle.
CloggedHEPAltercausepoorsuctionperformance.
Cleanoutthelterfromtimetotime.
OccasionallywashtheHEPAlterinwater,rinseand
dry thoroughly in the shade before use. Never wash the
lterinawashingmachine.
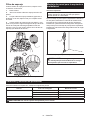
Sponge lter
Whenthespongelterbecomesdirty,cleanitas
follows.
1. Removethelter.
2. Pulloutthespongelterfrombetweenthepillars.
3. Cleanthespongelterbytappingorwashing.If
you wash it, dry it out thoroughly before use.
4. Insertthespongelterbetweenthepillarsandset
it in the original position. Make sure that each bottom
edgeofthepillarholdsdownthespongelter,and
thereisnogapbetweenthespongelterandsuction
opening.
1
2
►1.Spongelter2. Bottom edge of pillar
Wall mount for cordless cleaner
Optional accessory
NOTE: The screw to mount the holder is not included.
Prepareascrewwhichtswiththematerialtoscrew
into.
Attach the wall mount for cordless cleaner to a hard
wooden wall, beam or column, where the wall mount
forcordlesscleanercanbermlysecured.Alwaysbe
sure that the wall mount for cordless cleaner is securely
attached before hanging the cleaner.
1
►1. Wall mount for cordless cleaner
CAUTION: Do not hang the cleaner to the wall
mount violently or hang other appliances than the
cleaner.

14 ENGLISH
Troubleshooting
Before asking for repairs, check the following points.
Symptom Area to be investigated Fixing method
Weak suction power Is the capsule full of dust? Empty the capsule of dust.
Isthelterclogged? Cleanorwashthelter.
Is the battery cartridge exhausted ? Charge the battery cartridge.
Not working Is the battery cartridge exhausted ? Charge the battery cartridge.
CAUTION: Do not attempt to repair the cleaner by yourself.
OPTIONAL
ACCESSORIES
CAUTION: These accessories or attachments
are recommended for use with your Makita tool
specied in this manual. The use of any other
accessories or attachments might present a risk of
injurytopersons.Onlyuseaccessoryorattachment
for its stated purpose.
If you need any assistance for more details regard-
ing these accessories, ask your local Makita Service
Center.
• Extension wand (Straight pipe)
• Nozzle
• Nozzle for carpet
• Shelf brush
• Corner nozzle
• Round brush
• Flexible hose
• Filter
• Prelter
• Highperformancelter
• HEPAlter
• Makita genuine battery and charger
• Free nozzle
• Seat nozzle
• Crevice nozzle
• Wall mount for cordless cleaner
NOTE: Some items in the list may be included in the
tool package as standard accessories. They may
differ from country to country.
MAKITA LIMITED
WARRANTY
Please refer to the annexed warranty sheet for the
most current warranty terms applicable to this product.
If annexed warranty sheet is not available, refer to the
warranty details set forth at below website for your
respective country.
United States of America: www.makitatools.com
Canada: www.makita.ca
Other countries: www.makita.com

15 ESPAÑOL
ESPAÑOL (Instrucciones originales)
ESPECIFICACIONES
Modelo: XLC03
Capacidad 750 ml
Uso continuo (con batería BL1830B) Aprox. 20 min.
Longitud total 1 016 mm (40")
Tensión nominal 18 V c.c.
Peso neto 1,2 kg - 1,6 kg (2,7 lbs - 3,5 lbs)
• Debidoanuestrocontinuoprogramadeinvestigaciónydesarrollo,lasespecicacionesaquíincluidasestán
sujetasacambiosinprevioaviso.
• Lasespecicacionespuedenvariardepaísapaís.
• El peso incluye el o los cartuchos de batería, pero no los accesorios. La combinación de menor y mayor peso
del aparato y del o los cartuchos de batería se muestra en la tabla.
Cartucho de batería y cargador aplicables
Cartucho de batería
BL1815N / BL1820B / BL1830 / BL1830B / BL1840B / BL1850B /
BL1860B
Cargador DC18RC / DC18RD / DC18RE / DC18SD / DC18SE / DC18SF
• Algunos de los cartuchos de batería y cargadores enumerados arriba podrían no estar disponibles depen-
diendodesuáreaderesidencia.
ADVERTENCIA: Use únicamente los cartuchos de batería y los cargadores indicados arriba. El uso de
cualquier otro cartucho de batería y cargador podría ocasionar una lesión y/o un incendio.
ADVERTENCIAS DE
SEGURIDAD
INSTRUCCIONES
IMPORTANTES DE
SEGURIDAD
Al usar cualquier aparato eléctrico,
siempre deben seguirse las precaucio-
nes básicas, incluyendo las siguientes:
GUARDE ESTAS
INSTRUCCIONES.
ADVERTENCIA
Para reducir el riesgo de incendio, des-
carga eléctrica o lesión:
1. No deje el aparato con la batería
puesta. Retire la batería del aparato
cuando no lo vaya a utilizar y antes
de dar servicio de mantenimiento.
2. No lo utilice sobre supercies
húmedas. No lo exponga a la lluvia.
Almacénelo en interiores.
3.
No permita que sea utilizado como un
juguete. Supervise de cerca cuando lo
utilicen niños o se utilice cerca de ellos.
4.
Utilícelo solamente como se describe
en este manual. Sólo use aditamentos
recomendados por el fabricante.
5. No lo utilice con una batería dañada.
Si el aparato no está funcionando
como debiera, se ha dejado caer, se
ha dañado, se ha dejado a la intem-
perie o ha caído sobre agua, llévelo
a un centro de servicio.
6. No manipule el aparato con las
manos mojadas.
7.
No introduzca ningún objeto en las aber-
turas. No lo utilice con ninguna abertura
bloqueada; manténgalo libre de polvo,
pelusa, cabello y cualquier objeto que
pueda reducir el ujo de aire.

16 ESPAÑOL
8.
Mantenga el cabello, la ropa hol-
gada, los dedos y todas las partes
del cuerpo lejos de las aberturas y
piezas móviles.
9. Apague todos los controles antes
de retirar el cartucho de batería.
10. Tenga especial cuidado cuando lim-
pie en escaleras.
11. No lo utilice para recoger líquidos
inamables o combustibles, tal
como gasolina, ni en áreas donde
puedan estar presentes.
12. No recoja nada que se esté que-
mando o desprenda humo, tal
como cigarros, fósforos o cenizas
calientes.
13. No lo utilice sin la bolsa recolectora
de polvo y/o los ltros colocados en
su lugar.
14. No cargue la batería en exteriores.
15. Evite una puesta en marcha acci-
dental. Asegúrese de que el inte-
rruptor esté en la posición apagada
antes de conectar el paquete de
baterías, levantar el aparato o car-
garlo. Cargar el aparato con su dedo
en el interruptor o pasar energía al
aparato con el interruptor encendido
puedo propiciar accidentes.
16. Desconecte el paquete de baterías
del aparato antes de hacer cual-
quier ajuste, cambiar accesorios o
almacenar el aparato. Estas medidas
de seguridad preventivas reducen el
riesgo de poner en marcha el aparato
accidentalmente.
17. Recargue sólo con el cargador
especicado por el fabricante. Un
cargador que es adecuado para un
solo tipo de paquete de baterías puede
generar riesgo de incendio al ser utili-
zado con otro paquete de baterías.
18.
Use los aparatos únicamente con los
paquetes de baterías designados espe-
cícamente para ellos. El uso de otros
paquetes de baterías puede generar riesgo
de lesiones e incendio.
19. Cuando no se esté usando el
paquete de baterías, guárdelo
lejos de otros objetos metálicos
tales como sujetapapeles (clips),
monedas, llaves, clavos, tornillos u
otros objetos metálicos pequeños
que puedan crear una conexión
entre una terminal y otra. Ocasionar
un cortocircuito en las terminales de la
batería puede provocar quemaduras o
incendios.
20. En condiciones de mal uso, podría
escapar líquido de la batería; evite
tocarlo. Si lo toca accidentalmente,
enjuague con agua. Si el líquido
entra en contacto con los ojos,
solicite adicionalmente atención
médica. El líquido expulsado de la
batería puede causar irritación o
quemaduras.
21. No utilice un paquete de baterías
o aparato que esté dañado o haya
sido modicado. Las baterías daña-
das o modicadas podrían com-
portarse de manera impredecible
causando un incendio, explosión o
riesgo de lesión.
22. No exponga un paquete de baterías
o aparato al fuego o a una tempe-
ratura excesiva. La exposición al
fuego a una temperatura superior a
130 °C podría causar una explosión.
23. Siga todas las instrucciones rela-
tivas a la carga y no cargue el
paquete de baterías o el aparato
fuera del rango de temperatura
especicado en las instrucciones.
Cargar de manera inapropiada o a
temperaturas fuera del rango especi-
cadopodríadañarlabateríaeincre-
mentar el riesgo de incendio.
24. Pida que el servicio lo realice un
técnico en reparaciones calicado
y que utilice únicamente piezas de
repuesto idénticas a las originales.
Estogarantizaráquesemantengala
seguridad del producto.
25. No modique ni intente reparar el
aparato ni el paquete de baterías
salvo como se indique en las ins-
trucciones para el uso y cuidado.
GUARDE ESTAS
INSTRUCCIONES.

17 ESPAÑOL
REGLAS DE
SEGURIDAD
ADICIONALES
Este aparato está diseñado para un uso
doméstico solamente.
1. Lea cuidadosamente este manual
de instrucciones y el manual de
instrucciones del cargador antes de
usar el aparato.
2. No aspire los siguientes elementos:
• Líquidos inamables (quero-
seno, gasolina, disolventes
como bencina, diluyentes, etc.)
• Sustancias calientes que están
ardiendo o echando humo
(cigarrillos, cerillas, palitos de
incienso, velas, cenizas calien-
tes), chispas y polvo metálico
generados por el corte o el
lijado de metales, etc.
• Materiales inamables (tóner,
pinturas, aerosoles, etc.)
• Espumas, como limpiadores de
alfombras, etc. (pueden causar
explosiones o incendios)
• Sustancias explosivas o pirofó-
ricas (nitroglicerina, aluminio,
magnesio, titanio, zinc, fósforo
rojo, fósforo amarillo, celu-
loide, etc., y su polvo, gases o
vapores)
• Objetos alados (cristal, cubier-
tos, astillas de madera, meta-
les, piedras, clavos, cuchillas,
tachuelas, etc.)
• Polvo no conductor y solidi-
cante (polvo metálico o de
carbono)
• Deshumidicador
• Grandes cantidades de polvo
(harina, polvo de extintor de
incendios, etc.)
• Sustancias que causan sínto-
mas tóxicos
• Productos químicos agresivos
(ácidos, lixiviados, etc.)
• Basura líquida o húmeda, inclu-
yendo vómitos y heces
• Asbesto
• Pesticidas
Tal acción podría ocasionar un
incendio, lesiones y/o daños
materiales.
Para reducir la exposición a estas
sustancias químicas, utilice un
equipo de protección respiratoria
aprobado, tal como las máscaras
contra polvo que están especial-
mente diseñadas para ltrar partí-
culas microscópicas. No apunte la
salida de aire a la cara y al cuerpo.
3. Detenga la operación de inmediato
si nota algo anormal.
4.
Si deja caer o golpea la aspiradora, veri-
que cuidadosamente si hay grietas o
daños antes de la operación.
5. No la acerque a estufas ni a otras
fuentes de calor.
6.
No obstruya el oricio de ujo de
entrada ni los oricios de ventilación.
7. Este aparato no se destina para
utilizarse por personas (incluyendo
niños) cuyas capacidades físicas,
sensoriales o mentales sean dife-
rentes o estén reducidas o carezcan
de experiencia o de conocimiento,
a menos que dichas personas reci-
ban una supervisión o capacitación
para el funcionamiento del aparato
por una persona responsable de su
seguridad.
8. Los niños deben supervisarse para
asegurar que ellos no empleen los
aparatos como juguete.
GUARDE ESTAS
INSTRUCCIONES.
Símbolos
A continuación se muestran los símbolos
utilizados para la herramienta.
volts o voltios
corriente directa o continua

18 ESPAÑOL
Instrucciones
importantes de
seguridad para el
cartucho de batería
1.
Antes de utilizar el cartucho de batería,
lea todas las instrucciones e indicacio-
nes de precaución en el (1) el cargador
de batería, (2) la batería, y (3) el pro-
ducto con el que se utiliza la batería.
2. No desarme el cartucho de batería.
3.
Si el tiempo de operación se ha acor-
tado en exceso, deje de operar de
inmediato. Podría correrse el riesgo
de sobrecalentamiento, posibles que-
maduras e incluso explosión.
4.
En caso de que ingresen electrolitos
en sus ojos, enjuáguelos bien con
agua limpia y consulte de inmediato
a un médico. Esto podría ocasionar
pérdida de visión.
5. Evite cortocircuitar el cartucho de
batería:
(1) No toque las terminales con nin-
gún material conductor.
(2) Evite guardar el cartucho de
batería en un cajón junto con
otros objetos metálicos, tales
como clavos, monedas, etc.
(3) No exponga el cartucho de bate-
ría al agua o la lluvia.
Un cortocircuito en la batería puede
causar un ujo grande de corriente,
sobrecalentamiento, posibles quema-
duras e incluso una descompostura.
6. No guarde la herramienta ni el car-
tucho de batería en lugares donde la
temperatura pueda alcanzar o exce-
der los 50°C (122°F).
7. Nunca incinere el cartucho de bate-
ría incluso en el caso de que esté
dañado seriamente o ya no sirva
en absoluto. El cartucho de batería
puede explotar si se tira al fuego.
8. Tenga cuidado de no dejar caer ni
golpear la batería.
9. No use una batería dañada.
10.
Las baterías de ión de litio están suje-
tas a los requisitos reglamentarios en
materia de bienes peligrosos.
Para el trasporte comercial, por
ej., mediante terceros o agentes
de transporte, se deben tomar en
cuenta los requisitos especiales
relativos al empaque y el etiquetado.
Para efectuar los preparativos
del artículo que se va a enviar, se
requiere consultar a un experto en
materiales peligrosos. Si es posible,
consulte además otras regulaciones
nacionales más detalladas.
Pegue o cubra con cinta adhesiva
los contactos abiertos y empaque
la batería de manera que ésta no
pueda moverse dentro del paquete.
11. Siga las regulaciones locales rela-
cionadas al desecho de las baterías.
12.
Utilice las baterías únicamente con los
productos especicados por Makita.
Instalar las baterías en productos que no
cumplen con los requisitos podría ocasionar
un incendio, un calentamiento excesivo, una
explosión o una fuga de electrolito.
GUARDE ESTAS
INSTRUCCIONES.
PRECAUCIÓN: Utilice únicamente baterías
originales de Makita. El uso de baterías no origina-
les de Makita, o de baterías alteradas, puede ocasio-
nar que las baterías exploten causando un incendio,
lesionespersonalesydaños.Asimismo,estoinva-
lidarálagarantíadeMakitaparalaherramientayel
cargador Makita.
Consejos para alargar al máximo
la vida útil de la batería
1.
Cargue el cartucho de batería antes de que se
descargue completamente. Pare siempre la ope-
ración y cargue el cartucho de batería cuando
note menos potencia en la herramienta.
2. No cargue nunca un cartucho de batería que
esté completamente cargado. La sobrecarga
acortará la vida de servicio de la batería.
3. Cargue el cartucho de batería a una tempera-
tura ambiente de 10 °C - 40 °C (50 °F - 104 °F).
Si un cartucho de batería está caliente, déjelo
enfriar antes de cargarlo.
4. Cargue el cartucho de batería si no va a utili-
zarlo durante un período prolongado (más de
seis meses).

19 ESPAÑOL
DESCRIPCIÓN DEL
FUNCIONAMIENTO
PRECAUCIÓN: Asegúrese siempre de que la
herramienta esté apagada y el cartucho de batería
haya sido extraído antes de realizar cualquier
ajuste o comprobación en la herramienta.
PRECAUCIÓN: Tenga cuidado de que su(s)
dedo(s) no quede(n) atrapado(s) entre la aspi-
radora y la batería, tal como se ilustra en el dia-
grama, al momento de colocar la batería. Si su(s)
dedo(s) quedara(n) atrapado(s) podría(n) resultar
lesionado(s).
Instalación o extracción del
cartucho de batería
PRECAUCIÓN: Apague siempre la herra-
mienta antes de colocar o quitar el cartucho de
batería.
PRECAUCIÓN: Sujete la herramienta y el car-
tucho de la batería con rmeza al colocar o quitar
el cartucho de batería.Sinosesujetaconrmezala
herramienta y el cartucho de batería, puede ocasio-
narqueseresbalendesusmanoscausandodaños
a la herramienta y al cartucho de batería, así como
lesiones a la persona.
3
1
2
►1.Indicadorrojo2. Botón 3. Cartucho de batería
Para quitar el cartucho de batería, deslícelo de la herra-
mienta mientras desliza el botón sobre la parte delan-
tera del cartucho.
Para colocar el cartucho de batería, alinee la lengüeta
sobre el cartucho de batería con la ranura en la carcasa
y deslice en su lugar. Inserte por completo hasta que
sejeensulugarconunpequeñoclic.Sipuedeverel
indicadorrojodelladosuperiordelbotón,estoindica
quenohaquedadojoporcompleto.
PRECAUCIÓN: Introduzca siempre com-
pletamente el cartucho de batería hasta que
el indicador rojo no pueda verse. Si no, podría
accidentalmente salirse de la herramienta y caer al
suelo causando una lesión a usted o alguien a su
alrededor.
PRECAUCIÓN: No instale el cartucho de
batería a la fuerza. Si el cartucho no se desliza al
interiorfácilmente,sedebeaquenoestásiendo
insertado correctamente.
Sistema de protección de batería
Laherramientaestáequipadaconunsistemade
protección para la herramienta/batería. Este sistema
cortaautomáticamentelaalimentaciónalmotorpara
prolongar la vida de la herramienta y la batería. La
herramientasedetendráautomáticamentedurantela
operación si la herramienta o la batería se someten a
una de las siguientes condiciones.
Sobrecarga:
Laherramientaseestáutilizandodeunamaneraque
causa que consuma una cantidad de corriente inusual-
mente alta.
En este caso, apague la herramienta y detenga la apli-
cación que causó que la herramienta se sobrecargara.
Luego encienda la herramienta para reiniciarla.
Silaherramientanoarranca,signicaquelabateríase
sobrecalentó. En este caso, espere a que la batería se
enfríe antes de volver a encender la herramienta.
Bajo voltaje de la batería:
Lacapacidadrestantedelabateríaesdemasiadobaja
ylaherramientanofuncionará.Enestecaso,extraiga
la batería y vuelva a cargarla.
Indicación de la capacidad restante
de la batería
Únicamente para cartuchos de batería con el
indicador
1
2
►1. Luces indicadoras 2.Botóndevericación

20 ESPAÑOL
Oprimaelbotóndevericaciónenelcartuchodela
batería para que indique la capacidad restante de la
batería.Laslucesindicadorasseiluminaránporalgu-
nos segundos.
Luces indicadoras Capacidad
restante
Iluminadas Apagadas Parpadeando
75% a 100%
50% a 75%
25% a 50%
0% a 25%
Cargar la
batería.
La batería
pudo haber
funcionado
mal.
NOTA: Dependiendo de las condiciones de uso y
latemperaturaambiente,laindicaciónpodrádiferir
ligeramente de la capacidad real.
Accionamiento del interruptor
PRECAUCIÓN: Antes de instalar el cartucho
de batería en la herramienta, ponga el interruptor
deslizable en el lado “O” y compruebe que el
gatillo interruptor se accione debidamente y que
regrese a la posición “OFF” (apagado) una vez
que se suelte.
Cuando el interruptor deslizable se pone en el lado
“O”:
Para poner en marcha la herramienta, simplemente
jaleelgatillointerruptor.Paradetenerla,suelteelgatillo
interruptor.
Cuando el interruptor deslizable se pone en el lado
“I”:
Mientras el interruptor deslizable se pone en el lado “I”,
elgatillointerruptorsejalaautomáticamenteylaaspi-
radora continúa activada. Para detener la aspiradora,
ponga el gatillo interruptor en el lado “O” y libere el
gatillo interruptor.
1
2
►1. Interruptor deslizable 2. Gatillo interruptor
Encendido de la lámpara
PRECAUCIÓN: No mire a la luz ni vea a la
fuente de luz directamente.
Paraencenderlalámpara,jaleelgatillointerruptor.
Durante la puesta en marcha de la herramienta, la
lámparaseencenderá.
Suelteelinterruptorparaapagarlalámpara.
Cuandolacapacidadrestantedelabateríaestébaja,la
lámparacomenzaráaparpadear.
1
2
►1. Luz 2. Gatillo interruptor
NOTA:Elmomentoenelquelalámparacomenzará
aparpadeardependerádelatemperaturaenel
lugardetrabajoydelascondicionesdelcartuchode
batería.

21 ESPAÑOL
MONTAJE
PRECAUCIÓN: Asegúrese siempre de que la
herramienta esté apagada y el cartucho de batería
haya sido extraído antes de realizar cualquier
trabajo en la misma.
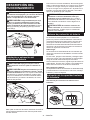
Descripción de las piezas
Accesorio opcional
Filtro de alto rendimiento y retenedor
y ltro de esponja
1
2
3
►1.Cápsula2. Filtro de alto rendimiento
3.Retenedoryltrodeesponja
Preltro o ltro de alto rendimiento y
ltro HEPA
1
2
4
3
►1.Cápsula2.Preltro3. Filtro de alto rendimiento
4. Filtro HEPA
AVISO: No utilice el ltro de alto rendimiento con
el ltro (accesorio opcional).Elltrodealtorendi-
miento podría no ser retirado de la aspiradora.
NOTA:Cuandouseelpreltroyelltroopcionales
conelltroHEPA,usesoloelpreltrosobreelltro
HEPA.SiusaelpreltroyelltroconelltroHEPAal
mismo tiempo, es posible que la potencia de succión
disminuya.
NOTA:CuandouseelltroHEPAconelltrodealto
rendimiento,useelltrodealtorendimientoconel
retenedor.
1
►1. Retenedor
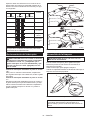
Eliminación del polvo
PRECAUCIÓN: Vacíe la aspiradora antes de
que se llene, o la fuerza de succión se debilitará.
PRECAUCIÓN: Asegúrese de vaciar el polvo
que haya dentro de la misma aspiradora. El no
hacerlopodríacausarqueelltrosetapeoqueel
motorsedañe.
Paraeliminarelpolvoquequedepegadosobreelltro
enlacápsula,déungolpeligeroalacápsulaunas4o
5 veces con su mano.
1
2
►1.Cápsula2. Entrada de succión
Dirijalaentradadesucciónhaciaabajo,girelacápsula
enladireccióndelaechaeneldiagramaydesconecte
lacápsulalentamenteyenlínearecta.
1
2
►1.Cápsula2. Entrada de succión

22 ESPAÑOL
NOTA: Es posible que se derrame polvo al abrir la
cápsula,porloquedeberáasegurarsedecolocar
unabolsadebasurapordebajodelacápsula.
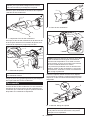
Elimineelpolvoacumuladoenelinteriordelacápsula
ydelltrodealtorendimiento.
1
2
►1.Cápsula2. Filtro de alto rendimiento
Enrosqueelltrodealtorendimientoenladirecciónde
laechaparadesabrocharelrebordedejacióndela
unidaddelaaspiradorayluegosaqueelltro.
1
►1.Rebordedejación
NOTA:Cuandoutiliceelpreltro,sigatambiénel
procedimiento anterior.
Limpieelpolvonoygolpeeligeramenteparadespren-
derelpolvodelltrodealtorendimiento.
Reensamble
Conecteelltrodealtorendimiento.Enestemomento,
asegúresedeenroscarelltrodealtorendimientode
talmaneraqueelrebordedejaciónquedermemente
bloqueado en la unidad de la aspiradora.
1
►1. Filtro de alto rendimiento
1
►1.Rebordedejación
AVISO:Asegúresesiempredevericarqueelltro
de alto rendimiento esté cargado correctamente
antesdeusarlaaspiradora.Sinoestáncorrecta-
mentepuestos,elpolvoseintroduciráalacarcasa
delmotorcausandodañosenelmismo.
Sisepresentaelproblemacomosedescribemás
adelante,elltrodealtorendimientonosepondrá
correctamente. Vuélvalos a colocar correctamente
para corregir el problema.
Conectelacápsula.Alineelamarcaenlacápsula
conlamarcaenelmangoyluegogirermementela
cápsulaenladireccióndelaechahastaquequede
asegurada.
3
2
1
►1. Marca 2. Mango 3.Cápsula
NOTA: Siempre elimine el polvo con antelación, ya
queelpoderdesucciónserámenorsihaydema-
siado polvo en la aspiradora.

23 ESPAÑOL
Ejemplos de problemas
Elrebordedejacióndelltrodealtorendimientono
estármementebloqueadoenlaranuradelacarcasa
de la aspiradora.
2
1
►1.Rebordedejación2. Ranura de la carcasa de
la aspiradora
Instalación o extracción del
retenedor/ltro HEPA
Accesorio opcional
Para el retenedor y ltro de esponja
Paraextraerelretenedor,empujehaciaarribalaparte
inferior de los pilares del retenedor con sus dedos y
libere su ranura de la parte saliente de la aspiradora.
Despuésdeesto,extraigaelltrodeesponja.
1
2
►1. Retenedor 2.Filtrodeesponja
Para instalar, alinee las ranuras sobre el retenedor con
lapartesalienteenlaaspiradora,luegoempujehasta
que haga clic.
Inserteelltrodeesponjaentrelospilaresycolóquelo
en la posición original.
Para el ltro HEPA
CuandoinstaleelltroHEPA,acomodelaranuradel
ltroHEPAconlapartesalientesobrelaaspiradora.
Luego,coloqueelpreltrooelltrodealtorendi-
mientoenelltroHEPAygíreloparaasegurarlo.Para
extraerlo, siga el procedimiento de instalación en orden
inverso.
1
2
►1. Filtro HEPA 2.Preltro
1
2
►1. Filtro HEPA 2. Filtro de alto rendimiento

24 ESPAÑOL
OPERACIÓN
PRECAUCIÓN: No ponga la cara cerca de la
abertura de ventilación cuando utilice la aspira-
dora. Si las partículas sopladas se introducen en los
ojos,podríancausarlesiones.
Instalación o desinstalación del
aditamento para aspiradora
PRECAUCIÓN: Después de instalar el adita-
mento, verique si está bien instalado. Si el adi-
tamentonoestáinstaladoperfectamentebien,éste
podría salirse y ocasionar una lesión.
PRECAUCIÓN: Cuando extraiga el adita-
mento, tenga cuidado de no golpear su mano
contra el muro, etc.
Cuando se utiliza el tubo de
extensión con la función de bloqueo
Para instalar el tubo de extensión, insértelo en la
entrada de succión de la aspiradora hasta que haga
clic. Asegúrese de que el tubo de extensión quede
asegurado.
1
2
3
►1. Entrada de succión 2. Tubo de extensión
3. Gancho
NOTA: Cuando instale el tubo de extensión, ase-
gúrese de alinear el botón de liberación con el
gancho sobre el tubo de extensión.Sinoestán
alineados,eltubonosebloquearáypuedesalirsede
la aspiradora.
NOTA: Cuando instale el tubo de extensión sin la
función de bloqueo (accesorio opcional), gírelo
e insértelo en la entrada de succión de la aspira-
dora en la dirección de la echa. Para desconectar,
gireyextráigalotambiénenladireccióndelaecha.
Paraextraerlo,jaleeltubodeextensiónoprimiendo
simultáneamenteelbotóndeliberación.
1
2
►1. Botón de liberación 2. Tubo de extensión
Cuando se utilice la boquilla
PRECAUCIÓN:
Para conectar la boquilla,
enrosque e insértela en la dirección de la echa para
asegurar la conexión durante el uso. Para desconectar
el aditamento, gírelo y extráigalo también en la direc-
ción de la echa. Si la boquilla se enrosca en la dirección
opuesta,lacápsulapodríaquedarsuelta.
Parainstalarlaboquilla,enrósquelaeinsértelarmemente
en la entrada de succión de la aspiradora o en el extremo del
tubodeextensión.Paradesconectarlo,retírelogirándolo.

25 ESPAÑOL
Aspirado (succión)
Boquilla
Coloque la boquilla para aspirar mesas, escritorios,
muebles,etc.Laboquillaseponefácilmente.
1
►1. Boquilla
Boquilla + Tubo de extensión (tubo recto)
El tubo de extensión se coloca entre la boquilla y la
aspiradora misma. Esta modalidad resulta conveniente
para aspirar un piso estando de pie.
2
1
3
►1. Cuerpo de la aspiradora 2. Tubo de extensión
3. Boquilla
Boquilla para esquinas
Coloque la boquilla para esquinas para aspirar esqui-
nas y huecos en autos y muebles.
1
2
►1. Boquilla para esquinas 2.
Cuerpo de la aspiradora
Boquilla para esquinas + Tubo de
extensión (tubo recto)
Utilice esta modalidad para espacios estrechos donde
la misma aspiradora no quepa, o en lugares elevados
difíciles de alcanzar.
1
2
3
►1. Boquilla para esquinas 2. Tubo de extensión
3. Cuerpo de la aspiradora
Aspirado sin boquilla
Puede aspirar el polvo sin el uso de la boquilla.
Para recoger polvo en un piso en posición de pie,
es conveniente colocar el tubo de extensión en la
aspiradora.
1
►1. Tubo de extensión

26 ESPAÑOL
MANTENIMIENTO
PRECAUCIÓN: Asegúrese siempre de que la
herramienta esté apagada y el cartucho de batería
extraído antes de intentar realizar una inspección
o mantenimiento.
Para mantener la SEGURIDAD y CONFIABILIDAD del
producto, las reparaciones y cualquier otro manteni-
mientooajustedebenserrealizadosporloscentrosde
servicioautorizadosporMakitaodefábrica,utilizando
siempre repuestos Makita.
Después del uso
AVISO: El colocar la aspiradora contra la pared
sin que haya ningún otro soporte podría ocasio-
nar que la aspiradora se cayera y se dañara.
Limpieza
AVISO: Nunca use gasolina, bencina, diluyente
(tíner), alcohol o sustancias similares. Puede que
esto ocasione grietas o descoloramiento.
AVISO: No use un soplador de aire con el n
de eliminar el polvo adherido en la aspiradora y
en los ltros. Esto introduciría polvo en la carcasa
pudiendocausardaños.
AVISO: Después de lavar los ltros, séquelos
completamente antes de usarlos.Silosltrosno
estáncompletamentesecoslasucciónpodríaser
decienteylavidaútildelmotorpodríareducirse.
AVISO: Después de limpiar los ltros y el ltro
de esponja, asegúrese de volverlos a instalar
antes del uso.Siutilizalaaspiradorasinlosltrosy
elltrodeesponja,elpolvoentraráalacarcasadel
motorcausandodañosenelmismo.
Cuerpo de la aspiradora
De vez en cuando, limpie el exterior (cuerpo) de la aspi-
radorausandounpañohúmedoyaguaenjabonada.
Asimismo,limpielaaberturadesucciónyeláreadonde
vainstaladoelltro.
Filtro de alto rendimiento
Laveelltroenaguaenjabonadacuandoéstesehaya
tapado con el polvo y disminuya la potencia de la aspi-
radora.Déjelosecarporcompletoantesdeusarlo.
Filtro HEPA
Accesorio opcional
AVISO: No frote ni raye el ltro HEPA con objetos
duros tales como un cepillo o una pala.
LaobstruccióndelltroHEPAhacequeeldesempeño
delasucciónseadeciente.Limpieelltrodevezen
cuando.
Devezencuando,laveelltroHEPAconagua,enjuá-
guelo y séquelo bien a la sombra antes de usarlo.
Nuncalaveelltroenlalavadora.

27 ESPAÑOL
Filtro de esponja
Cuandoelltrodeesponjaseensucie,límpielocomo
se indica a continuación.
1. Retireelltro.
2. Jalehaciaafueraelltrodeesponjadeentrelos
pilares.
3. Limpieelltrodeesponjamediantegolpecitoso
lavándolo.Silolava,déjelosecarporcompletoantes
de usarlo.
4. Inserteelltrodeesponjaentrelospilaresycoló-
quelo en la posición original. Asegúrese de que el borde
inferiordecadapilarmantengasujetadoelltrode
esponjayquenohayaningúnespacioentreelltrode
esponjaylaaberturadesucción.
1
2
►1.Filtrodeesponja2. Borde inferior del pilar
Montaje de pared para la aspiradora
inalámbrica
Accesorio opcional
NOTA:Eltornilloparainstalarelsoportenoestá
incluido. Prepare un tornillo que sea apto para el
material donde va a atornillarse.
Fijeelmontajedeparedparalaaspiradorainalámbrica
enunapared,travesañoocolumnademaderaresis-
tentedondeelmontajedeparedparalaaspiradora
inalámbricaquedermementeasegurado.Asegúrese
siempredequeelmontajedeparedparalaaspiradora
inalámbricaestérmementeaseguradoantesdecolgar
la aspiradora.
1
►1.Montajedeparedparalaaspiradorainalámbrica
PRECAUCIÓN: No cuelgue la aspiradora
en el montaje de pared forzadamente ni cuelgue
otros aparatos que no sean la aspiradora.
Detección y solución de problemas
Antesdesolicitarunareparación,veriquelossiguientespuntos.
Síntoma Área a ser investigada Método de solución
Potenciadesuccióndeciente ¿Lacápsulaestállenadepolvo? Vacíeelpolvodelacápsula.
¿Elltroestátapado? Limpieolaveelltro.
¿El cartucho de batería se ha agotado? Cargue el cartucho de batería.
No funciona ¿El cartucho de batería se ha agotado? Cargue el cartucho de batería.
PRECAUCIÓN: No intente reparar la aspiradora por su cuenta.

28 ESPAÑOL
ACCESORIOS
OPCIONALES
PRECAUCIÓN: Estos accesorios o aditamen-
tos están recomendados para utilizarse con su
herramienta Makita especicada en este manual.
El empleo de cualquier otro accesorio o aditamento
puede conllevar el riesgo de lesiones personales.
Utilice los accesorios o aditamentos solamente para
sunestablecido.
Sinecesitacualquierayudaparamásdetallesen
relación con estos accesorios, pregunte a su centro de
servicio local Makita.
• Tubo de extensión (tubo recto)
• Boquilla
• Boquilla para alfombra
• Cepillo para estantes
• Boquilla para esquinas
• Cepillo redondo
• Mangueraexible
• Filtro
• Preltro
• Filtro de alto rendimiento
• Filtro HEPA
• Batería y cargador originales de Makita
• Boquilla amplia
• Boquilla para asientos
• Boquilla para huecos
• Montajedeparedparalaaspiradorainalámbrica
NOTA: Algunos de los artículos en la lista pueden
incluirse en el paquete de la herramienta como acce-
soriosestándar.Éstospuedenvariardepaísapaís.
GARANTÍA LIMITADA DE
MAKITA
Ésta Garantía no aplica para México
Consultelahojadelagarantíaanexaparaverlos
términosmásvigentesdelagarantíaaplicableaeste
producto.Encasodenodisponerdeestahojade
garantía anexa, consulte los detalles sobre la garantía
descritos en el sitio web de su país respectivo indicado
a continuación.
Estados Unidos de América: www.makitatools.com
Canadá:www.makita.ca
Otros países: www.makita.com

29

30

31

Some dust created by power sanding, sawing, grinding, drilling, and other
construction activities contains chemicals known to the State of California
to cause cancer, birth defects or other reproductive harm. Some examples
of these chemicals are:
• lead from lead-based paints,
• crystalline silica from bricks and cement and other masonry products, and
• arsenic and chromium from chemically-treated lumber.
Your risk from these exposures varies, depending on how often you do this
type of work. To reduce your exposure to these chemicals: work in a well
ventilated area, and work with approved safety equipment, such as those
dust masks that are specially designed to filter out microscopic particles.
WARNING
< USA only >
ADVERTENCIA
Algunos polvos creados por el lijado, aserrado, esmerilado, taladrado y
otras actividades de la construcción contienen sustancias químicas
reconocidas por el Estado de California como causantes de cáncer, defectos
de nacimiento y otros peligros de reproducción. Algunos ejemplos de estos
productos químicos son:
• plomo de pinturas a base de plomo,
• sílice cristalino de ladrillos y cemento y otros productos de albañilería, y
• arsénico y cromo de maderas tratadas químicamente.
El riesgo al que se expone varía, dependiendo de la frecuencia con la que
realice este tipo de trabajo. Para reducir la exposición a estos productos
químicos: trabaje en un área bien ventilada y póngase el equipo de seguridad
indicado, tal como las máscaras contra polvo que están especialmente
diseñadas para filtrar partículas microscópicas.
< Sólo en los Estados Unidos >
Makita Corporation
3-11-8, Sumiyoshi-cho,
Anjo, Aichi 446-8502 Japan
www.makita.com
885705-948
XLC03-1
EN, ESMX
20190208
-
 1
1
-
 2
2
-
 3
3
-
 4
4
-
 5
5
-
 6
6
-
 7
7
-
 8
8
-
 9
9
-
 10
10
-
 11
11
-
 12
12
-
 13
13
-
 14
14
-
 15
15
-
 16
16
-
 17
17
-
 18
18
-
 19
19
-
 20
20
-
 21
21
-
 22
22
-
 23
23
-
 24
24
-
 25
25
-
 26
26
-
 27
27
-
 28
28
-
 29
29
-
 30
30
-
 31
31
-
 32
32


Makita XLC03R1BX4 Manual de usuario
- Categoría
- Herramientas eléctricas
- Tipo
- Manual de usuario
- Este manual también es adecuado para
en otros idiomas
- English: Makita XLC03R1BX4 User manual
Artículos relacionados
-
Makita XLC04ZBX4 Manual de usuario
-
-
-
Makita DCL284FZ Manual de usuario
-
-
Makita CL001G Manual de usuario
-
-
Makita DVC865L Manual de usuario
-
-