Pfaff 340.521.541.721.741 Manual de usuario
- Categoría
- Máquinas de coser
- Tipo
- Manual de usuario
La página se está cargando...

cxuencla
esta
hoja
Bu
sayfayt
disariya
doru
katlayiniz
Flettiô
lessari
sIôu
4
Some
safety
rules
a)
Take
care
to
avoid
injury
to
your
fingers
by
the
needle
during
sewing.
b)
Make
sure
you
unplug
the
power
cord
whenever
you
have
to
leave
the
machine
or
want
to
clean
it,
oil
it
or
change
mechanical
and
accessory
parts.
c)
Be
sure
to
use
only
a
15-watt
light
bulb
in
the
sewing
lamp.
Safety
rules
for
United
Kingdom
see
page
2
Normas
sobre
medidas
de
seguridad
para
máquinas
de
coser
domésticas
segün
DIN
57730,
sección
2
C
a)
Debido
at
movimiento
de
Ia
aguja,
el
usuario
de
toda
maquina
de
coser
deberã
tener
todo
et
cuidado
posible
durante
el
trabajo
y
no
apartar
Ia
vista
de
Ia
zona
de
costura.
b)
Siempre
que
haya
que
cambiar
Ia
aguja,
el
pie
prensatelas,
Ia
canilla
o
Ia
placa
de
aguja,
lo
mismo
que
at
impiar
o
engrasar
Ia
máquina,
o
cuando
no
se
use,
deberá
desconec
tarse
eléctricamente,
es
decir,
deberá
desenchufarse.
c)
La
potencia
maxima
admisible
de
Ia
bombilla
es
de
15
vatios.
DIN
(Alman
EndUstri
Normu)
57730
Kisim
2C’ye
gore
evde
kullanilan
dikis
makinalan
icin
güvenhik
talimatlari
a)
Makinayi
lullanan
kimsenin,
yukanya
ye
aaya
doru
hareket
eden
ine
dolayisiyla,
yeteri
kadar
dikkatli
davranrnasi
ye
calisma
esnasinda
dikis
yerini
devamh
olarak
gozlemesi
gerekir.
b)
Makinanin
terkedilmesi
esnasinda,
bakim
ileri
esnasinda
veya
makina
parcalarimn
veya
aye
parcalarin
deistirilmesi
sirasinda,
makinanin
fisini
prizden
ckarmak
suretiyle,
ceryanin
kesilmesi
gerekir.
c)
Lämbanin
müsaade
olunan
azami
gucu
15
Vattir.
Nokkrar
Oryggisráôstafanir
a)
Gtiâ
bess
aO
fingur
verãi
ekki
fynr
nálinni,
egar
saumaO
er.
b)
Geriô
aO
aO
venju
yôar
aâ
taka
vélina
ür
sambandi,
egar
skipta
arf
urn
na.
saurn
fOt.
eOa
egar
ér
eruô
aO
hreinsa
og
smyrja
vélina.
C)
AIdrel
ma
vera
sterkari
pera
i
vélinni
en
15W.
Contents
on
page
61
lndice
en
Ia
Pag.
63
icindekiler:
Sayfa
65
Efnisyfirlit
er
a
bls
67
4
C
C

4
Parts
of
the
sewing
machine
1
Take-up
lever
2
Bobbin
winder
tension
3
Carrying
handle
4
Spool
pins
(remove
and
insert)
5
Bobbin
winder
6
Hand
wheel
7
Disengaging
knob
8
Stitch
length
control
9
Detachable
work
support
with
accessories
box
10
Free-arm
cover,
enclosing
sewing
hook
11
Needle
plate
12
Sewing
foot
holder
with
sewing
foot
13
Needle
holder
with
retaining
screw
14
Thread
guides
15
Threading
slots
16
Needle
thread
tension
17
Free
arm
18
Presser
bar
with
thread
cutler
19
Presser
bar
lifter
20
Zigzag-
and
utility-stitch
knob
21
Utility-stitch,
stretch-and
fancy-stitch
knob,
Model
741
22
Reverse
control
23
Bedplate
24
Base
25
Bedplate
cover,
enclosing
sewing
hook
26
Accessories
compartment
Mandos
y
elementos
principales
th
máquina
de
coser
1
Palanca
tirahilos
2
Tensor
del
devanador
3
Asa
4
Espigas
portacarretes
(Se
encue
en
los
accesorios)
5
Devanador
(bobinadora)
6
Volante
7
Disco
de
desembrague
8
Regulador
del
argo
de
puntada
9
Superficie
de
costura
variable
cc
compartimento
para
accesorios
10
Casquete
de
cierre
(con
el
garfio
dentro)
11
Placa
de
aguja
12
Portaprensatelas
con
prensatela
13
Portagujas
con
tornillo
de
sujeci
14
Gulahilos
15
Ranuras
para
el
enhebrado
16
Tensor
del
hilo
superior
17
Brazo
al
aire
18
Barra
del
prensatelas
con
cortab
19
Palanca
alzaprensatelas
20
BotOn
para
puntadas
utilitarias
y
zigzag
21
BotOn
para
puntadas
utilitarias,
stretch
y
de
adorno
en
el
rnodel
22
BotOn
para
coslura
en
retroceso
23
Placa
base
24
ZOcalo
25
Tapa
de
Ia
placa
base
(debajo
está
el
garbo)
26
Compartimento
para
accesorios
4
_
/‘
F
ir
D
from
accessories
r
-
oy
L_
JJ9

Some
safety
rules
vahd
for
United
Kingdom
only
The
wires
in
this
mains
lead
are
coloured
according
to
following
code:
Blue:
Neutral
Brown:
Live
As
the
colours
of
the
wires
in
the
mains
lead
of
this
appliance
may
not
correspond
with
the
colour
coding
of
the
terminals
in
your
plug,
proceed
as
follows:
the
wire
which
is
coloured
blue
must
be
connected
to
the
terminal
which
is
marked
with
the
letter
N
or
coloured
black.
The
wire
which
is
coloured
brown
must
be
connected
to
the
terminal
which
is
marked
with
the
letter
L
or
coloured
red.
__________________________________
Please
note:
I
Inserting
the
spool
pins
When
a
13-ampere
plug
is
used
a
Two
spool
pins
are
included
in
the
provided
in
the
machine.
3-ampere
fuse
has
to
be
fitted.
accessories,
Insert
these
in
the
holes
Colocación
de
los
portacarretes:
En
los
accesorios
se
encuentran
dos
I
I
portacarretes.
Colóquelos
en
los
orificios
previstos
en
Ia
máquina
y
déjelos
intro
ducidos.
Makara
tutucusunun
takilmasi
I
Ilâve
parçalar
bölmesinde
iki
makara
tutucusu
bulunmaktadir.
Bunlar,
makina
üzerinde
bu
hususta
on
gorulen
delikiere
geirilirler
ye
burada
kahrlar.
Keflispinnarnirsettirá:
MeO
fylgihlutunum
eru
tveir
keflispinnar.
Sting
a
eim
I
gätin
ofan
a
vétinni,
og
látiO
á
vera
par.
nt
ceer.__
__
La página se está cargando...

4
4
Removing
the
carry
case,
free-arm
models
___—
Fold
down
the
carrying
handle.
(—
_—
I
COmo
sacar
Ia
maleta-funda
de
los
modelos
de
brazo
al
aire
Eche
hacia
atrás
el
asa
en
direcciOn
de
a
flecha.
Qantayi
çikarmak,
serbest
kollu-modeller
Tasima
kolunu
yan
tarafa
doru
deviriniz.
Taskan
tekur
at
friarmsvélunum
LeggiO
handfangiO
niãur
-
7—
Lift
off
the
case.
canta
kapainin
kaldirilmasi.
Tire
ahora
de
a
maleta
hacia
arriba.
LyftiO
tOskunni
slOan
upp.
Electrical
connection:
Set
the
foot
machine
and
plug
B
in
the
wall
socket.
control
on
the
floor.
Insert
plug
A
in
the
Conexión
eléctrica
Coloque
el
pedal
en
el
suelo.
lntroduzca
Ia
clavija
A
en
Ia
máquina,
y
Ia
clavija
B
en
el
enchute
de
Ia
red.
jiiIllI
Elektrik
balantisi:
Marsi
yere
koyunuz.
A
fisini,
makina
içerisine
ye
B
fiini
duvarda
bulunan
prize
sokunuz.
Rafmagnstenging.
SetjiO
mOtstöOuna
a
golf-
/
iO.
TengiO
klOna
A
viO
vélina,
en
kló
B
I
vegg
tengil.
__________________
)
4

t
Bobbin
winding
preparations:
Reach
under
work
support
9
and
pull
it
out
towards
the
left.
Preparación
para
el
devanado:
Meta
a
mano
izquierda
por
debajo
del
brazo
9
y
desvIelo
hacia
Ia
izquierda.
____—
ipHi
masuraya
sarma
iinin
hazirlan
mast:
Dikis
yüzeyi
9’un
alt
kismini
tutu
nuz
ye
bunu
sola
doru
disariya
çekiniz.
Spólun
undirbUin:
TakiO
undir
vinnuborOiO
og
dragiO
aO
üt
til
vinstri.
Remove
bed plate
cover
25
or
fold
free-
arm
cover
10
downwards.
Quite
a
tapa
25
de
Ia
placa
base
o
abra
el
casquete
de
cierre
10
hacia
abajo.
____________________
Alt
levha
kapaini
(25)
kaldiriniz,
veya
kapama
kapaini
(10)
aaiya
doru
açiniz.
OpniO
10km
(10
eOa
25)
yfir
griparanum.
—
______________
Raise
latch
A
and
pull
out
the
bobbin
case.
U
Levante
Ia
bisagrita
A
y
saqu
Ia
cápsula.
)
_.__—
A
kapaini
yukariya
doru
kaldinniz
mekii
diariya
dori
cekiniz.
7
I-’
TakiO
i
loku
A,
og
takiO
spóluhüsiO
ür.
Release
latch
A
and
take
out
the
bobbin.
Suelte
Ia
bisagrita
A
y
saque
Ia
canilla.
A
kapaini
serbest
birakiniz
ye
masurayi
disariya
çikariniz.
Sleppiô
loku
A
og
takiO
spóluna
ür
spOluhüs
mu.
5

/
c.
g
Place
the
bobbin
on
winder
spindle
5.
-
lntroduzca
Ia
canilla
en
el
husillo
5
del
devanador.
Masurayi,
masura
ii
(miii)
üzerine
takiniz.
SetiO
spóluna
a
spólarann
5
Push
the
bobbin
to
the
right
against
stop
A.
Presione
Ia
canilia
hacia
Ia
derecha
c
‘‘
contra
el
tope
A.
=
Masurayi
saga
doru,
A
dayanaina
kadar
bastiriniz.
YtiO
nü
spOlunni
til
hgri
aO
takka
A.
,/bisengaging
the
sewing
mechanism:
Hold
hand
wheel
6
firmly
and
turn knob
7
towards
you.
I
Desconexión
del
mecanismo
del
costura:
Sujete
con
una
mano
el
volante
6
y
gire
con
Ia
otra
el
disco
de
desem
‘
0
brague
7
hacia
el
frente.
Diki
mekanizmasini
kapatmak:
El
car
kini
(6>
tutunuz
ye
disk
7’yi
One
doru
çeviriniz.
_____
Takiô
gangverk
vélarinnar
ür
sambandi:
i
Haldiô
urn
handhjOl
6
og
losiO
urn
lausagangs
______________________________________
\..srüfuna
7.
Piaca
a
spool
on
one
of
the
pins
4.
lntroduzca
el
carrete
en
uno
de
los
portacarretes
4.
Makarayi
bir
tutucu
(4)
üzerine
sürünüz.
r
SetjiO
tvinnakefli
a
annan
keflispinnann.
6

r
i
7
/
Bobbin
winding:
Pull
the
thread
from
the
spool
into
tensioner
2,
to
the
bobbin,
through
one
hole
of
the
bobbin,
then
hold
it
there.
Press
the
foot
control
to
wind
the
bobbin.
After
a
few
turns,
let
go
of
the
thread
again.
Push
the
filled
bob
bin
to
the
left,
remove
it
and
cut
the
thread.
N
Devanado
del
hilo
(bobinado):
Tome
el
hilo
desde
el
carrete,
páselo
por
el
tensor
2,
Ilévelo
hacia
Ia
canilla,
introdüzcalo
en
uno
de
sus
agujeros
y
sujételo.
Pise
el
pedal
y
comience
a
devanar.
Después
de
unas
vueltas
de
devanado,
suelte
el
hilo.
Una
vez
Ilena
Ia
canilla,
empüjela
hacia
Ia
izquierda,
sáquela
y
corte
el
hilo.
Spólun:
SetjiO
tvinnan
a
milli
spenniskifanna
2,
—
rOiO
siOan
innan
frá
og
üt
urn
eitt
af
gbtum
spOlunnar
og
haldiO
i
tvinnann.
SetjiO
vélina
i
gang
meO
vi
aô
stiga
ámOtstôOuna.
Sleppiã
tvinnanum
eftir
aO
spólan
hefur
snUist
nokkra
hringi.
Ytiô
siOan
fullri
spOlunni
til
vinstri.
takiO
spóluna
af
og
slitlO
tvinnaendann.
IpIii
masuraya
sarmak:
Iiplii:
makara
dan
masura
on
gergi
düzenine
çekiniz,
masuraya
getiriniz,
masuranin
bir
deliin
den
geçiriniz
ye
sikica
tutunuz.
Ayak
marini
çalitiriniz
ye
iplii
masuraya
sariniz.
Bu
arada
birkaç
dönüten
sonra
iplii
birakiniz.
Dolu
masurayi
sola
doru
bastirintz,
çikariniz
ye
iplii
kesiniz.
}

4
Engaging
the
sewing
mechanism:
Hold
the
balance
wheel
firmly
and
turn
knob
7
away
from
you.
ConexiOn
del
mecanismo
de
costura:
Sujete
el
volante
y
gire
el
disco
7
hacia
atrás.
Dikis
mekanizmasintn
çalistirilmasi:
El
/
carkini
sikca
tutunuz
ye
disk
7’yi
arkaya
(
doru
çeviriniz.
Tengiô
gangverlc
vélarinnar:
HaldiO
urn
handhjOliO
og
festiO
lausagangsskrüfuna
7.
Inserting
the
bobbin:
With
thread
hanging
down
at
back
(A),
pull
it
into
slot
B,
under
the
spring
and
out
of
spring
C.
00
Colocación
de
Ia
canilla
en
la
cãpsula:
o
Coloque
Ia
canilla
en
Ia
cápsula
de
for
o
),))i
ma
que
el
hilo
caiga
hacia
atrás
(A).
V
Pase
luego
el
hilo
por
Ia
ranura
B
y
por
debajo
del
muelle
tensor
hasta
salir
por
el
orificio
C.
Masurayi
takmak
A
(iplik
arkaya
doru):
Iplii
B
yarii
içerisine
ye
yay
altindan
C
delii
içerisine
cekiniz.
Spólan
seft
i:
SpOlan
er
sett
annig
I
aO
tvinn
inn
renni
aftur
af
spOlunni.
Sloan
er
hann
agO
ur
I
rauf
B,
undir
fjöOrina
og
üt
I
gegruim
op
C.
La página se está cargando...
La página se está cargando...
La página se está cargando...

LJ
Ea
jz
f4
,
Models
521—741
have
a
free
arm
for
sewing
tubular
shaped
articles.
Los
modelos
521—741
van
provistos
de
brazo
al
aire
para
coser
articulos
tubulares.
521—741
modelleri,
boru
seklindeki
dikile
cek
seyler
için
bir
serbest
kola
sahip
bulunmaktadir.
Vélarnar
eru
meO
521-741
meô
friarm
sem
er
gilegt
fyrir
skálmar
og
ermar.
4
Push
the
detachable
work
support
onto
the
machine
(guide
pin
in
hole).
Acople
el
suptemento
a
Ia
máquina
de
forma
que
el
perno
guIa
encaje
en
el
orificio.
Diki
yüzeyini
makinaya
doru
sürünüz
(kilavuz
pimini
delik
içerisine).
RenniO
vinnuborOinu
aO
vélinni.
Place
fabric
under
the
sewing
foot.
Coloque
a
tela
debajo
del
pie
prensatelas.
Kuma
diki
ayai
altina
yerletiriniz.
Setjiô
efni
undir
fOtinn.
N
N
I
/1
Lower
presser
bar
lifter
19.
Baje
Ia
palanca
aizaprensatelas
19.
Kuma
bastirma
kolunu
(19)
aaiya
indiriniz.
Setjiô
fótlyftir
19
niOur.
12

4
S
Checking
the
needle
thread
tension:
The
normal
setting
is
in
the
white
range
between
3
and
5.
The
higher
the
number,
the
tighter
the
tension.
To
check
the
tension,
set
the
machine
at
a
wide
zigzag
stitch.
Sew
a
short
seam.
The
threads
should
interlock
in
the
middle
of
the
material.
\\JA\A/\/\d
j
U/
13
Operating
the
foot
control:
The
farther
you
press
the
pedal
down
the
faster
the
machine
runs.
Accionamiento
del
pedal:
Cuanto
más
profundo
pise
el
pedal
tanto
mayor
será
Ia
velocidad
de
costura
de
Ia
Hobby.
Marsa
ayakla
basiniz.
Marsa
nekadar
fazla
bir
sekilde
basl,rsa,
“hobby”
okadar
süraltli
diker.
Stigiô
a
mótstöôuna.
vi
fastar
sem
ér
stigiô
a
mOtstoàuna,
vI
hraOar
saumar
vélin.
4
Needle
thread
tension
16
A
=
Setting
mark.
Tension
del
hilo
superior
16
A
=
Marca
para
Ia
regulaciOn.
Ust
iplik
gerginlii
16
A
=
Ayar
isaretlemesi
Yfirtvinnaspennan
16
A
=
ViOmiOunarstrik.
4
ComprobaciOn
de
Ia
tensiOn
del
hilo:
La
regulaciOn
normal
se
halla
en
Ia
zona
blanca
entre
3
y
5.
Cuanto
más
alto
sea
el
nümero
tanto
mayor
será
Ia
tension.
La
comprobaciOn
se
hace
con
puntada
zigzag
ancha.
Haga
una
costura
corta.
Los
hilos
deberán
quedar
anudados
dentro
del
material.
La página se está cargando...

8
I
L
4
Setting
the
stitch
length
(8):
Set
the
required
stitch
length,
from
0
to
4
mm,
at
mark
A.
The
red
setting
range
from
0
to
1
is
for
sewing
buttonholes.
Regulación
del
largo
de
puntada
(8):
Gire
el
botOn
hasta
que
el
argo
de
puntada
deseado
entre
0
y
4
coincida
con
Ia
marca
A.
La
zona
roja
entre
0
y
1
se
usa
para
coser
ojales.
Bati
uzunluunun
ayarlanmasi
(8):
Arzu
edilen
batis
uzunluu
(0
ila
4
mm
arasinda),
A
ayar
iaretIemesinde
çevrilir.
0
ye
1
arasindaki
bolge,
ilik
dikimi
içindir.
Sporlengd
stillt
(8):
Tölurnar
a
sporlengdarskifunni
8
gefa
yOur
til
kynna
hvaO
margir
mm.
sporlO
se.
Hgt
er
aO
stilla
frá
04
mm.
RauOa
svOiO
a
milli
0
og
1
er
fyrir
étt
sport.
d.
fyrir
hnappagot.
N
4
Reverse
sewing:
Press
down
control
22.
The
machine
(____
sews
backwards
as
long
as
the
control
key
is
held
down.
Costura
en
retroceso:
j
Pulse
el
botón
22
hacia
abajo.
La
máquina
cose
hacia
atrás
mientras
el
botOn
esté
pulsado.
Geriye
doru
dikmek:
fl
Tu
22’yi
aaiya
doru
bastiriniz.
Tua
V
basIdii
sürece,
makina
geriye
doru
diker.
2.
YtlO
takka
22
niOur.
Vélin
saumar
afturãbak.
ems
lengi
og
honum
er
haldiO
niOri.
—
15

4
4
N
4
Stitch
pattern
knob
20
Models
340—721.
Turn
the
required
stitch
symbol
to
mark
A.
For
a
table
of
stitch
patterns
see
pages
16/17.
Botón
selector
de
puntadas
20
de
los
modelos
340—721:
Gire
el
botán
de
forma
que
el
tipo
de
puntada
deseado
coincida
con
Ia
marca
A.
Véase
Ia
tabla
de
puntadas
en
las
páginas
18
y
19.
340—721
modellerinin
batis
arnei-ayar
dümesi
(20)
Arzu
edilen
batis
ärneini,
A
ayar
isareti
nm
altina
gelecek
ekilde
çeviriniz.
Sayfa
16/17’deki
bati
örnei
cetveline
bakniz.
Stillihnappur
20.
a
vélum
340-721.
Snüt
stiiiihnappnum
ar
til
viOkomandi
saumur
Sr
fyrir
neOan
merkiO
A.
Sjá
einnig
saumatöflu
a
bls.
18-19.
)
For
sewing
stretch
stitches
(green),
set
the
stitch
length
control
at
“S.
S’
Stretch
stitches
can
be
lengthened
by
turning
the
control
towards
“+“
or
shortened
by
turning
it
towards
Para
coser
puntadas
elásticas
(stretch)
(sector
verde)
hay
que
colocar
el
regula
dor
de
puntada
sobre
el
simbolo
S.
S.
Girando
hacia
“+“
a
hacia
“—“
se
puede
alargar
o
acortar
Ia
puntada
elástica
para
adaptarse
a
las
caracteristicas
del
tejido.
Esnek
dikisierin
(yeiI)
dikilmesi
cm
ba
tis
uzunluu-ayarinin,
S.
S.
isareti
üzerine
getirilmesi
gerekir.
Kumain
cinsine
gore
esnek
bati,
+
‘ya
doru
çevrilmek
suretiyie
kisaltilir.
Pegar
sauma
a
teygjanlega
sauma
(grnr
verOur
aô
stilla
sporstillirinn
a
S.
S.
svOiO
(stretch
spar).
Alit
eftir
efninu,
sem
veriO
er
aO
sauma
gefiO
ér
breytt
lengd
sporanna.
Ef
ér
snüiô
I
átt
aO
+
lengjast
sporin
en
styttast
ef
jérsnüiO
aO
)
4
/1
16

4
Model
741
Zigzag-
and
utility-stitch
knob
20
Turn
the
required
stitch
to
mark
A.
B.
Stitch
pattern
setting
knob
21
Turn
the
required
stitch
pattern
to
mark
For
sewing
the
utility-
and
fancy
stitches,
zigzag
setting
knob
20
must
be
set
at
the
widest
zigzag
stitch.
For
a
table
of
stitch
patterns,
see
pages
18/19.
4
Modelo
741
Botön
selector
de
zigzag
y
ojales
(20).
Gire
el
botón
de
forma
que
Ia
puntada
deseada
coincida
con
Ia
marca
A.
BotOn
selector
de
puntadas
(21).
Gire
el
botón
de
forma
que
el
tipo
de
puntada
deseado
coincida
con
Ia
marca
B.
Para
coser
puntadas
utilitarias
y
decora
tivas,
el
botón
selector
de
zigzag
(20)
deberá
estar
colocado
sobre
el
zigzag
más
ancho.
La
tabla
de
puntadas
se
halla
en
las
páginas
18
y
19.
Model
741
Zikzak-
ye
ilik-ayar
dUmesi
(20),
Arzu
edilen
batis
örneini,
A
ayar
iareti
nm
altina
gelecek
ekilde
çeviriniz.
Bati
ornei-ayar
dUmesi
(21).
Arzu
edilen
batis
Orneini,
B
ayar
iaretinin
altina
gelecek
ekilde
çeviriniz.
Fonksiyonel
dikilerin
ye
süs
dikilerinin
dikilmesi
için
zikzak-ayar
dUmesinin
(20),
en
genis
zikzak
batia
ayarlanmas
gerekmektedir.
Bati
örnei
cetveli
18/19.
sayfalarda
bulunmaktadr.
Vél
741
Stillihnappur
fyrir
zik
zak
og
hnappagöt
20
SnüiO
stillihnappnum
ar
til
viökomandi
saum
ur
er
fyrir
neOan
merkiO
A.
Stillihriappurfyrir
nytja
09
skrautsauma
21.
SnüiO
stillihnappnum
ar
til
viOkomandi
saum
ur
er
fyrir
neOan
merkiO
8.
Pegar
sauma
a
nytja
og
skrautssauma
verOur
aO
stilla
hnapp
20
a
breiOasta
zik
zak.
Sjá
einnig
saumatöflu
a
bls.
18-19.
La página se está cargando...

Changing
the
needle
(System
130/705
H):
Push
the
needle
(with
its
flat
side
facing
Loosen
screw
A.
Take
out
the
needle.
towards
the
back)
up
as
far
as
it
will
go.
Tighten
the
screw.
Cambio
de
Ia
aguja
(sistema
130/705
H):
Afloje
el
tornillo
A.
Saque
Ia
aguja.
intro
duzca
a
nueva
aguja
(lada
piano
hacia
atrás)
hasta
el
tope.
Apriete
el
tornillo.
Ineyi
deitirmek
(Sistem
130/705):
o
—
A
vidasini
gevetiniz.
ineyi
çikariniz.
Yeni
ineyi
(basik
dip
kismi
arka
tarafa
doru)
tamamen
yukariya
doru
sürünüz.
Vidayi
sikistiriniz.
Skipt
urn
nál
(teg.
130/705H)
LosiO
urn
skrüfu
A.
TakiO
nálina
ir.
SetjiO
nja
nál
rneO
flata
Iegginn
frá
your,
og
ytiO
henni
ems
hátt
og
hun
kemst.
FestiO
skrüfuna
aftur.
Dropping
the
feed:
Remove
bedplate
cover
25
or
free-arm
cover
10.
Push
the
drop-feed
control
to
o
=
feed
disengaged,
and
to
B
again
for
sewing.
Ocultación
del
transportador:
Retire
Ia
tapa
25
de
Ia
piaca
base
0
abra
Ia
tapa
10
del
brazo
al
aire.
Corriendo
Ia
palanca
hacia
C,
queda
oculto
el
transportador;
corriéndoia
hacia
B,
pasa
a
Ia
posiciOn
normal
para
coser.
indirmek:
TransportorU
(taiyiciyi)
aatya
doru
Zemin
Ievhasi
kapaini
(25)
kaidiriniz
veya
serbest
kol
kapaini
(10)
aç:niz.
Aaiya
indirme
sürgüsünü
C’ye
doru
sürünüz
=
aaiya
inmi
durumda;
dikmek
icin
=
B’ye
doru
sürünüz.
Flytjarinn
tekinn
Ur
sambandi:
QpniO
IokiO
yfir
griparanum.
YtiO
stillinum
aO
C
og
á
er
flytjarinn
niOri.
AO
B
og
a
er
hann
i
sambandi.
20
La página se está cargando...

Sewing
feet
(standard
accessories)
1
Ordinary
sewing
3
Blindstitch
foot
toot
4
Zipper
2
Clear-view
foot
Pies
prensatelas
(accesorios
normales)
1
Prensatelas
3
Prensatelas
para
normal
puntada
invisible
2
Prensatelas
4
Prensatelas
para
transparente
cremalleras
Diki
ayaklari
(Normal ilâve
parçalar)
1
Normal
ayak
3
Kör-diki
ayai
2
$effaf
ayak
4
Fermuar
ayai
Ftur
(sem
fylgja
vélinni)
1.
Venjulegur
fOtur
3.
BlindsaumsfOtur
2.
GlrfOtur
4.
RennilásafOtur
D
Accessory
compartment:
ii”
(Models
521—741)
To
open
accessory
compartment
raise
cover
of
work
support
9.
Compartimento
para
accesorios
(módelos
521—741):
Abriendo
Ia
tapa
del
suplemento
9
se
encuentra
espaclo
para
colocar
accesorios.
Iâve
parcalar
kutusu:
(521—741
Modelleri)
—
Diki
yuzeyindeki
kapai
(9)
yukariya
doru
kaldiriniz.
Bunun
altinda
diki
için
ilâve
parçalara
alt
olan
yer
bulun
maktadir.
Hoif
fyrir
fylgahiuti
(Velar
521
741)
OpniO
lokiO
a
vinnuborOinu
9.
Undir
okinu
er
hOff
fyrir
fylgihiutina.
22

_____
/Accessory
compartment
(Model
340)
N
Compartment
is
in
right
side
of
base
(23).
2
Compartimento
para
accesorios
_____
I
_____
(modelo
340):
Se
halla
a
Ia
derecha
en
el
zOcalo
(23).
have
parcalar
kutusu:
(Model
340)
Bu
kutu
kaide
(altlik)
kisminin
(23)
sainda
bulunmaktadir.
Hólf
fyrir
fylgihiuti:
(Vél
340)
HOIfiô
fyrir
fylgihlutina
er
hgra
megin
I
sökkl
___________________________
mum
(23)
I
Detachable
work
support
(Model
340)
Attach
the
work
support
so
that
its
two
hooks
engage
in
the
openings
on
the
base.
Suplemento
de
costura
(modelo
340):
lntroduzca
el
suplemento
de
forma
que
los
dos
ganchos
encajen
en
los
orificios
del
zôcalo.
SUrme-diki
yUzeyi
(Model
340)
Kaide
(aitlik)
kisminda
bulunan
yariklara
her
iki
çengelin
asilacai
ekilde
olmak
üzere
sürünüz.
Auka
vinnuborô
(Vél
340)
RenniO
borOinu
annig
upp
aO
vélinni
aO
hökin
krkist
gotin
a
sokklinum.
/
(
After
attaching
the
support,
push
it
downwards
a
little.
Una
vez
encajado
el
suplemento,
presiO
nelo
un
poco
hacia
abajo.
Astiktan
sonra,
diki
yüzeyini
biraz
aaiya
doru
bastiriniz.
YtiO
slOan
ofan
a
vinnuborOiO.
23

0
0
Topstitching
Sewing
foot:
Ordinary
sewing
foot
or
clear-view
foot
and
edge
guide
(special
accessory):
straight
stitch
A
can
be
used
with
nearly
Fitting
the
edge
guide
(Special
accessory):
Push
edge
guide
A
through
hole
B
and
secure
it
in
position
with
screw
C.
The
guide
can
be
adjusted
to
the
desired
stit
ching
margin
for
various
applications.
With
the
edge
guide
attached,
it
is
easy
to
sew
parallel
lines
of
stitches
or
to
stitch
parallel
to
the
edge.
The
guide
either
follows
an
edge
(Fig.
D)
or
when
making
parallel
lines
of
stitches
runs
along
the
preceding
line
of
stitches
(Fig.
E).
The
seam
thus
made
looks
neat
and
accurate.
4
Pespunteados
Prensatelas:
Normal
o
el
transparente,
y
Ia
gula
marginal
(accesorlo
especial)
Puntada:
Punto
recto
La
gula
marginal
A
puede
emplearse
con
casi
todos
los
pies
prensatelas.
Fijaciôn
de
Ia
guia
(accesorio
especial):
Pase
Ia
guia
A
por
el
agujero
B
y
fijela
con
el
tornillo
C.
La
gula
se
puede
ajustar,
segün
Ia
labor,
a
a
distancia
deseada.
Con
Ia
ayuda
de
a
guIa
se
pueden
coser
con
toda
facilidad
costuras
parale
las
o
pespuntes
al
canto.
En
tales
casos,
Ia
gula
marcha
a
lo
largo
del
borde
(fig.
D)
o
a
Ic
largo
de
Ia
costura
anterior
en
el
caso
de
costuras
paralelas
(fig.
6).
De
esta
forma
se
obtienen
costuras
impecables.
7-
/
Id1
/
/
_
_
D
4
Stitch:
Edge
guide
all
sewing
feet.
p
B
A
rt
C
A
C
P
p
v
a
p,
d
ki
D
bi
24

4
0
4
Elastic
blind
Sewing
foot:
Tension:
stitch
blindstitch
foot
Thread:
Stitch:
Stitch
length:
Needle:
needle
thread
tension
a
little
slack.
ordinary
sewing
thread
elastic
blind
stitch
3—4
size
70
or
80
How
to
regulate
the
needle
penetration
Place
the
prepared
hem
under
the
blind-
stitch
sewing
foot.
The
crease
line
of
the
outer
fabric
runs
along
edge
guide
8
of
the
blindstitch
sewing
foot.
Turn
screw
A
to
adjust
edge
guide
B
so
far
to
the
left
that
the
needle
picks
up
only
one
thread
of
the
outer
fabric
when
penetrating
on
the
left
side
(Figs.
C
and
D).
First
make
a
sewing
test
using
a
piece
of
waste
material.
4
Punto
invisible
elástico:
Prensatelas: Prensatelas
para
puntada
invisible
Tension
del
hilo
superior:
Algo
mãs
floja
de
lo
normal
Hilo:
Normal
Puntada:
Puntada
invisible
elastica
Largo
de
puntada:
3
a
4
Aguja:
N
0
70
u
80
Regulación
de
Ia
penetración
de
Ia
aguja:
Coloque
debajo
del
prensatelas
para
puntada
invisible
el
dobladillo
previamen
te
preparado.
El
borde
del
doblez
supe
rior
deberá
deslizarse
contra
el
tope
B
del
prensatelas.
Con
el
tornillo
regulador
A
deberá
correr
ahora
el
tope
B
hacia
Ia
izquierda
de
for
ma
que
al
clavarse
Ia
aguja
por
a
izquierda
sOlo
prenda
un
hilo
del
borde
(fig.
C
y
D).
Haga
primeramente
una
costura
de
prueba
sobre
un
retal.
)
26

Ill
—
-
—
UI
—“I
:iI
.:.
\
4
Sewing
buttonholes
(Models
340
and
521)
Sewing
foot:
clear-view
foot
Tension:
needle
thread
tension
a
little
slack
Thread:
fine
machine
embroidery
thread
buttonhole
range
(red)
sizes
70/80
stitch
knob
20
to
sew
a
seam
width
of
2
mm,
i.
e.
Stitch
length:
Needle:
1.
Set
zigzag
buttonhole
roughly
at
‘B’.
Sew
the
first
buttonhole
seam.
At
the
end,
the
needle
must
be
raised
at
the
right.
Turn
knob
20
one
place
to
the
right.
2.
Insert
the
needle
at
the
right,
raise
the
sewing
foot,
turn
the
material
through
180°,
set
the
knob
at
“B”
again,
lower
the
sewing
foot
and
raise
the
needle.
3.
Set
the
zigzag
knob
at
“C”
and
sew
about
five
tacking
stitches.
Raise
needle
at
left.
4.
Set
knob
at
“B”
and
sew
the
second
buttonhole
seam
as
long
as
the
first.
Raise
needle
at
left.
5.
Set
knob
at
“C”
and
sew
about
five
tacking
stitches.
Raise
the
needle.
6.
Set
the
knob
at
ED
and
sew
a
num
ber
of
securing
stitches.
Cut
buttonhole
open
with
slitting
knife
(special
accessory).
Ojales
(modelos
340
y
521):
Prensatelas:
TensiOn
del
hilo
superior:
normal
Hilo:
Hilo
fino
de
bordar
Zona
del
ojal
(sector
rojo)
Aguja:
N°
70
u
80
1.
Con
el
botón
selector
del
zigzag
20
elija
una
anchura
de
unos
2
mm,
aprox.
en
B.
Cosa
el
primer
labio
del
ojal.
La
aguja
deberã
quedar
al
final
a
Ia
derecha
y
elevada.
Gire
ahora
el
botOn
20
un
paso
hacia
Ia
derecha.
2.
Haga
que
se
dave
Ia
aguja
a
Ia
dere
cha,
alce
el
prensatelas.
gire
a
tela
180°,
gire
de
nuevo
el
botOn
20
a
B.
baje
el
prensatelas
y
eleve
Ia
aguja.
3.
Gire
el
botOn
20
al
sector
C
y
haga
unas
5
puntadas
de
presilla.
Eleve
Ia
aguja
a
Ia
izquierda.
4.
Gire
de
nuevo
el
botón
20
al
sector
B
y
cosa
el
segundo
Iabio
del
ojal
igual
de
largo
que
el
primero.
Eleve
Ia
aguja
a
Ia
izquierda.
5.
Gire
el
botOn
20
al
sector
C
y
haga
unas
5
puntadas
de
presilla.
Eleve
Ia
aguja.
6.
Gire
el
botón
20
a
punto
recto
y
haga
unas
puntadas
de
remate.
Abra
el
ojal
con
el
descosedor
(acce
sorio
especial).
4
j
Transparente
Algo
más
floja
de
lo
Largo
de
puntada:
28

4
Sewing
buttonholes
(Models
541,
741)
Ojales
(modelos
541—741)
Sewing
foot:
clear-view
sewing
foot
Prensatelas:
Transparente
Tension:
needle
thread
tension
a
TensiOn
del
little
slack
hilo
superior:
Algo
más
floja
de
lo
Thread:
fine
machine
embroidery
normal
thread
Hilo:
Nib
fino
de
bordar
Stitch
length:
buttonhole
range
(red)
Largo
de
Utility-stitch
knob
21
at
puntada:
Zona
del
ojal
(sector
rojo)
Model
741:
red
buttonhole
symbol
Selector
de
Needle:
sizes
70
to
80
puntada
utili
taria/en
el
1
Set
utility-stitch
knob
20
at
jJ
and
modelo
741:
En
sImbobo
para
ojal
rojo
sew
the
first
buttonhole
seam.
Raise
Aguja:
N°
70
u
80
the
needle.
1.
Ponga
el
selector
de
puntada
2.
Set
knob
20
at
Jill
and
sew
four
to
utilitaria
20
en
Ill
y
cosa
el
primer
six
tacking
stitches.
Raise
the
needle.
labio
del
ojal.
Eleve
Ia
aguja.
3.
Set
knob
20
at
III
and
sew
the
2.
Ponga
el
botOn
20
en
iJIl
y
haga
de
second
buttonhole
seam
as
long
as
4
a
6
puntadas
de
presilla.
Eleve
Ta
the
first.
Raise
the
needle.
aguja.
4.
Set
knob
20
at
till
and
sea’
four
to
3.
Ponga
eb
botOn
20
en
y
cosa
el
six
tacking
stitches.
Raise
the
needle.
segundo
labio
del
ojal
igual
de
largo
que
el
primero.
Eleve
Ta
aguja.
5.
Set
knob
20
at
ZD
and
sew
a
few
securing
stitches.
4.
Ponga
el
botOn
20
en
y
haga
de
4
a
6
puntadas
de
presilla.
Eleve
Ta
6.
Cut
buttonhole
with
special
knife
aguja.
(special
accessory).
5.
Ponga
el
botOn
20
en
D
y
haga
unas
puntadas
de
remate.
6.
Abra
el
ojal
con
el
descosedor
(acce
sorio
especial).

S
Sewing
on
buttons
Sewing
foot:
without
sewing
foot
or
with
clear-view
foot
Stitch:
straight
stitch,
left
needle
position
Feed:
dropped
Thread:
fine
sewing
thread
Place
the
button
in
the
location
marked
beforehand
and
push
it
under
the
sewing
foot
holder.
Lower
the
sewing
foot
holder
into
the
button.
Lower
the
needle
into
the
left
hole
of
the
button.
Raise
the
needle.
Turn
knob
20
to
a
po
sition
in
which
the
needle
enters
the
right
hole
of
the
button
when
the
hand
wheel
is
turned.
Sew
six
to
eight
zigzag
stitches
and
a
number
of
securing
stit
ches
in
the
left
only
(A).
Sewing
on
buttons
with
stems
(for
large
buttons
in
heavy
materials)
Lower
the
needle
into
the
left
hole.
Place
a
match
on
the
middle
of
the
button.
Lower
the
sewing
foot
(B).
Sew
a
num
ber
of
zigzag
stitches
and
leave
a
thread
end
of
about
6
inches.
Pull
the
needle-
and
bobbin
threads
through
(C).
Wrap
the
stem
(D)
and
tie
off
the
threads.
4
Costura
de
botones:
Prensatelas:
Sin
prensatelas
a
con
el
Puntada:
PosiciOn
de
Ia
puntada:
lzquierda
Transportador:Oculto
Hilo:
Hilo
fino
Coloque
el
botOn
en
el
punto
marcado
previamente
e
introdüzcalo
debajo
del
soporte
del
prensatelas.
Haga
descender
Ia
barra
del
prensatelas.
Clave
a
aguja
en
el
agujero
izquierdo
del
botOn.
Eleve
Ia
aguja.
Gire
el
botón
20
en
a
zona
de
zigzag
hasta
que
Ia
aguja,
at
girar
el
vo
lante,
se
dave
en
el
agujero
derecho
del
botón.
Haga
de
6
a
8
puntos
en
zigzag
y
unas
puntadas
de
remate
en
el
agujero
izquierdo
(fig.
A).
Botón
con
cuello
(costura
de
botones
grandes
en
generos
pesados):
Clave
Ia
aguja
en
el
agujero
izquierdo
del
botón.
Coloque
un
palillo
de
dientes
o
similar
en
el
centro
del
botOn.
Baje
el
prensatelas
transparente
(B).
Haga
unas
puntadas
en
zigzag
y
deje
unos
15
cm
de
hilo.
Pase
los
hilos
superior
e
inferior
a!
ado
de
abajo
(C),
arrOllelos
alrededor
de
las
puntadas
(D)
y
anüdelos.
N
transparente
Punto
recto
—7
32

/
I
IL,’,
/ñfl’
I
/11/7
I/fl;
4
Sewing
in
zippers
Sewing
foot:
Stitch
length:
Stitch:
4
zipper
sewing
foot
2
to
3
Straight
stitch,
middle
needle
position
Thread:
Costura
de
cremalleras
Prensatelas:
sewing
thread
Prensatelas
para
cremalleras
2a3
Punto
recto
Largo
de
puntada:
Puntada:
Posición
de
Ia
puntada:
Central
Hilo:
Normal
This
is
how
the
zipper
foot
is
engaged
Insert
the
foot
with
the
back
pin
in
the
back
groove
E
and
push
the
shoe
of
the
foot
upwards,
until
the
front
pin
F
snaps
in.
The
zipper
foot
can
be
pushed
to
the
positions:
left
(Fig.
A),
right,
or
centre.
Completely
concealed
zip
closure
Baste
in
zip
by
hand
first.
Push
the
Colocación
del
prensatelas
para
cremalleras:
Enganche
Ia
barrita
posterior
del
pie
en
Ia
ranura
posterior
E
y
empuje
hacia
arriba
Ia
planta
del
pie
hasta
que
encaje
Ia
barrita
anterior
F.
El
pie
puede
correr
se
a
las
posiciones
derecha,
izquierda
(fig.
A)
y
central.
zipper
foot
to
the
left
as
far
as
it
will
go.
Place
the
open
zip
under
the
foot
so
that
its
teeth
run
along
the
right
guiding
edge
on
the
sole
of
the
foot
(Fig.
B).
Sew
about
half
the
length
of
the
zip
at
the
required
width.
Leave
the
needle
down
in
the
material,
raise
the
zipper
foot
and
close
the
zip
(Fig.
C).
Lower
the
zipper
foot
again,
continue
the
seam
and
then
sew
across
the
end.
Sew
the
other
side
of
the
zip
at
the
same
margin.
Shortly
before
the
end
of
the
seam
leave
the
needle
down
in
the
material,
raise
the
zipper
foot
and
open
the
zip
(Fig.
D).
Lower
the
zipper
foot
again
and
sew
to
the
end.
Cremalleras
cubiertas
del
todo
Hilvane
Ia
cremallera.
Corra
el
prensate
las
hacia
Ia
izquierda
hasta
el
tope.
Coloque
Ia
cremallera
abierta
debajo
del
prensatelas
de
forma
que
los
dientes
de
Ia
cremallera
discurran
a
lo
largo
de
Ia
guIa
derecha
(fig.
B),
Cosa
Ia
cremallera
a
Ia
anchura
deseada
hasta
Ia
mitad
aproximadamente.
Deje
Ia
aguja
clavada
en
Ia
tela,
alce
el
prensatelas
y
cierre
Ia
cremallera
(fig.
C).
Baje
eI
prensatelas,
termine
de
hacer
Ia
costura
y
haga
Ia
costura
lateral
de
remate.
Cosa
el
segundo
lado
de
Ia
cremallera
paralelamente
y
a
Ia
misma
distancia.
Poco
antes
del
final
de
Ia
costura,
deje
clavada
Ia
aguja
en
Ia
tela.
Alce
el
pren
satelas,
abra
Ia
cremallera
(fig.
D),
baje
el
prensatelas
y
termine
Ia
costura.
34

r
I
\
\
\
H
‘‘
—“
I
‘Q\
\
\
L
1111
I
I
‘%.\
\
\
I\lIIII
I
I
.\
\
\f
\
II
II
I
\
\
Thi1
IT
LII
i—1
‘
\
N
L4
IIJ
J
G\
N\
I
a
C
/
A
4
4
Seam-like
zipper
closure
Cremallera
cosida
en
una
costura
For
machine
setting
see
page
34
(Para
Ia
preparaciOn
de
Ia
máquina,
How
the
zipper
is
prepared
and
véase
Ia
Pág.
34)
inserted:
Preparación
y
colocación
de
Ia
Press
the
edges
of
the
placket.
Fold
out
cremallera:
the
left
seam
allowance
(Fig.
A).
Place
Doble
y
planche
los
cantos
de
Ia
the
left
side
of
the
open
zip
in
position
abertura.
Gire
el
margen
de
costura
so
that
its
teeth
protrude
a
little
beyond
izquierdo
hacia
afuera
(fig.
A).
Coloque
the
pressed
edge
(Fig.
8).
The
seam
is
encima,
como
muestra
Ia
fig.
B,
el
ado
sewn
along
this
edge.
izquierdo
abierto
de
Ia
cremallera.
Los
Move
the
zipper
foot
to
the
middle
so
dientes
de
Ia
cremallera
sobresalen
un
that
the
needle
stitches
into
the
middle
poco
del
canto
planchado.
La
costura
opening.
The
zip
teeth
run
into
the
left
discurre
a
lo
argo
del
canto
planchado.
guiding
groove
in
the
toot
(Fig.
C).
At
Corra
el
prensatelas
al
centro
de
forma
the
beginning
of
the
seam
lift
up
the
que
Ia
aguja
se
dave
en
el
agujero
teeth
a
lfttle
to
feed
them
into
the
central.
Los
dientes
de
Ia
cremallera
dis
guiding
groove.
Sew
the
seam
to
the
curren
por
Ia
ranura
izquierda
del
pie
end
and
secure
it.
prensatelas
(fig.
C).
Al
comenzar
Ia
Close
zip.
Pin
other
side
of
zip
to
costura,
deberá
levantar
un
poco
los
material
at
beginning
of
seam
(Fig..
D).
dientes
para
que
entren
en
Ia
ranura
Open
zip.
Remove
the
pin,
turn
out
the
guia.
Termine
Ia
costura
y
remátela.
‘
right
seam
allowance
with
the
zip
tape,
Cierre
a
cremallera.
Prenda
con
un
alfi
and
pin
the
latter
to
the
fabric,
as
shown
I
er
el
Segundo
lado
de
Ia
cremallera
al
in
Fig.
E.
The
zip
teeth
now
run
into
the
comienzo
de
Ia
costura
(fig.
D)
y
abra
Ia
right
guiding
groove
in
the
foot
(Fig.
F).
cremallera.
Gire
ahora
hacia
afuera
el
Finish
sewing
the
zip.
Now
sew
down
margen
de
costura
derecho
junto
con
Ia
the
zip
tape
letting
the
zip
teeth
run
cinta
de
Ia
cremallera,
después
de
haber
along
the
guiding
edge
of
the
foot
retirado
el
alfiler,
y
fije
dicha
cinta
con.
(Fig.
G).
un
alfiler
a
Ia
costura,
como
muestra
Ia
fig.
E.
Los
dientes
de
Ia
cremallera
dis
curren
ahora
por
Ia
ranura
derecha
del
prensatelas
(fig.
F).
Termine
de
coser
Ia
cremallera.
Pespuntee
ahora
Ia
cinta
de
Ia
cremallera
sobre
Ia
costura
al
ancho
del
prensatelas.
Los
dientes
de
Ia
cre
mallera
discurren
ahora
por
fuera
a
lo
largo
de
Ia
gula
del
prensatelas
(fig.
G).
36

K
Ik
//
—
__—,Iu
,,
II
tIi
—0
—0
B
Zippers
in
ladies’
slacks
For
machine
setting
see
page
34.
Move
the
zipper
foot
to
the
left
as
far
as
it
will
go.
Press
the
edges
of
the
placket.
Baste
the
closed
zip to
the
right
edge
of
the
placket
on
the
wrong
side
so
that
its
teeth
are
still
visible.
Pin
facing
strip
D
to
the
underside
and
stitch
t
down
at
the
same
time
as
you
sew
the
zip.
The
zip
teeth
run
along
the
right
guiding
edge
of
the
foot
(Fig.
A).
Shortly
before
the
end
of
the
seam
leave
the
needle
down
in
the
fabric,
raise
the
zipper
foot,
open the
zip,
lower
the
zipper
foot
again
and
finish
sewing
the
seam.
Close the
zip.
Pin
the overlapping
edge
along
the
intended
seam
line.
Baste
left
zip
edge
(Fig.
B).
Open
zip.
Attach
the
edge
guide
and
position
it
for
the
desired
seam
margin
so
that
it
moves along
the
edge
of
the
fabric
(Fig.
C).
Shortly
before the end
of
the
seam
leave the
needle
down
in
the
fabric,
raise
the
zipper
foot
and
close
the
zip.
Lower
the
zipper
foot
and
finish
sewing
the
seam.
Secure
the end
of
the
zip
seam
with
a
bartack.
I
Cremalleras
para
pantalones
de
señora
(Para
Ia
preparaciOn
de
a
maquina,
vêase
Pág.
34)
Corra
el
pie
para cremalleras
hacia
Ia
izquierda
hasta
el
tope.
Doble
y
planche
los
bordes
de
a
abertura.
Hilvane
Ia
cremallera
cerrada
por
debajo
del
ado
derecho
doblado de
forma
que
queden
visibles
los
dientes
de
Ia
cremallera,
Fije
ahora
Ia
tapeta
D
con
alfileres
para
que
quede
prendida
también
por
Ia
costura.
Los
dientes
de
Ia
cremallera
discurren
a
lo
argo
de
Ia
gula
derecha
del
prensate
las
(fig.
A).
Poco
antes
del
final
de
Ia
costura,
deje
Ia
aguja
clavada
en
Ia
tela,
alce
el
prensatelas,
y
abra
Ia
cremallera,
baje
el
prensatelas
y
termine
Ia
costura.
Cierre
a
cremallera.
Prenda
con
alfileres
el
borde
saliente
siguiendo
el
trayecto de
Ia
costura.
Hil
vane
el
lado
izquierdo
de
Ia
cremallera
(fig.
B).
Abra
Ia
cremallera.
Coloque
Ia
gufa
mar
ginal
y
posiciOnela
de
forma
que
dis
curra
a
lo
largo
del
borde
de
Ia
tela
(fig.
C).
Poco
antes
del
final
de
Ia
costura,
deje
Ia
aguja
clavada
en
Ia
tela,
alce
el
prensatelas,
cierre
Ia
cremallera, baje
el
prensatelas
y
termine
Ia
costura.
Asegure
el
final
de
Ia
costura
con
una
presilla.
38

4.
Zurcidos
Prensatelas:
Pie
para
zurcir
(acceso
rio
especial)
Puntada:
Punto
recto
Tension
del
hilo
superior:
Algo
más
floja
de
lo
normal
Hilo:
Hilo
fino
de
zurcir
Aguja:
N°
70
Transportador:
Oculto
Colocación
del
pie
zurcidor:
Retire
el
soporte
del
prensatelas
y
fije
el
pie
zurcidor
con
el
tornillo
A.
Aseguse
de
que
el
estribo
B
se
apoye
contra
el
portatornillos
C.
Para
comenzar
a
zurcir
extraiga
primera
mente
el
hilo
inferior.
Sujete
ambos
hilos
por
Ia
punta
al
cornenzar
a
coser.
Haga
ahora
unas
puntadas
en
Ia
tela.
Extien
da
los
hilos
bien
pegados
unos
a
otros
y
zurza
el
trozo
dañado
(fig.
D).
Zurza
en
redondo
al
final
de
cada
costura
(fig.
E).
Tan
pronto
como
esté
recubierto
unifor
memente
el
trozo
dañado,
gire
Ia
tela
90°
y
zurza
los
hilos
tensados
anterior
mente
(fig.
E)
hasta
que
el
trozo
dañado
quede
cerrado
por
completo.
El
largo
de
puntada
lo
determina
usted
misma
moviendo
a
tela
en
vaivén.
*
V
4
‘S
S.
‘S
—
—
‘S
•
‘.
•‘
•%
‘.5
%.
55%
‘.55’”
‘S_)
Darning
Preparing
the
machine:
Sewing
foot:
D
Stitch
type:
Needle
position:
Tension:
Darning
foot
(special
accessory)
Straight
stitch
Centre
Ease
needle
thread
Thread:
tension
Fine
machine
Needle:
embroidery
thread
Size
70
How
to
fit
the
darning
foot
Remove
the
sewing
foot
holder,
then
secure
the
darning
foot
with
screw
A.
making
sure
that
wire
B
is
resting
on
screw
shank
C.
First
draw
up
the
bobbin
thread
and
hold
both
threads
when
beginning
to
sew.
Then
make
a
few
stitches
in
the
material.
Stitch
back
and
forth
over
the
damaged
area
in
serpentine
fashion,
as
shown
in
Fig.
D,
rounding
the
end
of
each
line.
When
the
damaged
spot
is
covered
evenly,
turn
the
fabric
through
90°
and
darn
over
the
preceding
rows
of
stitches
(Fig.
E)
until
the
damaged
spot
is
covered.
On
this
type
of
work
you
determine
the
stitch
length
yourself
by
moving
the
fabric
back
and
forward.
40
La página se está cargando...

Hreinsun
og
smurning:
SetjiO
nálina
Og
saumfótinn
I
efstu
stOOu.
LosiO
skrüfurnar
sem
halda
stingplätunni
09
takiO
hana
I
burtu.
Hreinsiô
flytjarann
og
kringum
hann
meô
bursta.
SmelIiô
griparafestingum
A
üt
a
vIO.
TakiO
hnnginn
B
09
griparann
C
ür
vélinni
Hreinsiô
alla
essa
hluti
vel
og
smyrjiO
slOan
af
oq
til
I
gnparabrautina.
Agtiô:
aO
missa
ekki
griparann,
jvi
hann
er
viOkvmur.
Cleaning
and
oiling
Raise
the
needle
and
the
sewing
foot.
Remove
the
two
needle
plate
screws
and
take
off
the
needle
plate.
Clean
the
feed
dog
with
the
brush.
Push
catches
A
of
the
sewing
hook
outwards.
Take
out
ring
B
and
sewing
hook
C.
Clean
the
hook
raceway.
Apply
a
drop
of
oil
to
the
hook
raceway
occasionally.
Caution:
do
not
drop
the
sewing
hook.
4
Engrase
y
limpieza
Eleve
Ia
aguja
y
el
prensatelas.
Afloje
los
dos
tornillos
de
fijaciOn
y
retire
a
placa
de
aguja.
Limpie
el
transportador
con
un
pincel.
Gire
hacia
afuera
el
pestillo
A
del
garfio
(lanzadera).
Retire
el
anillo
B
y
el
garfio
C.
Limpie
Ia
pista
del
garfio.
Ponga
de
vez
en
cuando
una
go
ta
de
aceite
en
Ia
pista
del garfio.
Atención!
cuide
de
que
no
se
caiga
el
garfio
al
suelo.
4
Temiziemek
ye
yalamak
lneyi
ye
dikis
ayaini
yukariya
kaldiri
niz.
Her
iki
tespit
vidasini
gevsetip
çikari
niz
ye
batis
levhasini
çikartiniz.
Firça
ile
transportörü
(taiyiciyi)
temizleyiniz.
Kay
rayicinin
mandalini
(A)
diariya
doru
çe
viriniz.
B
halkasini
ye
C
kavrayicisini
cikariniz.
Kavrayicinin
bulunduu
hareket
sahasini
temizleyiniz.
Arasira
kavrayicinin
bulunduu
hareket
sahasina
bir
damla
ya
damlatiniz.
Dikkat,
kavrayiciyi
yere
dusürmeyiniz.
42
La página se está cargando...
La página se está cargando...
La página se está cargando...
La página se está cargando...
La página se está cargando...
La página se está cargando...
La página se está cargando...
Transcripción de documentos
cxuencla esta hoja Bu sayfayt disari ya doru katlayin iz Flettiô lessari sI ôu 4 Some safety rules a) Take care to avoid injury to your fingers by the ne edle during sew b) Make sure yo ing. u unplug the po wer cord whenever you have to leav e the machine or want to clean it, oil it or change mechani cal and access ory parts. c) Be sure to use only a 15-w att light bulb in the sewin g lamp. Safety rules fo r United Kingd om see page 2 Normas sobre medidas de se guridad para máquinas de coser domés ticas segün DIN 5773 0, sección 2 C a) Debido at m ovimiento de Ia aguja, el usuario de toda maquina de co ser deberã tener to do et cuidado po sible durante el traba jo y no apartar Ia vista de Ia zona de costura. b) Siempre que haya que cambi ar Ia aguja, el pie pr ensatelas, Ia ca nilla o Ia placa de aguj a, lo mismo qu e at impiar o engras ar Ia máquina, o cuando no se use, deberá desc onec tarse eléctricam ente, es decir, deberá desenchufarse. c) La potencia m axima admisibl e de Ia bombilla es de 15 vatios. Contents on page 61 lndice en Ia Pag. 63 4DIN (Alman EndUstri Norm u) 57730 Kisim 2C’ye go re evde kullani lan dikis makinalan icin güvenhik talimat lari a) Makinayi lulla nan kimsenin, yu kanya ye aaya doru hareket eden in e dolayisiyla, yete ri kadar dikkat li davranrnasi ye ca lisma esnasind a dikis yerini devam h olarak gozlem esi gerekir. b) Makinanin te rkedilmesi esna sinda, bakim ileri esna sinda veya mak ina parcalarimn veya aye parcalarin deistirilmesi sir asinda, makinan in fisini prizden ck armak suretiyle, ceryanin kesilm esi gerekir. c) Lämbanin m üsaade olunan azami gucu 15 Vattir. Nokkrar Oryggisr áôstafanir a) Gtiâ bess aO fingur verãi ekki fyn r nálinni, egar saumaO er. b) Geriô aO aO ve nju yôar aâ taka vélina ür sambandi, egar skipta arf urn na. saurn fOt. eOa egar ér eruô aO hreinsa og smyrja vélina. C) AIdrel ma ve ra sterkari pera i vélinni en 15W. C icindekiler: Sayf a 65 Efnisyfirlit er a bl s 67 C 4 F r ir - JJ9 /‘ oy L_ D 4 Parts of the sewing machine 1 Take-up lever 2 Bobbin winder tension 3 Carrying handle 4 Spool pins (remove from accessories and insert) 5 Bobbin winder 6 Hand wheel 7 Disengaging knob 8 Stitch length control 9 Detachable work support with accessories box 10 Free-arm cover, enclosing sewing hook 11 Needle plate 12 Sewing foot holder with sewing foot 13 Needle holder with retaining screw 14 Thread guides 15 Threading slots 16 Needle thread tension 17 Free arm 18 Presser bar with thread cutler 19 Presser bar lifter 20 Zigzag- and utility-stitch knob 21 Utility-stitch, stretch-and fancy-stitch knob, Model 741 22 Reverse control 23 Bedplate 24 Base 25 Bedplate cover, enclosing sewing hook 26 Accessories compartment Mandos y elementos principales th máquina de coser 1 Palanca tirahilos 2 Tensor del devanador 3 Asa 4 Espigas portacarretes (Se encue en los accesorios) 5 Devanador (bobinadora) 6 Volante 7 Disco de desembrague 8 Regulador del argo de puntada 9 Superficie de costura variable cc compartimento para accesorios 10 Casquete de cierre (con el garfio dentro) 11 Placa de aguja 12 Portaprensatelas con prensatela 13 Portagujas con tornillo de sujeci 14 Gulahilos 15 Ranuras para el enhebrado 16 Tensor del hilo superior 17 Brazo al aire 18 Barra del prensatelas con cortab 19 Palanca alzaprensatelas 20 BotOn para puntadas utilitarias y zigzag 21 BotOn para puntadas utilitarias, stretch y de adorno en el rnodel 22 BotOn para coslura en retroceso 23 Placa base 24 ZOcalo 25 Tapa de Ia placa base (debajo está el garbo) 26 Compartimento para accesorios __________________________________ _ _ Some safety rules vahd for United Kingdom only The wires in this mains lead are coloured according to following code: Blue: Neutral Brown: Live As the colours of the wires in the mains lead of this appliance may not correspond with the colour coding of the terminals in your plug, proceed as follows: the wire which is coloured blue must be connected to the terminal which is marked with the letter N or coloured black. The wire which is coloured brown must be connected to the terminal which is marked with the letter L or coloured red. Please note: When a 13-ampere plug is used a 3-ampere fuse has to be fitted. I I I I Inserting the spool pins Two spool pins are included in the accessories, Insert these in the holes provided in the machine. Colocación de los portacarretes: En los accesorios se encuentran dos portacarretes. Colóquelos en los orificios previstos en Ia máquina y déjelos intro ducidos. Makara tutucusunun takilmasi Ilâve parçalar bölmesinde iki makara tutucusu bulunmaktadir. Bunlar, makina üzerinde bu hususta on gorulen delikiere geirilirler ye burada kahrlar. Keflispinnarnirsettirá: MeO fylgihlutunum eru tveir keflispinnar. Sting a eim I gätin ofan a vétinni, og látiO á vera par. nt ceer.__ _____ 4 4 R emoving the carry case, free-arm models Fold down the carrying handle. COmo sacar Ia maleta-funda de los modelos de brazo al aire Eche hacia atrás el asa en direcciOn de a flecha. Qantayi çikarmak, serbest kollu-modeller Tasima kolunu yan tarafa doru deviriniz. Taskan tekur at friarmsvélunum LeggiO handfangiO niãur ___— (— _— I - 7— Lift off the case. Tire ahora de a maleta hacia arriba. canta kapainin kaldirilmasi. LyftiO tOskunni slOan upp. Electrical connection: Set the foot control on the floor. Insert plug A in the machine and plug B in the wall socket. Conexión eléctrica Coloque el pedal en el suelo. lntroduzca Ia clavija A en Ia máquina, y Ia clavija B en el enchute de Ia red. Elektrik balantisi: Marsi yere koyunuz. A fisini, makina içerisine ye B fiini duvarda bulunan prize sokunuz. jiiIllI Rafmagnstenging. SetjiO mOtstöOuna a golfiO. TengiO klOna A viO vélina, en kló B I vegg tengil. ) 4 / ____________________ ___________ ___ t B obbin winding preparations: Reach under work support 9 and pull it out towards the left. Preparación para el devanado: Meta a mano izquierda por debajo del brazo 9 y desvIelo hacia Ia izquierda. ipHi masuraya sarma iinin hazirlan mast: Dikis yüzeyi 9’un alt kismini tutu nuz ye bunu sola doru disariya çekiniz. Spólun undirbUin: TakiO undir vinnuborOiO og dragiO aO üt til vinstri. ____— Remove bed plate cover 25 or fold freearm cover 10 downwards. Quite a tapa 25 de Ia placa base o abra el casquete de cierre 10 hacia abajo. Alt levha kapaini (25) kaldiriniz, veya kapama kapaini (10) aaiya doru açiniz. OpniO 10km (10 eOa 25) yfir griparanum. — Raise latch A and pull out the bobbin case. U ) Levante Ia bisagrita A y saqu Ia cápsula. _.__— 7 I-’ A kapaini yukariya doru kaldinniz mekii diariya dori cekiniz. TakiO i loku A, og takiO spóluhüsiO ür. Release latch A and take out the bobbin. Suelte Ia bisagrita A y saque Ia canilla. A kapaini serbest birakiniz ye masurayi disariya çikariniz. Sleppiô loku A og takiO spóluna ür spOluhüs mu. 5 ______________________________________ _____ c. g Place the bobbin on winder spindle 5. - lntroduzca Ia canilla en el husillo 5 del devanador. Masurayi, masura ii (miii) üzerine takiniz. SetiO spóluna a spólarann 5 Push the bobbin to the right against stop A. c Presione Ia canilia hacia Ia derecha contra el tope A. ‘‘ = Masurayi saga doru, A dayanaina kadar bastiriniz. YtiO nü spOlunni til hgri aO takka A. ‘ 0 ,/bisengaging the sewing mechanism: Hold hand wheel 6 firmly and turn knob 7 towards you. Desconexión del mecanismo del I costura: Sujete con una mano el volante 6 y gire con Ia otra el disco de desem brague 7 hacia el frente. Diki mekanizmasini kapatmak: El car kini (6> tutunuz ye disk 7’yi One doru çeviriniz. Takiô gangverk vélarinnar ür sambandi: i Haldiô urn handhjOl 6 og losiO urn lausagangs \..srüfuna 7. Piaca a spool on one of the pins 4. lntroduzca el carrete en uno de los portacarretes 4. Makarayi bir tutucu (4) üzerine sürünüz. r 6 SetjiO tvinnakefli a annan keflispinnann. / i / N Bobbin winding: Pull the thread from the spool into tensioner 2, to the bobbin, through one hole of the bobbin, then hold it there. Press the foot control to wind the bobbin. After a few turns, let go of the thread again. Push the filled bob bin to the left, remove it and cut the thread. Devanado del hilo (bobinado): Tome el hilo desde el carrete, páselo por el tensor 2, Ilévelo hacia Ia canilla, introdüzcalo en uno de sus agujeros y sujételo. Pise el pedal y comience a devanar. Después de unas vueltas de devanado, suelte el hilo. Una vez Ilena Ia canilla, empüjela hacia Ia izquierda, sáquela y corte el hilo. IpIii masuraya sarmak: Iiplii: makara dan masura on gergi düzenine çekiniz, masuraya getiriniz, masuranin bir deliin den geçiriniz ye sikica tutunuz. Ayak marini çalitiriniz ye iplii masuraya sariniz. Bu arada birkaç dönüten sonra iplii birakiniz. Dolu masurayi sola doru bastirintz, çikariniz ye iplii kesiniz. Spólun: SetjiO tvinnan a milli spenniskifanna rOiO siOan innan frá og üt urn eitt af 2, gbtum spOlunnar og haldiO i tvinnann. SetjiO vélina i gang meO vi aô stiga ámOtstôOuna. Sleppiã tvinnanum eftir aO spólan hefur snUist nokkra hringi. Ytiô siOan fullri spOlunni til vinstri. takiO spóluna af og slitlO tvinnaendann. } r — 7 chanism: Hold Engaging the sewing me turn knob 7 and ly firm eel the balance wh away from you. 4 o de costura: ConexiOn del mecanism disco 7 hacia el e gir Sujete el volante y atrás. / ( 00 o V o ),))i çalistirilmasi: El Dikis mekanizmasintn disk 7’yi arkaya ye z unu carkini sikca tut doru çeviriniz. nnar: HaldiO urn Tengiô gangverlc vélari sskrüfuna 7. ang sag handhjOliO og festiO lau h thread Inserting the bobbin: Wit pull it into slot , (A) hanging down at back of spring C. out and ing B, under the spr en la cãpsula: Colocación de Ia canilla sula de for cáp Ia Coloque Ia canilla en ás (A). atr ia hac ga ma que el hilo cai ranura B y por Pase luego el hilo por Ia hasta salir por debajo del muelle tensor el orificio C. arkaya doru): Masurayi takmak A (iplik altindan C yay ye B yarii içerisine Iplii delii içerisine cekiniz. t annig I aO tvinn Spólan seft i: SpOlan er set Sloan er hann agO inn renni aftur af spOlunni. üt I gegruim op C. ur I rauf B, undir fjöOrina og LJ Models 521—741 have a free arm for sewing tubular shaped articles. Los modelos 521—741 van provistos de brazo al aire para coser articulos tubulares. 521—741 modelleri, boru seklindeki dikile cek seyler için bir serbest kola sahip bulunmaktadir. Ea Vélarnar eru meO 521-741 meô friarm sem er gilegt fyrir skálmar og ermar. jz 4 Push the detachable work support onto the machine (guide pin in hole). Acople el suptemento a Ia máquina de forma que el perno guIa encaje en el orificio. Diki yüzeyini makinaya doru sürünüz (kilavuz pimini delik içerisine). RenniO vinnuborOinu aO vélinni. f4 , Place fabric under the sewing foot. N Coloque a tela debajo del pie prensatelas. Kuma diki ayai altina yerletiriniz. Setjiô efni undir fOtinn. Lower presser bar lifter 19. N Baje Ia palanca aizaprensatelas 19. /1 Kuma bastirma kolunu (19) aaiya indiriniz. Setjiô fótlyftir 19 niOur. 12 I Operating the foot control: The farther you press the pedal down the faster the machine runs. Accionamiento del pedal: Cuanto más profundo pise el pedal tanto mayor será Ia velocidad de costura de Ia Hobby. Marsa ayakla basiniz. Marsa nekadar fazla bir sekilde basl,rsa, “hobby” okadar süraltli diker. Stigiô a mótstöôuna. vi fastar sem ér stigiô a mOtstoàuna, vI hraOar saumar vélin. 4 4Needle thread A S = tension 16 Setting mark. Tension del hilo superior 16 A = Marca para Ia regulaciOn. Ust iplik gerginlii 16 A = Ayar isaretlemesi Yfirtvinnaspennan 16 A = ViOmiOunarstrik. Checking the needle thread tension: The normal setting is in the white range between 3 and 5. The higher the number, the tighter the tension. To check the tension, set the machine at a wide zigzag stitch. Sew a short seam. The threads should interlock in the middle of the material. 4 ComprobaciOn de Ia tensiOn del hilo: La regulaciOn normal se halla en Ia zona blanca entre 3 y 5. Cuanto más alto sea el nümero tanto mayor será Ia tension. La comprobaciOn se hace con puntada zigzag ancha. Haga una costura corta. Los hilos deberán quedar anudados dentro del material. \\JA\A/\/\d j U/ 13 I 4Setting the stitch length (8): Set the required stitch length, from 0 to 4 mm, at mark A. The red setting range from 0 to 1 is for sewing buttonholes. Regulación del largo de puntada (8): Gire el botOn hasta que el argo de puntada deseado entre 0 y 4 coincida con Ia marca A. La zona roja entre 0 y 1 se usa para coser ojales. Bati uzunluunun ayarlanmasi (8): Arzu edilen batis uzunluu (0 ila 4 mm arasinda), A ayar iaretIemesinde çevrilir. 0 ye 1 arasindaki bolge, ilik dikimi içindir. 8 Sporlengd stillt (8): Tölurnar a sporlengdarskifunni 8 gefa yOur til kynna hvaO margir mm. sporlO se. Hgt er aO stilla frá 04 mm. RauOa svOiO a milli 0 og 1 er fyrir étt sport. d. fyrir hnappagot. L 4 Reverse sewing: Press down control 22. The machine sews backwards as long as the control key is held down. (____ N j Costura en retroceso: Pulse el botón 22 hacia abajo. La máquina cose hacia atrás mientras el botOn esté pulsado. Geriye doru dikmek: Tu 22’yi aaiya doru bastiriniz. Tua basIdii sürece, makina geriye doru diker. flV 2. YtlO takka 22 niOur. Vélin saumar afturãbak. ems lengi og honum er haldiO niOri. — 15 4 4 N For sewing stretch stitches (green), set the stitch length control at “S. S’ Stretch stitches can be lengthened by turning the control towards “+“ or shortened by turning it towards Para coser puntadas elásticas (stretch) (sector verde) hay que colocar el regula dor de puntada sobre el simbolo S. S. Girando hacia “+“ a hacia se puede alargar o acortar Ia puntada elástica para adaptarse a las caracteristicas del tejido. “—“ Esnek dikisierin (yeiI) dikilmesi cm ba tis uzunluu-ayarinin, S. S. isareti üzerine getirilmesi gerekir. Kumain cinsine gore esnek bati, + ‘ya doru çevrilmek suretiyie kisaltilir. Pegar sauma a teygjanlega sauma (grnr verOur aô stilla sporstillirinn a S. S. svOiO (stretch spar). Alit eftir efninu, sem veriO er aO sauma gefiO ér breytt lengd sporanna. Ef ér snüiô I átt aO + lengjast sporin en styttast ef jérsnüiO aO ) 4 /1 4 Stitch pattern knob 20 Models 340—721. Turn the required stitch symbol to mark A. For a table of stitch patterns see pages 16/17. Botón selector de puntadas 20 de los modelos 340—721: Gire el botán de forma que el tipo de puntada deseado coincida con Ia marca A. Véase Ia tabla de puntadas en las páginas 18 y 19. 340—721 modellerinin batis arnei-ayar dümesi (20) Arzu edilen batis ärneini, A ayar isareti nm altina gelecek ekilde çeviriniz. Sayfa 16/17’deki bati örnei cetveline bakniz. Stillihnappur 20. a vélum 340-721. Snüt stiiiihnappnum ar til viOkomandi saumur fyrir neOan merkiO A. Sjá einnig saumatöflu 16 Sr a bls. 18-19. ) 4 Model 741 Zigzag- and utility-stitch knob 20 Turn the required stitch to mark A. Stitch pattern setting knob 21 Turn the required stitch pattern to mark B. For sewing the utility- and fancy stitches, zigzag setting knob 20 must be set at the widest zigzag stitch. For a table of stitch patterns, see pages 18/19. Model 741 Zikzak- ye ilik-ayar dUmesi (20), Arzu edilen batis örneini, A ayar iareti nm altina gelecek ekilde çeviriniz. Bati ornei-ayar dUmesi (21). Arzu edilen batis Orneini, B ayar iaretinin altina gelecek ekilde çeviriniz. Fonksiyonel dikilerin ye süs dikilerinin dikilmesi için zikzak-ayar dUmesinin (20), en genis zikzak batia ayarlanmas gerekmektedir. Bati örnei cetveli 18/19. sayfalarda bulunmaktadr. 4 Modelo 741 Botön selector de zigzag y ojales (20). Gire el botón de forma que Ia puntada deseada coincida con Ia marca A. BotOn selector de puntadas (21). Gire el botón de forma que el tipo de puntada deseado coincida con Ia marca B. Para coser puntadas utilitarias y decora tivas, el botón selector de zigzag (20) deberá estar colocado sobre el zigzag más ancho. La tabla de puntadas se halla en las páginas 18 y 19. Vél 741 Stillihnappur fyrir zik zak og hnappagöt 20 SnüiO stillihnappnum ar til viökomandi saum ur er fyrir neOan merkiO A. Stillihriappurfyrir nytja 09 skrautsauma 21. SnüiO stillihnappnum ar til viOkomandi saum ur er fyrir neOan merkiO 8. Pegar sauma a nytja og skrautssauma verOur aO stilla hnapp 20 a breiOasta zik zak. Sjá einnig saumatöflu a bls. 18-19. Changing the needle (System 130/705 H): Loosen screw A. Take out the needle. Push the needle (with its flat side facing towards the back) up as far as it will go. Tighten the screw. Cambio de Ia aguja (sistema 130/705 H): Afloje el tornillo A. Saque Ia aguja. intro duzca a nueva aguja (lada piano hacia atrás) hasta el tope. Apriete el tornillo. o — Ineyi deitirmek (Sistem 130/705): A vidasini gevetiniz. ineyi çikariniz. Yeni ineyi (basik dip kismi arka tarafa doru) tamamen yukariya doru sürünüz. Vidayi sikistiriniz. Skipt urn nál (teg. 130/705H) LosiO urn skrüfu A. TakiO nálina ir. SetjiO nja nál rneO flata Iegginn frá your, og ytiO henni ems hátt og hun kemst. FestiO skrüfuna aftur. Dropping the feed: Remove bedplate cover 25 or free-arm cover 10. Push the drop-feed control to o = feed disengaged, and to B again for sewing. Ocultación del transportador: Retire Ia tapa 25 de Ia piaca base 0 abra Ia tapa 10 del brazo al aire. Corriendo Ia palanca hacia C, queda oculto el transportador; corriéndoia hacia B, pasa a Ia posiciOn normal para coser. TransportorU (taiyiciyi) aatya doru indirmek: Zemin Ievhasi kapaini (25) kaidiriniz veya serbest kol kapaini (10) aç:niz. Aaiya indirme sürgüsünü C’ye doru sürünüz = aaiya inmi durumda; dikmek icin = B’ye doru sürünüz. Flytjarinn tekinn Ur sambandi: QpniO IokiO yfir griparanum. YtiO stillinum aO C og á er flytjarinn niOri. AO B og a er hann i sambandi. 20 Sewing feet (standard accessories) 1 Ordinary sewing 3 Blindstitch foot 4 Zipper toot 2 Clear-view foot Pies prensatelas (accesorios normales) 1 Prensatelas 3 Prensatelas para puntada invisible normal 4 Prensatelas para 2 Prensatelas cremalleras transparente Diki ayaklari (Normal ilâve parçalar) 1 Normal ayak 3 Kör-diki ayai 4 Fermuar ayai 2 $effaf ayak Ftur (sem fylgja vélinni) 1. Venjulegur fOtur 3. BlindsaumsfOtur 4. RennilásafOtur 2. GlrfOtur D Accessory compartment: (Models 521—741) To open accessory compartment raise cover of work support 9. Compartimento para accesorios (módelos 521—741): Abriendo Ia tapa del suplemento 9 se encuentra espaclo para colocar accesorios. — Iâve parcalar kutusu: (521—741 Modelleri) Diki yuzeyindeki kapai (9) yukariya doru kaldiriniz. Bunun altinda diki için ilâve parçalara alt olan yer bulun maktadir. Hoif fyrir fylgahiuti (Velar 521 741) OpniO lokiO a vinnuborOinu 9. Undir okinu er hOff fyrir fylgihiutina. 22 ii” ___________________________ _____ _____ _____ N /Accessory compartment (Model 340) Compartment is in right side of base (23). Compartimento para accesorios 2 I (modelo 340): Se halla a Ia derecha en el zOcalo (23). have parcalar kutusu: (Model 340) Bu kutu kaide (altlik) kisminin (23) sainda bulunmaktadir. 340) HOIfiô fyrir fylgihlutina er hgra megin I sökkl mum (23) Hólf fyrir fylgihiuti: (Vél I Detachable work support (Model 340) Attach the work support so that its two hooks engage in the openings on the base. Suplemento de costura (modelo 340): lntroduzca el suplemento de forma que los dos ganchos encajen en los orificios del zôcalo. 340) Kaide (aitlik) kisminda bulunan yariklara her iki çengelin asilacai ekilde olmak üzere sürünüz. SUrme-diki yUzeyi (Model (Vél 340) RenniO borOinu annig upp aO vélinni aO hökin krkist gotin a sokklinum. Auka vinnuborô / ( After attaching the support, push it downwards a little. Una vez encajado el suplemento, presiO nelo un poco hacia abajo. Astiktan sonra, diki yüzeyini biraz aaiya doru bastiriniz. YtiO slOan ofan a vinnuborOiO. 23 _ 7- / _ Id1 / / 0 0 D 4 Topstitching Sewing foot: Ordinary sewing foot or clear-view foot and edge guide (special accessory): Stitch: straight stitch Edge guide A can be used with nearly all sewing feet. Fitting the edge guide (Special accessory): Push edge guide A through hole B and secure it in position with screw C. The guide can be adjusted to the desired stit ching margin for various applications. With the edge guide attached, it is easy to sew parallel lines of stitches or to stitch parallel to the edge. The guide either follows an edge (Fig. D) or when making parallel lines of stitches runs along the preceding line of stitches (Fig. E). The seam thus made looks neat and accurate. 24 4 Pespunteados Prensatelas: Normal o el transparente, y Ia gula marginal (accesorlo especial) Puntada: Punto recto La gula marginal A puede emplearse con casi todos los pies prensatelas. Fijaciôn de Ia guia (accesorio especial): Pase Ia guia A por el agujero B y fijela con el tornillo C. La gula se puede ajustar, segün Ia labor, a a distancia deseada. Con Ia ayuda de a guIa se pueden coser con toda facilidad costuras parale las o pespuntes al canto. En tales casos, Ia gula marcha a lo largo del borde (fig. D) o a Ic largo de Ia costura anterior en el caso de costuras paralelas (fig. 6). De esta forma se obtienen costuras impecables. p B A rt C A C P p v a p, d ki D bi 0 4 4 Elastic blind stitch Sewing foot: blindstitch foot Tension: needle thread tension a little slack. Thread: ordinary sewing thread Stitch: elastic blind stitch Stitch length: 3—4 Needle: size 70 or 80 How to regulate the needle penetration Place the prepared hem under the blindstitch sewing foot. The crease line of the outer fabric runs along edge guide 8 of the blindstitch sewing foot. Turn screw A to adjust edge guide B so far to the left that the needle picks up only one thread of the outer fabric when penetrating on the left side (Figs. C and D). First make a sewing test using a piece of waste material. 26 ) Punto invisible elástico: Prensatelas: Prensatelas para puntada invisible Tension del hilo Algo mãs floja de lo superior: normal Hilo: Normal Puntada: Puntada invisible elastica Largo de puntada: 3 a 4 Aguja: 0 70 u 80 N Regulación de Ia penetración de Ia aguja: Coloque debajo del prensatelas para puntada invisible el dobladillo previamen te preparado. El borde del doblez supe rior deberá deslizarse contra el tope B del prensatelas. Con el tornillo regulador A deberá correr ahora el tope B hacia Ia izquierda de for ma que al clavarse Ia aguja por a izquierda sOlo prenda un hilo del borde (fig. C y D). Haga primeramente una costura de prueba sobre un retal. 4 4 \ — UI —“I Ill :iI — .:. - j 4 Sewing buttonholes (Models 340 and 521) Sewing foot: clear-view foot Tension: needle thread tension a little slack Thread: fine machine embroidery thread Stitch length: buttonhole range (red) Needle: sizes 70/80 1. Set zigzag stitch knob 20 to sew a buttonhole seam width of 2 mm, i. e. roughly at ‘B’. Sew the first buttonhole seam. At the end, the needle must be raised at the right. Turn knob 20 one place to the right. 2. Insert the needle at the right, raise the sewing foot, turn the material through 180°, set the knob at “B” again, lower the sewing foot and raise the needle. 3. Set the zigzag knob at “C” and sew about five tacking stitches. Raise needle at left. 4. Set knob at “B” and sew the second buttonhole seam as long as the first. Raise needle at left. 5. Set knob at “C” and sew about five tacking stitches. Raise the needle. 6. Set the knob at ED and sew a num ber of securing stitches. Cut buttonhole open with slitting knife (special accessory). 28 Ojales (modelos 340 y 521): Prensatelas: Transparente TensiOn del hilo superior: Algo más floja de lo normal Hilo: Hilo fino de bordar Largo de puntada: Zona del ojal (sector rojo) Aguja: N° 70 u 80 1. Con el botón selector del zigzag 20 elija una anchura de unos 2 mm, aprox. en B. Cosa el primer labio del ojal. La aguja deberã quedar al final a Ia derecha y elevada. Gire ahora el botOn 20 un paso hacia Ia derecha. 2. Haga que se dave Ia aguja a Ia dere cha, alce el prensatelas. gire a tela 180°, gire de nuevo el botOn 20 a B. baje el prensatelas y eleve Ia aguja. 3. Gire el botOn 20 al sector C y haga unas 5 puntadas de presilla. Eleve Ia aguja a Ia izquierda. 4. Gire de nuevo el botón 20 al sector B y cosa el segundo Iabio del ojal igual de largo que el primero. Eleve Ia aguja a Ia izquierda. 5. Gire el botOn 20 al sector C y haga unas 5 puntadas de presilla. Eleve Ia aguja. 6. Gire el botón 20 a punto recto y haga unas puntadas de remate. Abra el ojal con el descosedor (acce sorio especial). 4 Sewing buttonholes (Models 541, 741) Sewing foot: clear-view sewing foot needle thread tension a Tension: little slack fine machine embroidery Thread: thread Stitch length: buttonhole range (red) Utility-stitch knob 21 at red buttonhole symbol Model 741: 70 to 80 sizes Needle: 1 jJ and Set utility-stitch knob 20 at e Rais . e seam nhol butto sew the first le. need the Jill and sew four to 2. Set knob 20 at e the needle. Rais hes. stitc six tacking III and sew the 3. Set knob 20 at as long as seam second buttonhole le. need the e Rais the first. till and sea’ four to 4. Set knob 20 at e the needle. Rais six tacking stitches. 5. Set knob 20 at ZD and sew a few securing stitches. 6. Cut buttonhole with special knife (special accessory). Ojales (modelos 541—741) Prensatelas: Transparente TensiOn del hilo superior: Algo más floja de lo normal Nib fino de bordar Hilo: Largo de Zona del ojal (sector rojo) puntada: Selector de puntada utili taria/en el rojo modelo 741: En sImbobo para ojal N° 70 u 80 Aguja: 1. Ponga el selector de puntada y cosa el primer utilitaria 20 en labio del ojal. Eleve Ia aguja. Ill iJIl y haga de 2. Ponga el botOn 20 en Eleve Ta lla. presi de adas punt 4 a 6 aguja. y cosa el 3. Ponga eb botOn 20 en largo segundo labio del ojal igual de a. aguj que el primero. Eleve Ta y haga de 4. Ponga el botOn 20 en Eleve Ta lla. presi de adas punt 4 a 6 aguja. haga 5. Ponga el botOn 20 en D y unas puntadas de remate. (acce 6. Abra el ojal con el descosedor . cial) espe sorio S Sewing on buttons Sewing foot: without sewing foot or with clear-view foot straight stitch, left needle Stitch: position dropped Feed: fine sewing thread Thread: Place the button in the location marked beforehand and push it under the sewing foot holder. Lower the sewing foot holder into the button. Lower the needle into the left hole of the button. Raise the needle. Turn knob 20 to a po sition in which the needle enters the right hole of the button when the hand wheel is turned. Sew six to eight zigzag stitches and a number of securing stit ches in the left only (A). N Sewing on buttons with stems (for large buttons in heavy materials) Lower the needle into the left hole. Place a match on the middle of the button. Lower the sewing foot (B). Sew a num ber of zigzag stitches and leave a thread end of about 6 inches. Pull the needleand bobbin threads through (C). Wrap the stem (D) and tie off the threads. 4 Costura de botones: Prensatelas: Sin prensatelas a con el transparente Punto recto Puntada: PosiciOn de lzquierda Ia puntada: Transportador:Oculto Hilo fino Hilo: Coloque el botOn en el punto marcado previamente e introdüzcalo debajo del soporte del prensatelas. Haga descender Ia barra del prensatelas. Clave a aguja en el agujero izquierdo del botOn. Eleve Ia aguja. Gire el botón 20 en a zona de zigzag hasta que Ia aguja, at girar el vo lante, se dave en el agujero derecho del botón. Haga de 6 a 8 puntos en zigzag y unas puntadas de remate en el agujero izquierdo (fig. A). Botón con cuello (costura de botones grandes en generos pesados): Clave Ia aguja en el agujero izquierdo del botón. Coloque un palillo de dientes o similar en el centro del botOn. Baje el prensatelas transparente (B). Haga unas puntadas en zigzag y deje unos 15 cm de hilo. Pase los hilos superior e inferior a! ado de abajo (C), arrOllelos alrededor de las puntadas (D) y anüdelos. —7 32 / IL,’, I /ñfl’ /11/7 I I/fl; 4 Sewing in zippers Sewing foot: zipper sewing foot Stitch length: 2 to 3 Stitch: Straight stitch, middle needle position Thread: sewing thread This is how the zipper foot is engaged Insert the foot with the back pin in the back groove E and push the shoe of the foot upwards, until the front pin F snaps in. The zipper foot can be pushed to the positions: left (Fig. A), right, or centre. Completely concealed zip closure Baste in zip by hand first. Push the zipper foot to the left as far as it will go. Place the open zip under the foot so that its teeth run along the right guiding edge on the sole of the foot (Fig. B). Sew about half the length of the zip at the required width. Leave the needle down in the material, raise the zipper foot and close the zip (Fig. C). Lower the zipper foot again, continue the seam and then sew across the end. Sew the other side of the zip at the same margin. Shortly before the end of the seam leave the needle down in the material, raise the zipper foot and open the zip (Fig. D). Lower the zipper foot again and sew to the end. 34 4 Costura de cremalleras Prensatelas: Prensatelas para cremalleras Largo de puntada: 2a3 Puntada: Punto recto Posición de Ia puntada: Central Hilo: Normal Colocación del prensatelas para cremalleras: Enganche Ia barrita posterior del pie en Ia ranura posterior E y empuje hacia arriba Ia planta del pie hasta que encaje Ia barrita anterior F. El pie puede correr se a las posiciones derecha, izquierda (fig. A) y central. Cremalleras cubiertas del todo Hilvane Ia cremallera. Corra el prensate las hacia Ia izquierda hasta el tope. Coloque Ia cremallera abierta debajo del prensatelas de forma que los dientes de Ia cremallera discurran a lo largo de Ia guIa derecha (fig. B), Cosa Ia cremallera a Ia anchura deseada hasta Ia mitad aproximadamente. Deje Ia aguja clavada en Ia tela, alce el prensatelas y cierre Ia cremallera (fig. C). Baje eI prensatelas, termine de hacer Ia costura y haga Ia costura lateral de remate. Cosa el segundo lado de Ia cremallera paralelamente y a Ia misma distancia. Poco antes del final de Ia costura, deje clavada Ia aguja en Ia tela. Alce el pren satelas, abra Ia cremallera (fig. D), baje el prensatelas y termine Ia costura. r \ I I I I \ \ H —“ \ \ L 1111 I ‘%.\ \ \ I\lIIII I .\ \ \f \ II II I \ \ Thi1 IT LII i—1 ‘ \ N L4 IIJ J G\ N\ I ‘Q\ ‘‘ a A C 4 ‘ 36 Seam-like zipper closure For machine setting see page 34 How the zipper is prepared and inserted: Press the edges of the placket. Fold out the left seam allowance (Fig. A). Place the left side of the open zip in position so that its teeth protrude a little beyond the pressed edge (Fig. 8). The seam is sewn along this edge. Move the zipper foot to the middle so that the needle stitches into the middle opening. The zip teeth run into the left guiding groove in the toot (Fig. C). At the beginning of the seam lift up the teeth a lfttle to feed them into the guiding groove. Sew the seam to the end and secure it. Close zip. Pin other side of zip to material at beginning of seam (Fig.. D). Open zip. Remove the pin, turn out the right seam allowance with the zip tape, and pin the latter to the fabric, as shown in Fig. E. The zip teeth now run into the right guiding groove in the foot (Fig. F). Finish sewing the zip. Now sew down the zip tape letting the zip teeth run along the guiding edge of the foot (Fig. G). 4 I Cremallera cosida en una costura (Para Ia preparaciOn de Ia máquina, véase Ia Pág. 34) Preparación y colocación de Ia cremallera: Doble y planche los cantos de Ia abertura. Gire el margen de costura izquierdo hacia afuera (fig. A). Coloque encima, como muestra Ia fig. B, el ado izquierdo abierto de Ia cremallera. Los dientes de Ia cremallera sobresalen un poco del canto planchado. La costura discurre a lo argo del canto planchado. Corra el prensatelas al centro de forma que Ia aguja se dave en el agujero central. Los dientes de Ia cremallera dis curren por Ia ranura izquierda del pie prensatelas (fig. C). Al comenzar Ia costura, deberá levantar un poco los dientes para que entren en Ia ranura guia. Termine Ia costura y remátela. Cierre a cremallera. Prenda con un alfi er el Segundo lado de Ia cremallera al comienzo de Ia costura (fig. D) y abra Ia cremallera. Gire ahora hacia afuera el margen de costura derecho junto con Ia cinta de Ia cremallera, después de haber retirado el alfiler, y fije dicha cinta con. un alfiler a Ia costura, como muestra Ia fig. E. Los dientes de Ia cremallera dis curren ahora por Ia ranura derecha del prensatelas (fig. F). Termine de coser Ia cremallera. Pespuntee ahora Ia cinta de Ia cremallera sobre Ia costura al ancho del prensatelas. Los dientes de Ia cre mallera discurren ahora por fuera a lo largo de Ia gula del prensatelas (fig. G). / Ik — __—,Iu // ,, II tIi —0 —0 B Zippers in ladies’ slacks For machine setting see page 34. Move the zipper foot to the left as far as it will go. Press the edges of the placket. Baste the closed zip to the right edge of the placket on the wrong side so that its teeth are still visible. Pin facing strip D to the underside and stitch t down at the same time as you sew the zip. The zip teeth run along the right guiding edge of the foot (Fig. A). Shortly before the end of the seam leave the needle down in the fabric, raise the zipper foot, open the zip, lower the zipper foot again and finish sewing the seam. Close the zip. Pin the overlapping edge along the intended seam line. Baste left zip edge (Fig. B). Open zip. Attach the edge guide and position it for the desired seam margin so that it moves along the edge of the fabric (Fig. C). Shortly before the end of the seam leave the needle down in the fabric, raise the zipper foot and close the zip. Lower the zipper foot and finish sewing the seam. Secure the end of the zip seam with a bartack. 38 I Cremalleras para pantalones de señora (Para Ia preparaciOn de a maquina, vêase Pág. 34) Corra el pie para cremalleras hacia Ia izquierda hasta el tope. Doble y planche los bordes de a abertura. Hilvane Ia cremallera cerrada por debajo del ado derecho doblado de forma que queden visibles los dientes de Ia cremallera, Fije ahora Ia tapeta D con alfileres para que quede prendida también por Ia costura. Los dientes de Ia cremallera discurren a lo argo de Ia gula derecha del prensate las (fig. A). Poco antes del final de Ia costura, deje Ia aguja clavada en Ia tela, alce el prensatelas, y abra Ia cremallera, baje el prensatelas y termine Ia costura. Cierre a cremallera. Prenda con alfileres el borde saliente siguiendo el trayecto de Ia costura. Hil vane el lado izquierdo de Ia cremallera (fig. B). Abra Ia cremallera. Coloque Ia gufa mar ginal y posiciOnela de forma que dis curra a lo largo del borde de Ia tela (fig. C). Poco antes del final de Ia costura, deje Ia aguja clavada en Ia tela, alce el prensatelas, cierre Ia cremallera, baje el prensatelas y termine Ia costura. Asegure el final de Ia costura con una presilla. K 4 * V ‘S ‘S S. ‘S • •% — ‘. ‘.5 %. ‘.55’” — •‘ 55% ‘S_) D Darning Preparing the machine: Sewing foot: Darning foot (special accessory) Stitch type: Straight stitch Needle position: Centre Tension: Ease needle thread tension Thread: Fine machine embroidery thread Needle: Size 70 How to fit the darning foot Remove the sewing foot holder, then secure the darning foot with screw A. making sure that wire B is resting on screw shank C. First draw up the bobbin thread and hold both threads when beginning to sew. Then make a few stitches in the material. Stitch back and forth over the damaged area in serpentine fashion, as shown in Fig. D, rounding the end of each line. When the damaged spot is covered evenly, turn the fabric through 90° and darn over the preceding rows of stitches (Fig. E) until the damaged spot is covered. On this type of work you determine the stitch length yourself by moving the fabric back and forward. 40 4Zurc .idos Prensatelas: Puntada: Tension del hilo superior: Pie para zurcir (acceso rio especial) Punto recto Algo más floja de lo normal Hilo: Hilo fino de zurcir Aguja: N° 70 Transportador: Oculto Colocación del pie zurcidor: Retire el soporte del prensatelas y fije el pie zurcidor con el tornillo A. Aseguse de que el estribo B se apoye contra el portatornillos C. Para comenzar a zurcir extraiga primera mente el hilo inferior. Sujete ambos hilos por Ia punta al cornenzar a coser. Haga ahora unas puntadas en Ia tela. Extien da los hilos bien pegados unos a otros y zurza el trozo dañado (fig. D). Zurza en redondo al final de cada costura (fig. E). Tan pronto como esté recubierto unifor memente el trozo dañado, gire Ia tela 90° y zurza los hilos tensados anterior mente (fig. E) hasta que el trozo dañado quede cerrado por completo. El largo de puntada lo determina usted misma moviendo a tela en vaivén. Cleaning and oiling Raise the needle and the sewing foot. Remove the two needle plate screws and take off the needle plate. Clean the feed dog with the brush. Push catches A of the sewing hook outwards. Take out ring B and sewing hook C. Clean the hook raceway. Apply a drop of oil to the hook raceway occasionally. Caution: do not drop the sewing hook. 4 Temiziemek ye yalamak lneyi ye dikis ayaini yukariya kaldiri niz. Her iki tespit vidasini gevsetip çikari niz ye batis levhasini çikartiniz. Firça ile transportörü (taiyiciyi) temizleyiniz. Kay rayicinin mandalini (A) diariya doru çe viriniz. B halkasini ye C kavrayicisini cikariniz. Kavrayicinin bulunduu hareket sahasini temizleyiniz. Arasira kavrayicinin bulunduu hareket sahasina bir damla ya damlatiniz. Dikkat, kavrayiciyi yere dusürmeyiniz. 42 4 Engrase y limpieza Eleve Ia aguja y el prensatelas. Afloje los dos tornillos de fijaciOn y retire a placa de aguja. Limpie el transportador con un pincel. Gire hacia afuera el pestillo A del garfio (lanzadera). Retire el anillo B y el garfio C. Limpie Ia pista del garfio. Ponga de vez en cuando una go ta de aceite en Ia pista del garfio. Atención! cuide de que no se caiga el garfio al suelo. Hreinsun og smurning: SetjiO nálina Og saumfótinn I efstu stOOu. LosiO skrüfurnar sem halda stingplätunni 09 takiO hana I burtu. Hreinsiô flytjarann og kringum hann meô bursta. SmelIiô griparafestingum A üt a vIO. TakiO hnnginn B 09 griparann C ür vélinni Hreinsiô alla essa hluti vel og smyrjiO slOan af oq til I gnparabrautina. Agtiô: aO missa ekki griparann, jvi hann er viOkvmur.-
 1
1
-
 2
2
-
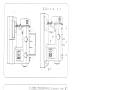 3
3
-
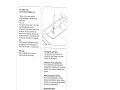 4
4
-
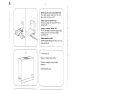 5
5
-
 6
6
-
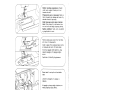 7
7
-
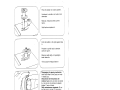 8
8
-
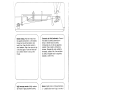 9
9
-
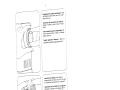 10
10
-
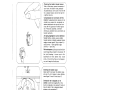 11
11
-
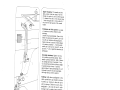 12
12
-
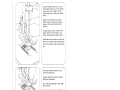 13
13
-
 14
14
-
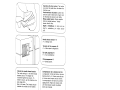 15
15
-
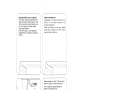 16
16
-
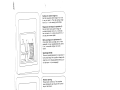 17
17
-
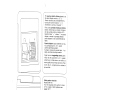 18
18
-
 19
19
-
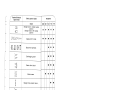 20
20
-
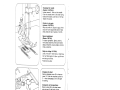 21
21
-
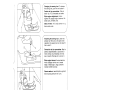 22
22
-
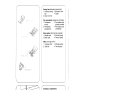 23
23
-
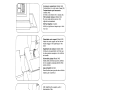 24
24
-
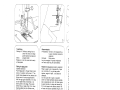 25
25
-
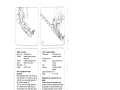 26
26
-
 27
27
-
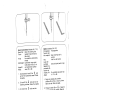 28
28
-
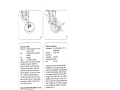 29
29
-
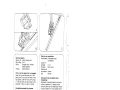 30
30
-
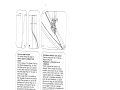 31
31
-
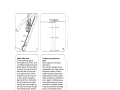 32
32
-
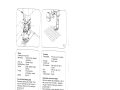 33
33
-
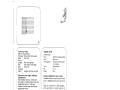 34
34
-
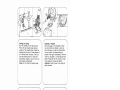 35
35
-
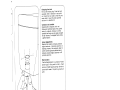 36
36
-
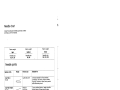 37
37
-
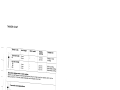 38
38
-
 39
39
-
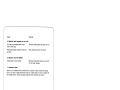 40
40
-
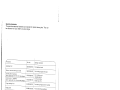 41
41
-
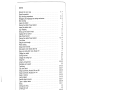 42
42


Pfaff 340.521.541.721.741 Manual de usuario
- Categoría
- Máquinas de coser
- Tipo
- Manual de usuario
en otros idiomas
Artículos relacionados
Otros documentos
-
IKEA SY Manual de usuario
-
Duraflame 00027 Instrucciones de operación
-
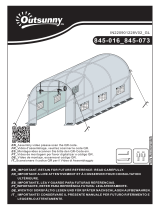 Outsunny 845-073 Guía del usuario
-
Brother PS-2500 Manual de usuario
-
-
White 1780 Manual de usuario
-
-
-
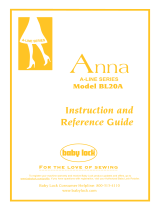 Baby Lock BL20A - A-line series - Anna El manual del propietario
-
Alfi AG1230CM2 Guía del usuario

