
Livro
de
instruçOes
Instruction
Book
Instrucciones
de
manejo
Kullanma
talimatnamesi

Virar
a
pàgina
para
fora
Fold
out
this
page
Extienda
esta
hoja
Bu
sayfayi
dIariya
doru
katlaylnlz
Normas
de
segurança:
a)
Ser
sempre
prudente
e
vigiar
conti
nuamente
o
trabalho.
b)
Desligar
sempre
a
màquina
da
to
mada
da
corrente,
quando
terminar
o
trabaiho.
c)
Poténcia
maxima
admissIvel
da
lámpada:
15
Watts.
-
d)
Entregar
a
afinaçao
da
tensao
da
correia
de
transmissao
ao
mecánico,
Some
safety
rules
a)
Take
care
to
avoid
injury
to
your
fingers
by
the
needle
during
sewing.
b)
Make
sure
you
unplug
the
power
cord
whenever
you
have
to
leave
the
machine
or
want
to
clean
it,
oil
it
or
change
mechanical
and
acces
sory
parts.
c)
Be
sure
to
use
only
a
15-watt
light
bulb
in
the
sewing
lamp.
d)
The
drive
belt
must
never
be
adjusted
by
anyone
but
an
authorized
agent.
Safety
rules
for
United
Kingdom
see
page
3.
Important
safety
instructions
for
USA
see
page
2.
Normas
sobre
medidas
de
seguridad
para
máquinas
de
coser
domésticas
segün
IEC
335-2-28
a)
Debido
al
movimiento
de
Ia
aguja,
el
usuario
de
toda
mãquina
de
coser
deberá
tener
todo
el
cuidado
posible
durante
el
trabajo
y
no
apartar
a
vista
de
Ia
zona
de
costura.
b)
Siempre
que
haya
que
cambiar
Ia
aguja,
el
pie
prensatelas,
Ia
canilla
o
Ia
placa
de
aguja,
Ic
mismo
que
aI
limpiar
o
engrasar
Ia
maquina,
o
cuando
no
se
use,
deberá
desco
nectarse
elOctricamente,
es
decir,
deberá
desenchufarse.
c)
La
potencia
maxima
admisible
de
Ia
bombilla
es
de
15
vatios.
d)
La
tensiOn
de
Ia
polea
motriz
deberá
ser
ajustada
solamente
por
un
mecánico.
DIN
(Alman
EndUstri
Normu)
IEC
335-2-28
gore
evde
kullantlan
diki
makinalari
1cm
gUvenlik
talimatlari
a)
Makinayt
lullanan
kimseniri,
yukanya
ye
asaiya
doru
hareket
eden
ine
dolayistyla,
yeteri
kadar
dikkatli
davranmasi
ye
çalima
esnasinda
diki
yerini
devamli
olarak
gOzlemesi
gerekir.
b)
Makinanin
terkedilmesi
esnasinda,
bakim
isleri
esnasinda
veya
makina
parçalartnin
veya
ilãve
parçalarin
deitiriImesi
sirasinda,
makinanin
fiini
prizden
cikarmak
suretiyle,
ceryanin
kesilmesi
gerekir.
c)
Lámbanin
müsaade
olunan
azami
gücü
15
Vattir.
d)
Tahrik
kayiinin
gerginliinin,
sadace
bir
Makina
uzmani
tarafindan
ayarlanmasi
gerekir.
lndice
pagina
57
Contents
on
page
59
DC
lndice
en
Ia
Pág.
61
lçindekiler:
Sayfa
63
4
i
I

4
Mandos
y
elementos
principales
de
Ia
mãquina
de
coser
Palanca
tirahilos
Tensor
del
devanador
Asa
Espigas
portacarretes
(se
encuentran
en
los
accesorios)
5
Devanador
(bobinadora)
6
Volante
7
Disco
de
desembrague
8
Regulador
del
argo
de
puntada
9
Superficie
de
costura
variable
con
compartimento
para
accesorios
10
Casquete
de
cierre
(con
el
gartlo
dentro)
11
Placa
de
aguja
12
Portaprensatelas
con
prensatelas
13
Portagujas
con
tornillo
de
sujeciôn
14
Guiahilos
15
Ranuras
para
el
enhebrado
16
Tensor
del
hilo
superior
17
Brazo
al
aire
18
Barra
del
prensatelas
con
cortahilos
19
Palanca
alzaprensatelas
20
Botón
para
puntadas
utilitarias
y
zigzag
21
Botôn
para
costura
en
retroceso
Diki
makinasinin
parcalari
1
Horoz
2
Masuraön
germe
düzeni
3
Tasima
kolu
4
Makara
pimleri
(have
parça
kutusundan
çikariniz
ye
takiniz)
5
Sanci
6
El
carki
7
Ayirma
diski
8
Dikis
(batis)
uzunluu
ye
örnek
uzunluu-tusu
9
Teferruat
(ilave
parçalar)
kutusuyha
birlikte
deiebilen
diki
yuzeyi
10
Kapak
klapesi,
arkasinda
kiskaç
11
Batis
levhasi
12
Dikis
ayai
tutamai,
diki
ayiyla
birlikte
13
ine
tutamai,
tespit
vidaslyla
birlikte
14
Iphik
kilavuzlari
15
lneye
iphik
geçirme
yariklan
16
Ust
iphikgerme
düzeni
17
Serbest
kot
18
Kuma
bastirma
cubuu,
iphik
kesiciyle
birhikte
19
Kumas
bastirma
kolu
20
Zikzak-
ye
fonksiyoneh
diki
dümesi
21
Geri
dikme
tusu
2
3
4
J

\

Componentes
da
máquina
1
Alavanca
tensora
do
fio
2
Tensor
do
caneleiro
3
Pega
4
Porta
tubos
(retirar
dos
acessOrios
e
colocar
no
lugar)
5
Canoleiro
(enchimento
das
canelas)
6
Volante
7
Disco
do
embraiagem
8
Selector
do
comprimento
do
ponto
9
Caixa
do
arrumaçao
formando
base
do
trabalho
10
Tampa
do
compartimonto
da
lancadeira
11
Chapa
da
agulha
12
Suporte
do
calcador
corn
calcador
13
Prondo
agulha
corn
parafuso
do
fixacão
14
Guia-fio
15
Passagem
do
f
0
16
Tensor
do
tb
da
agulha
17
Braço
livre
18
Barra
do
calcador
corn
corta
fio
19
Alavanca
do
calcador
20
Botão
do
rogulaçao
dos
pontos
zig-zag
e
utilitãrios
21
Tocla
do
marcha
atrás
Parts
of
the
sewing
machine
1
Take-up
lever
2
Bobbin
winder
tension
3
Carrying
handle
4
Spool
pins
(remove
from
accessories
and
insert)
5
Bobbin
winder
6
Hand
wheel
7
Disengaging
knob
8
Stitch
length
control
9
Detachable
work
support
with
accessories
box
10
Free-arm
cover,
enclosing
sewing
hook
11
Needle
plate
12
Sowing
foot
holder
with
sewing
foot
13
Needle
holder
with
retaining
screw
14
Thread
guides
15
Threading
slots
16
Needle
thread
tension
17
Free
arm
18
Presser
bar
with
thread
cutter
19
Presser
bar
lifter
20
Zigzag-
and
utility-stitch
knob
21
Reverse
control
4

IMPORTANT
SAFETY
INSTRUCTIONS
This
sewing
machine
is
designed
and
manufactured
for
HOUSEHOLD
use
only.
hen
using
an
electric
appliance,
basic
safety
precautions
should
always
be
followed,
ncluding
the
following:
ead
all
instructions
before
using
this
sewing
machine.
D
ANGER
To
reduce
the
risk
of
electric
schock:
The
sewing
machine
should
never
be
left
unattended
when
plugged
in.
Always
unplug
this
appliance
from
the
electric
outlet
immediately
after
using
and
before
cleaning.
.
Always
unplug
before
relamping.
Replace
bulb
with
same
type
rated
15
Watts.
3.
Do
not
reach
for
a
sewing
machine
that
has
fallen
into
water.
Unplug
immediately.
.
Do
not
place
or
store
sewing
machine
where
it
can
fall
or
be
pulled
into
a
tub
or
sink.
Do
not
place
in
or
drop
into
water
or
other
liquid.
VV
ARI\JING
To
reduce
the
risk
of
burns,
fire,
electric
schock,
or
injury
to
persons:
1.
Do
not
allow
to
be
used
as
a
toy.
Close
attention
is
necessary
when
this
sewing
machine
is
used
by
or
near
children.
2.
Use
this
sewing
machine
only
for
its
intended
use
as
described
in
this
manual.
Use
only
attachments
recommended
by
the
manufacturer
as
contained
in
this
manual.
3.
Never
operate
this
sewing
machine
if
it
has
a
damaged
cord
or
plug,
if
it
is
not
working
properly,
if
it
has
been
dropped
or
damaged,
or
dropped
into
water.
Return
the
appliance
to
the
nearest
authorized
dealer
or
service
center
for
exami
nation,
repair,
electrical
or
mechanical
adjustment.
4.
Never
operate
the
sewing
machine
with
any
air
openings
blocked.
Keep
ventilation
openings
of
the
sewing
machine
and
foot
controller
free
from
the
accumulation
of
lint,
dust,
and
loose
cloth.
5.
Never
drop
or
insert
any
object
into
any
opening.
6.
Do
not
use
outdoors.
7.
Do
not
operate
where
aerosol
(spray>
products
are
being
used
or
where
oxygen
is
being
administered.
8.
To
disconnect,
turn
all
controls
to
off
(‘0”>
position,
then
remove
plug
from
outlet.
9.
Never
operate
on
a
soft
surface
such
as
a
bed
or
couch
where
the
air
openings
may
be
blocked.
10.
Do
not
unplug
by
pulling
on
cord.
To
unplug,
grasp
the
plug,
not
the
cord.
11.
Keep
fingers
away
from
all
moving
parts.
Special
care
is
required
around
the
sewing
machine
needle.
12.
Always
use
the
proper
needle
plate.
The
wrong
plate
can
cause
the
needle
to
break.
13.
Do
not
use
bent
or
blunt
needles.
Use
needles
recommended
by
the
manufacturer
only.
14.
Do
not
pull
or
push
fabric
while
stitching.
It
may
deflect
the
needle
causing
it
to
break.
15.
Switch
the
sewing
machine
off
(“0”)
when
making
any
adjustments
in
the
needle
area,
such
as
threading
needle,
changing
needle,
threading
bobbin,
or
changing
presser
foot,
etc.
16.
Always
unplug
sewing
machine
from
the
electrical
outlet
when
removing
covers,
lubricating,
or
when
making
any
other
user
servicing
adjustments
mentioned
in
the
instruction
manual.
17.
Hold
plug
when
rewinding
into
cord
reel,
Do
not
allow
plug
to
whip
when
re
winding.
SAVE
THESE
INSTRUCTIONS

Some
safety
rules
valid
for
United
Kingdom
only
The
wires
in
this
mains
lead
are
coloured according
to
following
code:
Blue:
Neutral
Brown:
Live
As
the
colours
of
the
wires
in
the
mains
lead
of
this
appliance
may
not
correspond
with
the
colour
coding
of
the
terminals
in
your plug,
proceed
as
follows:
the
wire
which
is
coloured
blue
must
be
connected
to
the
terminal
which
is
marked
with
the
letter
N
or
coloured
black.
The
wire
which
is
coloured
brown
must
be
connected
to
the
terminal
which
is
marked
with
the letter
L
or
coloured
red.
Please
note:
When
a
13-ampere
plug
is
used
a
3-ampere
fuse
has
to
be
fitted.
Inserting
the
spool
pins:
Two
spool
pins
are
included
in
the
accessories.
Insert
these
in
the holes
provided
in
the
machine.
Colocación
de
los
portacarretes:
En
los
accesorios
se
encuentran
dos
portacarretes.
ColOquelos
en
los
orificios
previstos
en
Ia
maquina
y
déjelos
intro
ducidos.
Makara
tutucusunun
takilmasi:
lláve
parçalar
bölmesinde
iki
makara
tutucusu
bulunmaktadir.
Bunlar,
makina
üzerinde
bu
hususta
on
gOrulen
deliklere
geçirilirler
ye
burada
kalirlar.
4
Colocaçao
dos
suportes
dos
tubos
de
linha:
Junto
corn
os
acessOrios
estão
dois
suportes
para
tubos.
Encaixar
definitiva
mente
nos
orificios
previstos
para
este
efeito,
no
corpo
da
rnáquina,
3

4
Para
retirar
a
maleta.
Virar
a
pega
para
trás.
Removing
the
carry
case.
Fold
down
the
carrying
handle.
Cómo
sacar
a
maleta4unda,
Eche
hacia
atrás
el
asa
en
direcciOn
de
Ia
flecha.
cantayl
cikarmak.
Tasima
kolunu
yan
tarafa
doru
deviriniz.
Levantar
a
maleta
Lifi
off
the
case.
Tire
ahora
de
Ia
maleta
hacia
arriba.
Canta
kapainin
kaldirilmasi.
)
Ligacao
eléctrica:
Colocar
o
pedal
do
reOstato
no
chão.
Ligar
a
ficha
A
na
maquina
e
a
ficha
B
na
tomada
da
parede.
Electrical
connection:
Set
the
foot
control
on
the
floor.
Insert
plug
A
in
the
machine
and
plug
B
in
the
wall
socket.
Conexión
electrica:
Coloque
el
pedal
en
el
suelo.
lntroduzca
Ia
clavija
A
en
Ia
maquina,
y
Ia
clavija
B
en
el
enchufe
de
Ia
red.
Elektrik
balant,s,:
Mari
yere
koyunuz.
A
fisini,
makina
içerisine
ye
B
fisini
duvarda
bulunan
prize
sokunuz.
J

4
Preparar
as
canelas:
Colocar
a
mao
por
baixo
da
caixa
de
arrumação
9
e
retirá
Ia
para
a
esquerda.
Bobbin winding
preparations:
Reach
—
under
work
support
9
and
pull
it
out
towards
the
left.
—
Preparación
para
el
devanado:
Meta
Ia
mano
izquierda
por
debajo
del
bro
9
y
desvéelo
hacia
Ia
izquierda.
iphi
masuraya
sarma
iinin
hazirlan
mast:
Dikis
yuzeyi
9’un
alt
kismin
tutu
nuz
ye
bunu
sola
doru
diariya
çekiniz.
fre:m
c:eri0wnwards.
Abra
el
casquete
de
cierre
10
hacia
abajo.
Kaparna
kapaini
(10)
asaiya
doru
Levantar
o
fecho
A
e
retirar
a
cápsula.
U
Raise
latch
A
and
pull
out
the
bobbin
case.
a
bisagrita
A
y
saque
Ia
7
A
kapaini
yukariya
doru
kaldiriniz
ye
mekii
dariya
dori
cekiniz.
Soltar
o
fecho
A
e
retirar
a
canela.
)
Release
latch
A
and
take
out
the
bobbin.
Suelte
Ia
bisagrita
A
y
saque
Ia
canilla.
A
kapatni
serbest
birakiniz
ye
masurayt
00
00
diariya
cikanniz.
0
0
Q0
00000

introduzir
a
canela
no
perno
5
do
caneleiro.
_
_
Place
the
bobbin
on
winder
spindle
5.
lntroduzca
Ia
canilla
en
el
husillo
5
del
devanador.
Masurayt.
masura
ii
(miii)
üzerine
taki
niz.
Empurrar
a
canela
para
direita,
contra
o
batente
A.
Push
the
bobbin
to
the
right
against
stop
A
Presione
Ia
canilla
hacia
Ia
derecha
contra
el
tope
A
Masuraye
saga
dogru
A
dayanagena
kadar
basterenøz.
E
f’Destravar
o
mecanismo
da
costura:
Segurar
o
volante
6
e
rodar
o
disco
7
para
a
frente.
Disengaging
the
sewing
mechanism
Hold
hand
wheel
6
firmly
and
turn
knob
7
towards
you.
0
Desconexión
del
mecanismo
del
costura:
Sujete
con
una
mano
el
volante
6
y
gire
con
Ia
otra
el
disco
de
desem
brague
7
hacia
el
frente.
Diki
mekanizmasini
kapatmak:
El
car
ve
disk
7’yi
one
doru
Introduzir
o
tubo
do
fio
num
dos
porta
tubos
4.
Piaca
a
spool
on
one
of
the
pins
4.
lntroduzca
ei
carrete
en
uno
de
los
portacarretes
4.
Makarayi
bir
tutucu
(4)
üzerine
sürünüz.

6
Encher
as
canelas:
Passar
0
fio
no
tensor
2
em
direcção
a
canela,
Enfiar
o
fio
do
interior
para
0
exterior
e
segurá-lo.
Carregar
no
reóstato
e
bobinar.
Soltar
o
f
io
depois
de
algumas
voltas.
Empurrar
a
canela
cheia
para
a
esquerda,
retirá-la
e
cortar
o
tb.
Devanado
del
hilo
(bobinado):
Tome
el
hilo
desde
el
carrete,
paselo
por
el
tensor
2,
Ilévelo
hacia
Ia
canilla,
introdüzcalo
en
uno
de
sus
agujeros
y
sujételo.
Pise
el
pedal
y
comience
a
devanar.
Después
de
unas
vueltas
de
devanado,
suelte
el
hilo.
Una
vez
lena
Ia
canilla.
empüjela
hacia
Ia
izquierda,
sáquela
y
carte
el
hilo.
4
Bobbin
winding:
Pull
the
thread
from
the
spool
into
tensioner
2,
to
the
bobbin,
through
one
hole
of
the
bobbin,
then
hold
it
there.
Press
the
foot
control
to
wind
the
bobbin.
After
a
few
turns,
let
go
of
the
thread
again.
Push
the
filled
bobbin
to
the
left,
remove
it
and
cut
the
thread.
iplii
masuraya
sarmak:
liplii:
makaradan
masura
an
gergi
düzenine
çekiniz,
masuraya
getiriniz,
masurantn
bir
deliinden
geciriniz
ye
sikica
tutunuz.
Ayak
marsini
çalistinniz
ye
iplii
masuraya
sariniz.
Ru
arada
birkaç
dönüsten
sonra
iplii
birakiniz.
Dolu
masurayi
sola
doru
bastiriniz,
cika
riniz
ye
iplii
kesiniz.

4
Costurar:
Segurar
no
volante
e
rodar
o
disco
7
para
trás.
Engaging
the
sewing
mechanism:
Hold
the
balance
wheel
firmly
and
turn
knob
7
away
from
you.
Conexión
del
mecanismo
de
costura:
Sujete
el
volante
y
gire
el
disco
7
hacia
atrás.
Diki
mekanizmasinin
cahtiriImasi:
El
çarkini
sikica
tutunuz
ye
disk
7’yi
arkaya
doru
çeviriniz.
Colocacao
da
canela
A;
o
fio
desenrolando-se
para
trás.
Puxar
o
tb
pela
fenda
8
e
por baixo
da
mola
ate
a
Bdthdf
C
Colocación
de
Ia
canilla
en
Ia
cãpsula:
Coloque
Ia
canilla
en
Ia
cápsula
de
forma
que
el
hilo
caiga
hacia
atrás
(A).
Pase
luego
el
hilo
por
Ia
ranura
B
y
por
debajo
del
muelle
tensor
hasta
salir por
el
orificio
C
Masurayt
takmak
A
(iplik
arkaya
doru):
lpIii
B
yarii
içerisine
ye
yay
altindan
C
deIii
icerisine
cekiniz.

Veriticar
a
tensão
do
iio
da
canela:
Suspender
a
capsula
pelo
prOprio
fio
da
canela.
Ao
dar
ligeiros
puxOes
ao
tb
para
cima,
a
capsula
deve
descer
gra
dualmente.
Rotacao
do
parafuso
A
para
a
esquerda:redução
da
tensão;
rotaçao
para
a
direita:aumento
da
tensão.
Checking
the
bobbin
thread
tension:
With
a
brief
sharp
upward
movement
of
your
hand,
the bobbin
must
gradually
slip
downwards.
(Turn
screw
A
to
the
left
for
a
weaker
tension and
to
the
right
for
a
tighter
tension.)
Comprobación
de
Ia
tension
del
hilo
interior:
Suspendiendo
Ia
cápsula
con
Ia
canilla
de
su
propio
hilo.
Ia
cápsula
no
deberá
deslizarse
más
que
al
dar
tiron
citos
del
hilo
(girando
el
tornillo
regula
dor
A
hacia
Ia
izquierda,
Ia
tension
disminuye;
girándolo
hacia
Ia
derecha,
Ia
tensiOn
aumenta.
Alt
iplik
gerginhiinin
kontrol
edilmesi:
Mekii
hafifçe,
aniden
yukariya
doru
hareket
ettiriniz.
Mekiin
kademeli
olarak
aaiya
inmesi
gerekir.
(Ayar
vidasi
A’y
sola
cevriniz
=
daha
gevek,
saga
ceviriniz
=
daha
siki).
1
Colocaçao
de
capsula
no
seu
lugar:
levantar
o
fecho
B
e
encaixar
a
fundo
a
cápsula
no
suporte
C.
0
perno
D
deve
encaixar
na
abertura
C.
//
Inserting
the
bobbin
case:
Open
latch
B
and
push
the
bobbin
case
onto
pin
C
until
it
snaps
in
place.
Bobbin
case
finger
D
must
fit
into
cutout
E.
ColocaciOn
de
Ia
cápsula
con
Ia
canilla:
Levante
Ia
bisagrita
B
e
intro
duzca
Ia
cápsula
en
Ia
espiga
C
hasta
el
__________
tope.
El
dedo
D
de
Ia
capsula
deberá
encajar
en
Ia
escotadura
E.
mekii
dayanaa
kadar
C
pimi
üzerine
Mekii
takmak:
B
klapesini
kaldriniz
ye
sürünüz,
Mekik
parmainn
(D)
bu
arada
E
kesimini
kavramasi
gerekir.
\
9

Enfiamento
do
ho
da
aguiha:
A
agulha
e
a
alavanca
tensora
1
devem
estar
na
posiçao
superior.
Puxar
o
fio
pela
guia
A,
para
a
fenda
B,
por
trás
da
placa
C.
para
cima
pela
fenda
D,
pela
alavanca
1,
voltar
a
fenda
D,
pelo
guia-fios
E
e
F
e
ainda
no
guia-fio
direito
do
prende
agulha.
Upper
threading:
The
needle
and
the
take-up
lever
must
be
raised.
Pull
the
thread
into
guide
A,
slot
B,
behind
guide
C.
upwards
into
slot
D,
into
take-up
lever
1,
back
through
slot
D,
into
guides
E,
F
and
into
the
right
guide
of
the
needle
holder.
Enhebrado
del
hilo
superior:
La
aguja
y
Ia
palanca
tirahilos
deberán
estar
ele
vados.
Levante
el
pie
prensatelas,
Pase
el
hilo
desde
el
carrete
por
Ia
gua
A,
por
Ia
ranura
B,
por
detrás
de
a
chapa
guaa
C,
hacia
arriba
en
Ia
ranura
D
hasta
Ilegar
a
a
palanca
tirahilos
1.
A
continuaciOn
páselo
de
nuevo
por
a
ranura
D,
en
las
guéas
E,
F
y
en
el
guiahilos
derecho
del
portagujas.
Ust
ipliin
takilmas,:
Inenin
ye
horo
zun
yukarida
bulunmasi
gerekir.
Diki
ayaIni
yukariya
kaldiriniz.
IpIii
A
kila
vuzu
(yatai)
içerisine,
B
yariina,
C
kila
vuz
sac
levhasi
arkasina,
yukariya
doru
D
yarii
icerisine,
horoz
1
içerisine,
geriye
doru
D
yarii
arkasindan,
E
ye
F
kilavuzlari
icerisine
ye
ine
tutamain
daki
sa
kilavuz
içerisine
çekiniz.
x
I
_______
0
(‘Entiar
o
fio
da
aguiha
da
frente
para
trás
pelo
buraco
da
agulha.
Thread
the
needle
from
front
to
back.
—
superior
desde
eI
frente
hacia
atrãs
por
Enhebre
Ia
aguja
pasando
el
hilo
el
ojo
de
Ia
aguja.
Ust
iplii
on
taraftan
arka
taraf
a
doru,
ine
delii
içerisinden
geciriniz.

I
Segurar
o
fio
da
aguiha.
Rodar
o
volante
para
a
frente
e
coser
urn
ponto.
Parar
a
agulha
e a
alavanca
tensora
1
em
cima,
Puxar
o
fio
da
canela
para
dma
corn a
ajuda
do
fio
da agulha.
Drawing
up
the
bobbin
thread:
Hold
the
needle
thread
taut.
Turn
the
hand
wheel
towards
you
and
sew
a
stitch
until
both
needle
and take-up
lever
are
up.
Pull
out
the
bobbin
thread
by
means
of
the
needle
thread.
Extracción
del
hilo
inferior:
Sujete
el
hilo
superior.
Gire
el
volante
o
hacia
el
frente
y
haga
una
puntada
hasta
quo
a
aguja
y
Ia
palanca
tirahilos
se
hallen
en
su
posición
más
alta.
Saque
el
hilo
inferior
tirando
del
hilo
superior.
Alt
iplii
yukariya
getirmek:
Alt
iplii
sikca
tutunuz.
El
carkini
One
doru
çeviriniz,
ine
ye
horoz
tekrar
yukanda
duruncaya
kadar,
bir
bati
dikiniz.
Ust
iplikle,
alt
iplii
yukariya
doru
cekiniz.
o
por
baixo
do
calcador.
Place
both
threads
towards
the
right
under
the
sewing
foot.
Passar
Os
dois
fios
para
trás.
pela
direita
Coloque
ambos
hilos
hacia
Ia
derecha
debajo
del
prensatelas.
Ust-
ye
alt
iplii
saa
doru,
diki
ayai
altina
koyunuz.
Fechar
a
tampa
10.
Close
free-arm
cover
10.
Kapak
klapesini
(10)
kapatiniz.
Cierre
Ia
tapa
10.

f
N
14i
Os
modelos
corn
braço
livre
possuem
esse
braco
livre
para
coser
artigos
tubulares,
Free-arm
models
have
a
free
arm
for
sewing
tubular
shaped
articles.
Los
modelos
de
brazo
al
aire
van
provistos
de
brazo
al
aire
para
coser
artóculos
tubulares.
Serbest
kollu
modeller,
boru
seklinde
olan
dtkilecek
eyler
icin
serbest
bir
kola
sahip
bulunmaktadir.
N
Colocar
o
pIano
do
trabalho
no
lugar
(Os
suportes
devem
encaixar-se
nos
buracos
correspondentes).
Push
the
detachable
work
support
onto
the
machine
(guide
pin
in
hole).
Acople
el
suplemento
a
Ia
mãquina
de
forma
que
el
perno
gua
encaje
en
el
orificio.
Diki
yuzeyini
makinaya
doru
sürünüz
(kilavuz
pimini
delik
icerisine).
Colocar
o
tecido
debaixo
do
calcador.
Place
fabric
under
the
sewing
foot.
Coloque
Ia
tela
debajo
del
pie
prensatelas.
Kumai
dikis
ayai
altina
yerlestiriniz.
4
J
Descer
a
alavanca
19.
N
Lower
presser
bar
lifter
19.
Baje
Ia
palanca
alzaprensatelas
19.
Kumas
bastirma
kolunu
(19)
aaiya
indiriniz.

Afinacão
da
tensão
dos
fios:
A
posicão
de
regulacão
normal
é
entre
3
e
5.
assinalada
corn
uma
faixa
branca.
A
tensao
aumenta
consoante
o
n
for
major.
Para
controlar
use
urn
ponto
zig
zag
argo.
Coser
alguns
pontos.
Os
fios
devem-se
enlacar
dentro
da
espessura
do
tecido.
.
Carregar
no
pedal
do
reóstato:
Quanto
mais
se
carregar
no
pedal.
mais
depressa
costurará
a
máquina.
Operating
the
foot
control:
The
farther
you
press
the
pedal
down
the
faster
the
machine
runs.
Accionamiento
del
pedal:
Cuanto
rnás
profundo
pise
el
pedal
tanto
mayor
será
a
velocidad
de
costura
de
Ia
máquina.
Mara
ayakla
basiniz:
Marsa
nekadar
fazla
bir
sekilde
bastlirsa,
makina
okadar
süraltli
diker.
4
N
Tensão
do
fio
da
agulha
16
A
=
marca
para
a
regulacao.
Needle
thread
tension
16
A
=
Setting
mark.
Tension
del
hilo
superior
16
A
=
Marca
para
Ia
regulación.
Ust
iplik
gerginlii
16
A
=
Ayar
iaretlemesi
Checking
the
needle
thread
tension:
The
normal
setting
is
in
the
white
range
between
3
and
5.
The
higher
the
number,
the
tighter
the
tension.
To
check
the
tension,
set
the
machine
at
a
wide
zigzag
stitch.
Sew
a
short
seam.
The
threads
should
interlock
in
the
middle
of
the
material.
/
\/
\
-.
J

N
Comprobación
de
Ia
tension
del
hilo:
La
regulaciOn
normal
se
halla
en
a
zona
blanca
entre
3
y
5.
Cuanto
más
alto
sea
el
nimero
tanto
mayor
será
Ia
tensiOn.
La
comprobaciOn
se
hace
con
puntada
zigzag
ancha.
Haga
una
costura
corta,
Los
hilos
deberán
quedar
anudados
dentro
del
material.
Iplik
gerginhiinin
kontrol
edilmesi:
Normal
ayar.
beyazla
iaretlenmis
bOl
gede
3—5
arasinda
bulunmaktadir.
Sayi
nekadar
buyukse,
gerginlik
okadar
siki
dir.
Kontrol,
genis
bir
zikzak
dikisle
(batila)
yapilmaktadir.
Kisa
bir
diki
yapiniz.
Iplik
balantisi
(düümlenmesi),
kumaslarin
arkasinda
kalmalidir.
Levantar
a
alavanca
19.
Retirar
o
tecido
para
trás.
Raise
presser
bar
lifter
19.
Remove
the
fabric
by
pulling
it
towards
the
back.
Alce
a
palanca
alzaprensatelas
19.
Saque
a
tela
hacia atrás,
Kumas
bastirma
kolunu
(19)
yukariya
getiriniz.
Kumasi
arka
tarafa
doru
cikariniz.
4
N
Corta-tio
A:
Colocar
Os
fios
na fenda
e
puxá-los
para
baixo.
Thread
cutter
A:
Draw
the
threads
into
the
slot
and
pull
them
downwards.
Cortahilos
A.
Coloque
los
hilos
en
Ia
ranura
y
tire
de
ellos
hacia
abajo.
iplik
kesici
A.
Iplikieri
yerlestiriniz
ye
geriye
doru
cekiniz.

Seleccão
do
comprimento
do
ponto
(8)”
Rodar
0
botão
8
ate
ao
comprimento
do
ponto
desejado,
entre
0
e
4
mm,
estar
colocado
em
frente
a
marca
A.
A
faixa
vermelha entre
0
e
1,
serve
para coser
as
casas.
Setting
the stitch
length
(8):
Set the
required
stitch
length,
from
0
to
4
mm,
at
mark
A.
The
red
setting
range
from
0
to
1
is
for
sewing
buttonholes.
Regulaciôn
del
largo
de
puntada
(8):
Gire
el
botOn
hasta
que
el
largo
de
puntada
deseado
entre
0
y
4
coincida
con
a
marca
A.
La
zona
roja
entre
0
y
1
se
usa
para
coser
ojales.
Batas
uzunluunun
ayarlanmasi
(8):
Arzu
edilen
batis
uzunluu
(0
la
4
mm
arasinda),
A
ayar
isaretlemesinde
cevrilir,
0
ye
1
arasindaki
balge,
ilik
dikimi
icindir,
Costura
para
trás:
Baixar
a
tecla
21.
A
máquina
cose
para
trás
enquanto
premir
esta
tecla.
1everse
sewing:
Press
down
control
21.
The
machine
sews
backwards
as
long
as
the
control
key
is
held
down.
Costura
en
retroceso:
Pulse
el
botOn
21
hacia
abajo,
La
_____
botón
esté
pulsado.
máquina
cose
hacia
atrás
mientras
el
Geriye
doru
dikmek:
Tu
21’yi
aaiya
doru
bastiriniz.
Tua
basildii
sürece,
makina
geriye
doru
diker,

Selector
do
ponto
20:
Por
rotacao
do
botao,
colocar
0
ponto
desejado
na
direccao
da
marca
A.
Stitch
pattern
knob
20:
Turn
the
required
stitch
symbol
to
mark
A.
Botón
selector
de
puntadas
20:
Gire
el
botôn
de
forma
que
el
tipo
de
puntada
deseado
coincida
con
Ia
marca
A.
BatiS
örnei-ayar
dümesi
(20):
Arzu
edilen
babs
örneini,
A
ayar
iareti
nm
altina
gelecek
ekiIde
çeviriniz.
J
\‘
4

4
Symbolo/Symbol
Quadro
dos
pontos
Stitch
pattern
table
Costura
elástica
Elastik-dikis
yen
Punto
Stitch
Ponto
a
direito,
posicáo
aguiha
central
Straight
stitch,
middle
position
Ponto
a
direito,
posicão
aguiha
esquerda
Straight
stitch,
left
needle
position
\J\\A,,\v\J\
Ponto
zig-zag
Zigzag
stitch
range
2
IID
[fir
Simbolos
para
casear
Buttonhole
symbols
Ponto
de
concha
Shell-edging
stitch
Ponto
invisivel
elástico
Elastic
blind
stitch
—
dc::
Ponto
zig-zag
elástico
Elastic
seam
_-
“imbolo/Symbole
Tabla
de
puntadas
BatiS
örne-cetveIl
Puntada
Batis
Punto
recto.
posiciOn
central
de
a
puntada
Düz
batis:
Batis
durumu
ortada
Punto
recto,
posiciOn
izquierda
de
Ia
puntada
Düz
batis:
Batis
durumu
solda
Punto
zigzag
Zikzak
sehasi
fJl
2
111J
J3
f
4
Simbolos
para
ojales
lik
isaretteri
Puntada
para
remate
de
Midye
kenan
dikisi
,..
bordes
en
forma
de
choncha
Punto
invisible
elástico
Elastik-kär
dikis
—
>
-—

I
Baixar
o
arrastador:
Abrir
a
tampa
10
do
braço
livre.
Alavanca
em
posicao
C
=
arrastador
em
posicao
baixa;
alavanca
em
posicao
B
=
arrastador
em
posiçao
de
costura.
Dropping
the
feed:
Open
free-arm
cover
10.
Push
the
drop-feed
control
to
C
=
feed
disengaged,
and
to
B
again
for
sewing.
Ocultación
del
transportador:
Abra
Ia
tapa
10
del
brazo
at
aire.
Corriendo
Ia
palanca
hacia
C.
queda
ocuito
el
transporfador:
corriéndola
hacia
B,
pasa
a
Ia
posiciOn
normal
para
coser.
TransportorU
(taayiciyi)
aaiya
doru
ndirmek:
Serbest
kol
kapaini
(10)
aciniz.
Aaiya
indirme
sürgüsunü
C’ye
doru
sürünüz
=
aaiya
inmis
durumda;
dikmek
cm
=
Bye
doru
sürünüz.
Mudanca
da
agulha
(sistema
130/705
H):
Desapertar
o
parafuso
A
e
retirar
a
agulha.
Encaixar
a
aguiha
novamente
(com
0
facetado
do
tronco
virado
para
trás)
mesmo
ate
cima
e
apertar
o
parafuso.
Changing
the
needle
(System
130/705
H):
Loosen
screw
A.
Take
out
the
needle.
Push
the
needle
(with
its
flat
side
facing
towards
the
back)
up
as
far
as
it
will
go.
Tighten
the
screw.
Cambio
de
Ia
aguja
(sistema
130/705
H):
Afloje
el
tornillo
A.
Saque
Ia
aguia.
lntro
duzca
Ia
nueva
aguja
(lada
piano
hacia
atrás)
hasta
el
tope.
Apriete
el
tornillo.
ineyi
deitirmek
(Sistam
130/705):
A
vidasini
gevetiniz,
lneyi
cikariniz.
Yeni
ineyi
(basik
dip
kismi
arka
tarafa
doru)
famamen
yukariya
doru
sürünüz.
Vidayi
sikistiriniz.
/

Mudança
da
base
do
calcador:
Pressio
nar
0
botão
vermelho
A.
A
base
cal.
Changing
the
sewing
foot:
To
release
the
sewing
foot,
push
the
red
button
A.
Cambio
del
pie
prensatelas:
Pulse
el
botOn
rojo
A.
El
prensatelas
se
suelta.
Dikis
ayaini
deitirmek:
Kirmizi
dümeyi
(A)
aaiya
doru
bastiriniz.
Bu
arada
ayak,
yerinden
cikar.
N
Colocaçao
da
base
no
lugar:
Baixar
a
alavanca
do
calcador
e
colocar
a
base
de
forma
a
que
o
veio
B
se
introduza
na
ranhura
C.
Attaching
the
sewing
foot:
Lower
the
presser
bar
lifter
and
at
the
same
time
reposition
the
sewing
foot
so
that
stud
B
fits
in
slots
C.
Colocación
del
pie
prensatelas:
Baje
Ia
palanca
alzaprensatelas
y
posicione
al
mismo
tiempo
el
prerisatelas
de
forma
que
el
puente
B
encaje
en
a
ranura
C.
Diki
ayaInI
takmak:
Kuma
bastirma
kolunu
aaiya
indiriniz
ye
bu
arada
ayai,
B
köprücüü
C
oluu
içerisine
oturacak
sekilde
sürünüz.
D
e
E
servem
para
fixar
um
guia.
0
parafuso
F
fixa
o
suporte
do
calcador.
Hole
E
and
screw
D
are
used
for
attaching
an
edge
guide,
while
screw
F
is
the sewing
foot
holder
srew.
D
y
E
sirven
para
fijar
guoas.
F
sirve
para
fijar
el
soporte
del
prensatelas.
D
ye
E,
cetvelin
tespit
edilmesi
icindir.
F,
dikis
ayai
tutamak
vidasidir.
19

Calcadores
(acessOrios
normals)
1
Base
do
calcador
3
Base
do
calcador
normal
para
ponto
invisivel
2
Base
do
calcador
4
Base
do
calcador
4/
i
transparente
para
coser
fechos
de
correr
Sewing
feet
(standard
accessories)
1
Ordinary
sewing
3
Blindstitch
foot
foot
4
Zipper
2
Clear-view
foot
Pies
prensatelas
(accesorios
normales)
1
Prensatelas
3
Prensatelas
para
normal
puntada
invisible
2
Prensatelas
4
Prensatelas
para
transparente
cremalleras
Oiki
ayaklan
(Normal
ilãve
parcalar)
1
Normal
ayak
3
Kär-diki
ayai
__________
2
$effaf
ayak
4
Fermuar
aya
)8•694
4Q4UO
______________
______________)
Compartimento
para
acessórios:
Subir
a
tampa
da
caixa
de
arrumação
9
para
encontrar
Os
acessOrios.
Accessory
compartment:
To
open
accessory
compartment
raise
cover
of
work
support
9.
Compartimento
para
accesorios:
Abriendo
a
tapa
del
suplemento
9
se
encuentra
espacio
para
colocar
accesorios.
have
parcalar
kutusu:
Diki
yuzeyindeki
kapai
(9)
yukariya
doru
kaldiriniz.
Bunun
altinda
diki
cm
ilãve
parçalara
alt
olan
yer
bulun
maktadir.

I

/
/
_
_
/
/c
g1
/
Topstitching:
Sewing
foot:
Ordinary
sewing
foot
or
clear-view
foot
and
edge
guide
(special
accessory>:
Stitch:
straight
stitch
Edge
guide
A
can
be
used
with
nearly
all
sewing
feet.
Pespontar:
Calcador:
Base
normal
ou
base
em
plás
tico
e
guia
a
direita
(acessório
extra)
Ponto:
Ponto
direito
O
guia
direito
A
serve
em
quase
todos
os
calcadores.
Fixação
do
gula-direito:
Introduzir
o
guia
A
no
orifIcio
B
e
apertar
o
parafuso
C.
Segundo
a
aplicacao,
regular
o
guia
com
o
afastamento
dese
jado.
0
gula-direito
facilita
consideravel
mente
os
pespontos
paralelos
e
Os
pespontos
das
bordas,
Para
isso,
deve
se
acompanhar
o
bordo
do
tecido
(fig.
D)
ou
a
costura
anterior
com
0
guia-direito
(fig.
E).
A
costura
sairá
sempre
correcta
e
alinhada.
Fitting
the
edge
guide
(Special
accessory):
Push
edge
guide
A
through
hole
B
and
secure
it
in
position
with
screw
C.
The
guide
can
be
adjusted
to
the
desired
stit
ching
margin
for
various
applications.
With
the
edge
guide
attached,
it
is
easy
to
sew
parallel
lines
of
stitches
or
to
stitch
parallel
to
the
edge.
The
guide
either
follows
an
edge
(Fig.
D)
or
when
making
parallel
lines
of
stitches
runs
along
the
preceding
line
of
stitches
(Fig.
E).
The
seam
thus
made
looks
neat
and
accurate.
22

Pespur’iteados:
Prensatelas:
Normal
o
el
transparente,
y
a
guOa
marginal
(accesorio
especial)
Puntada:
Punto
recto
La
guøa
marginal
A
puede
emplearse
con
casi
todos
los
pies
prensatelas.
Fijación
de
Ia
guóa
(accesorio
especial):
Pase
Ia
gua
A
por
el
agujero
B
y
fójela
con
el
tornillo
C.
La
guéa
se
puede
ajustar.
segün
Ia
labor,
a
Ia
distancia
deseada.
Con
Ia
ayuda
de
Ia
guéa
se
pueden
coser
con
toda
facilidad
costuras
paralelas
o
pespuntes
al
canto
En
tales
casos,
Ia
gua
marcha
a
lo
argo
del
borde
(fig.
D)
0
a
0
argo
de
Ia
costura
anterior
en
el
caso
de
costuras
paralelas
(fig
E).
De
esta
forma
se
obtienen
costuras
impecables.
4
Pikür
çaIimaIari:
Diki
ayar
Normal-diki
ayai
veya
effaf
ayak
ye
kilavuz
cetveli
(özel
ilãve
parca)
Batis:
Düz
dikis
A
kilavuz
cetveli
hemen
tüm
diki
ayakla
nnda
kullanilabilir.
Cetvehn
tespit
edilmesi
(özel
ilâve
parca):
A
Cetvelini
B
delii
icerisine
sürünüz
ye
C
vidasiyla
sikitiriniz.
KuIlani
amacina
gOre
cetvel,
arzu
edilen
araIia
ayarla
nabilir.
Paralel
olarak
uzanan
pikur
cizgileri
veya
pikur
calismalari
kenar
kisimlarda,
kilavuz
cetveliyle
zahmetsizce
dikilir.
Bu
arada
kumasin
kenari
(Resim
D)
veya
paralel
olarak
uzanan
pikür
cizgilennde,
daha
Once
dikilmis
olan
pikür
çizgisi,
kilavuz
cetveli
boyunca
yurur
(Resim
E).
Dikiin
gidii.
daima
muntazam
ye
doru
bir
gOrunuse
sahip
olmaktadir.

Ponto
invisivel
elástico:
Calcador:
Base
para
pontos
invisi
veis
Tensão:
Fio
da
agulha
menos
Fio:
Compri
mento
do
ponto:
Agulha:
Regulacao
da
entrada
da
agulha
no
tecido:
Colocar
a
orla
preparada
debaixo
do
cal
cador
do
pontos
nvisiveis.
A
quebra
do
tecido
superior
deve
correr
ao
longo
da
guia
B
do
calcador.
Corn
a
ajuda
do
parafuso
de
regulacao
A,
deslocar
o
guia
B
para
a
esquerda
de
rnaneira
quo
a
agulha,
no
ponto
esquerdo.
apanhe
apenas
urn
f
io
do
tecido
superior
(fig.
C
e
D).
Realizar
prirneirarnente
urna
costura
de
ensaio,
nurn
retalho
de
tecido.
Elastic
blind
stitch:
Sewing
foot:
blindstitch
foot
Tension:
needle
thread
tension
a
little
slack.
Thread:
ordinary
sewing
thread
Stitch:
elastic
blind
stitch
Stitch
length:
Needle:
How
to
regulate
the
needle
penetration:
Place
the
prepared
hern
under
the
blind-
stitch
sewing
foot.
The
crease
line
of
the
outer
fabric
runs
along
edge
guide
B
of
the blindstitch
sewing
foot.
Turn
screw
A
to
adjust
edge
guide
B
so
far
to
the
left
that
the
needle
picks
up
only
one
thread
of
the
outer
fabric
when
penetrating
on
the
left
side
(Figs.
C
and
D).
First
make
a
sewing
test
using
a piece
of
waste
material.
preso
Fio
para
coser
3
a
4.
Grossura
70
ou
80.
3—4
size
70
or 80
I

3
5
Punto
invisible
elástico:
Prensatelas:
Prensatelas
para
puntada
invisible
Tension
del
hilo
superior:
Normal
Puntada
invisible
ela
stica
3a4
N
70u80
Regulacion
de
Ia
penetración
de
Ia
aguja:
Coloque
debajo
del
prensatelas
para
puntada
invisible
el
dobladillo
previa
mente
preparado.
El
borde
del
doblez
superior
deberã
deslizarse
contra
el
tope
B
del
prensatelas.
Con
el
tornillo
regulador
A
deberá
correr
ahora
el
tope
B
hacia
Ia
izquierda
de
forma
que
al
clavarse
Ia
aguja
por
Ia
izquierda
sOlo
prenda
un
hilo
del
borde
(fig.
C
y
D),
Haga
pri”ramente
una
costura
de
prueba
sobre
un
retal.
Elastik
kör-diki:
Diki
ayai:
Kör
dikisi
ayat
Gerginlik:
Ust
p11k
biraz
daha
gevek
Batis:
Elastik
kOr-dikis
Dikis
uzunluu:
3—4
Ine:
Kalinlii
70
veya
80
nenin
batie
u
ekiIde
ayarlanir:
Hazirlanmis
olan
kenari,
kOr-dikis
ayai
altina
koyunuz,
Ustte
bulunan
kumasin
kumas
kati,
bu
arada
B
kOr-dikis
ayal
nm
dayanai
boyunca
yurür.
A
ayar
vida
siyla
B
dayanaini,
inenin
sol
batista
üstteki
kumata
sadece
bir
iplii
kavraya
oak
sekilde,
sola
doru
çeviriniz
(Resim
C
ye
D),
Artakalmis
bir
kumas
parca
sinda
bir
deneme
dikisi
yapiniz.
4,.,
N
D
4
Algo
más
floja
de
10
normal
Hilo:
Puntada:
Largo
de
puntada:
Agua:
}

Casas:
Calcador:
Tensão:
Fio:
Comprirnento
do
ponto:
Agulha:
Base
transparente
Fio
da
agulha
urn
pouco
menos
tenso
Fio
de
bordar
fino
Faixa
vermelha
(casear)
Grossura
70
a
80
4
Sewing
buttonholes:
Sewing
foot:
clear-view
sewing
foot
Tension:
needle
thread
tension
a
little
slack
Thread:
fine
machine
embroidery
thread
Stitch
length:
buttonhole
range
(red)
Needle:
sizes
70
to
80
1
Regular
o
botão
20
(pontos
utilitários).
Na
posição
jj
e
coser
a
primeira
parede.
Parar
a
agulha
na
posição
em cima.
2.
Regular
o
botão
20
na
posicao
e
coser
4
a
6
pontos
de
segurança
(mosca).
Parar
a
agulha
no
alto.
3.
Regular
o
botão
20
na
posiçao
e
coser
a
segunda
parede
do
mesmo
tamanho
da
primeira.
Parar
a
agulha
no
alto.
4.
Regular
o
botão
20
na
posiçao
J
e
coser
4
a
6
pontos
de
seguranca
(mosca).
Parar
a
agulha
no alto.
5.
Regular
o
botão
20
na
posicao
cD
e
coser
alguns
pontos
de
remate.
1.
Set
utility-stitch
knob
20
at
and
sew
the
first
buttonhole
seam.
Raise
the
needle.
2.
Set
knob
20
at
U1J
and
sew
four
to
six
tacking
stitches.
Raise
the
needle.
3
Set
knob
20
at
‘
and
sew
the
second
buttonhole
seam
as
long
as
the
first.
Raise
the
needle.
4.
Set
knob
20
at
and
sew
four
to
six
tacking
stitches.
Raise
the
needle.
5.
Set
knob
20
at
and
sew
a
few
securing
stitches.
6
Cut
buttonhole
with
special
knife
(special
accessory).
4
I
6.
Abrir
a
casa
corn
o
abre-casas
(aces
sOrio
extra).

LY
7-
—
—
Ojales:
Ilikier:
Prensatelas:
Transparente
Diki
ayai:
eftaf
ayak
TensiOn
del
Gerginlik:
Ust
iplik
gerginlii
biraz
hilo
superior:
Algo
más
floja
de
0
daha
gevsek
normal
Iplik:
Ince
makina
naki
iplii
Hilo:
Hilo
fino
de
bordar
Batis
Largo
de
uzunluu:
Ilik
sahasi
(kirmizi)
puntada:
Zona
del
ojal
(sector
rojo)
lne:
Kalinlii
70—80
Aguja:
N
70
u
80
1.
Fonksiyonel
diki
dümesini
(20),
1
Ponga
el
selector
do
puntada
üzerine
getiriniz
ye
ilk
tirtili
dikiniz.
utilitaria
20
en
jj
y
cosa
01
primer
lneyi
yukariya
kaldiriniz.
labio
del
ojal.
Eleve
a
aguja.
2,
Dume
20’yi
jI1J
üzerine
getiriniz
ye
2.
Ponga
el
botón
20
en
y
haga
de
4—6
kenetleme
dikii
yapiniz.
lneyi
4
a
6
puntadas
do
presilla.
Eleve
la
yukanya
kaldiriniz.
aguja.
3.
Düme
20’yi
j
üzerino
getiriniz
ye
3.
Ponga
el
botOn
20
en
jI
y
cosa
el
ikinci
tirtili,
bIrincinin
uzunluu
kadar
segundo
labio
del
ojal
igual
de
argo
dikiniz.
lneyi
kaldiriniz,
quo
el
primero.
Eleve
Ia
aguja.
4.
Düme
20’yi
üzerine
getiriniz
ye
4.
Ponga
el
botOn
20
en
y
haga
do
4—6
kenetleme
dikii
yapiniz.
Ineyi
4
a
6
puntadas
do
presilla.
Eleve
Ia
‘
kaldiriniz.
aguja.
5.
Dume
20’yi
€D
üzerine
getiriniz
ye
5.
Ponga
el
botOn
20
en
y
haga
birkaç
takviye
dikisi
yapiniz.
unas
puntadas
do
remate.
6.
llii.
ucu
ok
seklinde
olan
ayirici
6.
Abra
el
ojal
con
el
descosedor
(ozel
ilàve
parca)
b
kesiniz.
(accesorio
especial).
J

Colocacao
de
botoés:
Calcador:
Sem
base
ou
corn
base
transparente
Ponto:
Ponto
a
direito
Arrastador:
Em
posicao
baixa
Flo:
Fio
de
coser
fino
Colocar
o
botão
no
lugar
marcado
ante
riormente
e
debaixo
do
suporte
do
calca
dor.
Descer
a
alavanca
do
calcador
e
introduzir
a
aguiha
no
orificio
esquerdo
do
botão.
Parar
a
agulha
no
alto,
Rodar
o
botão
20
para
a
posicao
“ponto
zig
zag”
ate
que
a
agulha,
rodando
o
volante,
so
coloque
no
orificio
direito
do
botão.
Executar
6
a
8
pontos
zig-zag
e
alguns
pontos
a
direito
no
orificio
esquerdo
do
botão
(A).
Botoés
corn
pe:
Grandes
botöes
sobre
tecidos
pesados.
Introduzir
a
aguiha
no
orificio
esquerdo
do
botão.
Colocar
urn
fósforo
no
melo
do
botão.
Descer
o
calcador
(B)
e
coser
alguns
pontos
zig-zags
e
deixar
sair
aproximadarnente
15
cm
de
fio.
Passar
Os
fios
sobre
o
tecido
(C)
e
enrolá-los
sobre
Os
fios
debaixo
do
botão
para
for-
mar
o
pe
(D).
Dar
urn
nO
nos
fios.
f
Sewing
on
buttons:
Sewing
toot:
without
sewing
foot
or with
clear-view
foot
Stitch:
straight
stitch,
left
needle
position
Feed:
dropped
Thread:
fine
sewing
thread
Place
the
button
in
the
location
marked
beforehand
and
push
it
under
the
sewing
foot
holder.
Lower
the
sewing
foot
holder
into
the
button.
Lower
the
needle
into
the
left
hole
of
the
button.
Raise
the
needle.
Turn
knob
20
to
a
position
in
which
the
needle
enters
the
right
hole
of
the
button
when
the
hand
wheel
is
turned.
Sew
six
to
eight
zigzag
stitches
and
a
number
of
securing
stit
ches
in
the
left
only
(A).
N
Sewing
on
buttons
with
stems
(for
large
buttons
in
heavy
materials):
Lower
the
needle
into
the
left
hole.
Place
a
match
on
the
middle
of
the
button.
Lower
the
sewing
foot
(B).
Sew
a
num
ber
of
zigzag
stitches
and
leave
a
thread
end
of
about
6
inches.
Pull
the
needle
and
bobbin
threads
through
(C).
Wrap
the
stem
(D)
and
tie
off
the
threads,
B
Aj

Costura
de
botones:
Prensatelas:
Sin
prensatelas
a
con
el
transparente
Puntada:
Punto
recto
PosiciOn
de
Ia
puntada:
Izquierda
Transportador:Oculto
Hilo:
Hilo
fino
Coloque
el
botôn
en
el
punto
marcado
previamente
e
introdüzcalo
debajo
del
soporte
del
prensatelas.
Haga
descender
Ia
barra
del
prensatelas.
Clave
a
aguja
en
el
agujero
izquierdo
del
botón.
Eleve
a
aguja.
Gire
el
botOn
20
en
a
zona
de
zigzag
hasta
que
a
aguja,
al
girar
el
volante,
se
dave
en
el
agujero
derecho
del
botOn.
Haga
de
6
a
8
puntos
en
zig
zag
y
unas
puntadas
de
remate
en
el
agujero
zquierdo
(fig.
A).
Botón
con
cuello
(costura
de
botones
grandes
en
géneros
pesados):
Clave
a
aguja
en
el
agujero
izquierdo
del
botón.
Coloque
un
palillo
de
dientes
o
similar
en
el
centro
del
botón.
Baie
el
prensatelas
transparente
(B).
Haga
unas
puntadas
en
zigzag
y
deje
unos
15
cm
de
hilo.
Pase
os
hilos
superior
e
inferior
al
ado
de
abajo
(C).
arróllelos
alrededor
de
as
puntadas
(D)
y
anüdelos.
DUme
dikmek:
Diki
ayaI:
Diki
ayakstz
veya
effaf
ayak
Batis:
Düz
dikis,
batis,
batis
durumu
solda
Transportär
(taiyidi):
Iplik:
Dumeyi,
Onceden
iaretlenmi
bulunan
yere
koyunuz
ye
diki
ayai
altina
sürü
riüz,
Diki
ayai
tutamaini
aaiya
doru
indiriniz.
lneyi
sol
düme
deliine
batiriniz.
lneyi
yukariya
getiriniz.
Dume
20’yi:
el
carkinin
çevrilmesi
esnasinda
ine
sa
delik
içerisine
batincaya
kadar,
zikzak
sahasi
içerisine
çeviriniz.
Sol
delik
içerisinde
(A),
6—8
ust
diki
ye
birkaç
pikur
dikii
yapiniz.
Air
kumalara
dikilen
bUyUk
dUmeIer
1cm
saph
dUme:
Ineyi
sol
delik
içerisine
batinniz.
Dü
meniri
ortasina
bir
kibrit
cäpu
koyunuz.
Dikis
ayaini
asaIya
indiriniz
(B).
Birkac
üst
diki
yapiniz
ye
takriben
15
cm
uzun
Iuunda
iplik
birakiniz.
Ust-
ye
alt
iplii
delikten
geçiriniz
(C).
Sapi
sanniz,
yani
dolayiniz
(D)
ye
iplikleri
düumleyiniz,
I
asaiya
indiriniz
lnce
dikis
iplii

N
zzz
A
O!l
Costura
de
techos
de
correr:
Calcador:
Base
de
fechos
de
correr
Compnme
nto
do
ponto:
Ponto:
2
a
3
mm
Ponto
a
direito
em
posi
cáo
media
Fio
para
coser
Colocacão
da
base
do
calcador
para
fechos:
Introduzir
o
perno
de
trás,
da
base,
na
ranhura
traseira
e
empurrar
a
base
para
cima,
para
que
a
porno
da
frente
F
tam
bern
se
encaixe.
0
calcador
pode
ser
colocado
a
direita,
a
esquerda.
(fig.
A)
ou
no
meio.
Colocacao
de
urn
fecho
coberto:
Pôr
o
fecho
em
posicão.
Deslizar
o
cat
cador
para
a
esquerda
ate
ao
batente;
pousar
o
fecho
aberto
debaixo
do
calca
dor
do
maneira
quo
Os
dentes
acompa
nhem
o
lado
direito
do
calcador
fig.
B).
Pespontar
o
fecho
ate
ao
meio
aproxi
madamente
a
distancia
desejada.
Deixar
a
agulha
em
baixo,
subir
o
calcador
e
fechar
o
(echo
de
correr
(fig.
C).
Baixar
o
calcador.
continuar
a
coser
ate
a
extremidade
do
(echo
e
fazer
a
costura
transversal.
Coser
paralelamente
o
outro
ado
do
fecho
a
mesma
dstancia.
Pouco
antes
do
fim
da
costura.
deixar
a
aguiha
no
tecido.
subir
o
calcador
e
abrir
o
fecho
(fig.
D).
Tornar
a
baixar
e
terminar
a
costura.
Sewing
in
zippers:
Sewing
foot:
zipper
sewing
foot
Stitch
length:
2
to
3
Stitch:
Straight
stitch,
middle
needle
position
Thread:
sewing
thread
This
is
how
the
zipper
toot
is
engaged:
Insert
the
foot
with
the
back
pin
in
the
back
groove
E
and
push
the
shoe
of
the
foot
upwards,
until
the
front
pin
F
snaps
in.
The
zipper
foot
can
be
pushed
to
the
positions:
left
(Fig.
A),
right,
or
centre.
Completely
concealed
zip
closure:
Baste
in
zip
by
hand
first,
Push
the
zipper
foot
to
the
left
as
far
as
it
will
go.
Place
the
open
zip
under
the
foot
so
that
its
teeth
run
along
the
right
guiding
edge
on
the
sole
of
the
foot
(Fig.
B).
Sew
about
half
the
length
of
the
zip
at
the
required
width.
Leave
the
needle
down
in
the
material,
raise
the
zipper
foot
and
close
the
zip
(Fig.
C).
Lower
the
zipper
foot
again,
continue
the
seam
and
then
sew
across
the
end.
Sew
the
other
side
of
the
zip
at
the
same
margin.
Shortly
before
the
end
of
the
seam
leave
the
needle
down
in
the
material,
raise
the
zipper
foot
and
open
the
zip
(Fig.
D).
Lower
the
zipper
foot
again
and
sew
to
[,the
end.
II
i
II
inK.!
II
ii
‘I
k/V
7
Flo:

/
Costura
de
cremalleras:
Prensatelas:
Prensatelas
para
cremalleras
Largo
de
puntada:
2
a
3
Punfada:
Punto
recto
PosiciOn
de
Ia
puntada:
Central
Hilo:
Normal
Colocaciôn
del
prensatelas
para
cremalleras:
Enganche
a
barrita
posterior
del
pie
en
a
ranura
posterior
E
y
empuje
hacia
arriba
a
planta
del
pie
hasta
que
encaje
a
barrita
anterior
F.
El
pie
puede
cor
rerse
a
las
posiciones
derecha,
izquierda
(fig.
A)
y
central.
Cremalleras
cubiertas
del
todo:
Hilvane
a
cremallera.
Corra
ci
prensate
las
hacia
Ia
zquierda
hasta
el
tope.
Coloque
a
cremallera
abierta
debajo
del
prensatelas
de
forma
que
los
dientes
de
a
cremallera
discurran
a
10
argo
de
Ia
gua
derecha
(fig.
B).
Cosa
a
cremallera
a
a
anchura
deseada
hasta
Ia
mitad
aproximadamente.
Deje
a
agua
ciavada
en
a
tela,
alce
ci
prensatelas
y
cierre
a
cremallera
(fig.
C).
Baje
ci
prensatelas,
termine
de
hacer
a
costura
y
haga
a
costura
lateral
de
remate.
Cosa
el
segundo
ado
de
a
cremallera
paralela
mente
y
a
Ia
misma
distancia,
Poco
antes
del
final
de
a
costura,
deje
ciavada
a
aguja
en
a
tela.
Alce
el
pren
sateias,
abra
Ia
cremallera
(fig.
0),
baje
ci
prensatelas
y
termine
a
costura.
31
4
Fermuar
dikmek:
Dikis
aya:
Fermuar
ayai
Batis
uzunluu:
2—3
Batis:
Düz
dikis
durumu,
batis
durumu
ortada
Iplik:
Diki
iplii
Fermuar-dikme
ayai
u
sekilde
yerine
oturmaktadir.
Ayai
arka
kaprucukle,
E
arka
oluu
cerisine
geçiriniz
ye
F
on
köprucüü
yerine
oturuncaya
kadar,
tabani
yukariya
doru
bastiriniz.
Ayak:
sa,
sol
(Resim
A)
veya
orta
pozisyona
getirilebilir
(sürü
lebilir).
Her
iki
taraftan
örtülmü
ekilde
dikilmi
alan
fermuar:
Fermuari
teyelleyiniz.
Diki
ayaini
sola
doru,
dayanaa
kadar
sürünüz.
Aciimi
haldeki
fermuari,
disler
sa
kilavuz
kOprucuu
boyunca
yuruyecek
sekilde,
ayain
altina
yerletiriniz
(Resim
B).
Fer
muari
takriben
yanya
kadar
arzu
edilen
9enislikte
ine
ardi
düz
dikisle
dikiniz.
lneyi
kumasa
batmi
durumda
birakiniz;
dikis
ayaini
kaldiriniz
ye
fermuari
kapa
tiniz
(Resim
2).
Dikis
ayaini
ndiriniz;
dikis
yenni
fermuarin
sonuna
kadar
devam
ettiriniz
ye
verev
diki
yerini
dikiniz.
Ikinci
fermuar
kenarini,
paralel
bir
sekiide,
ayni
aralikta
olmak
üzere
dikiniz.
Diki
yen
bitiminden
kisa
bir
mesafe
once,
ineyi
kumaa
batmi
durumda
birakiniz.
Diki
ayaini
kaldininiz
ye
fermuari
aciniz
(Resim
D).
Dikis
ayaini
aaiya
indiriniz,
dikii
tamamiayiniz.

1’
A
-J
Fecho
de
correr
invisivel:
Para
a
regulacão
da maquina
ver
página
30.
Els
como
se
deverá
proceder
para
preparar
e
apllcar
o
fecho:
Passar
a
ferro
Os
bordos
da
abertura.
Voltar
o
bordo
esquerdo
do
tecido
para
o
exterior
(fig.
A).
Abrir
o
fecho
e
por
no
lugar
o
ado
esquerdo.
como
indicado
na
figura
D,
ultrapassando
os
dentes
urn
pouco
o
bordo
passado
a
ferro.
Em
seguida cose-se
o
bordo
estendido.
Alinhar
o
calcador
ao
meio
para
que
a
agulha
penetre
exactamente
no
orif(cio
central.
Os
dentes
do
fecho
de
correr
correm pela
ranhura
esquerda
da
base
do
calcador
(fig.
C).
No
inicio
da
costura
levantar
urn
pouco
os
dentes
do
fecho
para
quo
se
introduzam
na
ranhura.
Ter
minar
a
costura
fazendo
alguns
pontos
de
remate.
Fechar
0
fecho
de
correr.
Colocar
urn
alfinete
no
inicio
da
costura
do
segundo
lado
do
fecho
e
abrir
nova
mente
o
fecho
(fig.
D).
Voltar
o
bordo
direito
do
tecido
corn
o
lado
direito
do
fecho
para
o
exterior,
rnas
retirar
os
alfinetes
(fig,
E).
Os
dentes
do
fecho
encaixarn
na
ranhura
direita
da
base
do
calcador
(fig.
F).
Para
terminar,
costurar
os
lados
do
fecho
a
distancia
da
largura
da
base,
deixando
correr
os
dentes
para
o
exterior
da
base
(fig.
0)
Seam-like
zipper
closure:
For
machine
setting
see
page
30.
How
the
zipper
is
prepared
and
inserted:
Press
the
edges
of
the
placket.
Fold
out
the
left
seam
allowance
(Fig.
A).
Place
ihe
left
side
of
the
open
zip
in
position
so
that
its
teeth protrude
a
little
beyond
the
pressed
edge
(Fig.
B).
The
seam
is
sewn
along
this
edge.
Move
the
zipper
foot
to
the
middle
so
that
the
needle
stit
ches
into
the
middle
opening.
The
zip
teeth
run
into
the
left
guiding
groove
n
the
foot
(Fig.
C).
At
the
beginning
of
the
seam
lift
up
the
teeth
a
little
to
feed
them
into
the guiding
groove.
Sew
the
seam
to
the
end and
secure
it.
Close
zip.
Pin
other
side
of
zip
to
material
at
beginning
of
seam
(Fig.
D).
Open
zip.
Remove
the
pin,
turn
out
the
right
seam
allowance
with
the
zip
tape,
and
pin
the
latter
to
the
fabric,
as
shown
in
Fig.
E.
The
zip
teeth
now
run
into
the
right
gui
ding
groove
in
the
foot
(Fig.
F).
Finish
sewing
the
zip.
Now
sew
down
the
zip
tape
letting
the
zip
teeth
run
along
the
guiding
edge
of
the
foot
(Fig.
0).
J
32

-0
,/•
,/
7’
Cremallera
cosida
en
una
costura:
(Para
Ia
preparación
de
Ia
máquina,
véase
Ia
Pág.
30).
Preparación
y
colocación
de
Ia
cremallera:
Doble
y
planche
os
cantos
de
a
abertura.
Gire
el
margen
de
costura
izquierdo
hacia
afuera
(fig.
A).
Coloque
encima,
como
muestra
Ia
fig.
B,
el
Iado
izquierdo
abierto
do
Ia
cremallera.
Los
dientes
de
Ia
cremallera
sobresalen
tin
poco
del
canto
planchado.
La
costura
discurre
a
lo
largo
del
canto
planchado.
Corra
el
prensatelas
al
centro
de
forma
que
a
aguja
se
dave
en
el
agujero
central.
Los
dientes
de
Ia
cremallera
dis
curren
por
Ia
ranura
izquierda
del
pie
prensatelas
(fig.
C).
Al
cornenzar
Ia
costura,
deberá
levantar
tin
poco
los
dientes
para
que
entren
en
Ia
ranura
guOa.
Termine
a
costura
y
remátela.
Cierre
Ia
cremallera.
Prenda
con
un
alfi
er
el
segundo
lado
de
Ia
cremallera
al
comienzo
de
Ia
costura
(fig.
D)
y
abra
Ia
cremallera.
Gtre
ahora
hacia
afuera
el
margen
de
costura
derecho
junto
con
Ia
cinta
de
Ia
cremallera,
después
de
haber
retirado
el
alfiler,
y
fije
dicha
cinta
con
un
alfiler
a
Ia
costura,
como
muestra
Ia
fig.
E.
Los
dientes
de
Ia
cremallera
dis
curren
ahora
por
Ia
ranura
derecha
del
prensatelas
(fig.
F).
Termine
de
coser
Ia
cremallera.
Pespuntee
ahora
Ia
cinta
de
a
cremallera
sobre
Ia
costura
al
ancho
del
prensatelas.
Los
dientes
de
a
cre
mallera
discurren
ahora
por
fuera
a
10
argo
de
Ia
gua
del
prensatelas
(fig.
G).
J
S
S
S
S
S
S
S
Diki
yen
fermuani:
Makina
ayari
için
sayfa
30’e
bakeniz.
Fermuar
u
ekiIde
hazirlanir
ye
takilir:
Yirtmaç
kenarlarini
ütuleyiniz.
Sol
diki
yen
geniliini
(diki$
payini)
danya
doru
çeviriniz
(Resim
A).
Açilmi
bulu
nan
fermuarin
sol
kenarini,
Resim
B’de
garuIduu
gibi
yerIetininiz.
Fermuarin
disleri,
ütülenmis
olan
kenann
biraz
dstnda
kalmaktadr.
Dikis
yen.
ütülenmis
olan
kenar
boyunca
yOrumektedir.
Diki
ayaini,
ne
orta
batis
deliine
batacak
sekilde
sUrünUz.
Fermuarin
dileri,
dikis
ayainda
sol
kilavuz
çizgisinde
yürür
(Resim
C).
Dikise
baslarken
disleri,
kilavuz
çizgisi
içerisine
sevk
etmek
icin
biraz
yOnlendiriniz.
Dikisi
tamamlayiniz
ye
diki
yen
sonunda,
takviye
dikisi
yapiniz.
Fermuani
kapatiniz.
kind
tenmuar
kenanni,
diki
yen
balangicinda
ineyle
tutturunuz
(Resim
D)
ye
fermuari
aciniz.
Fermuar
bandi
ile
birlikte
sa
diki
payini,
diariya
doru
çevininiz;
Once
neyi
cikanniz
ye
Resim
Ede
gOruldugu
gibi,
fermuar
bandini
dikis
yen
üzerine
ineyIe
tuttununuz.
Fermuarin
dikileni
imdi
diki
ayainda,
sa
kilavuz
cizgisinde
yurümektedir
(Resim
F).
Fermuan
tamamen
dikiniz.
Fermuar
bandini,
dikis
yen
üzerine,
dikis
ayai
geniIiinde
olmak
Ozere
dikiniz.
Fenmuar
disleni
dis
kisimda,
kilavuz
kOprucuü
boyunca
yurumektedir
(Resim
G).
33

4
N
Fechos
de
correr
para
calcas
de
senhora:
Para
a
regulaçao
da
maquina
vêr
página
30.
Deslocar
a
base
do
calcador
de
colocaçao
do
fechos
para
a
esquerda,
ate
ao
lirnite.
Passar
a
forro
Os
bordos da
abertura,
de
maneira
quo
os
dentes
do
fecho
ainda
sejarn
visiveis.
Colocar
Os
alfinetes
no
bordo
D
e
fixá-lo
corn
urna
costura.
Encostar
Os
dentos
do
fecho
ao
lado
diroito
da
base
do
calca
dor,
corno
mostra
a
figura
A.
Urn
pouco
antos
do
tim
da
costura,
levantar
o
cal
cador,
abrir
o
fecho,
baixar
o
calcador
e
terminar
a
costura.
Fechar
o
fecho
do
corror.
Colocar
alfinetes
na
carcola
sobrante
na
direcçao da
costura.
Cob-
car
em
posição
o
ado
osquordo
do
fecho
do
correr
(fig.
B).
Abrir
o
fecho,
Colocar
o
alinhavar
o
guia
diroito
de
forma
quo
acompanho
o
bordo
do
tecido
(fig.
C).
Um
pouco
antes
do
tim
da
costura,
doixar
a
agulha
em
baixo,
subir
o
calcador
o
fechar
o
fecho
de
corror.
Voltar
a
baixar
o
calcador
o
torminar
a
costura.
No tim
da
costura,
fazer
urn
romato.
Zippers
in
ladies’
slacks:
For
machine setting
see
page
30.
Move
the
zipper
toot
to
the
left
as
tar
as
it
will
go.
Press
the
edges
of
the
placket.
Baste
the
closed
zip
to
the
right
edge
of
the
placket
on
the
wrong
side
so
that
its
teeth
are
still
visible.
Pin
tacing
strip
D
to
the
underside
and
stitch
it
down
at
the
same
time
as
you
sew
the
zip.
The
zip
teeth
run
along
the
right
guiding
edge
of
the
foot
(Fig.
A).
Shortly
before
the
end
of
the
seam
leave the
needle
down
in
the
fabric,
raise
the
zipper
foot,
open
the
zip,
lower
the
zipper
foot
again
and
finish
sewing the
seam.
Close
the
zip.
Pin
the
overlapping
edge
along the
intended
seam
line.
Baste
left
zip
edge
(Fig.
B).
Open
zip.
Attach
the
edge
guide
and
position
it
for
the
desired
seam
margin
so
that
it
moves
along
the
edge
of
the
fabric
(Fig.
C).
Shortly
before
the
end
of
the
seam
leave
the
needle
down
in
the
fabric,
raise
the
zipper
foot
and
close
the
zip.
Lower
the
zipper
toot
and
tinish
sewing
the
seam.
Secure
the
end
of
the
zip
seam
with
a
bartack.
4

I
,ffI
I
‘
/
/
7
I
Cremalleras
para
pantalones
de
seinora:
(Para
a
preparaclón
de
a
maquina,
véase
Pãg.
30).
Corra
el
pie
para
cremalleras
hacia
Ia
izquierda
hasta
el
tope.
Doble
y
planche
os
bordes
do
a
abertura.
Hilvane
Ia
cremallera
cerrada
por
debajo
del
lado
derecho
doblado
de
forma
que
queden
visibles
los
dientes
de
a
cremallera.
File
ahora
a
tapeta
D
con
alfileres
para
que
quede
prendida
también
por
a
costura.
Los
dientes
do
a
cremallera
discurren
a
Ia
fargo
de
Ia
guéa
derecha
del
prensatelas
(fig.
A).
Poco
antes
del
final
de
Ia
costura,
deje
Ia
aguja
clavada
en
Ia
tela,
alce
el
pren
satelas,
y
abra
Ia
cremallera,
bajo
el
prensatelas
y
termine
Ia
costura.
Cierre
Ia
cremallera.
Prerida
con
alfileres
el
borde
saliente
siguiendo
el
trayecto
de
a
costura.
Hilvane
el
I
ado
izquierdo
de
Ia
cremallera
(fig.
B).
Abra
Ia
cremallera.
Coloque
Ia
guèa
marginal
y
posiciônela
de
forma
quo
discurra
a
a
fargo
del
borde
de
Ia
tela
(fig.
C).
Poco
antes
del
final
de
Ia
costura.
deje
Ia
aguja
clavada
en
a
tela,
alce
el
prensatelas,
cierre
Ia
cremallora,
bale
el
prensatelas
y
termine
Ia
costura.
Asegure
of
final
de
Ia
costura
con
una
presilla.
Pantalon
Fermuari
(Bayanlar
1cm):
Makina
ayari
cm
sayfa
30’e
bakiniz.
Fermuari
sofa
doru,
dayanaa
kadar
sürünüz.
Yirtmaç
kenarint
ütüleyiniz.
Fer
muan,
fermuar
dilori
halen
garulebile
cek
sekilde
olmak
üzere,
ütülonmis
olan
sa
ylrtmac
kenarina
teyelleyiniz.
Hazirlanmis
olan
altta
kalan
kumas
kenarini
(D)
ineleyiniz
ye
dikis
esnasinda
birlikte
tutturunuz.
Fermuarin
disleri,
sa
kilavuz
köprücuu
boyunca
yurümektedir
(Resim
A).
Diki
yen
bitiminden
kisa
bir
mesafe
änce,
ineyi
kumasa
batmis
durumda
birakiniz.
Dikis
ayaini
yukariya
kaldiriniz
ye
dikii
tamamlayiniz.
Fermuari
kapayin,z.
Diariya
doru
çikan
(taan)
yirtmaç
kenarini
diki
yen
boyunca
ineleyiniz.
Sol
fermuar
kenarini
teyelleyiniz
(Resim
B).
Fermuari
aciniz.
Kilavuz
cetvelini
yerletiriniz
ye
bunu,
kilavuz
cetveli
kumain
kenari
boyunca
yürüye
cek
ekilde
olmak
üzere,
diki
yerinin
kenara
alan
mesafesine
(genisliine)
gäre
yöneltiniz
(Resim
C).
Diki
yen
bitiminden
kisa
bir
mesafe
dnce
ineyi
kumasa
batmis
durumda
birakiniz.
Diki
ayaini
yukariya
kaldiriniz,
fermuari
kapatiniz,
diki
ayaini
aaiya
indiriniz
ye
dikisi
tamamlayiniz.
Fermuar
diki
yen
bitimini
bir
sürgü
tIe
takviye
ediniz.

Cerzir
(pontear):
Preparacao
da
rnaquina:
Calcador:
Calcador
para
cerzir
(acessOrio
extra)
Ponto:
Ponto
a
direito
Tensão
do
fio
da
aguiha:
Fio:
Aguiha:
Arrastador:
Colocacao
do
pé
para
cerzir:
Retirar
o
suporte
do
calcador;
corn
a
ajuda
do
parafuso
A.
fixar
o
calcador
para
cerzir.
verificando
se
a
alavanca
B
encosta
na
parte
superior
do
pemo
C
do
prende-aguiha.
Fazer
subir
o
fio
da
canela.
No
inicio
da
costura,
segurar
nos
dois
fios.
Executar
alguns
pontos
no
tecido,
encostando
os
dois
fios
urn
ao
outro
0
cobrir
a
zona
estragada
(ver
fig.
D).
No
firn
de
cada
linha
de
costura
fazer
urn
arco.
corno
indica
a
figura
D.
Quando
a
zona
estiver
totalmente
coberta,
rodar
o
tecido
900
e
coser
per
pendicuarrnente
as
costuras
anteriores
(fig.
E),
ate
cobrir
por
cornpleto
toda
a
zona.
Durante
esta
operacão
0
compri
rnento
do
ponto
e
cornandado
rnanual
rnente.
Darning
foot
(special
accessory)
Straight
stitch
Centre
Ease
needle
thread
tension
Fine
rnachine
ernbroidery
thread
Size
70
How
to
fit
the
darning
foot:
Rernove
the
sewing
foot
holder,
then
secure
the
darning
foot
with
screw
A,
rnaking
sure
that
wire
B
is
resting
on
screw
shank
C.
First
draw
up
the
bobbin
thread
and
hold
both
threads
when
beginning
to
sew.
Then
rnake
a
few
stitches
in
the
rnaterial.
Stitch
back
and
forth
over
the
darnaged
area
in
serpentine
fashion,
as
shown
in
Fig.
D,
rounding
the
end
of
each
line.
When
the
darnaged
spot
is
covered
evenly,
turn
the
fabric
through
90
and
darn
over
the
preceding
rows
of
stitches
(Fig.
E)
until
the
darnaged
spot
is
covered
On
this
type
of
work
you
deterrnine
the
stitch
length
yourself
by
rnoving
the
fabric
back
and
forward.
—
‘%
‘%%
•%
%
•S
S
—
S
S
*
*
S
%55%
_
*
%%
%.%
S__i
Darning:
Preparing
the
rnachine:
Sewing
foot:
Menos
forte
Fio
para
bordar
fino
Grossura
70
Ern
baixo
Stitch
type:
Needle
position:
Tension:
Thread:
Needle:

k-,’,--’—
*—-#-l--
—
)-t-t-t-4-’-I-
—
-j--t-1-44.———
-H-44——
A+
4-4-*—
+++4-
4
t—
1*q+44
-)4-+--
I
Zurcidos:
Prensatelas:
Algo
más
floja
de
10
normal
HiIo
fino
de
zurcir
N
70
Oculto
Colocación
del
pie
zurcidor:
Retire
el
soporte
del
prensatelas
y
fije
el
pie
zurcidor
con
el
tornillo
A.
Asegüse
de
que
el
estribo
B
se
apoye
contra
el
portatornillos
C.
Para
comenzar
a
zurcir
extraiga
primeramente
el
hilo
inferior.
Sujete
ambos
hilos
por
Ia
punta
al
comenzar
a
coser.
Haga
ahora
unas
puntadas
en
Ia
tela.
Extienda
los
hilos
bien
pegados
unos
a
otros
y
zurza
el
trozo
dainado
(fig.
D).
Zurza
en
redondo
al
final
de
cada
costura
(fig.
E).
Tan
pronto
como
esté
recubierto
uniforme
mente
el
trozo
dainado.
gire
Ia
tela
90’
y
zurza
los
hilos
tensados
anteriormente
(fig.
E)
hasta
que
el
trozo
dainado
quede
cerrado
por
completo.
El
argo
de
pun
tada
lo
determina
usted
misma
moviendo
Ia
tela
en
vaivén,
4
j
Orerek
tamir
etmek:
Makinanin
hazirlanmasi:
Diki
ayai:
Orerek
tamir
etme
ayai
Batis:
Düz
dikis
Ust
iplik
gerginhii:
Iplik:
lone:
Transportör
(taiyici):
Aaiya
indirilmi
durumda
Orerek
tamir
etme
ayaini
makinaya
äyle
takarsiniz:
Ayak
tutamaini
çikariniz,
ärerek
tamir
etme
ayaini
A
vidastyla
tespit
ediniz.
Bu
arada,
B
eri
kolunun
C
vida
sapi
(baIantisi)
üzerinde
yatay
duruma
gel
mesine
dikkat
ediniz,
Once
alt
iplii
yukariya
getiriniz.
Her
iki
plii,
dikie
baslarken
sikica
tutunuz.
Kumasa
änce
birkac
diki
(batis)
yapiniz.
Iplikleri
yan
yana
olmak
üzere
biraz
geriniz
ye
hasara
uramis
yen,
üst
kisimdan
ärerek
tamir
ediniz
(Resim
Dye
bakiniz).
Her
defasinda
diki
yen
sonunda,
yuvarlak
yaylar
halinde
Orerek
tamir
ediniz
(Resim
Eye
bakiniz).
Orerek
tamir
olunacak
kisim
muntazam
bir
sekilde
örtüldü
ünde,
kumai
90
derece
çeviriniz
ye
daha
änce
genilmi
olan
iplikler
üzenin
den
(Resim
E’ye
bakiniz)
Orülecek
kisim
kapanincaya
kadar,
ärerek
tamir
ediniz.
Bu
calisma
esnasinda
batis
uzunIuunu,
dikilecek
eyi
bir
oraya
bir
buraya
hareket
ettirmek
suretiyle, kendiniz
tayin
ediniz.
N
Pie
para
zurcir
(accesonio
especial)
Punto
recto
Puntada:
TensiOn
del
hilo
superior:
Hilo:
Aguja:
Transportador:
Biraz
daha
gevsek
Ince
makina
nakis
iplii
Kalinlik
70
I
I
I
I

(o
Limpeza
e
lubrificacao:
Levantar
o
calcador
e
a
agulha.
Desapertar
Os
dois
parafusos
de
fixacao
da
chapa
da
agulha
e
levantá—la.
Umpar
o
arrastador
corn
a
ajuda
do
pincel.
Desviar
as
patilhas
A
do
carril
para
o
exterior.
Retirar
o
aro
B
e
a
Iancadeira
C.
Limpar
o
carril.
Do
vez
ern
quando
pOr
urna
gota
do
Oteo
no
carril
da
lancadeira.
Atencão!
Não
deixar
cair
a
lança
deira
C.
4
Cleaning
and
oiling:
Raise
the
needle
and
the
sewing
foot.
Rernove
the
two
needle
plate
screws
and
take
off
the
needle
plate.
Clean
the
feed
dog
with
the
brush.
Push
catches
A
of
the
sewing
hook
outwards.
Take
out
ring
B
and
sewing
hook
C.
Clean
the
hook
raceway.
Apply
a
drop
of
oil
to
the
hook
raceway
occasionally.
Caution:
do not
drop
the
sewing
hook.
J
N
Engrase
y
limpieza:
Eleve
Ia
aguja
y
el
prensatelas.
Aftoje
los
dos
tornillos
de
fijacion
y
retire
Ia
placa
de aguja.
Lirnpie
el
transportador
con
un
pincel,
Gire
hacia
afuera
el
pestillo
A
del
garfio
(larizadera),
Retire
el
anillo
B
y
el
garfio
C.
Limpie
a
pista
del
garfio.
Ponga
do
vez
en
cuando
una
gota
do
aceite
en
Ia
pista
del
garfio.
Atención!
cuide de
que
no
se caiga
el
garfio
al
suelo.
Temizlemek
ye
yalamak:
lneyi
ye
diki
ayaini
yukariya
kaldiri
niz.
Her
iki
tespit
vidasini
gevetip
çikari
niz
ye
batis
levhasini
cikartiniz.
Firça
He
transportaru
(taslyiclyl)
ternizleyiniz.
Kav
rayicinin
rnandalini
(A)
diariya
doru
çeviriniz
B
halkasini
ye
C
kavrayicisini
cikariniz,
Kavrayicinin
buluriduu
hareket
sahasirii
ternizleyiniz.
Arasira
kavrayicinin
bulunduu
hareket
sahasina
bir
damla
ya
darnlatiniz.
Dikkat.
kavrayiciyi
yore
duurrneyiniz.
38

Mudança
da
lampada:
Desligar
a
máquina
da
ficha.
Empurrar
a
lampada
para
cima.
rodá-la
no
sentido
A
e
retiráIa.
Colocar
a
lampada
nova
de
maneira
que
Os
seus
espigoes
penetrem
nas
fendas
C.
Empurar
a
lampada para
O
alto
e
rodã-la
no
sentido
B.
_____
Changing
the
bulb:
Pull
out
the
mains
plug.
Push
the
bulb
upwards,
then
in
direction
A
and
pull
it
out.
Insert
the
new
bulb
so
that
the
pins
enter
slots
C.
push
the
bulb
upwards
and
turn
it
in
direction
B.
Cambio
de
Ia
bombilla:
Desenchufe
Ia
maquina
de
Ia
red.
Empuje
Ia
bombilla
hacia
arriba,
gèrela
hacia
A
y
saquela.
Coloque
Ia
nueva
bombilla
de
forma
que
las
guas
enca
jen
en
las
ranuras
C,
empüjela
hacia
arriba
y
greIa
hacia
B.
—
+
Ampul
deitirmek:
Elektrik
fiini
ceklniz.
Ampulü
yukariya
doru
bastiriniz,
A
yonunde
ceviriniz
ye
diariya
çikariniz.
Yeni
ampulü,
disler
C
yivleri
icerisine
girecek
ekilde
takiniz.
Ampulu
yukariya
doru
bastiriniz
ye
B
yönunde
ceviriniz.

Quadro
das
aguihas
A
escolha
da
ponta
da
aguiha
adequada
é
muito
mportante
e
garante
Os
meihores
resultados.
Matérias:
Matérias:
Matérias:
Leves
Médias
Pesadas
Aguthas:
Aguihas:
Aguihas:
60
70
75
[
80
90
100
110
120
Pontas
da
aguiha
Designacao
Forma
da
ponta
Ponta
e
Utilisaçoes
buraco
da
aguiha
130/705
H
Ponta
esférica
Aguiha,
normal
para
tecidos
sintéticos,
Grossura
da
fina
malha
fina,
inho
fino,
chiffon,
cambraia
agulha:
70/80
—
—
de
linho,
organdi,
tecidos
de
a,
veludos
para
costuras
de
ornamentacão
e
bordados.
130/705
H-SUK
Ponta
esférica
Tecidos
tricotados
de
maha
larga.
Grossura
da
media
tecidos
de
malha,
lastex,
interlock,
agulha:
70/110
Quiana,
Simplex.
130/705
H-PS
Ponta
esférica
Agulha
Stretch
especialmente
desenvol
Grossura
da
media
vida
para
máquirias.
Convém
parti
agulha:
75+90
cularmente
para
tecidos
Stretch
e
maihas
delicadas.
130/705
H-SK
Ponta
esferica
Lycra
para
malha
grossa
(bainnas,
cam
Grossura
da
—
—
—
grossa
binacOes,
etc.)
agulha:
70/110
Lycra,
Lastex,
Simplex.
130/705
H-J
Ponta
aguçada
Fustão,
roupa
do
trabalho,
linhos
pesa
Grossura
da
—
—
—
redonda
dos,
jeans,
tea
para
yeas
fina.
agulha:
90—110
130/705
H-LL
Ponta
cortante
Couros,
camurca,
peles.
Grossura
da
a
direita
agulha:
70—120
-1-
130(705
H-PCL
Ponta
cortante
mitacão
couro,
plástico,
Grossura
da
corn
rannura
folhas
plástico,
oleado,
agulha:
80—110
obliqua
(a
esquerda)
130
H-N
Ponta
estérica
Pontos
corn
seda
prOpria
para
casear
ou
Grossura
da
—
fina.
fio
sintético
30/3
agulha:
70-110
Buraco
longo
130/705
H-WING
Ponta
para
Costuras
ajour
muito
decorativas
em
Grossura
da
bordados
ajour
tecidos
finos,
organdi,
cambraia
do
agulha:
100
linho,

Duadro
das
aguthas
Designacao
Comprimento
Largura
DistiJtilisaçoe
do
ponto
do
ponto
entre
aguiflasi
1301705
H-ZWI
2,5
mm
—
1,6
mm
nervuras
‘fl
Grossura:
80
2,5
mm
—
2,0
mm
normais
1301705
H-ZWI
Grossura:
80
2,5
mm
—
2,5
mm
nervuras
Iargas
Grossura:
90
2,5
mm
—
3,0
mm
extra-largas
V
Grossura:
100
3,0
mm
—
4,0
mm
Costuras
de
ornamentação
corn
aguihas
duplas
Antes
da
costura
de
ornamentaçao,
rodar
o
volante
lentamente
e
controlar
se
as
aguihas
penetram
perfeitamente
na
chapa
da
aguiha.
Assim
não
correrá
o
risco
das
aguihas
se
partiren,
durante
a
costura.
i
Pontos
ornameritais/Pontos
zig-zag
1301705
H-ZWI
Grossura:
80
0,5—1.5
mm
larga
1
,6
mm
OrnamentacOes
Grossura:
80
0,5—1,5
mm
estreita
2,0
mm
Ornamentacoes
_____
Grossura:
80
0,5—1,5
mm
Lestreita
2,5
mm
Jornamentacoes
Orla
corn
ajour/Aguiha
dupla
especial
fl
130/705
H-ZWI-HO
Grossura:
80
2,0—3,0
mm
muito
estreita
—
Efeito
decorativo
j
Grossura:
100
2,0—3,0
mm
muito
estreita
—
de
orla
corn
J
ajour.
Sao
mais
apropriados
Os
tecidos
muito
trabaihados
e
a
cambraia
de
j
I

Needle
chart
Using
the
adequate
needle
guarantees
a
better
working
up
of
the
material.
Fabric
weight:
Fabric
weight:
Fabric
weight:
light
medium
heavy
NcJse:
Needle
points
System
&
No.
Profile
Point
&
eye
Suitable
for
130/705
H
Light
ball
point
Universal
needle
for
fine-meshed
—
70,
80
synthetics,
fine
linen,
chiffon,
batiste,
—
organdy, woolens,
velvet,
fancy
seams
and
embroidery
work
130/705
H-SUK
Medium
Coarse
knitted
fabrics,
Lastex,
double
70,
110
ball
point
jersey
fabrics,
Quiana and
Simplex.
130/705
H-PS
Medium
Stretch-fabric
needle.
Particularly
suitable
75,
90
ball
point
for
delicate stretch
and
knitted
fabrics.
130/705
H-SKF
Heavy
Wide-meshed
corsetry,
Lycra,
Simplex
70,
110
ball
point
and
Lastex.
130/705
H-J
Acute
Twill,
workwear,
heavy
linen,
blue
jeans
90—110
round
point
and
light
canvas.
130/705
H-LL
Narrow
Leather,
suede,
calf
and
goatskin
70—120
twist
point
leathers.
130/705
H-PCL
Narrow
wedge
Imitation
leathers,
plastic
materials,
80—110
point
with
plastic
sheeting
and
oilcloth.
left-twist
groove
130
H-N
Light
ball
point,
Seams topstitched
with
buttonhole
silk
70—110
long
eye
or
No.
30/3
synthetic thread.
130/705
H-WING
Hemstitching
Attractive
hemstitching
on
heavily
100
-E’J
—(
point
dressed
materials,
organdy
and
‘—
glass
cambric.

JeedIe
chart
System
&
No.
Stitch
length
1
Stitch
width
Needle
Suitable
for
spacing
130/705
H-ZWI
2.5
mm
-
1.6
mm
Medium-wide
80
2.5
mm
-
2.0
mm
cording
130/705
H-ZWI
I
80
2,5
mm
—
2.5mm
Wide
cording
90
2.5mm
-
3.0mm
Extra
wide
cording
100
3.0mm
-
4.0mm
Extra-wide
cording
Decorative
designs
sewn
with
twin
needles
Before
you
start
sewing,
turn
the
handwheel and
check
to
make
sure the
needles
stitch
into
the
fabric properly.
In
this
way,
needle
breakage
can
be
largely
prevented.
Decorative
and
zigzag
patterns
i
130/705
H-ZWI
80
0.5—1.5
mm
wide
1.6
mm
Ornamentations
80
0.5—1.5
mm
narrow
2.0
mm
Ornamentations
80
0.5—1.5mm
narrow
2.5mm
Ornamentations
Special hemstitching
twin
needle
ri
130/705
Jj.
HZWl-Ho
80
2.0—3.0
mm
very
narrow
—
Decorative
hem
100
2.0—3.0mm
very
narrow
—
stitching
effect
11
Heavily
dressed
[
fabrics
are
par
ticularly
suitable.

Tabla
de
agujas
La
elecciOn
de
Ia
aguja
correcta
es
algo
muy
importante
para
obtener
una
buena
costura.
]
Género
Genero
Género
ligero
medio
pesado
aguja
aguja
aguja
60
70
75
80
90
100
110
120
Punta
de
las
agujas
Sistema
Perfil
Forma
de
Ia
Apropiada
para
y
nUmero
punta
y
del
ojo
130/705
H
Punta
esférica
Aguja
universal
para tejidos
sintéticos
de
N°
70/80
—
pequena
malla
fina,
mo
fmno,
chifOn,
batista,
organdi,
‘—_.
lana,
terciopelo,
costuras
decorativas,
bordados.
130/705
H-SUK
Punta
esférica
Géneros
de
punto
de
malla
gruesa,
tricot,
N°
70/110
media
lastex,
interlock,
quiana,
simplex.
130/705
H-PS
Punta
esfénca
Aguja
especial
para
géneros
elãsticos
y
N°
75+90
-
media
géneros
de
punto
delicados.
130/705
H-SKF
Punta
esferica
Corseteria a
base
de
malla
gruesa,
licra,
70/110
grande
simplex,
lastex.
130/705
H-J
Punta
redonda
Sarga,
ropa
profesional
y
de
trabajo,
N°
90
-110
puntiaguda
mo
pesado,
vagueros,
lona
ligera.
130/705
H-LL
Punta
cortante
Cuero,
ante,
box-calf,
piel
de
cabra
N°
70
-120
a!
Ia
derecha
(cabritilla).
130/705
H-PCL
Punta
cortante
a
Cuero sintético,
plastico,
hule.
N°
80
-110
—Z
Ia
izquierda,
con
canal
en
punta
130
H-N
Punta
esférica
Pespunteados
con
hilo
de
seda
para
N°
100
-110
pequena,
ojo
ojales
o
hilo
sintético
del
N°
30/3
alargado
130/705
H-WING
—
Punta
pam
Calados
y
costuras
de
vainica
de
gran
N°
100
vainica
efecto
en
generos
de
mucho
apresto,
y
calados
organdi
y
similares

äbla
de
agujas
Sistema
Largo
de
Ancho
de
Distancia
Apropiada
para
y
nUmero
puntada
puntada
entre
agujas
[1
130/705
H-ZWI
2,5
mm
—
1,6
mm
Lorzas
normales
N°
80
2,5
mm
—
2,0
mm
Lorzas
normales
130/705
H-ZWI
N°
80
2,5
mm
-
2,5
mm
Lorzas
anchas
N°
90
2,5
mm
-
3,0
mm
Lorzas
muy
Y
N°
100
3,0mm
—
4,0mm
anchas
Motivos
decorativos
con
agujas
gemelas
Antes
de
comenzar
Ia
labor
deseada,
gire
el
volante
con
a
mano
para
comprobar
silas
agujas
Se
clavan
perfectamente;
de
esa
forma
evitará
Ia
rotura
de
las
agujas.
Adomoslzigzag
i
130/705
H-ZWI
N°80
0,5—1,5mm
ancho
1,6mm
Adomos
N°
80
0,5—1,5
mm
estrecho
2,0
mm
Adornos
N°
80
0,5—1,5
mm
estrecho
2,5
mm
Adomos
•
Vainica/Agujas
gemelas
especiales
11
130/705
‘
H-ZWI-HO
,
N°
80
2,0—3,0
mm
muy
estrecho
Calados
y
vaini—
N°
100
2,0—3,0
mm
muy
estrecho
ca
muy
deco
rativos
en
ge
hA
neros
de
mucho
apresto,
organdi
V
y
similares.
45

eulatauIukko
)ikea
neulan
valinta
varmistaa
parhaan
mpelutuloksen.
Kangaslaatu
Kangaslaatu
Kangaslaatu
ohut
kesklpaksu
paksu
Nea
Neulalajit
ja
neulankärjen
muodot
Neulalaji
Muoto
Neulan
kädd
Sopil
käytettavaksi
_iasiImâ
130/705
H
Pieni
pallokarki
Yleisneula:
pienisilmukkaiset
tekokuituneu
Koko
—
—
lekankaat.
ohuet
ja
keskipaksut
puuvillakan
70/80
kaat,
shifonki,
batisti,
organdy,
villakankaat,
sametti,
koristeompelu,
nimikointi
130/705
H-Suk
Pallokärki
Suurisilmukkaiset
neulekankaat,
virkatut
Koko
-z
kankaat,
lastex,
interlockneulos,
simplex
70/110
130/705
H-PS
erpaJlokärki
koneideneiikoisneulajoustaviinkan
Koko
pieni
kaisiin,
Sopii
erittäin
hyvin
erilaisiin
joustaviin
75
+
90
neulansilmä
kankaisiin
ja
neuleislin
ja
säämiskään.
130/705
H-SKF
___
Suuri
Suurisilmukkaiset
alusasumatenaalit,
lycra,
Koko
—
—
pallokärki
simplex,
lastex
70/110
130/705
H-J
Kärki:
Haalarikankaat
paksut
puuvillakankaat,
Koko
pyorea
puuvilladenimi,
farmarikankaat,
ohut
90—110
purjekangas,
ohut
nahka
130/705
H-IL
Viisto
kärki
Nahka,
en
laadut
ja
paksuudet
70—120
(viistottu
oikealle)
130/705
H-PCL
Viisto
kärki
Tekonahka,
kerni,
muovikankaat
ja
-kelmut
Koko
jossa
ura
80
—110
(vasemmalle)
130
H-N
Pitkä
neulansilma,
Koristetikkauksiin
napinläpisilkilla
tai
Koko
pieni
pallokärki
tekokuitulangalla
30/3
70—110
130/705
H-Wing
Reikäommel-
Koristeompeluun
kiinteäsidoksisiin
Koko
-fJ
—(
kärki
neuleisiin,
organdyyn,
lasibatistiin
100
46

ieulataulukko
to
,
pituus
leveys
käytettävaksi
130/705
H-ZWI
2,5
mm
-
1,6mm
Hiuslaskos
Koko
80
2,5
mm
—
2,0mm
Hiuslaskos
‘
130/705
H-ZW1
Koko
80
2,5
mm
—
2,5mm
Levea
hiuslaskos
j
Koko
90
2,5
mm
—
3,0
mm
Levea
hiuslaskos
Koko
100
3,0
mm
—
4,0
mm
Levea
hiuslaskos
Kotisteluompelu
kaksoisneulaa
käyttäen
Enneri
ompelua
on
hyvà
tarkistaa
koneen
kasipyörästä
kääntämällä,
että
neula
mahtuu
vapaasti
painumaan
alas.
Konsteommel/siksakmallit
1i
j
Koko8O
0,5—1,5mm
levea
1,6mm
Koristelu
Koko8O
0,5—1,5mm
kapea
2,0mm
Koristelu
Koko
80
0,5—1,5mm
kapea
2,5mm
Koristelu
Reikäommel/eiikoiskaksoisneula
n
-
———
H
130/705
H-ZWI-HO
I
Koko
80
2,0—3,0
mm
kapea
-
Reikäommel
Koko
100
2,0—3,0mm
kapea
—
koristeluohuisiin
I
ja
tãrkattyihin
kankaisiin
47

Syfejl
09
athjIpning
at
disse
Arsag:
1.
Maskinen
overspringer
sting
Nâlen
ikke
sat
rigtig
p
plads.
Der
er
sat
en
forkert
nl
i.
Nlen
er
bøjet
oIler
stump.
Maskinen
ikke
trádet
korrekt,
NMen
er
for
fin
hi
garnet.
2.
Overtráden
knkker
At
de
farnvnte
grunde.
For
stark
trâdspnding.
For
dárligt
eller
knudret
garn.
eller
garn,
som
er
blevet
for
tørt
gennem
lang
tids
lagring.
3.
Nàlen
knkker
Nálen
er
ikke
fart
hell
i
bund,
Nlen
er bajet.
Nlen
for
tynd
eller
for
tyk.
Nálen
bajes
og
stader
mod
stingpladen,
fordi
der
trkkes
oiler
skubbes
stoffet.
Spolekapsien
ikke
sat
rigtig
pa
plads.
4
Sommen
er
ikke
regelmssig
Spndingen
or
ude
at
justering.
For
kraftigt,
knudret
elier
hârdt
garn.
Undertráden
or
ujvnt
opspolet.
Trádlakker
pa
over-
oiler
undersiden
at
stottet.
Afhjipning:
Nien
fares
heit
op.
tii
den
gar
mod.
Den
flade
side
at
koiben
skai
vende
bagud.
Der
skai
anvendes
nab
at
system
130/705
H.
Ny
nâl
isttes.
Tradforlabet
kontrolberes.
Der
vlges
en
nãl
otter
nabetabeilen.
Se
under
1.
Tradspndingen
reguleres.
Anvend
kun
godt
sygarn.
Ny
nal
isttes
og
føres
helt
op.
til
den
gâr
mod.
Ny
nai
isttes.
Naletabellen falges.
Maskinen
skal
selv
transportere
stottet.
Sytøiet
ma
kun
fares
med
let
hand.
Ved
indstningen
af
spolekapsien
skal
denne
trykkes
helt
I
bund.
Over-
og
undertrádsspnding
kontrolleres.
Anvend
kun
pertekt
garn.
Opspolingen
ma
ikke
foretages
pa
hand.
Traden
skal
fares
gennem
spoleforspndingen.
Trádningen
kontrolieres.
Over
og
undertradsspndingen
kontrolieres.

Arsag:
Afhjlpnng:
5.
Maskinen
transporterer
ikke
euer
kun
uregelmssigt
Der
har
samlet
sig
for
meget
systev
Stingpladen
aftages,
og
systavet
fjernes
sammen
mellem
transporterens
med
en
pensel
tandrkker.
Transporteren
er
ssnket.
(Omskifteren
Omskifteren
for
transportorsnkning
for
transportersnkning
star
til
højre).
skydes
over
tH
venstre.
6.
Maskinen
gàr
tungt
Der
er
kommt
tradrester
kiemme
Tradresterne
fjernes,
og
der
kommes
griberbanen.
(kun)
en
drâbe
olie
pa
griberbanen.
Vigtigt
Nár
maskinen
er
tradet,
ma
den
ikke
startes
uden
ilagt stof.
Nár
man fortader
maskinen,
setv
for
et
kort
ajebtik,
skat
der slukkes
for
stremmen
med
hovedafbryderen.
Dette
er
specielt
vigtigt, hvis
der
er
børn
I
nrheden.

Faults
and
how
to
remedy
them
Cause:
1.
Machine
skips
stitches
Needle
not
inserted
correctly.
Wrong
needle used.
Needle bent
or
blunt.
Machine
threaded
improperly.
Needle
too
thin
for
thread
used.
2.
Needle
thread
breaks
For
any
of
the
above
reasons.
Thread
tension
too
strong.
Poor-quality
or
knotty
thread used,
or
thread that
has
become
too
dry
by
excessive
storage.
3.
Needle
breaks
Needle
not
pushed
up
as
far
as
it
will
go.
Needle
bent.
Needle
too
thin
or
too
thick.
Needle
bent
and
strikes
needle
plate
because
work
is
pushed
or
pulled.
Bobbin
case
improperly
inserted.
4.
Seam
is
not
uniform
Tension
out
of
adjustment.
Thread
too
thick,
knotty
or
hard.
Bobbin
thread
wound unevenly.
Remedy:
Push
needle
up
as
far
as
it
will
go,
its
flat
shank
side
facing toward
the
back.
Insert
system
130/705
H
needle.
Insert
new
needle.
Check
threading.
Select
needle
according
to
Needle
Chart.
See
par.
1
above.
Regulate thread
tensions.
Use
only
good-quality
thread.
Insert
new
needle
and
push
it
up
as
far
as
it
will
go.
Insert
new
needle.
See
Needle
Chart.
Let
machine
feed the
work
alone.
Only
guide
the
material
lightly.
When
inserting
the
bobbin
case,
push
it
in
as
far
as
it
will
go.
Check
upper
and
lower
tensions.
Use
first-class
thread
only.
During
bobbin
winding,
do
not hold
thread
in
hand,
but
pass
it
through
the
bobbin
tension
stud.
Thread machine
properly
and
check
both
tensions.
Kinks
appear
on
top
and
bottom
of
material.

Cause:
Remedy:
5.
Machine
feeds
irregularly
or
not
at
all
Lint
has
accumulated
between
tooth
Remove
needle
plate
and
clean
out
lint.
rows
of
feed
dog.
Feed
dog
dropped,
(Drop-feed
control
is
at
right.)
Flick
drop-feed
control
to
the
left.
6.
Machine
runs
with
difficulty
Thread
ends
in
hook
raceway.
Remove
thread
ends
and
put
a
drop
of
oil
into
hook
raceway.
7.
Important
notes:
Never
run
a
threaded
machine
unless
there
is
a
piece
of
fabric
under
the
sewing
foot.
If
you
have
to
leave
the
machine,
even
for
a
short
while,
be
sure
to
switch
off
the
master
switch.
This
is
particularly
important
when
children
are
around.
51

Fallos
y
remedios
Causa:
1.
La
máquina
hace
puntadas
saltadas
La
aguja
no
está
bien
colocada.
No
se
ha
colocado
Ia
aguja
correcta.
La
aguja
estã
torcida
o
despuntada.
La
maquina
no
está
enhebrada
debidamente.
La
aguja
es
demasiado
fina
para
€1
hilo
utilizado.
2.
El
hilo
superior
se
rompe
Por
las
razones
nombradas
anteriormente,
La
tension
del
hilo
es
demasiado
fuerte
El
hilo
no
es
de
buena
calidad
o
es
nudoso
o
ha
estado
almacenado
demasiado
tiempo.
3.
La
aguja
se
rompe
La
aguja
no
está
bien
colocada.
La
aguja
está
torcida.
La
aguja
es
demasiado
fina
o
demasiado
gruesa.
La
aguja
choca
contra
Ia
placa
de
aguja
por
tirar
de
Ia
tela
o
empujarla.
La
cápsula
de
Ia
canulla
no
está
colocada
debidamente.
4.
La
costura
no
es
unitorme
La
tensiOn
de
los
hilos
no
está
bien
regulada.
Hilo
demasiado
fuerte,
nudoso
o
rigido.
El
hilo
de
a
canilla
no
está
bien
devanado.
Los
hilos
no
se
anudan
dentro
del
material,
sino
encima
o
debajo.
Compruebe
si
está
introducida
hasta
el
tope
y
con
el
lado
piano
hacia
atrás.
Coloque
una
aguja
del
sistema
130/705
H.
Coloque
una
aguja
nueva.
Compruebe
el
enhebrado,
Elija
Ia
aguja
de
acuerdo
con
Ia
tabla
de
agujas.
Compruebe
los
puntos
citados
en
el
nümero
1.
Regule
a
tensiOn
de
los
hilos.
Utilice
hilos
de
buena
calidad
y
en
buenas
condiciones.
Compruebe
si
está
introducida
hasta
el
tope.
Coloque
una
aguja
nueva,
Siga
las
normas
de
Ia
tabla
de
agujas.
La
tela
deberá
ser
arrastrada
Urlicamente
por
Ia
mãquina.
Al
colocar
Ia
cãpsula
con
Ia
canulla
deberá
presionarse
un
poco
hasta
que
encaje
perfectamente.
Compruebe
Ia
tension
de
ambos
hilos.
Use
hilo
de
buena
calidad.
Haga
pasar
el
hilo
por
el
tensor
previo
siempre
que
llene
Ia
canilla.
Compruebe
el
enhebrado
y
Ia
tensiOn
de
ambos
hilos.
Remedio:

Causa:
Remedio:
5.
La
maquina
no
arrastra
el
material
O
10
hace
irregularmente
Se
ha
acumulado
polvo
y
suciedad
entre
Retire
Pa
placa
de
aguja
y
Pimpie
con
un
las
hileras
de
dientes
del
transportador.
pincel
el
transportador.
El
transportador
esta
oculto
(Pa
palanca
Ponga
Pa
palanca
a
Pa
izquierda.
está
a
Ia
derecha).
6.
La
maquina
va
forzada
En
Pa
pista
del
garfio
hay
restos
de
hilos,
Limpie
Pa
pista
del
garfio
y
ponga
una
gota
de
aceite.
7.
Nota
importante
No
ponga
en
marcha
Ia
maquina
enhe
brada
sin
haber
colocado
antes
una
pieza
de
costura.
Siempre
que
aban
done
Pa
mãquina,
aunque
sea
por
corto
tiempo,
desconecte
el
interruptor
gene
ral,
sobre
todo
si
hay
nitnos
cerca.
I

DikiSs
arozalaro
ye
bunlaron
giderilmesi
Nedini:
1.
Makina
diki
atlattyor
lone
doru
takilmamistir.
Yanlis
ine
takilmistir.
lone
egri
veya
küttür.
p11k
makinaya
doru
takilmamitir.
Ine,
iplik
icin
cok
incedir.
2.
Ust
iplik
kopuyor
Yukarida
belirtilen
nedenlerden,
Ipliin
gerginlii
fazla
se.
p11k
kätü
veya
düümlü
se
veya
uzun
sure
depolama
ile
cok
kurumusa.
3.
ine
kirillyor
Ine
dayanaa
kadar
yerIetiriImemistir.
lne
erilmitir.
lne
cok
ince
veya
çok
kalindir.
Kumai
cekmek
veya
itmek
suretlyle
ine
erilmitir
veya
bati
Ievhasina
carpmaktadir.
Mekik
doru
yerIememitir.
4.
Diki
yeknesak
(muntazam)
deiI
Gerginlik
ayari
bozulmutur.
Cok
kahn,
düümlü
veya
sert
iplik.
Alt
p11k
eiit
olmayan
bir
ekilde
sarilmi.
Giderilmesi:
Ineyi
dayanaa
kadar
yukariya
doru
sürünüz.
Basik
olan
dip
kismi
arkaya
doru
gelecek.
130/705
ine
sistemini
takiniz.
Yeni
ine
takiniz.
Ipliin
geçtii
yerleri
kontrol
ediniz.
Ineyi,
ine
cetveline
gore
seciniz.
1
e
bakiniz.
p11k
gerginliini
ayarlayiniz.
Sadece
iyi
p11k
kullaniniz.
Yeni
ineyi
dayanaa
kadar
sürünüz.
Yeni
ine
takiniz.
lone
cetveline
bakiniz.
Makinaya,
kumasi
kendi
kendine
çektiriniz.
Dikilen
eyi
sadece
hafifce
yOneltiniz.
Mekii
takarken,
bunu
dayanaa
kadar
arkaya
doru
sürünüz.
Ust
ye
alt
p11k
gerginliini
kontrol
ediniz.
Sadece
kusursuz
p11k
kullaniniz.
Masurayi
el
lIe
sarmayiniz,
bilãkis
iplii,
sarici-On
germe
düzeninden
geçiriniz.
Iplii
doru
bir
ekilde
takiniz.
Ust
ye
alt
p11k
gerginliini
kontrol
ediniz,
Kumasin
alt
ye
ust
tarafinda
p11k
düümlenmeleri.

Nedeni:
Giderilmesi:
5..
Makina
kumai
yUrUtmUyor
veya
düzensiz
bir
ekiIde
yürUtUyor
Transportörun
(taiyicinin)
di
siralari
Bati
Ievhasini
kaldiriniz;
diki
tozunu
arasinda
dikis
tozu
sikica
bastirilmistir.
firçayla
gideriniz.
Transportör
(taslylci)
gomulmustur.
Gämme
sUrgusunu
sol
tarafa
çeviriniz.
GOmme
sürgusU
sada
bulunmakta,
6.
Makina
air
cahsiyor
Kavrayici
sahasinda
ipik
kirpintilari
Iplik
kirpintilarini
uzaklastiriniz
ye
bulunmakta,
kavrayici
sahasina
sadece
bir
damla
ya
koyu
n
uz.
7.
Onemli
talimatlar
iplik
takiimi
makinayt
kuma
olmadan
harekete
geçirmeyiniz.
Makinayi
terk
ederken
kisa
sürelli
de
olsa,
ana
saiteri
kapatiniz.
Ru
husus.
yakinda
cocukiar
buIunduunda
Onemlidir.

Acessórios
especlais:
Estes
acessOrios
para
trabaihos
particulares
podem
ser
adquiridos
no
agente.
/“essOrios
Referencias
Operacoes
N
Fitador
(rebrar
suporte
do
calcador)
98-053484-91
Colocar
vivos
P4
para
nervuras,
5
ranhuras
(agulhas
9303595091
Costura
de
nervuras
gemeas
corn
distancia
de
1,8;
2,5
mm>
(agulhas
n°
80;
Pé
para
nervuras,
7
ranhuras
(agulhas
para
nervuras
bnas,
.
93-035953-91
a
ulhas
n°
70
gemeas
corn
distancia
de
1.4:
1,8
mm)
Calcador
para
franzir
93-035943-91
Costura
de
franzidos
Gula-direito
98-802
422-00
Alinhavar
Calcador
para
ponto
a
direito
98-694
803-00
Ahnhavar
e
costuras
sobre
-
—-—--—--—--—
—-—-—---—
tecidos
muito
boos
e
maclos
Chapa
de
aguiha
corn
furo
redondo
paracao
(jersey
de
seda)
Calcador
para
sobrecoser
4,5
mm
93-035946-91
-————---------—---—-—---—--—-——
—--—-----—
Costuras
sobrecosldas
Calcador
para
sobrecoser
6.5
mm
93-035948-91
Calcador
para
casear
98-694411-00
Fazer
casas
Calcador
para
franzir
93-035998-91
Franzir
foihos
Calcador
pars
aplicar
cordonnet
93-035915-91
Colocacao
de
cordSo
(lado
esquerdo)
Colocacao
e
costura
sirnultânea
Calcador
para
overlock
98-620404-00
das
faces
de
corte
Embainhador
3
mm
98-694401-00
Embainhar
Calcador
para
cerzir
(pontear)
93-106
103-91
Pont
ear
normal
e
corn
IS
Calcador
corn
base
de
Teflon
98-694801-00
Costura
de
matenais
plSsticos
e
sintéticos
\alcador
pars
pontos
decorabvos
98-694879-00
Costura
de
motivos
decorativos.

Indice
Colocão
dos
suportes
dos tubos
de
linha
2
Abertura
da
maleta
3
Ligacao
eléctrica
4
Preparaçao
das
canelas
5
Destravamento
do
mecanismo
da
costura
6
Enchimento
das
canelas
7
Costurar
8
Colocacão da
canela
8
Tensão
do
tb
da
canela
9
Colocaçao
da
cápsula
9
Enfiamento
do
fio
da
agulha
10
Tensäo
dos
fios
13
Corta-fio
14
Seleccao
do
comprimento
do
ponto
is
Costura
para
trãs
is
Selector
de
pontos
16
Quadro dos pontos
17
Mudancadaagulha
18
Mudanca
da base
do
calcador
19
Calcadores
20
Compartimento
para
acessórios
20
Pespontar
22
Ponto
invisivel
elástico
24
Casas
26
Colocaçao
do
botOes
28
Costura
de
fechos
de
correr
30
Costura
de
fecho
de
correr
invisivel
32
Costura
do
fecho
do
correr
para
calcas
do
senhora
34
Cerzir
(pontear)
36
Limpeza
e
lubrificaçao
38
Mudanca
da
lampâda
39
Quadro
das
agulhas
40
Causas
do
avarias
o
suas
solucoos
48
AcossOrios
ospociais
56

Special
accessories:
The
special
accessories
listed
below
are
intended
for
special
sewing
jobs.
They
can
be
obtained
from
your
dealer
at
an
extra
charge.
4essorY
Part
No.
Sewing
Operation
Binder
(remove
sewing
foot
holder)
98-053484-91
For
binding
edges
with
tape
Cording
foot,
5
grooves
93JJ35959
For
cording
work
-_(twin
needle
with
18—2.5
mm
needle
gauge)
(needle
size
80,
Cording
foot.
7
grooves
for
fine
cording
(twin
needle
with
14—1.8
mm
needle
gauge)
93-035953-91
needle
size
70)
Fringe
sewing
foot
93-035943-91
For
sewing
fringes
and
for
basting
Edge
guide
98-802
422-00
For
top-stitching
(wadding)
Straight-stitch
foot
with
round
needle
hole
98-694
803-00
For
topstitching
and
—
----------j-
sewing
very
delicate
Needle
plate
with
round
needle
hole
in
preperation
and
soft
fabrics
(silk
iersev
etc.)
Felling
foot,
4.5
mm
93-035946-91
—
———.——-—--.—-—-.——---—.—.-—--
For
felled
seams
Felling
foot,
6.5
mm
93-035948-91
Buttonhole
foot
98-694411-00
For
sewing
buttonholes
Shirring
foot
93-035998-91
For
shirring
valances
Single-needle
cording
foot
93-035915-91
For
single-needle
cording
For
finishing
raw
edges
or
for
joining
elastic
Overlock
foot
98-620404-00
fabrics
and
simultaneously
overcasting
their
edges
Hemmer
foot,
3
mm
98-694401-00
For
hemming
edges
Darning
foot
(remove
sewing
foot
holder)
93-106
103-91
Darning
fabric
and
wool
Teflon
foot
98-694801-00
For
sewing
plastic
materials
\ncy-stitch
foot
98-694879-00
For
sewing
fancy
patterns

Contents
Removing
the
carry
case
....................................,
3,
4
Electrical
connection
4
Bobbin
winding
preparations
5,
6
Disengaging
and
engaging
the
sewing
mechanism
6,
8
Bobbin
winding
7
Inserting
the
bobbin
8
Checking
the
bobbin
thread
tension
9
Inserting
the
bobbin
case
9
Upper
threading
10
Drawing
up
the
bobbin
thread
1
1
Operating
the
foot
control
13
Needle
thread
tension
13
Checking
the
needle
thread
tension
13,
14
Thread
cutter
14
Setting
the
stitch
length
15
Reverse
sewing
15
Stitch
pattern
knob
16
Stitch
pattern
table
17
Changing
the
needle
18
Dropping
the
feed
18
Changing
the
sewing
foot
19
Sewing
feet
20
Accessory
compartment
20
Top-stitching
22,
23
Elastic
blind
stitch
24,
25
Sewing
buttonholes
26,
27
Sewing
on
buttons
28,
29
Inserting
zippers
30,
31
Seam-like
zipper
closures
32,
33
Zippers
in
ladies’
slacks
34,
35
Darning
36,
37
Cleaning
and
oiling
38
Changing
the
bulb
39
Needle
chart
42,
43
Faults
and
how
to
remedy
them
50,
51
Special
accessories
58
59

4ccesorios
especiales:
Para
labores
de
costura
puede
adquirir
en
su
agencia
tienda
accesorios
especiales.
sorio
No.
de
pedido
Operación
Aparato
nbeteador
98-053
484-91
Para
ribetear
con
cinta
(retirese
el
soporte
del
prensatelas)
Pie
prensatelas
para
lorzas,
con
5
ranuras
93-035950-91
Para
hacer
lorzas,
alforzas,
(agujas
gemelas
con
separación
1,8
ó2Smm)
bordOn
y
costuras
similares
Pie
prensatelas
para
lorzas,
con
7
ranuras
(aguja
del
No,
80;
para
lorzas
93-035953-91
finas
del
No.
70)
(agujas
gemelas
con
separaciOn
1,4
ó
1,8
mm
Pie
prensatelas
para
flecos
93-035943-91
Pars
coser
flecos
y
para
marcar
con
hilván
GuIa
marginal
98-802422-00
Para
pespunteados
(acolchados)
Pie
prensatelas
para
punto
recto
98-694803-00
Para
pespuntear
y
para
coser
telas
muy
con
agujero
redondo
——--———
finas
y
blandas
(género
de
punto
a
base
Placa
de
aguja
con
agujero
redondo
en
preparacian
de
seda.
etc.)
Sobrecargador
4,5
mm
93-035946-91
—‘
Para
costuras
sobrecargadas
Sobrecargador
6,5
mm
93-035948-91
Pie
para
ojales
98-694411-00
Para
coser
ojales
Pie
fruncidor
93-035998-91
Para
fruncir
volantes,
etc.
Pie
prensatelas
para
cordoncillo
93-035915-91
Para
trabajos
de
cordoncillo
Pie
prensatelas
para
overlock
98-620404-00
Para
trabajos
de
sobrehilado
en
generos
elásticos
con
costura
de
union
a
Ta
vez
Dobladillador,
3
mm
98-694401-00
Para
dobladillar
bordes
Pier
zurcidor
93-106
103-91
Para
zurcir
y
remendar
(retirese
el
soporte
del
prensatelas)
Pie
prensatelas
de
teflOn
98-694801-00
Para
coser
sintéticos
\Piepara
puntadas
de
adorno
98-694
879-00
Para
costuras
decorativas

Indice
Accesosios
especiales
60
Accionamiento
del
pedal
13
BotOn
selector
de
puntadas
16
Cambio
de
Ia
aguja
18
Cambio
de
a
bombilla
39
Cambio
del
pie
prensatelas
19
Colocación
de
Ia
canilla
en
a
cápsula
8
Colocación
de
a
capsula
con
Ia
canilla
9
COmo
quitar
Ia
maleta4unda
3,
4
Compartimento
para
accesorios
20
Comprobaciôn
de
Ia
tensiOn
del
hilo
inferior
9
ComprobaciOn
do
Ia
tensiOn
del
hilo
superior
13,
14
Conexión
eléctrica
4
Cortahilos
14
Costura
de
botones
28,
29
Costura
do
cremalleras
30,
31
Costura
en
retroceso
15
Cremallera
cosida
en
una
costura
32,
33
Cremallera
para
pantalones
do
seinora
34,
35
DesconexiOn
del
mecanismo
do
costura
y
conexiOn
6,
8
Devanado
del
hilo
7
Engrase
y
limpieza
38
Enhebrado
del
hilo
superior
10
ExtracciOn
del
hue
inferior
11
Fallos
y
remedios
50,
51
OcultaciOn
del
transportador
18
Ojales
Modelos
26,
27
Palanca
alzaprensatelas
12
Pespunteados
22,
23
Pies
prensatelas
20
PreparaciOn
para
el
devanado
5,
6
Punto
invisible
elástico
24,
25
RegulaciOn
del
large
de
puntada
15
Tabla
do
agujas
44,
45
Tabla
de
puntadas
17
Zurcidos
36,
37
)
61

Ozel
ilâve
parcalar:
Ozel
have
parçalar,
äzel
diki
hIeri
i
indir.
Bunlar
Mazasindan
temin
olunabilir.
Sent
cevlricl
98-053484-91
Kenarlann
eritIe
cevrilmesi
cm
(Sent
ayag
tutamagini
uzaklatrin)
Nervür
ayai,
5
oluklu
93-035950-91
Nervür
dikii
cm
kzne,
Igne araligi
1,8—25)
(ine
kahnli
80,
NervOr
ayal,
7
oluklu
ince
nervurler
cm
(Ikiz
mne,
ine
aralmm
14—18)
ne
kalmnlmm
70)
Sacak
(pUskul)
ayai
93-035943-91
Sacak(pUskul)
dikmek
cm
ye
kopya
—
Kmlavuz
cetveli
98-802422-00
Pmkür
(yorgan
dikileri)
yapmak
cm
Duz
dikm
ayagm
98-694 803-00
PikUr
dikiIeri
ye
özellmkle
ince
ye
yumuak
kumalarmn
dikilmesi
icmn
(ipekli
Jarse
vs)
Yuvarlak
delikli
batm
levhasi
hazmrlanmakta
Kapper
(kivirma
dikicism)
4,5
mm
93-035946-91
-
---
----------
—
Kivmrma
dikeri
icmn
Kapper
(kivirma
dikicisi)
6,5
mm
93-035948-91
ik
ayagm
98-694411-00
Ilk
dikmek
cm
Buzgu
ayagm
93-035998-91
Farbalalarin
vs.
nm
buzgUlermni
yapmak
içmn
Kordonlama
ayagm
93-035915-91
Kordonmama
in
Kesmm
kenarlannmn
sürfmlesi
(temizlenmesi)
ye
Overlock
(üstten
gecmelm
dmkit)
ayagm
98-620404-00
aynm
zamanda
elastik
kumalarmn
bmrbirmne
dkiImesi
ye
surbfes
(temizienmesi)
cm
4
ãve
parcalar
Sipar-No.
Diki
im
Kenar
bastmrmcism
3
mm
Orerek
tamir
etme
ayagm
(Dmkm
ayagm
tutamagmnm
uzaklastmrmniz)
Teflon
ayagm
dmki$m
ayagm
98-694
401-00
Kenarlarmn
bastmnlmasm
cm
93-106103-91
Orerek
tammr
etmek
ye
yUnu
98-694601-00
Plastik
ye
sunm
kuma
dikmek
mçmn
98-694879-00
Süs
Orneklermnmn
dikmlmesm
icmn
62

Icindekiler
Alt
p11k
gerginhiinin
kontrol
edilmesi
9
Alt
ipliin
yukariya
getirilmesi
11
Ampul
detirmek
39
Batis
örnei-cetveli
17
Batis
arnei-ayar
dümesi
16
Bati
uzunluunun
ayarlanmasi
15
Cantayi
çikarmak
3,
4
Diki
arizalari
ye
bunlarin
giderilmesi
54, 55
Diki
ayaklari
20
Diki
ayaklarini
deitirmek
19
Diki
makanizmasini
kapatmak
ye
çalitirmak
6,
8
Diki
yen
fermuani
32,
33
Düme
dikmek
28,
29
Elastik
kär-diki
24,
25
Elektrik
balantisi
4
Fermuar
dikmek
30,
31
Geniye
doru
dikmek
15
lone
cetveli
44,
45
Igneyl
detirmek
18
lláve
parcalar
kutusu
15
!lik
dikmek
26,
27
Iplii
masuraya
sarma
iinin
hazirlanmasi
5,
6
iplii
masuraya
sarmak
7
Iplik
kesicisi
14
Mars
13
Masurayi
takmak
8
Mekii
takmak
9
Kumas
bastirma
kolu
12
Orerek
tamir
etmek
36,
37
Pantalon
fermuari
(bayanlar
cm)
34,
35
Pikür
calismalani
22,
23
Temizlemek
ye
yalamak
38
Transportäru
aaiya
doru
indirmek
20
Ust
iplik
gerginlimnmn
kontrol
edilmesi
13,
14
Ust
ipliin
takilmasi
10
-
 1
1
-
 2
2
-
 3
3
-
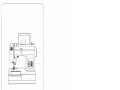 4
4
-
 5
5
-
 6
6
-
 7
7
-
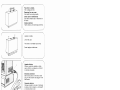 8
8
-
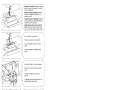 9
9
-
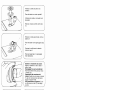 10
10
-
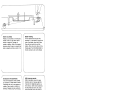 11
11
-
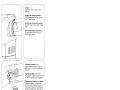 12
12
-
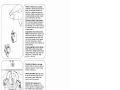 13
13
-
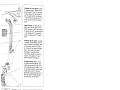 14
14
-
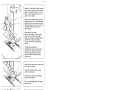 15
15
-
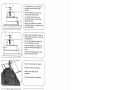 16
16
-
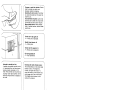 17
17
-
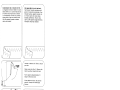 18
18
-
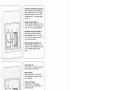 19
19
-
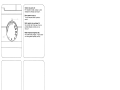 20
20
-
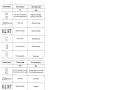 21
21
-
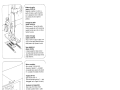 22
22
-
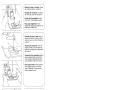 23
23
-
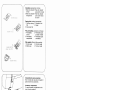 24
24
-
 25
25
-
 26
26
-
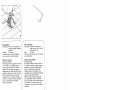 27
27
-
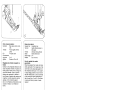 28
28
-
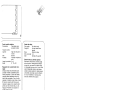 29
29
-
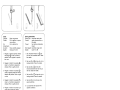 30
30
-
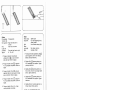 31
31
-
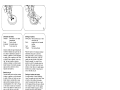 32
32
-
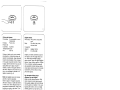 33
33
-
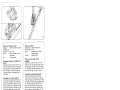 34
34
-
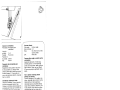 35
35
-
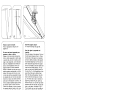 36
36
-
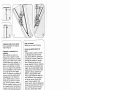 37
37
-
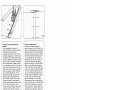 38
38
-
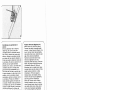 39
39
-
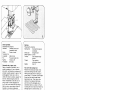 40
40
-
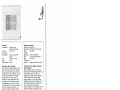 41
41
-
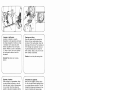 42
42
-
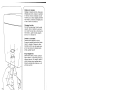 43
43
-
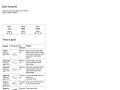 44
44
-
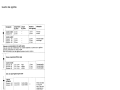 45
45
-
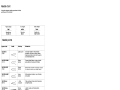 46
46
-
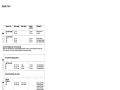 47
47
-
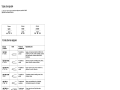 48
48
-
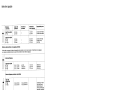 49
49
-
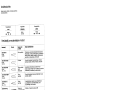 50
50
-
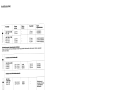 51
51
-
 52
52
-
 53
53
-
 54
54
-
 55
55
-
 56
56
-
 57
57
-
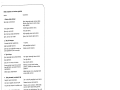 58
58
-
 59
59
-
 60
60
-
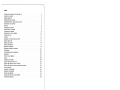 61
61
-
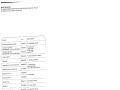 62
62
-
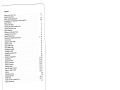 63
63
-
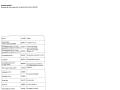 64
64
-
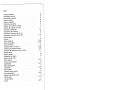 65
65
-
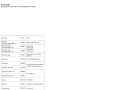 66
66
-
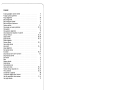 67
67


Pfaff hobby 301 El manual del propietario
- Tipo
- El manual del propietario
- Este manual también es adecuado para
en otros idiomas
- English: Pfaff hobby 301 Owner's manual
- português: Pfaff hobby 301 Manual do proprietário
Artículos relacionados
Otros documentos
-
SINGER 3150 El manual del propietario
-
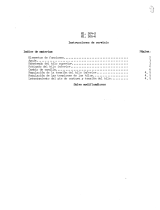 Duerkopp Adler 204-2 Instrucciones de operación
-
Alfa Network Next 830 Manual de usuario
-
JATA MC735N Manual de usuario
-
Brother LS 2125 - Sewing Machine 25 Stitch Function Manual de usuario
-
-
-
Silvercrest SNMD 33 A1 Instrucciones de operación
