Pfaff creative 1471 Manual de usuario
- Categoría
- Máquinas de coser
- Tipo
- Manual de usuario
La página se está cargando...

02/14/2008
•
I%
%%4L
LI
II
Extienda
esta
hoja
Bu
sayfayi
diariya
doru
katlayiniz
Flettiô
essari
sIôu
me
safety
rules
Take
care
to
avoid
injury
to
your
fingers
by
the
needle
during
sewing.
Make
sure
you
unplug
the
power
cord
whenever
you
have
to
leave
the
machine
or
want
to
clean
it,
oil
it
or
change
mechanical
and
accessory
parts.
Be
sure
to
use
only
a
15watt
light
bulb
in
the
sewing
lamp.
r
safety
rules
applicable
in
the
ited
Kingdom
please
see
page
47.
didas
de
seguridad
para
las
iquinas
de
coser
domésticas
segUn
‘1
57730,
parte
2C
Debido
al
peligro
de
accidentes
que
representa
01
movimiento
de
Ia
aguja,
el
usuarlo
deberã
poner
todo
el
cui
dado
posiblo
durante
01
trabajo
y
no
deberá
apartar
Ia
vista
do
a
zona
do
costura.
Antes
de
cambiar
a
aguja,
el
pie
prensatelas.
Ia
canilla
y
Ia
placa
de
aguja,
10
mismo
quo
a!
limpiar
o
ongrasar
Ia
maquina,
o
cuando
no
so
Ia
use,
deberá
desconectarse
eléctri
camente,
as
decir,
deberá
sacarse
el
enchufo
do
a
red.
La
potencia
max.
admisible
de
Ia
bombilla
es
de
15
vatios.
DIN
(Alman
End
üstri
Norm
u)
57730
Kisim
2c’ye
gore
evde
kullanalan
diki
makinalari
için
gUvenlik
talimatlari
a)
Makinayi
kullanan
kimsenin,
yukariya
ye
asaiya
doru
hareket
eden
ine
dolayistyla,
yeteri
kadar
dikkatli
davranmasi
ye
çalisma
esnas?nda
diki
yerini
devamli
olarak
gözlemesi
gerekir.
b)
Makinanin
terkodilmesi
esnasinda,
bakim
isbn
esnasinda
veya
makina
parçabannin
veya
iláve
parçalanin
deitiriImesi
sirasinda,
makinanin
fiini
pnizden
cikarmak
suretiyle,
ceryanin
kesilmesi
gerekir.
c)
Lâmbanin
müsaado
obunan
azami
gucü
15
Vattir.
Nokkrar
öryggisráôstafanir
a)
GstiO
hess
aO
fingur
verOi
ekki
fyrir
nálinni.
egar
saumaO
or.
b)
Geriô
aô
aO
venju
yOar
aO
taka
vélina
ür
sambandi.
iegar
skipta
part
urn
nál.
saumfót.
eôa
egar
ér
eruO
aO
hreinsa
og
smyrja
vélina.
c)
Aldrei
ma
vera
sterkari
pera
i
vélinni
en
15W.
ontents
on
page
67
dice
pag.
69
çindekiler
Sayfa
71
Efnisyfirlit
or
a
bls.
73
La página se está cargando...
La página se está cargando...

02/14/2008
Parts
of
your
sewing
machine
100
Carrying
handle
101
Hinged
top
cover
102
Hand
wheel
103
Stop
motion
knob
104
Display
105
Balancing-out
&
pattern
length
key
106
Stitch
length
&
pattern
length
key
107
Stitch
width
key
108
Master
switch
109
Detachable
work
support
with
accessory
box
and
compartment
110
Needle
plate
111
Sewing
foot
holder
with
sewing
foot
112
Needle
holder
with
set
screw
113
Bobbin
thread
monitor
light
114
needle
down
key
115
sew
slow
key
116
“reverse”
key
117
tie-off
/
buttonhole”
key
118
Presser
bar
with
thread
cutter
119
Presser
bar
lifter
120
Program
display
121
Programming
keys
(2)
122
Program
chart
(see
sewing
book)
123
Compartment
for
sewing
data
selector
124
Bobbin
winder
125
Key
for
program
cycle
and
sewing
recommendations
126
pattern
mirroring”
key
127
single
pattern’
key
128
“pattern
start”
key
129
‘twin
needle”
key
130
Base
plate
131
Free
arm
cover,
enclosing
sewing
hook
132
Free
arm
133
Sewing
light
134
Threading
slots
135
Needle
thread
tension
136
Bobbin
winder
thread
guide
137
Take-up
lever
138
Bobbin
winder
thread
guide
(swing-out)
139
Spool
holder
with
unreeling
disc
140
Second
spool
holder
(swing-up)
141
“repeat”
key
142
“corrector”
key
143
“program’
key
144
Dual
feed
with
thread
cutter
145
Threader
Eementos
y
maridos
de
Ia
máquina
100
Asa
101
Tapa
abatible
102
Volante
103
Disco
de
desembrague
104
Panel
indicador
105
BotOn
compensador
y
para
argo
de
motivo
106
Botón
para
argo
de
puntada
y
motivo
107
BotOn
para
ancho
de
puntada
108
Interruptor
general
109
Suplemento
con
compartimentos
para
accesorios
110
Placadeaguja
111
Portaprensatelas
con
prensatelas
112
Portagujas
con
tornillo
113
Control
del
hilo
inferior
114
BotOn
para
“aguja
abajo”
115
Botón
para
“costura
lenta”
116
Botón
para
“costura
atrfts”
117
BotOn
para
“rematar
ojal”
118
Barra
del
prensatelas
119
Palanca
aizaprensatelas
120
lndicador
del
programa
121
2
botones
programadores
122
Tabla
de
programas
(véase
cuademo
de
costura)
123
Compartimento
para
regla
de
costura
124
Devanador
125
Botôn
para
control
del
programa
y
recomendaciones
de
costura
126
BotOn
para
“inversion
motivo”
127
BotOn
para
“motivo
individual”
128
BotOn
para
“comienzo
del
motivo”
129
Botón
para
“agujas
gemelas”
130
ZOcalo
131
Tapa
del
garfio
132
Brazo
al
aire
133
Lámpara
de
costura
134
Ranura
de
enhebrado
135
Tensahilos
superior
136
Guiahilos
para
el
devanador
137
Palanca
tirahilos
138
Guiahilos
para
el
devanador
(abatible)
139
Portacarretes
con
discos
140
Segundo
partacarretes
(abatible)
141
Botón
para
“repeticiOn’
142
BotOn
para
“correcciOn”
143
BotOn
para
programaciOn
144
Doble
arrastre
con
cortahilos
145
Enhebrador
I
La página se está cargando...

02/14/2008
._
Pull
the
power
cord
out
of
the
foot
control.
7\_
Saque
el
cable
del
pedal.
Kabloyu
martan
dariya
doru
çekiniz
-—
Togiã
IeiOsluna
r
mótstOOunni.
-
—-—-
_______
__________________________
Plug
the
foot
control
lead
into
the
machine
socket
and
place
the
foot
.--
control
on
the
floor.
Coioque:ipedal
en
el
suelo
y
conéctelo
--
Mar
kablosunu
makinaya
balaytniz
ye
mari
yere
koyunuz
TengiO
IeiOsluna
viO
vélina.
og
setjiô
rnOtstöOuna
a
gOlfiO.
108;
the
sewing
Pulse
el
interruptor
general
108.
La
lam
para
de
costura
se
enciende.
Ana
altere
(108)
basiniz,
bu
arada
dikis
iI
yanar
Prstià
a
aOalrofann
108.
og
urn
IeiO
kviknar
a
Iósinu.
-
-
----
La página se está cargando...

02/14/2008
j
I
Place
the
bobbin
on
winder
124
and
turn
it
until
pin
A
engages
in
slot
B.
Coloque
a
canilla
en
el
devanador
124
y
girela
hasta
que
Ia
espiga
A
encaje
en
a
ranura
B.
A
pimi
B
yarii
içerisine
oturuncaya
kadar
masurayl,
sarici
uzerine
takiniz.
SetjiO
spOluna
a
spOlarann
124.
Hak
A
verOur
aO
falla
I
rauf
B.
‘isengaging
the
sewing
mechanism:
Hold
the
hand
wheel
steady
and
turn
V
knob
103
towards
you.
Desconexión
del
mecanismo
de
costura:
Sujete
el
volante
y
gire
el
disco
103
hacia
el
frente.
Diki
mekanizmasini
kapamak:
El
carki
ni
sikica
tutunuz
ye
disk
103’
ü
äne
doru
ceviriniz.
Setjiô
vélina
I
lausagang:
Haldô
urn
handhjáliô
og
losiô
skrüfu
103.
wing
the
thread
spool
towards
the
back.
Eche
hacia
atrás
el
segundo
portacarretes.
kind
makara
tutucusunu
geriye
doru
cevirerek
döndürünüz!
tiO
auka
ketlispinnanurn
upp.
Push
a
spool
of
thread
and
unwinding
collar
onto
the
holder.
lntroduzca
el
carrete
y
el
disco
pequeno
C
en
el
portacarretes.
Makarayi
ye
kucuk
döner
diski
(C)
tutamak
üzerine
sürünüz.
SetjiO
Mnnakefli
og
litla
skifu
C
a
pinnann.

Winding
from
a
second
spool:
Swing
thread
guide
138
forwards.
Pull
the
thread
through
guide
136,
then
into
guide
138,
placing
it
between
guide
and
tension
spring
A
(see
ill.)
Wind
a
few
turns
of
thread
on
the
bobbin
and
push
the
bobbin
towards
the
right.
Press
down
the
foot
control
and
wind
bobbin.
Push
the
full
bobbin
towards
the
left
and
take
it
out,
cutting
the
thread
in
thread
cutter
B.
Important:
It
is
not
possible
to
wind
the
bobbin
when
an
empty
M-
or
P-memory
is
selected.
Before
winding
is
begun
a
program
between
00
and
99
must
be
selected.
When
you
place
a
bobbin
with
thread
slot
on
the
spindle,
the
slot
must
point
towards
the
right.
Devanado
desde
un
segundo
carrete:
Eche
el
guiahilos
138
hacia
adelante.
Pase
el
hilo
por
las
gulas
136
y
138
co
mo
se
muestra
en
Ia
figura
y
de
forma
que
el
hilo
quede
entre
Ia
guia
y
el
muelle
tensor
A.
Arrolle
ahora
unas
vueltas
de
hilo
en
Ia
canilla
y
empUjela
hacia
Ia
derecha.
Accione
ahora
el
pedal
para
devanar.
Cuando
Ia
canilla
esté
lena,
cOrrala
hacia
Ia
izquiorda
y
retirela.
Tire
del
hilo
hacia
el
frente
y
cOrtelo
en
el
gancho
B.
Nota
importante:
Si
se
ha
seleccionado
una
memoria
vacia
M
o
P,
entonces
no
se
puede
devanar.
Antes
de
comenzar
a
devanar,
tendrá
que
estar
seleccionado
un
programa
entre
00
y
99.
En
el
caso
do
carretes
con
ranura
para
sujetar
el
hilo,
dicha
ranura
deberá
queder
a
Ia
derecha
al
introducir
el
carrete,
02/14/2008
L
it
U
t.
——
r-
___1
II
II
11
1
I
4
)
La página se está cargando...

02/14/2008
Winding
through
the
needle:
Raise
the
sewing
foot
with
the
needle
in
its
up
position.
Place
a
bobbin
on
spindle
124.
Disengage
the
sewing
mechanism.
Draw
the
needle
thread
under
the
sewing
foot,
up
and
through
guide
138
(see
ill.).
Wind
a
few
turns
of
thread
on
the
bobbin
and
push
the bobbin
towards
the
right.
Press
down
the
foot
control
and
wind.
Push
the
full
bobbin
towards
the
left
and
take
it
out,
cutting
the
thread
in
thread
cutter
“A”.
Important:
It
is
not
possible
to
wind
the
bobbin
when
an
empty
M-
or
P-memory
is
selected.
Before
winding
is
begun
a
program
between
00
and
99
must
be
selected.
Devanado
a
través
de
Ia
aguja
Eleve
el
pie
prensatelas
y
Ia
aguja.
Coloque
Ia
canilla
en
el
devanador
124.
Desconecte
el
mecanismo
de
costura.
Pase
el
hilo
superior
por
debajo
del
prensatelas
hacia
a
derecha
y
por
Ia
guia
138
(v.
figura).
Arrolle
unas
vueltas
de
hilo
en
Ia
canilla
y
cOrrala
hacia
Ia
derecha.
Accione
el
pedal
para
devanar.
Corra
Ia
canilla
Ilena
hacia
Ia
izquierda,
retirela
y
corte
el
hilo
en
el
gancho
‘A’.
Nota
importante:
Si
se
ha
seleccionado
una
memoria
vacia
M
0
P,
entonces
no
se
puede
devanar.
Antes
de
comenzar
a
devanar.
tendrá
que
estar
seleccionado
un
programa
entre
00
y
99.
______—
1L
4
N
4
La página se está cargando...
La página se está cargando...
La página se está cargando...

02/14/2008
Upper
threading:
With
the
needle
in
its
top
position,
raise
the
sewing
foot.
Draw
the
thread
into
slot
A,
from
below
into
slot
B
and
take-up
lever
137
(see
arrows),
then
back
into
slot
8
and
into
the
right
thread
guide
on
the
needle
holder.
Enhebrado
del
hilo
superior:
Eleve
a
aguja
y
el
prensatelas.
Pase
el
hilo,
siguiendo
Ia
flecha,
por
a
ranura
A,
des
de
abajo
por
Ia
ranura
B,
por
Ia
palanca
tirahilos
137,
de
nuevo
por
Ia
ranura
B
y
por
Ia
gula
derecha
del
portagujas.
Ust
ipIiin
takilmasi:
inenin
durumu,
yukarida.
Diki
ayaini
yukariya
kaldiriniz.
Iplii,
ok
istikametinde
olmak
üzere,
A
yarlina,
alt
taraftan
B
yarIIna,
horoz
(137)
içerisine,
geriye
doru
B
yariina
ye
iplik
tutamainda
bulunan
sa
kilavuz
içerisine
çekiniz.
Pr8ing:
Nálin
I
efstu
stöôu.
Fôtur
uppi.
PrOiO
ems
og
ärvarnar
sna
I
rauf
A,
aO
neOan
I
rauf
B.
i
ráOgjafa
137.
aftur
I
rauf
8.
og
siOan
I
hgri
stringu
a
nálahöldunni.
I
I
/
/III1Ic.’V
‘
.._—‘\J
/
,0
N
4
Place
the
needle
thread
behind
hook
D
and
hold
it
there.
Pull
threader
145
fully
downwards.
Coloque
el
hilo
superior
detrás
del
gancho
D
y
sujételo.
Empuje
el
enhebrador
145
hacia
abajo
eI
todo.
Ust
ipIii
D
çengeli
arkasina
yerIetiriniz
ye
tutunuz.
Ineye
iplik
geçiriciyi
(145)
tamamen
asaIya
doru
çekiniz.
Leggi
yfirtvinnann
undir
hak
D
og
haldiô
I
tvinnann.
Togiô
siOan
rôarann
145
alveg
niOur.
/
JI
A
I’
€1
0
La página se está cargando...

02/14/2008
0
ID
0
Hold
the
needle
thread
taut.
Turn
the
hand
wheel
toward
you
until
the
needle
moves
down
and
up
again.
Pull
the
bobbin
thread
up
by
pulling
on
the
needle
thread.
Sujete
el
hilo
superior,
gire
el
volante
hacia
el
frente,
haga
una
puntada
y
saque
el
hilo
inferior
tirando
del
hilo
superior.
Ust
iplii
sikica
tutunuz.
El
carkini
one
doru
ceviriniz,
Bir
batis
dikiniz,
Ust
iplikle,
alt
iplii
yukariya
doru
cekiniz.
HaidlO
I
yfirtvinnann,
SnuiO
handhjö{inu
tram
a
viO
ar
til
nãliri
hefur
tariô
niOur
og
kemur
upp
attur
TogiO
undirtvinnann
upp.
j
Place
both
threads
to
the
right
under
the
sewing
toot.
Eche
ambos
hilos
hacia
Ia
derecha
por
debajo
del
prensatelas.
Ust-
ye
alt
iplii
saOa
doru,
diki
ayai
altina
koyunuz.
Lãtiô
ytir-
og
undirtvinnann
undir
tOtinn
hgra
megin.
Close
the
free
arm
cover.
Cierre
a
tapa
131.
Kapak
klapesini
(131)
yukarsya
doru
kapatiniz,
Lokiôlokinu
131.
La página se está cargando...

02/14/2008
Operating
the
toot
control:
The
farther
you
press
the
pedal
down,
the
faster
the
machine
runs.
Para
poner
en
marcha
Ia
máquina,
pise
el
pedal:
a
medida
que
aumente
a
presiOn
aumentarâ
Ia
velocidad.
Marsa
ayakla
basiniz.
Marsa
nekadar
fazia
bir
sekilde
basilirsa,
creative”
okadar
süratli
diker,
StigEô
a
mótstöôuna:
tvi
fastar
sem
lér
stigiô.
vi
hraOar
saumar
vélin.
Needle
thread
tension
135
A
=
Setting
mark.
Tensahilos
superior
135
A
=
Marca
para
Ia
regulaciOn.
Ust
iplik
gerilimi
135
A
=
Ayar
aretlemesi.
Ytirspenna
135
A
viOmiôun
tyrir
rétta
spennu.
4
N
Checking
the
needle
thread
tension:
The
normal
setting
is
in
the
white
range
between
3
and
5.
The higher
the
num
ber,
the
tighter
the
tension.
To
check
the
tension,
set
the
machine
for
zigzag
stitch
by
entering
program
10
(page
22).
Sew
a
short
seam.
The
threads
should
interlock
in
the
middle
of
the
material.
4
Comprobación
de
Ia
tension
del
hilo:
La
regulaciOn
normal
se
encuentra
en
a
zona
blanca
entre
3
y
5.
Cuanto
más
alto
sea
el
nümero
tanto
mayor
será
a
tensiOn.
La
comprobaciOn
se
hace
con
Ia
puntada
zigzag.
Ajuste:
pulse
el
programa
10
(pag.
22):
haga
una
costura
corta;
os
hilos
debe
ran
quedar
anudados
dentro
de
las
piezas
de
costura.
—7
-—‘-7
La página se está cargando...
La página se está cargando...
La página se está cargando...

02/14/2008
Electronic
bobbin
thread
monitor:
Bobbin
thread
monitor
light
113
starts
to
flash
when
the
bobbin
thread
is
running
out.
It
goes
off
when
a
full
bobbin
is
inserted
and
sewing
is
resumed.
Important:
Free
arm
cover
131
must
be
kept
closed.
Needle
up
and
down
positions:
When
the
machine
stops,
the
needle
is
always
retained
at
its
up
position.
When
you
push
“needle
down”
key
114,
the
indicator
light
goes
on
and
the
needle
remains
down
in
the
fabric
when
the
machine
stops.
When
you
push
key
114
again,
the
light
goes
off,
the
needle
moves
up
and
remains
up.
Electronic
top
speed
selection:
When
you
press
“sew
slow”
key
115,
the
indicator
light
goes
on
and
the
machine
sews
at
half
its
speed.
When
you
push
key
115
again,
the
light
goes
off
and
the
machine
again
sews
at
top
speed.
Tie-off/buttonhole:
When
you
push
key
117,
the
indicator
light
goes
on
and
the
programmed
seam
is
tied
off
at
the
beginning,
then
the
light
goes
off
again.
When
you
push
the
key
during
sewing,
the
light
goes
on
and
a
seam
is
tied
off
right
away,
while
a
pattern
is
tied
off
at
the
end.
Then
the
light
goes
off.
Button
hole:
When
buttonhole
program
86
is
on,
key
117
serves
to
determine
and
memorize
the
seam
length.
Reverse
sewing:
Push
key
116
before
you
start
sewing.
The
indicator
light
goes
on
and
the
machine
sews
back
wards
permanently.
When
you
push
the
key
during
sewing,
the
light
does
not
go
on
and
the
machine
sews
backwards
as
long
as
you
keep
the
key
depressed.
Darning:
Key
116
is
also
used
to
deter
mine
and
memorize
the
seam
length
entered
in
darning
program
09.
Control
electrónico
del
fib
inferior:
cuando
et
hilo
inferior
estã
prOximo
a
terminarse,
el
piloto
113
comienza
a
lucir
intermitentemente.
Después
de
colocar
una
canilla
lena
y
comenzar
a
coser.
se
apaga.
Nota
importante:
a
tapa
131
tiene
que
estar
cerrada.
Posición
superior
e
inferior
de
Ia
aguja:
al
pararse
Ia
máquina,
Ia
aguja
queda
en
su
posiciOn
superior.
Pulsando
el
botôn
114
para
“aguja
abajo”,
se
enciende
Ia
lámpara
y
Ia
aguja
permanece
abajo
aJ
pararse
Ia
mãquina.
Pulsando
de
nuevo
el
botOn
114,
Ia
lámpara
se
apaga
y
Ia
aguja
pasa
a
su
posiciOn
superior
y
permanece
arriba.
Limitación
electrónica
de
Ia
vebocidad:
pulsando
el
botôn
115
para
“costura
lenta”,
a
Iámpara
se
enciende
y
Ia
ma
quina
cose
a
media
velocidad.
Pulsando
de
nuevo
el
botOn
115,
Ia
Iámpara
se
apaga
y
Ia
máquina
vuelve
a
coser
a
Ia
velocidad
maxima.
Rematado
de
Ia
costura/Ojal.
Remata
do:
pulsando
el
botôn
117,
Ia
Iampara
se
enciende,
Ia
costura
programada
queda
rematada
al
comienzo
y
Ia
lámpara
se
apaga.
Pulsando
dicho
botOn
durante
Ia
costura.
Ia
Iámpara
se
enciende,
Ia
costura
gueda
rematada
inmediatamente
o
al
final,
si
se
trata
do
un
motivo,
y
Ia
Iámpara
se
apaga.
Ojal:
en
el
caso
del
programa
86
para
ojales,
con
el
botón
117
so
determina
Ia
longitud
del
ojal
y
so
memoriza
al
mismo
tiempo.
Costura
en
retroceso:
pulsando
el
botôn
116
antes
do
comenzar
a
coser,
Ia
Iámpara
se
enciende
y
Ia
maquina
co
se
constantemente
hacia
atrás.
Pulsando
dicho
botón
durante
a
costura,
Ia
lámpara
no
so
enciende
pero
Ia
máquina
cose
hacia
atrás
mientras
se
mantenga
el
botôn
pulsado.
Zurcido:
con
el
botón
116
también
so
determina
Ia
ongitud
del
programa
para
zurcido
09
y
se
memoriza.
I
La página se está cargando...

02/14/2008
Operation
of
the
Creative
computer
Botones
de
mando
de
Ia
computadora
de
Ia
“Creative”
“Creative-komputer”
in
kullanilma
SekIl
Notkun
,,creative-tölvunnar”.
Stick
the
enclosed
English
labels
on
the
keys.
Pegue
los
letreros
espanoles,
adjuntos
e
los
botones
correspondientes.
Ekteki
tu
etiketlenni,
turkce
olmak
üzere,
yapitiriniz.
\.11m1ô
hjalagôa
miôa
a
viôkomandi
takka.
J

02/14/2008
T
i(1puter
of
the
Creative
contains
tillwnt
alphabets,
numbers
from
0
1
id
100
programs.
The
programs
together
with
the
seam
nit
the
corresponding
setting
ii
4
r
in
symbol
in
the
table
on
the
do
d
the
top
cover.
(i
ptirnum
width
and
length
for
each
iir.iin
is
also
indicated.
Recommenda
also
given
for
each
program
in
I
In
the
dual
feed,
needle
thread
rn
rnttings,
and
the
use
of
sewing
(fi
(fir
indication,
push
and
hold
key
125).
r.
ottings
become
visible
in
display
I
houe
the
keys.
The
programs
can
l\.
n
(hanged
with
those
keys
above
ii
in
indication
is
made.
i.
i
iiiiputer
also
contains
16
M
ruir
ins
for
program
combinations
and
>
riinrnories
for
free
programming.
In
piogramming
you
can
make
up
your
n
pittorns
and
store
them
in
the
com
ho
0
the
Creative.
Creative-komputer”
de
2
tarlcli
altabe
bulurimakta
olup,
Odan
9’a
kadar
olan
sayilar
ye
100
program
biriktiriImitir.
Programlar,
diki
(bati)
resmi
ye
buna
ait
olan
ayar
numarasi
(program
numarasi)
veya
ayar
sembolü
ile
birlikte
açilir
kapanir
kapak
icerisinde
gösterilmi
bulunmaktadir.
Her
programa
ait
olmak
üzere,
optimal
genilik
ye
uzunluk
düzenlenmitir,
yani
her
program
otomatik
olarak
optimal
uzunlukta
ye
genislikte
dikilmektedir.
Ay
ni
ekilde
bu
programlara,
çift
kuma
taimasi
ye
ust
iplik
gerginIii
ye
diki
ayaklarinin
kullanilmasi
cm
diki
tavsiyeleri
biriktiriImi
bulunmaktadir
(Tu
125’e
basiniz
ye
tusu
bu
sekilde
tutunuz.).
Ayarlar,
tuIar
üzerinde
bulunan
gOsterge
sahasi
104’de
gorulebilmekte
dir.
Programlar
sadece,
üzerlerinde
iaret
gorenen
tularIa
detirilebiIir.
Bundan
baka
komputerde,
program
kombinasyonlari
için
16
M-biriktiricisi
ye
serbest
programlanmasi
için
P-biriktiricisi
bulunmaktadir.
Serbest
programlama
esnasinda
kendi
örneinizi
duzenleyebilir
ye
bunu
“creativ-komputer”
de
biriktirebilirsiniz.
ii
innputadora
de
Ia
máquina
hay
i’idos
dos
altabetos
distintos,
las
i-.
)
a
9
y
100
programas.
Los
i
uiiis
se
hallan
ilustrados
en
a
a
ibatible
mediante
esquemas
de
i
y
los
respectivos
nOmeros
de
{Jrama
o
simbolos.
(
onjulna
cose
automáticamente
cada
programada
en
Ia
anchura
y
Ion
.1
iptimas.
Para
los
programas
van
.rzidas
también
recomendaciones
1
doble
arrastre
y
Ia
tensiOn
del
ipE’rior,
asi
como
el
empleo
de
los
(nflsatelas
(Pulse
el
botón
125
y
romnriqalo
pulsado).
Los
programas
iti-
so
muestran,
pulsando
los
“.lmondientes
botones,
en
eI
panel
1.
ntmr
104
i
ijrimas
sOlo
Se
pueden
modificar
ki
botones
sobre
los
que
se
en
I
i
una
lampara.
ii
en
a
computadora
van
inclui
(0
nomorias
M
para
combinaciones
ir
irnas
y
16
memorias
P
para
Ii
i,
.Jfirnacion
En
este
Oltimo
case,
ii
0,1
nace
sus
motivos
y
los
‘ia
on
Ia
computadora.
I
creativetOIvunni
eru
2
mismunandi
kerfi
fyrir
bOkstafi.
tOlustafi
frá
0—9
og
100
mynztur
eôa
sauma.
tau
eru
s’nd
meO
myndum
og
tilheyrandi
nOmerum
innan
a
fellilokinu.
Hvert
mynztur
eOa
spor
hefur
fengiO
ákveôna
og
hentugustu
sporbreidd
og
sporlengd.
I
minni
vélarinnar
eru
einnig
geymdar
uppl’s
ingar
fyrir
hvern
saum,
ráOleggingar
um
efri
ftytjarann,
yfirtvinnaspennuna
og
hvaOa
tOt
er
rOOlagt
aO
nota.
(YtiO
a
takka
125
og
haldiO
honum
inni).
Pessar
uppfysingar
koma
i
IjOs
a
snifletinum
104
fyrir
ofan
takkana.
Hgt
er
aO
breyta
stillingum
meO
eim
tOkk
um,
sem
ljOs
kviknar
viO.
I
tOlvunni
eru
auk
hess
16
M-minni,
ar
sem
ér
getiO
geymt
saman
16
mismunandi
mynzt
ur
eOa
sauma
og
16
P-minni,
en
au
getiO
ér
notaO
fyrir
sauma
eOa
mynztur
sem
Dér
getiô
hannah
sjálf
eq
siôan
geymt
i
vélinni.
I
/

02/14/2008
{iTfljflTr
Program
seclml:
“creative
nm
cahtinlmasi
sirasinda
gösterge
sahas
120’de
program
-00-
görülmektedir.
Arzu
edilen
numarayl:
program
tulari
(121)
Ozerine
basmak
suretiyle,
program
göstergesi
(120)
icensino
veriniz.
Alfabeler
ye
sayilar
1cm
semboller,
soldaki
tula
seçilir.
Harfler
ye
sayilar
sadaki
tula
seçilir.
\‘
Elección
del
programa:
Al
conectar
Ia
maquina
aparece
en
el
cuadro
indicador
120
el
programa
-00-.
lntroduzca
en
el
cuadro
indicador
120
el
nümero
de
programa
deseado
pulsando
para
ello
los
botones
programadores
121.
Con
el
botón
izquierdo
se
eligen
los
simbolos
para
los
alfabetos
y
cifras.
Con
el
derecho
las
letras
y
cifras.
Mynzturval:
l)egar
kveikt
era
vélinni
koma
tölurnar
00
a
snifIeti
120.
Vol
jiO
viôkomandi
nümer
meO
täkkunum
121
og
pau
koma
a
synifleti
120.
Táknin
fyrir
stafrófin
og
tälurnar
eru
valin
meô
vinstri
takkanum.
Bókstafirnir
og
tölumar
moo
eim
hgri.
JI
i
LL
U
Li
r”i
1’
Fl
prog
m
4
Program
selection:
When
the
Creative
is
switched
on,
pro
gram
-00-
appears
in
display
120.
Enter
the
required
number
in
program
display
120
using
programming
keys
121.
The
alphabet
and
number
symbols
are
selected
with
the
left
key,
while
letters
and
numbers
are
selected
with
the
right
key.
\
,1

02/14/2008
Stitch
width
setting:
The
stitch
width
ranges
from
0
to
6
mm.
Key
107
has
three
functions:
1.
Selection
of
stitch
for
the
respective
program.
2.
Selection
of
the
size
of
letters
and
numbers.
3.
Straight-stitch
needle
position
for
programs
01
and
03
(13
positions).
4.
Selection
of
the
width
position
of
the
needle
penetration
in
free
programming.
2
ED
cD
c
Regulacion
del
ancho
de
puntada:
El
ancho
de
puntada
va
de
0
a
6
mm.
El
botön
107
tiene
4
funciones:
ia
ElecciOn
del
ancho
de
puntada
en
los
programas.
2
ElecciOn
del
tamano
de
las
letras
y
cifras.
3
Elecciôn
de
Ia
posiciOn
do
Ia
aguja
para
Ia
puntada
recta
en
los
programas
01
y
03
(13
posiciones).
4
ElecciOn
do
Ia
posiciOn
del
ancho
de
puntada
en
Ia
libre
programaciOn.
I
Sporbreldd:
Sporbreiddin
er
frá
0-6
mm.
Takki
107
hefur4
stillingar
1,
Breidd
a
mynztrunum.
2.
Strô
a
bókstofum
og
tälum.
3.
Sporlegunaabeinusporimynzturol
ogO3
(13
stillingar).
4.
Val
yôar
a
breidd
zik
zak
sporsins
pegar
er
eruô
aô
hanna
yãar
elgin
sauma.
LLLLJ
iIIrTTIT
prog
()
17
4
Ornek
geniIil-ayari:
Diki
(bati)
0-6
mm’dir.
Tu?
107,
4
fonksiyona
sahiptir:
1.
Programlarda
geniliin
seçilmesi.
2.
Harflerin
ye
sayilarin
buyükluklerinin
secilmesi.
3.
Program
01
ye
03’de
(13
pozisyon)
doru
dikiin
batis
durumunun
secimi.
4.
Sorbost
programlama
esnasinda
ine
batiintn
genilik
durumunun
seçilmesi.
\
/

02)14/2008
Diki
(bati)
uzunluu-
ye
örnek
uzunluu
ayari:
1.
Yanan
A
göstergesi
bulunmayan
programlarda
diki
(batis)
uzunIuu
nun
seçilmesi.
Dikii
(batt)
uzunluu
sahasi
0—6
mm’dir.
Programlarin
bir
kismi,
sinirli
bir
diki
(batl)
uzunluuna
sahiptir.
2.
Yanan
A
göstergesi
bulunan
programlarda
amok
uzunluunun
seçilmesi.
Ornek
uzunluu
mm
olarak
verilmitir
ye
farklt
ekilde
sintrlandinlmttir.
3.
Serbest
programlama
esnasinda
ine
batiinin
uzunluk
durumunun
secilmesi.
Regulacion
del
largo
de
puntada
y
del
motivo:
El
botön
106
tiene
3
funciones:
i
a
Elección
dot
largo
de
puntada
en
programas
sin
lucimiento
de
Ia
lámpara
A.
El
largo
de
puntada
alcanza
de
0
a
6
mm.
Una
patio
do
los
programas
tiene
un
largo
de
puntada
limitado.
2
ElecciOn
del
largo
del
motivo
en
programas
con
lucimiento
do
Ia
lámpara
A.
El
argo
del
motivo
so
indica
en
mm
y
tiene
diversas
limita
ciones.
3
Elección
de
Ia
posiciOn
do
Ia
largura
do
Ia
puntada
en
Ia
libre
progma
macion.
4
N
Stilling
fyrir
sporlengd
og
mynzturlengd:
Takki
106
hefur
3
stillingar
1.
Val
a
sporlengd
a
mynztrum
ar
sem
Ij6si
A
kviknar
ekki.
Sporlengdin
em
0—6
mm.
Hiuti
af
mynztrunum
hefur
x5
takmarkaôa
sporlengd.
2.
Val
a
sporlengd
a
mynztrum
ar
sem
IjOsiO
A
kviknar.
Sporlengdin
er
gefin
upp
mm
og
takmörkuO
I
sumum
mynztrum.
3.
Val
yôar
a
sporlengdinni,
pegar
per
eruô
aô
hanna
yOar
elgin
sauma.
Li
LL
li
I
Lo’
‘1
7
./
)
/
Stitch
length
and
pattern
length
setting:
Key
106
has
three
functions:
1.
Selection
of
stitch
length
for
pro
grams
for
which
display
A
does
not
light
up.
The
stitch
length
ranges
from
0
to
6
mm.
For
some
of
the
programs
the
stitch
length
is
limited.
2.
Selection
of
pattern
length
for
programs
for
which
display
A
lights
up.
The
pattern
length
is
indicated
in
mm
and
is
limited
in
different
ways.
3.
Selection
of
the
lengthwise
position
of
the
needle
penetration
in
free
programming.
\
N

02/14/2008
Balancing
out
and
pattern
length
setting:
Key
105
has
three
functions:
1.
Adjusting
the
reverse
stitch
length
in
a
pattern
(for
balancing
out,
see
page
28)
in
programs
for
which
display
B
does
not
light
up.
2.
Selecting
the
pattern
length
in
mm
while
the
stitch
density
remains
the
same
in
programs
for
which
display
B
lights
up.
The
stitch
length
set
determines
the
maximum
pattern
length.
3.
Checking
and
altering
the
stitch
counter
in
free
programming.
Regulacion
de
Ia
compensaciôn
y
del
largo
del
motivo:
El
botón
105
tiene
tres
funciones:
1
a
Modificar
a
puntada
en
retroceso
(para
Ia
compensaciOn,
véase
Ia
pagina
28)
para
compensar
los
moti
vos
en
programas
sin
lucimiento
de
Ia
lampara
B.
2
ElecciOn
del
largo
del
motivo
en
mm,
sin
variar
Ia
densidad
de
puntada,
en
programas
con
lucimiento
de
Ia
lámpara
B.
El
largo
de
puntada
regulado
deter.
mina
el
largo
máximo
del
motivo.
3
Control
y
modificaciOn
del
contador
de
puntadas
en
Ia
libre
programacion.
Takki
105
hefur
3
stillingar
1.
Vat
a
breytingu
a
aftur
a
bak
spori
til
aô
jafna
üt
mynztur
ar
sem
ekki
kviknar
a
ljOsi
B.
2.
Val
a
mynzturlerigd.
an
hess
aô
sporétt
leiki
breytist.
A
mynztrum
ar
sem
kviknar
a
Ijósi
B.
Sporlengdin,
sem
stillt
hefur
veriô
a
ákvarô
ar
mestu
Iengd
mynztursins.
3.
Eftirlit
og
breytingu
a
sporateljara.
egar
ér
eruô
aô
hanna
yOar
eigin
mynztur.
‘
1
Li
/
4
N
Balans
(one
ye
arkaya
doru
bati
uzunluklari
arasinda
dengeleme)
ye
örnek
uzunluu-ayari:
Tu
105,
3
fonksiyona
sahiptir:
1.
Yanan
B
gUstergesi
bulunmayan
programlarda
Oinein
denkletirilmesi
için
geriye
doru
diki
(bati)
deiimi
(balans,
Sayfa
28’e
bakiniz).
2.
Yanan
B
gostergosi
bulunan
programlarda
ernek
uzunluunun
mm
olarak
ayni
diki
(batis)
sikIiinda
secilmesi.
Ayarlanmi
olan
diki
(bati)
uzunluu,
azamI
Omek
uzunluunu
belirler.
3.
Serbest
programlama
esnasinda
bati
sayacinin
kontrolu
ye
deitirilmesi.
/

02/14/2008
Balance,
or
the
correction
of
reverse
stitches
The
balance
control
serves
for
correction
of
pattern-
or
program
combinations
which
are
sewn
with
a
slight
shift
owing
to
influences
by
the
type
of
material
or
working
method
used.
The stitch
length
of
the
reverse
stitches
of
a
pattern
is
corrected
from
—7
to
+7;
the
normal
position
is
“0”.
The minus
settings
shorten
the
reverse
stitches
and
the
patterns
or
programs
become
longer,
and
the
plus
“+“
settings
length
en
the
reverse
stitches
and
the
pattern
or
programs
become
shorter.
Examples:
1.
Correction
of
individual
patterns
(also
in
the
P-memory)
Pattern
too
long
Prog.
09
Rule:
if
the
pattern
is
too
long,
cor
rection
has
to
be
made
by
+“
(from
+1
to
+7).
2.
Correction
of
pattern-
and
program
combinations
(in
the
M-memory)
1?”
Combination:
f.;’
Corrected
by:
+3:
Rule:
If
the
pattern
or
program
last
entered
is
corrected
with
“—“
or
“+“
and
entered,
this
applies
to
the
entire
program
combination.
Corrección
de
Ia
compensacion
o
de
Ia
puntada
en
retroceso
La
compensaciOn
sirve
para
corregir
combinaciones
de
motivos
o
de
progra
mas
que,
debido
a
Ia
clase
y
caracteristicas
del
tejido
p.
ej.,
se
han
cosido
ligeramente
desplazados.
Se
corrige
el
largo
de
las
puntadas
en
retroceso
de
un
motivo
desde
—7
hasta
+7.
La
regulaciOn
normal
es
0.
En
el
caso
de
—,
las
puntadas
en
retro
ceso
son
más
cortas;
los
motivos
o
pro
gramas
son
más
largos.
En
el
caso
de
+,
las
puntadas
en
retro
ceso
son
más
largas;
los
motivos
o
pro
gramas
son
más
cortos.
Ejomplo:
1.
Correccidn
de
un
motivo
individual
(también
en
Ia
memoria
P
para
pro
gramas)
Norma:
Si
el
motivo
es
demasiado
largo,
hay
quo
corregir
con
+
(de
+1
a
4-7).
2.
Corrección
de
combinaciones
de
motivos
y
combinaciones
de
programas
(memoria
M)
,
q
1
P”
Combinaciôn
.
Jfit.;ft:JV
“
corregido
con
+
3:
,
7
Norma:
Si
el
motivo
o
programa
quo
se
ha
de
memorizar
Ultimamente,
so
corrige
y
memoriza
con
—
o
con
+,
ello
será
válido
para
Ia
combinación
nnn,nIat
tint
83
+3
Corrected
by
+3
Motivo
demasiado
largo
09
Progr.
p
corregido
con
+
3
83
4?
+3
U
La página se está cargando...
La página se está cargando...

02/14/2008
Cancelling
a
program
combination:
[]
When
key
142
“Correct”
is
pressed,
the
program
memorized
last
in
the
combina
tion
will
be
cancelled.
Press
key 142
repeatedly
until
the
entire
combination
is
cancelled.
If
the
combination
consists
of
serveral
M
memories,
each
memory
has
to
be
se
lected
and
cancelled
individually.
The
memories
are
then
tree
for
new
combi
nations.
Memorización
de
combinaciones
de
programas
Realización
de
combinaciones
de
los
programas
00
al
99
asi
como
letras
y
cifras.
En
Ia
computadora
de
Ia
“Creative”
van
16
memorias
M
(para
motivos),
M
0
a
M
15.
Para
una
o
para
varias
combina
ciones
de
programas
so
pueden
memori
zar
249
letras
y
cifras
unas
detrás
do
las
otras
en
una
memoria
M,
O
373
letras
y
cifras
repartidas
entre
las
16
memorias
M.
Asimismo
se
pueden
momorizar
82
programas
do
Ia
serie
00
a
99
de
Ia
tapa
abatiblo
en
una
memoria
M
o
125
repartidos
entre
las
16
memorias
M.
Las
letras
y
cit
ras
se
pueden
combinar
con
los
programas
00
a
99.
Memorizaciôn:
Elija
primeramente
con
el
botôn
izqulerdo
121
M
0
y
con
el
botôn
derecho
121
una
memoria
M
libre.
La
memoria
M
estará
vacia
cuando
on
01
panel
indicador
104
no
aparezca
ninguna
indicaciOn.
Si
no
se
elige
previamente
ninguna
memoria
M
de
M
1
a
M
15,
entonces
todos
los
programas
pasan
a
Ia
memoria
M
0.
A
continuaciOn
pulse
el
botOn
143
(memorizacion
del
programa).
La
memo-
na
está
ahora
lista
para
funcionar.
Seguidamente
elija
los
programas,
letras
o
cifras,
uno
por
uno,
con
los
botones
programadores
121
y
memoricelos
pul
sando
el
botôn
143.
Los
nümeros
del
programa,
letras
0
numeros
aparecen
en
el
panel
indicador
104.
Los
programas
pueden
modificarse
en
el
largo
y
en
el
ancho
antes
do
me
morizarlos.
Las
cifras
y
palabras
de
una
combina
ción
do
programas
solo
pueden
coserse
en
un
determinado
tamaño,
el
cual
queda
doterminado
por
el
ajuste
do
Ia
ültima
letra
o
cifra.
Si
Ia
computadora
no
admite
nada
más,
entonces
Ia
capacidad
do
memorizaciOn
está
agotada
y
habrá
quo
anular
una
memoria
quo
ya
no
se
necesite.
Control
de
Ia
secuencla
de
una
combi
nación
de
programas
en
el
panel
in
dicador:
Si
so
han
memorizado
más
de
4
progra
mas
o
mâs
do
12
letras
o
cifras,
01
pro
grama
puede
leerse
en
01
panel
indicador
104,
do
derecha
a
izquierda,
pulsando
el
botOn
125.
Pulsando
do
nuevo
el
botOn
125,
so
detiene
Ia
indicaciOn
del
programa.
Pisando
01
pedal,
Ia
máquina
pasa
al
co
mionzo
do
Ia
combinaciOn.
Anulación
de
combinaciones
de
programas:
[J
Pulsando
el
botôn
142
“corrección”,
queda
anulado
el
ültimo
programa
memorizado
de
Ia
combinación,
y
asi
sucosivamonto
hasta
quo
quodo
anulada
toda
Ia
combinaciOn.
Si
Ia
combinaciôn
se
compono
do
varias
memorias
M,
entonces
habrá
quo
elegir
las
memorias,
una
por
una,
y
anularlas.
Do
esa
forma,
las
momorias
quodan
libros
para
nuevas
combinaciones.
N
I
La página se está cargando...
La página se está cargando...

02/14/2008
1’
[s-I
“repeat”
key
141
has
two
functions:
1.
Returning
a
program
combination
to
the
starting
position.
2.
Repeating
selected
program
combina
tions
after
other
programs
have
been
sewn
in
the
meantime.
3.
Initiating
sewing
after
free
programming.
)
Repeating
program
combinations:
Bir
program
kombinasyonun
tekrarlanmasi.
Tu
141
“tekrarlama”,
3
fonksiyona
sahiptir:
1.
Bir
program
kombinasyonunun
geriye
doru
çalitirma
suretiyle,
balangica
getirilerek
tekran.
2.
Seçilmi
olan
programlarin
belirli
bir
zaman
araliinda
dikiminden
sonra,
biriktirilmis
olan
kombinasyonlarin
tekrari.
3.
Serbest
programlamadan
sonra
diki
me hazir
halde
olma.
Repetición
de
una
combinación
de
programas:
El
botón
141
(repetición)
tiene
3
funciones:
1
Repetición
de
una
combinación
de
programas
volviendo
al
principio.
2
Repeticiôn
de
una
combinaciOn
de
programas
elegida
después
de
haber
cosido
otro
programa
entremedias.
3
Listo
para
coser
después
de
Ia
libre
programaciôn.
Endurtekning
samtengdra
mynztra:
[71
Takki
141
,,endurtekning”
hefur
3
stillingar
1.
Endurtekningu
mynzturraOar
frá
byrjun.
2.
Endurtekningu
mynzturraOar
eftir
aô ännur
mynztur
hafa
veriô
saumuO
i
millitiOinni.
3.
Setur
vélina
i
byrjunarstaôu
a
mynztri,
sem
ér
hafiô
sjálf
hannaô.

02/14/2008
Twin-needle
sewing:
Key
129
“twin
needle”
must
be
pushed
in.
Display
A
lights
up,
and
the
stitch
width
is
limited
to
4
mm.
Again
push
key
129
to
switch
off
indicator
light
and
function.
Pattern
start
setting:
i-1
L1
1.
Push
“pattern
start”
key
128.
A
pattern
in
progress
is
returned
to
the
starting
point.
2.
The
last
program
in
a
combination
appears
in
the
display.
3.
Length
programming
in
programs
86
and
09
is
cancefled.
Costura
con
agujas
gemelas:
Q’
Pulsando
el
botón
129
(agujas
geme
las),
se
enciende
Ia
lámpara
A,
el
ancho
de
puntada
se
reduce
4
mm
y
ya
se
puede
coser
con
las
agujas
gemelas.
Pulsando
de
nuevo
el
botOn
129,
se
apaga
a
lampara
y
se
anula
Ia
funciôn.
cift
ineyle
dikme:
o
Tu
129
(‘çift
ine”)
üzerine
basilmasi
gerekir.
Gasterge
A
yanar
ye
bati
geni
lii
4
mm’de
sinirlanir.
Tus
129’a
tekrar
basiniz,
lãmba
ye fonksiyon
kapanmi
olur.
Saumaô
meô
tvöfaldri
nat:
LJ
Ytiô
a
takka
129
,,tvr
nâlar”.
l’aô
kviknar
a
ljOsi
A
og
sporbreiddin
minnkar
14
mm,
‘?tiO
aftur
a
takka
129,
egar
ér
saumiô
meO
einni
nál,
og
ljósiô
släkknar.
4stilit
a
mynztur
byrjun
1.
Ytiô
a
takka
128
,,mynzturbyrjun”.
ViO
aO
frist
mynztriO
a
byrjun
hess.
2.
SlOasta
mynztriO
kemur
ni
fram
a
snifletinum.
3.
Mynztur
86
+
09
strikast
Cit.
Comienzo
del
motivo:
1.
Pulsando
el
botón
128
(comienzo
del
motivo),
cualquier
programa
comenzado
vuelve
al
comienzo
del
mismo.
2.
El
ültimo
programa
de
una
combina
dOn
aparece
en
el
panel
indicador.
3.
Con
el
programa
86+09
se
anula
Ia
programaciOn
de
Ia
largura.
Ornek
balangicinin
I
.
ayarlanmasi:
1.
Tu
128
(“örnek
baiangici”)
üzeri
ne
basiniz.
8aslamis
olan
bir
program,
balangica
alinmi
(geriye
getirilmi)
olur.
2.
Bir
kombinasyonun
son
programi
gOsterge
sahasinda
gOrunur.
3.
Program
86+09’da
uzunluk
programi
silinir.
I

02/14/2008
4
Tek
örnein
ayarlanmasi:
Tu
127
(“tek
örnek”)
üzerine
basiniz,
gösterge
A
yanar.
Sir
program
veya
bir
kombinasyon
dikilir
ye
balangiçta
ye
son
ksimda
takviye
dikii
yapilir.
Dikis
esnasinda
tua
basildiinda,
program
sonuna
kadar
dikilir
ye
takviye
dikii
yapilir.
I
Motivos
individuales:
17
.
1
L1
Pulsando
el
botôn
127
(motivo
indivi
dual),
se
enciende
Ta
lampara
A,
se
cose
un
programa
o
una
combinaciôn
y
se
remata
el
comienzo
y
elfin.
Si
so
pulsa
el
botón
durante
Ta
costura,
se
termina
de
coser
el
programa
y
se
remata.
4
__
N
Eitt
mynztur:
Ytiô
a
takka
127
,,eitt
mynztur”.
‘aô
kviknar
a
ljósi
B.
Vélin
saumar
nü
aôeins
eitt
mynztur
eôa
mynztursamstôu
og
heftir
fyrir
byrjun
og
enda,
Ef
‘tt
era
takkann
a
meOan
saumaO
or,
1a
saumar
véhn
mynztriô
til
enda,
og
hêftir
fyrir.
El
[[11
[Li_LLLflTJLI
÷
K
prog
()
99
93
LEJEILED
[ELEJEJE]
4
Single
pattern
setting:
Push
“single
pattern”
key
127.
Display
A
lights
up.
The
machine
sews
a
program
or
a
program
combination
and
ties
off
beginning
and
end
of
the
seam.
If
the
key
is
pressed
while
sewing
is
in
progress,
the
machine
completes
the
program
and
ties
off
the
seam.

02/14/2008
[.
Emm
Press
“pattern
mirroring
key
126.
Display
A
lights
up.
The
program
select
ed
is
mirrored.
Programs
can
also
be
entered
in
a
com
bination
for
mirroring.
When
key
141
is
pressed
beforehand,
the
pattern
combi
nation
is
mirrored.
Again
push
key
126
to
switch
off
display
and
function.
Inversion
del
motivo:
IW,
[.4_
Pulsando
el
botOn
126
(inversion
motivo),
se
enciende
Ia
lámpara
A
y
el
programa
seleccionado
se
cose
simétri
camente
invertido.
Los
programas
pueden
memorizarse
también
simétrica
mente
invertidos
dentro
de
una
combina
don.
Las
combinaciones
tambiOn
pueden
coserse
invertidas
pulsando
anteriormente
el
botOn
141.
Pulsando
de
nuevo
el
botón
126,
se
apaga
Ia
lámpara
y
se
anula
Ia
funciOn.
Mynzturspeglun
‘tiô
a
takka
126
,,mynzturspeglun”.
aô
kviknar
a
IjOsi
A.
MynztriO
sem
valiô
var
saumast
nU
ofugt.
Einnig
er
hgt
aô
velja
spegluô
mynztur
I
rOô.
Einnig
er
hgt
aô
sauma
heila
mynzturra
Ofugt
meô
vi
aô
‘ta
áôurátakka
141.
Ytiô
aftur
a
takka
126,
ljOsiô
slOkknar,
og
vélin
httir
aO
spegla
mynztrin.
N
LH
tj
Progr.
79
57
38
37
37
37
Pattern
mirroring:
_
N
Ornein
ters
gOrUnUmU
[0/
(ters
gOrUnüm):
Tu
126
(“ters
gorunum”)
üzerine
basiniz.
GOsterge
A
yanar.
Secilen
program
ters
gosterilen
(aynada
gorulen)
ekilde
dikilir.
Programlar,
ters
gOsterilen
(aynada
garulen)
ekilde
de
bir
kombinasyona
verilebilir.
Kambinasyonlar
daha
Once
tu
141
üzerine
basilmak
suretiyle
ters
gOru
len
(aynada
gOrulen)
ekilde
dikilebilir.
Tu
126’ya
tekrar
basniz,
gOsterge
ye
tonksiyon
kapanir.
/
/

02/14/2008
I
LLLT1LJ
pmg
()
.
E
1d
LIEIEIELIEEJ
Costura
en
punto
recto:
El
programa
00
sirve
para
coser
en
punto
recto
con
posiciOn
central
de
Ia
aguja.
Elija
el
large
de
puntada
deseado
con
el
botOn
106.
El
programa
01
sirve
para
coser
en
punto
recto
con
posicion
zquierda
de
Ia
aguja.
Con
el
botOn
107
se
puede
cob-
car
Ia
aguja
en
13
posiciorles,
de
izquierda
a
derecha.
Los
programas
02
y
03
son
para
coser
en
punto
recto
pero
en
retroceso.
Estos
programas
se
utilizan
para
cornbinacio
nes
de
prograrnas.
Con
el
prograrna
03
se
puede
coser
en
13
posiciones
de
Ia
aguja.
Los
ajustes
son
como
se
han
descrito
anteriormente.
Beint
spor:
Mynztur
00
er
fyrir
beint
spor
rneô
sporlegu
I
rniôju.
Sloan
vet
jiO
ér
sporlengdina
rneO
takka
106.
Mynztur
01
er
fyrir
beint
spor
eq
sporlegu
vnstra
megin.
MeO
takka
107
getiO
ér
fart
sporleguna
frá
vinstri
til
hgri
urn
13
stillingar.
Mynztur
02
og
03
er
fyrir
beint
spor
aftur
a
bak.
au
eru
notuO
fyrir
samtenglngar
saurna.
Hgt
er
aO
stilla
sporleguna
urn
13
sNlingar,
ems
og
áOur
var
lyst.
FTi[LIfJJLJi
___
LELLEI
ELIEE
Straight-stitch
sewing:
Program
00
is
straight-stitch
sewing
with
the
needle
in
its
central
position.
Set
the
desired
stitch
length
by
key
106.
Program
01
is
straight
stitching
with
the
needle
in
its
left
position.
With
key
107
the
needle
position
can
be
varied
in
13
steps
from
left
to
right.
Programs
02
and
03
are
reverse
straight-stitching.
These
programs
are
used
for
program
combinations.
Program
03
can
be
sewn
with
the
need
le
in
13
different
positions.
The
setting
is
made
as
described
above.
4
DUz
bati
dikil:
Program
00,
batis
durumu
ortada
olmak
üzere
düz
dikistir.
Arzu
edilen
batis
uzunluunu
tu
106
ile
seçiniz.
Program
01,
sol
bati
durumundaki
düz
dikitir.
Tu
107
be
bati
durumu,
soldan
saga
olmak
üzere
13
durumda,
detiri
lebilir.
Program
02
ye
Q3,
geriye
doru
dOz
di
kitir.
Bu
programlar,
program
kombina
syonlari
1cm
kullanilmaktadir.
Program
03,
13
bati
durumunda
dikile
bilir.
Ayarlar
daha
once
belirtildii
ekilde
yapilrnaktadir.
/

02/14/2008
Zigzag
sewing:
Program
10
is
zigzag
sewing
with
the
needle
in
its
left
position.
Program
11
is
a
zigzag
seam
made
with
the
needle
in
the
right
position.
With
key
107
the
stitch
width
can
be
set
between
0.5
and
6.0
mm.
Set
the
desired
stitch
length
with
key
106.
)
Costura
en
punto
zigzag:
El
programa
10
es
para
coser
en
punto
zigzag
con
Ia
aguja
en
posicion
central.
El
programa
11
es
para
coser
en
punto
zigzag
con
Ia
aguja
en
posición
derecha.
Elija
el
ancho
de
puntada
entre
0,5
y
6,0
mm
con
el
botôn
107
y
el
argo
de
puntada
deseado
con
el
botón
106.
Zik
zak
spor:
Mynztur
10
er
fyrir
zik
zak
spor
meO
sporlegu
frá
miôju.
Mynztur
11
er
fyrir
zik
zak
spor
meô
sporlegu
I
rá
hgri
MeO
takka
107
getiô
ér
valiO
urn
zik
zak
breidd
frá
0.5—6.0
mm.
Sporlengdina
veIjiO
lér
meO
takka
106.
J
T
1
L_i
J_Li
_LHJ
L
prog
o
mmm
prog
__
o
DEE
/
\
N
Zikzak
dikii:
Program
10,
bati
durumu
ortada
olrnak
üzere
zikzak
dikisidir.
Program
11,
bat
durumuna
gore
sada
olmak
üzere
zikzak
dikiidir.
0,5
ye
0,6
mm
olan
bati
genisliini
Tu
107
ile
seçiniz.
Arzu
edilen
batis
uzunlu
unu
Tus
106
ile
seçiniz.

02/14/2008
Recomendaclones
para
Ia
costura:
Para
cada
programa
00
a
99,
letras
y
cifras
van
mernorizadas
recornendacio
nes
do
costura
para
ol
doble
arrastro,
Ia
tensiOn
del
hilo
superior
y
ol
pie
prensa
telas
quo
deberá
emplearse.
Pulse
el
botdn
125
y
no
lo
suolte.
En
Ia
computadora
aparecen
3
simbolos
en
los
quo
so
indica
Ia
recomondaciOn
corres
pondiente.
A
=
doblo
arrastre
B
=
tension
del
hilo
superior
C
=
nümero
del
pie
prensatelas.
4
UppIsIngar
urn
sauma
og
stllllngar
fyrir
pa
I
minni
vOlarinnar
eru
geymdar
upplsingar
fyr
ir
hvern
saum
.
e.
a.
s.
ráôleggingar
urn
hvort
nota
elgi
efri
flytjarann,
hvemig
stilla
oigi
yfir
Mnnaspennuna
og
hvaôa
fOt
sé
bez.t
aô
nota.
‘?ti
a
takka
125
og
haldiô
honum
inni.
Fyrir
ofan
syniftOtinn
em
3
tákn,
og
korna
viO
komandi
uppl’singar
fyrir
neôan
au.
‘
[
W
Ti
I
/
I
/
LU
I
I
!J1
U
prog
()
r-3
N
Recommended
sewing
modes:
For
every
program
from
00
to
99,
and
for
letters
and
firgures
the
machine
will
indicate
recommended
sewing
modes
with
regard
to
dual
feed,
needle
thread
tension
and
sewing
feet.
Press
key
125
and
hold
it
in.
The
recommendations
appear
in
the
display
beneath
the
three
symbols
on
the
computer:
‘—S
--
,.
uUdI
iee
B:
needle
thread
tension
C:
number
of
sewing
foot
4
Diki
tavsiyeleri:
00’dan
99’a
kadar
olan
her
program,
harfler
ye
sayilar
cm,
çift
kuma
tai
masi,
ust
iplik
gerginlii
ye
kullanilacak
diki
ayai
hususunda
dikis
tavsiyeleri
biriktirilmis
bulunmaktadir.
Tu
125’e
basiniz
ye
sikica
tutunuz.
Komputer
üzerinde
3
sembol
bulunmakta
olup,
daha
sonra
bunlarin
altinda
uygun
olan
açiklama
gärünmektedir.
A
=
çift
kuma
taimas,
B
=
Ust
iplik
gerginlii
C
=
Diki
ayainin
numarasi
b
A:
Efn
ftytjarinn
B:
Yfirtvinnaspennan
C:
NUrner
a
saumfrnti
/

02/14/2008
Free
programming
Using
the
programming
sheet
inside
the
rear
cover
of
the
sewing
book
(also
available
from
your
dealer),
trace
your
own
design
and
number
the
penetration
points
on
it
(see
sewing
book).
This
numbering
is
entered
in
the
P
memory
reserved
for
this
purpose
in
the
computer.
The
Creative
1471
has
16
P-memories
from
P0
to
P15.
In
each
memory
up
to
99
stitches
can
be
stored.
If
a
pattern
has
more
than
99
stitches,
the
next
free
P-memory
has
to
be
selected
and
further
stitches
stored.
Up
to
694
stitches
can
be
memorized,
distributed
among
the
P
memories,
so
the
capacity
of
7
memo
ries
can
be
fully
utilized.
The
computer
will
not
accept
more
than
that.
The
total
of
16
P-memories
is
available
for
the
case
when
a
number
of
sewing
patterns
with
fewer
than
99
stitches
are
to
be
sewn.
Serbest
programlama:
Diki
kitabinin
arka
kapak
sayfasindan
Onceki
sayfaya
konulmu
olarak
bulaca
niz
ye
ilâveten
PFAFF-Maazanzdan
alabiIeceiniz
bir
programlama
kãidin
da,
bizzat
tasarlanmi
bulunan
diki
Or
nei
çizilmi
ye
bati
noktalari
numaralanmistir
(diki
kitabina
bakiniz).
Bu
numaralama,
komputerin
bu
hususta
OngOrUlen
P-biriktiricisine
verilmektedir.
Creative
1471,
P
O’dan
P
15’e
kadar,
16
P-biriktiricisine
sahiptir.
Her
biriktiricide,
99
bati
biriktirilebilir.
Bir
Ornein
99’dan
daha
fazla
batia
sahip
olmasi
halinde,
bu
durumda
bundan
sonraki
serbest
P
biriktiricisinin
seçilmesi
ye
biriktirmeye
devam
olunmas
gerekir.
P-biriktiricisine
daitilmi
ekilde,
toplam
olarak
694
bati
biriktirilebilir.
Bu
duruma
gore
7
biriktiricinin
kapasite
sinden
tamamen
yararlanilabilir.
Bundan
sonra
komputer,
artik
daha
fazlasini
kabul
etmez.
16
P-biriktiricileri,
99
batitan
daha
az
olan,
fazla
diki
Orneinin
bulunmasi
hali
içindir.
Programacion
libre:
En
una
hoja
do
programaciOn,
que
va
in
cluida
al
final
del
libro
de
costura
y
que
puede
adquirir
adicionalmente
en
su
agencia
Pfaff,
se
dibuja
el
motivo
creado
por
Vd.
misma
y
so
numeran
las
punta
das
(vease
el
libro
de
costura).
Dicha
numeraciOn
se
introduce
en
Ia
memoria
P
de
Ia
computadora
prevista
para
ello.
La
Creative
1471
tiene
16
memorias,
desdo
P
0
hasta
P
15.
Cada
memoria
tiene
capacidad
para
99
puntadas.
Si
un
motivo
tiene
más
de
99
puntadas,
enton
ces
habrá
que
elegr
Ia
siguiente
memo-
na
P
libre
y
continuar
memorizando.
La
memoria
P
admite
hasta
un
total
de
694
puntadas
repartidas,
o
sea
que
se
puede
aprovechar
por
completo
Ia
capacidad
de
7
memorias.
Lo
quo
sobrepase
de
Osto,
Ia
computadora
no
Ic
acepta.
Las
16
memorias
P
están
previstas
para
cuando
haya
que
cosei
más
motivos
con
menos
de
99
puntadas.
Hônnun
elgln
sauma
eôa
mynztra:
A
forritunarblaôin,
sem
eru
aftast
i
saumabOk
inni,
getiô
per
teiknaô
mynztur
eftir
eigin
hOfôi
og
siôan
setjiô
per
nümer
viô
hvem
punkt,
par
sem
nálin
a
aô
stinga
niôur
(sjá
nânar
i
sauma
bOkinni).
essi
nimer
eru
siOan
sett
inn
i
P
minni
vélarinnar.
I
CREATIVE
1471
eru
16
P-minni
frá
P-0
til
P-i
5.
I
hvert
minni
er
hgt
aO
setja
99
spor.
Ef
mynztriô
hefur
fleiri
on
99
spor
pa
verOiô
per
aO
velja
nsta
lausa
minni
og
halda
par
áfram.
Hgt
er
aô
setja
samtals
694
spor
inn
a
oIl
P-minnin.
PaO
vill
segja
aO
of
7
P-minni
em
n’tt
til
full
nustu,
pa
tekur
talvan
ekki
viO
meiru.
16
P
minnin
em
til
staOar
ef
pau
em
notuô
fyrir
frri
spor
en
99
i
hverju
minni.
4
La página se está cargando...

02/14/2008
w
I
I
I
I
I
i
I I
÷
rag
Con
el
botén
izquierdo
121
elija
prime
ramente
P
0
y
con
el
botôn
derecho
121,
una
memoria
libre
P.
Pulse
el
botOn
142
corrección
BL.
En
el
panel
indicador
104
aparece
B
00
sobre
el
pu[
sador
107
para
el
ancho
de
pun
tada
y
L
00
sobre
el
pulsador
106
para
el
lar
go
de
puntada.
B
es
para
programar
el
punto
del
ancho
de
puntada
y
L
para
el
punto
del
argo
de
puntada.
Sobre
el
baton
105,
a
Ia
derecha,
aparece
un
1
con
un
punto
luciendo
intermitentemente.
El
punto
intermitente
indica
Ia
capacidad
do
registro
de
Ia
memoria.
Por
cada
programaciOn
de
puntadas
se
cuenta
un
1
más.
Si
apare
ce
Ia
cifra
99,
entoncos
hay
programa
das
99
puntadas
y
habrá
que
elegir
Ia
prOxima
memoria
P
libre.
CorrecciOn
posterior
de
una
pun
tada
mat
programada
u
olvidada:
Sobre
el
botOn
105,
delante
del
nümero
do
Ia
ültima
puntada
programada,
luce
un
punto
intermitentemente.
Pulsando
el
signo
menos
(—),
del
botán
105,
se
pue
den
elegir
en
retroceso
todos
as
nüme
ros
por
orden
sucesivo
y
comprobar
y
corregir
cada
uno
de
los
datos
do
los
puntos
de
Ia
puntada,
Pulsando
el
signo
más
(+)
del
botOn
105,
se
puede
ajustar
de
nuevo
Ia
ültima
cifra
introducida
con
el
punto
inter
mitente.
Una
vez
memorizado
el
motivo,
habrá
que
pulsar
el
botOn
141
repeticiOn,
para
que
Ia
máquina
quede
lista
para
coser.
lntroducciOn
de
memorias
P
en
las
memorias
M:
Si
un
motivo
de
costura
de
programa
ciOn
libre
so
compone
de
varias
memo
rias
P
o
debe
combinarse
con
un
programa
do
Ia
tapa
abatible,
con
letras
o
con
citras,
entonces
se
pueden
intro
ducir
las
memorias
P
en
una
memoria
M.
Para
eDo,
elija
una
memoria
M
libre
o
Ia
memoria
con
los
motivos
ya
memoriza
dos.
Pulse
el
batOn
143)
(memorizaciàn
del
programa),
elija
Ia
memoria
P
corre
spondiente,
p.ej.
P
5,
y
pulse
de
nuevo
el
baton
143.
La
memoria
P
so
encuen
tra
ahora
en
Ta
memoria
M
preselec
cionada.
Elija
Ia
memoria
P
y
pulse
el
botOri
143,
continuando
asI
hasta
quo
todas
las
memorias
requeridas
se
hallen
en
Ia
memoria
M,
caso
de
el
motivo
sea
más
largo
que
1
memoria
P.
Para
hacer
Ia
comprobaciOn,
pulse
el
batOn
141)
(repeticiOn).
En
ese
momen
to
aparece
en
el
panel
indicador
Ia
memoria
P
introducida,
p.ej.
P
5.
Cuando
se
introducen
memorias
P
en
las
memorias
M,
so
mantienen
las
memorias
P.
Las
memorias
P
aparecen
en
el
panel
indicador
solamente
como
P0,
P1,
P2,
etc.
Cuando
so
anulen
las
memorias
P,
habrá
que
anular
tambien
las
memorias
M.
La
forma
do
programar
memorias
P
en
M
se
sescribe
detalladamente
en
el
libro
de
costura.
U
Li
zrn
rnnn
111111
,I
I
I
()
1’
,
oo1
I
MemorizaciOn
con
Ia
programaciôn
libre:
F
J
La página se está cargando...
La página se está cargando...

02/14/2008
7
.‘
7
Changing
the
needle
(System
1301705
H):
Loosen
screw
A.
Take
out
the
needle.
Push
the
needle
up
as
far
as
it
will
go
(flat
side
facing
the
back).
Tighten
the
screw.
Carnbio
de
Ia
aguja
(sisterna
130/705
H):
Afloje
el
tornillo
A
y
saque
Ia
aguja.
lntroduzca
Ia
nueva
aguja
hasta
el
tope
de
forma
quo
Ia
cara
plana
mire
hacia
atrás
y
apriete
de
nuevo
el
tornillo.
o
Ineyi
deitirmek
(Sistem
130/705
H):
—
A
vidasini
gevetiniz.
neyi
cikanniz.
Yeni
ineyi
(basik
dip
kismi
arka
tarafa
doru)
tamamen
yukanya
doru
sUrünüz.
Vidayi
sikitiriniz.
Skipt
urn
nál
(req.
130/705
H):
Losiô
urn
skrufu
A.
Takiô
nálina
ür.
SetjiO
nja
nál
moo
flata
legginn
frá
your,
og
‘tiO
henni
ems
hátt
og
hun
kemst.
FestiO
skrüfuna
aftur.
Dropping
the
feed
dog:
Open
free
arm
cover
131.
Push
the
drop4oed
control
toward
C
(feed
dog
dropped)
or
toward
B
(sewing
position).
Ocultación
del
transportador:
Abra
Ia
tapa
131.
Corriendo
el
mando
hacia
C,
el
transpor
tador
queda
oculto;
corriéndolo
hacia
B,
queda
lista
para
coser.
TransportorU
(taiyicayi)
aaiya
doru
_______________________________________
indirmek:
Kapak
131’i
aciniz.
Aaiya
indirme
sür
gusunü
C’ye
doru
sürünüz.
Asaiya
sOrOnUz.
Flytjarinn
tekinn
Ur
sambandi:
inmi
durumda,
dikmek
için
Bye
doru
YtiO
stillinum
aO
Cog
á
or
flytjarinn
niOri.
AO
B
og
á
or
hann
i
sambandi.

02/14/2008
usne
sweiy
rwes
a)
Take
care
to
avoid
injury
to
your
fingers
by
the
needle
during
sewing.
b)
Make
sure
you
unplug
the
power
cord
whenever
you
have
to
leave
the
machine
or
wish
to
clean
it,
oil
it
or
change
mechanical
and
accessory
parts.
c)
Be
sure
to
use
only
a
15-watt
light
bulb
in
the
sewing
lamp.
Some
safety
rules
valid
for
United
Kingdom
only
The
wires
in
this
mains
lead
are
coloured
in
accordance
with
the
following
code:
Blue:
Neutral
—
Brown:
Live
As
the
colours
of
the
wires
in
the
mains
lead
of
this
appliance
may
not
corres
pond
with
the
colour
coding
of
the
termi
nals
in
your
plug,
proceed
as
follows:
The
wire
which
is
coloured
blue
must
be
connected
to
the
terminal
which
is
mar
ked
with
the
letter
N
or
coloured
black.
The
wire
which
is
coloured
brown
must
be
connected
to
the
terminal
which
is
marked
with
the
letter
L
or
coloured
red.
Please
note:
When
a
13-amp
plug
is
used
a
3-amp
fuse
has
to
be
fitted.
DIN
(Alman
Endüstri
Normu)
57730
Ksim
2C’ye
gore
evde
kullanilan
diki
makinalari
için
guvenlik
talimatlari
a)
Makinayt
kullanan
kimsenin,
yukariya
ye
asatya
doru
hareket
eden
ine
dolayesiyla,
yeteri
kadar
dikkatli
day
ranmasi
ye
cahma
esnasinda
diki
yerini
devamli
olarak
gazlemesi
gerekir.
b)
Makinari,n
terkedilmesi
esnasinda,
bakim
isbn
esnasinda
veya
makina
parcalarinin
veya
ilãve
parçabarin
deitirilmesi
sirasinda,
makinanin
fi
ini
prizden
cikarmak
suretiyle,
ceryanin
kesilmesi
gerekir.
c)
Lâmbanin
müsaade
olunan
azmai
gucu
15
Vattir.
Medidas
de
seguridad
para
las
rnaquinas
de
coser
domésticas
segun
DIN
57730,
parte
2C
3)
Debido
al
peligro
de
accidente
quo
representa
el
movimienito
do
Ia
aguja,
el
usuario
deberá
poner
todo
eb
cuidado
posibbe
durante
el
trabajo
y
no
deberã
apartar
Ia
vista
do
Ia
zoria
do
costura.
)
Antes
de
cambiar
Ia
aguja,
el
pie
prensatelas,
Ia
canilla
y
Ia
placa
de
aguja,
10
mismo
quo
al
limpiar
o
engrasar
Ia
maquina,
0
cuando
no
se
Ia
use,
deberá
desconectarse
elOctri
camente,
es
decir,
deborá
sacarse
el
onchufe
de
Ia
red,
:)
La
potencia
max.
admisibbe
do
Ia
bombilla
es
do
15
vatios.
Nokkrar
oryggisraôstafanir
a)
GtiO
hess
aô
fingur
verOi
ekki
fyrir
nálin;ii.
egar
saumaO
er.
b)
Geriô
aO
aô
venju
yöar
aO
taka
vélina
ür
sambandi,
legar
skipta
larf
um
nab,
saumfót,
eOa
egar
ér
eruO
ab
hreinsa
og
smyrja
vélina.
c)
Aldrei
ma
vera
sterkari
pera
i
vélinni
en
15W.
1
I
La página se está cargando...

02/14/2008
Detachable
work
support
and
accessories:
The
work
support
can
be
lifted
out
(A).
Open
its
lid
and
take
out
accessory
box
C.
Underneath
the
box
is
an
accessory
compartment
B.
Illustration
D
shows
how
to
arrange
sewing
feet,
needles
and
bobbins
in
the
accessory
box.
0
Ordinary
sewing
foot
1
Fancy-stitch
foot,
with
dual
feed
2
Fancy-stitch
foot,
without
dual
feed
3
Blindstitch-
and
overlock
foot
4
Zipper
foot
5
Buttonhole
foot
6
Darning
foot
7
Hemming
foot
8
Edge
guide
Suplemento
y
accesorios:
El
suplemento
se
puede
quitar
del
todo
(A).
Abra
el
suplemento
y
saque
Ia
caja
de
accesorios
C.
Debajo
de
ella
hay
un
compartimento
B
para
accesorios.
La
figura
D
muestra
côrno
deben
colocarse
los
pies
prensatelas,
las
agujas
y
las
canillas.
0
Pie
normal
1
Pie
para
puntada
de
adorno
con
transporte
superior
2
Pie
para puntada
de
adorno
sin
transporte
superior
3
Pie
para puntada
invisible
y
para
overlock
4
Pie
para
cremalleras
5
Pie
para
ojales
6
Pie
zurcidor
7
Pie
dobladillador
8
Gula
Deisebilen
(dikilecek
eyln
üzerlne
konduu,
kaldirilabilir)
diki
yUzeyi
ye
have
parcalar:
Diki
yOzeyi
diariya
çikarilabilir
(A).
Di
ki
yüzeyini
açinlz,
teferruat
(ilãve
parça
lar)
kutucuunu
dianya
cikariniz.
Teferruat
kutucuunuri
altinda
bir
tefer
ruat
bälmesi
(B)
bulunmaktadtr.
Resim
D,
diki
ayaklarinin,
inelerin,
masurala
rin
nasil
dizilmesi
gerektiini
gaster
mektedir.
0
Normal
ayak
1
tJst
taimali
süs
dikii
ayai
2
Ust
taimasiz
süs
dikii
ayai
3
Kör
diki-
ye
overlock
(ustten
geçmeli
diki)
ayai
4
Fermuar
ayai
5
Ilik
ayaI
6
Orerek
tamir
etme
(yamama)
ayai
7
Etek
baski
ayai
8
Cetvel
Vlnnuborôiô
og
aukahiutir:
Hgt
er
aO
taka
borôi
af
A.
OpniO
l,aô
og
fjarlegiô
efri
tiluta
C.
Undir
efri
hiutanum
er
auka
gaymsluhôlf
B.
Mynd
D
s’nir
hvernig
fOtum,
nálum
og
spólum
er
haganlegast
korniô
fyrir.
0
Venjulegur
saumfótur
1
UtsaumsfOtur
fyrir
efri
flytjara
2
Utsaumsfótur
an
efn
flytjara
3
Blindföldunar
og
overlockfOtur
4
Rennilása
og
kanttOtur
5
HnappagatafOtur
6
StoppfOtur
7
FaldfOtur
8
Kantst’ring
I

02/14/
2008
I.nanglng
sewing
Toot;
noiu
sewing
iooi
at
front
and
push
down
to
disengage
foot.
Cambio
del
pie
prensatelas:
Para
desencajar
el
pie
prensatelas,
sujételo
por
su
parte
delantera
y
presiOnelo
hacia
abajo.
Oiki
ayaIni
deitirmek:
Diki
aya,ni
an
taraftan
tutunuz
ye
asaiya
doru
bastiriniz.
Bu
arada
ayak
yerinden
cikar.
Skipt
urn
ttur:
Takiô
urn
fótinn
aO
frarnan,
C
and
D
are
for
securing
accessories.
E
is
the
sewing
foot
screw.
C
y
D
sirven
para
fijar
los
accesorios.
E
es
el
tornillo
de
fijaciOn
del
portapren
satelas.
C
ye
D,
have
parcalann
tespit
edilrnesi
içindir.
E,
diki
ayai
vidasidir.
C
og
D
eru
til
aô
festa
aukahiuturn
ems
og
kantst’ringu.
E
festir
hälduna
fyrir
saurnft
4
Fitting
sewing
toot:
lower
lifting
lever
and
locate
foot
so
that
pins
A
enter
grooves
B.
Colocaciôn
del
pie
prensatelas:
Haga
descender
Ia
palanca
alzaprensatelas
y
ernpuje
el
prensatelas
de
forma
que
los
pasadores
A
encajeri
en
las
ranuras
B.
Diki
ayatni
takmak:
Kurna
bastirrna
kolunu
aaiya
indiriniz
ye
bu
arada
ayai,
B
käprucUu
C
oluu
içerisine
oturacak
sekilde
sürünüz.
Fótur
settur
a:
LkkiO
fótlyftirinn
og
friO
fôtinn
til
annig
aô
tittir
A
talli
I
raufar
B.
\
urnar.
La página se está cargando...

02/14/2008
Limpieza
y
engrase:
Levante
Ia
placa
de
aguja
por
detrás
(A).
y
retirela
(B).
Limpie
con
un
pincel
el
transportador
y
Ia
zona
del
garfio.
El
control
del
fib
inferior
se
limpiará
de
acuerdo
con
las
normas
de
Ia
página
47.
No
engrase
Ia
maquina.
Lo
ünico
que
necesita
hacer
es
poner
de
vez
en
cuan
do
una
gota
de
aceite
en
Ia
pista
del
garfio
como
muestra
Ia
figura.
Hrelnsun
og
smuming:
LyftiO
stingplatunni
upp
aô
aftan
A.
og
takiO
hana
af
B.
Hreinsiô
flytjarann
og
kringum
griparann
meO
bursta.
Hreinsiô
elektrOniska
eftirlittO
meô
undirtvinnanum
sky.
leiôbeiningum
a
bbs.
53.
Smyrjlô
ekkl
véllna,
pvi
hUn
er
sjãlfsmurb.
AlIt,
sem
ér
urfiô
aO
gera,
er
ac
smyra
öru
hvoru
I
griparann.
N
Cleaning
and
oiling
Tilt
the
needle
plate
up
at
the
back
(A)
and
remove
it
(B).
Clean
the
feed
dog
and
the
parts
in
the
vicinity
of
the
sew
ing
hook
with
a
soft
brush.
Clean
the
bobbin
thread
monitor
as
instructed
on
page
47.
Only
apply
a
drop
of
oil
in
the
hook
raceway
from
time
to
time.
4
N
Temiziemek
ye
yalamak:
Batis
levhasini
arkadan
kaldiriniz
(A)
ye
diariya
cikariniz
(B).
Transportorü
(tai
yiciyi)
ye
mekik
sahasini
firça
ile
temzleyi
niz.
Alt
iplik
kontrol
dUzeni
Sayfa
65’deki
talimatlara
gäre
temizlenecektir.
Makinayi
yalamayiniz.
Sadece
ara
sira
kavrayici
nm
bulunduu
sahasina,
resimde
gOste
rildii
gibi,
bir
damla
ya
damlatiniz.
I

02/14/2008
Changing
the
light
bulb:
Pull
out
the
mains
plug.
Close
the
hinged
top
cover
and
swing
up
the
carry
ing
handle.
Insert
the
edge
guide
into
cutout
D,
push
down
the
lamp
housing
and
hold
it
there.
Turn
the
light
bulb
to
wards
A
and
take
it
out.
Insert
the
new
bulb
so
that
its
pins
enter
slots
C.
Push
it
up
and
turn
it
towards
B.
Pull
out
the
edge
guide.
Camblo
de
Ia
bombilla:
Desconecte
a
máquina.
Cierre
Ia
tapa
abatible
y
levante
el
asa.
lntroduzca
Ia
gula
entre
a
tapa
frontal
y
Ia
carcasa
y
través
de
Ia
ranura
D.
Empuje
el
porta
Iámparas
hacia
abajo
y
sujételo
asi.
Gire
Ia
bombilla
a
Ia
izquierda
(A)
y
saquela.
Introduzca
Ia
nueva
bombilla
de
forma
que
las
guIas
encajen
en
las
muescas
C,
y
empüjela
y
girela
a
Ia
derecha
(B).
Retire
Ia
gula.
Skipt
urn
peru:
TakiO
rafmagnstengilinn
ür
sambandi.
LyftiO
handfanginu
upp.
Setjiô
kantst’ringuna
niôur
urn
rauf
D
ofan
a
vélinni.
l’rstiO
rneô
stringunni
ofan
a
peruhOlduna.
og
haldiO
henni
fastri.
l’rsttO
perunni
upp
a
viô
og
snüiO
i
átt
aO
A.
TakiO
peruna
ür
og
setjiô
nja
peru
annig
i
aâ
häkin
a
perunni
falli
I
raufar
C.
PrstiO
a
og
snüiO
I
átt
aO
8.
LosiO
nü
a
stringunni.
annig
aã
peruhaldan
fan
aftur
upp.
4
Ampul
deitirmek:
Elektnik
fiini
çekiniz.
Acilir
kapanir
kapa
i
kapatiniz
ye
taima
kolunu
yukariya
kaldininiz.
Kilavuz
cetvelini,
D
kertii
vasitasiyla
üst
kapak
ye
muhafaza
arasina
sokunuz.
Ampul
muhafazasini
asaIya
bastiriniz
ye
sikica
tutunuz.
Yeni
ampulu,
diler
C
yivleri
içerisine
girecek
sekilde
sürünüz,
yukariya
doru
bastini
niz
ye
B
yönunde
çevininiz.
Cetveli
dia
riya
cikariniz.
4
I

02/14/2008
Cambio
del
fusible:
Retire
el
enchufe
do
Ia
red.
Gire
con
un
destornillador
el
portafusibles
A
un
cuar
to
de
vuelta
hacia
a
zquierda,
suèltelo
y
sáquelo.
Saque
ahora
el
fusible
B
y
meta
un
nuevo
fusible.
Coloque
de
nuevo
el
portafusibles
en
su
lugar,
ernpüjelo
con
un
destornillador
y
gIrelo
un
cuarto
de
vuelta
a
Ia
derecha.
(Tipo
de
fusible:
FF2A).
Las
maquinas
do
110
V
no
tienen
fusible.
Skipt
urn
öryggi:
takiO
vélina
ür
sambandi
viO
veggtengil.
Moo
smapening
eOa
skn:ifjarni
oslO
ér
urn
oryggisholduna
A,
moO
vi
aO
snüa
henni
til
vinstri.
TakiO
hOlduna
ür
og
skiptiO
urn
OryggiO
B.
SetjiO
slOan
hölduna
aftur
I,
‘tiO
lauslega
a
hana
og
snüiO
til
hgri.
Oryggi
at
styrkielka
FF2A
fáiO
ér
hjá
PFAFF
umboOinu,
I
vélurn
fyrir
110
volt
er
ekkert
oryggi.
Changing
the
fuse
Pull
out
the
mains
plug.
Turn
fuse
holder
A
left
a
quarter
turn
with
a
screwdriver,
release
it
and
take
it
out.
Pull
out
fuse
B.
Insert
a
new
fuse
in
the
holder,
repla
ce
the
holder,
push
it
in
with
the
screw
driver,
then
turn
It
right
a
quarter
turn.
(The
fuse
type
is
FF2A.)
110-volt
machi
nes
have
no
fuse.
Sigortayi
deitirmek:
Ceryan
fiini
çekiniz.
A
sigorta
mesnedini
tornavidayla
därtte
birlik
bir
dändürme
lIe
sola
doru
çevirip
serbest
btrakrniz
ye
disariya
cikariniz.
B
sigortasini
disariya
doru
çekiniz.
‘toni
sigortayl
mesnet
ice
risine
sürünüz.
Mesnedi
yerlestiriniz,
tor
navidayla
arkaya
doru
bastirintz
ye
därtte
birlik
bir
dOndUrme
lIe
saa
doru
sikiniz.
(Sigorta
gucu
FF2A).
110
Voltluk
makinalarin
sigortasi
yoktur.
6
I

02/14/2008
Changing
the
batteries:
Switch
on
the
machine,
so
that
the
memories
are
not
lost
when
the
batteries
are
changed,
and
tilt
the
machine
over
backwards.
A
battery
compartment
is
infl
stalled
in
the
base.
Lift
cover
B
at
the
catches
in
recesses
A
and
remove
cover.
Take
out
the
batteries.
Insert
the
new
batteries
with
the
plus
side
(+)
facing
upwards:
Place
cover
B
in
so
that
hinges
C
engage
in
recesses
D
and
press
cover
until
it
snaps
in
place.
After
changing
the
batteries,
check
the
contents
of
the
memories.
Replacement
batteries:
2
Mignon
cells,
1.5
V,
type
LR
6
Only
use
non-leaking
batteriesl
Cambio
de
las
pilas:
Conecte
a
maquina,
para
que
las
memorias
no
so
anulen
al
cambiar
las
pilas,
y
vuelquela
hacia
atrãs.
En
su
base
hay
un
compartimento
para
as
pilas.
Levante
Ia
tapa
B
por
las
hendiduras
A
y
retire
las
pilas.
Coloque
las
nuevas
pilas
E,
con
el
ado
+
hacia
arriba.
Coloque
los
salientes
C
de
Ta
tapa
B
en
las
hendiduras
D
y
presione
Ia
tapa
hasta
que
encaje.
Nota:
DespuOs
de
cambiar
las
pilas,
es
aconsejable
comprobar
el
contenido
de
as
memorias.
Pilas
de
recambio:
2
pilas
Mignon
1,5
V;
tipo
LR
6
Utilice
solarnente
pilas
que
no
puedan
Skipt
urn
rahläOur:
Kveikiô
a
vélinni,
og
leggiô
hana
a
borôiô.
Nauôsynlegt
er
aô
kveik;a
a
vélinni
a
meôan
skipt
er
urn
rafhlOôumar,
vi
annars
fri
alit
t
af
P-minnum
vélarinnar
of
paô
or
ekki
gert.
A
botni
vélarinnar
or
hOlf
fyrir
rafhlaôumar.
Losiô
urn
Iokiô
B
meô
vi
aô
taka
urn
hOkin
A
og
fjartgiô
rafhlOôurnar.
Setjiô
njar
rafhlOô,
ur
E
pannig
i
vélina
aô
+
visi
upp
a
viô.
Setjiô
lokiô
aftur
a
sinn
staô
rneô
pvI
aô
renna
hOkum
C
I
got
Dog
srnelliô
lokinu
sloan
aftur
a
sinn
staO.
AthuglO:
aO
eftir
aO
per
haflO
skipt
urn
raThlaOur
tti
aO
fara
yfir
hvort
alit
sé
I
rninnurn
vélannri
ar,
sem
par
a
aO
vera.
RafhlOOur:
I
vOlinni
eru
2
rnignonrathlOOur
1,5
Volt
tegund
LR
6.
NotiO
aOeins
viOurkenndar
rafhlOOur,
4
Pilin
deitirilmesi:
Makinayi
calistiriniz
ye
geriye
doru
yati
rsniz.
Alt
kisimda
bir
pu
kutusu
bulun
maktad,r.
B
kapaini,
A
oyuklarndaki
tirnak
ktsmlarinda,
yukariya
doru
kaldiriniz.
Yeni
pilleri
(E),
+
kismi
yukariya
gelmek
üzere,
yerletiriniz.
B
kapainin
C
tirnak
kisimlarini,
D
oyuk
lan
içerisine
yerletiriniz
ye
kapai,
yen
ne
oturuncaya
kadar
bastiriniz.
Aciklama:
Pil
deistirildikten
sonra
birik
tirme
muhtevasi
kontrol
edilmelidir.
Yedek
piller:
2
Mignon-Pu
1,5
Voltluk;
Tip
LR
6
Sadece,
akmaya
kart
emniyetli
olan
pilleni
kullaniniz,

02/14/2008
Important
When
the
machine
is
switched
on
by
pushing
the
master
switch,
the
sewing
light
goes
on.
When
the
machine
is
switched
off
by
pushing
the
master
switch.
pufling
out
the
mains
plug
or
by
power
failure,
the
program
memory
in
its
computer
is
retai
ned
by
a
battery.
After
the
machine
is
switched
on
again,
program
00
(straight
stitching
with
the
needle
in
its
middle
position)
appears.
Program
combinations
remain
memorized.
If
a
program
is
enter
ed
during
sewing,
it
will
not
become
ef
fective
until
the
machine
has
stopped
and
the
foot
control
is
pressed
again.
Stitch
length
and
stitch
width
can
be
changed
during
sewing.
For
bobbin
winding
disengage
the
sew
ing
mechanism.
After
bobbin
winding
make
sure
you
re
engage
the
sewing
mechanism,
otherwise
the
hand
wheel
will
turn
at
an
extremely
high
speed
when
you
press
down
the
foot
control.
In
this
case,
take
the
toot
from
the
foot
control,
wait
for
the
hand
wheel
to
stop,
then
re-engage
the
sewing
mechanism.
Owing
to
the
use
of
electronic
components,
this
machine
becomes
warmer
than
non-electronic
machines.
This
is
quite
normal.
Batteries:
When
the
batteries
are
discharged,
display
104
will
indicate
‘battery
conti
nuously.
/
Nota
importante:
Al
conectar
Ia
mãquina
pulsando
el
inte
rruptor
general,
Ia
lámpara
de
costura
se
enciende.
Si
se
desconecta
Ia
máquina
pulsando
el
interruptor
general,
sacando
el
enchufe
de
Ia
red
o
por
corte
de
Ia
corriente,
Ia
memoria
del
programa
en
Ia
computado
ra
continua
siendo
efectiva
mediante
as
pilas.
Para
que
un
programa
introducido
du
rante
Ia
costura
sea
efectivo
hay
que
pa.
rar
antes
Ia
maquina
y
pisar
de
nuevo
el
pedal.
El
ancho
y
el
argo
de
puntada
se
pueden
modificar
durante
a
costura.
Para
devanar
(Ilenar
Ia
canilla)
hay
que
desconectar
el
mecanismo
de
costura,
sin
olvidarse
de
conectarlo
de
nuevo
después
del
devanado,
pues
de
lo
con
trario
marcharia
el
volante
a
gran
veloci
dad
al
pisar
el
pedal.
Caso
de
ocurrir
esto,
retire
inmediatamente
el
pie
del
pe
dal,
espere
a
que
se
pare
el
volante
y
conecte
después
el
mecanismo
de
coStura.
Debido
a
los
elementos
electrOnicos,
esta
máquina
se
calienta
más
que
las
no
electrónicas,
pero
eso
es
completamente
normal.
Pilas:
Cuando
se
gasten
las
pilas,
aparece
en
el
panel
indicador
104
Ia
palabra
“pila’
en
cuatro
idiomas.
La página se está cargando...
La página se está cargando...
La página se está cargando...

02/14/2008
Fallos
y
remedios
Causa:
Remedio:
1.
La
máquina
hace
puntadas
saltadas
La
aguja
no
estã
bien
colocada.
Se
ha
puesto
una
aguja
falsa,
La
aguja
esta
torcida
a
despuntada.
La
máquina
no
está
bien
enhebrada.
La
aguja
es
demasiado
hna
para
el
hilo
utilizado.
2.
El
hilo
superior
se
rompe
Por
as
razones
cifadas
anteriormente.
La
tensiOn
del
hilo
Os
demasiado
fuerte,
El
hilo
es
de
mala
calidad.
o
nudoso
a
so
ha
secado
par
estar
dernasiado
tiempo
almacenado.
3.
La
aguja
se
rompe
La
aguja
no
estO
bien
colocada.
La
aguja
está
torcida.
La
aguja
es
demasiado
fina
a
demasiado
gruesa.
La
aguja
se
dobla
y
choca
contra
Ia
placa
de
aguja
por
tirar
de
Ia
tela
o
empujarla.
La
capsula
portacanillas
no
está
bien
colocada.
4.
La
costura
no
es
uniforme
La
tension
de
los
hilos
no
estä
bien
regulada.
Hilo
demasiado
fuerte,
nudoso
o
rigido.
El
hilo
do
Ia
canilla
no
estO
bien
devanado.
El
anudado
do
los
hilos
no
tione
lugar
dentro
del
material,
sino
encima
a
debajo.
lntroduzca
Ia
aguja
hasta
el
tope
con
el
lado
pIano
hacia
atrás.
Coloque
una
aguja
del
sistema
130/705
H.
Coloque
una
aguja
nueva.
Enhebrela
bien.
Elija
Ia
aguja
do
acuerdo
con
Ia
tabla
do
hilos
y
agujas
del
folleto
do
instruc
ciones.
Compruebe
los
puntos
citados
en
el
nOmero
1.
Regule
Ia
tensiOn
do
los
hilos.
Utilice
hilos
de
buena
calidad
y
en
buenas
condiciones.
lntroduzca
Ia
agua
hasta
01
tope.
Coloque
una
aguja
nueva.
Siga
las
normas
do
Ia
labIa
do
hilos
y
agujas.
La
tela
doberO
ser
arrastrada
solamente
por
Ia
maquina.
Las
piezas
de
costura
solamonto
deberOn
ser
guladas
con
suavidad.
Al
colocar
Ia
cãpsula
con
Ia
canilla
Ofl
01
garfio
deberá
presionarso
un
poco
hasta
quo
encaje
pertoctamonte.
Compruebe
Ia
tensiOn
do
ambos
hilos.
Uso
hilo
do
buena
calidad.
Haga
pasar
el
hilo
par
el
tensor
provio
siempre
que
llene
Ia
canilla.
Compruebe
el
enhebrado
y
Ia
tensiOn
do
ambos
hilos.

02/14/2008
Causa:
Remedio:
5.
La
maquina
no
arrastra
el
material
o
10
hace
irregularmente
Se
ha
acumulado
polvo
y
suciedad
entre
Retire
a
placa
de
aguja
y
limpie
el
los
dientes
del
transportador.
transportador
con
un
pincel.
El
transportador
estã
oculto.
El
mando
Corra
el
mando
para
ocultar
el
transpor
para
ocultarlo
se
halla
a
Ia
derecha.
tador
a
Ia
izquierda.
6.
La
máquina
va
forzada
En
a
pista
del
garfio
hay
restos
de
hilos.
Retire
los
restos
de
hilos
y
ponga
una
gota
de
aceite
en
a
pista
del
garf
0,
7.
El
control
electrónico
del
hilo
inferior
falla
Se
ha
acumulado
polvo
y
suciedad
en
el
Retire
los
restos
de
hilos
y
a
suciedad.
casquete
de
cierre
sobre
el
ojo
de
con-
Tenga
mucho
cuidado
al
limpiar
el
trol,
en
Ia
zona
del
garfio,
en
Ia
cápsula
segundo
010
de
control.
de
Ia
canilla,
detrás
del
garfio
y
sobre
el
segundo
ojo
de
control
a
Ia
derecha
detrás
del
garfio.
8.
La
máquina
no
cose
el
programa
seleccionado
Desconecte
Ia
maquina
y
vuelva
a
conectarla
después
de
unos
30
segundos,
y
memorice
de
nuevo
el
programa
deseado.
9.
La
lámpara
de
costura
se
enciende
pero
Ia
mäquina
no
marcha
El
fusible
está
fundido.
Coloque
un
nuevo
fusible.
Observaciones
importantes
No
ponga
nunca
en
marcha
Ia
máquina
enhebrada
sin
tela.
Siempre
que
abandone
Ia
maquina,
aunque
sOlo
sea
por
un
momento,
desconéctela
mediante
el
interruptor
general.
Esto
es
muy
importante
sobre
todo
si
hay
niños
cerca,
La página se está cargando...
La página se está cargando...
La página se está cargando...
La página se está cargando...
La página se está cargando...
La página se está cargando...

02/14/2008
ara
labores
de
costura
especiales
se
pueden
adquirir
en
todas
las
agencas
y
endas
de
Pfaff
accesorios
especiales.
Los
accesorios
que
no
levan
asignados
nümero
de
pedido
se
hailan
en
preparaciOn
,
no
se
pueden
suministrar
todavia.
1orio
No
de
pedido
Operacion
Pie
prensatelas
para
apiicaciones
93-042941-91
Para
coser
aplicaciones
Ribeteador
98-053484-91
Para
ribetear
bordes
con
cinta
(debera
quitarse
SI
portaprensatelas)
Pie
prensatelas
para
nervaduras.
con
5
ranuras
93042
950-91
Para
hacer
nervaduras
(agujasgemelasconseparacionde1,8—2,5mm)
(aguja
del
No
80;
Pie
prensatelas
para
nervaduras,
con
7
ranuras
para
nervaduras
.
93-042953-91
tinas
del
No
70)
(agujas
gemelas
con
separaciOn
del
4—1,8
mm)
Lengueta
para
nervaduras
(2
piezas)
93-035952-45
Pie
prensatelas
para
flecos
93-042943-91
Para
coser
flecos
y
para
marcar
con
hilván
Pie
prensatelas
para
punto
recto
Para
pespuntear
y
para
coser
telas
muy
finas
y
blandas
(géneros
de
Placa
de
aguja
con
agujero
redondo
punto
a
base
de
seda,
etc.)
Sobrecargador
4,5
mm
93-042946-91
—
1
Para
costuras
sobrecargadas
Sobrecargador
6.5
mm
93-042
948-91
Pie
fruncidor
93-036998-91
Para
fruncir
volantes,
etc.
Pie
prensatelas
para
cordoncillo
93-036915-91
Para
trabajos
de
cordoncillo
Plaquita
para
bordado
inglés
93-036975-45
Para
bordado
inglés
(bordado
de
ojete)
Dobladillador
4
mm
Para
dobladillar
bordes
(para
transporte
supenor)

02/14/2008
Indice
alfabético
Botones
de
mando
de
a
parte
electrOnica
19—21
Botones
de mando
de
a
computadora
de
Ia
Creative
.
22.
23
Cambio
de
Ia
aguja
. .
.
.
46
Cambio
del
prensatelas
.
.
50
Cambio de
Ia
bombilla
53
Cambio
del
fusible
54
Cambio
de
las pilas
55
Colocación
de
a
canilla
en
a
cápsula
10
Colocación
de
Ia
cãpsula
con
Ia
canilla en
el
garfio
1 1
ColocaciOn
del
carrete
11
Comienzo
del
motivo
35
ComprobaciOn
de
Ia
tensiOn
del
fib
inferior
10
ComprobaciOn
de
Ia
tensiOn
del
hilo
16
ConexiOn elOctrica
2,
3
Cortahibos
17
CorrecciOn
de
Ia
compensaciOn
o
de
Ia
puntada
en
retroceso
28
Costura
con
agujas
gemelas
35
Costura
en
punto
redo
38
Costura
en
punto zigzag
39
Devanado
desde
un
segundo
carrete
6,
7
Devanado
a
través
de
Ia
aguja
8,
9
Doble
arrastre
18
ElecciOn
del
programa
24
ElecciOn
de
Ia
posiciOn
de
Ia
aguja
en
el
punto
recto
25
y
38
Enhebrado
del
hibo
superior
12,
13
ExtracciOn del
hibo
interior
14
Falbos
y
remedios
60,
61
InversiOn del
motivo
37
Limpieza
y
engrase
52
Medidas
de
seguridad
47
MemorizaciOn
de
combinaciones
de
programas
30,
31
Motivos
individuales
36
Nota
importante
56
Ocultamiento
del
transportador
46
Palanca
alzaprensatelas
15
Pedal
16
Pies
prensatelas
51
PreparaciOn
para
el
devanado
4,
5
ProgramaciOn
libre
41,
43
Recomendaciones
para
Ia
costura
40
Regulacion
del
ancho
del
puntada
25
Regulacion
del
argo
de
puntada
y
del
motivo
26
RegulaciOn
de
Ia
compensaciOn
y
del
largo
del
motivo
27
RepeticiOn
de
una
combinaciOn
del
programas
34
Suplemento
y
accesorios
49
La página se está cargando...
La página se está cargando...
La página se está cargando...
Transcripción de documentos
02/14/2008 • I% %%4L LI II Extienda esta hoja Bu sayfayi diariya doru katlayiniz Flettiô essari sIôu me safety rules Take care to avoid injury to your fingers by the needle during sewing. Make sure you unplug the power cord whenever you have to leave the machine or want to clean it, oil it or change mechanical and accessory parts. Be sure to use only a 15watt light bulb in the sewing lamp. r safety rules applicable in the ited Kingdom please see page 47. didas de seguridad para las iquinas de coser domésticas segUn ‘1 57730, parte 2C Debido al peligro de accidentes que representa 01 movimiento de Ia aguja, el usuarlo deberã poner todo el cui dado posiblo durante 01 trabajo y no deberá apartar Ia vista do a zona do costura. Antes de cambiar a aguja, el pie prensatelas. Ia canilla y Ia placa de aguja, 10 mismo quo a! limpiar o ongrasar Ia maquina, o cuando no so Ia use, deberá desconectarse eléctri camente, as decir, deberá sacarse el enchufo do a red. La potencia max. admisible de Ia bombilla es de 15 vatios. ontents on page 67 dice pag. 69 DIN (Alman End üstri Norm u) 57730 Kisim 2c’ye gore evde kullanalan diki makinalari için gUvenlik talimatlari a) Makinayi kullanan kimsenin, yukariya ye asaiya doru hareket eden ine dolayistyla, yeteri kadar dikkatli davranmasi ye çalisma esnas?nda diki yerini devamli olarak gözlemesi gerekir. b) Makinanin terkodilmesi esnasinda, bakim isbn esnasinda veya makina parçabannin veya iláve parçalanin deitiriImesi sirasinda, makinanin fiini pnizden cikarmak suretiyle, ceryanin kesilmesi gerekir. c) Lâmbanin müsaado obunan azami gucü 15 Vattir. Nokkrar öryggisráôstafanir a) GstiO hess aO fingur verOi ekki fyrir nálinni. egar saumaO or. b) Geriô aô aO venju yOar aO taka vélina ür sambandi. iegar skipta part urn nál. saumfót. eôa egar ér eruO aO hreinsa og smyrja vélina. c) Aldrei ma vera sterkari pera i vélinni en 15W. çindekiler Sayfa 71 Efnisyfirlit or a bls. 73 02/14/2008 Parts of your sewing machine 100 Carrying handle 101 Hinged top cover 102 Hand wheel 103 Stop motion knob 104 Display 105 Balancing-out & pattern length key 106 Stitch length & pattern length key 107 Stitch width key 108 Master switch 109 Detachable work support with accessory box and compartment 110 Needle plate 111 Sewing foot holder with sewing foot 112 Needle holder with set screw 113 Bobbin thread monitor light 114 needle down key 115 sew slow key 116 “reverse” key 117 tie-off / buttonhole” key 118 Presser bar with thread cutter 119 Presser bar lifter 120 Program display 121 Programming keys (2) 122 Program chart (see sewing book) 123 Compartment for sewing data selector 124 Bobbin winder 125 Key for program cycle and sewing recommendations 126 pattern mirroring” key 127 single pattern’ key 128 “pattern start” key 129 ‘twin needle” key 130 Base plate 131 Free arm cover, enclosing sewing hook 132 Free arm 133 Sewing light 134 Threading slots 135 Needle thread tension 136 Bobbin winder thread guide 137 Take-up lever 138 Bobbin winder thread guide (swing-out) 139 Spool holder with unreeling disc 140 Second spool holder (swing-up) 141 “repeat” key 142 “corrector” key 143 “program’ key 144 Dual feed with thread cutter 145 Threader Eementos y maridos de Ia máquina 100 Asa 101 Tapa abatible 102 Volante 103 Disco de desembrague 104 Panel indicador 105 BotOn compensador y para argo de motivo 106 Botón para argo de puntada y motivo 107 BotOn para ancho de puntada 108 Interruptor general 109 Suplemento con compartimentos para accesorios 110 Placadeaguja 111 Portaprensatelas con prensatelas 112 Portagujas con tornillo 113 Control del hilo inferior 114 BotOn para “aguja abajo” 115 Botón para “costura lenta” 116 Botón para “costura atrfts” 117 BotOn para “rematar ojal” 118 Barra del prensatelas 119 Palanca aizaprensatelas 120 lndicador del programa 121 2 botones programadores 122 Tabla de programas (véase cuademo de costura) 123 Compartimento para regla de costura 124 Devanador 125 Botôn para control del programa y recomendaciones de costura 126 BotOn para “inversion motivo” 127 BotOn para “motivo individual” 128 BotOn para “comienzo del motivo” 129 Botón para “agujas gemelas” 130 ZOcalo 131 Tapa del garfio 132 Brazo al aire 133 Lámpara de costura 134 Ranura de enhebrado 135 Tensahilos superior 136 Guiahilos para el devanador 137 Palanca tirahilos 138 Guiahilos para el devanador (abatible) 139 Portacarretes con discos 140 Segundo partacarretes (abatible) 141 Botón para “repeticiOn’ 142 BotOn para “correcciOn” 143 BotOn para programaciOn 144 Doble arrastre con cortahilos 145 Enhebrador I ______________________ 02/14/2008 ._ Pull the power cord out of the foot control. Saque el cable del pedal. Kabloyu martan dariya doru çekiniz Togiã IeiOsluna r mótstOOunni. -— - —-—- 7\_ Plug the foot control lead into the machine socket and place the foot control on the floor. .-- Coioque:ipedal en el suelo y conéctelo Mar kablosunu makinaya balaytniz ye mari yere koyunuz -- TengiO IeiOsluna viO vélina. og setjiô rnOtstöOuna a gOlfiO. 108; the sewing Pulse el interruptor general 108. La lam para de costura se enciende. Ana altere (108) basiniz, bu arada dikis iI yanar Prstià a aOalrofann 108. og urn IeiO kviknar a Iósinu. - - ---- 02/14/2008 I j V Place the bobbin on winder 124 and turn it until pin A engages in slot B. Coloque a canilla en el devanador 124 y girela hasta que Ia espiga A encaje en a ranura B. A pimi B yarii içerisine oturuncaya kadar masurayl, sarici uzerine takiniz. SetjiO spOluna a spOlarann 124. Hak A verOur aO falla I rauf B. ‘isengaging the sewing mechanism: Hold the hand wheel steady and turn knob 103 towards you. Desconexión del mecanismo de costura: Sujete el volante y gire el disco 103 hacia el frente. Diki mekanizmasini kapamak: El carki ni sikica tutunuz ye disk 103’ ü äne doru ceviriniz. Setjiô vélina I lausagang: Haldô urn handhjáliô og losiô skrüfu 103. wing the thread spool towards the back. Eche hacia atrás el segundo portacarretes. kind makara tutucusunu geriye doru cevirerek döndürünüz! tiO auka ketlispinnanurn upp. Push a spool of thread and unwinding collar onto the holder. lntroduzca el carrete y el disco pequeno C en el portacarretes. Makarayi ye kucuk döner diski (C) tutamak üzerine sürünüz. SetjiO Mnnakefli og litla skifu C a pinnann. __1 02/14/2008 U II L it —— r- t. II 11 1 I ) Winding from a second spool: Swing thread guide 138 forwards. Pull the thread through guide 136, then into guide 138, placing it between guide and tension spring A (see ill.) Wind a few turns of thread on the bobbin and push the bobbin towards the right. Press down the foot control and wind bobbin. Push the full bobbin towards the left and take it out, cutting the thread in thread cutter B. Important: It is not possible to wind the bobbin when an empty M- or P-memory is selected. Before winding is begun a program between 00 and 99 must be selected. When you place a bobbin with thread slot on the spindle, the slot must point towards the right. 4Devanado desde un segundo carrete: Eche el guiahilos 138 hacia adelante. Pase el hilo por las gulas 136 y 138 co mo se muestra en Ia figura y de forma que el hilo quede entre Ia guia y el muelle tensor A. Arrolle ahora unas vueltas de hilo en Ia canilla y empUjela hacia Ia derecha. Accione ahora el pedal para devanar. Cuando Ia canilla esté lena, cOrrala hacia Ia izquiorda y retirela. Tire del hilo hacia el frente y cOrtelo en el gancho B. Nota importante: Si se ha seleccionado una memoria vacia M o P, entonces no se puede devanar. Antes de comenzar a devanar, tendrá que estar seleccionado un programa entre 00 y 99. En el caso do carretes con ranura para sujetar el hilo, dicha ranura deberá queder a Ia derecha al introducir el carrete, _____— 02/14/2008 1L 4 Winding through the needle: Raise the sewing foot with the needle in its up position. Place a bobbin on spindle 124. Disengage the sewing mechanism. Draw the needle thread under the sewing foot, up and through guide 138 (see ill.). Wind a few turns of thread on the bobbin and push the bobbin towards the right. Press down the foot control and wind. Push the full bobbin towards the left and take it out, cutting the thread in thread cutter “A”. Important: It is not possible to wind the bobbin when an empty M- or P-memory is selected. Before winding is begun a program between 00 and 99 must be selected. N 4 Devanado a través de Ia aguja Eleve el pie prensatelas y Ia aguja. Coloque Ia canilla en el devanador 124. Desconecte el mecanismo de costura. Pase el hilo superior por debajo del prensatelas hacia a derecha y por Ia guia 138 (v. figura). Arrolle unas vueltas de hilo en Ia canilla y cOrrala hacia Ia derecha. Accione el pedal para devanar. Corra Ia canilla Ilena hacia Ia izquierda, retirela y corte el hilo en el gancho ‘A’. Nota importante: Si se ha seleccionado una memoria vacia M 0 P, entonces no se puede devanar. Antes de comenzar a devanar. tendrá que estar seleccionado un programa entre 00 y 99. 02/14/2008 / JI Upper threading: With the needle in its top position, raise the sewing foot. Draw the thread into slot A, from below into slot B and take-up lever 137 (see arrows), then back into slot 8 and into the right thread guide on the needle holder. Enhebrado del hilo superior: Eleve a aguja y el prensatelas. Pase el hilo, siguiendo Ia flecha, por a ranura A, des de abajo por Ia ranura B, por Ia palanca tirahilos 137, de nuevo por Ia ranura B y por Ia gula derecha del portagujas. A Ust ipIiin takilmasi: inenin durumu, yukarida. Diki ayaini yukariya kaldiriniz. Iplii, ok istikametinde olmak üzere, A yarlina, alt taraftan B yarIIna, horoz (137) içerisine, geriye doru B yariina ye iplik tutamainda bulunan sa kilavuz içerisine çekiniz. Pr8ing: Nálin I efstu stöôu. Fôtur uppi. PrOiO ems og ärvarnar sna I rauf A, aO neOan I rauf B. i ráOgjafa 137. aftur I rauf 8. og siOan I hgri stringu a nálahöldunni. I’ €1 0 I I 4 / /III1Ic.’V ‘ .._—‘\J / Place the needle thread behind hook D and hold it there. Pull threader 145 fully downwards. Coloque el hilo superior detrás del gancho D y sujételo. Empuje el enhebrador 145 hacia abajo eI todo. ,0 Ust ipIii D çengeli arkasina yerIetiriniz ye tutunuz. Ineye iplik geçiriciyi (145) tamamen asaIya doru çekiniz. Leggi yfirtvinnann undir hak D og haldiô I tvinnann. Togiô siOan rôarann 145 alveg niOur. N 02/14/2008 Hold the needle thread taut. Turn the hand wheel toward you until the needle moves down and up again. Pull the bobbin thread up by pulling on the needle thread. 0 Sujete el hilo superior, gire el volante hacia el frente, haga una puntada y saque el hilo inferior tirando del hilo superior. ID Ust iplii sikica tutunuz. El carkini one doru ceviriniz, Bir batis dikiniz, Ust iplikle, alt iplii yukariya doru cekiniz. 0 HaidlO I yfirtvinnann, SnuiO handhjö{inu tram a viO ar til nãliri hefur tariô niOur og kemur upp attur TogiO undirtvinnann upp. j Place both threads to the right under the sewing toot. Eche ambos hilos hacia Ia derecha por debajo del prensatelas. Ust- ye alt iplii saOa doru, diki ayai altina koyunuz. Lãtiô ytir- og undirtvinnann undir tOtinn hgra megin. Close the free arm cover. Cierre a tapa 131. Kapak klapesini (131) yukarsya doru kapatiniz, Lokiôlokinu 131. 02/14/2008 Operating the toot control: The farther you press the pedal down, the faster the machine runs. Para poner en marcha Ia máquina, pise el pedal: a medida que aumente a presiOn aumentarâ Ia velocidad. Marsa ayakla basiniz. Marsa nekadar fazia bir sekilde basilirsa, creative” okadar süratli diker, StigEô a mótstöôuna: tvi fastar sem lér stigiô. vi hraOar saumar vélin. Needle thread tension 135 A = Setting mark. Tensahilos superior 135 A = Marca para Ia regulaciOn. Ust iplik gerilimi 135 A = Ayar aretlemesi. Ytirspenna 135 A viOmiôun tyrir rétta spennu. 4 Checking the needle thread tension: The normal setting is in the white range between 3 and 5. The higher the num ber, the tighter the tension. To check the tension, set the machine for zigzag stitch by entering program 10 (page 22). Sew a short seam. The threads should interlock in the middle of the material. —7 N 4Comprobación de Ia tension del hilo: La regulaciOn normal se encuentra en a zona blanca entre 3 y 5. Cuanto más alto sea el nümero tanto mayor será a tensiOn. La comprobaciOn se hace con Ia puntada zigzag. Ajuste: pulse el programa 10 (pag. 22): haga una costura corta; os hilos debe ran quedar anudados dentro de las piezas de costura. -—‘-7 02/14/2008 Electronic bobbin thread monitor: Bobbin thread monitor light 113 starts to flash when the bobbin thread is running out. It goes off when a full bobbin is inserted and sewing is resumed. Important: Free arm cover 131 must be kept closed. Needle up and down positions: When the machine stops, the needle is always retained at its up position. When you push “needle down” key 114, the indicator light goes on and the needle remains down in the fabric when the machine stops. When you push key 114 again, the light goes off, the needle moves up and remains up. Electronic top speed selection: When you press “sew slow” key 115, the indicator light goes on and the machine sews at half its speed. When you push key 115 again, the light goes off and the machine again sews at top speed. Tie-off/buttonhole: When you push key 117, the indicator light goes on and the programmed seam is tied off at the beginning, then the light goes off again. When you push the key during sewing, the light goes on and a seam is tied off right away, while a pattern is tied off at the end. Then the light goes off. Button hole: When buttonhole program 86 is on, key 117 serves to determine and memorize the seam length. Reverse sewing: Push key 116 before you start sewing. The indicator light goes on and the machine sews back wards permanently. When you push the key during sewing, the light does not go on and the machine sews backwards as long as you keep the key depressed. Darning: Key 116 is also used to deter mine and memorize the seam length entered in darning program 09. I Control electrónico del fib inferior: cuando et hilo inferior estã prOximo a terminarse, el piloto 113 comienza a lucir intermitentemente. Después de colocar una canilla lena y comenzar a coser. se apaga. Nota importante: a tapa 131 tiene que estar cerrada. Posición superior e inferior de Ia aguja: al pararse Ia máquina, Ia aguja queda en su posiciOn superior. Pulsando el botôn 114 para “aguja abajo”, se enciende Ia lámpara y Ia aguja permanece abajo aJ pararse Ia mãquina. Pulsando de nuevo el botOn 114, Ia lámpara se apaga y Ia aguja pasa a su posiciOn superior y permanece arriba. Limitación electrónica de Ia vebocidad: pulsando el botôn 115 para “costura lenta”, a Iámpara se enciende y Ia ma quina cose a media velocidad. Pulsando de nuevo el botOn 115, Ia Iámpara se apaga y Ia máquina vuelve a coser a Ia velocidad maxima. Rematado de Ia costura/Ojal. Remata do: pulsando el botôn 117, Ia Iampara se enciende, Ia costura programada queda rematada al comienzo y Ia lámpara se apaga. Pulsando dicho botOn durante Ia costura. Ia Iámpara se enciende, Ia costura gueda rematada inmediatamente o al final, si se trata do un motivo, y Ia Iámpara se apaga. Ojal: en el caso del programa 86 para ojales, con el botón 117 so determina Ia longitud del ojal y so memoriza al mismo tiempo. Costura en retroceso: pulsando el botôn 116 antes do comenzar a coser, Ia Iámpara se enciende y Ia maquina co se constantemente hacia atrás. Pulsando dicho botón durante a costura, Ia lámpara no so enciende pero Ia máquina cose hacia atrás mientras se mantenga el botôn pulsado. Zurcido: con el botón 116 también so determina Ia ongitud del programa para zurcido 09 y se memoriza. 02/14/2008 Operation of the Creative computer Stick the enclosed English labels on the keys. Botones de mando de Ia computadora de Ia “Creative” Pegue los letreros espanoles, adjuntos e los botones correspondientes. “Creative-komputer” in kullanilma SekIl Ekteki tu etiketlenni, turkce olmak üzere, yapitiriniz. Notkun ,,creative-tölvunnar”. J \.11m1ô hjalagôa miôa a viôkomandi takka. 02/14/2008 T i(1puter of the Creative contains tillwnt alphabets, numbers from 0 1 id Creative-komputer” de 2 tarlcli altabe bulurimakta olup, Odan 9’a kadar olan sayilar ye 100 program biriktiriImitir. Programlar, diki (bati) resmi ye buna ait olan ayar numarasi (program numarasi) veya ayar sembolü ile birlikte açilir kapanir kapak icerisinde gösterilmi bulunmaktadir. Her programa ait olmak üzere, optimal genilik ye uzunluk düzenlenmitir, yani her program otomatik olarak optimal uzunlukta ye genislikte dikilmektedir. Ay ni ekilde bu programlara, çift kuma taimasi ye ust iplik gerginIii ye diki ayaklarinin kullanilmasi cm diki tavsiyeleri biriktiriImi bulunmaktadir (Tu 125’e basiniz ye tusu bu sekilde tutunuz.). Ayarlar, tuIar üzerinde bulunan gOsterge sahasi 104’de gorulebilmekte dir. Programlar sadece, üzerlerinde iaret gorenen tularIa detirilebiIir. Bundan baka komputerde, program kombinasyonlari için 16 M-biriktiricisi ye serbest programlanmasi için P-biriktiricisi bulunmaktadir. Serbest programlama esnasinda kendi örneinizi duzenleyebilir ye bunu “creativ-komputer” de biriktirebilirsiniz. 100 programs. The programs together with the seam the corresponding setting ii 4 r in symbol in the table on the do d the top cover. (i ptirnum width and length for each iir.iin is also indicated. Recommenda also given for each program in I In the dual feed, needle thread rn rnttings, and the use of sewing (fi (fir indication, push and hold key 125). r. ottings become visible in display I houe the keys. The programs can l\. n (hanged with those keys above ii in indication is made. i iiiiputer also contains 16 M i. ruir ins for program combinations and > riinrnories for free programming. In piogramming you can make up your n pittorns and store them in the com ho 0 the Creative. nit innputadora de Ia máquina hay i’idos dos altabetos distintos, las ) a 9 y 100 programas. Los i-. i uiiis se hallan ilustrados en a a ibatible mediante esquemas de i y los respectivos nOmeros de {Jrama o simbolos. ( onjulna cose automáticamente cada programada en Ia anchura y Ion .1 iptimas. Para los programas van .rzidas también recomendaciones 1 doble arrastre y Ia tensiOn del ipE’rior, asi como el empleo de los (nflsatelas (Pulse el botón 125 y romnriqalo pulsado). Los programas iti- so muestran, pulsando los “.lmondientes botones, en eI panel 1. ntmr 104 i ijrimas sOlo Se pueden modificar ki botones sobre los que se en I i una lampara. ii en a computadora van inclui (0 nomorias M para combinaciones ir irnas y 16 memorias P para Ii i, .Jfirnacion En este Oltimo case, ii 0,1 nace sus motivos y los ‘ia on Ia computadora. I creativetOIvunni eru 2 mismunandi kerfi fyrir ii bOkstafi. tOlustafi frá 0—9 og 100 mynztur eôa sauma. tau eru s’nd meO myndum og tilheyrandi nOmerum innan a fellilokinu. Hvert mynztur eOa spor hefur fengiO ákveôna og hentugustu sporbreidd og sporlengd. I minni vélarinnar eru einnig geymdar uppl’s ingar fyrir hvern saum, ráOleggingar um efri ftytjarann, yfirtvinnaspennuna og hvaOa tOt er rOOlagt aO nota. (YtiO a takka 125 og haldiO honum inni). Pessar uppfysingar koma i IjOs a snifletinum 104 fyrir ofan takkana. Hgt er aO breyta stillingum meO eim tOkk um, sem ljOs kviknar viO. I tOlvunni eru auk hess 16 M-minni, ar sem ér getiO geymt saman 16 mismunandi mynzt ur eOa sauma og 16 P-minni, en au getiO ér notaO fyrir sauma eOa mynztur sem Dér getiô hannah sjálf eq siôan geymt i vélinni. I / 02/14/2008 {iTfljflTr JI i r”i prog LL 1’ m U Fl Li 4 \‘ Program selection: When the Creative is switched on, pro gram -00- appears in display 120. Enter the required number in program display 120 using programming keys 121. The alphabet and number symbols are selected with the left key, while letters and numbers are selected with the right key. Program seclml: “creative nm cahtinlmasi sirasinda gösterge sahas 120’de program -00görülmektedir. Arzu edilen numarayl: program tulari (121) Ozerine basmak suretiyle, program göstergesi (120) icensino veriniz. Alfabeler ye sayilar 1cm semboller, soldaki tula seçilir. Harfler ye sayilar sadaki tula seçilir. Elección del programa: Al conectar Ia maquina aparece en el cuadro indicador 120 el programa -00-. lntroduzca en el cuadro indicador 120 el nümero de programa deseado pulsando para ello los botones programadores 121. Con el botón izquierdo se eligen los simbolos para los alfabetos y cifras. Con el derecho las letras y cifras. Mynzturval: kveikt era vélinni koma tölurnar 00 a snifIeti 120. Vol jiO viôkomandi nümer meO täkkunum 121 og pau koma a synifleti 120. Táknin stafrófin og tälurnar eru valin vinstri takkanum. Bókstafirnir og tölumar eim hgri. l)egar fyrir meô moo \ ,1 02/14/2008 LLLLJ iIIrTTIT prog ED () cD c 2 17 4 Stitch width setting: The stitch width ranges from 0 to 6 mm. Key 107 has three functions: 1. Selection of stitch for the respective program. 2. Selection of the size of letters and numbers. 3. Straight-stitch needle position for programs 01 and 03 (13 positions). 4. Selection of the width position of the needle penetration in free programming. Ornek geniIil-ayari: Diki (bati) 0-6 mm’dir. Tu? 107, 4 fonksiyona sahiptir: 1. Programlarda geniliin seçilmesi. 2. Harflerin ye sayilarin buyükluklerinin secilmesi. 3. Program 01 ye 03’de (13 pozisyon) doru dikiin batis durumunun secimi. 4. Sorbost programlama esnasinda ine batiintn genilik durumunun seçilmesi. Regulacion del ancho de puntada: El ancho de puntada va de 0 a 6 mm. El botön 107 tiene 4 funciones: ia ElecciOn del ancho de puntada en los programas. 2 ElecciOn del tamano de las letras y cifras. 3 Elecciôn de Ia posiciOn do Ia aguja para Ia puntada recta en los programas 01 y 03 (13 posiciones). 4 ElecciOn do Ia posiciOn del ancho de puntada en Ia libre programaciOn. Sporbreldd: Sporbreiddin er frá 0-6 mm. Takki 107 hefur4 stillingar 1, Breidd mynztrunum. 2. Strô bókstofum og tälum. 3. Sporlegunaabeinusporimynzturol ogO3 (13 stillingar). 4. Val yôar a breidd zik zak sporsins pegar er eruô aô hanna yãar elgin sauma. a a I \ / 02)14/2008 LL li I Lo’ Li ‘1 7 ) ./ / Stitch length and pattern length setting: Key 106 has three functions: 1. Selection of stitch length for pro grams for which display A does not light up. The stitch length ranges from 0 to 6 mm. For some of the programs the stitch length is limited. 2. Selection of pattern length for programs for which display A lights up. The pattern length is indicated in mm and is limited in different ways. 3. Selection of the lengthwise position of the needle penetration in free programming. Diki (bati) uzunluu- ye örnek uzunluu ayari: 1. Yanan A göstergesi bulunmayan programlarda diki (batis) uzunIuu nun seçilmesi. Dikii (batt) uzunluu sahasi 0—6 mm’dir. Programlarin bir kismi, sinirli bir diki (batl) uzunluuna sahiptir. 2. Yanan A göstergesi bulunan programlarda amok uzunluunun seçilmesi. Ornek uzunluu mm olarak verilmitir ye farklt ekilde sintrlandinlmttir. 3. Serbest programlama esnasinda ine batiinin uzunluk durumunun secilmesi. \ Regulacion del largo de puntada y del motivo: El botön 106 tiene 3 funciones: i a Elección dot largo de puntada en programas sin lucimiento de Ia lámpara A. El largo de puntada alcanza de 0 a 6 mm. Una patio do los programas tiene un largo de puntada limitado. 2 ElecciOn del largo del motivo en programas con lucimiento do Ia lámpara A. El argo del motivo so indica en mm y tiene diversas limita ciones. 3 Elección de Ia posiciOn do Ia largura do Ia puntada en Ia libre progma macion. N 4 Stilling fyrir sporlengd og mynzturlengd: Takki 106 hefur 3 stillingar 1. Val a sporlengd a mynztrum ar sem Ij6si A kviknar ekki. Sporlengdin em 0—6 mm. Hiuti af mynztrunum hefur x5 takmarkaôa sporlengd. 2. Val a sporlengd a mynztrum ar sem IjOsiO A kviknar. Sporlengdin er gefin upp mm og takmörkuO I sumum mynztrum. 3. Val yôar a sporlengdinni, pegar per eruô aô hanna yOar elgin sauma. N 02/14/2008 Li ‘ 1 / 4 Balancing out and pattern length setting: Key 105 has three functions: 1. Adjusting the reverse stitch length in a pattern (for balancing out, see page 28) in programs for which display B does not light up. 2. Selecting the pattern length in mm while the stitch density remains the same in programs for which display B lights up. The stitch length set determines the maximum pattern length. 3. Checking and altering the stitch counter in free programming. Regulacion de Ia compensaciôn y del largo del motivo: El botón 105 tiene tres funciones: 1 a Modificar a puntada en retroceso (para Ia compensaciOn, véase Ia pagina 28) para compensar los moti vos en programas sin lucimiento de Ia lampara B. 2 ElecciOn del largo del motivo en mm, sin variar Ia densidad de puntada, en programas con lucimiento de Ia lámpara B. El largo de puntada regulado deter. mina el largo máximo del motivo. 3 Control y modificaciOn del contador de puntadas en Ia libre programacion. N Balans (one ye arkaya doru bati uzunluklari arasinda dengeleme) ye örnek uzunluu-ayari: Tu 105, 3 fonksiyona sahiptir: 1. Yanan B gUstergesi bulunmayan programlarda Oinein denkletirilmesi için geriye doru diki (bati) deiimi (balans, Sayfa 28’e bakiniz). 2. Yanan B gostergosi bulunan programlarda ernek uzunluunun mm olarak ayni diki (batis) sikIiinda secilmesi. Ayarlanmi olan diki (bati) uzunluu, azamI Omek uzunluunu belirler. 3. Serbest programlama esnasinda bati sayacinin kontrolu ye deitirilmesi. Takki 105 hefur 3 stillingar 1. Vat a breytingu a aftur a bak spori til aô jafna üt mynztur ar sem ekki kviknar a ljOsi B. 2. Val a mynzturlerigd. an hess aô sporétt leiki breytist. A mynztrum ar sem kviknar a Ijósi B. Sporlengdin, sem stillt hefur veriô a ákvarô ar mestu Iengd mynztursins. 3. Eftirlit og breytingu a sporateljara. egar ér eruô aô hanna yOar eigin mynztur. / 02/14/2008 Balance, or the correction of reverse stitches The balance control serves for correction of pattern- or program combinations which are sewn with a slight shift owing to influences by the type of material or working method used. The stitch length of the reverse stitches of a pattern is corrected from —7 to +7; the normal position is “0”. The minus settings shorten the reverse stitches and the patterns or programs become longer, and the plus “+“ settings length en the reverse stitches and the pattern or programs become shorter. Examples: 1. Correction of individual patterns (also in the P-memory) Ejomplo: 1. Correccidn de un motivo individual (también en Ia memoria P para pro gramas) Pattern too long Prog. Corrección de Ia compensacion o de Ia puntada en retroceso La compensaciOn sirve para corregir combinaciones de motivos o de progra mas que, debido a Ia clase y caracteristicas del tejido p. ej., se han cosido ligeramente desplazados. Se corrige el largo de las puntadas en retroceso de un motivo desde —7 hasta +7. La regulaciOn normal es 0. En el caso de —, las puntadas en retro ceso son más cortas; los motivos o pro gramas son más largos. En el caso de +, las puntadas en retro ceso son más largas; los motivos o pro gramas son más cortos. 09 83 Motivo demasiado largo 09 Progr. 83 p Corrected by +3 4? +3 corregido con + 3 +3 U Rule: if the pattern is too long, cor rection has to be made by +“ (from +1 to +7). Norma: Si el motivo es demasiado largo, hay quo corregir con + (de +1 a 4-7). 2. Correction of pattern- and program combinations (in the M-memory) 2. Corrección de combinaciones de motivos y combinaciones de programas (memoria M) Combination: 1?” , f.;’ Corrected by: +3: Combinaciôn corregido con Rule: If the pattern or program last entered is corrected with or “+“ and entered, this applies to the entire program combination. “—“ . q 1 P ” Jfit.;ft:JV “ + 3: , 7 Norma: Si el motivo o programa quo se ha de memorizar Ultimamente, so corrige y memoriza con — o con +, ello será válido para Ia combinación nnn,nIat tint 02/14/2008 Cancelling a program combination: [] When key 142 “Correct” is pressed, the program memorized last in the combina tion will be cancelled. Press key 142 repeatedly until the entire combination is cancelled. If the combination consists of serveral M memories, each memory has to be se lected and cancelled individually. The memories are then tree for new combi nations. Memorización de combinaciones de programas Realización de combinaciones de los programas 00 al 99 asi como letras y cifras. En Ia computadora de Ia “Creative” van 16 memorias M (para motivos), M 0 a M 15. Para una o para varias combina ciones de programas so pueden memori zar 249 letras y cifras unas detrás do las otras en una memoria M, O 373 letras y cifras repartidas entre las 16 memorias M. Asimismo se pueden momorizar 82 programas do Ia serie 00 a 99 de Ia tapa abatiblo en una memoria M o 125 repartidos entre las 16 memorias M. Las letras y cit ras se pueden combinar con los programas 00 a 99. Memorizaciôn: Elija primeramente con el botôn izqulerdo 121 M 0 y con el botôn derecho 121 una memoria M libre. La memoria M estará vacia cuando I on 01 panel indicador 104 no aparezca ninguna indicaciOn. Si no se elige previamente ninguna memoria M de M 1 a M 15, entonces todos los programas pasan a Ia memoria M 0. A continuaciOn pulse el botOn 143 (memorizacion del programa). La memona está ahora lista para funcionar. Seguidamente elija los programas, letras o cifras, uno por uno, con los botones programadores 121 y memoricelos pul sando el botôn 143. Los nümeros del programa, letras 0 numeros aparecen en el panel indicador 104. Los programas pueden modificarse en el largo y en el ancho antes do me morizarlos. Las cifras y palabras de una combina ción do programas solo pueden coserse en un determinado tamaño, el cual queda doterminado por el ajuste do Ia ültima letra o cifra. Si Ia computadora no admite nada más, entonces Ia capacidad do memorizaciOn está agotada y habrá quo anular una memoria quo ya no se necesite. Control de Ia secuencla de una combi nación de programas en el panel in dicador: Si so han memorizado más de 4 progra mas o mâs do 12 letras o cifras, 01 pro grama puede leerse en 01 panel indicador 104, do derecha a izquierda, pulsando el botOn 125. Pulsando do nuevo el botOn 125, so detiene Ia indicaciOn del programa. Pisando 01 pedal, Ia máquina pasa al co mionzo do Ia combinaciOn. Anulación de combinaciones de programas: [J Pulsando el botôn 142 “corrección”, queda anulado el ültimo programa memorizado de Ia combinación, y asi sucosivamonto hasta quo quodo anulada toda Ia combinaciOn. Si Ia combinaciôn se compono do varias memorias M, entonces habrá quo elegir las memorias, una por una, y anularlas. Do esa forma, las momorias quodan libros para nuevas combinaciones. N 02/14/2008 1’ Repeating program combinations: [s-I Bir program kombinasyonun tekrarlanmasi. “repeat” key 141 has two functions: 1. Returning a program combination to the starting position. 2. Repeating selected program combina tions after other programs have been sewn in the meantime. 3. Initiating sewing after free programming. Tu 141 “tekrarlama”, 3 fonksiyona sahiptir: 1. Bir program kombinasyonunun geriye doru çalitirma suretiyle, balangica getirilerek tekran. 2. Seçilmi olan programlarin belirli bir zaman araliinda dikiminden sonra, biriktirilmis olan kombinasyonlarin tekrari. 3. Serbest programlamadan sonra diki me hazir halde olma. ) Repetición de una combinación de programas: El botón 141 (repetición) tiene 3 funciones: 1 Repetición de una combinación de programas volviendo al principio. 2 Repeticiôn de una combinaciOn de programas elegida después de haber cosido otro programa entremedias. 3 Listo para coser después de Ia libre programaciôn. Endurtekning samtengdra mynztra: [71 Takki 141 ,,endurtekning” hefur 3 stillingar 1. Endurtekningu mynzturraOar frá byrjun. 2. Endurtekningu mynzturraOar eftir aô ännur mynztur hafa veriô saumuO i millitiOinni. 3. Setur vélina i byrjunarstaôu a mynztri, sem ér hafiô sjálf hannaô. 02/14/2008 Twin-needle sewing: Pattern start setting: Key 129 “twin needle” must be pushed in. Display A lights up, and the stitch width is limited to 4 mm. Again push key 129 to switch off indicator light and function. 1. Push “pattern start” key 128. A pattern in progress is returned to the starting point. 2. The last program in a combination appears in the display. 3. Length programming in programs 86 and 09 is cancefled. Costura con agujas gemelas: Q’ Comienzo del motivo: Pulsando el botón 129 (agujas geme las), se enciende Ia lámpara A, el ancho de puntada se reduce 4 mm y ya se puede coser con las agujas gemelas. Pulsando de nuevo el botOn 129, se apaga a lampara y se anula Ia funciôn. 1. Pulsando el botón 128 (comienzo del motivo), cualquier programa comenzado vuelve al comienzo del mismo. 2. El ültimo programa de una combina dOn aparece en el panel indicador. 3. Con el programa 86+09 se anula Ia programaciOn de Ia largura. cift ineyle dikme: Ornek balangicinin ayarlanmasi: i-1 L1 o Tu 129 (‘çift ine”) üzerine basilmasi gerekir. Gasterge A yanar ye bati geni lii 4 mm’de sinirlanir. Tus 129’a tekrar basiniz, lãmba ye fonksiyon kapanmi olur. Saumaô meô tvöfaldri nat: I . 1. Tu 128 (“örnek baiangici”) üzeri ne basiniz. 8aslamis olan bir program, balangica alinmi (geriye getirilmi) olur. 2. Bir kombinasyonun son programi gOsterge sahasinda gOrunur. 3. Program 86+09’da uzunluk programi silinir. 4stilit a mynztur LJ Ytiô a takka 129 ,,tvr nâlar”. l’aô kviknar a ljOsi A og sporbreiddin minnkar 14 mm, ‘?tiO aftur a takka 129, egar ér saumiô meO einni nál, og ljósiô släkknar. byrjun 1. Ytiô a takka 128 ,,mynzturbyrjun”. ViO aO frist mynztriO a byrjun hess. 2. SlOasta mynztriO kemur ni fram a snifletinum. 3. Mynztur 86 + 09 strikast Cit. I __ 02/14/2008 [[11 prog [Li_LLLflTJLI () ÷ K El 99 93 LEJEILED[ELEJEJE] 4 I 4 Single pattern setting: Tek örnein ayarlanmasi: Push “single pattern” key 127. Display A lights up. The machine sews a program or a program combination and ties off beginning and end of the seam. If the key is pressed while sewing is in progress, the machine completes the program and ties off the seam. Tu 127 (“tek örnek”) üzerine basiniz, gösterge A yanar. Sir program veya bir kombinasyon dikilir ye balangiçta ye son ksimda takviye dikii yapilir. Dikis esnasinda tua basildiinda, program sonuna kadar dikilir ye takviye dikii yapilir. Motivos individuales: 17 4 . 1 N Eitt mynztur: L1 Pulsando el botôn 127 (motivo indivi dual), se enciende Ta lampara A, se cose un programa o una combinaciôn y se remata el comienzo y elfin. Si so pulsa el botón durante Ta costura, se termina de coser el programa y se remata. Ytiô a takka 127 ,,eitt mynztur”. ‘aô kviknar a ljósi B. Vélin saumar nü aôeins eitt mynztur eôa mynztursamstôu og heftir fyrir byrjun og enda, Ef ‘tt era takkann a meOan saumaO or, 1a saumar véhn mynztriô til enda, og hêftir fyrir. _ 02/14/2008 LH tj [. Progr. 79 57 38 37 37 37 Emm Pattern mirroring: Ornein ters gOrUnUmU (ters gOrUnüm): Press “pattern mirroring key 126. Display A lights up. The program select ed is mirrored. Programs can also be entered in a com bination for mirroring. When key 141 is pressed beforehand, the pattern combi nation is mirrored. Again push key 126 to switch off display and function. Tu 126 (“ters gorunum”) üzerine basiniz. GOsterge A yanar. Secilen program ters gosterilen (aynada gorulen) ekilde dikilir. Programlar, ters gOsterilen (aynada garulen) ekilde de bir kombinasyona verilebilir. Kambinasyonlar daha Once tu 141 üzerine basilmak suretiyle ters gOru len (aynada gOrulen) ekilde dikilebilir. Tu 126’ya tekrar basniz, gOsterge ye tonksiyon kapanir. Inversion del motivo: [0/ Mynzturspeglun IW, N N [.4_ ‘tiô a takka 126 ,,mynzturspeglun”. aô kviknar a IjOsi A. MynztriO sem valiô var saumast nU ofugt. Einnig er hgt aô velja spegluô mynztur I rOô. Einnig er hgt aô sauma heila mynzturra Ofugt meô vi aô ‘ta áôurátakka 141. Ytiô aftur a takka 126, ljOsiô slOkknar, og vélin httir aO spegla mynztrin. Pulsando el botOn 126 (inversion motivo), se enciende Ia lámpara A y el programa seleccionado se cose simétri camente invertido. Los programas pueden memorizarse también simétrica mente invertidos dentro de una combina don. Las combinaciones tambiOn pueden coserse invertidas pulsando anteriormente el botOn 141. Pulsando de nuevo el botón 126, se apaga Ia lámpara y se anula Ia funciOn. / / 02/14/2008 FTi[LIfJJLJi LLLT1LJ I pmg () . d 1 E LELLEI ELIEE LIEIEIELIEEJ Straight-stitch sewing: Program 00 is straight-stitch sewing with the needle in its central position. Set the desired stitch length by key 106. Program 01 is straight stitching with the needle in its left position. With key 107 the needle position can be varied in 13 steps from left to right. Programs 02 and 03 are reverse straight-stitching. These programs are used for program combinations. Program 03 can be sewn with the need le in 13 different positions. The setting is made as described above. Costura en punto recto: El programa 00 sirve para coser en punto recto con posiciOn central de Ia aguja. Elija el large de puntada deseado con el botOn 106. El programa 01 sirve para coser en punto recto con posicion zquierda de Ia aguja. Con el botOn 107 se puede cobcar Ia aguja en 13 posiciorles, de izquierda a derecha. Los programas 02 y 03 son para coser en punto recto pero en retroceso. Estos programas se utilizan para cornbinacio nes de prograrnas. Con el prograrna 03 se puede coser en 13 posiciones de Ia aguja. Los ajustes son como se han descrito anteriormente. 4 DUz bati dikil: Program 00, batis durumu ortada olmak üzere düz dikistir. Arzu edilen batis uzunluunu tu 106 ile seçiniz. Program 01, sol bati durumundaki düz dikitir. Tu 107 be bati durumu, soldan saga olmak üzere 13 durumda, detiri lebilir. Program 02 ye Q3, geriye doru dOz di kitir. Bu programlar, program kombina syonlari 1cm kullanilmaktadir. Program 03, 13 bati durumunda dikile bilir. Ayarlar daha once belirtildii ekilde yapilrnaktadir. Beint spor: Mynztur 00 er fyrir beint spor rneô sporlegu I rniôju. Sloan vetjiO ér sporlengdina rneO takka 106. Mynztur 01 er fyrir beint spor eq sporlegu vnstra megin. MeO takka 107 getiO ér fart sporleguna frá vinstri til hgri urn 13 stillingar. Mynztur 02 og 03 er fyrir beint spor aftur a bak. au eru notuO fyrir samtenglngar saurna. Hgt er aO stilla sporleguna urn 13 sNlingar, ems og áOur var lyst. / 02/14/2008 J T L_i J_Li 1 _LHJ L prog prog o o mmm / Zigzag sewing: Program 10 is zigzag sewing with the needle in its left position. Program 11 is a zigzag seam made with the needle in the right position. With key 107 the stitch width can be set between 0.5 and 6.0 mm. Set the desired stitch length with key 106. DEE \ N Zikzak dikii: Program 10, bati durumu ortada olrnak üzere zikzak dikisidir. Program 11, bat durumuna gore sada olmak üzere zikzak dikiidir. 0,5 ye 0,6 mm olan bati genisliini Tu 107 ile seçiniz. Arzu edilen batis uzunlu unu Tus 106 ile seçiniz. ) Costura en punto zigzag: El programa 10 es para coser en punto zigzag con Ia aguja en posicion central. El programa 11 es para coser en punto zigzag con Ia aguja en posición derecha. Elija el ancho de puntada entre 0,5 y 6,0 mm con el botôn 107 y el argo de puntada deseado con el botón 106. Zik zak spor: Mynztur 10 er fyrir zik zak spor meO sporlegu frá miôju. Mynztur 11 er fyrir zik zak spor meô sporlegu I rá hgri MeO takka 107 getiô ér valiO urn zik zak breidd frá 0.5—6.0 mm. Sporlengdina veIjiO lér meO takka 106. 02/14/2008 ‘ [ W Ti I / I / LU prog () Recommended sewing modes: For every program from 00 to 99, and for letters and firgures the machine will indicate recommended sewing modes with regard to dual feed, needle thread tension and sewing feet. Press key 125 and hold it in. The recommendations appear in the display beneath the three symbols on the computer: ‘—S -- ,. uUdI N r-3 4 cm, iee A = B: needle thread tension B = C: number of sewing foot C = A = doblo arrastre B = tension del hilo superior C = !J1 U Diki tavsiyeleri: 00’dan 99’a kadar olan her program, harfler ye sayilar çift kuma tai masi, ust iplik gerginlii ye kullanilacak diki ayai hususunda dikis tavsiyeleri biriktirilmis bulunmaktadir. Tu 125’e basiniz ye sikica tutunuz. Komputer üzerinde 3 sembol bulunmakta olup, daha sonra bunlarin altinda uygun olan açiklama gärünmektedir. 4 Recomendaclones para Ia costura: Para cada programa 00 a 99, letras y cifras van mernorizadas recornendacio nes do costura para ol doble arrastro, Ia tensiOn del hilo superior y ol pie prensa telas quo deberá emplearse. Pulse el botdn 125 y no lo suolte. En Ia computadora aparecen 3 simbolos en los quo so indica Ia recomondaciOn corres pondiente. b I I çift kuma taimas, Ust iplik gerginlii Diki ayainin numarasi UppIsIngar urn sauma og stllllngar fyrir pa I minni vOlarinnar eru geymdar upplsingar fyr ir hvern saum e. a. s. ráôleggingar urn hvort nota elgi efri flytjarann, hvemig stilla oigi yfir Mnnaspennuna og hvaôa fOt sé bez.t aô nota. ‘?ti takka 125 og haldiô honum inni. Fyrir ofan syniftOtinn em 3 tákn, og korna viO komandi uppl’singar fyrir neôan au. . a A: Efn ftytjarinn B: Yfirtvinnaspennan nümero del pie prensatelas. C: NUrner / a saumfrnti 02/14/2008 Free programming Using the programming sheet inside the rear cover of the sewing book (also available from your dealer), trace your own design and number the penetration points on it (see sewing book). This numbering is entered in the P memory reserved for this purpose in the computer. The Creative 1471 has 16 P-memories from P0 to P15. In each memory up to 99 stitches can be stored. If a pattern has more than 99 stitches, the next free P-memory has to be selected and further stitches stored. Up to 694 stitches can be memorized, distributed among the P memories, so the capacity of 7 memo ries can be fully utilized. The computer will not accept more than that. The total of 16 P-memories is available for the case when a number of sewing patterns with fewer than 99 stitches are to be sewn. Programacion libre: En una hoja do programaciOn, que va in cluida al final del libro de costura y que puede adquirir adicionalmente en su agencia Pfaff, se dibuja el motivo creado por Vd. misma y so numeran las punta das (vease el libro de costura). Dicha numeraciOn se introduce en Ia memoria P de Ia computadora prevista para ello. La Creative 1471 tiene 16 memorias, desdo P 0 hasta P 15. Cada memoria tiene capacidad para 99 puntadas. Si un motivo tiene más de 99 puntadas, enton ces habrá que elegr Ia siguiente memona P libre y continuar memorizando. La memoria P admite hasta un total de 694 puntadas repartidas, o sea que se puede aprovechar por completo Ia capacidad de 7 memorias. Lo quo sobrepase de Osto, Ia computadora no Ic acepta. Las 16 memorias P están previstas para cuando haya que cosei más motivos con menos de 99 puntadas. Serbest programlama: Diki kitabinin arka kapak sayfasindan Onceki sayfaya konulmu olarak bulaca niz ye ilâveten PFAFF-Maazanzdan alabiIeceiniz bir programlama kãidin da, bizzat tasarlanmi bulunan diki Or nei çizilmi ye bati noktalari numaralanmistir (diki kitabina bakiniz). Bu numaralama, komputerin bu hususta OngOrUlen P-biriktiricisine verilmektedir. Creative 1471, P O’dan P 15’e kadar, 16 P-biriktiricisine sahiptir. Her biriktiricide, 99 bati biriktirilebilir. Bir Ornein 99’dan daha fazla batia sahip olmasi halinde, bu durumda bundan sonraki serbest P biriktiricisinin seçilmesi ye biriktirmeye devam olunmas gerekir. P-biriktiricisine daitilmi ekilde, toplam olarak 694 bati biriktirilebilir. Bu duruma gore 7 biriktiricinin kapasite sinden tamamen yararlanilabilir. Bundan sonra komputer, artik daha fazlasini kabul etmez. 16 P-biriktiricileri, 99 batitan daha az olan, fazla diki Orneinin bulunmasi hali içindir. 4 Hônnun elgln sauma eôa mynztra: A forritunarblaôin, sem eru aftast i saumabOk inni, getiô per teiknaô mynztur eftir eigin hOfôi og siôan setjiô per nümer viô hvem punkt, par sem nálin a aô stinga niôur (sjá nânar i sauma bOkinni). essi nimer eru siOan sett inn i P minni vélarinnar. I CREATIVE 1471 eru 16 P-minni frá P-0 til P-i 5. I hvert minni er hgt aO setja 99 spor. Ef mynztriô hefur fleiri on 99 spor pa verOiô per aO velja nsta lausa minni og halda par áfram. Hgt er aô setja samtals 694 spor inn a oIl P-minnin. PaO vill segja aO of 7 P-minni em n’tt til full nustu, pa tekur talvan ekki viO meiru. 16 P minnin em til staOar ef pau em notuô fyrir frri spor en 99 i hverju minni. 02/14/2008 w rag I I I I I iI I ÷ U zrnrnnn 111111 ,I I I () , 1’ Li oo1 I F MemorizaciOn con Ia programaciôn libre: Con el botén izquierdo 121 elija prime ramente P 0 y con el botôn derecho 121, una memoria libre P. Pulse el botOn 142 corrección BL. En el panel indicador 104 aparece B 00 sobre el pu[ sador 107 para el ancho de pun tada y L 00 sobre el pulsador 106 para el lar go de puntada. B es para programar el punto del ancho de puntada y L para el punto del argo de puntada. Sobre el baton 105, a Ia derecha, aparece un 1 con un punto luciendo intermitentemente. El punto intermitente indica Ia capacidad do registro de Ia memoria. Por cada programaciOn de puntadas se cuenta un 1 más. Si apare ce Ia cifra 99, entoncos hay programa das 99 puntadas y habrá que elegir Ia prOxima memoria P libre. CorrecciOn posterior de una pun tada mat programada u olvidada: Sobre el botOn 105, delante del nümero do Ia ültima puntada programada, luce un punto intermitentemente. Pulsando el signo menos (—), del botán 105, se pue den elegir en retroceso todos as nüme ros por orden sucesivo y comprobar y corregir cada uno de los datos do los puntos de Ia puntada, Pulsando el signo más (+) del botOn 105, se puede ajustar de nuevo Ia ültima cifra introducida con el punto inter mitente. Una vez memorizado el motivo, habrá que pulsar el botOn 141 repeticiOn, para que Ia máquina quede lista para coser. lntroducciOn de memorias P en las memorias M: Si un motivo de costura de programa ciOn libre so compone de varias memo rias P o debe combinarse con un programa do Ia tapa abatible, con letras o con citras, entonces se pueden intro ducir las memorias P en una memoria M. Para eDo, elija una memoria M libre o Ia memoria con los motivos ya memoriza dos. Pulse el batOn 143) (memorizaciàn del programa), elija Ia memoria P corre spondiente, p.ej. P 5, y pulse de nuevo el baton 143. La memoria P so encuen tra ahora en Ta memoria M preselec cionada. Elija Ia memoria P y pulse el botOri 143, continuando asI hasta quo todas las memorias requeridas se hallen en Ia memoria M, caso de el motivo sea más largo que 1 memoria P. Para hacer Ia comprobaciOn, pulse el batOn 141) (repeticiOn). En ese momen to aparece en el panel indicador Ia memoria P introducida, p.ej. P 5. Cuando se introducen memorias P en las memorias M, so mantienen las memorias P. Las memorias P aparecen en el panel indicador solamente como P0, P1, P2, etc. Cuando so anulen las memorias P, habrá que anular tambien las memorias M. La forma do programar memorias P en M se sescribe detalladamente en el libro de costura. J 02/14/2008 7 .‘ 7 Changing the needle (System 1301705 H): Loosen screw A. Take out the needle. Push the needle up as far as it will go (flat side facing the back). Tighten the screw. Carnbio de Ia aguja (sisterna 130/705 H): Afloje el tornillo A y saque Ia aguja. lntroduzca Ia nueva aguja hasta el tope de forma quo Ia cara plana mire hacia atrás y apriete de nuevo el tornillo. o — Ineyi deitirmek (Sistem 130/705 H): A vidasini gevetiniz. neyi cikanniz. Yeni ineyi (basik dip kismi arka tarafa doru) tamamen yukanya doru sUrünüz. Vidayi sikitiriniz. Skipt urn nál (req. 130/705 H): Losiô urn skrufu A. Takiô nálina ür. SetjiO nja nál moo flata legginn frá your, og ‘tiO henni ems hátt og hun kemst. FestiO skrüfuna aftur. Dropping the feed dog: Open free arm cover 131. Push the drop4oed control toward C (feed dog dropped) or toward B (sewing position). Ocultación del transportador: Abra Ia tapa 131. Corriendo el mando hacia C, el transpor tador queda oculto; corriéndolo hacia B, queda lista para coser. TransportorU (taiyicayi) aaiya doru indirmek: Kapak 131’i aciniz. Aaiya indirme sür gusunü C’ye doru sürünüz. Asaiya inmi durumda, dikmek için Bye doru sOrOnUz. Flytjarinn tekinn Ur sambandi: YtiO stillinum aO Cog á or flytjarinn niOri. AO B og á or hann i sambandi. 02/14/2008 usne sweiy rwes a) Take care to avoid injury to your fingers by the needle during sewing. b) Make sure you unplug the power cord whenever you have to leave the machine or wish to clean it, oil it or change mechanical and accessory parts. c) Be sure to use only a 15-watt light bulb in the sewing lamp. Some safety rules valid for United Kingdom only The wires in this mains lead are coloured in accordance with the following code: Blue: Neutral Brown: Live As the colours of the wires in the mains lead of this appliance may not corres pond with the colour coding of the termi nals in your plug, proceed as follows: The wire which is coloured blue must be connected to the terminal which is mar ked with the letter N or coloured black. The wire which is coloured brown must be connected to the terminal which is marked with the letter L or coloured red. Please note: When a 13-amp plug is used a 3-amp fuse has to be fitted. — Medidas de seguridad para las rnaquinas de coser domésticas segun DIN 57730, parte 2C 3) Debido al peligro de accidente quo representa el movimienito do Ia aguja, el usuario deberá poner todo eb cuidado posibbe durante el trabajo y no deberã apartar Ia vista do Ia zoria do costura. ) Antes de cambiar Ia aguja, el pie prensatelas, Ia canilla y Ia placa de aguja, 10 mismo quo al limpiar o engrasar Ia maquina, 0 cuando no se Ia use, deberá desconectarse elOctri camente, es decir, deborá sacarse el onchufe de Ia red, :) La potencia max. admisibbe do Ia bombilla es do 15 vatios. DIN (Alman Endüstri Normu) 57730 Ksim 2C’ye gore evde kullanilan diki makinalari için guvenlik talimatlari a) Makinayt kullanan kimsenin, yukariya ye asatya doru hareket eden ine dolayesiyla, yeteri kadar dikkatli day ranmasi ye cahma esnasinda diki yerini devamli olarak gazlemesi gerekir. b) Makinari,n terkedilmesi esnasinda, bakim isbn esnasinda veya makina parcalarinin veya ilãve parçabarin deitirilmesi sirasinda, makinanin fi ini prizden cikarmak suretiyle, ceryanin kesilmesi gerekir. c) Lâmbanin müsaade olunan azmai gucu 15 Vattir. Nokkrar oryggisraôstafanir a) GtiO hess aô fingur verOi ekki fyrir nálin;ii. egar saumaO er. b) Geriô aO aô venju yöar aO taka vélina ür sambandi, legar skipta larf um nab, saumfót, eOa egar ér eruO ab hreinsa og smyrja vélina. c) Aldrei ma vera sterkari pera i vélinni en 15W. 1 I 02/14/2008 Detachable work support and accessories: The work support can be lifted out (A). Open its lid and take out accessory box C. Underneath the box is an accessory compartment B. Illustration D shows how to arrange sewing feet, needles and bobbins in the accessory box. 0 1 2 3 4 5 6 7 8 Suplemento y accesorios: El suplemento se puede quitar del todo (A). Abra el suplemento y saque Ia caja de accesorios C. Debajo de ella hay un compartimento B para accesorios. La figura D muestra côrno deben colocarse los pies prensatelas, las agujas y las canillas. 0 Pie normal 1 Pie para puntada de adorno con transporte superior 2 Pie para puntada de adorno sin transporte superior 3 Pie para puntada invisible y para overlock 4 Pie para cremalleras 5 Pie para ojales 6 Pie zurcidor 7 Pie dobladillador 8 Gula Deisebilen (dikilecek eyln üzerlne konduu, kaldirilabilir) diki yUzeyi ye have parcalar: Diki yOzeyi diariya çikarilabilir (A). Di ki yüzeyini açinlz, teferruat (ilãve parça lar) kutucuunu dianya cikariniz. Teferruat kutucuunuri altinda bir tefer ruat bälmesi (B) bulunmaktadtr. Resim D, diki ayaklarinin, inelerin, masurala rin nasil dizilmesi gerektiini gaster mektedir. 0 1 2 3 Vlnnuborôiô og aukahiutir: Hgt er aO taka borôi af A. OpniO l,aô og fjarlegiô efri tiluta C. Undir efri hiutanum er auka gaymsluhôlf B. Mynd D s’nir hvernig fOtum, nálum og spólum er haganlegast korniô fyrir. Ordinary sewing foot Fancy-stitch foot, with dual feed Fancy-stitch foot, without dual feed Blindstitch- and overlock foot Zipper foot Buttonhole foot Darning foot Hemming foot Edge guide 4 5 6 7 8 Normal ayak tJst taimali süs dikii ayai Ust taimasiz süs dikii ayai Kör diki- ye overlock (ustten geçmeli diki) ayai Fermuar ayai Ilik ayaI Orerek tamir etme (yamama) ayai Etek baski ayai Cetvel 0 1 2 3 4 5 6 7 8 Venjulegur saumfótur UtsaumsfOtur fyrir efri flytjara Utsaumsfótur an efn flytjara Blindföldunar og overlockfOtur Rennilása og kanttOtur HnappagatafOtur StoppfOtur FaldfOtur Kantst’ring I 02/14/ 2008 I.nanglng sewing Toot; noiu sewing iooi at front and push down to disengage foot. Cambio del pie prensatelas: Para desencajar el pie prensatelas, sujételo por su parte delantera y presiOnelo hacia abajo. Oiki ayaIni deitirmek: Diki aya,ni an taraftan tutunuz ye asaiya doru bastiriniz. Bu arada ayak yerinden cikar. Skipt urn ttur: Takiô urn fótinn aO frarnan, 4 Fitting sewing toot: lower lifting lever and locate foot so that pins A enter grooves B. Colocaciôn del pie prensatelas: Haga descender Ia palanca alzaprensatelas y ernpuje el prensatelas de forma que los pasadores A encajeri en las ranuras B. Diki ayatni takmak: Kurna bastirrna kolunu aaiya indiriniz ye bu arada ayai, B käprucUu C oluu içerisine oturacak sekilde sürünüz. Fótur settur a: LkkiO fótlyftirinn og friO fôtinn til annig aô tittir A talli I raufar B. C and D are for securing accessories. E is the sewing foot screw. C y D sirven para fijar los accesorios. E es el tornillo de fijaciOn del portapren satelas. C ye D, have parcalann tespit edilrnesi içindir. E, diki ayai vidasidir. \ C og D eru til aô festa aukahiuturn ems og kantst’ringu. E festir hälduna fyrir saurnft urnar. 02/14/2008 Cleaning and oiling Tilt the needle plate up at the back (A) and remove it (B). Clean the feed dog and the parts in the vicinity of the sew ing hook with a soft brush. Clean the bobbin thread monitor as instructed on page 47. Only apply a drop of oil in the hook raceway from time to time. 4 N Temiziemek ye yalamak: Batis levhasini arkadan kaldiriniz (A) ye diariya cikariniz (B). Transportorü (tai yiciyi) ye mekik sahasini firça ile temzleyi niz. Alt iplik kontrol dUzeni Sayfa 65’deki talimatlara gäre temizlenecektir. Makinayi yalamayiniz. Sadece ara sira kavrayici nm bulunduu sahasina, resimde gOste rildii gibi, bir damla ya damlatiniz. I Limpieza y engrase: Levante Ia placa de aguja por detrás (A). y retirela (B). Limpie con un pincel el transportador y Ia zona del garfio. El control del fib inferior se limpiará de acuerdo con las normas de Ia página 47. No engrase Ia maquina. Lo ünico que necesita hacer es poner de vez en cuan do una gota de aceite en Ia pista del garfio como muestra Ia figura. Hrelnsun og smuming: LyftiO stingplatunni upp aô aftan A. og takiO hana af B. Hreinsiô flytjarann og kringum griparann meO bursta. Hreinsiô elektrOniska eftirlittO meô undirtvinnanum sky. leiôbeiningum a bbs. 53. Smyrjlô ekkl véllna, pvi hUn er sjãlfsmurb. AlIt, sem ér urfiô aO gera, er ac smyra öru hvoru I griparann. N 02/14/2008 4 Changing the light bulb: Pull out the mains plug. Close the hinged top cover and swing up the carry ing handle. Insert the edge guide into cutout D, push down the lamp housing and hold it there. Turn the light bulb to wards A and take it out. Insert the new bulb so that its pins enter slots C. Push it up and turn it towards B. Pull out the edge guide. Camblo de Ia bombilla: Desconecte a máquina. Cierre Ia tapa abatible y levante el asa. lntroduzca Ia gula entre a tapa frontal y Ia carcasa y través de Ia ranura D. Empuje el porta Iámparas hacia abajo y sujételo asi. Gire Ia bombilla a Ia izquierda (A) y saquela. Introduzca Ia nueva bombilla de forma que las guIas encajen en las muescas C, y empüjela y girela a Ia derecha (B). Retire Ia gula. Ampul deitirmek: Elektnik fiini çekiniz. Acilir kapanir kapa i kapatiniz ye taima kolunu yukariya kaldininiz. Kilavuz cetvelini, D kertii vasitasiyla üst kapak ye muhafaza arasina sokunuz. Ampul muhafazasini asaIya bastiriniz ye sikica tutunuz. Yeni ampulu, diler C yivleri içerisine girecek sekilde sürünüz, yukariya doru bastini niz ye B yönunde çevininiz. Cetveli dia riya cikariniz. 4 Skipt urn peru: TakiO rafmagnstengilinn ür sambandi. LyftiO handfanginu upp. Setjiô kantst’ringuna niôur urn rauf D ofan a vélinni. l’rstiO rneô stringunni ofan a peruhOlduna. og haldiO henni fastri. l’rsttO perunni upp a viô og snüiO i átt aO A. TakiO peruna ür og setjiô nja peru annig i aâ häkin a perunni falli I raufar C. PrstiO a og snüiO I átt aO 8. LosiO nü a stringunni. annig aã peruhaldan fan aftur upp. I 02/14/2008 Changing the fuse Pull out the mains plug. Turn fuse holder A left a quarter turn with a screwdriver, release it and take it out. Pull out fuse B. Insert a new fuse in the holder, repla ce the holder, push it in with the screw driver, then turn It right a quarter turn. (The fuse type is FF2A.) 110-volt machi nes have no fuse. Cambio del fusible: Retire el enchufe do Ia red. Gire con un destornillador el portafusibles A un cuar to de vuelta hacia a zquierda, suèltelo y sáquelo. Saque ahora el fusible B y meta un nuevo fusible. Coloque de nuevo el portafusibles en su lugar, ernpüjelo con un destornillador y gIrelo un cuarto de vuelta a Ia derecha. (Tipo de fusible: FF2A). Las maquinas do 110 V no tienen fusible. Sigortayi deitirmek: Ceryan fiini çekiniz. A sigorta mesnedini tornavidayla därtte birlik bir dändürme lIe sola doru çevirip serbest btrakrniz ye disariya cikariniz. B sigortasini disariya doru çekiniz. ‘toni sigortayl mesnet ice risine sürünüz. Mesnedi yerlestiriniz, tor navidayla arkaya doru bastirintz ye därtte birlik bir dOndUrme lIe saa doru sikiniz. (Sigorta gucu FF2A). 110 Voltluk makinalarin sigortasi yoktur. 6 Skipt urn öryggi: takiO vélina ür sambandi viO veggtengil. Moo smapening eOa skn:ifjarni oslO ér urn oryggisholduna A, moO vi aO snüa henni til vinstri. TakiO hOlduna ür og skiptiO urn OryggiO B. SetjiO slOan hölduna aftur I, ‘tiO lauslega a hana og snüiO til hgri. Oryggi at styrkielka FF2A fáiO ér hjá PFAFF umboOinu, I vélurn fyrir 110 volt er ekkert oryggi. I 02/14/2008 Changing the batteries: Switch on the machine, so that the memories are not lost when the batteries are changed, and tilt the machine over backwards. A battery compartment is infl stalled in the base. Lift cover B at the catches in recesses A and remove cover. Take out the batteries. Insert the new batteries with the plus side (+) facing upwards: Place cover B in so that hinges C engage in recesses D and press cover until it snaps in place. After changing the batteries, check the contents of the memories. Replacement batteries: 2 Mignon cells, 1.5 V, type LR 6 Only use non-leaking batteriesl Cambio de las pilas: Conecte a maquina, para que las memorias no so anulen al cambiar las pilas, y vuelquela hacia atrãs. En su base hay un compartimento para as pilas. Levante Ia tapa B por las hendiduras A y retire las pilas. Coloque las nuevas pilas E, con el ado + hacia arriba. Coloque los salientes C de Ta tapa B en las hendiduras D y presione Ia tapa hasta que encaje. Nota: DespuOs de cambiar las pilas, es aconsejable comprobar el contenido de as memorias. Pilas de recambio: 2 pilas Mignon 1,5 V; tipo LR 6 Utilice solarnente pilas que no puedan 4 Pilin deitirilmesi: Makinayi calistiriniz ye geriye doru yati rsniz. Alt kisimda bir pu kutusu bulun maktad,r. B kapaini, A oyuklarndaki tirnak ktsmlarinda, yukariya doru kaldiriniz. Yeni pilleri (E), + kismi yukariya gelmek üzere, yerletiriniz. B kapainin C tirnak kisimlarini, D oyuk lan içerisine yerletiriniz ye kapai, yen ne oturuncaya kadar bastiriniz. Aciklama: Pil deistirildikten sonra birik tirme muhtevasi kontrol edilmelidir. Yedek piller: 2 Mignon-Pu 1,5 Voltluk; Tip LR 6 Sadece, akmaya kart emniyetli olan pilleni kullaniniz, Skipt urn rahläOur: Kveikiô a vélinni, og leggiô hana a borôiô. Nauôsynlegt er aô kveik;a a vélinni a meôan skipt er urn rafhlOôumar, vi annars fri alit t af P-minnum vélarinnar of paô or ekki gert. A botni vélarinnar or hOlf fyrir rafhlaôumar. Losiô urn Iokiô B meô vi aô taka urn hOkin A og fjartgiô rafhlOôurnar. Setjiô njar rafhlOô, ur E pannig i vélina aô + visi upp a viô. Setjiô lokiô aftur a sinn staô rneô pvI aô renna hOkum C I got Dog srnelliô lokinu sloan aftur a sinn staO. AthuglO: aO eftir aO per haflO skipt urn raThlaOur tti aO fara yfir hvort alit sé I rninnurn vélannri ar, sem par a aO vera. RafhlOOur: I vOlinni eru 2 rnignonrathlOOur 1,5 Volt tegund LR 6. NotiO aOeins viOurkenndar rafhlOOur, 02/14/2008 / Important Nota importante: When the machine is switched on by pushing the master switch, the sewing light goes on. When the machine is switched off by pushing the master switch. pufling out the mains plug or by power failure, the program memory in its computer is retai ned by a battery. After the machine is switched on again, program 00 (straight stitching with the needle in its middle position) appears. Program combinations remain memorized. If a program is enter ed during sewing, it will not become ef fective until the machine has stopped and the foot control is pressed again. Stitch length and stitch width can be changed during sewing. For bobbin winding disengage the sew ing mechanism. After bobbin winding make sure you re engage the sewing mechanism, otherwise the hand wheel will turn at an extremely high speed when you press down the foot control. In this case, take the toot from the foot control, wait for the hand wheel to stop, then re-engage the sewing mechanism. Owing to the use of electronic components, this machine becomes warmer than non-electronic machines. This is quite normal. Al conectar Ia mãquina pulsando el inte rruptor general, Ia lámpara de costura se enciende. Si se desconecta Ia máquina pulsando el interruptor general, sacando el enchufe de Ia red o por corte de Ia corriente, Ia memoria del programa en Ia computado ra continua siendo efectiva mediante as pilas. Para que un programa introducido du rante Ia costura sea efectivo hay que pa. rar antes Ia maquina y pisar de nuevo el pedal. El ancho y el argo de puntada se pueden modificar durante a costura. Para devanar (Ilenar Ia canilla) hay que desconectar el mecanismo de costura, sin olvidarse de conectarlo de nuevo después del devanado, pues de lo con trario marcharia el volante a gran veloci dad al pisar el pedal. Caso de ocurrir esto, retire inmediatamente el pie del pe dal, espere a que se pare el volante y conecte después el mecanismo de coStura. Debido a los elementos electrOnicos, esta máquina se calienta más que las no electrónicas, pero eso es completamente normal. Batteries: When the batteries are discharged, display 104 will indicate ‘battery conti nuously. Pilas: Cuando se gasten las pilas, aparece en el panel indicador 104 Ia palabra “pila’ en cuatro idiomas. 02/14/2008 Fallos y remedios Causa: Remedio: 1. La máquina hace puntadas saltadas La aguja no estã bien colocada. lntroduzca Ia aguja hasta el tope con el lado pIano hacia atrás. Se ha puesto una aguja falsa, Coloque una aguja del sistema 130/705 H. La aguja esta torcida a despuntada. Coloque una aguja nueva. La máquina no está bien enhebrada. Enhebrela bien. La aguja es demasiado hna para el hilo utilizado. Elija Ia aguja do acuerdo con Ia tabla do hilos y agujas del folleto do instruc ciones. 2. El hilo superior se rompe Por as razones cifadas anteriormente. Compruebe los puntos citados en el nOmero 1. La tensiOn del hilo Os demasiado fuerte, Regule Ia tensiOn do los hilos. El hilo es de mala calidad. o nudoso a so ha secado par estar dernasiado tiempo almacenado. Utilice hilos de buena calidad y en buenas condiciones. 3. La aguja se rompe La aguja no estO bien colocada. lntroduzca Ia agua hasta 01 tope. La aguja está torcida. Coloque una aguja nueva. La aguja es demasiado fina a demasiado gruesa. Siga las normas do Ia labIa do hilos y agujas. La aguja se dobla y choca contra Ia placa de aguja por tirar de Ia tela o empujarla. La tela doberO ser arrastrada solamente por Ia maquina. Las piezas de costura solamonto deberOn ser guladas con suavidad. La capsula portacanillas no está bien colocada. Al colocar Ia cãpsula con Ia canilla Ofl 01 garfio deberá presionarso un poco hasta quo encaje pertoctamonte. 4. La costura no es uniforme La tension de los hilos no estä bien regulada. Compruebe Ia tensiOn do ambos hilos. Hilo demasiado fuerte, nudoso o rigido. Uso hilo do buena calidad. El hilo do Ia canilla no estO bien devanado. El anudado do los hilos no tione lugar dentro del material, sino encima a debajo. Haga pasar el hilo par el tensor provio siempre que llene Ia canilla. Compruebe el enhebrado y Ia tensiOn do ambos hilos. 02/14/2008 Causa: Remedio: 5. La maquina no arrastra el material o 10 hace irregularmente Se ha acumulado polvo y suciedad entre los dientes del transportador. Retire a placa de aguja y limpie el transportador con un pincel. El transportador estã oculto. El mando para ocultarlo se halla a Ia derecha. Corra el mando para ocultar el transpor tador a Ia izquierda. 6. La máquina va forzada En a pista del garfio hay restos de hilos. Retire los restos de hilos y ponga una gota de aceite en a pista del garf 0, 7. El control electrónico del hilo inferior falla Se ha acumulado polvo y suciedad en el casquete de cierre sobre el ojo de control, en Ia zona del garfio, en Ia cápsula de Ia canilla, detrás del garfio y sobre el segundo ojo de control a Ia derecha detrás del garfio. Retire los restos de hilos y a suciedad. Tenga mucho cuidado al limpiar el segundo 010 de control. 8. La máquina no cose el programa seleccionado Desconecte Ia maquina y vuelva a conectarla después de unos 30 segundos, y memorice de nuevo el programa deseado. 9. La lámpara de costura se enciende pero Ia mäquina no marcha El fusible está fundido. Coloque un nuevo fusible. Observaciones importantes No ponga nunca en marcha Ia máquina enhebrada sin tela. Siempre que abandone Ia maquina, aunque sOlo sea por un momento, desconéctela mediante el interruptor general. Esto es muy importante sobre todo si hay niños cerca, 02/14/2008 ara labores de costura especiales se pueden adquirir en todas las agencas y endas de Pfaff accesorios especiales. Los accesorios que no levan asignados nümero de pedido se hailan en preparaciOn , no se pueden suministrar todavia. No de pedido Operacion Pie prensatelas para apiicaciones 93-042941-91 Para coser aplicaciones Ribeteador (debera quitarse SI portaprensatelas) 98-053484-91 Para ribetear bordes con cinta 1orio Pie prensatelas para nervaduras. con 5 ranuras 93042 950-91 (agujasgemelasconseparacionde1,8—2,5mm) Pie prensatelas para nervaduras, con 7 ranuras (agujas gemelas con separaciOn del 4—1,8 mm) 93-042953-91 Lengueta para nervaduras (2 piezas) 93-035952-45 Pie prensatelas para flecos 93-042943-91 . Pie prensatelas para punto recto 93-042946-91 Sobrecargador 4,5 mm Sobrecargador 6.5 mm Para coser flecos y para marcar con hilván Para pespuntear y para coser telas muy finas y blandas (géneros de punto a base de seda, etc.) Placa de aguja con agujero redondo — Para hacer nervaduras (aguja del No 80; para nervaduras tinas del No 70) 1 Para costuras sobrecargadas 93-042 948-91 Pie fruncidor 93-036998-91 Para fruncir volantes, etc. Pie prensatelas para cordoncillo 93-036915-91 Para trabajos de cordoncillo Plaquita para bordado inglés 93-036975-45 Para bordado inglés (bordado de ojete) Dobladillador 4 mm (para transporte supenor) Para dobladillar bordes 02/14/2008 Indice alfabético Botones de mando de a parte electrOnica Botones de mando de a computadora de Ia Creative Cambio de Ia aguja Cambio del prensatelas Cambio de Ia bombilla Cambio del fusible Cambio de las pilas Colocación de a canilla en a cápsula Colocación de Ia cãpsula con Ia canilla en el garfio ColocaciOn del carrete Comienzo del motivo ComprobaciOn de Ia tensiOn del fib inferior ComprobaciOn de Ia tensiOn del hilo ConexiOn elOctrica Cortahibos CorrecciOn de Ia compensaciOn o de Ia puntada en retroceso Costura con agujas gemelas Costura en punto redo Costura en punto zigzag Devanado desde un segundo carrete Devanado a través de Ia aguja Doble arrastre ElecciOn del programa ElecciOn de Ia posiciOn de Ia aguja en el punto recto Enhebrado del hibo superior ExtracciOn del hibo interior Falbos y remedios InversiOn del motivo Limpieza y engrase Medidas de seguridad MemorizaciOn de combinaciones de programas Motivos individuales Nota importante Ocultamiento del transportador Palanca alzaprensatelas Pedal Pies prensatelas PreparaciOn para el devanado ProgramaciOn libre Recomendaciones para Ia costura Regulacion del ancho del puntada Regulacion del argo de puntada y del motivo RegulaciOn de Ia compensaciOn y del largo del motivo RepeticiOn de una combinaciOn del programas Suplemento y accesorios . . . . . . . 19—21 22. 23 46 50 53 54 55 10 11 11 35 10 16 2, 3 17 28 35 38 39 6, 7 8, 9 18 24 25 y 38 12, 13 14 60, 61 37 52 47 30, 31 36 56 46 15 16 51 4, 5 41, 43 40 25 26 27 34 49-
 1
1
-
 2
2
-
 3
3
-
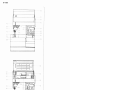 4
4
-
 5
5
-
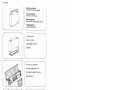 6
6
-
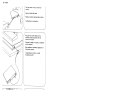 7
7
-
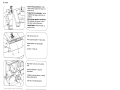 8
8
-
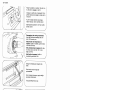 9
9
-
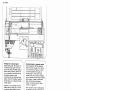 10
10
-
 11
11
-
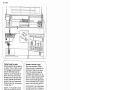 12
12
-
 13
13
-
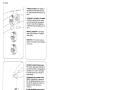 14
14
-
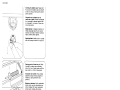 15
15
-
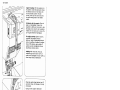 16
16
-
 17
17
-
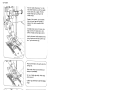 18
18
-
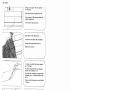 19
19
-
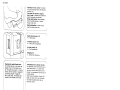 20
20
-
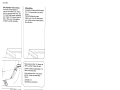 21
21
-
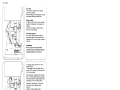 22
22
-
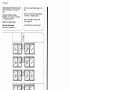 23
23
-
 24
24
-
 25
25
-
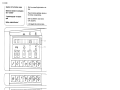 26
26
-
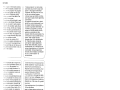 27
27
-
 28
28
-
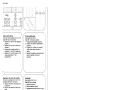 29
29
-
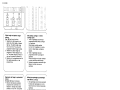 30
30
-
 31
31
-
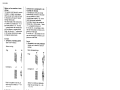 32
32
-
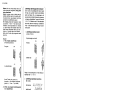 33
33
-
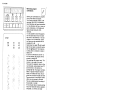 34
34
-
 35
35
-
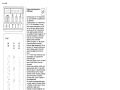 36
36
-
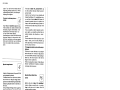 37
37
-
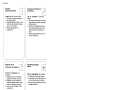 38
38
-
 39
39
-
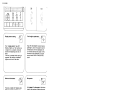 40
40
-
 41
41
-
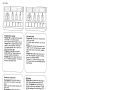 42
42
-
 43
43
-
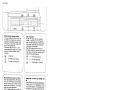 44
44
-
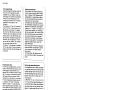 45
45
-
 46
46
-
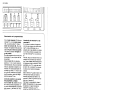 47
47
-
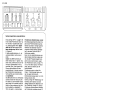 48
48
-
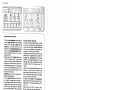 49
49
-
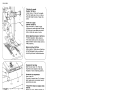 50
50
-
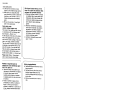 51
51
-
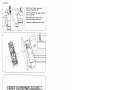 52
52
-
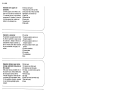 53
53
-
 54
54
-
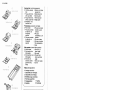 55
55
-
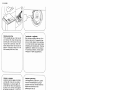 56
56
-
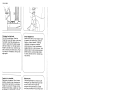 57
57
-
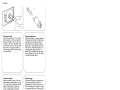 58
58
-
 59
59
-
 60
60
-
 61
61
-
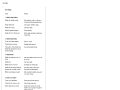 62
62
-
 63
63
-
 64
64
-
 65
65
-
 66
66
-
 67
67
-
 68
68
-
 69
69
-
 70
70
-
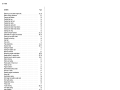 71
71
-
 72
72
-
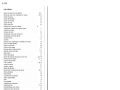 73
73
-
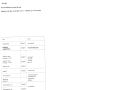 74
74
-
 75
75
-
 76
76


Pfaff creative 1471 Manual de usuario
- Categoría
- Máquinas de coser
- Tipo
- Manual de usuario
en otros idiomas
- English: Pfaff creative 1471 User manual
- Türkçe: Pfaff creative 1471 Kullanım kılavuzu