Hitachi L32A403 - 31.51" LCD TV Instrucciones de operación
- Categoría
- Televisores LCD
- Tipo
- Instrucciones de operación
Este manual también es adecuado para

NEED MORE INFO ON THE DTV TRANSITION?
See page 34 in this Operating Guide and
please visit www. dtvtransition.org
HITACHi
Inspire the Ne×}
0
Alpha Series LCD Flat Panel HDTV
perating Guide for L42A403 & L32A403
IMPORTANT SAFETY INSTRUCTIONS ...................................................................... 2-5
FIRST TIME USE ...................................................................................................... 6-17
THE REMOTE CONTROL ......................................................................................... 18-21
ON-SCREEN DISPLAY .......................................................................................... 22-34
USEFUL INFORMATION ........................................................................................ 35-41
LIMITED WARRANTY .................................................................................................... 42
END USER LICENSE AGREEMENT FOR HiTACHi DTV SOFTWARE ............. 43-48
APPENDIXES ................................................................................................................. 49
INDEX ............................................................................................................................. 50
READ THE ENCLOSED INSTRUCTIONS CAREFULLY. KEEP THIS OPERATING GUIDE FOR FUTURE REFERENCE.
Record the model name and serial number of your LCD Television for future reference.
MODEL NAME. SERIAL NO.
This information is located on the back and right side of the television.
TruSurreund HB
_E:3_l TM
HIGH-DEFINITION MULTIMEDIA INTERFAOE

Important Safety instructions
SAFETY POINTS YOU SHOULD KNOW ABOUT YOUR HITACHI LCD TELEViSiON \
Our reputation has been built on the quality, performance, and ease of service of Hitachi LCD televisions.
Safety is also foremost in our minds in the design of these units. To help you operate these products properly, this section illustrates safety
tips which will be of benefit to you. Please read it carefully and apply the knowledge you obtain from it to the proper operation of your Hitachi
LCD television.
CAUTION
CAUTION: TO REDUCE THE RISK OF ELECTRIC SHOCK,
DO NOT REMOVE COVER (OR SACK),
NO USER SERVICEABLE PARTS INSIDE
REFER SERVICING TO QUALIFIED SERVICE PERSONNEL
The lightning flash with arrowhead symbol, within an equilateral
triangle, is intended to alert the user to the presence of uninsulated
"dangerous voltage" within the product's enclosure that may be of a
sufficient magnitude to constitute a risk of electric shock to a person.
The exclamation point within an equilateral triangle, is intended to
alert the user to the presence of important operating and maintenance
(servicing) instructions in the literature accompanying the appliance.
READ BEFORE OPERATING EQUIPMENT
Follow all warnings and instructions marked on this LCD
television.
1. Read these instructions.
2. Keep these instructions.
3. Heed all warnings.
4. Follow all instructions.
5. Do not use this apparatus near water.
6. Clean onlywith a dry cloth.
7. Do not block any ventilation openings. Install in accordance
with the manufacturer's instructions.
8. Do not install near any heat sources such as radiators, heat
registers, stoves, or other apparatus (including amplifiers) that
produce heat.
9. Do not defeat the safety purpose of the polarized or grounding-
type plug. A polarized plug has two blades with one wider
than the other. A grounding type plug has two blades and
a third grounding prong. The wide blade or the third prong
are provided for your safety. If the provided plug does not fit
into your outlet, consult an electrician for replacement of the
obsolete outlet.
10. Protect the power cord from being walked on or pinched
particularly at plugs, convenience receptacles, and the point
where they exit from the apparatus.
11. Only use the attachments/accessories specified by the
manufacturer.
12. Use only with the cart, stand, tripod, bracket, or
table specified by the manufacturer, or sold with
the apparatus. When a cart is used, use caution
when moving the cart/apparatus combination to
avoid injury from tip-over.
13. Unplug this apparatus during lightning storms or when unused
for long periods of time.
14. Refer all servicing to qualified service personnel. Servicing
is required when the apparatus has been damaged in any
way, such as power-supply cord or plug is damaged, liquid
15.
16.
17.
18.
has been spilled or objects have fallen into the apparatus, the
apparatus has been exposed to rain or moisture, does not
operate normally, or has been dropped.
Televisions are designed to comply with the recommended
safety standards for tilt and stability. Do not apply excessive
pulling force to the front, or top, of the cabinet which could
cause the product to overturn resulting in product damage
and/or personal injury.
Follow instructions for wall, shelf or ceiling mounting as
recommended by the manufacturer.
An outdoor antenna should not be located in the vicinity of
overhead power lines or other electrical circuits.
If an outside antenna is connected to the receiver be sure the
antenna system is grounded so as to provide some protection
against voltage surges and built up static charges. Section
810 of the National Electric Code, ANSI/NFPA No. 70-1984,
provides information with respect to proper grounding for the
mast and supporting structure, grounding of the lead-in wire
to an antenna discharge unit, size of grounding connectors,
location of antenna discharge unit, connection to grounding
electrodes and requirements for the grounding electrode.
To the CATV system installer. This reminder is provided
to call the CATV system installer's attention to Article 820-
44 of the NEC that provides guidelines for proper grounding and, in
particular, specifies that the cable ground shall be connected to the
grounding system of the building, as close to the point of cable entry
as practical.
NECNational Electric Code
J
J Groundclamp
i
Electricservice equipment (NECSection 810-21)
I
Powerservicegrounding
electrode system (NEC A_t 250 Part H)
Power source
This LCD television is designed to operate on 120 volts 60 Hz, AC current. Insert the power cord into a 120 volt 60 Hz outlet. The mains plug
is used as the disconnect device and shall remain readily operable.
To prevent electric shock, do not use the LCD television's (polarized) plug with an extension cord, receptacle, or other outlet unless the
blades and ground terminal can be fully inserted to prevent blade exposure.
Never connect the LCD television to 50 Hz, direct current, or anything other than the specified voltage.
j_ Caution
Never remove the back cover of the LCD television as this can expose you to very high voltages and other hazards. If the
television does not operate properly, unplug the LCD television and call your authorized dealer or service center.
Adjust only those controls that are covered in the instructions, as improper changes or modifications not expressly approved by
Hitachi could void the user's warranty.

important Safety instructions
;arning
To reduce the risk of fire or electric shock, do not expose this apparatus to rain or moisture.
,_ The LCD television should not be exposed to dripping or splashing and objects filled with liquids, such as vases, should
not be placed on the television.
This apparatus shall be connected to a mains socket outlet with a protective earthing connection.
Public viewing of copyrighted material
Public viewing of programs broadcast by TV stations and cable companies, as well as programs from other sources, may require prior
authorization from the broadcaster or owner of the video program material.
This product incorporates copyright protection technology that is protected by U.S. patents and other intellectual property rights. Use of this
copyright protection technology must be authorized, and is intended for home and other limited payper-view uses only unless otherwise
authorized. Reverse engineering or disassembly is prohibited.
Lead/Mercury Notice
(_ This product contains lead and one or more non-replaceable mercury backlights. Do not put in trash. Recycle or dispose of
according to applicable laws. For product recycling and disposal information, contact your local government agency or visit www.
eiae.org (in USA) or www.epsc.ca (in Canada). FOR MORE iNFORMATION, CALL 800-HITACHI.
FEDERAL COMMUNICATIONS COMMISSION NOTICE
This equipment has been tested and found to comply with the limits for a Class B digital device, pursuant to Part 15 of the FCC Rules. These
limits are designed to provide reasonable protection against harmful interference in a residential installation. This equipment generates, uses
and can radiate radio frequency energy and if not installed and used in accordance with the instructions, may cause harmful interference
to radio communications. However, there is no guarantee that interference will not occur in a particular installation. If this equipment does
cause harmful interference to radio or television reception, which can be determined by turning the equipment off and on, the user is
encouraged to try to correct the interference by one or more of the following measures:
Reorient or relocate the receiving antenna.
Increase the separation between the equipment and the receiver.
Connect the equipment into an outlet on a circuit different from that to which the receiver is connected.
Consult the dealer or an experienced radio/television technician for help.
This device complies with Part 15 of the FCC Rules. Operation is subject to the following two conditions :
(1) This device may not cause harmful interference and (2) This device must accept any interference received, including interference that
may cause undesired operation.
Modifications
The FCC requires the user to be notified that any changes or modifications made to this device that are not expressly approved by Hitachi
Home Electronics (America), Inc, may void the user's authority to operate the equipment.
Cables
Connections to this device must be made with shielded cables with metallic RFI/EMI connector hoods to maintain compliance with FCC
Rules and Regulations.
Any cables that are supplied with the system must be replaced with identical cables in order to assure compliance with FCC rules. Order
Hitachi spares as replacement cables.
This LCD Television receiver will display television closed captioning, (rc_ or El ), in accordance with paragraph 15.119 and 15.122 of
the FCC rules.
INDUSTRY CANADA AGENCY REGULATORY INFORMATION
Cable Compatible Television Apparatus- Tdldvision c_blocompatible, Canada.
Declaration of Conformity
This device complies with part 15 of the FCC Rules. Operation is subject to the following two conditions :
(1)This device may not with cause harmful interference and (2)This device must accept any interference received,
including interference that may cause undesired operation.
For questions regarding this declaration, contact:
Hitachi Home Electronics (America), Inc.
900 Hitachi Way
Chula Vista, CA 91914-3556
Tel. 800-448-2244(800-HITACHI)
ATTN: Customer Relations
• VGA and XGA are trademarks of international Business Machines Corporation.
• VESA is a registered trademark of the Video Electronics Standard Association.
• HDMI, the HDMI logo and High-Definition Multimedia Interface are trademarks of registered trademarks of HDMI Licensing LLC.

important Safety instructions
Congratulations on your purchase! As you enjoy your new product, please
keep these safety tips on mind:
TUNE INTO SAFETY
THE ISSUE
• The home theater entertainment experience is a growing trend and larger flat
displays are popular purchases. However, flat panel displays are not always
supported on the proper stands or installed according to the manufacturer's
recommendations.
• Flat Panel displays that are inappropriately situated on dresser, bookcases,
shelves, desks, speakers, chest or carts may fall over and cause injury.
HITACHI CARES!
• The consumer electronics industry is commited to making home entertainment
enjoyable and safe.
4
° One size does NOT fit all. Follow the manufacturer's recommendations for
the safe installation and use of your flat panel display.
° Carefully read and understand all enclosed instructions for proper use of
this product.
• Don't allow children to climb on or play with furniture and television sets.
° Don't place flat panel displays on furniture that can easily be used as steps,
such as a chest of drawers.
° Remember that children can become excited while watching a program,
especially on a "larger than life" flat panel display. Care should be taken
to place or install the display where it cannot be pushed, pulled over, or
knocked down.
° Care should be taken to route all cords and cables connected to the
flat panel display so that they cannot be pulled or grabbed by curious
children.
WALL MOUNTING: IF YOU DECIDE TO WALL
MOUNTYOURFLATPANELDISPLAY,ALWAYS:
• Use a mount that has been recommended by the display manufacturer
and/or listed by an independent laboratory (such as UL, CSA, ETL).
• Follow all instructions supplied by the display and walt mount
manufacturers.
° If you have any doubts about your ability to safely install your flat panel
display, contact your retailer about professional installation.
• Make sure that the wall where you are mounting the display is appropriate.
Some walt mounts are not designed to be mounted to walls with steel studs
or old cinder block construction. If you are unsure, contact a professional
installer.
° A minimum of two people are required for installation. Flat panel displays
can be heavy.
CEA
Consumer Electronics Association
www.CE.org/sufely

PRECAUTIONS AND REMINDERS
b
Do not place the unit on
uneven surfaces, this may drop
or damage the unit, it may also
cause personal injury.
Unplug immediately if there is
a malfunction on the TV like
no picture, no video/audio or if
there is smoke and bad odor
coming from the TV.
o
Don't throw any objects inside
the TV like metals, coins or any
other flammable materials.
Don't place the TV in confined
spaces or inside a box when the
TV is operating.
Unplug immediately if any
foreign materials falls into the
TV or if the TV fell down.
Do not open the TV cabinet.
Remember to unplug the power
cord from the AC outlet before
cleaning. Do not use liquid
cleaners or aerosol cleaners to
clean the display.
Make sure to unplug the unit
when not in use for a long period
of time (days).
Do not cover or block any
vents and openings of the TV.
Inadequate ventilation may
shorten the life of the display
unit and cause overheating.
Avoid direct sunlight, dusty, high
humidity and smokey locations.
Do not place the TV near water,
such as a bathtub, shower
rooms, kitchen sink, laundry tub
or swimming pool. Avoid liquid
containers on top of the unit.
¢. 4b
Notice for Remote Controller
Avoid dropping the unit.
Avoid liquids on it.
Avoid aerosol cleaners.

Accessories
Check to make sure you have the following accessories before disposing of the packing material.
(_ Remote Control Unit _ "AA" Size (_ Operating
CLU-4591AV Batteries (2) (_ Power Cord Guide
Part No. HL02631
PMODE &MODE MTBISAP ASPECT
I_! [_!4 I! b
GD GD _D
MENU I_UT
i
=============================
HiTACHi
CLU-_IAV
HiTACHi
(_ Easy Graphic Guide
/
For optional accessories, please access our web site at: www.hitachi.us/tv
Ceiling mounting is not recommended. Mounting the panel on the ceiling does not provide adequate ventilation
for the electronics or proper support for the front glass panel. This LCD television product is designed for a
maximum tilting angle of 45 degrees from vertical
Please see page 8 for important information related to waft mounting.
%
REMOTE CONTROL BATTERY INSTALLATION AND REPLACEMENT
The remote control operates on 2 "AA" batteries.
1. Open the battery cover of the remote control by pushing and sliding it in the direction of
the arrow.
2. Insert two new "AA" size batteries for the Remote Control. When replacing old batteries,
push them towards the springs and lift them out.
3. Match the batteries to the (+) and (-) marks in the battery compartment.
4. Insert the bottom of the battery, the (-) side, into the battery compartment first, push
towards the springs and insert the top of the battery, the (+) side, into place. Do not force
the battery into the battery compartment.
5. Close the battery cover by sliding back the cover and push the cover until it clicks shut.
• Do not insert batteries with '+' and '-' polarities reversed as this may cause the batteries to swell or rupture
resulting in leakage.
• Never mix used and new batteries in the device.
• Replace all the batteries in the device at the same time.
• Remove the batteries if the remote control is not going to be used for an extended period of time.

How To install Your New Hitachi LCD Television
b
Take the following precautions to prevent the LCD Television from tipping over and possibly causing injury, it is important to
mount the unit on a stable and fiat surface.
ASSEMBLY OF THE BASE
IMPORTANT: The base of the LCD TV must be assembled
prior to use.
1. Place the TV unit face down on a soft and flat surface
covered by a blanket, foam, cloth, etc. to prevent any
damage or scratches to the LCD TV.
2. Carefully align and insert the Base to the TV stand post.
3. Insert the screws included with the accessories to the
bottom of the base and tighten the base to the stand.
• Do not block the ventilation holes of the LCD
Television. Blocking the ventilation holes might
cause overheating and damage.
• In case of an abnormal symptom, unplug the AC
cord and contact 800-HITACHI.
• If you purchased a wall mount bracket, please ask
for professional installation. Do not try to instafl by
yourself.
• Instafl the unit at a proper area where it does not
expose anyone to any danger of hitting themselves
(for example their hands, head or face, etc.) against
the edge of the unit that could cause personal
injury
Caution when moving the main unit
As this product is heavy, whenever it is moved, at least two people
are required to transport it safely. Whenever the unit is moved it
should be lifted forward using the top and base on both sides of the
Television for stability.
When moving the Television, lift from the corners, then support
the top frame as shown below.
Location
Select an area where sunlight or bright indoor illumination will not
fall directly on the picture screen. If so, drapes or screens can be
used to reduce the reflection.
Also, be sure that the location selected allows a free flow of air to
and from the perforated back cover of the set. In order to prevent an
internal temperature increase, maintain a space of 10 cm (4 inches)
from the sides/back of the Television, and 30 cm (12 inches) from
the top of the television to the ceiling. To avoid cabinet warping,
cabinet color changes, and increased chance of set failure, do not
place the TV where temperatures can become excessively hot, for
example, in direct sunlight or near a heating appliance, etc.
30 cm (12 inches)
10cm ) / _ 10cm
(4 inches (4 inches)
Power Cord Installation
The power cord provided with your new LCD Television needs to be
installed correctly to avoid its disconnection when rotating the TV
on its Table Top Stand.
Located on the back of the TV there is one plastic clamp to hold the
power cord. Please follow the instructions below.
(_ Pass the power cord through the clamp and connect it to the
TV.
(_ Close the clamp to fix the power cord to the TV.
(_) All the cables connected to the TV will be held by
this clamp.
AC Wire Clamp
Securing to a Wall
1. Using metallic wire (two locations) fasten the set to the
clamping screw on the rear of the LCD TV as shown below.
2. Keep the LCD television 4 inches away from the wall, except
when mounted using the wall mount bracket, and secure to
the wall as shown below:

How To install Your New Hitachi LCD Television
WALL MOUNTING SETUP
STEP (1) : REMOVE THE STAND BASE FROM THE LCD TELEViSiON
In order to remove the stand from the TV, please put the TV set on a soft and flat surface (blanket, foam, cloth, etc.) to prevent any
damage; then remove the 4 screws shown below in order to separate the TV from the Table Top Stand. Now the Stand can be separated
from the TV. Useful dimensions for the WALL MOUNT assembly are in page 39 and 40.
(a) 4 Screws ((a) M4 and
(a: _ _(b) (b) tapping ...... )Do
_,,,J
Stand Base
STEP (2) : INSTALL THE WALL MOUNT BRACKETS ON THE LCD TELEVISION USING 4 SCREWS.
ooooOOOlO111111OllOOlIIt1_w 11oooI1_I_11111IlOOOoloo1_#II111oooolllw 1_1111oolII1_IIIIIlOOOI1_
\ _ [Screw Mounting Holes (4 locations). Don't]
//- -_ _use the original screws (A) that were|
p,_t_ " lin the Tv f°r the Table T°p Stand The|
|original screws are not long enough to|
|properly secure the TV to the wall bracket.J
.......... (9" i
iiiiooooooooooooi11ooollti_,ll i_,,,111oo,IIIIIIIIII 1,1111oo._,1i I Wall Mount Brackets ]
o For Wall Mount assembly; please refer to the Installation Manual of the
Wall Mount Unit.
<
Screw Length (A)
Insertion length (B)
Spring Washer (C)
Plane Washer (D)
Wall Mount Bracket (E)
Example :
A = B+C+D+E
A: 13.5~15.5 ram.
_B:8.5-10.5 rnrn.
C: 1 ram.
D: 1 ram.
E:3 mm.
The screw type :Thread ISO M6 (Metric
type, do not use Standard type),
STEP (3) : TIPS TO CONSIDER FOR THE LOCATION OF THE LCD TELEVISION.
Although this LCD Display Panel can be installed using a variety of third party wall mounting brackets/devices,
third party brackets/devices have not been tested or approved by Hitachi for use or compatibility with this
Display Panel. Accordingly, Hitachi accepts no responsibility or liability for any injuries or property damage
resulting from the use of such third party brackets/devices. Hitachi strongly advises that any installation of
this LCD Display Panel using wall mounting brackets/devices be performed only by a qualified and experienced television installation
technician who has completed a thorough evaluation of:
a) the weight-bearing strength and stability of the intended wall mount surface; and
b) the weight-bearing strength and compatibility of the intended waft mount brackets/device.

Side Panel Jacks & Controls
FRONT VIEW
_E
o IIII
@=
o IIII
,<//,6_%h\>
@-
o
Only L42A403
Model
MENU
[]
POWER
_@
1@R/C Sensor
HIT_HI
IndicatingLamp
@
@
POWER button
This power button is for turning ON the LCD TV, in order
to turn the TV On, the standby indicator must be lit red.
If the indicator is off, plug the power cord into the AC
watt outlet.
MENU button
This button allows you to enter the MENU, making it
possible to set TV features to your preference without
using the remote. This button also serves as the Return
button when in the MENU system.
(_) INPUT button
Press this button to access the INPUT menu.
®
@
®
®
VOLUME (+/-) level
Press these buttons to adjust the sound level. The
volume level will be displayed on the TV screen. These
buttons also serve as the cursor left and right buttons
when in the Menu system.
CHANNEL selector
Press these buttons until the desired channel appears
in the top right corner of the TV screen. These buttons
also serve as the cursor down (T) and up (A) buttons
when in the MENU system.
AV2 (SIDE) JACKS
AV2 provide composite Video and S-Video (Only for
L42A403) jacks for connecting equipment with this
capability, such as a DVD player, Game Console or
Camcorders.
HDMI-3 & HDMI-4
Use these side HDMI inputs forAY equipment such as
Set-Top-Boxes or DVD players equipped with an HDMI
output connection (see page 14 for reference).
®
®
USB UPGRADE SLOT
This USB slot is for future software upgrades.
POWER light indicator
To turn the TV ON, press the Power button (Q). A red
stand-by indicator lamp located on the lower left corner
of the front bezel has to be illuminated in order to turn
ON the LCD TV.
Lights
Red
Lights
Blue
Quickly
Blinking Red
Slowly Blinks
Red
OFF
(Stand-by)
ON
ON
ON
(Stand-by)
When the LCD TV is plugged
to the AC line.
TV Power is ON; picture is
shown.
The TV is powering OFF.
It will soon be in the Off
(Stand-by) state.
TV is in the RGB input and
has been without an input
signal for 15 mins. TV will
resume after the input signal
is detected.
®
REMOTE CONTROL sensor
Point your remote at this area when selecting channels,
adjusting volume, etc.
• Your HITACHI LCD TV will not show anypicture if
there is no video input when AV1, AV2, Component1
or 2, or HDMI 1, 2, 3 or 4 is selected. Instead a
message will indicate "No Signal" and the Power
Light will remain Blue until the TV is turned off or in
Stand-by mode (lights red) when not in use.
• The Remote Control can turn the TV ON/OFF as
well as turning ON/OFF any compatible HDMI
CEC devices.
@ Headphone jack
Use this jack to connect headphones.

Rear Panel JacKs
f
®
AIR/CABLE
I
Antenna Input
To switch between Cable and Air, go to the Channels
Menu option to change the signal source CABLE orAIR
(see page 33).
,!
HDMI 1
/ f
HDMI 2
®
HDMI, the HDM! logo and High-Definition Multimedia
Interface are trademarks or registered trademarks of
HDM! Licensing LLC.
@
Component: Y-PbPr and Audio Inputs
Component 1 and 2 provide Y-PbPr and Audio jacks
for connecting equipment with this capability, such as a
DVD player or Set Top Box.
• Your component outputs may be labeled
Y, B-Y, and R-Y. In this case, connect the
components B-Y output to the TV's Pb input
and the components R-Y output to the TV's
Pr input.
• Your component outputs may be labeled
Y-CbCr. In this case, connect the component
Cb output to the TV's Pb input and the
component CRoutput to the TV's Pr inpuL
• It may be necessary to adjust TINT to obtain
optimum picture quality when using the
Y-PbPrinputs (see page 24).
® Digital Out (Optical Digital Audio)
This jack provides Digital Audio Output from a HDMI
source or digital program channel to your audio device
that is RAW and PCM compatible, such as an audio
amplifier.
*Manufactured under ficense from Dolby
Laboratories. "Do/by" and the double-D symbol
are trademarks of Do/by Laboratories.
® RGB and AUDIO for Personal Computers (PC)
Use the RGB/Anatog Audio input terminal for connecting
a PC or Laptop using a RGB cable (D-sub 15 pin) to
your LCD TV. Please see page 49 for compatible
resolutions.
® HDMI 1, 2 (High Definition Multimedia Interface)
ABOUT HDMI - HDMI is the
next-generation, atl digital m m__lm__ _ _ T.
interface for consumer ,,G,-OE_,,mO,MUL_,MEO,A,.TERFAO_
electronics. HDMI enables the secure distribution of
uncompressed high-definition video and muttichannel
audio in a single cable. Because digital television (DTV)
signals remain in digital format, HDMI assures that
pristine high-definition images retain the highest video
quality from the source all the way to your television
screen. Use the HDMI input for yourAV equipment such
as Set-Top-Boxes or DVD players equipped with an
HDMI output connection.
® Composite AVl JACKS
AV1 input provides composite Video and S-Video jacks
for connecting equipment with this capability, such as a
DVD player, Game Console or Camcorders.
(2) Audio Out jack
This jack provides stereo audio output from your TV to
your audio device, such as an audio amplifier.
10

Quick Reference Remote Contro| Buttons and Functions
,b
In addition to controlling all of the functions on your Hitachi LCD TV, the new remote control is designed to operate different
types of compatible HDMI CEC DVD Players, For HDMI CEC details please see page 31.
Power On/Off
Press this button to switch the TV set On or Off
standby.
Picture Mode
Picture mode can be changed, each time it is
pressed, in the following sequence.
[_ Dynamic _ Standard==_Movie 7
Game _q_==Custom -4 J
Numeric Buttons
Press these buttons to manually enter the
channel and for numeric entry when navigating
through the OSD menu system.
(-) Dash/Sleep Button
Press this button to tune a digital channel. Also
press to set your Sleep Timer from 5 minutes to
4 hours.
Last Channel Button
Press this button to switch between the current
and the last channel viewed.
Volume Button .....
Press up (+) to increase or down (-) to decrease
the audio level of your TV.
Energy Save Button
Press this button to set Power Consumption
reduction based on three levels (Min, Med, Max).
Closed Caption (CC) Button
Press to show and change the closed caption
mode.
Menu Button
Accesses the OSD menu system.
EXiT Button
Press this button to exit the OSD menu.
Cursor PAD/Select Buttons
The Cursor PAD is used to navigate through
the OSD and INPUT menu system, The Select
button is used to Set/Activate highlighted menu
items.
CONTROL BUTTONS
(DVD with CEC)
Control the functions of compatible DVD players
with HDMI-CEC control.
P.MODES.MODEMTStSAPASlSECT
][ )
E,SAVE
MENU
LASTCH
CC
HITACHI
CLU-4591AV
.......................................Aspect
Press this button to change picture size.
Sound Mode
Press this button to change the sound mode.
MTS/SAP
Press to change the audio source on the
programs that are showing.
..........Enter Button
Press this button to use as a SELECT feature.
..........Channel Up/Down Buttons
Changes the channels up or down.
.....Mute
Reduces the audio level to 0 if pressed once,
and to restore audio level press it a second
time or just press the volume key.
..........Favorite Channel Button
Press to access the Favorite Channel list.
Sleep Button
Press to set your Sleep Timer from 5 minutes
to 4 hours.
input Select
Press this button to change the input.
LInfo Button
Shows the input signal status and other
information.
- The TV's remote control sensor is located on the left bottom corner of the TV frame. To control TV functions, please point the
remote control directly at the sensor for best results.
- The pause key "ll "on the Remote Control can be use to Freeze the picture on the screen, in case that this key is pressed
by accident, please press it one more time to restore the moving picture.
11

Quick Setup Guide
Perform the following steps to quickly setup your new
Hitachi LCD Television Set.
1. ANTENNA CONNECTION
Unless your LCD Television is connected to a cable TV system or
to a centralized antenna system, a good outdoor color TV antenna
is recommended for best performance. However, if you are located
in an exceptionally good signal area that is free from interference
and multiple image ghosts, an indoor antenna may be sufficient.
a). VHF (75-Ohm) antenna/CATV (Cable TV)
When using a 75-Ohm coaxial cable system, connect the CATV
coaxial cable to the AIR/CABLE (75-Ohm) terminal. Or if you have
an antenna, connect the coaxial cable to the same AIR/CABLE
terminal.
Tooutdoor Antenna
ToAntenna
or Terminal
Cable TV (CATV)
System
b). VHF (300-Ohm) antenna/UHF antenna
When using a 300-Ohm twin lead from an outdoor antenna,
connect the VHF or UHF antenna leads to screws of the VHF or
UHF adapter. Plug the adapter into the antenna terminal on the
TV.
_'_ ,_ml_ TOAntenna
_-_ (, "_ TerminalTooutdoor VHF or .
UHFAntenna
Air/Cable
AIR/CABLE
©
Rear Panel Jack
c). When both VHF and UHF antennas are connected
Attach an optional antenna cable mixer to the TV antenna terminal
and connect the cables to the antenna mixer. Consult your dealer
or service store for the antenna mixer.
_'-__ _ To outdoor antenna
To UHF antenna _ _ _ or CATV system
t
Antenna Mixer
Connecting a 300-Ohm twin lead connector may cause interference. Using a 75-Ohm coaxial cable is recommended.
2. CONNECT YOUR NEW HITACHI LCD TV TO THE POWER SOURCE
a). Connect the power cord to your TV set and secure it c). The Indicating Lamp wilt light red (Standby mode) and
with the cable tie (see page 7). then light blue (image displays).
_ AC Wire Clamp ,n ,oat,n0
_E_ O @ PowEa
b). Connect the power cord to the AC wall outlet.
3. POWER ON/OFF YOUR NEW HITACHi LCD TV.
Press the POWER button on the Remote Control or the
POWER button on the Side Control Panel to power on/off
the LCD TV.
Or
For Stand-By '_'
Power OFF
If the Indicating lamp is OFF, the Power Button on the
Remote Control will not operate. Please make sure
that the power cord is plugged to the AC outleL
4. FOLLOW THE TV SETUP WIZARD iNSTRUCTIONS ON NEXT PAGE.
12

TV Setup Wizard
b
Your Hitachi LCD television has a TV Setup Wizard feature which has the ability to help you easily setup the first time you turn on your TV
and find the channels available in your area. Please follow the instructions below.
The First time you turn on your Hitachi LCD TV the setup wizard
screen will appear. The first step is to set the language of your TV
On Screen Menu. Select the language that you prefer. Use the A
and V CURSOR to select language and press the SELECT button
on the remote control.
The fifth step will start the scanning feature to find the channels
available on the antenna or cable system. Press the SELECT
button on the remote control to start the channel scan.
The second and third steps are to set the date and time. There are
two options; one for automatic time setting in which you will select
only the time zone in your area and the second option is a manual
setup for the date and time. Use the CURSOR pad to select and
change the options with the remote control.
The sixth step is the scanning process of the channels, it will first
the scan the analog channels and then the digital channels. The
scanning process will show how many channels have been found.
Please be patient while the scanning process searches for the
available channels in your area. If you wish to cancel the process,
press the SELECT button on the remote control.
The fourth step is designed to find broadcasting or cable channels.
There are two options, Air for an external antenna and Cable for a
cable system provider in your home. Use the A and Y CURSOR
to select a source and press the SELECT button on the remote
control.
Once the user cancels the wizard, the wizard will
not be shown again.
If you see the screen above and if you did not
connect your Antenna cables to your TV, turn off
your TV, unplug the power cord and connect your
cables according to the applicable connections
in the "First Time Use" section of this Operating
Guide.
After completing the TV Setup Wizard, these
screens will not appear again. For updating and
adding the channels available in your area refer to
the Add Channels to List feature on page 33.
The last step is the completion of process, it shows a brief message
and you are ready to view TV programing. This final message will
be shown for a few seconds and then the first detected channel will
be tuned in. You may also press EXIT on the remote control to tune
to the first detected channel.
13

Side Panel Connections
The following connection diagrams are offered as suggestions. However, you may need to modify them to accommodate your particular
assortment of components and features. For best performance, video and audio cables should be made from coaxial shielded wire.
There are 2 SIDE panel HDMI jacks provided as a convenience to allow you to easily connect HDMI or DVI signals from a DVD, Set-Top-
Box, Video Game as shown in the following examples (When a DVl product is connected, the use of a separate audio device is necessary
for audio, use an Audio Amplifier and connect to the Audio In jacks),
A) Connecting HDMI signal
SIDE INPUT PANEL
"0
HDMI DIGITAL
OUTPUT CAPABILITY
[HDMI] [HDMI]
B) Connecting DVi signal
Audio Amplifier
L (White)
SIDE INPUT PANEL R (Red)
DVl DIGITAL
OUTPUT CAPABILITY
L (White)
R (Red)
o_ =o
[HDMI] DVI to HDMI Cable [DVI]
DVD p}ayer
Set-Top Box
Home video game system
DVD player
Set-Top Box
Home video game system
The SIDE panel VIDEO and S-VIDEO (Only L42A403) jacks are provided as a convenience to allow you to easily connect a Camcorder,
DVD, Video Game and a VCR as shown in the following examples. (When connecting an S-VIDEO device, also connect the audio output
into the Side Audio Input jacks).: COMPOSITE VIDEO or
SIDE INPUT PANEL S-VIDEO OUTPUT CAPABILITY
m R *S-Video InputOnly for L42A403 DVDplayer
o
_,,]j C ......der
VIDEO (Yellow) VIDEO (Yellow)
\"-_J// OUTPUT
Home video game system
_:((((O))))
\\_/1
For monaural devices, please connect Audio signal cable into L/Mono input jack.
Completely insert connection cord plugs when connecting to side panel jacks. If you do not, the played back picture may
be abnormal.
Cable plugs are often color-coded. Match colors of plugs and terminals, i.e. connect red to red, white to white, etc.
When making video connections, connect S-Video only or Video only. If both are connected, S-Video takes priority.
The exact arrangement you use to connect the VCR, Camcorder, DVD player, or HDTV Set-Top-Box to your LCD TV is dependent on
the model and features of each component. Check the operating guide of each component for the location of video and audio inputs and
outputs.
Before Operating External Video Sources
Connect an external source to one of the INPUT terminals, then press the INPUT button to show the Inputs List. Use the CURSORS ( A
and T ) to select the Input of your choice. Then press the SELECT button to confirm your choice (see page 19).
Example: Selecting the
TV (Air/Cable) Input and
highlight "0:TV".
14

Rear Panel Connections
b
Outside antenna
or
Cable TV coaxial cable
2-Way _
signal
splitter ?
STEREO SYSTEM
AMPLIFIER
Cables are not included.
A R'CABI E
©
M_rnl
HOM,to
DVI
l
HDTV SET-TOP BOX DVD PLAYER
DVD PLAYER VIDEO GAME
with Component with Composite
Output capability video capability
HDMI DIGITAL
OUTPUT CAPABILITY
i
HDMI
to
HDMI
HDMromPm
DIGITAL
OUTPUT CAPABILITY
TIPS ON REAR PANEL CONNECTIONS
COMPONENT Y-PbPr (COMPONENT 1 & 2) or HDMI (1 & 2) connections are provided for high performance DVD players, VCRs etc.
that have this feature. Use these connections in place of the standard video connection if your device has this feature.
If your device has only one audio output (mono sound), connect it to the left audio jack on (L) the Rear Panel
Refer to the operating guide of your other electronic equipment for additional information on connecting your hook-up cables.
Connect only I component (VCR, DVD player, camcorder, etc) to each input jack
Your component outputs may be labeled Y, B-Y, and R-Y. In this case, connect the components B-Y output to the TV's Pb input and the
components R-Y output to the TV's Pr input
Your component outputs may be labeled Y-CbCr In this case, connect the components Cb output to the TV's Pb input and the
components Cr output to the TV's Pr input
It may be necessary to adjust TINT to obtain optimum picture quality when using the Y-PbPr inputs (See page 24)
When using a HDMI input from a Set-Top-Box, it is recommended to use a 1080p, 1080i or 720p input signal.
When the HDMI input is a 1080p signal, it is recommended that the length of the cable should be less than 5 meters.
. Completely insert all connection cord plugs when connecting to rearpaneljacks. The picture and sound that is played back
will be abnormal if the connection is loose.
• Cable plugs are often color-coded. Match colors of plugs and terminals, i.e. connect red to red, white to white, etc.
Connecting a Personal Computer PC.
Use the RGB PC connection terminal and the Analog
Audio Input terminals to connect the PC
1.
Connect the RGB (D-sub 15 Pin) and AUDIO
cable from the RGB and AUDIO OUT jack of the
PC to the RGB and AUDIO jack, as shown on the
Rear Panel on the right.
2. Press the INPUT button, then select RGB from the
INPUTS menu to view the signal from the PC.
IN OUT
<1:! :
(Audio)
(D-sub 15 Pin)
[PC sample]
15

Rear Pane| Connections
CONNECTING A VIDEO AND MONAURAL AUDIO
SOURCE TO AV1.
1.
2.
3.
Connect the VIDEO and AUDIO cable from the VIDEO
and AUDIO OUT jack of the VCR to the AVI (VIDEO) and
L(AUDIO) jack, as shown on the Rear Panel on the right.
Press the INPUT button, then select AVI from the INPUTS
menu to view the program from the VCR.
Select Audio menu, set Sound mode to "Custom", and set
"SRS Trusurround HD" to "On".
TV REAR PANEL
m
VCR
OUTPUT
_ I 1_AUDIO VIDEO
CONNECTING A VIDEO AND STEREO AUDIO SOURCE
TO AV1.
1.
2.
Connect the VIDEO and AUDIO cables from the VIDEO OUT
and AUDIO OUT jacks of the VCR to the AVI (VIDEO)jacks.
A VCR connection to Rear Panel AVI example is shown on
the right.
Press the INPUT button, then select AVI from the INPUTS
menu to view the program from the VCR.
TV REAR PANEL
JT
®
®
VCR
CONNECTING A COMPONENT /_¢I:T%',T, EREO AUDIO
/ l
SOURCE TO COMPONENT 1 or 2qPbP_
1. Connect the Y, Pb/Cb, Pr/Cr and AUDIO cables from the
Y, Pb/Cb, Pr/Cr OUT and AUDIO OUT jacks of the DVD
PLAYER or HDTV Set-Top-Box to the COMPONENT I or 2
YPbPr and AUDIO jacks. A DVD connection to Rear Panel
COMPONENT 2 example is shown on the right.
2. Press the INPUT button, then select COMPONENT 1 or 2
from the INPUTS menu to view the program from the DVD
player or HDTV Set-Top Box.
TV REAR PANEL
DVD Player/Recorder
ooo
Output
PB
Completely insert the connection cord plugs when connecting to rear paneljacks. The picture and sound that is played
back will be abnormal if the connection is loose.
Cable plugs are often color-coded. Match colors of plugs and terminals, Le. connect red to red, white to white, etc.
To return to the last channel viewed, select O.TV from the INPUTS menu.
16

Rear Panel Connections
b
CONNECTING AN EQUIPMENT SOURCE WITH HDMI
OR DVI CAPABILITY TO HDMI 1, HDMI 2
1. Connect the HDMI or DVI to HDMI connection cable from the
output of the HDTV set top box or DVD player to the HDMI
input as shown near the Rear panel at right.
2. With DVl output, connect the audio cables from the AUDIO
OUT jack of the HDTV set top box or DVD player to an external
audio amplifier as shown to the right below.
3. Press the INPUT button, then select HDMI 1 or 2 to view the
program from the HDTV SET-TOP BOX or DVD player.
HDMI Input
TV REAR PANEL
H_J
_i_i!_i!_i!_i!_i!_i'_i_!i_ii_!i_i!i_il_il_il_il_ii_i!_!!i!iii!ii!ii!ii_iii_!i_i!_i_i_!i:i!:i_i_%iiiiiiiiiiiiiiiiiiiiiiiiiiii_i_i_i_i_!i!!i!_ii_i_i_iiiiiiiiiiiiiiiiiiiiiii_i_i!i!_i_i_!_!_!_!_!_!_:i_i%i_i_i_i_i_i_i_i:_i:_i:_i:_i:_i_i!ii_i
ilii!i_!_iiii!:_!_i !i!_'i!iiiilililililiiiiiiiii!ii!!!i i!!i:_:_:_:_:_::_'_ii__'_":_"'_'_.... iii[i[ij!iiii!i!i'
7_IGITALOUT
HDMI DIGITAL
OUTPUT CAPABILITY
DVD Player/Recorder
[HDMII [HDMII
• Completely insert the connection cord plugs when
connecting to the rear panel jacks. The picture and
sound that is played back will be abnormal if the
connection is loose.
• When using a D VI to HDMI cable, connect the Audio
Out L and R cables to an external audio amplifier.
• The HDMI input on HDMI 1, 2, 3 and 4 contains
the copy protection system cafled High-bandwidth
Digital Content Protection (HDCP). HDCP is a
cryptographic system that encrypts video signals
when using HDMI connections to prevent illegal
copying of video contents.
• HDMlisnota"NETWORK"technology. Itestabllshes
a one-way, point-to-point connection for delivery of
uncompressed video to a display.
• The connected digital output device controls the
HDMI interface, so proper set-up of device user
settings determines final video appearance.
• Only HDMIf can support DVI audio input when it is
connected to the PC audio input terminal.
TV REAR PANEL
DVi to HDMI Input
DVI DIGITAL
OUTPUT CAPABILITY
i DVD Player/Recorder
I_ \°°_°/°°___i
[HDMII [DVll
AUDIO IN
AUDIO AMPLIFIER
Note : An external Audio amplifier can be
use for the same purpose.
CONNECTING AN EXTERNAL AUDIO AMPLiFiER
To monitor the audio level of the LCD TV to an external audio
amplifier, connect the system as shown on the right. The "OPTICAL
OUT" and "AUDIO OUT" from the Rear Panel is a fixed output. The
Volume of the amplifier is controlled by the amplifier, not by the
LCD Television.
The OPTICAL OUT terminal outputs all audio sources to equipment
with Optical IN capability.
1. Connect an optical cable from the OPTICAL OUT to the
OPTICAL IN of a separate Stereo System Amplifier as shown
on the Rear Panel on the right.
2. Connect an RCA stereo cable from the AUDIO OUT to the
Audio input of a separate Stereo System Amplifier as shown
on the Rear Panel on the right.
TV REAR PANEL
Optical cable
Completely insert the connection cord plugs when connecting to rear paneljacks. The picture and sound that is played
back will be abnormal if the connection is loose.
Cable plugs are often color-coded. Match colors of plugs and terminals, Le. connect red to red, white to white, etc.
To return to the last channel viewed, press the channel up/down key on the R/C.
17

The Remote Control
@
/
P,MODE &MODE MTS/SAP ASPECT
- iiHHi!iii4i!iiii!ii
,,H
CC SLEEP FAV,CH
INPUT
HITACHI
-0
-@
-0
0
O POWER button
Press this button to turn the TV set on or off.
O
0
0
Picture mode button
Press this button to toggle between Dynamic, Standard,
Movie, Custom and Game picture mode settings.
Select Dynamic for automatic brightness and contrast
adjustment. Select Standard for day time viewing with
more brightness and contrast to compete with room
light. Select Movie for viewing with less brightness and
contrast for a more detailed picture. Select Custom for
viewing with your own brightness and contrast picture
settings. Game for automatic brightness and contrast
adjustment when playing video games.(see page 24 for
settings changes).
CHANNEL SELECTOR / ENTER buttons
The CHANNEL SELECTOR buttons are used to select channels,
lock access code, etc. Use the CHANNEL SELECTOR buttons
to enter one, two, or three numbers to select channels. Enter 0
first for channels I to 9, or simply press the single digit channel
you wish to tune then press the ENTER button for the TV to
tune. Channel selection may also be performed by CHANNEL
(CH) UP (A) or CHANNEL (CH) DOWN (V).
(-) DASH/Sleep Button
Use the (-) DASH button with the CHANNEL SELECTOR
buttons to enter Digital Channels that have subchannel
numbers indicated by (-) DASH (example 15-1). Also press to
Set the Sleep Timer from 5 minutes to 4 hours.
O
O
LAST CHANNEL button
Press this button to toggle between the current and last channel
viewed.
VOLUME (VOL), MUTE button
Press the VOLUME button (+ or -) until you obtain the desired
sound level.
Press the MUTE button to turn the sound off completely (MUTE).
To restore the sound, press the MUTE button one more time,
or VOL UP (+).
18

How to Use the Remote to Contro| your TV
Closed Captioning will display automatically when MUTE is on
and Closed Caption is set to With Mute (see page 30).
When the TV power is turned off at a volume level 16 or greater,
the volume level will default to 15 when the TV is turned on.
However, if it is set to a level 15 or less, the volume level will
be at the level it was set when the TV is turned off.
VIDEO iNPUTS
O E.SAVE (ENERGY SAVE) button
Use this button to choose power consumption reduction
settings based on 3 levels (MIN., MEDIUM, MAX).
O
O
@
O
CLOSED CAPTIONS (CC) button
Use this button to display the dialogue, narration, and/
or sound effects of a television program or home video
which are displayed on the TV screen when available.
Your local TV program guide denotes these programs
as D or [_.
MENU button
The MENU button will start the On-Screen Display.
EXIT button
This button will exit all On-Screen Displays.
CURSOR Pad/SELECT button
All the On-Screen Display features can be set or adjusted
by using the CURSOR Pad and the SELECT button, except
for numeric entries. Press the CURSOR Pad toward desired
direction and press the SELECT button to select.
Program information
• Press the INFO button again or the EXIT button to
return to normal viewing.
• The Aspect INFO will not be shown when the INFO
key is pressed.
@ INPUT button
Press this button to access the INPUTS menu. Use the CURSOR
and SELECT buttons to scroll and select the inputs that are being
used. Pressing the INPUT button repeatedly will also cycle through
the Inputs menu items. Then press the SELECT button or wait 4
seconds to automatically select the highlighted input.
O INFO button
Press this button when you want to check the channel being
received, the picture source, if the channel has stereo (ST) or
second audio program (SAP), the time, and CHANNEL ID.
ANALOG CHANNELS
Program Information
DIGITAL CHANNELS
0. TV
I.AVI
2. AV2
3. Component1
4. Component2
5. RGB
6. HDMI 1
7. HDMI 2
8. HDMI 3
9. HDMI 4
Watch TV from an Air or Cable signal.
Select to choose AVl Input
Select to choose AV2 Input.
Select to choose Component Input I.
Select to choose Component Input 2.
Select to choose PC input.
Select to choose HDMI 1 Input.
Select to choose HDMI 2 Input.
Select to choose Side HDMI 3 Input.
Select to choose Side HDMI 4 Input.
_) SLEEP button
Press this button to set the Sleep Timer from 5 minutes to 4
hours.
Program hTformation Program Picture Format
Run Time
19

How to Use the Remote to Contro| your TV
® FAV CH button
Press the FAV CH button to display the Favorite CH List. You
have to first setup the Favorite Channels in the Channels Menu
in order display the list. Press the FAV. CH key on the remote
control to display the list and select the desired channel using
the cursor keys and then press SELECT to view.
@
S. MODE button
Press this button to change the sound mode. There are 4
modes available, Custom, Standard, Movie and News. For
Standard, Movie and News the options Bass Treble and SRS
TruSurround HD are not available(grey color). Selecting the
Custom Mode allows you to set the audio options to your
preference.
MTS/SAP button
Press to change the audio source on the programs that are
showing. For analog channels the signal choices(if available)
are Stereo, SAP, and Mono. For digital channels this button
will change the language(when available). (English, Spanish,
etc.).
@
CEC Device buttons
These buttons are for controlling devices with Consumer
Electronics Control (CEC) through the HDMI connection like
Blu Ray or DVD players, DVR, STB.
For some devices these keys are not available
to control through the TV and HDMI connection ;
please refer to the device operating guide for more
information.
2O

How to Use the Remote to Contro| your TV
_) ASPECT button
Press this button to quickly change the picture format ASPECT ratio. Depending on the input ratio, ASPECT allows you to adjust the
image through the following options.
AUTO
Use this aspect mode to have the aspect mode change automat:
cally by signal detector.
4:3
Use this aspect mode to display conventional (4:3) images. Side
panels (black areas) are placed to the left and right of the image to
preserve the original aspect ratio of the source.
16:9
Use this aspect mode to display 16:9 sources like HDTV and DVD's
preserving the original 16:9 aspect ratio showing 95% of the size.
Full
Use this aspect mode to display 16:9 sources like HDTV and
DVD's preserving the original 16:9 aspect ratio showing 100% of
the size.
ZOOMI/ZOOM2
Use these aspect modes to zoom in and to reduce the black bars.
AIR/CABLE - Analog Signal
AIR/CABLE - Digital Signal
Component
I_ AUTO
|
ZOOM 2
4:3
ZOOM 1
16:9
AV
I 'NPUTI
4:3
l
ZOOM2
16:9
!
ZOOM1
HDMI - VGA LMAGE
DVI - VGA ....................................................
I INPUT
HDMI - 1080p/1080i/720p/480p/480i
DVl - 1080p/1080i/720p/480p/480i
AUTO
Full
1
ZOOM2
_ll ZOOM1
1
Full
Each input has a memory for the Aspect setting. Changing the aspect on one input will not affect the aspect settings on
other inputs.
When displaying "Full" you may notice noise at the top of the picture. Select the "16:9" aspect mode to remove the noise.
The noise is normal for some signals.
See page 49 for Aspect availability according to signal format in use.
21

On-Screen Disp|ay
1.
Press MENU on the remote control to display the different
features on your Hitachi LCD TV.
2.
Use the CURS©R PAD (buttons, A, T, < and _) and
highlight a different feature of the On-Screen Display
menu. Press the SELECT button to select.
3.
Press EXIT on the remote control to quickly exit from a
menu.
This part of the screen shows which
selections are available.
MENU INPUT
EXIT INFO
The On Screen Display (OSD) forthe different submenus shown in the following pages are for illustration purposes
only, there may be slight differences from the actual appearance of the OSD of your Hitachi LCD TV.
Video
Picture Mode
Contrast
Brightness
Color
Tint
Sharpness
Color Temperature
Noise Reduction
Auto Movie
Backlight
Aspect Ratio
Reset
Select between 5 pictures modes; Dynamic, Standard, Movie, Custom and Game.
Adjust picture contrast.
Adjust picture brightness.
Adjust color.
Adjust tint.
Adjust sharpness.
Set this to High for less intense color with more blue, set to Medium for natural color and set to Standard for warm
colors.
Reduces conspicuous noise in the picture.
Select the 3:2 Pull down detection feature Auto/Off. For a film like picture.
Adjust to increase or decrease the brightness of backlight.
Choose the picture format aspect ratio.
Choose to Reset Video Settings to factory settings.
22

On-Screen Display
Audio
Sound Mode
Bass
Treble
Balance
Audio Source
Audio Language
Digital Output
Internal Speakers
Perfect Volume
SRS TruSurround HD
Reset
Selects 4 audio presets (Custom,Standard, Movie, News)
Adjust the intensity of low frequencies.
Adjust the intensity of high frequencies.
Adjust the balance.
Select between three Audio Sources (Stereo, Mono, SAP).
Select Language options if available.
Select Optical Output options.
Select internal or external speaker.
Adjust volume to be closer in level between channels.
Select Surround settings (Off, On)
Resets all Audio settings the original condition
The Audio Language and Digital
Output of the Audio OSD are only
available for Digital channels.
Setup
Menu Language
Time
Sleep Timer
Set Password
Parental Controls
Closed Captions
Digital Captions
Digital Captions Options
Analog Captions
Energy Options
Transparency
HDMI-CEC
Input Labels
Component Options
RGB Options
Reset AV & Setup
Choose English, French or Spanish OSD Language.
Set Clock Settings.
Set Sleep Timer intervals (5 minutes ~ 4 hours).
Set the password for the Parental control access.
Ratings system to block various types of programs.
Feature to turn On/Off closed captions.
Feature to display DIGITAL dialogue/text.
Feature to change the appearance of the DIGITAL CAPTIONS.
Feature to display ANALOG dialogue/text.
Select Power Consumption Savings options.
Feature to change the OSD Menu transparency.
Set to ON, this feature will enable simplified operation of compatible HDMI CEC components.
Label Video Inputs, VCR, DVD, etc.
Adjust the Phase and applies Reset to any adjustments made.
Adjust Horizontal Position, Vertical Position, Clock, Phase and Reset.
Resets all Audio, Video and Setup settings to the original condition.
Channels
Source
Signal Strength
New Channel Scan
Add Channels to List
Channels List
Channels Labels
Favorite Channels
Selects the type of signal to be used Cable or Air.
Access Signal Meter.
Set Auto Channel Scan.
Adds Channels to the List (Scanned channels remain the same until New Channel Scan is performed).
Set Channel List.
Set Labels on the channels. The Signal Strength feature of the
Set the favorite channels. Channels OSD is only available for
Digital (D TV) channels.
23

Video
Select VIDEO to adjust picture settings and improve picture Contrast
quality. You can independently customize each of the video inputs
Use this function to change the overall light output to match the
viewing area. Increase for brighter rooms.
to your preference to increase viewing performance and pleasure
depending upon the video program being viewed. Adjustments will
be applied to Custom settings.
MENU
Brightness
Use this function to change the overall brightness of the dark areas
of the picture.
Color
Use this function to adjust the level of color in the picture,
Tint
Use this function to adjust flesh tones so they appear natural,
Sharpness
Use this function to adjust the amount of fine detail in the picture,
Color Temperature
Set this to High for cooler color with more blue, set to Medium for a
more natural color or set to Standard for accurate color.
Picture Mode
Use this function to choose from preset picture settings to optimize
your TV's performance.
1. Use the CURSOR button D,.to select PICTURE MODE settings
(Dynamic, Standard, Movie, Custom or Game).
2. Then press the 4 button to return to the Video menu or press
EXIT to quit menu.
3.
There are 5 Picture Modes available : Dynamic, Standard,
Movie, Custom and Game mode. Dynamic is the factory preset
mode for your TV. The only mode that can be changed by
adjusting any video setting to your desire conditions is Custom
mode. The other modes are preset and can not be change.
Noise Reduction
The NOISE REDUCTION function automatically reduces
conspicuous noise in the picture without degrading picture quality.
Set NOISE REDUCTION to OFF if you see individual blocks in the
picture.
Auto Movie
The AUTO MOVIE function turns Auto or OFF the 3:2 pull down
detection feature. Theatrical movies are shot on film at 24 frames
or still pictures per second, instead of 30 frames or 60 fields like
video. When film is transferred to video for television viewing, the
disparity between the two frame rates must be reconciled. This
involves a process known as 3:2 pull down. When AUTO MOVIE is
set to Auto your Hitachi LCD Television will activate the circuitry for
this special feature to improve video performance when watching
interlaced format film based sources. Set to OFF to deactivate this
feature.
For the PC input there are only two Picture modes
available Standard and Custom. In this case
only Custom can be changed to your desired
conditions.
Video Setting can be set to the user's preference
in Game mode (Similar to Custom mode) with the
exception of, Auto Movie setting.
If you change any of the adjustments in the Dynamic,
Standard and Movie modes , the name of the
Custom option will change. For example changes
on Dynamic will rename the option as "Custom-
Dyn't This means that the original picture mode is
not affected by the changes; the only thing is that
Custom mode will take the video adjustments of the
mode where the change was made.
Backlight
Adjust the brightness of the Backlight for maximum visibility.
It changes the intensity of the backlight. Increase for bright
rooms and decrease for darker rooms to make the dark
areas of the picture black.
Aspect
Use this function to select the Picture Format Aspect Ratio.
Other Video Menu Setting Adjustments
Use the CURSOR PAD A or V to highlight the function to be
adjusted.
1. Press the SELECT button or the CURSOR PAD I_ to select the
function settings.
2. Press the CURSOR PAD _1or I_ to adjust the function.
3. Press MENU to return to main menu.
4. Press EXIT to quit menu.
Auto Aspect
Automatically adjust the Aspect Ratio depending on the input
signal.
Aspect Modes
Manually select the Aspect Ratio. There are different aspect
ratios available according to the signal in use. See page 49.
24

Video
Aspect Ratio reference
When Watching Standard Definition Pictures:
4:3 Displays 4:3 programs in there original aspect ratio with bars to
the left and right of the image.
_ ("_ .z_ 16 : 9 Expands a 4:3 aspect ratio program to fill the widescreen 16:9 screen
(4:3 Signal)
_ Use this aspect mode to expand letterbox movies to fill the screen.
Zoom 1 Note that some of the image may not be visible.
(Vista)
Use this aspect mode to fill the screen with very widescreen
Zoom 2 movies. Note that some of the image may not be viewable in
this mode.
(Cinema)
When Watching High Definition Pictures:
(16:9 Signal)
(4:3 Image in
16:9 Frame)
16:9
Full
o
Plays a 16:9 image faithfully showing 95 Yoof the size.
Should be: Use this mode when you want to see 100% of the signal.
Note that some signals have noise. In the case of noise use the 16:9
mode.
Reset
This function allows you to Reset the Video Menu Settings of the
present input and return it to the Dynamic video mode.
1. Use the CURSOR PAD A, V to the highlight functions.
2. Press the SELECT button or CURSOR PAD _ to select Yes
or No.
3. Press the SELECT button on the Yes option to execute the
reset of the Video settings.
You can customize each of the Video Inputs to your preference to
increase viewing performance and pleasure, depending upon the
video program being viewed. If RESET is selected, only the selected
Input will reset to the initial conditions as explained above.
If RESET is selected in HDMI1, only HDMI1 will return to factory
conditions.
25

Audio
Select Audio to adjust the sound to your preference.
PCM.- Select this feature if the TV is connected to an amplifier/
receiver with a PCM only decoder; it will provide two independent
soundtrack channels through the optical audio output jack (Digital
Audio).
RAW,- Select this feature to allow the original audio bit stream to
be passed through to the audio receiver.
Internal Speakers
This function is useful when using external speakers. Select ON if
using the internal speakers only. Select OFF if you prefer to use the
speakers from a separate stereo system.
Sound Mode
This function has four sound settings which are preset according
to the type of program. Standard for normal audio condition, Movie
audio settings for a movie, News audio setting for News programs
and Custom mode is for adjusting audio levels at your convenience.
Only on Custom mode you are able to change settings. The other
three modes will have unavailable settings grayed out.
Audio Menu Settings Adjustment
1. Press the CURSOR PAD A or V to select menu item.
2. Press the CURSOR PAD 4 or I_ to adjust the function.
3. Press EXIT to quit the MENU, or select AUDIO to return to the
main menu.
If Treble is selected you are adjusting treble. The
additional menu items Bass and Balance can be
selected and adjusted in the same manner.
Bass
This function controls the low frequency audio to the speakers.
Perfect Volume
This function will automatically adjust volume so each channel and
input has the same average volume level.
SRS TruSurround HD
Provides enveloping, immersive surround sound, for every seat
in the room, done with only two speaker, eliminating the need for
multiple external speakers. This is often done to create a more
realistic audio environment.
Use CURSOR I_ to select On/Off option.
Off: Turns off the surround sound effect.
On: : Provides the surround effect by simulating two or more
speakers to the rear of the listener.
Reset
This function allows you to Reset the Audio Menu Settings of
the present input and return it to the Custom mode and default
settings.
Treble
This function controls the high frequency audio to the speakers.
Balance
This function will control the left to right balance of the LCD TV
internal speakers and headphone jack.
Audio Source
Multi-Channel Television Sound will allow you to select STEREO (a
stereo broadcast), MONO (monaural sound) used when receiving
a weak stereo broadcast or SECOND AUDIO PROG (SAP) which
may be a secondary language, weather report, etc. This setting is
only for analog programing.
Preferred Language
Some programs transmit in other languages. This language function
will allow you to set between 3 language options (English,Espa_ol
& Frangais) to your preference as the audio default language.
Audio Language
Some programs transmit more than one DTV language option. Most
will have English as a default language. The language function will
allow you to select up to 6 language options (if available). Please
try all available options.
1. Use the CURSOR PAD A, Y
2. Press the SELECT button or the CURSOR PAD I_ to select
Yes or No,
3. Press the SELECT button on the Yes option to execute the
reset of the Audio settings.
You can customize each of the Audio Inputs to your preference
to increase audio performance and pleasure, depending upon the
audio program being heard. If RESET is selected, only the selected
Input will reset to the initial conditions as explained above.
If RESET is selected in HDMI1, only HDMI1 will return to factory
conditions.
Digital Output
This function allows you to select between RAW and PCM. This
setting changes the format of the Digital Optical Output.
26

Setup
Select SETUP when setting your TV up for the first time. Set Sleep Timer
Select this feature to set your SLEEP TIMER from 5 minutes to 4
hours.
1. Press the CURSOR PAD i_ repeatedly to set your Timer from
Off, 5 min, 10 min, 15 min, 30 min, 60 min, 90 min, 120 min,
180 min and 240 min.
1. Use the CURSOR PAD A or T to select the Setup menu.
2. Use the CURSOR _ to enter the option of your choice and
make the changes that you need.
3. Press the MENU key to return.
Menu Language
Sets the Language of the Menu OSD. This feature will allow you
to select any one of three different languages for the on-screen
displays.
1. Use the CURSOR Pad _- to select the language of your
choice.
2. Press EXiT to quit the menu or MENU key to return to the
previous menu.
Set Password
1. To change the Password, select Set the Password option to
change the factory preset password (OOOO)to your preference.
If you forget your Password, use the factory password 7777
to erase your key number. This will reset the access code
number back to the factory preset (OOOO).
2. Enter a new four digit number.
3. Press EXIT to quit the menu.
Parental Controls
This function will block out the picture and sound of the selected
rating levels.
The password to enter the Locks feature is a four digit number.
The factory preset password is 0000. Use the NUMBER buttons to
enter the password.
Time
Use this option to set the Clock, Date and Time Zone for your LCD
TV.
1. Use the CURSOR PAD A, _, I_ , to highlight and setup the
TIME settings.
2. If you observe daylight savings, use the CURSOR PAD to
highlight DAYLIGHT SAVINGS and press the I_ button to
activate it. This can only be changed if the Time Mode is set
to Auto.
3. Use the CURSOR PAD to highlight and adjust the CURRENT
TIME (hour and minute), AM or PM, MONTH, DAY, and
YEAR.
4. Press the SELECT button to set the TIME.
5. Press EXIT to quit the menu or the Menu key to return to the
previous menu.
• When AUTO is set DAYLIGHT SAVINGS can be
set, the TV will automatically calculate the clock
adjustment for Daylight Saving.
• The TV counts electrical pulses for regulating
the TIMERS. When the power cord is unplugged
quickly, the clock is stopped momentarily and the
TIME indication will become slow.
• Year, Month,Date and Time can be changed only if
the Time Mode is set to Manual
Panel Lock
When PANEL LOCK is turned On, all buttons on the Side Panel,
except the Power button will be deactivated.
Block Unrated TV
When this feature is turned On, programs without ratings will be
blocked.
US
This option will block TV and Movie Ratings in the USA to prevent
viewing of any content that you feel may be inappropriate (see
page 28).
Canada
This option will block TV and Movie Ratings in Canada to prevent
viewing of any content that you feel may be inappropriate due to its
content (see page 28-29).
27

Setup
Motion Picture Ratings Table
NOT RATED Contains no rating. Not Rated (NR) and Not Applicable (NA) programs. Movie has not been rated or ratings do not apply.
G General audiences. All ages admitted.
PG Parental guidance suggested. Some material may not be suitable for children.
PG-I 3 Parents strongly cautioned. Some material may be inappropriate for children under 13.
R Restricted. Under 17 requires accompanying parent or adult guardian.
NC-I 7 No one 17 and under admitted.
X Adults only
• If the movie does not carry a rating, the TV will not block iL
• Blocking NOTRATED programs may block emergencyprogramming, sports, news, pubfic service announcements, religious
programs and weather.
TV Parental Guide Ratings Table
TV-Y All children. The themes and elements in this program are specifically designed for a very young audience, including children
from ages 2-6.
TV-Y7 Directed to older children. Themes and elements in this program may include mild physical or comedic violence, or may
frighten children under the age of 7.
TV-G General audience. It contains little or no violence, no strong language, and little or no sexual dialogue or situations.
TV-PG Parental guidance suggested. The program may contain infrequent coarse language, limited violence, some suggestive
sexual dialogue and situations.
TV-14 Parents strongly cautioned. This program may contain sophisticated themes, intense sexual situation, more intense violence
and intensely suggestive dialogue.
TV-MA Mature audiences only. This program may contain mature themes, indecent language, graphic violence, and explicit sexual
content.
FV: FantasylCartoon Violence V: Violence S: Sexual Situation L: Adult Language D: Sexually Suggestive Dialogue
If you Block TV-14D, you will still permit TV-MA programs; If you block TV-14V, you will automatically block TV-MAV
programs, but you will still permit TV-MALS programs. This means that the TV will block violence in TV-14 and higher (TV-
MA), but not language and sex.
TV program ratings are dependent on the broadcaster. If the program is not rated, the TV will not block it.
Canadian
C
C8+
G
PG
14+
18+
Ratings English Table
Programming intended for children under age 8 - Violence Guidelines; Careful attention is paid to themes, which could threaten
children's sense of security and well-being. There will be no realistic scenes of violence. Depictions of aggressive behavior will
be infrequent and limited to portrayals that are clearly imaginary, comedic or unrealistic in nature. Other Content Guidelines:
There will be no offensive language, nudity or sexual content.
Programming generally considered acceptable for children 8 years and over to watch on their own - Violence Guidelines:
Violence will not be portrayed as the preferred, acceptable, or only way to resolve conflict; or encourage children to imitate
dangerous acts which they may see on television. Any realistic depictions of violence will be infrequent, discreet, of low intensity
and will show the consequences of the acts. Other Content Guidelines: There will be no profanity, nudity or sexual content.
General Audience - Violence Guidelines: Will contain very little violence, either physical or verbal or emotional. Will be sensitive
to themes which could frighten a younger child, will not depict realistic scenes of violence which minimize or gloss over the
effects of violent acts. Other Content Guidelines: There may be some inoffensive slang, no profanity and no nudity.
Parental Guidance - Programming intended for a general audience but which may not be suitable for younger children. Parents
may consider some content inappropriate for unsupervised viewing by children ages 8-13. Violence Guidelines: Depictions of
conflict and/or aggression will be limited and moderate; may include physical, fantasy, or supernatural violence. Other Content
Guidelines: May contain infrequent mild profanity, or mildly suggestive language. Could also contain brief scenes of nudity.
Programming contains themes or content which may not be suitable for viewers under the age of 14 - Parents are strongly
cautioned to exercise discretion in permitting viewing by pre-teens and early teens. Violence Guidelines: May contain intense
scenes of violence. Could deal with mature themes and societal issues in a realistic fashion. Other Content Guidelines: May
contain scenes of nudity and/or sexual activity. There could be frequent use of profanity.
Adult - Violence Guidelines: May contain violence integral to the development of the plot, character or theme, intended for adult
audiences. Other Content Guidelines: May contain graphic language and explicit portrayals of nudity and/or sex.
28

Setup
Canadian Ratings French Chart
G General - Programming intended for audiences of all ages. Contains no violence, or the violence content is minimal or is
depicted appropriately with humor or caricature or in an unrealistic manner.
8 ans+ 8 + General - Not recommended for young children - Programming intended for a broad audience but contains light or
occasional violence that could disturb young children. Viewing with an adult is therefore recommended for young children
(under the age of 8) who cannot differentiate between real and imaginary portrayals.
13 ans+ Programming may not be suitable for children under the age of 13 - Contains either a few violent scenes or one or more
sufficiently violent scenes to affect them. Viewing with an adult is therefore strongly recommended for children under 13.
16 ans+ Programming is not suitable for children under the age of 16 - Contains frequent scenes of violence or intense violence.
18 ans+ Programming restricted to adults - Contains constant violence or scenes of extreme violence.
Region 5
Use REGION 5 to block various types of movies and television
programs based on ratings systems used in the U.S. that you feel
may be inappropriate due to its content. The REGION 5 option will
operate for Digital Channels (ATSC) only.
Ratings Procedure
1. Use the CURSOR PAD <, _-toselecttheRATINGCATEGORY
(MPAA, TV Rating, etc.) that you want to block.
2. Press SELECT to block the RATING that you have selected.
3. Press EXIT to quit the menu.
Region 5 Alternate Ratings (Example Only)
G General audiences. All ages admitted.
PG Parental guidance suggested. Some material may not be suitable for children.
PG-I 3 Parents strongly cautioned. Some material may be inappropriate for children under 13.
R Restricted. Under 17 requires accompanying parent or adult guardian.
NC-I 7 No one 17 and under admitted.
X Adults only.
Y Adults only.
• In order to set the Region 5 Ratings the ATSC DigRal channel received must include Region 5 Ratings data. To see if the
channel has Region 5 Ratings, press the INFO key on the R/C.
• Once the TV has received Region 5 Ratings data, the Region 5 option in the Parental Controls menu will become available
and display the data.
29

Setup
Closed Captions
Closed Captions are the dialogue, narration, and/or sound effects
of a television program or home video which are displayed on the
TV screen. Your local TV program guide denotes these programs
as [_ or [_.
Energy Options
Use this feature to save energy when watching your Hitachi LCD
TV.
1.
2.
Use the CURSOR PAD I_, A and T to highlight and select
the function to change.
Press EXIT to quit menu or select CLOSED CAPTIONS to
return to the previous menu.
Closed Captions:
ON/OFF will turn the display D on or off.
With Mute will turn the display _ on when Mute is on.
Digital Captions
Set captions for digital programs and set available language.
Digital Captions Options
This function will help choose and set font, size, color and
background style of digital captions.
. The Digfal Closed Captions feature only works
when using the "TV" input of this television.
• Caption Display will not work when viewing a
480L 480p, 720p, 1080i or 1080p input via the
COMPONENT." Y-PbPr or HDMI inputs.
• Closed Captions and Digital Captions availability
and content depends on the broadcaster. Closed
Caption are available when the Closed Caption icon
is displayed on screen.
• Digital Captions language will not be available
(grayed out) when using analog channels.
Analog Captions:
Set CAPTIONS for Analog programs. This function will help
choose and set available mode and channel.
CCl,CC2, etc. : These are for the program you are viewing.
TEXT1, etc. : These are for additional information such as news
reports or a TV program guide. This information covers the entire
screen and viewing the _rogram is not possible. Text may not
be available with every _ program.
1. Press the CURSOR PAD ,_ or T to highlight Energy
Options.
2. Press the CURSOR PAD I_ to select your choice.
Picture Energy Saving
This function allows you to choose power consumption reduction
based on 3 levels (Min., Medium and Max).
Auto TV Off
This function turns Off the TV when no remote control signal is
detected for 3 hours to save energy. Please choose On or Off to
set this feature.
Transparency
This function allows you to change the transparency of OSD
based on 10 levels (0 opaque - 10 transparent). Adjust to
your own preference.
1. Press the CURSOR PAD A or _' to highlight Transparency.
2. Press the CURSOR I_ or SELECT.
3. Press the CURSOR I_ to increase or 4 to decrease the OSD
transparency.
3O

Setup
HDMI-CEC
Set to ON and this feature will enable the HDMI-CEC signal
bus to allow your Hitachi LCD TV to discover and communicate
automatically with other compatible HDMI-interfaced Audio/Video
equipment. The CEC signal bus makes global controls possible,
based on "plug & play" automation, to minimize the number of IR
remotes and key-presses required for basic operation of your AV
system. Select OFF to disable this option.
Input Labels
Use this feature to give a name to any of the nine video inputs
excluding the TV input.
1. Press the CURSOR PAD A or _' to highlight the Inputs
labels,
2. Press the CURSOR PAD I_ to select your choices,
With the "HDMI-CEC" feature, you can interface the connected
equipment through the HDMI terminal automatically if the connected
equipment meets the"HDMI CEC (Consumer Electronics Control)"
industry standard. Please check if the connected equipment
supports HDMI CEC before using this feature. For example, here
are three common functions when HDMI CEC is set to ON.
Feature Description
One-Touch Play Pushing the "Play" button on the CEC enabled device will
(TV Auto On) command the device to play, turn the TV on, and the HDMI
input, that the device is connected to, will become the active
input source for the TV.
System Standby When the user turns off the TV, all active CEC enabled
(Device Auto Off) devices on the HDMI input will go to Standby.
Playback Control The user can operate the CEC enabled device's deck
control functions (i.e. Play, Stop,Fast Forward and Rewind)
by the TV's remote control's transport keys (ie. _,m,44and
_).
The Input labels is Grayed out (Skip) or disabled until you
are on the INPUT that you like to change.
Then the Custom option is selected a KEYBOARD will
appear on the screen to place your desired label
Component Options
This function allows you to adjust the phase between your TV and
the Device with component output,
1. Press the CURSOR PAD A or _' to highlight Component
Options,
2. Press the CURSOR PAD _- to select your choice.
There are two options for the Component inputs:
Phase: Use this feature to fine-tune the display to perfectly
synchronize with the video signal source.
Reset: Return to the original condition for Component
inputs.
31

Setup
RGB Options
This function is to adjust the RGB input to match your PC or laptop
output with your LCD Television.
Reset AV & Setup
This feature restores all Audio, Video and Setup configuration that
you have made on the TV and it will return to the factory settings.
1. Press the CURSOR PAD A or _' to highlight RGB Options.
2. Press the CURSOR PAD _- to select your choices.
There are 6 options for the RGB input. H-Position, V-Position,
Clock, Phase, Auto Adjust and Reset.
H-Position
Adjusts the display position horizontally.
V-Position
Adjusts the display position vertically.
Clock
Minimizes vertical stripes on the screen.
Phase
Minimizes the blurring of letters and stripes on horizontal row.
Auto Adjust
Adjusts Horizontal Position, Vertical Position, Clock, and Phase
automatically.
Reset
Each item in RGB Options Menu will be restored to the factory
setting by selecting Yes.
32

Channe|s
Select CHANNELS to set your signal source options, run New
Channel Scan, Check Signal Meter and Set Channel List (Add
channels to List, Channel/Labels and Favorite Channels).
Add Channels to List
This function allows you to add channels to the channel memory.
Sometimes adjusting the antenna direction will allow reception of
additional channels..
1. Press CURSOR PAD A, Y to highlight functions.
2. Press the SELECT button or CURSOR PAD I_ to select.
1. Use the CURSOR PAD to select the Add Channels to List.
2. Press the SELECT button to start scanning.
3. Press the EXIT button to return to normal viewing.
Only the Channels that have not been added to the list will be
stored.
Source
Select the signal Source for the TV. When using an indoor or
outdoor antenna select Air. When using a cable system select
Cable.
Signal Strength
Select Signal Strength when using an indoor or outdoor antenna.
This feature will show the signal strength of the Antenna signal to
help you adjust your antenna to optimize signal reception. Use the
MENU button or EXIT button to return.
The Signal Strength will not be available (grayed
out) when watching analog channels.
New Channel Scan
This feature will automatically store active Analog and Digital
channels to the Channel list. This scan will erase all channels
previously stored in the list.
Channel List
This function allows you to review which channels have been
added to the CHANNEL list.
1. Use the CURSOR PAD to navigate the Channel List.
2. Press the SELECT or _, button to select SKIP or View.
3. Press the EXIT button to return to normal viewing.
The Channel List cannot be updated by only changing the cable
source. Auto Channel Scan must be performed for the Channel
List to be updated.
1.
Use the CURSOR buttons to highlight then press SELECT key
to start.
If you do not want to erase all scanned channels,
please use the Add Channels to List option instead.
33

Channels
Channel Labels
Use this feature to give a name to any of the channels, 1. Use the CURSOR PAD to navigate the Channel List,
1. Press the CURSOR PAD "_ or _- to highlight the channels.
2. Press the CURSOR down Y to change the channel label.
3. Press the SELECT key to show the Keyboard for editing the
channels.
2. Press the SELECT or _ button to check mark the channel and
make it a Favorite channel. Select all desired channels.
3. Press the EXIT button to return to normal viewing.
4. To view all the Favorite channels that you have choosen, press
the FAV. CH key on the Remote Control.
Favorite Channel
This function allows you to manage your Favorite Channels,
iMPORTANT NOTICE
The nationwide switch to digital television broadcasting wifl be
complete on June 12, 2009, but your local television stations may
switch sooner. After the switch, analog-only television sets that
receive TV programming through an antenna wifl need a converter
box to continue to receive over-the-air TV. Watch your local stations
to find out when they will turn off their analog signal and switch to
digital-only broadcasting. Information about the D TV transition is
available from your local television stations, www.DTV.gov, or 1
-888-CALL-FCC (TTY 1-888-TELL-FCC), and www.dtv2OO9.gov
or 1-888-DTV-2009 (TTY 1-877-530-2634) for information about
subsidized coupons for digital-to-analog converter boxes.
Please review this Operating Guide for further information
regarding such connections.
Hitachi supports the DTV transition and as a member of the DTV
Transition Coalition urges consumers to visit these web sites for
interactive guides and further detailed information:
www. dtvtransition, org
www.myceknowhow.com
www. dtv2009.gov
34

Equipment Care and Troub|eshooting
DO DO NOT
Dust the screen and cabinet with a soft cloth.
Clean the screen with a soft cloth moistened in warm water
and dry with a soft cloth. A mild soap may be used if the
screen is extremely dirty.
Place your LCD Television away from extreme heat, humidity
and extremely dusty places.
Remove the plug from the walt outlet if your LCD Television
will not be used for a long period of time, for instance, when
you go on vacation.
Do not clean your screen with strong cleaners, polishes or
a chemically treated cloth.
Do not place rubber or vinyl products or cellophane tape on
your LCD Television.
Avoid repeatedly touching the screen.
Do not subject the remote control to shocks such as
dropping it on the floor, etc. This may cause damage to the
precision parts.
Avoid placing the remote control in a high humidity place or
getting it wet. Do not leave it on or near a heater. Excessive
heat or moisture may cause the unit to fail.
When the batteries run down, remote control operation will
become erratic or become unresponsive. Replace the old
batteries with two new "AA" size batteries. Do not use an
old battery with a new battery.
Exposing the screen to direct sunlight for a long period of
time or heat may cause damage to the LCD screen.
TROUBLESHOOTING
Your HITACHI LCD Television incorporates advanced power surge protection technology designed to protect against
component or circuit damage due to external or internal voltage power surges.
IF YOUR TELEVISION SHOULD APPEAR TO HAVE A LOSS OF POWER, PLEASE FOLLOW THIS PROCEDURE:
1.
2.
3.
Press the POWER Button (ON/OFF button) once.
If there is still no power, wait 30 seconds and press the POWER button again.
Ifthere is still no power, unplug the power cord from the wall. Wait 30 seconds and plug the power cord back in. Press
the POWER button again.
This protective technology should provide or years of lasting entertainment from your HITACHI LCD Television.
Ifthere is a problem with your TV, before calling a service technician, check the following tables first. If the problem cannot be
solved with the suggested procedures, contact 800-HITACHI. For your safety, NEVER try to repair the product yourself.
When the Following Messages Appear on the Screen
No Signal The unit cannot detect any signals from any input terminals or the TV channel does not show picture.
• Check if the cable is connected correctly and firmly.
• Check if the power of any external equipment is ON.
• Check if the input selection matches the connection terminal.
• This message will be displayed for 15 minutes then the TV will turn Off.
35

Troubleshooting
Symptom and Checklist
No picture - no sound • Check the Indicating lamp status (Off, Red, Blue).
• Check the connection of the power cord and/or other cables.
• Check if the power of the unit or external equipment is ON.
• Check if the correct Video input is selected.
• Check if the unit is in "Standby mode".
• Adjust the values in "Video menu" and "Audio menu".
• Check the connections to external equipment.
9,12,
14~17
24-26
Multiple images-normal sound 14-17
Intermittent interference • Check if the source of interference is shielded correctly. 37
• Move these kinds of electrical devices away from the unit.
Normal picture, but no sound • Check the volume level. 18,
• Check if the MUTE button has been pressed or not. 14~17
• Check the connections to external equipment. 18, 26
• Try next/otherAudio Language.
No picture - normal sound • Check the value level of "Brightness" and "Contrast" in "Video Menu". 24
The remote control does not work. • Check if the batteries are installed correctly. 6, 9
• The batteries might be exhausted. Replace them with new ones.
• Remove all obstructions from in front of the sensor window on the unit.
• Check if the buttons on the control panel are working.
The buttons on both the remote control and • Unplug and connect the power cord again. 7, 35
control panel do not work.
Normal picture but no color-normal sound • Check the connections to external equipment. 14-17
No picture • Check if the power cord is plugged into the socket securely. 7, 9
The Indicating lamp _ Off
No picture • Check if the signal cable is connected correctly and securely. 12, 14~17,
The indicating lamp _ Blue • Adjust the level of Brightness and Contrast lower. 24
Some screen display aspects cannot be • Check the signal status by pressing the INFO button on the remote control. The available 11,21
switched in. screen display aspect is different depending on the current signal status. 49
No power • Check the power cord is connected to theAC oulet. 9, 12
Turns Off by itself • Check or ensure Sleep Timer settings are not activated. 11, 19, 27
Turns On by itself • Check if the HDMI-CEC feature is activated. 31
Picture may "block" or freeze when watching • Check signal strength under "Signal Strength". 33
a digital channel.
HDMI Issues
D • rT
No picture - no sound • Make sure you have selected the correct HDMI input. Toggle through them while HDMI
device is ON or during playback.
• Unplug and re-plug HDMI connection while TV and HDMI source device are powered on.
• Turn TV and HDMI device off. Turn TV on first and then HDMI device second.
14, 15, 17,
19
Error notice comes to screen • Try pressing "exit" on HDMI device remote control and then on TV remote to find source of 9, 11
the error OSD. If error persist or comes back even after pressing exit, try alternate HDMI 14, 17
input on TV.
• Unplug and re-plug HDMI connection while TV and HDMI source device are powered on.
• Turn TV and HDMI device off. Turn TV on first and then HDMI device second.
Normal picture, but no sound • Check HDMI Audio settings under the HDMI device menu (of the HDMI source device). In
order to get sound on TV, HDMI output must be set to PCM option.
No sound from TV Optical Out when using • Change Digital Output selection. 17
HDMI devices • As an option, use audio optical output from HDMI source device directly to separate Audio
Amplifier.
Picture flickers during channel change w/ • This is normal operation from the source switching delay itself. It's not an indicator of a TV
using HDMI Set Top Boxes malfunction.
Picture is blurry or fuzzy • If HDMI source is HD capable, ensure it's output is set to 1080i or 720p under HDMI device
menu (of the HDMI source device).
36

Reception Problems
IGNITION NOISE:
Black spots or horizontal streaks may appear, picture may flutter or drift. Usually caused
by interference from automobile ignition systems, neon lamps, electrical drills, and other
electrical appliances.
GHOSTS:
Ghosts are caused by the television signal following two paths. One is the direct path and
the other is reflected from tall buildings, hills or some other objects. Changing the direction
or position of the antenna may improve reception. Ghosting may also be caused by defects
in the antenna system such as unshielded leads or connecting several sets to the same
antenna without using multiple antenna couplers.
SNOW:
If your receiver is located in the fringe area of a television station where the signal is weak,
your picture may be marred by the appearance of small dots. When the signal is extremely
weak, it may be necessary to install a special antenna to improve the picture.
RADIO FREQUENCY INTERFERENCE:
The interference produces moving ripples or diagonal streaks, and in some cases, causes
loss of contrast in the picture.
PREVENTION OF AN OBSTACLE TO RADIO RECEIVERS
This television has been designed pursuant to the FCC class B Rules. This is to prevent a
problem to Radio receivers. Ifthis television causes a problem to Radio receivers, then take
the following steps:
• Keep the television away from Radio.
• Adjust Radio antennas in order for the television not to receive interference.
• The antenna cable of Radio should be kept away from the television.
° Use a coaxial cable for antenna.
You can check if this television influences Radio receivers by turning off all other equipment other than the television. If you
find a problem receiving Radio when using the television, check the instructions mentioned above.
BLOCK NOISE or FREEZE (DIGITAL INPUT):
Fuzzy blocks may appear in some area or the whole area of the screen. This is usually
caused by interference from automobile ignition systems, neon lamps, electrical drills, ghost-
ing of the image and lost or weak receiving signals.
BLACK SCREEN:
When using an antenna, weak signals will display a black screen. It may be necessary to
upgrade your antenna.
The TV set can generate sound distortion in external devices such as a radio. Please separate radio equipment
from the TV set to a considerable distance.
37

Features and Specifications
Features:
,' New High Gloss Black Frame
(4) HDMI TM (V.1.3 with x.v.Color TM, CEC)
- I080p60, 1080p24 Input Compatible
, New Multi-Function Remote Control
Dynamic/Standard/Movie/Custom/Game Picture Memories
3 Preset Color Temperatures
Game Mode
Video:
1920 x I080p Display Resolution L42A403
1366 x 768p Display Resolution L32A403
Wide Viewing Angle
Color Temperature Presets: High, Standard and Medium.
Multiple Screen Fill Modes: (Auto14:3116:91Zoom 11Zoom 2/
Full) 1
4MB 10-bit 3D YIC Comb Filter
Picture Modes : Dynamic, Standard, Movie, Custom and
Game
Supplied Accessories:
Remote Control
Batteries (AA)
6' AC Power cord cable
Operating Guide
Easy Graphic Guide
Inputs/Outputs:
Wideband Component Y, Pb, Pr ....................... 2
Composite Video .................................. 2
S-Video ........................................... 1122
Antenna (RF)lnputs .................................. 1
Audio Out ......................................... 1
Optical Output ..................................... 1
HDMI ............................................ 4
Upgrade USB Slot ................................... 1
RGB Input .............................................................................. 1
RGBAudio Input ...................................................................... 1
PhonoJackfor Headphones ................................... 1
Audio:
MTS Stereo/SAP
4 Sound Modes (Custom, Standard, Movie, News)
SRSTruSurround HD Sound
24W L42A403
20W L32A403
Inputs:
Power Input .......................... AC 120V, 60Hz
Power Consumption
Maximum Power L32A403: .............. 150 W, 1.5 A
Maximum Power L42A403: ............... 250 W, 2.5 A
Specifications:
FCC class: ......................... B for Consumer Use
Power Requirements .................. 108-132VAC, 60Hz
f Screen mode availability varies by input format
2Only the L42A403 has 2 available S-Video Inputs.
HDTV Televisions display HDTV only when an HDTV source is available
All specifications, weights, and dimensions are subject to change without prior notice.
Please access www.hitachi.us/tv for detailed specifications and dimensions for custom
installations.
H_:_T_I TM HDMI, the HDMI logo and High-Definition Mu}timedia Interface are
trademarks or registered trademarks of HDMI Licensing LLC.
,I_H-_EFINmO.MUI,IM_IAI_T_RFAOE
Antenna Input Impedance ..................... 75 Ohm
Channel Coverage ............................ 191ch.
VHF-Band ................................ 2-13
UHF-Band ............................... 14~69
CATV Mid Band ........................... A5-AI
........................................... AI
Super Band ................................ J-W
Hyper Band ......................... W+I - W+28
Ultra Band ......................... W+29 - W+94
Television System .................... NTSC Standard
............. ATSC Standard (8 VSB, 64-QAM, 256-QAM)
Video .............................. 1.0Vp-p, 75 Ohm
S-Video
Luminance(Y): ........................ 1.0Vp-p, 75 Ohm
Chrominance(C): ..................... 0.286Vp-p, 75 Ohm
Component Video
Luminance(Y_,_. ..................... 1.0Vp-p, 75 Ohm
Chrominanc_Pb/_r): ................... 0.7Vp-p, 75 Ohm
Audio Input Imped_rr_e .............. more than 20k Ohm
Average Input Level ........................ 470mVrms
HDMI ..................................... (19 PIN)
[1"1DOLBY, Manufactured under }i..... from Dolby Laboratories. 'Do}by" and
D_G_TAL 1 the douMe-D symbo} are trademarks of Do}by Laboratories.
38

Set Dimensions
L32A403 model (Includes Table Top Stand) Weight (IbsJkg): 26.5/12
Units 'Inches (mm)
co
co
J
i Io°
3 35164 (90.1)
!
I
27 37/6_(700.6)
(ACTIV_AREA)
!
CENTEROFTHESCREEN/
i
!
I
i
i
/
_w
i
19 1/2 (495,4)
I
I
I0 3/64 (255.3)
HOLEFOR
WALLMOUNT
(4PLACES)
\
\
Screw Length (A)
-_ Insertion length (B)
LOCATIONOFTHE
ACPOWERCORD
Rear View
Use as Reference for Walt Mount Bracket
• The screw type : Thread ISO M6 (Metric
type, do not use Standard type).
Side View
Watt Mount Screw specification
39

Set Dimensions
L42A403 model (Includes Table Top Stand) Weight (IbsJkg): 45.6/21
Units 'Inches (mm)
B
39 31/32 (1015.36)
36 3/4 (933.5) :::_
(ACTIVE AREA)
_,,<,
CE,TERO
I 24 55/64 (631.48)
3 3/4 (95.6)
J 114__9//66/(21__1.414L
1/ _(703.03)
HOLEFOR
WALLMOUNT
(4PLACES)
LOCATIONOFTHE
ACPOWERCORD
Rear View
Use as Reference for Wall Mount Bracket
Screw Length (A)
Insertion length (BJ
Spring Washer (C)
Plane Washer (D)
Wall Mount Bracket (E)
Example :
A = B+C+D+E
A: 13.5-15.5 mm.
B: 8.5-10.5 mm.
C: 1 mm.
D: 1 mm.
E: 3 mm.
=The screw type : Thread ISO M6 (Metric
type, do not use Standard type).
Side View
Wall Mount Screw specification
40

Service information
HITACHI HOME ELECTRONICS (AMERICA), INC.
Sincere - Prompt - Efficient
HITACHI
Inspire the Next
HITACHI has made every effort to assure you hours of trouble free operation from your Hitachi product.
Should you require service assistance with OPERATIONAL, HOOK UP, TECHNICAL ASSISTANCE OR WARRANTY
SERVICE SUPPORT, please contact one of our knowledgeable Customer Service Representatives at 800.HITACH!
(800.448.2244).
Our Customer Service Representatives will provide you with the assistance you need and if necessary coordinate the repair
process with a local Authorized Service Facility in your area. Please be prepared to submit proof of purchase and/or delivery
receipts to your 800.HITACHI Customer Service Representative. Warranty coverage will be provided in accordance with the
provisions of your Limited Warranty (see the Limited Warranty page in this operating guide).
Pour de plus amptes renseignements sur le service durant la periode couverte par la garantie, sur le fonctionnement ou pour
de rassistance technique communiquez avec:
Au Canada: 800.HITACHI J800.448.2244_
Lundi ~ Vendredi 8:00 am - 7:00 pm HNC
Samedi 10:00 am- 5:00 pm HNC
Hitachi Home Electronics
(America), Inc.
Customer Service Support
PO Box 3900
Peoria, IL 61612
U.S.A. customerservice.ce@h hea.hitachi.com
Canada: [email protected]
Customer Record
The MODEL NAME and SERIAL NUMBER of this product is located on the backcover and also on the RIGHT SIDE of the
set. Please follow the next steps to find this information and then record it in the space provided below for use in case you call
800.HITACHI, they will require this information in order to give you the proper support.
@
@
O
Look on the right side of the set
Locate the label where it shows the information
related to MODEL NAME and SERIAL #.
800.HITACHI will require this information in order
to give you the proper support regarding your
questions.
@
Model Name Serial Number
41

Limited Warranty
Congratulations on your purchase of a new Hitachi display product.
LIMITED WARRANTY
Hitachi Home Electronics
(America), Inc. warrants this
product in accordance with
the terms and conditions
applicable to the products
identified below:
Conditions of Hitachi Limited Warranty
This Hitachi display product (the "Product") is warranted to be free from defects in materials and workmanship beginning
on the date of purchase by the original owner and continuing for the duration of the applicable time periods specified
below. If the Product is found to be defective, Hitachi will repair or replace (at Hitachi's option) defective parts at no
charge, subject to the conditions of this Limited Warranty. If the original owner rejects, refuses or otherwise does not
accept Hitachi's offer to repair or replace such defective parts under this Limited Warranty, this Limited Warranty shall
be void and of no further force or effect. This Limited Warranty extends to the original owner only and is not transferable,
and such owner must provide a dated sales receipt for the Product to qualify for parts or service under this Limited
Warranty. The original owner must notify Hitachi of a defect claim by calling 800-HITACHI during the applicable Limited
Warranty period for this Limited Warranty to be effective. This Limited Warranty is valid only in the U.S.A. and Puerto
Rico.
Hitachi Product :
LCD Flat Panel Televisions
PARTS: The Limited Warranty period for parts is 1 year from the date of original purchase. During the Limited Warranty
period for parts, Hitachi will replace defective parts with new or rebuilt parts (at Hitachi's option) at no charge for such
parts. Any replacement part will be warranted for the remainder of the original warranty period applicable to the part
replaced.
LABOR: The Limited Warranty period for labor is 1 year from the date of original purchase. During the Limited Warranty
period for labor, Hitachi will repair or replace (at Hitachi's option) defective parts without charge for labor.
SERVICE LOCATION: In-home warranty service, which includes either in-home repair or free pick-up and delivery (at
Hitachi's option), applies to all Hitachi produc_ except: (i) 32-inch and smaller LCD Flat Panel Televisions; (ii) Products
located outside the U.S.A. or Puerto Rico; (!ii) #roducts located more than seventy-five (75) driving miles from Hitachi's
nearest Authorized Service Facility. If th# fo _in_ ¢lauses (i), (ii), (ill)apply, then the Product owner will be responsible
for bringing/delivering the Product to a Hi{ac_iAuthorized Service Facility and, following warranty service, retrieving the
Product from such Authorized Service Facility,
CERTIFIED
SERVICE
CENTER
Hitachi is a proud supporter
of the Certified Service Center
program. Businesses who
display the CSC certification
mark have demonstrated that
they operate in accordance
with the high standards of
professionalism prescribed by
the Consortium for Certified
Service Centers.
IM PORTANT:
Before using or installing
Product, please complete
form and attach your sales receipt
and retain them for your records.
This will help facilitate proper
800-HITACHI (800-448-224_)......
Please call 800-HITACH for operational, hook Lip or warranty
Visit our website _ w_W._itachi-homeeii
Hitachi's website f_tures _ wealth of inform;
guides and other u_U! in_0rmation ......
-_EALER NAM_ ....
DEALE£ ADDRESS ....
CITY ....
_upport.
as downloadable operating
SERIALNO.
DATE OF PURCHASE
STATE
warranty coverage.
Warranty Limitations ........ .................. ..........
This Hitachi Limited Warranty does not cover: .........
A, Any Product that has been modified or repaired in a manner not previousi_y_:horized by Hitachi in writing.
B. Any Product whose serial number has been removed, altered, replag_, def_@d or rendered illegible.
C. Any defect, malfunction, or failure caused by or resulting from imp_6pe_ _ unauthorized service, maintenance or repair.
D. Damage resulting from abuse, misuse, mishandling, neglect qr a_mage aused by exposure to hostile operating environments such as areas containing dust and/
or smoke.
E, Damage caused by power surges, accidents, natural events or circumstances outside Hitachi's control.
F. Any Product used in any manner inconsistent with the acce_sble s_t-up, usage, safety or installation configurations identified in the Product's Operating Guide.
G. Any Product used for purposes or applications, or su6i_ed _e 8perating conditions, other than those identified as acceptable in the Product's Operating Guide,
H. Product repairs (including any product whose case ha_ _e_ 5pened), or part replacements provided or installed, by any person other than an Authorized Hitachi
Service Facility Representative.
I. Improper uncrating, set-up or installation or any misadjustments caused by user-operated controls.
J. Any labor or costs associated with removing the Product from a custom cabinet or other specialized product installation that impedes direct and immediate removal
of the Product from the owner's premises (must be arranged and paid by the owner).
K. Product cabinets, cabinet parts, knobs, batteries or accessories.
L. Product screens that have been cleaned by any method other than as specified in the Product's Operating Guide.
M. Normal usage, degraded brightness caused by backlight aging and/or cell defects or ordinary wear and tear, including, without limitation, scratches or marks on the
Product's screen, cabinet or the appearance of bright or dark screen pixels.
N. Any Product returned for service that is damaged due to improper packaging, mishandling or shipping. (IMPORTANT: When shipping any Product to a Hitachi
Authorized Service Facility, Product owner must package it securely in the original shipping container or its equivalent to prevent damage. The Product must be
returned with the shipping charges prepaid and proof of purchases included in the shipping container. Failure to properly package such product during such shipment
will void all warranties.)
O, Any Product purchased or serviced outside the United States of America and Puerto Rico.
P.Any Product that has been used for commercial purposes.
NOPERSON,AGENT, DISTRIBUTOR, DEALER,SERVICE FACILITY,OR COMPANY ISAUTHORIZED TO CHANGE, MODIFY ORAMEND THE TERMSOF THIS LIMITED WARRANTY IN
ANY MANNERWHATSOEVER. EXCEPTAS PROVIDED tNTHIS LIMITED WARRANTY,HITACHIMAKES NOEXPRESS WARRANTY REGARDINGTHIS HITACHIPRODUCT. FURTHER,
ALL IMPLIED WARRANTIESRELATINGTOANY PORTION OFTHIS PRODUCT, INCLUDINGANY WARRANTYOF MERCHANTABILITYORFITNESS FORA PARTICULARPURPOSE ARE
LIMITEDTO THEDURATIONSPECIFIED UNDERTHIS LIMITED WARRANTY.HITACHISHALLNOT BELIABLETO THEPURCHASER ORTOANY OTHERPERSON FORANY INCIDENTAL
OR CONSEQUENTIAL DAMAGESOR LOSSOF PROFIT ORPRODUCT RESULTING FROMANY DEFECTIN, OR MALFUNCTIONOR FAILURE OF,THIS HITACHIPRODUCT.BECAUSE
SOME STATESDO NOTALLOW LIMITATIONSON HOW LONGAN IMPLIEDWARRANTY LASTS OR THE EXCLUSION OF INCIDENTALOR CONSEQUENTIAL DAMAGES THEABOVE
LIMITATIONSMAY NOTAPPLY TO YOU. THIS LIMITED WARRANTY CONFERS SPECIFIC LEGAL RIGHTS, INCLUDING CERTAIN OTHER RIGHTS THATMAYVARY DEPENDING ON
YOUR JURISDICTION.
42

End User License Agreement for HITACHI DTV Software
END USER LICENSE AGREEMENT FOR HiTACHi DTV SOFTWARE
IMPORTANT - READ CAREFULLY: This End User License Agreement for HITACHI
DTV Software (this "Agreement") is a legal agreement between you ("you" or "your"),
in your capacity as the owner of a HITACHI brand digital television (the "DTV"), and
HITACHI America, Ltd., Home Electronics Division ("HITACHI"). By using the DTV
or the digital television software installed on the DTV (the "DTV Software") or any
Upgrade (as defined below, and together with the DTV Software, the "Software"), you
agree to be bound by the terms and conditions of this Agreement. IF YOU DO NOT
AGREE TO BE BOUND BY THIS LICENSE AGREEMENT, DO NOT USE THE DTV
OR THE SOFTWARE.
LICENSE GRANT. HITACHI grants to you, for the life of the DTV, a non-
exclusive, non-transferable, revocable license to install and use one copy of the
Software on the DTV, subject to the following limitations and restrictions:
a. You may not share, duplicate, republish or redistribute the Software;
b. You may net resell, rent, lease, sublicense, gift, loan, as sign or otherwise
transfer the Software or any of your rights under this Agreement;
c. You may net modify, adapt, translate, reverse engineer, decempile,
disassemble or make derivative works from the Software or use the
Software in combination with any non-Hitachi software; and
d. You may not use the Software for any commercial purpose.
VIOLATIONS; INDEMNITY, You understand and agree that your use of the
Software in any manner except as permitted under this Agreement could
constitute a serious crime and could subject you to damages and an award to
HITACHI of attorneys' fees in connection with your violation of this Agreement.
You further understand that you may be held legally responsible for any
copyright infringement or other violation of intellectual property rights caused
or facilitated by your failure to abide by the terms of this Agreement. You agree
to defend, indemnify and hold HITACHI and its parent and affiliate companies
harmless from and against any and all liability resulting from any breach by you
of this Agreement.
INTELLECTUAL PROPERTY. The Software is protected by federal copyright
laws, international copyright treaties and other intellectual property laws and
treaties, The Software is licensed, not sold, to you. All right, title and interest in
and to the Software and any intellectual property associated therewith, including
any accompanying printed materials, shall belong to HITACHI and its licensors
and suppliers. Except as expressly provided herein, neither HITACHI nor any
of its licensors or suppliers grants to you under this Agreement any express or
implied right in or to any patents, copyrights, trademarks, trade secrets or other
intellectual property. All right, title and interest in and to the intellectual property
rights associated with any content that is accessible through use of the Software
shall belong to the applicable content owners and may be protected by copyright
or other intellectual property laws and treaties. This Agreement grants you no
rights to use such content. Any rights of HITACHI not expressly granted to you
hereunder are reserved expressly by Hitachi.
6,
7,
8,
9,
10.
government. You warrant and represent that neither the U.S. Bureau of Industry
and Security nor any other U.S federal Agency has suspended, revoked, or
denied your export privileges.
NO WARRANTIES. The software is provided to you in "as is" condition and
HITACHI makes no warranties of any kind whatsoever regarding the software
and, to the maximum extent permitted by law, hereby expressly disclaims
all warranties of any kind whatsoever, express or implied, with respect to
the software. All implied warranties, including without limitation, the implied
warranties of non-infringement, merchantability and fitness for a particular
purpose are hereby expressly disclaimed by HITACHI to the maximum extent
permitted by law.
LIMITATION OF LIABILITY. To the maximum extent permitted by applicable
law, HITACHI, its licensors, suppliers, parent companies, affiliates, subsidiaries,
employees and agents shall net under any circumstances be liable to you or
any third parties for any damages of any nature arising in any way from this
agreement, your use of the software or otherwise, whether indirect, special,
incidental, consequential or otherwise, including, without limitation, any claims
for lost profits, lost good will, lost data, business interruption, procurement of
substitute goods or services, or expenditures made or committed for in reliance
on the continuation of this agreement, even if advised in advance of the
possibility of such damages.
NO FAILURE OF ESSENTIAL PURPOSE, You agree that neither HITACHI'S
breach of this agreement nor its failure to repair a defect, error or bug in the
software shall constitute a failure of the essential purpose of this agreement.
CRYPTOGRAPHIC SOFTWARE. The software contains software developed by
the OpenSSL Project, including cryptegraphic software written by eric young
(the 'cryptegraphic software"). The cryptographic software is provided by the
OpenSSL Project in "as is" condition and any express or implied warranties,
including but not limited to, the implied warranties of merchantability and fitness
for a particular purpose are hereby expressly disclaimed to the maximum
extent permitted by law. In no event shall the OpenSSL Project, its contributors,
HITACHI or any of its parent or affiliate companies be liable for any direct,
indirect, incidental, special, exemplary, or consequential damages (including,
but not limited to, procurement of substitute goods or services; loss of use, data,
or profits; or business interruption) however caused and on any theory of liability,
whether in contract, strict liability, or tort (including negligence or otherwise)
arising in any way out of the use of the software or the cryptographic software,
even if advised in advance of the possibility of such damages.
TERMINATION. HITACHI may terminate this Agreement immediately at any
time by providing notice to you.
SOFTWARE UPGRADES. In the future, HITACHI may release or make
available one or more upgrades to the DTV Software (each, an 'Upgrade").
You understand and agree that if you decide to install or use any Upgrade, your
installation and use of such Upgrade and/or any other software or intellectual
property HITACHI may provide in connection therewith shall be governed by
the terms and conditions of this Agreement, except to the extent that HITACHI
provides different or supplementary license terms or conditions that accompany
such Upgrade or other software or intellectual property. In the event HITACHI
provides you with a "flash card" or other media to effect or facilitate an Upgrade,
you understand and acknowledge that your failure to return such flash card
or other media to HITACHI as HITACHI may require could result in HITACHI
placing your name and your DTV's serial number on a "No Further Upgrades"
list, which will prohibit you from receiving any subsequent Upgrades HITACHI
may later release or make available. IF YOU DO NOTAGREE WITH ALL THE
TERMS AND CONDITIONS OF THIS AGREEMENT OR ALL THE TERMS
AND CONDITIONS OF ANY DIFFERENT OR SUPPLEMENTARY LICENSE
THAT MAYACCOMPANY SUCH UPGRADE, (A) DO NOT USE ANY HITACHI-
PROVIDED FLASH CARD OR OTHER MEDIA, (B) DO NOT PERFORM
INSTALL ANY HITACHI-PROVIDED UPGRADE SOFTWARE ON YOUR DTV,
AND (C) PROMPTLY RETURN SUCH FLASH CARD OR OTHER MEDIA TO
HITACHI.
11.
GOVERNING LAW; SEVERABILITY, This Agreement will be governed by the
laws of the State of New York, and you consent to the exclusive jurisdiction and
venue in the federal courts sitting in the Southern District of New York, unless
no federal subject matter jurisdiction exists, in which case you consent to the
exclusive jurisdiction and venue in the Borough of Manhattan, New York, USA.
EXPORT RESTRICTIONS. HITACHI is licensing the Software for use within
North America only. You agree that you will not export or re-export the Software.
You specifically agree net to export or reexpert the Software: (i) to any country
to which the U.S. has embargoed or restricted the export of goods or services,
which currently include, but are not necessarily limited to Cuba, Iran, Libya,
North Korea, Sudan and Syria, or to any national of any such country, wherever
located, who intends to transmit or transport the Software back to such country;
(ii) to any person or entity who you know or have reason to know will utilize
the Software in the design, development, or production of nuclear, chemical,
or biological weapons; or (iii) to any person or entity who has been prohibited
from participating in U.S. export transactions by any federal agency of the U.S.
43

End User License Agreement for Open Source Software
OPEN SOURCE SOFTWARE LICENSE iNFORMATiON
This Hitachi TV incorporates open source software modules distributed under certain licenses, including the GNU General
Public License Version 3 (as defined by the Free Software Foundation, Inc.).
The open source software modules incorporated in this Hitachi TV are shown in the table below.
B
AC3 decoder
PNG decoder
zlib
/
liba52.c
libpng 1.0.2
Zlib 1.1.3
www.liba52.sourceforge.net
www.libpng.org/pub/png/libpng.html
www.zlib.net
GNU General Public License Version 3
http://www.tibpng.org/pub/png/src/
libpng-LICENSE.txt
http://www.ztib.net/ztib_license.html
THESE SOFTWARE MODULES AND THE SOURCE CODE MODIFICATIONS THERETO ARE PROVIDED "AS IS" AND
BOTH THE LICENSORS AND HITACHI DISCLAIM ANYAND ALL WARRANTIES OFANY KIND, INCLUDING THE IMPLIED
WARRANTY OF MERCHANTABILITY AND OF FITNESS FOR A PARTICULAR PURPOSE.
See above links and the GNU General Public License that appears on the following pages of this Operating Guide for
additional terms and conditions.
If you would like to learn more about the Free Software Foundation, Inc. or the GNU software project, please visit http://www.
fs£org. Ifyou would like to request a copy of the Source Code Modifications, please send an email to the following address:
44

End User License Agreement for Operating System Software
TERMS AND CONDmONS
0. Definitions.
"This License" refers to version 3 of the GNU General Public License.
"Copyright" also means copyright-like laws that apply to other kinds of works, such
as semiconductor masks.
"The Program" refers to any copyrightable work licensed under this License. Each
licensee is addressed as "you". "Licensees" and "recipients" may be individuals or
organizations.
To 'modify" a work means to copy from or adapt all or part of the work in a fashion
requiring copyright permission, other than the making of an exact copy. The resulting
work is called a "modified version" of the earlier work or a work "based on" the earlier
work.
A "covered work" means either the unmodified Program or a work based on the
Program.
To "propagate" a work means to do anything with it that, without permission, would
make you directly or secondarily liable for infringement under applicable copyright law,
except executing it on a computer or modifying a private copy. Propagation includes
copying, distribution (with or without modification), making available to the public, and
in some countries other activities as well.
To "convey" a work means any kind of propagation that enables other parties to
make or receive copies. Mere interaction with a user through a computer network, with
no transfer of a copy, is not conveying.
An interactive user interface displays "Appropriate Legal Notices" to the extent that
it includes a convenient and prominently visible feature that (1) displays an appropri-
ate copyright notice, and (2) tells the user that there is no warranty for the work (ex-
cept to the extent that warranties are provided), that licensees may convey the work
under this License, and how to view a copy of this License. If the interface presents a
list of user commands or options, such as a menu, a prominent item in the list meets
this criterion.
1. Source Code.
The "source code" for a work means the preferred form of the work for making
modifications to it. "Object code" means any non-source form of a work.
A "Standard Interface" means an interface that either is an official standard defined
by a recognized standards body, or, in the case of interfaces specified for a particular
programming language, one that is widely used among developers working in that
language,
The "System Libraries" of an executable work include anything, other than the work
as a whole, that (a) is included in the normal form of packaging a Major Component,
but which is not part of that Major Component, and (b) serves only to enable use of the
work with that Major Component, or to implement a Standard Interface for which an
implementation is available to the public in source code form. A "Major Component",
in this context, means a major essential component (kernel, window system, and so
on) of the specific operating system (if any) on which the executable work runs, or a
compiler used to produce the work, or an object code interpreter used to run it.
The "Corresponding Source" for a work in object code form means all the source
code needed to generate, install, and (for an executable work) run the object code and
to modify the work, including scripts to control those activities. However, it does not
include the work's System Libraries, or general-purpose tools or generally available
free programs which are used unmodified in performing those activities but which are
not part of the work. For example, Corresponding Source includes interface definition
files associated with source files for the work, and the source code for shared libraries
and dynamically linked subprograms that the work is specifically designed to require,
such as by intimate data communication or control flow between those subprograms
and other parts of the work.
The Corresponding Source need not include anything that users can regenerate
automatically from other parts of the Corresponding Source.
The Corresponding Source for a work in source code form is that same work.
2. Basic Permissions.
All rights granted under this License are granted for the term of copyright on the
Program, and are irrevocable provided the stated conditions are met. This License
explicitly affirms your unlimited permission to run the unmodified Program. The output
from running a covered work is covered by this License only if the output, given its
content, constitutes a covered work. This License acknowledges your rights of fair use
or other equivalent, as provided by copyright law.
You may make, run and propagate covered works that you do not convey, without
conditions so long as your license otherwise remains in force. You may convey cov-
ered works to others for the sole purpose of having them make modifications exclu-
sively for you, or provide you with facilities for running those works, provided that you
comply with the terms of this License in conveying all material for which you do not
control copyright. Those thus making or running the covered works for you must do
so exclusively on your behalf, under your direction and control, on terms that prohibit
them from making any copies of your copyrighted material outside their relationship
with you.
Conveying under any other circumstances is permitted solely under the conditions
stated below. Sublicensing is not allowed; section 10 makes it unnecessary.
3. Protecting Users' Legal Rights From Anti=
Circumvention Law.
No covered work shall be deemed part of an effective technological measure under
any applicable law fulfilling obligations under article 11 of the WIPO copyright treaty
adopted on 20 December 1996, or similar laws prohibiting or restricting circumvention
of such measures.
When you convey a covered work, you waive any legal power to forbid circumven-
tion of technological measures to the extent such circumvention is effected by exer-
cising rights under this License with respect to the covered work, and you disclaim
any intention to limit operation or modification of the work as a means of enforcing,
against the work's users, your or third parties' legal rights to forbid circumvention of
technological measures.
4. Conveying Verbatim Copies.
You may convey verbatim copies of the Program's source code as you receive it,
in any medium, provided that you conspicuously and appropriately publish on each
copy an appropriate copyright notice; keep intact all notices stating that this License
and any non-permissive terms added in accord with section 7 apply to the code; keep
intact all notices of the absence of any warranty; and give all recipients a copy of this
License along with the Program.
You may charge any price or no price for each copy that you convey, and you may
offer support or warranty protection for a fee.
5. Conveying Modified Source Versions.
You may convey a work based on the Program, or the modifications to produce it
from the Program, in the form of source code under the terms of section 4, provided
that you also meet all of these conditions:
a) The work must carry prominent notices stating that you modified it, and giv-
ing a relevant date.
b) The work must carry prominent notices stating that it is released under this
License and any conditions added under section 7. This requirement modi-
fies the requirement in section 4 to "keep intact all notices".
c) You must license the entire work, as a whole, under this License to anyone
who comes into possession of a copy. This License will therefore apply,
along with any applicable section 7 additional terms, to the whole of the
work, and all its parts, regardless of how they are packaged. This License
gives no permission to license the work in any other way, but it does not
invalidate such permission if you have separately received it.
d) If the work has interactive user interfaces, each must display Appropriate
Legal Notices; however, if the Program has interactive interfaces that do not
display Appropriate Legal Notices, your work need not make them do so.
A compilation of a covered work with other separate and independent works, which
are not by their nature extensions of the covered work, and which are not combined
with it such as to form a larger program, in or on a volume of a storage or distribution
medium, is called an "aggregate" if the compilation and its resulting copyright are not
used to limit the access or legal rights of the compilation's users beyond what the
individual works permit. Inclusion of a covered work in an aggregate does not cause
45

End User License Agreement for Operating System Software
this License to apply to the other parts of the aggregate.
6. Conveying Non-Source Forms.
You may convey a covered work in object code form under the terms of sections
4 and 5, provided that you also convey the machine-readable Corresponding Source
under the terms of this License, in one of these ways:
materially and adversely affects the operation of the network or violates the rules and
protocols for communication across the network.
Corresponding Source conveyed, and Installation Information provided, in accord
with this section must be in a format that is publicly documented (and with an imple-
mentation available to the public in source code form), and must require no special
password or key for unpacking, reading or copying.
a) Convey the object code in, or embodied in, a physical product (including a
physical distribution medium), accompanied by the Corresponding Source
fixed on a durable physical medium customarily used for software inter-
change.
b) Convey the object code in, or embodied in, a physical product (including a
physical distribution medium), accompanied by a written offer, valid for at
least three years and valid for as long as you offer spare parts or customer
support for that product model, to give anyone who possesses the object
code either (1) a copy of the Corresponding Source for all the software in
the product that is covered by this License, on a durable physical medium
customarily used for software interchange, for a price no more than your
reasonable cost of physically performing this conveying of source, or (2) ac-
cess to copy the Corresponding Source from a network server at no charge.
c) Convey individual copies of the object code with a copy of the written offer
to provide the Corresponding Source. This alternative is allowed only occa-
sionally and noncommercially, and only if you received the object code with
such an offer, in accord with subsection 6b.
d) Convey the object code by offering access from a designated place (gratis
or for a charge), and offer equivalent access to the Corresponding Source
in the same way through the same place at no further charge. You need
not require recipients to copy the Corresponding Source along with the
object code. If the place to copy the object code is a network server, the
Corresponding Source may be on a different server (operated by you or a
third party) that supports equivalent copying facilities, provided you main-
tain clear directions next to the object code saying where to find the Cor-
responding Source. Regardless of what server hosts the Corresponding
Source, you remain obligated to ensure that it is available for as long as
needed to satisfy these requirements.
e) Convey the object code using peer-to-peer transmission, provided you in-
form other peers where the object code and Corresponding Source of the
work are being offered to the general public at no charge under subsection
6d.
A separable portion of the object code, whose source code is excluded from the
Corresponding Source as a System Library, need not be included in conveying the
object code work.
A "User Product" is either (1) a "consumer product", which means any tangible per-
sonal property which is normally used for personal, family, or household purposes, or
(2) anything designed or sold for incorporation into a dwelling. In determining whether
a product is a consumer product, doubtful cases shall be resolved in favor of cover-
age. For a particular product received by a particular user, "normally used" refers
to a typical or common use of that class of product, regardless of the status of the
particular user or of the way in which the particular user actually uses, or expects or is
expected to use, the product. A product is a consumer product regardless of whether
the product has substantial commercial, industrial or non-consumer uses, unless such
uses represent the only significant mode of use of the product.
"Installation Information" for a User Product means any methods, procedures, au-
thorization keys, or other information required to install and execute modified versions
of a covered work in that User Product from a modified version of its Corresponding
Source. The information must suffice to ensure that the continued functioning of the
modified object code is in no case prevented or interfered with solely because modi-
fication has been made.
If you convey an object code work under this section in, or with, or specifically for
use in, a User Product, and the conveying occurs as part of a transaction in which
the right of possession and use of the User Product is transferred to the recipient in
perpetuity or for a fixed term (regardless of how the transaction is characterized),
the Corresponding Source conveyed under this section must be accompanied by the
Installation Information. But this requirement does not apply if neither you nor any
third party retains the ability to install modified object code on the User Product (for
example, the work has been installed in ROM).
The requirement to provide Installation Information does not include a requirement
to continue to provide support service, warranty, or updates for a work that has been
modified or installed by the recipient, or for the User Product in which it has been
modified or installed. Access to a network may be denied when the modification itself
7. Additional Terms.
"Additional permissions" are terms that supplement the terms of this License by
making exceptions from one or more of its conditions. Additional permissions that are
applicable to the entire Program shall be treated as though they were included in this
License, to the extent that they are valid under applicable law. If additional permis-
sions apply only to part of the Program, that part may be used separately under those
permissions, but the entire Program remains governed by this License without regard
to the additional permissions.
When you convey a copy of a covered work, you may at your option remove any
additional permissions from that copy, or from any part of it. (Additional permissions
may be written to require their own removal in certain cases when you modify the
work.) You may place additional permissions on material, added by you to a covered
work, for which you have or can give appropriate copyright permission.
Notwithstanding any other provision of this License, for material you add to a cov-
ered work, you may (if authorized by the copyright holders of that material) supple-
ment the terms of this License with terms:
a) Disclaiming warranty or limiting liability differently from the terms of sections
15 and 16 of this License; or
b) Requiring preservation of specified reasonable legal notices or author at-
tributions in that material or in the Appropriate Legal Notices displayed by
works containing it; or
c) Prohibiting misrepresentation of the origin of that material, or requiring that
modified versions of such material be marked in reasonable ways as differ-
ent from the original version; or
d) Limiting the use for publicity purposes of names of licensors or authors of
the material; or
e) Declining to grant rights under trademark law for use of some trade names,
trademarks, or service marks; or
f) Requiring indemnification of licensors and authors of that material by anyone
who conveys the material (or modified versions of it) with contractual as-
sumptions of liability to the recipient, for any liability that these contractual
assumptions directly impose on those licensors and authors.
All other non-permissive additional terms are considered "further restrictions"
within the meaning of section 10. If the Program as you received it, or any part of it,
contains a notice stating that it is governed by this License along with a term that is a
further restriction, you may remove that term. If a license document contains a further
restriction but permits relicensing or conveying under this License, you may add to a
covered work material governed by the terms of that license document, provided that
the further restriction does not survive such relicensing or conveying.
If you add terms to a covered work in accord with this section, you must place, in
the relevant source files, a statement of the additional terms that apply to those files,
or a notice indicating where to find the applicable terms.
Additional terms, permissive or non-permissive, may be stated in the form of a
separately written license, or stated as exceptions; the above requirements apply ei-
ther way.
8. Termination.
You may not propagate or modify a covered work except as expressly provided
under this License. Any attempt otherwise to propagate or modify it is void, and will
automatically terminate your rights under this License (including any patent licenses
granted under the third paragraph of section 11).
However, if you cease all violation of this License, then your license from a par-
ticular copyright holder is reinstated (a) provisionally, unless and until the copyright
holder explicitly and finally terminates your license, and (b) permanently, if the copy-
right holder fails to notify you of the violation by some reasonable means prior to 60
days after the cessation.
46

End User License Agreement for Operating System Software
Moreover, your license from a particular copyright holder is reinstated permanently
if the copyright holder notifies you of the violation by some reasonable means, this is
the first time you have received notice of violation of this License (for any work) from
that copyright holder, and you cure the violation prior to 30 days after your receipt of
the notice.
Termination of your rights under this section does not terminate the licenses of
parties who have received copies or rights from you under this License. If your rights
have been terminated and not permanently reinstated, you do not qualify to receive
new licenses for the same material under section 10.
9. Acceptance Not Required for Having Copies.
You are not required to accept this License in order to receive or run a copy of the
Program. Ancillary propagation of a covered work occurring solely as a consequence
of using peer-to-peer transmission to receive a copy likewise does not require accep-
tance. However, nothing other than this License grants you permission to propagate
or modify any covered work. These actions infringe copyright if you do not accept this
License. Therefore, by modifying or propagating a covered work, you indicate your
acceptance of this License to do so.
10. Automatic Licensing of Downstream Recipi=
ents.
Each time you convey a covered work, the recipient automatically receives a li-
cense from the original licensors, to run, modify and propagate that work, subject to
this License. You are not responsible for enforcing compliance by third parties with
this License.
An "entity transaction" is a transaction transferring control of an organization, or
substantially all assets of one, or subdividing an organization, or merging organiza-
tions. If propagation of a covered work results from an entity transaction, each party
to that transaction who receives a copy of the work also receives whatever licenses to
the work the party's predecessor in interest had or could give under the previous para-
graph, plus a right to possession of the Corresponding Source of the work from the
predecessor in interest, if the predecessor has it or can get it with reasonable efforts.
You may not impose any further restrictions on the exercise of the rights granted or
affirmed under this License. For example, you may not impose a license fee, royalty,
or other charge for exercise of rights granted under this License, and you may not
initiate litigation (including a cross-claim or counterclaim in a lawsuit) alleging that any
patent claim is infringed by making, using, selling, offering for sale, or importing the
Program or any portion of it.
11. Patents.
A "contributor" is a copyright holder who authorizes use under this License of the
Program or a work on which the Program is based. The work thus licensed is called
the contributor's "contributor version".
the covered work in a country, or your recipient's use of the covered work in a country,
would infringe one or more identifiable patents in that country that you have reason
to believe are valid.
If, pursuant to or in connection with a single transaction or arrangement, you con-
vey, or propagate by procuring conveyance of, a covered work, and grant a patent
license to some of the parties receiving the covered work authorizing them to use,
propagate, modify or convey a specific copy of the covered work, then the patent
license you grant is automatically extended to all recipients of the covered work and
works based on it.
A patent license is "discriminatory" if it does not include within the scope of its cov-
erage, prohibits the exercise of, or is conditioned on the non-exercise of one or more
of the rights that are specifically granted under this License. You may not convey a
covered work if you are a party to an arrangement with a third party that is in the busi-
ness of distributing software, under which you make payment to the third party based
on the extent of your activity of conveying the work, and under which the third party
grants, to any of the parties who would receive the covered work from you, a discrimi-
natory patent license (a) in connection with copies of the covered work conveyed by
you (or copies made from those copies), or (b) primarily for and in connection with
specific products or compilations that contain the covered work, unless you entered
into that arrangement, or that patent license was granted, prior to 28 March 2007.
Nothing in this License shall be construed as excluding or limiting any implied li-
cense or other defenses to infringement that may otherwise be available to you under
applicable patent law.
12. No Surrender of Others' Freedom.
If conditions are imposed on you (whether by court order, agreement or otherwise)
that contradict the conditions of this License, they do not excuse you from the condi-
tions of this License. If you cannot convey a covered work so as to satisfy simultane-
ously your obligations under this License and any other pertinent obligations, then as
a consequence you may not convey it at all. For example, if you agree to terms that
obligate you to collect a royalty for further conveying from those to whom you convey
the Program, the only way you could satisfy both those terms and this License would
be to refrain entirely from conveying the Program.
13. Use with the GNU Affero General Public
License.
Notwithstanding any other provision of this License, you have permission to link or
combine any covered work with a work licensed under version 3 of the GNU Affero
General Public License into a single combined work, and to convey the resulting work.
The terms of this License will continue to apply to the part which is the covered work,
but the special requirements of the GNU Affero General Public License, section 13,
concerning interaction through a network will apply to the combination as such.
14. Revised Versions of this License.
A contributor's "essential patent claims" are all patent claims owned or controlled
by the contributor, whether already acquired or hereafter acquired, that would be in-
fringed by some manner, permitted by this License, of making, using, or selling its
contributor version, but do not include claims that would be infringed only as a conse-
quence of further modification of the contributor version. For purposes of this defini-
tion, "control" includes the right to grant patent sublicenses in a manner consistent
with the requirements of this License.
Each contributor grants you a non-exclusive, worldwide, royalty-free patent license
under the contributor's essential patent claims, to make, use, sell, offer for sale, import
and otherwise run, modify and propagate the contents of its contributor version.
In the following three paragraphs, a "patent license" is any express agreement or
commitment, however denominated, not to enforce a patent (such as an express per-
mission to practice a patent or covenant not to sue for patent infringement). To "grant"
such a patent license to a party means to make such an agreement or commitment
not to enforce a patent against the party.
If you convey a covered work, knowingly relying on a patent license, and the Cor-
responding Source of the work is not available for anyone to copy, free of charge and
under the terms of this License, through a publicly available network server or other
readily accessible means, then you must either (1) cause the Corresponding Source
to be so available, or (2) arrange to deprive yourself of the benefit of the patent license
for this particular work, or (3) arrange, in a manner consistent with the requirements of
this License, to extend the patent license to downstream recipients. "Knowingly rely-
ing" means you have actual knowledge that, but for the patent license, your conveying
The Free Software Foundation may publish revised and/or new versions of the
GNU General Public License from time to time. Such new versions will be similar
in spirit to the present version, but may differ in detail to address new problems or
concerns.
Each version is given a distinguishing version number. If the Program specifies that
a certain numbered version of the GNU General Public License "or any later version"
applies to it, you have the option of following the terms and conditions either of that
numbered version or of any later version published by the Free Software Foundation.
If the Program does not specify a version number of the GNU General Public License,
you may choose any version ever published by the Free Software Foundation.
If the Program specifies that a proxy can decide which future versions of the GNU
General Public License can be used, that proxy's public statement of acceptance of a
version permanently authorizes you to choose that version for the Program.
Later license versions may give you additional or different permissions. However,
no additional obligations are imposed on any author or copyright holder as a result of
your choosing to follow a later version.
15. Disclaimer of Warranty.
THERE IS NO WARRANTY FOR THE PROGRAM, TO THE EXTENT PERMIT-
TED BY APPLICABLE LAW. EXCEPT WHEN OTHERWISE STATED IN WRITING
THE COPYRIGHT HOLDERS AND/OR OTHER PARTIES PROVIDE THE PRO-
47

End User License Agreement for Operating System Software
GRAM "AS IS" WITHOUT WARRANTY OF ANY KIND, EITHER EXPRESSED OR
IMPLIED, INCLUDING, BUT NOT LIMITED TO, THE IMPLIED WARRANTIES OF
MERCHANTABILITYAND FITNESS FOR A PARTICULAR PURPOSE. THE ENTIRE
RISK AS TO THE QUALITY AND PERFORMANCE OF THE PROGRAM IS WITH
YOU. SHOULD THE PROGRAM PROVE DEFECTIVE, YOU ASSUME THE COST
OFALL NECESSARY SERVICING, REPAIR OR CORRECTION.
16. Limitation of Liability.
IN NO EVENT UNLESS REQUIRED BY APPLICABLE LAW OR AGREED TO IN
WRITING WILLANY COPYRIGHT HOLDER, OR ANY OTHER PARTY WHO MODI-
FIES AND/OR CONVEYS THE PROGRAM AS PERMITTED ABOVE, BE LIABLE TO
YOU FOR DAMAGES, INCLUDING ANY GENERAL, SPECIAL, INCIDENTAL OR
CONSEQUENTIAL DAMAGES ARISING OUT OF THE USE OR INABILITY TO USE
THE PROGRAM (INCLUDING BUT NOT LIMITED TO LOSS OF DATA OR DATA
BEING RENDERED INACCURATE OR LOSSES SUSTAINED BY YOU OR THIRD
PARTIES OR A FAILURE OF THE PROGRAM TO OPERATE WITH ANY OTHER
PROGRAMS), EVEN IF SUCH HOLDER OR OTHER PARTY HAS BEEN ADVISED
OF THE POSSIBILITY OF SUCH DAMAGES.
17. interpretation of Sections 15 and 16.
If the disclaimer of warranty and limitation of liability provided above cannot be
given local legal effect according to their terms, reviewing courts shall apply local law
that most closely approximates an absolute waiver of all civil liability in connection with
the Program, unless a warranty or assumption of liability accompanies a copy of the
Program in return for a fee.
48

Appendixes
Appendix A: Picture Format for Each Input Source
Aspect Specifications
Yes: Available / --: Not Available
Input Signal
AIR / CABLE
Analog
AIR / CABLE
Digital
AVI
AV2
COMPONENT 1
COMPONENT 2
HDMI 1
HDMI 2
HDMI 3
HDMI 4
Video
YCbCr / YPbPr
Video / S-Video
Video
YPbPr
YPbPr
HDMI I
/ DVI I
i
HDMI I
HDMI I
HDMI I
1080p/1080i/
720p/480p/480i
VGA
1080p/1080i/
720p1480p1480i
VGA
1080p/1080i/
720p1480p1480i
VGA
1080p/1080i/
720p1480p1480i
VGA
RGB Analog RGB
Aspect
Auto I 4:3 16:9 Full
Yes I Yes Yes .....................
Yes I Yes Yes
Yes Yes
Yes Yes
Yes I Yes Yes
Yes I Yes Yes
Yes I Yes Yes Yes
Yes Yes
Yes I Yes Yes Yes
Yes
Yes I Yes Yes Yes
Yes
Yes I Yes Yes Yes
Yes Yes
Yes! Yes
Zoom 1
Yes
Yes
Yes
Yes
Yes
Yes
Yes
Yes
Yes
!!!i
Zoom2
Yes
Yes
Yes
Yes
Yes
Yes
Yes
Yes
Yes
Yes
Appendix B: RGB Format
Resolution Frequency(Hz) Remarks Resolution Frequency(Hz) Remarks
640x480 60172/75 1360x768 60 L32A403 only
720x400 70 1280x1024 60 L42A403 only
800x600 56/60172/75 1440x900 60 L42A403 only
1024x768 60170175 1680x1050 60 L42A403 only
1280x720 60 1920x1080 60 L42A403 only
1280x768 60
The type of video board or connecting cable may not allow for correct displays adjustment of H-Position,
V-Position, Clock and Phase.
49

A
Accessories ......................................... 6
Antennas (Connecting) ................................ 12
Aspect Ratio .................................... 21,24, 49
Audio
Audio Settings ................................... 26
Audio Source ....................................... 26
B
Backlight ........................................... 24
Balance ........................................... 26
Bass ............................................. 26
P
Parental Control
Set Password .............................. 27
Block Unrated Channel ..................................... 27
Panel Lock .......................... 27
Movie Ratings ..................................... 28, 29
TV Ratings ....................................... 28, 29
TV Ratings (Canadian- English) ...................... 28, 29
TV Ratings (Canadian- French) ....................... 28, 29
Region 5 (Downloadable VChip) .................. 28, 29
Perfect Volume ..................................... 26
Picture Mode ....................................... 24
C
Caution and Safety Tips .............................. 2-5
Channel .................................. 33
New Channel Scan ................................. 33
Closed Captions
Caption Display ................................... 30
Color Temperature ................................... 24
Color ............................................. 24
Contrast ...................................... 24
E
Energy Options .................................... 30
External Video Sources .............................. 14-17
F
Favorite Channel .................................... 34
Features .......................................... 38
G
Game Mode ........................................ 24
H
HDMI ....................................... 14, 15,17
HDMI-CEC ....................................... 31
R
Remote Control
Functions ...................................... 18-21
Installing Batteries .................................. 6
Reset (Video) ....................................... 25
Reset (Audio) ....................................... 26
Reset (AV& Setup) ....................................... 32
S
Setup ............................................ 27
Sharpness ......................................... 24
Speakers Internal .............................. 26
Specifications ...................................... 38-40
SRSTruSurround HD .......................................... 26
T
Time ............................................ 27
Tint ............................................... 24
Treble ............................................ 26
Troubleshooting ................................. 35-36
V
Video Settings ................................... 24-25
I
Input Setup ...................................... 31
L
Language
Menu Language .................................. 27
M
Menu Preference
Language ........................................ 27
OSD Transparency ...................................... 30
N
Noise Reduction ....................................... 24
50

NECESITA MAS INFORMAClON SOBRE LA
TRANStClON A TELEVISION DtG/TAL (DTV) ?
Lea la p_gina 34 en esta Guia de Operaciones y
por favor w;site www. dtvtransition.org
lnspJre
Televisor de
Guia de
HDTV Serie AIfa
Funciona_iento
L42A403 y L32A403
[ DOLBY
DiGiTAL I

lnstrucciones l pertantes de Seguridad
PUNTOS DE SEGURIDAD QUE USTED DEBE SABER ACERCA DE SU TELEVISOR DE LCD HITACHI
Nuestra reputaci6n se ha formado en base a la calidad, desempeSo y facilidad de servicio de los televisores de LCD Hitachi.
La segundad es la prioddad en nuestra mente al dise_ar estas unidades. Para ayudarlo a operar estos productos en forma apropiada, esta
secci6n iiustra datos de seguridad que seran de beneficio para usted. L@alos cuidadosamente y aplique los conocimientos adquiddos para
operar apropiadamente su televisor de LCD Hitachi.
AVI.SO: PARA REDUCUR EL RESGO DE DESCARGA
ELECTRICA, NO RETIRE LA CUBIERTA NI EL PANEL
POSTERIOR, EN EL INTERIOR DEL APARATO NO
EXmSTEN PARTES QUE DEBAN SER REPARADAS
POR EL . USUARUO. SOHCmTE SERVIOIO O
REPARACION A PERSONAL CALIFICADO=
El sirnbolo det rayo dentro de un triangulo equilatero tiene pot finalidad
alertar al usuano acerca de la presencia de voltaje peligroso (sin
aistamiento) en el interior de! producto, que puede tenet la intensidad
suficiente como para considerar un riesgo de descarga etectrica.
El signo de exclamaci6n dentro de un triangulo equilatero tiene pot
finalidad alertar al usuario de instrucciones importantes de operaci6n
y mantenimiento (servicio) en la literatura que acompa_a a este
aparato.
LEA ANTES DE OPERAR EL EQUIPO
Siga todas las advertencias e instrucciones marcadas en este
televisor de LCD.
1. Lea estas instrucciones.
2. Conserve ias instrucciones.
3. Tome en cuenta todos los avisos.
4. Sigatodas las instrucciones.
5. No utiiice este aparato cerca del agua.
6. Limpie el equipo con un paso seco.
7. No bloquee las rendijas de ventilaci6n. Instale el equipo segOn
ias instrucciones del fabncante.
8. No io instale cerca de fuentes de calor, como radiadores,
registros de calor, hornos o demas aparatos (incluidos
amplificadores) que produzcan calor.
9. No altere la funci6n de seguridad de la clavija de tipo conexi6n
a tierra. La clavija de tipo conexi6n a tierra tiene dos terminales
y una tercera terminal de conexi6n a tierra. La tercera terminal
se incluye para su segundad. Si ia clavija suministrada no
encaja en ia toma, p6ngase en contacto con un electricista
para que cambie el receptaculo de ia pared (enchufe).
10. Proteja el cable de alimentaci6n para que no se pise ni est@
retorcido, especialmente en las clavijas, los receptaculos y el
punto pot el que sale del aparato.
11. Utilice Onicamente los accesorios especificados pot el
fabncante.
12. Utiiice Onicamente el carro, mueble, tripie,
soporte o mesa especificado pot el fabricante
o de venta con el aparato. Si utiliza un carro,
tenga cuidado al mover el aparato para evitar
que se caiga y provoque lesiones personales.
13. Desconecte el equipo durante tormentas electricas o cuando
no Io vaya a utilizar durante periodos prolongados.
14. Para tareas de mantenimiento, dirijase a personal calificado.
Sera necesano recurnr a tareas de mantenimiento si el aparato
sufre da_os de cualquier tipo, si el cable de alimentaci6n o ia
clavija estan daSados, si ha caido iiquido u otros objetos en el
aparato o si @ste ha sido expuesto a la Iluvia o humedad, si no
Fuente de Energia
15.
16.
17.
18.
funciona con normalidad o se ha caido.
Los televisores estan diseSados para cumplir con los
estandares de segundad recomendados para inclinaci6n y
estabilidad. No aplique fuerza excesiva a ia parte superior o
frontal de gabinete que pudiera hacer que el televisor se caiga
causando daSo del producto y/o daSo personal.
Siga las instrucciones de montaje en ia pared, estante o techo
segOn io recomendado pot el fabricante.
Una antena exterior no debera set instalada en ia cercania
de iineas de alimentaci6n externas ni de otros circuitos de
iiuminaci6n el6ctrica.
Si se conecta una antena externa 6 sistema de cable a ia
unidad, cerci6rese de que el sistema de antena 6 cable esta
conectado a tierra para darie protecci6n contra sobretensi6n
y acumuiaci6n de carga estatica. La Secci6n 810 del C6digo
Nacional de Eiectricidad, ANSIINFPA 70-1984, proporciona
informaci6n con respecto a como poner a tierra el mastii
apropiadamente y ia estructura de sostenimiento, ai poner a
tierra el alambre de entrada a una unidad de descarga de
ia antena, tamaSo de los conectores para poner a tierra,
iocalidad de ia unidad de descarga de antena, conexi6n de
los electrodos a tierra y los requisitos para el electrodo que
pone a tierra.
CATV hada e! Artfculo 820-44 de la NEC que brinda gulas para una
puesta a tierra apropiada yen particular, especifica que la fierra de!
cable debe conectarse ai sistema de fierra de! edificio, tan pr6xime a
la entrada de cable come sea m4s pr4ctico.
NEC CODIGO NACIONAL DE ANTENA
ELECTRICIDAD
_UN_DAD DE DESCARGA DE LA
_E f ................ ANTENA (NEC SECC_ON 810 20)
ABRAZADE RA DE
RRA
i ...... i CONDUCTORES0£ PUESTAA
"o DE iSERVICIO ELECTRICO _ TfERRA (NEC SECCION 8/0 2/)
- _ - SERVICIO DE ALIMENTACION DE SISTEMA
aSRAZADERAS DE TIERRA_ _ -
(NEC ART 250 PARTE H}
Este televisor de LCD esta dise_ado para operar con corriente CA, 120 voltios 60 Hz. Inserte el cable de electricidad en un toma de elec=
tricidad de 120 voltios a 60 Hz. El cable se utiliza como dispositivo de desconexi6n y debe permanecer siempre disponibie.
Para impedir descarga electrica, no utilice la clavija (polarizada) del televisor de LCD con una extensi6n, receptaculo u otro enchufe a me-
nos que los terminales y la terminal de tierra puedan insertarse completamente para evitar que la terminal este expuesta.
Nunca conecte el televisor de LCD a 50 Hz, corriente directa o cualquier otto voltaje que no sea el especificado.
Precauci6n
Nunca quite la tapa trasera del televisor de LCD ya que esto puede exponerlo a voltajes muy altos y a otros peligros. Si
el televisor no funciona en forma apropiada, desenchufe el televisor de LCD y Ilame a su distribuidor o centro de servicio
autorizado. Ajuste solamente los controles que se incluyen en esta guia, los cambios inapropiados o modificaciones que no
esten expresamente aprobadas pot Hitachi poddan anular la garantia.

Adve_encia
Parareducirelriesgodefuegooshockelectrico,noexpongaelaparatoaIluviaohumedad.
EltelevisordeLCDnosedebeexponerafiltradoosalpicadodeliquidosyaobjetosconiiquidos,talescomoflorerosque
nosedebencolocarsobreeltelevisor.
Esteaparatosedebeconectaralareddeelectricidadconunaconexi6ndeprotecci6natierra.
Visi6npQblicadematerialconderechosdeautor
Lavisi6npOblicadeprogramastransmitidospotestacionesdetelevisi6nocompafiiasdecable,asicomoprogramasdeotrasfuentes,
puederequerirautodzaci6npreviadeldifusoropropietariodelmaterialdeprogramadevideo.Esteproductoincorporalatecno!ogia
deprotecci6ndederechosdeautor,queestaprotegidapotdemandasdemetodosdeciertaspatentesdeEE.UU.yotrosderechosde
propiedadintelectual.Elusodelatecnologiadeprotecci6nconderechosdeautordebesetautodzada,yessoloparausoenelhogaru
otrosusoslimitadosalconsumidoramenosqueseaautodzado.Estaprohibidalaingeniedainversaoeldesmontaje.
Aviso sobre Plomo/Mercurio
._g_ Este producto contiene ptomo y una o mas tamparas de retroituminaci6n de mercurio no reemptazables. No to tire a
ta basuraDeseche este producto de acuerdo alas leyes ambientates apticabtes. Para informaci6n sobre recictado y
desecho det producto, contacte su agencia gubemamentat local o visite wvcw.eiae.org (en EEUU.) o en vcww.epsc.ca
(en Canada). PARA MAYOR INFORMACION, LLAME AL 800-HITACHI.
DECLARACI6N DE LA FCC (FEDERAL COMMUNiCATiONS COMMiSSiON}
Este equipo ha sido probado y ha demostrado cumplir con las limitaciones para los dispositivos digitales Ciase B, de conformidad con el
Apartado 15 de las Normas de la FCC. Estos limites ban sido disefiados para proporcionar una protecci6n razonable contra las interferencias
perjudiciales en una instalaci6n residencial. Este equipo genera, utiliza y puede radiar energia radioelectrica, y si no se instala y utiliza de
acuerdo con las instrucciones, puede causar interferencias perjudiciales en las comunicaciones pot radio. Sin embargo, no existe ninguna
garantia de que las interferencias no se produzcan en una instalaci6n particular. Sieste equipo causa interferencias perjudiciales en la
recepci6n de la radio o televisi6n, Io que se puede determinar apagando y encendiendo el equipo, al usuario sele recomienda intentar
corregir la interferencia tomando una o mas de las siguientes medidas:
Cambie la orientaci6n o el lugar de instalaci6n de la antena.
Aumente la separaci6n entre el equipo y el receptor.
Conecte el equipo a una toma de corriente diferente de aquella a la que esta conectado el receptor.
Consulte a su proveedor o solicite la ayuda de un tecnico con expedencia.
Este dispositivo cumple con el Apartado 15 de las normas de la FCC. El funcionamiento esta sujeto alas dos condiciones siguientes:(1)
Este dispositivo no debera causar interferencias perjudiciales y (2) Este dispositivo debera aceptar cualquier interferencia que reciba,
incluyendo la interferencia que pueda causar un funcionamiento no deseado.
Modificaciones
La FCC requiere que se notifique al usuario que cualquier cambio o modificaci6n hecha a este dispositivo que no haya sido aprobada
expresamente pot Hitachi Home Electronics (America), Inc. puede anuiar la autoddad del usuario para operar este equipo.
Cables
Las conexiones a este dispositivo deben ser hechas con cables blindados con conectores metalicos RFIiEMI para estar en cumplimento
con las Normas y Regulaciones de la FCC. Cualquier cable que se incluya con el equipo debeser reemplazado con cables identicos para
asegurar el cumplimiento de las Normas de la FCC. Ordene repuestos Hitachi para reemplazar sus cables.
_i Eate receptor de televisi6n despliega subtitu!os (_ or _ ), en acuerdo con los p_rrafos 15.119 y 15.122 de/as normas de
la FCC.
INFORMACI6N REGULATORIA DE LA AGENCtA DE LA INDUSTRtA DE CANADA
Aparato de Televisi6n compatible con cable- Television c_blocompatible, Canada.
Deelaraci6n de Conformidad
Este dispositivo cumple con el Apartado 15 de las normas de la FCC. El funcionamiento esta sujeto alas dos condiciones siguientes:(l )
Este dispositivo no debera causar interferencias perjudiciales y (2) Este dispositivo debera aceptar cualquier interferencia que reciba,
incluyendo la interferencia que pueda causar un funcionamiento no deseado.Para preguntas sobre esta declaraci6n, favor de contactar a:
Hitachi Home Electronics (America), Inc.
900 Hitachi Way
Chula Vista, CA 91914-3556
Tel. 800-448-2244(800-HITACHI)
ATTN: Customer Relations
, VGA y XGA son marcas registradas de International Business Machines Corporation.
, VESA es una marca registrada de Video Electronics Standard Association.
, HDMI, el logo HDMI logo y High-Definition Multimedia Interface son marcas registradas de HDMI Licensing LLC.

4
Felicitaciones pot su compra! A medida que usted disfruta de su producto nuevo, pot favor tenga en mente estos
consejos de seguridad:
LA CUESTJ6N
* La experiencia de entretenimiento de cine en casa es una tendencia que va
en aumento y ias pantattas de panel deigado grandes son hoy en dia compras
populates. Sin embargo, ias pantaiias de panel deigado no siempre se apoyan en
los soportes apropiados ni estan instaladas siempre segOn tas recomendaciones deJ
fabricante.
- Las pantatias de panel deigado que se sitOan inadecuadamente en aparadores,
tibreros, estantes, escritorios, bocinas, cofres o camtos pueden caer encima y causar
tesi6n.
HITACHI SE PREOCUPA!
- La industria de Ja eiectr6nica de consumidor esta comprometida para hacer Ja
experiencia de entretenimiento de cine en casa agradabte y segura.
CONSIDERACJONES DE SEGURJDAD
* Un mismo tamaBo no es para todos Jos productos. Siga tas recomendaciones
deJ fabricante para ta instalaci6n y uso seguros de su pantaita de panel deigado.
- Cuidadosamente lea y comprenda todas tas instrucciones de esta guia de
operaci6n para el uso apropiado de este producto.
- No permita que los nitros trepen encima o jueguen con tos muebies y teievisores.
- No cotoque tas pantaJias de panel deigado en muebtes que pueden ser usados
como escaJones,tales como un cofre de cajones.
- Recuerde que los ni_os pueden emocionarse facilmente mientras ven un
programa de teievisi6n, especialmente en una pantaita de panel deigada "extra
grande". Se debe tener cuidado at cotocar o instalar ta pantaita donde no pueda
ser empujada, ]aiada o derrumbada.
* Se debe tenet cuidado de instaJartodos los cables y cordones conectados a ia
pantalia de panel deigado de manera que no puedan set ]atados o agarrados
pot ni_os curiosos.
SOBRE SJ USTED DECIDE
MONTARSUPANTALLADEPANELDELGADO
LAPARED,SIENPRE:
- Utitice un soporte que hatta sido recomendado por el fabricante de ta pantaJta yi
o enlistado por un taboratorio independiente (tat como UL, CSA, ETL).
- Siga tas instrucciones dadas pot tos fabricantes de ta pantalta y del soporte para
pared.
* Si tiene atguna duda acerca de su habilidad para instatar de manera segura
su pantaJla de panel detgado, pregunte a su vendedor sobre ta instalaci6n
profesional.
* AsegOrese que ta pared donde esta montando la pantaJta es apropiada. Algunos
soportes para pared no estan disefiados para set montados a paredes con
taquetes de metal o de bJoque hueco. Si usted no esta seguro, contacte a un
instaJador profesionaL
* Se requiere un minimo de dos personas para ta instalaci6n. Las pantaltas de
panel delgado pueden set pesadas.
CO_ EJ_on_ As_daSan

No colocar la unidad sobre
superficies desniveladas, puede
caer 6 da_ar la unidad, tambi6n
puede causar hendas,
Desconectar de inmediato si
hay un defecto en el TV como
no imagen, no audio/video 6 si
hay humo y mal olor proveniente
de_ TV.
o
No tirar objetos dentro de1 TV
como metales, monedas u otros
matedales flamables.
No colocar e_ TV en lugares
encerrados 6 dentro de una caja
al estar operando e_TV.
Desconectar de inmediato si
algun material extra_o cae
dentro del TV 6 si se cae e_TV.
No abrir e_gabinete del TV.
Recuerde desconectar e_ cable
de alimentaci6n de CA deJ
enchufe antes de limpiar. No
usar limpiadores liquidos 6 en
aerosol para limpiar la pantaHa.
Asegurese de desconectar la
unidad al no ser usada pot un
largo periodo de tiempo (d_as).
No tapar 6 bJoquear las ranuras
de ventHaci6n del TV. Una
ventilaci6n inadecuada puede
acortar Jaduraci6n de la pantaHa
y causar sobrecalentamiento.
Evitar la luz directa de1 sol,
lugares con polvo, alta humedad
y humo.
No colocar el TV cerca de
agua, como una tina de ba_o,
regadera, sink de cocina,
tina de lavar 6 alberca. Evitar
recipientes de liquidos sobre la
unidad.
Aviso para e_Control Remoto
Evite dejar caer unidad.
Evitar Hquidos encJma. Evitar limpiadores en aerosol.

Access@ri@s
Favor de asegurarse de tenet Ros siguientes aceesorios antes de desechar el material de empaque.
(_) Control Remoto (_) 2 Baterias 1.5V F,-, (_) Gu{a de
CLU4591AV Tipo "AA" k_ Cable de Alimentaci6n Funcionamiento
No. Parte HL02631
C)
PMODE 8_ODE MTI/_AP ASPECT
MENU i_PUT
© ©
H|TACHJ
CLU-4111AV
Guia Fac/Grafica
HmTACH|
LeD _LAT PANEL TEL_VISUON
oper_._ Gu{ae fo_,L42A403 & L32A_3
,_.... i._"J=2_ _i;
_,_2_J, _ _i
Para accesorios opciona/es, v/site nuestro sifio de intemet : wwwthitachL us/tv
INSTALACI6N Y REMPLAZO DE LAS BATERiAS DEL CONTROL REMOTO
Et control remoto funciona con dos batedas tipo "AA"
1. Abra ta cubierta de tas batedas dei controt remoto presionando y destsando ta cubierta en
ta direcci6n de la flecha.
2. Coloque dos batedas tipo "AA" para et controt remoto. Al remptazar tas batedas, empuje
hacia los resortes y tuego saquetas.
3. Haga coincidir tas marcas de las batedas (+) y (-) con tas marcas del compartimiento.
4. Inserte ta parte inferior de ta bateda, et tado (-) neg, en el compartimiento primero, tuego
empuje hacia tos resortes e inserte ta parte superior de ta bateria, el tado (+) pos, en su
tugar. No force ta bateda dentro det comparlmiento.
5. Cotoque de nuevo ta cubierta y destizar hasta que se escuche el click al cerrar.
E/montaje en el techo no es recomendab/e. Montar e! panel en el techo no provee /a adecuada vent_Taci_n
a/o e/ectrSnico _ el apropiado soporte a/ panel frontal de v_rio. Este te/ev;;sor de LCD esta dise_ado
para una indinaciSn m_xima de 45 ° desde /a verticaL
Por favor lea/a p_gina 8 para informaci6n importante acerca de/montaje en /a pared.
%
• No co/oque/as baterias con/a polar/dad '+'y C'invertidas esto puede causarque/as baterias se derramen
dentro de/compartimiento.
, Nunca mezde bateHas usadas con bateHas nuevas en este control remoto.
, Remp/ace todas/as baterias en el control remoto a! mismo tiempo.
, Remueva/as baterias si el control remoto no va a set utifizado pot un periodo de tiempo largo.

C6mo JnstaJar su Nuevo Televisor de LCD Hitachi
Como tomar medidas para evitar que el televisor de LCD se incline e impedir posibJes da_os, es impor_ante montar la unidad en
una superfi¢ie estable y lisa.
ENSAMBLE DE LA BASE
IMPORTANTE: La Base det Televisor LCD debe ser
ensambtada antes de usar.
1. Cotocar et TV con et frente hacia abajo sobre una
superficie plana cubierta con una teta suave como un
cobertor, sabana, etc. para prevenir atg6n da_o 6 ray6n at
Televisor de LCD.
2. Con cuidado atinear e insertar ta Base at poste del TV.
3. Insertar los tornittos inctuidos en los accesorios en ta parte
inferior de ta base y apretar los tornittos a ta base.
No b!oquee las ranuras de ventilaci6n de/televisor
de LCD. El b!oqueo de agujeros de ventilaci6n
podrla causar sobrecalentamiento o defectos.
En caso de un sintoma anorma!, desconecte el
cable de alimentaci6n y contacte a 800-HITACHL
Si compr6 un soporte de montaje para pared,
solicite un instalador profesionaL No/o instale pot
su cuenta.
Instale la unidad en un 4tea apropiada donde no
se exponga a nadie al peligro de golpearse (por
ejemplo, manos, cabeza 6 cara) contra e! borde de
la unidad y pueda causar una lesi6n personal.
Precauci6n al mover la unidad principal
Como este producto es pesado, para movedo, se requ_eren
dos personas para transportarlo con seguridad. Cada vez que
se mueva la unidad debe levantarse hacia adelante usando la
parte superior y la base a ambos lados del televisor para Iograr
estabilidad. Cuando mueva el televisor, levante de las esquinas y
luego tomar de la parte superior como se muestra :
Instalaci6n del cable de Aiimentaci6n CA
El cable de alimentaci6n CA incluido con su nuevo televisor de
LCD necesita set instalado correctamente para evitar su descon=
exi6n al mover el televisor.
Localizados en la parte posterior del televisor hay un sujetador
de plastico para sostener el cable de CA. Pot favor siga las
instrucciones mencionadas abajo.
(_ Pase el cable de CA a trav6s del sujetador y con6ctelo al
televisor.
(_ Cierre el sujetador para fijar el cable de CA al televisor.
Todos los cables conectados al televisor ser_n sujetados
pot este sujetador.
Ubicaci6n
Seleccione un area donde la iluminaci6n interior o la luz solar no
se dirijan directamente sobre la pantalla. Si esto no es posible, se
pueden usar cortinas para reducir el reflejo.
Tambien asegOrese de que ia ubicacidn seleccionada permite un
flujo iibre de aire hacia y desde ia tapa posterior del equipo. Para
evitar el aumento de temperatura interna, mantenga un espacio de
4 pulgadas (10 cm) desde los lados y la parte posterior del televisor,
y 30 cm (12 puigadas) desde la parte superior del televisor al techo.
Para evitar deformaciones del gabinete, cambios en el color del
gabinete y mayor probabilidad de falla en el equipo, no coloque el
televisor donde las temperaturas puedan volverse excesivamente
calidas pot ejemplo, a la luz solar o cerca de un calefactor, etc.
Asegurando a la pared
1. Use dos cables metalicos para sujetar el televisor a traves de
los tornillos sujetadores en la parte posterior del televisor LCD
como se muestra abajo.
2.
Mantenga el televisor LCD separado al menos 4 pulgadas (10
cm) de la pared (excepto cuando se monta a 6sta utilizando
una base adecuada) y asegOrela a la pared como se muestra

C6 o JnstaJar su Nuevo TeJevisor de LCD Hitachi
CONFIGURACJON PARA MONTAJE EN LA PARED
PASO (1) : REMUEVA LA BABE DBL TBLBVIBOR LCD
Para poder quitar la base del Televisor, favor de colocar el Televisor en una superficie lisa y cubrNa con una teJa suave (Cobertor,
sabana, etc.) para evitar cualquier da_o; Juego quitar los 4 torniJlos de Ja BASE del Televisor mostrados en Ja figura para separar Ja
BASE del Televisor, ahora la BASE puede ser separada del Televisor. Para dimensiones Otiles para el ensamble en Ja PARED favor
de ver ia pagina 39 y 40.
(a) (b) 4tornillos((o) M4 milimetrico
(a) _ _ y (b) tornille con rondano) no
b)e mezclor los tornillos
Base del Televisor
PABO (2) : JNBTALB LAB BABBB PARA BL MONTAJB BN LA PARBD BN BL TBLBVJBOR LCD UTIL_ZANDO 4 TORNILLOB.
Para el ensamble de ia Base para Pared; vet el Manual de Instalaci6n de
Ja Base para Pared.
Long. del Tornillo (A)
--> Long. de Inserci6n LB)
Rondana de pres. (C)
Rondana plana (D)
Soporte de la base (E)
Ejemplo :
A = B+C+D+E
A: 13.5~15.5 ram.
B: 8.5~10.5 ram.
C: 1 ram.
D: 1 ram.
E: 3 ram.
"El tipo de tornillo : Rosco ISO M6
(Milim6trico, no usor Est_ndor).
PA80 (3) : TIP8 A CON81DBRAR PARA LA UBICA¢I6N DBL TBLBWBOR DB LCD,
Mayor a
30 crrt (1').
aS blf_
hi( _e_
la _e¢
_Je re(
_a
Aunque este Televisor de LCD puede ser instalado usando una variedad de bases de otras mamas,
eataa bases 6 soportes de otras mamas no han aido probadas 6 aprobadas pot Hitachi para uso 6
compatibflidad con este Televisor de LCD. Pot consecuencia, Hitachi no acepta responsabifidad pot
cualquier lesion personal 6 daSo a! producto causado pot el uao de tal base o soporte de otras mamas.
Hitachi aconaeja en&rgicamente que cualquier instalaci6n de este Televisor de LCD usando una base para pared sea ejecutada pot
personal altamente calificado y con experiencia en inatalaciones de tele_Ysores que sea evaluado en:
a) la fuerza y eatabilidad de la aupefficie de la base que aoatiene el peso; y
b) la fuerza y compatibilidad de los soportes de la base que sostienen el peso.

ControJes y Cenexiones deJ PaneJ LateraJ
............................. VISTA FRONTAL
SOlO
modelo
L42A403
@-
i°U
©
+
VOL
A
CH
_v
v
MENU
INPUT
POWER
® Sensor de
_->@ Control
Remoto
HrrACH,
Luz Indicadora
® Bot6n de Encendido/Apagado
Este es el bot6n de encendido y apagado de1 televisor de
LCD, para poder encender el televisor, la luz indicadora debe
estar encendida (Indicador en Rojo). Si el indicador esta
apagado, conectar la clavija al enchufe.
Q Bot6n MENU
Este bot6n permite entrar al MENU, haciendo posible
configurar las opciones del Televisor a su preferencia sin
utilizar el control remoto. Este bot6n tambi6n sirve como el
bot6n Return (Regresar) a! estar en modo de MENU.
(_) Bot6n INPUT
Presione este bot6n para accesar el men0 de entradas.
(_) Nivel de VOLUMEN
Presione estos botones para ajustar el nivel de sonido. El nivel
de volumen sera desplegado en la imagen.Estos botones
tambi6n sirven como los cursores izquierdo (_1)y derecho (1_)
al estar en el modo de MENU.
®
Luz Indicadora de Encendido
Para encender el televisor, presione el bot6n de Encendidot
Apagado (C)). Una luz indicadora roja en la esquina inferior
izquierda del marco del televisor debera estar encendida para
poder encender el Televisor LCD.
Enciende OFF Cuando el Televisor LCD esta
Rojo (Standby) conectado a la alimentaci6nde CA.
Enciende ON Cuando elTelevisorLCD esta
Azal encendido, seve imagen.
Rapido ON El TV se esta apagando OFF.
Parpadeo Pronto estara apagado Off yen
Rojo modo de espera (Stand-by).
Lento ON El TV esta en la entrada RGB y
Parpadeo (Stand-by) ha estado sin ninguna sepal pot
Rojo 15 min. El TV reiniciara luego
de detectar la sepal.
(_) Selector de Canales
Presione estos botones hasta que el canal deseado aparezca
en la esquina superior derecha de la imagen.Estos botones
tambi6n siwen como los cursores abajo (_') y ardba (J,) al
estar en el modo de MENU.
(_ Terminales de Entrada Lateral (AV2)
Esta entrada provee terminales de video compuesto y
S-Video (Solo modelo L42A403) para conectar equipo con
esta capacidad, tales como reproductores de DVD, Consolas
de videojuegos 6 Videocamaras.
® HDMI-3 y HDMI-4
Utilice esta entrada HDMI para equipos externos como Set-
Top-Boxes 6 DVD equipados con conexi6n de salida HDMI
(ver pagina 14 para referencia).
Terminal de ActuaHzaci6n de Software pot USB
Esta opci6n es para mejoras futuras de software.
® Sensor del CONTROL REMOTO
Apunte su control remoto en esta area al elegir canales,
ajustando volumen, etc.
, Su televisor LCD Hitachi no mostrara imagen si no
hay ninguna entrada de video conectada cuando
se selecciona AV1, AV2, Component1 6 2, 6 HDM/
1, 2, 3 6 4. A su vez un mensaje de "No signal "
(sin serial) aparecera y adem4s la /uz indicadora
permanecer4 azul hasta que se apague el televisor
6 en modo de espera (luz roja) a/no estar en uso.
. El Control remoto puede encender/apagar el
televisor y adem4s encender y apagar cua/quier
equipo compatible con CEC.
_ Terminal de Audifono
Usar esta terminal para conectar audifonos.

®
@
A R/CABLE
v
HDMI 1 HDMi 2
©©
Y Pb Pr L R
k.
Entrada de Antena
Para cambiar entre la sepal Cable yAerea, ira ta opci6n
de Canales (Channel) para cambiar el tipo de se_at
CABLE 6 Aerea. (vet pagina 33).
Entrada pot Componente: Y-PbPr y Audio
Las entradas Component1 y 2 proveen terminales
Y-PbPr para conectar equipos con esta capacidad,
tales como reproductores de DVD 6 Set Top Box.
o Las saiidas pot componente de su equipo
pueden /iamarse Y,B-Y, y R-X En este caso,
conectar /a safida pot componente B-Y a/a
entrada Pb de/TV y la safida pot componente
R-Y a/a entrada Pr de/televisor.
Las salidas pot componente de su equipo
pueden flamarse Y-CbCr. En este caso,
conectar /a sa/ida pot componente Cb a /a
entrada Pb de/TV y la safida pot componente
Cr a/a entrada Pr.
Puede set necesario ajustar el T/NTE para
obtener una 6ptima ca/idad de imagen a/ usar
la entradas Y-PbPr (ver pag. 24).
®
satida HDMI.
HDM/, el logotipo HDM/ y el nombre High-Definition
Multimedia interface son marcas registradas de ta
compa_ia HDM/Licensing LLC.
Salida Optica (Digital Out)
Esta terminaI provee Salida de Audio Digital de un
equipo con HDMI 6 un programa de un canat digitaI a
un equipo de audio que es compatible con RAW y PCM,
tal como un amptificador de audio.
*Fabricado bajo ficencia de Dolby Laboratories.
"Dotby" y e/ simbolo doble-D son mamas
registradas de Dolby Laboratories.
® Entrada RGB y AUDIO para Cornputadoras
Personales (PC)
Usar ta terminal de entrada RGBiAudio Analogo para
conectar una PC 6 Laptop usando un cable RGB (D-sub
15 pines) a su televisor LCD. Favor de vet ta pagina 42
para tas se_ates compatibles (resotuci6n).
® Entradas HDMI 1, 2 (Interface Mumtirnedia de AIta
Definici6noHigh Definition Multimedia interface)
ce,co
I"II II,,,J | Ii II!!
es ta nueva-generaci6n de
interface digital para equipos H'GH=DEFIN'TION MULTIMEDIA 'NTEBFAOE
etectrdnicos. Et HDMI permite ta segura distdbucidn
de video de atta definici6n sin comprimir y mOltiples
canales de audio en un solo cable. Porque tas se_ales
digitates de TV (DTV) permanecen en formato digital,
et HDMI asegura que las imagenes de alta-definici6n
mantengan la mas atta calidad de video desde un equipo
a la pantalta de su Televisor. Usar ta entrada HDMI para
conectar equipos extemos tales como Set-Top-Boxes
6 reproductores de DVD equipados con conexi6n de
®
®
Terrninales de entrada de Video Cornpuesto AVI
La entrada AVI provee una entrada de Video compuesto
y S-Video para conectar equipo con esta capacidad,
tales como reproductores de DVD, Consota de Video
iuegos 6 Videocamaras.
Terminal de salida de Audio
Esta terminal provee salida de audio en estereo de su
televisor a un equipo de audio, tai como un amptificador
de audio.
10

Ademas de controJar todas Ins funciones de su Televisor de LCD Hitachi, el nuevo control remoto esta dise_ado para operar
diferentes tipos de reproductores de DVD compatibles con HDMI CEC. Para detaJles sobre el HDMFCEC favor de ver a
pagina 31.
Bot6n de Encendido (POWER) On/Off
Presionar este botSn para encender o apagar el
TV.
Bot6n del modo de Jmagen (R Mode)
Presione cada vez para cambiar el modo de la
imagen en _asiguiente secuencia:
C Dynamic _ Standard_ Movie _
Game _-iCustom _
(b/I __ Aspecto de Ba_magen"k
J _ Presione este bot6n para cambiar el tama_5o
P;40DEj S,M_DEI'_TS/SAPASPECT de la imagen.
J _ " _ • i -- Bot6n del Modo de Sonido (S.Mode)
1 Presionar este bot6n para cambiar el modo
ii12. h0oso ,0o.
Botdn NTS/SAP
...................56 .........4 ....... Presionar este bot6n para cambiar el tipo de
, audio de los programas de TV que se esta
Botones Num_ricos l viendo_
i
Presione estos botones para introducir .......7 .......
manualmente el canal en el televisor y para , --Bot6n Enter
introducir c6digos numericos cuando se navega Presione este bot6n para usarlo como la
en el menO en pantalla, i , - _ ,, ..... opci6n SELECT.
_i i I i i
Oot n(-)0°, n,Autoapa0ado(S,eep) ENTER'I --Oot ndeOana,Ar.ba,Abajo
Presionar este bot6n para sintonizar un canal i ................, L,_STCH ............. H Cambia hacia arriba o hacia abajo los
digital. Tambien presionar para seleccionar eJ I i "_ .......... / A " I_ canales.
tiempo de auto-apagado desde 5 minutos hasta I ,-..-.._/f_U ¢'PJ
4 horns, I I vv_ MUTE _/I I [= Bot6n Mute (SHencio)
I _ _ i_ ' /' I _ Reduce el nivel de audio a 0 si se preslona
Bot6n de Canal Anterior (LAST CH)= -- -- _J .... -' l ..... _! J una vez, y para restaurar el nlvel de audio
Cambia entre el canal actual y el Oltimo canal i ESAVE CC SLEEP FAV.CH I presionar otra vez 8 solo presionar la tecla de
visto. I I _ volumen.
Bot6n de VOLUMEN =Bot6n de CanaJ Favorito
Presione (+) para incrementar 6 (_) para PresJone para entrar/accesar el modo de
disminuir el nivel de audio del televisor. Canales Favoritos.
Bot6n de AHORRO de ENERGiA Auto Apagado (S_eep)
Presione este bot6n para activar ta reducci6n de Presionar para se_eccionar el tiempo de auto-
consumo de energia basado en tres niveles (Min, apagado desde 5 minutos hasta 4 horns.
Med, Max).
\ /
Bot6n CO (Subtitulos) Seleeci6n de Entradas (iNPUT)
Presione este bot6n para mostrar y cambiar el Presionar este bot6n para cambiar Ins
modo de subtJtu!os (CC). entradas.
Bot6n de MENU Jnformaci6n (INFO)
Accesa el menO en pantalla (OSD menu). Despliega e! estado de la se_a! de entrada y
otra informaci6n ta! como horario, etc.
Bot6n para SAUR (EXIT),
Presione este bot6n para salir del menO en
panta!la OSD.
Botones OURSORESISELEOT H| _Ti._
Los botones CURSORES son usados para / kCHn
navegar eJ cursor dentro del menO en pantalla y CLU-5gIAV
de Ins entradas (INPUTS), y el bot6n SELECT es
usado para ElegiriActivar la opci6n marcada.
Botones de Control
(DVD con CEC)
Controla las funciones de reproductores de DVD
compatibles con control HDMFCEC.
- El sensor de control remoto del TV esta !ocalizado en la parte inferior izquierda de la pantalla. Para controlar Ins funciones
del teledsor, pot favor apunte el control remoto directamente al sensor del televisor para obtener un mejor resultado.
- La tecla de pausa "li "en el Control Remoto puede set usada para congelar (Freeze) la imagen en la pantalla, en caso de
que esta tecla sea presionada por accidente, favor de presionar una vez m4s para restaurar la imagen en mov;_miento.
11

12
Reaiice Rassiguientes instrucciones para configurar de
manera r_pida su nuevo televisor de LCD HitachL
1. CONEXI6N DE ANTENA
A menos que su televisor de LCD est6 conectado a un sistema
de televisi6n pot cable o a un sistema de antena externa, se
recomienda una buena antena de televisi6n color para mejor
rendimiento. Sin embargo, si se encuentra en un area con sepal
excepcionalmente buena sin interferencia y sin fantasmas en ia
imagen, una antena interior puede set suficiente.
a). Antena VHF (75-Ohm)ICATV (TV pot Cable)
AI usar un sistema de cable coaxial 75=Ohm, conecte el cable
coaxial de seSal CATV a la terminal AIRICABLE (75-Ohm). O si
tiene una antena, conecte el cable coaxial a la misma terminal
AIR/CABLE.
Ala antena extema Ala
6 Terminal
Sistema de TV pot deAntena
cable(CATV)
b). Antena VHF (300-Ohm)/Antena UHF
AI usar un cable piano de 300-Ohm de una antena externa, conecte
los cables de ia antena VHF 6 UHF a los torniilos del adaptador
VHF 6 UHR Inserte el adaptador a ia terminal de antena en el
Televisor.
TerminalA la antena VHF 6 de Antena
UHF extema
SeSal Aerea
o pot Cable
Panel Posterior
de Antena
e). AI usar ambas antenas VHF y UHF eoneetadas
Use un mezclador de cable/antena opcional conectado a la terminal
de antena, y conectar los cables al mezclador. Consulte con su
distribuidor o centro de servicio pot los mezcladores de antena.
A la antena extema
A la antena UHF d sistema de CATV
Mezclador de Antena
Conectar un came piano de 300-Ohm puede causar interferencia. Es m#s recomendaMe usar un came coaxial de 75-Ohm.
2. CONECTE SU NUEVO TELEVISOR LCD HITACHI LCD A LA FUENTE DE ALIMENTACt6N
a). Conecte el cable de atimentaci6n CA a su televisor y c). La tuz indicadora encendera color roja (modo Standby)
asegQreto con el sujetador (ver pagina 7). y tuego encendera cotor azut (se ve ta imagen).
huz
Indicadora
b). Conecte et cabte de alimentaci6n a ta toma de
etectricidad de ta pared.
3. ENCIENDA Y APAGUE SU NUEVO TELEVISOR DE
LCD HTACH ...........
Pres,one e, bot6n de POWER en e, Contro, Remoto o e, '_
interruptor de Encendido en et Panel de Control Lateral para
encenderiapagar (modo Standby) su televisor. ' ........
Si la luz indicadora esta apagada (Off), e! bot6n de ._o_.
Power en e! C!R no funcionar& AsegOrese de que el
came de afimentaci&n este conectado al enchufe.
Para apagado
(modo Standby)
6
_ENU
[]
B_UT
[]
4. SIGA LAS INSTRUCCIONES DE LA GUiA DE CONFIGURACI6N DEL TELEVISOR EN LA SIGUIENTE P,&GINA,

Guia de Configuraci6n del Televisor
Su televisor de LCD Hitachi tiene una guia de configuraci6n con la capacidad de ayudarle a configurar faciimente su televisor la pdmera vez
que io enciende y encontrar los canales disponibies en su iocalidad. Pot favor siga las instrucciones que se mencionan abajo.
La primera vez que enciende su televisor LCD Hitachi aparecera la
pantalla de Configuraci6n Inicial. El primer paso es elegir el idioma
del MenO en pantalla del TV. Elija el idioma que prefiera. Usar
los cursores A y V para seleccionar y luego presionar el bot6n
SELECT en el control remoto.
En el quinto paso inicia la bOsqueda de canales para vet los
canales disponibles en la antena 6 sistema de cable. Presionar
el bot6n SELECT en el control remoto para iniciar ia b0squeda de
canales.
El segundo y tercer paso son para ajustar la hora y la fecha. Existen
dos opciones ; una automatica en la cual solo se elige la zona del
horatio en su area y la segunda opci6n es configurar manualmente
la hora y la fecha. Usar los CURSORES para elegir y cambiar las
opciones con el control remoto.
El sexto paso es el progreso de la b0squeda de canales, mostrando
primero los canales analogos y luego los digitales. El progreso va
indicando cuantos canales han sido encontrados. Sea paciente el
proceso tarda un poco porque busca los canales disponibles en su
area. Si desea cancelar el proceso, presionar el bot6n SELECT en
el control remoto para cancelar el proceso.
Ei cuarto paso es buscar los canales transmitidos pot cable o
antena. Existen dos opciones, Air (aerea) para una antena extema
y Cable para un sistema de TV pot cable en su hogar. Usar los
cursores A y V para elegir y presionar el bot6n SELECT en el
control remoto.
Si es que el usuario cancela esta guia, la guia no
aparecera de nuevo.
Si usted ve la pantalla de arriba y si aun no conecta
los cables de Antena a su teledsor, apague e!
teledsor, desconectar la clavija del enchufe y
conectar los cables de acuerdo a/as conexiones
indicadas en la secci6n "Uso por pfimera vez" de
esta Guia de Funcionamiento.
Luegode terminar esta Guia de Configuraei6n,
18s penteHe_ no 8p_recer_n de nuevo. Per8
eetueHzar y egreger eanelee dieponibles en su
aree referiree a I8 opei4n de Nueve b_squed_
de Cen_les en I_ p_gin_ 33.
El 01timo paso es el termino del proceso, muestra un breve mensaje
y esta listo para vet la programaci6n de TV. Este mensaje final ser_
mostrado pot unos segundos y luego el primer canal detectado
sera sintonizado. Tambi6n puede presionar la tecla EXIT en el
control remoto para vet e! primer canal detectado.
13

Cene×iones al Panel Lateral
Los siguientes diagramas de conexi6n se ofrecen como sugerencia. Sin embargo, usted tal vez tenga que modificarJos para ajustarse a
su combinaci6n particular de componentes de audio/video y funciones particulares. Para mejor desempe_o, los cables de video y audio
deben set coaxiales y blindados.
Las terminales iaterales se proveen para su conveniencia permiti@ndole la facii conexi6n de se_ales HDMI o DVl de un DVD, Set Top Box
y Video Juego como se muestra en los siguientes ejempios: (AI conectar un equipo con sepal DVl, usted puede usar un amplificador para
conectar ia satda de audio del equipo alas entradas de audio del amplificador). ReproductorDVD
A) Conectando seSal HDMI.
PANEL DE ENTRADA LATERAL
[HDMI]
B) Conectando sepal DVL
Amplificador de Audio
L (Blanco)
[HDMI]
Equipo con Capacidad
de Salida DIGITAL
HDMI
Equipo con Capacidad
de Salida DIGITAL DVI
L (Btanco)
Set-Top Box
[°
Console de videojuegos
Reproductor DVD
LATERAL
,<£
R (Rojo)
Cable DVI a HDMI
[HDMI] [UVl]
R (Rojo)
SALIDA DIG}TAL
Set-Top Box
°1
Console de videojuegos
Las terminales laterales de VIDEO y S-VIDEO se proveen para su conveniencia permiti@ndole la fact conexi6n de una Camara de Video,
un DVD, Video Juego y VCR tal como se muestra en los siguientes ejempios: (AI conectar ia sepal de S-VIDEO necesitar_ conectar ias
salida de audio en Jasentradas laterales de audio del televisor) : Equipo con Capacidad
de Salida Video Compuesto 6 SAiIDEO
*La entrada S-Video es solo para el L42A403 ReproductorDVD
L(Btanco) L (Blanco) I SABDA VCR
_ C_mara de video
ENTRADA LATERAL
©
--J_ttL2#ll
//f_.\\
/((0 ))I
VIDEO (Amarillo) 0 VIDEO (Amarillo)
Consola de videojuegos
Para dispositb'os monoaurales favor de conectar el cable de audio en la entrada L.
Inserte completamente los conectores cuando conecte las entradas del panel lateral. De no haceflo, la imagen desplegada
puede ser anormaL
Los conectores de los cables regularmente est4n codificados por colores. Haga coincidir los colores de los conectores
con los de las terminales, p.e. conecte el rojo al rojo, el blanco al blanco, etc.
Al hacer conexiones de video, conectar solo S-Wdeo 6 solo Video. Si ambas son conectadas, el S-Wdeo tiene prioridad.
El acomodo exacto que usted use para conectar el VCR, videoc&mara, reproductor de DVD 6 Set Top Box HDTV para su televisor de LCD
depende del modelo y funciones de cada componente. Revise la guia de operaci6n de cada componente para la ubicaci6n de entradas y
salidas de audio y video.
Antes de Operar Equipos Extemos de AudioNideo
Conecte un equipo externo a una de las terminaJes de entrada, despues presione el bot6n INPUT para mostrar el MenQ de ENTRADAS.
Use los CURSORES ( A y _' ) para seleccionar la Entrada de su preferencia. Entonces presione el bot6n SELECT o el CURSOR _- para
confirmar su elecci6n (ver pag. 19).
Ejemplo: Seleccionando la
entrada TV (A@ealCabie),
resaltando "0:TV"
14

Cone×ienes al Panel Posterior
Antena externa 6
Cable coaxial de TV
por cable
Divisor [i
de ........_ j
seSal
2Wias
HDM_ 1 HDMI 2 -_
f
HDMIa i _: _!!:L}jD,GtTALOUTPUT
DVI
Equipocon Capacidad
deSatidaDigital DVI
J
HDMla _
HDMI
f F_O_#FOU'r_Ur1
]
L,0D ] Equipo con Capacidad
de Satida Digital HDMI
o
Computadora Personal
Sistema de
AMPLIFICADOR
ESTEREO
Los Cables no est4n incluido&
HDTV SET-TOP BOX Reproductor de
Reproductor DVD con DVD/VIDEO Juego
capacidad de salida de con capacidad
Componente de salida de video
compuesto
CONSEJOS SOBRE LAS CONEXtONES DEL PANEL POSTERIOR
Las conexiones Y_PbPr (Component 1 y 2) 6 HDMI (1 y 2) se proveen para equipos de alta fidelidad tales como DVD's, VCR's etc.
que cuenten con esta opci6n. Use estas conexiones en lugar de una conexi6n de video estandar si su dispositivo cuenta con esta
opci6n.
Si su dispositivo tiene solamente una salida de audio (monaural), con6ctelo al canal izquierdo(L) en el panel posterior del televisor.
Consulte la guia de funcionamiento de sus otros equipos electr6nicos para informaci6n adicional sobre como instalar sus cables de
entradatsaJida.
Conecte solamente 1 equipo (VCR, Reproductor de DVD, videocamara, etc.) a cada terminal de entrada.
Las salidas pot componente de su equipo pueden Jlamarse Y, B-Y, y R-Y. En este caso, conectar Ja salida por componente B-Y a Ja
entrada Pb del TV y la salida pot componente R-Y a la entrada Pr del televisor.
Las saJidas pot componente de su equipo pueden Hamarse Y, CbCr. En este caso, conectar la salida pot componente Cb a la entrada
Pb del TV y Jasalida pot componente Cr a la entrada Pr del televisor.
Puede set necesario ajustar el TINTE para obtener una 6ptima calidad de imagen al usar la entradas Y_PbPr (vet p_gina 24).
AI usar Jaentrada HDMI desde un Set-Top-Box,se recomienda usar una seBal de entrada 1080p,1080i o 720p.
AI conectar una seBal de 1080p pot HDMI se recomienda que Ja Iongitud del cable de HDMI sea menor de 5 metros.
Asegl}rese de insertar completamente todas las conexiones de los cables en el panel posterior del televisor. La imagen
y el sonido reproducidos pueden ser anormales si la conexi6n esta floja o suelta.
Los conectores de los cables regularmente est4n codificados por colores. Haga coincidir los colores de los conectores
con los de las terminales, p.e. conecte el rojo al rojo, el blanco al blanco, etc.
Conectando una Computadora Personal
Usar la terminal RGB y la entrada de Audio Analogo
para conectar una computadora (PC).
1.
Conectar el cable too RGB (D_sub 15 Pines) y el
cable de AUDIO a la salida RGB y AUDIO OUT
de la PC en las terminales como se muestra a la
derecha en el Panel posterior del TV.
2. Presionar el bot6n INPUT, luego elegir RGB
del menO de entradas para vet la sepal de la
computadora.
JT
@
L
Entrada Salida
(Audio)
(D_sub 15 Pin)
[E]emplo PC]
15

CONECTANDO UN EQUIPO DE VIDEO Y AUDIO
MONOAURAL A LA ENTRADA AVI.
1.
2.
Conecte el cable de la salida de video (VIDEO OUT) y audio
(AUDIO OUT) del VCR a ia entrada de video AV1 y a la entrada
(L) de su televisor como se muestra en el Panel Posterior de
la derecha.
Presione el bot6n INPUT, entonces seleccione la entrada AVl
del MenO de Entradas para vet el programa de su VCR.
PANEL POSTERIOR DEL TV
L
®
VCR
3. Seleccionar el menO de Audio, configurar el Tipo de Sonido
a "Personalizado", y configurar el "SRS Trusurround HD" a
"On".
CONECTANDO UNA FUENTE DE VIDEO Y AUDIO
ESTEREO A LA ENTRADA AVI.
1.
Conecte los cables de AUDIO y VIDEO de la salida de video
(VIDEO OUT) y audio (AUDIO OUT) del VCR a la entrada
AV1 de su televisor. Un ejemplo de conexi6n de una VCR a la
entrada AVl se muestra en el Panel Posterior de la derecha.
2. Presione el bot6n INPUT, entonces seleccione la entrada AVl
del MenO de Entradas para vet el programa de su VCR.
PANEL POSTERIOR DEL TV
VCR
VIDEO SALILDA
Cuando se use la entrada AV1, es necesario conectar la safida de video del dispositivo a la terminal de entrada
WDEO del televisor.
CONECTANDO UN EQUIPO CON SALIDA DE
COMPONENTE Y DE AUDIO ESTEREO EN LAS
ENTRADAS COMPONENT1 6 2 : Y_PbPr
1.
Conecte los cables de Y, PbiCb, PriCr y AUDIO de la salida
de video Y, PblCb, PriCr y AUDIO del reproductor DVD 6
HDTV Set=Top=Box a ias entradas COMPONENT1 6 2 de su
televisor. Un ejemplo de conexi6n de un reproductor DVD a
ia entrada COMPONENT 2 se muestra en el Panel Posterior
de ia derecha.
2. Presione el bot6n INPUT, entonces seleccione la entrada
COMPONENT1 6 2 del MenO de Entradas para vet el
programa de su reproductor 6 HDTV Set=Top=Box.
PANEL POSTERIOR DEL TV
Reproductor DVD
o
AsegDrese de insertar completamente todas /as conexiones de los cables en el panel posterior del tele#Ysor. La imagen
y el sonido reproducidos pueden ser anormales si la conexi6n est_ floja o sue#&
Los conectores de los cables regularmente est_n codificados pot colores. Haga coincidir los colores de los conectores
con los de/as terminales, p.e. conecte el rojo al rojo, el blanco al blanco, etc.
Para regresar al Dltimo canal sintonizado, seleccione O:TV del mend de ENTRADAS.
16

Cene×iones al Panel Posterior
CONECTANDO UN EQUIPO CON SALIDA HDMI 6 DVl A
LAS ENTRADAS HDMI 1, HDMI 2
1. Conecte el cable HDMI o el adaptador DVliHDMI de la salida
del Set Top Box HDTV o reproductor de DVD a la entrada
HDMI tal como se muestra en la parte de la derecha.
2.
AI usar salida DVl, conecte los cables de AUDIO de la salida
del Set Top Box HDTV o reproductor DVD alas entradas de
Audio de un amplificador extemo. Un ejemplo se muestra en
la parte derecha abajo.
PANEL POSTERBOR Entrada HDMI
DEL TV
[HDMI]
Equ[po con capacidad
de sal[da DIGITAL
HDMI
Reproductor DVD
[HDMI]
3. Presione el bot6n INPUT, entonces seleccione HDMI 1 6 2
para vet el programa del Set Top Box HDTV 6 el Reproductor
de DVD.
o AsegDrese de insertar comp/etamente todas /as
conexiones de los cables en el panel posterior
de/televisor. La imagen y e! sonido reproducidos
pueden ser anormales si la conexi6n esta floja o
sue/ta.
, A/ usar un adaptador DW a HDMI, conecte los
cables de safida de audio (Audio Out) L y R a un
amplificador extemo.
, Las entradas HDMI en HDM/1, HDM/2, HDMI 3 y
HDM/ 4 contienen el sistema de protecci6n contra
copiado flamado High-bandwidth Digital Content
Protection(HDCP). El HDCP es un sistema que
codifica las setia/es de video cuando se usan
conexiones HDMI, para prevenir el copiado flegal
de la informaci6n de video.
, HDM/ no es una tecnologia de "RED", sino que
estab/ece una conexi6n punto-aopunto en un solo
sentido para /a entrega de video no comprimido en
una pantalla.
, El disposifivo digital conectado controla la interfase
HDMI, por /o tanto la configuraci6n adecuada de
las opciones de usuano del equipo determinan la
reso/uci6n final del video.
, Solo/a entrada HDMI1 puede usar la entrada de
audio DW al estar conectado a una terminal de
audio de PC.
CONECTANDO UN AMPLIFICADOR DE AUDIO EXTERNO
Para controlar el nivel de audio de su televisor de LCD con un
amplificador extemo de audio, conecte el sistema como se muestra
en ia derecha. Las salidas "OPTICAL OUT" y "AUDIO OUT" del
panel posterior son salidas fijas. El Volumen del amplificador es
controlado pot el amplificador, no pot el televisor de LCD.
La terminal OPTICAL OUT saca el audio de todas ias entradas a
todo equipo con Entrada Optic&
1. Conecte un cable 6ptico desde la salida Optical out a la entrada
Optica de un sistema de sonido 6 Amplificador como se muestra
en el Panel posterior en la figura de ia derecha.
2. Conectar un cable RCA est6reo a la salida "AUDIO OUT" a ia
entrada de Audio de un sistema de Amplificador Estereo como se
muestra a la derecha en el panel posterior.
PANEL POSTERIOR
DEL TV
Entrada HDMI-DVl
Equipo con capacidad
de salida DIGITAL DW
Reproductor DVD
[HDMI] [DVI]
(BJanco)
6
AUDIO IN
AMPLIFICADOR de AUDIO
Nota• Un amplificador de audio extemo
puede ser usado para ta misma conexi4n.
PANEL POSTERIOR DEL TV
Cable Optico
AsegOrese de insertar comp/etamente todas /as conexiones de los cables en el panel posterior del televisor. La imagen
y el sonido reproducidos pueden set anorma/es si la conexi6n est4 floja o suelta.
Los conectores de los cables regu/armente est4n codificados por co/ores. Haga coincidir los colores de los conectores
con los de las termina/es, p.e. conecte el rojo a/ rojo, e! b/anco a/ b/anco, etc.
Para regresar al Dltimo canal sintonizado, presionar la tecla de canal en el control remoto.
17

El Control Re oto
Bot6n de encendido/apagado (POWER)
Presione este bot6n para encender o apagar el televisor.
®/I
P,MODE
f
SMODE MTS/SAP ASPECT
/
OH
CO FAV.CH
INPUT
J
HITACHI
CLU-4591AV
@
0
0
NENU
Bot6n del Modo de Irnagen (P. Mode)
Presionar este bot6n para cambiar entre los modos
Dinamico, Estandar, Cine, Personatizar y Juegos.
Seleccionar Dinamico para a]ustes automaticos de britto
y contraste. Estandar para ver en el dia con mas britlo
y contraste para igualar con la luz de ta sata. Cine para
ver con menos briIIo y contraste para una imagen mas
detattada. Personatizar para vet con sus propios niveles
de britlo y contraste en ta imagen. Juegos para ajustes
autom&ticos de britto y contraste at jugar video juegos.
(ver ta pagina 24 para tas condiciones).
Botches del SELECTOR DE CANAL/ENTER.
Los botches del SELECTOR DE CANALES son usados para
seleccionar canales, ingresar c6digo de acceso, etc. Use los
botches del SELECTOR DE CANALES para ingresar uno, dos
o tres nOmeros para seleccionar los canales. Ingrese primero
el nOmero "0" para canales del 1 al 9, o simplemente presione
el 0nico digito del canal que se desea sintonizar y presione
el bot6n ENTER para que ia TV io sintonice. Para Canales
Digitales, use los botones del SELECTOR DE CANALES con
el bot6n del GUt0N (-). La selecci6n de canales tambi6n puede
set realizada con el bot6n CH (A) 6 CH (V).
O
O
Bot6n de Gui6n (-)/Auto-apagado
Use el bot6n de GUION (=) junto con los de SELECCION
DE CANALES para sintonizar Canales Digitales que tienen
nOmeros de subcanal indicados con un (-) GUt0N (ejemplo:
15-1). Para el modo TV solamente, presione este bot6n para
indicar el tiempo de auto-apagado desde 5 minutos a 4 horas.
Bot6n de 0LTIMO CANAL (LAST OH)
Presione este bot6n para cambiar entre el canal actual y el
Oltimo canal visto.
O Bot6n de VOLUMEN (VOL), Bot6n MUTE
Use el bot6n VOL (+ 6 -) hasta obtener el nivel de sonido
deseado. Presione e! bot6n MUTE un vez mas para apagar
el sonido completamente (MUTE). Para encender el sonido,
presione el bot6n MUTE una vez mas o el bot6n VOL (+).
18

@
O
O
@
Los Subtitulos seran desplegados automaticamente cuando
ia funci6n MUTE este activada y los Subtitulos esten en modo
Sin Sonido (vet p_g. 30).
Cuando el televisor sea apagado a un nivel de volumen de 16
6 mas, el nivel de volumen predeterminado ser_ de 15 cuando
el televisor sea encendido. Sin embargo, si el nivel esta en
15 6 menos, este nivel de volumen se mantendr_ cuando el
televisor sea encendido.
Bot6n de AHORRO DE ENERGiA (E.SAVE)
Utilice este bot6n para seleccionar el ajuste de reducci6n
de consumo de energia basado en 3 niveles (MIN, MEDIA,
MAX).
Bot6n de 8ubt[tulos (Closed CaptionsoOC)
Presione este bot6n para desplegar los subtitulos en la
pantalla cuando esten disponibles por el programa de TV.
En Canales Anal6gicos, presione el bot6n CC una y otra vez,
para ira traves de los modos de Subt[tulos y para desactivar
programas local ilustra estos
Bot6n MENU
El bot6n MENU desplegara el Men0 en Pantalla.
Bot6n EXIT
Este bot6n Iosacara de todos los men0s en pantalla.
ENTRADAS DE VIDEO
Informaci6n del Programa Formato de Imagen
@
• Presione el bot6n /NFO otra vez 6 e! bot6n EXIT
pare regresar a/ la imagen normal
o La informaci6n de/Aspecto no sera mostrada si/a
teda /NFO es presionada.
Bot6n de Entradas (INPUT)
Presione este bot6n para accesar al menO de ENTRADAS.
Use los CURSORES y el bot6n SELECT para elegir la entrada
que esta siendo utilizada. Presionando repetidamente el
bot6n de ENTRADAS Io Ilevara a traves de todas las opciones
del menO de entradas. Luego presione el bot6n SELECT 6
espere 4 segundos para seleccionar automaticamente la
opci6n elegida.
O Botones CURSOR/SELECT
Todas ias funciones del MenO en pantalla pueden ser
configurados o ajustados utilizando los CURSORES, excepto
los valores numedcos. Los CURSORES resaltaran, ajustaran
y configurar_n diversas funciones. Presione el CURSOR
de la direcci6n deseada y presione el bot6n SELECT para
selecc[onar o elegin
G
Bot6n INFO
Presione este bot6n cuando usted desee consultar el canal
recibido, el origen o fuente de ia imagen, si el canal tiene
estereo (ST) o programa secundario de audio (SAP), la hora,
el nombre del canal o si el tiempo de auto apagado esta
activado.
CANALES ANALOGOS
Informaci6n del Programa Canal An&logo
CANALES DIGtTALES
0. TV Ver programas de TV de Antena 6 Cable.
1. AV1 Eleglr para ver la entrada AVl.
2. AV2 Eleg_r para vet la entrada AV2 Input.
3. Component1 Eleg_r para vet la entrada Component1.
4. Component2 Eleg_r para vet la entrada Component2.
5. RGB Eleglr para vet la entrada PC.
6. HDMI 1 Eleg_r para vet la entrada HDMI 1.
7. HDMI 2 Eleg_r para vet la entrada HDMI 2.
8. HDMI 3 Eleg_r para vet la entrada HDMI 3.
9. HDMI 4 Eleg_r para vet la entrada HDMI 4.
Bot6n de Auto-apagado (SLEEP)
Presione este bot6n para indicar el tiempo de auto-apagado
desde 5 minutos a 4 horas.
Infcrmaci6n del Rrograma Formato de Imagen
dolp_o0_or_.o 19

@ Bot6n de Canales Favoritos (FAV CH)
Presionar el bot6n de canales favodtos (FAV CH) para
desplegar la Lista de Canales Favodtos. Primero se tiene que
configurar los Canales Favoritos en el MenO de Canales para
que se pueda desplegar la lista. Presionar la tecla FAV. CH en
el control remoto para desplegar la lista y poder seleccionar
el canal deseado usando los cursores y luego presionando
SELECT para verlo.
@
Bot6n del Modo de Sonido (S. MODE)
Presionar este bot6n para cambiar el modo de sonido. Existen
4 modos disponibles, Personalizar, Estandar, Cine y Noticias.
Para los modos Estandar, Cine y Noticias las opciones de
Bajos, Agudos y SRS TruSurround HD no estan disponibles
(en gris). AI elegir el modo de Personalizar le permitira
configurar las opciones de audio a su preferencia.
@
Bot6n MTS/SAP
Presionar para cambiar el tipo de audio en el programa que se
esta viendo. Para canales analogos el tipo de seSal (si estan
disponibles) son Est6reo, SAP, y Mono. Para canales digitales
este bot6n cambiara el idioma (si estan disponibles) (Ingles,
EspaSol, etc.).
@
Botones de Equipos con CEC
Estos botones son para controlar equipos que tienen la
opci6n de CEC (Consumer Electronics Control) que sirve para
controlar equipos a travez de la conexi6n HDMI, como pot
ejemplo reproductores de BIu Ray 6 DVD, DVR, STB.
Para a/gunos equipos estas tec/as no est_n
disponib/es para contro/ar a travez de/ Televisor y
/a conexi6n de HDM/; Favor de referir a/a guia de
operaci6n de/equipo para mayor informaci6n.
2O

Bot6n de ASPECTO (ASPECT)
Presione este bot6n para cambiar rapidamente ia relaci6n de aspecto de ia imagen. Dependiendo del formato de ]a sefiaJ de entrada
recibida, el aspecto del formato de imagen ie permke a usted ajustar ias imagenes atrav6s de las opciones de abajo.
AUTO
Usar este modo de aspecto para que cambie automaticamente por
el detector de sefiaJ.
4:3
Use este modo de aspecto para desplegar imagenes (4:3)
convencionales. Se colocan paneles iateraJes (areas negras) en
ia izquierda y derecha de ia imagen para conservar ia relaci6n de
aspecto original de la fuente.
Cornp[eto
Use este modo de aspecto para despiegar fuentes 16:9 como
HDTV y DVD's conservando Ja relaci6n de aspecto original 16:9
mostrando el 100% del tamafio.
ZOOM1 y ZOM2
Use este modo para aumentar ia imagen en el aspecto y para
reducir ias barras negras en ia imagen.
16:9
Use este modo de aspecto para desplegar fuentes 16:9 como
HDTV y DVD's conservando ia relaci6n de aspecto original 16:9
mostrando el 95% del tamafio.
A6rea/Cable -Serial AnaJoga
AereaiCable-Serial Digital
Entrada pot Componente
AUTO 4:3
ZOOM 2 ZOOM 1
16:9
AV
4:3 _ 16:9
ZOOM2 _ ZOOM1
HDMI - RGB
DVI - RGB
AUTO
Completo
HDMI _1080pi1080i/720pi480pi480i
DVI _ 1080pi1080i/720pi480p1480i
_ AUTO
ZOOM2
4:3
ZOOM1
_j_ 16:9
!
]_ Completo
Cada entrada tiene una memoria independiente para el modo de Aspecto. AI cambiar el aspecto en una entrada de
video, este no afectara los ajustes de aspecto en otras entradas de video.
Cuando se despfiegue el modo Completo, pueden aparecer fineas en /as oHflas de la imagen, considere que esto es
una operaci6n normal de! televisor.
Yea la p4gina 42 para la disponibifidad de modos de Aspecto de acuerdo al formato de la sepal en uso.
21

M÷nu en Pantalla
1. Presione MENU en el control remoto para desplegar las
diferentes funciones de su televisor de LCD Hitachi.
2.
Utilice los CURSORES (botones A,,Y, 4yl_) para navegar
por las diferentes opciones del menO y resaltarlas.
Presione el bot6n SELECT para elegir la opci6n.
3.
Presione EXIT en el control remoto para salir rapidamente
de cualquier menO.
Esta parte del menO en pantatla muestra
cuates son tas opciones disponibtes.
MENU iNPUT
EXIT INFO
* El men# preestablecido de fDbrica est# en idioma Ingl&s, para lograr verlo en idioma espa#ol favor de elegir
el men# Setup, luego elegir Set The Menu Options y cambiar en Lenguaje de English a Espa#oL
* Las pantaflas de los diferentes submen#s que se muestran en las siguientes pDginas son con fines/tustrativos,
pot lo tanto; no reflejan la apariencia actual de/men# en pantatla de su televisor LCD Hitachi.
Modo de Imagen
Contraste
BriHantez
Color
Tinte
Nitidez
Temperatura de Color
Redueir Ruido
Modo de Cine
Luz del panel
Aspecto
Restaurar
Selecciona uno de los cinco modos de imagen: Dinamico, Estandar, Cine, Personal y Juegos.
Ajusta el contraste de la imagen.
Ajusta el brillo de la imagen.
Ajuste el color de la imagen.
Ajuste el tinte de la imagen.
Ajuste la nitidez de la imagen.
Elija el modo ALTA para una menor intensidad de color con mas azul, elija MEDIA para un color natural y
ESTANDAR para colores estandares.
Reduce el ruido visible en la imagen.
EnciendelApaga la funci6n de detecci6n 3:2. Para una imagen parecida a una pelicula.
Para aumentar o reducir la intensidad de luz en la pantalla LCD.
Seleccione la relaci6n de aspecto del formato de imagen.
Seleccione esta opci6n para restaurar los ajustes de video a las condiciones de fabrica.
22

Tipo de 8onido
Graves
Agudos
Balance
Tipo de Audio
Idiomas
8alida Digital
Boeinas Internas
Volumen Perfecto
8R8 TruSurround ND
Restaurar
Elegir 4 tipos de audio predefinidos (Personalizado, Estandar, Cine y Noticias)
Ajusta la intensidad de los sonidos de baja frecuencia.
Ajusta la intensidad de los sonidos de alta frecuencia.
Ajusta el balance.
Selecciona entre tres tipos de Audio disponibles (ST, MONO, SAP)
Seleccione las opciones de Lenguaje si estan disponibles.
Seleccione opciones de salida 6ptica.
Selecciona ias bocinas intemas o bocinas extemas.
Ajusta el nivel de volumen entre canales.
Selecciona ias opciones del Sonido Surround (Off, On).
Seleccione esta opci6n para restaurar los ajustes de audio.
Las opciones de Lenguaje, y
Safida Digital del mend de
Audio solo est_n disponib/es
para cana/es digita/es.
Idioma del MenQ
Nora
Aato-apagado
C_ave
Control Patemo
8ubtitulos
8ubtituios Digitales
Seleccione idioma del menO Ingles, Frances 6 Espa_ol.
Configure las opciones del reloj.
Seleccione ei intervalo de auto=apagado ( 5 minutes ~ 4 horas).
Cambie la clave de acceso de las censuras.
Sistema de Clasificaci6n para bloquear varies tipos de programas.
Opci6n para activar o desactivar los Subtitulos.
Opci6n para desplegar Subtitulos Digitales de di_logoitexto en la pantalla.
Opeiones 8ubtitulos Digitales Opci6n para cambiar la apariencia de los Subtitulos Digitales.
8ubt. An_ogos
Opeiones de Energia
Transpareneia
NDMI-CEC
Nombres de Entradas
Opei6n Componente
Opeiones RGB
Restaurar Conf y AV
Opci6n para desplegar Subtitulos Analogos de dialogoitexto en la pantalla.
Seleccione las opciones de Ahorro de Consume de Energia.
Opci6n para cambiar la transparencia del MenO en pantalla.
Activada, esta opci6n permitira la operaci6n con equipos compatibles con control CEC.
Nombre las entradas de video, VCR, DVD, etc.
Ajusta la Fase y Restaura cualquier ajuste hecho.
Ajusta la Posici6n Horizontal, Posici6n Vertical, Reloj, Fase y Restaurar.
Restaura todas las configuraciones de Audio, Video y Configuraci6n alas condiciones originales.
Origen
Poteneia de 8e_al
Nueva Besqueda
Agregar Canales a la Lista
Lista de Canales
Nombres de Canal
Canales Favorites
Seleccionar el tipo de sepal que va a ser usada Cable 6 Aerea.
Accese al medidor de sepal.
Activar para programar los canales borrando los anteriores.
Agrega canales a ia lista de canales (Los canales seguiran a menos que se ejecute Nueva BOsqueda).
Configure la lista de canales.
Nombre los canales.
Configurar ia lista de Canales Favorites.
E/ Medidor de Seda/ del
mend de Cana/es so/amente
est_ disponible para cana/es
digita/es.
23

Seleccione VIDEO para ajustar las opciones de la imagen y mejorar
ia calidad de ia misma. Usted podra configurar independientemente
cada entrada de Video como prefiera, para mejorar el desempe_o
y iograr una visi6n placentera dependiendo del programa de
video que se esta viendo. Los ajustes se aplicar_n el modo
Personalizado.
MENU
4. Presione EXIT para salir del men0.
Contraste
Use esta funci6n para nivelar la imagen con la luz ambiente.
Aumentar para salas mas brillosas.
Brillantez
Use esta funci6n para cambiar el bdllo de las areas obscuras de
la imagen.
Color
Use esta funci6n para ajustar el nivel de color en la imagen
Tinte
Use esta funci6n para ajustar los tonos de piel para que parezcan
naturales.
Nitidez
Use esta funci6n para ajustar la cantidad de detalles finos en la
imagen.
Temp. de Color
Configure esta opci6n a ALTA para un color mas frio (azulado), a
MEDIA para un color mas natural y a ESTANDAR para un color
mas preciso.
Reducci6n de Ruido
La funci6n de Reducci6n de Ruido automaticamente reduce el
ruido visible en ia imagen sin degradar ia ca!idad de ia misma.
Desactive ia funci6n Reducci6n de Ruido si usted ve en el televisor
bloques individuales de ia imagen.
Modo de Imagen
Utiiice esta funci6n para elegir una de las opciones automaticas de
ia imagen para optimizar el desempe_o de su televisor.
1. Utilice los botones del CURSOR I_ para seleccionar ias
opciones del MODO DE IMAGEN (Dinamico, Estandar, Cine,
Personalizado 6 Videojuego).
2. Luego presionar el bot6n _t para regresar al men0 de Video 6
presionar EXIT para salir.
3. Existen 5 modos de imagen disponibles: Dinamico, Estandar,
Cine, Personalizado 6 Videojuego. Dinamico es el modo
preestablecido de fabrica en su T_L Ei 0nico modo en que
puede ajustar las condiciones de video a su preferencia es el
modo Personalizado. Los otros modos son predefinidos y no
se pueden cambiar.
Para la entrada de PC solo hay dos modos
disponibles Estandar y Personalizado. En este caso
solo el modo Personal;_zado puede set ajustado a
su preferencia.
Los ajustes de Video pueden set a su preferencia
en el modo de _,4_deojuego (Similar al modo
Personalizado) con la excepci6n del modo de cine.
Si cambia alguno de los ajustes en los modos
Din_mico, Estandar y Cine, e! nombre de la opci6n
Personalizar cambiarA Por ejemp!o cambios en
Din_mico renombrara la opci6n a "Personal;_zar o
Din't Esto significa que el modo de imagen origina!
no es afectado pot los cambios; Io Onico es que el
modo Personalizar tomara los ajustes de video del
modo donde se hizo el cambio.
Auto Movie
La funci6n Modo de Cine activa o desactiva ia funci6n especial
de detecci6n y conversi6n 3:2. Las peliculas de cine son filmadas
a 24 marcos o imagenes fijas pot segundo, en vez de 30 marcos
o 60 campos como el video. Cuando ia pelicula es transferida a
video para visualizaci6n en televisi6n, ia dispaddad entre ias dos
tasas de marcos debe set compensada. Esto involucra un proceso
conocido como detecci6n y conversi6n 3:2.Cuando ia funci6n
Modo de Cine es activado del Men0 de VIDEO, su televisor de
LCD HITACHI activara la circuiteria para esta funci6n especial
para mejorar el desempe_o de video cuando se yen formatos
entrelazados de peliculas de cine. Seleccione OFF para desactivar
esta funci6n.
Luz del panel
Ajustar el brilto de la luz det panel para mayor visibitidad.
Cambia ta intensidad de ta luz del panel. Incrementar para
salas bdtlantes y reducir para salas mas oscuras para hacer
tas areas negras de ta imagen negras.
Aspecto de Imagen
Use esta funci6n para seleccionar el aspecto del formato de
imagen.
24
Otros Ajustes de_ MenQ de Video
Utilice los CURSORES A, 6 Y para resaltar la funci6n a set
ajustada.
1. Presione el bot6n SELECT o el CURSOR _ para seleccionar
las opciones de la funci6n.
2. Presione los CURSORES 41 6 1_ para ajustar la funci6n
seleccionada.
3. Presione MENU para regresar al Men0 Principal.
_=ormato Automatieo (Auto)
Automaticamente ajusta ia relaci6n de aspecto dependiendo
del Ilenado de pantalla de la sepal de entrada
Formato
Seleccione manualmente la relaci6n de aspecto. Existen
varios formatos de aspectos disponibles dependiendo de la
sepal de entrada (Vet Apendices pagina 42)

ReferenciadelosAspectos
AI vet Imageries de Definici6n Estandar:
4:3 Desplega programas de 4:3 en su aspecto original con barras latera-
les a la izquierda y derecha de la imagen.
16 : 9 Expande un programa 4:3 para Ilenar toda ia pantalla !6:9,
(SePal 4:3)
Usar este aspecto para expander peliculas tipo vista (letterbox) para
Zoom ! llenar la pantaHa.
(Vista) Note que alguna porci6n de la imagen no se podr& ver.
Usar este aspecto para Itenar la pantarla con peticuras muy
Zoom 2 amplias (widescreen). Note que alguna porci6n de la imagen no
(Pelicuta) se podra ver en este modo.
AI vet Imageries de A_ta Definici6n:
(SePal 16:9 )
0magen 4:3 en
un cuadro16:9 )
16:9
Completo
Desplega una imagen 16:9 claramente mostrando un 95% de su
tama_o.
Se debeda usar este modo cuando se quiere ver el 100% de la serial,
Note que algunas se_ales tienen ruido. En este caso de ruido usar
el modo de !6:9,
Restaurar
Esta funci6n le permite restaurar las opciones del men0 de video
de la entrada actual y regresada al modo de imagen DINAMICO.
1. Use los CURSORES A, V para resaltar la funci6n Restaurar.
2. Presione el bot6n SELECT o el CURSOR I_ para elegir Si 6
No.
3. Presionar el bot6n SELECT en la opci6n Si para realizar la
restauraci6n de las condiciones de Video.
Usted puede personalizar cada una de ias entradas de Video a su
preferencia para incrementar el desempe_o y asi Iograr una visi6n
placentera, dependiendo del programa que se este viendo. Si se
selecciona el bot6n RESET, solamente la entrada seleccionada
sera restaurada alas condiciones iniciales condiciones odginales
de fabrica como se explica arriba.
Si ia funci6n Restaurar es aplicada en ia HDMI 1, solamente ia
HDMI 1 se restaurar_ aias condiciones de video odginales de
fabrica.
25

Seleccione el menO Audio para ajustar el sonido de su televisor Salida Digital
LCD a su preferencia. Esta funci6n ie permke seleccionar entre los sistemas RAW y
PCM. Esta opci6n cambia el formato de salida de ia Salida de
Audio Digital (Salida 0ptica).
Tipo de 8onido
Esta funci6n tiene 4 tipos de sonido ias cuales estan preajustadas
de acuerdo al tipo de programa. Estandar para condiciones de
audio normales, Cine para peliculas, Noticias para transmisi6n de
noticias y Personalizado para ajustar los niveies de audio a su
preferencia. Solo en el modo Personalizado se pueden cambiar
ias condiciones de audio. Los otros 3 modos apareceran en gds,
no disponibles.
Ajuste de Opciones del Men6 de Audio
1. Presione el CURSOR A 6 V para seleccionar las opciones de
la funci6n.
2. Presione los CURSORES _1 6 I_ para ajustar la funci6n
seleccionada.
3. Presione EXIT para salir del men6, o seleccione AUDIO para
regresar al Men6 Principal.
Si usted selecciona Agudos, usted ajustar4 lasfrecuencias altas. Las opciones adicionales del
men4 Graves y Balance pueden ser seleccionadas y
ajustadas de la misma manera.
G raves
Esta funci6n controla los sonidos de baja frecuencia hacia todas
las bocinas
Agudos
Esta funci6n controla los sonidos de alta frecuencia hacia todas
las bocinas.
PCM.- Elegir esta opci6n si el TV esta conectado a un amplificadori
receptor con un decodificador solo PCM; este proveera 2 canales
independientes de sonido a travez de la terminal de salida 6ptica
(Digital Audio).
RAW.- Elegir esta opci6n para darie el fiujo de datos del audio
odginal a travez del receptor de audio.
Bocinas Internas
Esta funci6n es 6til cuando se usan las bocinas extemas.
Seleccione ON si solo utiliza las bocinas intemas. Seleccione OFF
si prefiere utilizar las bocinas de un sistema estereo separado..
Volumen Perfecto
Esta funci6n automaticamente ajustara el volumen, para que cada
canal y entrada tenga el mismo nivel promedio de volumen.
SRS TruSurround HD
Provee un sonido envolvente, claro de sonido, para cada asiento
de la sala, solo con dos bocinas, eliminando la necesidad de
m61tiples bocinas externas. Esto se hace seguido para crear un
ambiente de audio mas real.
1.
Usar el CURSOR _ para elegir la opci6n On/Off.
Off: Apaga el efecto de sonido surround.
On: Provee el efecto de sonido surround al simular 2 6 mas
bocinas en la parte posterior del usuario.
Restaut_at _
Esta funci6n le permite restaurar las opciones del menO de Audio
de la entrada actual y regresarla a! modo Personalizado y las
condiciones iniciales.
Balance
Esta funci6n controlara el balance izquierdo a derecho de las
bocinas intemas y la terminal de audifonos del televisor de LCD.
Tipo de Audio
El sonido multicanal de Televisi6n (MTS-Multichannel Television
Sound) le permitir_ seleccionar ESTC:REO (transmisi6n est6reo),
MONO (sonido monoaural) usado cuando se recibe una sepal de
transmisi6n est6reo debil o SAP (SECOND AUDIO PROGRAM
(Segundo Programa de Audio)) que puede set un idioma diferente,
un reporte de clima, etc. Esta condici6n es solo para programaci6n
analoga.
Idiomas
AIgunos programas transmiten en otros idiomas. Esta funci6n de
idiomas le permitira escoger 3 idiomas (English,EspaSol y Frangais)
a su preferencia como su idioma para el audio predeterminado.
Idioma Audio
Algunos programas transmiten un programa DTV con mas de una
opci6n de lenguaje o idioma. La mayoria tienen al Ingles como
idioma predeterminado. Esta funci6n le permitira seleccionar hasta
14 opciones de lenguaje (si estan disponibles). Pot favor intente
todas las opciones disponibles.
1. Use los CURSORES A, V para resaltar la funci6n Restaurar.
2. Presione el bot6n SELECT o el CURSOR t_ para elegir Si 6
No.
3. Presionar el bot6n SELECT en la opci6n Si para realizar la
restauraci6n de las condiciones de Audio.
Usted puede personalizar cada una de las entradas de Audio
a su preferencia para incrementar el desempe_o del audio,
dependiendo del programa de audio que se esta escuchando. Si
se Restaura, solamente la entrada seleccionada sera restaurada a
las condiciones iniciales originales como se explica arriba.
Si la funci6n Restaurar es aplicada en la HDMI 1, solamente la
HDMI 1 se restaurar_ alas condiciones de audio originales de
fabrica.
26

Seteccione CONFIGURAR cuando configure su TV pot pri-
mera vez.
Auto Apagado
Seleccione esta funci6n para configurar el tiempo de Auto Apagado
desde 5 minutos hasta 4 horas.
1. Presionar el CURSOR _ repetidamente para configurar el
tiempo desde Off, 5 min, 10 min, 15 min, 30 min, 60 min, 90
min, 120 min, 180 min y 240 min.
1. Usar los Cursores _. 6 _ para elegir el menO de Configurar.
2. Usar el CURSOR _ para entrar a la opci6n que desee y hacer
los cambios que necesite.
3. Presionar ia tecla MENU para regresar.
Idioma del MenQ
Configura el idioma del MenO en pantalla (OSD). Esta funci6n le
permitira seleccionar cualquiera de tres diferentes idiomas para
las pantallas de menO.
Clave
1. Para cambiar la Clave, elegir la opci6n de Clave para cambiar
la clave predefinida de fabrica (0000) a su preferencia. Si
usted olvida su clave, usar la clave de fabrica 7777 para
borrar su clave anterior. Esto regresar_ la clave a la clave de
fabrica 0000.
2. Poner una nueva clave de 4 digitos.
3. Presionar EXIT para salir del menO.
Control Paterno
Esta funci6n bloquear_ la imagen y sonido dependiendo de la
clasificaci6n.
La clave para entrar alas censuras es un c6digo de 4 digitos. La
clave predefinida de fabrica (0000). Usar los botones Numedcos
para poner la clave.
1. Usar el CURSOR _ para elegir el idioma que desee.
2. Presionar EXIT para salir del menO 6 la tecla MENU para
regresar al menO anterior.
Ho_a
Usar esta opci6n para configurar el reloj, Fecha y la Hora pot Zona
para su Televisor LCD.
1. Use los CURSORES A, V, 411,I_ para resaltar y configurar las
opciones de la Hora.
2. Si usted Ileva horano de verano, use los CURSORES para
resaltar el horatio de verano y presione el bot6n _ para
activarlo. Esto solo se puede cambiar si el modo de la Hora
esta puesto como Auto.
3. Usar los CURSORES para resaltar y ajustar la Hora Actual
(hora y minutos), AM 6 PM, Mes, Dia, y A_o.
4. Presionar el bot6n SELECT para poner la Hora.
5. Presionar EXIT para salir del menO 6 la tecla MENU para
regresar al menO anterior.
o A/ e/egir AUTO el Horatio de verano se puede
configurar, /a TV ca/cu/ara autom4ticamente e/
ajuste de/re/oj para el horatio de verano.
o El TV hace un conteo de pu/sos e/ectricos
para regular los Tiempos. Cuando e! cable de
a/imentaci6n sea desconectado y conectado
rapidamente e! re/oj parara momentaneamente y/a
indicaci6n de/tiempo sera /enta.
o EL Afio, Mes, Dia y/a Hora se pueden cambiar solo
si e/modo de/a Hora esta puesto como Manual
Bloquear Panel
AI estar activado (On) el Bloquear Panel, todos los botones en el
Panel Lateral, excepto el bot6n Power seran desactivados.
BJoquear Prog sin Clas[f. (Unrated TV)
AI estar activada (On) esta funci6n, los programas sin clasificaci6n
seran bloqueados.
EE.UU.
Esta opci6n bloqueara las clasificaciones de TV y Pe!iculas en los
EE.UU. para prevenir vet cualquier contenido que usted sienta sea
inapropiado (vet pag. 28).
Canad_
Esta opci6n bloqueara las clasificaciones de TV y Peliculas en
Canada para prevenir vet cualquier contenido que usted sienta
sea inapropiado (vet pag. 28-29).
27

3
Tabls de CIssJficaei6n de PeJieuJss
SIN No contiene ciasificaci6n. Programas sin ciasificaci6n (NR) y no apiica (NA). La peiicuia no ha sido ciasificada o no apiican
CLASIFICACION clasificaciones.
G Audiencia General. Para todas las edades.
PG Se sugiere supervisi6n de padres. AIgOn material puede ser no apropiado para ni_os.
PG=13 Se requiere la supervisi6n de los padres. AIgOn material puede set no apropiado para ni_os menores de 13 a_os.
R Restringido. Menores de 17 a_os requiere la compa_ia de un padre o adulto.
NC=17 No se admite a nadie de 17 a_os o menor.
X Solamente Adultos.
• La clasificsci6n de Is pdiculs depende de Is pdicula que se eat6 viendo. Si Is pdiculs no contiene una clasificsci6n Is TV
no la bloquear4.
o El bloquesr programss SIN GLASIFICACION puede bloquear programaci6n de emergencia, deportes, noticias, anuncios
de servicio pDbfico, progrsmas reh'giosos y dims.
Tabls de ¢lssifics¢i6n de Programas de TV
TV-Y Para ni_os. Los temas y elementos en este programa son especificamente dise_ados para una audiencia muy joven, incluyendo
ni_os de 2=6 a_os.
TV-Y7 Dirigido a ni_os mayores. Los temas y elementos en este programa pueden incluirviolencia c6mica o ligeramente fisica, o puede
asustar a ni_os menores de 7 a_os.
TV-G Audiencia General. Contiene poca o ninguna violencia, sin lenguaje no apto para menores, y pocas o ninguna situaci6n o dialogo
de tipo sexual.
TV-PG Se sugiere supervisi6n de los padres. Este programa puede contener lenguaje soez, violencia limitada, algunas situaciones y
dialogo de tipo sexual.
TV-14 Se requiere supervisi6n de los padres. Este programa puede contener temas sofisticados, situaciones intensas de sexo, violencia
mas intensa y un mayor dialogo sugestivo.
TV-MA Solo Audiencia Madura. Este programa puede contener temas maduros, lenguaje indecente, violencia grafica y contenido sexual
expJicito.
FV: Violencia FantasiafAnimaci6n V: Violencia S: Escenas de sexo L: Lenguaje explicito D: Dialogo Sexualmente Sugestivo
• Si usted bloquea TV=f4D, seguir4 permitiendo los progrsmas TV=MA; si bloquea T_/:f4V, autom4ticamente bloquear4 los
prsgrsmss T_/:MA_4 pets seguira permifiends los prsgramas TV=MALS. Ests significa que la TV blsquesra la videncia en
T_/:14 y mayores (T_/:MA), pets ns e! lengusje y csntenido sexual
o Las clasificacisnes de prsgrsmas de TV dependen de la csmpafiia teledssrs. Si el prsgrsma ns esta clasificads, la TV ns
Is blsqueara.
C8+
G
PG
14+
18+
¢lssJfioaei6n de ¢snsd.'_ (Ingles)
Programaci6n dirigida a ni_os menores de 8 a_os - Lineamientos sobre violencia: atenci6n especial a los temas que pueden amenazar
el sentido de seguridad y bienestar del ni_o. No existen escenas reales de violencia. Las escenas de comportamiento agresivo seran
poco ffecuentes y limitadas a representaciones que son claramente imaginarias, c6micas e irreales por naturaleza. Otros lineamientos
de contenido: No habra lenguaje ofensivo, desnudos o contenido sexual.
Programaci6n generalmente considerada apta para ni_os de 8 a_os en adelante y que pueden vet solos - Lineamientos sobre violencia:
La violencia no sera mostrada como la @ica, preferida y aceptable manera de resolver los conflictos; o motivara a los ni_os a imitar
actos peligrosos que puedan ver en televisi6n. Cualqubr escena realista de violencia sera poco ffecuente, discreta, de baja intensidad
y mostrara las consecuencias de los actos. Otros lineamientos de contenido: No habra palabras altisonantes, desnudos o contenido
sexual.
Audiencia General - Lineamientos sobre violencia: Contendra muy poca violencia, ya sea fisica o verbal o emocionaL Sera sensible a
temas que puedan asustar a ni_os menores, no mostrara escenas reales de violencia que minimicen o subestime los efectos de actos
violentos. Otros lineamientos de contenido: Podra haber expresiones inofensivas, no habra palabras altisonantes, ni desnudos.
Supervisi6n de padres - Programaci6n dirigida para la audiencia general pero la cual puede no ser apta para ni_os menores. Los
padres pueden considerar parte del contenido inapropiado para ser visto sin supervisi6n pot ni_os entre los 8-13 a_os. Lineambntos
sobre violencia: Muestras de conflictos ylo agresiones seran limitadas y moderadas; puede incluir violencia fisica, irreal, o supernatural.
Otros Iineamientos de contenido: Puede contener pocas palabras altisonantes o lenguaje ligeramente sugestivo. Tambi6n puede
contener escenas breves de desnudos.
La programaci6n contiene temas o contenido que puede no set apto para menores de 14 a_os= Se advierte fuertemente a los padres
tener discreci6n al permitir vet a pre-adolescentes y adolescentes. Lineamientos sobre violencia: Puede contener escenas intensas de
violencia. Puede tratar con temas maduros y de la sociedad de una manera realista. Otros Iineamientos de contenido: Puede contener
escenas de desnudos ylo actividad sexual. Puede haber uso ffecuente de palabras altisonantes.
Adultos - Lineamientos sobre violencia: Puede contener violencia integral al desarrollo de la trama personaje o tema, dirigido para
audiencia adulta. Otros lineamientos de contenido: Puede contener lenguaje grafico y escenas explicitas de desnudo ylo sexo.
28

TabJa de ClasificaeiSn de Canada (Fran¢_s)
G General =Programaci6n dirigida para audiencia de todas las edades. No contiene violencia, o ei contenido de violencia es minimo
o es mostrado apropiadamente con humor o en forma de caricatura o de una manera irreaL
8 arts+ 8 + General oNo se recomienda para niSos menores de 8 a_os oProgramaci6n didgida para una audiencia amplia pero que contiene
violencia ligera u ocasional que puede perturbar a niSos menores. Para niSos menores de 8 aSos que no pueden diferenciar entre
escenas reales e imaginanas se recomienda ver acompaSado de un adulto.
13 arts+ Programaci6n que puede ser no apta para niSos menores de 13 aSos oContiene pocas escenas violentas o una o mas escenas
violentas que pueden afectarlos. Se recomienda fuertemente ver con un adulto para niSos menores de 13 aSos.
16 arts+ Programaci6n no apta para niSos menores de 16 a_os oContiene escenas frecuentes de violencia o violencia intensa.
18 arts+ Programaci6n solo para adultos oContiene escenas constantes de violencia o escenas de extrema violencia.
Regi6n S
Use REGION 5 para bloquear varios tipos de peliculas y programas
de TV basados en sistemas de clasificaci6n usados en U.S.A. que
usted considere inapropiados debido a su contenido. La opci6n
REGION 5 funcionara solamente para canales digitaJes (ATSC).
Procedirniento para CJasificar
1. Use los CURSORES A, V para seJeccionar ia CATEGORiA
DE CLASIFICACION (pel[cula, programa de TV, etc.) que
usted desea bloquear.
2. Presione el bot6n SELECT para bloquear la CLASIFICACION
que usted ha seJeccionado.
3. Presione EXIT para salir del menO.
Clasifieaei6n de Regi6n 5 (EjempJo) :
G Audiencia General. Para todas las edades.
PG Se sugiere supervisi6n de padres. AIgOn material puede ser no apropiado para niSos.
PG-13 Se requiere la supervisi6n de los padres. AIgOn material puede ser no apropiado para niSos menores de 13 aSos.
R Restringido. Menores de 17 aSos requiere la compaSia de un padre o adulto.
NC-17 No se admite a nadie de 17 aSos o menor.
X Solamente Adultos.
Y Solamente Adultos.
, Para poder activar la funci6n RegiSn 5, e! canal digital ATSC recibido debe incluir bs datos de la RegiSn 5. Para ver si el
canal tiene los datos de la Regi6n 5, presione la tecla INFO en el control remoto.
, Una vez que la TV ha recibido los datos de la Regi6n 5, la opciSn REGION 5 en el mend Control Patemo mostrara los
datos.
29

Subt[tuIos
Los Subtitulos son los dialogos, la narraci6n, yio los efectos de
sonido de un programa de TV o video los cuales son desplegados
en la pantalla de TV. Su gzJia de programaci6n Ioca! identifica estos
B
programas con 6 _.
Opciones de Energia
Usar esta funci6n para ahorrar energia al ver su Televisor LCD
Hitachi.
1. Usar los Cursores _, & y T para resaltar y elegir ia funci6n
a cambiar.
2. Presionar EXIT para salir del menO 6 elegir 8ubtitulos para
regresar al menO anterior.
8ubt[tulos:
ON/OFF encendera o apagara el subtitulo _ On 6 Off.
8in Audio encendera el subtitulo _'_ On al estar "Sin Audio"
activado.
Subtitulos Digitales
Configura los subtitulos para programas digitales y configura el
idioma si esta disponible.
Opciones Subtitulos Digitales
Esta le ayudar_ a elegir y configurar el lenguaje, ietra, tamaffo y
estilo de fondo de los subtitulos digitales.
Los subtitulos Dig/tales solo funciona a/ usar el
sintonizador de este te/e_Ysor.
MOS TRAR SUBT/TUL OS no #Jncionara con
seSa/es de entrada 480p, 720p, 1080i o 1080p a
trav&s de/as entradas pot COMPONENTE Y-PbPr
6 HDML
La disponibiTidad y el oontenido de los Subdtu/os
An_/ogos y Dig/tales dependen de /a emisora de
T_/I Los Subdtu/os estan disponib/es cuando el
icono es mostrado en pantal/a.
El Lenguaje de los Subtitu/os D(gita/es no estara
disponib/e (letras en gris) a/ recibir programaci6n
an_/oga.
Subt. Ana[ogos:
Configura los Subtitulos para programas Analogos. Esta funci6n
le ayudara a escoger y poner el modo disponible.
CC1,CC2, etc. : Estos son para el programa que esta viendo.
TEXT1, etc. : es para informaci6n adicional tal como reportes
de noticias o guia de programas de televisi6n. Esta informaci6n
cubre toda la pantalla y no es posible ver la imagen del programa
de televisi6n. TEXTO puede no estar disponible con todos los
programas [_.
1. Presionar los CURSORE8 _. 6 T para resaltar la funci6n
Opciones de Energia.
2. Presionar el CURSOR _ para elegir.
Ahorro en [magen
Esta funci6n ie permite elegir la reducci6n de consumo de potencia
basado en 3 niveles (Min., Media y Max).
Auto Apagado
Esta funci6n apaga el televisor cuando la seffal de Control Remoto
no es detectada por 3 horas, Favor de escoger On 6 Off para
poner la opci6n.
Transparencia
Esta funci6n te permite cambiar [a transparencia det menO
en pantatta (OSD) basado en 10 nivetes (0 opaco - 10
transparente). Ajustar a su preferencia.
1. Presionar los Cursores A 6 T para resaltar Transparencia.
2. Presionar el CURSOR _ 6 SELECT.
3. Presionar el CURSOR _ para incrementar 6 4 para reducir
la transparencia del menO en pantalla OSD.
3O

HDMJ_CEC
SeJeccione ON para habiiitar la serial HDMIoCEC de su televisor
de LCD HitacM que descubrira y se comunicara automaticamente
con otros equipos HDMi de Audio/Video compatibles. La se_aJ CEC
hace posible el control global basado en automatizaci6n "plug &
play" para minimizar eJ n0mero de presiones y controles remotos
requeddos para Ja operaci6n de su sistema AV. SeJeccione OFF
para deshabiiitar esta funci6n.
Nombres de Entradas
Usar esta opci6n para nombrar cuaJquiera de las 9 entradas
excluyendo la entrada de TV.
1. Presionar los Cursores a. 6 T para resaitar ia opci6n
Nombres de Entradas.
2. Presionar el CURSOR _ para elegir las opciones.
Con ia funci6n "HDMI-CEC", usted puede interfazar
autom_ticamente con el equipo conectado a traves de ia terminal
HDMJ si este cumple con el estandar industriaJ para el control
"HDMi CEC (Consumer Electronics Control)". Pot favor verifique
si el equipo conectado soporta se_aJizaci6n HDMJ CEC antes de
utiiizar esta funci6n. Pot ejemplo, aqui abajo se muestran dos
operaciones comunes aJ activar ia se_aJizaci6n HDMI CEC.
Opci6n Deaeripei6n
Un toque
reproduce
(Play} (TV Auto
Encendido)
Sistema en espera
(Equipo Auto
Apagado)
ControJ de
reproducir
Condici6n : Mientras e! TV LCD este
encendido.
AI apagar et TV LCD 6 poner en modo de espera,
el equipo conectado tambien se apaga 6 en
modo de espera.
Presionar el bot6n "Play" en equipo habilitado et
CEC controlar& el equipo a reproducir, enciende
el TV, y ta entrada HDMI , en la cual el equipo
esta conectado, activar& la entrada para el TV
Ei usuario puede operar ias funciones de
reproducir del equipo habilitado con CEC ( Play,
Stop,Fast Forward and Rewind) por Ias teclas del
control remoto (ie. _ ,B,44 and }_).
La opci6n de Nombres de Entradas estara en Gris
(Omitir) 8 deshabifitada hasta que usted este en una de
/a entradas a/a cua/ desea cambiar.
A/ e/egir /a opci6n de Personafizado un TECLADO apareo
cera en /a imagen para poner el nombre deseado.
Opci6n Componente
Esta funci6n ie permite ajustar ia fase entre su Televisor y el equipo
con salida por componente.
1. Presionar los Cursoree a. 6 T para resaitar ia Opci6n
Componente.
2. Presionar el CURSOR _- para elegir ias opciones.
Existen dos opciones para Jas entradas de Componente:
Fase: Usar esta opci6n para un ajuste fino para una imagen
perfecta sincronizada con Jase_at de video det equipo.
Restaurar: Regresa ta condici6n original para ta entrada
pot Componente.
31

Opciones RGB
Esta funci6n es para ajustar ia entrada RGB para combinar ia
salida de su computadora (PC) 6 laptop con su televisor LCD.
Restaurar Configuraci6n AV
Esta opci6n restaura todas ]as condiciones de Audio, Video y
Configuraci6n que usted ha hecho en su TV y los regresara alas
condiciones de fabrica.
1. Presionar los Cursores _. 6 _ para resaltar Opciones RGB.
2. Presionar el CURSOR _ para elegir ias opciones.
Existen 6 opciones para te entrada RGB. Posici6mH,
Posici6mV, Retoj, Fase, Auto Ajustar y Restaurar.
Posici6noN
Ajusta la posici6n de ia imagen horizontalmente.
Posici6noV
Ajusta la posici6n de ia imagen verticalmente.
Reloj
Minimiza las lineas verticales en ia imagen.
Pase
Minimiza las ietras difusas y ias iineas en los renglones
hodzontales.
Auto Ajustar
Ajusta la posici6n Horizontal, posici6n Vertical, Reloj, y Fase
automaticamente.
Re$,taulrar
Cada funci6n en el men0 de opciones RGB ser_n restauradas a
las condiciones de fabdca al elegir Si.
32

Elegir CANALES para configurar ias opciones de sepal, hacer Agregar Canales a la Lista
Nueva BOsqueda de Canales, verificar el Medidor de Se_a! y Esta funci6n le permite agregar canales a ia memoda. Algunas
configurar la Lista de Canales (Agrega canales a ia iista, hombres veces al ajustar la direcci6n de la antena permitira la recepci6n de
de canal y canales favoritos), canales adicionales.
1. Presionar los Cursores A, Y para resaltar Canales.
2. Presionar el bot6n SELECT 6 el CURSOR _- para elegir.
1. Usar los CURSORES para elegir la opci6n Agregar Canales
a la Lista.
2. Presionar el bot6n SELECT para iniciar ia bOsqueda.
3. Presionar el bot6n EXIT para regresar a vet los canales.
Solo los Cana/es que no han sido agregados a la fista seran
guardados en la memoria.
Lista de Canales
Esta funci6n ie permite revisar cuales canales han sido agregados
a la Lista de Canales.
Origen
Selecciona el tipo de seSal para su TV. AI usar una antena interna
6 extema elegir ACrea. AI usar un sistema de cable elegir Cable.
Potencia SePal
Elegir Potencia SePal al usar una antena interna 6 extema. Esta
opci6n le mostrara la intensidad de la sepal de la Antena para
ayudarle a ajustar su antena para optimizar la recepci6n de sepal.
Usar el bot6n MENU 6 EXIT para regresar.
El medidor de Potencia SePal no estara disponible
(en gnus)al ver canales an41ogos.
Nueva B@squeda
Esta opci6n guardar_ automaticamente canales Analogos y
Digitales disponibies a Ja lista de CanaJes. Esta bOsqueda borrara
todos los canales previamente guardados en la lista.
1. Usar los CURSORES para navegar en ia iista de Canales.
2. Presionar el bot6n SELECT 6 _" para elegir OMITIR 6 Vet.
3. Presionar el bot6n EXIT para regresar a vet los canales.
La lista de Canales no puede set actualizada pot solo cambiar la
fuente del sistema de cable. La opciOn Nueva BDsqueda debe set
realizada para que la lista de canales sea actualizada.
Usar los CURSORES para resaltar y iuego presionar ia tecla
SELECT para iniciar.
Si no desea borrar todos los canales guardados,
mejor usar la opci6n Agregar Canales a la Lista.
33

Nombres de Canal
Usar esta opci6n para dar nombre a cualquiera de los canales. 1. Usar los CURSORES para navegar la lista de Canales.
Elegir el nombre de la estaci6n a! vet un canal pot ejemplo.
1. Presionar los CURSORE8 _ 6 _ para cambiar Canales.
2. Presionar el CURSOR _' para elegir el nombre de canal.
3. Presionar la tecla SELECT para mostrar el Teclado para editar
los canales.
2. Presionar el bot6n SELECT 6 _" para marcar el canal y hacedo
un canal Favorito. Elegir todos los canales deseados.
3. Presionar el bot6n EXIT para para regresar a vet los canales.
4. Para vet todos los canales Favoritos que usted ha escogido,
presionar la tecla FAV. CH en el Control Remoto.
Canales Favoritos
Esta funci6n ie permite configurar sus Canales Favodtos.
INFORMACION MPORTANTE
La transmisiOn digital de TV en los Estados Unidos sera per
completo el 12 de Junio del 2009, pete sus estaciones locales
de television pedrlan cambiar antes. Despues de! cambio, Los
televisores analogos que reciben programaciOn de TV atravez de
una antena, necesitaran un convertidor para seguir recibiendo
sehal de TV transmitida per aire. Vea sus estaciones locales para
saber cuando dej_r4n de transmitir sehal an41oga y cambiaran a
transmisiOn digital Para informaci4n sobre la transiciOn a DTV en
sus estaciones locales de televisi6n, visite la pagina www.DTV.
gov; 0 1o888oCALLoFCC (TTY 1o888oTELLoFCC), www.dtv2009.
gov 4 1o888oDTVo2009 (TTY 1-877-530-2634) para informaciOn
sobre cupones de descuento para los cenvertidores de TV
digital.
Para mayor informaciOn con respecto a estas conexiones, per favor
revise esta gula de funcionamiento.Hitachi apoya la transiciOn a
TV Digital y come miembro de la Coalici4n de Transici6n DTV
insta a los consumidores a visitar estas p4ginas WEB para vet las
guias interactivas y una mayor informaci6n deta!lada.
www.dtvtransition.org
www.myceknowhow.oom
www.dtv2OO9.gov
34

PERMITIDO NO PERMITIDO
Desempotve ta pantatta y gabinete con una toalta suave.
Limpie ta pantatta con una toalla tigeramente hOmeda en
agua tibia y seque con una toalta seca. Un jab6n de reacci6n
media puede set usado si ta pantatta esta en extremo
sucia.
Cotoque su Televisor de LCD tejos det cator extremo,
humedad, y tugares con mucho potvo.
Remueva ta conexi6n de ta toma de corriente en la pared si
su Televisor no esta en uso pot un periodo largo de tiempo,
pot ejempto cuando usted sate de vacaciones.
No timpie su pantalta con limpiadores fuertes, no use
productos para putir o toattas tratadas con quimicos.
No coloque productos de vinit o hute o papet cetofan en su
Televisor de LCD.
No toque ta pantatta con frecuencia.
No exponga et control remoto a gotpes tales como dejarto
caer en et piso, etc. Esto puede resuttar en da_os en partes
de precisi6n.
Evite cotocar el controt remoto en tugares de atta humedad
o dejar que se mole. No to deje cerca o encima de un
aparato de calefacci6n. Cator o humedad excesiva puede
causar que ta unidad cese de operar.
Cuando tas batedas se desgastan, ta operaci6n det control
remoto se vuetve erratica o posibtemente se detenga pot
compteto. Reemptace tas batedas usadas con nuevas
batedas de tama_o "AA" tan pronto como sea posibte.
SOLUCI6N DE PROBLEP,/IAS
Et exponer ta pantaIla a ta tuz directa del sol o al calor pot
un tiempo protongado puede causar da_o a ta pantatta de
LCD.
Su Televisor de LCD HITACHI incorpora una avanzada tecnotog_a de protecci6n contra sobrevottaje dise_ada para proteger
contra da_o de componentes 6 circuitos a causa de un sobrevottaje externo o interno.
SI SU TELEVISOR TIENE PROBLEMAS PARA ENCENDER, FAVOR DE SEGUIR ESTE PROCEDIMENTO:
1.
2.
3.
Presione et bot6n de encendidoiapagado (Power) una sola vez.
Si aun no enciende,espere 30 segundos y presione et bot6n de encendidolapagado otra vez.
Si aun no enciende, desconecte ta Hnea de CA de ta toma de corriente de ta pared y espere 30 segundos para
conectarta de nuevo. Presione et bot6n de encendidolapagado una vez mas.
Esta tecnotogia protectora debe proporcionar muchos a_os de entretenimiento duradero de su Televisor de LCD Hitachi.
Si existe un problema con su televisor, antes de ttamar a un t¢cnico de servicio, verifique primero tas siguientes tablas.
Si et problema no puede set resuetto con los procedimientos sugendos, pot favor contacte a 800-HITACHI. Pot su propia
seguridad, NUNCA intente reparar et producto pot usted mismo.
Cuando mosSiguientes Mensajes Aparecen en RaPantaHa
Sin SeSa!
El televisor no puede detectar ninguna sepal de ninguna terminal de entrada.
, Verifique si los cables estan conectados correctamente y firmemente.
, Verifique si su equipo de A/V extemo esta encendido.
, Verifique si la selecci6n de entrada coincide con la terminal conectada.
, Este mensaje sera desplegado pot 15 minutos y luego el televisor se apagara
35

$oluc 6n de Preble as
Sintomas y Sugerencias
Sin Bmagen - sin sonido , Verifique el estado de la Luz Indicadora (Apagada, Roja, Azul).
, Verifique la conexi6n del cable de alimentaci6n y/u otros cables.
, Verifique si su televisor y equipo de A/V extemo esta encendido.
, Verifique si la entrada correcta esta seleccionada.
, Verifique si la unidad esta en modo de espera "Standby'.
, Ajuste los valores en el menO de "Video" y "Audio".
, Verifique las conexiones al equipo externo.
9,12,
14~17
24~26
Bmagenes MQItiples=sonido normal 14~17
hterferencia htermitente , Verifique si la fuente de interferencia esta btindada correctamente. 37
, Mueva este tipo de dispositivos el6ctricos lejos de la unidad.
Imagen Normal, pero sin sonido , Verifique el nivel de volumen. 18,
, Medfique si el bot6n MUTE ha sido presionado o no. 14~17
, Verifique las conexiones al equipo externo. 19, 26
, htente el siguiente/otro lenguaie de Audio.
Sin imagen =sonido normal , Verifique et nivel del valor de "Brillantez" y "Contraste" en el menO de "Video". 24
E! control remoto no funciona , Verifique si las batedas estan insta_adas correctamente. 6, 9
, Las baterias pueden estar bajas. Remplacelas con nuevas.
, Remueva todas las obstrucciones del frente de la ventana de1 sensor de la unidad.
, Verifique si los botones del panel de control estan funcionando.
Los botones en el control remoto yen el , Desconecte y conecte el cable de atimentaci6n nuevamente. 7, 35
panel de control no funcionan.
Imagen norma! pero sin color- sonido normal , Verifique las conexiones al equipo externo. 14~17
Sin ImagenLuz Indicadora _ Apagada , Verifique si la conexi6n del cable de alimentaci6n a la toma del televisor esta segura. 7, 9
, Verifique si la alimentaci6n principa! esta encendida.
Sin Imagen , Verifique si los cables estan conectados correctamente y firmemente. 12, 14~17,
Luz Indicadora _ Azul , Aiuste el nivel de Briilantez y Contraste mas abaio. 24
A_gunos modos de Aspecto de la imagen no , Verifique el estado de la sehal a! presionar e! bot6n INFO en el control remoto. El aspecto 11, 21
pueden ser seteccionados, disponible es diferente dependiendo de la condici6n de la seCial de entrada. 42
No enciende , Verifique si esta conectada la clavija a la alimentaci6n de CA. 9, 12
Se apaga sola , Verifique y asegOrese que las opciones del Auto Apagado no estan activadas. 11, 19, 27
Se enciende sola , Verifique y asegOrese que las funciones HDMI-CEC no estan activadas. 11, 19, 31
La imagen puede b!oquearse o congelarse , Verifique la potencia de la seha! y niveles de ruido con el medidor de sehal. 33
cuando se ve un canal digital.
PROBLEMAS DE ENTRADA HDMI
Sin imagen = sin sonido , AsegOrese que ha elegido la entrada HDMI correcta. Navega pot todas elias mientras el
dispositivo HDMI esta encendido 6 durante ta reproducci6n.
, Desconecte y conecte et cable HDMI mientras et TV y el dispositivo HDMI esta encendido.
, Apague el TV y el dispositivo. Encienda el TV primero y luego el dispositivo.
14, 15, 17,
21
Mensaje de error en la panta!la Intente presionando "exit" con e! control remoto de1 dispositivo HDMI y luego con et control 9, 11
remoto de_ TV para encontrar la fuente del despliegue del error. Si el error persiste o regresa 14, 17
aun despues de haber presionado "exit", intente otra entrada HDMI det T'v:
, Desconecte y conecte et cable HDMI mientras el TV yet dispositivo HDMI esta encendido.
Apague el TV y el dispositivo. Encienda el TV primero y luego el dispositivo.
Imagen normal, pero sin sonido , Verifique las opciones del Audio HDMI bajo el menu del dispositivo HDMI. Para poder
obtener sonido en el TV, la salida HDMI debe estar en la opci6n PCM
Sin sonido de la Salida Optica del televisor , Cambie la selecci6n de Salida Digital. 17
cuando se utitizan dispositivos HDMI. , Como una opci6n, use la salida de audio 6ptica del dispositivo HDMI directamente para
separar el Amplificador de Audio del televisor.
La imagen parpadea al cambiar entre , Esto es una operaci6n norma! del retardo del cambio de la fuente. No es indicador de una
canales digitales cuando se utiliza un Set fatla del televisor.
Top Box con salida HDMI.
Imagen borrosa o desenfocada , Si la fuente HDMI es HD, asegOrese de que la satida es 1080i 6 720p en el menO del
dispositivo HDML
36

RUIDO DE ENCENDIDO:
Pueden aparecer puntos negros o rayas horizontates, la imagen puede variar 6 moverse.
Usualmente causado pot interferencia de un sistema de arranque de un auto, tamparas de
ne6n, taJadros eJectricos, y otros aparatos electricos.
IMAGENES FANTASMAS:
Imageries fantasmas son causadas por sefiales de tetevisi6n siguiendo dos rutas distintas.
Una es de incidencia directa y ta otra es reflejada en edificios altos, montafias u otros ob]etos.
Cambiando ta direccidn o posicidn de ta antena puede me]orar la recepci6n. Imagenes
fantasmas tambien pueden set causadas por defectos del sistema de la antena tales como
cables sin blindaje o aJ conectar varios aparatos a ta misma antena sin usar divisores
mOttiptes de antena.
NIEVE:
Si su receptor esta ubicado en et Hmite de cobertura de una estaci6n de TV donde ta seBal
es debil, su imagen puede estar empafiada con la apariencia de pequefios puntos. Cuando
ta serial es extremadamente debit, puede set necesario instaJar una antena especial para
mejorar ta imagen.
INTERFERENClA DE FREQUENCJAS DE RADIO:
La interferencia produce ondas o rayas diagonates, yen aJgunos casos, causa perdida de
contraste en ta imagen.
PREVENCI6N DE OBSTACULOS PARA RECEPTORES DE RADIO
Esta televisi6n ha sido disefiada conforme a tas normas de ta FCC para aparatos de Ctase B.
Esto para prevenir probtemas a los receptores de Radio. Siesta tetevisi6n causa probtemas
a un receptor de Radio siga los siguientes pasos:
o Mantenga ta tetevisi6n le]os del Radio.
o Ajuste ta antena del Radio con el fin de no recibir interferencia.
o El cable de ta antena det Radio debe mantenerse tejos de ta tetevisi6n.
Use cable coaxial para ta antena.
Usted puede comprobar si esta tetevisidn interfiere en los receptores de Radio apagando todos los equipos excepto ta TV. Si
usted encuentra un probtema aJ recibir el Radio aJestar usando ta television, siga tas instrucciones mencionadas arriba.
IMAGEN DIGITALJZADA 6 CUADRICULADA (ENTRADA DIGITAL):
Puede aparecer imagen cuadricutada puede aparecer en una parle o en toda ta pantatla.
Usuatmente causado por interferencia de un sistema de arranque de un auto, tamparas
de ne6n, taJadros eJectricos, fantasmas de ta imagen y sefiates de recepci6n debites o
perdidas.
IMAGEN OBSCURA:
AI recibir canates digitaJes usando una antena y esta serial sea muy debit, ta imagen
aparecera obscura, puede set necesario mejorar su sistema de antena.
El Televisor puede generar distorsiOn de sonido en dispositivos extemos tales como una radio. Favor de separar
el equipo de radio del televisor y ponedo a una distancia considerable.
37

Funciones y Especificaciones
Funciones:
• Nuevo Marco de Alto Brillo color Negro
(4) HDMI TM (V.1.3 con x.v.Color TM, CEC)
- Entradas compatibles 1080p60, 1080p24
• Nuevo Control Remoto Multi-Funci6n
Memorias de Imagen DinamicotEst,_ndadCinel Personalizadot
Juego.
3 Temperaturas de Color Predeterminadas
Modo de VideoJuego
Video:
Pantalla de Resoluci6n 1920 x 1080p (L42A403)
Pantalla de Resoluci6n 1366 x 768p (L32A403)
Amplio Angulo de Visi6n
3 Modos de Temperatura de Color :AIta, Media y Estandar.
Modos Multiples de Despiiegue en Pantalla (Aspectos):
(AUTOI4:3116:91 Zoom llZoom2tCompleto) 1
Fiitro 3D YtC de 4MB 10obit
Modos de Imagen: Dinamico, Estandar, Cine, Personalizado,
Juego
Accesorios Incluidos:
Control Remoto
Baterias (AA)
Cable de CA de 6 pies
Guia de Funcionamiento
Guia Grafica para Facil Conexi6n
Entradas/Salidas:
Video Componente Y, Pb,Pr....................... 2
Video Compuesto .................................. 2
S-Video ........................................... 1t22
Entradas de Antena (RF) ............................. 1
Salida 0ptica ..................................... 1
Salida deAudio (Audio Out) ............................ 1
HDMI ................................................ 4
Ranura de USB de Actualizaci6n ..................... 1
Entrada de RGB (PC) ............................ 1
Entrada deAudio RGB (PC) ............................ 1
Terminal para Aud(fonos ............................ 1
Audio:
MTS Stereo/SAP
4 tipos de sonido (Personalizado, Estandar, Cine y Noticias)
Sonido SRSTruSurroundHD
24W L42A403
20W L32A403
Entradas:
Aiimentaci6n ......................... AC 120V, 60Hz
Consumo de Potencia
Potencia Maxima: ..... (L32A403) 150 W, 1.5 A
(L42A403) 250 W, 2.5 A
Impedancia de Entrada de Antena ............... 75 Ohm
Cobertura de CanaJes ......................... 191ch
Banda VHF ............................... 2~13
Banda UHF .............................. 14~69
Banda Media CATV ....................... A5~AI
........................................... AI
Super Banda ............................... J-W
Hiper Banda ........................ W+l - W+28
Ultra Banda ....................... W+29 - W+94
Sistema de Televisi6n ................. Estandar NTSC
............. Estandar ATSC (8 VSB, 64-QAM, 256-QAM)
Video .............................. 1.0Vp-p, 75 Ohm
Especificaciones:
Ciase FCC: ................ B para productos de Consumo
Requerimientos de Potencia ......... 108-132VAC, 60Hz
La disponibilidad de! modo de desptiegue varia debido a ta seSat de entrada.
2Solo e! modelo L42A403 tienes 2 entradas S-Video disponibles.
Las TV's HDTV desptiegan HDTV solo cuando una fuente HDTV est8 disponible.
Las especificaciones, pesos, y dimensiones estSn sujetos a sambio sin notificaci6n
previa. Favor de accesar a www.hitachi.us/tv para especificasiones y dimensiones
deta!ladas que le puedan serw para su instalasi6n.
W_m TM HDMI, el logo HDMI logo y High-Definition Multimedia Interf......
m i_m m ilmlll
marcas Fegistradas de HDMI Licensing LLC.
| DOLB¥ *Fob,,cada baio,, .... ia de Dolby Laboratories. "Dolby" y el sirnboio
D_G_TAL 1 doble-DsonmarcasregistradasdeDolbyLaboratories.
SoVideo
Luminancia(Y): ........................ 1.0Vp-p, 75 Ohm
Crominancia(C): ..................... 0.286Vp-p, 75 Ohm
Video Componente
Luminancia(Y): ........................ 1.0Vp-p, 75 Ohm
Crominancia(PblPr): ................... 0.7Vp-p, 75 Ohm
Impedancia de Entrada de Audio ........ mas de 20k Ohm
Nivel promedio de entrada .................. 470mVrms
HDMI ..................................... (19 PiN)
38

D ensienes
Modelo L32A403 (mncluye Base) Peso (_bsJkg): 2&5/12
Unidades " Pulgadas (mm)
¢4
3 35/64 (90.1)
31 1/8 (790.5)
4
(AREA4CTIVA)I A'
27 37/64 (700.6) ;_
I _o
/
CENTRODELAPANTALLA,/
!
!
i
i
_LL3
19 1/2 (495.4) _ 10 3/64 (255.3)_
ORIFICIOPARA
MONTAJEENPARED
(4 POStC!ONES
OD_ DODQDDODDDODQ_ODDDDODQDODDDD
POSIC!ONDELCABLE
DEALIMENTAQON
Vista Posterior
Osese como referencia para ta instalaci6n en pared.
Long, dei To_'nillo (A)
Long. de InserciSn (B_B_)
Rondana de pres. (C)
Rondana plana (D)
Soporte de _a base (E)
Ejempio :
A = B+C+D+E
A: 13,5~15.5 mm,
,_: &5~10.5 mm=
C 1 mm,
D: I mm,
E: 3 mm.
El tipo de tornillo : Rosca _SO M6
(Milim6trico, no usar Est&ndar).
Vista Lateral
Especificaci6n de tornilto para
Base de Montaje en pared
39

ModeJo L42A403 (JncJuye Base) Peso (Jbs./kg}: 45.6/21
Unidades " Pulgadas (mm)
39 31/32 (1015.36)
3 3/4 (95.6)
.... 363/4(933.5/ I/ _- _
AREA AOTIVA) /
/
S1_ 2_2s/3_!_ /7o9o9)
I I
24 55/64 (631.48)
ORIFICIOPARA
MONTAJEENPARED
(4 POStCIONES_
04
O_UHOOtO_H_O_UnO_UHn_HHI
Bfl_dOBIOIOBOH_BUHUDOOODIOD
POSIClONDELCABLE/
DEALIMENTACION
Vista Posterior
Osese come referencia para ta instaiaci6n en pared.
Long, del Tomillo (A)
E! tipo de tornillo : Rosca ISO M6
(Milim@trico, no usar Est@ndar),
Vista Lateral
Especificaci6n de tomitto para
Base de Montaje en pared
4O

Sincere - Prompt = Efficient
HiTACHi
Inspire the Ne×_
HITACHI HOME ELECTRONICS(AMERICA), iNC.
HFACHI ha hecho et maximo esfuerzo para asegurade horas y horas de funcionamiento tibre de problemas.
En caso de requerir asistencia acerca de LA OPERAOI6N, CONEXI6N, ASlSTENOtA TEONICA 6 SOPORTE DE SU
GARANTiA, pot favor contacte nuestros representantes calificados al 800.HTACHJ (800.448.2244).
Nuestros representantes le brindara ta ayuda que usted necesite y de set necesado la direcci6n det Centro de Servicio
Autorizado HITACHI mas cercano a usted. Solo presente ta factura y/o recibo de compra at representante dei Centro de
Servicio 800.HFACHI. La cobertura de la garantia sete proporcionara de acuerdo con tos terminos estabtecidos en ta
garanfia (Ver ta pagina de ta garantia en esta guia de operaci6n del producto).
Pour de plus amples renseignements sur te service durant ta periode couverte par ta garanfie, sur te fonctionnement ou pour
de t'assistance technique communiquez avec:
Au Canada: 800.HITACHI _800.448.2244}.
Lundi- Vendredi 8:00 am = 7:00 pm HNC
Samedi 10:00 am = 5:00 pm HNC
Hitachi Home Emectronics
(America), Inc.
Customer Service Support
PC Box 3900Peoria, IL 61612
U.S.A. [email protected]
Canada: [email protected]
Informaci6n demCliente
Et MODELO y el NOMERO DE SERE de este producto estan tocatizados en ta parte POSTERIOR y al lado DERECHO del
producto. Favor de seguir los siguientes pasos para encontrar esta informaci6n y entonces anotartos en el espacio reservado
abajo para usarto en caso de ttamar at 800.HITACHI, eltos te soticitaran esta informaci6n con el fin de darte et soporte
adecuado.
@ Observe et tado derecho det producto.
Localice la etiqueta donde se muestra la informaci6n
retacionada con el MODELO y el NOMERO DE
SERE.
O 800.HFACHI te soticitara esta informaci6n con ei fin
de darte el soporte adecuado.
Modelo N6mero de Serie
41

Ap_ndice A: Formato de lmagen para cada SeSal de Entrada
Especificaciones de Aspecto
SePal de Entrada Aspecto
AIR / CABLE
Analoga
AIR / CABLE
Digital
AV1
AV2
COMPONENT 1
COMPONENT 2
HDMI 1
HDMI 2
HDMI 3
HDMI 4
Video
YCbCr / YPbPr
RGB
Notas
Auto 4:3
84 84
84 84
Si: Disponibie -< No Disponibie
16:9 Completo Zoom1 Zoom2
84 84 84
Video / S-Video 84 84 84 84
Video 84 84 84 84
YPbPr 84 84 84 84 84
YPbPr 84 84 84 84 84
HDMI 1080p11 080ii 84 84 84 84 84 84
t DVl 720pt480pi480i
VGA 84 84
HDMI 1080p11 080ii 84 84 84 84 84 84
720pt480p1480i
VGA 84 84
HDMI 1080p11 080ii 84 84 84 84 84 84
720pt480p1480i
VGA 84 84
HDMI 1080p11 080ii 84 84 84 84 84 84
720pt480p1480i
VGA 84 84
Analoga RGB 84 84
Ap_ndice B: Formatos RGB
Resoluci6n Frequencia(Hz)
640x480 60172t75
720x400 70
800x600 56160172t75
1024x768 60170175
1280x720 60
1280x768 60
Resoluci6n
1360x768
1280x1024
1440x900
1680x1050
1920x1080
Frequencia(Hz)
6O
6O
6O
6O
6O
Notas
Solo L32A403
Solo L42A403
Solo L42A403
Solo L42A403
Solo L42A403
El tipo de tarieta de video 6 et cable de conexi6n no podrian permitirte corregir ajustes en ta imagen como
Posici6n-H, Posici6n-V, Retoj y Fase.
42

C
Canales
Canal Favodtos ....................... 34
Lista de Canales ............................... 33
Nueva BOsqueda ............................... 33
Potencia de SePal ............................... 33
Color ............................................. 30
Conexiones de Equipo de AiV Extemo ............. 14-17
Configurar ................................. 39
Configurar Entradas ................................. 40
Control Patemo
_,Desea Cambiar Clave? ................................. 27
Bloquear Panel .................................... 27
Clasificaci6n de Cine ................................. 28, 29
CIasificaci6n deTV ................................. 28, 29
Clasificaci6n para Canada (Ingl6s) ................. 28, 29
Ctasificaci6n para Canada (Frances) ................. 28,29
Regi6n 5 ................................. 29
Control Remote
Funciones ................................... 18-21
Instataci6n de Batedas ............................ 6
O
Opciones de Energia ...................... 30
P
Preferencias del MenO
Transparencia de MenQ .............................. 30
R
Reducci6n de Ruido ............................... 24
E
Especificaciones ...................................... 38-40
F
Funciones .................................... 22
G
Graves .................................... 26
N
Nitidez ....................................... 24
43
-
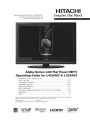 1
1
-
 2
2
-
 3
3
-
 4
4
-
 5
5
-
 6
6
-
 7
7
-
 8
8
-
 9
9
-
 10
10
-
 11
11
-
 12
12
-
 13
13
-
 14
14
-
 15
15
-
 16
16
-
 17
17
-
 18
18
-
 19
19
-
 20
20
-
 21
21
-
 22
22
-
 23
23
-
 24
24
-
 25
25
-
 26
26
-
 27
27
-
 28
28
-
 29
29
-
 30
30
-
 31
31
-
 32
32
-
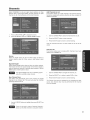 33
33
-
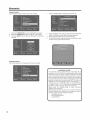 34
34
-
 35
35
-
 36
36
-
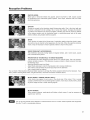 37
37
-
 38
38
-
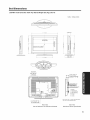 39
39
-
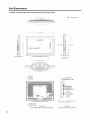 40
40
-
 41
41
-
 42
42
-
 43
43
-
 44
44
-
 45
45
-
 46
46
-
 47
47
-
 48
48
-
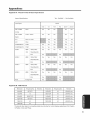 49
49
-
 50
50
-
 51
51
-
 52
52
-
 53
53
-
 54
54
-
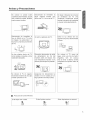 55
55
-
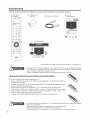 56
56
-
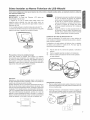 57
57
-
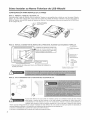 58
58
-
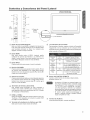 59
59
-
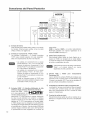 60
60
-
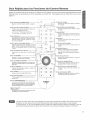 61
61
-
 62
62
-
 63
63
-
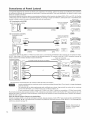 64
64
-
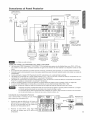 65
65
-
 66
66
-
 67
67
-
 68
68
-
 69
69
-
 70
70
-
 71
71
-
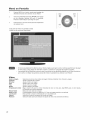 72
72
-
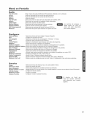 73
73
-
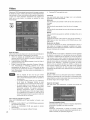 74
74
-
 75
75
-
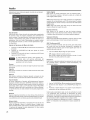 76
76
-
 77
77
-
 78
78
-
 79
79
-
 80
80
-
 81
81
-
 82
82
-
 83
83
-
 84
84
-
 85
85
-
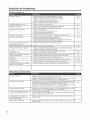 86
86
-
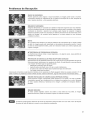 87
87
-
 88
88
-
 89
89
-
 90
90
-
 91
91
-
 92
92
-
 93
93


Hitachi L32A403 - 31.51" LCD TV Instrucciones de operación
- Categoría
- Televisores LCD
- Tipo
- Instrucciones de operación
- Este manual también es adecuado para
en otros idiomas
Artículos relacionados
-
Hitachi LE49S508 El manual del propietario
-
-
Hitachi L47V651 Manual de usuario
-
-
-
-
-
-
Hitachi ULTRAVISION LE22S314 Manual de usuario
-
Otros documentos
-
Haier HL32R1 - R-Series - 31.5" LCD TV El manual del propietario
-
Haier HL32R1 - R-Series - 31.5" LCD TV El manual del propietario
-
Magnavox 15MF400T - LCD TV FLAT PANEL MONITOR Manual de usuario
-
RCA LED42A45RQ Manual de usuario
-
-
Sharp LC40LE550U Instrucciones de operación
-
Sharp LC-55LE643U El manual del propietario
-
 3D Cabin 3D PHUELB 1 Instrucciones de operación
-
 3D Cabin 3D PS4WB Instrucciones de operación
-
jWIN JD-VD755 Quick Connect Manual

