Tommee Tippee 22110520 3 Manual de usuario
- Categoría
- Sacaleches
- Tipo
- Manual de usuario

manual breast pump
instructions for use
22110520_3
Let us know what you think
We’d love to hear what you think of the
Made for Me® range. Share your photos,
reviews and tell us about your experiences
on our social channels.
Any questions?
Visit our website: tommeetippee.com
Distributed by
Distribuido por
Mayborn USA Inc.
1010 Washington Boulevard, 11th Floor,
Stamford, CT 06901
Copyright © 2022. TOMMEE TIPPEE®.
MADE FOR ME®.
All IP rights held by Mayborn (UK) Limited and/or its aliates.
Todos los derechos de propiedad intelectual
de Mayborn (UK) Limited y / o sus afiliados.
Patented; Patentado;
https://www.tommeetippee.com/en-us/legals/patent.
522244

B
F
D
E
C
A
Contents
Getting started
Dos and Don’ts
How to clean
Putting your pump together
Using your breast pump
Using your pump on the go
REMEMBER
Storing breast milk
Health and Safety
Advice and FAQs
Warnings
1
2
2
3
4
5
5
6
6
7
8
Mom, you’re one
of a kind.
Treat yourself like the true wonder you
are and let us support you through your
unique breastfeeding experience with the
Made for Me® range from Tommee Tippee®.
Your Made for Me® manual breast pump is
the simple, comfortable and discreet way to
express your breast milk. Its ergonomic design
is specially shaped to fit women’s hands.
Together with the narrow neck and curved
handle this helps to maximise the power of
your pumping action while reducing the strain
on your hand as you pump your breast milk.
Made especially for you because
you’re a one o…
Check out the rest of our Made for Me® range,
designed to help you on your breastfeeding journey.
www.tommeetippee.com.
Getting Started
IMPORTANT WARNINGS!
Please keep this instruction guide
for future reference as it includes
important information.
You can also find these instructions
at tommeetippee.com.
Mom, we know you have a lot to
think about, but can we suggest that
you get to know your breast pump
before you need to start using it?
It should make for a more relaxed
experience, and you’ll soon be an
expert at this (as well as many other
new things).
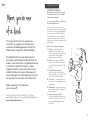
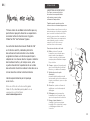
Get to know your breast pump
A. Flange - trumpet shaped
part with a soft edge to sit
comfortably against your breast
and petals for massaging to
stimulate more milk flow.
B. Body – duck-shaped part that
connects the flange and cup to
your bottle and attaches to the
handle.
C. Duck-bill valve (peach) –
small one-way valve that lets
breast milk into your bottle, but
doesn’t let it back through.
D. Connector – rod shaped piece
that connects the handle to the
diaphragm.
E. Diaphragm – small, transparent
cup-shaped part that creates the
pump pressure.
F. Handle and cap (peach) –
The curved handle that you use
to pump. This snaps onto to the
body and diaphragm via the
connector.
2
EN |

7
7. Push the flange onto
the body until it’s fully
engaged and secure.
Turn your pump upside
down.
8. Insert the duck-bill valve.
Gently squeeze the sides
of the valve to make sure
it opens.
9. Screw in a Tommee
Tippee Closer to Nature
or Advanced Anti-Colic
bottle. This breast pump
is designed to fit all
Tommee Tippee Closer
to Nature and Advanced
Anti-Colic bottles
and Pump & Go milk
pouches with adaptor
rings (excludes Tommee
Tippee Closer to Nature
Glass bottles).
10. Place the assembled
pump on a flat surface.
Remember
DO wash your hands with soap and
water and dry thoroughly before
handling your breast pump.
DO thoroughly clean and sterilize
all the parts of your breast pump
following the instructions below.
DO this before you use it for the first
time and after every use.
How to clean
1. Unscrew the bottle from the pump
body.
2. Pull the flange away from the pump
body and remove the duck-billed valve.
3. Disconnect the handle from the
body by pulling away from the body
horizontally.
4. Lift out the diaphragm from the body.
5. Pull out the connector rod from
the diaphragm.
6. Wash all parts in clean soapy water.
Don’t use water that you’ve used for
cleaning other products.
7. Rinse thoroughly with clean water.
8. You can also wash the pump
components in the top rack of a
dishwasher. Place the peach duck-bill
valve in the cutlery rack or dishwasher
pod to help keep it safe.
9. Sterilize all parts of the pump using
either cold water sterilization,
microwave sterilization, boiling water,
or electric steam sterilization.
10. For best results use Tommee Tippee
electric or microwave sterilizers.
3 4
2
4
5
6
3
8
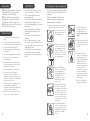
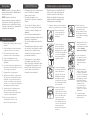
Putting your pump together
Each time you use your breast pump,
check all parts of the pump for any
damage.
Wash your hands with soap and
water and dry thoroughly before
handling your breast pump.
1. Make sure that all parts of the pump
have been washed and sterilized.
2. Push the connector rod
through the bottom of
the diaphragm.
3. With two hands gently
squeeze the bottom of
the diaphragm over the
ring in the base of the
connector rod. The rod
should be securely held
by the diaphragm.
4. Place the diaphragm
in the top of the pump
body and push the
diaphragm edge down
around the whole
circumference of the
pump body to make
a good seal.
5. Pick up the pump body
and, from the side, slide
the handle onto the body,
so that the clips on the
top slide onto the top of
the connecting rod, and
the two clips at the side
snap onto the back of the
pump body.
6. The handle should now
freely move up and down
and you should see the
diaphragm lift up when
you press the handle
down.
9
• Keep all components not in use
out of the reach of children.
• Do not clean with solvents or
harsh chemicals.
• Do not place fingers between the
handle and the pump body or
bottle when pumping as you may
trap them.
• User maintenance, other than
cleaning and sterilizing is not
required.
• Do not leave the unit in direct
sunlight.
• Do not allow product to come
into contact with oil-based foods
(e.g. oil/tomato-based sauces) as
staining will occur.
• This product is a personal care
product and therefore cannot
be returned once opened unless
faulty.
WARNINGS

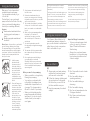
Using your breast pump
Okay mom. You’ve cleaned and
assembled your breast pump.
You’re prepped and ready to go…
Let’s do this.
The best time to use your breast
pump is after the first feed of the day
(unless your breastfeeding advisor
has told you something dierent).
Hygiene
Hands washed and dried before
touching your breast pump or
body?
Breast pump parts washed and
sterilized?
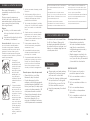
About you - Get yourself in a comfortable
position, sitting, standing or half-lying.
The important thing is to keep the pump
handset vertical while you hold it against
your breast. You’ll also need a flat surface
nearby to put the pump and bottle on
when you’re done.
1. Hold the pump
handset around
the narrow neck of
the body. Hold it in
whichever hand feels
most comfortable.
As you use it, you
may find it’s more
comfortable to cup
your hand around the
bottle.
2. Place the flange over
your breast so that it
creates a seal all the
way around with your
nipple at the centre
of the hole. You
don’t need to cover
the whole of your
areola or breast with
the flange, so don’t
force it. It should
sit comfortably. If it
doesn’t feel right,
relax and reposition.
3. Gently squeeze the handle and you’ll
feel the suction.
4. Release the handle and allow it to
return to its resting position. Releasing
the handle opens the valve so your milk
can flow into the bottle.
5. Try to imitate the rhythm of your baby
as they suck. You don’t have to squeeze
hard – just as much as is comfortable
for you.
6. When you first start pumping milk, use
the pump for 3-5 minutes on
each breast. Over time you will be
able to build up to 10-15 minutes on
each breast.
7. You can help stimulate your milk
flow by gently stroking and massaging
your breast.
8. The amount of milk you pump and the
time it takes will vary. Don’t worry, this
is normal.
9. If air is getting in around the flange,
your pump may not suck milk
eectively. Adjust your position and
replace the cup on your breast so that
it feels comfortable and the pump is
expressing milk.
When you want to stop pumping
• When your milk is no longer freely
flowing, stop pumping.
• You can store your breast milk
in the bottle, by adding a clean
sterilized lid or nipple and hood
(see page 7 for storage advice).
Or use it to feed it to your baby.
• When you’ve finished using the
pump, disassemble all the parts
and clean it. You do not need to
sterilize it until you’re ready to
use it again.
5 6
Your Tommee Tippee Made for Me®
manual breast pump is designed to
give you the freedom to pump breast
milk at home, at work or anywhere
that’s comfortable for you.
Using your pump on the go
If using this breast pump is more painful
than when you breast feed, stop using it
immediately.
The flange should feel comfortable against your
breast. If it doesn’t, you may need a dierent
size. Contact us at www.tommeetippee.com
When pumping your nipple should sit
comfortably in the centre of the flange and will
be extended down the tube by gentle suction.
The pump creates a seal around your areola
DO
Always wash your hands and any
surfaces that your breast pump
will come into contact with.
Follow the cleaning, sterilizing and
set up instructions in this guide.
Do this before you use it for the
first time and after every use.
Keep the pump away from direct
sunlight.
Dos and Don'ts
DON’T
× Don’t clean with solvents or harsh
chemicals.
× Don’t use whilst driving or
operating machinery.
× Don’t use whilst bathing or
showering.
× Don’t use whilst sleeping.
× Don't use in temperatures below
50 degrees farenheit.
× Don’t share your breast pump
with other moms.
and nipple. You do not need to cover the whole
of your areola or breast with the flange. Do not
force your breast or nipple into the flange.
Don’t tilt the bottle while pumping. Keep
it upright to keep your milk flowing into
the bottle.
You don’t need strong suction to pump milk
from just behind your nipple.
Important things to remember:
• To keep your breast pump sterile
on the go, carry it in a Tommee
Tippee® Travel and Microwave
Sterilizer bag.
• Always store your breast pump
handset in a cool, dry place away
from heat and moisture and out
of direct sunlight.
1
2

• When you want to freeze breast
milk, allow space at the top of
your bottle for it to expand. It’s
easiest to freeze breast milk in
individual feed quantities of 2-4oz
/60-125ml.
• Your breast milk may separate out
into layers when you store it. Give
it a shake to remix it thoroughly
before feeding your baby.
Storing breast milk
• Thaw frozen breast milk in the
fridge or by standing your bottle
in lukewarm water until it has
reached body temperature.
Or use a Tommee Tippee
bottle warmer.
• If you want to take pumped milk
out and about with you, make
sure it stays cold or frozen until
you need to feed your baby.
• Keep your breast pump and
anything else you use around
breastfeeding clean. Wash all the
washable parts of your pump and
sterilize them before using.
• Keep this breast pump away
from children who may choke
on small parts.
Health and Safety
7 8
Health and Safety
Get comfortable with your
breast pump
• Unless you’ve been told
otherwise, the best time to try
your breast pump for the first
time is after your baby’s first
feed of the day.
• Make sure you’re in a comfortable
position and try to relax.
• You’re not trying to suck milk out.
It comes from just behind your
nipple.
• Using your breast pump shouldn’t
hurt. Check your breasts. If you
have any red or hot areas, stop
using the breast pump and get
in touch with your breastfeeding
advisor as soon as possible.
• Every mom is dierent. You may
only produce a little milk, or flow
freely. You may produce more
milk at dierent times of the day
(morning or evening) or dierent
volumes from one breast to
another.
• Don’t continue using the pump
once your milk has stopped
coming. Give your breasts a
break.
• The Made for Me® range includes
nipple cream to help keep your
nipples supple.
Advice and FAQs
FAQs
Help – there’s no or very little
suction. What can I do?
It’s most likely that there’s some air
getting in somewhere, which means
the pump won’t work properly.
• Make sure that the flange forms
a comfortable seal around your
breast. Adjust your position if you
need to.
• Check that the diaphragm cup
is sitting on the top of the pump
body. Make sure it’s been pushed
down all the way around the top
of the circumference to make a
good seal.
• Check that the connector rod is
sitting properly in the diaphragm
cup. The rod should be pushed
through so that the big part sits
under, and the small part sits
above the base of the diaphragm.
• Check that there are no tears on
the diaphragm cup.
• Check the valve is clean and
opens easily. Give it a gentle
squeeze if it’s stuck.
Why do I have to use a Tommee
Tippee® bottle?
The Tommee Tippee® Made for Me®
manual breast pump is designed to
be a perfect fit for Tommee Tippee
bottles and pouches (excludes
Tommee Tippee Closer to Nature
Glass bottles). You may get leaks
and spills if you use other brands of
bottles and containers that don’t fit
correctly.
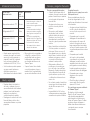
Method of storing milk Use within REMEMBER
• Never defrost or heat breast milk in a
microwave
• Never refreeze breast milk
• Milk stored in the fridge but intended
for freezing should be frozen within
24 hours
• Once defrosted, the breast milk
should be kept in the fridge and used
within 12 hours
• Do not boil breast milk
• Throw away any leftover breast milk
after feeding
Room temperature <77°F
Refrigerated at 41-50°F
Refrigerated at 32-39.2°F
Frozen
6 hours
3 days
6 days
6 months

B
F
D
E
C
A
Getting started
Dos and Don’ts
How to clean
Putting your pump together
Using your breast pump
Using your pump on the go
REMEMBER
Storing breast milk
Health and Safety
Advice and FAQs
Warnings
1
2
2
3
4
5
5
6
6
7
8
Mamá
, eres única.
Trátese como la verdadera maravilla que es y
permítanos apoyarla durante su experiencia
única de lactancia materna con la gama
Made for Me™ de Tommee Tippee.
Su extractor de leche manual Made for Me®
es la forma sencilla, cómoda y discreta
de extraerse la leche materna. Su diseño
ergonómico tiene una forma especial para
adaptarse a las manos de las mujeres. Además
del cuello estrecho y la manija curva, esto
ayuda a maximizar la potencia de su acción
de extracción mientras reduce la tensión en su
mano mientras extrae la leche materna.
Hecho especialmente para ti porque
eres única...
Eche un vistazo al resto de nuestra gama
Made for Me, diseñada para ayudarte en su
experiencia con la lactancia.
www.tommeetippee.com.
Empezando
¡ADVERTENCIAS IMPORTANTES!
Por favor, conserve esta hoja
de instrucciones para futuras
referencias, ya que incluye
información importante.
También puede encontrar estas
instrucciones en tommeetippee.com.
Mamá, sabemos que tienes mucho en
qué pensar, pero ¿podemos sugerirte
que conozcas tu extractor de leche
antes de que necesites comenzar a
usarlo? Debería ser una experiencia
más relajada, y pronto serás un
experto en esto (así como en
muchas otras cosas nuevas).
Conozca su extractor de leche
A. Brida - pieza en forma de
trompeta con un borde suave
para asentar cómodamente
contra su pecho y pétalos para
masajeo para estimular un mayor
flujo de leche.
B. Cuerpo – pieza en forma de pato
que conecta la brida y la taza al
biberón y se adhiere a la manija.
C. Válvula de pico de pato
(durazno) –
pequeña válvula unidireccional
que permite que la leche materna
ingrese a su biberón, pero no deja
que salga.
D. Conector – pieza en forma de
varilla que conecta la manija al
diafragma.
E. Diafragma – pieza pequeña y
transparente en forma de copa
que crea la presión del extractor.
F. Mango y tapa (durazno) –
el mango curvo que usa para
bombear. Esto se ajusta al cuerpo
y al diafragma a través del
conector.
10
ES |

7
Cada vez que use su extractor de
leche, revise todas las piezas del
extractor para ver si hay daños.
Wash your hands with soap and
water and dry thoroughly before
handling your breast pump.
1. Asegúrese de que todas las partes del
extractor se hayan lavado y esterilizado.
2. Empuje la varilla del
conector a través de
la parte inferior del
diafragma.
3. Con las dos manos,
apriete suavemente
la parte inferior del
diafragma sobre el anillo
en la base de la varilla del
conector. El diafragma
debe sujetar de forma
segura a la varilla.
4. Coloque el diafragma
en la parte superior del
cuerpo del extractor
y empuje el borde del
diafragma hacia abajo
alrededor de toda la
circunferencia del cuerpo
del extractor para lograr
un buen sellado.
5. Levante el cuerpo del
extractor y, desde el
costado, deslice la manija
sobre el cuerpo, de modo
que los clips de la parte
superior se deslicen
sobre la parte superior
de la varilla del conector
y los dos clips del lateral
encajen en la parte
posterior del cuerpo del
extractor.
6. Ahora, la manija se
debería mover libremente
hacia arriba y hacia
abajo y debería ver que
el diafragma se levanta
cuando presiona la manija
hacia abajo.
7. Empuje la brida sobre el
cuerpo hasta que esté
completamente encajada
y segura.
Ponga el
extractor boca abajo.
8. Inserte la válvula de
pico de pato. Presione
suavemente los lados
de la válvula para
asegurarse de que se
abra.
9. Enrosque un biberón
Tommee Tippee Closer
to Nature o Advanced
Anti-Colic. Este extractor
de leche está diseñado
para adaptarse a todas
las botellas Tommee
Tippee Closer to Nature
y Advanced Anti-
Colic y las bolsas de
leche Express & Go /
Pump & Go con anillos
adaptadores.
10. Coloque la bomba
ensamblada sobre una
superficie plana.
Remember
DEBE las manos con agua y jabón y
séquese bien antes de manipular su
extractor de leche.
DEBE tlimpiar y esterilizar
minuciosamente todas las partes de
su extractor de leche siguiendo las
instrucciones a continuación. Haga
esto antes de usarlo por primera vez
y después de cada uso.
Cómo limpiarlo
1. Desenrosque el biberón del cuerpo del
extractor.
2. Retire la brida del cuerpo del extractor
y retire la válvula con pico de pato.
3. Desconecte la manija del cuerpo
tirando del cuerpo horizontalmente.
4. Saque el diafragma del cuerpo.
5. Extraiga la varilla del conector del
diafragma.
6. Lave todas las piezas en agua jabonosa
limpia. Don’t use water that you’ve used
for cleaning other products.
7. Enjuague bien con agua limpia.
8. También puede lavar los componentes
del extractor en la rejilla superior de un
lavavajillas. Coloque la válvula de pico
de pato color durazno en la rejilla para
cubiertos o en el canasto del lavavajillas
para ayudar a mantenerla segura.
9. Sterilize all parts of the pump using
either cold water sterilization,
microwave sterilization, boiling water,
or electric steam sterilization.
10. Para mejores resultados, use
esterilizadores eléctricos o de
microondas Tommee Tippee.
11 12
2
4
5
6
3
8
Cómo montar su extractor de leche
9
• Mantenga todos los componentes
que no se utilicen fuera del
alcance de los niños.
• No limpie el aparato con
disolventes o productos químicos
fuertes.
• No coloque los dedos entre el
mango y el cuerpo de la bomba
o biberón cuando extraiga o los
atrapará.
• No se requiere mantenimiento
por parte del usuario, aparte de la
limpieza y esterilización.
• No deje la unidad expuesta al sol
directo.
• No permita que el producto entre
en contacto con alimentos a base
de aceite (p. ej. salsas a base
de aceite y tomate), ya que se
producirán manchas.
• Este producto es un producto
de cuidado personal y por lo
tanto no puede ser devuelto una
vez abierto.Este producto es un
producto de cuidado personal
y por lo tanto no puede ser
devuelto una vez abierto.
¡ADVERTENCIAS!

Usando su extractor de leche
Bien mami. Ha limpiado y
ensamblado su extractor de leche.
Hagámoslo.
El mejor momento para usar su
extractor de leche es después de la
primera alimentación del día (a menos
que su asesor de lactancia le haya
dicho algo diferente).
Higiene
¿Se lavó y secó las manos antes
de tocar el extractor de leche o el
cuerpo?
¿Las piezas del extractor de leche
se lavaron y esterilizaron?
Acerca de usted - colóquese en una
posición cómoda, sentada, parada o
recostada. Lo importante es mantener
el extractor portátil en posición vertical
mientras lo sostiene contra su pecho.
También necesitará una superficie plana
cerca para colocar el extractor y el biberón
cuando haya terminado.
1. Sostenga el
extractor de leche
alrededor del cuello
estrecho del cuerpo.
Sosténgalo en la
mano que se sienta
más cómoda. A
medida que lo use,
es posible que le
resulte más cómodo
rodear la botella con
la mano.
2. Coloque el reborde
sobre su seno para
que cree un sello en
todo el contorno con
su pezón en el centro
del orificio, no es
necesario que cubra
toda la areola o el
seno con el reborde,
así que no lo fuerce.
Se debe apoyar de
forma cómoda. Si
no se siente bien,
relájese y cambie de
posición.
3. Apriete suavemente la manija y sentirá
la succión.
4. Suelte la manija y déjela volver a su
posición de reposo. Al soltar la manija,
se abre la válvula para que la leche
pueda fluir hacia el biberón.
5. Try to imitate the rhythm of your baby
as they suck. You don’t have to squeeze
hard – just as much as is comfortable
for you.
6. Cuando comience a extraer leche por
primera vez, use el extractor durante
3 a 5 minutos en cada seno. Con el
tiempo, podrá acumular hasta por 10 a
15 minutos en cada seno.
7. Puede ayudar a estimular el flujo
de leche acariciando y masajeando
suavemente su seno.
8. La cantidad de leche que extrae y
el tiempo que tarda variará. No se
preocupe, esto es normal.
9. Si entra aire alrededor de la brida, es
posible que su extractor no succione
la leche con eficacia. Modifique su
posición y vuelva a colocar la taza
sobre su seno para que se sienta
cómoda y el extractor extraiga leche.
Cuando quieres dejar de expresarte
• Cuando la leche ya no fluya
libremente, deje de extraer.
• Puedes almacenar tu leche
materna en la botella, agregando
una tapa limpia esterilizada o una
tetina y una tapa. (Ver abajo para
consejos de almacenamiento). O
úselo para alimentar a su bebé.
• Cuando haya terminado de usar
el extractor, desmonte todas
las piezas y límpielas. No es
necesario esterilizarlo hasta que
esté lista para usarlo nuevamente.
13 14
Su extractor de leche manual Made
for Me® de Tommee Tippee está
diseñado para brindarle la libertad
de extraer la leche en su hogar, en el
trabajo o en cualquier lugar que sea
cómodo para usted.
Usar su bomba sobre la marcha
Si usar este extractor de leche es más doloroso
que cuando amamanta, deje de usarlo de
inmediato.
La brida debe sentirse cómoda contra su
pecho. Si no es así, es posible que necesite un
tamaño diferente. Comuníquese con nosotros
en www.tommeetippee.com
Al bombear, su pezón debe asentarse
cómodamente en el centro de la brida y se
extenderá por el tubo mediante una succión
DEBE
Always wash your hands and any
surfaces that your breast pump
will come into contact with.
Follow the cleaning, sterilizing and
set up instructions in this guide.
Do this before you use it for the
first time and after every use.
Keep the pump away from direct
sunlight.
Recuerda
QUÉ NO HACER
× No lo limpie con solventes o
productos químicos fuertes.
× No lo use mientras conduce o
maneja maquinaria.
× No lo use mientras se baña o se
ducha.
× No lo use mientras duerme.
× No lo utilice en temperaturas
inferiores
× No lo comparta su extractor de
leche con otras mamás.
suave.
La bomba crea un sello alrededor de
su areola y pezón. No necesita cubrir toda su
areola o seno cubierto por la bocina. No fuerce
su seno o pezón contra el Brida.
No incline la botella mientras expresa. Mantener
en posición vertical para mantener su leche
fluyendo hacia la botella.
No necesita una succión fuerte para extraer la
leche justo detrás del pezón.
Cosas importantes para recordar:
• Para mantener su extractor
de leche esterilizado mientras
viaja, llévelo en una bolsa de
esterilizador para microondas y
viaje Tommee Tippee®.
• Guarde siempre su extractor de
leche portátil en un lugar fresco y
seco, lejos del calor y la humedad
y fuera de la luz solar directa.
1
2

Método para
almacenar leche Utilizar
enel
plazo de
RECUERDE
• Nunca descongele o caliente la
leche en un microondas.
• Nunca vuelva a congelar la leche
materna.
• La leche almacenada en la refriger-
adora, pero destinada a congelarse,
debe congelarse en un plazo de 24
horas.
• Una vez descongelada, debe
guardar la leche en el frigorífico y
utilizarla en el plazo de 12 horas.
• No hierva la leche materna.
• Tire siempre la leche sobrante
después de cada toma.
Temperatura ambiente
<77°F
Refrigerada a
41-50°F
Refrigerada a
32-39.2°F
Congelada
6
horas
3 dias
6 dias
6 meses
• Cuando quiera congelar la leche
materna, deje espacio en la parte
superior de su bote para que se
expanda. Es más fácil congelar la
leche en tomas individuales, en
cantidades de 60-125 ml / 2-4 oz.
• Su leche materna podría separarse
en capas cuando la almacene.
Agítela bien para volver a
mezclarlas antes de dársela al bebé.
Almacenar la leche materna
• Descongele la leche congelada en
el frigorífico o metiendo el bote
en agua tibia hasta que alcance
la temperatura corporal. O use
un calentador de biberones de
Tommee Tippee.
• Si quiere llevarse leche extraída
con usted, asegúrese de que se
mantiene fría o congelada hasta
que necesite alimentar a su bebé.
• Mantener limpios su extractor
de leche y cualquier otra cosa
que use alrededor de la lactancia
materna. Lave todas las partes
lavables de su extractor y
esterilícelas antes de usarlas.
• Mantenga este extractor de leche
fuera del alcance de los niños
que pueden asfixiarse con piezas
pequeñas.
Salud y seguridad
15 16
Health and Safety
Consejos y preguntas frecuentes
• A menos que le hayan dicho lo
contrario, el mejor momento para
probar el sacaleches por primera
vez es después de la primera
toma del día.
• Asegúrese de estar en una
posición cómoda y trate de
relajarse.
• Recuerde: no está tratando
de absorber leche. La leche
está justo detrás de su pezón.
Comience con el modo y la
intensidad que le resulten más
cómodos y que le permitan sacar
la leche.
• Usar el sacaleches no debe doler.
Si lo hace, pruebe con un ajuste
más suave. Revise sus senos. Si
tiene alguna zona roja o caliente,
deje de usar el extractor de leche
materna y póngase en contacto
con su asesor de lactancia
materna lo antes posible.
• Cada mamá es diferente. Es
posible que solo produzca un
poco de leche o que esta fluya
libremente. Puede producir más
leche a diferentes horas del día
(por la mañana o por la noche)
o a diferentes volúmenes de un
seno a otro.
• No continúe usando el sacaleches
una vez que la leche haya dejado
de salir. Dele un respiro a sus
pechos.
• La gama Made for Me® incluye
crema para pezones para ayudar
a mantener sus pezones flexibles.
Consejos y preguntas frecuentes
Preguntas frecuentes
Ayuda: la succión es muy leve o nula
¿Qué puedo hacer?
Es muy probable que entre algo
de aire por alguna parte, lo que
significa que la bomba no funcionará
correctamente.
• Asegúrese de que la brida forme
un sello cómodo alrededor de
su seno. Ajuste su posición si lo
necesita.
• Compruebe que la copa del
diafragma esté asentada en la
parte superior del cuerpo del
extractor. Asegúrese de que se
haya empujado bien hacia abajo
en torno a la parte superior de la
circunferencia para hacer un buen
sellado.
• Compruebe que la varilla
del conector esté asentada
correctamente en la copa del
diafragma. La varilla se debe
empujar a través de modo que la
parte grande se asiente debajo y
la parte pequeña se asiente por
encima de la base del diafragma.
• Compruebe que no haya
desgarros en la copa del
diafragma.
• Check the valve is clean and
opens easily. Give it a gentle
squeeze if it’s stuck.
¿Por qué tengo que usar un biberón
de Tommee Tippee?
El extractor de leche manual
Made for Me de Tommee Tippee
está diseñado para adaptarse
perfectamente a los biberones y
bolsas de Tommee Tippee. Podrían
producirse fugas o derrames si
utiliza otras marcas de biberones
y recipientes que no encajan
correctamente.
-
 1
1
-
 2
2
-
 3
3
-
 4
4
-
 5
5
-
 6
6
-
 7
7
-
 8
8
-
 9
9


Tommee Tippee 22110520 3 Manual de usuario
- Categoría
- Sacaleches
- Tipo
- Manual de usuario
en otros idiomas
- English: Tommee Tippee 22110520 3 User manual
Artículos relacionados
-
Tommee Tippee closer to nature Single Electric Breast Pump Manual de usuario
-
Tommee Tippee 1092 Instructions Manual
-
-
-
Tommee Tippee SUPERSTEAM Manual de usuario
-
Tommee Tippee 0549402 Manual de usuario


