Volteck Lait ARB-001S El manual del propietario
- Tipo
- El manual del propietario

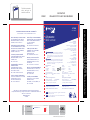
FRONT
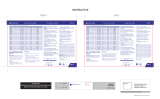
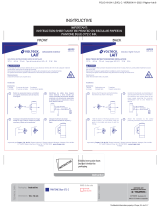
TECHNICAL DATA
IMAGES / LINKS
SOFTWARE: Illustrator CC
MAC & PC Platform compatible
21.5 x 27.8 cm
Instructive
INKS & die cuts
Packaging:
Dimensions:
CUT-LINE
(Do not print)
BENT-LINE
(Do not print)
PANTONE Blue 072 C
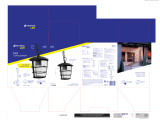
Arbotante
Wall sconce
Instructive
Fold the instructive
sheet and put it
inside the color box.
IMPORTANT:
INSTRUCTION SHEET MUST BE PRINTED ON REGULAR PAPER IN
PANTONE BLUE 072 C INK.
BAJA CALIFORNIA | SUCURSAL TIJUANA
AV. LA ENCANTADA, LOTE #5, PARQUE
INDUSTRIAL EL FLORIDO II, C.P 22244,
TIJUANA, B.C. TEL.: 66 4969 5100
CHIHUAHUA | SUCURSAL CHIHUAHUA
AV. SILVESTRE TERRAZAS #128-11, PARQUE
INDUSTRIAL BAFAR, CARRETERA MÉXICO
CUAUHTÉMOC, C.P. 31415, CHIHUAHUA,
CHIH. TEL. 61 4434 0052
COAHUILA | SUCURSAL TORREÓN
CALLE METAL MECÁNICA #280, PARQUE
INDUSTRIAL ORIENTE, C.P. 27278,
TORREÓN, COAH.
TEL.: 87 1209 6823
ESTADO DE MÉXICO | SUCURSAL
CENTRO JILOTEPEC
PARQUE INDUSTRIAL 1, PARQUE
INDUSTRIAL JILOTEPEC, JILOTEPEC,
EDO. DE MÉX. C.P. 54257
TEL: 76 1782 9101 EXT. 5728 Y 5102
JALISCO | SUCURSAL GUADALAJARA
AV. ADOLFO B. HORN # 6800, COL: SANTA
CRUZ DEL VALLE, C.P.: 45655,
TLAJOMULCO DE ZUÑIGA, JAL.
TEL.: 33 3606 5285 AL 90
NUEVO LEÓN | SUCURSAL MONTERREY
CARRETERA LAREDO #300, 1B MONTERREY
PARKS COLONIA PUERTA DE ANÁHUAC,
C. P. 66052, ESCOBEDO,
NUEVO LEÓN, N.L.
TEL.: 81 8352 8791 / 81 8352 8790
PUEBLA | SUCURSAL PUEBLA
AV PERIFÉRICO #2-A, SAN LORENZO
ALMECATLA, C.P. 72710,
CUAUTLACINGO, PUE.
TEL.: 22 2282 8282 / 84 / 85 / 86
SINALOA | SUCURSAL CULIACÁN
AV. JESÚS KUMATE SUR #4301, COL.
HACIENDA DE LA MORA, C.P. 80143,
CULIACÁN, SIN.
TEL.: 66 7173 9139 / 66 7173 8400
TABASCO | SUCURSAL VILLAHERMOSA
CALLE HELIO LOTES 1, 2 Y 3 MZ. #1, COL.
INDUSTRIAL, 2A ETAPA, C.P. 86010,
VILLAHERMOSA, TAB.
TEL.: 99 3353 7244
YUCATÁN | SUCURSAL MÉRIDA
CALLE 33 #600 Y 602, LOCALIDAD
ITZINCAB Y MULSAY,
MPIO. UMÁN, C.P. 97390, MÉRIDA, YUC.
TEL.: 99 9912 2451
LUGARES DONDE HACER VALIDA LA GARANTÍA
PLACES WHERE TO MAKE THE WARRANTY VALID
“Condential Information property of Truper, S.A. de C.V."
Importado por / Imported by Truper, S.A. de C.V. Parque Industrial 1,
Parque Industrial Jilotepec, Jilotepec, Edo. de Méx. C.P. 54257 Made in/Hecho en
China, Tel.: 76 1782 9100.
www.truper.com
06-2023
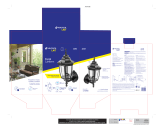
INSTRUCTIVE
YOU MUST PUT IT INSIDE THE COLOR BOX
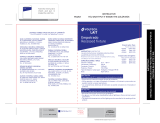
Antes de instalar, interrumpa el
paso de energía mediante el interruptor de circuito o
fusible. Asegúrese que el circuito no esté energizado
y que el área esté libre de humedad antes de iniciar la
instalación.
Before starting the installation, turn off
the power by removing a fuse or by the circuit-breaker
box. Make sure the circuit is not energized and that
the area is free of humidity.
ADVERTENCIA
WARNING
Especificaciones:
Tensión: 120 V~
Frecuencia: 60 Hz
Corriente: 0.83 A
Potencia: 100 W máx.
Tipo de fuente de luz: ç
Incandescente / Halógeno / LED de 100 W máx
Base: E27
IP44
Utilizar sólo piezas de repuesto originales suministradas o
aprobadas por el proveedor.
Use only original spare parts from the manufacturer or
approved by the manufacturer.
AVISO
NOTICE
Contenido:
2 Tornillos de ensamble
2 Taquetes
3 Capuchones para cable 18 AWG
2 Pijas de ensamble
1 Tornillo de acople de 25 mm
1 Juego de tuercas (ciega y de seguridad)
1 Barra de montaje
1 Arbotante
Content:
2 Assembly screws
2 anchors
3 Cable glands 18 AWG
2 Assembly pins
1 Coupling screw 1”
1 Set of nuts (blind and safety)
1 Assembly bar
1 Wall sconce
2 400 Wh/día
No aplica
Consumo de energía eléctrica
Con base en 24 horas de uso continuo
Consumo de energía:
Por unidad de tiempo en condiciones
normales de operación del aparato.
Consumo de energía en espera:
En unidad de tiempo del aparato.
Specs:
Voltage: 120 V ~
Frequency: 60 Hz
Current: 0.83 A
Power: 100 W max.
Type of light source:
Incandescent / Halogen / LED 100 W max
Base: E27
IP44
2 400 Wh/day
Does not apply
Electric power consumption
Based on 24 hours of continuous use
Energy consumption:
Per unit of time under normal
operating conditions of the device.
Standby Power Consumption:
In unit of device time.
47286
ARB-001S

BACK
TECHNICAL DATA
IMAGES / LINKS
SOFTWARE: Illustrator CC
MAC & PC Platform compatible
21.5 x 27.8 cm
Instructive
INKS & die cuts
Packaging:
Dimensions:
CUT-LINE
(Do not print)
BENT-LINE
(Do not print)
PANTONE Blue 072 C
IMPORTANT:
INSTRUCTION SHEET MUST BE PRINTED ON REGULAR PAPER IN
PANTONE BLUE 072 C INK.
“Condential Information property of Truper, S.A. de C.V."
INSTRUCTIVE
YOU MUST PUT IT INSIDE THE COLOR BOX
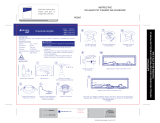
INSTRUCTIVO
LEA ESTAS INSTRUCCIONES ANTES DE INSTALAR:
LIMPIEZA
• Limpie con un trapo absorbente y suave.
• Las manchas de agua se pueden eliminar con agua fría y jabón de manos liquido (No aplique fuerza).
• Las huellas digitales se pueden eliminar puliendo con un trapo absorbente y suave.
• No use abrasivos fuertes, detergentes o cualquier producto que contenga amoniaco.
• Tenga cuidado de no despostillar, rallar o dañar el recubrimiento.
Instalación en pared o caja:
1. Inserte los tornillos o pijas de montaje en los orificios de la barra de montaje.
2. Fije la barra de montaje a la caja o pared según sea el caso.
3. Conecte los cables del tomacorriente a los cables del arbotante respetando la identificación de los
conductores: Línea a Línea; Neutro a Neutro; Tierra a Tierra. Utilice los capuchones o cinta para
aislar la unión
4. Coloque el arbotante a la barra de montaje, use el tornillo de acople, primero enroscandolo en la
tuerca de seguridad sobre la barra de montaje y después ajustarlo con la tuerca ciega. El espacio
entre la base y la superficie se debe sellar con material para calafatear en exteriores.
5. Retire la pantalla de vidrio. Coloque la lámpara (No debe exceder la potencia marcada en la
etiqueta). Vuelva a colocar la pantalla de vidrio.
6. Conecte la energía eléctrica.
INSTRUCTIVE
READ THESE INSTRUCTIONS BEFORE INSTALLING:
CLEANING
• Clean with a soft absorbent cloth.
• Water stains can be removed with cold water and liquid hand soap (Do not apply force).
• Fingerprints can be removed by polishing with a soft, absorbent cloth.
• Do not use strong abrasives, detergents or any product that contains ammonia.
• Be careful not to chip, grate or damage the coating.
Wall or box installation:
1. Insert the mounting screws into the holes in the mounting bar.
2. Attach the mounting bar to the box or wall as the case may be.
3. Connect the cables from the outlet to the unit cables, respecting the identification of the
conductors: Line to Line; Neutral to Neutral; Ground to Ground. Use caps or tape to insulate the
joint
4. Attach the wall sconce to the mounting bar, use the coupling bolt, first screwing it into the locknut
on the mounting bar and then tightening it with the cap nut. The space between the base and the
surface should be sealed with exterior caulking material.
5. Remove the glass shade. Attach the lamp (Do not exceed the wattage marked on the label).
Replace the glass shade.
6. Connect the electrical power.
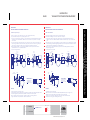
Tuerca
ciega
Tornillo
de acople
Barra de
montaje
Tornillo de
ensamble para
chalupa
Tuerca de
seguridad
Caja de
conexiones
B
N
DIAGRAMA ELÉCTRICO
( B ) Cable blanco: Neutro
( N ) Cable negro: Línea
( ) Cable de cobre: Tierra
B
N
B
N
Pantalla
Pedestal
Aterrizado
Negro
Caja de
tomacorriente Blanco
Tuerca de
seguridad
Tuerca
ciega
Tornillo
de acople
Barra de
montaje
Pija para pared
Taquetes
Pared
BNBlind nut
Nipple
with thread
Mounting
bar
Assembly
screw for boat
Safety nut
Box of
connections
B
N
ELECTRIC DIAGRAM
(W) White wire: Neutral
(B) Black wire: Line
( ) Copper wire: Ground
B
N
B
N
Screen
Pedestal
Landed
Black
Outlet
box White
Lock nut
Blind nut
Nipple
with thread
Mounting
bar
Mounting
screw
Anchors
Wall
BN
-
 1
1
-
 2
2


Volteck Lait ARB-001S El manual del propietario
- Tipo
- El manual del propietario
en otros idiomas
- English: Volteck Lait ARB-001S Owner's manual
Artículos relacionados
-
 Volteck Lait ARB-001L El manual del propietario
-
 Volteck Lait ARB-100S El manual del propietario
-
 Volteck Lait ARB-101L El manual del propietario
-
 Volteck Lait COL-101L El manual del propietario
-
 Volteck Lait EMP-112S El manual del propietario
-
 Volteck Lait PLA-214L El manual del propietario
-
 Volteck Lait COL-103S El manual del propietario
-
 Volteck Lait ARB-101S El manual del propietario
-
 Volteck Lait EMP-105S El manual del propietario
-
 Volteck Lait ARB-201L El manual del propietario


Otros documentos
-
Volteck POLCA-10 El manual del propietario
-
-
-
-
Truper CAU-25ERK El manual del propietario
-
PRETUL CAP-2010P El manual del propietario
-