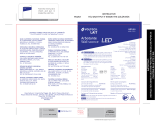
Volteck Lait COL-103S El manual del propietario
- Tipo
- El manual del propietario

Farol
Ceiling lantern
COLGANTE
Hanging mount
Cuerpo de aluminio
Aluminum body
PET
TECHNICAL DATA
IMAGES / LINKS
SOFTWARE: Illustrator CC
MAC & PC Platform compatible
74.9 x 55.8 cm
AMB-3.tif
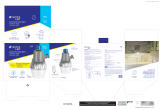
COL-103S.tif
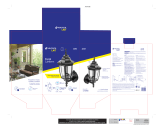
Color box
INKS & die cuts
Packaging:
Dimensions:
CUT-LINE
(Do not print)
BENT-LINE
(Do not print)
PANTONE Blue 072 C
C M Y K
“Condential Information property of Truper, S.A. de C.V."
YOU MUST USE VERY RESISTANT CARTON ACCORDING TO SAMPLE.
WE NEED YOU TO APPLY A MATTE LAMINATION FINISH.
IMPORTANT: The materials must match the Pantone colors AFTER the requested nish is applied.
COLOR BOX
CONT.: 1 PIEZA
Base
E27
Utiliza una lámpara
de 60 W máx.
(No incluida)
Protección
Protection
IP
44
45094
COL-103S
45094
COL-103S
45094
COL-103S
Incluye tornillería para su instalación.
Volteck LAIT®
es una marca de
10-2022
Sello del establecimiento comercial.
Fecha de entrega:
Garantía. Duración: 1 año. Cobertura: piezas, componentes y mano de obra contra defectos de
fabricación o funcionamiento, excepto si se usó en condiciones distintas a las normales; cuando no fue
operado conforme instructivo; fue alterado o reparado por personal no autorizado por Truper®. Para
hacer efectiva la garantía presente el producto, póliza sellada o factura o recibo o comprobante, en el
establecimiento donde lo compró o en Corregidora 22, Centro, Cuauhtémoc, CDMX, 06060, donde
también podrá adquirir partes, componentes, consumibles y accesorios. Incluye los gastos de
transportación del producto que deriven de su cumplimiento de su red de servicio. Tel. 800 - 018-7873.
Made in/Hecho en China. Importador Truper, S.A. de C.V. Parque Industrial 1, Parque Industrial Jilotepec,
Jilotepec, Edo. de Méx. C.P. 54257, Tel. 761 782 9100.
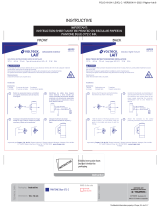
Antes de instalar, interrumpa
el paso de energía mediante el interruptor de
circuito o fusible. Asegúrese que el circuito no
esté energizado y que el área esté libre de
humedad antes de iniciar la instalación.
Before starting the installation,
turn off the power by removing a fuse or by the
circuit-breaker box. Make sure the circuit is not
energized and that the area is free of humidity.
ADVERTENCIA
WARNING
1 440 Wh/día
No aplica
Consumo de energía eléctrica
Con base en 24 horas de uso continuo
Consumo de energía:
Por unidad de tiempo en condiciones
normales de operación del aparato.
Consumo de energía en espera:
En unidad de tiempo del aparato.
Especificaciones:
Tensión: 127 V~
Frecuencia: 60 Hz
Corriente: 0.5 A
Potencia: 60 W máx.
Tipo de fuente de luz: LED / Incandescente
Base: E27
IP44
Incluye 2 tornillos y taquetes plásticos
INSTRUCTIVO INSTRUCTIVE
LEA ESTAS INSTRUCCIONES ANTES DE INSTALAR:
READ THESE INSTRUCTIONS BEFORE INSTALLATION:
LIMPIEZA
1. Limpiar con un trapo absorbente y suave.
2. Las manchas de agua se pueden eliminar con agua fría
y jabón de manos líquido (No aplicar fuerza).
3. Las huellas digitales se pueden eliminar puliendo con
un trapo absorbente y suave.
4. No usar abrasivos fuertes, detergentes o cualquier
producto que contenga amoniaco.
5. Tenga cuidado de no despostillar, rallar o dañar el
recubrimiento.
CLEANING
1. Clean with a soft absorbent cloth.
2. Water spots can be removed with cold water and
liquid hand soap (Do not use force).
3. Fingerprints can be removed by polishing with a
soft absorbent cloth.
4. Do not use strong abrasives, detergents or any
product containing ammonia.
5. Be careful not to chip, scratch or damage the
coating.
Utilizar sólo piezas de
repuesto originales suministradas o
aprobadas por el proveedor.
Use only original spare parts
from the manufacturer or approved
by the manufacturer.
AVISO
NOTICE
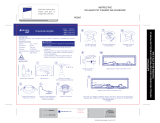
1. Retire las tuercas frontales de la
base para retirar la tapa trasera
de sujeción.
1. Remove the front nuts from the
base to remove the rear retaining
cap.
2. En la tapa trasera de sujeción
perfore las dos guías para fijarla en
la superficie en la que desea colocar
el arbotante.
2. Drill holes in the two guides on the
rear clamping cover to fix it to the
surface where you want to place the
flying buttress.
3. Perfore el concentrador de
esfuerzos (tapón) para poder
introducir los cables de corriente y
conectarlos al arbotante.
3. Drill the stress concentrator (plug) to
be able to insert the power cables and
connect them to the flying buttress.
4. Sujete la base a la pared con los
taquetes y tornillos incluidos.
4. Fasten the base to the wall with
the included wall plugs and
screws.
5. Conecte los cables de Línea,
Neutro y Tierra al arbotante
respetando la identificación de
los conductores.
5. Connect the Line, Neutral and
Ground wires to the flying
buttress respecting the
identification of the conductors.
6. Para colocar o reemplazar la
lámpara, quite los tornillos que
sujetan la tapa superior del
arbotante para tener acceso al
portalámpara.
6. To install or replace the lamp, remove
the screws that hold the top cover of
the flying buttress to gain access to
the lamp.
7. Fije el arbotante a la base con las dos
tuercas frontales y conecte la
energía para comprobar su
funcionamiento.
7. Fasten the lamp clamp to the base
with the two front nuts and connect
the power to check its operation.
2
3
DIAGRAMA
DE FLUJO
( L ) Línea
( N ) Neutro
( ) Tierra
LN
5
4
6
7
1
18
cm
50
cm
16
cm
10
cm
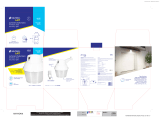
Para jardines, terrazas,
entradas y corredores
For gardens, terraces,
entries and corridors
Fácil instalación
Easy installation
Para exterior
Outdoor
Compatible con lámpara:
LED, ahorradora o incandescente.
FOLIO 16088 / LEVEL C / VERSION 10-2022 / Página 2 de 7
-
 1
1

Volteck Lait COL-103S El manual del propietario
- Tipo
- El manual del propietario
Documentos relacionados
-
 Volteck Lait ARB-001S El manual del propietario
-
 Volteck Lait ARB-201L El manual del propietario
-
 Volteck Lait ARB-001L El manual del propietario
-
 Volteck Lait ARB-101S El manual del propietario
-
 Volteck Lait ARB-902S El manual del propietario
-
 Volteck Lait EMP-105S El manual del propietario
-
 Volteck Lait ARB-105S El manual del propietario
-
 Volteck Lait SUB-820F El manual del propietario
-
 Volteck Lait SUB-810F El manual del propietario


