LG 32LC50C El manual del propietario
- Categoría
- Televisores
- Tipo
- El manual del propietario

담 당 관리자
MODEL
BRAND
Printing Specification
1. Trim Size (Format) : 185 mm x 260 mm
2. Printing Colors
• Cover : 1 COLOR (BLACK)
•Inside : 1 COLOR (BLACK)
3. Stock (Paper)
• Cover : Coated paper , Snow White 150 g/㎡
• Inside : Uncoated paper , 백상지 60 g/㎡
4. Printing Method : OFF-SET
5. Bindery : Perfect Bind
6. Language : English/Spanish
7. Number of pages : 180
Model Description
Part No.
2.
User’s Guide Specification
1.
User’s Guide Specification
Changes
4.
REV.
NO.
MM/DD/YY
SIGNATURE
CHANGE NO.
CHANGE CONTENTS
1
2
4
5
7
6
SUFFIX
32/37/42LC5DC
32LX5DC/42PX8DC
LG
MFL34797070
(0904-REV01)
(1) Origin Notification
* LGESY : China * LGEVN : Vietnam * LGEEG : Egypt * LGEAZ : Brazil
* LGENP : China * LGETH : Thailand * LGEMA : Poland
* LGEIN : Indonesia * LGEIL : India * LGERA : Russia
* LGEDI : Indonesia * LGEAK : Kazakhstan * LGERS : Mexico
8
9
Special Instructions3.
Product Name
32/37/42LC5DC,32LX5DC,
42PX8DC
KIM WON
MI
08.01.02
KANG KWANG
SUK
08.01.02
PANAMA
“This part contain Eco-hazardous substances (Pb, Cd, Hg, Cr6+, PBB, PBDE, etc.) within LG standard level,
Details should be followed Eco-SCM management standard[LG(56)-A-2524].
Especially, Part should be followed and controlled the following specification.
(1)Eco-hazardous substances test report should be submitted
when Part certification test and First Mass Production.
(2) Especially, Don’t use or contain lead(Pb) and cadmium(Cd) in ink.
N
O
T
E
S
April./16/09 Kim won mi S9-50216
[ LA64A ] Add the model name in the manual.

Pagination sheet
Pagination sheet
P/NO. MFL34797070
Total pages : 180 pages
Front cover
1
…
LG(EN)
P/No.
87
LG
…
1
…
LG(SP)
Rear cover
87
LG
…

Please read this manual carefully before operating
your set.
Retain it for future reference.
Record model number and serial number of the set.
See the label attached on the back cover and quote
this informa tion to your dealer
when you require service.
LCD TV
OWNER’S MANUAL
32LC5DC
32LC5DCS
32LC5DCB
37LC5DC
37LC5DCB
37LC5DC1
42LC5DC
32LX5DC
32LX5DCS
42LB5DC
32LC50C
32LC50CS
32LC50CB
32LX50C
32LX50CS
37LC50
37LC50CB
42LB50C
42LC50C
www.lgcommercial.com
PLASMA TV MODEL
42PX8DC
PLASMA TV
P/NO : MFL34797070 (0904-REV01)
LCD TV MODELS
MFL34797070en-1 4/16/09 2:14 PM Page 1

MFL34797070en-1 4/16/09 2:14 PM Page 2

1
SAFETY INSTRUCTION
IMPORTANT SAFETY INSTRUCTIONS
Read these instructions.
Keep these instructions.
Heed all warnings.
Follow all instructions.
Do not use this apparatus near water.
Clean only with dry cloth.
Do not block any ventilation openings. Install in
accordance with the manufacturer’s instructions.
Do not install near any heat sources such as
radiators, heat registers, stoves, or other apparatus
(including amplifiers)that produce heat.
.
Protect the power cord from being walked on
or pinched particularly at plugs, convenience
receptacles, and the point where they exit from
the apparatus.
Only use attachments/accessories specified by
the manufacturer.
Use only with the cart, stand, tripod, bracket,
or table specified by the manufacturer, or sold
with the apparatus. When a cart is used, use
caution when moving the cart/apparatus
combination to avoid injury from tip-over.
Unplug this apparatus during lighting storms or
when unused for long periods of time.
Refer all servicing to qualified service personnel.
Servicing is required when the apparatus has been
damaged in any way, such as power-supply cord or
plug is damaged, liquid has been spilled or objects
have fallen into the apparatus, the apparatus has
been exposed to rain or moisture, does not operate
normally, or has been dropped.
1
2
3
4
6
7
5
8
9
MFL34797070en-1 4/16/09 2:14 PM Page 1

2
SAFETY INSTRUCTION
Never touch this apparatus or antenna during a
thunder or lighting storm.
When mounting a TV on the wall, make sure not to
install the TV by the hanging power and signal
cables on the back of the TV.
Do not allow an impact shock or any objects to fall
into the product, and do not drop onto the screen
with something.
CAUTION concerning the Power Cord :
It is recommend that appliances be placed upon a
dedicated circuit; that is, a single outlet circuit which
powers only that appliance and has no additional
outlets or branch circuits. Check the specification
page of this owner's manual to be certain.
Do not connect too many appliances to the same
AC power outlet as this could result in fire or elec-
tric shock.
Do not overload wall outlets. Overloaded wall out-
lets, loose or damaged wall outlets, extension cords,
frayed power cords, or damaged or cracked wire
insulation are dangerous. Any of these conditions
could result in electric shock or fire. Periodically
examine the cord of your appliance, and if its
appearance indicates damage or deterioration,
unplug it, discontinue use of the appliance, and
have the cord replaced with an exact replacement
part by an authorized servicer. Protect the power
cord from physical or mechanical abuse, such as
being twisted, kinked, pinched, closed in a door, or
walked upon. Pay particular attention to plugs, wall
outlets, and the point where the cord exits the
appliance.
Do not make the TV with the power cord plugged
in. Do not use a damaged or loose power cord. Be
sure do grasp the plug when unplugging the power
cord. Do not pull on the power cord to unplug the
TV.
WARNING - To reduce the risk of fire or electrical
shock, do not expose this product to rain, moisture
or other liquids. Do not touch the TV with wet
hands. Do not install this product near flammable
objects such as gasoline or candles or expose the
TV to direct air conditioning.
Do not expose to dripping or splashing and do not
place objects filled with liquids, such as vases, cups,
etc. on or over the apparatus (e.g. on shelves above
the unit).
GGRROOUUNNDDIINNGG
Ensure that you connect the earth ground wire to
prevent possible electric shock. (i.e. a TV with a
three-prong grounded AC plug must be connected
to a three-prong grouned AC outlet) If grounding
methods are not possible, have a qualified electri-
cian install a separate circuit breaker.
Do not try to ground the unit by connecting it to
telephone wires, lightening rods, or gas pipes.
DDIISSCCOONNNNEECCTTIINNGG DDEEVVIICCEE FFRROOMM MMAAIINNSS
Mains plug is the disconnecting device. The plug
must remain readily operable.
Keep the product away from direct sunlight.
11
10
13
12
15
16
17
18
Power
Supply
Short-circuit
Breaker
14
MFL34797070en-1 4/16/09 2:14 PM Page 2

3
Cleaning
When cleaning, unplug the power cord and scrub
gently with a soft cloth to prevent scratching. Do not
spray water or other liquids directly on the TV as
electric shock may occur. Do not clean with chemi-
cals such as alcohol, thinners or benzene.
Moving
Make sure the product is turned off, unplugged
and all cables have been removed. It may take 2 or
more people to carry larger TVs. Do not press
against or put stress on the front panel of the TV.
Ventilation
Install your TV where there is proper ventilation. Do
not install in a confined space such as a bookcase.
Do not cover the product with cloth or other mate-
rials (e.g.) plastic while plugged in. Do not install in
excessively dusty places.
If you smell smoke or other odors coming from the
TV or hear strange sounds, unplug the power cord
contact an authorized service center.
Do not press strongly upon the panel with a hand or
sharp object such as nail, pencil or pen, or make a
scratch on it.
21
19
22
23
20
MFL34797070en-1 4/16/09 2:14 PM Page 3

4
CONTENTS
WARNING / CAUTION
. . . . . . . . . . . . . . . . . . . . . . . . . . . . 1
SAFETY INSTRUCTION
. . . . . . . . . . . . . . . . . . . . . . . . . . . . 2
FEATURE OF THIS TV . . . . . . . . . . . . . . . . . . . . . . . . . . . . . . 6
PREPARATION
Accessories
. . . . . . . . . . . . . . . . . . . . . . . . . . . . . . . . . . . . . . . . . . . . . . . . . . . . . . 7
Front Panel Controls
. . . . . . . . . . . . . . . . . . . . . . . . . . . . . . . . . . . . . . . . . 8
Back Panel Information
. . . . . . . . . . . . . . . . . . . . . . . . . . . . . . . . . . . . . 11
Back Cover for Wire Arrangement
. . . . . . . . . . . . . . . . . . . . . 13
Attaching the TV to a Wall
. . . . . . . . . . . . . . . . . . . . . . . . . . . . . . . 16
Swivel Stand
. . . . . . . . . . . . . . . . . . . . . . . . . . . . . . . . . . . . . . . . . . . . . . . . . . . . 16
Attaching the TV to a Desk
. . . . . . . . . . . . . . . . . . . . . . . . . . . . . . 17
Stand Installation
. . . . . . . . . . . . . . . . . . . . . . . . . . . . . . . . . . . . . . . . . . . . . 18
VESA Wall Mounting . . . . . . . . . . . . . . . . . . . . . . . . . . . . . . . . . . . . . . . . 19
Desktop Pedestal Installation
. . . . . . . . . . . . . . . . . . . . . . . . . . . 19
Antenna or Cable Connection
. . . . . . . . . . . . . . . . . . . . . . . . . . 20
EXTERNAL EQUIPMENT SETUP
HD Receiver Setup
. . . . . . . . . . . . . . . . . . . . . . . . . . . . . . . . . . . . . . . . . 21
DVD Setup
. . . . . . . . . . . . . . . . . . . . . . . . . . . . . . . . . . . . . . . . . . . . . . . . . . . . . 24
VCR Setup
. . . . . . . . . . . . . . . . . . . . . . . . . . . . . . . . . . . . . . . . . . . . . . . . . . . . . 26
Other A/V Source Setup
. . . . . . . . . . . . . . . . . . . . . . . . . . . . . . . . 28
Digital Audio Output . . . . . . . . . . . . . . . . . . . . . . . . . . . . . . . . . . . . . . 28
PC Setup . . . . . . . . . . . . . . . . . . . . . . . . . . . . . . . . . . . . . . . . . . . . . . . . . . . . . . . . 29
WATCHING TV / CHANNEL CONTROL
Remote Control Functions . . . . . . . . . . . . . . . . . . . . . . . . . . . . . . . 32
Turning On TV
. . . . . . . . . . . . . . . . . . . . . . . . . . . . . . . . . . . . . . . . . . . . . . . . 34
Channel Selection . . . . . . . . . . . . . . . . . . . . . . . . . . . . . . . . . . . . . . . . . . . 34
Volume Adjustment
. . . . . . . . . . . . . . . . . . . . . . . . . . . . . . . . . . . . . . . . . 34
On-Screen Menus Selection . . . . . . . . . . . . . . . . . . . . . . . . . . . . . 35
Channel Setup
. . . . . . . . . . . . . . . . . . . . . . . . . . . . . . . . . . . . . . . . . . . . . . . . 36
- Auto Scan (EZ Scan)
. . . . . . . . . . . . . . . . . . . . . . . . . . . . . . . . . 36
- Add / Delete Channel (Manual Scan)
. . . . . . . . . 37
- Channel Editing
. . . . . . . . . . . . . . . . . . . . . . . . . . . . . . . . . . . . . . . . 38
DTV Signal Strength
. . . . . . . . . . . . . . . . . . . . . . . . . . . . . . . . . . . . . . . . 39
Channel Label
. . . . . . . . . . . . . . . . . . . . . . . . . . . . . . . . . . . . . . . . . . . . . . . . . 40
PICTURE CONTROL
Watching DW (Double Window) . . . . . . . . . . . . . . . . . . . . . . . 41
Picture Size (Aspect Ratio) Control
. . . . . . . . . . . . . . . . . . 43
Preset Picture Settings
- EZ Picture - Preset
. . . . . . . . . . . . . . . . . . . . . . . . . . . . . . . . . . . . 45
- Color Tone - Preset.
. . . . . . . . . . . . . . . . . . . . . . . . . . . . . . . . . . 46
Manual Picture Adjustment
- EZ Picture - User Mode
. . . . . . . . . . . . . . . . . . . . . . . . . . . . 47
- Color Tone - User Mode
. . . . . . . . . . . . . . . . . . . . . . . . . . . 48
XD - Picture Improvement Technology
. . . . . . . . . . . . . 49
Advanced - Cinema Mode
. . . . . . . . . . . . . . . . . . . . . . . . . . . . . . . 50
Advanced - Black (Darkness) Level
. . . . . . . . . . . . . . . . . . . 51
Picture Reset
. . . . . . . . . . . . . . . . . . . . . . . . . . . . . . . . . . . . . . . . . . . . . . . . . 52
Low-Power Picture Mode
. . . . . . . . . . . . . . . . . . . . . . . . . . . . . . . . 52
Image Sticking Minimization( ISM) Method
. . . . . . . . . . . . . 53
SOUND & LANGUAGE CONTROL
Auto Volume Leveler (EZ SoundRite)
. . . . . . . . . . . . . . . . 54
Preset Sound Setting (EZ Sound)
. . . . . . . . . . . . . . . . . . . . . 55
Sound Setting Adjustment - User Mode
. . . . . . . . . . . 56
Balance Adjustment
. . . . . . . . . . . . . . . . . . . . . . . . . . . . . . . . . . . . . . . . . 57
TV Speakers On/Off Setup
. . . . . . . . . . . . . . . . . . . . . . . . . . . . . . 58
Stereo/SAP Broadcasts Setup
. . . . . . . . . . . . . . . . . . . . . . . . . . 59
Audio Language
. . . . . . . . . . . . . . . . . . . . . . . . . . . . . . . . . . . . . . . . . . . . . . 60
On-Screen Menus Language Selection
. . . . . . . . . . . . . . 61
Caption/Text
. . . . . . . . . . . . . . . . . . . . . . . . . . . . . . . . . . . . . . . . . . . . . . . . . . 62
- Analog Broadcasting System Captions
. . . . . . . 62
- Digital Broadcasting System Captions
. . . . . . . . 63
Caption Options
. . . . . . . . . . . . . . . . . . . . . . . . . . . . . . . . . . . . . . . . . . . . 64
MFL34797070en-1 4/16/09 2:14 PM Page 4

5
TIME SETTING
Clock Setting . . . . . . . . . . . . . . . . . . . . . . . . . . . . . . . . . . . . . . . . . . . . . . . . . . 65
- Auto Clock Setup
. . . . . . . . . . . . . . . . . . . . . . . . . . . . . . . . . . . . 65
- Manual Clock Setup
. . . . . . . . . . . . . . . . . . . . . . . . . . . . . . . . . 66
Auto On/Off Timer Setting
. . . . . . . . . . . . . . . . . . . . . . . . . . . . . 67
Auto Shut-off Setting . . . . . . . . . . . . . . . . . . . . . . . . . . . . . . . . . . . . . . . 68
Sleep Timer Setting
. . . . . . . . . . . . . . . . . . . . . . . . . . . . . . . . . . . . . . . . . 69
SCREEN ADJUSTMENT
Auto Configure (RGB(PC) Mode only) . . . . . . . . . . . . . 70
Manual Configure . . . . . . . . . . . . . . . . . . . . . . . . . . . . . . . . . . . . . . . . . . . . 71
Selecting XGA Mode . . . . . . . . . . . . . . . . . . . . . . . . . . . . . . . . . . . . . . . 72
Initializing (Reset to Original Factory Settings)
. 73
PARENTAL CONTROL / RATINGS
Set Password & Lock System . . . . . . . . . . . . . . . . . . . . . . . . . . . .74
Channel Blocking
. . . . . . . . . . . . . . . . . . . . . . . . . . . . . . . . . . . . . . . . . . . . 76
External Input Blocking
. . . . . . . . . . . . . . . . . . . . . . . . . . . . . . . . . . . . 76
Movie & TV Rating . . . . . . . . . . . . . . . . . . . . . . . . . . . . . . . . . . . . . . . . . .
77
APPENDIX
Troubleshooting . . . . . . . . . . . . . . . . . . . . . . . . . . . . . . . . . . . . . . . . . . . . . . 80
Maintenance . . . . . . . . . . . . . . . . . . . . . . . . . . . . . . . . . . . . . . . . . . . . . . . . . . . 82
Product Specifications
. . . . . . . . . . . . . . . . . . . . . . . . . . . . . . . . . . . . . 83
Programming the Remote Control
. . . . . . . . . . . . . . . . . . . . 84
Set ID
. . . . . . . . . . . . . . . . . . . . . . . . . . . . . . . . . . . . . . . . . . . . . . . . . . . . . . . . . . . . 86
IR Codes
. . . . . . . . . . . . . . . . . . . . . . . . . . . . . . . . . . . . . . . . . . . . . . . . . . . . . . . . 87
MFL34797070en-1 4/16/09 2:14 PM Page 5

6
ON DISPOSAL
(Only Hg lamp used LCD TV)
The fluorescent lamp used in this product contains a small amount of mercury. Do not dispose of this prod-
uct with general household waste. Disposal of this product must be carried out in accordance to the regula-
tions of your local authority.
FFoorr LLCCDD TTVV
If the TV feels cold to the touch, there may be a small “flicker” when it is turned on. This is normal, there is
nothing wrong with TV.
Some minute dot defects may be visible on the screen, appearing as tiny red, green, or blue spots.
However, they have no adverse effect on the monitor's performance.
Avoid touching the LCD screen or holding your finger(s) against it for long periods of time. Doing so may
produce some temporary distortion effects on the screen.
FEATURE OF THIS TV
MFL34797070en-1 4/16/09 2:14 PM Page 6

PREPARATION
7
PREPARATION
ACCESSORIES
Ensure that the following accessories are included with your product. If an accessory is missing, please con-
tact the dealer where you purchased the product.
User must use shielded signal interface cables (D-sub 15 pin cable) with ferrite cores to maintain standard
compliance for the product.
Owner’s Manual
ENTER
TV
IN
P
U
T
M
O
D
E
DVD
M
U
L
T
I
EXIT
OL
E
Z SO
U
ND
INFO
SWAP
EZ PIC
TIM
ER
MUTE
CH
S
A
P
CC
RATIO
MENU
VCR
POWER
23
6
9
PIP
PIP CH - PIP CH +
PIP INPUT
ENTER
TVTV
IN
P
U
T
IN
P
U
T
M
O
D
E
DVD
M
U
L
T
I
EXIT
VOL
EZ SO
UN
D
INFO
SWAP
EZ PIC
TIMER
MUTE
CH
S
A
P
CC
RATIO
MENU
VCR
POWER
123
456
789
0
FLASH
BACK
PIP
PIP CH - PIP CH +
PIP INPUT
PAGE
PAGE
Remote Control,
Batteries
Power Cord
PPllaassmmaa TTVV mmooddeell oonnllyy
75 ohm Round
Cable
D-sub 15 Pin
Cable
1.5V 1.5V
* Slightly wipe stained spot on the exterior only
with the polishing cloth for the product exteri-
or if there is stain or fingerprint on surface of
the exterior.
* Do not wipe roughly when removing stain.
Please be cautions of that excessive pressure
may cause scratch or discoloration.
Polishing Cloth
This feature is not available
for all models.
LLCCDD TTVV mmooddeell oonnllyy
D-sub 15 pin Cable
OOppttiioonn EExxttrraass
1-Bolt for fixing the
Cable Holder
(Refer to p.13-14)
Cable Management
(Refer to p.13)
Cable Holder
(Refer to p.13-14)
Only 32/37/42LC5DC*,
32/37/42LC50C*,
42LB5DC,
42LB50C
models
x 2
M4xL22
Torx plus
Star head screw
(Refer to p.8)
Protective Bracket and Bolt for
Power Cord
(This feature is not available for all models.)
(Refer to P.13-14)
4-Bolts for stand
assembly
(Refer to p.18)
Only 32/37LC5DC*,
32/37LC50*
models
MFL34797070en-1 4/16/09 2:31 PM Page 7

PREPARATION
8
FRONT PANEL CONTROLS
PREPARATION
■
Here shown may be somewhat different from your TV.
CHCH
VOLOL
ENTERENTER
MENUMENU
INPUTINPUT
Remote Control Sensor
Power/Standby Indicator
Illuminates red when the TV is in standby mode.
Illuminates green when the TV is switched on.
CHANNEL Buttons
VOLUME Buttons
ENTER Button
MENU Button
INPUT Button
POWER Button
32/37/42LC5DC*,32/37/42LC50C*, 42LB5DC, 42LB50C
Tighten the two of these four screws and
the two Torx plus star head screws (provid-
ed as parts of the TV) to secure the TV.
Tighten the two Torx plus star head screws
with a star head driver bit (not provided
as parts of the TV).
x 2
x 2
x 4
Tighten the stand with the
four screws (provided as parts
of the TV).
or
MFL34797070en-1 4/16/09 2:14 PM Page 8

PREPARATION
9
32LX5DC*, 32LX50C*
CH
CH
VOL
VOL
ENTER
ENTER
INPUT
INPUT
MENU
MENU
ON/OFF
ON/OFF
VOLUME Buttons
Remote Control Sensor
Power/Standby
Indicator
Illuminates red when the
TV is in standby mode.
Illuminates green when
the TV is switched on.
CHANNEL Buttons
ENTER Button
ON/OFF Button
INPUT Button
MENU Button
MFL34797070en-1 4/16/09 2:14 PM Page 9

PREPARATION
10
PREPARATION
42PX8DC
CH
VOL
MENUINPUT
ENTER
INPUTINPUT
ENTERENTER
INPUT
ENTER
VOLUME Buttons
CHANNEL Buttons
ENTER Button
POWER Button
INPUT Button
MENU Button
Remote Control Sensor
Power/Standby Indicator
Illuminates red when the TV is in standby mode.
Illuminates green when the TV is switched on.
This TV’s stand is sold, separately.
MFL34797070en-1 4/16/09 2:14 PM Page 10

PREPARATION
11
BACK PANEL INFORMATION
■
Here shown may be somewhat different from your TV.
AV IN 2
L/
MO
N
O
R
AUDIO
O
V
IDE
O
S-VIDEO
( )
ANTENNA IN
M.P.I.
S-VIDEO Input
Provides better picture quality than the
video input.
VIDEO Input
Connects the video signal from a video
device.
AUDIO Input
11
32/37/42LC5DC*,32/37/42LC50C*, 42LB5DC, 42LB50C
32LX5DC*, 32LX50C*
R
S-VIDEO Input
Provides better picture quality than the
video input.
VIDEO Input
Connects the video signal from a video
device.
AUDIO Input
AV IN 2
VIDEO
S-VIDEO
L/MONO
R
AUDIO
42PX8DC
S-VIDEO Input
Provides better picture quality than the
video input.
VIDEO Input
Connects the video signal from a video
device.
AUDIO Input
11
11
AV IN 2
L/
MO
N
O
R
AUDIO
A
O
VIDE
O
S-VIDEO
MFL34797070en-1 4/16/09 2:14 PM Page 11

PREPARATION
12
PREPARATION
HDMI/DVI IN , HDMI IN
Connect a HDMI (DVI) connection to either input.
DIGITAL AUDIO OUT
Connect digital audio from various types of equip-
ment.
Note: In standby mode, these ports do not work.
M.P.I
RESET/UPDATE/REMOTE CONTROL OUT
SERVICE ONLY
RGB IN (PC)
Connect the output from a PC.
AUDIO IN (RGB, DVI)
Connect the audio from a PC or DTV.
SPEAKER OUT 8Ω
AV (Audio/Video) IN
Connect audio/video output from an external
device to these jacks.
S-VIDEO
Connect S-Video out from an S-VIDEO device.
COMPONENT IN
Connect a component video/audio device to these
jacks.
RJP INTERFACE
Power Cord Socket
For operation with AC power.
Caution: Never attempt to operate the TV on DC
power.
ANTENNA IN
Connect over-the air signals to this jack.
1
8
9
10
11
12
2
3
4
5
6
7
VIDEO
AUDIO
VIDEO
AUDIO
MONO
( )
S-VIDEO
REMOTE
CONTROL
OUT
RGB IN
AUDIO
IN
(RGB, DVI)
RESET
UPDATE
M.P.I.
1
(
DVI
)
RJP
INTERFACE
2
SERVICE ONLY
HDMI
/
DVI I
N
SPEAKER
OUT
8
AV IN 1
COMPONENT IN
DIGITA
L
A
U
DI
O
OUT
(
OPTICAL
)
ANTENNA INANTENNA IN
M.P.I.M.P.I.
6
1
5
2
3
4
7
8
9
10
12
13
13
■
Here shown may be somewhat different from your TV.
This part mainly use picture for the LCD TV models.
MFL34797070en-1 4/16/09 2:14 PM Page 12

PREPARATION
13
BACK COVER FOR WIRE ARRANGEMENT
Connect the cables as necessary.
To connect an additional equipment, see the EXTERNAL
EQUIPMENT SETUP section.
Secure the power cable with the PROTECTIVE
BRACKET and the screw as shown. It will help prevent
the power cable from being removed by accident.
Install the CABLE MANAGEMENT as shown.
How to remove the CABLE MANAGEMENT
GG
Hold the CABLE MANAGEMENT with both hands and
pull it backward.
CABLE MANAGEMENT
GG
Do not hold the CABLE MANAGEMENT when moving
the product.
- If the product is dropped, you may be injured or the
product may be damaged.
NOTE
1
3
Install the CABLE HOLDER as shown.
CABLE HOLDER
2
BOLT
■
Here shown may be somewhat different from your TV.
PROTECTIVE BRACKET
(This feature is not available for all models.)
MFL34797070en-1 4/16/09 2:14 PM Page 13

PREPARATION
14
BACK COVER FOR WIRE ARRANGEMENT
PREPARATION
■
Here shown may be somewhat different from your TV.
(This feature is not available for all models.)
Connect the cables as necessary.
To connect an additional equipment, see the EXTERNAL
EQUIPMENT SETUP section.
Secure the power cable with the PROTECTIVE
BRACKET and the screw as shown. It will help prevent
the power cable from being removed by accident.
2
Install the CABLE HOLDER as shown.
CABLE
HOLDER
3
BOLT
To separate the CABLE HOLDER, loosen the bolt
installed the set.
1
PROTECTIVE BRACKET
MFL34797070en-1 4/16/09 2:14 PM Page 14

PREPARATION
15
42PX8DC
Hold the CABLE MANAGEMENT with both
hands and pull it as shown.
Connect the cables as necessary.
To connect an additional equipment, see the
EXTERNAL EQUIPMENT SETUP section.
1
2
Install the CABLE MANAGEMENT as shown.
3
45
°
GG
Do not hold the CABLE MANAGEMENT CLIP
when moving the TV.
- If the TV is dropped, you may be injured or
the product may be broken.
NOTE
!
■
Here shown may be somewhat different from your TV.
MFL34797070en-1 4/16/09 2:14 PM Page 15

PREPARATION
16
PREPARATION
The TV can be conveniently swivelled on its stand 20°or 90° to the left or right to provide the opti-
mum viewing angle.
SWIVEL STAND
20° (37LC5DC1, 42LC5DC,
42LC50C,
42PX8DC,
42LB5DC, 42LB50C
models)
90° (32LX5DC/S,
32LX50C/S,
32LC5DC/S,
32LC50C/S,
37LC5DC,
37LC50
models)
ATTACHING THE TV TO A WALL
We recommend that you set up the TV close to a wall so it cannot fall over if pushed backwards.
Additionally, we recommend that the TV be attached to a wall so it cannot be pulled in a forward direction,
potentially causing injury or damaging the product.
Caution: Please make sure that children don’t climb on or hang from the TV.
■
Insert the TV brackets (or eye-bolts) and bolts to tighten the product to the wall as shown in the picture.
*If your product has the bolts in the eye-bolts position before inserting the eye-bolts, loosen the bolts.
Secure the wall brackets with the bolts (not provided as parts of the product, must purchase separately) on
the wall. Match the height of the bracket that is mounted on the wall to the holes in the product.
Ensure the eye-bolts or brackets are tightened securely.
■
Use a sturdy rope (not provided as parts of the product, must pur-
chase separately) to tie the product. It is safer to tie the rope so it
becomes horizontal between the wall and the product.
■
This feature is not available for all models.
MFL34797070en-1 4/16/09 2:14 PM Page 16

PREPARATION
17
ATTACHING THE TV TO A DESK
The TV must be attached to desk so it cannot be pulled in a forward/backward direction,
potentially causing injury or damaging the product.
*
SSccrreewwss -- MM55 xx LL ((ttaabbllee ddeepptthh ++ 88
~
1100 mmmm))
ex) table depth-15mm: Bolts - M5 x 25
WARNING
GG
This apparatus must be securely attached to the floor/wall per installation
instructions.Tipping, shaking, or rocking the machine may cause injury/death.
4-Screws
(not provided as parts of the product)
Stand
Desk
32/37/42LC5DC*, 32/37/42LC50C*, 42LB5DC, 42LB50C
32LX5DC*, 32LX50C*
42PX8DC
4-Screws
(not provided as parts of the product)
Stand
Desk
2-Screws
(not provided as parts of the product)
Stand
Desk
MFL34797070en-1 4/16/09 2:14 PM Page 17

PREPARATION
18
PREPARATION
STAND INSTALLATION (Only 32/37LC5DC*,
32/37LC50*
models)
Carefully place the product screen side down on a cushioned surface that will protect prod-
uct and screen from damage.
Assemble the product stand with the product as shown.
Securely install the 4 bolts provided.
1
2
3
MFL34797070en-1 4/16/09 2:14 PM Page 18

PREPARATION
19
VESA WALL MOUNTING
This product accepts a VESA-compliant mounting interface pad. (optional)
There 4 threaded holes are available for attaching the bracket.
GG
Screw length needed depends on the wall mount used. For further information, refer to the VESA
Wall Mounting Instruction Guide.
NOTE
Product Model
VESA
(A
*
B)
32LC5DC*, 32LC50C*,
32LX5DC*,
32LX50C*
32/37/42LC5DC*, 32/37/42LC50C*,
42LB5DC, 42LB50C
42PX8DC
200
*
10 0
600
*
400
600
*
400
LCD TV
PLASMA TV
AA
BB
■
This feature is not available for all models.
For proper ventilation, allow a clearance of 4inches on each side from the wall.
■
Image shown may differ from your TV.
DESKTOP PEDESTAL INSTALLATION
GG
Ensure adequate ventilation by following the clearance recommendations.
CAUTION
4 inches
4 inches
4 inches
4 inches
■
This feature is not available for all models.
MFL34797070en-1 4/16/09 2:14 PM Page 19

PREPARATION
20
PREPARATION
ANTENNA OR CABLE CONNECTION
1. Antenna (Analog or Digital)
Wall Antenna Socket or Outdoor Antenna without a Cable Box
Connections.
For optimum picture quality, adjust antenna direction if needed.
2. Cable
Wall
Antenna
Socket
Outdoor
Antenna
(VHF, UHF)
Cable TV
Wall Jack
Multi-family Dwellings/Apartments
(Connect to wall antenna socket)
RF Coaxial Wire (75 ohm)
RF Coaxial Wire (75 ohm)
Single-family Dwellings /Houses
(Connect to wall jack for outdoor antenna)
Be careful not to bend the bronze wire
when connecting the antenna.
Copper Wire
ANTENNA IN
M.P.I.
ANTENNA IN
M.P.I.
ANTENNA IN
M.P.I.
GG
The TV will let you know when the analog, cable, and digital channel scans are complete.
NOTE
■
To improve the picture quality in a poor signal area, please purchase a signal amplifier and install properly.
■
If the antenna needs to be split for two TV’s, install a 2-Way Signal Splitter.
■
If the antenna is not installed properly, contact your dealer for assistance.
Antenna
UHF
Signal
Amplifier
VHF
MFL34797070en-1 4/16/09 2:14 PM Page 20

EXTERNAL EQUIPMENT SETUP
21
HD RECEIVER SETUP
EXTERNAL EQUIPMENT SETUP
This TV can receive Digital Over-the-air/Cable signals without an external digital set-top box. However, if you
do receive digital signals from a digital set-top box or other digital external device, refer to the figure as shown
below.
( )
( )
( )
S-VIDEO
M.P.I.
1(DVI)
RJP
RFACE
2
HDMI/DVI IN
COMPONENT IN
DIGITAL
AUDIO
OUT
(OPTICAL)
VIDEO
AUDIO
Y L RPB PR
When connecting Component cable
1
2
1. How to connect
Connect the video outputs
(
Y, P
B, PR
)
of the digital set
top box to the
CCOOMMPPOONNEENNTT IINN VVIIDDEEOO
jacks on
the set. Match the jack colors
(Y = green, P
B = blue, and PR = red).
Connect the audio output of the digital set-top box to
the
CCOOMMPPOONNEENNTT IINN AAUUDDIIOO
jacks on the set.
2
1
2. How to use
■
Turn on the digital set-top box.
(
Refer to the owner’s manual for the digital set-top box.
)
■
Select
CCoommppoonneenntt
input source with using the
IINNPPUUTT
button on the remote control.
Signal
480i
480p
720p
108 0 i
108 0 p
Component
Yes
Yes
Yes
Yes
Yes
HDMI1/DVI,
HDMI2
No
Yes
Yes
Yes
Yes
■
To prevent the equipment damage, never plug in any power cords until you have finished connecting all equipment.
■
This part of external equipment setup mainly use picture for LCD TV models.
* 42LB5DC, 42LB50C model only
MFL34797070en-1 4/16/09 2:14 PM Page 21

EXTERNAL EQUIPMENT SETUP
22
EXTERNAL EQUIPMENT SETUP
When connecting HDMI cable
Connect the digital set-top box to
HHDDMMII//DDVVII IINN
11((DDVVII))
or
22
jack on the set.
No separated audio connection is necessary.
HDMI supports both audio and video.
1. How to connect
2. How to use
■
Turn on the digital set-top box.
(
Refer to the owner’s manual for the digital set-top box.
)
■
Select
HHDDMMII11//DDVVII
or
HHDDMMII22
input source with using
the
IINNPPUUTT
button on the remote control.
2
1
( )
VIDEO
AUDIO
( )
M.P.I
1(DVI)
RJP
INTERFACE
2
HDMI/DVI IN
COMPONENT IN
DIGITAL
AUDIO
OUT
(OPTICAL)
( )
HDMI-DTV OUTPUT
1
GG
If the device does not support Auto HDMI, you need to set
the output resolution appropriately.
NOTE
MFL34797070en-1 4/16/09 2:14 PM Page 22

EXTERNAL EQUIPMENT SETUP
23
VIDEO
AUDIO
VIDEO
AUDIO
MONO
( )
S-VIDEO
REMOTE
CONTROL
OUT
RGB IN
AUDIO
IN
(RGB, DVI)
RESET
UPDATE
M.P.I.
1(DVI)
RJP
INTERFACE
2
SERVICE ONLY
HDMI/DVI IN
SPEAKER
OUT
8
AV IN 1
COMPONENT IN
DIGITAL
AUDIO
OUT
(OPTICAL)
( )
( )
L R
DVI-DTV OUTPUT
Connect the DVI output of the digital set-top box to the
HHDDMMII//DDVVII IINN 11((DDVVII))
or
22
jack on the set.
Connect the audio output of the digital set-top box to the
AAUUDDIIOO IINN
((
RRGGBB,,DDVVII
))
jack on the set.
1. How to connect
■
Turn on the digital set-top box.
(
Refer to the owner’s manual for the digital set-top box.
)
■
Select
HHDDMMII11//DDVVII
or
HHDDMMII22
input source with using the
IINNPPUUTT
button on the remote control.
2. How to use
2
1
1
2
When connecting HDMI to DVI cable
MFL34797070en-1 4/16/09 2:14 PM Page 23

EXTERNAL EQUIPMENT SETUP
24
EXTERNAL EQUIPMENT SETUP
DVD SETUP
When connecting Component cable
( )
( )
S-VIDEO
M.P.I.
1(DVI)
RJP
ERFACE
2
HDMI/DVI IN
COMPONENT IN
DIGITAL
AUDIO
OUT
(OPTICAL)
VIDEO
AUDIO
Y L RPB PR
( )
Component Input ports
To get better picture quality, connect a DVD player to the component input ports as shown below.
Component ports on the TV
YPB PR
Video output ports
on DVD player
Y
Y
Y
Y
P
B
B-Y
Cb
Pb
P
R
R-Y
Cr
Pr
Connect the video outputs
(
Y, PB
, PR
)
of the DVD to
the
CCOOMMPPOONNEENNTT IINN VVIIDDEEOO
jacks on the set.
Match the jack colors
(
Y = green, P
B = blue, and PR = red
)
.
Connect the audio outputs of the DVD to the
CCOOMMPPOONNEENNTT IINN AAUUDDIIOO
jacks on the set.
1. How to connect
2. How to use
■
Turn on the DVD player, insert a DVD.
■
Select
CCoommppoonneenntt
input source with using the
IINNPPUUTT
button on the remote control.
■
Refer to the DVD player's manual for operating instructions.
2
1
1 2
MFL34797070en-1 4/16/09 2:14 PM Page 24

EXTERNAL EQUIPMENT SETUP
25
When connecting with an S-Video cable
AUDIO
REMOTE
CONTROL
OUT
RESET
UPDATE
M.P.I.
S
SPEA
O
AV IN 1
NT IN
GITAL
UDIO
OUT
TICAL)
( )
( )
AUDIO
MONO
( )
S-VIDEO
VIDEO
L R
S-VIDEO
AUDIO
1
2
VIDEO
AUDIO
( )
M.P.I
1(DVI)
RJP
INTERFACE
2
HDMI/DVI IN
COMPONENT IN
DIGITAL
AUDIO
OUT
(OPTICAL)
( )
HDMI-DVD OUTPUT
( )
1
Connect the S-VIDEO output of the DVD to the
SS --VVIIDDEEOO
input on the set.
Connect the audio outputs of the DVD to the
AAUUDDIIOO
input jacks on the set.
1. How to connect
2. How to use
■
Turn on the DVD player, insert a DVD.
■
Select
AAVV11
input source with using the
IINNPPUUTT
button on
the remote control.
■
If connected to
AAVV IINN22
, select
AAVV22
input source.
■
Refer to the DVD player's manual for operating instructions.
When connecting HDMI cable
Connect the HDMI output of the DVD to the
HHDDMMII//DDVVII IINN 11((DDVVII))
or
22
jack on the set.
No separated audio connection is necessary.
HDMI supports both audio and video.
1. How to connect
2. How to use
■
Select
HHDDMMII11//DDVVII
or
HHDDMMII22
input source with using
the
IINNPPUUTT
button on the remote control.
■
Refer to the DVD player's manual for operating instructions.
2
1
2
1
GG
If the device does not support Auto HDMI, you need to
set the output resolution appropriately.
NOTE
MFL34797070en-1 4/16/09 2:14 PM Page 25

EXTERNAL EQUIPMENT SETUP
26
EXTERNAL EQUIPMENT SETUP
VCR SETUP
When connecting with an antenna
■
To avoid picture noise
(
interference
)
, leave an adequate distance between the VCR and TV.
■
Use the ISM feature in the Option menu to avoid having a fixed image remain on the screen for a long period
of time.
(Only
Plasma TV model
)
. If the 4:3 picture format is used; the fixed images on the sides of the screen
may remain visible on the screen. This phenomenon is common to all manufactures and in consequence the
manufactures warranty does not cover the product bearing this phenomenon.
( )
( )
ANTENNA IN
M.P.I.
L R
S-VIDEO VIDEO
OUTPUT
SWITCH
ANT IN
ANT OUT
Wall Jack
Antenna
1
2
Connect the RF antenna out socket of the VCR to the
AAnntteennnnaa
socket on the set.
Connect the antenna cable to the RF antenna in socket of the VCR.
1. How to connect
■
Set VCR output switch to 3 or 4 and then tune TV to the same channel number.
■
Insert a video tape into the VCR and press PLAY on the VCR.
(
Refer to the VCR owner’s manual.
)
2. How to use
2
1
MFL34797070en-1 4/16/09 2:14 PM Page 26

EXTERNAL EQUIPMENT SETUP
27
GG
Do not connect to both Video
and S-Video at the same time. In
the event that you connect both
Video and the S-Video cables,
only the S-Video will work.
CAUTION
When connecting with a RCA cable
GG
The picture quality is improved: compared to normal
composite (RCA cable) input.
NOTE
AUDIO
REMOTE
CONTROL
OUT
R
RESET
UPDATE
M.P.I.
SERV
SPEAKE
OUT
8
AV IN 1
T IN
TAL
DIO
UT
CAL)
AUDIO
MONO
( )
S-VIDEO
VIDEO
( )
L R
S-VIDEO VIDEO
OUTPUT
SWITCH
ANT IN
ANT OUT
ANTENNA IN
M.P.I.
( )
AUDIO
REMOTE
CONTROL
OUT
RESET
UPDATE
M.P.I.
SER
SPEAK
OUT
8
AV IN 1
ENT IN
GITAL
AUDIO
OUT
PTICAL)
AUDIO
MONO
( )
S-VIDEO
VIDEO
L R
S-VIDEO VIDEO
OUTPUT
SWITCH
ANT IN
ANT OUT
ANTENNA IN
M.P.I.
Connect the
AAUUDDIIOO
/
VVIIDDEEOO
jacks between TV and
VCR. Match the jack colors (Video = yellow, Audio Left
= white, and Audio Right = red)
1. How to connect
2. How to use
■
Insert a video tape into the VCR and press PLAY on the
VCR.
(
Refer to the VCR owner’s manual.
)
■
Select
AAVV11
input source with using the
IINNPPUUTT
button on
the remote control.
■
If connected to
AAVV IINN22
, select
AAVV22
input source.
When connecting with an S-Video cable
Connect the S-VIDEO output of the VCR to the
SS --VVIIDDEEOO
input on the set.
Connect the audio outputs of the VCR to the
AAUUDDIIOO
input jacks on the set.
1. How to connect
2. How to use
■
Insert a video tape into the VCR and press PLAY on the VCR.
(
Refer to the VCR owner’s manual.
)
■
Select
AAVV11
input source with using the
IINNPPUUTT
button on
the remote control.
■
If connected to
AAVV IINN22
, select
AAVV22
input source.
1
2
1
GG
If you have a mono VCR, con-
nect the audio cable from the
VCR to the
AAUUDDIIOO
LL//MMOONNOO
jack of the set.
NOTE
1
1
2
MFL34797070en-1 4/16/09 2:14 PM Page 27

EXTERNAL EQUIPMENT SETUP
28
EXTERNAL EQUIPMENT SETUP
DIGITAL AUDIO OUTPUT
VIDEO
AUDIO
( )
S-V
M.P.I.
1(DVI)
RJP
NTERFACE
2
HDMI/DVI IN
COMPONENT IN
DIGITAL
AUDIO
OUT
(OPTICAL)
GG
When connecting with external audio equipments, such as ampli-
fiers or speakers, please turn the TV speakers off. (
GG
pp..5588
)
NOTE
GG
Do not look into the optical output port. Looking at the
laser beam may damage your vision.
CAUTION
Connect one end of an optical cable to the TV Digital
Audio
(
Optical
)
Output port.
Connect the other end of the optical cable to the
digital audio
(
optical
)
input on the audio equipment.
Set the “TV Speaker option - Off” in the AUDIO
menu. (
GG
pp..5588
). See the external audio equipment
instruction manual for operation.
1. How to connect
2
3
1
1
2
OTHER A/V SOURCE SETUP
AV IN 2
L/MONO
R
AUDIO
VIDEO
S-VIDEO
L R
VIDEO
Camcorder
Video Game Set
Connect the
AAUUDDIIOO
/
VVIIDDEEOO
jacks
between TV and external equipment.
Match the jack colors
.
(
Video = yellow, Audio Left = white, and
Audio Right = red
)
1. How to connect
2. How to use
■
Select
AAVV22
input source with using the
IINNPPUUTT
button on the remote control.
■
If connected to
AAVV IINN11
input, select
AAVV11
input source.
■
Operate the corresponding external equipment.
1
1
i.e)
32/37/42LC5DC*, 32/37/42LC50C*,
42LB5DC, 42LB50C
Send the TV’s audio to external audio equipment via the Digital Audio Output
(
Optical
)
port.
MFL34797070en-1 4/16/09 2:14 PM Page 28

EXTERNAL EQUIPMENT SETUP
29
PC SETUP
When connecting HDMI to DVI cable
Connect the DVI output of the PC to the
HHDDMMII//DDVVII
IINN 11((DDVVII))
jack on the set.
Connect the PC audio output to the
AAUUDDIIOO IINN
((
RRGGBB//DDVVII
))
jack on the set.
1. How to connect
2. How to use
■
Turn on the PC and the set
■
Select
HHDDMMII11//DDVVII
input source with using the
IINNPPUUTT
button on the remote control.
2
1
This TV provides Plug and Play capability, meaning that the PC adjusts automatically to the TV's settings.
When connecting D-sub 15pin cable
Connect the RGB output of the PC to the
RRGGBB IINN
jack on the set.
Connect the PC audio output to the
AAUUDDIIOO IINN
((
RRGGBB,, DDVVII
))
jack on the set.
1. How to connect
2. How to use
■
Turn on the PC and the set.
■
Select
RRGGBB--PPCC
input source with using the
IINNPPUUTT
button
on the remote control.
2
1
VIDEO
( )
1(DVI)
RJP
INTERFACE
2
HDMI/DVI IN
COMPONENT
DIGITA
AUDIO
OUT
(OPTICA
DVI-PC OUTPUT AUDIO
( )
( )
RGB IN
AUDIO
IN
(RGB, DVI)
VICE ONLY
ER
( )
1
2
RGB OUTPUT AUDIO
( )
VIDEO
AUDIO
MONO
( )
REMOTE
CONTROL
OUT
RGB IN
AUDIO
IN
(RGB, DVI)
ATE
SERVICE ONLY
SPEAKER
OUT
8
AV IN 1
1
2
MFL34797070en-1 4/16/09 2:14 PM Page 29

EXTERNAL EQUIPMENT SETUP
30
EXTERNAL EQUIPMENT SETUP
GG
Depending on the graphics card, DOS mode may
not work if a HDMI to DVI Cable is in use.
GG
Check the image on your TV. There may be noise
associated with the resolution, vertical pattern,
contrast or brightness in PC mode. If noise is pre-
sent, change the PC output to another resolution,
change the refresh rate to another rate or adjust
the brightness and contrast on the VIDEO menu
until the picture is clear. If the refresh rate of the
PC graphic card can not be changed, change the
PC graphic card or consult the manufacturer of
the PC graphic card.
GG
Avoid keeping a fixed image on the screen for a
long period of time. The fixed image may become
permanently imprinted on the screen.
GG
The synchronization input form for Horizontal and
Vertical frequencies is separate.
NOTES
Supported Display Specifications
(
RGB/HDMI1-PC
)
Horizontal Vertical
Frequency
(
KHz
)
Frequency
(
Hz
)
31.469 70.08
31.469 59.94
37.861 72.80
37.500 75.00
35.156 56.25
37.879 60.31
48.077 72.18
46.875 75.00
48.363 60.00
56.476 70.06
60.023 75.02
47.700 60.00
47.720 59.799
47.130 59.658
Resolution
640x350
* RGB-DOS mode only: 640x350
640x480
800x600
1024x768
Supported Display Specifications (
HDMI2-DTV)
Horizontal Vertical
Frequency
(
KHz
)
Frequency
(
Hz
)
31.500 60.00
31.469 59.94
44.960 59.94
45.000 60.00
33.720 59.94
33.750 60.00
Resolution
720x480
1280x720
1920x1080i
1280x768
1360x768
1366x768
Supported Display Specifications
(
Y, CB /PB,CR /PR
)
Horizontal Vertical
Frequency
(
KHz
)
Frequency
(
Hz
)
15.73 59.94
15.73 60.00
31.47 59.94
31.50 60.00
44.96 59.94
45.00 60.00
33.72 59.94
33.75 60.00
Resolution
1280x720
1920x1080i
720x480
Supported Display Specifications (RGB/HDMI1-DTV)
Horizontal Vertical
Frequency
(
KHz
)
Frequency
(
Hz
)
31.50 60.00
31.47
(HDMI1-DTV:31.469) 59.94
44.96 59.94
45.00 60.00
33.72 59.94
33.75 60.00
Resolution
720x480
1280x720
1920x1080i
MFL34797070en-1 4/16/09 2:14 PM Page 30

EXTERNAL EQUIPMENT SETUP
31
Supported Display Specifications
(
RGB/HDMI1-PC
)
Horizontal Vertical
Frequency
(
KHz
)
Frequency
(
Hz
)
31.469 70.08
31.469 59.94
37.861 72.80
37.500 75.00
35.156 56.25
37.879 60.31
48.077 72.18
46.875 75.00
48.363 60.00
56.476 70.06
60.023 75.02
47.700 60.00
47.720 59.799
47.130 59.658
63.668 59.895
65.317 59.978
74.537 59.869
66.587 59.934
74.038 59.950
Resolution
640x350
(RGB only)
* RGB-DOS mode only: 640x350
640x480
800x600
1024x768
Supported Display Specifications (
HDMI2-DTV)
Horizontal Vertical
Frequency
(
KHz
)
Frequency
(
Hz
)
31.500 60.00
31.469 59.94
44.960 59.94
45.000 60.00
33.720 59.94
33.750 60.00
67.500 60.00
Resolution
720x480
1280x720
1920x1080
1280x768
1360x768
1366x768
Supported Display Specifications
(
Y, CB /PB,CR /PR
)
Horizontal Vertical
Frequency
(
KHz
)
Frequency
(
Hz
)
15.73 59.94
15.73 60.00
31.47 59.94
31.50 60.00
44.96 59.94
45.00 60.00
33.72 59.94
33.75 60.00
67.50 60.00
Resolution
1280x720
1920x1080
720x480
Supported Display Specifications (RGB/HDMI1-DTV)
Horizontal Vertical
Frequency
(
KHz
)
Frequency
(
Hz
)
31.50 60.00
31.47
(HDMI1-DTV:31.469) 59.94
44.96 59.94
45.00 60.00
33.72 59.94
33.75 60.00
67.43
(HDMI1-DTV:67.5) 59.94
Resolution
720x480
1280x720
1920x1080
1280x1024
(RGB only)
1400x1050
(RGB only)
1600x1200
1920x1080
1920x1200
* 42LB5DC, 42LB50C
MFL34797070en-1 4/16/09 2:14 PM Page 31

WATCHING TV / CHANNEL CONTROL
32
REMOTE CONTROL FUNCTIONS
WATCHING TV / CHANNEL CONTROL
When using the remote control, aim it at the remote control sensor on the TV.
ENTER
TVTV
INPUT
INPUT MODE
DVD
MULTI
EXIT
VOL
EZ SOUND
INFO
SWAP
EZ PIC
TIMER
MUTE
CH
SAP
CC
RATIO
MENU
VCR
POWER
123
456
789
0
FLASH
BACK
PIP
PIP CH - PIP CH +
PIP INPUT
PAGE
POWER
TV INPUT
INPUT
MULTI
THUMBSTICK
(Up/Down/Left
/Right/ENTER)
VOLUME UP
/DOWN
TIMER
MUTE
CHANNEL
UP/DOWN
PAGE
UP/DOWN
— (DASH)
FLASH BACK
Turns your TV or any other programmed equipment on
or off, depending on mode.
In AV 1-2, Component, RGB, HDMI1/DVI, and HDMI2
input sources, screen returns to the last TV channel.
External input modes rotate in regular sequence: TV, AV1-
2, Component, RGB, HDMI1/DVI and HDMI2.
Selects: RGB,HDMI1/DVI, HDMI2 and Component input
sources.
Adjusts brightness on screen.
Control video cassette recorders or DVD players.
Navigate the on-screen menus and adjust the system
settings to your preference.
Increase/decrease the sound level.
Select the amount of time before your TV turns off auto-
matically.
GG
pp..6699
Switch the sound on or off.
GG
pp..3344
Select available channels.
Move from one full set of screen information to the next one.
Used to enter a program number for multiple program
channels such as 2-1, 2-2, etc.
Tune to the last channel viewed.
NUMBER button
VCR/DVD
control buttons
MFL34797070en-1 4/16/09 2:14 PM Page 32

WATCHING TV / CHANNEL CONTROL
33
■
Open the battery compartment cover on the back side and install the batteries matching correct
polarity
(
+ with +, - with -
)
.
■
Install two 1.5V AA batteries. Don’t mix old or used batteries with new ones.
■
Close cover.
Installing Batteries
Select the remote’s operating mode: TV, DVD, VCR.
Switches the sub picture Double Window or off mode.
GG
pp..4411--4422
Changes the PIP channel.
GG
pp..4422
Select the connected input source for the sub-picture.
GG
pp..4411
Selects the factory preset picture depend on the viewing environment.
GG
pp..4455
Selects the factory preset sound for type of program.
GG
pp..5555
Exchange the main/sub images.
GG
pp..4422
Display information at the top of the screen.
Clears all on-screen displays and returns to TV viewing from any menu.
Select a closed caption.
GG
pp..6622
(*In DTV/CADTV mode
GG
pp..6633
)
Displays the main menu.
Change the aspect ratio.
GG
pp..4433--4444
Analog mode: Selects MTS sound (Mono, Stereo, or SAP)
GG
pp..5599
DTV mode: Changes the audio language.
MODE
PIP
PIP CH +/-
PIP INPUT
EZ PIC
EZ SOUND
SWAP
INFO
EXIT
CC
MENU
RATIO
SAP
MFL34797070en-1 4/16/09 2:14 PM Page 33

WATCHING TV / CHANNEL CONTROL
34
WATCHING TV /CHANNEL CONTROL
TURNING ON TV
NOTE
GG
If you intend to be away on vacation, disconnect the power plug from the wall power outlet.
First, connect power cord correctly.
At this moment, the TV switches to standby mode.
■
In standby mode to turn TV on, press the (or
OONN//OOFFFF
) button on
the TV or press the
PPOOWWEERR
button on the remote control.
Select the viewing source by using the
TTVV IINNPPUUTT
,
IINNPPUUTT
button on the
remote control.
■
This TV is programmed to remember which power state it was last set to,
even if the power cord is out.
When finished using the TV, press the
PPOOWWEERR
button on the remote con-
trol. The TV reverts to standby mode.
1
2
3
Press the
CCHH
+ - or
NNUUMMBBEERR
buttons to select a channel number.
1
VOLUME ADJUSTMENT
CHANNEL SELECTION
Press the
VVOOLL
+ or - button to adjust the volume.
If you want to switch the sound off, press the
MMUUTTEE
button.
You can cancel the Mute function by pressing the
MMUUTTEE
or
VVOOLL
+ or -
button.
Adjust the volume to suit your personal preference.
1
2
3
MFL34797070en-1 4/16/09 2:14 PM Page 34

WATCHING TV / CHANNEL CONTROL
35
ON-SCREEN MENUS SELECTION
Press the
MMEENNUU
button and then use
DD
or
EE
button to select the each menu.
Press the
GG
button and then use
DD EE FF GG
button to display the available menus.
Your TV's OSD
(
On Screen Display
)
may differ slightly from what is shown in this manual.
2
1
SETUP
VIDEO
SCREEN
TIME
AUDIO
EZ Scan
Manual Scan
Channel Edit
DTV Signal
Channel Label
EZ Picture
Color Temperature
XD
Advanced
Reset
Audio Language
EZ SoundRite
EZ Sound
Balance 0
TV Speakers
Auto Clock
Manual Clock
Off Timer
On Timer
Auto Off
Auto config.
Manual config.
XGA Mode
Reset
SCREEN
LOCK
OPTION
TIME
AUDIO
VIDEO
SETUP
SCREEN
LOCK
OPTION
TIME
AUDIO
VIDEO
SETUP
LOCK
SCREEN
LOCK
OPTION
TIME
AUDIO
VIDEO
SETUP
SCREEN
LOCK
OPTION
TIME
AUDIO
VIDEO
SETUP
SCREEN
LOCK
OPTION
TIME
AUDIO
VIDEO
SETUP
OPTION
Aspect Ratio
Caption/Text
Caption Options
Language
ISM Method
Low Power
Set ID
SCREEN
LOCK
OPTION
TIME
AUDIO
VIDEO
SETUP
Only Plasma TV model
Lock System
Set Password
Block Channel
Movie Rating
TV Rating-Children
TV Rating-General
Aux. Block
Downloadable Rating
SCREEN
LOCK
OPTION
TIME
AUDIO
VIDEO
SETUP
MFL34797070en-1 4/16/09 2:14 PM Page 35

WATCHING TV / CHANNEL CONTROL
36
WATCHING TV /CHANNEL CONTROL
CHANNEL SETUP
Press the
MMEENNUU
button and then use
DD
or
EE
button
to select the
SSEETTUUPP
menu.
Press the
GG
button and then use
DD
or
EE
button to
select
EEZZ SSccaann
.
Press the
EENNTTEERR
button to begin the channel search.
Allow
EEZZ SSccaann
to complete the channel search cycle
for
AANNTTEENNNNAA
and
CCAABBLLEE
.
Automatically finds all channels available through antenna
or cable inputs, and stores them in memory on the channel
list.
Run EZ Scan again after any Antenna/Cable connection
changes.
A password is required to gain access to EZ Scan menu if
the Lock System is turned on.
EZ Scan
G
Manual Scan
Channel Edit
DTV Signal
Channel Label
Selection (
G
or ) leads you
to the EZ scan screen.
EZ Scan
G
Manual Scan
Channel Edit
DTV Signal
Channel Label
2
3
1
1
2
3
Auto Scan (EZ Scan)
EZ Scan
Manual Scan
Channel Edit
DTV Signal
Channel Label
SCREEN
LOCK
OPTION
TIME
AUDIO
VIDEO
SETUP
Selection (
G
or ) leads you
to the EZ scan screen.
MENU Prev.
Next
Processing EZ scan...
ANALOG 9
Found Channel(s) 4
SCREEN
LOCK
OPTION
TIME
AUDIO
VIDEO
SETUP
SCREEN
LOCK
OPTION
TIME
AUDIO
VIDEO
SETUP
MFL34797070en-1 4/16/09 2:14 PM Page 36

WATCHING TV / CHANNEL CONTROL
37
A password is required to gain access to Manual Scan
menu if the Lock System is turned on.
Press the
MMEENNUU
button and then use
DD
or
EE
button
to select the
SSEETTUUPP
menu.
Press the
GG
button and then use
DD
or
EE
button to
select
MMaannuuaall SSccaann
.
Press the
GG
button and then use
DD
or
EE
button to
select Analog(
TTVV
,
CCAATTVV
), Digital(
DDTTVV
,
CCAADDTTVV
).
Press the
GG
button and then use
DD
or
EE
button to
select channel you want to add or delete.
Press the
EENNTTEERR
button to add or delete the channel.
Press the
EEXXIITT
button to return to TV viewing or press
MMEENNUU
button to return to the previous menu.
EZ Scan
Manual Scan
G
Channel Edit
DTV Signal
Channel Label
Channel Type Number
ANALOG 2
EZ Scan
Manual Scan
Channel Edit
DTV Signal
Channel Label
2
1
4
3
6
5
Channel Type Number
ANALOG
GG
2
Press
to delete the channel.
ANALOG 2
DD
EE
1
2
3 4 5
Add/Delete Channel (Manual Scan)
EZ Scan
Manual Scan
Channel Edit
DTV Signal
Channel Label
SCREEN
LOCK
OPTION
TIME
AUDIO
VIDEO
SETUP
SCREEN
LOCK
OPTION
TIME
AUDIO
VIDEO
SETUP
SCREEN
LOCK
OPTION
TIME
AUDIO
VIDEO
SETUP
MFL34797070en-1 4/16/09 2:14 PM Page 37

WATCHING TV / CHANNEL CONTROL
38
WATCHING TV /CHANNEL CONTROL
A Custom List can be created by toggling each channel on
or off with ENTER button. The channels in the Custom List
are displayed in black, and the channels deleted from the
Custom List are displayed in gray. Once a channel is high-
lighted you can add or delete the channel by referring to the
small window at the top-left corner of the screen.
A password is required to gain access to Manual Scan menu
if the Lock System is turned on.
Press the
MMEENNUU
button and then use
DD
or
EE
button
to select the
SSEETTUUPP
menu.
Press the
GG
button and then use
DD
or
EE
button to
select
CChhaannnneell EEddiitt
.
Press the
GG
button and then use
DD
or
EE
button to
select
AANNAALLOOGG
or
DDIIGGIITTAALL
.
Press the
GG
button and then use
DD
or
EE
button to
select channel and then use the
EENNTTEERR
button to add
or delete it.
Press
EEXXIITT
button to return to TV viewing or press
MMEENNUU
button to return to the previous menu.
EZ Scan
Manual Scan
Channel Edit
DTV Signal
Channel Label
2
1
3
4
5
1
2
3 4
Channel Editing
DD
EE
G
DD
EE
ANALOG
EZ Scan
Manual Scan
Channel Edit
G
DTV Signal
Channel Label
ANALOG
DD
EE
2-0
4-0
6-0
9-0
11-0
13-0
14-0
2-0
4-0
6-0
9-0
11-0
13-0
14-0
EZ Scan
Manual Scan
Channel Edit
DTV Signal
Channel Label
SCREEN
LOCK
OPTION
TIME
AUDIO
VIDEO
SETUP
SCREEN
LOCK
OPTION
TIME
AUDIO
VIDEO
SETUP
SCREEN
LOCK
OPTION
TIME
AUDIO
VIDEO
SETUP
MFL34797070en-1 4/16/09 2:15 PM Page 38

WATCHING TV / CHANNEL CONTROL
39
DTV SIGNAL STRENGTH
This feature displays the DTV signal levels being received
and indicates whether you need to adjust your antenna or
digital cable input. The higher the signal strength, the less
likely you are to experience picture degradation.
DTV Signal: This function is only available when the input
signal is DTV or CADTV.
Press the
MMEENNUU
button and then use
DD
or
EE
button
to select the
SSEETTUUPP
menu.
Press the
GG
button and then use
DD
or
EE
button to
select
DDTTVV SSiiggnnaall..
View the on-screen signal strength monitor to see
the quality of the signal being received.
Press
EEXXIITT
button to return to TV viewing or press
MMEENNUU
button to return to the previous menu.
EZ Scan
Manual Scan
Channel Edit
DTV Signal
Channel Label
Bad Normal Good
2
3
4
1
1
2 3
EZ Scan
Manual Scan
Channel Edit
DTV Signal
Channel Label
SCREEN
LOCK
OPTION
TIME
AUDIO
VIDEO
SETUP
SCREEN
LOCK
OPTION
TIME
AUDIO
VIDEO
SETUP
MFL34797070en-1 4/16/09 2:15 PM Page 39

WATCHING TV / CHANNEL CONTROL
40
WATCHING TV /CHANNEL CONTROL
CHANNEL LABEL
Choose preset labels for your channels.
If a channel label is provided on the signal from the
broadcasting station, the TV displays a short name for a
channel even if you didn't preset a label for the channel.
Press the
MMEENNUU
button and then use
DD
or
EE
button
to select the
SSEETTUUPP
menu.
Press the
GG
button and then use
DD
or
EE
button to
select
CChhaannnneell LLaabbeell..
Press the
GG
button and then use
DD
or
EE
button to
select a channel to label.
Press the
GG
button and then use
DD
or
EE
button to
select the appropriate label for the channel.
Press
EEXXIITT
button to return to TV viewing or press
MMEENNUU
button to return to the previous menu.
EZ Scan
Manual Scan
Channel Edit
DTV Signal
Channel Label
G
2
3
4
5
1
1
2 3
Ch. ANALOG 2
Logo No Logo
EZ Scan
Manual Scan
Channel Edit
DTV Signal
Channel Label
SCREEN
LOCK
OPTION
TIME
AUDIO
VIDEO
SETUP
SCREEN
LOCK
OPTION
TIME
AUDIO
VIDEO
SETUP
MFL34797070en-1 4/16/09 2:15 PM Page 40

PICTURE CONTROL
41
WATCHING DW (DOUBLE WINDOW)
PICTURE CONTROL
Double Window mode splits the screen into two images, allowing two picture
sources to be shown on the TV screen at the same time. Each source is given half
the screen.
Watching Double Window
Press the
PPIIPP
button to access the sub picture.
DW Mode
Selecting an Input Signal Source for
Double Window
Use the
PPIIPP IINNPPUUTT
button to select the input source for the sub picture.
Each press of
PPIIPP IINNPPUUTT
button changes the PIP source.
PIP Off
Use the
PPIIPP IINNPPUUTT
button to select the input source for the sub picture. Each press of
PPIIPP IINNPPUUTT
button
changes the PIP source.
Main Picture Source Available Sub Picture Sources
TV AV1, AV2
AV1 TV, AV2
AV2 TV, AV1
RGB, Component, HDMI1/DVI, HDMI2 TV, AV1, and AV2
MFL34797070en-2 4/16/09 2:17 PM Page 41

PICTURE CONTROL
42
PICTURE CONTROL
Repeatedly, use the
SSWWAAPP
button to switch the main and sub pictures.
■
Component, RGB, HDMI1/DVI, HDMI2 input sources for the main picture can’t be used to swap the
main and sub pictures.
Swapping the PIP / Double Window
1
TV Program Selection for PIP
Use the
PPIIPP CCHH ++//--
button to select a channel for the sub picture.
The selected channel number is displayed just below the input source of main picture.
1
MFL34797070en-2 4/16/09 2:17 PM Page 42

PICTURE CONTROL
43
PICTURE SIZE (ASPECT RATIO) CONTROL
This feature allows an analog picture with a 4:3 aspect ratio is displayed on your TV.
When you receive an analog picture with a 4:3 aspect ratio on your 16:9 TV, you
need to specify how the picture is to be displayed.
■
RGB-PC/DVI-PC input source use 4:3 or 16:9 aspect ratio.
Set by program
Selects the proper picture proportion to match the source’s image.
4:3
Choose 4:3 when you want to view a picture with an original 4:3 aspect ratio.
16:9
Adjust the picture horizontally, in a linear proportion to fill the entire screen.
Press the
RRAATTIIOO
button repeatedly to select the desired picture format.
■
You can also adjust
AAssppeecctt RRaattiioo
in the
OOPPTTIIOONN
menu.
1
4:3
Set By Program
Set By Program
(4:3 4:3)
(16:9 16:9)
16:9
MFL34797070en-2 4/16/09 2:17 PM Page 43

PICTURE CONTROL
44
PICTURE CONTROL
Horizon
The screen size is, more enlarged at both sides, to create a spectacular view.
Zoom 1
Choose Zoom 1 when you want to view the picture without any alteration. However, the top and bottom portions
of the picture will be cropped.
Zoom 2
Choose Zoom 2 when you want the picture to be altered, both vertically extended and cropped. The pic-
ture taking a halfway trade off between alteration and screen coverage.
Horizon
Zoom 1
Zoom 2
MFL34797070en-2 4/16/09 2:17 PM Page 44

PICTURE CONTROL
45
PRESET PICTURE SETTINGS
EZ Picture - Preset
Press the
EEZZ PPIICC
button repeatedly to select the picture
appearance setup option as below:
DDaayylliigghhtt
,
NNoorrmmaall
,
NNiigghhtt TTiimmee
,
UUsseerr11
, and
UUsseerr22
(your own settings).
Press the
EEXXIITT
button to save and return to TV viewing.
EZ Picture adjusts the TV for the best picture appearance. Select
the preset value in the EZ Picture menu based on the program
category.
DDaayylliigghhtt
,
NNoorrmmaall
,
NNiigghhtt TTiimmee
Settings are preset for the opti-
mum picture quality at the factory and are not adjustable.
In the
UUsseer
r11
and
UUsseerr22
modes only, user can directly adjust
the contrast, brightness, color, sharpness, tint.
■
You can also use the
VVIIDDEEOO
menu to adjust
EEZZ PPiiccttuurree
.
2
1
EZ Picture
G
Color Temperature
XD
Advanced
Reset
Daylight
Normal
Night time
User 1
User 2
EZ Picture
Color Temperature
XD
Advanced
Reset
SCREEN
LOCK
OPTION
TIME
AUDIO
VIDEO
SETUP
SCREEN
LOCK
OPTION
TIME
AUDIO
VIDEO
SETUP
MFL34797070en-2 4/16/09 2:17 PM Page 45

PICTURE CONTROL
46
PICTURE CONTROL
Color Tone - Preset
Choose one of three automatic color adjustments. Set to
warm to enhance hotter colors such as red, or set to cool
to see less intense colors with more blue.
When selecting EZ Picture (User 1 and User 2), you can
choose the
CCoolloorr TTeemmppeerraattuurree
.
Press the
MMEENNUU
button and then use
DD
or
EE
button
to select the
VVIIDDEEOO
menu.
Press the
GG
button and then use
DD
or
EE
button to
select
CCoolloorr TTeemmppeerraattuurree
.
Press the
GG
button and then use
DD
or
EE
button to
select either
CCooooll
,
NNoorrmmaall
,
WWaarrmm
or
UUsseerr
.
Press
EEXXIITT
button to return to TV viewing or press
MMEENNUU
button to return to the previous menu.
2
3
4
1
EZ Picture
Color Temperature
G
XD
Advanced
Reset
Cool
Normal
Warm
User
1
2 3
EZ Picture
Color Temperature
XD
Advanced
Reset
SCREEN
LOCK
OPTION
TIME
AUDIO
VIDEO
SETUP
SCREEN
LOCK
OPTION
TIME
AUDIO
VIDEO
SETUP
MFL34797070en-2 4/16/09 2:17 PM Page 46

PICTURE CONTROL
47
MANUAL PICTURE ADJUSTMENT
EZ Picture - User Mode
Adjust the picture appearance to suit your preference and
viewing situations.
This feature operate only if the EZ Picture set
UUsseerr 11
or
UUsseerr 22
.
EZ Picture
Color Temperature
XD
Advanced
Reset
Daylight
Normal
Night Time
User 1
G
User 2
Contrast 85
FF
G
EE
User1
Contrast 85
G
Brightness 50
Color 50
Sharpness 50
Tint 0
R G
1
2 3
4
5
Press the
MMEENNUU
button and then use
DD
or
EE
button
to select the
VVIIDDEEOO
menu.
Press the
GG
button and then use
DD
or
EE
button to
select
EEZZ PPiiccttuurree
.
Press the
GG
button and then use
DD
or
EE
button to
select
UUsseerr 11
or
UUsseerr 22
.
Press the
GG
button and then use
DD
or
EE
button to
select the desired picture option
((
CCoonnttrraasstt
,
BBrriigghhttnneessss
,
CCoolloorr
,
SShhaarrppnneessss
, or
TTiinntt
))
.
Press the
GG
button and then use
FF
or
GG
button to
make appropriate adjustments.
Press
EEXXIITT
button to return to TV viewing or press
MMEENNUU
button to return to the previous menu.
2
3
4
5
6
1
EZ Picture
Color Temperature
XD
Advanced
Reset
SCREEN
LOCK
OPTION
TIME
AUDIO
VIDEO
SETUP
SCREEN
LOCK
OPTION
TIME
AUDIO
VIDEO
SETUP
SCREEN
LOCK
OPTION
TIME
AUDIO
VIDEO
SETUP
SCREEN
LOCK
OPTION
TIME
AUDIO
VIDEO
SETUP
MFL34797070en-2 4/16/09 2:17 PM Page 47

PICTURE CONTROL
48
PICTURE CONTROL
You can also adjust the detailed settings (Red, Green, Blue)
by selecting the
CCoolloorr TTeemmppeerraattuurree--UUsseerr
menu.
Color Tone - User Mode
Press the
MMEENNUU
button and then use
DD
or
EE
button
to select the
VVIIDDEEOO
menu.
Press the
GG
button and then use
DD
or
EE
button to
select
CCoolloorr TTeemmppeerraattuurree
.
Press the
GG
button and then use
DD
or
EE
button to
select
UUsseerr
.
Press the
GG
button and then use
DD
or
EE
button to
select
RReedd
,
GGrreeeenn
, or
BBlluuee
.
Press the
GG
button and then use
FF
or
GG
button to
make appropriate adjustments.
■
The adjustment range of
RReedd
,
GGrreeeenn
, or
BB ll uuee
is
-40 ~ +40.
Press
EEXXIITT
button to return to TV viewing or press
MMEENNUU
button to return to the previous menu.
EZ Picture
Color Temperature
XD
Advanced
Reset
2
3
4
5
6
1
User
Red 0
G
Green 0
Blue 0
Cool
Normal
Warm
User
G
Red 0
FF
G
EE
2 3
1
4
5
EZ Picture
Color Temperature
XD
Advanced
Reset
SCREEN
LOCK
OPTION
TIME
AUDIO
VIDEO
SETUP
SCREEN
LOCK
OPTION
TIME
AUDIO
VIDEO
SETUP
SCREEN
LOCK
OPTION
TIME
AUDIO
VIDEO
SETUP
SCREEN
LOCK
OPTION
TIME
AUDIO
VIDEO
SETUP
MFL34797070en-2 4/16/09 2:17 PM Page 48

PICTURE CONTROL
49
XD - PICTURE IMPROVEMENT TECHNOLOGY
Press the
MMEENNUU
button and then use
DD
or
EE
button
to select the
VVIIDDEEOO
menu.
Press the
GG
button and then use
DD
or
EE
button to
select
XX DD
.
Press the
GG
button and then use
DD
or
EE
button to
select
AAuuttoo
or
MMaannuuaall
.
Press
EEXXIITT
button to return to TV viewing or press
MMEENNUU
button to return to the previous menu.
XD is LG Electronic’s unique picture improving technology
to display a real HD source through an advanced digital sig-
nal processing algorithm.
When selecting EZ Picture options (Daylight, Normal and
Night time), XD is automatically changed to Auto.
When selecting EZ Picture options (User 1 and User 2), you
can choose the Auto / Manual.
When selecting the Manual, you can adjust the XD
Contrast, XD color and XD Noise.
EZ Picture
Color Temperature
XD
G
Advanced
Reset
2
3
4
1
SSeelleeccttiinngg tthhee MMaannuuaall
1. Press the
GG
button and then use
DD
or
EE
button to
select
XXDD CCoonnttrraasstt
,
XXDD CCoolloorr
or
XXDD NNRR
((NNooiissee))
,
MMPPEEGG NNRR
.
■
XXDD CCoonnttrraasstt::
Optimizing the contrast auto-
matically according to the brightness of the
reflection.
■
XXDD CCoolloorr::
Adjusting the colors of the reflection
automatically to reproduce as closely as possible
to the natural colors.
■
XXDD NNRR ((NNooiissee))::
Removing the noise up to the
point where it does not damage the original pic-
ture.
■
MMPPEEGG NNRR::
To reduce the picture noise which may
appear on the screen during watching the TV.
2. Press the
FF
or
GG
button to select
OOnn
or
OOffff
.
2 3
1
Auto
Manual
XD Contrast
On
XD Color On
XD NR
Off
MPEG NR 0
EZ Picture
Color Temperature
XD
Advanced
Reset
SCREEN
LOCK
OPTION
TIME
AUDIO
VIDEO
SETUP
SCREEN
LOCK
OPTION
TIME
AUDIO
VIDEO
SETUP
MFL34797070en-2 4/16/09 2:17 PM Page 49

PICTURE CONTROL
50
PICTURE CONTROL
ADVANCED - CINEMA MODE
Press the
MMEENNUU
button and then use
DD
or
EE
button
to select the
VVIIDDEEOO
menu.
Press the
GG
button and then use
DD
or
EE
button to
select
AAddvvaanncceedd
.
Press the
GG
button and then use
DD
or
EE
button to
select
CCiinneemmaa
.
Press the
GG
button and then use
DD
or
EE
button to
select
OOnn
or
OOffff
.
Press
EEXXIITT
button to return to TV viewing or press
MMEENNUU
button to return to the previous menu.
Set up the TV for the best picture appearance for viewing
movies.
When you operate Cinema (3:2 Pull-Down Mode or Cinema
Correction Mode), the TV will adjust 24 fps video from
movies to 30 fps video for display.
This feature operates only in Analog, AV1, AV2, and
Component 480i mode.
2
3
4
5
1
2 3 4
1
EZ Picture
Color Temperature
XD
Advanced
G
Reset
Cinema
Off
Black level
Low
EZ Picture
Color Temperature
XD
Advanced
Reset
SCREEN
LOCK
OPTION
TIME
AUDIO
VIDEO
SETUP
SCREEN
LOCK
OPTION
TIME
AUDIO
VIDEO
SETUP
MFL34797070en-2 4/16/09 2:17 PM Page 50

PICTURE CONTROL
51
ADVANCED - BLACK (DARKNESS) LEVEL
Press the
MMEENNUU
button and then use
DD
or
EE
button
to select the
VVIIDDEEOO
menu.
Press the
GG
button and then use
DD
or
EE
button to
select
AAddvvaanncceedd
.
Press the
GG
button and then use
DD
or
EE
button to
select
BBllaacckk lleevveell
.
Press the
GG
button and then use
DD
or
EE
button to
select
LLooww
or
HHiigghh
.
■
LLooww
The screen gets darker.
■
HHiigghh
The screen gets brighter.
Press
EEXXIITT
button to return to TV viewing or press
MMEENNUU
button to return to the previous menu.
Adjusting the contrast and the brightness of the screen
using the black level of the screen.
This feature operates only in AV1, AV2, HDMI1/DVI, or
HDMI2mode.
EZ Picture
Color Temperature
XD
Advanced
G
Reset
Cinema
Off
Black level
Low
2
3
4
5
1
3 42
1
EZ Picture
Color Temperature
XD
Advanced
Reset
SCREEN
LOCK
OPTION
TIME
AUDIO
VIDEO
SETUP
SCREEN
LOCK
OPTION
TIME
AUDIO
VIDEO
SETUP
MFL34797070en-2 4/16/09 2:17 PM Page 51

PICTURE CONTROL
52
PICTURE CONTROL
PICTURE RESET
Press the
MMEENNUU
button and then use
DD
or
EE
button
to select the
VVIIDDEEOO
menu.
Press the
GG
button and then use
DD
or
EE
button to
select
RReesseett
.
Press the
GG
button to reset the Video menu options to
original values.
Use to quickly reset all the Video menu options to their
original factory preset values.
EZ Picture
Color Temperature
XD
Advanced
Reset
G
To set
2
3
1
2 3
1
EZ Picture
Color Temperature
XD
Advanced
Reset
SCREEN
LOCK
OPTION
TIME
AUDIO
VIDEO
SETUP
SCREEN
LOCK
OPTION
TIME
AUDIO
VIDEO
SETUP
LOW-POWER PICTURE MODE
(Only Plasma TV model)
Low power reduces the plasma display power consumption.
Press the
MMEENNUU
button and then use
DD
or
EE
button
to select the
OOPPTTIIOONN
menu.
Press the
GG
button and then use
DD
or
EE
button to
select
LLooww PPoowweerr
.
Press the
GG
button and then use
DD
or
EE
button to
select
OOnn
or
OOffff
.
■
When you select On, the screen darkens.
Press
EEXXIITT
button to return to TV viewing or press
MMEENNUU
button to return to the previous menu.
2
3
4
1
Aspect Ratio
Caption/Text
Caption Options
Language
ISM Method
Low Power
G
Set ID
Off
On
1
32
Aspect Ratio
Caption/Text
Caption Options
Language
ISM Method
Low Power
Set ID
SCREEN
LOCK
OPTION
TIME
AUDIO
VIDEO
SETUP
SCREEN
LOCK
OPTION
TIME
AUDIO
VIDEO
SETUP
MFL34797070en-2 4/16/09 2:17 PM Page 52

PICTURE CONTROL
53
IMAGE STICKING MINIMIZATION(ISM) METHOD
Press the
MMEENNUU
button and then use
DD
or
EE
button
to select the
OOPPTTIIOONN
menu.
Press the
GG
button and then use
DD
or
EE
button to
select
IISSMM MMeetthhoodd
.
Press the
GG
button and then use
DD
or
EE
button to
select either
NNoorrmmaall
,
WWhhiittee WWaasshh
,
OOrrbbiitteerr
or
IInnvveerrssiioonn
.
■
NNoorrmmaall
If image sticking is never a problem, ISM is not necessary
set to Normal.
■
WWhhiittee wwaasshh
White Wash removes permanent images from the
screen.
■
OOrrbbiitteerr
Orbiter may help prevent ghost images. However, it
is best not to allow any fixed image to remain on the
screen. To avoid a permanent image on the screen,
the image will move once per 2 minutes : Left
Right Upside Downside Right Left
Downside Upside.
■
IInnvveerrssiioonn
Inversion will automatically invert the plasma display
panel color every 30 minutes.
Press
EEXXIITT
button to return to TV viewing or press
MMEENNUU
button to return to the previous menu.
A frozen still picture from a PC/video game displayed on
the screen for prolonged periods will result in a ghost
image. Use our unique method to minimize any fixed image
on the screen.
NOTE
An excessive permanent image may be impossible
to clear entirely with White Wash. To return to
normal viewing, press any button.
2
3
4
1
Aspect Ratio
Caption/Text
Caption Options
Language
ISM Method
G
Low Power
Set ID
Normal
White Wash
Orbiter
Inversion
1
32
Aspect Ratio
Caption/Text
Caption Options
Language
ISM Method
Low Power
Set ID
SCREEN
LOCK
OPTION
TIME
AUDIO
VIDEO
SETUP
SCREEN
LOCK
OPTION
TIME
AUDIO
VIDEO
SETUP
MFL34797070en-2 4/16/09 2:17 PM Page 53

SOUND & LANGUAGE CONTROL
54
SOUND & LANGUAGE CONTROL
AUTO VOLUME LEVELER (EZ SOUNDRITE)
Press the
MMEENNUU
button and then use
DD
or
EE
button
to select the
AAUUDDIIOO
menu.
Press the
GG
button and then use
DD
or
EE
button to
select
EEZZ SSoouunnddRRiittee
.
Press the
GG
button and then use
DD
or
EE
button to
select
OOnn
or
OOffff
.
Press
EEXXIITT
button to return to TV viewing or press
MMEENNUU
button to return to the previous menu.
Scans for changes in sound levels during commercials, then
adjusts the sound to match the specified audio level.
SoundRite makes sure that the volume level remains consis-
tent whether you are watching a commercial or a regular TV
program.
2
3
4
1
Audio Language
EZ SoundRite
G
EZ Sound
Balance 0
TV Speakers
Off
On
2 3
1
Audio Language
EZ SoundRite
EZ Sound
Balance 0
TV Speakers
SCREEN
LOCK
OPTION
TIME
AUDIO
VIDEO
SETUP
SCREEN
LOCK
OPTION
TIME
AUDIO
VIDEO
SETUP
MFL34797070en-2 4/16/09 2:17 PM Page 54

SOUND & LANGUAGE CONTROL
55
PRESET SOUND SETTINGS (EZ SOUND)
EZ Sound lets you enjoy the best sound without any special
adjustment because the TV sets the appropriate sound options
based on the program content.
Normal, Stadium, News, Music and Theater are preset for good
sound quality at the factory and are not adjustable.
Press the
EEZZ SSOOUUNNDD
button repeatedly to select the
appropriate sound setup as below:
NNoorrmmaall
,
SSttaaddiiuumm
,
NNeewwss
,
MMuussiicc
,
TThheeaatteerr
, and
UUsseerr
(your own settings).
Press
EEXXIITT
button to return to TV viewing.
■
You can also adjust
EEZZ SSoouunndd
in the
AAUUDDIIOO
menu.
2
1
Audio Language
EZ SoundRite
EZ Sound
G
Balance 0
TV Speakers
Normal
Stadium
News
Music
Theater
User
Audio Language
EZ SoundRite
EZ Sound
Balance 0
TV Speakers
SCREEN
LOCK
OPTION
TIME
AUDIO
VIDEO
SETUP
SCREEN
LOCK
OPTION
TIME
AUDIO
VIDEO
SETUP
MFL34797070en-2 4/16/09 2:17 PM Page 55

SOUND & LANGUAGE CONTROL
56
SOUND &LANGUAGE CONTROL
SOUND SETTING ADJUSTMENT - USER MODE
Adjust the sound to suit your taste and room situations.
Front Surround Off
33DD EEcchhooSSoouunndd SSyysstteemm
Creates a stunning simulated stereo effect from any mono
sound and a realistic three-dimensional sound with a very
wide and deep sound stage.
Press the
MMEENNUU
button and then use
DD
or
EE
button
to select the
AAUUDDIIOO
menu.
Press the
GG
button and then use
DD
or
EE
button to
select
EEZZ SSoouunndd
.
Press the
GG
button and then use
DD
or
EE
button to
select
UUsseerr
.
Press the
GG
button and then use
DD
or
EE
button to
select the desired sound option (
TTrreebbllee
,
BBaassss
,or
FFrroonntt SSuurrrroouunndd
).
Press the
GG
button and then use
FF
or
GG
button to
make appropriate adjustments.
SSeelleeccttiinngg tthhee FFrroonntt ssuurrrroouunndd
Press the
GG
button and then use
FF
or
GG
button to
select
OOffff
or
33DD EEcchhooSSoouunndd SSyysstteemm
.
Press
EEXXIITT
button to return to TV viewing or press
MMEENNUU
button to return to the previous menu.
Audio Language
EZ SoundRite
EZ Sound
Balance 0
TV Speakers
Normal
Stadium
News
Music
Theater
User
G
User
Treble 50
G
Bass 50
Front Surround Off
2
3
4
5
6
1
2
1
3
4
5
Audio Language
EZ SoundRite
EZ Sound
Balance 0
TV Speakers
SCREEN
LOCK
OPTION
TIME
AUDIO
VIDEO
SETUP
SCREEN
LOCK
OPTION
TIME
AUDIO
VIDEO
SETUP
SCREEN
LOCK
OPTION
TIME
AUDIO
VIDEO
SETUP
SCREEN
LOCK
OPTION
TIME
AUDIO
VIDEO
SETUP
MFL34797070en-2 4/16/09 2:17 PM Page 56

SOUND & LANGUAGE CONTROL
57
BALANCE ADJUSTMENT
Press the
MMEENNUU
button and then use
DD
or
EE
button
to select the
AAUUDDIIOO
menu.
Press the
GG
button and then use
DD
or
EE
button to
select
BBaallaannccee
.
Press the
GG
button and then use
FF
or
GG
button to
make appropriate adjustments.
Press
EEXXIITT
button to return to TV viewing or press
MMEENNUU
button to return to the previous menu.
Adjust the left/right sound of speaker to suit your taste and
room situations.
2
3
4
1
1
2
3
Audio Language
EZ SoundRite
EZ Sound
Balance 0
G
TV Speakers
L R
Audio Language
EZ SoundRite
EZ Sound
Balance 0
TV Speakers
FF
G
L R
Audio Language
EZ SoundRite
EZ Sound
Balance 0
TV Speakers
SCREEN
LOCK
OPTION
TIME
AUDIO
VIDEO
SETUP
SCREEN
LOCK
OPTION
TIME
AUDIO
VIDEO
SETUP
SCREEN
LOCK
OPTION
TIME
AUDIO
VIDEO
SETUP
MFL34797070en-2 4/16/09 2:17 PM Page 57

SOUND & LANGUAGE CONTROL
58
SOUND &LANGUAGE CONTROL
TV SPEAKERS ON/OFF SETUP
Press the
MMEENNUU
button and then use
DD
or
EE
button
to select the
AAUUDDIIOO
menu.
Press the
GG
button and then use
DD
or
EE
button to
select
TTVV SSppeeaakkeerrss
.
Press the
GG
button and then use
DD
or
EE
button to
select
OOnn
or
OOffff
.
Press
EEXXIITT
button to return to TV viewing or press
MMEENNUU
button to return to the previous menu.
Turn the TV speakers off if using external audio equipment.
Feature turns the TV Speakers option On or Off.
Audio Language
EZ SoundRite
EZ Sound
Balance
TV Speakers
G
Off
On
2
3
4
1
2 3
1
Audio Language
EZ SoundRite
EZ Sound
Balance 0
TV Speakers
SCREEN
LOCK
OPTION
TIME
AUDIO
VIDEO
SETUP
SCREEN
LOCK
OPTION
TIME
AUDIO
VIDEO
SETUP
MFL34797070en-2 4/16/09 2:17 PM Page 58

SOUND & LANGUAGE CONTROL
59
STEREO/SAP BROADCAST SETUP
This TV can receive MTS stereo programs and any SAP
(
Secondary Audio Program
)
that accompanies the stereo pro-
gram if the station transmits an additional sound signal as well
as the original one and when you select Stereo or SAP on the
remote control.
Mono sound is automatically received if the broadcast is only in
Mono; even though Stereo or SAP has been selected.
Select Mono if you want to listen to the mono sound in remote
areas during stereo/SAP broadcasting.
Stereo or SAP can be received in Analog channel.
Use the
SSAAPP
button to select your desired MTS mode in
analog signal. Each time you press the
SSAAPP
button,
MMoonnoo
,
SStteerreeoo
, or
SSAAPP
appear in turn.
■
If other languages available on the digital signal, select
them with the
SSAAPP
button.
Press
EEXXIITT
button to save and return to TV viewing.
2
1
MFL34797070en-2 4/16/09 2:17 PM Page 59

SOUND & LANGUAGE CONTROL
60
SOUND &LANGUAGE CONTROL
AUDIO LANGUAGE
Other languages may be available if a digital signal is provided
by the broadcasting station.
This feature operates only in DTV/CADTV mode.
Press the
MMEENNUU
button and then use
DD
or
EE
button
to select the
AAUUDDIIOO
menu.
Press the
GG
button and then use
DD
or
EE
button to
select
AAuuddiioo LLaanngguuaaggee
.
Press the
GG
button and then use
DD
or
EE
button to
select:
EEnngglliisshh
,
SSppaanniisshh
, or
FFrreenncchh
.
Press
EEXXIITT
button to return to TV viewing or press
MMEENNUU
button to return to the previous menu.
Audio Language
G
EZ Sound
Balance
TV Speakers
English
Spanish
French
2
3
4
1
2 3
1
Audio Language
EZ SoundRite
EZ Sound
Balance 0
TV Speakers
SCREEN
LOCK
OPTION
TIME
AUDIO
VIDEO
SETUP
SCREEN
LOCK
OPTION
TIME
AUDIO
VIDEO
SETUP
MFL34797070en-2 4/16/09 2:17 PM Page 60

SOUND & LANGUAGE CONTROL
61
ON-SCREEN MENUS LANGUAGE SELECTION
Aspect Ratio
Caption/Text
Caption Options
Language
G
ISM Method
Low Power
Set ID
The menus can be shown on the screen in the selected lan-
guage. First select your language.
English
Spanish
French
Press the
MMEENNUU
button and then use
DD
or
EE
button
to select the
OOPPTTIIOONN
menu.
Press the
GG
button and then use
DD
or
EE
button to
select
LLaanngguuaaggee..
Press the
GG
button and then use
DD
or
EE
button to
select your desired language.
From this point on, the on-screen menus will be shown
in the selected language.
Press the
EEXXIITT
button to return to TV viewing or
press
MMEENNUU
to return to the previous menu.
1
2
3
4
1
32
Aspect Ratio
Caption/Text
Caption Options
Language
ISM Method
Low Power
Set ID
SCREEN
LOCK
OPTION
TIME
AUDIO
VIDEO
SETUP
SCREEN
LOCK
OPTION
TIME
AUDIO
VIDEO
SETUP
MFL34797070en-2 4/16/09 2:17 PM Page 61

SOUND & LANGUAGE CONTROL
62
SOUND &LANGUAGE CONTROL
CAPTION / TEXT
Use the
CCCC
button repeatedly to select Caption
OOffff
,
CCCC11
,
CCCC22
,
CCCC33
,
CCCC44
,
TTeexxtt11
,
TTeexxtt22
,
TTeexxtt33
or
TTeexxtt44
.
■
CCAAPPTTIIOONN
The term for the words that scroll across the bottom of the TV screen; usual-
ly the audio portion of the program provided for the hearing impaired.
■
TTEEXXTT
The term for the words that appear in a large black frame and almost cover
the entire screen; usually messages provided by the broadcaster.
Press
EEXXIITT
to save and return to TV viewing.
2
1
Analog Broadcasting System Captions
Select a caption mode for displaying captioning information if provided on a
program. Analog caption displays information at any position on the screen and
is usually the program's dialog.
Text displays information, usually at the bottom position and is used for a data
service, generally not program related.
Caption/Text, if provided by the broadcaster, would be available for both digital
and analog channels on the Antenna/Cable.
This TV is programmed to memorize the caption/text mode which was last set
when you turn the power off.
When you select the CC1 ~ Text4, Caption options must be disabled.
■
You can also use the
OOPPTTIIOONN
menu to select
CCaappttiioonn
/
TTeexxtt
.
Aspect Ratio
Caption/Text
G
Caption Options
Language
ISM Method
Low Power
Set ID
Off
CC1
CC2
CC3
CC4
Text1
Text2
Text3
Text4
Aspect Ratio
Caption/Text
Caption Options
Language
ISM Method
Low Power
Set ID
SCREEN
LOCK
OPTION
TIME
AUDIO
VIDEO
SETUP
SCREEN
LOCK
OPTION
TIME
AUDIO
VIDEO
SETUP
MFL34797070en-2 4/16/09 2:17 PM Page 62

SOUND & LANGUAGE CONTROL
63
Press the
MMEENNUU
button and then use
DD
or
EE
button
to select the
OOPPTTIIOONN
menu.
Press the
GG
button and then use
DD
or
EE
button to
select
CCaappttiioonn
/
TTeexxtt
.
Press the
GG
button and then use
DD
or
EE
button to
select available caption languages:
EEnngglliisshh
,
SSppaanniisshh
,
or
FFrreenncchh
.
Press
EEXXIITT
button to return to TV viewing or press
MMEENNUU
button to return to the previous menu.
Choose the language you want the DTV/CADTV Captions
to appear in.
Other Languages can be chosen for digital sources only if
they are included on the program.
Aspect Ratio
Caption/Text
G
Caption Options
Language
ISM Method
Low Power
Set ID
Off
English
Spanish
French
2
3
4
1
1
32
Digital Broadcasting System Captions
Aspect Ratio
Caption/Text
Caption Options
Language
ISM Method
Low Power
Set ID
SCREEN
LOCK
OPTION
TIME
AUDIO
VIDEO
SETUP
SCREEN
LOCK
OPTION
TIME
AUDIO
VIDEO
SETUP
MFL34797070en-2 4/16/09 2:17 PM Page 63

SOUND & LANGUAGE CONTROL
64
SOUND &LANGUAGE CONTROL
CAPTION OPTIONS
Aspect Ratio
Caption/Text
Caption Options
G
Language
ISM Method
Low Power
Set ID
Set by Program
Custom
1
3
4
2
Customize the DTV/CADTV captions that appear on your
screen.
Press the
MMEENNUU
button and then use
DD
or
EE
button
to select the
OOPPTTIIOONN
menu.
Press the
GG
button and then use
DD
or
EE
button to
select
CCaappttiioonn OOppttiioonnss
.
Press the
GG
button and then use
DD
or
EE
button to
select
CCuussttoomm
.
Press the
GG
button and then use
DD
or
EE
button to
customize the
SSttyyllee
,
FFoonntt
, etc., to your preference.
A preview icon is provided at the bottom of the
screen, use it to see the caption language.
Press
EEXXIITT
button to return to TV viewing or press
MMEENNUU
button to return to the previous menu.
2
3
4
5
1
GG
SSiizzee
: Set the word size.
GG
FFoonntt
: Select a typeface for the text.
GG
TTeexxtt CCoolloorr
: Choose a color for the text.
GG
TTeexxtt OOppaacciittyy
: Specify the opacity for the text color.
GG
BBgg
((
BBaacckkggrroouunndd
))
CCoolloorr
: Select a background color.
GG
BBgg
((
BBaacckkggrroouunndd
))
OOppaacciittyy
: Select the opacity for the
background color.
GG
EEddggee TTyyppee
: Select an edge type.
GG
EEddggee CCoolloorr
: Select a color for the edges.
Aspect Ratio
Caption/Text
Caption Options
Language
ISM Method
Low Power
Set ID
SCREEN
LOCK
OPTION
TIME
AUDIO
VIDEO
SETUP
SCREEN
LOCK
OPTION
TIME
AUDIO
VIDEO
SETUP
SCREEN
LOCK
OPTION
TIME
AUDIO
VIDEO
SETUP
Size
FF
A Standard G
Font Font 0
Text Color White
Text Opacity Solid
Bg Color Black
Bg Opacity Solid
Edge Type None
Edge Color Black
MFL34797070en-2 4/16/09 2:17 PM Page 64

TIME SETTING
65
CLOCK SETTING
TIME SETTING
Auto Clock Setup
The time is set automatically from a digital channel signal.
The digital channel signal includes information for the
current time provided by the broadcasting station.
Set the clock manually if the current time is set incorrectly
by the auto clock function.
The factory default value of the Auto Clock is Off, because
a clock information sent each broadcasting station is different.
Press the
MMEENNUU
button and then use
DD
or
EE
button
to select the
TTIIMMEE
menu.
Press the
GG
button and then use
DD
or
EE
button to
select
AAuuttoo CClloocckk
.
Press the
GG
button and then use
DD
or
EE
button to
select
OOnn
.
Press the
GG
button and then use
DD
or
EE
button to
select your viewing area time zone
EEaasstteerrnn
,
CCeennttrraall
,
MMoouunnttaaiinn
,
PPaacciiffiicc
,
AAllaasskkaa
or
HHaawwaaiiii
.
Press the
GG
button and then use
DD
or
EE
button to
select
AAuuttoo
,
OOffff
,
OOnn
, depending on whether or not
your viewing area observes Daylight Saving time.
Press
EEXXIITT
button to return to TV viewing or press
MMEENNUU
button to return to the previous menu.
Auto Clock
G
Manual Clock
Off Timer
On Timer
Auto Off
Off
On
Time Zone
Eastern
Daylight Savings
Auto
2
3
4
5
6
1
1
32 54
Auto Clock
Manual Clock
Off Timer
On Timer
Auto Off
SCREEN
LOCK
OPTION
TIME
AUDIO
VIDEO
SETUP
SCREEN
LOCK
OPTION
TIME
AUDIO
VIDEO
SETUP
MFL34797070en-2 4/16/09 2:18 PM Page 65

TIME SETTING
66
TIME SETTING
Manual Clock Setup
Press the
MMEENNUU
button and then use
DD
or
EE
button
to select the
TTIIMMEE
menu.
Press the
GG
button and then use
DD
or
EE
button to
select
MMaannuuaall CClloocckk
.
Press the
GG
button and then use
FF
or
GG
to select
either the year, date, or time option. Once selected, use
the
DD
or
EE
button to set the year, date, and time
option.
Press
EEXXIITT
button to return to TV viewing or press
MMEENNUU
button to return to the previous menu.
If the current time setting is wrong, reset the clock manually.
Auto Clock
Manual Clock
G
Off Timer
On Timer
Auto Off
Year
- - - -
Date
- - / - -
Time
- - : - - - -
2
3
4
1
1
32
Auto Clock
Manual Clock
Off Timer
On Timer
Auto Off
SCREEN
LOCK
OPTION
TIME
AUDIO
VIDEO
SETUP
SCREEN
LOCK
OPTION
TIME
AUDIO
VIDEO
SETUP
MFL34797070en-2 4/16/09 2:18 PM Page 66

TIME SETTING
67
AUTO ON/OFF TIMER SETTING
Press the
MMEENNUU
button and then use
DD
or
EE
button
to select the
TTIIMMEE
menu.
Press the
GG
button and then use
DD
or
EE
button to
select
OOffff TTiimmeerr
or
OOnn TTiimmeerr
.
Press the
GG
button and then use
DD
or
EE
button to
select
OOnn
.
■
To cancel the
OOnn//OOffff ttiimmeerr
function, select
OOffff
.
Press the
GG
button and then use
DD
or
EE
button to set
the hour.
Press the
GG
button and then use
DD
or
EE
button to set
the minutes.
Press
EEXXIITT
button to return to TV viewing or press
MMEENNUU
button to return to the previous menu.
Auto Clock
Manual Clock
Off Timer
On Timer
G
Auto Off
2
3
4
5
6
1
The timer function operates only if the current time has
been set.
The Off-Timer function overrides the On-Timer function if
they are both set to the same time.
The TV must be in standby mode for the On-Timer to work.
If you do not press any button within 2 hours after the TV
turns on with the On Timer function, the TV will automatically
revert to standby mode.
1
32 54
Off
On
6 : 30 AM
Auto Clock
Manual Clock
Off Timer
On Timer
Auto Off
SCREEN
LOCK
OPTION
TIME
AUDIO
VIDEO
SETUP
SCREEN
LOCK
OPTION
TIME
AUDIO
VIDEO
SETUP
MFL34797070en-2 4/16/09 2:18 PM Page 67

TIME SETTING
68
TIME SETTING
AUTO SHUT-OFF SETTING
If set to on and there is no input signal, the TV turns off
automatically after 10 minutes.
Press the
MMEENNUU
button and then use
DD
or
EE
button
to select the
TTIIMMEE
menu.
Press the
GG
button and then use
DD
or
EE
button to
select
AAuuttoo OOffff
.
Press the
GG
button and then use
DD
or
EE
button to
select
OOnn
or
OOffff
.
Press
EEXXIITT
button to return to TV viewing or press
MMEENNUU
button to return to the previous menu.
Auto Clock
Manual Clock
Off Timer
On Timer
Auto Off
G
Off
On
If set to On and there is
no input signal, the TV
turns automatically
after 10 minutes.
2
3
4
1
1
32
Auto Clock
Manual Clock
Off Timer
On Timer
Auto Off
SCREEN
LOCK
OPTION
TIME
AUDIO
VIDEO
SETUP
SCREEN
LOCK
OPTION
TIME
AUDIO
VIDEO
SETUP
MFL34797070en-2 4/16/09 2:18 PM Page 68

TIME SETTING
69
SLEEP TIMER SETTING
Press the
TTIIMMEERR
button repeatedly to select the number of
minutes. First the
OOffff
option appears on the screen, followed
by the following sleep timer options: 10, 20, 30, 60, 90,
120, 180, and 240 minutes.
When the number of minutes you want is displayed on the
screen, press the
EENNTTEERR
button. The timer begins to count
down from the number of minutes selected.
To check the remaining minutes before the TV turns off, press
the
TTIIMMEERR
button once.
To cancel the Sleep Timer, press the
TTIIMMEERR
button repeatedly
to select
OOffff
.
The Sleep Timer turns the TV off at the preset time.
Note that this setting is cleared when the TV is turned off.
2
3
4
1
MFL34797070en-2 4/16/09 2:18 PM Page 69

SCREEN ADJUSTMENT
70
SCREEN ADJUSTMENT
AUTO CONFIGURE (RGB [PC] MODE ONLY)
Press the
MMEENNUU
button and then use
DD
or
EE
button
to select the
SSCCRREEEENN
menu.
Press the
GG
button and then use
DD
or
EE
button to
select
AAuuttoo ccoonnffiigg..
.
Press the
GG
button to start
AAuuttoo ccoonnffiigg..
.
■
When
AAuuttoo ccoonnffiigg..
has finished,
OOKK
will be
shown on screen.
■
If the position of the image is still not correct, try
Auto adjustment again.
If the picture needs to be adjusted more after Auto
adjustment in RGB (PC), you can adjust the
MMaannuuaall
ccoonnffiigg..
.
Press the
EEXXIITT
button to return to TV viewing or
press the
MMEENNUU
button to return to the previous
menu.
Automatically adjusts picture position and minimizes image
shaking.
Although the image is still not correct, your set is functioning
properly but needs further adjustment.
1
2
3
4
5
1
2 3
Auto config.
G
Manual config.
XGA Mode
Reset
To set
Auto config.
Manual config.
XGA Mode
Reset
SCREEN
LOCK
OPTION
TIME
AUDIO
VIDEO
SETUP
SCREEN
LOCK
OPTION
TIME
AUDIO
VIDEO
SETUP
MFL34797070en-2 4/16/09 2:18 PM Page 70

SCREEN ADJUSTMENT
71
MANUAL CONFIGURE
If the picture isn’t clear after auto adjustment and especial-
ly if characters are still trembling, adjust the picture phase
manually.
This function works in the following mode: RGB-PC, RGB-DTV,
Component 480p/720p/1080i, HDMI 480p/720p/1080i.
The Phase, Clock functions work in the following mode:
RGB-PC mode.
Press the
MMEENNUU
button and then use
DD
or
EE
button
to select the
SSCCRREEEENN
menu.
Press the
GG
button and then use
DD
or
EE
button to
select
MMaannuuaall ccoonnffiigg..
.
Press the
GG
button and then use
DD
or
EE
button to
select
PPhhaassee
,
CClloocckk
,
HH--ppoossiittiioonn
or
VV--ppoossiittiioonn
.
■
PPhhaassee
This function allows you to remove any horizontal
noise and clear or sharpen the image of characters.
■
CClloocckk
This function is to minimize any vertical bars or
stripes visible on the screen background. And the
horizontal screen size will also change.
■
HH--ppoossiittiioonn
/
VV--ppoossiittiioonn
This function is to adjust picture to left/right and
up/down as you prefer.
Press the
FF
or
GG
button to make appropriate adjustments.
Press the
EEXXIITT
button to return to TV viewing or
press the
MMEENNUU
button to return to the previous
menu.
1
2
3
4
5
2 3 4
1
Auto config.
Manual config.
G
XGA Mode
Reset
Phase 0
Clock 0
H-Position 0
V-Position 0
Auto config.
Manual config.
XGA Mode
Reset
SCREEN
LOCK
OPTION
TIME
AUDIO
VIDEO
SETUP
SCREEN
LOCK
OPTION
TIME
AUDIO
VIDEO
SETUP
MFL34797070en-2 4/16/09 2:18 PM Page 71

SCREEN ADJUSTMENT
72
SCREEN ADJUSTMENT
SELECTING XGA MODE
To see a normal picture, match the resolution of RGB mode and
selection of XGA mode.
This function works in the following mode: RGB-PC mode.
If you select the 1600x1200, 1920x1200 resolution,
uuXXGGAA
mmooddee
is displayed.
Press the
MMEENNUU
button and then use
DD
or
EE
button
to select the
SSCCRREEEENN
menu.
Press the
GG
button and then use
DD
or
EE
button to
select
XXGGAA mmooddee
.
Press the
GG
button and then use
DD
or
EE
button to
select the desired XGA resolution.
Press
EEXXIITT
button to return to TV viewing or press
MMEENNUU
button to return to the previous menu.
2
3
4
1
1
2 3
Auto config.
Manual config.
XGA Mode
G
Reset
1024 x 768
1280 x 768
1360 x 768
1366 x 768
Auto config.
Manual config.
XGA Mode
Reset
SCREEN
LOCK
OPTION
TIME
AUDIO
VIDEO
SETUP
SCREEN
LOCK
OPTION
TIME
AUDIO
VIDEO
SETUP
MFL34797070en-2 4/16/09 2:18 PM Page 72

SCREEN ADJUSTMENT
73
INITIALIZING
(RESET TO ORIGINAL FACTORY SETTINGS)
This function operates in current mode.
To initialize the adjusted value.
Press the
MMEENNUU
button and then use
DD
or
EE
button
to select the
SSCCRREEEENN
menu.
Press the
GG
button and then use
DD
or
EE
button to
select
RReesseett
.
Press the
GG
button.
1
2
3
1
2 3
Auto config.
Manual config.
XGA Mode
Reset
G
To set
Auto config.
Manual config.
XGA Mode
Reset
SCREEN
LOCK
OPTION
TIME
AUDIO
VIDEO
SETUP
SCREEN
LOCK
OPTION
TIME
AUDIO
VIDEO
SETUP
MFL34797070en-2 4/16/09 2:18 PM Page 73

PARENTAL CONTROL / RATING
74
PARENTAL CONTROL / RATINGS
Parental Control can be used to block specific channels, ratings and other viewing sources.
The Parental Control Function (V-Chip) is used to block program viewing based on the ratings
sent by the broadcasting station. The default setting is to allow all programs to be viewed.
Viewing can be blocked by choosing the type of the program and the categories. It is also possi-
ble to block all program viewing for a time period. To use this function, the following must be
done:
1. Set ratings and categories to be blocked.
2. Specify a password
3. Enable the lock
V-Chip rating and categories
Rating guidelines are provided by broadcasting stations. Most television programs and television
movies can be blocked by TV Rating and/or Individual Categories. Movies that have been shown
at the theaters or direct-to-video movies use the Movie Rating System
(
MPAA
)
only.
Ratings for Television programs including made-for-TV movies:
■
TV-G
(
General audience
)
■
TV-PG
(
Parental guidance suggested
)
■
TV-14
(
Parents strongly cautioned
)
■
TV-MA
(
Mature audience only
)
■
TV-Y
(
All children
)
■
TV-Y7
(
Children 7 years older
)
SET PASSWORD & LOCK SYSTEM
Set up blocking schemes to block specific channels, ratings, and
external viewing sources.
A password is required to gain access to this menu.
Press the
MMEENNUU
button and then use the
DD
or
EE
button
to select the
LLOOCCKK
menu. Then, press the
GG
button.
■
Enter the password as requested.
■
The TV is set up with the initial
password “0-0-0-0”.
Enter Password
1
Setting up your password
MFL34797070en-2 4/16/09 2:18 PM Page 74

PARENTAL CONTROL / RATING
75
After inputting the password, use the
DD
or
EE
button
to choose
SSeett ppaasssswwoorrdd
.
Press the
GG
button and then choose any 4 digits for
your new password.
As soon as the 4 digits are entered, re-enter the same
4 digits on the
CCoonnffiirrmm
.
Then your changed password has been memorized.
Press
EEXXIITT
to return to TV viewing or press
MMEENNUU
to return to the previous menu.
Change the password by inputting a new password twice.
Lock System
Set Password
G
Block Channel
Movie Rating
TV Rating-Children
TV Rating-General
Aux. Block
Downloadable Rating
New
Confirm
2
3
1
****
****
1
2
NOTE
GG
If you ever forget your password, key in ‘7’, ‘7’, ‘7’, ‘7’
on the remote control.
After inputting the password, use the
DD
or
EE
button
to choose
LLoocckk SSyysstteemm
.
Press the
GG
button and then use the
DD
or
EE
button
to select
OOnn
or
OOffff
.
■
When you select
OOnn
, the Lock System is enable.
Press
EEXXIITT
button to return to TV viewing or press
MMEENNUU
button to return to the previous menu.
Enables or disables the blocking scheme you set up previously.
Lock System
G
Set Password
Block Channel
Movie Rating
TV Rating-Children
TV Rating-General
Aux. Block
Downloadable Rating
Off
On
2
3
1
1
2
Set Password
Lock System
Lock System
Set Password
Block Channel
Movie Rating
TV Rating-Children
TV Rating-General
Aux. Block
Downloadable Rating
SCREEN
LOCK
OPTION
TIME
AUDIO
VIDEO
SETUP
SCREEN
LOCK
OPTION
TIME
AUDIO
VIDEO
SETUP
SCREEN
LOCK
OPTION
TIME
AUDIO
VIDEO
SETUP
Lock System
Set Password
Block Channel
Movie Rating
TV Rating-Children
TV Rating-General
Aux. Block
Downloadable Rating
SCREEN
LOCK
OPTION
TIME
AUDIO
VIDEO
SETUP
MFL34797070en-2 4/16/09 2:18 PM Page 75

PARENTAL CONTROL / RATING
76
PARENTAL CONTROL /RATINGS
CHANNEL BLOCKING
Blocks any channels that you do not want to watch or that
you do not want your children to watch.
After inputting the password, use the
DD
or
EE
button
to choose
BBlloocckk CChhaannnneell
.
Press the
GG
button. You will now see a screen filled
with channel numbers and a preview picture.
Use
DD EE FF GG
button to select a channel and then
use the
EENNTTEERR
button to block or unblock it.
Press
EEXXIITT
button to return to TV viewing or press
MMEENNUU
button to return to the previous menu.
Lock System
Set Password
Block Channel
G
Movie Rating
TV Rating-Children
TV Rating-General
Aux. Block
Downloadable Rating
2
3
4
1
1
2
Enables you to select a source to block from the external
source devices you have hooked up.
After inputting the password, use the
DD
or
EE
button
to choose
AAuuxx.. BBlloocckk
.
Press the
GG
button and then use the
FF
or
GG
button
to select a source.
Press the
GG
button and then use the
DD
or
EE
button
to select
OOnn
or
OOffff
on the each source.
Press
EEXXIITT
button to return to TV viewing or press
MMEENNUU
button to return to the previous menu.
Lock System
Set Password
Block Channel
Movie Rating
TV Rating-Children
TV Rating-General
Aux. Block
G
Downloadable Rating
AV1 On
AV2 On
Component Off
RGB
Off
HDMI1/DVI On
HDMI2 Off
2
3
4
1
1
32
SCREEN
LOCK
OPTION
TIME
AUDIO
VIDEO
SETUP
SCREEN
LOCK
OPTION
TIME
AUDIO
VIDEO
SETUP
Off
On
Lock System
Set Password
Block Channel
Movie Rating
TV Rating-Children
TV Rating-General
Aux. Block
Downloadable Rating
SCREEN
LOCK
OPTION
TIME
AUDIO
VIDEO
SETUP
EXTERNAL INPUT BLOCKING
Lock System
Set Password
Block Channel
Movie Rating
TV Rating-Children
TV Rating-General
Aux. Block
Downloadable Rating
SCREEN
LOCK
OPTION
TIME
AUDIO
VIDEO
SETUP
1
MFL34797070en-2 4/16/09 2:18 PM Page 76

PARENTAL CONTROL / RATING
77
MOVIE & TV RATING
Movie Rating (MPAA)
Blocks movies according to the movie ratings limits specified, so children cannot view
certain movies. You can set the ratings limit by blocking out all the movies with the
ratings above a specified level. Keep in mind that the movie ratings limit only applies
to movies shown on TV, not TV programs, such as soap operas.
After inputting the password, use the
DD
or
EE
button
to choose
MMoovviiee RRaattiinngg
.
Press the
GG
button and then use the
DD
or
EE
button
to select
GG
,
PPGG
,
PPGG--1133
,
RR
,
NNCC--1177
or
XX
.
■
G (General audiences)
■
PG (Parental guidance suggested)
■
PG-13 (Parents strongly cautioned)
■
R (Restricted)
■
NC-17 (No one 17 and under admitted)
■
X (Adult only)
■
Blocking Off (Permits all programs)
Press
EEXXIITT
button to return to TV viewing or press
MMEENNUU
button to return to the previous menu.
GG
If you set PG-13: G and PG movies will be available,
PG-13, R, NC-17 and X will be blocked.
Lock System
Set Password
Block Channel
Movie Rating
G
TV Rating-Children
TV Rating-General
Aux. Block
Downloadable Rating
G
PG
PG-13
R
NC-17
X
Blocking Off
2
3
1
1
2
SCREEN
LOCK
OPTION
TIME
AUDIO
VIDEO
SETUP
Lock System
Set Password
Block Channel
Movie Rating
TV Rating-Children
TV Rating-General
Aux. Block
Downloadable Rating
SCREEN
LOCK
OPTION
TIME
AUDIO
VIDEO
SETUP
Downloadable Rating
After inputting the password, use the
DD
or
EE
button to
choose
DDoowwnnllooaaddaabbllee RRaattiinngg
.
Press the
GG
button and then use the
DD
or
EE
button
to select
DDiimm00
,
DDiimm11
,
DDiimm22
, or
DDiimm33
.
Press the
GG
button and then use the
DD
or
EE
button
to select
DD11LL11
,
DD11LL22
, or
DD11LL33
.
Press
EEXXIITT
button to return to TV viewing or press
MMEENNUU
button to return to the previous menu.
2
3
1
4
GG
This function may become available in the future and
will be available only for digital channel signal.
GG
This function operates only when TV has received
Region5 Rating data.
NOTE
Lock System
Set Password
Block Channel
Movie Rating
TV Rating-Children
TV Rating-General
Aux. Block
Downloadable Rating
G
2
1
SCREEN
LOCK
OPTION
TIME
AUDIO
VIDEO
SETUP
Downloadable Rating
Dim0
Dim1
Dim2
Dim3
GG
Based on rating table, your TV's OSD
(
On
Screen Display
)
may differ slightly from what
is shown in this manual.
Lock System
Set Password
Block Channel
Movie Rating
TV Rating-Children
TV Rating-General
Aux. Block
Downloadable Rating
SCREEN
LOCK
OPTION
TIME
AUDIO
VIDEO
SETUP
MFL34797070en-2 4/16/09 2:18 PM Page 77

PARENTAL CONTROL / RATING
78
PARENTAL CONTROL /RATINGS
TV Rating Children
After inputting the password, use the
DD
or
EE
button to
choose
TTVV RRaattiinngg--CChhiillddrreenn
.
Press the
GG
button and then use the
DD
or
EE
button to
select
AAggee
, or
FFaannttaassyy VViioolleennccee
.
Press the
GG
button and then use the
DD
or
EE
button to
select block options.
■
Age (applies to TV-Y, TV-Y7)
■
Fantasy Violence (applies to TV-Y7)
Press
EEXXIITT
button to return to TV viewing or press
MMEENNUU
button to return to the previous menu.
Prevents children from watching certain children's TV programs, according to
the ratings limit set. The children rating does not apply to other TV programs.
Unless you block certain TV programs intended for mature audiences in the TV
Rating - sub menu, your children can view those programs.
Lock System
Set Password
Block Channel
Movie Rating
TV Rating-Children
G
TV Rating-General
Aux. Block
Downloadable Rating
Age
Fantasy Violence
2
3
1
1
2
SCREEN
LOCK
OPTION
TIME
AUDIO
VIDEO
SETUP
Lock System
Set Password
Block Channel
Movie Rating
TV Rating-Children
TV Rating-General
Aux. Block
Downloadable Rating
SCREEN
LOCK
OPTION
TIME
AUDIO
VIDEO
SETUP
MFL34797070en-2 4/16/09 2:18 PM Page 78

PARENTAL CONTROL / RATING
79
TV Rating General
After inputting the password, use the
DD
or
EE
button to
choose
TTVV RRaattiinngg--GGeenneerraall
.
Press the
GG
button and then use the
DD
or
EE
button to
select
AAggee
,
DDiiaalloogguuee
,
LLaanngguuaaggee
,
SSeexx
or
VViioolleennccee
.
Press the
GG
button and then use the
DD
or
EE
button to
select block options.
■
Age (applies to TV-G,TV-PG,TV-14,TV-MA)
■
Dialogue-sexual dialogue (applies to TV-PG,TV-14)
■
Language-adult language (applies to TV-PG,TV-14,TV-MA)
■
Sex-sexual situations (applies to TV-PG,TV-14,TV-MA)
■
Violence (applies to TV-PG,TV-14,TV-MA)
Press
EEXXIITT
button to return to TV viewing or press
MMEENNUU
button to return to the previous menu.
Based on the ratings, blocks certain TV programs that you
and your family do not want to view.
Lock System
Set Password
Block Channel
Movie Rating
TV Rating-Children
TV Rating-General
G
Aux. Block
Downloadable Rating
Age
Dialogue
Language
Sex
Violence
2
3
1
1
2
SCREEN
LOCK
OPTION
TIME
AUDIO
VIDEO
SETUP
Lock System
Set Password
Block Channel
Movie Rating
TV Rating-Children
TV Rating-General
Aux. Block
Downloadable Rating
SCREEN
LOCK
OPTION
TIME
AUDIO
VIDEO
SETUP
MFL34797070en-2 4/16/09 2:18 PM Page 79

APPENDIX
80
TROUBLESHOOTING
APPENDIX
TThhee ooppeerraattiioonn ddooeess nnoott wwoorrkk nnoorrmmaallllyy..
TThhee vviiddeeoo ffuunnccttiioonn ddooeess nnoott wwoorrkk..
No picture &No sound
No or poor color
or poor picture
Poor reception on
some channels
Lines or streaks
in pictures
Horizontal/vertical bars
or picture shaking
Picture appears slowly
after switching on
The remote control
doesn’t work
Power is suddenly
turned off
■
Check to see if there is any object between the product and the remote control
causing obstruction. Ensure you are pointing the remote control directly at the TV.
■
Ensure that the batteries are installed with correct polarity (+ to +, - to -).
■
Ensure that the correct remote operating mode is set: TV, VCR etc.
■
Install new batteries.
■
Is the sleep timer set?
■
Check the power control settings. Power interrupted.
■
No broadcast on station tuned with Auto off activated.
■
Check whether the product is turned on.
■
Try another channel. The problem may be with the broadcast.
■
Is the power cord inserted into wall power outlet?
■
Check your antenna direction and/or location.
■
Test the wall power outlet, plug another product’s power cord into the outlet
where the product’s power cord was plugged in.
■
This is normal, the image is muted during the product startup process. Please
contact your service center, if the picture has not appeared after five minutes.
■
Adjust Color in menu option.
■
Keep a sufficient distance between the product and the VCR.
■
Try another channel. The problem may be with the broadcast.
■
Are the video cables installed properly?
■
Activate any function to restore the brightness of the picture.
■
Check for local interference such as an electrical appliance or power tool.
■
Station or cable product experiencing problems, tune to another station.
■
Station signal is weak, reorient antenna to receive weaker station.
■
Check for sources of possible interference.
■
Check antenna (Change the direction of the antenna).
MFL34797070en-2 4/16/09 2:18 PM Page 80

APPENDIX
81
■
Press the VOL or VOLUME button.
■
Sound muted? Press MUTE button.
■
Try another channel. The problem may be with the broadcast.
■
Are the audio cables installed properly?
■
Adjust Balance in menu option.
■
A change in ambient humidity or temperature may result in an unusual noise
when the product is turned on or off and does not indicate a fault with the
product.
Picture OK & No sound
Unusual sound from
inside
the product
No output from one
of the speakers
TThheerree iiss aa pprroobblleemm iinn PPCC mmooddee.. ((OOnnllyy PPCC mmooddee aapppplliieedd))
■
Adjust resolution, horizontal frequency, or vertical frequency.
■
Check the input source.
■
Work the Auto configure or adjust clock, phase, or H/V position. (Option)
■
Check the signal cable.
■
Reinstall the PC video card.
The signal is out of range
Screen color is unstable
or single color
Vertical bar or stripe on
background &
Horizontal Noise &
Incorrect position
TThhee aauuddiioo ffuunnccttiioonn ddooeess nnoott wwoorrkk..
MFL34797070en-2 4/16/09 2:18 PM Page 81

APPENDIX
82
APPENDIX
MAINTENANCE
Early malfunctions can be prevented. Careful and regular cleaning can extend the amount of time you can
enjoy your new TV.
Caution: Be sure to turn the power off and unplug the power cord before you begin any cleaning.
Cleaning the Screen
Here’s a great way to keep the dust off your screen for a while. Wet a soft cloth in a mixture of lukewarm
water and a little fabric softener or dish washing detergent. Wring the cloth until it’s almost dry, and then
use it to wipe the screen.
Make sure the excess water is off the screen, and then let it air-dry before you turn on your TV.
Cleaning the Cabinet
■
To remove dirt or dust, wipe the cabinet with a soft, dry, lint-free cloth.
■
Please be sure not to use a wet cloth.
Extended Absence
GG
If you expect to leave your TV dormant for a long time (such as a vacation), it’s a good idea to unplug
the power cord to protect against possible damage from lightning or power surges.
CAUTION
2
1
MFL34797070en-2 4/16/09 2:18 PM Page 82

APPENDIX
83
PRODUCT SPECIFICATIONS
■
The specifications shown above may be changed without prior notice for quality improvement.
Width x Height x Depth With Stand
(inches/mm)
Without Stand
Weight (pounds / kg) With Stand
Without Stand
Width x Height x Depth With Stand
(inches/mm)
Without Stand
Weight (pounds / kg) With Stand
Without Stand
Width x Height x Depth With Stand
(inches/mm)
Without Stand
Weight (pounds / kg) With Stand
Without Stand
Width x Height x Depth With Stand
(inches/mm)
Without Stand
Weight (pounds / kg) With Stand
Without Stand
Width x Height x Depth With Stand
(inches/mm)
Without Stand
Weight (pounds / kg) With Stand
Without Stand
Width x Height x Depth With Stand
(inches/mm)
Without Stand
Weight (pounds / kg) With Stand
Without Stand
32LC5DC/S/B
(32LC5DC/S/B-UA)
32LC50C/S/B
(32LC50C/S/B-UA)
37LC5DC/1/B
(37LC5DC/1/B-UA)
37LC50/B
(37LC50/B-UA)
AC100-240V ~ 50/60Hz
NTSC-M, ATSC, 64 & 256 QAM
VHF 2-13, UHF 14-69, CATV 1-135, DTV 2-69, CADTV 1-135
75 ohm
32 ~ 104°F (0 ~ 40°C)
Less than 80%
-4 ~ 140°F (-20 ~ 60°C)
Less than 85%
36.5 x 27.4 x 10.4 inches
926.8 x 695.8 x 264.6 mm
36.5 x24.8 x 4.2 inches
926.8 x 629.8 x 107.4 mm
47.2 pounds / 21.4 kg
36.8 pounds / 16.7 kg
31.8 x 23.9 x 9.8 inches
806.6 x 607.5 x 249.0 mm
31.8 x 21.7 x 3.8 inches
806.6 x 552.3 x 97.2 mm
33.7 pounds / 15.3kg
27.6 pounds / 12.5 kg
42LC5DC
(42LC5DC-UA)
42LC50C
(42LC50C-UA)
40.7 x 29.6 x 11.6 inches
1033.1 x 750.7 x 294.2 mm
40.7 x 27.0x 4.3 inches
1033.1 x 686.5 x 110.2 mm
61.3 pounds / 27.8 kg
47.2 pounds / 21.4 kg
Power requirement
Television System
Program Coverage
External Antenna Impedance
Operating Temperature Range
Operating Humidity Range
Storage Temperature Range
Storage Humidity Range
32LX5DC/S
(32LX5DC/S-UA)
32LX50C/S
(32LX50C/S-UA)
42PX8DC
(42PX8DC-UA)
36.3 x 24.2 x 11.3 inches
922.0 x 615.0x 288.0 mm
36.3 x 21.5 x 3.9 inches
922.0 x 546.0 x 98.0 mm
39.0 pounds / 17.7 kg
30.4 pounds / 13.8 kg
46.7 x 28.1 x 10.6 inches
1186.0 x 714.0 x 270.0 mm
46.7 x 25.7 x 3.9 inches
1186.0 x 654.0 x 99.0 mm
72.5 pounds / 32.9 kg
55.6 pounds / 25.2 kg
42LB5DC
(42LB5DC-UA)
42LB50C
(42LB50C-UA)
40.7 x 29.6 x 11.6 inches
1033.1 x 750.7 x 294.2 mm
40.7 x 27.0x 4.3 inches
1033.1 x 686.5 x 110.2 mm
61.3 pounds / 27.8 kg
47.2 pounds / 21.4 kg
Power
Cosumption (W)
150 W
18 0 W
230W
150 W
330W
240W
MFL34797070en-2 4/16/09 2:18 PM Page 83

APPENDIX
84
APPENDIX
PROGRAMMING THE REMOTE CONTROL
The provided universal remote control can be programmed to operate most remote-controllable devices.
Note that the remote may not control all models of other brands.
Programming a code into a remote mode
To find out whether your remote control can operate each device without programming, turn on the device
(such as a VCR) and press the corresponding mode button on the remote.
After that, press the
PPOOWWEERR
button. If the device is turned off and it responds properly the remote control
need not be programmed. If not, the remote should be programmed to operate the device. The program-
ming procedures are explained below.
Press the
MMEENNUU
and
MMUUTTEE
button continuously at the same time for two seconds; the currently selected
device button is illuminated.
If you don't press any button for 20 seconds, the light on the mode button will be turned off. In that case,
you have to repeat from step 2.
Enter the appropriate code from the code table on the following pages. When pressing the button, the
light blinks at a time. If the device turned off, the programming is successful.
Press the
MMEENNUU
button to store the code. After blinking twice, this code is stored.
Test the remote control functions to see if the device responds properly. If not, steps 2-5.
2
3
4
5
1
Brand Codes Brand Codes Brand Codes
APEX DIGITAL 022
DENON 020 014
GE 005 006
HARMAN KARDON 027
JVC 012
LG 001 010 016 025
MAGNAVOX 013
MARANTZ 024
MITSUBISHI 002
NAD 023
ONKYO 008 017
PANASONIC 003 009
PHILIPS 013
PIONEER 004 026
PROCEED 021
PROSCAN 005 006
RCA 005 006
SAMSUNG 011 015
SONY 007
THOMPSON 005 006
TOSHIBA 019 008
YAMAHA 009 018
ZENITH 010 016 025
Remote Control Code
DVD
MFL34797070en-2 4/16/09 2:18 PM Page 84

APPENDIX
85
Brand Codes Brand Codes Brand Codes
AIWA 034
AKAI 016 043 046 124
12 5 146
AMPRO 072
ANAM 031 033 103
AUDIO DYNAMICS
012 023 039 043
BROKSONIC 035 037 129
CANON 028 031 033
CAPEHART 108
CRAIG 003 040 135
CURTIS MATHES 031 033 041
DAEWOO 005 007 010 064
065 108 110 111
112 116 117 119
DAYTRON 108
DBX 012 023 039 043
DYNATECH 034 053
ELECTROHOME 059
EMERSON 006 017 025 027
029 031 034 035
036 037 046 101
129 131 13 8 15 3
FISHER 003 008 009 010
FUNAI 034
GE 031 033 063 072
10 7 10 9 144 14 7
GO VIDEO 132 136
HARMAN KARDON 012 045
HITACHI 004 018 026 034
043 063 137 150
INSTANTREPLAY 031 033
JCL 031 033
JCPENNY 012 013 015 033
040 066 101
JENSEN 043
JVC 012 031 033 043
048 050 055 060
130 150 15 2
KENWOOD 014 034 039 043
047 048
LG (GOLDSTAR) 001 012 013 020
101 106 114 123
LLOYD 034
LXI 003 009 013 014
017 034 101 106
MAGIN 040
MAGNAVOX 031 033 034 041
067 068
012 031 033 067
MARANTZ 069
MARTA 101
MATSUI 027 030
MEI 031 033
MEMOREX 003 010 014 031
033 034 053 072
101 102 134 13 9
MGA 045 046 059
MINOLTA 013 020
MITSUBISHI 013 020 045 046
049 051 059 061
15 1
MTC 034 040
MULTITECH 024 034
NEC 012 023 039 043
048
NORDMENDE 043
OPTONICA 053 054
PANASONIC 066 070 074 083
13 3 140 145
PENTAX 013 020 031 033
063
PHILCO 031 034 067
PHILIPS 031 033 034 054
067 071 101
PILOT 101
PIONEER 013 021 048
PORTLAND 108
PULSAR 072
QUARTZ 011 014
QUASAR 033 066 075 145
RCA 013 020 033 034
040 041 062 063
107 109 140 144
14 5 14 7
REALISTIC 003 008 010 014
031 033 034 040
053 054 101
RICO 058
RUNCO 148
SALORA 014
SAMSUNG 032 040 102 104
10 5 10 7 10 9 112
113 115 120 12 2
12 5
SANSUI 022 043 048 135
SANYO 003 007 010 014
10 2 134
SCOTT 017 037 112 129
131
SEARS 003 008 009 010
013 014 017 020
031 042 073 081
101
SHARP 031 054 149
SHINTOM 024
SONY 003 009 031 052
056 057 058 076
077 078 149
SOUNDESIGN 034
STS 013
SYLVANIA 031 033 034 059
067
SYMPHONIC 034
TANDY 010 034
TATUNG 039 043
TEAC 034 039 043
TECHNICS 031 033 070
TEKNIKA 019 031 033 034
101
THOMAS 034
TMK 006
TOSHIBA 008 013 042 047
059 082 112 131
TOTEVISION 040 101
UNITECH 040
VECTOR RESEARCH
012
VICTOR 048
VIDEO CONCEPTS
012 034 046
VIDEOSONIC 040
WARDS 003 013 017 024
031 033 034 040
053 054 131
YAMAHA 012 034 039 043
ZENITH 034 048 056
058 072 080 101
VCR
MFL34797070en-2 4/16/09 2:18 PM Page 85

APPENDIX
86
APPENDIX
SET ID
Press the
MMEENNUU
button and then use
DD
or
EE
button
to select the
OOPPTTIIOONN
menu.
Press the
GG
button and then use
DD
or
EE
button to
select
SSeett IIDD
.
Press the
GG
button and then use
DD
or
EE
button to
adjust
SSeett IIDD
to choose the desired TV ID number.
The adjustment range of Set ID is 1~99.
Press
EEXXIITT
button to return to TV viewing or press
MMEENNUU
button to return to the previous menu.
Use this function to specify a TV ID number.
2
3
4
1
Aspect Ratio
Caption/Text
Caption Options
Language
ISM Method
Low Power
Set ID
SCREEN
LOCK
OPTION
TIME
AUDIO
VIDEO
SETUP
Aspect Ratio
Caption/Text
Caption Options
Language
ISM Method
Low Power
Set ID
G
2 3
1
SCREEN
LOCK
OPTION
TIME
AUDIO
VIDEO
SETUP
1
MFL34797070en-2 4/16/09 2:18 PM Page 86

APPENDIX
87
IR CODES
Code
Function Note
(Hexa)
Code
Function Note
(Hexa)
0F TV INPUT Remote control Button
0B INPUT Remote control Button
08 POWER
Remote control Button (Power On/Off)
98 MULTI Remote control Button
79 RATIO Remote control Button
0E TIMER Remote control Button
10-19 Number Key 0-9 Remote control Button
4C - (Dash) Remote control Button
1A FLASH BACK Remote control Button
09 MUTE Remote control Button
02 VOL + Remote control Button
03 VOL - Remote control Button
00 CH + Remote control Button
01 CH - Remote control Button
39 CC Remote control Button
40
DD
Remote control Button
41
EE
Remote control Button
07
FF
Remote control Button
06
GG
Remote control Button
44 ENTER Remote control Button
43 MENU Remote control Button
52 EZ SOUND Remote control Button
4D EZ PIC Remote control Button
5B EXIT Remote control Button
0A SAP Remote control Button
E1 Remote control Button
E0 Remote control Button
AA INFO Remote control Button
60 PIP Remote control Button
72 PIP CH - Remote control Button
71 PIP CH + Remote control Button
61 PIP INPUT Remote control Button
63 SWAP Remote control Button
D6 TV Discrete IR Code
(TV Input Selection)
C4 POWER ON Discrete IR Code
(Only Power On)
C5 POWER OFF Discrete IR Code
(Only Power Off)
5A AV1 Discrete IR Code
(AV1 Input Selection)
D0 AV2 Discrete IR Code
(AV2 Input Selection)
BF COMPONENT Discrete IR Code
(Component Input Selection)
D5 RGB-PC Discrete IR Code
(RGB-PC Input Selection)
CE HDMI1/DVI Discrete IR Code
(HDMI1/DVI Input Selection)
CC HDMI2 Discrete IR Code
(HDMI2 Input Selection)
76 Ratio 4:3 Discrete IR Code
(Only 4:3 Mode)
77 Ratio 16:9 Discrete IR Code
(Only 16:9 Mode)
AF Ratio Zoom Discrete IR Code
(Only Zoom1 Mode)
MFL34797070en-2 4/16/09 2:18 PM Page 87

MFL34797070en-2 4/16/09 2:18 PM Page 88

Por favor, lea detenidamente este manual antes de
poner en funcionamiento su set.
Guárdelo para referencias futuras.
Registre el número de modelo y serie de la unidad.
Vea la etiqueta pegada en el panel posterior y presente
esta información a su distribuidor cuando requiera
el servicio.
32LC5DC
32LC5DCS
32LC5DCB
37LC5DC
37LC5DCB
37LC5DC1
42LC5DC
32LX5DC
32LX5DCS
42LB5DC
32LC50C
32LC50CS
32LC50CB
32LX50C
32LX50CS
37LC50
37LC50CB
42LB50C
42LC50C
www.lgcommercial.com
MODELOS DE PLASMA TV
42PX8DC
TELEVISOR
LCD
TELEVISOR
PLASMA
MANUAL DE USUARIO
MODELOS DE LCD TV
MFL34797070sp-1 4/16/09 2:11 PM Page 1

MFL34797070sp-1 4/16/09 2:11 PM Page 2

1
ADVERTENCIA
INSTRUCCIONES DE SEGURIDAD IMPORTANTES
Lea estas instrucciones.
Guarde estas instrucciones.
Tenga en cuenta todas las advertencias.
Siga todas las instrucciones.
No utilice este producto cerca del agua.
Límpielo sólo con un paño seco.
No bloquee las aberturas de ventilación. Instale
siguiendo las instrucciones del fabricante.
No lo coloque cerca de fuentes de calor, como
radiadores, rejillas de aire caliente, estufas u
otros aparatos (incluidos los amplificadores)
que emitan calor.
Proteja el cable de alimentación para que no lo
pisen ni aplasten, especialmente en las clavijas,
las tomas y el punto de salida del aparato
Utilice únicamente acoplamientos y accesorios
especificados por el fabricante.
Utilícelo sólo con el estante fijo o con ruedas,
trípode, soporte o mesa especificados por el
fabricante o con el accesorio suministrado con
el aparato. Si utiliza un carrito, tenga cuidado al
moverlo junto con el aparato para evitar
lesiones en caso de que éste se caiga.
Desenchufe este producto en caso de no
utilizarlo durante un largo periodo de tiempo.
Desenchufe este equipo durante tormentas
con aparato eléctrico o si no piensa usarlo
durante largos períodos de tiempo.
Sólo el personal calificado puede encargarse
del servicio técnico. La asistencia técnica es
necesaria si el aparato presenta algún daño,
como por ejemplo, si el cable o la clavija de
alimentación están dañados, si se derrama
líquido o se introducen objetos dentro del
aparato, si el aparato ha estado expuesto a la
lluvia o humedad, si no opera correctamente o
si se ha caído.
1
2
3
4
6
7
5
8
9
MFL34797070sp-1 4/16/09 2:11 PM Page 1

2
ADVERTENCIA
No toque el aparato o la antena durante una
tormenta eléctrica.
Cuando monte el televisor en la pared,
asegúrese de no colgar el televisor en cables
eléctricos y de señal de la parte trasera.
No golpee el producto ni permita que le caigan
objetos encima ni en la pantalla.
PRECAUCIÓN en cuanto al cable de alimentación:
Se recomienda colocar la mayoría de los aparatos
en un circuito dedicado. Es decir, un circuito de
salida única que alimenta sólo a ese aparato y que
no tiene tomas o circuitos adicionales.
Compruebe la página de especificaciones de este
manual del propietario para estar seguro.
No conecte demasiados electrodomésticos a
la misma toma de pared de corriente alterna ya
que hacerlo podría suponer riesgo de incendio
o choque eléctrico.
No sobrecargue las tomas de pared. Las tomas
de pared sobrecargadas, sueltas o dañadas,
los alargadores, los cables de alimentación
deshilachados o el aislante agrietado de los
cables podrían resultar peligrosos. Cualquiera
de estas condiciones podría provocar un
incendio o una descarga eléctrica. Examine
periódicamente el cable de su aparato y si
parece dañado o deteriorado, desenchúfelo,
deje de usarlo y solicite al centro de servicio
técnico autorizado que lo sustituyan por un
nuevo equivalente. Proteja el cable de ali-
mentación de daños físicos o mecánicos y
evite doblarlo, aplastarlo, pellizcarlo o pisarlo
con una puerta o caminar sobre él. Ponga
especial atención en los enchufes, tomas de
pared y el punto por donde el cable sale del
aparato.
No manipule la TV con el cable de ali-
mentación enchufado. No utilice cables de ali-
mentación dañados o mal conectados.
Asegúrese de desenchufar el cable de ali-
mentación sujetando el enchufe. No tire del
cable de alimentación para desenchufar la TV.
ADVERTENCIA - A fin de reducir el riesgo de
incendio o choque eléctrico, no exponga este
aparato a la lluvia, humedad u otros líquidos. No
toque la TV con las manos mojadas. No instale
este producto cerca de objetos inflamables como
gasolina o velas, ni exponga la TV al flujo directo
de aparatos de aire acondicionado.
No exponga este aparato a goteos o salpica-
duras, ni coloque sobre él objetos que con-
tengan líquidos, como floreros, tazas, etc. (por
ejemplo en estantes sobre la unidad).
TTOOMMAA AA TTIIEERRRRAA
Asegúrese de conectar el cable de toma a tierra
para evitar posibles descargas eléctricas. (es
decir, que una TV con un enchufe de tres polos,
debe conectarse a una toma de pared con tres
polos). Si no es posible la puesta a tierra, con-
tacte con un electricista calificado para que
instale un interruptor automático independiente.
No intente conectar la unidad a tierra medi-
ante cables telefónicos, pararrayos o tuberías
de gas.
DDEESSCCOONNEECCTTAARR EELL DDIISSPPOOSSIITTIIVVOO DDEE LLAA RREEDD
Este dispositivo se desconecta desenchufándolo
del cable de red. El enchufe debe con tar con
un acceso sin obstáculos.
Mantenga el producto lejos de la luz directa
del sol.
11
10
13
12
15
16
17
18
Aliment
ación
Interruptor
diferencial
14
MFL34797070sp-1 4/16/09 2:11 PM Page 2

3
LLiimmppiieezzaa
Antes de iniciar labores de limpieza, desenchufe
el cable de alimentación y limpie cuidadosa-
mente la unidad con un paño suave para evitar
arañazos superficiales. No rocíe directamente
agua vaporizada u otros líquidos sobre la TV
para evitar posibles choques eléctricos. No
limpie la unidad con productos químicos como
alcoholes, disolventes o benceno.
TTrraannssppoorrttee
Asegúrese de que el producto esté apagado,
desenchufado y que todos los cables hayan
sido desconectados. Harán falta dos o más
personas para transportar TVs de gran tamaño.
No someta el panel frontal de la TV a presiones
o esfuerzos excesivos.
VVeennttiillaacciióónn
Instale su TV en un lugar que disponga de ven-
tilación apropiada. No la instale en espacios
cerrados como, por ejemplo, una estantería. No
cubra el producto con paños u otros materiales,
como plásticos, mientras esté enchufada. No
instale la unidad en lugares con exceso de polvo.
Si percibe olor a quemado o de cualquier otro
tipo, o detecta sonidos extraños procedentes
de su TV, desenchufe el cable de alimentación
y contacte con el servicio técnico autorizado.
No presione en exceso el panel con sus manos
u objetos afilados, como tornillos, lápices o
bolígrafos, y evite rayarlo.
19
22
23
20
21
MFL34797070sp-1 4/16/09 2:11 PM Page 3

4
CONTENIDO
ADVERTENCIA
. . . . . . . . . . . . . . . . . . . . . . . . . . . . . . . . . . . . . . . . . . . 1
INSTRUCCIÓNES DE LA SEGURIDAD
. . . . . 2
FUNCIONES DE ESTE TV . . . . . . . . . . . . . . . . . . . . . . . . . 6
PREPARACIÓN
Accessories
. . . . . . . . . . . . . . . . . . . . . . . . . . . . . . . . . . . . . . . . . . . . . . . . . . . . . . 7
Controles del Panel Frontal
. . . . . . . . . . . . . . . . . . . . . . . . . . . . . . . 8
Información del panel posterior
. . . . . . . . . . . . . . . . . . . . . . . 11
Contraportada para Cableado
. . . . . . . . . . . . . . . . . . . . . . . . . . . . . 13
Cómo instalar el producto ensamblado en la pared
evitando la caida de la unidad
. . . . . . . . . . . . . . . . . . . . . . . . . . . . . 16
Soporte del eslabon giratorio
. . . . . . . . . . . . . . . . . . . . . . . . . . . . . . 16
Fijación de la TV a su lugar de ubicación
. . . . . . . . . . . 17
Instalación de la base
. . . . . . . . . . . . . . . . . . . . . . . . . . . . . . . . . . . . . . 18
Montaje para la pared VESA
. . . . . . . . . . . . . . . . . . . . . . . . . . . . 19
Instalación de un Pedestal de Escritorio
. . . . . . . . . . . . 19
Conexión de la Antena o cable
. . . . . . . . . . . . . . . . . . . . . . . . . 20
CONEXION DE EQUIPO EXTERNO
Instalación del HDSTB . . . . . . . . . . . . . . . . . . . . . . . . . . . . . . . . . . . . 21
Instalación del DVD
. . . . . . . . . . . . . . . . . . . . . . . . . . . . . . . . . . . . . . . . . 24
Instalación del VCR
. . . . . . . . . . . . . . . . . . . . . . . . . . . . . . . . . . . . . . . . 26
Configuración de otra fuente de A/V . . . . . . . . . . . . . 28
Salida de Audio Digital . . . . . . . . . . . . . . . . . . . . . . . . . . . . . . . . . . . 28
Instalación de la PC
. . . . . . . . . . . . . . . . . . . . . . . . . . . . . . . . . . . . . . . . . 29
VER LA TV / CONTROL DE CANAL
Funciones de los botones del control remoto . . . . 32
Encendiendo la TV . . . . . . . . . . . . . . . . . . . . . . . . . . . . . . . . . . . . . . . . . 34
Ajuste del Canal
. . . . . . . . . . . . . . . . . . . . . . . . . . . . . . . . . . . . . . . . . . . . . 34
Ajuste del volumen . . . . . . . . . . . . . . . . . . . . . . . . . . . . . . . . . . . . . . . . . 34
Selección y ajuste del menú pantalla
. . . . . . . . . . . . . . . . 35
Búsqueda de canales
. . . . . . . . . . . . . . . . . . . . . . . . . . . . . . . . . . . . . . 36
- Escaneo automático (EZ Búsqueda)
. . . . . . . . . . 36
- Agregar/Eliminar los Canales (Búsqueda manual)
. 37
- Edición de Canal
. . . . . . . . . . . . . . . . . . . . . . . . . . . . . . . . . . . . . . 38
Fuerza de la señal DTV
. . . . . . . . . . . . . . . . . . . . . . . . . . . . . . . . . . . . 39
Signal de Canales . . . . . . . . . . . . . . . . . . . . . . . . . . . . . . . . . . . . . . . . . . . . 40
CONTROL DE IMAGEN
Disfrutando de la ventana doble . . . . . . . . . . . . . . . . . . . . . . . 41
Tamaño de la Imagen (Control de Relacion de aspecto)
43
Ajustes de la Imagen Prestablecida
- EZ Video -
Presintonizada
. . . . . . . . . . . . . . . . . . . . . . . . . . . 45
-
Tono de control
-
Presintonizada
. . . . . . . . . . . . . . . . . . 46
Control Manual de Imagen
- EZ Video - Modo usuario
. . . . . . . . . . . . . . . . . . . . . . . . . . 47
-
Tono de control –
Modo usuario . . . . . . . . . . . . . . . . 48
XD - Tecnología de Mejora de la Imagen
. . . . . . . . 49
Avanzado - Modo Cinema 3:2 desplegable
. . . . . 50
Avanzado - Nivel de negros (Oscuridad)
. . . . . . . . . 51
Restablecimiento de la imagen
. . . . . . . . . . . . . . . . . . . . . . . 52
Modo de imagen de poca energía
. . . . . . . . . . . . . . . . . . . . . . . 52
Minimización de imagen fantasma
. . . . . . . . . . . . . . . . . . . . . . . . . . 53
CONTROL DE SONIDO Y IDIOMA
Nivelador Automático de Volumen (EZ SoundRite) . 54
Ajustes de sonido preestablecidos (EZ Audio) . . . . . . . . . . 55
Ajuste de sonido - modo usuario
. . . . . . . . . . . . . . . . . . . . . 56
Ajuste de Balance
. . . . . . . . . . . . . . . . . . . . . . . . . . . . . . . . . . . . . . . . . . . . 57
Disposición de bocinas de TV
. . . . . . . . . . . . . . . . . . . . . . . . . . 58
Disfrute de la transmisión Estéreo/SAP
. . . . . . . . . . . 59
Idioma del audio
. . . . . . . . . . . . . . . . . . . . . . . . . . . . . . . . . . . . . . . . . . . . . 60
Selección del lenguaje en la pantalla
. . . . . . . . . . . . . . . . . 61
Subtít/Texto
. . . . . . . . . . . . . . . . . . . . . . . . . . . . . . . . . . . . . . . . . . . . . . . . . . . 62
-
Sistemas de texto oculto de programas analógicos
. . . . . . 62
-
Sistemas de texto oculto de programas digitales
. . . . . 63
Opciones del texto oculto
. . . . . . . . . . . . . . . . . . . . . . . . . . . . . . . . . 64
MFL34797070sp-1 4/16/09 2:11 PM Page 4

5
CONFIGURACIÓN HORARIA
Programacion del reloj . . . . . . . . . . . . . . . . . . . . . . . . . . . . . . . . . . . . . 65
- Configuración Auto del Reloj . . . . . . . . . . . . . . . . . . . . 65
- Configuración Manual del Reloj
. . . . . . . . . . . . . . 66
Ajustes de Encendido / Apagado Automático del
temporizador
. . . . . . . . . . . . . . . . . . . . . . . . . . . . . . . . . . . . . . . . . . . . . . . . .
67
Configuración de Corte Automático
. . . . . . . . . . . . . . . . 68
Configuración del Temporizador de apagado
automático
. . . . . . . . . . . . . . . . . . . . . . . . . . . . . . . . . . . . . . . . . . . . . . . . . . . . . 69
AJUSTE DE PANTALLA
Configuración Automática(Sólo modo RGB[PC]) . 70
Configuración Manual
. . . . . . . . . . . . . . . . . . . . . . . . . . . . . . . . . . . . . . . 71
Seleccíon del Modo XGA
. . . . . . . . . . . . . . . . . . . . . . . . . . . . . . . . . 72
Inicialización(Restablecer el valor original de fábrica)
. 73
CONTROL PATERNO /CLASIFICACIONES
Establecer contraseña y bloqueo del sistema
. . . . .74
Bloqueo de Canales
. . . . . . . . . . . . . . . . . . . . . . . . . . . . . . . . . . . . . . . . . . . 76
Bloqueo de entrada externa
. . . . . . . . . . . . . . . . . . . . . . . . . . . . 76
Clasificaciones de películas y TV . . . . . . . . . . . . . . . . . . . . . 77
APÉNDICE
Lista de verificación de problemas . . . . . . . . . . . . . . . . . . 80
Mantenimiento . . . . . . . . . . . . . . . . . . . . . . . . . . . . . . . . . . . . . . . . . . . . . . . 82
Especificaciones del producto
. . . . . . . . . . . . . . . . . . . . . . . . . 83
Programando el control remoto . . . . . . . . . . . . . . . . . . . . . . 84
Configuración de ID
. . . . . . . . . . . . . . . . . . . . . . . . . . . . . . . . . . . . . . . . 86
Códigos de IR . . . . . . . . . . . . . . . . . . . . . . . . . . . . . . . . . . . . . . . . . . . . . . . 87
MFL34797070sp-1 4/16/09 2:11 PM Page 5

6
FUNCIONES DE ESTE TV
DISPOSICIÓN
(Sólo lámpara de Hg utilizada en TV LCD)
Lámpara fluorescente usada en este producto contiene una cantidad mínima de mercurio. No lo
disponga este producto con basura normal de la casa. Disposición de este producto debe ser mane-
jado de acuerdo a la autoridad local de su provincia.
PPAARRAA LLAA TTVV DDEE LLCCDD
Si siente la TV fría al tocar, puede que haya un pequeño “flicker” cuando se ha encendido. Esto es normal,
no hay nada malo con la TV.
Unos pocos defectos de puntos pueden ser visibles en la pantalla, apareciendo en un color rojo, verde o
azul. Pero ellos no tienen ningún efecto equivocado para la función del monitor.
Evitese a tocar la pantalla LCD o agarrarla con su(s) dedo(s) por un periodo largo de tiempo. Si lo hace,
eso puede provocar una distorción temporal en la pantalla.
MFL34797070sp-1 4/16/09 2:11 PM Page 6

PREPARACIÓN
7
PREPARACIÓN
ACCESORIOS
Asegurese de que los siguientes accesorios estén incluidos con su TV. Si algún accesorio no está incluido, favor
de contactar al distribuidor del producto en el lugar donde realizó la compra.
Los accesorios que se incluyen pueden ser diferentes a los de las imágenes a continuación.
Manual de Usuario
ENTER
TV
IN
P
U
T
M
O
D
E
DVD
M
U
L
T
I
EXIT
L
EZ SO
UN
D
INFO
SWAP
EZ PIC
TIM
ER
MUTE
CH
S
A
P
CC
RATIO
MENU
VCR
POWER
23
6
9
PIP
PIP CH - PIP CH +
PIP INPUT
ENTER
TVTV
IN
P
U
T
IN
P
U
T
M
O
D
E
DVD
M
U
L
T
I
EXIT
VOL
EZ S
OU
ND
INFO
SWAP
EZ PIC
TIME
R
MUTE
CH
S
A
P
CC
RATIO
MENU
VCR
POWER
123
456
789
0
FLASH
BACK
PIP
PIP CH - PIP CH +
PIP INPUT
PAGE
PAGE
Control Remoto,
Baterías
Cable de Alimentación
PPaarraa mmooddeellooss ddee TTeelleevviissoorreess PPllaassmmaa
Cable redondo
de 75Ω
Cable D-sub de
15 terminales
1.5V 1.5V
■
Si la superficie exterior de la unidad tiene
manchas o marcas de huellas, limpie suave-
mente utilizando únicamente paños de
limpieza diseñados para tal fin.
■
No limpie con demasiada fuerza para intentar
quitar las manchas. Tenga cuidado, ya que si
limpia con demasiada fuerza podría rayar o
decolorar la superficie.
Paño de limpieza
Esta característica no se
encuentra disponible para
todos los modelos.
PPaarraa mmooddeellooss ddee TTeelleevviissoorreess LLCCDD
Cable D-sub de 15
terminales
OOppcciioonneess EExxttrraass
1-Perno de fijación
del sujetacables
(refiérase a p.
13-14)
Sujetador de cables
(refiérase a p.
13 )
Sujetacables
(refiérase a p.
13-14)
Sólo modelo 32/37/42LC5DC*,
32/37/42LC50C*,
42LB5DC,
42LB50C
x 2
M4xL22
Tornillo con la
cabeza de estrella
(refiérase a p.
8)
Soporte de protección y el Tornillo
para Cable de Alimentación
(
Esta característica no se encuentra
disponible para todos los modelos.
)
(refiérase a p.
13-14)
4-Pernos para la base ensam-
blada
(refiérase a p.
18 )
Sólo modelo
32/37LC5DC*,
32/37LC50*
MFL34797070sp-1 4/16/09 2:32 PM Page 7

PREPARACIÓN
8
CONTROLES DEL PANEL FRONTAL
PREPARACIÓN
■
Es probable que la imagen sea un poco diferente que su unidad de TV.
CHCH
VOLOL
ENTERENTER
MENUMENU
INPUTINPUT
Sensor de Control
Remoto
Indicador de Encendido/Standby
Se ilumina en rojo en el modo de espera.
Se ilumina de color verde cuando el aparato está
encendido.
Botones de CANAL
Botones de VOLUMEN
Botón ENTER
Botón MENU
Botón INPUT
Botón POWER
32/37/42LC5DC*,32/37/42LC50C*, 42LB5DC, 42LB50C
Ensamble dos de estos cuatro tornillos y
dos de los tonillis (incluidos como las
partes del producto) con la cabeza de
estrella para que se ensamblen seguramente el
televisor.Ensamble los dos tornillos con la
cabeza de estrella con el desarmador para
estos tornillos con la cabeza de estrella.(no
incluidos como las partes del producto).
x 2
x 2
x 4
Ensamble la base con los cua-
tro tornillos (incluidos como
las partes del producto).
y
MFL34797070sp-1 4/16/09 2:11 PM Page 8

PREPARACIÓN
9
32LX5DC*, 32LX50C*
CH
CH
VOL
VOL
ENTER
ENTER
INPUT
INPUT
MENU
MENU
ON/OFF
ON/OFF
Botones de VOLUMEN
Sensor de Control
Remoto
Indicador de
Encendido/Standby
Se ilumina en rojo en
el modo de espera.
Se ilumina de color
verde cuando el
aparato está
encendido.
Botones de CANAL
Botón ENTER
Botón ON/OFF
Botón INPUT
Botón MENU
MFL34797070sp-1 4/16/09 2:11 PM Page 9

PREPARACIÓN
10
PREPARACIÓN
42PX8DC
CH
VOL
MENUINPUT
ENTER
INPUTINPUT
ENTERENTER
INPUT
ENTER
Botones de VOLUMEN
Botones de CANAL
Botón ENTER
Botón POWER
Botón INPUT
Botón MENU
Sensor de Control Remoto
Indicador de Encendido/Standby
Se ilumina en rojo en el modo de espera.
Se ilumina de color verde cuando el aparato está
encendido.
Este soporte para TV se vende por separado.
MFL34797070sp-1 4/16/09 2:11 PM Page 10

PREPARACIÓN
11
INFORMACIÓN DEL PANEL POSTERIOR
■
Es probable que la imagen sea un poco diferente que su unidad de TV.
AV IN 2
L/
MO
N
O
R
AUDIO
O
V
IDE
O
S-VIDEO
( )
ANTENNA IN
M.P.I.
Entrada de S-Video
Conecte la salida de
S-Video de un dispositivo de S-VIDEO.
Entrada de AUDIO/VIDEO
Conecte la salida de audio/video de un dis-
positivo externo a estos puertos.
11
32/37/42LC5DC*,32/37/42LC50C*, 42LB5DC, 42LB50C
32LX5DC*, 32LX50C*
R
Entrada de S-Video
Conecte la salida de
S-Video de un dispositivo de S-VIDEO.
Entrada de AUDIO/VIDEO
Conecte la salida de audio/video de un dis-
positivo externo a estos puertos.
AV IN 2
VIDEO
S-VIDEO
L/MONO
R
AUDIO
42PX8DC
Entrada de S-Video
Conecte la salida de
S-Video de un dispositivo de S-VIDEO.
Entrada de AUDIO/VIDEO
Conecte la salida de audio/video de un dis-
positivo externo a estos puertos.
11
11
AV IN 2
L/
MO
N
O
R
AUDIO
A
O
VIDE
O
S-VIDEO
MFL34797070sp-1 4/16/09 2:11 PM Page 11

PREPARACIÓN
12
PREPARACIÓN
HDMI/DVI IN, HDMI IN
Conecte una toma HDMI (DVI) a cualquier entrada.
DIGITAL AUDIO OUT
Conecte audio digital desde diferentes equipos.
Nota: en el modo de espera, estos puertos no fun-
cionan.
M.P.I
RESET/UPDATE/REMOTE CONTROL OUT
SERVICE ONLY
RGB IN (PC)
Conecte la salida desde una PC.
AUDIO IN (RGB, DVI)
Conecte el audio desde una PC o DTV.
SPEAKER OUT 8Ω
AV (Audio/Video) IN
Conecte la salida de audio/video de un dispositivo
externo a estos puertos.
S-VIDEO
Conecte la salida de S-Video de un dispositivo de
S-VIDEO.
COMPONENT IN
Conecte un dispositivo de video/audio de compo-
nente a estas entradas.
RJP INTERFACE
Socket del Cordón de Alimentación
Esta TV funciona con alimentación de corriente
alterna (ca).
Cuidado: Nunca aplique voltaje de corriente con-
tinua (cc)a esta TV.
ANTENNA IN
Conecte las señales de la transmisión a este puerto.
1
8
9
10
11
12
2
3
4
5
6
7
VIDEO
AUDIO
VIDEO
AUDIO
MONO
( )
S-VIDEO
REMOTE
CONTROL
OUT
RGB IN
AUDIO
IN
(RGB, DVI)
RESET
UPDATE
M.P.I.
1
(
DVI
)
RJP
INTERFACE
2
SERVICE ONLY
HDMI
/
DVI I
N
SPEAKER
OUT
8
AV IN 1
COMPONENT IN
DIGITA
L
A
U
DI
O
OUT
(
OPTICAL
)
ANTENNA INANTENNA IN
M.P.I.M.P.I.
6
1
5
2
3
4
7
8
9
10
12
13
13
■
Es probable que la imagen sea un poco diferente que su unidad de TV.
■
Las imágenes de esta parte se utilizan principalmente para modelos de TV LCD.
MFL34797070sp-1 4/16/09 2:11 PM Page 12

PREPARACIÓN
13
CONTRAPORTADA PARA CABLEADO
Conecte los cables según sea necesario.
Para conectar un equipo adicional, consulte la sección
Conexiones de equipamiento externo.
Asegure el cable de alimentación con la
SSOOPPOORRTTEE DDEE
PPRROOTTEECCCCIIÓÓNN
y el tornillo como se muestra. Esto ayu-
dará a evitar que el cable de alimentación sea removido por
accidente.
Instale el organizador de cables como la imagen.
Cómo quitar el organizador de cables
GG
Sostenga el
OORRGGAANNIIZZAADDOORR DDEE CCAABBLLEESS
con ambas
manos jale hacia arriba.
SOPORTE DE CABLES
GG
No agarre el organizador de cables cuando mueve el
producto.
Si el producto se cae, ud. se puede herir o el produc-
to se puede romper.
NOTA
!
1
3
Instale el SUJETACABLES como se muestra.
SUJETACABLES
2
PERNO
■
Es probable que la imagen sea un poco diferente que su unidad de TV.
SSOOPPOORRTTEE DDEE PPRROOTTEECCCCIIÓÓNN
(Esta característica no se encuentra disponible para todos los modelos. )
MFL34797070sp-1 4/16/09 2:11 PM Page 13

PREPARACIÓN
14
CONTRAPORTADA PARA CABLEADO
PREPARACIÓN
(Esta característica no se encuentra disponible para todos los modelos. )
Conecte los cables según sea necesario.
Para conectar un equipo adicional, consulte la sección
Conexiones de equipamiento externo.
Asegure el cable de alimentación con la
SSOOPPOORRTTEE DDEE
PPRROOTTEECCCCIIÓÓNN
y el tornillo como se muestra. Esto ayu-
dará a evitar que el cable de alimentación sea removido por
accidente.
2
Instale el SUJETACABLES como se muestra.
SUJETACABLES
3
PERNOS
Para quitar el SUJETACABLES, afloje el perno instalado
en el equipo.
1
SSOOPPOORRTTEE DDEE PPRROOTTEECCCCIIÓÓNN
MFL34797070sp-1 4/16/09 2:11 PM Page 14

PREPARACIÓN
15
42PX8DC
Sujete el SOPORTE DE CABLES con
ambas manos y tire de él como se muestra.
Conecte los cables según sea necesario.
Para conectar un equipo adicional, consulte la
sección Conexiones de equipamiento externo.
1
2
Instale el organizador de cables como la imagen.
3
45
°
MFL34797070sp-1 4/16/09 2:11 PM Page 15

PREPARACIÓN
16
PREPARACIÓN
La TV puede girarse convenientemente sobre su soporte 20º ó 90º a izquierda o derecha para
lograr un ángulo de visión óptimo.
SOPORTE DEL ESLABON GIRATORIO
20° (modelo 37LC5DC1, 42LC5DC,
42LC50C,
42PX8DC,
42LB5DC, 42LB50C
)
90° (modelo 32LX5DC/S,
32LX50C/S,
32LC5DC/S,
32LC50C/S,
37LC5DC,
37LC50
)
CÓMO INSTALAR EL PRODUCTO ENSAMBLADO EN LA PARED
EVITANDO LA CAIDA DE LA UNIDAD
Instalelo cerca de la pared así el producto no se cae cuando esté presionado hacia atrás.
Además, recomendamos fijar la TV a la pared para que no pueda caerse hacia delante y cause lesiones o se dañe
el producto.
Precaución: Favor de estar seguro de que los niños no se suban ni se cuelguen del producto.
■
Inserte los pernos de ojo (o el soporte de TV y los pernos) para sujetar el producto a la pared como se muestra
en la imagen. *Introduzca los pernos de anillo y apriételos de forma segura en los orificios superiores.
Asegúrese de los soportes con los pernos (no incluidos como las partes del producto, debe comprarlos separada-
mente) en la pared que estén ajustados firmemente. Haga coincidir con la altura del soporte montado en la
pared.
Asegúrese de que los pernos de ojo o soportes están fijados firmemente.
■
Use un cordón fuerte (no incluido como la parte del producto, debe
comprarlo separadamente) para ajustar el producto. Es más seguro
usar un cordón, así se quedará horizontalmente entre la pared y el
producto.
■
Esta característica no se encuentra disponible para todos los modelos.
MFL34797070sp-1 4/16/09 2:11 PM Page 16

PREPARACIÓN
17
FIJACIÓN DE LA TV A SU LUGAR DE UBICACIÓN
La TV puede fijarse al lugar de emplazamiento y así impedir su desplazamiento hacia delante o atrás, ya que
podría ocasionar lesiones físicas o daños al producto.
*
TToorrnniillllooss –– MM55 xx LL ((eessppeessoorr ddeell ttaabblleerroo ++ 88~~1100 mmmm))
ej.) espesor del tablero-15mm: Pernos – M5 x 25
ADVERTENCIA
!
GG
Este aparato debe asegurarse al suelo/pared conforme a las instrucciones de instalación.
Inclinar, agitar o sacudir la unidad podría ser causa directa de lesiones o incluso la muerte.
4-PERNOS
(No incluidos como las partes del producto)
Soporte
Tablero
32/37/42LC5DC*, 32/37/42LC50C*, 42LB5DC, 42LB50C
32LX5DC*, 32LX50C*
42PX8DC
4-PERNOS
(No incluidos como las partes del producto)
Soporte
Tablero
2-PERNOS
(No incluidos como las partes del producto)
Soporte
Tablero
MFL34797070sp-1 4/16/09 2:11 PM Page 17

PREPARACIÓN
18
PREPARACIÓN
INSTALACIÓN DE LA BASE (Sólo modelo 32/37LC5DC*,
32/37LC50*
)
Coloque cuidadosamente el producto con la pantalla abajo en una superficie acolchada que
protegerá el producto y pantalla de algún daño.
Monte el soporte del producto con el producto, como aparece en la ilustración.
Instale firmemente los 4 pernos que se incluyen.
1
2
3
MFL34797070sp-1 4/16/09 2:11 PM Page 18

PREPARACIÓN
19
MONTAJE PARA LA PARED VESA
Este producto acepta una almohadilla de interfaz de montaje compatible con VESA. (opcional)
En los cuatro orificios roscados se puede instalar el soporte.
GG
La longitud de las tuercas depende del montaje para pared utilizado. Para obtener más información,
consulte la Guía de instrucciones para montaje en pared VESA.
NOTA
!
Producto Modelos
VESA
(A
*
B)
32LC5DC*, 32LC50C*,
32LX5DC*,
32LX50C*
32/37/42LC5DC*, 32/37/42LC50C*,
42LB5DC, 42LB50C
42PX8DC
200
*
10 0
600
*
400
600
*
400
LCD TV
PLASMA TV
AA
BB
■
Esta característica no se encuentra disponible para todos los modelos.
Para la ventilación apropiada deje un espacio de 4 pulgadas en cada lado desde la pared.
■
Es probable que la imagen sea un poco diferente que su unidad de TV.
INSTALACIÓN DE UN PEDESTAL DE ESCRITORIO
GG
Ensure adequate ventilation by following the clearance recommendations.
CAUTION
4
pulgadas
4
pulgadas
4
pulgadas
4
pulgadas
■
Esta característica no se encuentra disponible para todos los modelos.
MFL34797070sp-1 4/16/09 2:11 PM Page 19

PREPARACIÓN
20
PREPARACIÓN
CONEXIÓN DE LA ANTENA O CABLE
1. Antena (analógica o digital)
Toma de entrada de pared o antena exterior sin conexiones a caja de
cables. Para lograr la mejor calidad de imagen, ajuste la posición de
la antena si fuera necesario.
2. Cable
Enchufe de
antena de
la pared
Antena de
exterior
(VHF, UHF)
Puerto de
TV de
Cable en
la pared
Viviendas/Apartamentos
(Conectar al enchufe de antena en la pared)
Cable Coaxial RF
(75 ohm)
Cable Coaxial RF (75 ohm)
Casa privada
(Conectar a un enchufe de pared de la antena
exterior)
Sea cuidadoso y trate de no doblar el
alambre de bronce cuando conecte la antena.
Alambre de
bronce
ANTENNA IN
M.P.I.
ANTENNA IN
M.P.I.
ANTENNA IN
M.P.I.
GG
El televisor informará cuando finalice la exploración de canales análogo y de cable.
NOTA
!
■
En áreas de señal deficiente, puede obtener una mejor calidad en la imagen si instala un amplificador de señal
como se muestra arriba.
■
Si esta siendo utilizada una antena para dos unidades, use un divisor de señal para conectarse.
■
El cable y el convertidor de antena no son proporcionados con el producto.
Antena
UHF
Amplificador
de la señal
VHF
MFL34797070sp-1 4/16/09 2:11 PM Page 20

CONEXIONES DE EQUIPO EXTERNO
21
INSTALACIÓN DEL HDSTB
CONEXIONES DE EQUIPO EXTERNO
Este TV puede recibir señales de la transmisión digital/Cable sin una caja sintonizadora externa. Pero si ud.
recibe señales digitales desde una caja sintonizadora u otro dispositivo externo digital, refierase a las siguientes
figuras.
( )
( )
( )
S-VIDEO
M.P.I.
1(DVI)
RJP
RFACE
2
HDMI/DVI IN
COMPONENT IN
DIGITAL
AUDIO
OUT
(OPTICAL)
VIDEO
AUDIO
Y L RPB PR
Cuando lo conecta con un cable de componente
1
2
1. Cómo conectar
Conecte las salidas de video (Y, P
B, PR) del DVD a los
puertos de
CCOOMMPPOONNEENNTT IINN VVIIDDEEOO11
en la
unidad. Haga coincidir los colores de los conectores
(
Y = Verde, P
B = azul, PR = rojo
)
.
Conecte las salidas de audio del DVD a los puertos de
CCOOMMPPOONNEENNTT IINN AAUUDDIIOO11
en la unidad.
2
1
2. Cómo usar
■
Encienda el decodificador digital.
(Refiérase al manual de usuario
del decodificador digital.)
■
Seleccione el componente deseado como fuente de entra-
da utilizando el botón INPUT del mando a distancia.
Señal
480i
480p
720p
108 0 i
108 0 p
Componente
Sí
Sí
Sí
Sí
Sí
HDMI1/DVI,
HDMI2
No
Sí
Sí
Sí
Sí
■
Para evitar daños en el equipo, no enchufe ningún cable de alimentación hasta haber finalizado la conexión completa
de todo el equipo.
■
Esta parte de la configuración del Equipo EXTERNO utiliza principalmente imagen para modelo de televisor LCD.
Sólo modelo * 42LB5DC, 42LB50C
MFL34797070sp-1 4/16/09 2:11 PM Page 21

CONEXIONES DE EQUIPO EXTERNO
22
CONEXIONES DE EQUIPO EXTERNO
Cuando lo conecte con un cable de HDMI
Conecte la salida de HDMI IN del decodificador digital al
puerto de
HHDDMMII//DDVVII IINN 11((DDVVII))
o
22
en la unidad.
No se necesita conexión de audio por separado.
HDMI admite audio y video.
1. Cómo conectar
2. Cómo usar
■
Encienda el decodificador digital.
(Refiérase al manual de usuario del decodificador digital.
)
■
Seleccione la entrada de la fuente
HHDDMMII11//DDVVII
o
HHDDMMII22
usando el botón
IINNPPUUTT
del control remoto.
2
1
( )
VIDEO
AUDIO
( )
M.P.I
1(DVI)
RJP
INTERFACE
2
HDMI/DVI IN
COMPONENT IN
DIGITAL
AUDIO
OUT
(OPTICAL)
( )
HDMI-DTV OUTPUT
1
GG
Si el dispositivo no admite Auto HDMI, deberá configurar
adecuadamente la resolución de salida.
NOTA
MFL34797070sp-1 4/16/09 2:11 PM Page 22

CONEXIONES DE EQUIPO EXTERNO
23
VIDEO
AUDIO
VIDEO
AUDIO
MONO
( )
S-VIDEO
REMOTE
CONTROL
OUT
RGB IN
AUDIO
IN
(RGB, DVI)
RESET
UPDATE
M.P.I.
1(DVI)
RJP
INTERFACE
2
SERVICE ONLY
HDMI/DVI IN
SPEAKER
OUT
8
AV IN 1
COMPONENT IN
DIGITAL
AUDIO
OUT
(OPTICAL)
( )
( )
L R
DVI-DTV OUTPUT
Conecte la salida de DVI del decodificador al puerto de
HHDDMMII//DDVVII IINN 11((DDVVII))
o
22
en la unidad.
Conecte las salidas de audio del decodificador al puerto de
AAUUDDIIOO IINN
((
RRGGBB,,DDVVII
))
en la unidad.
1. Cómo conectar
■
Apague el decodificador de señal digital. (Consulte el manual de usuario del decodificador de señal digital.)
■
Seleccione la entrada de la fuente de
HHDDMMII11//DDVVII
o
HHDDMMII22
usando el botón de
IINNPPUUTT
del control
remoto.
2. Cómo usar
2
1
1
2
Cuando lo conecta con un cable de HDMI al DVI
MFL34797070sp-1 4/16/09 2:11 PM Page 23

CONEXIONES DE EQUIPO EXTERNO
24
CONEXIONES DE EQUIPO EXTERNO
INSTALACIÓN DEL DVD
Cuando lo conecta con un cable de componente
( )
( )
S-VIDEO
M.P.I.
1(DVI)
RJP
ERFACE
2
HDMI/DVI IN
COMPONENT IN
DIGITAL
AUDIO
OUT
(OPTICAL)
VIDEO
AUDIO
Y L RPB PR
( )
Puertos de la Entrada de Componente
Puede obtener una mejor calidad de imagen si conecta el reproductor de DVD a los puertos de la entrada del
componente como la imagen mostrada.
Puertos de Componente en la TV
YPB PR
Puertos de Componentes del
reproductor de DVD
Y
Y
Y
Y
P
B
B-Y
Cb
Pb
P
R
R-Y
Cr
Pr
Conecte las salidas de video (Y, P
B, PR) del DVD a los
puertos de
CCOOMMPPOONNEENNTT IINN VVIIDDEEOO
en la unidad.
Haga coincidir los colores de los conectores
(
Y = Verde, P
B = azul, PR = rojo
)
.
Conecte las salidas de audio del DVD a los puertos de
CCOOMMPPOONNEENNTT IINN AAUUDDIIOO
en la unidad.
1. Cómo conectar
2. How to use
■
Encienda el reproductor de DVD, inserte un DVD.
■
Seleccione la entrada de la fuente
CCoommppoonneennttee
usando
el botón
IINNPPUUTT
del control remoto.
■
Refiérase al manual de usuario del reproductor de DVD para
seguir las instrucciones.
2
1
1 2
MFL34797070sp-1 4/16/09 2:11 PM Page 24

CONEXIONES DE EQUIPO EXTERNO
25
Cuando lo conecta con un cable de S-Video
AUDIO
REMOTE
CONTROL
OUT
RESET
UPDATE
M.P.I.
S
SPEA
O
AV IN 1
NT IN
GITAL
UDIO
OUT
TICAL)
( )
( )
AUDIO
MONO
( )
S-VIDEO
VIDEO
L R
S-VIDEO
AUDIO
1
2
VIDEO
AUDIO
( )
M.P.I
1(DVI)
RJP
INTERFACE
2
HDMI/DVI IN
COMPONENT IN
DIGITAL
AUDIO
OUT
(OPTICAL)
( )
HDMI-DVD OUTPUT
( )
1
Conecte la salida de S-VIDEO del DVD a la entra-
da de
SS --VVIIDDEEOO
en la unidad.
Conecte las salidas de audio del DVD a los puertos de
la entrada de
AAUUDDIIOO
en la unidad.
1. Cómo conectar
2. Cómo usar
■
Encienda el reproductor de DVD, inserte un DVD.
■
Seleccione la entrada de la fuente
AAVV11
usando el botón
IINNPPUUTT
del control remoto.
■
Si está conectado a la entrada de
AAVV IINN22
, seleccione la
entrada de la fuente
AAVV22
.
■
Refiérase al manual de usuario del reproductor de DVD para
seguir las instrucciones.
Cuando lo conecta con un cable de HDMI
Conecte la salida de HDMI del DVD al puerto de
HHDDMMII//DDVVII IINN 11((DDVVII))
o
22
en la unidad.
No se necesita conexión de audio por separado.
La conexión HDMI admite audio y vídeo al mismo tiempo.
1. Cómo conectar
2. Cómo usar
■
Seleccione la entrada de la fuente
HHDDMMII11//DDVVII
o
HHDDMMII22
usando el botón
IINNPPUUTT
del control remoto.
■
Refiérase al manual de usuario del reproductor de DVD para
seguir las instrucciones.
2
1
2
1
GG
Si el dispositivo no admite Auto HDMI, deberá configurar
adecuadamente la resolución de salida.
NOTA
MFL34797070sp-1 4/16/09 2:11 PM Page 25

CONEXIONES DE EQUIPO EXTERNO
26
CONEXIONES DE EQUIPO EXTERNO
INSTALACIÓN DEL VCR
Cuando lo conecta con una antena
■
Para evitar ruido en la imagen (interferencia), deje una distancia adecuada entre el VCR y la TV.
■
Si el formato de imagen es de 4:3, las imagenes congeladas en los lados de la pantalla se pueden quedar vi-
sibles permanentemente. Este fenómeno es común para todos los fabricantes y, por lo tanto, la garantía de
los fabricantes no cubre los productos que presentan este fenómeno.
( )
( )
ANTENNA IN
M.P.I.
L R
S-VIDEO VIDEO
OUTPUT
SWITCH
ANT IN
ANT OUT
Conector de pared
Antena
1
2
Conecte el conector de la antena exterior de RF del VCR al conector de la
AAnntteennnnaa
del televisor.
Conecte el cable de antena al puerto de la antena RF del VCR.
1. Cómo conectar
■
Ponga el interruptor de salida del VCR en 3 ó 4 y luego sintonice el televisor en el mismo número de
canal.
■
Inserte una cinta de video en el VCR y presione el botón AUDIO PLAY del VCR.
(Vea el manual de usuario del VCR).
2. Cómo usar
2
1
MFL34797070sp-1 4/16/09 2:11 PM Page 26

CONEXIONES DE EQUIPO EXTERNO
27
GG
Si los dos puertos de S-VIDEO y
VIDEO están conectados al S-
VHS VCR simultáneamente, sólo
el S-VIDEO puede ser recibido.
CUIDADO
Cuando lo conecta con el cable RCA
GG
La calidad de la imagen mejora: en comparación con
una entrada compuesta (cable RCA).
NOTA
AUDIO
REMOTE
CONTROL
OUT
R
RESET
UPDATE
M.P.I.
SERV
SPEAKE
OUT
8
AV IN 1
T IN
TAL
DIO
UT
CAL)
AUDIO
MONO
( )
S-VIDEO
VIDEO
( )
L R
S-VIDEO VIDEO
OUTPUT
SWITCH
ANT IN
ANT OUT
ANTENNA IN
M.P.I.
( )
AUDIO
REMOTE
CONTROL
OUT
RESET
UPDATE
M.P.I.
SER
SPEAK
OUT
8
AV IN 1
ENT IN
GITAL
AUDIO
OUT
PTICAL)
AUDIO
MONO
( )
S-VIDEO
VIDEO
L R
S-VIDEO VIDEO
OUTPUT
SWITCH
ANT IN
ANT OUT
ANTENNA IN
M.P.I.
Conecte las salidas de
AAUUDDIIOO
/
VVIIDDEEOO
entre la TV y el
VCR. Coincida los colores de salidas (Video = amarillo,
Audio izquierdo = blanco, y Audio derecho = rojo).
1. Cómo conectar
2. Cómo usar
■
Inserte una cinta de video en el VCR y presione el botón
PLAY del VCR. (Vea el manual de usuario del VCR).
■
Seleccione la entrada de la fuente
AAVV11
usando el botón
IINNPPUUTT
del control remoto.
■
Si está conectado al
AAVV IINN 22
, seleccione la entrada de la
fuente
AAVV22
.
Cuando lo conecta con un cable de S-Video
Conecte la salida de S-VIDEO del VCR a la entra-
da de
SS --VVIIDDEEOO
en la unidad. La calidad de imagen
mejora en comparación con la entrada compuesta nor-
mal (cable RCA).
Conecte las salidas de audio del VCR a los puertos de
AAUUDDIIOO
de la unidad.
1. Cómo conectar
2. Cómo usar
■
Inserte una cinta de video en el VCR y presione el botón
PLAY del VCR.
(Vea el manual de usuario del VCR.)
■
Seleccione la entrada de la fuente
AAVV 11
usando el botón
IINNPPUUTT
del control remoto.
■
Si está conectado al
AAVV IINN 22
, seleccione la entrada de la
fuente
AAVV22
.
1
2
1
GG
Si ud.tiene un VCR monofóni-
co,conecte el cable de audio
de VCR al puerto
AAUUDDIIOO
LL//MMOONNOO
de la unidad.
NOTA
1
1
2
MFL34797070sp-1 4/16/09 2:11 PM Page 27

CONEXIONES DE EQUIPO EXTERNO
28
CONEXIONES DE EQUIPO EXTERNO
DIGITAL AUDIO OUT (SALIDA DE AUDIO DIGITAL)
VIDEO
AUDIO
( )
S-V
M.P.I.
1(DVI)
RJP
NTERFACE
2
HDMI/DVI IN
COMPONENT IN
DIGITAL
AUDIO
OUT
(OPTICAL)
GG
Cuando conecte equipos de audio externos, como amplifi-
cadores o bocinas, desconecte las bocinas del televisor.
(
GG
pp..5588
)
NOTA
!
GG
No mire dentro del puerto de salida óptica. Mirar el rayo
láser puede dañar su vista.
PRECAUCIÓN
Connect one end of an optical cable to the TV Digital
Audio
(
Optical
)
Output port.
Connect the other end of the optical cable to the
digital audio
(
optical
)
input on the audio equipment.
Ajuste la “Bocinas de TV - Apagado” en el menú
AUDIO. (
GG
pp..5588
). Cuando se conecta a un equipo de
audio externo como amplificadores o bocinas por
favor apague las bocinas de TV.
1. Cómo conectar
2
3
1
1
2
CONFIGURACIÓN DE OTRA FUENTE DE A/V
AV IN 2
L/MONO
R
AUDIO
VIDEO
S-VIDEO
L R
VIDEO
Grabadora de video
Unidad de video juego
Conecte los puertos de
AAUUDDIIOO//VVIIDDEEOO
entre la TV y un equipo externo.
Coincida los colores de puertos (Video
= amarillo, Audio izquierdo = blanco, y
Audio derecho = rojo).
1. Cómo conectar
2. Cómo usar
■
Seleccione la salida de la fuente
AAVV22
usando
el botón
IINNPPUUTT
del control remoto.
■
Si está conectado a la entrada de
AAVV IINN11
,
seleccione la entrada de la fuente
AAVV11
.
■
Opere el equipo externo correspondiente.
Refiérase a la guía de la operación de equipo
externo.
1
1
i.e)
32/37/42LC5DC*, 32/37/42LC50C*,
42LB5DC, 42LB50C
Envíe la señal de audio de su TV a un equipo de audio externo a través del puerto óptico Digital Audio
Output (Salida de audio digital).
MFL34797070sp-1 4/16/09 2:11 PM Page 28

CONEXIONES DE EQUIPO EXTERNO
29
INSTALACIÓN DE LA PC
Cuando lo conecta con un cable de HDMI al DVI
Conecte la salida de DVI del decodificador digital al
puerto de
HHDDMMII//DDVVII IINN 11((DDVVII))
en la unidad.
Conecte las salidas de audio del decodificador al puer-
to de
AAUUDDIIOO IINN
((
RRGGBB//DDVVII
))
en la unidad.
1. Cómo conectar
2. Cómo usar
■
Encienda la PC y la unidad.
■
Seleccione la entrada de la fuente de
HHDDMMII11//DDVVII
usando
el botón de
IINNPPUUTT
del control remoto.
2
1
Esta TV proporciona la capacidad de Plug and Play, significa que la PC se ajusta automáticamente por las
programaciones de la TV.
Cuando la conecte con un cable de D-sub de 15 terminales
Conecte la salida de RGB de la PC al puerto de
RRGGBB
IINN
en la unidad.
Conecte las salidas de audio de la PC al puerto de
AAUUDDIIOO IINN
((
RRGGBB,, DDVVII
))
en la unidad.
1. Cómo conectar
2. Cómo usar
■
Encienda la PC y la unidad.
■
Seleccione la entrada de la fuente
RRGGBB--PPCC
usando el
botón
IINNPPUUTT
del control remoto.
2
1
VIDEO
( )
1(DVI)
RJP
INTERFACE
2
HDMI/DVI IN
COMPONENT
DIGITA
AUDIO
OUT
(OPTICA
DVI-PC OUTPUT AUDIO
( )
( )
RGB IN
AUDIO
IN
(RGB, DVI)
VICE ONLY
ER
( )
1
2
RGB OUTPUT AUDIO
( )
VIDEO
AUDIO
MONO
( )
REMOTE
CONTROL
OUT
RGB IN
AUDIO
IN
(RGB, DVI)
ATE
SERVICE ONLY
SPEAKER
OUT
8
AV IN 1
1
2
MFL34797070sp-1 4/16/09 2:11 PM Page 29

CONEXIONES DE EQUIPO EXTERNO
30
CONEXIONES DE EQUIPO EXTERNO
GG
Dependiendo de la tarjeta gráfica, el modo DOS
puede no funcionar si utiliza un cable HDMI a DVI.
GG
Revise la imagen del televisor. Puede que hay un
ruido de acuerdo a alguna resolución, patrón ver-
tical, contraste o brillo en el modo PC. Entonces
cambie el modo PC a otra resolución, cambie la
velocidad de regenerar, o ajuste el brillo y con-
traste en el menú hasta que la imagen esté limpia.
Si la velocidad para regenerar de la tarjeta de video
de la PC no puede ser cambiada, entonces cambie
la tarjeta o consulte al fabricante de la tarjeta.
GG
Evite mantener una imagen fija en pantalla durante
largos periodos de tiempo. La imagen fija podría
grabarse permanentemente en pantalla.
GG
Las formas de la entrada de sincronización para la
frecuencia horizontal y vertical están separadas.
NOTA
!
Resolución de Desplieguea
(
RGB/HDMI1-PC
)
Frecuencia Frecuencia
Horizontal(kHz) Vertical(Hz)
31.469 70.08
31.469 59.94
37.861 72.80
37.500 75.00
35.156 56.25
37.879 60.31
48.077 72.18
46.875 75.00
48.363 60.00
56.476 70.06
60.023 75.02
47.700 60.00
47.720 59.799
47.130 59.658
Resolución
640x350
*
Sólo para RGB-DOS : 640x350
640x480
800x600
1024x768
Resolución de Desplieguea (
HDMI2-DTV)
Frecuencia Frecuencia
Horizontal(kHz) Vertical(Hz)
31.500 60.00
31.469 59.94
44.960 59.94
45.000 60.00
33.720 59.94
33.750 60.00
Resolución
720x480
1280x720
1920x1080
1280x768
1360x768
1366x768
Resolución de Desplieguea
(
Y, CB /PB,CR /PR
)
Frecuencia Frecuencia
Horizontal(kHz) Vertical(Hz)
15.73 59.94
15.73 60.00
31.47 59.94
31.50 60.00
44.96 59.94
45.00 60.00
33.72 59.94
33.75 60.00
Resolución
1280x720
1920x1080
720x480
Resolución de Desplieguea (RGB/HDMI1-DTV)
Frecuencia Frecuencia
Horizontal(kHz) Vertical(Hz)
31.50 60.00
31.47
(HDMI1-DTV:31.469) 59.94
44.96 59.94
45.00 60.00
33.72 59.94
33.75 60.00
Resolución
720x480
1280x720
1920x1080
MFL34797070sp-1 4/16/09 2:11 PM Page 30

CONEXIONES DE EQUIPO EXTERNO
31
Resolución de Desplieguea
(
RGB/HDMI1-PC
)
Frecuencia Frecuencia
Horizontal(kHz) Vertical(Hz)
31.469 70.08
31.469 59.94
37.861 72.80
37.500 75.00
35.156 56.25
37.879 60.31
48.077 72.18
46.875 75.00
48.363 60.00
56.476 70.06
60.023 75.02
47.700 60.00
47.720 59.799
47.130 59.658
63.668 59.895
65.317 59.978
74.537 59.869
66.587 59.934
74.038 59.950
Resolución
640x350
(Sólo RGB)
*
Sólo para RGB-DOS : 640x350
640x480
800x600
1024x768
Resolución de Desplieguea (
HDMI2-DTV)
Frecuencia Frecuencia
Horizontal(kHz) Vertical(Hz)
31.500 60.00
31.469 59.94
44.960 59.94
45.000 60.00
33.720 59.94
33.750 60.00
67.500 60.00
Resolución
720x480
1280x720
1920x1080
1280x768
1360x768
1366x768
Resolución de Desplieguea
(
Y, CB /PB,CR /PR
)
Frecuencia Frecuencia
Horizontal(kHz) Vertical(Hz)
15.73 59.94
15.73 60.00
31.47 59.94
31.50 60.00
44.96 59.94
45.00 60.00
33.72 59.94
33.75 60.00
67.50 60.00
Resolución
1280x720
1920x1080
720x480
Resolución de Desplieguea (RGB/HDMI1-DTV)
Frecuencia Frecuencia
Horizontal(kHz) Vertical(Hz)
31.50 60.00
31.47
(HDMI1-DTV:31.469) 59.94
44.96 59.94
45.00 60.00
33.72 59.94
33.75 60.00
67.43
(HDMI1-DTV:67.5) 59.94
Resolución
720x480
1280x720
1920x1080
1280x1024
(Sólo RGB)
1400x1050
(Sólo RGB)
1600x1200
1920x1080
1920x1200
* 42LB5DC, 42LB50C
MFL34797070sp-1 4/16/09 2:11 PM Page 31

VER LA TV / CONTROL DE CANAL
32
FUNCIONES DE LOS BOTONES DEL CONTROL REMOTO
VER LA TV / CONTROL DE CANAL
Cuando use el control remoto dirija el del control remoto hacia el panel frontal de la TV.
ENTER
TVTV
INPUT
INPUT MODE
DVD
MULTI
EXIT
VOL
EZ SOUND
INFO
SWAP
EZ PIC
TIMER
MUTE
CH
SAP
CC
RATIO
MENU
VCR
POWER
123
456
789
0
FLASH
BACK
PIP
PIP CH - PIP CH +
PIP INPUT
PAGE
POWER
TV INPUT
INPUT
MULTI
THUMBSTICK
(Up/Down/Left
/Right/ENTER)
VOLUME UP
/DOWN
TIMER
MUTE
CHANNEL
UP/DOWN
PAGE
UP/DOWN
— (GUIÓN)
FLASH BACK
Enciende su TV o deja cualquier otro equipo programado
encendido o apagado dependiendo del modo.
En las fuentes de entrada AV 1-2, Componente, RGB,
HDMI1/DVI y HDMI2, la pantalla vuelve al último canal de
TV.
Los modos de entrada externa rotan en una secuencia
regular: TV, AV1-2, Componente, RGB, HDMI1/DVI y
HDMI2 .
Selecciona: RGB, HDMI1/DVI, HDMI2 y fuentes de
entrada de componentes.
Ajusta el brillo de la pantalla.
Controla las grabadoras de vídeo o los reproductores de DVD.
Navega a través de los menús de Pantalla y ajusta el sis-
tema de tu preferencia.
Aumenta/disminuye el nivel de sonido.
Programa el temporizador para dormir.
GG
pp..6699
Enciende y apaga el sonido.
GG
pp..3344
Selecciona los canales disponibles encontrados durante
la escaneada manual.
Cambia de un conjunto completo de información en pantalla
a la siguiente página.
Entra al número de canales multiples de programa como
2-1, 2-2, etc.
Sintoniza el último canal visto.
Botones
NUMÉRICOS
VCR/DVD
control buttons
MFL34797070sp-1 4/16/09 2:11 PM Page 32

VER LA TV / CONTROL DE CANAL
33
■
Abra la tapa del compartimiento de las baterías en
la parte posterior e instale las baterías con la
polaridad correcta.(+con +,-con -)
■
Instale dos baterías de 1.5 V tipo AA. No mezcle
las baterías nuevas con las usadas.
■
Cierre la tapa.
Colocando las Baterías
Seleccione el modo operativo de la unidad: TV, DVD, VCR
Alterna activando o desactivando los modos de ventana doble de imagen secundaria.
GG
pp..4411
Cambia el canal PIP.
GG
pp..4422
Selecciona la fuente de entrada conectada para la imagen secundaria.
GG
pp..4411
Selecciona la imagen predeterminada de fábrica en función de las condiciones de observación.
GG
pp..4455
Para seleccionar el sonido apropiado de acuerdo al programa.
GG
pp..5555
Intercambia imágenes principales/secundarias.
GG
pp..4422
Muestra información en la parte superior de la pantalla.
Borra todos los desplegados en la pantalla y vuelve a la TV donde estaba viendo desde
cualquier menú.
Seleccione un subtítulo.
GG
pp..6622
(*En el modo DTV/CADTV
GG
pp..6633
)
Selecciona un menú.
Selecciona el tamaño de imagen deseado.
GG
pp..4433--4444
Analog mode: Selecciona el sonido MTS (Mono, Stereo, y SAP)
GG
pp..5599
DTV mode: lenguaje de audio.
MODE
PIP
PIP CH +/-
PIP INPUT
EZ PIC
EZ SOUND
SWAP
INFO
EXIT
CC
MENU
RATIO
SAP
MFL34797070sp-1 4/16/09 2:11 PM Page 33

VER LA TV / CONTROL DE CANAL
34
VER LA TV / CONTROL DE CANAL
ENCENDIENDO LA TV
NOTA
!
GG
Si usted va a estar ausente en vacaciones, desconecte el TV del tomacorriente.
Primero conecte el cordón de alimentación correctamente.
En este momento, la TV se cambia al modo de espera.
■
En el modo de espera para encender la TV, presione los botones (o
OONN//OOFFFF
) de la TV o presione los botones
PPOOWWEERR
del control remo-
to, si se encenderá la TV.
Seleccione la fuente de visualización utilizando el botón
TTVV IINNPPUUTT
,
IINNPPUUTT
del control remoto.
■
Esta TV está programada para recordar el último modo en que se ajustó,
incluso si la apaga.
Cuando quiera apagar la TV, pulse el botón
PPOOWWEERR
del control remoto. La
TV regresará al modo de espera.
1
2
3
Presione el botón
CCHH
+ - o de NÚMERO para seleccionar un número del
canal.
1
AJUSTE DEL VOLUMEN
AJUSTE DEL CANAL
Presione el botón
VVOOLL
+ o - para ajustar el volumen.
Si ud. quiere apagar el sonido, presione el botón
MMUUTTEE
.
Ud. puede cancelar esta función presionando el botón
MMUUTTEE
o
VVOOLL
+ o -
button.
Ajuste el volumen según su preferencia personal.
1
2
3
MFL34797070sp-1 4/16/09 2:11 PM Page 34

VER LA TV / CONTROL DE CANAL
35
SELECCIÓN Y AJUSTE DEL MENÚ PANTALLA
Presione el botón
MMEENNUU
y enseguida presione los botones
DD
o
EE
para desplegar cada menú.
Presione el botón
GG
y enseguida presione los botones
DD EE FF GG
para seleccionar un
ítem del menú.
El OSD (On Screen Display, Despliegue En la Pantalla)de su TV puede ser un poco diferente
que este manual.
2
1
SETUP
VIDEO
SCREEN
TIME
AUDIO
EZ Búsqueda
Búsqueda manual
Edición de Canales
Señal DTV
Signal de Canales
EZ Video
Temperatura Color
XD
Avanzado
Reajuste
Audio Lenguaje
EZ SoundRite
EZ Audio
Balance 0
Bocinas de TV
Reloj Automático
Reloj Manual
Timer Off
Timer On
Auto Off
Config. Auto
Config. Manual
Modo XGA
Reajuste
SCREEN
LOCK
OPTION
TIME
AUDIO
VIDEO
SETUP
SCREEN
LOCK
OPTION
TIME
AUDIO
VIDEO
SETUP
LOCK
SCREEN
LOCK
OPTION
TIME
AUDIO
VIDEO
SETUP
SCREEN
LOCK
OPTION
TIME
AUDIO
VIDEO
SETUP
SCREEN
LOCK
OPTION
TIME
AUDIO
VIDEO
SETUP
OPTION
Relación de Aspecto
Subtít/Texto
Opción Subtítulos
Idioma(Language)
Metodo ISM
Bajo Consumo
Set ID
SCREEN
LOCK
OPTION
TIME
AUDIO
VIDEO
SETUP
Sólo televisor Plasma
Sist. De Bloqueo
Fijar Contraseña
Bloquear Canales
Clasif. Películas
Clasif. Niños
Clasif. General
Bloqueo entradas
Clasif. Descargable
SCREEN
LOCK
OPTION
TIME
AUDIO
VIDEO
SETUP
MFL34797070sp-1 4/16/09 2:11 PM Page 35

VER LA TV / CONTROL DE CANAL
36
VER LA TV / CONTROL DE CANAL
BÚSQUEDA DE CANALES
Presione el botón
MMEENNUU
y luego presione el botón
DD
o
EE
para seleccionar el menú
SSEETTUUPP
.
Presione el botón
GG
y luego presione el botón
DD
o
EE
para seleccionar
EEZZ BBúússqquueeddaa
.
Presione el botón
EENNTTEERR
para empezar la búsque-
da de canales. Deje
EEZZ BBúússqquueeddaa
completar el
ciclo de busqueda por
AANNTTEENNNNAA
y
CCAABBLLEE
.
Busca automaticamente todos los canales disponibles por
las entradas de antena o Cable y los guarda en la memoria
de la lista de canales.
Corra
EZ Búsqueda
otra vez después de cualquier cambio
de conexión de antena/Cable.
Se requiere una contraseña para acceder al menú
Sintonización automática si el sistema de bloqueo está
encendido.
EZ Búsqueda
G
Búsqueda manual
Edición de Canales
Señal DTV
Signal de Canales
Selección (ó ) le llevará al
menú de EZ búsqueda.
EZ Búsqueda
G
Búsqueda manual
Edición de Canales
Señal DTV
Signal de Canales
2
3
1
1
2
3
Escaneo automático (EZ Búsqueda)
EZ Búsqueda
Búsqueda manual
Edición de Canales
Señal DTV
Signal de Canales
SCREEN
LOCK
OPTION
TIME
AUDIO
VIDEO
SETUP
Selección (ó ) le llevará al
menú de EZ búsqueda.
MENU Prev.
Next
Procesando...
ANALOG 9
Found Channel(s) 4
SCREEN
LOCK
OPTION
TIME
AUDIO
VIDEO
SETUP
SCREEN
LOCK
OPTION
TIME
AUDIO
VIDEO
SETUP
MFL34797070sp-1 4/16/09 2:11 PM Page 36

VER LA TV / CONTROL DE CANAL
37
Se requiere una contraseña para acceder al menú
Búsqueda manual
si el sistema de bloqueo está
encendido.
Presione el botón
MMEENNUU
y luego presione el botón
DD
o
EE
para seleccionar el menú
SSEETTUUPP
.
Presione el botón
GG
y luego presione el botón
DD
o
EE
para seleccionar
BBúússqquueeddaa mmaannuuaall
.
Presione el botón
GG
y luego presione el botón
DD
o
EE
para seleccionar Analog(
TTVV
,
CCAATTVV
),
Digital(
DDTTVV
,
CCAADDTTVV
).
Presione el botón
GG
y luego presione el botón
DD
o
EE
para seleccionar el número de canal que ud.
quiere agregar o eliminar.
Presione el botón
EENNTTEERR
para agregar o eliminar
números de canal.
Presione el botón
EEXXIITT
para regresar a la TV donde
estaba viendo o presione el botón
MMEENNUU
para regre-
sar al menú previo.
EZ Búsqueda
Búsqueda manual
G
Edición de Canales
Señal DTV
Signal de Canales
Tipo de Canal Numero
ANALOG 2
EZ Búsqueda
Búsqueda manual
Edición de Canales
Señal DTV
Signal de Canales
2
1
4
3
6
5
Tipo de Canal Numero
ANALOG
GG
2
Presione
para borrar el canal.
ANALOG 2
DD
EE
1
2
3 4 5
Agregar/Eliminar los Canales
(Búsqueda manual)
EZ Búsqueda
Búsqueda manual
Edición de Canales
Señal DTV
Signal de Canales
SCREEN
LOCK
OPTION
TIME
AUDIO
VIDEO
SETUP
SCREEN
LOCK
OPTION
TIME
AUDIO
VIDEO
SETUP
SCREEN
LOCK
OPTION
TIME
AUDIO
VIDEO
SETUP
MFL34797070sp-1 4/16/09 2:11 PM Page 37

VER LA TV / CONTROL DE CANAL
38
VER LA TV / CONTROL DE CANAL
La lista de cliente puede ser creada moviendo cada canal
encendido o apagado con el botón ENTER. Los canales en
la lista de cliente se aparecen en el color negro, y los canales
eliminados en la lista de cliente se aparecen en el color gris.
Una vez que un canal está resaltado ud. lo puede agregar o
eliminar referiendose a la ventana pequeña en la esquina
izquierda superior de la pantalla.
Presione el botón
MMEENNUU
y luego presione el botón
DD
o
EE
para seleccionar el menú
SSEETTUUPP
.
Presione el botón
GG
y luego presione el botón
DD
o
EE
para seleccionar
EEddiicciióónn ddee CCaannaalleess
.
Presione el botón
GG
y luego presione el botón
DD
o
EE
para seleccionar
AANNAALLOOGG
y
DDIIGGIITTAALL
.
Presione el botón
GG
y luego presione el botón
DD
o
EE
para seleccionar un canal y luego utilice el
botón
EENNTTEERR
para agregar o eliminarlo.
Presione el botón
EEXXIITT
para regresar a la TV donde
estaba viendo o presione el botón
MMEENNUU
para regre-
sar al menú previo.
EZ Búsqueda
Búsqueda manual
Edición de Canales
Señal DTV
Signal de Canales
2
1
3
4
5
1
2
3 4
Edición de Canales
DD
EE
G
DD
EE
ANALOG
EZ Búsqueda
Búsqueda manual
Edición de Canales
G
Señal DTV
Signal de Canales
ANALOG
DD
EE
2-0
4-0
6-0
9-0
11-0
13-0
14-0
2-0
4-0
6-0
9-0
11-0
13-0
14-0
EZ Búsqueda
Búsqueda manual
Edición de Canales
Señal DTV
Signal de Canales
SCREEN
LOCK
OPTION
TIME
AUDIO
VIDEO
SETUP
SCREEN
LOCK
OPTION
TIME
AUDIO
VIDEO
SETUP
SCREEN
LOCK
OPTION
TIME
AUDIO
VIDEO
SETUP
MFL34797070sp-1 4/16/09 2:11 PM Page 38

VER LA TV / CONTROL DE CANAL
39
FUERZA DE LA SEÑAL DTV
Muestra que tan fuerte está su señal DTV y si necesta ajustar la entra-
da digital de su antena o Cable. Cuanto más alta sea la fuerza de la
señal, menos probable será que haya una degradación de la imagen.
Señales DTV: Sólo cuando la señal de entrada es DTV o CADTV, esta
función está disponible.
Presione el botón
MMEENNUU
y luego presione el botón
DD
o
EE
para seleccionar el menú
SSEETTUUPP
.
Presione el botón
GG
y luego presione el botón
DD
o
EE
para seleccionar
SSeeññaall DDTTVV..
Vea el monitor de fuerza de señal de pantalla para verificar la
calidad de señal que está recibiendo.
Presione el botón
EEXXIITT
para regresar a la TV donde
estaba viendo o presione el botón
MMEENNUU
para regre-
sar al menú previo.
EZ Búsqueda
Búsqueda manual
Edición de Canales
Señal DTV
Signal de Canales
Mala Normal Buena
2
3
4
1
1
2 3
EZ Búsqueda
Búsqueda manual
Edición de Canales
Señal DTV
Signal de Canales
SCREEN
LOCK
OPTION
TIME
AUDIO
VIDEO
SETUP
SCREEN
LOCK
OPTION
TIME
AUDIO
VIDEO
SETUP
MFL34797070sp-1 4/16/09 2:11 PM Page 39

VER LA TV / CONTROL DE CANAL
40
VER LA TV / CONTROL DE CANAL
SIGNAL DE CANALES
Seleccione etiquetas preestablecidas para sus canales.
Si una etiqueta de canal está proporcionada mediante
señal desde la emisora, la TV muestra un nombre corto
para este, aunque usted no haya preestablecido etiqueta
alguna para dicho canal.
Presione el botón
MMEENNUU
y luego presione el botón
DD
o
EE
para seleccionar el menú
SSEETTUUPP
.
Presione el botón
GG
y luego presione el botón
DD
o
EE
para seleccionar
SSiiggnnaall ddee CCaannaalleess..
Presione el botón
GG
y, a continuación, utilice los botones
DD
o
EE
para seleccionar un canal para etiquetar.
Presione el botón
GG
y, a continuación, utilice los
botones
DD
o
EE
para seleccionar la etiqueta apropiada
para dicho canal.
Presione el botón
EEXXIITT
para regresar a la TV donde
estaba viendo o presione el botón
MMEENNUU
para regre-
sar al menú previo.
EZ Búsqueda
Búsqueda manual
Edición de Canales
Señal DTV
Signal de Canales
G
2
3
4
5
1
1
2 3
Ch. ANALOG 2
Logo No Logo
EZ Búsqueda
Búsqueda manual
Edición de Canales
Señal DTV
Signal de Canales
SCREEN
LOCK
OPTION
TIME
AUDIO
VIDEO
SETUP
SCREEN
LOCK
OPTION
TIME
AUDIO
VIDEO
SETUP
MFL34797070sp-1 4/16/09 2:11 PM Page 40

CONTROL DE IMAGEN
41
DISFRUTANDO DE LA VENTANA DOBLE
CONTROL DE IMAGEN
El modo de ventana doble divide la pantalla en dos partes, permitiendo que se
muestren dos fuentes de imagen en la TV al mismo tiempo. Cada fuente es emitida
a media pantalla.
Disfrutando de la ventana doble
Presione el botón PIP para acceder a la imagen secundaria.
Ventana doble
Selección de una fuente de señal de entrada para el modo de
ventana doble
Utilice el botón PIP INPUT para seleccionar la fuente de entrada para la imagen secundaria.
Con cada presión del botón PIP INPUT cambiará la fuente PIP.
PIP desactivado
Utilice el botón PIP INPUT para seleccionar la fuente de entrada para la imagen secundaria. Con
cada presión del botón PIP INPUT cambiará la fuente PIP.
Fuente de imagen principal Fuentes de imagen secundaria disponibles
TV AV1, AV2
AV1 TV, AV2
AV2 TV, AV1
RGB, vídeo por componentes, HDMI1/DVI, HDMI2 TV, AV1, y AV2
MFL34797070sp-2 4/16/09 2:21 PM Page 41

CONTROL DE IMAGEN
42
CONTROL DE IMAGEN
Presione repetidamente el botón SWAP para cambiar entre la imagen principal y secundaria.
■
No es posible utilizar como fuentes de entrada principal las de vídeo por componentes, RGB,
HDMI1/DVI, HDMI2 para intercambiar entre la imagen principal y la secundaria.
Intercambiando entre PIP/Ventana doble
1
Selección de un canal de TV mediante PIP
Utilice el botón PIP CH +/- para seleccionar un canal como imagen secundaria.
El número del canal seleccionado se muestra justo debajo de la fuente de entrada de la imagen
principal.
1
MFL34797070sp-2 4/16/09 2:21 PM Page 42

CONTROL DE IMAGEN
43
TAMAÑO DE LA IMAGEN
(CONTROL DE RELACION DE ASPECTO)
Esta función permite escoger el modo de visualización de una imagen analógica
con una relación de aspecto 4:3 en su TV. Al recibir una imagen analógica con una
relación de aspecto 4:3 en su 16:9 TV, será necesario especificar cómo se visu-
alizará la imagen.
■
La fuente de entrada RGB-PC/DVI-PC utilizan una proporción de aspecto de 4:3 ó
16:9.
Por Programa
Selecciona la proporción de imagen adecuada para que se corresponda con la imagen fuente.
4:3
La selección siguiente le dejará ver una imagen con la proporción original de aspecto 4:3.
16:9
Seleccione cuando desea ajustar la imagen horizontalmente, en una proporción lineal para llenar la pantalla
completa.
Presione el botón
RRAATTIIOO
repetidamente para seleccionar el tamaño de la imagen
deseado.
También ud. puede hacer la
RReellaacciióónn ddee AAssppeeccttoo
con el menú
IIMMAAGGEENN
.
1
4:3
Por Programa
Por Programa
(4:3 4:3)
(16:9 16:9)
16:9
MFL34797070sp-2 4/16/09 2:21 PM Page 43

CONTROL DE IMAGEN
44
CONTROL DE IMAGEN
Horizontal
Seleccione Horizontal cuando ud.quiere ajustar la imagen en la proporción no-lineal, que es más largo en los dos lados para crear
una vista espectacular.
Zoom 1
Seleccione cuando desea ver la imagen sin ninguna alteración. Sin embargo, las porciones superior e inferior de la imagen serán
cortadas.
Zoom 2
Seleccione Zoom 2 cuando desee modificar la imagen, ya sea para ampliarla horizontalmente o reducirla verticalmente. La ima-
gen está a mitad de camino entre la modificación y la cobertura de la imagen.
Horizontal
Zoom 1
Zoom 2
MFL34797070sp-2 4/16/09 2:21 PM Page 44

CONTROL DE IMAGEN
45
AJUSTES DE LA IMAGEN PRESTABLECIDA
EZ Video - Presintonizada
Presione el botón
EEZZ PPIICC
para seleccionar la condición de
imagen deseada:
LLuuzz ddeell DDííaa
,
NNoorrmmaall
,
NNooccttuurrnnoo
,
UUssuuaarriioo 11
, and
UUssuuaarriioo
22
(su propia configuración).
Presione el botón
EEXXIITT
para regresar a la TV donde estaba
viendo.
La EZ video ajusta la TV para obtener el mejor aspecto de la ima-
gen. Seleccione el valor preestablecido en el menú de EZ video
basado en la categoría del programa.
LLuuzz ddeell DDííaa
,
NNoorrmmaall
,
NNooccttuur
rnnoo
son preestablecidos en fábrica
para lograr la mejor calidad de imagen, y no son ajustables.
Sólo en los modos
UUssuuaarriioo 11
, y
UUssuuaarriioo 22
el usuario podrá
ajustar directamente el contraste, brillo, color, nitidez, tinte y
Control de luz de fondo.
■
Usted también puede ajustar EZ Video desde el menú
VVIIDDEEOO
.
2
1
EZ Video
G
Temperatura Color
XD
Avanzado
Reajuste
Luz del Día
Normal
Nocturno
Usuario 1
Usuario 2
EZ Video
Temperatura Color
XD
Avanzado
Reajuste
SCREEN
LOCK
OPTION
TIME
AUDIO
VIDEO
SETUP
SCREEN
LOCK
OPTION
TIME
AUDIO
VIDEO
SETUP
MFL34797070sp-2 4/16/09 2:21 PM Page 45

CONTROL DE IMAGEN
46
CONTROL DE IMAGEN
Tono de color - Presintonizada
Elija uno de los tres ajustes automáticos de color. Seleccione
warm (caliente) para realzar los colores más cálidos, como
el rojo, o seleccione cool (frío) para ver menos colores
intensos y más tonos azules.
Al seleccionar las opciones de EZ Video (Usuario 1y Usuario
2), puede elegir Temperatura Color.
Presione el botón
MMEENNUU
y luego presione el botón
DD
o
EE
para seleccionar el menú
VVIIDDEEOO
.
Presione el botón
GG
y luego presione el botón
DD
o
EE
para seleccionar
TTeemmppeerraattuurraa CCoolloorr
.
Presione el botón
GG
y luego presione el botón
DD
o
EE
para seleccionar
FFrrííaa
,
NNoorrmmaall
,
CCáálliiddaa
o
UUssuuaarriioo
.
Presione el botón
EEXXIITT
para regresar a ver TV o pre-
sione el botón
MMEENNUU
para regresar al menú previo.
2
3
4
1
EZ Video
Temperatura Color
G
XD
Avanzado
Reajuste
Fría
Normal
Cálida
Usuario
1
2 3
EZ Video
Temperatura Color
XD
Avanzado
Reajuste
SCREEN
LOCK
OPTION
TIME
AUDIO
VIDEO
SETUP
SCREEN
LOCK
OPTION
TIME
AUDIO
VIDEO
SETUP
MFL34797070sp-2 4/16/09 2:21 PM Page 46

CONTROL DE IMAGEN
47
CONTROL MANUAL DE IMAGEN
EZ Video – Modo usuario
Ajuste la apariencia de la imagen según sus preferencias y
situaciones de visualización.
Al seleccionar las opciones de EZ Video (Usuario 1y Usuario
2), puede elegir Temperatura Color.
EZ Video
Temperatura Color
XD
Avanzado
Reajuste
Luz del Día
Normal
Nocturno
Usuario 1
G
Usuario 2
Contraste 85
FF
G
EE
Usuario1
Contraste 85
G
Brillo 50
Color 50
Nitidez 50
Tinte 0
R G
1
2 3
4
5
Presione el botón
MMEENNUU
y luego presione el botón
DD
o
EE
para seleccionar el menú
VVIIDDEEOO
.
Presione el botón
GG
y luego presione el botón
DD
o
EE
para seleccionar
EEZZ VViiddeeoo
.
Presione el botón
GG
y luego presione el botón
DD
o
EE
para seleccionar
UUssuuaarriioo 11
o
UUssuuaarriioo 22
.
Presione el botón
GG
y luego presione el botón
DD
o
EE
para seleccionar la opción de imagen deseada
(
CCoonnttrraassttee
,
BBrriilllloo
,
CCoolloorr
,
NNiittiiddeezz
y
TTiinnttee
).
Presione el botón
GG
y luego presione el botón
FF
o
GG
para hacer el ajuste apropiado.
Presione el botón
EEXXIITT
para regresar a ver TV o pre-
sione el botón
MMEENNUU
para regresar al menú previo.
2
3
4
5
6
1
EZ Video
Temperatura Color
XD
Avanzado
Reajuste
SCREEN
LOCK
OPTION
TIME
AUDIO
VIDEO
SETUP
SCREEN
LOCK
OPTION
TIME
AUDIO
VIDEO
SETUP
SCREEN
LOCK
OPTION
TIME
AUDIO
VIDEO
SETUP
SCREEN
LOCK
OPTION
TIME
AUDIO
VIDEO
SETUP
MFL34797070sp-2 4/16/09 2:21 PM Page 47

CONTROL DE IMAGEN
48
CONTROL DE IMAGEN
También puede ajustar los valores detallados (Rojo, Verde,
Azul) mediante la selección del menú Usuario.
Tono de color - Modo usuario
Presione el botón
MMEENNUU
y luego presione el botón
DD
o
EE
para seleccionar el menú
VVIIDDEEOO
.
Presione el botón
GG
y luego presione el botón
DD
o
EE
para seleccionar
TTeemmppeerraattuurraa CCoolloorr
.
Presione el botón
GG
y luego presione el botón
DD
o
EE
para seleccionar
UUssuuaarriioo
.
Presione el botón
GG
y luego presione el botón
DD
o
EE
para seleccionar
RRoojjoo
,
VVeerrddee
o
AAzzuull
.
Presione el botón
GG
y luego presione el botón
FF
o
GG
para hacer el ajuste apropiado.
■
El rango de ajuste de
RRoojjoo
,
VVeerrddee
o
AAzzuull
es -40
--
+40.
Presione el botón
EEXXIITT
para regresar a ver TV o pre-
sione el botón
MMEENNUU
para regresar al menú previo.
EZ Video
Temperatura Color
XD
Avanzado
Reajuste
2
3
4
5
6
1
Usuario
Rojo 0
G
Verde 0
Azul 0
Fría
Normal
Cálida
Usuario
G
Rojo 0
FF
G
EE
2 3
1
4
5
EZ Video
Temperatura Color
XD
Avanzado
Reajuste
SCREEN
LOCK
OPTION
TIME
AUDIO
VIDEO
SETUP
SCREEN
LOCK
OPTION
TIME
AUDIO
VIDEO
SETUP
SCREEN
LOCK
OPTION
TIME
AUDIO
VIDEO
SETUP
SCREEN
LOCK
OPTION
TIME
AUDIO
VIDEO
SETUP
MFL34797070sp-2 4/16/09 2:21 PM Page 48

CONTROL DE IMAGEN
49
XD - TECNOLOGÍA DE MEJORA DE LA IMAGEN
Presione el botón
MMEENNUU
y luego presione el botón
DD
o
EE
para seleccionar el menú
VVIIDDEEOO
.
Presione el botón
GG
y luego presione el botón
DD
o
EE
para seleccionar
XX DD
.
Presione el botón
GG
y luego presione el botón
FF
o
GG
para seleccionar
AAuuttoommááttiiccoo
o
MMaannuuaall
.
Presione el botón
EEXXIITT
para regresar a ver TV o pre-
sione el botón
MMEENNUU
para regresar al menú previo.
XD es una tecnología de perfeccionamiento de imagen exclu-
siva de LG Electronics que permite desplegar una fuente HD
a través de un avanzado procesador de algoritmo de señal
digital.
Cuando seleccione las opciones EZ Video(Luz del Día, Normal
y Nocturno), XD cambia automáticamente a Auto
(Automático).
Al seleccionar las opciones de EZ Video (Usuario 1 y
Usuario 2),podrá seleccionar Automático/Manual y al selec-
cionar Manual, podrá ajustar el contraste XD, color XD y el
NR XD.
EZ Video
Temperatura Color
XD
G
Avanzado
Reajuste
2
3
4
1
SSeelleecccciióónn ddee MMaannuuaall
1. Presione el botón
EE
y luego presione el botón
DD
ó
EE
para seleccionar
CCoonnttrraassttee XXDD
,
CCoolloorr
XXDD,, NNRR XXDD
o
MMPPEEGG NNRR
.
■
CCoonnttrraassttee XXDD::
Optimiza el contraste automáti-
camente de acuerdo al brillo de reflexión.
■
CCoolloorr XXDD::
Ajusta los colores de reflexión
automáticamente para reproducir lo más cerca
posible a los colores naturales.
■
NNRR XXDD ::
Remueve el ruido hasta el punto donde
no se daña la imagen original.
■
MMPPEEGG NNRR::
Para reducir el ruido de imagen que
puede aparecer en pantalla mientras disfruta de la
TV.
2. Presione el botón
FF
o
GG
para seleccionar
EEnncc..
o
AAppaagg..
.
2 3
1
Automático
Manual
Contraste XD
Enc.
Color XD Enc.
NR XD
Apag.
MPEG NR 0
EZ Video
Temperatura Color
XD
Avanzado
Reajuste
SCREEN
LOCK
OPTION
TIME
AUDIO
VIDEO
SETUP
SCREEN
LOCK
OPTION
TIME
AUDIO
VIDEO
SETUP
MFL34797070sp-2 4/16/09 2:21 PM Page 49

CONTROL DE IMAGEN
50
CONTROL DE IMAGEN
AVANZADO - MODO CINEMA 3:2 DESPLEGABLE
Presione el botón
MMEENNUU
y luego presione el botón
DD
o
EE
para seleccionar el menú
VVIIDDEEOO
.
Presione el botón
GG
y luego presione el botón
DD
o
EE
para seleccionar
AAvvaannzzaaddoo
.
Presione el botón
GG
y luego presione el botón
DD
o
EE
para seleccionar
CCiinnee
.
Utilice el botón
FF
o
GG
para seleccionar
EEnncc..
o
AAppaagg..
.
Presione el botón
EEXXIITT
para regresar a ver TV o pre-
sione el botón
MMEENNUU
para regresar al menú previo.
Configure la TV para la apariencia de la mejor imagen para
las películas.
Cuando ud. opera el cine (3:2 Modo total o Modo de
Corrección del Cine), la TV ajustará a 24 cuadros por segun-
do de video desde las películas de 30 cuadros por segundo
de video para el despliegue.
Esta función sólo se opera en los modos de análogo, AV1,
AV2, Componente 480i .
2
3
4
5
1
2 3 4
1
EZ Video
Temperatura Color
XD
Avanzado
G
Reajuste
Cine
Apag.
Nivel Negro
Alto
EZ Video
Temperatura Color
XD
Avanzado
Reajuste
SCREEN
LOCK
OPTION
TIME
AUDIO
VIDEO
SETUP
SCREEN
LOCK
OPTION
TIME
AUDIO
VIDEO
SETUP
MFL34797070sp-2 4/16/09 2:21 PM Page 50

CONTROL DE IMAGEN
51
AVANZADO - NIVEL NEGRO (OSCURIDAD)
Presione el botón
MMEENNUU
y luego presione el botón
DD
o
EE
para seleccionar el menú
VVIIDDEEOO
.
Presione el botón
GG
y luego presione el botón
DD
o
EE
para seleccionar
AAvvaannzzaaddoo
.
Presione el botón
GG
y luego presione el botón
DD
o
EE
para seleccionar
NNiivveell NNeeggrroo
.
Utilice el botón
FF
o
GG
para seleccionar para selec-
cionar
BBaajjoo
o
AAllttoo
.
■
BBaajjoo
La reflexión de pantalla se pone más obscura.
■
AAllttoo
La reflexión de pantalla se pone más clara.
Presione el botón
EEXXIITT
para regresar a ver TV o pre-
sione el botón
MMEENNUU
para regresar al menú previo.
Ajusta el contraste y brillo de la pantalla usando el nivel
negro de pantalla.
Esta función trabaja en el modo siguiente: AV1, AV2,
HDMI1/DVI o HDMI2.
EZ Video
Temperatura Color
XD
Avanzado
G
Reajuste
Cine
Apag.
Nivel Negro
Alto
2
3
4
5
1
3 42
1
EZ Video
Temperatura Color
XD
Avanzado
Reajuste
SCREEN
LOCK
OPTION
TIME
AUDIO
VIDEO
SETUP
SCREEN
LOCK
OPTION
TIME
AUDIO
VIDEO
SETUP
MFL34797070sp-2 4/16/09 2:21 PM Page 51

CONTROL DE IMAGEN
52
CONTROL DE IMAGEN
RESTABLECIMIENTO DE LA IMAGEN
Presione el botón
MMEENNUU
y luego presione el botón
DD
o
EE
para seleccionar el menú
VVIIDDEEOO
.
Presione el botón
GG
y luego presione el botón
DD
o
EE
para seleccionar
RReeaajjuussttee
.
Presione el botón
GG
para inicializar el valor ajustado.
Use para restablecer rápidamente todas las opciones del menú
Video a sus valores predeterminados originales de fábrica.
EZ Video
Temperatura Color
XD
Avanzado
Reajuste
G
Para ajustar
2
3
1
2 3
1
EZ Video
Temperatura Color
XD
Avanzado
Reajuste
SCREEN
LOCK
OPTION
TIME
AUDIO
VIDEO
SETUP
SCREEN
LOCK
OPTION
TIME
AUDIO
VIDEO
SETUP
MODO DE IMAGEN DE POCA ENERGÍA
-
Sólo televisor Plasma
Esta funcion es para reducir el consumo de potencia de la unidad.
Presione el botón
MMEENNUU
y luego presione el botón
DD
o
EE
para seleccionar el menú
OOPPTTIIOONN
.
Presione el botón
GG
y luego presione el botón
DD
o
EE
para seleccionar
BBaajjoo CCoonnssuummoo
.
Presione el botón
GG
y luego presione el botón
DD
o
EE
para seleccionar
AAppaagg..
o
EEnncc..
.
■
Al seleccionar
EEnncc..
, la pantalla se oscurecerá.
Presione el botón
EEXXIITT
para regresar a ver TV o pre-
sione el botón
MMEENNUU
para regresar al menú previo.
2
3
4
1
Relación de Aspecto
Subtít/Texto
Opción Subtítulos
Idioma(Language)
Metodo ISM
Bajo Consumo
G
Set ID
Apag.
Enc.
1
32
Relación de Aspecto
Subtít/Texto
Opción Subtítulos
Idioma(Language)
Metodo ISM
Energia Baja
Set ID
SCREEN
LOCK
OPTION
TIME
AUDIO
VIDEO
SETUP
SCREEN
LOCK
OPTION
TIME
AUDIO
VIDEO
SETUP
MFL34797070sp-2 4/16/09 2:21 PM Page 52

CONTROL DE IMAGEN
53
MINIMIZACIÓN DE IMAGEN FANTASMA
Presione el botón
MMEENNUU
y luego presione el botón
DD
o
EE
para seleccionar el menú
OOPPTTIIOONN
.
Presione el botón
GG
y luego presione el botón
DD
o
EE
para seleccionar
MMeettooddoo IISSMM
.
Presione el botón
GG
y luego presione el botón
DD
o
EE
para seleccionar
NNoorrmmaall
,
BBllaannqquueeaarr
,
OOrrbbiitteerr
o
IInnvveerrssiióónn
.
■
NNoorrmmaall
Si la imagen fantasma no es un problema, ISM no es
necesario - Seleccione Normal.
■
BBllaannqquueeaarr
Es la función que remueve las imágenes permanentes
de la pantalla.
Use moderadamente. Mire el televisor normalmente
durante un momento antes de utilizar esta función
para ver si desaparece la imagen fantasma por sí sola.
■
OOrrbbiitteerr
Esta función puede ayudar a prevenir imagenes fan-
tasma. Sin embargo, es mejor no permitir imagenes
fijas en pantalla. Para evitar que haya una imagen fija
en la pantalla, la pantalla se moverá cadaminuto:
Izquierda Derecha Hacia arriba Hacia
Derecha Izquierda Hacia Hacia arriba.
■
IInnvveerrssiióónn
Automáticamente, cada 30 minutos invertirá los
colores desplegados en la pantalla.
Presione el botón
EEXXIITT
para regresar a ver TV o pre-
sione el botón
MMEENNUU
para regresar al menú previo.
Una imagen congelada de un juego para PC / video que aparezca en pantalla
durante un período prolongado, resultará en una imagen fantasma que per-
manecerá incluso al cambiar de imagen. ISM evita que las imágenes fijas per-
manezcan en la pantalla del TV durante un largo período de tiempo.
NOTA
GG
Es imposible limpiar perfectamente una imagen que
ha permanecido expuesta por mucho tiempo. Para
regresar a la pantalla, presione cualquier botón.
2
3
4
1
Relación de Aspecto
Subtít/Texto
Opción Subtítulos
Idioma(Language)
Metodo ISM
G
Bajo Consumo
Set ID
Normal
Blanquear
Orbiter
Inversión
1
32
Relación de Aspecto
Subtít/Texto
Opción Subtítulos
Idioma(Language)
Metodo ISM
Bajo Consumo
Set ID
SCREEN
LOCK
OPTION
TIME
AUDIO
VIDEO
SETUP
SCREEN
LOCK
OPTION
TIME
AUDIO
VIDEO
SETUP
MFL34797070sp-2 4/16/09 2:21 PM Page 53

CONTROL DE SONIDO Y DE IDIOMA
54
CONTROL DE SONIDO Y DE IDIOMA
NIVELADOR AUTOMÁTICO DE VOLUMEN
(EZ SOUNDRITE)
Presione el botón
MMEENNUU
y luego presione el botón
DD
o
EE
para seleccionar el menú
AAUUDDIIOO
.
Presione el botón
GG
y luego presione el botón
DD
o
EE
para seleccionar
EEZZ SSoouunnddRRiittee
.
Presione el botón
GG
y luego presione el botón
DD
o
EE
para seleccionar
AAppaagg..
o
EEnncc..
.
Presione el botón
EEXXIITT
para regresar a ver TV o pre-
sione el botón
MMEENNUU
para regresar al menú previo.
Busca cambios en el nivel de sonido durante los anuncios y,
a continuación, ajusta el sonido para hacerlo corresponder
con el nivel de audio. Volumen automático le asegura que el
nivel de vo- lumen permanece constante si está viendo
anuncios o un programa de televisión.
2
3
4
1
Audio Lenguaje
EZ SoundRite
G
EZ Audio
Balance 0
Bocinas de TV
Apag.
Enc.
2 3
1
Audio Lenguaje
EZ SoundRite
EZ Audio
Balance 0
Bocinas de TV
SCREEN
LOCK
OPTION
TIME
AUDIO
VIDEO
SETUP
SCREEN
LOCK
OPTION
TIME
AUDIO
VIDEO
SETUP
MFL34797070sp-2 4/16/09 2:21 PM Page 54

CONTROL DE SONIDO Y DE IDIOMA
55
AJUSTES DE SONIDO PREESTABLECIDOS
(EZ AUDIO)
EZ Audio le permite disfrutar del mejor sonido sin ningún ajuste
especial porque la televisión configura las opciones de sonido
apropiadas según el contenido del programa.
NNoorrmmaall
,
EEssttaaddiioo
,
NNoottiicciiaass
,
MMúússiiccaa yy TTeeaattrroo
son prefijados
para la buena calidad de sonido en la fabrica y no son ajustables.
Presione el botón EZ
SSOOUUNNDD
repetidamente, para selec-
cionar entre las siguientes opciones de sonido:
NNoorrmmaall
,
EEssttaaddiioo
,
NNoottiicciiaass
,
MMúússiiccaa,, TTeeaattrroo
, and
U
Ussuuaarriioo
(su propia configuración).
Presione el botón
EEXXIITT
para regresar a ver TV.
■
También ud. puede hacer el EZ Audio con el menú
AAUUDDIIOO
.
2
1
Audio Lenguaje
EZ SoundRite
EZ Audio
G
Balance 0
Bocinas de TV
Normal
Estadio
Noticias
Música
Teatro
Usuario
Audio Lenguaje
EZ SoundRite
EZ Audio
Balance 0
Bocinas de TV
SCREEN
LOCK
OPTION
TIME
AUDIO
VIDEO
SETUP
SCREEN
LOCK
OPTION
TIME
AUDIO
VIDEO
SETUP
MFL34797070sp-2 4/16/09 2:21 PM Page 55

CONTROL DE SONIDO Y DE IDIOMA
56
CONTROL DE SONIDO Y DE IDIOMA
AJUSTE DE SONIDO - MODO USUARIO
Usted puede ajustar sonidos agudos y bajos a los niveles de su preferencia.
Surr. Frontal Apag.
SSiisstteemmaa 33DD EEcchhooSSoouunndd
Crea unos estupendos efectos estéreo simulados a partir de
cualquier sonido mono y un sonido tridimensional realista
con una sensación de sonido envolvente amplia e intensa
a partir de un sonido estéreo.
Presione el botón
MMEENNUU
y luego presione el botón
DD
o
EE
para seleccionar el menú
AAUUDDIIOO
.
Presione el botón
GG
y luego presione el botón
DD
o
EE
para seleccionar
EEZZ AAuuddiioo
.
Presione el botón
GG
y luego presione el botón
DD
o
EE
para seleccionar
UUssuuaarriioo
.
Presione el botón
GG
y luego presione el botón
DD
o
EE
para seleccionar la opción de sonido deseada (
AAgguuddooss
,
GGrraavveess
o
SSuurrrr.. FFrroonnttaall
).
Presione el botón
GG
y luego presione el botón
FF
o
GG
para hacer los ajustes apropiados.
SSeelleecccciioonnaannddoo FFrroonntt SSuurrrroouunndd
Presione el botón
GG
y luego presione el botón
FF
o
GG
para seleccionar
AAppaagg..
y
SSiisstteemmaa 33DD EEcchhooSSoouunndd
.
Presione el botón
EEXXIITT
para regresar a ver TV o pre-
sione el botón
MMEENNUU
para regresar al menú previo.
Audio Lenguaje
EZ SoundRite
EZ Audio
Balance 0
Bocinas de TV
Normal
Estadio
Noticias
Música
Teatro
Usuario
G
Usuario
Agudos 50
G
Graves 50
Surr. Frontal Apag.
2
3
4
5
6
1
2
1
3
4
5
Audio Lenguaje
EZ SoundRite
EZ Audio
Balance 0
Bocinas de TV
SCREEN
LOCK
OPTION
TIME
AUDIO
VIDEO
SETUP
SCREEN
LOCK
OPTION
TIME
AUDIO
VIDEO
SETUP
SCREEN
LOCK
OPTION
TIME
AUDIO
VIDEO
SETUP
SCREEN
LOCK
OPTION
TIME
AUDIO
VIDEO
SETUP
MFL34797070sp-2 4/16/09 2:21 PM Page 56

CONTROL DE SONIDO Y DE IDIOMA
57
AJUSTE DE BALANCE
Presione el botón
MMEENNUU
y luego presione el botón
DD
o
EE
para seleccionar el menú
AAUUDDIIOO
.
Presione el botón
GG
y luego presione el botón
DD
o
EE
para seleccionar
BBaallaannccee
.
Presione el botón
GG
y luego presione el botón
FF
o
GG
para hacer un ajuste deseado.
Presione el botón
EEXXIITT
para regresar a ver TV o pre-
sione el botón
MMEENNUU
para regresar al menú previo.
Puede ajustar el balance de sonido de las bocinas a los niveles
que desea ud.
2
3
4
1
1
2
3
Audio Lenguaje
EZ SoundRite
EZ Audio
Balance 0
G
Bocinas de TV
L R
Audio Lenguaje
EZ SoundRite
EZ Audio
Balance 0
Bocinas de TV
FF
G
L R
Audio Lenguaje
EZ SoundRite
EZ Audio
Balance 0
Bocinas de TV
SCREEN
LOCK
OPTION
TIME
AUDIO
VIDEO
SETUP
SCREEN
LOCK
OPTION
TIME
AUDIO
VIDEO
SETUP
SCREEN
LOCK
OPTION
TIME
AUDIO
VIDEO
SETUP
MFL34797070sp-2 4/16/09 2:21 PM Page 57

CONTROL DE SONIDO Y DE IDIOMA
58
CONTROL DE SONIDO Y DE IDIOMA
DISPOSICIÓN DE BOCINAS DE TV
Presione el botón
MMEENNUU
y luego presione el botón
DD
o
EE
para seleccionar el menú
AAUUDDIIOO
.
Presione el botón
GG
y luego presione el botón
DD
o
EE
para seleccionar
BBoocciinnaass ddee TTVV
.
Presione el botón
GG
y luego presione el botón
DD
o
EE
para seleccionar
EEnncc..
o
AAppaagg..
.
Presione el botón
EEXXIITT
para regresar a ver TV o pre-
sione el botón
MMEENNUU
para regresar al menú previo.
Apague los altavoces si está utilizando un equipo de audio
externo. La función le permite activar o desactivar los altav-
oces mediante la opción Apagado / Encendido.
Audio Lenguaje
EZ SoundRite
EZ Audio
Balance 0
Bocinas de TV
G
Apag.
Enc.
2
3
4
1
2 3
1
Audio Lenguaje
EZ SoundRite
EZ Audio
Balance 0
Bocinas de TV
SCREEN
LOCK
OPTION
TIME
AUDIO
VIDEO
SETUP
SCREEN
LOCK
OPTION
TIME
AUDIO
VIDEO
SETUP
MFL34797070sp-2 4/16/09 2:21 PM Page 58

CONTROL DE SONIDO Y DE IDIOMA
59
DISFRUTE DE LA TRANSMISIÓN ESTÉREO/SAP
La TV puede recibir los programas de estéreo MTS y cualquier
SAP (Programa de Audio Secundario) que acompañan el progra-
ma estéreo; si la transmisión manda una señal adicional de
sonido, la agrega a la original y al seleccionar Estéreo o SAP en el
mando a distancia.
El sonido Mono se recibe automáticamente si el programa emite
en Mono aunque se haya seleccionado Stereo o SAP.
Seleccione Mono si desea escuchar el sonido mono en zonas
limítrofes remotas durante una emisión estéreo o SAP.
Es posible recibir emisiones estéreo o SAP en un canal analógico.
Utilice el botón
SSAAPP
para seleccionar el modo MTS desea-
do en una señal analógica. Cuando presione el botón
SSAAPP
,
verá aparecer uno a uno
MMoonnoo
,
SStteerreeoo
, o
SSAAPP
.
■
Si hay otros idiomas disponibles en la señal digital, puede
seleccionarlos con el botón
SSAAPP
.
Presione el botón
EEXXIITT
para regresar a ver TV.
2
1
MFL34797070sp-2 4/16/09 2:21 PM Page 59

CONTROL DE SONIDO Y DE IDIOMA
60
CONTROL DE SONIDO Y DE IDIOMA
IDIOMA DEL AUDIO
Es posible que haya otros idiomas disponibles si la emisora
proporciona una señal digital.
Esta función opera sólo en modo DTV/CADTV.
Presione el botón
MMEENNUU
y luego presione el botón
DD
o
EE
para seleccionar el menú
AAUUDDIIOO
.
Presione el botón
GG
y luego presione el botón
DD
o
EE
para seleccionar
AAuuddiioo LLeenngguuaajjee
.
Presione el botón
GG
y luego presione el botón
DD
o
EE
para seleccionar:
IInnggllééss
,
EEssppaaññooll
o
FFrraannccééss
.
Presione el botón
EEXXIITT
para regresar a ver TV o pre-
sione el botón
MMEENNUU
para regresar al menú previo.
Audio Lenguaje
G
EZ SoundRite
EZ Audio
Balance 0
Bocinas de TV
Inglés
Español
Francés
2
3
4
1
2 3
1
Audio Lenguaje
EZ SoundRite
EZ Audio
Balance 0
Bocinas de TV
SCREEN
LOCK
OPTION
TIME
AUDIO
VIDEO
SETUP
SCREEN
LOCK
OPTION
TIME
AUDIO
VIDEO
SETUP
MFL34797070sp-2 4/16/09 2:21 PM Page 60

CONTROL DE SONIDO Y DE IDIOMA
61
SELECCIÓN DEL LENGUAJE EN LA PANTALLA
Relación de Aspecto
Subtít/Texto
Opción Subtítulos
Idioma(Language)
G
Metodo ISM
Bajo Consumo
Set ID
Los menus pueden ser mostrados en la pantalla en el idioma
inicial seleccionado. Primero seleccione su idioma.
Inglés
Español
Francés
Presione el botón
MMEENNUU
y luego presione el botón
DD
o
EE
para seleccionar el menú
OOPPTTIIOONN
.
Presione el botón
GG
y luego presione el botón
DD
o
EE
para seleccionar
IIddiioommaa((LLaanngguuaaggee))..
Presione el botón
GG
y luego presione el botón
DD
o
EE
para seleccionar el lenguaje deseado. De aquí en ade-
lante la exhibición en la pantalla aparecerá en el
idioma selecccionado.
Presione el botón
EEXXIITT
para regresar a ver TV o pre-
sione el botón
MMEENNUU
para regresar al menú previo.
1
2
3
4
1
32
Relación de Aspecto
Subtít/Texto
Opción Subtítulos
Idioma(Language)
Metodo ISM
Bajo Consumo
Set ID
SCREEN
LOCK
OPTION
TIME
AUDIO
VIDEO
SETUP
SCREEN
LOCK
OPTION
TIME
AUDIO
VIDEO
SETUP
MFL34797070sp-2 4/16/09 2:21 PM Page 61

CONTROL DE SONIDO Y DE IDIOMA
62
CONTROL DE SONIDO Y DE IDIOMA
SUBTÍT / TEXTO
Presione el botón
CCCC
repetidamente Apag., CC1, CC2, CC3, CC4,
Texto1, Texto2, Texto3 y Texto4.
■
CCCC
Término que se utiliza para las palabras que aparecen en la parte inferior de
la pantalla de la televisión; Se trata normalmente de las partes de audio del
programa que se proporcionan para las personas con deficiencias auditivas.
■
TTEEXXTTOO
Término que se utiliza para las palabras que aparecen en un gran marco
negro y que cubren casi toda la pantalla; Se trata normalmente de los men-
sajes proporcionados por el proveedor del programa.
Presione el botón
EEXXIITT
para regresar a ver TV.
2
1
Sistemas de texto oculto de programas analógicos
Seleccione un modo de texto oculto para visualizar la información subtitulada
si el programa la proporciona.
El texto oculto analógico muestra la información en cualquier lugar de la pan-
talla.
El texto muestra normalmente la información en la parte inferior y se utiliza
como servicio de datos.
El texto subtít/texco, si lo proporciona el programa, estará disponible tanto para los
canales digitales como los analógicos con conexiones de antena o de cable.
La televisión está programada para recordar el modo caption/text seleccionado
en la última configuración cuando la apague.
Cuando selecciona CC1 - Texto4, se debe desactivar la opción Caption.
■
También ud. puede usar
SS
ubtít
//TT
exto con el menú
OOPPTTIIOONN
.
Relación de Aspecto
Subtít/Texto
G
Opción Subtítulos
Idioma(Language)
Metodo ISM
Bajo Consumo
Set ID
Apag.
CC1
CC2
CC3
CC4
Texto1
Texto2
Texto3
Texto4
Relación de Aspecto
Subtít/Texto
Opción Subtítulos
Idioma(Language)
Metodo ISM
Bajo Consumo
Set ID
SCREEN
LOCK
OPTION
TIME
AUDIO
VIDEO
SETUP
SCREEN
LOCK
OPTION
TIME
AUDIO
VIDEO
SETUP
MFL34797070sp-2 4/16/09 2:21 PM Page 62

CONTROL DE SONIDO Y DE IDIOMA
63
Presione el botón
MMEENNUU
y luego presione el botón
DD
o
EE
para seleccionar el menú
OOPPTTIIOONN
.
Presione el botón
GG
y luego presione el botón
DD
o
EE
para seleccionar
SSuubbttíítt//TTeexxttoo
.
Presione el botón
GG
y, a continuación, utilice el botón
DD
o
EE
para seleccionar el texto oculto en los idiomas
disponibles: Inglés, Español o Francés.
Presione el botón
EEXXIITT
para regresar a ver TV o pre-
sione el botón
MMEENNUU
para regresar al menú previo.
Seleccione el idioma en el que desea que aparezcan los
textos ocultos de DTV/CADTV.
Relación de Aspecto
Subtít/Texto
G
Opción Subtítulos
Idioma(Language)
Metodo ISM
Bajo Consumo
Set ID
Apag.
Inglés
Español
Francés
2
3
4
1
1
32
Sistemas de texto oculto de programas digitales
Relación de Aspecto
Subtít/Texto
Opción Subtítulos
Idioma(Language)
Metodo ISM
Bajo Consumo
Set ID
SCREEN
LOCK
OPTION
TIME
AUDIO
VIDEO
SETUP
SCREEN
LOCK
OPTION
TIME
AUDIO
VIDEO
SETUP
MFL34797070sp-2 4/16/09 2:21 PM Page 63

CONTROL DE SONIDO Y DE IDIOMA
64
CONTROL DE SONIDO Y DE IDIOMA
Opciones del texto oculto
Relación de Aspecto
Subtít/Texto
Opción Subtítulos
G
Idioma(Language)
Metodo ISM
Bajo Consumo
Set ID
Por Programa
Personalizar
1
3
4
2
Personalice el texto oculto de DTV/CADTV que aparece en
la pantalla.
Presione el botón
MMEENNUU
y luego presione el botón
DD
o
EE
para seleccionar el menú
OOPPTTIIOONN
.
Presione el botón
GG
y luego presione el botón
DD
o
EE
para seleccionar
OOppcciióónn SSuubbttííttuullooss
.
Presione el botón
GG
y luego presione el botón
DD
o
EE
para seleccionar
PPeerrssoonnaalliizzaarr
.
Utilice el botón
DD
o
EE
para personalizar el Style
(Estilo), Font (Fuente), etc., según sus preferencias. En
la parte inferior de la pantalla se proporciona un
icono de previsualización. Utilícelo para ver el idioma
del texto oculto.
Presione el botón
EEXXIITT
para regresar a ver TV o pre-
sione el botón
MMEENNUU
para regresar al menú previo.
2
3
4
5
1
■
TTaammaaññoo
: Ajuste el tamaño en el que aparecerán las palabras.
■
FFuueennttee
: Seleccione un tipo de letra para las palabras.
■
CCoolloorr ddeell TTeexxttoo
: Escoja un color para el texto.
■
PPaalliiddeezz ddeell TTeexxttoo
: Especifique la opacidad del color
del texto.
■
CCoolloorr ddee FFoonnddoo
: Seleccione un color de fondo.
■
PPaalliiddeezz ddeell FFoonnddoo
: Seleccione la opacidad del color de
fondo.
■
TTiippoo ddee CCoonnttoorrnnoo
: Seleccione un tipo de borde.
■
CCoolloorr ddeell CCoonnttoorrnnoo
: Seleccione un color para el borde.
Relación de Aspecto
Subtít/Texto
Opción Subtítulos
Idioma(Language)
Metodo ISM
Bajo Consumo
Set ID
SCREEN
LOCK
OPTION
TIME
AUDIO
VIDEO
SETUP
SCREEN
LOCK
OPTION
TIME
AUDIO
VIDEO
SETUP
SCREEN
LOCK
OPTION
TIME
AUDIO
VIDEO
SETUP
Tamaño
FF
A
Estándar
G
Fuente Font
0
Color del Texto
Blanco
Palidez del Texto
Sólido
Color de Fondo
Negro
Palidez del Fondo
Sólido
Tipo de Contorno
Ninguno
Color del Contorno
Negro
MFL34797070sp-2 4/16/09 2:21 PM Page 64

CONFIGURACIÓN HORARIA
65
PROGRAMACION DEL RELOJ
CONFIGURACIÓN HORARIA
Configuración Auto del Reloj
El temporizador apagado cambia la unidad automáticamente al modo de
espera en el tiempo prefijo.
La función de apagado se invalida en la función de encendido si ambos están
configurados para el msimo tiempo.
La unidad debe estar en el modo de espera para que funcione el tempo-
rizador encendido.
Después de dos horas de que está cambiada la unidad por la función de
encendido, se cambiará al modo de espera automáticamente si no haya pre-
sionado ningún botón.
Presione el botón
MMEENNUU
y luego presione el botón
DD
o
EE
para seleccionar el menú
TTIIMMEE
.
Presione el botón
GG
y luego presione el botón
DD
o
EE
para seleccionar
RReelloojj AAuuttoommááttiiccoo
.
Presione el botón
GG
y luego presione el botón
DD
o
EE
para seleccionar
EEnncc..
.
Presione el botón
GG
y luego presione el botón
DD
o
EE
para seleccionar la zona horaria de su área de recepcion:
EEssttee
,
CCeennttrraall
,
MMoonnttaaññaa
,
PPaacciiffiiccoo
,
AAllaasskkaa
or
HHaawwaaiiii
.
Presione el botón
GG
y luego presione el botón
DD
o
EE
para seleccionar
AAuuttoo
,
AAppaagg..
,
EEnncc..
, dependiendo de
si su región hace o no uso del Horario de verano.
Presione el botón
EEXXIITT
para regresar a ver TV o pre-
sione el botón
MMEENNUU
para regresar al menú previo.
Reloj Automático
G
Reloj Manual
Timer Off
Timer On
Auto Off
Apag.
Enc.
Zona horaria
Este
Hora. Verano
Auto
2
3
4
5
6
1
1
32 54
Reloj Automático
Reloj Manual
Timer Off
Timer On
Auto Off
SCREEN
LOCK
OPTION
TIME
AUDIO
VIDEO
SETUP
SCREEN
LOCK
OPTION
TIME
AUDIO
VIDEO
SETUP
MFL34797070sp-2 4/16/09 2:21 PM Page 65

CONFIGURACIÓN HORARIA
66
CONFIGURACIÓN HORARIA
Configuración Manual del Reloj
Presione el botón
MMEENNUU
y luego presione el botón
DD
o
EE
para seleccionar el menú
TTIIMMEE
.
Presione el botón
GG
y luego presione el botón
DD
o
EE
para seleccionar
RReelloojj MMaannuuaall
.
Presione el botón
GG
y luego presione el botón
FF
o
GG
para seleccionar bien el año, la fecha o la hora. Una vez
que lo haya seleccionado, utilice el botón
DD
o
EE
para
ajustar el año, la fecha o la hora.
Presione el botón
EEXXIITT
para regresar a ver TV o pre-
sione el botón
MMEENNUU
para regresar al menú previo.
Si la hora actual programada esta equivocada, restablezca
el reloj manualmente.
Reloj Automático
Reloj Manual
G
Timer Off
Timer On
Auto Off
Año
- - - -
Fecha
- - / - -
Hora
- - : - - - -
2
3
4
1
1
32
Reloj Automático
Reloj Manual
Timer Off
Timer On
Auto Off
SCREEN
LOCK
OPTION
TIME
AUDIO
VIDEO
SETUP
SCREEN
LOCK
OPTION
TIME
AUDIO
VIDEO
SETUP
MFL34797070sp-2 4/16/09 2:21 PM Page 66

CONFIGURACIÓN HORARIA
67
AJUSTES DE ENCENDIDO/ APAGADO
AUTOMÁTICO DEL TEMPORIZADOR
Presione el botón
MMEENNUU
y luego presione el botón
DD
o
EE
para seleccionar el menú
TTIIMMEE
.
Presione el botón
GG
y luego presione el botón
DD
o
EE
para seleccionar
TTiimmeerr OOffff
or
TTiimmeerr OOnn
.
Presione el botón
GG
y luego presione el botón
DD
o
EE
para seleccionar
EEnncc..
.
■
Para cancelar la función de
TTiimmeerr OOffff//OOnn
, selec-
cionar
AAppaagg..
.
Presione el botón
GG
y luego presione el botón
DD
o
EE
para seleccionar la hora actual.
Presione el botón
GG
y luego presione el botón
DD
o
EE
para seleccionar los minutos.
Presione el botón
EEXXIITT
para regresar a ver TV o pre-
sione el botón
MMEENNUU
para regresar al menú previo.
Reloj Automático
Reloj Manual
Timer Off
Timer On
G
Auto Off
2
3
4
5
6
1
El temporizador apagado cambia la unidad automática-
mente al modo de espera en el tiempo prefijo.
La función de apagado se invalida en la función de encendi-
do si ambos están configurados para el msimo tiempo.
La unidad debe estar en el modo de espera para que fun-
cione el temporizador encendido.
Después de dos horas de que está cambiada la unidad por
la función de encendido, se cambiará al modo de espera
automáticamente si no haya presionado ningún botón.
1
32 54
Apag.
Enc.
6 : 30 AM
Reloj Automático
Reloj Manual
Timer Off
Timer On
Auto Off
SCREEN
LOCK
OPTION
TIME
AUDIO
VIDEO
SETUP
SCREEN
LOCK
OPTION
TIME
AUDIO
VIDEO
SETUP
MFL34797070sp-2 4/16/09 2:21 PM Page 67

CONFIGURACIÓN HORARIA
68
CONFIGURACIÓN HORARIA
CONFIGURACIÓN DE CORTE AUTOMÁTICO
El Televisor se apagará automáticamente en 10 minutos en
caso de que no haya señal.
Presione el botón
MMEENNUU
y luego presione el botón
DD
o
EE
para seleccionar el menú
TTIIMMEE
.
Presione el botón
GG
y luego presione el botón
DD
o
EE
para seleccionar
AAuuttoo OOffff
.
Presione el botón
GG
y luego presione el botón
DD
o
EE
para seleccionar
AAppaagg..
y
EEnncc..
.
Presione el botón
EEXXIITT
para regresar a ver TV o pre-
sione el botón
MMEENNUU
para regresar al menú previo.
Reloj Automático
Reloj Manual
Timer Off
Timer On
Auto Off
G
Apag.
Enc.
Si esta activado y no hay
señal en la entrada, el
televisor se apaga
automáticamente después
de 10 minutos.
2
3
4
1
1
32
Reloj Automático
Reloj Manual
Timer Off
Timer On
Auto Off
SCREEN
LOCK
OPTION
TIME
AUDIO
VIDEO
SETUP
SCREEN
LOCK
OPTION
TIME
AUDIO
VIDEO
SETUP
MFL34797070sp-2 4/16/09 2:21 PM Page 68

CONFIGURACIÓN HORARIA
69
CONFIGURACIÓN DEL TEMPORIZADOR
DE APAGADO AUTOMÁTICO
Presione el botón
TTIIMMEERR
repetidamente para seleccionar el
número de mi- nutos. Se aparecerá
AAppaagg..
en la pantalla,
seguido por 10, 20, 30, 60, 90, 120, 180 y 240.
Cuando se desplega el número de minutos que desea ud. en
la pantalla, presione el botón
EENNTTEERR
. El temporizador
empieza a contar del número de minutos seleccionado.
Para ver el tiempo remanente para dormir, presione el botón
TTIIMMEERR
.
Para cancelar el tiempo para dormir, presione el botón
TTIIMMEERR
repetidamente hasta que apareza
AAppaagg..
.
El Hora del Apagador para Dormir apaga el TV después de un
tiempo prefijado.
Si apaga el TV después de haber programado la hora del
Apagador para dormir, el ajuste se borrará.
2
3
4
1
MFL34797070sp-2 4/16/09 2:21 PM Page 69

SCREEN ADJUSTMENT
70
AJUSTE DE PANTALLA
CONFIGURACIÓN AUTOMÁTICA
(SÓLO MODO RGB [PC])
Presione el botón
MMEENNUU
y luego presione el botón
DD
o
EE
para seleccionar el menú
SSCCRREEEENN
.
Presione el botón
GG
y luego presione el botón
DD
o
EE
para seleccionar
CCoonnffiigg.. MMaannuuaall
.
Presione el botón
GG
para iniciar la Config. Manual.
■
Al finalizar la Config. Auto, aparecerá en la pantalla
el mensaje OK.
■
Si la posición de la imagen aún no es correcta,
pruebe de nuevo el ajuste automático.
Si la imagen RBG (PC) aún requiriera ajustes tras el
ajuste automático, podrá utilizar la Config. Manual.
Presione el botón
EEXXIITT
para regresar a ver TV o pre-
sione el botón
MMEENNUU
para regresar al menú previo.
Ajusta automáticamente la posición y minimiza la fluctuación de
la imagen.
Aunque la imagen no sea aún correcta, su configuración está
funcionando pero necesita más ajustes.
1
2
3
4
5
1
2 3
Config.Auto
G
Config. Manual
Modo XGA
Reajuste
Para ajustar
Config.Auto
Config. Manual
Modo XGA
Reajuste
SCREEN
LOCK
OPTION
TIME
AUDIO
VIDEO
SETUP
SCREEN
LOCK
OPTION
TIME
AUDIO
VIDEO
SETUP
MFL34797070sp-2 4/16/09 2:21 PM Page 70

SCREEN ADJUSTMENT
71
CONFIGURACIÓN MANUAL
Si la imagen no fuese clara tras el ajuste automático, espe-
cialmente si los caracteres fluctuaran, ajuste la imagen en
fase manual.
Esta función trabaja en el siguiente modo: RGB-PC, RGB-DTV,
vídeo por componentes 480p/720p/1080i, HDMI
480p/720p/1080i.
Las funciones Fase y Reloj operan en el siguiente modo: modo
RGB-PC.
Presione el botón
MMEENNUU
y luego presione el botón
DD
o
EE
para seleccionar el menú
SSCCRREEEENN
.
Presione el botón
GG
y luego presione el botón
DD
o
EE
para seleccionar
ccoonnffiigg..MMaannuuaall
.
Presione el botón
GG
y luego presione el botón
DD
o
EE
para seleccionar
PPhhaassee
,
CClloocckk
,
HH--ppoossiicciioonn
or
VV --
ppoossiicciioonn
.
■
PPhhaassee
Esta función le permite eliminar cualquier ruido hori
zontal y limpiar o aportar más nitidez a la imagen de
los caracteres.
■
CClloocckk
Esta función sirve para minimizar la apariencia de bar-
ras o rayas verticales visibles en el fondo de
pantalla. Igualmente variará el tamaño horizontal de la
pantalla.
■
HH--ppoossiicciioonn
/
VV--ppoossiicciioonn
Esta función sirve para ajustar la imagen hacia izquier-
da/derecha o arriba/abajo, como prefiera.
Presione el botón
FF
o
GG
para realizar los ajustes adecua-
dos.
Presione el botón
EEXXIITT
para regresar a ver TV o pre-
sione el botón
MMEENNUU
para regresar al menú previo.
1
2
3
4
5
2 3 4
1
Config.Auto
Config. Manual
G
Modo XGA
Reajuste
Phase 0
Clock 0
H-Posicion 0
V-Posicion 0
Config.Auto
Config. Manual
Modo XGA
Reajuste
SCREEN
LOCK
OPTION
TIME
AUDIO
VIDEO
SETUP
SCREEN
LOCK
OPTION
TIME
AUDIO
VIDEO
SETUP
MFL34797070sp-2 4/16/09 2:21 PM Page 71

SCREEN ADJUSTMENT
72
AJUSTE DE PANTALLA
SELECCIÓN DEL MODO XGA
Para disfrutar de una imagen normal, haga coincidir el modo de
RBG y la selección del modo XGA.
Esta función trabaja en el siguiente modo: modo RGB-PC.
Si selecciona la resolución 1600x1200, 1920x1200, se visualizará
el modo uXGA.
Presione el botón
MMEENNUU
y luego presione el botón
DD
o
EE
para seleccionar el menú
SSCCRREEEENN
.
Presione el botón
GG
y luego presione el botón
DD
o
EE
para seleccionar
XXGGAA mmooddee
.
Presione el botón
GG
y, a continuación, utilice el botón
DD
o
EE
para seleccionar la resolución XGA deseada.
Presione el botón
EEXXIITT
para regresar a ver TV o pre-
sione el botón
MMEENNUU
para regresar al menú previo.
2
3
4
1
1
2 3
Config.Auto
Config. Manual
Modo XGA
G
Reajuste
1024 x 768
1280 x 768
1360 x 768
1366 x 768
Config.Auto
Config. Manual
Modo XGA
Reajuste
SCREEN
LOCK
OPTION
TIME
AUDIO
VIDEO
SETUP
SCREEN
LOCK
OPTION
TIME
AUDIO
VIDEO
SETUP
MFL34797070sp-2 4/16/09 2:21 PM Page 72

SCREEN ADJUSTMENT
73
Inicialización (Restablecer el valor original de fábrica)
Esta función opera en el modo actual.
Para inicializar valores ajustados.
Presione el botón
MMEENNUU
y luego presione el botón
DD
o
EE
para seleccionar el menú
SSCCRREEEENN
.
Presione el botón
GG
y luego presione el botón
DD
o
EE
para seleccionar
RReeaajjuussttee
.
Presione el botón
GG
.
1
2
3
1
2 3
Config.Auto
Config. Manual
Modo XGA
Reajuste
G
Para ajustar
Config.Auto
Config. Manual
Modo XGA
Reajuste
SCREEN
LOCK
OPTION
TIME
AUDIO
VIDEO
SETUP
SCREEN
LOCK
OPTION
TIME
AUDIO
VIDEO
SETUP
MFL34797070sp-2 4/16/09 2:21 PM Page 73

CONTROL PATERNO /CLASIFICACIONES
74
CONTROL PATERNO /CLASIFICACIONES
Es posible utilizar el control paterno para bloquear los canales específicos, las clasificaciones y otras
fuentes de visualización.
La función del control paterno (V-Chip) se utiliza para bloquear la visualización de un programa que
se basa en las clasificaciones enviadas por la emisora. La configuración por defecto permite ver todos
los programas. Es posible bloquear la visualización según el tipo de programa y las categorías que se
quieran bloquear. También es posible bloquear la visualización de todos los programas durante un
período de tiempo. Para utilizar esta función, debe hacer lo siguiente:
1. Configure las clasificaciones y las categorías que desee bloquear.
2. Especifique una contraseña.
3. Permita el bloqueo
Clasificaciones y categorías V-Chip
Las pautas para la clasificación las proporcionan las emisoras. La mayoría de los programas y
películas de televisión se pueden bloquear mediante las clasificaciones de la televisión y/o las ca-
tegorías individuales. Tanto las películas que se han emitido en los cines como las películas de sa-
lida directa de alquiler utilizan únicamente el sistema de clasificación de películas de la Asociación
Americana de Películas (MPAA).
Clasificación para los programas de televisión que incluye a las
películas para televisión:
■
TV-G
(
Para todos los públicos
)
■
TV-PG
(
Se sugiere la compañía paterna
)
■
TV-14
(
Para mayores de 14 años. Se recomienda la
supervisión paterna
)
■
TV-MA
(
Sólo público adulto
)
■
TV-Y
(
Para todas las edades
)
■
TV-Y7
(
Para niños mayores de 7 años
)
ESTABLECER CONTRASEÑA Y BLOQUEO
DEL SISTEMA
Le deja configurar el esquema de bloqueo para bloquear unos
canales especificados, clasificación y fuentes de vista.
Una cotraseña es requerida para acceder a este menú si el sistema
de bloqueo está activado.
Presione el botón
MMEENNUU
y luego presione el botón
DD
o
EE
para seleccionar el menú
LLOOCCKK
. Presione el botón
GG
.
■
Entre la contraseña requerida.
■
La TV está configurada con la contraseña
inicial “0-0-0-0”.
Enter Password
1
Configuración de su Contraseña
MFL34797070sp-2 4/16/09 2:21 PM Page 74

CONTROL PATERNO /CLASIFICACIONES
75
Después de meter la contraseña, utilice el botón
DD
o
EE
para seleccionar
FFiijjaarr CCoonnttrraasseeññaa
.
Presione el botón
GG
escoja 4 dígitos para su
NNuueevvoo
contraseña e introdúzcalos.
Después de introducir los 4 dígitos, vuelva a hacerlo en
el campo
CCoonnffiirrmmaarr
.
De esta forma el sistema memorizará su nuevo con-
traseña.
Presione el botón
EEXXIITT
para regresar a ver TV o pre-
sione el botón
MMEENNUU
para regresar al menú previo.
Cambie la contraseña introduciendo dos veces una nueva.
Sist. de Bloqueo
Fijar Contraseña
G
Bloquear Canales
Clasif. Películas
Clasif. Niños
Clasif. General
Bloqueo Entradas
Clasif. Descargable
Nuevo
Confirmar
2
3
1
****
****
1
2
NOTA
GG
Si alguna vez olvida su contraseña, teclee ‘7’, ‘7’, ‘7’,
‘7’ en el mando a distancia.
Después de meter la contraseña, utilice el botón
DD
o
EE
para seleccionar
SSiisstt.. ddee BBllooqquueeoo
.
Presione el botón
GG
y luego el botón
DD
o
EE
para
seleccionar
AAppaagg..
o
EEnncc..
.
■
Al seleccionarlo,activará el Bloqueo del sistema.
Presione el botón
EEXXIITT
para regresar a ver TV o pre-
sione el botón
MMEENNUU
para regresar al menú previo.
Activa o desactiva el estado de bloqueo establecido con anterioridad.
Sist. de Bloqueo
G
Fijar Contraseña
Bloquear Canales
Clasif. Películas
Clasif. Niños
Clasif. General
Bloqueo Entradas
Clasif. Descargable
Apag.
Enc.
2
3
1
1
2
Establecer Contraseña
Bloqueo Del Sistema
Sist. de Bloqueo
Fijar Contraseña
Bloquear Canales
Clasif. Películas
Clasif. Niños
Clasif. General
Bloqueo Entradas
Clasif. Descargable
SCREEN
LOCK
OPTION
TIME
AUDIO
VIDEO
SETUP
SCREEN
LOCK
OPTION
TIME
AUDIO
VIDEO
SETUP
SCREEN
LOCK
OPTION
TIME
AUDIO
VIDEO
SETUP
SCREEN
LOCK
OPTION
TIME
AUDIO
VIDEO
SETUP
Sist. de Bloqueo
Fijar Contraseña
Bloquear Canales
Clasif. Películas
Clasif. Niños
Clasif. General
Bloqueo Entradas
Clasif. Descargable
SCREEN
LOCK
OPTION
TIME
AUDIO
VIDEO
SETUP
MFL34797070sp-2 4/16/09 2:21 PM Page 75

CONTROL PATERNO /CLASIFICACIONES
76
CONTROL PATERNO/CLASIFICACIONES
BLOQUEO DE CANALES
BLOQUEO DE ENTRADA EXTERNA
Bloquea cualquier canal que no desee visualizar o que no
desea que sus hijos puedan ver.
Después de meter la contraseña, utilice el botón
DD
o
EE
para seleccionar
BBllooqquueeaarr CCaannaalleess
.
Presione el botón
GG
. A continuación observará una pan-
talla llena de números de canales y una imagen de vista
previa.
Utilice el botón
DD EE FF GG
para seleccionar un canal y
después el botón
EENNTTEERR
para bloquearlo o
desbloquearlo.
Presione el botón
EEXXIITT
para regresar a ver TV o pre-
sione el botón
MMEENNUU
para regresar al menú previo.
Sist. de Bloqueo
Fijar Contraseña
Bloquear Canales
G
Clasif. Películas
Clasif. Niños
Clasif. General
Bloqueo Entradas
Clasif. Descargable
2
3
4
1
1
2
Le permite seleccionar la fuente que desea bloquear entre
los dispositivos de fuente externa conectados a su TV.
Después de meter la contraseña, utilice el botón
DD
o
EE
para seleccionar
BBllooqquueeoo EEnnttrraaddaass
.
Presione el botón
GG
y después utilice el botón
FF
o
GG
para seleccionar una fuente.
Presione el botón
DD
o
EE
para seleccionar
AAppaagg..
ó
EEnncc..
de cada fuente.
Presione el botón
EEXXIITT
para regresar a ver TV o pre-
sione el botón
MMEENNUU
para regresar al menú previo.
Sist. de Bloqueo
Fijar Contraseña
Bloquear Canales
Clasif. Películas
Clasif. Niños
Clasif. General
Bloqueo Entradas
G
Clasif. Descargable
AV1 Apag.
AV2 Apag.
Componente Apag.
RGB
Apag.
HDMI1/DVI Apag.
HDMI2 Enc.
2
3
4
1
1
32
SCREEN
LOCK
OPTION
TIME
AUDIO
VIDEO
SETUP
SCREEN
LOCK
OPTION
TIME
AUDIO
VIDEO
SETUP
Apag.
Enc.
1
SCREEN
LOCK
OPTION
TIME
AUDIO
VIDEO
SETUP
Sist. de Bloqueo
Fijar Contraseña
Bloquear Canales
Clasif. Películas
Clasif. Niños
Clasif. General
Bloqueo Entradas
Clasif. Descargable
SCREEN
LOCK
OPTION
TIME
AUDIO
VIDEO
SETUP
SCREEN
LOCK
OPTION
TIME
AUDIO
VIDEO
SETUP
Sist. de Bloqueo
Fijar Contraseña
Bloquear Canales
Clasif. Películas
Clasif. Niños
Clasif. General
Bloqueo Entradas
Clasif. Descargable
SCREEN
LOCK
OPTION
TIME
AUDIO
VIDEO
SETUP
MFL34797070sp-2 4/16/09 2:21 PM Page 76

CONTROL PATERNO /CLASIFICACIONES
77
CLASIFICACIONES DE PELÍCULAS Y TV
Clasificaciones de peliculas
Bloquea películas conforme a los límites de clasificación especificados, de tal forma
que los niños no puedan ver ciertas películas. Puede configurar este límite para que
bloquee todas las películas cuya clasificación sea superior a un nivel especificado.
Tenga presente que este límite sólo será aplicable a las películas que aparezcan en
TV, no a los propios programas de TV, como series de TV.
Después de meter la contraseña, utilice el botón
DD
o
EE
para seleccionar
CCllaassiiff.. PPeellííccuullaass
.
Presione el botón
GG
y luego presione el botón
DD
o
EE
para seleccionar
GG
,
PPGG
,
PPGG--1133
,
RR
,
NNCC--1177
o
XX
.
■
G (Para todos los públicos)
■
PG (Se sugiere la compañía paterna)
■
PG-13 (Para mayores de 13 años. Se recomienda la
supervisión paterna)
■
R (Restringido/Sólo para mayores)
■
NC-17 (No recomendado a menores de 17 años)
■
X (Sólo para adultos)
■
Desbloqueado (Permite todos los programas)
Presione el botón
EEXXIITT
para regresar a ver TV o pre-
sione el botón
MMEENNUU
para regresar al menú previo.
GG
Si selecciona PG-13: Estarán disponibles las películas G
y PG mientras que se bloquearán las PG-13, R, NC-17 y
X.
Sist. de Bloqueo
Fijar Contraseña
Bloquear Canales
Clasif. Películas
G
Clasif. Niños
Clasif. General
Bloqueo Entradas
Clasif. Descargable
G
PG
PG-13
R
NC-17
X
Desbloqueado
2
3
1
1
2
SCREEN
LOCK
OPTION
TIME
AUDIO
VIDEO
SETUP
Sist. de Bloqueo
Fijar Contraseña
Bloquear Canales
Clasif. Películas
Clasif. Niños
Clasif. General
Bloqueo Entradas
Clasif. Descargable
SCREEN
LOCK
OPTION
TIME
AUDIO
VIDEO
SETUP
Clasificación Descargable
Después de meter la contraseña, utilice el botón
DD
o
EE
para seleccionar
CCllaassiiff.. DDeessccaarrggaabbllee
.
Presione el botón
GG
y luego presione el botón
DD
o
EE
para seleccionar
DDiimm00
,
DDiimm11
,
DDiimm22
o
DDiimm33
.
Presione el botón
GG
y luego presione el botón
DD
o
EE
para seleccionar
DD11LL11
,
DD11LL22
o
DD11LL33
.
Presione el botón
EEXXIITT
para regresar a ver TV o pre-
sione el botón
MMEENNUU
para regresar al menú previo.
2
3
1
4
GG
Esta función puede llegar a estar disponible en el futuro y
estar disponible solamente para la señal del canal digital.
GG
Esta función funciona solamente cuando la TV ha recibido
datos del grado Region5.
NOTA
Sist. de Bloqueo
Fijar Contraseña
Bloquear Canales
Clasif. Películas
Clasif. Niños
Clasif. General
Bloqueo Entradas
Clasif. Descargable
G
2
1
SCREEN
LOCK
OPTION
TIME
AUDIO
VIDEO
SETUP
Clasif.Descargable
Dim0
Dim1
Dim2
Dim3
GG
De acuerdo con la tabla del grado, OSD
(Desplegado en la pantalla) de su TV puede
diferenciar levemente de lo que se muestra
en este manual.
Sist. de Bloqueo
Fijar Contraseña
Bloquear Canales
Clasif. Películas
Clasif. Niños
Clasif. General
Bloqueo Entradas
Clasif. Descargable
SCREEN
LOCK
OPTION
TIME
AUDIO
VIDEO
SETUP
MFL34797070sp-2 4/16/09 2:21 PM Page 77

CONTROL PATERNO /CLASIFICACIONES
78
CONTROL PATERNO/CLASIFICACIONES
Clasificacion de TV- Infantil
Después de meter la contraseña, utilice el botón
DD
o
EE
para seleccionar
CCllaassiiff.. NNiiññooss
Presione el botón
GG
y luego presione el botón
DD
o
EE
para seleccionar
EEddaadd
, o
VViioolleenncciiaa ddee FFaannttaassííaa
.
Presione el botón
GG
y luego presione el botón
DD
o
EE
para seleccionar las opciones de bloqueo.
■
Edad (se aplica a TV-Y, TV-Y7)
■
Violencia de fantásía (se aplica a TV-Y7)
Presione el botón
EEXXIITT
para regresar a ver TV o presione
el botón
MMEENNUU
para regresar al menú previo.
Evita que los niños vean ciertos programas infantiles de TV, conforme al límite
de clasificación establecido. Esta clasificación no es aplicable a otros programas
de TV.
A menos que bloquee ciertos programas de TV pensados para audiencias
maduras en el menú secundario de clasificación de la TV, sus hijos estarán
expuestos a estos programas.
Sist. de Bloqueo
Fijar Contraseña
Bloquear Canales
Clasif. Películas
Clasif. Niños
G
Clasif. General
Bloqueo Entradas
Clasif. Descargable
Edad
Violencia de Fantasía
2
3
1
1
2
SCREEN
LOCK
OPTION
TIME
AUDIO
VIDEO
SETUP
Sist. de Bloqueo
Fijar Contraseña
Bloquear Canales
Clasif. Películas
Clasif. Niños
Clasif. General
Bloqueo Entradas
Clasif. Descargable
SCREEN
LOCK
OPTION
TIME
AUDIO
VIDEO
SETUP
MFL34797070sp-2 4/16/09 2:21 PM Page 78

CONTROL PATERNO /CLASIFICACIONES
79
Clasificacion de TV - General
Después de meter la contraseña, utilice el botón
DD
o
EE
para seleccionar
CCllaassiiff GGeenneerraall
.
Presione el botón
GG
y luego el botón
DD
o
EE
para selec-
cionar
EEddaadd
,
DDiiáállooggoo
,
LLeenngguuaajjee
,
SSeexxoo
o
VViioolleenncciiaa
.
Presione el botón
GG
y luego utilice el botón
DD
o
EE
para seleccionar las opciones de bloque.
■
Edad (Edad se aplica a TV-G,TV-PG,TV-14,TV-MA)
■
Diálogos- diálogos con contenido sexual (se aplica a
TV-PG y TV-14)
■
Lenguaje- lenguaje adulto (se aplica a TV-PG, TV-14 y
TV-MA)
■
Sexo - situaciones sexuales (se aplica a TV-PG, TV-14 y
TV-MA)
■
Violencia (se aplica a TV-PG,TV-14,TV-MA)
Presione el botón
EEXXIITT
para regresar a ver TV o pre-
sione el botón
MMEENNUU
para regresar al menú previo.
En base a la Clasificación esta opción bloquea ciertos pro-
gramas de TV que usted y su familia no desean ver.
Sist. de Bloqueo
Fijar Contraseña
Bloquear Canales
Clasif. Películas
Clasif. Niños
Clasif. General
G
Bloqueo Entradas
Clasif. Descargable
Edad
Diálogo
Lenguaje
Sexo
Violencia
2
3
1
SCREEN
LOCK
OPTION
TIME
AUDIO
VIDEO
SETUP
Sist. de Bloqueo
Fijar Contraseña
Bloquear Canales
Clasif. Películas
Clasif. Niños
Clasif. General
Bloqueo Entradas
Clasif. Descargable
SCREEN
LOCK
OPTION
TIME
AUDIO
VIDEO
SETUP
MFL34797070sp-2 4/16/09 2:21 PM Page 79

APÉNDICE
80
APÉNDICE
LISTA DE VERIFICACIÓN DE PROBLEMAS
No imagen
No sonido
Color o imagen deficiente, o
No color
Recepción pobre en
algunos canales
Lineas o rayas en las
imagenes
Bar horizontal/vertical o
imagen temblante
La imagen aparece lenta-
mente después de enceder
la TV
■
Verifique si el producto está encendido.
■
Intente otro canal. El problema puede ser con la transmisión.
■
Está metido el cordón de alimentación dentro del tomacorriente de la pared?
■
Verifique la dirección y/o la ubicación de su antena.
■
Pruebe el tomacorriente, enchufe un cordón de alimentación de otro producto en el
tomacorriente donde estaba enchufado el cordón de alimentación del producto.
■
Es normal, la imagen es muda durante el proceso de inicio del producto. Favor de
contactar a su centro de servicio, si la imagen no aparece cinco minutos después.
■
Ajuste Color en la opción del menú.
■
Mantenga una distancia suficiente entre el producto y el VCR.
■
Intente otro canal. El problema puede ser con la transmisión.
■
Están instalados apropiadamente los cables de video?
■
Active cualquier función para restablecer el brillo de la imagen.
■
Verifique la inteferencia local como aparatos eléctricos o herramientas de potencia.
■
Estación o cable con problemas experimentales, sintonice a otra estación.
■
Si la señal de estación es débil, reubique la antena para recibir estación más debil.
■
Verifique las fuentes de la interferencia posible.
■
Verifique la antena (Cambie la dirección de la antena).
NNoo ssee ttrraabbaajjaa nnoorrmmaallmmeennttee..
El control remoto no
funciona
De repente la TV se
apaga
■
Verifique para ver si hay algún objeto entre el producto y el control remoto cau-
sando la obstrucción. Asegúrese de apuntar el control remoto directamente al televisor.
■
Están puestas las baterías con la polaridad correcta (+con +, -con -)?
■
Está correcta la configuración del modo remoto de la operación: TV, VCR etc.?
■
Ponga nuevas baterías.
■
Está configurado el tiempo para dormir?
■
Verifique las configuraciones de control de la potencia. La potencia interrumpida.
■
No enciende la transmisión en la estación con el auto-apagado activo.
NNoo ssiirrvvee llaa ffuunncciióónn ddee vviiddeeoo..
MFL34797070sp-2 4/16/09 2:21 PM Page 80

APÉNDICE
81
NNoo ssiirrvvee llaa ffuunncciióónn ddee aauuddiioo..
HHaayy uunn pprroobblleemmaa eenn eell mmooddoo PPCC.. ((SSóólloo ssee aapplliiccaa eenn eell mmooddoo PPCC))
■
Presione el botón VOL +/- (o Volume).
■
Sonido mudo? Presione el botón MUTE.
■
Intente otro canal. El problema puede ser con la transmisión.
■
Están instalados apropiadamente los cables de audio?
■
Ajuste el Balance en la opción del menú.
■
Un cambio en el ambiente de humedad o temperatura puede causar un sonido
raro cuando enciende o apaga el producto y esto no significa la falla del pro-
ducto.
Imagen OK pero
No sonido
Sonido raro desde interior
del producto
No salida de una de las
bocinas
■
Ajuste la resolución, la frecuencia horizontal o vertical.
■
Verifique la fuente de la entrada.
■
Ponga a trabajar auto-configuración o ajuste el reloj, la fase o la posición H/V.
(opción)
■
Verifique el cable de señal.
■
Reinstale la tarjeta de video de la PC.
La señal está fuera del
rango
(Formato no válido)
El color de pantalla es
inestable o color único
Barra o raya vertical en
el fondo, Ruido horizon-
tal y posicion incorrecta
MFL34797070sp-2 4/16/09 2:21 PM Page 81

APÉNDICE
82
APÉNDICE
MANTENIMIENTO
Las malfunciones anticipadas pueden ser prevenidas. La limpieza regular y cuidadosa puede extender la suma
de tiempo que ud. va a tener su nueva TV. Asegurese apagar la TV y desenchufar el cordón de alimentación
antes de empezar cualquier tipo de limpieza.
Limpiando la pantalla
Aqui hay una buena manera para mantener su pantalla limpia por un tiempo. Moje una tela suave en una
mezcla de agua tibia con un poco de suavizante de ropa, o detergente de platos. Escurra la tela hasta que
esté casi seca, luego limpie la pantalla con ella.
Asegurese que no haya exceso de agua por la pantalla,luego dejela secar por el aire antes de encender su TV.
Limpiando el gabinete
■
Para remover la suciedad o polvo, limpie el gabinete con una tela suave, seca y sin pelusa.
■
Favor de asegurarse no usar una tela mojada.
Ausencia Extendida
GG
Si ud. espera dejar su TV por un tiempo largo (como las vacaciones), será buena idea desenchufar el
cordón de alimentación para proteger la TV contra el daño posible por alguna descarga electrica.
PRECAUCIÓN
2
1
MFL34797070sp-2 4/16/09 2:21 PM Page 82

APÉNDICE
83
ESPECIFICACIONES DEL PRODUCTO
■
Las especificaciones mostradas arriba se pueden cambiar sin previo aviso para la mejora de calidad.
Ancho x Altura x Profundidad
incluyendo la base
(pulgadas/mm)
excluyendo la base
Peso (libras / kg) incluyendo la base
excluyendo la base
Ancho x Altura x Profundidad
incluyendo la base
(pulgadas/mm)
excluyendo la base
Peso (libras / kg) incluyendo la base
excluyendo la base
Ancho x Altura x Profundidad
incluyendo la base
(pulgadas/mm)
excluyendo la base
Peso (libras / kg) incluyendo la base
excluyendo la base
Ancho x Altura x Profundidad
incluyendo la base
(pulgadas/mm)
excluyendo la base
Peso (libras / kg) incluyendo la base
excluyendo la base
Ancho x Altura x Profundidad
incluyendo la base
(pulgadas/mm)
excluyendo la base
Peso (libras / kg) incluyendo la base
excluyendo la base
Ancho x Altura x Profundidad
incluyendo la base
(pulgadas/mm)
excluyendo la base
Peso (libras / kg) incluyendo la base
excluyendo la base
32LC5DC/S/B
(32LC5DC/S/B-UA)
32LC50C/S/B
(32LC50C/S/B-UA)
37LC5DC/1/B
(37LC5DC/1/B-UA)
37LC50/B
(37LC50/B-UA)
AC100-240V ~ 50/60Hz
NTSC-M, ATSC, 64 & 256 QAM
VHF 2-13, UHF 14-69, CATV 1-135, DTV 2-69, CADTV 1-135
75 ohm
32 ~ 104°F (0 ~ 40°C)
Menos de 80%
-4 ~ 140°F (-20 ~ 60°C)
Menos de 85%
36.5 x 27.4 x 10.4
pulgadas
926.8 x 695.8 x 264.6 mm
36.5 x24.8 x 4.2
pulgadas
926.8 x 629.8 x 107.4 mm
47.2 libras / 21.4 kg
36.8 libras / 16.7 kg
31.8 x 23.9 x 9.8
pulgadas
806.6 x 607.5 x 249.0 mm
31.8 x 21.7 x 3.8
pulgadas
806.6 x 552.3 x 97.2 mm
33.7 libras / 15.3kg
27.6 libras / 12.5 kg
42LC5DC
(42LC5DC-UA)
42LC50C
(42LC50C-UA)
40.7 x 29.6 x 11.6
pulgadas
1033.1 x 750.7 x 294.2 mm
40.7 x 27.0x 4.3
pulgadas
1033.1 x 686.5 x 110.2 mm
61.3 libras / 27.8 kg
47.2 libras / 21.4 kg
Potencia requerida
Sistema de la TV
Cobertura de programas
Impedancia de Antena Externa
Temp.de operación
Humedad de operación
Temp.para almacenar
Humedad para almacenar
32LX5DC/S
(32LX5DC/S-UA)
32LX50C/S
(32LX50C/S-UA)
42PX8DC
(42PX8DC-UA)
36.3 x 24.2 x 11.3
pulgadas
922.0 x 615.0x 288.0 mm
36.3 x 21.5 x 3.9
pulgadas
922.0 x 546.0 x 98.0 mm
39.0 libras / 17.7 kg
30.4 libras / 13.8 kg
46.7 x 28.1 x 10.6
pulgadas
1186.0 x 714.0 x 270.0 mm
46.7 x 25.7 x 3.9
pulgadas
1186.0 x 654.0 x 99.0 mm
72.5 libras / 32.9 kg
55.6 libras / 25.2 kg
42LB5DC
(42LB5DC-UA)
42LB50C
(42LB50C-UA)
40.7 x 29.6 x 11.6
pulgadas
1033.1 x 750.7 x 294.2 mm
40.7 x 27.0x 4.3
pulgadas
1033.1 x 686.5 x 110.2 mm
61.3 libras / 27.8 kg
47.2 libras / 21.4 kg
Consumo de la
potencia (W)
150 W
18 0 W
230W
150 W
330W
240W
MFL34797070sp-2 4/16/09 2:21 PM Page 83

APÉNDICE
84
APÉNDICE
Marca Códigos Marca Códigos Marca Códigos
APEX DIGITAL 022
DENON 020 014
GE 005 006
HARMAN KARDON 027
JVC 012
LG 001 010 016 025
MAGNAVOX 013
MARANTZ 024
MITSUBISHI 002
NAD 023
ONKYO 008 017
PANASONIC 003 009
PHILIPS 013
PIONEER 004 026
PROCEED 021
PROSCAN 005 006
RCA 005 006
SAMSUNG 011 015
SONY 007
THOMPSON 005 006
TOSHIBA 019 008
YAMAHA 009 018
ZENITH 010 016 025
Códigos de Programación
DVD
PROGRAMANDO EL CONTROL REMOTO
Programando un código en un modo remoto
Para verificar si su control remoto puede operar el componente sin programación, encienda el componente
como un VCR y presione el botón del modo correspondiente del control remoto, mientras indique en el
componente.
Pruebe los botones
PPOOWWEERR
para ver si el componente responde apropiadamente. Si no, el control remoto
requiere la programación para operar el dispositivo.
Presione los botones
MMEENNUU
y
MMUUTTEE
en forma continua y al mismo tiempo durante dos segundos; se ilu-
minará el botón actualmente seleccionado.
Si no presiona algún botón durante 20 segundos, la luz del botón de modo se apagará. En ese caso, debe
repetir el proceso desde el paso 2.
Ponga un número de código usando los botones de número del control remoto. Los números de código de
la programación para el componente correspondiente puede ser encontrados en las páginas siguientes. Si
el código está correcta,el dispositivo se apagará.
Presione el botón
MMEENNUU
para memorizar el código. Luego de parpadear dos veces, se almacenará este
código.
Pruebe las funciones del control remoto para ver si el componente responde apropiadamente. Si no, repita
desde el paso 2-5.
El control remoto es un multi-marcas o un control remoto universal. Puede ser programado para operar la
mayoría de los aparatos controlados por remotos de otras manufactureras.
Nota que el control remoto no puede controlar todos los modelos de otras marcas.
2
3
4
5
1
MFL34797070sp-2 4/16/09 2:21 PM Page 84

APÉNDICE
85
Marca Códigos Marca Códigos Marca Códigos
AIWA 034
AKAI 016 043 046 124
12 5 146
AMPRO 072
ANAM 031 033 103
AUDIO DYNAMICS
012 023 039 0 43
BROKSONIC 035 037 129
CANON 028 031 033
CAPEHART 108
CRAIG 003 040 135
CURTIS MATHES 031 033 041
DAEWOO 005 007 010 064
065 108 110 111
112 116 117 119
DAYTRON 108
DBX 012 023 039 043
DYNATECH 034 053
ELECTROHOME 059
EMERSON 006 017 025 027
029 031 034 035
036 037 046 101
129 131 13 8 15 3
FISHER 003 008 009 010
FUNAI 034
GE 031 033 063 072
10 7 10 9 144 14 7
GO VIDEO 132 136
HARMAN KARDON 012 045
HITACHI 004 018 026 034
043 063 137 150
INSTANTREPLAY 031 033
JCL 031 033
JCPENNY 012 013 015 033
040 066 101
JENSEN 043
JVC 012 031 033 043
048 050 055 060
130 150 15 2
KENWOOD 014 034 039 043
047 048
LG (GOLDSTAR) 001 012 013 020
101 106 114 123
LLOYD 034
LXI 003 009 013 014
017 034 101 106
MAGIN 040
MAGNAVOX 031 033 034 041
067 068
012 031 033 067
MARANTZ 069
MARTA 101
MATSUI 027 030
MEI 031 033
MEMOREX 003 010 014 031
033 034 053 072
101 102 134 13 9
MGA 045 046 059
MINOLTA 013 020
MITSUBISHI 013 020 045 046
049 051 059 061
15 1
MTC 034 040
MULTITECH 024 034
NEC 012 023 039 043
048
NORDMENDE 043
OPTONICA 053 054
PANASONIC 066 070 074 083
13 3 140 145
PENTAX 013 020 031 033
063
PHILCO 031 034 067
PHILIPS 031 033 034 054
067 071 101
PILOT 101
PIONEER 013 021 048
PORTLAND 108
PULSAR 072
QUARTZ 011 014
QUASAR 033 066 075 145
RCA 013 020 033 034
040 041 062 063
107 109 140 144
14 5 14 7
REALISTIC 003 008 010 014
031 033 034 040
053 054 101
RICO 058
RUNCO 148
SALORA 014
SAMSUNG 032 040 102 104
10 5 10 7 10 9 112
113 115 120 12 2
12 5
SANSUI 022 043 048 135
SANYO 003 007 010 014
10 2 134
SCOTT 017 037 112 129
131
SEARS 003 008 009 010
013 014 017 020
031 042 073 081
101
SHARP 031 054 149
SHINTOM 024
SONY 003 009 031 052
056 057 058 076
077 078 149
SOUNDESIGN 034
STS 013
SYLVANIA 031 033 034 059
067
SYMPHONIC 034
TANDY 010 034
TATUNG 039 043
TEAC 034 039 043
TECHNICS 031 033 070
TEKNIKA 019 031 033 034
101
THOMAS 034
TMK 006
TOSHIBA 008 013 042 047
059 082 112 131
TOTEVISION 040 101
UNITECH 040
VECTOR RESEARCH
012
VICTOR 048
VIDEO CONCEPTS
012 034 046
VIDEOSONIC 040
WARDS 003 013 017 024
031 033 034 040
053 054 131
YAMAHA 012 034 039 043
ZENITH 034 048 056
058 072 080 101
VCR
MFL34797070sp-2 4/16/09 2:21 PM Page 85

APÉNDICE
86
APÉNDICE
Configuración de ID
Presione el botón
MMEENNUU
y luego presione el botón
DD
o
EE
para seleccionar el menú
OOPPCCIIOONN
.
Presione el botón
GG
y luego presione el botón
DD
o
EE
para seleccionar
SSeett IIDD
.
Presione el botón
GG
y luego presione el botón
DD
o
EE
para ajustar
SSeett IIDD
seleccionar el número deseado
de ID del monitor. Rango de ajuste de
SSeett IIDD
1
-
99.
Presione el botón
EEXXIITT
para regresar a ver TV o pre-
sione el botón
MMEENNUU
para regresar al menú previo.
Use esta función para especificar un número de ID de la
unidad.
2
3
4
1
Relación de Aspecto
Subtít/Texto
Opción Subtítulos
Idioma(Language)
Metodo ISM
Bajo Consumo
Set ID
SCREEN
LOCK
OPTION
TIME
AUDIO
VIDEO
SETUP
Relación de Aspecto
Subtít/Texto
Opción Subtítulos
Idioma(Language)
Metodo ISM
Bajo Consumo
Set ID
G
2 3
1
SCREEN
LOCK
OPTION
TIME
AUDIO
VIDEO
SETUP
1
MFL34797070sp-2 4/16/09 2:21 PM Page 86

APÉNDICE
87
CÓDIGOS DE IR
Código
Función Nota
(Hexa)
Código
Función Nota
(Hexa)
0F TV INPUT Botón control Remoto
0B INPUT Botón control Remoto
08 POWER
Botón control Remoto (Encendido/apagado)
98 MULTI Botón control Remoto
79 RATIO Botón control Remoto
0E TIMER Botón control Remoto
10-19 Number Key 0-9 Botón control Remoto
4C - (Dash) Botón control Remoto
1A FLASH BACK Botón control Remoto
09 MUTE Botón control Remotov
02 VOL + Botón control Remoto
03 VOL - Botón control Remoto
00 CH + Botón control Remoto
01 CH - Botón control Remoto
39 CC Botón control Remoto
40
DD
Botón control Remoto
41
EE
Botón control Remoto
07
FF
Botón control Remoto
06
GG
Botón control Remoto
44 ENTER Botón control Remoto
43 MENU Botón control Remoto
52 EZ SOUND Botón control Remoto
4D EZ PIC Botón control Remoto
5B EXIT Botón control Remoto
0A SAP Botón control Remoto
E1 Botón control Remoto
E0 Botón control Remoto
AA INFO Botón control Remoto
60 PIP Botón control Remoto
72 PIP CH - Botón control Remoto
71 PIP CH + Botón control Remoto
61 PIP INPUT Botón control Remoto
63 SWAP Botón control Remoto
D6 TV Código discreto IR
(TV de entrada)
C4 POWER ON Código discreto IR
(Sólo encendido)
C5 POWER OFF Código discreto IR
(Sólo apagado)
5A AV1 Código discreto IR
(AV1 de entrada)
D0 AV2 Código discreto IR
(AV2 de entrada)
BF COMPONENT Código discreto IR
(Componente de entrada)
D5 RGB-PC Código discreto IR
(RGB-PC de entrada)
CE HDMI1/DVI Código discreto IR
(HDMI1/DVI de entrada)
CC HDMI2 Código discreto IR
(HDMI2 de entrada)
76 Ratio 4:3 Código discreto IR
(Sólo modo 4:3)
77 Ratio 16:9 Código discreto IR
(Sólo modo 16:9)
AF Ratio Zoom Código discreto IR
(Sólo modo Zoom1)
MFL34797070sp-2 4/16/09 2:21 PM Page 87

MFL34797070sp-2 4/16/09 2:21 PM Page 88
-
 1
1
-
 2
2
-
 3
3
-
 4
4
-
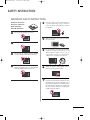 5
5
-
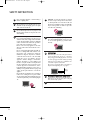 6
6
-
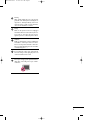 7
7
-
 8
8
-
 9
9
-
 10
10
-
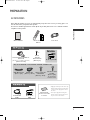 11
11
-
 12
12
-
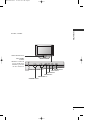 13
13
-
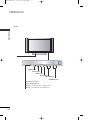 14
14
-
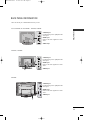 15
15
-
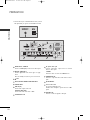 16
16
-
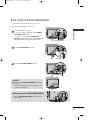 17
17
-
 18
18
-
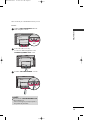 19
19
-
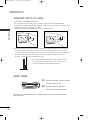 20
20
-
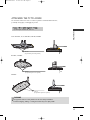 21
21
-
 22
22
-
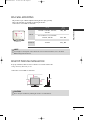 23
23
-
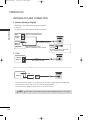 24
24
-
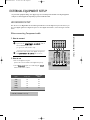 25
25
-
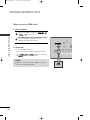 26
26
-
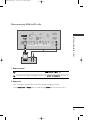 27
27
-
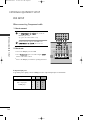 28
28
-
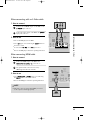 29
29
-
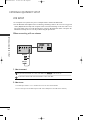 30
30
-
 31
31
-
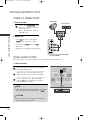 32
32
-
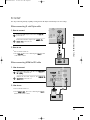 33
33
-
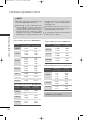 34
34
-
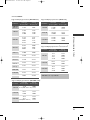 35
35
-
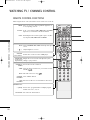 36
36
-
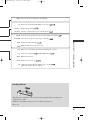 37
37
-
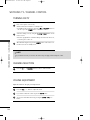 38
38
-
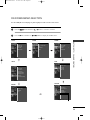 39
39
-
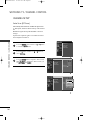 40
40
-
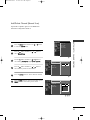 41
41
-
 42
42
-
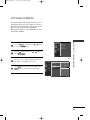 43
43
-
 44
44
-
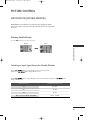 45
45
-
 46
46
-
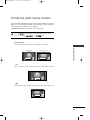 47
47
-
 48
48
-
 49
49
-
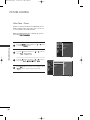 50
50
-
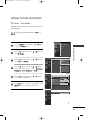 51
51
-
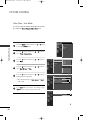 52
52
-
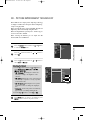 53
53
-
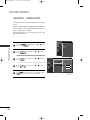 54
54
-
 55
55
-
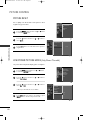 56
56
-
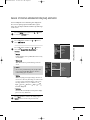 57
57
-
 58
58
-
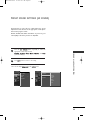 59
59
-
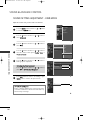 60
60
-
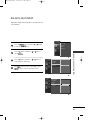 61
61
-
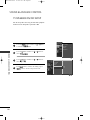 62
62
-
 63
63
-
 64
64
-
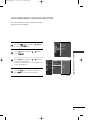 65
65
-
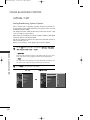 66
66
-
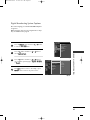 67
67
-
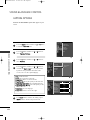 68
68
-
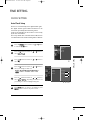 69
69
-
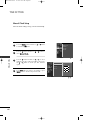 70
70
-
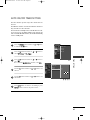 71
71
-
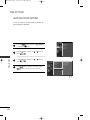 72
72
-
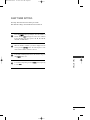 73
73
-
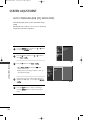 74
74
-
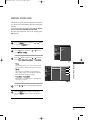 75
75
-
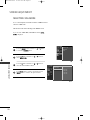 76
76
-
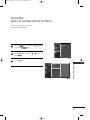 77
77
-
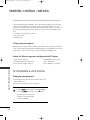 78
78
-
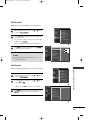 79
79
-
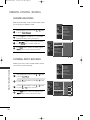 80
80
-
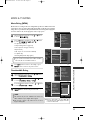 81
81
-
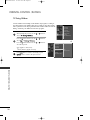 82
82
-
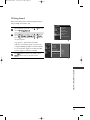 83
83
-
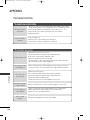 84
84
-
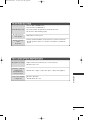 85
85
-
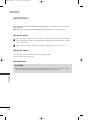 86
86
-
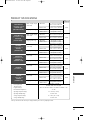 87
87
-
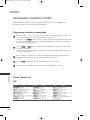 88
88
-
 89
89
-
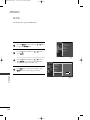 90
90
-
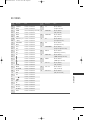 91
91
-
 92
92
-
 93
93
-
 94
94
-
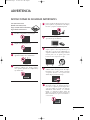 95
95
-
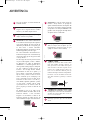 96
96
-
 97
97
-
 98
98
-
 99
99
-
 100
100
-
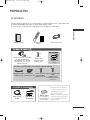 101
101
-
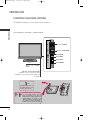 102
102
-
 103
103
-
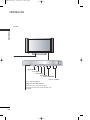 104
104
-
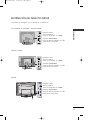 105
105
-
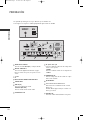 106
106
-
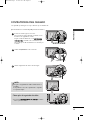 107
107
-
 108
108
-
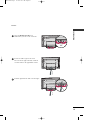 109
109
-
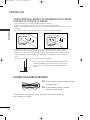 110
110
-
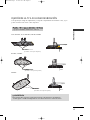 111
111
-
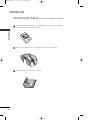 112
112
-
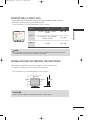 113
113
-
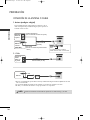 114
114
-
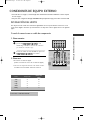 115
115
-
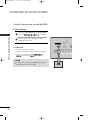 116
116
-
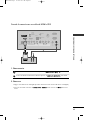 117
117
-
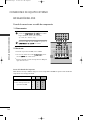 118
118
-
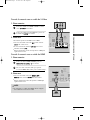 119
119
-
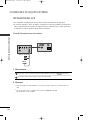 120
120
-
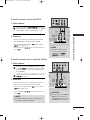 121
121
-
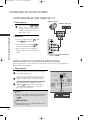 122
122
-
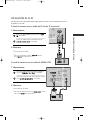 123
123
-
 124
124
-
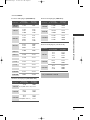 125
125
-
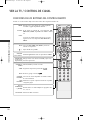 126
126
-
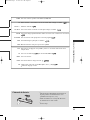 127
127
-
 128
128
-
 129
129
-
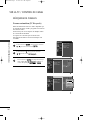 130
130
-
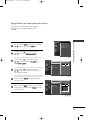 131
131
-
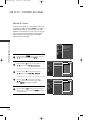 132
132
-
 133
133
-
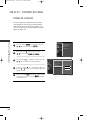 134
134
-
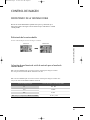 135
135
-
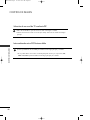 136
136
-
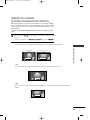 137
137
-
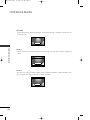 138
138
-
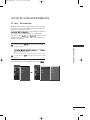 139
139
-
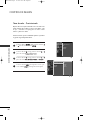 140
140
-
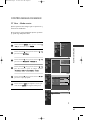 141
141
-
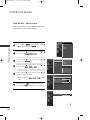 142
142
-
 143
143
-
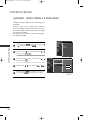 144
144
-
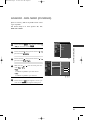 145
145
-
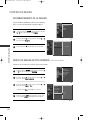 146
146
-
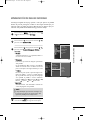 147
147
-
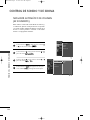 148
148
-
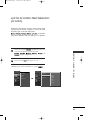 149
149
-
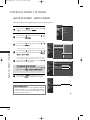 150
150
-
 151
151
-
 152
152
-
 153
153
-
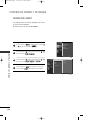 154
154
-
 155
155
-
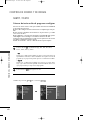 156
156
-
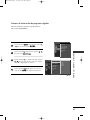 157
157
-
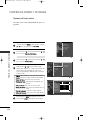 158
158
-
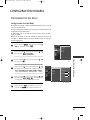 159
159
-
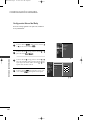 160
160
-
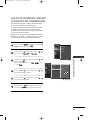 161
161
-
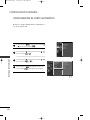 162
162
-
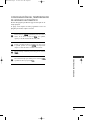 163
163
-
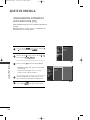 164
164
-
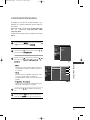 165
165
-
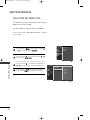 166
166
-
 167
167
-
 168
168
-
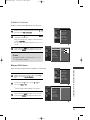 169
169
-
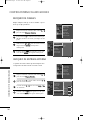 170
170
-
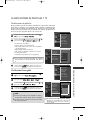 171
171
-
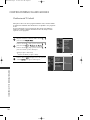 172
172
-
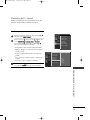 173
173
-
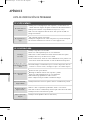 174
174
-
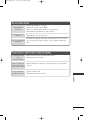 175
175
-
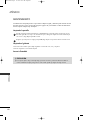 176
176
-
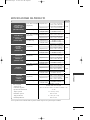 177
177
-
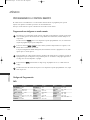 178
178
-
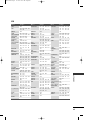 179
179
-
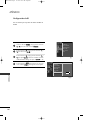 180
180
-
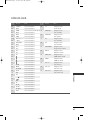 181
181
-
 182
182


LG 32LC50C El manual del propietario
- Categoría
- Televisores
- Tipo
- El manual del propietario
en otros idiomas
- English: LG 32LC50C Owner's manual
Artículos relacionados
-
LG 32PC5RVH-MF Manual de usuario
-
LG 42LB9DFB El manual del propietario
-
LG 20LS1RA Manual de usuario
-
LG 47LT770H El manual del propietario
-
LG 47LY760H El manual del propietario
-
LG 47LT777H El manual del propietario
-
LG 42LG50FR Manual de usuario
-
LG 26LG30R Manual de usuario
-
LG 47LG30R Manual de usuario
-
LG 42LG60FR Manual de usuario

