Linksys Q87-WRK54GV3 Manual de usuario
- Categoría
- Enrutadores
- Tipo
- Manual de usuario
Este manual también es adecuado para

A Division of Cisco Systems, Inc.
®
Model No.
Wireless
1
Quick Installation Guide
WRK54G (EU/LA/UK)
Broadband Router
Wireless-G
Package Contents*
• Wireless-G Broadband Router
• Setup CD-ROM (with Symantec
Internet Security)
• User Guide on CD-ROM (English
Only)
• Power Adapter
• Ethernet Network Cable
• Quick Installation Guide
*other items may be included
GHz
2
802.11g
4
,

2
1
A Before you begin, make sure
that you have the setup
information for your specific
type of Internet connection.
The installation technician from
your ISP should have left this
information with you after
installing your broadband
connection. If not, you can call
your ISP to request the settings.
B Make sure that all of your
network’s hardware is powered
off, including the Router, PCs,
and cable or DSL modem.
C Connect one end of an
Ethernet network cable to one
of the ports (labeled 1-4) on
the back of the Router, and the
other end to an Ethernet port
on a PC.
D Repeat step C to connect
additional PCs or other network
devices to the Router.
Connect the Broadband Router
C

3
E Connect a different Ethernet
network cable from your cable
or DSL modem to the Internet
port on the Router’s back
panel. This is the only port that
will work for your modem
connection.
F Power on the cable or DSL
modem.
G Connect the AC power
adapter to the Router’s Power
port and the other end into an
electrical outlet.
H Make sure the Power and
Internet LEDs on the front panel
light up green.
I The Power LED will flash green
for a few seconds when the
Router goes through its self-
diagnostic test. This LED will stay
solidly lit when the self-test is
complete. If it does not stop
flashing, refer to “Appendix A:
Troubleshooting” in the Router’s
User Guide on the Setup CD-
ROM.
J Power on the PC you wish to
use to configure the Router.
Proceed to Step 2.
IMPORTANT: Make sure you use
the power adapter that is supplied
with the Router. Use of a different
power adapter could damage the
Router.
G
E

4
2
These instructions will show you how
to configure the Router. You only
need to configure it once.
A Open your web browser. Enter
http://192.168.1.1 in its
Address field. Press the Enter
key.
B A password request screen will
appear. Leave the User Name
field empty, and enter the
default password, admin, in
lowercase letters in the
Password field. (You should
later set a new password,
using the Administration tab’s
Management screen of the
Web-based Utility). Then, click
the OK button.
C The Web-based Utility will
appear with the Setup tab
selected. If requested by your
ISP (usually cable ISPs),
complete the Host Name and
Domain Name fields.
Otherwise, leave them blank.
D For the Internet Connection
Type setting, six connection
types are offered through the
drop-down menu. Each Setup
screen and available features
will differ depending on which
connection type you select.
C
NOTE: Make sure your PC’s Ethernet
adapter is set to obtain an IP address
automatically. For more information,
refer to Windows Help.
A
Configure the Broadband Router
B

5
Internet Configuration Type
DHCP: If you are connecting
through DHCP or a dynamic IP
address from your ISP, keep the
default setting Obtain an IP
automatically.
Static IP: If your ISP assigns you a
static IP address, select Static IP
from the drop-down menu.
Complete the Internet IP
Address, Subnet Mask, Gateway,
and Static DNS fields. You need
to enter at least one DNS
address.
PPPoE: If you are connecting
through PPPoE, select PPPoE from
the drop-down menu. Complete
the User Name and Password
fields. Select Keep Alive if you
always want to be connected to
your ISP, or select Connect on
Demand if you are charged for
the time that you are connected
to your ISP.
L2TP: L2TP is a service used in Israel
only. If you are using an L2TP
connection, check with your ISP
for setup information.
PPTP: PPTP is a service used in
Europe only. If you are using a
PPTP connection, select PPTP
from the drop-down menu
.
Complete the IP Address, Subnet
Mask, Default Gateway, User
Name ,and Password fields.
Select Keep Alive
if you always
DHCP
Static IP
PPPoE
L2TP
PPTP

6
want to be connected to your ISP,
or select Connect on Demand if
you are charged for the time that
you are connected to your ISP.
Telstra: Telstra (HeartBeat Signal)
is a service used in Australia only. If
you are using a HeartBeat Signal
connection, check with your ISP for
setup information.
E When you have finished
entering your Internet
connection settings, click the
Save Settings button to save
your changes.
F To configure the Router for your
wireless network, select the
Wireless Tab’s Basic Wireless
Settings screen.
G Wireless Network Mode.
Select the mode you are using
from the drop-down menu: If
you are using only 802.11g,
select G-Only; if you’re using
802.11b only, select B-Only; if
you’re using both 802.11b and
802.11g, keep Mixed setting.
H Wireless Network Name (SSID).
The SSID is the network name
shared among all devices in a
wireless network. The SSID must
be identical for all devices in
the wireless network. It is case-
sensitive and must not exceed
32 characters (use any
keyboard character). For
F
Telstra

7
added security, you should
change the default SSID linksys
to a unique name.
I Wireless Channel. Select the
appropriate channel from the
list provided to correspond with
your network settings. All
devices in your wireless network
must broadcast on the same
channel in order to function
correctly.
J Wireless SSID Broadcast. When
wireless clients survey the local
area for wireless networks to
associate with, they will detect
the SSID broadcast by the
Router. To broadcast the
Router's SSID, keep the default
setting, Enable. If you do not
want to broadcast the Router's
SSID, then select Disable.
K Change these settings as
described here and click the
Save Settings button to apply
your changes.
L Power your modem off and
back on again.
M Restart your computer.
N Test the setup by opening your
web browser and entering
http://www.linksys.com/
registration
.
The installation of the Wireless-G
Broadband Router is complete.
N
NOTE: For more advanced settings
and security options, refer to the
User Guide on the Router’s CD-ROM.
IMPORTANT: Once the Router is
configured, wireless security,
either WEP or WPA, should be
configured to prevent security
breaches in your network.

3
The Router comes equipped with
four types of wireless security: WEP,
WPA Pre-Shared, WPA Enterprise, and
RADIUS. These security methods are
not enabled right out of the box,
however. To configure wireless
security on the Router, do the
following:
A Open the Router’s Web Utility
as shown in Step 2, and click
the Wireless tab. The Basic
Wireless Settings screen will
appear.
B Select Wireless Security to
configure wireless security on
the Router.
Directions for the configuration
of WEP and WPA Pre-Shared
wireless security are provided
here.
C From the Security Mode pull-
down menu, select the type of
wireless security you’ll use on
your network.
WEP: WEP is a basic encryption
method, which is not as secure as
WPA. To use WEP, select a Default
Transmit Key (choose which Key to
use), and a level of WEP
encryption, 64 bits 10 hex digits
or 128 bits 26 hex digits. Then
either generate a WEP key using
the Passphrase or enter the WEP
key manually.
Configuring Wireless Security
NOTE: If your wireless adapters
support Secure Easy Setup (SES), you
can use the SES button on the Router
to set up wireless security.
Basic Wireless Settings
NOTE: Please refer to the User Guide
if you wish to configure WPA Enterpise
or RADIUS wireless security options.
WEP Security Settings

WPA Pre-Shared: WPA gives you
two encryption methods, TKIP and
AES, with dynamic encryption keys.
Select the type of algorithm, TKIP
or AES. Enter a WPA Shared Key of
8-63 characters. Then enter a
Group Key Renewal period, which
instructs the Router how often it
should change the encryption
keys.
D Click the Save Settings button.
Congratulations! Wireless Security
is now configured on the Router.
WRK54G-EU-LA-UK_V2-QIG-51114 TE
Linksys is a registered trademark or trademark of
Cisco Systems, Inc. and/or its affiliates in the U.S.
and certain other countries. Copyright © 2005
Cisco Systems, Inc. All rights reserved.
For additional information or troubleshooting
help, refer to the User Guide on the CD-ROM
or the Technical Support Insert. You can also
e-mail for further support.
Website
http://www.linksys.com/international
Product Registration
http://www.linksys.com/registration
WPA Pre-Shared
Security Settings

A Division of Cisco Systems, Inc.
®
Modelnr.
Wireless
1
Installationsvejledning
WRK54G (DK)
Bredbånds-router
Trådløs-G
Pakkens indhold*
• Trådløs-G Bredbånds-router
• Installations-cd-rom (med Symantec
Internet Security)
• Brugervejledning på cd-rom (kun på
engelsk)
• Strømforsyning
• Ethernet-kabel
• Installationsvejledning
*andre dele kan være vedlagt
GHz
2
802.11g
4
,

2
1
A Før du begynder, skal du have
konfigurationsoplysningerne til din
internetforbindelsestype. Du har
sandsynligvis fået oplysningerne
af din internetudbyder i
forbindelse med installationen af
din bredbåndsforbindelse. Hvis
det ikke er tilfældet, kan du
henvende dig til din
internetudbyder for at få
indstillingerne.
B Sørg for, at al netværkshardware
er slukket, herunder router, pc'er
og kabel- eller DSL-modem.
C Tilslut den ene ende af et
Ethernet-kabel til en af portene
(mærket 1-4) bag på routeren og
den anden ende til en Ethernet-
port på en pc.
D Gentag trin C for at tilslutte
yderligere pc'er eller andre
netværksenheder til routeren.
Tilslutning af bredbånds-routeren
C

3
E Tilslut et andet Ethernet-kabel fra
kabel- eller DSL-modemmet til
internetporten på routerens
bagpanel. Dette er den eneste
port, der kan bruges til din
modemforbindelse.
F Tænd kabel- eller DSL-modemmet.
G Tilslut vekselstrømsforsyningen til
routerens strømstik og en
stikkontakt.
H Kontroller, at lysdioderne Power og
Internet på frontpanelet lyser
grønt.
I Lysdioden Power blinker grønt i
nogle få sekunder, mens routeren
udfører sin selvdiagnosticeringstest.
Lysdioden lyser vedvarende, når
selvtesten er udført. Hvis lysdioden
ikke holder op med at blinke, skal
du se "Appendix A:
Troubleshooting" (Fejlfinding) i
brugervejledningen til routeren på
installations-cd-rom'en.
J Tænd den pc, du vil bruge til
konfiguration af routeren.
Fortsæt til trin 2.
VIGTIGT: Brug den strømforsyning,
der følger med routeren. Brug af en
anden strømforsyning kan beskadige
routeren.
G
E

4
2
Følg nedenstående vejledning for at
konfigurere routeren. Du skal kun
konfigurere den én gang.
A Åbn webbrowseren. Indtast
http://192.168.1.1 i feltet Address
(Adresse). Tryk på Enter.
B Der vises et skærmbillede til
indtastning af en adgangskode.
Lad feltet User Name
(Brugernavn) stå tomt, og indtast
standardadgangskoden admin
med små bogstaver i feltet
Password (Adgangskode).
(Du bør senere angive en ny
adgangskode i skærmbilledet
Management (Styring) under
fanen Administration i det
webbaserede hjælpeprogram).
Klik på knappen OK.
C Det webbaserede
hjælpeprogram vises med fanen
Setup (Konfiguration) valgt. Hvis
din internetudbyder kræver det
(normalt kabel-internetudbydere),
skal du udfylde felterne Host
Name (Værtsnavn) og Domain
Name (Domænenavn). I modsat
fald, skal du ikke udfylde dem.
D Du har mulighed for at vælge
mellem seks
internetforbindelsestyper i
rullemenuen.
Konfigurationsskærmbillederne
og de tilgængelige funktioner
varierer, afhængigt af hvilken
forbindelsestype du vælger.
C
BEMÆRK: Sørg for, at pc'ens Ethernet-
adapter er indstillet, så den automatisk
henter en IP-adresse. Se hjælpen til Windows
for at få yderligere oplysninger.
A
Konfiguration af bredbånds-routeren
B

5
Internetkonfigurationstype
DHCP: Hvis du opretter forbindelse via
DHCP eller en dynamisk IP-adresse fra
din internetudbyder, skal du beholde
standardindstillingen Obtain an IP
automatically (Hent automatisk en
IP-adresse).
Static IP (Statisk IP):Hvis din
internetudbyder tildeler dig en statisk
IP-adresse, skal du vælge Static IP i
rullemenuen. Udfyld felterne Internet
IP Address (Internet-IP-adresse), Subnet
Mask (Undernetmaske), Gateway og
Static DNS (Statisk DNS). Du skal
indtaste mindst én DNS-adresse.
PPPoE: Hvis du opretter forbindelse
via PPPoE, skal du vælge PPPoE i
rullemenuen. Udfyld felterne User
Name (Brugernavn) og Password
(Adgangskode). Vælg Keep Alive
(Permanent) hvis du altid vil have
forbindelse til din internetudbyder,
eller vælg Connect on Demand
(Opret forbindelse efter behov), hvis
du betaler for den tid, du har oprettet
forbindelse til din internetudbyder.
L2TP: L2TP er en tjeneste, der kun bruges
i Israel. Hvis du bruger en L2TP-forbindelse,
skal du henvende dig til din
internetudbyder for at få
konfigurationsoplysninger.
PPTP: PPTP er en tjeneste, der kun
bruges i Europa. Hvis du bruger en
PPTP-forbindelse, skal du vælge PPTP
i rullemenuen
. Udfyld felterne IP
Address (IP-adresse), Subnet Mask
(Undernetmaske), Default Gateway
(Standardgateway), User Name
(Brugernavn) og Password
DHCP
Static IP (Statisk IP)
PPPoE
L2TP
PPTP

6
(Adgangskode). Vælg Keep Alive
(Permanent) hvis du altid vil have
forbindelse til din internetudbyder,
eller vælg Connect on Demand
(Opret forbindelse efter behov), hvis
du betaler for den tid, du har oprettet
forbindelse til din internetudbyder.
Telstra (HeartBeat-signal): Telstra
(HeartBeat Signal) er en tjeneste, der
kun bruges i Australien. Hvis du bruger
en HeartBeat Signal-forbindelse, skal
du henvende dig til din
internetudbyder for at få
konfigurationsoplysninger.
E Når du er færdig med at indtaste
indstillinger for din internetforbindelse,
skal du klikke på knappen Save
Settings (Gem indstillinger) for at
gemme ændringerne.
F Vælg skærmbilledet Basic
Wireless Settings (Basisindstillinger
for trådløs) under fanen Wireless
(Trådløs) for at konfigurere routeren
til dit trådløse netværk.
G Tilstand for det trådløse netværk.
Vælg den tilstand, du bruger, i
rullemenuen: Hvis du kun bruger
802.11g, skal du vælge G-Only (Kun
G). Hvis du kun bruger 802.11b, skal
du vælge B-Only (Kun B). Hvis du
bruger både 802.11b og 802.11g,
skal du beholde indstillingen Mixed
(Blandet).
H Wireless Network Name (Navn på
trådløst netværk) (SSID). SSID er
det netværksnavn, der deles af
alle enhederne i et trådløs
netværk. SSID skal være identisk
for alle enheder i det trådløse
netværk. Der er forskel på store og
F
Telstra
(Heart Beat-signal)

7
små bogstaver i navnet, og det
må ikke være længere end 32
tegn (alle tegn på tastaturet må
bruges). Af sikkerhedsmæssige
årsager bør du ændre standard-
SSID'et linksys til et entydigt navn.
I Wireless Channel (Trådløs kanal).
Vælg den relevante kanal på den
viste liste, så den passer til dine
netværksindstillinger. Alle enheder
i dit trådløse netværk skal sende
på den samme kanal for at
fungere korrekt.
J Wireless SSID Broadcast (Trådløs
SSID-broadcast). Når trådløse
klienter overvåger lokalområdet for
at finde trådløse netværk, de kan
oprette forbindelse til, registrerer de
det SSID, der udsendes af routeren.
Behold standardindstillingen Enable
(Aktiver) for at udsende routerens
SSID. Vælg Disable (Deaktiver), hvis
du ikke vil udsende routerens SSID.
K Rediger disse indstillinger, som
beskrevet her, og klik på knappen
Save Settings (Gem indstillinger)
for at anvende indstillingerne.
L Sluk og tænd modemmet.
M Genstart computeren.
N Test konfigurationen ved at åbne
webbrowseren og indtaste
http://www.linksys.com/registration.
Installationen af Trådløs-G Bredbånds-
routeren er færdig.
N
BEMÆRK: Se oplysninger om mere
avancerede indstillinger og
sikkerhedsindstillinger i
brugervejledningen på cd-rom'en til
routeren.
VIGTIGT: Så snart routeren er
konfigureret, bør den trådløse
sikkerhed (enten WEP eller WPA)
konfigureres for at undgå, at der
opstår åbninger i dit netværk.

3
Routeren leveres med fire typer trådløs
sikkerhed: WEP, WPA Pre-Shared, WPA
Enterprise og Radius. Disse sikkerheds-
metoder aktiveres dog ikke, hvis du
ikke foretager dig noget. Hvis du vil
konfigurere trådløs sikkerhed på
routeren, skal du gøre følgende:
A
Åbn routerens
webhjælpeprogram som vist
under trin 2, og klik på fanen
Wireless
(Trådløs). Skærmbilledet
Basic Wireless Settings
(Basisindstillinger for trådløs) vises.
B Vælg Wireless Security (Trådløs
sikkerhed) for at konfigurere
trådløs sikkerhed på routeren.
Her angives retningslinjer for
konfiguration af trådløs WEP-
og WPA Pre-Shared-sikkerhed.
C I rullemenuen Security Mode
(Sikkerhedstilstand) skal du
vælge den type trådløs
sikkerhed, du vil anvende på dit
netværk.
WEP: WEP er en grundlæggende
krypteringsmetode, der ikke er så
sikker som WPA. For at anvende WEP
skal du vælge en Default Transmit
Key (Transmissionsnøgle) (vælg,
hvilken nøgle, du vil anvende) og et
WEP-krypteringsniveau: 64 bit 10
tegn i hex eller 128 bit 26 tegn i
hex. Derefter skal du enten
generere en WEP-nøgle ved hjælp
af dit adgangsord, eller angive
WEP-nøglen manuelt.
Konfiguration af trådløs sikkerhed
BEMÆRK: Hvis dine trådløse netværk-
skort understøtter Secure Easy Setup
(SES) (Sikker Nem Konfiguration), kan du
bruge SES-knappen på routeren til at
konfigurere Trådløs sikkerhed.
BEMÆRK: Hvis du ønsker at
konfigurere de trådløse
sikkerhedsmuligheder Radius
eller WPA Enterprise, skal du se i
brugervejledningen.
WEP Security Settings
(WEP-sikkerhedsind-
stillinger)
Basic Wireless Settings
(Basisindstillinger for
trådløs)

WPA Pre-Shared: Med WPA har du
to krypteringsmetoder med
dynamiske krypteringsnøgler: TKIP
og AES. Vælg algoritmetypen TKIP
eller AES. Indtast en WPA Shared
Key på 8-63 tegn. Indtast derefter
en udskiftningsperiode for
gruppenøglerne, som angiver
over for routeren, hvor ofte den
bør ændre krypteringsnøglerne.
D Klik på knappen Save Settings
(Gem indstillinger).
Tillykke! Wireless Security
(Trådløs sikkerhed) er nu
konfigureret på routeren.
WRK54G-DK_V2-QIG-51114 TE
Linksys er et registreret varemærke tilhørende
Cisco Systems, Inc. og/eller Cisco Systems
associerede selskaber i USA og visse andre lande.
Copyright © 2005 Cisco Systems, Inc. Alle
rettigheder forbeholdes.
Yderligere oplysninger eller hjælp til
fejlfinding finder du i brugervejledningen på
cd-rom'en eller på arket med teknisk
support. Du kan også sende en e-mail for at
få yderligere support.
Websted
http://www.linksys.com/international
Produktregistrering
http://www.linksys.com/registration
WPA Pre-Shared
Security Settings
(Sikkerhedsindstillinger)

A Division of Cisco Systems, Inc.
®
Modèle réf.
Sans fil
1
Guide d'installation rapide
WRK54G (FR)
Routeur haut débit
Sans fil G
Contenu de l'emballage*
• Routeur haut débit sans fil G
• CD-ROM d'installation (avec Symantec
Internet Security)
• Guide de l'utilisateur sur CD-ROM (en
anglais uniquement)
• Adaptateur électrique
• Câble réseau Ethernet
• Guide d'installation rapide
*d'autres éléments peuvent être inclus
GHz
2
802.11g
4
,

2
1
A Avant de commencer, vérifiez que
vous disposez des paramètres de
configuration propres à votre type
de connexion Internet. Le
technicien de votre fournisseur
d'accès Internet doit vous avoir
communiqué ces données après
avoir installé votre connexion haut
débit. Dans le cas contraire,
appelez votre fournisseur d'accès
Internet pour les lui demander.
B Vérifiez que tous les périphériques
de votre réseau sont hors tension, y
compris le routeur, les ordinateurs et
le modem câble ou DSL.
C Reliez une extrémité d'un câble
réseau Ethernet à l'un des ports
(numérotés de 1 à 4) situés sur le
panneau arrière du routeur et l'autre
extrémité au port Ethernet d'un
ordinateur.
Branchement du routeur haut débit
C

3
D Recommencez l'étape C pour relier
des ordinateurs supplémentaires ou
d'autres périphériques réseau au
routeur.
E Reliez votre modem câble ou DSL
au port Internet situé sur le panneau
arrière du routeur au moyen d'un
autre câble réseau Ethernet. Il s'agit
du seul port compatible avec votre
connexion modem.
F Mettez le modem câble ou DSL
sous tension.
G Branchez l'adaptateur secteur au
port d'alimentation du routeur et
branchez l'autre extrémité à une
prise d'alimentation.
H Les voyants d'alimentation (Power)
et Internet situés sur le panneau
avant s'illuminent en vert.
I Le voyant d'alimentation clignote
en vert pendant quelques
secondes lorsque le test
d'autodiagnostic du routeur est en
cours. Le voyant reste allumé
lorsque le test d'autodiagnostic est
terminé. S'il ne s'arrête pas de
clignoter, reportez-vous à la section
« Annexe A : Dépannage » du
Guide de l'utilisateur du routeur
figurant sur le CD-ROM d'installation.
J Allumez l'ordinateur que vous voulez
utiliser pour configurer le routeur.
Passez à l'étape 2.
IMPORTANT : Veillez à utiliser
l'adaptateur secteur fourni avec le
routeur. Le branchement d'un autre
adaptateur pourrait endommager le
routeur.
G
E

4
2
Ces instructions vous expliquent
comment configurer le routeur. Il vous
suffit de le configurer une seule fois.
A Ouvrez votre navigateur Web.
Entrez http://192.168.1.1 dans le
champ Adresse. Appuyez sur la
touche Entrée.
B Un écran vous invite à entrer un mot
de passe. Ne renseignez pas le
champ Nom d'utilisateur et saisissez
le mot de passe par défaut, admin,
en minuscules dans le champ Mot
de passe. Vous devrez ultérieurement
définir un nouveau mot de passe à
l'aide de l'écran Management
(Gestion) de l'onglet Administration de
l'utilitaire Web. Puis cliquez sur le
bouton OK.
C L'utilitaire Web apparaît et son
onglet Setup (Configuration) est
sélectionné. Si ces informations
sont requises par votre fournisseur
d'accès Internet (généralement il
s'agit des fournisseurs d'accès via
le câble), renseignez les champs
Host Name (Nom de l'hôte) et
Domain Name (Nom de
domaine). Dans le cas contraire,
laissez ces champs vides.
D Six types de connexion sont
proposés dans un menu déroulant
pour définir le paramètre Internet
Connection Type (Type de connexion
Internet). Les écrans d'installation et
les options disponibles varient selon le
type de connexion sélectionné.
C
REMARQUE : Assurez-vous que
l'adaptateur Ethernet de votre ordinateur est
configuré pour obtenir automatiquement
une adresse IP. Pour obtenir de plus amples
informations, reportez-vous à la rubrique
d'aide de Windows.
A
Configuration du routeur haut débit
B

5
Type de configuration Internet
DHCP : si vous vous connectez à votre
fournisseur d'accès Internet au moyen
d'une adresse DHCP ou IP dynamique,
ne modifiez pas la configuration par
défaut Obtain an IP automatically
(Obtenir automatiquement un
fournisseur d'accès Internet).
Static IP : si votre fournisseur d'accès
Internet vous attribue une adresse IP
statique, sélectionnez Static IP
(IP statique) dans le menu déroulant.
Renseignez les champs Internet
IP Address (Adresse IP Internet), Subnet
Mask (Masque de sous-réseau),
Gateway (Passerelle) et Static DNS
(DNS statique). Vous devez entrer au
moins une adresse DNS.
PPPoE : si vous vous connectez via le
protocole PPPoE, sélectionnez PPPoE
dans le menu déroulant. Renseignez
les champs User Name (Nom
d'utilisateur) et Password (Mot de
passe). Sélectionnez Keep Alive
(Activé) si vous souhaitez rester
connecté à votre fournisseur d'accès
Internet ou Connect on Demand
(Connexion à la demande) si l'on vous
facture le temps de connexion à votre
fournisseur d'accès Internet.
L2TP: L2TP est un service utilisé en Israël
uniquement. Si vous utilisez une
connexion L2TP, demandez les
paramètres de configuration à votre
FAI.
PPTP : PPTP est un service utilisé en
Europe uniquement. Si vous utilisez une
connexion PPTP, sélectionnez PPTP dans
le menu déroulant
. Renseignez les
champs IP Address (Adresse IP), Subnet
Mask (Masque de sous-réseau), Default
Gateway (Passerelle par défaut), User
DHCP
Adresse IP statique
PPPoE
L2TP
Protocole PPTP

6
Name (Nom de l'utilisateur) et Password
(Mot de passe). Choisissez l'option Keep
Alive (Activé) si vous souhaitez toujours
être connecté à votre fournisseur d'accès
Internet (FAI) ou sélectionnez Connect on
Demand (Connexion à la demande) si
vous êtes facturé pour le temps
connecté à votre FAI.
Telstra (HeartBeat Signal) : Telstra est un
service utilisé en Australie uniquement. Si
vous utilisez une connexion HeartBeat
Signal, consultez votre fournisseur d'accès
Internet pour obtenir des informations
sur la configuration.
E Lorsque vous avez terminé de
renseigner vos paramètres de
connexion Internet, cliquez sur le
bouton Save Settings (Enregistrer les
paramètres) pour enregistrer vos
modifications.
F Pour configurer le routeur et l'utiliser
avec votre réseau sans fil,
sélectionnez l'écran Basic Wireless
Settings (Paramètres sans fil de
base) de l'onglet Wireless (Sans fil).
G Wireless Network Mode (Mode réseau
sans fil). Sélectionnez le mode que
vous souhaitez utiliser dans le menu
déroulant : si vous utilisez uniquement
des périphériques 802.11g,
sélectionnez G-Only (G uniquement) ;
si vous utilisez uniquement des
périphériques 802.11b, sélectionnez
B-Only (B uniquement) ; si vous utilisez
les périphériques 802.11b et 802.11g,
conservez le paramètre Mixed (Mixte).
H Wireless Network Name (Nom du
réseau sans fil ou SSID). Il s'agit du nom
de réseau que partagent tous les
périphériques interconnectés à un
réseau sans fil. Il doit être identique
pour tous les périphériques du réseau
sans fil. Ce paramètre est sensible à la
F
Telstra

casse et ne doit pas comprendre plus
de 32 caractères (tous les caractères
du clavier peuvent être utilisés). Pour
optimiser la sécurité, vous devez
remplacer le paramètre SSID par
défaut (linksys) par un nom unique.
I Wireless Channel (Canal sans fil).
Sélectionnez le canal approprié dans
la liste fournie en fonction de vos
paramètres réseau. Tous les
périphériques de votre réseau sans fil
doivent communiquer sur le même
canal pour fonctionner correctement.
J Wireless SSID Broadcast (Diffusion
SSID sans fil). Lorsque des ordinateurs
clients sans fil recherchent sur le
réseau local des réseaux sans fil
auxquels s'associer, ils détectent le
SSID diffusé par le routeur. Pour
diffuser le SSID du routeur, conservez
le paramètre par défaut Enable
(Activer). Si vous ne souhaitez pas
diffuser le SSID du routeur,
sélectionnez Disable (Désactiver).
K Modifiez ces paramètres comme
décrit ici et cliquez sur le bouton
Save Settings (Enregistrer les
paramètres) pour appliquer vos
changements.
L Mettez votre modem hors tension,
puis de nouveau sous tension.
M Redémarrez votre ordinateur.
N Testez la configuration en ouvrant le
navigateur Web et en saisissant
http://www.linksys.com/registration
.
L'installation du routeur haut débit sans
fil G est terminée.
N
REMARQUE :
Pour obtenir plus d'informations
sur les paramètres avancés et sur les options de
sécurité, reportez-vous au Guide de l'utilisateur
figurant sur le CD-ROM d'installation du routeur.
IMPORTANT : Une fois que le
routeur est configuré, il est
nécessaire de configurer la
sécurité sans fil, WEP ou WPA,
afin d'éviter les failles de
sécurité sur votre réseau.

9
3
Le routeur comprend quatre types
de sécurité sans fil : WEP, WPA Pre-
Shared Key, WPA Enterprise et Radius.
Ces méthodes de sécurité ne sont
cependant pas activées. Pour
configurer la sécurité sans fil du
routeur, procédez comme suit :
A Ouvrez l'utilitaire Web du routeur
comme indiqué à l'étape 2 et
cliquez sur l'onglet Wireless (Sans
fil). L'écran Basic Wireless Settings
(Paramètres sans fil de base)
apparaît.
B Sélectionnez l'option Wireless
Security (Sécurité sans fil) pour
configurer la sécurité sans fil du
routeur.
Cette section comporte des
instructions de configuration de la
sécurité sans fil WEP et WPA Pre-
Shared Key (clé WPA pré-
partagée).
C Sélectionnez le type de sécurité
sans fil que vous souhaitez utiliser
pour votre réseau dans le menu
déroulant Security Mode (Mode
de sécurité).
WEP : le système WEP est une méthode
de cryptage élémentaire qui n'est pas
aussi sûre que le système WPA. Pour
utiliser ce système, sélectionnez une clé
de transmission par défaut en regard
de l'option appropriée Default Transmit
Key (Clé de transmission par défaut),
puis un niveau de cryptage WEP :
64 bits 10 hex digits (64 bits et
10 chiffres hexadécimaux) ou 128 bits
26 hex digits (128 bits et 26 chiffres
hexadécimaux). Générez ensuite une
clé WEP à partir d'une phrase de passe
ou entrez-la manuellement.
Configuration de la sécurité sans fil
REMARQUE : Reportez-vous au guide
de l'utilisateur si vous souhaitez
configurer les options de sécurité
sans fil WPA Enterprise ou Radius.
Basic Wireless
Settings (Paramètres
sans fil de base)
Paramètres de
sécurité WEP

10
WPA Pre-Shared key (clé WPA pré-
partagée) : le système WPA vous
propose deux méthodes de cryptage,
TKIP et AES, associées à des clés de
cryptage dynamiques. Sélectionnez le
type d'algorithme : TKIP ou AES. Entrez
une clé WPA pré-partagée composée
de 8 à 63 caractères. Précisez ensuite
un délai de renouvellement des clés
dans la zone Group Key Renewal
(Renouvellement des clés du groupe)
pour indiquer au routeur à quelle
fréquence il doit changer les clés de
cryptage.
D Cliquez sur le bouton Save
Settings (Enregistrer les
paramètres).
Félicitations ! La sécurité sans fil du
routeur est configurée.
WRT54G-FR_V2-QIG-51114 TE
Linksys est une marque déposée ou une marque
commerciale de Cisco Systems, Inc. et/ou ses
filiales aux Etats-Unis et dans certains autres
pays. Copyright © 2005 Cisco Systems, Inc.
Tous droits réservés.
Pour obtenir de plus amples informations
ou bénéficier d'une assistance technique,
reportez-vous au guide de l'utilisateur du
CD-ROM ou à la fiche d'assistance
technique. Pour obtenir davantage d'aide,
vous pouvez également envoyer un e-mail.
Site Web
http://www.linksys.com/international
Enregistrement du produit
http://www.linksys.com/registration
Paramètres de
sécurité WPA Pre-
Shared Key (Clé
WPA pré-partagée)

A Division of Cisco Systems, Inc.
®
Modell-Nr.
Wireless
1
Kurzanleitung
WRK54G (DE)
Broadband Router
Wireless-G
Lieferumfang*
• Wireless-G Broadband-Router
• Eine Installations-CD-ROM mit Symantec
Internet Security.
• Benutzerhandbüch auf CD-ROM
(nur auf Englisch verfügbar)
• Netzteil
• Ethernet-Netzwerkkabel
• Kurzanleitung
* Der Lieferumhang kann u. U. variieren.
GHz
2
802.11g
4
,

2
1
A Stellen Sie zunächst sicher, dass Sie
die Setup-Informationen für Ihre
Internetverbindung zur Hand haben.
Diese Informationen sollten Sie von
Ihrem Internet-Dienstanbieter (ISP)
bei der Installation Ihrer Breitband-
Verbindung erhalten haben. Wenn
diese Einstellungsdaten nicht zur
Verfügung stehen, fordern Sie sie
von Ihrem ISP an.
B Vergewissern Sie sich, dass alle
Netzwerkgeräte ausgeschaltet sind
(einschließlich Router, PCs und
Kabel- bzw. DSL-Modem).
C Schließen Sie ein Ende des
Ethernet-Netzwerkkabels an einen
der Ports (mit 1-4 beschriftet) auf der
Rückseite des Routers und das
andere Ende am Ethernet-Port des
PCs an.
D Wiederholen Sie Schritt C, um
weitere PCs oder andere
Netzwerkgeräte an den Router
anzuschließen.
Verbinden des Broadband Routers
C

3
E Verbinden Sie Ihr Kabel- oder DSL-
Modem mit einem anderen
Ethernet-Netzwerkkabel über einen
anderen Internet-Port auf der
Rückseite des Routers. Dies ist der
einzige Port, der für eine
Modemverbindung verwendet
werden kann.
F Schalten Sie das Kabel- oder
DSL-Modem ein.
G Schließen Sie den Netzteil
an den Stromanschluss des Routers
an, und stecken Sie das andere
Ende in eine Netzsteckdose.
H Vergewissern Sie sich, dass die LEDs
für Netzstrom und Internet auf der
Vorderseite grün leuchten.
I Während der Router seine
Selbstdiagnose durchführt, blinkt die
LED Power (Netzstrom) einige
Sekunden lang grün. Diese LED
leuchtet konstant, wenn die
Selbstdiagnose abgeschlossen ist.
Wenn sie nicht aufhört zu blinken,
schlagen Sie im Benutzerhandbuch
der Routers auf der Installations-CD-
ROM unter „Appendix A:
Troubleshooting“ (Anhang A:
Fehlerbehebung) nach.
J Schalten Sie dann den Computer
ein, mit dem Sie den Router
konfigurieren möchten.
Fahren Sie mit Schritt 2 fort.
WICHTIG: Verwenden Sie nur den
Netzteil, der im Lieferumfang
des Routers enthalten ist. Bei
Verwendung eines anderen
Netzteils könnte der Router
beschädigt werden.
G
E

4
2
In diesen Anweisungen wird erklärt, wie Sie
den Router konfigurieren. Sie müssen den
Router nur einmal konfigurieren.
A Öffnen Sie Ihren Web-Browser.
Geben Sie http://192.168.1.1 in
das Feld Adresse ein. Drücken Sie
die Eingabetaste.
B Es wird das Fenster zur Eingabe des
Kennworts angezeigt. Lassen Sie das
Feld Benutzername leer, und geben
Sie dann das Standardkennwort
admin in Kleinschreibung in das Feld
Kennwort ein. (Ändern Sie später im
webbasierten Dienstprogramm auf
der Registerkarte Administration
(Verwaltung) im Fenster Management
(Verwaltungsfunktionen) das
Kennwort.) Klicken Sie anschließend
auf die Schaltfläche OK.
C Das webbasierte Router-
Dienstprogramm wird mit
ausgewählter Registerkarte Setup
(Einrichtung) angezeigt. Sofern diese
Angaben von Ihrem ISP (in der Regel
Kabel-ISPs) angefordert werden,
geben Sie die relevanten
Informationen in die Felder Host
Name (Hostname) und Domain
Name (Domänenname) ein.
Andernfalls lassen Sie diese Felder leer.
D Im Dropdown-Menü stehen zur
Einstellung des Internet-
Verbindungstyps sechs
Verbindungstypen zur Verfügung. Die
Setup-Fenster und verfügbaren
Funktionen unterscheiden sich je
nach ausgewähltem Verbindungstyp.
C
HINWEIS: Stellen Sie sicher, dass der
Ethernet-Adapter Ihres PCs so eingestellt ist,
dass er automatisch eine IP-Adresse bezieht.
Weitere Informationen hierzu finden Sie in der
Windows-Hilfe.
A
Konfigurieren des Broadband-Router
B

5
Internet-Konfigurationstyp
DHCP: Wenn Sie eine Verbindung über
DHCP bzw. über eine dynamische IP-
Adresse Ihres ISPs herstellen, behalten
Sie die Standardeinstellung Obtain an
IP automatically (IP-Adresse
automatisch beziehen) bei.
Statische IP-Adresse: Wenn Ihnen Ihr ISP
eine statische IP-Adresse zuweist, wählen
Sie aus dem Dropdown-Menü Static IP
(Statische IP-Adresse) aus. Füllen Sie die
Felder Internet IP Address (Internet-IP-
Adresse), Subnet Mask (Subnetzmaske),
Gateway, and Static DNS (Statischer
DNS) aus. Sie müssen mindestens eine
DNS-Adresse eingeben.
PPPoE: Wenn Sie Verbindungen über
PPPoE herstellen, wählen Sie im
Dropdown-Menü die Option PPPoE
aus. Füllen Sie die Felder User Name
(Benutzername) und Password
(Kennwort) aus. Wählen Sie für eine
ständige Verbindung zu Ihrem ISP
Keep Alive (Verbindung aufrecht
halten), oder wählen Sie Connect on
Demand (Bei Bedarf verbinden), falls
die Verbindungszeit mit Ihrem ISP
gebührenpflichtig ist.
L2TP: L2TP ist ein Dienst, der nur in Israel
verwendet wird. Wenn Sie eine L2TP-
Verbindung verwenden, klären Sie die
erforderlichen Setup-Infor-mationen mit
Ihrem ISP ab.
PPTP: PPTP ist ein Dienst, der nur in Europa
verwendet wird. Wenn Sie eine PPTP-
Verbindung verwenden, wählen Sie aus
dem Dropdown-Menü PPTP aus.
Füllen Sie die folgenden Felder aus: IP
Address, Subnet Mask, Default
Gateway, User Name und Password (IP-
Adresse, Subnetzmaske, Standard-
Gateway, Benutzername und Kennwort).
Wählen Sie für eine ständige Verbindung
DHCP
Statische IP-Adresse
PPPoE
L2TP
PPTP

6
zu Ihrem ISP Keep Alive (Verbindung
aufrecht halten), oder wählen Sie
Connect on Demand (Bei Bedarf
verbinden), falls die Verbindungszeit mit
Ihrem ISP gebührenpflichtig ist.
Telstra (HBS): Telstra (Heart Beat Signal)
ist ein Dienst, der nur in Australien
verwendet wird. Wenn Sie eine HBS-
Verbindung verwenden, klären Sie die
erforderlichen Setup-Informationen mit
Ihrem ISP ab.
E Wenn Sie alle Einstellungen zur
Internetverbindung vorgenommen
haben, klicken Sie auf die
Schaltfläche Save Settings
(Einstellungen speichern), um die
Änderungen zu speichern.
F Um den Router für Ihr drahtloses
Netzwerk zu konfigurieren, wählen
Sie auf der Registerkarte Wireless
das Fenster Basic Wireless Settings
(Grundlegende drahtlose
Einstellungen) aus.
G Wireless Network Mode (Wireless-
Netzwerkmodus): Wählen Sie den
derzeit verwendeten Modus aus
dem Dropdown-Menü aus: Wenn Sie
nur 802.11g-Geräte verwenden,
wählen Sie den Modus G-Only (Nur
G); wenn Sie nur 802.11b-Geräte
verwenden, wählen Sie den Modus
B-Only (Nur B); wenn Sie sowohl
802.11b-Geräte als auch 802.11g-
Geräte verwenden, behalten Sie die
Einstellung Mixed (Gemischt) bei.
H Wireless Network Name (SSID) [Wireless-
Netzwerk-Name (SSID)]: Bei der SSID
handelt es sich um den Netzwerk-
Namen, der von allen Geräten im
drahtlosen Netzwerk verwendet wird.
Die SSID muss für alle Geräte im
Wireless-Netzwerk identisch sein. Für die
F
Telstra

7
maximal 32 Zeichen lange SSID dürfen
alle Zeichen der Tastatur verwendet
werden. Es wird zwischen Groß- und
Kleinschreibung unterschieden. Um die
Sicherheit zu erhöhen, sollten Sie die
Standard-SSID linksys in einen
eindeutigen Namen ändern.
I Wireless Channel (Wireless-Kanal):
Wählen Sie aus der Liste den Ihren
Netzwerkeinstellungen
entsprechenden Kanal aus. Der
einwandfreie Betrieb Ihres drahtlosen
Netzwerks ist nur gewährleistet, wenn
die Übertragung für alle Geräte über
denselben Kanal erfolgt.
J Wireless SSID Broadcast (Wireless-
SSID-Übertragung): Wenn Wireless-
Clients im lokalen Netzwerk nach
einer Verbindung zu Wireless-
Netzwerken suchen, erkennen sie die
Übertragung der SSID über den
Router. Zur Übertragung der SSID des
Routers behalten Sie die
Standardeinstellung Enable
(Aktivieren) bei. Wenn Sie die SSID des
Routers nicht übertragen möchten,
wählen Sie Disable (Deaktivieren) aus.
K Ändern Sie die Einstellungen wie hier
beschrieben, und klicken Sie auf die
Schaltfläche Save Settings
(Einstellungen speichern), um Ihre
Änderungen anzuwenden.
L Schalten Sie Ihr Modem aus und
anschließend wieder ein.
M Starten Sie Ihren Computer neu.
N Überprüfen Sie die Installation,
indem Sie den Web-Browser öffnen
und Folgendes eingeben:
http://www.linksys.com/registration.
Die Installation des Wireless-G
Broadband-Routers ist abgeschlossen.
N
HINWEIS: Informationen zu erweiterten
Einstellungen und Sicherheitsoptionen
finden Sie im Benutzerhandbuch auf der
CD-ROM des Routers.
WICHTIG: Sobald der Router
konfiguriert ist, muss die
Wireless-Sicherheit (WEP oder
WPA) konfiguriert werden, sodass
keine Sicherheitslücken in Ihrem
Netzwerk bestehen.

9
3
Auf dem Router können vier Wireless-
Sicherheitstypen eingerichtet werden:
WEP
,
WPA Pre-Shared
(WPA Vorläufiger gemein-
samer Schlüssel),
WPA Enterprise
und
Radius
. Diese Sicherheitseinstellungen sind
jedoch nicht sofort nach Kauf des Geräts
aktiviert. Wenn Sie die Wireless-Sicherheit
auf dem Router konfigurieren möchten,
führen Sie folgende Schritte aus:
A
Öffnen Sie das webbasierte
Dienstprogramm des Routers wie in
Schritt 2 erklärt, und klicken Sie auf die
Registerkarte
Wireless
. Das Fenster
Basic Settings
(Grundlegende
Einstellungen) wird angezeigt.
B
Wählen Sie
Wireless Security
(Wireless-Sicherheit), um die
Sicherheit des Routers im Wireless-
Netzwerkbetrieb zu konfigurieren.
Hier erhalten Sie Anweisungen
zum Konfigurieren der Wireless-
Sicherheitsoptionen WEP und
WPA Pre-Shared (WPA Vorläufiger
gemeinsamer Schlüssel).
C
Wählen Sie aus dem Pulldown-Menü
Security Mode
(Sicherheitsmodus)
den Wireless-Sicherheitstyp aus, den
Sie in Ihrem Netzwerk verwenden.
WEP
: WEP ist eine einfache
Verschlüsselungsmethode, die nicht so
sicher wie WPA ist. Um WEP zu
verwenden, wählen Sie einen Wert
(bzw. den gewünschten Schlüssel) für
Default Transmit Key
(Standard-
Übertragungsschlüssel) sowie die WEP-
Verschlüsselungsebene (
64 bits 10 hex
digits
(64 Bit 10 Hexadezimalziffern)
oder
128 bits 26 hex digits
(128 Bit
26 Hexadezimalziffern)) aus. Erstellen
Sie anschließend einen WEP-Schlüssel,
indem Sie entweder die Passphrase
verwenden oder den WEP-Schlüssel
manuell eingeben.
Konfigurieren von Wireless-Sicherheit
HINWEIS: Wenn Ihre Wireless-
Adapter SES (Secure Easy Setup)
unterstützen, können Sie die SES-
Taste auf dem Router verwenden, um
Wireless-Sicherheit einzurichten.
Basic Wireless Settings
HINWEIS: Lesen Sie im
Benutzerhandbuch nach, wenn Sie die
Wireless-Sicherheitsoptionen WPA
Enterprise oder RADIUS konfigurieren
möchten.
WEP (Sicherheitse-
Wireless-Einstellungen)
(Grundlegende
instellungen)

10
WPA Pre-Shared
(WPA Vorläufiger
gemeinsamer Schlüssel): Bei WPA
stehen Ihnen zwei Verschlüsselungs-
methoden (TKIP und AES) mit
dynamischen Verschlüsselungs-
schlüsseln zur Verfügung. Wählen Sie
den Algorithmus aus:
TKIP
oder
AES
.
Geben Sie im Feld
WPA Shared Key
(WPA/Gemeinsamer Schlüssel) einen
gemeinsamen WPA-Schlüssel mit
einer Länge von 8 bis 63 Zeichen ein.
Legen Sie anschließend den Zeitraum
für
Group Key Renewal
(Erneuerung
Gruppenschlüssel) fest. Diese
Zeitangabe teilt dem Router mit, wie
oft die Verschlüsselungsschlüssel
auszutauschen sind.
D Klicken Sie auf die Schaltfläche
Save Settings (Einstellungen
speichern).
Herzlichen Glückwunsch!
Wireless-Sicherheit ist nun auf dem
Router konfiguriert.
WRK54G-DE_V2-QIG-51114 TE
Linksys ist eine eingetragene Marke bzw. eine
Marke von Cisco Systems, Inc. und/oder deren
Zweigunternehmen in den USA und anderen
Ländern. Copyright © 2005 Cisco Systems, Inc.
Alle Rechte vorbehalten.
Weitere Informationen und Anleitungen
zur Fehlerbehebung finden Sie im Benutzer-
handbuch auf der CD-ROM und in der Beilage
zum technischen Support. Sie können auch
per E-Mail weitere Unterstützung anfordern.
Website
http://www.linksys.com/international
Produktregistrierung
http://www.linksys.com/registration
WPA Pre-Shared
einstellungen
(WPA Vorläufiger
gemeinsamer
Schlüssel) Sicherheits-

A Division of Cisco Systems, Inc.
®
N. modello
Wireless
1
Guida di installazione rapida
WRK54G (IT)
Router a banda larga
Wireless-G
Contenuto della confezione*
• Router a banda larga Wireless-G
• Setup CD-ROM (CD-ROM per
l'installazione guidata) con Symantec
Internet Security
• User Guide (Guida per l'utente) su CD-
ROM (solo in inglese)
• Adattatore di corrente
• Cavo di rete Ethernet
• Guida di installazione rapida
*potrebbero essere inclusi altri articoli
GHz
2
802.11g
4
,

2
1
A Prima di iniziare, assicurarsi di
disporre delle informazioni sulla
configurazione relative al tipo di
connessione Internet utilizzata. Tali
dati dovrebbero essere stati forniti
dall'installatore del provider di servizi
Internet dopo aver installato la
connessione a banda larga. In caso
contrario, richiedere le impostazioni
al provider di servizi Internet.
B Verificare che tutti i dispositivi
hardware collegati in rete siano
spenti, compresi il router, i PC e il
modem via cavo o DSL.
C Collegare un'estremità del cavo di
rete Ethernet a una delle porte
(etichettate da 1 a 4) sul retro del
router e l'altra estremità alla porta
Ethernet del PC.
D Ripetere la Fase C per collegare
altri PC o periferiche di rete al router.
Collegamento del router
C
a banda larga

3
E Collegare un altro cavo di rete
Ethernet dal modem via cavo o DSL
alla porta Internet presente sul
pannello posteriore del router.
Questa è l'unica porta funzionante
per la connessione modem.
F Accendere il modem via cavo o
DSL.
G Collegare l'adattatore di corrente
CA alla porta Power (Alimentazione)
del router e l'altra estremità a una
presa elettrica.
H Assicurarsi che sia accesa la luce
verde degli indicatori LED di
alimentazione e Internet presenti sul
pannello anteriore.
I La spia verde dell'indicatore LED di
alimentazione lampeggia per
qualche secondo mentre il router
esegue la procedura di
autodiagnostica. Quando l'autotest
è completato, questo LED rimane
acceso. Se il LED non smette di
lampeggiare, consultare
l'“Appendix A: Troubleshooting”
(Appendice A: Risoluzione dei
problemi) nella User Guide (Guida
per l'utente) del router contenuta
nel Setup CD-ROM (CD-ROM per
l'installazione).
J Accendere il PC che si desidera
utilizzare per configurare il router.
Continuare con la Fase 2.
IMPORTANTE Assicurarsi di utilizzare
l'adattatore di corrente fornito con il
router. L'uso di un diverso adattatore di
corrente può provocare danni al router.
G
E

4
2
Attenersi alle istruzioni riportate di seguito
per configurare il router. È necessario
configurare il router una sola volta.
A Aprire il browser Web. Immettere
http://192.168.1.1 nel campo
Indirizzo. Premere il tasto Invio.
B Verrà visualizzata una schermata in
cui si chiede di immettere la
password. Lasciare vuoto il campo
riservato al nome utente e
immettere la password predefinita,
admin, in lettere minuscole
nell'apposito campo. Si consiglia di
impostare in seguito una nuova
password nella scheda
Administration (Amministrazione)
della schermata Management
(Gestione) dell'utilità basata sul Web.
Fare quindi clic sul pulsante OK.
C Verrà visualizzata l'utilità basata sul
Web con la scheda Setup
(Configurazione) selezionata. Se
richiesto dal provider di servizi
Internet (solitamente un provider
che fornisce connettività via cavo),
completare anche i campi Host
Name (Nome host) e Domain
Name (Nome dominio). In caso
contrario, lasciarli vuoti.
D Nel menu a discesa
dell'impostazione del tipo di
connessione Internet sono
disponibili sei opzioni. La
schermata Setup (Configurazione)
con le relative funzioni varia a
seconda del tipo di connessione
selezionato.
C
NOTA Assicurarsi che l'adattatore Ethernet
del PC sia impostato in modo da ottenere
automaticamente un indirizzo IP. Per
ulteriori informazioni, consultare la Guida
in linea di Windows.
A
Configurazione del router
B
a banda larga

5
Tipo di configurazione Internet
DHCP: se la connessione avviene
tramite DHCP o indirizzo IP dinamico
del provider di servizi Internet, non
modificare l'impostazione predefinita
Obtain an IP automatically (Ottieni
automaticamente un indirizzo IP).
Static IP (Indirizzo IP statico): se l'indirizzo
IP assegnato dal provider di servizi
Internet è statico, selezionare Static IP
(Indirizzo IP statico) dal menu a discesa.
Completare i campi Internet IP Address
(Indirizzo IP Internet), Subnet Mask
(Maschera di sottorete), Gateway e
Static DNS (DNS Statico). È necessario
specificare almeno un indirizzo DNS.
PPPoE: se la connessione avviene
tramite PPPoE, selezionare PPPoE dal
menu a discesa. Completare i campi
User Name (Nome utente) e
Password. Selezionare Keep Alive
(Connessione sempre attiva) se si
desidera essere sempre collegati al
provider di servizi Internet oppure
selezionare Connect on Demand
(Connessione su richiesta) se la tariffa
viene conteggiata in base al tempo
effettivo di connessione al provider.
L2TP: L2TP è un servizio utilizzato
esclusivamente in Israele. Se si utilizza
una connessione L2TP, contattare il
provider di servizi Internet per ottenere
le informazioni di configurazione.
PPTP: PPTP è un servizio utilizzato
esclusivamente in Europa. Se si utilizza
una connessione PPTP, selezionare PPTP
dal menu a discesa
. Completare i
campi IP Address (Indirizzo IP), Subnet
Mask (Maschera di sottorete), Default
Gateway (Gateway predefinito), User
DHCP
Indirizzo IP statico
PPPoE
L2TP
PPTP

6
Name (Nome utente) e Password.
Selezionare Keep Alive (Connessione
sempre attiva) se si desidera essere
sempre collegati al provider di servizi
Internet oppure selezionare Connect on
Demand (Connessione su richiesta) se la
tariffa viene conteggiata in base al tempo
effettivo di connessione al provider.
Telstra (Heart Beat Signal): Telstra
(Heart Beat Signal) è un servizio utilizzato
esclusivamente in Australia. Se si utilizza
una connessione Heart Beat Signal,
contattare il provider di servizi Internet
per ottenere le informazioni necessarie
alla configurazione.
E Una volta terminata l'impostazione
dei parametri della connessione a
Internet, fare clic sul pulsante Save
Settings (Salva impostazioni) per
salvare le modifiche apportate.
F Per configurare il router per la rete
wireless, selezionare la scheda Wireless
nella schermata Basic Wireless Settings
(Impostazioni wireless di base).
G WIreless Network Mode (Modalità
di rete wireless). Selezionare la
modalità utilizzata dal menu a
discesa: se si utilizza solo 802.11g,
selezionare G-Only (Solo G); se si
utilizza solo 802.11b, selezionare
B-Only (Solo B); se si utilizza sia
802.11b che 802.11g, mantenere
l'impostazione Mixed (Modalità
mista).
H Wireless Network Name (SSID)
(Nome di rete wireless). Per SSID si
intende il nome di rete condiviso da
tutti i dispositivi di una rete wireless
che deve essere identico per tutti i
dispositivi collegati in rete. Questo
F
Telstra

7
nome è sensibile alla distinzione tra
maiuscole e minuscole e non può
contenere più di 32 caratteri (che
possono essere scelti tra tutti quelli
disponibili sulla tastiera). Per una
maggiore sicurezza, si consiglia di
sostituire il valore SSID predefinito
(linksys) con un nome univoco.
I Wireless Channel (Canale Wireless).
Nell'elenco fornito selezionare il canale
appropriato corrispondente alle
impostazioni di rete. Tutte le periferiche
collegate alla rete wireless devono
comunicare sullo stesso canale per
poter funzionare correttamente.
J Wireless SSID Broadcast
(Trasmissione SSID Wireless). Durante
la ricerca di reti wireless a cui
collegarsi all'interno dell'area locale,
i client wireless rilevano il valore SSID
Broadcast del router. Per trasmettere
il valore SSID del router, mantenere
l'impostazione predefinita Enable
(Attiva). Se non si desidera
trasmettere il valore SSID del router,
selezionare Disable (Disattiva).
K Modificare le impostazioni come
indicato e fare clic sul pulsante
Save Settings (Salva impostazioni)
per applicare i cambiamenti.
L Spegnere e riaccendere il modem.
M Riavviare il computer.
N Per verificare la configurazione,
aprire il browser Web da uno dei
computer e immettere
http://www.linksys.com/registration.
La procedura di installazione del router
a banda larga Wireless-G è conclusa.
N
NOTA Per altre opzioni di sicurezza e
impostazioni avanzate, consultare la User
Guide (Guida per l'utente) disponibile nel
Setup CD-ROM (CD per l'installazione) del
router.
IMPORTANTE Una volta configurato
il router, è necessario configurare
la protezione wireless, WEP o WPA,
per impedire violazioni della
sicurezza in rete.
IMPORTANTE Una volta configurato
il router, è necessario configurare
la protezione wireless, WEP o WPA,
per impedire violazioni della
sicurezza in rete.

3
Il router è dotato di quattro tipi di
protezione wireless: WEP, WPA Pre-
Shared (WPA precondivisa), WPA
Enterprise e Radius. Questi metodi di
sicurezza non sono tuttavia pronti per
l'immediato utilizzo. Per configurare la
protezione wireless sul router, attenersi
alla seguente procedura:
A Aprire l'utilità del router basata sul
Web come mostrato nella fase 2,
quindi fare clic sulla scheda
Wireless. Viene visualizzata la
schermata Basic Wireless Settings
(Impostazioni wireless di base).
B Selezionare Wireless Security
(Sicurezza wireless) per configurare
la protezione wireless sul router.
Qui vengono fornite le istruzioni per
la configurazione della protezione
wireless WEP e WPA Pre-Shared
(WPA precondivisa).
C Nel menu a discesa Security
Mode (Modalità sicurezza),
selezionare il tipo di sicurezza
wireless da utilizzare per la rete.
WEP: WEP è un metodo di cifratura di
base meno sicuro di WPA. Per utilizzare
WEP, selezionare una chiave di
trasmissione predefinita (scegliere quale
chiave usare) e un livello di cifratura WEP,
64 bits 10 hex digits (64 bit 10 cifre
esadecimali) o 128 bits 26 hex digits
(128 bit 26 cifre esadecimali). Quindi,
generare una chiave WEP utilizzando
una passphrase o immettere la chiave
WEP manualmente.
Configurazione della protezione
NOTA Per configurare le opzioni di
sicurezza WPA Enterprise o Radius
,
consultare la Guida per l'utente
(solo in inglese).
Impostazioni di
sicurezza WEP
Basic Wireless Settings
(Impostazioni wireless
di base)
wireless

WPA Pre-Shared (WPA precondivisa):
WPA consente di scegliere tra due
metodi di cifratura, TKIP e AES, che
utilizzano chiavi dinamiche.
Selezionare il tipo di algoritmo, TKIP o
AES. Immettere una chiave WPA
condivisa di lunghezza compresa tra
8 e 63 caratteri. Quindi immettere un
intervallo di rinnovo della chiave di
gruppo per specificare la frequenza
con cui si desidera che il router
modifichi le chiavi di cifratura.
D Fare clic sul pulsante Save
Settings (Salva impostazioni).
Congratulazioni! La sicurezza wireless
è ora configurata sul router.
WRK54G-IT_V2-QIG-51114
Linksys è un marchio registrato o un marchio di
Cisco Systems, Inc. e/o dei relativi affiliati negli
Stati Uniti e in altri Paesi. Copyright © 2005 Cisco
Systems, Inc. Tutti i diritti riservati.
Per ulteriori informazioni o istruzioni relative
alla risoluzione dei problemi, consultare la
Guida per l'utente (solo in inglese) su CD-ROM
oppure il supplemento per l'assistenza
tecnica. È possibile ricevere ulteriore
assistenza anche inviando un messaggio di
posta elettronica.
Sito Web
http://www.linksys.com/international
Registrazione del prodotto
http://www.linksys.com/registration
Impostazioni di
sicurezza WPA
precondivisa

A Division of Cisco Systems, Inc.
®
Modelo n.º
Wireless
1
Manual de Instalação Rápida
WRK54G (PT)
Router de banda larga
Sem fios G
Conteúdo da embalagem*
• Router sem fios G de banda larga
• CD-ROM de configuração (com Symantec
Internet Security)
• Manual do utilizador no CD-ROM
(disponíveis apenas em inglês)
• Transformador
• Cabo de rede Ethernet
• Manual de Instalação Rápida
*poderão ser fornecidos outros itens
GHz
2
802.11g
4
,

2
1
A Antes de começar, certifique-se de
que tem as informações de
configuração do tipo específico de
ligação à Internet. O técnico de
instalação do ISP deverá ter
fornecido estas informações depois
de ter instalado a ligação de
banda larga. Caso contrário,
poderá contactar o ISP para
solicitar as definições.
B Certifique-se de que todo o
hardware da rede está desligado,
incluindo o Router, os
computadores e o modem de
cabo ou DSL.
C Ligue uma extremidade do cabo
de rede Ethernet a uma das portas
(numeradas de 1 a 4) na parte
posterior do Router e a outra
extremidade a uma porta Ethernet
do computador.
Ligar o Router de banda larga
C

3
D Repita o passo C para ligar mais
computadores ou outros
dispositivos de rede ao Router.
E Ligue um cabo de rede Ethernet
diferente do modem de cabo ou
DSL à porta de Internet no painel
posterior do Router. Esta é a única
porta que funcionará para a
ligação ao modem.
F Ligue o modem de cabo ou DSL.
G Ligue o transformador CA à porta
de alimentação do Router e a
outra extremidade a uma tomada.
H Certifique-se de que os LEDs Power
(Alimentação) e Internet do painel
frontal estão acesos e verdes.
I O LED Power (Alimentação) ficará
intermitente e verde durante alguns
segundos quando o Router estiver a
executar o teste de diagnóstico
automático. Este LED permanecerá
aceso quando o teste automático
for concluído. Se não parar de
piscar, consulte o “Apêndice A:
Resolução de problemas” no
Manual do Utilizador do Router no
CD-ROM de configuração.
J Ligue o computador que pretende
utilizar para configurar o Router.
Avance para o Passo 2.
IMPORTANTE: Certifique-se de que
utiliza o transformador fornecido
juntamente com o Router. A utilização
de um transformador diferente poderá
danificar o Router.
G
E

4
2
Estas instruções mostrarão como
configurar o Router. Só é necessário
efectuar a configuração uma vez.
A
Abra o Web browser. Introduza
http://192.168.1.1
no respectivo
campo
Endereço
. Prima a tecla
Enter
.
B
Será apresentado um ecrã a solicitar
a palavra-passe. Deixe o campo
Nome de utilizador
em branco e
introduza a palavra-passe
predefinida,
admin
, em minúsculas,
no campo campo
Palavra-passe
.
(Posteriormente, deverá definir uma
nova palavra-passe, utilizando o ecrã
Management
(Gestão) do separador
Administration (Administração) do
Utilitário baseado na Web). Em
seguida, clique no botão
OK
.
C O Utilitário baseado na Web será
apresentado com o separador
Setup (Configurar) seleccionado. Se
for solicitado pelo ISP (normalmente
ISPs do serviço de cabo), preencha
os campos Host Name (Nome do
sistema anfitrião) e Domain Name
(Nome de domínio). Caso
contrário, deixe-os em branco.
D Para a definição de Internet
Connection Type (Tipo de ligação
à Internet), são fornecidos seis
tipos de ligação através do menu
pendente. Os ecrãs Setup
(Configurar) e as funcionalidades
disponíveis variarão consoante o
tipo de ligação seleccionado.
.
C
NOTA: Certifique-se de que a placa Ethernet
do computador está definida para obter um
endereço IP automaticamente. Para obter mais
informações, consulte a Ajuda do Windows.
A
Configurar o Router de
B
banda larga

5
Tipo de configuração da Internet
DHCP: Se estiver a ligar através de
DHCP ou de um endereço IP
dinâmico do ISP, mantenha a
predefinição Obtain an IP
automatically (Obter um IP
automaticamente).
Static IP (IP estático): Se o ISP atribuir
um endereço IP estático, seleccione
Static IP (IP estático) no menu
pendente. Preencha os campos
Internet IP Address (Endereço IP de
Internet), Subnet Mask (Máscara de
sub-rede), Gateway, e Static DNS (DNS
estático). É necessário introduzir, pelo
menos, um endereço de DNS.
PPPoE: Se estiver a ligar através de
PPPoE, seleccione PPPoE a partir do
menu pendente. Preencha os
campos User Name (Nome de
utilizador) e Password (Palavra-passe).
Seleccione Keep Alive (Manter ligado)
se pretender estar sempre ligado ao
ISP ou seleccione Connect on
Demand (Ligar mediante pedido) se
for cobrado pelo tempo que está
ligado ao ISP.
L2TP: L2TP é um serviço utilizado
apenas em Israel. Se estiver a utilizar
uma ligação L2TP, contacte o ISP para
obter as informações de configuração.
PPTP: PPTP é um serviço utilizado
apenas na Europa. Se estiver a utilizar
uma ligação PPTP, seleccione PPTP no
menu pendente
. Preencha os
campos IP Address, Subnet Mask,
Default Gateway, User Name e
Password (Endereço IP, Máscara de
sub-rede, Gateway predefinido,
Nome de utilizador e Palavra-passe).
Seleccione Keep Alive (Manter ligado)
se pretender estar sempre ligado ao
ISP ou seleccione Connect on
Demand (Ligar mediante pedido) se
for cobrado pelo tempo que está
DHCP
IP estático
PPPoE
L2TP
PPTP

6
ligado ao ISP.
HeartBeat Signal: HeartBeat Signal é um
serviço utilizado apenas na Austrália. Se
estiver a utilizar uma ligação HeartBeat
Signal, consulte o ISP para obter as
informações de configuração.
E Quando concluir a introdução das
definições de ligação à Internet,
clique no botão Save Settings
(Guardar definições) para guardar
as alterações.
F Para configurar o Router na rede
sem fios, seleccione o ecrã Basic
Wireless Settings (Definições sem
fios básicas) do separador Wireless
(Sem fios).
G Wireless Network Mode (Modo de
rede sem fios). Seleccione o modo
que está a utilizar a partir do menu
pendente: se estiver a utilizar só
802.11g, seleccione G-Only (Só G);
se estiver a utilizar só 802.11b,
seleccione B-Only (Só B); se estiver a
utilizar 802.11b e 802.11g,
mantenha a definição Mixed
(Misto).
H Wireless Network Name (SSID)
(Nome da rede sem fios). O SSID é
o nome da rede partilhado por
todos os dispositivos de uma rede
sem fios. O SSID tem de ser idêntico
para todos os dispositivos na rede
sem fios. É sensível a maiúsculas e
minúsculas e não pode exceder 32
caracteres (utilize qualquer
carácter do teclado). Para obter
segurança adicional, deverá
alterar o SSID predefinido (linksys)
para um nome exclusivo.
F
Telstra

7
I Wireless Channel (Canal sem fios).
Seleccione o canal adequado a
partir da lista fornecida, para
corresponder às definições da
rede. Todos os dispositivos da rede
sem fios têm de difundir no mesmo
canal para funcionarem
correctamente.
J Wireless SSID Broadcast (Difusão de
SSID sem fios). Quando os clientes
sem fios pesquisarem a área local
para se associarem a redes sem
fios, detectarão a difusão do SSID
efectuada pelo Router. Para
difundir o SSID do Router, mantenha
a predefinição, Enable (Activar). Se
não pretender difundir o SSID do
Router, seleccione Disable
(Desactivar).
K Altere as definições, conforme aqui
se descreve, e clique no botão
Save Settings (Guardar definições)
para aplicar as alterações.
L Desligue e volte a ligar o modem.
M Reinicie o computador.
N Teste a configuração abrindo o
Web browser e introduzindo
http://www.linksys.com/registration
.
A instalação do Router sem fios G de
banda larga está concluída.
N
NOTA: Para obter definições e opções de
segurança mais avançadas, consulte o
Manual do Utilizador no CD-ROM do
Router.
IMPORTANTE: Assim que o
Router estiver configurado, deve
ser configurada a segurança sem
fios (WEP ou WPA) para evitar
falhas de segurança na rede.
IMPORTANTE: Assim que o
Router estiver configurado, deve
ser configurada a segurança sem
fios (WEP ou WPA) para evitar
falhas de segurança na rede.

3
O Router vem equipado com quatro
tipos de segurança sem fios:
WEP
,
WPA Pre-Shared
(WPA pré-partilhada),
WPA Enterprise
e
Radius
. No entanto,
estes métodos de segurança não
vêm já activados. Para configurar a
segurança sem fios no Router,
efectue os seguintes procedimentos:
A
Abra o Utilitário baseado na Web do
Router, conforme é mostrado no
Passo 2, e clique no separador
Wireless
(Sem fios). Será apresentado
o ecrã
Basic Wireless Settings
(Definições sem fios básicas).
B
Seleccione Wireless Security
(Segurança sem fios) para configurar
a segurança sem fios no Router.
As instruções para a configuração
da segurança sem fios
WEP
e
WPA
Pre-Shared
(WPA pré-partilhada)
são fornecidas aqui.
C No menu pendente Security
Mode (Modo de segurança),
seleccione o tipo de
segurança sem fios que irá
utilizar na rede.
WEP
: WEP é um método de
encriptação básico, que não é tão
seguro como o WPA. Para utilizar WEP,
seleccione a Default Transmit Key
(Chave de transmissão predefinida)
que pretende utilizar, bem como o
nível de encriptação WEP,
64 bits 10
hex digits
(64 bits, 10 dígitos
hexadecimais) ou
128 bits 26 hex
digits
(128 bits, 26 dígitos
hexadecimais). Em seguida, proceda
à geração de uma chave WEP
utilizando a frase-passe ou introduza a
chave WEP manualmente.
Configurar a segurança sem fios
NOTA: Consulte o Manual do
Utilizador se pretender configurar as
opções de segurança sem fios WPA
Enterprise ou Radius.
Basic Wireless
Settings (Definições
sem fios básicas)
Definições de
segurança WEP

WPA Pre-Shared (WPA pré-
partilhada): A WPA oferece dois
métodos de encriptação, TKIP e
AES, com chaves de encriptação
dinâmicas. Seleccione o tipo de
algoritmo, TKIP ou AES. Introduza
uma WPA Shared Key (Chave
partilhada WPA) que tenha entre 8
e 63 caracteres. Em seguida,
introduza o período de Group Key
Renewal (Renovação das chaves
de grupo), que indica ao Router a
frequência com que deve alterar
as chaves de encriptação.
D Clique no botão Save Settings
(Guardar definições).
Parabéns! A segurança sem fios
está configurada no Router.
WRK54G-PT_V2-QIG-51114 TE
Linksys é uma marca registada ou marca
comercial da Cisco Systems, Inc. e/ou das
respectivas afiliadas nos E.U.A. e noutros países.
Copyright © 2005 Cisco Systems, Inc. Todos os
direitos reservados.
Para obter informações adicionais ou ajuda
para resolução de problemas, consulte o
Manual do Utilizador no CD-ROM ou a Folha
de Suporte Técnico. Também poderá enviar
uma mensagem de correio electrónico para
obter suporte.
Web site
http://www.linksys.com/international
Registo do produto
http://www.linksys.com/registration
Definições de
segurança WPA
Pre-Shared (WPA
pré-partilhada)

A Division of Cisco Systems, Inc.
®
Nº de modelo
Wireless
1
Guía de instalación rápida
WRK54G (ES)
Ruteador de banda ancha
Wireless-G
Contenido del paquete*
• Ruteador de banda ancha Wireless-G
• CD-ROM de configuración (incluye
Symantec Internet Security)
• Guía del usuario en CD-ROM
(sólo en inglés)
• Adaptador de corriente
• Cable de red Ethernet
• Guía de instalación rápida
*el paquete puede incluir otros elementos
GHz
2
802.11g
4
,

2
1
A Antes de comenzar, asegúrese de
que dispone de la información de
configuración para el tipo de
conexión a Internet específico. El
técnico de instalación del
proveedor de servicios de Internet
le debe haber proporcionado esta
información al instalar la conexión
de banda ancha. Si no es así,
póngase en contacto con dicho
proveedor para solicitar los
parámetros.
B Asegúrese de que ha apagado
todos los elementos de hardware
de la red, incluidos el ruteador, los
PC y el módem por cable o DSL.
C Conecte uno de los extremos de
un cable de red Ethernet a uno de
los puertos (numerados de 1 a 4)
de la parte posterior del ruteador y
el otro extremo a un puerto Ethernet
de un PC.
Conecte el ruteador de banda ancha
C

3
D Repita el paso C para conectar los
demás PC o dispositivos de red al
ruteador.
E Conecte un cable de red Ethernet
distinto desde el módem por cable
o DSL al puerto de Internet del
panel posterior del ruteador. Es el
único puerto que funciona con la
conexión del módem.
F Encienda el módem por cable
oDSL.
G Conecte el adaptador de corriente
CA al puerto de alimentación del
ruteador y el otro extremo del cable
a una toma de corriente.
H Asegúrese de que las luces Power
(Alimentación) e Internet del panel
frontal están encendidas en verde.
I La luz Power (Alimentación)
parpadeará en verde durante unos
segundos cuando el ruteador
ejecute la prueba de
autodiagnóstico. Esta luz
permanece encendida de forma
continua cuando la prueba finaliza.
Si no deja de parpadear, consulte
el apéndice A de resolución de
problemas de la guía del usuario
del ruteador incluida en el CD-ROM
de configuración.
J Encienda el PC que desea utilizar
para configurar el ruteador.
Siga en el paso 2.
IMPORTANTE: Debe utilizar el
adaptador de corriente proporcionado
con el ruteador. Si utiliza un adaptador
de corriente distinto puede provocar
daños al producto.
G
E

4
2
En estas instrucciones se explica como
configurar el ruteador. Sólo tiene que
configurarlo una vez.
A Abra el explorador Web. Escriba
http://192.168.1.1 en el campo
Dirección. Pulse la tecla Intro.
B Aparece una pantalla en la que se
solicita una contraseña. Deje vacío
el campo Usuario e introduzca la
contraseña predeterminada, admin
(todo minúsculas), en el campo
Contraseña. (Debe establecer una
nueva contraseña posteriormente,
mediante la pantalla de
administración de la ficha de
administración de la utilidad
basada en Web.) A continuación,
haga clic en el botón Aceptar.
C Aparece la utilidad basada en Web
del ruteador con la ficha Setup
(Configurar) seleccionada. Si el
proveedor de servicios de Internet
(por lo general, proveedores de
servicios de Internet por cable) lo
solicita, rellene los campos Host
Name (Nombre de host) y Domain
Name (Nombre de dominio). Si no
lo solicita, déjelos en blanco.
D En el parámetro Internet
Connection Type (Tipo de
conexión a Internet), se ofrecen
seis tipos de conexión en un
menú desplegable. Cada
pantalla de configuración y las
funciones disponibles son distintas
dependiendo del tipo de
conexión que seleccione.
C
NOTA: Asegúrese de que el adaptador
Ethernet del PC está definido para obtener una
dirección IP automáticamente. Para obtener
más información, consulte la ayuda de
Windows.
A
Configuración del ruteador de
B
banda ancha

5
Tipo de conexión de Internet
DHCP: Si va a realizar la conexión
mediante DHCP o una dirección IP
dinámica del ISP, mantenga el
parámetro predeterminado Obtain
an IP automatically (Obtener una
dirección IP automáticamente).
Static IP (IP estática): Si el ISP le asigna
una dirección IP estática, seleccione
este parámetro en el menú
desplegable. Rellene los campos
Internet IP Address (Dirección IP de
Internet), Subnet Mask (Máscara de
subred), Gateway (Puerta de enlace) y
Static DNS (DNS estático). Debe introducir
por lo menos una dirección DNS.
PPPoE (Protocolo de punto a punto en
Ethernet): si realiza la conexión mediante
PPPoE, seleccione PPPoE en el menú
desplegable. Rellene los campos User
Name (Nombre de usuario) y Password
(Contraseña). Seleccione Keep Alive
(Mantener activo) si desea estar
continuamente conectado al ISP. De lo
contrario, seleccione Connect on
Demand (Conectar cuando se solicite) si
debe pagar todo el tiempo que esté
conectado al ISP.
L2TP: L2TP es un servicio que sólo se
utiliza en Israel. Si utiliza una conexión
L2TP, consulte con el ISP para obtener
la información de configuración.
PPTP (Protocolo de punto a punto en
túnel): PPTP es un servicio que sólo se
utiliza en Europa. Si utiliza una
conexión PPTP, seleccione PPTP en el
menú desplegable
. Rellene los
campos IP Address (Dirección IP),
Subnet Mask (Máscara de subred),
Default Gateway (Puerta de enlace
predeterminada), User Name
DHCP
Static IP (IP estática)
PPPoE
L2TP
PPTP

6
(Nombre de usuario) y Password
(Contraseña). Seleccione Keep Alive
(Mantener activo) si desea estar
continuamente conectado al ISP. De lo
contrario, seleccione Connect on
Demand (Conectar cuando se solicite)
si debe pagar todo el tiempo que esté
conectado al ISP.
Telstra: Telstra (Heart Beat Signal) es
un servicio que sólo se usa en Australia.
Si utiliza una conexión Heart Beat Signal,
consulte con el ISP para obtener la
información de configuración.
E Cuando termine de introducir los
parámetros de conexión a Internet,
haga clic en el botón Save Settings
(Guardar parámetros) para guardar
los cambios.
F Para configurar el ruteador para la
red inalámbrica, seleccione la
pantalla Basic Wireless Settings
(Parámetros inalámbricos básicos)
de la ficha Wireless (Inalámbrico).
G Wireless Network Mode (Modo de
red inalámbrica). Seleccione el
modo que utiliza en el menú
desplegable: si utiliza sólo 802.11g,
seleccione G-Only (Sólo G); si utiliza
sólo 802.11b, seleccione B-Only
(Sólo B); si utiliza tanto 802.11b
como 802.11g, mantenga el
parámetro Mixed (Mixto).
H Wireless Network Name (SSID)
(Nombre de la red inalámbrica,
SSID). EL SSID es un nombre de red
que comparten todos los
dispositivos de una red inalámbrica.
Debe ser el mismo para todos los
dispositivos de la red inalámbrica. El
nombre distingue entre mayúsculas
y minúsculas y no debe tener una
longitud superior a los 32 caracteres
F
Telstra

(puede elegir entre cualquiera de
los caracteres del teclado). Para
mayor seguridad, debe cambiar el
SSID predeterminado linksys a un
nombre único.
I Wireless Channel (Canal
inalámbrico). Seleccione el canal
de la lista correspondiente a los
parámetros de red. Para que el
funcionamiento sea correcto, todos
los dispositivos de la red inalámbrica
deben emitir en el mismo canal.
J Wireless SSID Broadcast (Difusión
inalámbrica SSID). Cuando los
clientes inalámbricos sondeen el
área local en busca de redes
inalámbricas con las que asociarse,
detectarán la difusión SSID que
realiza el ruteador. Para difundir el
SSID del ruteador, mantenga el
parámetro predeterminado, Enable
(Activar). Si no desea difundir el SSID
del ruteador, seleccione Disable
(Desactivar).
K Cambie estos parámetros según lo
descrito aquí y haga clic en el botón
Save Settings (Guardar parámetros)
para aplicar los cambios.
L Apague el módem y vuelva a
encenderlo.
M Reinicie el ordenador.
N Pruebe la configuración: abra el
explorador Web y escriba
http://www.linksys.com/registration.
La instalación del ruteador de banda
ancha Wireless-G ha finalizado.
N
NOTA: Para informarse sobre parámetros
avanzados y opciones de seguridad,
consulte la guía del usuario del CD-ROM
del ruteador.
IMPORTANTE: Una vez
configurado el ruteador se debe
configurar la seguridad
inalámbrica, ya sea WEP o WPA,
para evitar que se vulnere la
seguridad de la red.
IMPORTANTE: Una vez
configurado el ruteador se debe
configurar la seguridad
inalámbrica, ya sea WEP o WPA,
para evitar que se vulnere la
seguridad de la red.

3
El ruteador incorpora cuatro tipos de
seguridad inalámbrica: WEP, WPA Pre-
Shared Key (Clave precompartida WPA),
WPA Enterprise y Radius. Sin embargo,
estos métodos de seguridad no están
activados de forma automática. Para
configurar la seguridad inalámbrica en el
ruteador, realice las siguientes acciones:
A Abra la utilidad Web del ruteador
como se muestra en el paso 2 y
haga clic en la ficha Wireless
(Inalámbrico). Aparece la pantalla
Basic Wireless Settings (Parámetros
inalámbricos básicos).
B Seleccione Wireless Security
(Seguridad inalámbrica) para
configurar la seguridad
inalámbrica en el ruteador.
En este documento se
proporcionan instrucciones para la
configuración de la seguridad
inalámbrica WEP y WPA Pre-Shared
Key (Clave precompartida WPA).
C En el menú desplegable Security
Mode (Modo de seguridad),
seleccione el tipo de seguridad
inalámbrica que utilizará en la red.
WEP: Se trata de un método de
encriptación básico y no es tan seguro
como WPA. Para utilizar WEP, seleccione
una clave de transmisión
predeterminada (Default Transmit Key;
elija la que desea utilizar) y un nivel de
encriptación WEP, 64 bits 10 hex digits
(64 bits, 10 dígitos hexadecimales) o
128 bits 26 hex digits (128 bits, 26
dígitos hexadecimales). A continuación,
cree una clave WEP mediante la frase
de paso (Passphrase) o introduzca
manualmente la clave WEP.
Configuración de la seguridad
NOTA: Si los adaptadores inalámbricos
admiten Secure Easy Setup (SES),
puede utilizar el botón SES del ruteador
para configurar la seguridad
inalámbrica (Wireless Security).
Basic Wireless Settings
NOTA: Consulte la guía del usuario
si desea configurar las opciones de
seguridad inalámbrica Radius
o WPA Enterprise.
Parámetros de
(Parámetros
inalámbricos básicos)
seguridad WEP
inalámbrica

WPA Pre-Shared Key (Clave
precompartida WPA): WPA ofrece dos
métodos de encriptación, TKIP y AES,
con claves de encriptación
dinámica. Seleccione el tipo de
algoritmo, TKIP o AES. Introduzca una
clave compartida WPA (WPA Shared
Key) de 8 a 63 caracteres. A
continuación, introduzca un periodo
de renovación de clave de grupo
(Group Key Renewal), que indica al
ruteador la frecuencia con que debe
cambiar las claves de encriptación.
D Haga clic en el botón Save
Settings (Guardar parámetros).
Enhorabuena. La seguridad
inalámbrica ya está configurada
en el ruteador.
WRK54G-ES_V2-QIG-51114 TE
Linksys es una marca registrada o marca
comercial de Cisco Systems, Inc. y/o sus filiales
en EE.UU. y otros países. Copyright © 2005 Cisco
Systems, Inc. Todos los derechos reservados.
Para obtener información adicional o ayuda
sobre resolución de problemas, consulte la
guía del usuario que se incluye en el CD-ROM
o el suplemento de asistencia técnica.
También puede solicitar más asistencia
mediante el correo electrónico.
Sitio Web
http://www.linksys.com/international
Registro de productos
http://www.linksys.com/registration
Parámetros de
WPA Pre-Shared Key
seguridad de
(Clave precom-
partida WPA)

A Division of Cisco Systems, Inc.
®
Modellnr
Wireless
1
Snabbinstallationshandbok
WRK54G (SE)
Bredbandsrouter
Wireless-G
Innehåll i förpackningen*
• Wireless-G Bredbandsrouter
• Installations-cd-skivor (med Symantec Internet
Security)
• Användarhandböcker på cd-skivor (endast
engelska)
• Strömadapter
• Ethernet-nätverkskabel
• Snabbinstallationshandbok
*andra artiklar kan medfölja
GHz
2
802.11g
4
,

2
1
A Innan du börjar måste du ha
inställningsinformationen för just
din typ av Internet-anslutning. Du
bör ha fått den här informationen
av installationsteknikern från din
Internet-leverantör när
bredbandsanslutningen
installerades. Annars kan du ringa
din Internet-leverantör och be om
inställningarna.
B Kontrollera att alla maskinvaror i
nätverket är avstängda, inklusive
routern, datorn samt kabel- eller
DSL-modemet.
C Anslut den ena änden av en
Ethernet-nätverkskabel till en av
portarna (märkt 1-4) på baksidan
av routern och den andra änden
till en Ethernet-port på en dator.
D Upprepa steg C om du vill ansluta
ytterligare datorer eller andra
nätverksenheter till routern.
Ansluta bredbandsroutern
C

3
E Anslut en annan Ethernet-
nätverkskabel från kabel- eller DSL-
modemet till Internet-porten på
baksidan av routern. Det här är
den enda porten som fungerar för
modemanslutningen.
F Starta kabel- eller DSL-modemet.
G Anslut strömadaptern till routerns
strömport och den andra änden
till ett eluttag
H Kontrollera att ström- och Internet-
lysdioderna på frontpanelen lyser
grönt.
I Strömlysdioden blinkar grönt
några sekunder medan routern
utför självtestet. Lysdioden lyser
med fast sken när självtestet har
slutförts. Information om vad du
ska göra om den inte slutar blinka
finns i "Bilaga A, Felsökning" i
användarhandboken för routern
på installations-cd:n.
J Starta den dator du vill använda
till att konfigurera routern.
Gå vidare till steg 2.
VIKTIGT: Se till att du använder
strömadaptern som medföljer
routern. Om du använder en annan
strömadapter kan routern skadas.
G
E

4
2
De här anvisningarna beskriver hur du
konfigurerar routern. Du behöver bara
konfigurera den en gång.
A Öppna webbläsaren. Ange
http://192.168.1.1 i fältet
Adress. Tryck på Enter.
B En skärm visas där du blir ombedd
att ange lösenord. Lämna fältet
Användarnamn tomt och skriv
sedan standardlösenordet admin
med små bokstäver i fältet
Lösenord. (Senare bör du skapa ett
nytt lösenord genom att använda
fliken Administration på skärmen
Management (Administration) i det
webbaserade verktyget.) Klicka
sedan på OK.
C Det webbaserade verktyget visas
med fliken Setup (Inställningar)
markerad. Om du blir ombedd
av Internet-leverantören
(vanligen kabel-Internet-
leverantörer) fyller du i fälten Host
Name (Värdnamn) och Domain
Name (Domännamn). I annat fall
lämnar du dem tomma.
D För inställningen av Internet-
anslutningstyp kan du välja
mellan sex olika anslutningstyper
i listrutan. Alla Setup-skärmar och
tillgängliga funktioner skiljer sig åt
beroende på vilken
anslutningstyp du väljer.
C
OBS! Kontrollera att datorns Ethernet-
adapter är inställd på Hämta IP-adress
automatiskt. Mer information finns i
Windows-hjälpen.
A
Konfigurera bredbandsroutern
B

5
Typ av Internet-konfiguration
DHCP: Om du ansluter via DHCP
eller en dynamisk IP-adress från din
Internet-leverantör behåller du
standardinställningen Obtain an IP
automatically (Hämta IP-adress
automatiskt)
Static IP (Statisk IP-adress): Om
Internet-leverantören tillhandahåller
en statisk IP-adress väljer du Static IP
i listrutan. Fyll i fälten Internet IP
Address (Internet-IP-adress), Subnet
Mask (Nätmask), Gateway och
Static DNS (Statisk DNS). Du måste
ange minst en DNS-adress
PPPoE: Om du ansluter via PPPoE
väljer du PPPoE i listrutan. Fyll i fälten
User Name (Användarnamn) och
Password (Lösenord). Välj Keep Alive
(Behåll anslutning) om du alltid vill
vara ansluten till Internet, eller välj
Connect on Demand (Anslut på
begäran) om du debiteras för den
tid du är ansluten till Internet.
.
L2TP: L2TP är en tjänst som endast
används i Israel. Om du använder en
L2TP-anslutning kontaktar du
Internet-leverantören och ber om
inställningsinformation.
PPTP: PPTP är en tjänst som endast
används i Europa. Om du använder
en PPTP-anslutning väljer du PPTP i
listrutan
. Fyll i fälten IP Address
(IP-adress), Subnet Mask (Nätmask),
Default Gateway (Standard-
gateway), User Name
(Användarnamn) och Password
(Lösenord). Välj Keep Alive (Behåll
anslutning) om du alltid vill vara
ansluten till Internet, eller välj
DHCP
Static IP (Statisk
PPPoE
L2TP
PPTP
IP-adress)

6
Connect on Demand (Anslut på
begäran) om du debiteras för den tid
du är ansluten till Internet.
Telstral: Telstra (HeartBeat Signal) är
en tjänst som endast används i
Australien. Om du använder en
HeartBeat Signal-anslutning kontaktar
du Internet-leverantören och ber om
inställningsinformation
E När du är klar med inställningarna för
din Internet-anslutning klickar du på
Save Settings (Spara inställningar) för
att spara alla ändringar.
F Om du vill konfigurera routern för
det trådlösa nätverket väljer du
fliken Wireless (Trådlöst) på
skärmen Basic Wireless Settings
(Grundläggande trådlösa
inställningar)
G Trådlöst nätverksläge. Välj det läge
som du använder i listrutan. Om du
endast använder 802.11g väljer du
G-Only, om du endast använder
802.11b väljer du B-Only och om
du använder både 802.11b och
802.11g behåller du inställningen
Mixed (Blandat).
H Trådlöst nätverksnamn (SSID).
SSID (Service Set Identifier) är
nätverksnamnet som delas av alla
enheter i nätverket. SSID:t måste
vara identiskt för alla enheter i det
trådlösa nätverket. Namnet är
skiftlägeskänsligt och får inte
överstiga 32 tecken (alla
tangentbordstecken kan
användas). Av säkerhetsskäl bör
du ändra standard-SSID:t linksys till
ett unikt namn.
F
Telstra

7
I Trådlös kanal. I listan väljer du en
lämplig kanal som motsvarar dina
nätverksinställningar. Alla enheter i
det trådlösa nätverket måste
sändas på samma kanal för att
fungera korrekt.
J Trådlös SSID Broadcast. När
trådlösa kunder söker i det lokala
nätet efter trådlösa nätverk att
koppla till kommer routern att
känna av SSID Broadcast. Om du
vill sända routerns SSID behåller du
standardinställningen Enable
(Aktivera). Om du inte vill sända
routerns SSID väljer du Disable
(Avaktivera).
K Ändra inställningarna enligt den
här beskrivningen och klicka på
Save Settings (Spara inställningar)
för att verkställa ändringarna.
L Stäng av modemet och sätt
sedan på det igen.
M Starta om datorn.
N Testa inställningarna genom att
öppna webbläsaren och gå in på
http://www.linksys.com/registration
.
Installationen av Wireless-G
Bredbandsrouter är klar.
N
OBS! Mer avancerade inställningar och
säkerhetsalternativ finns i
användarhandboken för routern på
installations-cd:n.
VIKTIGT! När routern är
konfigurerad bör trådlös säkerhet,
antingen WEP eller WPA, vara
konfigurerat för att förhindra
säkerhetsrisker på nätverket.

3
Routern levereras med fyra typer
av trådlös säkerhet: WEP, WPA Pre-
Shared (WPA med för-delad nyckel),
WPA Enterprise och Radius.
De här säkerhetsmetoderna
är dock inte aktiverade direkt utan
att du behöver göra något.
Konfigurera trådlös säkerhet på
routern genom att göra följande:
A Öppna routerns webbverktyg
på det sätt som beskrivs i steg 2
och klicka på fliken Wireless
(Trådlöst). Fönstret Basic Wireless
Settings (Grundläggande
trådlösa inställningar) visas.
B Välj Wireless Security (Trådlös
säkerhet) för att konfigurera
trådlös säkerhet på routern.
Anvisningar för konfigurationen
av WEP och WPA Pre-Shared
(WPA med för-delad nyckel)
finns här.
C På menyn Security Mode
(Säkerhetsläge) väljer du den
typ av trådlös säkerhet du vill
använda på nätverket.
WEP: WEP är en enkel
krypteringsmetod som inte är lika
säker som WPA. Om du vill
använda WEP väljer du en
standardnyckel (ange vilken
nyckel som ska användas) och en
nivå för WEP-krypteringen, 64 bitar
10 hex-siffror eller 128 bitar 26
hex-siffror. Sedan genererar du en
WEP-nyckel med ett lösenord eller
anger WEP-nyckeln manuellt.
Konfigurera trådlös säkerhet
OBS! Om dina trådlösa adaptrar
stöder Secure Easy Setup (SES) kan
du använda knappen SES på routern
för att konfigurera trådlös säkerhet.
Basic Wireless Settings
OBS! Läs i användarhandboken om du
vill konfigurera alternativen för trådlös
säkerhet, WPA Enterprise eller
Radius.
WEP-säkerhetsinställningar
(Grundläggande
trådlösa inställningar)

WPA Pre-Shared (WPA med
för-delad nyckel): Med WPA får
du två krypteringsmetoder, TKIP
och AES, med dynamiska
krypteringsnycklar. Välj typ av
algoritm, TKIP eller AES. Ange en
WPA-delad nyckel med 8–63
tecken. Slutligen anger du en
gruppnyckelförnyelseperiod, vilket
anger hur ofta krypteringsnycklarna
ska ändras för routern.
D Klicka på Save Settings
(Spara inställningar).
Klart! Trådlös säkerhet har nu
konfigurerats på routern.
WRK54G-SE_V2-QIG-51114 TE
Linksys är ett registrerat varumärke eller ett
varumärke som tillhör Cisco Systems, Inc. och/
eller dess samarbetspartner i USA och i vissa
andra länder. Copyright © 2005 Cisco Systems,
Inc. Med ensamrätt.
Mer information samt felsökningshjälp finns
i användarhandboken på cd-skivan och i
supportbilagan. Du kan också skicka e-post
till vår supportavdelning.
Webbplats
http://www.linksys.com/international
Produktregistrering
http://www.linksys.com/registration
Säkerhetsinställningar
för WPA Pre-Shared
(WPA med för-delad
nyckel)

A Division of Cisco Systems, Inc.
®
Model No.
Broadband Router
Wireless-G
WRK54G (EU/LA)
User Guide
WIRELESS
GHz
802.11g
2,4

Wireless-G Broadband Router
Copyright and Trademarks
Specifications are subject to change without notice. Linksys is a registered trademark or trademark of Cisco
Systems, Inc. and/or its affiliates in the U.S. and certain other countries. Copyright © 2006 Cisco Systems, Inc. All
rights reserved. Other brands and product names are trademarks or registered trademarks of their respective
holders.
How to Use This User Guide
This User Guide has been designed to make understanding networking with the Wireless-G Broadband Router
easier than ever. Look for the following items when reading this User Guide:
In addition to these symbols, there are definitions for technical terms that are presented like this:
Also, each figure (diagram, screenshot, or other image) is provided with a figure number and description, like
this:
Figure numbers and descriptions can also be found in the “List of Figures” section in the “Table of Contents”.
This exclamation point means there is a caution or
warning and is something that could damage your
property or the Wireless-G Broadband Router.
This checkmark means there is a note of interest and
is something you should pay special attention to
while using the Wireless-G Broadband Router.
This question mark provides you with a reminder
about something you might need to do while using
the Wireless-G Broadband Router.
word: definition.
Figure 0-1: Sample Figure Description
WRK54G-EU-UG-51114 BW

Wireless-G Broadband Router
Table of Contents
Chapter 1: Introduction
Welcome 1
What’s in this User Guide? 2
Chapter 2: Planning Your Wireless Network 4
Network Topology 4
Ad-Hoc versus Infrastructure Mode 4
Network Layout 4
Chapter 3: Getting to Know the Wireless-G Broadband Router 6
The Back Panel 6
The Front Panel 7
Chapter 4: Connecting the Wireless-G Broadband Router 8
Overview 8
Hardware Installation for Connection to Your Broadband Modem 8
Hardware Installation for Connection to Another Router 10
Chapter 5: Configuring the Wireless-G Broadband Router 12
Overview 12
The Setup Tab - Basic Setup 13
The Setup Tab - DDNS 18
The Setup Tab - MAC Address Clone 19
The Setup Tab - Advanced Routing 20
The Wireless Tab - Basic Wireless Settings 21
The Wireless Tab - Wireless Security 22
The Wireless Tab - Wireless MAC Filter 25
The Wireless Tab - Advanced Wireless Settings 26
The Security Tab - Firewall 27
The Security Tab - VPN Passthrough 27
The Access Restrictions Tab - Internet Access 28
The Applications and Gaming Tab - Port Range Forward 30
The Applications & Gaming Tab - Port Triggering 31
The Applications and Gaming Tab - DMZ 32
The Applications and Gaming Tab - QoS 32
The Administration Tab - Management 35

Wireless-G Broadband Router
The Administration Tab - Log 35
The Administration Tab - Diagnostics 36
The Administration Tab - Factory Defaults 37
The Administration Tab - Firmware Upgrade 37
The Administration Tab - Config Management 37
The Status Tab - Router 38
The Status Tab - Local Network 39
The Status Tab - Wireless 39
Appendix A: Troubleshooting 40
Common Problems and Solutions 40
Frequently Asked Questions 48
Appendix B: Wireless Security 55
Security Precautions 55
Security Threats Facing Wireless Networks 55
Appendix C: Upgrading Firmware 58
Appendix D: Windows Help 59
Appendix E: Finding the MAC Address and IP Address for Your Ethernet Adapter 60
Windows 98SE or Me Instructions 60
Windows 2000 or XP Instructions 60
For the Router’s Web-based Utility 61
Appendix F: Glossary 62
Appendix G: Specifications 69
Appendix H: Warranty Information 71
Appendix I: Regulatory Information 72
Appendix J: Contact Information 83

Wireless-G Broadband Router
List of Figures
Figure 3-1: The Router’s Back Panel 6
Figure 3-2: The Router’s Front Panel 7
Figure 4-1: Connecting Your Internet Connection 8
Figure 4-2: Connecting Your Network Devices 9
Figure 4-3: Connecting the Power 9
Figure 4-4: Diagram for Connection to Another Router 10
Figure 4-5: Connecting Another Router 10
Figure 4-6: Connecting Your Network Devices 11
Figure 4-7: Connecting the Power 11
Figure 5-1: Password Screen 12
Figure 5-2: Setup Tab - Basic Setup 13
Figure 5-3: DHCP Connection Type 13
Figure 5-4: Static IP Connection Type 13
Figure 5-5: PPPoE Connection Type 14
Figure 5-6: PPTP Connection Type 14
Figure 5-7: L2TP Connection Type 15
Figure 5-8: Telestra Cable Connection Type 15
Figure 5-9: Optional Settings 16
Figure 5-10: Router IP 16
Figure 5-11: Network Address Server Settings 17
Figure 5-12: Time Setting 17
Figure 5-13: Setup Tab - DDNS - DynDNS account 18
Figure 5-14: Setup Tab - DDNS - TZO account 18
Figure 5-15: Setup Tab - MAC Address Clone 19
Figure 5-16: Setup Tab - Advanced Routing (Gateway) 20
Figure 5-17: Setup Tab - Advanced Routing (Router) 20
Figure 5-18: Wireless Tab - Basic Wireless Settings 21
Figure 5-19: Wireless Tab - Wireless Security (WPA Personal) 22
Figure 5-20: Wireless Tab - Wireless Security (WPA Enterprise) 22
Figure 5-21: Wireless Tab - Wireless Security (WPA2 Personal) 23
Figure 5-22: Wireless Tab - Wireless Security (WPA2 Enterprise) 23

Wireless-G Broadband Router
Figure 5-23: Wireless Tab - Wireless Security (RADIUS) 24
Figure 5-24: Wireless Tab - Wireless Security (WEP) 24
Figure 5-25: Wireless Tab - Wireless MAC Filter 25
Figure 5-26: MAC Address Filter List 25
Figure 5-27: Wireless Tab - Advanced Wireless Settings 26
Figure 5-28: Security Tab - Firewall 27
Figure 5-29: Security Tab - VPN Passthrough 27
Figure 5-30: Access Restrictions Tab - Internet Access 28
Figure 5-31: Internet Policy Summary 28
Figure 5-32: List of PCs 28
Figure 5-33: Port Services 29
Figure 5-34: Applications and Gaming Tab - Port Range Forward 30
Figure 5-35: Applications and Gaming Tab - Port Triggering 31
Figure 5-36: Applications and Gaming Tab - DMZ 32
Figure 5-37: Applications and Gaming Tab - QOS 32
Figure 5-38: Applications and Gaming Tab - QOS Adding an New Application 33
Figure 5-39: Administration Tab - Management 35
Figure 5-40: Administration Tab - Log 35
Figure 5-41: Administration Tab - Diagnostics 36
Figure 5-42: The Ping Test 36
Figure 5-43: The Traceroute Test 36
Figure 5-44: Administration Tab - Factory Defaults 37
Figure 5-45: Administration Tab - Firmware Upgrade 37
Figure 5-46: Administration Tab - Config Management 37
Figure 5-47: Status Tab - Router 38
Figure 5-48: Status Tab - Local Network 39
Figure 5-49: DHCP Clients Table 39
Figure 5-50: Status Tab - Wireless 39
Figure C-1: Upgrade Firmware 58
Figure E-1: IP Configuration Screen 60
Figure E-2: MAC Address/Adapter Address 60
Figure E-3: MAC Address/Physical Address 60
Figure E-4: MAC Address Filter List 61
Figure E-5: MAC Address Clone 61

1
Chapter 1: Introduction
Welcome
Wireless-G Broadband Router
Chapter 1: Introduction
Welcome
Thank you for choosing the Linksys Wireless-G Broadband Router. The Wireless-G Broadband Router will allow
you to network wirelessly better than ever, sharing Internet access, files and fun, easily and securely.
How does the Wireless-G Broadband Router do all of this? A router is a device that allows access to an Internet
connection over a network. With the Wireless-G Broadband Router, this access can be shared over the four
switched ports or via the wireless broadcast at up to 11Mbps for Wireless-B or up to 54Mbps for Wireless-G.
Use the WPA standard to secure your wireless network while the whole network is protected through a Stateful
Packet Inspection (SPI) firewall and Network Address Translation (NAT) technology. Run the Setup Wizard and it
will guide you through the steps. You can also access the Router’s features through the easy-to-use, browser-
based utility.
But what does all of this mean?
Networks are useful tools for sharing computer resources. You can access one printer from different computers
and access data located on another computer's hard drive. Networks are even used for playing multiplayer video
games. So, networks are not only useful in homes and offices, they can also be fun.
PCs on a wired network create a LAN, or Local Area Network. They are connected with Ethernet cables, which is
why the network is called “wired”.
PCs equipped with wireless cards or adapters can communicate without cumbersome cables. By sharing the
same wireless settings, within their transmission radius, they form a wireless network. This is sometimes called
a WLAN, or Wireless Local Area Network. The Wireless-G Broadband Router bridges wireless networks of both
802.11b and 802.11g standards and wired networks, allowing them to communicate with each other.
With your networks all connected, wired, wireless, and the Internet, you can now share files and Internet
access—and even play games. All the while, the Wireless-G Broadband Router protects your networks from
unauthorized and unwelcome users.
Linksys recommends using the Setup CD-ROM for first-time installation of the Router. If you do not wish to run
the Setup Wizard on the Setup CD-ROM, then use the instructions in this Guide to help you connect the
Wireless-G Broadband Router, set it up, and configure it to bridge your different networks. These instructions
should be all you need to get the most out of the Wireless-G Broadband Router.
lan (local area network): The computers and
networking products that make up the network in
your home or office.
nat (network address translation): NAT technology
translates IP addresses of a local area network to a
different IP address for the Internet.
spi (stateful packet inspection) firewall: a technology
that inspects incoming packets of information before
allowing them to enter the network.
firewall: Security measures that protect the
resources of a local network from intruders.

2
Chapter 1: Introduction
What’s in this User Guide?
Wireless-G Broadband Router
What’s in this User Guide?
This user guide covers the steps for setting up and using the Wireless-G Broadband Router.
• Chapter 1: Introduction
This chapter describes the Router’s applications and this User Guide.
• Chapter 2: Planning Your Wireless Network
This chapter describes the basics of wireless networking.
• Chapter 3: Getting to Know the Wireless-G Broadband Router
This chapter describes the physical features of the Router.
• Chapter 4: Connecting the Wireless-G Broadband Router
This chapter instructs you on how to connect the Router to your network.
• Chapter 5: Configuring the Wireless-G Broadband Router
This chapter explains how to use the Web-based Utility to configure the settings on the Wireless-G Broadband
Router.
• Appendix A: Troubleshooting
This appendix describes some problems and solutions, as well as frequently asked questions, regarding
installation and use of the Wireless-G Broadband Router.
• Appendix B: Wireless Security
This appendix explains the risks of wireless networking and some solutions to reduce the risks.
• Appendix C: Upgrading Firmware
This appendix instructs you on how to upgrade the firmware on the Router should you need to do so.
• Appendix D: Windows Help
This appendix describes how you can use Windows Help for instructions about networking, such as installing
the TCP/IP protocol.
• Appendix E: Finding the MAC Address and IP Address for your Ethernet Adapter.
This appendix describes how to find the MAC address for your computer’s Ethernet adapter so you can use
the MAC filtering and/or MAC address cloning feature of the Router.
• Appendix F: Glossary
This appendix gives a brief glossary of terms frequently used in networking.

3
Chapter 1: Introduction
What’s in this User Guide?
Wireless-G Broadband Router
• Appendix G: Specifications
This appendix provides the technical specifications for the Router.
• Appendix H: Warranty Information
This appendix supplies the warranty information for the Router.
• Appendix I: Regulatory Information
This appendix supplies the regulatory information regarding the Router.
• Appendix J: Contact Information
This appendix provides contact information for a variety of Linksys resources, including Technical Support.

4
Chapter 2: Planning Your Wireless Network
Network Topology
Wireless-G Broadband Router
Chapter 2: Planning Your Wireless Network
Network Topology
A wireless local area network (WLAN) is exactly like a regular local area network (LAN), except that each
computer in the WLAN uses a wireless device to connect to the network. Computers in a WLAN share the same
frequency channel and SSID, which is an identification name shared by the wireless devices belonging to the
same wireless network.
Ad-Hoc versus Infrastructure Mode
Unlike wired networks, wireless networks have two different modes in which they may be set up: infrastructure
and ad-hoc. An infrastructure configuration is a WLAN and wired LAN communicating to each other through an
access point. An ad-hoc configuration is wireless-equipped computers communicating directly with each other.
Choosing between these two modes depends on whether or not the wireless network needs to share data or
peripherals with a wired network or not.
If the computers on the wireless network need to be accessible by a wired network or need to share a peripheral,
such as a printer, with the wired network computers, the wireless network should be set up in Infrastructure
mode. The basis of Infrastructure mode centers around a wireless router or an access point, such as the
Wireless-G Broadband Router, which serves as the main point of communications in a wireless network. The
Router transmits data to PCs equipped with wireless network adapters, which can roam within a certain radial
range of the Router. You can arrange the Router and multiple access points to work in succession to extend the
roaming range, and you can set up your wireless network to communicate with your Ethernet hardware as well.
If the wireless network is relatively small and needs to share resources only with the other computers on the
wireless network, then the Ad-Hoc mode can be used. Ad-Hoc mode allows computers equipped with wireless
transmitters and receivers to communicate directly with each other, eliminating the need for a wireless router or
access point. The drawback of this mode is that in Ad-Hoc mode, wireless-equipped computers are not able to
communicate with computers on a wired network. And, of course, communication between the wireless-
equipped computers is limited by the distance and interference directly between them.
Network Layout
The Wireless-G Broadband Router has been specifically designed for use with both your 802.11b and 802.11g
products. Now, products using these standards can communicate with each other.
infrastructure: a wireless network that is bridged
to a wired network via an access point.
ssid (service set identifier): your wireless network’s name.
ad-hoc: a group of wireless devices
communicating directly to each other (peer-to-
peer) without the use of an access point.

5
Chapter 2: Planning Your Wireless Network
Network Layout
Wireless-G Broadband Router
The Wireless-G Broadband Router is compatible with all 802.11b and 802.11g adapters, such as the Notebook
Adapters (WPC54G, WPC11) for your laptop computers, PCI Adapter (WMP54G, WMP11) for your desktop PC, and
USB Adapter (WUSB54G, WUSB11) when you want to enjoy USB connectivity. The Broadband Router will also
communicate with the Wireless PrintServer (WPS54G) and Wireless Ethernet Bridges (WET54G, WET11).
When you wish to connect your wireless network with your wired network, you can use the Wireless-G
Broadband Router’s four LAN ports. To add more ports, any of the Wireless-G Broadband Router's LAN ports can
be connected to any of Linksys's switches (such as the SD205 or SD208).
With these, and many other, Linksys products, your networking options are limitless. Go to the Linksys website at
www.linksys.com/international for more information about products that work with the Wireless-G Broadband
Router.

6
Chapter 3: Getting to Know the Wireless-G Broadband Router
The Back Panel
Wireless-G Broadband Router
Chapter 3: Getting to Know the Wireless-G Broadband
Router
The Back Panel
The Router's ports, where the cables are connected, are located on the back panel.
Reset Button There are two ways to reset the Router's factory defaults. Either press the Reset Button, for
approximately five seconds, or restore the defaults from the Administration tab - Factory
Defaults in the Router's Web-based Utility.
Internet The Internet port is where you will connect your broadband Internet connection.
1, 2, 3, 4 These ports (1, 2, 3, 4) connect the Router to your networked PCs and other Ethernet network
devices.
Power The Power port is where you will connect the power adapter.
IMPORTANT: Resetting the Router will erase all of
your settings (Internet connection, wireless
security, and other settings) and replace them with
the factory defaults. Do not reset the Router if you
want to retain these settings.
Figure 3-1: The Router’s Back Panel

7
Chapter 3: Getting to Know the Wireless-G Broadband Router
The Front Panel
Wireless-G Broadband Router
The Front Panel
The Router’s SecureEasySetup button (the Cisco logo) and LEDs are located on the front panel.
Power Green. The Power LED lights up and will stay on while the Router is powered on. When the
Router goes through its self-diagnostic mode during every boot-up, this LED will flash. When
the diagnostic is complete, the LED will be solidly lit.
DMZ Green. The DMZ LED indicates when the DMZ function is being used. This LED will remain lit
as long as DMZ is enabled.
WLAN Green. The WLAN LED lights up whenever there is a successful wireless connection. If the LED
is flashing, the Router is actively sending or receiving data over the network.
1, 2, 3, 4 Green. These numbered LEDs, corresponding with the numbered ports on the Router’s back
panel, serve two purposes. If the LED is continuously lit, the Router is successfully connected
to a device through that port. A flashing LED indicates network activity over that port.
Internet Green. The Internet LED lights up when there is a connection made through the Internet port.
Figure 3-2: The Router’s Front Panel

8
Chapter 4: Connecting the Wireless-G Broadband Router
Overview
Wireless-G Broadband Router
Chapter 4: Connecting the Wireless-G Broadband Router
Overview
This chapter includes two sets of instructions. If the Wireless-G Broadband Router will be the only router in your
network, follow the instructions in “Hardware Installation for Connection to Your Broadband Modem.” If you want
to install the Wireless-G Broadband Router behind another router in your network, then follow the instructions in
“Hardware Installation for Connection to Another Router.”
Hardware Installation for Connection to Your Broadband Modem
1. Power down your network devices.
2. Locate an optimum location for the Router. The best place for the Router is usually at the center of your
wireless network, with line of sight to all of your mobile stations.
3. Fix the direction of the antennas. Try to place the Router in a position that will best cover your wireless
network. Normally, the higher you place the antenna, the better the performance will be.
4. Connect a standard Ethernet network cable to the Router’s Internet port. Then, connect the other end of the
Ethernet cable to your cable or DSL broadband modem.
Figure 4-1: Connecting Your Internet Connection

9
Chapter 4: Connecting the Wireless-G Broadband Router
Hardware Installation for Connection to Your Broadband Modem
Wireless-G Broadband Router
5. Connect your network PCs or Ethernet devices to the Router’s numbered ports using standard Ethernet
network cabling.
6. Connect the AC power adapter to the Router's Power port and the other end into an electrical outlet. Only use
the power adapter supplied with the Router. Use of a different adapter may result in product damage.
Now that the hardware installation is complete, proceed to “Chapter 5: Setting up the Wireless-G
Broadband Router,” for directions on how to configure the Router.
Figure 4-2: Connecting Your Network Devices
Figure 4-3: Connecting the Power
IMPORTANT: Make sure you use the power adapter
that is supplied with the Router. Use of a different
power adapter could damage the Router.

10
Chapter 4: Connecting the Wireless-G Broadband Router
Hardware Installation for Connection to Another Router
Wireless-G Broadband Router
Hardware Installation for Connection to Another Router
Before you install the Router, you must change the default IP address of the other router. This is mandatory
because both routers may be set to the same IP address by default. If you do not change the other router’s
default IP address, then you may not be able to set up the Router.
First, make sure the Router is NOT connected to your network. Then follow these instructions:
1. To access the other router’s Web-based Utility, launch Internet Explorer or Netscape Navigator, and enter the
other router’s default IP address, 192.168.1.1, in the Address field. Then press Enter.
2. A password request page will appear. Leave the User Name field blank. In the Password field, enter the
password you have set (the default password is admin). Then click the OK button.
3. The first screen that appears will display the Setup tab. In the Network Setup section, there is a setting called
Local IP Address, which is set to 192.168.1.1. Change this to 192.168.2.1.
4. Click the Save Settings button to save your change, and then exit the Web-based Utility.
5. Power down your network devices. Now you will begin the hardware installation of Router.
6. Locate an optimum location for the Router. The best place for the Router is usually at the center of your
wireless network, with line of sight to all of your mobile stations.
7. Fix the direction of the antennas. Try to place the Router in a position that will best cover your wireless
network. Normally, the higher you place the antenna, the better the performance will be.
8. Connect a standard Ethernet network cable to the Router’s Internet port. Then, connect the other end of the
Ethernet cable to one of the numbered Ethernet ports on your other router.
Figure 4-4: Diagram for Connection to Another Router
NOTE: Steps 1-4 are instructions for a typical Linksys
router; however, if you are using a non-Linksys router,
refer to the other router’s documentation for
instructions on how to change its local IP address to
192.168.2.1.
Internet
Broadband
Modem
Router
Wireless-G
Broadband
Router
Figure 4-5: Connecting Another Router
Multiple PCs

11
Chapter 4: Connecting the Wireless-G Broadband Router
Hardware Installation for Connection to Another Router
Wireless-G Broadband Router
9. Decide which network computers or Ethernet devices you want to connect to the Router.
Disconnect the selected computers or devices from the other router, and then connect them to the Router’s
numbered ports using standard Ethernet network cabling.
10. Connect the AC power adapter to the Router's Power port and the other end into an electrical outlet. Only use
the power adapter supplied with the Router. Use of a different adapter may result in product damage.
Now that the hardware installation is complete, proceed to
“Chapter 5: Configuring the Wireless-G Broadband Router”.
IMPORTANT: Make sure you use the power adapter
that is supplied with the Router. Use of a different
power adapter could damage the Router.
Figure 4-6: Connecting Your Network Devices
Figure 4-7: Connecting the Power

12
Chapter 5: Configuring the Wireless-G Broadband Router
Overview
Wireless-G Broadband Router
Chapter 5: Configuring the Wireless-G Broadband
Router
Overview
Linksys recommends using the Setup CD-ROM for first-time installation of the Router. If you do not wish to run
the Setup Wizard on the Setup CD-ROM, then you can use the Web-based Utility to configure the Router. For
advanced users, you may configure the Router’s advanced settings through the Web-based Utility.
This chapter will describe each web page in the Utility and each page’s key functions. The utility can be accessed
via your web browser through use of a computer connected to the Router. For a basic network setup, most users
will use these two screens of the Utility:
• Basic Setup. On the Basic Setup screen, enter the settings provided by your ISP.
• Management. Click the Administration tab and then the Management tab. The Router’s default password is
admin. To secure the Router, change the Password from its default.
There are seven main tabs: Setup, Wireless, Security, Access Restrictions, Applications & Gaming, Administration,
and Status. Additional tabs will be available after you click one of the main tabs.
To access the Web-based Utility, launch Internet Explorer or Netscape Navigator, and enter the Router’s default IP
address, 192.168.1.1, in the Address field. Then press Enter.
A password request page will appear. (Non-Windows XP users will see a similar screen.) Leave the User Name
field blank. The first time you open the Web-based Utility, use the default password admin. (You can set a new
password from the Administration tab’s Management screen.) Then click the OK button.
HAVE YOU: Enabled TCP/IP on your PCs? PCs
communicate over the network with this protocol.
Refer to “Appendix D: Windows Help” for more
information on TCP/IP.
NOTE: For first-time installation, Linksys
recommends using the Setup Wizard on the Setup
CD-ROM. If you want to configure advanced settings,
use this chapter to learn about the Web-based Utility.
Figure 5-1: Password Screen

13
Chapter 5: Configuring the Wireless-G Broadband Router
The Setup Tab - Basic Setup
Wireless-G Broadband Router
The Setup Tab - Basic Setup
The first screen that appears displays the Setup tab. This allows you to change the Router's general settings.
Change these settings as described here and click the Save Settings button to apply your changes or Cancel
Changes to cancel your changes.
Internet Setup
The Internet Setup section configures the Router to your Internet connection. Most of this information can be
obtained through your ISP.
Internet Connection Type
Choose the type of Internet connection your ISP provides from the drop-down menu.
• DHCP. By default, the Router’s Internet Connection Type is set to Automatic Configuration - DHCP, which
should be kept only if your ISP supports DHCP or you are connecting through a dynamic IP address.
• Static IP. If you are required to use a permanent IP address to connect to the Internet, select Static IP.
Internet IP Address. This is the Router’s IP address, when seen from the Internet. Your ISP will provide you
with the IP Address you need to specify here.
Subnet Mask. This is the Router’s Subnet Mask, as seen by users on the Internet (including your ISP). Your ISP
will provide you with the Subnet Mask.
Gateway. Your ISP will provide you with the Gateway Address, which is the ISP server’s IP address.
DNS. Your ISP will provide you with at least one DNS (Domain Name System) Server IP Address.
Figure 5-2: Setup Tab - Basic Setup
Figure 5-3: DHCP Connection Type
Figure 5-4: Static IP Connection Type
Static IP address: a fixed address assigned to a
computer or device connected to a network.

14
Chapter 5: Configuring the Wireless-G Broadband Router
The Setup Tab - Basic Setup
Wireless-G Broadband Router
• PPPoE. Some DSL-based ISPs use PPPoE (Point-to-Point Protocol over Ethernet) to establish Internet
connections. If you are connected to the Internet through a DSL line, check with your ISP to see if they use
PPPoE. If they do, you will have to enable PPPoE.
User Name and Password. Enter the User Name and Password provided by your ISP.
Connect on Demand: Max Idle Time. You can configure the Router to cut the Internet connection after it has
been inactive for a specified period of time (Max Idle Time). If your Internet connection has been terminated
due to inactivity, Connect on Demand enables the Router to automatically re-establish your connection as
soon as you attempt to access the Internet again. If you wish to activate Connect on Demand, click the radio
button. In the Max Idle Time field, enter the number of minutes you want to have elapsed before your Internet
connection terminates.
Keep Alive Option: Redial Period. If you select this option, the Router will periodically check your Internet
connection. If you are disconnected, then the Router will automatically re-establish your connection. To use
this option, click the radio button next to Keep Alive. In the Redial Period field, you specify how often you want
the Router to check the Internet connection. The default Redial Period is 30 seconds.
• PPTP. Point-to-Point Tunneling Protocol (PPTP) is a service that applies to connections in Europe only.
Specify Internet IP Address. This is the Router’s IP address, as seen from the Internet. Your ISP will provide
you with the IP Address you need to specify here.
Subnet Mask. This is the Router’s Subnet Mask, as seen by users on the Internet (including your ISP). Your ISP
will provide you with the Subnet Mask.
Gateway. Your ISP will provide you with the Gateway Address.
User Name and Password. Enter the User Name and Password provided by your ISP.
Connect on Demand: Max Idle Time. You can configure the Router to cut the Internet connection after it has
been inactive for a specified period of time (Max Idle Time). If your Internet connection has been terminated
due to inactivity, Connect on Demand enables the Router to automatically re-establish your connection as
soon as you attempt to access the Internet again. If you wish to activate Connect on Demand, click the radio
button. In the Max Idle Time field, enter the number of minutes you want to have elapsed before your Internet
connection terminates.
Keep Alive Option: Redial Period. If you select this option, the Router will periodically check your Internet
connection. If you are disconnected, then the Router will automatically re-establish your connection. To use
this option, click the radio button next to Keep Alive. In the Redial Period field, you specify how often you want
the Router to check the Internet connection. The default Redial Period is 30 seconds.
Figure 5-5: PPPoE Connection Type
Figure 5-6: PPTP Connection Type

15
Chapter 5: Configuring the Wireless-G Broadband Router
The Setup Tab - Basic Setup
Wireless-G Broadband Router
• L2TP. Layer 2 Tunneling Protocol (L2TP) is a service that applies to connections in Europe only.
User Name. Enter the User Name provided by your ISP.
Password. Enter the Password provided by your ISP.
L2TP Server. Enter the IP address of the L2TP server you are using; this should be provided by your ISP.
Connect on Demand. If you want the Router to end the Internet connection after it has been inactive for a
period of time, select Connect on Demand and designate the number of minutes you want that period of
inactivity to last.
Keep Alive. If you want the Router to periodically check your Internet connection, select Keep Alive. Then
specify how often you want the Router to check the Internet connection. If the connection is down, the Router
will automatically re-establish your connection.
• Telestra Cable. Telestra Cable is a service that applies to connections in Australia only. If your ISP is Telstra,
then select Telestra Cable.
User Name and Password. Enter the User Name and Password provided by your ISP.
Heart Beat Server. This is the IP address that the Router has, when seen from the Internet. Your ISP will
provide you with the IP Address you need to specify here.
Connect on Demand. If you want the Router to end the Internet connection after it has been inactive for a
period of time, select Connect on Demand and designate the number of minutes you want that period of
inactivity to last.
Keep Alive. If you want the Router to periodically check your Internet connection, select Keep Alive. Then
specify how often you want the Router to check the Internet connection. If the connection is down, the Router
will automatically re-establish your connection.
Figure 5-7: L2TP Connection Type
Figure 5-8: Telestra Cable Connection Type

16
Chapter 5: Configuring the Wireless-G Broadband Router
The Setup Tab - Basic Setup
Wireless-G Broadband Router
Optional Settings
Some of these settings may be required by your ISP. Verify with your ISP before making any changes.
Router Name. In this field, you can type a name of up to 39 characters to represent the Router.
Host Name/Domain Name. These fields allow you to supply a host and domain name for the Router. Some ISPs,
usually cable ISPs, require these names as identification. You may have to check with your ISP to see if your
broadband Internet service has been configured with a host and domain name. In most cases, leaving these
fields blank will work.
MTU. MTU is the Maximum Transmission Unit. It specifies the largest packet size permitted for Internet
transmission. The default setting, Manual, allows you to enter the largest packet size that will be transmitted.
The recommended size, entered in the Size field, is 1492. You should leave this value in the 1200 to 1500 range.
To have the Router select the best MTU for your Internet connection, select Auto.
Network Setup
The Network Setup section changes the settings on the network connected to the Router’s Ethernet ports.
Wireless Setup is performed through the Wireless tab.
Router IP
This presents both the Router’s IP Address and Subnet Mask as seen by your network.
Figure 5-9: Optional Settings
Figure 5-10: Router IP

17
Chapter 5: Configuring the Wireless-G Broadband Router
The Setup Tab - Basic Setup
Wireless-G Broadband Router
Network Address Server Settings (DHCP)
The settings allow you to configure the Router’s Dynamic Host Configuration Protocol (DHCP) server function. The
Router can be used as a DHCP server for your network. A DHCP server automatically assigns an IP address to
each computer on your network. If you choose to enable the Router’s DHCP server option, you must configure all
of your network PCs to connect to a DHCP server (the Router), and make sure there is no other DHCP server on
your network.
DHCP Server. DHCP is enabled by factory default. If you already have a DHCP server on your network, or you
don’t want a DHCP server, then click the Disable radio button (no other DHCP features will be available).
Starting IP Address. Enter a value for the DHCP server to start with when issuing IP addresses. Because the
Router’s default IP address is 192.168.1.1, the Starting IP Address must be 192.168.1.2 or greater, but smaller
than 192.168.1.253. The default Starting IP Address is 192.168.1.100.
Maximum Number of DHCP Users. Enter the maximum number of PCs that you want the DHCP server to assign
IP addresses to. This number cannot be greater than 253. The default is 50.
Client Lease Time. The Client Lease Time is the amount of time a network user will be allowed connection to the
Router with their current dynamic IP address. Enter the amount of time, in minutes, that the user will be “leased”
this dynamic IP address. After the time is up, the user will be automatically assigned a new dynamic IP address.
The default is 0 minutes, which means one day.
Static DNS (1-3). The Domain Name System (DNS) is how the Internet translates domain or website names into
Internet addresses or URLs. Your ISP will provide you with at least one DNS Server IP Address. If you wish to use
another, type that IP Address in one of these fields. You can type up to three DNS Server IP Addresses here. The
Router will use these for quicker access to functioning DNS servers.
WINS. The Windows Internet Naming Service (WINS) manages each PC’s interaction with the Internet. If you use
a WINS server, enter that server’s IP Address here. Otherwise, leave this blank.
Time Setting
Change the time zone in which your network functions from this pull-down menu. (You can even automatically
adjust for daylight savings time.)
Figure 5-11: Network Address Server Settings
Figure 5-12: Time Setting

18
Chapter 5: Configuring the Wireless-G Broadband Router
The Setup Tab - DDNS
Wireless-G Broadband Router
The Setup Tab - DDNS
The Router offers a Dynamic Domain Name System (DDNS) feature. DDNS lets you assign a fixed host and domain
name to a dynamic Internet IP address. It is useful when you are hosting your own website, FTP server, or other
server behind the Router. Before you can use this feature, you need to sign up for DDNS service with a DDNS
service provider, www.dyndns.org or www.TZO.com.
Select your DDNS service, DynDNS or TZO, from the DDNS Service pull-down menu. You may be asked for a User
Name, Password, E-mail Address, Domain Name, or Host Name. Simply enter the appropriate information for your
DDNS account.
The following information will also be displayed.
Internet IP Address. This is the Router’s current IP Address as seen on the Internet.
Status. This displays the status of the DDNS connection.
Change these settings as described here and click the Save Settings button to apply your changes or Cancel
Changes to cancel your changes.
Figure 5-13: Setup Tab - DDNS - DynDNS account
Figure 5-14: Setup Tab - DDNS - TZO account

19
Chapter 5: Configuring the Wireless-G Broadband Router
The Setup Tab - MAC Address Clone
Wireless-G Broadband Router
The Setup Tab - MAC Address Clone
A MAC address is a 12-digit code assigned to a unique piece of hardware for identification. Some ISPs will
require you to register a MAC address in order to access the Internet. If you do not wish to re-register the MAC
address with your ISP, you may assign the MAC address you have currently registered with your ISP to the Router
with the MAC Address Clone feature.
Enable/Disable. To have the MAC Address cloned, click the radio button beside Enable.
User Defined Entry. Enter the MAC Address registered with your ISP here.
Clone Your PC’s MAC Address. Clicking this button will clone the MAC address.
Change these settings as described here and click the Save Settings button to apply your changes or Cancel
Changes to cancel your changes.
Figure 5-15: Setup Tab - MAC Address Clone

20
Chapter 5: Configuring the Wireless-G Broadband Router
The Setup Tab - Advanced Routing
Wireless-G Broadband Router
The Setup Tab - Advanced Routing
This tab is used to set up the Router’s advanced functions. Operating Mode allows you to select the type(s) of
advanced functions you use. Dynamic Routing will automatically adjust how packets travel on your network. Static
Routing sets up a fixed route to another network destination.
Operating Mode
. Select the mode in which this Router will function. If this Router is hosting your network’s
connection to the Internet, select
Gateway
. If another Router exists on your network, select
Router
. When Router is
chosen,
Dynamic Routing
will be enabled.
Dynamic Routing
. This feature enables the Router to automatically adjust to physical changes in the network’s
layout and exchange routing tables with the other router(s). The Router determines the network packets’ route
based on the fewest number of hops between the source and the destination. This feature is
Disabled
by default.
From the drop-down menu, you can also select
LAN & Wireless
, which performs dynamic routing over your
Ethernet and wireless networks. You can also select
WAN
, which performs dynamic routing with data coming from
the Internet. Finally, selecting
Both
enables dynamic routing for both networks, as well as data from the Internet.
Static Routing
. To set up a static route between the Router and another network, select a number from the Static
Routing drop-down list. (A static route is a pre-determined pathway that network information must travel to reach a
specific host or network.) Enter the information described below to set up a new static route. (Click the
Delete This
Entry
button to delete a static route.)
Enter Route Name
. Enter a name for the Route here, using a maximum of 25 alphanumeric characters.
Destination LAN IP
. The Destination LAN IP is the address of the remote network or host to which you want to
assign a static route.
Subnet Mask
. The Subnet Mask determines which portion of a Destination LAN IP address is the network
portion, and which portion is the host portion.
Default Gateway
. This is the IP address of the gateway device that allows for contact between the Router and
the remote network or host.
Interface
. This interface tells you whether the Destination IP Address is on the
LAN & Wireless
(Ethernet and
wireless networks), the
WAN
(Internet), or
Loopback
(a dummy network in which one PC acts like a network—
necessary for certain software programs).
Click the
Show Routing Table
button to view the Static Routes you’ve already set up.
Change these settings as described here and click the
Save Settings
button to apply your changes or
Cancel
Changes
to cancel your changes.
Figure 5-17: Setup Tab - Advanced Routing (Router)
Figure 5-16: Setup Tab - Advanced Routing (Gateway)

21
Chapter 5: Configuring the Wireless-G Broadband Router
The Wireless Tab - Basic Wireless Settings
Wireless-G Broadband Router
The Wireless Tab - Basic Wireless Settings
The basic settings for wireless networking are set on this screen.
Wireless Network Mode. From this drop-down menu, you can select the wireless standards running on your
network. If you have both 802.11g and 802.11b devices in your network, keep the default setting, Mixed. If you
have only 802.11g devices, select G-Only. If you have only 802.11b devices, select B-Only. If you do not have any
802.11g and 802.11b devices in your network, select Disable.
Wireless Network Name (SSID). The SSID is the network name shared among all devices in a wireless network.
The SSID must be identical for all devices in the wireless network. It is case-sensitive and must not exceed 32
characters (use any of the characters on the keyboard). Make sure this setting is the same for all devices in your
wireless network. For added security, you should change the default SSID (linksys) to a unique name.
Wireless Channel. Select the appropriate channel from the list provided to correspond with your network
settings. All devices in your wireless network must be broadcast on the same channel in order to function
correctly.
Wireless SSID Broadcast. When wireless clients survey the local area for wireless networks to associate with,
they will detect the SSID broadcast by the Router. To broadcast the Router's SSID, keep the default setting,
Enable. If you do not want to broadcast the Router's SSID, then select Disable.
Change these settings as described here and click the Save Settings button to apply your changes or Cancel
Changes to cancel your changes.
Figure 5-18: Wireless Tab - Basic Wireless Settings

22
Chapter 5: Configuring the Wireless-G Broadband Router
The Wireless Tab - Wireless Security
Wireless-G Broadband Router
The Wireless Tab - Wireless Security
The Wireless Security settings configure the security of your wireless network. There are four wireless security
mode options supported by the Router: WPA Personal, WPA Enterprise, WPA2 Personal, WPA2 Enterprise,
RADIUS, and WEP. (WEP stands for Wired Equivalent Privacy, WPA stands for Wi-Fi Protected Access, which is a
security standard stronger than WEP encryption. WPA2 is stronger than WPA. WPA Enterprise is WPA used in
coordination with a RADIUS server. RADIUS stands for Remote Authentication Dial-In User Service.) These are
briefly discussed here. For detailed instructions on configuring wireless security for the Router, turn to “Appendix
B: Wireless Security.”
WPA Personal. WPA gives you two encryption methods, TKIP and AES, with dynamic encryption keys. Select the
type of algorithm, TKIP or AES. Enter a WPA Shared Key of 8-63 characters. Then enter a Group Key Renewal
period, which instructs the Router how often it should change the encryption keys.
WPA Enterprise. This option features WPA used in coordination with a RADIUS server. (This should only be used
when a RADIUS server is connected to the Router.) First, select the type of WPA algorithm you want to use, TKIP
or AES. Enter the RADIUS server’s IP Address and port number, along with a key shared between the Router and
the server. Last, enter a Key Renewal Timeout, which instructs the Router how often it should change the
encryption keys.
Figure 5-20: Wireless Tab - Wireless Security
(WPA Enterprise)
Figure 5-19: Wireless Tab - Wireless Security
(WPA Personal)
IMPORTANT: If you are using WPA, always remember
that each device in your wireless network MUST use
the same WPA method and shared key, or else the
network will not function properly.
Transcripción de documentos
® A Division of Cisco Systems, Inc. Package Contents* • Wireless-G Broadband Router • Setup CD-ROM (with Symantec Internet Security) • User Guide on CD-ROM (English Only) • Power Adapter • Ethernet Network Cable • Quick Installation Guide *other items may be included 2,4GHz Wireless-G 802.11g Broadband Router Wireless Model No. WRK54G (EU/LA/UK) Quick Installation Guide 1 1 A B C Connect the Broadband Router Before you begin, make sure that you have the setup information for your specific type of Internet connection. The installation technician from your ISP should have left this information with you after installing your broadband connection. If not, you can call your ISP to request the settings. Make sure that all of your network’s hardware is powered off, including the Router, PCs, and cable or DSL modem. Connect one end of an Ethernet network cable to one of the ports (labeled 1-4) on the back of the Router, and the other end to an Ethernet port on a PC. C D 2 Repeat step C to connect additional PCs or other network devices to the Router. E F G H I J Connect a different Ethernet network cable from your cable or DSL modem to the Internet port on the Router’s back panel. This is the only port that will work for your modem connection. Power on the cable or DSL modem. Connect the AC power adapter to the Router’s Power port and the other end into an electrical outlet. E Make sure the Power and Internet LEDs on the front panel light up green. The Power LED will flash green for a few seconds when the Router goes through its selfdiagnostic test. This LED will stay solidly lit when the self-test is complete. If it does not stop flashing, refer to “Appendix A: Troubleshooting” in the Router’s User Guide on the Setup CDROM. G IMPORTANT: Make sure you use the power adapter that is supplied with the Router. Use of a different power adapter could damage the Router. Power on the PC you wish to use to configure the Router. Proceed to Step 2. 3 2 Configure the Broadband Router These instructions will show you how to configure the Router. You only need to configure it once. NOTE: Make sure your PC’s Ethernet adapter is set to obtain an IP address automatically. For more information, refer to Windows Help. A B C D 4 Open your web browser. Enter http://192.168.1.1 in its Address field. Press the Enter key. A password request screen will appear. Leave the User Name field empty, and enter the default password, admin, in lowercase letters in the Password field. (You should later set a new password, using the Administration tab’s Management screen of the Web-based Utility). Then, click the OK button. The Web-based Utility will appear with the Setup tab selected. If requested by your ISP (usually cable ISPs), complete the Host Name and Domain Name fields. Otherwise, leave them blank. For the Internet Connection Type setting, six connection types are offered through the drop-down menu. Each Setup screen and available features will differ depending on which connection type you select. A B C Internet Configuration Type DHCP: If you are connecting through DHCP or a dynamic IP address from your ISP, keep the default setting Obtain an IP automatically. Static IP: If your ISP assigns you a static IP address, select Static IP from the drop-down menu. Complete the Internet IP Address, Subnet Mask, Gateway, and Static DNS fields. You need to enter at least one DNS address. PPPoE: If you are connecting through PPPoE, select PPPoE from the drop-down menu. Complete the User Name and Password fields. Select Keep Alive if you always want to be connected to your ISP, or select Connect on Demand if you are charged for the time that you are connected to your ISP. DHCP Static IP PPPoE L2TP: L2TP is a service used in Israel only. If you are using an L2TP connection, check with your ISP for setup information. PPTP: PPTP is a service used in Europe only. If you are using a PPTP connection, select PPTP from the drop-down menu. Complete the IP Address, Subnet Mask, Default Gateway, User Name ,and Password fields. Select Keep Alive if you always L2TP PPTP 5 want to be connected to your ISP, or select Connect on Demand if you are charged for the time that you are connected to your ISP. Telstra: Telstra (HeartBeat Signal) is a service used in Australia only. If you are using a HeartBeat Signal connection, check with your ISP for setup information. E F G H 6 Telstra When you have finished entering your Internet connection settings, click the Save Settings button to save your changes. To configure the Router for your wireless network, select the Wireless Tab’s Basic Wireless Settings screen. Wireless Network Mode. Select the mode you are using from the drop-down menu: If you are using only 802.11g, select G-Only; if you’re using 802.11b only, select B-Only; if you’re using both 802.11b and 802.11g, keep Mixed setting. Wireless Network Name (SSID). The SSID is the network name shared among all devices in a wireless network. The SSID must be identical for all devices in the wireless network. It is casesensitive and must not exceed 32 characters (use any keyboard character). For F added security, you should change the default SSID linksys to a unique name. I Wireless Channel. Select the appropriate channel from the list provided to correspond with your network settings. All devices in your wireless network must broadcast on the same channel in order to function correctly. J Wireless SSID Broadcast. When wireless clients survey the local area for wireless networks to associate with, they will detect the SSID broadcast by the Router. To broadcast the Router's SSID, keep the default setting, Enable. If you do not want to broadcast the Router's SSID, then select Disable. K IMPORTANT: Once the Router is configured, wireless security, either WEP or WPA, should be configured to prevent security breaches in your network. Change these settings as described here and click the Save Settings button to apply your changes. L Power your modem off and back on again. M N Restart your computer. Test the setup by opening your web browser and entering http://www.linksys.com/ registration. N NOTE: For more advanced settings and security options, refer to the User Guide on the Router’s CD-ROM. The installation of the Wireless-G Broadband Router is complete. 7 3 Configuring Wireless Security The Router comes equipped with four types of wireless security: WEP, WPA Pre-Shared, WPA Enterprise, and RADIUS. These security methods are not enabled right out of the box, however. To configure wireless security on the Router, do the following: A B Open the Router’s Web Utility as shown in Step 2, and click the Wireless tab. The Basic Wireless Settings screen will appear. Select Wireless Security to configure wireless security on the Router. Directions for the configuration of WEP and WPA Pre-Shared wireless security are provided here. C NOTE: If your wireless adapters support Secure Easy Setup (SES), you can use the SES button on the Router to set up wireless security. Basic Wireless Settings NOTE: Please refer to the User Guide if you wish to configure WPA Enterpise or RADIUS wireless security options. From the Security Mode pulldown menu, select the type of wireless security you’ll use on your network. WEP: WEP is a basic encryption method, which is not as secure as WPA. To use WEP, select a Default Transmit Key (choose which Key to use), and a level of WEP encryption, 64 bits 10 hex digits or 128 bits 26 hex digits. Then either generate a WEP key using the Passphrase or enter the WEP key manually. WEP Security Settings WPA Pre-Shared: WPA gives you two encryption methods, TKIP and AES, with dynamic encryption keys. Select the type of algorithm, TKIP or AES. Enter a WPA Shared Key of 8-63 characters. Then enter a Group Key Renewal period, which instructs the Router how often it should change the encryption keys. D WPA Pre-Shared Security Settings Click the Save Settings button. Congratulations! Wireless Security is now configured on the Router. For additional information or troubleshooting help, refer to the User Guide on the CD-ROM or the Technical Support Insert. You can also e-mail for further support. Website http://www.linksys.com/international Product Registration http://www.linksys.com/registration Linksys is a registered trademark or trademark of Cisco Systems, Inc. and/or its affiliates in the U.S. and certain other countries. Copyright © 2005 Cisco Systems, Inc. All rights reserved. WRK54G-EU-LA-UK_V2-QIG-51114 TE ® A Division of Cisco Systems, Inc. Pakkens indhold* • Trådløs-G Bredbånds-router • Installations-cd-rom (med Symantec Internet Security) • Brugervejledning på cd-rom (kun på engelsk) • Strømforsyning • Ethernet-kabel • Installationsvejledning *andre dele kan være vedlagt 2,4GHz Trådløs-G 802.11g Wireless Modelnr. Bredbånds-router WRK54G (DK) Installationsvejledning 1 1 A B C D 2 Tilslutning af bredbånds-routeren Før du begynder, skal du have konfigurationsoplysningerne til din internetforbindelsestype. Du har sandsynligvis fået oplysningerne af din internetudbyder i forbindelse med installationen af din bredbåndsforbindelse. Hvis det ikke er tilfældet, kan du henvende dig til din internetudbyder for at få indstillingerne. Sørg for, at al netværkshardware er slukket, herunder router, pc'er og kabel- eller DSL-modem. Tilslut den ene ende af et Ethernet-kabel til en af portene (mærket 1-4) bag på routeren og den anden ende til en Ethernetport på en pc. Gentag trin C for at tilslutte yderligere pc'er eller andre netværksenheder til routeren. C E F G H I J Tilslut et andet Ethernet-kabel fra kabel- eller DSL-modemmet til internetporten på routerens bagpanel. Dette er den eneste port, der kan bruges til din modemforbindelse. Tænd kabel- eller DSL-modemmet. Tilslut vekselstrømsforsyningen til routerens strømstik og en stikkontakt. E Kontroller, at lysdioderne Power og Internet på frontpanelet lyser grønt. Lysdioden Power blinker grønt i nogle få sekunder, mens routeren udfører sin selvdiagnosticeringstest. Lysdioden lyser vedvarende, når selvtesten er udført. Hvis lysdioden ikke holder op med at blinke, skal du se "Appendix A: Troubleshooting" (Fejlfinding) i brugervejledningen til routeren på installations-cd-rom'en. Tænd den pc, du vil bruge til konfiguration af routeren. G VIGTIGT: Brug den strømforsyning, der følger med routeren. Brug af en anden strømforsyning kan beskadige routeren. Fortsæt til trin 2. 3 2 Konfiguration af bredbånds-routeren Følg nedenstående vejledning for at konfigurere routeren. Du skal kun konfigurere den én gang. BEMÆRK: Sørg for, at pc'ens Ethernetadapter er indstillet, så den automatisk henter en IP-adresse. Se hjælpen til Windows for at få yderligere oplysninger. A B C D 4 Åbn webbrowseren. Indtast http://192.168.1.1 i feltet Address (Adresse). Tryk på Enter. Der vises et skærmbillede til indtastning af en adgangskode. Lad feltet User Name (Brugernavn) stå tomt, og indtast standardadgangskoden admin med små bogstaver i feltet Password (Adgangskode). (Du bør senere angive en ny adgangskode i skærmbilledet Management (Styring) under fanen Administration i det webbaserede hjælpeprogram). Klik på knappen OK. A B Det webbaserede hjælpeprogram vises med fanen Setup (Konfiguration) valgt. Hvis din internetudbyder kræver det (normalt kabel-internetudbydere), skal du udfylde felterne Host Name (Værtsnavn) og Domain Name (Domænenavn). I modsat fald, skal du ikke udfylde dem. Du har mulighed for at vælge mellem seks internetforbindelsestyper i rullemenuen. Konfigurationsskærmbillederne og de tilgængelige funktioner varierer, afhængigt af hvilken forbindelsestype du vælger. C Internetkonfigurationstype DHCP: Hvis du opretter forbindelse via DHCP eller en dynamisk IP-adresse fra din internetudbyder, skal du beholde standardindstillingen Obtain an IP automatically (Hent automatisk en IP-adresse). Static IP (Statisk IP):Hvis din internetudbyder tildeler dig en statisk IP-adresse, skal du vælge Static IP i rullemenuen. Udfyld felterne Internet IP Address (Internet-IP-adresse), Subnet Mask (Undernetmaske), Gateway og Static DNS (Statisk DNS). Du skal indtaste mindst én DNS-adresse. PPPoE: Hvis du opretter forbindelse via PPPoE, skal du vælge PPPoE i rullemenuen. Udfyld felterne User Name (Brugernavn) og Password (Adgangskode). Vælg Keep Alive (Permanent) hvis du altid vil have forbindelse til din internetudbyder, eller vælg Connect on Demand (Opret forbindelse efter behov), hvis du betaler for den tid, du har oprettet forbindelse til din internetudbyder. DHCP Static IP (Statisk IP) PPPoE L2TP: L2TP er en tjeneste, der kun bruges i Israel. Hvis du bruger en L2TP-forbindelse, skal du henvende dig til din internetudbyder for at få konfigurationsoplysninger. PPTP: PPTP er en tjeneste, der kun bruges i Europa. Hvis du bruger en PPTP-forbindelse, skal du vælge PPTP i rullemenuen. Udfyld felterne IP Address (IP-adresse), Subnet Mask (Undernetmaske), Default Gateway (Standardgateway), User Name (Brugernavn) og Password L2TP PPTP 5 (Adgangskode). Vælg Keep Alive (Permanent) hvis du altid vil have forbindelse til din internetudbyder, eller vælg Connect on Demand (Opret forbindelse efter behov), hvis du betaler for den tid, du har oprettet forbindelse til din internetudbyder. Telstra (HeartBeat-signal): Telstra (HeartBeat Signal) er en tjeneste, der kun bruges i Australien. Hvis du bruger en HeartBeat Signal-forbindelse, skal du henvende dig til din internetudbyder for at få konfigurationsoplysninger. E F G H 6 Telstra (Heart Beat-signal) Når du er færdig med at indtaste indstillinger for din internetforbindelse, skal du klikke på knappen Save Settings (Gem indstillinger) for at gemme ændringerne. Vælg skærmbilledet Basic Wireless Settings (Basisindstillinger for trådløs) under fanen Wireless (Trådløs) for at konfigurere routeren til dit trådløse netværk. Tilstand for det trådløse netværk. Vælg den tilstand, du bruger, i rullemenuen: Hvis du kun bruger 802.11g, skal du vælge G-Only (Kun G). Hvis du kun bruger 802.11b, skal du vælge B-Only (Kun B). Hvis du bruger både 802.11b og 802.11g, skal du beholde indstillingen Mixed (Blandet). Wireless Network Name (Navn på trådløst netværk) (SSID). SSID er det netværksnavn, der deles af alle enhederne i et trådløs netværk. SSID skal være identisk for alle enheder i det trådløse netværk. Der er forskel på store og F små bogstaver i navnet, og det må ikke være længere end 32 tegn (alle tegn på tastaturet må bruges). Af sikkerhedsmæssige årsager bør du ændre standardSSID'et linksys til et entydigt navn. I J K L M N Wireless Channel (Trådløs kanal). Vælg den relevante kanal på den viste liste, så den passer til dine netværksindstillinger. Alle enheder i dit trådløse netværk skal sende på den samme kanal for at fungere korrekt. Wireless SSID Broadcast (Trådløs SSID-broadcast). Når trådløse klienter overvåger lokalområdet for at finde trådløse netværk, de kan oprette forbindelse til, registrerer de det SSID, der udsendes af routeren. Behold standardindstillingen Enable (Aktiver) for at udsende routerens SSID. Vælg Disable (Deaktiver), hvis du ikke vil udsende routerens SSID. VIGTIGT: Så snart routeren er konfigureret, bør den trådløse sikkerhed (enten WEP eller WPA) konfigureres for at undgå, at der opstår åbninger i dit netværk. Rediger disse indstillinger, som beskrevet her, og klik på knappen Save Settings (Gem indstillinger) for at anvende indstillingerne. Sluk og tænd modemmet. Genstart computeren. Test konfigurationen ved at åbne webbrowseren og indtaste http://www.linksys.com/registration. Installationen af Trådløs-G Bredbåndsrouteren er færdig. N BEMÆRK: Se oplysninger om mere avancerede indstillinger og sikkerhedsindstillinger i brugervejledningen på cd-rom'en til routeren. 7 3 Konfiguration af trådløs sikkerhed Routeren leveres med fire typer trådløs sikkerhed: WEP, WPA Pre-Shared, WPA Enterprise og Radius. Disse sikkerhedsmetoder aktiveres dog ikke, hvis du ikke foretager dig noget. Hvis du vil konfigurere trådløs sikkerhed på routeren, skal du gøre følgende: A B Åbn routerens webhjælpeprogram som vist under trin 2, og klik på fanen Wireless (Trådløs). Skærmbilledet Basic Wireless Settings (Basisindstillinger for trådløs) vises. Vælg Wireless Security (Trådløs sikkerhed) for at konfigurere trådløs sikkerhed på routeren. Her angives retningslinjer for konfiguration af trådløs WEPog WPA Pre-Shared-sikkerhed. C I rullemenuen Security Mode (Sikkerhedstilstand) skal du vælge den type trådløs sikkerhed, du vil anvende på dit netværk. WEP: WEP er en grundlæggende krypteringsmetode, der ikke er så sikker som WPA. For at anvende WEP skal du vælge en Default Transmit Key (Transmissionsnøgle) (vælg, hvilken nøgle, du vil anvende) og et WEP-krypteringsniveau: 64 bit 10 tegn i hex eller 128 bit 26 tegn i hex. Derefter skal du enten generere en WEP-nøgle ved hjælp af dit adgangsord, eller angive WEP-nøglen manuelt. BEMÆRK: Hvis dine trådløse netværkskort understøtter Secure Easy Setup (SES) (Sikker Nem Konfiguration), kan du bruge SES-knappen på routeren til at konfigurere Trådløs sikkerhed. Basic Wireless Settings (Basisindstillinger for trådløs) BEMÆRK: Hvis du ønsker at konfigurere de trådløse sikkerhedsmuligheder Radius eller WPA Enterprise, skal du se i brugervejledningen. WEP Security Settings (WEP-sikkerhedsindstillinger) WPA Pre-Shared: Med WPA har du to krypteringsmetoder med dynamiske krypteringsnøgler: TKIP og AES. Vælg algoritmetypen TKIP eller AES. Indtast en WPA Shared Key på 8-63 tegn. Indtast derefter en udskiftningsperiode for gruppenøglerne, som angiver over for routeren, hvor ofte den bør ændre krypteringsnøglerne. D WPA Pre-Shared Security Settings (Sikkerhedsindstillinger) Klik på knappen Save Settings (Gem indstillinger). Tillykke! Wireless Security (Trådløs sikkerhed) er nu konfigureret på routeren. Yderligere oplysninger eller hjælp til fejlfinding finder du i brugervejledningen på cd-rom'en eller på arket med teknisk support. Du kan også sende en e-mail for at få yderligere support. Websted http://www.linksys.com/international Produktregistrering http://www.linksys.com/registration Linksys er et registreret varemærke tilhørende Cisco Systems, Inc. og/eller Cisco Systems associerede selskaber i USA og visse andre lande. Copyright © 2005 Cisco Systems, Inc. Alle rettigheder forbeholdes. WRK54G-DK_V2-QIG-51114 TE ® A Division of Cisco Systems, Inc. Contenu de l'emballage* • Routeur haut débit sans fil G • CD-ROM d'installation (avec Symantec Internet Security) • Guide de l'utilisateur sur CD-ROM (en anglais uniquement) • Adaptateur électrique • Câble réseau Ethernet • Guide d'installation rapide *d'autres éléments peuvent être inclus 2,4GHz Sans fil G 802.11g Routeur haut débit Sans fil Guide d'installation rapide Modèle réf. WRK54G (FR) 1 1 A B C Branchement du routeur haut débit Avant de commencer, vérifiez que vous disposez des paramètres de configuration propres à votre type de connexion Internet. Le technicien de votre fournisseur d'accès Internet doit vous avoir communiqué ces données après avoir installé votre connexion haut débit. Dans le cas contraire, appelez votre fournisseur d'accès Internet pour les lui demander. Vérifiez que tous les périphériques de votre réseau sont hors tension, y compris le routeur, les ordinateurs et le modem câble ou DSL. Reliez une extrémité d'un câble réseau Ethernet à l'un des ports (numérotés de 1 à 4) situés sur le panneau arrière du routeur et l'autre extrémité au port Ethernet d'un ordinateur. C 2 D E F G H I J Recommencez l'étape C pour relier des ordinateurs supplémentaires ou d'autres périphériques réseau au routeur. Reliez votre modem câble ou DSL au port Internet situé sur le panneau arrière du routeur au moyen d'un autre câble réseau Ethernet. Il s'agit du seul port compatible avec votre connexion modem. Mettez le modem câble ou DSL sous tension. E Branchez l'adaptateur secteur au port d'alimentation du routeur et branchez l'autre extrémité à une prise d'alimentation. Les voyants d'alimentation (Power) et Internet situés sur le panneau avant s'illuminent en vert. Le voyant d'alimentation clignote en vert pendant quelques secondes lorsque le test d'autodiagnostic du routeur est en cours. Le voyant reste allumé lorsque le test d'autodiagnostic est terminé. S'il ne s'arrête pas de clignoter, reportez-vous à la section « Annexe A : Dépannage » du Guide de l'utilisateur du routeur figurant sur le CD-ROM d'installation. G IMPORTANT : Veillez à utiliser l'adaptateur secteur fourni avec le routeur. Le branchement d'un autre adaptateur pourrait endommager le routeur. Allumez l'ordinateur que vous voulez utiliser pour configurer le routeur. Passez à l'étape 2. 3 2 Configuration du routeur haut débit Ces instructions vous expliquent comment configurer le routeur. Il vous suffit de le configurer une seule fois. REMARQUE : Assurez-vous que l'adaptateur Ethernet de votre ordinateur est configuré pour obtenir automatiquement une adresse IP. Pour obtenir de plus amples informations, reportez-vous à la rubrique d'aide de Windows. A B C D 4 Ouvrez votre navigateur Web. Entrez http://192.168.1.1 dans le champ Adresse. Appuyez sur la touche Entrée. A Un écran vous invite à entrer un mot de passe. Ne renseignez pas le champ Nom d'utilisateur et saisissez le mot de passe par défaut, admin, en minuscules dans le champ Mot de passe. Vous devrez ultérieurement définir un nouveau mot de passe à l'aide de l'écran Management (Gestion) de l'onglet Administration de l'utilitaire Web. Puis cliquez sur le bouton OK. L'utilitaire Web apparaît et son onglet Setup (Configuration) est sélectionné. Si ces informations sont requises par votre fournisseur d'accès Internet (généralement il s'agit des fournisseurs d'accès via le câble), renseignez les champs Host Name (Nom de l'hôte) et Domain Name (Nom de domaine). Dans le cas contraire, laissez ces champs vides. Six types de connexion sont proposés dans un menu déroulant pour définir le paramètre Internet Connection Type (Type de connexion Internet). Les écrans d'installation et les options disponibles varient selon le type de connexion sélectionné. B C Type de configuration Internet DHCP : si vous vous connectez à votre fournisseur d'accès Internet au moyen d'une adresse DHCP ou IP dynamique, ne modifiez pas la configuration par défaut Obtain an IP automatically (Obtenir automatiquement un fournisseur d'accès Internet). Static IP : si votre fournisseur d'accès Internet vous attribue une adresse IP statique, sélectionnez Static IP (IP statique) dans le menu déroulant. Renseignez les champs Internet IP Address (Adresse IP Internet), Subnet Mask (Masque de sous-réseau), Gateway (Passerelle) et Static DNS (DNS statique). Vous devez entrer au moins une adresse DNS. PPPoE : si vous vous connectez via le protocole PPPoE, sélectionnez PPPoE dans le menu déroulant. Renseignez les champs User Name (Nom d'utilisateur) et Password (Mot de passe). Sélectionnez Keep Alive (Activé) si vous souhaitez rester connecté à votre fournisseur d'accès Internet ou Connect on Demand (Connexion à la demande) si l'on vous facture le temps de connexion à votre fournisseur d'accès Internet. DHCP Adresse IP statique PPPoE L2TP: L2TP est un service utilisé en Israël uniquement. Si vous utilisez une connexion L2TP, demandez les paramètres de configuration à votre FAI. PPTP : PPTP est un service utilisé en Europe uniquement. Si vous utilisez une connexion PPTP, sélectionnez PPTP dans le menu déroulant. Renseignez les champs IP Address (Adresse IP), Subnet Mask (Masque de sous-réseau), Default Gateway (Passerelle par défaut), User L2TP Protocole PPTP 5 Name (Nom de l'utilisateur) et Password (Mot de passe). Choisissez l'option Keep Alive (Activé) si vous souhaitez toujours être connecté à votre fournisseur d'accès Internet (FAI) ou sélectionnez Connect on Demand (Connexion à la demande) si vous êtes facturé pour le temps connecté à votre FAI. Telstra (HeartBeat Signal) : Telstra est un service utilisé en Australie uniquement. Si vous utilisez une connexion HeartBeat Signal, consultez votre fournisseur d'accès Internet pour obtenir des informations sur la configuration. E F G H 6 Telstra Lorsque vous avez terminé de renseigner vos paramètres de connexion Internet, cliquez sur le bouton Save Settings (Enregistrer les paramètres) pour enregistrer vos modifications. Pour configurer le routeur et l'utiliser avec votre réseau sans fil, sélectionnez l'écran Basic Wireless Settings (Paramètres sans fil de base) de l'onglet Wireless (Sans fil). Wireless Network Mode (Mode réseau sans fil). Sélectionnez le mode que vous souhaitez utiliser dans le menu déroulant : si vous utilisez uniquement des périphériques 802.11g, sélectionnez G-Only (G uniquement) ; si vous utilisez uniquement des périphériques 802.11b, sélectionnez B-Only (B uniquement) ; si vous utilisez les périphériques 802.11b et 802.11g, conservez le paramètre Mixed (Mixte). Wireless Network Name (Nom du réseau sans fil ou SSID). Il s'agit du nom de réseau que partagent tous les périphériques interconnectés à un réseau sans fil. Il doit être identique pour tous les périphériques du réseau sans fil. Ce paramètre est sensible à la F casse et ne doit pas comprendre plus de 32 caractères (tous les caractères du clavier peuvent être utilisés). Pour optimiser la sécurité, vous devez remplacer le paramètre SSID par défaut (linksys) par un nom unique. I Wireless Channel (Canal sans fil). Sélectionnez le canal approprié dans la liste fournie en fonction de vos paramètres réseau. Tous les périphériques de votre réseau sans fil doivent communiquer sur le même canal pour fonctionner correctement. J Wireless SSID Broadcast (Diffusion SSID sans fil). Lorsque des ordinateurs clients sans fil recherchent sur le réseau local des réseaux sans fil auxquels s'associer, ils détectent le SSID diffusé par le routeur. Pour diffuser le SSID du routeur, conservez le paramètre par défaut Enable (Activer). Si vous ne souhaitez pas diffuser le SSID du routeur, sélectionnez Disable (Désactiver). K L Modifiez ces paramètres comme décrit ici et cliquez sur le bouton Save Settings (Enregistrer les paramètres) pour appliquer vos changements. Mettez votre modem hors tension, puis de nouveau sous tension. M N Redémarrez votre ordinateur. Testez la configuration en ouvrant le navigateur Web et en saisissant http://www.linksys.com/registration. L'installation du routeur haut débit sans fil G est terminée. REMARQUE : Pour obtenir plus d'informations sur les paramètres avancés et sur les options de sécurité, reportez-vous au Guide de l'utilisateur figurant sur le CD-ROM d'installation du routeur. IMPORTANT : Une fois que le routeur est configuré, il est nécessaire de configurer la sécurité sans fil, WEP ou WPA, afin d'éviter les failles de sécurité sur votre réseau. N 3 Configuration de la sécurité sans fil Le routeur comprend quatre types de sécurité sans fil : WEP, WPA PreShared Key, WPA Enterprise et Radius. Ces méthodes de sécurité ne sont cependant pas activées. Pour configurer la sécurité sans fil du routeur, procédez comme suit : A B Ouvrez l'utilitaire Web du routeur comme indiqué à l'étape 2 et cliquez sur l'onglet Wireless (Sans fil). L'écran Basic Wireless Settings (Paramètres sans fil de base) apparaît. Sélectionnez l'option Wireless Security (Sécurité sans fil) pour configurer la sécurité sans fil du routeur. Cette section comporte des instructions de configuration de la sécurité sans fil WEP et WPA PreShared Key (clé WPA prépartagée). C Sélectionnez le type de sécurité sans fil que vous souhaitez utiliser pour votre réseau dans le menu déroulant Security Mode (Mode de sécurité). WEP : le système WEP est une méthode de cryptage élémentaire qui n'est pas aussi sûre que le système WPA. Pour utiliser ce système, sélectionnez une clé de transmission par défaut en regard de l'option appropriée Default Transmit Key (Clé de transmission par défaut), puis un niveau de cryptage WEP : 64 bits 10 hex digits (64 bits et 10 chiffres hexadécimaux) ou 128 bits 26 hex digits (128 bits et 26 chiffres hexadécimaux). Générez ensuite une clé WEP à partir d'une phrase de passe ou entrez-la manuellement. Basic Wireless Settings (Paramètres sans fil de base) REMARQUE : Reportez-vous au guide de l'utilisateur si vous souhaitez configurer les options de sécurité sans fil WPA Enterprise ou Radius. Paramètres de sécurité WEP 9 WPA Pre-Shared key (clé WPA prépartagée) : le système WPA vous propose deux méthodes de cryptage, TKIP et AES, associées à des clés de cryptage dynamiques. Sélectionnez le type d'algorithme : TKIP ou AES. Entrez une clé WPA pré-partagée composée de 8 à 63 caractères. Précisez ensuite un délai de renouvellement des clés dans la zone Group Key Renewal (Renouvellement des clés du groupe) pour indiquer au routeur à quelle fréquence il doit changer les clés de cryptage. D Paramètres de sécurité WPA PreShared Key (Clé WPA pré-partagée) Cliquez sur le bouton Save Settings (Enregistrer les paramètres). Félicitations ! La sécurité sans fil du routeur est configurée. Pour obtenir de plus amples informations ou bénéficier d'une assistance technique, reportez-vous au guide de l'utilisateur du CD-ROM ou à la fiche d'assistance technique. Pour obtenir davantage d'aide, vous pouvez également envoyer un e-mail. Site Web http://www.linksys.com/international Enregistrement du produit http://www.linksys.com/registration Linksys est une marque déposée ou une marque commerciale de Cisco Systems, Inc. et/ou ses filiales aux Etats-Unis et dans certains autres pays. Copyright © 2005 Cisco Systems, Inc. Tous droits réservés. 10 WRT54G-FR_V2-QIG-51114 TE ® A Division of Cisco Systems, Inc. Lieferumfang* • Wireless-G Broadband-Router • Eine Installations-CD-ROM mit Symantec Internet Security. • Benutzerhandbüch auf CD-ROM (nur auf Englisch verfügbar) • Netzteil • Ethernet-Netzwerkkabel • Kurzanleitung * Der Lieferumhang kann u. U. variieren. 2,4GHz Wireless-G 802.11g Wireless Modell-Nr. Broadband Router WRK54G (DE) Kurzanleitung 1 1 A B C D 2 Verbinden des Broadband Routers Stellen Sie zunächst sicher, dass Sie die Setup-Informationen für Ihre Internetverbindung zur Hand haben. Diese Informationen sollten Sie von Ihrem Internet-Dienstanbieter (ISP) bei der Installation Ihrer BreitbandVerbindung erhalten haben. Wenn diese Einstellungsdaten nicht zur Verfügung stehen, fordern Sie sie von Ihrem ISP an. Vergewissern Sie sich, dass alle Netzwerkgeräte ausgeschaltet sind (einschließlich Router, PCs und Kabel- bzw. DSL-Modem). Schließen Sie ein Ende des Ethernet-Netzwerkkabels an einen der Ports (mit 1-4 beschriftet) auf der Rückseite des Routers und das andere Ende am Ethernet-Port des PCs an. C Wiederholen Sie Schritt C, um weitere PCs oder andere Netzwerkgeräte an den Router anzuschließen. E F G H I J Verbinden Sie Ihr Kabel- oder DSLModem mit einem anderen Ethernet-Netzwerkkabel über einen anderen Internet-Port auf der Rückseite des Routers. Dies ist der einzige Port, der für eine Modemverbindung verwendet werden kann. Schalten Sie das Kabel- oder DSL-Modem ein. Schließen Sie den Netzteil an den Stromanschluss des Routers an, und stecken Sie das andere Ende in eine Netzsteckdose. E Vergewissern Sie sich, dass die LEDs für Netzstrom und Internet auf der Vorderseite grün leuchten. Während der Router seine Selbstdiagnose durchführt, blinkt die LED Power (Netzstrom) einige Sekunden lang grün. Diese LED leuchtet konstant, wenn die Selbstdiagnose abgeschlossen ist. Wenn sie nicht aufhört zu blinken, schlagen Sie im Benutzerhandbuch der Routers auf der Installations-CDROM unter „Appendix A: Troubleshooting“ (Anhang A: Fehlerbehebung) nach. Schalten Sie dann den Computer ein, mit dem Sie den Router konfigurieren möchten. G WICHTIG: Verwenden Sie nur den Netzteil, der im Lieferumfang des Routers enthalten ist. Bei Verwendung eines anderen Netzteils könnte der Router beschädigt werden. Fahren Sie mit Schritt 2 fort. 3 2 Konfigurieren des Broadband-Router In diesen Anweisungen wird erklärt, wie Sie den Router konfigurieren. Sie müssen den Router nur einmal konfigurieren. HINWEIS: Stellen Sie sicher, dass der Ethernet-Adapter Ihres PCs so eingestellt ist, dass er automatisch eine IP-Adresse bezieht. Weitere Informationen hierzu finden Sie in der Windows-Hilfe. A B C D 4 Öffnen Sie Ihren Web-Browser. Geben Sie http://192.168.1.1 in das Feld Adresse ein. Drücken Sie die Eingabetaste. Es wird das Fenster zur Eingabe des Kennworts angezeigt. Lassen Sie das Feld Benutzername leer, und geben Sie dann das Standardkennwort admin in Kleinschreibung in das Feld Kennwort ein. (Ändern Sie später im webbasierten Dienstprogramm auf der Registerkarte Administration (Verwaltung) im Fenster Management (Verwaltungsfunktionen) das Kennwort.) Klicken Sie anschließend auf die Schaltfläche OK. Das webbasierte RouterDienstprogramm wird mit ausgewählter Registerkarte Setup (Einrichtung) angezeigt. Sofern diese Angaben von Ihrem ISP (in der Regel Kabel-ISPs) angefordert werden, geben Sie die relevanten Informationen in die Felder Host Name (Hostname) und Domain Name (Domänenname) ein. Andernfalls lassen Sie diese Felder leer. Im Dropdown-Menü stehen zur Einstellung des InternetVerbindungstyps sechs Verbindungstypen zur Verfügung. Die Setup-Fenster und verfügbaren Funktionen unterscheiden sich je nach ausgewähltem Verbindungstyp. A B C Internet-Konfigurationstyp DHCP: Wenn Sie eine Verbindung über DHCP bzw. über eine dynamische IPAdresse Ihres ISPs herstellen, behalten Sie die Standardeinstellung Obtain an IP automatically (IP-Adresse automatisch beziehen) bei. Statische IP-Adresse: Wenn Ihnen Ihr ISP eine statische IP-Adresse zuweist, wählen Sie aus dem Dropdown-Menü Static IP (Statische IP-Adresse) aus. Füllen Sie die Felder Internet IP Address (Internet-IPAdresse), Subnet Mask (Subnetzmaske), Gateway, and Static DNS (Statischer DNS) aus. Sie müssen mindestens eine DNS-Adresse eingeben. PPPoE: Wenn Sie Verbindungen über PPPoE herstellen, wählen Sie im Dropdown-Menü die Option PPPoE aus. Füllen Sie die Felder User Name (Benutzername) und Password (Kennwort) aus. Wählen Sie für eine ständige Verbindung zu Ihrem ISP Keep Alive (Verbindung aufrecht halten), oder wählen Sie Connect on Demand (Bei Bedarf verbinden), falls die Verbindungszeit mit Ihrem ISP gebührenpflichtig ist. DHCP Statische IP-Adresse PPPoE L2TP: L2TP ist ein Dienst, der nur in Israel verwendet wird. Wenn Sie eine L2TPVerbindung verwenden, klären Sie die erforderlichen Setup-Infor-mationen mit Ihrem ISP ab. PPTP: PPTP ist ein Dienst, der nur in Europa verwendet wird. Wenn Sie eine PPTPVerbindung verwenden, wählen Sie aus dem Dropdown-Menü PPTP aus. Füllen Sie die folgenden Felder aus: IP Address, Subnet Mask, Default Gateway, User Name und Password (IPAdresse, Subnetzmaske, StandardGateway, Benutzername und Kennwort). Wählen Sie für eine ständige Verbindung L2TP PPTP 5 zu Ihrem ISP Keep Alive (Verbindung aufrecht halten), oder wählen Sie Connect on Demand (Bei Bedarf verbinden), falls die Verbindungszeit mit Ihrem ISP gebührenpflichtig ist. Telstra (HBS): Telstra (Heart Beat Signal) ist ein Dienst, der nur in Australien verwendet wird. Wenn Sie eine HBSVerbindung verwenden, klären Sie die erforderlichen Setup-Informationen mit Ihrem ISP ab. E F G H 6 Telstra Wenn Sie alle Einstellungen zur Internetverbindung vorgenommen haben, klicken Sie auf die Schaltfläche Save Settings (Einstellungen speichern), um die Änderungen zu speichern. Um den Router für Ihr drahtloses Netzwerk zu konfigurieren, wählen Sie auf der Registerkarte Wireless das Fenster Basic Wireless Settings (Grundlegende drahtlose Einstellungen) aus. Wireless Network Mode (WirelessNetzwerkmodus): Wählen Sie den derzeit verwendeten Modus aus dem Dropdown-Menü aus: Wenn Sie nur 802.11g-Geräte verwenden, wählen Sie den Modus G-Only (Nur G); wenn Sie nur 802.11b-Geräte verwenden, wählen Sie den Modus B-Only (Nur B); wenn Sie sowohl 802.11b-Geräte als auch 802.11gGeräte verwenden, behalten Sie die Einstellung Mixed (Gemischt) bei. Wireless Network Name (SSID) [WirelessNetzwerk-Name (SSID)]: Bei der SSID handelt es sich um den NetzwerkNamen, der von allen Geräten im drahtlosen Netzwerk verwendet wird. Die SSID muss für alle Geräte im Wireless-Netzwerk identisch sein. Für die F maximal 32 Zeichen lange SSID dürfen alle Zeichen der Tastatur verwendet werden. Es wird zwischen Groß- und Kleinschreibung unterschieden. Um die Sicherheit zu erhöhen, sollten Sie die Standard-SSID linksys in einen eindeutigen Namen ändern. I Wireless Channel (Wireless-Kanal): Wählen Sie aus der Liste den Ihren Netzwerkeinstellungen entsprechenden Kanal aus. Der einwandfreie Betrieb Ihres drahtlosen Netzwerks ist nur gewährleistet, wenn die Übertragung für alle Geräte über denselben Kanal erfolgt. J K L M N Wireless SSID Broadcast (WirelessSSID-Übertragung): Wenn WirelessClients im lokalen Netzwerk nach einer Verbindung zu WirelessNetzwerken suchen, erkennen sie die Übertragung der SSID über den Router. Zur Übertragung der SSID des Routers behalten Sie die Standardeinstellung Enable (Aktivieren) bei. Wenn Sie die SSID des Routers nicht übertragen möchten, wählen Sie Disable (Deaktivieren) aus. WICHTIG: Sobald der Router konfiguriert ist, muss die Wireless-Sicherheit (WEP oder WPA) konfiguriert werden, sodass keine Sicherheitslücken in Ihrem Netzwerk bestehen. Ändern Sie die Einstellungen wie hier beschrieben, und klicken Sie auf die Schaltfläche Save Settings (Einstellungen speichern), um Ihre Änderungen anzuwenden. Schalten Sie Ihr Modem aus und anschließend wieder ein. Starten Sie Ihren Computer neu. Überprüfen Sie die Installation, indem Sie den Web-Browser öffnen und Folgendes eingeben: http://www.linksys.com/registration. Die Installation des Wireless-G Broadband-Routers ist abgeschlossen. N HINWEIS: Informationen zu erweiterten Einstellungen und Sicherheitsoptionen finden Sie im Benutzerhandbuch auf der CD-ROM des Routers. 7 3 Konfigurieren von Wireless-Sicherheit Auf dem Router können vier WirelessSicherheitstypen eingerichtet werden: WEP, WPA Pre-Shared (WPA Vorläufiger gemeinsamer Schlüssel), WPA Enterprise und Radius. Diese Sicherheitseinstellungen sind jedoch nicht sofort nach Kauf des Geräts aktiviert. Wenn Sie die Wireless-Sicherheit auf dem Router konfigurieren möchten, führen Sie folgende Schritte aus: A B C HINWEIS: Wenn Ihre WirelessAdapter SES (Secure Easy Setup) unterstützen, können Sie die SESTaste auf dem Router verwenden, um Wireless-Sicherheit einzurichten. Öffnen Sie das webbasierte Dienstprogramm des Routers wie in Schritt 2 erklärt, und klicken Sie auf die Registerkarte Wireless. Das Fenster Basic Settings (Grundlegende Einstellungen) wird angezeigt. Wählen Sie Wireless Security (Wireless-Sicherheit), um die Sicherheit des Routers im WirelessNetzwerkbetrieb zu konfigurieren. Hier erhalten Sie Anweisungen zum Konfigurieren der WirelessSicherheitsoptionen WEP und WPA Pre-Shared (WPA Vorläufiger gemeinsamer Schlüssel). Wählen Sie aus dem Pulldown-Menü Security Mode (Sicherheitsmodus) den Wireless-Sicherheitstyp aus, den Sie in Ihrem Netzwerk verwenden. WEP: WEP ist eine einfache Verschlüsselungsmethode, die nicht so sicher wie WPA ist. Um WEP zu verwenden, wählen Sie einen Wert (bzw. den gewünschten Schlüssel) für Default Transmit Key (StandardÜbertragungsschlüssel) sowie die WEPVerschlüsselungsebene (64 bits 10 hex digits (64 Bit 10 Hexadezimalziffern) oder 128 bits 26 hex digits (128 Bit 26 Hexadezimalziffern)) aus. Erstellen Sie anschließend einen WEP-Schlüssel, indem Sie entweder die Passphrase verwenden oder den WEP-Schlüssel manuell eingeben. Basic Wireless Settings (Grundlegende Wireless-Einstellungen) HINWEIS: Lesen Sie im Benutzerhandbuch nach, wenn Sie die Wireless-Sicherheitsoptionen WPA Enterprise oder RADIUS konfigurieren möchten. WEP (Sicherheitseinstellungen) 9 WPA Pre-Shared (WPA Vorläufiger gemeinsamer Schlüssel): Bei WPA stehen Ihnen zwei Verschlüsselungsmethoden (TKIP und AES) mit dynamischen Verschlüsselungsschlüsseln zur Verfügung. Wählen Sie den Algorithmus aus: TKIP oder AES. Geben Sie im Feld WPA Shared Key (WPA/Gemeinsamer Schlüssel) einen gemeinsamen WPA-Schlüssel mit einer Länge von 8 bis 63 Zeichen ein. Legen Sie anschließend den Zeitraum für Group Key Renewal (Erneuerung Gruppenschlüssel) fest. Diese Zeitangabe teilt dem Router mit, wie oft die Verschlüsselungsschlüssel auszutauschen sind. D WPA Pre-Shared (WPA Vorläufiger gemeinsamer Schlüssel) Sicherheitseinstellungen Klicken Sie auf die Schaltfläche Save Settings (Einstellungen speichern). Herzlichen Glückwunsch! Wireless-Sicherheit ist nun auf dem Router konfiguriert. Weitere Informationen und Anleitungen zur Fehlerbehebung finden Sie im Benutzerhandbuch auf der CD-ROM und in der Beilage zum technischen Support. Sie können auch per E-Mail weitere Unterstützung anfordern. Website http://www.linksys.com/international Produktregistrierung http://www.linksys.com/registration Linksys ist eine eingetragene Marke bzw. eine Marke von Cisco Systems, Inc. und/oder deren Zweigunternehmen in den USA und anderen Ländern. Copyright © 2005 Cisco Systems, Inc. Alle Rechte vorbehalten. 10 WRK54G-DE_V2-QIG-51114 TE ® A Division of Cisco Systems, Inc. Contenuto della confezione* • Router a banda larga Wireless-G • Setup CD-ROM (CD-ROM per l'installazione guidata) con Symantec Internet Security • User Guide (Guida per l'utente) su CDROM (solo in inglese) • Adattatore di corrente • Cavo di rete Ethernet • Guida di installazione rapida *potrebbero essere inclusi altri articoli 2,4GHz Wireless-G 802.11g Wireless N. modello Router a banda larga WRK54G (IT) Guida di installazione rapida 1 1 A B C D 2 Collegamento del router a banda larga Prima di iniziare, assicurarsi di disporre delle informazioni sulla configurazione relative al tipo di connessione Internet utilizzata. Tali dati dovrebbero essere stati forniti dall'installatore del provider di servizi Internet dopo aver installato la connessione a banda larga. In caso contrario, richiedere le impostazioni al provider di servizi Internet. Verificare che tutti i dispositivi hardware collegati in rete siano spenti, compresi il router, i PC e il modem via cavo o DSL. Collegare un'estremità del cavo di rete Ethernet a una delle porte (etichettate da 1 a 4) sul retro del router e l'altra estremità alla porta Ethernet del PC. Ripetere la Fase C per collegare altri PC o periferiche di rete al router. C E F G H I J Collegare un altro cavo di rete Ethernet dal modem via cavo o DSL alla porta Internet presente sul pannello posteriore del router. Questa è l'unica porta funzionante per la connessione modem. Accendere il modem via cavo o DSL. Collegare l'adattatore di corrente CA alla porta Power (Alimentazione) del router e l'altra estremità a una presa elettrica. Assicurarsi che sia accesa la luce verde degli indicatori LED di alimentazione e Internet presenti sul pannello anteriore. La spia verde dell'indicatore LED di alimentazione lampeggia per qualche secondo mentre il router esegue la procedura di autodiagnostica. Quando l'autotest è completato, questo LED rimane acceso. Se il LED non smette di lampeggiare, consultare l'“Appendix A: Troubleshooting” (Appendice A: Risoluzione dei problemi) nella User Guide (Guida per l'utente) del router contenuta nel Setup CD-ROM (CD-ROM per l'installazione). E G IMPORTANTE Assicurarsi di utilizzare l'adattatore di corrente fornito con il router. L'uso di un diverso adattatore di corrente può provocare danni al router. Accendere il PC che si desidera utilizzare per configurare il router. Continuare con la Fase 2. 3 2 Configurazione del router a banda larga Attenersi alle istruzioni riportate di seguito per configurare il router. È necessario configurare il router una sola volta. NOTA Assicurarsi che l'adattatore Ethernet del PC sia impostato in modo da ottenere automaticamente un indirizzo IP. Per ulteriori informazioni, consultare la Guida in linea di Windows. A B C D 4 Aprire il browser Web. Immettere http://192.168.1.1 nel campo Indirizzo. Premere il tasto Invio. Verrà visualizzata una schermata in cui si chiede di immettere la password. Lasciare vuoto il campo riservato al nome utente e immettere la password predefinita, admin, in lettere minuscole nell'apposito campo. Si consiglia di impostare in seguito una nuova password nella scheda Administration (Amministrazione) della schermata Management (Gestione) dell'utilità basata sul Web. Fare quindi clic sul pulsante OK. A B Verrà visualizzata l'utilità basata sul Web con la scheda Setup (Configurazione) selezionata. Se richiesto dal provider di servizi Internet (solitamente un provider che fornisce connettività via cavo), completare anche i campi Host Name (Nome host) e Domain Name (Nome dominio). In caso contrario, lasciarli vuoti. Nel menu a discesa dell'impostazione del tipo di connessione Internet sono disponibili sei opzioni. La schermata Setup (Configurazione) con le relative funzioni varia a seconda del tipo di connessione selezionato. C Tipo di configurazione Internet DHCP: se la connessione avviene tramite DHCP o indirizzo IP dinamico del provider di servizi Internet, non modificare l'impostazione predefinita Obtain an IP automatically (Ottieni automaticamente un indirizzo IP). Static IP (Indirizzo IP statico): se l'indirizzo IP assegnato dal provider di servizi Internet è statico, selezionare Static IP (Indirizzo IP statico) dal menu a discesa. Completare i campi Internet IP Address (Indirizzo IP Internet), Subnet Mask (Maschera di sottorete), Gateway e Static DNS (DNS Statico). È necessario specificare almeno un indirizzo DNS. PPPoE: se la connessione avviene tramite PPPoE, selezionare PPPoE dal menu a discesa. Completare i campi User Name (Nome utente) e Password. Selezionare Keep Alive (Connessione sempre attiva) se si desidera essere sempre collegati al provider di servizi Internet oppure selezionare Connect on Demand (Connessione su richiesta) se la tariffa viene conteggiata in base al tempo effettivo di connessione al provider. DHCP Indirizzo IP statico PPPoE L2TP: L2TP è un servizio utilizzato esclusivamente in Israele. Se si utilizza una connessione L2TP, contattare il provider di servizi Internet per ottenere le informazioni di configurazione. PPTP: PPTP è un servizio utilizzato esclusivamente in Europa. Se si utilizza una connessione PPTP, selezionare PPTP dal menu a discesa. Completare i campi IP Address (Indirizzo IP), Subnet Mask (Maschera di sottorete), Default Gateway (Gateway predefinito), User L2TP PPTP 5 Name (Nome utente) e Password. Selezionare Keep Alive (Connessione sempre attiva) se si desidera essere sempre collegati al provider di servizi Internet oppure selezionare Connect on Demand (Connessione su richiesta) se la tariffa viene conteggiata in base al tempo effettivo di connessione al provider. Telstra (Heart Beat Signal): Telstra (Heart Beat Signal) è un servizio utilizzato esclusivamente in Australia. Se si utilizza una connessione Heart Beat Signal, contattare il provider di servizi Internet per ottenere le informazioni necessarie alla configurazione. E F G H 6 Telstra Una volta terminata l'impostazione dei parametri della connessione a Internet, fare clic sul pulsante Save Settings (Salva impostazioni) per salvare le modifiche apportate. Per configurare il router per la rete wireless, selezionare la scheda Wireless nella schermata Basic Wireless Settings (Impostazioni wireless di base). WIreless Network Mode (Modalità di rete wireless). Selezionare la modalità utilizzata dal menu a discesa: se si utilizza solo 802.11g, selezionare G-Only (Solo G); se si utilizza solo 802.11b, selezionare B-Only (Solo B); se si utilizza sia 802.11b che 802.11g, mantenere l'impostazione Mixed (Modalità mista). Wireless Network Name (SSID) (Nome di rete wireless). Per SSID si intende il nome di rete condiviso da tutti i dispositivi di una rete wireless che deve essere identico per tutti i dispositivi collegati in rete. Questo F nome è sensibile alla distinzione tra maiuscole e minuscole e non può contenere più di 32 caratteri (che possono essere scelti tra tutti quelli disponibili sulla tastiera). Per una maggiore sicurezza, si consiglia di sostituire il valore SSID predefinito (linksys) con un nome univoco. I J K L M N Wireless Channel (Canale Wireless). Nell'elenco fornito selezionare il canale appropriato corrispondente alle impostazioni di rete. Tutte le periferiche collegate alla rete wireless devono comunicare sullo stesso canale per poter funzionare correttamente. Wireless SSID Broadcast (Trasmissione SSID Wireless). Durante la ricerca di reti wireless a cui collegarsi all'interno dell'area locale, i client wireless rilevano il valore SSID Broadcast del router. Per trasmettere il valore SSID del router, mantenere l'impostazione predefinita Enable (Attiva). Se non si desidera trasmettere il valore SSID del router, selezionare Disable (Disattiva). IMPORTANTE IMPORTANTEUna Unavolta voltaconfigurato configurato ililrouter, router,èènecessario necessarioconfigurare configurare lalaprotezione protezionewireless, wireless,WEP WEPooWPA, WPA, per impedire violazioni della per impedire violazioni della sicurezza sicurezzaininrete. rete. Modificare le impostazioni come indicato e fare clic sul pulsante Save Settings (Salva impostazioni) per applicare i cambiamenti. Spegnere e riaccendere il modem. Riavviare il computer. Per verificare la configurazione, aprire il browser Web da uno dei computer e immettere http://www.linksys.com/registration. La procedura di installazione del router a banda larga Wireless-G è conclusa. N NOTA Per altre opzioni di sicurezza e impostazioni avanzate, consultare la User Guide (Guida per l'utente) disponibile nel Setup CD-ROM (CD per l'installazione) del router. 7 3 Configurazione della protezione wireless Il router è dotato di quattro tipi di protezione wireless: WEP, WPA PreShared (WPA precondivisa), WPA Enterprise e Radius. Questi metodi di sicurezza non sono tuttavia pronti per l'immediato utilizzo. Per configurare la protezione wireless sul router, attenersi alla seguente procedura: A B Aprire l'utilità del router basata sul Web come mostrato nella fase 2, quindi fare clic sulla scheda Wireless. Viene visualizzata la schermata Basic Wireless Settings (Impostazioni wireless di base). Selezionare Wireless Security (Sicurezza wireless) per configurare la protezione wireless sul router. Qui vengono fornite le istruzioni per la configurazione della protezione wireless WEP e WPA Pre-Shared (WPA precondivisa). C Nel menu a discesa Security Mode (Modalità sicurezza), selezionare il tipo di sicurezza wireless da utilizzare per la rete. WEP: WEP è un metodo di cifratura di base meno sicuro di WPA. Per utilizzare WEP, selezionare una chiave di trasmissione predefinita (scegliere quale chiave usare) e un livello di cifratura WEP, 64 bits 10 hex digits (64 bit 10 cifre esadecimali) o 128 bits 26 hex digits (128 bit 26 cifre esadecimali). Quindi, generare una chiave WEP utilizzando una passphrase o immettere la chiave WEP manualmente. Basic Wireless Settings (Impostazioni wireless di base) NOTA Per configurare le opzioni di sicurezza WPA Enterprise o Radius, consultare la Guida per l'utente (solo in inglese). Impostazioni di sicurezza WEP WPA Pre-Shared (WPA precondivisa): WPA consente di scegliere tra due metodi di cifratura, TKIP e AES, che utilizzano chiavi dinamiche. Selezionare il tipo di algoritmo, TKIP o AES. Immettere una chiave WPA condivisa di lunghezza compresa tra 8 e 63 caratteri. Quindi immettere un intervallo di rinnovo della chiave di gruppo per specificare la frequenza con cui si desidera che il router modifichi le chiavi di cifratura. D Impostazioni di sicurezza WPA precondivisa Fare clic sul pulsante Save Settings (Salva impostazioni). Congratulazioni! La sicurezza wireless è ora configurata sul router. Per ulteriori informazioni o istruzioni relative alla risoluzione dei problemi, consultare la Guida per l'utente (solo in inglese) su CD-ROM oppure il supplemento per l'assistenza tecnica. È possibile ricevere ulteriore assistenza anche inviando un messaggio di posta elettronica. Sito Web http://www.linksys.com/international Registrazione del prodotto http://www.linksys.com/registration Linksys è un marchio registrato o un marchio di Cisco Systems, Inc. e/o dei relativi affiliati negli Stati Uniti e in altri Paesi. Copyright © 2005 Cisco Systems, Inc. Tutti i diritti riservati. WRK54G-IT_V2-QIG-51114 ® A Division of Cisco Systems, Inc. Conteúdo da embalagem* • Router sem fios G de banda larga • CD-ROM de configuração (com Symantec Internet Security) • Manual do utilizador no CD-ROM (disponíveis apenas em inglês) • Transformador • Cabo de rede Ethernet • Manual de Instalação Rápida *poderão ser fornecidos outros itens 2,4GHz Sem fios G 802.11g Router de banda larga Wireless Manual de Instalação Rápida Modelo n.º WRK54G (PT) 1 1 A B C Ligar o Router de banda larga Antes de começar, certifique-se de que tem as informações de configuração do tipo específico de ligação à Internet. O técnico de instalação do ISP deverá ter fornecido estas informações depois de ter instalado a ligação de banda larga. Caso contrário, poderá contactar o ISP para solicitar as definições. Certifique-se de que todo o hardware da rede está desligado, incluindo o Router, os computadores e o modem de cabo ou DSL. Ligue uma extremidade do cabo de rede Ethernet a uma das portas (numeradas de 1 a 4) na parte posterior do Router e a outra extremidade a uma porta Ethernet do computador. C 2 D E F G H I J Repita o passo C para ligar mais computadores ou outros dispositivos de rede ao Router. Ligue um cabo de rede Ethernet diferente do modem de cabo ou DSL à porta de Internet no painel posterior do Router. Esta é a única porta que funcionará para a ligação ao modem. Ligue o modem de cabo ou DSL. E Ligue o transformador CA à porta de alimentação do Router e a outra extremidade a uma tomada. Certifique-se de que os LEDs Power (Alimentação) e Internet do painel frontal estão acesos e verdes. O LED Power (Alimentação) ficará intermitente e verde durante alguns segundos quando o Router estiver a executar o teste de diagnóstico automático. Este LED permanecerá aceso quando o teste automático for concluído. Se não parar de piscar, consulte o “Apêndice A: Resolução de problemas” no Manual do Utilizador do Router no CD-ROM de configuração. G IMPORTANTE: Certifique-se de que utiliza o transformador fornecido juntamente com o Router. A utilização de um transformador diferente poderá danificar o Router. Ligue o computador que pretende utilizar para configurar o Router. Avance para o Passo 2. 3 2 Configurar o Router de banda larga Estas instruções mostrarão como configurar o Router. Só é necessário efectuar a configuração uma vez. NOTA: Certifique-se de que a placa Ethernet do computador está definida para obter um endereço IP automaticamente. Para obter mais informações, consulte a Ajuda do Windows. A B Será apresentado um ecrã a solicitar a palavra-passe. Deixe o campo Nome de utilizador em branco e introduza a palavra-passe predefinida, admin, em minúsculas, no campo campo Palavra-passe. (Posteriormente, deverá definir uma nova palavra-passe, utilizando o ecrã Management (Gestão) do separador Administration (Administração) do Utilitário baseado na Web). Em seguida, clique no botão OK. C D 4 Abra o Web browser. Introduza http://192.168.1.1 no respectivo campo Endereço. Prima a tecla Enter. . O Utilitário baseado na Web será apresentado com o separador Setup (Configurar) seleccionado. Se for solicitado pelo ISP (normalmente ISPs do serviço de cabo), preencha os campos Host Name (Nome do sistema anfitrião) e Domain Name (Nome de domínio). Caso contrário, deixe-os em branco. Para a definição de Internet Connection Type (Tipo de ligação à Internet), são fornecidos seis tipos de ligação através do menu pendente. Os ecrãs Setup (Configurar) e as funcionalidades disponíveis variarão consoante o tipo de ligação seleccionado. A B C Tipo de configuração da Internet DHCP: Se estiver a ligar através de DHCP ou de um endereço IP dinâmico do ISP, mantenha a predefinição Obtain an IP automatically (Obter um IP automaticamente). Static IP (IP estático): Se o ISP atribuir um endereço IP estático, seleccione Static IP (IP estático) no menu pendente. Preencha os campos Internet IP Address (Endereço IP de Internet), Subnet Mask (Máscara de sub-rede), Gateway, e Static DNS (DNS estático). É necessário introduzir, pelo menos, um endereço de DNS. PPPoE: Se estiver a ligar através de PPPoE, seleccione PPPoE a partir do menu pendente. Preencha os campos User Name (Nome de utilizador) e Password (Palavra-passe). Seleccione Keep Alive (Manter ligado) se pretender estar sempre ligado ao ISP ou seleccione Connect on Demand (Ligar mediante pedido) se for cobrado pelo tempo que está ligado ao ISP. DHCP IP estático PPPoE L2TP: L2TP é um serviço utilizado apenas em Israel. Se estiver a utilizar uma ligação L2TP, contacte o ISP para obter as informações de configuração. PPTP: PPTP é um serviço utilizado apenas na Europa. Se estiver a utilizar uma ligação PPTP, seleccione PPTP no menu pendente. Preencha os campos IP Address, Subnet Mask, Default Gateway, User Name e Password (Endereço IP, Máscara de sub-rede, Gateway predefinido, Nome de utilizador e Palavra-passe). Seleccione Keep Alive (Manter ligado) se pretender estar sempre ligado ao ISP ou seleccione Connect on Demand (Ligar mediante pedido) se for cobrado pelo tempo que está L2TP PPTP 5 ligado ao ISP. HeartBeat Signal: HeartBeat Signal é um serviço utilizado apenas na Austrália. Se estiver a utilizar uma ligação HeartBeat Signal, consulte o ISP para obter as informações de configuração. E F G H 6 Quando concluir a introdução das definições de ligação à Internet, clique no botão Save Settings (Guardar definições) para guardar as alterações. Telstra Para configurar o Router na rede sem fios, seleccione o ecrã Basic Wireless Settings (Definições sem fios básicas) do separador Wireless (Sem fios). Wireless Network Mode (Modo de rede sem fios). Seleccione o modo que está a utilizar a partir do menu pendente: se estiver a utilizar só 802.11g, seleccione G-Only (Só G); se estiver a utilizar só 802.11b, seleccione B-Only (Só B); se estiver a utilizar 802.11b e 802.11g, mantenha a definição Mixed (Misto). Wireless Network Name (SSID) (Nome da rede sem fios). O SSID é o nome da rede partilhado por todos os dispositivos de uma rede sem fios. O SSID tem de ser idêntico para todos os dispositivos na rede sem fios. É sensível a maiúsculas e minúsculas e não pode exceder 32 caracteres (utilize qualquer carácter do teclado). Para obter segurança adicional, deverá alterar o SSID predefinido (linksys) para um nome exclusivo. F I Wireless Channel (Canal sem fios). Seleccione o canal adequado a partir da lista fornecida, para corresponder às definições da rede. Todos os dispositivos da rede sem fios têm de difundir no mesmo canal para funcionarem correctamente. J Wireless SSID Broadcast (Difusão de SSID sem fios). Quando os clientes sem fios pesquisarem a área local para se associarem a redes sem fios, detectarão a difusão do SSID efectuada pelo Router. Para difundir o SSID do Router, mantenha a predefinição, Enable (Activar). Se não pretender difundir o SSID do Router, seleccione Disable (Desactivar). K IMPORTANTE: Assim Assim que que oo IMPORTANTE: Router estiver estiver configurado, configurado, deve deve Router ser configurada a segurança sem ser configurada a segurança sem fios (WEP ou WPA) para evitar fios (WEP ou WPA) para evitar falhas de de segurança segurança na na rede. rede. falhas Altere as definições, conforme aqui se descreve, e clique no botão Save Settings (Guardar definições) para aplicar as alterações. L M N Desligue e volte a ligar o modem. Reinicie o computador. N Teste a configuração abrindo o Web browser e introduzindo http://www.linksys.com/registration. A instalação do Router sem fios G de banda larga está concluída. NOTA: Para obter definições e opções de segurança mais avançadas, consulte o Manual do Utilizador no CD-ROM do Router. 7 3 Configurar a segurança sem fios O Router vem equipado com quatro tipos de segurança sem fios: WEP, WPA Pre-Shared (WPA pré-partilhada), WPA Enterprise e Radius. No entanto, estes métodos de segurança não vêm já activados. Para configurar a segurança sem fios no Router, efectue os seguintes procedimentos: A B C Abra o Utilitário baseado na Web do Router, conforme é mostrado no Passo 2, e clique no separador Wireless (Sem fios). Será apresentado o ecrã Basic Wireless Settings (Definições sem fios básicas). Seleccione Wireless Security (Segurança sem fios) para configurar a segurança sem fios no Router. As instruções para a configuração da segurança sem fios WEP e WPA Pre-Shared (WPA pré-partilhada) são fornecidas aqui. No menu pendente Security Mode (Modo de segurança), seleccione o tipo de segurança sem fios que irá utilizar na rede. WEP: WEP é um método de encriptação básico, que não é tão seguro como o WPA. Para utilizar WEP, seleccione a Default Transmit Key (Chave de transmissão predefinida) que pretende utilizar, bem como o nível de encriptação WEP, 64 bits 10 hex digits (64 bits, 10 dígitos hexadecimais) ou 128 bits 26 hex digits (128 bits, 26 dígitos hexadecimais). Em seguida, proceda à geração de uma chave WEP utilizando a frase-passe ou introduza a chave WEP manualmente. Basic Wireless Settings (Definições sem fios básicas) NOTA: Consulte o Manual do Utilizador se pretender configurar as opções de segurança sem fios WPA Enterprise ou Radius. Definições de segurança WEP WPA Pre-Shared (WPA prépartilhada): A WPA oferece dois métodos de encriptação, TKIP e AES, com chaves de encriptação dinâmicas. Seleccione o tipo de algoritmo, TKIP ou AES. Introduza uma WPA Shared Key (Chave partilhada WPA) que tenha entre 8 e 63 caracteres. Em seguida, introduza o período de Group Key Renewal (Renovação das chaves de grupo), que indica ao Router a frequência com que deve alterar as chaves de encriptação. D Definições de segurança WPA Pre-Shared (WPA pré-partilhada) Clique no botão Save Settings (Guardar definições). Parabéns! A segurança sem fios está configurada no Router. Para obter informações adicionais ou ajuda para resolução de problemas, consulte o Manual do Utilizador no CD-ROM ou a Folha de Suporte Técnico. Também poderá enviar uma mensagem de correio electrónico para obter suporte. Web site http://www.linksys.com/international Registo do produto http://www.linksys.com/registration Linksys é uma marca registada ou marca comercial da Cisco Systems, Inc. e/ou das respectivas afiliadas nos E.U.A. e noutros países. Copyright © 2005 Cisco Systems, Inc. Todos os direitos reservados. WRK54G-PT_V2-QIG-51114 TE ® A Division of Cisco Systems, Inc. Contenido del paquete* • Ruteador de banda ancha Wireless-G • CD-ROM de configuración (incluye Symantec Internet Security) • Guía del usuario en CD-ROM (sólo en inglés) • Adaptador de corriente • Cable de red Ethernet • Guía de instalación rápida *el paquete puede incluir otros elementos 2,4GHz Wireless-G 802.11g Ruteador de banda ancha Wireless Guía de instalación rápida Nº de modelo WRK54G (ES) 1 1 A B C Conecte el ruteador de banda ancha Antes de comenzar, asegúrese de que dispone de la información de configuración para el tipo de conexión a Internet específico. El técnico de instalación del proveedor de servicios de Internet le debe haber proporcionado esta información al instalar la conexión de banda ancha. Si no es así, póngase en contacto con dicho proveedor para solicitar los parámetros. Asegúrese de que ha apagado todos los elementos de hardware de la red, incluidos el ruteador, los PC y el módem por cable o DSL. Conecte uno de los extremos de un cable de red Ethernet a uno de los puertos (numerados de 1 a 4) de la parte posterior del ruteador y el otro extremo a un puerto Ethernet de un PC. C 2 D E F G H I J Repita el paso C para conectar los demás PC o dispositivos de red al ruteador. Conecte un cable de red Ethernet distinto desde el módem por cable o DSL al puerto de Internet del panel posterior del ruteador. Es el único puerto que funciona con la conexión del módem. Encienda el módem por cable o DSL. E Conecte el adaptador de corriente CA al puerto de alimentación del ruteador y el otro extremo del cable a una toma de corriente. Asegúrese de que las luces Power (Alimentación) e Internet del panel frontal están encendidas en verde. La luz Power (Alimentación) parpadeará en verde durante unos segundos cuando el ruteador ejecute la prueba de autodiagnóstico. Esta luz permanece encendida de forma continua cuando la prueba finaliza. Si no deja de parpadear, consulte el apéndice A de resolución de problemas de la guía del usuario del ruteador incluida en el CD-ROM de configuración. G IMPORTANTE: Debe utilizar el adaptador de corriente proporcionado con el ruteador. Si utiliza un adaptador de corriente distinto puede provocar daños al producto. Encienda el PC que desea utilizar para configurar el ruteador. Siga en el paso 2. 3 2 Configuración del ruteador de banda ancha En estas instrucciones se explica como configurar el ruteador. Sólo tiene que configurarlo una vez. NOTA: Asegúrese de que el adaptador Ethernet del PC está definido para obtener una dirección IP automáticamente. Para obtener más información, consulte la ayuda de Windows. A B C D 4 Abra el explorador Web. Escriba http://192.168.1.1 en el campo Dirección. Pulse la tecla Intro. Aparece una pantalla en la que se solicita una contraseña. Deje vacío el campo Usuario e introduzca la contraseña predeterminada, admin (todo minúsculas), en el campo Contraseña. (Debe establecer una nueva contraseña posteriormente, mediante la pantalla de administración de la ficha de administración de la utilidad basada en Web.) A continuación, haga clic en el botón Aceptar. Aparece la utilidad basada en Web del ruteador con la ficha Setup (Configurar) seleccionada. Si el proveedor de servicios de Internet (por lo general, proveedores de servicios de Internet por cable) lo solicita, rellene los campos Host Name (Nombre de host) y Domain Name (Nombre de dominio). Si no lo solicita, déjelos en blanco. En el parámetro Internet Connection Type (Tipo de conexión a Internet), se ofrecen seis tipos de conexión en un menú desplegable. Cada pantalla de configuración y las funciones disponibles son distintas dependiendo del tipo de conexión que seleccione. A B C Tipo de conexión de Internet DHCP: Si va a realizar la conexión mediante DHCP o una dirección IP dinámica del ISP, mantenga el parámetro predeterminado Obtain an IP automatically (Obtener una dirección IP automáticamente). Static IP (IP estática): Si el ISP le asigna una dirección IP estática, seleccione este parámetro en el menú desplegable. Rellene los campos Internet IP Address (Dirección IP de Internet), Subnet Mask (Máscara de subred), Gateway (Puerta de enlace) y Static DNS (DNS estático). Debe introducir por lo menos una dirección DNS. PPPoE (Protocolo de punto a punto en Ethernet): si realiza la conexión mediante PPPoE, seleccione PPPoE en el menú desplegable. Rellene los campos User Name (Nombre de usuario) y Password (Contraseña). Seleccione Keep Alive (Mantener activo) si desea estar continuamente conectado al ISP. De lo contrario, seleccione Connect on Demand (Conectar cuando se solicite) si debe pagar todo el tiempo que esté conectado al ISP. DHCP Static IP (IP estática) PPPoE L2TP: L2TP es un servicio que sólo se utiliza en Israel. Si utiliza una conexión L2TP, consulte con el ISP para obtener la información de configuración. PPTP (Protocolo de punto a punto en túnel): PPTP es un servicio que sólo se utiliza en Europa. Si utiliza una conexión PPTP, seleccione PPTP en el menú desplegable. Rellene los campos IP Address (Dirección IP), Subnet Mask (Máscara de subred), Default Gateway (Puerta de enlace predeterminada), User Name L2TP PPTP 5 (Nombre de usuario) y Password (Contraseña). Seleccione Keep Alive (Mantener activo) si desea estar continuamente conectado al ISP. De lo contrario, seleccione Connect on Demand (Conectar cuando se solicite) si debe pagar todo el tiempo que esté conectado al ISP. E Telstra: Telstra (Heart Beat Signal) es un servicio que sólo se usa en Australia. Si utiliza una conexión Heart Beat Signal, consulte con el ISP para obtener la información de configuración. F G H 6 Telstra Cuando termine de introducir los parámetros de conexión a Internet, haga clic en el botón Save Settings (Guardar parámetros) para guardar los cambios. Para configurar el ruteador para la red inalámbrica, seleccione la pantalla Basic Wireless Settings (Parámetros inalámbricos básicos) de la ficha Wireless (Inalámbrico). Wireless Network Mode (Modo de red inalámbrica). Seleccione el modo que utiliza en el menú desplegable: si utiliza sólo 802.11g, seleccione G-Only (Sólo G); si utiliza sólo 802.11b, seleccione B-Only (Sólo B); si utiliza tanto 802.11b como 802.11g, mantenga el parámetro Mixed (Mixto). Wireless Network Name (SSID) (Nombre de la red inalámbrica, SSID). EL SSID es un nombre de red que comparten todos los dispositivos de una red inalámbrica. Debe ser el mismo para todos los dispositivos de la red inalámbrica. El nombre distingue entre mayúsculas y minúsculas y no debe tener una longitud superior a los 32 caracteres F (puede elegir entre cualquiera de los caracteres del teclado). Para mayor seguridad, debe cambiar el SSID predeterminado linksys a un nombre único. I Wireless Channel (Canal inalámbrico). Seleccione el canal de la lista correspondiente a los parámetros de red. Para que el funcionamiento sea correcto, todos los dispositivos de la red inalámbrica deben emitir en el mismo canal. J Wireless SSID Broadcast (Difusión inalámbrica SSID). Cuando los clientes inalámbricos sondeen el área local en busca de redes inalámbricas con las que asociarse, detectarán la difusión SSID que realiza el ruteador. Para difundir el SSID del ruteador, mantenga el parámetro predeterminado, Enable (Activar). Si no desea difundir el SSID del ruteador, seleccione Disable (Desactivar). K Cambie estos parámetros según lo descrito aquí y haga clic en el botón Save Settings (Guardar parámetros) para aplicar los cambios. L M N Apague el módem y vuelva a encenderlo. Reinicie el ordenador. Pruebe la configuración: abra el explorador Web y escriba http://www.linksys.com/registration. La instalación del ruteador de banda ancha Wireless-G ha finalizado. NOTA: Para informarse sobre parámetros avanzados y opciones de seguridad, consulte la guía del usuario del CD-ROM del ruteador. IMPORTANTE:Una Unavez vez IMPORTANTE: configuradoelelruteador ruteadorse sedebe debe configurado configurar la seguridad configurar la seguridad inalámbrica,ya yasea seaWEP WEPooWPA, WPA, inalámbrica, paraevitar evitarque quese sevulnere vulnerelala para seguridadde delalared. red. seguridad N 3 Configuración de la seguridad inalámbrica El ruteador incorpora cuatro tipos de seguridad inalámbrica: WEP, WPA PreShared Key (Clave precompartida WPA), WPA Enterprise y Radius. Sin embargo, estos métodos de seguridad no están activados de forma automática. Para configurar la seguridad inalámbrica en el ruteador, realice las siguientes acciones: A B Abra la utilidad Web del ruteador como se muestra en el paso 2 y haga clic en la ficha Wireless (Inalámbrico). Aparece la pantalla Basic Wireless Settings (Parámetros inalámbricos básicos). Seleccione Wireless Security (Seguridad inalámbrica) para configurar la seguridad inalámbrica en el ruteador. En este documento se proporcionan instrucciones para la configuración de la seguridad inalámbrica WEP y WPA Pre-Shared Key (Clave precompartida WPA). C NOTA: Si los adaptadores inalámbricos admiten Secure Easy Setup (SES), puede utilizar el botón SES del ruteador para configurar la seguridad inalámbrica (Wireless Security). En el menú desplegable Security Mode (Modo de seguridad), seleccione el tipo de seguridad inalámbrica que utilizará en la red. WEP: Se trata de un método de encriptación básico y no es tan seguro como WPA. Para utilizar WEP, seleccione una clave de transmisión predeterminada (Default Transmit Key; elija la que desea utilizar) y un nivel de encriptación WEP, 64 bits 10 hex digits (64 bits, 10 dígitos hexadecimales) o 128 bits 26 hex digits (128 bits, 26 dígitos hexadecimales). A continuación, cree una clave WEP mediante la frase de paso (Passphrase) o introduzca manualmente la clave WEP. Basic Wireless Settings (Parámetros inalámbricos básicos) NOTA: Consulte la guía del usuario si desea configurar las opciones de seguridad inalámbrica Radius o WPA Enterprise. Parámetros de seguridad WEP WPA Pre-Shared Key (Clave precompartida WPA): WPA ofrece dos métodos de encriptación, TKIP y AES, con claves de encriptación dinámica. Seleccione el tipo de algoritmo, TKIP o AES. Introduzca una clave compartida WPA (WPA Shared Key) de 8 a 63 caracteres. A continuación, introduzca un periodo de renovación de clave de grupo (Group Key Renewal), que indica al ruteador la frecuencia con que debe cambiar las claves de encriptación. D Parámetros de seguridad de WPA Pre-Shared Key (Clave precompartida WPA) Haga clic en el botón Save Settings (Guardar parámetros). Enhorabuena. La seguridad inalámbrica ya está configurada en el ruteador. Para obtener información adicional o ayuda sobre resolución de problemas, consulte la guía del usuario que se incluye en el CD-ROM o el suplemento de asistencia técnica. También puede solicitar más asistencia mediante el correo electrónico. Sitio Web http://www.linksys.com/international Registro de productos http://www.linksys.com/registration Linksys es una marca registrada o marca comercial de Cisco Systems, Inc. y/o sus filiales en EE.UU. y otros países. Copyright © 2005 Cisco Systems, Inc. Todos los derechos reservados. WRK54G-ES_V2-QIG-51114 TE ® A Division of Cisco Systems, Inc. Innehåll i förpackningen* • Wireless-G Bredbandsrouter • Installations-cd-skivor (med Symantec Internet Security) • Användarhandböcker på cd-skivor (endast engelska) • Strömadapter • Ethernet-nätverkskabel • Snabbinstallationshandbok *andra artiklar kan medfölja 2,4GHz Wireless-G 802.11g Bredbandsrouter Wireless Modellnr WRK54G (SE) Snabbinstallationshandbok 1 1 A B C D 2 Ansluta bredbandsroutern Innan du börjar måste du ha inställningsinformationen för just din typ av Internet-anslutning. Du bör ha fått den här informationen av installationsteknikern från din Internet-leverantör när bredbandsanslutningen installerades. Annars kan du ringa din Internet-leverantör och be om inställningarna. Kontrollera att alla maskinvaror i nätverket är avstängda, inklusive routern, datorn samt kabel- eller DSL-modemet. Anslut den ena änden av en Ethernet-nätverkskabel till en av portarna (märkt 1-4) på baksidan av routern och den andra änden till en Ethernet-port på en dator. Upprepa steg C om du vill ansluta ytterligare datorer eller andra nätverksenheter till routern. C E F G H I J Anslut en annan Ethernetnätverkskabel från kabel- eller DSLmodemet till Internet-porten på baksidan av routern. Det här är den enda porten som fungerar för modemanslutningen. Starta kabel- eller DSL-modemet. Anslut strömadaptern till routerns strömport och den andra änden till ett eluttag E Kontrollera att ström- och Internetlysdioderna på frontpanelen lyser grönt. Strömlysdioden blinkar grönt några sekunder medan routern utför självtestet. Lysdioden lyser med fast sken när självtestet har slutförts. Information om vad du ska göra om den inte slutar blinka finns i "Bilaga A, Felsökning" i användarhandboken för routern på installations-cd:n. Starta den dator du vill använda till att konfigurera routern. Gå vidare till steg 2. G VIKTIGT: Se till att du använder strömadaptern som medföljer routern. Om du använder en annan strömadapter kan routern skadas. 3 2 Konfigurera bredbandsroutern De här anvisningarna beskriver hur du konfigurerar routern. Du behöver bara konfigurera den en gång. OBS! Kontrollera att datorns Ethernetadapter är inställd på Hämta IP-adress automatiskt. Mer information finns i Windows-hjälpen. A B C D 4 Öppna webbläsaren. Ange http://192.168.1.1 i fältet Adress. Tryck på Enter. A En skärm visas där du blir ombedd att ange lösenord. Lämna fältet Användarnamn tomt och skriv sedan standardlösenordet admin med små bokstäver i fältet Lösenord. (Senare bör du skapa ett nytt lösenord genom att använda fliken Administration på skärmen Management (Administration) i det webbaserade verktyget.) Klicka sedan på OK. Det webbaserade verktyget visas med fliken Setup (Inställningar) markerad. Om du blir ombedd av Internet-leverantören (vanligen kabel-Internetleverantörer) fyller du i fälten Host Name (Värdnamn) och Domain Name (Domännamn). I annat fall lämnar du dem tomma. För inställningen av Internetanslutningstyp kan du välja mellan sex olika anslutningstyper i listrutan. Alla Setup-skärmar och tillgängliga funktioner skiljer sig åt beroende på vilken anslutningstyp du väljer. B C Typ av Internet-konfiguration DHCP: Om du ansluter via DHCP eller en dynamisk IP-adress från din Internet-leverantör behåller du standardinställningen Obtain an IP automatically (Hämta IP-adress automatiskt) Static IP (Statisk IP-adress): Om Internet-leverantören tillhandahåller en statisk IP-adress väljer du Static IP i listrutan. Fyll i fälten Internet IP Address (Internet-IP-adress), Subnet Mask (Nätmask), Gateway och Static DNS (Statisk DNS). Du måste ange minst en DNS-adress PPPoE: Om du ansluter via PPPoE väljer du PPPoE i listrutan. Fyll i fälten User Name (Användarnamn) och Password (Lösenord). Välj Keep Alive (Behåll anslutning) om du alltid vill vara ansluten till Internet, eller välj Connect on Demand (Anslut på begäran) om du debiteras för den tid du är ansluten till Internet. . L2TP: L2TP är en tjänst som endast används i Israel. Om du använder en L2TP-anslutning kontaktar du Internet-leverantören och ber om inställningsinformation. PPTP: PPTP är en tjänst som endast används i Europa. Om du använder en PPTP-anslutning väljer du PPTP i listrutan. Fyll i fälten IP Address (IP-adress), Subnet Mask (Nätmask), Default Gateway (Standardgateway), User Name (Användarnamn) och Password (Lösenord). Välj Keep Alive (Behåll anslutning) om du alltid vill vara ansluten till Internet, eller välj DHCP Static IP (Statisk IP-adress) PPPoE L2TP PPTP 5 Connect on Demand (Anslut på begäran) om du debiteras för den tid du är ansluten till Internet. Telstral: Telstra (HeartBeat Signal) är en tjänst som endast används i Australien. Om du använder en HeartBeat Signal-anslutning kontaktar du Internet-leverantören och ber om inställningsinformation E F G H 6 Telstra När du är klar med inställningarna för din Internet-anslutning klickar du på Save Settings (Spara inställningar) för att spara alla ändringar. Om du vill konfigurera routern för det trådlösa nätverket väljer du fliken Wireless (Trådlöst) på skärmen Basic Wireless Settings (Grundläggande trådlösa inställningar) Trådlöst nätverksläge. Välj det läge som du använder i listrutan. Om du endast använder 802.11g väljer du G-Only, om du endast använder 802.11b väljer du B-Only och om du använder både 802.11b och 802.11g behåller du inställningen Mixed (Blandat). Trådlöst nätverksnamn (SSID). SSID (Service Set Identifier) är nätverksnamnet som delas av alla enheter i nätverket. SSID:t måste vara identiskt för alla enheter i det trådlösa nätverket. Namnet är skiftlägeskänsligt och får inte överstiga 32 tecken (alla tangentbordstecken kan användas). Av säkerhetsskäl bör du ändra standard-SSID:t linksys till ett unikt namn. F I J K L M N Trådlös kanal. I listan väljer du en lämplig kanal som motsvarar dina nätverksinställningar. Alla enheter i det trådlösa nätverket måste sändas på samma kanal för att fungera korrekt. Trådlös SSID Broadcast. När trådlösa kunder söker i det lokala nätet efter trådlösa nätverk att koppla till kommer routern att känna av SSID Broadcast. Om du vill sända routerns SSID behåller du standardinställningen Enable (Aktivera). Om du inte vill sända routerns SSID väljer du Disable (Avaktivera). VIKTIGT! När routern är konfigurerad bör trådlös säkerhet, antingen WEP eller WPA, vara konfigurerat för att förhindra säkerhetsrisker på nätverket. Ändra inställningarna enligt den här beskrivningen och klicka på Save Settings (Spara inställningar) för att verkställa ändringarna. Stäng av modemet och sätt sedan på det igen. Starta om datorn. Testa inställningarna genom att öppna webbläsaren och gå in på http://www.linksys.com/registration. Installationen av Wireless-G Bredbandsrouter är klar. N OBS! Mer avancerade inställningar och säkerhetsalternativ finns i användarhandboken för routern på installations-cd:n. 7 3 Konfigurera trådlös säkerhet Routern levereras med fyra typer av trådlös säkerhet: WEP, WPA PreShared (WPA med för-delad nyckel), WPA Enterprise och Radius. De här säkerhetsmetoderna är dock inte aktiverade direkt utan att du behöver göra något. Konfigurera trådlös säkerhet på routern genom att göra följande: A B Öppna routerns webbverktyg på det sätt som beskrivs i steg 2 och klicka på fliken Wireless (Trådlöst). Fönstret Basic Wireless Settings (Grundläggande trådlösa inställningar) visas. Välj Wireless Security (Trådlös säkerhet) för att konfigurera trådlös säkerhet på routern. Anvisningar för konfigurationen av WEP och WPA Pre-Shared (WPA med för-delad nyckel) finns här. C OBS! Om dina trådlösa adaptrar stöder Secure Easy Setup (SES) kan du använda knappen SES på routern för att konfigurera trådlös säkerhet. Basic Wireless Settings (Grundläggande trådlösa inställningar) OBS! Läs i användarhandboken om du vill konfigurera alternativen för trådlös säkerhet, WPA Enterprise eller Radius. På menyn Security Mode (Säkerhetsläge) väljer du den typ av trådlös säkerhet du vill använda på nätverket. WEP: WEP är en enkel krypteringsmetod som inte är lika säker som WPA. Om du vill använda WEP väljer du en standardnyckel (ange vilken nyckel som ska användas) och en nivå för WEP-krypteringen, 64 bitar 10 hex-siffror eller 128 bitar 26 hex-siffror. Sedan genererar du en WEP-nyckel med ett lösenord eller anger WEP-nyckeln manuellt. WEP-säkerhetsinställningar WPA Pre-Shared (WPA med för-delad nyckel): Med WPA får du två krypteringsmetoder, TKIP och AES, med dynamiska krypteringsnycklar. Välj typ av algoritm, TKIP eller AES. Ange en WPA-delad nyckel med 8–63 tecken. Slutligen anger du en gruppnyckelförnyelseperiod, vilket anger hur ofta krypteringsnycklarna ska ändras för routern. D Säkerhetsinställningar för WPA Pre-Shared (WPA med för-delad nyckel) Klicka på Save Settings (Spara inställningar). Klart! Trådlös säkerhet har nu konfigurerats på routern. Mer information samt felsökningshjälp finns i användarhandboken på cd-skivan och i supportbilagan. Du kan också skicka e-post till vår supportavdelning. Webbplats http://www.linksys.com/international Produktregistrering http://www.linksys.com/registration Linksys är ett registrerat varumärke eller ett varumärke som tillhör Cisco Systems, Inc. och/ eller dess samarbetspartner i USA och i vissa andra länder. Copyright © 2005 Cisco Systems, Inc. Med ensamrätt. WRK54G-SE_V2-QIG-51114 TE ® A Division of Cisco Systems, Inc. 2,4 GHz Wireless-G 802.11g WIRELESS Model No. Broadband Router WRK54G (EU/LA) User Guide Wireless-G Broadband Router Copyright and Trademarks Specifications are subject to change without notice. Linksys is a registered trademark or trademark of Cisco Systems, Inc. and/or its affiliates in the U.S. and certain other countries. Copyright © 2006 Cisco Systems, Inc. All rights reserved. Other brands and product names are trademarks or registered trademarks of their respective holders. How to Use This User Guide This User Guide has been designed to make understanding networking with the Wireless-G Broadband Router easier than ever. Look for the following items when reading this User Guide: This checkmark means there is a note of interest and is something you should pay special attention to while using the Wireless-G Broadband Router. This exclamation point means there is a caution or warning and is something that could damage your property or the Wireless-G Broadband Router. This question mark provides you with a reminder about something you might need to do while using the Wireless-G Broadband Router. In addition to these symbols, there are definitions for technical terms that are presented like this: word: definition. Also, each figure (diagram, screenshot, or other image) is provided with a figure number and description, like this: Figure 0-1: Sample Figure Description Figure numbers and descriptions can also be found in the “List of Figures” section in the “Table of Contents”. WRK54G-EU-UG-51114 BW Wireless-G Broadband Router Table of Contents Chapter 1: Introduction Welcome What’s in this User Guide? Chapter 2: Planning Your Wireless Network Network Topology Ad-Hoc versus Infrastructure Mode Network Layout Chapter 3: Getting to Know the Wireless-G Broadband Router The Back Panel The Front Panel Chapter 4: Connecting the Wireless-G Broadband Router Overview Hardware Installation for Connection to Your Broadband Modem Hardware Installation for Connection to Another Router 1 2 4 4 4 4 6 6 7 8 8 8 10 Chapter 5: Configuring the Wireless-G Broadband Router 12 Overview The Setup Tab - Basic Setup The Setup Tab - DDNS The Setup Tab - MAC Address Clone The Setup Tab - Advanced Routing The Wireless Tab - Basic Wireless Settings The Wireless Tab - Wireless Security The Wireless Tab - Wireless MAC Filter The Wireless Tab - Advanced Wireless Settings The Security Tab - Firewall The Security Tab - VPN Passthrough The Access Restrictions Tab - Internet Access The Applications and Gaming Tab - Port Range Forward The Applications & Gaming Tab - Port Triggering The Applications and Gaming Tab - DMZ The Applications and Gaming Tab - QoS The Administration Tab - Management 12 13 18 19 20 21 22 25 26 27 27 28 30 31 32 32 35 Wireless-G Broadband Router The Administration Tab - Log The Administration Tab - Diagnostics The Administration Tab - Factory Defaults The Administration Tab - Firmware Upgrade The Administration Tab - Config Management The Status Tab - Router The Status Tab - Local Network The Status Tab - Wireless Appendix A: Troubleshooting Common Problems and Solutions Frequently Asked Questions Appendix B: Wireless Security 35 36 37 37 37 38 39 39 40 40 48 55 Security Precautions Security Threats Facing Wireless Networks 55 55 Windows 98SE or Me Instructions Windows 2000 or XP Instructions For the Router’s Web-based Utility 60 60 61 Appendix C: Upgrading Firmware 58 Appendix D: Windows Help 59 Appendix E: Finding the MAC Address and IP Address for Your Ethernet Adapter 60 Appendix F: Glossary Appendix G: Specifications Appendix H: Warranty Information Appendix I: Regulatory Information Appendix J: Contact Information 62 69 71 72 83 Wireless-G Broadband Router List of Figures Figure 3-1: The Router’s Back Panel Figure 3-2: The Router’s Front Panel Figure 4-1: Connecting Your Internet Connection Figure 4-2: Connecting Your Network Devices Figure 4-3: Connecting the Power Figure 4-4: Diagram for Connection to Another Router Figure 4-5: Connecting Another Router Figure 4-6: Connecting Your Network Devices Figure 4-7: Connecting the Power Figure 5-1: Password Screen Figure 5-2: Setup Tab - Basic Setup Figure 5-3: DHCP Connection Type Figure 5-4: Static IP Connection Type Figure 5-5: PPPoE Connection Type Figure 5-6: PPTP Connection Type Figure 5-7: L2TP Connection Type Figure 5-8: Telestra Cable Connection Type Figure 5-9: Optional Settings Figure 5-10: Router IP Figure 5-11: Network Address Server Settings Figure 5-12: Time Setting Figure 5-13: Setup Tab - DDNS - DynDNS account Figure 5-14: Setup Tab - DDNS - TZO account Figure 5-15: Setup Tab - MAC Address Clone Figure 5-16: Setup Tab - Advanced Routing (Gateway) Figure 5-17: Setup Tab - Advanced Routing (Router) Figure 5-18: Wireless Tab - Basic Wireless Settings Figure 5-19: Wireless Tab - Wireless Security (WPA Personal) Figure 5-20: Wireless Tab - Wireless Security (WPA Enterprise) Figure 5-21: Wireless Tab - Wireless Security (WPA2 Personal) Figure 5-22: Wireless Tab - Wireless Security (WPA2 Enterprise) 6 7 8 9 9 10 10 11 11 12 13 13 13 14 14 15 15 16 16 17 17 18 18 19 20 20 21 22 22 23 23 Wireless-G Broadband Router Figure 5-23: Wireless Tab - Wireless Security (RADIUS) Figure 5-24: Wireless Tab - Wireless Security (WEP) Figure 5-25: Wireless Tab - Wireless MAC Filter Figure 5-26: MAC Address Filter List Figure 5-27: Wireless Tab - Advanced Wireless Settings Figure 5-28: Security Tab - Firewall Figure 5-29: Security Tab - VPN Passthrough Figure 5-30: Access Restrictions Tab - Internet Access Figure 5-31: Internet Policy Summary Figure 5-32: List of PCs Figure 5-33: Port Services Figure 5-34: Applications and Gaming Tab - Port Range Forward Figure 5-35: Applications and Gaming Tab - Port Triggering Figure 5-36: Applications and Gaming Tab - DMZ Figure 5-37: Applications and Gaming Tab - QOS Figure 5-38: Applications and Gaming Tab - QOS Adding an New Application Figure 5-39: Administration Tab - Management Figure 5-40: Administration Tab - Log Figure 5-41: Administration Tab - Diagnostics Figure 5-42: The Ping Test Figure 5-43: The Traceroute Test Figure 5-44: Administration Tab - Factory Defaults Figure 5-45: Administration Tab - Firmware Upgrade Figure 5-46: Administration Tab - Config Management Figure 5-47: Status Tab - Router Figure 5-48: Status Tab - Local Network Figure 5-49: DHCP Clients Table Figure 5-50: Status Tab - Wireless Figure C-1: Upgrade Firmware Figure E-1: IP Configuration Screen Figure E-2: MAC Address/Adapter Address Figure E-3: MAC Address/Physical Address Figure E-4: MAC Address Filter List Figure E-5: MAC Address Clone 24 24 25 25 26 27 27 28 28 28 29 30 31 32 32 33 35 35 36 36 36 37 37 37 38 39 39 39 58 60 60 60 61 61 Wireless-G Broadband Router Chapter 1: Introduction Welcome Thank you for choosing the Linksys Wireless-G Broadband Router. The Wireless-G Broadband Router will allow you to network wirelessly better than ever, sharing Internet access, files and fun, easily and securely. How does the Wireless-G Broadband Router do all of this? A router is a device that allows access to an Internet connection over a network. With the Wireless-G Broadband Router, this access can be shared over the four switched ports or via the wireless broadcast at up to 11Mbps for Wireless-B or up to 54Mbps for Wireless-G. Use the WPA standard to secure your wireless network while the whole network is protected through a Stateful Packet Inspection (SPI) firewall and Network Address Translation (NAT) technology. Run the Setup Wizard and it will guide you through the steps. You can also access the Router’s features through the easy-to-use, browserbased utility. But what does all of this mean? spi (stateful packet inspection) firewall: a technology that inspects incoming packets of information before allowing them to enter the network. Networks are useful tools for sharing computer resources. You can access one printer from different computers and access data located on another computer's hard drive. Networks are even used for playing multiplayer video games. So, networks are not only useful in homes and offices, they can also be fun. firewall: Security measures that protect the resources of a local network from intruders. PCs on a wired network create a LAN, or Local Area Network. They are connected with Ethernet cables, which is why the network is called “wired”. nat (network address translation): NAT technology translates IP addresses of a local area network to a different IP address for the Internet. PCs equipped with wireless cards or adapters can communicate without cumbersome cables. By sharing the same wireless settings, within their transmission radius, they form a wireless network. This is sometimes called a WLAN, or Wireless Local Area Network. The Wireless-G Broadband Router bridges wireless networks of both 802.11b and 802.11g standards and wired networks, allowing them to communicate with each other. lan (local area network): The computers and networking products that make up the network in your home or office. With your networks all connected, wired, wireless, and the Internet, you can now share files and Internet access—and even play games. All the while, the Wireless-G Broadband Router protects your networks from unauthorized and unwelcome users. Linksys recommends using the Setup CD-ROM for first-time installation of the Router. If you do not wish to run the Setup Wizard on the Setup CD-ROM, then use the instructions in this Guide to help you connect the Wireless-G Broadband Router, set it up, and configure it to bridge your different networks. These instructions should be all you need to get the most out of the Wireless-G Broadband Router. Chapter 1: Introduction Welcome 1 Wireless-G Broadband Router What’s in this User Guide? This user guide covers the steps for setting up and using the Wireless-G Broadband Router. • Chapter 1: Introduction This chapter describes the Router’s applications and this User Guide. • Chapter 2: Planning Your Wireless Network This chapter describes the basics of wireless networking. • Chapter 3: Getting to Know the Wireless-G Broadband Router This chapter describes the physical features of the Router. • Chapter 4: Connecting the Wireless-G Broadband Router This chapter instructs you on how to connect the Router to your network. • Chapter 5: Configuring the Wireless-G Broadband Router This chapter explains how to use the Web-based Utility to configure the settings on the Wireless-G Broadband Router. • Appendix A: Troubleshooting This appendix describes some problems and solutions, as well as frequently asked questions, regarding installation and use of the Wireless-G Broadband Router. • Appendix B: Wireless Security This appendix explains the risks of wireless networking and some solutions to reduce the risks. • Appendix C: Upgrading Firmware This appendix instructs you on how to upgrade the firmware on the Router should you need to do so. • Appendix D: Windows Help This appendix describes how you can use Windows Help for instructions about networking, such as installing the TCP/IP protocol. • Appendix E: Finding the MAC Address and IP Address for your Ethernet Adapter. This appendix describes how to find the MAC address for your computer’s Ethernet adapter so you can use the MAC filtering and/or MAC address cloning feature of the Router. • Appendix F: Glossary This appendix gives a brief glossary of terms frequently used in networking. Chapter 1: Introduction What’s in this User Guide? 2 Wireless-G Broadband Router • Appendix G: Specifications This appendix provides the technical specifications for the Router. • Appendix H: Warranty Information This appendix supplies the warranty information for the Router. • Appendix I: Regulatory Information This appendix supplies the regulatory information regarding the Router. • Appendix J: Contact Information This appendix provides contact information for a variety of Linksys resources, including Technical Support. Chapter 1: Introduction What’s in this User Guide? 3 Wireless-G Broadband Router Chapter 2: Planning Your Wireless Network Network Topology A wireless local area network (WLAN) is exactly like a regular local area network (LAN), except that each computer in the WLAN uses a wireless device to connect to the network. Computers in a WLAN share the same frequency channel and SSID, which is an identification name shared by the wireless devices belonging to the same wireless network. ssid (service set identifier): your wireless network’s name. Ad-Hoc versus Infrastructure Mode Unlike wired networks, wireless networks have two different modes in which they may be set up: infrastructure and ad-hoc. An infrastructure configuration is a WLAN and wired LAN communicating to each other through an access point. An ad-hoc configuration is wireless-equipped computers communicating directly with each other. Choosing between these two modes depends on whether or not the wireless network needs to share data or peripherals with a wired network or not. If the computers on the wireless network need to be accessible by a wired network or need to share a peripheral, such as a printer, with the wired network computers, the wireless network should be set up in Infrastructure mode. The basis of Infrastructure mode centers around a wireless router or an access point, such as the Wireless-G Broadband Router, which serves as the main point of communications in a wireless network. The Router transmits data to PCs equipped with wireless network adapters, which can roam within a certain radial range of the Router. You can arrange the Router and multiple access points to work in succession to extend the roaming range, and you can set up your wireless network to communicate with your Ethernet hardware as well. infrastructure: a wireless network that is bridged to a wired network via an access point. ad-hoc: a group of wireless devices communicating directly to each other (peer-topeer) without the use of an access point. If the wireless network is relatively small and needs to share resources only with the other computers on the wireless network, then the Ad-Hoc mode can be used. Ad-Hoc mode allows computers equipped with wireless transmitters and receivers to communicate directly with each other, eliminating the need for a wireless router or access point. The drawback of this mode is that in Ad-Hoc mode, wireless-equipped computers are not able to communicate with computers on a wired network. And, of course, communication between the wirelessequipped computers is limited by the distance and interference directly between them. Network Layout The Wireless-G Broadband Router has been specifically designed for use with both your 802.11b and 802.11g products. Now, products using these standards can communicate with each other. Chapter 2: Planning Your Wireless Network Network Topology 4 Wireless-G Broadband Router The Wireless-G Broadband Router is compatible with all 802.11b and 802.11g adapters, such as the Notebook Adapters (WPC54G, WPC11) for your laptop computers, PCI Adapter (WMP54G, WMP11) for your desktop PC, and USB Adapter (WUSB54G, WUSB11) when you want to enjoy USB connectivity. The Broadband Router will also communicate with the Wireless PrintServer (WPS54G) and Wireless Ethernet Bridges (WET54G, WET11). When you wish to connect your wireless network with your wired network, you can use the Wireless-G Broadband Router’s four LAN ports. To add more ports, any of the Wireless-G Broadband Router's LAN ports can be connected to any of Linksys's switches (such as the SD205 or SD208). With these, and many other, Linksys products, your networking options are limitless. Go to the Linksys website at www.linksys.com/international for more information about products that work with the Wireless-G Broadband Router. Chapter 2: Planning Your Wireless Network Network Layout 5 Wireless-G Broadband Router Chapter 3: Getting to Know the Wireless-G Broadband Router The Back Panel The Router's ports, where the cables are connected, are located on the back panel. Figure 3-1: The Router’s Back Panel Reset Button There are two ways to reset the Router's factory defaults. Either press the Reset Button, for approximately five seconds, or restore the defaults from the Administration tab - Factory Defaults in the Router's Web-based Utility. Internet The Internet port is where you will connect your broadband Internet connection. 1, 2, 3, 4 These ports (1, 2, 3, 4) connect the Router to your networked PCs and other Ethernet network devices. Power The Power port is where you will connect the power adapter. Chapter 3: Getting to Know the Wireless-G Broadband Router The Back Panel IMPORTANT: Resetting the Router will erase all of your settings (Internet connection, wireless security, and other settings) and replace them with the factory defaults. Do not reset the Router if you want to retain these settings. 6 Wireless-G Broadband Router The Front Panel The Router’s SecureEasySetup button (the Cisco logo) and LEDs are located on the front panel. Figure 3-2: The Router’s Front Panel Power Green. The Power LED lights up and will stay on while the Router is powered on. When the Router goes through its self-diagnostic mode during every boot-up, this LED will flash. When the diagnostic is complete, the LED will be solidly lit. DMZ Green. The DMZ LED indicates when the DMZ function is being used. This LED will remain lit as long as DMZ is enabled. WLAN Green. The WLAN LED lights up whenever there is a successful wireless connection. If the LED is flashing, the Router is actively sending or receiving data over the network. 1, 2, 3, 4 Green. These numbered LEDs, corresponding with the numbered ports on the Router’s back panel, serve two purposes. If the LED is continuously lit, the Router is successfully connected to a device through that port. A flashing LED indicates network activity over that port. Internet Green. The Internet LED lights up when there is a connection made through the Internet port. Chapter 3: Getting to Know the Wireless-G Broadband Router The Front Panel 7 Wireless-G Broadband Router Chapter 4: Connecting the Wireless-G Broadband Router Overview This chapter includes two sets of instructions. If the Wireless-G Broadband Router will be the only router in your network, follow the instructions in “Hardware Installation for Connection to Your Broadband Modem.” If you want to install the Wireless-G Broadband Router behind another router in your network, then follow the instructions in “Hardware Installation for Connection to Another Router.” Hardware Installation for Connection to Your Broadband Modem 1. Power down your network devices. 2. Locate an optimum location for the Router. The best place for the Router is usually at the center of your wireless network, with line of sight to all of your mobile stations. 3. Fix the direction of the antennas. Try to place the Router in a position that will best cover your wireless network. Normally, the higher you place the antenna, the better the performance will be. 4. Connect a standard Ethernet network cable to the Router’s Internet port. Then, connect the other end of the Ethernet cable to your cable or DSL broadband modem. Figure 4-1: Connecting Your Internet Connection Chapter 4: Connecting the Wireless-G Broadband Router Overview 8 Wireless-G Broadband Router 5. Connect your network PCs or Ethernet devices to the Router’s numbered ports using standard Ethernet network cabling. Figure 4-2: Connecting Your Network Devices 6. Connect the AC power adapter to the Router's Power port and the other end into an electrical outlet. Only use the power adapter supplied with the Router. Use of a different adapter may result in product damage. IMPORTANT: Make sure you use the power adapter that is supplied with the Router. Use of a different power adapter could damage the Router. Figure 4-3: Connecting the Power Now that the hardware installation is complete, proceed to “Chapter 5: Setting up the Wireless-G Broadband Router,” for directions on how to configure the Router. Chapter 4: Connecting the Wireless-G Broadband Router Hardware Installation for Connection to Your Broadband Modem 9 Wireless-G Broadband Router Hardware Installation for Connection to Another Router NOTE: Steps 1-4 are instructions for a typical Linksys router; however, if you are using a non-Linksys router, refer to the other router’s documentation for instructions on how to change its local IP address to 192.168.2.1. Before you install the Router, you must change the default IP address of the other router. This is mandatory because both routers may be set to the same IP address by default. If you do not change the other router’s default IP address, then you may not be able to set up the Router. First, make sure the Router is NOT connected to your network. Then follow these instructions: 1. To access the other router’s Web-based Utility, launch Internet Explorer or Netscape Navigator, and enter the other router’s default IP address, 192.168.1.1, in the Address field. Then press Enter. 2. A password request page will appear. Leave the User Name field blank. In the Password field, enter the password you have set (the default password is admin). Then click the OK button. 3. The first screen that appears will display the Setup tab. In the Network Setup section, there is a setting called Local IP Address, which is set to 192.168.1.1. Change this to 192.168.2.1. Internet Broadband Modem 4. Click the Save Settings button to save your change, and then exit the Web-based Utility. 5. Power down your network devices. Now you will begin the hardware installation of Router. Router 6. Locate an optimum location for the Router. The best place for the Router is usually at the center of your wireless network, with line of sight to all of your mobile stations. 7. Fix the direction of the antennas. Try to place the Router in a position that will best cover your wireless network. Normally, the higher you place the antenna, the better the performance will be. 8. Connect a standard Ethernet network cable to the Router’s Internet port. Then, connect the other end of the Ethernet cable to one of the numbered Ethernet ports on your other router. Wireless-G Broadband Router Multiple PCs Figure 4-4: Diagram for Connection to Another Router Figure 4-5: Connecting Another Router Chapter 4: Connecting the Wireless-G Broadband Router Hardware Installation for Connection to Another Router 10 Wireless-G Broadband Router 9. Decide which network computers or Ethernet devices you want to connect to the Router. Disconnect the selected computers or devices from the other router, and then connect them to the Router’s numbered ports using standard Ethernet network cabling. Figure 4-6: Connecting Your Network Devices 10. Connect the AC power adapter to the Router's Power port and the other end into an electrical outlet. Only use the power adapter supplied with the Router. Use of a different adapter may result in product damage. IMPORTANT: Make sure you use the power adapter that is supplied with the Router. Use of a different power adapter could damage the Router. Figure 4-7: Connecting the Power Now that the hardware installation is complete, proceed to “Chapter 5: Configuring the Wireless-G Broadband Router”. Chapter 4: Connecting the Wireless-G Broadband Router Hardware Installation for Connection to Another Router 11 Wireless-G Broadband Router Chapter 5: Configuring the Wireless-G Broadband Router Overview Linksys recommends using the Setup CD-ROM for first-time installation of the Router. If you do not wish to run the Setup Wizard on the Setup CD-ROM, then you can use the Web-based Utility to configure the Router. For advanced users, you may configure the Router’s advanced settings through the Web-based Utility. This chapter will describe each web page in the Utility and each page’s key functions. The utility can be accessed via your web browser through use of a computer connected to the Router. For a basic network setup, most users will use these two screens of the Utility: NOTE: For first-time installation, Linksys recommends using the Setup Wizard on the Setup CD-ROM. If you want to configure advanced settings, use this chapter to learn about the Web-based Utility. HAVE YOU: Enabled TCP/IP on your PCs? PCs communicate over the network with this protocol. Refer to “Appendix D: Windows Help” for more information on TCP/IP. • Basic Setup. On the Basic Setup screen, enter the settings provided by your ISP. • Management. Click the Administration tab and then the Management tab. The Router’s default password is admin. To secure the Router, change the Password from its default. There are seven main tabs: Setup, Wireless, Security, Access Restrictions, Applications & Gaming, Administration, and Status. Additional tabs will be available after you click one of the main tabs. To access the Web-based Utility, launch Internet Explorer or Netscape Navigator, and enter the Router’s default IP address, 192.168.1.1, in the Address field. Then press Enter. A password request page will appear. (Non-Windows XP users will see a similar screen.) Leave the User Name field blank. The first time you open the Web-based Utility, use the default password admin. (You can set a new password from the Administration tab’s Management screen.) Then click the OK button. Figure 5-1: Password Screen Chapter 5: Configuring the Wireless-G Broadband Router Overview 12 Wireless-G Broadband Router The Setup Tab - Basic Setup The first screen that appears displays the Setup tab. This allows you to change the Router's general settings. Change these settings as described here and click the Save Settings button to apply your changes or Cancel Changes to cancel your changes. Internet Setup The Internet Setup section configures the Router to your Internet connection. Most of this information can be obtained through your ISP. Internet Connection Type Choose the type of Internet connection your ISP provides from the drop-down menu. • DHCP. By default, the Router’s Internet Connection Type is set to Automatic Configuration - DHCP, which should be kept only if your ISP supports DHCP or you are connecting through a dynamic IP address. • Static IP. If you are required to use a permanent IP address to connect to the Internet, select Static IP. Internet IP Address. This is the Router’s IP address, when seen from the Internet. Your ISP will provide you with the IP Address you need to specify here. Figure 5-2: Setup Tab - Basic Setup Subnet Mask. This is the Router’s Subnet Mask, as seen by users on the Internet (including your ISP). Your ISP will provide you with the Subnet Mask. Gateway. Your ISP will provide you with the Gateway Address, which is the ISP server’s IP address. Figure 5-3: DHCP Connection Type DNS. Your ISP will provide you with at least one DNS (Domain Name System) Server IP Address. Figure 5-4: Static IP Connection Type Static IP address: a fixed address assigned to a computer or device connected to a network. Chapter 5: Configuring the Wireless-G Broadband Router The Setup Tab - Basic Setup 13 Wireless-G Broadband Router • PPPoE. Some DSL-based ISPs use PPPoE (Point-to-Point Protocol over Ethernet) to establish Internet connections. If you are connected to the Internet through a DSL line, check with your ISP to see if they use PPPoE. If they do, you will have to enable PPPoE. User Name and Password. Enter the User Name and Password provided by your ISP. Connect on Demand: Max Idle Time. You can configure the Router to cut the Internet connection after it has been inactive for a specified period of time (Max Idle Time). If your Internet connection has been terminated due to inactivity, Connect on Demand enables the Router to automatically re-establish your connection as soon as you attempt to access the Internet again. If you wish to activate Connect on Demand, click the radio button. In the Max Idle Time field, enter the number of minutes you want to have elapsed before your Internet connection terminates. Figure 5-5: PPPoE Connection Type Keep Alive Option: Redial Period. If you select this option, the Router will periodically check your Internet connection. If you are disconnected, then the Router will automatically re-establish your connection. To use this option, click the radio button next to Keep Alive. In the Redial Period field, you specify how often you want the Router to check the Internet connection. The default Redial Period is 30 seconds. • PPTP. Point-to-Point Tunneling Protocol (PPTP) is a service that applies to connections in Europe only. Specify Internet IP Address. This is the Router’s IP address, as seen from the Internet. Your ISP will provide you with the IP Address you need to specify here. Subnet Mask. This is the Router’s Subnet Mask, as seen by users on the Internet (including your ISP). Your ISP will provide you with the Subnet Mask. Gateway. Your ISP will provide you with the Gateway Address. User Name and Password. Enter the User Name and Password provided by your ISP. Figure 5-6: PPTP Connection Type Connect on Demand: Max Idle Time. You can configure the Router to cut the Internet connection after it has been inactive for a specified period of time (Max Idle Time). If your Internet connection has been terminated due to inactivity, Connect on Demand enables the Router to automatically re-establish your connection as soon as you attempt to access the Internet again. If you wish to activate Connect on Demand, click the radio button. In the Max Idle Time field, enter the number of minutes you want to have elapsed before your Internet connection terminates. Keep Alive Option: Redial Period. If you select this option, the Router will periodically check your Internet connection. If you are disconnected, then the Router will automatically re-establish your connection. To use this option, click the radio button next to Keep Alive. In the Redial Period field, you specify how often you want the Router to check the Internet connection. The default Redial Period is 30 seconds. Chapter 5: Configuring the Wireless-G Broadband Router The Setup Tab - Basic Setup 14 Wireless-G Broadband Router • L2TP. Layer 2 Tunneling Protocol (L2TP) is a service that applies to connections in Europe only. User Name. Enter the User Name provided by your ISP. Password. Enter the Password provided by your ISP. L2TP Server. Enter the IP address of the L2TP server you are using; this should be provided by your ISP. Connect on Demand. If you want the Router to end the Internet connection after it has been inactive for a period of time, select Connect on Demand and designate the number of minutes you want that period of inactivity to last. Figure 5-7: L2TP Connection Type Keep Alive. If you want the Router to periodically check your Internet connection, select Keep Alive. Then specify how often you want the Router to check the Internet connection. If the connection is down, the Router will automatically re-establish your connection. • Telestra Cable. Telestra Cable is a service that applies to connections in Australia only. If your ISP is Telstra, then select Telestra Cable. User Name and Password. Enter the User Name and Password provided by your ISP. Heart Beat Server. This is the IP address that the Router has, when seen from the Internet. Your ISP will provide you with the IP Address you need to specify here. Connect on Demand. If you want the Router to end the Internet connection after it has been inactive for a period of time, select Connect on Demand and designate the number of minutes you want that period of inactivity to last. Keep Alive. If you want the Router to periodically check your Internet connection, select Keep Alive. Then specify how often you want the Router to check the Internet connection. If the connection is down, the Router will automatically re-establish your connection. Figure 5-8: Telestra Cable Connection Type Chapter 5: Configuring the Wireless-G Broadband Router The Setup Tab - Basic Setup 15 Wireless-G Broadband Router Optional Settings Some of these settings may be required by your ISP. Verify with your ISP before making any changes. Router Name. In this field, you can type a name of up to 39 characters to represent the Router. Host Name/Domain Name. These fields allow you to supply a host and domain name for the Router. Some ISPs, usually cable ISPs, require these names as identification. You may have to check with your ISP to see if your broadband Internet service has been configured with a host and domain name. In most cases, leaving these fields blank will work. Figure 5-9: Optional Settings MTU. MTU is the Maximum Transmission Unit. It specifies the largest packet size permitted for Internet transmission. The default setting, Manual, allows you to enter the largest packet size that will be transmitted. The recommended size, entered in the Size field, is 1492. You should leave this value in the 1200 to 1500 range. To have the Router select the best MTU for your Internet connection, select Auto. Network Setup The Network Setup section changes the settings on the network connected to the Router’s Ethernet ports. Wireless Setup is performed through the Wireless tab. Router IP This presents both the Router’s IP Address and Subnet Mask as seen by your network. Chapter 5: Configuring the Wireless-G Broadband Router The Setup Tab - Basic Setup Figure 5-10: Router IP 16 Wireless-G Broadband Router Network Address Server Settings (DHCP) The settings allow you to configure the Router’s Dynamic Host Configuration Protocol (DHCP) server function. The Router can be used as a DHCP server for your network. A DHCP server automatically assigns an IP address to each computer on your network. If you choose to enable the Router’s DHCP server option, you must configure all of your network PCs to connect to a DHCP server (the Router), and make sure there is no other DHCP server on your network. DHCP Server. DHCP is enabled by factory default. If you already have a DHCP server on your network, or you don’t want a DHCP server, then click the Disable radio button (no other DHCP features will be available). Starting IP Address. Enter a value for the DHCP server to start with when issuing IP addresses. Because the Router’s default IP address is 192.168.1.1, the Starting IP Address must be 192.168.1.2 or greater, but smaller than 192.168.1.253. The default Starting IP Address is 192.168.1.100. Figure 5-11: Network Address Server Settings Maximum Number of DHCP Users. Enter the maximum number of PCs that you want the DHCP server to assign IP addresses to. This number cannot be greater than 253. The default is 50. Client Lease Time. The Client Lease Time is the amount of time a network user will be allowed connection to the Router with their current dynamic IP address. Enter the amount of time, in minutes, that the user will be “leased” this dynamic IP address. After the time is up, the user will be automatically assigned a new dynamic IP address. The default is 0 minutes, which means one day. Static DNS (1-3). The Domain Name System (DNS) is how the Internet translates domain or website names into Internet addresses or URLs. Your ISP will provide you with at least one DNS Server IP Address. If you wish to use another, type that IP Address in one of these fields. You can type up to three DNS Server IP Addresses here. The Router will use these for quicker access to functioning DNS servers. WINS. The Windows Internet Naming Service (WINS) manages each PC’s interaction with the Internet. If you use a WINS server, enter that server’s IP Address here. Otherwise, leave this blank. Time Setting Change the time zone in which your network functions from this pull-down menu. (You can even automatically adjust for daylight savings time.) Figure 5-12: Time Setting Chapter 5: Configuring the Wireless-G Broadband Router The Setup Tab - Basic Setup 17 Wireless-G Broadband Router The Setup Tab - DDNS The Router offers a Dynamic Domain Name System (DDNS) feature. DDNS lets you assign a fixed host and domain name to a dynamic Internet IP address. It is useful when you are hosting your own website, FTP server, or other server behind the Router. Before you can use this feature, you need to sign up for DDNS service with a DDNS service provider, www.dyndns.org or www.TZO.com. Select your DDNS service, DynDNS or TZO, from the DDNS Service pull-down menu. You may be asked for a User Name, Password, E-mail Address, Domain Name, or Host Name. Simply enter the appropriate information for your DDNS account. The following information will also be displayed. Internet IP Address. This is the Router’s current IP Address as seen on the Internet. Figure 5-13: Setup Tab - DDNS - DynDNS account Status. This displays the status of the DDNS connection. Change these settings as described here and click the Save Settings button to apply your changes or Cancel Changes to cancel your changes. Figure 5-14: Setup Tab - DDNS - TZO account Chapter 5: Configuring the Wireless-G Broadband Router The Setup Tab - DDNS 18 Wireless-G Broadband Router The Setup Tab - MAC Address Clone A MAC address is a 12-digit code assigned to a unique piece of hardware for identification. Some ISPs will require you to register a MAC address in order to access the Internet. If you do not wish to re-register the MAC address with your ISP, you may assign the MAC address you have currently registered with your ISP to the Router with the MAC Address Clone feature. Enable/Disable. To have the MAC Address cloned, click the radio button beside Enable. User Defined Entry. Enter the MAC Address registered with your ISP here. Clone Your PC’s MAC Address. Clicking this button will clone the MAC address. Figure 5-15: Setup Tab - MAC Address Clone Change these settings as described here and click the Save Settings button to apply your changes or Cancel Changes to cancel your changes. Chapter 5: Configuring the Wireless-G Broadband Router The Setup Tab - MAC Address Clone 19 Wireless-G Broadband Router The Setup Tab - Advanced Routing This tab is used to set up the Router’s advanced functions. Operating Mode allows you to select the type(s) of advanced functions you use. Dynamic Routing will automatically adjust how packets travel on your network. Static Routing sets up a fixed route to another network destination. Operating Mode. Select the mode in which this Router will function. If this Router is hosting your network’s connection to the Internet, select Gateway. If another Router exists on your network, select Router. When Router is chosen, Dynamic Routing will be enabled. Dynamic Routing. This feature enables the Router to automatically adjust to physical changes in the network’s layout and exchange routing tables with the other router(s). The Router determines the network packets’ route based on the fewest number of hops between the source and the destination. This feature is Disabled by default. From the drop-down menu, you can also select LAN & Wireless, which performs dynamic routing over your Ethernet and wireless networks. You can also select WAN, which performs dynamic routing with data coming from the Internet. Finally, selecting Both enables dynamic routing for both networks, as well as data from the Internet. Static Routing. To set up a static route between the Router and another network, select a number from the Static Routing drop-down list. (A static route is a pre-determined pathway that network information must travel to reach a specific host or network.) Enter the information described below to set up a new static route. (Click the Delete This Entry button to delete a static route.) Figure 5-16: Setup Tab - Advanced Routing (Gateway) Enter Route Name. Enter a name for the Route here, using a maximum of 25 alphanumeric characters. Destination LAN IP. The Destination LAN IP is the address of the remote network or host to which you want to assign a static route. Subnet Mask. The Subnet Mask determines which portion of a Destination LAN IP address is the network portion, and which portion is the host portion. Default Gateway. This is the IP address of the gateway device that allows for contact between the Router and the remote network or host. Interface. This interface tells you whether the Destination IP Address is on the LAN & Wireless (Ethernet and wireless networks), the WAN (Internet), or Loopback (a dummy network in which one PC acts like a network— necessary for certain software programs). Click the Show Routing Table button to view the Static Routes you’ve already set up. Change these settings as described here and click the Save Settings button to apply your changes or Cancel Changes to cancel your changes. Chapter 5: Configuring the Wireless-G Broadband Router The Setup Tab - Advanced Routing Figure 5-17: Setup Tab - Advanced Routing (Router) 20 Wireless-G Broadband Router The Wireless Tab - Basic Wireless Settings The basic settings for wireless networking are set on this screen. Wireless Network Mode. From this drop-down menu, you can select the wireless standards running on your network. If you have both 802.11g and 802.11b devices in your network, keep the default setting, Mixed. If you have only 802.11g devices, select G-Only. If you have only 802.11b devices, select B-Only. If you do not have any 802.11g and 802.11b devices in your network, select Disable. Wireless Network Name (SSID). The SSID is the network name shared among all devices in a wireless network. The SSID must be identical for all devices in the wireless network. It is case-sensitive and must not exceed 32 characters (use any of the characters on the keyboard). Make sure this setting is the same for all devices in your wireless network. For added security, you should change the default SSID (linksys) to a unique name. Figure 5-18: Wireless Tab - Basic Wireless Settings Wireless Channel. Select the appropriate channel from the list provided to correspond with your network settings. All devices in your wireless network must be broadcast on the same channel in order to function correctly. Wireless SSID Broadcast. When wireless clients survey the local area for wireless networks to associate with, they will detect the SSID broadcast by the Router. To broadcast the Router's SSID, keep the default setting, Enable. If you do not want to broadcast the Router's SSID, then select Disable. Change these settings as described here and click the Save Settings button to apply your changes or Cancel Changes to cancel your changes. Chapter 5: Configuring the Wireless-G Broadband Router The Wireless Tab - Basic Wireless Settings 21 Wireless-G Broadband Router The Wireless Tab - Wireless Security The Wireless Security settings configure the security of your wireless network. There are four wireless security mode options supported by the Router: WPA Personal, WPA Enterprise, WPA2 Personal, WPA2 Enterprise, RADIUS, and WEP. (WEP stands for Wired Equivalent Privacy, WPA stands for Wi-Fi Protected Access, which is a security standard stronger than WEP encryption. WPA2 is stronger than WPA. WPA Enterprise is WPA used in coordination with a RADIUS server. RADIUS stands for Remote Authentication Dial-In User Service.) These are briefly discussed here. For detailed instructions on configuring wireless security for the Router, turn to “Appendix B: Wireless Security.” IMPORTANT: If you are using WPA, always remember that each device in your wireless network MUST use the same WPA method and shared key, or else the network will not function properly. WPA Personal. WPA gives you two encryption methods, TKIP and AES, with dynamic encryption keys. Select the type of algorithm, TKIP or AES. Enter a WPA Shared Key of 8-63 characters. Then enter a Group Key Renewal period, which instructs the Router how often it should change the encryption keys. Figure 5-19: Wireless Tab - Wireless Security (WPA Personal) WPA Enterprise. This option features WPA used in coordination with a RADIUS server. (This should only be used when a RADIUS server is connected to the Router.) First, select the type of WPA algorithm you want to use, TKIP or AES. Enter the RADIUS server’s IP Address and port number, along with a key shared between the Router and the server. Last, enter a Key Renewal Timeout, which instructs the Router how often it should change the encryption keys. Figure 5-20: Wireless Tab - Wireless Security (WPA Enterprise) Chapter 5: Configuring the Wireless-G Broadband Router The Wireless Tab - Wireless Security 22-
 1
1
-
 2
2
-
 3
3
-
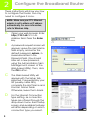 4
4
-
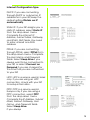 5
5
-
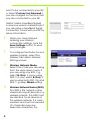 6
6
-
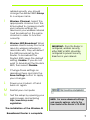 7
7
-
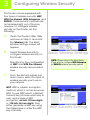 8
8
-
 9
9
-
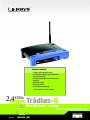 10
10
-
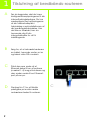 11
11
-
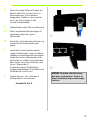 12
12
-
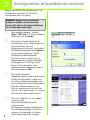 13
13
-
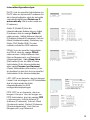 14
14
-
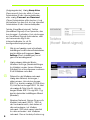 15
15
-
 16
16
-
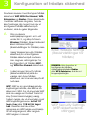 17
17
-
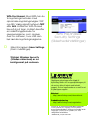 18
18
-
 19
19
-
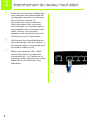 20
20
-
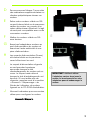 21
21
-
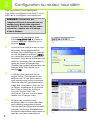 22
22
-
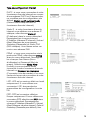 23
23
-
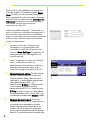 24
24
-
 25
25
-
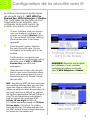 26
26
-
 27
27
-
 28
28
-
 29
29
-
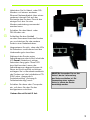 30
30
-
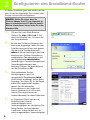 31
31
-
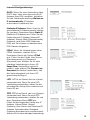 32
32
-
 33
33
-
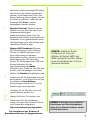 34
34
-
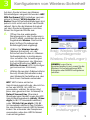 35
35
-
 36
36
-
 37
37
-
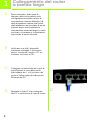 38
38
-
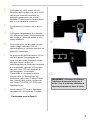 39
39
-
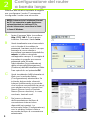 40
40
-
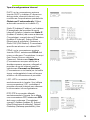 41
41
-
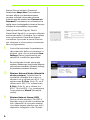 42
42
-
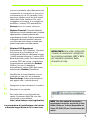 43
43
-
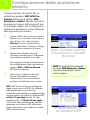 44
44
-
 45
45
-
 46
46
-
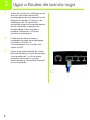 47
47
-
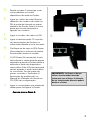 48
48
-
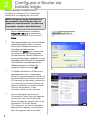 49
49
-
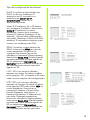 50
50
-
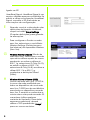 51
51
-
 52
52
-
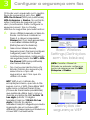 53
53
-
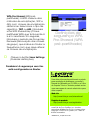 54
54
-
 55
55
-
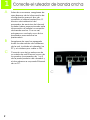 56
56
-
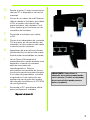 57
57
-
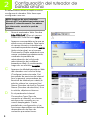 58
58
-
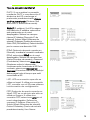 59
59
-
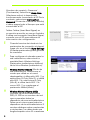 60
60
-
 61
61
-
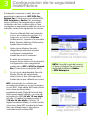 62
62
-
 63
63
-
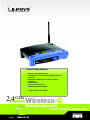 64
64
-
 65
65
-
 66
66
-
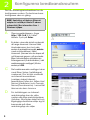 67
67
-
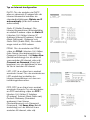 68
68
-
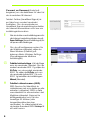 69
69
-
 70
70
-
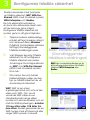 71
71
-
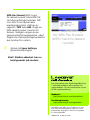 72
72
-
 73
73
-
 74
74
-
 75
75
-
 76
76
-
 77
77
-
 78
78
-
 79
79
-
 80
80
-
 81
81
-
 82
82
-
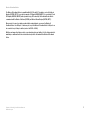 83
83
-
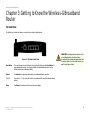 84
84
-
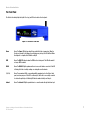 85
85
-
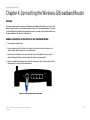 86
86
-
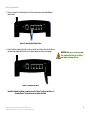 87
87
-
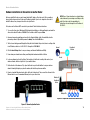 88
88
-
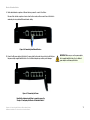 89
89
-
 90
90
-
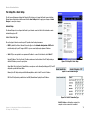 91
91
-
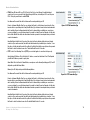 92
92
-
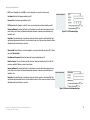 93
93
-
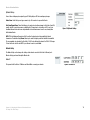 94
94
-
 95
95
-
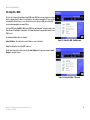 96
96
-
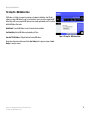 97
97
-
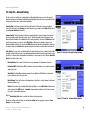 98
98
-
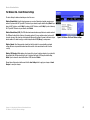 99
99
-
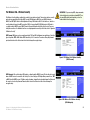 100
100


Linksys Q87-WRK54GV3 Manual de usuario
- Categoría
- Enrutadores
- Tipo
- Manual de usuario
- Este manual también es adecuado para
En otros idiomas
- français: Linksys Q87-WRK54GV3 Manuel utilisateur
- English: Linksys Q87-WRK54GV3 User manual
- português: Linksys Q87-WRK54GV3 Manual do usuário
- dansk: Linksys Q87-WRK54GV3 Brugermanual
- svenska: Linksys Q87-WRK54GV3 Användarmanual
Documentos relacionados
-
Cisco WRT320N Manual de usuario
-
Linksys WRT54G El manual del propietario
-
Linksys WRT54G(EU/LA) Manual de usuario
-
Linksys X1000 El manual del propietario
-
Cisco X2000 El manual del propietario
-
-
Linksys WAG200G Manual de usuario
-
-
Linksys WRT54G2 El manual del propietario
-
Linksys E7350 Guía del usuario
Otros documentos
-
 Corega 613-00041-01 Manual de usuario
-
Dynex DX-EBNBC - Wireless G Notebook Card Manual de usuario
-
-
Dynex DX-WEGRTR Manual de usuario
-
-
Belkin F5D7632EA4A Manual de usuario
-
Topcom WBR 7011 B Manual de usuario
-
Vivanco WLAN ROUT 54-N El manual del propietario
-
Dynex DX-E402 El manual del propietario
-
König CMP-WNROUT41 Guía de instalación
