WINTAIR AP-08CK1FDS Guía del usuario
- Tipo
- Guía del usuario

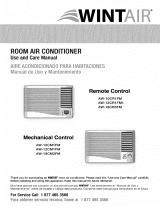
Portable Air Conditioner
Use and Care Manual
Thank you very much for purchasing a Wintair Air Conditioner,
please read this Use and Care Manual carefully before installing
and using this appliance and keep this manual for future reference.
Muchas gracias por comprar un Aire Acondicionado Wintair.
Lea este Manual de Uso y Mantenimiento detenidamente
antes de instalary usar este electrodom stico y conserve
este manual para consultarlo en el futuro.
For service, call 1 877 465 3566
Para obtener servicio t cnico, llame al 1 877 465 3566
Aire Acondicionado Portatil
Manual de Uso y Mantenimiento
,

CONTENTS
CONTENIDO
Identification of parts
Identificacion de las piezas
Control panel
Panel de control
Identification of parts
Identificacion de las piezas
Operation modes
Modos de funcionamiento
Introduction
Iintroduccion
Maintenance
Mantenimiento
Protection
Proteccion
Troubleshooting
Solucion de problemas
Installation instructions
Instrucciones de instalacion
Selecting the installation location
Seleccion de la ubicacion para la instalacion
Accessories and window kit installation
Instalacion de accesorios y juego de ventana
Notes
Warranty
Garantia
Notas
1
12
2
13
3
14
6
15
8
17
7
16
9
18
4
19
5
20
10
11
22
21
,
,
,
,
,
,
,
,
,
,

Introduction
1
1. All wiring must comply with local and national electrical codes and be installed by a qualified electrician.
If you have any questions regarding the following instructions, contact a qualified electrician.
Thank you for choosing this portable air conditioner to provide you and your family with all of the
Home Comfort requirements for your home, cottage or office. The appliance can be moved
from room to room within your home and set-up in just minutes.
It is a multi-functional room air exchanging, air-processing appliance, designed to offer you the
functions of : Air Conditioning, Dehumidifying, Heating(for heating model only) and Independent Fan.
This manual will provide you with valuable information necessary for the proper care and maintenance
for your new appliance. Please take a few moments and read the instructions thoroughly. If properly
maintained, your appliance will give you many years of trouble free operation.
2. Check available power supply and resolve any wiring problems before installation and operation of
this unit.
3. For your safety and protection, this unit is grounded through the power cord plug when plugged into
a matching wall outlet. If you are not sure whether the wall outlets in your home are properly
grounded, please consult an electrician. Do not use plug adapters or extension cords with this unit.
If it is necessary to use an extension cord,please use a heavy appliance extension cord only(available
at most local hardware stores).
Electrical Specifications

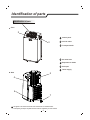
The figures in this manual are based on the external view of a standard model.
Consequently, the shape may differ from that of the air conditioner you have selected.
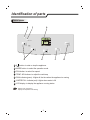
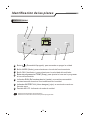
Identification of parts
2
1
2
3
4
5
7
6
Control panel
Cold air outlet
Transport handle
Evaporator air intake
Drain port
Air outlet hose
Power supply
Identification of parts
1
2
4
6
7
5
Front
Back
3

AD
C
B
RUN
WATER FULL
TEMP.
A
D
J.
F
A
N
LowLow
HighHigh
Ò£¿ØÆ÷
MODE
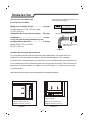
Identification of parts
3
A
B
C
button: to start or stop the appliance
MODE button: to select the operation mode
FAN button: to select fan speed
3
E
F
G
TEMP. ADJ buttons: to adjust the real temp
RUN indicator(green): it lights all the time when the appliance is running
WATER FULL indicator(red): it lights when water is full
LCD display: to display the appliance running status.
D
Control panels
D
E
F
G
Display room temperature
Display set temperature with flashing
A
B
C

4
FIGURE 1 FIGURE 2
Installation
Installation accessories
Description
Quantity
Window kit installation
Your window kit has been designed to fit most standard
vertical and horizontal window applications. However, it
may be necessary for you to improvise/modify some
aspects of the installation procedures for certain types of
windows. Please refer to Figures 1 & 2 below for minimum
and maximum window openings.
Window slider kit
minimum: 28 1/8"(72cm)
maximum:55 3/8"(140cm)
Window slider kit
minimum: 28 1/8"(72cm)
maximum:55 3/8"(140cm)
Air outlet hose.......................... .............. 1/set
stretches from 17 3/4"(45cm) up to
70 5/8"(180cm)
Window exhaust adapter............ ............
Adapter............ ..........................................
2/set
1pc
Window/patio door slider kit.....................
3/set
from 28 3/8"(72cm) up to
55 5/8"(140cm)
Air outlet hose
Window exhaust adapter
Adapter
Window/patio door slider kit
Note: Window kit is only available for some models.

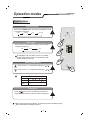
Each time the MODE button is pressed, the operation mode
is changed in sequence:
Each time the "FAN" button is pressed, the fan speed is
changed in sequence:
18 (64 )
~
32 (90 )
fan only
smart
cooling
dry
Selecting mode
FAN mode
2(4)
+
-
Auto
High
Low
At "FAN ONLY" mode, only "High" and "Low" are available.
At "DRY" mode, airflow is set at "Low" automatically, "FAN"
button is ineffective in this case.
Setting temperature
Press once to temperature setting by 1lower (2 )
Press once to temperature setting by 1 (2 )raise
Range of available set temperatures
COOLING
DRY
FAN
unable to set
room temperature
Turning on
Press button, when the appliance receives the
signal, the RUN indicator of the air conditioner lights up.
When changing modes during operation, the unit does not always immediately respond.
Wait 3 minutes before restarting the appliance.
ONLY
Operation modes
6
Operation modes
RUN
WATER FULL
TEMP.
A
D
J.
F
A
N
LowLow
HighHigh
Ò£¿ØÆ÷
MODE
2
4
3
1

5
Installation instructions
Select the
best l
oca
tion
Install
atio
n in
stru
ctio
n
Ins
tall
ation sequenc
e
Before starting th
is u
nit
Bes
ide a
window, a
door or
a Fr
ench win
dow.
Kee
p th
e requir
ed distan
ce fr
om
the
retu
rn a
ir outlet to the wall or oth
er o
bsta
cles
at le
ast 5
0cm
.
Fix o
ne end o
f the
air
hose
on
the
air
outlet un
derside t
he a
pplia
nce.
Extend t
he a
ir ho
se to
insure the other
end of t
he air ho
se has clearanc
e betwee
n th
e windo
w, doo
r,
or French window, or w
all h
ole.
Air o
utlet or
inta
ke cann
ot be blocked by protective g
rid o
r an
y obstac
le.
Note: water
shou
ld be drained out
when
the w
ater fu
ll light is on
.
Air outlet or intake indoor side cannot be blocked by a curtain, or any obstacle.
The end of the air hose cannot be blocked by a shutter or any obstacle.
Do not bend the air hose when assembling; keep it straight as in FIGURE 3.
When the appliance is in cool or dry mode, condensation will concentrate in water box of chassis.
when the box is full, water full indicator shows red. The compressor stops running at the same time,
the motor and fan will continuous operation. Now the power supply should be shut off, then pull out
the rubber plug in drain port underside the appliance, drain the water into a prepared container, or
drain the water by moving the appliance to a suitable place.
1. Select a suitable location, make sure you have easy access
to an electrical outlet.
2. Install the flexible exhaust hose and adjustable window slider
kit as depicted in FIGURE 3.
3. Plug the appliance into a grounded electrical outlet. Please select an appropriate power
supply basis the nameplate.
4. Turn the appliance on, press On/Off button.
FIGURE 3
While running or installing, the hoses cannot be blocked
by curtains or any obstacle.
Note: Do not use a regular extension cord. If it is necessary to use an extension cord with this unit,
use an approved "air conditioner" extension cord only.
(Available at most local hardware stores)
Note:

FIGURE 3
(FIGURA 2)
(FIGURA 1)
(FIGURA 3)
FIGURE 1
FIGURE 2
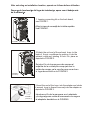
2.Attach the unit end of the exhaust hose to the
back of the
air conditioner by pushing it into the
exhaust outlet and twisting to lock it in place as
depicted in FIGURE 2.
Sujeta el fin de la manguera de escape al
espalda de la unidad para empujarla en la
salida de escape ya la enrolle para cerrarla en
el lugar describido en la FIGURA 2.
3.Insert the end of the hose into the adapter and rotate
it several turns to thread it securely into the adapter as
depicted in FIGURE 3.
Introduzca el fin de la manguera en el adaptador
y la doga algunaa vueltas a amenazarla con segura
al adaptador decribido en le FIGURA3.
1. Loosing connecting lid on the back board,
see FIGURE 1.
A
floje la tapa de conexi n de la tabla espalda.
Vea FIGURA 1.
After selecting an installation location, operate as follows before utilization
Despu s de la selecci n del lugar de instalaci n, opere con el debajo ante
de la utilizaci n
(Adaptador)

Operating conditions
The protective device may trip and stop the appliance in the cases listed below.
COOLING
DRY
Room temperature is below
Room temperature is below
If the plug is taken out when you restart the appliance, it will return to the original mode.
Drain water
In COOLING or DRY operation, it is possible that water full indicator(red) lights up.Please
cut off the power supply, move the appliance to a suitable place to pull out the water plug
and drain the water. After this, be sure to re-install the plug or the appliance may leak and
make your room wet.
If the appliance is placed in a position admitting drain water, you also can connect the drain
hose to the drain port to drain water.
7
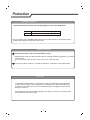
Protection
Features of protector
The protective device will work in the following cases.
Restarting the unit at once after operation stops or changing mode during operation, you need to
wait 3 minutes.
Connect to power supply and turn on the unit at once, it may start later.
If the air conditioner runs in COOLING or DRY mode with door or window opened for a long time when relative
humidity is above 80%,dew may drip down from the outlet.
18 (64 )
18 (64 )

Turn off the appliance
first before disconnecting
from the power supply.
It is necessary to clean the air filter
after using it for about 100 hours.
Clean it as follows:
Appliance maintenance
Maintenance after using
Air filter maintenance
Cut off the power supply
Never use volatile substance
such as gasoline or polishing
powder to clean the appliance.
Clean and reinstall the air filter.
1. If the appliance will not be used for a long time, be sure to Pull out the rubber plug of the
drain port underside in order to drain the water.
2. Keep the appliance running with the FAN mode for a half day during a sunny day to dry
the appliance inside and to prevent from going moldy.
3. Stop the appliance and pull out the power supply plug, store the appliance properly.
4. Clean the air filter and reinstall it.
5. Remove the air hoses and store them properly, and cover the hole tightly.
Wipe with a soft
and dry cloth.
Use lukewarm water
(below 104 ) to clean
if the appliance
is very dirty.
Never sprinkle water onto the
main unit
If the dirt is noticeable,
wash it with a detergent in
lukewarm water.After
cleaning, dry it in a
shaded and cool place,
and then reinstall it.
Stop the appliance first,
then push up the air filter.
Clean the air filter every two weeks
if the air conditioner operates in an
extremely dusty environment.
Stop the appliance
and remove the air
filter.
soft cloth to
clean it.
Use a dry and
8
Maintenance
Electric
shock!
Dangerous!

Trouble Analysis
Does not run
Runs for a short while only
Runs but not cooling
Water leak during
moving
Drain the condensate before moving.
Does not run and water full
indicator lights
Pull out the rubber plug to drain the water.
If it is often in this state, please contact
licensed service technician.
The protector trip or fuse is blown.
The plug is not properly plugged in.
Wait for 3 minutes and start again,
protector device may be preventing unit to work.
The following cases may not always be a malfunction, please check suggestions below before asking
for service.
The set temperature is close to room
temperature, you can lower the set temperature.
Air outlet blocked by obstacle.
Take the obstacle away.
A door or window is open.
Another appliance heat working like a
heater or lamp, etc. .
The air filter is dirty, please clean it.
Air outlet or intake blocked.
Set temperature is too high.
7
Troubleshooting
don't cool

Please read this manual before installing and using the portable air conditioner.
Do not let air enter the refrigeration system or discharge refrigerant when moving the air conditioner.
Test run the air conditioner after finishing installation, and record details of operation.
Type of fuse used on indoor unit controller is 50T, with a rating 3.15 A,T,250V.
The fuse for the unit is to be provided by the user according to the current at maximum power
input or use.
10
Notes
Notes

Warranty
11
5 YEAR FULL WARRANTY
This product is warranted for 5 years from the date of original purchase. Any part
which fails in materials or workmanship will be replaced within the warranty period.
This warranty covers in home service. A copy of your proof of purchase, with date of
purchase and product name included, is required to arrange this service repair.
For the name and location of an authorized service provider nearest you, please
CALL 1-877-465-3566. Please reference product name, brand name, and model
This warranty does not apply if the damage occurs because of accident, improper
handling or operation, shipping damage, abuse, misuse, unauthorized repairs
made or attempted, or the use of the product for commercial use, or any other use
ALL WARRANTIES, EXPRESSED OR IMPLIED, LAST FOR 5 YEARS FROM THE
DATE OF ORIGINAL PURCHASE. THIS WARRANTY DOES NOT COVER
LIABILITY FOR INCIDENTAL OR CONSEQUENTIAL DAMAGES FOR ANY
This warranty is extended to the original owner and any succeeding owner for
products purchased for home use within the USA. Some states do not allow the
exclusion or limitation of incidental or consequential damages. This warranty
gives you specific rights, and you may also have other rights which may vary from
state to state. To know what your legal rights are, consult your local or state
number when you call.
for which it was not intended.
CAUSE WHATSOEVER.
consumer affairs office or your state's Attorney General.

12
Introduccion
Especificaciones Electricas
1. Todos los cables deben cumplir con los codigos electricos locales y nacionales y lo
s debe instalar un electricista autorizado. Si tiene preguntas relacionadas con las siguiente
s instrucciones, comuniquese con un electricista autorizado.
2. Verifique el suministro de energia disponible y resuelva cualquier problema con
los cables antes de instalar y hacer funcionar esta unidad.
3. Para su seguridad y proteccion, esta unidad esta conectada a tierra a traves del cable d
e alimentacion (solo cuando se lo enchufa a un tomacorriente de pared provisto de conexion
a tierra). Si no esta segurode que los tomacorrientes de pared de su hogar cuentan con la
conexion a tierra apropiada, consulte con un electricista. No utilice adaptadores de enchufe
ni cables de extension. Si es necesario utilizar un cable de extension, solo use un cable de
extension para electrodomesticos pesados (disponible en la mayoria de las ferreterias locales).
Gracias por elegir este aire acondicionado portatil para cubrir sus necesidades de Comodidad
para el Hogar y las de su familia, en su casa, su cabana o su oficina. La unidad se puede
trasladar de una habitacion a otra e instalar en cuestion de minutos.
Es un electrodomestico multifuncional, renovador y purificador de aire, disenado para o
frecer las siguientes funciones: Aire Acondicionado, Deshumidificador, Calefactor (solo
en el modelo con calefaccion) y Ventilador Independiente.
Este manual le brindara informacion valiosa y necesaria para el cuidado y el mantenimiento
adecuados de su nuevo aire acondicionado. Tomese un momento para leer todas las instrucciones.
Si le brinda el mantenimiento apropiado, funcionara sin problemas durante muchos anos.
,
,
,
,
,
,
,
,
,
,
,
,
,
,
,
,
,
,
,
,
,
,
,
,
,
,
,
,
,
~
~
~

13
1
2
3
4
5
7
6
1
2
4
6
7
5
3
Identificacion de las piezas
Identificacion de las piezas
1
2
Anverso
Reverso
7
6
Panel de control
Salida de aire frio
Mango de transporte
Manguera para salida de aire
Entrada de aire del evaporador
Orificio de drenaje
Suministro de energia
Las imagenes de este manual estan basadas en la vista externa de un modelo estandar.
En consecuencia, es probable que la forma sea diferente a la del aire acondicionado que usted selecciono.
,
,
,
,
,
,
,
,

AD
C
B
RUN
WATER FULL
TEMP.
A
D
J.
F
A
N
LowLow
HighHigh
Ò£¿ØÆ÷
MODE
14
A
B
C
3
E
F
G
D
D
E
F
G
A
B
C
Identificacion de las piezas
Paneles de control
B
C
Boton (Encendido/Apagado): para encender o apagar la unidad
Boton MODE (Modo): para seleccionar el modo de funcionamiento
Boton FAN (Ventilador): para seleccionar la velocidad del ventilador
Boton de programacion TEMP(Temp): para ajustar la hora real o programar
la hora de encendido
Indicador se mantiene encendido
constantemente durante el funcionamiento de la unidad
RUN (En funcionamiento) (verde):
Indicador WATER FULL (Lleno de agua) (rojo): se enciende cuando se
llena de agua
Pantalla de LCD: Indicacion el mode de unidad
D
Muestra la temperatura de la habitacion
Muestra en forma intermitente la temperatura programada
,
,
,
,
,,
,
,

15
Instalacion
Accesorios de instalacion
Descripcion Cantidad
Manguera de salida de aire................. 1/juego
se estira desde 17 3/4" (45 cm) hasta
70 5/8" (180 cm)
Adaptador de escape para ventana.....
Adaptador........................................
2/juego
1 pieza
Juego de guia de desplazamiento para
ventana/puerta de patio...................... 3/juego
desde 28 3/8" (72 cm) hasta
55 5/8" (140 cm)
Instalacion del juego para ventana
Su juego para ventana ha sido disenado para adaptarse a la mayoria de las
aplicaciones en ventanas verticales y horizontales estandar. Sin embargo,
posiblemente sea necesario que usted improvise o modifique algunos aspectos de
los procedimientos de instalacion para ciertos tipos de ventanas. Para conocer las
aperturas de ventana minima y maxima, mire las Figuras 1 y 2 que se encuentran
a continuacion.
Nota: El juego de ventana solo esta disponible en algunos modelos.
Juego de guia
Juego de guia
Minimo: 28 1/8" (72 cm)
Minimo: 28 1/8" (72 cm)
Maximo: 55 3/8" (140 cm) Maximo: 55 3/8" (140 cm)
Manguera de salida de aire
Adaptador de escape
para ventana
Adaptador
FIGURA 1
FIGURA 2
Juego de guia de desplazamiento para
ventana/puerta de patio
~

16
FIGURA3
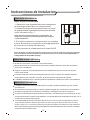
Instrucciones de instalacion
Seleccione la mejor ubicacion
Al lado de una ventana, una puerta o una puerta ventana.
Mantenga la distancia necesaria de al menos 50 cm desde la salida de retorno del aire hasta la
pared u otros obstaculos.
Asegure un extremo de la manguera de aire en la salida de aire que se encuentra en la parte
inferior de la unidad.
Extienda la manguera de aire para asegurarse de que el otro extremo de la manguera de aire
tenga espacio entre la ventana, la puerta, la puerta ventana o el boquete de la pared.
La salida o entrada de aire no pueden quedar bloqueadas por rejillas protectoras u otro obstaculo.
Instrucciones de instalacion
La salida o el lado interior de la entrada de aire no pueden quedar bloqueados por una cortina u
otro obstaculo.
El extremo de la manguera de aire no puede quedar bloqueado por una persiana u otro obstaculo.
No doble la manguera de aire durante el ensamblaje, mantegala recta como en la figura 3.
Cuando la unidad este en modo Enfriamiento o Secado, la condensacion se concentrara en la caja
de agua del armazon. Cuando la caja este llena, el indicado Water Full mostrara una luz roja y en la
ventana de LCD aparecera el signo E.
La unidad dejara de funcionar al mismo tiempo. Ahora el suministro de energia debera cortarse,
luego habra que quitar el tapon de goma del orificio de drenaje de la parte inferior de la unidad,
purgar el agua en un contenedor preparado o purgarla trasladando la unidad a un lugar adecuado
Nota: el agua se debera purgar cuando este encendida la luz del indicador Water Full; de lo contrario, la unidad no
Funcionara cuando la vuelva a iniciar.
Secuencia de instalacion
Antes de iniciar esta unidad
1. Seleccione una ubicacion adecuada y asegurese
de que tenga acceso facil a un tomacorriente.
3. Enchufe la unidad en un tomacorriente con conexion
a tierra. Seleccione un suministro de energia apropiado
de acuerdo con la placa del fabricante.
4. Para encender la unidad presione el boton On/Off.
Nota: No utilice un cable de extension normal. Si es necesario utilizar un cable de extension
con esta unidad, utilice solamente uno autorizado para aire acondicionado (disponible en
la mayoria de las ferreterias locales).
2. Instale la manguera de escape flexible y el juego
de guia ajustable de desplazamiento para ventana
como lo muestra la Fig. 1.
Nota: Durante el funcionamiento o la instalacion, las
mangueras no pueden quedar bloqueadas por cortinas
u otros obstaculos.

17
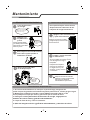
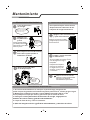
Mantenimiento
Mantenimiento de la Unidad
Corte el suministro
de energia.
Apague el aire acondicionado
antes de desconectarlo del
suministro de energia.
Limpielo con
un pano suave
y seco.
Limpielo con
un pano suave
y seco.
Utilice agua templada
(por debajo de los 40 C)
para limpiar si la unidad
esta muy sucia
Para limpiar el aire acondicionado
nunca utilice polvo pulidor ni
sustancias volatiles
Nunca rocie agua sobre
la unidad principal.
Descarga!
Electrica
Peligro!
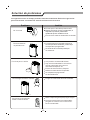
Mantenimiento del Filtro de Aire
Es necesario limpiar el filtro de aire
despues de unas 100 horas de uso.
Limpielo de la siguiente manera:
Apague el aire acondicionado
y quite el filtro de aire.
Apague primero la unidad
y luego empuje hacia arriba
el filtro de aire.
Limpie y vuelva a instalar
el filtro de aire.
Si la suciedad es notoria, lavelo
con detergente en agua
templada.
Despues de limpiarlo,
deje que se seque en
un lugar fresco y con
sombra, y luego vuelva
a instalarlo.
Limpie el filtro de aire cada dos
semanas si el aire acondicionado
funciona en un ambiente
extremadamente polvoriento.
Mantenimiento despues del Uso
1. Si el aire acondicionado no se usara por un periodo largo, asegurese de
quitar el tapon de goma del orificio de drenaje de la parte inferior, a fin de purgar el agua.
2. Mantenga la unidad funcionando en modo FAN durante medio dia en un dia
de sol para que se seque por dentro y para evitar que se cubra de moho.
3. Detenga la unidad y desenchufe el suministro de energia, luego quite las
baterias del control remoto y guardelo adecuadamente
4. Limpie el filtro de aire y vuelva a instalarlo.
5. Quite las mangueras de aire y guardelas adecuadamente, y cubra bien el orificio.
,
,
,
,
,
,
,
,
,
,
,
,
,
,
,
,
,
,
,
,

18
18 (64 )
18 (64 )
Proteccion
Condiciones de Funcionamiento
El dispositivo protector puede detener el aire acondicionado en los casos que se
enumeran a continuacion.
La temperatura ambiente es menor a
La temperatura ambiente es menor a
Funciones del protector
El dispositivo protector funcionara en los siguientes casos:
Al reiniciar la unidad inmediatamente despues de que se detenga el funcion
amiento o al cambiar de modo durante el funcionamiento, debe esperar 3 minutos.
Conecte al suministro de energia y encienda la unidad inmediatamente.
Se puede iniciar 20 segundos mas tarde.
Si se desenchufa, cuando reinicie la unidad volvera al modo original
y tendra que volver a programar el ENCENDIDO PROGRAMADO y el APAGA
DO PROGRAMADO.
Drenaje de agua
En funcionamiento de SECADO o ENFRIAMIENTO es posible que se encienda
el indicador water full (rojo). En ese caso, corte el suministro de energia, trasla
de la unidad a un lugar adecuado para quitar el tapon y purgar el agua. Despues
de esto, asegurese de volver a colocar el tapon. De lo contrario, la unidad podria
tener filtraciones y humedecer su habitacion.
Si la unidad esta ubicada en una posicion que permite el drenaje de agua,
tambien puede conectar la manguera de drenaje al orificio de drenaje para
purgar el agua.
ENFRIAMIENTO
SECADO
Si el aire acondicionado funciona en modo ENFRIAMIENTO o SECADO con una puerta o una ventana
abierta durante mucho tiempo cuando la humedad relativa es superior al 80%, puede gotear agua
por la salida.
,
,
,
,
,
,
,
,
,
,
,
,
,
,
,
,
,

19
Mantenimiento
Mantenimiento de la Unidad
Corte el suministro
de energia.
Apague el aire acondicionado
antes de desconectarlo del
suministro de energia.
Limpielo con
un pano suave
y seco.
Limpielo con
un pano suave
y seco.
Utilice agua templada
(por debajo de los 40 )
para limpiar si la unidad
esta muy sucia
Para limpiar el aire acondicionado
nunca utilice polvo pulidor ni
sustancias volatiles
Nunca rocie agua sobre
la unidad principal.
Descarga!
Electrica
Peligro!
Mantenimiento del Filtro de Aire
Es necesario limpiar el filtro de aire
despues de unas 100 horas de uso.
Limpielo de la siguiente manera:
Apague el aire acondicionado
y quite el filtro de aire.
Apague primero la unidad
y luego empuje hacia arriba
el filtro de aire.
Limpie y vuelva a instalar
el filtro de aire.
Si la suciedad es notoria, lavelo
con detergente en agua
templada.
Despues de limpiarlo,
deje que se seque en
un lugar fresco y con
sombra, y luego vuelva
a instalarlo.
Limpie el filtro de aire cada dos
semanas si el aire acondicionado
funciona en un ambiente
extremadamente polvoriento.
Mantenimiento despues del Uso
1. Si el aire acondicionado no se usara por un periodo largo, asegurese de
quitar el tapon de goma del orificio de drenaje de la parte inferior, a fin de purgar el agua.
2. Mantenga la unidad funcionando en modo FAN durante medio dia en un dia
de sol para que se seque por dentro y para evitar que se cubra de moho.
3. Detenga la unidad y desenchufe el suministro de energia, luego quite las
baterias del control remoto y guardelo adecuadamente
4. Limpie el filtro de aire y vuelva a instalarlo.
5. Quite las mangueras de aire y guardelas adecuadamente, y cubra bien el orificio.
,
,
,
,
,
,
,
,
,
,
,
,
,
,
,
,
,
,
,
,

20
no enfria
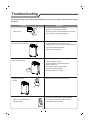
Solucion de problemas
Los siguientes casos no siempre se deben a mal funcionamiento. Revise las sugerencias
que se encuentran a continuacion antes de solicitar servicio tecnico.
Problema Analisis
No funciona
La salida de aire esta bloqueada por
un obstaculo.
Funciona pero no enfria
Una puerta o ventana esta abierta.
Hay otro electrodomestico en funciona
miento que genera calor como un
calentador o lampara, etc.
El filtro de aire esta sucio, limpielo.
Salida o entrada de aire bloqueada.
La temperatura programada
es demasiado alta.
Se filtra agua durante el traslado
Purgue el condensado antes de trasladar.
No funciona y el indicador
Water Full se enciende
Quite el tapon de goma para purgar el agua.
Si se encuentra siempre en este estado,
pongase en contacto con un tecnico de
servicio autorizado
El interruptor o el fusible protector esta
Espere 3 minutos e inicie nuevamente, el
dispositivo protector puede estar
mpidiendo que la unidad funcione.
El enchufe no esta correctamente enchufado.
'
'
'
'
'
Funciona durante
un periodo corto
La temperatura programada esta cerca
de la temperatura ambiente, puede bajar
la temperatura programada.
,
,
,
,
,
,
,
,
,
,
,
,
,
,

21
Notas
Notas
Lea este manual antes de instalar y utilizar el aire acondicionado portatil.
No permita que al trasladar el aire acondicionado se vierta refrigerante o se introduzca
aire en el sistema de refrigeracion.
Ponga a prueba el funcionamiento del aire acondicionado despues de terminar la
instalacion y registre los detalles de su funcionamiento.
El tipo de fusible utilizado en el controlador de una unidad de interior es 50T, con
clasificacio 3.15 A, T, 250 V.
El usuario adquirira el fusible para la unidad de acuerdo con la corriente en la maxima
potencia de entrada o uso.

22
GARANTIA
GARANTIA COMPLETA DE 5 ANOS
Este producto se garantiza por 5 anos a partir de la fecha de la compra original.
Cualquier parte que falle en materiales o la ejecuci n ser substituida dentro del
per odo de la garant a. La garantia includy servicio a domicilio. Una copia de su
prueba de la compra, con la fecha de la compra del producto incluida, se requiere
para acordar esta reparaci n del servicio.
Para el nombre y la localizaci n de un prestador de servicio autorizado lo m s
cerca posible a usted, llame por favor al 1-877-465-3566. Refi rase por favor al
nombre del producto, a la marca, y al n mero de modelo cuando usted llama.
Esta garant a no se aplica si el dano ocurre debido a accidente, manejo u
operaci n incorrectos, danos de transporte, abuso, uso err neo, reparacion no
autorizada, el uso comercial del producto utro uso para el cual no fuera pensado.
TODAS LAS GARANTIAS, EXPRESADAS O IMPLICADAS, DURAN POR 5 ANOS
A PARTIR DE LA FECHA DE LA COMPRA ORIGINAL. ESTA GARANTIA NO
CUBRE LA RESPONSABILIDAD POR LOS DANOS FORTUITOS O
CONSECUENTES PARA CUALESQUIER CAUSA EN NINGUNCASO.
Esta garant a se extiende al dueno original y a cualquier dueno subsiquiente para
los productos comprados para el uso casero dentro de los E.E.U.U.. Algunos
estados no permiten la exclusi n o la limitaci n de danos fortuitos o consecuentes
Esta garant a le da las derecho espec ficos, y usted puede tambi n tener otras
erechos que puedan variar de estado a estado. Para saber cu les son, sus
derechas legales consulte a su oficina local del consumidor o a la procuraduria de
su estado.

Version No. 819042128-01
Printed in China
2002-2005 Kelon Air Conditioner Co. and Kelon USA, Inc. All rights reserved.
-
 1
1
-
 2
2
-
 3
3
-
 4
4
-
 5
5
-
 6
6
-
 7
7
-
 8
8
-
 9
9
-
 10
10
-
 11
11
-
 12
12
-
 13
13
-
 14
14
-
 15
15
-
 16
16
-
 17
17
-
 18
18
-
 19
19
-
 20
20
-
 21
21
-
 22
22
-
 23
23
-
 24
24
-
 25
25
-
 26
26


WINTAIR AP-08CK1FDS Guía del usuario
- Tipo
- Guía del usuario
en otros idiomas
- English: WINTAIR AP-08CK1FDS User guide
Artículos relacionados
Otros documentos
-
Royal Sovereign ARP-1000ES El manual del propietario
-
Hisense AP10CR1W Guía de instalación
-
Admiral AAW-18CM3FHU Manual de usuario
-
LG LP1200SDR El manual del propietario
-
-
Amcor NanoMax Series El manual del propietario
-
-
Kenmore 580.72187300 El manual del propietario
-
Midea MPM3-10CR-BB6 El manual del propietario