
ScUID__iNsiall!_ilONiNsmUcilONS
Please retain this owner's manual for future
reference.
Read and follow all safety rules and instructions
before using this product.
To contact LG Electronics, 24 hours a day,
7 days a week:
1-800-243-0000 (US)
Or visit us on the Web at: us.lge.com
Para comunicarse con LG Electronics,
24 horas al dia, 7 dias a la semana:
1-800=243=0000
0 visitenos en la Web en: us.lge.com
AcONDlclONADOR
DEAIREPORI! IIL
c;UiADEUSUAI_IOE
INSIP,Uc€ION[SD[ INsi_!A€ION
Guarde este manual de usuario para referencia
futura. Lea y siga todas
las reglas e instrucciones de seguridad antes
de utilizar este producto.
Model/Modelo
LP1200SDR
P/No. MFL62172001

INIRODUCIION
iMPORTANT SAFETY iNSTRUCTiONS
Basic safety Precautions ................... 3, 4
Electrical Safety ........................... 4, 5
PARTS AND FEATURES
Key Parts and Components ................... 6
Control Panel and Remote .................... 7
HOW TO USE
Before Using Your Air Conditioner ............ 8, 9
Using the Controls ....................... 10-12
INSTALLATON INSTRUCTIONS
Preparing for Installation ..................... 13
Attaching the Hose and Diffuser ............... 14
Window Vent Panel and Extensions ............ 15
Installation in Vertical Sliding Windows ....... 16, 17
Installation in Casement Windows .......... 18, 19
CARE AND CLEANING
Cleaning the Case .......................... 20
Cleaning the Air Filter ....................... 20
Emptying the Water Collection Tank ............ 21
Storing the Air Condition er ................... 22
f
THANK YOU!
Congratulations on your purchase
and welcome to the LG family.
Your new LG Air Conditioner
combines high=efficiency operation
with portable convenience.
By following the operating and care
instructions in this manual, your air
conditioner will provide you with
many years of reliable service.
,J
TROUBLESHOOTING
Before Calling for Service ................. 23, 24
WARRANTY
Product Registration information ............. 25

iMPORIANISAFELYiNSIRUcliONS
READ ALL iNSTRUCTiONS BEFORE USE
Your safety and the safety of others is very important.
We have provided many important safety messages in this manual and on your appliance. Always read and
obey all safety messages.
This is the safety alert symbol.
This symbol alerts you to potential hazards that can kill or hurt you and others.
All safety messages will follow the safety alert symbol and either the word "WARNING" or "CAUTION':
These words mean:
S WARN|NG
"CAUT'ON
This symbol indicates the possibility of death or serious injury.
This symbol indicates the possibility of injury or damage to property.
BASIC SAFETY PRECAUTIONS
WAB |Ud _
Toreducether,sko,,,re,o.ootr,oshock,or,njo
to persons when using this appliance, follow basic precautions, including the following:
. Do not attempt to repair or replace any part
of your air conditioner unless it is specifically
recommended in this manual. All other services
should be referred to a qualified technician.
. If the power cord becomes worn or damaged,
the cord should only be replaced by a qualified
service technician using genuine replacement
parts.
. The air conditioner should be plugged into its
own grounded 15A, 60 Hz., 120 VAC circuit.
. Do not plug other appliances into the same
outlet; it can overload the circuit and cause a fire
or electric shock.
. Do not remove the round grounding prong from
the plug. it can result inthe risk of electric shock.
. This air conditioner is not designed for use by
young children. Young children should be
supervised to ensure that they do not play with
or climb on the air conditioner.
. Be sure all packaging materials are removed
from the air conditioner before use. it can result
in personal injury.
. Do not disassemble or modify the air conditioner
or the power cord. It can result in the risk of
electric shock or fire.
. Do not place the power cord or air conditioner
near a heater, radiator, or other heat source. It
can result in the risk of electric shock or fire.
. Do not use this or any appliance near flammable
gases or liquids or other combustibles, such as
gasoline, benzene, thinner, etc. It can result in
the risk of electric shock or fire.
. Make sure the power cord is plugged firmly and
completely intothe outlet, it can result in the risk
of electric shock or fire.
. Do not start or stop operation by plugging in or
unplugging the power cord. It can result in the
risk of electric shock.
. If the air conditioner ismaking unusual sounds
or is emitting smoke or an unusual odor, unplug
it immediately, it can result in the risk of electric
shock or fire.
. Do not use if the electrical socket is loose or
damaged. It can result in the risk of electric
shock or fire.
. Do not operate with wet hands or in a damp
environment, it can result in the risk of electric
shock.
. Do not use this or any electrical appliance if you
smell gas. it can result in the risk of fire or
explosion.
. Turn off and unplug the air conditioner before
cleaning to avoid the risk of electric shock.
. Do not clean the unit with water. Water can enter
the unit and damage the insulation, creating a
shock hazard. Ifwater enters the unit, unplug it
immediately and contact Customer Service. It
can result in the risk of electric shock.
. Use two or more people to lift and installthe
unit. Failure to do so can cause back injury or
other injuries.

llviPORlANlSAFELYINSIRUcllONS
READ ALL iNSTRUCTiONS BEFORE USE
BASic SAFETY PREcAUTiONS
using this appliance, follow basic precautions, including the following:
, To avoid possible cuts, avoid contacting the , To prevent spills and property damage, be sure
metal parts of the air conditioner when removing
or reinstalling the filter. It can result in the risk of
personal injury.
, Do not block the air inlet or outlet of the air
conditioner. Reduced air flow will result in poor
performance and could damage the unit.
, Always grasp the plug when plugging in or
unplugging the air conditioner. Never unplug by
pulling on the cord. It can result in result in the
risk of electrical shock and damage.
, Always turn off and unplug the air conditioner
when it will not be used for extended period of
time. This conserves energy and reduces the
chance of accidents.
, Secure the wheels with blocks to prevent the air
conditioner from rolling on smooth floors.
, Install the air conditioner on a sturdy, level floor
capable of supporting up to 110 Ibs (50 kg).
Installation on a weak or unlevel floor can result
in result in the risk of property damage and
personal injury.
, Make sure the air conditioner is the correct size
for the area you wish to cool. Using an air
conditioner that is the wrong size can waste
energy and damage the air conditioner.
, Close all doors and windows to the room for
most efficient operation.
, To prevent damage to the surface finish, use only
a soft cloth to clean the air conditioner. Do not
use wax, thinner, or a strong detergent.
to drain the air conditioner properly.
, To prevent the coils from freezing, do not
operate the air conditioner if the room
temperature is below 65°F (18°C).
, Do not position the air conditioner so that
pets or house plants are exposed to the
direct air flow. It can result in the risk of injury
to pets or house plants.
, This air conditioner is designed for normal
household use. Do not use for cooling pets,
foods, precision machinery, or art objects.
, Do not drink the water from the drain pan.
Dispose of it properly outdoors or down
the drain.
, Do not operate air conditioner without the filter
securely in place. Operation without the filter
could damage the unit.
, Clean the filter every two weeks, or more often
if needed.
, Ifyou eat the liquid from the batteries, brush your
teeth and see doctor. Do not use the remote if
the batteries have leaked. The chemicals in
batteries could cause burns or other health
hazard.
, Ifthe liquid from the batteries gets onto your skin
or clothes, wash it well with clean water. Do not
use the remote if the batteries have leaked. The
chemicals in batteries could cause burns or other
health hazard.
ELECTRICALSAFETY
WA I G
Electrical Shock Hazard
Failure to follow these instructions can result
in death, fire, or electrical shock.
- This unit must be properly grounded.
- Do not, under any circumstances, cut or
remove the ground prong.
- If you do not have a properly grounded
outlet, or if there is any doubt that the outlet
is not properly grounded, a qualified
electrician should check the outlet and
circuit, and, if necessary, install a properly
grounded outlet.
- This air conditioner must be plugged
into a grounded 60 Hz, 120 VAC outlet
protected by a 15 amp time delay fuse
or circuit breaker.
- This air conditioner must be installed in
accordance with national wiring codes.
- Do not alter or modify the plug or cord
of this air conditioner. If the power cord
becomes worn or damaged, the cord should
only be replaced by a qualified service
technician using genuine replacement parts.
- Do not use an extension cord.

iMPORIANISAFELYiNSIRUcliONS
READ ALL iNSTRUCTiONS BEFORE USE
ELECTRICAL SAFETY
f,,_L
/NTEGRA TED CIRCU/T BREAKER
For additional safety,
the power cord
features an integrated
circuit breaker, Test
and reset buttons are
provided on the plug
case.
The circuit breaker
should be tested
periodically by
pressing the TEST
button then the RESET button. If the TEST
button does not cause the circuit breaker to trip,
or if the RESETbutton will not stay engaged,
unplug the air conditioner immediately and
contact your LG service technician.
Due to potential safety hazards, the use of
an adapter plug is strongly discouraged.
For temporary connections, use only a
UL-listed adapter. Ensure that the large slot
in the adapter is aligned with the large slot
in the outlet.
To prevent damage to the adapter's ground
terminal, hold the adapter in place while
plugging in or unplugging the air conditioner.
• Attaching the adapter ground terminal to
the wall receptacle cover screw does not
ground the appliance unless the cover
screw is metal and not insulated, and the
wall receptacle is grounded through the
house wiring.
yf
PREFERRED
GROUNDING METHOD
Ensure proper
ground exists
_\.._ before use.
METHOD
(Use of adapter
plugs not
perm itted
in Canada)
TEMPORAR Y GROUNDNG
_ Ensure proper
ground exists
before use.
Frequent connection and disconnection
can damage the ground terminal on the
adapter. Never use a broken or damaged
adapter.
SAVE THESE INSTRUCTIONS

PARlS ANDFEAlURES
KEY PARTS AND COMPONENTS
CONTROL PANEL AND DISPLA Y
Easy=to=read white LCD display shows the operatin
state. Digital touch buttons make changing settings
quick and easy.
MOTORIZED AIR DISCHARGE
The adjustable Iouvered air discharge opens
automatically when the air conditioner is turned
on, and closes when it is turned off. It can also
be set to oscillate to distribute air more evenly
through the room.
INFRARED REMOTE CONTROL
The LCD remote control allows you to adjust the
temperature and operate most functions of the
air cond itioner from across the room.
HOSE AND DIFFUSER
Use the diffuser and hose to connect the air
conditioner to the window installation kit to vent
exhaust air outside.
FILTER
You can pull out and insert the filter easily.
HA ND LES
The handles provide a convenient grip
when lifting the air conditioner.
SWIVELING CASTERS
Swiveling casters allow you to move the air
conditioner easily on most floor surfaces.
BOTTOM DRAIN PORT
Before moving the unit, drain the internal water
collection tank completely by using bottom drain
port.
MUL TI-SPEED FANS
The air conditioner features two multi=speed
fans: a circulation fan for moving air inside
the room, and an exhaust fan to vent hot
air outdoors through the hose and diffuser.
POWER SUPPLY CORD HOLDER
Wrap power supply cord around the holders for
your convenience.
O_G
m

PARlS ANDFEAlURES
CONTROLPANELAND REMOTE
A PART
I
B PART
NOTE:Please press the _ part to operate the button.
Operation of functions is the same when using the remote or the
control panel, unless otherwise stated.
For detailed instructions on each function, see the following pages
POWER ON/OFF
Turns the air conditioner on and off. When turning on,
a rising tone will sound to confirm. When turning off,
a descending tone will sound.
AUTO CLEAN
The AUTO CLEAN function is used to remove
moisture from the heat exchangers and helps
prevent odor from forming. This function can be
activated from the Remote only.
FAN
Adjusts the circulation fan speed between low (F1),
medium (F2), and high (F3}
MODE
Switches the air conditioner between COOL, FAN,DRY,
and ENERGY SAVER modes. The active mode will be
shown in the LCD display.
LCD DISPLAY
A PART shows the set temperature ( °Cor °{2),
fan speed, or the selected TIMER delay.
B PART shows the active mode(COOL,FAN,DRY and
ENERGY SAVER),Auto clean,Water full and Timer.
,L / Y (TEMP/T/MER)
Use these buttons to adjust the set temperature up or
down, or to adjust the timer delay time.
TIMER
Allows you to set a delay from 1 to 24 hours that will
turn the air conditioner on or off automatical ly.
oC_OF
C001 Fan Dry
Tirl:er .,dill
!211--1.,
Et lZto_
Auto Auto Energy
Clean Swing Saver
Use this button,the temperature display can be switched
between degrees Celsius(°C) and degrees Fahrenheit(°F ")
AUTO SWING
Sets the motorized air discharge to oscillate,
improving air circulation in the room. This function
can only be activated and displayed from the remote
control.

ttOWlO USE
BEFORE USINGYOUR AiR CONDiTiONER
PREPARING FOR OPERATION
Refer to the Installation Instructions included in
this manual before using the air conditioner.
Once the air conditioner has been properly
assembled and installed:
O Plug the power cord into its own dedicated
properly grounded outlet. You will hear a
tone to confirm that the conditioner is
plugged in. Do not plug other appliances
into the same outlet; it could overload the
outlet and create a fire hazard.
Make sure the air conditioner and cord is
positioned where it does not create a
tripping hazard and will receive adequate
ventilation. Do not place it directly next to
furniture or objects that could block the
vent openings.
Make sure that any items that could be
blown over or damaged by the airflow from
the fan are out of the airflow path.
UNPACKING THE AIR CONDiTiONER
Remove and store packing materials for reuse.
Remove any shipping tape before using the
air conditioner. If the tape leaves behind any
adhesive, rub a small amount of liquid dish
soap onto it and wipe with a damp cloth. Do
NOT use sharp instruments, alcohol, thinners,
or abrasive cleaners to remove adhesive.
They could damage the finish.
IMPORTANT:
• Do not remain in the direct airflow from the air
conditioner for extended periods of time.
• To prevent damage or injury to pets and
plants, make sure they are not exposed to
direct airflow from the air conditioner.
• When used at the same time as stoves,
fireplaces, and other combustion devices,
make sure there is a sufficient flow of fresh air
into the room. Do not use in tightly enclosed
spaces with these types of devices.
• This air conditioner is intended for household
use as a consumer comfort appliance. Do not
use it as a precision climate control system,
or for purposes such as cooling precision
equipment, food, pets, plants, artwork, etc.
Such items could be damaged.
• Do not bend the hose downward when
window installation kit is not applied. It may
cause failure of air conditioner or performance
deterioration.

HOWlO USE
BEFORE USING YOUR AiR CONDiTiONER
/NSER TING BATTERIES/IV THE REMOTE
Before using your remote, install the provided
AAA batteries:
O Press and glide the battery cover on the back
of the remote,then you can remove the cover.
Insert two new alkaline AAA batteries into
the battery compartment, being sure to note
the proper polarity.
Reattach the battery cover, making sure the
locking tab clicks into place.
NOTES:
• Use only alkaline batteries. Do not use
rechargeable batteries.
• When replacing batteries, always replace both
batteries with new batteries. Do not mix old
and new batteries.
• If the air conditioner will not be used for an
extended period of time, remove the batteries
from the remote.
REMOTE S TORA GE
Your air conditioner has a special place for
convenient storage the remote control.
See Right Figure.
NOTE:
In order to avoide Iossing the remote,please
put the remote inside of the storage place when
you not use it.
f
Be sure to note
olarity!
CALITI
, if the liquid from the batteries gets onto your skin or clothes, wash itwell with clean water.
Do not use the remote if the batteries have leaked.
, if you eat the liquid from the batteries, brush your teeth and see doctor.
The chemicals in batteries could cause burns or other health hazards.

ttOWlO USE
USING THE CONTROLS
Control panel buttons shoWn. Operation
using the remote control is the same, unless
specifically noted.NOTE: The remote sensor is
located under the air discharge and on the top
of the front panel.
POWER
Press the POWER button to turn the air
conditioner ON or OFF. When you turn the air
i___ ._j conditioner on, an ascending
tone will play and the LCD
POWER display will show the set
temperature and any active
mode.The air discharge on the top of the air
conditioner wil automatically open.
When turning the air conditioner off, you will
hear a descending tone and the air discharge
on the top of the air conditioner will close.
Any control settings such as Mode, Set
Temperature, Auto Swing, etc. will be retained
in memory when the power is off.
NOTE: When turned on after being unplugged,
the air conditioner will automatically reset to
COOL mode, with a temperature setting of 72°E
Any settings will need to be re-entered.
Always point the remote at the sensor. The
remote may not work if the sensor is in bright
light or ff there is not a clear path between the
remote and the sensor.
MODE
Press the MODE button to select the operating
mode (COOL, FAN,DRYor ENERGY SAVER) for
the air conditioner.And you can
m w
!_ 1I_-_-_ _1 seeLODtheDisplay.aCtivemode through the
The default setting is COOL.
Press the MODE button to
change to FAN, press again to change to DRY,
again to change to ENERGY SAVER,and again
to return to COOL.
COOL Compressorrunsandcoolstheroom.Usethe
A / V andFANbuttonstosetthedesied
temperatureandcirculationfanspeed,
FAN Fancirculatesairbutcompressordoesnotrun.
UsetheFANbuttontosetthedesiredfanspeed.
DRY Drymodeisusedtoremovehumidityfromtheroom
withoutadditionalcooling.Oncethesettemperature
isreached,thecompressorandcirculationfanturns
offandonlytheexhaustfanwillrun.Fanspeedis
pre-setandcannotbeadjusted.
ENERGY
SAVER
Undernormaloperation,theexhaustfan cycleson
andoffwiththecompressor,andthecirculationfan
runsatthesetspeed.
Themodehelpsreducepowerconsumptionby
automaticallyturningoffthecirculationfanaswell
astheexhaustfanwhenthe compressorisoff.The
airconditionerwillautomaticallycyclebothfanson
andoff withthecompressorasneededforcooling.
_J

ttOWlO USE
USINGTHE CONTROLS
FAN
Pressing the FAN button cycles the circulation
fan speed from low (F1) to medium (F2) to high
(F3).The selected fan speed
O ",_ will be shown in the LCD display.
FAN
J
The function can be used in
either COOL or FAN modes.
When changing fan speeds, there is a brief
delay before the fan motor changes speed.
A / Y (TEMP/TIMER)
In COOL and DRY modes, the A/V(TEMP/TIMER)
buttons adjust the set temperature up to 86°F or
down to 60°F, in one degree
_ A O_ increments. The temperature can
be switched between degrees
T Fahrenheit and degrees Celsius,
pressing theA button andV button
at the same time,or pressing °Cz°F button on the
remote.
When the TIMER function is selected, use the
A,/V(TEMP/TIMER) buttons to adjust the delay
time from 1 to 24 hours, in one hour increments.
If you press and hold the A/V(TEMP/TIMER)
buttons, the set temperature or time will change
automatically after a few seconds.
NOTE: The displayed temperature is the SET
temperature, not the room temperature.In COOL,
DRYor ENERGYSAVERmode, thethermostatin the
air conditioner will run the compressor until the
set temperature is reached, then cycle the
compressor on and off to maintain the set
tem pe rature.
TIMER
When theTIMER function is selected, you can set
the air conditioner to either automatically turn
iL Oi OFF °r turn ON after a delay °f
7_MER up to 24 hours. The display will
show 0.Use the A/V(TEMP/TIMER)
buttons to adjust the delay
time from 1 to 24 hours, in one
hour increments.
To set an automatic off delay, press the TIMER
button while the air conditioner is running and
use the A/V(TEMP/TIMER)buttons to adjust the
delay time. The air conditioner will automatically
turn OFF after the set delay.
To set an automatic on delay, press the TIMER
button while the air conditioner is off and use
the A/V(TEMP/TIMER) buttons to adjust the
delay time.
The display will show the number of hours
remaining until the unit is set to come on. The
air conditioner will automatically turn ON
after the set delay.
If you want to know how many hours you have
setted, press the TIMER button and then you
can see the time through the LCD display.
If you want to change the set timer,press the
TIMER button and adjust the time when the
number is flickering.
To cancel the Timer function,one method is
press the TIMER button and adjust the number
to"0" when the number is flickering,then the
function will be canceled in a few seconds.
Another better method is Press the TIMER
button and Press this button again when the
number is still flickering.
NOTE: Do not unplug the air conditioner when
using the timer function.

ttOWlO USE
USING THE CONTROLS
AUTO CLEAN
To turn the AUTOCLEANfunction on, press the
AUTOCLEANbutton while the air conditioner is
c_+_ SAVER mode. This function
can only be selected from the
remote ;it is not available from
the control panet.lt must be set
each time you wish to run the AUTOCLEAN
function.
AUTOCLEAN is used to remove moisture from
the heat exchange coils. This helps prevent the
formation of mildew and odors.
ATo use AUTO CLEAN
With the air conditioner running in COOL,
DRY or ENERGYSAVER mode, press the
AUTO CLEANbutton.
• Jb"AUTO CLEAN" will be displayed in the
LCD diplay.
Press the POWER button to turn the air
cond itioner off.AUTO CLEANwill run
the circulation and exhaust fans with the
compressor off for a few minutes after
the power is turned off.
To cancel AUTOCLEAN,or to stop an
AUTOCLEANcycle in process, simply press
the AUTO CLEANbutton again. The AUTOCLEAN
function will not operate if the air conditioner is
already off.
AUTO SW/NG
AUTOSWINGfunction can only be activated with
the remote. When this function is on, the air
Auto
Swing
remote again.
discharge will oscillate to
circulate air more evenly
through the room. To turn this
function off, simply press the
AUTOSWINGbutton with the
With AUTOSWINGoff, you may also manually
adjust the air discharge to the desired position.
It will maintain this position until the air
cond itioner is turned off or AUTOSWING
is activated.
oC =*F
°C=°F function can only be activated with the
oc=oF remote.When the displayed
temperature is °C(of °F),you
can press this button to swith
to °F(or °C).

iNslallaliON iNSIRUcliONS
PREPARING FOR INSTALLATION
WABU|U
,WWI,_FI|I ||1 The air conditioner is heavy! Use two or more people to
lift and install the unit! Failure to do so could result in back injury or other injuries.
EXHA US T COV/P OIVEN TS
The following components are used for window venting.
Not all components are used for every installation.
Flexible Venting Hose
Diffuser
Extension
Vent Panel
Large
Extension
Panel
Vent Panel
\
Window Installation Kit
(includes 2 Window Vent
Panel and 2 Extension
Panels)
Small
Extension
Panel
2 Type A Foam Seals
(adhesive)
1 Type B Foam Seal
(non-adhesive)
2 Type C Foam Seals
(Adhesive type-Shorter)
Security Bracket 10 Type A Screws
13 (_

iNSlAilaliONiNSIRUcliONS
ATTACHINGTHE HOSEAND DIFFUSER
NOTE: The air conditioner is shipped With the hose instafled. The hose may be removed for cleaning
and storage, if necessary. Simply reverse the steps below to remove.
As you see from Fig,insert this end of the hose
into the hole on the back of the air conditioner.
(Make sure the right marker I::]on the connector
is match with the marker A which is on the Air
Conditioner.)
Twist slightly counterclockwise until it locks into
place.

iNslali_aliONiNSIRUcliONS
WINDOW VENT PANELAND EXTENSIONS
The window installation kit allows you to install the air conditioner in most vertical-sliding windows 18"
to 48" wide, or casement-style windows from 18" to 48"high.
For an 18" window opening, use the window
vent panel by itself,
Small extension
panel
Small
- extension
panel
For window openings from 18¼" to 24",
use the window vent panel and the small
extension panel.
Large
extension
panel
Vent
Panel
24" - 29"
For window openings from 24" to 29",
use the window vent panel and the large
extension panel.
Large extension
panel
Large
29" - 36
Vent
Panel
Small
lextension
panel
Small
extension
panel
For window openings from 29" to 36", use the
window vent panel and both extension panels.
Extension
panel
Extension 36" - 48"
panel Large
_ eitensi°n
panel
I Vent III
Panel III
Small
J_: _ extension
36" - 48';........ _-" .... panel
panel
Panel
Sm_
extension
panel
For window openings from 36" to 48", use both
vent panels and both extension panels.

iNslAilaliON iNslRUcliONs
iNSTALLATiONiN VERTICALSLiDiNGWINDOWS
NOTE: The WindoW installation kit can be used with vertical sliding windows between 18"
and 48" wide.
<
Foam seal C
type-shorter)
(Adhesive type)
Cut the foam seal A(adhesive type) &
C(adhesive type-shorter)to the proper
length, and attach it to the window sash and
frame.
Extension panel
_L(_required) |
T-------_ v_____ent I
/ / -
Insert the vent panel assembly, including
extension panels, if needed, into the window
opening. Extend the extension panels, if
used.
.... JJ
Carefully lower the window. Secure the vent
panel in place with 4 type A screws, plus
one screw for each extension:
Vent panel only:
Vent panel and
one extension:
Vent panel and
two extensions:
4 type A screws
5 type A screws
6 type A screws
Two vent panels and
two extensions: 9 type A screws
Foamseal B
on-adhesive type)
Cut the foam seal B(Non=adhesive type) to
the window width. Stuff the foam seal B
between the glass and the window to
prevent air and insects from getting into the
room.
O16

iNslallaliON iNSIRUcliONS
iNSTALLATiONIN VERTICALSLiDiNGWINDOWS
J
!
Type A
screw
Security Bracket
Install the security bracket with a type A
screw, as shown.
Insert the oval end of the diffuser into the
window installation kit until the locking tabs
engage.

iNslAilaliON iNslRUcliONs
iNSTALLATiONiN cASEMENT STYLEWINDOWS
NOTE: The window installation kit can be used with casement windows between 18" and 48" tall.
......_,,%
Foam sealC
(Adhesive
type-shorter)
Foamseal
(Adhesivetype)
Cut the foam seal A(adhesive type) &
C(adhesive type-shorter)to the proper
length, and attach it to the window sash and
frame.
f_
Insert the vent panel assembly, including
extension panels, if needed, into the window
opening. Extend the extension panels, if
used.
_,Type A screws
Carefully close the window. Secure the vent
panel in place with 4 type A screws, plus
one screw for each extension:
Vent panel only:
Vent panel and
one extension:
4 type A screws
5 type A screws
Vent panel and
two extensions: 6 type A screws
Two vent panels and
two extensions: 9 type A screws
Foamseal B
(Non-adhesive type)
_J
Cut the foam seal B(Nomadhesive type) to
the window height. Stuff the foam seal B
between the glass and the window to
prevent air and insects from getting into the
room.

iNslallaliON iNSIRUcliONS
iNSTALLATiONiN cASEMENT STYLEWINDOWS
Security
bracket
f
Type A screw
install the window security bracket with a
type A screw, as shown.
Insert the oval end of the diffuser into the
window installation kit until the locking tabs
engage.

CAREAND€iEANiNc
Your air conditioner is designed for year-round
operation with only minimal cleaning and
maintenance.
For maximum efficiency, it is recommended
that you have the cooling coils inspected and
cleaned annually. Your local LG Authorized
Service Center can provide this inspection
and cleaning service for a nominal fee.
WARNING
• Unplug the air conditioner before cleaning or performing any maintenance or servicing.
• Be careful when cleaning coils or removing or reinstalling the filtermthe cooling fins
are sharp!
Failure to follow the above precautions could result in electrical shock or personal injury.
CLEANING THE CASE
Wipe the case with a
slightly damp cloth, then
wipe dry with a dry cloth
or towel.
• To prevent damage to the finish, do not use
gasoline, benzene, thinner, etc., or any
abrasive cleansers to clean the air
conditioner; they may damage the finish.
• Never pour water onto or into the unit; it
could damage internal components and
create a shock and fire hazard.
CLEANING THE AIR FILTER
The air filter should be cleaned every two weeks;
depending on indoor air quality, more frequent
cleaning may be needed. A dirty air filter will
decrease airflow and reduce efficiency.
Do not operate the air conditioner without
the air filter in place.
I_ Grasp the grip which
is in the center and
on the top of the filtel
and pull out the filter
directly.
O
Use a vacuum cleaner to clean the filter. If
the filter is heavily soiled, it can be washed
in warm water using a mild detergent.
Do not use harsh cleaners or very hot
water. Do not wash in a dish asher
_l Allow the filter to dry completely before
reinstalling.
!_ Reinsert the filter, making sure that the
bottom of the filter is between the tabs and
the coil guard. Reinstall the filter cover,
making sure it clips into place.

CAREAND€iEANiNc
EMPTYING THE WATER:COLLECTIONTANK
Using the bottom drain port
When the internal water collection tank is full, FL
will appear in the display and the air conditioner
will turn off until the tank is emptied.
Unplug the air conditioner, disconnect
the exhaust hose from the back, and move
the air conditioner to a suitable drain
location or outdoors. You may also place
a pan under the drain that will hold up
to 1 quart of water.
Remove the drain cap and the rubber plug
from the drain outlet.
0
Once the water collection tank is drained,
reinstall the rubber plug and the drain cap,
making sure it is on securely.
Place the air conditioner in the desired
location, reconnect the exhaust hose, and
plug in the air conditioner.
Drain Outlet
Drain
NOTES:
• When turned on after being unplugged, the air
conditioner will automatically reset to COOL
mode, with a temperature setting of 72°R

CAREAND€iEANiNc
STORINGTHE AiR cONDiTiONER
If the air conditioner will not be used for an
extended period of time:
0 Drain the water collection tank completely
and leave the bottom drain cap and rubber
plug long enough to allow any residual water
to drain out. Once the tank is completely
drained and no more water flows out,
reinstall the rubber plug and cap.
Remove and clean the filter, allow it to dry
completely, then reinstall it.
Remove the batteries from the remote.
Store the air conditioner in a cool, dry
location, away from direct sunlight, extreme
temperatures, and excessive dust.
Before using the air conditioner again:
Make sure the filter and drain cap are
in place.
Check the cord to make sure it is in good
condition, with no cracks or damage.
Place new batteries in the remote.
Install the air conditioner as described in the
Installation Instructions.

IROUB[ESttOOIiNc
BEFORE CALLINGFOR SERviCE
Before you call for service, review this list. It may save you time and expense. This list includes common
occurrences that are not the result of a defect in workmanship or materials.
.......................; i..........................................................................................................................................................................................;...........................................................................................................................................................................................................................................................................................................................................................................................................Makesuree ectrica p ugisp uggedcompletelyintoa.......................
not start notcompletelyinsertedin live,properlygroundedoutlet.
theelectricaloutlet.
Airconditionerdoes
not cool properly
• Thehousefuseisblownorthe
circuitbreakerhastripped.
Powerfailure.
• Theintegratedcircuitbreakerinthe
plughastripped.
. FLappearsinthe display.
Roomtemperatureis lessthanthe
settemperature.
Airflow is restricted.
• Theairfilter is dirty.
• Theroomis very hot,or notenough
time allowedfor cooling.
• Coldair is escaping.
Coolingcoilshaveicedup.
Areato becooledistoo largefor
the air conditioner.
o Doorsor windowsareopen.
Airconditionerruns
too oftenor too long
Replacethefuseor resetthecircuitbreaker.Makesure
thattherearenootherappliancesonthesamecircuit.
• Ifa powerfailureoccurs,turnthepowerOFEWhen
powerisrestored,wait3 minutesbeforerestartingthe
airconditioner.
• PresstheRESETbuttonontheair conditionerplug.
Iftheresetbuttonwill notstayengaged,unplugtheair
conditionerandcontacta qualifiedservicetechnician.
• Thewater collectiontank isfull.Drainthetankand
resetyoursettings.
SeetheCareandCleaningsection.
Thisis normal.Theair conditionerautomatically
shutsoff whenthe roomequalsor is lessthanthe
settemperature.Adjustthe temperaturesetting,
if needed.
Makesurethereis sufficientclearancearoundthe
air conditionerandthatthe air inletandoutletare
notblockedbyfurniture,curtains,etc.
Cleantheair filter at leasteverytwo weeks.Seethe
CareandCleaningsection.
• Whenfirst turnedon,allowthe air conditioner
sufficienttime to coolthe room.
Checkfor openfurnacefloor registersor coldair
returns,or openwindowsordoors.
• Inespeciallyhot, humidweatherandwhenthe air
conditionerisrunningfrequentlyorfor extended
periods,icecanform onthe coolingcoils,blocking
airflow. Setthe controlsto HighFan(F3)or High
Cool(F3),andset to a warmertemperature.
• Consultyour dealerfor theair conditionercapacity
necessaryto coolthe desiredarea.
Makesuredoorsand windowsare closed.
_,,_/

IROU iESttOOllNG
BEFORE CALMNGFOR SERVICE
f_
Problem Possible Causes Solutions
Codeappearsin
thedisplay:
F1,F2,or F3
FL
CH01
CH02
OH03
• AirconditionerisinFANmode
andthenumbershownistheset
fanspeed.
• Thewatercollectiontankisfull.
Shortoropencircuitintheindoor
airthermostat.
Shortoropencircuitintheindoor
pipethermostat
ThedifferencebetweenEvaporator
temperatureandindoortemperature
islessthan3°0.
• Thisisnormal.Theairconditionerisworking properly.
Emptythewatercollectiontank.Seethe
CareandCleaningsection.
Unplugtheairconditionerandcontactyourauthorized
LGservicecenter.
Unplugtheairconditionerandcontactyourauthorized
LGservicecenter.
Unplugtheairconditionerandcontactyourauthorized
LGservicecenter.

ShouldyourLGPortableAir Conditionerproveto be defective inmaterialor workmanship under normaluse duringthe warranty period listedbelow,
effectivefrom the dateof original consumerpurchaseof the product,LGElectronicswill replacethe defectivepart(s).Replacementpartswill meetintended
fit andfunction of the original part. Replacementpartsare warrantedforthe unexpiredportionof the original warranty period.This limited warranty is good
onlyto the original purchaserofthe productand effectiveonlywhen usedin the UnitedStatesof America.
WARRANTY PERIOD:
Forthe Periodof:
Oneyearfromdate
oforiginalpurchase
Fiveyearsfromdate
oforiginalpurchase
Fiveyearsfromdate
oforiginalpurchase
LGWill Replace:
Any part of the LGEPortableAir Conditionerwhich fails dueto a defect in materialsor workmanship. Duringthis full
one-year warranty, LGEwill alsoprovide,free of charge, all labor andon-site serviceto replacethe defectivepart.
Any part of the sealed refrigerating system (thecompressor,condensor,evaporator,andall connectingtubing)
which fails dueto adefect in materials or workmanship.Duringthis full five-year sealed refrigerating system
warranty, LGEwill alsoprovide,free of charge, all laborandon-site serviceto replacethe defectivepart.
Forthe second through the fifth year from the dateof original purchase,LGEwill replace certain parts that fail due
to a defect in materialsor workmanship. Partscoveredare fan motors,switches,thermostats, heater,heater
protectors,compressoroverload,solenoids,circuit boards,auxiliarycontrols,thermistors,frost controls, ICRpump,
capacitors,varistors,and indoor blowerbearing. Duringthis limited four=year parts warranty, youwill be
responsiblefor any laboror on-site service costs.
No otherwarranty isapplicable to this product.THISWARRANTYiS iN LiEUOFANYOTHERWARRANTY,EXPRESSORiMPLiED,iNCLUDiNG
WITHOUTLiMiTATiON,ANYWARRANTYOFMERCHANTABiLiTYORFITNESSFORA PARTICULARPURPOSE.TOTHEEXTENTANYiMPLiEDWARRANTY
iS REQUIREDBY LAW,iT iS LiMiTEDiN DURATIONTOTHEEXPRESSWARRANTYPERIODABOVE.NEITHERTHEMANUFACTURERNORiTS U.S.
DISTRIBUTORSHALLBELIABLEFORANY INCIDENTAL,CONSEQUENTIAL,INDIRECT,SPECIAL,ORPUNITIVEDAMAGESOFANYNATURE,INCLUDING
WITHOUTLiMiTATiON,LOSTREVENUESORPROFITS,ORANYOTHERDAMAGEWHETHERBASEDiN CONTRACT,TORT,OROTHERWISE.Somestates
and/orterritories do not allow the exclusionor limitation of incidentalor consequentialdamagesor limitationson how longan impliedwarranty lasts,sothe
aboveexclusionor limitation maynot apply to you.This warranty givesyou,the originalpurchaser,specific legalrights and you may alsohave other rights
thatvary from state to state or territory toterritory.
THIS LIMITEDWARRANTYDOESNOTAPPLYTO:
1. Servicecallsto your homefor deliveryor pick-up, installation,
instruction,replacementof housefuses, connectionof housewiring
or plumbing,or to correctunauthorizedrepairs.
2. Failureof productto performduring powerfailures and interruptions
or inadequateelectricalservice.
3. Damagecausedbytransportation orhandling.
4. Damagecausedto the product byaccident,vermin, lightning, winds,
fire,floods,or acts of God.
5. Damagescausedby leakyor brokenwater pipes,frozen water pipes,
restricted drain lines,or inadequateor interruptedwater supply.
6. Damagescausedby inadequatesupplyof air.
7. Damagescausedbyoperatingthe product in a corrosive
atmosphere.
8. Repairswhen your LGproduct isused in other than normal,single-
family householduseor contraryto the instructionsdescribedinthe
product User'sGuide.
TO CONTACT LG ELECTRONICS BY MAIL:
LG Customer interactive Center
P. O. Box 240007
201 James Record Road
Huntsville, Alabama 35824
ATTN: CIC
9. Damageresulting from accident,alteration, misuse,abuse,or
improper installation,repair,or maintenance.Improperrepair includes
the use of partsnot approvedor specifiedby LG.
10.Normalmaintenanceas describedin the User'sGuide,such as
cleaningor replacing filters, cleaningcoils,etc.
11.Useof accessoriesor componentsthat are not compatiblewith this
product.
12.Productswith alteredor removedserial numbers.
13.Changesin the appearanceof the productthat do notaffect product
performance.
14.Increasesinutility costsand additional utility expenses.
The cost of repair or replacement underthese excluded
circumstances shall he borne bythe consumer.
ProductRegistrationInformation
Model Number:
Serial Number:
You can find these numbers on a label on the side of the
air conditoner.
Date of Purchase:
Dealer's Name:
25
@

INIRODUCCION
INSTRUCCIONES DE SEGURIDAD
IMPORT'ANTES
Precauciones basicas de seguridadM ........ 27, 28
Seguridad etectrica ..................... 28, 29
PIEZAS Y CARACTERiSTICAS
Piezas y componentes clave ................. 30
Panel de control y control remoto ............. 31
COMO UTILIZAR EL ARTEFACTO
Antes de utitizar su acondicionador de aire ... 32, 33
C6mo usar los controles ................. 34-36
INSTRUCCIONES DE INSTALACION
Preparaci6n para ta instalaci6n ............... 37
C6mo conectar la manguera y et difusor ........ 38
Panel de ventitaci6n y extensiones de
la ventana ................................ 39
Instalaci6n en ventanas de
deslizamiento vertical .................... 40, 41
Instalaci6n en ventanas de
deslizamiento horizontal .................. 42, 43
CUIDADO Y LIMPIEZA
C6mo limpiar ta cubierta .................... 44
C6mo limpiar et fittro de aire ................. 44
C6mo vaciar et tanque de recolecci6n
de agua .................................. 45
C6mo guardar et acondicion ador de aire ........ 46
f
iGRACIAS!
Felicitaciones por su compra y
bienvenido a la familia de LG.
Su nuevo acondicionador de aire
LG combina un funcionamiento
de alta eficiencia con la comodidad
de la portabilidad.
Siguiendo las instrucciones de
funcionamiento y cuidados de este
manual, su acondicionador de aire
le brindara muchos afios de
servicio confiable.
DETECCION DE PROBLEMAS
Antes de ltamar al servicio tecnico ......... 47, 48
GARANTiA
Informaci6n sobre registro de producto ......... 49

INSIfiUcclONES DE SECURIDADIMPOfilANIES
I-SA TODAS I-AS |NSTRUCC|ONSS
ANTES DS USAR
Su seguridad y ia seguridad de otros son muy importantes.
Hemos incluido muchos mensajes de segufidad importantes en este manual yen su artefacto. Siempre lea y
obedezca todos los mensajes de seguridad.
Este es el dmbolo de alerta de seguridad.
Este s{mbolo Io alerta sobre peligros potenciales que pueden matarlo a lastimarlo a usted o a otros.
Todos los mensajes de seguridad se encontraran despues de los s{mbolos de alerta de seguridad y de las
palabras "ADVEFITENCIA" O "PFIECAUCION". Estas palabras significan:
ADVIERTSNOIA Este s_mbolo indica la posibilidad de muerte o lesiones graves.
L_ PR_CAUC|(_). Este dmbolo indica la posibilidad de lesiones o dafios a la propiedad. /
PRECAUCIONESBASICASDE SEGURIDAD
ADVERTIENCIA o,
lesiones personales al usar este artefacto, siga las
siguientes:
,, No intente reparar o cambiar ninguna pieza de ,,
su acondicionador de aire a menos que est6
especificamente recomendado en este manual.
Cualquier otro servicio debe realizarlo un t_cnico
calificado. ,,
,, Si el cable de energia se gasta o dafia, s61o un
t_cnico calificado puede cambiarlo, utilizando
piezas de repuesto genuinas. ,,
,, El aire acondicionado debe enchufarse en su
propio circuito de 15A, 60 Hz., 120 VAC con
conexi6n a tierra.
,, No enchufe otros artefactos en el mismo
tomacorriente ya que puede sobrecargar el circuito ,,
y provocar un incendio o descarga electrica.
,, No quite la pata redonda de conexi6n a tierra del
enchufe. Puede provocar un riesgo de descarga ,,
electrica.
,, El acondicionador de aire no est,. disefiado para
que Io usen nifios pequefios. Los nifios pequefios ,,
deben estar siempre bajo control para asegurar
que no jueguen o se cuelguen del acondicionador
de aire. =
,, AsegOrese de quitar todos los materiales de
empaque del acondicionador de aire antes de
usarlo. Puede provocar lesiones personales. ,,
,, No desarme o modifique el acondicionador de aire
o el cable de energia. Puede provocar un riesgo de
descarga electrica o incendio.
,, No coloque el cable de energia o acondicionador
de aire cerca de un calentador, radiador, u otra
fuente de calor. Puede provocar un riesgo de ,,
descarga electrica o incendio.
,, No use este u otro artefacto cerca de gases o
liquidos inflamables u otros combustibles, tales
como gasolina, benceno, solvente, etc. Puede
provocar un riesgo de descarga electrica o
incendio.
riesgo de incendio, descarga electrica o
precauciones b_sicas, incluyendo las
Verifique que el cable de energia est6 enchufado
firmemente y por completo en el tomacorriente.
Puede provocar un riesgo de descarga electrica
o incendio.
No inicie o detenga el funcionamiento enchufando
o desenchufando el cable de energia. Puede
provocar un riesgo de descarga electrica.
Si el acondicionador de aire est,. haciendo sonidos
inusuales o est,. emitiendo humo u olor poco
comQn, desenchQfelo de inmediato. Puede
provocar un riesgo de descarga electrica o
incendio.
No Io use si el tomacorriente est,. suelto o dafiado.
Puede provocar un riesgo de descarga electrica o
incendio.
No Io opere con manos mojadas o en un medio
hQmedo. Puede provocar un riesgo de descarga
electrica.
No utilice este u otro artefacto electrico si huele
gas. Puede provocar un riesgo de incendio o
explosi6n.
Apague y desenchufe el acondicionador de aire
antes de limpiarlo para evitar el riesgo de una
descarga electrica.
No limpie la unidad con agua. El agua puede
ingresar a la unidad y dafiar la aislaci6n, creando
asi un peligro de descarga electrica. Si ingresa
agua a la unidad, desenchQfela de inmediato y
comuniquese con el Servicio de atenci6n al cliente.
Puede provocar un riesgo de descarga electrica.
Utilice dos o m_.s personas para levantar e instalar
la unidad. No hacerlo puede provocar lesiones en
la espalda u otras lesiones.

INSIfiUcclONES DE SEGURIDADllviPOfilANIES
M=A TODAS LAS |NSTRUCC|ONSS ANTSS DS USAR
PRECAUCIONESBASICASDE SEGURIDAD
AV
PRECAUC|ON o, dosco,.goo, c .coo
lesiones a personas cuando utilice este artefacto, deben seguirse precauciones b_sicas de
seguridad, incluyendo las siguientes:
* Para evitar posibles cortes, evite el contacto con las
piezas metb,licas del acondicionador de aire cuando
quite o vuelva a instalar el filtro. Puede provocar un
riesgo de lesiones personales.
* No bloquee la toma o salida de aire del acondicionador
de aire. Una corriente de aire reducida provocarb, un
desempefio pobre y podria dafiar launidad.
* Siempre tome el enchufe cuando enchufe o desenchufe
el acondicionador de aire. Nunca desenchufe tirando del
cable. Puede provocar un riesgo de descarga electrica y
dafios.
* Siempre apague y desenchufe el acondicionador de aire
cuando no vaya a utilizarlo pot perfodos extensos. Esto
conserva la energia y reduce la posibilidad de accidentes.
* Ajuste las ruedas con trabas para evitar que
acondicionador de aire se deslice en pisos lisos.
* Instale el acondicionador de aire sobre un piso resistente
y nivelado que pueda soportar hasta 110 Ibs (50kg). La
instalaci6n sobre un piso debfl o desparejo puede
provocar un riesgo para lapropiedad y lesiones
personales.
* Verifique que el acondicionador de aire sea del tamafio
adecuado para el area que desea enfriar. Usar un
acondicionador de aire de un tamafio incorrecto puede
malgastar energia y dafiar el artefacto.
* Cierre todas las puertas y ventanas de la habitaci6n para
una operaci6n mas efectiva.
* Para evitar dafios al acabado de la superficie, utilice s61o
un patio suave para limpiar elacondicionador de aire. No
utilice cera, solvente, o un detergente fuerte.
* Para evitar derrames y dafios a la propiedad, asegOrese
de drenar el acondicionador de aire correctamente.
* Para evitar que las serpentinas se congelen, no opere el
acondicionador de aire si la temperatura de la habitaci6n
se encuentra por debajo de 65°F (18°O).
* No coloque el acondicionador de aire de modo de
exponer mascotas o plantas domesticas a la corriente
directa de aire. Puede provocar un riesgo de lesi6n para
mascotas o plantas domesticas.
* Este acondicionador de aire esta disefiado para un uso
domestico normal. No Io use para enfriar mascotas,
alimentos, maquinaria de precisi6n
u objetos de arte.
* No beba el agua del dep6sito de drenaje. Eliminela en el
exterior o en el desagQe.
* No opere el acondicionador de aire sin el filtro en su
lugar. El funcionamiento sin el filtro puede dafiar la
unidad.
,,, Limpie el filtro cada dos semanas, o mas a menudo si
hiciera falta.
* Si el liquido de las pilas alcanzara su boca, cepille sus
dientes y consulte a un medico. No utilice el mando a
distancia si las pilas han experimentado fugas. Los
productos qu[micos de las pilas pueden ocasionar
quemaduras uotros peligros para la salud.
* Si el ffquido de las pilas entra en contacto con su piel o
ropas, Dvese bien con agua limpia. No utilice el mando a
distancia si las pilas han experimentado fugas. Los
productos qu[micos de las pilas pueden ocasionar
quemaduras uotros peligros para la salud.
SEGURIDAD ELi CTRICA
ADVERTENCIA
Peligro de descarga el_ctrica
No seguir estas instrucciones puede provocar
la muerte, un incendio o una descarga
el_ctrica.
* Esta unidad debe contar con una adecuada
conexi6n a tierra.
* Bajo ninguna circunstancia corte o quite la
pata de cone×i6n a tierra.
* Si no cuenta con un tomacorriente con una
adecuada cone×i6n, o si existe alguna duda
sobre el mismo, un electricista calificado
debe verificar el tomacorriente o el circuito, y
si fuese necesario, instalar un tomacorriente
con adecuada cone×i6n.
* Este acondicionador de aire debe conectarse
en un tomacorriente con cone×i6n a tierra de
60 Hz, 120 VAC protegido pot una fusible de
acci6n retardada de 15 amperes o un
disyuntor.
* Este acondicionador de aire debe instalarse
de acuerdo con los c6digos nacionales de
cableado.
* No altere o modifique el enchufe o cable
de este acondicionador de aire. Si el cable
de energia se gasta o dada, s61oun tecnico
calificado puede cambiarlo utilizando piezas
de repuesto genuinas.
* No utilice un cable de extensi6n.

MFL36812504_SP:Layout 1 2007.12.8 1:43 PM Page 53
]NSTRUCCI ONNDE SEGURIDADIMPORTANI S
LEA TODAS LAS INST RU CC
ANT ES DE USAR
SEGURIDAD ELECTRICA
IONES
,fi_
........>117.......
DISYUNTOR INTEGRADO
Para seguridad
guraci6n adicional, el cable
de energia cuenta
con un disyuntor
integrado. Los
botones de
prueba y de
reconfiguraci6n
se encuentran
en el enchufe.
El disyuntor debe
probarse en forma peri6dica presionando el
bot6n TEST (prueba) y luego el bot6n RESET
(reconfiguraci6n). Si el bot6n TEST (prueba) no
hacen saltar el disyuntor, o si el bot6n RESET
(reconfiguraci6n) no queda trabado, desenchufe
el acondicionador de aire de inmediato y
comuniquese con un tecnico de LG.
Debido a peligros de segurid ad potenciales,
recomen damos enfaticamente no utilizar un
enchu fe adaptador.
Para conexiones temporales, use solo un
adaptador listado UL. Verifique que la ranura
grande del adaptador este alineada con la
ranura grande del tomacorriente.
Para evitar dafios a la terminal de la conexi6n a
tierra del adaptador, sostenga el adaptador en
su lugar mientras enchufa o desenchufa el
acondicionador de aire.
• Conectar la terminal de la conexi6n a
tierra del adaptador al tornillo de la tapa
del tomacorriente de pared no conectara
el artefacto a tierra a menos que el
tornillo sea de metal y no aislado, y el
tomaco rriente de pared es% conectado a
tierra a traves del cableado domestico.
/METODO DE CONEXION
A TIERRAPREFERIDO
Verifique que
haya una
conexi6n a tierra
adecuada antes
del uso. j/
METODO DE CONEXION A TIERRA "%
TEMPORAL
(El uso de enchufes
adapt adore s no
esta permit ido
en Canada)
conexi6n a tierra
adecuada antes
del uso.
,J
Una conexi6n y desconexi6n frecuente
pueden dafiar la terminal de tierra del
adaptador. Nunca utilice un adaptador
roto o da_ado.
........,.17.......
GUARDE ESTAS INSTRUCCIONES

PIEZASY €ARAclERiSllcAS
PARTES Y comPONENTES PRINCIPALES
PANEL DE CONTROL YPANTALLA
La pantalla LCD de facil lectura muestra el estado
de funcionamiento. Los botones tactiles digitales
permiten cambiar la configuraci6n de forma rapida
y sencilla.
DESCARGA DE AIRE /ViOTORIZADA
La rejilla ajustable de descarga de aire se abre
automaticamente cuando el equipo se enciende
y se cierra cuando se apaga el equipo.
Tambien puede configurarse para oscilar y distribuir
el aire de forma mas homogenea en la sala.
CONTROL REMO TO POR INFRARROJOS
El control remoto LCD le permite ajustar la
temperatura y operar la mayoria de las funciones
del aire acondicionado desde el otto extremo de
la sala.
CONDUCTO Y DIFUSOR
Utilice el difusor y el conducto para conectar el
aire acondicionado al kit de instalaci6n de ventana
para expulsar el aire de salida al exterior.
FIL TRO
El filtro puede retirarse e insertarse facilmente.
ASAS
Las asas proporcionan un agarre c6modo para
levantar el aire acondicionado.
RUEDAS GIRA TORIAS
Las ruedas giratorias le permiten mover facilmente
el aire acondicionado por la mayoria de las
superficies de suelo.
PLIER TO DE DRENAJE INFERIOR
Antes de mover la unidad, drene el agua del
dep6sito interior de recogida usando el puerto de
drenaje inferior.
VENTILADORES MUL TIVEL OCIDAD
El aire acondicionado incluye dos ventiladores de
varias velocidades: un ventilador para mover el aire
del interior de la habitaci6n y un ventilador de salida
para ventilar el aire caliente hacia fuera por la
manguera y el difusor.
SOPORTE DE CABLE DE SUMINISTRO ELECTRICO
Envuelva el cable de alimentaci6n alrededor de los
soportes para su comodidad.
O _G
m

PIEZASY €ARAclERTSllcAS
PANEL DE CONTROL Y CONTROL REmOTO
A PART
I
B PART
NOTA: Pulse la parte (_) para utiNzar el bot6n.
En caso de no indicar Io contrario, la operaci6n de las funciones
es la misma al usar el control remoto y el panel de control.
Para obtener una informaci6n detallada acerca de cada funci6n,
consulte las paginas siguientes.
EN CEND /D 0 YA PA GAD 0
Enciende y apaga la el aire acondicionado. AI encender el
equipo, sonara un tono ascendente para confirmar el encendido.
AI apagar la unidad, sonara un tono descendente.
AUTOI.IMPIEZA
La funci6n AUTOLIMPIEZA se utiliza para eliminar la humedad
del intercambiador de calory ayuda evitar la formaci6n de olores.
Esta funci6n puede activarse solamente desde el control remoto.
VENTILADOR
Ajusta la velocidad del ventilador de circulaci6n entre las
opciones baja (F1), media (F2) y alta (F3).
MODO
Cambia el modo del aire acondicionado entre COOL
(FRiO), FAN (VENTILADOR), DRY (SECADO)y
ENERGY SAVER (AHORRO DE ENERGiA). El modo
activo se mostrara en la pantalla LCD.
O
Co01 Fan Dry
?im_r ..dill
!211.21.,
t21!21oF
Auto Auto Energy
Clean Swing Saver
PANTALLA LCD
La PARTE A muestra la temperatura seleccionada
(°C o °F), la velocidad del ventilador o la demora
seleccionada en el TEMPORIZADOR.
La PARTE B muestra el modo activo (COOL (FRiO),
FAN (VENTILADOR), DRY (SECADO) y ENERGY
SAVER (AHORRO DE ENERGiA)), Autolimpieza,
Agua Ilena y Temporizador.
A / V(TEMP/TEMPORIZADOR)
Utilice estos botones para ajustar la temperatura
seleccionada subiendola o bajandola, o s61o para
ajustar el tiempo de demora del temporizador.
TEMPORIZADOR
Le permite configurar la demora entre 1 y 24 horas
para apagar o encender automaticamente el aire
acondicionado.
oC:OF
Utilizando este bot6n, la temperatura mostrada puede
cambiarse entre grados Centigrados (°C) y
Fahrenheit (°F)
OSCILACION A UTOMA TICA
Configura la descarga de aire para oscilar, mejorando
la circulaci6n de aire de la sala.
Esta funci6n s61o puede activarse y mostrarse desde
el control remoto.
31@

cOMOUliiiZaR Ei ARIEFACIO
ANTES DE UTILIZAR ELACONDICIONADOR DE AIRE
PREPARACION PARA LA OPERACION
Lea las Instrucciones de instalaci6n incluidas en
este manual antes de usar el acondicionador de
aire.
Una vez que el acondicionador de aire se ha
montado e instalado correctamente:
O Enchufe el cable de energia en un
tomacorriente de uso exclusivo con adecuada
conexi6n a tierra. Escuchara una serial sonora
que confirma que el acondicionador esta
enchufado. No enchufe otros artefactos en
el mismo tomacorriente, ya que podria
sobrecargarlo y generar un peligro de
incendio.
AsegOrese de que el acondicionador de aire
y el cable esten ubicados en un lugar donde
nadie pueda tropezarse y donde reciban una
ventilaci6n adecuada. No Io coloque
directamente al lado de muebles u objetos que
podria bloquear las aberturas de ventilaci6n.
O Verifique que que podrian
los elementos
volarse o dafiarse pot la corriente de aire
proveniente del ventilador no se encuentren
en el camino de la corriente.
IMPORTANTE:
o No permanezca frente a la corriente de aire del
acondicionador de aire pot periodos largos.
Para evitar el dafio o lesi6n a mascotas o
plantas, constate que no esten expuestos a la
corriente directa del acondicionador de aire.
Cuando Io use al mismo tiempo con cocinas,
chimeneas, u otros dispositivos de combustion,
asegOrese de que haya una suficiente corriente
de aire fresco en la habitaci6n. No Io use en
espacios muy cerrados con esta clase de
dispositivos.
Este acondicionador de aire es para uso
domestico como un artefacto de confort para
el consumidor. No Io use como un sistema
de control preciso de clima, o para enfriar
equipamientos de precisi6n, alimentos,
mascotas, plantas, obras de arte, etc. Dichos
elementos podrian dafiarse.
• No doble el tubo flexible hacia abajo si no
dispone del conjunto de instalacion de la
ventana. Se puede dafiar el sistema de aire
acondicionado o se puede deteriorar su
funcionamiento.
COMO DESEMPACAR EL
ACONDICIONADOR DE AIRE
Quite y guarde los materiales de empaque para
volverlos a usar.
Quite la cinta de embalaje antes de usar el
acondicionador de aire. Si la cinta deja restos de
adhesivo, frote una pequefia cantidad de jabon
Iiquido y limpie con un patio hOmedo. NO USE
instrumentos afilados, alcohol, solventes, o
Iimpiadores abrasivos para quitar el adhesivo.
Podrian arruinar el acabado.

cOMOUliiiZaR Ei ARIEFACIO
ANTES DE USAR EL AIRE ACONDICIONADO
INSERC/ON DE/_AS BA TERiAS EN EL CONTROL REMOTO
Antes de usar el control remoto, instale las baterias
AAA proporcionadas:
_ Apriete deslice la cubierta de baterias del control
Y
remoto y, a continuaci6n, retire la cubierta.
O
O
Inserte dos baterias alcalinas AAA nuevas en el
compartimento asegurandose de utilizar la
polaridad adecuada.
Vuelva a colocar la cubierta de baterias
asegurandose de que las pesta_as de cierre
entran en su sitio con un clic.
NOTAS:
- Utilice solamente baterias alcalinas. No utilice
baterias recargables.
. AI cambiar las baterias, cambie siempre ambas
batedas por unas nuevas.
No combine baterias nuevas y viejas.
- Si el aire acondicionado no va a utilizarse durante
un largo periodo de tiempo, retire las batedas del
control remoto.
ALMA CENAM/ENTO DE CONTROL
RE/V/O TO
El aire acondicionado dispone de un lugar especial
para guardar c6modamente el control remoto.
Vease la figura de la derecha.
NOTA:
Para evitar perder el control remoto, col6quelo en el
lugar de almacenamiento cuando no vaya a usarlo.
f
PRECAUC
iAsegOrese de tener en
ridad!
.....................................................................................................,,
!
• Si el liquido de las baterias entra en contacto con la piel o la ropa, lave la zona con
abundante agua.
No utilice el control remoto si las baterias tienen fugas.
• Si ingiere el liquido de las baterias, lavese los dientes y consulte a un medico.
Los productos quimicos de las baterias podrian causar quemaduras u otros riesgos para
su salud.

cONOUliliZaR [i ARIEFACIO
UTILIZACION DE LOS CONTROLES
Se muestran los botones del panel de control.
La operaci6n usando el control remoto es la
misma, a menos que se especifique Io contrario.
NO TA: El sensor remoto se encuentra bajo la
salida de aire yen la parte superior del panel
frontal.
ENCENDIDO
Pulse el bot6n POWER (ENCENDIDO) para
encender o apagar el aire acondicionado.
iO POWER_j Alencenderelaire
acondicionado, escuchara un
tono y la pantalla LCD mostrara
la temperatura seleccionada y
cualquier modo activo.
AI apagar la salida de aire de la parte superior
del aire acondicionado escuchara un tono
descendente y la salida de aire se cerrar&
Cualquier configuraci6n de control como las de
Modo, Temperatura seleccionada, Oscilaci6n
automatica, etc.., se guardaran en la memoria
cuando se apague el equipo.
NOTA:Cuando el aire acondicionado se
enciende despues de haberlo desenchufado, se
reiniciara automaticamente al modo COOL
(REFRIGERACION) con una temperatura
seleccionada de 72°F.
Sera necesario volver a introducir toda la
informaci6n de configuraci6n.
Apunte siempre el control remoto hacia el sensor.
El control remoto podria no funcionar si el sensor
se encuentra bajo una luz brillante o no hay una
linea directa entre el control remoto y el sensor.
MODO
Pulse el bot6n MODE (NIODO) para seleccionar
el modo de operaci6n (COOL (REFRIGERACION),
FAN (VENTILACION), DRY (SECADO) o ENERGY
del aire acondicionado.
Y podra vet el modo activo en la
pantalla LCD.
La configuraci6n predeterminada es COOL
(REFRIGERACION).
Pulse el bot6n MODE (MODO) para cambiar al
modo FAN (VENTILAClON), pQIselo de nuevo
para cambiar a DRY (SECADO), una vez mas
para cambiar a ENERGY SAVER (AHORRO DE
ENERGiA) y de nuevo para regresar a COOL
(REFRIGERACION).
COOL
(REFRIGERACtON)
El compresorfuncionay refrigerala sala.
Utilicelosbotones(A / V) yFAN(VENTILAClON)
paraconfigurarlatemperaturay velocidadde
ventiladordecirculaci6nquedesee.
FAN El ventiladorhacecircularelaireperoelcompr,esor
(VENTILACtON)nofunciona.Utiliceel bot6nFAN(VENTILACION)
paraconfigurarlavelocidaddeventiladorquedesee.
DRY El mododesecadoseutilizaparaeliminarla
(SECADO)humedaddelasalasinaria@refrigeraci6nadicional.
Unavezsealcanzalatemperatura,el compresory
el ventiladordecirculaci6nse apaganyseiniciar&
el ventiladordeexpulsi6n.Lavelocidaddelventilador
est&predefinidaynopuedeajustarse.
ENERGY
SAVER
(AHORRODE
ENERGIA)
Enel funcionamientonormal,elventiladorde
expulsi6nsigueunciclodeencendidoyapagado
conel compresoryel ventiladordecirculaci6n
funcionaalavelocidadconfigurada.Elmodoayuda
areducirelconsumodeenergiaautom&ticamente
apagandoelventiladordecirculaci6ny elventilador
deexpulsi6ncuandoseapagaelcompresor.Elaire
acondicionadoentrar&autom&ticamenteenel ciclo
conambosventiladoresencendi6ndosey
apag_&ndoseconelcompresorsegOnsenecesite
parala refrigeraci6n. ..j,x

¢OMOU[iliZaR ei ARIEFACIO
UTILIZACiON DE LOS CONTROLES
VEL OCIDAD DE VENTILADOR
Pulsar el bot6n FAN SPEED (VELOCIDAD DE
VENTILADOR) iniciara un ciclo de velocidad de
ventilador entre baja (F1) a media
(F2) a alta (F3). La velocidad de
ventilador seleccionada se mostrara
en la pantalla LCD.
La funci6n puede usarse en los modos COOL
(REFRIGERACION) o FAN (VENTILACION).
AI cambiar las velocidades de ventilador, existe
una pequeffa demora antes de que el motor del
ventilador cambie la velocidad.
A / V(TEMP/TEMPOR/ZAOOR)
En los modos COOL (REFRIGERACK[)N) y DRY
SECADO), los botones (A/V) (TEMP/TIMER)
TEMP/TEMPORIZADOR) ajusta la temperatura
se selecci6n hasta 86°F o 60 °F,
en incrementos de un grado.
La temperatura puede cambiarse
entre grados Fahrenheit y
Centigrados, pulsando el bot6n ( A ) y (V)
simultaneamente, o pulsando el bot6n (z) en el
control remoto. Cuando se selecciona la funci6n
TIMER (TEMPORIZADOR), utilice los botones
(A/Y) (TEMP/TIMER)(TEMP/TEMPORIZADOR)
para ajustar el tiempo de demora entre 1 y 24
horas, en incrementos de una hora.
Si mantiene pulsado el boton (A/V) (TEMP/TIMER)
(TEMP/TEMPORIZADOR), la temperatura y o el
tiempo cambiara automaticamente tras unos
segundos.
NOTA: La temperatura mostrada sera la
temperatura SELECCIONADA no la temperatura
de la sala.
En los modos COOL (REFRIGERACION), DRY
(SECADO) o ENERGY SAVER (AHORRO DE
ENERGIA), el termostato del aire acondicionado
activara el compresor hasta que se haya
alcanzado la misma temperatura, iniciando a
continuaci6n un ciclo de encendido y apagado
para mantener la temperatura seleccionada.
TEMPORIZADOR
Cuando se selecciona la funci6n TIMER
(TEMPORIZADOR) puede configurar el aire
IL DI ac°ndici°nad° para encenderse °
TIMER apagarse automaticamente tras
una demora de hasta 24 horas.
La pantalla mostrara 0.
Utilice los botones (A IV) (TEMP/TIMER)
(TEMP/TEMPORIZADOR) para ajustar el tiempo
de demora entre 1 y 24 horas, en incrementos
de una hora.
Para configurar un tiempo de desconexi6n
automatica, pulse el bot6n TIMER
(TEMPORIZADOR) mientras el aire
acondicionado se encuentra en funcionamiento
y pulse los botones ( A IV) (TEMP/TIMER)
(TEMP/TEMPORIZADOR) para ajustar el
tiempo de demora. El aire acondicionado se
apagara automaticamente transcurrido el tiempo
de demora seleccionado, pulse el bot6n TIMER
(TEMPORIZADOR) mientras el equipo esta
apagado y utilice los botones (A/V) (TEMP/TIMER)
(TEMP/TEMPORIZADOR) para ajustar el tiempo
de demora.
La pantalla mostrara el n0mero de horas
restantes hasta la hora en que la unidad se
encendera. El aire acondicionado se encendera
automaticamente tras la demora.
Si desea saber cuantas horas ha definido, pulse
el bot6n TIMER (TEMPORIZADOR) y, a
continuaci6n, podra vet el tiempo en la pantalla LCD.
Si desea cambiar el temporizador configurado,
pulse el bot6n TIMER (TEMPORIZADOR) y ajuste
el tiempo cuando el n0mero parpadee.
Para cancelar la funci6n Timer (Temporizador), un
metodo es pulsar el boton TIMER
(TEMPORIZADOR) y ajuste el nQmero a "0"
cuando el nQmero parpadee y, a continuaci6n, la
funci6n se cancelara en unos segundos.
Otro metodo adecuado es pulsar el bot6n TIMER
(TEMPORIZADOR) y pulsarlo de nuevo cuando
el nQmero parpadee.
NOTA: No desenchufe el aire acondicionado
mientras usa la funci6n de temporizador.

cOMOUliliZafi Ei ARIEFACIO
UTILIZACION DE LOS CONTROLES
A UTOL IMPIEZA
Para activar la funciGn AUTO CLEAN
(AUTOLIMPIEZA), pulse el botGn AUTO CLEAN
_ _ _ (AUTOLIMPIEZA) mientras el aire
c_;_, acondicionado funciona en los
modos COOL (REFRIGERACION),
DRY (SECADO) o ENERGY
SAVER (AHORRO DE ENERGiA). Esta funciGn sGIo
puede seleccionarse desde el control remoto; no esta
disponible en el panel de control. Debe configurarse
cada vez que desee ejecutar la funciGn AUTO CLEAN
(AUTOLIMPIEZA).
La funciGn AUTO CLEAN (AUTOLIMPIEZA) se utiliza
para eliminar la humedad de las bobinas del
intercambiador de calor. Esto ayuda a evitar laformaciGn
de moho y de olores.
O Para utilizar la funcion AUTO CLEAN
(AUTOLIMPIEZA)
Con el aire acondicionado funcionando en los
modos COOL (REFRIGERAClON), DRY
(SECADO) o ENERGY SAVER (ANORRO DE
ENERGiA), pulse el boton AUTO CLEAN
(AUTOLIMPIEZA).
O La pantalla LCD indicara "AUTO CLEAN"
(AUTOLIMPIEZA).
Pulse el boton POWER (ENCENDIDO) para
apagar el aire acondicionado.
La funcion AUTO CLEAN (AUTOLIMPIEZA)
encendera los ventiladores de circulacion y de
expulsiGn con el compresor apagado durante unos
minutos despues de apagar el aire acondicionado.
Para cancelar la funci6n AUTO CLEAN
(AUTOLIMPIEZA), o para detener el ciclo de
autolimpieza, simplemente pulse de nuevo el bot6n
AUTO CLEAN (AUTOLIMPIEZA).
La funci6n AUTO CLEAN (AUTOLIMPIEZA) no
funcionara si el aire acondicionado ya esta apagado.
OSCILA CION A UTOM.4 T/CA
La funciGn AUTO SWING (OSCILACION
AUTOM/_TICA) sGIo puede activarse desde el
_t_ control remoto.
s,_ Cuando esta funciGn esta activada,
la salida de aire oscilara para que el
aire circule de forma mas homogenea
en la sala.
Para desactivar esta funciGn, simplemente pulse el
botGn AUTO SWING (OSCILACION AUTOMATICA)
de nuevo en el control remoto.
Con la funcion AUTO SWING (OSClLACIGN
AUTOMATICA) desactivada, tambien puede ajustar
manualmente la salida de aire a la posiciGn que desee.
Mantendra esta posiciGn hasta que se apague el
aire acondicionado o se active la funciGn AUTO
SWING (OSCILACION AUTOMATICA).
oC=OF
°C_=°F La funciGn (*) sGIo puede activarse desde el
,control remoto.
°c=°F ICuando la temperatura se muestre
en °C (o °F), puede pulsar este
/botGn para cambiar a °F (o °C).
4

MFL36812504_SP:Layollt 1 2007.12.8 1:43 PM Page 61
INSI UCCI(NES DE INS LAGON
PREP AIRACION PARA LA INSTALACION
AD VER TEN CIA iEl_condicionadordo_dleospos_do! iUtJlico
dos o mOs personas pttrtt lewtntttr o inst_tlttrlttunidttd!No h_tcorlo puodo provocttr
le_ionos on lttosp_tldtt u otrtts les ionos.
COMPO _\_ N TES DE SALIDA
Los siguie_tes compo nentesse usan para laventilaci6fle laventana.
No t{)dos los corn ponentes se utilizt_i_ todas lasin_alaciones
Manguez'a flexiblge vent ilac i6n
,f]h
Extensi6n y panel /
de ventilaci6n
Pa de
extensi6n
grande
Panel de ventilaci6n
Equipo de instalaci6n en
ventanas (incluye 2 panel
de ventilaci6n para
ventanas y 2 paneles de
extensi6n)
Panelde
extensi6n
pequefio
2 selladores de espuma
Tipo A(adhesivos)
1 selladozde espuma TipoB
(no adhesivos)
Sellantede esptmla C 2EA
(Tipoadhesivo m0s cot'to)
Sopoz'te de segtE'idad
10 toz'niBs T_)o A

iNSIRUcciONES DE iNslalaciON
COMO CONECTARLA MANGUERA Y EL DIFUSOR
NOTA: El aire acondicionado se envia con la manguera instalada, Si es necesario, puede retirarla para
limpieza y almacenamiento, Para retirarla simplemente siga los pasos anteriores en sentido inverso,
Como puede ver en la figura, inserte el extremo
de la manguera en el orificio de la parte trasera
del aire acondicionado. (AsegQrese de que la
marca derecha del conector coincide con la
marca del aire acondicionado.)
Girela ligeramente en sentido contrario alas
agujas del reloj hasta que entre en su lugar.

iNSIRUcciONES DE iNslaiaciON
PANEL DE VENTILACION Y EXTENSIONES
DE LAVENTANA
El equipo de instalacidn le permite instalar el acondicionador de aire en la mayoffa de las ventanas
de desfizamiento vertical de 18 "a 48" de ancho, o ventanas deslizamiento horizontal de 18 "a 48"
de altura.
Panel de
ventilaci6n
Para una abertura de ventana de 18", use el
panel de ventilacion solo.
Panel de
extensi6n
grande
4,,,,%
Panel de extensi6n
Panel de
ventilaci6n
Para aberturas de ventana de 24" a 29", utilice
el panel de ventilacion y el panel de extension
grande.
Extensi6n,
deventilaci6n
Extensi6ny 36" - 48"
deventilaciOn
extensi6n
Iill I grande
1/11tI I
. Panel de
Panel de
extension
grande
de
ventilaciOn
P_e-'Fd_
extensi6n
pequerio
Panel de extensi6n °°'"n
peque_o
Panel de 18¼" - 24" _ _
ventilaci6n / I II_ll I
_11 Panel de ext
h___ _ _ ensi6n
.._i peque_o
18¼"-24" _
Para aberturas de ventana de 181/4'' a 24", utilice
el panel de ventilaciOn y el panel de extension
peque_o.
Panel de extensi6n
Panel de
extensi6n
grande
Panel de
ventilaci6n
Panel de grande_-
ventilaci6n
Panelde
extensi6n
Panelde
-extensiOn
peque_o _
Para aberturas de ventana de 29" a 36", utilice
el panel de ventilaciOn y ambos paneles de
extension.
Para aberturas de ventana de 36" a 48", utilice
el panel de ventilaciOn y ambos paneles de
extension.

iNSIRUcciONES DE iNslalaciON
INSTALACIONEN VENTANAS DE
DESLIZAMIENTO VERTICAL
NOTA: El equipo de instalaci6n en ventanas puede utilizarse con ventanas de deslizamiento vertical de
un ancho de entre 18" y 48".
Tipo C de sellado con espuma
(tipo adhesivo-mas corto).
Sellante de espuma A
adhesivo)
.... _J
Corte la espuma A (tipo adhesivo) y C (tipo
adhesivo=mas corto) segQn la Iongitud
adecuada, y col6quelo en la hoja y el marco
de la ventana.
.....jJ
Introduzca el montaje de panel de
ventilaci6n, incluyendo los paneles de
extensi6n, si fueran necesarios, en la
abertura de la ventana. Extienda los paneles
de extensi6n, si los esta utilizando.
Tornillos Tipo A
Baje la ventana con cuidado. Ajuste el panel
de ventilaci6n en su lugar con 4 tornillos tipo
A, mas un tornillo pot cada extensi6n:
$61o panel de
ventilaci6n:
Panel de ventilaci6n
y una extensi6n:
Panel de ventilaci6n
y dos extensiones:
Dos paneles de
ventilaci6n
y dos extensiones: 9 tornillos Tipo A
4 tornillos Tipo A
5 tornillos Tipo A
6 tornillos Tipo A
Sellado con espuma B _ ........... 4\
3o no adhesivo)
J
Corte la espuma B (tipo no adhesivo) segQn
el ancho de la ventana. Rellene con la
espuma B la separaci6n existente entre el
cristal y la ventana a fin de prevenir la
entrada de aire o insectos en la habitaci6n.

iNSIRUcciONES DE iNslaiaciON
INSTALACIONEN VENTANAS DE
DESLIZAMIENTO VERTICAL
J
!
Tornillos
Tipo A
Sopo_e de seguridad
Instale el soporte de seguridad con un
tornillo tipo A, como puede verse.
I
,s
Introduzca el extremo oval del difusor dentro
del equipo de instalaci6n en ventanas hasta
que las lengOetas queden trabadas.

iNSIRUcciONES DE iNslalaciON
INSTALACIONEN VENTANAS DE
DESLIZAMIENTO HORIZONTAL
NOTA: El equipo de instalaci6n de ventanas puede usarse con ventanas con bisagras con una altura
de 18"a 48".
Sellado con
espuma A
Sellado con
espuma C
(tipo adhesivo-
as corto)
Panel de
ventilaci6n
Corte la espuma A (tipo adhesivo) y C (tipo
adhesivo-mas corto) segQn la Iongitud
adecuada, y col6quelo en la hoja y el marco
de la ventana.
,Tornillos Tipo A
Cierre la ventana con cuidado. Ajuste el
panel de ventilaci6n en su lugar con 4
tornillos tipo A, mas un tornillo pot
cada extensi6n:
$61o panel de
ventilaci6n:
Panel de ventilaci6n
y una extensi6n:
Panel de ventilaci6n
y dos extensiones:
Dos paneles de
ventilaci6n y dos
extensiones:
4 tornillos Tipo A
5 tornillos Tipo A
6 tornillos Tipo A
9 tornillos Tipo A
Introduzca el montaje de panel de ventilaci6n,
incluyendo los paneles de extensi6n, si fueran
necesarios, en la abertura de la ventana.
Extienda los paneles de extensi6n, si los esta
utilizando.
Sellado con espuma B
(tipo adhesivo)
_J
Corte la espuma B (tipo no adhesivo) segQn
el ancho de la ventana. Rellene con la
espuma B la separaci6n existente entre el
cristal y la ventana a fin de prevenir la
entrada de aire o insectos en la habitaci6n.

iNSIRUcciONES DE iNslaiaciON
INSTALACIONEN VENTANAS DE
DESLIZAMIENTO HORIZONTAL
Tornillos
Tipo A
Soporte de
seguridad
Instale el soporte de seguridad con un
tornillo tipo A, como puede verse.
...........................................................................................................................j
Introduzca el extremo oval del difusor
dentro del equipo de instalaci6n en ventanas
hasta que las lengQetas queden trabadas.

€UiDADOY illviPIEZA
Su acondicionador de aire esta disef)ado para
funcionar durante todo el ado con sdlo una
fimpieza y mantenimiento mfnimos.
ADVERTENCIA
Para una eficiencia m#_xima, se recomienda que
haga inspeccionar y Iimpiar las serpentinas de
enfriamiento una vez por ado. Su Centro de
Servicio Autorizado LG local puede prestar
este servicio de inspeccidn y fimpieza por
una mddica suma.
• Desenchufe el acondicionador de aire antes de limpiar o realizar cualquier clase de
mantenimiento o arreglo.
• Tenga cuidado al limpiar las serpentinas o al quitar o volver a instalar el filtro: ilas aletas
de enfriamiento son filosas!
No seguir estas precauciones puede provocar una descarga electrica o lesiones personales.
COMO LIMPIAR LACUBIERTA
®
Limpie la cubierta con
un patio ligeramente
hOmedo, luego seque
con un patio o toalla.
Para evitar daSos al acabado, no utilice
gasolina, benceno, solvente, etc., o
cualquier limpiador abrasivo para limpiar
el acondicionador de aire; pueden da_ar
el acabado.
Nunca vierta agua sobre o dentro de la
unidad; podria daSar los componentes
internos y generar un peligro de descarga
el6ctrica o incendio.
COMO LIMPIAR EL FILTRODE AIRE
El filtro de aire debe limpiarse cada dos semanas,
dependiendo de la calidad del aire de interior,
puede set necesario limpiarlo con mayor frecuencia.
Un filtro de aire sucio reducira el caudal de aire y
reducira la eficacia.
No utilice el aire acondicionado sin el filtro en
su lugar.
t_ Sujete el asa del
centro yen la parte
superior del filtro y
tire directamente
hacia fuera.
j/
0
Utilice un aspirador para limpiar el filtro.
Si el filtro esta muy manchado, puede lavarse
en agua caliente usando un detergente suave.
No utilice limpiadores agresivos ni agua
demasiado caliente.
No Io lave en un lavaplatos
Deje que el filtro se seque completamente
antes de volver a instalarlo.
Vuelva a insertar el filtro, asegurandose de
que la parte inferior del filtro se encuentra
entre las pesta_as y la guarda de la bobina.
Vuelva a colocar la cubierta del filtro,
asegurandose de que entra en su sitio.

€UiDADO¥ [iMPiEZA
COIViOVAClAR ELTANOUE DE
DE AGUA
Empleando el puerto inferior de drenaje
Cuando el tanque interno de recolecci6n de
agua est_ Ileno, aparecer& FL en la pantalla y el
acondicionador de aire se apagar_ hasta que se
vacie el tanque.
a Desenchufe el acondicionador de aire,
desconecte la manguera de salida de la parte
trasera, y traslade el acondicionador de aire a
un lugar de drenaje adecuado o al exterior.
Tambi6n puede colocar un recipiente bajo el
drenaje con capacidad para 1 cuarto de
gal6n de agua.
O Quite la tapa de drenaje de la salida de
drenaje.
O Una vez que el tanque de recolecci6n de agua
se ha drenado, vuelva a instalar la tapa de
drenaje, cercior_ndose que est6 bien
colocada.
Coloque el acondicionador de aire en la
ubicaci6n deseada, reconecte la manguera de
salida, y enchufe el acondicionador de aire.
RECOLECCION
f_
Drain
Drain Outlet
NOTAS:
• Cuando se Io encienda despu6s de haber sido
desenchufado, el acondi cionador de aire se reconfigurar_
autom_ticamente en el modo COOL (fdo), con una
temperatura establecida de 72°R

€UiDADO¥ iiMPIEZA
COMO GUARDAR ELACONDICIONADOR DE AIRE
Si no va a usar el acondicionador de aire durante
un perfodo prolongado:
Drene el tanque de recolecci6n de
agua
completamente y deje el pico de drenaje
destapado el tiempo suficiente para eliminar
el agua residual. Una vez que el tanque se
haya drenado por completo y no salga mas
agua, vuelva a colocar la tapa.
_ Quite y limpie el filtro, deje que se seque pot
completo y vuelva a instalarlo.
O Quite las baterias del control remoto.
O Guarde el acondicionador de aire en un lugar
frio y seco, lejos de luz solar directa,
temperaturas extremas, y polvillo excesivo.
Antes de volver a usar el acondicionador de aire:
Gb Verifique que el filtro y la tapa de drenaje esten
en su lugar.
Verifique el cable para asegurar que este en
buenas condiciones, sin grietas o dados.
O Coloque baterias nuevas en el control remoto.
_I_ Instale el acondicionador de aire como se
indica en las Instrucciones de instalacidn.

DEiECCION DE PROB[EMAS
ANTES DE LLAMAR AL SERVlClO Ti CNICO
Antes de Ilamar al servicio tecnico, examine esta list& Puede ahorrarle tiempo y dinero. La [ista incluye
situaciones comunes que no son el resultado de mano de obra o materiales defectuosos del artefacto.
deairenoseenciende
Elacondicionador
de aire noenfria
correctamente
noestaintroducidodeltodoenel
tomacorriente.
• Elfusibledom6sticosehaquemado
oel disyuntorhasaltado.
Cortedeenergia.
Eldisyuntorintegradodeenchufe
hasaltado.
ApareceFLen la pantalla.
Elacondicionador
de aire funciona muy
a menudoodurante
touchetiempo
• Latemperaturadela habitaci6nes
menora la temperaturaprogramada.
Lacorrientedeaire estadisminuida.
Elfiltro de aireestasucio.
• Lahabitaci6nestamuy caliente,
o nose hadejadoeltiempo
suficientede enfriamiento.
Elairefrio seesta escapando.
• Lasserpentinasdeenfriamiento
se hancongelado.
Elareaa enfriaresdemasiado
grandeparael artefacto.
Haypuertasoventanasabiertas.
a untomacorrientecontensi6nyadecuadaconexi6n
atierra.
Cambieelfusibleovuelvaaconfigurarel disyuntor.
Verifiquequenohayaotrosartefactosenelmismo
circuito.
Siocurreuncortedeenergia,apagueel artdacto.
Cuandovuelvalaenergia,espere3 minutosantes
devolvera encenderelacondicionadordeaire.
Presioneelbot6nRESET(reconfigurar)enel
enchufedelacondicionadordeaire.Sielbot6nde
reconfiguraci6nnoquedatrabado,desenchufeel
acondicionadordeairey comuniqueseconun
t6cnicocalificado.
Eltanquederecolecci6nde aguaestaIleno.Drene
el tanquey vuelvaa configurar.
Verlasecci6nCuidadoy limpieza.
Estoesnormal.Elacondicionadorde airese apaga
automaticamentecuandolatemperaturade la
habitaci6nesigual o menora la configurada.
Si hacefalta,ajustela configuraci6ndetemperatura.
Verifiquequehayasuficienteespacioalrededordel
artefactoy que laentraday salidade aire noest6n
bloqueadaspor muebles,cortinas,etc.
• Limpieelfiltro de aire porIomenoscadados
semanas.Verla secci6nCuidadoy limpieza.
Despu6sdeencenderlo,dejeel tiemponecesario
paraque el acondicionadordeaire enfrie
la habitaci6n.
Verifiquequenohayarejillasde pisodecalderas
o retornosde airefrio, oventanaso puertas
abiertas.
Enclimasespecialmentecalidosy hOmedosy
cuandoel acondicionadorde airefuncionacon
frecuenciao porperiodoprolongados,puede
formarsehieloen lasserpentinasdeenfriamiento,
Ioquebloqueala corrientede aire.Configurelos
controlesen HighFan(ventiladoralto)(F3)o
HighCool(frioalto)(F3),y configureen una
temperaturamaselevada.
Consulteasuvendedorsobrela capacidad
necesariaparaenfriarel areadeseada.
AsegOresedeque puertasy ventanasest6ncerradas.
47 @

DEIE€€ION DE PROB/EMAS
ANTES DE LLAMARAL SERVlClOTi CNICO
Problema
En la pantalla aparece
el C6digo:
F1, F2, o F3
FL
CH01
CH02
CH03
Causas posibles Soluciones
• El aire acondicionado se encuentra en
el modo FAN (VENTILACION) y el
nQmero que se muestra es la velocidad
del ventilador.
• El dep6sito de recogida de agua est_
Ileno.
• Hay un circuito cortado o abierto en el
termostato del aire de interior,
• Hay un circuito cortado o abierto en el
termostato de la tuberia interior,,
• La diferencia entre la temperatura Eva y
la temperatura interior es menor a 3°C.
• Esto es normal, El aire acondicionado funciona
correctamente
• Vacie el dep6sito de recogida de agua.
Vease la secci6n de Cuidado y limpieza.
• Desenchufe el aire acondicionado y p6ngase en
contacto con un servicio tecnico LG autorizado.
• Desenchufe el aire acondicionado y p6ngase en
contacto con un servicio tecnico LG autorizado.
• Desenchufe el aire acondicionado y p6ngase en

LG
SisuacondicionadordeaireportatilLGIlegaraa tenerdefectosenlosmaterialesoen lamanodeobrabajounusonormal,duranteelperiododegarantia
establecidoacontinuaci6n,vigentedesdelafechaoriginaldecompradelproducto,LGElectronicsreemplazaralaspiezasdefectuosas.Laspiezasde
reemplazotendranlasmismascaracteristicasyfuncionesdelapiezaoriginal.Laspiezasdereemplazotienengarantiaduranteeltiemporestantedel
periododegarantiaoriginal.Estagarantialimitadasolamentecubreal compradororiginaldelproductoytienevigencias61ocuandoseIoutilicedentrode
losEE.UU.
PERiODO DE GARANT|A:
P(}rel peri(}d(}de:
UnaS(}desde
la fecha decompra original
tint(} aS(}sdesde
la fecha decompra original
tint(} aS(}s desde
la fecha de compraoriginal
solenoides,
varistores,y
responsable
LGreemplazar&:
Cualquierpiezadelacondicionadordeaireporta.tilLGEquefalledebidoa undefectodelosmaterialeso
demanodeobra.Duranteestagarantiac(}mpletadeun aS(},LGEtambi6nofrece,enformagratuita,la manode
obraytrabajosenelhogarparareemplazarlapiezadefectuosa.
Cualquierpartedel sistemasellad(}de refrigeraci6n(compresor,condensador,evaporadorytodaslas
tuberiasdeconexi6n)quefallaradebidoa undefectodelosmaterialesode manodeobra.Duranteesta
garantiac(}mpletadecinc(}a_(}sdelsistemasellad(}derefrigeraci6n,LGEtambi6nofrece,enf(}rmagratuita,
la manodeobraytrabajosenel hogarparareemplazarlapiezadefectuosa.
Desdeel segund(}al quint(}aS(}delafechade compraoriginal,LGEreemplazaraciertas piezasquefallaran
debidoa undefectodelosmaterialeso de manode obra.Laspartescubiertassonmotoresdelosventiladores,
interruptores,termostatos,calentador,protectoresde calentador,protectordesobrecargadelcompresor,
placasdelcircuito,controlesauxiliares,termistores,controlesdeescarcha,bombaICR,capacitores,
cojinetedelventiladorinterno.Duranteestagarantialimitadadepiezasdecuatr(}a_(}s,ustedsera
decualquierclasedecostosdemanodeobrao trabajosenel hogar.
Ninguna(}tragarantiaesaplicablea esteproduct(}.ESTAGARANTiAREEMPLAZACUALQUIEROTRAGARANTiA,EXPRESA0 IMPLiCiTA,
INCLUYENDO,SiNLiMiTACION,CUALQUIERGARANTiADECOMERCIABILiDADOAPTITUDPARAUNORJETIVOPARTICULAR.ENLAIMIEDiDAENQUE
CUALQUIERGARANTiAllVIPLiCITASEAREQUERIDAPORLALEY,SEUMiTAENDURACIONALPERJODODEGARANTiAEXPRESOANTERIOR.NIEL
FABRICANTENISUDISTRIBUIDORENLOSEE.UU.SERANRESPONSABLESDEDAI_OSINCIDENTALES,RESULTANTES,INDIRECTOS,ESPECIALES0
PUNITIVOSDECUALQUIERNATURALEZA,INCLUYENDO,SiNLilVIITACi0N,GANANCIASOINGRESOSPERDIDOS,OCUALQUiEROTRODA_IO
EXPRESADOMEDIANTECONTRATO,EXTRACONTRACTUALNIENTEODECUALQUiEROTRAFORMA.Algunosestadosy/oterritoriosnopermitenla
exclusi6no limitaci6ndedaSoso limitacionesincidentalesoresultantessobreeltiempodeduraci6ndeunagarantia,porIotantolaslimitacioneso
exclusionesanteriorespuedennoaplicarseensucaso.Estegarantiaotorgaal compradororiginalderechoslegalesespecificosyustedpuedecontarcon
otrosderechos,quepuedenvariardeestadoa estadoo deterritorioaterritorio.
ESTAGARANTiALIMITADANOSEAPUCAA:
1. Visitasasudomicilioparaentregaro retirarpiezas,instalar,instruir,
reemplazarfusiblesdom6sticos,conexi6ndecableadoso caSerias,o
paracorregirreparacionesnoautorizadas.
2. Fallasdelproductodurantefallase interrupcionesdeenergiao
serviciosel6ctricosinadecuados.
3. DaSoprovocadoportransporteo manipulaci6n.
4. Dadosal productoprovocadosporaccidentes,alimadas,rayos,
viento,incendio,inundaciones,ofuerzamayor.
5. DaSosprovocadosportuberiasdeaguarotaso conp6rdidas,
tuberiascongeladas,lineasdedrenajerestringidas,o suministrode
aguainadecuadao interrumpida.
6. Dadosprovocadosporsuministrodeaireinadecuado.
7. DaSosprovocadosporutilizarelproductoenunaatm6sfera
corrosiva.
8. ReparacionescuandosuproductoLGnoseutilizadeunamanera
normalenunaviviendafamiliarunicaocuandoseutilizano
respetandolasinstruccionesdescriptasenlaGuiadelUsuario
delproducto.
PARA CONTAOTAR LG ELECTRONICS
POR CORREO:
LG Customer Interactive Center
R O. Box 240007
201 James Record Road
Huntsville, Alabama 35824
ATTN: CIC
9. DaSosprovocadosporaccidentes,modificaciones,uso indebido,
abuso,o instalaci6ninadecuada,reparaci6n,o mantenimiento.Las
reparacionesinadecuadasincluyen el uso depiezas noaprobadas
o especificadaspor LG.
10.Mantenimientonormalcomo se describe el la Guiade Usuario,como
limpiezao reemplazodefiltros, limpieza de serpentinas,etc.
11.Usodeaccesorioso componentesno compatiblescon este producto.
12.Productoscon numerosde seriemodificadoso borrados.
13.Cambiosen la aparienciadelproducto que no afecten el desempeSo
del producto.
14.Incrementosen los costos de losserviciospublicos y gastos
adicionalesde servicios publicos.
El cost(}de la reparaci6n (} reemplaz(} baj(}estas circunstancias
excluidas qaedar_a cargo del c(}nsumid(}r.
Informaci6n sobre registro deproducto
NQmerode modelo:
NQmerode serie:
Puede encontrari6s en laetiquetad de laparte lateral del
acondicionador de aire.
Fecha de compra:
Nombre del vendedor:
49
@

NOIES

NOIES

P/No. MF162172001
Printed in China
-
 1
1
-
 2
2
-
 3
3
-
 4
4
-
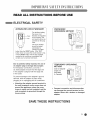 5
5
-
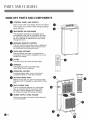 6
6
-
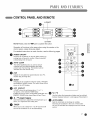 7
7
-
 8
8
-
 9
9
-
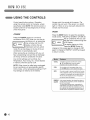 10
10
-
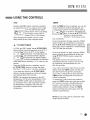 11
11
-
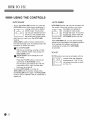 12
12
-
 13
13
-
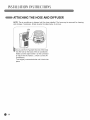 14
14
-
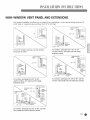 15
15
-
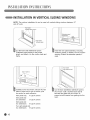 16
16
-
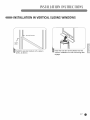 17
17
-
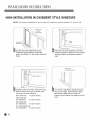 18
18
-
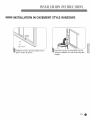 19
19
-
 20
20
-
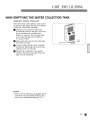 21
21
-
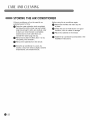 22
22
-
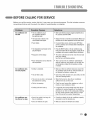 23
23
-
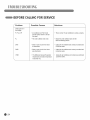 24
24
-
 25
25
-
 26
26
-
 27
27
-
 28
28
-
 29
29
-
 30
30
-
 31
31
-
 32
32
-
 33
33
-
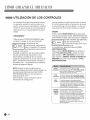 34
34
-
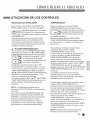 35
35
-
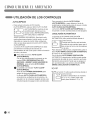 36
36
-
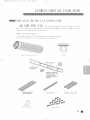 37
37
-
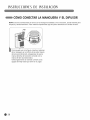 38
38
-
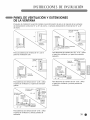 39
39
-
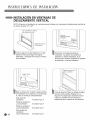 40
40
-
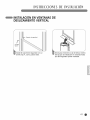 41
41
-
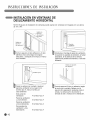 42
42
-
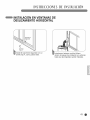 43
43
-
 44
44
-
 45
45
-
 46
46
-
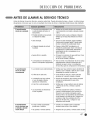 47
47
-
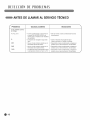 48
48
-
 49
49
-
 50
50
-
 51
51
-
 52
52


en otros idiomas
- English: LG LP1200SDR Owner's manual
Artículos relacionados
-
LG LP1111WXR El manual del propietario
-
LG LP1111WXR El manual del propietario
-
-
-
-
-
-
LG 500611 El manual del propietario
-
