
OWNER’S MANUAL
AIR CONDITIONER
Please read this manual carefully before operating
your set and retain it for future reference.
www.lgappliances.com
TYPE:PORTABLE AIR CONDITIONER
MODEL: LP0711WNR

2
Congratulations on your purchase
and welcome to the LG family.
Your new LG Air Conditioner
combines high-efficiency operation
with portable convenience.
By following the operating and care
instructions in this manual, your air
conditioner will provide you with
many years of reliable service.
THANK YOU!
INTRODUCTION
IMPORTANT SAFETY INSTRUCTIONS
Basic Safety Precautions . . . . . . . . . . . . . . . . . . . 3, 4
Electrical Safety. . . . . . . . . . . . . . . . . . . . . . . . . . . 4, 5
PARTS AND FEATURES
Key Parts and Components . . . . . . . . . . . . . . . . . . . 6
Control Panel and Remote . . . . . . . . . . . . . . . . . . . . 7
HOW TO USE
Before Using Your Air Conditioner . . . . . . . . . . . . 8, 9
Using the Controls. . . . . . . . . . . . . . . . . . . . . . . . . . 10
Preparing for Installation . . . . . . . . . . . . . . . . . . . . . 13
Window Vent Panel and Extensions . . . . . . . . . . . . 14
Installation in Vertical Sliding Windows . . . . . . . 15, 16
Installation in Casement Windows . . . . . . . . . . 17, 18
CARE AND CLEANING
Before Calling for Service. . . . . . . . . . . . . . . . . 22, 23
TROUBLESHOOTING
Product Registration Information . . . . . . . . . . . . . 24
INSTALLATION INSTRUCTIONS
Cleaning . . . . . . . . . . . . . . . . . . . . . . . . . . . . . . . . . 20
Air Filter . . . . . . . . . . . . . . . . . . . . . . . . . . . . . . . . . .20
Water Drainage . . . . . . . . . . . . . . . . . . . . . . . . . . . . 19
Storing the Air Conditioner . . . . . . . . . . . . . . . . . . . 21
WARRANTY
Defrost Operation . . . . . . . . . . . . . . . . . . . . . . . . . . . 20
Selection of Installation Location . . . . . . . . . . . . . . . 11
Attaching the Hose and Diffuser. . . . . . . . . . . . . . . . 12

IMPORTANT SAFETY INSTRUCTIONS
READ ALL INSTRUCTIONS BEFORE USE
3
English
WARNING This symbol indicates the possibility of death or serious injury.
CAUTION This symbol indicates the possibility of injury or damage to property.
Your safety and the safety of others is very important.
We have provided many important safety messages in this manual and on your appliance. Always read and
obey all safety messages.
This is the safety alert symbol.
This symbol alerts you to potential hazards that can kill or hurt you and others.
All safety messages will follow the safety alert symbol and either the word “WARNING” or “CAUTION”.
These words mean:
WARNING To reduce the risk of fire, electric shock, or injury
to persons when using this appliance, follow basic precautions, including the following:
• Do not attempt to repair or replace any part
of your air conditioner unless it is specifically
recommended in this manual. All other services
should be referred to a qualified technician.
• If the power cord becomes worn or damaged,
the cord should only be replaced by a qualified
service technician using genuine replacement
parts.
• The air conditioner should be plugged into its
own grounded 15A, 60 Hz., 120 VAC circuit.
• Do not plug other appliances into the same
outlet; it can overload the circuit and cause a fire
or electric shock.
• Do not remove the round grounding prong from
the plug. It can result in the risk of electric shock.
• This air conditioner is not designed for use by
young children. Young children should be
supervised to ensure that they do not play with
or climb on the air conditioner.
• Be sure all packaging materials are removed
from the air conditioner before use. It can result
in personal injury.
• Do not disassemble or modify the air conditioner
or the power cord. It can result in the risk of
electric shock or fire.
• Do not place the power cord or air conditioner
near a heater, radiator, or other heat source. It
can result in the risk of electric shock or fire.
• Do not use this or any appliance near flammable
gases or liquids or other combustibles, such as
gasoline, benzene, thinner, etc. It can result in
the risk of electric shock or fire.
• Make sure the power cord is plugged firmly and
completely into the outlet. It can result in the risk
of electric shock or fire.
• Do not start or stop operation by plugging in or
unplugging the power cord. It can result in the
risk of electric shock.
• If the air conditioner is making unusual sounds or
is emitting smoke or an unusual odor, unplug it
immediately. It can result in the risk of electric
shock or fire.
• Do not use if the electrical socket is loose or
damaged. It can result in the risk of electric
shock or fire.
• Do not operate with wet hands or in a damp
environment. It can result in the risk of electric
shock.
• Do not use this or any electrical appliance if you
smell gas. It can result in the risk of fire or
explosion.
• Turn off and unplug the air conditioner before
cleaning to avoid the risk of electric shock.
• Do not clean the unit with water. Water can enter
the unit and damage the insulation, creating a
shock hazard. If water enters the unit, unplug it
immediately and contact Customer Service. It
can result in the risk of electric shock.
• Use two or more people to lift and install the
unit. Failure to do so can cause back injury or
other injuries.
BASIC SAFETY PRECAUTIONS

4
IMPORTANT SAFETY INSTRUCTIONS
READ ALL INSTRUCTIONS BEFORE USE
• To avoid possible cuts, avoid contacting the
metal parts of the air conditioner when removing
or reinstalling the filter. It can result in the risk of
personal injury.
• Do not block the air inlet or outlet of the air
conditioner. Reduced air flow will result in poor
performance and could damage the unit.
• Always grasp the plug when plugging in or
unplugging the air conditioner. Never unplug by
pulling on the cord. It can result in the
risk of electrical shock and damage.
• Always turn off and unplug the air conditioner
when it will not be used for extended period of
time. This conserves energy and reduces the
chance of accidents.
• Secure the wheels with blocks to prevent the air
conditioner from rolling on smooth floors.
• Install the air conditioner on a sturdy, level floor
capable of supporting up to 110 lbs (50 kg).
Installation on a weak or unlevel floor can
result in the risk of property damage and
personal injury.
• Make sure the air conditioner is the correct size
for the area you wish to cool. Using an air
conditioner that is the wrong size can waste
energy and damage the air conditioner.
• Close all doors and windows to the room for
most efficient operation.
• To prevent damage to the surface finish, use only
a soft cloth to clean the air conditioner. Do not
use wax, thinner, or a strong detergent.
• To prevent spills and property damage, be sure
to drain the air conditioner properly.
• To prevent the coils from freezing, do not operate
the air conditioner if the room temperature is
• Do not position the air conditioner so that
pets or house plants are exposed to the
direct air flow. It can result in the risk of injury
to pets or house plants.
• This air conditioner is designed for normal
household use. Do not use for cooling pets,
foods, precision machinery, or art objects.
• Do not drink the water from the drain pan.
Dispose of it properly outdoors or down
the drain.
• Do not operate air conditioner without the filter
securely in place. Operation without the filter
could damage the unit.
• Clean the filter every two weeks, or more often
if needed.
BASIC SAFETY PRECAUTIONS
CAUTION To reduce the risk of fire, electric shock, or injury to persons when
using this appliance, follow basic precautions, including the following:
ELECTRICAL SAFETY
WARNING
Electrical Shock Hazard
Failure to follow these instructions can result
in death, fire, or electrical shock.
• This unit must be properly grounded.
• Do not, under any circumstances, cut or
remove the ground prong.
• If you do not have a properly grounded
outlet, or if there is any doubt that the outlet
is not properly grounded, a qualified
electrician should check the outlet and
circuit, and, if necessary, install a properly
grounded outlet.
• This air conditioner must be plugged
into a grounded 60 Hz, 120 VAC outlet
protected by a 15 amp time delay fuse
or circuit breaker.
• This air conditioner must be installed in
accordance with national wiring codes.
• Do not alter or modify the plug or cord
of this air conditioner. If the power cord
becomes worn or damaged, the cord should
only be replaced by a qualified service
technician using genuine replacement parts.
• Do not use an extension cord.
below 17°C (62°F).


6
PARTS AND FEATURES
KEY PARTS AND COMPONENTS
2
1
8
4
5
6
7
7
3
1
2
3
4
SWIVELING CASTERS
INFRARED REMOTE CONTROLLER
5
Check all the accessories included in the package and
please refer to the installation instructions for their usage.
EXHAUST AIR OUTLET VENT
Swiveling casters allow you to move the air conditioner easily
on most floor surfaces.
The remote controller allows you to adjust the temperature
and operate most functions of the air conditioner
from across the room.
AIR DISCHARGE
HOSE
Use the di
AND DIFFUSER
Use the diffuser and hose to connect the air conditioner to the
window installation kit to vent exhaust air outside.
CONTROL PANEL AND DISPLAY
Easy-to-read digital display shows the set temperature and
indicator lights show the operating mode. Simple push buttons
make changing settings quick and easy.
Adjusting the horizontal louver up and down will change
vertial airflow.
The direction of air can be controlled wherever you want to cool
by adjusting the horizontal louver.
8
6
BOTTOM DRAIN PORT
Used when water tank is full or free of using long time.
Before moving the unit, drain the internal water collection
tank completely by using bottom drain port.
7
AIR FILTER
Insert the large adapter at end of the hose into the hole on the
back of the air conditioner.Align the pins on the connector with
the slots in the hole. Twist slightly clockwise until it locks into place.

PART AND FEATURES
CONTROL PANEL AND REMOTE
For detailed instructions on each function,see the following pages.
POWER
Operation begins when this button is pressed and stops
when you press the button again.
MODE
Press this button to select Cool,Dry(Dehumidify),Fan mode.
FAN SPEED
Adjusts the circulation fan speed between High,
Low fan speed.
TIMER
Press this button to set TIMER ON, TIMER OFF
or NO TIMER
UP & DOWN
LED Display
Setting sleeping mode, the temperature will rise
1 °C after 2 hours, and another 2 hours later, rise 1 °C
Operation of functions is the same when using the remote or the control panel,
unless otherwise stated.
1
2
4
5
6
Display different signals accordingly.
7
SLEEP MODE
8
CELSIUS AND FAHRENHEIT EXCHANGE BUTTON
5
2
1
8
8
1
3
4
7
Press these buttons to set room temperature
or timer when in Timer On/Off mode.
Timer
1
2
3
6
4
5
3
English

Refer to the Installation Instructions included in
this manual before using the air conditioner.
Once the air conditioner has been properly
assembled and installed:
Plug the power cord into its own dedicated
properly grounded outlet.
Do not plug
other
it could overload the outlet and create a
e hazard.
Make sure the air conditioner and cord is
positioned where it does not create a
tripping hazard and will receive adequate
ventilation. Do not place it directly next to
furniture or objects that could block the
vent openings.
Make sure that any items that could be
blown over or damaged by the airflow from
the fan are out of the airflow path.
B
PREPARING FOR OPERATION
1
2
Refer to the Installation Instructions included in
this manual before using the air conditioner.
Once the air conditioner has been properly
assembled and installed:
co into own dedicate
r rly grounded outlet.
onotplug
DSSliances
into the same outlet;
it could overload the outlet and c a
fir
e
Make sure the air conditioner and cord is
positioned where it does not create a
tripping hazard and will receive adequate
ventilation. Do not place it directly next to
furniture or objects that could block the
vent openings.
Make sure that any items that could be
blown over or damaged by the airflow from
are out of the path.
BEFORE USING YOUR AIR CONDITIONER
3
• Do not remain in the direct airflow from the air
conditioner for extended periods of time.
• To prevent damage or injury to pets and
plants, make sure they are not exposed to
direct airflow from the air conditioner.
• When used at the same time as stoves,
fireplaces, and other combustion devices,
make sure there is a sufficient flow of fresh air
into the room. Do not use in tightly enclosed
spaces with these types of devices.
• This air conditioner is intended for household
use as a consumer comfort appliance. Do not
use it as a precision climate control system,
or for purposes such as cooling precision
equipment, food, pets, plants, artwork, etc.
Such items could be damaged.
• Do not bend the hose downward when
window installation kit is not applied. It may
cause failure of air conditioner or performance
deterioration.
IMPORTANT:
Remove and store packing materials for reuse.
Remove any shipping tape before using the
air conditioner. If the tape leaves behind any
adhesive, rub a small amount of liquid dish
soap onto it and wipe with a damp cloth. Do
NOT use sharp instruments, alcohol, thinners,
or abrasive cleaners to remove adhesive.
They could damage the finish.
UNPACKING THE AIRCONDITIONER
HOW TO USE

Be sure to note
proper polarity!
噝
噝
噝
1
2
3
BEFORE USING YOUR AIR CONDITIONER
INSERTING BATTERIES IN THE REMOTE
Before using your remote, install the provided
AAA batteries :
Press in the locking tab on the battery cover
on the back of the remote and remove the
cover
Insert two new alkaline AAA batteries into
the battery compartment, being sure to note
the proper polarity.
Reattach the battery cover, making sure the
locking tab clicks into place.
NOTE :
Use only alkaline batteries. Do not use
rechargeable batteries.
When replacing batteries, always replace both
batteries with new batteries. Do not mix old
and new batteries.
If the air conditioner will not be used for an
extended period of time, remove the batteries
from the remote.
CAUTION
If the liquuid from the batteries
gets onto
Do not use the remote if the
batteries have
If you eat the liquid from the
batteries,
The chemicals in batteries could
cause bur
your skin or clothes, wash it well with clean water.
leaked.
brush your teeth and see doctor.
ns or other health hazards.
H O W TO USE
9
English

USING THE CONTROLS
H O W TO U S E
Control panel buttons shown. Operation using the remote control is the same, unless
specifically noted.
1. COOLING MODE
· Press MODE button to choose Cool
mode, the Cool mode indicator will flash.
·
Press UP or DOWN button to set room
temperature between
.
·
Press SPEED button (or High/Low button)
to select high, low fan speed.
2. FAN MODE
· Press MODE button (or Fan button) to
choose Fan mode, the Fan mode indicator
will flash.
Select the fan speed by press FAN button
or press High / Low button directly.
4. TIMER MODE
· When the appliance is switch off, press
Timer button to set timer-on.
·
The temperature can not be set.
·
Press Up or Down button to adjust time
from 1 hour to 24 hours. The Time
on indicator will flash.
·
Setting sleep mode, the temperature
will rise 1
after 2 hours, and another 2
hours later, rise 1
· Then it will keep steady and low fan blow.
62 F to 86 F
3. DRY MODE
·
When the appliance is running, press
Timer button to set timer-off.
NOTE
Always point the remote at the sensor. The remote may not work if the
sensor is in bright light or if there is not a clear path between the remote
and the sensor.
5. SLEEP MODE
·
Select Dry button for dehumidify Mode.
In Dry mo
de fan speed is preset. Speed
button is not available. The temperature
can’t be set either.
·
Press Swing button to make the louver swing
(use remote control only).
10

INSTALLATION INSTRUCTIONS
The length of the exhaust pipe is specially designed according to the specification of this product.
Do not replace or prolong it with your own private hose as this could cause mal-function.
WARNING
SELECTION OF INSTALLATION LOCATION
Install the unit on a flat and dry place.
For best performance,allow at least 50cm
of air space on all sides of the unit for
good air circulation.
1
2
11
English

NOTE: The air conditioner is shipped with the hose installed. The hose may be removed for cleaning
and storage, if necessary. Simply reverse the steps below to remove.
INSTALLATION INSTRUCTIONS
ATTACHING THE HOSE AND DIFFUSER
Insert the large adapter end of the hose into
the hole on the back of the air conditioner.
12

13
English
INSTALLATION INSTRUCTIONS
PREPARING FOR INSTALLATION
WARNING The air conditioner is heavy! Use two or more people to
lift and install the unit! Failure to do so could result in back injury or other injuries.
The following components are used for window venting.
Not all components are used for every installation.
EXHAUST COMPONENTS
Window Installation Kit
(includes 2 Window Vent
Panel and 2 Extension
Panels)
Flexible Venting Hose
4 Type A Screws
10 Type B Screws
Security Bracket
1 Type B Foam Seal
(non-adhesive)
2 Type A Foam Seals
(adhesive)
Vent Panel
Large
Extension
Panel
Extension
Vent Panel
Small
Extension
Panel
2 Type C Foam Seals
(Adhesive type-Shorter)

I N S TA L L AT I O N I N S T RU C T I O N S
WINDOW VENT PANEL AND EXTENSIONS
The window installation kit allows you to install the air conditioner in most vertical-sliding windows 18"
to 48" wide, or casement-style windows from 18" to 48" high.
For an 18" window opening, use the window
vent panel by itself.
14
For window openings from 18
1
⁄4" to 24",
use the window vent panel and the small
extension panel.
For window openings from 24" to 29",
use the window vent panel and the large
extension panel.
For window openings from 29" to 36", use the
window vent panel and both extension panels.
Vent
Panel
Small
extension
panel
Vent
Panel
18"
18"
Vent
Panel
18
1
⁄4" − 24"
18
1
⁄4" − 24"
Small extension
panel
Vent
Panel
Large
extension
panel
Vent
Panel
24" − 29"
Large extension
panel
Vent
Panel
24" − 29"
Large
extension
panel
Vent
Panel
29" − 36"
Large extension
panel
Vent
Panel
29" − 36"
Small
extension
panel
Small
extension
panel
For window openings from 36″ to 48″, use both
vent panels and both extension panels.
Large
extension
panel
Vent
Panel
36" − 48"
Large
extension
panel
Extension vent
panel
Extension vent
panel
Vent
Panel
36" − 48"
Small
extension
panel
Small
extension
panel

Foam seal A
(Adhesive type)
Foam seal C
(Adhesive type-shorter)
NOTE: The window installation kit can be used with vertical sliding windows between 18"
and 48" wide.
1
Cut the foam seal A(adhesive type) &
C(adhesive type-shorter) to the proper
length, and attach it to the window sash and
frame.
2
Insert the vent panel assembly, including
extension panels, if needed, into the window
opening. Extend the extension panels, if
used.
Foam seal B
(Non-adhesive type)
4
Cut the foam seal B(Non-adhesive type) to
the window width. Stuff the foam seal B
between the glass and the window to
prevent air and insects from getting into the
room.
3
Carefully lower the window. Secure the vent
panel in place with 4 type B screws, plus
one screw for each extension:
Vent panel only: 4 type B screws
Vent panel and
one extension: 5 type B screws
Vent panel and
two extensions: 6 type B screws
Two vent panels and
two extensions: 9 type B screws
Type B screws
Extension panel
(if required)
Vent
Panel
I N S TA L L AT I O N I N S T RU C T I O N S
INSTALLATION IN VERTICAL SLIDING WINDOWS
15
English

INSTALLATION IN VERTICAL SLIDING WINDOWS
5
Install the security bracket with a type B
screw, as shown.
Type B
screw
Security Bracket
INSTALLATION INSTRUCTIONS
16
6
Insert the oval end of the diffuser into the
window installation kit until the locking tabs
engage. Secure in place with four Type A
screws.

Foam seal A
(Adhesive type)
Foam seal C
(Adhesive
type-shorter)
1
Cut the foam seal A(adhesive type) &
C(adhesive type-shorter) to the proper
length, and attach it to the window sash and
frame.
2
Insert the vent panel assembly, including
extension panels, if needed, into the window
opening. Extend the extension panels, if
used.
Foam seal B
(Non-adhesive type)
4
Cut the foam seal B(Non-adhesive type) to
the window height. Stuff the foam seal B
between the glass and the window to
prevent air and insects from getting into the
room.
Vent
Panel
Type B screws
Carefully close the window. Secure the vent
panel in place with 4 type B screws, plus
one screw for each extension:
Vent panel only: 4 type B screws
Vent panel and
one extension: 5 type B screws
Vent panel and
two extensions: 6 type B screws
Two vent panels and
two extensions: 9 type B screws
INSTALLATION IN CASEMENT STYLE WINDOWS
NOTE: The window installation kit can be used with casement windows between 18
″
and 48
″
tall.
3
I N S TA L L AT I O N I N S T RU C T I O N S
Extension panel
(if required)
17
English

5
Install the window security bracket with a
type B screw, as shown.
Type B screw
Security
bracket
INSTALLATION IN CASEMENT STYLE WINDOWS
INSTALLATION INSTRUCTIONS
6
Insert the oval end of the diffuser into the
window installation kit until the locking tabs
engage. Secure in place with four of the
included screws.
18

CARE AND CLEANING
Your air conditioner is designed for year-round
operation with only minimal cleaning and
maintenance.
For maximum efficiency, it is recommended
that you have the cooling coils inspected and
cleaned annually. Your local LG Authorized
Service Center can provide this inspection
and cleaning service for a nominal fee.
WARNING
• Unplug the air conditioner before cleaning or performing any maintenance or servicing.
• Be careful when cleaning coils or removing or reinstalling the filter—the cooling fins
are sharp!
Failure to follow the above precautions could result in electrical shock or personal injury.
English
WATER DRAINAGE A
This product has a self-evaporative system. The condensing water will be recycled to cool the
condenser. This can not only improve cooling efficiency, but also save energy for you.
·
If the inside water is full , the display panel will display “FL”, and the compressor will stop running.
Please turn the machine off and move the machine to the place where can drain water, then unplug
the water-draining hole. After drainage, you can power it on and the machine will run again.
Unplug the air conditioner, disconnect the exhaust
hose from the back, and move the air conditioner to
a suitable drain location or outdoors. You may also
place a pan under the drain that will hold up to 1
quart of water.
When the internal water collection tank is full, the air conditioner will turn off until the tank is
emptied.
Remove the drain cap from the drain outlet.
Once the water collection tank is drained,reinstall the
drain cap, making sure it is on securely.
Place the air conditioner in the desired location,
reconnect the exhaust hose, and plug in the air
conditioner.
1
2
3
19

CARE AND CLEANING
Air filter
· Clean the air filter every 2 weeks. If the air filter is
blocked with dust, the efficiency will reduce.
·
Open the air filter cover upwards, then take out the
air filter.
·
Wash the air filter by immersing it gently into warm
(about 40ć) water with a neutral detergent, rinse it
and dry it thoroughly in a shaded place.
Cleaning
· Unplug the unit before any cleaning.
·
Clean the housing with a soft moisture cloth. Do not
use chemical solvent (such as benzene, alcohol,
gasoline).The surface may be damaged or even the
whole case may be deformed.
·
Do not sprinkle water on the unit.
20
Defrost Operation
The air conditioner has a built-in defrost control senses frost built up
on the evaporator coils.During defrost the compressor off,keeping
the fan on to defrost the coils.
WARNING
For inner cleaning, contact an Authorized Service Center or a dealer.
Do not use harsh detergent that causes corrosion or damage on the unit.
Harsh detergent may also cause failure of product, fire, or electronic shock.

1
2
3
1
2
3
4
4
STORING THE AIR CONDITIONER
If the air conditioner will not be used for an
extened period of time :
Drain the water collection tank completely
and leave the bottom drain cap off long
enough to allow any residual water to drain
out. Once the tank is completely drained
and no more water flows out, reinstall the
cap.
Remove and clean the filter, allow it to dry
completely, then reinstall it.
Store the air conditioner in a cool,dry
location, away from direct sunlight, extreme
temperatures, and excessive dust.
Remove the batteries from the remote.
Before using the air conditioner again :
Make sure the filter and drain cap are
in place
Check the cord to make sure it is in good
condition, with no cracks or damage.
Place new batteries in the remote.
Install the air conditioner as described in the
Installation Instructions.
21
hh
CARE AND CLEANING
English

BEFORE CALLING FOR SERVICE
TROUBLESHOOTING
Problem Possible Causes Solutions
Air conditioner will • The air conditioner plug is • Make sure electrical plug is plugged completely into a
not start not completely inserted in live, properly grounded outlet.
the electrical outlet.
• The house fuse is blown or the • Replace the fuse or reset the circuit breaker. Make sure
circuit breaker has tripped. that there are no other appliances on the same circuit.
• Power failure. • If a power failure occurs, turn the power OFF. When
power is restored, wait 3 minutes before restarting the
air conditioner.
• The integrated circuit breaker in the • Press the RESET button on the air conditioner plug.
plug has tripped. If the reset button will not stay engaged, unplug the air
conditioner and contact a qualified service technician.
•
reset your settings.
• Room temperature is less than the • This is normal. The air conditioner automatically
set temperature. shuts off when the room equals or is less than the
set temperature. Adjust the temperature setting,
if needed.
Air conditioner does • Airflow is restricted. • Make sure there is sufficient clearance around the
not cool properly air conditioner and that the air inlet and outlet are
not blocked by furniture, curtains, etc.
• The air filter is dirty. • Clean the air filter at least every two weeks. See the
Care and Cleaning section.
• The room is very hot, or not enough • When first turned on, allow the air conditioner
time allowed for cooling. sufficient time to cool the room.
• Cold air is escaping. • Check for open furnace floor registers or cold air
returns, or open windows or doors.
• Cooling coils have iced up. • In especially hot, humid weather and when the air
conditioner is running frequently or for extended
periods, ice can form on the cooling coils, blocking
air flow. Set the controls to High Fan or High
Cool, and set to a warmer temperature.
Air conditioner runs • Area to be cooled is too large for • Consult your dealer for the air conditioner capacity
too often or too long the air conditioner. necessary to cool the desired area.
• Doors or windows are open. • Make sure doors and windows are closed.
Before you call for service, review this list. It may save you time and expense. This list includes common
occurrences that are not the result of a defect in workmanship or materials.
FL
appears in the display.
The water collection tank is full. Drain the tank and
22

TROUBLESHOOTING
BEFORE CALLING FOR SERVICE
Problem
Code appears in the
display.
Protection ( Water-full protection, to prevent spilling).
FL
E1, E2
E4
Description
Sensor protection, to avoid occurrence of unit damage, auto-stop protection.
, the unit will stop and display E4 to defrost,
and fan speed is low.
, the unit will re-cool.
Cautions: Switch off the unit and unplug it immediately if anything abnormal happens.
Then contact a qualified electrician.
Above data without advance notice for product improvement.
23
English

WARRANTY
LG PORTABLE AIR CONDITIONER LIMITED WARRANTY - USA
WH
AT THIS WARRANTY COVERS:
LG Electronics U.S.A., Inc. (“LG”) warrants your LG Portable Air Conditioner ("product") against defect in materials or workmanship
under normal household use, during the warranty period set forth below, LG will, at its option, repair or replace the product. This
limited warranty is valid only to the original retail purchaser of the product, is not assignable or transferrable to any subsequent
purchaser or user, and applies only when the product is purchased through an LG authorized dealer or distributor and used within
the United States (“U.S.”) including U.S. Territories.
Note: Repla
cement products and repair parts may be new or factory-remanufactured and are warranted for the remaining portion
of the original unit’s warranty period or ninety (90) days, whichever is longer. Please retain dated receipt or delivery ticket as
evidence of the Date of Purchase for proof of warranty (you may be required to submit a copy to LG or authorized representative).
WARRANTY PERIOD:
1 year from the Date of Purchase: Any
internal/ functional Parts and Labor.
HOW SERVIC
E IS HANDLED: In-Home Service
In-home service will be provided during the warranty period subject to availability within the United States. In-home service may
not be avai
lable in all areas. To receive in-home service, the product must be unobstructed and accessible to service personnel. If
during in-home service repair cannot be completed, it may be necessary to remove, repair and return the product. If in-home
service is unavailable, LG may elect, at our option, to provide for transportation of our choice to and from a LG authorized service
center.
THIS LIMITED WARRANTY
DOES NOT COVER:
1
. Ser
vice trips to deliver, pick up, or install the product or
for instruction on product use.
2. Replacing house fuses or resetting of circuit breakers,
correction of house wiring or plumbing, or correction of
product installation.
3. Damage or failure caused by leaky/ broken/ frozen water
pipes, restricted drain lines, inadequate or interrupted
water supply or inadequate supply of air.
4. Damage or failure caused by accidents, pests and vermin,
lightning, wind, fire, floods or acts of God.
5. Damage or failure resulting from misuse, abuse, improper
installation, repair or maintenance. Improper repair
includes use of parts not
approved or specified by LG.
6. Damage or failure caused by unauthorized modification or
alteration to the product.
7. Damage or failure caused by incorrect electrical current,
voltage, or plumbing codes.
8. Cosmetic damage, including scratches, dents, chips or
other damage to the finish of the product, unless such
damage results from defects in materials or
workmanship and is reported to LG within seven (7)
calendar days from the date of delivery.
9. Damage or missing items to any display, open box,
discounted, or refurbished product.
10. Product where the original factory serial numbers have
been removed, defaced or changed in any way.
11. Repairs when product is used in other than normal and
usual household use (e.g. rental, commercial use,
offices, or recreational facilities) or contrary to the
instructions outlined in the owner’s manual.
12. The removal and reinstallation of the Product if it is
installed in an inaccessible location.
THIS
WARRANTY IS IN LIEU OF ANY OTHER WARRANTY, EXPRESS OR IMPLIED, INCLUDING AND WITHOUT LIMITATION TO, ANY
WARRANTY OF MERCHANTABILITY OR FITNESS FOR A PARTICULAR PURPOSE. T
O THE EXTENT ANY IMPLIED WARRANTY IS
REQUIRED BY LAW, THIS WARRANTY IS LIMITED IN DURATION TO THE TERM PERIOD EXPRESSED ABOVE. REPAIR OR
REPLACEMENT AS PROVIDED UNDER THIS WARRANTY IS THE EXCLUSIVE REMEDY FOR THE CUSTOMER. NEITHER THE
MANUFACTURER NOR ITS U.S. DISTRIBUTOR SHALL BE LIABLE FOR ANY INCIDENTAL, CONSEQUENTIAL, INDIRECT, SPECIAL, OR
PUNITIVE DAMAGES OF ANY NATURE, INCLUDING AND WITHOUT LIMITATION TO, LOST REVENUES OR
PROFITS, OR ANY OTHER
DAMAGE, WHETHER BASED IN CONTRACT, TORT, OR OTHERWISE.
SOME STATES DO NOT ALLOW THE EXCLUSION OR LIMITATION OF INCIDENTAL OR CONSEQUENTIAL DAMAGES OR LIMITATIONS
ON HOW LONG AN IMPLIED WARRANTY LASTS, SO THE ABOVE EXCL
USION
OR LIMITATION MAY NOT APPLY TO YOU. THIS
WARRA
NTY
GI
VES
Y
O
U SPECIFIC LEGAL RIGHTS AND YOU MAY ALSO HAVE OTHER RIGHTS THAT VARY FROM STATE TO STATE.
HOW TO OBTAIN WARRANTY SERVICE & ADDITIONAL INFORMATION:
Call 1-800-243-0000 or visit our website at www.lg.com
.
Mail to: LG Customer Information Center (ATTN: CIC)
201 James Record Road, Huntsville, AL 35824

25
Felicitaciones por su compra y
bienvenido a la familia de LG.
Su nuevo acondicionador de aire
LG combina un funcionamiento
de alta eficiencia con la comodidad
de la portabilidad.
Siguiendo las instrucciones de
funcionamiento y cuidados de este
manual, su acondicionador de aire
le brindará muchos años de
servicio confiable.
¡GRACIAS!
INSTRUCCIONES DE SEGURIDAD
IMPORTANTES
Precauciones básicas de seguridad N. . . . . . . . 26,27
Seguridad eléctrica . . . . . . . . . . . . . . . . . . . . . 27,28
PIEZAS Y CARACTERÍSTICAS
Piezas y componentes clave . . . . . . . . . . . . . . . . . 29
Panel de control y control remoto . . . . . . . . . . . . . 30
INSTRUCCIONES DE INSTALACIÓN
Elección de ubicación para la instalación . . . . . . . . 34
Cómo conectar la manguera y el difusor . . . . . . . . 35
Cómo conectar la protección
contra lluvia . . . . . . . . . . . . . . . . . . . . . . . . . . . . . . 36
Panel de ventilación y extensiones de
la ventana . . . . . . . . . . . . . . . . . . . . . . . . . . . . . . . . 37
Instalación en ventanas de
deslizamiento vertical . . . . . . . . . . . . . . . . . . . . 38,39
Instalación en ventanas de
deslizamiento horizontal . . . . . . . . . . . . . . . . . . 40,41
DETECCIÓN DE PROBLEMAS
Antes de llamar al servicio técnico . . . . . . . . . 45,46
GARANTÍA
Información sobre registro de producto . . . . . . . . . 47
CÓMO UTILIZAR EL ARTEFACTO
Antes de utilizar su acondicionador de aire . . . 31,32
Cómo usar los controles . . . . . . . . . . . . . . . . . . . 33
CUIDADO Y LIMPIEZA
Drinaje de agua . . . . . . . . . . . . . . . . . . . . 42
Limpieza . . . . . . . . . . . . . . . . . 43
Filtro de aire . . . . . . . . . . . . . . . . . . . . . . . . . . . . . . 43
Operación descogelación . . . . . . . . . . . . . . . . . . . . 43
Cómo guardar el acondicionador de aire . . . . . . . . 44
INTRODUCCIÓN
Español

I N S T RU C C I O N E S D E S E G U R I DA D I M P O RTA N T E S
LEA TODAS LAS INSTRUCCIONES
ANTES DE USAR
ADVERTENCIA Este símbolo indica la posibilidad de muerte o lesiones graves.
PRECAUCIÓN Este símbolo indica la posibilidad de lesiones o daños a la propiedad.
Su seguridad y la seguridad de otros son muy importantes.
Hemos incluido muchos mensajes de seguridad importantes en este manual y en su artefacto. Siempre lea y
obedezca todos los mensajes de seguridad.
Este es el símbolo de alerta de seguridad.
Este símbolo lo alerta sobre peligros potenciales que pueden matarlo a lastimarlo a usted o a otros.
Todos los mensajes de seguridad se encontrarán después de los símbolos de alerta de seguridad y de las
palabras "ADVERTENCIA" O "PRECAUCIÓN". Estas palabras significan:
ADVERTENCIA Para reducir el riesgo de incendio, descarga eléctrica o
lesiones personales al usar este artefacto, siga las precauciones básicas, incluyendo las
siguientes:
• No intente reparar o cambiar ninguna pieza de
su acondicionador de aire a menos que esté
específicamente recomendado en este manual.
Cualquier otro servicio debe realizarlo un técnico
calificado.
• Si el cable de energía se gasta o daña, sólo un
técnico calificado puede cambiarlo, utilizando
piezas de repuesto genuinas.
• El aire acondicionado debe enchufarse en su
propio circuito de 15A, 60 Hz., 120 VAC con
conexión a tierra.
• No enchufe otros artefactos en el mismo
tomacorriente ya que puede sobrecargar el circuito
y provocar un incendio o descarga eléctrica.
• No quite la pata redonda de conexión a tierra del
enchufe. Puede provocar un riesgo de descarga
eléctrica.
• El acondicionador de aire no está diseñado para
que lo usen niños pequeños. Los niños pequeños
deben estar siempre bajo control para asegurar
que no jueguen o se cuelguen del acondicionador
de aire.
• Asegúrese de quitar todos los materiales de
empaque del acondicionador de aire antes de
usarlo. Puede provocar lesiones personales.
• No desarme o modifique el acondicionador de aire
o el cable de energía. Puede provocar un riesgo de
descarga eléctrica o incendio.
• No coloque el cable de energía o acondicionador
de aire cerca de un calentador, radiador, u otra
fuente de calor. Puede provocar un riesgo de
descarga eléctrica o incendio.
• No use este u otro artefacto cerca de gases o
líquidos inflamables u otros combustibles, tales
como gasolina, benceno, solvente, etc. Puede
provocar un riesgo de descarga eléctrica o
incendio.
• Verifique que el cable de energía esté enchufado
firmemente y por completo en el tomacorriente.
Puede provocar un riesgo de descarga eléctrica
o incendio.
• No inicie o detenga el funcionamiento enchufando
o desenchufando el cable de energía. Puede
provocar un riesgo de descarga eléctrica.
• Si el acondicionador de aire está haciendo sonidos
inusuales o está emitiendo humo u olor poco
común, desenchúfelo de inmediato. Puede
provocar un riesgo de descarga eléctrica o
incendio.
• No lo use si el tomacorriente está suelto o dañado.
Puede provocar un riesgo de descarga eléctrica o
incendio.
• No lo opere con manos mojadas o en un medio
húmedo. Puede provocar un riesgo de descarga
eléctrica.
• No utilice este u otro artefacto eléctrico si huele
gas. Puede provocar un riesgo de incendio o
explosión.
• Apague y desenchufe el acondicionador de aire
antes de limpiarlo para evitar el riesgo de una
descarga eléctrica.
• No limpie la unidad con agua. El agua puede
ingresar a la unidad y dañar la aislación, creando
así un peligro de descarga eléctrica. Si ingresa
agua a la unidad, desenchúfela de inmediato y
comuníquese con el Servicio de atención al cliente.
Puede provocar un riesgo de descarga eléctrica.
• Utilice dos o más personas para levantar e instalar
la unidad. No hacerlo puede provocar lesiones en
la espalda u otras lesiones.
PRECAUCIONES BÁSICAS DE SEGURIDAD
26

LEA TODAS LAS INSTRUCCIONES ANTES DE USAR
• Para evitar posibles cortes, evite el contacto con las
piezas metálicas del acondicionador de aire cuando
quite o vuelva a instalar el filtro. Puede provocar un
riesgo de lesiones personales.
• No bloquee la toma o salida de aire del acondicionador
de aire. Una corriente de aire reducida provocará un
desempeño pobre y podría dañar la unidad.
• Siempre tome el enchufe cuando enchufe o desenchufe
el acondicionador de aire. Nunca desenchufe tirando del
cable. Puede provocar un riesgo de descarga eléctrica y
daños.
• Siempre apague y desenchufe el acondicionador de aire
cuando no vaya a utilizarlo por períodos extensos. Esto
conserva la energía y reduce la posibilidad de accidentes
.
• Ajuste las ruedas con trabas para evitar que
acondicionador de aire se deslice en pisos lisos.
• Instale el acondicionador de aire sobre un piso resistente
y nivelado que pueda soportar hasta 110 lbs (50 kg). La
instalación sobre un piso débil o desparejo puede
provocar un riesgo para la propiedad y lesiones
personales.
• Verifique que el acondicionador de aire sea del tamaño
adecuado para el área que desea enfriar. Usar un
acondicionador de aire de un tamaño incorrecto puede
malgastar energía y dañar el artefacto.
• Cierre todas las puertas y ventanas de la habitación para
una operación más efectiva.
• Para evitar daños al acabado de la superficie, utilice sólo
un paño suave para limpiar el acondicionador de aire. No
utilice cera, solvente, o un detergente fuerte.
• Para evitar derrames y daños a la propiedad, asegúrese
de drenar el acondicionador de aire correctamente.
• Para evitar que las serpentinas se congelen, no opere el
acondicionador de aire si la temperatura de la habitación
se encuentra por debajo de 62°F (17°C).
• No coloque el acondicionador de aire de modo de
exponer mascotas o plantas domésticas a la corriente
directa de aire. Puede provocar un riesgo de lesión para
mascotas o plantas domésticas.
• Este acondicionador de aire está diseñado para un uso
doméstico normal. No lo use para enfriar mascotas,
alimentos, maquinaria de precisión
u objetos de arte.
• No beba el agua del depósito de drenaje. Elimínela en el
exterior o en el desagüe.
• No opere el acondicionador de aire sin el filtro en su
lugar. El funcionamiento sin el filtro puede dañar la
unidad.
• Limpie el filtro cada dos semanas, o más a menudo si
hiciera falta.
PRECAUCIONES BÁSICAS DE SEGURIDAD
PRECAUCIÓN Para reducir el riesgo de incendio, descarga eléctrica o
lesiones a personas cuando utilice este artefacto, deben seguirse precauciones básicas de
seguridad, incluyendo las siguientes:
SEGURIDAD ELÉCTRICA
ADVERTENCIA
Peligro de descarga eléctrica
No seguir estas instrucciones puede provocar
la muerte, un incendio o una descarga
eléctrica.
• Esta unidad debe contar con una adecuada
conexión a tierra.
• Bajo ninguna circunstancia corte o quite la
pata de conexión a tierra.
• Si no cuenta con un tomacorriente con una
adecuada conexión, o si existe alguna duda
sobre el mismo, un electricista calificado
debe verificar el tomacorriente o el circuito, y
si fuese necesario, instalar un tomacorriente
con adecuada conexión.
• Este acondicionador de aire debe conectarse
en un tomacorriente con conexión a tierra de
60 Hz, 120 VAC protegido por una fusible de
acción retardada de 15 amperes o un
disyuntor.
• Este acondicionador de aire debe instalarse
de acuerdo con los códigos nacionales de
cableado.
• No altere o modifique el enchufe o cable
de este acondicionador de aire. Si el cable
de energía se gasta o daña, sólo un técnico
calificado puede cambiarlo utilizando piezas
de repuesto genuinas.
• No utilice un cable de extensión.
INSTRUCCIONESDESEGURIDADIMPORTANTES
27
Español


8
29
P I E Z A S Y C A R AC T E R Í S T I C A S
PIEZAS Y COMPONENTES CLAVE
Español
1
2
2
1
3
8
4
RUEDAS GIRATORIAS
CONTROL REMOTO INFRARROJO
5
Chequee todos los accesorios incluidos en el paquete y
por favor consulte las instrucciones de instalación en caso de su uso.
VENTANILLA PARA EXPULSAR EL AIRE DE ESCAPE
Las ruedas giratorias le permiten desplazar el acondicionador
de aire fácilmente sobre la mayoría de las superficies.
El control remoto le permite ajustar la temperatura y
manejar la mayoría de las funciones del acondicionador de
aire desde lejos.
La Transpiración del Aire
MANGUERA Y DIFUSOR
Utilice el difusor y la manguera para conectar el acondicionador
de aire al equipo de instalación de la ventana para enviar el
aire de salida hacia fuera.
PANEL DE CONTROL Y PANTALLA
La pantalla digital de fácil lectura muestra la temperatura
configurada y las luces indicadoras indican el modo de
funcionamiento. Los simples botones de presión facilitan y
aceleran los cambios de configuración.
La dirección del aire se puede controlar adondequeiera que usted
necesite frescar por adjustar la lumbrera horizontal.
Ajustar arriba y abajo la lumbrera horizontal va a cambiar el
fluido vertical.
8
6
PUERTO INFERIOR DE DRENAJE
Antes de desplazar la unidad, drene completamente el
depósito interno de recogida de agua mediante el puerto
inferior de drenaje.
7
FILTRO DE AIRE
Encaje el extremo de adaptador grande de la maguera en el agujero
a la espalda del aire acondicionado. Alinee el imperdible sobre el
contacto con el gargol en el agujero. Gire ligeramente a las derechas
hasta que lo encaje en su lugar.
4
5
6
7
7
3

P I E Z A S Y C A R AC T E R Í S T I C A S
30
PANEL DE CONTROL Y CONTROL REMOTO
PODER
La operación se empieza al apretar el botón y se termina al
hacerlo otra vez.
MODO
Apriete este botón para elegir el modo de COOL
(REFRIGERACIÓN), DRY (SECADO), FAN (VENTILADOR)
FAN SPEED
Ajusta la velocidad del ventilador de circulación entre
baja , alta .
TEMPORIZADOR
Apriete el botón para establecer TEMPORIZADOR ENCENDIDO,
TEMPORIZADOR APAGADO o NO TIEMPO.
ARRIBA O ABAJO
PANTALLA LED
Al establecer el modo de suspención, la temperatura va a subir 1 C
después de 2 horas, y otras 2 horas después, 1 C más.
El uso de funciones es el mismo cuando utilice el control remoto o el panel de
control, a menos que se indique lo contrario.
Para instrucciones detalladas de cada función, lea las páginas siguientes.
1
2
4
5
6
Muestran diferentes signos a respecto
7
MODO DE SUSPENSIÓN
8
BOTÓN DE CAMBIO ENTRE CELSIU Y FAHRENHEIT
2
1
8
8
1
6
Apriete los botones para establecer la temperatura del cuarto o
tiempo cuando está en modo de Tiempo Encendido/Apagado.
3
Timer
1
2
3
6
4
5
5
2
1
8
8
1
3
4
7

Lea las Instrucciones de instalación incluidas en
este manual antes de usar el acondicionador de
aire.
Una vez que el acondicionador de aire se ha
montado e instalado correctamente:
Conecte el cable en su propia fuente de
alimentación bien colocada en el suelo. No
conecte otros aparatos en la misma fuente, si
no, podría causar una sobrecarga de la toma
de corriente y crear un peligro de incendio.
Asegúrese de que el acondicionador de aire
y el cable estén ubicados en un lugar donde
nadie pueda tropezarse y donde reciban una
ventilación adecuada. No lo coloque
directamente al lado de muebles u objetos que
podría bloquear las aberturas de ventilación.
Verifique que los elementos que podrían
volarse o dañarse por la corriente de aire
proveniente del ventilador no se encuentren
en el camino de la corriente.
ANTES DE UTILIZAR EL ACONDICIONADOR DE AIRE
PREPARACIÓN PARA LA OPERACIÓN
1
2
3
• No permanezca frente a la corriente de aire del
acondicionador de aire por períodos largos.
• Para evitar el daño o lesión a mascotas o
plantas, constate que no estén expuestos a la
corriente directa del acondicionador de aire.
• Cuando lo use al mismo tiempo con cocinas,
chimeneas, u otros dispositivos de combustión,
asegúrese de que haya una suficiente corriente
de aire fresco en la habitación. No lo use en
espacios muy cerrados con esta clase de
dispositivos.
• Este acondicionador de aire es para uso
doméstico como un artefacto de confort para
el consumidor. No lo use como un sistema
de control preciso de clima, o para enfriar
equipamientos de precisión, alimentos,
mascotas, plantas, obras de arte, etc. Dichos
elementos podrían dañarse.
• No doble el tubo flexible hacia abajo si no
dispone del conjunto de instalación de la
ventana. Se puede dañar el sistema de aire
acondicionado o se puede deteriorar su
funcionamiento.
IMPORTANTE:
Quite y guarde los materiales de empaque para
volverlos a usar.
Quite la cinta de embalaje antes de usar el
acondicionador de aire. Si la cinta deja restos de
adhesivo, frote una pequeña cantidad de jabón
líquido y limpie con un paño húmedo. NO USE
instrumentos afilados, alcohol, solventes, o
limpiadores abrasivos para quitar el adhesivo.
Podrían arruinar el acabado.
CÓMO DESEMPACAR EL
ACONDICIONADOR DE AIRE
C Ó M O U T I L I Z A R E L A RT E FAC TO
31
Español

32
Español
C Ó M O U T I L I Z A R E L A RT E FAC TO
Antes de usar el control remoto, instale las baterías AAA
provistas:
Presione la lengüeta de bloqueo de la tapa de las
baterías en la parte trasera del control remoto y quite
la tapa.
Introduzca dos baterías alcalinas nuevas AAA en el
compartimento de las baterías, asegurando de utilizar
la polaridad correcta.
Vuelva a colocar la tapa de las baterías, verificando
que la lengüeta queda trabada en su lugar.
NOTAS:
• Sólo use baterías alcalinas. No utilice baterías
recargables.
• Al cambiar las baterías, siempre reemplácelas con unidades nuevas. No mezcle baterías usadas con
nuevas.
• Si el acondicionador de aire no será utilizado por un período prolongado, quite las baterías del control
remoto.
CÓMO COLOCAR LAS BATERÍAS EN
EL CONTROL REMOTO
1
2
3
ANTES DE UTILIZAR EL ACONDICIONADOR DE AIRE
PRECAUCIÓN
• Si entra líquido de las pilas en contacto con la piel o ropa, lávela inmediatamente con agua.
No utilice el control remoto si las pilas tienen fugas.
• Si el líquido de las pilas alcanzara su boca, cepille sus dientes y consulte a un médico.
Los productos químicos de las pilas podrían causar quemaduras u otros perjuicios a la salud.

CÓMO USAR LOS CONTROLES
C Ó M O U T I L I Z A R E L A RT E FAC TO
A continuación pueden verse los botones del panel de control. La operación con el control
remoto es la misma, a menos que se especifique lo contrario.
1. MODO DE FRESCO
·
Apriete el botón de MODO para elegir el modo de
FRESCO, y el indicador de este modo centellará.
·
Apriete el botón de ARRIBA o ABAJO para establecer la
temperatura del cuarto de los 62 F a los 86 F
.
·
Apriete el botón VELOCIDAD (o el botón ALTO/
BAJO) para elegir la velocidad del ventilador alta
o baja.
2. MODO DE VENTILACIÓN
·
Apriete el botón de MODO (o botón de Ventilación)
para elegir su modo de Ventilación, y el indicador
del mismo modo entrellará.
Elija la velocidad con apretar el botón de
VENTILACIÓN o marcar el botón de ALTO/
BAJO directamente.
4. MODO DE TIEMPO
·
Cuando el aparato está apagado, apriete el
botón de Temporizador para establecer
Temporizador-encendido.
·
La temperatura no se puede establecer.
·
Apriete el botón de ARRIBA o ABAJO para
establecer el tiempo desde 1 hora hasta
24 horas, y el indicador de tiempo entrellará.
·
Cuando el aparato está funcionando, apirete
el botón de Temporizador para establecer el
temporizador-apagado.
NOTA
Siempre apunte el remoto en el sensor. El control remoto no puede funcionar
si el sensor está en la luz brillante o si no hay una ruta clara entre el remoto y
el sensor.
5. MODO DE SUSPENSIÓN
·
Al establecer el modo de suspención, la
temperatura subirá 1 C después de 2 horas, y
otras 2 horas después, un otro 1 C más.
·
Luego va a seguir estable y bajo un soplo de viento.
3. MODO SECO
• Seleccione el botón Dry (Seco) para activar el
modo de deshumidificación.
•
En el modo Dry (Seco) la velocidad del ventilador
está predefinida. El botón de velocidad
no estará
disponible. La temperatura tampoco puede
seleccionarse.
• Pulse el botón de oscilación para hacer que la
rejilla oscile .
33
Español

34
La longitud del tubo de escape es designado especialmente de acuerdo a las especificaciones
del producto. No lo sustituya ni prolongue con su manguera privada ya que esto podría causar
mal funcionamiento.
ADVERTENCIA
Elección de ubicación para la instalación.
Instale la unidad sobre un sitio plano y seco.
Para lograr un mejor rendimiento, deje al
menos 50 cm de espacio a todos los lados
de la unidad para una buena circulación
de aire.
1
2
I N S T RU C C I O N E S D E I N S TA L AC I Ó N

I N S T RU C C I O N E S D E I N S TA L AC I Ó N
CÓMO CONECTAR LA MANGUERA Y EL DIFUSOR
NOTA: El acondicionador de aire se envía con la manguera instalada. Si fuese necesario, la manguera
puede quitarse para limpieza o almacenamiento. Simplemente invierta los pasos siguientes para
quitarla.
Introduzca el extremo grande del adaptador
de la manguera dentro del orificio ubicado
en la parte trasera del acondicionador de
aire.
35
Español

36
Español
I N S T RU C C I O N E S D E I N S TA L AC I Ó N
PREPARACIÓN PARA LA INSTALACIÓN
ADVERTENCIA ¡El acondicionador de aire es pesado! ¡Utilice
dos o más personas para levantar e instalar la unidad! No hacerlo puede provocar
lesiones en la espalda u otras lesiones.
Los siguientes componentes se usan para la ventilación de la ventana.
No todos los componentes se utilizan en todas las instalaciones.
COMPONENTES DE SALIDA
Equipo de instalación en
ventanas (incluye 2 panel
de ventilación para
ventanas y 2 paneles de
extensión)
Manguera flexible de ventilación
4 tornillos Tipo A
10 tornillos Tipo B
Soporte de seguridad
1 sellador de espuma Tipo B
(no adhesivos)
2 selladores de espuma
Tipo A (adhesivos)
Panel de ventilación
Panel de
extensión
grande
Panel de
extensión
pequeño
Sellante de espuma C 2EA
(Tipo adhesivo-más corto)
Extensión y panel
de ventilación

37
Español
I N S T RU C C I O N E S D E I N S TA L AC I Ó N
PANEL DE VENTILACIÓN Y EXTENSIONES
DE LA VENTANA
El equipo de instalación le permite instalar el acondicionador de aire en la mayoría de las ventanas
de deslizamiento vertical de 18
ʺ
a 48
ʺ
de ancho, o ventanas deslizamiento horizontal de 18
ʺ
a 48
ʺ
de altura.
Para una abertura de ventana de 18ʺ, use el
panel de ventilación solo.
Para aberturas de ventana de 18
1
⁄4ʺ a 24ʺ, utilice
el panel de ventilación y el panel de extensión
pequeño.
Para aberturas de ventana de 24ʺ a 29ʺ, utilice
el panel de ventilación y el panel de extensión
grande.
Para aberturas de ventana de 29ʺ a 36ʺ, utilice
el panel de ventilación y ambos paneles de
extensión.
Panel de
ventilación
Panel de extensión
pequeño
Panel de
ventilación
18ʺ
18ʺ
18
1
⁄4ʺ − 24ʺ
18
1
⁄4ʺ − 24ʺ
Panel de extensión
pequeño
Panel de
extensión
grande
Panel de
ventilación
24ʺ − 29ʺ
Panel de extensión
grande
24ʺ − 29ʺ
Panel de
extensión
grande
Panel de
ventilación
29ʺ − 36ʺ
Panel de extensión
grande
Panel de
ventilación
29ʺ − 36ʺ
Panel de
extensión
pequeño
Panel de
extensión
pequeño
Panel de
ventilación
Panel de
ventilación
Panel de
ventilación
Para aberturas de ventana de 36ʺ a 48ʺ, utilice
el panel de ventilación y ambos paneles de
extensión.
Panel de
extensión
grande
Panel de
ventilación
36" − 48"
Panel de
extensión
grande
Panel de
ventilación
36" − 48"
Panel de
extensión
pequeño
Panel de
extensión
pequeño
Extensión y panel
de ventilación
Extensión y panel
de ventilación

38
I N S T RU C C I O N E S D E I N S TA L AC I Ó N
Sellante de espuma A
(Tipo adhesivo)
Tipo C de sellado con espuma
(tipo adhesivo-más corto).
J
INSTALACIÓN EN VENTANAS DE
DESLIZAMIENTO VERTICAL
NOTA: El equipo de instalación en ventanas puede utilizarse con ventanas de deslizamiento vertical de
un ancho de entre 18ʺ y 48ʺ.
1
Corte la espuma A (tipo adhesivo) y C (tipo
adhesivo-más corto) según la longitud
adecuada, y colóquelo en la hoja y el marco
de la ventana.
2
Introduzca el montaje de panel de
ventilación, incluyendo los paneles de
extensión, si fueran necesarios, en la
abertura de la ventana. Extienda los paneles
de extensión, si los está utilizando.
Sellado con espuma B
(tipo no adhesivo)
4
Corte la espuma B (tipo no adhesivo) según
el ancho de la ventana. Rellene con la
espuma B la separación existente entre el
cristal y la ventana a fin de prevenir la
entrada de aire o insectos en la habitación.
3
Baje la ventana con cuidado. Ajuste el panel
de ventilación en su lugar con 4 tornillos tipo
B, más un tornillo por cada extensión:
Sólo panel de
ventilación: 4 tornillos Tipo B
Panel de ventilación
y una extensión: 5 tornillos Tipo B
Panel de ventilación
y dos extensiones: 6 tornillos Tipo B
Dos paneles de
ventilación
y dos extensiones: 9 tornillos Tipo B
Tornillos Tipo B
Panel de
extensión (si fuera
necesario)
Panel de
ventilación

39
Español
INSTALACIÓN EN VENTANAS DE
DESLIZAMIENTO VERTICAL
I N S T RU C C I O N E S D E I N S TA L AC I Ó N
5
Instale el soporte de seguridad con un
tornillo tipo B, como puede verse.
Tornillos
Tipo B
Soporte de seguridad
6
Tornillos tipo A
Introduzca el extremo oval del difusor dentro
del equipo de instalación en ventanas hasta
que las lengüetas queden trabadas. Ajuste
en su lugar con cuatro tornillos Tipo A.

40
INSTALACIÓN EN VENTANAS DE
DESLIZAMIENTO HORIZONTAL
NOTA: El equipo de instalación de ventanas puede usarse con ventanas con bisagras con una altura
de 18ʺ a 48ʺ.
Sellado con
espuma A
(tipo adhesivo)
Sellado con
espuma C
(tipo adhesivo-
más corto)
1
Corte la espuma A (tipo adhesivo) y C (tipo
adhesivo-más corto) según la longitud
adecuada, y colóquelo en la hoja y el marco
de la ventana.
2
Introduzca el montaje de panel de ventilación,
incluyendo los paneles de extensión, si fueran
necesarios, en la abertura de la ventana.
Extienda los paneles de extensión, si los está
utilizando.
3
I N S T RU C C I O N E S D E I N S TA L AC I Ó N
Panel de extensión
(si fuera necesario)
Panel de
ventilación
Tornillos Tipo B
Sellado con espuma B
(tipo adhesivo)
J
4
Corte la espuma B (tipo no adhesivo) según
el ancho de la ventana. Rellene con la
espuma B la separación existente entre el
cristal y la ventana a fin de prevenir la
entrada de aire o insectos en la habitación.
Cierre la ventana con cuidado. Ajuste el
panel de ventilación en su lugar con 4
tornillos tipo B, más un tornillo por
cada extensión:
Sólo panel de
ventilación: 4 tornillos Tipo B
Panel de ventilación
y una extensión: 5 tornillos Tipo B
Panel de ventilación
y dos extensiones: 6 tornillos Tipo B
Dos paneles de
ventilación y dos
extensiones: 9 tornillos Tipo B

41
Español
5
Instale el soporte de seguridad con un
tornillo tipo B, como puede verse.
Introduzca el extremo oval del difusor
dentro del equipo de instalación en ventanas
hasta que las lengüetas queden trabadas.
Ajuste en su lugar con cuatro de los
tornillos incluidos.
Tornillos tipo A
6
Tornillos tipo A
I N S T RU C C I O N E S D E I N S TA L AC I Ó N
Tornillo Tipo B
Soporte de
seguridad
INSTALACIÓN EN VENTANAS DE
DESLIZAMIENTO HORIZONTAL

C U I DA D O Y L I M P I E Z A
Su acondicionador de aire está diseñado para
funcionar durante todo el año con sólo una
limpieza y mantenimiento mínimos.
Para una eficiencia máxima, se recomienda que
haga inspeccionar y limpiar las serpentinas de
enfriamiento una vez por año. Su Centro de
Servicio Autorizado LG local puede prestar
este servicio de inspección y limpieza por
una módica suma.
ADVERTENCIA
• Desenchufe el acondicionador de aire antes de limpiar o realizar cualquier clase de
mantenimiento o arreglo.
• Tenga cuidado al limpiar las serpentinas o al quitar o volver a instalar el filtro: ¡las aletas
de enfriamiento son filosas!
No seguir estas precauciones puede provocar una descarga eléctrica o lesiones personales.
Drinaje de agua
Este producto tiene un sistema de auto-evaporación. El agua de condensación, se reciclará para
enfriar el condensador. Esto no sólo puede mejorar la eficiencia de enfriamiento, sino también
ahorrar energía para usted.
·
Si el agua interior está llena, la pantalla panel mostrará ¨FL¨, y el compresor terminará de funcionar.
Apague la máquina y muévala adonde puede drenar el agua, a continuación, desenchufe el agujero de agua
drenaje. Después del drenaje, puede encenderlo y la máquina volverá a trabajar.
Desconecte el aire acondicionado y la manguera de
escape de la espalda, y mueva el aire acondicionado
a un lugar adecuado de drenaje o al aire libre. Usted
también puede colocar un recipiente debajo de la
salida de la drenaje. Con el cual puede recoger hasta
1 quarto de agua.
Cuando el tanque interior de colección de agua está lleno, el aire acondicionado se apagará hasta que el cual se vacíe.
Quite el tapón de drenaje de la salida.
Una vez que el tanque de colección de agua se drene,
vuelva a instalar el tapón de drenaje confirmando que
está en forma segura.
Coloque el aire condicionado en la ubicación deseada,
vuelva a conectar el tubo de escape y el aire
acondicionado.
1
2
3
42

43
Español
C U I DA D O Y L I M P I E Z A
Filtro de Aire
· Limpie el filtro de aire a las 2 semanas. Si el filtro de aire
está tapado por el polvo, la eficiencia se reducirá.
·
Abra la tapa del filtro de aire hacia arriba, y luego saque
el filtro de aire.
·
Lave el filtro de aire por inmergir suavemente en agua caliente
(alrededor de 40 C) mixta con un detergente neutro, enjuáguelo
y séquelo completamente en un lugar sombreado.
Operación de descongelación
El deshumidificador tiene un control incorporado de sentido de
cogelación construido en las bobinas de evaporador. Durante la
descongelación el compresor está apagado mientras mantiene
encendido el ventilador para descongelar las bobinas.
ADVERTENCIA
Para una limpieza interior, póngase en contacto con un Centro de Servicios
Autorizado o un revendedor.
No utilice detergentes abrasivos que causan corrosión o dañan la unidad.
Los detergentes abrasivos pueden igualmente provocar un fallo del producto,
un incendio o una descarga electrónica.
Limpieza
· Desconecte la unidad antes de cualquiera limpieza.
·
Limpie la caja con un paño suave humedo. No utilice
disolventes químicos (así como el benceno, el alcohol y
la gasolina). La superficie puede dañarse o incluso toda
la caja puede ser deformado.
·
No rocie agua sobre la unidad.

44
C U I DA D O Y L I M P I E Z A
CÓMO GUARDAR EL ACONDICIONADOR DE AIRE
Si no va a usar el acondicionador de aire durante
un período prolongado:
Drene el tanque de recolección de agua
completamente y deje el pico de drenaje
destapado el tiempo suficiente para eliminar
el agua residual. Una vez que el tanque se
haya drenado por completo y no salga más
agua, vuelva a colocar la tapa.
Quite y limpie el filtro, deje que se seque por
completo y vuelva a instalarlo.
Quite las baterías del control remoto.
Guarde el acondicionador de aire en un lugar
frío y seco, lejos de luz solar directa,
temperaturas extremas, y polvillo excesivo.
Antes de volver a usar el acondicionador de aire:
Verifique que el filtro y la tapa de drenaje estén
en su lugar.
Verifique el cable para asegurar que esté en
buenas condiciones, sin grietas o daños.
Coloque baterías nuevas en el control remoto.
Instale el acondicionador de aire como se
indica en las Instrucciones de instalación.
1
2
3
1
2
3
4
4

45
Español
ANTES DE LLAMAR AL SERVICIO TÉCNICO
Antes de llamar al servicio técnico, examine esta lista. Puede ahorrarle tiempo y dinero. La lista incluye
situaciones comunes que no son el resultado de mano de obra o materiales defectuosos del artefacto.
El acondicionador • El enchufe del acondicionador de aire • Verifique que el enchufe eléctrico esté conectado
de aire no se enciende no está introducido del todo en el a un tomacorriente con tensión y adecuada conexión
tomacorriente. a tierra.
• El fusible doméstico se ha quemado • Cambie el fusible o vuelva a configurar el disyuntor.
o el disyuntor ha saltado. Verifique que no haya otros artefactos en el mismo
circuito.
• Corte de energía. • Si ocurre un corte de energía, apague el artefacto.
Cuando vuelva la energía, espere 3 minutos antes
de volver a encender el acondicionador de aire.
• El disyuntor integrado de enchufe • Presione el botón RESET (reconfigurar) en el
ha saltado.
enchufe del acondicionador de aire. Si el botón de
reconfiguración no queda trabado, desenchufe el
acondicionador de aire y comuníquese con un
técnico calificado.
• Aparece FL en la pantalla. • El tanque de recolección de a gua está lleno. Drene
el tanque y vuelva a configurar.
Ver la sección Cuidado y limpieza.
• La temperatura de la habitación es • Esto es normal . El acondicionador de aire se apaga
menor a la temperatura programada. automáticamente cuando la temperatura de la
habitación es igual o menor a la configurada.
Si hace falta, ajuste la configuración de temperatura.
El acondicionador • La corriente de aire está disminuida. • Verifique que haya suficiente espacio alrededor del
de aire no enfría artefacto y que la entrada y salida de aire no estén
correctamente bloqueadas por muebles, cortinas, etc.
• El filtro de aire está sucio. • Limpie el filtro de aire por lo menos cada dos
semanas. Ver la sección Cuidado y limpieza.
• La habitación está muy caliente, • Después de encenderlo, deje el tiempo necesario
o no se ha dejado el tiempo para que el acondicionador de aire enfríe
suficiente de enfriamiento. la habitación.
• El aire frío se está escapando. • Verifique que no haya rejillas de piso de calderas
o retornos de aire frío, o ventanas o puertas
abiertas.
• Las serpentinas de enfriamiento • En climas especialmente cálidos y húmedos y
se han congelado. cuando el acondicionador de aire funciona con
frecuencia o por período prolongados, puede
formarse hielo en las serpentinas de enfriamiento,
lo que bloquea la corriente de aire. Configure los
controles en High Fan (ventilador alto)o
High Cool (frío alto) , y configure en una
temperatura más elevada.
El acondicionador • El área a enfriar es demasiado • Consulte a su vendedor sobre la capacidad
de aire funciona muy grande para el artefacto. necesaria para enfriar el área deseada.
a menudo o durante
mucho tiempo • Hay puertas o ventanas abiertas. • Asegúrese de que puertas y ventanas estén cerradas.
D E T E C C I Ó N D E P RO B L E M A S
Problema Causas posibles Soluciones

46
D E T E C C I Ó N D E P RO B L E M A S
ANTES DE LLAMAR AL SERVICIO TÉCNICO
Prblemas
Cotigo se muestra
en la pantalla
·
Protección (Protección de agua llena, para evitar derrame).
FL
E1, E2
E4
Descripción
·
La protección del sensor, para evitar ocurrir daños a la unidad, protección de auto-parar.
·
·
Cuando el sensor de la bobina siente la temperatura está por debajo de los 2 C, la unidad
detendrá y mostrará en la pantalla E4 para descongelar, y la velocidad del ventilador será baja.
·
Cuando la temperatura de bobina llega hasta los 8 C , la unidad volverá a enfrigirse.
Precauciones: Apague la unidad y desenchúfelo inmediatamente si ocurre algo anormal.
Entonces póngase en contacto con un electricista calificado.
Con los datos arriba mencionados, el mejoramiento de productos sin previo aviso.

Garantía
GARANTÍA LIMITADA DEL AIRE ACONDICIONADO LG - EE.UU.
COBERTURA DE LA GARANTÍA:
LG Electronics Inc. (“LG”) garantiza que reparará o sustituirá, gratuitamente, su producto si resulta defectuoso en materiales o
mano de obra bajo condiciones normales de uso durante el periodo de garantía mencionado más abajo, efectivo a partir de
la fecha de compra del producto original por parte del consumidor. Esta garantía limitada sólo es válida para el comprador
original del producto y no es asignable ni transferible a ningún otro comprador o usuario final subsecuentes, y efectiva
únicamente cuando el producto se compra a través de un distribuidor autorizado de LG y se utiliza en los Estados Unidos ("EE
UU") o en cualquiera
de sus territorios.
Nota: Los recambios y piezas de repuesto pueden ser nuevos o estar reconstruidos de fábrica y están garantizados durante el
tiempo restante del periodo de garantía de la unidad original o noventa días (90), el periodo de los dos que sea más largo. Por
favor, guarde el recibo de compra o la nota de entrega como prueba de la fecha de compra como comprobante de garantía (se le
puede pedir que presente una copia a LG o a su representante autorizado).
PERIODO DE GARANTÍA:
1 año desde la fecha de compra: Cualquier repuesto interno/funcional y mano de obra
PROCESO DE
SERVICIO: Servicio a domicilio
Los servicios a domicilio se prestarán durante el periodo de garantía sujeto a disponibilidad en los Estados Unidos. El servicio a
domicilio puede no estar disponible en todas las áreas. Para recibir asistencia técnica a domicilio, el producto debe estar en un
entorno despejado y accesible al personal técnico. Si durante el servicio a domicilio la reparación no se puede llevar a cabo, es
posible que sea necesario desplazarlo a nuestras instalaciones, repararlo y devolverlo a su hogar. Si este fuera el caso, LG puede
optar, a petición nuestra, a utilizar el
transporte de nuestra elección para desplazar la unidad al y del centro de servicio
autorizado de LG.
ESTA GARANTÍA LIMITADA NO SE APLICA A:
1. Las visitas de Asistencia a domicilio para entregar, recoger
y/o instalar el producto, instruir o sustituir fusibles.
2. Sustitución de fusibles de la casa o reajuste de
interruptores de circuito, la corrección del cableado de la casa
o de la tubería, o la corrección de la instalación del producto.
3. Los daños o averías cau
sados por fugas / roturas/
congelación de tuberías de agua, líneas de drenaje restringido,
suministro insuficiente de agua o interrumpido, o suministro
insuficiente de aire.
4. Los daños o averías causados por accidentes, plagas e
insectos, rayos, viento, fuego, inundaciones o actos de Dios.
5. Los daños o fallos ocasionados por el mal uso, abuso,
instalación inadecuada, reparación o mantenimiento. Se
considera reparación inadecuada aquella en que se hayan
utilizado piezas no aprobadas o especificadas por LG.
6. Los daños o averías causados por modificaciones no
autorizadas o alteraciones del producto.
7. Los daños o averías cau
sados por la utilización de una
corriente eléctrica, tensión o código de plomería incorrectos.
8. Daños estéticos, incluyendo arañazos, abolladuras,
desportilladuras u otros daños en el acabado del producto, a
menos que dichos daños sean el resultado de defectos en los
materiales o mano de obra y se informe a LG en el plazo de
siete días naturales (7) a partir de la fecha de entrega.
9. Los daños o la pérdida de componentes de cualquier
producto cuya caja haya sido abierta, haya sido objeto de un
descuento o se haya restaurado.
10. Los productos cuyos números de serie de fábrica
originales hayan sido quitados, borrados o cambiados de
ninguna manera.
11. Las reparaciones cuando el producto se utiliza para
cualquier cosa fuera de lo normal y del uso doméstico
habitual (por ejemplo su alquiler, uso comercial, en oficinas o
en instalaciones de ocio) o en contra de la instrucciones que
se indican en el manual del propietario.
12. La extracción y reinstalación del producto si está instalado
en un lugar inaccesible.
ESTA GARANTÍA SE OTORGA EN SUSTITUCIÓN O EXCLUSIÓN DE TODA OTRA GARANTÍA, EXPRESA O IMPLÍCITA, INCLUYENDO SIN
LIMITAR CUALQUIER GARANTÍA DE CALIDAD O IDONEIDAD CON UN PROPÓSITO CONCRETO. EN LA MEDIDA EN QUE CUALQUIER
GARANTÍA IMPLÍCITA ES
OBLIGADA POR LA LEY, ESTÁ LIMITADA EN DURACIÓN AL PERIODO DE GARANTÍA YA MENCIONADO. LA
REPARACIÓN O REEMPLAZO DE PIEZAS, SEGÚN LO ESTABLECIDO EN ESTA GARANTÍA, ES EL ÚNICO QUE PUEDE RECLAMAR EL
CLIENTE. NI EL FABRICANTE NI SU DISTRIBUIDOR EN LOS EE.UU. SE HACE RESPONSABLE DE CUALQUIER DAÑO (DERIVADO,
INDIRECTO, ESPECIAL O PENAL) DE CUALQUIER NATURALEZA, INCLUYENDO, SIN LIMITACION, LA PÉRDIDA DE INGRESOS O
BENEFICIOS O CUALQUIER OTRO TIPO DE DAÑO, AÚN BASADO EN UN CONTRATO, SEA UN AGRAVIO O DE CUALQUIER OTRA
MANERA.
ALGUNOS ESTADOS NO PERMITEN LA EXCLUSIÓN O LIMITACIÓN DE DAÑOS IMPREVISTOS O RESULTANTES, O LIMITACIONES A LA
DURACIÓN DE LAS GARANTÍAS IMPLÍCITAS, POR LO QUE LA EXCLUSIÓN O LIMITACIÓN MENCIONADA ANTERIORMENTE NO SERÁ
APLICABLE AL USUARIO. ESTA GARANTÍA LE OTORGA DERECHOS LEGALES ESPECÍFICOS Y TAMBIÉN PUEDE TENER
OTROS QUE
VARIARÁN DE UN ESTADO A OTRO.
COMO OBTENER EL SERVICIO DE ESTA GARANTÍA E INFORMACIÓN ADICIONAL:
Llame al 1-800-243-0000 o visite nuestra página web: www.lg.com.
Dirección de correo ordinario: LG Customer Information Center (ATTN: CIC)
201 James Record Road, Huntsville, AL 35824
Español

1-800-243-0000
LG Customer Information Center
Register your product Online
www.lgappliances.com
LG ELECTRONICS,INC.
1000 Sylvan Ave.,Englewood Cliffs,NJ 07632
-
 1
1
-
 2
2
-
 3
3
-
 4
4
-
 5
5
-
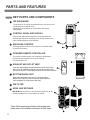 6
6
-
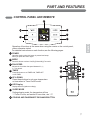 7
7
-
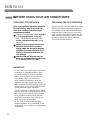 8
8
-
 9
9
-
 10
10
-
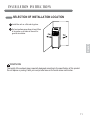 11
11
-
 12
12
-
 13
13
-
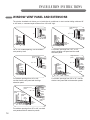 14
14
-
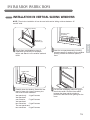 15
15
-
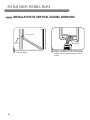 16
16
-
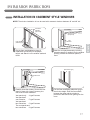 17
17
-
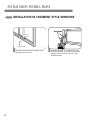 18
18
-
 19
19
-
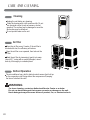 20
20
-
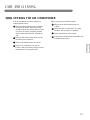 21
21
-
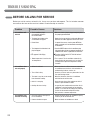 22
22
-
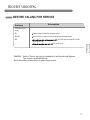 23
23
-
 24
24
-
 25
25
-
 26
26
-
 27
27
-
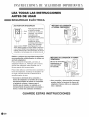 28
28
-
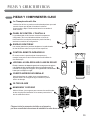 29
29
-
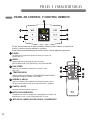 30
30
-
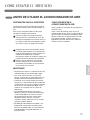 31
31
-
 32
32
-
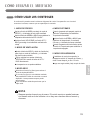 33
33
-
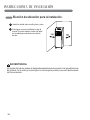 34
34
-
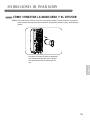 35
35
-
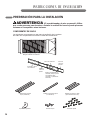 36
36
-
 37
37
-
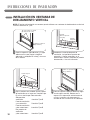 38
38
-
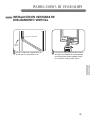 39
39
-
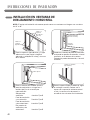 40
40
-
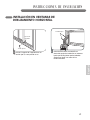 41
41
-
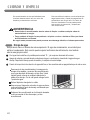 42
42
-
 43
43
-
 44
44
-
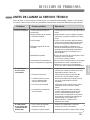 45
45
-
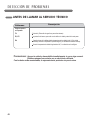 46
46
-
 47
47
-
 48
48


en otros idiomas
- English: LG LP0711WNRY2 Owner's manual
Artículos relacionados
-
LG Electronics LP0711WNR El manual del propietario
-
 WINTAIR LP0910WNR El manual del propietario
-
LG LP1210BXR El manual del propietario
-
-
-
-
-
-
LG LP1111WXR El manual del propietario
-

Otros documentos
-
-
-
Hisense AP1319HR1G Manual de usuario
-
-
-
-
-