Kobalt KSP 2040-06 Guía del usuario
- Categoría
- Rociador de pintura
- Tipo
- Guía del usuario
Este manual también es adecuado para

Español p. 20
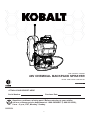
REYARPS KCAPKCAB LACIMEHC V04
ITEM # 2675012 / 2644068
Questions, problems, missing parts? Before returning to your retailer,
call our customer service department at 1-888-3KOBALT (1-888-356-2258),
8 a.m. - 8 p.m., EST, Monday - Sunday.
Purchase DateSerial Number
ATTACH YOUR RECEIPT HERE
1
MODEL # KSP 440-06 / KSP 2040-06

2
TABLE OF CONTENTS
PRODUCT SPECIFICATIONS
SPECIFICATIONS
Universal Motor 40V
Max. Pounds Per Square Inch Pressure Up to 70 PSI
Rated Gallons Per Minute 0.5 GPM
Maximum Inlet Water Temperature 104°F (40°C)
Cleaning Units 35 C.U.
Net Weight 4.5 kg (9.92 lbs.)
Gallons Per Charge With 2.0 Ah Battery 120 Gallons Per Charge
Product Specications...........................................................................................................2
Package Contents.................................................................................................................3
Symbols................................................................................................................................ 4
Safety Information.................................................................................................................6
Assembly Instructions ........................................................................................................ 8
Operating Instructions.........................................................................................................12
Care and Maintenance........................................................................................................15
Troubleshooting........................................................................................................................ 16
Warranty ................................................................................................................................ 17
Replacement Parts List.......................................................................................................18

3
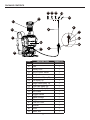
PART DESCRIPTION QUANTITY
A Tank Lid 1
B Tank 1
C Battery Door 1
D On/Off Power Switch 1
E Backpack 1
F1 Double Head Spray Tip 1
F2 Fan Spray Tip 1
F3 Single Head Spray Tip 1
F4 Four Hole Spray Tip 1
F5 Adjustable Spray Tip 1
G Gun Wand 1
H Trigger Handle 1
I Wand Storage 1
J Trigger 1
K Lock-out Lever 1
L Strainer 1
M Hose 1
N Water Inlet 1
PACKAGE CONTENTS
A
B
C
D
I
L
E
G
F1
F2
F3
F4
F5
H
M
N
J
K

4
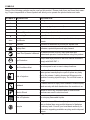
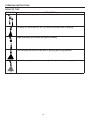
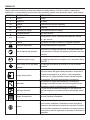
SYMBOLS
Some of the following symbols may be used on this product. Please study them and learn their mean-
ing. Proper interpretation of these symbols will allow you to operate the product better and safer.
SYMBOLS DESIGNATION EXPLANATION
V Volts Voltage
A Amperes Current
Hz Hertz Frequency (cycles per second)
W Watts Power
no No Load Speed Rational speed, at no load
Alternating Current Type of current
/min Per Minute
Revolutions, strokes, surface speed, orbits, etc., per
minute
PSI Pressure Pressure is measured in pounds per square inch
Safety Alert Indicates a potential personal injury hazard.
Read The Operator’s Manual
To reduce the risk of injury, user must read and
understand operator’s manual before using this product.
Eye Protection
Always wear eye protection with side shields marked to
comply with ANSI Z87.1.
Wet Conditions Alert
Do not expose to rain or use in damp locations.
Risk of Injection
To reduce the risk of injection or injury, never direct a
water system toward people or pets or place any body
part in the stream. Leaking hoses and ttings are also
capable of causing injection injury. Do not hold hoses or
ttings.
Kickback
To reduce the risk of injury from kickback, hold the spray
wand securely with both hands when the machine is on.
Electric Shock
Failure to use in dry conditions and to observe safe
practices can result in electric shock.
Risk of Explosion Do not spray ammable liquids.
Recycle
This product uses lithium-ion (Li-ion) batteries. Local,
state or federal laws may prohibit disposal of batteries
in ordinary trash. Consult your local waste authority for
information regarding available recycling and/or disposal
options.

5
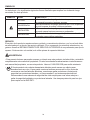
The following signal words and meanings are intended to explain the levels of risk associated
with this product.
WARNING
• To avoid serious personal injury, do not attempt to use this product until you have read the Owner's
Manual thoroughly and understand it completely. If you do not understand the warnings and
instructions in this Owner's Manual, do not use this product. Call 1-888-356-2258 for assistance.
The operation of any power tool can result in foreign objects being thrown into your eyes, which
can result in severe eye damage. Before operating a power tool, always wear safety goggles,
safety glasses with side shields, or a full face shield when needed. We recommend a Wide
Vision Safety Mask for use over eyeglasses or standard safety glasses with side shields. Always
use eye protection that is marked to comply with ANSI Z87.1.
•
SYMBOL SIGNAL MEANING
DANGER
Indicates an imminently hazardous situation, which, if not
avoided, will result in death or serious injury.
WARNING
Indicates a potentially hazardous situation, which, if not
avoided, could result in death or serious injury.
CAUTION
Indicates a potentially hazardous situation, which, if not
avoided, may result in minor or moderate injury.
CAUTION
(Without Safety Alert Symbol) Indicates a situation that may
result in property damage.
SERVICE
Servicing requires extreme care and knowledge and should be performed only by a qualied service
technician. For service, return the product to your nearest AUTHORIZED SERVICE CENTER for
repair. When servicing, use only identical replacement parts.
SYMBOLS

6
SAFETY INFORMATION
GENERAL BACKPACK SPRAYER SAFETY WARNINGS
Instructions pertaining to a risk of re, electric shock, or injury to persons, when using electric
products, basic precautions should always be followed, including the following:
• Read all the instructions before using the Kobalt 40-volt backpack sprayer.
• To reduce the risk of injury, close supervision is necessary when the backpack sprayer is used
near children.
• Do not come in contact or interfere with moving parts, or liquids being sprayed from wand.
• Only use attachments recommended or sold by the manufacturer.
• To reduce the risk of electrical shock, do not put in water or other liquid.
• Do not place or store backpack sprayer where it can fall or be pulled into a tub or sink. Do not sub-
merge in water or other liquids.
• Replace damaged or worn parts with replacement parts listed on page 18.
• Use only the 40V Kobalt charger supplied by the manufacturer to recharge.
Read all safety warnings and instructions. Failure to follow the warnings and instructions may result in
electric shock, re and/or serious injury.
• To prevent unintentional starting, ensure the switch is in the off-position before connecting to
battery pack, picking up or carrying the backpack sprayer. Carrying the backpack sprayer with
your nger on the switch can cause accidental starting. Remove your nger from the on/off switch
before carrying or moving the backpack sprayer.
• Disconnect the battery pack from the backpack sprayer before making any adjustments, changing
accessories, or storing. Such preventive safety measures reduce the risk of starting the backpack
sprayer accidentally.
This warning is not applicable for batteries that cannot be disconnected from the appliance in normal
use.
• For use only with Kobalt 40V chargers KRC 40-06.
• For use only with Kobalt 40V batteries KB 240C-06.
• When battery pack is not in use, keep it away from other metal objects, like paper clips coins,
keys, nails, screws or other small metal objects, that can make a connection from one terminal to
another. Shorting the battery terminals together may cause burns or a re.
• Do not use a battery pack or backpack sprayer that is damaged or modied. Damaged or modied
batteries may exhibit unpredictable behavior resulting in re, explosion or risk of injury.
• Do not expose a battery pack or backpack sprayer to re or excessive temperature. Exposure to
re or temperature above 130°C may cause explosion. The temperature of 130°C can be re-
placed by the temperature of 265°F.
WARNING
WARNING
NOTE

7
SAFETY INFORMATION
• Follow all charging instructions and do not charge the battery pack or appliance outside of the
temperature range specic in the instructions. Charging improperly or at temperatures outside of
the specic range may damage the battery and increase the risk of re.
• All servicing should be performed by a qualied repair person using only identical replacement
parts. This will ensure that the safety of the product is maintained.
• Do not modify or attempt to repair the appliance or the battery pack (as applicable) except as indi-
cated in the instructions for use and care.
WARNING PROPOSITION 65
Some dust created by power sanding, sawing, grinding, drilling, and other construction activities
contains chemicals known to cause cancer, birth defects or other reproductive harm. Some examples
of these chemicals are:
• Lead from lead-based paints
• Crystalline silica from bricks and cement and other masonry products
• Arsenic and chromium from chemically-treated lumber
Your risk from these exposures varies, depending on how often you do this type of work.
To reduce your exposure to these chemicals: work in a well ventilated area, and work with approved
safety equipment, such as dust masks that are specially designed to lter out microscopic particles.
SAVE THESE INSTRUCTIONS

8
ASSEMBLY INSTRUCTIONS
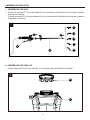
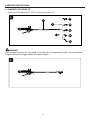
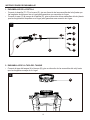
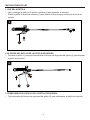
1. ASSEMBLING THE GUN
• Connect the nozzle (F1-F5) to the wand (G), turn clockwise until the tabs lock into place to ensure
leak-free connection.
• Connect the wand (G) to the gun handle (H), turn clockwise until the tabs lock into place to ensure
a leak-free connection.
2. ASSEMBLING THE TANK LID
• Connect the tank lid (A) to the tank (B) , turn clockwise until the tabs lock into place.
2
A
B
G
H
1
F5
F1
F2
F3
F4

9
ASSEMBLY INSTRUCTIONS
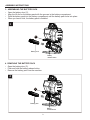
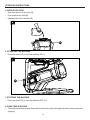
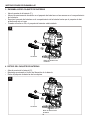
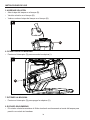
3. ASSEMBLING THE BATTERY PACK
• Open the battery door (C).
• Align the lift ribs on the battery pack with the grooves in the battery compartment.
• Push the battery pack into the battery compartment until the battery pack locks into place.
• When you hear a click, the battery pack is installed.
4. REMOVING THE BATTERY PACK
• Open the battery door (C).
• Push and hold the battery release button.
• Remove the battery pack from the machine.
3
Battery pack
Battery
release button
C
4
Battery pack
Battery
release button
C

10
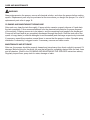
ASSEMBLY INSTRUCTIONS
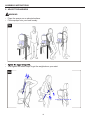
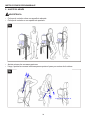
• Place the sprayer on an elevated surface.
• Fit the sprayer onto your back loosely.
•
• Then tighten the lower straps to get the weight above your waist.
WARNING
5. ADJUST THE HARNESS
5a
5b

11
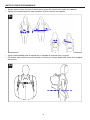
ASSEMBLY INSTRUCTIONS
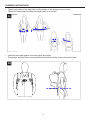
• Tighten both sides of the waist belt until the weight of the sprayer is on your hips.
• Tighten the chest strap the keep the weight close to your back.
• Install the back pad against your back tightly and safely.
• The sprayer should sit above your waist and the tank should be close to the user’s back.
5c
5d

12
OPERATING INSTRUCTIONS
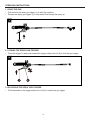
1. USING THE GUN
• Pull and hold the spray gun trigger (J) to start the machine.
• Release the spray gun trigger (J) to stop water ow through the spray tip.
2. LOCKING THE SPRAY GUN TRIGGER
• Press the trigger (J) and push forward the trigger safety lock-out (K) to lock the gun trigger.
3. UNLOCKING THE SPRAY GUN TRIGGER
• Pull backwards on the trigger safety lock-out (K) to unlock the gun trigger.
2
J
K
1
J

13
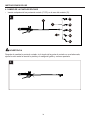
4. CHANGING THE SPRAY TIP
• Insert any of the spray tips (F1-F5) onto the spray wand (G).
After changing the spray tip, if the angle of the spray tip is not appropriate, adjust the joint between
the gun wand and the triggle handle and tighten it again.
OPERATING INSTRUCTIONS
4
F5
F2
F3
F4
F2
J
F
WARNING
5

14
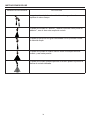
SPRAY TIP TYPE
APPLICATIONSPRAY TIP
Double head spray tip sprays water from both tips at the same time.
Fan spray tip, also known as "fan" tip creates the widest area of spraying.
Single head spray tip provides the highest versatility.
Four hole spray tip covers a wide area of spraying and strong pressure.
Adjustable spray tip allows the user to adjust the tip to the desired spraying technique.
OPERATING INSTRUCTIONS

15
OPERATING INSTRUCTIONS
5. ADDING SOLUTION
• Open the tank lid on the tank (B).
• Pour solution into tank (B).
• Reattach tank lid to the tank (B).
6. OPERATING THE MACHINE
• Press the switch (D) to turn the machine ON (I).
7. STOPPING THE MACHINE
• Press the switch (D) to turn the machine OFF (O).
8. PUMP-FREE SPRAYING
• The battery-powered sprayer keeps uid continously cycling through the tank to allow pump-free
spraying.
7
D
I
O
6
B

16
CARE AND MAINTENANCE
Always depressurize the sprayer, remove all chemical solution, and clean the sprayer before making
repairs. Replacement parts may be purchased at the store where you bought the sprayer. For a list of
replacement parts refer to page 18.
CLEANING AND MAINTAINING THE MACHINE
After each use, clean the tank thoroughly. If spray solution remains, properly dispose of it and drain
the tank completely. Follow recommendations from the chemical manufacturer for proper disposal
of the solution. Pumping causes air to be taken in, and the remaining liquid needs to be discharged.
Pump until all liquid and air are completely discharged through the nozzle. Rell the tank with a few
quarts of soapy water (a mild dish detergent is recommended) and discharge as previously instructed.
If necessary, repeat this procedure several times to ensure that the sprayer is clean. Sporadic spray
distribution is caused by a clogged nozzle. If necessary, remove and clean nozzle.
MAINTENANCE AND STORAGE
After use, the sprayer should be properly cleaned and stored away from direct sunlight to prevent UV
damage. Before storing for the winter, be sure that all liquid is completely drained from the tank, lines
and air chamber. (Refer to the CLEANING AND MAINTAINING THE SPRAYER instructions above).
Regularly inspect hose, pump tank for water, damage or leaks.
WARNING

17
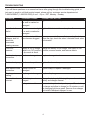
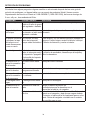
PROBLEM POSSIBLE CAUSE CORRECTIVE ACTION
Liquid leaks. Nut may be loose or rub-
ber seal is cracked or
damaged.
Tighten the nut and/or replace the seal and lubricate.
Liquid leaks from
the lid.
Lid not screwed on tight-
ly or seal is cracked or
damaged.
Tighten lid. Lubricate the seal, replace if necessary.
Tank starts to
collapse; tank lid
cannot be
unscrewed
creating vacuum.
Vent holes in tank lid
have become clogged.
Remove cap and with a small wire, unclog the holes.
Clean the cap, check the valve. Lubricate check valve
and reinstall.
Low or no
pressure.
Battery is out of charge,
switch is in "off" position
or tip nozzle is stuck.
Charge the battery to full charge, turn switch to ON
position, unscrew nozzle, and remove debris.
Tank leaks at pump
connection.
Seals are damaged. Replace damaged seals
Tank leaks at pump. The hose clamp is loose. Tighten the hose clamp.
Tank leaks at hose
connection.
Clamp is loose or
damaged.
Tighten clamp or replace if damaged.
Diaphragm is
leaking.
Diaphragm is damaged. Replace diaphragm.
The machine does
not start.
The battery is not
charged.
Charge the battery by following the procedures in the
battery and charger manual.
Battery is too cold. Remove battery from backpack sprayer. Place battery
on charger and allow to charge for 10 minutes or until
the changing light turns green. Remove from charger
and install in backpack sprayer for use.
TROUBLESHOOTING
If you still have questions or an unresolved issue after going through this troubleshooting guide, or
just want to speak to a Kobalt product expert, please call our customer service department at
1-888-3KOBALT (1-888-356-2258), 8 a.m. - 8 p.m., EST, Monday - Sunday.

18
WARRANTY
5-YEAR REPAIR WARRANTY
This Kobalt 40V sprayer is warranted to the original purchaser from the original purchase date for ve
(5) year subject to the warranty coverage described herein.
This Kobalt 40V sprayer is warranted for the original user to be free from defects in material and
workmanship.
If you believe that the 40V sprayer is defective at any time during the specied warranty period,
simply call our Warranty service (1-888-356-2258) along with proof of purchase.
This warranty is void if: defects in materials or workmanship or damages result from repairs or
alterations which have been made or attempted by others or the unauthorized use of nonconforming
parts; the damage is due to normal wear, damage is due to abuse (including overloading of the tool
beyond capacity), improper maintenance, neglect or accident; or the damage is due to the use of the
tool after partial failure or use with improper accessories or unauthorized repair or alteration.
This warranty gives you specic legal rights, and you may also have other rights that vary from
province to province.

19
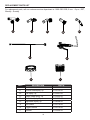
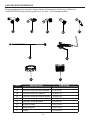
REPLACEMENT PARTS LIST
For replacement parts, call our customer service department at 1-888-356-2258, 8 a.m. - 8 p.m., EST,
Monday - Sunday.
PART DESCRIPTION PART #
A Tank Lid C1103665-00
F1 Double Head Spray Tip C1103722-00
F2 Fan Spray Tip C1103667-00
F3 Single Head Spray Tip C1103663-00
F4 Four Hole Spray Tip C1104975-00
F5 Adjustable Spray Tip C1104999-00
G Gun Wand C1103718-00
H Trigger Handle C1103719-00
L Strainer C1103666-00
A L
F1 F2
F3
F4
G
F5
H

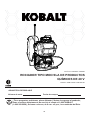
ROCIADOR TIPO MOCHILA DE PRODUCTOS
QUÍMICOS DE 40 V
ARTÍCULO # 2675012 / 2644068
¿Tiene preguntas, problemas, piezas faltantes? Antes de regresar al vendedor,
llame a nuestro departamento de servicio al cliente al 1-888-3KOBALT
(1-888-356-2258), de lunes a viernes, de 8 a.m. a 8 p.m., hora estándar del Este.
Fecha de compraNúmero de serie
ADJUNTE SU RECIBO AQUÍ
20
MODELO # KSP 440-06 / KSP 2040-06

21
ÍNDICE
ESPECIFICACIONES DEL PRODUCTO
ESPECIFICACIONES
Voltaje 40V
Presión máxima de libras por pulgada cuadrada Up to 70 PSI
Litros nominales por minuto 0,5 GPM
Temperatura máxima del agua de entrada 40 ºC (104 ºF)
Unidades de limpieza 35 C.U.
Peso neto 4,49 kg (9,92 lb)
Litros por carga con batería de 2,0 Ah 454,25 litros por carga
Especicaciones del producto..............................................................................................21
Contenido del paquete..........................................................................................................22
Símbolos................................................................................................................................ 23
Información de seguridad......................................................................................................25
Instrucciones de ensamblaje ............................................................................................... 27
Instrucciones de uso...........................................................................................................31
Cuidado y mantenimiento...................................................................................................35
Detección de problemas.................................................................................................... 36
Garantía ................................................................................................................................ 37
Lista de repuestos..............................................................................................................38

22
PIEZA DESCRIPCIÓN CANTIDAD
A Tapa del tanque 1
B Tanque 1
C Tapa de la batería 1
D Interruptor eléctrico de encendido/
apagado
1
E Mochila 1
F1 Punta de rociado de doble cabezal 1
F2 Punta de rociado de “abanico” 1
F3 Punta de rociado de cabezal simple 1
F4 Punta de rociado de cuatro oricios 1
F5 Punta de rociado ajustable 1
G Vara de la pistola 1
H Mango de gatillo 1
I Almacenamiento de la vara 1
J Gatillo 1
K Palanca de bloqueo 1
L Colador 1
M Manguera 1
N Entrada de agua 1
CONTENIDO DEL PAQUETE
A
B
C
D
I
L
E
G
F1
F2
F3
F4
F5
H
M
N
J
K

23
SÍMBOLOS
Algunos de estos símbolos pueden ser usados en este producto. Por favor, léalos y aprenda su
signicado. La interpretación correcta de estos símbolos permite una operación mejor y más segura.
SÍMBOLO DESIGNACIÓN EXPLICACIÓN
V Voltios Voltaje
A Amperios Corriente
Hz Hercios Frecuencia (ciclos por segundo)
W Vatios Potencia
no Velocidad sin carga Velocidad racional, sin carga
Corriente alterna Tipo de corriente
/min Por minuto
Revoluciones, ciclos, velocidad de supercie, órbitas,
etc., por minuto.
PSI
Presión La presión se mide en libras por pulgada cuadrada
Alerta de seguridad Precauciones para su seguridad.
Lea el manual del operario
Para reducir el riesgo de lesiones, el usuario debe leer
y comprender el manual del operario antes de usar este
producto.
Protección para los ojos
Cuando use este equipo, use protección para los ojos
con cobertura lateral que cumpla con los requisitos de la
ANSI Z87.1.
Alerta sobre el uso en áreas
mojadas
No exponga el producto a la lluvia ni lo use en áreas
húmedas.
Riesgo de inyección
Para reducir el riesgo de inyecciones o lesiones, nunca
dirija un sistema de agua hacia personas o mascotas ni
coloque ninguna parte en el chorro. Las mangueras y
accesorios con fugas también pueden causar lesiones
por inyección. No sujete mangueras ni accesorios.
Retroceso
Para reducir el riesgo de lesiones por contragolpe,
sostenga la vara del rociador de forma segura con am-
bas manos cuando la máquina esté encendida.
Descarga eléctrica
Si no se usa en condiciones secas y no se siguen las
prácticas seguras, se pueden producir descargas eléctri-
cas.
Riesgo de explosión No rocíe líquidos inamables.
Recicle
Este producto utiliza baterías de iones de litio.Las
leyes locales, estatales o federales podrían prohibir la
eliminación de baterías en basureros comunes.Consulte
a la autoridad reguladora de desechos local para obtener
información sobre las opciones de reciclaje o eliminación
disponible.

24
La simbología y los signicados siguientes fueron diseñados para explicar los niveles de riesgo
asociados con este producto.
ADVERTENCIA
• Para prevenir lesiones personales severas, no intente usar este producto sin haber leído y entendido
completamente este manual del propietario. Si usted no entiende las advertencias e instrucciones en
este manual del propietario, no use este producto. Llame al 1-888-356-2258 para recibir asistencia.
El funcionamiento de cualquier herramienta eléctrica puede causar que objetos sean
lanzados hacia sus ojos, lo que puede ocasionar lesiones severas en los ojos. Antes de
comenzar a usar herramientas eléctricas, use siempre gafas protectoras o anteojos de
seguridad con protectores laterales y, si fuera necesario, una máscara protectora total.
Recomendamos una máscara de seguridad de visión amplia para usar sobre anteojos o
gafas de seguridad estándar con protectores laterales. Use siempre protección para los ojos
que cumpla con la ANSI Z87.1.
•
SÍMBOLO SEÑAL SIGNIFICADO
PELIGRO
Indica una situación de peligro inminente que, si no es preveni-
da, causará la muerte o lesiones severas.
ADVERTENCIA
Indica una situación de peligro potencial que, si no es preveni-
da, podría causar la muerte o lesiones severas.
PRECAUCIÓN
Indica una situación de peligro potencial que, si no es preveni-
da, puede causar lesiones menores o moderadas.
PRECAUCIÓN
(Sin el símbolo de alerta de seguridad) Indica una situación
que puede causar daños materiales.
SERVICIO
El servicio de la producto requiere extremo cuidado y conocimientos técnicos, por lo cual solo debe
ser efectuado por un técnico de servicio calicado. Si no comprende los avisos de advertencia y su-
gerimos llevarla al ESTABLECIMIENTO DE SERVICIO AUTORIZADO de su preferencia para que la
reparen. Al dar servicio a la unidad, solo utilice piezas de repuesto idénticas.
SÍMBOLOS

25
INFORMACIÓN DE SEGURIDAD
ADVERTENCIAS GENERALES DE SEGURIDAD DEL ROCIADOR TIPO MOCHILA
Instrucciones con relación a riesgos de incendio, descarga eléctrica o lesiones en las personas al
usar productos eléctricos, siempre se deben respetar las siguientes medidas de precaución básicas,
entre ellas:
• Lea todas las instrucciones antes de usar el rociador tipo mochila Kobalt de 40 voltios.
• Para reducir el riesgo de lesiones, es necesario vigilar atentamente cuando el rociador tipo mochi-
la se use cerca de los niños.
• No entre en contacto ni interera con las piezas móviles o los líquidos que se rocían de la vara.
• Use solo accesorios recomendados o vendidos por el fabricante.
• Para reducir el riesgo de descarga eléctrica, no sumerja en agua ni en cualquier otro líquido.
• No coloque ni guarde el rociador tipo mochila donde se pueda caer o sumergirse en una bañera o
fregadero. No sumerja en agua u otros líquidos.
• Reemplace las piezas dañadas o gastadas por las piezas de repuesto que se enumeran en la
página 18.
• Use únicamente el cargador Kobalt de 40 V proporcionado por el fabricante para la recarga.
Lea todas las advertencias de seguridad y todas las instrucciones. El incumplimiento de las
advertencias y las instrucciones podría provocar descargas eléctricas, incendios o lesiones graves.
• Para evitar un arranque involuntario, asegúrese de que el interruptor esté en la posición de apa-
gado antes de conectar el paquete de baterías, levantar o transportar el rociador tipo mochila.
Transportar el rociador tipo mochila con el dedo en el interruptor puede provocar un arranque
accidental. Retire el dedo del interruptor de encendido/apagado antes de transportar o mover el
rociador tipo mochila.
• Desconecte el paquete de baterías del rociador tipo mochila antes de realizar ajustes, cambiar
accesorios o almacenar. Estas medidas de seguridad preventivas reducen el riesgo de encender
el rociador tipo mochila accidentalmente.
Esta advertencia no se aplica a baterías que no se pueden desconectar del electrodoméstico en uso
normal.
• Use solo con los cargadores Kobalt de 40 V KRC 40-06.
• Para usar solo con baterías Kobalt de 40 V KB 240C-06.
• Cuando el paquete de baterías no esté en uso, aléjelo de objetos metálicos, como sujetapapeles,
monedas, llaves, clavos, tornillos u otros objetos metálicos pequeños que puedan crear una
conexión entre los terminales. Es posible que una conexión entre los terminales produzca
quemaduras o un incendio.
• No use un paquete de baterías o un rociador tipo mochila que esté dañado o modicado. Las
baterías dañadas o modicadas pueden exhibir un comportamiento impredecible que tenga como
resultado fuego, explosión o riesgo de lesiones.
• No exponga un paquete de baterías o un rociador tipo mochila al fuego ni a temperaturas exce-
sivas. La exposición al fuego o temperaturas superiores a 129,4 °C (265 °F) puede causar una
explosión. La temperatura de 130 °C se puede reemplazar por la temperatura de 265 °F.
ADVERTENCIA
ADVERTENCIA
NOTA

26
INFORMACIÓN DE SEGURIDAD
• Siga todas las instrucciones de carga y no cargue el paquete de baterías o el electrodoméstico
fuera del rango de temperatura especicado en las instrucciones. La carga incorrecta o a
temperaturas fuera del rango especicado puede dañar la batería y aumentar el riesgo de
incendio.
• Todas las reparaciones debe realizarlas una persona calicada que utilice solo piezas de repues-
to idénticas. Esto mantendrá la seguridad del producto.
• No modique ni intente reparar el electrodoméstico ni el paquete de baterías (según corresponda)
excepto como se indique en las instrucciones para uso y cuidado.
ADVERTENCIA (PROPUESTA 65)
Parte del polvo creado al lijar, aserrar, esmerilar, taladrar y otras actividades de construcción contiene
sustancias químicas reconocidas como causantes de cáncer, defectos congénitos y otros daños al
sistema reproductivo. Algunos ejemplos de estas sustancias químicas son:
• El plomo de las pinturas a base de plomo
• La sílice cristalina de los ladrillos, el cemento y otros productos de mampostería
• El arsénico y el cromo de la madera tratada químicamente.
El riesgo derivado de estas exposiciones varía según la frecuencia con la que se realice este tipo de
trabajo.
Para reducir la exposición a estas sustancias químicas, trabaje en un área bien ventilada y
utilice equipo de seguridad aprobado, como máscaras contra el polvo diseñadas especialmente para
ltrar las partículas microscópicas.
GUARDE ESTAS INSTRUCCIONES

27
INSTRUCCIONES DE ENSAMBLAJE
1. ENSAMBLAJE DE LA PISTOLA
• Conecte la boquilla (F1-F5) a la vara (G), gire en dirección de las manecillas del reloj hasta que
las lengüetas se bloqueen en su lugar para garantizar una conexión sin fugas.
• Conecte la vara (G) al mango de la pistola (H), gire en dirección de las manecillas del reloj hasta
que las lengüetas se bloqueen en su lugar para garantizar una conexión sin fugas.
2. ENSAMBLAJE DE LA TAPA DEL TANQUE
• Conecte la tapa del tanque (A) al tanque (B), gire en dirección de las manecillas del reloj hasta
que las lengüetas encajen en su lugar.
2
A
B
G
H
1
F5
F1
F2
F3
F4

28
INSTRUCCIONES DE ENSAMBLAJE
3. ENSAMBLAJE DEL PAQUETE DE BATERÍAS
• Abra la puerta de la batería (C).
• Alinee las secciones de elevación en el paquete de baterías con las ranuras en el compartimiento
de la batería.
• Empuje el paquete de baterías en el compartimiento de la batería hasta que el paquete de bat-
erías encaje en su lugar.
• Cuando escuche un clic, el paquete de baterías está instalado.
4. RETIRO DEL PAQUETE DE BATERÍAS
• Abra la puerta de la batería (C).
• Mantenga presionado el botón de liberación de la batería.
• Retire el paquete de baterías de la máquina.
3
La batería
Botón de liberación de
la batería
C
4
La batería
Botón de liberación de
la batería
C

29
INSTRUCCIONES DE ENSAMBLAJE
• Coloque el rociador sobre una supercie elevada.
• Coloque el rociador en su espalda sin apretarlo.
• Apriete primero las correas superiores.
• Luego, apriete las correas inferiores para soportar el peso por encima de la cintura.
ADVERTENCIA
5. AJUSTE EL ARNÉS
5a
5b

30
INSTRUCCIONES DE ENSAMBLAJE
• Apriete ambos lados del cinturón hasta que el peso del rociador esté sobre sus caderas.
• Apriete la correa para pecho para mantener el peso cerca de su espalda.
• Apoye la almohadilla para la espalda en su espalda de manera rme y segura.
• El rociador debe colocarse por encima de su cintura y el tanque debe estar cerca de la espalda
del usuario.
5c
5d

31
INSTRUCCIONES DE USO
1. USO DE LA PISTOLA
• Jale y sostenga el gatillo de la pistola rociadora (J) para encender la máquina.
• Suelte el gatillo de la pistola rociadora (J) para detener el ujo de agua a través de la punta de
rociado.
2. BLOQUEO DEL GATILLO DE LA PISTOLA ROCIADORA
• Presione el gatillo (J) y empuje hacia delante el bloqueo de seguridad del gatillo (K) para bloquear
el gatillo de la pistola.
3. DESBLOQUEO DEL GATILLO DE LA PISTOLA ROCIADORA
• Tire hacia atrás del bloqueo de seguridad del gatillo (K) para desbloquear el gatillo de la pistola.
2
J
K
1
J

32
4. CAMBIO DE LA PUNTA DE ROCIADO
• Inserte cualquiera de las puntas de rociado (F1-F5) en la vara del rociador (G).
Después de cambiar la punta de rociado, si el ángulo de la punta de rociado no es el adecuado,
ajuste la unión entre la vara de la pistola y el mango del gatillo y vuelva a apretarla.
INSTRUCCIONES DE USO
4
F5
F2
F3
F4
F2
J
F
ADVERTENCIA
5

33
INSTRUCCIONES DE USO
BOQUILLA ROCIADORA APLICACIÓN
Las puntas de rociado de cabezal doble rocían agua de ambas
boquillas al mismo tiempo.
La punta de rociado de "abanico", también conocida como punta de
"abanico", crea el área más amplia de rociado.
La punta proporciona una gran versatilidad con su punta de rociado
de cabezal simple.
La punta de rociado de cuatro oricios cubre una amplia zona de
rociado y una fuerte presión.
La punta de rociado ajustable permite al usuario ajustar la punta a la
técnica de rociado deseada.

34
INSTRUCCIONES DE USO
5. AGREGAR SOLUCIÓN
• Abra la tapa del tanque en el tanque (B).
• Vierta la solución en el tanque (B).
• Vuelva a colocar la tapa del tanque en el tanque (B).
6. OPERACIÓN DE LA MÁQUINA
• Presione el interruptor (D) para encender la máquina (I).
7. DETENER LA MÁQUINA
• Presione el interruptor (D) para apagar la máquina (O).
8. ROCIADO SIN BOMBEAR
• El rociador a baterías mantiene el uido circulando continuamente a través del tanque para
permitir un rociado sin bombear.
7
D
I
O
6
B

35
CUIDADO Y MANTENIMIENTO
Siempre despresurice el rociador, elimine toda la solución de productos químicos y limpie el rociador
antes de realizar reparaciones. Las piezas de repuesto se pueden comprar en la tienda donde com-
pró el rociador. Para obtener una lista de piezas de repuesto, consulte la página 18.
LIMPIEZA Y MANTENIMIENTO DE LA MÁQUINA
Después de cada uso, limpie el tanque a fondo. Si queda solución de rociado, deséchela
adecuadamente y drene el tanque por completo. Siga las recomendaciones del fabricante de
productos químicos para conocer la eliminación adecuada de la solución. El bombeo hace que se
absorba aire y es necesario descargar el líquido restante. Bombee hasta que todo el líquido y el
aire se hayan descargado por completo a través de la boquilla. Vuelva a llenar el tanque con unos
cuantos litros de agua jabonosa (se recomienda un detergente suave para platos) y descárguelo
como se indicó anteriormente. Si es necesario, repita este procedimiento varias veces para
asegurarse de que el rociador esté limpio. La distribución esporádica del rociado se debe a una
boquilla obstruida. Si es necesario, retire y limpie la boquilla.
MANTENIMIENTO Y ALMACENAJE
Después de su uso, el rociador debe limpiarse adecuadamente y almacenarse lejos de la luz solar
directa para evitar daños por rayos ultravioleta. Antes de almacenar para el invierno, asegúrese de
que todo el líquido se haya drenado por completo del tanque, las líneas y la cámara de aire. (Consulte
las instrucciones de LIMPIEZA Y MANTENIMIENTO DEL ROCIADOR anteriores). Inspeccione
periódicamente la manguera, el tanque de la bomba en busca de agua, daños o fugas.
ADVERTENCIA

36
PROBLEMA CAUSA POSIBLE SOLUCIÓN
Fugas de líquido. La tuerca puede estar
suelta o el sello de goma
está agrietado o dañado.
Apriete la tuerca o reemplace el sello y lubrique.
Fugas de líquido
por la tapa.
La tapa no está bien
enroscada o el sello está
agrietado o dañado.
Apriete la tapa. Lubrique el sello, reemplácelo si es
necesario.
El tanque comienza
a colapsar; la tapa
del tanque no se
puede desenroscar
y crea un vacío.
Los oricios de venti-
lación de la tapa del
tanque están obstruidos.
Quite la tapa y con un alambre pequeño destape los
agujeros. Limpie la tapa, revisar la válvula. Lubrique
la válvula de retención y vuelva a instalar.
Presión baja o nula. La batería está descar-
gada, el interruptor está
en la posición “apagado”
o la boquilla de la punta
está atascada.
Cargue la batería por completo, gire el interruptor a
la posición de encendido, desenrosque la boquilla y
retire los desechos.
El tanque tiene fu-
gas en la conexión
de la bomba.
Los sellos están daña-
dos.
Reemplace sellos dañados
El tanque tiene fu-
gas en la bomba.
La abrazadera para
manguera está suelta.
Apriete la abrazadera para manguera.
El tanque tiene fu-
gas en la conexión
de la manguera.
La abrazadera está suel-
ta o dañada.
Apriete la abrazadera o reemplácela si está dañada.
El diafragma tiene
fugas.
El diafragma está daña-
do.
Reemplace el diafragma.
La máquina no se
pone en marcha.
La batería no está car-
gada.
Cargue la batería siguiendo los
procedimientos que se describen en el
manual de la batería y el cargador.
La batería está demasi-
ado fria.
Retire la batería del rociador tipo mochila. Coloque la
batería en el cargador y deje que se cargue durante
10 minutos o hasta que la luz cambiante pase a color
verde. Retire del cargador e instálelo en el rociador
tipo mochila para su uso.
DETECCIÓN DE PROBLEMAS
Si todavía tiene alguna pregunta o alguna cuestión no solucionada después de leer este guía de
solución de problemas, o si desea hablar con un experto de productos Kobalt, llame a nuestro
Departamento de Servicio al Cliente al 1-888-3KOBALT (1-888-356-2258), de lunes a domingo de
8 a.m. a 8 p.m., hora estándar del Este.

37
GARANTÍA
GARANTÍA DE REPARACIÓN DE 5 AÑOS
Este rociador Kobalt de 40 V está garantizado para el comprador original desde la fecha de compra
original durante cinco (5) años y está sujeto a la cobertura de garantía que se describe en el
presente.
Este rociador Kobalt de 40 V tiene una garantía para el usuario original contra defectos en los
materiales y la mano de obra.
Si cree que el rociador Kobalt de 40 V está defectuoso en cualquier momento durante el período de
garantía especicado, simplemente llame a nuestro servicio de garantía (1-888-356-2258) junto con
el comprobante de compra.
Esta garantía es nula si: los defectos en los materiales o la mano de obra o los daños han sido
causados por reparaciones o modicaciones hechas o que se hayan intentado hacer por parte de
terceros o el uso no autorizado de piezas incompatibles; el daño es debido al desgaste normal;
el daño es debido al abuso (lo que incluye la sobrecarga de la herramienta por encima de su
capacidad), mantenimiento inadecuado, negligencia o accidente; o el daño es debido al uso de
la herramienta después de una falla parcial, el uso con accesorios inadecuados o reparaciones o
alteraciones no autorizadas.
Esta garantía le concede derechos legales especícos y usted pudiera tener además otros derechos
que varían de un estado a otro.

38
LISTA DE PIEZAS DE REPUESTO
Para encargar piezas de repuesto, llame a nuestro Departamento de Servicio al Cliente al
1-888-356-2258 de lunes a domingo de 8 a.m. a 8 p.m. , hora estándar del Este.
PIEZA DESCRIPCIÓN # DE PIEZA
A Tapa del tanque C1103665-00
F1 Punta de rociado de doble cabezal C1103722-00
F2 Punta de rociado de “abanico” C1103667-00
F3 Punta de rociado de cabezal simple C1103663-00
F4 Punta de rociado de cuatro oricios C1104975-00
F5 Punta de rociado ajustable C1104999-00
G Vara del rociador C1103718-00
H Mango de gatillo C1103719-00
L Colador C1103666-00
A L
F1 F2
F3
F4
G
F5
H
-
 1
1
-
 2
2
-
 3
3
-
 4
4
-
 5
5
-
 6
6
-
 7
7
-
 8
8
-
 9
9
-
 10
10
-
 11
11
-
 12
12
-
 13
13
-
 14
14
-
 15
15
-
 16
16
-
 17
17
-
 18
18
-
 19
19
-
 20
20
-
 21
21
-
 22
22
-
 23
23
-
 24
24
-
 25
25
-
 26
26
-
 27
27
-
 28
28
-
 29
29
-
 30
30
-
 31
31
-
 32
32
-
 33
33
-
 34
34
-
 35
35
-
 36
36
-
 37
37
-
 38
38


Kobalt KSP 2040-06 Guía del usuario
- Categoría
- Rociador de pintura
- Tipo
- Guía del usuario
- Este manual también es adecuado para
En otros idiomas
- English: Kobalt KSP 2040-06 User guide
Documentos relacionados
Otros documentos
-
Ryobi P2800 Manual de usuario
-
Ryobi P2890 El manual del propietario
-
-
Simplicity BACKPACK SPRAYER Manual de usuario
-
Chapin 97902 Manual de usuario
-
-
-
Maruyama MS046 El manual del propietario
-
Milwaukee M18 SWITCH TANK 49-16-28PS Manual de usuario
-
STIHL SGA 85 Manual de usuario